BoNUS Developer Guide [T09 B3][Bo NUS]Developer
User Manual: Pdf
Open the PDF directly: View PDF ![]() .
.
Page Count: 38
- BoNUS - Developer Guide
- 1. Introduction
- 2. Setting up
- 3. Design
- 4. Implementation
- 5. Documentation
- 6. Testing
- 7. Dev Ops
- Appendix A: Suggested Ways to Get Started
- Appendix B: User Stories
- Appendix C: Use Cases
- Appendix D: Non Functional Requirements
- Appendix E: Glossary
- Appendix F: Product Survey

BoNUS - Developer Guide
By: CS2103T T09-B3 Team Since: Sep 2017 Licence: MIT
1. Introduction
2. Setting up
2.1. Prerequisites
2.2. Setting up the project in your computer
2.3. Verifying the setup
2.4. Configurations to do before writing code
3. Design
3.1. Architecture
3.2. UI component
3.3. Logic component
3.4. Model component
3.5. Storage component
3.6. Common classes
4. Implementation
4.1. Undo/Redo mechanism
4.2. Logging
4.3. Generic property
4.4. Auto reminders
4.5. Switch themes mechanism
4.6. Import & export XML mechanism
4.7. Import timetable from NUSMods
4.8. Contacts/event listing order by name/date time mechanism
4.9. Emailing mechanism
4.10. Calendar mechanism
4.11. Configuration
5. Documentation
5.1. Editing documentation
5.2. Publishing documentation
5.3. Converting documentation to PDF format
6. Testing
6.1. Running Tests
6.2. Types of tests
6.3. Troubleshooting Testing
7. Dev Ops
7.1. Build Automation
7.2. Continuous Integration
7.3. Making a Release
7.4. Managing Dependencies
Appendix A: Suggested Ways to Get Started
A.1. Example Programming Task - Creating a new command: remark
A.2. Full Solution
Appendix B: User Stories
Appendix C: Use Cases
Appendix D: Non Functional Requirements
Appendix E: Glossary
Appendix F: Product Survey
1
1. Introduction
This Developer Guide is written by the BoNUS v1.5 team for the benefits of future developers and
maintainers of the application.
This guide includes instructions for setting up the development environment.
This guide provides sufficient UMLs (unified model diagrams) to illustrate the architectural
structure and design methodology.
This guide offers advice for troubleshooting some common issues.
BoNUS is an open-source project, should any developers be interested, see
Contact Us page for more
information.
2. Setting up
2.1. Prerequisites
1. JDK 1.8.0_60 or later
Having any Java 8 version is not enough.
This app will not work with earlier versions of Java 8.
We do have the plan to upgrade to Java 9 in the foreseeable future.
Please pay close attention to this document.
2. IntelliJ IDE
IntelliJ by default has Gradle and JavaFx plugins installed.
Do not disable them. If you have disabled them, go to File > Settings > Plugins to
re-enable them.
2.2. Setting up the project in your computer
1. Fork this repo, and clone the fork to your computer (we use
Git as our version control system)
2. Open IntelliJ (if you are not in the welcome screen, click File > Close Project to close the
existing project dialog first)
3. Set up the correct JDK version for Gradle
a. Click Configure > Project Defaults > Project Structure
b. Click New… and find the directory of the JDK
4. Click Import Project
5. Locate the build.gradle file and select it. Click OK
6. Click Open as Project
7. Click OK to accept the default settings
8. Open a console and run the command gradlew processResources (Mac/Linux: ./gradlew
processResources ). It should finish with the BUILD SUCCESSFUL message.
This will generate all resources required by the application and tests.
2

2.3. Verifying the setup
1. Run the seedu.address.MainApp and try a few commands
2. Run the tests to ensure they all pass.
2.4. Congurations to do before writing code
2.4.1. Conguring the coding style
This project follows oss-generic coding standards. IntelliJ’s default style is mostly compliant with ours
but it uses a different import order from ours. To rectify,
1. Go to File > Settings… (Windows/Linux), or IntelliJ IDEA > Preferences… (macOS)
2. Select Editor > Code Style > Java
3. Click on the Imports tab to set the order
For Class count to use import with '*' and Names count to use static import with '*' : Set to
999 to prevent IntelliJ from contracting the import statements
For Import Layout : The order is import static all other imports , import java.* , import
javax.* , import org.* , import com.* , import all other imports . Add a <blank line> between
each import
Optionally, you can follow the UsingCheckstyle.adoc document to configure Intellij to check style-
compliance as you write code.
2.4.2. Updating documentation to match your fork
After forking the repo, links in the documentation will still point to the se-edu/addressbook-level4
repo. If you plan to develop this as a separate product (i.e. instead of contributing to the se-
edu/addressbook-level4 ) , you should replace the URL in the variable repoURL in
DeveloperGuide.adoc and UserGuide.adoc with the URL of your fork.
2.4.3. Setting up CI
Set up Travis to perform Continuous Integration (CI) for your fork. See
UsingTravis.adoc to learn how
to set it up.
Optionally, you can set up AppVeyor as a second CI (see
UsingAppVeyor.adoc).
Having both Travis and AppVeyor ensures your App works on both Unix-based platforms
and Windows-based platforms (Travis is Unix-based and AppVeyor is Windows-based).
Thus, we strongly encourage you to set up both.
2.4.4. Getting started with coding
When you are ready to start coding,
1. Get some sense of the overall design by reading the
Architecture section.
2. Take a look at the section Suggested Programming Tasks to Get Started.
2.4.5. Using Git
We use Git as our version control software (VCS). See
UsingGit.adoc if you find any difficulty when
using Git.
3
3. Design
3.1. Architecture
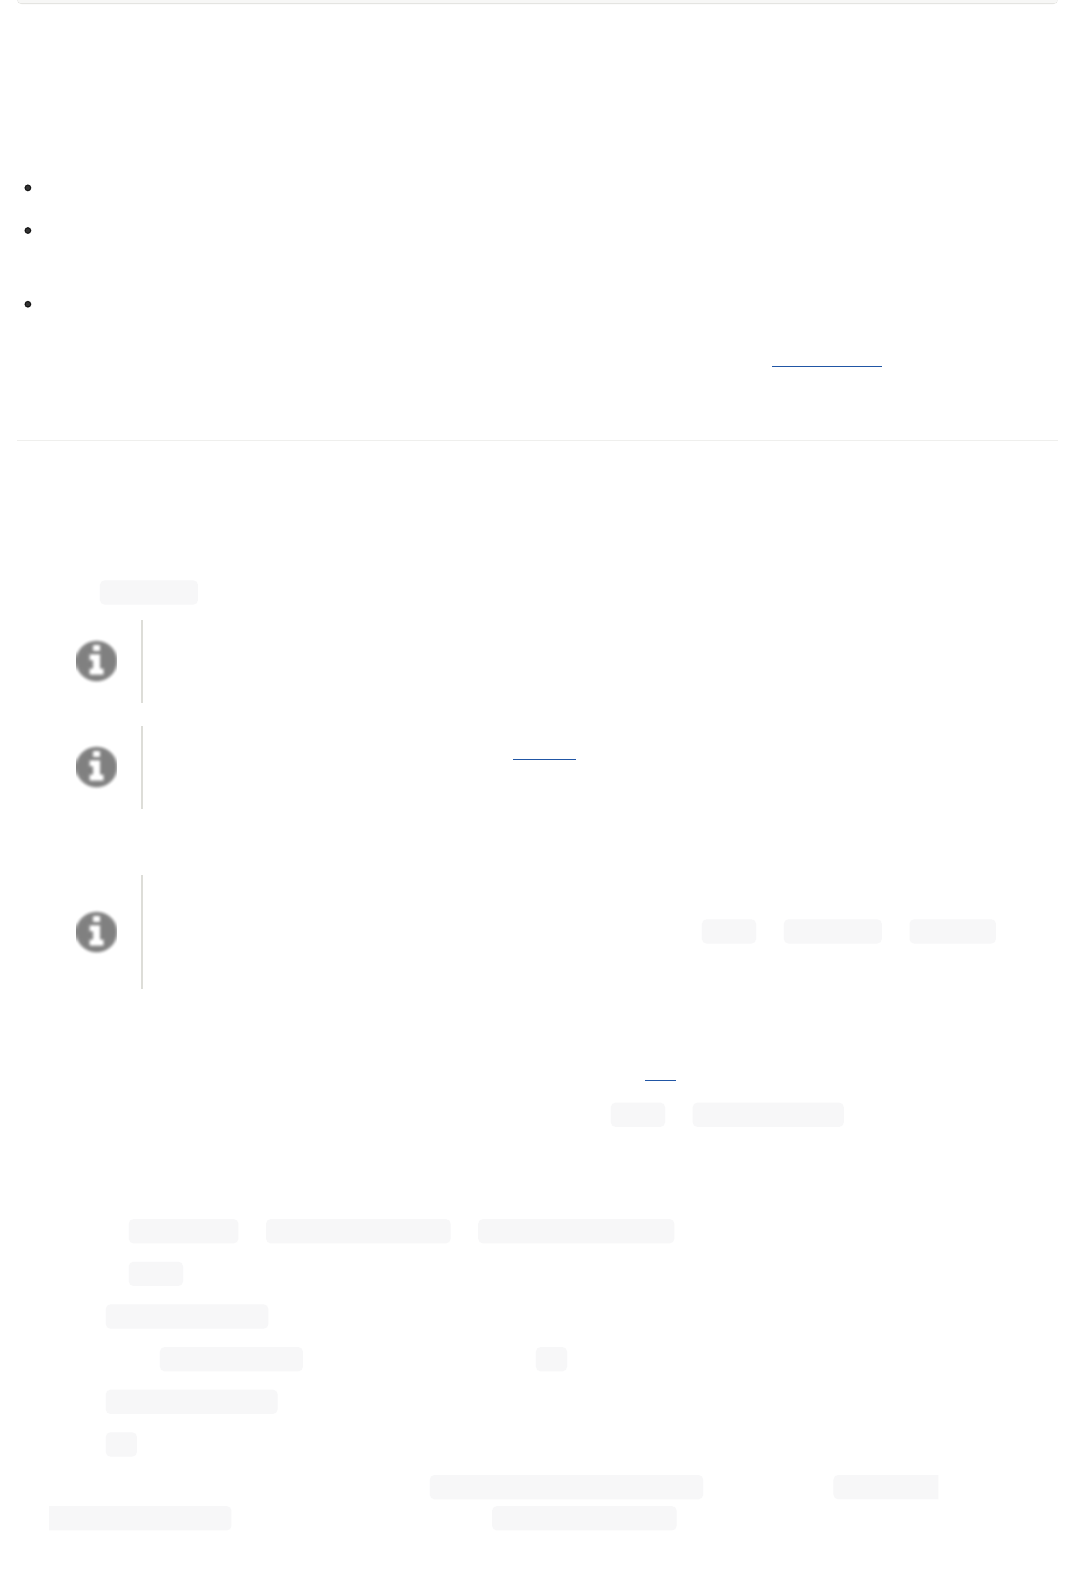
Figure 3.1.1 : Architecture Diagram
The Architecture Diagram given above explains the high-level design of the App. Given below is a
quick overview of each component.
The .pptx
files used to create diagrams in this document can be found in the
diagrams
folder. To update a diagram, modify the diagram in the pptx file, select the objects of the
diagram, and choose
Save as picture
.
Main has only one class called
MainApp . It is responsible for,
At app launch: Initializes the components in the correct sequence, and connects them up with each
other.
At shut down: Shuts down the components and invokes cleanup method where necessary.
Commons represents a collection of classes used by multiple other components. Two of those classes
play important roles at the architecture level.
EventsCenter : This class (written using
Google’s Event Bus library
) is used by components to
communicate with other components using events (i.e. a form of Event Driven design)
LogsCenter : Used by many classes to write log messages to the App’s log file.
The rest of the App consists of four components.
UI : The UI of the App.
Logic : The command executor.
Model
: Holds the data of the App in-memory.
Storage : Reads data from, and writes data to, the hard disk.
Each of the four components
Defines its API in an
interface with the same name as the Component.
Exposes its functionality using a
{Component Name}Manager class.
4
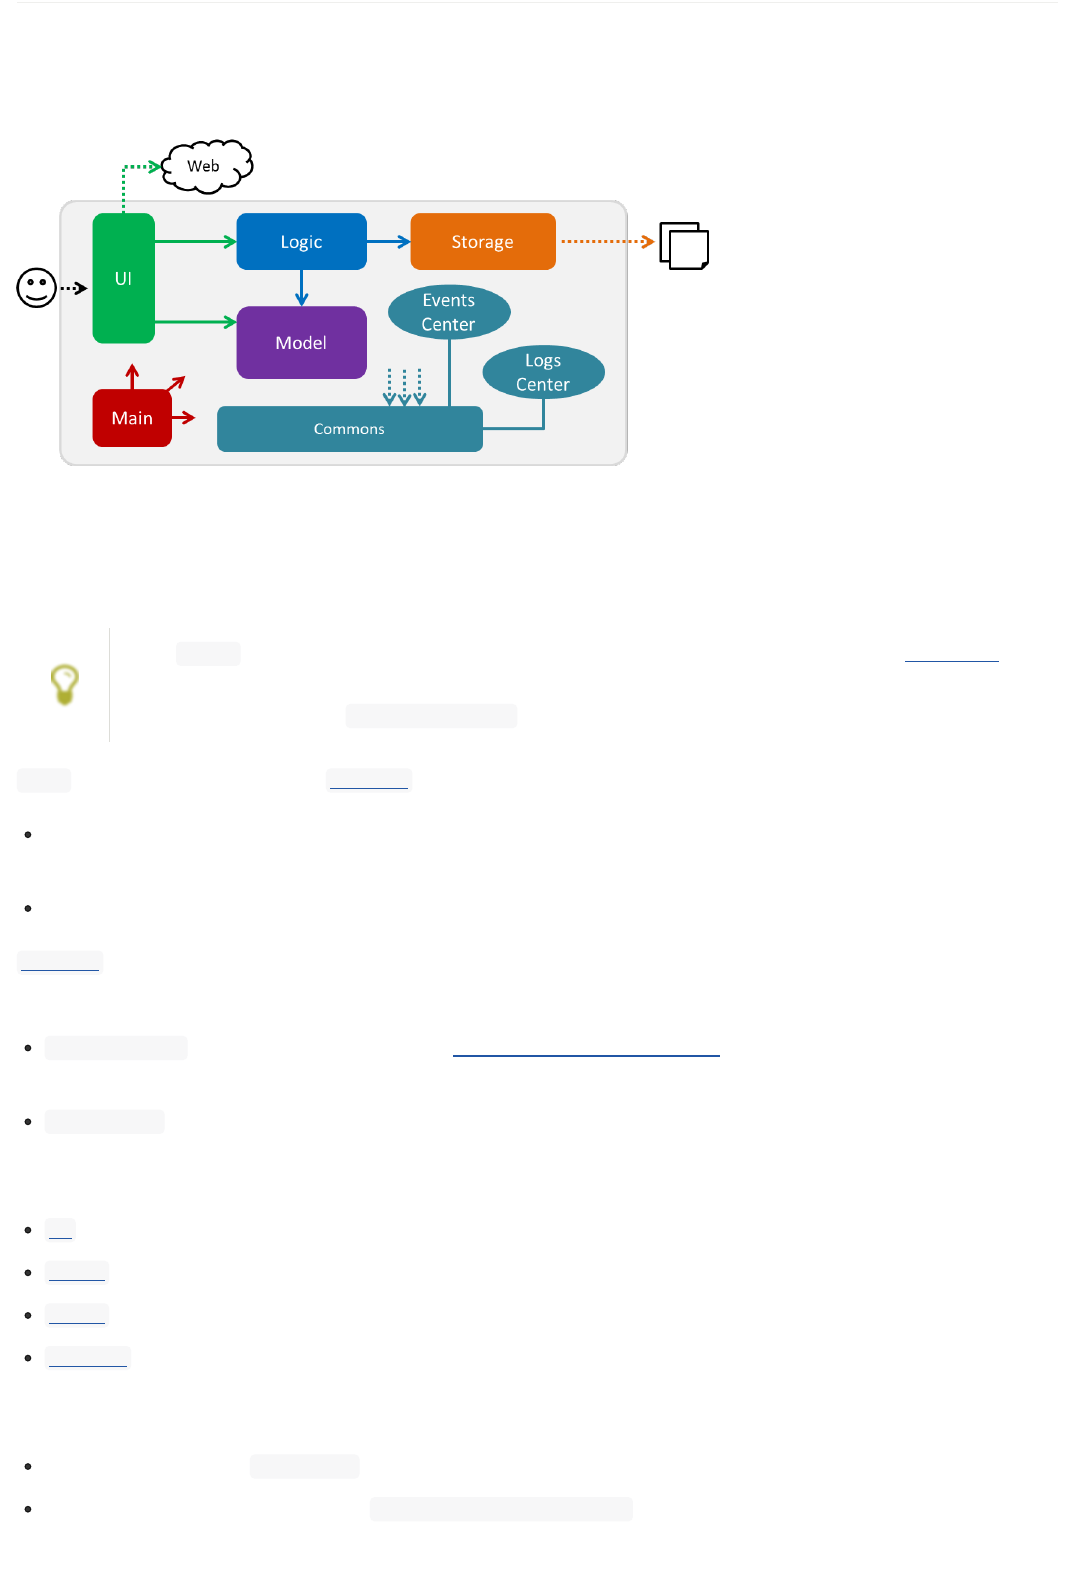
For example, the Logic component (see the class diagram given below) defines its API in the
Logic.java interface and exposes its functionality using the LogicManager.java class.
Figure 3.1.2 : Class Diagram of the Logic Component
Events-Driven nature of the design
The Sequence Diagram below shows how the components interact for the scenario where the user
issues the command delete 1 .
Figure 3.1.3a : Component interactions for
delete 1
command (part 1)
Note how the
Model simply raises a
AddressBookChangedEvent
when the Address Book
data are changed, instead of asking the Storage to save the updates to the hard disk.
The diagram below shows how the
EventsCenter reacts to that event, which eventually results in the
updates being saved to the hard disk and the status bar of the UI being updated to reflect the 'Last
Updated' time.
5
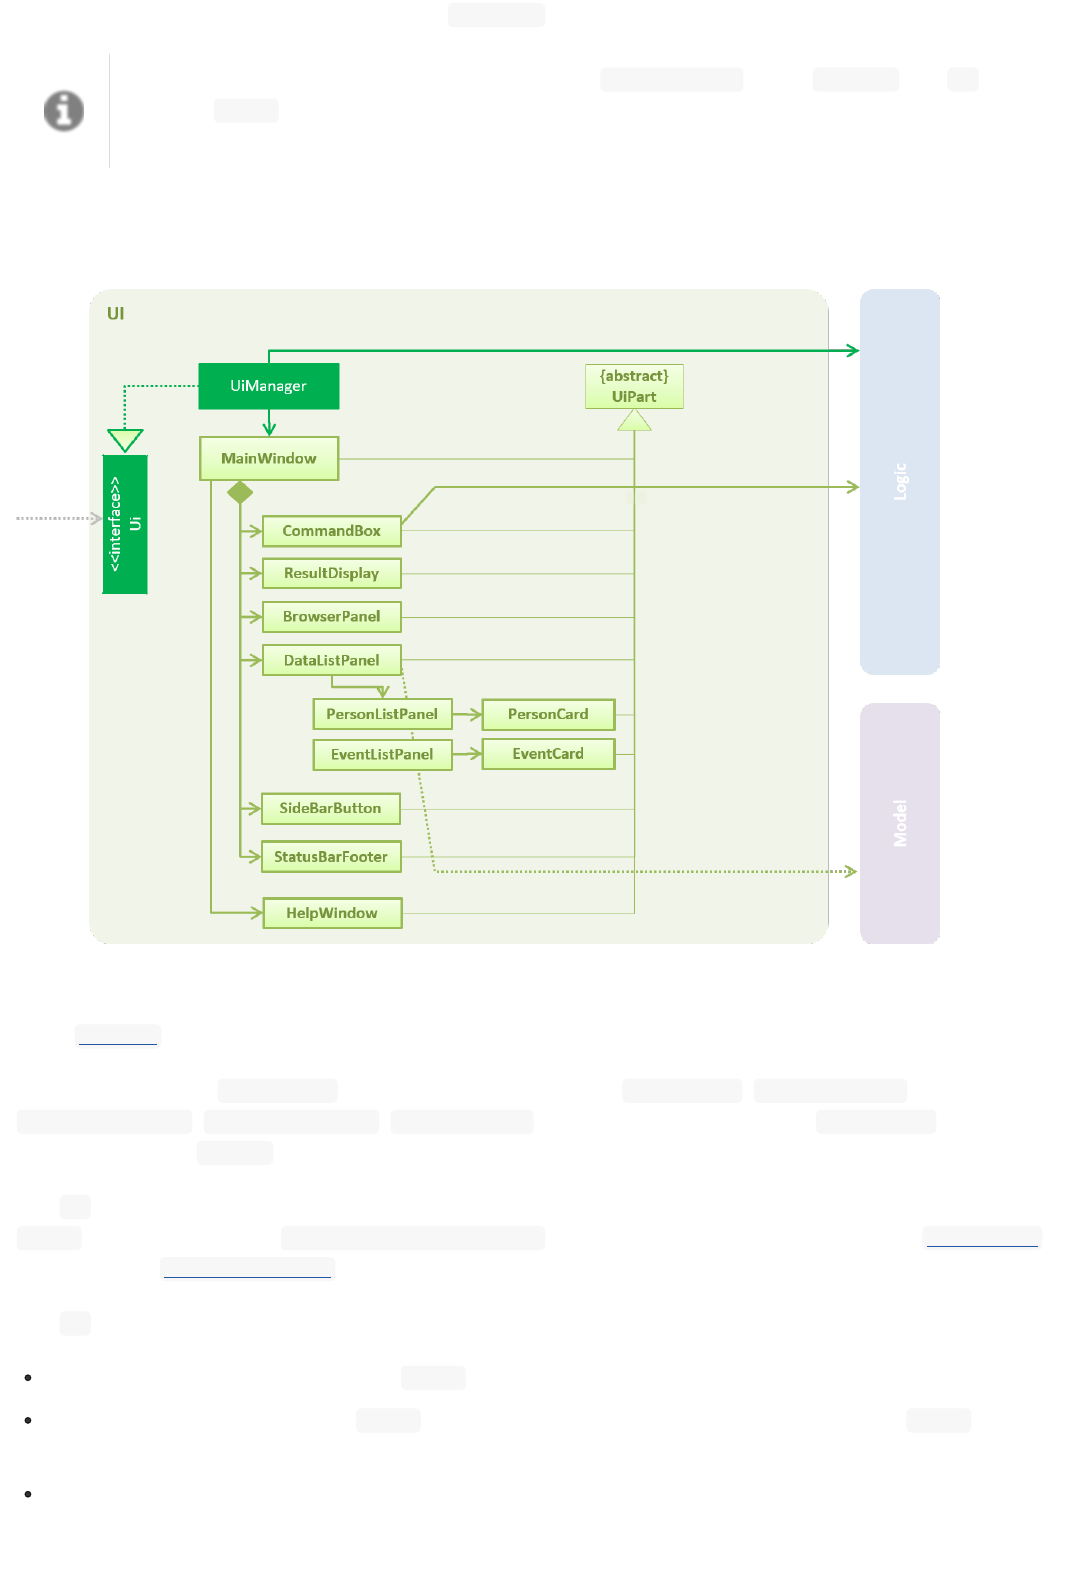
Figure 3.1.3b : Component interactions for delete 1 command (part 2)
Note how the event is propagated through the EventsCenter to the Storage and UI
without Model having to be coupled to either of them. This is an example of how this
Event Driven approach helps us reduce direct coupling between components.
The sections below give more details of each component.
3.2. UI component
Figure 3.2.1 : Structure of the UI Component
API :
Ui.java
The UI consists of a
MainWindow that is made up of parts e.g.
CommandBox ,
ResultDisplay
,
PersonListPanel
,
StatusBarFooter ,
BrowserPanel etc. All these, including the
MainWindow , inherit
from the abstract
UiPart class.
The
UI component uses JavaFx UI framework. The layout of these UI parts are defined in matching
.fxml files that are in the
src/main/resources/view folder. For example, the layout of the
MainWindow
is specified in
MainWindow.fxml
The UI component,
Executes user commands using the
Logic component.
Binds itself to some data in the Model so that the UI can auto-update when data in the
Model
change.
Responds to events raised from various parts of the App and updates the UI accordingly.
3.3. Logic component
6
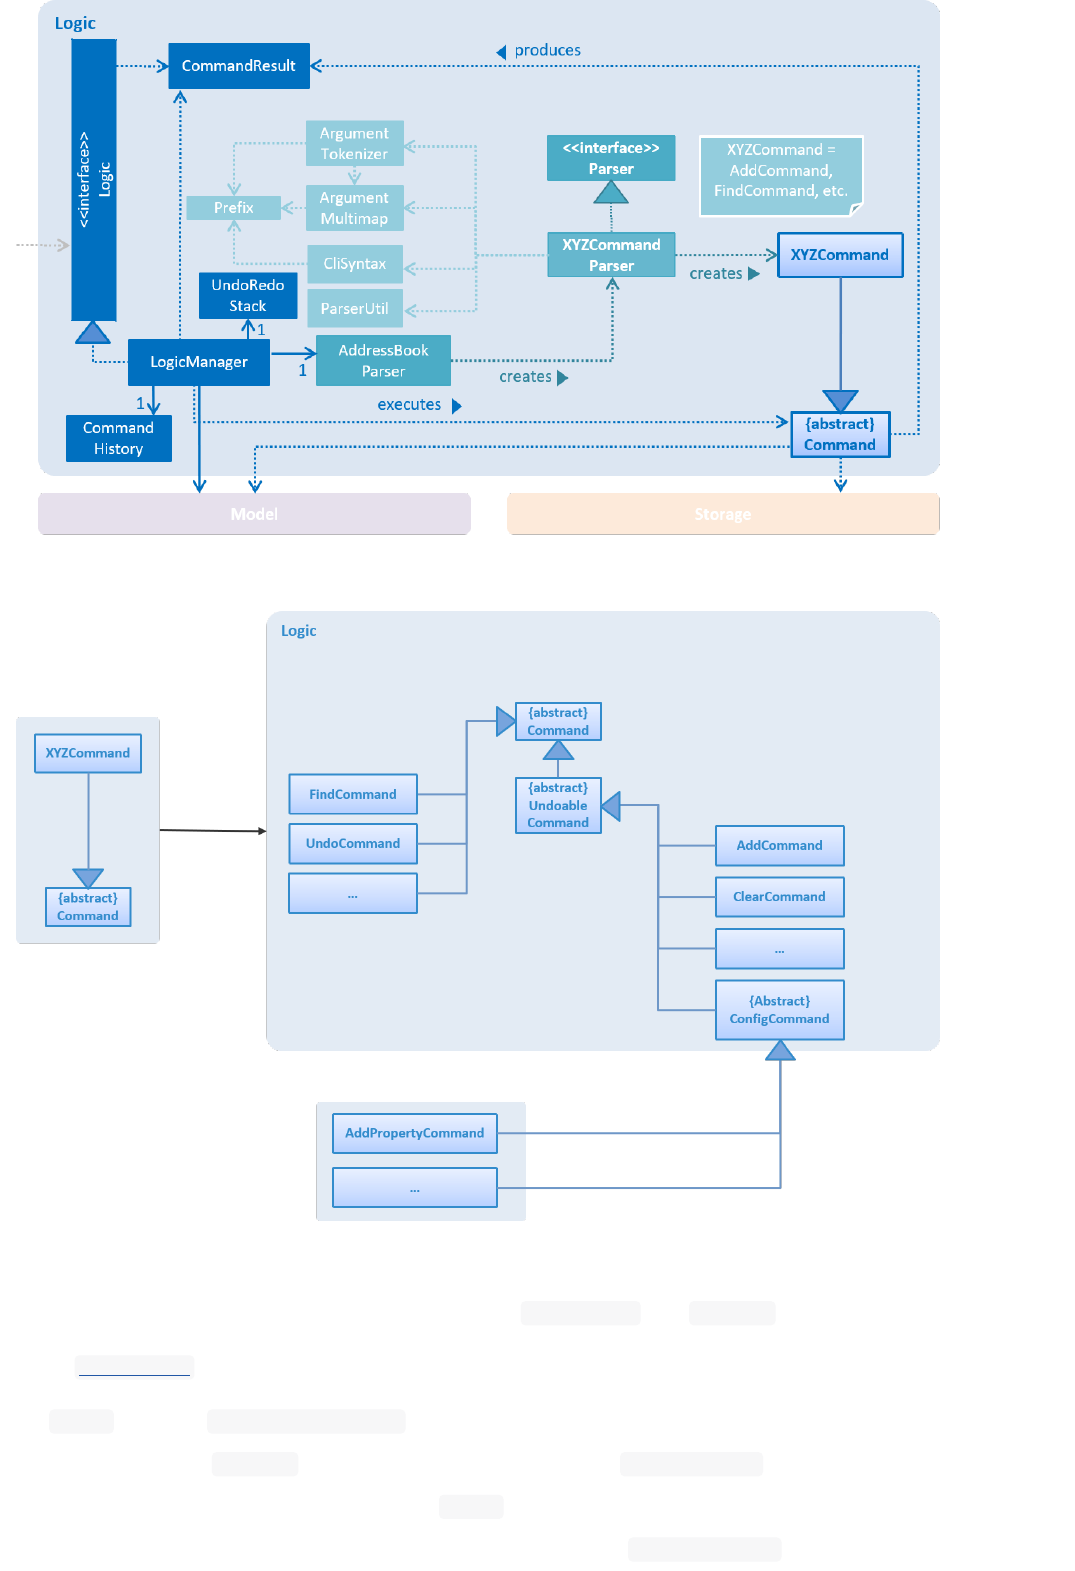
Figure 3.3.1 : Structure of the Logic Component
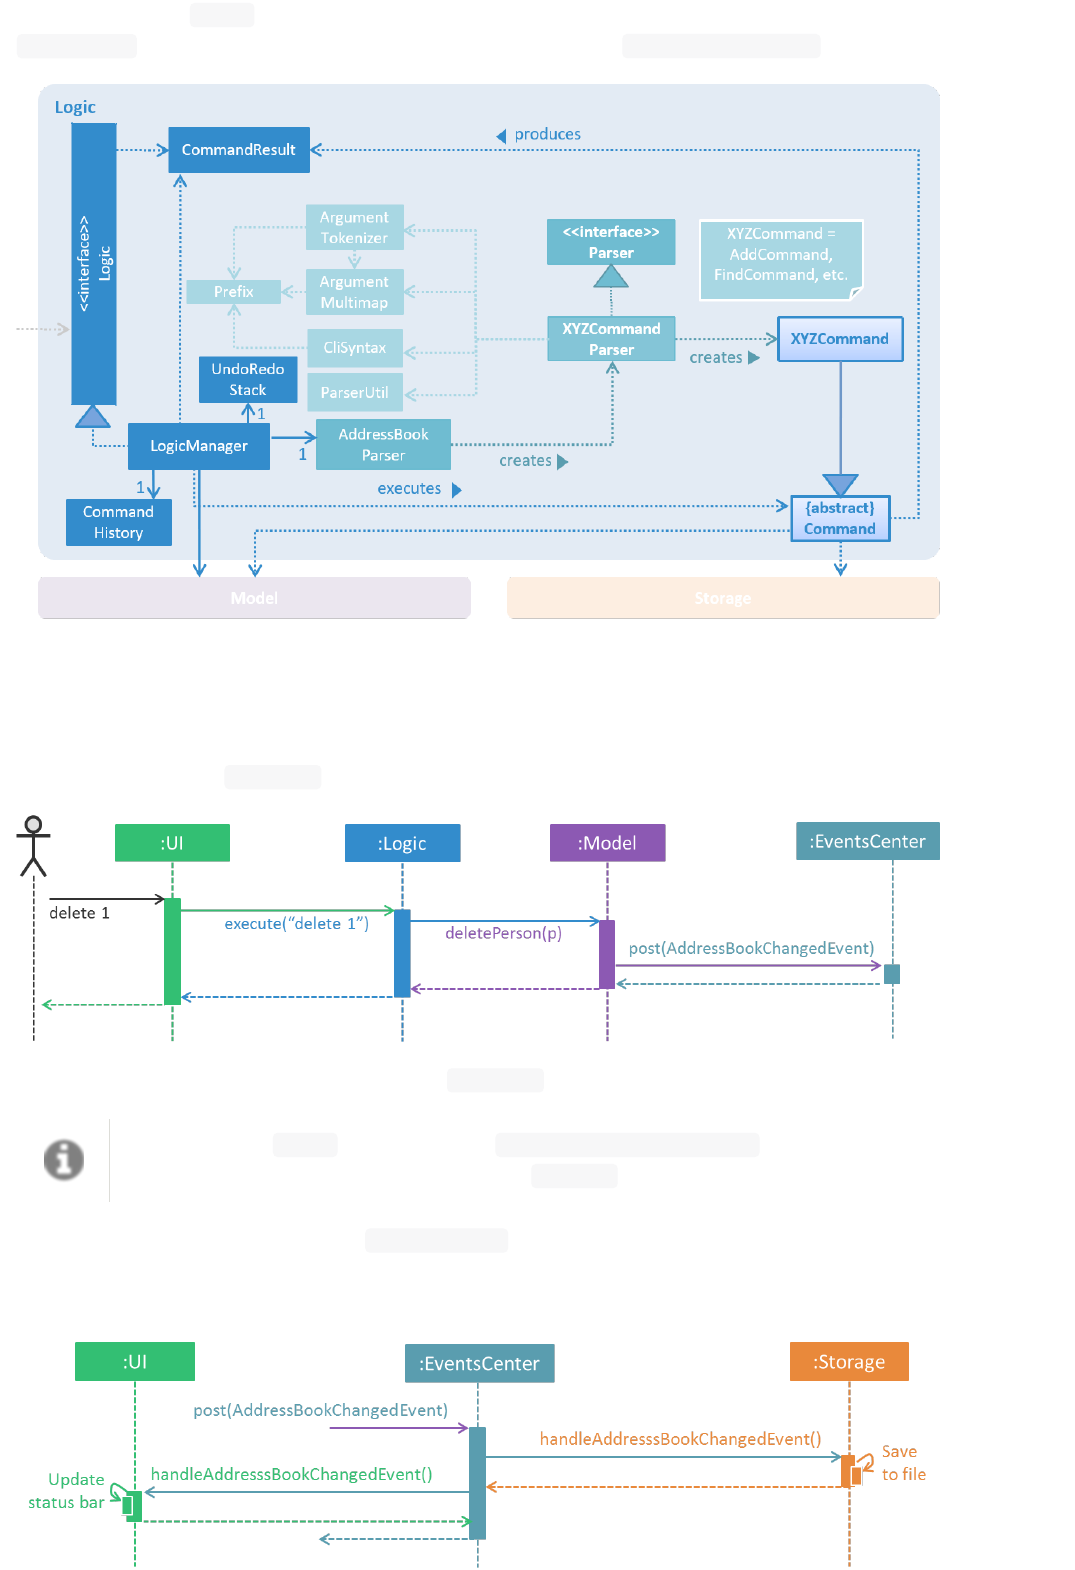
Figure 3.3.2 : Structure of Commands in the Logic Component.
The diagram above shows finer details concerning XYZCommand
and Command in Figure 2.3.1
API :
Logic.java
1.
Logic uses the
AddressBookParser class to parse the user command.
2. This results in a
Command object which is executed by the
LogicManager .
3. The command execution can affect the
Model (e.g. adding a person) and/or raise events.
4. The result of the command execution is encapsulated as a
CommandResult object which is passed
7
back to the Ui .
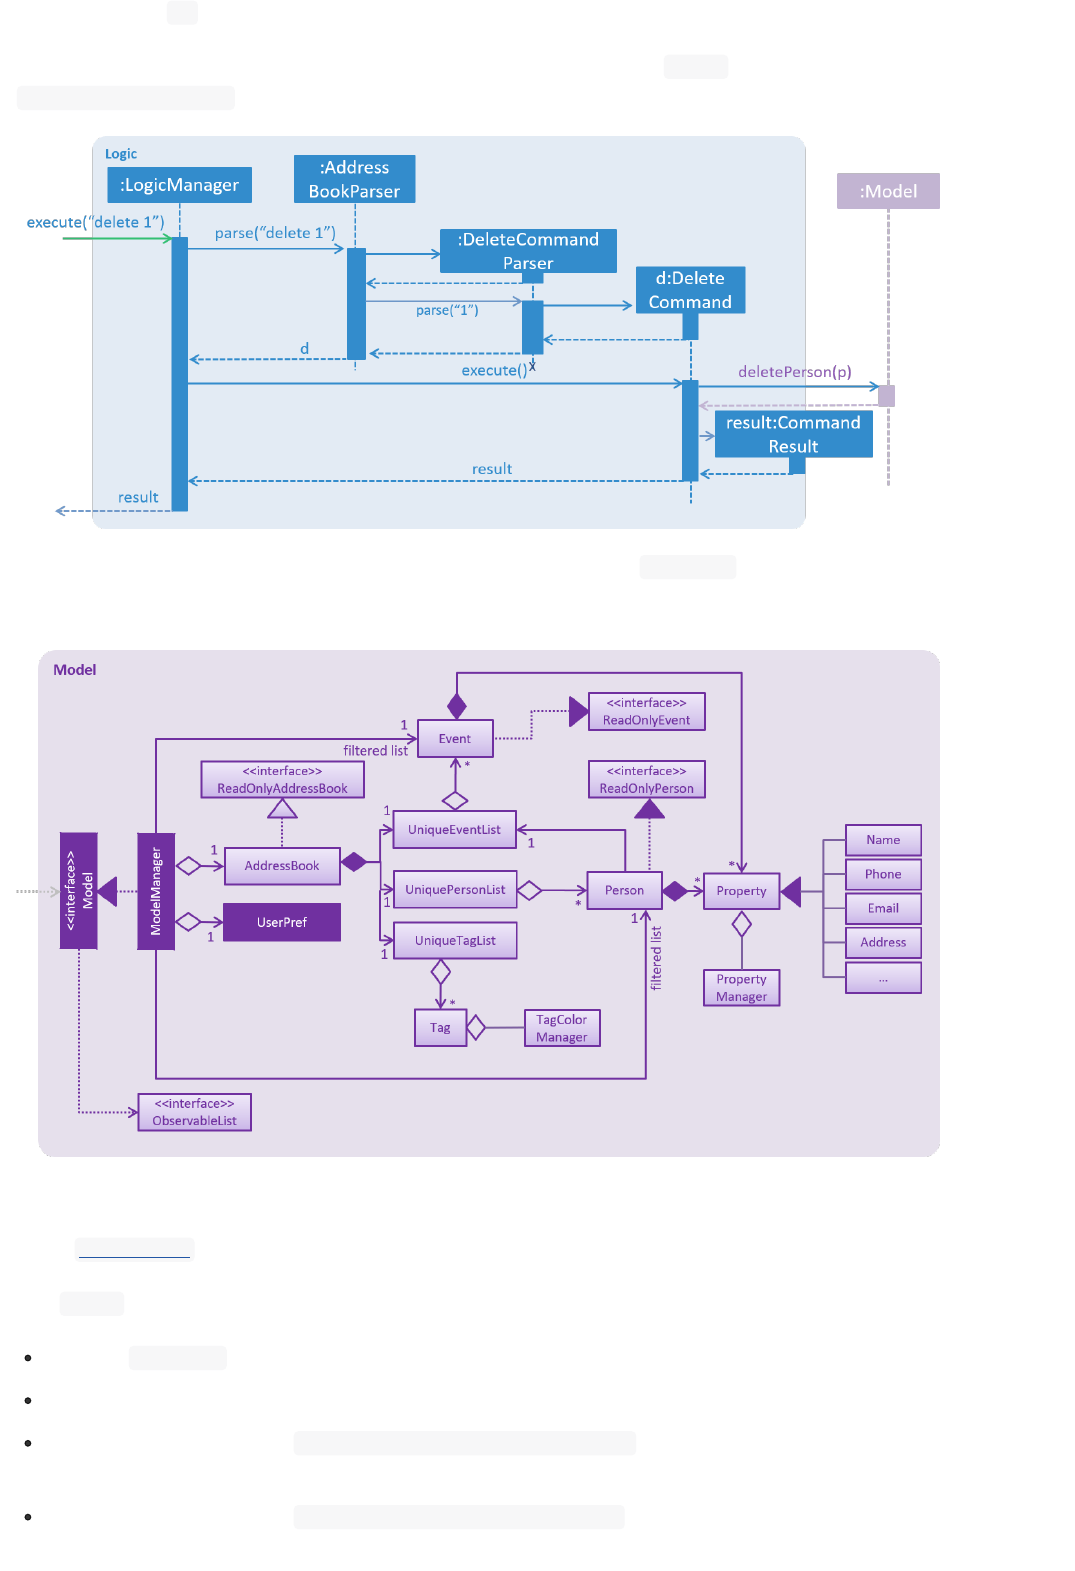
Given below is the Sequence Diagram for interactions within the Logic component for the
execute("delete 1") API call.
Figure 2.3.1 : Interactions Inside the Logic Component for the delete 1 Command
3.4. Model component
Figure 3.4.1 : Structure of the Model Component
API : Model.java
The
Model ,
stores a
UserPref object that represents the user’s preferences.
stores the Address Book data.
exposes an unmodifiable
ObservableList<ReadOnlyPerson> that can be 'observed' e.g. the UI can be
bound to this list so that the UI automatically updates when the data in the list change.
exposes an unmodifiable
ObservableList<ReadOnlyEvent> that can be 'observed' e.g. the UI can be
bound to this list so that the UI automatically updates when the data in the list change.
8
does not depend on any of the other three components.
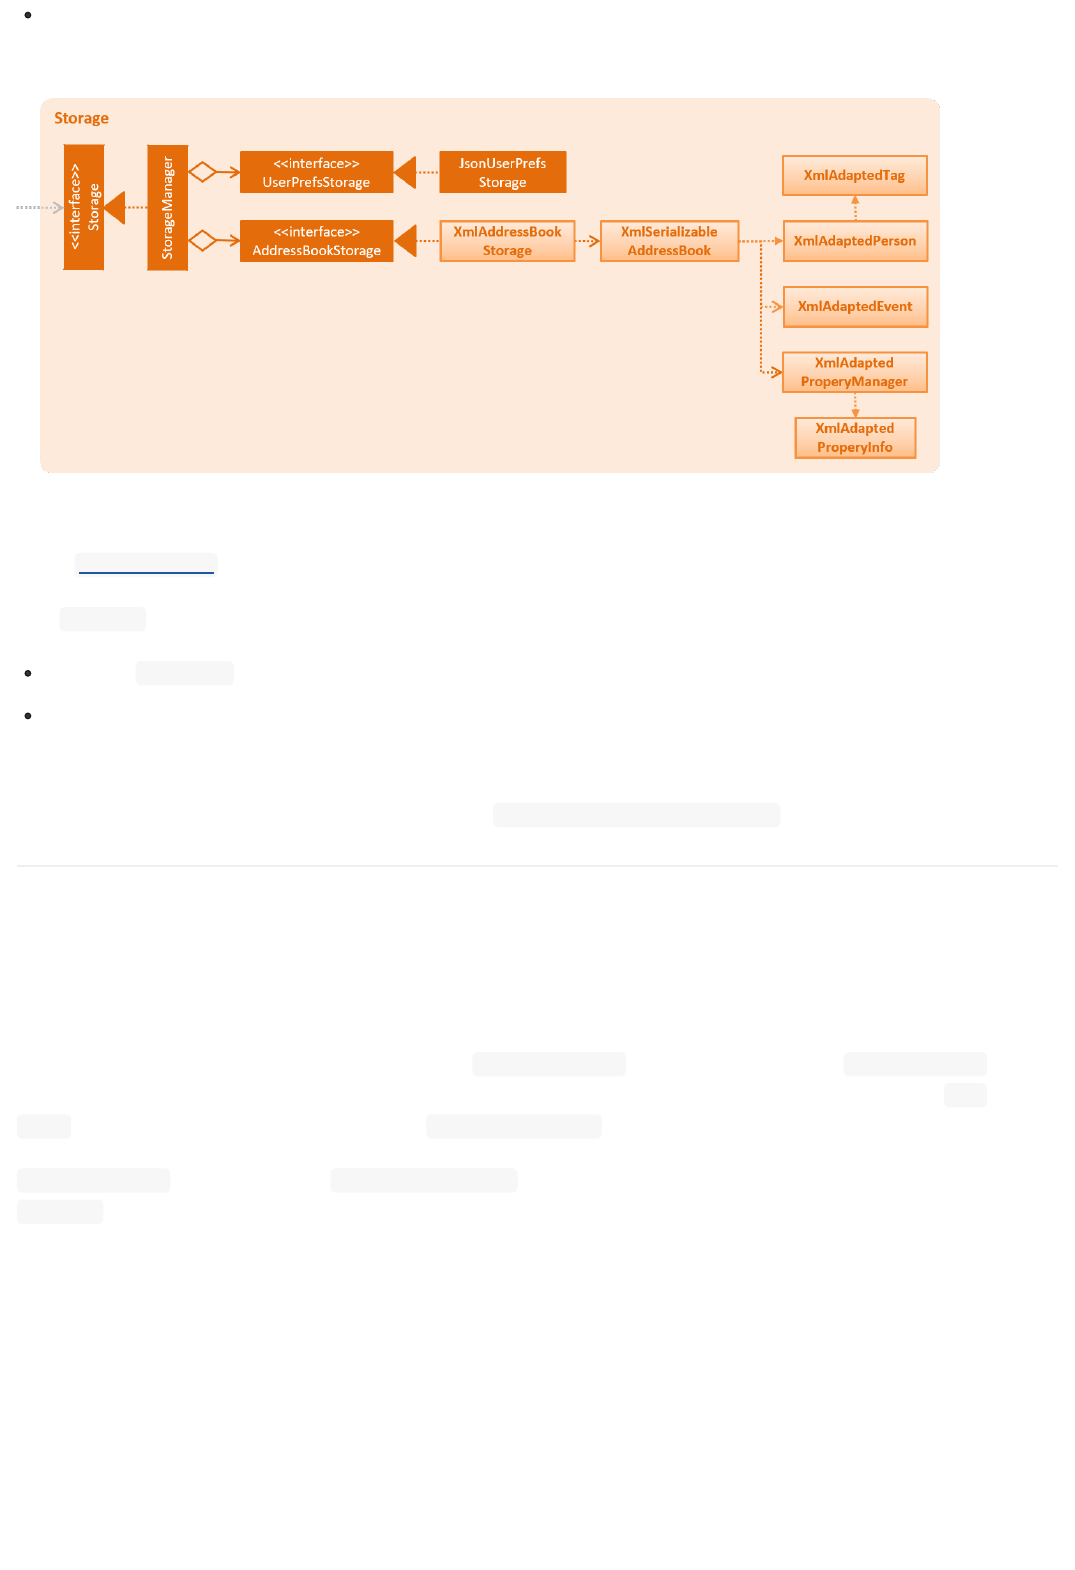
3.5. Storage component
Figure 3.5.1 : Structure of the Storage Component
API :
Storage.java
The
Storage component,
can save
UserPref objects in json format and read it back.
can save the Address Book data in xml format and read it back.
3.6. Common classes
Classes used by multiple components are in the
seedu.addressbook.commons package.
4. Implementation
This section describes some noteworthy details on how certain features are implemented.
4.1. Undo/Redo mechanism
The undo/redo mechanism is facilitated by an
UndoRedoStack , which resides inside
LogicManager . It
supports undoing and redoing of commands that modifies the state of the address book (e.g.
add ,
edit ). Such commands will inherit from UndoableCommand
.
UndoRedoStack only deals with
UndoableCommands . Commands that cannot be undone will inherit from
Command instead. The following diagram shows the inheritance diagram for commands:
9
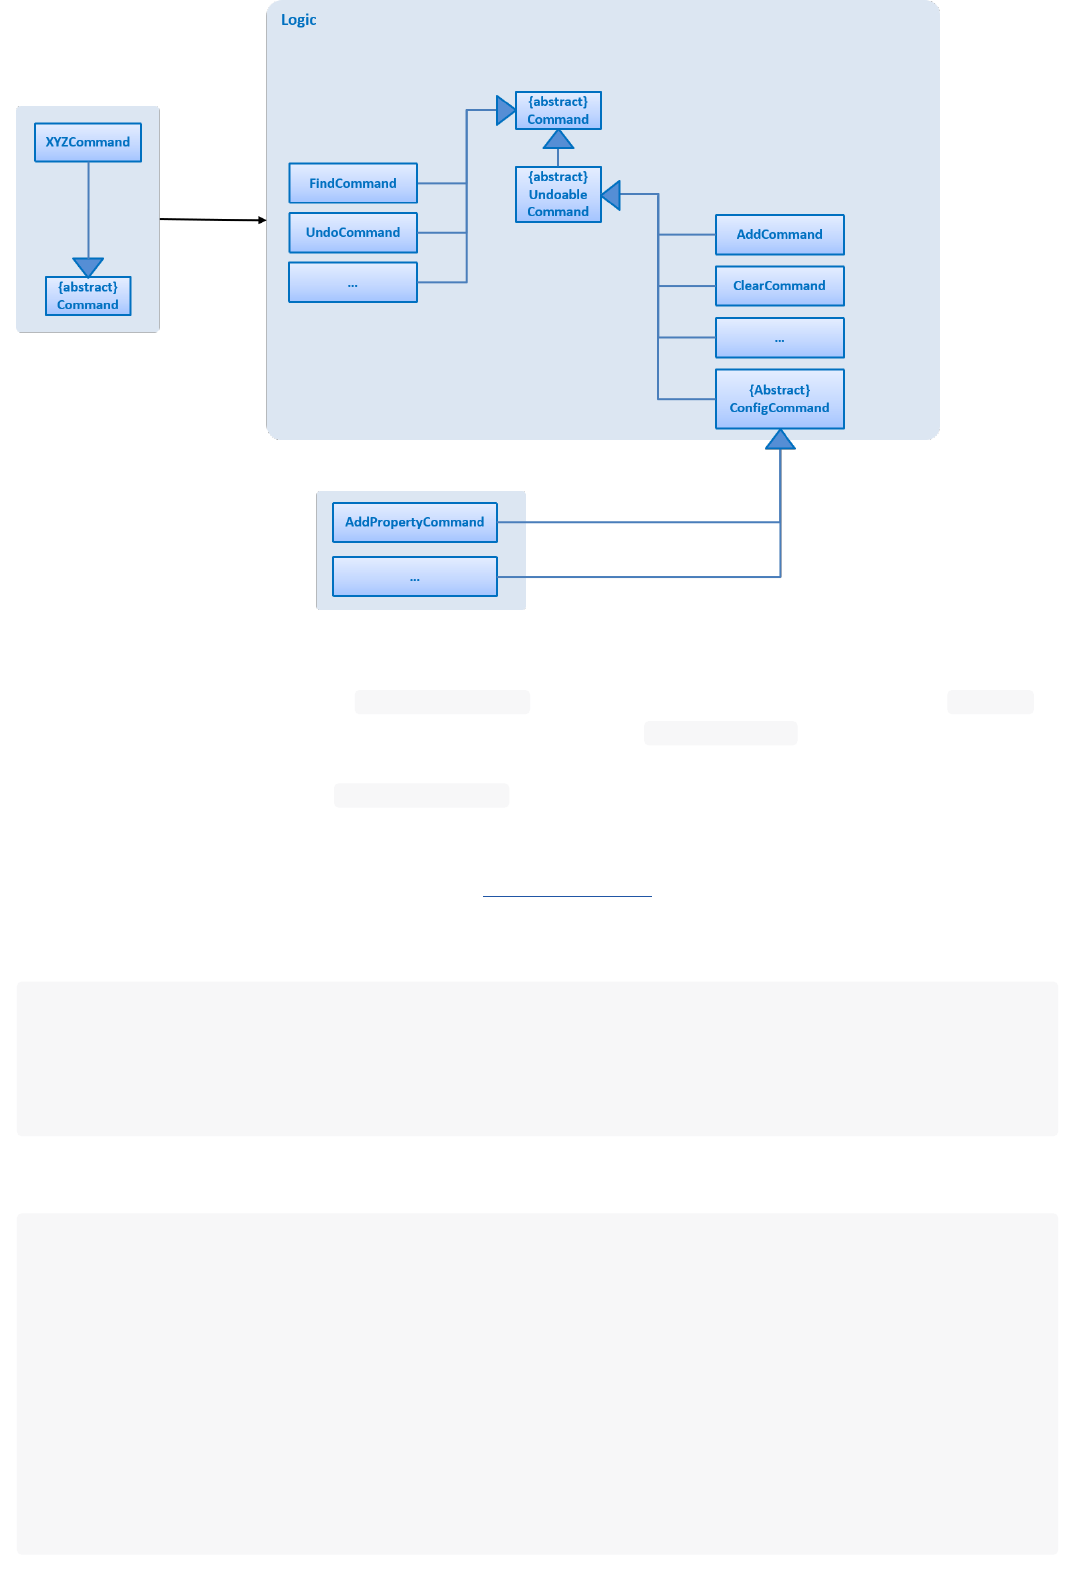
Figure 4.1.1 : Logic Component Class Diagram
As you can see from the diagram, UndoableCommand
adds an extra layer between the abstract
Command
class and concrete commands that can be undone, such as the
DeleteCommand
. Note that extra tasks
need to be done when executing a command in an undoable way, such as saving the state of the
address book before execution.
UndoableCommand contains the high-level algorithm for those extra
tasks while the child classes implements the details of how to execute the specific command. Note that
this technique of putting the high-level algorithm in the parent class and lower-level steps of the
algorithm in child classes is also known as the
template pattern
.
Commands that are not undoable are implemented this way:
With the extra layer, the commands that are undoable are implemented this way:
public class ListCommand
extends Command {
@Override
public CommandResult execute() {
// ... list logic ...
}
}
public abstract class UndoableCommand
extends Command {
@Override
public CommandResult execute() {
// ... undo logic ...
executeUndoableCommand();
}
}
public class
DeleteCommand extends UndoableCommand {
@Override
public CommandResult executeUndoableCommand() {
// ... delete logic ...
}
}
10
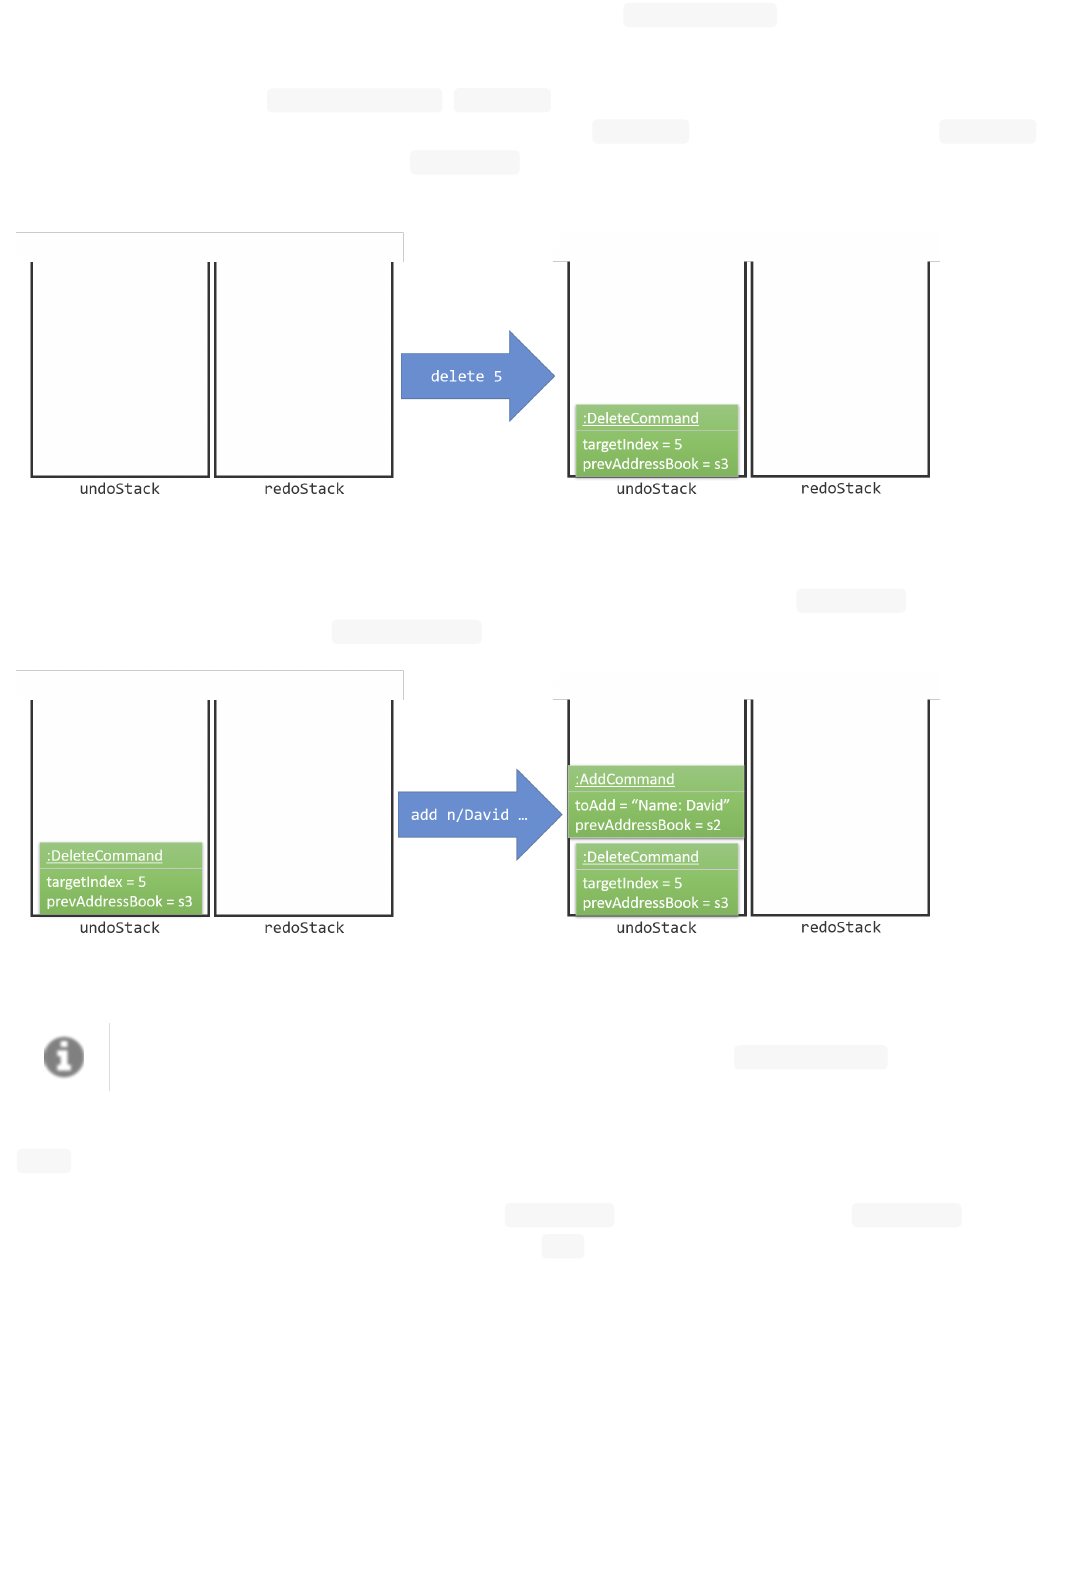
Suppose that the user has just launched the application. The UndoRedoStack will be empty at the
beginning.
The user executes a new UndoableCommand , delete 5 , to delete the 5th person in the address book.
The current state of the address book is saved before the delete 5 command executes. The delete 5
command will then be pushed onto the undoStack (the current state is saved together with the
command).
Figure 4.1.2(a) : Undo Stack
As the user continues to use the program, more commands are added into the
undoStack . For
example, the user may execute
add n/David … to add a new person.
Figure 4.1.2(b) : Undo Stack
If a command fails its execution, it will not be pushed to the
UndoRedoStack at all.
The user now decides that adding the person was a mistake, and decides to undo that action using
undo .
We will pop the most recent command out of the
undoStack and push it back to the
redoStack
. We
will restore the address book to the state before the
add command executed.
11
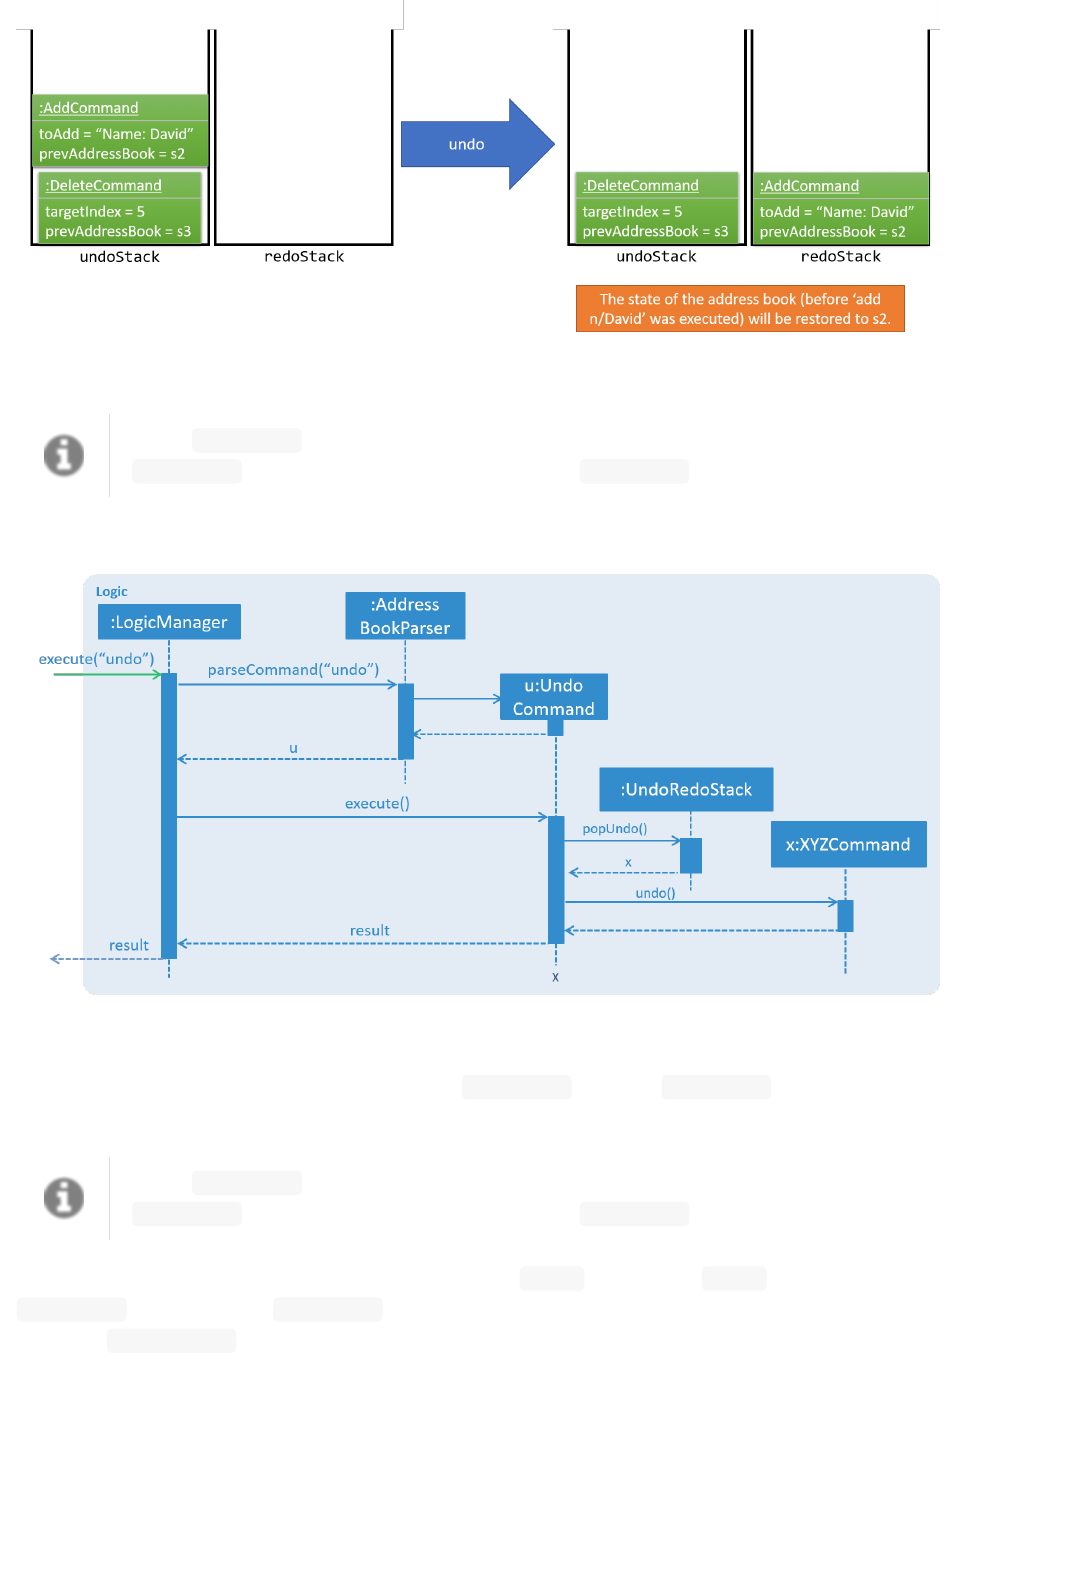
Figure 4.1.2(c) : Undo Stack
If the undoStack is empty, then there are no other commands left to be undone, and an
Exception will be thrown when popping the undoStack .
The following sequence diagram shows how the undo operation works:
Figure 4.1.3 : Undo Command Sequence Diagram
The redo does the exact opposite (pops from redoStack , push to undoStack
, and restores the address
book to the state after the command is executed).
If the
redoStack
is empty, then there are no other commands left to be redone, and an
Exception will be thrown when popping the
redoStack .
The user now decides to execute a new command, clear
. As before,
clear
will be pushed into the
undoStack
. This time the redoStack is no longer empty. It will be purged as it no longer make sense to
redo the
add n/David command (this is the behavior that most modern desktop applications follow).
12
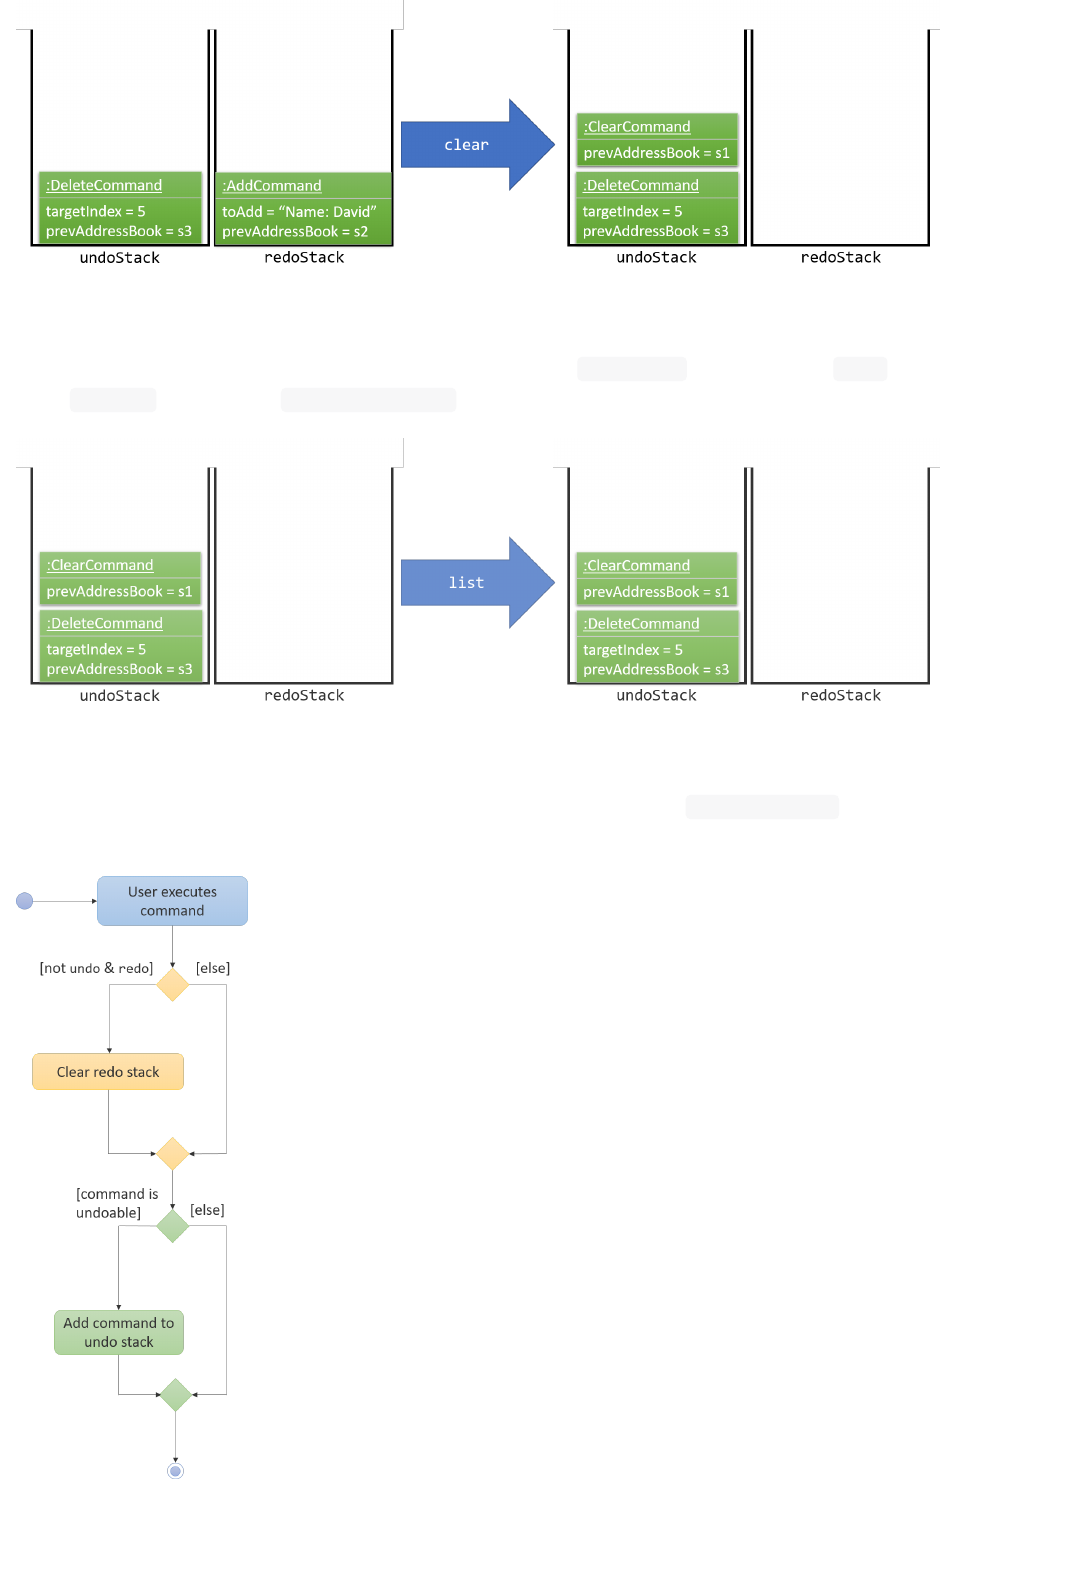
Figure 4.1.4(a) : Redo Stack
Commands that are not undoable are not added into the
undoStack . For example,
list , which inherits
from
Command rather than
UndoableCommand
, will not be added after execution:
Figure 4.1.4(b) : Redo Stack
The following activity diagram summarize what happens inside the
UndoRedoStack when a user
executes a new command:
Figure 4.1.5 : Redo Command Activity Diagram
13

4.1.1. Design Considerations
Aspect: Implementation of UndoableCommand
Alternative 1 (current choice): Add a new abstract method executeUndoableCommand()
Pros: We will not lose any undone/redone functionality as it is now part of the default behaviour.
Classes that deal with Command do not have to know that executeUndoableCommand() exist.
Cons: Hard for new developers to understand the template pattern.
Alternative 2: Just override execute()
Pros: Does not involve the template pattern, easier for new developers to understand.
Cons: Classes that inherit from UndoableCommand must remember to call super.execute() , or lose the
ability to undo/redo.
Aspect: How undo & redo executes
Alternative 1 (current choice): Saves the entire address book.
Pros: Easy to implement.
Cons: May have performance issues in terms of memory usage.
Alternative 2: Individual command knows how to undo/redo by itself.
Pros: Will use less memory (e.g. for delete , just save the person being deleted).
Cons: We must ensure that the implementation of each individual command are correct.
Aspect: Type of commands that can be undone/redone
Alternative 1 (current choice): Only include commands that modifies the address book (add , clear ,
edit ).
Pros: We only revert changes that are hard to change back (the view can easily be re-modified as no
data are lost).
Cons: User might think that undo also applies when the list is modified (undoing filtering for example),
only to realize that it does not do that, after executing undo .
Alternative 2: Include all commands.
Pros: Might be more intuitive for the user.
Cons: User have no way of skipping such commands if he or she just want to reset the state of the
address book and not the view.
Additional Info: See our discussion here.
Aspect: Data structure to support the undo/redo commands
Alternative 1 (current choice): Use separate stack for undo and redo
Pros: Easy to understand for new Computer Science student undergraduates to understand, who are
likely to be the new incoming developers of our project.
Cons: Logic is duplicated twice. For example, when a new command is executed, we must remember to
update both HistoryManager and UndoRedoStack .
Alternative 2: Use HistoryManager for undo/redo
Pros: We do not need to maintain a separate stack, and just reuse what is already in the codebase.
Cons: Requires dealing with commands that have already been undone: We must remember to skip
these commands. Violates Single Responsibility Principle and Separation of Concerns as
HistoryManager now needs to do two different things.
4.2. Logging
We are using java.util.logging package for logging. The LogsCenter class is used to manage the
logging levels and logging destinations.
The logging level can be controlled using the logLevel setting in the configuration file (See
14
Configuration)
The Logger for a class can be obtained using LogsCenter.getLogger(Class) which will log
messages according to the specified logging level
Currently log messages are output through: Console and to a .log file.
Logging Levels
SEVERE : Critical problem detected which may possibly cause the termination of the application
WARNING : Can continue, but with caution
INFO : Information showing the noteworthy actions by the App
FINE : Details that is not usually noteworthy but may be useful in debugging e.g. print the actual
list instead of just its size
4.3. Generic property
We are using a generic Property class to support arbitrary field feature.
4.3.1. Inspiration
Users should not be limited to the provided four fields, i.e. Name , Email , Phone , Address (we are
talking about the contact component here, of course one more DateTime for event component). They
should have the freedom to enter all kinds of information about their contacts apart from the pre-
defined ones.
Through a brief product survey on other existing similar software in the market, we found that they
usually ask users to type all other information in the so-called Description or Details field. This is
not a good design because doing so will make the information stored messy. The application is used to
organize personal information conveniently. It is a major drawback if the data are not stored (and thus
presented to users) in a well-organized way.
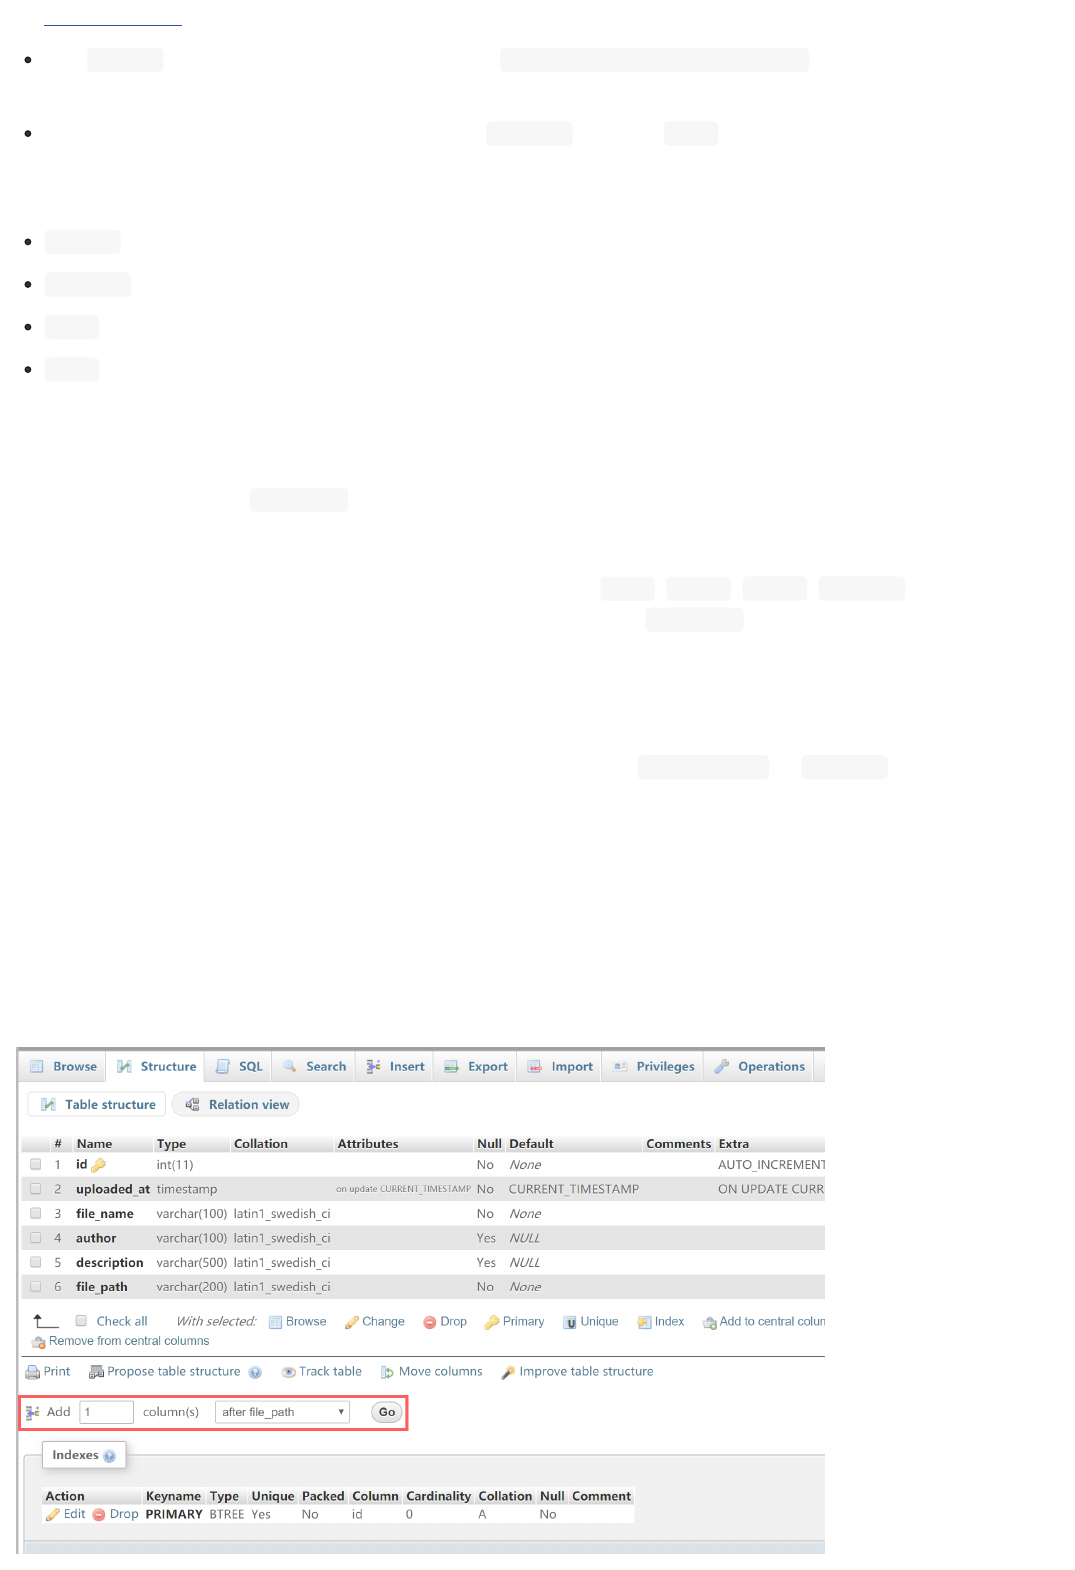
Learning from many modern database implementations, we should think of the data as two tables: one
for contacts and the other one for events. Each table is composed of many rows and many columns. A
single contact/event is one row, while all their different properties/fields are the columns (as can be
seen from Figure 4.3.1.1 and 4.3.1.2).
15
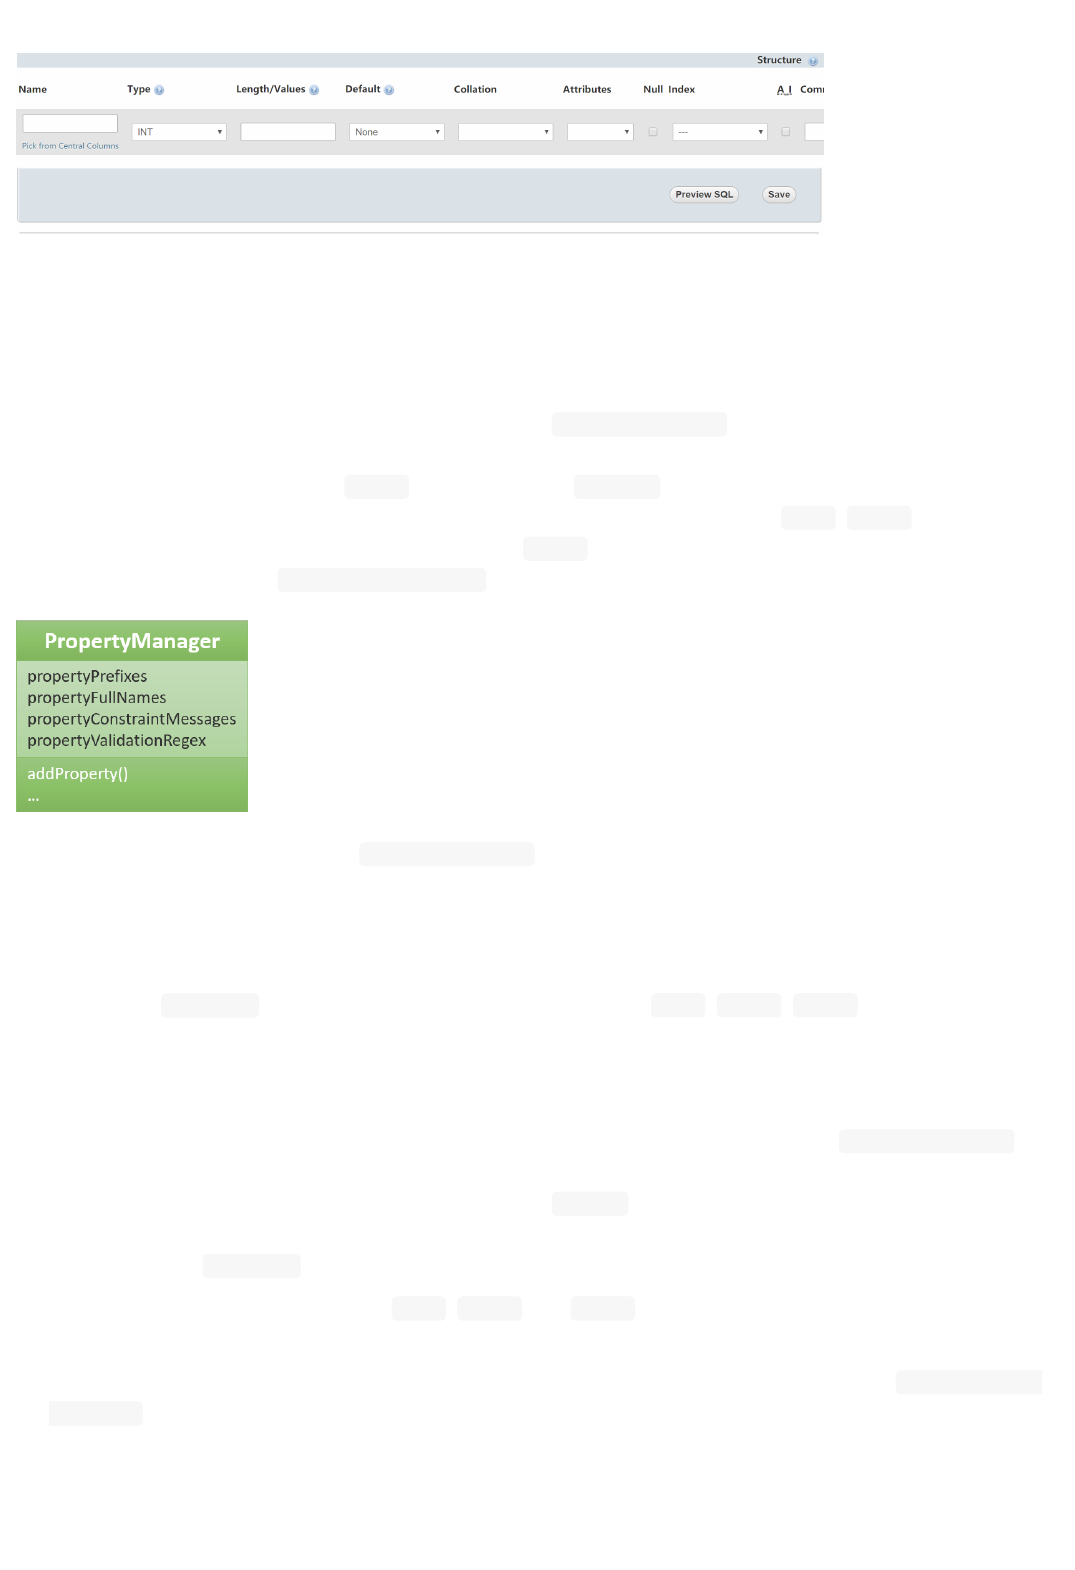
Figure 4.3.1.1 : Data Table View of phpMyAdmin (a MySQL visualization tool)
Figure 4.3.1.2 : Add New Column in phpMyAdmin
4.3.2. Design Consideration
Aspect: Where to store the "metadata" of different properties (short name, full name, regular
expression, etc.)
Alternative 1 (current choice): Create a new class
PropertyManager in Figure 4.3.2.1
Pros: Efficient (there is only one copy) and easy for future development since it is centralized.
Cons: Requires major change to Model component and Storage
component.
Alternative 2: Store these data along with each specific property class, like
Name ,
Email
Pros: Able to adapt the current implementation of
Model component.
Cons: Hard to implement
AddPropertyCommand , and difficult to manage as the project grows larger.
Figure 4.3.2.1 : Class Diagram for
PropertyManager
4.3.3. Implementation Outline
1. Create a more general class to capture the common patterns among all columns (all different
fields/properties): according to the basic OOP concept, a more generic class should become the
superclass
Property
; then, other more specific classes (like
Name ,
Email ,
Phone , etc.) can inherit
from it. This design reduces a lot of code duplicates.
2. Find a way to store the metadata of all columns (fields/properties): in popular SQL database
implementation, they usually have a separate database reserved for the database server system
itself. We must store similar information somewhere as well. Thus, we create a
PropertyManager
to
store these "metadata", including short names, full names, constraint messages and regular
expressions used for input validation. They are all
static variables because there should only be
one copy of these "metadata". It will waste a lot of resources if we store these "metadata" with each
instance of the Property
class.
3. Pre-loaded properties: Things like
Name
,
Email and
Phone
are widely used. They should ship with
the application and users do not need any additional setup steps to use them.
4. Add new customize properties: advanced users should be provided with a command (
config --add-
property
) to add their own customize fields (as shown in Figure 4.3.3.1). They should have the
freedom to arbitrarily choose things like short name, full name, etc. They can easily add/edit these
properties of each contact stored in the application, just like the pre-loaded ones.
16
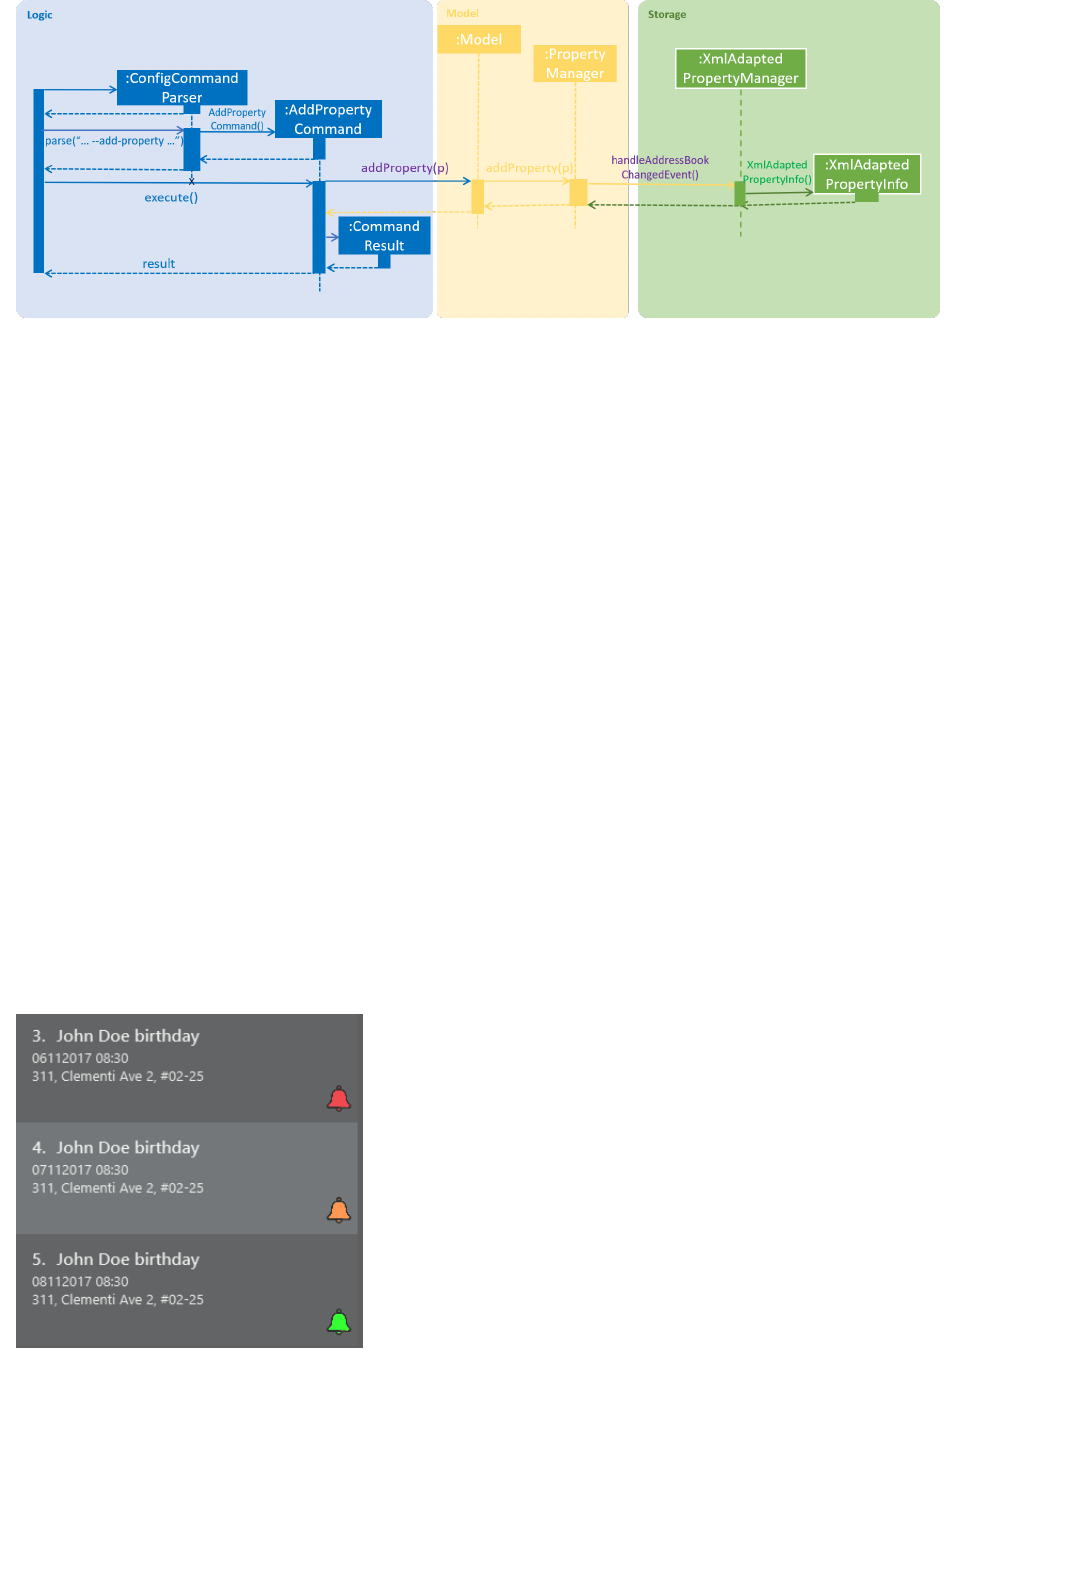
Figure 4.3.3.1 : Sequence Diagram for Adding a Customize Property
4.4. Auto reminders
We are adding a reminder to the event whenever an event is added. Reminders will notify users 2 days
in advance before event itself.
As we are targeting NUS students, in view of the busy schedules of students, students should be able
to set reminders for events that they have to attend to. In the case that students forget to set
reminders themselves, we automatically preset a reminder that will trigger from 2 days before the
event such that students have ample time to be aware and be prepared for the event itself.
Learning from many modern applications, the logic behind the applications are usually efficient and is
able to handle multiple tasks at once. By automatically adding reminders alongside the addition of
events, it makes it more convenient for the users themselves. We have set a default reminder to trigger
2 days before the actual event to remind users of their upcoming events via different colour schemes.
As shown in the Figure 4.4.1
1. The red bell indicates the day of the event
2. The orange bell indicates one day before event.
3. The green bell indicates two days before event.
Figure 4.4.1 : Reminders via different colour schemes to indicate urgency
4.4.1. Design Consideration
Aspect: How to implement the idea of reminders into Events
Alternative 1 (current choice): Create a new reminder class that contains an event parameter to it.
Events have a
17
list of reminders within them (Figure 4.4.1.1).
Pros: Independent. Reminder class is on its own and easy for future usage since it is already a class by
itself.
Each reminder is tagged to an event, such that if we want to access the reminders in an event, it is
easy to do so.
Cons: Require major changes to Logic and Model components for Event
Alternative 2: Add a new parameter for Event called Reminders to display time till event.
Pros: Less changes as it is just an implementation of a new parameter.
Cons: Less versatile and reminders cannot be applied anywhere else if needed.
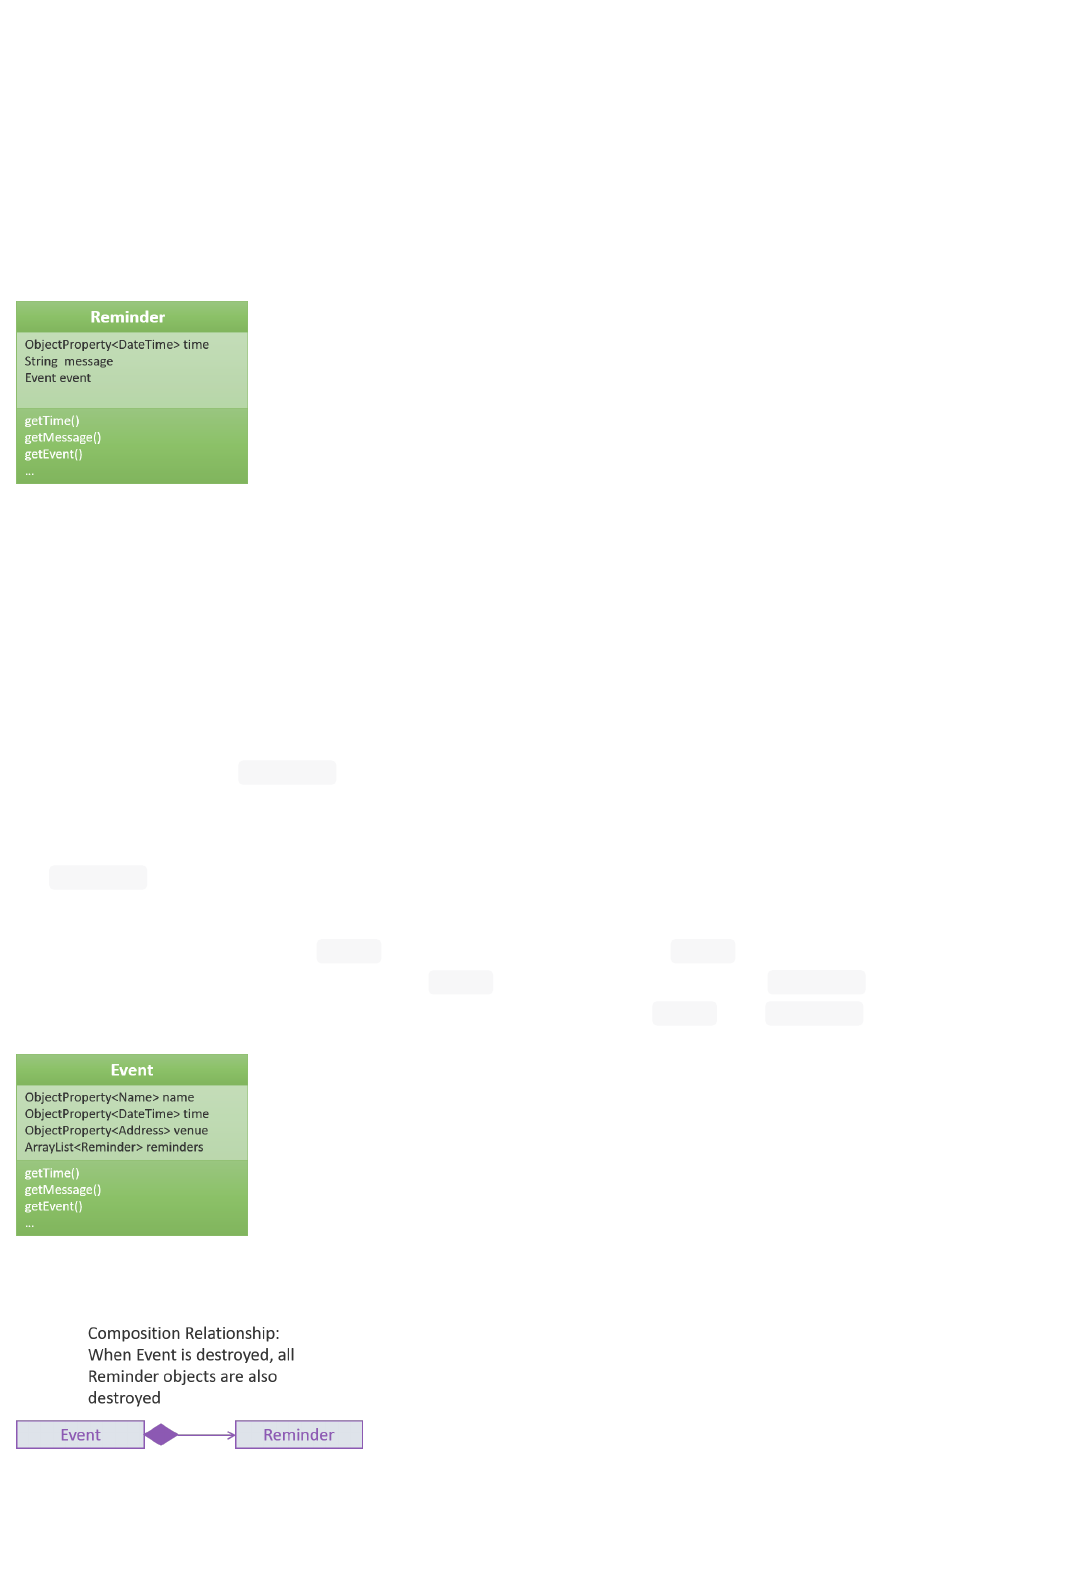
Figure 4.4.1.1 : Class Diagram for `Reminder`
Therefore we have decided to adopt alternative 1 of creating a Reminder class as it is more versatile
for future usage.
4.4.2. Implementation Outline
1. Create a ReadOnlyReminder class such that it only contains immutable instances of Reminders.
2. Create a general class such that Reminder that implements ReadOnlyReminder. It can inherit
properties such as
DateTime from PropertyClass as well. In the event that a new property needs to
be added, it can be done. Such a design makes Reminder class more adaptable to changes and
ready for future code usage.
3. Reminder
is now more open to changes if needed and can easily add parameters and methods now
that it is a class on its own.
4. Have a list of reminders in
Event class (Figure 4.4.2.1). Since Event can have multiple reminders,
each reminder is instantiated with an Event parameter in it such that a
Reminder is tagged to an
Event itself. Figure 4.4.2.2 depicts the relationship between
Event and Reminder .
Figure 4.4.2.1 : Class Diagram for `Event`
Figure 4.4.2.2 : Relationship of Event and Reminder
The following sequence diagram (Figure 4.4.2.3) shows how reminders are automatically added upon
18
the addition of events.
Figure 4.4.2.3 : Sequence Diagram for Adding an event (reminders are automatically added)
4.5. Switch themes mechanism
As BoNUS is targeted at students, we want to allow students to personalise BoNUS. To open up such a
possibility, we decided to introduce the
SwitchThemeCommand to support bright and dark themes.
In the following sections below, the Switch Themes mechanism will be elaborated with the aid of
illustrated diagrams to depict the interactions between the components in BoNUS.
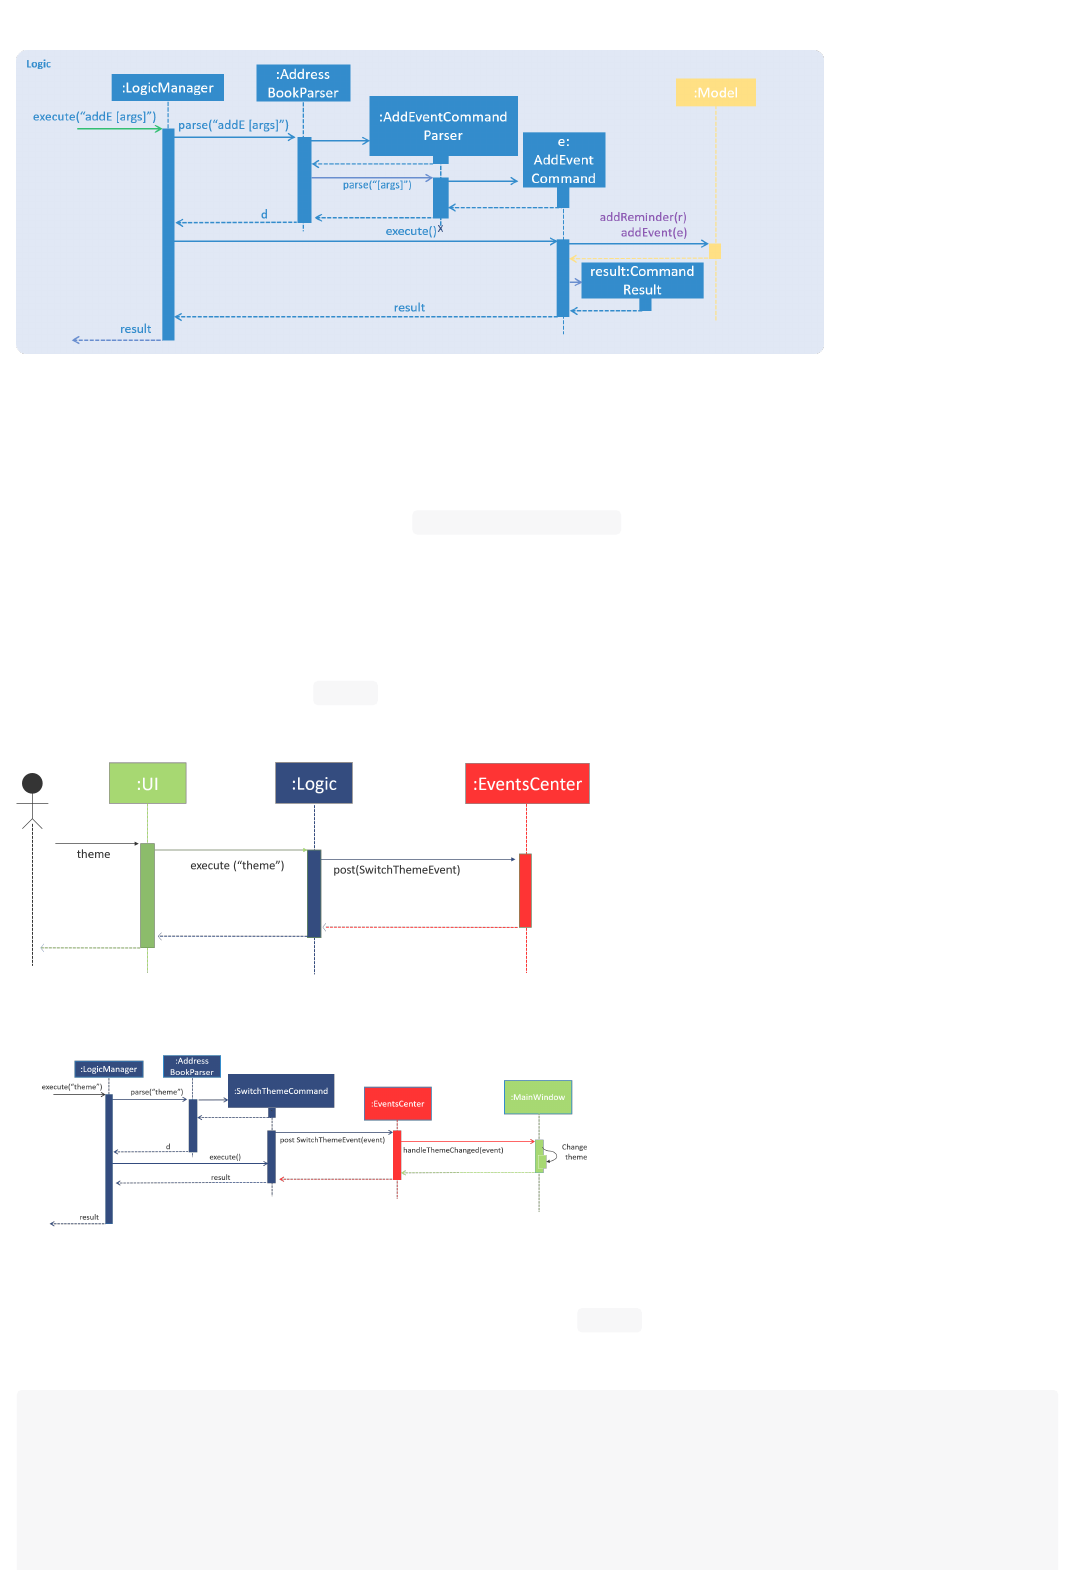
The Sequence Diagram in Figure 4.5.1 illustrates how the components interact for the scenario where
the user issues the command
theme . Also, the Sequence Diagram illustrates the events-driven
architectural style in BoNUS.
Figure 4.5.1 : Events-Driven nature of Switch Theme
Figure 4.5.2 : Sequence diagram for Switch Theme mechanism
As can be seen from Figure 4.5.2, upon the execution of theme command, SwitchThemeEvent is then
raised :
public class SwitchThemeCommand
extends Command {
public static final String COMMAND_WORD =
"theme";
public static final String COMMAND_ALIAS = "t";
public static final String MESSAGE_USAGE = COMMAND_WORD + ": Toggles between bright and dark theme.\n"
+ "Example: " + COMMAND_WORD;
19

It is from there that the event will be handled by MainWindow where the change of theme occurs as
shown below:
4.5.1. Design Consideration
Aspect: How to implement the theme command
Alternative 1 (current choice): Create a SwitchThemeCommand command under Logic component.
Create an event for it to handle
the switching of themes in MainWindow . Implement the switch theme process in MainWindow . No
parsing is involved since
it is switching between two themes.
Pros: Simple interaction between UI and Logic by raising an event to handle the changing of themes
in MainWindow
from SwitchThemeCommand under the Logic component.
Cons: Without parsing, only two themes can be set.
Alternative 2: Handle theme switch by directly accessing MainWindow from SwitchThemeCommand
Pros: Shortcut to make the theme command work.
Cons: Logic and UI component should not be easily interchangeably accessed in this manner. Also, it
violates Single Responsibility Principle (SRP). Logic is only supposed to handle logic components such
as commands, it should not be able to openly access UI components such as MainWindow .
4.5.2. Implementation Outline
1. Create a SwitchThemeCommand under logic component. Create a SwitchThemeEvent for EventBus to
handle the event accordingly whenever SwitchThemeCommand is executed.
2. Create a CSS file for BrightTheme which include its main CSS file as well as its extension files.
Remove the default CSS styles from the FXML files in BoNUS.
3. Implement the switching of themes in MainWindow . Create a method in MainWindow to subscribe it
to the event change. Raise the event whenever SwitchThemeCommand is executed such that the
theme will change accordingly in MainWindow .
4.6. Import & export XML mechanism
In order to open up more possibilities to BoNUS, we have introduced the import and export
public static final String MESSAGE_SUCCESS = "Theme switched!";
@Override
public CommandResult execute() {
raise(new SwitchThemeEvent());
return new CommandResult(MESSAGE_SUCCESS);
}
}
@Subscribe
private void handleThemeChanged(SwitchThemeEvent event) {
if (prefs.getAddressBookTheme() == darkTheme) {
getRoot().getStylesheets().clear();
getRoot().getStylesheets().add(brightTheme);
getRoot().getStylesheets().add(brightExtension);
prefs.setAddressBookTheme(brightTheme);
} else {
getRoot().getStylesheets().clear();
getRoot().getStylesheets().add(darkTheme);
getRoot().getStylesheets().add(darkExtension);
prefs.setAddressBookTheme(darkTheme);
}
}
20

commands. We are using ImportXmlCommand and ExportCommand to support importing and exporting of
address book data through XML files.
In the following sections, we will focus on how these commands depend on the Storage component to
retrieve external data, as well as the file path validation mechanism adopted on a high-level basis.
4.6.1. Implementation
External Data Access
In order to achieve their tasks, both import and export commands natively require access to the
external environment, unlike other commands. Hence, these commands are designed to depend
directly on the Storage component.
The dependence of Storage in import and export is achieved through the
Command.setStorage(Storage) method. This method mimics the existing Command.setData(Model,
CommandHistory, UndoRedoStack) method, where only commands that make use of the relevant data
will override this method to gain access to the dependencies.
The following shows the implementation of Command.setStorage(Storage) , which is not overridden
commands other than ImportXmlCommand and ExportCommand :
In ImportXmlCommand and ExportCommand , the overridden method is implemented in this way:
Through this implementation, commands that depend directly on the Storage component (ie. import
and export ) are able to gain full access to Storage , while commands that do not rely on Storage
remain weakly coupled to it. The following class diagram of the Logic component reflects the overall
implementation on an architectural-level point of view:
public void setStorage(Storage storage) {
// intentionally left empty
}
@Override
public void setStorage(Storage storage) {
this.storage = storage;
}
21
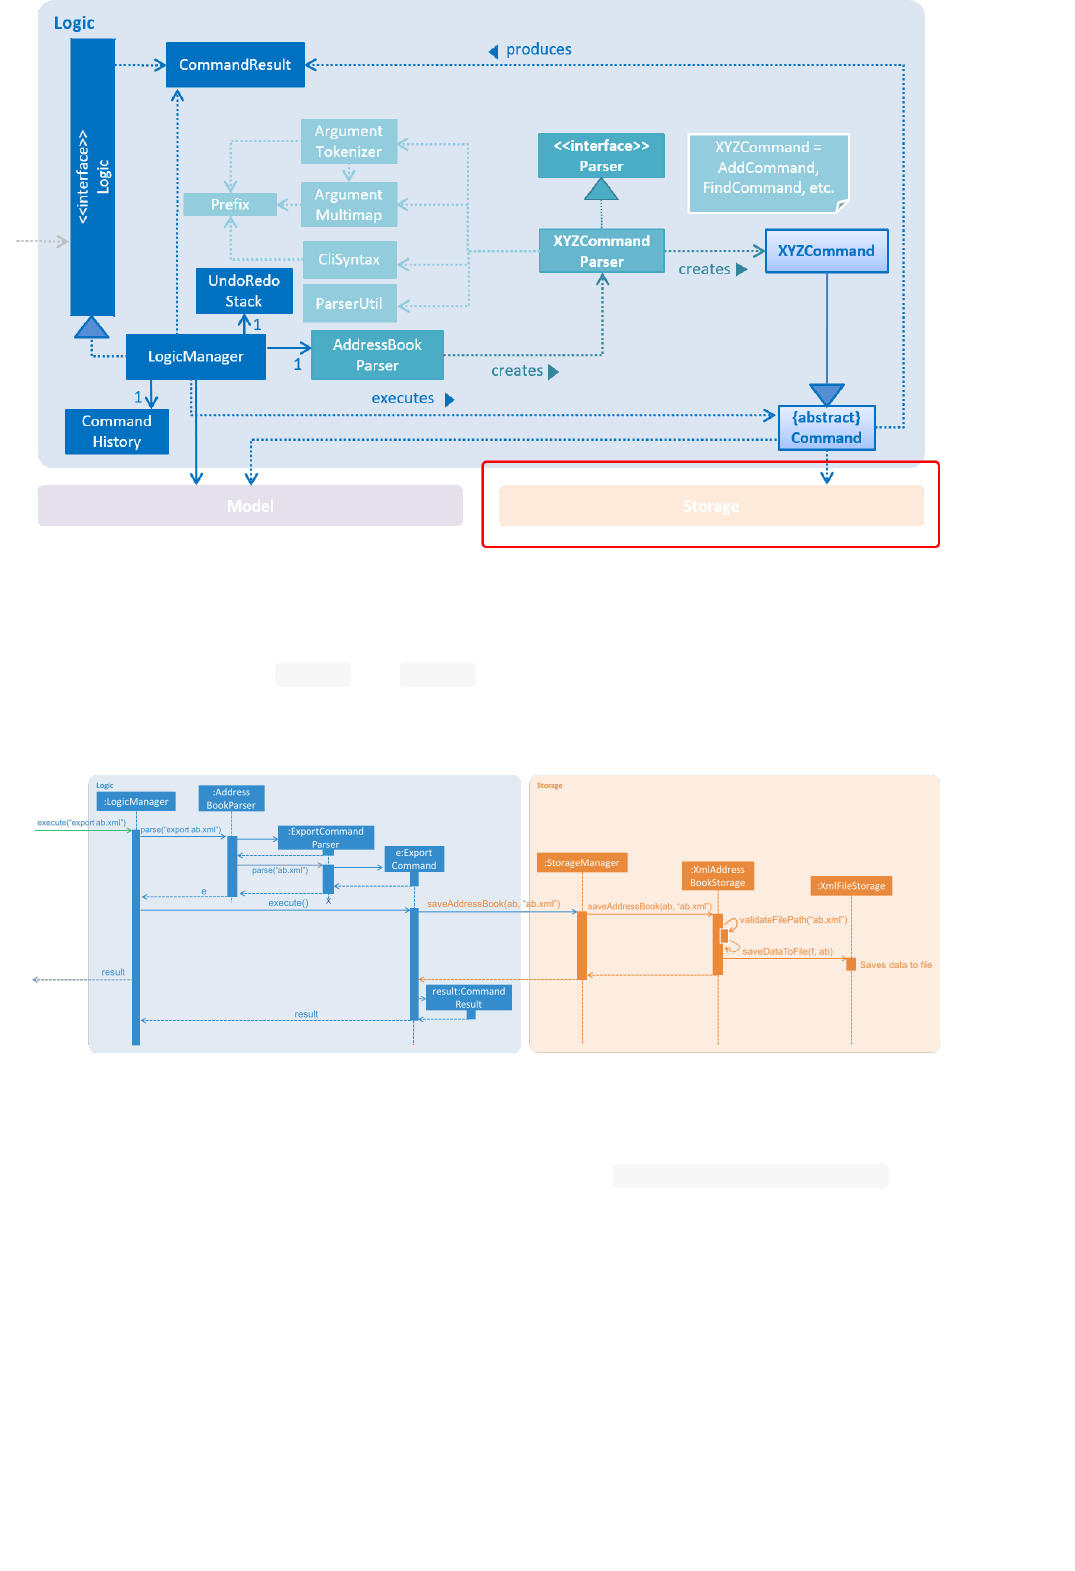
Figure 4.5.1.1 : Structure of the Logic Component
File Path Validation
File paths, as required by
import and
export
commands, are validated during the execution of the
corresponding command. The following sequence diagram shows an example of how file path
validation is performed prior exporting the address book data:
Figure 4.5.1.2 : Sequence Diagram for Export Command
To facilitate better handling of invalid file paths and to provide appropriate feedback to the user,
several exception classes, all of which are derived from the
InvalidFilePathException class, have
been implemented. The following shows the inheritance diagram of the above-mentioned exception
classes:
22
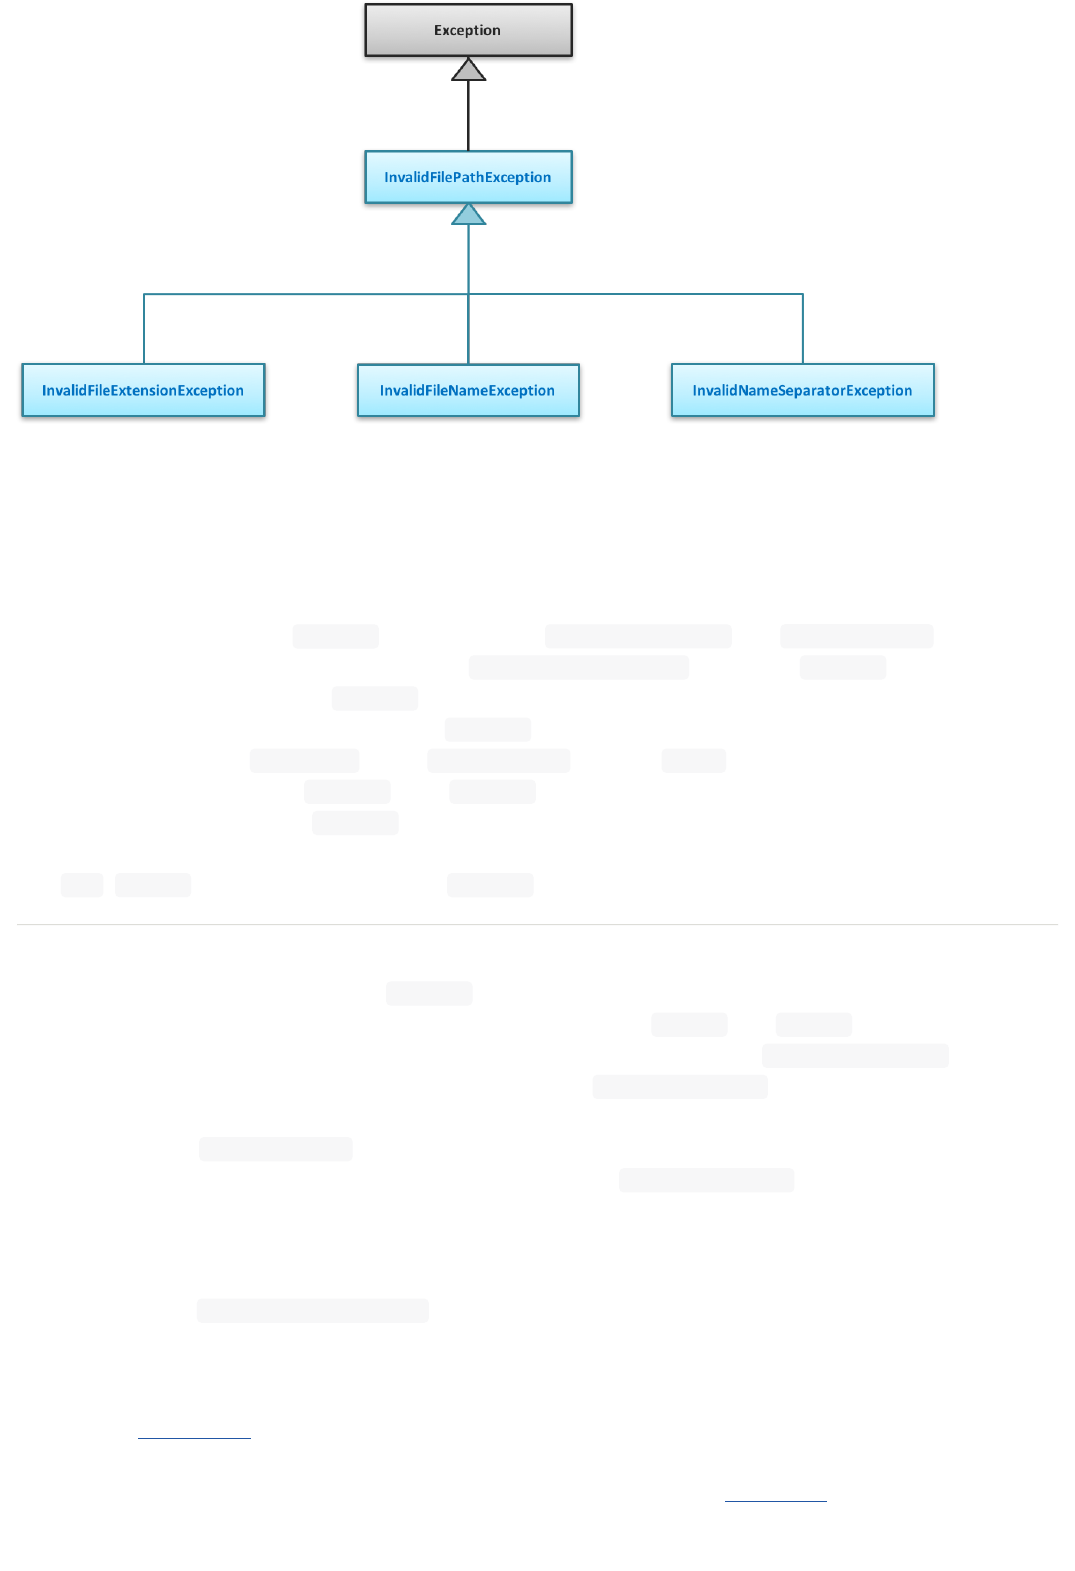
Figure 4.5.1.3 : Structure of Exception Classes related to File Path Validation
With that, we are able to ensure that data would be exported to or imported from a truly valid file path
as specified by the user, while being able to inform users on the mistakes that they have made.
4.6.2. Design Considerations
Aspect: Implementation of Storage dependency for ImportXmlCommand and ExportCommand
Alternative 1 (current choice): Add a new setStorage(Storage) method in Command
Pros: Provides direct access to Storage for commands that only requires it.
Cons: There is an inherent dependency on Storage for all commands, although the coupling is weak.
Alternative 2: Raise a BaseEvent in the EventsCenter through Model
Pros: Completely decouples Command from Storage .
Cons: The need for access to Storage is not a side-effect as with other commands that mutate the
address book
(eg. add , delete etc.). The dependency of Storage is part of their native behaviour.
Aspect: Location for Implementation of File Path Validation
Alternative 1 (current choice): In Storage
Pros: Validation is not just done for user input file paths (ie. via import and export commands), but
also for the address book file path as defined in the user’s preferences (ie. preferences.json ).
Cons: Validation is performed after every execution of an UndoableCommand due to the saving of the
address book.
Alternative 2: In CommandParser
Pros: Validation will not be done after every execution of an UndoableCommand unnecessarily.
Cons: File path validation may also be required for other purposes.
4.7. Import timetable from NUSMods
We implement an ImportNusmodsCommand to help users directly import their NUSMods timetable to
BoNUS by simply copy-paste the URL.
4.7.1. Inspiration
As stated in User Guide, BoNUS helps you better(B) organize(o) your NUS life. Thus, we want to make
the application an integrated personal manager for NUS students. The main activities for most
students are study-related and most NUS students are currently using NUSMods to build their school
timetable (as shown in Figure 4.7.1.1).
23
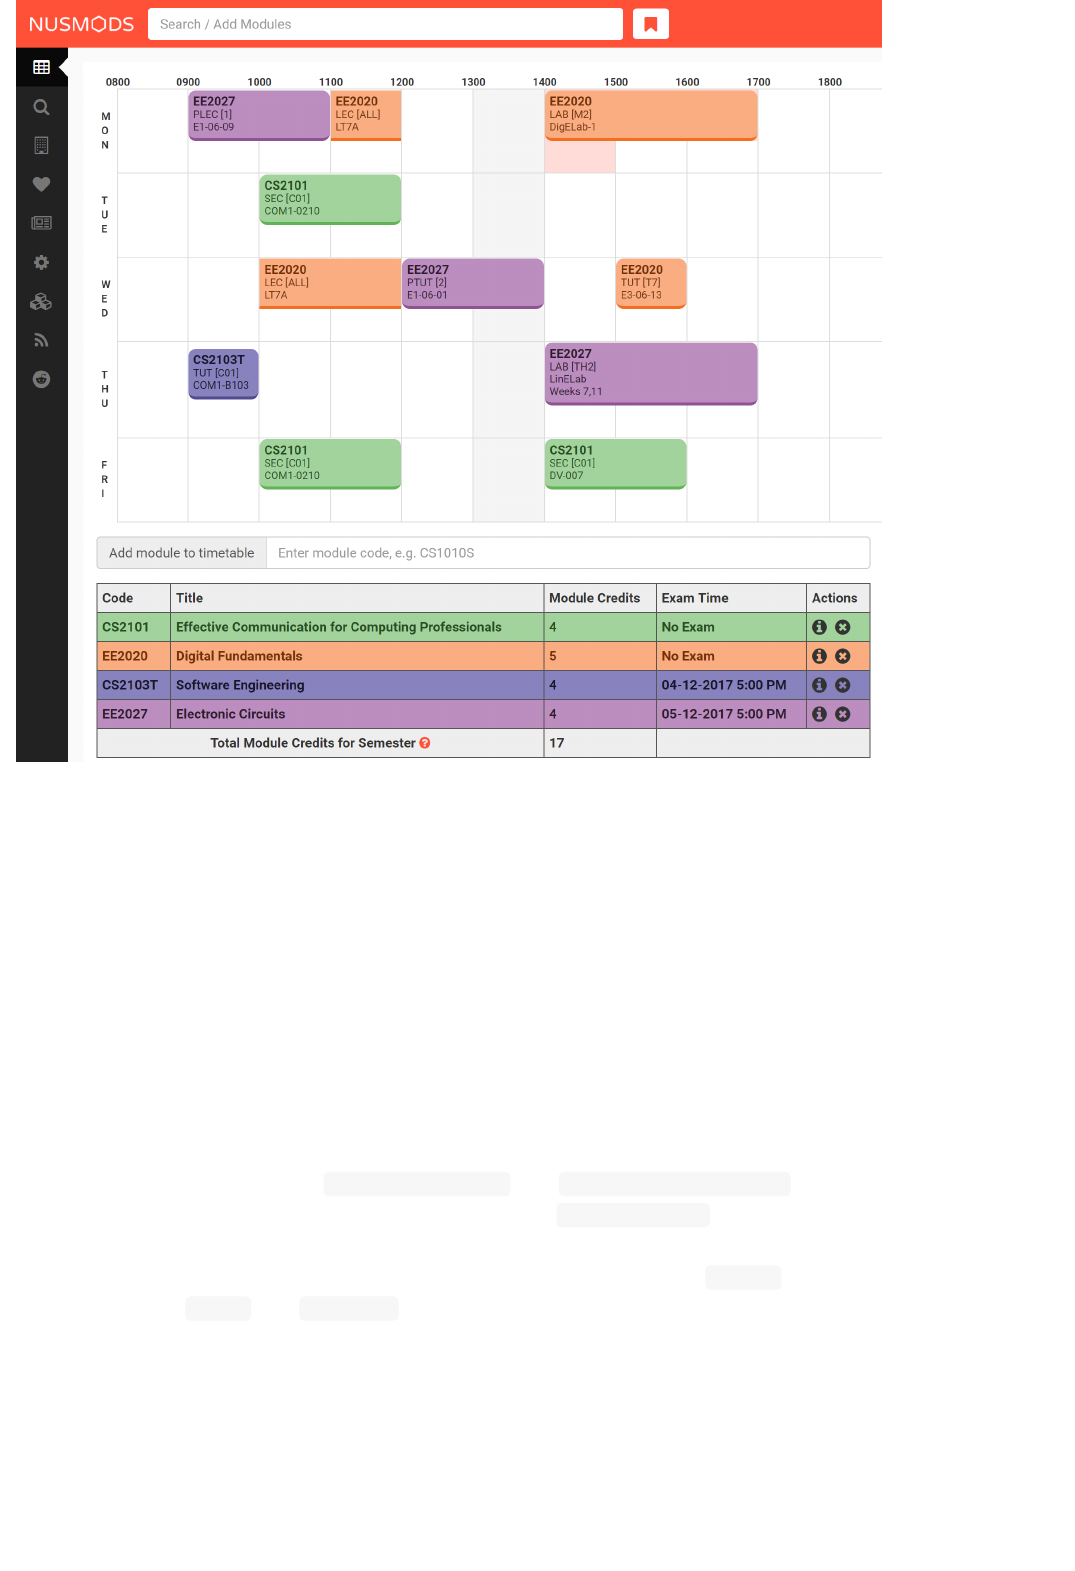
Figure 4.7.1.1 : NUSMods Website Interface
Let’s imagine some of our users want to use the event feature in BoNUS. They want to input final
examinations for all the modules they are taking as upcoming events. It would be very inconvenient
and tedious if they have to do this manually. Even worse, it is very likely they are already using
NUSMods and thus are not willing to add these events again. They may end up not using the event
feature at all.
However, users may find it very useful if they can import their NUSMods timetable using a simple
command. Eventually, they would choose BoNUS because they can manage both contacts and events in
one application conveniently and the migration from NUSMods to BoNUS is not troublesome.
4.7.2. Design Considerations
Aspect: Relationship between
ImportXmlCommand and
ImportNusmodsCommand
Alternative 1 (current choice): Add a new abstract ImportCommand class and let both of them
become its sub-commands (inherit from it).
Pros: This is inspired by many popular command-line tools (like Git). import is called the actual
command, while --xml and --script is called the options. Most Unix/Linux users would be used to
this approach. This is important for us because we assume our users are typists and they are very likely
to frequently use these command-line tools.
Cons: Need to write extra codes and parsing also becomes more complicated.
Alternative 2: Implement these two commands separately.
Pros: Easy to implement and similar to other commands.
Cons: Our users may not be used to it. The command word will become longer. It is not a good OOP
practice as well because common details are not abstracted into a parent class and this produces
duplicate codes.
24
(Similar strategy has been adopted in ConfigCommand )
Aspect: How to obtain user’s NUSMods timetable
Alternative 1 (current choice): Let users copy-paste the URL as a parameter of
ImportNusmodsCommand .
Pros: Simple to use and easy to implement as well
Cons: Need to check whether the URL is valid and from NUSMods (currently using regular
expression).
Alternative 2: Implement a built-in browser and render the NUSMods page
Pros: Users are more used to this interface.
Cons: Need much extra work to implement the built-in browser. The page may not be rendered well
since the built-in browser is typically smaller than OS browser and NUSMods does not fully adopt
responsive UI framework and may not work well on a small browser window.
4.7.3. Implementation Outline
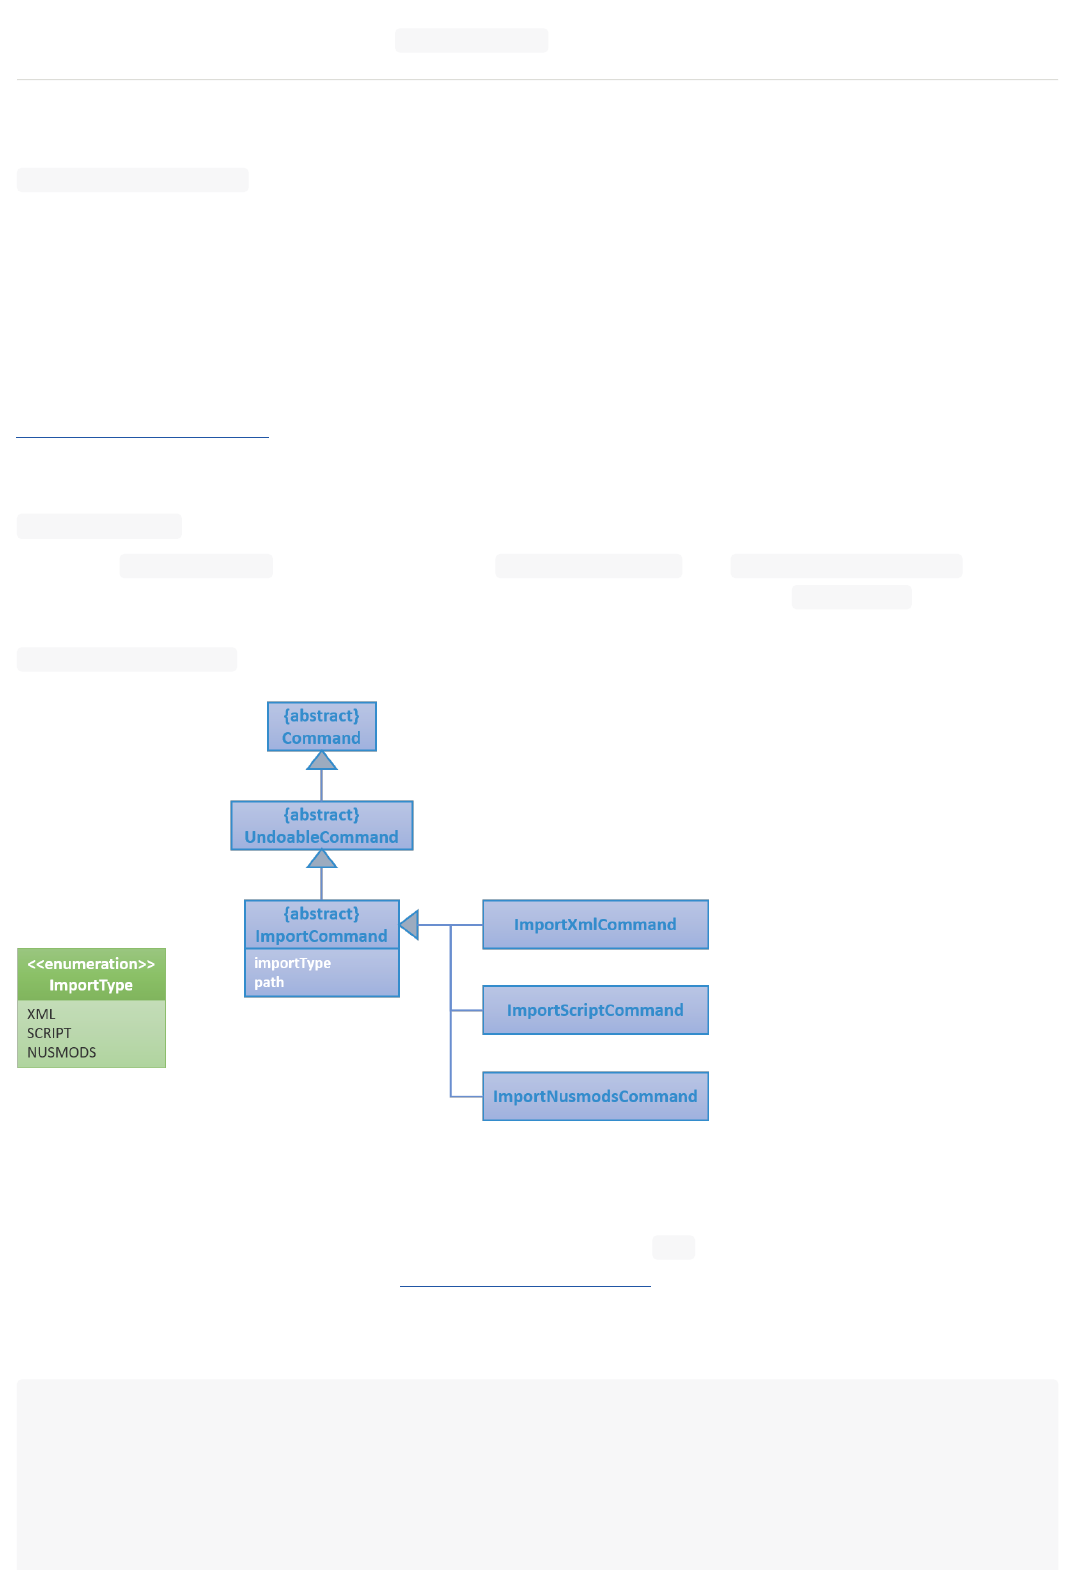
ImportCommand abstract class
Create an ImportCommand abstract class and let ImportXmlCommand and ImportNusmodsCommand inherit
from it (as in Figure 4.7.3.1). It is also a good practice to use an enumeration ImportType because the
possible types of the import are within a fixed set of values. This leads to better modularity in
ImportCommandParser as well.
Figure 4.7.3.1 : Class Diagram for Related Import Commands
Parsing of NUSMods Timetable URL
Implement utility method to validate a given URL and parse the
GET parameters. Although it is
possible to utilize external library like Apache HttpComponents, we decide to implement on our own
because it is relative simple to do so and using external library comes with extra expenses (such as
licence, etc).
public static Map<String, String> fetchUrlParameters(URL url) throws UnsupportedEncodingException {
String query = urlDecode(url.getQuery());
if (Strings.isNullOrEmpty(query)) {
return Collections.emptyMap();
}
Map<String, String> pairs = new HashMap<>();
25

Fetch information from NUSMods API
The URL parsed just now only contains the module codes and grouping for each module. In order to
add upcoming events, we need more information such as module names, examination dates, etc. We
decide to use API provided by NUSMods to fetch the information we need. NUSMods API is in JSON
format, which would be very simple for us as we already use Jackson library in our project.
Add upcoming events
After obtaining all the information we need, we can simply use the addEvent method in ModelManager
class to add the final examinations as upcoming events into BoNUS. This should be a similar process
as AddEventCommand .
4.8. Contacts/event listing order by name/date time mechanism
Whenever there is a command that triggers the "refresh" of PersonListPanel or EventListPanel , like
when adding a new contact (i.e. add command), all the cards will be loaded in the incremental order
by name or date time respectively. The sorting mechanism uses the sort method which resides inside
List interface to sort the contacts by name.
4.9. Emailing mechanism
The automatic opening of email on the user’s desktop is facilitated mainly by the Desktop class which
allows the Java application to launch the default mail application registered inside the user’s native
desktop to handle the email URI .
4.10. Calendar mechanism
An in-built calendar is added to the panel beside the list of events. This calendar shows a monthly view
of the current month.
for (String pair: query.split("&")) {
int index = pair.indexOf("=");
pairs.put(pair.substring(0, index), pair.substring(index + 1));
}
return pairs;
}
/**
* Read JSON data from a given URL and convert the data to an instance of the given class.
* @param url is the URL to the remote JSON data.
*/
public static <T> T fromJsonUrl(URL url, Class<T> instanceClass) throws IOException {
return objectMapper.readValue(url, instanceClass);
}
26

Figure 4.10.1 : Calendar for month of November 2017
This is useful for users to be able to compare their list of events in the calendar. It can help users to
check what day of the week their event is happening on. This is especially useful for NUS students as
there is a fixed daily schedule and it would be easy to check what day it falls on to ensure their
availability for the event. Other usages include having to see what dates lie on a particular day for
students to plan weekly events. All in all, it provides a convenient way for students to have access to a
calendar without having to open any external applications.
4.10.1. Design Considerations
Aspect: How to display the individual dates.
Alternative 1 (current choice): Use a GridPane to design the table in XML. Include a class to
calculate dates to be shown, before populating individual cells in GridPane using data from class.
Pros: This method makes use of JavaFX, possibly allowing us to improve the aesthetic design in the
future. It also allows individual objects to be created for individual cells. This could allow us to write
more functionality such as showing number of events per day to dynamic colour changes in the future.
The
monthDateBuilder method provides an accurate graphical representation of the days in a monthly
calendar.
Cons: The 42 cell design is fairly cumbersome, requiring the initialization of at least 42 cells. The class
is limited in a way that it must have 42 cells, thus sometimes many cells are left unused, and there is a
wastage of memory.
Alternative 2: Use JTable to display individual dates.
Pros: A ready to use API that can allow easy building of table showing dates. It is also a powerful tool
with many functions.
Cons: JTable is a UI element from a different UI design model, and cannot make use of advantages
brought about by the new advantages from JavaFX, such as the node capability of JavaFX and certain
aesthetic modifications. Many of the JTable functions might not be used.
4.10.2. Implementation Outline
1. Create a
EventCalendar class that contains the month that will be shown, containing all the
necessary information required for a monthly calendar (i.e. dates, name of month).
2. Create a
monthDateBuilder class that will be used to set the current month and year of the
calendar. It will also be arranging the dates in a way that will correspond to which day of the week
it belongs to.
3. Use
Calendar class to set the current year and month and store in an array (i.e.monthYearArray ) in
27
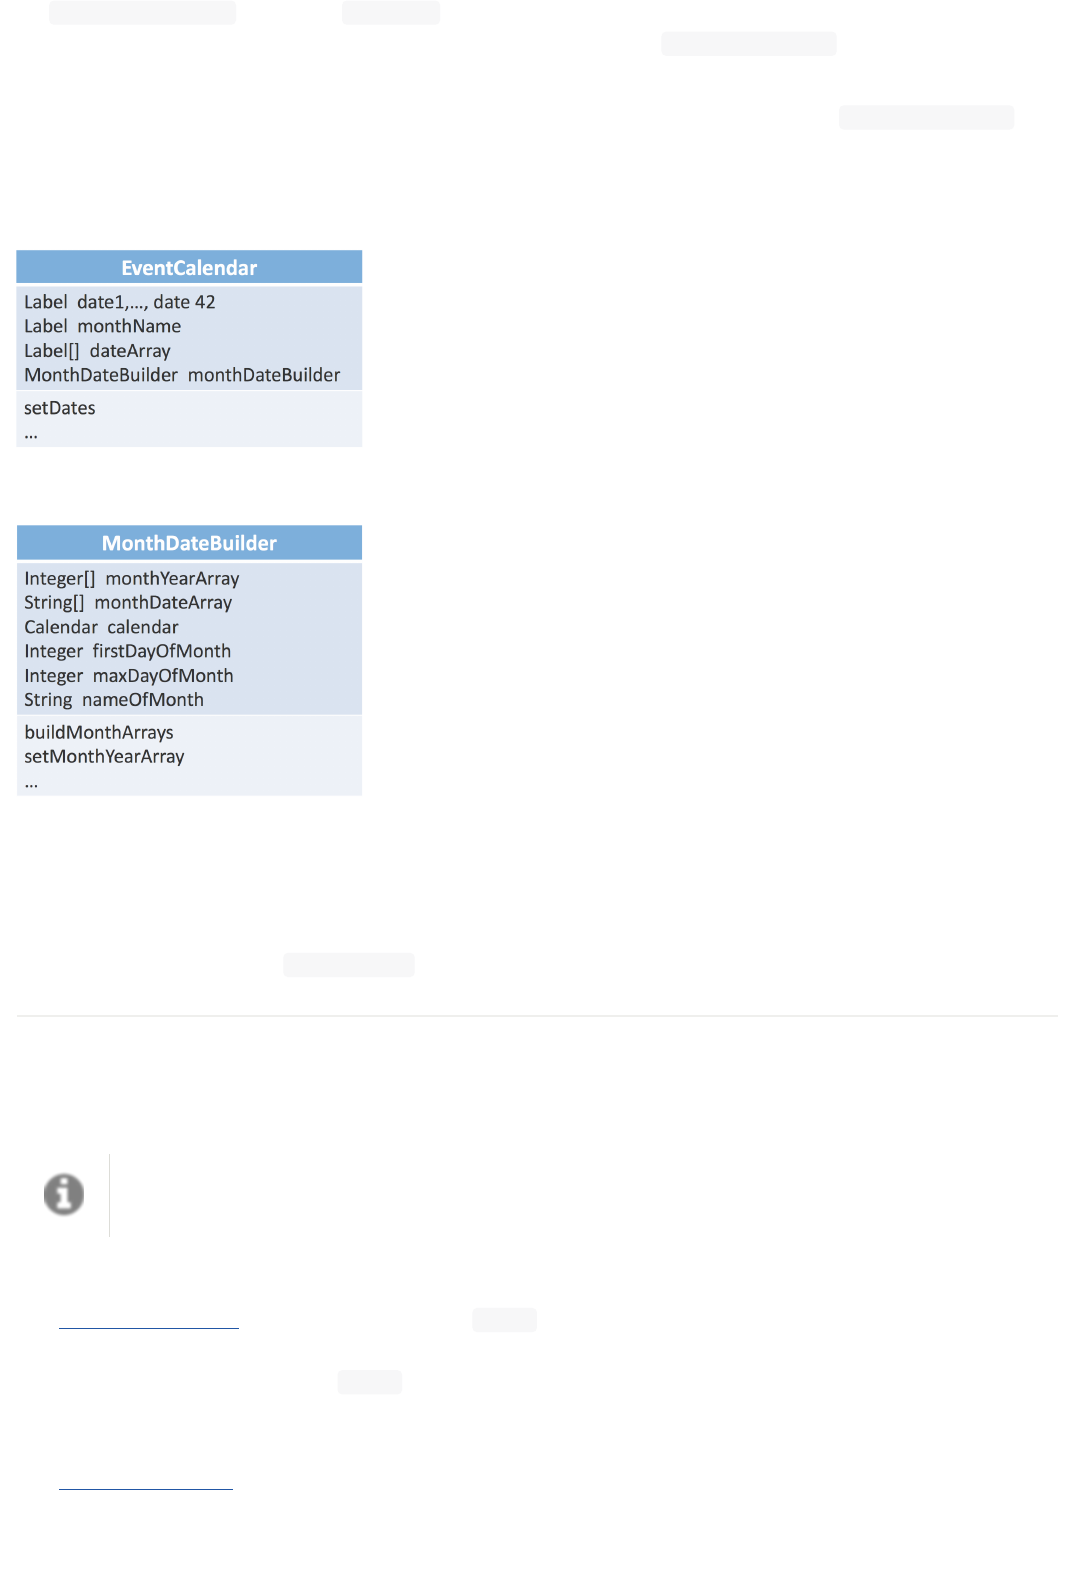
monthDateBuilder . Also, use Calendar class to set the number of days in the current month and
the day that the first date of the month falls on (i.e. set using setMonthAnchors method). These
details are required to build the monthly view.
4. There are a maximum of 42 cells to fill up in every month. Create a method (i.e.
buildMonthArray
method) to store the position of the dates in. Use an algorithm to store all the dates before the first
date of the month as a blank, fill up the subsequent dates using the value of the first day of the
month and their cell number, and the leftover dates will continue to be blanks until the 42nd cell.
Figure 4.10.1.1 : Class Diagram for `EventCalendar`
Figure 4.10.1.2 : Class Diagram for `MonthDateBuilder`
4.11. Conguration
Certain properties of the application can be controlled (e.g App name, logging level) through the
configuration file (default:
config.json ).
5. Documentation
We use AsciiDoc for writing documentation.
We chose AsciiDoc over Markdown because AsciiDoc, although a bit more complex than
Markdown, provides more flexibility in formatting.
5.1. Editing documentation
See UsingGradle.adoc to learn how to render .adoc files locally to preview the end result of your edits.
Alternatively, you can download the AsciiDoc plugin for IntelliJ, which allows you to preview the
changes you have made to your .adoc files in real-time.
5.2. Publishing documentation
See
UsingTravis.adoc
to learn how to deploy GitHub Pages using Travis.
5.3. Converting documentation to PDF format
28
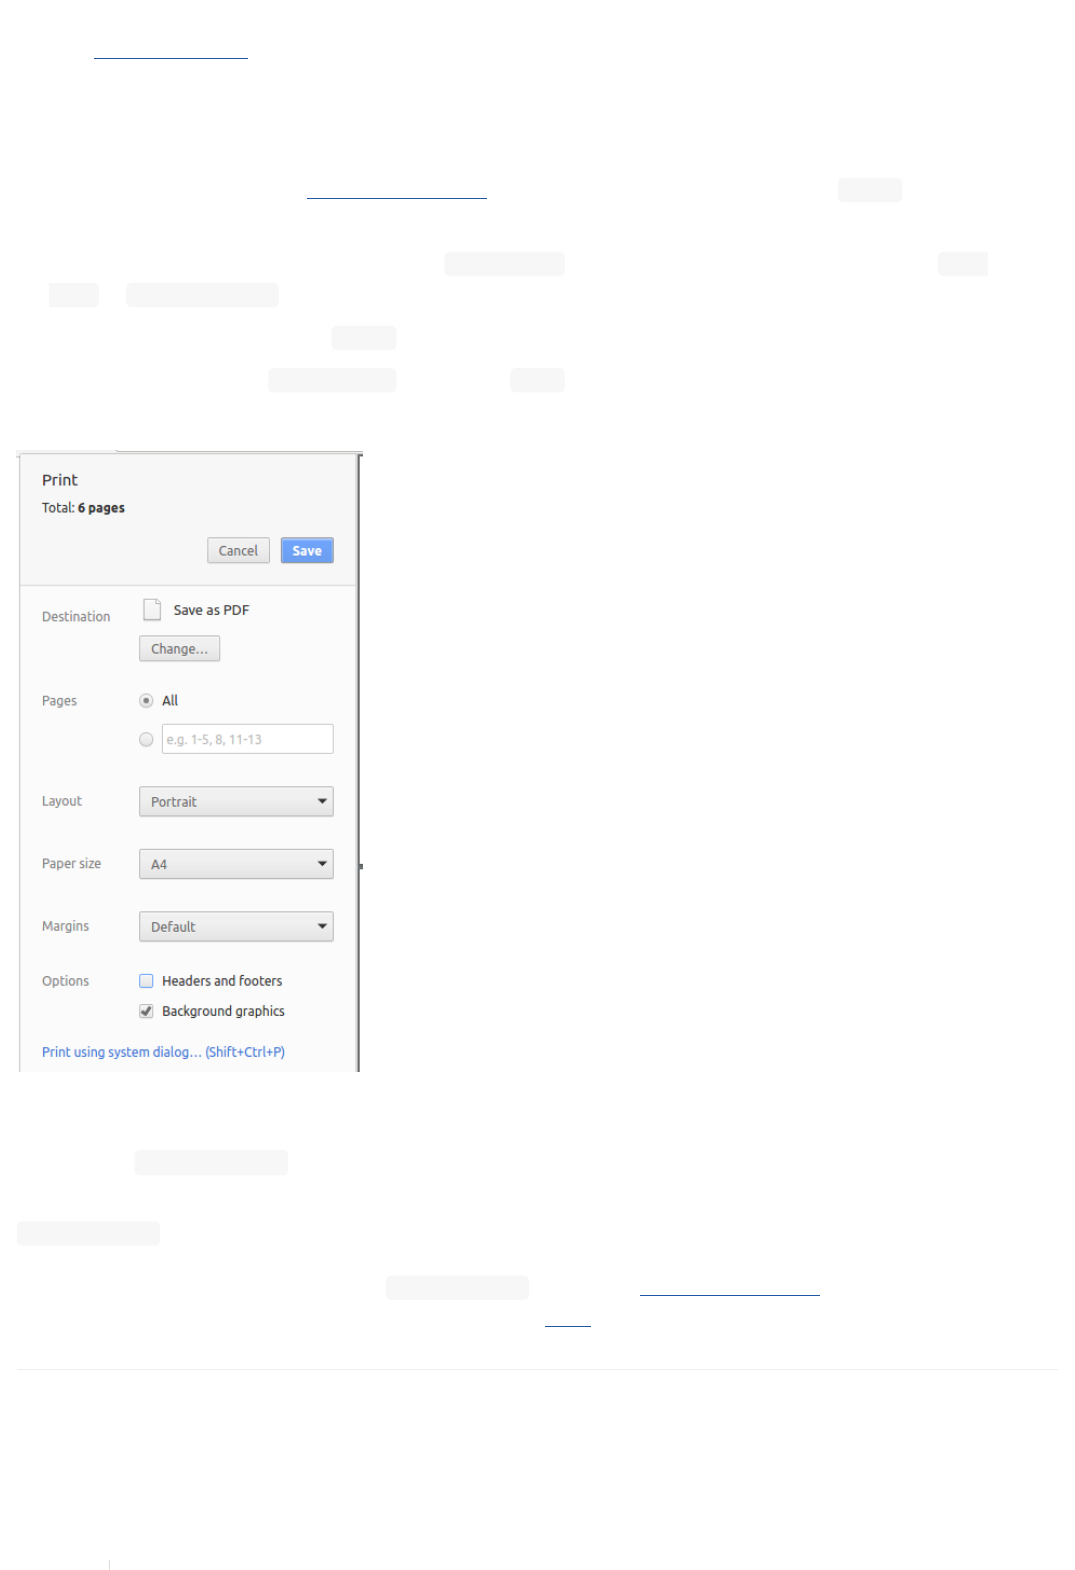
5.3.1. Using Google Chrome PDF printer
We use Google Chrome for converting documentation to PDF format, as Chrome’s PDF engine
preserves hyperlinks used in webpages.
Here are the steps to convert the project documentation files to PDF format.
1. Follow the instructions in UsingGradle.adoc to convert the AsciiDoc files in the docs/ directory to
HTML format.
2. Go to your generated HTML files in the build/docs folder, right click on them and select Open
with → Google Chrome .
3. Within Chrome, click on the Print option in Chrome’s menu.
4. Set the destination to Save as PDF , then click Save to save a copy of the file in PDF format. For
best results, use the settings indicated in the screenshot below.
Figure 5.3.1 : Saving documentation as PDF files in Chrome
5.3.2. Using
asciidoc-pdf Ruby gem
If you have Ruby installed on your development machine, we suggest you using a useful gem
asciidoc-pdf
to automatically convert the documentation into PDF format.
You can find more information about
asciidoc-pdf from their GitHub repository. Instructions on how
to use it can also be found on AsciiDoctor website at here.
6. Testing
6.1. Running Tests
There are three ways to run tests.
29

The most reliable way to run tests is the 3rd one. The first two methods might fail some
GUI tests due to platform/resolution-specific idiosyncrasies.
Method 1: Using IntelliJ JUnit test runner
To run all tests, right-click on the src/test/java folder and choose Run 'All Tests'
To run a subset of tests, you can right-click on a test package, test class, or a test and choose
Run
'ABC'
Method 2: Using Gradle
Open a console and run the command gradlew clean allTests (Mac/Linux: ./gradlew clean
allTests )
See UsingGradle.adoc for more info on how to run tests using Gradle.
Method 3: Using Gradle (headless)
Thanks to the TestFX library we use, our GUI tests can be run in the headless mode. In the headless
mode, GUI tests do not show up on the screen. That means the developer can do other things on the
Computer while the tests are running.
To run tests in headless mode, open a console and run the command gradlew clean headless
allTests (Mac/Linux: ./gradlew clean headless allTests )
6.2. Types of tests
We have two types of tests:
1. GUI Tests - These are tests involving the GUI. They include,
a. System Tests that test the entire App by simulating user actions on the GUI. These are in the
systemtests package.
b. Unit tests that test the individual components. These are in seedu.address.ui package.
2. Non-GUI Tests - These are tests not involving the GUI. They include,
a. Unit tests targeting the lowest level methods/classes.
e.g. seedu.address.commons.StringUtilTest
b. Integration tests that are checking the integration of multiple code units (those code units are
assumed to be working).
e.g. seedu.address.storage.StorageManagerTest
c. Hybrids of unit and integration tests. These test are checking multiple code units as well as how
the are connected together.
e.g. seedu.address.logic.LogicManagerTest
6.3. Troubleshooting Testing
Problem: HelpWindowTest fails with a NullPointerException .
Reason: One of its dependencies, UserGuide.html in src/main/resources/docs is missing.
Solution: Execute Gradle task processResources .
30

7. Dev Ops
7.1. Build Automation
See UsingGradle.adoc to learn how to use Gradle for build automation.
7.2. Continuous Integration
We use Travis CI and AppVeyor to perform Continuous Integration on our projects. See
UsingTravis.adoc and UsingAppVeyor.adoc for more details.
7.3. Making a Release
Here are the steps to create a new release.
1. Update the version number in MainApp.java .
2. Generate a JAR file using Gradle.
3. Tag the repo with the version number. e.g. v0.1
4. Create a new release using GitHub and upload the JAR file you created.
7.4. Managing Dependencies
A project often depends on third-party libraries. For example, Address Book depends on the
Jackson
library for XML parsing. Managing these dependencies can be automated using Gradle. For example,
Gradle can download the dependencies automatically, which is better than these alternatives.
a. Include those libraries in the repo (this bloats the repo size)
b. Require developers to download those libraries manually (this creates extra work for developers)
Appendix A: Suggested Ways to Get Started
Suggested path for new programmers:
1. First, add small local-impact (i.e. the impact of the change does not go beyond the component)
enhancements to one component at a time.
2. Next, add a feature that touches multiple components to learn how to implement an end-to-end
feature across all components.
A.1. Example Programming Task - Creating a new command: remark
The section below walks you on how to create a new command called remark . By creating this
command, you will get a chance to learn how to implement a feature end-to-end, touching all major
components of the app.
A.1.1. Description
Edits the remark for a person specified in the INDEX .
Format: remark INDEX r/[REMARK]
Examples:
remark 1 r/Likes to drink coffee.
Edits the remark for the first person to Likes to drink coffee.
31

remark 1 r/
Removes the remark for the first person.
A.1.2. Step-by-step Instructions
[Step 1] Logic: Teach the app to accept 'remark' which does nothing
Let’s start by teaching the application how to parse a remark command. We will add the logic of
remark later.
Main:
1. Add a RemarkCommand that extends UndoableCommand . Upon execution, it should just throw an
Exception .
2. Modify AddressBookParser to accept a RemarkCommand .
Tests:
1. Add RemarkCommandTest that tests that executeUndoableCommand() throws an Exception.
2. Add new test method to AddressBookParserTest , which tests that typing "remark" returns an
instance of RemarkCommand .
[Step 2] Logic: Teach the app to accept 'remark' arguments
Let’s teach the application to parse arguments that our remark command will accept. E.g. 1 r/Likes
to drink coffee.
Main:
1. Modify RemarkCommand to take in an Index and String and print those two parameters as the error
message.
2. Add RemarkCommandParser that knows how to parse two arguments, one index and one with prefix
'r/'.
3. Modify AddressBookParser to use the newly implemented RemarkCommandParser .
Tests:
1. Modify RemarkCommandTest to test the RemarkCommand#equals() method.
2. Add RemarkCommandParserTest that tests different boundary values for RemarkCommandParser .
3. Modify AddressBookParserTest to test that the correct command is generated according to the user
input.
[Step 3] Ui: Add a placeholder for remark in PersonCard
Let’s add a placeholder on all our PersonCard s to display a remark for each person later.
Main:
1. Add a Label with any random text inside PersonListCard.fxml .
2. Add FXML annotation in PersonCard to tie the variable to the actual label.
Tests:
1. Modify PersonCardHandle so that future tests can read the contents of the remark label.
32

[Step 4] Model: Add Remark class
We have to properly encapsulate the remark in our ReadOnlyPerson class. Instead of just using a
String , let’s follow the conventional class structure that the codebase already uses by adding a
Remark class.
Main:
1. Add Remark to model component (you can copy from Address , remove the regex and change the
names accordingly).
2. Modify RemarkCommand to now take in a Remark instead of a String .
Tests:
1. Add test for Remark , to test the Remark#equals() method.
[Step 5] Model: Modify ReadOnlyPerson to support a Remark eld
Now we have the Remark class, we need to actually use it inside ReadOnlyPerson .
Main:
1. Add three methods setRemark(Remark) , getRemark() and remarkProperty() . Be sure to implement
these newly created methods in Person , which implements the ReadOnlyPerson interface.
2. You may assume that the user will not be able to use the add and edit commands to modify the
remarks field (i.e. the person will be created without a remark).
3. Modify SampleDataUtil to add remarks for the sample data (delete your addressBook.xml so that
the application will load the sample data when you launch it.)
[Step 6] Storage: Add Remark eld to XmlAdaptedPerson class
We now have Remark s for Person s, but they will be gone when we exit the application. Let’s modify
XmlAdaptedPerson to include a Remark field so that it will be saved.
Main:
1. Add a new Xml field for Remark .
2. Be sure to modify the logic of the constructor and toModelType() , which handles the conversion
to/from ReadOnlyPerson .
Tests:
1. Fix validAddressBook.xml such that the XML tests will not fail due to a missing <remark> element.
[Step 7] Ui: Connect Remark eld to PersonCard
Our remark label in PersonCard is still a placeholder. Let’s bring it to life by binding it with the actual
remark field.
Main:
1. Modify PersonCard#bindListeners() to add the binding for remark .
Tests:
1. Modify GuiTestAssert#assertCardDisplaysPerson(…) so that it will compare the remark label.
33
2. In PersonCardTest , call personWithTags.setRemark(ALICE.getRemark()) to test that changes in the
Person 's remark correctly updates the corresponding PersonCard .
[Step 8] Logic: Implement RemarkCommand#execute() logic
We now have everything set up… but we still can’t modify the remarks. Let’s finish it up by adding in
actual logic for our remark command.
Main:
1. Replace the logic in RemarkCommand#execute() (that currently just throws an Exception ), with the
actual logic to modify the remarks of a person.
Tests:
1. Update RemarkCommandTest to test that the execute() logic works.
A.2. Full Solution
See this PR for one possible step-by-step solution.
Appendix B: User Stories
Priorities: High (must have) - * * * , Medium (nice to have) - * * , Low (unlikely to have) - *
Priority As a … I want to … So that I can…
* * * new user see usage
instructions
refer to
instructions
when I forget
how to use the
App
* * * user add a new
person/event
save my
contacts in the
App / plan my
schedule in the
App
* * * user delete a
person/event
remove entries
that I no longer
need
* * * user find a person
by name
locate details of
persons without
having to go
through the
entire list
* * NUS
student
import
schedule from
NUSMods
automatically
generate my
school timetable
* * frequent
user
import
contacts from
iCloud,
sync all my
contacts
34
Google+,
Facebook,etc.
* * busy user set notification
before an event
starts/ends
avoid missing
important
issues
* * busy user auto-sort my
events by
date/time
be clear of
possible clashes
in scheduling in
school
* * careful
user
soft delete my
contacts/events
get them back
manually if it is
a mistake
* * user hide private
contact details
by default
minimize
chance of
someone else
seeing them by
accident
* * user with
many
persons in
the address
book
sort persons by
name
locate a person
easily
* * user change the UI
theme
customize my
App
*loyal user send feedback
to developers
help further
improve this
App
*admin user check the
audit_log of
the application
control how
everyone in my
organization
uses the
application
*advance
user
export all
contacts/events
to excel
view them on a
device without
this application
*user save my
contacts on the
cloud
sync between
different
devices
Priority As a … I want to … So that I can…
Appendix C: Use Cases
(For all use cases below, the System is the AddressBook and the Actor is the user , unless specified
otherwise)
Use case: Add person / event
35

MSS
1. User inputs text to console to add person/event.
2. Address Book acknowledges and adds person/event to the list.
3. Address Book is updated with a latest list of persons/events.
Use case ends.
Extensions
1a. The format of parameters entered are invalid.
1a1. AddressBook shows an error message.
Use case resumes at step 1.
Use case: Select person
MSS
1. User requests to list persons
2. AddressBook shows a list of persons
3. User requests to select a specific person in the list
4. AddressBook selects the person
Use case ends.
Extensions
2a. The list is empty.
Use case ends.
3a. The given index is invalid.
3a1. AddressBook shows an error message.
Use case resumes at step 2.
Use case: Edit person/event
MSS
1. User requests to edit a specific person/event in the list.
2. AddressBook updates itself.
Use case ends.
Extensions
1a. The list is empty.
1a1. AddressBook shows an error message.
Use case ends.
1b. The arguments for edit command are invalid.
1b1. AddressBook shows an error message.
Use case resumes at step 1.
36

Use case: Delete person/event
MSS
1. User requests to list persons/events
2. AddressBook shows a list of persons/events
3. User requests to delete a specific person/event in the list
4. AddressBook deletes the person/event
Use case ends.
Extensions
2a. The list is empty.
Use case ends.
3a. The given index is invalid.
3a1. AddressBook shows an error message.
Use case resumes at step 2.
Appendix D: Non Functional Requirements
1. Should work on any mainstream OS as long as it has Java 1.8.0_60 or higher installed.
2. Should be able to hold up to 1000 persons without a noticeable sluggishness in performance for
typical usage.
3. A user with above average typing speed for regular English text (i.e. not code, not system admin
commands) should be able to accomplish most of the tasks faster using commands than using the
mouse.
4. Should be a portable application (ie. there is no need for an installer to use it).
5. JAR file should not exceed 50 MB.
6. Test coverage should reach 85% at any time.
7. Should always favour security over efficiency in development.
8. Any user who understands English should be able to use the application with the help of the
User
Guide.
9. Internet connection is required if users want to sync their contacts/events in all devices and import
timetable from NUSMods.
Appendix E: Glossary
Mainstream OS
Windows, Linux, Unix, OS-X
Responsive UI Framework
A front-end framework for web design that makes your web page looks good and easy to use regardless of the size
37
of the browser window, like Bootstrap.
Private contact detail
A contact detail that is not meant to be shared with others
Appendix F: Product Survey
Contacts
(renamed from Address Book since Mac OS X 10.8)
Author: Apple Inc.
Pros:
Able to import contacts from other softwares/websites, like Facebook, LinkedIn, Google+, etc.
Able to send an email, start a call or text someone directly in the application thanks to integration
with other applications.
Able to organize contacts into different groups.
Cons:
Data is not stored in a human editable text file (advanced users cannot manipulate the data
manually).
Only works on Mac OS, no corresponding version on Windows and Linux.
TM
Last updated 2017-11-13 13:34:34 +00:00
38
