706800 Instructions
2017-04-29
: Pdf 706800 Instructions 706800_Instructions product s
Open the PDF directly: View PDF ![]() .
.
Page Count: 2
600 & 1000 Watt
light systems used
in Sun Huts need to
be air cooled.
FAN BRACKET & 2 PHILIPS SCREWS
1 PIECE
4 plastic ties for securing floor liner
12 bolts & wing nuts to attach flange
4 straps to secure blower & filter
2 FLANGES 2 FLANGE PLATES
2 PIECES
CEILING GRID
BLOWER & FILTER RODS
2 PIECES
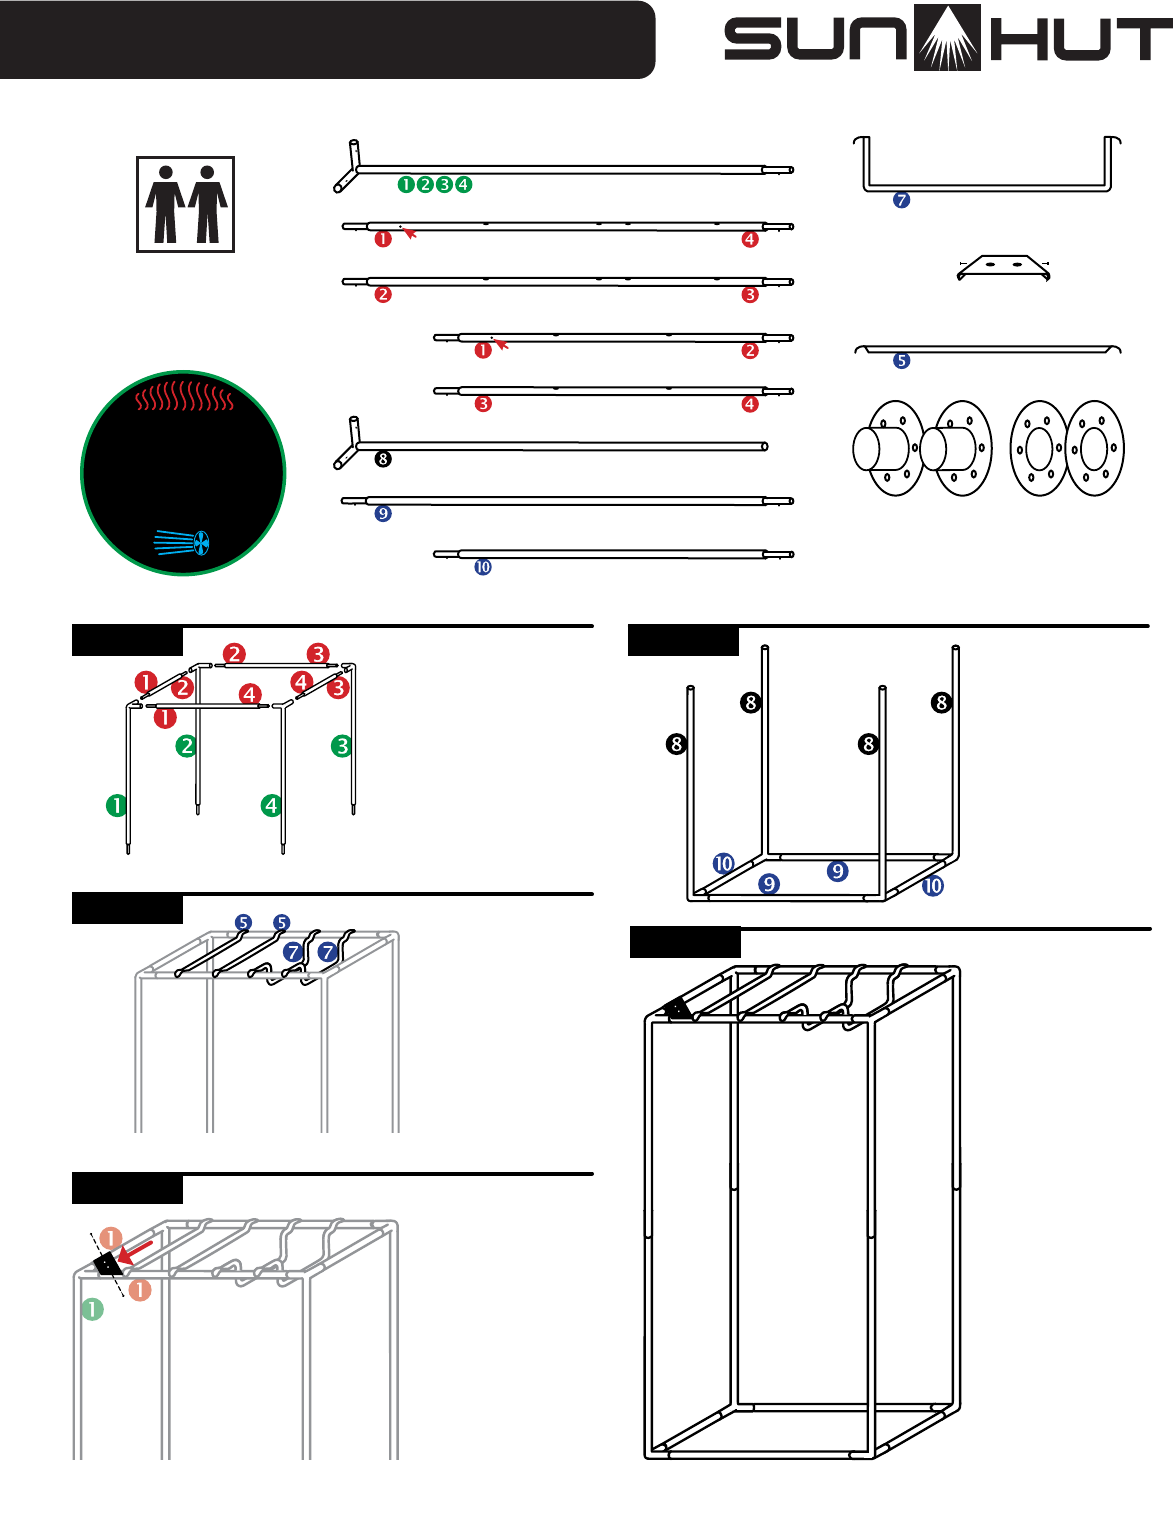
The 2 straight bars
(#5) and 2 fan &
blower bars (#7)
should be spaced
evenly on the
upper frame to
support the ceiling
(see diagram).
STEP 2
Assemble bottom
corner poles (#8)
with bottom
connector poles
(#9) as shown
(see diagram).
STEP 4
STEP 5 Attach top half
to the bottom
half to complete
the frame
(see diagram).
Separate numbered
poles. Assemble top
poles first. Insert two
#1 poles into #1 3-way
corner pole. The ball
bearing locks when
correctly connected.
See diagram for
connecting the poles.
STEP 1
1 PIECE
Screw hole for
fan bracket
4 PIECES
4 PIECES
1 PIECE
Screw hole for fan bracket
1 PIECE
1 PIECE
2 PIECES
2 PIECES
STEP 3
Attach fan bracket
into ceiling framing
as shown. Tighten
4 screws (provided)
into bracket (do
not over-tighten).
Sun Hut - 2x4 (#706800)
2 people
recommended
for assembly
THE BIG EASYTM
For more information visit:
www.sun-huts.com
Tent
Body
A
BC
Roll out tent body and bottom tray on floor.
Assemble bottom pole sections and corner
connectors inside the bottom tray.
2
L (3x3) Model Shown
XL (4x4)≈ Model Shown
ASSEMBLY INSTRUCTIONS
Start at the bottom.
Insert pole sections into bottom corner
connectors. Use pole connectors as needed
to build vertical pole sections (A & B). Place
corner connectors at the very top of each
vertical pole (C).*
3Assemble vertical poles.
1
Identify and organize parts.
All models have similar parts to those shown below. Lay
out all parts in groups, allowing plenty of space for assembly.
4
Connect roof frame.
Insert pole sections between top corner
connectors.* Make sure pole sections are
inserted all the way into connectors.
5
Work tent body over frame.
Raise roof of tent body and gently work over
top of frame. NOTE: 2 people are required for
4x8 model assembly.
6
Install extra supports.
Attach end clips to remaining pole sections.
Install in roof as desired for your model,
depending on where you plan to install
support for lights, fans, etc.
7
Install liner and cover(s).
Fold out tray liner in bottom tray and smooth
flat, making sure it reaches all corners. Secure
vent cover(s) over vents if desired.
8
Start growing!
Smooth out any remaining folds and wrinkles.
Check all zippers to make sure they work
smoothly. START GROWING!
4x8 model – Connectors
with 4 holes go on both
middle poles on 8’ sides.
B
F
G
D
E
C
AA
Vent Cover(s)
B
Tray Liner
C
Corner Connectors
D
End Clips
E
Pole Connectors
F
Pole Sections
G
Tent Body
*Refer to Frame Diagrams on
reverse for pole positioning
on your particular model.
2 PEOPLE
Recommended
for Assembly
SEE
ASSEMBLY
VIDEO
http://youtu.be/qCy5H6-ipBE
THE ORIGINAL
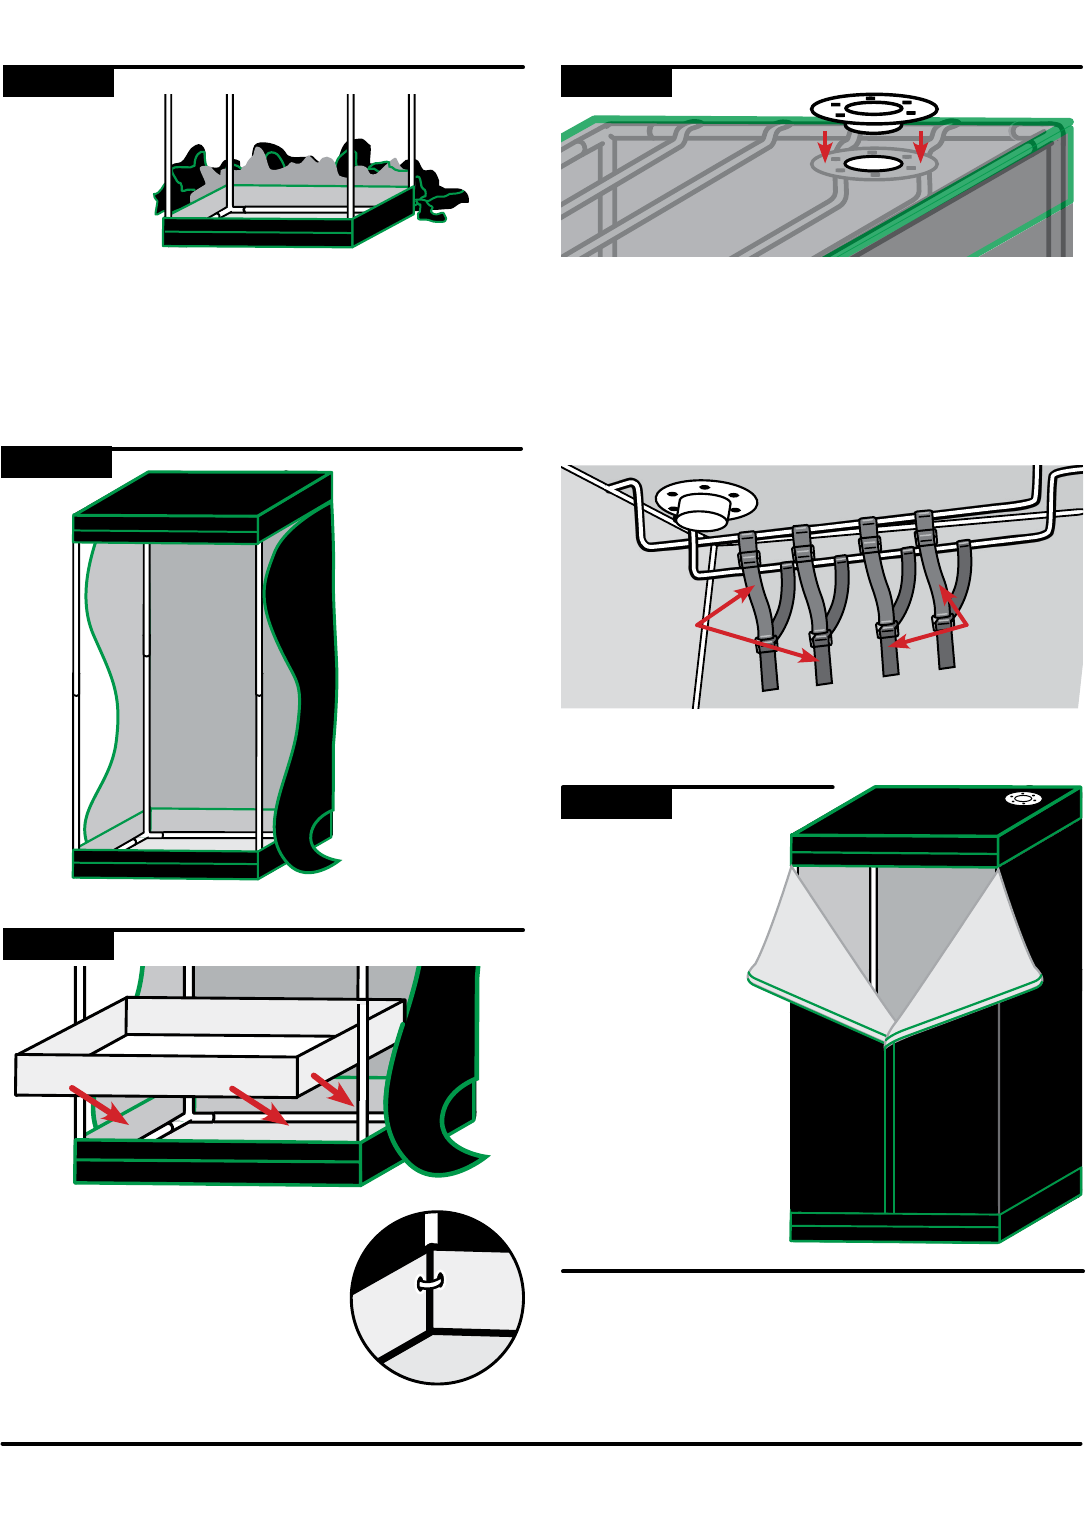
Place inner waterproof floor liner
into the floor of the Sun Hut. Insert
plastic ties into the holes at the
corners of the floor liner and
secure to the corner poles (see
Figure A). This will make the Sun
Hut floor water-tight.
STEP 8
Figure A
Place canvas flat with bottom open on the floor. Unzip
canvas completely. Face front of Sun Hut with fan &
blower brackets in upper right. Place frame into bottom
of canvas and pull canvas up around all four corners so
that it fits tightly around bottom of frame (see diagram).
STEP 6
STEP 7 Pull canvas up the
back and over the
top of the frame.
Carefully pull
canvas around the
4 corners of the
ceiling. Fits snug.
Pull sides toward
the front.
(see diagram).
Slide flange into canvas and ring above fan & mounting
rods. Push bolt through flange, canvas & ring; and tight-
en wing nuts on the outside. Attach intake flange on
bottom left. Slide blower and filter straps onto brackets.
Tighten straps around blower and filter. Use duct work
(not included) to connect blower to flange.
STEP 9
FILTER
STRAPS
BLOWER
STRAPS
STEP 10
Zip up doors to make
sure that your Sun Hut
fits properly.
OPTIONAL FLANGES
Optional flanges and optional two-way flanges are also
available. For any questions or to see optional items
for your Sun Hut, talk to your local dealer. Log on to
www.n-g-w.com to locate a dealer near you.
FOR MORE INFORMATION VISIT
WWW.SUN-HUTS.COM
