A Practical Guide To Git And GitHub For Windows Users: From Beginner Expert In Easy Step By Exercises & Hub
User Manual: Pdf
Open the PDF directly: View PDF ![]() .
.
Page Count: 175 [warning: Documents this large are best viewed by clicking the View PDF Link!]
- Table of Contents
- Introduction
- Chapter 1: Getting Started
- Chapter 2: Installation and Configuration
- Chapter 3: Hosting Your Projects on GitHub
- Chapter 4: Project Version Control with Git
- Chapter 5: Working With Branches
- Chapter 6: Collaborating with Others on GitHub
- Chapter 7: More Git Magic
- Chapter 8: Git Concepts


A Practical Guide to Git and GitHub for Windows Users
From Beginner to Expert in Easy Step-By-Step Exercises
Copyright © 2016 Roberto Vormittag. All rights reserved.
You can contact the author at http://robertovormittag.net/ebooks
This publication is protected by copyright, and written permission should be
obtained from the publisher prior to any prohibited reproduction, storage in
a retrieval system or transmission in any form or by any means, graphic,
electronic or mechanical.
All trademarks are the property of their respective owners.
While every precaution has been taken in the preparation of this book, the
publisher and author assume no responsibility for errors or omissions, or for
damages resulting from the use of the information or code contained herein.
~
To the memory of my beloved father
~
TABLE OF CONTENTS
Introduction
CHAPTER 1
Getting Started
1.1 Definitions
What is Git?
What is GitHub?
1.2 Book Companion Website
CHAPTER 2
Installation and Configuration
2.1 Installing Git for Windows
2.2 An Introduction to Git Bash
2.3 Git Configuration
2.4 Setting Up a GitHub Account
2.5 Connecting Git to GitHub
Step 1. Generate your SSH private and public keys
Step 2. Register your private key with the ssh-agent
Step 3. Register your public key with GitHub
Step 4. Testing the connection between Git and GitHub
CHAPTER 3
Hosting Your Projects on GitHub
3.1 The Phonetic Website Project
3.2 Hosting Your Project
Step 1. Create a repository on GitHub
Step 2. Cloning the repository
Step 3. Adding files to the project
Step 4. Adding files to the index (staging area)
Step 5. Committing changes to the repository
Step 6. Pushing a new version to GitHub
3.3 Summary
CHAPTER 4
Project Version Control with Git
4.1 Implementing a Feature Request
4.2 Updating the Local Repository
4.3 Viewing Project History
4.4 What is a Branch?
4.5 Comparing Versions
Viewing Unstaged Changes
Viewing Changes Between the Index and the Last Commit
Viewing Changes Since the Last Commit
Viewing Changes Between Any Two Commits
4.6 Undoing Changes
Undoing Changes Before Staging
Undoing Changes After Staging
Undoing Committed Changes
4.7 Tagging Versions
4.8 Summary
CHAPTER 5
Working With Branches
5.1 Moving, Deleting and Renaming Files
5.2 Switching Branches Without Merging
5.3 Merging
5.4 Resolving Conflicts
5.5 Summary
CHAPTER 6
Collaborating with Others on GitHub
6.1 Social Coding
6.2 Forking a Repository
6.3 Making Changes
6.4 Opening a Pull Request
6.5 Receiving a Pull Request
Start a Conversation
Merge the Change
Close the Pull Request
6.6 Keeping your Fork Synchronized
6.7 Summary
CHAPTER 7
More Git Magic

Introduction
There are two reasons that inspired me to write this book.
First, the phenomenal success of Git as a version control system and of
GitHub as an open source code repository means that they are both must-
have skills for anyone with an interest in the software profession.
Additionally, despite the plethora of articles, blogs, references and tutorials
on the Web about Git and GitHub, I could not find a resource that focussed
on helping Windows users to overcome platform-specific issues and
familiarize with Linux tools and command-line interfaces.
Using a pragmatic "learn by doing" approach you will be working on small
projects with lots of examples and exercises to practice what you learn and
plenty of screenshots and step-by-step instructions to help you along.
The objective of this book is to make the process of acquiring Git and
GitHub skills fun, easy and quick. The only previous knowledge required
are basic Windows skills and the ability to use a text editor like Notepad
and a Web browser.
You will learn to interact with Git and GitHub in a professional way using
Git Bash, the command-line interface installed with Git For Windows,
which gives Windows users the same power and flexibility available on
Linux and Mac computers.
To make the learning process more lively and interactive I have setup a
companion website with additional resources where you can also post
questions and comments. See Chapter 1 for details.
The book is organized in 8 chapters. Each chapter can be completed on
average in about 1 hour of study. You can become a Git and GitHub expert
in one day. So let's get started!
* * *
CHAPTER 1
Getting Started
In this chapter we will briefly define what Git and GitHub are and
introduce you to the book companion website.
1.1 Definitions
What is Git?
Git is a Version Control System (VCS). Professional software developers
use Git to track and control changes to a project's source code, configuration
files and documentation. With Git you can check the history of changes
made to source code over time and if needed revert back to a previous
version in case you made a change and realized it was a mistake. A VCS is
particularly useful when working in a team, but even if you are the only
developer in a project it can still provide many benefits.
Git stores the history of changes in a database called repository. Think of a
repository as a folder containing all your project files, plus a special .git
subdirectory created by Git to store project history information.
What is GitHub?
To share code and collaborate with others it is necessary to setup a Git
repository in a place that can be accessed by everyone. GitHub is such a
place: it is a hosting service for Git repositories on the Internet, and is free
to use for open source projects. It is also a social networking site for
developers to follow each other's activities.
GitHub has become very popular - in December 2013 it announced that it
had reached an astonishing 10 million repositories. Today a professional
software developer is expected to have an active GitHub account to
showcase his/her code, take part on open source projects and network with
fellow developers.

1.2 Book Companion Website
This book has a companion website with additional resources that I
encourage you to use as it will make your reading experience richer and
more interactive. It is located at the following address:
http://robertovormittag.net/ebooks/git-and-github/
In the book website you will find:
Git For Windows installation screenshots with recommended options.
A quick reference to Git commands used throughout the book.
Latest updates, errata and more.
Check it out regularly!
* * *
CHAPTER 2
Installation and Configuration
Git was written by the developers of the Linux operating system and comes
pre-installed on Linux and Mac OS X computers (which are Linux-based).
Fortunately thanks to the Git for Windows open source project Windows
users can also enjoy the full power of Git on their favourite operating
system.
There are differences in the way Windows and Linux handle line endings in
text files and other low level details that need to be taken care of during the
installation and configuration process to prevent problems from occurring
later.
In this section we will setup and configure everything you need to work
smoothly with Git and GitHub on Windows, starting with the installation of
Git for Windows on your PC.
Then we will take a tour of the Git Bash command-line interface and learn
some useful commands that will be used throughout the book. We will also
use Git Bash to configure Git including some important Windows-specific
settings.
Next we will setup a GitHub account to host your first repository and
configure Git to connect with your GitHub account in a secure way.
At the end of this section you will have everything in place to start working
on your first project.

2.1 Installing Git for Windows
The first thing to do is to download the Git for Windows installer from the
following website:
https://git-for-windows.github.io/
On the book companion website you will find all the installation
screenshots with the recommended options.
Once the download is complete run the installer. During installation you
can specify a different install location, for example C:/apps/git if like me
you prefer short directory names. Please avoid installing in a location that
has directory names with spaces in the path such as "Program Files" or
"My Documents". I recommend selecting the option to create a desktop
icon. Make sure to select the option "Use Git from Bash only" as this is
what we will be using throughout the book.
When the installation is complete you should find a Git Bash icon on your
desktop, or you can also reach it from the Windows Start button -> All
Programs -> Git -> Git Bash.
Bash is the acronym for "Borne Again Shell" and is the most popular
command-line user interface on Linux systems. Git Bash simulates the

Linux environment in Windows. It is a command-line tool that gives you
much more than just Git. In fact what you get is the power of the Linux
tools on Windows. We will explore some useful Linux commands that you
can run from Git Bash. Do not worry if you have never worked with a Linux
shell before. Each command will be clearly explained with examples.
Git for Windows also installs a Git GUI tool which provides a graphical
user interface for Git. Here however we will concentrate on using the Git
Bash command-line interface (CLI) for a number of reasons:
All Git commands can be issued from the CLI whereas the GUI offers
only a subset.
CLI commands can be scripted and automated, essential in today's
DevOps world.
CLI commands are the same in all platforms (Windows, Mac or Linux) so
what you will learn here you can use everywhere.
Not convinced of the CLI usefulness yet? In the science fiction blockbuster
"Jurassic Park" it is a kid's knowledge of the Unix command line interface
that saves the day and prevent the story heroes from becoming a T-Rex
meal. How about that for motivation?
2.2 An Introduction to Git Bash
In this section you will learn some basic Linux file system navigation
commands that we will be using throughout this book. If you are
comfortable using command-line interfaces and know basic Linux shell
commands you can safely skip this section. If it all sounds new or you need
a refresher read on.
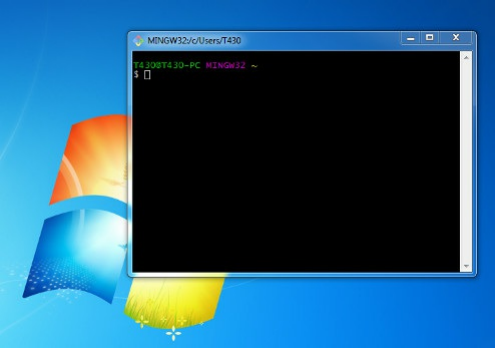
Start the Git Bash console by double-clicking on the desktop icon (you can
also reach it from the Windows Start button -> All Programs -> Git -> Git
Bash).
Once the console is up and running you can start entering commands. The
way it works is very simple: you type in a command, strike the [Enter] key
and the command is executed. You can also paste commands into the
console by hitting the [Insert] key.
The illustration below shows how the console looks like when running. The
cursor will be flashing, waiting for a command to be entered besides the $
sign.

Type the following commands on the console, followed by [Enter]. Type
only the commands after the dollar ($) sign. Ignore the lines starting with #
as these are just comments to explain what the command does:
# change to home directory
$ cd ~
# creates a folder
$ mkdir myfolder
# change to myfolder
$ cd myfolder
# prints current directory
$ pwd
# list folder contents
$ ls -a
The first command cd is used to change directories. In Linux the shorthand
for home directory is the tilde character (~). So the command cd ~ changes
to your home directory. This is normally C:/Users/username on Windows
Vista, 7, 8 and 10 or C:/Documents and Settings/username on Windows
XP. The home directory is where you would usually store project files.
Note: in this book the terms directory and folder are used interchangeably.
The mkdir command ("make directory") is used to create a new directory.
The command pwd prints the name of the current working directory.
Note: The Git Bash prompt will normally show the user name, the
computer name and the current directory in the format user@computer
MINGW32 directory displayed in different colours. MINGW32 stands for

"Minimalist GNU for Windows". GNU is a collection of software tools
which make up the Linux operating system.
The ls command is used to list directory contents. Most commands take
"switches" which are usually letters or words following a minus (-) sign.
The ls command is often used with the -a switch to display all the folder
contents including hidden files.
Note: I do not recommend creating folders with spaces in the folder name
as it can confuse some Linux commands. I suggest instead using the
underscore (_) character if you prefer longer, more descriptive directory
names such as my_first_website_project.
This ends our crash course on Linux file system commands. Come back to
this section as often as needed until you are familiar with the commands
and comfortable navigating directories and listing files in your PC using Git
Bash.
In the next section we will use Git Bash to configure Git.

2.3 Git Configuration
Before start using Git we need to run some basic configuration commands
to tell Git who you are, how to handle end-of-line characters in Windows
and which text editor to use by default.
Start Git Bash (if not already running) and enter the Git configuration
commands below. In the user.name and user.email settings replace "Your
Name" and "your.email@domain.com" with your name and email address
(Git will record this information against the changes you will be making to
project files). Be careful to enter the commands exactly as shown. Note that
the --global and --list switches are preceded by two minus (-) signs.
# tells git who you are
$ git config --global user.name "Your Name"
# tells git how to email you
$ git config --global user.email "your.email@domain.com"
# handles end-of-line character differences
$ git config --global core.autocrlf true
# prevents conversion warning messages
$ git config --global core.safecrlf false
# sets Notepad as the default editor
$ git config --global core.editor notepad
# list all current configuration settings
$ git config --list
The core.autocrlf and core.safecrlf settings are needed to handle end-of-
line character differences between Windows and Unix. When you are
writing code in an editor every time you press the [return] or [enter] key you
are actually inserting an invisible special character called end-of-line
(EOL). The Windows EOL character (CRLF) is different from that used in
Unix-based systems (LF) such as Linux and Mac. To prevent these
differences from causing problems to Mac and Linux users when
collaborating on GitHub projects we set the core.autocrlf property to true.
This tells Git to store files in the repository using the Unix EOL and convert
it back to the Windows EOL when working with the file locally on
Windows.
Some Git commands fire up automatically a text editor into which to enter a
comment. Here we have setup Git core.editor configuration to fire up
Notepad since it is the standard editor on Windows systems.
In the last command the --list switch displays all your current Git
configuration settings. Check the output and make sure your name, email
address and the other settings have been entered correctly. If you need to
correct any of the settings just re-enter the respective git config command.
We are now done with Git configuration. In the next section you will set up
a GitHub account to host your first repository.

2.4 Setting Up a GitHub Account
Now that you have Git installed you need a place to host a repository to
share your projects. This place of course is GitHub. To create a free public
GitHub account point your browser to:
https://github.com/
Click on the [Sign Up] button and follow the simple instructions. You will
be asked to enter a username, email address and password. Click on
[Create an account] and select the "Free Plan" which gives you unlimited
public repositories and collaborators. Once the signup is complete you will
be taken to your GitHub home page which will have a URL (Web address)
of the form:
https://github.com/your-user-name
In the URL your-user-name is the user name you supplied during
registration. Make sure you keep a record of your username and password
for future reference.
From your GitHub home page you can create and manage repositories and
monitor activity. All functionality is accessible from the GitHub menu
located on the top right-hand corner.
Note: the screenshots provided are current at the time of writing but be
aware that, as with all active websites, the GitHub user interface could
change over time. The underlying functionality however will still be the
same and it should be easy to find. Updates will be posted on the book
website so check it out from time to time.

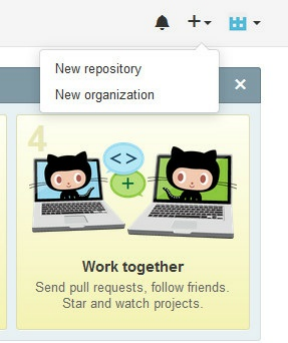
Above is an illustration of the GitHub menu. The bell icon gives access to
notifications, the plus sign (+) can be used to add a repository and the
avatar icon gives access to your profile and settings. The avatar icon will
be replaced by your picture when you upload one. Now is a good time to
complete your profile.
From the GitHub menu, select Avatar ->Settings. Under Profile you can
upload a picture, add your name, email addresses and other information that
will help other users find or get to know you.
Under Emails you can verify the email address you supplied at registration.
Under Account Settings you can change your username and password.
To go back to your GitHub home page select Avatar -> Your Profile.
In the next section we are going to configure Git to connect to GitHub in a
secure way.

2.5 Connecting Git to GitHub
This is a one-time-only procedure that will provide access to the repositories
you are going to create on GitHub from your PC using a protocol called
SSH (for "secure shell"). To do that you need to open your Git Bash console
and enter a few commands as explained below.
During this process you are going to be asked to enter a passphrase to
safeguard your SSH private key. Think about the passphrase you want to
use now and make a note of it as it will be needed later.
The SSH protocol works by exchanging information between your computer
and a server, using public and private keys to verify identity. Once identity
has been verified your computer can communicate with the remote server
(in this case GitHub) securely.
The process is made up of the following steps:
1- SSH keys generation (private and public)
2- Private key registration with SSH
3- Public key registration on GitHub
4- Testing the connection between Git and GitHub
Step 1. Generate your SSH private and public keys
Start Git Bash and change to your home directory.
Next, type the following command to generate a pair of SSH keys making
sure you replace your.email@domain.com with your GitHub email address

(the one you provided at registration). Pay attention to the command syntax.
$ ssh-keygen -t rsa -b 4096 -C "your.email@domain.com"
After a while ssh-keygen asks you to enter a file in which to save the key.
Accept the default suggestion and press [Enter].
Then it will ask you for a passphrase. Enter your passphrase and press
[Enter].
Confirm the passphrase when asked and press [Enter].
Once you have confirmed the passphrase, ssh-keygen will tell you where
your private and public keys have been saved with a message similar to the
one below:
Your identification has been saved in .ssh/id_rsa
Your public key has been saved in .ssh/id_rsa.pub
The key fingerprint is:
01:0f:f4:3b:ca:85:d6:17:a1 your.email@domain.com
The ssh-keygen command creates a .ssh folder under your home directory
and place both the public and private keys there. You can verify this with
the following command:
$ ls .ssh
id_rsa id_rsa.pub
The public and private "keys" are just text files with encrypted content used
by the server to identify your computer. Let's do a simple exercise to
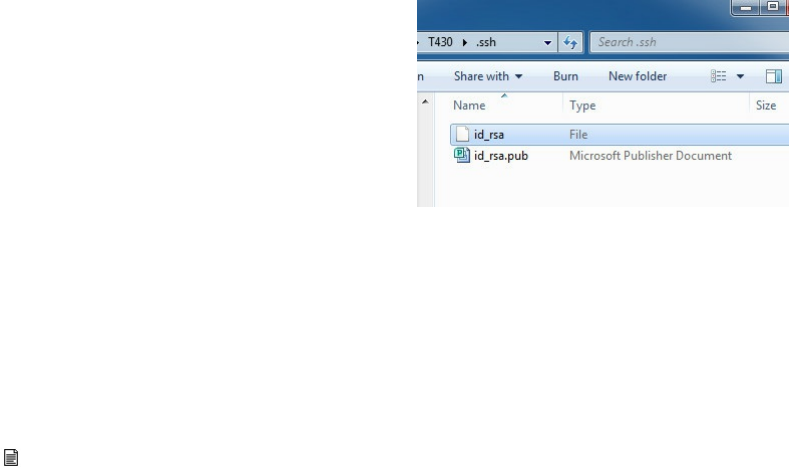
familiarize with the key files.
Exercise
Using Windows Explorer, navigate to the .ssh folder located under your
home directory. You should see both key files as illustrated below:
The id_rsa file is your private key and the id_rsa.pub file is your public
key.
Note: the .pub extension can trick Windows Explorer to believe that your
public key file is a Microsoft Publisher Document. Just disregard the
association and treat it as a simple text file.
Start Notepad or your favourite text editor and open the key files to look at
the content. Be careful NOT to accidentally edit these files - if you do, just
exit the editor without saving the changes.
The private key file starts with the text -----BEGIN RSA PRIVATE KEY---
--
The public key file starts with the text ssh-rsa and ends with your email
address. Keep the public key file open in your text editor. You will soon
need to copy its contents into your GitHub settings.

Step 2. Register your private key with the ssh-agent
We now need to run the SSH agent. Important: in the command illustrated
below the `ssh-agent -s` argument following the eval keyword is enclosed
within grave accent quotes - do not confuse them with the single quote
character. The grave accent quote has a special meaning for the Linux shell
and Git Bash. The key for this character is usually located on the top left
corner of a standard Windows keyboard. See illustration below. You must
use the grave accent character when typing this command otherwise it will
not work.
On the Git Bash console enter the following command to run the ssh-agent
utility making sure `ssh-agent -s` is enclosed within grave accent quotes:
$ eval `ssh-agent -s`
Agent pid 9792
The command should output the Agent Process ID (pid) confirming that the
ssh-agent is running. We can now add the private key using the ssh-add
utility. When prompted, enter your passphrase (the one you used in Step 1)
and press [Enter]:

$ ssh-add ~/.ssh/id_rsa
# Enter passphrase for .ssh/id_rsa
# Identity added: .ssh/id_rsa
The command should confirm that your private key (also known as identity)
has been added.
Step 3. Register your public key with GitHub
In Step 1 we created the two SSH key files:
Private key: rsa_id
Public key: rsa_id.pub
You need now to copy the contents of the public key file and add it to your
GitHub account so that GitHub can authenticate your PC connection
requests from Git.
If you have followed the exercise in Step 1 you should already have the
public key file open in your text editor. Use CTRL-A and CTRL-C to copy
its contents into the clipboard.
Now login to your GitHub account on https://github.com/
From the GitHub menu on the top-right corner of the page select Avatar ->
Settings.
From the Settings page select SSH keys then click on the [New SSH key]
button.
In the "Title" field type something descriptive to remind you of which

computer this key belongs to, e.g. Home Windows 7 Professional PC.
In the "Key" field paste the contents of your public key file id_rsa.pub.
Click on the [Add SSH key] button.
If required, enter your GitHub password to confirm.
Your public key will be added to your GitHub settings.
We are almost there... now to the last step: testing the connection.
Step 4. Testing the connection between Git and GitHub
We are ready now to test that your PC can connect to GitHub in a secure
way using SSH. To do that go back to the Git Bash console and type the
following command:
$ ssh -T git@github.com
...
Enter passphrase for key '.ssh/id_rsa':
Hi username! You've successfully authenticated,
but GitHub does not provide shell access.
It will output your public key fingerprint and ask if you want to continue.
Type yes and press [Enter].
It will then ask for your private key passphrase. Type it and press [Enter].
You should get a message similar to the above. If the username in the
message is your GitHub username it means everything has been setup
correctly. Congratulations are in order.
You are ready now to host your very own first Git project on GitHub. This
is the subject covered in the next chapter.
* * *

CHAPTER 3
Hosting Your Projects on GitHub
After all the hard preparatory work that you have done in the previous
chapters, now comes the fun part. Here you will learn the process of hosting
a project on GitHub. Like the rest of the book this is a very hands-on
chapter where you will be learning by doing. The first thing we need is a
project to experiment with. To introduce it I have to digress a little.
In radio communication it is not easy to distinguish the sound of individual
letters. To overcome this problem people use phonetic alphabets where each
letter is replaced by a word. Over radio it is much easier to distinguish the
words Delta and Tango rather than the letters D and T.
There are several of these alphabets in use, and the most widely known is
the pilot's alphabet beginning with Alpha, Bravo, Charlie (for A, B and C).
For instance flight BA-461 will be spelled by pilots over the radio as
"Bravo Alpha Four Six One".
Our experimental project is a Phonetic Website that displays the pilot's
phonetic alphabet plus two additional alphabets made up with names of
cities and people.
3.1 The Phonetic Website Project
The Phonetic Website is a compact but complete static website built with
HTML and CSS. This project has been specifically designed for Git and
GitHub training. It is hosted on GitHub and you can download it from the
following URL by clicking on the [Clone or Download -> Download Zip]
button:
https://github.com/robertovormittag/phonetic-website
Note: You do not need to have previous knowledge of HTML and CSS.
Every change to this project in the exercises that follow will be clearly
explained.
Once you have downloaded the ZIP file, extract the contents. You will find
that the project consists of three HTML pages and a "style" folder inside
which there are four CSS stylesheets. You can delete the README.md file
as it is not needed.
Following is a description of each file:
File Description
cities.html Phonetic alphabet based on city names
names.html Phonetic alphabet based on people names
pilots.html Pilot's phonetic alphabet
style Folder containing all stylesheets
style/cities.css Stylesheet for cities.html
style/names.css Stylesheet for names.html
style/pilot.css Stylesheet for pilots.html
style/site.css Stylesheet for entire site
To see how the website looks like, open it in your Web browser. This is
how it appears on Internet Explorer:
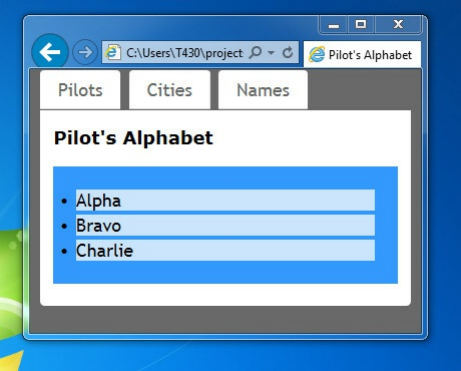
There are three navigation tabs to switch between the alphabets. At present
it only contains the first three letters of each alphabet. Your task will be to
gradually build the website and complete the alphabets from A to Z.
Now that you have a project to work with you need a repository to host it.
3.2 Hosting Your Project
You will now host the Phonetic Website project you have just downloaded
on GitHub. This is what you need to do step by step:
Step 1: Create a repository on GitHub
Login into your GitHub account.
From the GitHub menu select the Plus (+) icon, then New repository:
Enter a repository name, e.g. simple-website.
Enter a project description, e.g. "Phonetic alphabet website".
Make sure that Public is selected (public repositories are free).
Check the box "Initialize this repository with a README file" so that it
will be ready to clone.
Leave the .gitignore and license lists set to "None".
Click on [Create repository].
You will be redirected to your new repository homepage. Its URL (Web
address) will have the following format:
https://github.com/your-github-username/your-repository-name
Let's explore the GitHub repository page. Each project has the following
tabs:
Code: list of all the files and folders in the project (at the moment you will
see only a single file README.md).
Issues: a space to log feature requests, bugs and things to do.
Pull requests: we will cover pull requests later in the book.
Wiki: a space to document the project.
Pulse: provides an overview of the project activities.
Graphs: displays project statistics in graphical format.
Settings: manage repository settings.
The Code tab is the one that you will be using most. From here you can
browse the project files and directories and also see information on
commits, branches, releases and contributors.
You will also find three buttons on the top-right hand corner:
[Watch]: get notifications for this repository.

[Star]: kind of a "bookmark" for repositories.
[Fork]: we will learn what a fork is later in the book.
You are now ready to clone your GitHub repository locally on your PC.
Step 2: Cloning the repository
The GitHub repository you have created in the previous step is your official
project central repository. Developers never work on the central
repository, they clone it instead and work independently on their local copy,
adding files and making changes. Only when the changes have been
thoroughly tested the central repository is updated.
To clone your GitHub repository open Git Bash and run the following
commands making sure you replace "your-name" and "your-repo" with your
GitHub user name and repository name respectively:
$ cd ~
$ git clone https://github.com/your-name/your-repo
You may be prompted to enter your GitHub username and password. Enter
the information requested and click OK.
The output will be something like the following:
Cloning into 'your-repo'...
remote: Counting objects: 3, done.
remote: Compressing objects: 100% (2/2), done.

remote: Total 3 (delta 0), reused 0 (delta 0), pack-reused 0
Unpacking objects: 100% (3/3), done.
Checking connectivity... done.
Your repository has now been cloned into a directory with the same name
on your PC.
This is now your project working directory, sometimes referred to as the
working tree in the Git documentation. All the files and folders for your
project must be placed inside this directory.
Change to the working directory and list the contents (replace your-repo in
the example command below with your repository name):
$ cd your-repo
$ ls -a
.git/ README.md
You should find the README.md file added by GitHub when you created
the repository. The listing also shows a .git directory. This is where Git
stores information about changes in your project files. We will explore the
.git directory in detail in another section, but for now think of it as the local
repository version control database.
You can check the status of the files in your working directory by running
the git status command:
$ git status

On branch master
Your branch is up-to-date with 'origin/master'.
nothing to commit, working directory clean
The output message means that there have not been any additions or
changes to the files so far in the working directory and there is nothing to
commit. The git status command detects any uncommitted change in the
working directory and reports it.
Developers usually go about their work in the local repository using the
following routine:
Add or make changes to the source code in the working directory.
Test that the changes work as expected.
Run git status to see what has changed.
Stage the changes you want to commit as a unit with the git add
command.
Run the git commit command to record the changes in the repository.
We will see in practice how this works in the next steps.
Step 3: Adding files to the project
You are now ready to add the source code to the project. Using Windows
Explorer, copy the Phonetic Website files you have downloaded earlier into
the project working directory you have created in the previous step.
Once the copy operation is complete use Git Bash to list again the contents
of the working directory:

$ cd ~/your-repo
$ ls -a
./ ../ .git/
cities.html
names.html
pilots.html
README.md
style/
$ ls -a style
./ ../ cities.css
names.css
pilot.css
site.css
Make sure that all the HTML and CSS files have been copied. Test the
website in a Web browser to verify that everything works. You should be
able to switch between the alphabets by clicking on the navigation tabs.
If you now run git status it will detect the new files:
$ git status
On branch master
Your branch is up-to-date
Untracked files:
(use "git add <file>..."
cities.html
names.html
pilots.html
style/
no changes added to commit

Git refers to files and folders added to the working directory as untracked
files. Git will not track changes to these files until you add them to the
index. This is what you are going to do next.
Step 4: Adding files to the index (staging area)
To add the new files to the repository first we need to add them to the
index. Think of the index as the list of files that are going to be committed
to the repository. The index is also known as the staging area for the next
commit.
You add files to the index by running the git add command as follows:
$ git add style
$ git add *.html
The first git add command adds the "style" folder with all its contents to the
index. The second adds all the files with the html extension to the index.
Let's now check the status of the working directory again:
$ git status
On branch master
Your branch is up-to-date
Changes to be committed:
new file: cities.html

new file: names.html
new file: pilots.html
new file: style/cities.css
new file: style/names.css
new file: style/pilot.css
new file: style/site.css
There are no longer untracked files. All the new project files and folders are
now in the staging area (index) ready to be committed.
Step 5: Committing changes to the repository
To commit the files added to the index run the git commit command as
follows:
$ git commit -m "Source code added"
[master dd34039] Source code added
7 files changed
create mode 100644 cities.html
create mode 100644 names.html
create mode 100644 pilots.html
create mode 100644 style/cities.css
create mode 100644 style/names.css
create mode 100644 style/pilot.css
create mode 100644 style/site.css
The -m flag in the git commit command is used to enter a comment within
double quotes. Commit comments are compulsory and are recorded in the
repository.

Let's check the status of the working directory now:
$ git status
On branch master
Your branch is ahead
of 'origin/master' by 1 commit.
use "git push" to publish
your local commits
nothing to commit,
working directory clean
Git is reporting that the working directory is now clean. There are no
pending changes and nothing to commit. The local repository is however
ahead of the remote central repository on GitHub by 1 commit because we
just committed a new version of the project with the source code in it.
We want to keep the GitHub central repository synchronized with new
significant versions. This is what you are going to do in the next step.
Step 6: Pushing a new version to GitHub
Before we can publish the new version of the project to GitHub, we need to
find out how Git identifies the remote repository. You can do that by
running the git remote command:
$ git remote
origin

The output shows that Git knows about a remote repository called origin.
That is the name Git is using to identify your remote repository on GitHub.
Let's find out more detailed information about it:
$ git remote show origin
* remote origin
Fetch URL:
https://github.com/your-name/your-repo
Push URL:
https://github.com/your-name/your-repo
HEAD branch: master
In the output you should see the URL of your repository on GitHub.
To update the GitHub repository with the new version of the project run the
git push command. You may be prompted for your GitHub username and
password.
$ git push origin master
Counting objects, done.
Delta compression using up
to 4 threads.
Compressing objects, done.
Writing objects, done.
Total 11
To
https://github.com/your-name/your-repo
5e4ad5a..dd34039
master -> master
Now the central repository has been updated. If you login to your GitHub
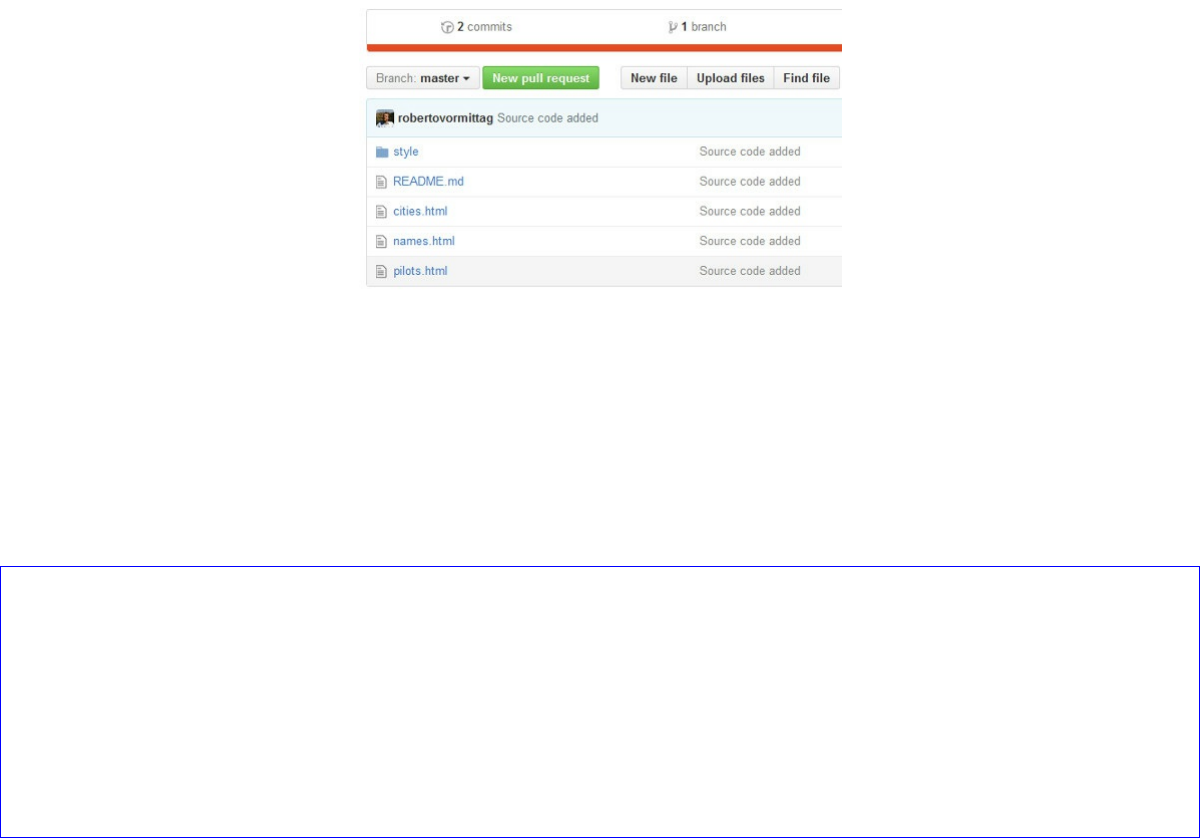
account and look at the repository page in the Code tab you will find that
all the source code files of your website project have been uploaded.
Notice that the commit comment "Source code added" appears besides each
file. If you click on the commits link you can see details of the two commits
in the project so far.
Git status should now report that your local and remote repositories are in
sync:
$ git status
On branch master
Your branch is up-to-date
with 'origin/master'.
nothing to commit,
working directory clean
You have just hosted your first project on GitHub.

3.3 Summary
In this chapter you have covered a lot of ground. You started by creating a
repository on GitHub to host your first project. Then you cloned it on your
PC creating the project local working directory to which you added the
source code and committed a new version to the local repository.
Finally you pushed the new version to the remote repository on GitHub.
This constitutes the basic Git-GitHub workflow for personal projects.
You have learned that committing a new version of a project to the local
repository is a two-stage process:
1. First you need to add the changes to Git's index (staging area) with the
git add command.
2. Then you run git commit to store the new version into the repository.
Here is a summary of the Git Bash commands introduced in this chapter:
# clone a GitHub repository
$ git clone <URL>
# check working directory changes
$ git status
# add changes to index
$ git add <folder>
$ git add <file>
# commit a new version
$ git commit -m <comment>

# identify remote repository
$ git remote
$ git remote show <repo name>
# push new version to GitHub
$ git push origin master
In the next chapter we will add more functionality to the Phonetic Website
project. We will modify the source code and take a more detailed look at
how to use Git to monitor project history, compare versions and undo
changes.
* * *
CHAPTER 4
Project Version Control with Git
During the life of a project you will implement new features and
continuously make changes to the working directory by adding, deleting,
renaming and editing source code and other files.
In this chapter you will add content to the Phonetic Website project and
learn how to use Git to monitor project history, compare versions, undo
changes and update the central repository on GitHub.

4.1 Implementing a Feature Request
A feature request is a requirement to modify or add functionality to an
application or website. Suppose that you have received a requirement to add
the letter D to the Phonetic Website. To implement it you need to modify
the three HTML files located in the working directory of the project.
Let's start with the pilot's alphabet. Open pilots.html in Notepad or any
other text editor and locate the following section of code:
<!-- ALPHABET START -->
<li>Alpha</li>
<li>Bravo</li>
<li>Charlie</li>
<!-- ALPHABET END -->
The alphabet is implemented as an HTML list of words. In HTML the <li>
tag defines a list item. All you need to do is add another <li> element with
the value "Delta" just below "Charlie" like this:
<!-- ALPHABET START -->
<li>Alpha</li>
<li>Bravo</li>
<li>Charlie</li>
<li>Delta</li>
<!-- ALPHABET END -->
Save the changes and test that it works by loading pilots.html on a Web
browser. The new word you have just added should appear in the Pilot's

Alphabet page.
Do the same to add the letter D to the Cities' and Names' Alphabets by
editing cities.html and names.html. For example:
<!-- ALPHABET START -->
<li>Atlanta</li>
<li>Boston</li>
<li>Chicago</li>
<li>Detroit</li>
<!-- ALPHABET END -->
<!-- ALPHABET START -->
<li>Andrew</li>
<li>Brigitte</li>
<li>Charles</li>
<li>David</li>
<!-- ALPHABET END -->
Save the changes and test that you can see the new words when browsing
the website.

4.2 Updating the Local Repository
We want to store the changes made in the previous section as a new version
of the website in the local repository. We have already been through this
process in the previous chapter: stage the changes and then commit.
The reason why Git uses two phases - staging and committing - to update
the repository is that by staging first you can group all related changes
into a single commit and give it a meaningful comment.
Open Git Bash and cd to the Phonetic Website project working directory.
Check the status of the working tree with git status. Note that you must
always run git commands from within the working directory of your
project, otherwise you will get a "not a git repository" error message.
$ cd ~/your-repo
$ git status
Changes not staged:
modified: cities.html
modified: names.html
modified: pilots.html
no changes added to commit
(use "git add". . .)
Git should flag the HTML files as modified and not staged. It also suggests
to use git add <file> to update the index for the next commit. Let's do it:

$ git add *.html
$ git status
On branch master
Changes to be committed:
modified: cities.html
modified: names.html
modified: pilots.html
The new version is now ready to be committed to the repository:
$ git commit -m "Added letter D"
[master cdc81d8] Added letter D
3 files changed, 3 insertions(+)
Following the commit operation, the working directory should be clean (i.e.
with no uncommitted changes) and the local repository should be ahead of
the remote repo on GitHub by 1 commit.
$ git status
On branch master
Your branch is ahead of
'origin/master' by 1 commit.
(use "git push" to publish
your local commits)
nothing to commit,
working directory clean
The Phonetic Website project is beginning to evolve. After creating and
cloning the GitHub repository, you added the initial source code and
implemented a feature request. Next we are going to see how you can
monitor the evolution of a project - its history - using the git log command.

4.3 Viewing Project History
You can check the history of commits in a project by running the git log
command:
$ git log
commit cdc81d848c8554d304ea1e8cd886ccd2ffd51884
Author: Your Name <your email>
Date: Day Month Time
Added letter D
commit dd340395aeb30be571ff7536d686d566adb8b362
Author: Your Name <your email>
Date: Day Month Time
Source code added
commit 5e4ad5a92a7070d209479a3fa330ac05cc9f3c96
Author: Your Name <your email>
Date: Day Month Time
Initial commit
For each commit it shows the long hash (an alpha-numeric string that is
generated by Git to uniquely identify an object) as well as the commit
author, date and comment.
If the history display takes more than one screen you can scroll down by
striking the [Enter] key. Type q to quit history viewing at any point.
A commit is a central concept in Git. Each commit represents a version

of your project. You can also think of a commit as a snapshot of your
project at a specific point in time. Commits allow users to undo changes in
a project and go back to previous versions. We will shortly explore these
features.
It is also possible to apply switches to the git log command to output
information in a more compact format. Try the following variations:
$ git log --oneline --decorate
cdc81d8 (HEAD -> master) Added letter D
dd34039 (origin/master, origin/HEAD) Source code added
5e4ad5a Initial commit
$ git log --oneline --decorate --max-count=2
cdc81d8 (HEAD -> master) Added letter D
dd34039 (origin/master, origin/HEAD) Source code added
$ git log --oneline --decorate --author=yourname
The --oneline switch displays the short hash (the first seven characters of
the long hash). The short hash is sufficient to uniquely identify a commit.
Note that hash values for your project will be different as the algorithm
that computes it takes into account local variables.
The --max-count switch displays only the most recent commits. For
example, the switch --max-count=2 displays the two most recent commits
only.
The --author switch displays only the commits from a specific user.
The --decorate switch adds information about branches and the HEAD
pointer. To understand what that means we need to briefly introduce the
concept of branches in Git.

4.4 What is a Branch?
A branch represents an independent line of development in a project with
its own separate history of commits.
You can list the branches in the local repository by running the git branch
command. The --remote switch shows the local copy of the branches in the
remote repository on GitHub.
$ git branch
* master
$ git branch --remote
origin/HEAD -> origin/master
origin/master
Right now your repository has only a single branch called master both
locally and remotely. When you first setup a repository Git creates the
master branch automatically for you. All Git projects have a master
branch by default. If your Git project were a tree the master branch would
be the trunk. From the trunk it is possible to manually create separate lines
of development as independent branches with their own separate commits.
A Git repository history can be illustrated graphically using lines
representing branches and circles representing individual commits on each
branch. Using this convention your Phonetic Website project repository
looks like the following illustration at the moment:
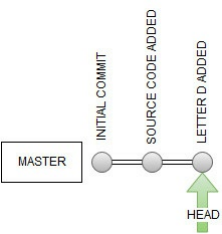
The line represents the master branch with each commit shown as a circle.
The arrow symbolizes the HEAD pointer. The branch pointed to by HEAD
is the current or checked out branch.
If you look again at the output of the git log command using the --oneline
and --decorate switches you will see in the output HEAD -> master. It
means that HEAD is currently pointing to the master branch. The contents
of the working directory reflect the last commit on the checked out branch
plus any changes you have made.
We will cover these concepts in detail in the next chapter.

4.5 Comparing Versions
It is important at this point to note that there are several versions of a file
in a Git project:
1- The working directory version (the one that you use for editing)
2- The staged version (after you run git add <file> to add the file to the
index for the next commit)
3- The committed versions (one version for each commit)
The git diff command shows changes between the working directory, index
and commit versions.
If you have followed the exercises so far, you should at this point have a
clean working directory without any uncommitted changes in the Phonetic
Website project. To explore the capabilities of the git diff command we
need to create some additional versions. We will do that in the following
exercises.
Exercise
Implement the following feature request: add the letter E to the Phonetic
Website. To execute you need to modify the HTML files pilots.html,
cities.html and names.html in the same way as you did when you added the
letter D. For example:
pilots.html

<!-- ALPHABET START -->
<li>Alpha</li>
<li>Bravo</li>
<li>Charlie</li>
<li>Delta</li>
<li>Echo</li>
<!-- ALPHABET END -->
cities.html
<!-- ALPHABET START -->
<li>Atlanta</li>
<li>Boston</li>
<li>Chicago</li>
<li>Detroit</li>
<li>Eldorado</li>
<!-- ALPHABET END -->
names.html
<!-- ALPHABET START -->
<li>Andrew</li>
<li>Brigitte</li>
<li>Charles</li>
<li>David</li>
<li>Eva</li>
<!-- ALPHABET END -->
Browse the website to verify that the changes are correct, check the status
and add the files to the index with git add:
$ git status

On branch master
Changes not staged
modified: cities.html
modified: names.html
modified: pilots.html
$ git add *.html
Exercise
Now implement another feature request: add the letter F to the Phonetic
Website. For example you can add the words "Foxtrot" to pilots.html,
"Fillmore" to cities.html and "Fred" to names.html.
Browse the website to test the changes. This time do not stage. Check the
status of the working directory:
$ git status
On branch master. . .
Changes to be committed:
modified: cities.html
modified: names.html
modified: pilots.html
Changes not staged:
modified: cities.html
modified: names.html
modified: pilots.html
As you can see from the output of git status we have now two different
versions of the HTML files. One version contains the staged changes in the

first exercise. The second one contains the unstaged changes we did in the
second exercise. And of course we also have the committed versions as
shown by git log:
$ git log --oneline --decorate
cdc81d8 (HEAD -> master) Added letter D
dd34039 (origin/master, origin/HEAD) Source code added
5e4ad5a Initial commit
We can now use git diff to view the differences between the various
versions. We will take the pilots.html file as an example.
Viewing Unstaged Changes
To view the changes in pilots.html that have not been staged type:
$ git diff pilots.html
@@ -22,6 +22,7 @@
<li>Charlie</li>
<li>Delta</li>
<li>Echo</li>
+ <li>Foxtrot</li>
<!-- ALPHABET END -->
The output shows that the line containing the word Foxtrot has been added
as indicated by the plus (+) sign. That is expected as we have added the
word Foxtrot without staging the change in the second exercise.
Viewing Changes Between the Index and the Last Commit

To view the changes in pilots.html between the index (staging area) and the
last commit use the --cached switch:
$ git diff --cached pilots.html
@@ -21,6 +21,7 @@
<li>Bravo</li>
<li>Charlie</li>
<li>Delta</li>
+ <li>Echo</li>
<!-- ALPHABET END -->
The output shows that the line containing the word Echo has been added as
indicated by the plus (+) sign. That is expected since we have staged this
change in the first exercise.
Viewing Changes Since the Last Commit
To view the changes in pilots.html since the last commit type:
$ git diff HEAD pilots.html
@@ -21,6 +21,8 @@
<li>Bravo</li>
<li>Charlie</li>
<li>Delta</li>
+ <li>Echo</li>
+ <li>Foxtrot</li>
<!-- ALPHABET END -->
The output shows that the lines containing the words Echo and Foxtrot
have been added as indicated by the plus (+) signs. The git diff command

interprets HEAD as the hash of the last commit. The result is expected since
the last commit occurred before we made the changes in the previous two
exercises.
Viewing Changes Between Any Two Commits
To view the changes between the last commit and the commit before last
type:
$ git diff HEAD~1 HEAD pilots.html
@@ -20,6 +20,7 @@
<li>Alpha</li>
<li>Bravo</li>
<li>Charlie</li>
+ <li>Delta</li>
<!-- ALPHABET END -->
The output shows that the line containing the word Delta has been added as
indicated by the plus (+) sign. The git diff command interprets HEAD~1 as
the hash of the commit before last.
You can also use the short hash obtained from git log to view the difference
between any two commits:
$ git log --oneline --decorate
cdc81d8 (HEAD -> master) Added letter D
dd34039 (origin/master, origin/HEAD) Source code added
5e4ad5a Initial commit
$ git diff dd34039 cdc81d8 pilots.html

@@ -20,6 +20,7 @@
<li>Alpha</li>
<li>Bravo</li>
<li>Charlie</li>
+ <li>Delta</li>
<!-- ALPHABET END -->
In the example above the hashes dd34039 and cdc81d8 identify the before
last and last commits. In your repository these identifiers will be different so
use the hashes you get from running the git log command in your computer.
We have now covered all the basic use cases. Before moving to the next
section let's commit the pending changes. First commit the letter E change
request which is already staged:
$ git commit -m "Added letter E"
[master 1c709dd] Added letter E
3 files changed, 3 insertions(+)
Now stage and commit the letter F change request:
$ git add *.html
$ git commit -m "Added letter F"
[master fccad77] Added letter F
3 files changed, 3 insertions(+)
You should now have a clean working directory and a longer history log:

$ git status
Your branch is ahead of
'origin/master' by 3 commits.
nothing to commit,
working directory clean
$ git log --oneline --decorate
fccad77 (HEAD -> master) Added letter F
1c709dd Added letter E
cdc81d8 Added letter D
dd34039 (origin/master, origin/HEAD) Source code added
5e4ad5a Initial commit
Comparing what has changed between different versions of a source code
file is very useful, but what if we want to undo a change? This is the subject
covered in the next section.

4.6 Undoing Changes
One of the reasons to track a project's history is to have the ability to undo
changes. It is a common situation in software development: you change
something, you test the change and it does not quite work the way you
expected. You then decide to revert the code back to the previous version.
With Git you can easily accomplish that.
There are three possible undo scenarios in Git:
1- Undoing changes in the working directory before staging
2- Undoing changes after staging and before committing
3- Undoing committed changes
Exercise: Unwanted Change
To demonstrate each of the above scenarios we will need an unwanted
change to undo. We will again use the Phonetic Website project to
experiment with. If you have followed all the exercises in the previous
sections you should now have a clean working directory without any
uncommitted changes.
Open pilots.html in a text editor and delete all the words except "Alpha" so
that the alphabet ends up looking like this:
<!-- ALPHABET START -->
<li>Alpha</li>
<!-- ALPHABET END -->

Save the change and test how the page looks now when browsing the
website. You should have only the letter A left in the Pilot's Alphabet. We
will learn how to recover the lost words using Git undo features. In this
simple case you could just manually add the lost words again to fix the
problem. Suppose however the change involved editing dozens of lines of
code in various parts of the source file. In that case it would be impossible
to correct it manually. In such a situation Git undo features become
invaluable.
Undoing Changes Before Staging
To recover the lost words in pilots.html (following the "Unwanted Change
Exercise" at the beginning of this section) all you have to do is to revert the
file back to its last committed version using the git checkout command as
follows:
$ git checkout pilots.html
$ git status
Browse the website to verify that the words have been recovered. The git
status command should report a clean working directory.
Undoing Changes After Staging
Repeat the "Unwanted Change Exercise" at the beginning of this section.
Now stage the change:
$ git add pilots.html
$ git status

Run git status. It shows that pilots.html is ready to be committed. It also
suggests to run git reset HEAD <file> to un-stage the change. And that is
what we need to do first:
$ git reset HEAD pilots.html
Unstaged changes after reset:
pilots.html
The git reset command has removed the file from the index (staging area)
however the unwanted change is still in the working directory. To recover
the lost words, you still need to repeat the process for undoing un-staged
changes and run git checkout to restore the last committed version:
$ git checkout pilots.html
$ git status
The working directory should be now clean. Browse the website to verify
that the words have been recovered.
Undoing Committed Changes
Repeat the "Unwanted Change Exercise" at the beginning of this section.
This time we are going to commit the unwanted change:
$ git add pilots.html

$ git commit -m "Unwanted change"
[master c0a71ac] Unwanted change
1 file changed, 5 deletions(-)
Run git log to see the new commit:
$ git log --oneline --decorate
c0a71ac (HEAD -> master) Unwanted change
fccad77 Added letter F
1c709dd Added letter E
cdc81d8 Added letter D
dd34039 (origin/master, origin/HEAD) Source code added
5e4ad5a Initial commit
To undo the committed change you need to run the git revert command
specifying the hash of the unwanted commit as shown in your git log output
(do not use the hash you see in the example below as it will be different in
your computer).
$ git revert c0a71ac --no-edit
[master 20dd92b] Revert "Unwanted change"
1 file changed, 5 insertions(+)
The --no-edit flag prevents the commit editor to popup. Browse the website
to verify that the unwanted change has gone.
Let's check the project history:

$ git log --oneline --decorate
20dd92b (HEAD -> master) Revert "Unwanted change"
c0a71ac Unwanted change
fccad77 Added letter F
1c709dd Added letter E
cdc81d8 Added letter D
dd34039 (origin/master, origin/HEAD) Source code added
5e4ad5a Initial commit
As you can see from the git log output a revert commit was added to
cancel the effect of the unwanted change. Git is designed to never loose
history so it keeps the commit you want to revert and overrides it with a
new one.
We have covered in this section three basic undo change scenarios for a
single file. Later in the book we will learn how to navigate history and get
the whole project back to a previous version. In the next section we will
learn how to give a meaningful name to stable versions of a project.

4.7 Tagging Versions
You can use Git to attach a tag to easily identify a stable version of a project
with the git tag command. The tag can be any arbitrary string but
traditional versioning schemes assign a number sequence starting with zero.
For instance, suppose you want to assign the tag v0.1 to the version
(commit) where you added the letter F to the Phonetic Website project. First
you need to find out what the short hash is for the corresponding commit
from the history log (in my case fccad77) and then type the following
command to tag it:
$ git tag -a v0.1 fccad77 -m "v0.1"
The new tag will show in the output of git log:
$ git log --oneline --decorate
20dd92b (HEAD -> master) Revert "Unwanted change"
c0a71ac Unwanted change
fccad77 (tag: v0.1) Added letter F
1c709dd Added letter E
cdc81d8 Added letter D
dd34039 (origin/master, origin/HEAD) Source code added
5e4ad5a Initial commit
You can now refer to this version of the website using the assigned tag
instead of the short hash.

Let's check the status of the working tree:
$ git status
On branch master
Your branch is ahead of
'origin/master' by 5 commits.
(use "git push" to publish
your local commits)
nothing to commit,
working directory clean
The working directory is clean but the remote repository on GitHub is
behind by 5 commits. It is time to synchronize:
$ git push origin master
Total 19 (delta 12),
reused 0 (delta 0)
To https://github.com/...
dd34039..20dd92b
master -> master
Check the Phonetic Website central repository on GitHub to verify that it is
now up-to-date with all the latest commits.

4.8 Summary
In this chapter we started to modify the Phonetic Website project by
implementing feature requests and updating the local repository with new
versions. We then learned to view the history of commits in a project using
the git log command.
Next we looked at what versions of a file exist in Git and how to view the
differences between versions using the git diff command. Then we learned
how to undo changes under a number of different scenarios using the git
checkout, git reset and git revert commands.
We briefly introduced the concept of branches in Git and we learned how to
list the local and remote branches in a project with the git branch
command. In the next chapter we will look in detail at how to work with
branches in Git.
Here is a summary of the Git Bash commands introduced in this chapter:
# show history of commits
$ git log --oneline --decorate
# list local branches
$ git branch
# list remote branches
$ git branch --remote
# view changes in the working tree
# not yet staged
$ git diff <file>
# view the changes between

# the index and the last commit
$ git diff --cached <file>
# view the changes in the working
# tree since the last commit
$ git diff HEAD <file>
# view changes between
# two commits
$ git diff <commit1> <commit2> <file>
# undo unstaged changes
$ git checkout <file>
# unstage changes
$ git reset HEAD <file>
# undo committed change
$ git revert <commit> --no-edit
# apply tag to a version
$ git tag -a <tag> <commit> -m <comment>
* * *
CHAPTER 5
Working With Branches
A branch in Git is an independent line of development with a separate
commit history. In large projects each new feature or bug fix is often
developed on a separate branch and, once completed, merged into the main
code base. In this chapter we will look at branching and merging operations
in Git.

5.1 Moving, Deleting and Renaming Files
Branches are useful when you want to try out changes to a project without
affecting the main code base in master. In this section we are going to
create a separate branch to experiment with deleting, moving and renaming
files in a Git project.
Open Git Bash and change to the Phonetic Website project working
directory. Run the following commands to create a new branch called "test"
and switch to it:
$ git branch test
$ git checkout test
Switched to branch 'test'
$ git branch
master
* test
The git branch <name> command creates a new branch with the specified
name (in this case test).
The git checkout <branch> command switches to the specified branch
making it the current branch.
The git branch command without any arguments lists all local branches in
the project. A star (*) is placed next to the current branch.

Let's take a look at the history of the test branch:
$ git log --oneline --decorate
20dd92b (HEAD -> test...)
You will find that the new test branch shares all the previous commits
with the master branch. HEAD is now pointing to the test branch (HEAD
-> test) confirming that test is now the current branch.
We are now free to make changes without affecting the main code base in
the master branch. To demonstrate this feature we will make some
structural changes and move all the stylesheets of the website up one level:
$ git mv style/*.css ./
The git mv command can be used to move or rename files. The change is
immediately added to the index for the next commit. The git rm command
can be used to delete files from the command line.
Note: you can also use Windows Explorer, an IDE or any other file
management tool to move, rename or delete files in a Git project. Git will
detect the changes just as well. The only difference is that if you use the git
mv and git rm commands the changes will automatically be staged for you,
whereas if you use other tools you will have to stage the changes manually
with git add before you can commit them.
Test the website in a browser. You will find that the Phonetic Website has
lost its styling and both the menu and the alphabet pages are displayed as
simple lists without formatting. This is because the location of the CSS files

has changed and the stylesheet links in the HTML files are broken.
Let's fix this problem. Open each HTML file in turn and locate the <head>
section at the top of the file:
<head>
<title>Pilot's Alphabet</title>
<meta charset="UTF-8">
<link href="style/site.css" rel="stylesheet">
<link href="style/pilot.css" rel="stylesheet">
</head>
Remove the style directory path from each stylesheet link as follows:
<head>
<title>Pilot's Alphabet</title>
<meta charset="UTF-8">
<link href="site.css" rel="stylesheet">
<link href="pilot.css" rel="stylesheet">
</head>
Make the above change on pilots.html, cities.html and names.html. Save
and test again the website in a browser. You will find that the styling of the
Phonetic Website is back as the CSS links are now correct. Let's add the
changes to the index for the next commit:
$ git add *.html
The style directory is now empty and can be removed by entering the

following Git Bash command (or if you prefer you can delete the folder
using Windows Explorer):
$ rmdir style
Check the status of the working directory:
$ git status
On branch test
Changes to be committed:
renamed:
style/cities.css -> cities.css
modified:
cities.html
renamed:
style/names.css -> names.css
modified:
names.html
renamed:
style/pilot.css -> pilot.css
modified:
pilots.html
renamed:
style/site.css -> site.css
We can now commit the changes:
$ git commit -m "CSS files renamed"
[test 0f4feb6] CSS files renamed

The history of the test branch now shows the new commit:
$ git log --oneline --decorate
0f4feb6 (HEAD -> test)
CSS files renamed
...
Note that HEAD is pointing to the last commit in the test branch (HEAD -
> test). The working directory should now be clean:
$ git status
On branch test
nothing to commit,
working directory clean
What happens now if we switch back to the master branch?

5.2 Switching Branches Without Merging
You can see the extent of the changes you have made on the test branch of
the Phonetic Website project in the previous section by listing the contents
of the working directory:
$ ls -a
All the CSS files have moved one level up and the style directory no longer
exists.
We are now going to see the power of branches.
Let's switch back to the master branch using the git checkout command
and list the contents of the working directory again:
$ git checkout master
Switched to branch master
Your branch is up-to-date
with origin/master.
$ ls -a
As you can see from the listing, the content of the working directory has
been restored. The style directory is back containing all the CSS files. The
stylesheet references in the HTML code have not changed. Test the website
in a browser to verify that it is working correctly.
How is that possible?
Every time you switch branches Git will fetch from the repository
database the contents of the working directory from the last commit on that
branch.
When you run the git checkout <branch> command the HEAD pointer
moves to the last commit of the branch you are checking out, and the
content of the working directory reflects what is pointed to by HEAD.
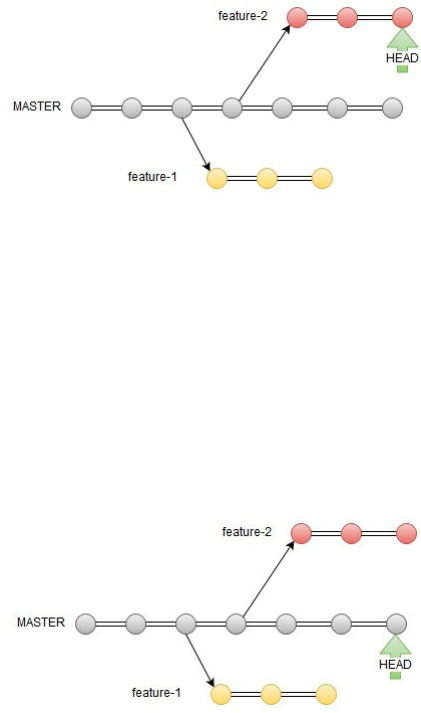
Below is a graphic illustration of the switch process. In the first picture the
branch feature-2 is the current branch. HEAD is pointing to the last commit
on feature-2:
Following a git checkout master command the HEAD pointer moves to
the last commit on the master branch and the contents of the working
directory change accordingly:
You can always verify which branch is current with either git branch or git

log:
$ git branch
* master
test
$ git log --oneline --decorate
20dd92b (HEAD -> master)
. . .
In case you have uncommitted changes when you switch to another
branch, Git will try to merge those changes on to the target branch. If the
changes are incompatible, then Git will not allow the switch. You can force
the switch using the -f option e.g. git checkout -f master if you don't care
about loosing the uncommitted changes. It is good practice to switch
branches only when the working directory is clean.
The commits for each branch are safely stored in the project repository
database (the .git directory). No matter what changes you make on another
branch, everything will be restored when you switch back unless you decide
to merge the changes. Merging is the subject covered in the next section.

5.3 Merging
In a typical Git workflow developers normally implement a feature request
on a separate branch. This way they can freely experiment with changes
without affecting the main code base. The changes are thoroughly tested in
the feature branch. Only after successful testing the changes are merged on
to the main development branch.
Let's assume we have two new feature requests to implement. The first is to
add the letters G, H, I and the second is to add the letters J, K, L to the
Phonetic Website. We will implement each of these feature requests on
separate branches.
Open Git Bash and change to the Phonetic Website working directory.
Make sure the current branch is master and that the working directory is
clean. Create two new feature branches using the following commands:
$ git status
On branch master
nothing to commit,
working directory clean
$ git branch g-h-i
$ git branch j-k-l
$ git branch
g-h-i
j-k-l
* master
test

Let's implement the first feature request through an exercise.
Exercise
To add the letters G-H-I first switch to the g-h-i branch:
$ git checkout g-h-i
Switched to branch 'g-h-i'
Add the letter G to pilots.html, cities.html and names.html (e.g. "Golf",
"Greenville" and "Gloria"). Browse the website to test the changes, stage
and commit with the comment "Added letter G". Refer to Chapter 4 if you
need a refresher.
Repeat the same process to add the letter H (e.g. "Hotel", "Houston" and
"Henry") then stage and commit.
Repeat the same process to add the letter I (e.g. "India", "Illinois" and
"Isabel") then stage and commit.
On completion of this exercise the g-h-i branch history should look like the
following:
$ git log --oneline
9e8c630 Added letter I
8d9e46d Added letter H
8243fe7 Added letter G
20dd92b Revert "Unwanted change"
c0a71ac Unwanted change
fccad77 Added letter F
1c709dd Added letter E

cdc81d8 Added letter D
dd34039 Source code added
5e4ad5a Initial commit
The working directory should be clean without uncommitted changes:
$ git status
On branch g-h-i
nothing to commit,
working directory clean
We are ready now to merge the changes on to the master branch. First
switch back to master and check the history:
$ git checkout master
$ git log --oneline
20dd92b Revert "Unwanted change"
c0a71ac Unwanted change
fccad77 Added letter F
1c709dd Added letter E
cdc81d8 Added letter D
dd34039 Source code added
5e4ad5a Initial commit
Now browse the Phonetic Website and you will find that it is still on the
letter F. This will change once we have merged the changes from the g-h-i
branch. The git merge command lets you integrate separate timelines of
development into a single branch. To incorporate the feature you have

implemented in the g-h-i branch into master we just need to run the
following command:
$ git merge g-h-i
Updating...
Fast-forward
cities.html | 3 +++
names.html | 3 +++
pilots.html | 3 +++
3 files changed, 9 insertions(+)
Let's look at the history of the master branch after the merge:
$ git log --oneline
9e8c630 Added letter I
8d9e46d Added letter H
8243fe7 Added letter G
20dd92b Revert "Unwanted change"
c0a71ac Unwanted change
fccad77 Added letter F
1c709dd Added letter E
cdc81d8 Added letter D
dd34039 Source code added
5e4ad5a Initial commit
You can see that the commits you made on g-h-i have been integrated. If
you browse the website now you can confirm that the changes have been
incorporated, including the words up to the letter I.
Git does a good job of merging changes in different parts of the same file
automatically. Sometimes a conflict may arise during the merging
operation. That happens when the changes you made collide with the
existing code in the branch you are merging into. In the next section we will
see how to resolve conflicts.

5.4 Resolving Conflicts
We will now implement the second feature request outlined in the previous
section: to add the letters J, K and L to the Phonetic Website. We have
already created a feature branch named j-k-l to make this change so let's
switch to it:
$ git checkout j-k-l
Switched to branch 'j-k-l'
Let's look at the history of the j-k-l branch:
$ git log --oneline
20dd92b Revert "Unwanted change"
c0a71ac Unwanted change
fccad77 Added letter F
1c709dd Added letter E
cdc81d8 Added letter D
dd34039 Source code added
5e4ad5a Initial commit
As you can see, the history of the j-k-l branch mirrors the history of the
master branch at the point of split when the branch was created. However
it does not contain the latest changes on master derived from the merge with
the g-h-i branch.
Exercise

Add the letter J to pilots.html, cities.html and names.html (e.g. "Juliet",
"Jackson" and "James") immediately after the letter F. The code in
pilots.html should look like the following:
<!-- ALPHABET START -->
<li>Alpha</li>
<li>Bravo</li>
<li>Charlie</li>
<li>Delta</li>
<li>Echo</li>
<li>Foxtrot</li>
<li>Juliet</li>
<!-- ALPHABET END -->
Do not worry about the gap caused by the missing G, H and I letters. We
will sort that out when merging the changes on to the master branch.
Browse the website to test the changes, stage and commit with the
comment "Added letter J". Refer to Chapter 4 if you need a refresher.
Repeat the same process to add the letter K (e.g. "Kilo", "Kingston" and
"Kate") then stage and commit.
Repeat the same process to add the letter L (e.g. "Lima", "Lincoln" and
"Laura") then stage and commit.
On completion of the exercise the j-k-l branch history should look like the
following:
$ git log --oneline
2402d34 Added letter L
a351b12 Added letter K

da1b2ea Added letter J
20dd92b Revert "Unwanted change"
c0a71ac Unwanted change
fccad77 Added letter F
1c709dd Added letter E
cdc81d8 Added letter D
dd34039 Source code added
5e4ad5a Initial commit
The working directory should be clean without any uncommitted changes:
$ git status
On branch j-k-l
nothing to commit,
working directory clean
We are ready now to merge the changes on to the master branch. First
switch back to master and check the history:
$ git checkout master
$ git log --oneline
9e8c630 Added letter I
8d9e46d Added letter H
8243fe7 Added letter G
20dd92b Revert "Unwanted change"
c0a71ac Unwanted change
fccad77 Added letter F
1c709dd Added letter E
cdc81d8 Added letter D
dd34039 Source code added
5e4ad5a Initial commit

If you browse the Phonetic Website now you will find that it is still on the
letter I. Let's merge the feature we implemented on the j-k-l branch and see
what happens:
$ git merge j-k-l
Auto-merging pilots.html
CONFLICT (content):
Merge conflict in pilots.html
Auto-merging names.html
CONFLICT (content):
Merge conflict in names.html
Auto-merging cities.html
CONFLICT (content):
Merge conflict in cities.html
Automatic merge failed;
fix conflicts and then
commit the result.
The git merge output is flagging conflicts on the three HTML files. That
was to be expected as we made changes in the same lines of code on both
branches. Running git status will tell you that the files have been modified:
$ git status
On branch master
Unmerged paths:
both modified: cities.html
both modified: names.html
both modified: pilots.html

In case of conflicts during a merge, Git cleverly highlights the conflicts in
the source code in each file keeping both changes (the one in the feature
branch and the one in the target branch) leaving it to the developer to
resolve the conflicts manually.
Let's fix pilots.html first. Open it in your favourite text editor. The
conflicting changes will be clearly marked by Git:
<<<<<<< HEAD
<li>Golf</li>
<li>Hotel</li>
<li>India</li>
=======
<li>Juliet</li>
<li>Kilo</li>
<li>Lima</li>
>>>>>>> j-k-l
The section of code between <<<<<<< HEAD and ======= shows the
code in the current branch. The section of code between ======= and
>>>>>>> j-k-l shows the conflicting changes merged from the j-k-l branch.
Resolving the conflict in this case is quite easy. As we want to keep both
changes we just need to delete the Git markings and retain the sequence
of words in alphabetical order.
Open pilots.html in your favourite editor and delete the Git markings so that
the alphabet list ends up looking like this:
<!-- ALPHABET START -->
<li>Alpha</li>
<li>Bravo</li>
<li>Charlie</li>
<li>Delta</li>

<li>Echo</li>
<li>Foxtrot</li>
<li>Golf</li>
<li>Hotel</li>
<li>India</li>
<li>Juliet</li>
<li>Kilo</li>
<li>Lima</li>
<!-- ALPHABET END -->
Delete also the Git markings in cities.html and names.html to resolve the
conflicts and save. Browse the website to test. When all looks good, add the
files to the index and commit as usual:
$ git add *.html
$ git commit -m "Resolved j-k-l merge conflict"
Let's now take a look at the history of the master branch:
$ git log --oneline --decorate
ca2b371 (HEAD -> master)
Resolved j-k-l merge conflict
2402d34 (j-k-l) Added letter L
a351b12 Added letter K
da1b2ea Added letter J
9e8c630 (g-h-i) Added letter I
8d9e46d Added letter H
8243fe7 Added letter G
20dd92b (origin/master, origin/HEAD)
Revert "Unwanted change"
c0a71ac Unwanted change
fccad77 (tag: v0.1) Added letter F

1c709dd Added letter E
cdc81d8 Added letter D
dd34039 Source code added
5e4ad5a Initial commit
All the commits from the j-k-l branch have been integrated. The last
commit is the one you have just executed following the merge conflict
resolution. The git merge command is designed to preserve history
whenever possible.
To conclude let's tag this version as v0.2 and update the remote repository
on GitHub. You may be required to enter your username and password:
$ git tag v0.2
$ git push origin master
Your local and remote repositories are now synchronized and you should
have a clean working tree:
$ git status
On branch master
Your branch is up-to-date
with 'origin/master'.
nothing to commit,
working directory clean
Take a look at the Phonetic Website central repository on GitHub to verify
that it is up-to-date.
Note that we have pushed changes to the remote repository master branch
only. It is also possible to push local branches to a remote repository with
the command git push origin <branch>. We will be using this technique
in the next chapter when collaborating with open source projects on
GitHub.

5.5 Summary
Working with branches is an essential part of the Git workflow. In this
chapter we have looked at:
How to use a branch to independently test changes
What happens when switching branches
How to use branches to implement feature requests
How to merge new features into the master branch
How to resolve conflicts
The know-how we have covered so far is enough to get you started working
in real-world Git projects. In the next chapter we will look at how to use
GitHub to collaborate with others in open source projects.
Here is a summary of the Git Bash commands introduced in this chapter:
# move or rename a file
# and stage
$ git mv <source> <destination>
# delete a file and stage
$ git rm <file>
# create a branch
$ git branch <branch name>
# switch to another branch
$ git checkout <branch name>
# merge from branch
$ git merge <branch name>
# tag the last commit

$ git tag <version>
* * *
CHAPTER 6
Collaborating with Others on GitHub
GitHub is the largest open source community today providing a number of
collaboration features that makes it easier for developers to share code.
There is no better way to improve your coding skills than contributing to an
open source project, either by proposing a bug fix or adding a new feature.

6.1 Social Coding
GitHub has a social element too. Users have a profile page listing their
repositories and contributions. For instance my profile page is located at:
https://github.com/robertovormittag
You can follow other GitHub users when you land on their profile page by
clicking on the [Follow] button located just below the GitHub menu.
Clicking on one of the user's repository links will take you to that repository
home page, where you can look at the code, issues, pull requests and
activity levels.
On each repository page you will find three buttons located below the
GitHub menu:
Click the [Watch] button to follow the repository and be notified of all
events related to that project, such as comments on a pull request, or an
issue being raised. You can [Unwatch] the project at any time if no longer
interested.
Click on the [Star] button to bookmark the project. You can access your
bookmarked projects by selecting "Your stars" from the GitHub profile
menu.
In the next section we will explore the function of the [Fork] button.

6.2 Forking a Repository
You can contribute to any public repository on GitHub. To do that you first
need to fork the repository. When you fork a repo GitHub creates a copy of
the repository under your own account, and you are free to push changes to
it just like you do with your own remote repositories.
To see how that works I have setup a public repository containing a simple
website project at the following URL:
https://github.com/robertovormittag/open-website
You can contribute to this project in various ways, by adding content or
changing the style of the website.
Make sure you are logged in to your GitHub account, then visit the above
URL to get to the repository home page. You can look at the project
description and browse the source code to familiarize with it. When ready
click on the [Fork] button located on the top right-hand corner.
GitHub will create a copy of the forked repository under your account with
the following URL:
https://github.com/your-user-name/open-website
You now have full access to this repository just as if you had created it
yourself and you can start contributing to the project by pushing changes to
it. This is the subject of the next section.

6.3 Making Changes
Once you have forked a project you need to clone it in order to work on
your PC, using your favourite IDE and development tools.
We will now clone the Open Website project you forked in the previous
section. Start Git Bash, change to your home directory and enter the
following command taking care of replacing "your-user-name" with your
GitHub username to clone the open-website fork:
$ git clone https://github.com/your-user-name/open-website
Cloning into 'open-website'...
Checking connectivity... done.
The cloning operation creates a new open-website project folder under your
home directory. Let's change to it and list the contents:
$ cd open-website/
$ ls
index.html README.md style/
$ ls style
site.css
Open index.html with your Web browser to see how the website looks like.

Let's now take a look at the branches and the history of this project. As this
is a shared public project, you will find that a number of commits already
exist. Remember that you can limit the number of commits listed by git log
using the --max-count switch. The following command will display only
the last 5 commits:
$ git log --oneline --decorate --max-count=5
$ git branch
* master
The repository has only the master branch. Making changes to the master
branch however would make it difficult for the owner of the project to
manage contributions from several developers. For this reason, developers
contributing to open source projects on GitHub make changes on a separate
branch (called a topic or feature branch) without merging their work.
Once the changes are complete they push the topic branch to GitHub and
propose the changes by opening a pull request to the project owner. We will
use this workflow step-by-step to propose changes to the Open Website
project.
The first thing you need to do is to create a topic branch. You can give the
branch any name you like. The following commands create a topic branch
called "new-para" and switch to it:
$ git branch new-para
$ git checkout new-para

Switched to branch 'new-para'
You can start now making changes without affecting the main code base in
the master branch. Let's say you simply want to add a new paragraph
element to the home page index.html.
Open index.html in your favourite editor and add a paragraph anywhere
inside the <body> of the page e.g.:
<p>I am having fun with Git and GitHub!</p>
Browse the website to check that you are happy with the changes you made
then stage and commit as usual:
$ git add index.html
$ git commit -m "New paragraph added"
Check again history and status. You should see your new commit in the log
and a clean working directory:
$ git log --oneline --decorate --max-count=1
50de7b4 (HEAD -> new-para)
New paragraph added
$ git status

On branch new-para
nothing to commit,
working directory clean
The next step is to push the topic branch to your GitHub fork by entering
the commands below. Replace new-para with the name of your topic branch
if you have named it differently. You may be asked to enter your GitHub
username and password:
$ git remote
origin
$ git push origin new-para
You are ready to propose your changes. This is the subject of the next
section.
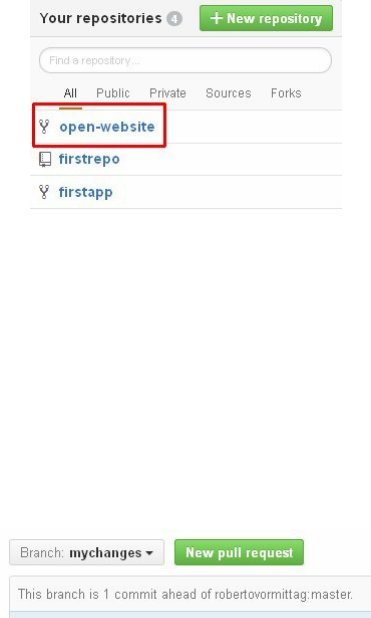
6.4 Opening a Pull Request
In GitHub "opening a pull request" is the way to propose changes you made
to a forked repository in a topic branch.
From your GitHub profile page click on the link to your open-website fork:
Now click on the [Branch] button and you should see listed the topic branch
you pushed in the previous section. Select it and your commit comment
should appear next to index.html.
Click on the [New Pull Request] button.
GitHub will open a pull request page on the project owner account with
information about your proposed change. This page compares the original
master branch with your topic branch and reports any conflict. At the
bottom of the page you can see a summary of the commits and changes that
you have made on the topic branch.
You can enter a title and a comment describing your proposed change.
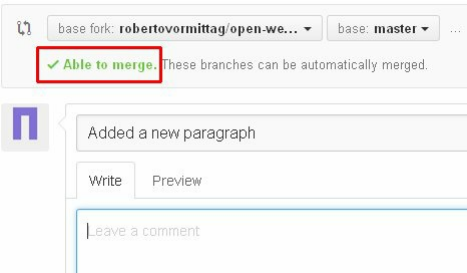
Providing a good description will help the owner of the project to
understand what your change is all about and decide accordingly.
Enter a title (it defaults to your commit comment) and a description then
click the [Create pull request] button.
GitHub will open the pull request page on the owner's repository
[Conversation] tab. This page is used to record conversations between the
owner and contributors to the project. Here you can enter additional
comments or close the pull request if you change your mind.
In case the project owner starts a conversation requesting some adjustment
to your code, go back to your topic branch, make the required changes and
push the branch again to your fork on GitHub. Then go to the
[Conversation] tab of the pull request page to notify the owner that you have
modified the code and wait for more feedback.
As a contributor you have done your bit. It is now the project owner's
responsibility to take action either by accepting, rejecting or making
comments. This is the subject covered in the next section.

6.5 Receiving a Pull Request
Let's see now what happens on the receiving side of a pull request. Suppose
you are the repository owner. When someone opens a pull request
proposing changes to your code, GitHub will send you an email and a
notification with a link to the pull request page where you can check all the
relevant information and take appropriate action.
The pull request page provides three tabs: [Conversation] is where all the
conversation and events that take place during the lifetime of the pull
request are displayed; [Commits] show all commits belonging to this pull
request and [Files changed] show the differences between the original
master version and the topic branch version of the changed files.
You should review all the information on the pull request page and decide
what to do. There are three possible actions you can take: start a
conversation, merge the change or reject the request.
Start a Conversation
You can click on the [Conversation] tab to send a comment to the
contributor if you want to discuss or ask clarifications about the change.
You can also send comments by clicking on the [Files changed] tab,
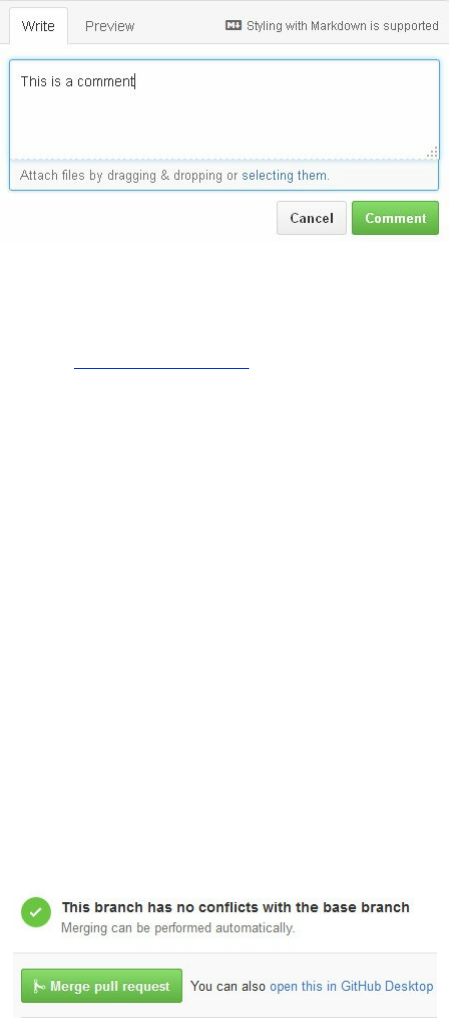
selecting a specific line of code and clicking on the plus sign [+] to enter
and send a comment.
By clicking on the green [Comment] button a notification will be sent to
the contributor, who in turn will be able to reply in the same way.
The comment field supports Markdown, a set of simple style markings to
format text on the Web.
Merge the Change
GitHub will show a [Merge pull request] green button in the
[Conversation] tab of the pull request page if there are no detected conflicts.
Click on it if you are happy with the proposed change and decide to merge.
This action will merge the code in the contributor's topic branch on to the
main code base in master.
Upon clicking the [Merge pull request] button GitHub will ask for
confirmation, perform the merge, and close the pull request.
Close the Pull Request
In case you do not agree with the proposed change you will find a [Close
pull request] button at the bottom of the [Conversation] tab in the pull
request page. By clicking on it the collaborator will be notified and the pull
request closed.
Open source projects can be very active with lots of contributions from
many developers being merged all the time. When your pull request stays
around for some time, your fork can become out of date. In the event that
you want to make more changes you need to synchronize it with the original
project so that you can work on the latest code base. This is the subject
covered in the next section.

6.6 Keeping your Fork Synchronized
In the event that your pull requests are long lived you need to keep your fork
synchronized with the original upstream repository, so you can work and
make changes on the latest version of the code. We will use the Open
Website project fork you created earlier to illustrate how to ensure that your
fork is in sync.
Open Git Bash and change to your local open-website working directory.
Add the original upstream repository (the one from which you have forked)
as a new remote repo. The following command adds the original open-
website repository on my account as a new remote identified by upstream:
$ cd ~/open-website
$ git remote add upstream https://github.com/robertovormittag/open-website
$ git remote -v
origin
https://github.com/your-user-name/open-website (fetch)
origin
https://github.com/your-user-name/open-website (push)
upstream
https://github.com/robertovormittag/open-website (fetch)
upstream
https://github.com/robertovormittag/open-website (push)
Now fetch the latest code changes from the upstream remote:
$ git fetch upstream

* [new branch]
master -> upstream/master
Remote commits to master will be stored in a local branch named
upstream/master. You will need to merge it to your local master branch.
The following command lists both local and remote tracking branches:
$ git branch -a
* master
remotes/origin/HEAD -> origin/master
remotes/origin/master
remotes/upstream/master
To complete the sync, first checkout your local fork master branch:
$ git checkout master
Then bring your local master branch in line with the upstream repository by
merging the latest changes:
$ git merge upstream/master
You need to manually resolve any conflicts, then stage and commit. We

covered conflict resolution in Section 5.4.
Your local master branch will now be in sync with the original project. You
can make more changes on a new topic branch or reuse an existing one. If
you want to merge the latest code into an existing topic branch you just
need to check it out and merge from master.
Exercise
Let's add another paragraph to index.html. Test the change and when you
are happy with it stage and commit then push the topic branch to your fork
on GitHub as you did previously.
Go to your forked Open Website project repository page on GitHub and
select the topic branch you have just pushed using the [Branch] button.
Then open another pull request to the owner of the project, as you did in the
previous section.
You can continue repeating this cycle of fetch -> merge -> change -> push
-> open pull request for as long as you want to contribute to a project
ensuring that you are always working on the latest version of the code.

6.7 Summary
GitHub is the largest social coding and open source collaboration platform
today. It allows you to follow the activities of other developers and
bookmark repositories of interest.
To collaborate on an open source project you first need to fork its repository.
You then clone and make changes to it locally on a separate feature branch.
When ready to propose your changes, you push the feature branch to
GitHub and open a pull request starting a conversation with the project
owner. Once the changes have been agreed they are merged to the main
code base.
To keep your fork synchronized with the original project you need to add
the upstream repository as a remote repo. Once you have done that, you can
keep contributing to the project over time by following a continuous cycle of
fetching the latest code base, merging, making the changes and pushing
your feature branch to GitHub to open a new pull request.
Collaborating on open source projects is the best way to improve your
coding skills.
Here is a summary of the Git Bash commands introduced in this chapter:
# add a new remote
# identified by upstream
$ git remote add upstream <URL>
# lists both local and
# remote tracking branches
$ git branch -a
$ git branch --all

# list remotes with URL
$ git remote -v
$ git remote --verbose
# fetch the latest commits from remote
# identified by upstream
$ git fetch upstream
# update local master from remote
# identified by upstream
$ git checkout master
$ git merge upstream/master
* * *
CHAPTER 7
More Git Magic
The Git commands you have used so far make up the core command set that
you need to work with Git on a day-to-day basis. We have learned how to
clone GitHub projects, undo and commit changes, branch and merge,
inspect history, compare different versions and synchronize with GitHub
repositories.
In this chapter we will explore additional commands that are at the heart of
the Git toolset.
All the previous examples used static website projects to illustrate Git
commands in order to create a scenario as close as possible to that of a real-
world project. In this chapter we will use instead simple text files that you
can quickly create and edit from the Git Bash command line to make it
easier to see the effect of Git commands on both the working directory and
commit history.

7.1 Initializing a Local Repository
Up to now we have cloned remote repositories created on GitHub to kick
start a project. It is also possible to create a brand new Git repository locally
on your machine using the git init command. A local private repository not
shared with anyone is a good place to experiment with new Git commands
without worrying about making mistakes.
To initialize a local repository open Git Bash and change to your home
directory. Create a new folder that will serve as the working directory of
your new local repo. In the following example we create a folder named
"alphabets". Change to the new project directory and type the command git
init to initialize the local repository. Here is the full command sequence:
$ cd ~
$ mkdir alphabets
$ cd alphabets
$ git init
Initialized empty Git repository
The output should confirm that a new Git repository has been initialized.
Now list the contents of the working directory, and you will see that a .git
folder has been setup by Git. This is the repository database which we will
explore later:
$ ls -a

./ ../ .git/
$ git status
On branch master
Initial commit
nothing to commit
Your new local Git repository is ready to use. You can now start adding
files to it.
Tip: To create an empty file from the Git Bash command line use the
Linux touch <filename> command.
The following command sequence creates an empty text file which is then
staged and committed to the new repository on the master branch:
$ touch pilots.txt
$ git add pilots.txt
$ git commit -m "Initial commit"
$ git log --oneline --decorate
30c26be (HEAD -> master)
Initial commit
Let's now build some commit history. Make a change to pilots.txt by
inserting the word "Alpha" on the first line. To edit the file you can use any
text editor or the command sequence illustrated below.
Tip: To quickly open a text file in Notepad from the command line type

notepad <filename>.
Tip: To quickly insert a line into a text file from the command line use the
Linux command echo "some text" >> <filename>.
Tip: to quickly display the contents of a text file from the command line
use the Linux command cat <filename>.
The following command sequence inserts the word "Alpha" to pilots.txt,
displays the file contents, commits the change and shows the history log:
$ echo "Alpha" >> pilots.txt
$ cat pilots.txt
Alpha
$ git add pilots.txt
$ git commit -m "Alpha added"
$ git log --oneline --decorate
46d3185 (HEAD -> master) Alpha added
30c26be Initial commit
Repeat the above command sequence to insert two more words: "Bravo"
and "Charlie" and add two more commits so that the file contents and
history log of the master branch end up looking like the following:
$ cat pilots.txt
Alpha
Bravo

Charlie
$ git log --oneline --decorate
5b41f59 (HEAD -> master) Charlie added
b02d358 Bravo added
46d3185 Alpha added
30c26be Initial commit
$ git status
On branch master
nothing to commit,
working directory clean
In the next section we will use this local repository to learn how to bring an
entire project back to a previous version.
Note: A remote repository is not required to follow the exercises in this
chapter, however for your reference a local Git repository created with git
init can easily be uploaded to GitHub from the command line. All you have
to do is create a new empty repository on GitHub, add it as a new remote
and push the contents of the local repo. Here is the full command sequence:
# add a new remote identified as origin
$ git remote add origin https://github.com/your-name/your-repo
# verify the new remote
$ git remote --verbose
# push the contents of the master branch
$ git push origin master

7.2 Going Back in History
You have already used the git checkout command to switch branches and
to undo unstaged changes in a file. It can also be used to go back in history
in the form git checkout <commit> where <commit> is the hash (or
identifier) of a commit in the revision history.
This use of the checkout command will cause the files in the working
directory to go back to the state they were when the specified commit
took place. Once in this state, called detached HEAD state, any commit
you make will be discarded as soon as you perform another checkout
operation. To preserve any changes you make in a detached HEAD state
you need to create a branch. The following exercise will illustrate how this
works.
Exercise
Open Git Bash and change to the local repository created in the previous
section. List the log history:
$ cd ~/alphabets
$ git log --oneline --decorate
5b41f59 (HEAD -> master) Charlie added
b02d358 Bravo added
46d3185 Alpha added
30c26be Initial commit
If you run git checkout <hash> passing the hash of the commit when you
inserted the word "Bravo" (in my history it is the commit b02d358, in your

history it will be a different hash) you will see that the pilots.txt file
contents go back to that point in time, as demonstrated by the following
command sequence:
$ git checkout b02d358
You are in 'detached HEAD' state.
...
HEAD is now at b02d358... Bravo added
$ cat pilots.txt
Alpha
Bravo
The git checkout output warns of the detached HEAD state. Any new
commits made whilst in this state will be lost as soon as you perform
another checkout operation. We will demonstrate this with an experiment.
Let's add a new word to pilots.txt and commit:
$ echo "Delta" >> pilots.txt
$ git add pilots.txt
$ git commit -m "Delta added"
[detached HEAD 6ab2346] Delta added
1 file changed, 1 insertion(+)
$ git log --oneline --decorate
6ab2346 (HEAD) Delta added
b02d358 Bravo added
46d3185 Alpha added
30c26be Initial commit

$ cat pilots.txt
Alpha
Bravo
Delta
File pilots.txt now contains "Alpha", "Bravo", "Delta". However if we move
the HEAD pointer back to its usual place (HEAD normally points to the
last commit on the current branch) the Delta change will be lost as the
following command sequence demonstrates:
$ git checkout master
$ cat pilots.txt
Alpha
Bravo
Charlie
$ git log --oneline --decorate
5b41f59 (HEAD -> master) Charlie added
b02d358 Bravo added
46d3185 Alpha added
30c26be Initial commit
To keep the changes you make whilst in a detached HEAD state you
need to create a branch.
Let's do another experiment to demonstrate this. Checkout again the commit
where you added the word "Bravo" and create a new branch called "delta"
as shown in the following command sequence (use the hash displayed in
your history log):

$ git checkout b02d358
Note: checking out 'b02d358'.
You are in 'detached HEAD' state...
HEAD is now at b02d358... Bravo added
$ git checkout -b delta
Switched to a new branch 'delta'
$ git branch --all
* delta
master
Note the git checkout -b delta command. The -b option creates a new
branch (named delta) and immediately switches to it. The current branch
is now delta as you can see from the output of the git branch --all
command. Let's make the same change we did earlier to add the word
"Delta" to pilots.txt and commit:
$ echo "Delta" >> pilots.txt
$ cat pilots.txt
Alpha
Bravo
Delta
$ git add pilots.txt
$ git commit -m "Delta added"

[delta 3d33c70] Delta added
1 file changed, 1 insertion(+)
$ git log --oneline --decorate
3d33c70 (HEAD -> delta) Delta added
b02d358 Bravo added
46d3185 Alpha added
30c26be Initial commit
Now the Delta change will be preserved even after you switch branches:
$ git checkout master
Switched to branch 'master'
$ cat pilots.txt
Alpha
Bravo
Charlie
$ git checkout delta
Switched to branch 'delta'
$ cat pilots.txt
Alpha
Bravo
Delta
To bring the changes into the master branch you just have to merge. In this
case Git will flag a conflict in the third line of pilots.txt as the content
differs between the two branches (we have "Charlie" in master and "Delta"

in delta). Let's switch to master and merge:
$ git checkout master
Switched to branch 'master'
$ git merge delta
Merge conflict in pilots.txt
fix conflicts and then commit.
$ cat pilots.txt
Alpha
Bravo
>>>>>>> HEAD
Charlie
=======
Delta
<<<<<<< delta
We need to resolve the conflict manually. Open pilots.txt with Notepad and
delete the markings added by Git leaving both words ("Charlie" and
"Delta") and then commit:
$ notepad pilots.txt
$ cat pilots.txt
Alpha
Bravo
Charlie
Delta
$ git add pilots.txt

$ git commit -m "Delta added"
[master 345ed2b] Delta added
The history in master now shows two additional commits:
$ git log --oneline --decorate
345ed2b (HEAD -> master) Delta added
3d33c70 (delta) Delta added
5b41f59 Charlie added
b02d358 Bravo added
46d3185 Alpha added
30c26be Initial commit
$ git status
On branch master
nothing to commit,
working directory clean
The commit 3d33cc70 (delta) Delta added is the merge from the delta
branch.
The commit 345ed2b (HEAD -> master) Delta added is the commit
following conflict resolution.
The hash values of course will be different in your history log.
This experiment has demonstrated the power of the git checkout
<commit> command. It allows you to go back to any point in time in the
commit history of your source code, make experimental changes in a
separate branch and, if required, merge the results back to the main code

base.
You can use the git branch -D <branch> command to remove a
development branch you no longer need:
$ git branch -D delta
Deleted branch delta
(was 3d33c70).
$ git branch --all
* master
In the next section we will use this repository to examine Git commands
that can modify the commit history of a branch.

7.3 Changing History
There are two Git commands capable of re-writing the commit history of a
branch: git reset and git rebase.
Reset
We will demonstrate what git reset does with an experiment. Open Git
Bash and change to the local "alphabets" repository created earlier. Dump
the log history of the master branch:
$ git log --oneline --decorate
345ed2b (HEAD -> master) Delta added
3d33c70 Delta added
5b41f59 Charlie added
b02d358 Bravo added
46d3185 Alpha added
30c26be Initial commit
Suppose you want to reset the history of commits to the point where you
added the word "Charlie" (hash 5b41f59 in my history log, it will be
something else in your repo). All you have to do is typing the following
command replacing the hash value with the one in your history log:
$ git reset --hard 5b41f59
HEAD is now at 5b41f59 Charlie added

Now check again the history log and you will find that the last two
commits have been removed. The pilots.txt file contents have gone back
to the point prior to the merging operation we performed in the previous
section:
$ git log --oneline --decorate
5b41f59 (HEAD -> master) Charlie added
b02d358 Bravo added
46d3185 Alpha added
30c26be Initial commit
$ cat pilots.txt
Alpha
Bravo
Charlie
Although removing unwanted commits can be useful in some situations, it
must be done with extreme caution. Warning: Never change the commit
history of shared branches when collaborating with other users as it will
cause them a lot of problems when you push the changes back to a shared
public repository. Only use this form of reset if you want to remove
unwanted commits from a local private branch.
Rebase
The command git rebase can be used in place of git merge to integrate the
work you have done in separate branches. Whereas the merge operation
preserves history, the rebase operation can modify the target branch
history by inserting intermediary commits.
We will explore the difference between git merge and git rebase with an

exercise.
Exercise
Open Git Bash and change to the local "alphabets" project working
directory created earlier. List the history log of the master branch:
$ cd ~/alphabets
$ git log --oneline --decorate
5b41f59 (HEAD -> master) Charlie added
b02d358 Bravo added
46d3185 Alpha added
30c26be Initial commit
Create a new branch called "cities" and switch to it. Add a file named
"cities.txt" containing the word "Atlanta", then stage and commit. Here is
the full command sequence:
$ git checkout -b cities
Switched to a new branch 'cities'
$ touch cities.txt
$ echo "Atlanta" >> cities.txt
$ git add cities.txt
$ git commit -m "Atlanta added"
[cities 508b77e] Atlanta added
1 file changed, 1 insertion(+)

create mode 100644 cities.txt
To build history add the words "Boston" and "Chicago" to cities.txt on
separate commits so that the history log of the cities branch ends up looking
like the following:
$ git log --oneline --decorate
fdba36a (HEAD -> cities) Chicago added
25f0ef6 Boston added
508b77e Atlanta added
5b41f59 (master) Charlie added
b02d358 Bravo added
46d3185 Alpha added
30c26be Initial commit
Now switch back to the master branch. List again the history log:
$ git checkout master
$ git log --oneline --decorate
5b41f59 (HEAD -> master) Charlie added
b02d358 Bravo added
46d3185 Alpha added
30c26be Initial commit
Let's now build some more history on the master branch. Insert the word
"Delta" to pilots.txt then stage and commit:

$ echo "Delta" >> pilots.txt
$ git add pilots.txt
$ git commit -m "Delta added"
[master 1c7daa4] Delta added
1 file changed, 1 insertion(+)
Repeat again the above command sequence to add the words "Echo" and
"Foxtrot" to pilots.txt on separate commits so that the history log of the
master branch ends up looking like the following:
$ git log --oneline --decorate
c2f55da (HEAD -> master) Foxtrot added
2b300d0 Echo added
1c7daa4 Delta added
5b41f59 Charlie added
b02d358 Bravo added
46d3185 Alpha added
30c26be Initial commit
Suppose we want to integrate the work we have done on the cities branch
on to the master branch. This time, instead of git merge, we will use git
rebase. Let's see what happens:
$ git rebase cities
First, rewinding head to replay
your work on top of it...
Applying: Delta added
Applying: Echo added

Applying: Foxtrot added
Now list the history log of the master branch again and observe the results:
$ git log --oneline --decorate
92c1424 (HEAD -> master) Foxtrot added
620a381 Echo added
f747e7b Delta added
fdba36a (cities) Chicago added
25f0ef6 Boston added
508b77e Atlanta added
5b41f59 Charlie added
b02d358 Bravo added
46d3185 Alpha added
30c26be Initial commit
With git merge the commits would have been added to the history of the
master branch at the point of merge, leaving the previous history intact. The
rebase operation instead has replayed the commits we did on the cities
branch on top of the master branch effectively modifying its history as if
we had done all the work sequentially on the master branch.
Warning: As we have already stated, changing the commit history of a
public shared branch will confuse and potentially cause errors when
collaborating with other users. Only use rebase instead of merge in short-
lived local private branches where you want to see the commit history of
the feature branch replayed onto the target branch. Never use rebase on
public shared branches that are pushed to remote repositories.

7.4 Saving Changes
The git stash command can be used to "stash away" half-baked changes
that you are not prepared to commit yet but want to keep for later.
Let's see how it works through a practical exercise.
Open Git Bash and change to the local "alphabets" repository working
directory created earlier. If you have followed all the previous exercises to
completion you should have a clean working directory containing two text
files namely pilots.txt and cities.txt:
$ cd ~/alphabets
$ ls
cities.txt pilots.txt
$ git status
On branch master
nothing to commit,
working directory clean
Make some changes to both files (e.g. by adding new words) then stage but
do not commit, so that git status reports the following:
$ git status
On branch master
Changes to be committed:

modified: cities.txt
modified: pilots.txt
Suppose now you decide to start some other work from a clean working
directory but without loosing the changes you have made so far. You can
simply stash the changes away by typing:
$ git stash
Saved working directory
and index state WIP on master
HEAD is now at 92c1424 Foxtrot added
The working directory and index are now clean:
$ git status
On branch master
nothing to commit,
working directory clean
But your changes have not been lost. You can view any modifications
stashed away with the following commands:
$ git stash list
stash@{0}: WIP on master:
92c1424 Foxtrot added

$ git stash show
cities.txt | 1 +
pilots.txt | 1 +
2 files changed, 2 insertions(+)
When you decide to restore the work you have stashed away you can do so
by entering the command git stash apply:
$ git stash apply
On branch master
Changes not staged for commit:
modified: cities.txt
modified: pilots.txt
no changes added to commit
(use "git add" and/or "git commit -a")

7.5 Summary
The git init command can be used to initialize a local private repository. We
learned how to use the git checkout <commit> command to go back in
time through the history of a project. This can be useful in a situation where
you want to try an alternative implementation. The changes must be made
on a separate branch to be persistent.
We have used the git reset command to change the commit history of a
branch and the git rebase command as an alternative way to integrate work
done on separate branches. Since both reset and rebase change the commit
history, they must only be used on local private short-lived branches,
never on public branches shared with other users on remote repositories
such as GitHub.
To conclude, we learned to use the git stash command to clean the working
directory and index whilst saving the changes made up to that point. The
saved changes can be viewed and restored at any time.
Here is a summary of the commands introduced in this chapter:
# Git commands
# initializes a local repo
# inside current directory
$ git init
# goes back to the specified commit
$ git checkout <commit>
# creates a new branch and
# immediately switches to it
$ git checkout -b <branch>

# deletes a branch
$ git branch -D <branch>
# move HEAD pointer to specified commit
$ git reset --hard <commit>
# replay commits on current branch
$ git rebase <branch>
# saves working directory
$ git stash
# list saved changes
$ git stash list
# show saved changes
$ git stash show
# Linux commands
# creates an empty file
$ touch <filename>
# open a text file in Notepad
$ notepad <filename>
# inserts a string into a text file
$ echo "some string" >> <filename>
# show contents of text file
$ cat <filename>
* * *
CHAPTER 8
Git Concepts
In this chapter we will look at some fundamental Git concepts, starting with
the Git repository database. You don't need to know how Git works
internally to use it, but if you do, it will make you a more competent and
confident user.

8.1 The Repository Database
Every time you initialize a local or remote Git repository a sub-directory
named .git is automatically created for you. The .git directory is where Git
stores all the commit history and metadata for a project. In this section we
will explore the .git directory in some detail.
Start Git Bash and change to the open-website project working directory we
created previously. List the contents of the .git directory:
$ cd ~/open-website
$ ls .git
COMMIT_EDITMSG description HEAD
index logs/ ORIG_HEAD refs/
config FETCH_HEAD hooks/
info/ objects/ packed-refs
The listing shows five sub-directories (ending with a forward slash) and a
number of files, one of which is HEAD. As we have previously mentioned,
HEAD contains a pointer to the current branch. You can look at the HEAD
contents by using the Unix cat command:
$ cat .git/HEAD
ref: refs/heads/master
From the output you can see that HEAD is pointing to the master branch.

The refs directory contains references to commits for local and remote
tracking branches. You can use the Linux find command to see the refs
directory tree:
$ find .git/refs
.git/refs
.git/refs/heads
.git/refs/heads/master
.git/refs/remotes
.git/refs/remotes/origin
.git/refs/remotes/origin/HEAD
.git/refs/remotes/origin/master
.git/refs/tags
To see the reference to the most recent commit in the master branch type:
$ cat .git/refs/heads/master
f26bc487f9ba866acd512a85461a2c77d463c3fe
The long alpha-numeric string that you get (the value will be different in
your repository) is the hash of the last commit on master. If you look at the
history of the master branch using the git log command you will find that
the short hash of the most recent commit matches it:
$ git log --oneline --max-count=1
f26bc48 Some comment

The actual commits are stored in the objects directory. Git stores four types
of objects in this directory: commits, trees (directories), blobs (files) and
tags.
Looking inside the objects directory we will find a folder with the name of
the corresponding hash for each of the objects that make up the version
history for the project.
$ find .git/objects
.git/objects
.git/objects/0d
.git/objects/0d/178985f0b0df73aa1b9dbcfdc1fdc0c472437a
...
...
.git/objects/f2
.git/objects/f2/2bdf8b448b6ca035124c165d9d0d734d95e92f
.git/objects/f2/6bc487f9ba866acd512a85461a2c77d463c3fe
.git/objects/info
.git/objects/pack
You can find out the type of each of the objects listed above using the git
cat-file command with the -t option. You only need to specify the first
seven characters of the object's hash. Let's use the hash of the last commit
in master (use the hash in your repository not the one in the example):
$ git cat-file -t f26bc48
commit
The git cat-file output confirms that it is a commit object. You can look at
its contents using the -p option:

$ git cat-file -p f26bc48
tree 40be475a6f44f18dfbf609fa3abc7662862d8402
parent 4f41c728f8e14ed5ec2f05e911c68001bd997a65
author ...
committer ...
Some comment
Each commit object contains a pointer to a tree (directory) object. The
parent attribute shows the hash of the previous commit in the history. The
commit object also records the author and the committer for this commit.
Let's take a look at the tree object using the first 7 characters of the hash:
$ git cat-file -p 40be475
100644 blob 25bfc3da1d5ec423366766970971b5fedc505026 README.md
100644 blob e359294d413374e8820e422a9529101266be7fb6 index.html
040000 tree c190123d73387bf2d49a95d875b7ac3a9b992485 style
The tree object contains a pointer to two blob objects (files) in the root
directory of the project (namely README.md and index.html) and a
pointer to another tree object which is the style sub-directory.
Let's now look at the style tree:
$ git cat-file -p c190123d
100644 blob b0bc3d7857bfbfb6a8bb461509edea4ffd050c47 site.css

The tree object is pointing to a blob which is the site.css file located inside
the style directory.
It is also possible to see the contents of any of the blob objects. Let's look at
site.css:
$ git cat-file -p b0bc3d7
/* general */
body {
font-family: "Trebuchet MS", Verdana, sans-serif;
font-size: 16px;
background-color: dimgrey;
color: #696969;
padding: 3px;
}
...
The output displays the source code of site.css.
We have followed the trail from HEAD all the way to the last commit
object on master and the associated directory and files. This is how Git
stores the project history and is able to retrieve any previous versions.
Before closing this section let's take a quick tour of some of the other
components of the .git directory.
The config file contains project-specific configuration. The index file is the
staging area where changes are grouped before doing a commit. The hooks
directory contains scripts that are executed before or after a specific Git
command. The info directory contains additional information about the
repository.
The logs directory contains the history of each branch as displayed by the
git log command. And this takes us to the subject of the next section: how
to display a more sophisticated view of the project history.

8.2 A More Sophisticated History View
We have often used the git log command with the --oneline and --decorate
options to view the history of commits in a project. However there is a way
to type less and get more information out of git log by using aliases. An
alias is an alternative name that you can give to a Git command.
Aliases can be setup in the Git configuration file .gitconfig located in your
home directory. Start Git Bash and enter the following commands to locate
it:
$ cd ~
$ ls -a .gitconfig
.gitconfig
The .gitconfig file (as well as all other text files in Git Bash) uses the Unix
end-of-line (EOL) character and will not display correctly on some
Windows editors such as Notepad. In this case, we need to convert the EOL
characters to the Windows format before editing. First make a back up copy
of .gitconfig:
$ cp .gitconfig .gitconfig.bak
Now run the following command to convert the EOL characters to the
Windows format:

$ unix2dos .gitconfig
unix2dos: .gitconfig MODE 0100644 (regular file)
unix2dos: using ./d2utmppZAQxV as temporary file
unix2dos: converting file .gitconfig to DOS format...
You can now open .gitconfig using Notepad or any other text editor. The
file contains the configuration information we have entered in Section 2.3.
We will now add an [alias] entry named hist as shown in the example
below. Pay attention to the syntax, including the single quotes and white
spaces:
[user]
name = your name
email = your email
[core]
autocrlf = true
safecrlf = false
editor = notepad
[alias]
hist = log --pretty=format:'%h %ad | %s%d [%an]' --graph --date=short
Save the change and convert the file back to its original Unix EOL format:
$ dos2unix .gitconfig
dos2unix: .gitconfig MODE 0100644 (regular file)
dos2unix: using ./d2utmplFoO43 as temporary file
dos2unix: converting file .gitconfig to Unix format...

The hist entry that you have just configured is a shorthand (alias) for the git
log command using the --pretty option with a specification to format the
output.
To try the new alias change to a Git project working directory and type git
hist:
$ cd ~/projects/alphabets/
$ git hist
* 92c1424 2016-03-23 | Foxtrot added (HEAD -> master) [Author]
* 620a381 2016-03-23 | Echo added [Author]
* f747e7b 2016-03-23 | Delta added [Author]
...
* 30c26be 2016-03-21 | Initial commit [Author]
The git log alias we just created shows the date of the commit as well as the
name of the author. You can still append additional switches such as the --
max-count to limit the output to the more recent commits only:
$ git hist --max-count=3
* 92c1424 2016-03-23 | Foxtrot added (HEAD -> master) [Author]
* 620a381 2016-03-23 | Echo added [Author]
* f747e7b 2016-03-23 | Delta added [Author]

8.3 Ignoring Files
In a project there are often files that you do not want Git to track because
there is no interest in keeping a version history of them. They can be binary
files produced by a compiler or other temporary files generated
automatically by code editors and other tools. You do not want all this
"noise" in your working directory to go into your project history repository.
To prevent Git from tracking such files and directories all you have to do is
to create a text file named .gitignore in the root of the working directory of
your project. Inside .gitignore you can specify the names of files and
directories you want Git to ignore.
Let's see how this works with a couple of exercises. Suppose we want to
ignore all files with a .bak extension. Start Git Bash and change to the
alphabets project working directory we used earlier:
$ cd ~/alphabets
$ ls
cities.txt pilots.txt
Create a file with the .bak extension by copying an existing file:
$ cp pilots.txt pilots.bak
$ ls
cities.txt pilots.bak pilots.txt

Git will normally track the .bak file we just added:
$ git status
On branch master
Untracked files:
pilots.bak
nothing added to commit
but untracked files present
To tell Git to stop tracking files with a .bak extension first create a
.gitignore file:
$ touch .gitignore
$ ls -a
./ ../ .git/ .gitignore
cities.txt pilots.bak pilots.txt
Then open .gitignore in a text editor and add *.bak to it. The file should
look like this:

The asterisk (*) is a wildcard character that matches any filename, therefore
any file in this project with the .bak extension will be ignored.
Save the file and exit.
Check that Git has stopped tracking .bak files:
$ git status
On branch master
Untracked files:
.gitignore
nothing added to commit
but untracked files present
As you can see git status is now ignoring *.bak files. It is good practice to
commit the .gitignore file to the repository:
$ git add .gitignore
$ git commit -m "Ignoring .bak files"
[master 9708188] Ignoring .bak files
1 file changed, 2 insertions(+)
create mode 100644 .gitignore

You can also instruct Git to ignore an entire directory. Let's create a new
directory called temp containing two files using the command sequence
below:
$ mkdir temp
$ touch temp/temp.log
$ touch temp/temp.old
Git will normally track the directory we just added:
$ git status
On branch master
Untracked files:
temp/
nothing added to commit
but untracked files present
Let's instruct Git to stop tracking the temp/ directory. Open .gitignore in a
text editor and add the directory name to the list:
*.bak
temp

Save and exit.
Check that Git is no longer tracking the temp directory (and any files and
folders contained in it):
$ git status
On branch master
Changes not staged for commit:
modified: .gitignore
no changes added to commit
Commit the changes to .gitignore:
$ git add .gitignore
$ git commit -m "Ignoring temp directory"
[master c52d950] Ignoring temp directory
1 file changed, 2 insertions(+)
The working directory should now be clean:
$ git status
On branch master
nothing to commit,
working directory clean

8.4 Git Workflows
Git is a lot more flexible compared with other version control systems
because of its distributed nature, and can be adapted to a variety of different
ways of organizing how each team member contributes to a project. In this
section we will review the basic Git workflows used in this book.
Centralized Workflow
In Chapter 3 you learned how to showcase your own project on GitHub,
effectively using what is called a Centralized Workflow with the GitHub
repo functioning as the central repository. This workflow does not require
any additional branches other than the master branch. Being the only
developer in the project you did not have to worry about synchronizing your
work but in a team effort there are additional steps to consider.
The Centralized Workflow uses a central repository as the official project
repo. Each developer contributes code using the following routine:
Start by cloning the official central repository
Implement a feature and commit changes locally
Fetch the most recent commits from the remote central repo
Merge and resolve conflicts
Push changes to the remote central repo
We covered the remote fetch and merge process in Section 6.6.
Feature Branch Workflow
In Chapter 5 we learned how to use branches. Branches allow for a more
flexible way of collaborating among developers in a team using what is
called a Feature Branch Workflow.

In the Feature Branch Workflow each feature (a new functionality or a bug
fix) is implemented in a dedicated branch instead of the master branch.
The master branch still contains the main codebase and project history.
This workflow also uses a central repo as the official project repository.
Each developer contributes code using the following routine:
Start by cloning the official central repository
Create a feature branch locally giving it a meaningful name
Commit changes locally to the feature branch
Push the feature branch to the remote central repo
Code is reviewed and tested by the team
Code is merged into the central repository master branch
Forking Workflow
In Chapter 6 we learned how to collaborate with other developers on
GitHub using what is called the Forking Workflow.
In the Forking Workflow there is a public remote central repository that acts
as the official repository for the project. Developers in the project fork the
central repo creating a public remote repository of their own, which mirrors
the central repo. Then each developer clones its own fork, starts editing
source code and committing changes locally in a topic branch, following a
similar routine to that used in the Feature Branch workflow.
Once the feature has been implemented, developers push the topic branch
to their own remote fork and initiate a pull request to notify the project
owners that a new feature is ready to be integrated.
The project owners will pull the contributor's changes into their local
repository for testing. If the tests pass, they will merge and push the
changes to the remote central repository master branch. Only the project
owners can push to the central remote repo directly.
Centralized, Feature Branch and Forking are just some of the workflows
that are possible to use when collaborating with other developers in a team-
based project using Git. Often in real-world projects, teams tend to mix and
match aspects of the basic workflows reviewed here to best suit the project
size and team structure.

8.5 Summary
This chapter started by looking at the internal structure of Git's repository
database. We have navigated from the hash of a commit object down to
its component folders and files (trees and blobs) and described the contents
of the .git directory.
Next, we learned how to customize the output of the git log command to
obtain more information about the history of commits, and how to instruct
Git to ignore files and directories we do not want to track.
Lastly we introduced the concept of a Git workflow and reviewed some of
the workflows we have been using in this book.
Here is a summary of the commands introduced in this chapter:
# list repository folder
$ ls .git
# look at HEAD pointer
$ cat .git/HEAD
# list refs directory tree
$ find .git/refs
# last commit on master
$ cat .git/refs/heads/master
# list objects directory tree
$ find .git/objects
# displays type of a Git object
$ git cat-file -t <hash>

# displays the content of a Git object
$ git cat-file -p <hash>
# convert end-of-line to DOS format
$ unix2dos <file>
# convert end-of-line to Unix format
$ dos2unix <file>
# formatting history log
$ git log --pretty=format:'%h %ad | %s%d [%an]' --graph --date=short
# using an alias
$ git <alias>

8.6 Next Steps (Where To Go From Here)
Overall Git provides a very rich command set. It is beyond the scope of this
book to cover the whole spectrum, but you are now well equipped to
explore more advanced features at your own pace as you become a more
experienced and confident user.
The full Git command set is detailed in the official documentation website.
Some commands are used only by system administrators or in exotic
workflows, so you may never need them.
You have learned to interact with Git and GitHub from the command-line,
which allows you to work under different operating systems (Git Bash on
Windows as well as the Bash console on Linux and Mac computers). The
commands are exactly the same. The knowledge you have gained enables
you to work with Git and GitHub on real-world projects at a professional
level.
We have illustrated the use of GitHub as a remote repository because of its
huge popularity. Bear in mind however that there are other hosted solutions,
and that it is also possible to run your own private Git server. This topic is
also detailed in the official documentation.
Make sure you keep practicing the exercises in this book until you are
confident that you have mastered the commands and workflows illustrated.
Start by using Git to manage the version history of your own projects and
showcase some of your work on GitHub.
Explore the GitHub showcase page, fork a project that is of interest to you
and start exploring the source code. You will find all sorts of cool projects
there, including games, editors, programming languages, databases and a

lot more. Contribute to some of your favourite projects.
Do not forget to visit regularly this book's companion website to get
updates, additional material and to post questions, comments and
suggestions.
I hope you have enjoyed reading this book and that it has helped you in your
learning journey.
I wish you the best of luck with your projects.
* * *
