A Beginner's Guide To The ESP8266
A-Beginner's-Guide-to-the-ESP8266
A-Beginner's-Guide-to-the-ESP8266
A-Beginners-Guide-to-the-ESP8266-1
User Manual: Pdf
Open the PDF directly: View PDF ![]() .
.
Page Count: 55

ABeginner'sGuidetotheESP8266
PieterP, 08-03-2017
Sometimeago,IwroteaBeginner'sGuidetoArduinothatseemstobeverypopular,soIdecidedtocreateafollow-up:ABeginner's
GuidetotheESP8266.That'sright,atutorialonhowtousetheworld'smostpopular$3Wi-Fiboard.
Thisisgoingtobeaveryin-depthtutorial,coveringsomenetworkingconceptsaswell.Ifyou'reabeginner,andjustwanttogo
straighttothemoreexcitingWi-Fipart,feelfreetodoso,IincludedshortTL;DR'sinthelonger,moretechnicalparts.
AshortoverviewofwhatI'llcoverinthisarticle:
1. WhatisanESP8266?AshortoverviewofwhatanESP8266is,andwhatyoucandowithit
2. Decidingonwhatboardtobuy:There'sloadsofdifferentESP8266availablethesedays,findingtheonethat'sbestforyou
canbehard
3. Installingthesoftware:youneedtoinstallsomesoftwaretoprogramtheESP8266,andmaybeaUSBdriver
4. Settingupthehardware:somemodulesandboardsneedsomeexternalcomponents
5. TheESP8266asamicrocontroller:theESP8266canbeusedasanormalmicrocontroller,justlikeanArduino
6. Networkprotocols:BeforewestartusingtheWi-FicapabilitiesoftheESP8266,I'llteachyousomeofthenetworkprotocols
involved
7. SettingupaWi-Ficonnection:That'sprobablywhyyou'rereadingthis,right?
8. Nameresolution:FindtheESP8266onyourlocalnetworkusingmDNS
9. Settingupasimplewebserver:ThisenablesyoutoaddwebpagestotheESP8266,andbrowsethemfromyourcomputeror
phone
10. Settingupanadvancedwebserver:amoreadvancedserverwitharealfilesystemthatallowsyoutouploadnewfilesover
Wi-Fi
11. OTA-uploadingprogramsoverWi-Fi:Youdon'thavetouploadprogramsoverUSB,youcanuseWi-Fiinstead
12. WirelesslycontrollingyourRGBlighting:ChangethecolorofyourLEDstripsusingyourphoneorcomputer
13. Gettingthetime:ConnecttoatimeserverusingNTPandsynctheESP'sclock
14. Monitoringsensors:logthetemperatureinyourlivingroom,saveitinflashmemoryandshowitinafancygraphinyour
browser
15. Gettingemailnotifications:Turnonanotificationlightwhenyou'vegotunreademails
16. Advancedfeatures:useDNS,captiveportals,Wi-Ficonnectorlibraries,OSC...
ThisguideexpectssomebasicknowledgeofmicrocontrollersliketheArduino.Ifthat'ssomethingyou'renotalreadyfamiliarwith,I'd
recommendyoutoreadmyBeginner'sGuidetoArduinofirst,itcoversalotofthebasicsthatIwon'tgointointhisarticle.
IreallywanttofocusontheESP8266-specificthings,likeWi-Fiandothernetworkprotocols,theESP'shardware,software,IoT,etc...
WhatisanESP8266?
TheESP8266isaSystemonaChip(SoC),manufacturedbytheChinesecompanyEspressif.ItconsistsofaTensilicaL10632-bit
microcontrollerunit(MCU)andaWi-Fitransceiver.Ithas11GPIOpins*(GeneralPurposeInput/Outputpins),andananalog
inputaswell.ThismeansthatyoucanprogramitlikeanynormalArduinoorothermicrocontroller.Andontopofthat,yougetWi-Fi
communication,soyoucanuseittoconnecttoyourWi-Finetwork,connecttotheInternet,hostawebserverwithrealwebpages,let
yoursmartphoneconnecttoit,etc...Thepossibilitiesareendless!It'snowonderthatthischiphasbecomethemostpopularIOT
deviceavailable.
Therearemanydifferentmodulesavailable,standalonemodulesliketheESP-##seriesbyAIThinker,orcompletedevelopment
boardsliketheNodeMCUDevKitortheWeMosD1.Differentboardsmayhavedifferentpinsbrokenout,havedifferentWi-Fiantennas,
oradifferentamountofflashmemoryonboard.
(*)TheESP8266chipitselfhas17GPIOpins,but6ofthesepins(6-11)areusedforcommunicationwiththeon-boardflashmemorychip.
Programming
TherearedifferentwaystoprogramtheESP8266,butI'llonlycoverthemethodusingtheArduinoIDE.Thisisreallyeasyfor
beginners,andit'saveryfamiliarenvironmentifyou'veusedArduinoboardsbefore.
Justkeepinmindthatit'snotlimitedtothisoption:there'salsoanofficialSDKavailabletoprogramitinrealC,thisisveryusefulif
youwanttooptimizeyourcodeordosomeadvancedtricksthataren'tsupportedbytheArduinoIDE.Anotherpossibilityistoflashit
withaLUAinterpreter,soyoucanuploadandrunLUAscripts.Ormaybeyou'remorefamiliarwithPython?Thenyoushouldcheckout
theMicroPythonfirmwaretointerpretMicroPythonscripts.I'msurethere'sotherlanguagesavailableaswell,sojustdoaquickGoogle
searchandwriteyourcodeinthelanguageofyourchoice.
Requirements
You'llneedacoupleofthingsinordertofollowthisguide:
AnESP8266board
AcomputerthatcanruntheArduinoIDE(Windows,MacorLinux)
AUSB-to-Serialconverter,itisveryimportantthatyouusea3.3Vmodel*
AUSBcable
A3.3Vpowersupplyorvoltageregulator*
AWi-Finetworktoconnectto
(*)Yourboardmayalreadyincludethese.Moreinformationcanbefoundinthenextchapter.

Hardware
Decidingonwhatboardtobuy
ESP8266isjustthenameofthechip,manycompanieshavedesignedtheirownboardsthatusethischip,sotherearemanydifferent
ESP8266boardsonthemarket.Ifyoudon'tknowthedifferencebetweenallthesedifferentmodels,youmighthaveahardtime
decidingonwhatboardtobuy.
Theeasiest(andfastest)waytogetanESP8266boardistobuyonefromawell-knownelectronicsshoplikeAdafruitorSparkFun,but
ifyouwantitcheap,youshouldcheckoutEbayorothersiteswhereyoucanorderthemdirectlyfromChina.
Developmentboards
Someboardshaveallkindsoffeatureson-boardtohelpdevelopingESP8266hardwareandsoftware:forexample,aUSBtoSerial
converterforprogramming,a3.3Vregulatorforpower,on-boardLEDsfordebugging,avoltagedividertoscaletheanaloginput...
Ifyou'reabeginner,Iwoulddefinitelyrecommendadevelopmentboard.It'seasiertogetstartedifyoudon'thavetoworryaboutall
thesethings.
Bare-bonesAIThinkerboards
IfyouwanttoaddanESP8266toasmallproject,orifyouwantacheaper*board,youmightwanttobuyaboardthatdoesn'thave
thesefeatures.Inthatcase,youcanbuyoneofthemanyESP-##modulesdevelopedbyAIThinker.TheycontainjusttheESP8266
andthenecessarycomponentstorunit.
Toprogramtheboard,you'llneedanexternalUSB-to-Serialconverter.
Withsomemodules,yougetanon-boardantenna(PCBorceramic)andanLED,someboardshavejustanantennaconnector,orno
LEDsatall.Theyalsodifferinphysicalsize,andflashmemorysize.Animportantthingtonotice,isthatsomeboardsdonotbreak
outallGPIOpins.Forexample,theESP-01onlyhas2I/Opinsavailable(apartfromtheTXandRXpins),whileothermoduleslikethe
ESP-07orESP-12breakoutallavailableI/Opins.
(*)Theboarditselfischeaper,butyou'llhavetospendmoreonexternalparts.
Overview
Here'satablewithsomeofthemostpopularESP8266developmentboardsandtheirfeatures:
Board GPIO 3.3V
Vreg
USB-to-
Serial
Auto-
Reset
Auto-
Program Flash ADC
range Extra
SparkFunESP8266Thing 11 + - + ±* 512KB(4Mb) 0-1V Batterycharger,cryptoelement,
temperaturesensor,lightsensor
SparkFunESP8266Thing
-DevBoard 11 + + + + 512KB(4Mb) 0-1V
NodeMCU 11 + + + + 4MB(32Mb) 0-3.3V
AdafruitFeatherHUZZAH
withESP8266 11 + + + + 4MB(32Mb) 0-1V Batterycharger
AdafruitHUZZAH
ESP8266Breakout 11 + - - - 4MB(32Mb) 0-1V 5V-tolerantRXandResetpins
ESP-## 4-
11 - - - - 512KB(4Mb)–
4MB(32Mb) 0-1V Smallandcheap
YoucanfindthefulllistofESP-##moduleshere.
Asyoucansee,boththeNodeMCUandtheAdafruitFeatherHUZZAHaresolidchoices.
(*)Whenauto-programontheSparkFunESP8266Thingisenabled,youcan'tusetheSerialMonitor.
Gettingthehardwareready
TherearetwomaincategoriesofESP8266boards:developmentboardswithaUSBinterface(USB-to-Serialconvertor)on-board,and
boardswithoutaUSBconnection.
DevelopmentboardswithaUSBinterface
Forexample:NodeMCU,SparkFunESP8266Thing-DevBoard,SparkFunBlynkBoard,AdafruitFeatherHUZZAHwithESP8266Wi-Fi...
TheseboardswillshowupinDevicemanager(Windows)orinlsusb(Linux)assoonasyouplugthemin.
Theyhavea3.3Vregulatoron-board,andcanbeprogrammedoverUSBdirectly,soyoudon'tneedanyexternalcomponentstogetit
working.
Theonlythingyoumayneedtodo,issolderonsomeheaders.
Bare-bonesboardsandboardswithoutaUSBinterface
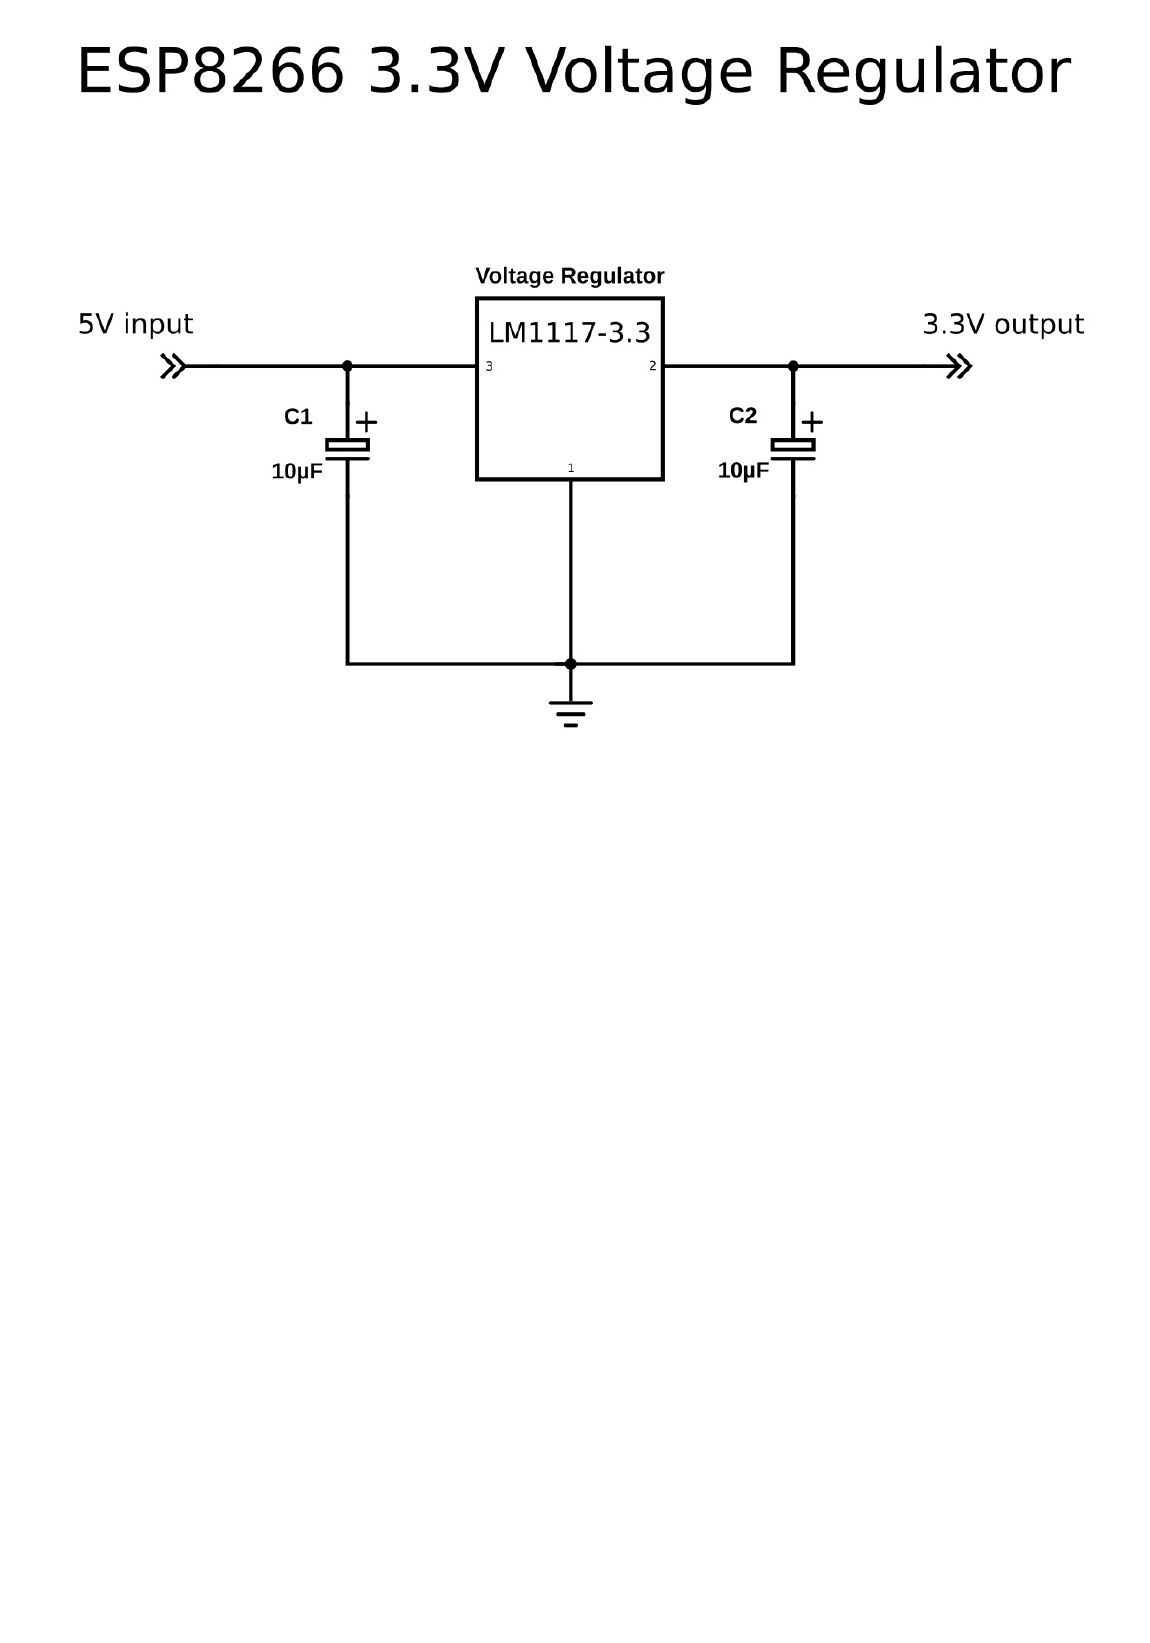
Thiscategoryhas2sub-categories:boardswitha3.3Vregulatoron-board,andboardswithjusttheESP8266andaflashmemory
chip,without3.3Vregulator.Ifyourboarddoesn'thavea5Vto3.3Vregulator,buyoneseparately.YoucoulduseanLM1117-3.3for
example.Theon-board3.3VregulatorofmostArduinoboardsisnotpowerfulenoughtopowertheESP.
Toprogramtheboard,you'llneedaUSB-to-Serialconverter.TheFTDIFT232RLisquitepopular,becauseitcanswitchbetween5Vand
3.3V.ItisessentialthattheUSB-to-Serialconverteryoubuyoperatesat3.3V.Ifyoubuya5Vmodel,youwilldamage
theESP8266.
ConnectingtheUSB-to-Serialconverter

1. Connecttheground(GND)oftheUSB-to-SerialconvertertothegroundoftheESP8266.
2. ConnecttheRX-pinoftheUSB-to-SerialconvertertotheTXDpinoftheESP8266.(Onsomeboards,it'slabelledTXinsteadof
TXD,butit'sthesamepin.)
3. ConnecttheTX-pinoftheUSB-to-SerialconvertertotheRXDpinoftheESP8266.(Onsomeboards,it'slabelledRXinsteadof
RXD,butit'sthesamepin.)
4. IfyourESP8266boardhasaDTRpin,connectittotheDTRpinoftheUSB-to-Serialconverter.Thisenablesauto-resetwhen
uploadingasketch,moreonthatlater.
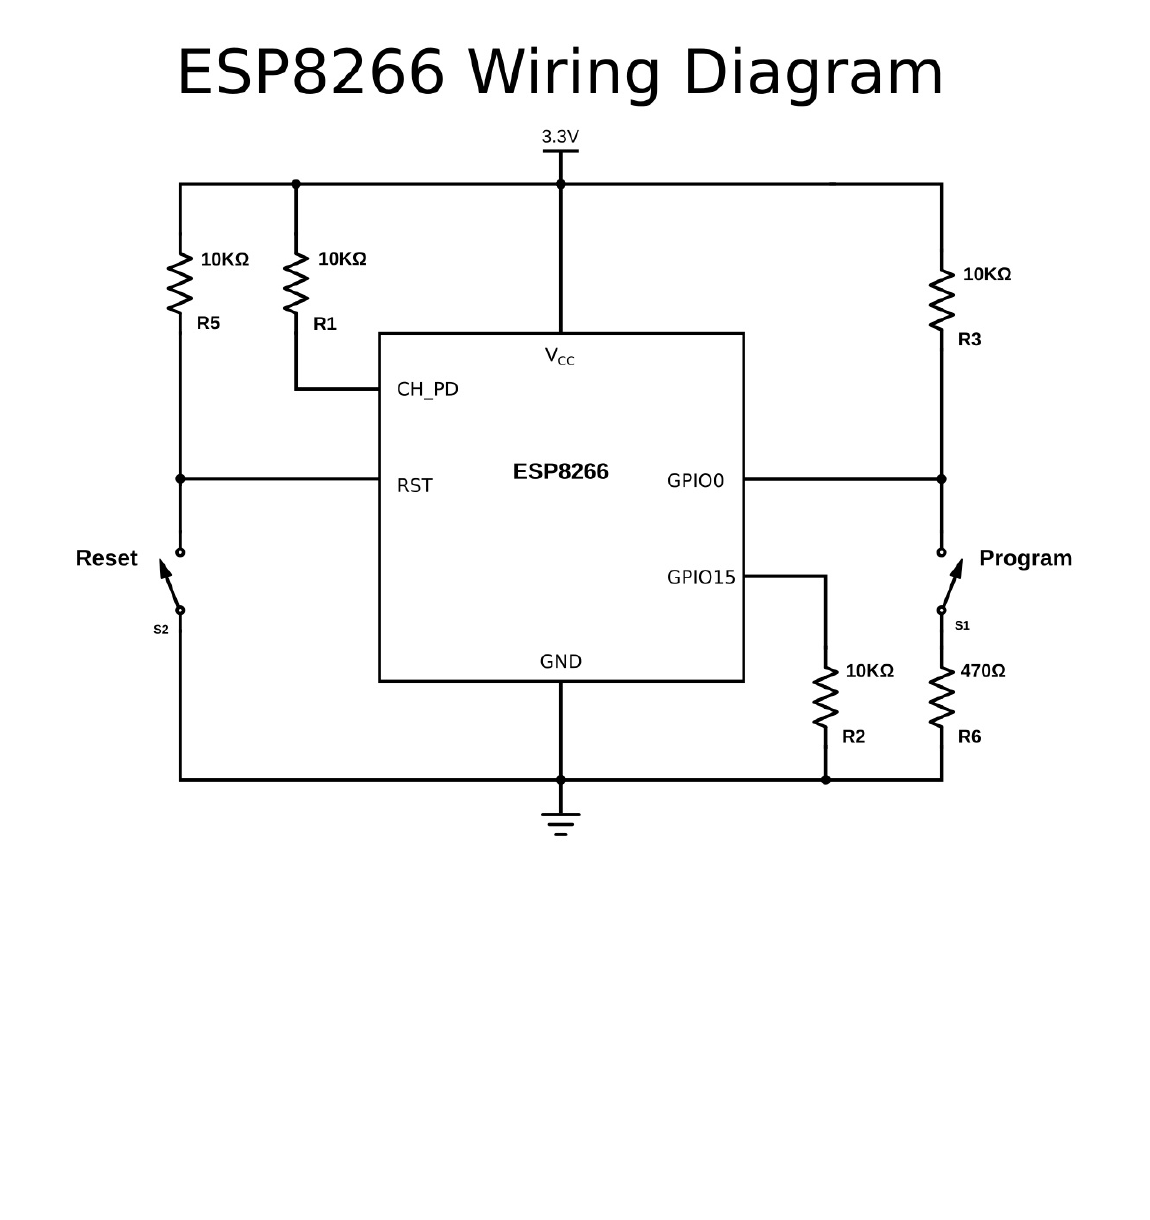
Enablingthechip
Ifyou'reusingabare-boneESP-##boardbyAIThinker,youhavetoaddsomeresistorstoturnontheESP8266,andtoselecttheright
bootmode.
1. EnablethechipbyconnectingtheCH_PD(ChipPowerDown,sometimeslabeledCH_ENorchipenable)pintoVCCthrougha10KΩ
resistor.
2. DisableSD-cardbootbyconnectingGPIO15togroundthrougha10KΩresistor.
3. SelectnormalbootmodebyconnectingGPIO0toVCCthrougha10KΩresistor.
4. PreventrandomresetsbyconnectingtheRST(reset)pintoVCCthrougha10KΩresistor.
5. Makesureyoudon'thaveanythingconnectedtoGPIO2(moreinformationinthenextchapter).
Addingresetandprogrambuttons
IfyourESP8266boarddoesn'thavearesetbutton,youcouldaddonebyconnectingapushbuttontobetweentheRSTpinand
ground.
Toputthechipintoprogrammingmode,youhavetopullGPIO0lowduringstartup.That'swhywealsoneedaprogrambutton.
Becauseit'spossibletouseGPIO0asanoutput,wecan'tdirectlyshortittoground,thatcoulddamagethechip.Topreventthis,
connect470Ωresistorinserieswiththeswitch.It'simportantthatthisresistanceislowenough,otherwise,itwillbepulledhighbythe
10KΩresistorweaddedinthepreviousparagraph.
Connectingthepowersupply
IftheESP8266moduleyouhavedoesn'thavea3.3Vvoltageregulatoronboard,youhavetoaddoneexternally.Youcouldusean
LM1117-3.3forexample.
1. Connectthefirstpinoftheregulatortoground.
2. Placea10µFcapacitorbetweenpin2(Vout)andground.Watchthepolarity!
3. Placea10µFcapacitorbetweenpin3(Vin)andground.
4. Connectpin2tothe3.3VorVCCoftheESP8266.
5. Connectpin3toa5Vpowersource,aUSBport,forexample.
Beforeyoubegin...
There'safewthingsyouhavetolookoutforwhenusinganESP8266:Themostimportantthingisthatitrunsat3.3V,soifyou
connectittoa5Vpowersupply,you'llkillit.Unlikesome3.3VArduinoorTeensyboards,theESP8266'sI/Opinsarenot5V
tolerant,soifyouusea5VUSB-to-Serialconverter,or5Vsensorsetc.you'llblowitup.
AsecondthingtokeepinmindisthattheESP8266canonlysourceorsink12mAperoutputpin,comparedto20-40mAformost
Arduinos.
TheESP8266hasoneanalogtodigitalconverter,butithasastrangevoltagerange:0-1V,voltagesabove1Vmightdamagethe
board.
OnelastthingtokeepinmindisthattheESP8266hastosharethesystemresourcesandCPUtimebetweenyoursketchandtheWi-Fi
driver.Also,featureslikePWM,interruptsorI²Careemulatedinsoftware,mostArduinosontheotherhand,havededicatedhardware
partsforthesetasks.
Formostapplicationshowever,thisisnottoomuchofanissue.

Software
Installationoftherequiredsoftware
ThefirststepistodownloadandinstalltheArduinoIDE.IexplainedthisinABeginner'sGuidetoArduino.(AsofFebruary7th2017,
thelateststableversionoftheIDEis1.8.1.)
ToprogramtheESP8266,you'llneedapluginfortheArduinoIDE,itcanbedownloadedfromGitHubmanually,butitiseasiertojust
addtheURLintheArduinoIDE:
1. OpentheArduinoIDE.
2. GotoFile>Preferences.
3. PastetheURLhttp://arduino.esp8266.com/stable/package_esp8266com_index.jsonintotheAdditionalBoardManagerURLsfield.
(YoucanaddmultipleURLs,separatingthemwithcommas.)
4. GotoTools>Board>BoardManagerandsearchfor'esp8266'.Selectthenewestversion,andclickinstall.(AsofFebruary7th
2017,thelateststableversionis2.3.0.)
Youcancheckouttheofficialinstallguidehere.
Drivers
IfyouareusingaboardwiththeCH340(G)USB-to-Serialchip,liketheNodeMCU,you'llprobablyhavetoinstalltheUSBdriversforit.
TheycanbefoundonGitHub.
IfyouareusingaboardwiththeCP2104USB-to-Serialchip,liketheAdafruitFeatherHUZZAHboard,you'llprobablyhavetoinstall
USBdriversaswell.YoucanfindthemontheSiliconLabswebsite.
BoardswithanFTDIchipshouldworkrightoutofthebox,withouttheneedofinstallinganydrivers.
Python
IfyouwanttouseOverTheAirupdatesonWindows,youhavetoinstallPython2.7.Youcandownloaditfrompython.org.Duringthe
installation,youhavetoselecttheoptiontoaddPythontoyourpath.Ifyoudon'tdothis,theArduinoIDEwon'tbeabletofindthe
Pythonexecutable.
Examples
YoucanfindallexamplesusedinthisarticleonmyGitHub.Justdownloaditasa.ZIPfile,unzipittoaconvenientlocation,andyou're
goodtogo!

TheESP8266asamicrocontroller-Hardware
WhiletheESP8266isoftenusedasa‘dumb’Serial-to-WiFibridge,it’saverypowerfulmicrocontrolleronitsown.Inthischapter,we’ll
lookatthenon-Wi-FispecificfunctionsoftheESP8266.
DigitalI/O
JustlikeanormalArduino,theESP8266hasdigitalinput/outputpins(I/OorGPIO,GeneralPurposeInput/Outputpins).Asthename
implies,theycanbeusedasdigitalinputstoreadadigitalvoltage,orasdigitaloutputstooutputeither0V(sinkcurrent)or3.3V
(sourcecurrent).
Voltageandcurrentrestrictions
TheESP8266isa3.3Vmicrocontroller,soitsI/Ooperatesat3.3Vaswell.Thepinsarenot5Vtolerant,applyingmorethan3.6V
onanypinwillkillthechip.
ThemaximumcurrentthatcanbedrawnfromasingleGPIOpinis12mA.
Usablepins
TheESP8266has17GPIOpins(0-16),however,youcanonlyuse11ofthem,because6pins(GPIO6-11)areusedtoconnectthe
flashmemorychip.Thisisthesmall8-leggedchiprightnexttotheESP8266.Ifyoutrytouseoneofthesepins,youmightcrashyour
program.
GPIO1and3areusedasTXandRXofthehardwareSerialport(UART),soinmostcases,youcan’tusethemasnormalI/Owhile
sending/receivingserialdata.
Bootmodes
Asmentionedinthepreviouschapter,someI/Opinshaveaspecialfunctionduringboot:Theyselect1of3bootmodes:
GPIO15 GPIO0 GPIO2 Mode
0V 0V 3.3V UartBootloader
0V 3.3V 3.3V Bootsketch(SPIflash)
3.3V x x SDIOmode(notusedforArduino)
Note:youdon’thavetoaddanexternalpull-upresistortoGPIO2,theinternaloneisenabledatboot.
Wemadesurethattheseconditionsaremetbyaddingexternalresistorsinthepreviouschapter,ortheboardmanufacturerofyour
boardaddedthemforyou.Thishassomeimplications,however:
GPIO15isalwayspulledlow,soyoucan’tusetheinternalpull-upresistor.YouhavetokeepthisinmindwhenusingGPIO15asan
inputtoreadaswitchorconnectittoadevicewithanopen-collector(oropen-drain)output,likeI²C.
GPIO0ispulledhighduringnormaloperation,soyoucan’tuseitasaHi-Zinput.
GPIO2can’tbelowatboot,soyoucan’tconnectaswitchtoit.
Internalpull-up/-downresistors
GPIO0-15allhaveabuilt-inpull-upresistor,justlikeinanArduino.GPIO16hasabuilt-inpull-downresistor.
PWM
UnlikemostAtmelchips(Arduino),theESP8266doesn’tsupporthardwarePWM,however,softwarePWMissupportedonalldigital
pins.ThedefaultPWMrangeis10-bits@1kHz,butthiscanbechanged(upto>14-bit@1kHz).
Analoginput
TheESP8266hasasingleanaloginput,withaninputrangeof0-1.0V.Ifyousupply3.3V,forexample,youwilldamagethechip.
SomeboardsliketheNodeMCUhaveanon-boardresistivevoltagedivider,togetaneasier0-3.3Vrange.Youcouldalsojustusea
trimpotasavoltagedivider.
TheADC(analogtodigitalconverter)hasaresolutionof10bits.
Communication
Serial
TheESP8266hastwohardwareUARTS(Serialports):
UART0onpins1and3(TX0andRX0resp.),andUART1onpins2and8(TX1andRX1resp.),however,GPIO8isusedtoconnectthe
flashchip.ThismeansthatUART1canonlytransmitdata.
UART0alsohashardwareflowcontrolonpins15and13(RTS0andCTS0resp.).ThesetwopinscanalsobeusedasalternativeTX0
andRX0pins.
I²C
TheESPdoesn’thaveahardwareTWI(TwoWireInterface),butitisimplementedinsoftware.Thismeansthatyoucanusepretty
muchanytwodigitalpins.Bydefault,theI²Clibraryusespin4asSDAandpin5asSCL.(ThedatasheetspecifiesGPIO2asSDAand
GPIO14asSCL.)Themaximumspeedisapproximately450kHz.
SPI

TheESP8266hasoneSPIconnectionavailabletotheuser,referredtoasHSPI.ItusesGPIO14asCLK,12asMISO,13asMOSIand15
asSlaveSelect(SS).ItcanbeusedinbothSlaveandMastermode(insoftware).
GPIOoverview
GPIO Function State Restrictions
0 Bootmodeselect 3.3V NoHi-Z
1 TX0 - NotusableduringSerialtransmission
2Bootmodeselect
TX1 3.3V(bootonly) Don’tconnecttogroundatboottime
Sendsdebugdataatboottime
3 RX0 - NotusableduringSerialtransmission
4 SDA(I²C) - -
5 SCL(I²C) - -
6-11 Flashconnection x Notusable,andnotbrokenout
12 MISO(SPI) - -
13 MOSI(SPI) - -
14 SCK(SPI) - -
15 SS(SPI) 0V Pull-upresistornotusable
16 Wakeupfromsleep - Nopull-upresistor,butpull-downinstead
ShouldbeconnectedtoRSTtowakeup
TheESP8266asamicrocontroller-Software
MostofthemicrocontrollerfunctionalityoftheESPusesexactlythesamesyntaxasanormalArduino,makingitreallyeasytoget
started.
DigitalI/O
JustlikewitharegularArduino,youcansetthefunctionofapinusingpinMode(pin,mode);wherepinistheGPIOnumber*,andmodecan
beeitherINPUT,whichisthedefault,OUTPUT,orINPUT_PULLUPtoenablethebuilt-inpull-upresistorsforGPIO0-15.Toenablethepull-
downresistorforGPIO16,youhavetouseINPUT_PULLDOWN_16.
(*)NodeMCUusesadifferentpinmapping,readmorehere.ToaddressaNodeMCUpin,e.g.pin5,useD5:forinstance:pinMode(D5,
OUTPUT);
Tosetanoutputpinhigh(3.3V)orlow(0V),usedigitalWrite(pin,value);wherepinisthedigitalpin,andvalueeither1or0(orHIGH
andLOW).
Toreadaninput,usedigitalRead(pin);
ToenablePWMonacertainpin,useanalogWrite(pin,value);wherepinisthedigitalpin,andvalueanumberbetween0and1023.
Youcanchangetherange(bitdepth)ofthePWMoutputbyusinganalogWriteRange(new_range);
ThefrequencycanbechangedbyusinganalogWriteFreq(new_frequency);.new_frequencyshouldbebetween100and1000Hz.
Analoginput
JustlikeonanArduino,youcanuseanalogRead(A0)togettheanalogvoltageontheanaloginput.(0=0V,1023=1.0V).
TheESPcanalsousetheADCtomeasurethesupplyvoltage(VCC).Todothis,includeADC_MODE(ADC_VCC);atthetopofyoursketch,and
useESP.getVcc();toactuallygetthevoltage.
Ifyouuseittoreadthesupplyvoltage,youcan’tconnectanythingelsetotheanalogpin.
Communication
Serialcommunication
TouseUART0(TX=GPIO1,RX=GPIO3),youcanusetheSerialobject,justlikeonanArduino:Serial.begin(baud).
Tousethealternativepins(TX=GPIO15,RX=GPIO13),useSerial.swap()afterSerial.begin.
TouseUART1(TX=GPIO2),usetheSerial1object.
AllArduinoStreamfunctions,likeread,write,print,println,...aresupportedaswell.
I²CandSPI
YoucanjustusethedefaultArduinolibrarysyntax,likeyounormallywould.
SharingCPUtimewiththeRFpart
OnethingtokeepinmindwhilewritingprogramsfortheESP8266isthatyoursketchhastoshareresources(CPUtimeandmemory)
withtheWi-Fi-andTCP-stacks(thesoftwarethatrunsinthebackgroundandhandlesallWi-FiandIPconnections).
Ifyourcodetakestoolongtoexecute,anddon’tlettheTCPstacksdotheirthing,itmightcrash,oryoucouldlosedata.It’sbestto
keeptheexecutiontimeofyouloopunderacoupleofhundredsofmilliseconds.
Everytimethemainloopisrepeated,yoursketchyieldstotheWi-FiandTCPtohandleallWi-FiandTCPrequests.
Ifyourlooptakeslongerthanthis,youwillhavetoexplicitlygiveCPUtimetotheWi-Fi/TCPstacks,byusingincludingdelay(0);or
yield();.Ifyoudon’t,networkcommunicationwon’tworkasexpected,andifit’slongerthan3seconds,thesoftWDT(WatchDog
Timer)willresettheESP.IfthesoftWDTisdisabled,afteralittleover8seconds,thehardwareWDTwillresetthechip.

Fromamicrocontroller’sperspectivehowever,3secondsisaverylongtime(240millionclockcycles),sounlessyoudosome
extremelyheavynumbercrunching,orsendingextremelylongstringsoverSerial,youwon’tbeaffectedbythis.Justkeepinmind
thatyouaddtheyield();insideyourfororwhileloopsthatcouldtakelongerthan,say100ms.
Sources
ThisiswhereIgotmostofmyinformationtowritthisarticle,there’ssomemoredetailsontheGitHubpages,ifyou’reintosomemore
advancedstuff,likeEEPROMordeepsleepetc.
https://github.com/esp8266/Arduino/issues/2942
https://github.com/esp8266/Arduino/pull/2533/files
https://github.com/esp8266/Arduino/blob/master/doc/libraries.md
https://github.com/esp8266/Arduino/blob/master/doc/reference.md
https://github.com/esp8266/Arduino/blob/master/doc/boards.md

Wi-Fi
UsingtheESP8266asasimplemicrocontrollerisgreat,butthereasonwhymostpeopleuseit,isitsWi-Ficapabilities.Inthischapter,
we'lldiveintothewonderfulworldofnetworkprotocols,likeWi-Fi,TCP,UDP,HTTP,DNS...Alltheseacronymsmightintimidateyou,
butI'lltrymybesttoexplainthemstep-by-stepandinaneasyway.
Someparagraphsareinitalic.Theseprovidesomeextrainformation,butarenotcriticaltounderstandingtheESP'sWi-Fifunctions,so
don'tgetfrustratediftherearethingsyoudon'tunderstand.
It'sreallyhardtogiveaclearexplanation,withoutover-complicatingthingsandwhilekeepingitshortenoughaswell.Ifyou'vegot
anyfeedbackorremarks,besuretoleaveacommenttohelpimprovethisarticle.Thanks!
TheTCP/IPstack
Thesystemmostpeoplerefertoas'TheInternet'isn'tjustoneprotocol:it'sanentirestackoflayersofprotocols,oftenreferredtoas
theTCP/IPstack.We'llgooverthesedifferentlayers,becauseweneedtounderstandhowourESP8266communicateswithother
devicesonthenetwork.
Layer Protocols
Application HTTP,FTP,mDNS,WebSocket,OSC...
Transport TCP,UDP
Internet IP
Link Ethernet,Wi-Fi...
TheLinklayer
Thelinklayercontainsthephysicallinkbetweentwodevices,anEthernetcable,forexample,oraWi-Ficonnection.Thisisthelayer
thatisclosesttothehardware.
ToconnectanESP8266tothenetwork,youhavetocreateaWi-Filink.Thiscanhappenintwodifferentways:
1. TheESP8266connectstoawirelessaccesspoint(WAPorsimplyAP).TheAPcanbebuilt-intoyourmodemorrouter,for
example.
Inthisconfiguration,theESPactslikeawirelessstation.
2. TheESP8266actsasanaccesspointandwirelessstationscanconnecttoit.Thesestationscouldbeyourlaptop,a
smartphone,orevenanotherESPinstationmode.
OncetheWi-Filinkisestablished,theESP8266ispartofalocalareanetwork(LAN).AlldevicesonaLANcancommunicatewith
eachother.
Mostofthetime,theAPisconnectedtoaphysicalEthernetnetworkaswell,thismeansthattheESP8266canalsocommunicatewith
devicesthatareconnectedtotheAP(modem/router)viaawiredEthernetconnection(desktopcomputers,gamingconsolesandset-
topboxes,forinstance).
IftheESP8266isinaccesspointmode,itcancommunicatewithanystationthatisconnectedtoit,andtwostations(e.g.alaptopand
asmartphone)canalsocommunicatewitheachother.
TheESPcanbeusedinAP-only,station-only,orAP+stationmode.
TL;DR
Thelinklayeristhephysicallinkbetweendevices:inthecaseoftheESP8266,thisisaWiFiconnection.TheESPcanactasastation
andconnecttoanaccesspoint,oractasanaccesspointandletotherdevicesconnecttoit.
TheInternetorNetworklayer
Althoughthedevicesarenowphysicallyconnected(eitherthroughactualwires(Ethernet)orthroughradiowaves(Wi-Fi)),theycan't
actuallytalktoeachotheryet,becausetheyhavenowayofknowingwheretosendthemessageto.
That'swheretheInternetProtocol(IP)comesin.EverydeviceonthenetworkhasapersonalIPaddress.TheDHCPserver(Dynamic
HostConfigurationProtocolServer)makessurethattheseaddressesareunique.
Thismeansthatyoucannowsendamessagetoaspecificaddress.
TherearetwoversionsoftheInternetProtocol:IPv4andIPv6.IPv6isanimprovedversionofIPv4andhasmuchmoreaddressesthan
IPv4(becausetherearemuchmoredevicesthanavailableIPv4addresses).Inthisarticle,we'llonlytalkaboutIPv4addresses,since
mostLANsstillusethem.
TheIPaddressconsistsof4numbers,forexample192.168.1.5isavalidIPv4address.Itactuallyconsistsoftwoparts:thefirstpartis
192.168.1,thisistheaddressofthelocalnetwork.Thelastdigit,5inthiscase,isspecifictothedevice.
ByusingIPaddresses,wecanfindtheESP8266onthenetwork,andsendmessagestoit.TheESPcanalsofindourcomputerorour
phone,ifitknowstheirrespectiveIPaddresses.
Sub-netmask(optional)
ThissubdivisionoftheIPaddressisdeterminedbythesub-netmask,oftenwrittenas255.255.255.0.Youcanseethatitconsistsof
fournumbers,justliketheIPaddress.Ifapartofthesub-netmaskis255,itmeansthatthecorrespondingpartoftheIPaddressis
partofthenetworkaddress,ifit's0,thecorrespondingIPpartispartoftheaddressofthespecificaddress.Adifferentnotationto"IP:
192.168.1.5,sub-netmask:255.255.255.0"wouldbe"192.168.1.5/24",becausethebinaryrepresentationofthesub-netmaskis
11111111.11111111.11111111.00000000,andithas24ones.
Ifyouwanttoknowmoreaboutsub-nets,I'drecommendyoutoreadtheWikipediaarticle.
(Aquicktiptohelpyouremember:it'scalledthesub-netmask,becauseifyouperformabitwiseANDoperationontheIPaddressand
thesub-netmask(i.e.usethesub-netmaskasamaskfortheIPaddress),yougettheaddressofthesub-net.)

MACaddressesandARP(optional)
ItisactuallyimpossibletosendpacketsdirectlytoanothermachineusingonlytheIPaddress.Tosendapackettoaspecificdeviceon
theLAN(Wi-FiorEthernet),youhavetoknowitsMAC-address.TheMACaddressisauniquenumberthatisuniqueforeverynetwork
device,anditneverchanges,it'shardwiredinthenetworkchip.ThismeansthateveryESP8266,everynetworkcard,every
smartphone...evermade,hasadifferentMACaddress.
SobeforetheESPcansendapackettoyoursmartphoneforexample,ithastoknowitsMACaddress.Itdoesn'tknowthisyet,theESP
onlyknowstheIPaddressofthesmartphone,say192.168.1.6.Todothis,theESPsendsabroadcastmessage(i.e.amessage
addressedtoalldevicesontheLAN)saying"I'mlookingfortheMACaddressofthedevicewiththeIPaddress192.168.1.6".TheESP
alsoincludesitsownIPandMACaddresswiththemessage.Whenthesmartphonereceivesthisbroadcastmessage,itrecognizesits
ownIPaddress,andrespondstotheESPbysendingitsownMACaddress.NowtheESPandthephonebothknoweachother'sIPand
MACaddresses,andtheycancommunicateusingIPaddresses.ThismethodiscalledtheAddresResolutionProtocol,orARP.
WhatabouttheInternet?
Asyoumighthavenoticed,Ionlytalkedaboutthelocalareanetwork,thesearethecomputersinyourownhouse.Sohowcanthe
ESP8266communicatewiththeInternet,youmayask?Well,there'salotofnetworkinfrastructureinvolvedin'TheInternet',andthey
allobeytheIPrules,tomakesuremostofyourpacketsarriveattheredestination.It'snotthatsimpleofcourse,there'salotofthings
goingon,likeroutingandNetworkAddressTranslation(NAT),butthatfallsoutsidethescopeofthisarticle,andit'snotreally
somethingmostpeoplehavetoworryabout.
TL;DR
TheInternetlayerusesIPaddressesinordertoknowwhereitshouldsendthedata.Thismeansthattwodevicescannowsend
packetsofdatatoeachother,evenovertheInternet.
TheTransportlayer
ThedifferentdevicesinthenetworkdotheirbesttodelivertheseIPpacketstotheaddressee,however,it'snotuncommonfora
packettogetlost,soitwillneverarrive.Orthepacketmightgetcorruptedontheway:thedataisnolongercorrect.IPalsocan't
guaranteethatthepacketsarriveinthesameordertheyweresentin.
Thismeansthatwecan'treliablysendmessagesyetbyonlyusingthelinkandtheInternetlayer,sincewecanneverknowwhenand
whetherapacketwillarrive,orknowforcertainthatareceivedpacketiscorrect.
WeneedathirdlayerontopoftheInternetlayer:theTransportlayer.
Therearemainlytwoprotocolsthatmakeupthisthirdlayer:theTransmissionControlProtocol(TCP)andtheUserDatagramProtocol
(UDP).
TCPmakessurethatallpacketsarereceived,thatthepacketsareinorder,andthatcorruptedpacketsarere-sent.Thismeans
thatitcanbeusedforcommunicationbetweenmultipleapplications,withouthavingtoworryaboutdataintegrityorpacket
loss.Thisiswhyit'susedforthingslikedownloadingwebpages,sendingemail,uploadingfilesetc.
UDPontheotherhand,doesn'tguaranteethateverypacketreachesitsdestination,itdoescheckforerrorshowever,but
whenitfindsone,itjustdestroysthepacket,withoutre-sendingit.Thismeansthatit'snotasreliableasTCP,butit'sfaster,
andhasamuchlowerlatency,becauseitdoesn'trequireanopenconnectiontosendmessages,likeTCPdoes.That'swhyit's
usedinvoiceandvideochats,andforexampleinonlinegames.
IfyouwanttoknowmoreaboutthedifferencesbetweenTCPandUDP,checkoutthisvideo.
TL;DR
TheIPprotocolisnotreliable,andhasnoerrorchecking.TCPsolvesthisbyre-sendinglostorcorruptpackages,andorderspackets
thatarereceivedinthewrongorder.UDPalsochecksforcorruptpackages,butdoesn'tre-sendthem,soithaslesslatencythanTCP.
TheApplicationlayer
WenowhavereliablecommunicationusingTCP,butthere'sstilloneproblem.Thinkofitthisway:youaresendingaletter,andTCP
guaranteesthatitwillarriveatitsdestination,butifthereceiverdoesn'tunderstandthelanguageit'swrittenin,hewon'tknowwhat
todowithit.
Inotherwords,weneedafourthlayerofprotocols,fortwoprogramstobeabletocommunicatewitheachother.
There'slotsofdifferentprotocolsoutthere,butwe'llmostlyfocusontheprotocolsforwebserversandbrowsers.
HyperTextTransferProtocol
TheHyperTextTransferProtocol,orHTTP,istheprotocol(cfr.language)thatisusedbybothwebserversandwebclientsinorderto
communicate.Itusestexttoperformsendrequestsandresponsesfromtheclienttotheserverandbackagain.
Forexample,whenyoutypehttp://www.google.comintotheaddressbarofawebbrowser(client),itwillsendanHTTPGETrequestto
theGooglewebserver.TheserverunderstandsthisHTTPrequest,andwillsendtheGooglewebpageasaresponse.Orwhenyou
uploadanimagetoInstagram,yourbrowsersendsanHTTPPOSTrequestwithyourselfieattachedtotheInstagramserver.The
serverunderstandstherequest,savestheimageandaddsitintothedatabase,sendstheURLofthenewimagebacktoyourbrowser,
andthebrowserwilladdtheimageonthewebpage.
Asyoucansee,neithertheclientnortheserverhastoworryabouttheintegrityofthemessagestheysend,andtheyknowthatthe
recipientunderstandstheirlanguage,andthatitwillknowwhattodowithacertainHTTPrequest.
MostmodernsitesuseasecureversionofHTTP,calledHTTPS.Thissecureconnectionencryptsthedata,forsecurityreasons.(You
don'twantanyonereadingthepacketsfromyourmailserver,orthepacketsyousenttoyourbank,forinstance.)
WebSocket
HTTPisgreatforthingslikedownloadingwebpages,uploadingphotosetc.butit'squiteslow:everytimeyousendanHTTPrequest,
youhavetostartanewTCPconnectiontotheserver,thensendyourrequest,waitfortheservertorespond,anddownloadthe
response.Wouldn'titbegreatifwedidn'thavetoopenanewconnectioneverytimewewanttosendsomedata,andifwecould
sendandreceivedataatthesametimeatanymomentwe'dlike?That'swhereWebSocketcomestotherescue:youcankeeptheTCP
connectionwiththeserveropenatalltimes,yougetperfectTCPreliability,andit'sprettyfast.
OpenSoundControl

HTTPandWebSocketbothuseTCPconnections.Whatifyouwantlowerlatency?Well,OpenSoundControl,orOSC,usesUDPtosend
smallpiecesofdata,likeints,floats,shorttextetc...withverylowlatency.Itwasoriginallydesignedforcontrollinglowlatencyaudio
applications,butit'saveryflexibleprotocol,soit'softenusedforlow-latencytasksotherthanaudiocontrol.
DomainNameSystem
Asmentionedbefore,youcanonlysendamessagetoanothercomputerifyouknowitsIPaddress.ButwhenyoubrowsetheInternet,
youonlyknowawebsite'sdomainname(e.g.www.google.com).YourcomputerusestheDomainNameSystemtotranslatethis
domainnametotherightIPaddress.Moreonthislater.
Sources
https://en.wikipedia.org/wiki/Internet_protocol_suite
https://en.wikipedia.org/wiki/Port_(computer_networking)
https://en.wikipedia.org/wiki/Transmission_Control_Protocol
https://en.wikipedia.org/wiki/Internet_Protocol
https://en.wikipedia.org/wiki/User_Datagram_Protocol
UploadingsketchestotheESP8266
TheuploadprocedureforESP8266boardsisalittledifferentfromthenormalArduinoprocedure.MostArduinoswillautomatically
resetwhenanewprogramisbeinguploaded,andwillautomaticallyenterprogrammingmode.
OnsomeESPboardsyouhavetomanuallyenterprogrammingmode,andonthebare-bonesmodules,youevenhavetoresetthem
manually.
However,therearesomesimplecircuitsyoucanusetogetautomaticuploads.
Auto-reset
Thisonlyappliestoboardswithoutanon-boardUSB-to-Serialconverter.
IftheUSB-to-Serialconverteryou'reusinghasaDTRflowcontrolline,youcanautomatetheresetsignal.Whensendingdatatothe
ESP,theDTRlinegoeslow,andstayslowforsometime.ToresettheESP,weneedalowpulseontheRSTpin.Theproblemisthatthe
DTRpinstayslow.Tosolvethis,we'regoingtobuildacrudeedgedetectorcircuit,usingacapacitor.Takealookatthefollowing
schematic:
Youmightrecognizethatthisisbasicallyalow-cutfilter.Innormalconditions,DTRishigh(3.3V),andtheresetlineisalsohigh,
becauseofthepull-upresistorR2.Thismeansthatthevoltageacrossthecapacitoris0V.WhenDTRsuddenlydrops(to0V),the
voltageacrossthecapacitorisstill0V,meaningthattheresetlinewillbeat0V+0V=0V,andaresetistriggered.
However,C1immediatelystartschargingthroughR2,andreaches3.3V.Atthispoint,DTRisstillat0V,meaningthatthere'snow3.3V
acrossthecapacitor.WhenDTRrisesagain,theresetlinewillbeat3.3V+3.3V=6.6V,andthenimmediatelystartstodischarge
throughR2,finallyreaching3.3Vagain,with0VacrossC1.
Thisisaproblem:6.6VcandamagetheESP,sowehavetofindawaytogetridofthepositivepeak.
OneglanceatthisMATLABsimulationshowsustheproblemevenbetter:
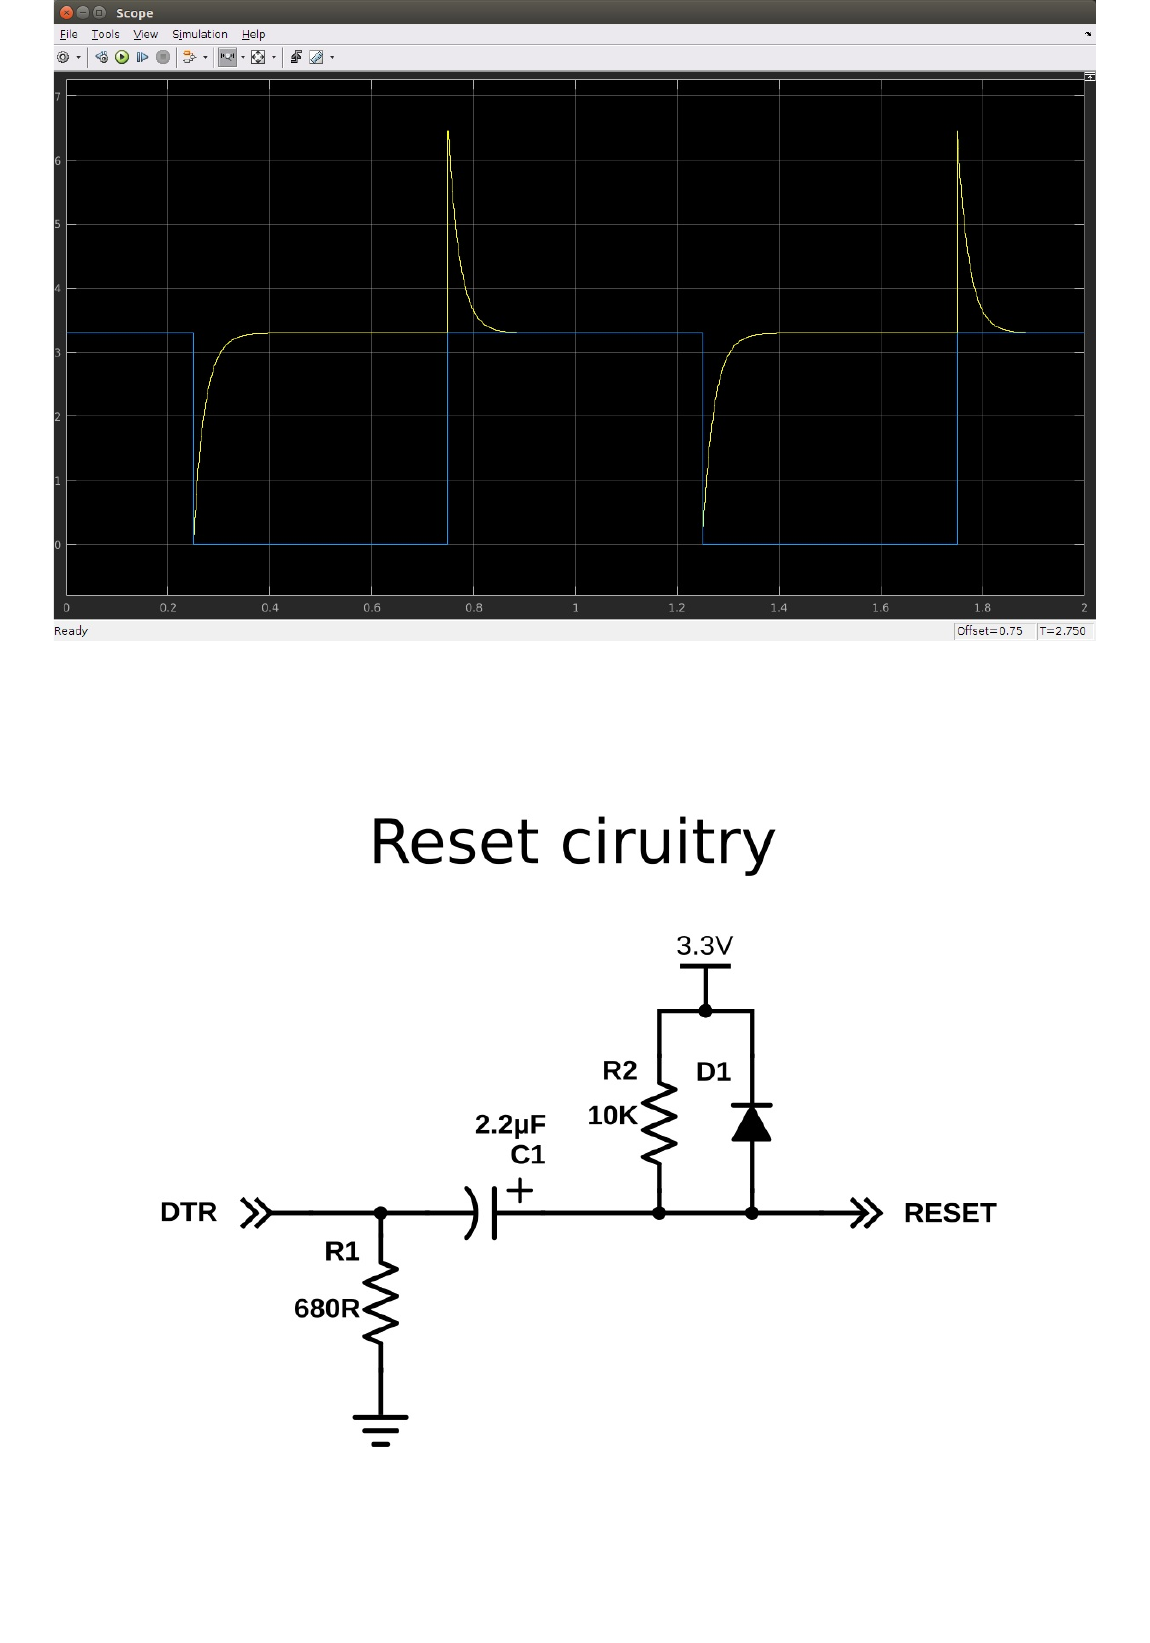
ThebluesignalisthevoltageontheDTRpin,andtheyellowsignalisthevoltageontheresetpin.
Thesolutionistoaddadiode:whilechargingthecapacitor,itshouldn'tchangeanything,soitshouldbereversebiased(justafancy
wayofsayingthatit'snotconductinganycurrentbecausethepolarityistheotherwayaround),andwhilethecapacitoris
discharging,itshoulddischargethecapacitor"immediately".
Here'swhatthatlookslike:
Let'srunthesimulationagaintocheckifourproblemissolved:
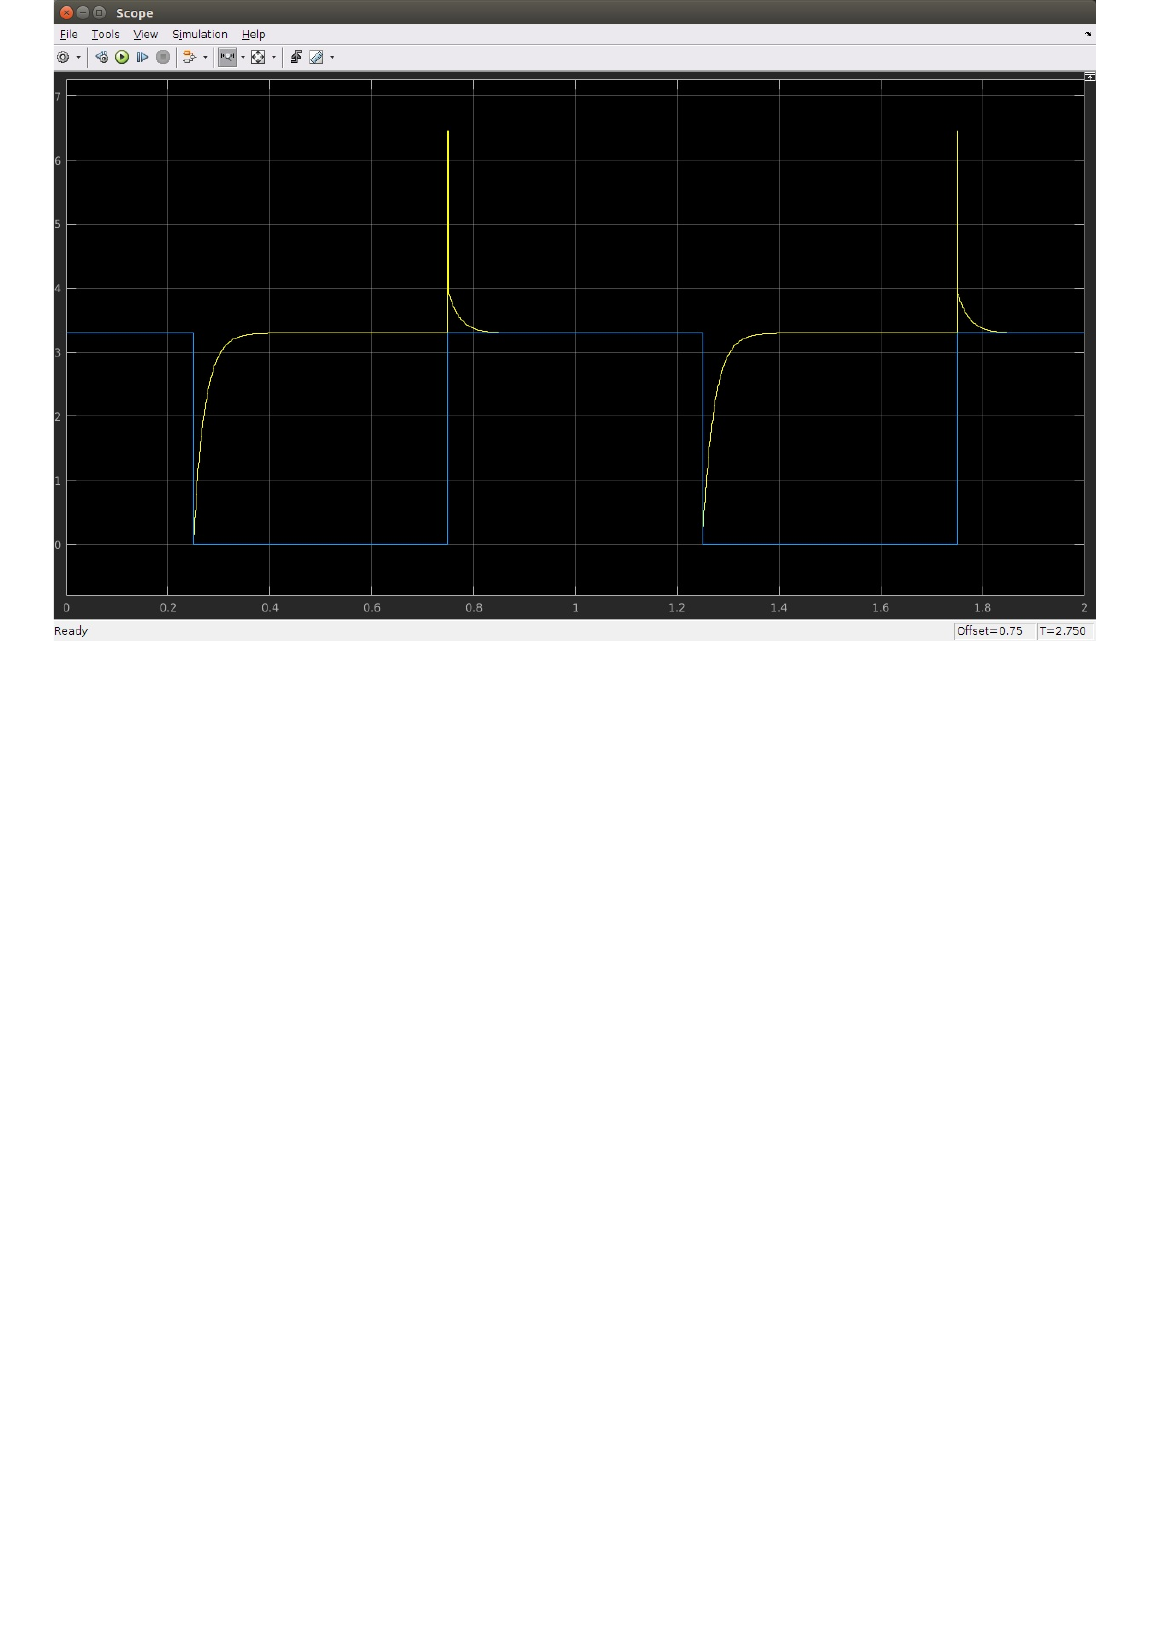
Asyoucansee,the6.6Vpeakisnowverynarrow,justlikewewanted.It'simpossibletodischargethecapacitorinstantly,thatwould
requireacapacitorandadiodewith0Ωofseriesresistance,andaninfinitecurrent,whichisimpossible,obviously.There'salsoa
smallerbutrelativelywidepeakofapproximately3.9V.Thisisbecauseadiodeonlyconductswhenthevoltageacrossitishigherthan
~600mV.Thismeansthatthelast0.6Vthat'sleftinthecapacitor(from3.9to3.3V)willstillbedischargedthroughR2only.
Nevertheless,thevoltagepeakismuchlowerandnarrowerthanwithoutthediode,andit'ssafetoconnecttotheESP8266.
ThisexactcircuitisalsousedintheArduinoUno,forexample.
Note:ifyoufollowedtheinstructionsinthehardwarestepcorrectly,youshouldalreadyhaveaddedR2toyourESP.
HowtouseAuto-reset
Tousethisauto-resetcircuit,connectittotheDTRlineofyourUSB-to-Serialconverter,andtotheresetlineoftheESP,asshownin
thediagram.Thenclickcompile(justbecausethefirstcompilationcantakequitesometime).GotoTools>Resetandselect'ck'.
Whenit'sdonecompiling,holddowntheprogrambuttonweaddedinthehardwarestep,andclickupload.Waitforittosay
"Uploading..."andthenreleasetheprogrambutton.
Auto-resetandAuto-program
Thisonlyappliestoboardswithoutanon-boardUSB-to-Serialconverter.
Themethodabovestillrequiresyoutopressabuttontouploadanewsketch.IfyourUSB-to-SerialconverterhasaRTSlineaswellas
aDTRline,youcanautomatetheentireprocess.
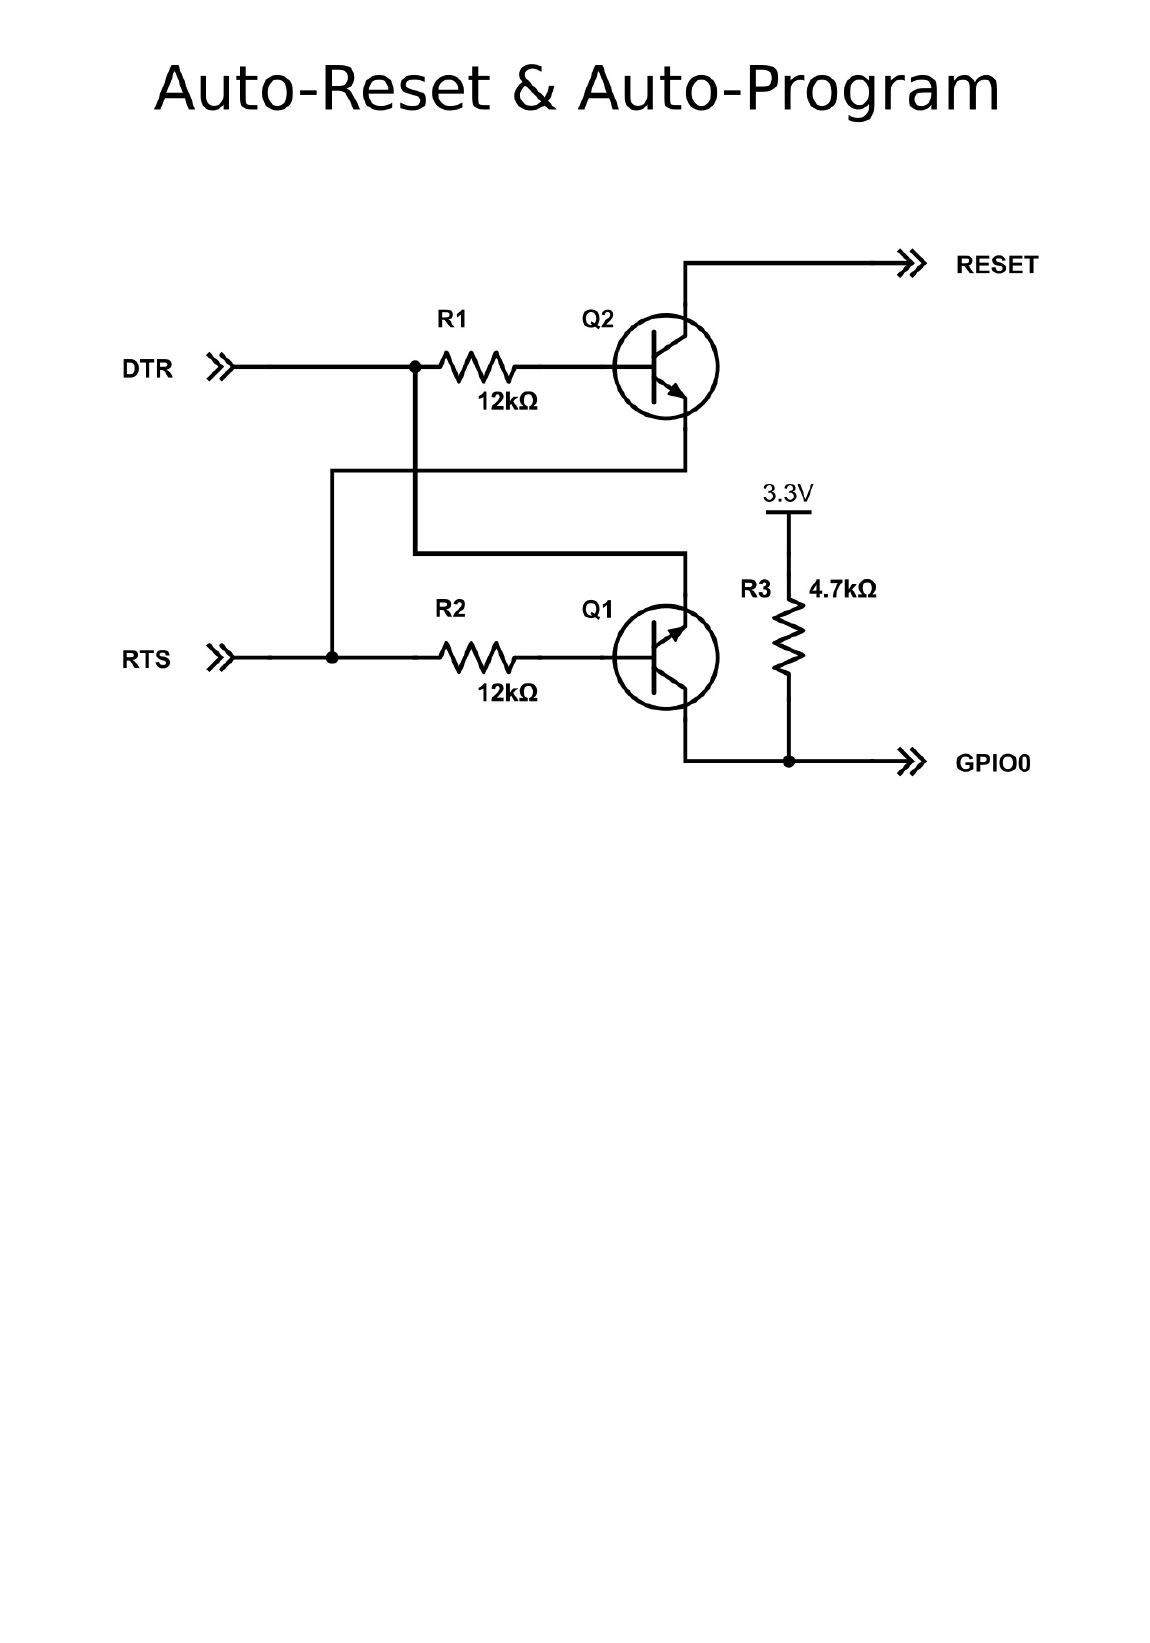
Youmayfindoutthatthe4.7kΩresistordoesn'tworkforyou.Inthatcase,trysomeothervalue,like10kΩ,forexample.
ThismethodwasfirstusedintheNodeMCU,sogotoTools>ResetMethod,andselect"nodemcu".ThiswilldrivetheDTR&RTSpins
highandlowintherightsequencetogetitinprogrammingmodebeforeuploading.
Thisisbyfarthebestmethod,buttheproblemisthatyouneedaccesstoboththeRTSandDTRpins,whilemostUSB-to-Serial
adaptersbreakoutonlyoneofthetwo.
Manualresetandmanualprogram
Thisonlyappliestoboardswithoutanon-boardUSB-to-Serialconverter.
Ifyoudon'thaveaUSB-to-SerialconverterwithDTRandRTSlines,youcouldalsojustusetheresetandprogrambuttonsweaddedin
thehardwarechapter.TogettheESPinprogrammode,GPIO0mustbelowwhilebooting:
1. pressandholdtheresetbutton
2. pressandholdtheprogrambutton
3. releasetheresetbutton,theESPwillbootinprogrammode
4. releasetheprogrambutton
5. uploadthesketch
Ifyouwanttogetoutofprogrammodewithoutuploading,justpressreset(withoutpressingtheprogrambutton).
Boardoptions
IfyourspecificboardisintheTools>Boardlist(e.g.NodeMCU,SparkFunandAdafruitboards),youcanjustselectit,andyouwillget
therightsettings.Whenyourboardisn'tinthelist,you'llhavetoselectaGenericESP8266.Inthatcasethere'slotsofnewoptionsin
theToolsmenuoftheArduinoIDE,solet'sgooverthemandpicktherightsettings.
FlashMode
LikeIsaidbefore,theESP8266usesanexternalflashchipforstorage.Youcancommunicatewiththischipover2datalines(DIO),or
overall4datalines(QIO).Using4linesistwotimesfasterthan2lines,soinmostcases,youshouldchooseQIO.(Ifyou'redoingsome
advancedstuffandyouneed2moreGPIOpins,youcoulduse2linesinsteadof4,andusethe2linesasI/O.Mostmodulesdon'tgive
youaccesstothesepins,though.)
FlashSize
Differentboards/moduleshavedifferentsizesofflashchipsonboard.Thereareboardswith512kB,1MB,2MBand4MBofflash.To

knowhowmuchflashyourboardhas,youcantrytheExamples>ESP8266>CheckFlashConfigtoseeifyourflashsettingiscorrect,
oryoucancheckthespecificationsofyourspecificboardonline.
YoucanalsoselecttheSPIFFS(SPIFlashFileSystem)size.TheSPIFFSpartitionisasmallfilesystemtostorefiles.Ifyou'renotusing
it,youcanselecttheminimum.Lateroninthearticle,we'lluseSPIFFS,andI'llremindyoutoselectalargerSPIFFSsize,butfornow,
itdoesn'treallymatter.
Debugport
There'saloadofthingsgoingonwhentheESPisrunning:ThingslikeWi-Ficonnections,TCPconnections,DNSlookups...younameit.
Allthesesmalltasksproduceawholelotofdebugoutputtohelpyoutroubleshoot.However,inanormalsituation,whereyour
programisbehavingasexpected,youdon'tneedallthosedebugmessagestofloodtheSerialMonitor,soyoucanjustturnthemoff
byselecting'Disabled'.
Ifyoudowishtoreceivedebugmessages,youcanselecttheporttosendthemto.(Serialonpins1and3,orSerial1onpin2)
Debuglevel
Thisallowsyoutochoosewhatkindofdebugmessagesyouwanttoshow.
ResetMethod
Asmentionedintheparagraphsabove,therearedifferentmethodsforauto-resetandauto-program.Ifyou'reusingthefirstmethod
(usingtheedgedetector),youshoulduse'ck',ifyouusethetwo-transistorcircuit,select'nodemcu'.
FlashFrequency
Ifyouneedsomeextramemoryspeed,youcouldchangetheflashfrequencyfrom40MHzto80MHz.Thisistheclockfrequencyofthe
SPI/SDIOlink.
CPUFrequency
IfyouneedsomeextraCPUperformance,youcandoubletheclockspeedfrom80MHzto160MHz.It'sactuallyanoverclock,butI've
neverhadanyissuesorinstability.
UploadSpeed
ThebaudrateforuploadingtotheESP.Thedefaultis115200baud,butyoucangohigher(ifyou'rechangingyoursketchalot,it
mightbetooslow).921600baudworksmostofthetime,butyoumaygetanerrorsometimes,ifthat'sthecase,switchingbackto
115200willprobablysolveallproblems.

EstablishingaWi-Ficonnection
LikeImentionedinthepreviouschapter,theESP8266canoperateinthreedifferentmodes:Wi-Fistation,Wi-Fiaccesspoint,andboth
atthesametime.We'llstartbylookingattheconfigurationofaWi-Fistation.
Stationmode
Connectingtoonespecificnetwork
#include<ESP8266WiFi.h>//IncludetheWi-Filibrary
constchar*ssid="SSID";//TheSSID(name)oftheWi-Finetworkyouwanttoconnectto
constchar*password="PASSWORD";//ThepasswordoftheWi-Finetwork
voidsetup(){
Serial.begin(115200);//StarttheSerialcommunicationtosendmessagestothecomputer
delay(10);
Serial.println('\n');
WiFi.begin(ssid,password);//Connecttothenetwork
Serial.print("Connectingto");
Serial.print(ssid);Serial.println("...");
inti=0;
while(WiFi.status()!=WL_CONNECTED){//WaitfortheWi-Fitoconnect
delay(1000);
Serial.print(++i);Serial.print('');
}
Serial.println('\n');
Serial.println("Connectionestablished!");
Serial.print("IPaddress:\t");
Serial.println(WiFi.localIP());//SendtheIPaddressoftheESP8266tothecomputer
}
voidloop(){}
Thecodetoconnecttoawirelessaccesspointisrelativelystraightforward:entertheSSIDandthepasswordofthenetworkyouwant
toconnectto,andcalltheWiFi.beginfunction.Thenwaitfortheconnectiontocomplete,etvoilà,yourESP8266isnowconnectedto
yourLocalAreaNetwork.
Don'tbelieveme?I'llproveittoyou:opentheSerialmonitor(CTRL+SHIFT+M)anduploadthesketch.Youshouldseesomethinglike
this:
ConnectingtoSSID...
123456...
Connectionestablished!
IPaddress: 192.168.1.3
Nowgotoyourcomputerandopenupaterminal:OnWindows,searchfor"CommandPrompt",onMacorLinux,searchfor"Terminal".
Youcouldalsousetheshortcuts:onWindows,hit +R,type"cmd"andhitenter,onLinux,useCTRL+ALT+T.
Next,typeping,andthentheIPaddressyoureceivedintheSerialmonitor.Ifyou'reonMacorLinux,useCTRL+Ctostopitaftera
coupleoflines.Theoutputshouldlooksomethinglikethis:
user@computername:~$ ping192.168.1.3
PING192.168.1.3(192.168.1.3)56(84)bytesofdata.
64bytesfrom192.168.1.3:icmp_seq=1ttl=128time=6.38ms
64bytesfrom192.168.1.3:icmp_seq=2ttl=128time=45.2ms
64bytesfrom192.168.1.3:icmp_seq=3ttl=128time=69.1ms
64bytesfrom192.168.1.3:icmp_seq=4ttl=128time=94.0ms
64bytesfrom192.168.1.3:icmp_seq=5ttl=128time=20.5ms
64bytesfrom192.168.1.3:icmp_seq=6ttl=128time=7.37ms
^C
---192.168.1.3pingstatistics---
6packetstransmitted,6received,0%packetloss,time5003ms
rttmin/avg/max/mdev=6.384/40.463/94.047/32.588ms
ThepingcommandsendssmallpacketstotheIPaddressoftheESP8266.WhentheESPreceivessuchapacket,itsendsitbacktothe
sender.PingispartofthesecondlayeroftheTCP/IPstack,theInternetlayer.ItreliesonboththeDataLinklayer(Wi-Fi)andthe
InternetProtocol*.
Youcanseethatintheexampleabove,wesent6packetstotheESP,andwealsoreceived6response(echo)packets.Thistellsus
thattheDataLink,theWi-Ficonnection,andtheInternetProtocolareworkingcorrectly.
WenowknowthattheESPcansuccessfullycommunicatewithotherdevicesonthenetwork,andifyourlocalnetworkisonline(ifitis
connectedtotheInternetviayourmodem),theESPcanalsocommunicatewithanydeviceontheweb!
PingisagreattooltocheckiftheESP(oranydevice,really)isstillconnectedtothenetwork,andifit'sstillworkingfine.
OnedrawbackisthatIPaddressescanchangeovertime,butthat'saproblemwe'lladdressinoneofthefollowingchapters...
(*)I'msimplifyingthingsabithere.Actually,pingispartoftheInternetControlMessageProtocol(ICMP),that'salsopartofthesecondlayer,justliketheInternet
Protocol.Don'tworrytoomuchaboutit,justrememberthatifyoucansendpingpacketstoadevice,youcanalsosendIPpackets.
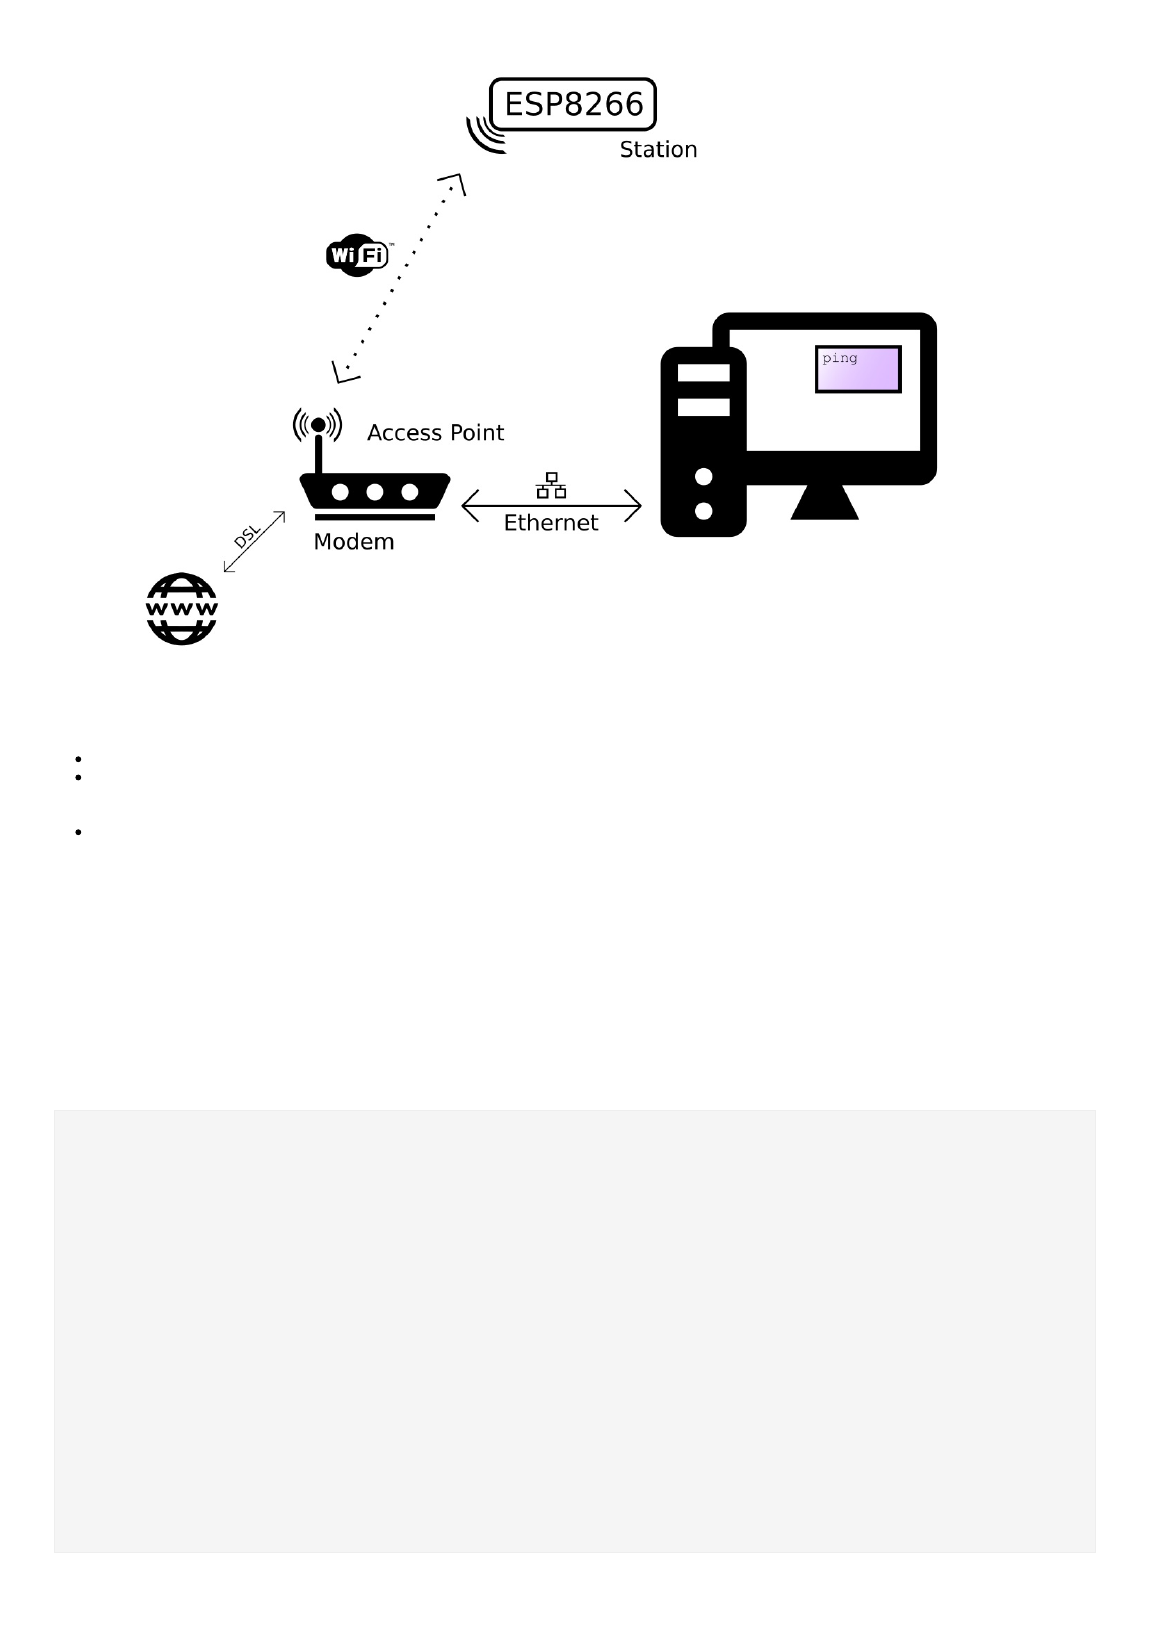
Thedevicewiththeantennaservesmanydifferentpurposes:
Accesspoint:OtherWi-Fidevicescanconnecttoit,tobepartofthelocalnetwork.
Router:ItroutesIPpacketstotherightsub-netssothattheywillarriveattheirdestination.E.g.ifthecomputersendsa
messagethatismeantfortheESPovertheEthernetsub-net,therouterwillsendthepackettotheWi-Fisub-net,becauseit
knowsthat'swheretheESPis.
Modem:iftheroutercan'tfindtheaddresseeonthelocalnetwork,thepacketwillbepassedontotheintegratedmodem,andit
willbesenttotheInternetServiceProvideroveraDSLline,headingfortheInternet,wherelotsofotherrouterswilltrytogetthe
packettotherightdestination.
Butinreality,youdon'thavetoworrytoomuchaboutit,becauseit'salldoneforyou,inafractionofasecondwithoutyoueven
noticingit!
Automaticallyconnecttothestrongestnetwork
Thesketchabovemightbeenoughforyourspecificapplication,butifyouneedtobeabletoconnecttomultipleWi-Finetworks,for
exampletheWi-FiathomeandtheWi-Fiattheoffice,itwon'twork.
Tosolvethisproblem,we'llusetheWi-Fi-Multilibrary:Youcanaddasmanynetworksasyoulike,anditautomaticallyconnectstothe
onewiththestrongestsignal.
#include<ESP8266WiFi.h>//IncludetheWi-Filibrary
#include<ESP8266WiFiMulti.h>//IncludetheWi-Fi-Multilibrary
ESP8266WiFiMultiwifiMulti;//CreateaninstanceoftheESP8266WiFiMulticlass,called'wifiMulti'
voidsetup(){
Serial.begin(115200);//StarttheSerialcommunicationtosendmessagestothecomputer
delay(10);
Serial.println('\n');
wifiMulti.addAP("ssid_from_AP_1","your_password_for_AP_1");//addWi-Finetworksyouwanttoconnectto
wifiMulti.addAP("ssid_from_AP_2","your_password_for_AP_2");
wifiMulti.addAP("ssid_from_AP_3","your_password_for_AP_3");
Serial.println("Connecting...");
inti=0;
while(wifiMulti.run()!=WL_CONNECTED){//WaitfortheWi-Fitoconnect:scanforWi-Finetworks,andconnecttothestrongestof
thenetworksabove
delay(1000);
Serial.print('.');
}
Serial.println('\n');
Serial.print("Connectedto");
Serial.println(WiFi.SSID());//Telluswhatnetworkwe'reconnectedto
Serial.print("IPaddress:\t");
Serial.println(WiFi.localIP());//SendtheIPaddressoftheESP8266tothecomputer
}
voidloop(){}
AccessPointmode

ToconfiguretheESP8266asanaccesspoint,toallowotherdeviceslikesmartphonesorlaptopstoconnecttoit,youcanusethe
softAPfunction:
#include<ESP8266WiFi.h>//IncludetheWi-Filibrary
constchar*ssid="ESP8266AccessPoint";//ThenameoftheWi-Finetworkthatwillbecreated
constchar*password="thereisnospoon";//Thepasswordrequiredtoconnecttoit,leaveblankforanopennetwork
voidsetup(){
Serial.begin(115200);
delay(10);
Serial.println('\n');
WiFi.softAP(ssid,password);//Starttheaccesspoint
Serial.print("AccessPoint\"");
Serial.print(ssid);
Serial.println("\"started");
Serial.print("IPaddress:\t");
Serial.println(WiFi.softAPIP());//SendtheIPaddressoftheESP8266tothecomputer
}
voidloop(){}
Toseeifitworks,opentheWi-Fisettingsonyourcomputer,lookforanetworkcalled"ESP8266AccessPoint",enterthepassword
"thereisnospoon",andconnecttoit.Thenopenaterminal,andpingto192.168.4.1(thisisthedefaultIPaddressofourESPAP).You'll
seethattheESPrespondstoyourpings.
However,ifyoutrytogotoanonlinewebsite,you'llgetatimeoutoraDNSerror.ThisisbecausetheESPitselfisnotconnectedtothe
internet.Thesub-netthatconsistsoftheESPandthecomputerisnotconnectedtoanyothernetworks,sothere'snowayforapacket
onthisnetworktomakeittotheInternet.
IfyouconnectedasecondstationtotheESPaccesspointontheotherhand,youwouldbeabletopingfromonestationtotheother
withoutproblems,becausethey'reonthesamenetwork.

MulticastDomainNameSystem
DNS
Let'sfaceit,constantlytypingIPaddressesisreallycumbersome,anditwouldbeimpossibletorememberallyourfavoritewebsites'
addresses,especiallyiftheyuseIPv6.
That'swhydomainnameswereintroduced:asimplestringoftextthat'seasytoremember,forexamplewww.google.com.
However,tosendarequesttoawebsite,yourcomputerstillneedstoknowitsIPaddress.That'swhereDNScomesin.Itstandsfor
DomainNameSystem,andisawaytotranslateawebsite'sdomainnametoitsIPaddress.OntheInternet,therearealotofDNS
servers.EachDNSserverhasalonglistofdomainnamesandtheircorrespondingIPaddresses.DevicescanconnecttoaDNSserver
andsendadomainname,theDNSserverwillthenrespondwiththeIPaddressoftherequestedsite.
Youcouldcompareittoatelephonedirectory:youcanlookupanametofindthecorrespondingphonenumber.
TheDNSlookuphappenscompletelyinthebackground:whenyougotoawebsiteinyourbrowser,itwillfirstsendarequesttoaDNS
server(thisimpliesthatthecomputerknowstheIPaddressoftheDNSserveritself),waitfortheresponseofthelookup,andthen
sendtheactualrequesttotherightIPaddress.
mDNS
DNSworksgreatfornormalsitesontheInternet,butmostlocalnetworksdon'thavetheirownDNSserver.Thismeansthatyoucan't
reachlocaldevicesusingadomainname,andyou'restuckusingIPaddresses...
Fortunately,there'sanotherway:multicastDNS,ormDNS.
mDNSusesdomainnameswiththe.localsuffix,forexamplehttp://esp8266.local.Ifyourcomputerneedstosendarequesttoa
domainnamethatendsin.local,itwillsendamulticastquerytoallotherdevicesontheLANthatsupportmDNS,askingthedevice
withthatspecificdomainnametoidentifyitself.Thedevicewiththerightnamewillthenrespondwithanothermulticastandsendits
IPaddress.NowthatyourcomputerknowstheIPaddressofthedevice,itcansendnormalrequests.
Luckilyforus,theESP8266ArduinoCoresupportsmDNS:
#include<ESP8266WiFi.h>//IncludetheWi-Filibrary
#include<ESP8266WiFiMulti.h>//IncludetheWi-Fi-Multilibrary
#include<ESP8266mDNS.h>//IncludethemDNSlibrary
ESP8266WiFiMultiwifiMulti;//CreateaninstanceoftheESP8266WiFiMulticlass,called'wifiMulti'
voidsetup(){
Serial.begin(115200);//StarttheSerialcommunicationtosendmessagestothecomputer
delay(10);
Serial.println('\n');
wifiMulti.addAP("ssid_from_AP_1","your_password_for_AP_1");//addWi-Finetworksyouwanttoconnectto
wifiMulti.addAP("ssid_from_AP_2","your_password_for_AP_2");
wifiMulti.addAP("ssid_from_AP_3","your_password_for_AP_3");
Serial.println("Connecting...");
inti=0;
while(wifiMulti.run()!=WL_CONNECTED){//WaitfortheWi-Fitoconnect:scanforWi-Finetworks,andconnecttothestrongestof
thenetworksabove
delay(1000);
Serial.print(++i);Serial.print('');
}
Serial.println('\n');
Serial.print("Connectedto");
Serial.println(WiFi.SSID());//Telluswhatnetworkwe'reconnectedto
Serial.print("IPaddress:\t");
Serial.println(WiFi.localIP());//SendtheIPaddressoftheESP8266tothecomputer
if(!MDNS.begin("esp8266")){//StartthemDNSresponderforesp8266.local
Serial.println("ErrorsettingupMDNSresponder!");
}
Serial.println("mDNSresponderstarted");
}
voidloop(){}
Uploaditandopenpingagain.Trytopingtoesp8266.local:
user@computername:~$ pingesp8266.local
PINGesp8266.local(10.92.237.128)56(84)bytesofdata.
64bytesfrom10.92.237.128:icmp_seq=1ttl=128time=5.68ms
64bytesfrom10.92.237.128:icmp_seq=2ttl=128time=3.41ms
64bytesfrom10.92.237.128:icmp_seq=3ttl=128time=2.55ms
64bytesfrom10.92.237.128:icmp_seq=4ttl=128time=2.19ms
64bytesfrom10.92.237.128:icmp_seq=5ttl=128time=2.29ms
64bytesfrom10.92.237.128:icmp_seq=6ttl=128time=2.74ms
^C
---esp8266.localpingstatistics---
6packetstransmitted,6received,0%packetloss,time5007ms
rttmin/avg/max/mdev=2.190/3.148/5.687/1.202ms
Asyoucansee,pingwillautomaticallyfindtheIPaddressoftheESPforyou.
mDNSissupportedonWindows,OSX,LinuxandiOS,butnot(yet?)onAndroid.
It'sarealshamethatAndroiddoesn'tsupportit,youcanhelpbystarringthisissuereportfortheChromiumprojecttoaskformDNS
supportinChromeonAndroid.
Ofcourse,youcanchangethedomainnameoftheESPbychangingtheparameterofMDNS.begin.


ESP8266WebServer
BeingabletopingtheESPisquiteanachievementifyoulookatitfromatechnicalpointofview,butformostpeople,it'snotthat
exciting,andnotreallyuseful.
Inthischapter,I'llcoverthebasicsofawebserver,andteachyouhowtohostawebpageontheESP.
Webservers
AwebserverisanInternet-connecteddevicethatstoresandservesfiles.Clientscanrequestsuchafileoranotherpieceofdata,and
theserverwillthensendtherightdata/filesbacktotheclient.RequestsaremadeusingHTTP.
HTTP
HTTPortheHypertextTransferProtocolisthetext-basedprotocolusedtocommunicatewith(web)servers.TherearemultipleHTTP
requestmethods,butI'llonlycoverthetwomostwidelyusedones:GETandPOST.
HTTPGET
GETrequestsareusedtoretrievedatafromaserver,awebpageforinstance.Itshouldn'tchangeanythingontheserver,itjust
getsthedatafromtheserver,withoutsideeffects.
Whenyouopenawebpageinyourbrowser,itwilltaketheURLandputitinanHTTPGETrequest.Thisisjustplaintext.Thenitwill
sendtherequesttotherightserverusingTCP.Theserverwillreadtherequest,checktheURL,andsendtherightHTTPresponsefor
thatURLbacktothebrowser.
TheanatomyofaGETrequest
ThemostimportantpartsofaGETrequestaretherequestlineandthehostheader.Let'stakealookatanexample:
Ifyouclickthefollowinglink:https://www.w3.org/Protocols/rfc2616/rfc2616-sec5.html,yourbrowserwillsendoutthefollowingHTTP
request:
GET/Protocols/rfc2616/rfc2616-sec5.htmlHTTP/1.1
Host:www.w3.org
Connection:keep-alive
Pragma:no-cache
Cache-Control:no-cache
Upgrade-Insecure-Requests:1
User-Agent:Mozilla/5.0(X11;Linuxx86_64)AppleWebKit/537.36(KHTML,likeGecko)Chrome/56.0.2924.87Safari/537.36
Accept:text/html,application/xhtml+xml,application/xml;q=0.9,image/webp,*/*;q=0.8
DNT:1
Referer:https://www.google.be/
Accept-Encoding:gzip,deflate,sdch,br
Accept-Language:en-US,en;q=0.8
Thefirstlineistherequestline:itcontainstherequestmethod:GET,inthiscase,theURIorUniformResourceIdentifier:
/Protocols/rfc2616/rfc2616-sec5.html,andtheHTTPversion:1.1.
Thesecondlineisthehostheader,itspecifiesthedomainnameofthehost(server).
Therearemanyotherheadersaswell,butthey'renotreallyimportantwhenusinganESP8266.
MostserverswillcheckiftheURIisafileontheirfilesystem,andifthat'sthecase,they'llsendthatfileasaresponse.
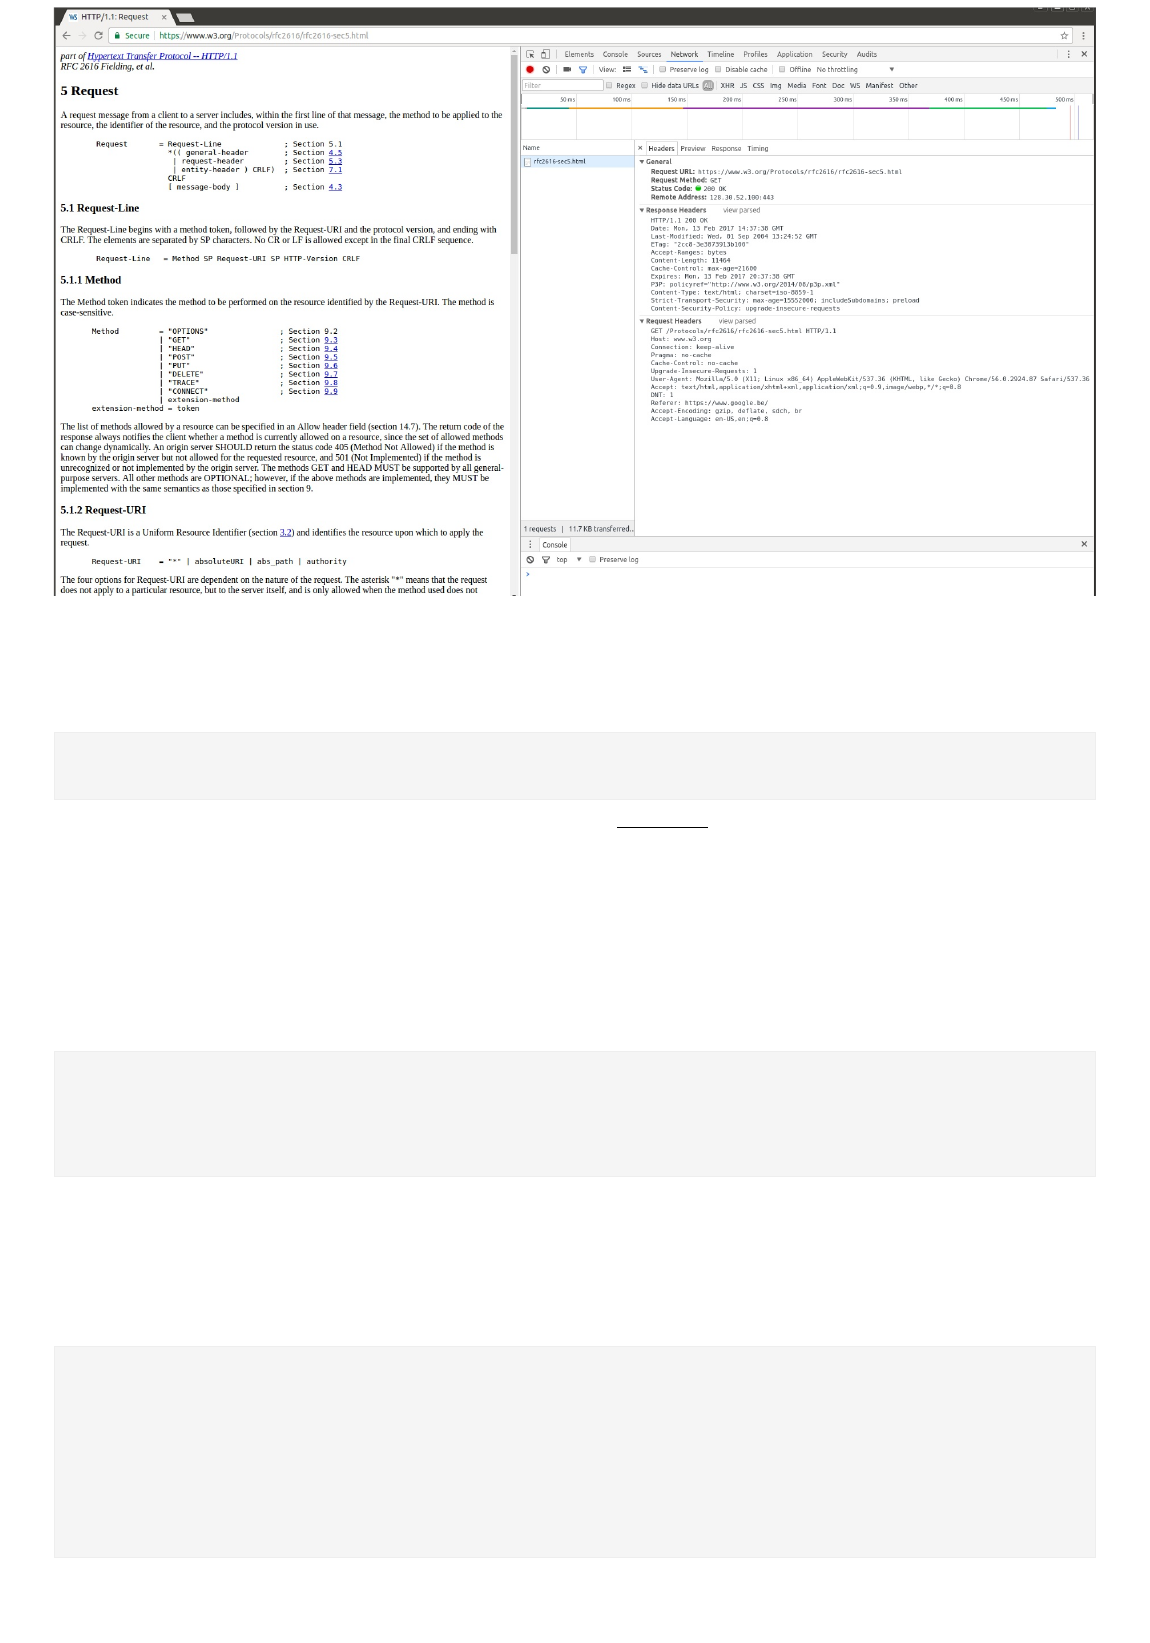
ViewingHTTPheadersinthebrowser
Ifyouwanttochecktheheadersyourbrowsersends,youcanpressF12,gotothenetworktab,reloadthepage,andclicktherequest
youwanttoinspect.Ifyouwant,youcanclick'viewsource',thiswillshowyoutheactualHTTPtext.
Here'swhatthatlookslikeinChrome:
Sendingextrainformationtotheserver
Sometimes,youmightwanttoaddextrainformationtotheGETrequest.Youcansendkey-valuepairsbyaddingaquestionmark(?)
totheURI,followedbykey=value.Multiplepairsareseparatedbyanampersand(&).
Forexample:
GET/get-phone-number.php?firstName=John&lastName=DoeHTTP/1.1
Host:www.phonebook.example.com
...
Ifyouuseanyspecialcharactersinthekeyorvaluenames,youhavetoURL-encodethem.
HTTPPOST
POSTrequestsareusedtosenddatatotheserver,forexample,tosendyourusernameandpasswordtotheserverwhenyoulogin,
orwhenyouuploadaphoto.UnlikeGET,POSTcanchangethedataontheserverorthestateoftheserver.
POSThasabodythatcancontaindatathatissenttotheserver.
TheanatomyofaPOSTrequest
Forexample,theloginpageofyourfavoritesitemightsendsomethinglikethiswhenyouenteryourcredentialsandclickthe
loginbutton:
POST/login.phpHTTP/1.1
Host:www.example.com
Connection:keep-alive
Content-Length:480
Origin:http://www.example.com
Content-Type:multipart/form-data;boundary=----WebKitFormBoundaryQNEJOasMvgAOg8Kt
...
Asyoucansee,therequestlinenowhasthePOSTmethodinit,andisstillfollowedbyaURI,/login.php,andtheHTTPversion,1.1.
Thehostheaderstillcontainsjustthedomainname.
Therealdifferenceistherequestbody:aGETrequesthasnopayload,whileyoucanaddalotofdatatothebodyofaPOSTrequest.
Thisdatacouldbenormalkey-valuepairs,likeausernameandapassword,oractualfilesthatarebeinguploaded.
AlsonotetheContent-Typeheader:ittellstheserverwhatkindofdatacanbefoundinthebodyofthePOSTrequest.
Let'stakealookatthebodyoftheloginexample:
------WebKitFormBoundaryQNEJOasMvgAOg8Kt
Content-Disposition:form-data;name="username"
JohnDoe
------WebKitFormBoundaryQNEJOasMvgAOg8Kt
Content-Disposition:form-data;name="password"
p@ssw0rd123
------WebKitFormBoundaryQNEJOasMvgAOg8Kt
Content-Disposition:form-data;name="token"
9i9ZoLHl5pkRAeuKCEu76TbaCnMphwYkPEovEUY9PHk=
------WebKitFormBoundaryQNEJOasMvgAOg8Kt--
Asyoucansee,therearethreeparametersinsidethebody,everyparameterhasaname(e.g.username),andavalue(e.g.John
Doe).
YoucouldalsousethesamesyntaxweusedbeforewhenaddingparameterstoaGETrequest:

POST/add-user.phpHTTP/1.1
Host:www.example.com
Content-Length:27
Content-Type:application/x-www-form-urlencoded
...
Andthepayload:
firstName=John&lastName=Doe
Asyoucansee,theContent-Typeheaderisdifferent,indicatingthattheencodingofthevaluesinthepayloadisdifferent.
HTTPstatuscodes
AservershouldanswerallrequestswithanHTTPstatuscode.Thisisa3-digitnumberindicatingiftherequestwassuccessfulor
tellingtheclientwhatwentwrong.Here'satablewithsomeofthemostimportantandusefulones.
StatusCode Meaning
200 OK:therequestwassuccessful
303 SeeOther:usedtoredirecttoadifferentURI,afteraPOSTrequest,forinstance
400 BadRequest:theservercouldn'tunderstandtherequest,becausethesyntaxwasincorrect
401 Unauthorized:userauthenticationisrequired
403 Forbidden:theserverrefusestoexecutetherequest,authorizationwon'thelp
404 NotFound:therequestedURIwasnotfound
500 InternalServerError:Theserverencounteredanunexpectedconditionandcouldn'tfulfilltherequest
TCP&UDPPorts
Inmostcases,onedevicehasmanydifferentservices,forexample,awebserver,anemailserver,anFTPserver,aSpotifystreaming
service,...
IfthedevicehadjustanIPaddress,itwouldbeimpossibletoknowwhichapplicationapacketwassentto.That'swhyeveryservice
hasaportnumber.It'sanidentifierforalldifferentservicesorapplicationsonasingledevice.Intheexampleabove,thewebserver
willonlylistenforrequestsonport80,theemailserveronlyonport25,theFTPserveronlyonport20,Spotifywillonlyreceive
streamsonport4371...
Tospecifyacertainport,youcanuseacolonaftertheIPaddressofafterthedomainname.Butmostofthetime,youdon'thaveto
additexplicitly.Forexample,allwebserverslistenonport80,soawebbrowserwillalwaysconnecttoport80.
http://stackoverflow.com/questions/176264/what-is-the-difference-between-a-uri-a-url-and-a-urn
https://www.w3.org/Protocols/rfc2616/rfc2616-sec10.html
https://en.wikipedia.org/wiki/List_of_HTTP_status_codes

ESP8266FirstWebServer
Theactualimplementationofawebserverismucheasierthanitsounds,becausetheESP8266ArduinoCoreincludessomegreat
librariesthathandleprettymucheverythingforyou.Let'slookatabasicHelloWorld!example.
#include<ESP8266WiFi.h>
#include<WiFiClient.h>
#include<ESP8266WiFiMulti.h>
#include<ESP8266mDNS.h>
#include<ESP8266WebServer.h>//IncludetheWebServerlibrary
ESP8266WiFiMultiwifiMulti;//CreateaninstanceoftheESP8266WiFiMulticlass,called'wifiMulti'
ESP8266WebServerserver(80);//CreateawebserverobjectthatlistensforHTTPrequestonport80
voidhandleRoot();//functionprototypesforHTTPhandlers
voidhandleNotFound();
voidsetup(void){
Serial.begin(115200);//StarttheSerialcommunicationtosendmessagestothecomputer
delay(10);
Serial.println('\n');
wifiMulti.addAP("ssid_from_AP_1","your_password_for_AP_1");//addWi-Finetworksyouwanttoconnectto
wifiMulti.addAP("ssid_from_AP_2","your_password_for_AP_2");
wifiMulti.addAP("ssid_from_AP_3","your_password_for_AP_3");
Serial.println("Connecting...");
inti=0;
while(wifiMulti.run()!=WL_CONNECTED){//WaitfortheWi-Fitoconnect:scanforWi-Finetworks,andconnecttothestrongestof
thenetworksabove
delay(250);
Serial.print('.');
}
Serial.println('\n');
Serial.print("Connectedto");
Serial.println(WiFi.SSID());//Telluswhatnetworkwe'reconnectedto
Serial.print("IPaddress:\t");
Serial.println(WiFi.localIP());//SendtheIPaddressoftheESP8266tothecomputer
if(MDNS.begin("esp8266")){//StartthemDNSresponderforesp8266.local
Serial.println("mDNSresponderstarted");
}else{
Serial.println("ErrorsettingupMDNSresponder!");
}
server.on("/",handleRoot);//Callthe'handleRoot'functionwhenaclientrequestsURI"/"
server.onNotFound(handleNotFound);//WhenaclientrequestsanunknownURI(i.e.somethingotherthan"/"),callfunction
"handleNotFound"
server.begin();//Actuallystarttheserver
Serial.println("HTTPserverstarted");
}
voidloop(void){
server.handleClient();//ListenforHTTPrequestsfromclients
}
voidhandleRoot(){
server.send(200,"text/plain","Helloworld!");//SendHTTPstatus200(Ok)andsendsometexttothebrowser/client
}
voidhandleNotFound(){
server.send(404,"text/plain","404:Notfound");//SendHTTPstatus404(NotFound)whenthere'snohandlerfortheURIinthe
request
}
There'salotofcodethat'sthesameasintheWi-FiandmDNSexamples.
Theactualservercodeisprettystraightforward.First,wecreateaserverinstancethatlistensforHTTPrequestsonport80.Thisisthe
defaultportforwebservers.Inthesetup,wetelltheserverwhattodowithcertainHTTPrequests.IftheURI'/'isrequested,the
servershouldreplywithaHTTPstatuscodeof200(Ok)andthensendaresponsewiththewords'Helloworld!'.Weputthecodefor
generatingaresponseinaseparatefunction,andthewetelltheservertoexecuteitwhen'/'isrequested,usingtheserver.on
function.
Wehaven'tspecifiedwhattheservershoulddoiftheclientrequestsanyURIotherthan'/'.ItshouldrespondwithanHTTPstatus404
(NotFound)andamessagefortheuser.Weputthisinafunctionaswell,anduseserver.onNotFoundtotellitthatitshouldexecuteit
whenitreceivesarequestforaURIthatwasn'tspecifiedwithserver.on.
ThenwestartlisteningforHTTPrequestsbyusingserver.begin.
Duringtheloop,weconstantlycheckifanewHTTPrequestisreceivedbyrunningserver.handleClient.IfhandleClientdetectsnew
requests,itwillautomaticallyexecutetherightfunctionsthatwespecifiedinthesetup.
Totestitout,uploadthesketch,openanewbrowsertab,andbrowsetohttp://esp8266.local.YoushouldgetawebpagesayingHello
world!.Ifyoutrytogotoadifferentpage,http://esp8266.local/test,forinstance,youshouldgeta404error:404:Notfound.
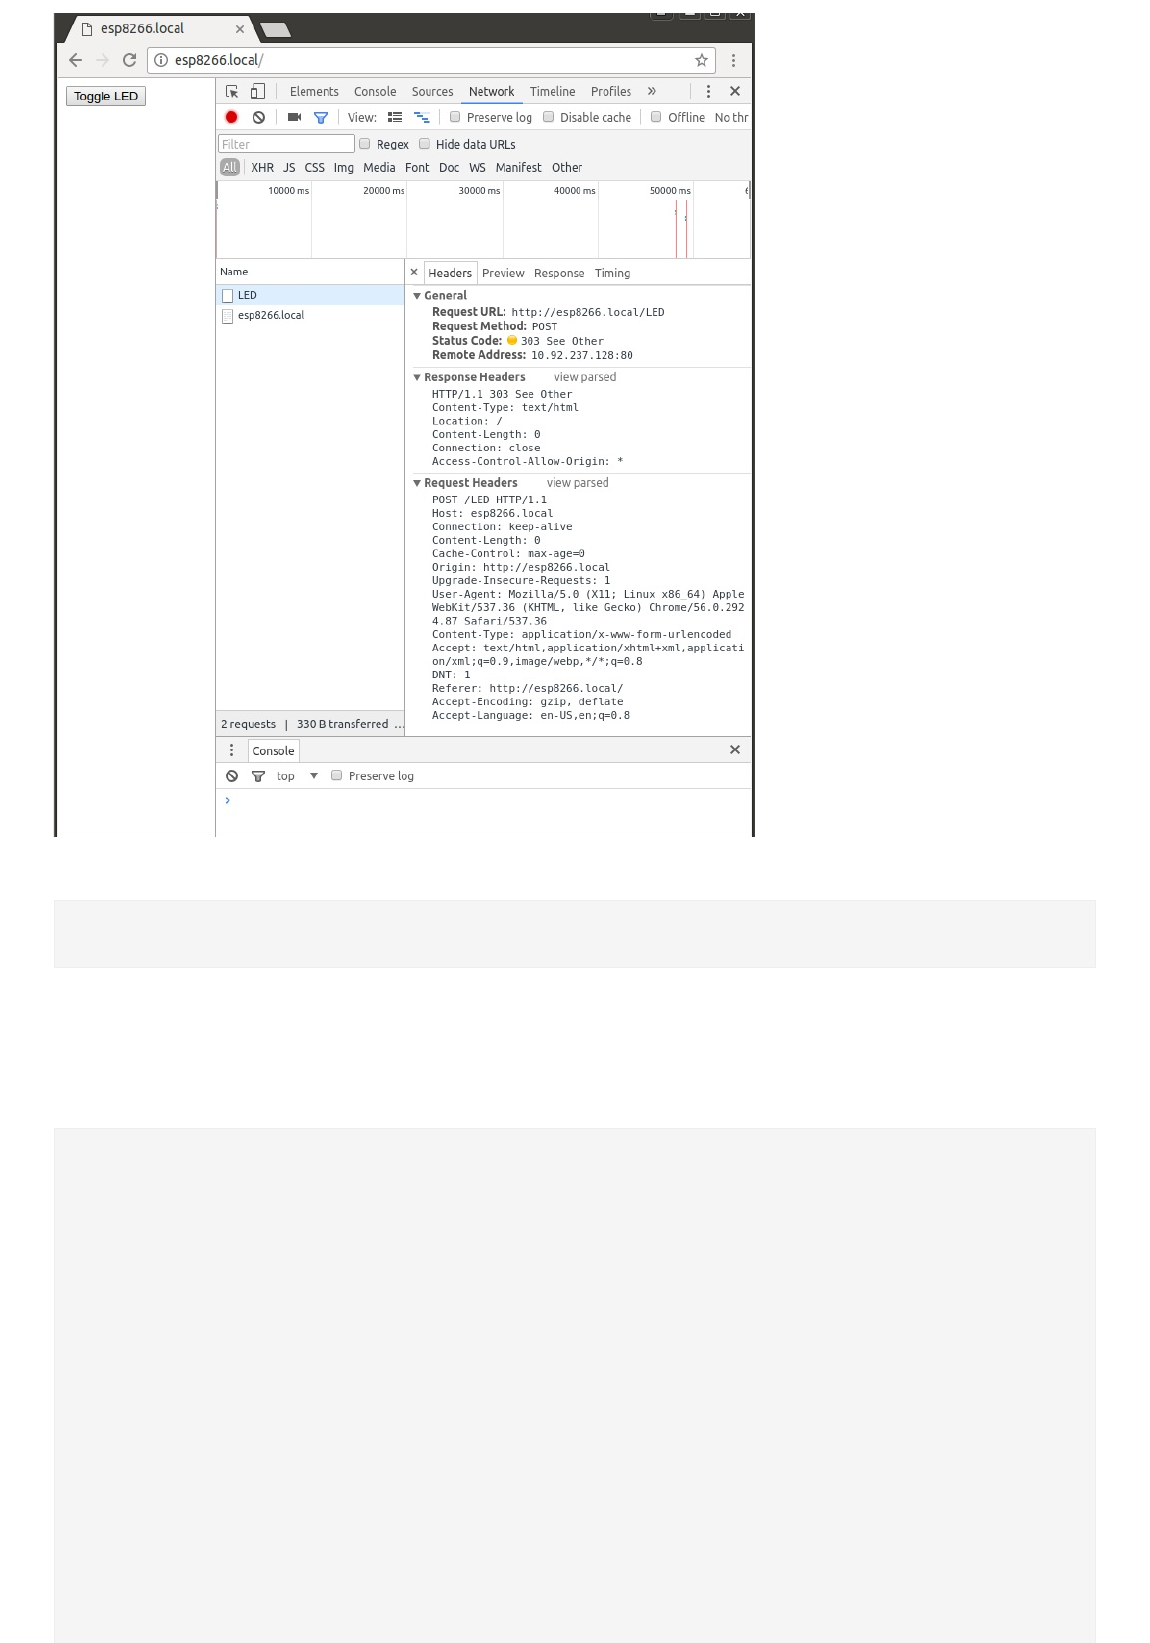
TurningonandoffanLEDoverWi-Fi
Wecanusethewebservertoserveinteractivepages,andtoreacttocertainPOSTrequest.Inthefollowingexample,theESP8266
hostsawebpagewithabutton.Whenthebuttonispressed,thebrowsersendsaPOSTrequestto/LED.WhentheESPreceivessucha
POSTrequestonthe/LEDURI,itwillturnonorofftheLED,andthenredirectthebrowserbacktothehomepagewiththebutton.
Inordertoperformthisredirect,theESPhastoaddaLocationheadertotheresponse,andusea303(SeeOther)HTTPstatuscode.
ThebuttontosendthePOSTrequestinthebrowserispartofanHTMLform.YouhavetospecifythetargetURItosendtherequestto,
andtherequestmethod,inthiscasethisis"/LED"andPOSTrespectively.
NotethatIchangedthecontenttypeoftheresponsefrom"text/plain"to"text/html".Ifyousenditasplaintext,thebrowserwill

displayitastextinsteadofinterpretingitasHTMLandshowingitasabutton.
#include<ESP8266WiFi.h>
#include<WiFiClient.h>
#include<ESP8266WiFiMulti.h>
#include<ESP8266mDNS.h>
#include<ESP8266WebServer.h>
ESP8266WiFiMultiwifiMulti;//CreateaninstanceoftheESP8266WiFiMulticlass,called'wifiMulti'
ESP8266WebServerserver(80);//CreateawebserverobjectthatlistensforHTTPrequestonport80
constintled=2;
voidhandleRoot();//functionprototypesforHTTPhandlers
voidhandleLED();
voidhandleNotFound();
voidsetup(void){
Serial.begin(115200);//StarttheSerialcommunicationtosendmessagestothecomputer
delay(10);
Serial.println('\n');
pinMode(led,OUTPUT);
wifiMulti.addAP("ssid_from_AP_1","your_password_for_AP_1");//addWi-Finetworksyouwanttoconnectto
wifiMulti.addAP("ssid_from_AP_2","your_password_for_AP_2");
wifiMulti.addAP("ssid_from_AP_3","your_password_for_AP_3");
Serial.println("Connecting...");
inti=0;
while(wifiMulti.run()!=WL_CONNECTED){//WaitfortheWi-Fitoconnect:scanforWi-Finetworks,andconnecttothestrongestof
thenetworksabove
delay(250);
Serial.print('.');
}
Serial.println('\n');
Serial.print("Connectedto");
Serial.println(WiFi.SSID());//Telluswhatnetworkwe'reconnectedto
Serial.print("IPaddress:\t");
Serial.println(WiFi.localIP());//SendtheIPaddressoftheESP8266tothecomputer
if(MDNS.begin("esp8266")){//StartthemDNSresponderforesp8266.local
Serial.println("mDNSresponderstarted");
}else{
Serial.println("ErrorsettingupMDNSresponder!");
}
server.on("/",HTTP_GET,handleRoot);//Callthe'handleRoot'functionwhenaclientrequestsURI"/"
server.on("/LED",HTTP_POST,handleLED);//Callthe'handleLED'functionwhenaPOSTrequestismadetoURI"/LED"
server.onNotFound(handleNotFound);//WhenaclientrequestsanunknownURI(i.e.somethingotherthan"/"),callfunction
"handleNotFound"
server.begin();//Actuallystarttheserver
Serial.println("HTTPserverstarted");
}
voidloop(void){
server.handleClient();//ListenforHTTPrequestsfromclients
}
voidhandleRoot(){//WhenURI/isrequested,sendawebpagewithabuttontotoggletheLED
server.send(200,"text/html","<formaction=\"/LED\"method=\"POST\"><inputtype=\"submit\"value=\"ToggleLED\"></form>");
}
voidhandleLED(){//IfaPOSTrequestismadetoURI/LED
digitalWrite(led,!digitalRead(led));//ChangethestateoftheLED
server.sendHeader("Location","/");//Addaheadertorespondwithanewlocationforthebrowsertogotothehomepageagain
server.send(303);//SenditbacktothebrowserwithanHTTPstatus303(SeeOther)toredirect
}
voidhandleNotFound(){
server.send(404,"text/plain","404:Notfound");//SendHTTPstatus404(NotFound)whenthere'snohandlerfortheURIinthe
request
}
Asyoucansee,theserver.onfunctionnowtakesthreeparameters:theURI,therequestmethod(GETorPOST)andthefunctionto
execute.
ConnectanLEDtoGPIO2,anduploadthesketch.Thengotohttp://esp8266.local/andclickthebuttontoturntheLEDonoroff.
YoucanopenthedeveloperoptionsinChrome(F12)tochecktheHTTPrequestthataremadewhenyouclickthebutton:you'llsee
thatitfirstsendaPOSTrequest,andthenreceivesa303(SeeOther)HTTPstatusasaresponse.TheresponsealsohasaLocation
headercontainingtheURI"/",sothebrowserwillsendaGETrequesttotheURIofthisnewlocation:
Ifyoucheckthepagesource(CTRL+U),youcanseethesimpleHTMLformthat'sused:
<formaction="/LED"method="POST">
<inputtype="submit"value="ToggleLED">
</form>
SendingdatatotheESPusingHTTPPOST
Inthepreviousexample,wesentanemptyPOSTrequesttotheESP8266.Inthepreviouschapterhowever,Iexplainedthatit's
possibletosendallkindsofdatainthebodyofthePOSTrequest.
Inthisexample,I'llshowyouhowtosendausernameandapasswordtotheESP.TheESPwillthencheckiftheyarecorrect,and
respondtotherequestwiththeappropriatepage.
#include<ESP8266WiFi.h>
#include<WiFiClient.h>
#include<ESP8266WiFiMulti.h>
#include<ESP8266mDNS.h>
#include<ESP8266WebServer.h>
ESP8266WiFiMultiwifiMulti;//CreateaninstanceoftheESP8266WiFiMulticlass,called'wifiMulti'
ESP8266WebServerserver(80);//CreateawebserverobjectthatlistensforHTTPrequestonport80
voidhandleRoot();//functionprototypesforHTTPhandlers
voidhandleLogin();
voidhandleNotFound();
voidsetup(void){
Serial.begin(115200);//StarttheSerialcommunicationtosendmessagestothecomputer
delay(10);
Serial.println('\n');
wifiMulti.addAP("ssid_from_AP_1","your_password_for_AP_1");//addWi-Finetworksyouwanttoconnectto
wifiMulti.addAP("ssid_from_AP_2","your_password_for_AP_2");
wifiMulti.addAP("ssid_from_AP_3","your_password_for_AP_3");
Serial.println("Connecting...");
inti=0;
while(wifiMulti.run()!=WL_CONNECTED){//WaitfortheWi-Fitoconnect:scanforWi-Finetworks,andconnecttothestrongestof
thenetworksabove
delay(250);
Serial.print('.');
}
Serial.println('\n');
Serial.print("Connectedto");
Serial.println(WiFi.SSID());//Telluswhatnetworkwe'reconnectedto
Serial.print("IPaddress:\t");

Serial.println(WiFi.localIP());//SendtheIPaddressoftheESP8266tothecomputer
if(MDNS.begin("esp8266")){//StartthemDNSresponderforesp8266.local
Serial.println("mDNSresponderstarted");
}else{
Serial.println("ErrorsettingupMDNSresponder!");
}
server.on("/",HTTP_GET,handleRoot);//Callthe'handleRoot'functionwhenaclientrequestsURI"/"
server.on("/login",HTTP_POST,handleLogin);//Callthe'handleLogin'functionwhenaPOSTrequestismadetoURI"/login"
server.onNotFound(handleNotFound);//WhenaclientrequestsanunknownURI(i.e.somethingotherthan"/"),callfunction
"handleNotFound"
server.begin();//Actuallystarttheserver
Serial.println("HTTPserverstarted");
}
voidloop(void){
server.handleClient();//ListenforHTTPrequestsfromclients
}
voidhandleRoot(){//WhenURI/isrequested,sendawebpagewithabuttontotoggletheLED
server.send(200,"text/html","<formaction=\"/login\"method=\"POST\"><inputtype=\"text\"name=\"username\"
placeholder=\"Username\"></br><inputtype=\"password\"name=\"password\"placeholder=\"Password\"></br><inputtype=\"submit\"
value=\"Login\"></form><p>Try'JohnDoe'and'password123'...</p>");
}
voidhandleLogin(){//IfaPOSTrequestismadetoURI/login
if(!server.hasArg("username")||!server.hasArg("password")
||server.arg("username")==NULL||server.arg("password")==NULL){//IfthePOSTrequestdoesn'thaveusernameandpassword
data
server.send(400,"text/plain","400:InvalidRequest");//Therequestisinvalid,sosendHTTPstatus400
return;
}
if(server.arg("username")=="JohnDoe"&&server.arg("password")=="password123"){//Ifboththeusernameandthepasswordare
correct
server.send(200,"text/html","<h1>Welcome,"+server.arg("username")+"!</h1><p>Loginsuccessful</p>");
}else{//Usernameandpassworddon'tmatch
server.send(401,"text/plain","401:Unauthorized");
}
}
voidhandleNotFound(){
server.send(404,"text/plain","404:Notfound");//SendHTTPstatus404(NotFound)whenthere'snohandlerfortheURIinthe
request
}
TheHTMLinhandleRootis:
<formaction="/login"method="POST">
<inputtype="text"name="username"placeholder="Username"></br>
<inputtype="password"name="password"placeholder="Password"></br>
<inputtype="submit"value="Login">
</form>
<p>
Try'JohnDoe'and'password123'...
</p>
Uploadthesketchandgotohttp://esp8266.local/,thentype'JohnDoe'intotheusernamefield,and'password123'intothepassword
field,andclick'Login'.Youshouldgetawelcomescreen.Ifyouleaveonorbothofthefieldsblank,youshouldgeta400(Bad
Request)error.Ifyouenterawrongusernameorpassword,youshouldgeta401(Unauthorized)error.
ThedataofthePOSTbodycanbeaccessedusingserver.arg("key"),andyoucancheckifaspecifickeyexistsusing
server.hasArg("key").ThekeynameontheESP8266correspondstothenameargumentintheHTMLformonthewebpage.
WhenwegetaPOSTrequest,wefirstcheckifthenecessaryarguments(usernameandpassword)arepresent.Ifthat'snotthecase,
wesenda400(InvalidRequest)status.
Thenwecheckifthecredentialsmatch'JohnDoe'&'password123'.Ifthat'sthecase,werespondwithastatus200(Ok)anda
welcomepage.Iftheusernameand/orpassworddoesn'tmatch,wesenda401(Unauthorized)status.
Inlinefunctions
Inthepreviousexamples,wepassedhandleRootandhandleNotFoundtotheserver.onfunctionasaparameter(callbackfunction).Insome
caseshowever,it'smorereadabletojustwritethedefinitionofthefunctioninline,likeso:
voidsetup(){
//...
server.onNotFound([](){
server.send(404,"text/plain","404:Notfound");
});
}

SPIFlashFileSystem
Upuntilnow,we'vealwaysincludedtheHTMLforourwebpagesasstringliteralsinoursketch.Thismakesourcodeveryhardto
read,andyou'llrunoutofmemoryratherquickly.
Ifyouremembertheintroduction,ImentionedtheSerialPeripheralInterfaceFlashFileSystem,orSPIFFSforshort.It'salight-weight
filesystemformicrocontrollerswithanSPIflashchip.Theon-boardflashchipoftheESP8266hasplentyofspaceforyourwebpages,
especiallyifyouhavethe1MB,2MBor4MBversion.
SPIFFSlet'syouaccesstheflashmemoryasifitwasanormalfilesystemliketheoneonyourcomputer(butmuchsimplerofcourse):
youcanreadandwritefiles,createfolders...
TheeasiestwaytolearnhowtouseSPIFFSistolookatsomeexamples.Butafileserverwithnofilestoserveisprettypointless,soI'll
explainhowtouploadfilestotheSPIFFSfirst.
UploadingfilestoSPIFFS
Toselecttherightfilestoupload,youhavetoplacetheminafoldercalleddata,insidethesketchfolderofyourproject:Openyour
sketchintheArduinoIDE,andhitCTRL+K.Waitforafileexplorerwindowtoopen,andcreateanewfoldernameddata.Copyyour
filesovertothisfolder.(Onlyusesmallfilesliketextfilesoricons.There'snotenoughspaceforlargephotosorvideos.)
Next,selectallfilesinthefolder(CTRL+A)andcheckthesizeofallfilescombined(don'tforgetsubfolders).GototheArduinoIDE
again,andunderTools>FlashSize,selectanoptionwiththerightflashsizeforyourboard,andaSPIFFSsizethatislargerthanthe
sizeofyourdatafolder.
Thenuploadthesketch.Whenthat'sfinished,makesurethattheSerialMonitorisclosed,thenopentheToolsmenu,andclick
ESP8266sketchdataupload.IfyourESPhasauto-resetandauto-program,itshouldworkautomatically,ifyoudon'thaveauto-
program,youhavetomanuallyenterprogrammodebeforeuploadingthedatatoSPIFFS.Theprocedureisexactlythesameas
enteringprogrammodebeforeuploadingasketch.
IfyougetanerrorsayingSPIFFS_writeerror(-10001):Filesystemisfull,thismeansthatyourfilesaretoolargetofitintotheSPIFFS
memory.SelectalargerSPIFFSsizeunderTools>FlashSize,ordeletesomefiles.
EvenifyourcomputersaysthatthefilesaresmallerthantheselectedSPIFFSsize,youcanstillgetthiserror:thishastodowithblock
sizes,andmetadatalikefileandfoldernamesthattakeupspaceaswell.
IfyouchangetheSPIFFSsize,youhavetoreuploadyoursketch,becausewhenyouchangetheSPIFFSsize,thememorylocationwill
bedifferent.TheprogramhastoknowtheupdatedSPIFFSaddressoffsettobeabletoreadthefiles.
SPIFFSFileServer
Thefollowingexampleisaverybasicfileserver:itjusttakestheURIoftheHTTPrequest,checksiftheURIpointstoafileinthe
SPIFFS,andifitfindsthefile,itsendsitasaresponse.
#include<ESP8266WiFi.h>
#include<WiFiClient.h>
#include<ESP8266WiFiMulti.h>
#include<ESP8266mDNS.h>
#include<ESP8266WebServer.h>
#include<FS.h>//IncludetheSPIFFSlibrary
ESP8266WiFiMultiwifiMulti;//CreateaninstanceoftheESP8266WiFiMulticlass,called'wifiMulti'
ESP8266WebServerserver(80);//CreateawebserverobjectthatlistensforHTTPrequestonport80
StringgetContentType(Stringfilename);//convertthefileextensiontotheMIMEtype
boolhandleFileRead(Stringpath);//sendtherightfiletotheclient(ifitexists)
voidsetup(){
Serial.begin(115200);//StarttheSerialcommunicationtosendmessagestothecomputer
delay(10);
Serial.println('\n');
wifiMulti.addAP("ssid_from_AP_1","your_password_for_AP_1");//addWi-Finetworksyouwanttoconnectto
wifiMulti.addAP("ssid_from_AP_2","your_password_for_AP_2");
wifiMulti.addAP("ssid_from_AP_3","your_password_for_AP_3");
Serial.println("Connecting...");
inti=0;
while(wifiMulti.run()!=WL_CONNECTED){//WaitfortheWi-Fitoconnect
delay(250);
Serial.print('.');
}
Serial.println('\n');
Serial.print("Connectedto");
Serial.println(WiFi.SSID());//Telluswhatnetworkwe'reconnectedto
Serial.print("IPaddress:\t");
Serial.println(WiFi.localIP());//SendtheIPaddressoftheESP8266tothecomputer
if(MDNS.begin("esp8266")){//StartthemDNSresponderforesp8266.local
Serial.println("mDNSresponderstarted");
}else{
Serial.println("ErrorsettingupMDNSresponder!");
}
SPIFFS.begin();//StarttheSPIFlashFilesSystem
server.onNotFound([](){//IftheclientrequestsanyURI
if(!handleFileRead(server.uri()))//senditifitexists
server.send(404,"text/plain","404:NotFound");//otherwise,respondwitha404(NotFound)error
});
server.begin();//Actuallystarttheserver
Serial.println("HTTPserverstarted");
}
voidloop(void){
server.handleClient();
}

StringgetContentType(Stringfilename){//convertthefileextensiontotheMIMEtype
if(filename.endsWith(".html"))return"text/html";
elseif(filename.endsWith(".css"))return"text/css";
elseif(filename.endsWith(".js"))return"application/javascript";
elseif(filename.endsWith(".ico"))return"image/x-icon";
return"text/plain";
}
boolhandleFileRead(Stringpath){//sendtherightfiletotheclient(ifitexists)
Serial.println("handleFileRead:"+path);
if(path.endsWith("/"))path+="index.html";//Ifafolderisrequested,sendtheindexfile
StringcontentType=getContentType(path);//GettheMIMEtype
if(SPIFFS.exists(path)){//Ifthefileexists
Filefile=SPIFFS.open(path,"r");//Openit
size_tsent=server.streamFile(file,contentType);//Andsendittotheclient
file.close();//Thenclosethefileagain
returntrue;
}
Serial.println("\tFileNotFound");
returnfalse;//Ifthefiledoesn'texist,returnfalse
}
Asyoucansee,wedon'tuseserver.oninthisexample.Instead,weuseserver.onNotFound:thiswillmatchanyURI,sincewedidn't
declareanyspecificURIhandlerslikeinthepreviousserverexamples.
WhenaURIisrequested,wecallthefunctionhandleFileRead.ThisfunctionchecksiftheURIoftheHTTPrequestisthepathtoan
existingfileintheSPIFFS.Ifthat'sthecase,itsendsthefilebacktotheclient.Ifthepathdoesn'texist,itreturnsfalse,anda404(Not
Found)HTTPstatuswillbesent.
TheMIMEtypeforthedifferentfilesisbasedonthefileextension.
Youcouldaddotherfiletypesaswell.Forinstance:
StringgetContentType(Stringfilename){
if(filename.endsWith(".htm"))return"text/html";
elseif(filename.endsWith(".html"))return"text/html";
elseif(filename.endsWith(".css"))return"text/css";
elseif(filename.endsWith(".js"))return"application/javascript";
elseif(filename.endsWith(".png"))return"image/png";
elseif(filename.endsWith(".gif"))return"image/gif";
elseif(filename.endsWith(".jpg"))return"image/jpeg";
elseif(filename.endsWith(".ico"))return"image/x-icon";
elseif(filename.endsWith(".xml"))return"text/xml";
elseif(filename.endsWith(".pdf"))return"application/x-pdf";
elseif(filename.endsWith(".zip"))return"application/x-zip";
elseif(filename.endsWith(".gz"))return"application/x-gzip";
return"text/plain";
}
ThisexampleisadaptedfromtheFSBrowserexamplebyHristoGochkov.
Compressingfiles
TheESP8266'sflashmemoryisn'thuge,andmosttextfiles,likehtml,cssetc.canbecompressedbyquitealargefactor.Modernweb
browsersacceptcompressedfilesasaresponse,sowe'lltakeadvantageofthisbyuploadingcompressedversionsofourhtmland
iconfilestotheSPIFFS,inordertosavespaceandbandwidth.
Todothis,weneedtoaddtheGNUzipfiletypetoourlistofMIMEtypes:
StringgetContentType(Stringfilename){
if(filename.endsWith(".html"))return"text/html";
elseif(filename.endsWith(".css"))return"text/css";
elseif(filename.endsWith(".js"))return"application/javascript";
elseif(filename.endsWith(".ico"))return"image/x-icon";
elseif(filename.endsWith(".gz"))return"application/x-gzip";
return"text/plain";
}
AndweneedtochangeourhandleFileReadfunctionaswell:
boolhandleFileRead(Stringpath){//sendtherightfiletotheclient(ifitexists)
Serial.println("handleFileRead:"+path);
if(path.endsWith("/"))path+="index.html";//Ifafolderisrequested,sendtheindexfile
StringcontentType=getContentType(path);//GettheMIMEtype
StringpathWithGz=path+".gz";
if(SPIFFS.exists(pathWithGz)||SPIFFS.exists(path)){//Ifthefileexists,eitherasacompressedarchive,ornormal
if(SPIFFS.exists(pathWithGz))//Ifthere'sacompressedversionavailable
path+=".gz";//Usethecompressedversion
Filefile=SPIFFS.open(path,"r");//Openthefile
size_tsent=server.streamFile(file,contentType);//Sendittotheclient
file.close();//Closethefileagain
Serial.println(String("\tSentfile:")+path);
returntrue;
}
Serial.println(String("\tFileNotFound:")+path);
returnfalse;//Ifthefiledoesn'texist,returnfalse
}
Now,trycompressingsomeofthefilestotheGNUzipformat(.gz),anduploadingthemtoSPIFFS.Oryoucanjustdownloadthenew
datafolder(unzipitfirst).
Everytimeaclientrequestsacertainfile,theESPwillcheckifacompressedversionisavailable.Ifso,itwillusethatinsteadofthe
uncompressedfile.TheoutputintheSerialMonitorshouldlooksomethinglikethis:
handleFileRead:/
Sentfile:/index.html.gz
handleFileRead:/main.css
Sentfile:/main.css
handleFileRead:/JavaScript.js
Sentfile:/JavaScript.js
handleFileRead:/folder/JavaScript.js
Sentfile:/folder/JavaScript.js
handleFileRead:/favicon.ico
Sentfile:/favicon.ico.gz

Itautomaticallydetectedthatithadtosendthecompressedversionsofindex.htmlandfavicon.ico.

Uploadingfilestotheserver
Therearescenarioswhereyoumaywanttouploadnewfilestotheserverfromwithinabrowser,withouthavingtoconnecttothe
ESP8266overUSBinordertoflashanewSPIFFSimage.
Inthischapter,I'llshowyouhowtouseHTMLformsandPOSTrequeststouploadoreditfilestoourlittleESPserver.
Client:HTMLform
TheeasiestwaytouploadfilesisbyusinganHTMLform,justlikeinthefirstserverexamples,whereweusedformstoturnon/off
LEDs,andtosendthelogincredentialsbacktotheserver.Ifyouchooseafileinput,youautomaticallygetafilepicker,andthe
browserwillsendtherightPOSTrequesttotheserver,withthefileattached.
<formmethod="post"enctype="multipart/form-data">
<inputtype="file"name="name">
<inputclass="button"type="submit"value="Upload">
</form>
Server
IntheESPcode,wehavetoaddahandlertoourserverthathandlesPOSTrequeststothe/uploadURI.WhenitreceivesaPOST
request,itsendsastatus200(OK)backtotheclienttostartreceivingthefile,andthenwriteittotheSPIFFS.Whenthefileis
uploadedsuccessfully,itredirectstheclienttoasuccesspage.
TherelevantnewcodeisfoundinthesetupandthehandleFileUploadfunction.
#include<ESP8266WiFi.h>
#include<WiFiClient.h>
#include<ESP8266WiFiMulti.h>
#include<ESP8266mDNS.h>
#include<ESP8266WebServer.h>
#include<FS.h>//IncludetheSPIFFSlibrary
ESP8266WiFiMultiwifiMulti;//CreateaninstanceoftheESP8266WiFiMulticlass,called'wifiMulti'
ESP8266WebServerserver(80);//CreateawebserverobjectthatlistensforHTTPrequestonport80
FilefsUploadFile;//aFileobjecttotemporarilystorethereceivedfile
StringgetContentType(Stringfilename);//convertthefileextensiontotheMIMEtype
boolhandleFileRead(Stringpath);//sendtherightfiletotheclient(ifitexists)
voidhandleFileUpload();//uploadanewfiletotheSPIFFS
voidsetup(){
Serial.begin(115200);//StarttheSerialcommunicationtosendmessagestothecomputer
delay(10);
Serial.println('\n');
wifiMulti.addAP("ssid_from_AP_1","your_password_for_AP_1");//addWi-Finetworksyouwanttoconnectto
wifiMulti.addAP("ssid_from_AP_2","your_password_for_AP_2");
wifiMulti.addAP("ssid_from_AP_3","your_password_for_AP_3");
Serial.println("Connecting...");
inti=0;
while(wifiMulti.run()!=WL_CONNECTED){//WaitfortheWi-Fitoconnect
delay(1000);
Serial.print(++i);Serial.print('');
}
Serial.println('\n');
Serial.print("Connectedto");
Serial.println(WiFi.SSID());//Telluswhatnetworkwe'reconnectedto
Serial.print("IPaddress:\t");
Serial.println(WiFi.localIP());//SendtheIPaddressoftheESP8266tothecomputer
if(!MDNS.begin("esp8266")){//StartthemDNSresponderforesp8266.local
Serial.println("ErrorsettingupMDNSresponder!");
}
Serial.println("mDNSresponderstarted");
SPIFFS.begin();//StarttheSPIFlashFilesSystem
server.on("/upload",HTTP_GET,[](){//iftheclientrequeststheuploadpage
if(!handleFileRead("/upload.html"))//senditifitexists
server.send(404,"text/plain","404:NotFound");//otherwise,respondwitha404(NotFound)error
});
server.on("/upload",HTTP_POST,//iftheclientpoststotheuploadpage
[](){server.send(200);},//Sendstatus200(OK)totelltheclientwearereadytoreceive
handleFileUpload//Receiveandsavethefile
);
server.onNotFound([](){//IftheclientrequestsanyURI
if(!handleFileRead(server.uri()))//senditifitexists
server.send(404,"text/plain","404:NotFound");//otherwise,respondwitha404(NotFound)error
});
server.begin();//Actuallystarttheserver
Serial.println("HTTPserverstarted");
}
voidloop(){
server.handleClient();
}
StringgetContentType(Stringfilename){//convertthefileextensiontotheMIMEtype
if(filename.endsWith(".html"))return"text/html";
elseif(filename.endsWith(".css"))return"text/css";
elseif(filename.endsWith(".js"))return"application/javascript";
elseif(filename.endsWith(".ico"))return"image/x-icon";
elseif(filename.endsWith(".gz"))return"application/x-gzip";
return"text/plain";
}

boolhandleFileRead(Stringpath){//sendtherightfiletotheclient(ifitexists)
Serial.println("handleFileRead:"+path);
if(path.endsWith("/"))path+="index.html";//Ifafolderisrequested,sendtheindexfile
StringcontentType=getContentType(path);//GettheMIMEtype
StringpathWithGz=path+".gz";
if(SPIFFS.exists(pathWithGz)||SPIFFS.exists(path)){//Ifthefileexists,eitherasacompressedarchive,ornormal
if(SPIFFS.exists(pathWithGz))//Ifthere'sacompressedversionavailable
path+=".gz";//Usethecompressedverion
Filefile=SPIFFS.open(path,"r");//Openthefile
size_tsent=server.streamFile(file,contentType);//Sendittotheclient
file.close();//Closethefileagain
Serial.println(String("\tSentfile:")+path);
returntrue;
}
Serial.println(String("\tFileNotFound:")+path);//Ifthefiledoesn'texist,returnfalse
returnfalse;
}
voidhandleFileUpload(){//uploadanewfiletotheSPIFFS
HTTPUpload&upload=server.upload();
if(upload.status==UPLOAD_FILE_START){
Stringfilename=upload.filename;
if(!filename.startsWith("/"))filename="/"+filename;
Serial.print("handleFileUploadName:");Serial.println(filename);
fsUploadFile=SPIFFS.open(filename,"w");//OpenthefileforwritinginSPIFFS(createifitdoesn'texist)
filename=String();
}elseif(upload.status==UPLOAD_FILE_WRITE){
if(fsUploadFile)
fsUploadFile.write(upload.buf,upload.currentSize);//Writethereceivedbytestothefile
}elseif(upload.status==UPLOAD_FILE_END){
if(fsUploadFile){//Ifthefilewassuccessfullycreated
fsUploadFile.close();//Closethefileagain
Serial.print("handleFileUploadSize:");Serial.println(upload.totalSize);
server.sendHeader("Location","/success.html");//Redirecttheclienttothesuccesspage
server.send(303);
}else{
server.send(500,"text/plain","500:couldn'tcreatefile");
}
}
}
ThehandleFileUploadfunctionjustwritesthefileattachedtothePOSTrequesttoSPIFFS.
Ifyouwantouseotherfiletypesaswell,youcanjustaddthemtothegetContentTypefunction.
Uploadingfiles
TouploadanewfiletotheESP,ortoupdateanexistingfile,justgotohttp://esp8266.local/upload,clicktheChooseFilebutton,select
thefileyouwishtoupload,andclickUpload.YoucannowentertheURLintotheURLbar,andopenthenewfile.
Anoteonsafety
Thisexampleisn'tverysecure(obviously).EveryonethatcanconnecttotheESPcanuploadnewfiles,oredittheexistingfilesand
insertXSScode,forexample.There'salsonotalotoferrorchecking/handling,likecheckingifthere'senoughspaceintheSPIFFSto
uploadanewfile,etc.
Advancedexample
ThecodefortheseSPIFFSserverexamplescomes(forthemostpart)fromanexamplewrittenbyHristoGochkov.Youcanfinditunder
File>Examples>ESP8266WebServer>FSBrowser.Ithasawebinterfaceforbrowsingandeditingfilesinyourbrowser,andhas
someothernicefeaturesaswell.

OverTheAirUpdates
UploadingoverSerialisfineduringdevelopment,whenyouhaveaccesstotheSerialpinsandtheUSBport.Butonceyourprojectis
finished,andyouputitinsideanenclosure,itnotthateasytouploadupdateswithbugfixesornewfeatures.
AsolutiontothisproblemisOverTheAirupdating,orOTAforshort.Asthenameimplies,thistechnologyallowsyoutouploadnew
codeoverWi-Fi,insteadofSerial.
Theonlydisadvantageisthatyouhavetoexplicitlyaddthecodeforittoeverysketchyouupload.Youalsoneedaflashchipthatis
twicethesizeofyoursketch,soitwon'tworkfor512kBboards.(Ithastodownloadthenewsketchwhilestillrunningtheoldcode.)
Let'stakealookatanexample...
BlinkOTA
ThefollowingexampleisbasicallyBlinkWithoutDelay,butwiththenecessaryOTAandWi-Ficodeaddedaswell.
#include<ESP8266WiFi.h>
#include<ESP8266WiFiMulti.h>
#include<ArduinoOTA.h>
ESP8266WiFiMultiwifiMulti;//CreateaninstanceoftheESP8266WiFiMulticlass,called'wifiMulti'
constbyteled=13;
voidsetup(){
Serial.begin(115200);//StarttheSerialcommunicationtosendmessagestothecomputer
delay(10);
Serial.println('\n');
wifiMulti.addAP("ssid_from_AP_1","your_password_for_AP_1");//addWi-Finetworksyouwanttoconnectto
wifiMulti.addAP("ssid_from_AP_2","your_password_for_AP_2");
wifiMulti.addAP("ssid_from_AP_3","your_password_for_AP_3");
Serial.println("Connecting...");
inti=0;
while(wifiMulti.run()!=WL_CONNECTED){//WaitfortheWi-Fitoconnect
delay(250);
Serial.print('.');
}
Serial.println('\n');
Serial.print("Connectedto");
Serial.println(WiFi.SSID());//Telluswhatnetworkwe'reconnectedto
Serial.print("IPaddress:\t");
Serial.println(WiFi.localIP());//SendtheIPaddressoftheESP8266tothecomputer
ArduinoOTA.setHostname("ESP8266");
ArduinoOTA.setPassword("esp8266");
ArduinoOTA.onStart([](){
Serial.println("Start");
});
ArduinoOTA.onEnd([](){
Serial.println("\nEnd");
});
ArduinoOTA.onProgress([](unsignedintprogress,unsignedinttotal){
Serial.printf("Progress:%u%%\r",(progress/(total/100)));
});
ArduinoOTA.onError([](ota_error_terror){
Serial.printf("Error[%u]:",error);
if(error==OTA_AUTH_ERROR)Serial.println("AuthFailed");
elseif(error==OTA_BEGIN_ERROR)Serial.println("BeginFailed");
elseif(error==OTA_CONNECT_ERROR)Serial.println("ConnectFailed");
elseif(error==OTA_RECEIVE_ERROR)Serial.println("ReceiveFailed");
elseif(error==OTA_END_ERROR)Serial.println("EndFailed");
});
ArduinoOTA.begin();
Serial.println("OTAready");
pinMode(led,OUTPUT);
digitalWrite(led,1);
}
unsignedlongpreviousTime=millis();
constunsignedlonginterval=1000;
voidloop(){
ArduinoOTA.handle();
unsignedlongdiff=millis()-previousTime;
if(diff>interval){
digitalWrite(led,!digitalRead(led));//ChangethestateoftheLED
previousTime+=diff;
}
}
AddyourWi-Ficredentials,anduploadthesketchoverSerial.ConnectanLED(+resistor)topin13.ThenrestarttheIDE(youhaveto
closeallwindows).GotoTools>Port,andyoushouldgetanewoption:NetworkPorts:ESP8266at192.168.1.x.Selectit.
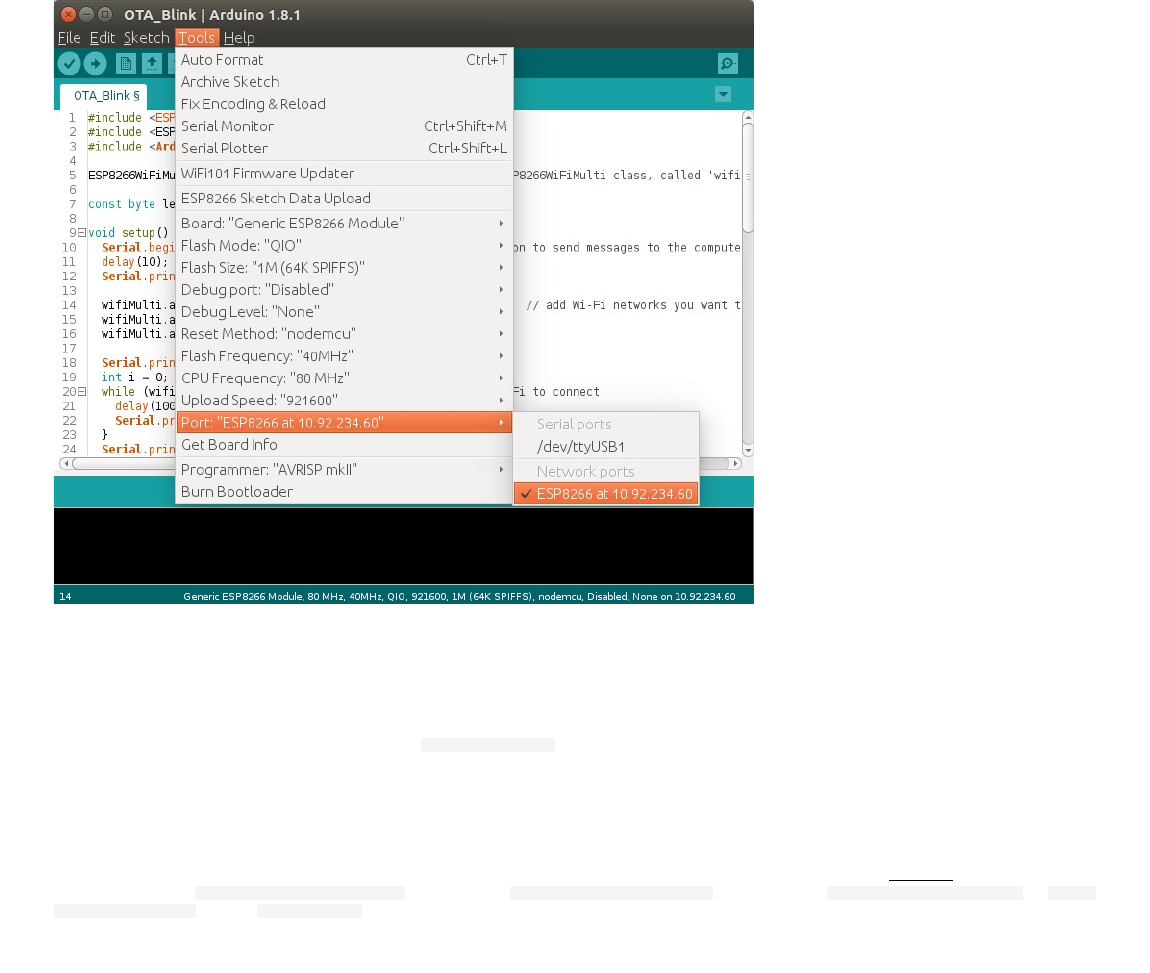
Next,changetheintervalonline59from1000to500milliseconds,andclickupload.Youshouldgetapasswordprompt:enter
"esp8266".Thispasswordissetonline31,soyoucanchangeitifyouwantto.Youcanalsodeleteline31altogethertouseitwithout
apassword,butit'snotrecommended-forobvioussecurityreasons.
Thesketchshoulduploadjustfine,andoncetheESPhasresetitself,theLEDshouldblinktwiceasfast.
Onceinawhile,youmightgetanerrorsaying[ERROR]:NoAnswer.Ifthishappens,justenterthepassword,andtryagain.
SerialMonitorOTA
UsingtheSerialMonitoroverWi-Fiisnotpossible(yet?).Whenyoutrytoopenit,you'llbepromptedapassword,enteringthe
passwordwon'twork,becausethereisnoSSHsupporttoaccesstheESP'sconsole.
YoucanuseadifferentprogramtogetdebugoutputfromthephysicalSerialport.OnWindows,youcantryPortmon.OnLinux,you
cantryGTKTerm(sudoapt-getinstallgtkterm)orScreen(sudoapt-getinstallscreentoinstall,andscreen/dev/ttyUSB0115200orscreen
/dev/ttyACM0115200torun;CTRL+A,CTRL+Dtoexit).

WebSocketcommunication
Upuntilnow,we'vealwaysusedlinks(GET)andHTMLforms(POST)togetdatafromtheESP,ortosenddatatoit.Thisalways
resultedinabrowsernavigationaction.TherearemanysituationswhereyouwanttosenddatatotheESPwithoutrefreshingthe
page.
OnewaytodothisisbyusingAJAXandXMLHTTPrequests.ThedisadvantageisthatyouhavetoestablishanewTCPconnectionfor
everymessageyousend.Thisaddsaloadoflatency.
WebSocketisatechnologythatkeepstheTCPconnectionopen,soyoucanconstantlysenddatabackandforthbetweentheESPand
theclient,withlowlatency.Andsinceit'sTCP,you'resurethatthepacketswillarriveintact.
ControllingRGBLEDsfromawebinterfaceusingWebSocket
TolearnhowtouseWebSockets,Icreatedthiscomprehensiveexample,itusesprettymucheverythingwe'vecoveredsofar.
TheESPhostsawebpagewiththreesliderstosetthered,greenandbluelevelsofanRGBLED(orLEDstrip).There'salsoabuttonto
turnonarainboweffectthatcyclesthroughtheentirecolorwheel.ColordataistransmittedfromthebrowsertotheESPviaa
WebSocketconnection.
YoucanconnecttotheESPdirectly,usingitasanAP,orlettheESPconnecttoadifferentAP.YoucanusemDNStoopenthe
webpage,bybrowsingtohttp://esp8266.local.
AllfilesarestoredintheESP'sSPIFFS,andyoucanuploadnewfiles,orupdatefilesviaawebinterface.
YoucanalsousetheOTAservicetouploadnewfirmware(sketches)overWi-Fi.
Improvingreadability
Whendealingwithlargeandcomplicatedprograms,it'sagoodideatomakeabstractionofsomethings,andcreatefunctionswitha
descriptivenameinsteadofendlesslinesofmeaninglesscode.
Evenifyouhavelotsofcommentsinyourcode,it'llbeveryhardtopreserveanoverview.Usingfunctionswillgreatlyimprovethe
readabilityofyourcode.
Sojustsplitupthecodeintodifferentpartsandmoveallpiecestofunctionsatthebottomofyoursketch,oreventodifferentfiles.
Inthefollowingexample,thesetupwasverylongandcluttered,soIsplititupintoseveraldifferentfunctions:onetoconnecttothe
Wi-Fi,onetostarttheOTAupdateservice,onetostarttheSPIFFS...andsoon.
DownloadingWebSocketsforArduino
We'llbeusingthearduinoWebSocketslibrarybyLinks2004.DownloaditfromGitHubandinstallit.(Sketch>IncludeLibrary>Add
.ZIPLibrary...)
Libraries,constantsandglobals
Atthetopofthesketchwe'llincludethenecessarylibraries,createsomeglobalserverandfileobjectslikeinthepreviousexamples,
andsomeconstantsforthehostname,APssid,passwords,LEDpins...
#include<ESP8266WiFi.h>
#include<ESP8266WiFiMulti.h>
#include<ArduinoOTA.h>
#include<ESP8266WebServer.h>
#include<ESP8266mDNS.h>
#include<FS.h>
#include<WebSocketsServer.h>
ESP8266WiFiMultiwifiMulti;//CreateaninstanceoftheESP8266WiFiMulticlass,called'wifiMulti'
ESP8266WebServerserver=ESP8266WebServer(80);//createawebserveronport80
WebSocketsServerwebSocket=WebSocketsServer(81);//createawebsocketserveronport81
FilefsUploadFile;//aFilevariabletotemporarilystorethereceivedfile
constchar*ssid="ESP8266AccessPoint";//ThenameoftheWi-Finetworkthatwillbecreated
constchar*password="thereisnospoon";//Thepasswordrequiredtoconnecttoit,leaveblankforanopennetwork
constchar*OTAName="ESP8266";//AnameandapasswordfortheOTAservice
constchar*OTAPassword="esp8266";
#defineLED_RED15//specifythepinswithanRGBLEDconnected
#defineLED_GREEN12
#defineLED_BLUE13
constchar*mdnsName="esp8266";//DomainnameforthemDNSresponder
Youshouldalreadybefamiliarwithmostofthiscode.TheonlynewpartistheWebSocketserverlibrarythatisincluded,andthe
WebSocketserverobject,butthisshouldn'tbeaproblem.
Setup
voidsetup(){
pinMode(LED_RED,OUTPUT);//thepinswithLEDsconnectedareoutputs
pinMode(LED_GREEN,OUTPUT);
pinMode(LED_BLUE,OUTPUT);
Serial.begin(115200);//StarttheSerialcommunicationtosendmessagestothecomputer
delay(10);
Serial.println("\r\n");
startWiFi();//StartaWi-Fiaccesspoint,andtrytoconnecttosomegivenaccesspoints.Thenwaitforeitheran
APorSTAconnection
startOTA();//StarttheOTAservice

startSPIFFS();//StarttheSPIFFSandlistallcontents
startWebSocket();//StartaWebSocketserver
startMDNS();//StartthemDNSresponder
startServer();//StartaHTTPserverwithafilereadhandlerandanuploadhandler
}
Asyoucansee,thesetupisnowmuchmorecondensedandgivesamuchbetteroverviewofwhatit'sdoing.Tounderstandthe
program,youdon'thavetoknoweachindividualstepthatisrequiredtoconnecttoaWi-Finetwork,it'senoughtoknowthatitwill
connecttoaWi-Finetwork,becausethat'swhatthestartWiFifunctiondoes.
Loop
boolrainbow=false;//Therainboweffectisturnedoffonstartup
unsignedlongprevMillis=millis();
inthue=0;
voidloop(){
webSocket.loop();//constantlycheckforwebsocketevents
server.handleClient();//runtheserver
ArduinoOTA.handle();//listenforOTAevents
if(rainbow){//iftherainboweffectisturnedon
if(millis()>prevMillis+32){
if(++hue==360)//Cyclethroughthecolorwheel(incrementbyonedegreeevery32ms)
hue=0;
setHue(hue);//SettheRGBLEDtotherightcolor
prevMillis=millis();
}
}
}
Samegoesfortheloop:mostoftheworkisdonebythefirstthreefunctionsthathandletheWebSocketcommunication,HTTP
requestsandOTAupdates.Whensuchaneventhappens,theappropriatehandlerfunctionswillbeexecuted.Thesearedefined
elsewhere.
Thesecondpartistherainboweffect.Ifitisturnedon,itcyclesthroughthecolorwheelandsetsthecolortotheRGBLED.
Ifyoudon'tunderstandwhyIusemillis(),youcantakealookattheBlinkWithoutDelayexample.
Setupfunctions
voidstartWiFi(){//StartaWi-Fiaccesspoint,andtrytoconnecttosomegivenaccesspoints.ThenwaitforeitheranAPorSTA
connection
WiFi.softAP(ssid,password);//Starttheaccesspoint
Serial.print("AccessPoint\"");
Serial.print(ssid);
Serial.println("\"started\r\n");
wifiMulti.addAP("ssid_from_AP_1","your_password_for_AP_1");//addWi-Finetworksyouwanttoconnectto
wifiMulti.addAP("ssid_from_AP_2","your_password_for_AP_2");
wifiMulti.addAP("ssid_from_AP_3","your_password_for_AP_3");
Serial.println("Connecting");
while(wifiMulti.run()!=WL_CONNECTED&&WiFi.softAPgetStationNum()<1){//WaitfortheWi-Fitoconnect
delay(250);
Serial.print('.');
}
Serial.println("\r\n");
if(WiFi.softAPgetStationNum()==0){//IftheESPisconnectedtoanAP
Serial.print("Connectedto");
Serial.println(WiFi.SSID());//Telluswhatnetworkwe'reconnectedto
Serial.print("IPaddress:\t");
Serial.print(WiFi.localIP());//SendtheIPaddressoftheESP8266tothecomputer
}else{//IfastationisconnectedtotheESPSoftAP
Serial.print("StationconnectedtoESP8266AP");
}
Serial.println("\r\n");
}
voidstartOTA(){//StarttheOTAservice
ArduinoOTA.setHostname(OTAName);
ArduinoOTA.setPassword(OTAPassword);
ArduinoOTA.onStart([](){
Serial.println("Start");
digitalWrite(LED_RED,0);//turnofftheLEDs
digitalWrite(LED_GREEN,0);
digitalWrite(LED_BLUE,0);
});
ArduinoOTA.onEnd([](){
Serial.println("\r\nEnd");
});
ArduinoOTA.onProgress([](unsignedintprogress,unsignedinttotal){
Serial.printf("Progress:%u%%\r",(progress/(total/100)));
});
ArduinoOTA.onError([](ota_error_terror){
Serial.printf("Error[%u]:",error);
if(error==OTA_AUTH_ERROR)Serial.println("AuthFailed");
elseif(error==OTA_BEGIN_ERROR)Serial.println("BeginFailed");
elseif(error==OTA_CONNECT_ERROR)Serial.println("ConnectFailed");
elseif(error==OTA_RECEIVE_ERROR)Serial.println("ReceiveFailed");
elseif(error==OTA_END_ERROR)Serial.println("EndFailed");
});
ArduinoOTA.begin();
Serial.println("OTAready\r\n");
}
voidstartSPIFFS(){//StarttheSPIFFSandlistallcontents
SPIFFS.begin();//StarttheSPIFlashFileSystem(SPIFFS)
Serial.println("SPIFFSstarted.Contents:");
{
Dirdir=SPIFFS.openDir("/");

while(dir.next()){//Listthefilesystemcontents
StringfileName=dir.fileName();
size_tfileSize=dir.fileSize();
Serial.printf("\tFSFile:%s,size:%s\r\n",fileName.c_str(),formatBytes(fileSize).c_str());
}
Serial.printf("\n");
}
}
voidstartWebSocket(){//StartaWebSocketserver
webSocket.begin();//startthewebsocketserver
webSocket.onEvent(webSocketEvent);//ifthere'sanincommingwebsocketmessage,gotofunction'webSocketEvent'
Serial.println("WebSocketserverstarted.");
}
voidstartMDNS(){//StartthemDNSresponder
MDNS.begin(mdnsName);//startthemulticastdomainnameserver
Serial.print("mDNSresponderstarted:http://");
Serial.print(mdnsName);
Serial.println(".local");
}
voidstartServer(){//StartaHTTPserverwithafilereadhandlerandanuploadhandler
server.on("/edit.html",HTTP_POST,[](){//IfaPOSTrequestissenttothe/edit.htmladdress,
server.send(200,"text/plain","");
},handleFileUpload);//goto'handleFileUpload'
server.onNotFound(handleNotFound);//ifsomeonerequestsanyotherfileorpage,gotofunction'handleNotFound'
//andcheckifthefileexists
server.begin();//starttheHTTPserver
Serial.println("HTTPserverstarted.");
}
Thesearethefunctiondefinitionsofthefunctionsusedinthesetup.Nothingnewhere,apartfromthestartWebSocketfunction.You
justhavetostarttheWebSocketserverusingthebeginmethod,andthengiveitacallbackfunctionthatisexecutedwhentheESP
receivesaWebSocketmessage.
Serverhandlers
Thisisthecodethatisexecutedoncertainserver-relatedevents,likewhenanHTTPrequestisreceived,whenafileisbeing
uploaded,whenthere'sanincomingWebSocketmessage...etc.
voidhandleNotFound(){//iftherequestedfileorpagedoesn'texist,returna404notfounderror
if(!handleFileRead(server.uri())){//checkifthefileexistsintheflashmemory(SPIFFS),ifso,sendit
server.send(404,"text/plain","404:FileNotFound");
}
}
boolhandleFileRead(Stringpath){//sendtherightfiletotheclient(ifitexists)
Serial.println("handleFileRead:"+path);
if(path.endsWith("/"))path+="index.html";//Ifafolderisrequested,sendtheindexfile
StringcontentType=getContentType(path);//GettheMIMEtype
StringpathWithGz=path+".gz";
if(SPIFFS.exists(pathWithGz)||SPIFFS.exists(path)){//Ifthefileexists,eitherasacompressedarchive,ornormal
if(SPIFFS.exists(pathWithGz))//Ifthere'sacompressedversionavailable
path+=".gz";//Usethecompressedverion
Filefile=SPIFFS.open(path,"r");//Openthefile
size_tsent=server.streamFile(file,contentType);//Sendittotheclient
file.close();//Closethefileagain
Serial.println(String("\tSentfile:")+path);
returntrue;
}
Serial.println(String("\tFileNotFound:")+path);//Ifthefiledoesn'texist,returnfalse
returnfalse;
}
voidhandleFileUpload(){//uploadanewfiletotheSPIFFS
HTTPUpload&upload=server.upload();
Stringpath;
if(upload.status==UPLOAD_FILE_START){
path=upload.filename;
if(!path.startsWith("/"))path="/"+path;
if(!path.endsWith(".gz")){//Thefileserveralwaysprefersacompressedversionofafile
StringpathWithGz=path+".gz";//Soifanuploadedfileisnotcompressed,theexistingcompressed
if(SPIFFS.exists(pathWithGz))//versionofthatfilemustbedeleted(ifitexists)
SPIFFS.remove(pathWithGz);
}
Serial.print("handleFileUploadName:");Serial.println(path);
fsUploadFile=SPIFFS.open(path,"w");//OpenthefileforwritinginSPIFFS(createifitdoesn'texist)
path=String();
}elseif(upload.status==UPLOAD_FILE_WRITE){
if(fsUploadFile)
fsUploadFile.write(upload.buf,upload.currentSize);//Writethereceivedbytestothefile
}elseif(upload.status==UPLOAD_FILE_END){
if(fsUploadFile){//Ifthefilewassuccessfullycreated
fsUploadFile.close();//Closethefileagain
Serial.print("handleFileUploadSize:");Serial.println(upload.totalSize);
server.sendHeader("Location","/success.html");//Redirecttheclienttothesuccesspage
server.send(303);
}else{
server.send(500,"text/plain","500:couldn'tcreatefile");
}
}
}
voidwebSocketEvent(uint8_tnum,WStype_ttype,uint8_t*payload,size_tlenght){//WhenaWebSocketmessageisreceived
switch(type){
caseWStype_DISCONNECTED://ifthewebsocketisdisconnected
Serial.printf("[%u]Disconnected!\n",num);
break;
caseWStype_CONNECTED:{//ifanewwebsocketconnectionisestablished
IPAddressip=webSocket.remoteIP(num);
Serial.printf("[%u]Connectedfrom%d.%d.%d.%durl:%s\n",num,ip[0],ip[1],ip[2],ip[3],payload);
rainbow=false;//Turnrainbowoffwhenanewconnectionisestablished
}
break;
caseWStype_TEXT://ifnewtextdataisreceived
Serial.printf("[%u]getText:%s\n",num,payload);
if(payload[0]=='#'){//wegetRGBdata

uint32_trgb=(uint32_t)strtol((constchar*)&payload[1],NULL,16);//decodergbdata
intr=((rgb>>20)&0x3FF);//10bitspercolor,soR:bits20-29
intg=((rgb>>10)&0x3FF);//G:bits10-19
intb=rgb&0x3FF;//B:bits0-9
analogWrite(LED_RED,r);//writeittotheLEDoutputpins
analogWrite(LED_GREEN,g);
analogWrite(LED_BLUE,b);
}elseif(payload[0]=='R'){//thebrowsersendsanRwhentherainboweffectisenabled
rainbow=true;
}elseif(payload[0]=='N'){//thebrowsersendsanNwhentherainboweffectisdisabled
rainbow=false;
}
break;
}
}
Again,mostofthecodeisadaptedfromthepreviousexamples,onlytheWebSocketpartisnew.
TherearedifferenttypesofWebSocketmessages,butwe'reonlyinterestedinthetexttype,becausetheJavaScriptcodeattheclient
sidesendsthecolordataintextformat,asahexadecimalnumber,startingwitha'#'sign.
Eachcolorisa10-bitnumber,sointotal,itgivesusa30-bitnumberfortheRGBvalue.
Whentherainbowfunctionisenabled,JavaScriptsendsan'R'character,andwhenit'sdisabled,itsendsa'N'character.
Let'stakealookattheHTMLandJavaScriptcodeaswell:
HTML
<!DOCTYPEhtml>
<html>
<head>
<title>LEDControl</title>
<linkhref='https://fonts.googleapis.com/css?family=Roboto:300'rel='stylesheet'type='text/css'>
<linkhref='main.css'rel='stylesheet'type='text/css'>
<linkrel="apple-touch-icon"sizes="180x180"href="/apple-touch-icon-180x180.png">
<linkrel="icon"type="image/png"sizes="144x144"href="/favicon-144x144.png">
<linkrel="icon"type="image/png"sizes="48x48"href="/favicon.ico">
<linkrel="manifest"href="/manifest.json">
<metaname="theme-color"content="#00878f">
<metacontent='width=device-width,initial-scale=1.0,maximum-scale=1.0,user-scalable=0'name='viewport'>
<scriptsrc="WebSocket.js"type="text/javascript"></script>
</head>
<body>
<center>
<header>
<h1>LEDControl</h1>
</header>
<div>
<table>
<tr>
<tdstyle="width:14.4px;text-align:right">R:</td>
<td><inputclass="enabled"id="r"type="range"min="0"max="1023"step="1"oninput="sendRGB();"value="0"></td>
</tr>
<tr>
<tdstyle="width:14.4px;text-align:right">G:</td>
<td><inputclass="enabled"id="g"type="range"min="0"max="1023"step="1"oninput="sendRGB();"value="0"></td>
</tr>
<tr>
<tdstyle="width:14.4px;text-align:right">B:</td>
<td><inputclass="enabled"id="b"type="range"min="0"max="1023"step="1"oninput="sendRGB();"value="0"></td>
</tr>
</table>
<pstyle="margin:8px0px">
<buttonid="rainbow"class="button"style="background-color:#999"onclick="rainbowEffect();">Rainbow</button>
</p>
</div>
</center>
</body>
</html>
There'sreallynotmuchtoit,just3slidersandabuttonlinkedtoJavaScriptfunctions.
JavaScript
varrainbowEnable=false;
varconnection=newWebSocket('ws://'+location.hostname+':81/',['arduino']);
connection.onopen=function(){
connection.send('Connect'+newDate());
};
connection.onerror=function(error){
console.log('WebSocketError',error);
};
connection.onmessage=function(e){
console.log('Server:',e.data);
};
connection.onclose=function(){
console.log('WebSocketconnectionclosed');
};
functionsendRGB(){
varr=document.getElementById('r').value**2/1023;
varg=document.getElementById('g').value**2/1023;
varb=document.getElementById('b').value**2/1023;
varrgb=r<<20|g<<10|b;
varrgbstr='#'+rgb.toString(16);
console.log('RGB:'+rgbstr);
connection.send(rgbstr);
}
functionrainbowEffect(){
rainbowEnable=!rainbowEnable;
if(rainbowEnable){

connection.send("R");
document.getElementById('rainbow').style.backgroundColor='#00878F';
document.getElementById('r').className='disabled';
document.getElementById('g').className='disabled';
document.getElementById('b').className='disabled';
document.getElementById('r').disabled=true;
document.getElementById('g').disabled=true;
document.getElementById('b').disabled=true;
}else{
connection.send("N");
document.getElementById('rainbow').style.backgroundColor='#999';
document.getElementById('r').className='enabled';
document.getElementById('g').className='enabled';
document.getElementById('b').className='enabled';
document.getElementById('r').disabled=false;
document.getElementById('g').disabled=false;
document.getElementById('b').disabled=false;
sendRGB();
}
}
WejustcreateaWebSocketconnectionobjecttosenddatatotheESP.
Theneverytimeasliderismoved,wetakethevaluesofthethreeslidersandwesquarethecolorvaluestogetasmootherandmore
naturalcurve.Wethencombinethemintoa30-bitnumber(10bitspercolor).Finally,theRGBvaluegetsconvertedtoahexadecimal
string,a'#'isadded,andit'ssenttotheESP.
Whentherainbowbuttonispressed,theslidersaredisabled,andan'R'issenttotheESP.Whentherainbowbuttonispressedagain,
theslidersareenabled,andan'N'issent.
Helperfunctions
BacktotheESP8266Arduinocodeagain.Weneedsomeotherfunctionsaswell,toconvertbytestoKBandMB,todeterminefile
typesbasedonfileextensionsandtoconvertahueangletoRGBvalues.
StringformatBytes(size_tbytes){//convertsizesinbytestoKBandMB
if(bytes<1024){
returnString(bytes)+"B";
}elseif(bytes<(1024*1024)){
returnString(bytes/1024.0)+"KB";
}elseif(bytes<(1024*1024*1024)){
returnString(bytes/1024.0/1024.0)+"MB";
}
}
StringgetContentType(Stringfilename){//determinethefiletypeofagivenfilename,basedontheextension
if(filename.endsWith(".html"))return"text/html";
elseif(filename.endsWith(".css"))return"text/css";
elseif(filename.endsWith(".js"))return"application/javascript";
elseif(filename.endsWith(".ico"))return"image/x-icon";
elseif(filename.endsWith(".gz"))return"application/x-gzip";
return"text/plain";
}
voidsetHue(inthue){//SettheRGBLEDtoagivenhue(color)(0°=Red,120°=Green,240°=Blue)
hue%=360;//hueisananglebetween0and359°
floatradH=hue*3.142/180;//Convertdegreestoradians
floatrf,gf,bf;
if(hue>=0&&hue<120){//ConvertfromHSIcolorspacetoRGB
rf=cos(radH*3/4);
gf=sin(radH*3/4);
bf=0;
}elseif(hue>=120&&hue<240){
radH-=2.09439;
gf=cos(radH*3/4);
bf=sin(radH*3/4);
rf=0;
}elseif(hue>=240&&hue<360){
radH-=4.188787;
bf=cos(radH*3/4);
rf=sin(radH*3/4);
gf=0;
}
intr=rf*rf*1023;
intg=gf*gf*1023;
intb=bf*bf*1023;
analogWrite(LED_RED,r);//WritetherightcolortotheLEDoutputpins
analogWrite(LED_GREEN,g);
analogWrite(LED_BLUE,b);
}
ToconvertfromhuetoRGB,weusesinesandcosines,becausethesumoftheirsquaresisalwaysone,sothetotalintensitywill
alwaysbemoreorlessthesame.
ThisresultsinthefollowingRGBcurves:
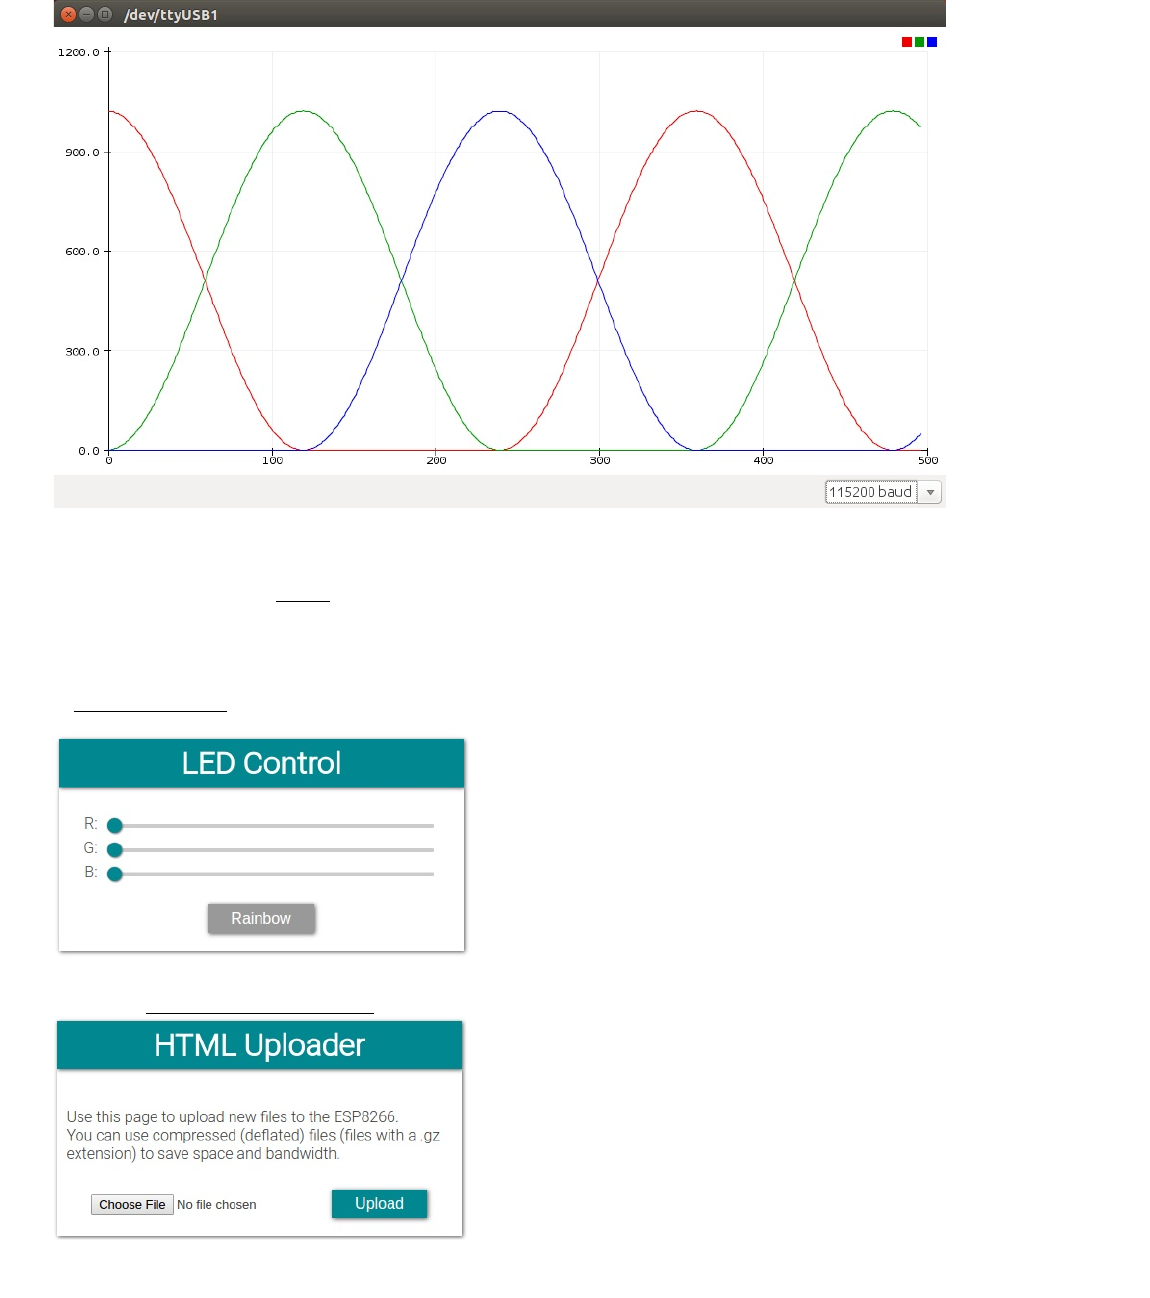
Usingtheexample
DownloadtheexamplefromGitHubandopenitintheArduinoIDE.ThenaddyourWi-Ficredentials(lines83-85).
ConnectanRGBLEDwithredtopin15,greentopin12andbluetopin13.Don'tforgetthecurrentlimitingresistors!
SelecttheSPIFFSsize(64KBshouldbeenough,butifyouwanttouploadmorefileslater,youshouldsetithigher).Uploadthesketch
overSerial,andthenuploadtheSPIFFSfilesusingTools>ESP8266SketchDataUpload.
WaitforittoconnecttoaWi-Finetwork,orconnecttotheESP8266AccessPointusingthepassword'thereisnospoon',andgo
tohttp://esp8266.local.Youshouldgetapagethatlookslikethis:
UsethesliderstoadjustthecolorlevelsoftheLED,andpresstheRainbowbuttontoenabletherainboweffect.
Ifyougotohttp://esp8266.local/edit.html,youcanuploadorupdatefiles:

NetworkTimeProtocol
Therearemanyapplicationswhereyouwanttoknowthetime.InanormalArduinoproject,youwouldhavetogetaRTCmodule,set
therighttime,sacrificesomeArduinopinsforcommunication...AndwhentheRTCbatteryrunsout,youhavetoreplaceit.
OntheESP8266,allyouneedisanInternetconnection:youcanjustaskatimeserverwhattimeitis.Todothis,theNetworkTime
Protocol(NTP)isused.
Inthepreviousexamples(HTTP,WebSockets)we'veonlyusedTCPconnections,butNTPisbasedonUDP.Thereareacoupleof
differences,butit'sreallyeasytouse,thankstothegreatlibrariesthatcomewiththeESP8266ArduinoCore.
ThemaindifferencebetweenTCPandUDPisthatTCPneedsaconnectiontosendmessages:Firstahandshakeissentbytheclient,
theserverresponds,andaconnectionisestablished,andtheclientcansenditsmessages.Aftertheclienthasreceivedtheresponse
oftheserver,theconnectionisclosed(exceptwhenusingWebSockets).Tosendanewmessage,theclienthastoopenanew
connectiontotheserverfirst.Thisintroduceslatencyandoverhead.
UDPdoesn'tuseaconnection,aclientcanjustsendamessagetotheserverdirectly,andtheservercanjustsendaresponse
messagebacktotheclientwhenithasfinishedprocessing.Thereis,however,noguaranteethatthemessageswillarriveattheir
destination,andthere'snowaytoknowwhethertheyarrivedornot(withoutsendinganacknowledgement,ofcourse).Thismeans
thatwecan'thalttheprogramtowaitforaresponse,becausetherequestorresponsepacketcouldhavebeenlostontheInternet,
andtheESP8266willenteraninfiniteloop.
Insteadofwaitingforaresponse,wejustsendmultiplerequests,withafixedintervalbetweentworequests,andjustregularlycheck
ifaresponsehasbeenreceived.
Gettingthetime
Let'stakealookatanexamplethatusesUDPtorequestthetimefromaNTPserver.
Libraries,constantsandglobals
#include<ESP8266WiFi.h>
#include<ESP8266WiFiMulti.h>
#include<WiFiUdp.h>
ESP8266WiFiMultiwifiMulti;//CreateaninstanceoftheESP8266WiFiMulticlass,called'wifiMulti'
WiFiUDPUDP;//CreateaninstanceoftheWiFiUDPclasstosendandreceive
IPAddresstimeServerIP;//time.nist.govNTPserveraddress
constchar*NTPServerName="time.nist.gov";
constintNTP_PACKET_SIZE=48;//NTPtimestampisinthefirst48bytesofthemessage
byteNTPBuffer[NTP_PACKET_SIZE];//buffertoholdincomingandoutgoingpackets
TouseUDP,wehavetoincludetheWiFiUdplibrary,andcreateaUDPobject.We'llalsoneedtoallocatememoryforabuffertostore
theUDPpackets.ForNTP,weneedabufferof48byteslong.
ToknowwheretosendtheUDPpacketsto,weneedthehostnameoftheNTPserver,thisistime.nist.gov.
Setup
voidsetup(){
Serial.begin(115200);//StarttheSerialcommunicationtosendmessagestothecomputer
delay(10);
Serial.println("\r\n");
startWiFi();//Trytoconnecttosomegivenaccesspoints.Thenwaitforaconnection
startUDP();
if(!WiFi.hostByName(NTPServerName,timeServerIP)){//GettheIPaddressoftheNTPserver
Serial.println("DNSlookupfailed.Rebooting.");
Serial.flush();
ESP.reset();
}
Serial.print("TimeserverIP:\t");
Serial.println(timeServerIP);
Serial.println("\r\nSendingNTPrequest...");
sendNTPpacket(timeServerIP);
}
Inthesetup,wejuststartourSerialandWi-Fi,asusual,andwestartUDPaswell.We'lllookattheimplementationofthisfunction
later.
WeneedtheIPaddressoftheNTPserver,soweperformaDNSlookupwiththeserver'shostname.There'snotmuchwecando
withouttheIPaddressofthetimeserver,soifthelookupfails,reboottheESP.
IfwedogetanIP,sendthefirstNTPrequest,andentertheloop.
Loop
unsignedlongintervalNTP=60000;//RequestNTPtimeeveryminute
unsignedlongprevNTP=0;
unsignedlonglastNTPResponse=millis();
uint32_ttimeUNIX=0;
unsignedlongprevActualTime=0;
voidloop(){
unsignedlongcurrentMillis=millis();
if(currentMillis-prevNTP>intervalNTP){//IfaminutehaspassedsincelastNTPrequest

prevNTP=currentMillis;
Serial.println("\r\nSendingNTPrequest...");
sendNTPpacket(timeServerIP);//SendanNTPrequest
}
uint32_ttime=getTime();//CheckifanNTPresponsehasarrivedandgetthe(UNIX)time
if(time){//Ifanewtimestamphasbeenreceived
timeUNIX=time;
Serial.print("NTPresponse:\t");
Serial.println(timeUNIX);
lastNTPResponse=currentMillis;
}elseif((currentMillis-lastNTPResponse)>3600000){
Serial.println("Morethan1hoursincelastNTPresponse.Rebooting.");
Serial.flush();
ESP.reset();
}
uint32_tactualTime=timeUNIX+(currentMillis-lastNTPResponse)/1000;
if(actualTime!=prevActualTime&&timeUNIX!=0){//Ifasecondhaspassedsincelastprint
prevActualTime=actualTime;
Serial.printf("\rUTCtime:\t%d:%d:%d",getHours(actualTime),getMinutes(actualTime),getSeconds(actualTime));
}
}
ThefirstpartoftheloopsendsanewNTPrequesttothetimeservereveryminute.ThisisbasedonBlinkWithoutDelay.
ThenwecallthegetTimefunctiontocheckifwe'vegotanewresponsefromtheserver.Ifthisisthecase,weupdatethetimeUNIX
variablewiththenewtimestampfromtheserver.
Ifwedon'tgetanyresponsesforanhour,thenthere'ssomethingwrong,sowereboottheESP.
Thelastpartprintstheactualtime.TheactualtimeisjustthelastNTPtimeplusthetimesincewereceivedthatNTPmessage.
Setupfunctions
Nothingspecialhere,justafunctiontoconnecttoWi-Fi,andanewfunctiontostartlisteningforUDPmessagesonport123.
voidstartWiFi(){//Trytoconnecttosomegivenaccesspoints.Thenwaitforaconnection
wifiMulti.addAP("ssid_from_AP_1","your_password_for_AP_1");//addWi-Finetworksyouwanttoconnectto
wifiMulti.addAP("ssid_from_AP_2","your_password_for_AP_2");
wifiMulti.addAP("ssid_from_AP_3","your_password_for_AP_3");
Serial.println("Connecting");
while(wifiMulti.run()!=WL_CONNECTED){//WaitfortheWi-Fitoconnect
delay(250);
Serial.print('.');
}
Serial.println("\r\n");
Serial.print("Connectedto");
Serial.println(WiFi.SSID());//Telluswhatnetworkwe'reconnectedto
Serial.print("IPaddress:\t");
Serial.print(WiFi.localIP());//SendtheIPaddressoftheESP8266tothecomputer
Serial.println("\r\n");
}
voidstartUDP(){
Serial.println("StartingUDP");
UDP.begin(123);//StartlisteningforUDPmessagesonport123
Serial.print("Localport:\t");
Serial.println(UDP.localPort());
Serial.println();
}
Helperfunctions
uint32_tgetTime(){
if(UDP.parsePacket()==0){//Ifthere'snoresponse(yet)
return0;
}
UDP.read(NTPBuffer,NTP_PACKET_SIZE);//readthepacketintothebuffer
//Combinethe4timestampbytesintoone32-bitnumber
uint32_tNTPTime=(NTPBuffer[40]<<24)|(NTPBuffer[41]<<16)|(NTPBuffer[42]<<8)|NTPBuffer[43];
//ConvertNTPtimetoaUNIXtimestamp:
//UnixtimestartsonJan11970.That's2208988800secondsinNTPtime:
constuint32_tseventyYears=2208988800UL;
//subtractseventyyears:
uint32_tUNIXTime=NTPTime-seventyYears;
returnUNIXTime;
}
voidsendNTPpacket(IPAddress&address){
memset(NTPBuffer,0,NTP_PACKET_SIZE);//setallbytesinthebufferto0
//InitializevaluesneededtoformNTPrequest
NTPBuffer[0]=0b11100011;//LI,Version,Mode
//sendapacketrequestingatimestamp:
UDP.beginPacket(address,123);//NTPrequestsaretoport123
UDP.write(NTPBuffer,NTP_PACKET_SIZE);
UDP.endPacket();
}
inlineintgetSeconds(uint32_tUNIXTime){
returnUNIXTime%60;
}
inlineintgetMinutes(uint32_tUNIXTime){
returnUNIXTime/60%60;
}
inlineintgetHours(uint32_tUNIXTime){
returnUNIXTime/3600%24;
}
InthegetTimefunction,wefirsttrytoparsetheUDPpacket.Ifthere'snopacketavailable,thefunctionjustreturns0.IfthereisaUDP
packetavailablehowever,readitintothebuffer.TheNTPtimestampis32bitsor4byteswide,sowecombinethesebytesintoone
longnumber.ThisnumberisthenumberofsecondssinceJan1,1900,00:00:00,butmostapplicationsuseUNIXtime,thenumberof
secondssinceJan1,1970,00:00:00(UNIXepoch).ToconvertfromNTPtimetoUNIXtime,wejustsubtract70yearsworthofseconds.

TorequestthetimefromtheNTPserver,youhavetosendacertainsequenceof48bytes.Wedon'tneedanyfancyfeatures,sojust
setthefirstbytetorequestthetime,andleaveallother47byteszero.
Toactuallysendthepacket,youhavetostartthepacket,specifyingtheIPaddressoftheserver,andtheNTPportnumber,port123.
Thenjustwritethebuffertothepacket,andsenditwithendPacket.
Thelastthreefunctionsarejustsomesimplemathtoconvertsecondstohours,minutesandseconds.
Usingtheexample
EnteryourWi-Ficredentialsonlines79-81,andhitupload.IfyouhaveaworkingInternetconnection,youshouldgetanoutputthat
lookslikethis:
Connecting
.........
ConnectedtoWi-FiSSID
IPaddress: 192.168.1.2
StartingUDP
Localport: 123
TimeserverIP:216.229.0.179
SendingNTPrequest...
NTPresponse: 1488378061
UTCtime: 14:21:53
SendingNTPrequest...
NTPresponse: 1488378114
UTCtime: 14:22:53
SendingNTPrequest...
NTPresponse: 1488378174
UTCtime: 14:23:53
SendingNTPrequest...
NTPresponse: 1488378234
UTCtime: 14:24:53
SendingNTPrequest...
NTPresponse: 1488378294
UTCtime: 14:25:53
...
Youshouldseethetimeupdateeverysecond,andSendingNTPrequest...shouldshowupeveryminute.
Ifyoudon'thaveanInternetconnection,theDNSlookupofthetimeserverwillfail:
Connecting
.........
ConnectedtoWi-FiSSID
IPaddress: 192.168.1.2
StartingUDP
Localport: 123
DNSlookupfailed.Rebooting.
etsJan82013,rstcause:2,bootmode:(3,6)
Ifyourconnectionisnotreliable,orifthere'sheavytraffic,youmightencountersomedroppedpackets:
SendingNTPrequest...
NTPresponse: 1488378780
UTCtime: 14:33:54
SendingNTPrequest...
UTCtime: 14:34:54
SendingNTPrequest...
NTPresponse: 1488378895
UTCtime: 14:35:0
Asyoucansee,theESPneverreceivedaresponsetothesecondNTPrequest.That'snotreallyanissue,aslongasatleastsome
packetsmakeitthrough.
Localtimeanddaylightsavings
AnNTPserverreturnstheUTCtime.Ifyouwantlocaltime,youhavetocompensateforyourtimezoneanddaylightsavings.For
example,ifyouwantCET(CentralEuropeanTime),youhavetoadd3600totheUNIXtimeduringwinter,(3600s=1h),and7200
duringsummer(DST).

Datalogging
AcommonuseforIoTdevicesliketheESP8266ismonitoringsensors.Usingthecodeinthepreviousexample,wecanrequestthe
time,andsavesomesensorvaluestoafile.Ifwerunaserveraswell,wecanshowthisdatainaprettygraphinawebpage.
Temperaturelogger
Inthefollowingexample,we'lluseaDS18S20temperaturesensortologthetemperatureovertimeandsaveittotheSPIFFS.Itcan
thenbedisplayedinagraphinthebrowser.
Installinglibraries
First,downloadtheDallasTemperaturelibrarybyMilesBurtonandtheOneWirelibrarybyJimStudt:GotoSketch>IncludeLibrary...
>ManageLibrariesandsearchfor'DallasTemperature'and'OneWire'(makesureyoudownloadthecorrectversion).
Hardware
ConnectthegroundoftheDS18S20temperaturesensor(pin1)tothegroundoftheESP,connectthedatapin(pin2)toGPIO5,and
VCC(pin3)tothe3.3VoftheESP.Finally,connecta4k7ΩresistorbetweenthedatapinandVCC.
Libraries,constantsandglobals
#include<OneWire.h>
#include<DallasTemperature.h>
#include<ESP8266WiFi.h>
#include<ESP8266WiFiMulti.h>
#include<WiFiUdp.h>
#include<ArduinoOTA.h>
#include<ESP8266WebServer.h>
#include<ESP8266mDNS.h>
#include<FS.h>
#defineONE_HOUR3600000UL
#defineTEMP_SENSOR_PIN5
OneWireoneWire(TEMP_SENSOR_PIN);//SetupaOneWireinstancetocommunicatewithOneWiredevices
DallasTemperaturetempSensors(&oneWire);//Createaninstanceofthetemperaturesensorclass
ESP8266WebServerserver=ESP8266WebServer(80);//createawebserveronport80
FilefsUploadFile;//aFilevariabletotemporarilystorethereceivedfile
ESP8266WiFiMultiwifiMulti;//CreateaninstanceoftheESP8266WiFiMulticlass,called'wifiMulti'
constchar*OTAName="ESP8266";//AnameandapasswordfortheOTAservice
constchar*OTAPassword="esp8266";
constchar*mdnsName="esp8266";//DomainnameforthemDNSresponder
WiFiUDPUDP;//CreateaninstanceoftheWiFiUDPclasstosendandreceiveUDPmessages
IPAddresstimeServerIP;//Thetime.nist.govNTPserver'sIPaddress
constchar*ntpServerName="time.nist.gov";
constintNTP_PACKET_SIZE=48;//NTPtimestampisinthefirst48bytesofthemessage
bytepacketBuffer[NTP_PACKET_SIZE];//Abuffertoholdincomingandoutgoingpackets
TheonlynewthingsherearetheOneWireandDallasTemperaturelibraries,togetthetemperaturefromthesensor.
Setup
voidsetup(){
Serial.begin(115200);//StarttheSerialcommunicationtosendmessagestothecomputer
delay(10);
Serial.println("\r\n");
tempSensors.setWaitForConversion(false);//Don'tblocktheprogramwhilethetemperaturesensorisreading
tempSensors.begin();//Startthetemperaturesensor
if(tempSensors.getDeviceCount()==0){
Serial.printf("NoDS18x20temperaturesensorfoundonpin%d.Rebooting.\r\n",TEMP_SENSOR_PIN);
Serial.flush();
ESP.reset();
}
startWiFi();//StartaWi-Fiaccesspoint,andtrytoconnecttosomegivenaccesspoints.Thenwaitforeitheran
APorSTAconnection
startOTA();//StarttheOTAservice
startSPIFFS();//StarttheSPIFFSandlistallcontents
startMDNS();//StartthemDNSresponder
startServer();//StartaHTTPserverwithafilereadhandlerandanuploadhandler
startUDP();//StartlisteningforUDPmessagestoport123
WiFi.hostByName(ntpServerName,timeServerIP);//GettheIPaddressoftheNTPserver
Serial.print("TimeserverIP:\t");
Serial.println(timeServerIP);
sendNTPpacket(timeServerIP);
}

Inthesetup,there'snotmuchneweither,wejuststartthetemperaturesensor,andcheckifwecancommunicatewithit.Ifno
temperaturesensorisfound,theESPresets.
Gettingthetemperaturefromthesensormaytakesometime(upto750ms).Wedon'twantourlooptotakelongerthanacoupleof
milliseconds,sowecan'twait750ms.Ifwedid,theHTTPserveretc.wouldstarttomisbehave.
Thesolutionistorequestthetemperaturefirst.Thesensorwillthenstartreadingtheanalogtemperature,andstoresitinitsmemory.
Inthemeantime,theloopjustkeepsonrunning,theserverrefreshesetc.After750ms,wecontactthesensoragain,andreadthe
temperaturefromitsmemory.
Totellthelibrarythatwedon'twanttowaitfortheanalogtodigitalconversionofthesensor,weusesetWaitForConversion.
Loop
constunsignedlongintervalNTP=ONE_HOUR;//Updatethetimeeveryhour
unsignedlongprevNTP=0;
unsignedlonglastNTPResponse=millis();
constunsignedlongintervalTemp=60000;//Doatemperaturemeasurementeveryminute
unsignedlongprevTemp=0;
booltmpRequested=false;
constunsignedlongDS_delay=750;//ReadingthetemperaturefromtheDS18x20cantakeupto750ms
uint32_ttimeUNIX=0;//Themostrecenttimestampreceivedfromthetimeserver
voidloop(){
unsignedlongcurrentMillis=millis();
if(currentMillis-prevNTP>intervalNTP){//Requestthetimefromthetimeservereveryhour
prevNTP=currentMillis;
sendNTPpacket(timeServerIP);
}
uint32_ttime=getTime();//Checkifthetimeserverhasresponded,ifso,gettheUNIXtime
if(time){
timeUNIX=time;
Serial.print("NTPresponse:\t");
Serial.println(timeUNIX);
lastNTPResponse=millis();
}elseif((millis()-lastNTPResponse)>24UL*ONE_HOUR){
Serial.println("Morethan24hourssincelastNTPresponse.Rebooting.");
Serial.flush();
ESP.reset();
}
if(timeUNIX!=0){
if(currentMillis-prevTemp>intervalTemp){//Everyminute,requestthetemperature
tempSensors.requestTemperatures();//Requestthetemperaturefromthesensor(ittakessometimetoreadit)
tmpRequested=true;
prevTemp=currentMillis;
Serial.println("Temperaturerequested");
}
if(currentMillis-prevTemp>DS_delay&&tmpRequested){//750msafterrequestingthetemperature
uint32_tactualTime=timeUNIX+(currentMillis-lastNTPResponse)/1000;
//TheactualtimeisthelastNTPtimeplusthetimethathaselapsedsincethelastNTPresponse
tmpRequested=false;
floattemp=tempSensors.getTempCByIndex(0);//Getthetemperaturefromthesensor
temp=round(temp*100.0)/100.0;//roundtemperatureto2digits
Serial.printf("Appendingtemperaturetofile:%lu,",actualTime);
Serial.println(temp);
FiletempLog=SPIFFS.open("/temp.csv","a");//Writethetimeandthetemperaturetothecsvfile
tempLog.print(actualTime);
tempLog.print(',');
tempLog.println(temp);
tempLog.close();
}
}else{//Ifwedidn'treceiveanNTPresponseyet,sendanotherrequest
sendNTPpacket(timeServerIP);
delay(500);
}
server.handleClient();//runtheserver
ArduinoOTA.handle();//listenforOTAevents
}
Thelooplooksalotmorecomplex,butit'sactuallyprettysimple.It'sallbasedonBlinkWithoutDelay.
There'stwothingsgoingon:
1. Everyhour,theESPrequeststhetimefromanNTPserver.Thenitconstantlychecksforaresponse,andupdatesthetimeifit
getsanNTPresponse.Ifithasn'treceivedanyresponsesforover24hours,there'ssomethingwrong,andtheESPresetsitself.
2. Everyminute,theESPrequeststhetemperaturefromtheDS18x20sensor,andsetsthe'tmpRequested'flag.Thesensorwill
starttheanalogtodigitalconversion.
750msaftertherequest,whentheconversionshouldbefinished,theESPreadsthetemperaturefromthesensor,andresetsthe
flag(otherwise,itwouldkeeponreadingthesametemperatureoverandoveragain).Thenitwritesthetimeandthe
temperaturetoafileinSPIFFS.
BysavingitasaCSVfileinthefilesystem,wecaneasilydownloadittotheclient(usingthewebserverthatisrunning),andit's
easytoparsewithJavaScript.
IfwemissthefirstNTPresponse,timeUNIXwillbezero.Ifthat'sthecase,wesendanotherNTPrequest(otherwise,thenextrequest
wouldbeanhourlater,andthetemperatureloggingonlystartswhenthetimeisknown).
WealsoneedtoruntheserverandOTAfunctionstohandleHTTPandOTArequests.
Setupfunctions,serverhandlersandhelperfunctions
Thesefunctionshaven'tchangesincethepreviousexample,sothere'snoneedtocoverthemhere.Youdoneedthemtogetthe
programrunning,though.DownloadtheZIParchivewithexamplesforthefullsketch.
HTMLandJavaScript
There'ssomeHTMLandJavaScriptfilestoplotthetemperatureusingGoogleGraphs.Iwon'tcoverithere,butifyouwan'ttoknow
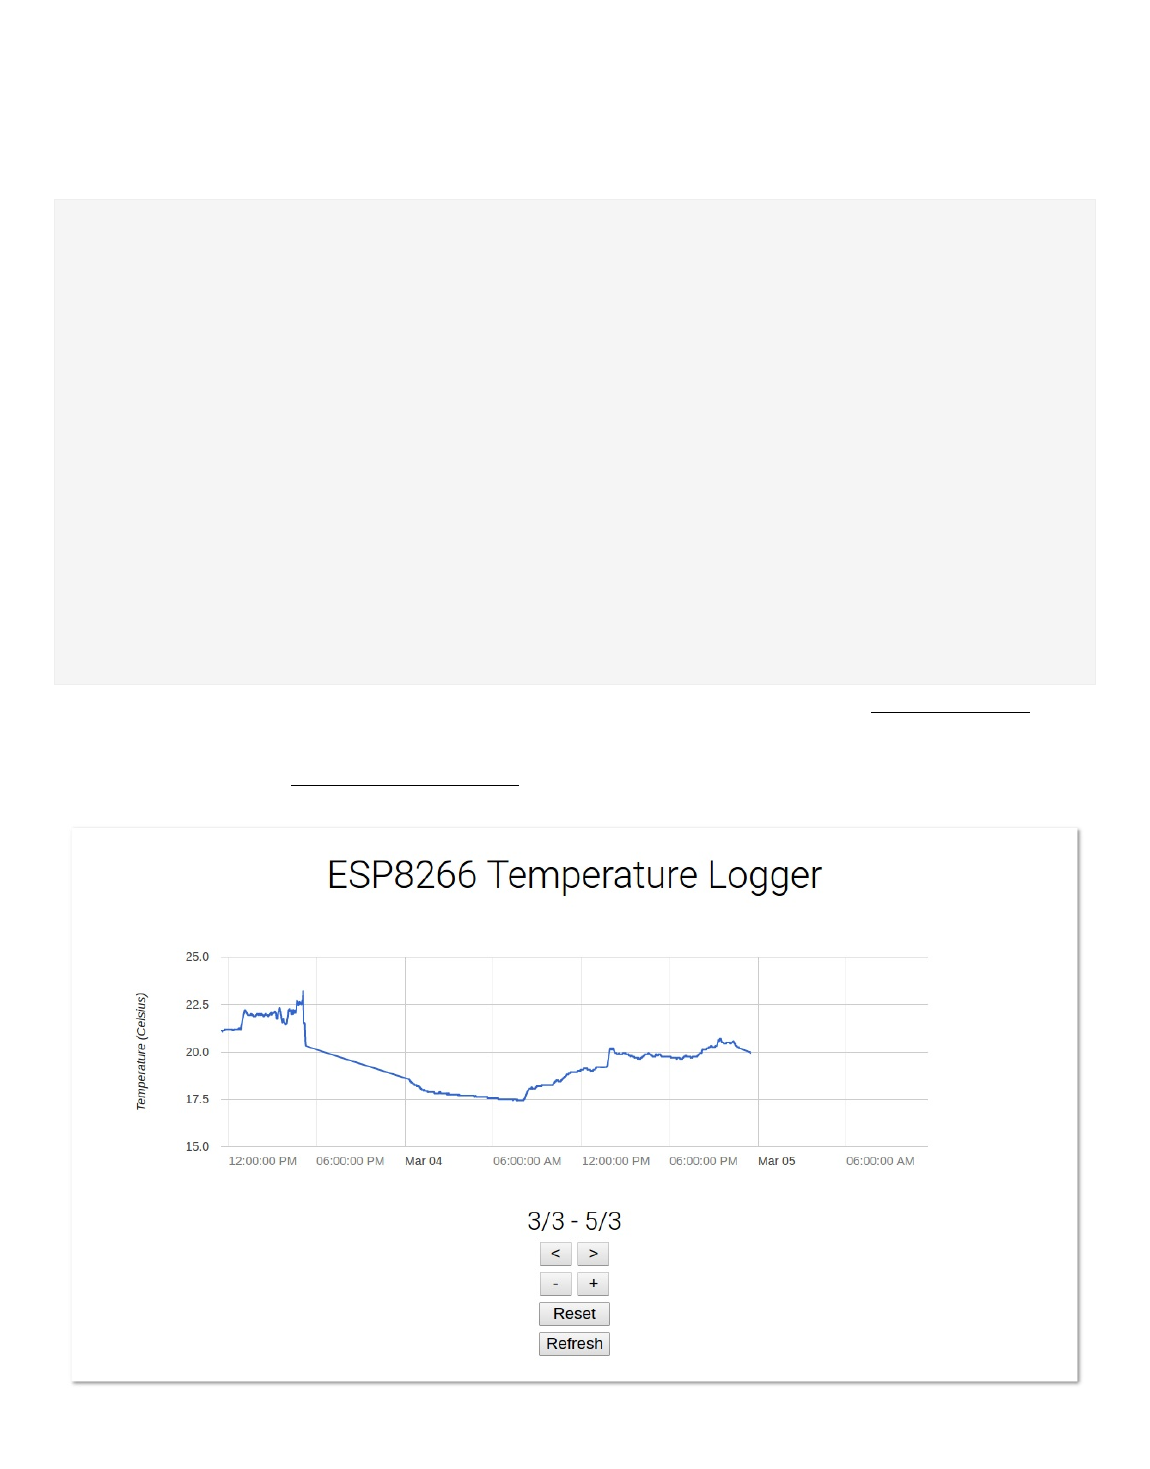
howitworks,youcanfindthefilesintheZIParchive.
Usingtheexample
SettheSPIFFSsizeto64KBorlargerifyouplantouseitforprolongedperiodsoftime.(Youcouldalsoincreasetheloggingintervalon
line80tosavespace.)
EnteryourWi-Ficredentialsonlines138-140,andhitupload.ThenuploadthewebpagesandscriptstoSPIFFSusingTools>ESP8266
SketchDataUpload.
Makesureyouhavethetemperaturesensorconnected,asdescribedatthetopofthispage.Openaterminaltoseeifitworks.You
shouldseesomethinglikethis:
Connecting
..........
ConnectedtoSSID
IPaddress: 192.168.1.2
OTAready
SPIFFSstarted.Contents:
FSFile:/favicon-144x144.png,size:2.81KB
FSFile:/temperatureGraph.js.gz,size:1.17KB
FSFile:/temp.csv,size:42.50KB
FSFile:/success.html.gz,size:456B
FSFile:/edit.html.gz,size:700B
FSFile:/main.css.gz,size:349B
FSFile:/index.html.gz,size:795B
FSFile:/manifest.json,size:169B
FSFile:/favicon.ico.gz,size:1.91KB
mDNSresponderstarted:http://esp8266.local
HTTPserverstarted.
StartingUDP
Localport: 123
TimeserverIP:216.229.0.179
SendingNTPrequest
NTPresponse: 1488666586
Temperaturerequested
Appendingtemperaturetofile:1488666627,20.00
Temperaturerequested
Appendingtemperaturetofile:1488666687,19.94
Temperaturerequested
...
Letitrunforacoupleofminutes,togathersometemperaturedata.Thenopenawebbrowser,andgotohttp://esp8266.local/.
Youshouldgetagraphshowingthetemperaturecurve.Youcanusethearrowbuttonstotravelthroughtime,andthe+and-buttons
tozoominorout.Theresetbuttonresetsthezoom,andjumpsbacktothepresent.Refreshrequeststhelatesttemperaturedata.
Ifyouwant,youcanstillgotohttp://esp8266.local/edit.htmltouploadnewfiles.
Thewebinterfaceshouldlooklikethis:
ItworksonWindows,LinuxandAndroid,butiOSseemstohavesomeproblemsrenderingthegraph(inbothChromeandSafari).

Emailnotifier
AnothergreatuseforIoTdevicesisdisplayingthingsliketrafficinformation,weatherforecast,socialmediaupdates...Thisrequires
ustosendanHTTPGETrequesttotheserveroftheservicewe'dliketoaccess.MostpopularserviceshaveAPI(Application
ProgrammingInterface)documentsthatexplainthatexplainhowyoucanretrievecertaininformation,andwhatformatthat
informationisin.Inthefollowingexample,we'lllookatGmailspecifically,butthecodeshouldbesimilarforotherservices.
Showingthenumberofunreademails
TocommunicatewithGoogle'sGmailservers,wehavetoestablishasecureconnectiontotheserverandsendasecureHTTPSrequest
withouremailaddressandpassword.GmailwillthenrespondwithanXMLdocumentcontainingallkindsofinformation,like(partsof)
yourmostrecentmessagesandthenumberofunreademails.
Tomakesurewedon'tsendourGooglepasswordtoamaliciousserver,wehavetochecktheserver'sidentity,usingtheSHA-1
fingerprintoftheSSLcertificate.Thisisauniquesequenceofhexadecimalcharactersthatidentifiestheserver.
Allowingaccesstotheemailfeed
Theonlyway(Iknowof)togetemailinformationfromGoogleontheESPcurrentlyistheGoogleAtomFeed.Thisisanoldermethod,
soyouhavetochangeyourGmailsettingstoallowaccesstothefeed.
Gotohttps://www.google.com/settings/security/lesssecureappstoenableaccessfor"lesssecureapps":

Untilthere'ssupportforthenewOAuth2protocolontheESP,we'llhavetousetheold,lesssecuremethod.
Hardware
ConnectanLED(+resistor)topin13,asanunreademailindicator.
TheCode
#include<WiFiClientSecure.h>//IncludetheHTTPSlibrary
#include<ESP8266WiFi.h>//IncludetheWi-Filibrary
#include<ESP8266WiFiMulti.h>//IncludetheWi-Fi-Multilibrary
ESP8266WiFiMultiwifiMulti;//CreateaninstanceoftheESP8266WiFiMulticlass,called'wifiMulti'
constchar*host="mail.google.com";//theGmailserver
constchar*url="/mail/feed/atom";//theGmailfeedurl
constinthttpsPort=443;//theporttoconnecttotheemailserver
//TheSHA-1fingerprintoftheSSLcertificatefortheGmailserver(seebelow)
constchar*fingerprint="D390FC8207E60DC2CEF99D797FECF6E63ECB8BB3";
//TheBase64encodedversionofyourGmaillogincredentials(seebelow)
constchar*credentials="ZW1haWwuYWRkcmVzc0BnbWFpbC5jb206cGFzc3dvcmQ=";
constbyteled=13;
voidsetup(){
Serial.begin(115200);//StarttheSerialcommunicationtosendmessagestothecomputer
delay(10);
Serial.println('\n');
pinMode(led,OUTPUT);
wifiMulti.addAP("ssid_from_AP_1","your_password_for_AP_1");//addWi-Finetworksyouwanttoconnectto
wifiMulti.addAP("ssid_from_AP_2","your_password_for_AP_2");
wifiMulti.addAP("ssid_from_AP_3","your_password_for_AP_3");
Serial.println("Connecting...");
inti=0;
while(wifiMulti.run()!=WL_CONNECTED){//WaitfortheWi-Fitoconnect:scanforWi-Finetworks,andconnecttothestrongestof
thenetworksabove
delay(250);
Serial.print('.');
}
Serial.println('\n');
Serial.print("Connectedto");
Serial.println(WiFi.SSID());//Telluswhatnetworkwe'reconnectedto
Serial.print("IPaddress:\t");
Serial.println(WiFi.localIP());//SendtheIPaddressoftheESP8266tothecomputer
Serial.println('\n');
}
voidloop(){
intunread=getUnread();
if(unread==0){
Serial.println("\r\nYou'vegotnounreademails");
digitalWrite(led,LOW);
}elseif(unread>0){
Serial.printf("\r\nYou'vegot%dnewmessages\r\n",unread);
digitalWrite(led,HIGH);
}else{
Serial.println("Couldnotgetunreadmails");
}
Serial.println('\n');
delay(5000);
}
intgetUnread(){//afunctiontogetthenumberofunreademailsinyourGmailinbox
WiFiClientSecureclient;//UseWiFiClientSecureclasstocreateTLS(HTTPS)connection
Serial.printf("Connectingto%s:%d...\r\n",host,httpsPort);
if(!client.connect(host,httpsPort)){//ConnecttotheGmailserver,onport443
Serial.println("Connectionfailed");//Iftheconnectionfails,stopandreturn
return-1;
}
if(client.verify(fingerprint,host)){//ChecktheSHA-1fingerprintoftheSSLcertificate
Serial.println("Certificatematches");

}else{//ifitdoesn'tmatch,it'snotsafetocontinue
Serial.println("Certificatedoesn'tmatch");
return-1;
}
Serial.print("RequestingURL:");
Serial.println(url);
client.print(String("GET")+url+"HTTP/1.1\r\n"+
"Host:"+host+"\r\n"+
"Authorization:Basic"+credentials+"\r\n"+
"User-Agent:ESP8266\r\n"+
"Connection:close\r\n\r\n");//SendtheHTTPrequestheaders
Serial.println("Requestsent");
intunread=-1;
while(client.connected()){//Waitfortheresponse.TheresponseisinXMLformat
client.readStringUntil('<');//readuntilthefirstXMLtag
Stringtagname=client.readStringUntil('>');//readuntiltheendofthistagtogetthetagname
if(tagname=="fullcount"){//ifthetagis<fullcount>,thenextstringwillbethenumberofunread
emails
StringunreadStr=client.readStringUntil('<');//readuntiltheclosingtag(</fullcount>)
unread=unreadStr.toInt();//convertfromStringtoint
break;//stopreading
}//ifthetagisnot<fullcount>,repeatandreadthenexttag
}
Serial.println("Connectionclosed");
returnunread;//Returnthenumberofunreademails
}
Howitworks
Thesetupshouldbeprettyfamiliarbynow.
TheonlynewthingisthegetUnread()function:
First,itstartsanHTTPSconnectiontotheGmailserveronport443.Thenitchecksifthefingerprintofthecertificatematches,soit
knowsthatit'stherealGoogleserver,andnotsomehacker.Ifthecertificatedoesn'tmatch,it'snotsafetosendthecredentialstothe
server.
Ifitmatches,wesendaHTTPGETrequesttotheserver:
GET/mail/feed/atomHTTP/1.1\r\n
Host:mail.google.com\r\n
Authorization:BasicaVeryLongStringOfBase64EncodedCharacters=\r\n
User-Agent:ESP8266\r\n
Connection:close\r\n\r\n
TherequestcontainstheURIwewanttoaccess(inthiscasethisistheAtomfeedURL),thehost(whichismail.google.com),andthe
base64-encodedversionofyourlogincredentials.
Asyoucansee,thedifferentlinesoftheheaderareseparatedbyaCRLF(CarriageReturn+LineFeed,\r\n).TwoCRLF'smarktheend
oftheheader.
TheGmailserverwillprocessourrequest,andsendthefeedasaresponseoverthesameHTTPSconnection.ThisresponseisanXML
document,thatconsistsoftagswithangledbrackets,justlikeHTML.Ifyouneedalotofdata,it'srecommendedtouseaproperXML
parserlibrary,butweonlyneedonetag,sowecanjustskimthroughtheresponsetextuntilwefindthe<fullcount>x</fullcount>
tag.Thenumberinsidethistagisthenumberofunreademailsintheinbox.
Wecanjustconvertittoaninteger,andstopreading.
ThisistheformatoftheXMLfeed,youcanseethefullcounttagonline5:
<?xmlversion="1.0"encoding="UTF-8"?>
<feedxmlns="http://purl.org/atom/ns#"version="0.3">
<title>Gmail-Inboxforesp8266.test.mail@gmail.com</title>
<tagline>NewmessagesinyourGmailInbox</tagline>
<fullcount>5</fullcount>
<linkrel="alternate"href="https://mail.google.com/mail"type="text/html"/>
<modified>2017-03-05T15:54:06Z</modified>
<entry>
<title>Newsign-infromFirefoxonLinux</title>
<summary>Newsign-infromFirefoxonLinuxHiESP8266,YourGoogleAccountesp8266.test.mail@gmail.comwasjustusedtosignin
fromFirefoxonLinux.ESP8266Testesp8266.test.mail@gmail.comLinuxSunday,</summary>
<linkrel="alternate"href="https://mail.google.com/mail?
account_id=esp8266.test.mail@gmail.com&message_id=123456789&view=conv&extsrc=atom"type="text/html"/>
<modified>2017-03-05T15:52:45Z</modified>
<issued>2017-03-05T15:52:45Z</issued>
<id>tag:gmail.google.com,2004:123456789123456789</id>
<author>
<name>Google</name>
<email>no-reply@accounts.google.com</email>
</author>
</entry>
...
</feed>
Theloopjustprintsthenumberofunreademails,andturnsonanLEDifyouhaveunreadmessages.
GettingthefingerprintoftheGmailserver
LikeImentionedbefore,weneedafingerprinttochecktheidentityoftheserver.Togetthisfingerprint,executethefollowing
commandinaterminal(Linux&Mac):
openssls_client-connectmail.google.com:443</dev/null2>/dev/null|opensslx509-fingerprint-noout-in/dev/stdin|sed's/://g'
Copythehexadecimalfingerprintstringandpasteitintothesketchonline12.Forexample:
constchar*fingerprint="D390FC8207E60DC2CEF99D797FECF6E63ECB8BB3";

Encodingyourlogincredentials
Togetaccesstothefeed,youhavetoenteryouremailaddressandpassword.Youcan'tsendthemasplaintext,youhavetoencode
themtobase64first.Usethefollowingcommandinaterminal(Linux&Mac):
echo-n"email.address@gmail.com:password"|base64
Thenaddittoline15ofthesketch.Forexample:
constchar*credentials="ZW1haWwuYWRkcmVzc0BnbWFpbC5jb206cGFzc3dvcmQ=";
OtherAPIs
ManyservicessendtheirdatainJSONformat.Ifyoujustneedonepieceofinformation,youmaybeabletousethesameapproachof
scanningtheentireJSONtextforacertainword,butit'smucheasiertouseaJSONparser,liketheArduinoJsonlibrary.Itwill
deserializetheJSONtext,andcreateaJSONobject,youcouldcompareittoanassociativearray.Youcanbrowsetheentiretree
structure,andeasilyfindthedatayou'relookingfor.
Thedownsideisthatitusesmorememory.

Advanced
DNSCaptivePortal
WhenusingtheESP8266inaccesspointmode,youprobablywanttoredirectuserstotherightpage.Youcandothisbycreatinga
captiveportal,usingDNS.It'sbasicallyjustaDNSserverthatwillconvertallhostnamestotheESP'sownIPaddress.
ThistechniqueisalsousedbyopenWi-Finetworksthatredirectyoutoaloginpagebeforeyoucanstartbrowsingtheinternet.
Wi-Ficonfiguration
IfyouwanttobeabletochangetheWi-Ficonnectionsettingswithoutre-uploadingthecode,youcouldtakealookattheWiFiManager
librarybytzapu.Thiswilltrytoconnecttoknownnetworks,butifitfails,itwillstartaWi-Fiaccesspoint.Youcanthenconnecttothis
accesspoint,openthebrowser,andpickanetworktoconnectto.Thenewconfigurationissaved.
TheWiFiManagerlibraryusesacaptiveportaltopresentyouwiththerightWi-Fisettingspage.
YoucouldalsoimplementaWi-Fimanageryourself,oryoucanjustcheckouttheexamplethatcomeswiththeESP8266ArduinoCore
(Examples>DNSServer>CaptivePortalAdvanced).
I²S
TheESP8266hasanI²SbusontheRXDpin.Itcanrunat80MHz,andhasDMA(directmemoryaccess),soit'sreallyfast.Itsmain
purposeistoconnectanI²SDAC(DigitaltoAnalogConverter)tohaveanaudiooutput,butyoucanuseitforotherthingsaswell.
Forexample,CNLohrmanagedtotransmitanalogtelevision,byconnectinganantennawiretotheI²Spin.Youcanalsouseitto
controlWS2812BsLEDs.YoucanevenuseittocommunicateoverEthernet(notreallyuseful,anddefinitelynotrecommended,butit
works).
AnothergreatusefortheI²Sbusisoutputtingdatatoshiftregisters.Thisgivesyouextraoutputsthatarereasonablyfast,forthings
likeLEDsorsteppermotors.
Otherexamples
YoucanfindlotsofotherexamplesintheArduinoIDE,I'drecommendtocheckthoseoutaswell.
YouTube
There'ssomegreatchannelsonYouTubethatdoamazingthingswiththeESP8266.Here'sashortlistoftheonesI'mcurrently
following.Ifyou'vegotmorerecommendation,justleaveacomment!
AndreasSpiess
CNLohr
Acrobotic
MiikaKurkela

Inconclusion...
Congratulations,you'vereachedtheendofthisratherlongarticleonthebasicsoftheESP8266.Ihopethiswasinterestingtoyou,
andthatyou'llusethisknowledgeforyourownDIYprojects.
Ifyouhaveanyremarksorifyouwanttohelpimprovethisguide,don'thesitatetoleaveacommentortosendmeamessage.
Thankyouforreading!
Pieter,8-3-2017
