ADCS Installation And Configuration Lab Manual
User Manual: Pdf
Open the PDF directly: View PDF ![]() .
.
Page Count: 46
Certificate Authority Infrastructure Hands-On Lab
Part 1: ADCS Installation & Configuration
Information Technology & Security
CLASS DESCRIPTION
The first of a two-part hands-on-lab series; this lab will take you step-by-step through the installation and configuration
of an enterprise Public Key Infrastructure (PKI) using Microsoft Active Directory Certificate Services (ADCS).
OVERVIEW
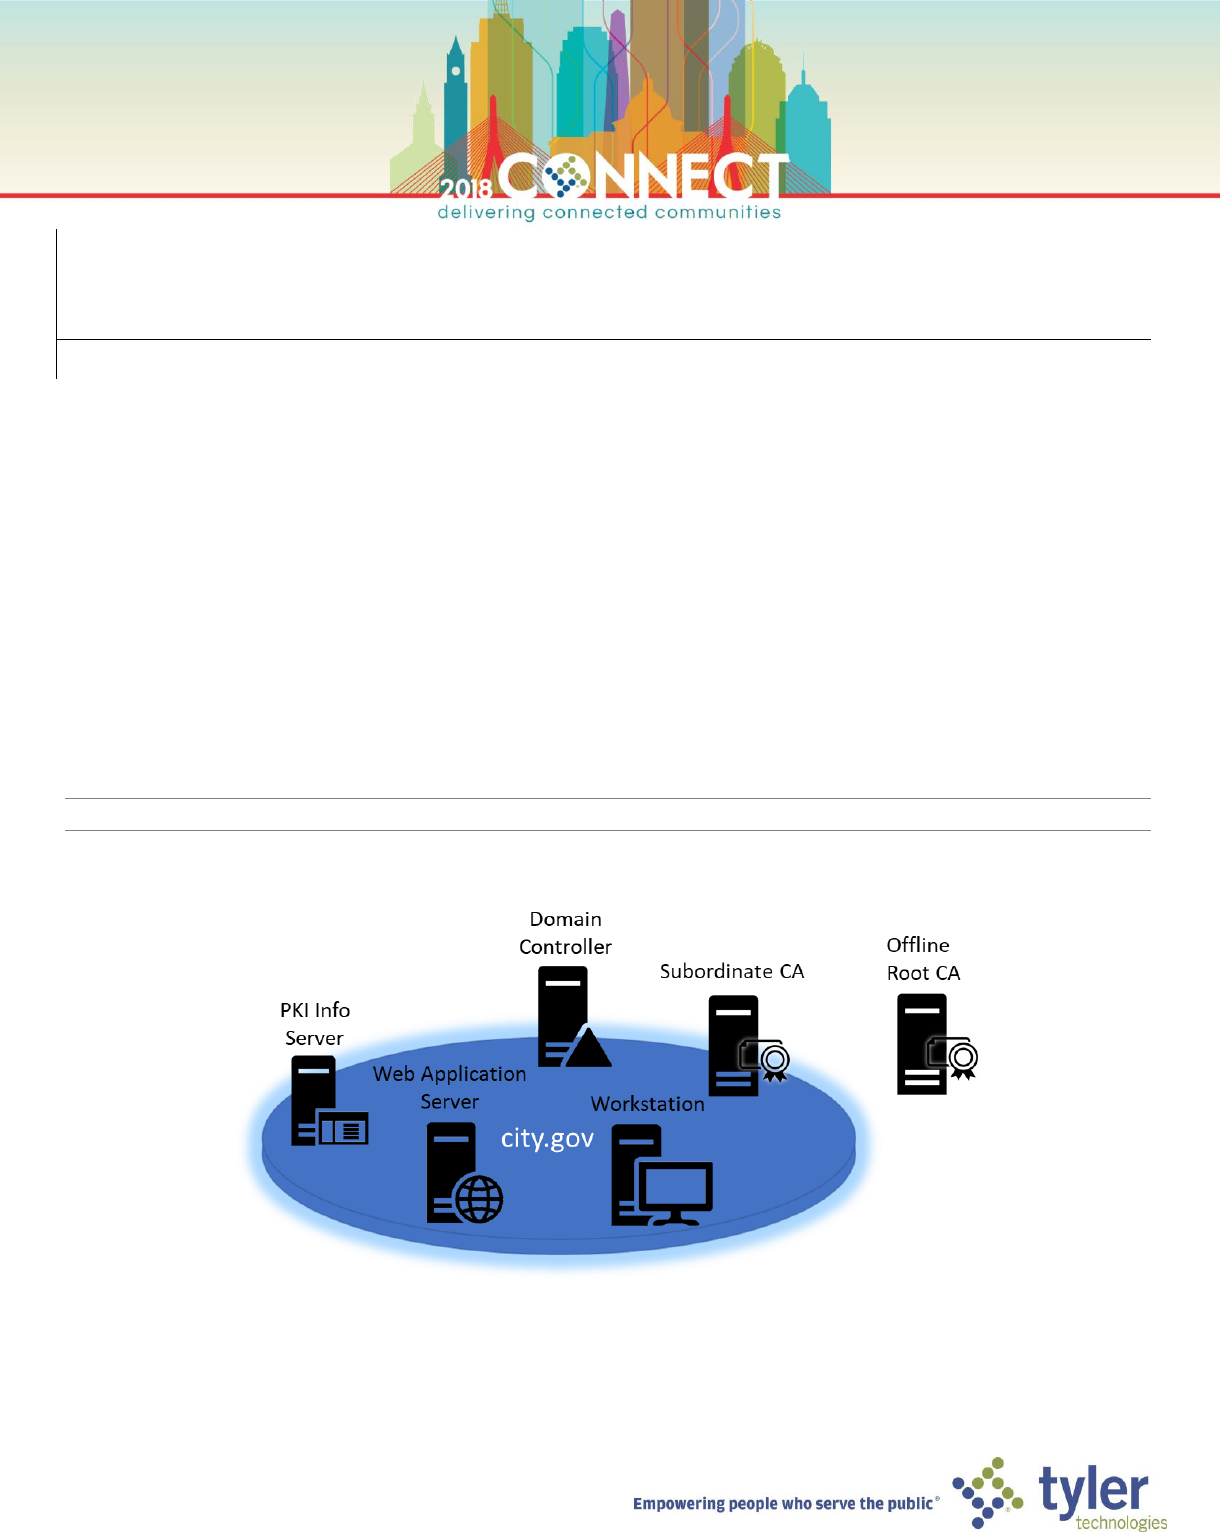
We will be deploying the PKI environment described below in Figure 1 and Table 1. The installation procedure will follow
these major steps:
• Provision a web server to host PKI information (CDP and AIA).
• Deploy a standalone root CA
• Deploy an enterprise subordinate CA
NOTE: All domain and local account passwords are set to pw
Figure 1 - Lab Infrastructure
2
Machine
Roles
FQDN [IP]
Domain Controller
DC, DNS, DHCP, WINS
dc.city.gov [10.10.10.10]
Root CA
Certificate Authority
rootca.city.gov [10.10.10.5]
Subordinate CA
Certificate Authority, Web
Enrollment
subca.city.gov [DHCP]
PKI Info Server
IIS, File Share
pkiinfo.city.gov [DHCP]
Web Application Server
IIS
webapps.city.gov [DHCP]
Workstation
Windows Client OS
workstation.city.gov [DHCP]
Table 1 - Listing of Lab Machines
ADCS INSTALLATION AND CONFIGURATION HANDS-ON-LAB
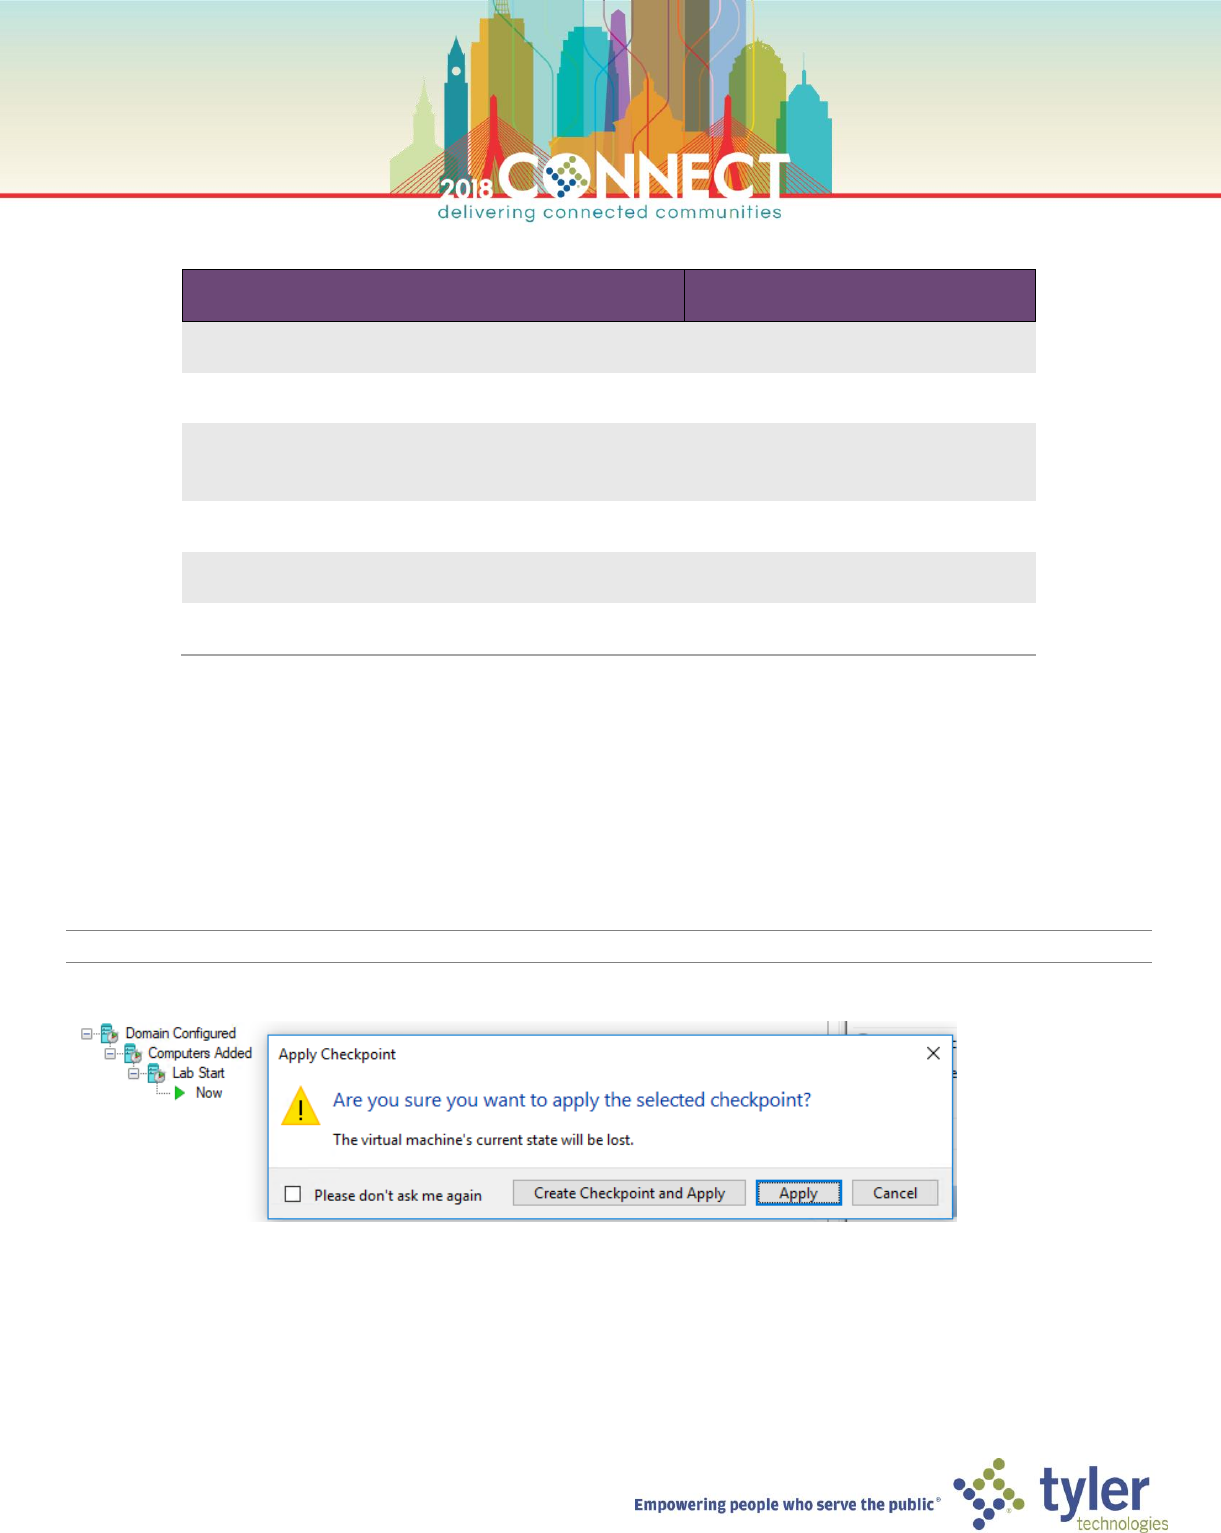
TIP: Before starting any VM in this lab for the first time, you should apply the Lab Start checkpoint
3
Provisioning the PKI Information Distribution Server
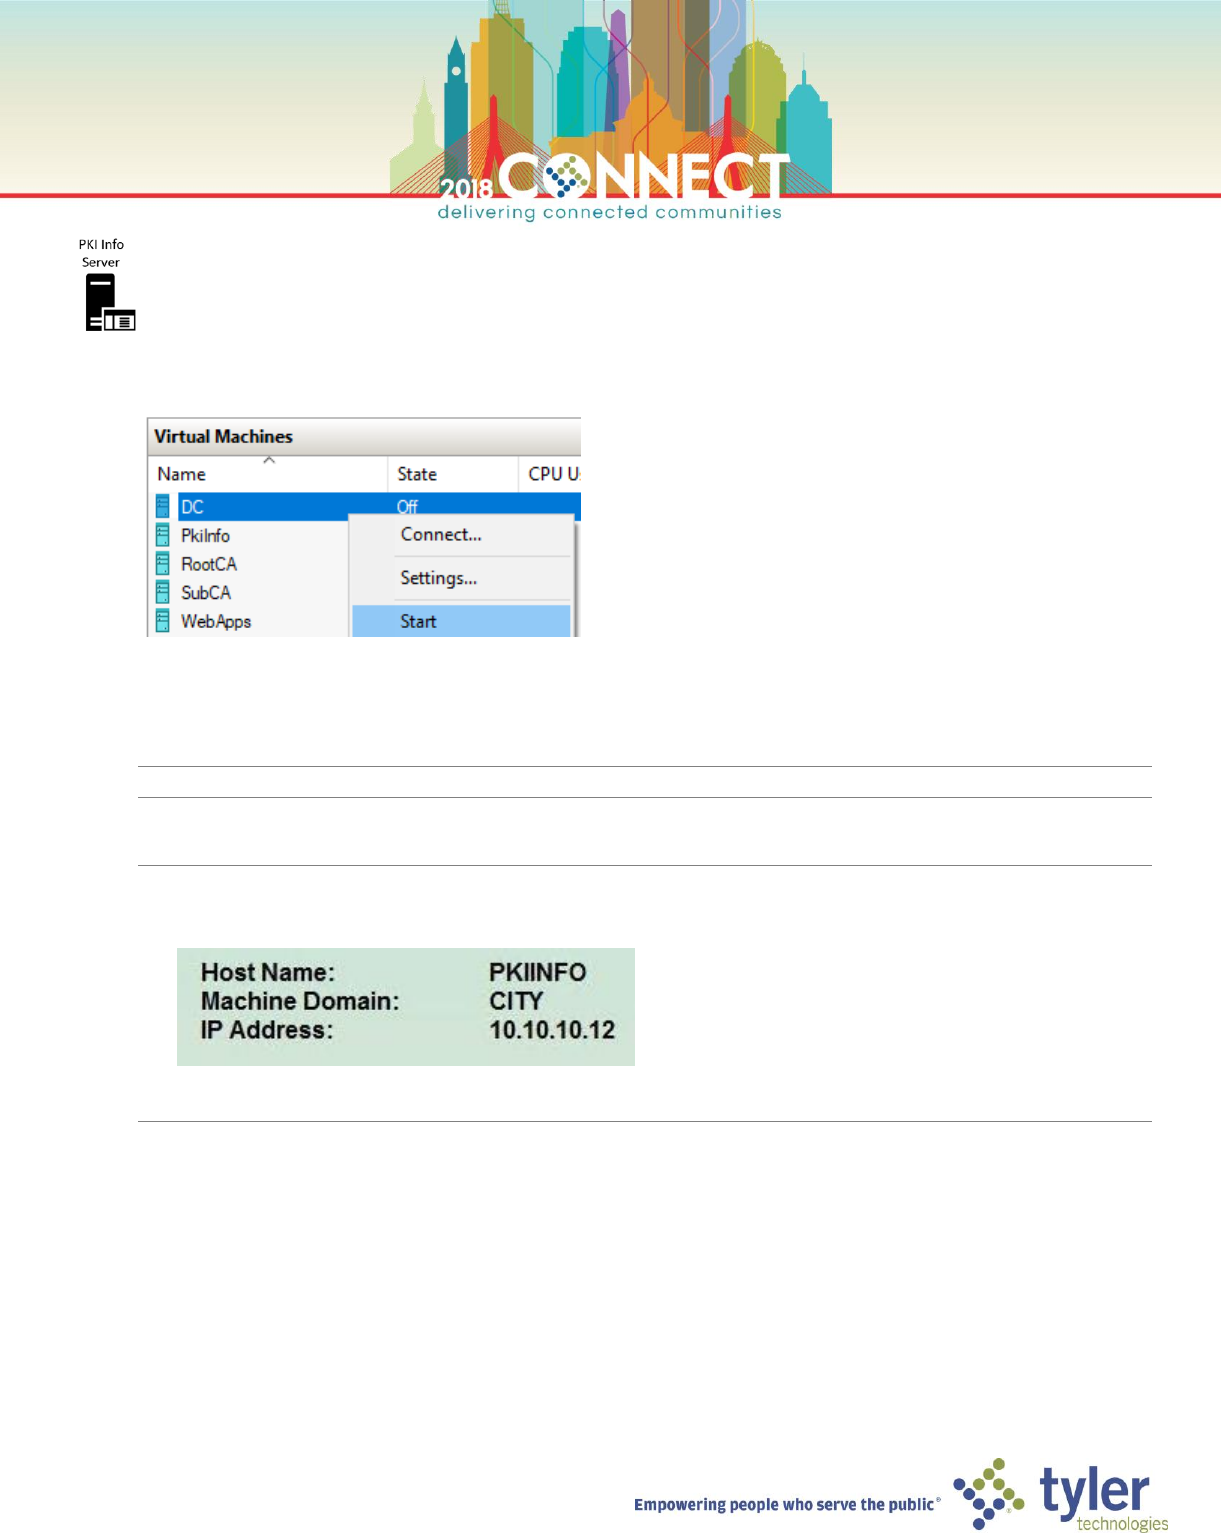
1. Start the Domain Controller (DC) if it isn’t already running, wait for it to
2. Start the PKI Information server (PkiInfo)
3. Start a Hyper-V Virtual Machine Connection to PKiInfo and login as domain administrator
NOTE: Domain administrator credentials are user name: CITY\Administartor password: pw
TIP: When logged in as the domain administrator you should see the following information in the top right of the
desktop wallpaper:
If the information shown is different you may have logged in as local administrator, log out and try again.

4
4. Start Internet Information Services Manager (IIS Manager) and verify that the certinfo directory is exists under
the Default Web Site and directory browsing is enabled
5. Start Internet Explorer and verify that you can browse to http://pkiinfo.city.gov/certinfo
5
Deploying the Root Certificate Authority – Installation
1. Start the Root CA server (RootCA) and login as local Administrator
NOTE: A DNS entry for rootca.city.gov [10.10.10.5] has already been manually created for this server since it is
not a domain member and hence will not self-register with the domain DNS.
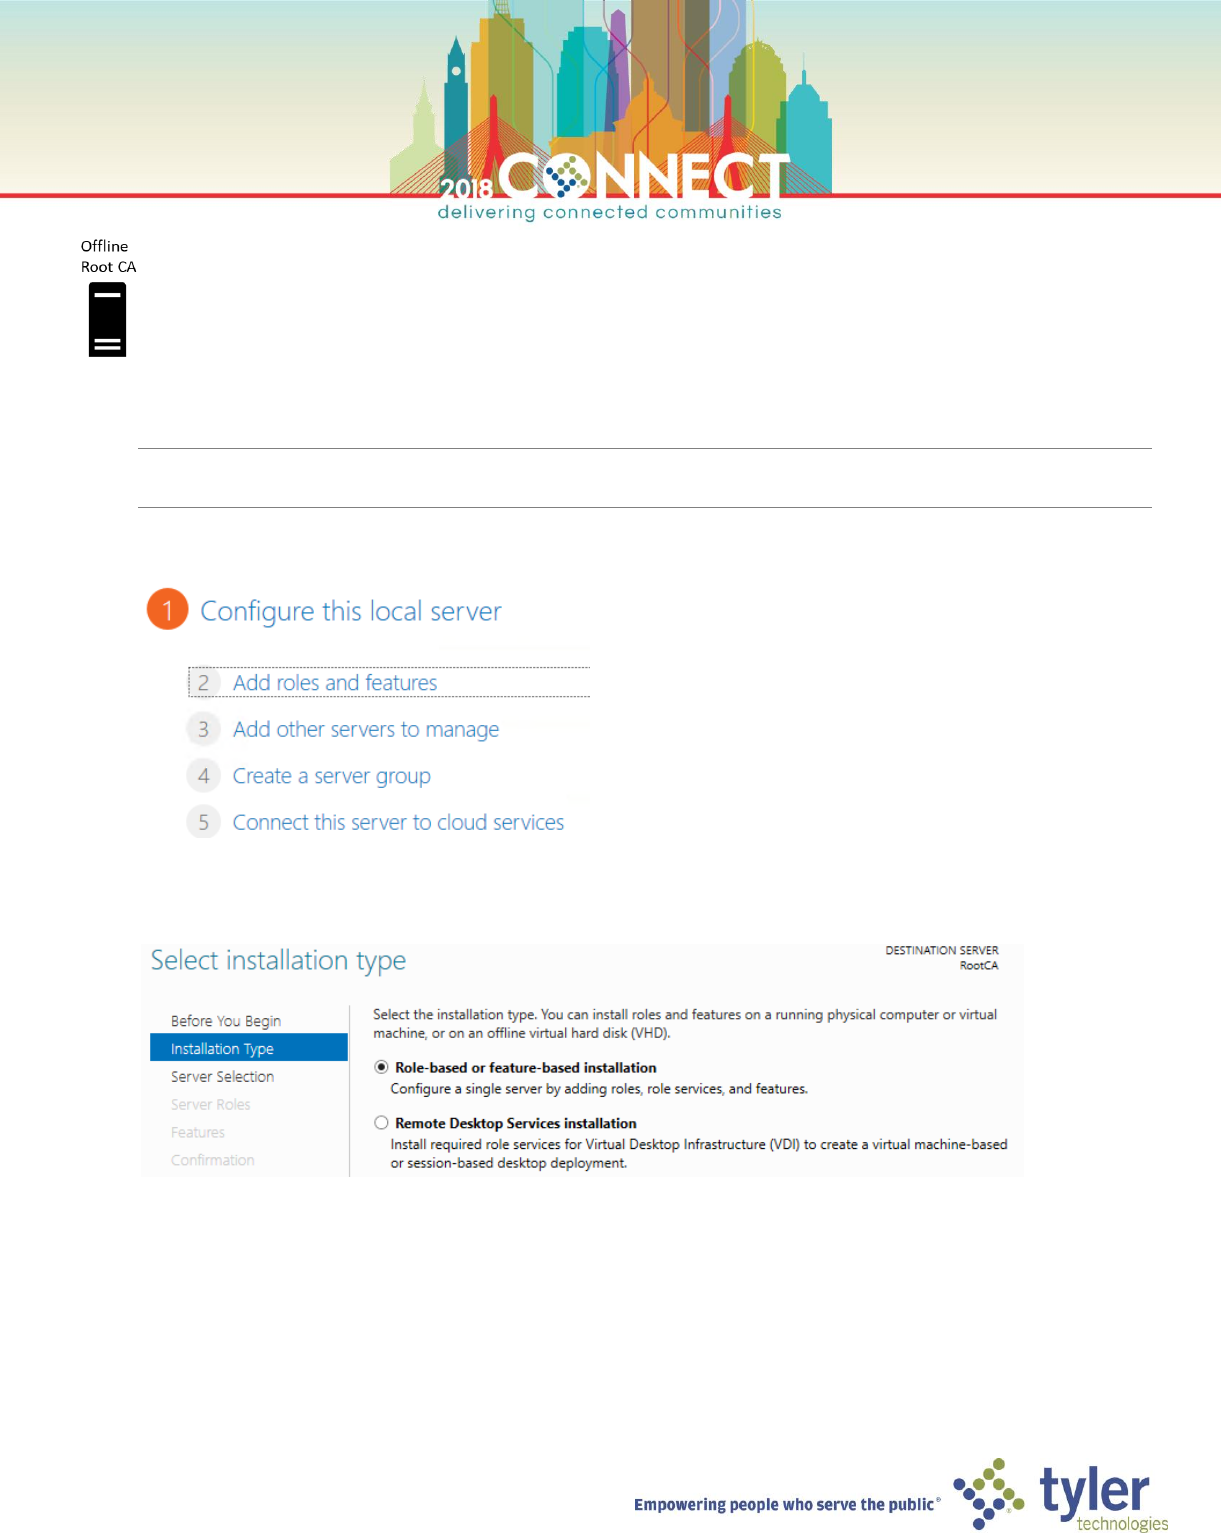
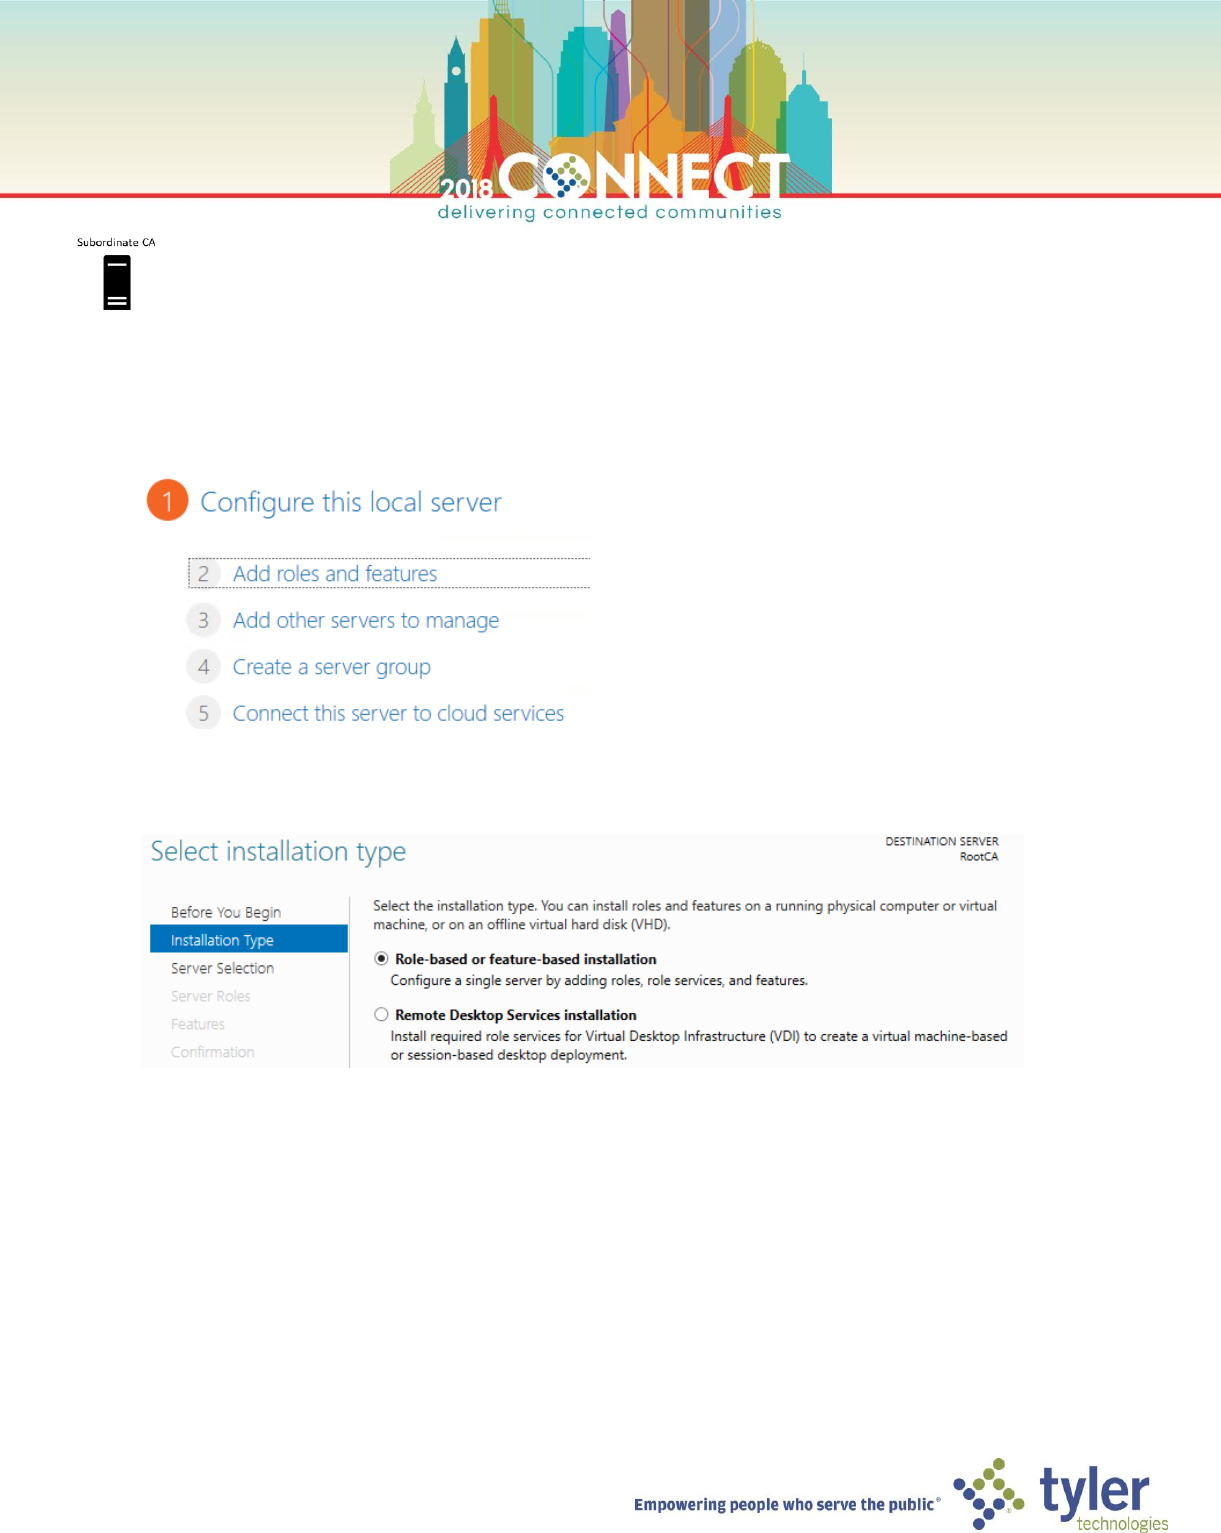
2. Start Server Manager and select Add roles and features, under the Configure this local server section
3. On the Select installation type screen, select Role-based or feature-based installation and click next
6
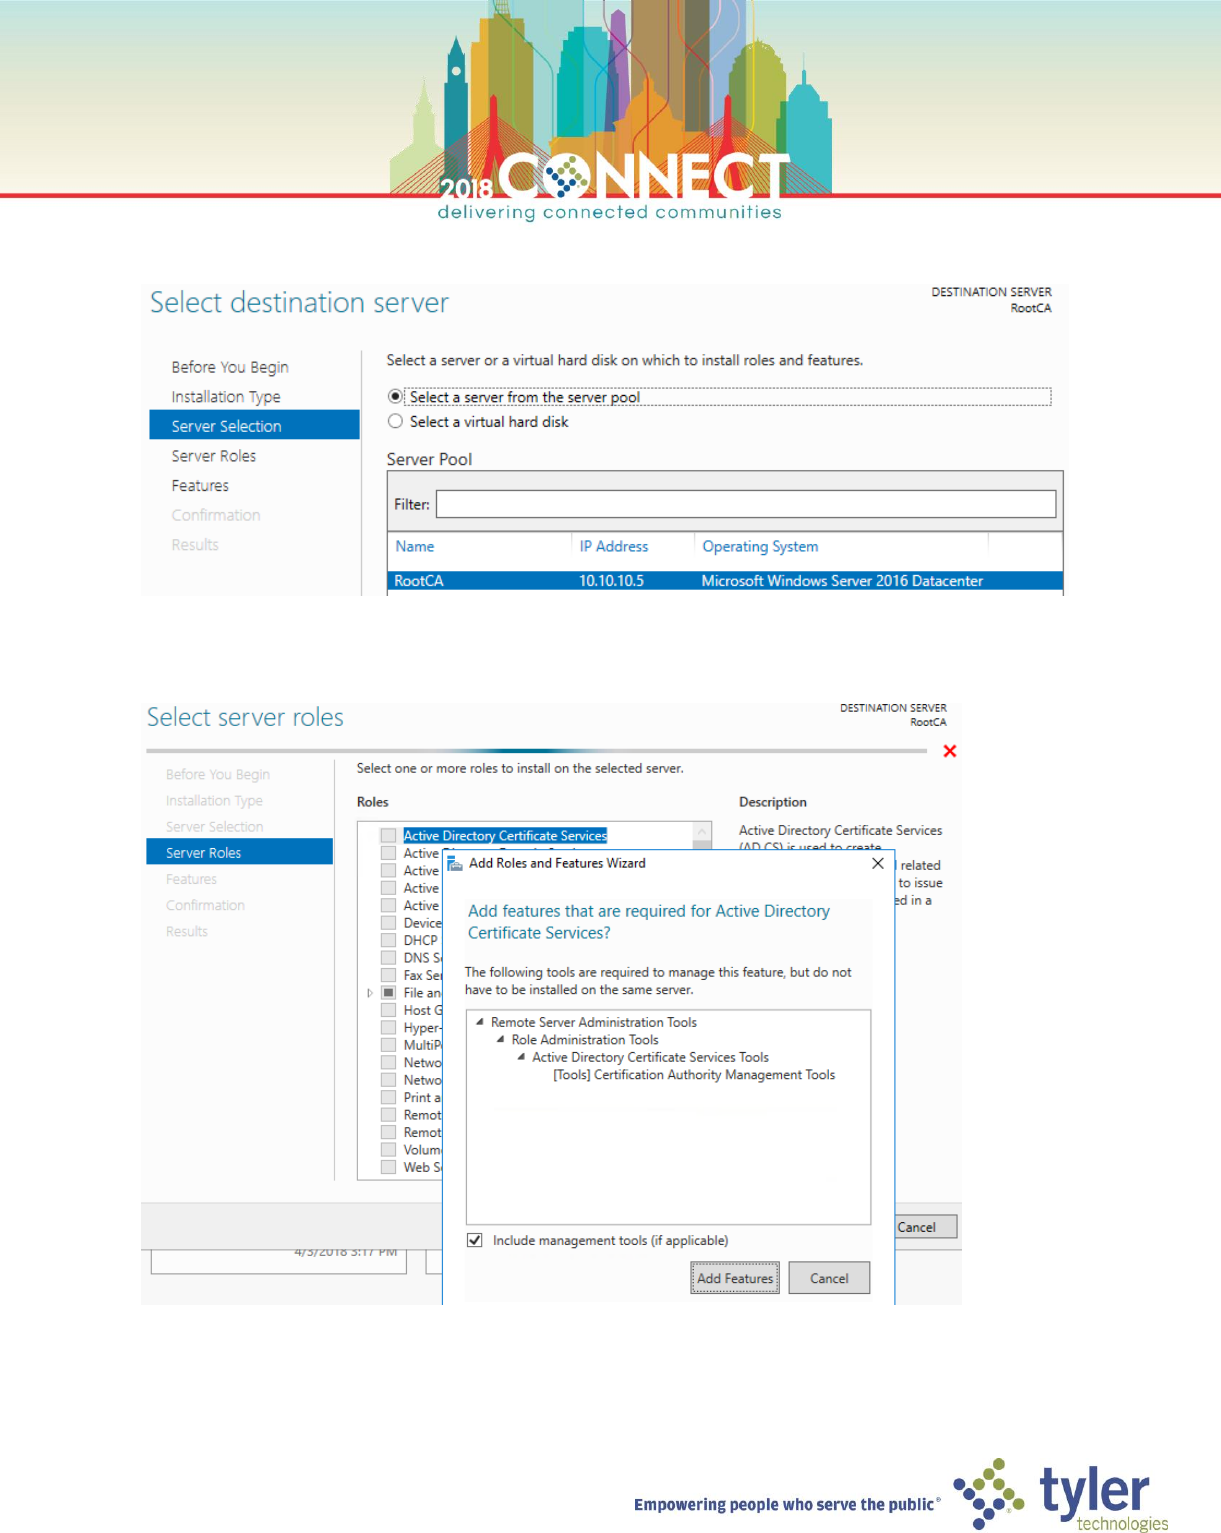
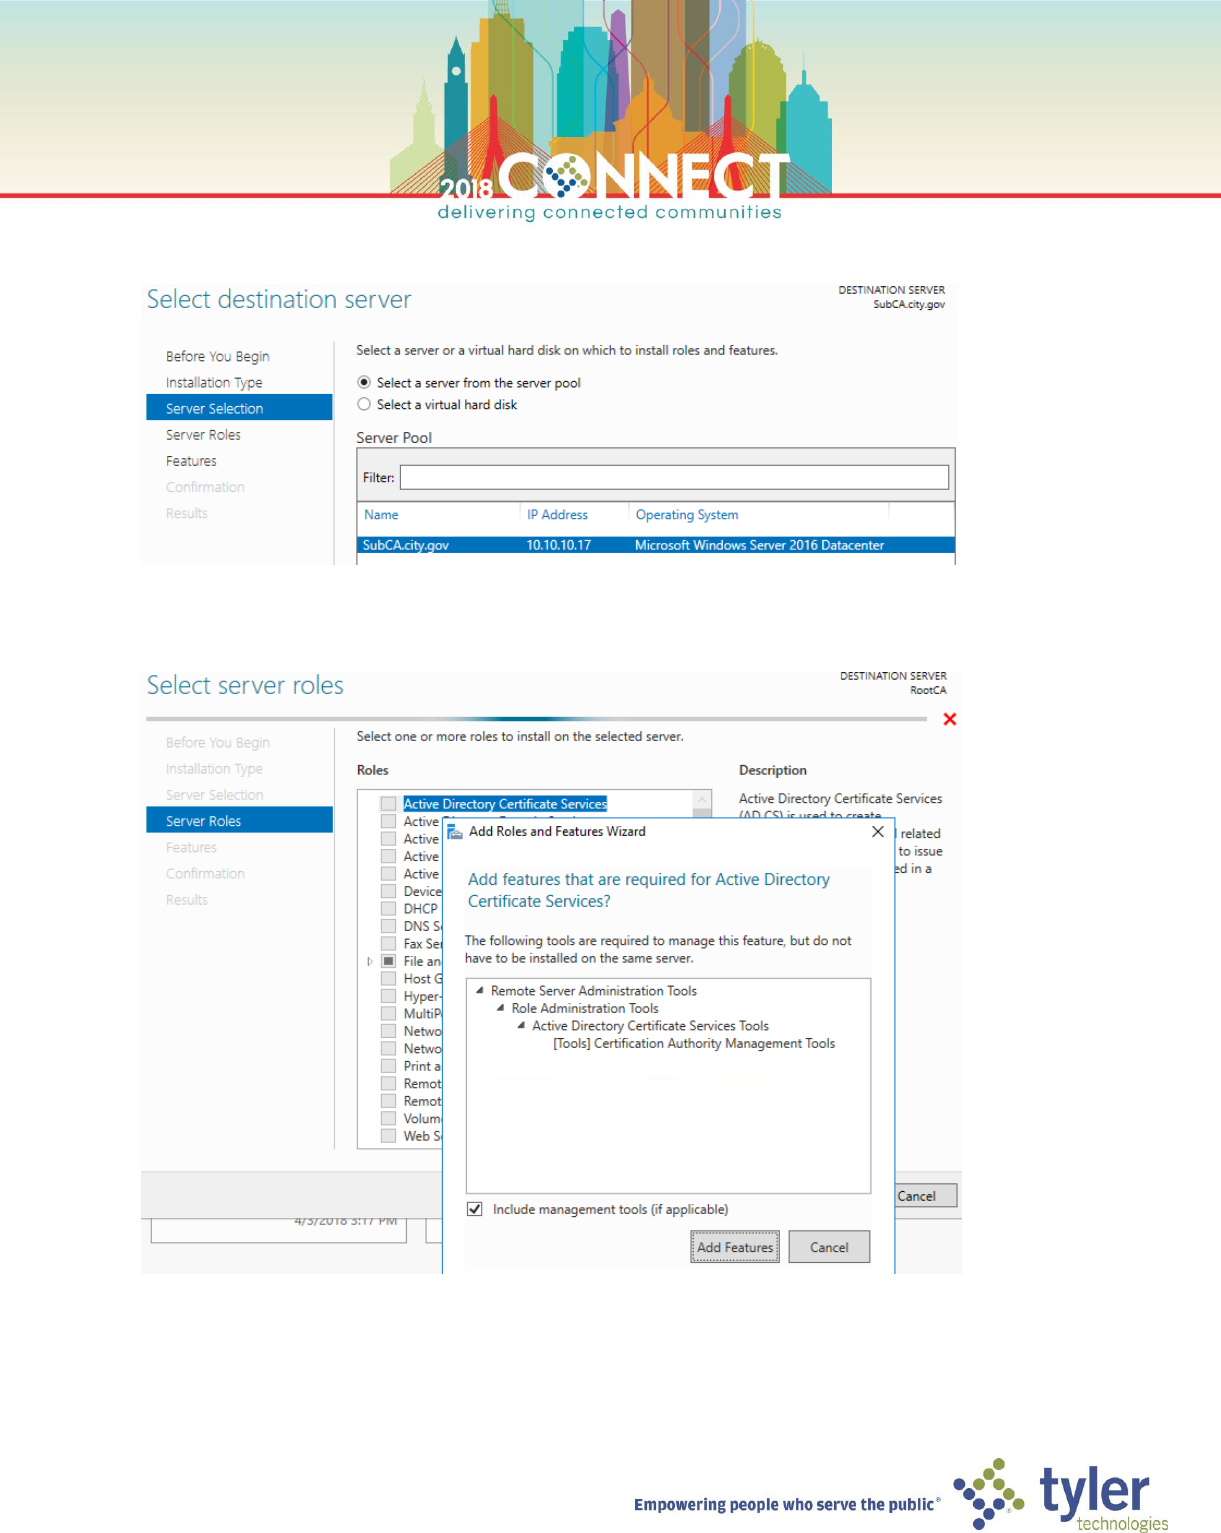
4. On the Select destination server screen ensure the RootCA server is selected and click next
5. On the Select server roles screen, select Activity Directory Certificate Services then click Add Features in the
dialog window. Click Next.
7
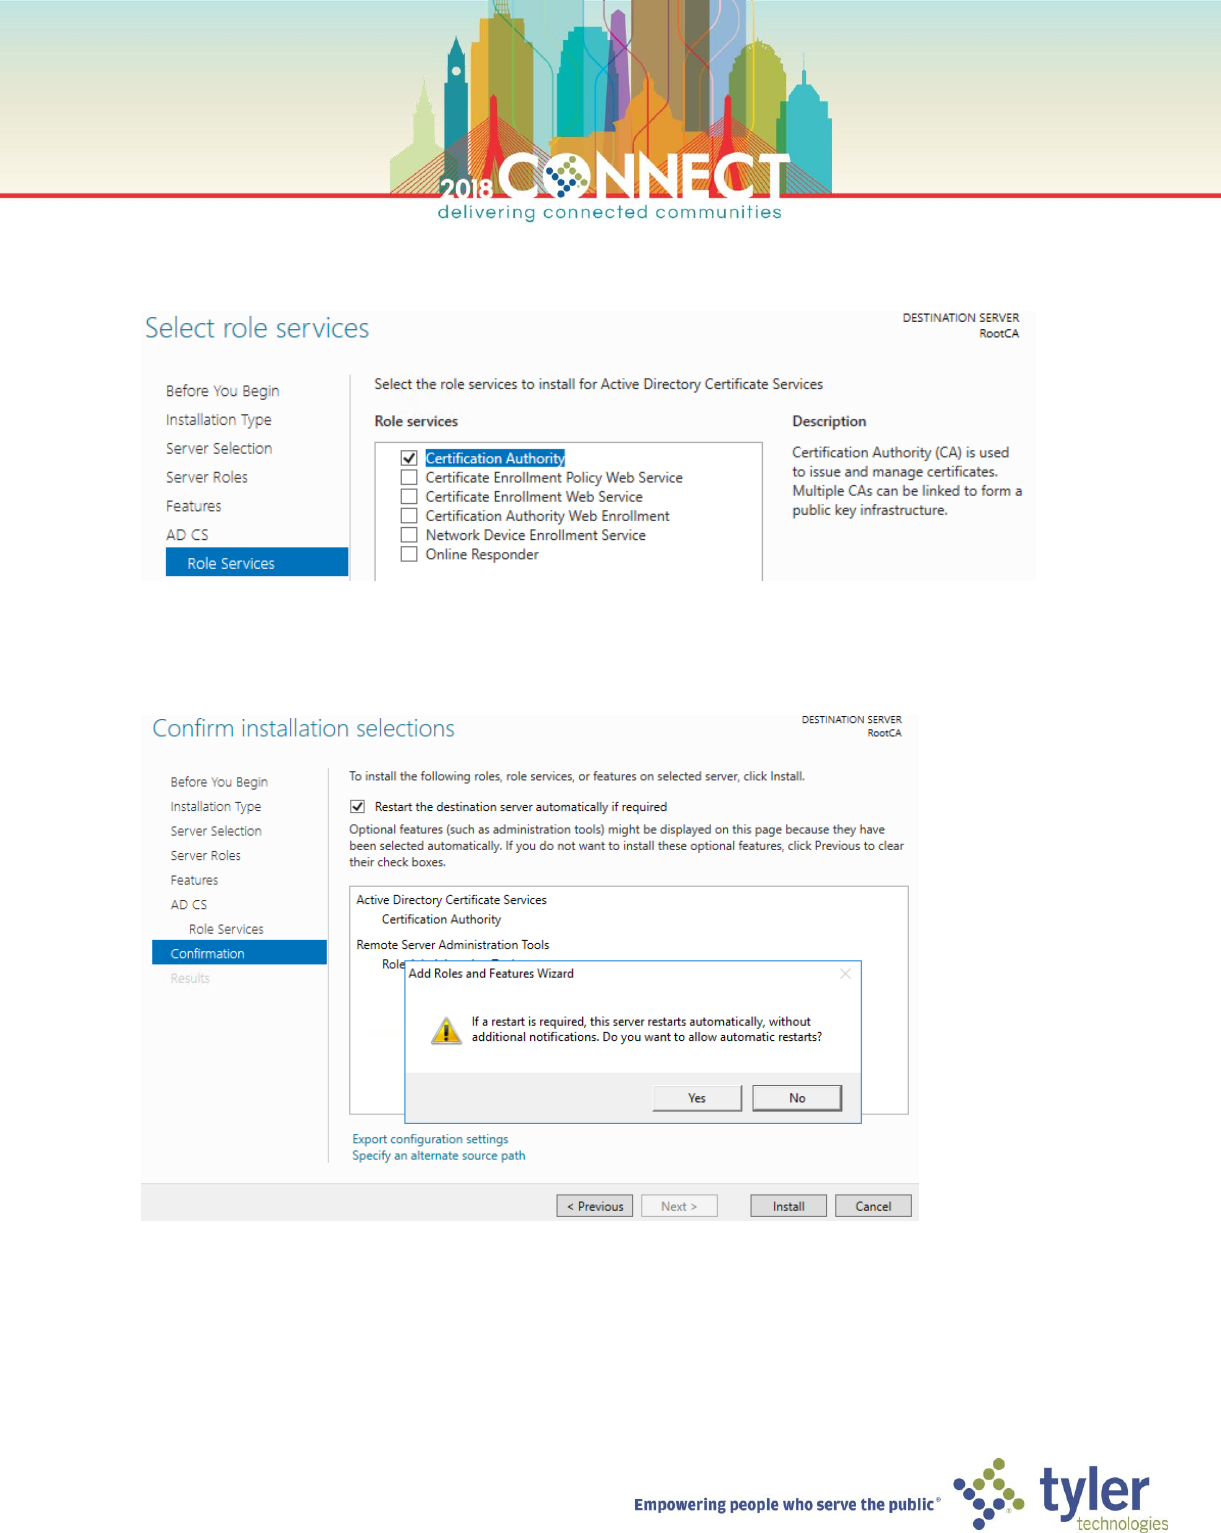
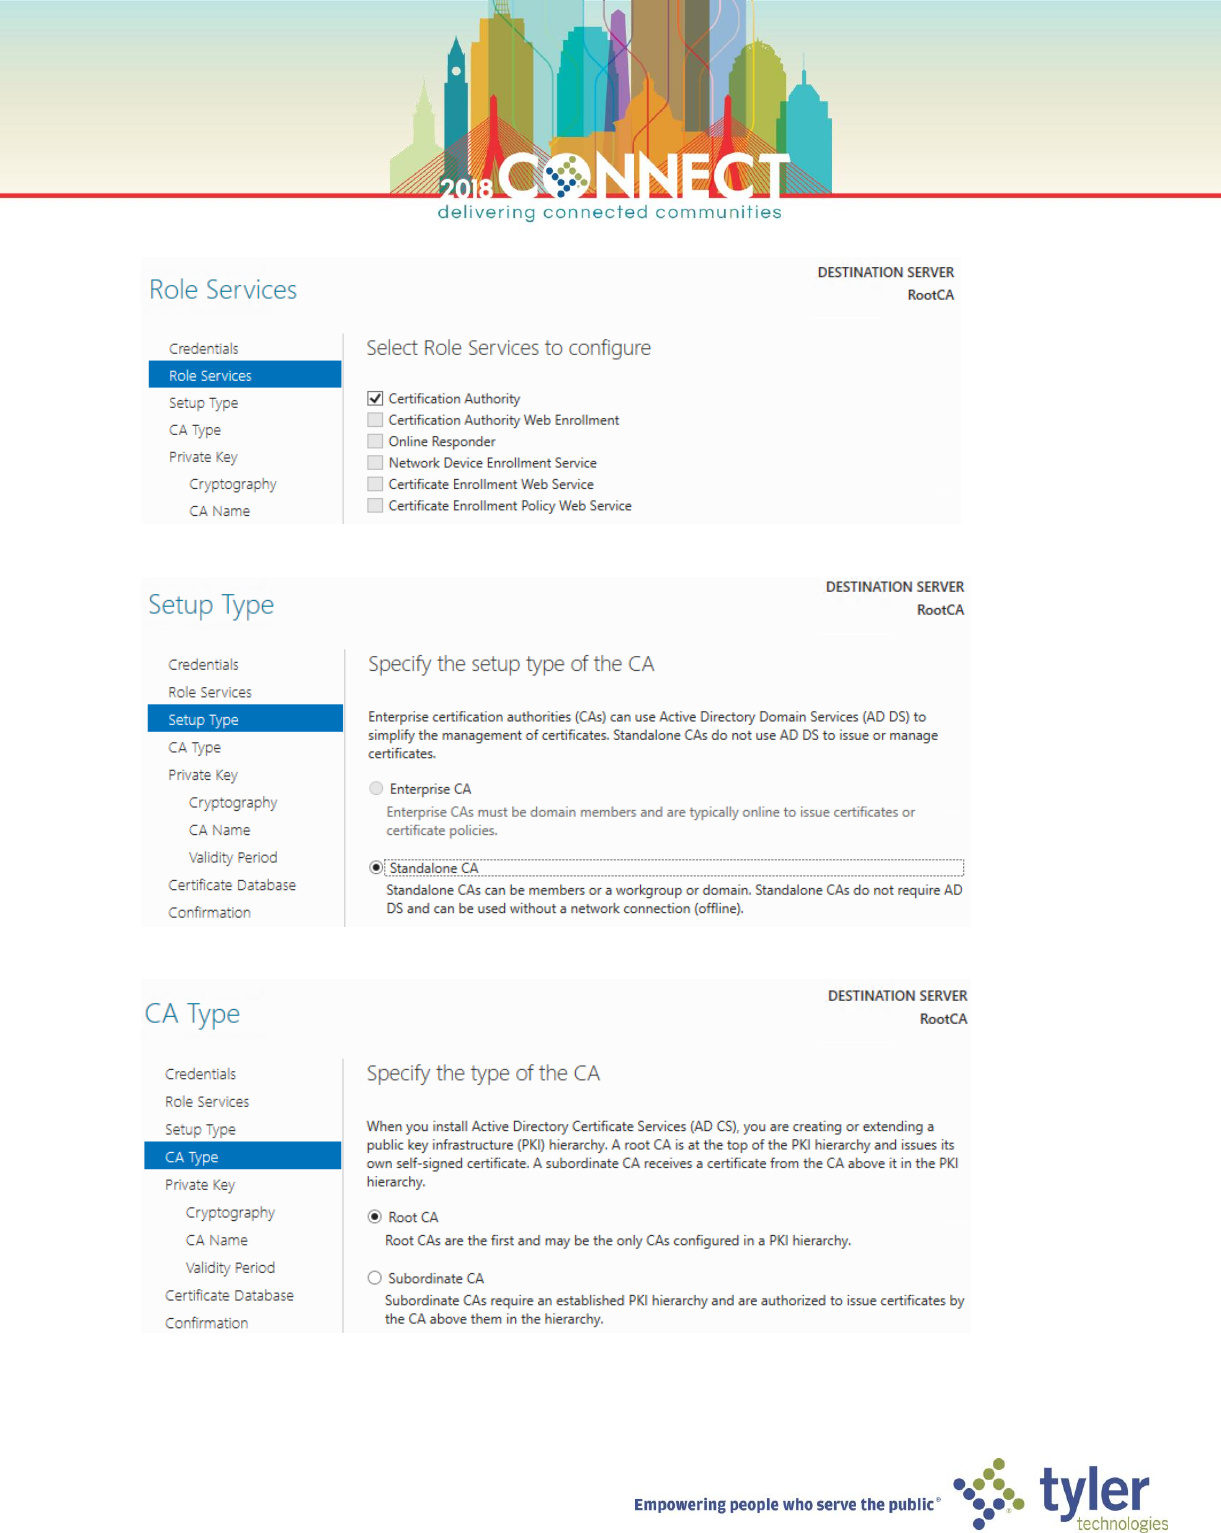
6. Skip to the Roles Services screen under AD CS and verify that only the Certificate Authority role service is
selected. Click Next
7. On the Confirm installation selections screen, check the box to allow automatic restarts during installation and
click Yes in the dialog box and finally click Install
8
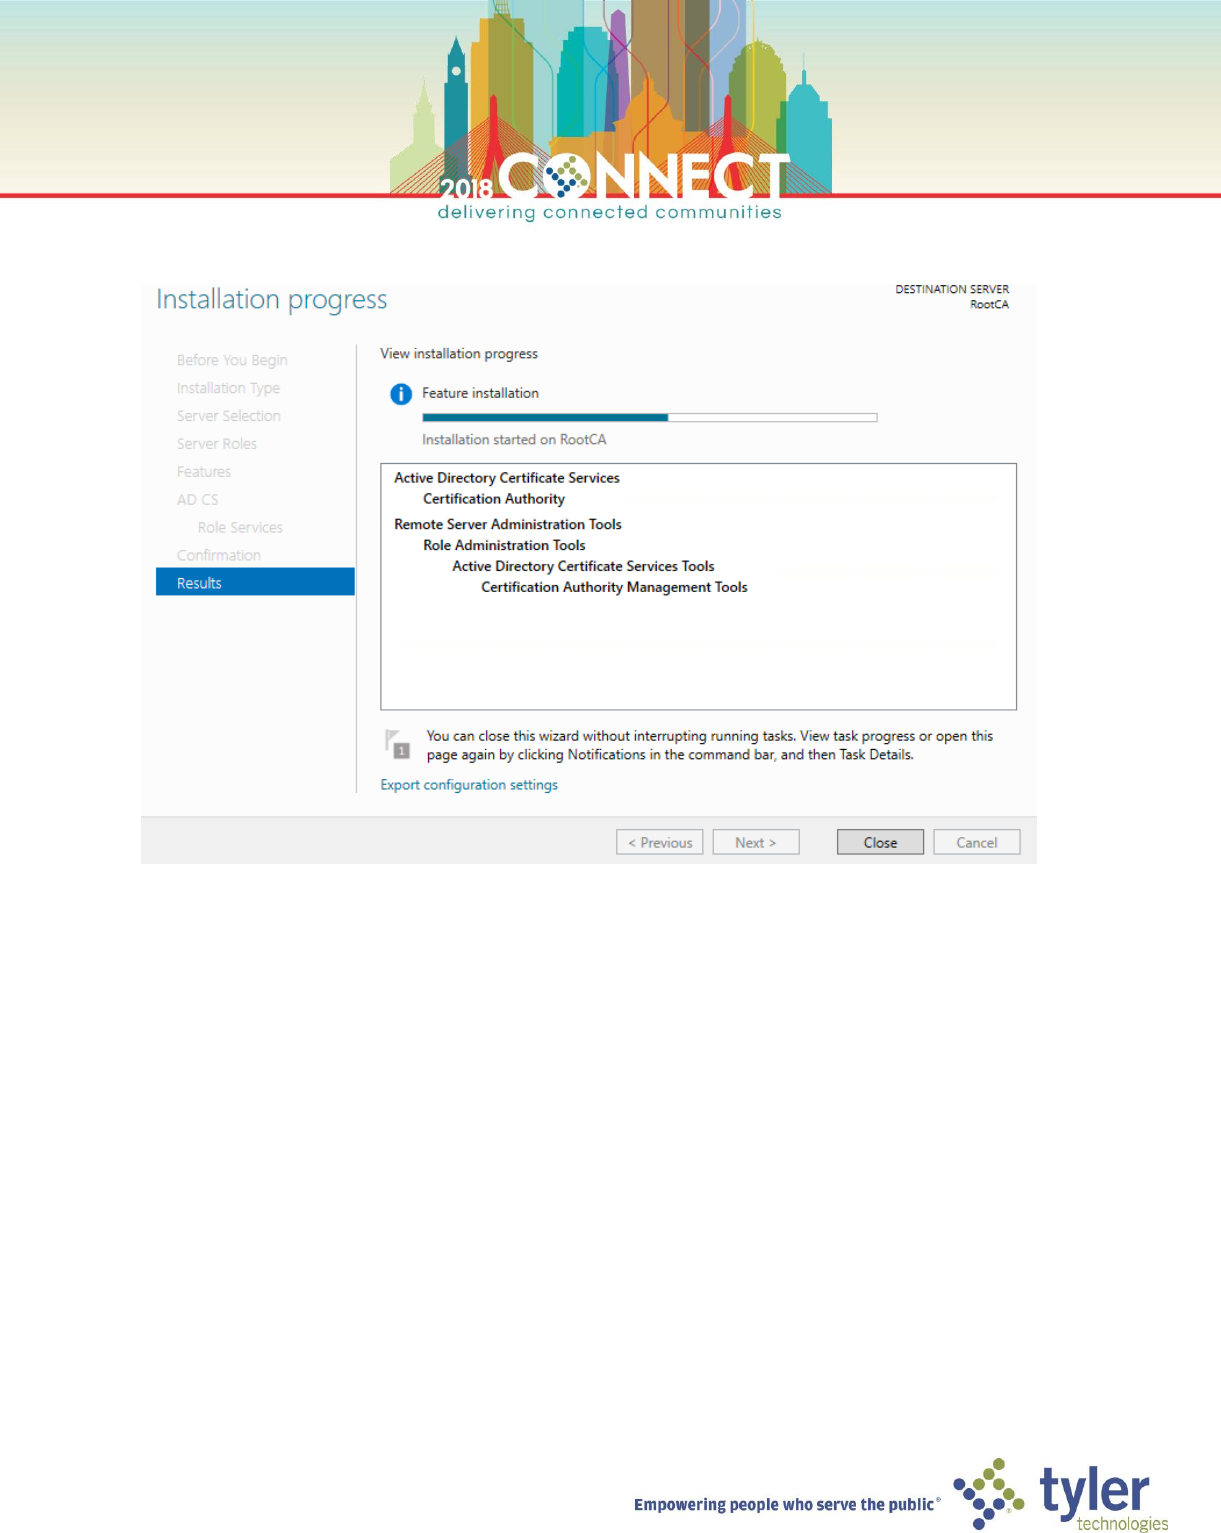
8. Wait for the installation to complete then click Close. The Certificate Authority role is now installed.
9
Deploying the Root Certificate Authority – Configuration
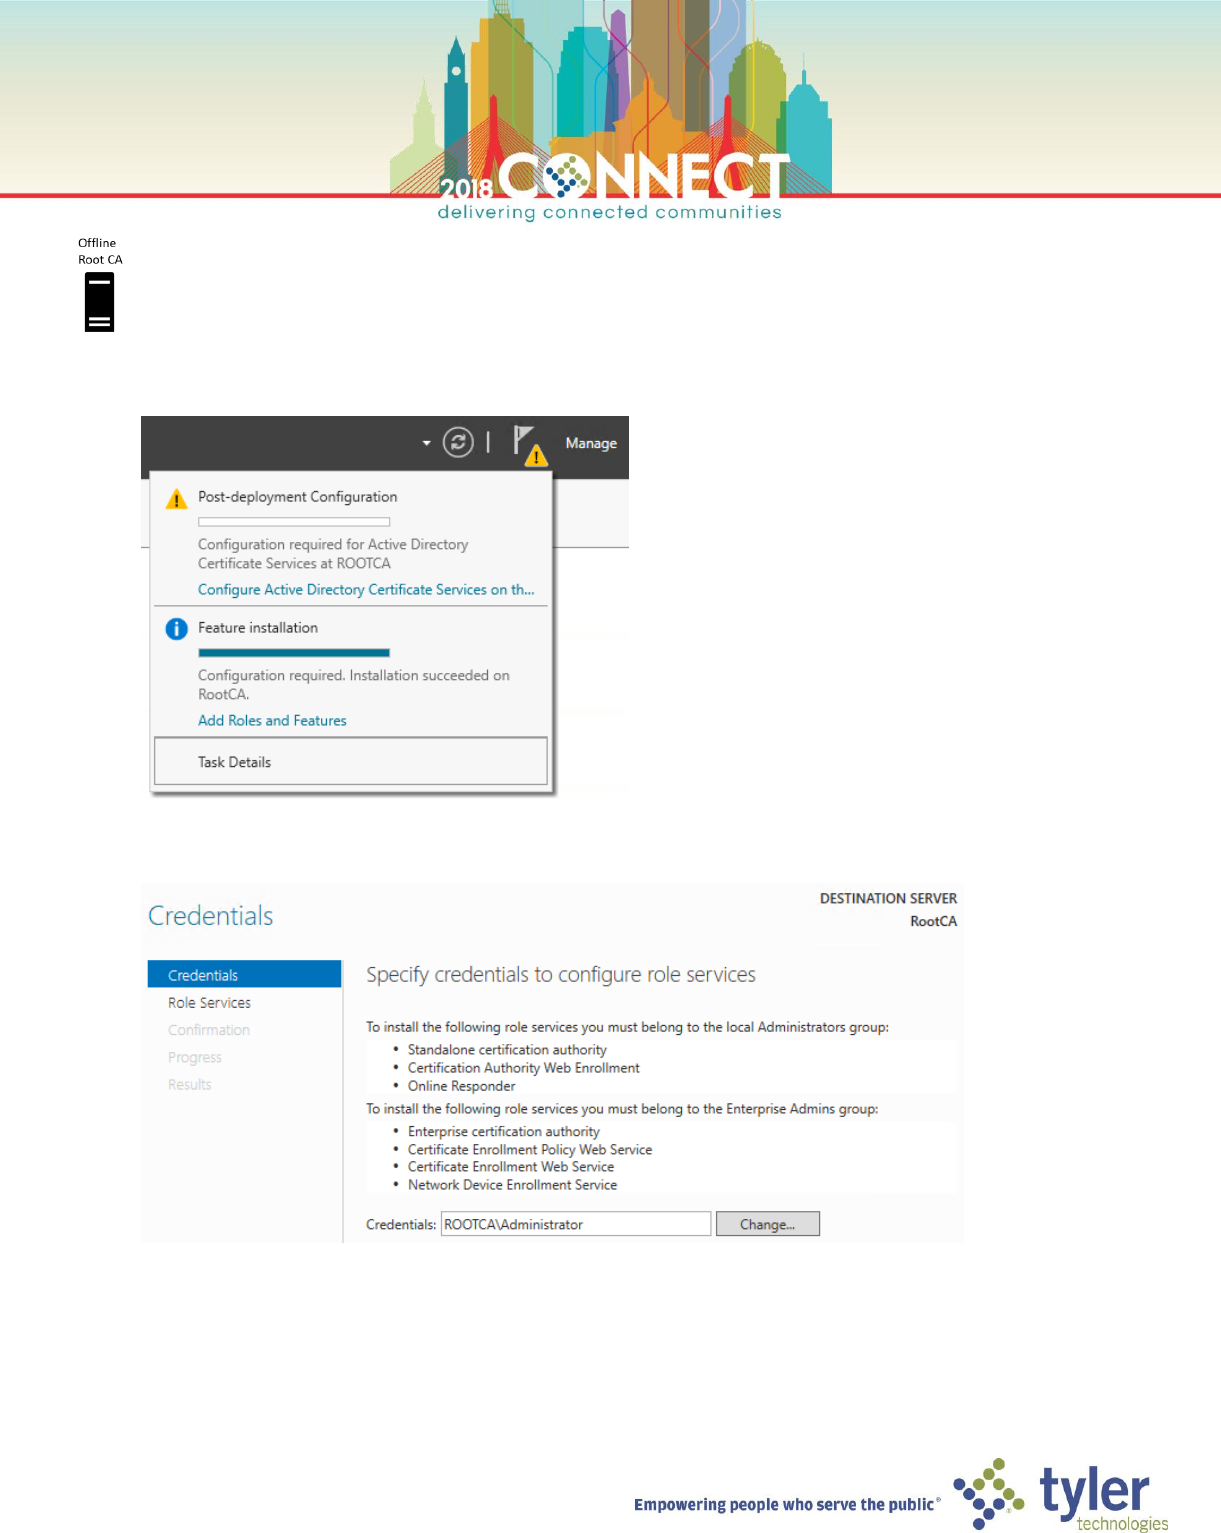
1. In the Server Manager notifications menu, find the Post-deployment Configuration notification and click the
Configure Active Directory Certificate Services on the destination server link
2. On the Credentials screen of the AD CS Configuration wizard, accept the default local Administrator credentials
and click Next
10
3. On the Roles Services screen, select Certificate Authority then click Next
4. On the Setup Type screen ensure Standalone CA is selected then click Next.
5. On the CA Type screen ensure Root CA is selected then click Next
11
6. On the Private Key screen select Create a new private key then click Next
7. On the Cryptography for CA screen ensure RSA#Microsoft Software Key Storage Provider and SHA256 are
selected, however, change the Key Length to 4096 and check the Allow administrator interaction when the
private key is accessed by the CA option then click Next
8. On the CA Name screen, enter a common name for you Root CA, we will use CityRootCA for this lab

12
9. On the Validity Period screen enter the period for which the Root CA certificate will be valid, we will use 15
years for this lab
TIP: Given cryptography settings of SHA256 and 4096 key length or stronger, 10 – 20 years is a reasonable range
for validity periods.
10. On the CA Database screen accept the default locations and click Next
13
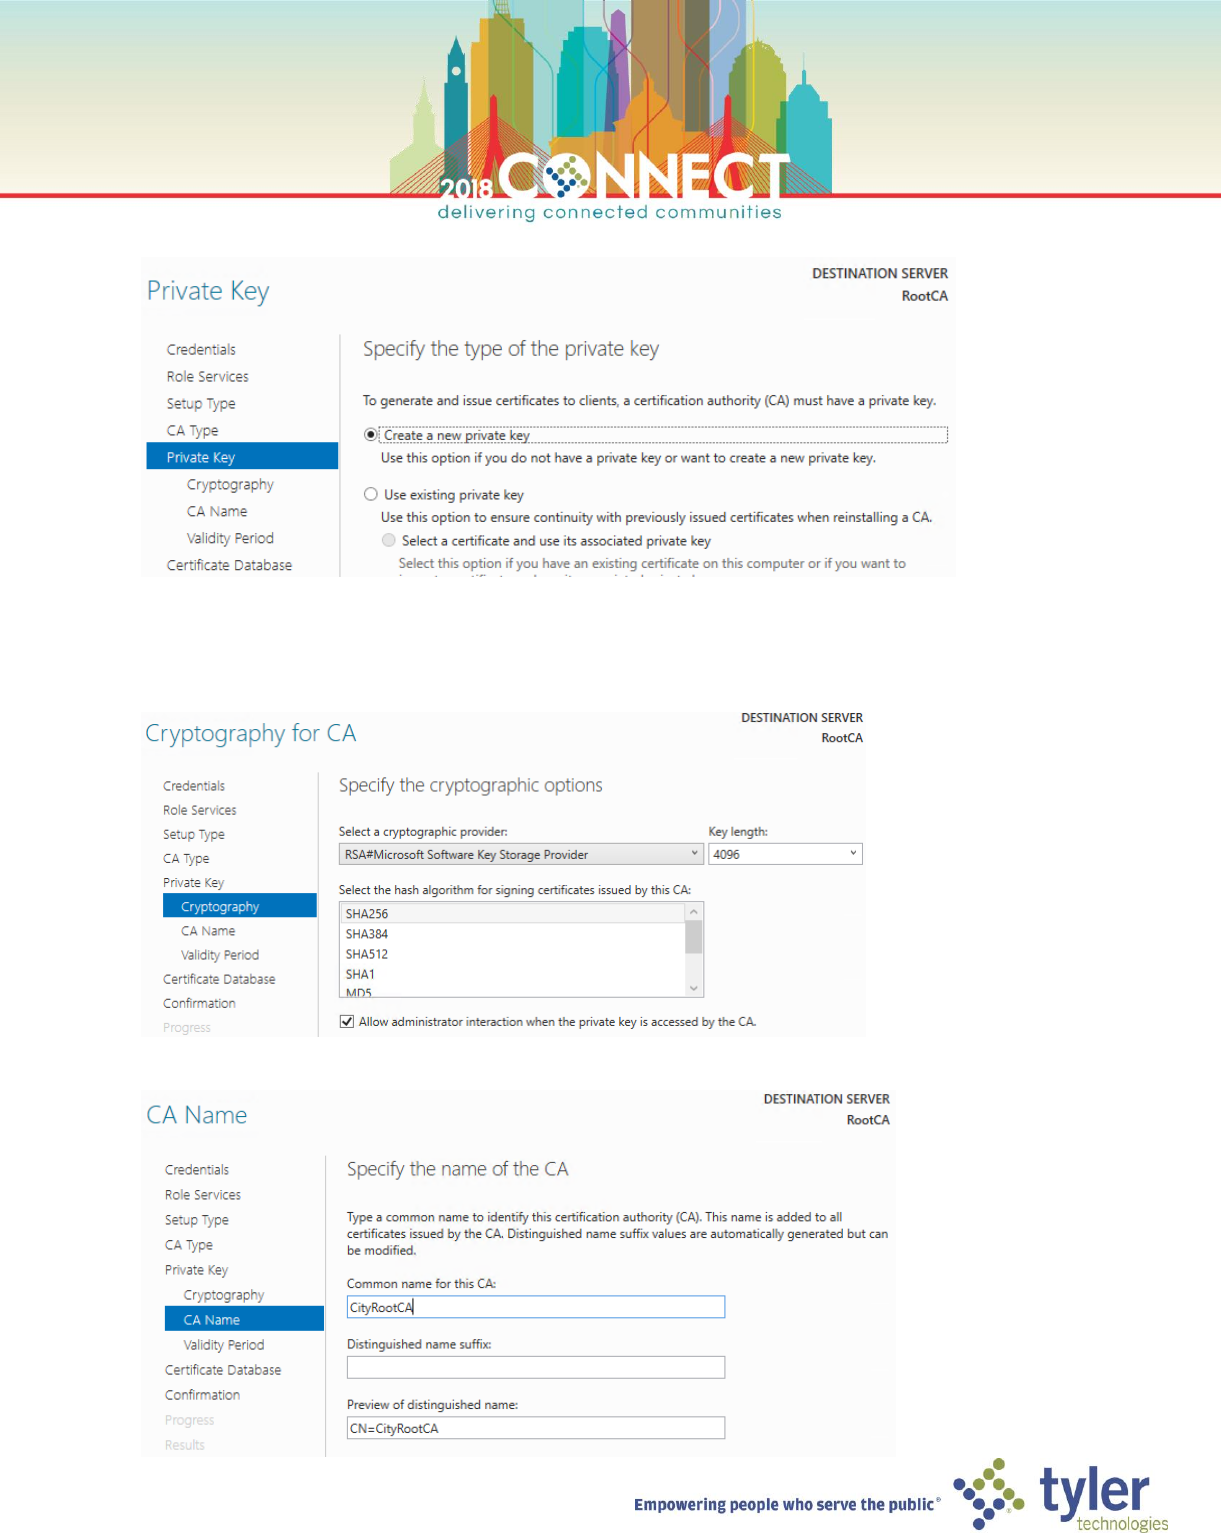
11. On the Confirmation screen, verify all choices then click Configure
12. The Certificate Authority role service is now configured. Click Close.
NOTE: We now need to configure the locations of the CDP and AIA to point to the PKI Information Server, so that the
domain infrastructure has access to information published by the Root CA once it is offline
13. In the Tools menu of Server Manager, launch the Certificate Authority management console
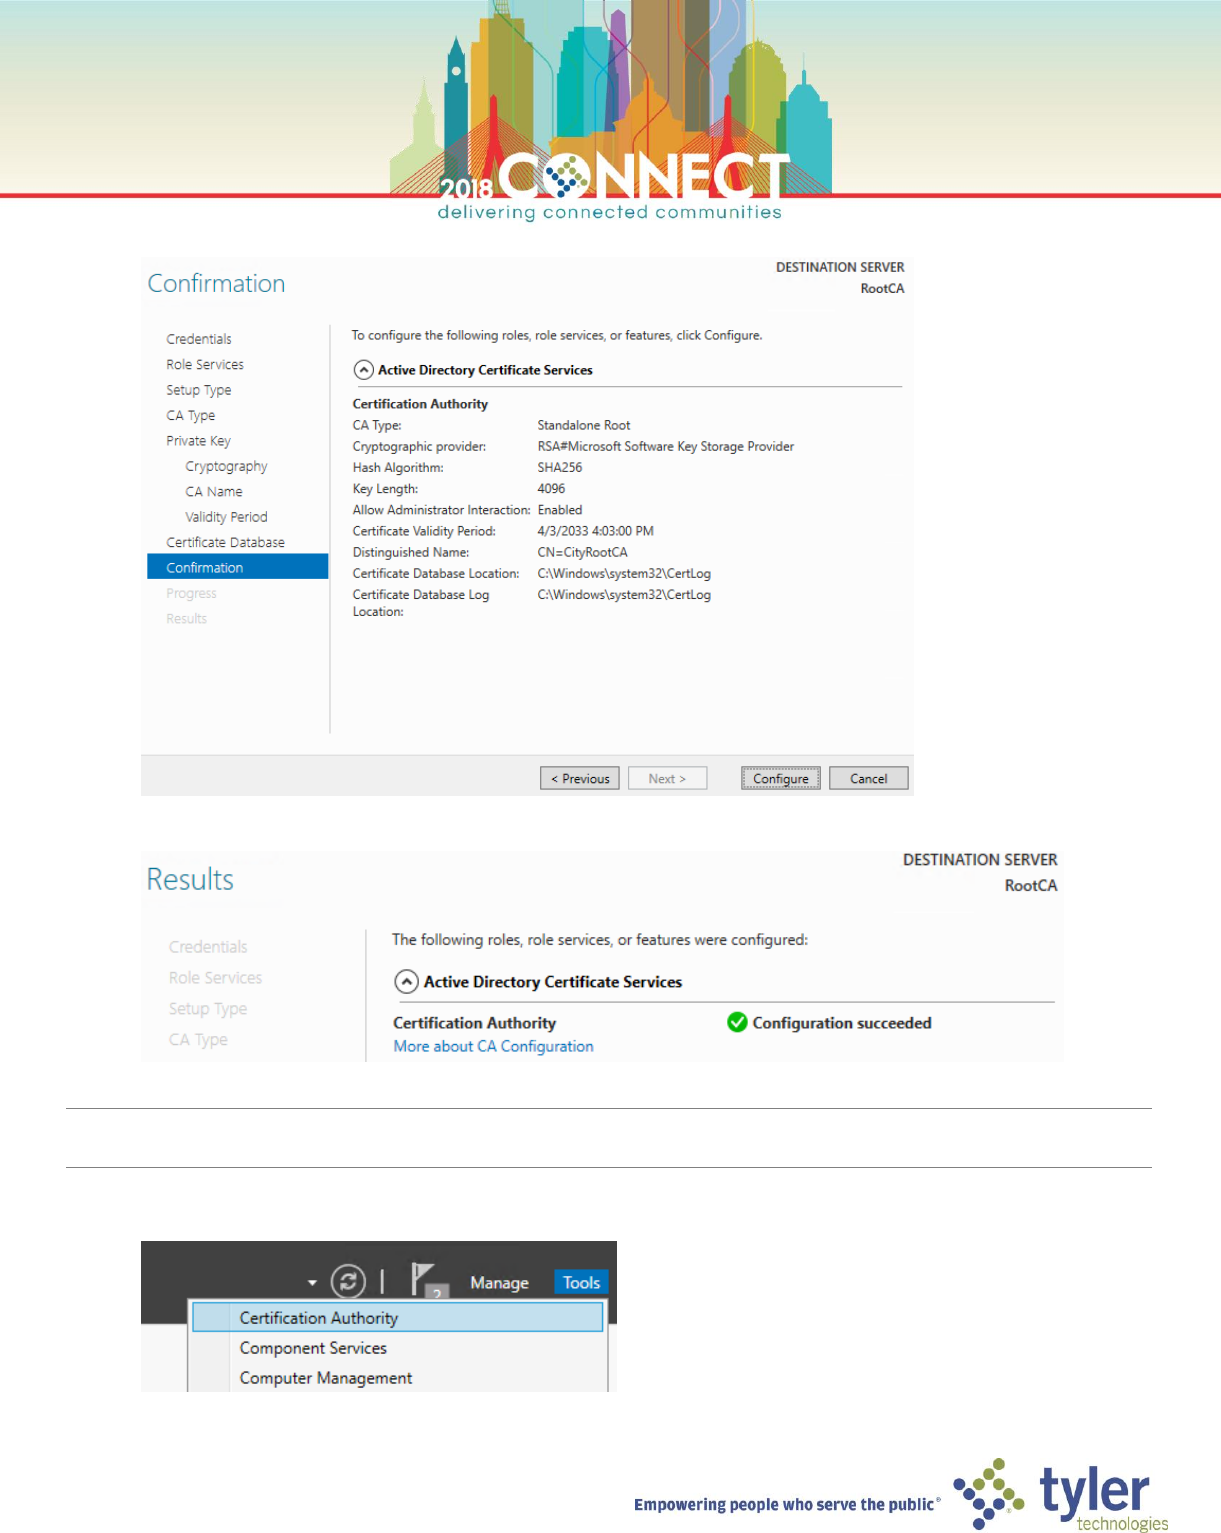
14
14. Verify that the CityRootCA certificate authority service is running (green check mark)
15. Right click the CityRootCA node and select Properties
NOTE: It takes a few seconds for the Properties dialog box to show
16. In the CityRootCA Properties dialog, select the Extensions tab
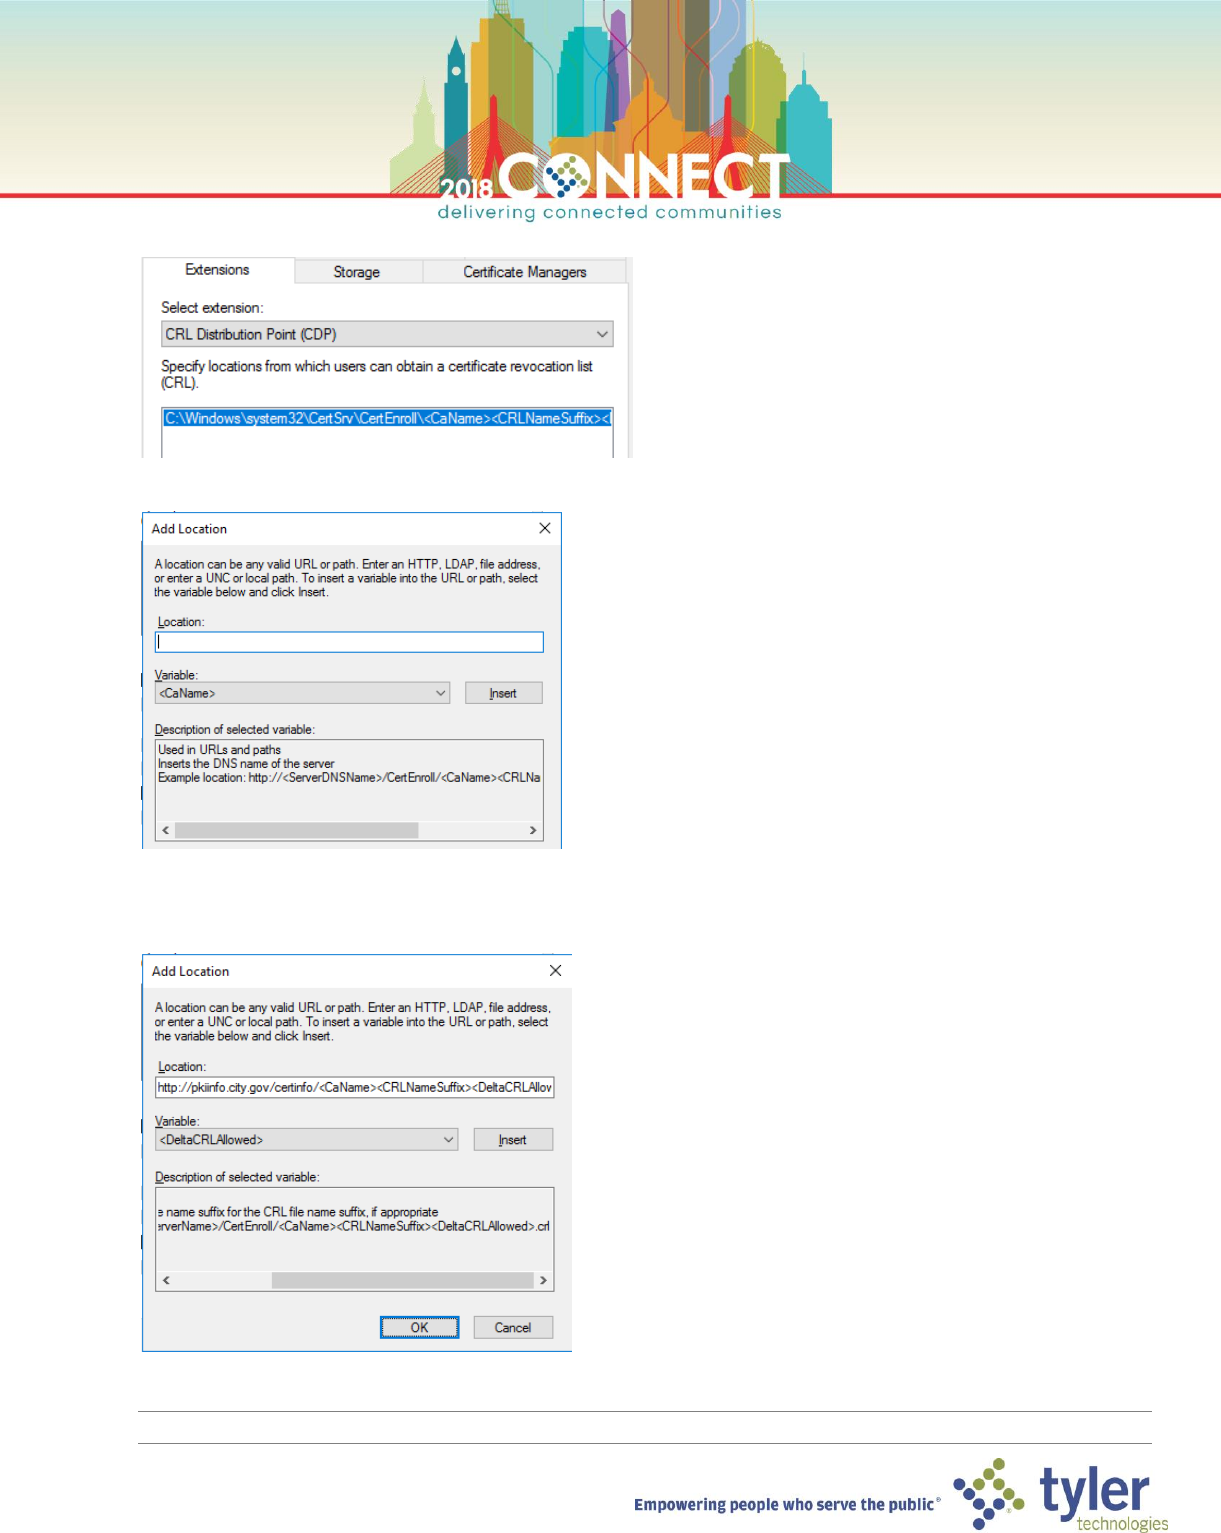
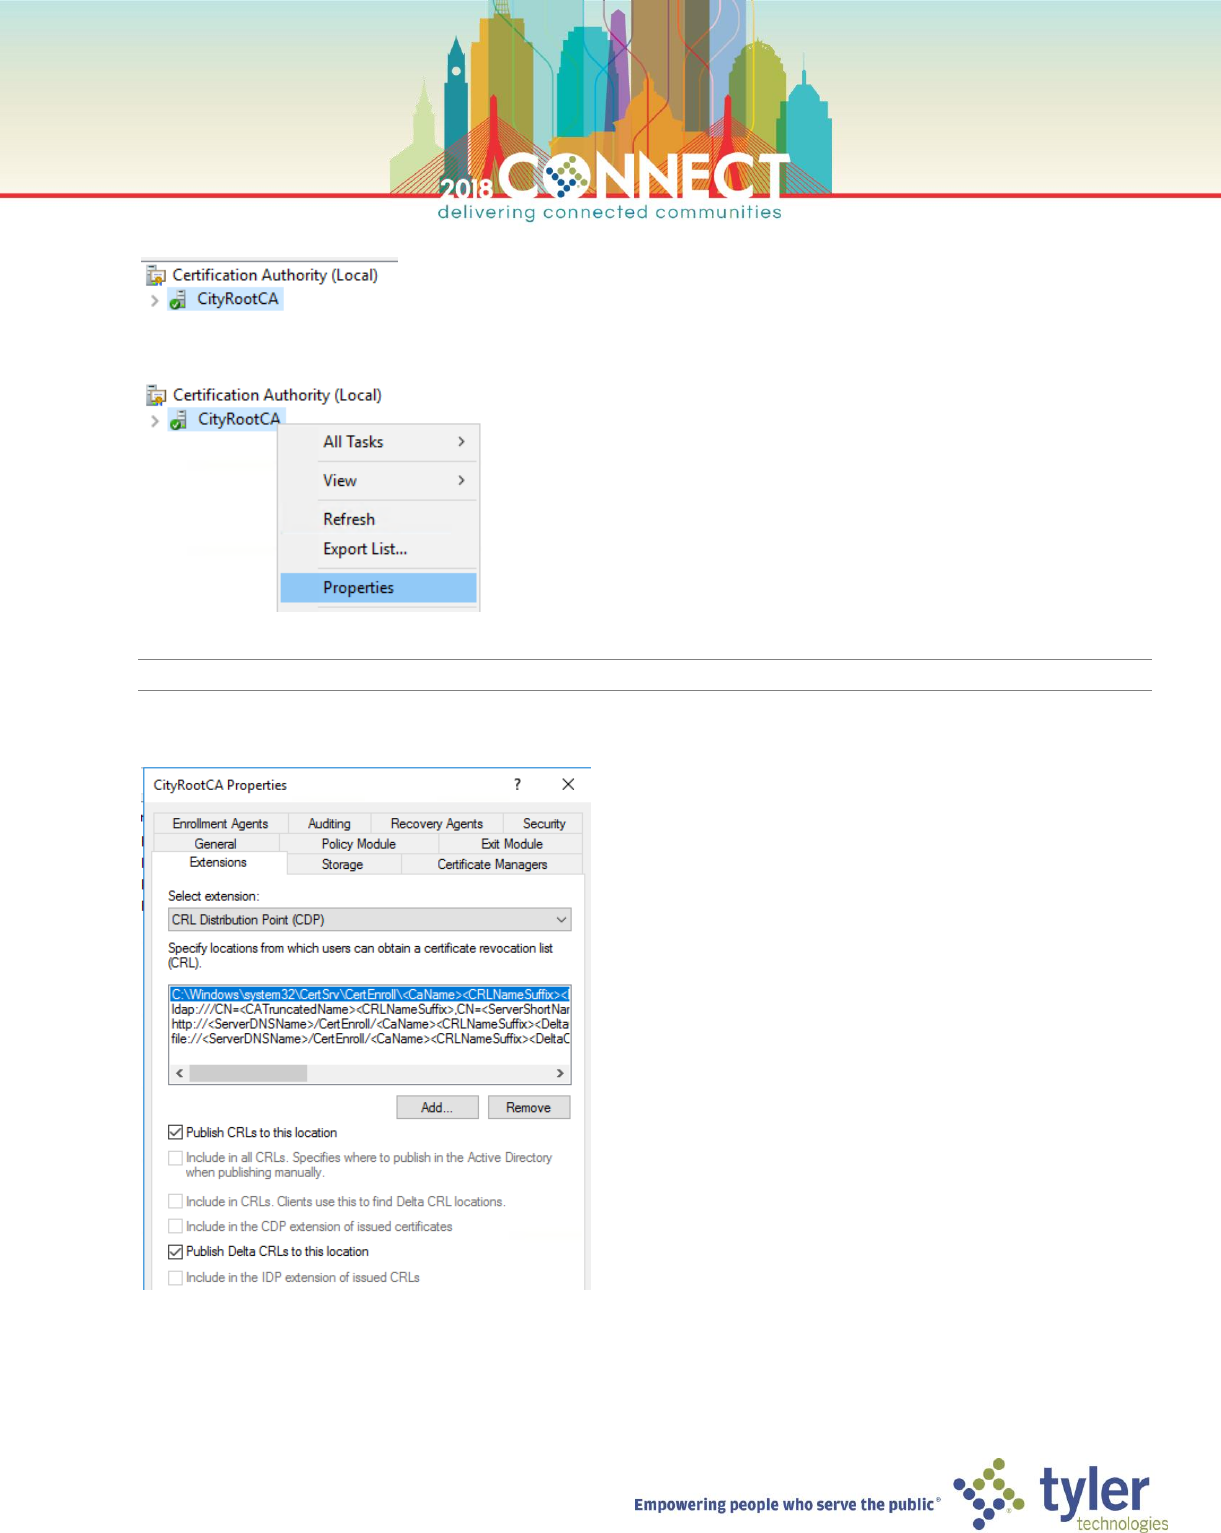
15
17. Remove all entries for the CRL Distribution Point, except for the file system entry on drive C:
18. Click Add… to open the Add Location dialog
19. Enter for following URL to the PKI Information Server and click OK
http://pkiinfo.city.gov/certinfo/<CaName><CRLNameSuffix><DeltaCRLAllowed>.crl
TIP: Use the Variable dropdown to insert the URL parts to avoid typos
16
20. For this location check both the Include in CRLs. Clients use this to find Delta CRL Locations and the Include in
the CDP extension of issued certificates options, then click Apply
21. Click Yes in the Certificate Authority dialog box to restart the CA service
17
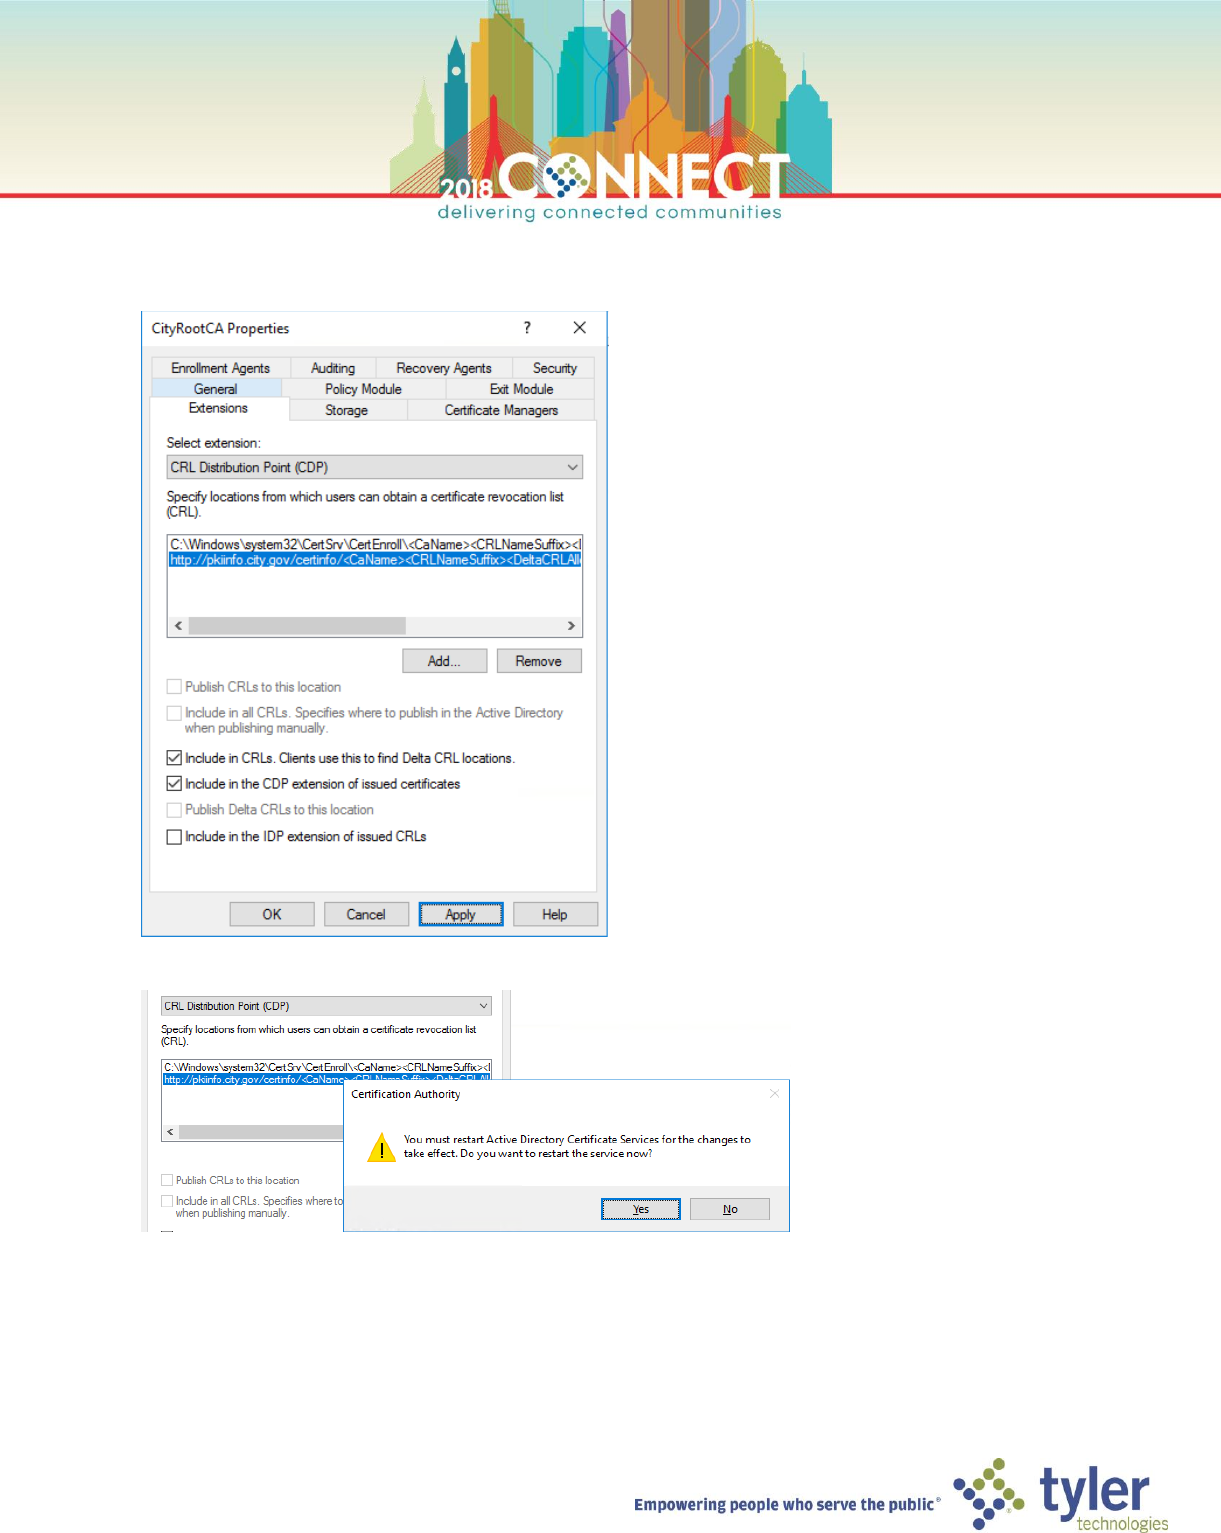
22. In the Select extension dropdown, choose Authority Information Access (AIA)
23. Just as we did for the CDP, remove all entries except for the file system entry on drive C:
24. Click Add… and enter for following URL to the PKI Information Server then click OK
http://pkiinfo.city.gov/certinfo/<ServerDNSName>_<CaName><CertificateName>.crt
18
25. For this location check the Include AIA extension of issued certificates options, click OK then click Yes to restart
the CA service
26. Right-click the Revoked Certificates node and select Properties
27. In the Revoked Certificates Properties dialog, set the CRL publication interval to 1 year, then click OK
TIP: Expired CRLs will prevent online CA services from starting. Be careful to choose a publication interval that is
sensible for your organization
19
NOTE: We now need to publish the certificate revocation list (CRL) along with the AIA certificate that signs the CRL
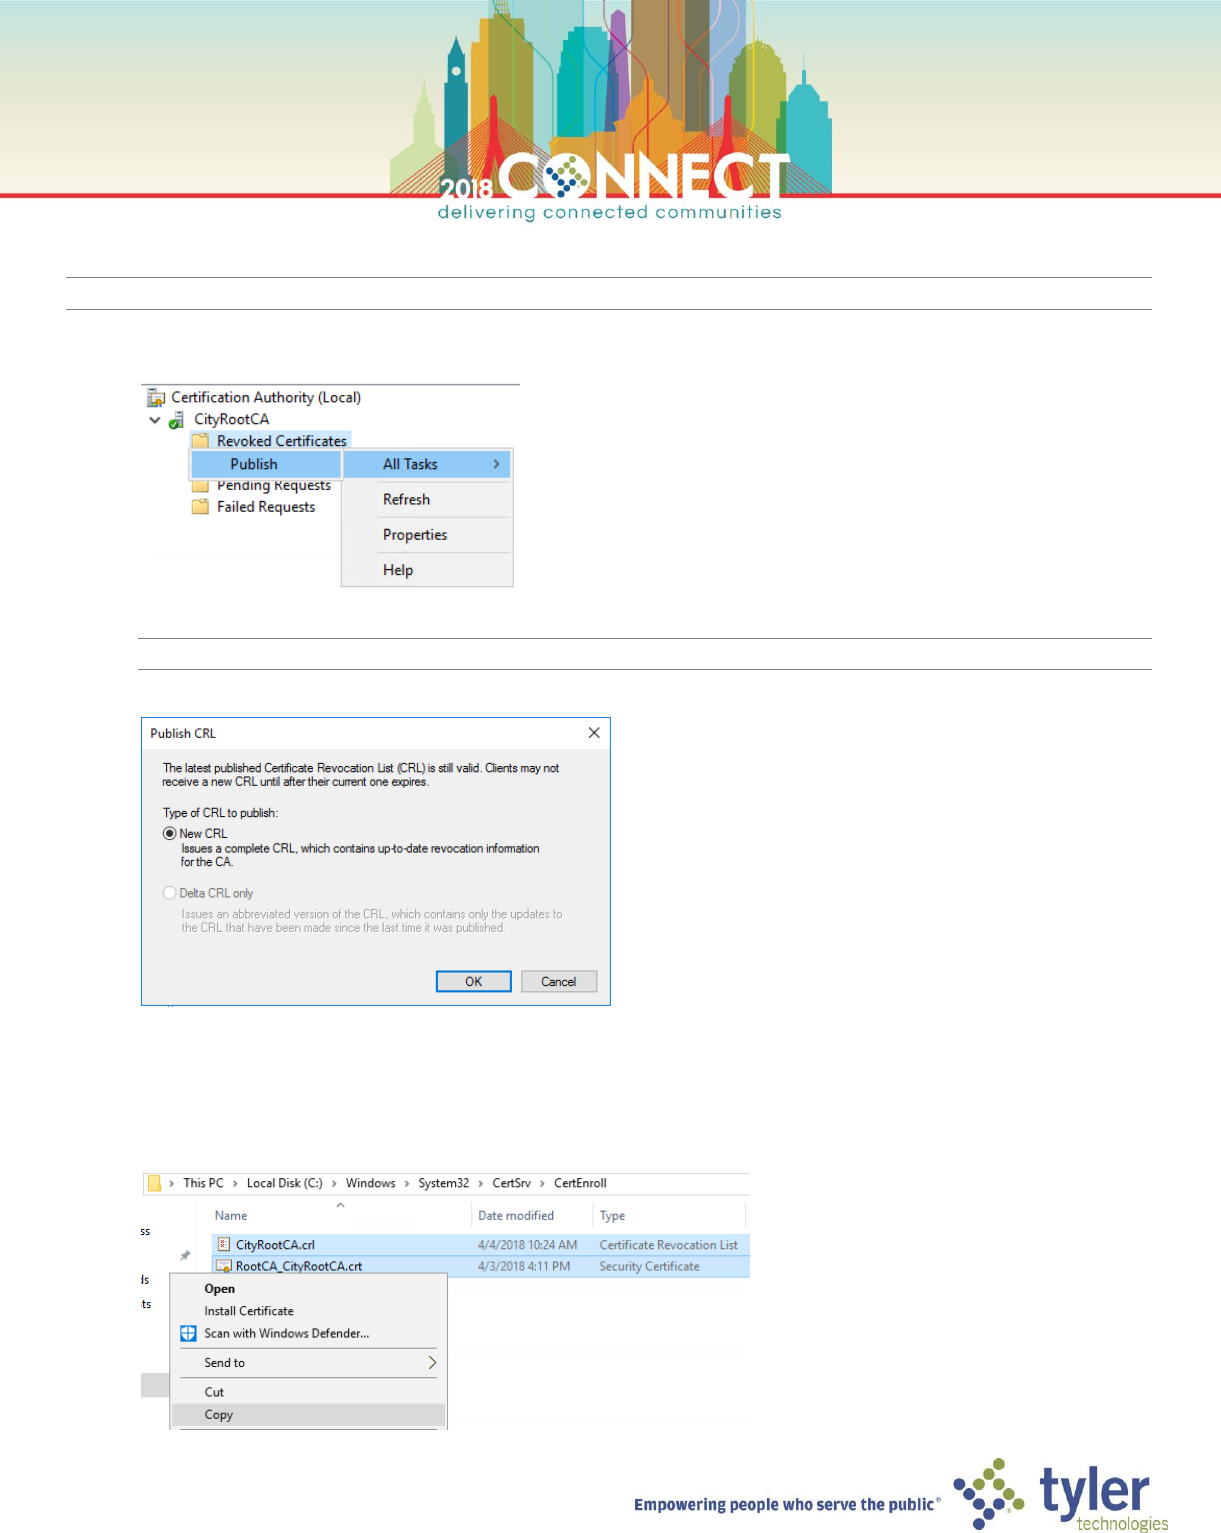
28. In the Certificate Authority management console, right click Revoked Certificates folder under CityRootCA, go
to All Tasks and click Publish
NOTE: It can take a few seconds for the Publish CRL dialog box to show
29. Ensure the New CRL option is selected and click OK
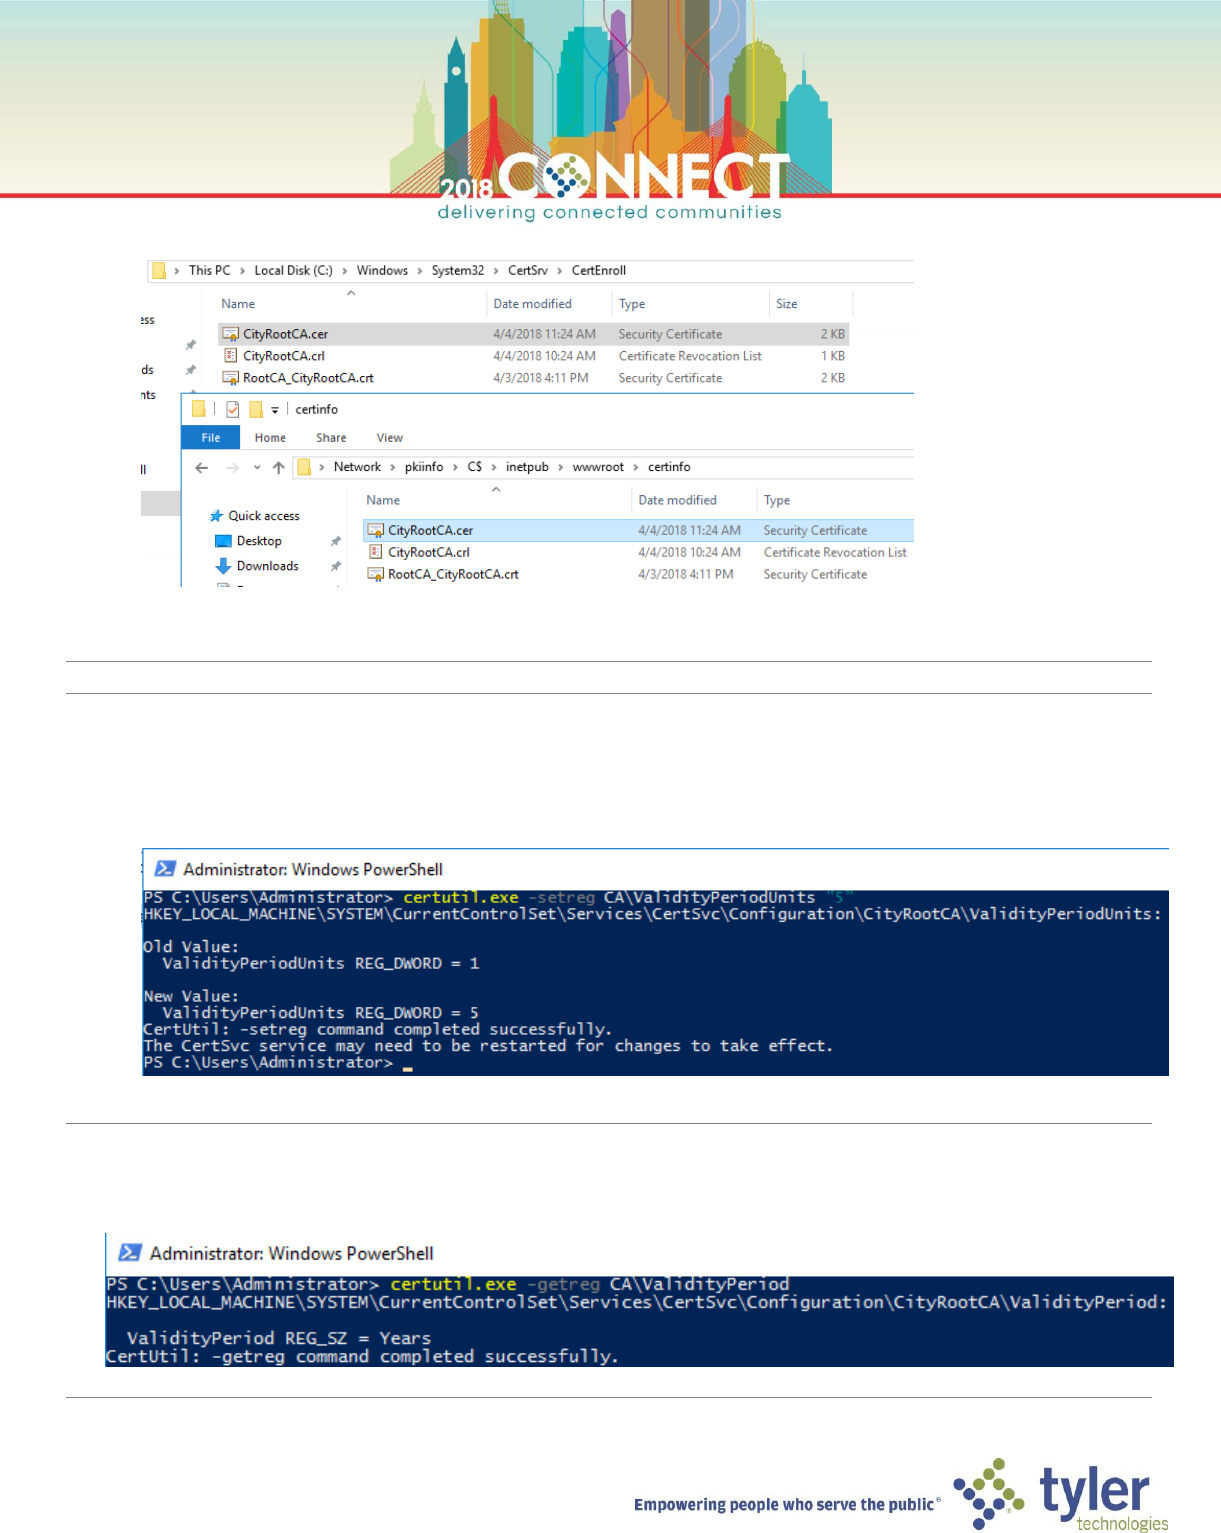
30. In Windows Explorer browse to the following path and copy the crl and crt files. These are the certificate
revocation list and AIA cert
C:\Windows\System32\CertSrv\CertEnroll
20
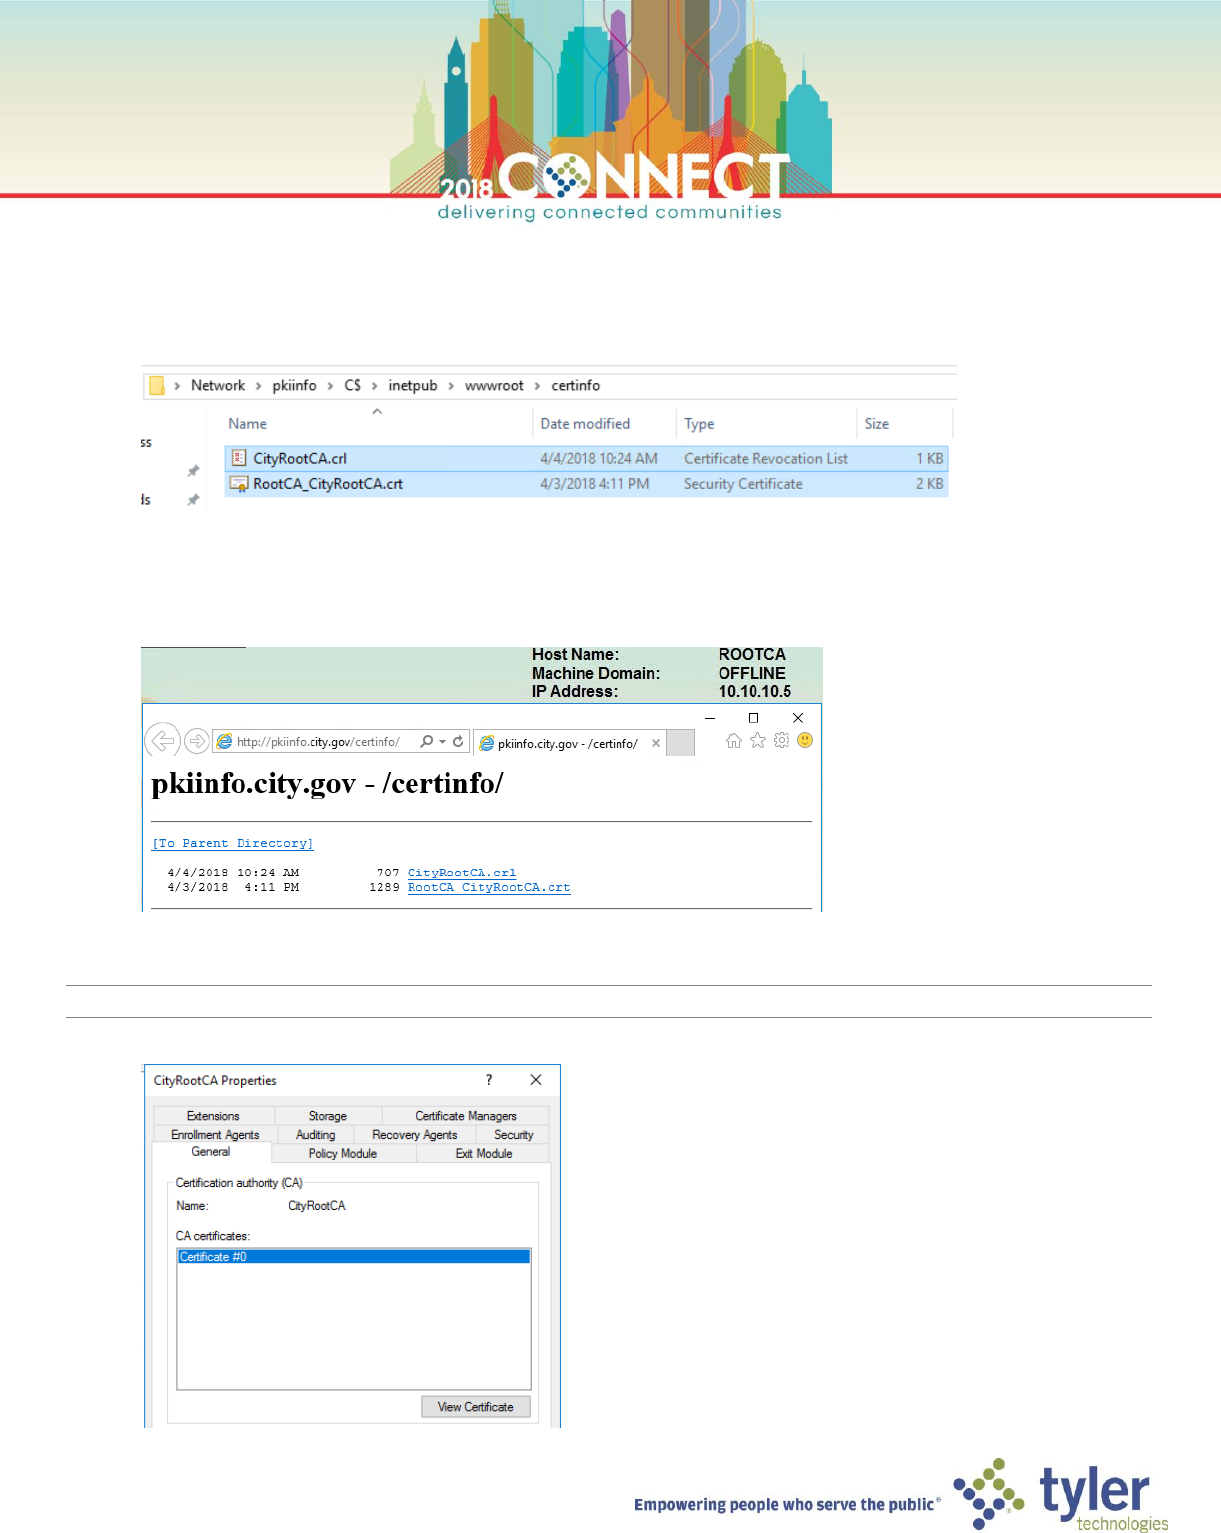
31. Browse to the administrative share for drive C: on the PKI Information Server (PkiInfo) and copy the crl and crt
files to the certinfo folder of the web server
\\pkiinfo\C$\inetpub\wwwroot\certinfo
32. Use Internet Explorer to verify that the crl and crt files are available via the PKI Information Server URL
http://pkiinfo.city.gov/certinfo
NOTE: Next we will make the Root CA certificate available via the PKI Information Server
33. In the Certificate Authority console, open the properties of the CityRootCA and go to the General tab
21
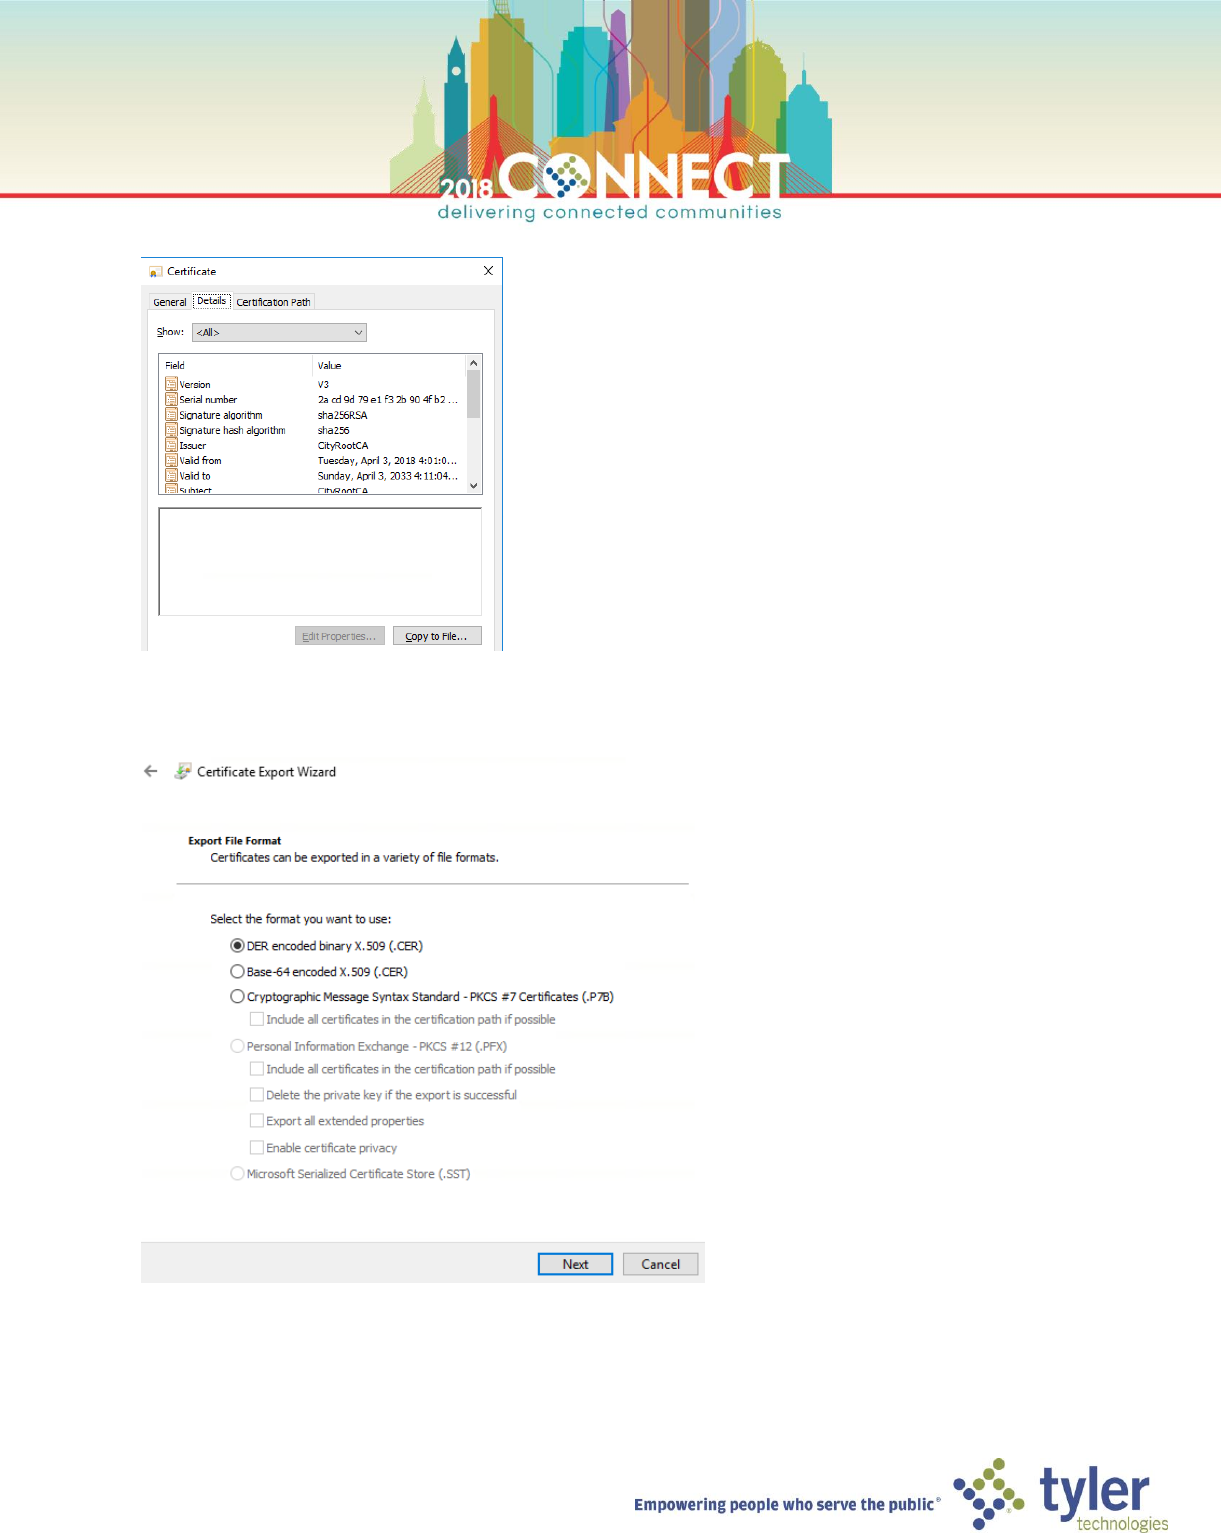
34. Click View Certificate to open the Certificate dialog and go to the Details tab
35. Click Copy to File… then click Next in the Certificate Export Wizard dialog. Ensure the DER encoded binary X.509
(.CER) option is selected then click Next
22
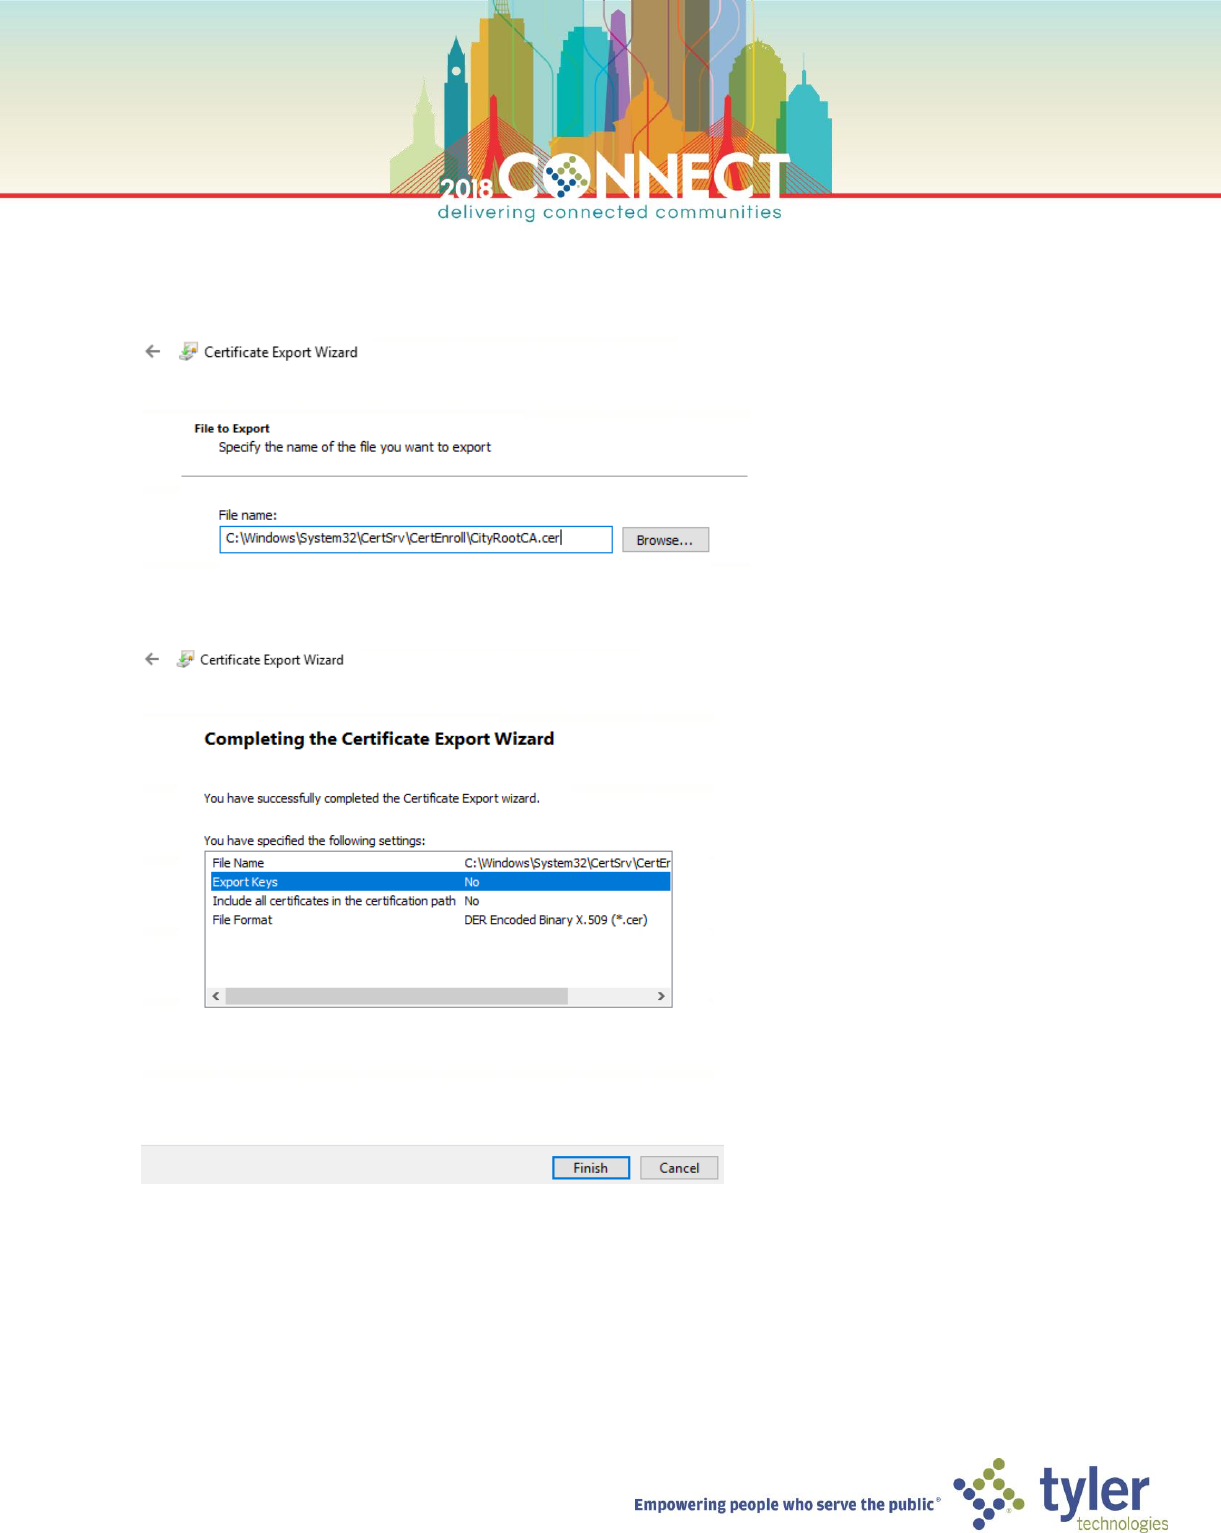
36. Enter the following file path for the Root CA certificate export, then click Next
C:\Windows\System32\CertSrv\CertEnroll\CityRootCA.cer
37. Verify the information in the summary screen shows then click Finish
23
38. Copy the CityRootCA.cer file to the PKI Information Server
NOTE: Lastly, we update the validity period of certificates created by the Root CA to 5 years
39. In PowerShell run the following command
certutil.exe -setreg CA\ValidityPeriodUnits "5"
TIP: Whenever modifying validity period units, always verify that the validity period is set correctly, to years in this case
certutil.exe -getreg CA\ValidityPeriod
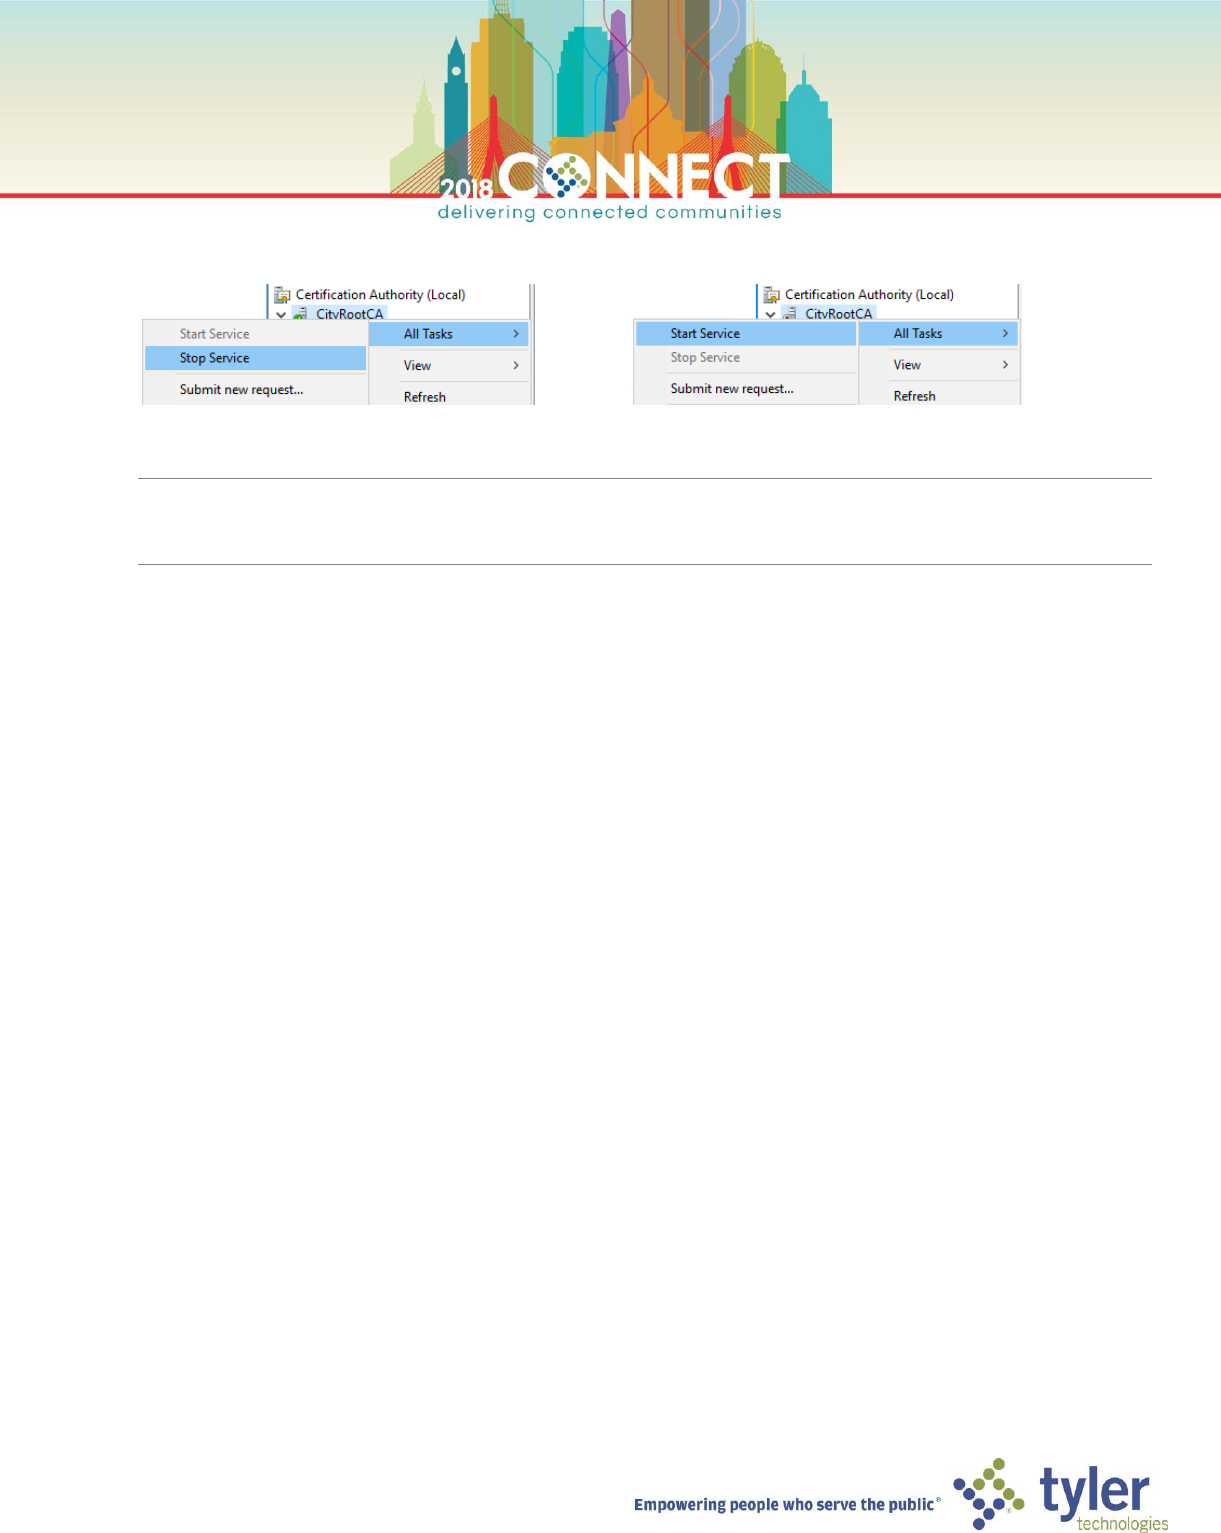
24
40. Stop, then Start the Certificate Authority service to pick up these registry changes
TIP: You can also run the following commands to stop and start the CA service:
stop-service certsvc then start-service certsvc
25
Deploying the Root Certificate Authority – Trusted Root Certificate Group Policy
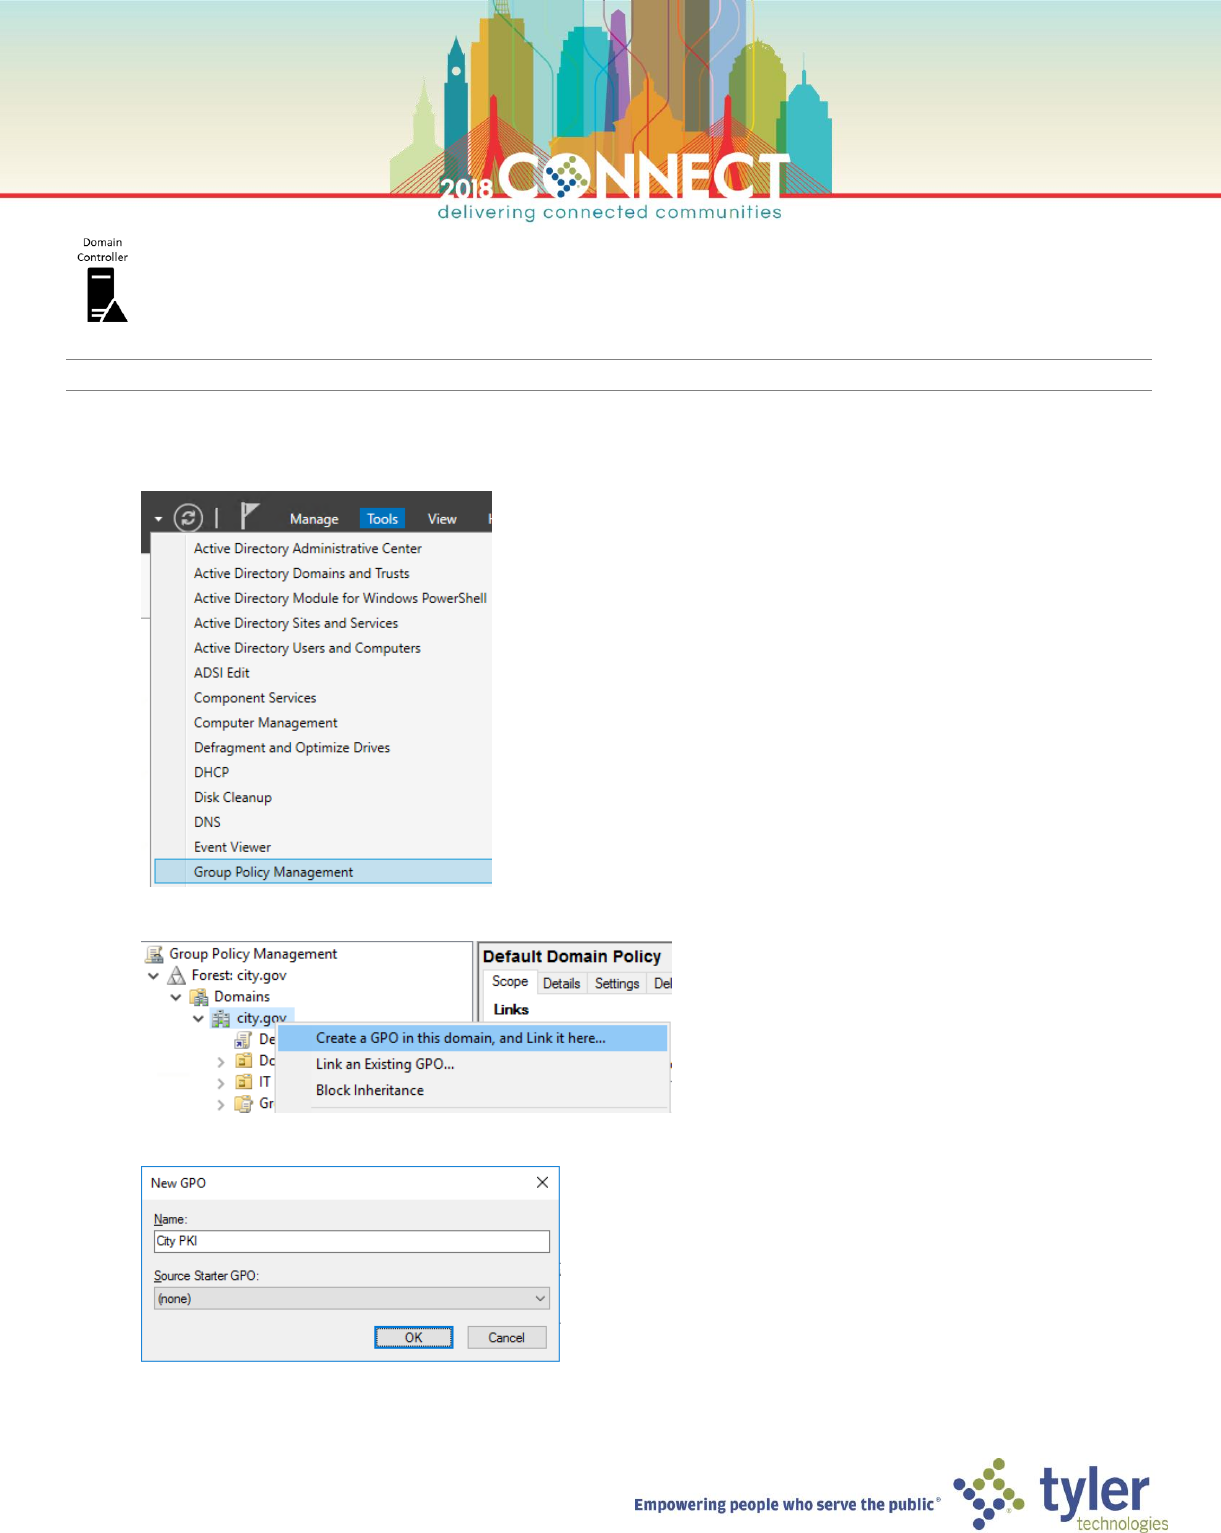
NOTE: Now we need to configure a domain group policy so that all machines in the domain will trust the RootCA
1. Open a Virtual Machine Connection to the Domain Controller (DC) and login
2. In Server Manager, launch Group Policy Manager from the Tools menu
3. Create a new GPO for the city.gov domain named City PKI

26
4. Edit the City PKI GPO
5. In the Group Policy Management Editor navigate to the following policy path then right click and select Import
from the Trusted Root Certification Authorities node
Computer Configuration > Policies > Windows Settings > Security Settings > Public Key Policies > Trusted Root
Certification Authorities
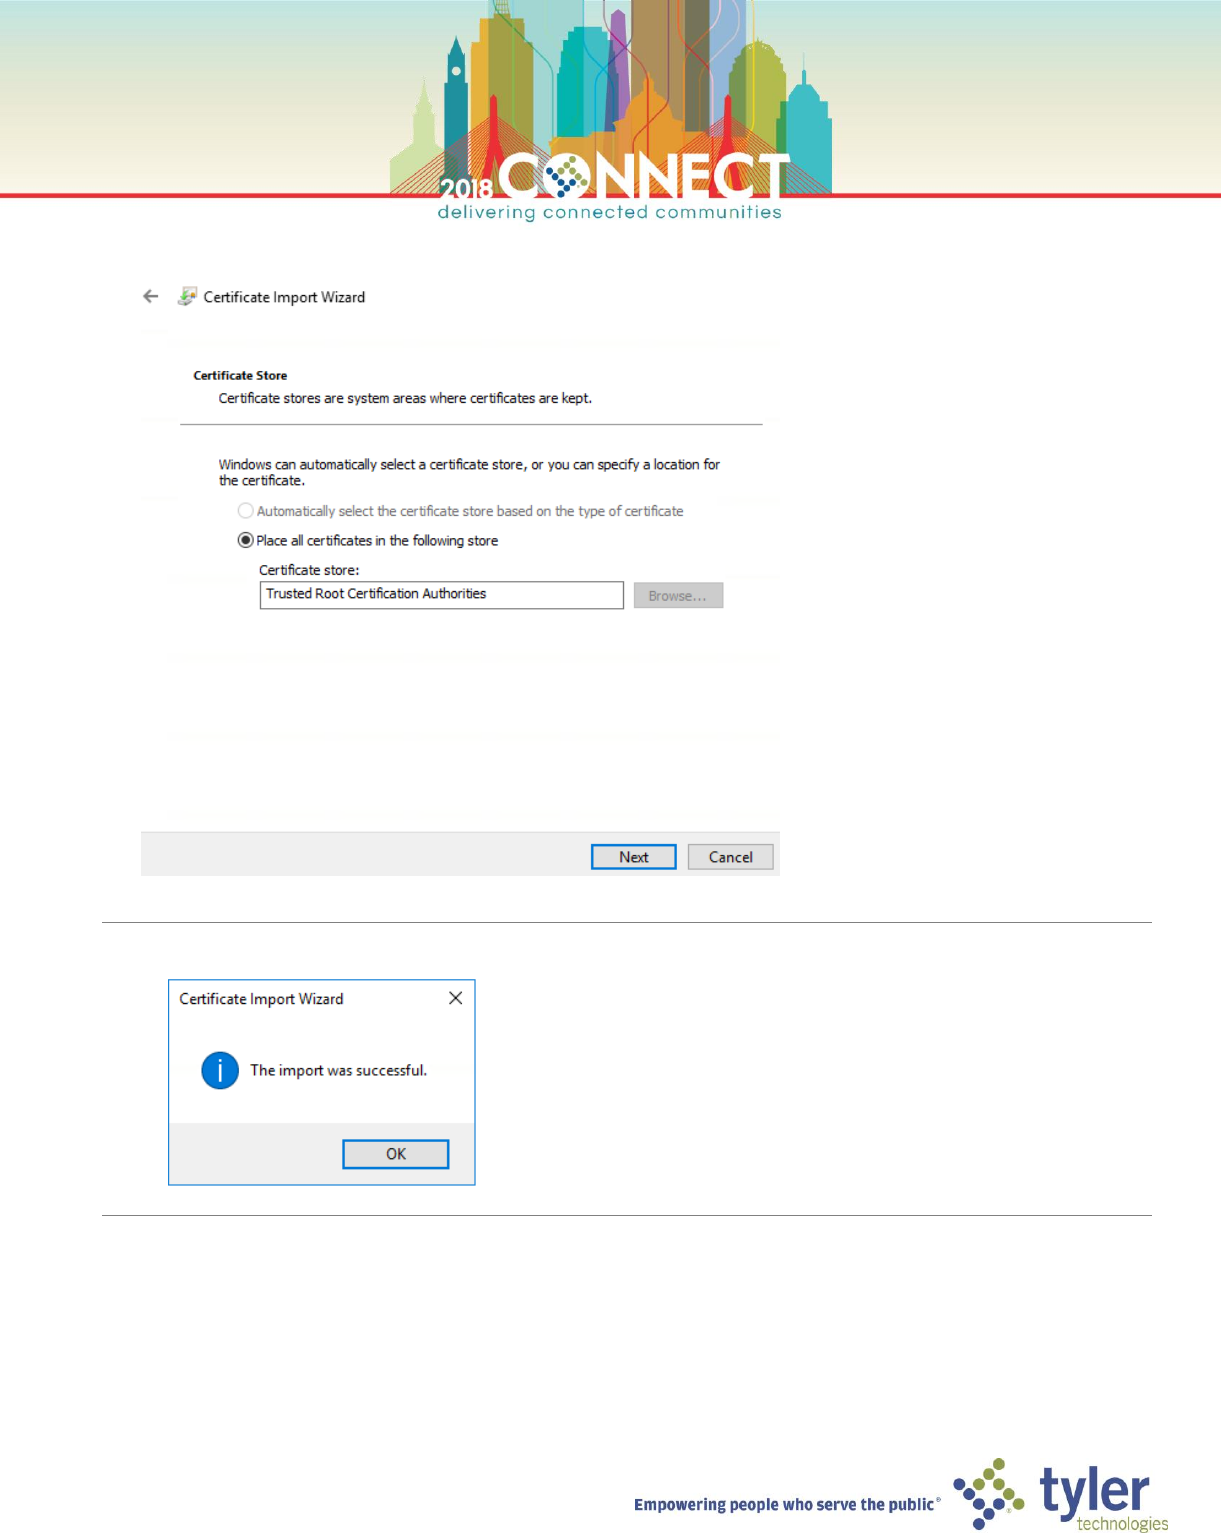
6. In the Certificate Import Wizard dialog click Next and then Browser… and enter the following path to the
Root CA certificate, then click Open then click Next
\\pkiinfo\C$\inetpub\wwwroot\certinfo\CityRootCA.cer
27
7. On the Certificate Store page of the Certificate Import Wizard, ensure the certificate store is set to Trusted Root
Certification Authorities, then click Next then click Finish
NOTE: It will take a few seconds to import the Root CA certificate. Once imported you will see the following dialog.
Click OK then refresh the Group Policy Manager Editor

28
8. Go to the Properties of the imported CityRootCA certificate
9. Here you can make updates to the Root CA certificate, we will update Friendly Name and Description
NOTE: We now have a fully configured Root Certificate Authority!
You may need to run gpupdate /force on domain members to immediately pull these GPO updates.
29
Deploying the Enterprise Subordinate Certificate Authority – Installation
1. In Hyper-V Manager, start the Subordinate CA (SubCA) virtual machine
2. Open a Virtual Machine Connection to the Subordinate CA (SubCA) and login as domain Administrator
3. Start Server Manager and select Add roles and features, under the Configure this local server section
4. On the Select installation type screen, select Role-based or feature-based installation and click next
30
5. On the Select destination server screen ensure the SubCA server is selected and click next
6. On the Select server roles screen, select Activity Directory Certificate Services then click Add Features in the
dialog window. Click Next.
31
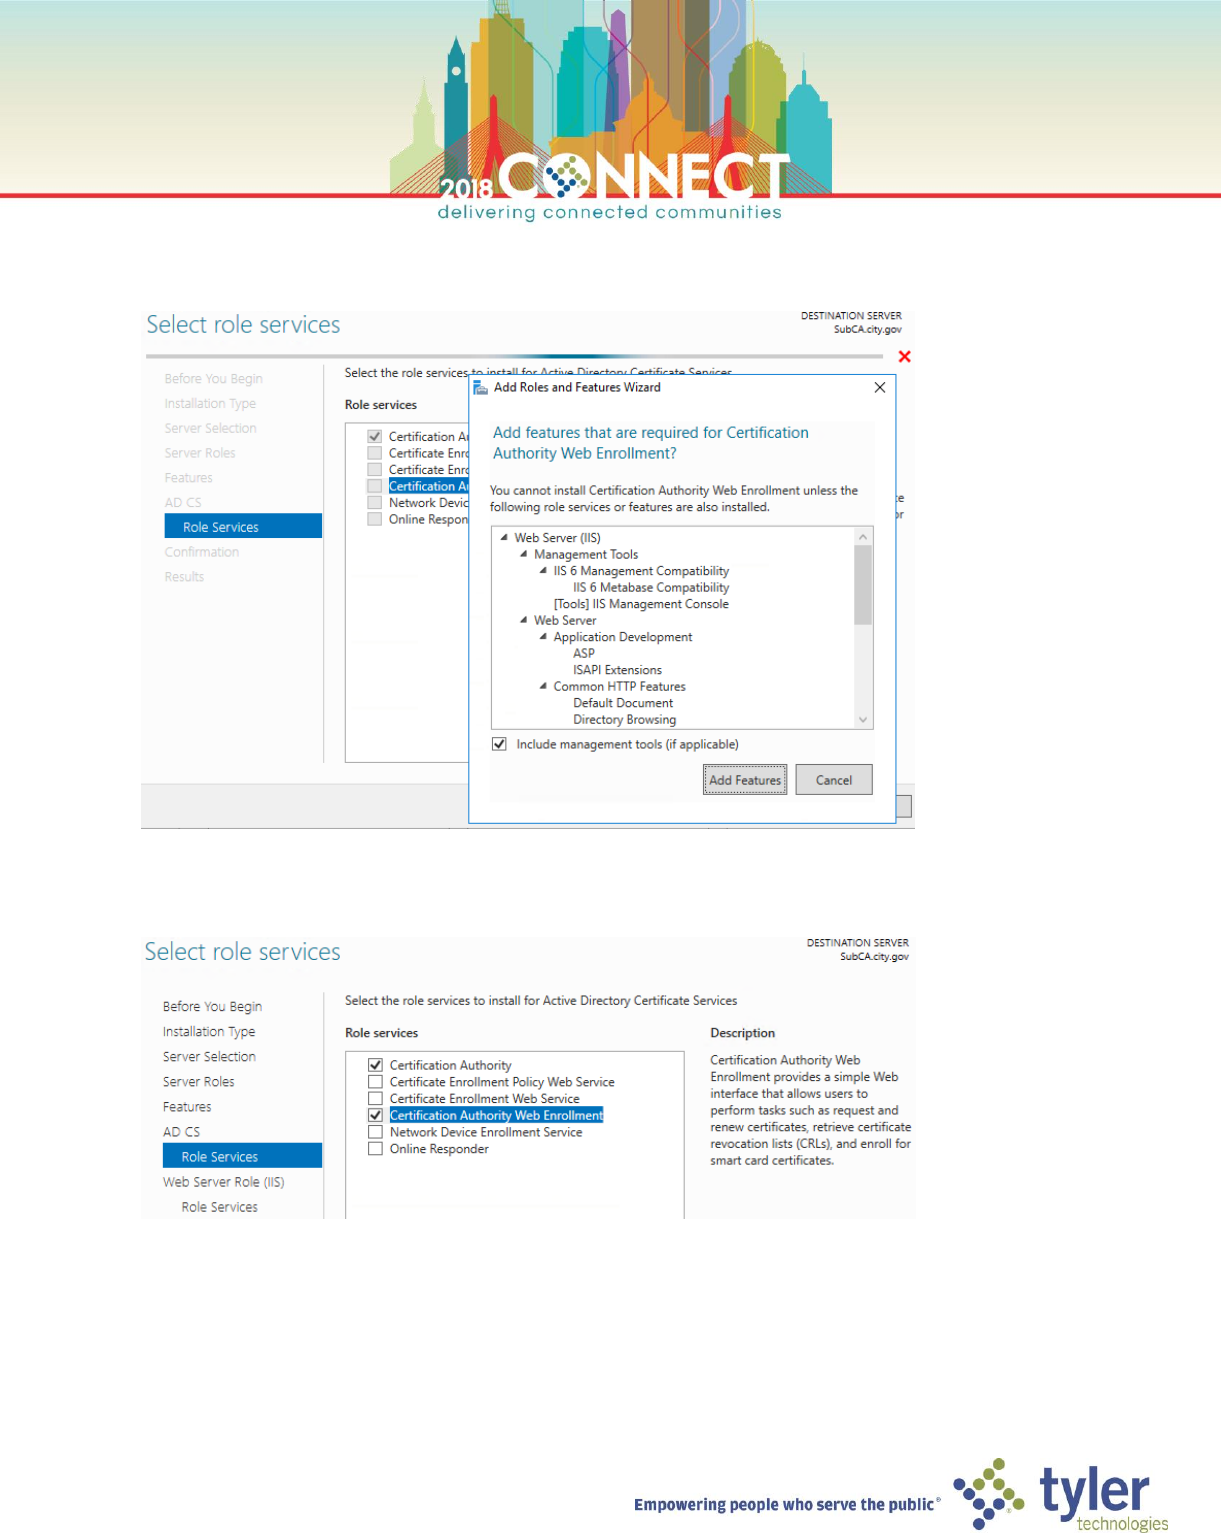
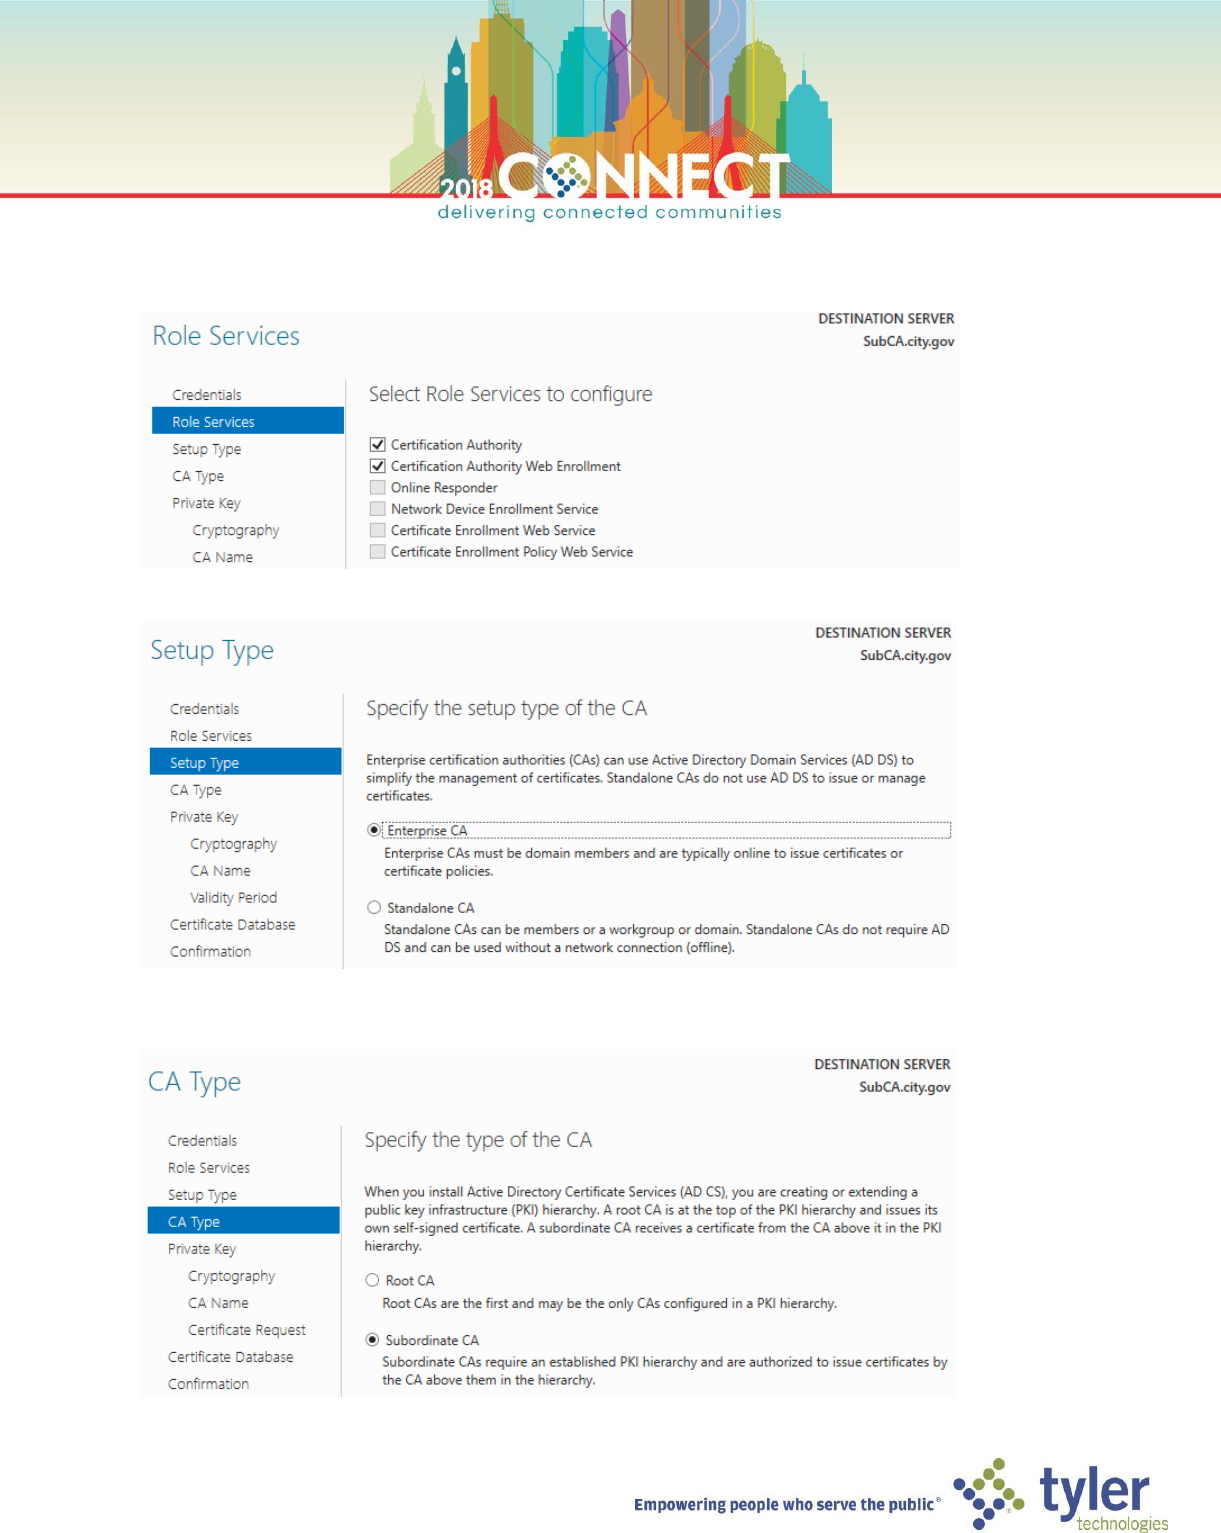
7. Skip to the Roles Services screen under AD CS and select Certificate Authority Web Enrollment then click Add
Features to Add the IIS dependency.
8. Ensure both the Certificate Authority and Certificate Authority Web Enrollment role services are selected, then
click Next
32
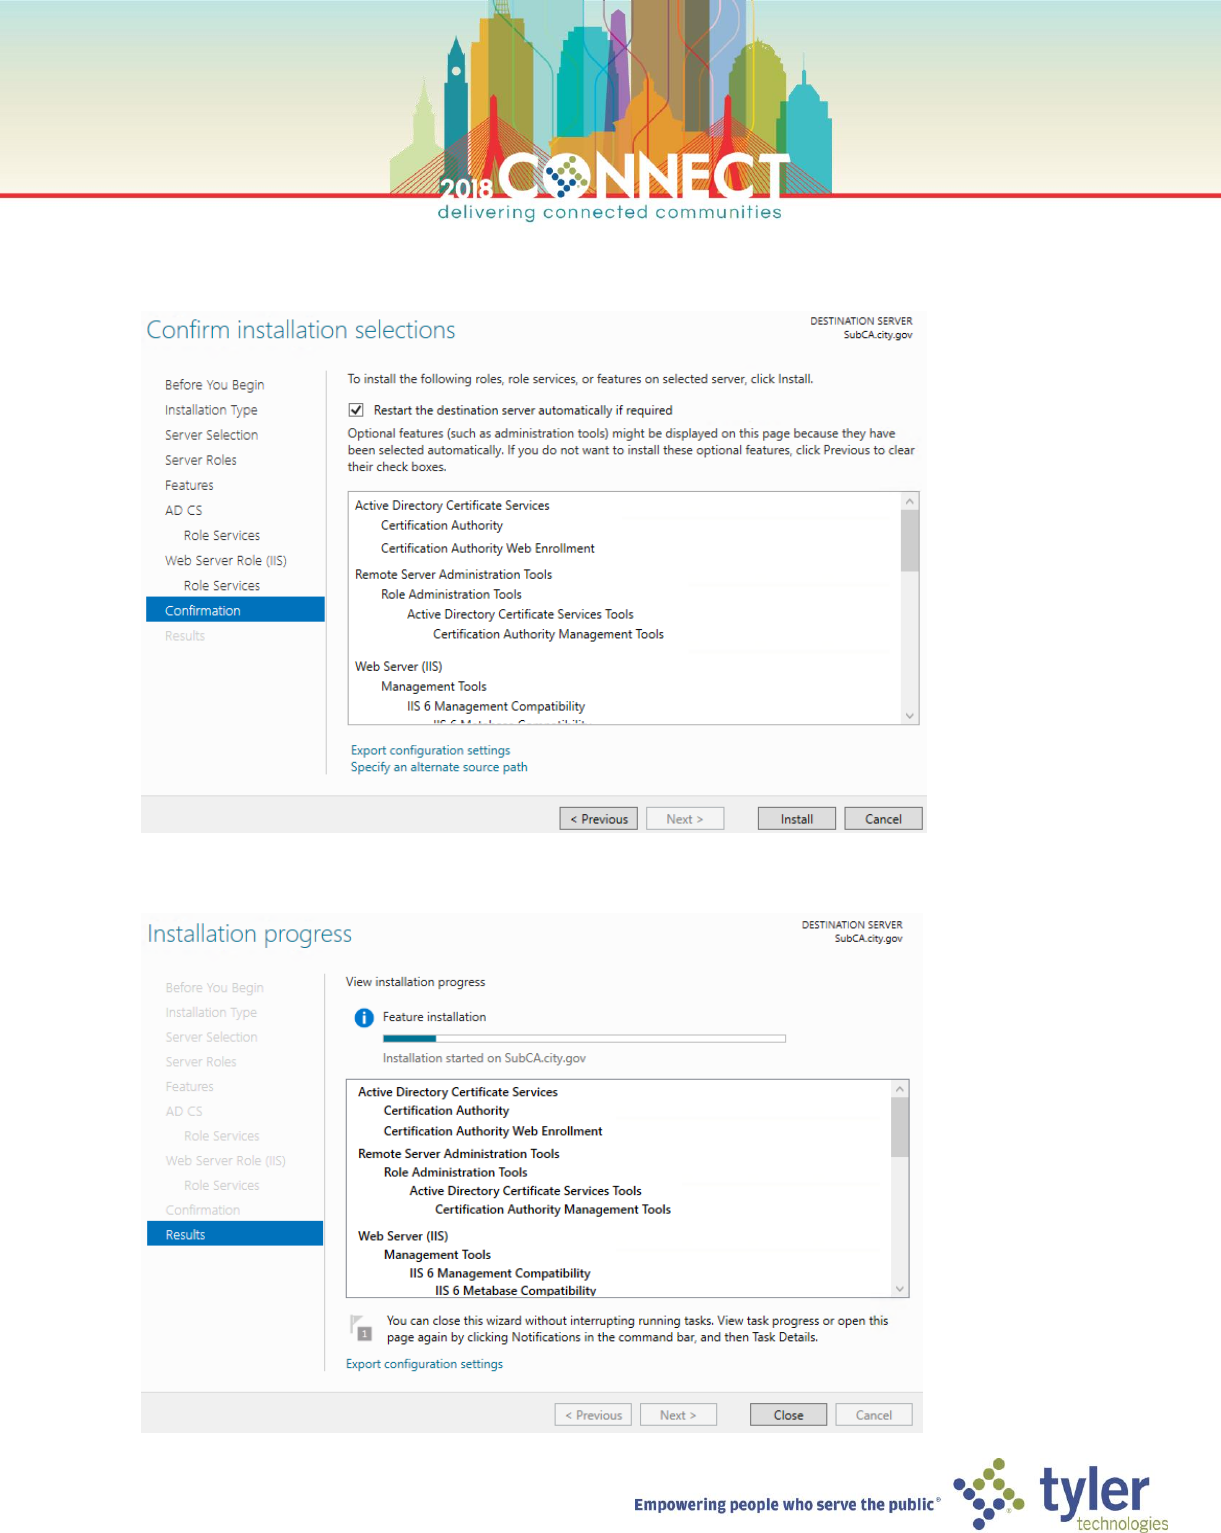
9. Skip to the Configuration page and check Restart the destination server automatically if required, before
clicking Install
10. Wait for the installation process to complete then click Close

33
Deploying the Enterprise Subordinate Certificate Authority – Configuration
1. In the Server Manager notifications menu, find the Post-deployment Configuration notification and click the
Configure Active Directory Certificate Services on the destination server link
2. On the Credentials screen of the AD CS Configuration wizard, accept the default domain Administrator
credentials and click Next
34
3. On the Roles Services screen, select Certificate Authority and Certificate Authority Web Enrollment for
configuration, then click Next
4. On the Setup Type screen ensure Enterprise CA is selected then click Next.
5. On the CA Type screen ensure Subordinate CA is selected then click Next
35
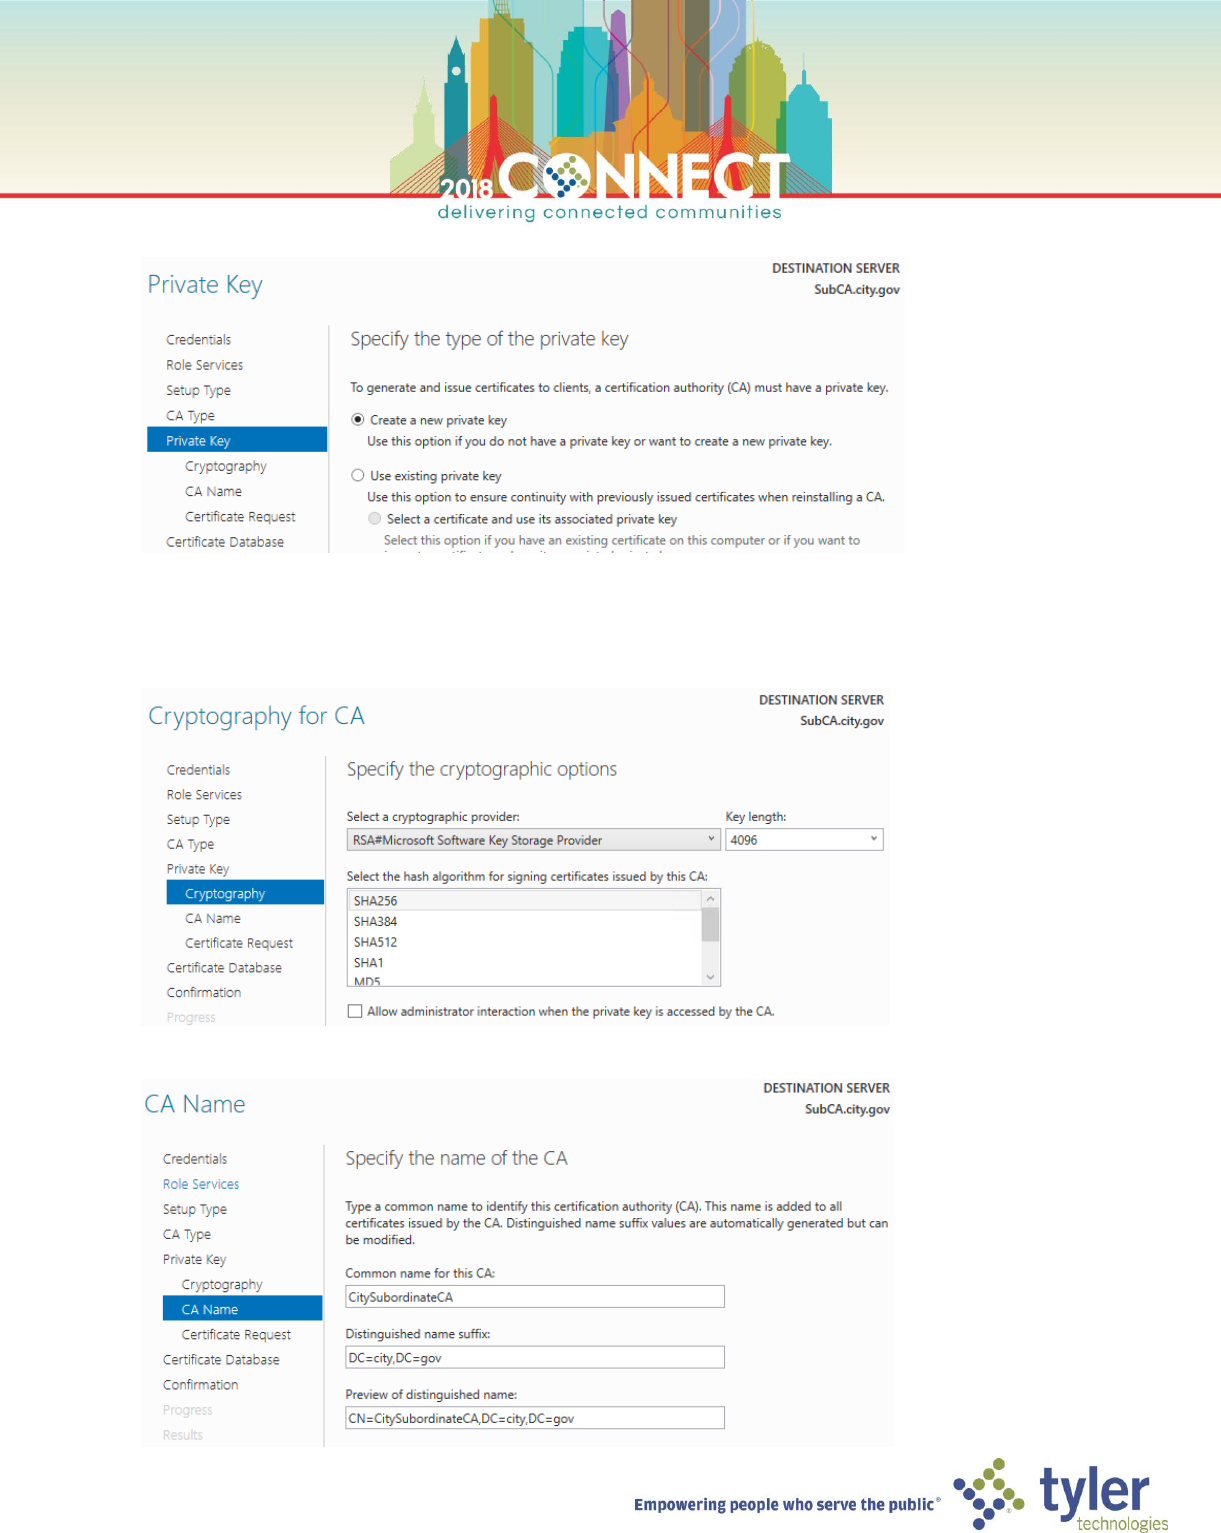
6. On the Private Key screen select Create a new private key then click Next
7. On the Cryptography for CA screen ensure RSA#Microsoft Software Key Storage Provider and SHA256 are
selected, however, change the Key Length to 4096 and uncheck the Allow administrator interaction when the
private key is accessed by the CA option then click Next
8. On the CA Name screen, enter a common name for you Root CA; we will use CitySubordinateCA for this lab
36
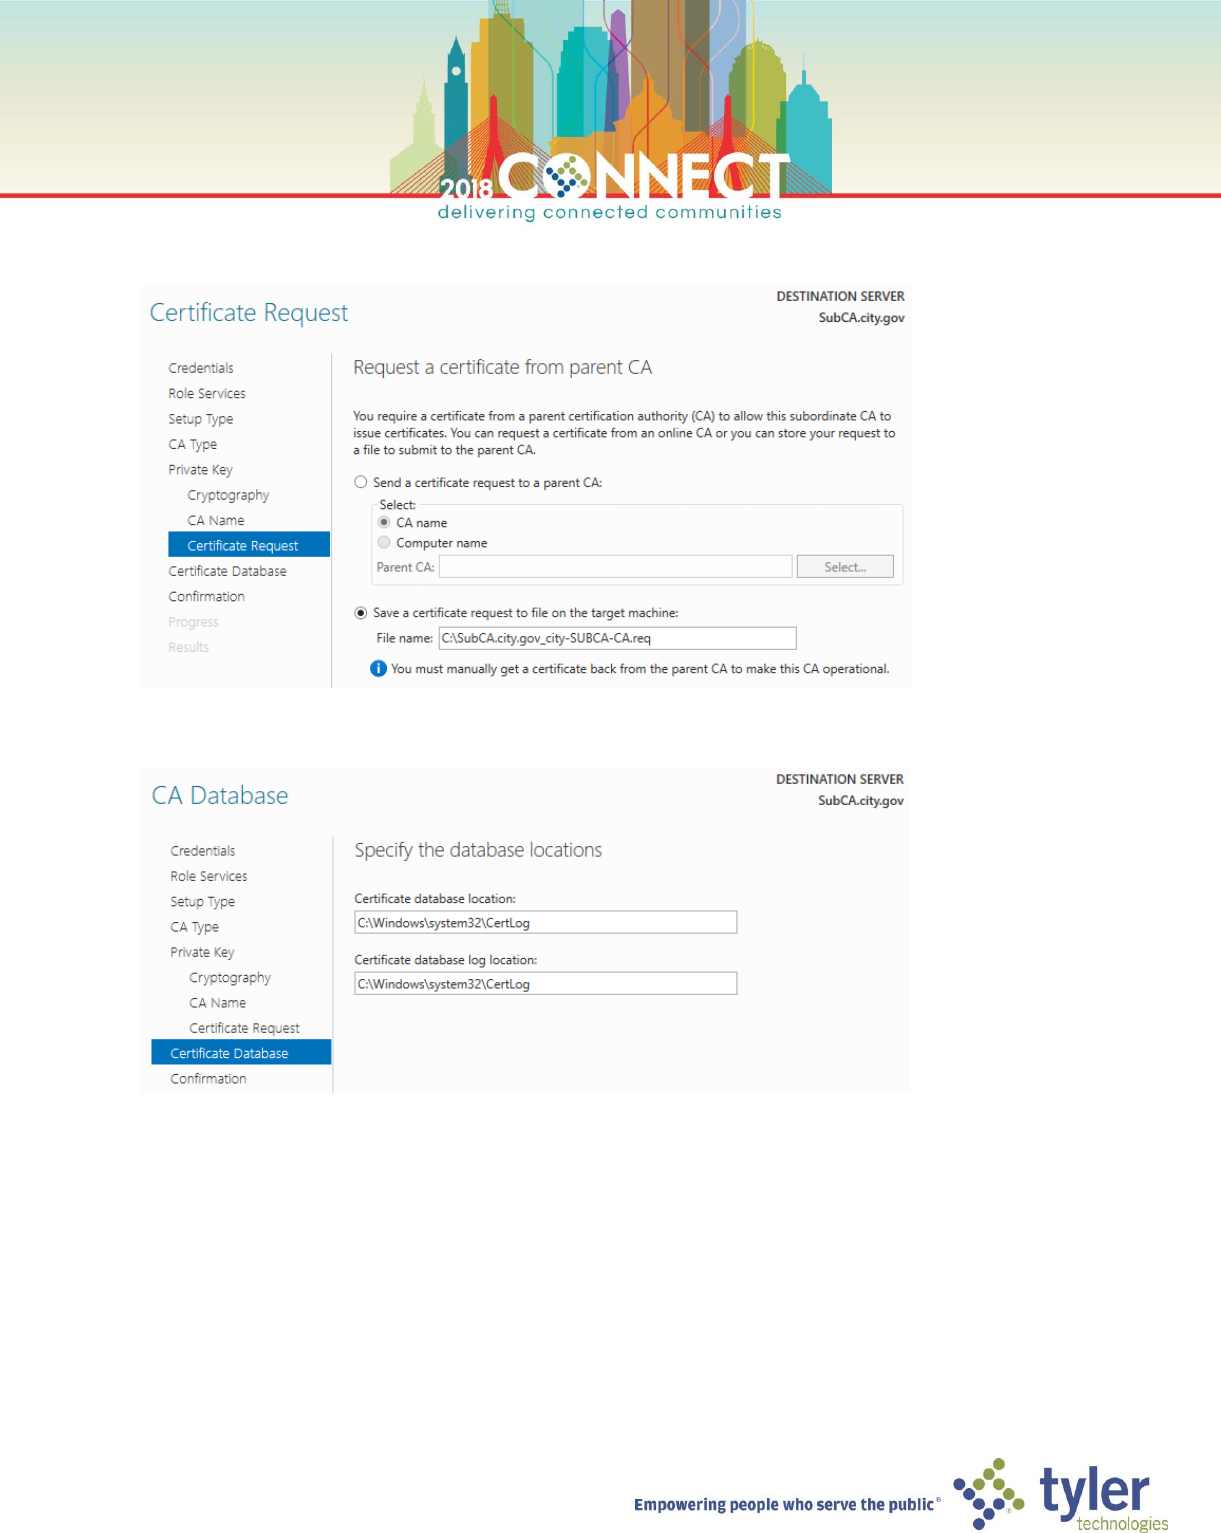
9. On the Certificate Request screen, save the request as a file
10. On the CA Database screen accept the default locations and click Next
37
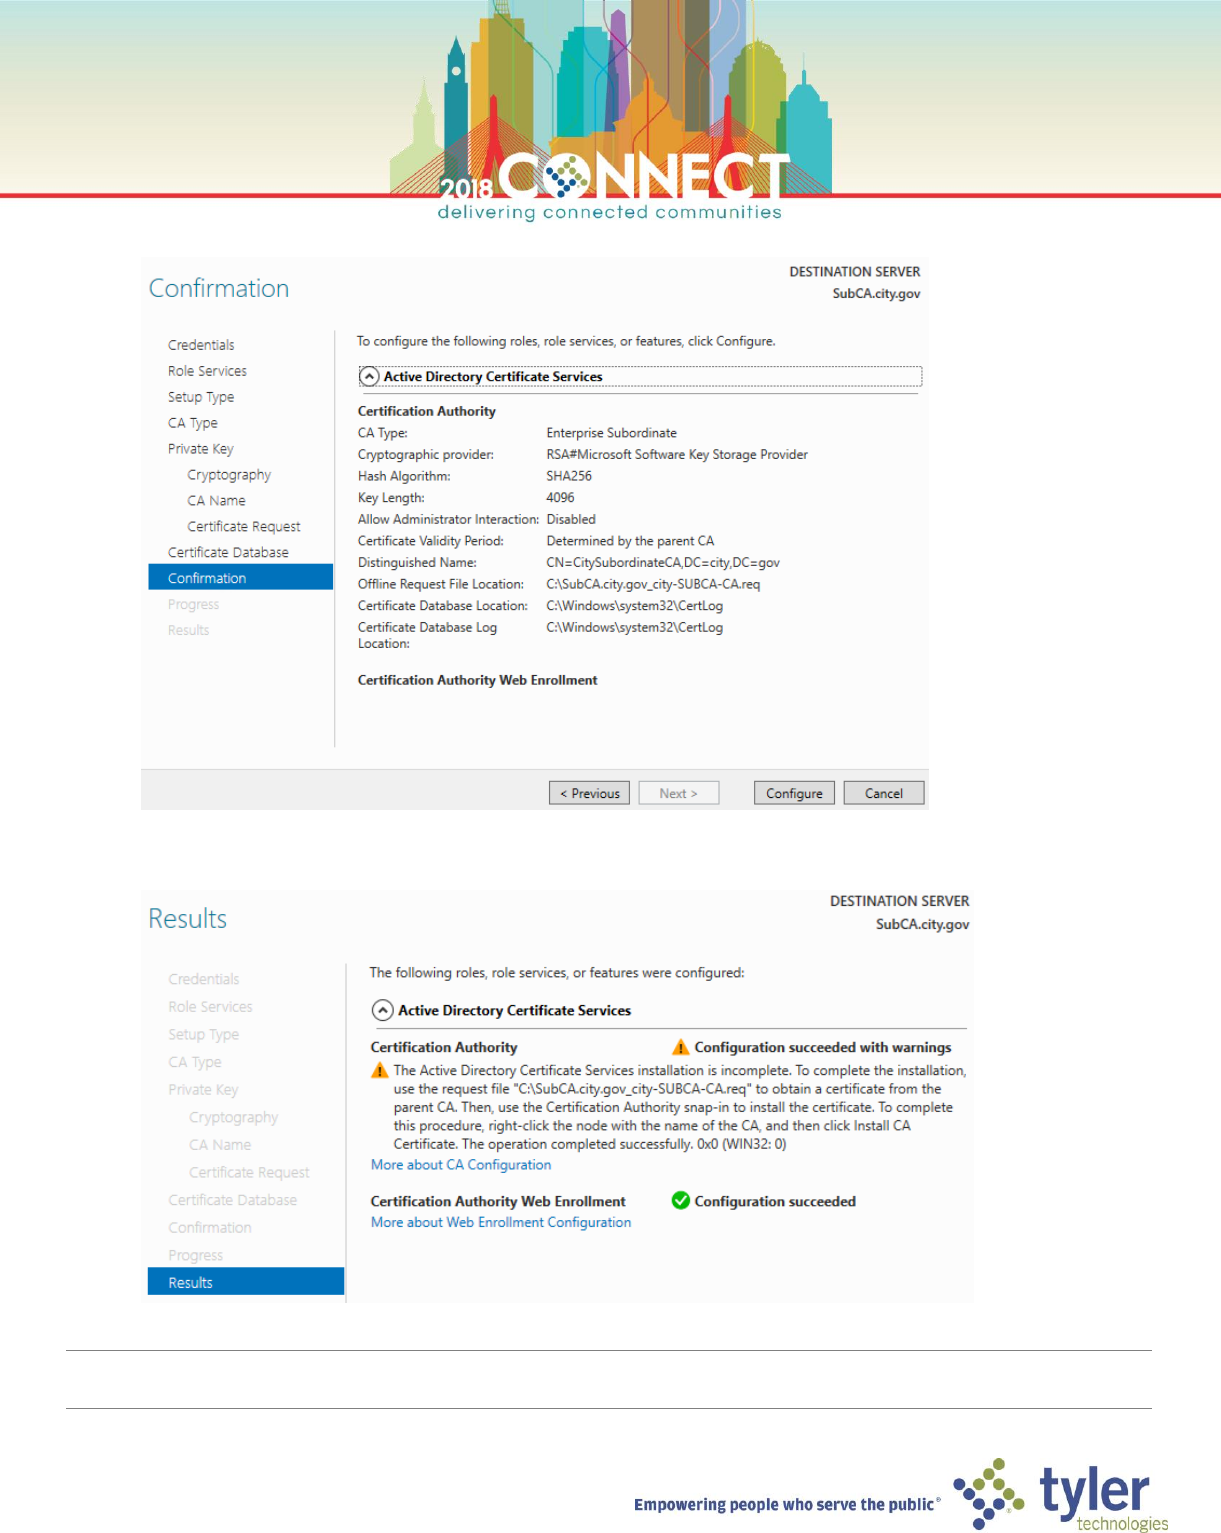
11. On the Confirmation screen, verify all choices then click Configure
12. Review to configuration results. The Certificate Authority Web Enrollment role service should be completely
configured, however, we still need to complete the configuration of Certificate Authority role service
NOTE: We now need to have the Root CA issue a certificate for the Subordinate CA. We will do this next by submitting
the certificate request file that was just created to the Root CA for issuance.
38
Deploying the Enterprise Subordinate Certificate Authority – Certificate Issuance
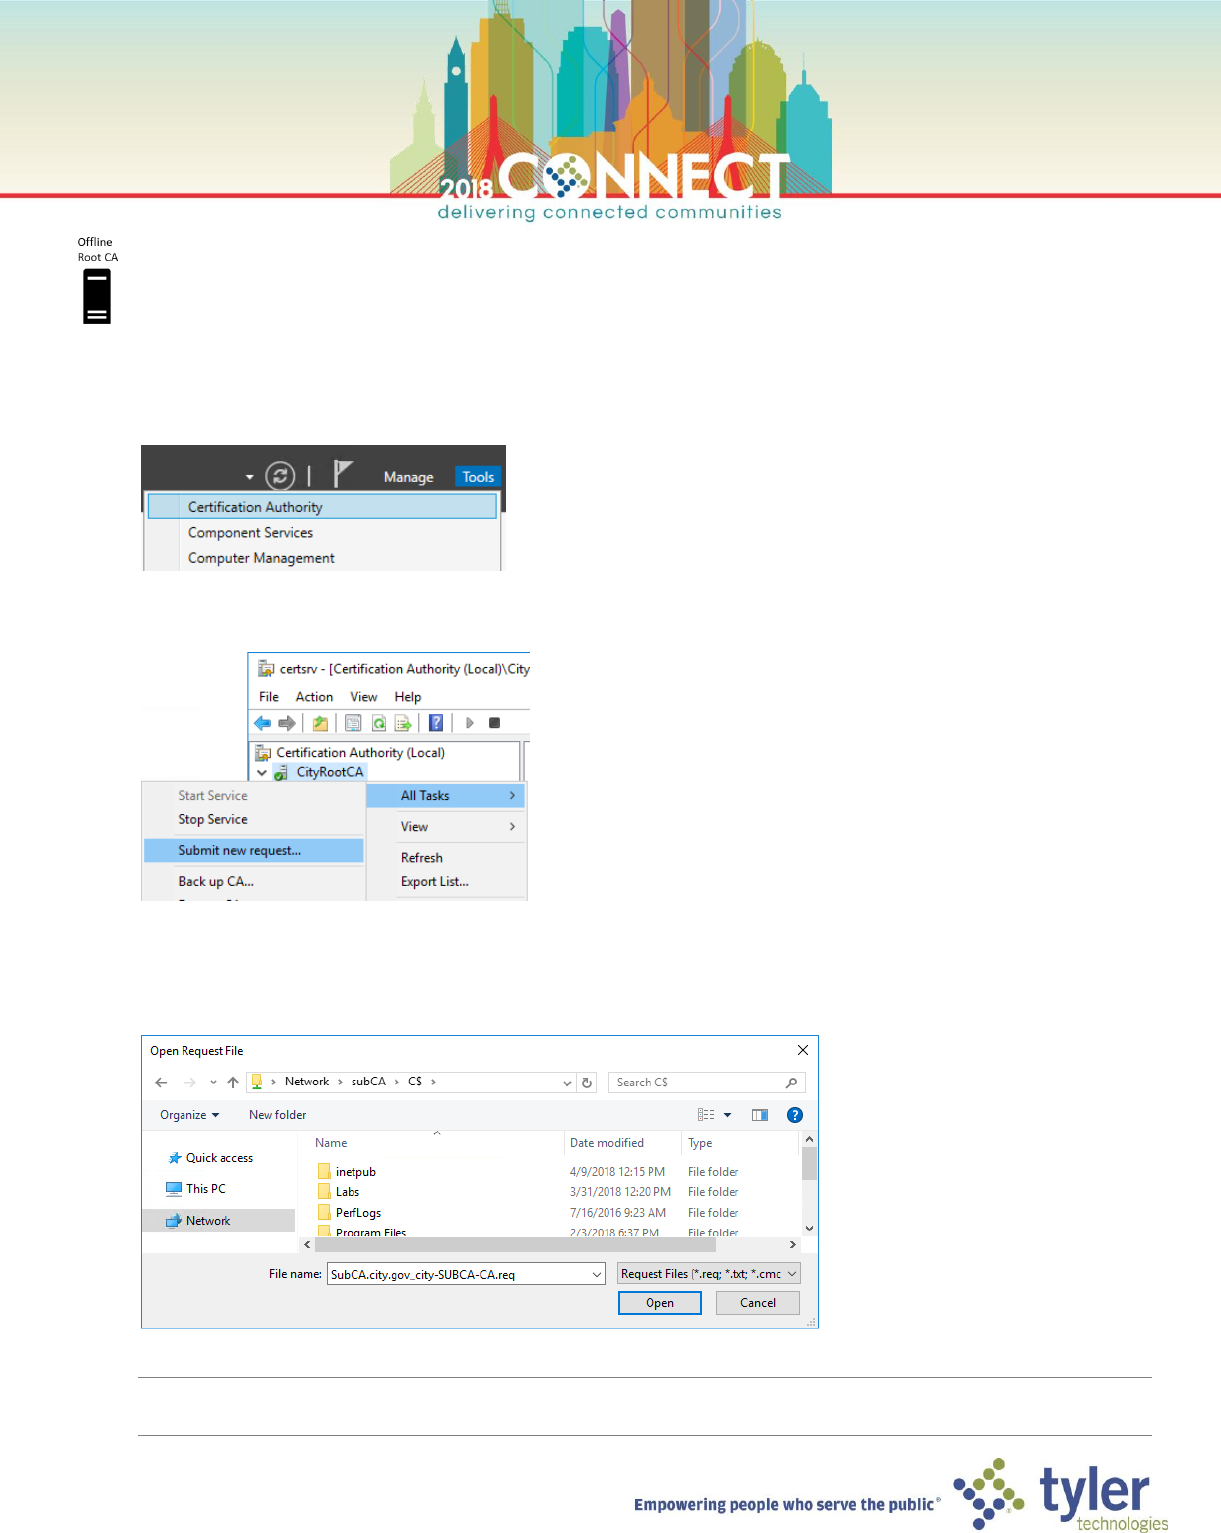
1. Open a Virtual Machine Connection to the Root CA (RootCA) and login
2. In Server Manager, launch the Certificate Authority management console from the Tools menu
3. Right click the CityRootCA node and under the All Tasks menu select Submit new request…
4. In the Open Request File dialog box, browse the certificate request created on the Subordinate CA
\\subCA\C$\SubCA.city.gov_city-SUBCA-CA.req
NOTE: It can a take up to 15 seconds for the request to be imported even though the console remains usable.
Refresh the console until you see the certificate request in the Pending Requests node.
39
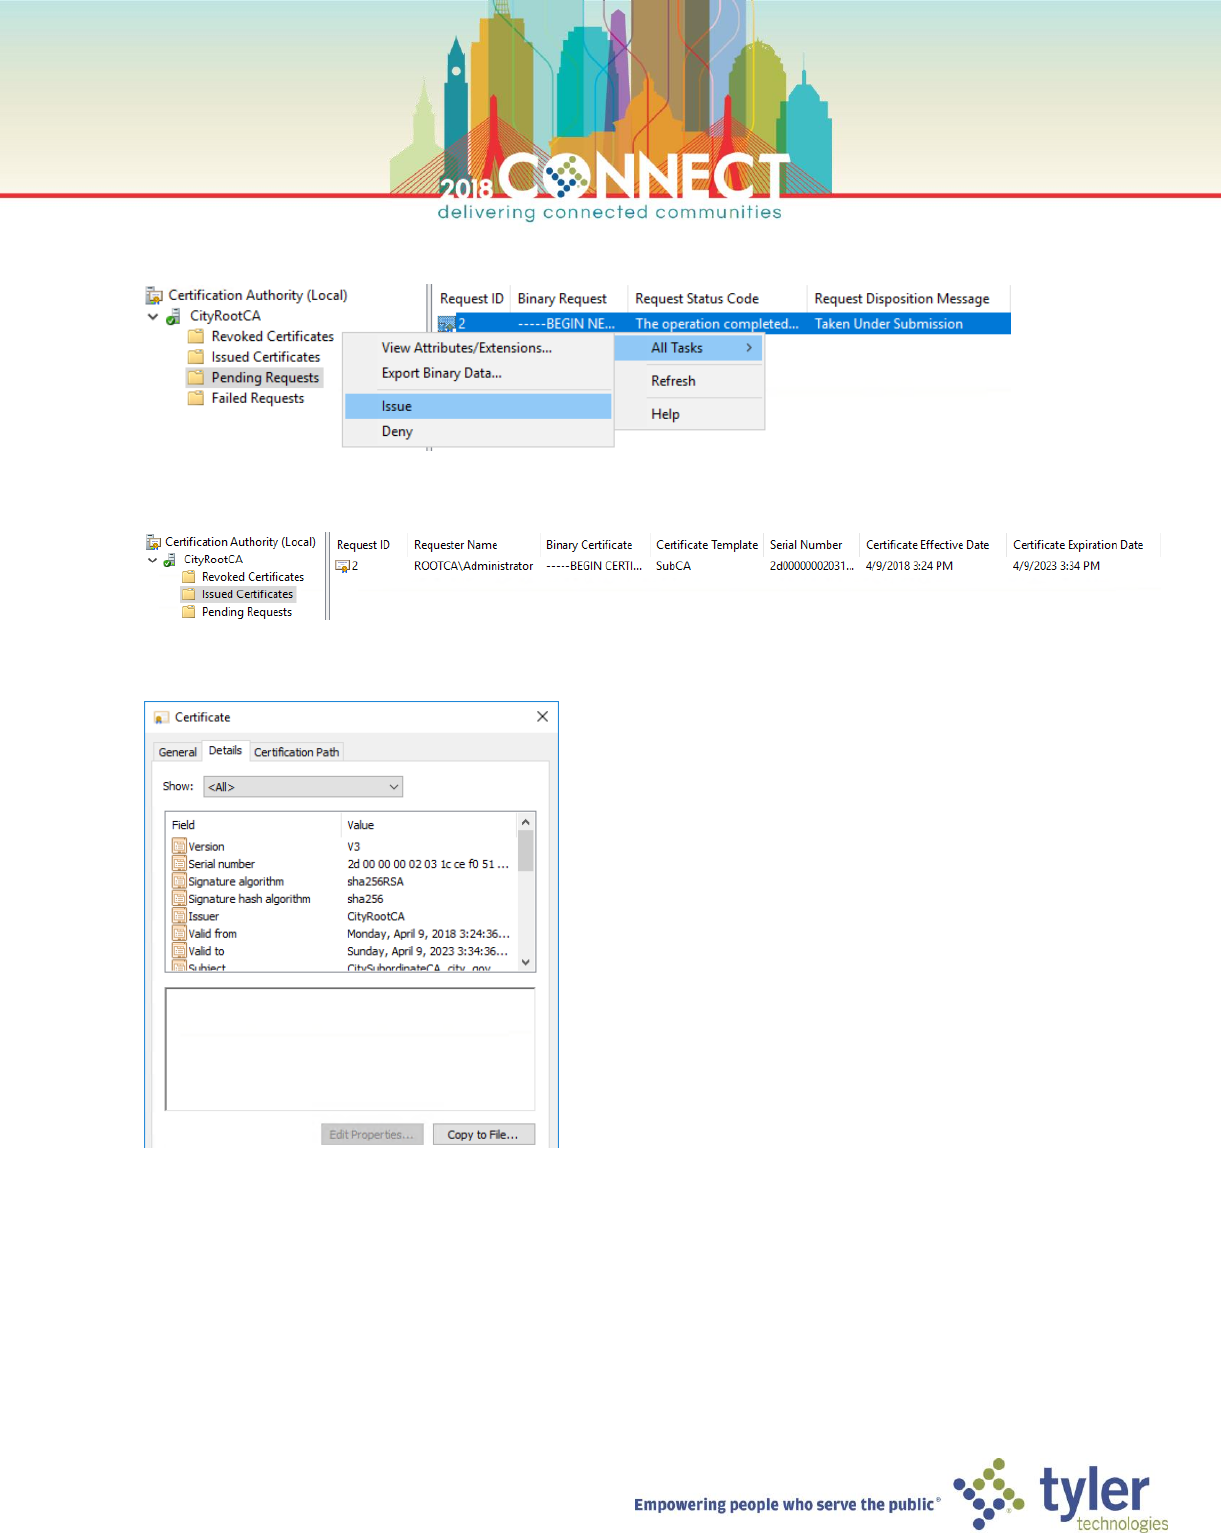
5. In the Pending Requests node, right click on the imported certificate request and select All Tasks > Issue
6. In the Issued Certificates node, verify that the Subordinate CA certificate has been issued
7. Double-click to open the issued certificate and go to the Details tab of the Certificate dialog
40
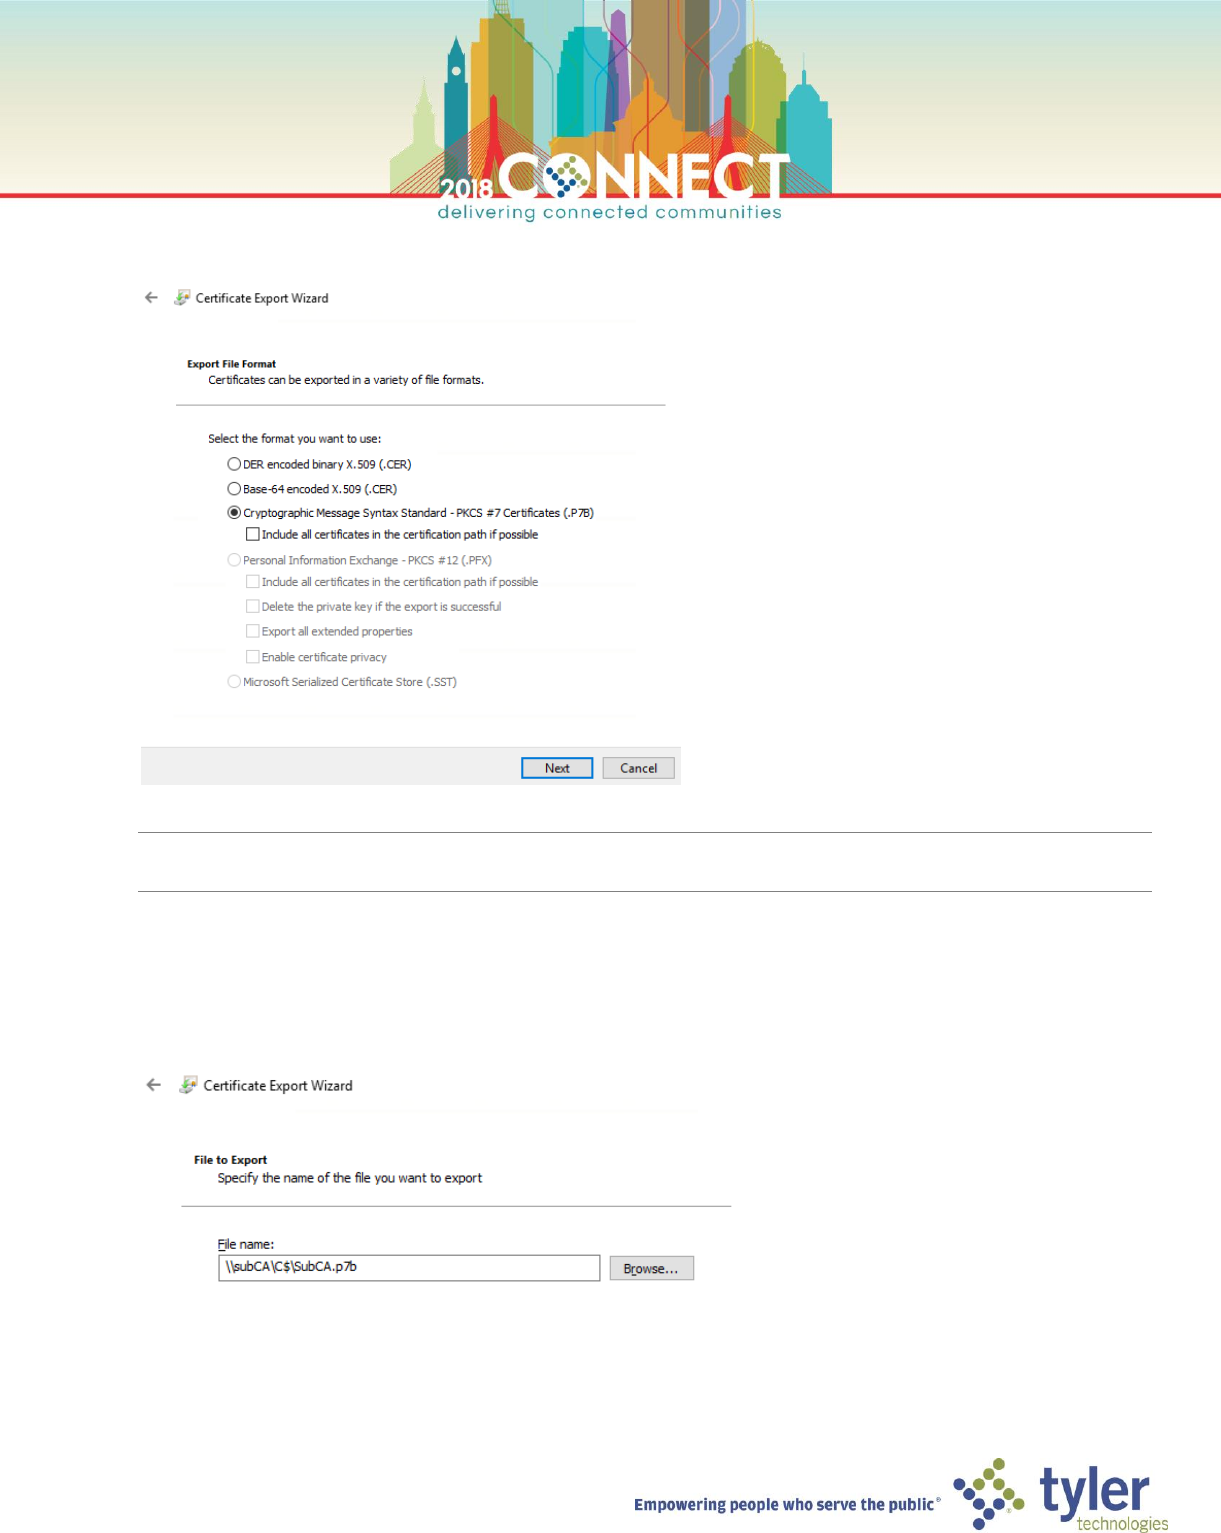
8. Click Copy to File… then click Next in the Certificate Export Wizard dialog. Ensure the Cryptographic Message
Syntax Standard option is selected then click Next
TIP Enabling the Include all certificates in the certificate path if possible options will include the root certificate
in the export file as well.
9. Enter the following file path for the Root CA certificate export, then click Next
\\subCA\C$\SubCA.p7b
41
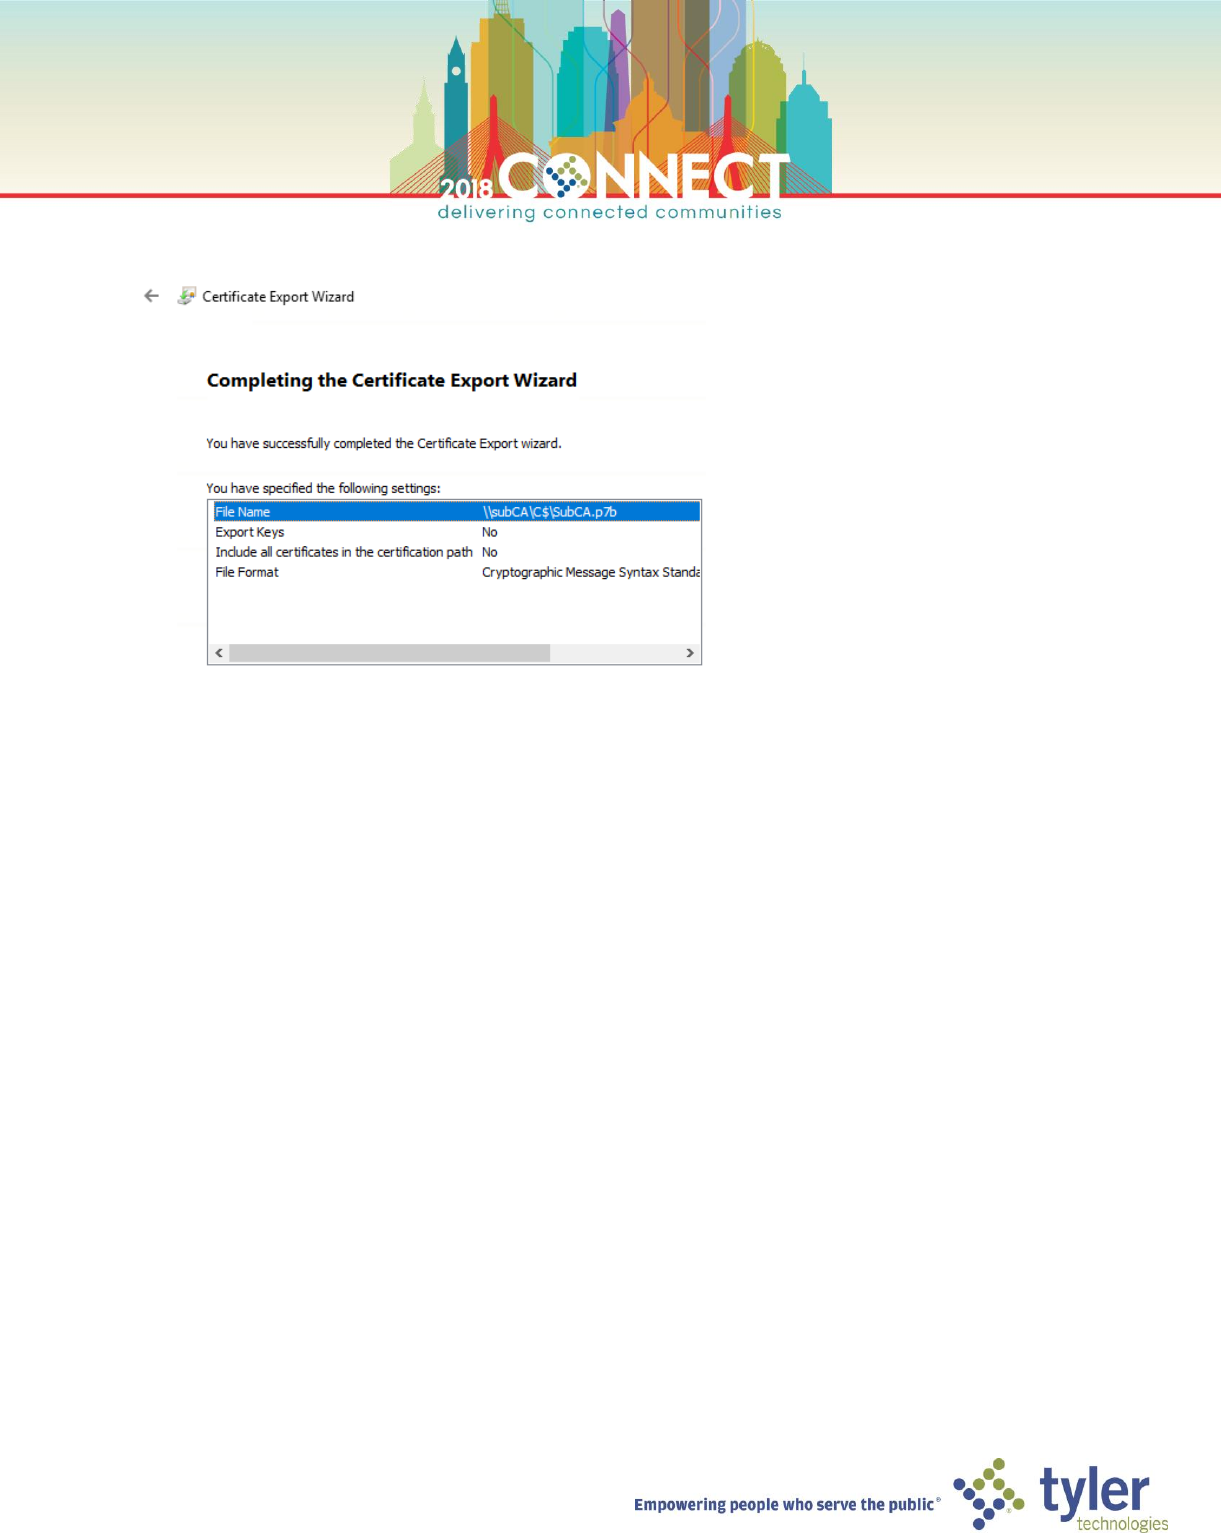
10. Verify the information in the summary screen shows then click Finish
42
Deploying the Enterprise Subordinate Certificate Authority – Certificate Installation
1. Open a Virtual Machine Connection to the Subordinate CA (SubCA) and login as the domain Administrator
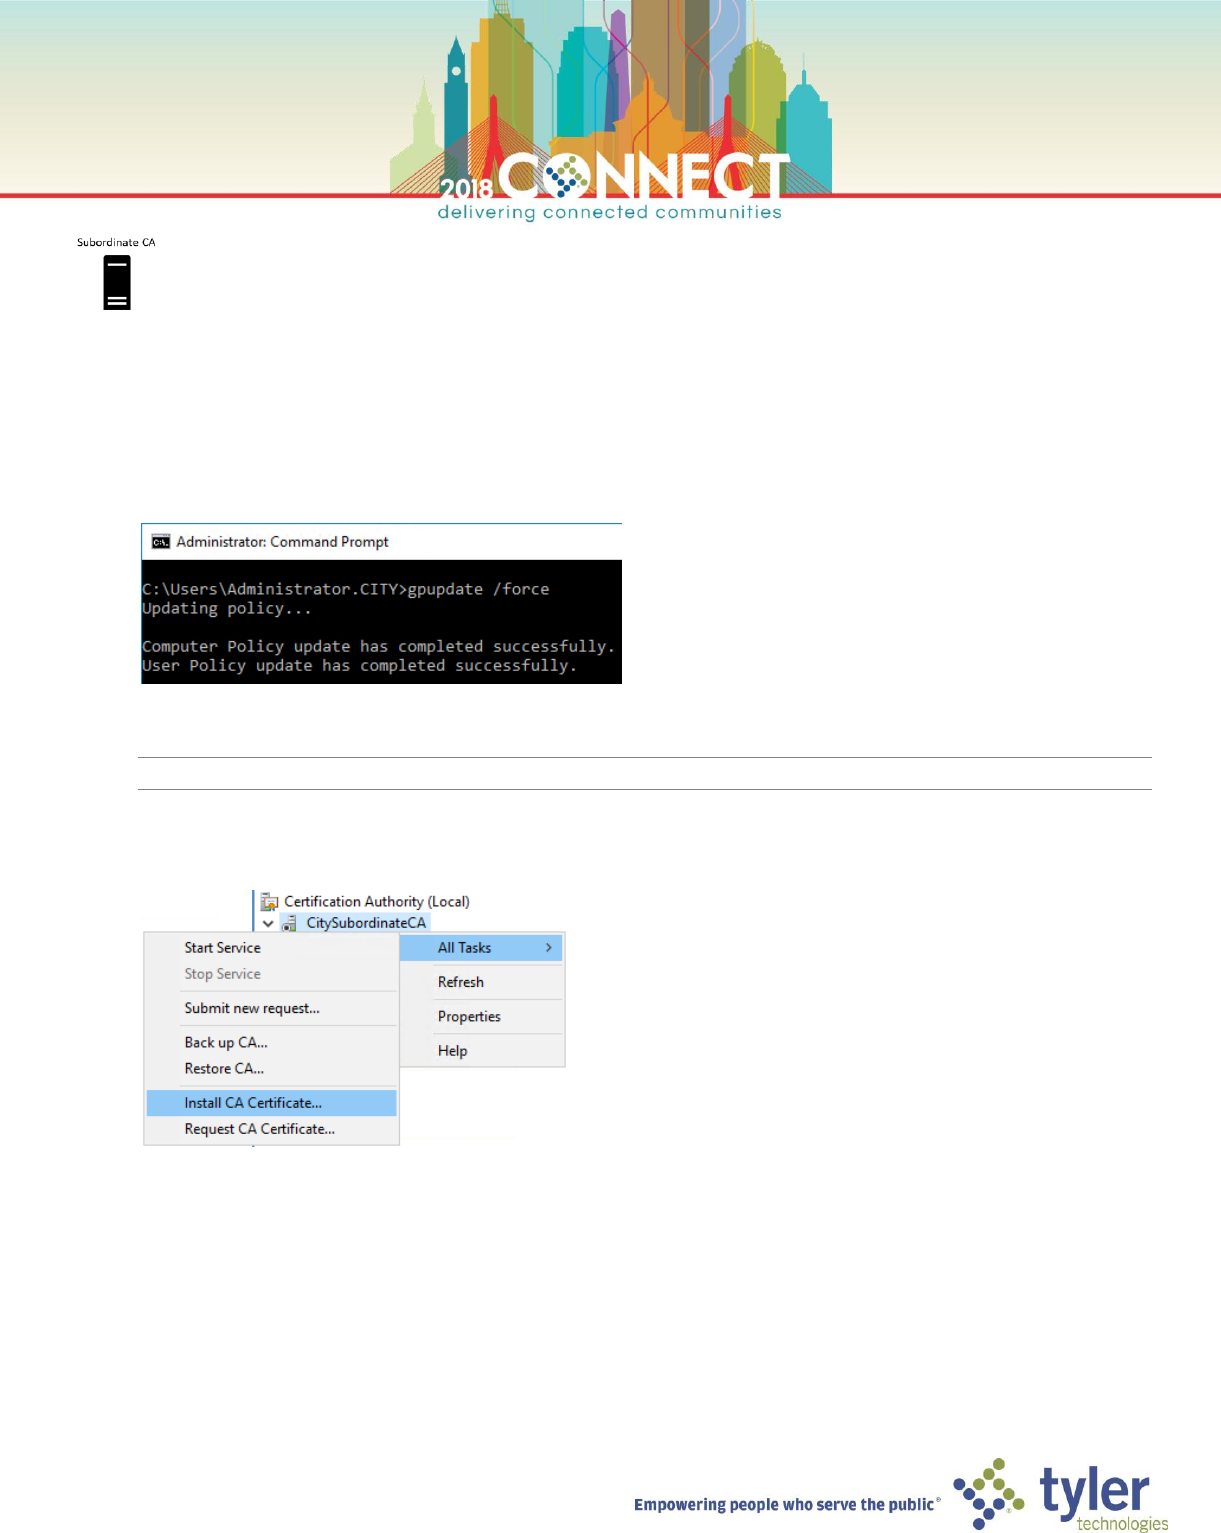
2. In a command prompt, force a group policy update to ensure the City PKI GPO has been applied
gpudate /force
3. In Server Manager, launch the Certificate Authority management console from the Tools menu
NOTE: The Certificate Authority service for the Subordinate CA is currently stopped
4. Right click the CitySubordinateCA node and select All Tasks > Install CA Certificate…
43
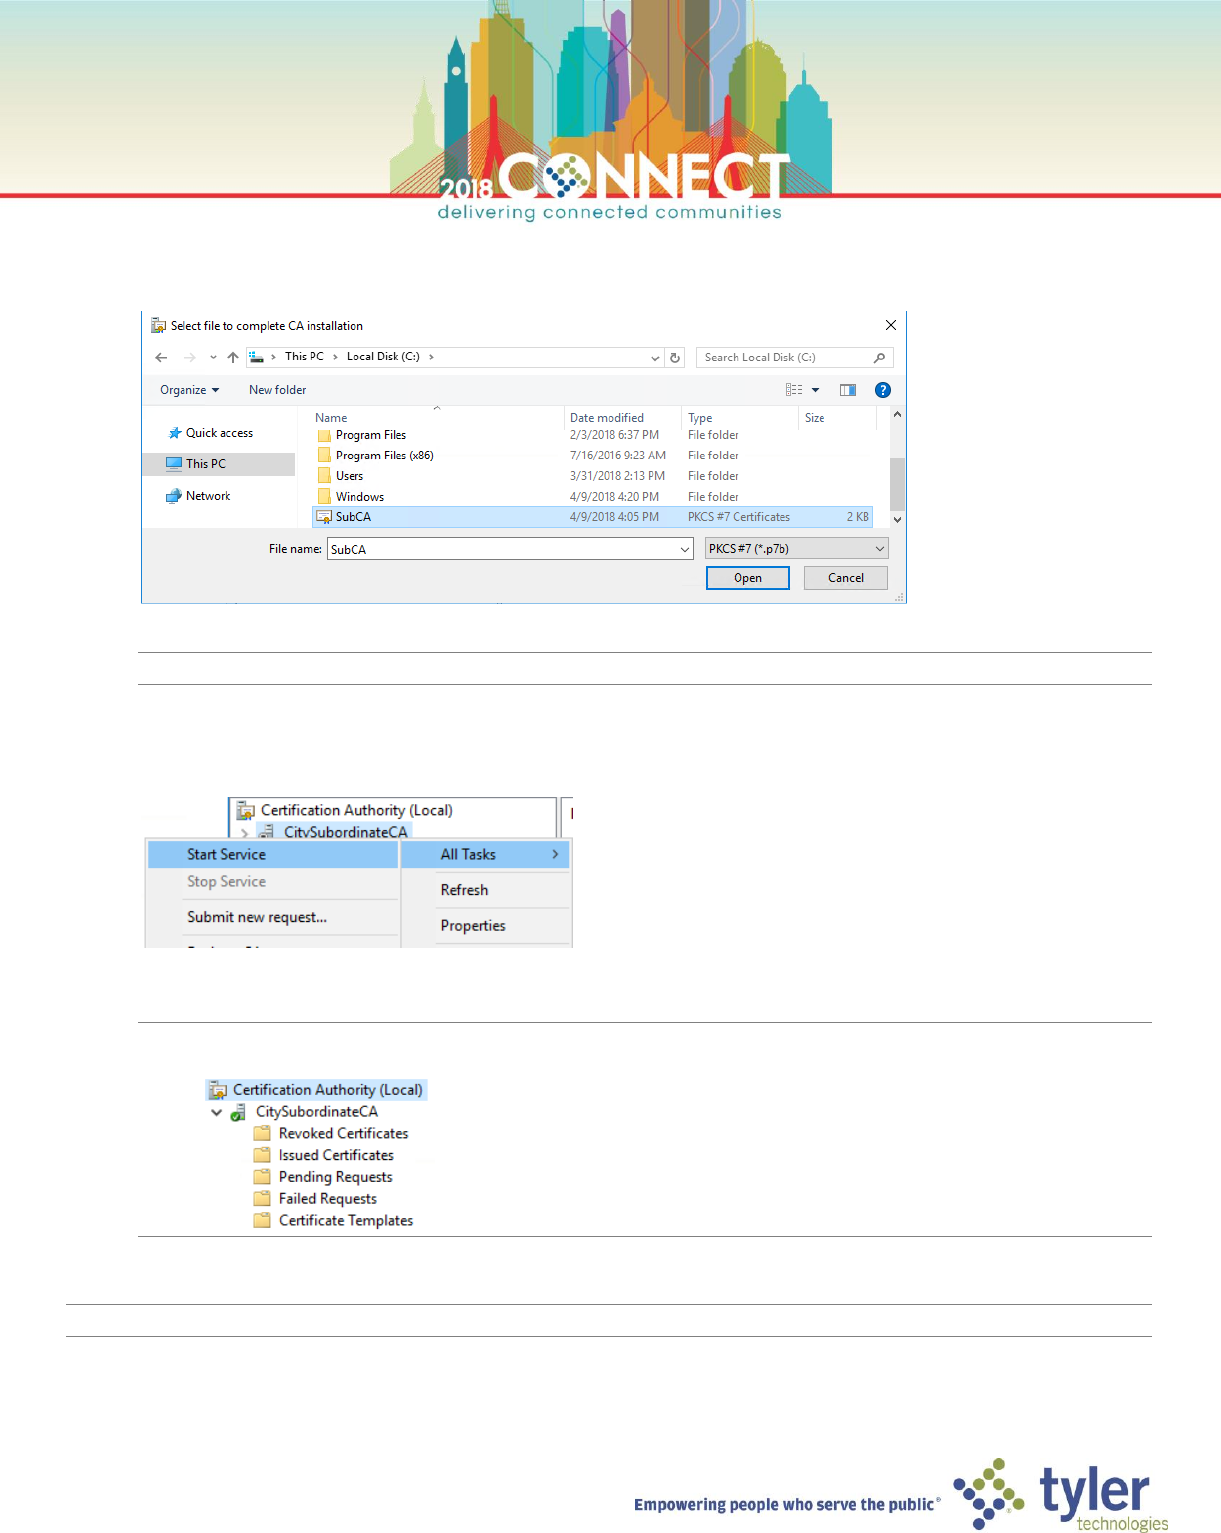
5. In the Select file to complete CA installation dialog, browse the certificate file (.p7b) that was issued and
exported from the Root CA
NOTE: The certificate will take a few seconds to install, during which time the mmc console will be unresponsive
6. Right-click the CitySubordinateCA node and select All Tasks > Start Service
NOTE: The CA service will take a few seconds to start up.
NOTE: Lastly, we need to update the CDP and AIA extensions to point to the PKI Information Server
44
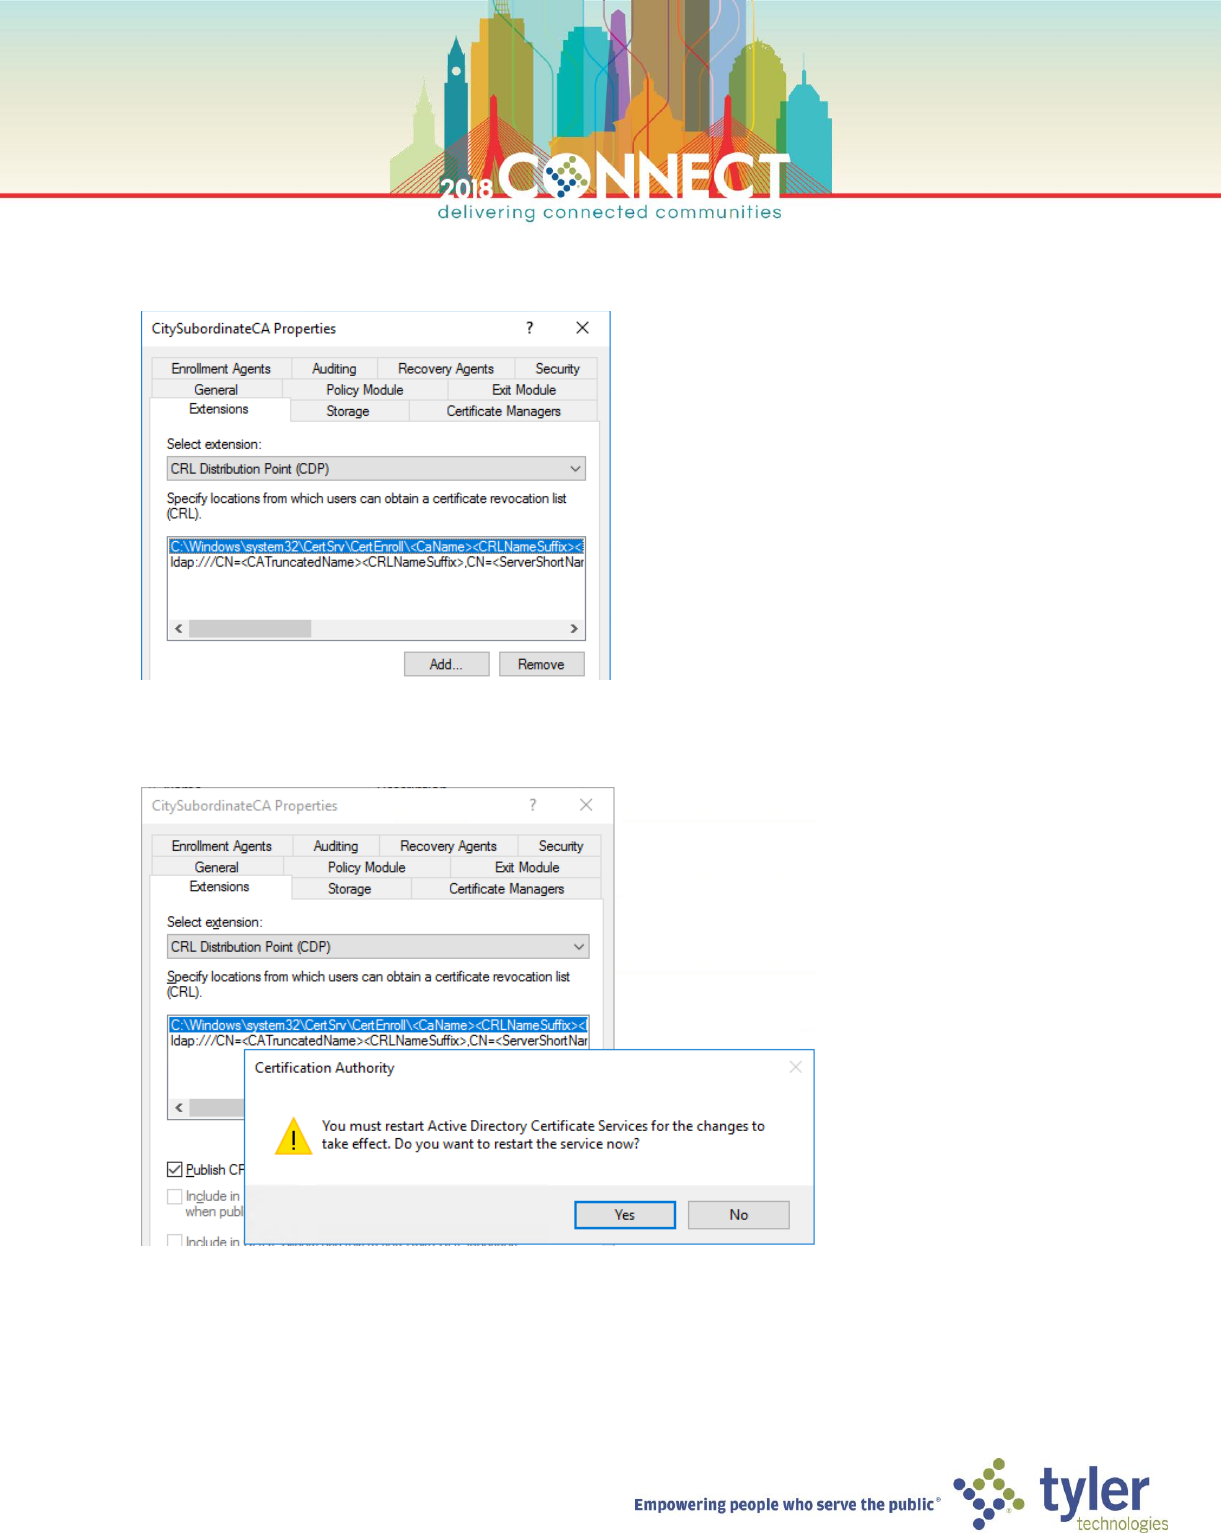
7. In the CitySubordinateCA Properties dialog, select the Extensions tab and remove the http and file entries for
the CRL Distribution Point then click Apply
8. Click Yes in the Certificate Authority dialog box to restart the CA service
45
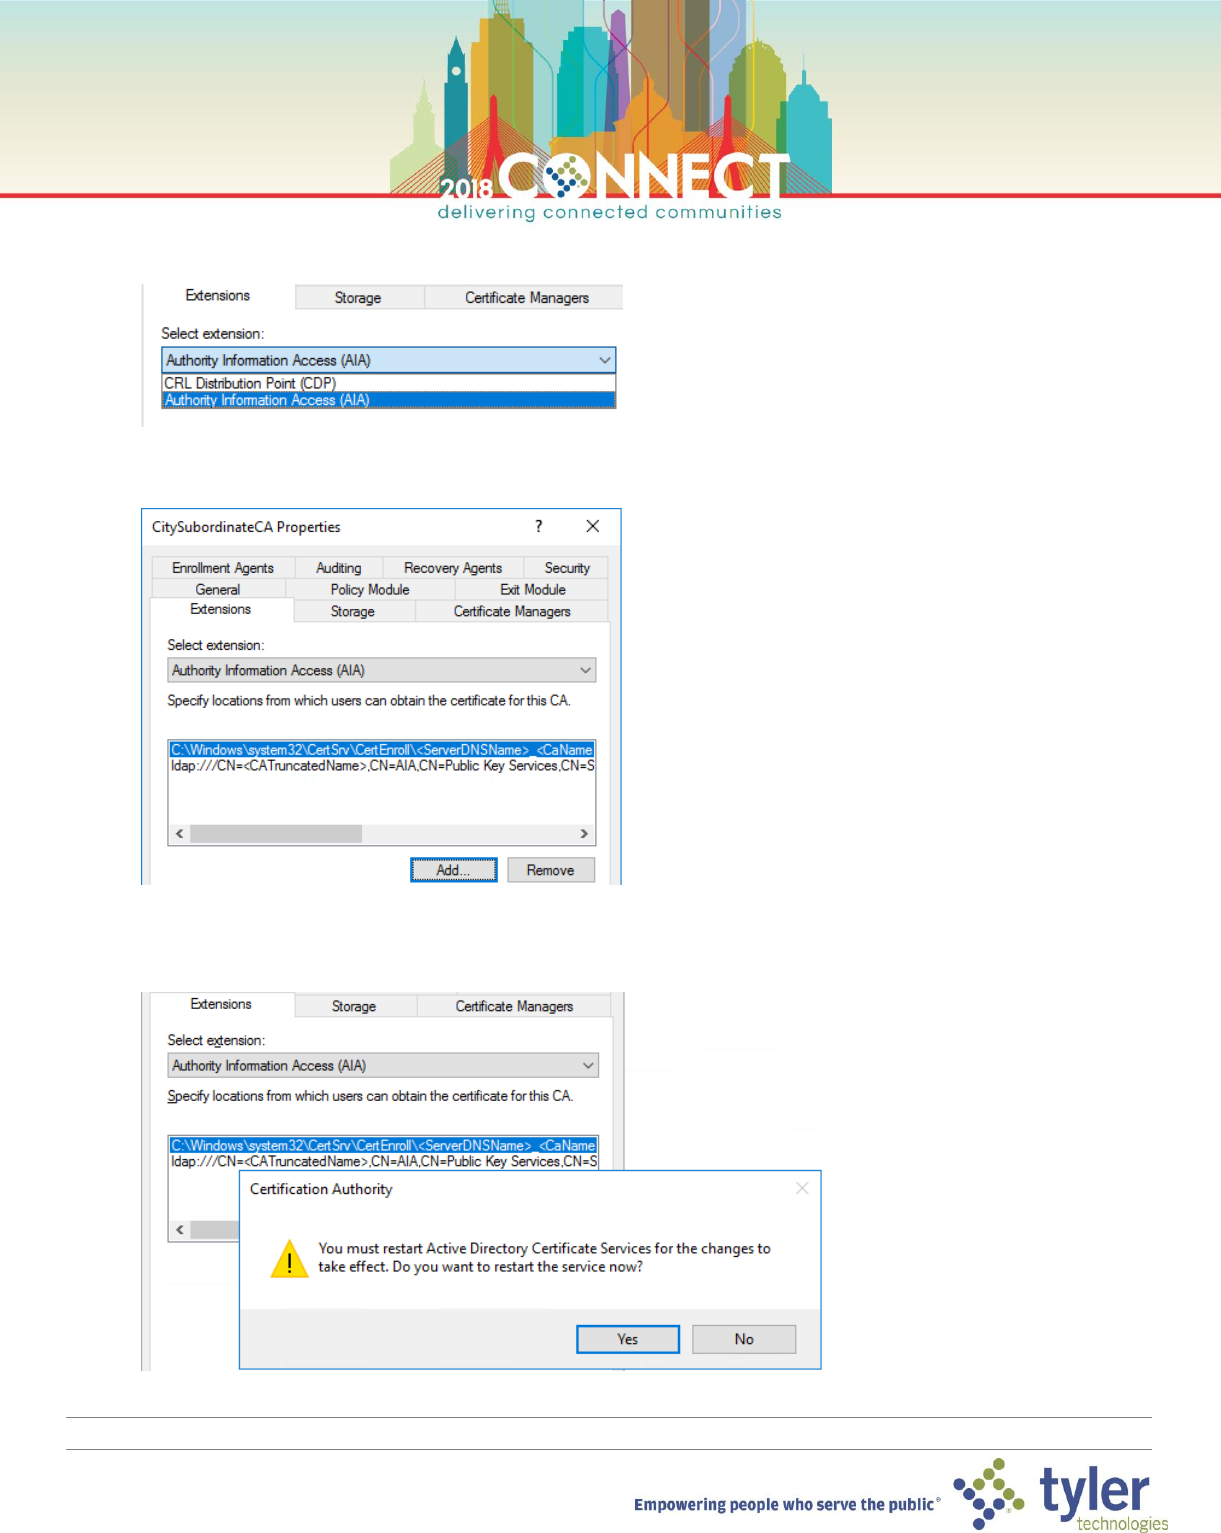
9. In the Select extension dropdown, choose Authority Information Access (AIA)
10. Just as we did for the CDP, remove the http and file entries for the AIA then click Apply
11. Click Yes to restart the CA service
NOTE: We now need to publish the certificate revocation list (CRL) along with the AIA certificate that signs the CRL
46
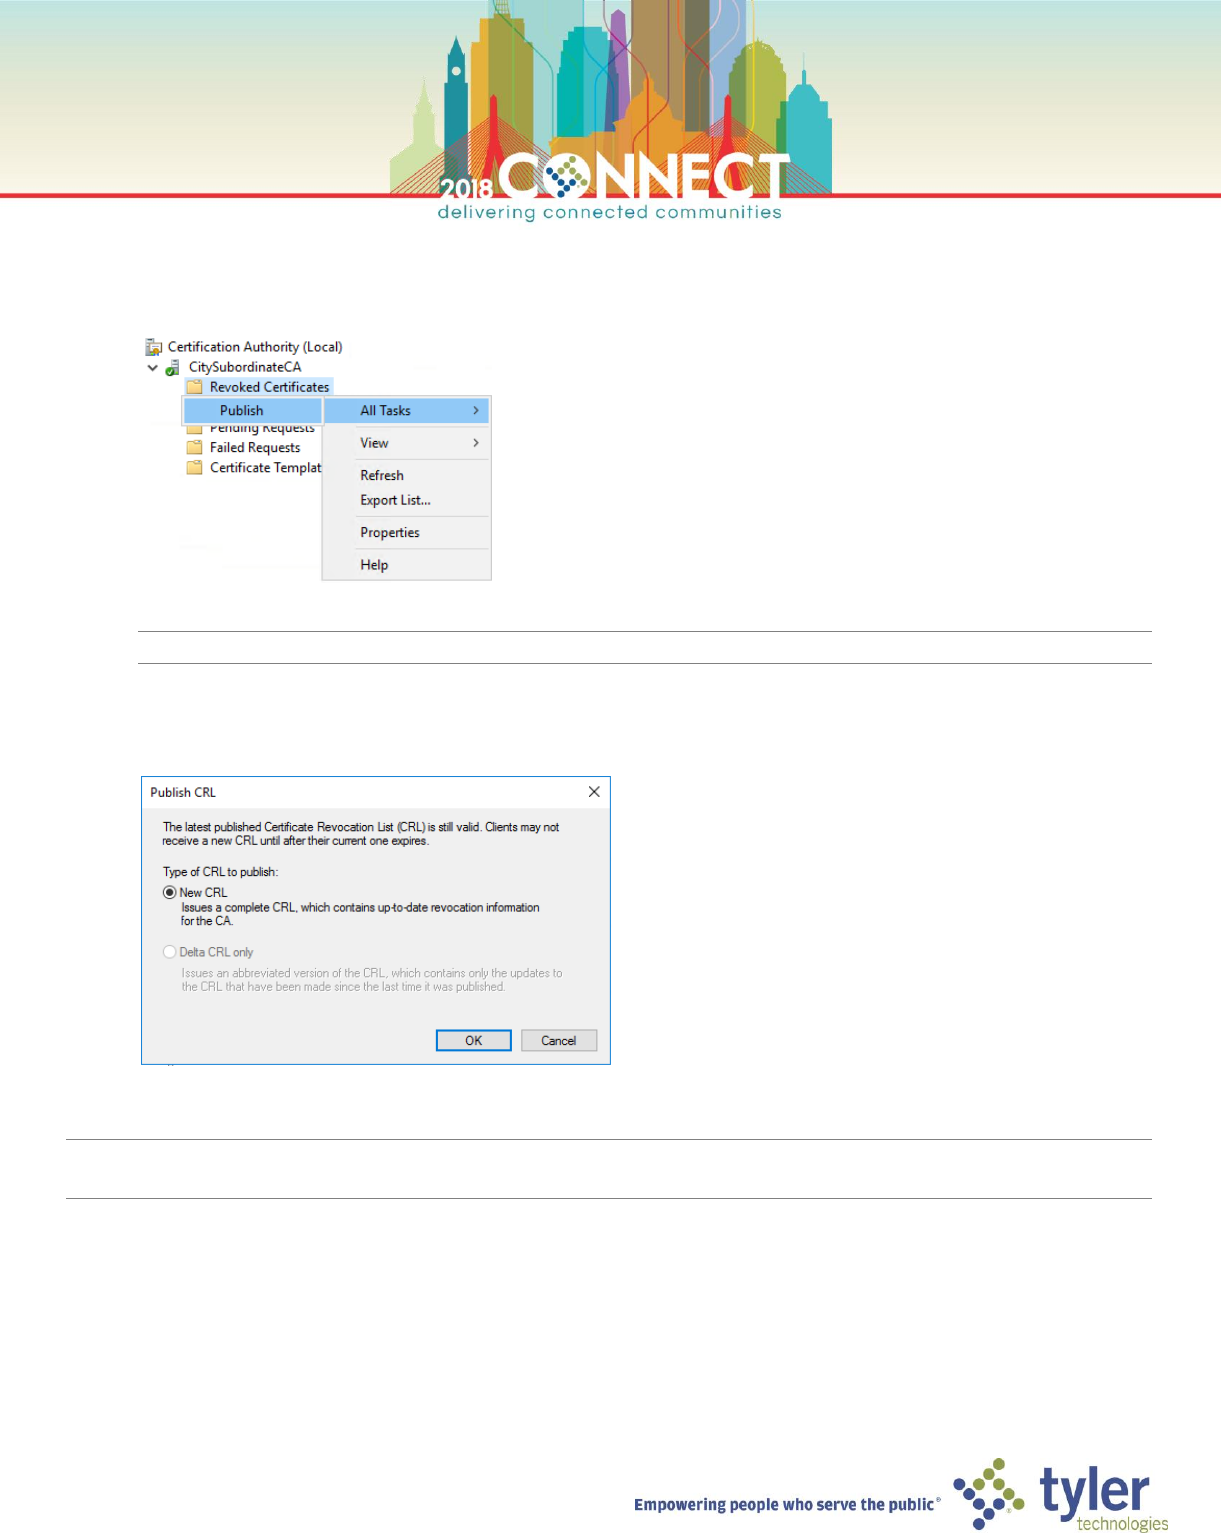
12. In the Certificate Authority management console, right click Revoked Certificates folder under
CitySubordinateCA, go to All Tasks and click Publish
NOTE: It can take a few seconds for the Publish CRL dialog box to show
13. Ensure the New CRL option is selected and click OK
NOTE: Congratulations! You have successfully deployed a Two-Tier Enterprise PKI.
You may now shut down the Root CA and keep it offline.
