ADCS Administration And Maintenance Lab Manual
User Manual: Pdf
Open the PDF directly: View PDF ![]() .
.
Page Count: 25
Certificate Authority Infrastructure Hands-On Lab
Part 2: ADCS Administration & Maintenance
Information Technology & Security
CLASS DESCRIPTION
The second in a two-part hands-on-lab series; this lab will introduce the tasks you will need to perform to administer and
maintain an ADCS public key infrastructure (PKI).
OVERVIEW
We will practice performing the following administrative tasks on the PKI you deployed in part 1 of this lab:
• Issuing Certificates
• Revoking Certificates
• Backing up a Certificate Authority
• Restoring a Backed-up Certificate Authority
NOTE: All domain and local account passwords are set to pw
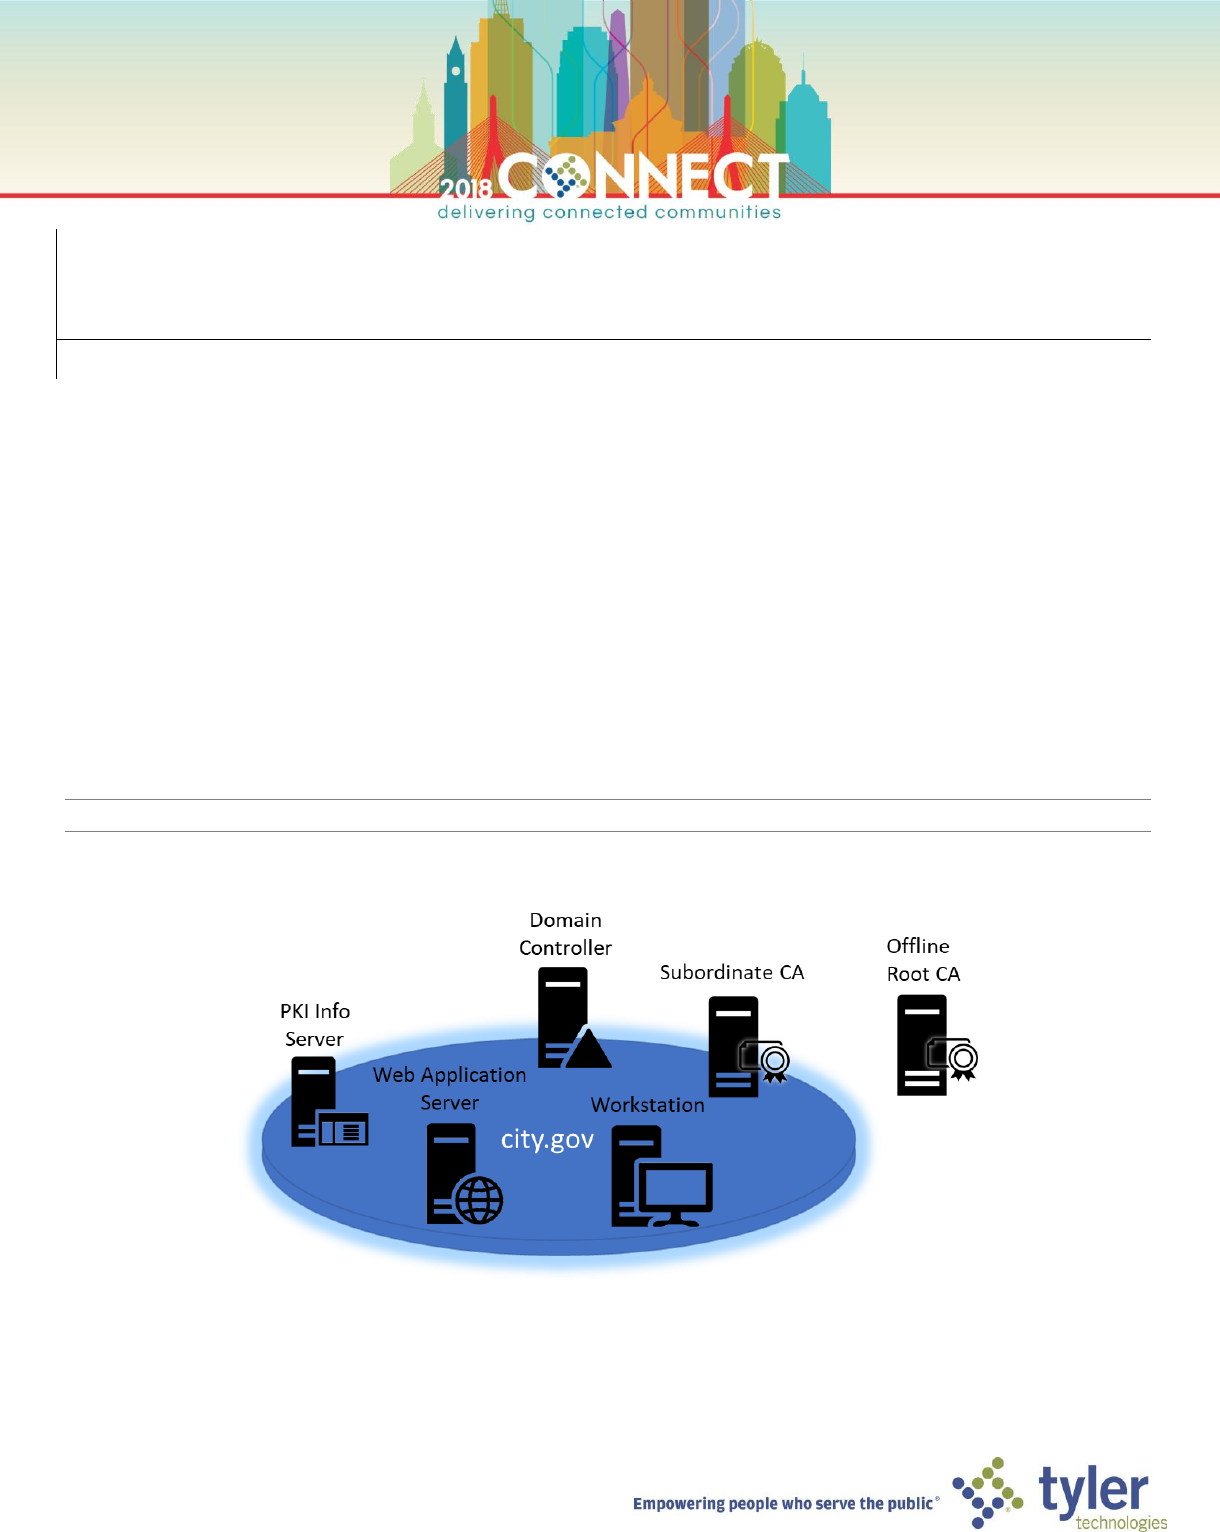
Figure 1 - Lab Infrastructure
2
Machine
Roles
FQDN [IP]
Domain Controller
DC, DNS, DHCP, WINS
dc.city.gov [10.10.10.10]
Root CA
Certificate Authority
rootca.city.gov [10.10.10.5]
Subordinate CA
Certificate Authority, Web
Enrollment
subca.city.gov [DHCP]
PKI Info Server
IIS, File Share
pkiinfo.city.gov [DHCP]
Web Application Server
IIS
webapps.city.gov [DHCP]
Workstation
Windows Client OS
workstation.city.gov [DHCP]
Table 1 - Listing of Lab Machines
ADCS ADMINISTRATION AND MAINTENANCE HANDS-ON-LAB
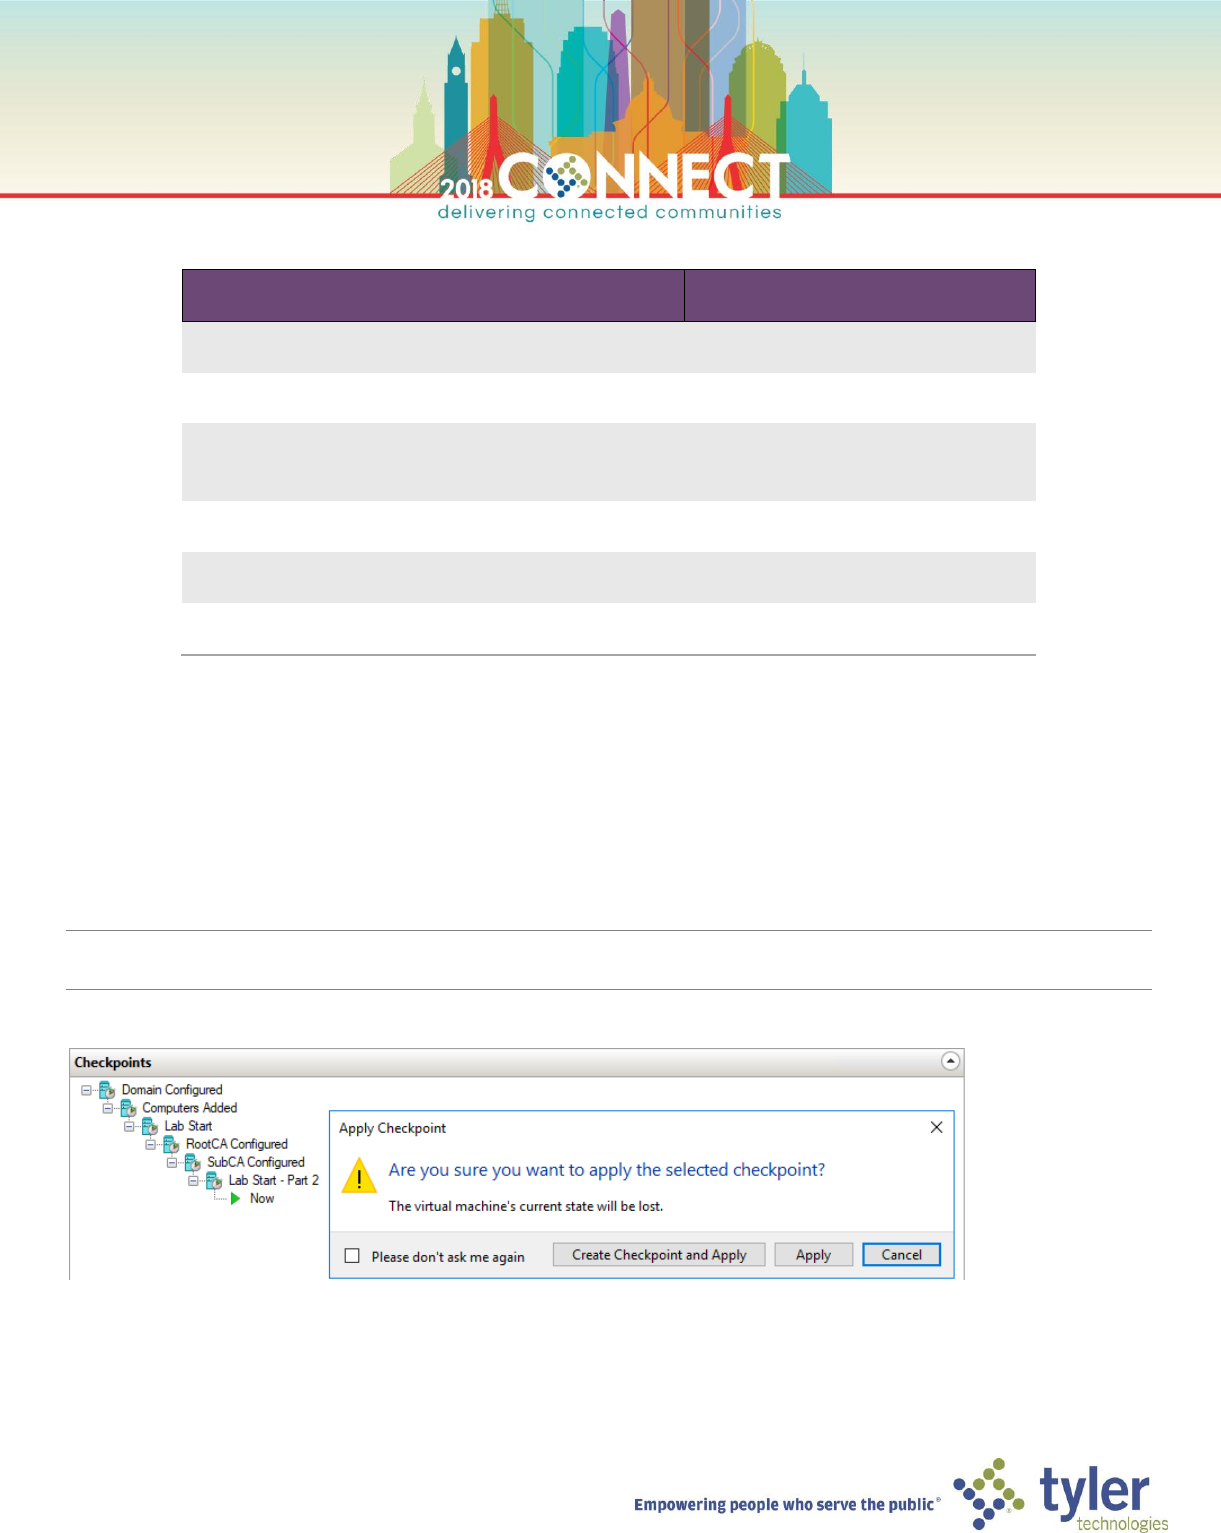
TIP: If you did not complete all tasks in part 1 of this lab, you may jump ahead by applying the Lab Start – Part 2 checkpoints
on the DC, RootCA, PkiInfo and SubCA virtual machines.
3
Certificate Authority Administration – Requesting & Issuing a SSL Certificate
NOTE: We have already experienced manually requesting and issuing a certificate during the provisioning of the
subordinate CA. Here we will look at the experience of using client tooling to automatically submit a certificate
request which will be automatically issued.
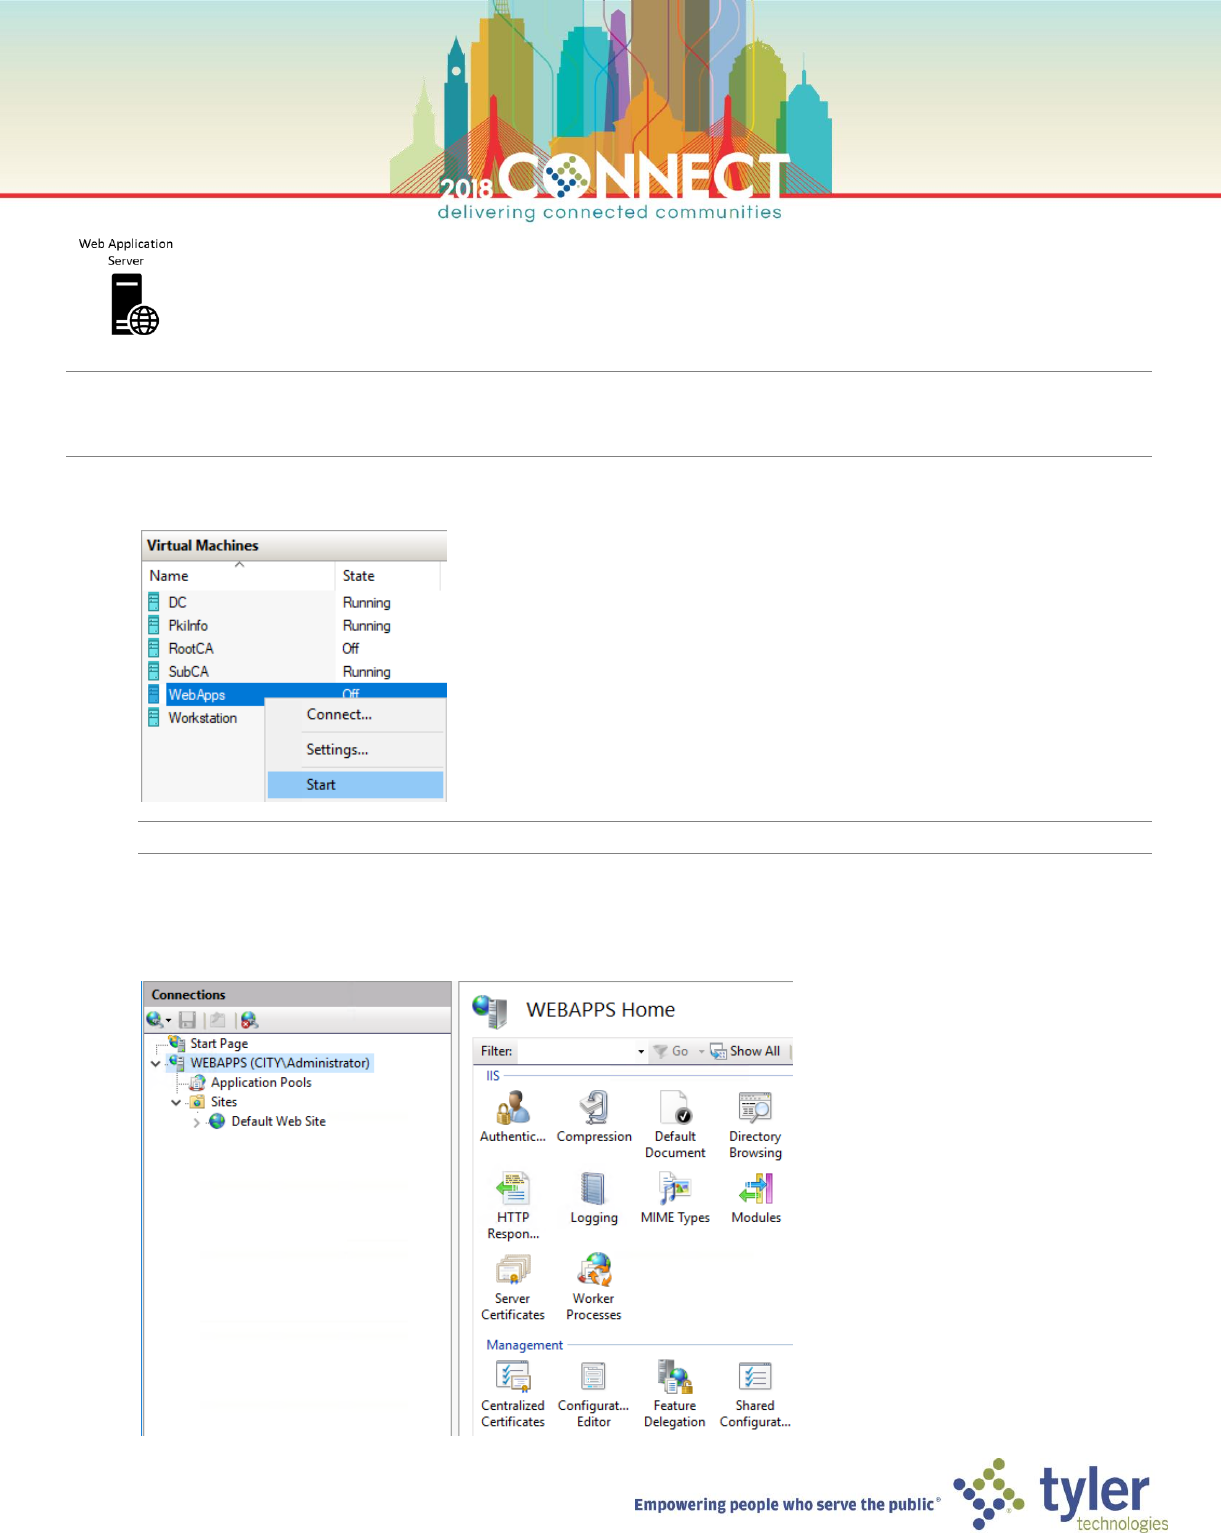
1. Start the Web Application Server (WebApps) and login as the domain Administrator
TIP: To login as domain administrator enter the user name as City\Administrator
2. Start the Internet Information Services (IIS) Manager
3. In the left navigation pane, select the WEBAPPS server
4
4. In the center WEBAPPS Home pane, double-click Server Certificates
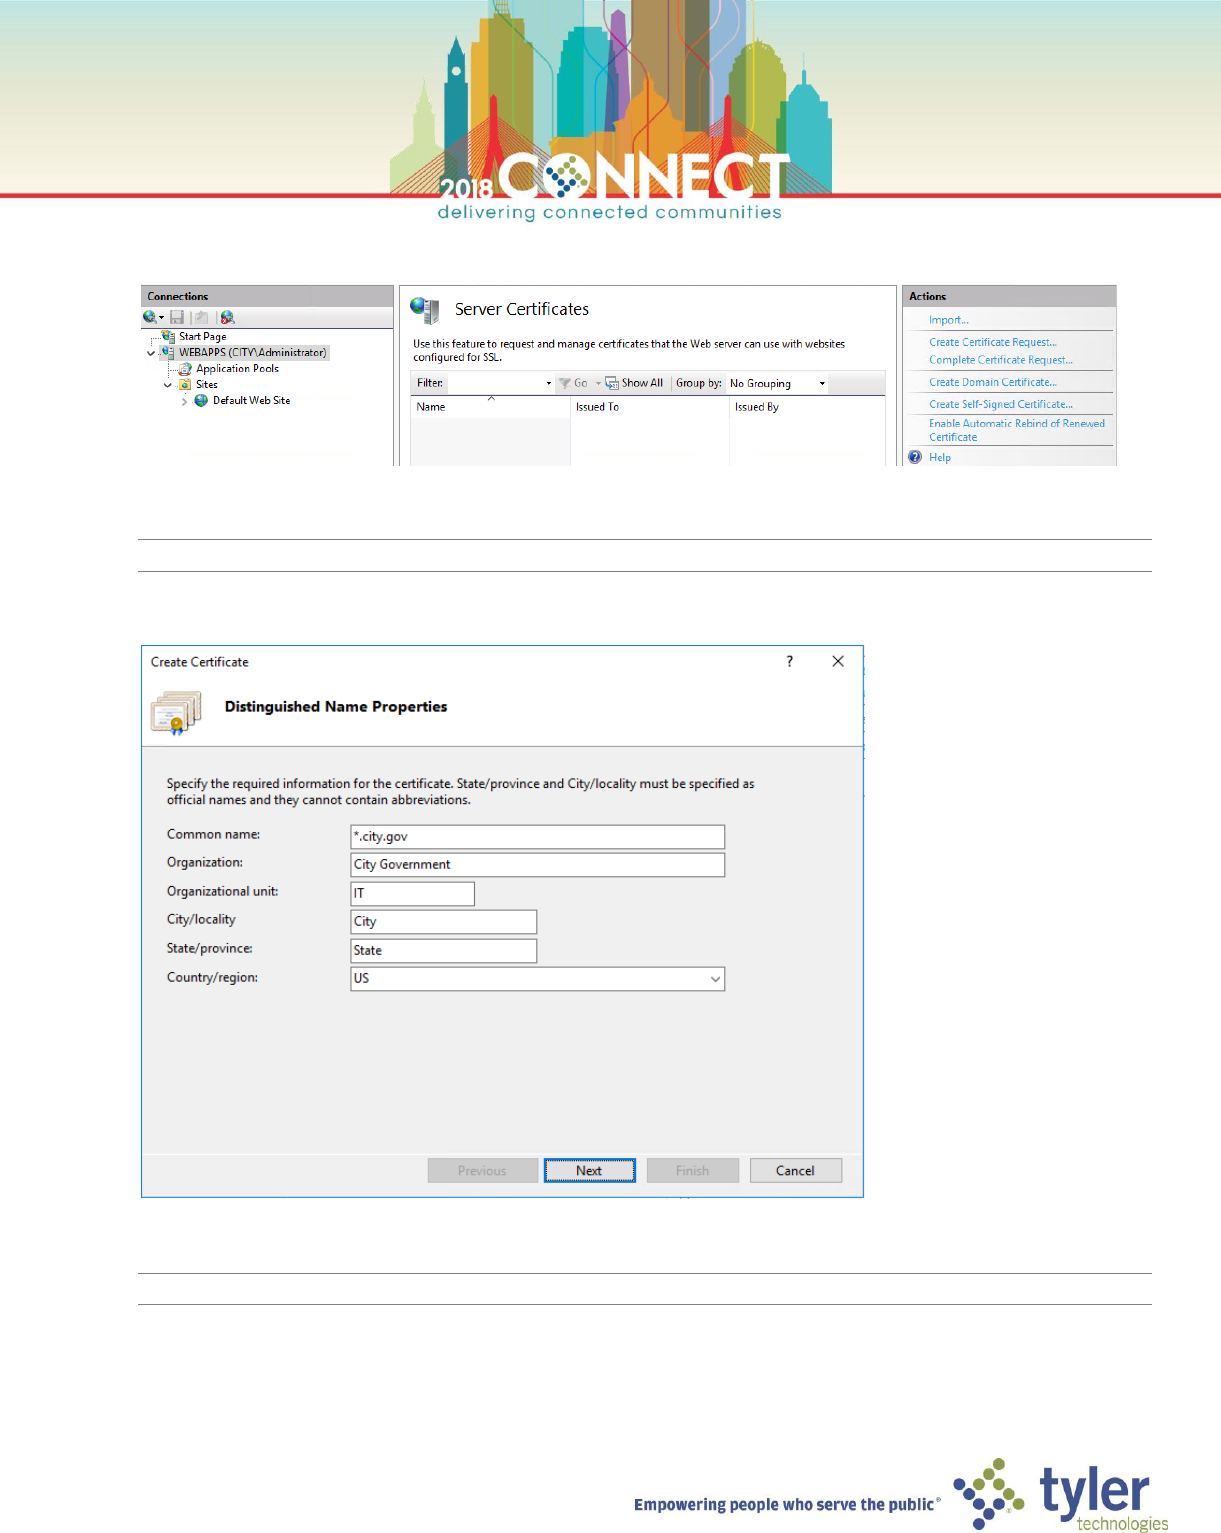
5. In the right Actions menu, select Create Domain Certificate…
NOTE: It can take a few seconds for the Create Certificate wizard dialog to show
6. Enter the following information on the Distinguished Name Properties page then click Next
NOTE: We are requesting a wildcard certificate!
5
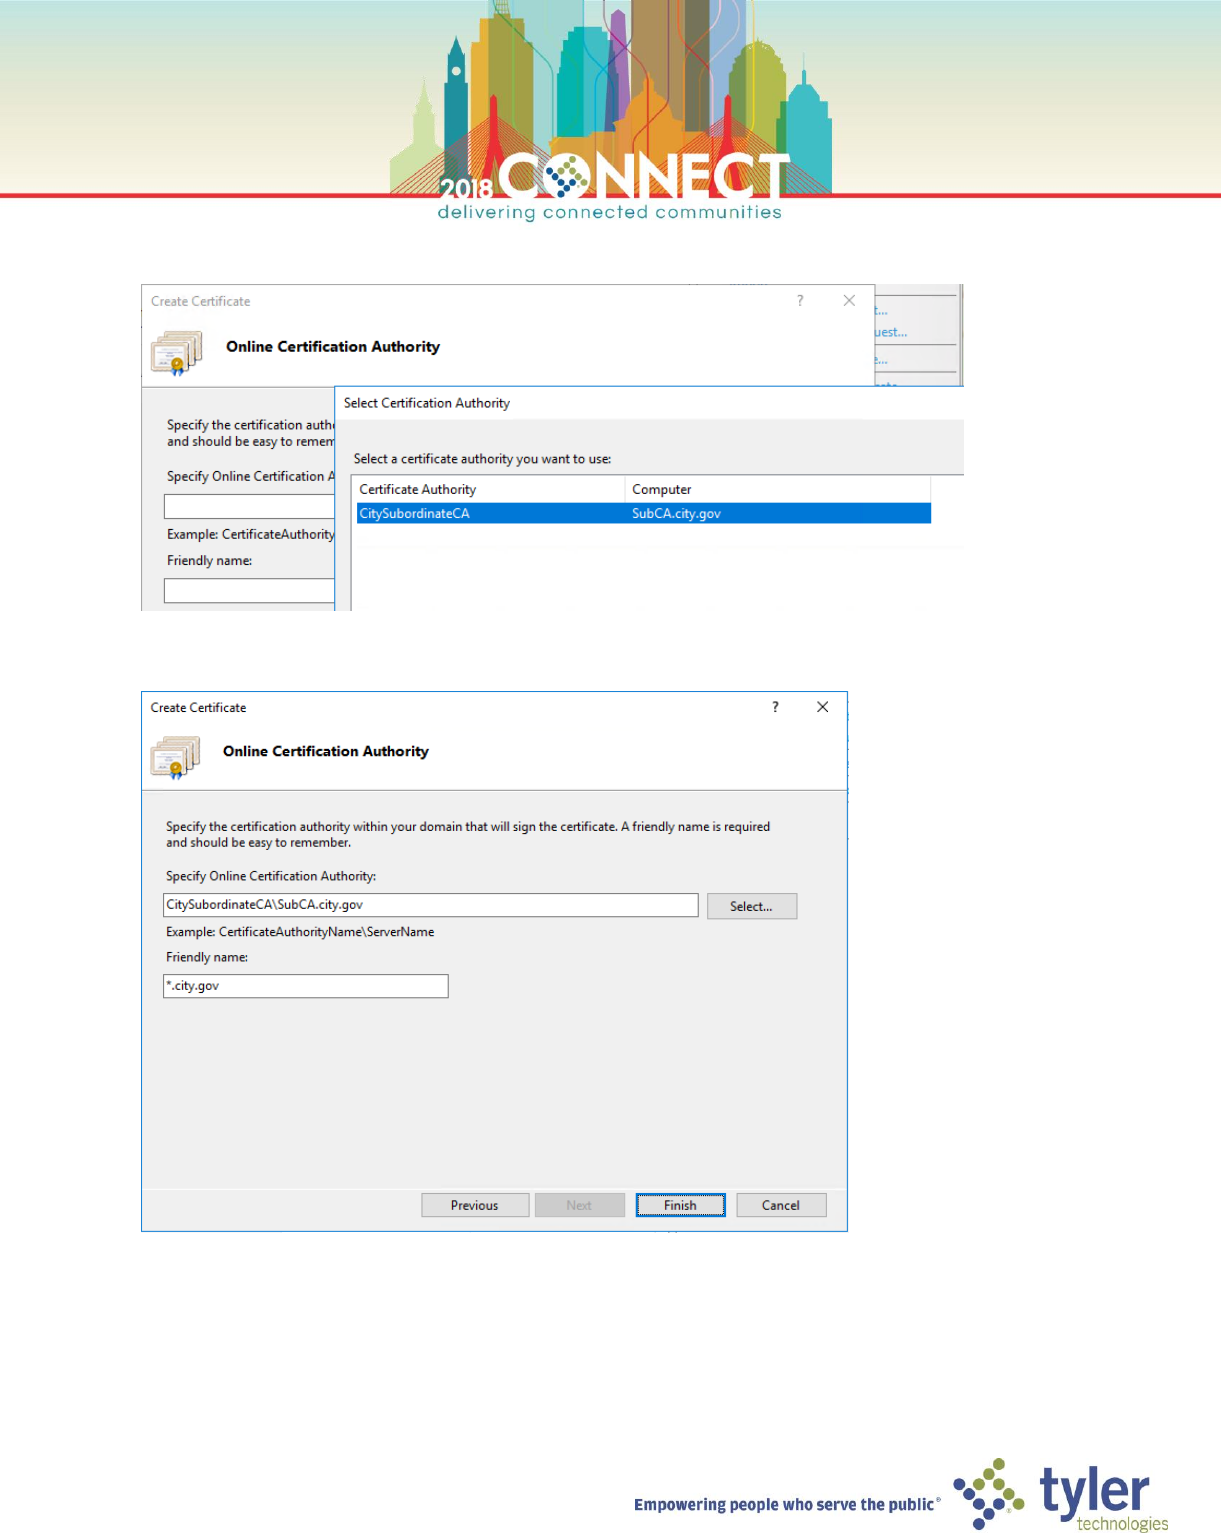
7. On the Online Certification Authority page, click Select… and choose the CitySubordinateCA
8. On the Online Certification Authority page, enter *.city.gov as the friendly name for the requested certificate
6
9. Click Finish and wait for the certificate to be issued
TIP: If the certificate request fails the first time, simply click Finish again to resubmit the request.
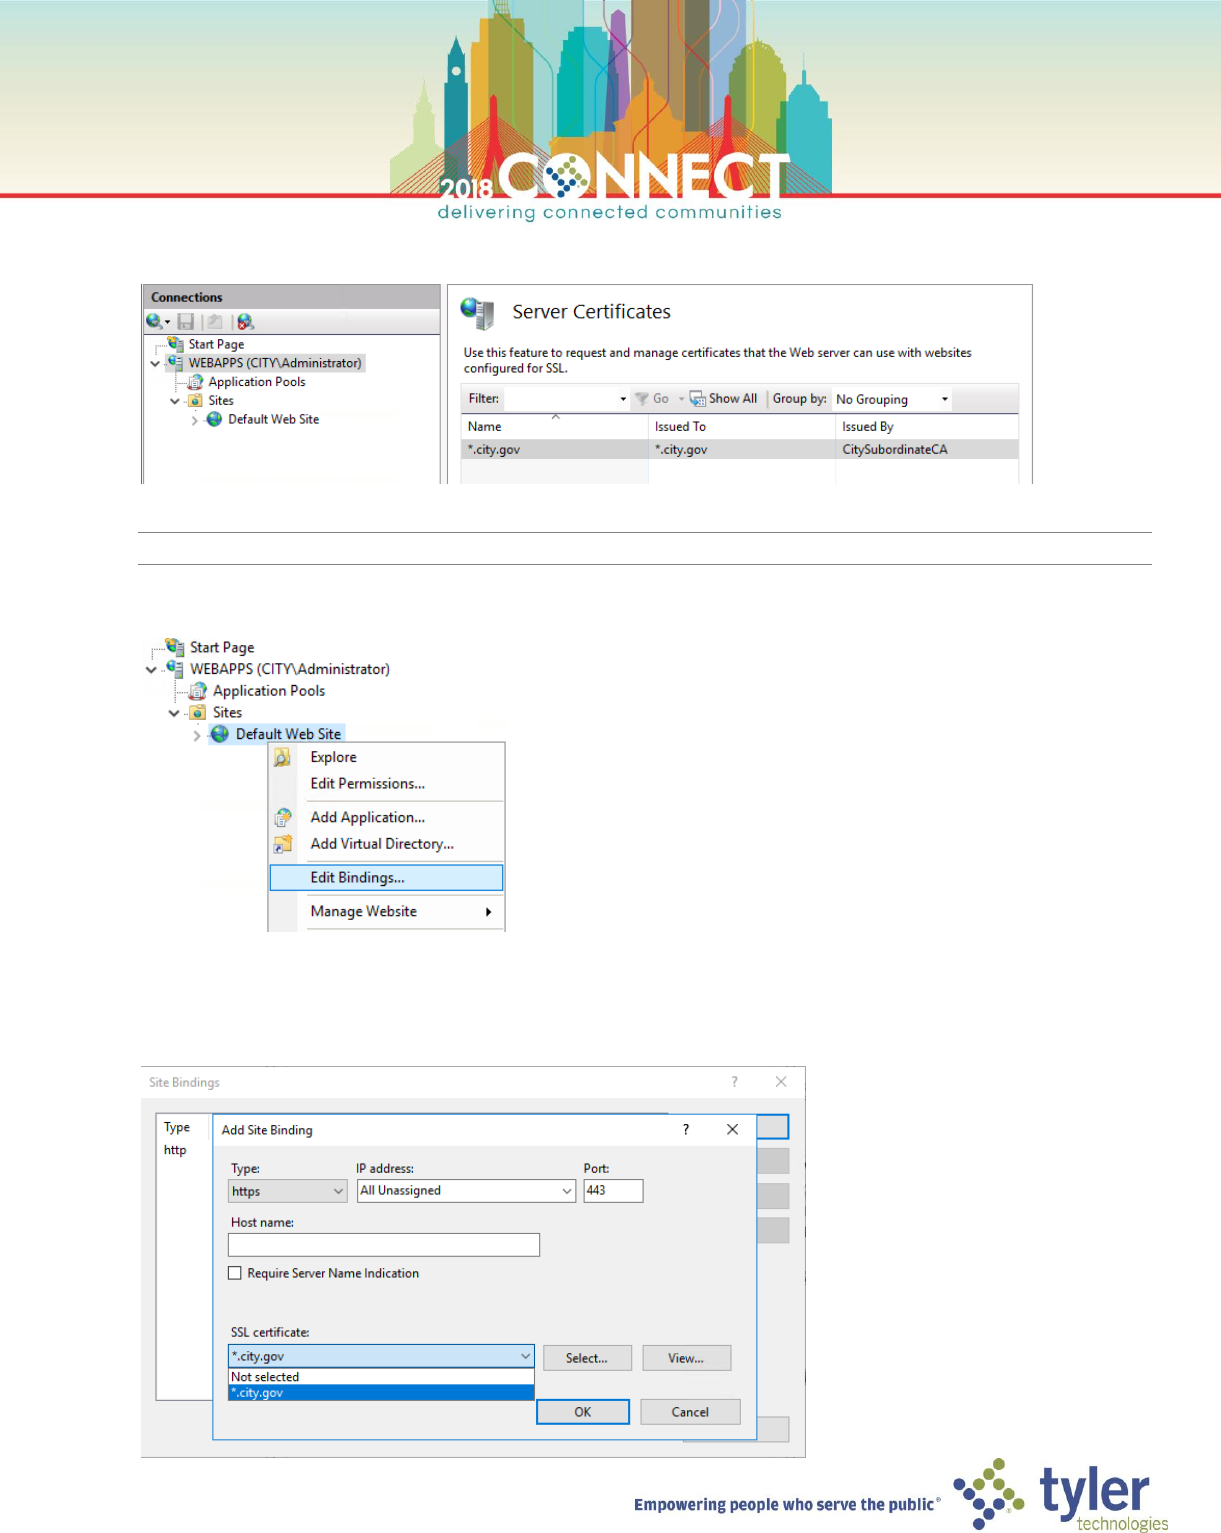
10. In the left navigation pane, right-click the Default Web Site and select Edit Bindings…
11. In the Site Bindings dialog, click Add…
12. In the Add Site Binding dialog select https from the Type dropdown and *.city.gov from the SSL certificate
dropdown then click OK and click Close
7
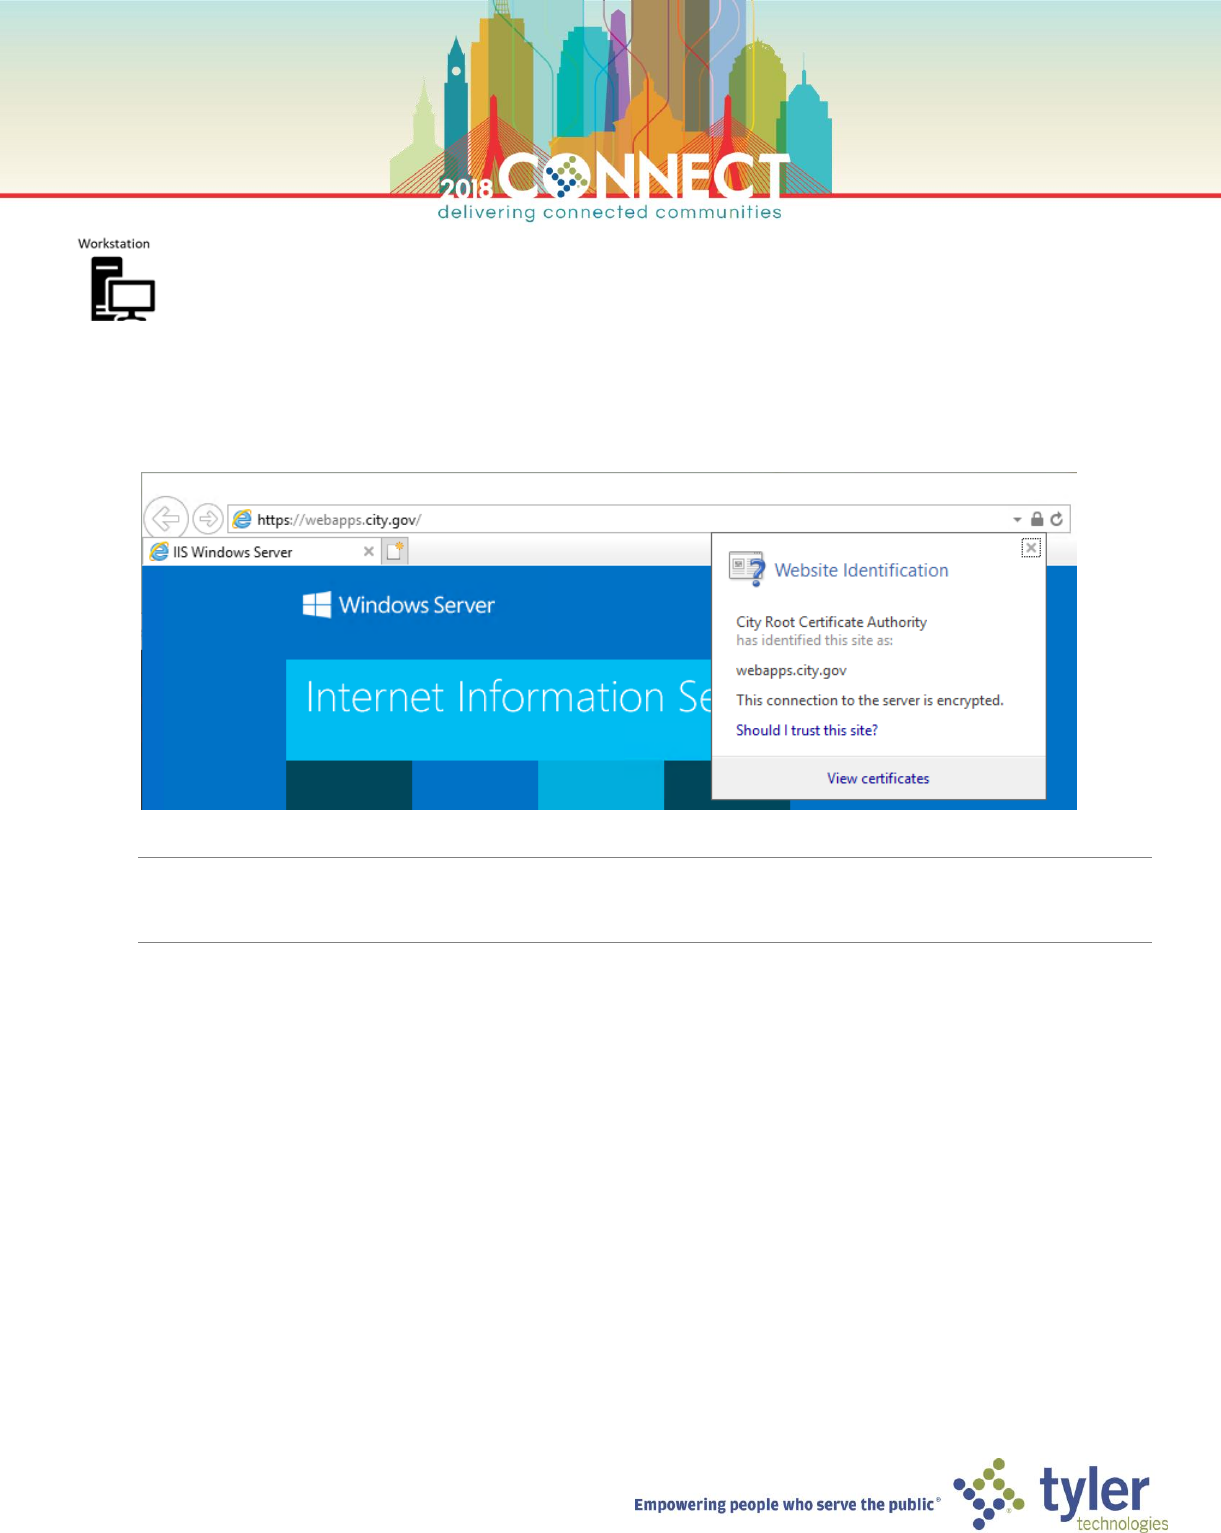
Certificate Authority Administration – Client Testing of Valid Certificate
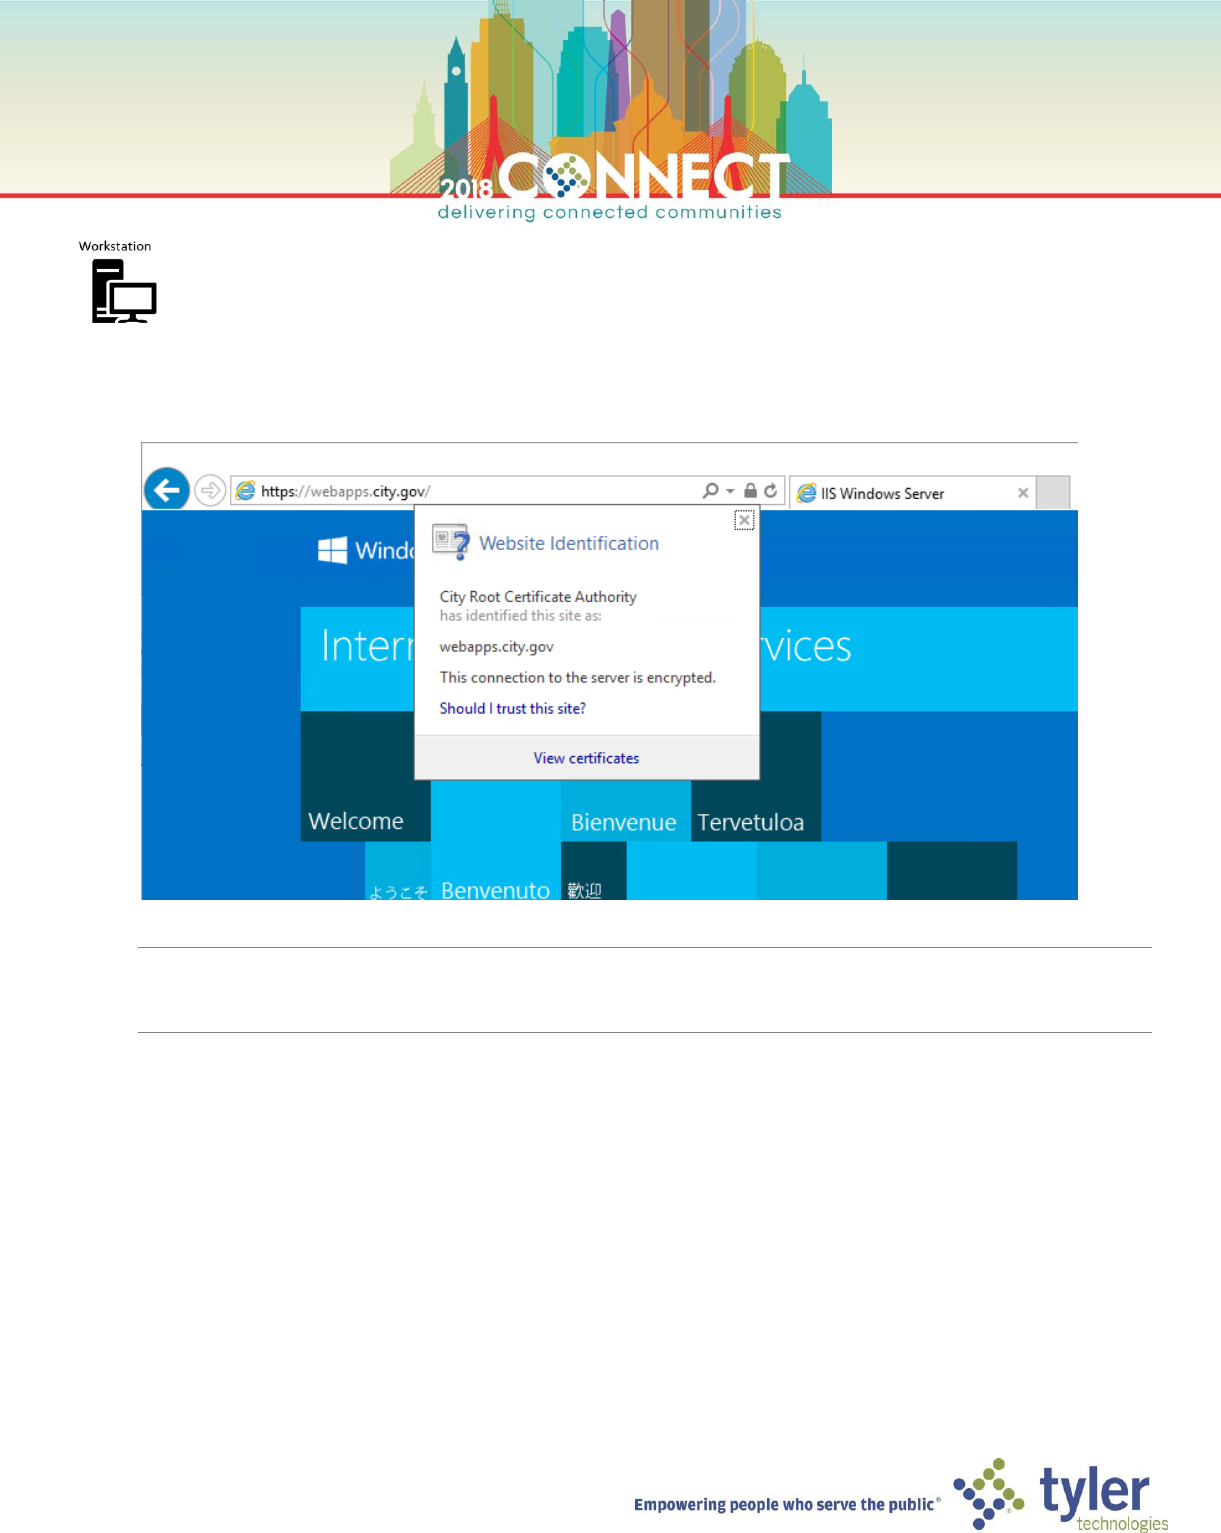
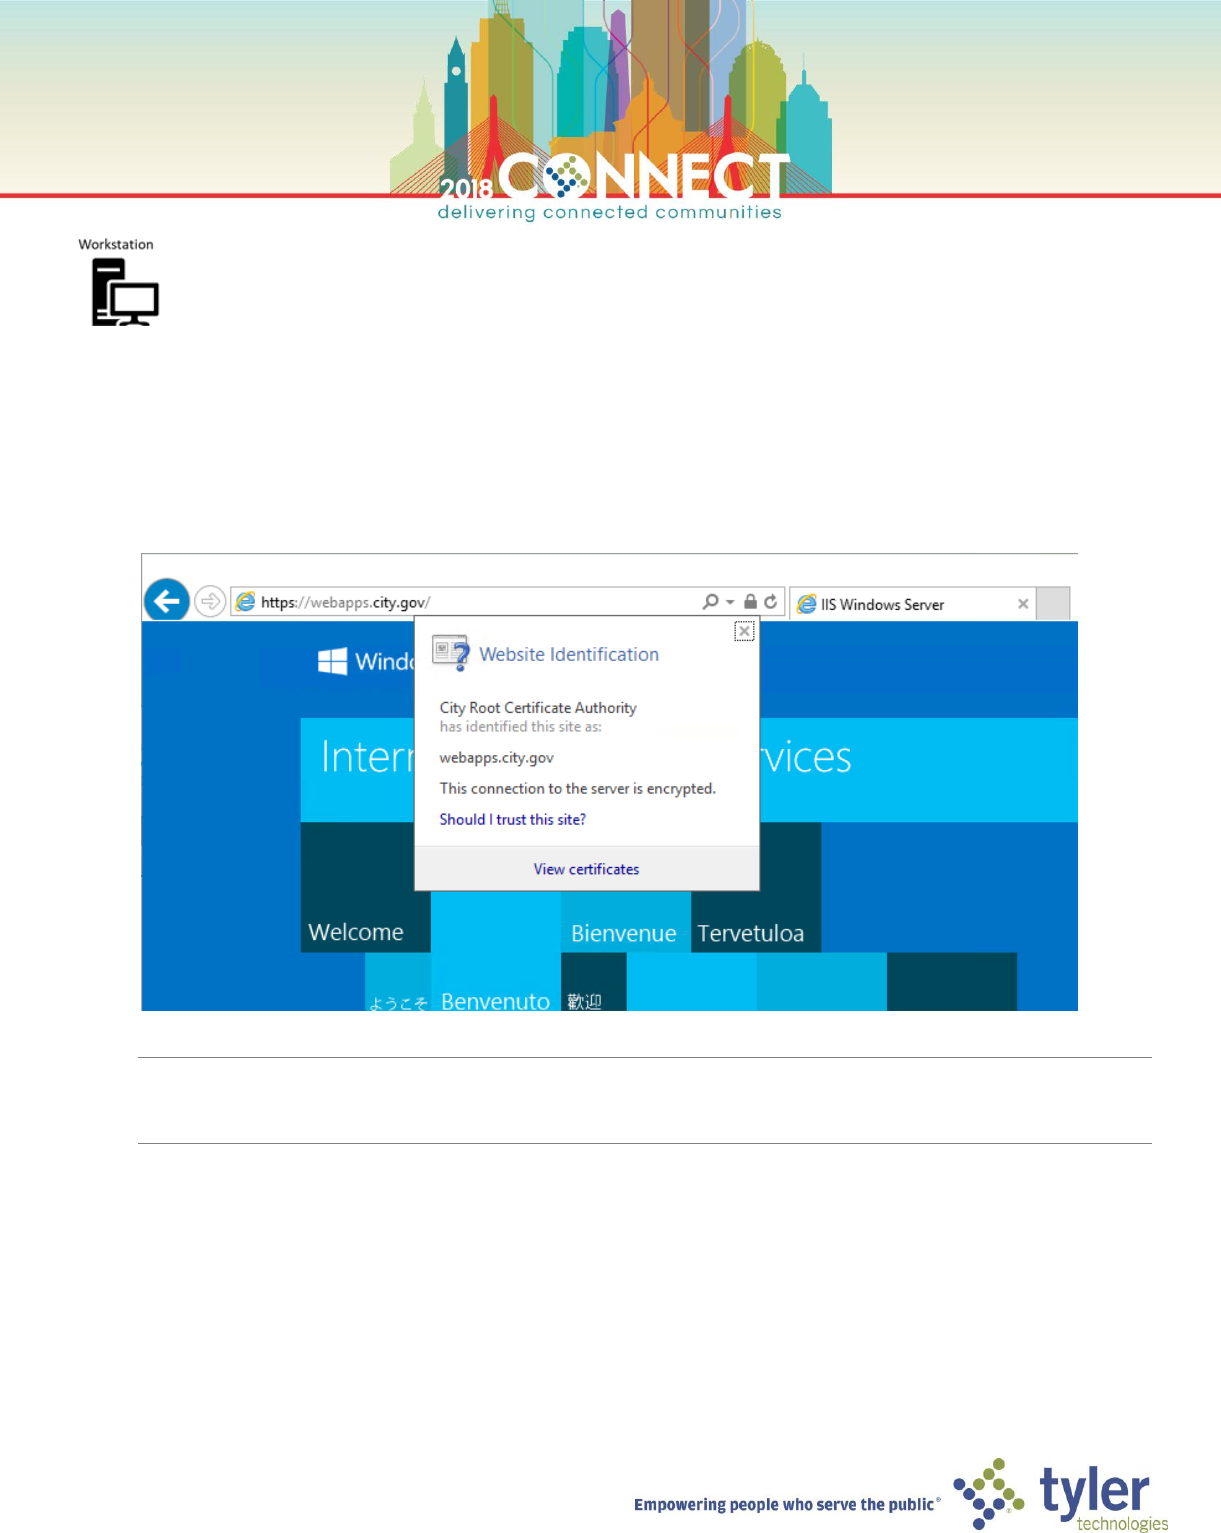
1. Start the windows 10 client virtual machine (Workstation) and login as the domain Administrator
2. Open Internet Explorer and browse to https://webapps.city.gov and verity that the site loads securely
NOTE: You might need to force a group policy update to ensure the workstation trusts the root certificate
gpupdate /force
8
Certificate Authority Administration – Certficate Revocation
1. Open a Virtual Machine Connection to the subordinate CA (SubCA) and login as domain Administrator
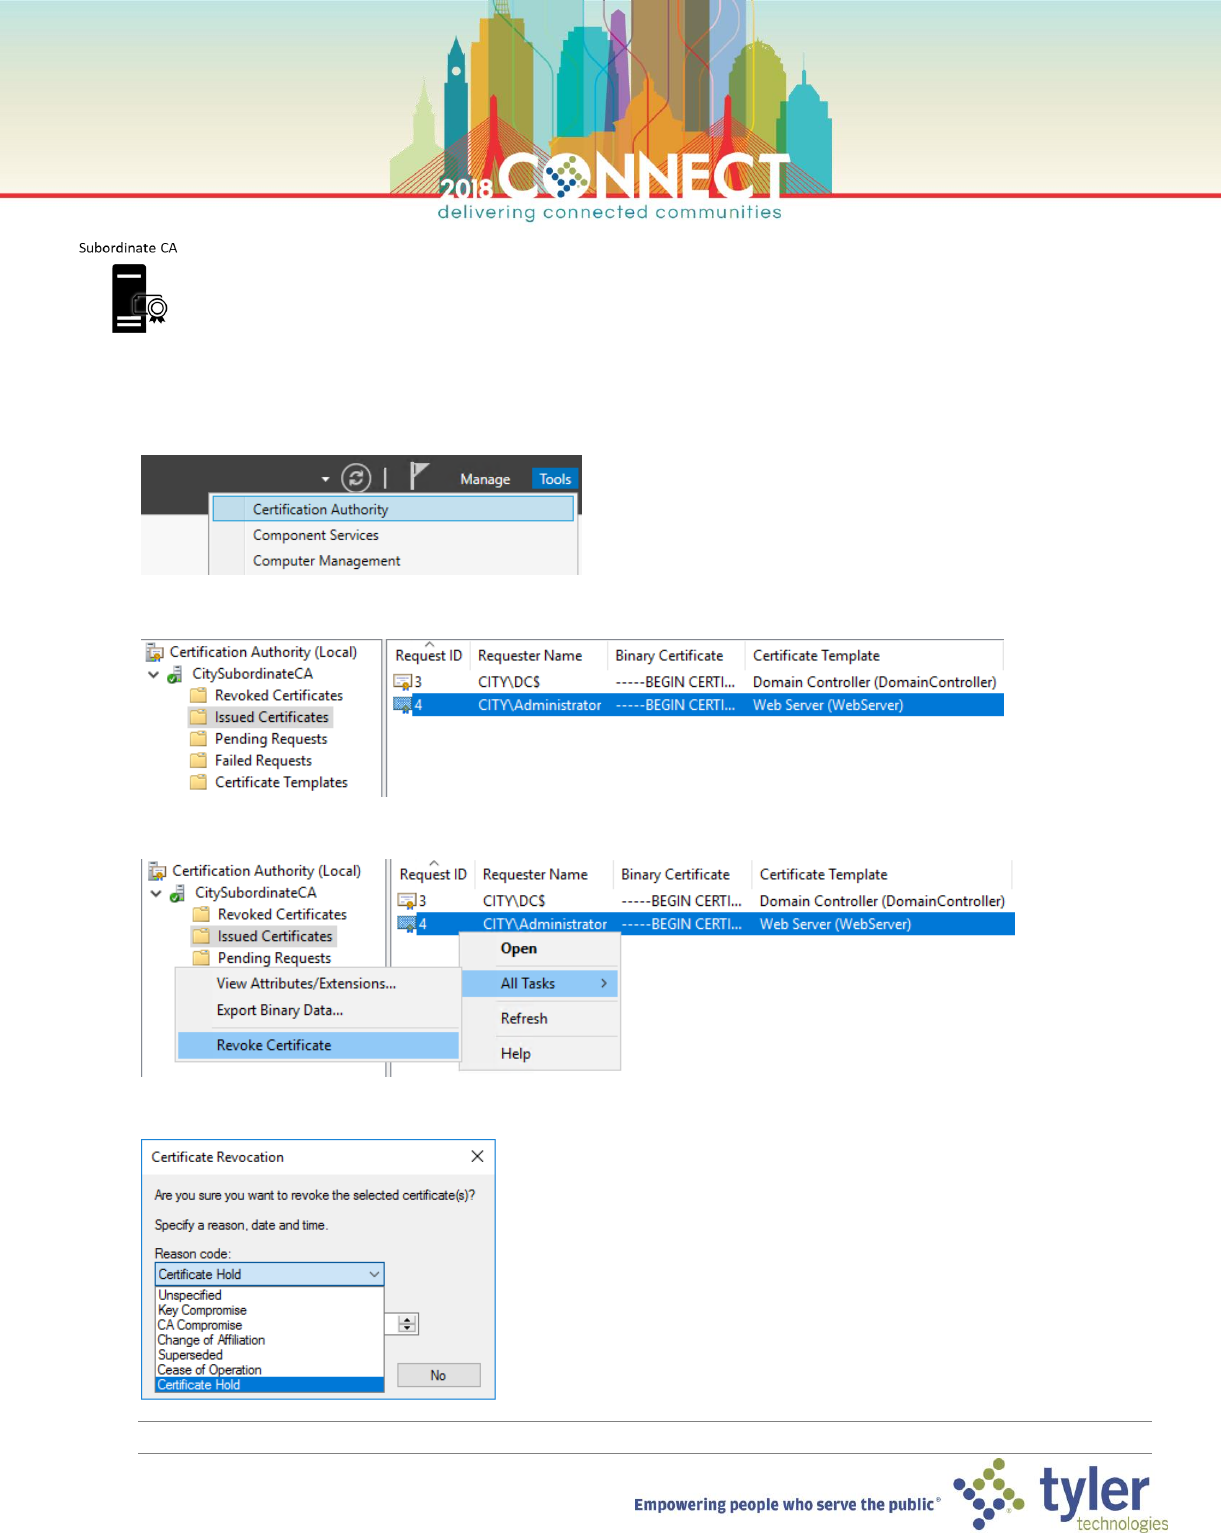
2. Launch the Certificate Authority management console from the Tools menu in Server Manager
3. In the Certificate Authority management console, find the issued SSL certificate in the Issued Certificates node
4. Right-click the certificate and choose Revoke Certificate from the All Tasks menu
5. In the Certificate Revocation dialog select Certificate Hold as the Reason code then click Yes
NOTE: Certificate Hold is the only reversible revocation reason. All other revocations are permanent!
9
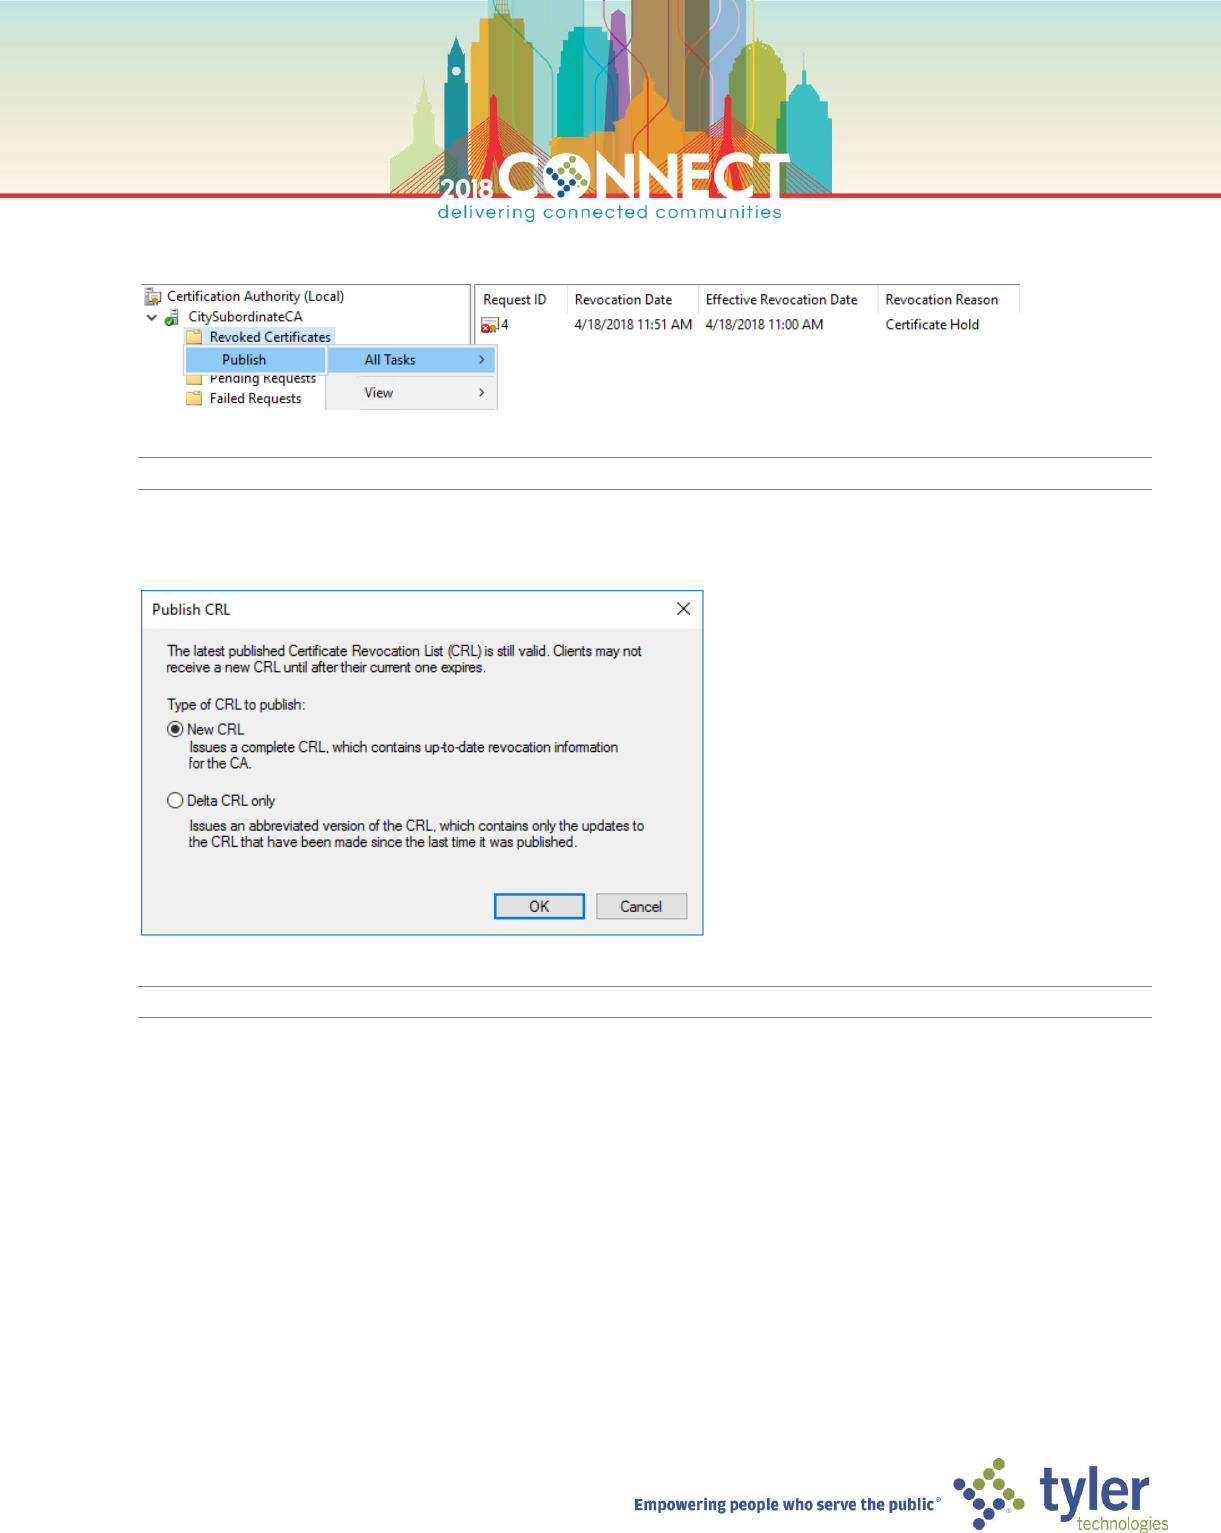
6. Right-click the Revoked Certificates node and select Publish from the All Tasks menu
NOTE: It can take about 15 seconds for the Publish CRL dialog to show
7. In the Publish CRL dialog, select New CRL and click OK
NOTE: It can take a few seconds before CRL publication finishes and the console is once again responsive
10
Certificate Authority Administration – Client Testing of Revoked Certificate
1. Open a Virtual Machine Connection to the workstation VM (Workstation) and login as domain Administrator
2. Open Internet Explorer and browse to https://webapps.city.gov
Notice whether the browser treats the revoked certificate as valid; in all likelihood the certificate will be treated
as valid since the CRL was updated only moments ago and Windows has not yet retrieved the updates
NOTE: Windows and other software/infrastructure will cache CRLs and only periodically check for updates!
We will force windows to flush the CRL cache, which should cause IE to read the updated CRL
11
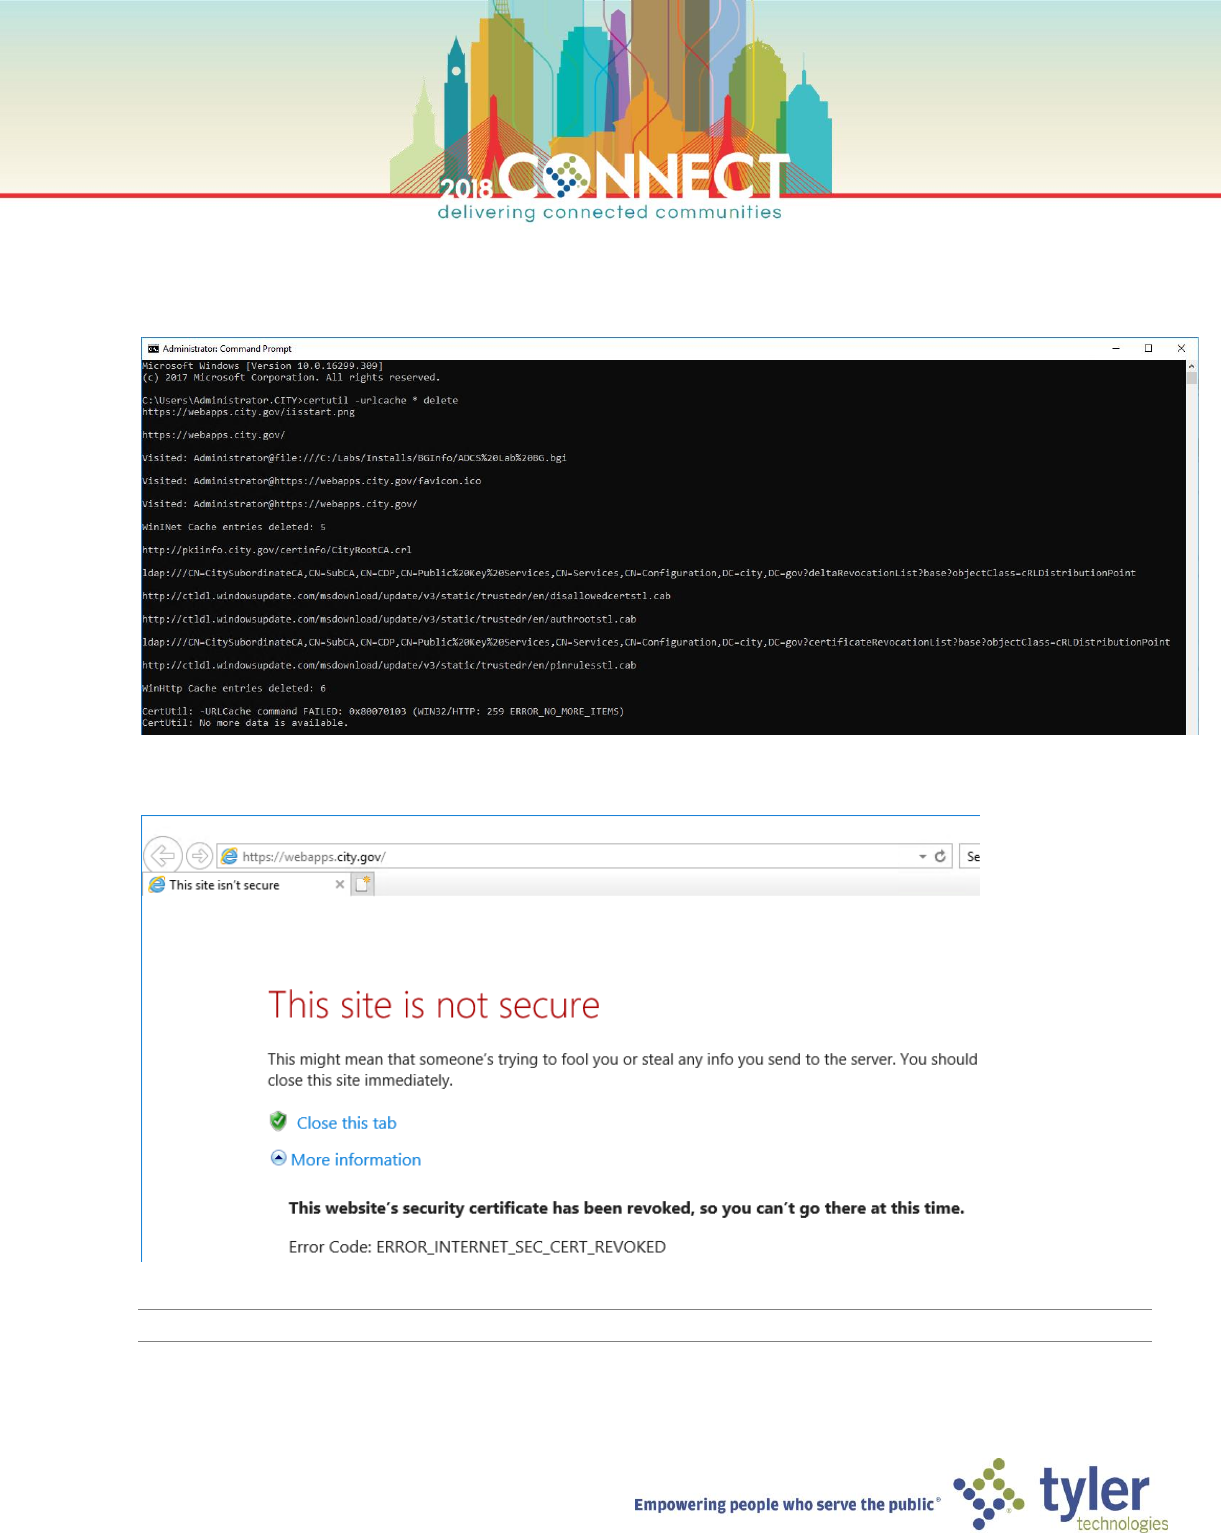
3. Start an administrative command prompt and run the following certutil command
certutil -urlcache * delete
4. In Internet Explorer refresh the URL https://webapps.city.gov and verify that the certificate is rejected
NOTE: There is no option to continue to the site, as in the case of an untrusted certificate chain
12
Certificate Authority Administration – Certificate UnRevocation
NOTE: Only certificates revoked with a Certificate Hold reason code can be reinstated and removed from the CRL
1. Open a Virtual Machine Connection to the subordinate CA (SubCA) and login as domain Administrator
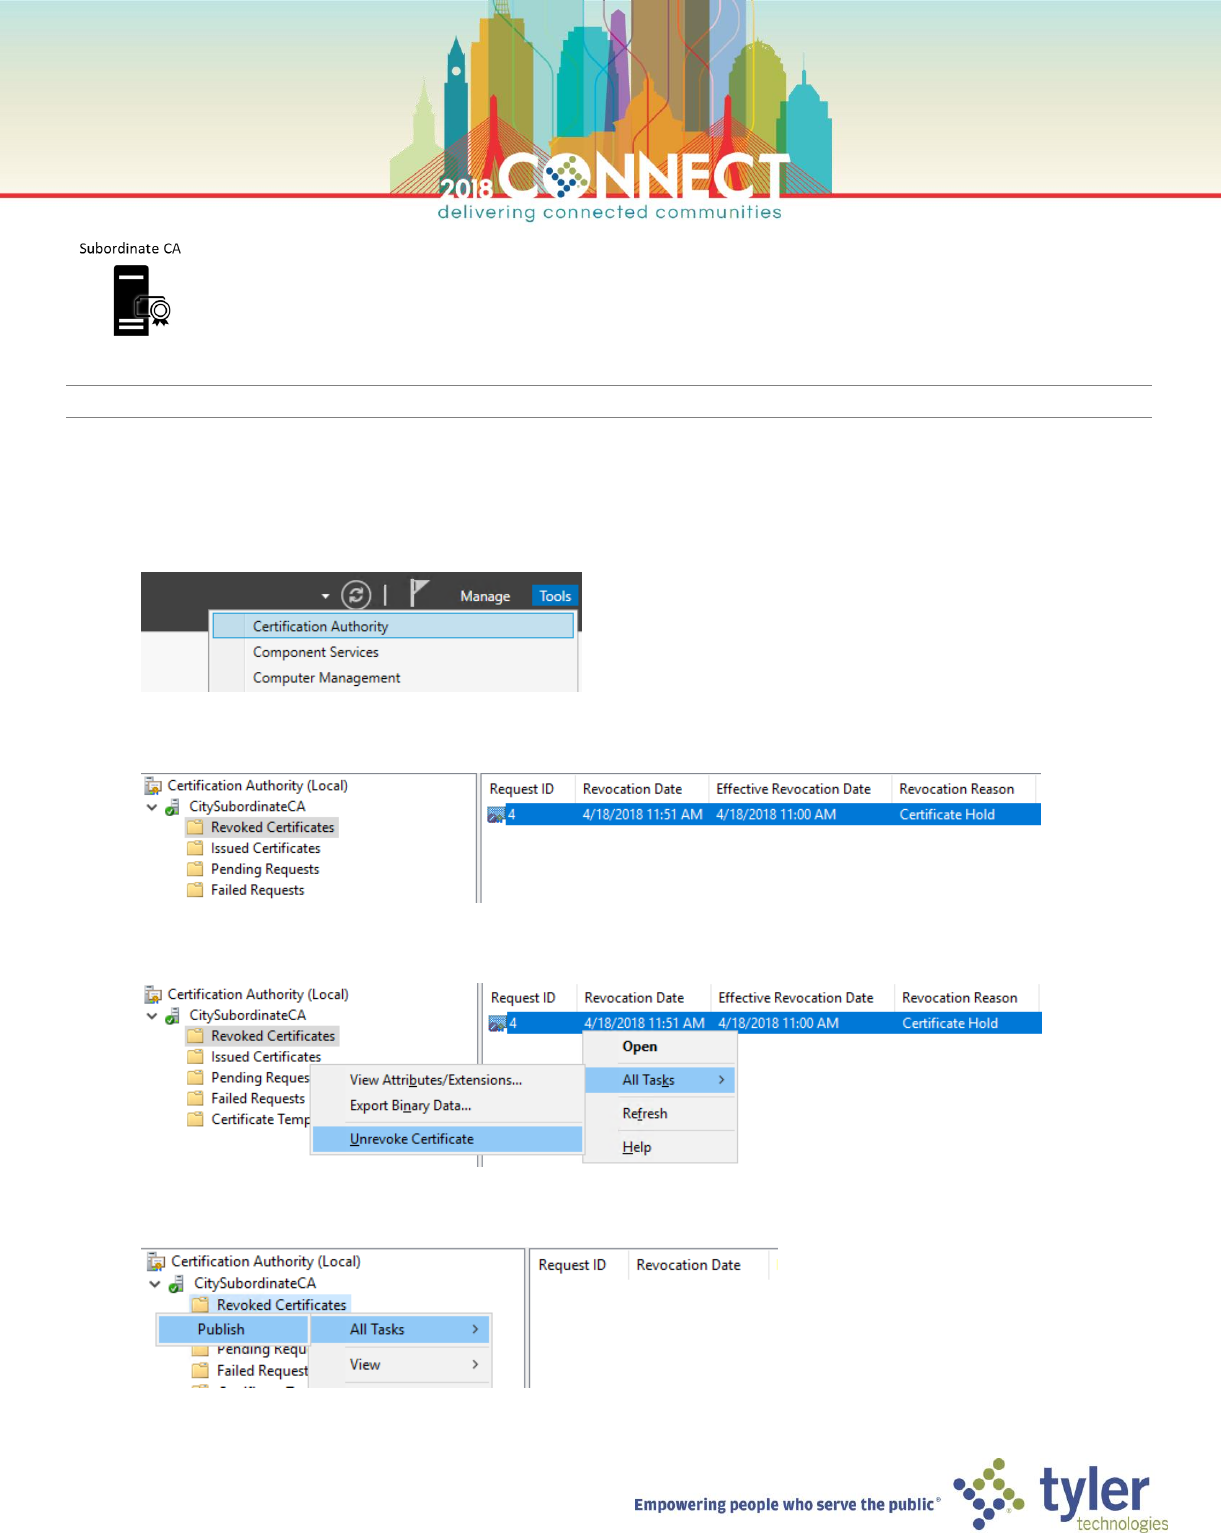
2. Launch the Certificate Authority management console from the Tools menu in Server Manager
3. In the Certificate Authority console find the revoked SSL certificate in the Revoked Certificates node
4. Right-click the certificate and choose Revoke Certificate from the All Tasks menu
5. Right-click the Revoked Certificates node and choose Publish from the All Tasks menu
13
Certificate Authority Administration – Client Testing of UnRevoked Certificate
1. Open a Virtual Machine Connection to the workstation VM (Workstation) and login as domain Administrator
2. Open Internet Explorer and browse to https://webapps.city.gov and verify the certificate is again accepted
NOTE: You might once again need to clear the CRL cache before IE again recognizes the certificate as valid
certutil -urlcache * delete

14
Certificate Authority Maintenance – Backing up a Certificate Authority
1. Open a Virtual Machine Connection to the subordinate CA (SubCA) and login as domain Administrator
2. Open Windows Explorer and browse to the administrative share for the C Drive on the PKI Info (PkiInfo) server
\\pkiinfo\C$
3. Create a directory named SubCABackup which we will use as the backup storage location for this lab
4. Launch the Certificate Authority management console from the Tools menu in Server Manager
5. Right-click the CitySubordinateCA node and select Back up CA… from the All Tasks menu
6. On the Certificate Authority Backup Wizard dialog welcome screen click Next

15
7. On the Items to Back Up screen select the Private key and CA certificate and Certificate database and
certificate database log options then enter the below path as the backup location and click Next
\\pkiinfo\C$\SubCABackup\
8. On the Select a Password screen we will use pw as the backup password for this lab
9. On the completion screen verify the items that will be backed up then click Finish
16
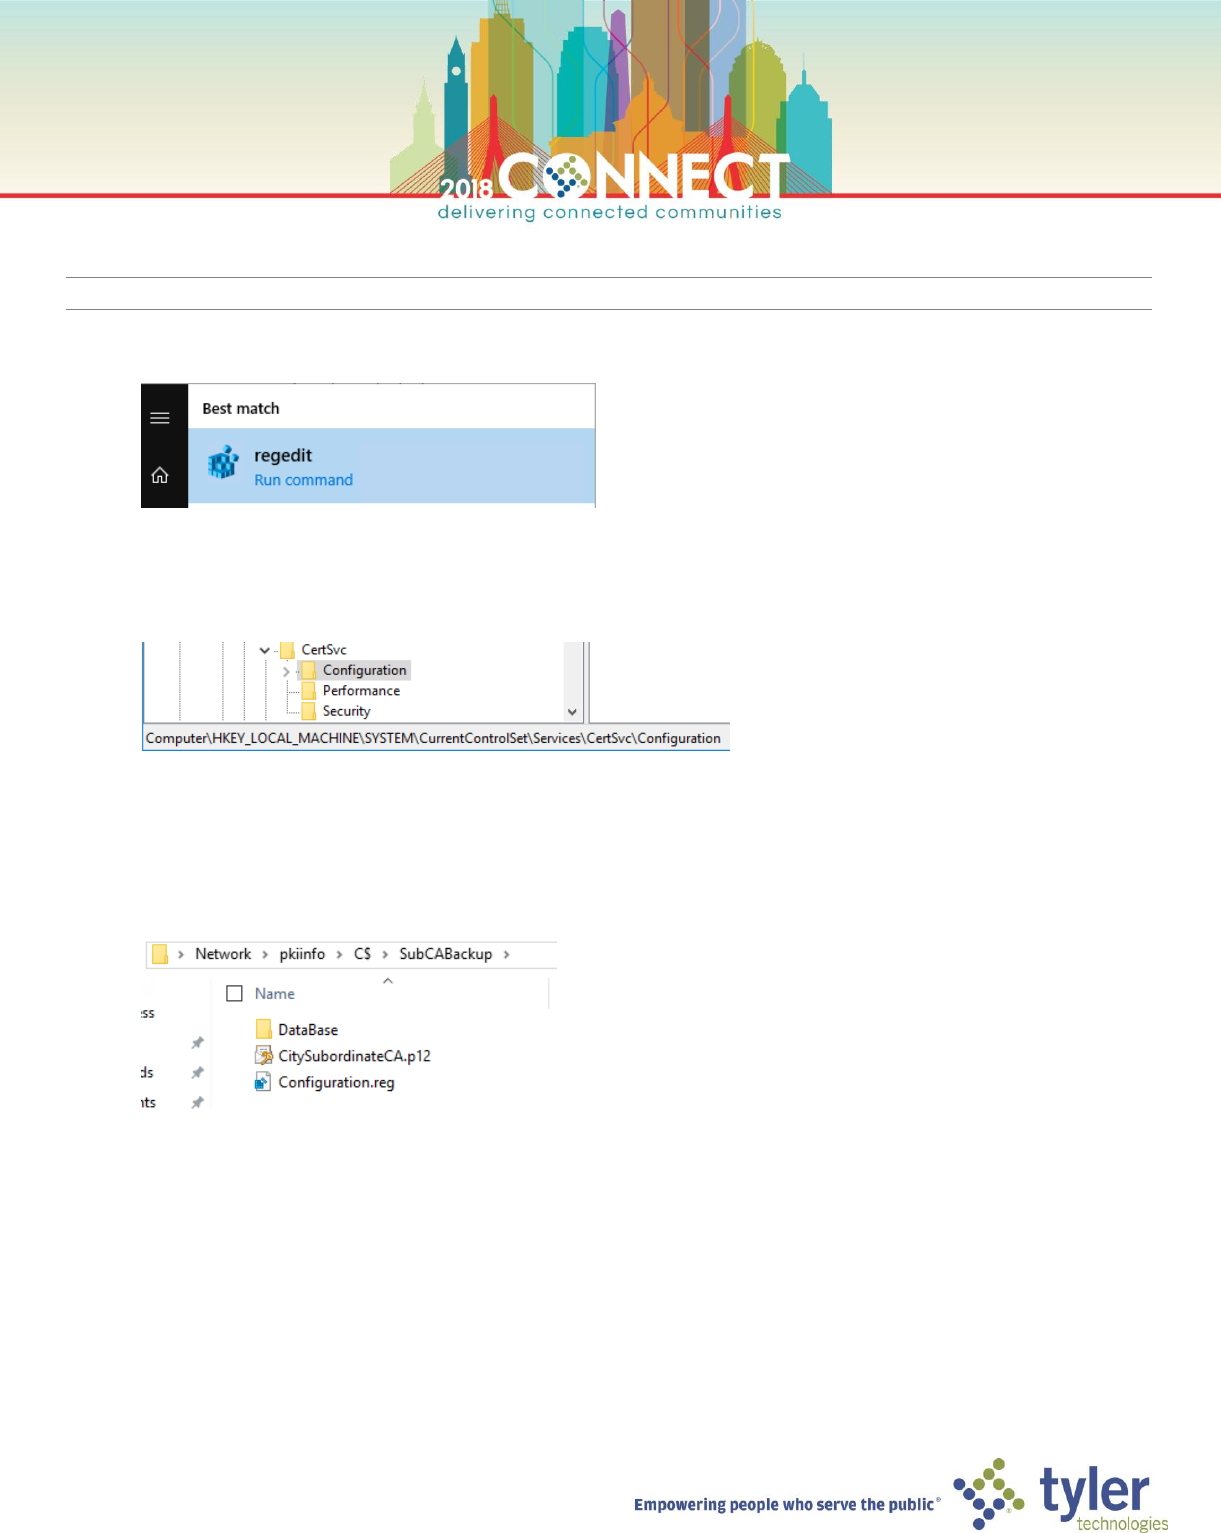
NOTE: We also need to backup the certificate services configuration in the windows registry
10. Run the Windows Registry Editor
11. Navigate to the following registry key
Computer\HKEY_LOCAL_MACHINE\SYSTEM\CurrentControlSet\Services\CertSvc\Configuration
12. Export the CertSvc Configuration key to the backup location created in step #3
\\pkiinfo\C$\SubCABackup\Configuration.reg
13. Your backup directory should have three items; the CA database, the CA key and the CA registry configuration
17
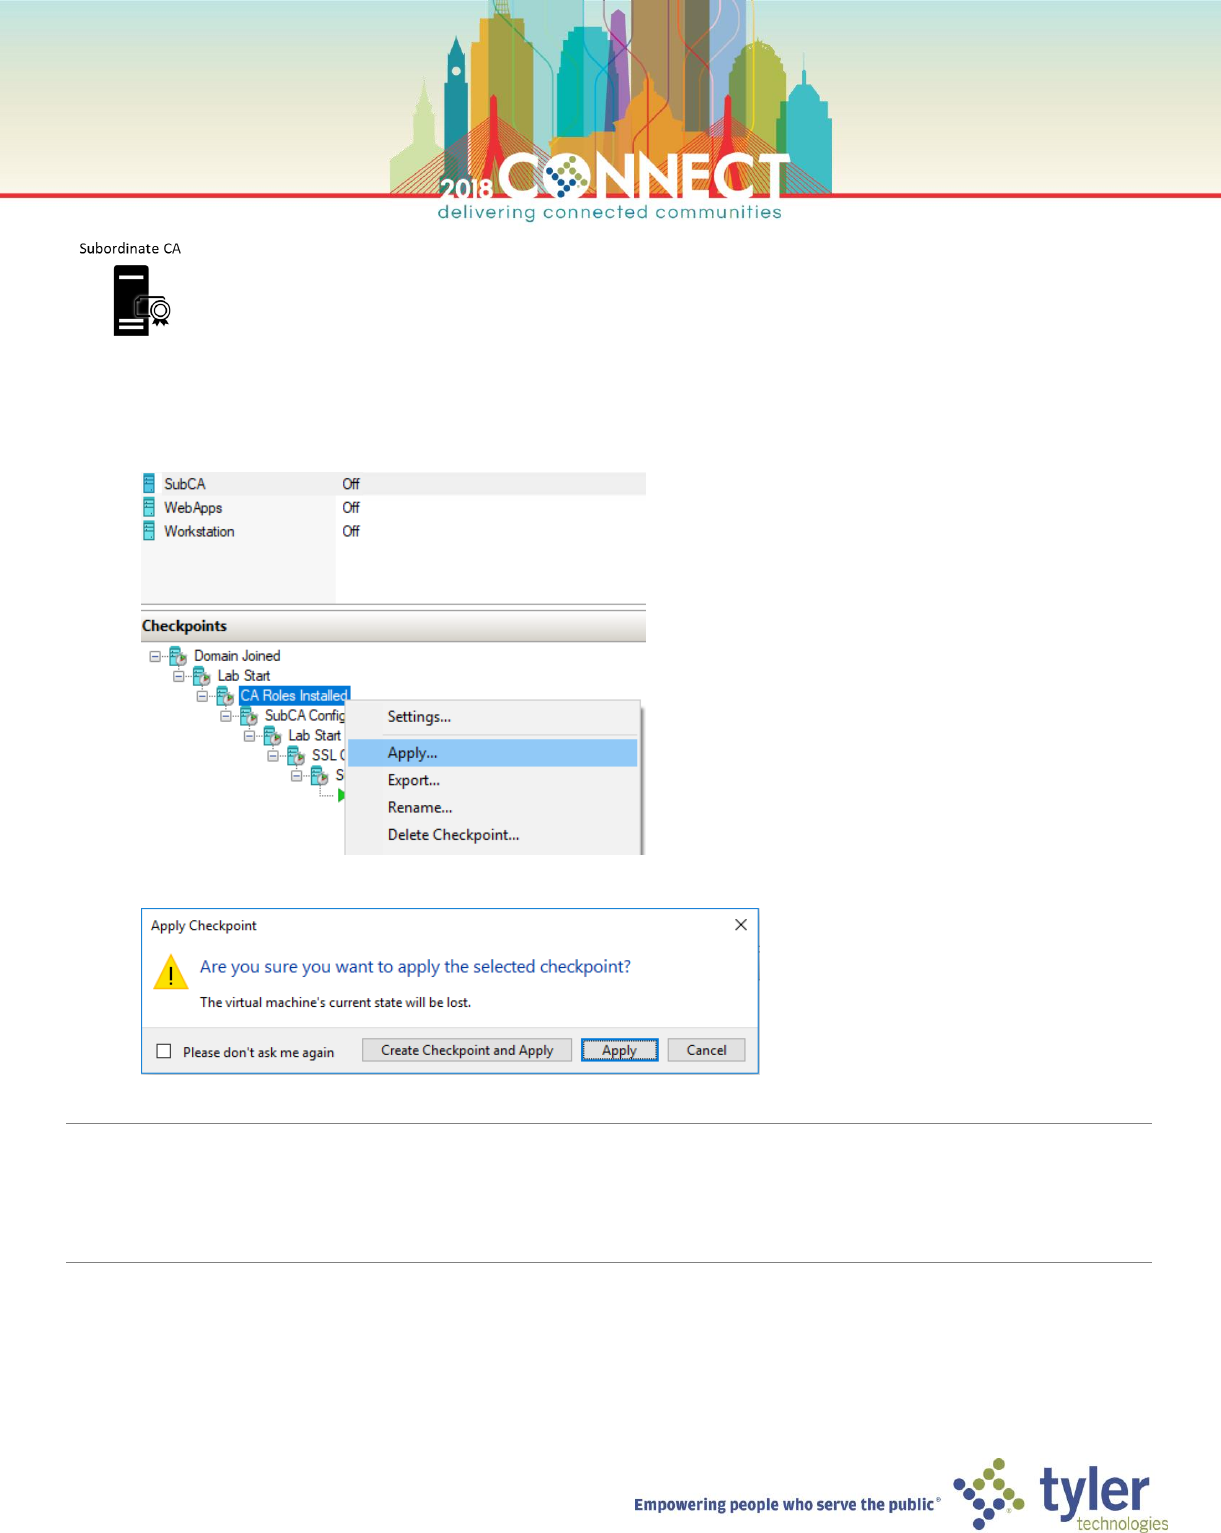
Certificate Authority Maintenance – Restoring a Backed Up Certificate Authority
1. Open Hyper-V Manager and shutdown the Subordinate CA (SubCA) virtual machine
2. Apply the CA Roles Installed checkpoint on the Subordinate CA (SubCA) virtual machine
NOTE: The Subordinate CA (SubCA) is now in a clean state with the CA Roles installed but not configured
When restoring a CA in production ensure that:
> the computer name is the same as the original CA
> the IP address is the same as the original CA (use static or DHCP reserved IP addresses for your CA servers)
18
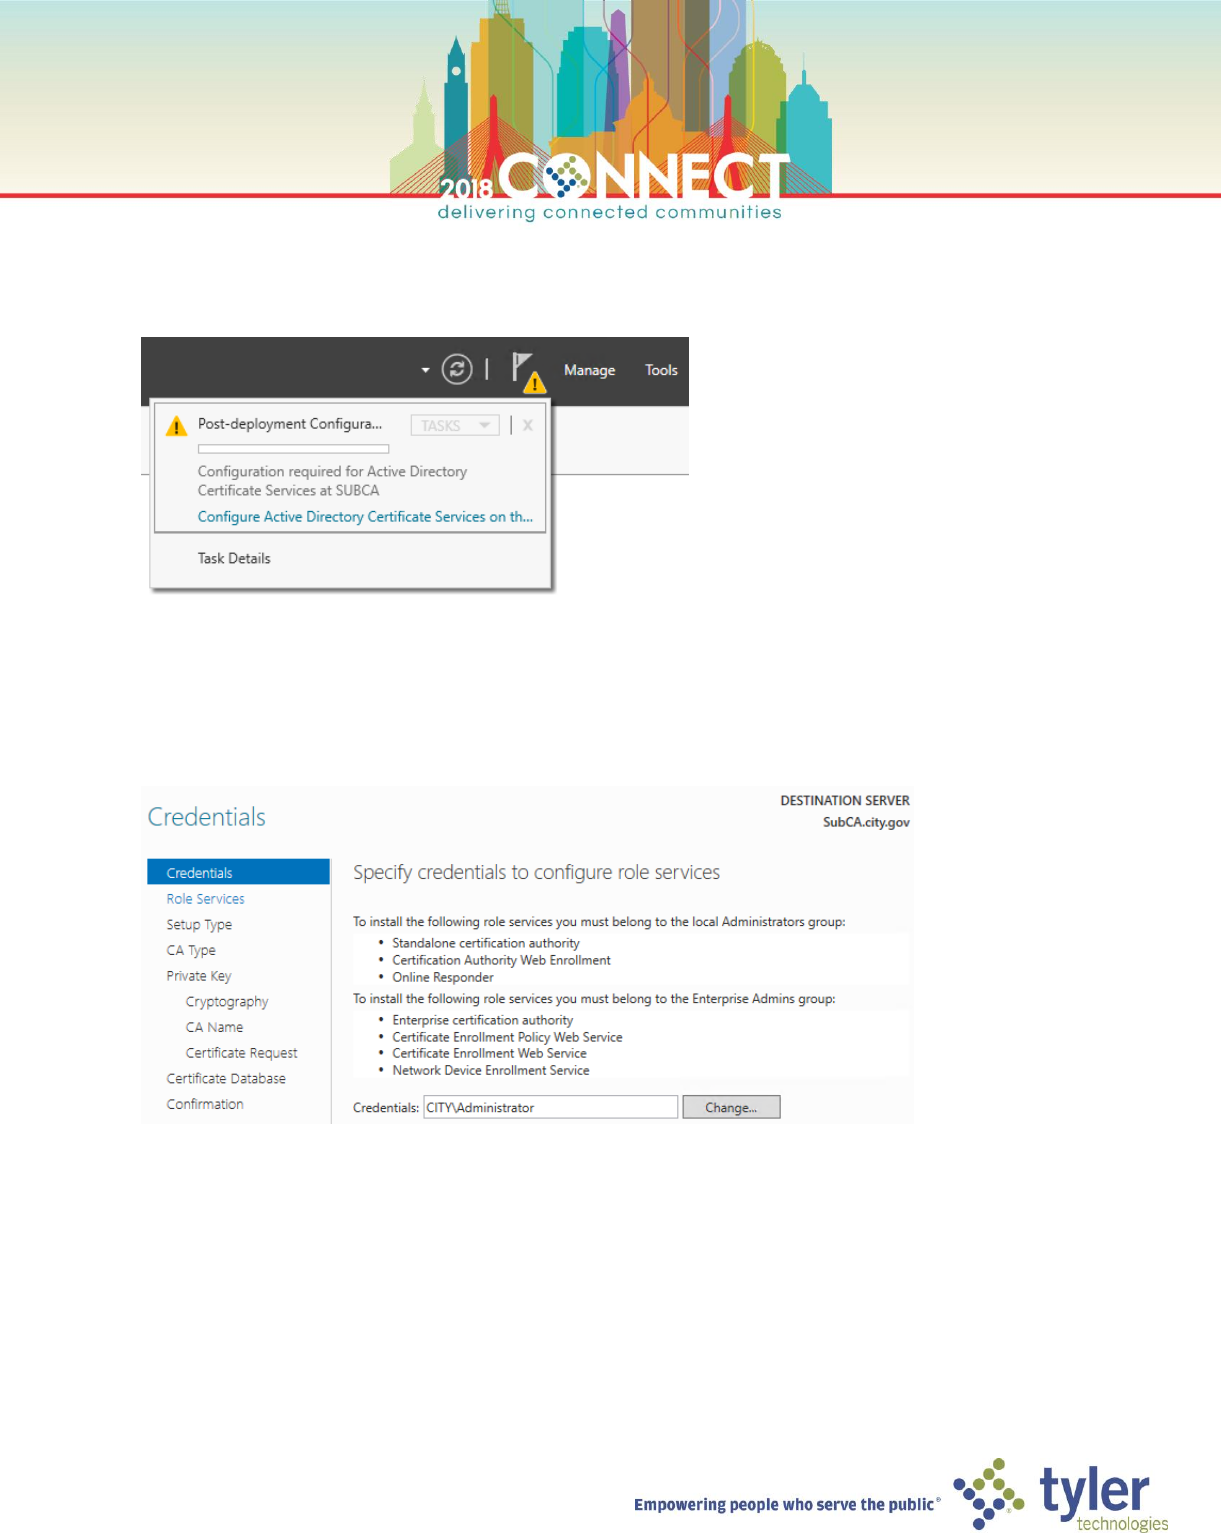
3. Start the Subordinate CA (SubCA) and login as domain Administrator
4. Start Server Manager open the notifications in the top right menu bar
5. In the Post-deployment Configuration notification, click the Configure Active Directory Certificate Services on
the destination server link
6. On the Credentials screen of the AD CS Configuration wizard, accept the default domain Administrator
credentials and click Next

19
7. On the Roles Services screen, select Certificate Authority and Certificate Authority Web Enrollment for
configuration, then click Next
8. On the Setup Type screen ensure Enterprise CA is selected then click Next.
9. On the CA Type screen ensure Subordinate CA is selected then click Next
20
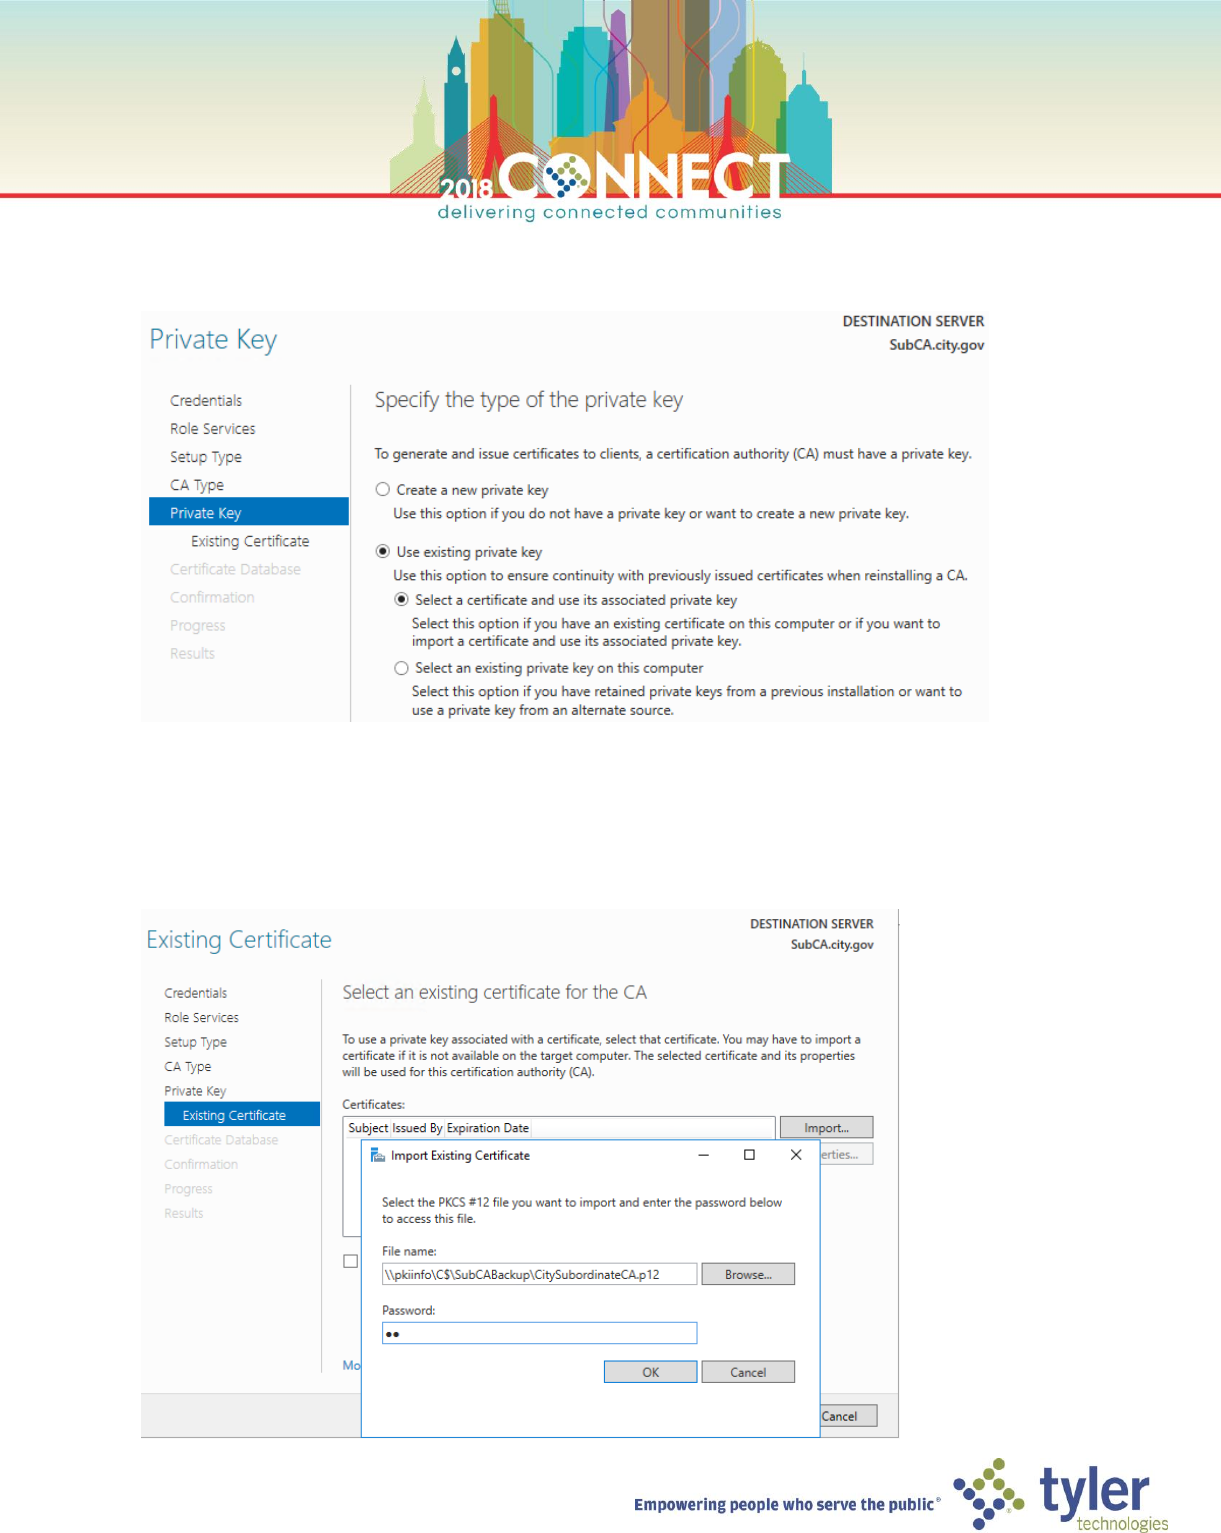
10. On the Private Key screen select Use existing private key and Select a certificate and use its associated private
key then click Next
11. On the Existing Certificate screen click Import… then Browse… to select the backed-up CA certificate
\\pkiinfo\C$\SubCABackup\CitySubordinateCA.p12
Enter pw in the Password field then click OK

21
12. Wait for the certificate to import then select it from the Certificates list, then click Next
13. On the CA Database screen accept the default locations and click Next
NOTE: These values should consistent with the values on original CA at the time of backup. You can verify the
original values from the exported registry configuration
22
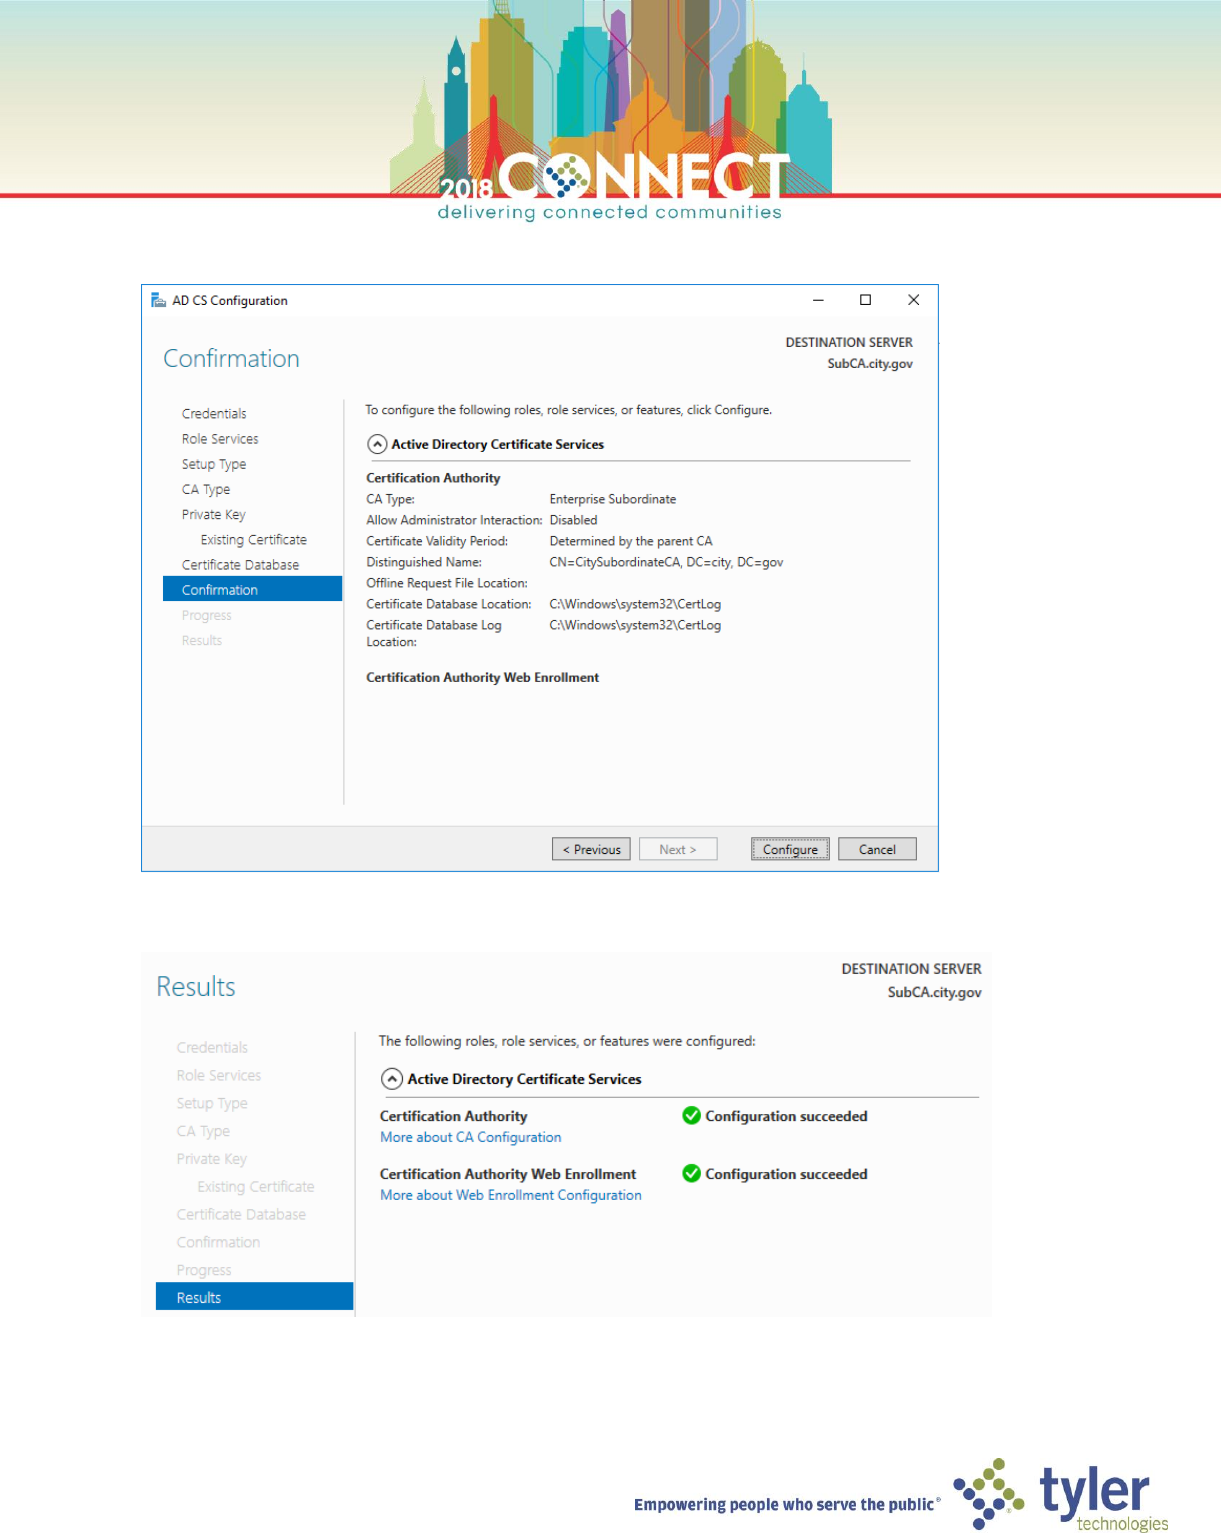
14. On the Confirmation screen, verify all choices then click Configure
15. In the Results screen, verify that all CA roles were successfully configured then click Close

23
16. Launch the Certificate Authority management console from the Tools menu in Server Manager
17. Right-click the CitySubordinateCA node and select Stop Service from the All Tasks menu
18. Open Windows Explorer and browse to the backup location
\\pkiinfo\C$\SubCABackup
19. Right-click the Configuration.reg file and select Merge; accept any warnings and click Yes apply registry changes
20. In the Certificate Authority management console, right-click the CitySubordinateCA node and select Restore
CA… from the All Tasks menu
21. Click Next on the Certificate Authority Restore Wizard welcome screen
24
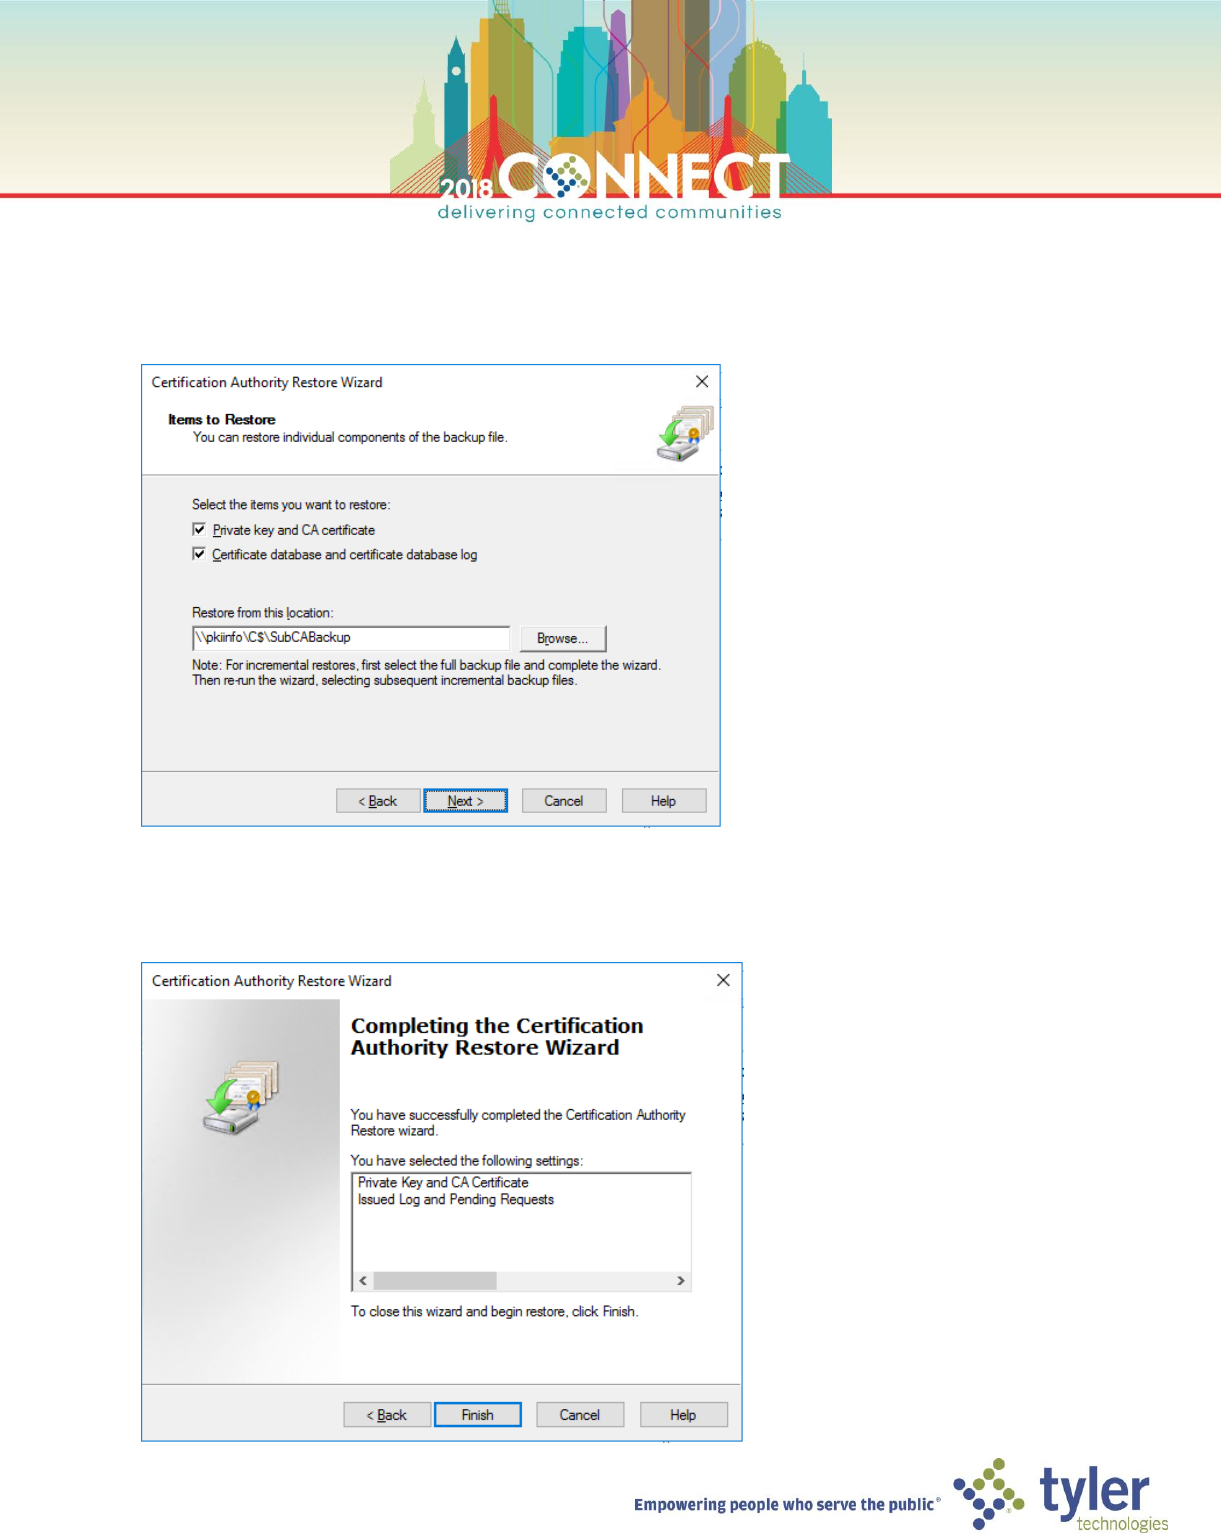
22. On the Items to Restore screen, select the Private key and CA certificate and Certificate database and
certificate database log options, then enter the backup location and click Next
\\pkiinfo\C$\SubCABackup
23. On the Provide Password screen enter pw in the Password field and click Next
24. Review the items that will be restored then click Finish
25
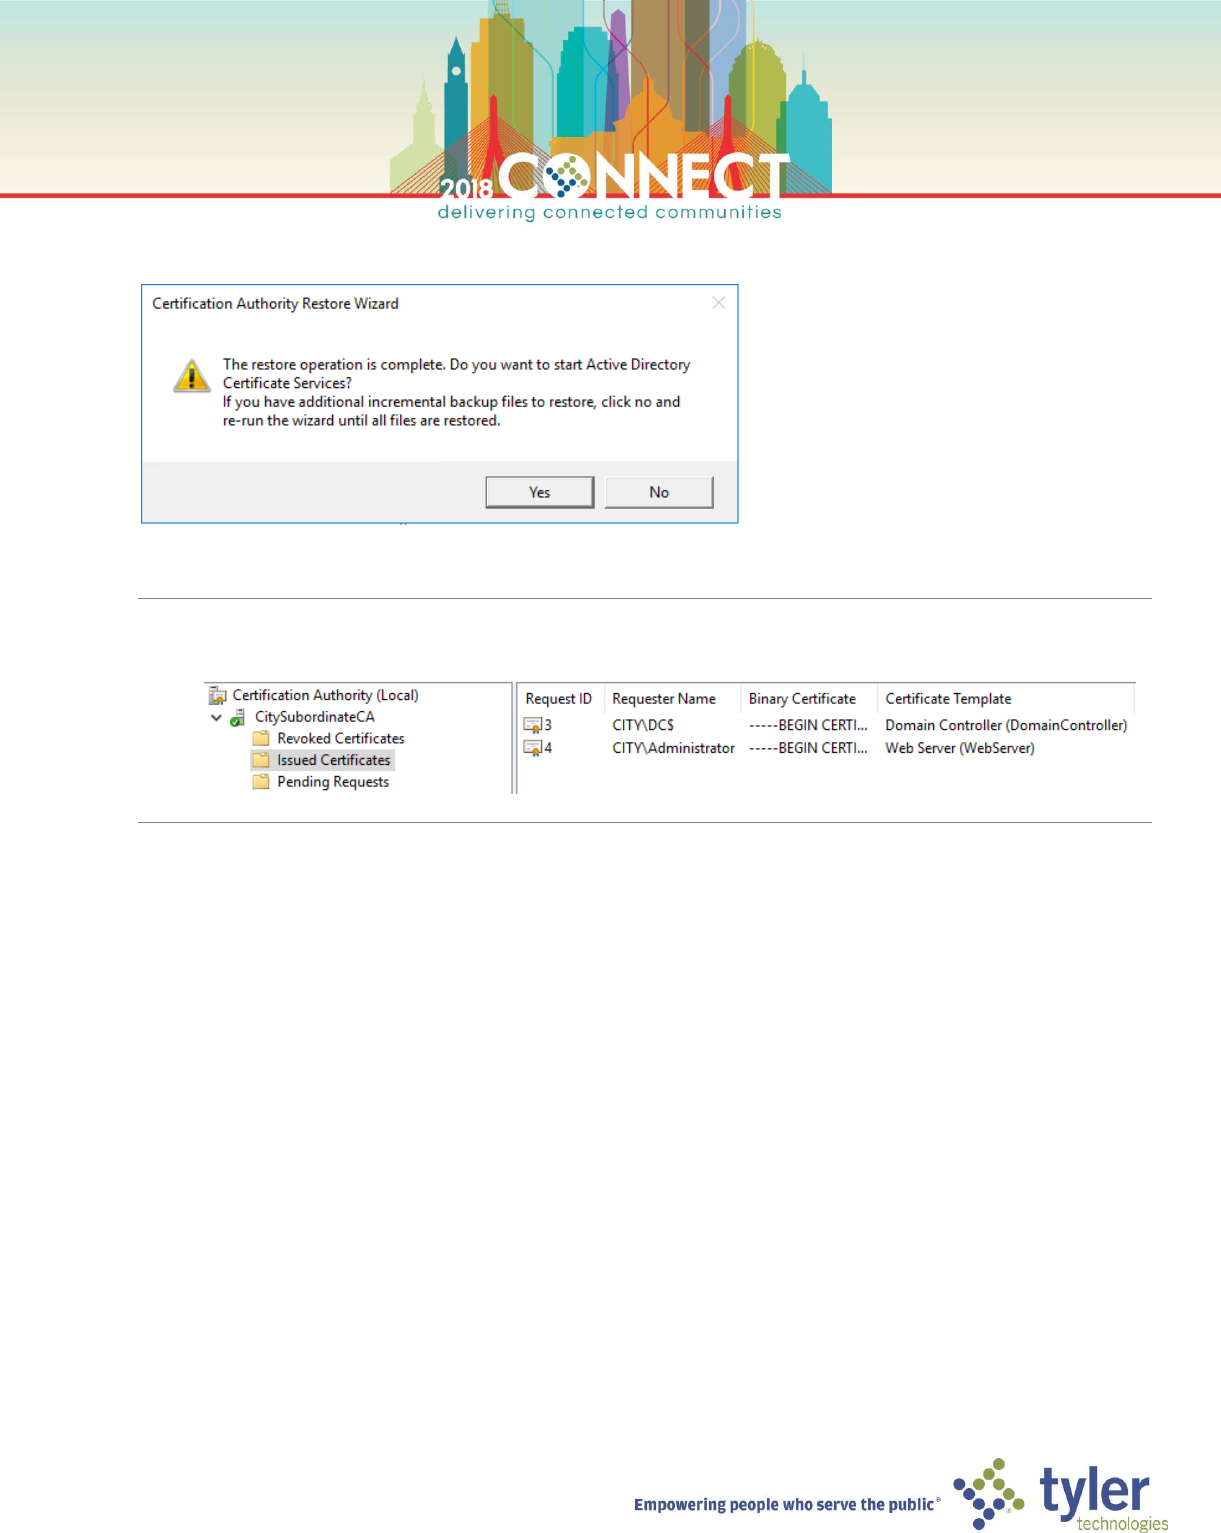
25. Wait for the restoration to complete then click Yes in the Certification Authority Restore Wizard dialog
NOTE: You have successfully restored a CA from backup. You can verify that all previously issued/revoked
certificates are properly shown in the Certificate Authority console
