ADVi3++ User Manual
User Manual: Pdf
Open the PDF directly: View PDF ![]() .
.
Page Count: 50

ADVi3++ User Manual
SEBASTIEN ANDRIVET
2018-01-12

ADVi3++ User Manual 2018-01-12
ADVi3++ User Manual
Version 2.1 - January 12, 2018
Table of content
•Introduction
•How to Flash
•LCD Touch Screen Manual
•Default Configuration
•Resources
Introduction
ADVi3++
is a custom firmware for
Wanaho
Duplicator i3+ printers (and their clones like the Monoprice
Select Plus). It is based on the latest stable release of Marlin and adds some new specific features. It
has the following features when compared to the stock Wanhao firmwares:
•Based on Marlin 1.1.8 (Wanhao firmware is based on a fork of Marlin created in 2014)
•New LCD screens in color (yes, your LCD display is able to show colors)
•
Access on the LCD display to more printer parameters like Feedrate, Acceleration and Jerk settings
Sebastien Andrivet 2

ADVi3++ User Manual 2018-01-12
•Calibration of the X, Y, and Z motors and of the extruder
•Temperature graphs
•3 preheat presets
•5 points manual bed leveling
•
Display of messages (M117 code) from external soware such as OctoPrint (Detailed progress
plugin for example)
•An up to date User Manual
Source Code
The full source code of ADVi3++ is available in the following GitHub repositories:
•ADVi3pp-Marlin
•ADVi3pp-LCD
•ADVi3pp-User-Manual
Disclaimers
I am not ailiated, associated, authorized, endorsed by, or in any way oicially connected with
Wanaho
,
or any of its subsidiaries or its ailiates.
USE THIS CUSTOM FIRMWARE AT YOUR OWN RISK. I am not responsible for any damage done to
your printer or LCD when using this firmware.
Copyrights
ADVi3++
•Copyright ©2017-2018 Sebastien Andrivet GitHub advi3pp-Marlin project
•Copyright ©2016-2018 MarlinFirmware
•Based on Sprinter and grbl.
•Copyright ©2011 Camiel Gubbels / Erik van der Zalm
ADVi3++ User Manual
•Copyright ©2018 Sebastien Andrivet
Licenses
ADVi3++
Sebastien Andrivet 3

ADVi3++ User Manual 2018-01-12
This program is free soware: you can redistribute it and/or modify it under the terms of the
GNU General Public License as published by the Free Soware Foundation, either version 3 of the
License, or (at your option) any later version.
This program is distributed in the hope that it will be useful, but WITHOUT ANY WARRANTY; without
even the implied warranty of MERCHANTABILITY or FITNESS FOR A PARTICULAR PURPOSE. See
the GNU General Public License for more details.
You should have received a copy of the GNU General Public License along with this program. If
not, see http://www.gnu.org/licenses/.
ADVi3++ User Manual
This manual is licensed under a Creative Commons Attribution-ShareAlike 4.0 International License.
How to Flash
There are two parts to flash:
•The LCD resources
•The mainboard (custom Marlin firmware)
It is recommended to flash first the LCD resources.
Part 1 - Flashing the LCD resources
Note:The LCD resources are hosted on their own GitHub project: ADVi3pp-LCD.
LCD Step 1 - Prepare a microSD card
IMPORTANT
: You have to use a microSD card with a maximum capacity of
8GiB
. If you use a microSD
card with a greater capacity, the results are
unreliable
(sometimes it flashes, sometimes not). This is a
limitation of the LCD display itself.
You have two possibilities to flash:
Sebastien Andrivet 4

ADVi3++ User Manual 2018-01-12
LCD Step 1 - Option 1 - Manual copy
•Download the LCD resources: ADVi3pp-LCD-x.x.x.zip
•Unzip the file somewhere
•
Copy manually all the files and folders in the uncompressed zip file to the root of a microSD card.
The microSD card
has
to be formatted with the following parameters: FAT32, 4096 bytes per
cluster (i.e. 8 sectors).
•To format under Linux (and macOS with the dosfstools Homebrew package):
1mkfs.fat -F32 -nSD-s8 -v/dev/disk2
Of course, replace /dev/disk2 with the right value.
•To format under Windows (Command Prompt):
1format G: /FS:FAT32 /V:LCD /A:4096
Of course, replace G:with the right volume letter.
LCD Step 1 - Option 2 - SD image
•Download the microSD card image: ADVi3pp-LCD-x.x.x.img.zip
•
Unzip the
.img.zip
file and use either
dd
(Linux, macOS) or Etcher (Windows, Linux, macOS).
For example with dd:
1unzip ADVi3pp-LCD-1.0.0.img.zip
2sudo dd if=ADVi3pp-LCD-1.0.0.img of=/dev/disk2 bs=64K
Of course, replace /dev/disk2 with the right value.
If you prefer graphical applications, Etcher is a great multi-platform tool.
LCD Step 2 - Install the new version
•Disconnect the printer from power
•Remove the two screws located on the front and loose the two M3 screws on the top
Sebastien Andrivet 5

ADVi3++ User Manual 2018-01-12
Figure 1: front-panel-screws
•Remove the front panel carefully (don’t break the flat cable)
•
If you are lucky, you can insert the microSD card on the le of the panel (this is the case on the
Monoprice clone)
•Otherwise, remove the four M3 screws and remove the cover
•Insert the microSD card in the slot
Sebastien Andrivet 6

ADVi3++ User Manual 2018-01-12
Figure 2: lcd-board-microsd
•
Turn on the printer (either by connecting it to power or by connecting the USB slot to the com-
puter)
•The screen turns blue and then every image will appear one by one
•Aer around 2 or 3 minutes, no more images appear
•Turn o the printer and remove the microSD card
•Re-assemble the front panel, do not forget the two M3 screws on the top
•Turn the printer on. You know have the new version of the LCD images
Sebastien Andrivet 7
ADVi3++ User Manual 2018-01-12
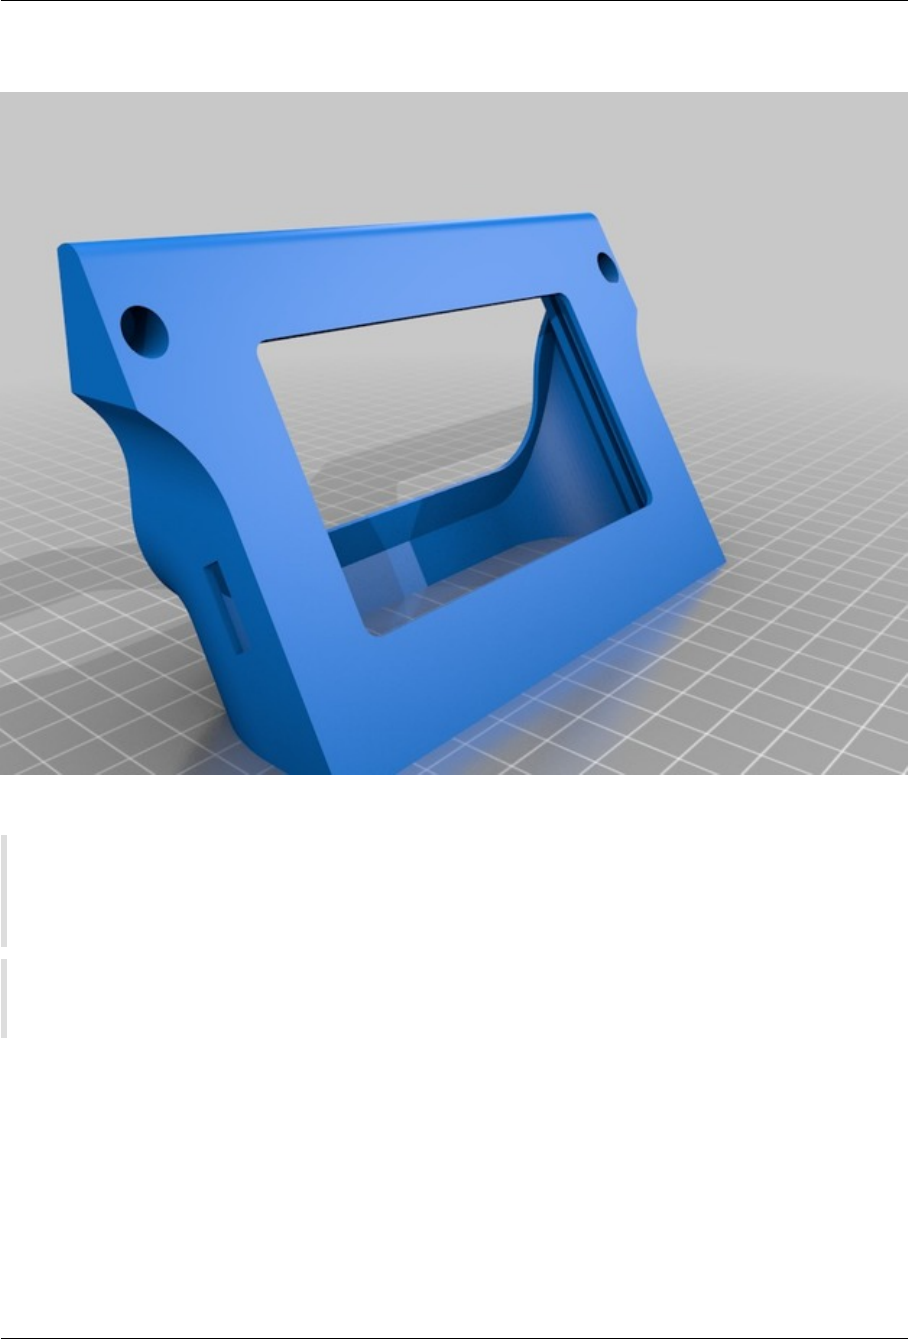
LCD Enclosure
From Thingiverse “Wanhao Duplicator I3 Plus LCD enclosure” by bosbessenbasje:
The standard enclosure puts the LCD in a 90 degrees angle towards the table and that makes it
hard to read. This enclosure will put the LCD in 60 degrees angle which improves readability at
the cost of a slightly large space on the table.
Note that the new enclosure allows you to insert a
micro SD in the LCD to upgrade the LCD
firmware if you want to. You will probably need some pliers to do it though.
I highly recommend this LCD enclosure. It will simplify a lot your life.
Part 2 - Flashing the mainboard firmware
There are several ways to flash the mainboard firmware. The first step is to download the firmware
from the Releases page on GitHub:
Sebastien Andrivet 8

ADVi3++ User Manual 2018-01-12
ADVi3pp-Mainboard-x.x.x.hex
Then choose the option you are the most comfortable with.
Note:It is not possible to flash the mainboard using the SD card slot of the printer.
Mainboard Option 1 - Flashing using Cura
•
if net yet done, download Cura. I recommend either Cura for Wanhao (if you directly connect the
printer to your computer with a USB cable) or Ultimaker Cura 3 (if, for example, you are using
OctoPrint to print)
•Start Cura
•In the top menu, under Settings →Printer, select Manage Printers
•Select your printer or Add your printer if it is not already done
•Select Upgrade Firmware and then Upload custom Firmware
•Select the downloaded file ADVi3pp-Mainboard-x.x.x.hex and click on Open
Mainboard Option 2 - Flashing using OctoPrint
You need advdude and the development build of the Firmware Updater plugin.
To install advdude on a Raspberry Pi:
•Connect to the Raspberry (for example through SSH) and enter the command:
1sudo apt update;sudo apt install avrdude
To install the development build of the Firmware Updater plugin
•Open a navigator and connect to OctoPrint
•Login and click on the wrench icon in the toolbar
•Select Plugin Manager →Get More...
•
Under
from URL
enter
https://github.com/OctoPrint/OctoPrint-FirmwareUpdater
/archive/devel.zip and click on Install
•Restart OctoPrint
To flash the firmware:
Sebastien Andrivet 9
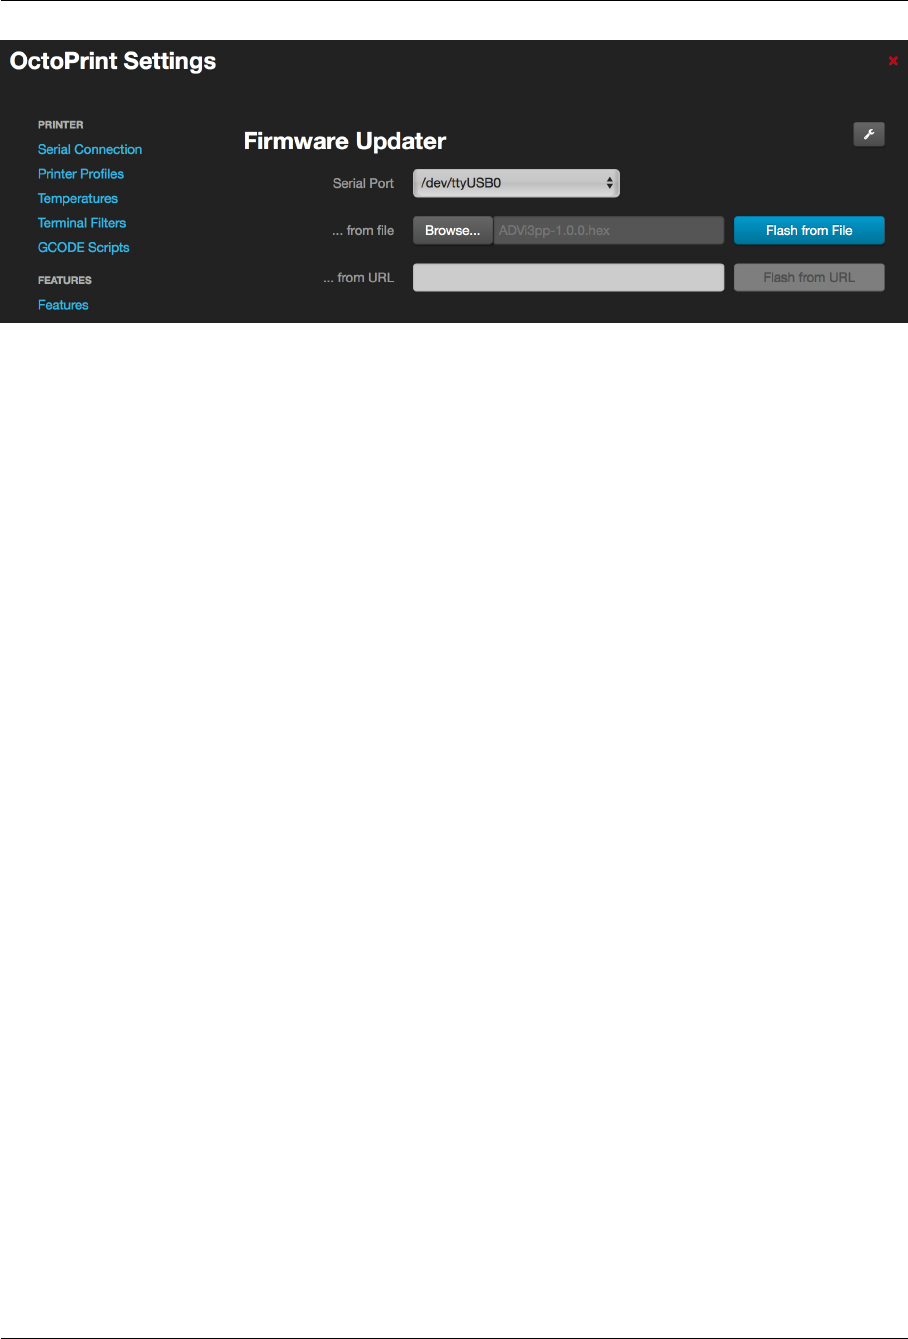
ADVi3++ User Manual 2018-01-12
Figure 3: firmwareupdater
•When OctoPrint in rebooted and the UI reloaded, click on the wrench icon in the toolbar
•Under Plugins, choose Firmware Updater
•
Click on the wrench icon, and aer
Path to advdude
, enter
/usr/bin/avrdude
and click
Save
•Be sure your USB port appears aer Serial Port
•
Aer
... from file
, click on
Browse
and select the firmware you have downloaded such as
ADVi3pp-Mainboard-x.x.x.hex
•Click on Flash from File
•The flashing process may take around 30 seconds
•When it is finished, a message appears saying “Flashing successful”. Click on Save
•Reconnect the printer
Mainboard Option 3 - Flashing using Arduino IDE
•Connect your printer to your PC using the USB cable
•Download Arduino IDE
•Open Arduino IDE
•Under Tools →Board, select Arduino/Genuino Mega or Mega 2560
•Under Tools →Processor, select ATMega2560 (Mega 2560)
•Under Tools →Port, select the port your printer uses
Sebastien Andrivet 10
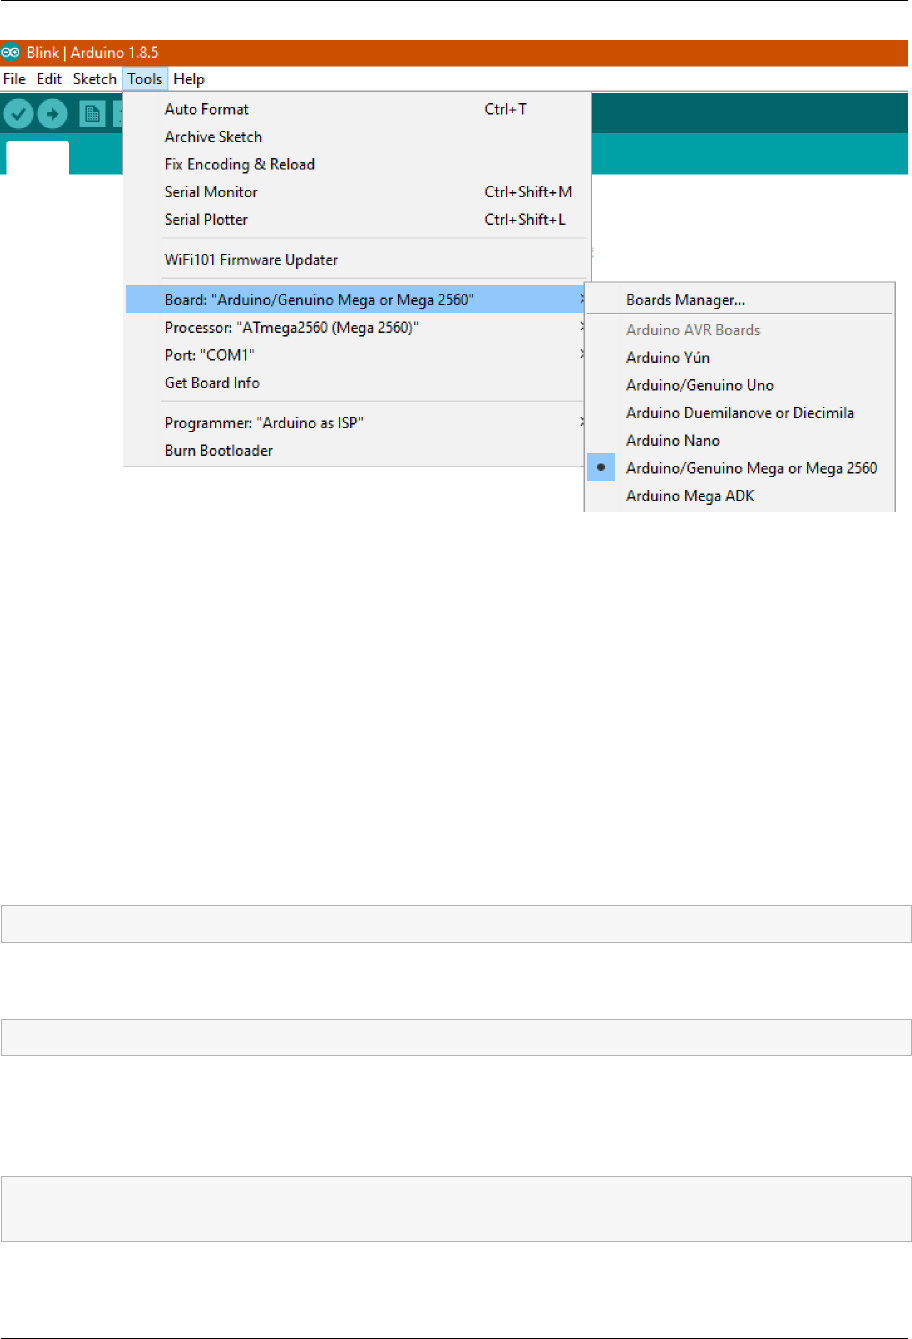
ADVi3++ User Manual 2018-01-12
•Under File →Open, select Marlin.ino located in the Marlin folder
•Click on the Upload button, on press Ctrl +U
The firmware is compiled and uploaded. When the uploading is finished, the printer reboots.
Mainboard Option 4 - Flashing using avrdude
All the previous options are using
avrdude
underneath.
avrdude
is an utility to download/upload/-
manipulate the ROM and EEPROM contents of AVR microcontrollers. It can be downloaded from your
favorite repository or from Savannah Non-GNU web site.
•For Debian/Ubuntu:
1sudo apt install avrdude
•For macOS (Homebrew):
1brew install avrdude
•For Windows, download avrdude-6.3-mingw32.zip or a higher version.
The command line is the following:
1avrdude -v-p m2560 -c wiring -P<printer_port> -U flash:w:<firmware.
hex>:i-D
Sebastien Andrivet 11
ADVi3++ User Manual 2018-01-12
Replace <printer_port>and <firmware.hex>with the right values. For example (Windows):
1avrdude -v-p m2560 -c wiring -P COM3 -U flash:w:ADVi3pp-Mainboard
-2.0.0.hex:i-D
or (Linux):
1avrdude -v-p m2560 -c wiring -P/dev/ttyUSB0 -U flash:w:ADVi3pp-
Mainboard-2.0.0.hex:i-D
LCD Touch Screen
Figure 4: Boot
Boot animation
Sebastien Andrivet 12
ADVi3++ User Manual 2018-01-12
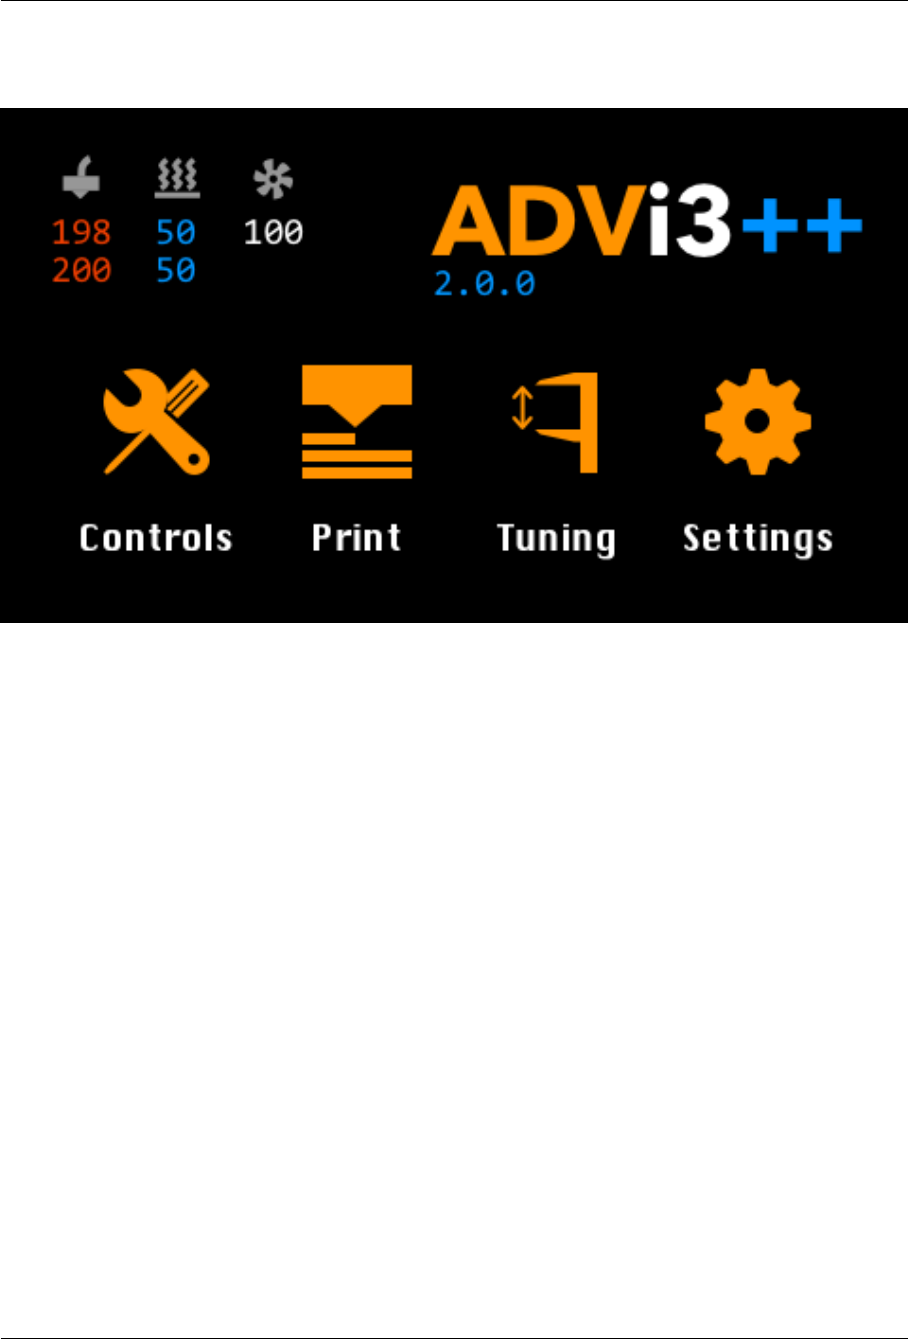
Main panel
Figure 5: Main
•Temperatures
: Displays the current temperature of the extruder and of the bed. Displays also
the current speed of the extruder’s fan. Tap on this area to show a graph of temperatures.
•Version
: Displays the version number of ADVi3++. Taps on this area to show an About panel with
information about the release installed.
•Controls
: Taps on this button to display the
Controls
panel with tools such as Load and Unload
Filament, Move, etc.
•Print
: Taps on this button to display the
Print
panel (if your are printing) or the Temperature
graph (if you are not).
•Tuning
: Taps on this button to display the
Tuning
panel with tools to help you adjust some
parameters of your printer.
•Settings
: Taps on this button to display the
Settings
panel. In this panel, you can view and
modify several parameters of the printer.
Sebastien Andrivet 13
ADVi3++ User Manual 2018-01-12
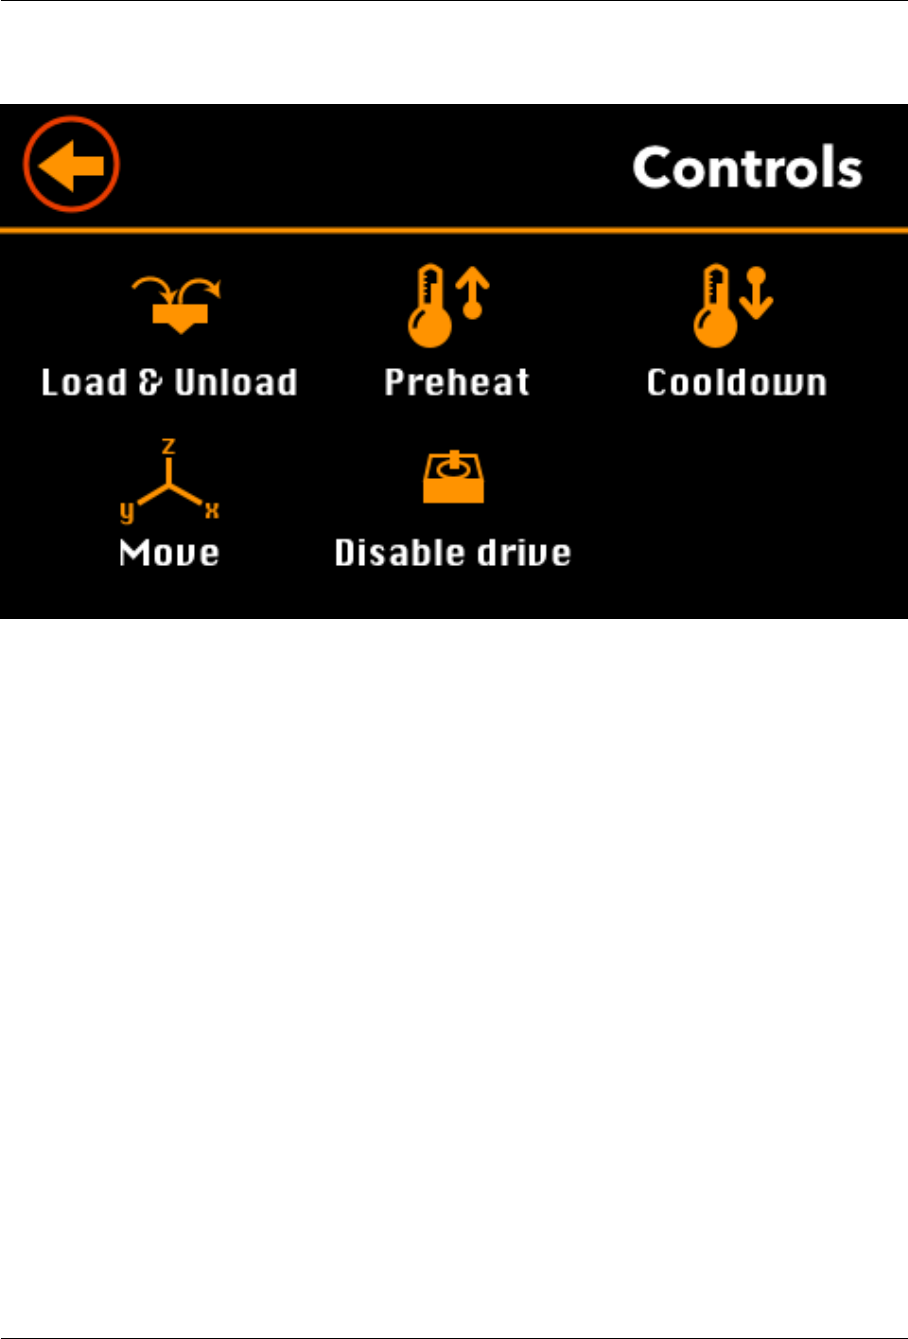
Controls
Figure 6: Controls
This panel gives you access to tools to control your printer.
•Load & Unload: Tools to Load or Unload Filament (see below).
•Preheat: Set of preheat settings (both Hot-end and Bed - see below).
•Cooldown: Disable both heated bed and Hot-end.
•Move: Tools to move the head of the printer, and to extrude or unextrude filament (see below).
•Disable drive: Disables all motors so you are able to move the head manually.
Sebastien Andrivet 14
ADVi3++ User Manual 2018-01-12
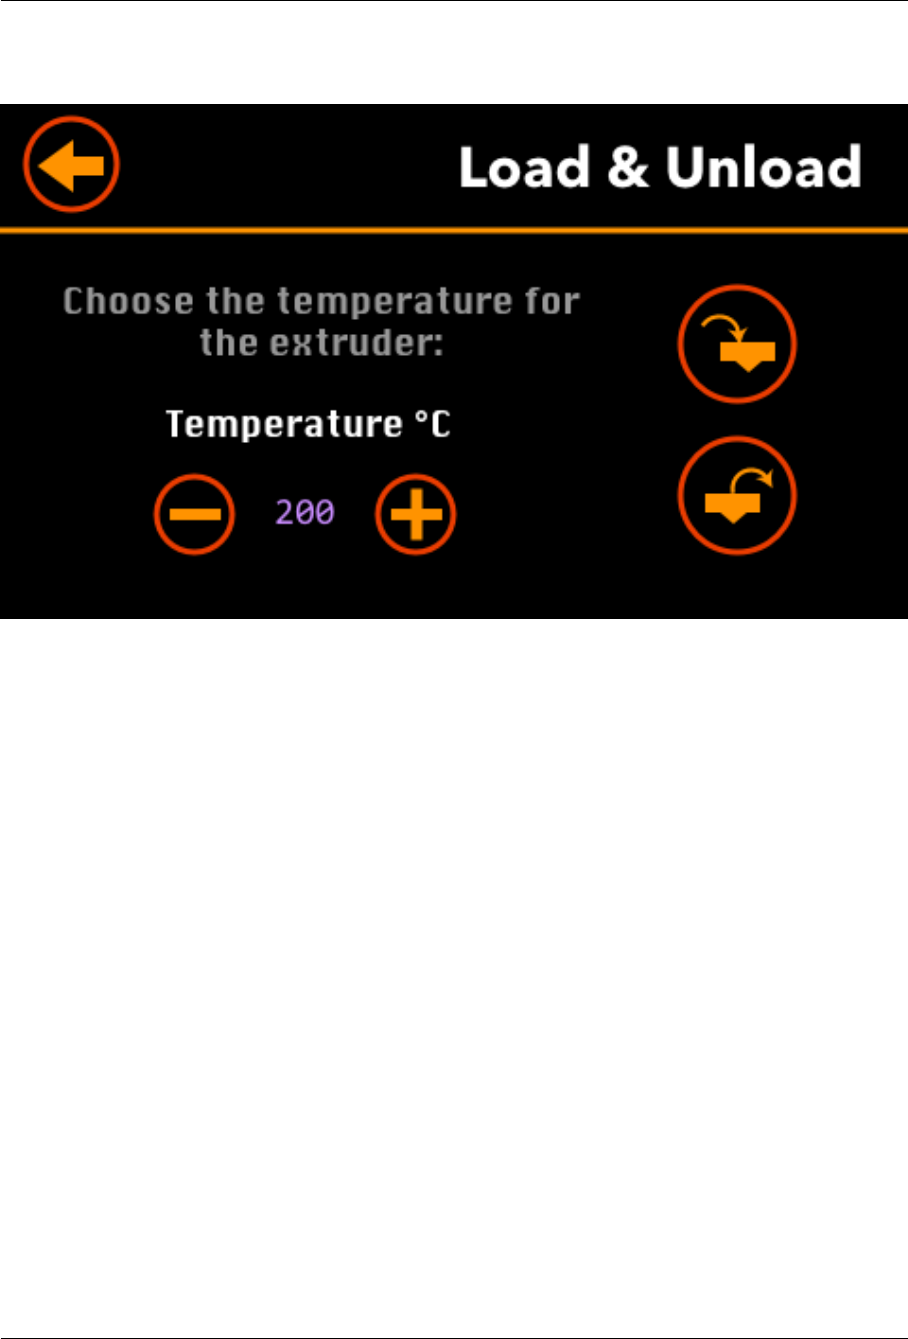
Load & Unload
Figure 7: Load & Unload
Select the extruder’s target temperature you want to use (with the plus and minus buttons) and press
either the Load or Unload button.
Tip:Keep the button pressed to quickly increment or decrement the temperature.
Sebastien Andrivet 15

ADVi3++ User Manual 2018-01-12
Figure 8: Load & Unload
When the target temperature is almost reached, the extruder motor starts extruding filament. When
the filament comes out of the nozzle, press the Back button.
Sebastien Andrivet 16
ADVi3++ User Manual 2018-01-12
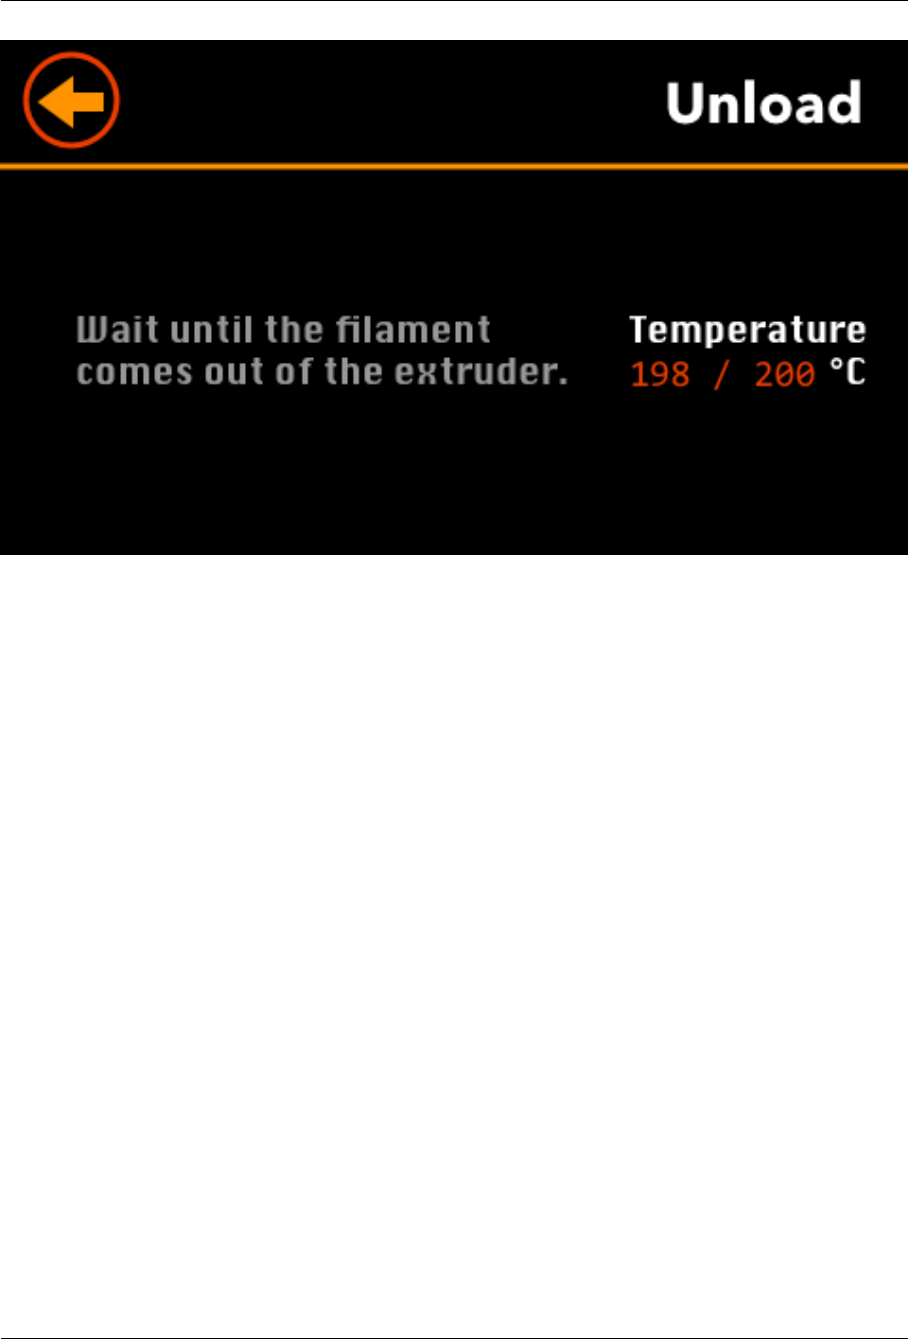
Figure 9: Load & Unload
When the target temperature is almost reached, the extruder motor starts unextruding filament. When
the filament comes out of the extruder, press the Back button.
Sebastien Andrivet 17
ADVi3++ User Manual 2018-01-12
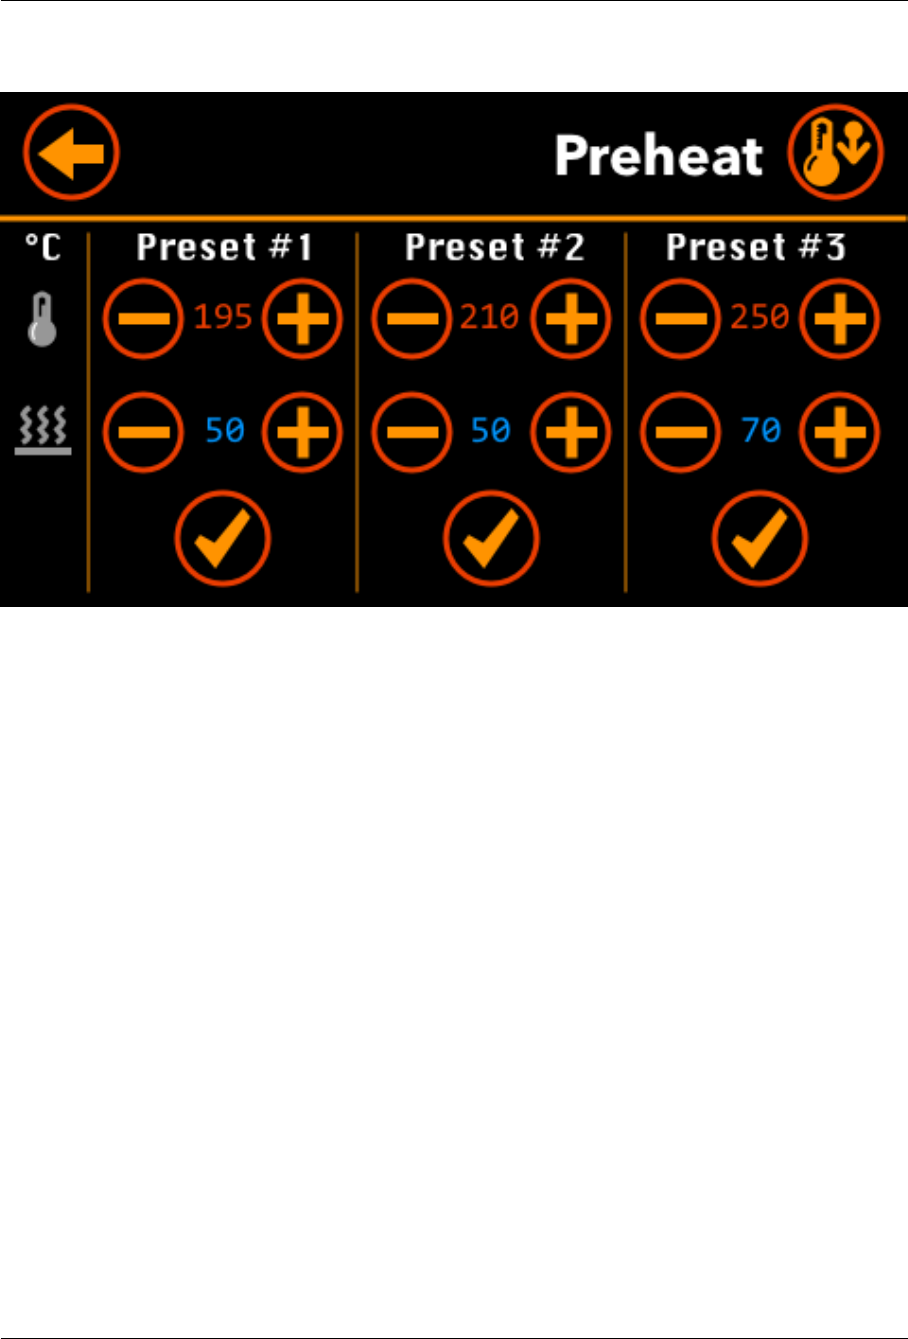
Preheat
You have the choice of three presets (both bed and hot-end temperatures). You can adjust each value
by pressing the plus and minus buttons. To start heating bed and hot-end, press one of the checkmark
button. To stop heating, press the cooldown button on the top right corner.
Tip:Keep the button pressed to quickly increment or decrement a temperature.
Important
:If you press the
Back
button, the printer continues to heat the bed and the hot-end. Press
Cooldown on this screen or on the Tools screen to stop heating.
Sebastien Andrivet 18

ADVi3++ User Manual 2018-01-12
Move
•You can move the head (X & Z) and the bed (Y) by pressing the buttons with arrows.
Tip:Keep the button pressed to quickly move the head or the bed.
•Press the E+button to extrude some filament; press the E-button to un-extrude.
Important
:The printer will extrude or un-extrude only if the temperature of the hot-end has reached a
minimal value.
•
Press a button with a house icon to home the head (X & Z) or the bed (Y). Press the button with
the star (*) to return both bed and hot-end to their home positions.
•
Press the button with the motor icon (top-right corner) to disable all motors so they are free to
move by hand.
Sebastien Andrivet 19

ADVi3++ User Manual 2018-01-12
Print
Figure 10: Print
The exact screen displayed is dependent of the context (in this order):
•If you are printing from the SD card, the SD Print screen is displayed (see below).
•
If you are printing through USB (i.e. from Cura, OctoPrint, ...), the
USB Print
screen is displayed
(see below).
•
If you are not printing and a SD card is inserted in the SD slot (and readable), the
SD Card
screen
is displayed (see below).
•Otherwise, the Temperature Graphs is displayed (see below).
Sebastien Andrivet 20

ADVi3++ User Manual 2018-01-12
SD Card
Figure 11: SD Card
The
SD Card
screen is displayed only when a SD card is inserted in the SD slot of the printer and is
readable. It displays all the files in the root of the SD card.
•If there are more than 5 files, use the two arrow button to display the files page per page.
•To print a file, press its name. The SD Print is displayed and the printing starts.
Sebastien Andrivet 21
ADVi3++ User Manual 2018-01-12
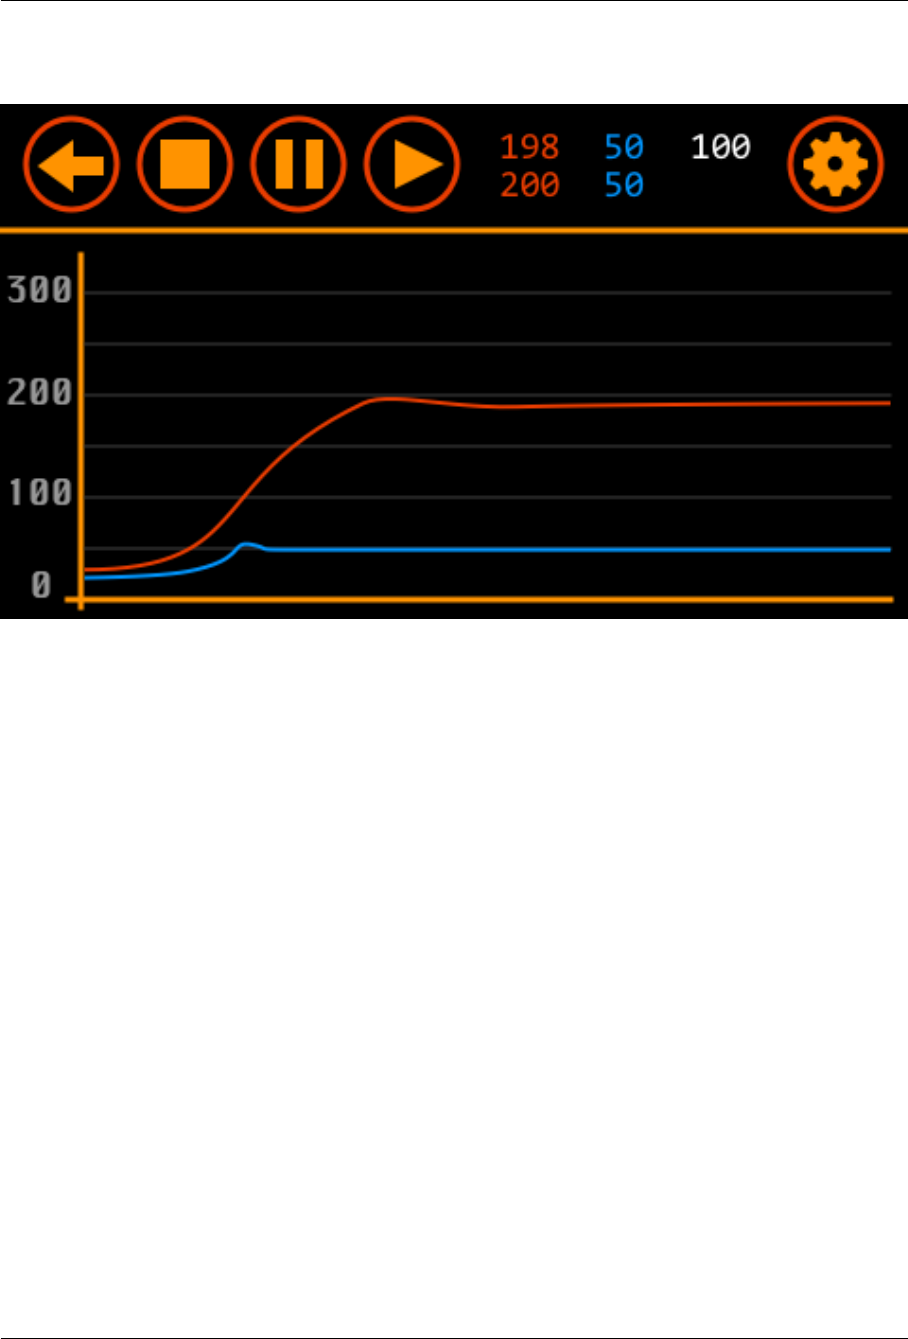
SD Print
Figure 12: SD Print
The SD Print screen is displayed only when a print is running from the SD card.
•It displays a graph of the temperatures (bed in blue, hot-end in red).
•Stop
: Press the
Stop
button to stop the current printing. It also goes back to the previous screen
(SD Card).
•Pause: Press the Pause button to temporary stop the printing.
•Resume: Press the Resume button to resume a paused printing.
•Print Settings
: Press on the gear button to display and modify the
Print Settings
like the tem-
perature, the fan speed, etc.
•Back
: If you press the
Back
button, the printing continues and it goes back to the previous screen
(SD Card).
Sebastien Andrivet 22
ADVi3++ User Manual 2018-01-12
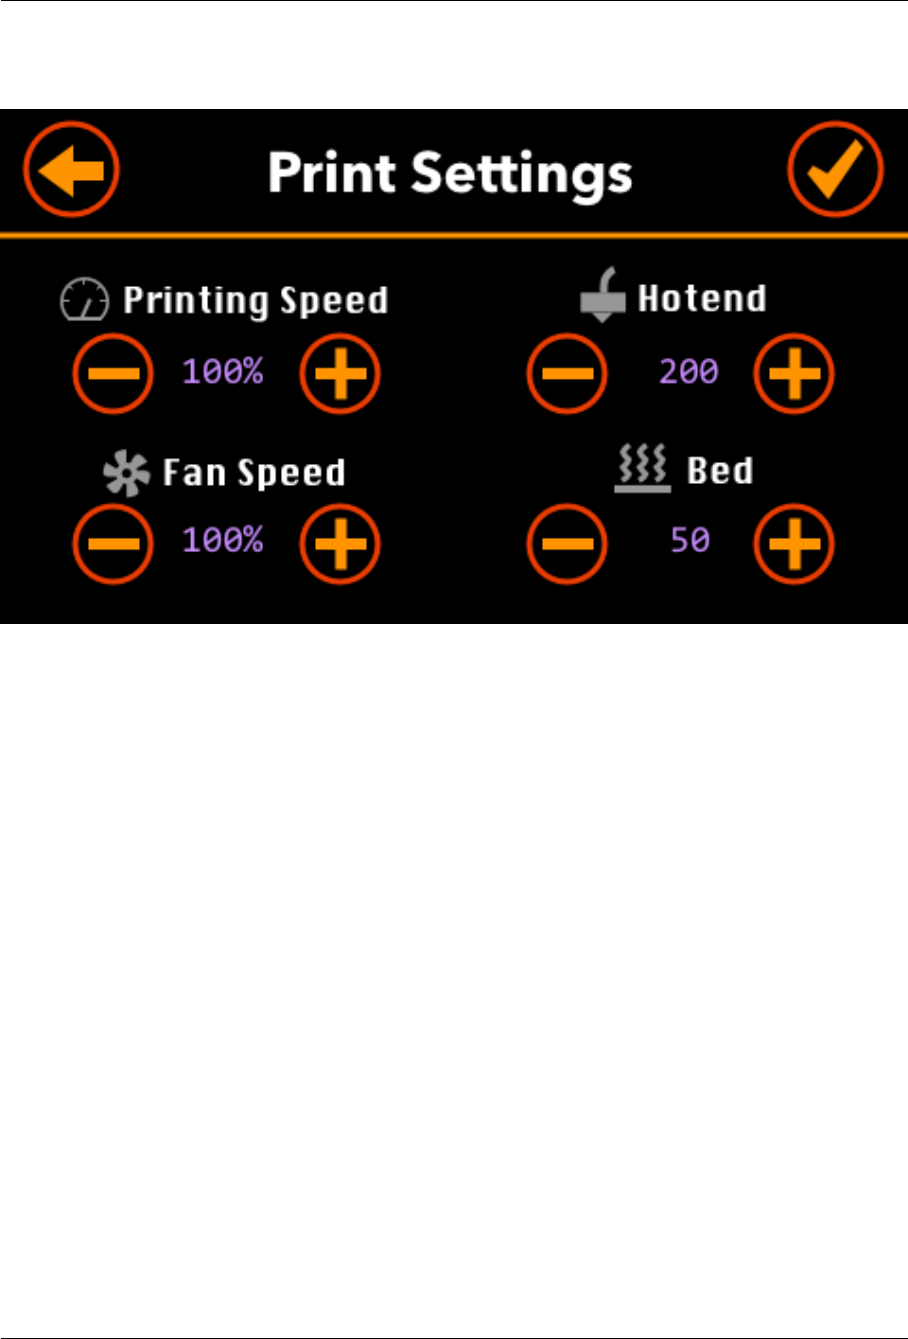
Print Settings
Figure 13: print Settings
In this screen, you can adjust print parameters during a SD card printing:
•Printing Speed: The motor speed multiplier. Speed of motors ismultiplied by this rate.
•Fan Speed: The fan speed multiplier. Speed of the fan (in the front) is multiplied by this rate.
•Hot-end: Temperature of the hot-end.
•Bed: Temperature of the bed.
Sebastien Andrivet 23
ADVi3++ User Manual 2018-01-12
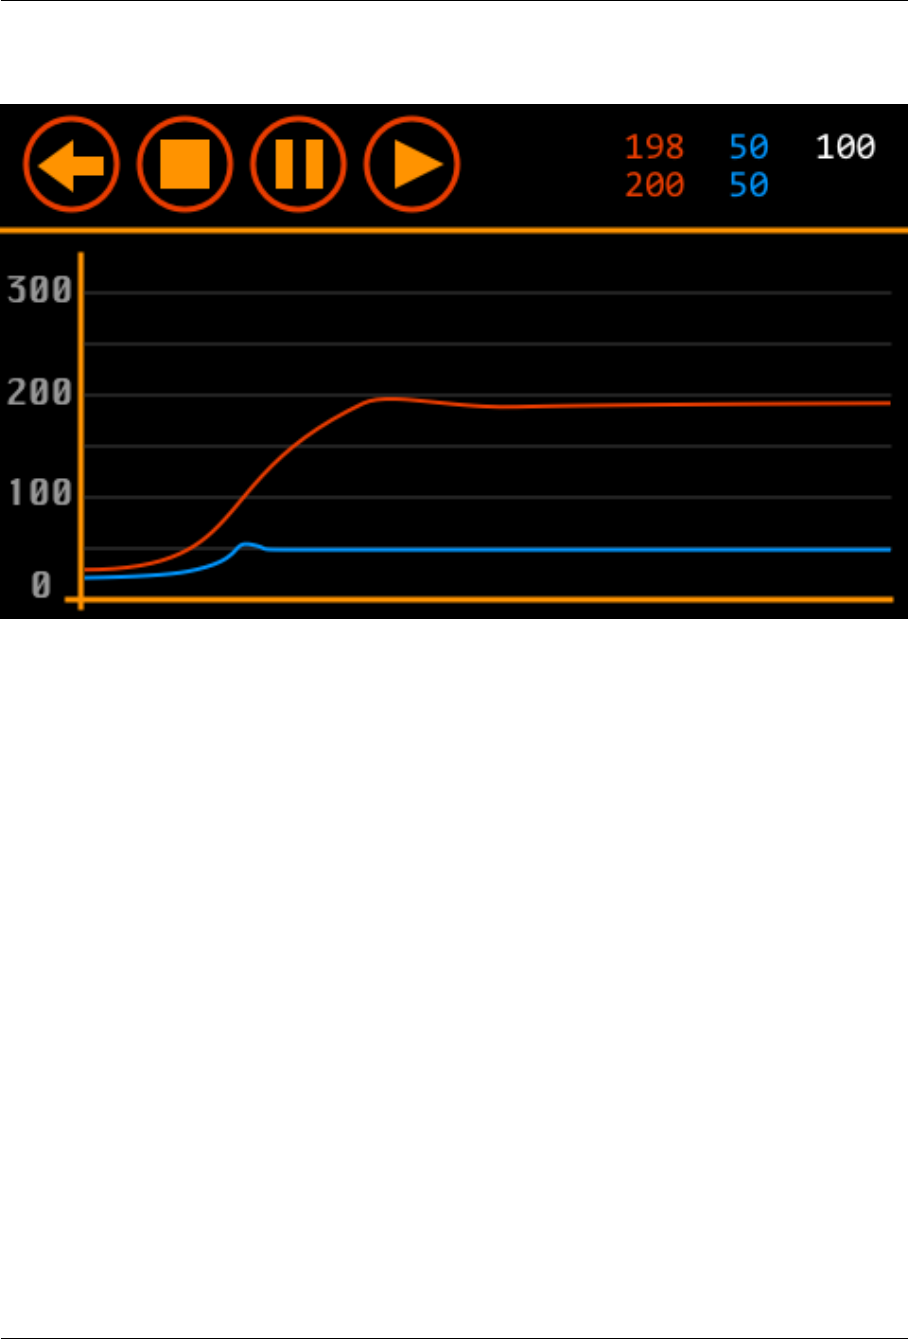
USB Print
Figure 14: USB Print
The USB Print screen is displayed only when a print is running through the USB cable (i.e. from Cura,
OctoPrint, etc)
•It displays a graph of the temperatures (bed in blue, hot-end in red)
•Stop
: Press the
Stop
button to stop the current printing. It also goes back to the previous screen.
•Pause: Press the Pause button to temporary stop the printing.
•Resume: Press the Resume button to resume a paused printing.
•Print Settings
: Press on the gear button to display and modify the
Print Settings
like the tem-
perature, the fan speed, etc.
•Back
: If you press the
Back
button, the printing continues and it goes back to the previous
screen.
Sebastien Andrivet 24
ADVi3++ User Manual 2018-01-12
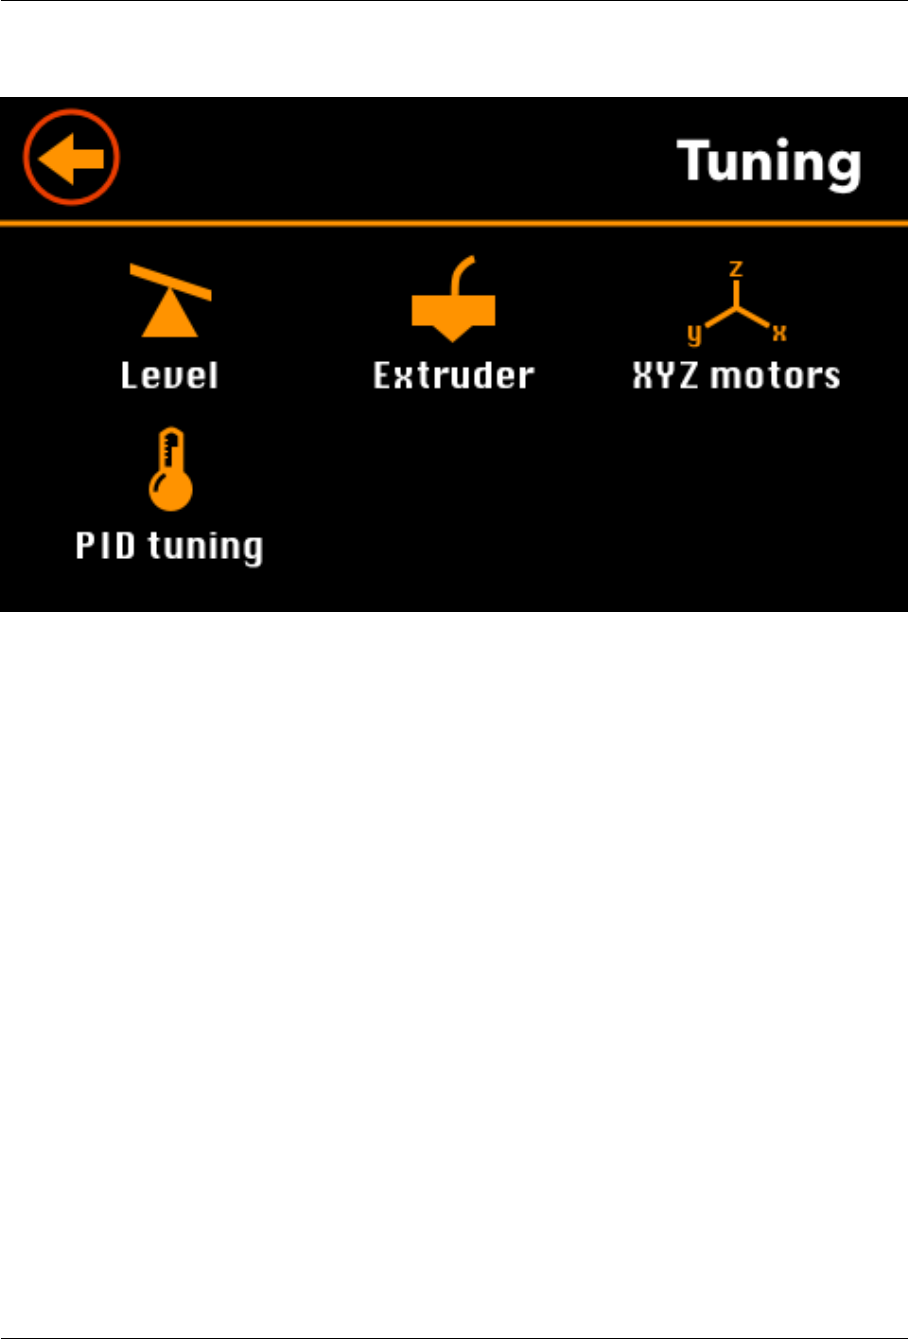
Tuning
This panel gives you access to tools to help you adjust some parameters of your printer.
Important
: Some parameters are directly derived from the mechanical parts of the printer. Unless you
change these parts (like the step motors), there is no need to change them.
•Level: Tool to help you level your bed.
•Extruder: Tool to help you adjust the number of steps per millimeter for the extruder motor.
•XYZ motors: Tool to help you adjust the number of steps per millimeter for X and Y motors.
•PID tuning
: Tool to help you adjust the PID parameters (proportional-integral-derivative control
algorithm).
Level
This tool helps you level your bed.
•First, the head and bed return to their home position.
Sebastien Andrivet 25
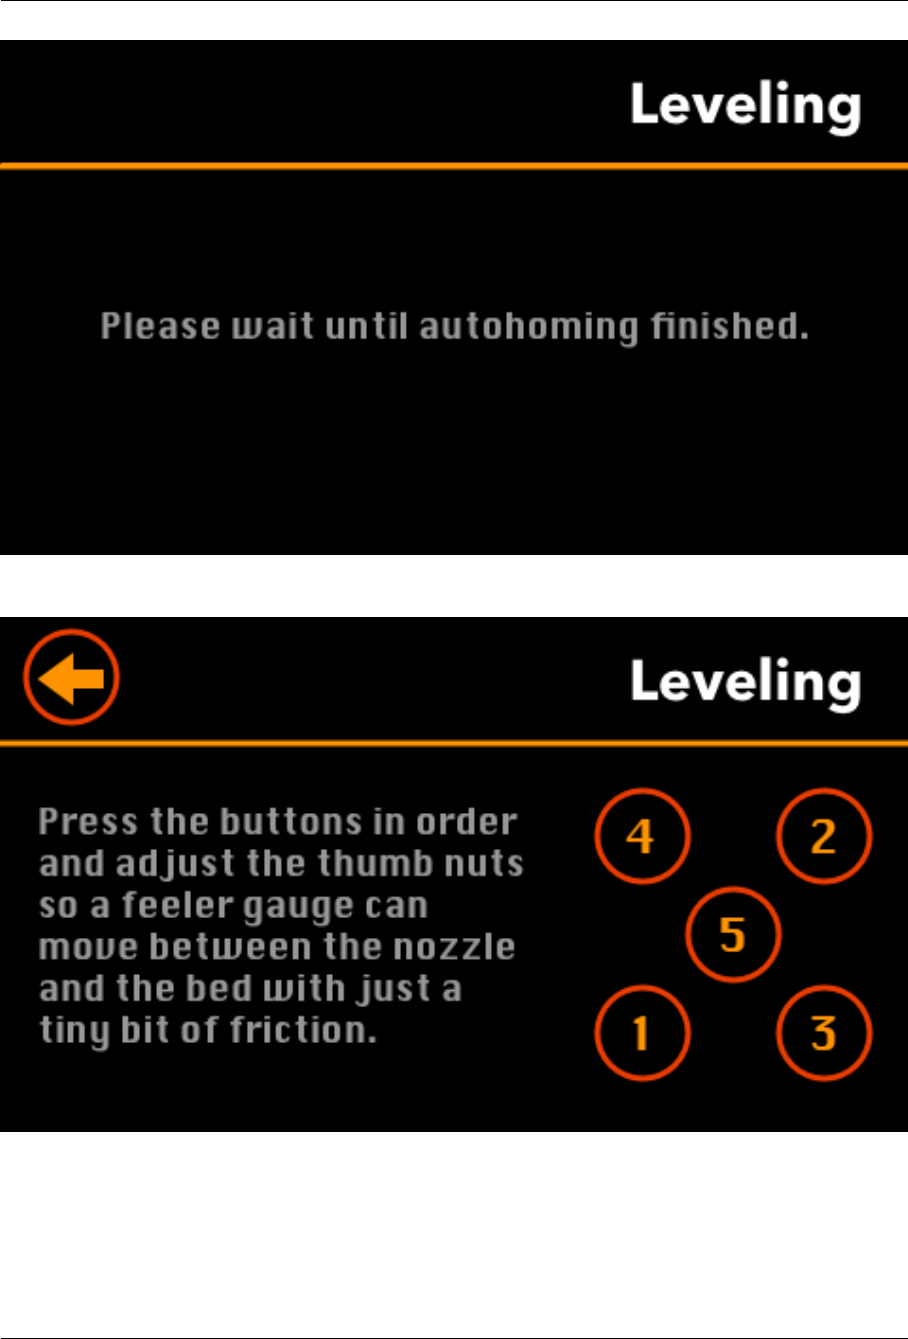
ADVi3++ User Manual 2018-01-12
•Then, press one of the button with a number to go to each position:
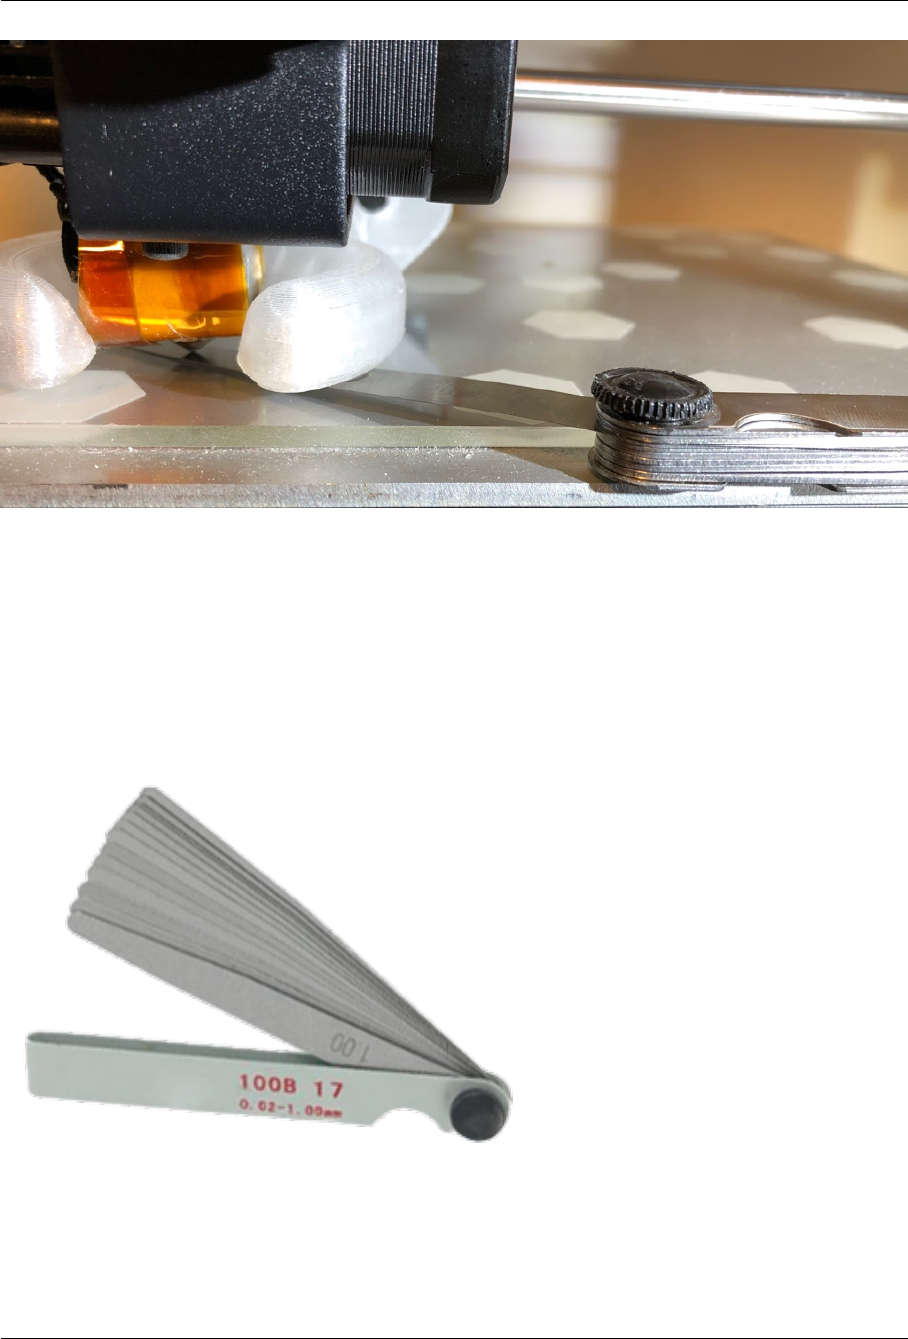
•
Adjust each thumb nut so a feeler gauge (0.1 mm) can move between the nozzle and the bed
with just a tiny bit of friction:
Sebastien Andrivet 26
ADVi3++ User Manual 2018-01-12
•If you do not have a feeler gauge, you can also use a sheet of paper but it is less accurate.
•
Press the 5th button to check that your leveling is good. Press any of the other button to level
again the corresponding corner.
•Once you are satisfied with the leveling, press the Back button.
Tip
:A feeler gauge are cheap and you can buy one for a few dollars on Amazon, Banggood, etc. For
example (randomly chosen items):
amazon.com
Sebastien Andrivet 27
ADVi3++ User Manual 2018-01-12
banggood.com
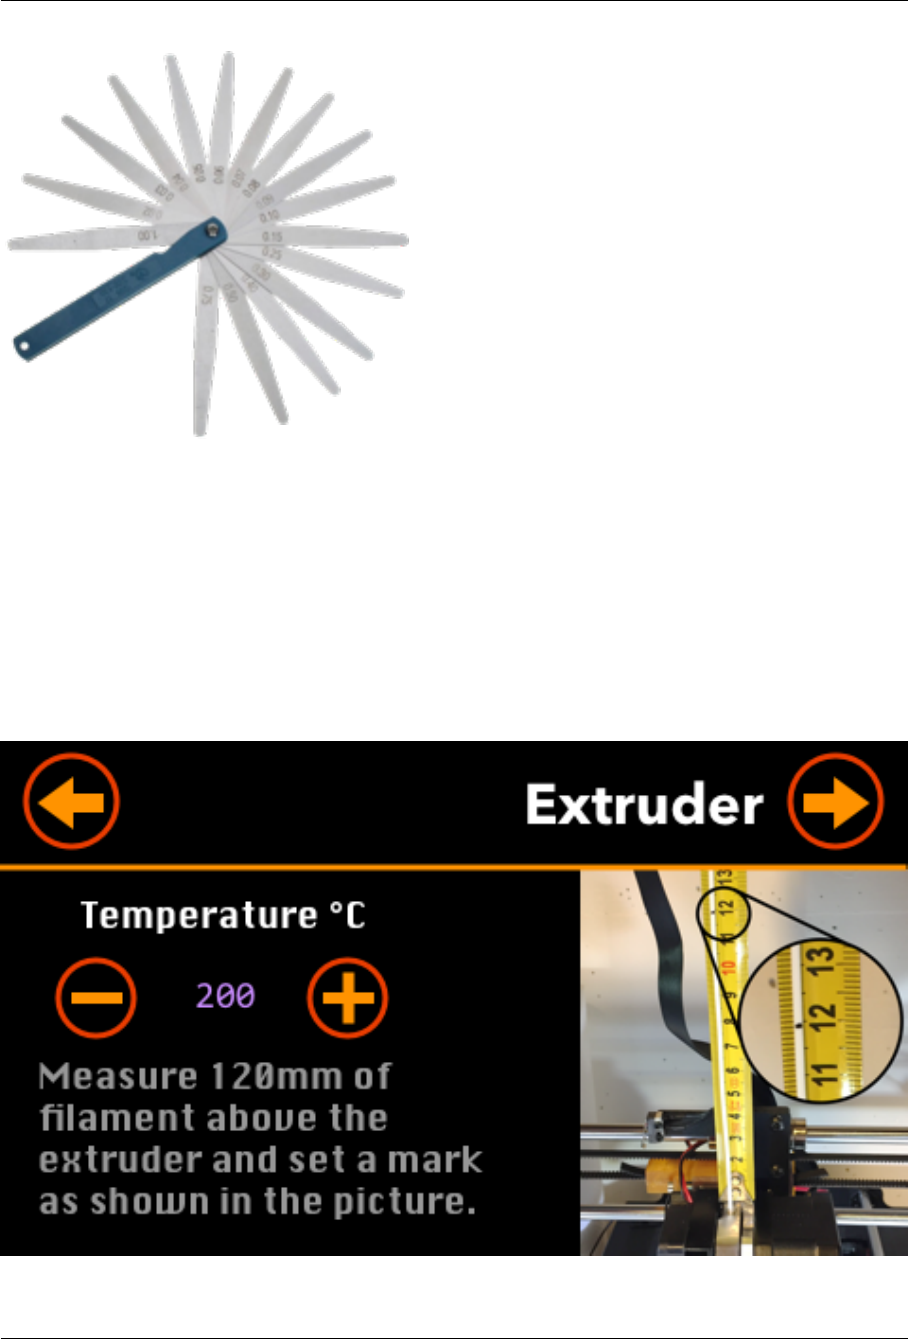
Extruder
This tool helps you adjust adjust the number of steps per millimeter for the extruder motor. There is no
need to do this more than once, except if you change some mechanical parts.
Important
:This parameter (number of steps per millimeter) is directly derived from the mechanical parts
of the printer (the step motor, the gear, ...) Unless you change these parts (like the gear), there is no need
to change this parameter. Its default value is 400.5.
Sebastien Andrivet 28
ADVi3++ User Manual 2018-01-12
•Measures 120 mm of filament above the extruder and set, with a pen, a mark on the filament:
•
Select the extruder’s target temperature you want to use (with the plus and minus buttons) and
press the arrow button (top-right corner).
Tip:Keep the button pressed to quickly increment or decrement the temperature.
Sebastien Andrivet 29
ADVi3++ User Manual 2018-01-12
•
The printer starts heating the hot-end and when the target temperature is reached, it extrudes
100 mm of filament.
•
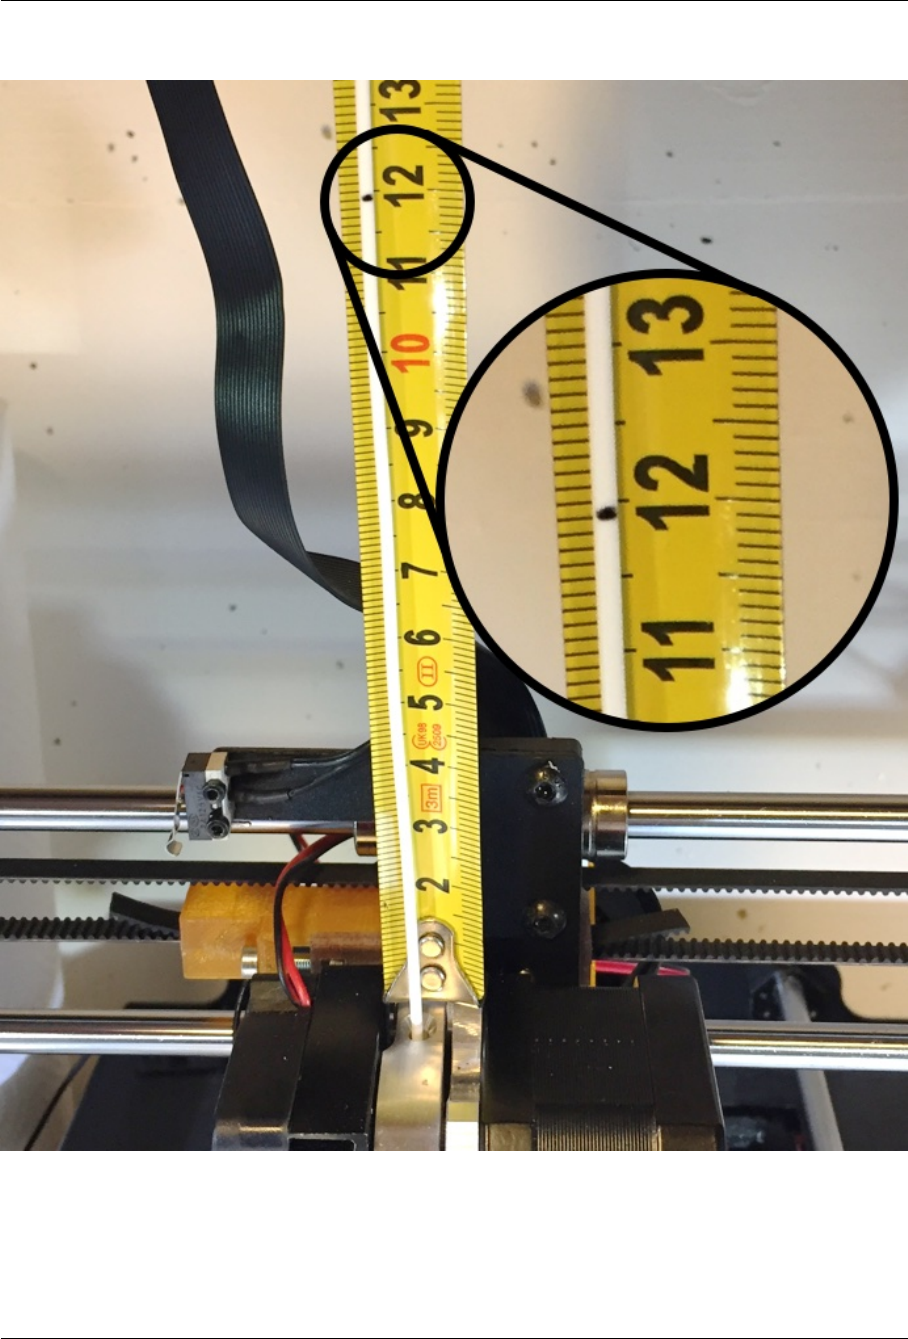
Once the extrusion is finished (it takes around a minute), measures the filament remaining
between the extruder and your mark:
Sebastien Andrivet 30
ADVi3++ User Manual 2018-01-12
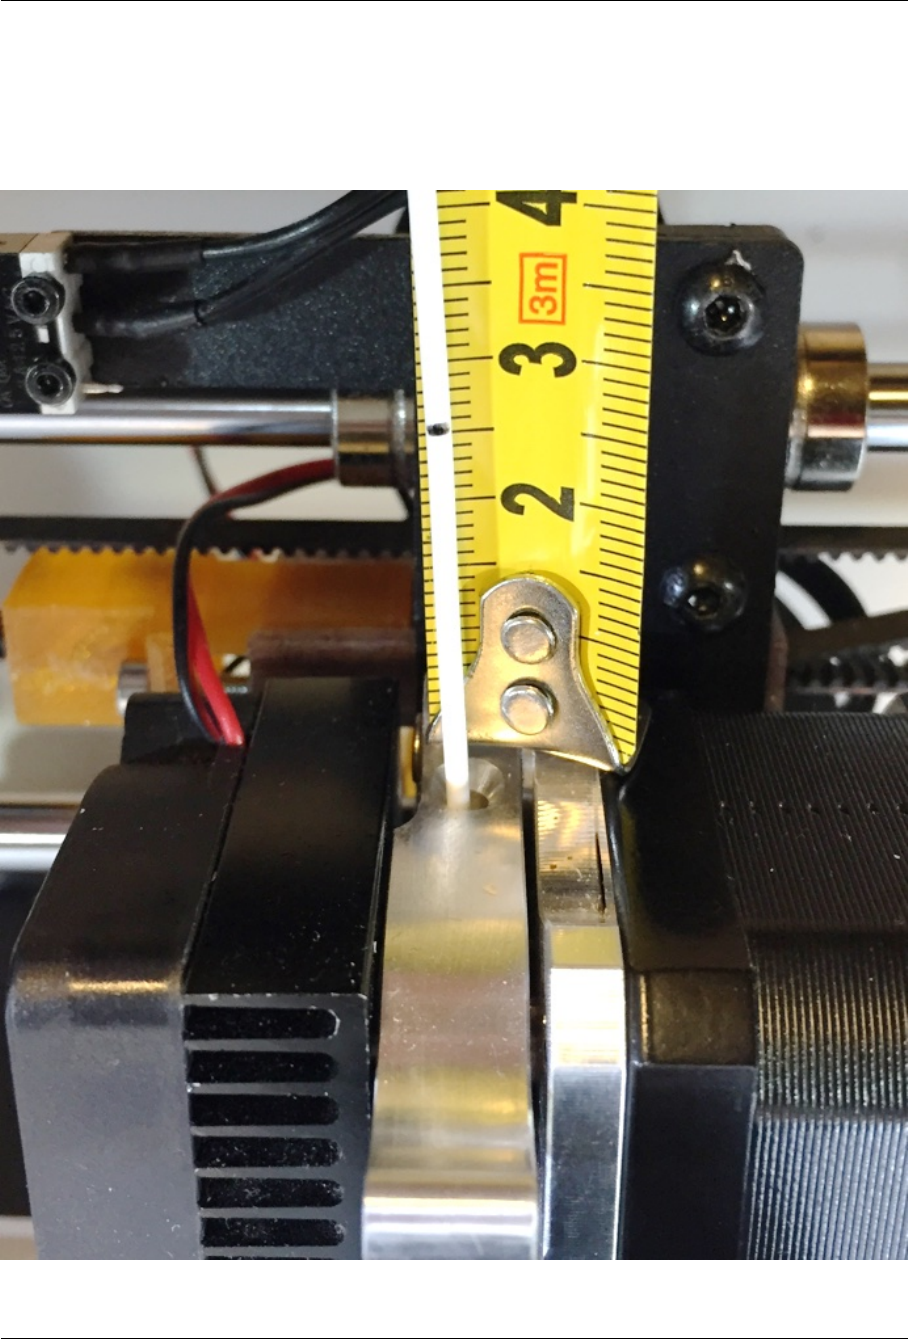
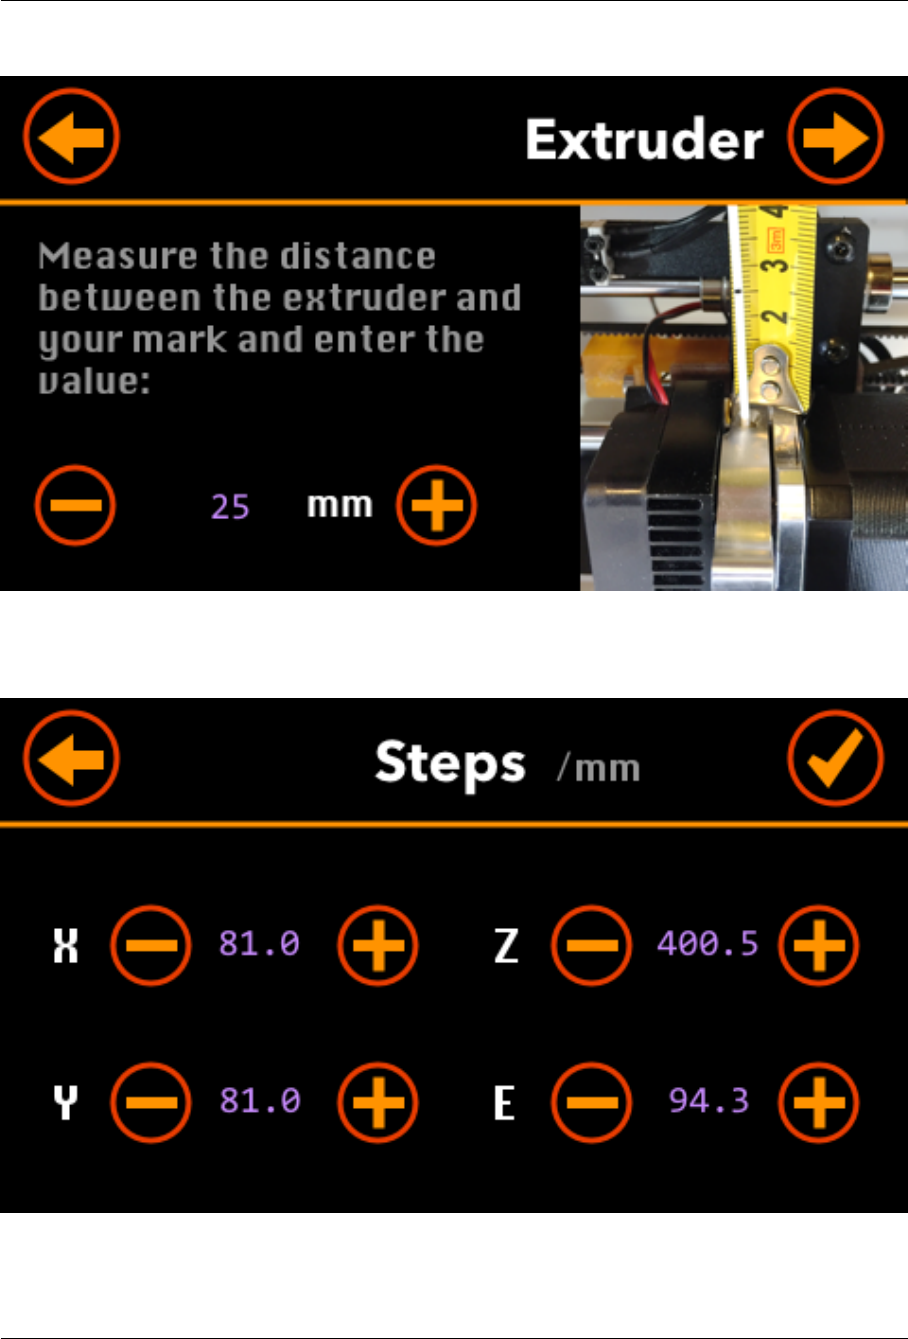
•Enter the value in mm:
Tip:Keep the button pressed to quickly increment or decrement the value.
•The computed value (E) is displayed and you can adjust it manually if you want:
•
Press the
Back
button the restart the process, or on the
Checkmark
button to save the settings.
Sebastien Andrivet 31
ADVi3++ User Manual 2018-01-12
They are saved in the EEPROM memory of the motherboard.
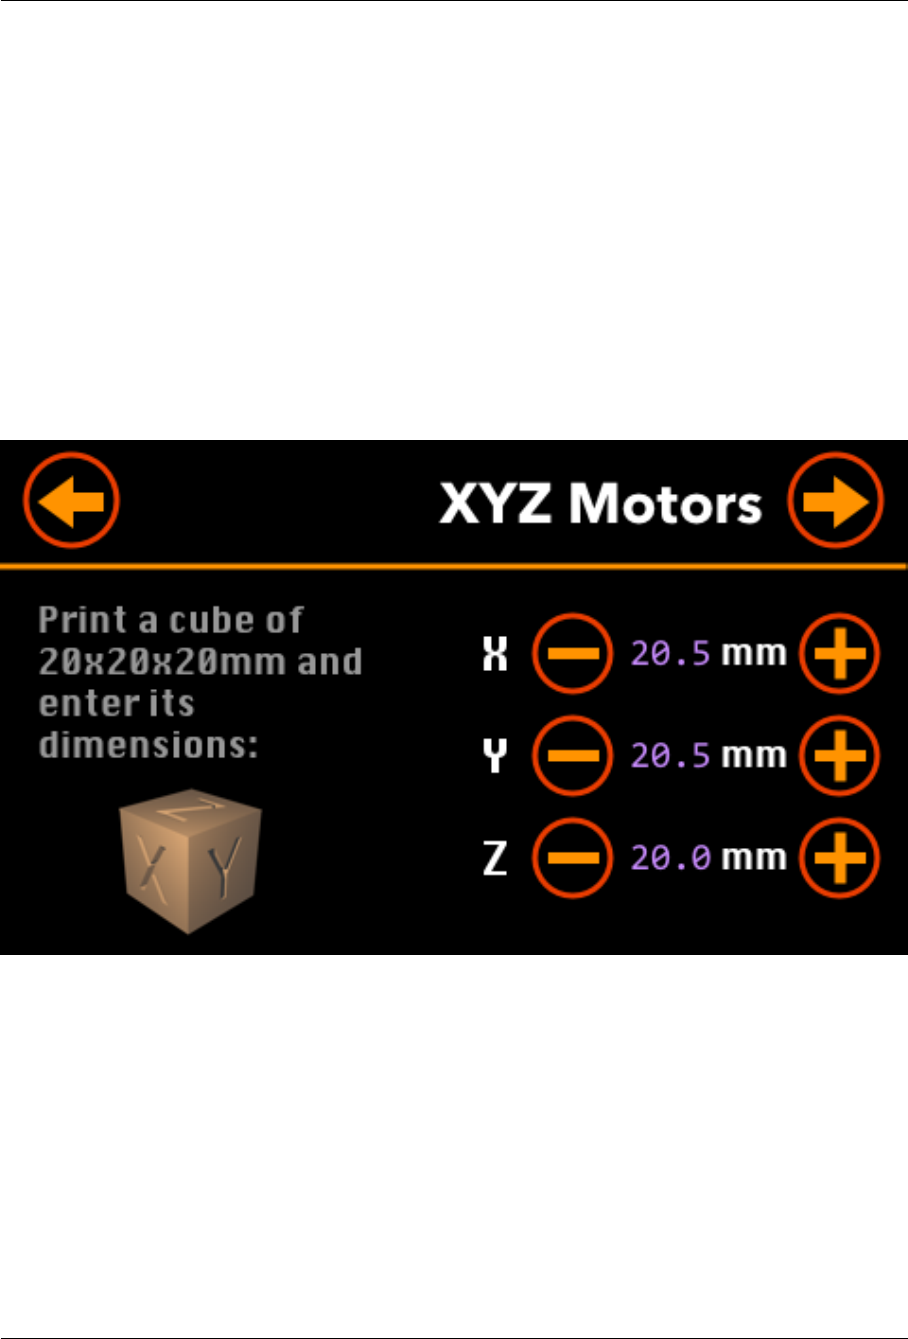
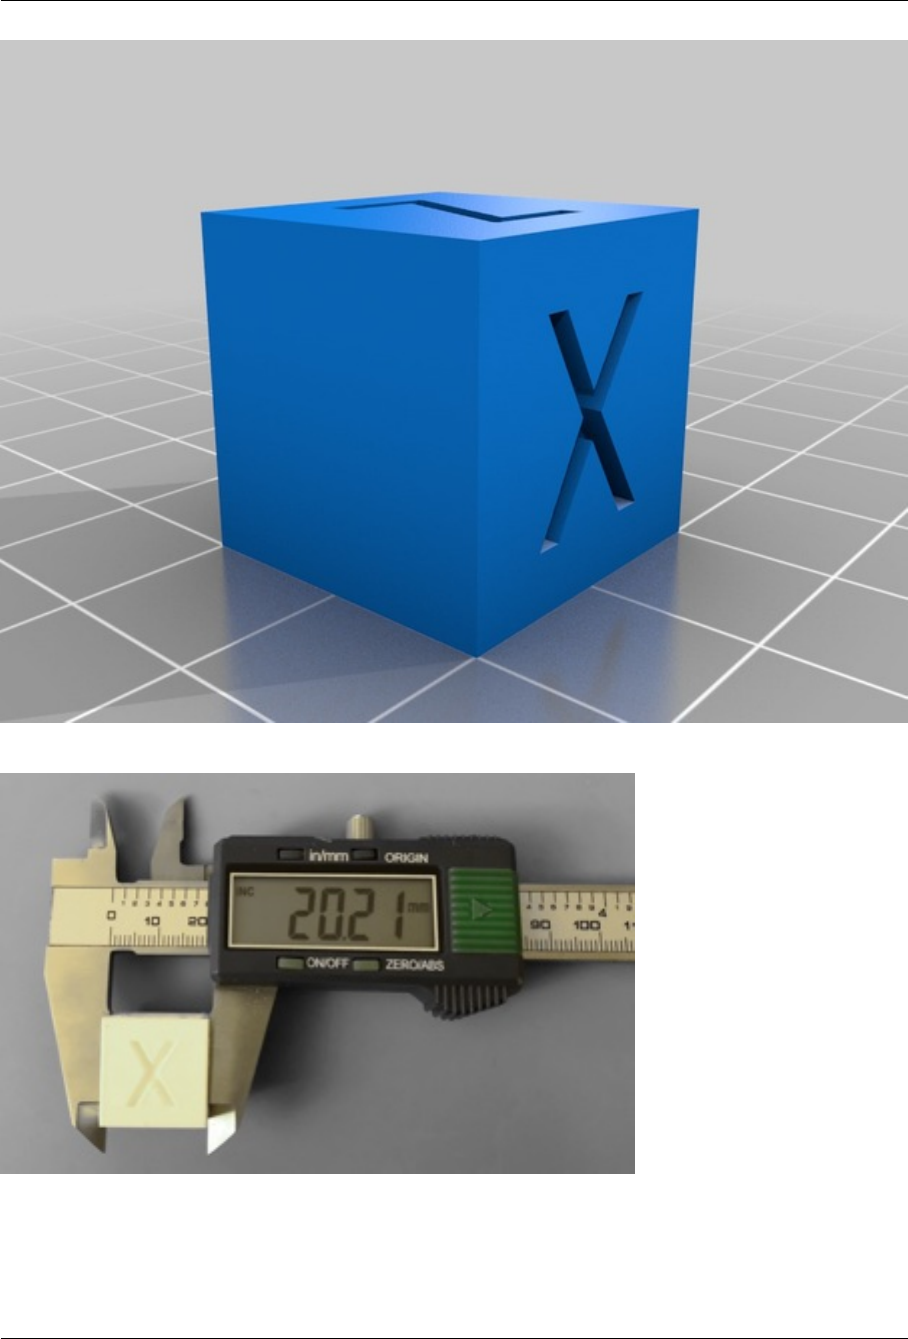
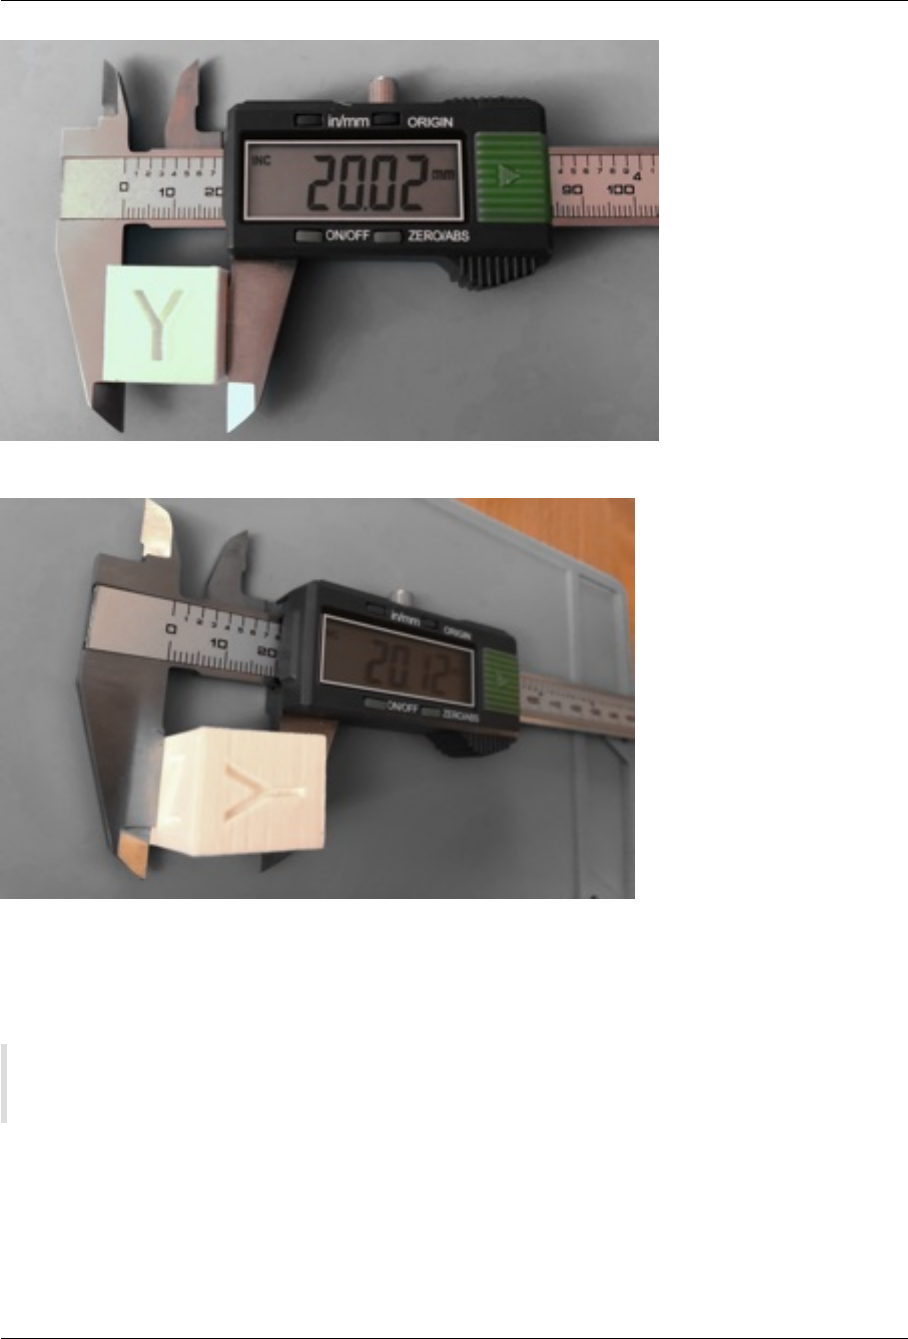
XYZ motors
This tool helps you adjust adjust the number of steps per millimeter for the X, Y and Z motors. There is
no need to do this more than once, except if you change some mechanical parts.
Important
:These parameters (number of steps per millimeter) are directly derived from the mechanical
parts of the printer (the step motor, ...) Unless you change these parts (like the motors), there is no need
to change this parameter. The default values are 81,81, and 400.5.
•
Print a cube 20x20x20 mm and enter it actual dimensions (make more than one measure for
each side and take the average):
•The computed values (X, Y and Z) are displayed and you can adjust them manually if you want:
Sebastien Andrivet 32

ADVi3++ User Manual 2018-01-12
•
Select the extruder’s target temperature you want to use (with the plus and minus buttons) and
press the arrow button (top-right corner).
Tip:Keep the button pressed to quickly increment or decrement the temperature.
•
The PID tuning process starts. The printer increase and decrease the temperature of the hot-end
around the target value:
Sebastien Andrivet 36

ADVi3++ User Manual 2018-01-12
•When the PID tuning is finished (aer some minutes), the new PID values are displayed:
•
Press the
Back
button the restart the process, or on the
Checkmark
button to save the settings.
They are saved in the EEPROM memory of the motherboard.
Sebastien Andrivet 37
ADVi3++ User Manual 2018-01-12
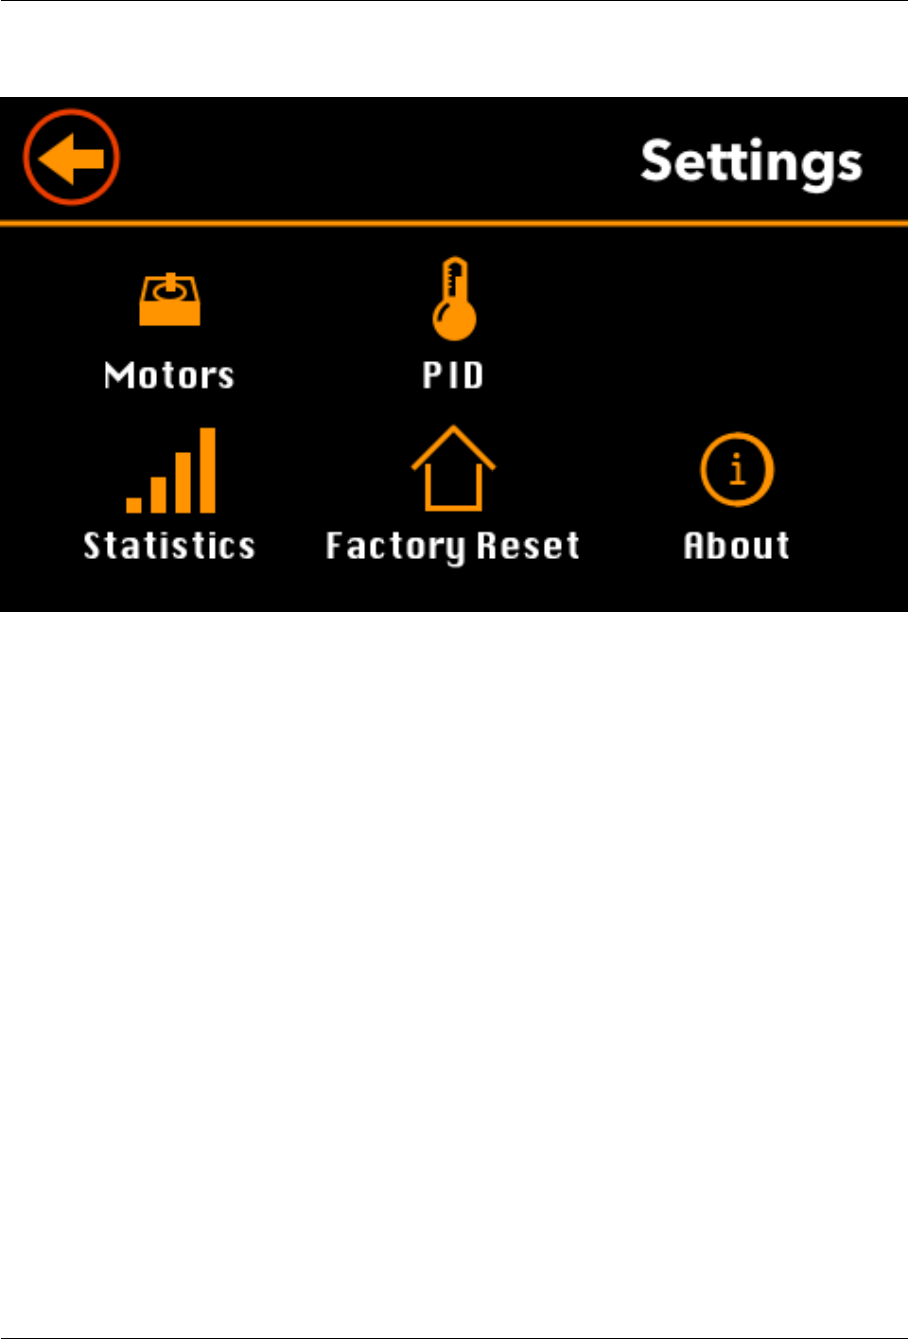
Settings
•Motors: Displays several settings related to the step motors (see bellow).
•PID: Displays the current PID settings.
•Statistics: Displays printing statistics.
•Factory Reset: Resets the various settings to their default values.
•About: Displays information about the dierent soware components.
Sebastien Andrivet 38

ADVi3++ User Manual 2018-01-12
Motors
•Steps: Displays step settings of the motors.
•Feedrate: Display feedrate (speed) settings of the motors.
•Acceleration: Displays acceleration settings of the motors.
•Jerk: Displays jerk settings of the motors.
Sebastien Andrivet 39
ADVi3++ User Manual 2018-01-12
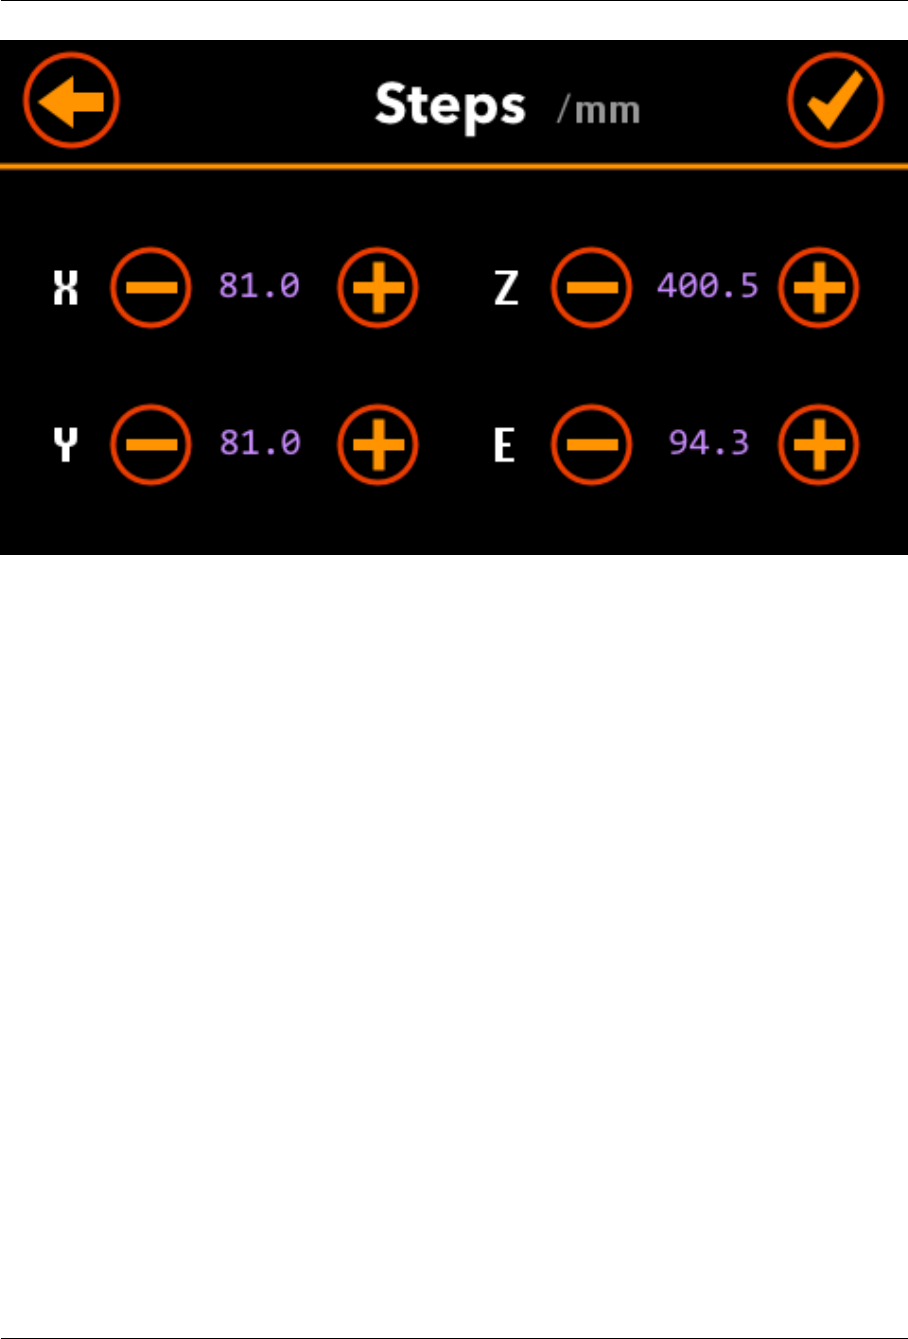
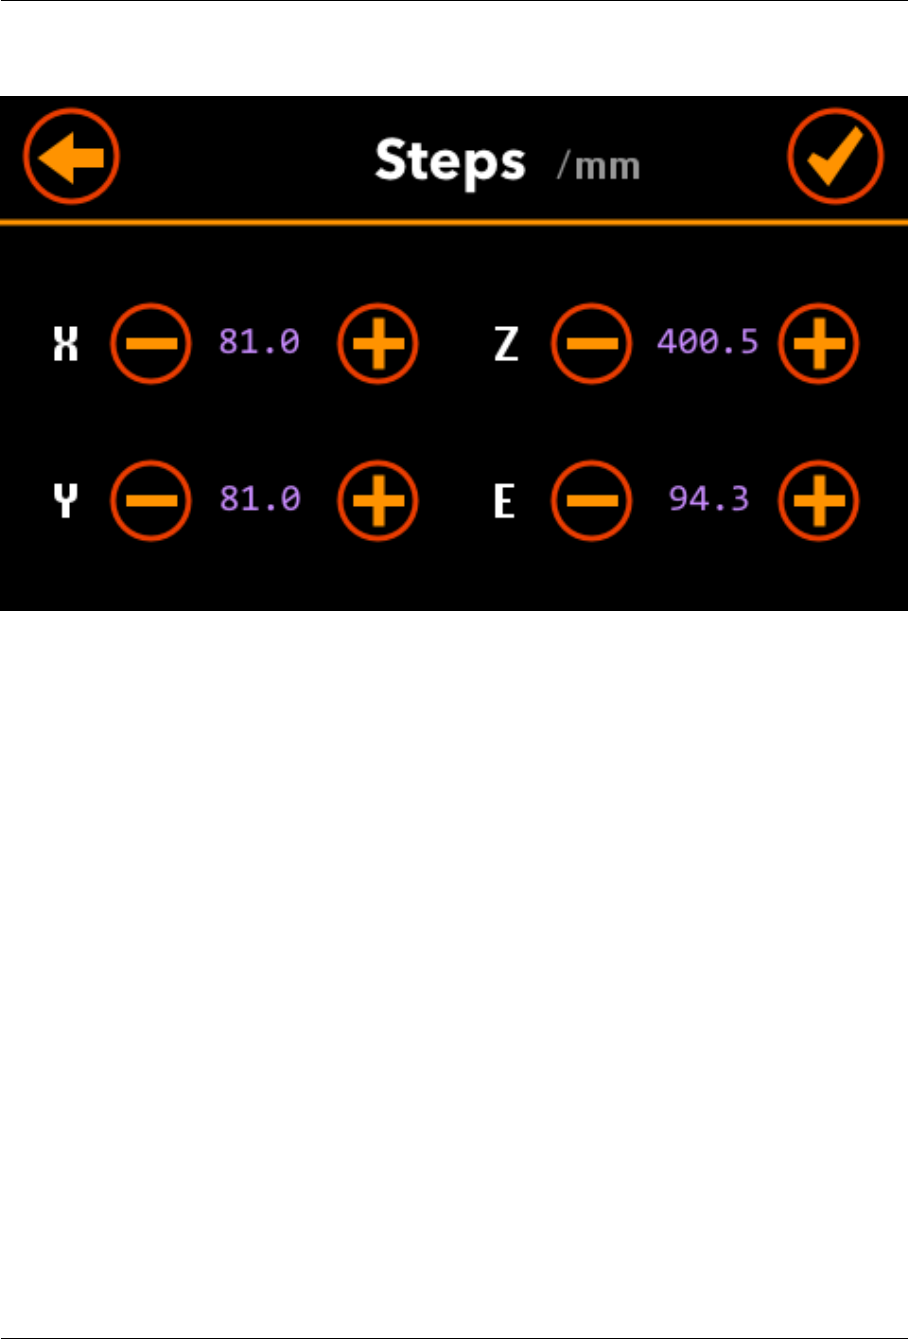
Steps
This screen display the step settings of the motors.
•To adjust them manually, press the minus or plus buttons.
Tip:Keep the button pressed to quickly increment or decrement the temperature.
•
To save them, press the
Checkmark
button. The settings are saved in the EEPROM memory of
the motherboard.
•The cancel any changes, press the Back button. It goes back to the previous screen.
Sebastien Andrivet 40
ADVi3++ User Manual 2018-01-12
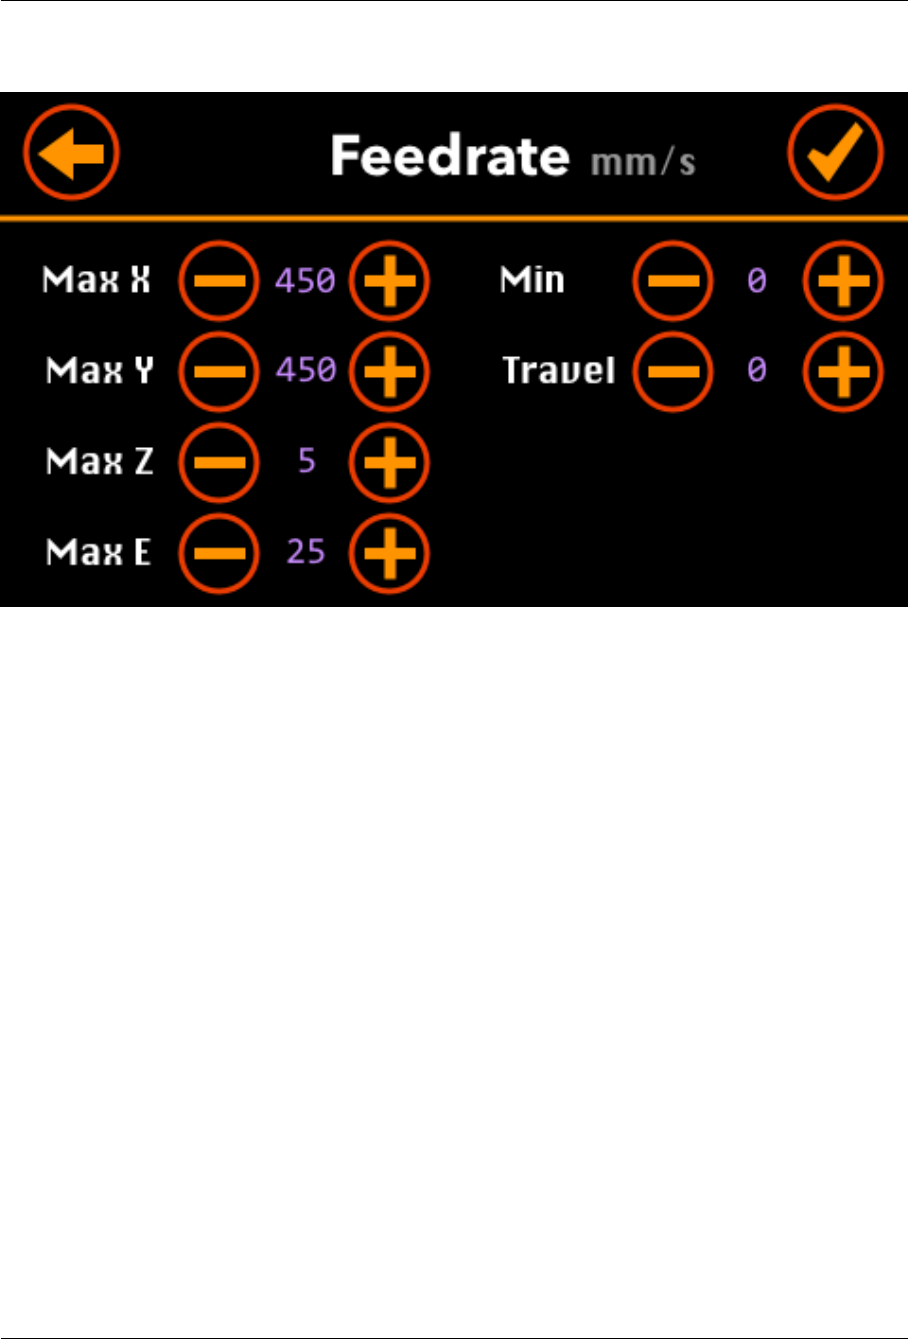
Feedrate
This screen display the feedrate (speed) settings of the motors.
•To adjust them manually, press the minus or plus buttons.
Tip:Keep the button pressed to quickly increment or decrement the temperature.
•
To save them, press the
Checkmark
button. The settings are saved in the EEPROM memory of
the motherboard.
•The cancel any changes, press the Back button. It goes back to the previous screen.
Sebastien Andrivet 41
ADVi3++ User Manual 2018-01-12
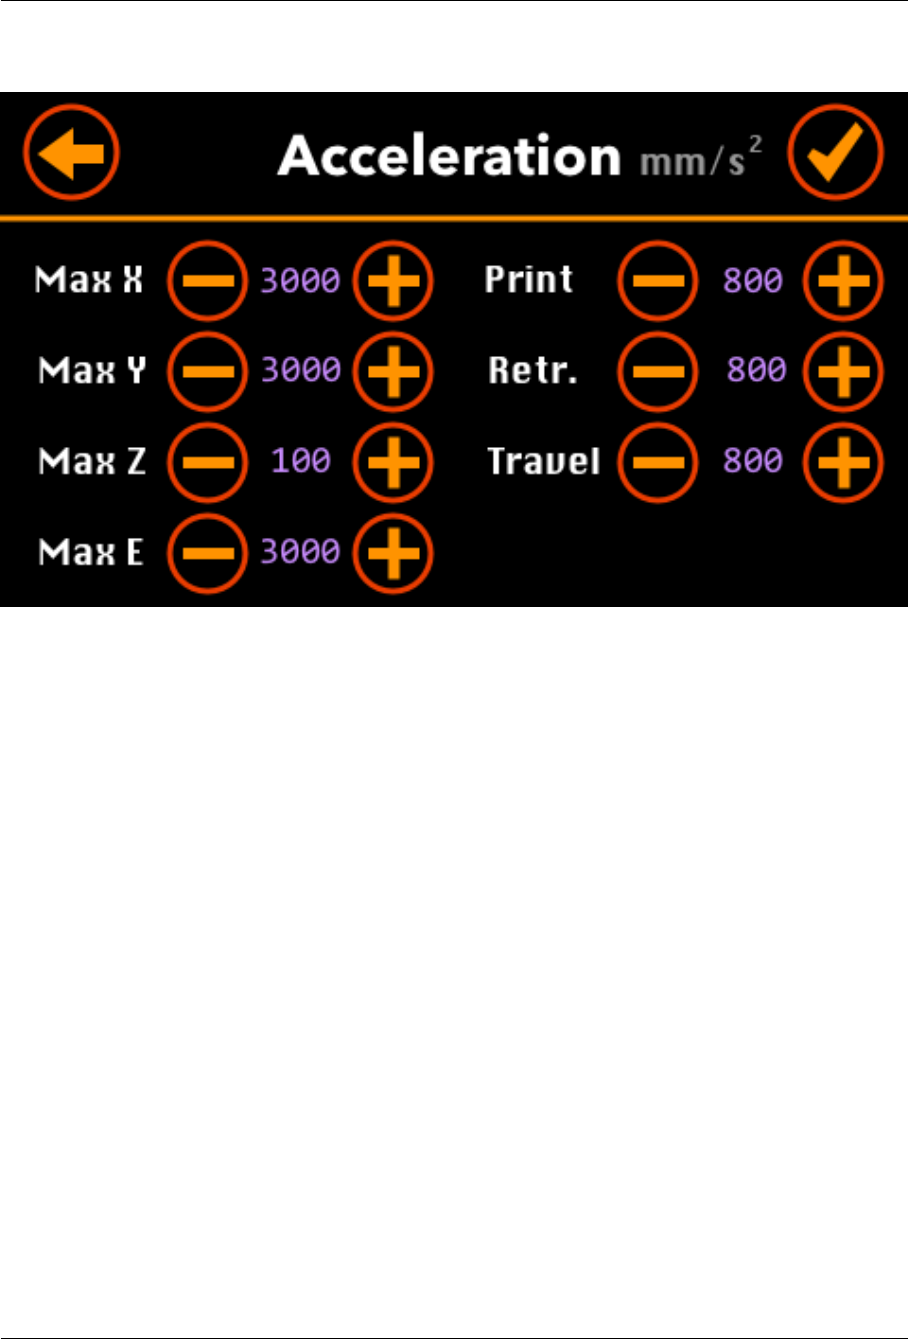
Acceleration
This screen display the acceleration settings of the motors.
•To adjust them manually, press the minus or plus buttons.
Tip:Keep the button pressed to quickly increment or decrement the temperature.
•
To save them, press the
Checkmark
button. The settings are saved in the EEPROM memory of
the motherboard.
•The cancel any changes, press the Back button. It goes back to the previous screen.
Sebastien Andrivet 42
ADVi3++ User Manual 2018-01-12
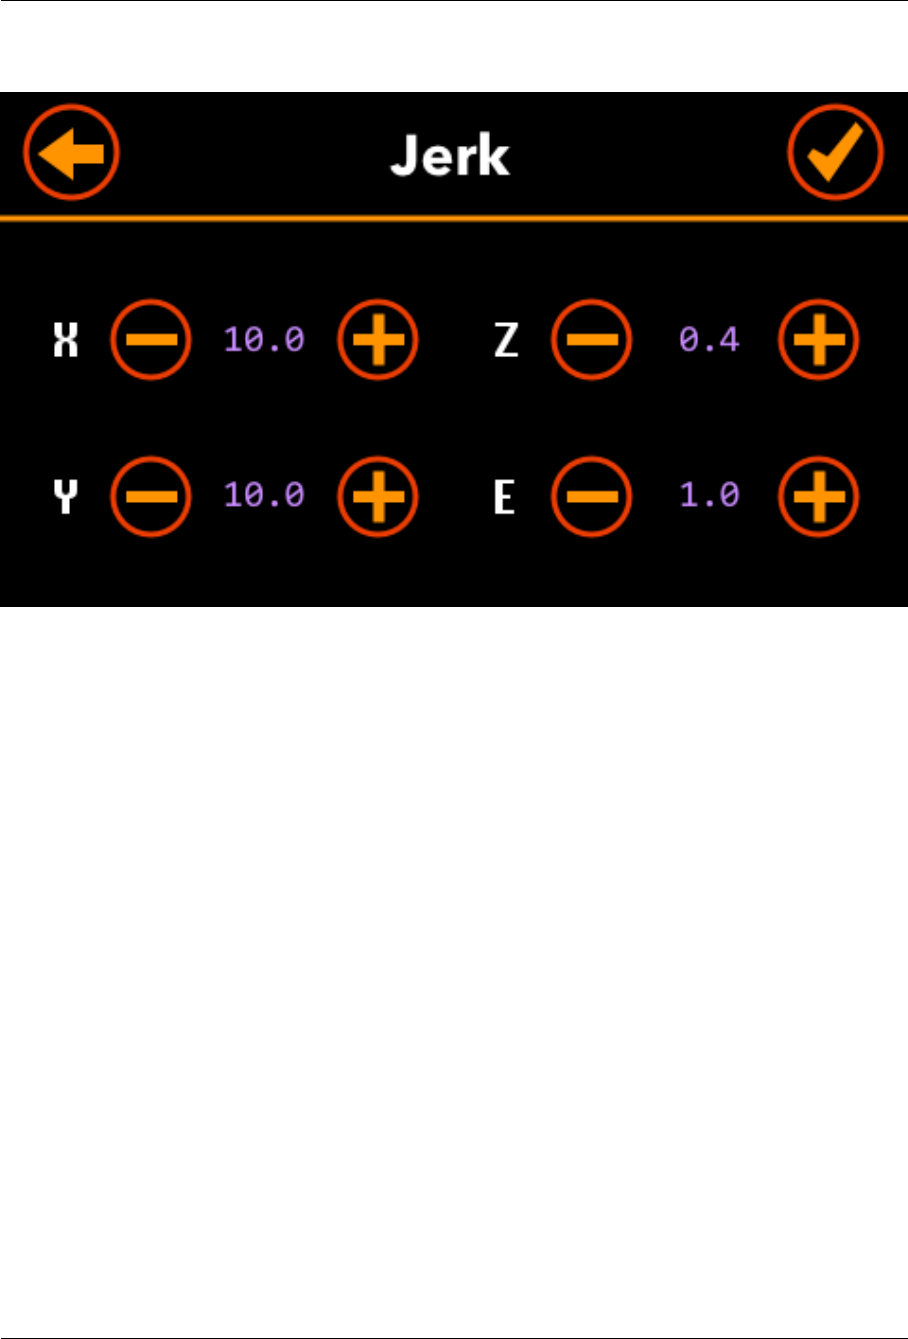
Jerk
This screen display the jerk settings of the motors. The (maximum) jerks are the instantaneous change
of speed that can be made. In other words, it is the (maximum( speed that the printer will immediately
jump to before taking acceleration into account.
•To adjust them manually, press the minus or plus buttons.
Tip:Keep the button pressed to quickly increment or decrement the temperature.
•
To save them, press the
Checkmark
button. The settings are saved in the EEPROM memory of
the motherboard.
•The cancel any changes, press the Back button. It goes back to the previous screen.
Sebastien Andrivet 43
ADVi3++ User Manual 2018-01-12
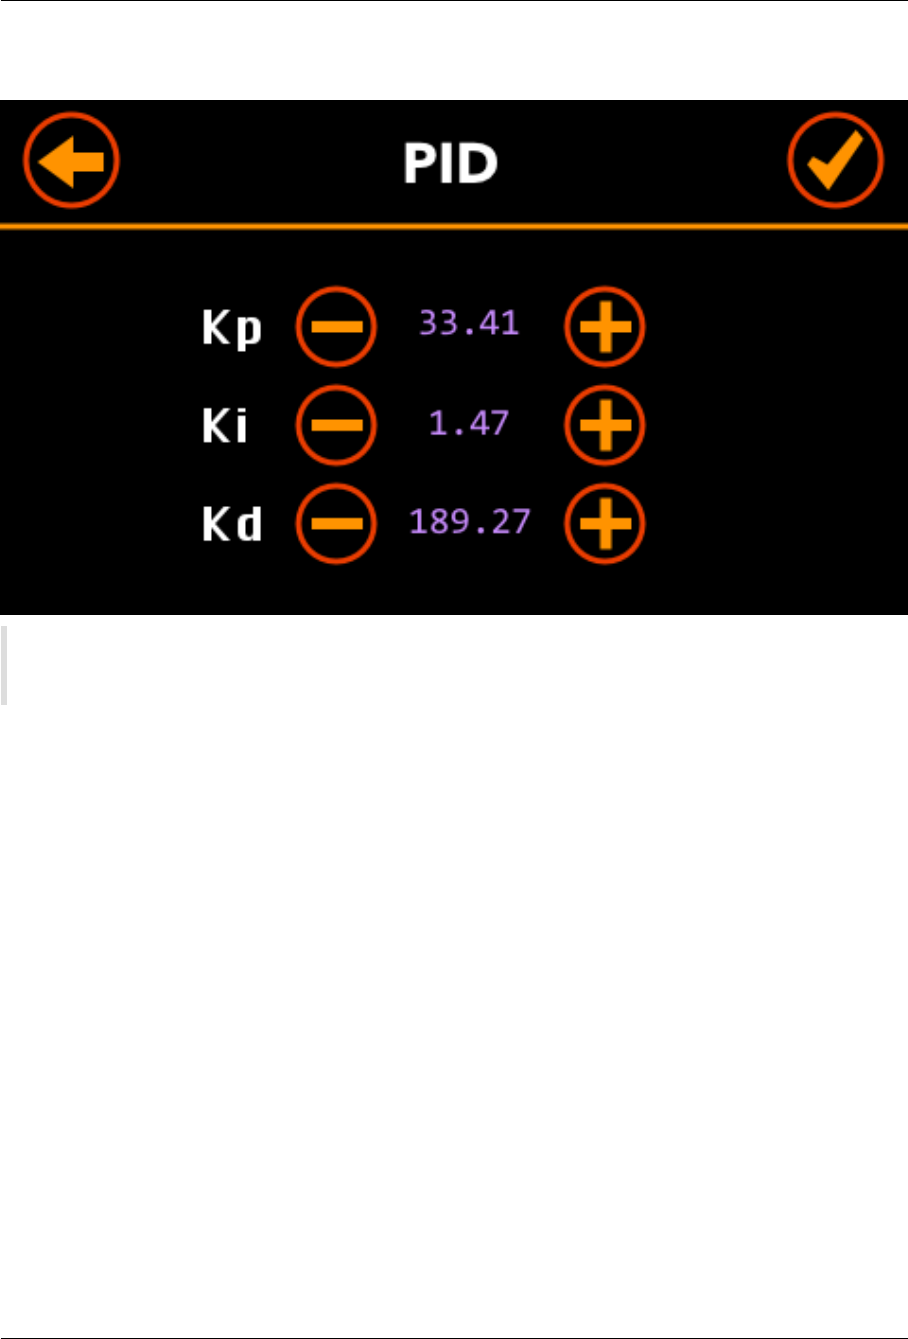
PID
PID tuning refers to the parameters adjustment of a proportional-integral-derivative control
algorithm used in most repraps for hot ends and heated beds.
RepRap web site
This screen display the jerk settings of the motors. The (maximum) jerks are the instantaneous change
of speed that can be made. In other words, it is the (maximum( speed that the printer will immediately
jump to before taking acceleration into account.
•To adjust the PID settings manually, press the minus or plus buttons.
Tip:Keep the button pressed to quickly increment or decrement the temperature.
•
To save them, press the
Checkmark
button. The settings are saved in the EEPROM memory of
the motherboard.
•The cancel any changes, press the Back button. It goes back to the previous screen.
Sebastien Andrivet 44
ADVi3++ User Manual 2018-01-12
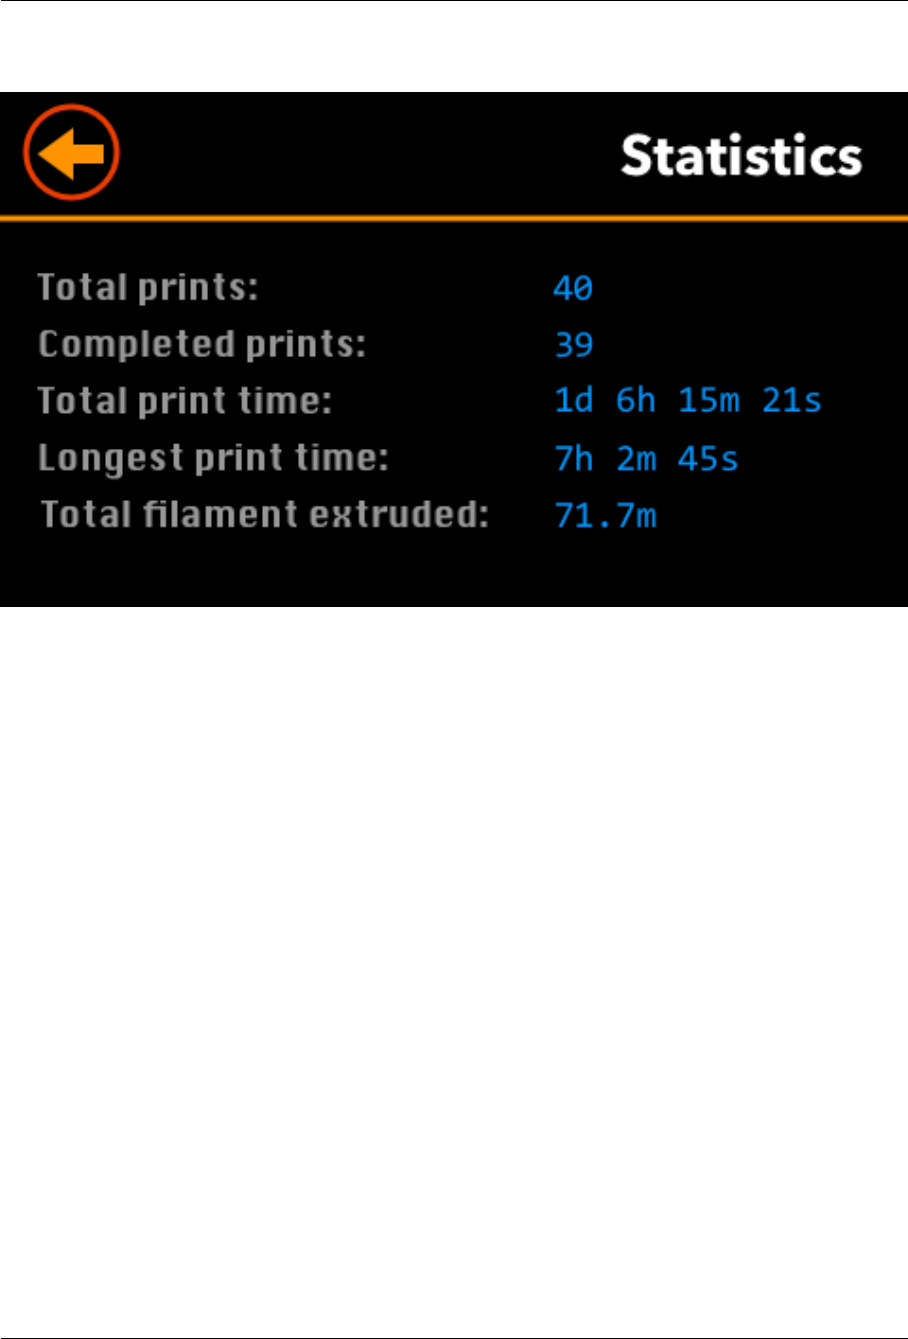
Statistics
This screen display various statistics:
•Total prints: The number of prints send to the printer.
•Completed prints: The number of prints completed.
•Total print time: The total time spend on printing.
•Longest print time: The longest print.
•Total filament extruded: The total number of meters of filament extruded.
Sebastien Andrivet 45
ADVi3++ User Manual 2018-01-12
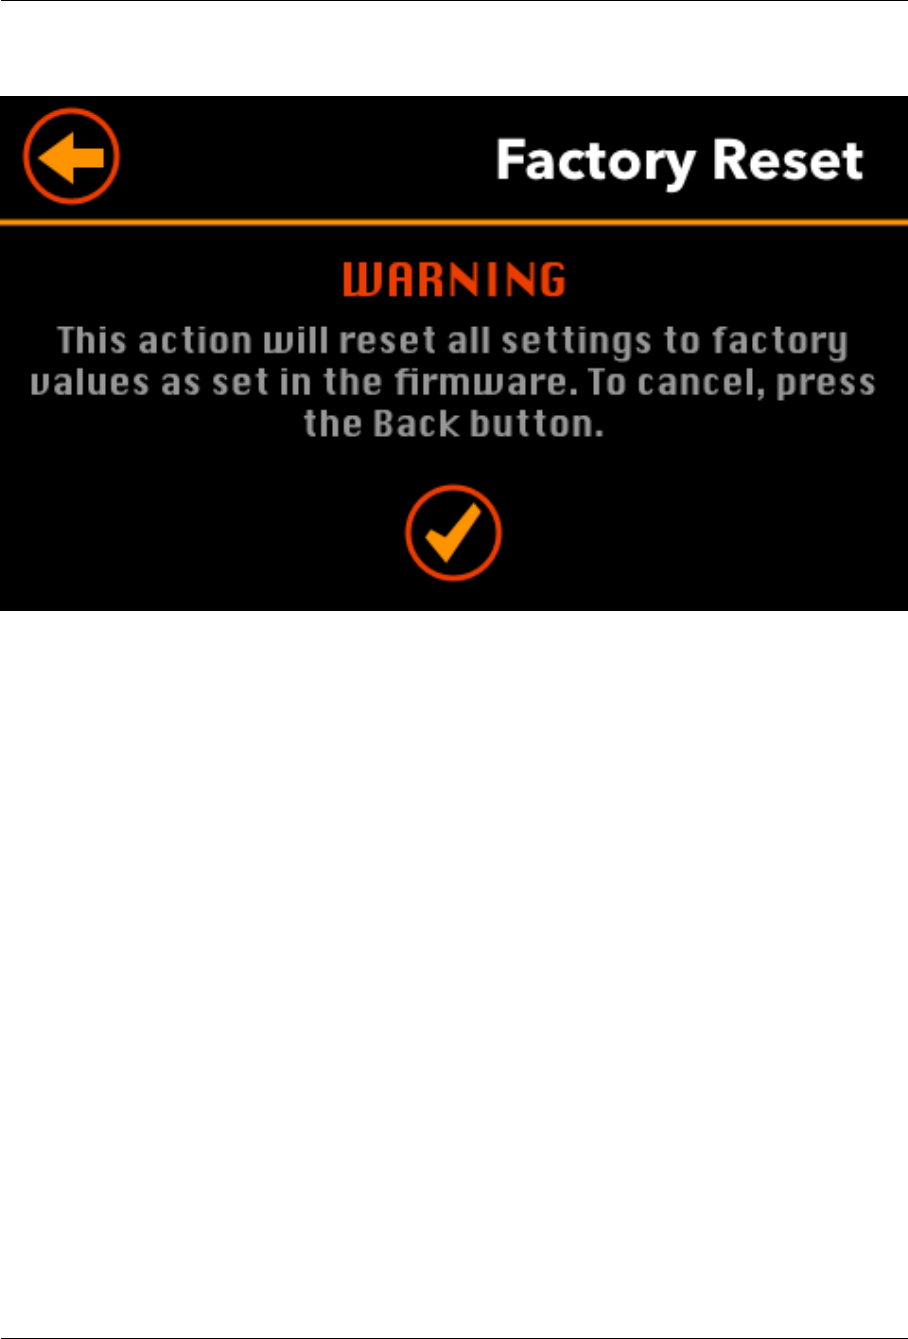
Factory Reset
•
Before resetting all the settings to their default, you have to confirm it by pressing the **Check-
mark* button.
•If you do not want to reset the settings, press the Back button.
Once confirmed, all settings are reset to their default and save in the EEPROM memory of the mother-
board.
Sebastien Andrivet 46
ADVi3++ User Manual 2018-01-12
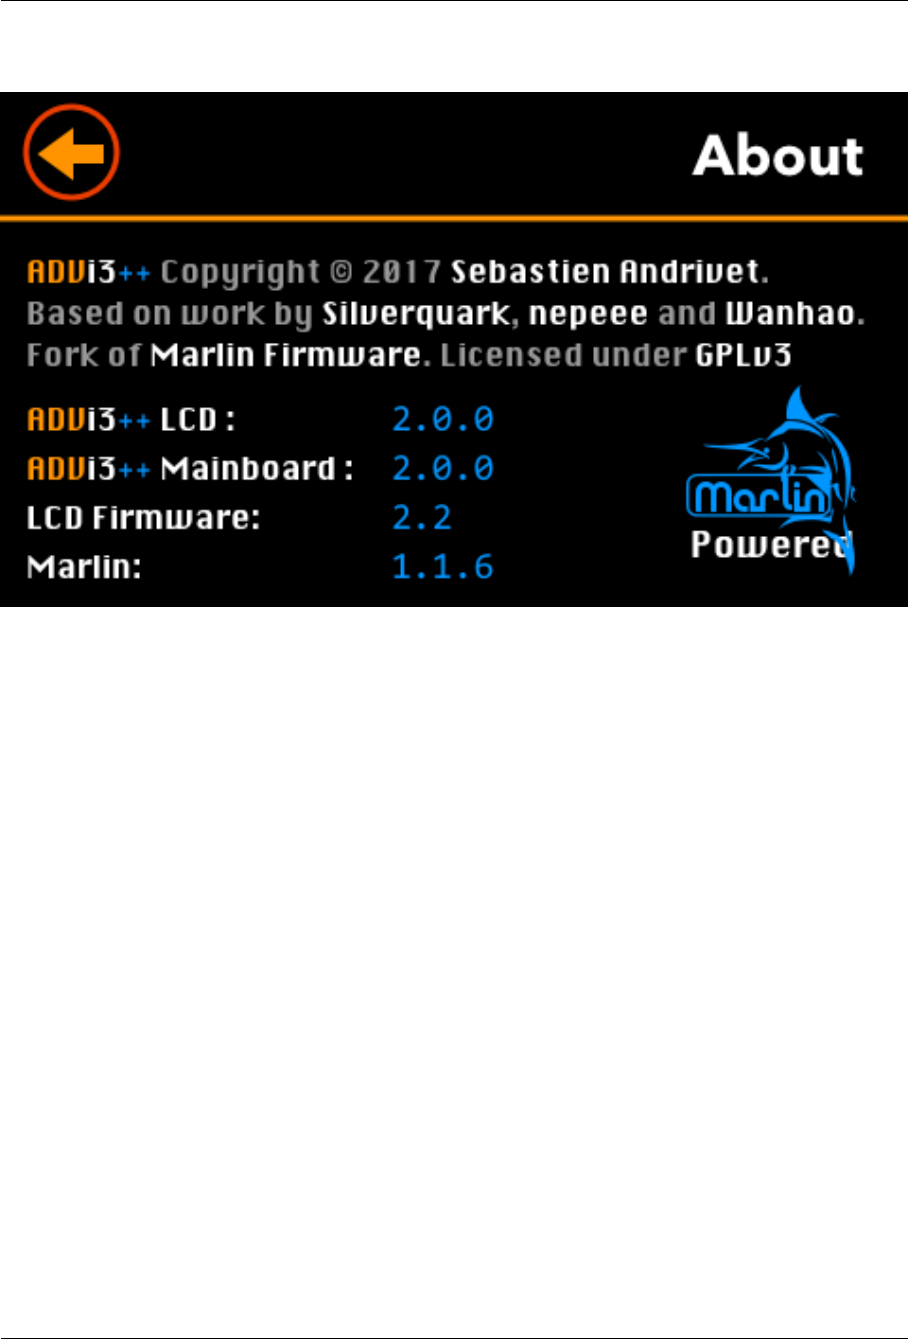
About
This screen display the version of several soware components:
•ADVi3++ LCD: The version of the LCD part of ADVi3++.
•ADVi3++ Motherboard: The version of the Motherboard part of ADVi3++.
•LCD firmware: The version of the (internal) LCD touch screen display.
•Marlin: The version of the Marlin sources used by ADVi3++.
Sebastien Andrivet 47
ADVi3++ User Manual 2018-01-12
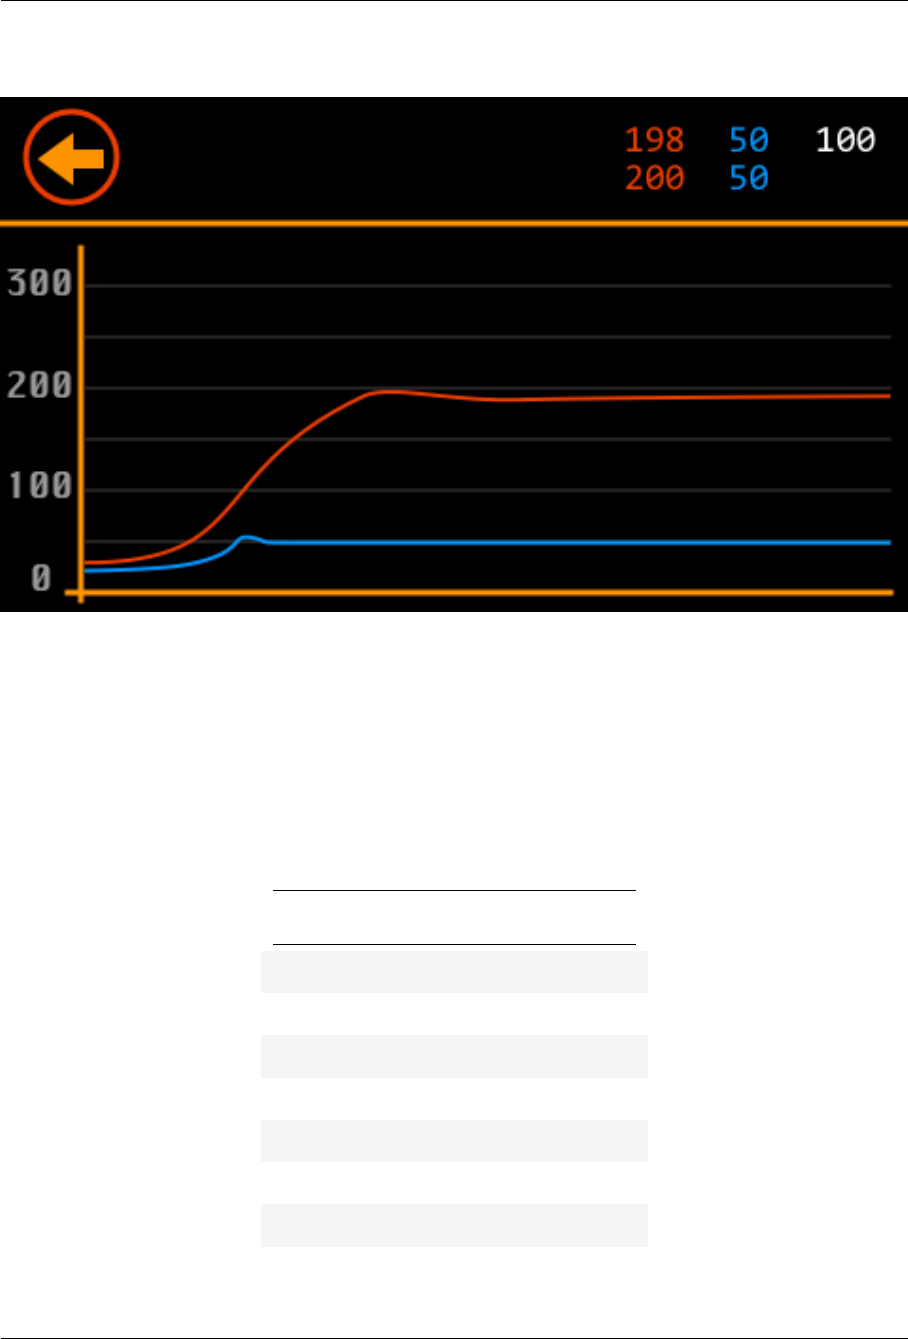
Temperature graph
This screen displays a graph of the temperatures (bed in blue, hot-end in red).
•Press the Back button to go back to the previous screen.
Default Configuration
The default parameters of this firmware are the following:
Settings Default values
Step Settings
X 81
Y 81
Z 400.5
E 94.30
PID Settings
P 33.41
I 1.47
Sebastien Andrivet 48

ADVi3++ User Manual 2018-01-12
Settings Default values
D 189.27
Feedrate Settings
Max X 450
Max Y 450
Max Z 5
Max E 25
Min 0
Travel 0
Acceleration Settings
Max X 1000
Max Y 1000
Max Z 100
Max E 1000
Print 800
Retract 800
Travel 800
Jerk Settings
X 8
Y 8
Z 0.4
E 1.0
Resources
•ADVi3++ Source Code
•Marlin - Open Source 3D Printer Firmware
•RepRap, humanity’s first general-purpose self-replicating manufacturing machine.
•Duplicator i3 Plus Facebook Group
Sebastien Andrivet 49

ADVi3++ User Manual 2018-01-12
•PrusaPrinters Calculator
Note:
In the past, it was possible to download the following resources directory from the dwin.com.cn
website. It is no more the case (you get plenty of errors) so I copy them into the ADVi3++ repository.
•DMT48270M043_05W (LCD Touch Display) Datasheet
•DWIN DGUS Display Development Guide version 4.0 - 2014
•DGUS SDK User Guide 5.1
•DGUS SDK 5.1 Setup - Windows only
Sebastien Andrivet 50
