Afs_doc_04 AFS And Texture Guide
User Manual: Pdf
Open the PDF directly: View PDF  .
.
Page Count: 9
Model and Texture Guide
Advanced
Foliage Shader 4
Content
1. AFS Grass Shaders
2. AFS Foliage Shaders
2.1. General Requirements
2.2. Bending
2.2.1. Adjusting primary and secondary—using vertex colors only
2.2.2. Adjusting primary and secondary bending—using UV4
2.2.3. Comparison
2.2.4. General bending parameters
3. AFS Grass and Foliage shaders and the terrain engine

1. AFS Grass Shaders
Both AFS Grass shaders – the one replacing the built in terrain engine’s grass shader and the shader
for manually placed grass models share the same requirements:
Geometry
Grass should be modelled as single sided geometry.
Please make sure that the pivot is at the bottom of your model. Raising the pivot will make the grass
sink into the terrain or underlaying geometry which will allow you to even add grass on steep slopes.
Vertex Colors
Vertex color alpha controls bending: Alpha = 0 means no bending and should be applied to the lower
vertices whereas Alpha = 1 means full bending which you will probably apply to the upper vertices.
Using vertex colors instead of UV coordinates lets you create even complex shapes like 3 dimension-
al flowers or small saplings with overlapping UVs.
You may also edit the RGB channels of the vertex colors in order to add e.g. ambient occlusion or
some variation in color.
Please note: In case you are not able to edit vertex color alpha (as e.g. you are using Blender) you may
take advantage of using the “AfsGrassModel Postprocessor” script which will automatically create
those colors on importing the mesh. Have a look at the “AfsGrassModel Postprocessor.rtf” to find out
more.
Textures
The grass shaders generally only need a diffuse albedo texture including a transparency mask in the
Alpha channel.
However if you enable the “approximated translucency” option in the “Setup Advanced Foliage
Shader” script you also have to add a translucency texture.
As all grass textures should be combined into one single texture atlas to speed up rendering the
translucency textures have to be as well. And as i am assuming that you will mix manually placed
grass with grass placed within the terrain engine the translucency textures are part ot the global
“Combined Normal/Translucency/Smoothness map” which is needed by the terrain engine to sup-
port e.g. bump mapping on foliage.
Please have a look at the Grass shader documentation for further details.
2. AFS Foliage Shaders
2.1. General Requirements
Geometry
In order to support (receiving and casting) correct shadows and lighting we need double sided geom-
etry on anything that usually just would be a single plane like leaves, for single sided geometry could
not be lit in a proper way.
Please note: The package ships with 2 dedicated deferred foliage shaders of which one uses single
sided geometry (beta).
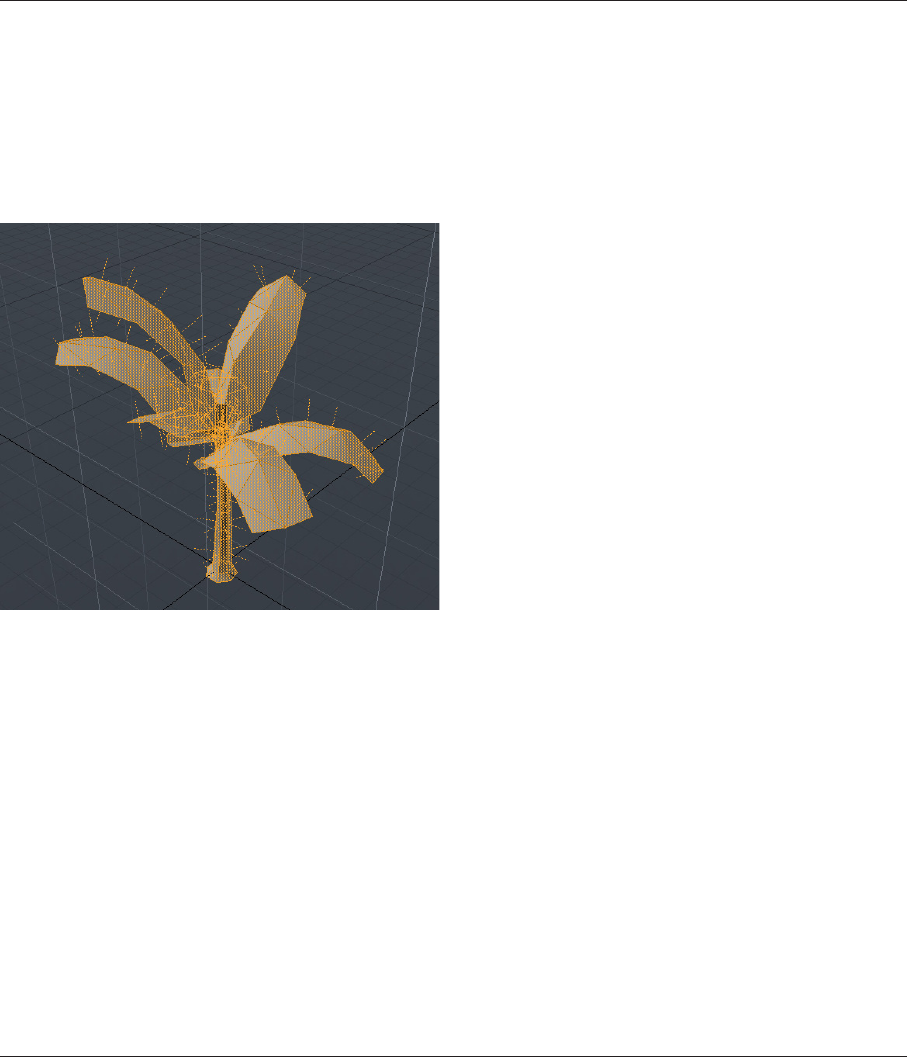
Creating double sided geometry
Just model your model the way you like and
unwrap it. Then select all single, simple planes
for leaves or whatever, duplicate them, flip their
normals and merge them with the original mesh.
In the end we need one single mesh with just
one material assigned to it.
Leaves planes must be double sided in case you use the
regular foliage shaders.
2.2. Bending
The foliage shaders support complex bending as you might know from the built in tree creator shad-
ers. It is controlled by the vertex colors applied to the model and/or UV4 coordinates and consists of
3 blended animations:
1. Primary or Main bending, which animates the entire model along the wind direction.
2. Secondary or Detail bending, adding a higher frequent animation mostly along the y-axis.
3. Edge fluttering.
In order to make the whole blending more believable, there is a fourth factor:
4. per-leaf / per-branch phase variation.
2.2.1. Adjusting primary and secondary—using vertex colors only
When using legacy bending all bending information is stored in vertex colors only. But as we also
would like to have ambient occlusion baked to the alpha channel we only have 3 colors left for 4 par-
ams and have to combine main and detail bending. This will give us less control over the overall look
but a pretty small vertex count.
Please note: Legacy bending is needed on all plants you want to place using the terrain engine.
In case you are looking for some more advanced bending please continue reading at “New bend-
ing—using UV4”.
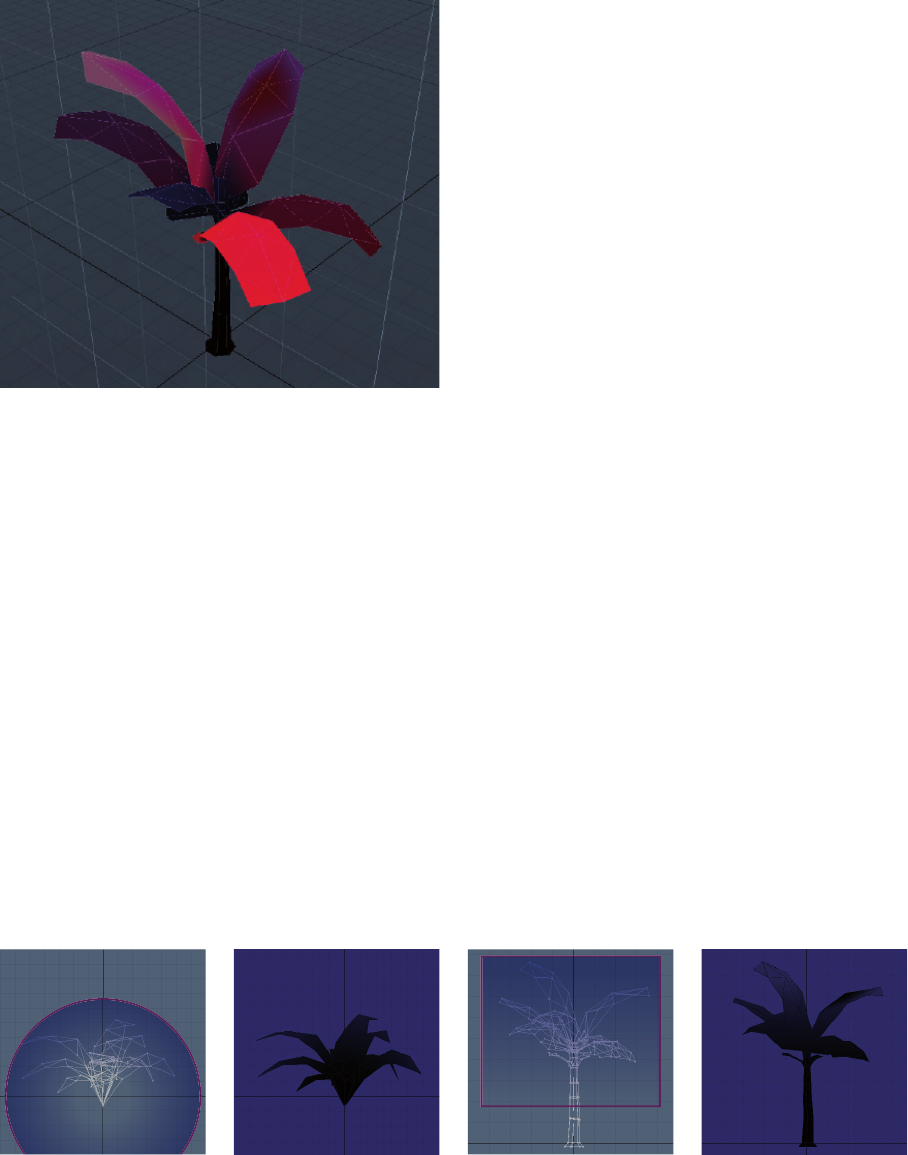
Legacy Bending—Vertex Colors
1. Main bending --> Vertex color blue
2. Detail bending --> Vertex color blue
3. Edge fl uttering --> Vertex color green
4. Phase variation --> Vertex color red
So when setting up main and detail bending
you should keep in mind that wind settings like
direction and strength for all different kinds of
foliage are equal – but different kinds of plants
might react differently to wind according to their
overall size, size of leaves, stiffness and so on
and so forth. For this reason all plants within
your scene need their own main and detail bending which means: All different plants do have to have
unique maximum values of vertex blue in order to achieve a variety in bending. So please constantly
compare all models and their bending to each other within Unity during the process of adjusting the
vertex colors.
Using the AFS Foliage Tool to adjust main and detail bending
You may just set up edge fl uttering and phase variation using your 3d app – and use the AFS Foliage
Tool to set up main and detail bending right within unity.
Manually adjust main and detail bending
The way how to apply vertex color blue depends on what kind of plant you are working on.
The package ships with two different models marking the two poles of supported geometry:
Whereas the fern model is the most simple one, the small banana tree is the most complex one, for it
consists of a rather stiff trunk and pretty fl exible leaves.
Tip: When starting adding vertex colors for main and detail bending to the fi rst model do not as-
sign the highest possible value (which would be blue = 1.0) but start right in the middle:
max blue = 0.5. That leaves you some space for plants with less or more bending.
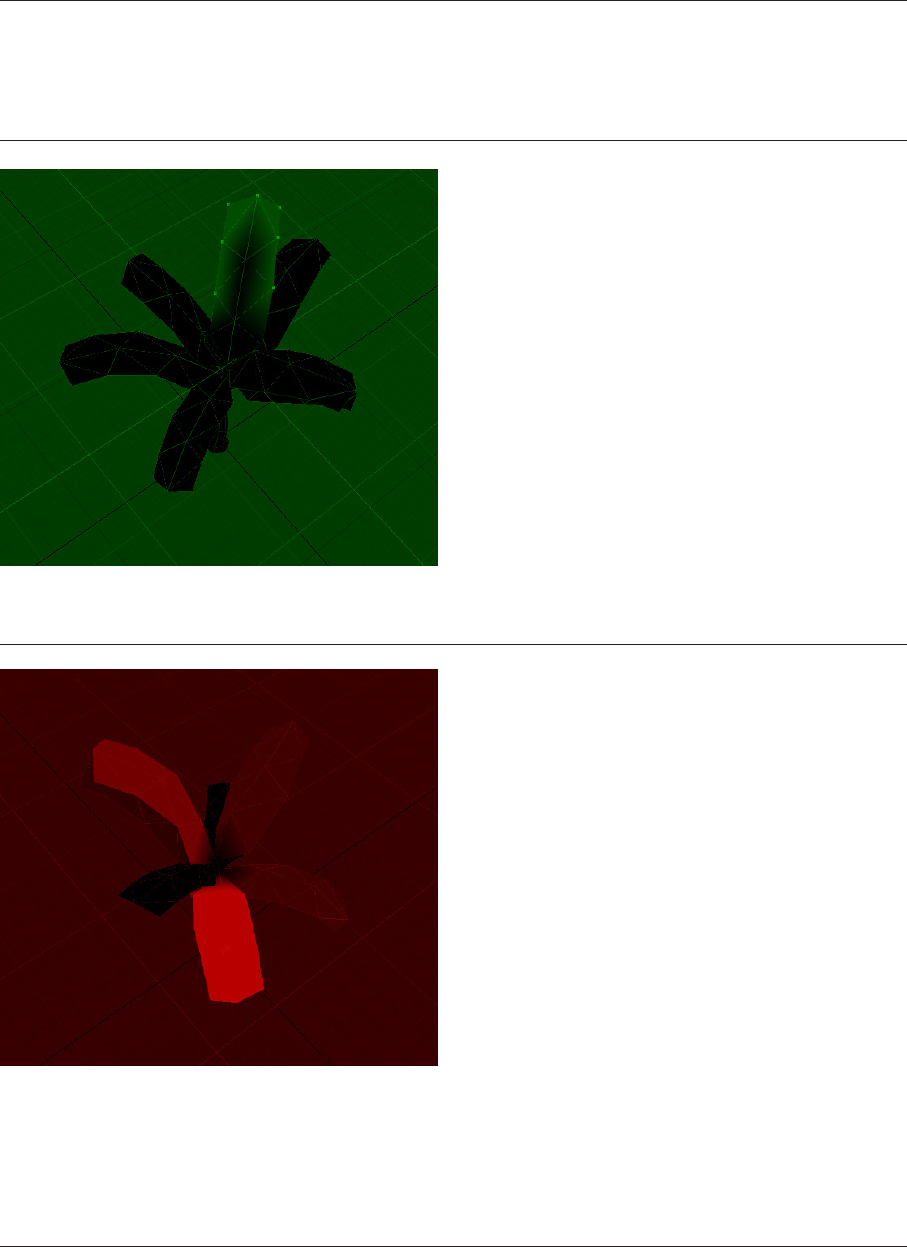
Setting up the fern model
As we do not want to have any bending at its pivot but a lot
of it at its outer leaves we simply assign a radial gradient
from blue=0 at its pivot to blue = 0.5 at its outer regions.
Setting up the banana tree
Simply assign a linear gradient from blue=0 at one third
from its pivot to blue = 0.7 at its upper parts.
2.2.2. Adjusting primary and secondary bending—using UV4
The new bending allows you to store primary and secondary bending separately in UV4.
But as setting up this kind of bending manually is pretty complex i highly recommend to apply it
directly within Unity using the “AFS Foliage Tool”.
You might simply prepare your models by adjusting “edge fl uttering” and “phase variation” as de-
scribed below and the “AFS Foliage Tool” will let you adjust primary and secondary bending along the
y and xw axes.
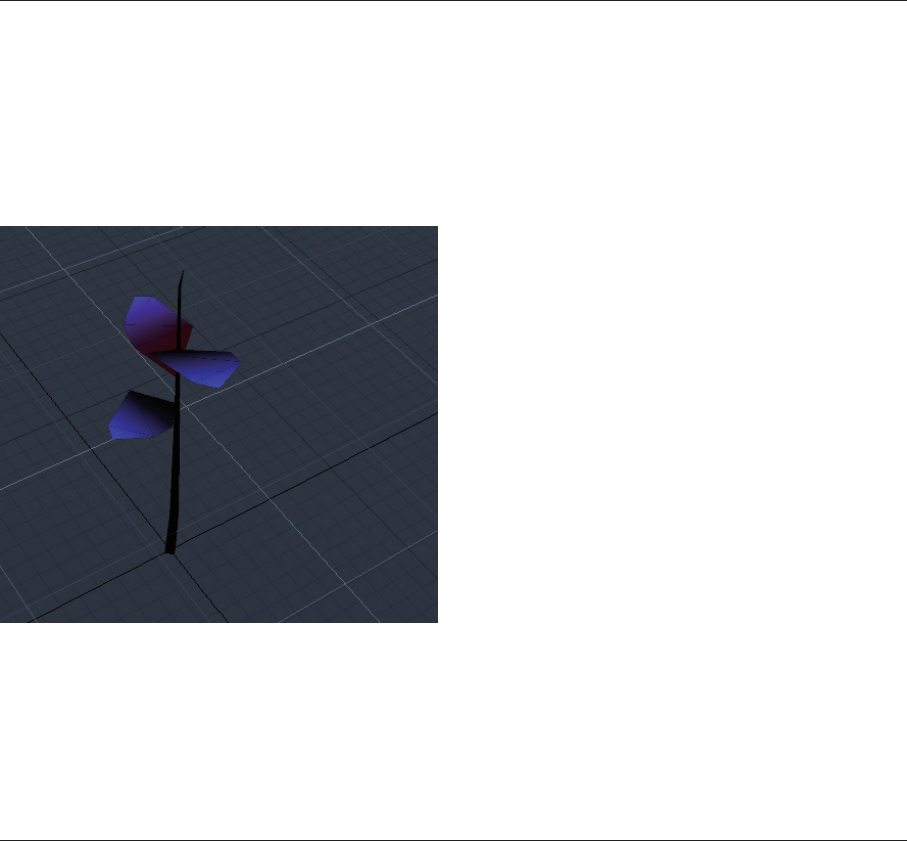
However in case you have more complex models
or want to have most control at least on second-
ary bending you can mask it by adding vertex
colors to the blue channel:
Only apply vertex color blue to parts of your
plants which should be effected by secondary
bending like the leaves in the example on the
left. You may even paint or bake the strength of
the secondary bending by using gradients as
shown on the leaves.
Please note: The red vertex colors on one of the
leaves defi nes per-branch phase variation as
described below.
Using vertex color blue to mask secondary
bending currently is the most advanced technique and allows you to create pretty complex models.
Using such geometry in conjunction with the “AFS Foliage Tool” will make it easy to create lively and
realistically bending plants at the costs of some higher vertex count.
2.2.3. Comparison Vertex Colors only vs. Vertex Colors and UV4
Vertex colors only
- works for manually placed foliage
and foliage placed within the terrain engine
- smaller vertex count
- less control over primary and secondary
bending
Vertex Colors and UV4
- works for manually placed foliage only
- slighly higher vertex count
- better control over primary and secondary
bending
- more variety between adjacent plants
(bending in slighly different phases) when
using the “Combine children AFS” script
2.2.4. General Bending Parameters
No matter if you have chosen to go with legacy or new bending—you will have to set up “Edge flut-
tering” and “per-leaf / per-branch phase variation” manually.
Adjusting edge fluttering
Edge fluttering means just deforming the edges,
using the vertex color’s green channel for
controlling edge stiffness: green=0 --> no
fluttering / green=1 --> full fluttering.
Add edge fluttering to leaves by simply adding
some green to the outer vertices of the leaves.
Tip: Make sure that the connecting point (or piv-
ots) of the leaves have vertex color green=0.
Otherwise leaves might loose connection to their
parent geometry.
Adjusting phase variation
In order to avoid that all leaves or branches of
your model bend to the exact same pulse, you
can add different shades of red to single leaves.
Tip: When using legacy bending make sure that
the connecting points (or pivots) of the leaves
have vertex color red fitting the vertex color red of
the point they are connected to. Otherwise leaves
might loose connection to their parent geometry.
Please note: In case you use Touch Bending
vertex color red is added on top of primary and
secondary bending in order to give you more va-
riety in touch bending. Branches which are pretty
much exposed and should be strongly effected
by touch bending should have high red values. In case you use Leaf Turbulence (see: “Foliage Shaders.
rtf”) vertex color red is multiplied with the given Leaf Turbulence value.
For these reasons i recommend to limit the range of used red shades to e.g. 0.5 – 1.0.
Adding ambient occlusion
Ambient occlusion can be baked to vertex color alpha. How you will do this is up to you and depends
on your 3d App.In order to bake ao within unity you can use a small script, which can be found it
here: http://adrianswall.com/shared/unity_vertex_ao.rar
Textures
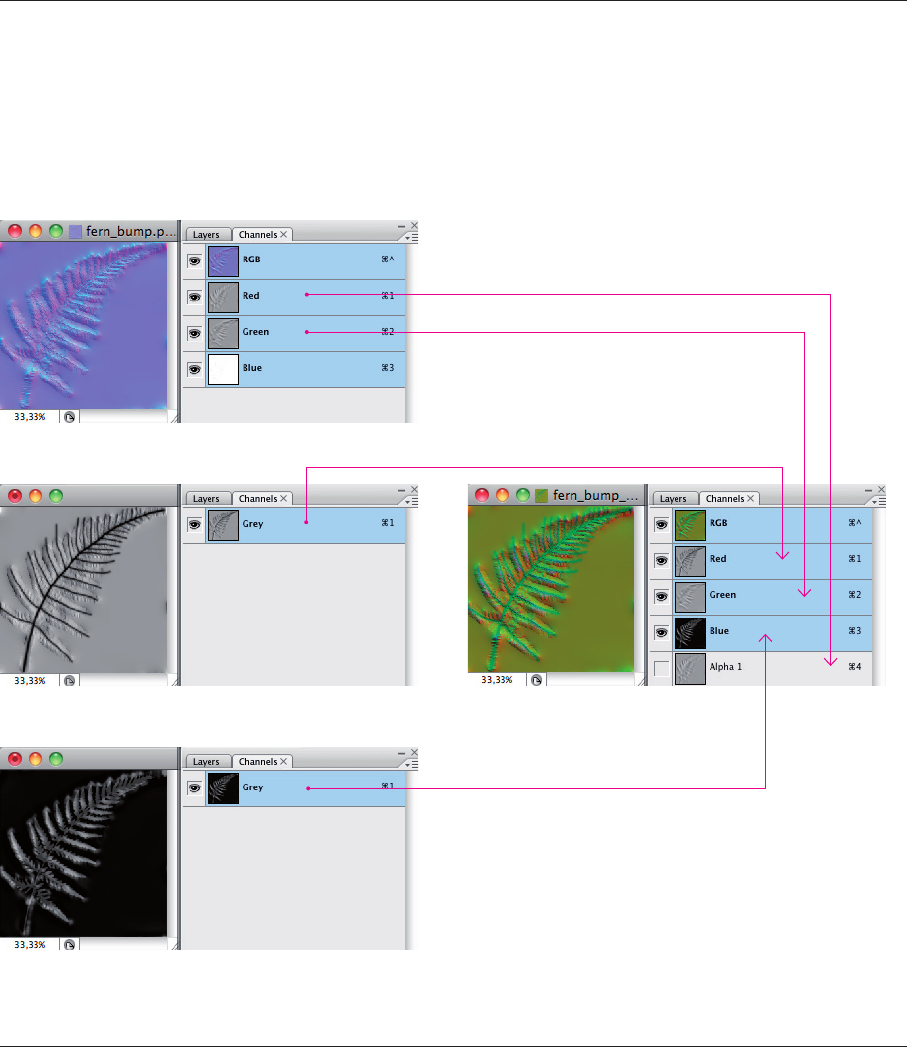
The foliage shaders support diffuse, alpha, normal, smoothness and translucency maps but in order
to keep the texture load and bandwidth footprint as small as possible those are combined into 2
textures: Diffuse/Alpha and Normal/Translucency/Smoothness.
You will have to generate the combined Normal/Translucency/Smoothness texture manually like
shown in the fi gure below.
Normal Map (RGB)
Translucency Map (Grey)
Smoothness Map (Grey)
Texture Atlasing
In order to let the “Combine Children AFS” script combine different plants into one mesh those
plants have to share the same material and textures. So you will have to create a texture atlas for
those plants and map all models to that atlas.
Dynamic and static batching also rely on this texture atlas.
3. AFS Grass and Foliage shaders and the terrain engine
Usually you would just add single textures or models to the terrain and let the terrain engine create
a texture atlas for all given details automatically. Unfortunately this will not work in case you want to
use the AFS grass and foliage shaders within the terrain engine as at least the foliage shaders need
a second texture containing the combined Normal/Translucency/Smoothness maps.
For this reason you will have to create the texture atlas manually and map all objects—no matter if
they use the grass shader or the foliage shader—to that atlas.
Please note: Using a manually generated atlas won’t let you use any grass rendered as billboard or
simple texture, because adding this kind of grass would add a second texture to the internal texture
atlas of the terrain engine and corrupt the texture lookup within the manually setup atlas.
Please note: Placing meshes within the terrain engine implies all disadvantages placing meshes
within the terrain engine usually does: They do not cast shadows and they do not have any collider.
