AMD MxGPU And VMware Deployment Guide, V2.2 Radeon PRO Citrix Mx GPU Deploymentguide 2.2
User Manual: Pdf AMD Radeon PRO Citrix MxGPU Deploymentguide 2.2
Open the PDF directly: View PDF ![]() .
.
Page Count: 53
- AMD MxGPU and VMware
- Overview
- ESXi MxGPU Setup
- Using the Radeon Pro Settings Plug-in for vSphere Client
- Configuring Desktop Pools
- Remote Connection Setup
- AMD MxGPU and VMware

AMD MxGPU and
VMware
Deployment Guide v2.2
This guide describes host and VM configuration procedures to enable AMD
MxGPU hardware-based GPU virtualization using the PCIe SR-IOV protocol.

MxGPU/VMware Deployment Guide v2.2 ©2018 Advanced Micro Devices, Inc. All rights reserved.
DISCLAIMER
The information contained herein is for informational purposes only and is subject to change
without notice. While every precaution has been taken in the preparation of this document, it may
contain technical inaccuracies, omissions, and typographical errors, and AMD is under no
obligation to update or otherwise correct this information. Advanced Micro Devices, Inc. makes no
representations or warranties with respect to the accuracy or completeness of the contents of
this document, and assumes no liability of any kind, including the implied warranties of non-
infringement, merchantability or fitness for particular purposes, with respect to the operation or
use of AMD hardware, software or other products described herein. No license, including implied
or arising by estoppel, to any intellectual property rights is granted by this document. Terms and
limitations applicable to the purchase or use of AMD’s products are as set forth in a signed
agreement between the parties or in AMD's Standard Terms and Conditions of Sale.
©2018 Advanced Micro Devices, Inc. All rights reserved. AMD, the AMD arrow, FirePro, Radeon Pro
and combinations thereof are trademarks of Advanced Micro Devices, Inc. in the United States
and/or other jurisdictions. OpenCL is a trademark of Apple, Inc. and used by permission of
Khronos. PCIe and PCI Express are registered trademarks of the PCI-SIG Corporation. VMware is a
registered trademark of VMware, Inc. in the United States and/or other jurisdictions. Other names
are for informational purposes only and may be trademarks of their respective owners.
REVISION HISTORY
Version Date Notes
1.0 07/28/2017 First released version
2.0 08/21/2017 Additional plug-in and config info
2.1 09/22/2017 Clarified MxGPUAlarm instructions
2.2 01/22/2018 Minor BIOS requirement change

MxGPU/VMware Deployment Guide v2.2 ©2018 Advanced Micro Devices, Inc. All rights reserved.
iii
OVERVIEW
Table of Contents
Overview ................................................................................................................. 1
Why MxGPU? ...............................................................................................................................2
System Topology .......................................................................................................................3
Hardware and Software Requirements .....................................................................................4
ESXi MxGPU Setup .................................................................................................. 7
Prerequisites ...............................................................................................................................8
Using the MxGPU Setup Script ..................................................................................................8
Modifying MxGPU Settings ..................................................................................................... 11
VF Passthrough ........................................................................................................................ 12
Automatic VF Assignment Using the MxGPU Setup Script .................................................. 14
Specifying Eligible Virtual Machines ....................................................................................... 16
Adding the Graphics Driver To a VM ....................................................................................... 18
VM Snapshots and Templates ................................................................................................ 19
Using the Radeon Pro Settings Plug-in for vSphere Client.................................... 21
Installing the Radeon Pro Driver ............................................................................................. 22
Installing the Plug-in on VMware vCenter Server .................................................................. 23
Radeon Pro Settings Registration Tool................................................................................... 23
VMware Managed Object Browser.......................................................................................... 24
Offline ....................................................................................................................................... 27
Launching the Plug-in .............................................................................................................. 28
The Radeon Pro Settings Plug-in Interface ............................................................................ 29
The VM Tab............................................................................................................................... 29
The MxGPU Tab........................................................................................................................ 30
Using the Plug-in ...................................................................................................................... 31
Manually Assigning MxGPUs to VMs........................................................................................ 31
Automatically Assigning MxGPUs to VMs............................................................................... 32
Configuring MxGPUs................................................................................................................ 33
Known Issues ........................................................................................................................... 34
Updating the Plug-in ................................................................................................................ 35
Troubleshooting ...................................................................................................................... 36

MxGPU/VMware Deployment Guide v2.2 ©2018 Advanced Micro Devices, Inc. All rights reserved.
iv OVERVIEW
Configuring Desktop Pools................................................................................... 39
Enabling Automated Desktop Pools .......................................................................................40
Troubleshooting .......................................................................................................................42
Remote Connection Setup ................................................................................... 43
Setting Up Horizon View Client ...............................................................................................44
Zero Client Setup .....................................................................................................................46

1
MxGPU/VMware Deployment Guide v2.2 ©2018 Advanced Micro Devices, Inc. All rights reserved.
Overview
This Deployment Guide describes configuring VMware® products to use AMD
Multiuser GPU (MxGPU) technology, which allows system administrators to
deploy and manage graphics-accelerated virtual machines using the AMD
FirePro™ S7100X, S7150, and S7150 x2 family of products in MxGPU mode.
MxGPU technology uses the Single Root I/O Virtualization (SR-IOV) PCIe®
virtualization standard to create up to 16 virtual MxGPUs per physical GPU.
These MxGPUs can then be automatically or manually assigned to virtual
machines on the VMware host.

MxGPU/VMware Deployment Guide v2.2 ©2018 Advanced Micro Devices, Inc. All rights reserved.
2OVERVIEW
Why MxGPU?
AMD MxGPU technology offers the following benefits:
• Full Workstation Acceleration: Hardware-based virtualization enables workstation-grade
Radeon™ Pro 2D/3D graphics acceleration using the Single Root I/O Virtualization (SR-IOV)
PCIe virtualization standard. This eliminates proprietary and complex software from the
hypervisor, and allows each VM to use native Radeon™ Pro drivers with natural compatibility
and access to all GPU graphics and compute functions on the server. Each physical GPU can
support 1 to 16 users and requires no profiles. The consistent performance delivered by
hardware-based MxGPU virtualization fully realizes all of the other benefits described here
while also simplifying resource allocation and planning.
•Real-Time Remote Access: Replacing an individual workstation with an access portal allows
each authorized user to access either a desktop (personalized or pooled) and/or applications at
virtually any time from virtually any location on virtually any device via almost any broadband
connection. Flexible permissions allow groups and individuals to access only the resources
they need. Users transmit commands and receive fully-rendered pixels, with all compute and
graphics processing taking place on the server and all data remaining in the datacenter.
Updates made by one user are instantly visible to all users with appropriate access privileges.
•Data Security: Traditional workstations often use locally-stored working copies of data, which
exposes that data to potential loss or theft. Centralizing data storage facilitates backup and
other protective measures while eliminating these possibly catastrophic losses. User sessions
that transmit only commands and fully-rendered pixels but no actual data further mitigate the
risks of unauthorized access. This also allows fast, easy IT management and maintenance from
a single location.
•Scalability and Flexibility: Adding and removing users is as easy as creating or removing
accounts and allocating resources. Users needing access to different applications and/or GPU
performance when shifting projects can receive the resources they need within minutes.
•Effective Version Control: All compute and graphics functions occur on the server. Users
receive only fully-rendered pixels and transmit only commands. The data itself remains in the
datacenter, with no need to transfer large files between locations nor reconcile changes.
Hosting environments in the data center also ensures standardization among all users, further
reducing the need to control versions.

MxGPU/VMware Deployment Guide v2.2 ©2018 Advanced Micro Devices, Inc. All rights reserved.
3
OVERVIEW
•Cost Effectiveness: IT departments no longer need to procure, support, repair, and upgrade
individual workstations with multiple hardware, OS, and application configurations, especially
among ever-shifting project teams. Users simply log in to their virtual desktops at virtually any
time from virtually any device and receive full workstation performance, GPU acceleration, and
application/data access based on their credentials and assigned resources. Predictable,
profile-less GPU assignment simplifies resource allocation and planning with linear scalability
and no additional hardware licensing or other fees beyond the hardware purchase. Persistent
desktops can be used for internal parties with consistent needs, while third parties or users
with widely varying needs can access pooled desktops. There is also less need for personnel to
be on site to work. Additional savings can be realized from a reduced need to transfer large file
between locations and reconcile different versions of that data.
System Topology
The following diagram displays the high-level system topology where a single host is running
multiple MxGPU-enabled virtual machines that are being accessed by remote users on a variety of
devices.

MxGPU/VMware Deployment Guide v2.2 ©2018 Advanced Micro Devices, Inc. All rights reserved.
4OVERVIEW
Hardware and Software Requirements
The following requirements must be met in order to enable MxGPU virtualization:
•Host/Server: Please contact AMD for an up-to-date list of MxGPU-certified servers. Each
server must have the following minimum configuration:
-Graphics Adapter: AMD FirePro™ S7100X, S7150, or S7150 x2.
-CPU: Two or more quad-core Intel VT or AMD-V 64-bit x86-based CPU(s) with MMU
support.
-System memory: 32 GB (minimum; 1 TB maximum). The number of guest VMs and
individual use cases will determine the optimum amount of RAM needed.
-Storage: 500 GB (minimum). The number of guest VMs and individual use cases will
determine the optimum type(s) and amount of storage needed.
-Network adapter: Gigabit Ethernet (GbE) and up.
-BIOS: Enable IOMMU (AMD CPUs) or VT-d (Intel CPUs), SR-IOV, Alternative Routing ID
(ARI), memory mapping above 4 GB, MMIO High Size (if available). UEFI boot is
recommended, but not required. Please refer to your BIOS documentation for instructions
on enabling these options.
-Software: The host/server must have VMware ESXi 6.0 or later installed.
•Client: Any of the following client devices can be used to access virtual machines that have
been configured on the host/server:
- Zero client (up to 4 connectors) with standard mouse, keyboard, and monitor.
- Thin client with standard mouse, keyboard, and monitor running Microsoft® Windows®
Embedded OS.
- Laptop/desktop with standard mouse, keyboard, and monitor running with Microsoft
Windows 7 or later.
Note: Some platforms support additional virtualization options. For example, the
AMD Kaveri APU includes an ARI (Alternative Reroute Interface). Please refer to your
platform documentation for information and instructions.

MxGPU/VMware Deployment Guide v2.2 ©2018 Advanced Micro Devices, Inc. All rights reserved.
5
OVERVIEW
•Administrator System: The system used for administrative functions must be configured as
follows:
-OS: Windows 7 or later (64-bit).
-Browser: Microsoft Internet Explorer® 11+, Microsoft Edge™, Google Chrome™, or Mozilla
Firefox®.
•Guest VM resources: The following table lists some recommended resource allocations for
guest VMs depending on user needs:
•Guest VM configuration: Each guest VM must be configured as follows:
- Parameters: During installation, use the Configuration Parameters window to specify
pciHole.start=2048 and pciHole.end=4096.
-OS: Windows 7 or 10 (64-bit).
-AMD Drivers: Radeon™ Pro Software 17.5.2 or later.
-Client viewer: Horizon Client 7 or later.
User Type/Performance vCPU cores System
memory
(GB)
# of enabled
MxGPUs
Frame buffer
size (MB)1
Workstation
(High-performance)
4 8 2 3840
Power
(Professional)
2 4 4 1920
Knowledge
(Enhanced)
238960
2 3 10 768
Task
(Standard)2
1 2 16 480
Note: All guest memory must be locked/reserved.
1. Amount of memory available to each VF.
2. ESXi limits the number of VFs per GPU to 15.

MxGPU/VMware Deployment Guide v2.2 ©2018 Advanced Micro Devices, Inc. All rights reserved.
6OVERVIEW
This page intentionally left blank.

7
MxGPU/VMware Deployment Guide v2.2 ©2018 Advanced Micro Devices, Inc. All rights reserved.
ESXi MxGPU Setup
Configuring VMware ESXi for MxGPU virtualization is a straightforward
procedure. First, use the setup script to determine how many VFs to assign
to each eligible AMD GPU. Next, specify how to pass virtualized GPUs to VMs.
Install the AMD graphics drivers on each VM, and then consider creating
snapshots of the VMs for backup purposes and to have templates for
accelerating future VM creation.

MxGPU/VMware Deployment Guide v2.2 ©2018 Advanced Micro Devices, Inc. All rights reserved.
8ESXi MxGPU SETUP
Prerequisites
The following prerequisites must be met before configuring MxGPU on an ESXi host:
• The host meets all of the applicable requirements listed in “Hardware and Software
Requirements” on page 4, including BIOS configuration.
• VMware ESXi has been installed on the host (server).
• VMware vSphere Client has been installed on the management system.
• All required VMware licenses have been installed.
• One or more virtual machine(s) meeting all of the applicable requirements in “Hardware and
Software Requirements” on page 4 have been created on the host, and both an operating
system and VMware Horizon have been installed on the virtual machine(s).
Using the MxGPU Setup Script
To configure MxGPU using the setup script:
1. Download the amdgpuv.vib and MxGPU-Setup-Script-Installer.zip files from the
following links:
-ESXi 6.0: http://support.amd.com/en-us/download/
workstation?os=VMware%20vSphere%20ESXi%206.0#catalyst-pro.
-ESXi 6.5: http://support.amd.com/en-us/download/
workstation?os=VMware%20vSphere%20ESXi%206.5#catalyst-pro.
2. Copy the downloaded files to a persistent disrectory, such as the recommended /vmfs/
volumes/datastore1, and then unzip MxGPU-Setup-Script-Installer.zip.
3. If some VMs are not eligible for MxGPU, then open vms.cfg, and then specify the virtual
machines (VMs) that will use the AMD virtual GPUs. Otherwise, proceed directly to Step 4.
4. Edit vms.cfg to include any VMs that should be considered for auto-assign. See “Specifying
Eligible Virtual Machines” on page 16 for more information.
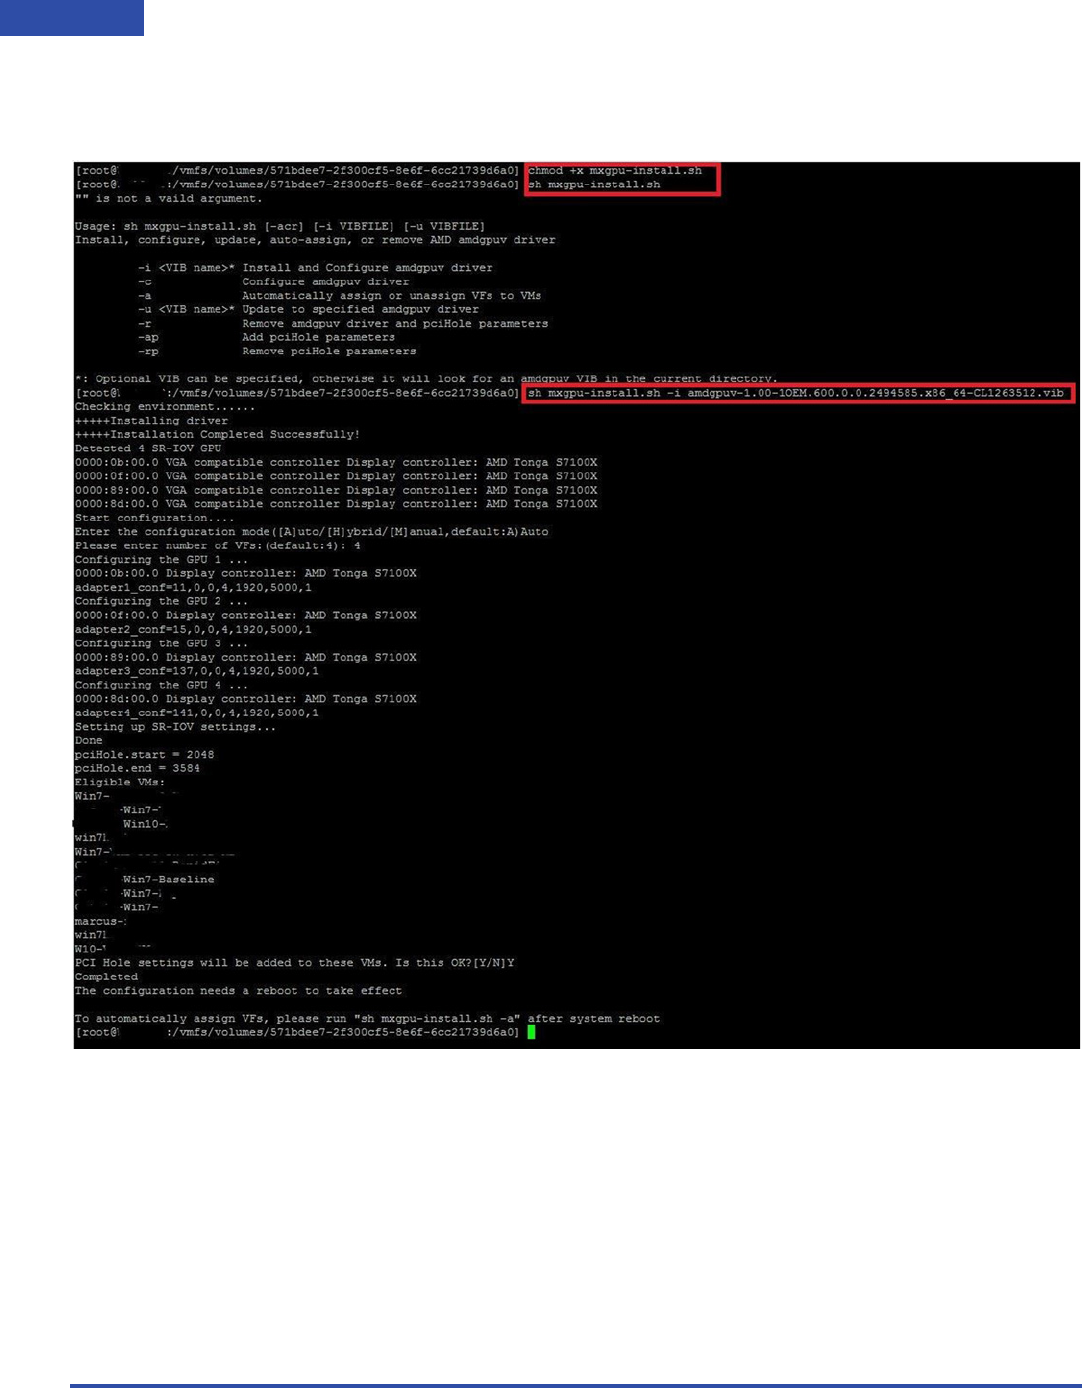
5. Make mxgpu-install.sh executable by executing the command chmod +x mxgpu-.
6. Execute the command sh mxgpu-install.sh to obtain a list of available commands.
Note: When creating the VM, you can select either None or any available GPU when
prompted to assign a virtual GPU.

MxGPU/VMware Deployment Guide v2.2 ©2018 Advanced Micro Devices, Inc. All rights reserved.
9
ESXi MxGPU SETUP
7. Verify that there is only one amdgpuv.vib file in the directory, and then execute the
command sh mxgpu-install.sh -i.
The script confirms system compatibility and then displays all available AMD adapters.
8. GPUs that are in passthrough mode cannot be virtualized. The script will give you the
opportunity to disable passthrough mode on any affected GPU(s). Further, if MxGPU is
available, you will see an option to allow the Radeon Pro Settings vSphere plug-in to configure
MxGPU.
- If MxGPU is enabled and you have access to a vCenter server, then use the plug-in (not the
script) to configure and manage VF assignments. See <xref>.
- If you do not have MxGPU enabled and/or do not have access to a vCenter server, then
proceed to Step 9.
9. The script then presents two options: Auto and Hybrid.
-Auto mode configures the same number of virtual functions (VFs) to all GPUs. Selecting
this mode will prompt you to enter the number of desired VFs per GPU and sets all
parameters (frame buffer, time slice, etc.) accordingly. These settings apply to all AMD
GPUs that are available on the bus. The script adds pciHole parameters to the eligible
VMs that you specified in the vms.cfg file in Step 3.
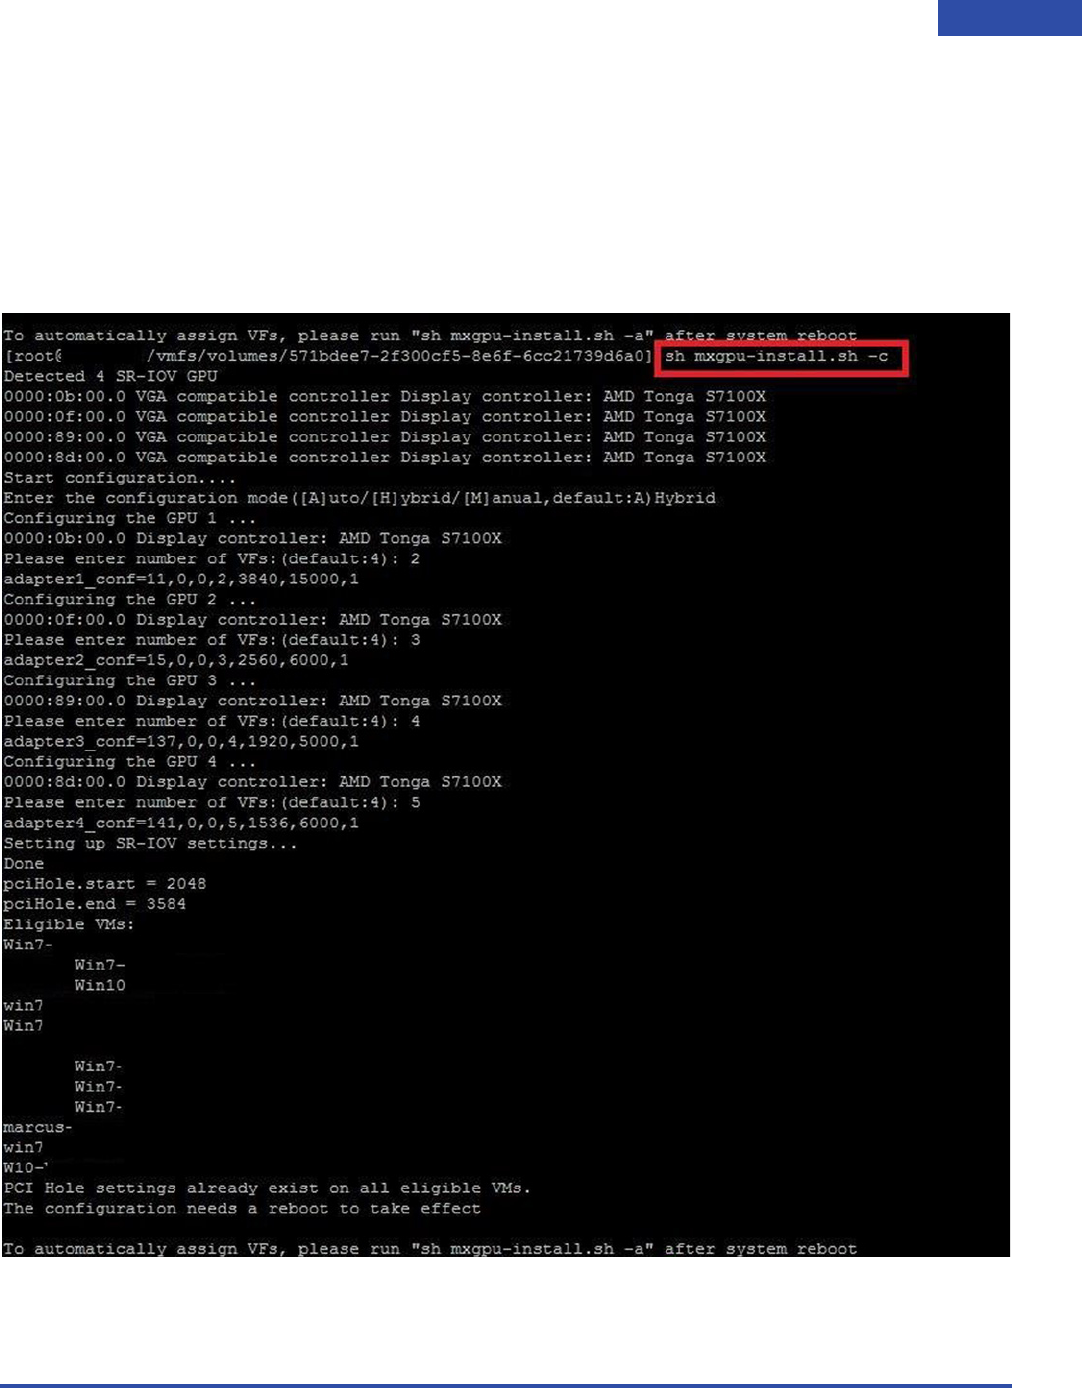
-Hybrid mode allows you to specify the number of VFs to assign on a GPU-by-GPU basis.
Selecting this mode will prompt you to enter the number of desired VFs per GPU and sets all
parameters (frame buffer, time slice, etc.) accordingly. The script adds pciHole
parameters to the eligible VMs that you specified in the vms.cfg file in Step 3. This
process repeats for every remaining AMD GPU.
Note: The script will exit if the directory has more than one amdgpuv.vib file.
Note: You must reboot for changes to take effect.
Note: Any GPUs that are in passthrough mode will not be virtualized, and these
settings will not affect those GPUs.
MxGPU/VMware Deployment Guide v2.2 ©2018 Advanced Micro Devices, Inc. All rights reserved.
10 ESXi MxGPU SETUP
This image depicts a typical MxGPU setup script flow.
MxGPU/VMware Deployment Guide v2.2 ©2018 Advanced Micro Devices, Inc. All rights reserved.
11
ESXi MxGPU SETUP
Modifying MxGPU Settings
To modify MxGPU settings using the setup script, execute the command sh mxgpu-
install.sh -c. The script displays the current settings. You can modify them as described in
“Using the MxGPU Setup Script” on page 8.

MxGPU/VMware Deployment Guide v2.2 ©2018 Advanced Micro Devices, Inc. All rights reserved.
12 ESXi MxGPU SETUP
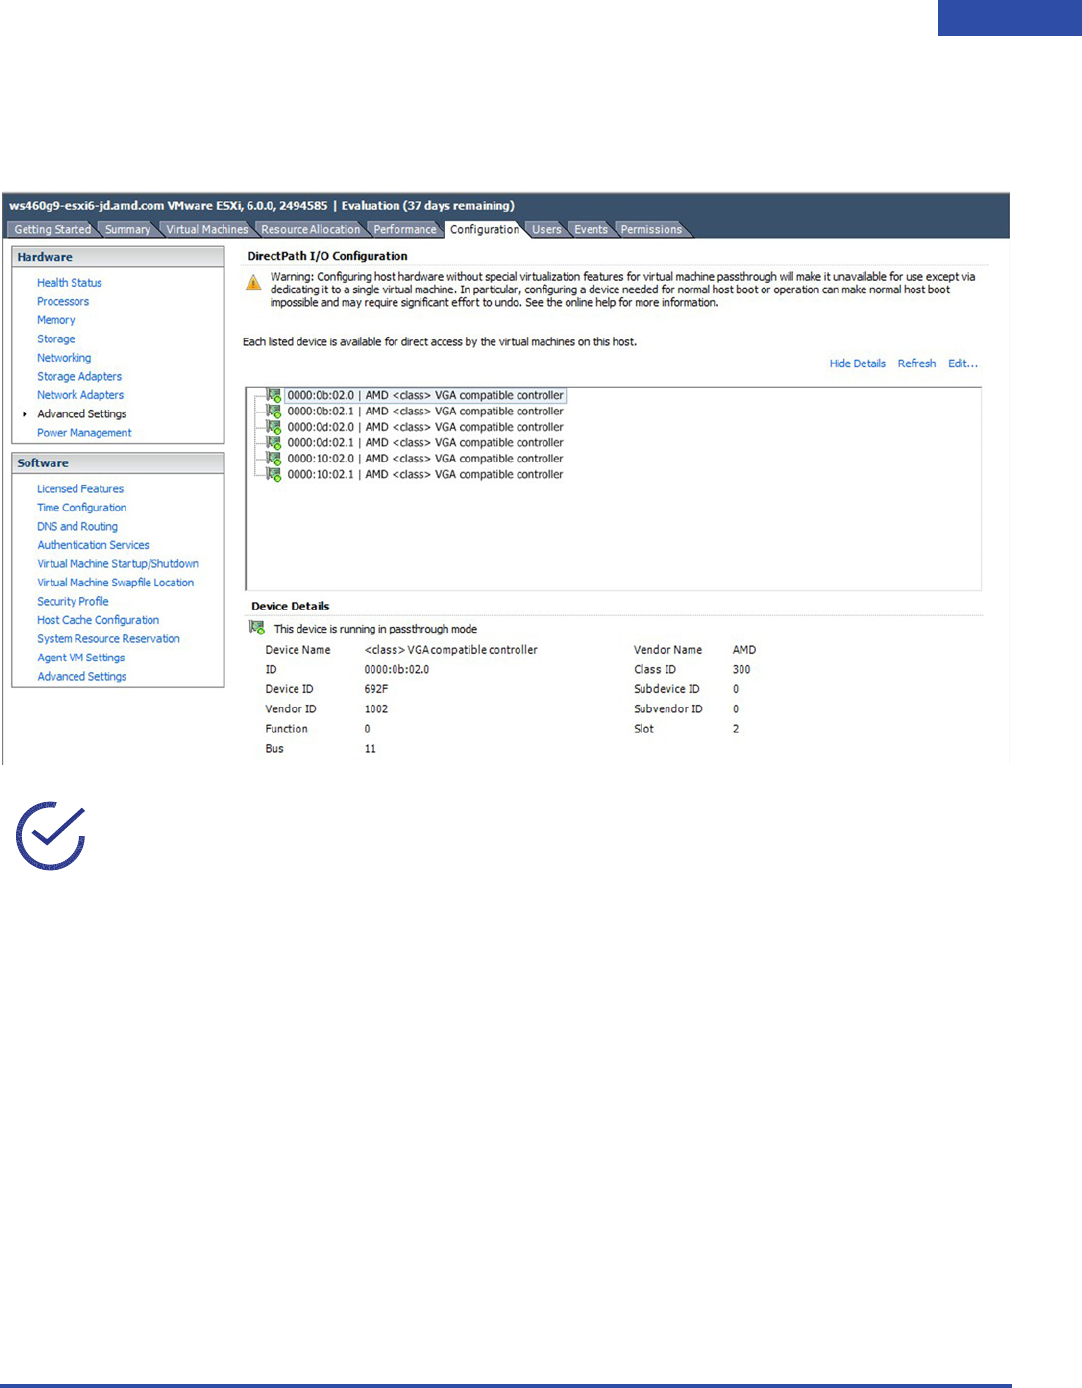
VF Passthrough
Passing through a configured VF is the same as passing through a physical device, provided that
the VM meets the requirements listed in “Hardware and Software Requirements” on page 4.
However, the physical device cannot be configured as a passthrough device, or the VGPU driver
will not install correctly. If that happens, then the VF will not be enabled.
MxGPU/VMware Deployment Guide v2.2 ©2018 Advanced Micro Devices, Inc. All rights reserved.
13
ESXi MxGPU SETUP
Enabled VFs will appear in the list of devices available for direct access by the virtual machines on
the host. No additional operation is needed to move the VF into the passthrough device list.
Note: The pchole.start and pcihole.end settings must be configured as
described in “Hardware and Software Requirements” on page 4.

MxGPU/VMware Deployment Guide v2.2 ©2018 Advanced Micro Devices, Inc. All rights reserved.
14 ESXi MxGPU SETUP
Automatic VF Assignment Using the MxGPU
Setup Script
To automatically assign VFs using the MxGPU setup script:
1. Reboot the system, and then verify that VFs are populated on the device list.
2. Navigate to the directory containing the mxgpu-install.sh script, and then launch the
script.
3. When prompted, select Auto-Assign.
4. Execute the desired command(s) to assign/unassign VFs:
-Assign: Assign VFs to all eligible VMs, if there are enough VFs. This command will exit if the
number of eligible VMs exceeds the number of VFs. By default, all VMs on the host are
considered eligible. If needed, modify vms.cfg to specify which VMs are elligibile for
automatic VF assignment, as described in “Specifying Eligible Virtual Machines” on page 16.
-Unassign: Unassign VFs from all eligible VMs. This command will only unassign VFs from
eligible VMs.
-List: List all VM and GPU configurations on the host.
-Help: Print a helpful message with these descriptions.
5. Power on the VMs, and then refer to Section 3.4 of the Basic Virtual Environment Setup for
instructions on installing the GuestOS driver in a VM.
Note: There is a known issue where VMs will show “ghost” VFs that are assigned but
not actually available on the bus after reconfiguring amdgpuv and restarting. To work
around this issue, use the Unassign command to unassign all the “ghost” VFs, and
then run the automatic assignment with the Assign command to assign real VFs to
VMs.

MxGPU/VMware Deployment Guide v2.2 ©2018 Advanced Micro Devices, Inc. All rights reserved.
15
ESXi MxGPU SETUP
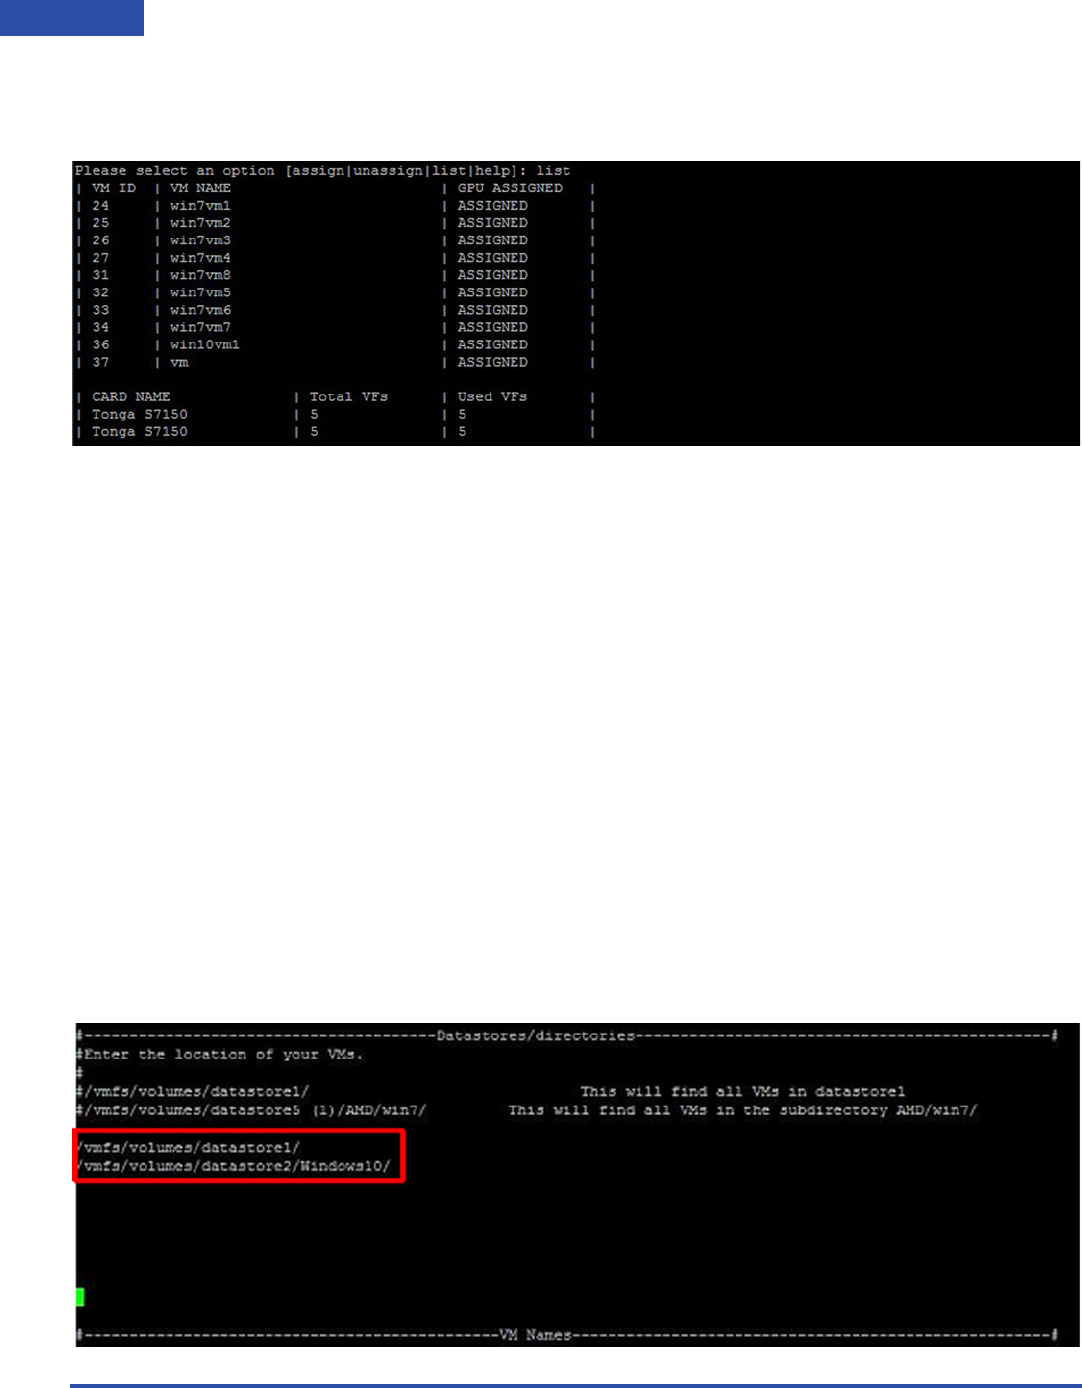
This image displays the auto-assignment options before assigning VFs to VMs.
MxGPU/VMware Deployment Guide v2.2 ©2018 Advanced Micro Devices, Inc. All rights reserved.
16 ESXi MxGPU SETUP
This image displays the auto-assignment options after assigning VFs to VMs.
Specifying Eligible Virtual Machines
This section describes how to specify which VMs on a host will be considered eligible for adding
and removing PCI Hole Setting. It also describes assigning and unassigning VFs using the MxGPU
auto-assign function.
1. Use a text editor to edit vms.cfg, which is contained within MxGPU-Setup-Script.zip.
This file should be present in the same directory as mxgpu-install.sh.
2. The line / #REMOVE this line before making changes to this file. specifies
that all VMs on the host as eligible. Remove it if you want to specify individual VMs.
3. Specify eligible VMs as follows:
-Specify all VMs in a directory or datastore: Enter the path to a directory or datastore in
the Datastore/Directories section. All VMs under that directory or datastore will be
recursively considered an eligible VM. You can enter multiple directories in this section by
adding one directory per line. This example specifies that all VMs in datastore1 and all
VMs in the datastore2/WIndows10 directory are eligible.
MxGPU/VMware Deployment Guide v2.2 ©2018 Advanced Micro Devices, Inc. All rights reserved.
17
ESXi MxGPU SETUP
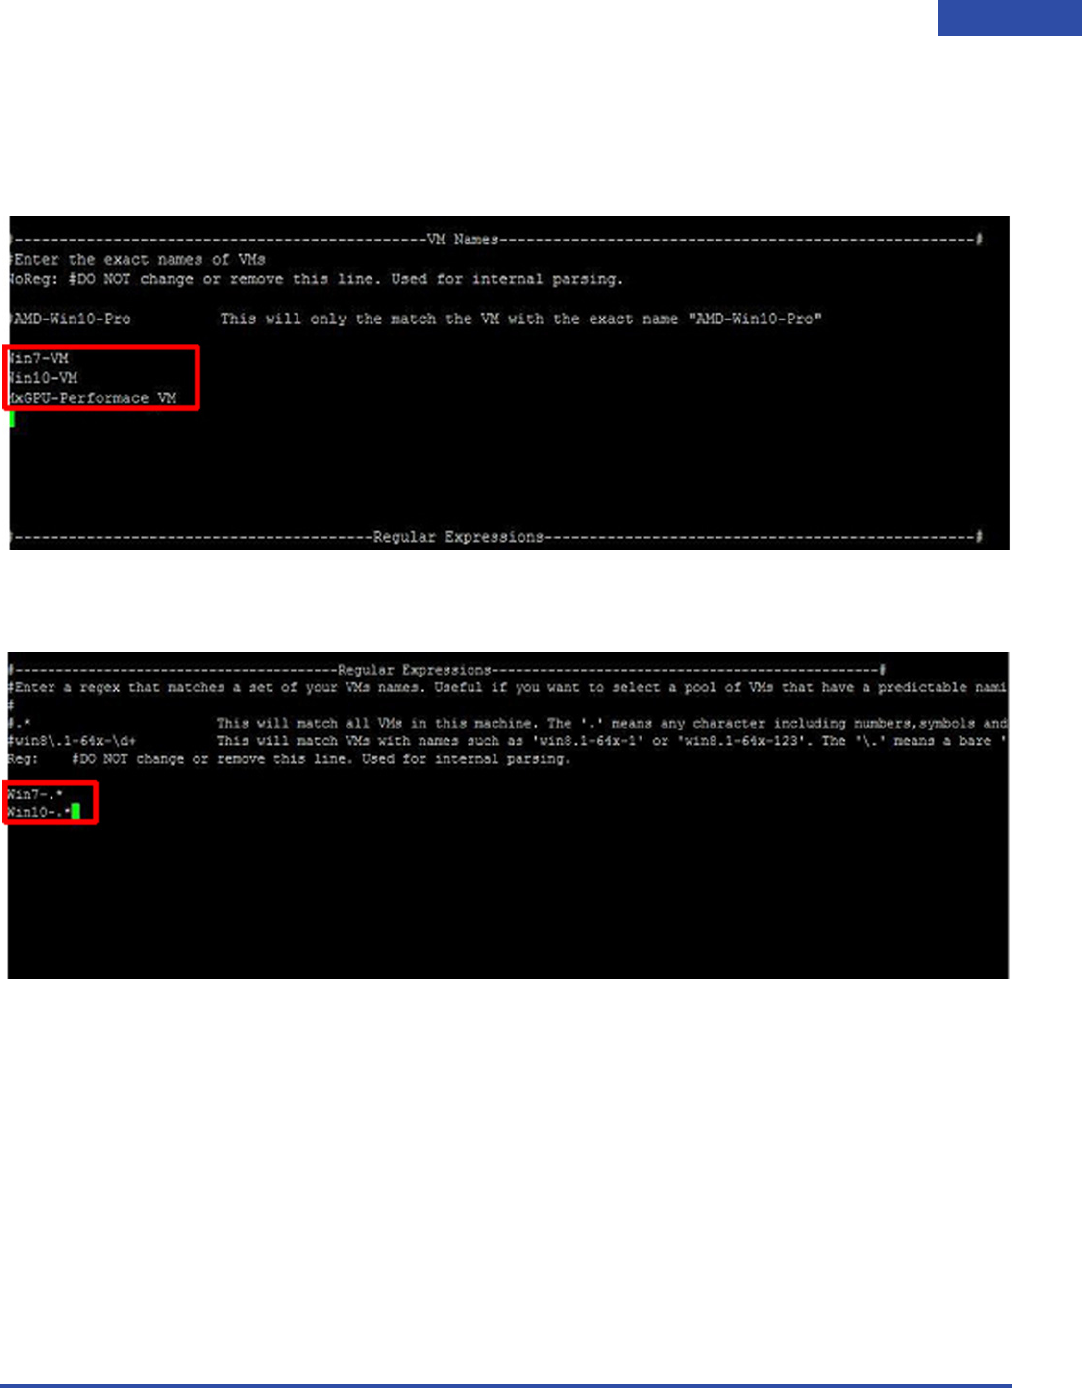
-Specify VMs by name: Enter the names of the desired VMs in the VM Names section, one
name per line. The listed VMs will be considered eligible. This example shows some VMs
specified by name.
-Specify VMs by regular expression: Enter a regular expression that can match multiple
VMs that follow a similar naming pattern. This can be useful to specify a collection or pool of
VMs. This example specifies all VMs that start with Win7- and Win10-.
You may use any one or combination of these methods to specify eligible VMs. For example, you
can specify all VMs in datastore1 and all VMs that start with Win7-. VMs that meet one or more
of these expressions will be eligible.
MxGPU/VMware Deployment Guide v2.2 ©2018 Advanced Micro Devices, Inc. All rights reserved.
18 ESXi MxGPU SETUP
Adding the Graphics Driver To a VM
AMD MxGPU technology uses the Single Root I/O Virtualization (SR-IOV) PCIe® virtualization
standard to create up to 16 virtual MxGPUs per physical GPU. The procedure for installing the
MxGPU driver on a VM is identical to the procedure used to install the driver on a VM that is using
regular vDGA passthrough. To install the driver using Horizon View Agent 6.1.0 or higher:
1. If needed, create a guest VM that complies with the requirements described in “Hardware and
Software Requirements” on page 4 without GPU passthrough, and then reboot that VM.
Alternatively, you may access an existing VM that meets these requirements.
2. Install VMtools from the vSphere client and VM console, and then reboot the VM.
3. Install unified Horizon View Agent and Horizon View Agent Direct Connection from the
vSphere client and VM console, and then shut down the guest VM.
4. Assign an AMD GPU device to the guest VM from the vSphere Client, and then start the VM.
Wait until the Summary tab displays an IP address for the guest VM.
5. On the client system, launch the Horizon View client application from client system, configure
it for PCoIP and full screen, and then connect to the guest VM. See <xref>.
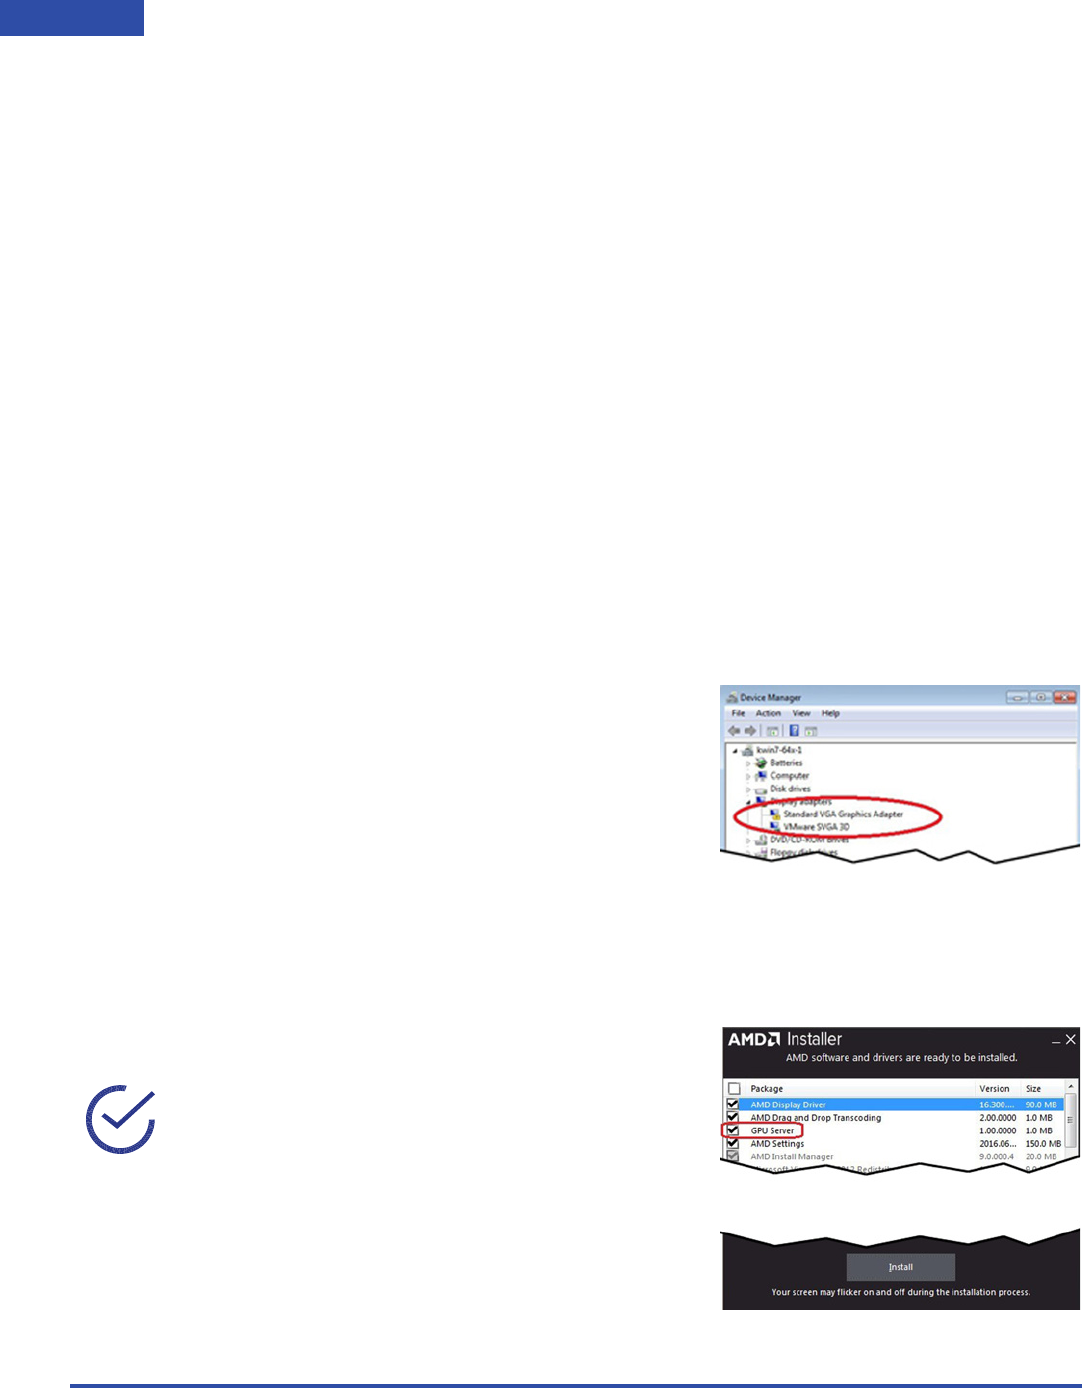
6. On the guest VM, launch Device Manager, and then verify
that a Standard VGA Graphics Adapter appears under
Display Devices.
7. Download the AMD graphics driver package to the VM from
the following links:
-ESXi 6.0: http://support.amd.com/en-us/download/
workstation?os=VMware%20vSphere%20ESXi%206.0#catalyst-pro.
-ESXi 6.5: http://support.amd.com/en-us/download/
workstation?os=VMware%20vSphere%20ESXi%206.5#catalyst-pro.
8. Launch setup.exe.
The AMD Installer window appears.
Note: The GPU Server option must be
present and selected in the AMD Installer
window, or the installer will not recognize the
GPU as a virtualization-capable device.

MxGPU/VMware Deployment Guide v2.2 ©2018 Advanced Micro Devices, Inc. All rights reserved.
19
ESXi MxGPU SETUP
9. Click the Install button.
The system installs the AMD graphics driver package. During installation:
- The progress bar may remain at 2% for some time, but will eventually advance.
- If the screen freezes and/or the primary desktop disappears, close the Horizon View
connection and then reconnect to the guest VM.
- The console will appear frozen once the driver assumes control of the desktop; use Horizon
View to view the virtual desktop going forward.
10. Reboot and then reconnect to the guest VM once it comes back up (once an IP address appears
in the Summary tab).
11. Adjust your displays and screen resolution as appropriate for the Windows version installed on
the guest VM.
VM Snapshots and Templates
The snapshot feature allows you to copy an instance of a VM in a particular state. You can then use
this snapshot to create stable backup points for that VM. You can also use the snapshot to create a
template that you can use to deploy future VMs without having to install the OS/drivers on those
VMs. Please see your VMware documentation for instructions.

MxGPU/VMware Deployment Guide v2.2 ©2018 Advanced Micro Devices, Inc. All rights reserved.
20 ESXi MxGPU SETUP
This page intentionally left blank.

21
MxGPU/VMware Deployment Guide v2.2 ©2018 Advanced Micro Devices, Inc. All rights reserved.
Using the Radeon Pro Settings
Plug-in for vSphere Client
The Radeon Pro Settings plug-in allows you to create up to 16 virtual MxGPUs
per physical GPU. These MxGPUs can be automatically or manually assigned
VMs on the ESXi Host across multiple hosts and datacenters with only a few
mouse click. The plug-in allows you to change MxGPU partitioning on the fly,
with no need to reboot the ESXi host system. The plug-in also allows easy
visualization of your deployment with partition usage for MxGPUs and VMs.

MxGPU/VMware Deployment Guide v2.2 ©2018 Advanced Micro Devices, Inc. All rights reserved.
22 USING THE RADEON PRO SETTINGS PLUG-IN
Installing the Radeon Pro Driver
You will need to install the Radeon Pro drivers (amdgpuv and amdgpuv-cim) on each VMware
ESXi Host that will be managed by the plug-in interface. To install the drivers:
1. Download the appropriate file for your ESXi version:
-VMware ESXi 6.5: Download the AMD FirePro - VMware vSphere ESXi 6.5 driver and install
the following:
amdgpuv-1.02-1OEM.650.0.0.4598673.x86_64-CL1356850.vib
amdgpuv-cim-1.00-6.5.0-4598673.vib
-VMware ESXi 6.0: Download the AMD FirePro - VMware vSphere ESXi 6.0 driver and install
the following:
amdgpuv-1.02-1OEM.600.0.0.2494585.x86_64-CL1356850.vib
amdgpuv-cim-1.00-6.0.0-2768847.vib
2. Reboot the server.
You will see the following no matter how many virtual MxGPUs are configured for each GPU:
-VMware ESXi 6.0: 15 MxGPUs on the bus for each GPU.
-VMware ESXi 6.5: 16 MxGPUs on the bus for each GPU.
3. Copy the amdgpuv driver and CIM to a data store using SSH.
4. Install the driver by executing the following commands:
esxcli software vib install --no-sig-check -v /vmfs/volumes/
datastore1/amdgpuv-1.02- 1OEM.650.0.0.4598673.x86_64.vib
esxcli software vib install --no-sig-check -v /vmfs/volumes/
datastore1/amdgpuv-cim-1.00- 6.5.0-4598673.vib

MxGPU/VMware Deployment Guide v2.2 ©2018 Advanced Micro Devices, Inc. All rights reserved.
23
USING THE RADEON PRO SETTINGS PLUG-IN
Installing the Plug-in on VMware vCenter Server
There are three ways to install the Radeon Pro Settings plug-in:
•Registration Tool: The Radeon Pro Settings Registration Tool allows a Windows or Linux
computer to remotely register the plug-in to a vSphere Client, and to quickly update or register
the plug-in by providing the client’s credentials. See “Radeon Pro Settings Registration Tool”
on page 23.
•VMware Managed Object Browser: See “VMware Managed Object Browser” on page 24.
•Offline: Use this method if you are unable to download the plug-in via the vCenter server. See
“Offline” on page 27.
Radeon Pro Settings Registration Tool
To install the Radeon Pro Settings plug-in using the Registration Tool:
1. Download the Registration Tool from http://support.amd.com/en-us/download/
workstation?os=VMware%20vSphere%20ESXi%206.5#beta to your local system.
2. Launch the RPSRegistrator for Linux or Windows, depending on your OS, and then click Next.
The RPS window appears.
3. Enter the following information in the appropriate fields:
- IP address or FQDN of the vSphere Client.
- Username and password.
- Port.
- Use the Version pull-down menu to select the plug-in version to install.
- If you want to enable support for non-persistent virtual machines, then check the
checkbox. This feature is currently in development.
MxGPU/VMware Deployment Guide v2.2 ©2018 Advanced Micro Devices, Inc. All rights reserved.
24 USING THE RADEON PRO SETTINGS PLUG-IN
4. Click Connect.
5. The tool will attempt to register and install the plug-in on the server. If the plug-in is already
registered, then click Update when prompted
6. If registration was successful, you will be prompted to restart the vSphere Client Service.
7. Log in to the VMware vSphere Web Client (Flash).
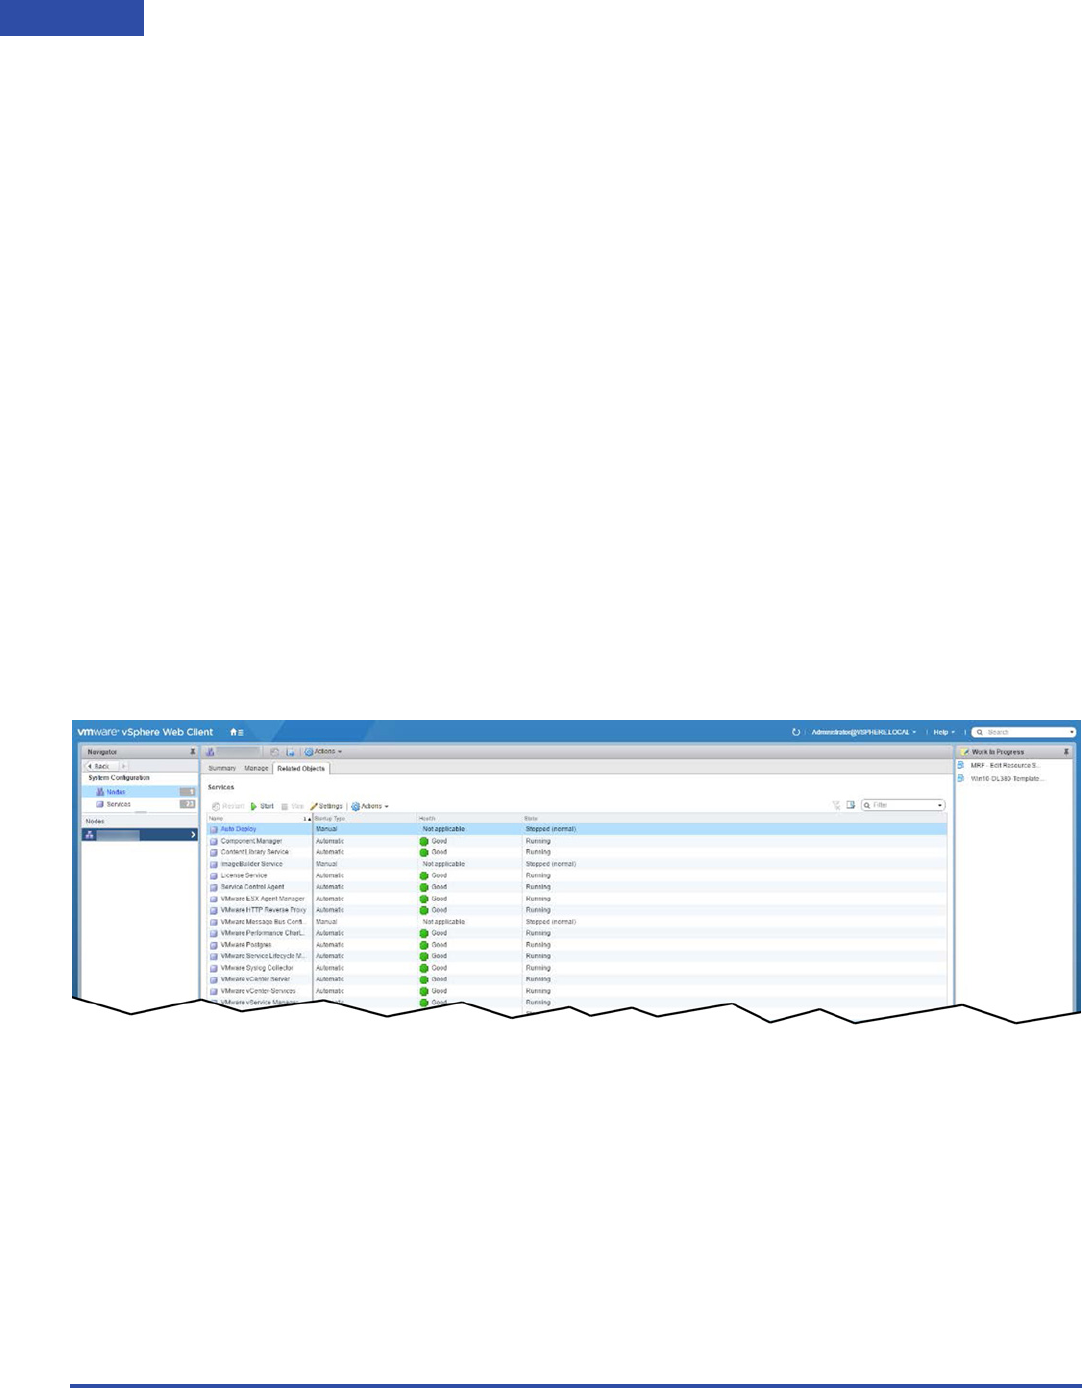
8. Click the Home icon, and then select Administration>Deployment>System Configuration.
9. In the left navigation bar, click Nodes, and then select the desired VMware vCenter server.
10. Select the Related Objects tab, and then start the VMware vSphere Client service.
VMware Managed Object Browser
To install the Radeon Pro Settings plug-in using the VMware Managed Object Browser:
1. Log in to the VMware vSphere Web Client (Flash).
2. Click the Home icon, and then select Administration>Deployment>System Configuration.
3. In the left navigation bar, click Nodes, and then select the desired VMware vCenter server.
4. Select the Related Objects tab, and then stop the VMware vSphere Client service.
MxGPU/VMware Deployment Guide v2.2 ©2018 Advanced Micro Devices, Inc. All rights reserved.
25
USING THE RADEON PRO SETTINGS PLUG-IN
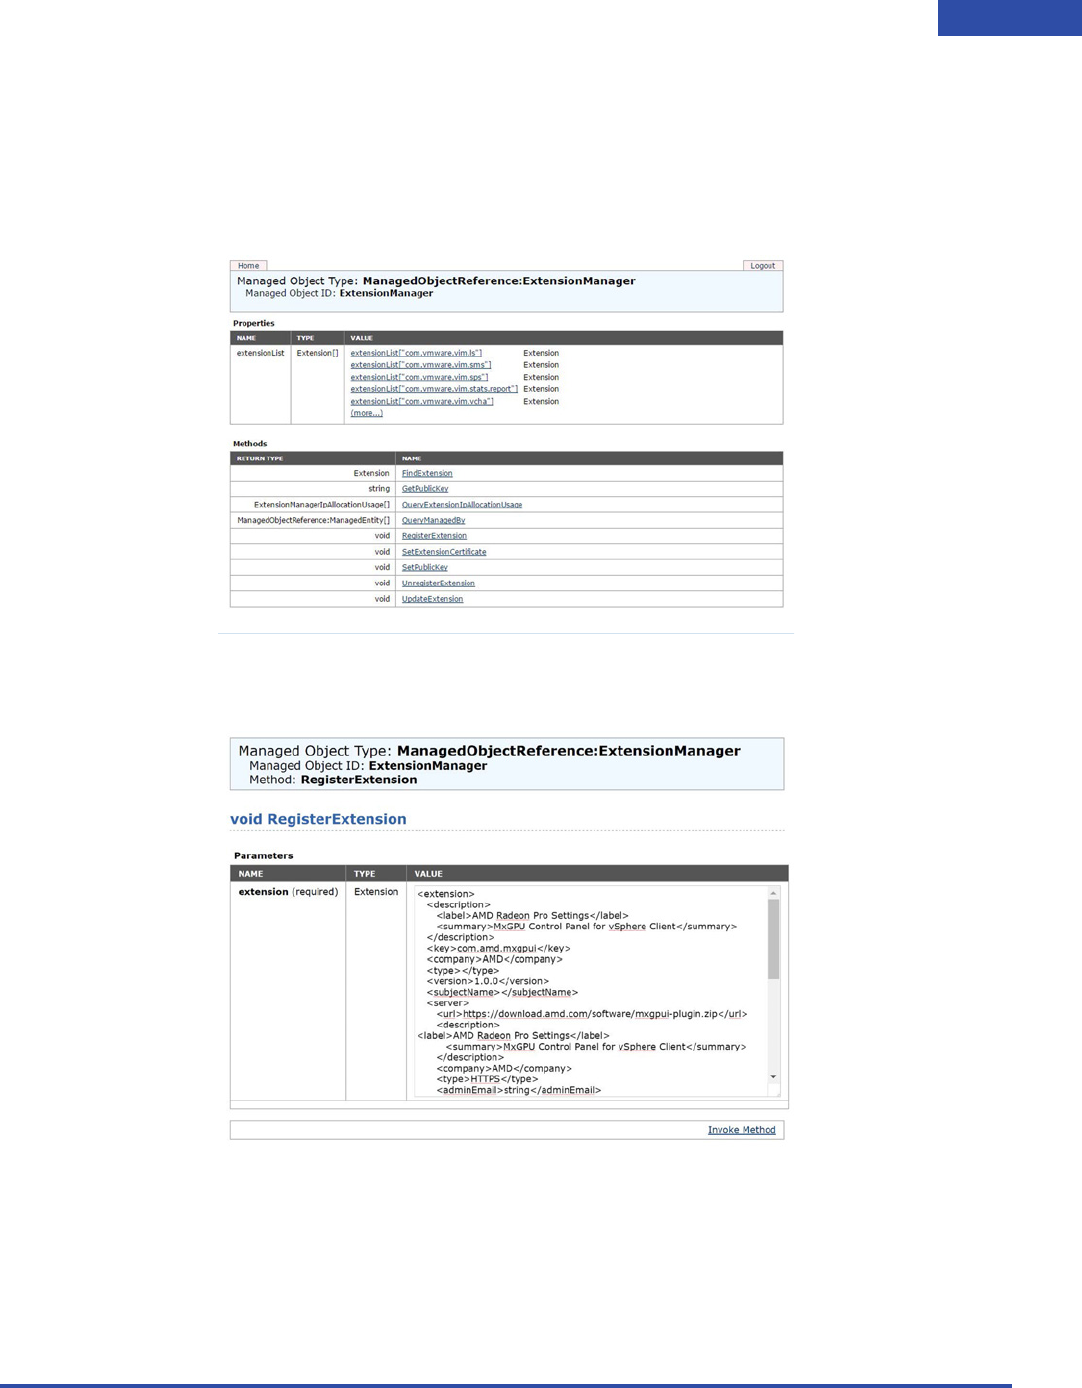
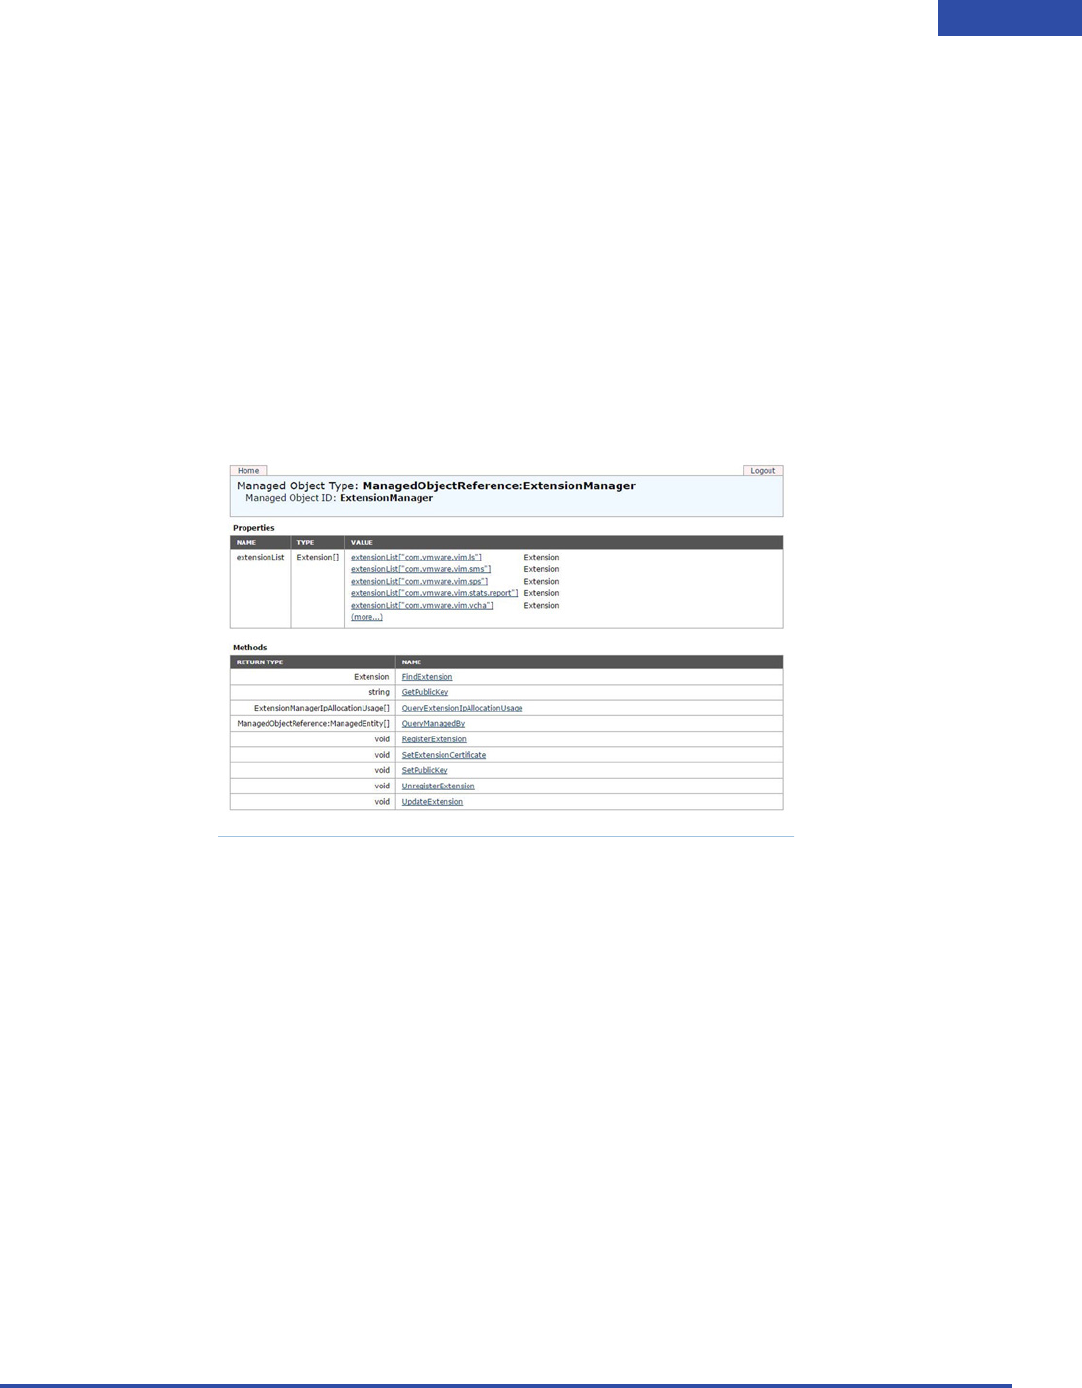
5. Launch a web browser and point it to https://<vcenter_name>/mob/
?moid=ExtensionManager, where <vcenter_name> is the name of the desired VMware
vCenter server.
The following window (or similar) appears:
6. In the Methods section, click the RegisterExtension link.
The following window appears:

MxGPU/VMware Deployment Guide v2.2 ©2018 Advanced Micro Devices, Inc. All rights reserved.
26 USING THE RADEON PRO SETTINGS PLUG-IN
7. Copy and paste the following XML into the VALUE text box. This will register the plug-in and
install the necessary files to your VMware vCenter Server.
<extension>
<description>
<label>AMD Radeon Pro Settings</label>
<summary>MxGPU Control Panel for vSphere Client</summary>
</description>
<key>com.amd.mxgpui</key>
<company>AMD</company>
<type></type>
<version>1.0.1</version>
<subjectName></subjectName>
<server>
<url>https://download.amd.com/software/mxgpui-plugin.zip</url>
<description>
<label>AMD Radeon Pro Settings</label>
<summary>MxGPU Control Panel for vSphere Client</summary>
</description>
<company>AMD</company>
<type>HTTPS</type>
<adminEmail>string</adminEmail>
<serverThumbprint>
A3:50:BF:3E:48:05:6E:26:B5:49:B9:83:E7:BA:0B:4E:1E:94:DC:35
</serverThumbprint>
</server>
<client>
<version>1.0.1</version>
<description>
<label>AMD Radeon Pro Settings</label>
<summary>MxGPU Control Panel for vSphere Client</summary>
</description>
<company>AMD</company>
<type>vsphere-client-serenity</type>
<url>https://download.amd.com/software/mxgpui-plugin.zip</url>
</client>
<lastHeartbeatTime>2017-03-15T09:00:00Z</lastHeartbeatTime>
<healthInfo>
<url></url>
</healthInfo>
<shownInSolutionManager>true</shownInSolutionManager>
</extension>
8. At the bottom right of the window, click Invoke Method. You will see the message Method
Invocation Result: void at the bottom left of the window upon successful plug-in installation
and registration.
9. Log in to the VMware vSphere Web Client (Flash).
10. Click the Home icon, and then select Administration>Deployment>System Configuration.

MxGPU/VMware Deployment Guide v2.2 ©2018 Advanced Micro Devices, Inc. All rights reserved.
27
USING THE RADEON PRO SETTINGS PLUG-IN
11. In the left navigation bar, click Nodes, and then select the desired VMware vCenter server.
12. Select the Related Objects tab, and then start the VMware vSphere Client service.
Offline
This option allows you to install the Radeon Pro Settings plug-in when you are unable to download
it via the vCenter server. To install the plug-in while offline:
1. Download the Registration Tool as a ZIP file from http://support.amd.com/en-us/download/
workstation?os=VMware# to the appropriate location on your local system:
-VCSA: /usr/lib/vmware-vsphere-ui/plug-in-packages/
-Windows vCenter:
C:\ProgramData\VMware\vCenterServer\runtime\vsphere-ui\plug-in-
packages
2. Create a new folder in plug-in-packages named mxgpui, and then extract the ZIP file into
plug-in-packages/mxgpui.
3. Register the plug-in using the Managed Object Browser, as described in “VMware Managed
Object Browser” on page 24, except use this XML script instead:
<extension>
<description>
<label>MxGPUI</label>
<summary></summary>
</description>
<key>com.amd.mxgpui</key>
<version>1.0.1</version>
<lastHeartbeatTime>2017-04-17T18:53:00Z</lastHeartbeatTime>
</extension>
MxGPU/VMware Deployment Guide v2.2 ©2018 Advanced Micro Devices, Inc. All rights reserved.
28 USING THE RADEON PRO SETTINGS PLUG-IN
Launching the Plug-in
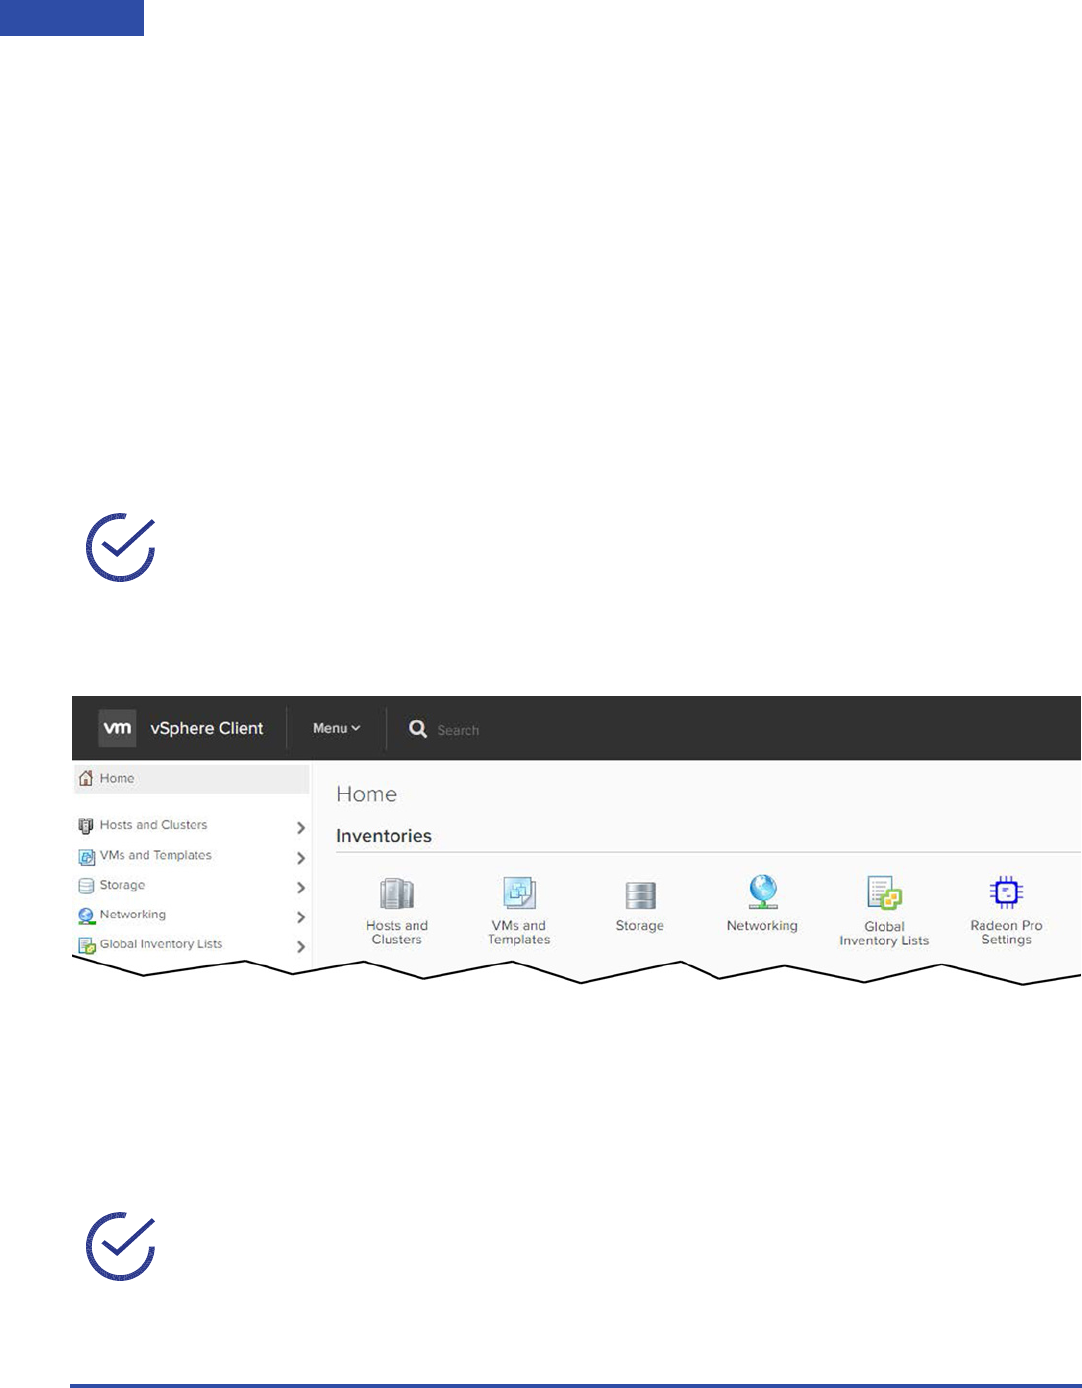
To launch the Radeon Pro Settings plug-in from the VMware vSphere Client Home page:
1. Launch a web browser and point it to https://<vcenter_name>, where
<vcenter_name> is either the IP adress or FQDN of the desired VMware vCenter server with
the Radeon Pro Settings plug-in installed.
The Getting Started window appears.
2. Select VSphere Client (HTML5). If this option is not available, be sure that you are using
vSphere 6.5. If you are using a fling HTML5 client, you can navigate to https://
<html_client_name>/ui.
3. Log in to the VMware vSphere Client using an account with administrator privileges.
4. On the VMware vSphere Client Home page, click the Radeon Pro Settings icon.
5. Select the datacenter you wish to manage, as follows:
- Click Go to Data Center to view and manage VMs and MxGPUs on all hosts in the selected
datacenter.
- View and manage VMs and MxGPUs on a specific host by selecting that host using the
Choose a Host pull-down menu and then clicking Go to Host.
Note: The plug-in does not currently support the Flash client.
Note: You may also access the plug-in from the navigation bar in the VMware vSphere
Client by right-clicking a datacenter or host in the left-hand navigation, and then
selecting Radeon Pro Settings in the context menu that appears.

MxGPU/VMware Deployment Guide v2.2 ©2018 Advanced Micro Devices, Inc. All rights reserved.
29
USING THE RADEON PRO SETTINGS PLUG-IN
The Radeon Pro Settings Plug-in Interface
The interface of the Radeon Pro Settings plug-in consists of two tabs:
•VM: See “The VM Tab” on page 29.
•MxGPU: See “The MxGPU Tab” on page 30.
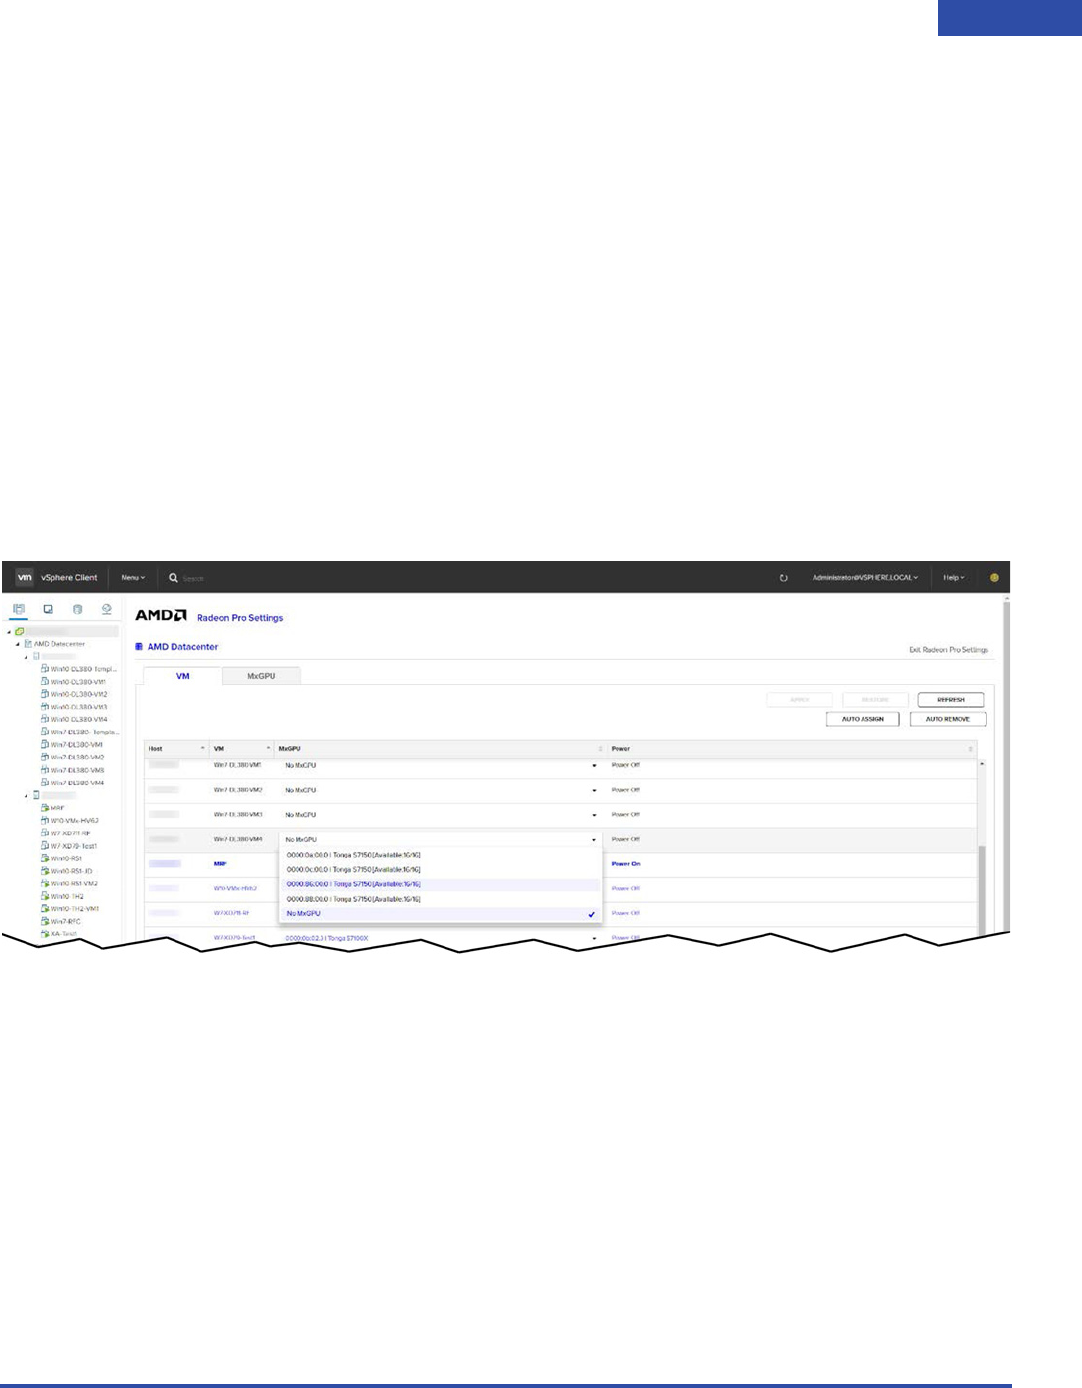
The VM Tab
The VM tab displays the following information for all of the VMs in the selected datacenter or host:
• Name of the host where the VM resides.
• Name of the VM.
• PCIe bus number.
• Name of the MxGPU assigned to the VM.
•Power state: Whether the VM is powered on or off.
- When the VM is powered off (Power Off), then no MxGPU is assigned to that VM.
- When the VM is powered on (Power On), then an MxGPU is assigned to that VM. You cannot
assign or unassign an MxGPU when a VM is powered on.
MxGPU/VMware Deployment Guide v2.2 ©2018 Advanced Micro Devices, Inc. All rights reserved.
30 USING THE RADEON PRO SETTINGS PLUG-IN
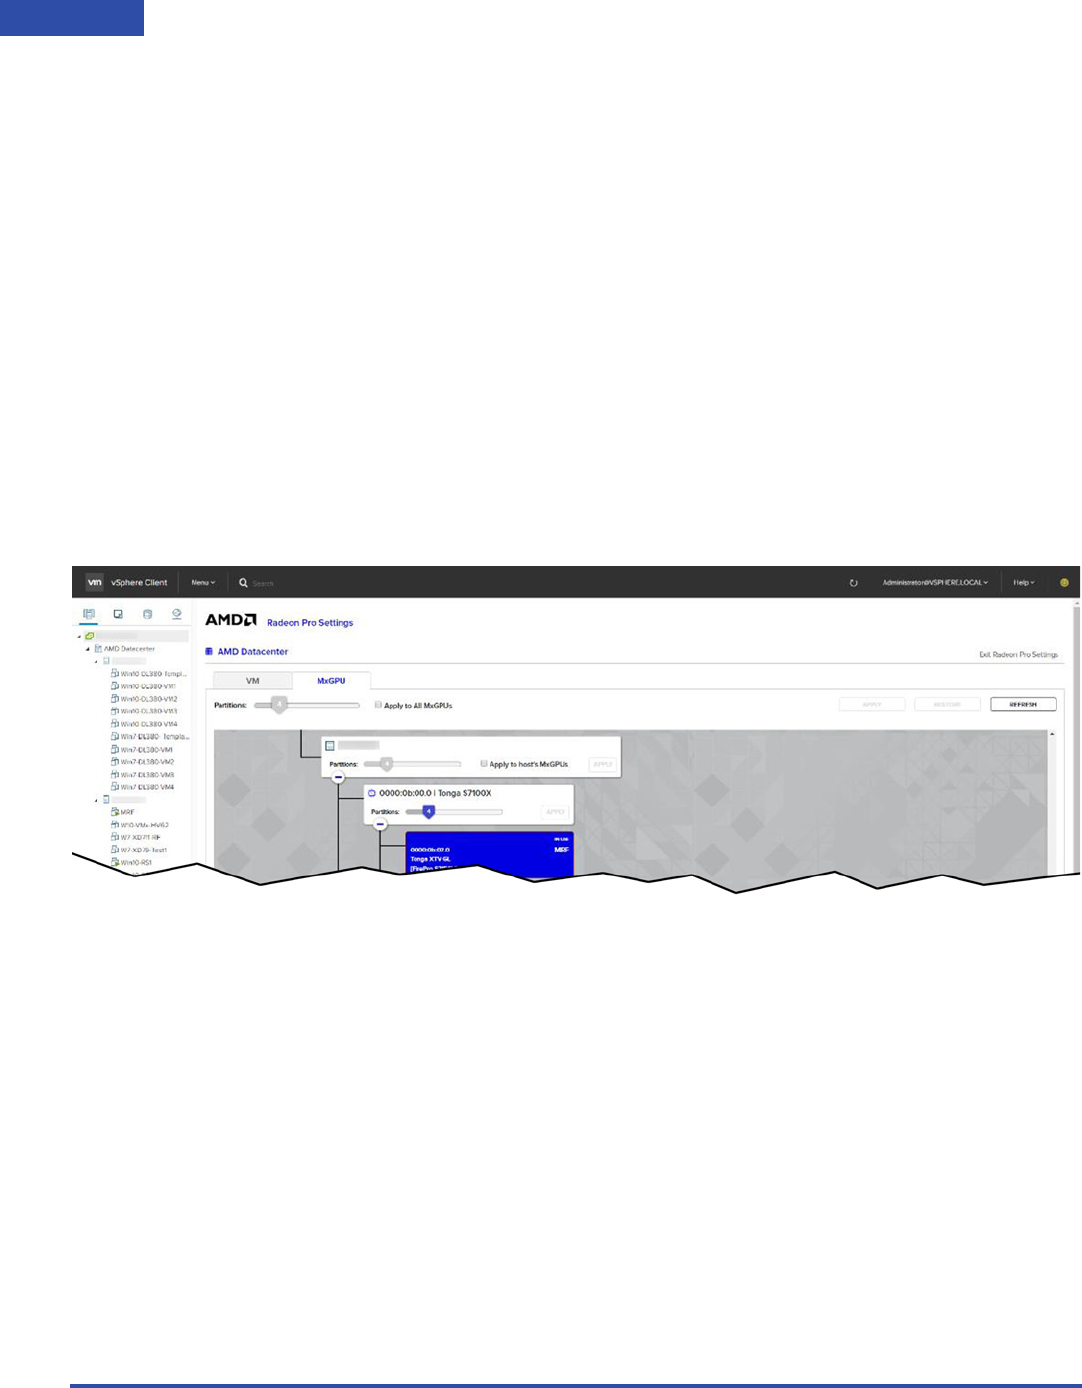
The MxGPU Tab
The MxGPU tab displays all of the physical GPUs and the virtual MxGPUs that have been
partitioned from each physical GPU. It also contains the following information for each MxGPU:
• PCIe bus number
• MxGPU name.
• Power state.
• Name of the VM to which the MxGPU is assigned, if any.
• State of the MxGPU. This can be one of the following:
-Not Assigned: The MxGPU is available for assignment to a VM.
-Assigned: The MxGPU is assigned to a VM that is currently powered off.
-In Use: The MxGPU is assigned to a VM that is currently powered on.
MxGPU/VMware Deployment Guide v2.2 ©2018 Advanced Micro Devices, Inc. All rights reserved.
31
USING THE RADEON PRO SETTINGS PLUG-IN
Using the Plug-in
The Radeon Pro Settings plug-in allows you to perform the following functions:
•Manual MxGPU assignment: See “Manually Assigning MxGPUs to VMs” on page 31.
•Automatic MxGPU assignment: See “Automatically Assigning MxGPUs to VMs” on page 32.
•MxGPU configuration: See “Configuring MxGPUs” on page 33.
Manually Assigning MxGPUs to VMs
VMs must be powered off in order to have an MxGPU assigned or unassigned. Each VM may have a
single MxGPU assigned to it at once. Consider reducing the number of GPU partitions to improve
graphics performance on the guest VM.
To manually assign MxGPUs to VMs:
1. Configure MxGPU partitioning as described in “Configuring MxGPUs” on page 33.
2. In the VM tab of the Radeon Pro Settings interface, click the MxGPU pull-down menu for the
desired VM to see a list of all of the MxGPUs that are available for assignment to the VM, along
with the number of available MxGPUs on each physical GPU. Clicking an MxGPU assigns it to the
VM. Selecting No MxGPU to removes the assigned MxGPU from the VM.
3. Repeat Step 2 as needed for additional VMs.
4. Click the APPLY button to assign the MxGPUs to the respective VMs.

MxGPU/VMware Deployment Guide v2.2 ©2018 Advanced Micro Devices, Inc. All rights reserved.
32 USING THE RADEON PRO SETTINGS PLUG-IN
Automatically Assigning MxGPUs to VMs
The Auto Assign and Auto Remove functions act on VMs as follows:
• If you are in Datacenter view, then automatic assignment affects all VMs in that datacenter.
• If you are in Host view, then automatic assignment affects all VMs on that host only.
VMs must be powered off in order to have an MxGPU assigned or unassigned. Each VM may have a
single MxGPU assigned to it at once. Consider reducing the number of GPU partitions to improve
graphics performance on the guest VM. To automatically assign MxGPUs to VMs:
1. Configure MxGPU partitioning as described in “Configuring MxGPUs” on page 33.
2. In the VM tab of the Radeon Pro Settings interface, click the AUTO ASSIGN button to
automatically assign MxGPUs to all VMs. MxGPUs will be assigned from the first physical GPU in
a host that has available MxGPUs until the physical GPU has no more available MxGPUs. This
continues until either:
- All VMs have been assigned an MxGPU.
- There are no more available MxGPUs.
3. Click the AUTO REMOVE button to automatically unassign MxGPUs from all VMs.
Note: For optimal performance, AMD recommends identical partitioning of all
physical GPUs on a host to ensure identical VM performance.
MxGPU/VMware Deployment Guide v2.2 ©2018 Advanced Micro Devices, Inc. All rights reserved.
33
USING THE RADEON PRO SETTINGS PLUG-IN
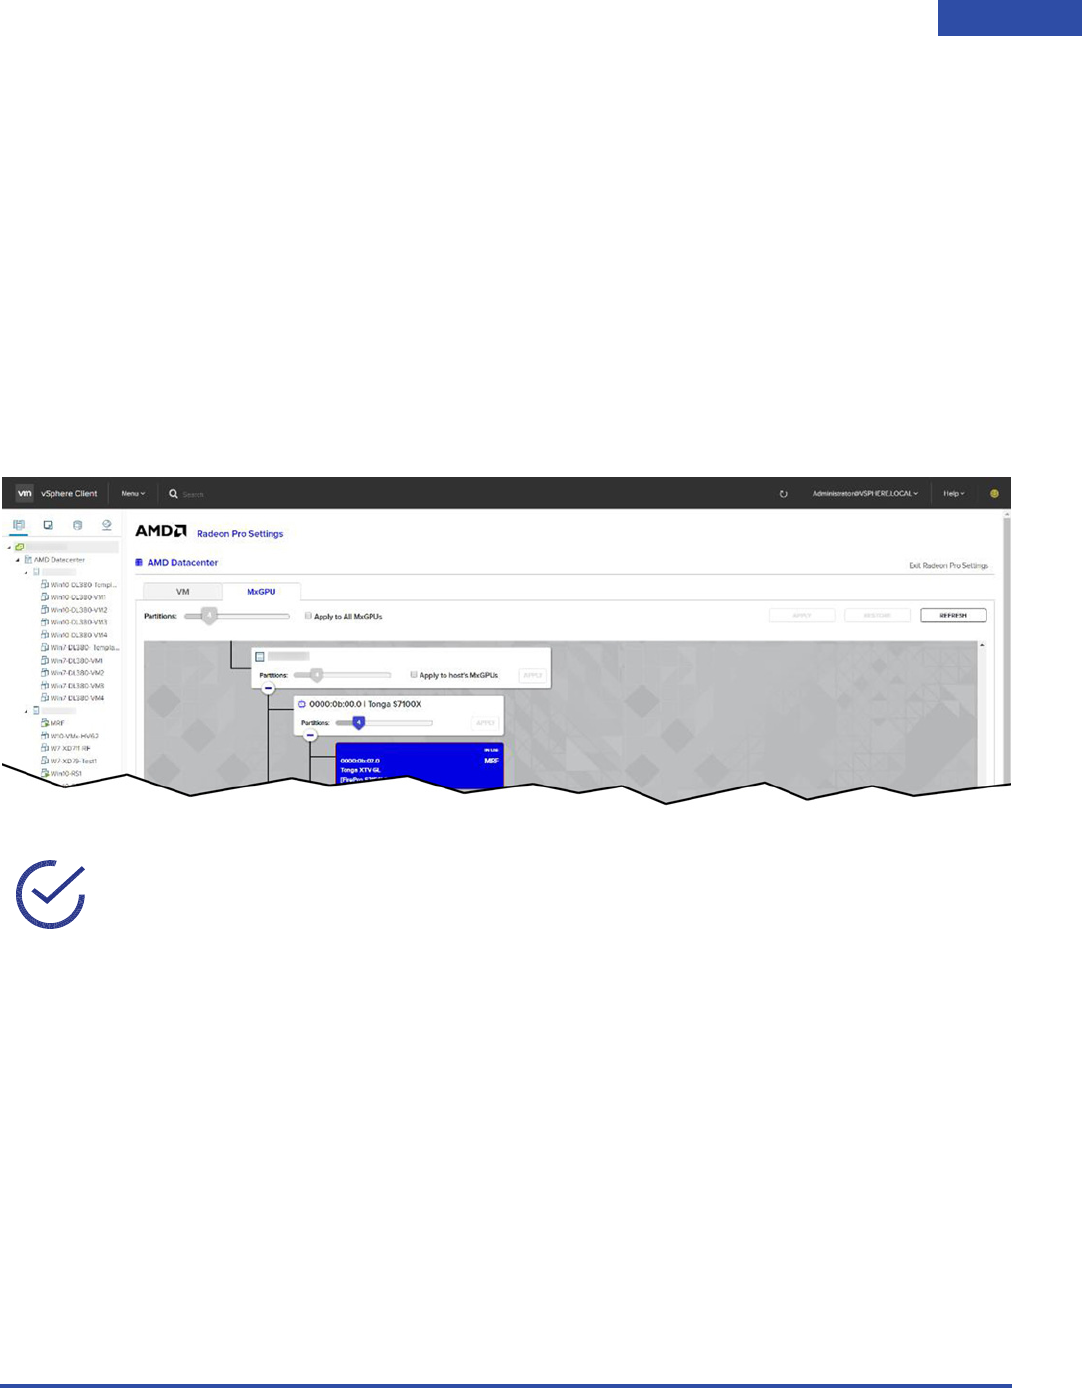
Configuring MxGPUs
The MxGPU tab of the Radeon Pro Settings plug-in allows you to configure MxGPU partitions, as
follows:
•MxGPU: Moving this slider changes the number of MxGPU partitions on the selected physical
GPU.
•Host: Checking the Host checkbox and then moving this slider changes the number of MxGPU
partitions on all of the physical GPUs on the selected host.
•Master: Clicking the Master checkbox and then moving this slider changes the number of
MxGPU partitions on all of the physical GPUs on either the selected host or datacenter,
depending on the view you are currently in.
When configuring MxGPUs:
• You cannot reconfigure a physical GPU that has one or more MxGPU(s) in use.
• If a physical GPU with assigned MxGPUs is reconfigured to offer a lower number of MxGPUs
where some of the assigned MxGPUs will no longer be valid, then the invalid MxGPUs will be
automatically unassigned from the VMs. This is why AMD recommends configuring MxGPUs
before assigning them to VMs.
Note: AMD recommend using the Host or Master slider to configure MxGPUs if you
plan to automatically assign MxGPUs to VMs in order to ensure that all assigned VMs
have identical performance.

MxGPU/VMware Deployment Guide v2.2 ©2018 Advanced Micro Devices, Inc. All rights reserved.
34 USING THE RADEON PRO SETTINGS PLUG-IN
Known Issues
The following known issues currently exist with the Radeon Pro Settings plug-in:
• The plug-in is not compatible with the vSphere Web Client (Flash).
• VMware vSphere Client build 4598948 does not detect PCI passthrough devices in VM
settings. To confirm a successful MxGPU assignment, either:
- Power on and log in to the VM, and then check Device Manager.
- Log in to the Flash version of the VMware vSphere Web Client and check the VM setting
there.
• The new AMDGPUV host driver for ESXi host can repartition MxGPUs without the need to
reboot the host. This streamlines the user experience, but it does require all 16 MxGPUs to be
visible to the VMware ESXi host system at all times. This means that only the first n partitions
are usable, where n is the number of partitions configured on the physical GPU. AMD
recommends using the Radeon Pro Settings interface to make all changes since it will only
detect usable mxGPUs.
MxGPU/VMware Deployment Guide v2.2 ©2018 Advanced Micro Devices, Inc. All rights reserved.
35
USING THE RADEON PRO SETTINGS PLUG-IN
Updating the Plug-in
To update the Radeon Pro Settings plug-in:
1. Stop the VMware vSphere Client service, as described in Steps 1-4 in “Installing the Plug-in on
VMware vCenter Server” on page 23.
2. Launch a web browser and point it to https://<vcenter_name>/mob/
?moid=ExtensionManager, where <vcenter_name> is the name of the desired VMware
vCenter server.
The following window (or similar) appears:
3. In the Methods section, click the UpdateExtension link.
4. Copy and paste the following XML into the VALUE text box, being sure to change the
<version> and <url> as appropriate.
<extension>
<description>
<label>AMD Radeon Pro Settings</label>
<summary>MxGPU Control Panel for vSphere Client</summary>
</description>
<key>com.amd.mxgpui</key>
<company>AMD</company>
<type></type>
<version>1.0.1</version>
<subjectName></subjectName>
<server>
<url>https://download.amd.com/software/mxgpui-plugin.zip</url>
<description>
<label>AMD Radeon Pro Settings</label>
<summary>MxGPU Control Panel for vSphere Client</summary>
</description>

MxGPU/VMware Deployment Guide v2.2 ©2018 Advanced Micro Devices, Inc. All rights reserved.
36 USING THE RADEON PRO SETTINGS PLUG-IN
<company>AMD</company>
<type>HTTPS</type>
<adminEmail>string</adminEmail>
<serverThumbprint>
A3:50:BF:3E:48:05:6E:26:B5:49:B9:83:E7:BA:0B:4E:1E:94:DC:35
</serverThumbprint>
</server>
<client>
<version>1.0.1</version>
<description>
<label>AMD Radeon Pro Settings</label>
<summary>MxGPU Control Panel for vSphere Client</summary>
</description>
<company>AMD</company>
<type>vsphere-client-serenity</type>
<url>https://download.amd.com/software/mxgpui-plugin.zip</url>
</client>
<lastHeartbeatTime>2017-03-15T09:00:00Z</lastHeartbeatTime>
<healthInfo>
<url></url>
</healthInfo>
<shownInSolutionManager>true</shownInSolutionManager>
</extension>
5. At the bottom right of the window, click Invoke Method. You will see the message Method
Invocation Result: void at the bottom left of the window upon successful plug-in installation
and registration.
6. Restart the VMware vSphere Client service, as described in Steps 9-12 in “Installing the Plug-in
on VMware vCenter Server” on page 23.
Troubleshooting
• You may receive the XML error Invalid Property: “extension.key” when registering
the plug-in if it has already been registered. Check the extension list to verify plug-in
registration. A similar error may also occur in vCenter 6.0 when registering the plug-in without
a connected vSphere Client (HTML5) appliance. Please refer to your VMware vSphere Client
(HTML5) Fling documentation for assistance.
• If the plug-in is unresponsive or fails to load data (including after some period of inactivity),
then click Exit Radeon Pro Settings to exit the plug-in, and then relaunch the plug-in. If that
does not work, then log out of the vSphere client, restart it, and then log back in.

MxGPU/VMware Deployment Guide v2.2 ©2018 Advanced Micro Devices, Inc. All rights reserved.
37
USING THE RADEON PRO SETTINGS PLUG-IN
• If you cannot adjust the adjust the number of MxGPU partitions, then verify that the service
that handles CIM requests is running by executing the command //etc/init.d/sfcbd-
watchdog status on the host. If the service is not running, then execute the following
commands to start the service:
xesxcli system wbem set –enable true
/etc/init.d/sfcbd-watchdog start

MxGPU/VMware Deployment Guide v2.2 ©2018 Advanced Micro Devices, Inc. All rights reserved.
38 USING THE RADEON PRO SETTINGS PLUG-IN
This page intentionally left blank.

39
MxGPU/VMware Deployment Guide v2.2 ©2018 Advanced Micro Devices, Inc. All rights reserved.
Configuring Desktop Pools
This chapter describes how to enable desktop pools using the MxGPU Alarm
utility. Desktop pools allow multiple users to share a single, non-persistent
desktop configuration. For example, a user with access to Pool A logs in and
receives a desktop provided by a specific VM. When that user logs out,
another user may now log in and receive a new desktop provided by the same
VM. This allows the number of users to exceed the number of available VMs,
which can, for example, optimize resource usage across multiple shifts.

MxGPU/VMware Deployment Guide v2.2 ©2018 Advanced Micro Devices, Inc. All rights reserved.
40 CONFIGURING DESKTOP POOLS
Enabling Automated Desktop Pools
The MxGPU Alarm utility uses specified credentials to create an alarm in vSPhere that triggers
when a VM error message is detected. A triggered alarm executes the appropriate command(s) to
check whether the error message was caused by an unavailable AMD GPU. If so, the utility uses
vSphere APIs to reconfigure the VM with a new AMD device and then powers the VM back on.
MxGPU Alarm is a general-purpose utility; however, it can be used for a number of use case, such
as:
• Enabling non-persistent desktop pools of Full and Linked clones. (Instant clones are not
supported.)
• Enabling over-subscribed Desktop pools that have more VMs than available MxGPUs.
To use this utility:
1. If you are using Microsoft Windows 2012 R2, then you must install Visual C++ 2015 runtime,
which you can download from https://www.microsoft.com/en-us/download/
details.aspx?id=52685. This runtime is also installed as part of Windows Update KB2999226.
Reboot the system after installation.
2. Copy the mxgpualarm.zip (Windows) or mxgpualarm.tar (VCSA) to vCenter, and then
extract the contents by executing the command tar zxvf mxgpualarm.tar.gz.
3. Execute the following command:
Linux: ./createMxGPUAlarm -u '<username>' -p '<password>' -o '<port>'
-e 'entity' -s '<script>'
Windows: createMxGPUAlarm -u “<username>” -p “<password>” -o “<port>”
-e “<entity>” -s “<script>”
where:
-<username> is the name of the user that is connecting to the host.
-<password> is the password to use when connecting to the host.
-<port> is the port to use when connecting to vCenter. The -o switch is only needed when
using a port other than 443.
Note: If needed, please visit http://vnugget.com/vmware/uploading-files-to-
vcenter-server-appliance-using-winscp-sftpscp/ for assistance with uploading files
to vCenter.

MxGPU/VMware Deployment Guide v2.2 ©2018 Advanced Micro Devices, Inc. All rights reserved.
41
CONFIGURING DESKTOP POOLS
-<entity> is the name of the entity (datacenter, cluster, host, or VM) on which to create
the alarm. The –e switch can be used to create the alarm on a datacenter/cluster/host, but
the alarm can only exist on one entity at a time. If two hosts need the alarm, they should be
placed in the same datacenter/cluster and the name of this datacenter/cluster should be
used when executing the script. The –s switch is only necessary if mxgpualarm-
1.0.1.exe is in another folder or if there are other files with the name mxgpualarm-.
-<script> is the full path to mxgpualarm.exe on vCenter, such as:
/root/mxgpualarm/mxgpualarm-1.0.1 (Linux) or
C:\mxgpualarm\mxgpualarm-1.0.1.exe (Windows).
The following messages appear:
Contacting Server...
Connection Successful
To create automated desktop pools (without instant clone support) using the MxGPU Alarm
utility:
1. Create a VM that meets all of the requirements described in “Hardware and Software
Requirements” on page 4.
2. Assign valid MxGPU resources using the Radeon Pro Settings plug-in.
3. Install the OS, drivers, and desired applications on the VM.
4. Launch the vSphere client, select Edit VM Settings>VM Options>Advanced>Edit
Configuration, and then add a new field with the Name MxGPU and a Value between 0 and 16.
The Value tells the script to only assign MxGPUs from GPUs that have been partitioned to that
value. A Value of 0 assigns a full passthrough GPU to that VM instead of an MxGPU.
5. Create a template from the VM.

MxGPU/VMware Deployment Guide v2.2 ©2018 Advanced Micro Devices, Inc. All rights reserved.
42 CONFIGURING DESKTOP POOLS
When a VM error is detected because the PCI device is in use, the script will reconfigure the VM
with a new device of the required profile as defined by the MxGPU value.
Troubleshooting
This section addresses some common issues.
• If Visual C++ 2015 is required but not installed, then you will see the error message The
program can’t start because api-ms-win-crt-math-l1-1.0.dll is missing from your
computer. Try reinstalling the program to fix this problem. To resolve this issue, install Visual
C++ 2015.
• If the alarm triggered on a VM that was not reconfigured and that remained powered off with a
yellow warning icon (exclamation point) in vSphere Client, this is most likely caused by a
mismatch between the MxGPU setting of the VM and the GPU partitioning on the host. The
MxGPU profile setting on the VM should match the partitioning of one of the GPUs on its host,
as returned by esxcfg-module –g amdgpuv.
• The script generates log files at $VMWARE_LOG_DIR/mxgpu/mxgpu_alarm.log.
-VCSA:
/var/log/mxgpu/mxgpu_alarm.log
-Windows:
C:\ProgramData\VMware\vCenterServer\logs\mxgpu\mxgpu_alarm.log
Note: if a GPU corresponding to the MxGPU setting is not found, then the script will
not do anything and the VM will be left powered off with a yellow warning icon
(exclamation point).

43
MxGPU/VMware Deployment Guide v2.2 ©2018 Advanced Micro Devices, Inc. All rights reserved.
Remote Connection Setup
This chapter describes how to install Horizon View Client on the client device,
and then guides you through connecting to an MxGPU-enabled virtual
machine. Installing Horizon View Client is a one-time process; for subsequent
connections, simply open Horizon View, log in, and connect to an available
virtual machine. You may also connect using a zero client.
MxGPU/VMware Deployment Guide v2.2 ©2018 Advanced Micro Devices, Inc. All rights reserved.
44 REMOTE CONNECTION SETUP
Setting Up Horizon View Client
To set up Horizon View Client:
1. Verify that the Direct Connect plug-in and View agent are installed on the VM(s) that you will be
accessing.
2. Download the Horizon View installation package to the client or administrator system, and
then launch the installer.
The End-User License Agreement window appears.
3. Check the I accept the terms of the License Agreement checkbox, and then click Next.
The Custom Setup window appears.
4. Click Next.
The Default Server window appears.
5. Leave the field blank, and click Next.
Create the desktop and Start menu shortcuts, review the installation summary, and then click
Install to complete the installation.
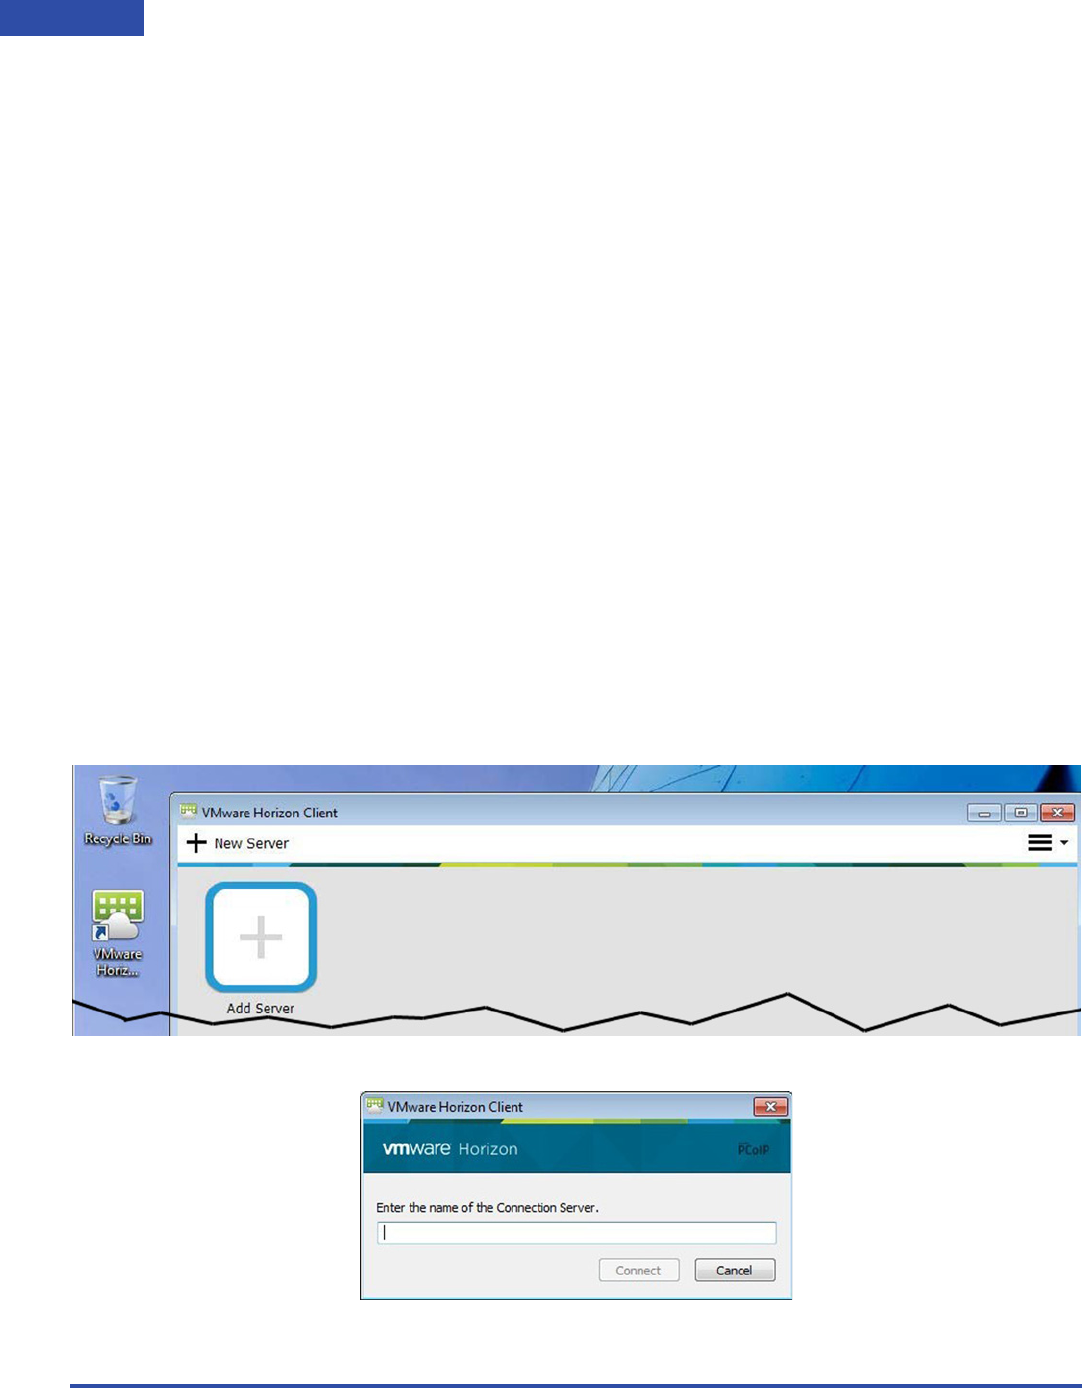
6. Launch Horizon View to open the VMware Horizon Client window, and then click the Add
Server button.
A popup window appears.
MxGPU/VMware Deployment Guide v2.2 ©2018 Advanced Micro Devices, Inc. All rights reserved.
45
REMOTE CONNECTION SETUP
7. Enter the IP address of the guest VM that you want to connect to in the field, and then click
Connect. You can find the IP address of the guest VM in the Summary tab of the vSphere client
application.
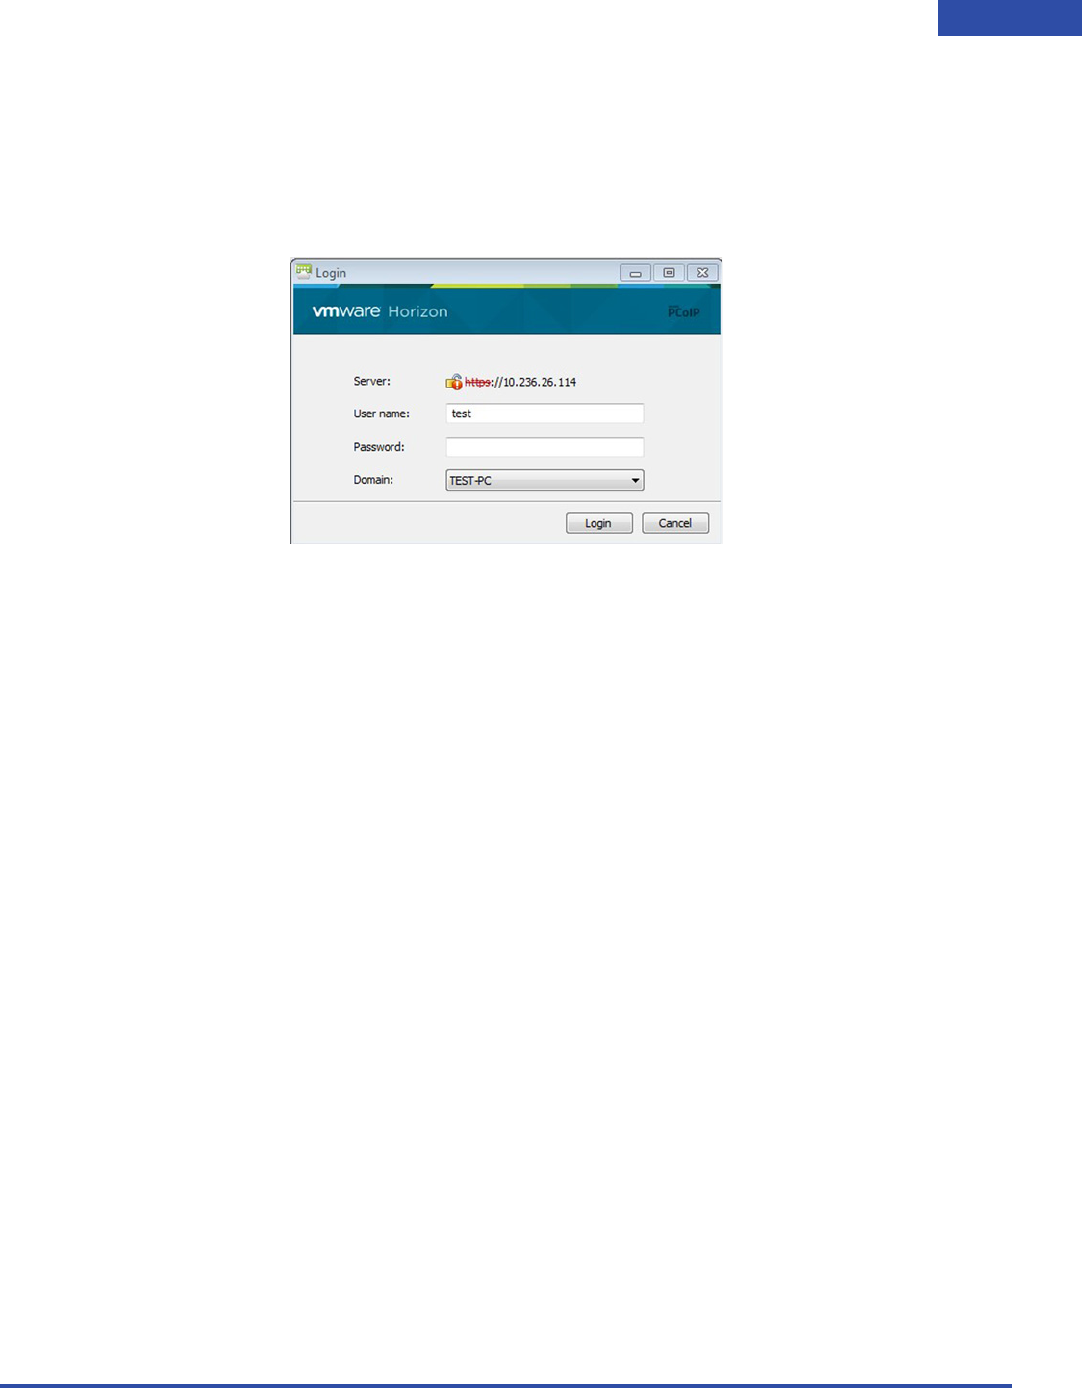
The Login window appears.
8. Enter the appropriate username and password, and then click Login.
After logging in, the virtual machine desktop will automatically snap to full screen size of the
connected monitor.

MxGPU/VMware Deployment Guide v2.2 ©2018 Advanced Micro Devices, Inc. All rights reserved.
46 REMOTE CONNECTION SETUP
Zero Client Setup
To set up a zero client:
1. Connect the keyboard, mouse, monitor(s), and network to the zero client.
2. If this is your first time using this zero client on this network, then select
Options>Configuration>Reset, and then click the Reset button. Click Ye s to confirm the reset
when prompted.
3. When the system restarts, select Options>Configuration>Session, and then select View
Connection Server using the Connection Type pull-down menu.
4. Enter the IP address of the guest VM you want to connect to in the DNS Name or IP Address
field, and then click Apply.
A connection window will appear with the guest VM address selected in the Server pull-down
menu.
5. Click Connect.
The Login window appears.
6. Enter the appropriate username and password, and then click Login.
The guest VM desktop should appear on the monitor.
Note: If the monitor resolution is too big (such as 1920x1080), then you may only see
a black screen. If this happens, switch to a lower native monitor resolution (such as
1366x768), and then install the AMD graphics driver as described in “Adding the
Graphics Driver To a VM” on page 18.

MxGPU/VMware Deployment Guide v2.2 ©2018 Advanced Micro Devices, Inc. All rights reserved.
47
REMOTE CONNECTION SETUP
This page intentionally left blank.

MxGPU/VMware Deployment Guide v2.2 ©2018 Advanced Micro Devices, Inc. All rights reserved.
48 REMOTE CONNECTION SETUP

AMD MxGPU
and VMware
Deployment Guide v2.2
01/22/2018
©2018 Advanced Micro Devices, Inc.
All rights reserved.
