Accounts_Receivable_User_Guide Ftp://145.14.60.120/Software/Progression/Macola ES S/Accounts_Receivable_User_Guide Accounts Receivable User Guide
User Manual: Pdf ftp://145.14.60.120/Software/Progression/Macola ES s/Accounts_Receivable_User_Guide user guide pdf
Open the PDF directly: View PDF ![]() .
.
Page Count: 215 [warning: Documents this large are best viewed by clicking the View PDF Link!]

Accounts Receivable User Guide for
Macola ES
Accounts Receivable User Guide
Macola ES Release 360
Version 4.0.0.321

Proprietary Rights Notice: All rights reserved. This material contains the valuable properties and trade
secrets of Exact Software, embodying substantial creative efforts and confidential information, ideas and
expressions, no part of which may be reproduced or transmitted in any form or by any means, electronic,
mechanical, or otherwise, including photocopying and recording or in connection with any information
storage or retrieval system without obtaining permission, in writing, from Exact Software.
Copyright Notice: © 2006 an unpublished work by Exact Software.
Exact Software and Macola Enterprise Suite are registered trademarks of Exact Holding North America.
8800 Lyra Drive, Suite 350 Columbus, OH 43240
sales: 800.468.0834 tel: 614.410.2600 fax: 866.544.5456
http://www.exactamerica.com/

Accounts Receivable User Guide i
Table of Contents
Chapter 1: Getting Started............................................................................................ 1
About this Guide .......................................................................................................... 2
Before You Begin Using Macola ES......................................................................... 3
Information Resources ............................................................................................. 3
Macola ES Operating System Requirements........................................................... 5
What Do I Do If I Get an Error Message? ................................................................ 5
Updating Your License............................................................................................. 6
Accessing Macola ES Online Help........................................................................... 6
Available Information in Macola ES Online Help...............................................................6
Running Macola ES Online Help.......................................................................................7
Running Macola ES Online Help from an Application ...................................................7
Logging in to Macola ES ...................................................................................................7
Windows Authentication................................................................................................7
Opening a Macola ES Company ...................................................................................8
Choosing a Company....................................................................................................8
Deleting a Company......................................................................................................9
Macola ES Toolbar and Menu Selections .........................................................................9
Macola ES Menu Style....................................................................................................11
Menu and Application Icons ........................................................................................12
Icon Table....................................................................................................................12
Classic Menu Style......................................................................................................14
Panel Menu Style ........................................................................................................14
Explorer Menu Style ....................................................................................................15
Selecting a Main Level Menu ......................................................................................15
Opening a Macola ES Application from the Menu Tree ..............................................15
Explorer Menu Tabs....................................................................................................16
Using Shortcuts...........................................................................................................16
Creating a Macola ES Application Shortcut ................................................................17
Creating a non-Macola ES Shortcut............................................................................17
Opening a Macola ES Application from the Shortcut Area..........................................17
Modifying an Existing Shortcut....................................................................................18
Deleting an Existing Shortcut ......................................................................................18
Using the Role Bar ......................................................................................................18
Displaying the Role Bar...............................................................................................19
Creating Application Shortcuts on a Role Bar.............................................................19
Renaming an Application Shortcut..............................................................................19
Deleting an Application Shortcut .................................................................................19
Renaming a Role Bar Group.......................................................................................20
Deleting a Role Bar Group ..........................................................................................20
Entering Data into Macola ES ................................................................................ 20
Entering Data On the Fly.................................................................................................20
Saving Your Work ...........................................................................................................21
Grouping Fields...............................................................................................................21
Field Types......................................................................................................................21
Required Fields ...............................................................................................................23
Default Values.................................................................................................................23
User Defined Fields.........................................................................................................23

ii Accounts Receivable User Guide
Document Fields .............................................................................................................24
Check Boxes ...................................................................................................................26
Radio Buttons..................................................................................................................26
Combo Boxes..................................................................................................................26
Buttons ............................................................................................................................27
Note Fields ......................................................................................................................27
Financial and Set Up Application Note Fields .............................................................27
Macola ES Note Fields................................................................................................28
Screen Level Notes.....................................................................................................28
Field Level Notes.........................................................................................................29
Adding a Note Button to a Field ..................................................................................29
Searches .........................................................................................................................30
Browser Searches.......................................................................................................30
Filter Criteria Fields .....................................................................................................30
Record Specific Fields.................................................................................................30
Browser Search Fields ................................................................................................31
Browser Search Action Bar .........................................................................................31
Customizing the Search Screen..................................................................................31
Adding Columns to the Search List Box......................................................................32
Removing Columns from the Search List Box.............................................................32
Changing the Order of the Columns in the Search List Box........................................32
Changing the Sort Column of a Search.......................................................................32
Changing the Sort Order of a Search..........................................................................32
Adding Multiple Columns to the Sort Order.................................................................32
Changing the Order of the Sort Columns ....................................................................33
Removing a Column from the Sort Order....................................................................33
Using the Browser Search...........................................................................................33
Performing a Search from the Browser Search...........................................................33
Opening a Record from a Search................................................................................33
Creating a New Record...............................................................................................34
Deleting a Record from the Application Table.............................................................34
Field Level Search.......................................................................................................34
Customizing the Field Level Search Screen ...............................................................35
Using the Field Level Search ......................................................................................35
Performing a Search from the Field Level Search ......................................................36
Selecting a Record to Enter in the Field......................................................................36
Opening a Record from a Field Level Search .............................................................36
Creating a New Record from a Field Level Search .....................................................36
List Boxes........................................................................................................................37
Grid Control for Macola ES Entry Screens..................................................................37
Viewing Information Using List Boxes.........................................................................38
Tabs on a Macola ES Screen .........................................................................................38
Tab Icons.....................................................................................................................39
OW Tabs .....................................................................................................................39
User Defined Tabs ......................................................................................................40
Date Entry .......................................................................................................................40
Date Calendar .............................................................................................................40
Entering a Date Using the Calendar............................................................................40
Dates in Reports..........................................................................................................41
Printing in Macola ES............................................................................................. 41
Printing a Report or Form................................................................................................41

Accounts Receivable User Guide iii
Printing Macola ES Standard Reports ............................................................................42
Selecting Print Options for Standard Reports .............................................................42
Printing a Report to Printer..........................................................................................43
Use Print Dialog ..........................................................................................................43
Use Font Dialog...........................................................................................................45
Deferring Printing ........................................................................................................45
Printing a Report to Screen.........................................................................................46
Report Screen Options................................................................................................47
Printing a Report to File...............................................................................................47
Deferring Printing ........................................................................................................48
Appending a Spooled Report ......................................................................................49
Printing a Report to E-mail ..........................................................................................49
Canceling a Print Job ..................................................................................................50
Printing Macola ES Crystal Reports................................................................................50
Macola ES Crystal Report Print Setup ........................................................................50
Printer Settings Option ................................................................................................50
Settings Button............................................................................................................51
Network Button............................................................................................................51
Setting Form Printers ..................................................................................................51
Printing a Crystal Report to Screen.............................................................................52
Print Preview Menu and Toolbars ...............................................................................53
Changing the Report Options..........................................................................................54
Searching for a Particular Record in a Report.............................................................55
Printing a Crystal Report to Printer..............................................................................55
Printing a Crystal Report to File ..................................................................................56
Keyboard Shortcuts................................................................................................ 56
Chapter 2: Accounts Receivable Overview............................................................... 59
Welcome to Macola Enterprise Suite Accounts Receivable ...................................... 60
Requirements and Integration................................................................................ 60
Using Order Entry with Accounts Receivable .................................................................60
Accounts Receivable Basics .................................................................................. 60
Project Numbers .............................................................................................................60
How A/R Calculates the Average Number of Days to Pay..............................................61
Calculating Salesperson Commission.............................................................................61
Discounts and Allowances ..............................................................................................62
Using Tax Detail Codes and Tax Schedules for A/R Transactions.................................62
Posting Sales Process ....................................................................................................63
Invoice Amount............................................................................................................63
Sale Amount if You Distribute Sales ...........................................................................63
Sales Tax Account ......................................................................................................63
Miscellaneous Charges Amount..................................................................................63
Freight Amount............................................................................................................63
Chapter 3: Setup and Maintenance............................................................................ 65
Setting Up and Maintaining Accounts Receivable ..................................................... 66
Sales People.......................................................................................................... 66
Setting Up a Salesperson Record...................................................................................67

iv Accounts Receivable User Guide
Deleting a Salesperson Record ......................................................................................68
Carrier Codes......................................................................................................... 68
Adding a Carrier Code ....................................................................................................68
Deleting a Carrier Code ..................................................................................................69
Carrier Modes ........................................................................................................ 70
Adding a Carrier Mode ....................................................................................................70
Deleting a Carrier Mode ..................................................................................................71
Ship Via Codes ...................................................................................................... 71
Defining a Ship Via Code ................................................................................................72
Deleting a Ship Via Code ................................................................................................73
Terms Codes.......................................................................................................... 74
Defining a Terms Code ...................................................................................................75
Deleting a Terms Code ...................................................................................................76
Service Codes........................................................................................................ 76
Defining a Service Code .................................................................................................77
Deleting a Service Code .................................................................................................78
Customer Types..................................................................................................... 79
Defining a Customer Type ..............................................................................................80
Deleting a Customer Type ..............................................................................................81
Accounts Receivable Setup ................................................................................... 82
Setting Up Accounts Receivable.....................................................................................83
Chapter 4: Using Accounts Receivable..................................................................... 87
Entering and Maintaining Customers......................................................................... 88
Maintaining Customers .......................................................................................... 88
Assigning Tax Detail Codes or Tax Schedules to Customers.........................................96
Deleting a Customer Record...........................................................................................96
Customer Addresses.......................................................................................................96
Editing Customer Address Information................................................................... 97
Editing the Visit Address from Customer Maintenance...................................................97
Changing the Invoice or Postal Address from Customer Maintenance...........................98
Editing a Delivery Address from Customer Maintenance................................................99
Adding a Delivery Address from Customer Maintenance..............................................100
Deleting an Address from Customer Maintenance........................................................101
Customer Master List ........................................................................................... 102
Printing a Customer Master List....................................................................................102
Viewing Customer Accounts ................................................................................ 103
Setting up Tax Detail Codes and Tax Schedules................................................. 106
Calculating PST/GST and VAT Taxes ..........................................................................106
Entering and Processing Sales Transactions .......................................................... 107
A/R Sales Transaction Process Flow ................................................................... 107
Batch Control ................................................................................................................108
Transaction Document Types .......................................................................................108
Entering Sales Transactions ................................................................................ 108
Entering a Sales Transaction ........................................................................................109
Deleting Transactions .......................................................................................... 112
Deleting a Transaction ..................................................................................................112
Deleting All Transactions in a Batch .............................................................................112

Accounts Receivable User Guide v
Deleting a Transaction Distribution ...............................................................................113
Customer Statements .......................................................................................... 114
Printing Customer Statements ......................................................................................114
Commission Due Reports .................................................................................... 116
Based on Cash Receipts...............................................................................................117
Printing a Commission Due Report Based on Cash Receipts ......................................118
Based on Invoices.........................................................................................................119
Printing a Commission Due Report Based on Invoices.................................................119
Printing Sales Transactions ................................................................................. 120
Printing Transactions ....................................................................................................120
Posting Sales Transactions.................................................................................. 121
Posting a Transaction ...................................................................................................121
Entering and Processing Recurring Transactions.................................................... 122
A/R Recurring Transactions Process Flow........................................................... 122
Entering Recurring Transactions.......................................................................... 123
Entering a Recurring Transaction .................................................................................124
Entering, Editing, or Deleting Distributions....................................................................126
Deleting Recurring Distributions and Transactions .............................................. 126
Deleting a Recurring Distribution ..................................................................................126
Deleting a Recurring Transaction..................................................................................127
Printing Recurring Sales Transactions ................................................................. 127
Printing a Recurring Transaction List ............................................................................127
Posting Recurring Transactions ........................................................................... 128
Posting a Recurring Transaction...................................................................................128
Customer Statements .......................................................................................... 129
Printing Customer Statements ......................................................................................129
Commission Due Reports .................................................................................... 131
Based on Cash Receipts...............................................................................................132
Printing a Commission Due Report Based on Cash Receipts ......................................133
Based on Invoices.........................................................................................................134
Printing a Commission Due Report Based on Invoices.................................................134
Printing Sales Transactions ................................................................................. 135
Printing Transactions ....................................................................................................135
Posting Sales Transactions.................................................................................. 136
Posting a Transaction ...................................................................................................136
Entering and Processing Service Invoices............................................................... 137
A/R Service Invoices Process Flow...................................................................... 137
Batch Control ................................................................................................................138
Service Transaction Types............................................................................................138
Entering Invoices.................................................................................................. 139
Entering an Invoice .......................................................................................................140
Customer Info and Credit History Windows ..................................................................142
Deleting Service Invoices..................................................................................... 142
Deleting a Service Invoice.............................................................................................142
Deleting All Service Invoice Transactions in a Batch ....................................................143
Printing Invoice Transactions ............................................................................... 143
Printing Invoice Transactions ........................................................................................144
Printing Invoices................................................................................................... 145

vi Accounts Receivable User Guide
Printing Invoices from Multiple Workstations ................................................................145
Printing an Invoice.........................................................................................................146
Printing an Invoice (Crystal Reports Option).................................................................147
Generating Recurring Invoices............................................................................. 148
Generating Recurring Invoices......................................................................................148
Posting Invoices................................................................................................... 149
Posting an Invoice.........................................................................................................149
Reprinting Posted Invoices .................................................................................. 150
Reprinting a Posted Invoice ..........................................................................................151
Creating and Printing Statements, Labels, and Reminders.................................. 151
Customer Labels ...........................................................................................................151
Creating a Customer Label Layout ...............................................................................152
Layout Menu Selections and Definitions .......................................................................153
Printing a Customer Label Layout.................................................................................154
Editing a Customer Label Layout ..................................................................................155
Deleting a Customer Label Layout................................................................................156
Importing a Customer Label Layout ..............................................................................156
Exporting a Customer Label Layout..............................................................................157
Customer Statements ...................................................................................................159
Printing Customer Statements ..................................................................................159
Checklist........................................................................................................................161
Reminders.....................................................................................................................161
Processing of Reminders ..........................................................................................162
Printing Reminders....................................................................................................163
Printing a Report of Outstanding Items .....................................................................165
Viewing A/R Information .......................................................................................... 167
Customer History View......................................................................................... 167
Viewing Credit History Information....................................................................... 168
Viewing Customer Information Using the Customer Info Button .......................... 168
Clearing PTD and YTD Tax Accumulators .............................................................. 170
Clearing PTD/YTD Tax Accumulators.................................................................. 170
Chapter 5: Reporting in A/R ..................................................................................... 171
Accounts Receivable Balance List ....................................................................... 172
Sections of the AR Distribution to GL Report ....................................................... 174
AR Sales Analysis Report .................................................................................... 175
Printing the AR Sales Analysis Report..........................................................................175
Serialized Document History Report .................................................................... 175
Printing a Serialized Document History Report.............................................................176
A/R Aging Analysis............................................................................................... 176
Printing the A/R Aging Analysis Report.........................................................................177
Accounts Receivables Report .............................................................................. 179
Printing the Receivables Report....................................................................................179
Accounts Receivable Chart.................................................................................. 181
Printing the Accounts Receivable Chart by Date ..........................................................181
Printing the Accounts Receivable Chart by Receivables Age.......................................182
Commission Due Reports .................................................................................... 182

Accounts Receivable User Guide vii
Based on Cash Receipts...............................................................................................183
Based on Invoices.........................................................................................................184
How Macola ES Calculates Commission Amount or Percent .......................................184
Calculating Salesperson Commission...........................................................................185
Charting Sales Transactions ................................................................................ 186
Generating a Sales Transaction Chart..........................................................................186
Receivables History ............................................................................................. 186
Printing a Receivables History Report ..........................................................................187
Service Invoice History Report............................................................................. 187
Printing a Service Invoice History Report......................................................................187
Glossary..................................................................................................................... 189
Index...........................................................................................................................195

Chapter 1: Getting Started
Accounts Receivable User Guide 1
Chapter 1: Getting Started

Chapter 1: Getting Started
2 Accounts Receivable User Guide
About this Guide
The Macola ES Accounts Receivable User Guide provides information and step-by-step
instructions on how to navigate, set up, and maintain Accounts Receivable. For instructions on
installing Macola ES, see the installation and setup information in the Macola ES Installation and
Setup Guide.
The following is an overview of the chapters in this guide:
Chapter 1 - Getting Started
This chapter provides details on obtaining more information about Macola ES, tips for entering
data and working in Macola ES, and an explanation of and instructions for printing.
Chapter 2 - Accounts Receivable Overview
This chapter provides an overview of the Accounts Receivable package and how it integrates
with other Macola ES packages.
Chapter 3 - Setup and Maintenance
This chapter presents information on the setup and maintenance of Accounts Receivable. Before
you begin entering, printing, or posting transactions, you must set up the package and enter data
on the maintenance screens.
Chapter 4 - Using Accounts Receivable
This chapter provides information about using each screen in Accounts Receivable.
Chapter 5 - Generating Reports
This chapter provides information about the reports and lists. Reports provide a detailed view of
various aspects of your business. They may include pieces of information arrived at by a
calculation, and which may access more than one data file to process information. Lists are
straightforward lists of data based on a single data file. These lists provide a formatted summary
of the data, and can be used to quickly obtain all information about a particular aspect of your
company.
Glossary
A concise list of terms used throughout Macola ES.
Index
Refer to the index to quickly and easily locate topics in this user guide.

Chapter 1: Getting Started
lAccounts Receivable User Guide 3
Before You Begin Using Macola ES
Before you begin using Macola ES you need to verify that certain steps have been completed
during your installation or update of your Macola ES software.
The following steps should be completed:
1. Install your initial Macola ES installation from the CD or run the update from the Customer
Portal at http://www.exactamerica.com/.
2. If necessary add a new company.
3. Select the license file to use for your installation of the software during creation of the new
company or update the license file with a new license file downloaded from the Customer
Portal at http://www.exactamerica.com/.
4. Set up or update your company and user specific settings. Setting up your company prepares
Macola ES to run according to your companyʹs specifications. For more information, refer to
Setting up a Macola ES Company Task list.
Note: Electronic funds transfer transactions, commonly known as ACH, must include your Federal Tax
ID number in the file that you send to the bank. Therefore, you must enter your Federal Tax ID number in
the Fiscal Code field of the Company data option in Company Settings [System/Company/Company
settings]. For the number to be read correctly by the system, you must enter the Fiscal Code without a
hyphen. The NACHA file format used to create the file you send to the bank includes the first nine
characters entered in the Fiscal Code field, therefore only enter the nine digits of your Federal Tax ID
number in this field.
5. Set up all maintenance applications.
Information Resources
Macola ES Process Flow Guides -- The Macola ES Process Flow Guides provide overview and
process flow information covering all of Macola ES. The following Process Flow guides are
provided in the series:
• Macola ES Setup and Implementation Guide
• Information Flow and Posting for Accounting and Distribution Packages
• Information Flow and Posting for Manufacturing Packages
• Year End Process
• Order to Cash: Macola ES Order Entry
• Inventory Control Techniques
Macola ES Online Help -- The Macola ES Online Help system provides a quick way to obtain
information on a specific topic. The Help system includes overview information and task
oriented instructions for each Macola ES application. For instructions on using the Help system,
see Accessing Macola ES Online Help.
Installation and Update Instructions -- For instructions on how to install or update Macola ES,
see the installation and update instructions provided with your software. For basic information,
you can also see Updating Your Version of Macola ES.

Chapter 1: Getting Started
4 Accounts Receivable User Guide
Technical Support -- Optional technical support is also available from Exact Software (Exact). For
more information on various technical support plans, please contact your business partner.
Exactʹs Web Site -- Visit the Exact web site at http://www.exactamerica.com/ for information on
Exactʹs products, business forms, upgrades, technical support, training, consulting,
customization, whatʹs new, press releases, trade shows, and conferences. This web site provides
access to three main areas:
1. Public -- provides general information about Exact, Exactʹs products, and special
demonstration offers.
2. Customer -- provides access to several areas of information to supply you with the tools you
need to run your software. The Customer Portal can be accessed only by Exact customers
using a password and their customer number. The Customer Portal provides the following
types of information:
Product -- allows access to customer-only resources such as the product release schedule,
instructions for participating in Controlled Release programs, and links to product details on
Exactʹs public web site.
Customer News -- allows access to the latest announcements from Exact and the SoftWire
newsletter.
Account Information -- allows you to view and update your account information, including:
contacts, contracts, transaction data, and your customer portal password.
Technical Support -- allows access to answers for technical questions, download the latest
updates, report suspected program errors, and check the status of your logged questions:
• Hot Topics -- allows you to check the latest high priority product related issues
• InfoMine -- allows you to search the Exact Software knowledge base, containing
thousands of commonly asked questions and answers
• Downloads -- allows you to access the downloads area which provides you with the
latest service pack, documentation, file layouts, and other useful files
• View Requests -- allows you to view all of your support and product development
related requests
• Macola ES Reference Library (e-Synergy document: 01.578.604) -- allows you to view a
collection of helpful installation, implementation, and development related reference
materials
• Contact Support -- Submit a support request directly to Exactʹs support department
3. Partners -- provides access to several areas of information to supply you with the tools you
need to provide service to your customers using Exact software. The Partner Portal can be
accessed only by Exact business partners using a password and logon ID. This area allows
business partners to access the following types of information:
Hot Topics -- allows you to check the latest high priority product related issues.
Partner News -- allows you access to the latest announcements from Exact.

Chapter 1: Getting Started
lAccounts Receivable User Guide 5
Marketing -- allows access to marketing pieces and collateral that Exact has to offer.
Product -- allows access to resources including ʹRelease Policy Documentsʹ, Controlled
Release details, and a release schedule.
Training -- allows access to resources to assist in obtaining available training options and
certifications.
Sales Tools -- allows access to tools and resources including pricing, order forms, and current
promotions.
Technical Support -- allows you to access answers to your technical questions, download the
latest updates, report suspected program errors, and check the status of your logged
questions. This area allows business partners to access all of the same types of information as
listed for Technical Support from the Customer Portal.
Macola ES Start Page (e-Synergy document: 00.854.477) -- contains information about Macola
ES, business forms, upgrades, technical support, training, consulting, customization, whatʹs
new, press releases, trade shows, and conferences.
Macola ES Operating System Requirements
Information on the operating system and other requirements for Macola ES can be found on the
Exact Software web site. Navigate on the web site to the Reference Library section of the Support
area accessed from the Customer or Partner portals at: http://www.exactamerica.com/.
What Do I Do If I Get an Error Message?
With Macola ES release 360, you have the ability to e-mail Macola ES error messages to Exact
Software support. If you get an error message in Macola ES, on the error window, there is a
button called E-mail. If you click this button, the system will open Microsoft Outlook and create
an e-mail that contains the details of the error message. You will need to enter additional
information, including the e-mail address for support if you would like to report the problem
automatically.
You should add the following information to the e-mail before sending it to support. The more
information you add, the better support will be able to assist in correcting and preventing the
error in the future.
Send To = support@macola.com
Subject = Customerʹs Company Name and Exact license number, which can be found by selecting
Help on the menu, and selecting About in Macola ES.
Added to body of the e-mail =
• The module or menu item being used when the error message was received

Chapter 1: Getting Started
6 Accounts Receivable User Guide
• Details that may help Exact support understand what the user was doing at the time the error
message was received.
• Person to contact regarding the error message – if you would like to be contacted by Support
Any e-mail received that does not have the license number or company name will be gathered for
information only. These will be tracked to determine how frequently any given error has been
received.
Updating Your License
It is possible to update the license for a company without having the company open. To do so,
you must have administrative rights in Macola ES.
When you choose to update the license, the system displays a message telling you that the license
update is not an update, allowing you to cancel. If you update a license in an open company, you
must close the company and open it again for the change to take affect.
1. On the menu, select File, Update license. This opens the Update License screen.
2. Select a company in the list.
3. Enter the path and license in the Filename field. To search for one, click the Browse button.
4. Click the Update button.
5. At the prompt ʺThe certificate is not an update. Do you want to set the license anyway?ʺ
Click Yes to continue. Click No to cancel.
6. At the prompt ʺLicense has been written successfullyʺ click OK.
Accessing Macola ES Online Help
Macola ES Help provides a quick way to obtain information on a specific package, application, or
field.
To learn more about Macola ES and become familiar with the Macola ES Help, take a few
minutes to review the following topics.
Available Information in Macola ES Online Help
Macola ES Online help provides the following types of information for each application:
• Overview -- Screen-specific help, including the purpose of the screen/application,
prerequisites, and links to related topics.
Many topics (not only the overview) within the Macola ES Help contain Related topics links
at the bottom of the topic. These topics provide additional information relevant to the subject
being discussed in the current topic. Click the Related Topics button to see the additional
related topics.

Chapter 1: Getting Started
lAccounts Receivable User Guide 7
• Concepts -- Additional information providing the ʺbehind the scenesʺ rationale for using a
screen (the when, why, and how); explanations of terminology; processing details; examples;
and rules, principles, and guidelines for using Macola ES.
• List of Fields -- Field-specific help including the size and type of the field; default value for
the field; a description of the field; and how this field integrates with other Macola ES
packages, applications, or fields. For definitions of the available field types, see Field Types.
• Procedures -- Step-by-step instructions on how to complete a task for each application.
Running Macola ES Online Help
If you would like to run the Macola ES help without accessing it through the application screen,
you can access all of the available help files from \Program Files\Exact Software\LNG on your
hard drive. You simply run a help file; these have a .chm extension. For example, aphelp.chm is
the Accounts Payable help file.
Running Macola ES Online Help from an Application
Macola ES allows access to help information in the following ways:
• Press the F1 keyboard key
• Select Help, Help from the application menu
• Select the Help button on the application toolbar
Logging in to Macola ES
Logging on to Macola ES is an automated process using Windows authentication; therefore, it
allows you to log in to Macola ES at the time you log on to your computer. When you run Macola
ES, you are provided with options that allow you to access the appropriate company. This allows
you to quickly start or restart Macola ES and begin your work.
Windows Authentication
Authentication is the process the system uses to validate your logon information. The process
consists of comparing your name and password against an authorized list; if a match is found,
access is granted with the rights specified in the permissions list.
Windows authentication consists of these:
• An interactive logon process that confirms your identification to either a domain account or a
local computer
• A network authentication process that confirms your identification to a any network service
that you attempt to access
For further information, see the Microsoft Windows help or your system administrator.

Chapter 1: Getting Started
8 Accounts Receivable User Guide
Opening a Macola ES Company
When you run Macola ES the Open Company dialog opens. Use this dialog to select the company
you want to work in. Highlight a company in the Company list box and click OK to open that
company. The Advanced button allows you to select a specific server and company database.
Cancel Button -- Click the Cancel button to exit the company selection dialog. Macola ES opens
without any company information.
Company -- Allows you to select a company database from a list of the available databases on the
selected Server. This field resides on the lower section of the Open Company screen, visible when
you click the Details button.
Company List Box -- Displays a list of the companies set up using Macola ES. Includes the
company number and description. Select a company from the list and click OK to access the
company and run Macola ES.
Default date -- Allows you to select the date that will default in the date fields throughout Macola
ES. This field is on the lower section of the Open Company screen, visible when you click the
Details button.
Advanced Button -- Allows you to toggle the bottom half of the Open Company screen. Displays
the Server, Company, and Default date fields.
OK -- Highlight a company from the Company list box and click OK to access the company and
run Macola ES.
Server -- Allows you to select a server name or enter (local) to indicate where the company
database resides. This field is on the lower section of the Open Company screen, visible when
you click the Details button.
User
The user currently logged on to your computer. Macola ES uses Windows NT Authentication to
log in to the system.
Choosing a Company
1. Select Macola ES from the Windows Start menu or your desktop. Macola ES displays the
Open Company dialog.
2. You have three options:
♦ Highlight a company from the Company list box.
OR
♦ Click Cancel to run Macola ES without selecting a company.
OR
♦ Click the Advanced button to select a different server and company.
• Click the Advanced button.
• Enter a Server name for the server where the company resides.
Chapter 1: Getting Started
lAccounts Receivable User Guide 9
• Enter the Company ID for the company database on the selected server.
• Enter the date that you want to be your Default date.
3. Click OK. The company opens in Macola ES.
Deleting a Company
Warning: Choose your company carefully before deleting. A delete process cannot be un-done.
If needed, verify that you have current backups of your companies before deleting one.
You must have the Administrator Role to have the rights to delete a company.
1. On the menu, select File, Delete company. This opens the Delete company screen. This shows
each company by number, description, and server.
2. Select a company to delete.
3. If you use Windows authentication to log in to the company, select the Windows
authentication check box.
4. If you do not use Windows authentication to log in, clear the Windows authentication check
box, and enter your Logon name and Password.
5. Click Delete.
6. At the prompt ʺDelete? Database: x Server: xʺ, click Yes to proceed or No to cancel. If you
click No, the prompt closes. If you click Yes, Macola ES deletes the company.
7. Delete another company, or click Close.
Macola ES Toolbar and Menu Selections
Menu
Selection
Toolbar
Buttons
Shortcut
Keys
Purpose
File, Open
Company
Allows you to open a Macola ES company.
File, Close
company
Allows you to close an open company.
File, New
company
Allows you to add a new Macola ES company.
File, Delete
company
Allows you to delete a Macola ES company. You can
only delete a company that you are currently not
logged in to and that resides on the computer that you
are accessing.
File, Update
license
Displays a standard Windows open dialog that allows
you to navigate to and select the license file that you
want to use for your Macola ES installation.
File, New Ctrl + n Allows you to create a new record from a browser
search.
File, Open Ctrl + o Allows you to open an existing record from within a
browser search. Highlight the record in the browser
search and then select this menu option.
Chapter 1: Getting Started
10 Accounts Receivable User Guide
Menu
Selection
Toolbar
Buttons
Shortcut
Keys
Purpose
File, Print
Ctrl + p When available, this button allows you to print the
active report, list, etc.
File, Preview
Ctrl + F2 When available, this button allows you to run a report
for preview or printing.
File, Printer
settings
Allows you to set printer specific settings to be used in
Macola ES.
File, Form
printer
Allows you to select the default printer for forms used
in Macola ES. You also have the option to update the
printer settings.
File, Back
Allows you to move back to a previous screen that
has been accessed in Macola ES.
File, Forward
After moving back, allows you to move forward to a
screen that you previously accessed in Macola ES.
File, Exit Closes Macola ES.
Edit, Undo Ctrl + z Allows you to undo recent text changes.
Edit, Cut Ctrl + x Allows you to cut selected text.
Edit, Copy Ctrl + c Allows you to copy selected text.
Edit, Paste Ctrl + v Allows you to paste text that has been cut or copied to
a new location.
View, Filter
Allows you to add filter criteria to a Browser Search.
This option allows you to toggle the available filter
fields from available to unavailable, and vice versa.
View,
Refresh
F9 Updates the screen based on recent changes.
View, Format
columns
Allows you to add columns to a Browser Search. This
option displays a dialog where you can select the
columns to add to the search window.
View, Role
bar, Display
Allows you to display the Role bar shortcut area of the
Macola ES screen. This area of the screen allows you
to create and organize shortcuts to your most often
used Macola ES applications.
View, Role
bar, Search
Allows you to display the Search bar. This area of the
screen allows you to search or create records for
Human Resources, Customers, or Projects. This
option displays in the bottom left corner of the Macola
ES shell unless the Role bar is not displayed, then this
option expands to cover the entire Role bar area.
View, Role
bar, Large
icons
Allows you to display the shortcuts in the Role bar
with large icons.
View, Role
bar, Add
group
Allows you to add a group to the Role bar shortcut
area. This option adds a heading bar, which you can
expand to display the shortcuts included in that group.
View, Role Allows you to change a Role bar group name.
Chapter 1: Getting Started
lAccounts Receivable User Guide 11
Menu
Selection
Toolbar
Buttons
Shortcut
Keys
Purpose
bar, Rename
group
View, Role
bar, Delete
group
Allows you to delete a Role bar group and all
associated shortcuts.
View, Tool
bar, Large
icons
Allows you to display the toolbar buttons with large
icons.
View, Tool
bar, Show
labels
Allows you to display the name of the toolbar button
on the button.
View, Menu
F3 Allows you to switch back to the menu structure after
opening an application. This closes the open
application.
View, Menu
style, Classic
Menu
Allows you to display the menu structure in a classic
menu style. Keyboard shortcuts are provided next to
each menu selection.
View, Menu
style,
Explorer
Menu
Allows you to display the menu structure in an
explorer view much like Windows Explorer. This menu
structure includes the Shortcuts and Task lists tabs
that allow you to create shortcuts to Macola ES and
non-Macola ES applications.
View, Menu
style, Panel
Menu
Allows you to display the menu structure in a panel
menu style. This view shows the sub menu selections
under a heading for each upper level selection. The
view changes as you move your cursor with your
mouse.
Help, Help F1 Allows you to access further information for the
currently selected object.
Help, Internet
Update
Closes Macola ES and displays the Update screen,
which allows you to update to the current version of
the Macola ES software. Provides the option of
updating from a CD-ROM or the internet.
Help, About Displays a screen that allows you to view information
on the current version and license for Macola ES.
Additional tabs are available to access information on
the open company and applications used in this
Macola ES installation.
If your company has purchased and is using e-
Synergy, this button will open your internet browser to
the web site entered in the e-Synergy URL field on the
General tab of the Company Settings screen.
Macola ES Menu Style
Macola ES provides three choices for displaying your menu structure. You select these styles by
selecting View, Menu style, and then one of the three style selections: Classic Menu, Explorer
Menu, or Panel Menu.
Chapter 1: Getting Started
12 Accounts Receivable User Guide
Menu and Application Icons
Macola ES uses many standard icons on application page tabs and within the menu structure of
the software. These icons help you quickly identify applications and information on screens that
you need to process or enter.
Note: Icons are used in the Explorer menu and Panel menu styles. These icons are used for all shortcuts in
the Role bar and Shortcuts tabs or Task lists tabs of the Explorer menu.
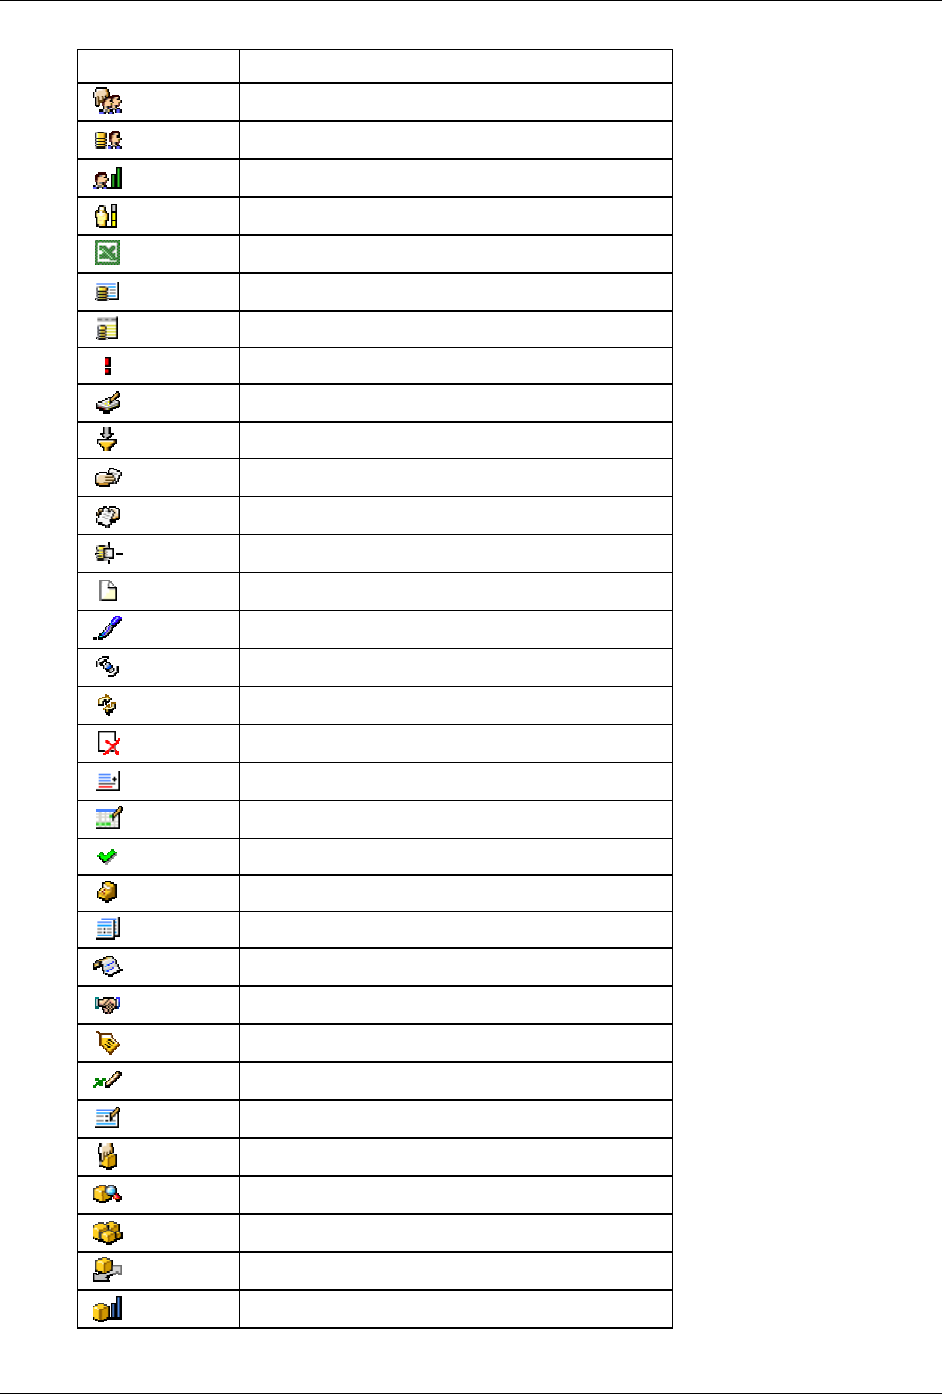
The Icon table outlines the icons used on the Macola ES menus and application screens and the
meaning of each icon.
Icon Table
Icon Meaning
Entry/Journalize
Post/posting
Label
Maintenance
Searching
View
Print Standard Macola ES report
Print Macola ES Crystal Report
Parent menu
Card
Transactions
Accounts
Accounts receivable
Accounts payable
List
Chart
Selection
Balance
Link
VAT register
VAT return
VAT
Assign
Entries
Depreciation
Chapter 1: Getting Started
lAccounts Receivable User Guide 13
Icon Meaning
Head count
Payroll
Activity monitor
Age analysis
Excel report
Budgets
Statement (bank)
Reminder
Sales order
Import (statement)
Sales invoice
Purchase invoice
Cost allocation
Audit file
Analytical
Update
Process
Delete (dispose)
Totals
Generate entitlement
Authorize
Payment
Reports
Receipt
Sales
Purchase
Check
Entry reports
Inventory count
Stock browser
Stock positions
Goods transactions
Future available stock
Chapter 1: Getting Started
14 Accounts Receivable User Guide
Icon Meaning
Change / modify
Activate
Entitlement (absence)
Classic Menu Style
The Classic menu provides three areas to the screen: the Menu Selection Display, the Main Level
Section, and the Sub Menu Section. The Classic menu displays all main level selections in the
Main Level Section of the screen and secondary level selections in the Sub Menu Section of the
screen. When you select a secondary level selection, it is displayed in the Main Level Section and
any available sub menu selections are displayed in the Sub Menu Section.
Press the letter key on the keyboard that corresponds to the letter next to the selection to either
display the next level in the menu or open the screen. The Menu Select Display shows the letters
selected and the menu selection names to show you where you are in the menu structure. Press
the Esc key to move back one level.
To use your mouse to make your selection, click once to highlight a menu selection on the Main
Level Section of the screen. This displays all sub level selections and applications on the Sub
Menu Section of the menu structure area. Click once on a menu selection on the Sub Menu
Section of the menu structure area. If the menu selection has further sub menu selections, the
selection is moved to the Main Level Section of the menu structure area and the available sub
menu selections are displayed in the Sub Menu Section of the menu structure area. If the menu
selection is an application, you can press the enter key or double-click to run the application.
Panel Menu Style
The Panel Menu style combines the look and feel of a standard Windows menu with web page
navigation. At the top of the menu Macola ES displays button style links for each main level of
the menu structure. The button link changes color to signify the current main level being
displayed in the lower portion of the screen.
The lower portion of the screen displays the Secondary Menu Area with the secondary menu
selections in the standard Windows menu style. Selections that have further sub menu selections
display with an arrow to the right of the selection. When you highlight these selections a sub
menu displays with all of the sub menu selections.
Use the Arrow keys to highlight a selection and use the Enter key to open the sub menu or run
the application. You can also use keyboard shortcuts at the sub menu level. The Classic menu
style displays each menu option with a letter to the left, you can use these same letters in the
Panels menu style to select the sub menu option and run the application indicated by the selected
letter.
If you are using your mouse to select a menu selection, the bottom portion of the screen will
move the direction you are moving your mouse when you move the cursor to the edge of the
screen. This allows you to display any further menu selections. To open a sub menu or run an
application using your mouse, click the menu selection.
The Close button closes Macola ES.

Chapter 1: Getting Started
lAccounts Receivable User Guide 15
Explorer Menu Style
The Explorer menu style is similar to the Windows Explorer and the Macola Progression 7.x
series Progression Workflow Explorer. The menu selections and applications are displayed in a
menu tree format. Clicking the plus (+) sign to the left of a selection expands that menu selection
and display the available sub menu options. Clicking the minus (-) sign to the left of a selection
collapses that menu selection. You can also use the arrow keys and the enter key to expand,
collapse, and select a menu selection.
Selecting a Main Level Menu
You can select a Main level menu two ways: from the Menu Selection field or from the Menu tree.
1. Click once in the Menu Selection field or on the arrow to the right of the field; or press the
Tab key until the cursor is in the field and then press the F4 key. The system displays the list
of Main level menu options.
2. Select the Main level menu that you want to work in. The system switches to that Main level
menu and displays its sub-menus in the Menu Tree.
OR
Select (All Menus). The system displays a list of the Main level menu options in the Menu
tree.
3. Click the plus sign to the left of the menu option you want to select; or, with the cursor in the
Menu Tree area, press the up or down arrow key until the menu option that you want to
select is highlighted, and then press the right arrow key.
4. The system opens the menu, displaying the sub-menu and applications contained in that
menu.
Opening a Macola ES Application from the Menu Tree
You can open an application two ways: from the Menu Tree or from the Shortcut Area. For
instructions on opening an application from the Shortcut area, see Using Shortcuts for
instructions.
1. With the correct package displayed in the Menu Tree, click the plus sign to the left of the
package to display the applications and submenu items; or, with the cursor in the Menu Tree
area, press the up or down arrow key until the package is highlighted, then press the right
arrow key.
2. If the application is on a submenu, click on the plus sign to the left of the submenu to display
all applications contained in the submenu; or press the up or down-arrow key until the
submenu that you want to open is highlighted, then press the right arrow key.
3. Double-click the application that you want to open. The system opens the application.
For general information on Macola ES application screens, see Using the Macola ES Application
Screen.

Chapter 1: Getting Started
16 Accounts Receivable User Guide
Explorer Menu Tabs
You can create two different types of tabs: shortcuts and task lists. These tabs display to the right
of the Menu tree area of the Explorer menu. The concept of Shortcuts and Task lists are built
upon one central theme: running a program. That program may be a Macola ES program
(sometimes called an application), or a non-Macola ES program (such as Microsoft Word).
• Shortcut tabs contain, as the name implies, shortcuts to applications and allow you to
quickly run applications without having to find the application each time. You can create
shortcuts to Macola ES and non-Macola ES applications. You can create a shortcut by
dragging the desired application from the left-side menu tree or your Windows desktop and
dropping it into the workspace area of the shortcut tab.
• Task list tabs allow you to group applications into a logical order by dragging-and-dropping
them onto the task list and moving them into the required order. The order of the
applications allow you to create ʺworkflowsʺ, and you are warned when you attempt to run a
task out of sequence. For example, you may have a specific procedure for performing A/R
month-end. Accordingly, you would create a task list tab, and drag-and-drop the
applications onto the task list in the order you want them performed. A check box is
provided to remind you which applications have been run, along with a ʺLast Performedʺ
column which is updated each time you open the application.
You can assign Notes to each application within the shortcut or task list tabs. These notes are
helpful if specific instructions need to be included before or after running an application. These
notes are entered from the Properties dialog.
Tabs are set up on a user by user basis, that is, you can only create a tab for the user you are
logged in as. If you want to create a shortcut or task list tab for another user within your
company you can create the tab and then use the export or import process to send and receive the
tab. This allows you to e-mail or send the tab on a floppy to the person that needs to import it.
For information on how to export and import tabs, see Copying Tabs Using the Export/Import
Tabs Function.
Role bars, Shortcuts, and Task lists
Macola ES provides three ways to organize your applications for ease of access: the Role bar,
Short Cut tabs, and Task list tabs.
• Role bar -- allows you to create shortcuts to Macola ES applications.
• Shortcut tabs -- allow you to create shortcuts to Macola ES applications and non-Macola ES
applications.
• Task list tabs -- allow you to create shortcuts to Macola ES applications and non-Macola ES
applications. It also allows you to specify the sequence for running the applications; displays
the date and time the application was last opened; and marks the task as completed.
Use the method that best manages your business processes for improved performance while
accessing Macola ES and non-Macola ES applications to perform your duties.
Using Shortcuts
Macola ES allows you to create shortcuts to both Macola ES applications and to non-Macola ES
applications. Like standard Windows shortcuts, Macola ES shortcuts allow you to open a specific

Chapter 1: Getting Started
lAccounts Receivable User Guide 17
application that you use frequently and access them from a single location. All shortcut
descriptions are limited to 64 characters. A shortcut will not save if the description length is too
long.
Macola ES allows you to create, open, modify, delete, and change display options for a shortcut.
The following instructions explain how to complete these tasks for a Macola ES shortcut.
Creating a Macola ES Application Shortcut
1. Click on the tab that you want to add the shortcut to. This becomes the active tab.
2. In the Menu area, select an application.
3. Drag-and-drop the application to the Shortcut area. Macola ES displays the new shortcut in
the Shortcut Area of the Explorer menu.
Note: You can also drag-and-drop applications from the Role bar area of the Macola ES Shell.
Shortcuts can be added to the Shortcuts tab or a Task list tab, when added to a task list tab the task is added
as the last task in the list. Remember, users must complete tasks in the order in which you place them in a
task list. You can re-sequence the tasks, for information see Organizing tasks in a task list.
Creating a non-Macola ES Shortcut
1. Make sure that Macola ES is open and that you are using the Explorer menu style. Macola ES
must be the active application in Windows. If necessary, resize the Macola ES shell to create
room to select the appropriate icon.
2. If the icon that you want to create a shortcut for is in a window and not on the Windows
desktop, open that window.
Note: You can drag-and-drop any shortcut from the desktop, Windows Explorer, or Internet Explorer
Favorites list. You cannot copy shortcuts from the Start menu. Also, icons on your desktop must be actual
shortcuts—displaying the box containing the Windows shortcut sign in the bottom left of the shortcut.
3. Click on the icon and hold down the mouse button.
4. Drag the icon onto the Shortcut area of the Explorer menu. As you drag the icon, the cursor
will appear with a blank box and a box containing the Windows shortcut sign. This indicates
that the shortcut is being copied to the Explorer menu.
5. Release the mouse button. Macola ES displays the new shortcut in the Shortcut Area of the
Explorer menu.
Opening a Macola ES Application from the Shortcut Area
Once you have added shortcuts to your Explorer menu, double-click the shortcut for the
application you want to open.
Note: From a task list, if you try to open a task out of order, the system displays a warning message that
the task is being run out of order and asks if you want to continue.
For general information on Macola ES application screens, see Using the Macola ES Application
Screen.

Chapter 1: Getting Started
18 Accounts Receivable User Guide
Modifying an Existing Shortcut
1. Highlight the shortcut you want to modify.
2. Right-click the shortcut. The system displays the context menu.
3. Select Properties. The Properties dialog opens.
4. Change the shortcut display name (Description).
5. Select the Exact Command Line check box to allow the system to update the Parameters field
with the database and server being accessed by your Macola ES company. This check box is
available only if you are modifying a non-Macola ES shortcut.
The Parameters field is available only when the Exact Command Line check box is selected.
The system automatically updates this field with the information on the database and server
being used by your Macola ES company when you open the non-Progression application.
This field is updated each time the application is opened.
Note: If the non-Macola ES application was not created to use this functionality the Parameters field will
not be updated.
6. Enter Notes to display in the Notes area of the Explorer menu for the shortcut.
7. Click OK. Macola ES makes the changes to the shortcut.
Deleting an Existing Shortcut
1. Highlight the shortcut you want to delete.
2. Right-click the shortcut. The system displays the context menu.
3. Select Remove function. The system deletes the shortcut from the Shortcut area.
Using the Role Bar
You use role bars for quick access to your Macola ES applications. Role bar application shortcuts
allow you to click a shortcut to run the application. This lets you run an application without
having to go through the appropriate menu paths.
The Role bar functions on the idea that most users act from the function (role) they have within
an organization. The Role bar is an easily maintainable, standard selection of functions most
commonly used by a person performing certain tasks within a company or department. For
instance, a person working in the sales department uses different functions than a person
working in the purchase department. By having a toolbar available with role specific functions,
the time to start up and find applications is reduced and the use of the software becomes easier
(since you do not need to know your way around the entire Macola ES menu).
Besides the ability of each user to create a role bar, role bars can be assigned to user roles using
the Role bar tab in the Maintain roles application (on the System menu, under the HR & Security
heading, select Security, Roles). The advantage of creating standard roles in the Maintain roles
application is that users granted a role would automatically receive the role bars created for that
role. For more information, see the Setting Up Roles.
You can also create shortcuts using the Explorer menu style. Two types of tabs can be created,
Shortcuts and Task lists. These tabs not only allow you to create shortcuts to Macola ES

Chapter 1: Getting Started
lAccounts Receivable User Guide 19
applications but also allow you to create shortcuts to non-Macola ES applications. Task lists also
allow you to set the shortcuts in the order that they need to be run and notifies you when the
applications are run out of sequence. For information on using the shortcuts or task lists tabs, see
Role Bars, Shortcuts, and Task Lists.
Displaying the Role Bar
From the Macola ES toolbar, click the Role bar button. This button allows you to toggle the role
bar on and off.
OR
Select View, Role bar, Display from the Macola ES Shell menu. To turn the role bar off, select the
option a second time.
Creating Application Shortcuts on a Role Bar
1. Navigate to the application you want to add.
2. Click and hold the left mouse button on the application menu option, then drag the
application to the role bar.
The application shortcut displays with default text signifying the menu path of the
application. You can leave this text or edit it to any text you want.
3. Change the default text, then click outside the application shortcut. The application shortcut
is now saved to the role bar.
Renaming an Application Shortcut
1. Right-click the application shortcut.
2. Select Rename function from the context menu.
3. Type the new label for the application shortcut.
4. Click outside of the label field to save the new label for the application shortcut.
Deleting an Application Shortcut
1. Right-click the application shortcut.
2. Click Delete from the context menu. This removes the shortcut from the role bar.
Creating a New Role Bar Group
1. Select View, Role bar, Add group.
OR
Right click the role bar Title bar and select Add group from the context menu.
2. Type the title for the new group.
3. Click outside of the title field to save the title for the new role bar group.
4. Add application shortcuts to the new group.

Chapter 1: Getting Started
20 Accounts Receivable User Guide
Renaming a Role Bar Group
1. Expand the role bar you want to delete by clicking the Title bar.
2. Select View, Role bar, Rename group: <group name>.
OR
Right click the role bar Title bar and select Rename group: <group name> from the context
menu.
3. Type the new name for the group.
4. Click outside of the name field to save the new name for the role bar group.
Deleting a Role Bar Group
1. Expand the role bar you want to delete by clicking the Title bar.
2. Select View, Role bar, Delete group: <group name>.
OR
Right click the role bar Title bar, and select Delete group: <group name> from the context
menu.
3. At the prompt, ʺAre you sure you want to delete this group?ʺ select Yes to delete the group.
The role bar group is removed from the role bar area.
Entering Data into Macola ES
You enter data into Macola ES through a series of fields, check boxes, combo boxes, radio
buttons, list boxes, buttons, and search and note fields. Use the Tab key to move from one field to
the next. If a screen has multiple tabs (pages), pressing the Tab key when the cursor is on the last
field of a page automatically advances you to the next page of the screen.
Entering Data On the Fly
There are times when you need to enter a new code during entry of a record. If you enter the new
code without adding it to your maintenance files, Macola ES shades the field red and displays a
screen tip notifying you that the code record is not on file. To enter the new code without closing
the screen you have open, you can enter the new date on the fly.
The on-the-fly capability is available on search fields that refer to files with maintenance
applications. To use this, click the Search button for the field. Macola ES displays the Search
dialog for the applicable maintenance table. Click the New button on the Search dialog. Macola
ES opens the maintenance screen for the type of record that you are entering. Enter the new
record. When you save the record, Macola ES returns you to the Search dialog. Search for the new
record, highlight the record, and click Select. Macola ES enters the new value in the field and you
can continue entering your data.

Chapter 1: Getting Started
lAccounts Receivable User Guide 21
For example, while entering an item on the Item Master Maintenance screen, you may need to
enter a new Location for the item. Instead of closing the Item Master Maintenance screen and
opening the Inventory Location Maintenance screen, you can add the new location directly from
the Item Master Maintenance screen or from any other screen that accesses the inventory
locations.
Note: On-the-fly maintenance is available only if the user is set up with access rights to the related
maintenance screen. In the example provided, on-the-fly maintenance would be available only if the user
had access to the Inventory Location Maintenance screen.
Saving Your Work
After completing data entry, click the Save toolbar button, click the Save button in the Action
bar, or press the Enter key to save the record.
Grouping Fields
The Macola ES screens are designed for easy data entry. Two options group similar fields, one of
these are Tabs used on a screen to organize like information on a page. The second is 3D Lines
used to organize fields on a page of a screen. 3D Lines separate one or more fields from the rest of
the screen.
Field Types
Macola ES screens use any of fourteen different types of fields. The following list describes each:
Note: Macola ES application screens display a pencil icon beside each field name where data has been
entered or changed, an arrow icon next to each required field, and a red explanation point next to fields
containing inaccurate or incomplete information.
Date -- You must enter a date in proper date format. Macola ES allows you to enter dates in either
American format (MMDDYY or MMDDYYYY) or International format (DDMMYY or
DDMMYYYY). Whether you enter the date in the six-digit or eight-digit format, the date will
display in the eight-digit format. Macola ES stores and processes all dates as eight digits,
regardless of the format used to enter the date. Also, when entering a date Macola ES
automatically fills in the slashes (ʺ/ʺ) for you. Do not enter dashes (ʺ-ʺ) in date fields, as an Input
Error will occur.
To quickly enter a date in a date field Macola ES provides the ability to select a date from an
online calendar. Clicking the Calendar button next to date fields in Macola ES displays a pop-up
window displaying the current month. You select a date on the calendar to enter it as the date for
the date field in Macola ES.
See Date Entry for more information on how Macola ES processes dates.
List -- You must choose from the supplied list of choices. In some cases, Macola ES displays an
explanation along with the available selections. For many fields, Macola ES displays the
selections in the Information/Error Display at the bottom of the screen.
Numeric -- You can only enter digits. Numeric fields also allow you to enter decimal numbers,
the amount of decimal places depends on the properties set for the field. Macola ES also formats

Chapter 1: Getting Started
22 Accounts Receivable User Guide
the field based on the field properties, displaying dollar signs, commas, and decimal points
where appropriate.
Password -- This field accepts both digits and alphabetic characters. The system formats the entry
as you type, displaying the characters as asterisks (*).
Phone Number -- You must enter 10 numeric digits. The field defaults to North American phone
number format (formatted as 999-999-9999).
Question -- You must answer Yes or No. If the question is in the form of a check box, selecting
the check box signifies Yes. Clearing the check box (leaving it empty) represents No.
Signed -- You may enter a positive or a negative value. If you want to enter a negative value, you
must enter the minus sign manually. In the absence of a minus sign, Macola ES treats the value as
positive.
Social Security Number -- You must enter 9 numeric digits. The system formats the entry in
standard Social Security number format—formatted as 999-99-9999.
Uppercase alphanumeric -- This field accepts both digits and alphabetic characters. During data
entry, Macola ES automatically converts lower case characters to upper case. This field type is
commonly found on fields that Macola ES uses for sorting purposes.
Upper/Lowercase alphanumeric -- This field accepts both digits and alphabetic characters. These
fields are usually associated with names, addresses, or descriptions where lower case letters are
standard.
Document-Aware -- Display-only fields that are available in the tab order, typically on the Extra
tab, of a screen. Two buttons on the right-hand side of each document-aware field (Attachment
and Document) allow you to attach the document, open the document, edit the document outside
of the system, or delete the document.
Click the Attachment button to display the Document dialog and select the file you want to
attach in the File name field on this dialog. The File name field is followed by a browse button
that allows you to navigate to and select the specific file you want to attach. The path and
document name display in the File name field. The screen also provides display-only fields with
the date the source file was last saved and the size of the file. Enter a Description of the file. Click
Save to attach the document to the record.
Note: Some of the financial and set up screens have an Attachment button, which will display the
Document dialog or a similar Attachment dialog.
For more information, see Document Fields.
E-mail Address -- You must enter an active e-mail address. A button displays at the end of the
field, allowing you to launch your e-mail program with the address you enter in the field in the
TO line of the e-mail form.
Internet URL -- You must enter an active internet address. A button displays at the end of the
field, allowing you to launch your browser and open the web page you enter in the field.
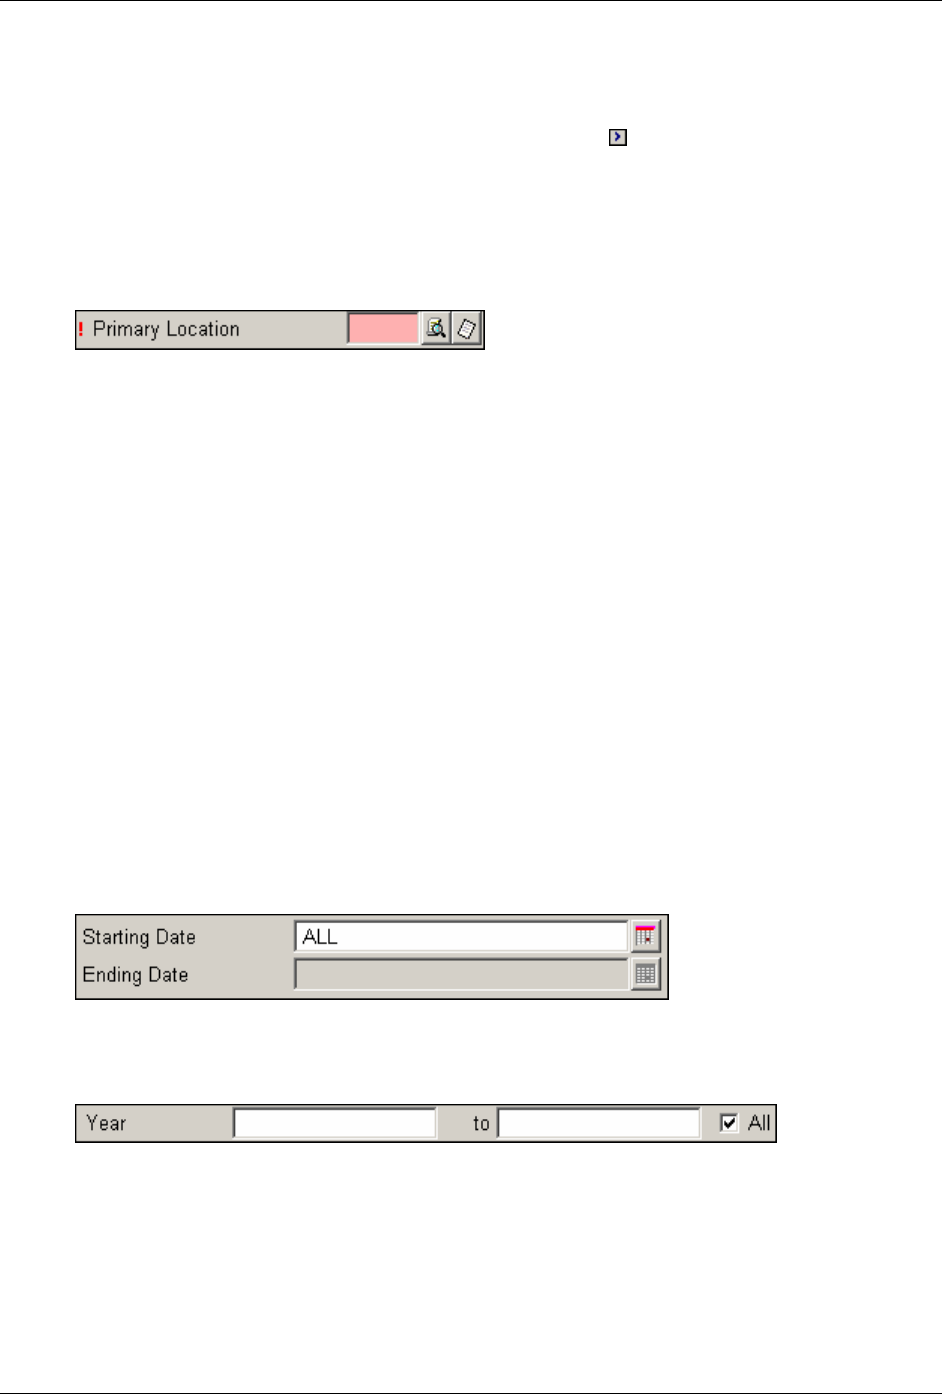
Chapter 1: Getting Started
lAccounts Receivable User Guide 23
Required Fields
Some fields require you to enter data before proceeding further on the screen. These fields are
referred to as required fields, and are signified by an arrow ( ) beside the field name on Macola
ES screens.
While entering data on a Macola ES screen, if you attempt to move past a required field without
entering data, Macola ES turns the field by red and displays a screen tip message specifying that
the field cannot be blank. In some cases you can continue entering data on the screen. However,
you cannot save the data if required fields are left blank.
Macola ES also shades fields that have been entered incorrectly in red and marks the field with an
explanation point before the field name. If you hold the mouse cursor over a field that is shaded
red, a screen tip message displays that indicates the reason for the shading. For example,
ʺInvalidʺ for a date that has been entered in an incorrect format.
Default Values
Default values help speed the data entry process. Default information is entered in other Macola
ES applications.
For example, when you set up a customer record on the Customer Maintenance screen, you enter
the default location for the customer. When you enter an order for the customer, the default
customer location in the Location field on the Basics tab and the Loc field for the item on the
Enter Orders screen automatically default to the location you entered for the customer on the
Customer Maintenance screen.
Macola ES also uses default fields for ranges. Many Macola ES screens prompt you for a Starting
and Ending range (normally when printing a report). If you press the Tab key while in the
Starting field, Macola ES defaults the range to ALL. Macola ES then includes all items in the
range. For example, if you press the Tab key in the Starting Account No. field, Macola ES
includes all the account numbers in the report.
When you tab from a starting range field in many of the financial and set up screens, Macola ES
selects an All check box that follows the ending field. This check box defaults to selected, but it
clears when you enter specific values in the range fields.
User Defined Fields
User defined fields allow you to enter unique information for your company. These fields can be
used for any purpose you choose and are valuable for use for special instructions, specific
information about an item, comments about a particular vendor or customer, preferences for a
customer, etc.
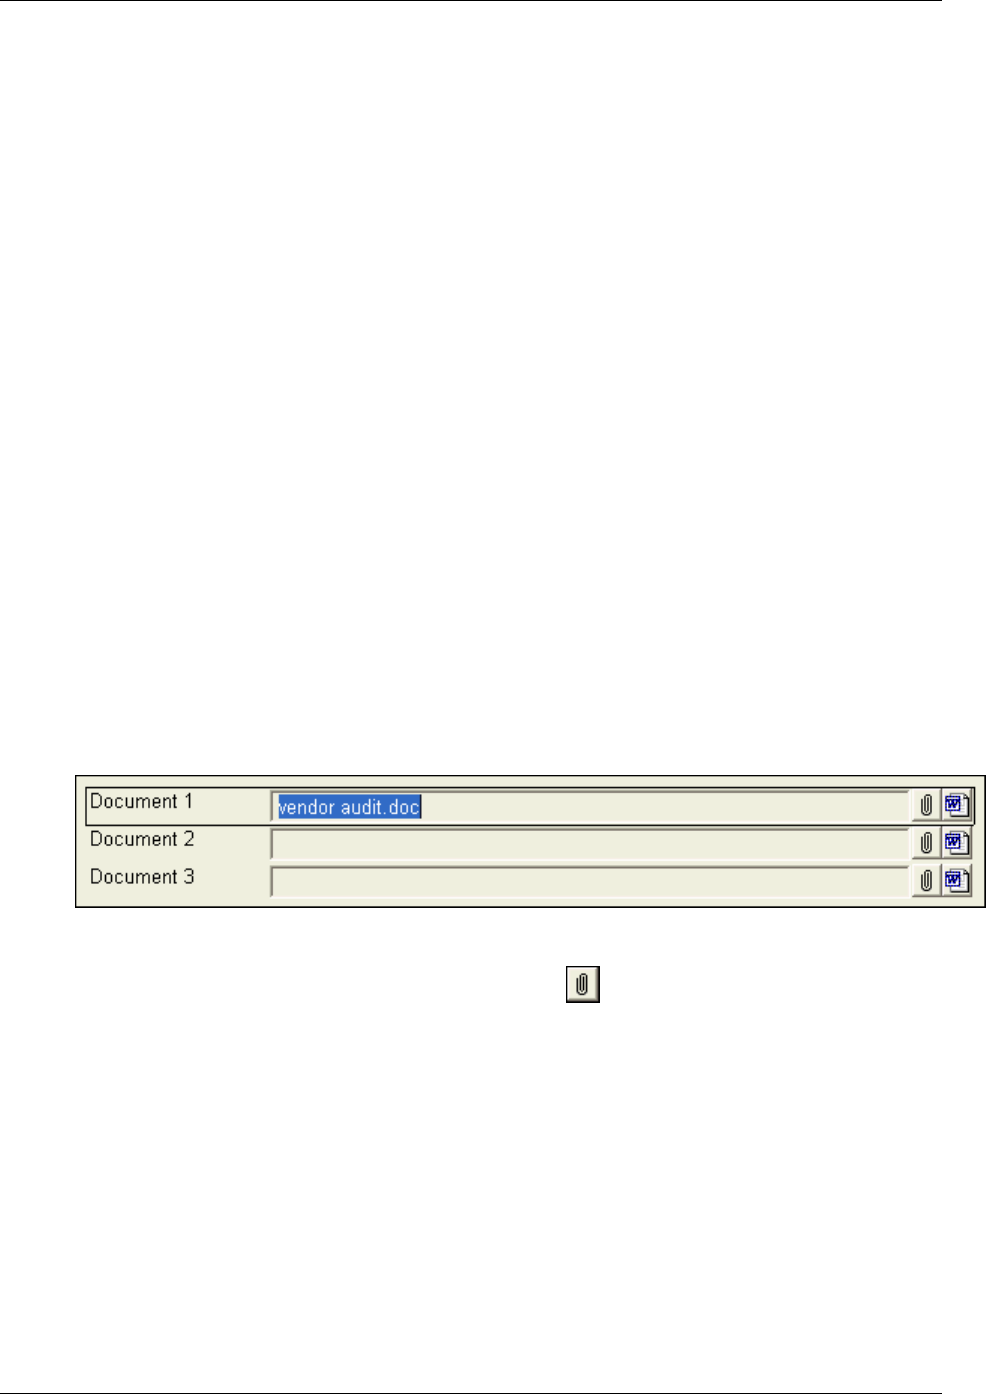
Chapter 1: Getting Started
24 Accounts Receivable User Guide
Macola ES provides a User Defined Fields page on most maintenance and transaction screens.
This page provides you with several fields where you can enter any additional information you
want for the record. In most cases, five User Defined 30-character alphanumeric fields are
provided and three Document fields that allow you to link documents (such as word, excel, or
PDF files) to a record. Some screens provide additional Note Literals. These are user defined note
literals that you can use in any way that you choose. Also provided with these note literals are a
user defined amount and date.
User defined fields are a valuable tool for providing additional information to your staff. Several
transaction screens, such as Order Entry and Purchase Order Entry, have five user defined fields
on a page tab at the header level or a button at the line item level.
For example, while entering an order in Order Entry, an Extra page is available after you enter
the header information. On this page you can enter up to five lines of user defined text. These
User Defined fields are directly linked to the header record of the order and are saved to the
Order Header table.
The Basics tab of the Enter Orders screen also provides access to five User Defined fields. When
you enter information in the User Defined Fields screen (click the Line User Fields button while
entering a line item on the order), the five lines of user-defined text are linked to the line item and
saved to the Order Line Item table.
Document Fields
Document-aware fields in Macola ES are display-only fields, which are available typically on the
Extra tab of a screen. Two buttons on the right-hand side of each document-aware field
(Attachment and Document) allow you to attach the document, open the document, edit the
document outside of the system, or delete the document.
To attach a document
From the Document field, click the Attachment button ( ) or press the F7 key to display the
Document dialog.
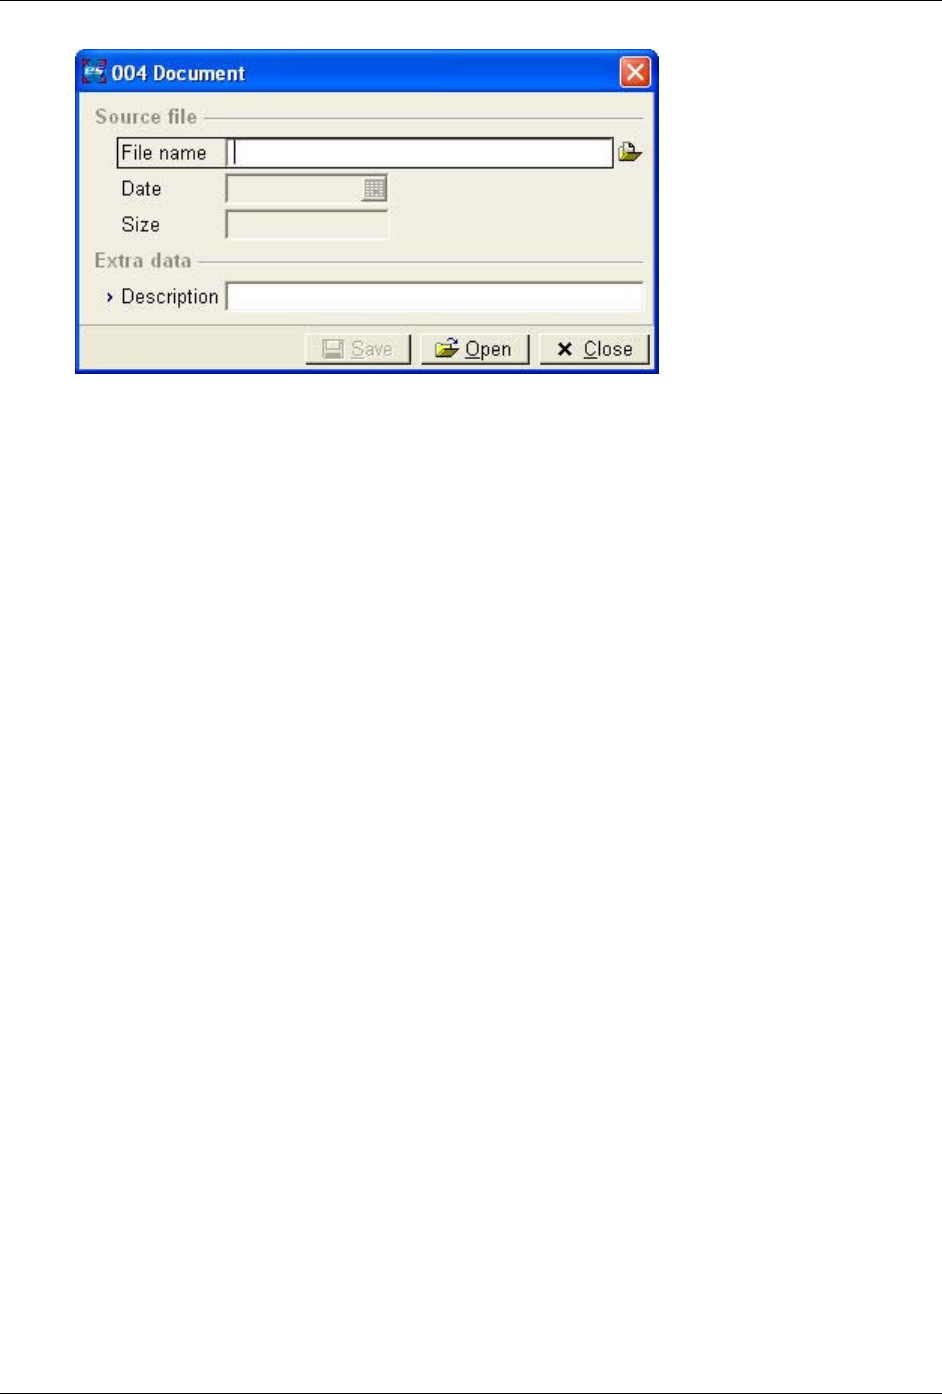
Chapter 1: Getting Started
lAccounts Receivable User Guide 25
The document dialog allows you to enter the file you want to attach. The File name field is
followed by a browse button that allows you to navigate to and select the file you want to attach.
The path and document name display in the File name field. The screen also provides display-
only fields with the Date the source file was last saved and the Size of the file. Enter a Description
of the file. Click Save to attach the document to the record.
When the document is attached to the record, a copy of the source document is stored in the
BacoDiscussions table. This allows flexible handling of the attached document and also allows e-
Synergy (if used) access to the document. Once saved to the BacoDiscussions table, the document
accessed from the record is the copy of the file in the database, not the file on the hard drive.
When you edit or delete this file, you are not updating the original source document.
Document-Aware fields also allow you to open the attached documents. You can open a
document either using the Document button or the Open button on the Document dialog. When
a document is opened, the system creates a temporary file in your Microsoft Windows temp
directory. You can work with the document, but any changes made at this time will not be saved
to the BacoDiscussions table.
To Edit a Document
From a Document field with a file already attached, click the Attachment button or press the F7
key to display a context menu with two options: Edit and Delete.
• Click Edit to open the Document dialog.
• Edit the Description field.
• If you edit the File name field, you are changing the document attached to the record and it
must include the path for the location of the file.
• Click Open to open the attached document in the appropriate software application. This
allows you to work with the document, however, any changes made at this time will not be
saved to your company database (specifically in the BacoDiscussions table). If changes are
necessary, you edit to the original source document and re-attach it.
• Click Delete to remove the attached document from the record. The system deletes the
corresponding BacoDiscussions table record.
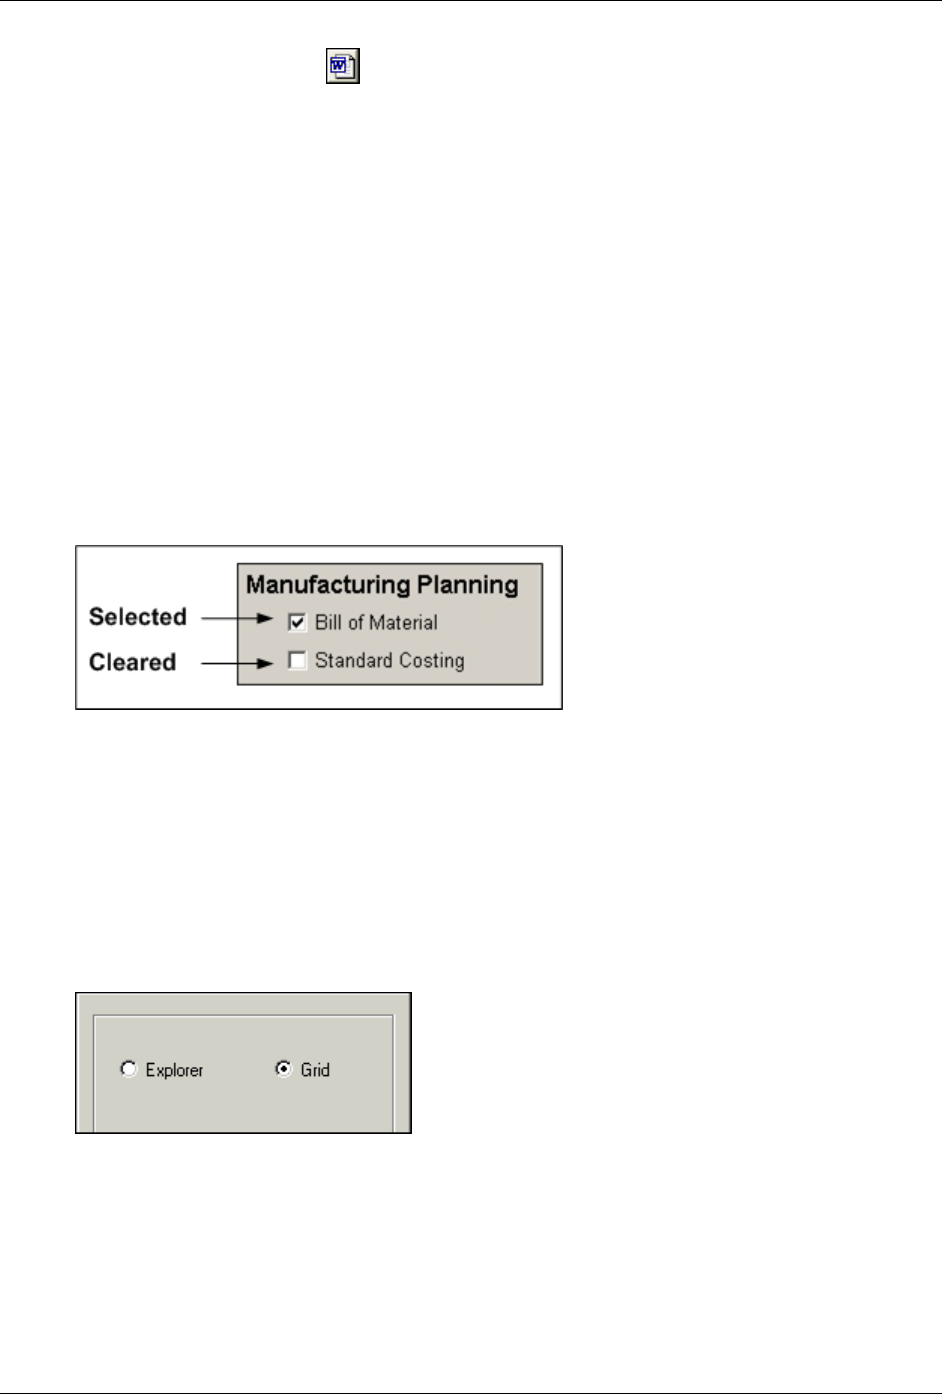
Chapter 1: Getting Started
26 Accounts Receivable User Guide
Click the Document button ( ) to open the attached document in the appropriate software
application. You can work with the document, but any changes made at this time will not be
saved to the BacoDiscussions table.
When you open a document either using the Document button or the Open button on the
Document dialog, the system creates a temporary file in your Microsoft Windows temp directory.
The Document button defaults to the Microsoft Word icon when empty, but changes to the
appropriate software application icon when the document is attached.
Check Boxes
Check boxes are usually associated with a yes/no or activate/deactivate situation. To answer Yes
(or to ʺselectʺ a check box), press the Spacebar, or use the left mouse button to click the check box.
This puts a checkmark in the check box to indicate that it is selected.
To clear a check box, perform the same steps: press the spacebar, use the left mouse button to
click the check box, or click the field name next to the selected check box. This removes the
checkmark from the check box to indicate that it is cleared.
Radio Buttons
Radio buttons are used when only one of a series of options is allowed.
To choose an option, using the left mouse button, click the open circle beside the text, or use the
Tab key to highlight the desired button name, then press the Spacebar. You can also choose an
option by clicking the field name text.
You can toggle options by clicking with the mouse, by pressing the Spacebar, or by clicking the
field name.
Combo Boxes
Combo boxes contain choices from a drop-down list and are usually required fields; that is, you
must choose an item from the list before entering any more data. To display the selections, do one
of the following:
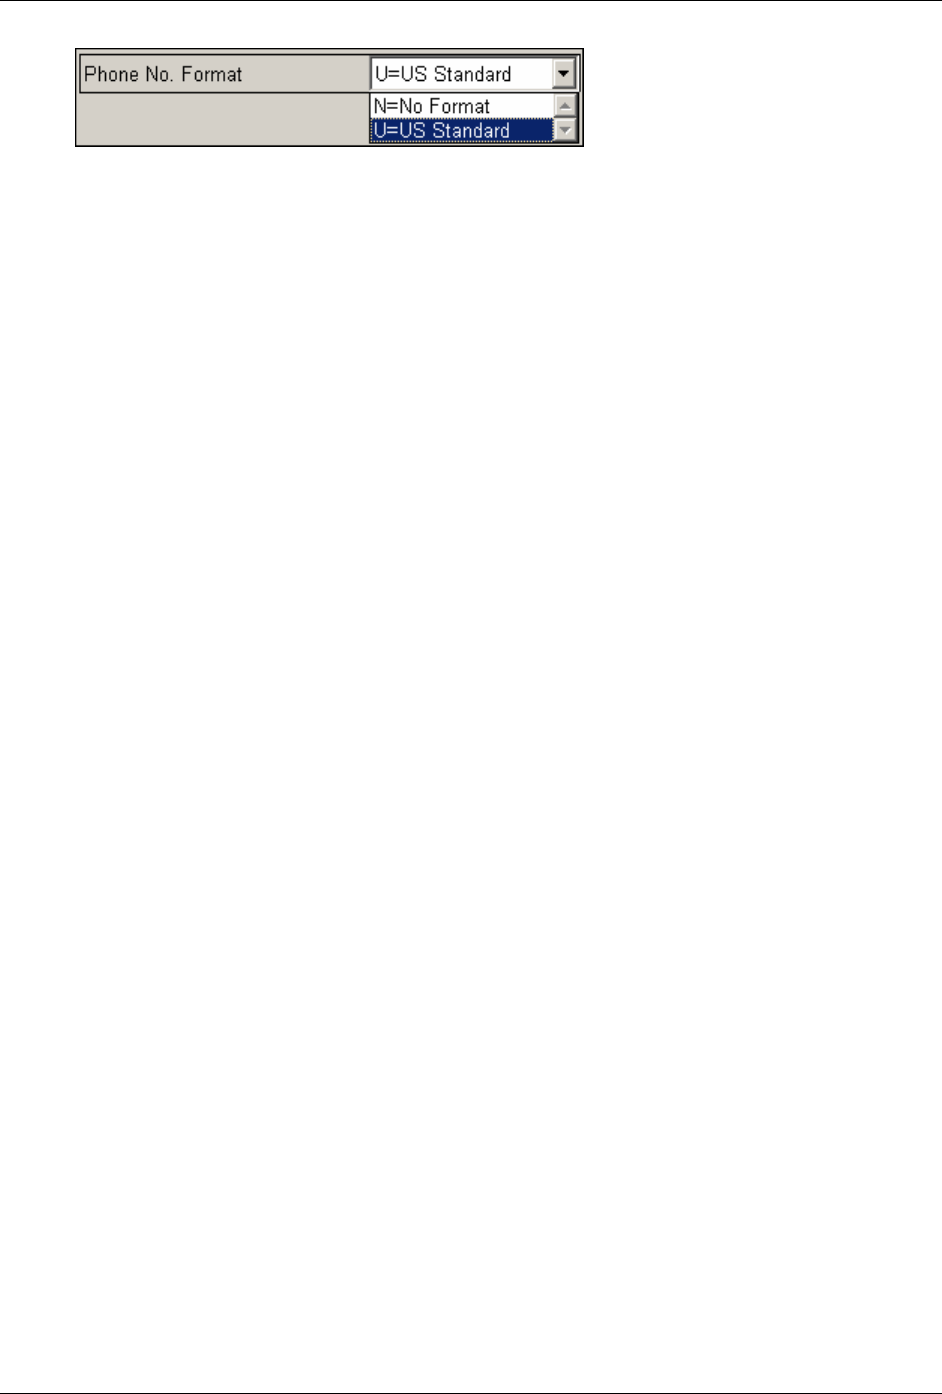
Chapter 1: Getting Started
lAccounts Receivable User Guide 27
• With the cursor in the combo box, press the Up/Down arrow keys. Use the PgUp or PgDn
keys to display the first or last selection.
• With the cursor in the combo box, press the F4 key to display the drop-down list of
selections.
• Click on the drop-down arrow next to the combo box. The drop-down list displays with the
available selections. If more selections are available than displayed in the drop-down list, use
the scroll bar to display the remaining selections.
Also, when the cursor is in the combo box, Macola ES displays the selections in the
Information/Error Display at the bottom of the screen.
To choose one of the selections, use the Up/Down arrow keys to highlight a selection and press
the Tab key when the desired selection is highlighted, or click the left mouse button on the
appropriate value.
Buttons
Buttons open a secondary screen where you can enter or view additional information that
pertains to the current application or perform a secondary task. Performing a secondary task
consists of displaying a secondary screen that allows you to perform a process that is not
required by the current application. For example, the Copy Work Center button on the Work
Center Maintenance screen displays the Copy Work Center screen, which allows you to copy a
work center to another department. This allows you to cut down on processing time while
entering similar work centers.
Buttons can also perform a particular task on a screen. For example, in Standard Costing, on the
Zero Out Current and Projected Cost screen, the Select All button selects all of the totals and cost
check boxes to be zeroed in the cost master.
Note Fields
The following provide information on how to use the note features available from Macola ES
application screens.
Financial and Set Up Application Note Fields
Many of the financial and set up screens provide methods to enter notes specific to a record. The
following example Notes dialog can be accessed by clicking a notes button on a screen or on the
application toolbar; by entering a record ID (the dialog displays automatically); or by clicking the
Notes button in the Action bar of a screen.
The Notes dialog allows you to enter any information that may be required for the record. For
example, you may want to enter comments about the vendor; such as, how they do business,
their shipping preferences, problems you may have had with the vendor, etc.

Chapter 1: Getting Started
28 Accounts Receivable User Guide
In the notes dialog you can type an unlimited amount of text. As you type the text wraps until
you press Enter. Clicking the Timestamp button enters the user ID of the user who entered the
note and the date and time the note was entered within brackets. Click Save to save the note, then
the next time you open the notes dialog for the record, you can view the notes already entered or
add additional notes. Use the Timestamp to separate notes.
Macola ES Note Fields
Use the Macola ES Notes feature to record information about information you have entered.
Macola ES has two types of Notes buttons, the Note button on the toolbar and the Notes button
beside fields on Macola ES screens.
There is no limit on the number of notes you can enter using these Note buttons. However, each
note has a maximum of 256 characters. Each record is stored with a description and is uniquely
identified by the following system generated information in the notes record:
• note_name -- this is name the system stores in the sysnotes_sql table indicating the screen or
record type for which the note is entered. For example, the Item No. field on the Item Master
Maintenance screen has a note_name of IM-ITEM.
• note_name_value -- this is the ID of the record for which the note is entered. For example,
the Item No. of the record on the Item Master Maintenance screen for which you are entering
the note (for example, BIKEAS).
• note_tm -- this is the date and time stamp of when the note was entered and is displayed in
the Date field. The date and time stamp is unique to each record and is the key value for the
notes record.
• user_name -- this is the ID of the user who entered the note and is displayed in the Entered
By User field. A user can enter multiple notes throughout the Macola ES system.
The combination of the above information uniquely identifies the note and specifies when the
note should be displayed in the Notes dialog. The system allows you to enter the same text in the
Topic and Notes fields of the Notes dialog for multiple notes. This information is not unique to
the note record.
Note: These Notes are for reference only. If you want to enter notes to print on a report, you will need to
use the Notes, User Notes, or Comments buttons from the application screen. However, some Macola ES
applications do not have these buttons available.
Notes entered using either button can be deleted only by the user who entered them. If the note
was entered by anyone other than the user currently logged in, the Delete button is grayed out.
For example, if user ʺDemoʺ entered a note on the Item No. field on the Item Master Maintenance
screen. ʺDemoʺ is the only user that can delete the note. If user ʺGuestʺ opens the same item
record, ʺGuestʺ can add, edit, or view notes but cannot delete notes entered by ʺDemoʺ. Any user
can edit a note entered by any other user, including notes entered by the supervisor user.
Screen Level Notes
Click the Notes button on the toolbar to add notes for an application or about the screen. You can
view or delete Notes added at the screen level by clicking the Notes toolbar button on the screen
in which they were originally created. (Notes can be deleted only by the user who entered them.)
Chapter 1: Getting Started
lAccounts Receivable User Guide 29
For example, if you created a note on the Item Master Maintenance screen, you could access that
note only on the Item Master Maintenance screen.
Field Level Notes
Click the Notes button at the field level, using the mouse or by pressing the F8 key, to add notes
about a particular record in that field. To activate the field level Notes, you must have a value in
the field preceding the Notes button. Notes that you add to a record are record specific. For
example, on the Item Master Maintenance screen, if you add a note to Buyer/Planner 100, the note
would be available for Buyer/Planner 100 regardless of the item number.
The Customer No. field notes button displays the icon indicating that the value in the field has
one or more notes associated with it. The Item No. field notes button displays the icon indicating
that the field supports notes but does not yet have any notes for the item number entered.
Since each note record is uniquely identified by the notes name (Note/DDE Name). Some notes
entered for a record may not be available when you enter that record on another screen. For
example, notes are entered for a particular purchase order when the purchase order is entered on
the Purchase Order Entry screen. However, when you enter the same purchase order number on
the A/P Enter Voucher Transactions screen, the notes you entered in P/O are not available. The
reason for this is that the Note/DDE Name in P/O is PO-ORDER-HEADER and in A/P the
Note/DDE Name is AP-PO-ORDER-NUMBER. However, Macola ES allows you to work around
this by customizing your screensets using the Macola ES Designer application. In Designer, you
open the A/P screen and change the Note/DDE Name to PO-ORDER-HEADER, this will display
the notes entered in P/O when you click the Note button in A/P for that PO record.
Adding a Note Button to a Field
If a field on an entry screen currently does not have a Notes button you can add one using the
following steps. You must be a user with Administrator rights to complete this procedure.
Note: Designer is not available from all of the Macola ES applications. Look for the Designer toolbar
button in applications where the option is available:
See ScreenSet Designer help for information on restrictions based on your Macola ES license. You may
need to make a copy of the screenset before continuing with these steps.
1. Open Macola ES.
2. Open the screen you want to edit in Designer mode.
3. Right-click the field to add the note button.
4. Select Note/DDE Name. Macola ES displays the Progression: Enter Note/DDE Name screen.
5. Enter the note field name and click OK. Macola ES adds the Note button next to the field.
6. Click Save to save the screenset.
7. Macola ES asks, ʺDo You Want To Save The Changes You Made?ʺ If you want to save the
changes you have made to the screenset, click Yes. If you do not want to save the changes,
click No. After you select Yes or No, Macola ES will exit Designer mode.
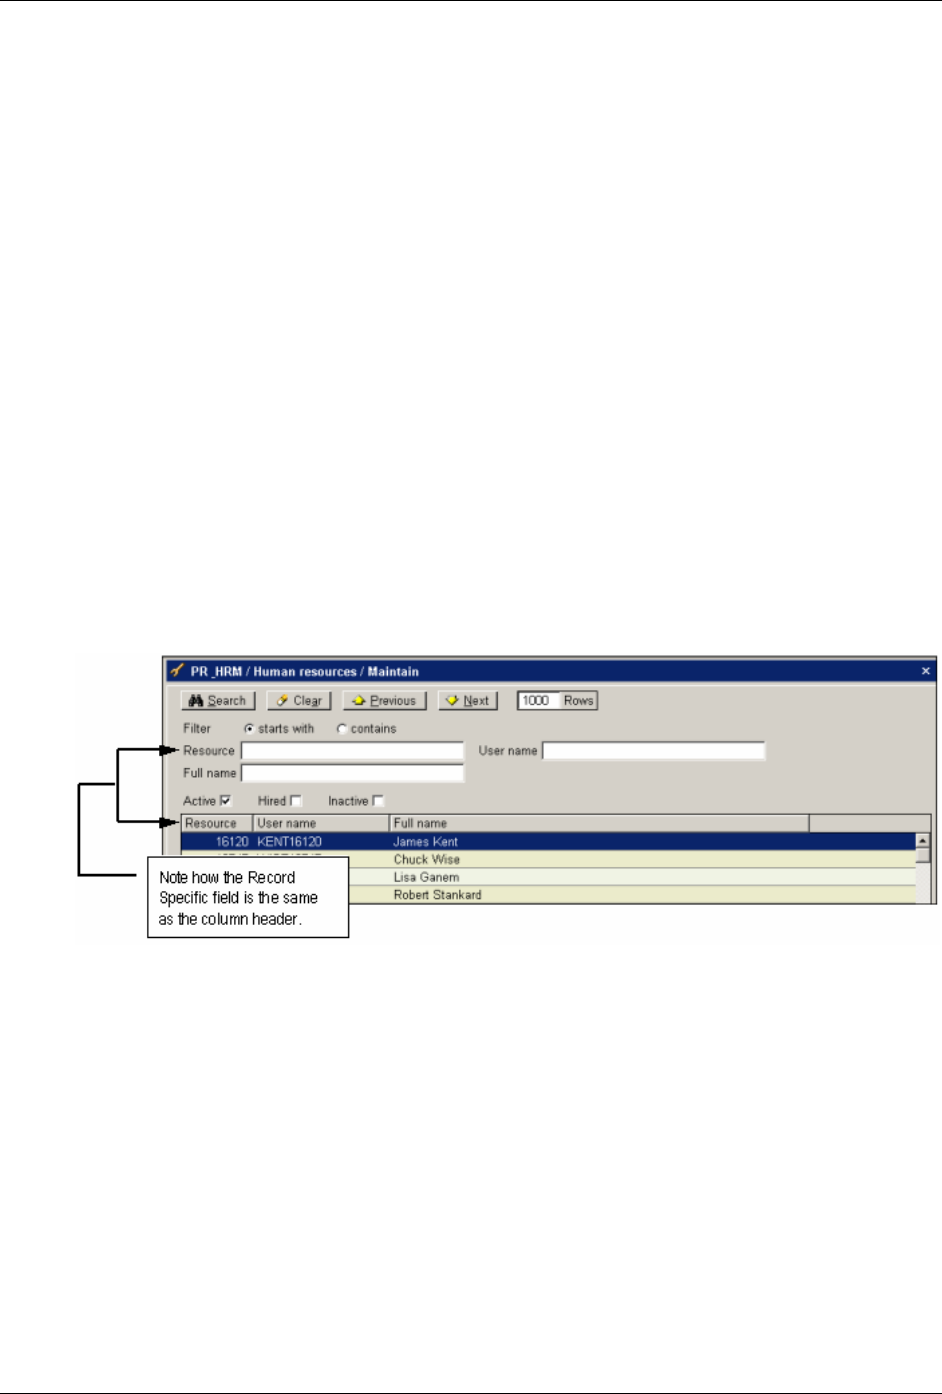
Chapter 1: Getting Started
30 Accounts Receivable User Guide
Searches
Macola ES provides two levels of search methods that allow you access to your data. The Browser
Search screen is shown first before many Macola ES screens. Browser Searches allow you to
search and select records to open for editing and allow you delete and create new records from
the Browser Search screen. Field Level Searches are available at the field level for many fields
where values are maintained by other applications. Field level searches allow you to search and
select a value for entry into a field.
Browser Searches
Browser Searches are available from many of the financial, maintenance, and view screens. These
searches display all available records in a list box. Filter criteria is available to limit the number of
records displayed. You can open one of the existing records or click the New button in the Action
bar to create a new record.
Filter Criteria Fields
Filter Criteria fields display at the top of the Browser Search screen. These fields allow you to
narrow the search results displayed in the Search list box and are composed of Filter radio
buttons and Record Specific fields.
Clicking the Filter toolbar button allows you to toggle on and off the filter criteria fields that
display at the top of the Main shell area.
Record Specific Fields
The Record Specific fields are based on the columns displayed in the Search list box. These fields
are located after the starts with and contains radio buttons on the Search screen. You can display
a maximum of six fields.
The fields displayed and their display order will change based on the changes you make to the
columns. For example, if you delete a column that currently is available as a search criteria
Record Specific field, the fields will adjust locations and the next available column will now
display as the last Record Specific field.
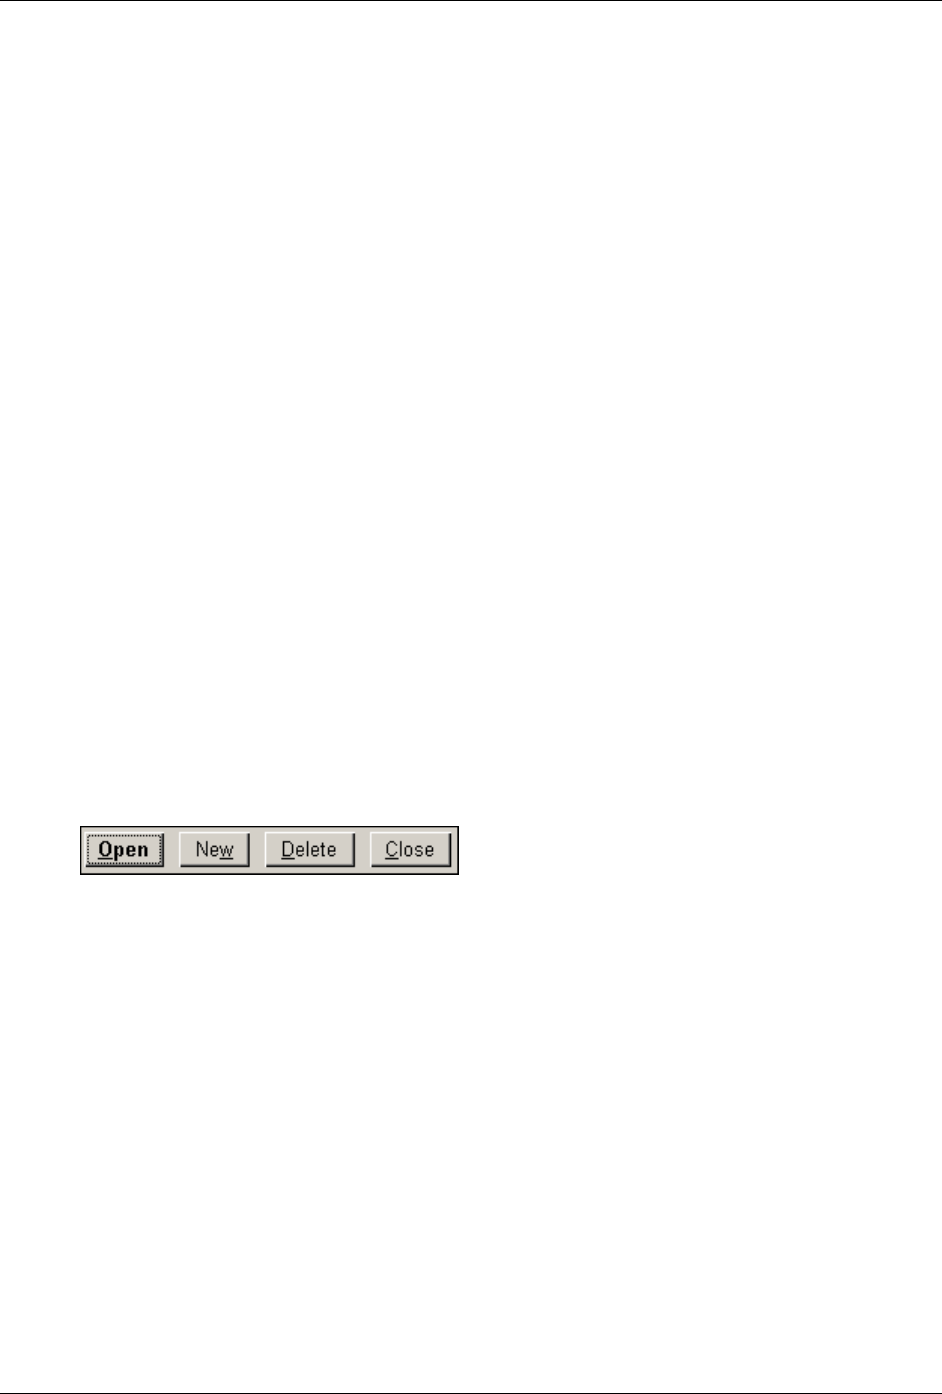
Chapter 1: Getting Started
lAccounts Receivable User Guide 31
Browser Search Fields
The following descriptions provide information on each field type available in the Filter Criteria
fields section of the Browser Search screen.
• Clear button -- Clears any filter criteria entered in the filter criteria fields
• contains -- Allows you to specify that all records should contain the values entered in the
Record Specific fields
• Next button -- Displays the next set of records in the list box. The records displayed depend
on the filter criteria and the number entered in the Rows field. The button grays out when
there are no more records to display.
• Previous button -- Displays the previous set of records in the list box. The records displayed
depend on the filter criteria and the number entered in the Rows field. The button grays out
when there are no more records to display.
• Record Specific fields -- These fields are based on the columns you have displayed in the list
box. You can display up to six Record Specific fields. Enter the text you want to search for in
each column. This text is further filtered using the starts with and contains radio buttons.
• Rows -- Allows you to enter the number of records you want displayed in the list box. You
can enter maximum value of 999 and a minimum value of 1.
• Search button -- Performs the search based on the filter criteria entered
• Starts with -- Allows you to specify that all records should begin with the values entered in
the Record Specific fields
Browser Search Action Bar
Buttons in the Action bar (at the bottom of the Browser Search) allow you to process the
information further. For example, the buttons shown in the following image:
• Open button –- Allows you to open a highlighted record from the list box
• New button –- Allows you to display the maintenance screen to create a new record
• Delete button –- Allows you to delete a highlighted record from the application table
• Close button –- Allows you to close the Browser Search and return to the menu
These and various other buttons are available depending on the screen. Buttons not discussed
above are discussed in the relevant application.
Customizing the Search Screen
The Search screen allows you to customize what you view in the Search list box. You do this by
adding or deleting columns from the list box display, changing the columns order, and changing
the sort order.

Chapter 1: Getting Started
32 Accounts Receivable User Guide
Adding Columns to the Search List Box
1. From the Search screen, either click the Columns toolbar button or right click on a column
displayed in the list box and select Insert column from the right mouse menu. Macola ES
displays the Insert column dialog.
2. Select the column that you want to add to the Search list box.
3. Click OK. The column is inserted in the list box.
Removing Columns from the Search List Box
1. From the Search screen, right click on a column displayed in the list box.
2. Select Delete column from the right mouse menu. The column is removed from the Search
list box.
Note: You cannot remove the column that is used to sort the list box. You must first select another column
as the Sort column. See Changing the sort order of a search for instructions.
Changing the Order of the Columns in the Search List Box
1. From the Search screen, click and drag the column you want to move. The cursor displays a
box indicating that you are moving the column.
2. Drop the column on another column to move it there. The moved column displays to the left
of the column it was dropped onto.
Note: The Sort column, or the column that is set as the sort order column, must be the first column
displayed. You cannot move this column from that position.
Changing the Sort Column of a Search
1. From the Search screen, right click on a column in the Search list box.
2. Select Sort from the right mouse menu. This changes the column you right clicked to the Sort
column of the search.
Changing the Sort Order of a Search
1. From the Search screen, right click the Sort column in the Search list box.
2. Select Reverse sorting order from the right mouse menu. This changes the sort order
between ascending and descending.
Adding Multiple Columns to the Sort Order
1. From the Search screen, right click the column that you want to add to the sort order.
2. Select Add to sorting order from the right mouse menu. The search will now be sorted first
by the original sort column and secondly by the newly added sort column.
Note: Neither the original or the new sort column can be moved to a new column location using the drag
and drop method. For instructions on changing the column location, see Changing the order of the sort
columns.

Chapter 1: Getting Started
lAccounts Receivable User Guide 33
Changing the Order of the Sort Columns
1. From the Search screen, right click the second sort column.
2. Select Put first in sorting order from the right mouse menu. This changes the selected
column to the first sort column.
Removing a Column from the Sort Order
1. From the Search screen, right click the sort column that you want to remove from the sort
order.
2. Select Remove from sorting order from the right mouse menu. This removes the selected
column from the sort order and places it in its normal database location.
Note: If you remove the first column in the database from the sort order, it becomes the first column after
the sort column(s).
Using the Browser Search
The Browser Search allows you to search for specific records for quick and easy access to your
data for processing. The Browser Search provides options for searching, deleting, and creating
new records in your Macola ES tables.
Performing a Search from the Browser Search
1. Select the menu option of the screen you want to open.
2. Enter the number of Rows you want displayed in the list box. You can enter maximum value
of 999 and a minimum value of 1.
3. Select the starts with option to specify that all records should begin with the values entered
in the Record Specific fields.
4. Select the contains option to specify that all records should contain the values entered in the
Record Specific fields. You can select only one of the two options.
5. Enter the text in the Record Specific fields that you want to search for in each column. These
fields are based on the columns you have displayed in the list box. You can display up to six
Record Specific fields.
6. Click the Search button to perform the search based on the filter criteria you enter.
7. Click the Next button to display the next set of records in the list box. The records displayed
depends on the filter criteria and the number entered in the Rows field. The button grays out
when there are no more records to display.
8. Click the Previous button to display the previous set of records in the list box. The records
displayed depends on the filter criteria and the number entered in the Rows field. The button
grays out when there are no more records to display.
9. Click Close to exit the Browser Search and screen, or click one of the other buttons in the
Action bar to perform a task.
Opening a Record from a Search
1. Select the menu option of the screen you want to open.
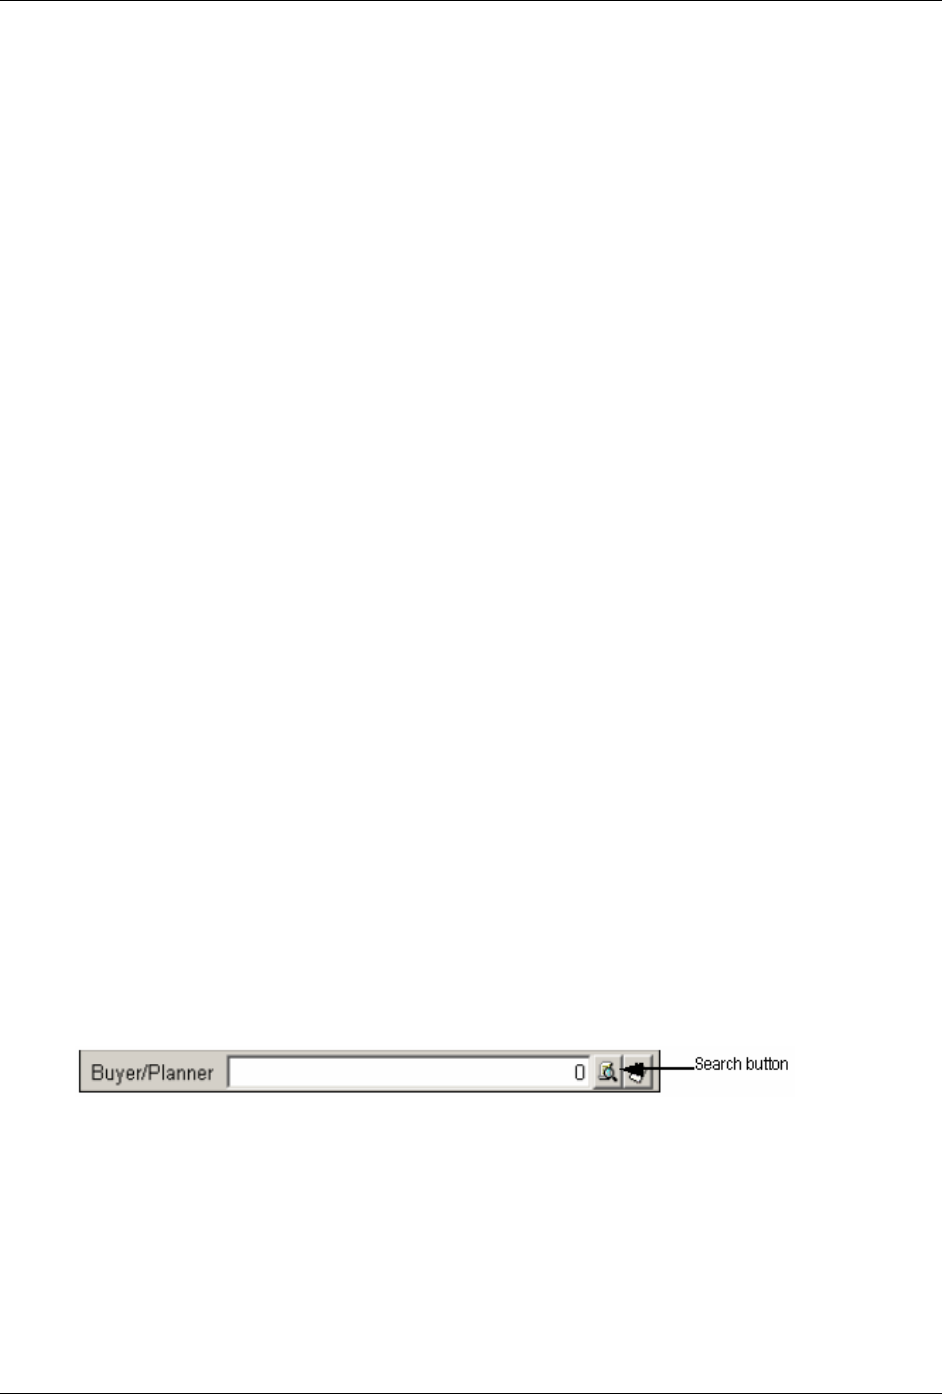
Chapter 1: Getting Started
34 Accounts Receivable User Guide
2. Perform a search from the Browser Search.
3. Highlight a record in the Search list box.
4. Click the Open button or Select button in the Action bar. Macola ES opens the screen and the
record you highlighted for editing or viewing.
Creating a New Record
1. Select the menu option of the screen you want to open.
2. Click the New button in the Action bar. Macola ES opens the screen in Add mode.
Deleting a Record from the Application Table
1. Select the menu option of the screen you want to open.
2. Perform a search from the Browser Search.
3. Highlight the record in the Search list box that you want to delete.
4. Click the Delete button in the Action bar. Macola ES displays a message to verify that you
want to delete the record.
5. Click Yes to delete the record or No to return to the Browser Search screen. If you click Yes,
the system displays a dialog with the processing status.
6. When the record is processed, the system displays a verification dialog stating whether the
record was deleted and, if applicable, why the record was not deleted. The dialog allows you
to print a report of the deletion.
7. Click Print to print a report of the deletion, or click Close to return to the Browser Search
screen.
8. Continue to delete records, or click Close.
Field Level Search
Field Level Searches are available for many fields where values are maintained by other
applications. These searches display in the Search dialog by pressing the F7 key or clicking the
Search button next to the field. The Search dialog allows you to search and select a value for entry
into an application screen. Filter criteria is available to limit the number of records displayed. You
can select one of the existing records or print a report of the records from the Action bar using the
Select and Report buttons.
Records display in alternating colors to allow a clearer representation of the data. The Rows field
allows you to specify the number of records to display in the Search list box. Use the Up/Down
arrow keys to scroll through the choices. If the record you are searching for does not display, try
selecting a higher number in the Rows field to display further records.
Note: You can enter a minimum value of 1 and a maximum value of 999 in the Rows field.
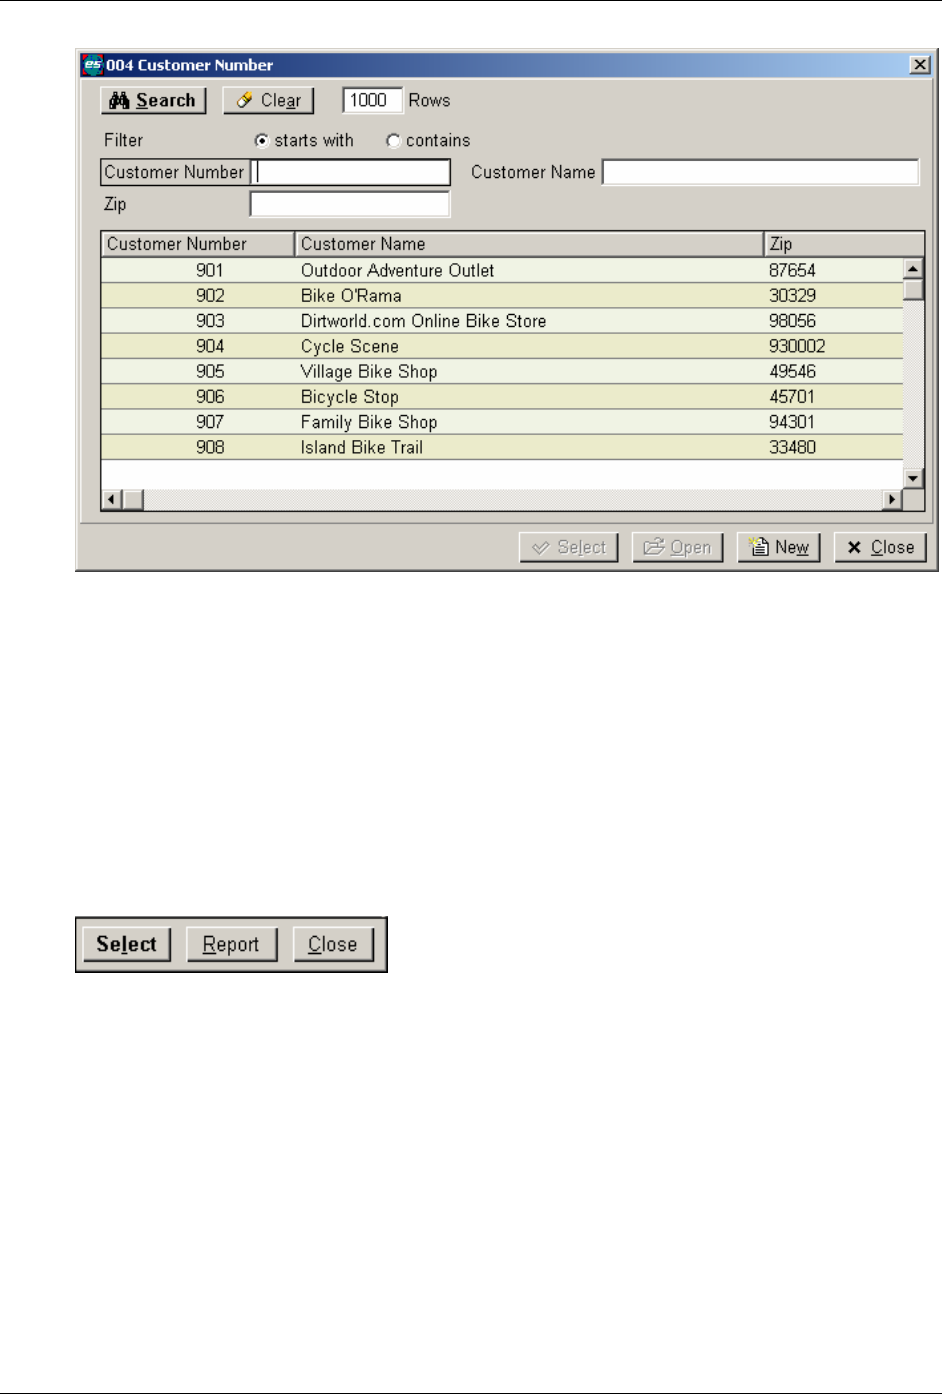
Chapter 1: Getting Started
lAccounts Receivable User Guide 35
To return a record to the main screen, highlight the desired record and click Select, press the
Enter key, or double-click the record with the left mouse button.
The search dialog contains fields that allow you to filter the records returned by the search. These
fields function the same as the fields on the Browser Search. For more information, see Filter
Criteria Fields.
Buttons at the bottom of the Search dialog allow you to process the information further. As
shown in the following screenshot, the Select button returns a highlighted record to the
application screen; the Report button processes a list of the records displayed; and the Close
button closes the Search dialog and returns you to the main application screen. In the example
screen above, the Open button opens the maintenance application with the highlighted record for
editing and the New button opens the maintenance application for you to enter a new record.
Customizing the Field Level Search Screen
The Field Level Search allows you to customize what you view in the Search list box. You do this
by adding or deleting columns from the list box display, changing the columns order, and
changing the sort order. For information on customizing the search screen, see Customizing the
Search Screen.
Using the Field Level Search
The Field Level Search allows you to search for specific records for quick and easy entry of data
during processing of an application. The Field Level Search provides options for searching,
selecting, and creating new records in your Macola ES tables.

Chapter 1: Getting Started
36 Accounts Receivable User Guide
Performing a Search from the Field Level Search
1. With your cursor in the field you want to search on, click the Search button. Macola ES
displays the Search screen.
2. Enter the number of Rows you want displayed in the list box. You can enter maximum value
of 999 and a minimum value of 1.
3. Select the starts with option to specify that all records should begin with the values entered
in the Record Specific fields.
4. Select the contains option to specify that all records should contain the values entered in the
Record Specific fields. You can select only one of the two options: starts with or contains.
5. Enter the text in the Record Specific fields that you want to search for in each column. These
fields are based on the columns you have displayed in the list box. You can display up to six
Record Specific fields.
6. Click the Search button to perform the search based on the filter criteria you enter.
7. Click the Next button to display the next set of records in the list box. The records displayed
depends on the filter criteria and the number entered in the Rows field. The button grays out
when there are no more records to display.
8. Click the Previous button to display the previous set of records in the list box. The records
displayed depends on the filter criteria and the number entered in the Rows field. The button
grays out when there are no more records to display.
9. Click Close to exit the Search screen, or click one of the other buttons in the Action bar to
perform a task.
Selecting a Record to Enter in the Field
1. Select the menu option of the screen you want to open.
2. Perform a search from the Field Level Search.
3. Highlight a record in the Search list box.
4. Click the Select button in the Action bar. Macola ES enters the code or number that identifies
the record in the field on the screen.
Opening a Record from a Field Level Search
1. Select the menu option of the screen you want to open.
2. Perform a search from the Field Level Search.
3. Highlight a record in the Search list box.
4. Click the Open button in the Action bar. Macola ES runs the maintenance or entry screen of
the record and opens the record you highlighted for editing or viewing.
Creating a New Record from a Field Level Search
1. Select the menu option of the screen you want to open.
2. Click the New button in the Action bar. Macola ES opens the screen in Add mode.

Chapter 1: Getting Started
lAccounts Receivable User Guide 37
List Boxes
Several data entry screens in Macola ES use list boxes to display transactions or account
distributions. Many views and other processing screens use list boxes to display data. Macola ES
list boxes provide two options that help you view, sort, and display your data.
• The list view has alternating colors for the line items to allow a clearer representation of your
data.
• The ability to sort the items in the list box in alphabetical/numeric or reverse
alphabetical/numeric order. Macola ES allows you to sort the displayed records by one of the
displayed columns. Click once on a column header and Macola ES sorts the displayed
records according to the column in ascending order, click a second time to display the
records in descending order.
When adding transactions, the list box displays the distributions or line items as they are saved to
help you keep track of the data entry process. It also displays previously entered transactions. To
enter a transaction, press the Insert key or double-click a blank line in the list box. To use the
Insert key to insert a new distribution or line item, the cursor must be in the list box.
When changing transactions, the list box normally shows all distributions or line items for a
transaction. This allows you an opportunity to edit particular transactions. To edit a transaction,
highlight a desired transaction and press the Enter key (or double-click with the mouse). Macola
ES displays the transaction information in the data entry line and allows you to change various
fields.
You can also delete transactions from a list box. To delete a list box transaction, highlight the
desired transaction, and press the Delete key or click the Delete button in the Action bar.
Click the Save button in the Action bar or the Save toolbar button to accept any changes you have
made in a list box. Click Cancel from the Action bar to exit.
Grid Control for Macola ES Entry Screens
A new grid control in Macola ES introduces a significant change to all data entry screens.
Previously, you entered data into a data-entry line—a series of fields used for data entry on entry
screens. When you saved the entry, the information from the fields would be displayed in a list
box at the bottom of the screen. Grid control provides a less cumbersome interface, combining the
data-entry fields into the list box. This grid is a side-scrolling table containing all the detail fields.
Entering data into the grid control itself is much like entering information into a spreadsheet.
This layout streamlines data entry by allowing users to enter a header and detail information on a
single screen.
You can customize a screen that has grid fields by dragging and dropping the fields in the order
you want. This can offer faster data entry by moving commonly used fields to the beginning of
the grid control.
An example of the grid control is visible on the O/E Enter Orders screen.
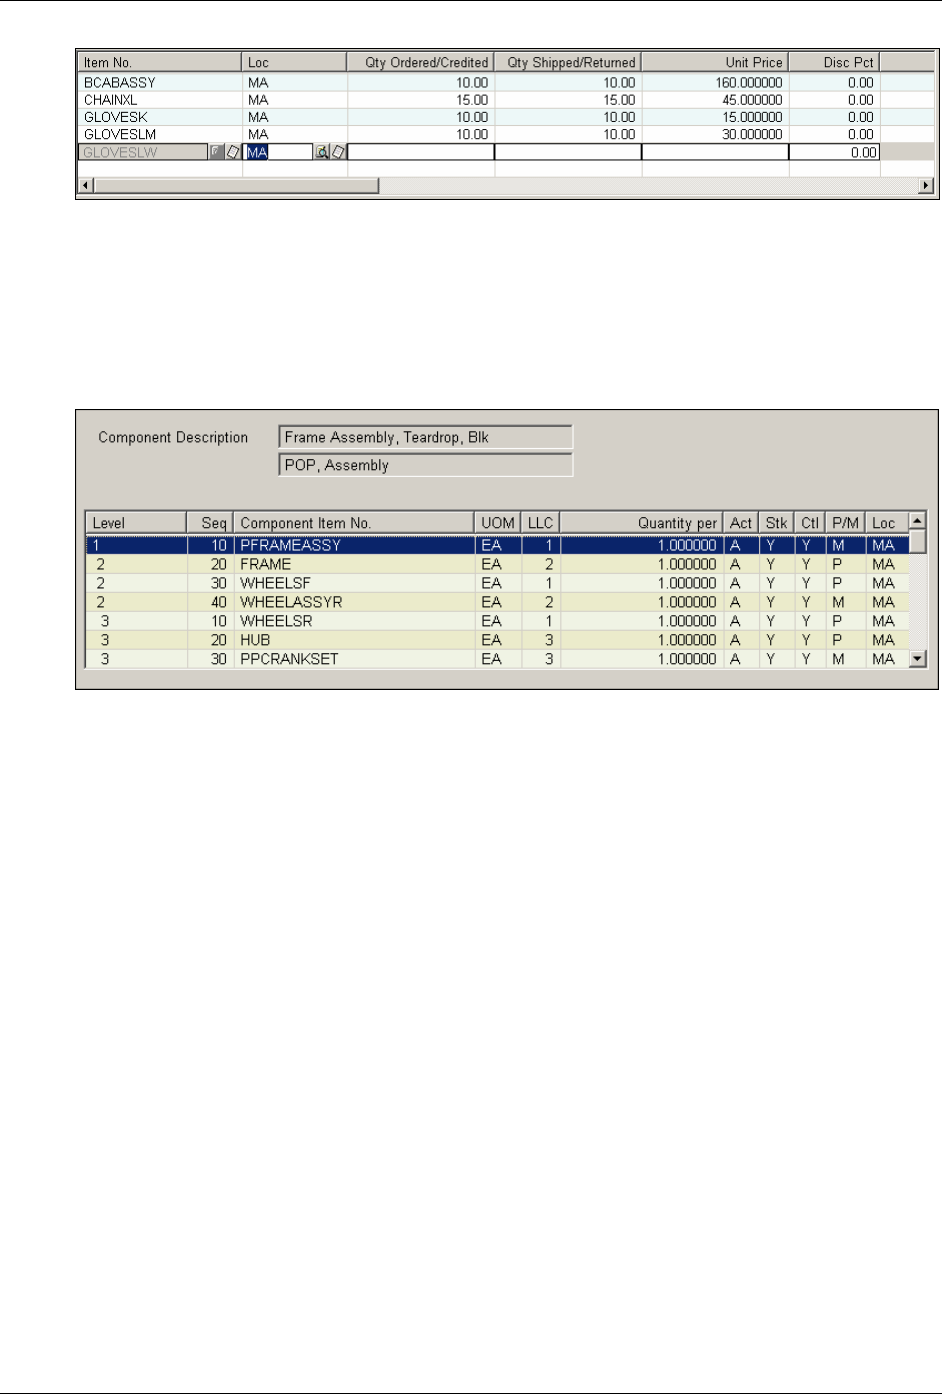
Chapter 1: Getting Started
38 Accounts Receivable User Guide
Viewing Information Using List Boxes
Besides allowing you to access transaction data during the entry process, Macola ES also uses list
boxes to list transactions on view screens. On view screens, when you highlight a transaction in a
list box, Macola ES displays the data entered during entry of the record in the data-entry line.
This information is display-only and cannot be changed. In the example below, the Component
Description of the highlighted item displays.
The list view has alternating colors for the line items to allow a clearer representation of your
data. Settings are on the User Settings screen (on the System menu, under the Company heading,
select User settings). From the Color page of this screen you can select to display the header in
3D, display lines between cells, and the color of the rows, text, and lines between cells.
While viewing transactions in a list box, many screens have buttons that open (drill down to) a
secondary screen with additional information about the selected transaction. If further
information is unavailable, the button may be grayed out or a message will display notifying you
that no further transaction information is available.
In some list boxes, you can drill down to more information. When more information is available,
move the mouse pointer over the transaction and it will change to a magnifying glass. Highlight
a transaction and press the Enter key or double-click with the mouse. This opens a secondary
screen showing you more information about the selected transaction.
Tabs on a Macola ES Screen
Many screens within Macola ES use tabs to display the fields necessary to run an application.
Macola uses these tabs to group similar information, giving you quick access to the information
you need. You can access these tabs by either clicking the tab at the top of the screen or pressing
the Tab key from the last field of a previous tab.
Chapter 1: Getting Started
lAccounts Receivable User Guide 39
Tab Icons
Macola ES uses many standard icons on application page tabs and within the menu structure of
the software. These icons help you quickly identify applications and information on screens that
you need to process or enter.
The following table outlines the icons used on tabs within Macola ES and the meaning of each
icon.
Icon Meaning
Indicates a page of standard fields for an application.
Indicates a page of fields providing address
information for the record.
Indicates a page of fields providing extra information
for the record.
Indicates a page of fields providing resource specific
information.
Indicates a page providing information on the projects
that a record is part of.
Indicates a page providing the rights available to the
human resource.
Indicates a page of fields providing the schedule of
the human resource.
Indicates a page providing the assets available to a
record.
Indicates a page of fields providing information about
a resource for the record. This tab provides
information for an employee, salesperson, or
customer.
Indicates a page of fields providing contact
information for a record.
Indicates a page of fields providing financial
information for the record.
Indicates a page of fields providing price information
for the record.
Indicates a page of fields providing item, stock, or
manufacturing information for a record.
Indicates a page of fields providing purchasing
information for a record.
Specific
Logistics
Indicates a page of fields providing information about
cost centers/cost units or categories.
OW Tabs
Macola ES has a feature called OW Tabs. This feature allows Macola ES to display secondary
screens as tabs of a main screen, providing easier access to the necessary information. In cases
where the OW Tabs option has been used, buttons that would normally be available from the
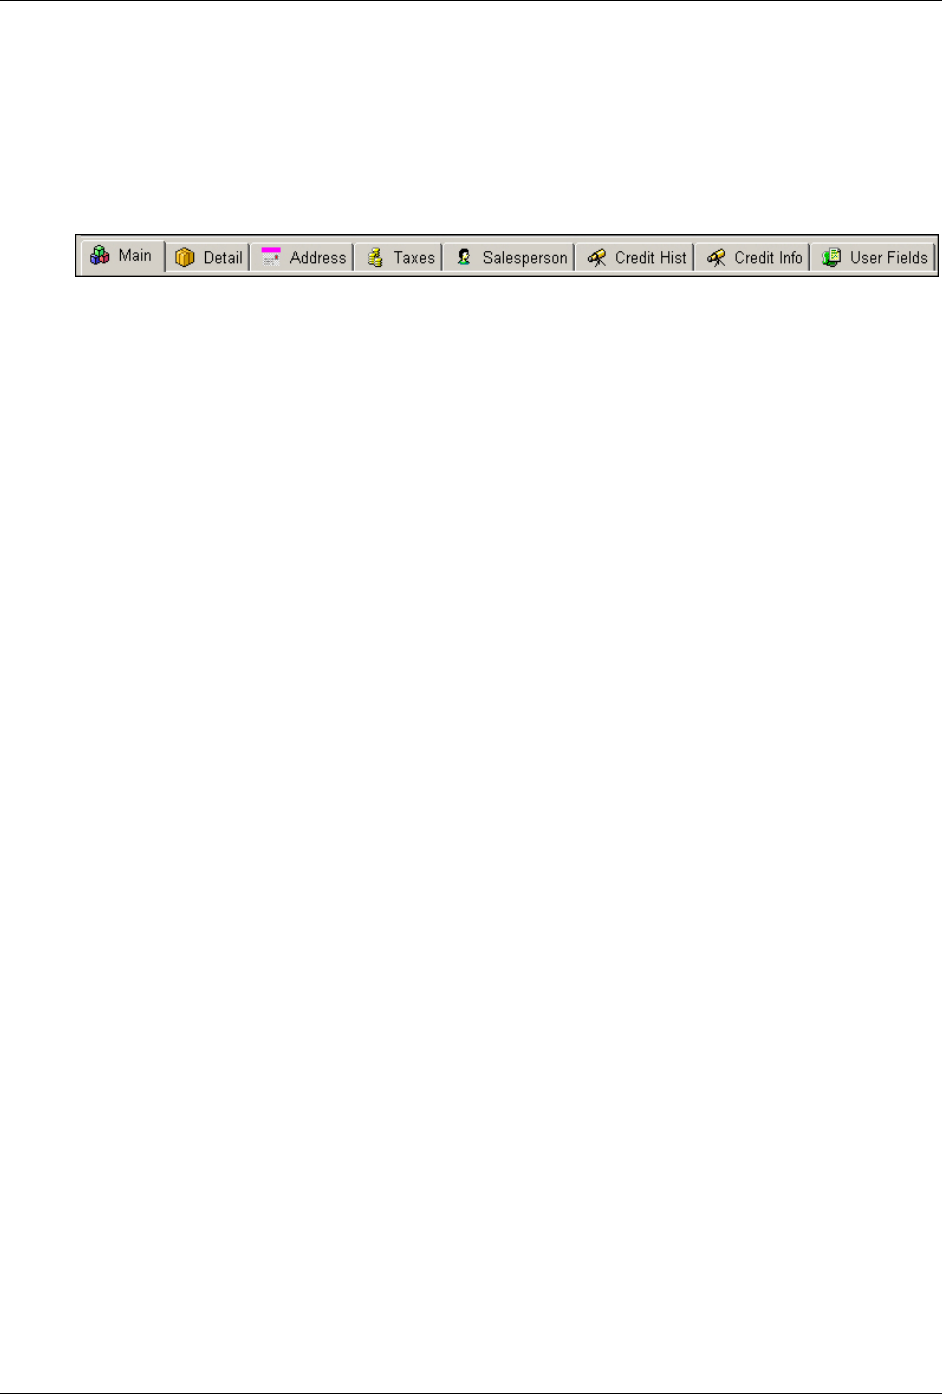
Chapter 1: Getting Started
40 Accounts Receivable User Guide
application screen are no longer available, the screens that these buttons access are now available
by selecting the tab of the corresponding OW Tab.
For example, the Taxes, Salesperson, Credit Info, and User Fields tabs on the Enter Orders screen
as shown below are examples of OW Tabs. These tabs allow you to enter or view additional
information that pertains to the current application. The information on these tabs are normally
not required for successful completion of the application.
User Defined Tabs
With Macola ES, you have the addition of a User Defined Fields tab to most maintenance and
transaction screens. This tab provides you with several fields where you can enter any additional
information you want for the record. In most cases, five User Defined 30-character alphanumeric
fields are provided and three Document fields that allow you to link documents, such as Word,
Excel, or PDF files, to a record.
Date Entry
Macola ES stores all dates as eight digits (YYYYMMDD). All internal date processing takes into
account both 20th and 21st century dates, and properly calculates leap years.
You can use two methods to enter dates: the eight-digit date method and the six-digit date
method.
• Use the eight-digit method if you want to enter a four-digit year (MMDDYYYY). If you enter
an eight-digit date, you do not need to enter slashes or dashes in the date field. Macola ES
automatically fills in the slashes (ʺ/ʺ) for you. Do not enter dashes (ʺ-ʺ) in date fields, as an
Input Error will occur.
• Use the six-digit method if you want to enter a two-digit year (MMDDYY). The six-digit
entry option is provided for usability and speed of entry. If you enter a six-digit date, Macola
ES still stores and internally processes the date as an eight-digit date with a four-digit year.
Also, whether you enter the date in the six-digit or eight-digit format, the date will display on
the application screen in the eight-digit format.
Date Calendar
On date fields, Macola ES provides the ability to view and select a date using an online calendar.
Pressing the F9 key or clicking the Calendar button next to date fields in Macola ES opens a pop-
up window of the current month. Select a date from the pop-up calendar to populate the date
field in Macola ES.
Note: Many of the financial and set up applications do not use the F9 key to display the calendar. You
must click the Calendar button to display the pop-up calendar.
Entering a Date Using the Calendar
1. With your cursor in the date field, click the Calendar button to the right of the field. Macola
ES displays the Select Date window.
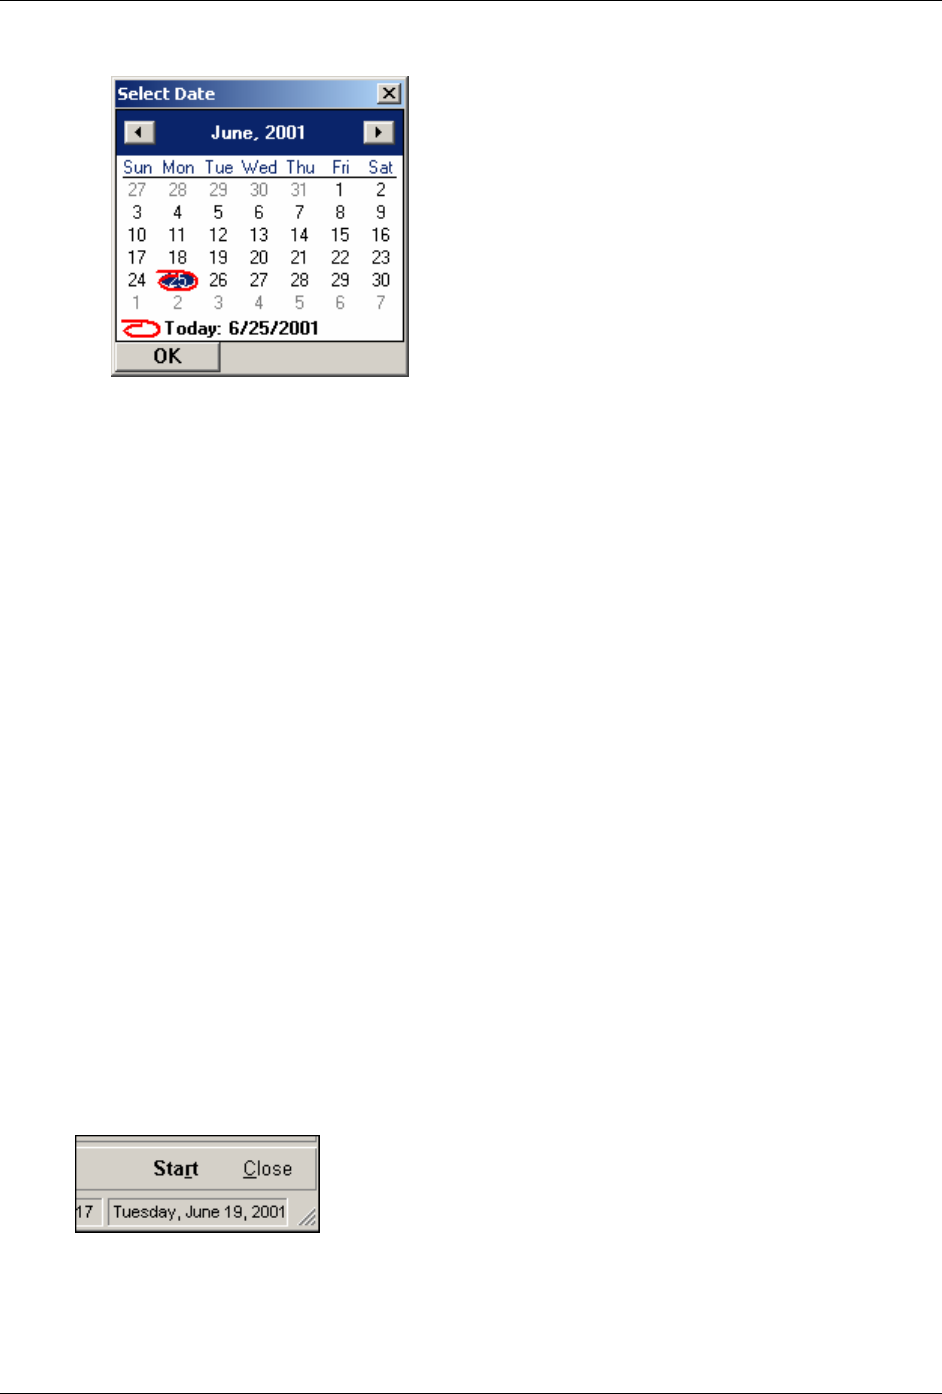
Chapter 1: Getting Started
lAccounts Receivable User Guide 41
2. Select a date from the calendar.
Arrows on either side of the header allow you to move to previous or future months. Click
the Today: <current date> line at the bottom of the window to immediately return to the
current system date.
3. Double-click a date, or select a date and press Enter. Macola ES enters the selected date in the
date field.
Dates in Reports
Due to a SQL standard in the way that dates are handled in SQL Server, when you print a Macola
ES report that includes records with a <Null> value in a date field, this date prints as 01/01/1753
on the report.
Printing in Macola ES
Macola ES allows you to use virtually any Windows-enabled printer to produce hard copy
output. Additionally, you can specify your own preference for printer, paper size, orientation,
number of copies and collating for each report or printed form. See the following topics for
information on how to print reports and forms throughout Macola ES. The following topics also
provide information on changing printer settings.
Printing a Report or Form
When you open a report or form screen, you can enter or select the criteria for printing the report
or form. Once you select the appropriate criteria, click Save from the toolbar or Start from the
Action bar to run the report or form.
You can open some reports from the Reports menu available to the left of the key zone on some
screens. Select the report option that you want to run, and Macola ES displays the report screen
to allow you to select the appropriate criteria for your report. Then click Start, Save, or OK from
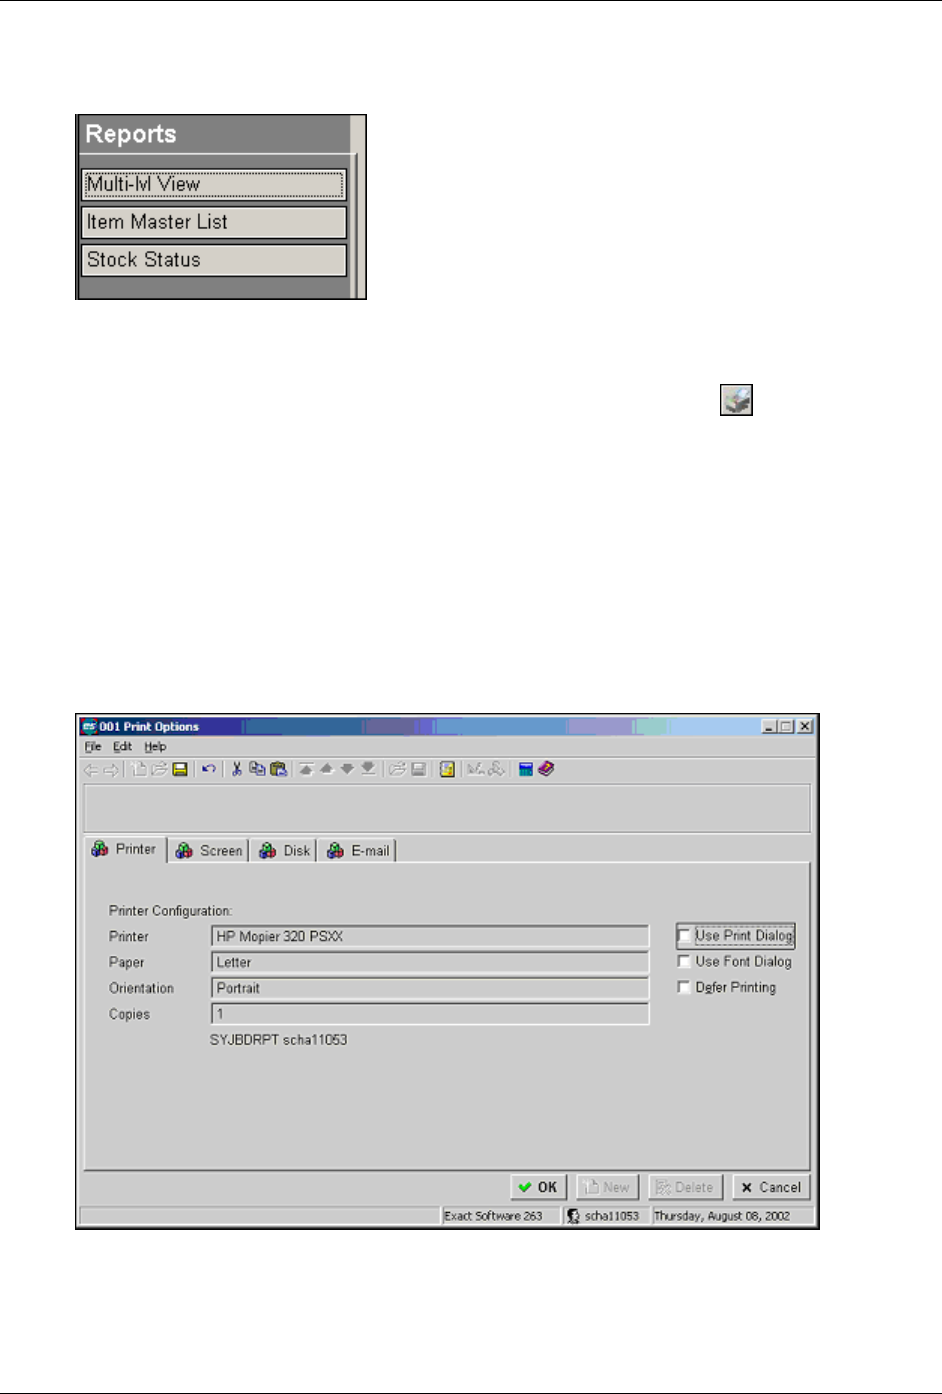
Chapter 1: Getting Started
42 Accounts Receivable User Guide
the Action bar to run the report or form. Some screens have a print button on the Action bar of
the search dialog to print the selected report.
Printing Macola ES Standard Reports
Macola ES Standard Reports are indicated by the Standard Reports icon ( ) in the menu
structure. These icons display in either the Explorer or Panel menu style. These reports display a
selection screen, which allows you to enter filter criteria and select check boxes to narrow the
output of the report. When you click OK to print the report, the Print Options screen opens,
which allows you to print the report to a printer, to screen, to file, or to a file attached to an e-
mail.
Selecting Print Options for Standard Reports
The Print Options screen opens when you select to print a Macola ES standard report. Use the
Print Options screen to select the method of production (printer, screen, disk, or e-mail) and to
change printer defaults.
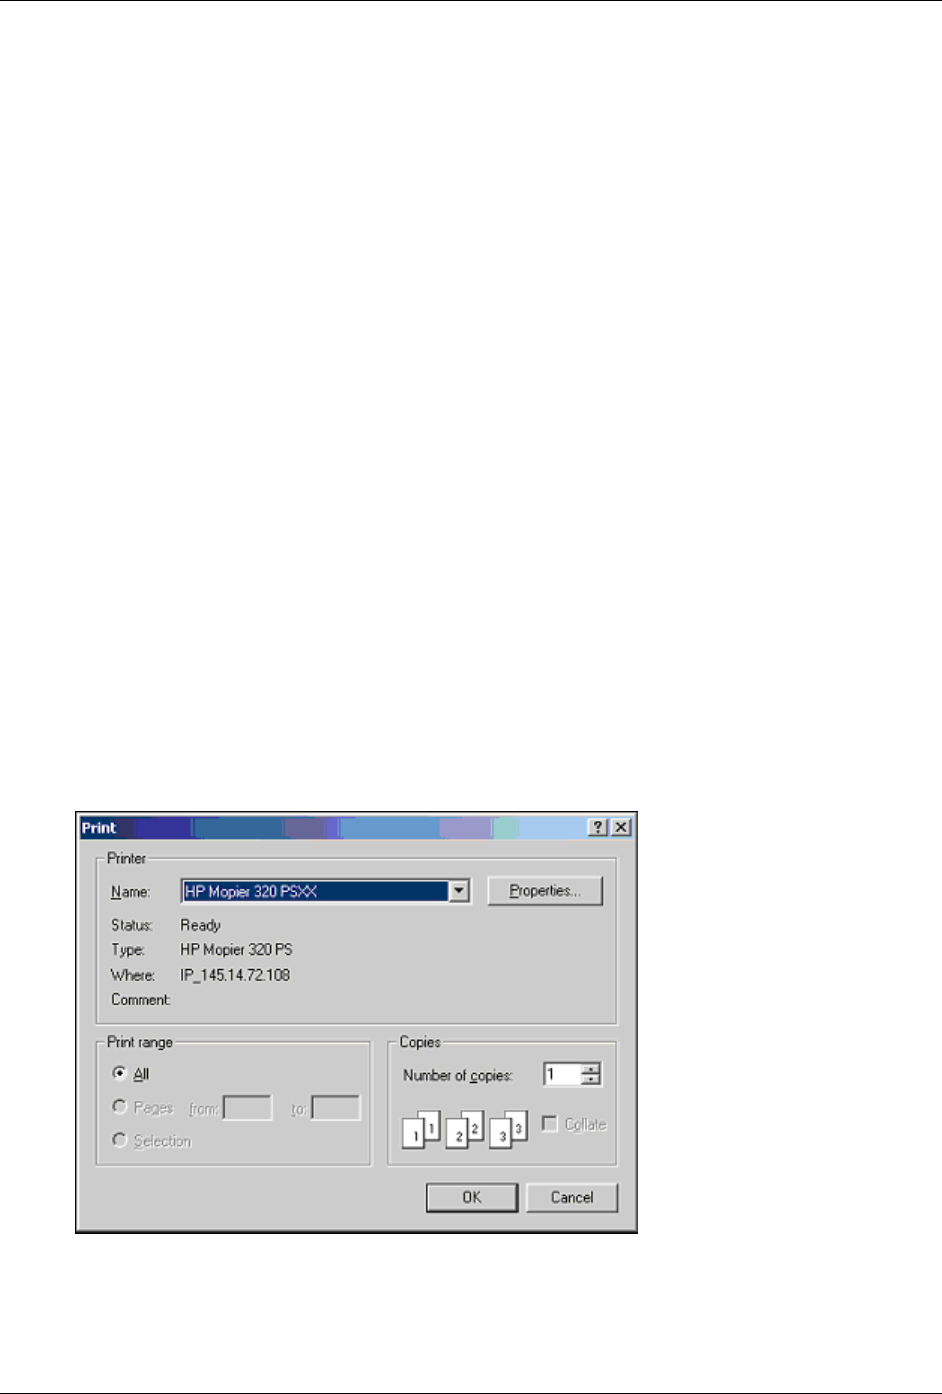
Chapter 1: Getting Started
lAccounts Receivable User Guide 43
Printing a Report to Printer
The first tab of the Print Options screen is the Printer tab. This tab allows you to print the report
to a specified printer. This tab contains the following information:
• Name -- The list box contains a list of available configurations for printing the report. A
description of the selected configuration follows the list box.
• Printer -- This is the name of the printer where the report will be sent.
• Paper -- This is the paper size for the printer to use when printing. This is defined as part of
the configuration and is one of the supported paper sizes for the printer.
• Orientation -- This displays the default page orientation of the printer.
• Copies -- This displays the default number of copies that will print when the report is
printed.
• Use Print Dialog -- This check box displays the Windows Print dialog when you click OK to
print the report.
• Use Font Dialog -- This check box displays the Windows Font dialog when you click OK to
print the report.
• Defer Printing -- This check box defers the printing of the report to a later time. Use the
Deferred Reports application to maintain the deferred reports.
When the correct printer and printer settings are selected, click OK to print the report.
Use Print Dialog
You can change the printer and any of the printer settings by selecting the Use Print Dialog check
box on the Printer tab. This check box displays the Windows Print dialog, which allows you
select the printer, number of copies, and select printer properties for this run of the report.
Note: Macola ES uses the default printer, paper size, and orientation default from the Windows operating
system. You can use these defaults or change them by selecting the Use Print Dialog check box.

Chapter 1: Getting Started
44 Accounts Receivable User Guide
• Printer
Select the printer you want to use for this Macola ES document from the Name field. This
field defaults to the default Windows printer the first time the report is run. When you click
OK on the Print dialog, the system saves the newly selected printer as the default printer for
the report or form you are printing.
Note: Macola ES saves only the Printer and the Copies/Collating setting as defaults. Any other changes
you make to the layout or special printer features, like watermarks, are not saved as defaults.
• Paper Size
Click the Properties button to open the Printers Properties screen. From this screen you can
view the default paper size and select a different paper size from the available options. This
field defaults to the paper size set for the default Windows printer.
• Orientation
Click the Properties button to open the Printers Properties screen. From this screen you can
view the default orientation and change it to either Portrait or Landscape. This field defaults
to the orientation set for the default Windows printer.
• Copies/Collating
Some printers support printing multiple copies and collate the output. If the printer supports
multiple copies, you can specify a Number of Copies. If the printer supports collating, you
can select the Collate option. When you click OK from the Windows Print dialog, Macola ES
saves the number you entered as the default number of copies and the collating option as the
default collating setting for this report or form.
Using Special Printer Features
Some printers have features that allow for two-up and four-up printing, duplex printing, special
watermarks for official documents, tray selections, etc. Because these special features are not
common across all printers, Macola ES does not save their default values. To use these features,
you must specify them each time you print a report or form that requires them.
When you select the Use Print Dialog check box, the standard Windows Print dialog opens each
time you print a Macola ES document. Click the Properties button to review and change settings
for these features. When you click OK, the selected settings are used only this time for the report
or form. Each time you print this report, you will need to review and change these settings. For
that reason, once you select the Use Print Dialog check box, it remains selected and opens the
Print dialog while printing. If you no longer need to use these settings, clear the Use Print Dialog
check box.
Each time you print a document from within Macola ES, your selected printer will use the default
settings for these special printer features. However, you can install the same physical printer
multiple times under different names, each with different defaults for different features. That
way, you can select a printer name that has the features you want without using the Use Print
Dialog option each time to specify them.
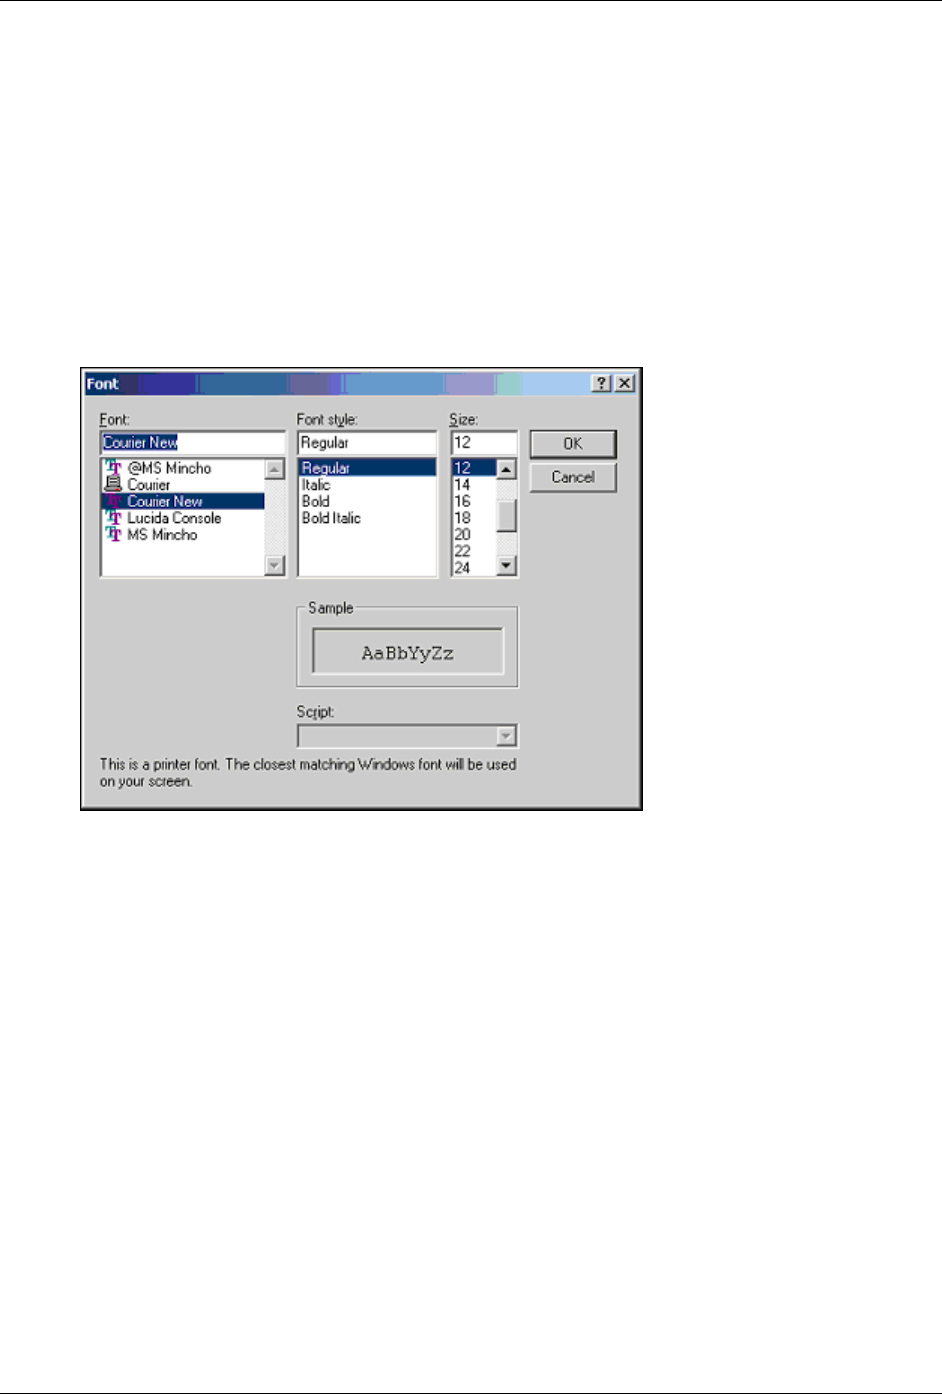
Chapter 1: Getting Started
lAccounts Receivable User Guide 45
For example, a laser printer has two trays for different kinds of paper: plain letter paper and
letterhead paper. You could install one printer named ʺLaser with Plain Paperʺ and another
named ʺLaser with Letterheadʺ, each defaulting to the corresponding tray and pointing to the
same physical printer. Then you could set the default printer for certain forms to use ʺLaser with
Letterheadʺ and the rest to ʺLaser with Plain Paperʺ. This would result in printing from the
correct tray without using the Use Print Dialog option.
Use Font Dialog
You can change the font settings during runtime of a report by selecting the Use Font Dialog
check box on the Printer tab. This check box displays the Windows Font dialog, which allows you
select the Font, Font style, and size for this run of the report.
By default, Macola ES selects the ʺbestʺ font for printing the particular report or form. In general,
this will be the largest, fastest font that will fit within the number of columns on the specified
page size. If you need a different font, select the Use Font Dialog check box before clicking OK to
start printing.
If you select the Use Font Dialog check box, Macola ES displays the standard Windows font
selection dialog with a list of available fonts that will fit the requirements for this print job.
Macola ES defaults to the font and size it would select but allows you to select any font and size
you want to use for the print job. Your font selection is used this time only for the report or form.
The Use Font Dialog check box remains selected, so the next time you print the report or form,
the font dialog opens prompting you to select a font and size. If you no longer need to specify a
font and size, clear this check box before clicking OK on the Print Options screen, and Macola ES
does not display the Font dialog.
Deferring Printing
You can delay printing a report by selecting the Defer this job… check box. By deferring a report,
you can generate reports in predefined intervals. For example, you can set up batch reports and
process them at night or once a month.
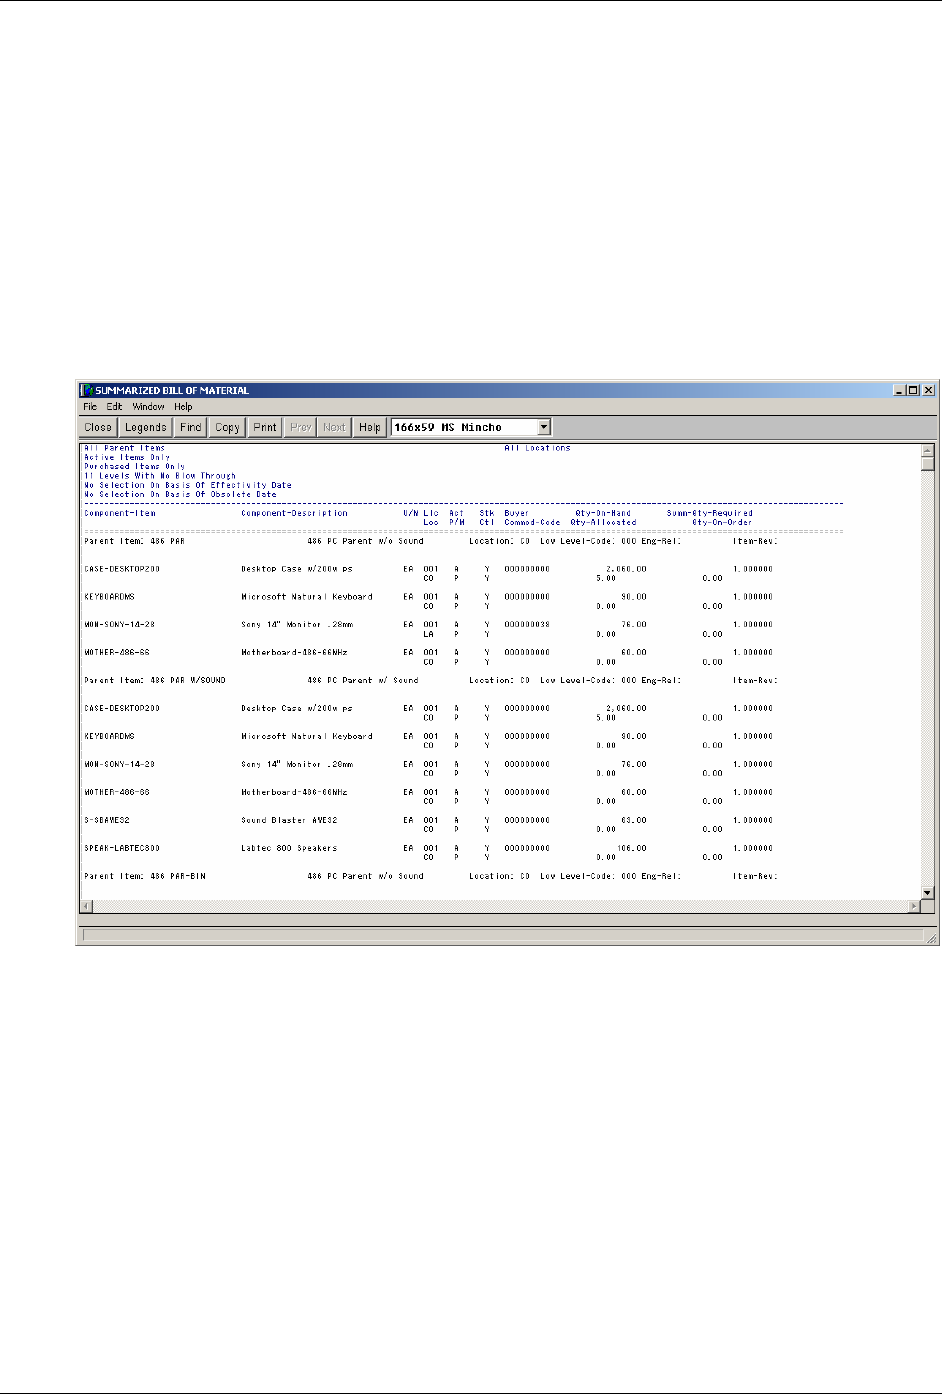
Chapter 1: Getting Started
46 Accounts Receivable User Guide
When you select to defer a report, Macola ES displays the Deferred Print Options window where
you can enter the information necessary to defer the report. For more information on deferred
reports, see Deferred Reports in the System Manager online help.
Printing a Report to Screen
The Screen tab of the Print Options screen allows you to print report information to display on
your computer monitor. This function displays in a report screen and is called Print to Screen.
Not all reports can be printed to screen. Preprinted forms (invoices and checks), posting reports,
and reports with the purge option selected do not print to screen.
To print a report to screen, click Save with the Screen tab selected. The screen tab does not require
entry of any fields.
Macola ES creates files named SCREEN##.TMP (where ## represents a 2-digit number) in the
system directories when a report is printed to screen. The total range of numbers available for
these files range from 01 through 99 or SCREEN01.TMP through SCREEN99.TMP.
These files are automatically deleted when the report has run and is closed. SCREEN##.TMP files
are typically left behind if the system is closed when print screens have been left open, the
process was aborted prior to completion, or if you do not have delete rights in the data directory.
If while printing to screen, you receive a blank report but no error messages, these files may not
be deleting. Look for these files exist in the data directory; if there are no other users printing
reports to screen, then delete them. If they are being created routinely and not deleted, then your
system administrator should validate that your user rights, and all relevant client/server settings,
have been defined according to Exact Softwareʹs recommendations.
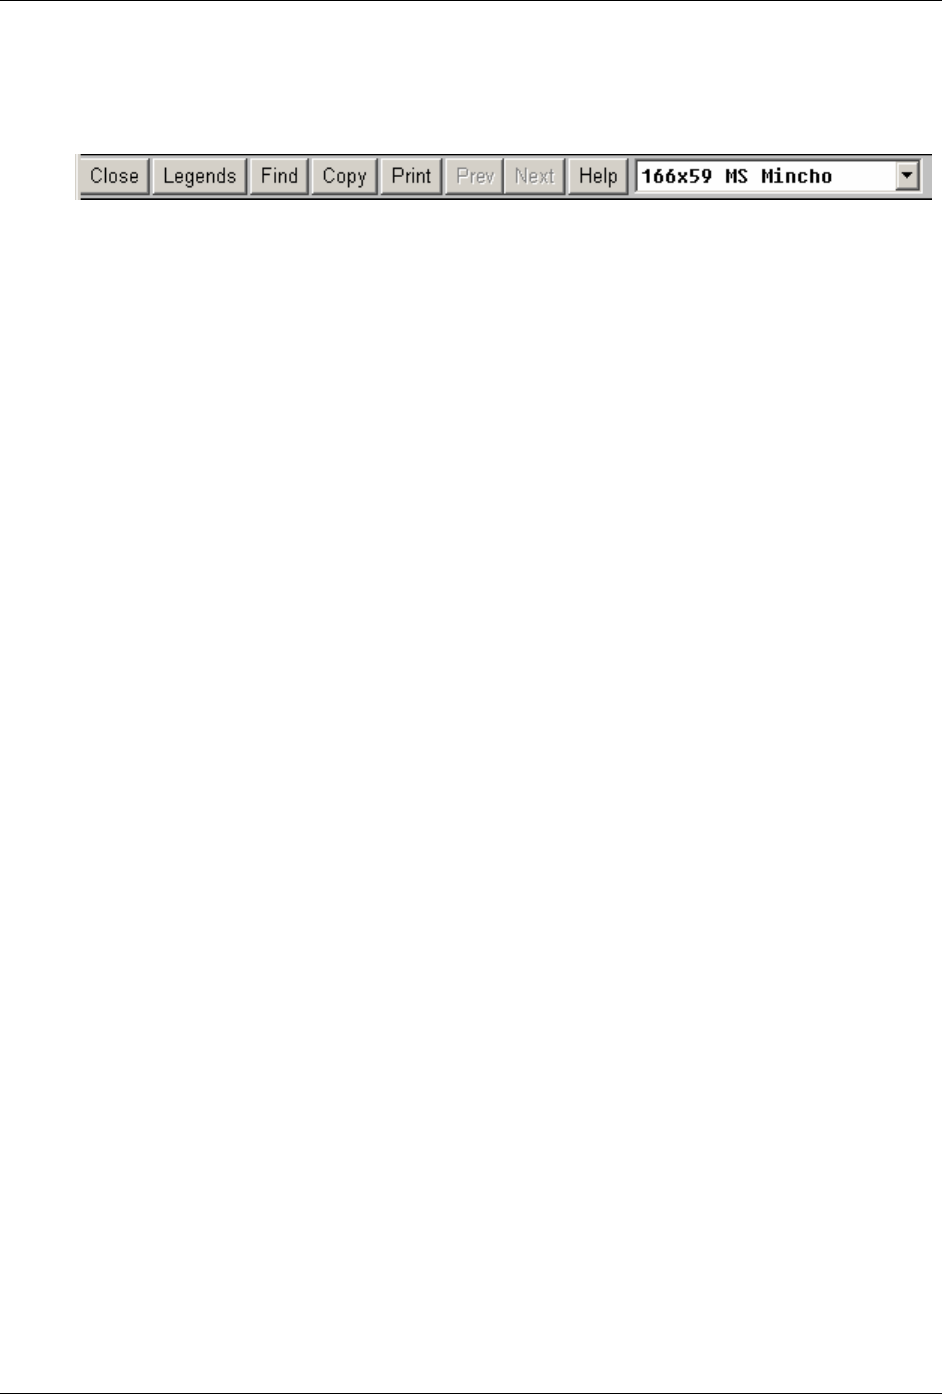
Chapter 1: Getting Started
lAccounts Receivable User Guide 47
Report Screen Options
Toolbar buttons at the top of the screen allow you to change the display of the report, close the
report, copy the report, or print the report once you have viewed the information.
Close -- allows you to close the Report screen.
Legends -- allows you to toggle the legend for the report on or off. This legend consists of the
lines of text above the first dashed line which crosses the page. When the legend is displayed
(on), the report information scrolls while the legend remains stationary.
Find -- allows you to search for a word or group of words contained in the report. For example,
search for a specific item number.
Copy -- allows you to copy the report information currently visible in the Report screen. For
example, you might want to copy only a set range of information to include on a weekly report to
give management an idea of the status of a product.
Print -- allows you to print the report to a printer of your choice. The Print dialog displays
allowing you to specify the printer, number of copies, and using the Properties button you can
select printing settings for the printer.
Note: If Adobe® Acrobat® is one of your printers, you can print the report to a PDF file.
Page/Font -- allows you to select a page size and font type to use for the display of the report
information.
Use the following navigational keys to access the information on the screen.
• Up and Down Arrow keys -- move up and down the report one page at a time
• Page Up and Page Down keys -- move immediately to the beginning or end of the report
• Esc key -- exit the report
Printing a Report to File
Many of the Macola ES reports use the Disk tab of the Print Options screen to spool the report to
file.
Note: You can spool all Standard Reports to file except for preprinted forms (invoices and checks.) For
these types of reports only the Printer tab of the Print Options screen is available.
The Specify an output filename field defaults to a report directory and name specified by Macola.
The default report directory is located at c:\Program Files\Exact Software\… and the name
defaults to an eight character file name comprised of a six letter abbreviation of the program
generating the report and a two digit number, which will increment each time the report is
printed (You can print a report to disk up to 99 times). However, the system allows you to spool
these reports to any location on your computer or network. The Disk tab also allows you to
change the name of the .prt file generated by this function.
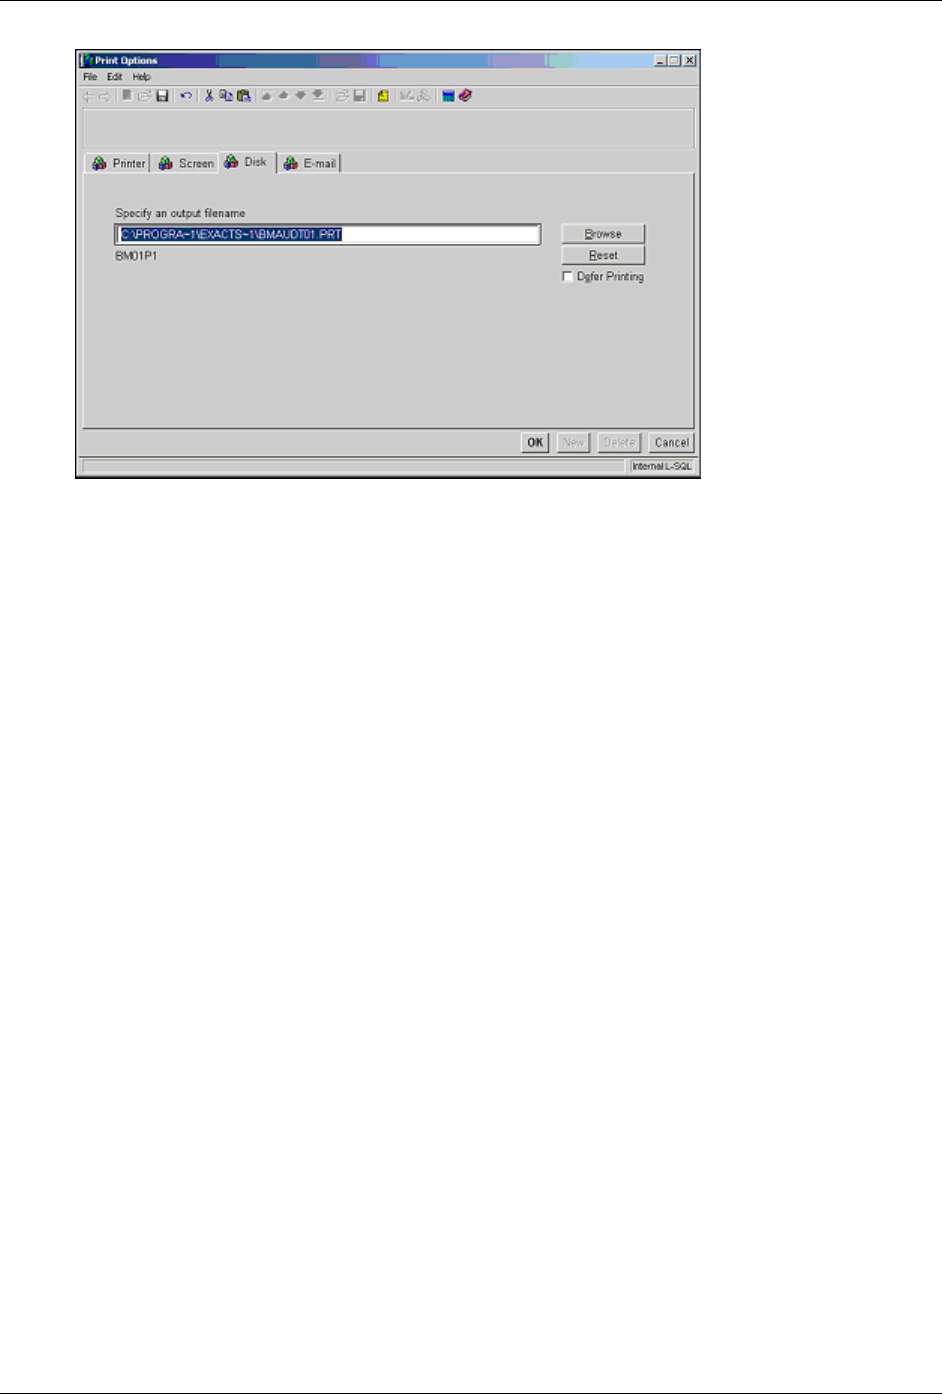
Chapter 1: Getting Started
48 Accounts Receivable User Guide
The first time you print a report, the Specify an output filename field defaults to the default
report directory and default name specified by Macola. However, you can change this path and
name using the Browse button to navigate to any location on your computer or network and
typing a new file name.
Note: Spooling a report to disk allows you to modify the file extension as well as the file name. File types
that are supported by this function and the Print Spooled Reports application include: Microsoft Word
(.doc), text files (.txt), and the Macola default .prt. You can also create HTML and HTM files that can be
viewed using the Print Spooled Reports application; however, when you open these files using your
internet explorer they are poorly formatted and hard to read.
For example, you can spool the Product Structure Audit Trail Report to the default BMAUDT01.PRT or
to BMAUDT01.DOC. Both file types are supported and can be accessed using the Print Spooled Reports
screen.
Once you run a report, the path and file name used during that run defaults to the Specify an
output filename field the next time you run the report (each path and file name is unique to the
specific application). In subsequent runs of the report, selecting Reset defaults the field back to
the previous path used when the application was last run.
Clicking Save spools the report to the path and file name displayed in the Specify an output
filename field. Use the Spooled Reports application to print or delete any reports that have been
spooled to file. For information on printing spooled reports, see Spooled Reports in the System
Manager help.
Deferring Printing
You can delay printing a report by selecting the Defer this job… check box. By deferring a report,
you can generate reports in predefined intervals. For example, you can set up batch reports and
process them at night or once a month.
When you select to defer a report, Macola ES displays the Deferred Print Options window where
you can enter the information necessary to defer the report. For more information on deferred
reports, see Deferred Reports in the System Manager online help.
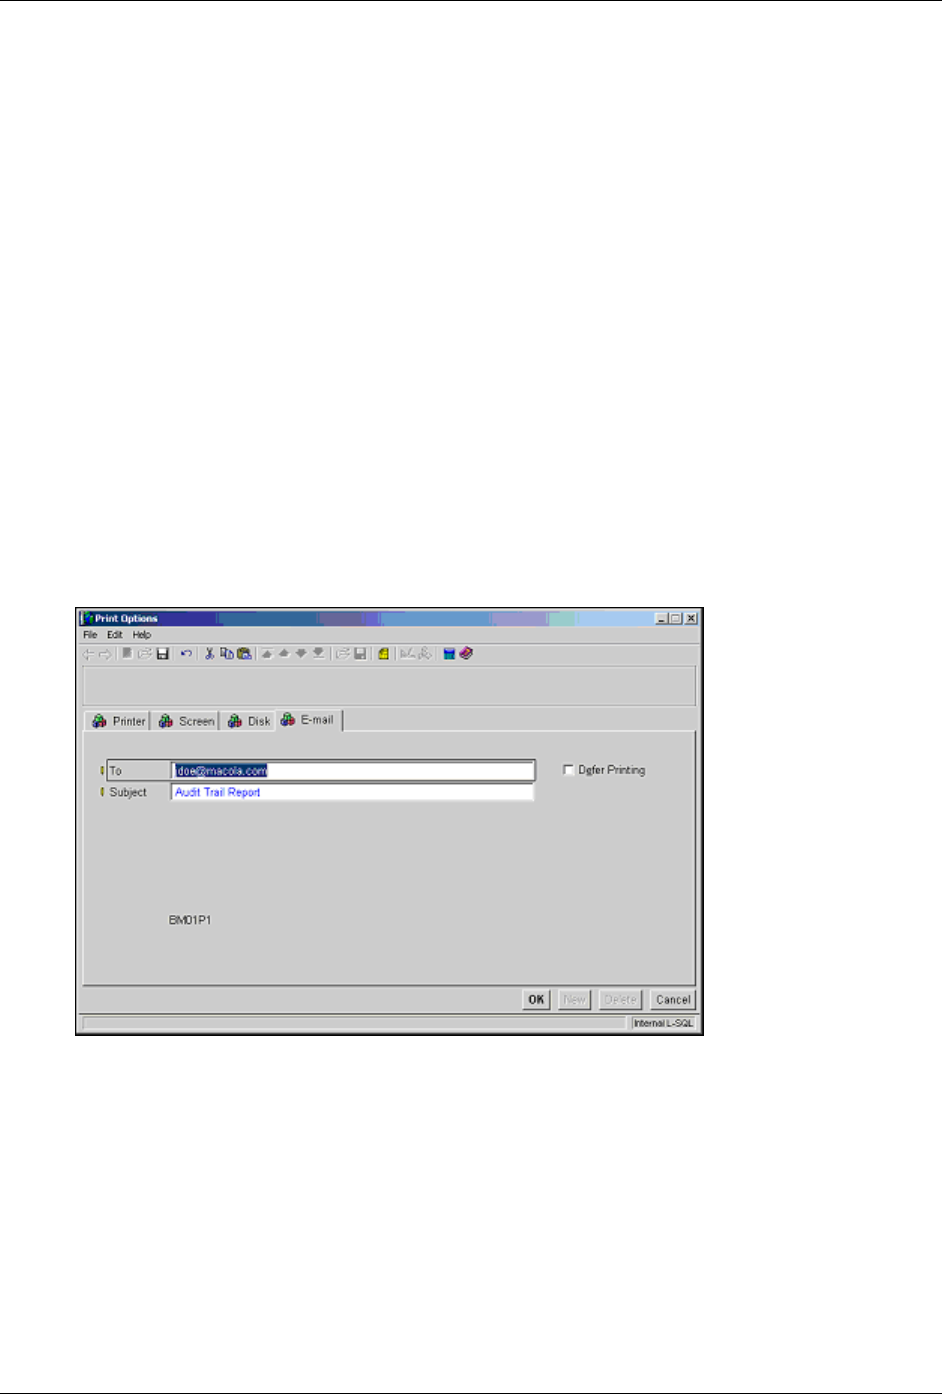
Chapter 1: Getting Started
lAccounts Receivable User Guide 49
Appending a Spooled Report
The Print Options screen also allows you to append information to an existing report that was
previously spooled to disk. Reports printed using the default eight character file name do not use
this option. You can print a report to disk up to 99 times. If you modified the name of the report
and previously printed the report to this file name, then the system displays a message asking if
you want to append the file. If you select No, the system overwrites the existing file. If you select
Yes, the existing file is opened and the new information is inserted and saved at the end of the
report file.
Printing a Report to E-mail
The Print Options screen allows you to print several system documents which are collectively
referred to as reports. These documents include reports, invoices, and forms. Many of the Macola
ES Standard Reports use the E-mail tab of the Print Options screen to send the report to anyone
who has a valid e-mail account.
Note: The Print Options screen is not used by the Macola Crystal Reports; therefore, the e-mail function is
not available for these types of reports.
You can spool all standard reports to file except for preprinted forms (invoices and checks.) For these only
the Printer tab of the Print Options screen is available.
To send a report by e-mail, enter the report criteria on the report screen, click OK, and select the
E-mail tab of the Print Options screen. On this tab, enter an active e-mail address in the To: field
and a description in the Subject: field. The e-mail is created and sent using your e-mail program.
If your e-mail program is open, the report is spooled to file and attached to the e-mail. When
processing is complete the Print Option screen closes. If your e-mail program is closed, the report
spools to file, and the Print Options screen displays an Enter Password dialog requesting the
Username, Domain Name, and Password for your e-mail. When you enter the information to logs
you in to your e-mail, the e-mail is generated and sent.
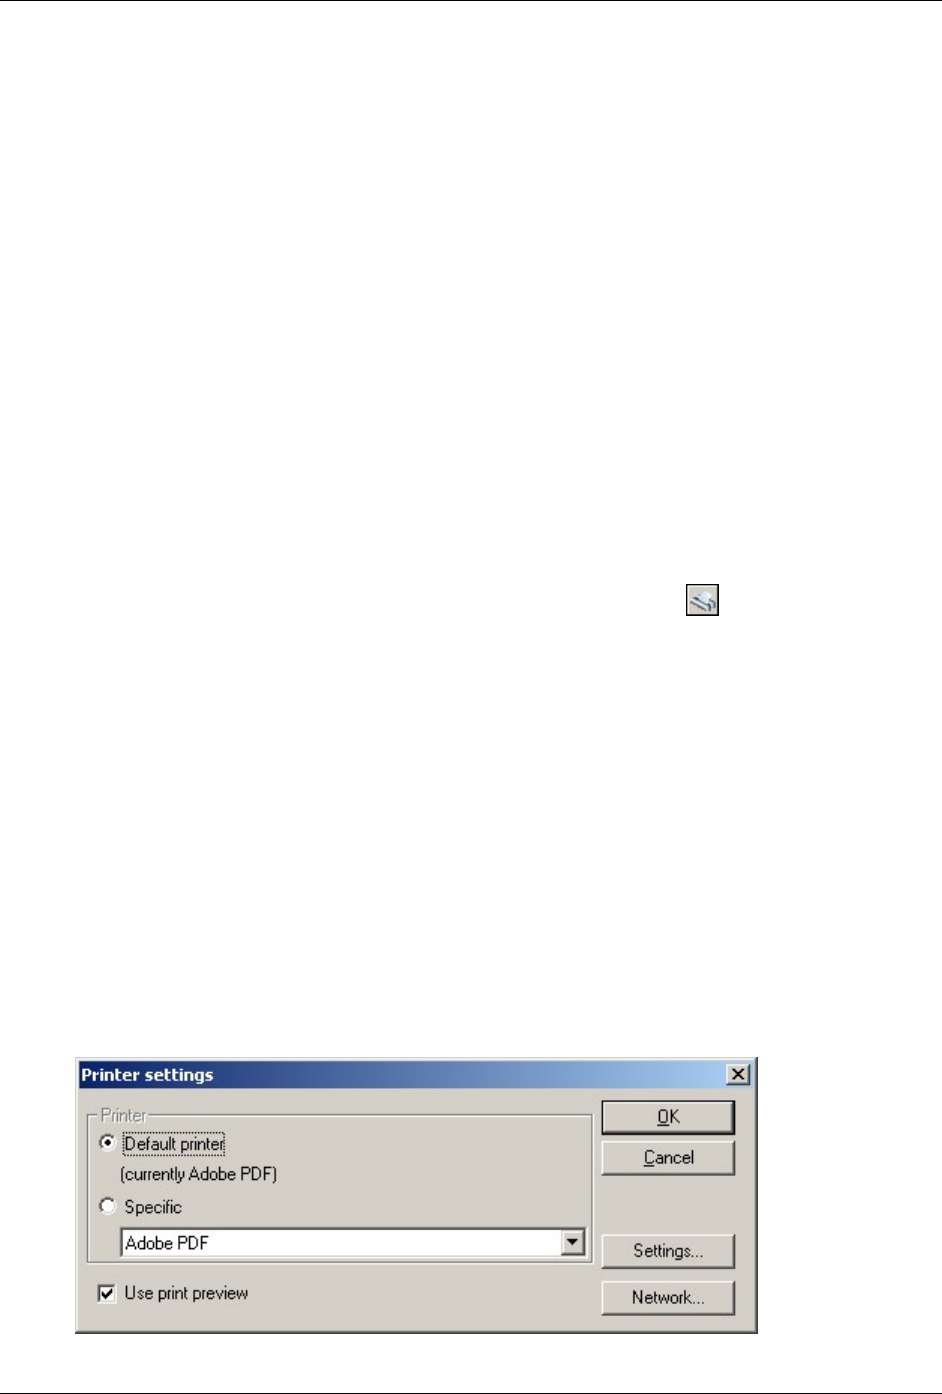
Chapter 1: Getting Started
50 Accounts Receivable User Guide
Note: Logging in to your e-mail system using the Enter Password dialog does not open your e-mail
system, it allows the e-mail to be processed behind the scenes and when the report process is complete you
are logged off from your e-mail.
The system prints the report using the default file name and extension entered on the Disk tab of
the Print Options screen. If you need the file to spool to file in a particular format (such as, .doc,
.txt, or .prt), you must first print the report to file using the correct file name and extension from
the Disk tab. When you print to the file using the E-mail tab, the file is spooled using these
specifications and attached to the e-mail that is created and sent to the recipient. This all happens
behind the scenes as the report processes.
Canceling a Print Job
You can stop a print job (to file, screen, or printer) by pressing the Esc key. Macola ES allows you
to abort a print job except when the following conditions apply:
• You are printing preprinted forms (invoices and checks)
• You are running a posting process
Printing Macola ES Crystal Reports
Macola ES Crystal Reports are indicated by the Crystal Reports icon ( ). These icons display in
either the Explorer or Panel menu style. These reports use the Crystal reports criteria selection
screen, these screens allow you to enter filter criteria and select check boxes to narrow the output
of the report. When you click Start to print the report, the report is printed to screen.
Macola ES Crystal Report Print Setup
Macola ES allows you to set default printer settings for reports using two options from the File
menu. The first is the File, Printer setting that allows you to change global settings for the whole
system. The second is File, Form printer which allows you to set the printer to be used when a
form is printed. Macola ES also provides access from the Form printer option to change a specific
printerʹs settings.
Printer Settings Option
Selecting File, Printer settings opens the Print Settings dialog. Use this dialog to select the default
printer for Macola ES. This can be the same as the default printer for your computer or a printer
you select from the Specific printer drop down list.
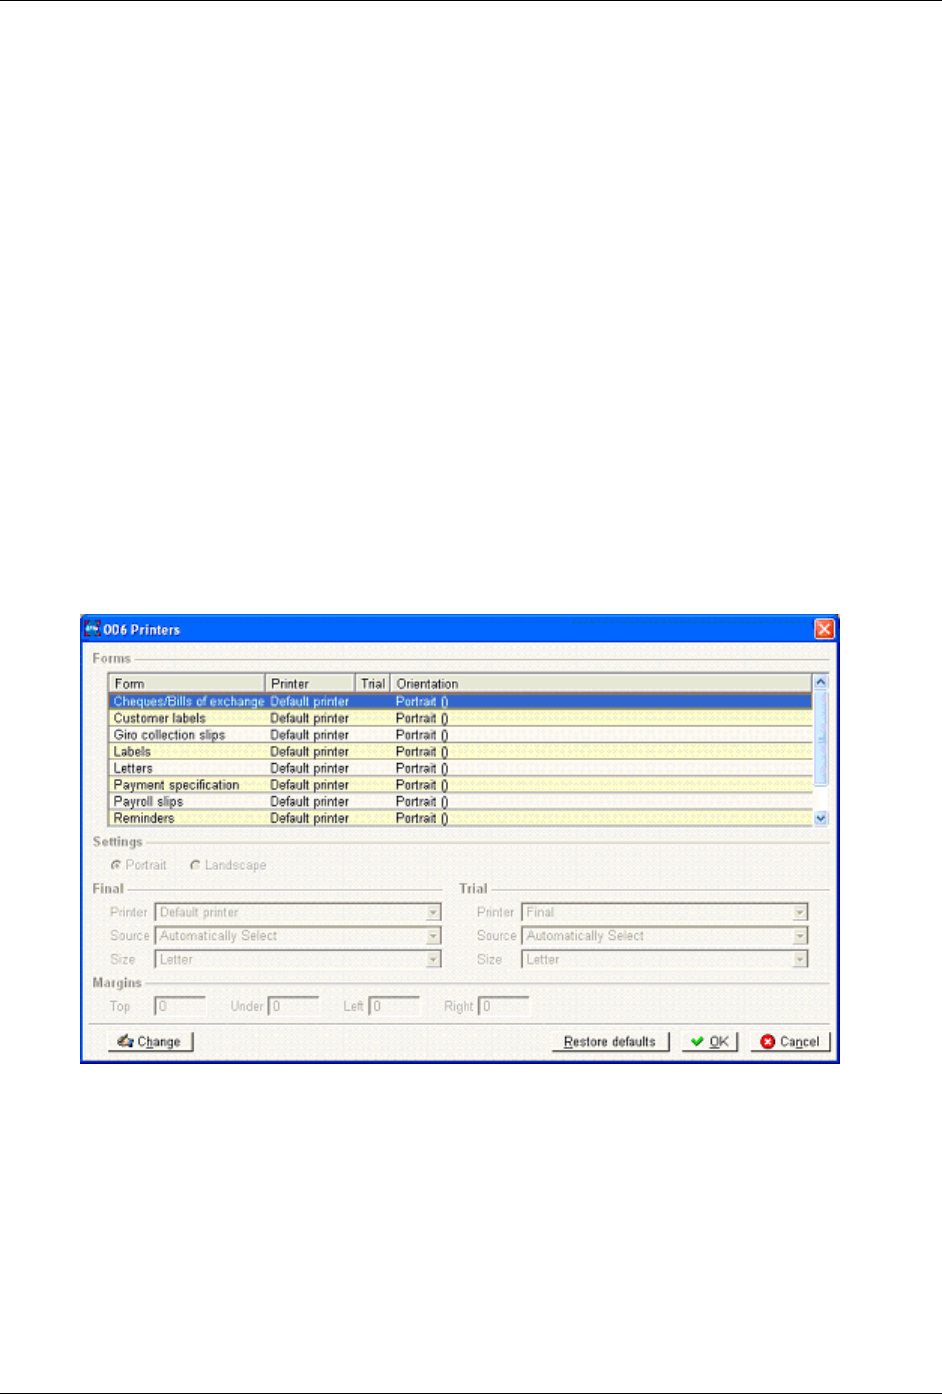
Chapter 1: Getting Started
lAccounts Receivable User Guide 51
Select the Use print preview check box to use a preview a report before printing it (this is not
applicable for all reports).
Click the Settings button for additional settings for the selected printer. These settings include
the paper source (tray), paper size, and margins.
Settings Button
The Settings button displays the Settings dialog. This dialog allows you to set text and page
specific settings; such as, font, page orientation, page margins, and paper size and source.
Network Button
The Network button allows you to select any printer available from your network connection.
Type the specific printer in the Printer field or expand the network available in the Shared
Printers list box. Click OK to accept the specified printer.
Setting Form Printers
The Printers dialog allows you to set a default printer and settings for commonly printed forms
within Macola ES, such as, checks, reminders, and labels. The default printer is the Windows
default printer for your computer, but you can change this for a form by clicking the Change
button to select any printer available for your computer.
Setting Printer Defaults for Forms
1. Select File, Form printers from the Macola ES menu. The Printers dialog opens.
2. Highlight the Form in the Forms list for which you want to set printer settings.
3. Click Change. The fields in the Settings, Final, Trial, and Margins areas are now available. In
addition, Save and Cancel buttons replace the Change button.
4. Select Portrait or Landscape for the page orientation of the form.

Chapter 1: Getting Started
52 Accounts Receivable User Guide
5. In the Final and Trial areas, enter a Printer for each version of the form that you print (the
Trial area is for when you print a trial version of a form). This field lists the printers that you
currently have set up on your computer. The Trial area field allows you to use the same
printer as the Final area field by selecting ʺFinalʺ.
6. In the Final and Trial areas, enter the Source tray to use when printing from the printer
selected in the Printer field.
7. In the Final and Trial areas, enter the Size of paper to use when printing the form from the
printer selected in the Printer field.
8. In the Margins area, enter a value in millimeters for the margins to use for the form. (Note: 1
inch is equal to 25.4 millimeters.) This area allows you to enter a Top, bottom (Under), Left,
and Right margin. Any value that you enter will be in addition to the margins already set in
the form layout.
For example, entering margins will allow you to set the correct margins when printing with
letterhead.
9. Click Save to accept the new settings that you have entered for the form.
10. You now have four options:
• Highlight another form and click Change to continue setting printer defaults for forms.
• Highlight a changed form and click Restore defaults to return the form settings to the
system default.
• Click OK to accept all changes and close the dialog.
• Click Cancel to close the dialog without changing any of the form settings based on what
you entered. This cancels all settings changed during this session of the dialog, even if
you clicked Save.
Printing a Crystal Report to Screen
When you print a Crystal Report from within Macola ES, it automatically prints to screen. As in
the following example screen image, the report displays in Print Preview mode. The menu and
toolbar allow you to search for specific information that you would like to view. Then, click the
Print or Close button from the Action bar to print the report or exit the screen.
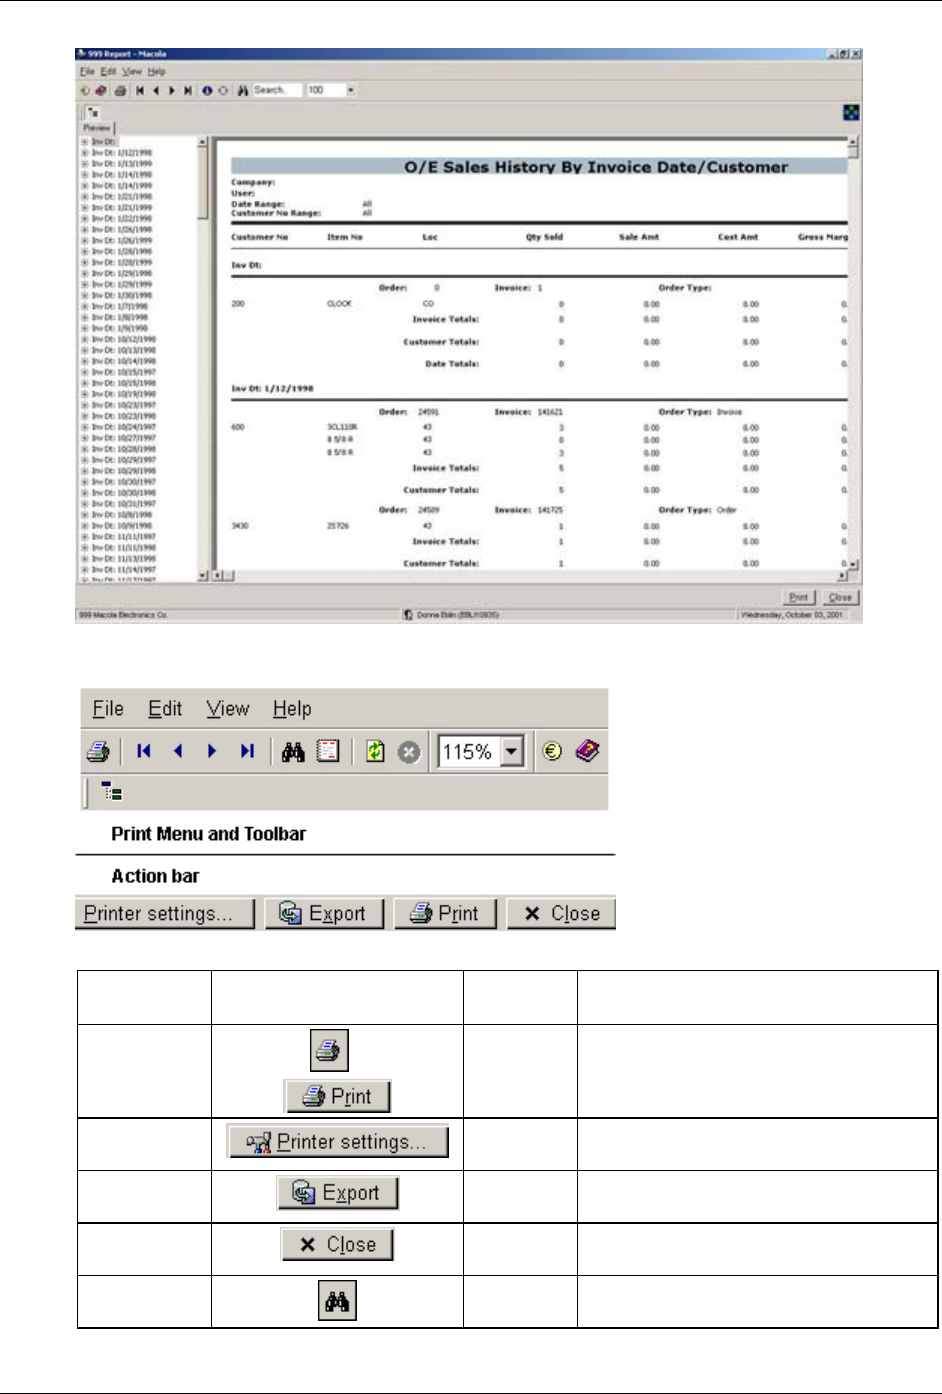
Chapter 1: Getting Started
lAccounts Receivable User Guide 53
Print Preview Menu and Toolbars
Menu
Selection
Toolbar Buttons Shortcut
Keys
Purpose
File, Print
or
Ctrl + P
or
Alt + R
Opens the print dialog, so that you can
print the report.
File, Printer
settings
Alt + P Opens the Print Setup dialog, so that you
can change the printer settings.
File, Export
Alt + X Opens the Export dialog so that you can
export the report data.
File, Close Alt + B Closes the Report Preview screen, and
returns you to the application screen.
Edit, Find
Ctrl + B Opens the Search dialog so that you can
search for information in the report.
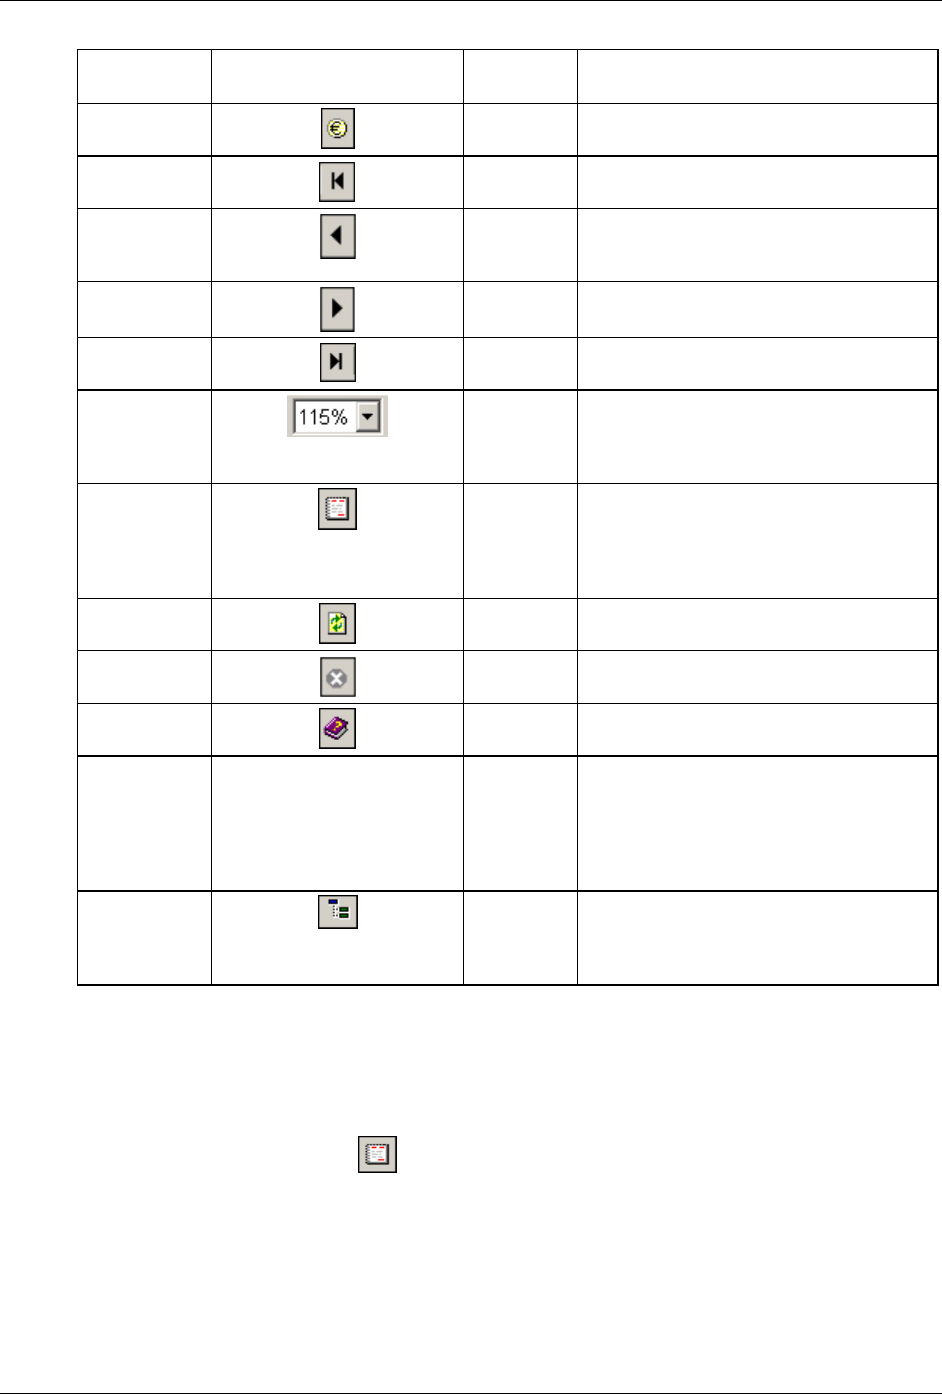
Chapter 1: Getting Started
54 Accounts Receivable User Guide
Menu
Selection
Toolbar Buttons Shortcut
Keys
Purpose
Edit,
Percolator
none Opens the Euroculator screen.
View, To
first page
none Goes to the first page of the report.
View, To
previous
page
none Goes to the previous page of the report.
View, To
next page
none Goes to the next page of the report.
View, To last
page
none Goes to the last page of the report.
View,
Display
none Changes the magnification size of the
display. You can select a percentage or
fit the page within the Report Preview
window.
View, Report
options
none Displays the Report options dialog, which
allows you to select information that you
want to include on the reports -- License
name, Company, User, Time, Date,
Range, and Color.
View,
Refresh
none Refreshes the report display.
View,
Cancel
none Cancel loading the report.
Help, Help
F1 Access help for the screen and fields on
the screen.
Help, About none none Displays information on the current
version and license for Macola ES.
Additional information can be accessed
using buttons for the modules and
applications used in this Macola ES
installation.
none none Displays or hides the Group Tree. Click
the Toggle Group Tree button to display
the group tree to the left of the Print
Preview window.
Changing the Report Options
The Report options dialog allows you to select various types of information that you want to
include on your Crystal Reports. For example, the page number, date, or time.
Click the Report options button from the Print Preview toolbar to display the Report options
dialog. Select the check box next to each option that you want to appear on your reports, and
then click OK to save the changes.
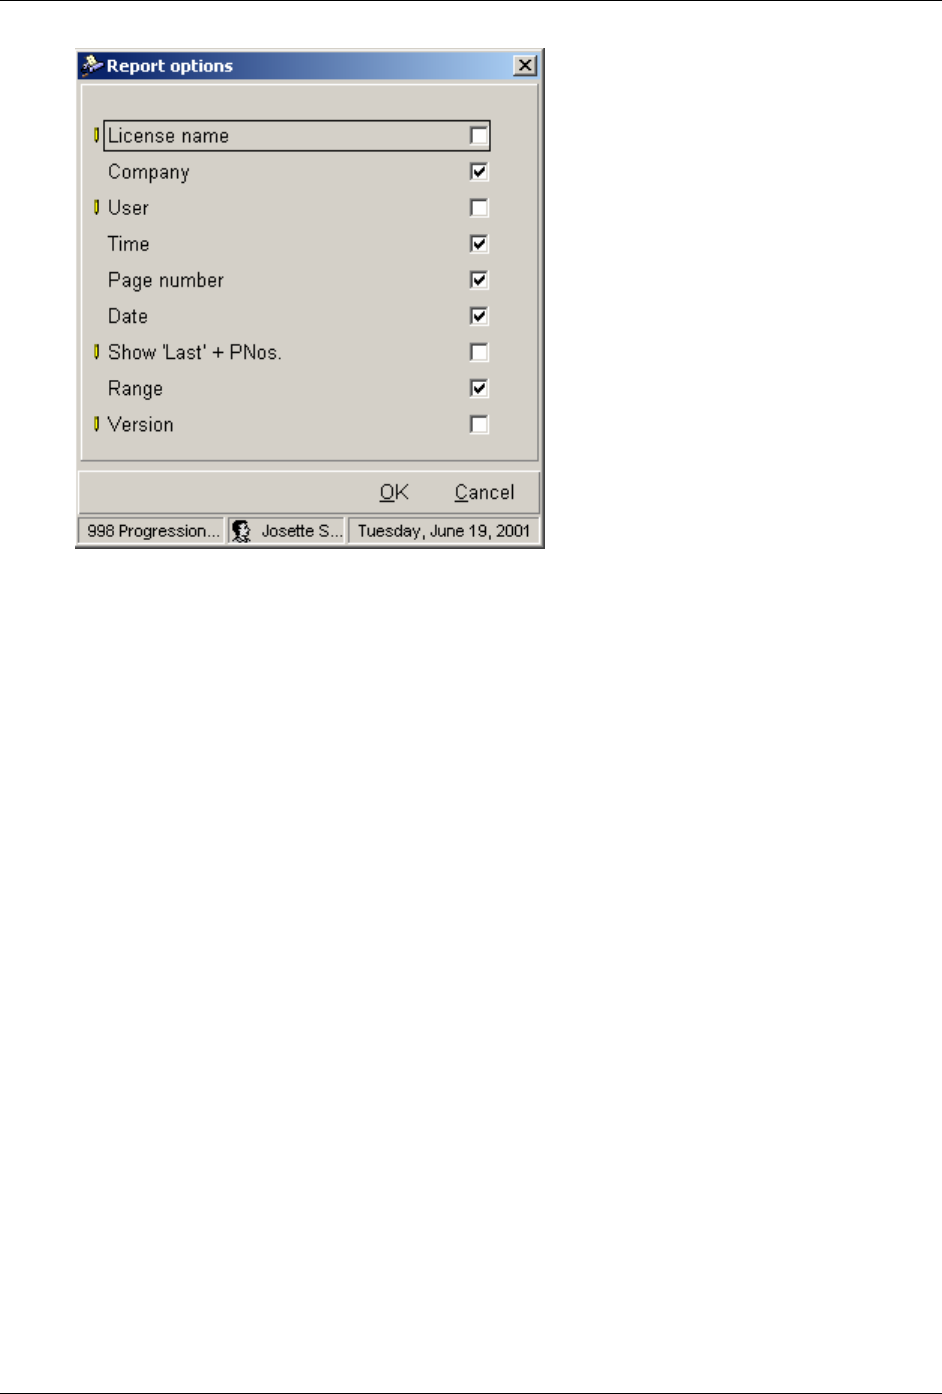
Chapter 1: Getting Started
lAccounts Receivable User Guide 55
Searching for a Particular Record in a Report
Macola ES displays each Crystal Report in Print Preview, which allows you to verify that the
required information is available in the report before sending it to the printer. Print Preview
provides two methods of searching for a specified record or piece of information:
• Using the Group Tree option -- Click the Toggle group tree button at the top of the Print
Preview screen to display a group tree of the records included in the report to the left of the
Print Preview screen. Select a record from the group tree to display the page of the report
with that records information. The system highlights the header line of the record with a
colored box.
• Using the Search (Find) feature -- Enter the search text in the Search field of the Print
Preview toolbar. Click the Find button to search for the specified text in the report. Each time
you click the Find button, the system searches the report for the specified text. When the text
is found it is highlighted in the report by placing a colored box around the text.
Printing a Crystal Report to Printer
To print a Crystal Report, the system first prints the report to screen. From the Print Preview
screen, you can then select to print the report to the specified printer for that report.
Print the report by clicking the Print button or selecting Alt+p. The Print dialog displays and
allows you to specify the Print Range, the number of copies, and whether you want the copies
collated. Click OK to print the report or Cancel.
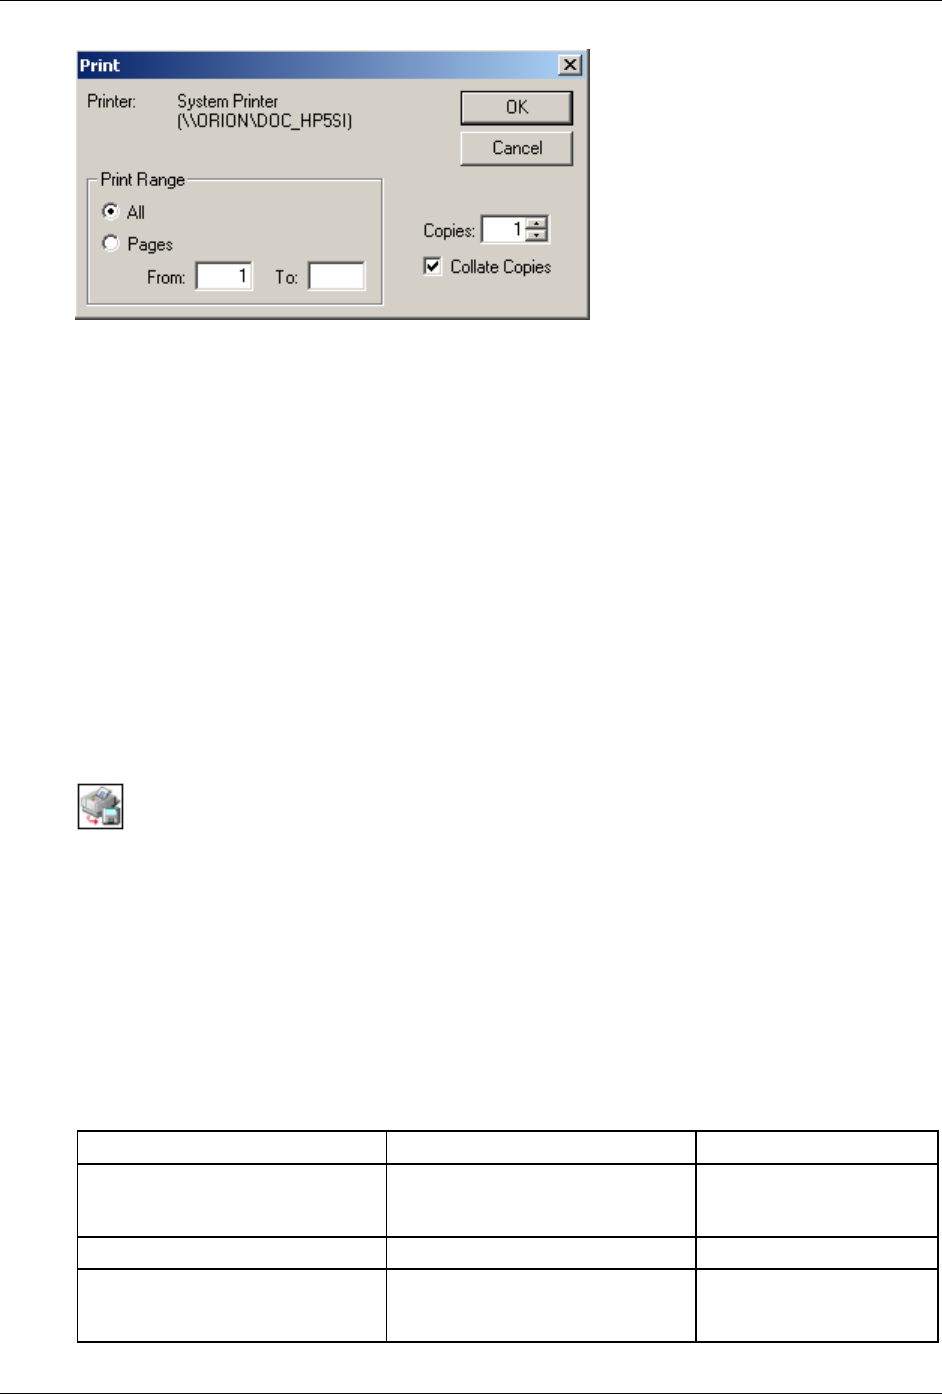
Chapter 1: Getting Started
56 Accounts Receivable User Guide
Printing a Crystal Report to File
Macola ES does not provide a direct path from the Crystal Report you are printing that will allow
you to print the report to file. If you need to print a Crystal Report to file you use one of two
options to set the printer used for printing the document to a ʺtext onlyʺ printer.
• Printer Settings -- this setting allows you to set the printer as the default printer for the each
Crystal Report in the system. This means that this printer is used to print each report, unless
a printer has been selected using the Form Printer option. This option is useful if you print a
large volume of documents to file.
• Form Printer -- this setting allows you to set the printer as the default printer for a specific
report.
To use either of these options, you set up a printer as a text only printer using the Add a Printer
wizard provided by Microsoft Windows. The wizard allows you to select File: as the port for the
printer which specifies the printer as text only. You can recognize the printer in your printer list
by the following icon:
For further assistance with installing a text only printer, see the Microsoft Windows help or your
system administrator.
Note: If you do not want the text only printer to be the permanent default for the system for a particular
Crystal Report, you must change the default setting each time you need to print to file.
For information on using the Printer Settings option, see Printer Settings Option.
For information on using the Form Printer option, see Setting Form Printers.
Keyboard Shortcuts
Screen Level Shortcut To Keyboard Key(s) Description
Delete line Delete Deletes a line from a list box
or deletes information in a
field.
Delete record Ctrl + d Deletes the current record.
Delete shortcut Delete Deletes a selected shortcut
from the Explorer shortcut
area.
Chapter 1: Getting Started
lAccounts Receivable User Guide 57
Screen Level Shortcut To Keyboard Key(s) Description
Designer Ctrl + z Activates the Designer
application for the current
screen.
Display list F4 In any combo box field,
displays the items in the
drop-down list.
Exit/Cancel/ Restart Esc Exits list boxes and screens,
or restarts data entry on a
screen.
First choice in combo box PgUp Displays the first choice in a
combo box.
First record Ctrl + f Displays the first record in the
file that is currently open.
Field Level Help F1 With the cursor in any field,
displays the size, type,
default, a brief description,
and integration information of
that field.
Last choice in combo box PgDn Displays the last choice in a
combo box.
Last record Ctrl + l Displays the last record in the
file that is currently open.
List box search Shift + F3 With the cursor in a list box,
displays the Search The List
screen, which allows you to
search for specific text in the
contents of a list box.
Next record Ctrl + n Advances to the next record
in the file.
Notes F8 or Ctrl + o Displays the Notes dialog for
the current field.
Page down Ctrl + PgDn Displays the next page of a
multi-page screen.
Page up Ctrl + PgUp Displays the previous page of
a multi-page screen.
Preceding record Ctrl + p Displays the record
immediately preceding the
current record.
Save Enter or Ctrl + s Saves a new record or
updates an existing one.
Screen Level Help Ctrl + F1 Displays the overview help
topic for the current screen.
Search F7 Displays the Search dialog.

Chapter 1: Getting Started
58 Accounts Receivable User Guide

Chapter 2: Accounts Receivable Overview
Accounts Receivable User Guide 59
Chapter 2: Accounts Receivable
Overview

Chapter 2: Accounts Receivable Overview
60 Accounts Receivable User Guide
Welcome to Macola Enterprise Suite
Accounts Receivable
Welcome to Macola Enterprise Suite (Macola ES) Accounts Receivable (A/R). The Accounts
Receivable Help and User Guide provide detailed information that you will need to use Macola
ES Accounts Receivable. It provides overviews of each Accounts Receivable option, data entry
steps, and related topics.
This section provides an overview of Macola ES Accounts Receivable (A/R) and explains the basic
concepts and terms related to Accounts Receivable.
Requirements and Integration
Using Order Entry with Accounts Receivable
If you are using Macola ES O/E, the same batch ID cannot be printed simultaneously in A/R Print
Invoices and in O/E Print Invoices. You can, however, enter A/R sales and service transactions
while O/E invoices are being printed.
Accounts Receivable Basics
This section is designed to acquaint you with some of the concepts and terms used in Macola ES
Accounts Receivable (A/R). You can also find information about posting, which files are posted to
or updated, and other helpful suggestions.
In A/R, a document refers to a record of the actual paper document used to make the transaction.
A/R uses the following four types of documents and document codes:
• Invoices
• Payments
• Credit Memos
• Debit Memos
Project Numbers
Project numbers allow you to track sales and expenses associated with a defined job to determine
its cost. Projects can be particular projects, activities, or contracts. You assign each project a
number. When you enter new sales transactions into Macola ES, the amount can be distributed to
one or more projects. Then, after you post sales transactions, you can print a project analysis

Chapter 2: Accounts Receivable Overview
lAccounts Receivable User Guide 61
report that itemizes all expenses and amounts billed to each project and compare them to the
budgeted amounts for each project.
How A/R Calculates the Average Number of Days to Pay
Macola ES A/R calculates the average number of days it took a customer to pay as follows:
1. It calculates the number of days it took the customer to pay the current invoice. This is the
number of days from invoice date to the final payment date. If you are paying an invoice in
multiple installments, interim payment amounts are not included in the calculation. Macola
ES does not include the invoice in the calculation until the final payment on those invoices
has been received.
2. It calculates the number of days it took the customer to pay all existing invoices, excluding
the current invoice. (The average days to pay YTD multiplied by the number of invoices paid
YTD.)
3. It then adds the two totals together (the total now includes the current invoice) to get the total
number of days.
4. The new total number of invoices paid is calculated by adding 1 to the number of invoices
paid YTD.
5. It then divides the total number of days by the total number of invoices to get the new
average. (New Total Days divided by the New Number of Invoices equals the New Average.)
Calculating Salesperson Commission
How Macola ES calculates commission depends on the Macola ES packages you are using.
If you are using Macola ES A/R only:
Macola ES calculates commission based on the customer type and commission percentage
information set up on the Salesperson Maintenance screen:
When you enter a sales transaction in A/R, Macola ES matches the customer type on the sales
transaction with the customer type associated with the sales person on the sales transaction; it
uses the corresponding commission percentage to calculate commission.
If Macola ES does not find a matching customer type, it calculates commission as zero. You can
override the commission field on the A/R Enter Sales Transactions screen.
If you are using Macola ES A/R, I/M, and O/E:
If you are using Macola ES A/R, I/M, and O/E, how Macola ES calculates commission depends
upon the value selected in the Calc Commission Method field on the Order Entry Setup screen.
If the Calc Commission Method field is I = Itm Pct/Amt
Macola ES calculates commission based on the Commission Method field and Commission
Amount/Pct field on the I/M Item Master Maintenance screen for each item on a sales order
entered in O/E.

Chapter 2: Accounts Receivable Overview
62 Accounts Receivable User Guide
If Macola ES finds no commission for an item, it will calculate commission for that item as zero.
When the Calc Commission Method field is set to I = Itm Pct/Amt, you cannot change the
Commission Percent field on the O/E Billing Information screen. This is because the commission
is calculated based on the item commission percent and not the total amount of the item order.
If the Calc Commission Method field is M = Sale Amt - Cst Amt
Macola ES calculates commission based on the total gross margin (sale amount - cost amount) for
the order.
When you enter a sales order in O/E, Macola ES matches the customer type on the order with the
customer type associated with the sales person on the order; it uses the corresponding
commission percentage.
If Macola ES does not find a matching customer type, it calculates commission as zero. You can
override the commission amount field on the O/E Billing Information screen.
If the Calc Commission Method field is S = Total Sale Amt
Macola ES calculates commission based on the total sale amount for the order.
When you enter a sales order in O/E, Macola ES matches the customer type on the order with the
customer type associated with the sales person on the order; it uses the corresponding
commission percentage.
If Macola ES does not find a matching customer type, it calculates commission as zero. You can
override the commission amount field on the O/E Billing Information screen.
Discounts and Allowances
When customers send in payments on their accounts, they might also claim some sort of a
discount on those items. You have to determine whether that discount is valid or not, and
whether you are going to allow it. Usually this decision is fairly straightforward: did the
customer send in payment early enough to qualify for the discount? When you apply cash to an
open item customerʹs account, as you bring up each unpaid open item for payment, Macola ES
calculates and displays the amount of any valid discount. Macola ES calculates this valid
discount based on how many days the customer has to make payment before losing the discount,
using the discount information entered for the customer. This calculation is for your information.
You can enter any amount of discount that you want to give the customer or no discount at all.
You do not have to accept the calculated amount.
Occasionally, you may give the customer some additional credit on their account other than the
payment amount or a discount amount. You can enter an additional discount or agree to take an
amount off of the original invoice at the time you enter the cash receipt. This additional amount
of credit is called an allowance.
Using Tax Detail Codes and Tax Schedules for A/R
Transactions
Macola ES gives you the option of using tax detail codes or a tax schedule during sales
transaction entry. During recurring sales transactions and service invoice transactions Macola ES

Chapter 2: Accounts Receivable Overview
lAccounts Receivable User Guide 63
only allows you to enter tax schedules. However, if you have set up Tax Detail Codes for your
customers, Macola ES calculates tax based on the Tax Detail Codes when you post recurring sales
transactions or enter service invoices. If you entered a tax schedule for a service code and a tax
schedule for a customer, Macola ES compares the customer tax schedule to the tax schedules for
the service codes. Only the tax detail codes that match within the tax schedules for both the
customer and service codes are used to calculate sales tax.
For example, if you entered tax schedule AC (tax detail codes A and C) for a customer, Macola ES
looks for tax detail codes A and C in the tax schedules of the service codes. If Macola ES finds a
match, it calculates sales tax. If no tax detail codes match, the tax amount is zero. If you entered a
Tax Detail Code for a customer and a Tax Schedule for a service code, Macola ES calculates tax
based on the Tax Detail Code.
Posting Sales Process
During the posting sales process in A/R, a number of files and accounts are updated. Following
are various sale amounts and accounts and a short description of what occurs when posting to
A/R with valid G/L accounts.
Invoice Amount
The total invoice amount is automatically posted as a debit to the A/R account assigned to the
Customer Type Code entered for the customer.
Sale Amount if You Distribute Sales
If you choose not to distribute sales, all sales are posted as credits to the sales account entered on
the Customer Type Maintenance screen.
If you choose to distribute sales, you must manually enter a sales account when you enter a sales
transaction. Each sale is then posted as a credit to the accounts entered.
Sales Tax Account
Sales tax is automatically credited to the GL account assigned to the tax detail codes. Sales tax
distributions cannot be done manually.
Miscellaneous Charges Amount
If you choose not to distribute miscellaneous charges, Macola ES posts all miscellaneous charges
from A/R sales transactions as credits to the default miscellaneous charges account set up in the
ship via code used for this customer.
If you choose to distribute miscellaneous charges, you must enter and distribute these amounts
manually. Macola ES posts the miscellaneous charges as credits to the individual accounts.
Freight Amount
If you choose not to distribute freight, Macola ES posts all freight to the default freight account
set up in the ship via code used for this customer.

Chapter 2: Accounts Receivable Overview
64 Accounts Receivable User Guide
If you choose to distribute freight, you must enter and distribute these freight accounts manually.
After you distribute the freight charges, Macola ES posts them as credits to the individual
accounts.

Chapter 3: Setup and Maintenance
Accounts Receivable User Guide 65
Chapter 3: Setup and Maintenance
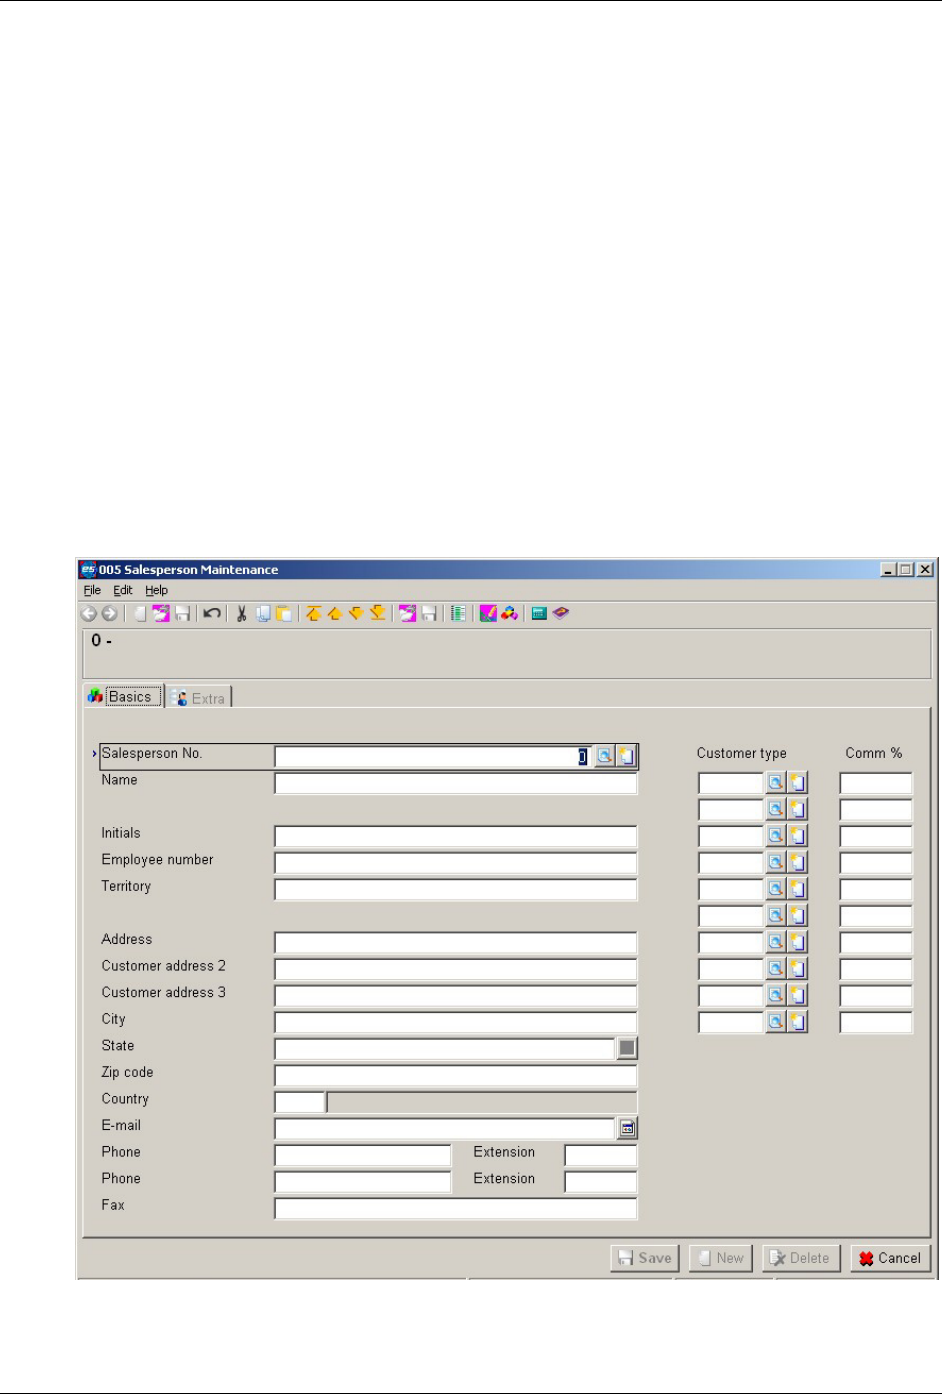
Chapter 3: Setup and Maintenance
66 Accounts Receivable User Guide
Setting Up and Maintaining Accounts
Receivable
This section presents information on the Accounts Receivable setup and maintenance screens.
Before you begin entering, printing, or posting transactions, you must enter some required data.
Some processes require setup information and default information before you can complete
them. Therefore, it is important that you pay close attention for prerequisite information for each
screen.
Sales People
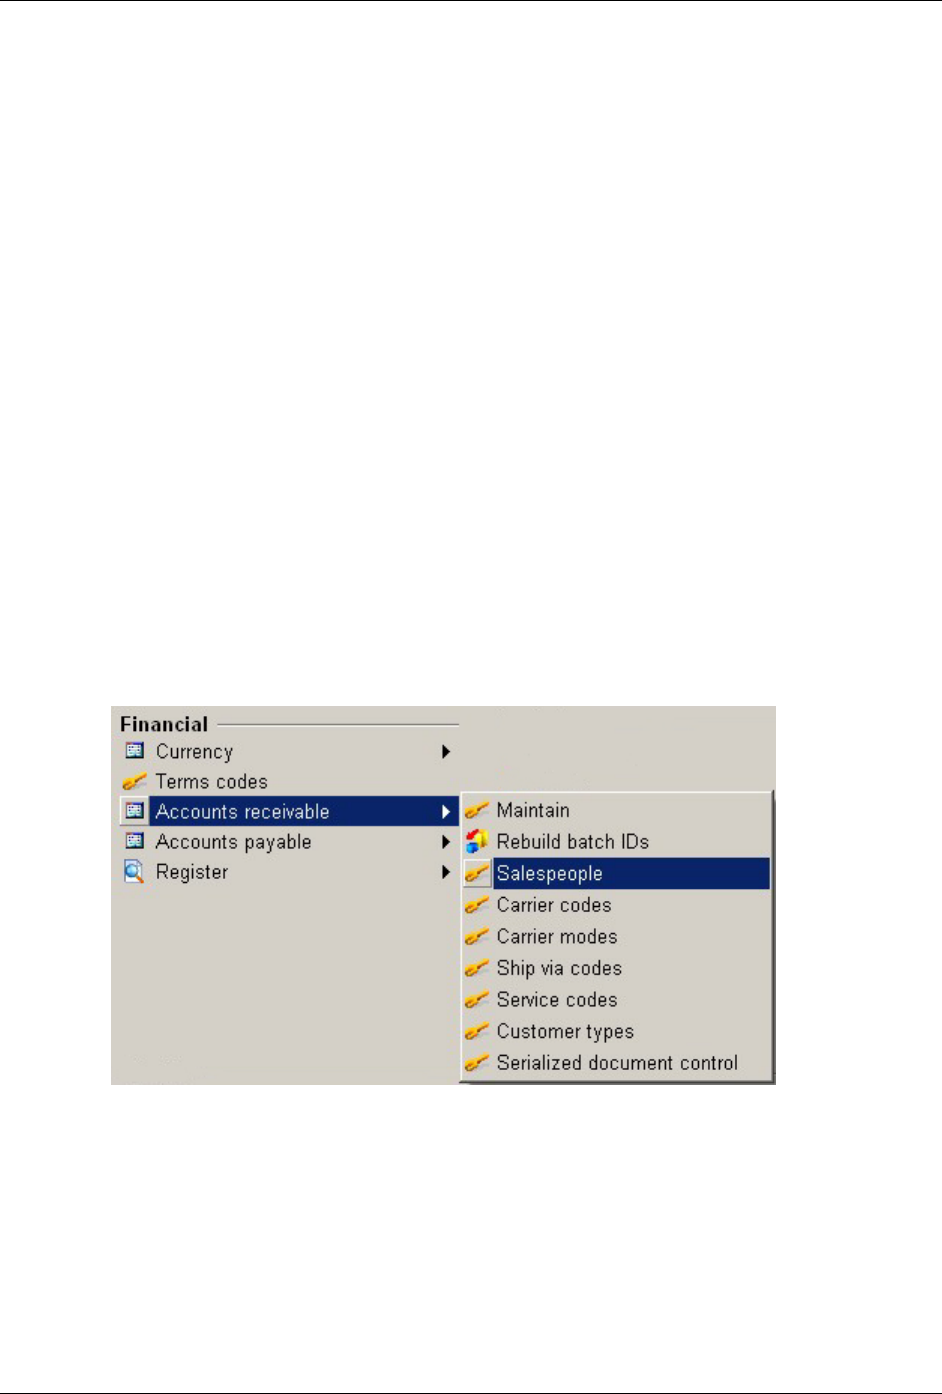
Chapter 3: Setup and Maintenance
lAccounts Receivable User Guide 67
Use the Salesperson Maintenance screen to enter information on all salespeople that your
company employs. Macola ES uses this information during transaction entry to calculate
commissions.
A salesperson must have a human resources record before you set them up as a salesperson.
• Add human resource records on the System menu, under the HR & Security heading by
selecting Resources.
• Add salesperson records on the System menu, under the Financial heading, by selecting
Accounts Receivable, Salespeople.
The Salesperson Maintenance screen links a salesperson to specific customer types and determine
the commission percentage the salesperson receives when sales are entered for customers that
have that customer type.
If a salespersonʹs human resource record needs to be updated, you can make changes using the
Maintain Resources screen unless you need to add a customer type or change a commission
percentage; those must be changed the Salesperson Maintenance screen. If a salesperson leaves
the company, you can delete the salesperson number from the salesperson record, but you cannot
delete the user if there are transactions for the salesperson. Macola ES deletes the salesperson
number, but keeps the salespersonʹs information.
Setting Up a Salesperson Record
1. On the System menu, under the Financial heading, select Accounts Receivable, Salespeople.
Macola ES displays the Salesperson Maintenance browser search screen.
2. Click the New button.
3. Enter a Salesperson No. The salesperson must be on file as a user before they can be used as
a salesperson.
4. Enter the Customer Type to use in calculating salesperson commissions.
5. Enter the commission percentage (Comm %) associated with that Customer Type. Repeat
steps 4 and 5 for all necessary customer types.
6. Click the Extra tab.
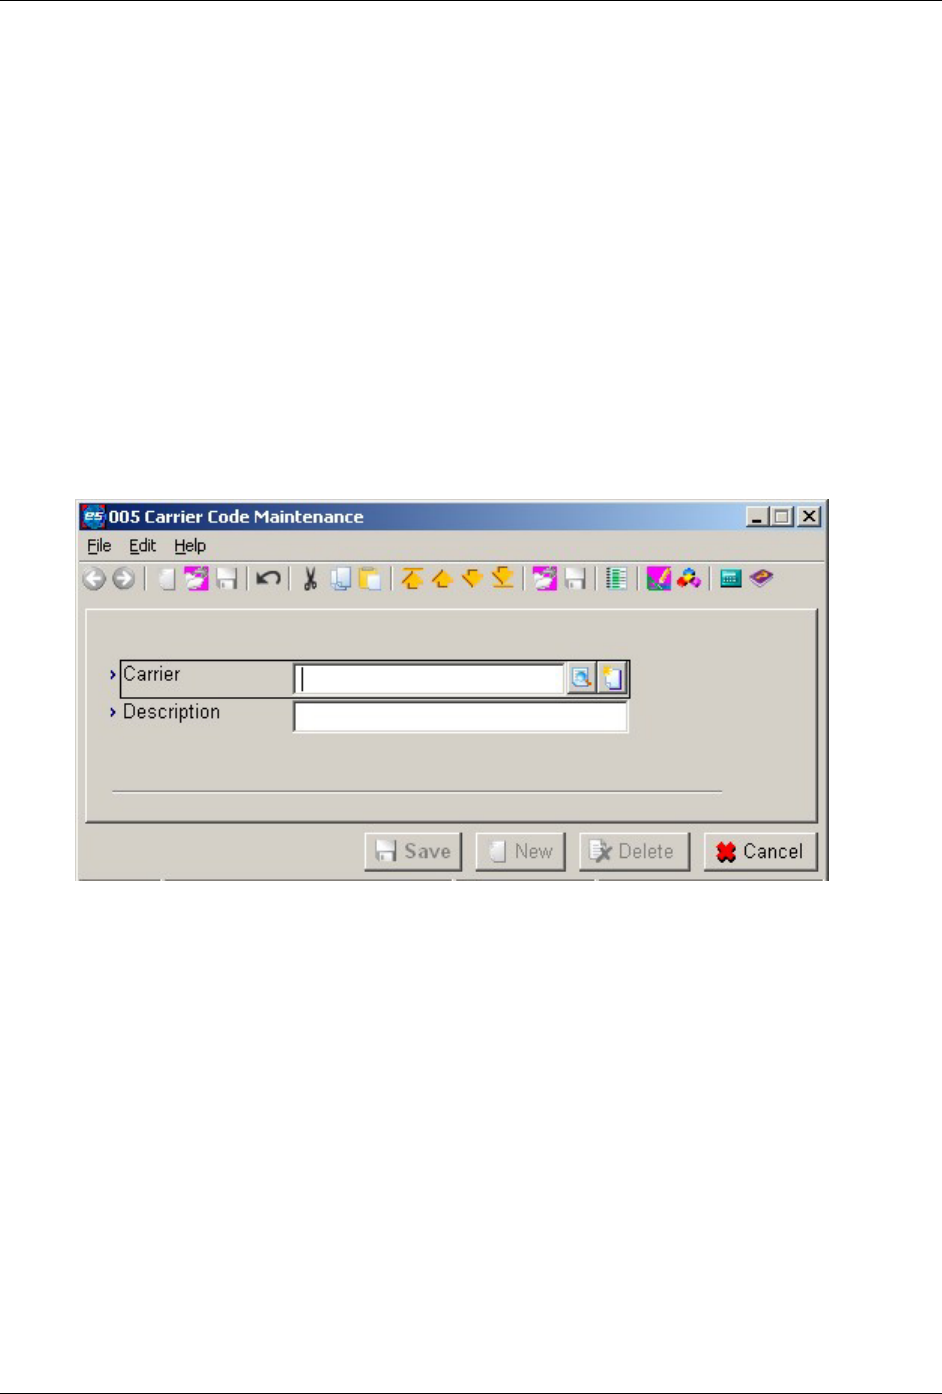
Chapter 3: Setup and Maintenance
68 Accounts Receivable User Guide
7. If needed, enter up to five user defined fields where you can store information about the
salesperson and three document fields where you can attach files to the salesperson.
8. Click Save.
Deleting a Salesperson Record
1. On the System menu, under the Financial heading, select Accounts Receivable, Salespeople.
2. Select the salesperson number (Salesperson No.) that you want to delete.
3. Click the Open button.
4. Click Delete.
5. At the prompt ʺOK to delete?ʺ click Yes.
Carrier Codes
The Carrier Code Maintenance screen is available for the manifest shipping add-on. Use this to
define specific carriers (such as FedEx, UPS, and Conrail) and the codes that represent them.
Carrier codes are used on the Ship Via Maintenance screen.
Adding a Carrier Code
1. On the System menu, under the Financial heading, select Accounts receivable, Carrier codes.
Macola ES opens the Carrier Codes screen. Carrier codes are used on the Ship Via
Maintenance screen to assign a type of carrier to a method of shipping, such as air freight,
rail, or truck.

Chapter 3: Setup and Maintenance
lAccounts Receivable User Guide 69
2. Click the New button.
3. Enter a code to represent a specific shipping carrier (Carrier) such as FedEx, UPS, or Contrail.
4. Enter a Description for the carrier code. Descriptions are displayed as read-only on screens
that allow you to select a Carrier Code.
5. Click Save to save the new record.
6. Click Cancel to close the screen.
Deleting a Carrier Code
1. On the System menu, under the Financial heading, select Accounts Receivable, Carrier codes.
Macola ES displays the Carrier Codes browser search screen.
2. Select the Carrier you want to delete.
3. Click the Open button.
4. Click Delete.
5. At the prompt ʺOK to delete?ʺ, click Yes.
6. At the prompt ʺRecord Deletedʺ, click OK.
7. Click Close to exit the screen.
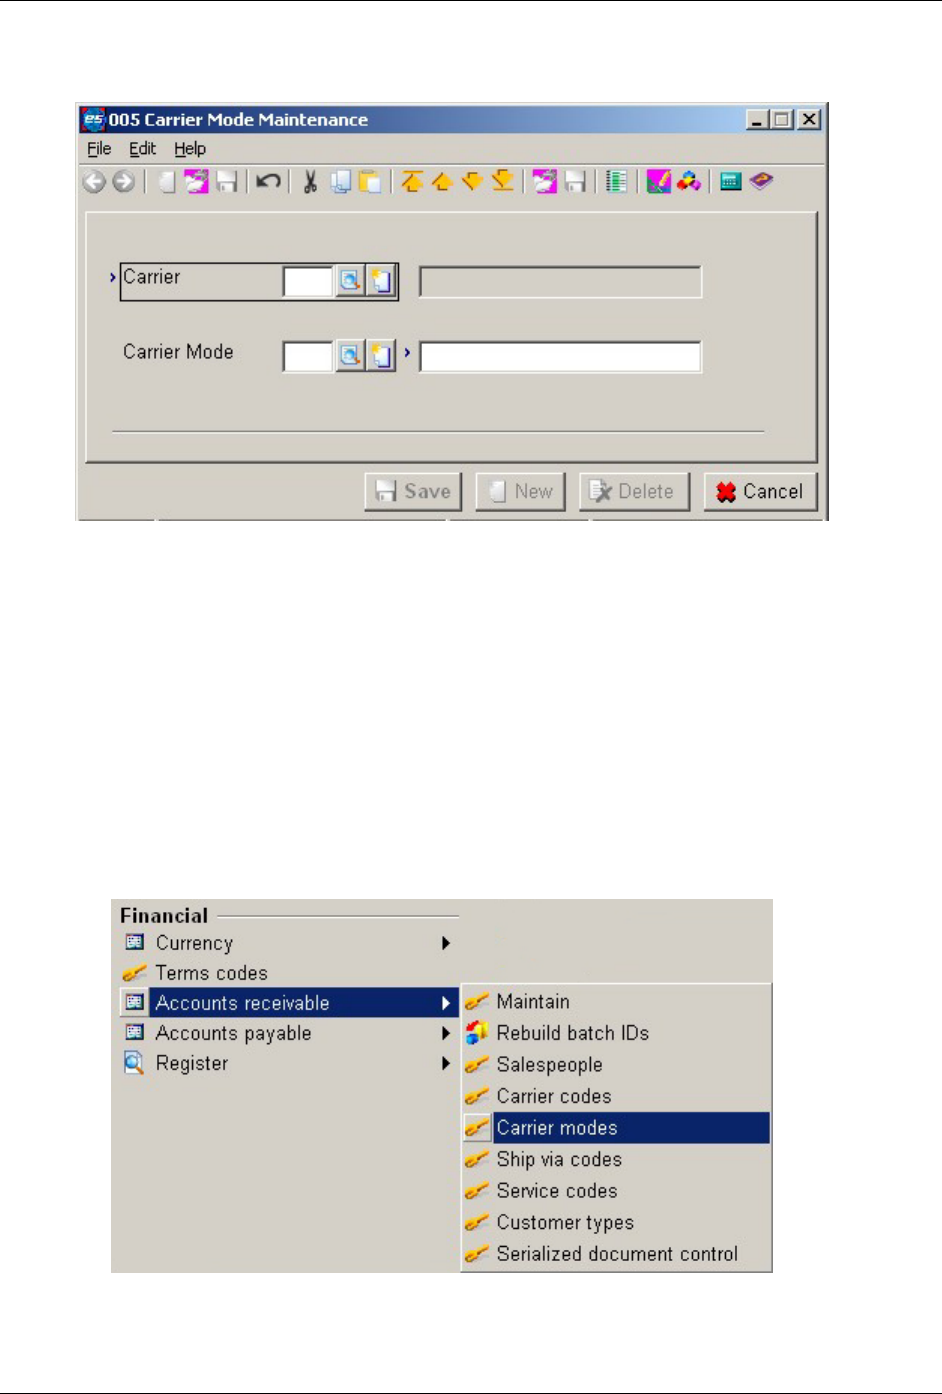
Chapter 3: Setup and Maintenance
70 Accounts Receivable User Guide
Carrier Modes
Use the Carrier Mode Maintenance screen you to designate a particular service offered for
carriers you have defined on the Carrier Code Maintenance screen. To define a carrier mode, first
select a carrier code. After selecting a carrier code, you then enter a code to represent the carrier
mode and a description of that mode. For example, you can select FedEx as the carrier code and
enter a 1 in the Carrier Mode field to represent a mode of transportation such as overnight, next
day air, or 2nd day air.
Note: If you have defined LTL Carrier Codes in your manifest software, you need to create a blank carrier
mode code for LTL Carrier Codes.
Adding a Carrier Mode
1. On the System menu, under the Financial heading, select Accounts receivable, Carrier modes.
Macola ES displays the Carrier Modes browser search screen.
2. Click the New button.
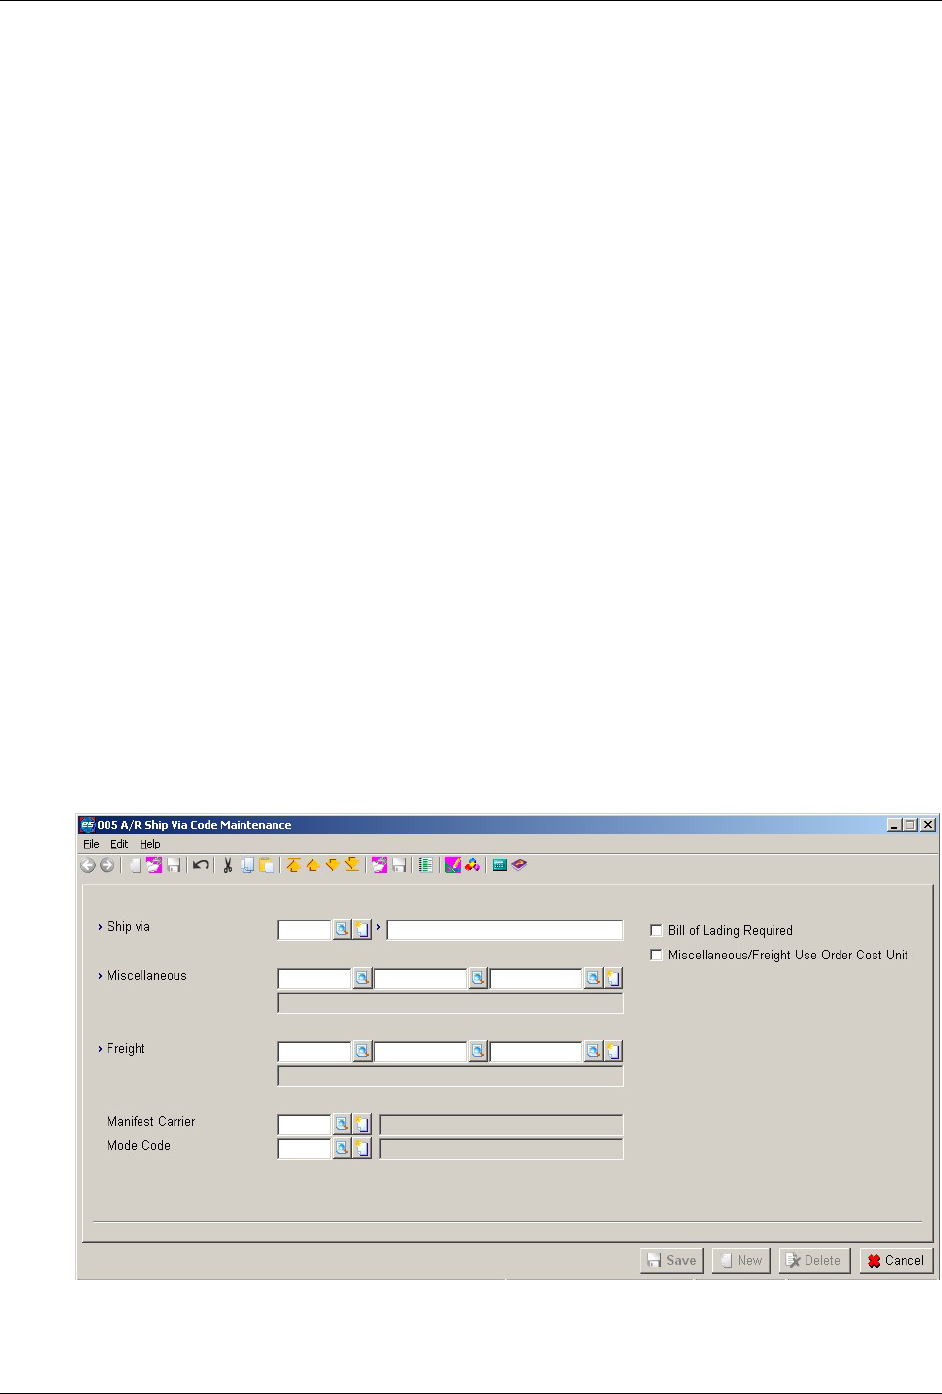
Chapter 3: Setup and Maintenance
lAccounts Receivable User Guide 71
3. Select the Carrier to define a mode of transportation for it.
4. Enter a code (Carrier Mode) that defines the mode of transportation for the carrier. For
example, if you picked FedEx in the Carrier Code, you might assign a carrier mode code that
represents a mode of transportation such as overnight, next day air, or 2nd day air.
Note: If you are using LTL Carriers, you will need to set up a blank carrier mode for LTL Carrier Codes.
5. Enter a Description for the carrier mode. Descriptions are displayed as read-only on screens
that allow you to select a Carrier mode.
6. Click Save to save the new record.
7. Click Cancel to close the screen.
Deleting a Carrier Mode
1. On the System menu, under the Financial heading, select Accounts Receivable, Carrier
modes. Macola ES displays the Carrier Modes browser search screen.
2. Select the Carrier and Carrier Mode you want to delete.
3. Click the Open button.
4. Click Delete.
5. At the prompt ʺOK to delete?ʺ, click Yes.
6. At the prompt ʺRecord deletedʺ, click OK.
7. Click Cancel to exit the screen.
Ship Via Codes
Chapter 3: Setup and Maintenance
72 Accounts Receivable User Guide
Ship via codes define the methods you use for shipping goods to customers. When you add
customers, you must designate which shipping method the customer normally uses.
Be sure to define all methods of shipping your company uses. For example, if you use several
trucking firms to deliver your goods, you may want to define a ship via code for each firm. Some
example shipping methods and codes are as follows:
• U = UPS
• T = Truck
• A = Air Freight
• R = Railway
• F = Federal Express
If you are using a manifest system, you will enter a ship via codes, a carrier code, and a carrier
mode.
Defining a Ship Via Code
1. On the System menu, under the Financial heading, select Accounts Receivable, Ship via
codes. Macola ES opens the A/R Ship Via Code Maintenance screen.
2. Enter a Ship Via Code to represent the shipping method. This can be up to three alpha-
numeric characters.
3. Enter the Description of the shipping method. This can be up to thirty alpha-numeric
characters.
4. Enter the Miscellaneous Account Number. Macola ES uses this account number as the
miscellaneous charges account number when you enter sales transactions, if you do not have
the Distribute Miscellaneous Charges check box selected on the Accounts Receivable Setup
screen.
5. Enter the Freight Account Number. Macola ES uses this account number as the freight
charges account number when you enter sales transactions, if you do not have the Distribute
Freight check box selected on the Accounts Receivable Setup screen.

Chapter 3: Setup and Maintenance
lAccounts Receivable User Guide 73
If you are using a manifest system, complete steps 6 to 9. If you are not using a manifest
system, skip to step 10.
6. Enter the Manifest Carrier that you want to associate with this ship via method. These are
the carrier codes you have defined on the Carrier Code Maintenance screen. Macola ES
displays a description of the Carrier Code.
7. Select the mode of transportation (Mode Code) that you want to associate with this ship via
method. These are the carrier modes you have defined on the Carrier Mode Maintenance
screen. Macola ES displays a description of the Carrier Mode.
8. Select the Bill of Lading Required check box, if you want to use the generate bill of lading
application in Order Entry for this ship via code. You cannot automatically generate bills of
lading for customers that use a ship via code if this check box is cleared.
9. Select the Miscellaneous/Freight Use Order Cost Unit, if you want to use the sales order cost
unit for the miscellaneous and freight accounts when entering an order in Order Entry
instead of the cost unit entered for the miscellaneous and freight accounts for the ship via
code.
10. Click Save to save the record.
11. Click Cancel to close the screen.
Deleting a Ship Via Code
1. On the System menu, under the Financial heading, select Accounts Receivable, Ship via
codes.
2. Enter the Ship Via Code that you want to delete.
3. Click the Delete button.
4. At the prompt ʺOK to delete?ʺ, click Yes.
5. At the prompt ʺRecord deletedʺ, click OK.
6. Click Cancel to close the screen.

Chapter 3: Setup and Maintenance
74 Accounts Receivable User Guide
Terms Codes
Terms codes define the usual payment terms for a given customerʹs account. For example, you
may give customers a 5% discount on purchases if payment is received within 15 days. Macola
ES uses the terms when you apply payments to outstanding transactions.
A check box on the A/R Terms Code Maintenance screen designates an A/R Terms code for use
with credit card processing. If you want to use a terms code with credit card processing, select
the Credit Card Verification check box in the A/R Terms Code Maintenance screen. When you
enter an O/E order using this terms code, Macola ES will automatically execute a credit card
payment for the order.
Designating a Terms Code for credit card payment will affect any customer who has that terms
code as the default in their A/R customer record. When you enter an O/E order for a customer
with a credit card terms code, O/E will automatically process the order as having a credit card
payment (unless you change the Terms Code during O/E order entry). Therefore, you may wish
to create new Terms Codes specifically for those customers who will be regularly paying by
credit card.

Chapter 3: Setup and Maintenance
lAccounts Receivable User Guide 75
Defining a Terms Code
1. On the System menu, under the Financial heading, select Terms codes. Macola ES opens the
Terms Code Maintenance browser search screen.
2. Click the New button.
3. Enter a Payment Condition Code to represent this calculation. This can be up to two alpha-
numeric characters. A terms code defines the usual payment method terms for a given
customerʹs account. The terms of a customer invoice include the date the invoice is due, the
amount of any early payment discount that can be taken on the invoice, and the date that the
invoice must be paid to qualify for the early payment discount to be taken.
4. Enter the Description of the terms code. This can be up to thirty alpha numeric characters.
For example, you might enter 5/15 Net 30 as the description of Terms Code 1. This indicates
that the customer can obtain a 5% discount if paid within 15 days, and that the net amount is
due within 30 days.
5. Enter the number of days from the invoice date to the due date (Due Days). This is the
number of days after which a customerʹs account is considered overdue. This field calculates
the invoiceʹs due date by adding this number to the invoice date. If you enter 30, then the
invoice due date is 30 days after the invoice date. If you enter a value in this field, you cannot
enter a value in the Day of Month Due field.
6. Enter the day of the month the invoice is due (Day of Month Due). This field is used if a
customerʹs invoice is due on a specific day of the month regardless of when the invoice is
entered. For example, if you gave your customer terms that said their invoice is always due
on the 30th of the month, enter 30. This field is not available if you entered a value in the Due
Days field. You can enter data in this field only if the Due Days field is zero.
7. Enter the Number of Months until the invoice is due. This field is used in conjunction with
the Day of the Month Due field. This field determines which month the invoice will be due. If
for example you enter 30 as the day of the month due and enter 0 in the No. of Months field,
the invoice is due on the 30th of the same month you entered as the invoice date. If for
example you enter 30 as the day of the month due and enter 1 in the No. of Months field, the
invoice is due on the 30th of the month following the invoice date.
Example: Day of Month Due field = 30
No. Of Months field = 1
Enter an invoice with a date of 6/1. The due date is 7/30.
8. Enter the number of days from the invoice date in which the customer must pay to obtain a
valid discount (Discount Days).
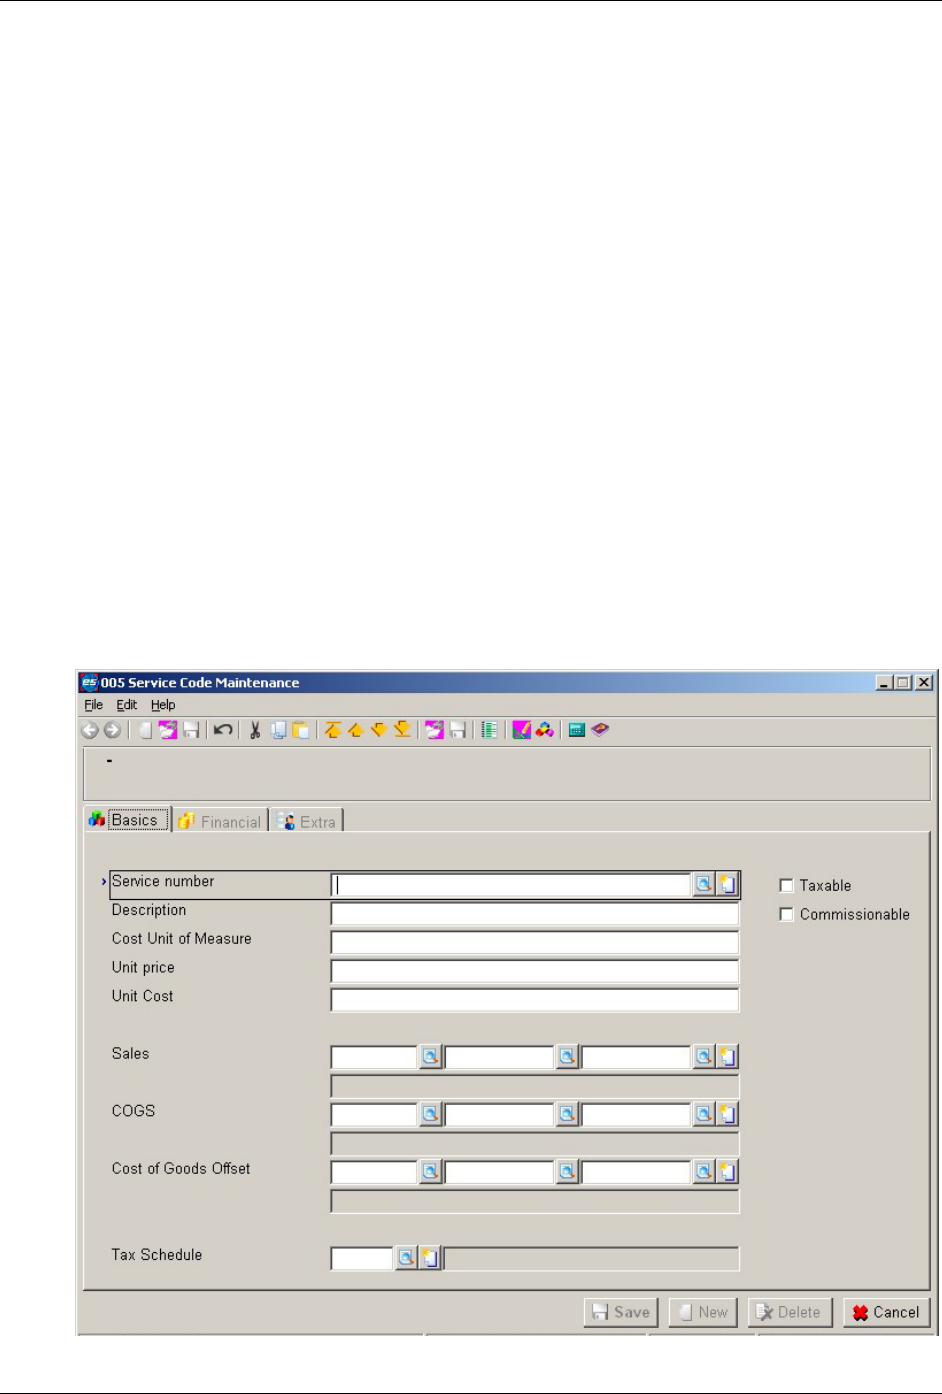
Chapter 3: Setup and Maintenance
76 Accounts Receivable User Guide
9. Enter the Discount Percent the customer is to receive if the invoice is paid within the number
of discount days entered.
10. To use this terms code with credit card processing, select the Credit Card Verification check
box.
11. Click Save.
12. Click Close to close the screen.
Deleting a Terms Code
1. On the System menu, under the Financial heading, select Terms Codes.
2. Highlight the Terms code you wish to delete.
3. Click the Delete button.
4. At the prompt ʺDepending on the size of your company, this function may take a long time
because all files will be checked. Delete?ʺ, click Yes.
5. Print a record of the deleted terms code, or click Close.
6. Click Close.
Service Codes
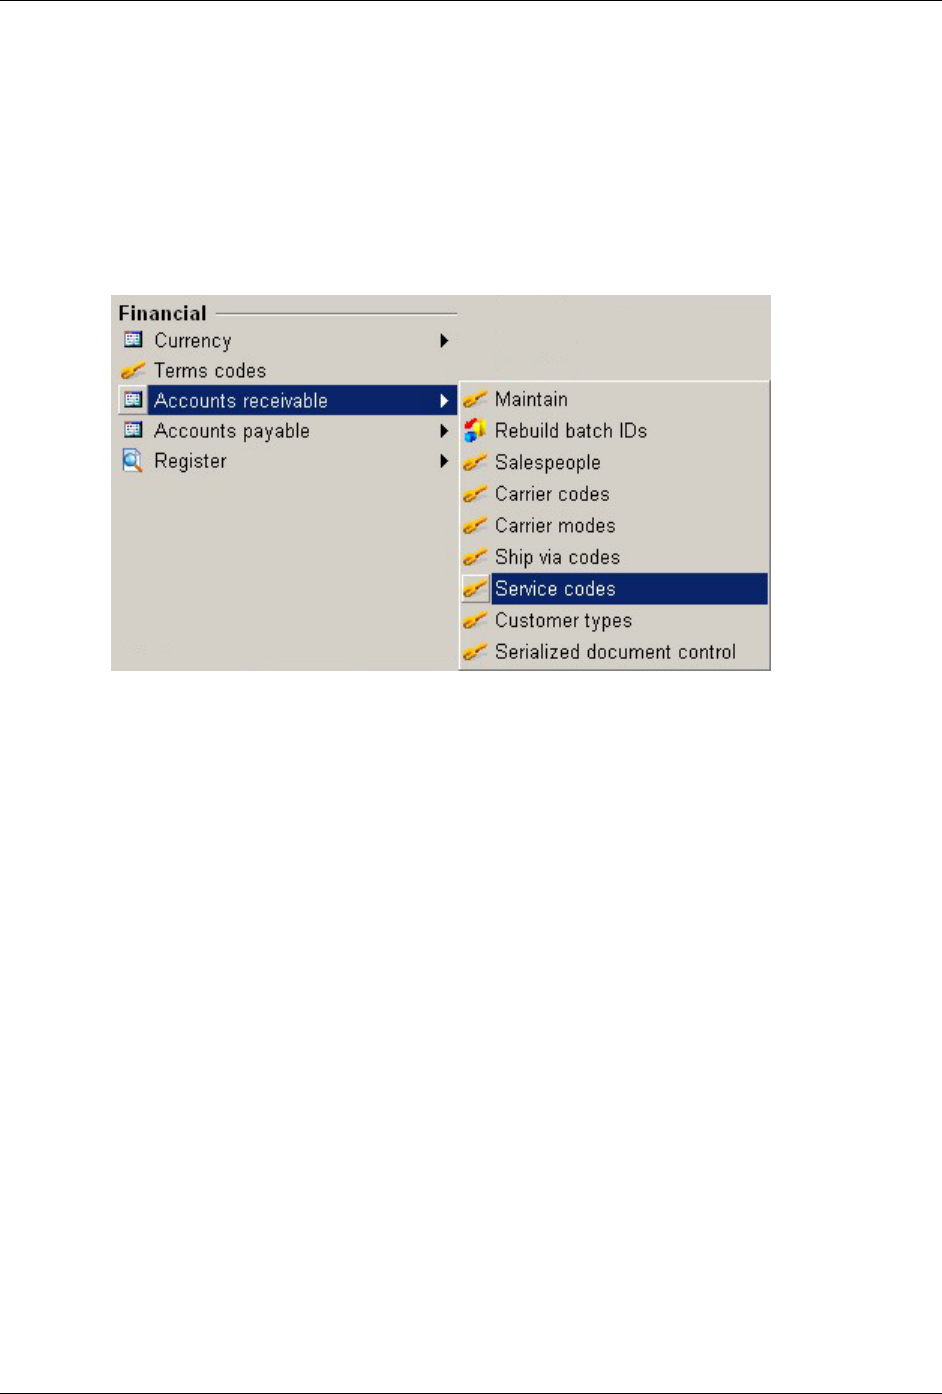
Chapter 3: Setup and Maintenance
lAccounts Receivable User Guide 77
Service codes allow your company to track the efficiency and profitability of its billable services.
A service in Macola ES A/R refers to a non-inventory item like consulting or training. Tracking
services is a benefit to your respective operational departments as they allocate, plan, or monitor
resources. Order Entry also uses service codes.
Defining a Service Code
1. On the System menu, under the Financial heading, select Accounts Receivable, Service codes.
Macola ES opens the Service Code Maintenance browser search screen.
2. Click the New button.
3. Enter up to thirty alphanumeric characters in the Service No. field to represent the service.
For example, you might want to enter Support to represent Software Support.
4. Enter up to thirty alphanumeric characters as the Description of the service code.
5. Enter up to four alphanumeric characters as the Cost unit of measure associated with this
service code. For example, you can enter HR to enter the cost as an hourly rate.
6. Enter up to ten whole numbers before the decimal and six decimal places as the Unit Price to
charge per unit.
7. Enter up to ten whole numbers before the decimal and six decimal places as the Unit Cost.
This is the cost for one unit of the service. For example, if the service is sold in hours, enter
your cost for one hour of the service.
8. Enter the General Ledger Sales account number associated with this service number. Macola
ES credits this account number for every service sold.
This field defaults from the Service Sales account number entered on the Accounts Receivable
Setup screen.
9. Enter the General Ledger COGS (Cost of Goods Sold) account number. This account is
debited for the total cost of the service when service invoices are posted.
10. Enter the General Ledger Cost of Goods Offset account number. This account is credited for
the total cost of the service when service invoices are posted.

Chapter 3: Setup and Maintenance
78 Accounts Receivable User Guide
11. To calculate taxes for this service, select the Taxable check box. If this check box is not
selected, no taxes will be calculated if the Tax Schedule Usage field is set as Not Used or
Optional on the Accounts Receivable Setup screen. However, if tax schedule usage is set as
Enforced, you must enter a tax schedule and tax will be calculated for this service.
12. To calculate commission as defined in the Salesperson file by customer type, select the
Commissionable check box. Otherwise, no commissions will be calculated.
13. If a tax schedule applies to this service, enter the appropriate Tax Schedule code to designate
how sales tax will be calculated. This field is not available if tax schedules are not in use. To
open the Tax schedules screen, on the G/L menu, under the Taxes heading, select Tax
Schedules.
Note: If you selected the Taxable check box and do not enter a Tax Schedule code Macola ES will calculate
tax based on the Tax Detail Code or Tax Schedule on the customer record when you use this service code in
Service invoices, Enter invoices. See Entering a service invoice.
If you enter a tax schedule and the customer has a different tax schedule, Macola ES will
perform a matching process to determine if any of the tax detail codes in the tax schedules
match. If a code is in both tax schedules, taxes will be calculated based on that tax detail code.
If there are no tax detail codes that match, then no tax will be calculated.
If you enter a tax schedule and your customer has tax detail codes defined, Macola ES
calculates tax based on the tax detail codes.
14. Click Save.
15. Click Cancel to close the screen.
Deleting a Service Code
1. On the System menu, under the Financial heading, select Accounts Receivable, Service codes.
2. Select the Service No you want to delete.
3. Click the Open button.
4. Click the Delete button.
5. At the prompt ʺOK to Delete?ʺ, click Yes to delete the service code.
6. At the prompt ʺRecord Deletedʺ, click OK.
7. Click the Cancel button to exit the service maintenance screen.
8. Click the Close button to exit the service maintenance browser search screen.

Chapter 3: Setup and Maintenance
lAccounts Receivable User Guide 79
Customer Types
Customer types group customers into categories. Although your company may have many
customers, you probably have few customer types. Macola ES uses the customer types you define
here throughout A/R for transactions, reports, lists, distributions, etc.
When you create a customer type, you must assign G/L account numbers to it. When you create a
customer, you link a customer type to that customer. The account numbers assigned to the
customer type are linked to the customer record. If you make any changes to the customer type
account numbers, the change affects all customers assigned that customer type. This feature
allows you to streamline processing by tracking customers to specific account numbers by
customer type.
Note: If you make changes to a customer type, existing orders, invoices, and history will not be affected.
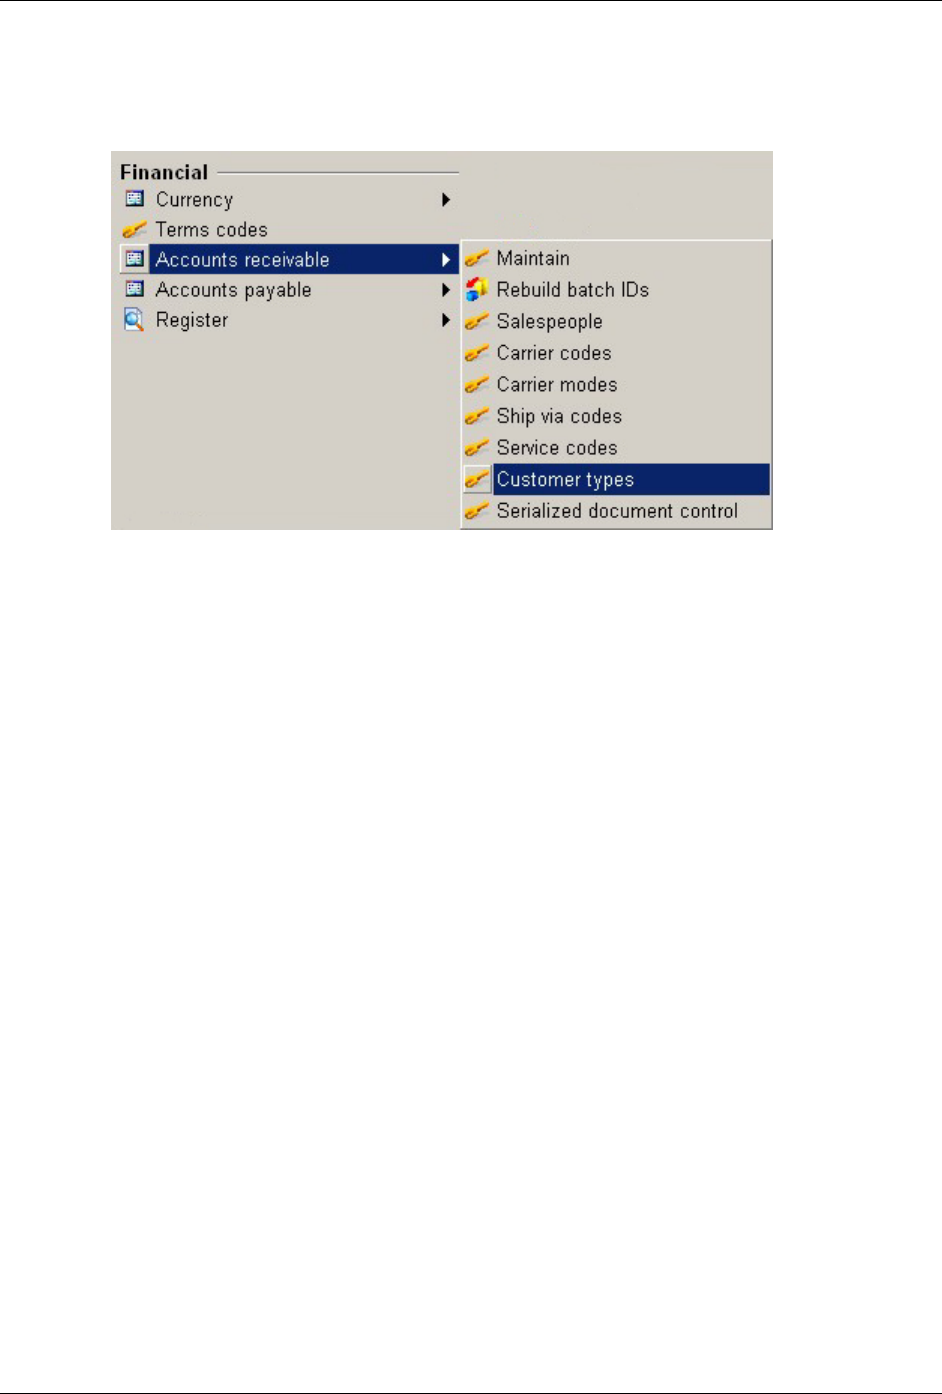
Chapter 3: Setup and Maintenance
80 Accounts Receivable User Guide
Defining a Customer Type
1. On the System menu, under the Financial heading, select Accounts Receivable, Customer
Types. Macola ES opens the Customer Type Maintenance screen.
2. Click the New button.
3. Enter a Customer Type. You can define any system of customer types that you want. You
can enter up to five alphanumeric characters to define your customer type.
4. Enter the Description that best describes the customer type. You can enter up to fifteen
alphanumeric characters.
5. Select the Price by Whole Order check box to give all customers with this customer type a
price break for all items with a product category that has the Price by Whole Order check box
selected. If this check box is selected, customers who belong to this customer type will be
eligible for pricing by whole order or product category, if the Price Method field on the
Order Entry Setup screen is set to W = Whole Order or P = Product Category. If this check
box is not selected, and the O/E Price Method is set to P or W, the system will apply line item
pricing to orders from customers belonging to this customer type. For more information on
O/E price by whole order see Pricing Methods in O/E.
Note: If O/E is set up to use whole order or product category pricing, the system will apply only that
method for customers belonging to a customer type where the Price by Whole Order check box is selected.
Further, this pricing will apply only to those line items belonging to Product Categories where the Price
by Whole Order check box is selected.
6. Enter the Accounts Receivable account number to use for this customer type. This is the
account that Macola ES debits when you enter a sales transaction.
7. Enter the Sales account number and description for this customer type. This is the account
that Macola ES credits when you enter an A/R sales transaction using the automatic
distribution (F5).
8. Enter the Discount Account number. This is the account that Macola ES uses if a discount is
calculated for this customer type during cash receipts.
9. Enter the Service Sales Account number. This is the account number where A/R service sales
are posted.

Chapter 3: Setup and Maintenance
lAccounts Receivable User Guide 81
10. Enter the account number for the Sales Discount account.
On Order Entry Setup screen, if the Distribute Discount Amount check box is selected,
Macola ES will use this account to track discounts for O/E orders. The Sales account receives
the credit for the full amount of the order, and the Sales Discount account receives the debit
for the amount of the discounts. The A/R account is debited the discounted order price, along
with any sales tax.
On Order Entry Setup screen, if the Distribute Discount Amount check box is cleared, Macola
ES will not use the Sales Discount account. Instead, Macola ES will subtract any discounts
from the total order amount and credit the adjusted amount to the Sales account.
11. Enter the Write-off account number. This is the account where A/R write-off amounts are
posted. This field is available only if the Multiple Write-off Accts check box is selected on
the Accounts Receivable Setup screen.
12. Click the Extra tab to enter User-defined fields and attach documents.
13. Click Save.
Deleting a Customer Type
Note: Before deleting a customer type, verify that the customer type is not associated with any customer
records.
1. On the System menu, under the Financial heading, select Accounts Receivable, Customer
Types.
2. Highlight the Customer Type you want to delete.
3. Click the Open button.
4. Click the Delete button. The message ʺOK to Delete?ʺ appears.
Click Yes to delete the Customer type. The message ʺRecord Deletedʺ appears. Click OK.
Click No to return to the customer type maintenance screen.
5. Click the Cancel button to exit the customer type maintenance screen.
6. Click the Close button to exit the customer type maintenance browser search screen.
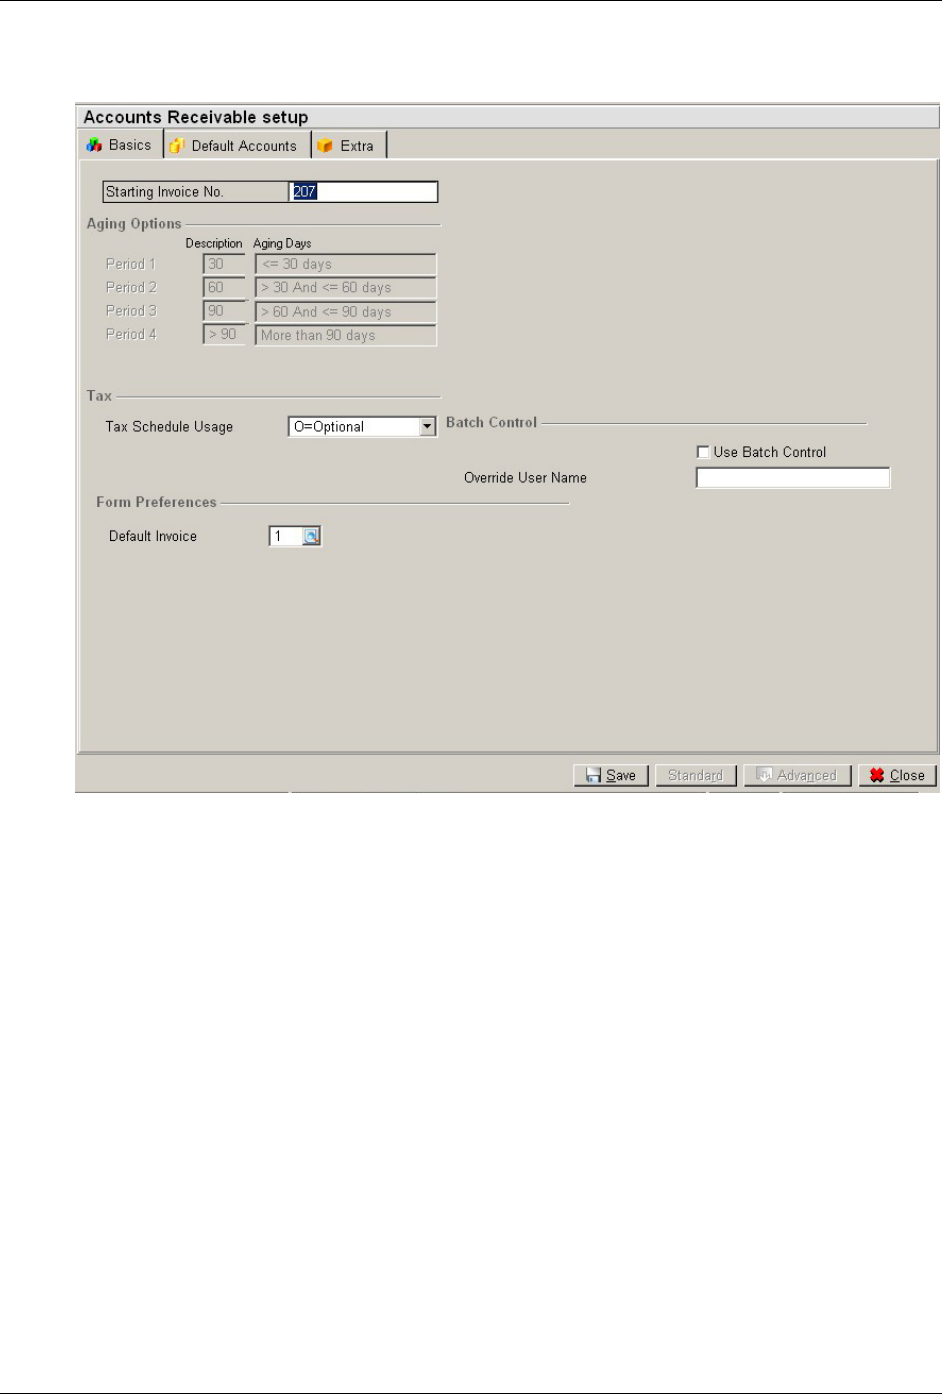
Chapter 3: Setup and Maintenance
82 Accounts Receivable User Guide
Accounts Receivable Setup
Use the Accounts Receivable Setup screen to customize the A/R package to match your
companyʹs accounting practices.
On the Basics tab, enter a starting invoice number; select a tax schedule use option; enter batch
control preferences; and enter a default invoice form number.
On the Default Accounts tab, enter default general ledger account numbers.
On the Extra tab, determine whether you want to distribute sales, miscellaneous charges, and
freight amounts. Perhaps you have more than one area of your company that generates sales. In
this case, if you want to keep a record of the income each area generated, select the distribute
check boxes. However, if you want to record all income from sales in one sales account, you
would clear the distribute check boxes. This is also where you activate the use of serialized
document numbers.
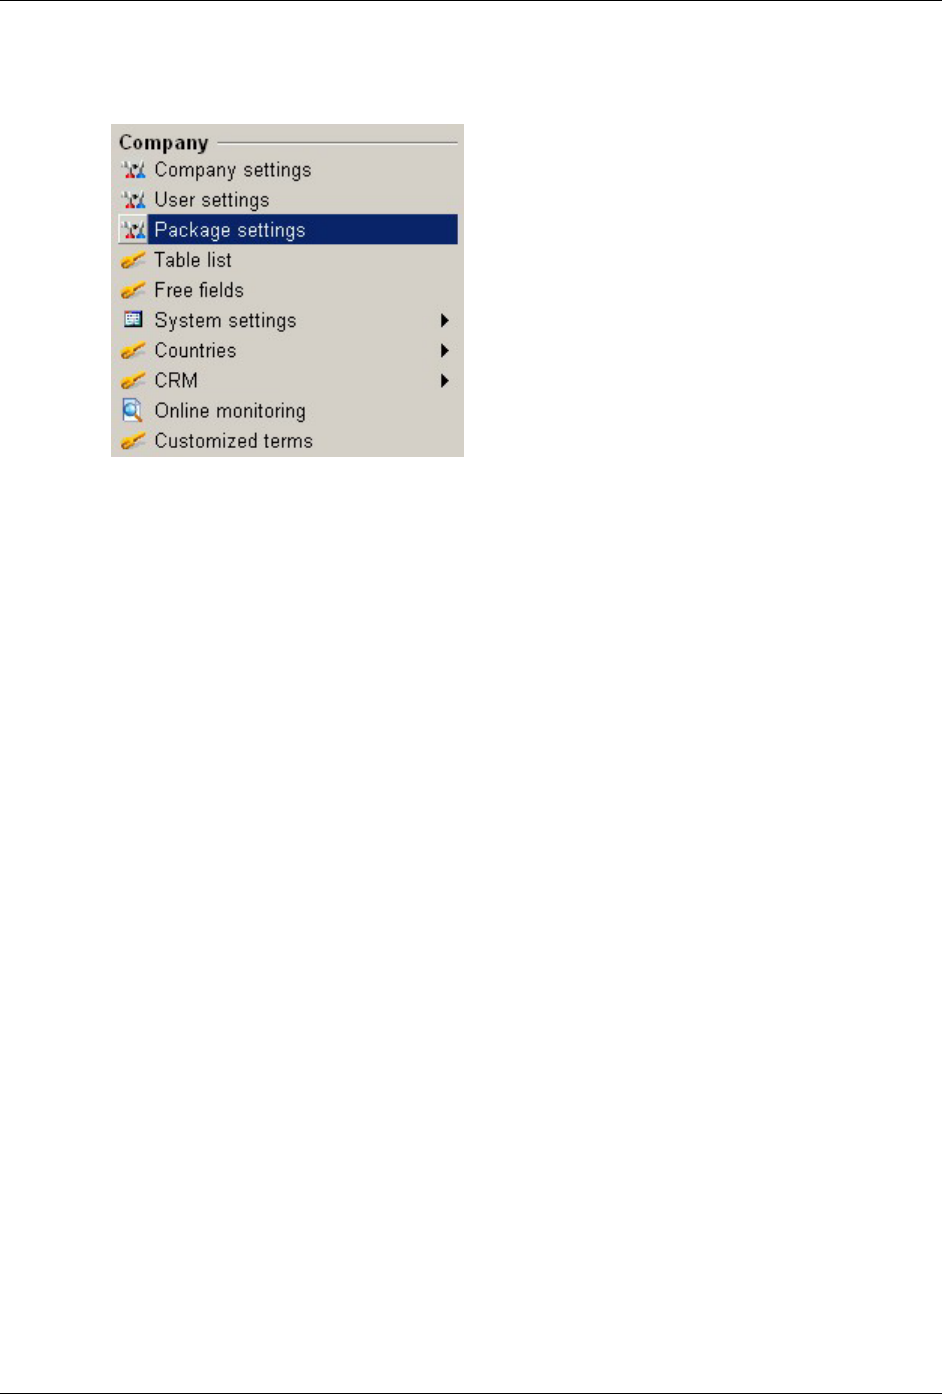
Chapter 3: Setup and Maintenance
lAccounts Receivable User Guide 83
Setting Up Accounts Receivable
1. On the System menu, under the Company heading, select Package Settings.
2. Select the Accounts Receivable Setup folder under the Financial Bar. This opens the
Accounts Receivable Setup screen.
Basics tab
3. Enter the first document number (Starting Invoice No.) you will assign during transaction
and service transactions entry or during invoice printing if you are using the Order Entry
package. Macola ES increments the Starting Invoice No. field when you press the F5 key for
the document number in enter transactions, service transactions, or each time you print an
invoice in Order Entry.
4. Enter the Default Ticket Tax Code. This field is used as the default tax code when you enter
ticket transactions. Ticket transactions are available only for the Spanish Legislation, they are
not used for the English Legislation.
5. The Aging Options Section of the screen is display only. You set the aging options when you
print the Aging Analysis Report, Receivables Report, or Customer Statements.
6. Select a Tax Schedule Usage:
E = Enforced -- Tax Schedule Codes must be entered on each customer.
N = Not Used -- Tax Detail Codes must be entered on each customer. No applications allow
the entry of a tax schedule code. Tax schedule fields will not be available.
O = Optional -- Either a Tax Schedule or Tax Detail Codes must be entered each customer.
Tax schedules are maintained on the G/L menu. For more information, read Using Tax Detail
Codes and Tax Schedules for A/R Transactions.
Note: If you select the Use Batch Control check box, you should limit access to the Accounts Receivable
Setup screen. (Use the User Rights screen to do this.) This prevents users from clearing the Batch Control
check box to gain access to other batches.
7. To allow batch control by the user, select the Batch Control by User check box. Read Batch
Control for more information on batches.

Chapter 3: Setup and Maintenance
84 Accounts Receivable User Guide
8. Enter the Override User Name if there is someone who has access to all batches. This is
usually a manager or supervisor that has the authority to override batch control.
9. Enter the Default Invoice form number.
10. Click Save.
Default Accounts tab
11. Enter the Discount account number used in Macola ES A/R. This is the default discount
account used in Customer Type Maintenance. The discount account in the customer type is
used when you post a discount amount in cash receipts.
12. Enter the A/R account number. Macola ES uses this account number as the default A/R
account number in Customer Type Maintenance. The AR account in the customer type is
posted to when you post transactions and service invoices in AR and post invoices in Order
Entry.
Note: This account must be an account that has a subtype of customer account. For more information on
setting up General Ledger Account Numbers, read Entering a General Ledger Account Number.
13. Enter the Sales account number. This sales account number is the default sales account on the
Customer Type Maintenance screen. If you clear the Distribute Sales check box on the Extra
tab, the system will post ALL A/R sales transactions to this sales account.
14. Enter the Freight account number. This is the default freight account used on the Ship Via
Code Maintenance screen.
Note: When you enter a credit memo transaction that credits an A/R account, the system debits this write-
off account if you select the write-off check box when entering the credit memo.
15. Enter the Writeoff account number. This is the default for the Write off account used on the
Customer Type Maintenance screen. If you clear the multiple Write-off Accounts check box
on the Extra tab, the system will post all write offs to this account.
Note: Finance charges are not currently supported in Macola ES.
16. Finance Charges account number
17. Enter the Miscellaneous account number. This is the default for the Miscellaneous account
used on the Ship Via Code Maintenance screen.
18. Enter the Cash account number. Macola ES uses this cash account as the default cash account
throughout A/R.
19. Enter the Allowance account number. An allowance is an additional discount that you give
to a customer. Macola ES uses this account as the default allowance account number.
20. Enter the Service Sales account number. This is the default for the service sales account used
on the Customer Type Maintenance screen and on the Service Code Maintenance screen.
21. Enter the Sales Discount account number. This is the default sales discount account used on
the Customer Type Maintenance screen. If the Distribute Discount Amount check box is
selected on the Order Entry Setup screen, Macola ES will use the sales discount account from
customer type maintenance to track discounts for O/E orders. The sales account receives the
credit for the full amount of the order. The sales discount account receives the debit for the
amount of the discounts. The A/R account is debited the discounted order price, along with

Chapter 3: Setup and Maintenance
lAccounts Receivable User Guide 85
any sales tax.
If the Distribute Discount Amount check box is not selected on the Order Entry Setup screen,
Macola ES will not use the sales discount account. Instead, Macola ES will subtract any
discounts from the total order amount and credit the adjusted amount to the sales account.
22. Enter the Ticket Sales Account No account number. This account number is the default
ticket sales account number when you enter ticket transactions. Ticket transactions are
available only in the Spanish Legislation.
Extra tab
Note: If you want to use Project numbers (the Use Job Numbers check box), you must select at least one of
the following check boxes: Distribute Sales, Distribute Miscellaneous Charges, or Distribute Freight.
23. When you enter sales transactions, if you want to distribute the transactions to various
account numbers, select the Distribute Sales check box. You cannot change this check box if
you have un-posted sales transactions.
If you clear the Distribute Sales check box, the system will post all A/R sales transactions to
the default sales account number entered on the Default Accounts tab and disable the Sales
account field on the Customer Type Maintenance screen.
24. If you want to distribute miscellaneous charges to various miscellaneous charges account
numbers when you enter sales transactions, select the Distribute Miscellaneous Charges
check box. You cannot change this check box if you have un-posted transactions.
If you clear the Distribute Miscellaneous Charges check box, the system will post all
miscellaneous charges to the Miscellaneous account entered on the Ship Via Code
Maintenance screen.
25. If you want to distribute freight charges to various freight charge account numbers when you
enter sales transactions, select the Distribute Freight check box. You cannot change this
check box if you have un-posted sales transactions.
If you clear the Distribute Freight check box, the system will post all freight charges to the
Freight account entered on the Ship Via Code Maintenance screen.
26. Select the Check Credit Limit check box if you want a message to appear for any customers
over their credit limit while entering transactions for them in A/R.
27. If the sales tax is subject to discounts based on the customer payment terms, select the
Discount Sales Tax check box.
28. If the miscellaneous charges are subject to discounts based on the customer payment terms,
select the Discount Miscellaneous check box.
29. If the freight charges are subject to discounts based on the customer payment terms, select
the Discount Freight check box.
30. If you use multiple write-off accounts, select the Multiple Write-off Accounts check box. If
you want to use only one write-off account, clear this check box to use the Write off account
entered on the Default Accounts tab.

Chapter 3: Setup and Maintenance
86 Accounts Receivable User Guide
If you clear the Multiple Write-off Accounts check box, the Write off account field on the
Customer Type Maintenance screen is disabled.
31. If you plan to use Project numbers in A/R, select the Use Job Numbers check box. You cannot
select this check box unless you select at least one of the following check boxes: Distribute
Sales, Distribute Miscellaneous, or Distribute Freight.
You define all project numbers on the Maintain Projects screen, which is on the G/L menu.
If you prefer not to use Project numbers in A/R, clear this check box. This disables the job
number field in sales transactions and service invoices.
32. If you want to use the invoice date (the date printed on the invoice) when posting service
invoices, select the Service Open Items Based On Inv Date check box.
If you leave this field blank, Macola ES uses the original document date when posting service
invoices.
33. If you want to use unique numbers for each invoice and credit memo select the Use Serial
Docs check box. For more information on using Serial Docs, read Serialized Document
Control.
34. Select the Use Settlement Discount check box if you use VAT and settlement discounts.
Note: The Use Settlement Discount check box is used for VAT calculations and discounts for early
payment in the UK and Canada.
35. After entering all data, click Save.
36. Click Close.

Chapter 4: Using Accounts Receivable
Accounts Receivable User Guide 87
Chapter 4: Using Accounts Receivable
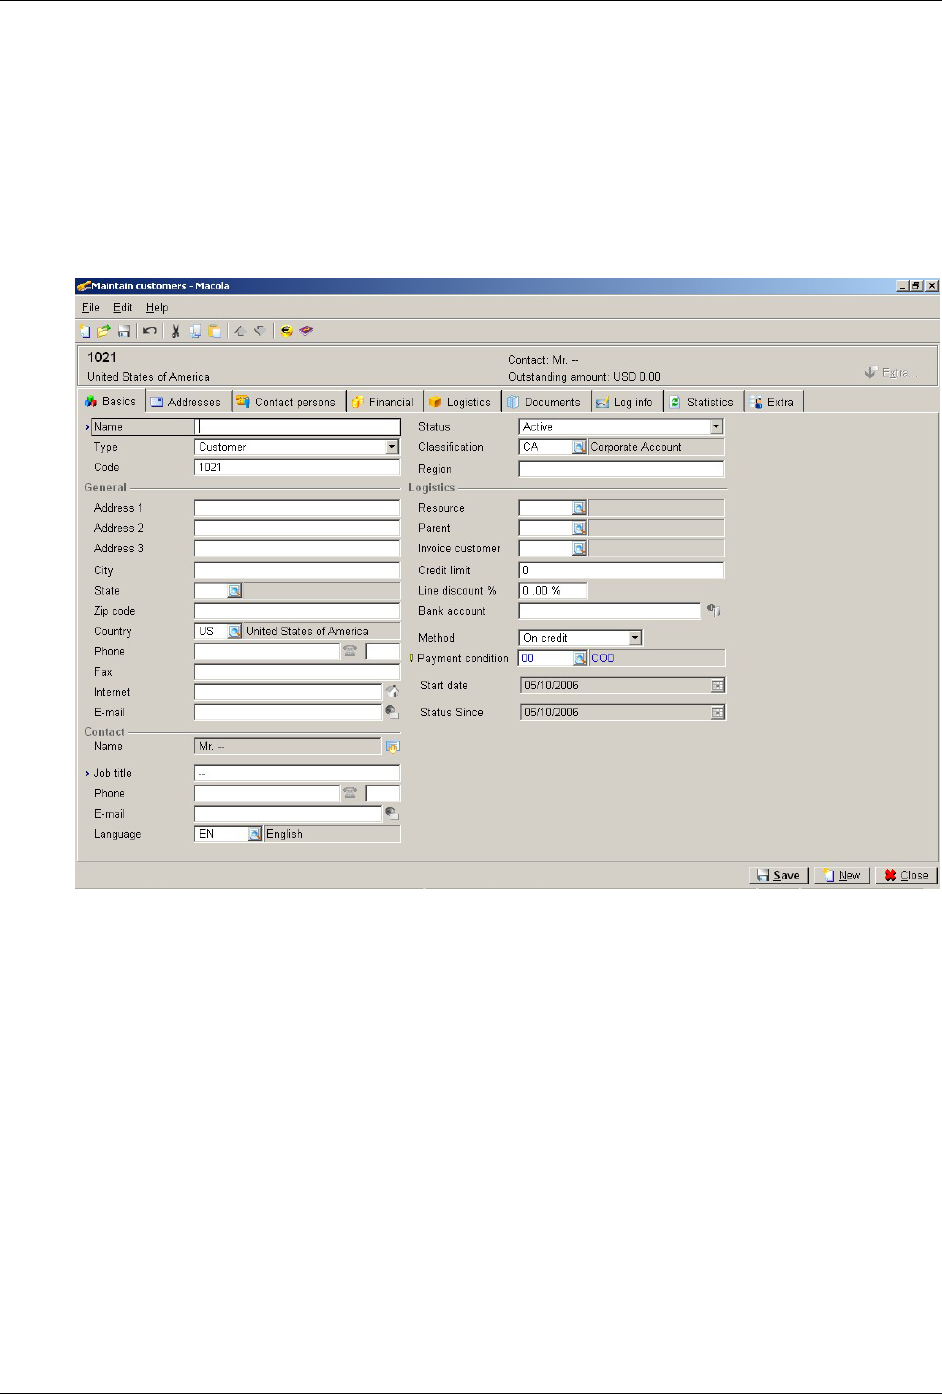
Chapter 4: Using Accounts Receivable
88 Accounts Receivable User Guide
Entering and Maintaining Customers
Use the Customer Maintenance screen to enter specific information about each customer, such as
customer specific information such as name, address, phone number, terms codes, tax codes, and
salesperson. Accounts Receivable uses this information for customer invoices; Order Entry uses
this information for sales orders; and Cash Flow uses this information for cash receipts.
When entering customer information, only a few of the fields are required, many fields are
optional. However, the more data you enter, the more useful your customer records can be.
See Maintaining Customers for instructions on entering and maintaining a customer record.
Maintaining Customers
When you enter a new customer, at a minimum, you need to enter the following for each
customer: on the Basics tab, the customer name, type, code, status, country, contact job title,
payment method, and payment condition (terms); on the Financial tab, account employee, tax
schedule or tax code, and customer type; on the Logistics tab, invoice form.
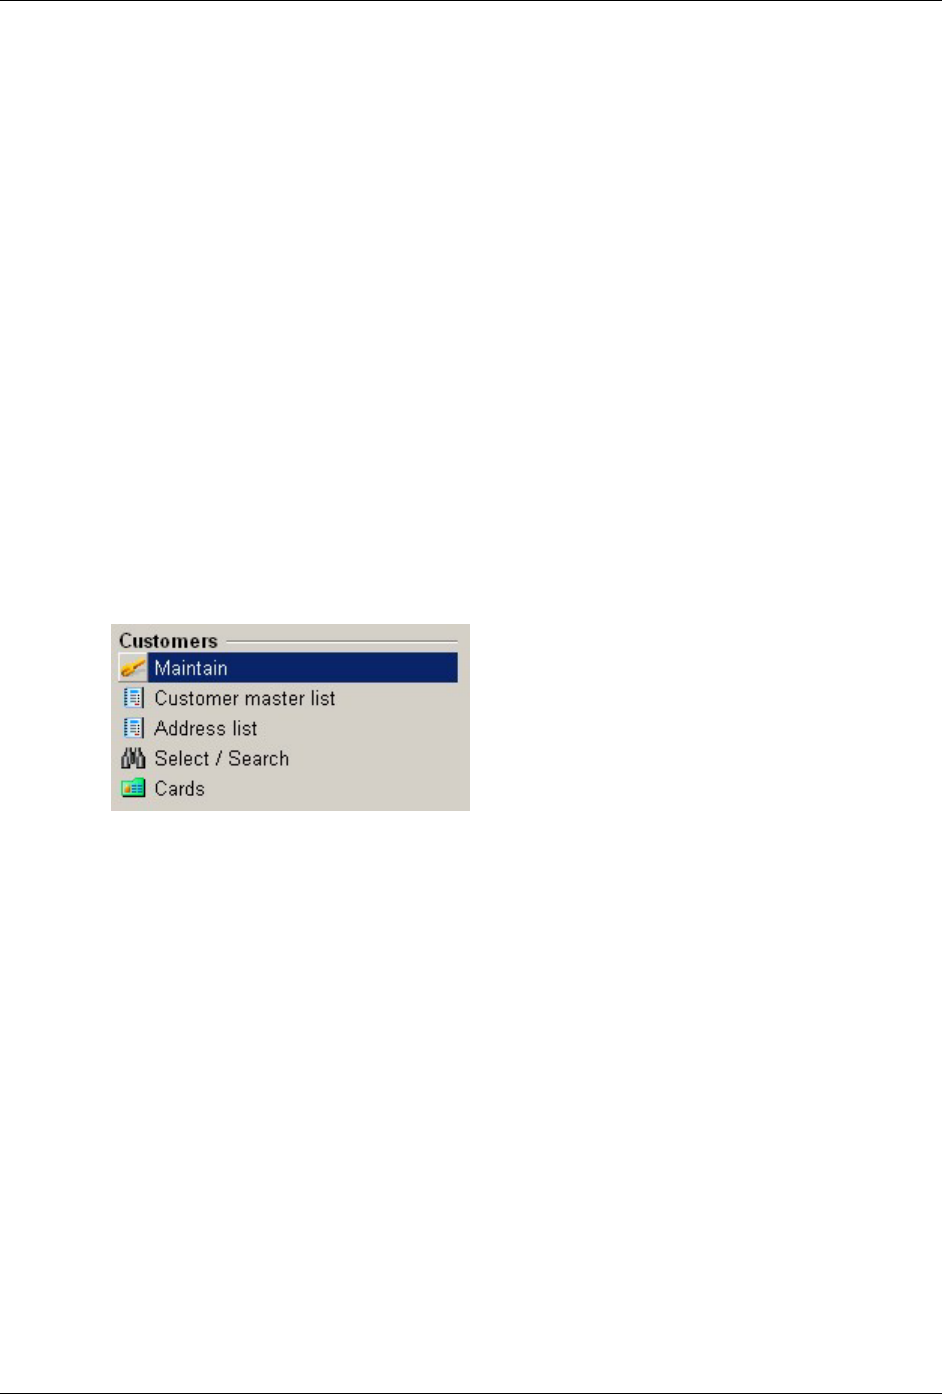
Chapter 4: Using Accounts Receivable
lAccounts Receivable User Guide 89
If you do not enter date in a required field, the field turns red, and the system displays a message
to correct the fields marked in red.
When entering a customer, complete the fields on the Basics tab; add any additional contacts on
the Contact Persons tab; add any additional delivery addresses on the Addresses tab; and then
complete the fields on the Financial tab and the Logistics tab.
The Maintain Customers screen has the following tabs:
Basics tab
Addresses tab
Contact Persons tab
Financial tab
Logistics tab
Documents tab
Log Info tab
Statistics tab
Extra tab
1. On the A/R menu, under the Customers heading, select Maintain.
2. To edit an existing customer, select the customer in the list box and click Open. To create a
new customer record, click New.
Basics tab
3. Enter the Name for the customer. This field can be up to 50 alphanumeric characters.
4. Select the customerʹs Type:
Associate -- Use this type for companies that are not customers for which you might want to
track entries (investors or companies you organize events with, for example).
Bank -- Use this type to set up your bank as a customer type to track entries for specific
circumstances.
Customer -- Use this type for any of your customers. This is the default.
Division -- Use this type if you are setting up a division as a customer to be able to do
intercompany transfers.

Chapter 4: Using Accounts Receivable
90 Accounts Receivable User Guide
Prospect -- This type is not used at this time.
Reseller -- Use this type if your customer is also a reseller of your products.
Suspect -- This type is not used at this time.
5. Enter a customer Code, or accept the value from the system. This is the customer number
used throughout the system. This field can be up to 20 numeric characters.
6. Select the customerʹs Status:
Active -- Use this status if the customer is able to place to orders. This is the default.
Blocked -- Use this status if you want to place the customer on credit hold. Orders can still be
entered for the customer, but they will be placed on credit hold. If you are using e-Synergy
integrated with Macola ES, this will also update the customerʹs status to blocked in e-
Synergy. No actions will be allowed on the customerʹs e-Synergy account, and the customer
will not have access to e-Synergy.
Inactive -- Use this status if this customer cannot place more orders.
Pilot -- Use this status if this customer is in a pilot program testing a pilot version of one of
your products. Use this status for reporting and tracking which customers are participating
in pilot programs so you can contact them.
Reference -- Use this status if this customer has agreed to be a reference for potential
customers. This allows you to track which customers may need special attention, since they
provide information to potential customers about your products and services.
Passive -- This status is not used in Macola ES. This status is used for e-Synergy to indicate
that a customer does not have a service contract.
7. Enter the customerʹs Classification. A classification is a way of categorizing your customers.
You can sort the Aging Analysis and Receivables report by classifications.
8. Enter the customerʹs Region. This field can contain up to six alphanumeric characters.
9. In the General section, enter the customerʹs street address in Address 1, Address 2, and
Address 3 fields. You can add additional addresses on the Addresses tab.
10. Enter the customerʹs city in the City field.
11. Enter the customerʹs state in the State field.
Note: You can enter the Zip code, and the system will automatically fill in the city and state.
12. Enter the customerʹs postal code in the Zip code field.
13. Enter the customerʹs Country. You can enter only those countries marked as Active on the
Countries screen, which is on the System menu.
Chapter 4: Using Accounts Receivable
lAccounts Receivable User Guide 91
14. Enter the customerʹs phone number in the Phone field. Use hyphens if you want them to
appear in the phone number. If your workstation has a configured modem, you can click the
Phone icon to dial the phone number.
15. Enter the phone number extension in the field to the right of the phone button. You can enter
up to four digits in this field.
16. Enter the customerʹs Fax number. Use hyphens if you want them to appear in the fax
number.
17. In the Internet field, enter the URL of the customerʹs web site. If your workstation is
connected to the Internet, you can click the House icon to launch your web browser and
view the customerʹs site.
18. In the E-mail field, enter the customerʹs email address. If your workstation is configured for
e-mail, you can click the E-mail icon next to this field to open your mail client with a new
message to the customer.
19. In the Contact section, click the Contact icon to the right of the Name field to open the
Contact screen. (You can add additional contacts on the Contact Persons tab.)
a. In the Contact Entry dialog, enter a Title for the customer contact. Click the search button
to select an existing title. If the title does not exist, click the New button on the search
screen to enter a new title.
b. Enter the First Name, Middle Name, Last Name, and Initials for the customer contact.
c. Click Save to save the Contact Entry information and return to Customer Maintenance.
20. In the Job Title field, enter the job title of the customer contact.
21. Enter the contactʹs Phone number. Enter the hyphens if you want the number hyphenated. If
your workstation has a configured modem, you can click the Phone icon to dial the phone
number.
22. Enter the phone number extension in the field to the right of the phone button. You can enter
up to four digits in this field.
23. In the E-mail field, enter the contactʹs email address. If your workstation is configured for e-
mail, you can click the E-mail icon next to this field to open your mail client with a new
message to the contact.
24. Enter the contactʹs Language.
25. In the Logistics section, enter the Resource number to link to the customer. This field defaults
to the employee number creating the customer record.
26. If this customer is a subsidiary of another customer, enter the Parent customer.
27. If you want invoices for this customer sent to another customer (such as a parent customer),
enter the Invoice Customer number. If you enter an Invoice Customer, all invoices for the
current customer will be sent to the invoice customer. This field does not affect transactions
or service invoices entered in A/R -- these will be sent to the current customer, not the invoice
customer.

Chapter 4: Using Accounts Receivable
92 Accounts Receivable User Guide
28. Enter the customerʹs Credit limit. You can enter up to 12 digits.
29. In the Line discount % field, enter the customerʹs discount. This is the default discount for
this customer for sales orders entered in O/E.
Note: You will not be able to enter the customerʹs bank account until you save the customer record. Before
you can save the record, you must finish entering data in all required fields.
30. Enter the customerʹs Bank account for electronic fund transfers. To add the customerʹs bank
account click the search button for bank accounts , and read Adding a Bank Account for
a Customer or Vendor.
31. Select the customerʹs payment Method (this is the default payment method in O/E and A/R):
On Credit (select this option if this customer will pay by electronic fund transfer)
Check
Factoring
Collection
Cash
Debt Collection
Payment on Delivery
Credit Card
Settle
Letter of Credit
32. In the Payment condition field, enter the customerʹs terms.
33. The Start date defaults to the date the customer record is created in Macola ES.
Addresses tab
The Addresses tab shows the Delivery, Invoice, Postal, and Visit addresses. The address
information entered on the Basics tab appears for the Visit address. Initially, this same address
appears for the Delivery, Invoice, and Postal addresses, too. In addition, the contact for these
addresses is also copied for the contact entered on the Basics tab. If you plan to add or change
address, you should add contacts first. For more information about customer and contact
addresses, read Customer Addresses and Editing Customer Addresses.
O/E will use either the Invoice address or Visit address for billing. The Use Invoice Address for
Billing Address check box on the Order Entry Setup screen determines which address O/E will
use. If the Use Invoice Address for Billing Address check box is selected, O/E uses the Invoice
address. If the check box is cleared, O/E uses the Visit address.
Contact Persons tab
The Contact Persons tab allows you to maintain additional contacts for the customer. Initially,
only the contact entered on the Basics tab appears on this list. You can enter additional contacts
for the customer. If different delivery addresses have different contacts, you will maintain the
contacts on this page. See Editing customer contacts for more information.
Financial tab
34. In the General section of the Financial tab, enter the Currency used by this customer.

Chapter 4: Using Accounts Receivable
lAccounts Receivable User Guide 93
35. In the Last Reminder field, enter the date of the last reminder. Reminders are a statement of
the customerʹs account. If you have not send any reminders, leave this field blank.
36. Select the Send reminders check box if you want to send reminders to this customer when
payments are due.
37. Click the Layouts icon to select the reminder layouts for this customer. This opens the
Customer Layout Links screen, which has fields for up to nine layouts.
a. Starting in Layout 1, enter or search for each layout you want to use.
b. Select a layout, and click OK.
c. When finished selecting layouts, click Save on the Customer Layout Links screen.
d. Click Close.
38. In the Credit Management section, enter an account employee in the Account empl. field.
This could be the collector for this account. You can print the Aging Analysis and the
Receivables report for each account employee so you can give them a list of what their
accounts owe so they can make collection calls.
39. In the Rating field, enter credit rating information for the customer.
40. In the Tax section, select the Tax check box if this customer is taxable.
If the Tax check box is selected in the Customer record and tax codes are set up for that
customer, tax will be calculated. If the Tax check box is cleared in the Customer record, no tax
will be calculated, even if tax codes are set up for that customer.
The Tax field applies only to tax codes, not tax schedules. For example, if the Tax check box is
cleared in the Customer record, but a tax schedule is defined for the customer, tax will be
calculated based on the tax codes defined in the tax schedule.
Whether a customer is taxable or not, you must enter a tax detail code or a tax schedule. For
tax exempt customers, set up and use a tax schedule or tax code that does not calculate tax.
41. If the customer is tax exempt, enter the Tax Exempt No. This field is not available if you
selected the Tax check box.
42. You must enter a tax Schedule or at least one Tax code for each customer. If you are using tax
schedules, enter the tax Schedule to use for the customer.
43. If you are not using tax schedules, enter up to three Tax codes for the customer.
44. In the ID field, enter the customerʹs tax identification number.
45. Enter your warehouse Location that will ship products to the customer. This is the default
location in O/E when entering sales orders for this customer.
46. In the Customer statements section, select the Print check box if you want to print statements
for this customer. These statements are on the A/R menu, under the Statements/Labels
heading.
Note: To update the Last printed field and the Last Seq Number field, you must print the final statement to
the printer, not just preview it on the screen.

Chapter 4: Using Accounts Receivable
94 Accounts Receivable User Guide
47. The Last printed field automatically updates when you print the customer statement and
mark it Final.
48. The Last seq. number field automatically updates when you print the customer statement
and mark it Final.
49. In the Payment section, enter the customerʹs Credit card number, if this customer pays with a
credit card. Enter the expiration date of the credit card in the field to the right of the credit
card number. For security, only the last four digits of the credit card number are shown. If
you enter a new credit card number, all but the last four digits are hidden when you exit the
field.
Press the F2 key to reveal the credit card number. If there is a password set up for this field
on the Password Protection Maintenance screen, you must enter the password to proceed.
50. In the Responsible field, enter the name that appears on the credit card or the name of the
person responsible for the card.
51. Enter a Description for the credit card (for example, Visa or MasterCard).
52. In the Specific section, enter the SalesPersonNumber that has the account for this customer.
53. Enter the Customer Type for this customer. The customer type is required.
Logistics tab
54. On the Logistics tab, enter the Invoice Form to use as the default invoice form for this
customer when entering a sales order in O/E. This is not the default invoice form used when
entering a Service Invoice in A/R.
To use a form, the form must be pre-defined using the form designer, which is on the System
menu. Read Form Designer Maintenance for instructions.
55. If you ship to this company using UPS, enter the UPS Zone where you ship to the customer.
56. Enter the Ship via code for the customer. This is required.
57. If the customer allows you to ship substitute items when an item they order is on backorder,
select the Substitute Item check box. If the Substitute Item check box is cleared, the system
displays a warning message during order entry (in the Order Entry package) if a substitute
item is selected.
58. If the customer allows backorders for O/E orders, select the Back orders permitted check box.
If the Back orders permitted check box is cleared, the system displays a warning message
during order entry (in the Order Entry package) if an item is partially or fully backordered.
59. If the customer allows you to ship part of an O/E order when some items are backordered,
select the Allow Partial Delivery check box. If the Allow Partial Delivery check box is cleared,
the system displays a warning message during order entry (in the Order Entry package) if all
line items are not selected for billing.
60. In the Comment 1 and Comment 2 fields, enter the any comments you want to associate with
this customer. These comments can be viewed from the Customer Info button in the
Customer History View and from the Credit Info tab on the O/E Enter Orders application.
You can enter up to 30 alphanumeric characters.

Chapter 4: Using Accounts Receivable
lAccounts Receivable User Guide 95
61. Click Save.
Documents tab
The Documents tab displays any document files attached to the customerʹs record. You can view,
edit, add, and delete documents to a customerʹs record using this tab. See Working with customer
documents for more information.
Log Info tab
The list box of the Log Info tab displays any changes made to this customerʹs record. For each
change, the list box displays the date and time of the change, the field that was changed, the old
value of the field, the new value of the field and the resource who made the change. To view
changes made by a specific resource, enter the userʹs ID in the Resource field and click Search.
Statistics tab
The Statistics tab displays customer statistics (from the general ledger transactions table). These
fields are not accumulators; these fields are calculated on the fly from posted transactions when
you access the Statistics tab. Therefore, these fields are not cleared using the Clear Accumulators
process. The Statistics tab is divided into three sections:
• Statistics -- Displays last sale, last payment, and average days to pay information from O/E
and A/R. The last sale date field shows information from only sales accounts and does not
include taxes.
• Aging -- Displays a bar chart showing aging amounts based on aging periods defined for
sub-ledger accounts. The aging amounts are based on the current system date and the invoice
date. Partial payments applied to invoices are based on the invoice date not the payment
date. This graph shows everything that is open. The graph is by invoice date and does not
show matched transactions. For example, if you have an invoice dated 06/15 and a partial
payment applied dated 06/30, the balance of the invoice would be aged based on the 6/15
date.
• Accumulators -- Display the sales, cost, invoices, and paid invoices based on the period-date
calendar. This information is calculated on-the-fly when you access this tab. These fields are
not stored in accumulator fields in the database. The accumulators show only sales
transactions. This means that it is possible to have invoices shown in the Invoice column that
do not have a sales account, so the amounts are not reflected in the Sales column. The paid
invoices column is based on the date of the invoice not the date of the payment. For example,
if you have an invoice with a date in period 6 and the payment is made in period 7, the
invoice is added to the paid invoice column of period 6. You can use the Export
Accumulators to Excel button to export the contents of the Accumulators list box to Microsoft
Excel. This allows further analysis, or you can send the spreadsheet to others who need the
information but do not have access to the Maintain Customers screen.
Extra tab
62. The Extra tab has user-defined fields where you can enter any information specific to a
customer that does not have a specific field on the other tabs of the Maintain Customers
screen.

Chapter 4: Using Accounts Receivable
96 Accounts Receivable User Guide
The Note 1 to Note 5 fields hold up to 80 alphanumeric characters.
The Note 6 to Note 10 fields hold up to 75 alpha-numeric characters.
The Account 1 to Account 2 fields are numeric fields, which hold up to 13 numbers before the
decimal and up to 2 numbers after the decimal.
The YesNo1 to YesNo2 fields are check boxes.
There are five user-defined date fields: Date1 to Date5.
63. Click Save to save the customer record.
64. Click New to add a new customer record.
65. Click Close to exit the Customer Maintenance application.
Assigning Tax Detail Codes or Tax Schedules to
Customers
On the Maintain Customers screen, you can assign either tax detail codes or a tax schedule to
each customer. When you enter a tax schedule for a customer, it becomes the default tax schedule
that appears when you enter sales orders or service invoices. You can override the default tax
schedule by assigning a different tax schedule.
You may need to report both the taxable and nontaxable portion of sales to specific taxing
entities. If this is the case, you will need to create a tax schedule with an amount set to zero and
define the tax schedule as ʺNonʺ or some name that easily identifies it as the tax schedule you use
to report nontaxable portions of a sale. For more information, read Tracking Nontaxable
Transactions.
Deleting a Customer Record
Note: You cannot delete a customer record that has items in the general ledger, open service transactions
(Service Invoices), or open sales orders in O/E.
1. On the A/R menu, under the Customers heading, select Maintain.
2. Select the customer that you want to delete.
3. Click Delete.
4. At the prompt ʺDepending on the size of your company, this function may take a long time
because all files will be checked. Delete?ʺ, click Yes.
5. Click Close.
Customer Addresses
The Addresses tab of the Maintain Customers screen displays the available addresses for the
customer. There are four customer address types: Delivery, Invoice, Postal, and Visit.
Delivery -- These are alternate ship to addresses for sales orders in O/E. You can have multiple
delivery addresses, but each must have a unique contact. There is one main delivery address
linked to the main contact. Delivery addresses are similar to alternate addresses in Exactʹs
Progression series.
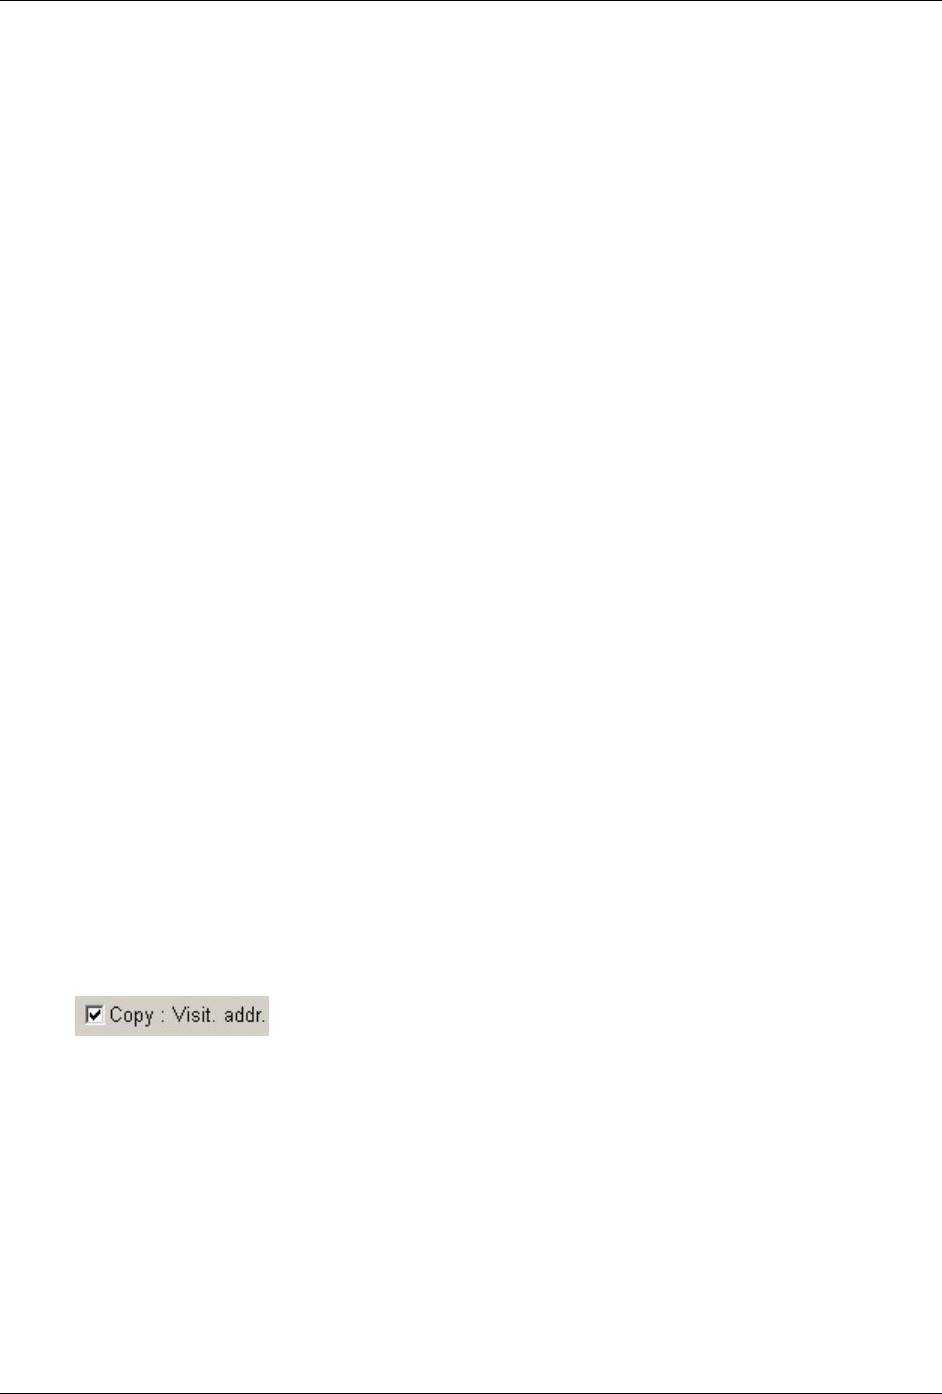
Chapter 4: Using Accounts Receivable
lAccounts Receivable User Guide 97
Invoice -- A/P and O/E can use the invoice address, depending on how they are set up. You can
have only one invoice address. You can change this address.
Postal -- This address comes from the main contact entered on the Basics tab of the Maintain
Customers screen. You can change this address but not the contact. In Macola ES, you can add
only one postal address; the system creates this when you create the customer. (If you are using
e-Synergy, you can add multiple postal addresses. You can see these in Macola ES.)
Visit -- A/P and O/E can use the visit address, depending on how they are set up. You can have
only one visit address, which is linked to the main contact. Changing this address changes the
address shown on the Basics tab on the Maintain Customers screen.
When you create a new customer record, Macola ES automatically creates one of each address
type. Initially, each address type has the same address and contact, which come from the address
and contact entered on the Maintain Customers screen Basics tab.
This Addresses tab also appears as a standalone screen when creating a new address from the
Alternate Address search from another Macola ES screen. Read Adding Addresses from the
Search Screen for more information and specific instructions.
If you select a different contact person to be the main contact, Macola ES changes the invoice,
postal, visit, and main delivery addresses to reflect the new main contact. If no delivery address
exists for the new main contact, Macola ES will create it.
If you attempt to add an address for a contact when an address already exists for the contact,
Macola ES will display ʺData already existsʺ. This applies if you are attempting to add a duplicate
delivery address from the Addresses tab on the Maintain Customers screen, or when adding a
new address from the Alternate Address search screen.
Editing Customer Address Information
Editing the Visit Address from Customer Maintenance
1. On the Maintain Customers screen, click the Addresses tab.
Note: Changing the main visit address for a customer will change any other address where the Copy: Visit.
Addr. check box is selected.
It will also change the address information on the Basics tab of the Maintain Customers screen:
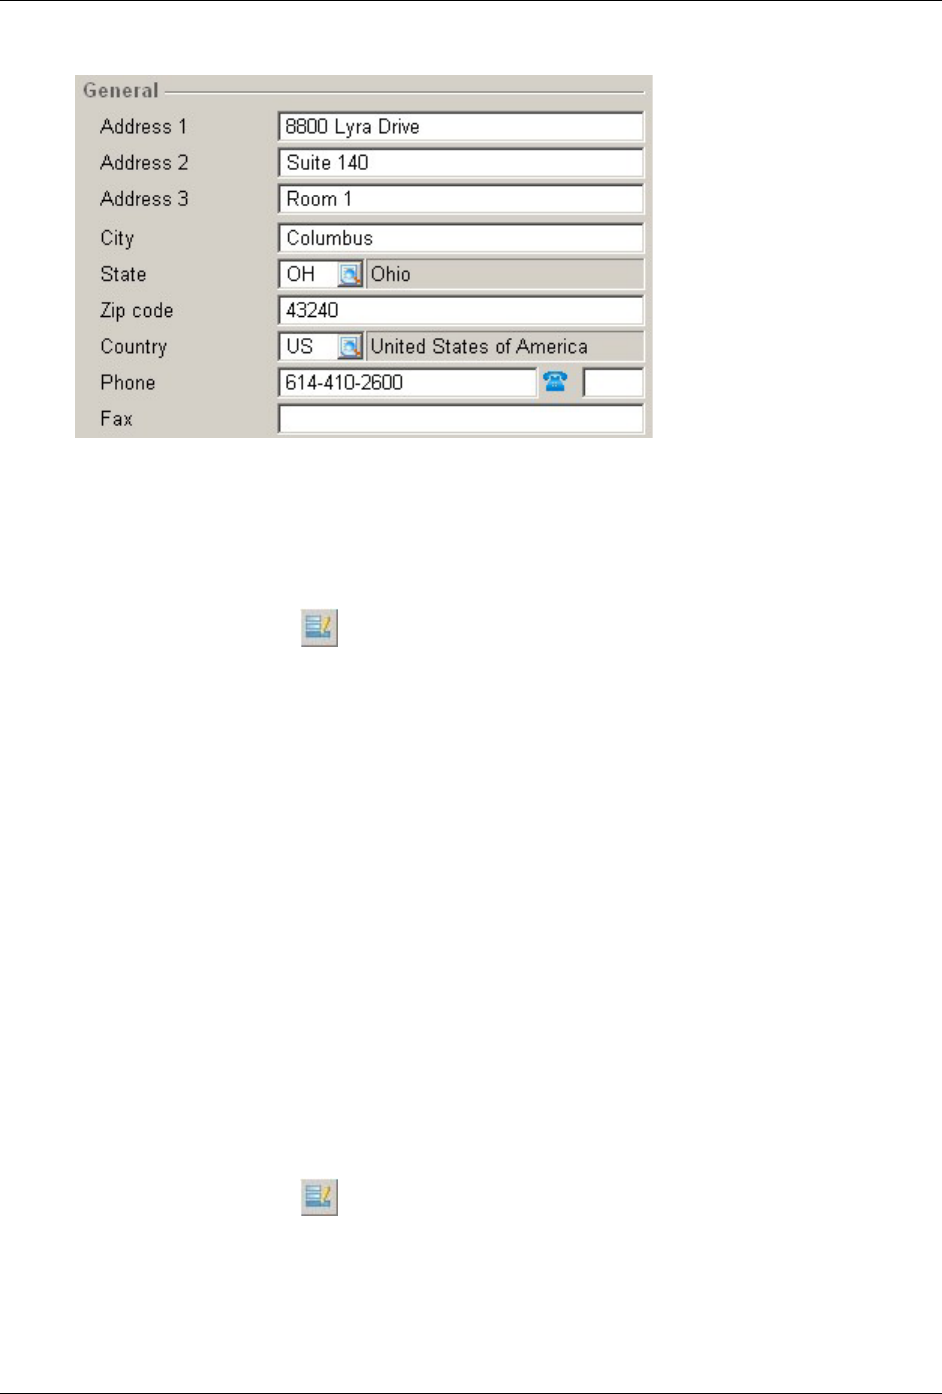
Chapter 4: Using Accounts Receivable
98 Accounts Receivable User Guide
2. Select the visit address.
Note: You can edit the visit address using the Addresses tab for customers only if your User ID appears in
the Resource field of the Logistics section on the Basics tab on the Maintain Customers screen. If you are
not the resource for the customer, you can edit the visit address by changing address information on the
Basics tab on the Maintain Customers screen.
3. Click the Edit button to the right of the list box. The Addresses screen opens with
information for the address.
4. In the Address 1, Address 2, and Address 3 fields, enter the street address portion of the
address.
5. In the City field, enter the city of the address.
6. In the State field, enter the state of the address.
7. Enter the Zip Code for the address.
8. Enter the Country for the address.
9. In the Phone and Fax fields, enter the phone and fax numbers for the address.
10. Click Save to save the record.
Changing the Invoice or Postal Address from Customer
Maintenance
1. On the Maintain Customers screen, click the Addresses tab.
2. Select the invoice or postal address.
3. Click the Edit button to the right of the list box. The Addresses screen opens with
information for the address.
4. The Copy: Visit. Addr check box controls if the invoice or postal address will match the visit
address. If you want to enter different street, city, and state information for the address, clear

Chapter 4: Using Accounts Receivable
lAccounts Receivable User Guide 99
the Copy: Visit. Addr. check box and continue to the next step. If you want the address to
match the visit address, select this check box and skip to step 11.
5. In the Address 1, Address 2, and Address 3 fields, enter the street address portion of the
address.
6. In the City field, enter the city of the address.
7. In the State field, enter the state of the address.
8. Enter the Zip Code for the address.
9. Enter the Country for the address.
10. In the Phone and Fax fields, enter the phone and fax numbers for the address.
11. Click Save to save the record.
Editing a Delivery Address from Customer Maintenance
When you edit a delivery address, all fields are disabled, except the Location field, if the Copy:
Visit. addr. check box is selected. To edit the delivery address, clear the Visit. addr. check box.
1. On the Maintain Customers screen, click the Addresses tab.
2. Select the delivery address you want to edit.
3. Click the Edit button to the right of the list box. The Addresses screen opens with
information for the Delivery address.
4. The Copy: Visit. Addr. check box controls if the delivery address will match the visit address.
If the fields you want to edit are disabled, clear the Copy: Visit. Addr. check box. If you make
changes to the delivery address and select this check box again, you will lose your changes.
5. In the Address 1, Address 2, and Address 3 fields, enter the street address portion of the
address.
6. In the City field, enter the city of the address.
7. In the State field, enter the state of the address.
8. Enter the Zip Code for the address.
9. Enter the Country for the address.
10. In the Phone and Fax fields, enter the phone and fax numbers for the address.
11. Enter an inventory location to associate with this address in the Location field.
Macola ES uses the inventory location entered here as the default shipping location when
entering sales orders in O/E for this customer. You can change the default location when you
enter sales orders.
For example, if you have several distribution centers across different regions, a sales order
might be filled by the closest location. When you enter a sales order in O/E for the customer,
Macola ES will verify that the item is actually stocked in the customerʹs ordering location,
and that there is sufficient stock of the item at that location to fill the order.
Chapter 4: Using Accounts Receivable
100 Accounts Receivable User Guide
12. Enter the Address Code for the address. This field identifies the address on the alternate
address search screen. You may wish to include the contact name in this code, as it will allow
users to determine existing contact delivery addresses from the search.
13. Enter the FOB code for the address.
14. Enter the Ship Via code for the address.
15. If you will ship to this address using UPS, enter the UPS Zone for the address.
16. You must enter either a Tax Schedule or a Tax Code for each delivery address. If you are
using tax codes, you can enter up to three tax detail codes.
17. Enter the Salesperson Number for the salesperson in responsible for the customer account.
18. Enter the Final Destination.
19. Enter the Distribution Center.
20. Enter the Destination Name.
21. Click Save to save the record.
Adding a Delivery Address from Customer Maintenance
1. On the Maintain Customers screen, click the Addresses tab.
2. Click the New button to the right of the list box. The Type search screen opens.
3. Select Delivery and click the Select button. The Addresses screen opens.
4. Enter the Contact for the new delivery address. If the contact does not exist, you can click the
Search button; open the search screen; and click the New button to add one.
If a delivery address already exists for this contact, Macola ES will not allow you to add a
new address for the same contact. When you attempt to save the address, Macola ES will
display ʺData already existsʺ.
5. The Copy: Visit. Addr. check box controls if the delivery address will match the visit address.
If you want to enter different street, city, and state information for the delivery address, clear
the Copy: Visit. Addr. check box and continue to the next step. If you want the delivery
address to match the visit address, select this check box and skip to step 12.
If you make changes to the delivery address and select this check box again, you will lose
your changes.
6. In the Address 1, Address 2, and Address 3 fields, enter the street address portion of the
address.
7. In the City field, enter the city of the address.
8. In the State field, enter the state of the address.
9. Enter the Zip Code for the address.
10. Enter the Country for the address.

Chapter 4: Using Accounts Receivable
lAccounts Receivable User Guide 101
11. In the Phone and Fax fields, enter the phone and fax numbers for the address.
12. Enter an inventory location to associate with this address in the Location field.
Macola ES uses the inventory location entered here as the default shipping location when
entering sales orders in O/E for this customer. You can change the default location when you
enter sales orders.
For example, if you have several distribution centers across different regions, a sales order
might be filled by the closest location. When you enter a sales order in O/E for the customer,
Macola ES will verify that the item is actually stocked in the customerʹs ordering location,
and that there is sufficient stock of the item at that location to fill the order.
13. Enter the Address Code for the address. This field identifies the address on the alternate
address search screen. You may wish to include the contact name in this code, as it will allow
users to determine existing contact delivery addresses from the search.
14. Enter the FOB code for the address.
15. Enter the Ship Via code for the address.
16. If you will ship to this address using UPS, enter the UPS Zone for the address.
17. You must enter either a Tax Schedule or a Tax Code for each delivery address. If you are
using tax codes, you can enter up to three tax detail codes.
18. Enter the Salesperson Number for the salesperson in responsible for the customer account.
19. Click Save to save the record. If you receive the message ʺData already existsʺ, then a delivery
address already exists for the selected contact. You can change the contact to one who does
not have an associated delivery address, or return to the Addresses tab screen and edit the
existing delivery address for the contact.
Deleting an Address from Customer Maintenance
Important: Be sure to select the correct address before deleting. When you click the Delete
button, the system deletes the address without confirmation.
To delete an alternate delivery address from the Addresses tab on the Maintain Customers
screen, select the address and click the Delete button . After deleting the delivery address for
a contact, you can delete the contact using the Contact Persons tab.
You cannot delete any of the four main addresses.
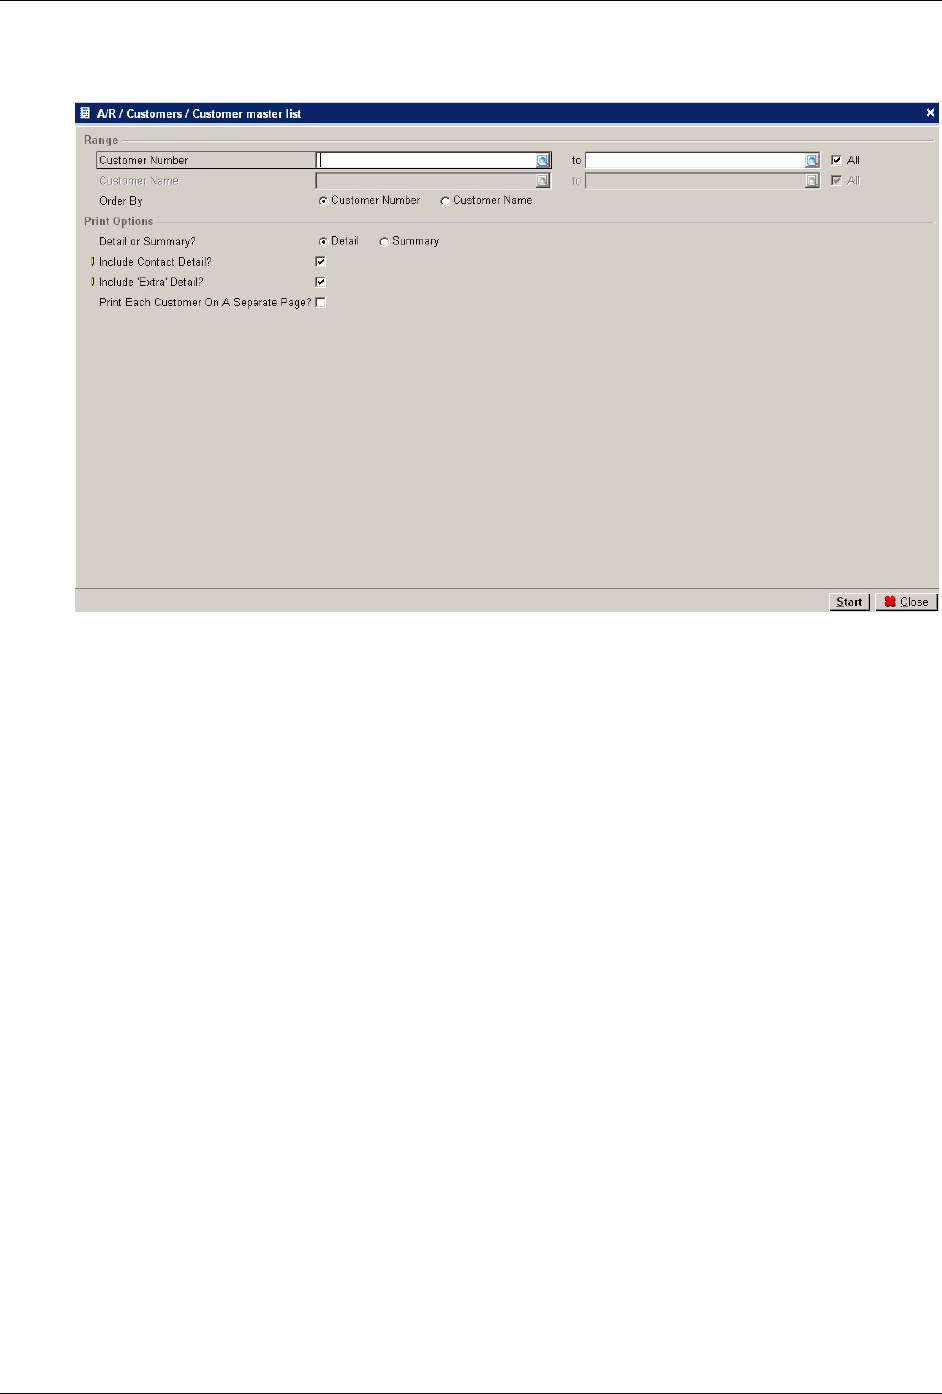
Chapter 4: Using Accounts Receivable
102 Accounts Receivable User Guide
Customer Master List
The customer master list prints the information you entered on the customer record. You can
print the list in detail to include the logistics, payment, and tax information along with the
general information or you can print it in summary to include only the general information. The
general information includes the customer number, name, address, telephone number, fax
number, e-mail address, internet address, start date, customer type, terms, and outstanding
balance information. You can choose to print the extra fields and the contacts on the list whether
you print in summary or detail. The credit card number printed on the report for any customer is
masked, which means only the last four digits are visible.
Printing a Customer Master List
1. On the A/R menu, under the Customers heading, select Customer Master List.
2. To search for customers by number, select Order By Customer Number. This allows you to
enter a customer number.
3. Enter a beginning and ending Customer Number, or select the All check box to include all
customers.
4. To search for customer by name, select Order By Customer Name. This allows you to enter a
customer name.
5. Enter a beginning and ending Customer Name, or select the All check box to include all
customers.
6. Select to print the report in Detail to include the logistics and financial information, or
Summary to exclude the logistics, payment, and tax information.

Chapter 4: Using Accounts Receivable
lAccounts Receivable User Guide 103
7. Select the Include Contact Detail check box to include the information from the Maintain
Customers screen Contact Persons tab.
8. Select the Include Extra Detail check box to include the information from the Maintain
Customers screen Extra tab.
9. Select the Print Each Customer On A Separate Page check box to print each customerʹs
information on a separate page.
10. Click Start. This displays the report in the Crystal report viewer.
Viewing Customer Accounts
You can view the transactions of your customer accounts using the customer account cards.
Cards are the computerized equivalent of a customer ledger card, displaying all sales, credit
memos, and payments on a customerʹs account. You also have the option to view only the
receivables still due on a customerʹs account, or you can view all the general ledger entries
associated with the customerʹs account.
When you select a customer, there are many fields for filtering, sorting, and grouping
transactions.
In addition, you can print financial entries (read Printing Customer Account Cards); export
entries to Microsoft Excel, create a graph of transactions (also in Excel); add notes; attach files;
view transaction details; open the Maintain Customers screen; match invoices with payments;
view sales orders from O/E history; change transaction details; and view transaction by our ref or
your ref.
1. On the A/R menu, under the Customers heading, select Cards.
2. Select an account in the list, or search for specific accounts:
a. Enter a customer number, name, address, city, country, or bank.
b. Click the Search button.
c. Select a customer Status: Active, Blocked, Inactive, Not validated, Pilot, Reference,
Passive
3. Select an account, and click the Display button to see the card.
4. Filter the information on the card:
a. Enter a beginning and ending Date, or select the All check box.
b. Select a Display:
Card -- view all transactions for the general ledger account.
Receivables -- displays only the unpaid transactions on the customer account.
Invoice list -- displays invoiced and paid amounts. You cannot use the Group by field to
group transactions if you select Invoice list.
All -- view all transactions for the general ledger account and all offsetting account
entries with the same our ref. number.

Chapter 4: Using Accounts Receivable
104 Accounts Receivable User Guide
5. Click the blue arrow button beside the Date field to see additional fields:
a. In the Group by field, select a way to group the entries:
None, Our ref., Your reference, Payment reference, Order number, Cost center, Cost unit,
Resource, Project, G/L, Journal, Classifications, Sub-Classifications, Account
classifications, Ratio type, SAF type, Period, Date, Week, Month, Quarter, or Year
The selection in the Group by field groups all transactions into one line item on the
screen and displays the Debit and Credit totals for the group of transactions. If you select
to display Invoice list, the Group by field is disabled.
b. Select a Transaction type to display:
All, Sales invoice, Sales credit note, Debit memo, Charge (financial), Purchase invoice,
Purchase credit note, Payment, Cash receipt, Payroll, Revaluation, Disposal, Other, or
Reversal entry
If you select to display Invoice list, the Transaction field is disabled.
c. Select the Unprocessed check box to see unprocessed transactions. This check box is
visible if you select to display Card or All.
d. Select the Payments in transit to display: All, Exclusive, Exclude
This field is visible only if you select to display Receivables.
e. Select the To be invoiced check box to see only the transactions to be invoiced. This field
is visible only if you select to display Receivables.
f. Select the Show Matched & Unmatched check box to see matched transactions with the
unmatched ones. This field is visible only if you select to display Receivables. If you
select this check box, the closing balance shown when you choose to display card
transactions (step 4b) is the same as the balance when you choose to display receivable
transactions (step 4b). If you view transactions for a date range and clear this check box,
the two balances shown could be different. This is because the receivables balances
would not show and include matched transactions.
g. Select the Sales invoice check box to only the sales invoices. This field is visible only if
you select to display the Invoice list.
6. Click the Filter button for additional fields:
Filter: Starts with or Contains
Our ref.
Your reference
Order
Entry number
Description
GL account
Vendor
Journal
Resource
Item

Chapter 4: Using Accounts Receivable
lAccounts Receivable User Guide 105
Project
Cost center
Cost unit
Amount: All; equal to; not equal to; less than; less than or equal to; greater than; greater than
or equal to; between; not between
If you select anything other than All, another field appears on screen where you enter the
dollar amount.
7. The following buttons are available along the bottom of the screen. Depending on the
selection you choose to Display and the value in the Group by field, not all buttons are
visible:
Refresh -- refreshes the display showing records based on new filter criteria.
Print -- prints a Crystal report showing the financial entries related to the customer
Export -- exports the customer card to Microsoft Excel.
Graph -- exports the general ledger card to a chart in Excel. You can group by Cost center,
Project, or Resource.
Note -- allows you to enter and view notes attached to the highlighted transaction.
Attachment -- allows you to attach a file to a transaction or open an attached file.
Zoom -- shows all the transactions included in the group by.
Details -- shows the transaction details for the customer. You can view or add notes
associated with the transaction. Notes are visible in the Notes box. To add a note, click the
Notes button, type a note, and click Save.
Maintain -- opens the Maintain Customers screen.
Note: You cannot un-match a transaction in a closed period if the un-match process will void or delete any
entries. An example of this is an entry that is matched to a write-off. To un-match an entry like this, you
must open the period.
Unmatch -- unmatches the selected transaction. This button is available when you select to
display Receivables.
Match -- allows you to match cash flow to transactions.
Invoice -- shows the O/E history on invoices posted from Order Entry.
Reminder -- opens the print reminders screen allowing you to print a payment reminder for
the customer. To use this, you must have a reminder set up in Company Settings. This button
is available when you select to display Receivables.
Note: You cannot change a transaction that has been matched. If you select a matched transaction, the
Change button is not enabled. If you need to change a matched transaction, you must unmatch it first.
Change -- allows you to change information about the highlighted transaction. For more
information see The Change Button.
Our ref -- shows all of the general ledger entries with the same our reference.
Your ref -- shows all of the general ledger entries with the same your reference.
Payment reference -- opens the Terms screen showing the terms for the selected transaction.
This button is available when you select to display Receivables or Invoice list.
Close -- closes the screen.
8. When finished reviewing transactions, click Close.

Chapter 4: Using Accounts Receivable
106 Accounts Receivable User Guide
Setting up Tax Detail Codes and Tax Schedules
Macola ES uses tax detail codes to calculate sales tax on transactions. Individual tax detail codes
are applied to simple taxation needs such as a sale to a local customer. For more complicated
taxation needs, tax schedules are used. Tax schedules can contain up to 99 tax detail codes and
are necessary when applying more than three tax detail codes, applying tax to a service invoice or
a recurring sales transaction, tracking nontaxable transactions, or computing complex taxes. You
can create a tax schedule to automatically calculate multiple sales tax percentages on the same
transaction. For example, one tax percentage might be calculated for state sales tax, another
percentage for city sales tax, and another percentage for freight.
Calculating PST/GST and VAT Taxes
Tax schedules are especially useful for calculating Canadian PST and GST taxes and European
VAT taxes. The Tax Schedule Usage field on the Accounts Receivable Setup screen must be set to
E=Enforced if you want the tax analysis reports to calculate the taxes paid out and the taxes
collected.
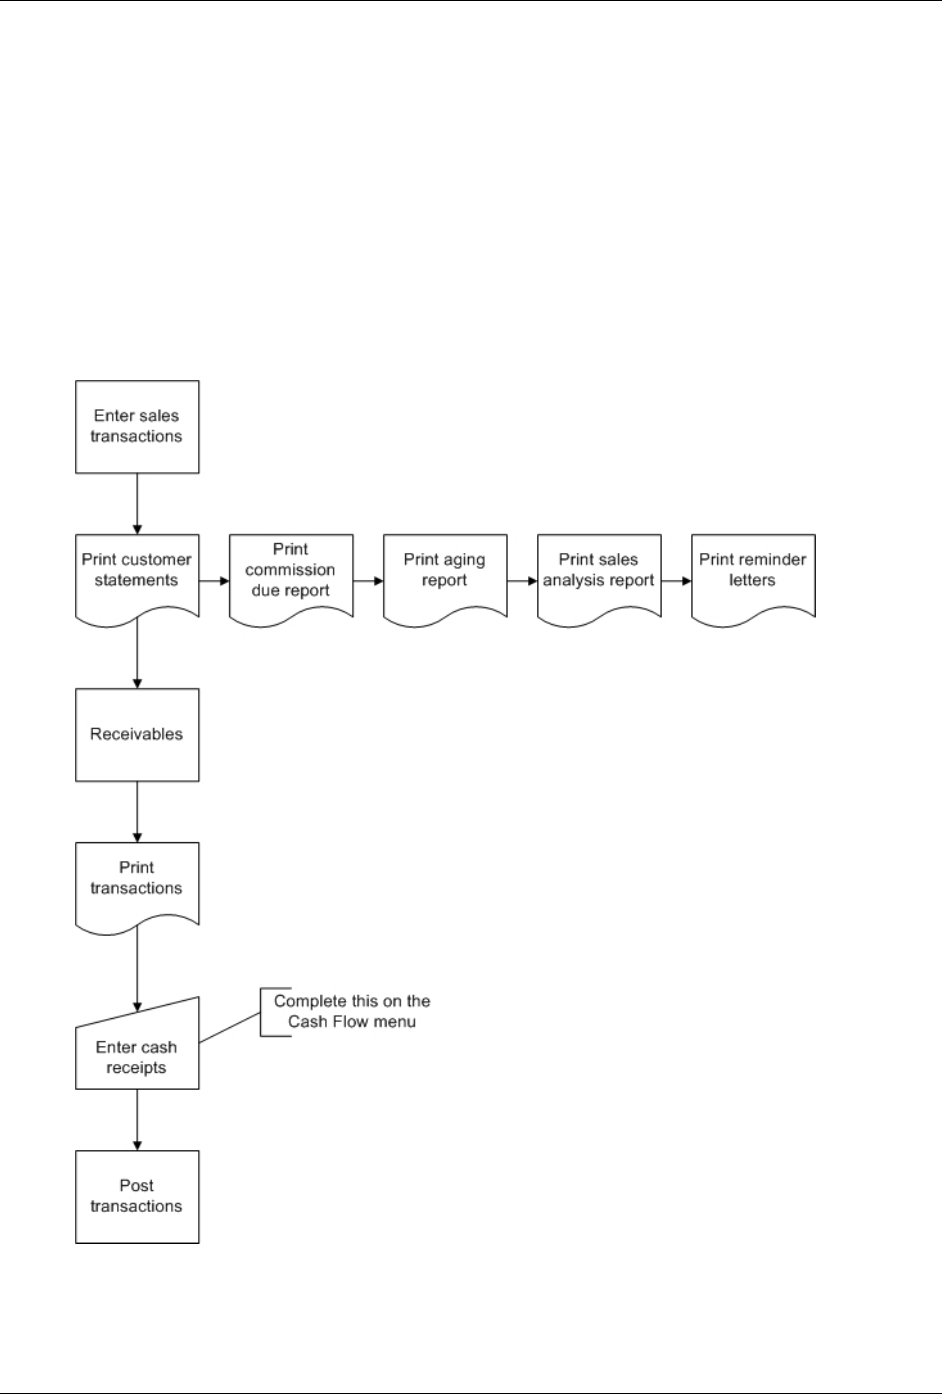
Chapter 4: Using Accounts Receivable
lAccounts Receivable User Guide 107
Entering and Processing Sales
Transactions
A/R Sales Transaction Process Flow

Chapter 4: Using Accounts Receivable
108 Accounts Receivable User Guide
Batch Control
A batch is a group of transactions with a common identification code. Macola ES supports the use
of batches during transaction entry, printing, and posting. Macola ES refers to the identification
code as the Batch ID. All transactions require a Batch ID.
The transaction edit lists can be printed in Batch ID order, thereby allowing data entry personnel
to verify the accuracy of their own transactions. In addition, the posting routines allow users to
post by Batch ID.
Macola ES also provides greater control over batch transaction entry through the use of the Batch
Control By User check box on the Accounts Receivable Setup screen. When the check box is
selected, Macola ES records the name of the user along with the Batch ID for every transaction.
Macola ES restricts access to a particular batch (whether being printed on an edit list or posted) to
the user who entered the batch.
Finally, Macola ES allows you to specify a user that can override Batch Control. The Override
Username is a user name that is granted access to any batch when the Batch Control by User
check box is selected. The override name is commonly the department manager or supervisor in
charge of the transaction data entry team.
Transaction Document Types
You can enter three types of transactions in A/R: invoice, credit memo, and debit memo.
An invoice is a transaction recording the sale made by your company to a customer. If an invoice
is paid off immediately at the time of the sale, it does not become a receivable. If payment is
deferred, then the invoice is classified as a receivable.
A credit memo is a transaction recording a credit that you are giving the customer (other than a
payment), usually because some of the goods sold were found to be unsatisfactory upon receipt;
for example, if some of the goods were damaged or found not to be exactly what was ordered. In
this case, you would give the customer credit against the amount of the original invoice by
entering a credit memo.
A debit memo is a transaction recording an additional charge that you are adding to the
customerʹs account; for example if the price of the sale was negotiated with the customer based
on a certain shipping method, which later on turned out not to be fast enough, so a faster (and
more expensive) method of shipping was used. You could charge the customer for this additional
expense by entering a debit memo, which will add to the amount the customer owes you for the
sale.
Entering Sales Transactions
A/R daily business begins with entering sales information. This includes three types of sales
transactions: invoices, debit memos, and credit memos. The most common transaction is an
invoice.
Use the Enter Sales Transactions screen to enter new transactions that have occurred. If do not
have the Macola ES Order Entry (O/E) package, you will enter all accounts receivable activity
with your customers, except payments and service invoices, using the Enter Sales Transactions

Chapter 4: Using Accounts Receivable
lAccounts Receivable User Guide 109
screen. If you have and use O/E, you will not need to manually enter sales transactions that result
from invoiced orders. O/E automatically creates sales transactions in A/R.
Sales transactions do not produce printed invoices; use the Customer Statements screen to print
statements to send to your customers.
Service invoice processing produces printed invoices as does the invoice processing in O/E.
Entering a Sales Transaction
1. On the A/R menu, under the Entries heading, select Sales Transactions. This opens the Enter
Sales Transactions screen.
2. Enter the Batch for the sales transaction. The Batch designates transactions that have been
grouped together for easier access by a single user.
Everyone entering sales transactions must enter a Batch. If you set batch security when you
set up A/R, only the override user or the user who originally entered the batch can access the
transaction.
3. Enter the document number (Our ref) for this transaction.
Press the F5 key to automatically assign the next available document number. This
increments the transactions as they are entered. The manual entry of a document number
does not affect the automatic assignment of numbers.
Note: Macola ES does not allow you to enter a record where the document number and document type are
the same as a previously entered record. You must make a new record unique.
4. Select the Document Type:
C = Credit Memo
D = Debit Memo
I = Invoice
5. Enter the Customer No associated with this transaction.
6. Macola ES automatically displays the customerʹs name, salesperson number, terms, and tax
information.
7. The Customer Info and Credit information buttons are now available:
Click the Customer Info button to view basic customer information such as the customer
address, salesperson, or comments about the customer. For more information on this view,
see View Customer Information.
Click the Credit information button to view basic customer credit information such as the
customerʹs credit limit and balance. For more information on this view, see View Customer
Credit History Information.
8. If you are entering a credit memo and you are entering this transaction to write off an
existing invoice, select the Write off check box. This field is available only if you are entering
a credit memo.

Chapter 4: Using Accounts Receivable
110 Accounts Receivable User Guide
9. Enter an Apply To number. This field is available only if you are entering a credit memo or a
debit memo.
For example, suppose you previously entered an invoice for customer number 10, and the
invoice number of the transaction was number 1100. The customer later wrote to tell you that
a portion of the order was damaged in route, and he would like a credit for that portion of
the order. Now you are entering the credit memo that will record this credit. This credit
memo applies to invoice number 1100. So, you would enter 1100 in this Apply To field. This
will have the effect of reducing the amount the customer owes you for invoice number 1100.
10. Enter the Document Date. This field defaults to the system date.
11. Enter the Due Date, the date after which this document can be considered overdue. Macola
ES automatically calculates this date based on the terms code entered for the customer (this is
in the Payment condition field on the Basics tab on the Maintain Customers screen). You can
change the due date.
12. Enter a Your reference for this transaction. Press the F2 key to use the document number,
which is the Our Ref; press the F3 key to use the document date; or enter a value. This field is
required.
13. Enter the number of the Salesperson No responsible for this sale. This field defaults to the
salesperson number entered for the customer on the Maintain Customers screen. Macola ES
displays the salespersonʹs name.
You can change the Salesperson field if you are entering an invoice, credit memo, or debit
memo.
14. Enter the Term code for this sale. Macola ES automatically displays the term code
description. This defaults to the Payment condition shown on the Basics tab on the Maintain
Customers screen.
15. In the Reference field, enter a brief description of the transaction or some comments about it.
The default reference consists of the document number.
16. Enter the Sales Amount. This amount does not include any sales tax or other charges.
17. Enter the Freight Charge the customer is expected to pay.
18. Enter the Miscellaneous Charge amount. These are charges such as special handling or
packaging charges the customer is expected to pay.
Note: Whether a customer is taxable or not, you must enter a tax detail code or a tax schedule.
The setting of the Tax Schedule Usage field on the Accounts Receivable Setup screen
determines whether you use a tax detail code or a tax schedule.
• If the Tax Schedule Usage field is set to N=Not Used, you must enter a Tax Detail code.
• If the Tax Schedule Usage field is set to O=Optional, you can enter a Tax Detail code or a Tax
Schedule.
• If the Tax Schedule Usage field is set to E=Enforced, you must enter a Tax Schedule.
You can set up a tax detail code that has a tax percent or a tax amount of zero to track non-
taxable transactions. You can add that tax detail code to a tax schedule if you want to track

Chapter 4: Using Accounts Receivable
lAccounts Receivable User Guide 111
non-taxable transactions using tax schedules.
If you are not using Tax Schedules, proceed to step 21.
19. Accept the default Tax Schedule or enter a new one. Tax schedules are maintained through
Setup, Financial, Taxes, Tax Schedules.
If tax schedule usage is set as Enforced the Accounts Receivable Setup screen, you must enter
a tax schedule. If tax schedule usage is set as Optional, you must enter either a tax schedule
code in this field or tax detail codes in the Tax Code fields.
20. If you entered a tax schedule code, the Tax button is available. To view or edit the taxable
amounts:
a. Click the Tax button to display the Sales Tax Calculations screen. Macola ES displays the
tax codes in the list box.
b. Select the tax that you want to edit and press the Enter key. The Taxable Amount field is
enabled.
c. Make any necessary changes to the Taxable Amount field. This is the dollar amount
Macola ES uses to calculate the tax.
d. Press the Tab key and make any necessary changes to the Tax field. This is the amount of
tax that will appear on the document. You can press the F5 key in this field to recalculate
the tax based on the new taxable amount.
e. Click Save.
f. Continue to modify the tax information, or click Exit.
21. If a tax schedule does not apply to this transaction, enter the appropriate Tax Codes to
designate how sales tax will be calculated. To set up tax codes, on the G/L menu, under the
Taxes heading, select Tax detail codes. You can enter up to three tax codes for each
transaction. If the second Tax Code field is blank, you cannot enter a tax detail code in the
third Tax Code field.
Note: Enter the tax detail codes in the order in which you want taxing to occur. Otherwise, Macola ES
may incorrectly calculate taxes.
22. Macola ES calculates and displays the amount of the sales tax for Tax codes 1 - 3. These tax
amounts are based on the total sale amount and on the miscellaneous and freight charges.
You can accept the computed sales tax, or you can enter a different sales tax by typing over
the displayed sales tax.
Macola ES automatically displays the invoice Sales Amount. If Currency Manager is in use,
the Currency Rate is displayed.
23. Macola ES calculates the Commissions based on the commission percentage you defined
when setting up salesperson records. However, you can change the commission value and
enter the amount of commission the salesperson will be paid as a result of the sale.
24. To distribute amounts, the list box is now available.
25. Enter the Main segment of the account number to distribute to. Macola ES automatically
displays the Description of the account. You can press the F5 key to automatically distribute

Chapter 4: Using Accounts Receivable
112 Accounts Receivable User Guide
the sales amount to the default sales account in the customer type. If the Distribute
Miscellaneous Charges check box and the Distribute Freight check box are selected on the
Accounts Receivable Setup screen, pressing the F5 key will also distribute the miscellaneous
and freight amounts to the default accounts shown on the Accounts Receivable Setup screen.
26. Enter the Cost Unit you want this amount to distribute to. This must be a valid cost unit that
is linked to the main account entered in General Ledger account maintenance.
27. Enter the Cost Center you want this amount to distribute to. This must be a valid cost center
that is linked to the main account entered in General Ledger account maintenance.
28. Enter the Amount to distribute to this account number.
29. Enter the Project to which this amount is to be distributed. You can access this field only if
the Use Job Numbers check box is selected on the Accounts Receivable Setup screen.
30. Click Save, or press the Enter key.
31. Continue to distribute amounts, or click Cancel to enter another transaction.
32. Click Cancel to exit the sales transaction entry screen.
Deleting Transactions
Deleting a Transaction
1. On the A/R menu, under the Entries heading, select Sales Transactions.
2. Enter the Batch for the sales transaction that you want to delete.
3. Enter the document number (Our ref) for the sales transaction that you want to delete.
4. The message ʺRight Trx?ʺ appears:
Click Yes if this is the transaction you want to delete.
Click No if this is not the transaction you want to delete, and then select a different
transaction.
5. Click the Delete key.
6. The Delete Trx or Batch screen opens:
Click the Delete Transaction button if you want to delete only this transaction.
Click the Delete Batch button if you want to delete all transactions in this batch.
7. Click the Cancel button to exit the Enter Sales Transactions screen.
Deleting All Transactions in a Batch
1. On the A/R menu, under the Entries heading, select Sales Transactions.
2. Enter the Batch for the sales transactions that you want to delete.
3. Enter the document number (Our ref) for one of the sales transactions in the batch you want
to delete, or click the yellow arrow icon to select the first transaction in the batch.

Chapter 4: Using Accounts Receivable
lAccounts Receivable User Guide 113
4. At the prompt ʺRight Trx?ʺ --
Click Yes if this is the right transaction.
Click No to select another transaction.
5. Click Delete.
6. The Delete Trx or Batch screen opens.
Click the Delete Transaction button if you want to delete only this transaction.
Click the Delete Batch button if you want to delete all transactions in this batch.
7. Click the Cancel button to exit the sales transaction entry screen.
Deleting a Transaction Distribution
1. On the A/R menu, under the Entries heading, select Sales Transactions.
2. Enter the Batch for the distribution that you want to delete.
3. Enter the document number (Our ref) for the distribution that you want to delete.
4. At the prompt ʺRight Trx?ʺ --
Click Yes if this is the right transaction.
Click No to select a different transaction.
5. Select the distribution that you want to delete.
6. Click Delete.
7. At the prompt ʺOK To Delete?ʺ, click Yes.
8. When all desired deletions have been made, redistribute the remaining amount to the correct
account.
9. Select the blank line and press the Enter key, or double-click the blank line to add a new
distribution.
10. Click the Cancel button to clear the transactions.
11. Click Cancel to close the screen.
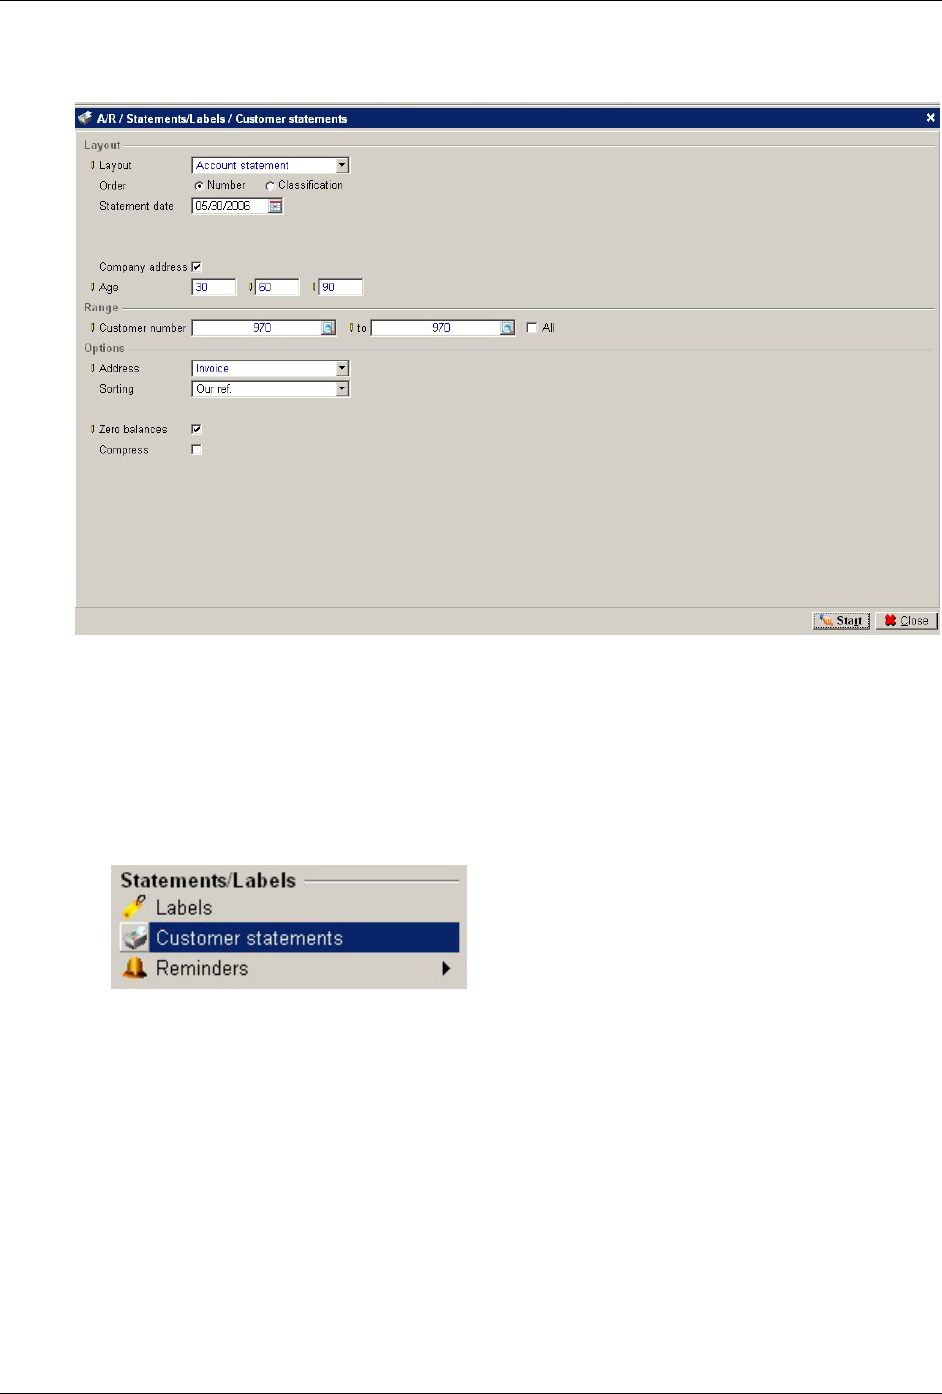
Chapter 4: Using Accounts Receivable
114 Accounts Receivable User Guide
Customer Statements
Customer statements show the invoices that are due on a customerʹs account. You can send these
to your customers so they know which invoices have not been paid. The customer can verify with
their records to verify whether they agree or determine if they have sent payments that you have
not recorded against their account.
Printing Customer Statements
1. On the A/R menu, under the Statements/Labels heading, select Customer statements.
2. Select the Layout: (The layout you select can reveal or hide fields on the screen.)
Payables -- This layout allows you to choose whether to age the invoices by invoice date or
due date.
Account Statement -- This layout allows you to compress transactions before a certain date or
certain period into a one line balance so you do not have to see all the detail of the
outstanding transactions.
Currency data -- This layout is similar to the Account Statement layout but shows the invoice
currency amount and the default currency amount if a customer has a different currency.
User-defined -- This selection reveals the Layout field, which you can use to select a pre-
defined layout.
3. Select the Order to print the statements: The order determines the range you can select to
print. See step 8.

Chapter 4: Using Accounts Receivable
lAccounts Receivable User Guide 115
Number -- Allows you to select to print statements for a range of customers based on
customer number.
Classification -- Allows you to select to print statements for a range of classifications.
4. Enter the Statement date. This is the date printed on the statement. The aging of the items is
based on this date.
5. Select to print a Trial statement or the Final Statement by clicking the Trial or Final fields. If
you select Final and then print the statement to the printer, the Last Printed date is updated
in the customer statement section of the Financial tab in customer maintenance and the last
seq no field in customer maintenance is updated with the statement number.
Note: This option is available when printing the Payables layout or the User-defined layout.
6. Select the Company address check box if you want to print your company address at the
top of the statement. (Your company address is defined on the Company Settings screen.)
7. Enter the aging periods in the Age fields. Enter three numbers greater than zero for the
aging periods. For example you can enter 15 days in the first field, 30 days in the second
field, and 45 days in the third field. These would place the invoices in separate columns on
the report based on their invoice date or due date depending on your selection and the
reference date. The first number must be greater than zero, the second number must be
greater than the first number, and the third number must be greater than the second
number. When you enter numbers in these fields, the aging period fields for the Receivables
Report, the Customer Balance List, the Aging Analysis, and the Accounts Receivable Setup
are changed. All of these use the same aging numbers.
8. This field depends on the Order selected in step 3.
Enter a beginning and ending Customer number, or select the All check box.
or
Enter a beginning and ending Classification, or select the All check box.
9. Select which customer Address to print on the statements. Choose from Invoice address,
Postal address, Delivery address, or Visiting address.
10. Select the Aging date:
Invoice date
Due date
Note: This option is available when printing the Payables layout or the User-defined layout.
11. Choose the Sorting order for the transactions on the statement:
Our ref.
Invoice date
Due date
12. Select the Zero balances check box to include invoices that have been paid on the statement.
13. Select the Compress check box to compress some transactions into one balance line instead
of showing each individual transaction on the statement. You can compress by date or by
period.

Chapter 4: Using Accounts Receivable
116 Accounts Receivable User Guide
Period -- compresses all transactions before a certain period.
Enter the Year and the period number that you want to compress all previous transactions
into. For example, if you are printing statements for the month of December 2002 (and
December is set up in your period-date calendar as the 12th period) and you do not want
the individual transactions for the previous months to print on the statement enter 2002 for
the year and 12 for the period.
Date -- compresses all transactions before a certain date.
Enter the date that you want to compress all previous transactions. For example, if you
want to compress all transactions before 01/10/03 into one balance line enter 1/10/03.
Note: The compress check box is not available when printing the Payables layout.
14. Click Start.
Commission Due Reports
The Commission Due Reports list commissions that are due to each salesperson. You can print
the Commission Due Report based on invoices or on cash receipts. When sales transactions are
posted to A/R, Macola ES updates the commissions due to reflect the commission amounts that
each sales person has earned.
Note: Macola ES calculates commissions due based on Amount 1 (the sale amount) of an invoice only. It
does not include Amount 2 (the total of the miscellaneous charges, the freight charges, and the taxes) when
calculating commissions.
If you are also using Order Entry, A/R automatically calculates the amount of the salesperson
commission, but you can override the calculated amount. After you invoice orders in O/E, they
generate Open Item transactions in the A/R package, and the commissions due information is
also passed along.

Chapter 4: Using Accounts Receivable
lAccounts Receivable User Guide 117
Based on Cash Receipts
The Commissions Due Report Based On Cash Receipts includes only those invoice records that
are in both the commissions due and the open items and only when a payment exists in the open
items that has not been updated in the commissions due. To appear on this report, credit memo
records must also be in both. If you have paid all commissions for all payments received, there
will be no records for this report to print.
On this report, the commission amount to pay column always shows the amount of the current
commissions payment less the commission amount owed to the salesperson from the latest cash
receipt, even after you have updated the commissions due to show that you have actually paid
the salesperson. The commission amount paid column shows the total amount that you have
paid (after updating the commissions due to show that you have actually paid the salesperson)
for all payments on for this invoice.
If you are printing this report based on cash receipts and you use open item accounting, the
payment received must apply to the invoice that you are paying. If the apply to numbers do not
match, Macola ES will not calculate the commission amount to pay correctly.
A specific situation requires a detailed explanation: You create an invoice using a salesperson
that is not the default salesperson for that customer. You then receive a payment or create a credit
memo and apply it to 0 for the default salesperson. Using the To Be Matched screen, you match
the payment or the credit memo to the invoice. In this situation, Macola ES keeps the default
salesperson on that payment or credit memo record, and it creates a commission due record for
that default salesperson. (It does not create a commission due record for the salesperson used on
the invoice.)
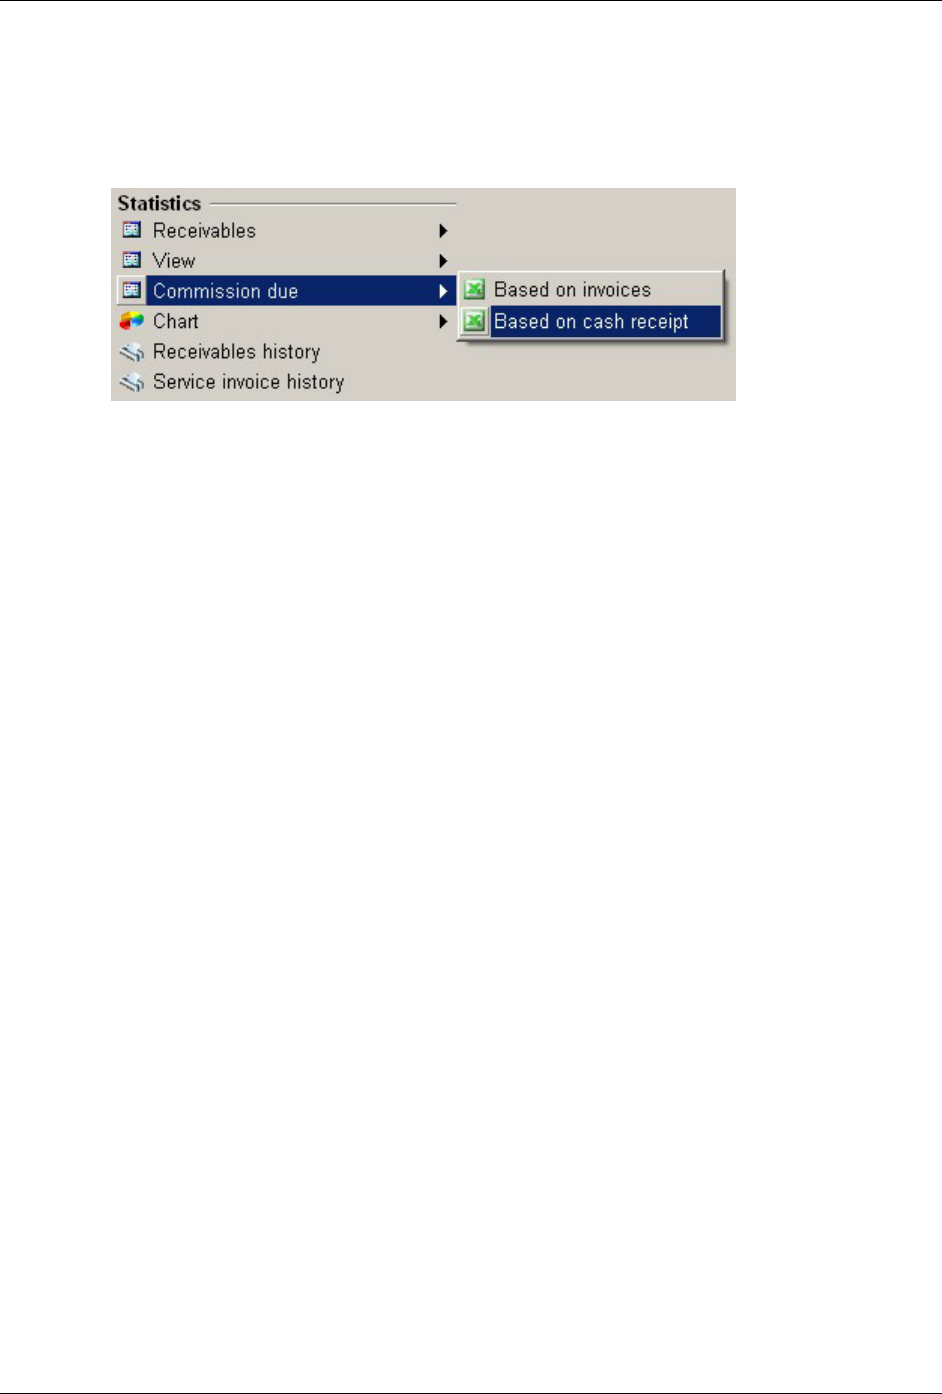
Chapter 4: Using Accounts Receivable
118 Accounts Receivable User Guide
Printing a Commission Due Report Based on Cash
Receipts
1. On the A/R menu, under the Statistics heading, select Commission Due, Based On Cash
Receipt. Macola ES opens the Commission Due Based on Cash Receipt screen.
2. Enter a beginning and ending Cash Receipt Date, or select the All check box for all cash
receipt dates. The system records the dates for cash receipts as the cash receipts are entered
on the Cash Flow menu.
3. Enter a beginning and ending Salesperson Number, or select the All check box for all sales
people.
4. Click Start. Macola ES generates the report in Microsoft Excel.
The report shows the sales person number and name, customer number and name, the
document number (this is the Our Ref number), the document type, the cash receipt date, the
your ref number, the commission amount due, the sales amount, the invoice total, credit
memos and debit memos, and the total receipts.

Chapter 4: Using Accounts Receivable
lAccounts Receivable User Guide 119
Based on Invoices
The Commission Due Report Based On Invoices includes all invoices in the Commission Due
table.
Printing a Commission Due Report Based on Invoices
1. On the A/R menu, under the Statistics heading, select Commission Due, Based On Invoices.
Macola ES opens the Commission Due Based On Invoices screen.
2. Enter a Document Date, a range of document dates, or select the All check box to include all
dates.
3. Enter a Salesperson number, a range of salesperson numbers, or select the All check box to
include all salespeople.
4. To include on the report salespeople who have no commission due, select the Print Zero
Commission Due Records check box.
5. Click the Start button. The commission due report opens in Microsoft Excel as a spreadsheet.

Chapter 4: Using Accounts Receivable
120 Accounts Receivable User Guide
Printing Sales Transactions
Use the Sales Edit List to verify transactions, dates, and amounts before posting. You should print
a Sales Transaction List before you post transactions.
When you enter an invoice it goes into a temporary Sales Transaction table. The transaction list is
a printout of what you have entered. If you need to make corrections, you can make them before
the transactions become permanent, upon posting. When you post the transactions, Macola ES
removes them from the temporary table and posts them to the general ledger.
Printing Transactions
1. On the A/R menu, under the Entries heading, select Print Transactions. This opens the Print
Sales Transactions screen.
2. Enter the starting Batch for the range to include on the list.
3. Enter the ending batch (To) for the range to include on the list.
4. Select the Criteria for the report:
Summary
Detail
5. Click OK. A/R generates the report.
6. Review, Export, or Print the report.
7. When finished, click Close.
8. Click Close to close the report screen.
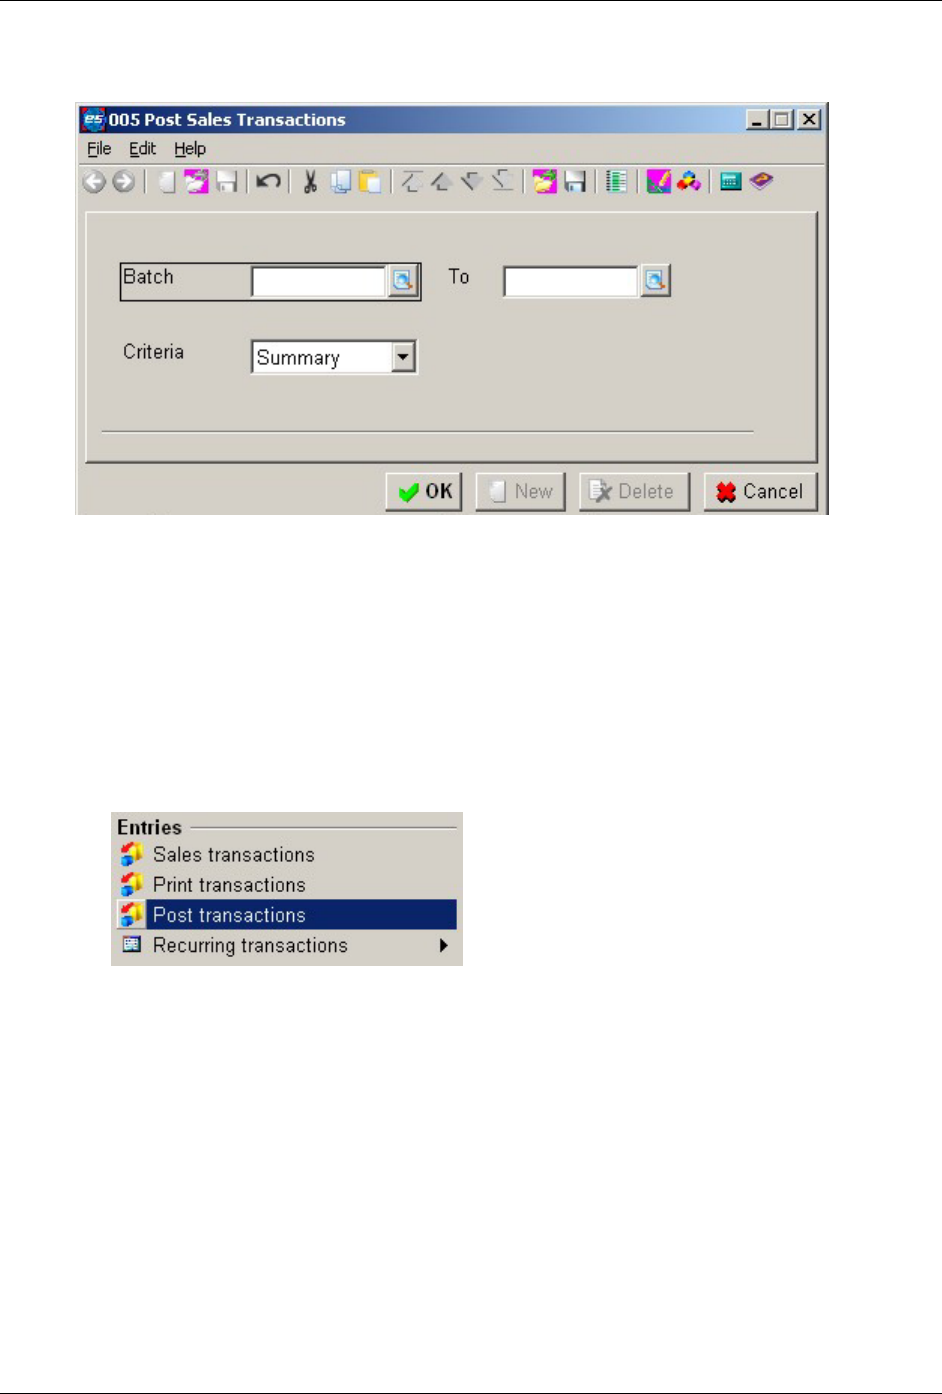
Chapter 4: Using Accounts Receivable
lAccounts Receivable User Guide 121
Posting Sales Transactions
The Post Sales Transactions screen transfers all transactions that you entered using the Enter
Sales Transactions screen to the general ledger. Posting automatically adjusts the balance that a
given customer owes your business.
When you post, Macola ES prints a report of all transactions that were posted and records
distributions you entered during data entry to the General Ledger.
Posting a Transaction
1. On the A/R menu, under the Entries heading, select Post Transactions. This opens the Post
Sales Transactions screen.
2. Enter the starting Batch for the range to post.
3. Enter the ending batch (To) for the range to post.
4. Click Criteria for the posting report:
Detail
Summary
5. Click OK. A/R generates the report.
6. Review, Export, or Print the report.
7. When finished, click Close.
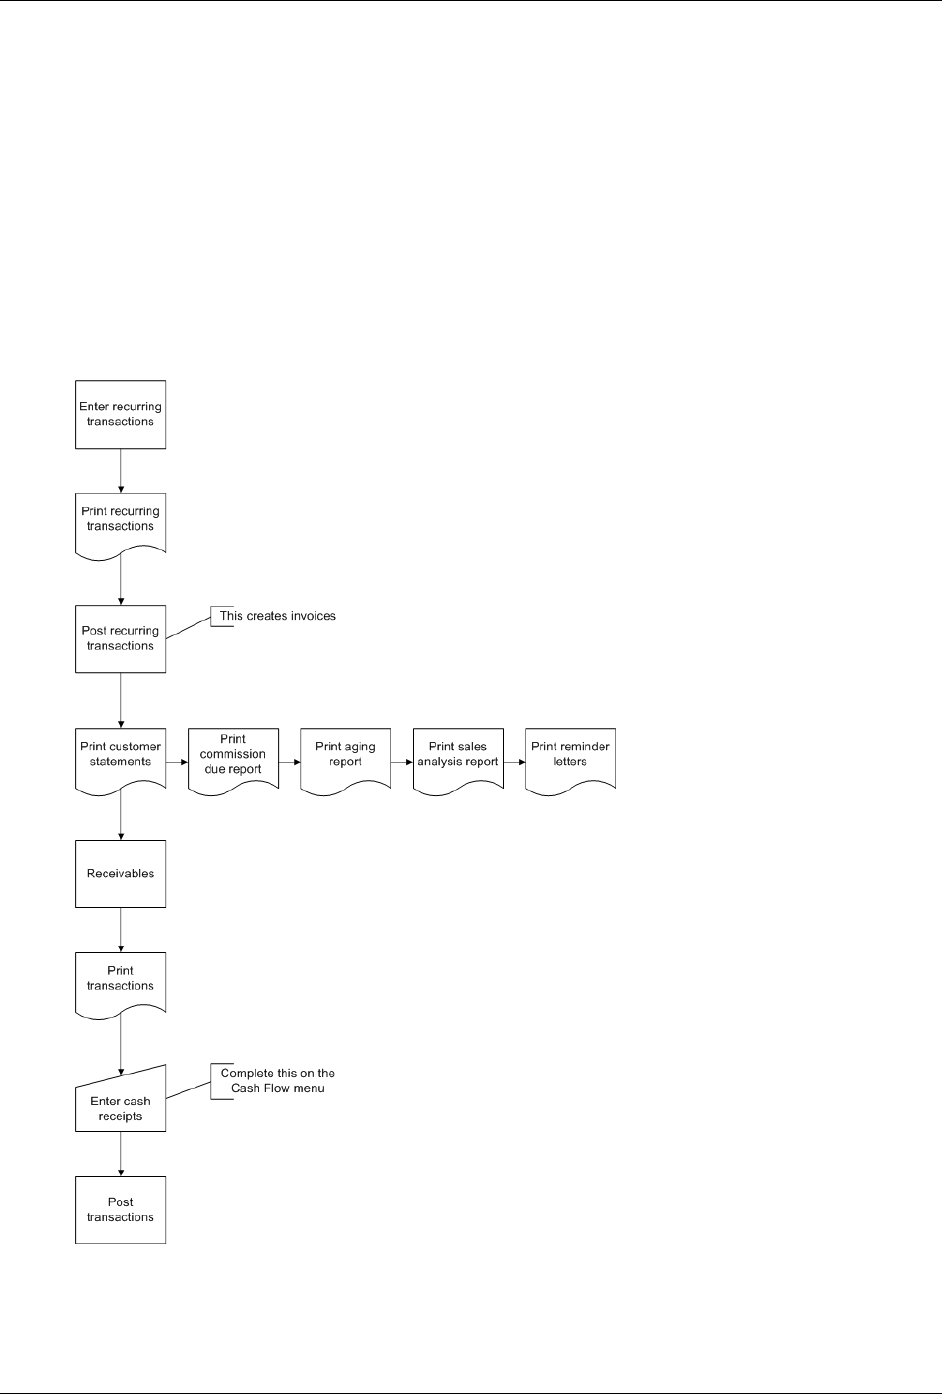
Chapter 4: Using Accounts Receivable
122 Accounts Receivable User Guide
Entering and Processing Recurring
Transactions
A/R Recurring Transactions Process Flow
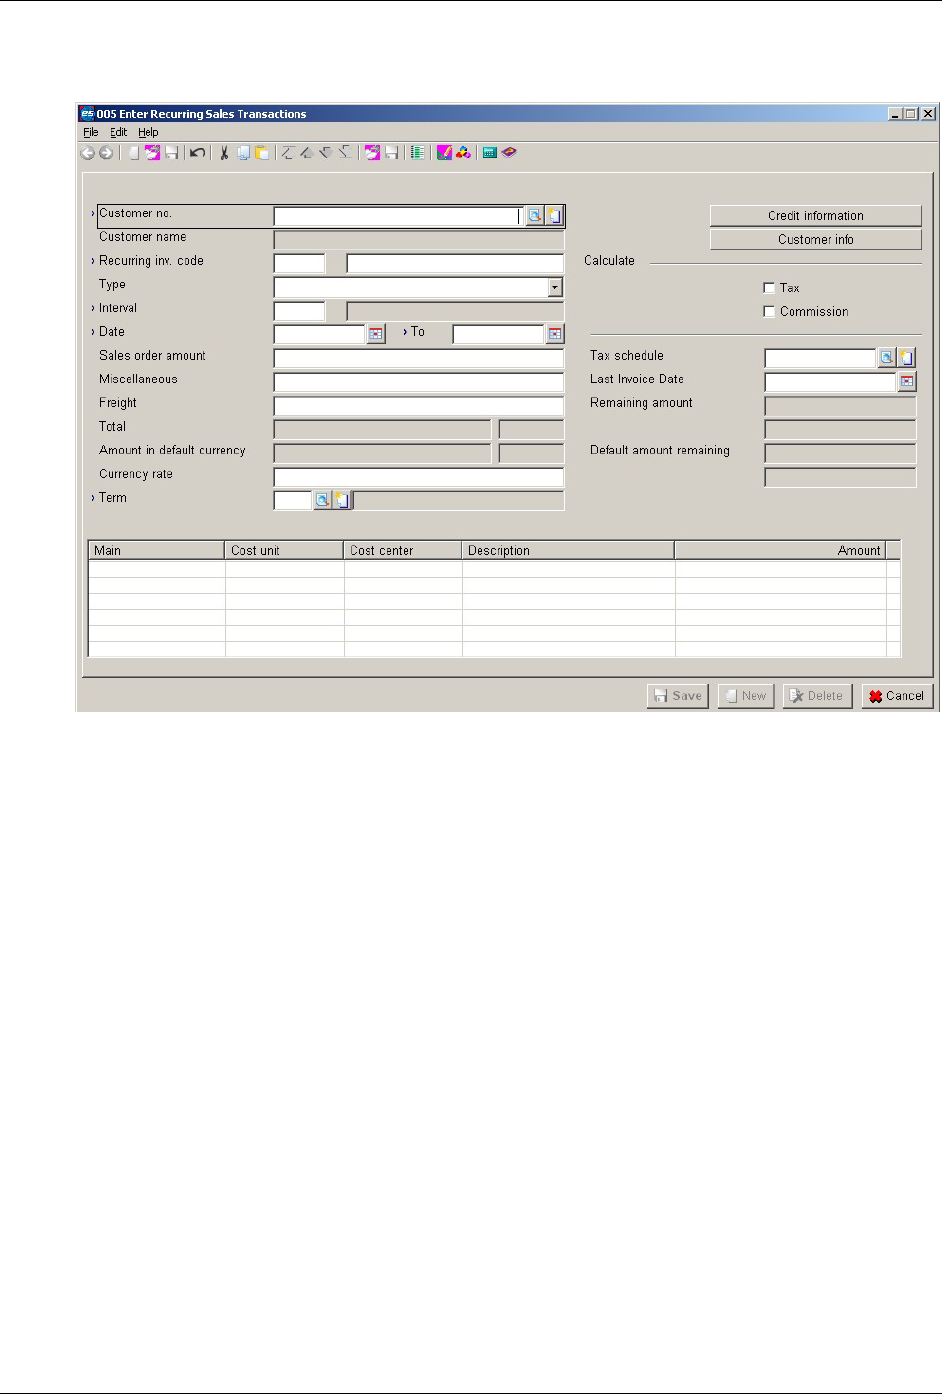
Chapter 4: Using Accounts Receivable
lAccounts Receivable User Guide 123
Entering Recurring Transactions
Recurring transactions are sales that occur on a regular basis. They recur in two ways in Macola
ES A/R:
M = Monthly -- Issued on a specific day of the month; use this if an invoice will always be issued
on a certain day of the month, even if there will be more than one month between invoices.
N = Number of days -- Issued every so many days (for example, every 14 days or every 30 days);
use this if an invoice is issued every specified number of days (such as once every 30 days), enter
N. Once information is entered into this field, it cannot be changed.
Each recurring transaction has a starting date and an ending date. The starting date is the date
Macola ES should issue the first invoice. The ending date is the date Macola ES should issue the
last invoice. In some cases, you might have a customer with a certain number of invoices at one
amount and then more invoices at another amount. You can set up two recurring transactions
with consecutive date ranges to automatically handle the changes in invoice amount.
Once you have set up the Recurring transactions, post the recurring transactions on a regular
basis. These transactions are, in turn, posted to the General Ledger, the same as sales transactions.
Even if the recurring sales transactions are not posted to the A/R Sales Transaction table
frequently enough, Macola ES will not skip invoices. The Post Recurring Transactions option will
automatically create as many A/R transactions as needed to bring the invoices up to date.
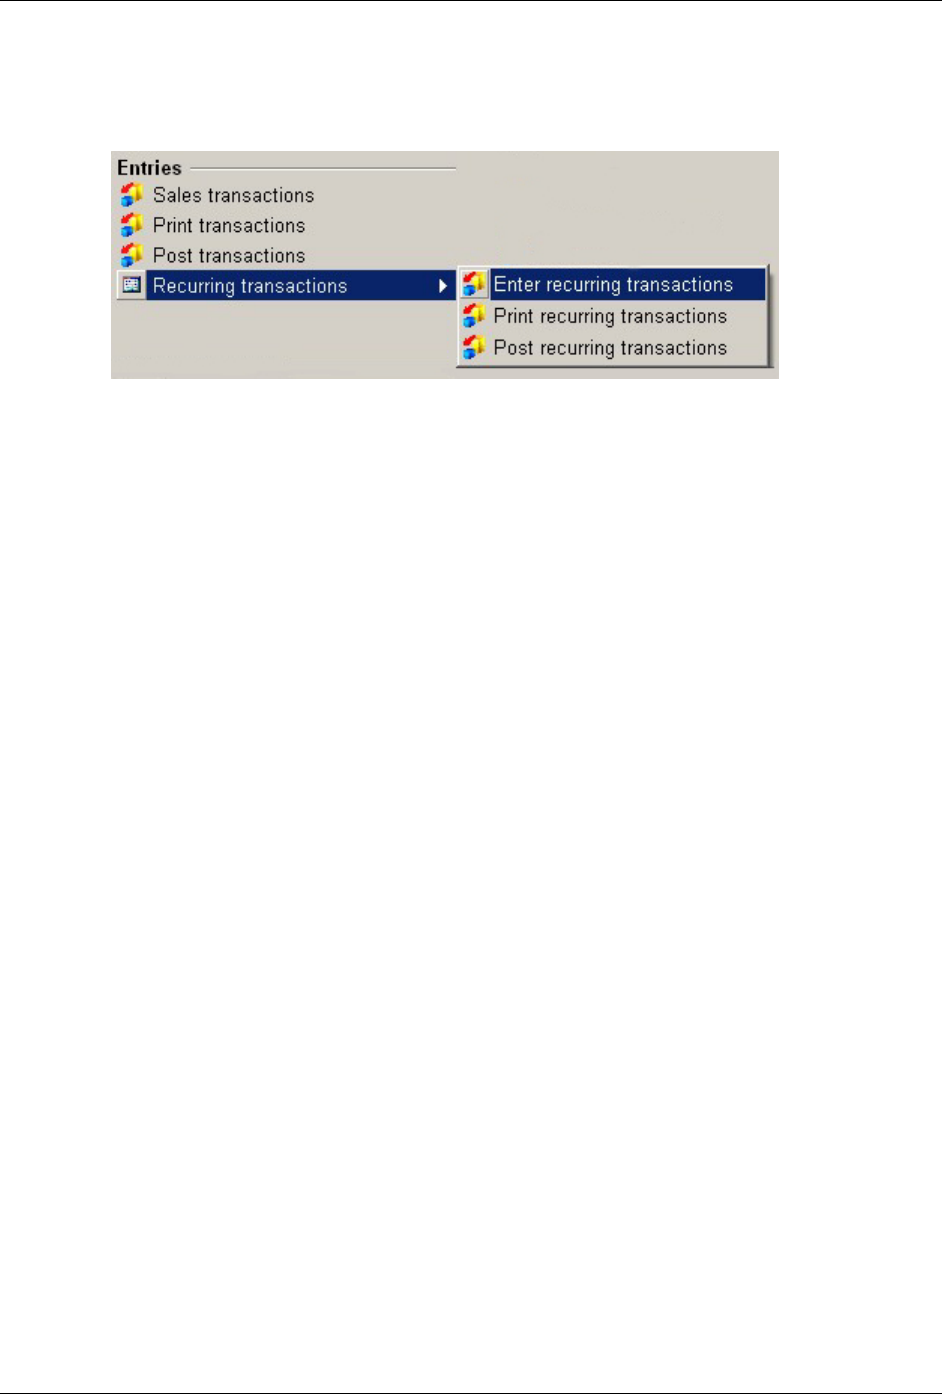
Chapter 4: Using Accounts Receivable
124 Accounts Receivable User Guide
Entering a Recurring Transaction
1. On the A/R menu, under the Entries heading, select Recurring Transactions, Enter Recurring
Transactions. The Enter Recurring Sales Transactions screen opens.
2. Enter the Customer No for the invoice. Macola ES automatically displays the customerʹs
name, terms code, and terms code description.
3. The Customer Info and Credit Information buttons are now available.
Click the Customer Info button to view basic customer information such as the customer
address, salesperson, or comments about the customer. For more information on this view,
see View Customer Information.
Click the Credit Information button to view basic customer credit information such as the
customerʹs credit limit and current balance. For more information on this view, see View
Customer Credit History Information.
4. Enter a Recurring Invoice Code that defines the recurring transaction for the customer. Enter
up to four alpha-numeric characters in this field.
You can define several recurring transactions for a customer.
5. Enter the Description of the recurring transaction. For example, a recurring transaction
might have the description ʺMembership Duesʺ. You can enter up to 30 alpha-numeric
characters. This field defaults to AR Rec: plus the recurring ID. For example, if you enter the
recurring id MEMB the description defaults to AR Rec: MEMB.
6. Select a recurring invoice Type:
M = Monthly -- Monthly indicates the recurring invoice is created on the same day of the
month. This field works with the interval field to determine whether the invoices are created
every month, every other month, every year, etc.
N = No. of days -- Number of days indicates the recurring invoice will be created every so
many days. This field works with the interval field to determine how many days are between
each recurring invoice.
7. Enter an invoice Interval. You can enter up to three numeric characters in this field. This field
works with the Type field. The interval dictates how many months or days are between the
recurring invoices. If you set the type to M = Monthly and enter 2 in the interval, recurring
invoices are created every two months. For example the type is M = Monthly, the interval is 2

Chapter 4: Using Accounts Receivable
lAccounts Receivable User Guide 125
and the start date is 06/01, then the first invoice is created on 06/01 and the second invoice is
created with a date of 08/01.
8. Enter the starting Date to issue the first invoice. If this is a monthly type (M) recurring
transaction, Macola ES always issues invoices on the same day of the month as this date. If
the starting date is the 31st day of the month, the recurring invoices will be created on the last
day of the month for months with less than 31 days.
Macola ES displays the description of when the invoice is issued. For example; if you enter
the type monthly, interval 1, and enter the starting date 06/01, the description displays ʺOn
the 1st of Every Monthʺ.
If you change this date, Macola ES sets the last invoice date to zero.
9. Enter the To date that the last invoice is to be issued or the date after which no invoices
should be issued. This date does not need to fall exactly on an invoice date.
10. If you want Macola ES to calculate tax on this recurring sales transaction, select the Tax check
box.
Note: On the Accounts Receivable Setup screen, if the Tax Schedule Usage field is set to Not Used or
Optional and you have not entered a Tax Schedule, Macola ES will calculate tax based on the Tax Detail
Code in the customer record.
11. To calculate commission on this recurring transaction, select the Commission check box.
Clear the check box if this is a non-commission sale.
12. Enter the Sales Order Amount.
13. Enter the Miscellaneous charges for each invoice.
14. Enter the Freight amount for each invoice.
15. If needed, enter the Currency Rate.
16. Enter the Terms code you want to use with this recurring transaction. Macola ES
automatically displays the terms code and description from the customer record, or you can
enter a new one.
17. Enter a Tax Schedule. This field defaults to the tax schedule on the customer record, if you
entered one.
18. Macola ES automatically displays the Last Invoice Date on which an invoice was last issued
for the recurring sale. Macola ES uses this field to keep track of the last invoice that was
posted from this recurring invoice.
Note: Leave this field blank when you are setting up the recurring invoice unless you have manually
created invoices dated after the starting date and you want to start generating invoices with a later date. If
you enter a date in this field, the first invoice will not be generated until after the date you enter in this
field.
Macola ES automatically displays the amount remaining to be distributed and updates this
amount after you enter each distribution. Macola ES does not allow you to exit this screen
until the amount remaining to be distributed is zero.

Chapter 4: Using Accounts Receivable
126 Accounts Receivable User Guide
19. Enter the Main segment of the account number to distribute to. Macola ES automatically
displays the Description of the account.
You can press the F5 key to automatically distribute the sales amount to the default sales
account in the customer type file. If the Distribute Miscellaneous Charges check box and the
Distribute Freight check box are selected on the Accounts Receivable Setup screen, pressing
the F5 key will also distribute the miscellaneous and freight amounts to the default Freight
and Miscellaneous accounts on the Accounts Receivable Setup screen.
20. Enter the Cost Unit you want this amount to distribute to. This must be a valid cost unit that
is linked to the main account.
21. Enter the Cost Center you want this amount to distribute to. This must be a valid cost center
that is linked to the main account.
22. Enter the Amount to distribute to this account number.
The total of all distribution amounts must equal the amount of the recurring transaction.
23. Click Save or press the enter key.
24. Continue to distribute amounts, or click Cancel to enter a new recurring transaction.
25. Click Cancel again to exit the screen.
Entering, Editing, or Deleting Distributions
You can add a distribution by double-clicking a blank line in the list box. Enter the distribution,
and click Save to add it to the list box.
To delete a distribution, select it in the list box, and click Delete. Macola ES removes the
distribution and adjusts the amount remaining accordingly.
The Remaining Amount field must be zero before you can exit the screen.
Deleting Recurring Distributions and Transactions
Deleting a Recurring Distribution
1. On the A/R menu, under the Entries heading, select Recurring transactions, Enter Recurring
Transactions.
2. Enter the customer number (Customer No.) for the recurring ID containing the distributions
you want to delete.
3. Enter the Recurring ID containing the distributions you want to delete.
4. In the grid in the lower part of the screen, select the distribution you want to delete.
5. Click the Delete button.
6. At the prompt ʺOK To Delete?ʺ, click Yes.
7. When all desired deletions have been made, redistribute the remaining amount.
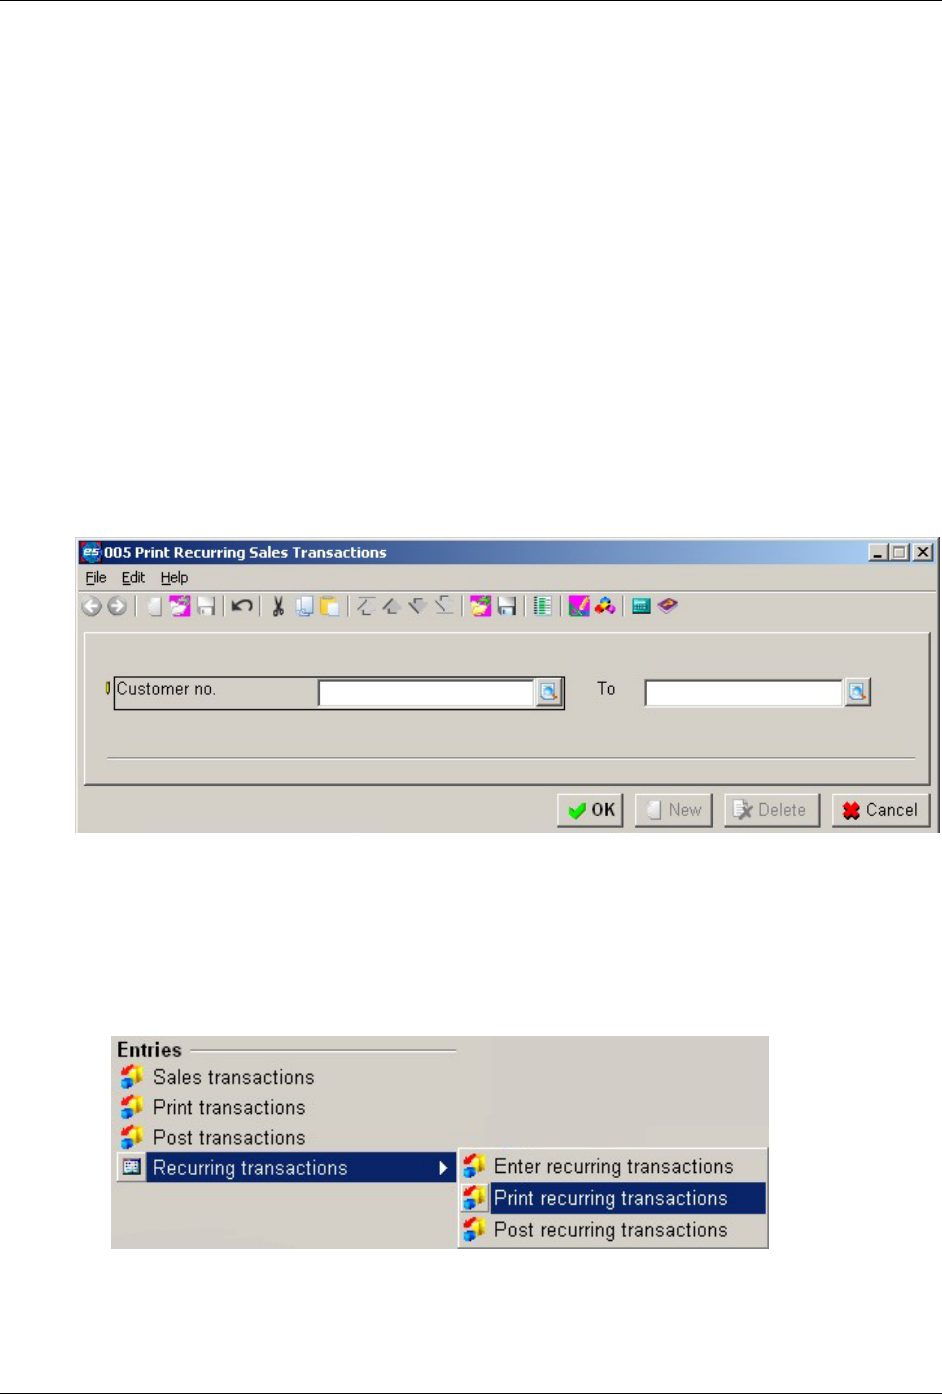
Chapter 4: Using Accounts Receivable
lAccounts Receivable User Guide 127
8. Click Cancel to clear the screen.
9. Click Cancel to close the screen.
Deleting a Recurring Transaction
1. On the A/R menu, under the Entries heading, select Recurring transactions, Enter Recurring
Transactions.
2. Enter the Customer No for the recurring transaction you want to delete.
3. Enter the Recurring ID for the recurring transaction you want to delete.
4. Click the Delete button. The system displays the message ʺOK To Delete?ʺ
5. Click Yes. Macola ES removes the recurring transaction.
6. Click Cancel to exit the Recurring Transaction Entry Screen.
Printing Recurring Sales Transactions
The Recurring Transaction List provides a means of verifying the data entry of the recurring
transactions. Use this list as a reference or a visual check before posting.
Printing a Recurring Transaction List
1. On the A/R menu, under the Entries heading, select Recurring Transactions, Print Recurring
Transactions. This opens the Print Recurring Sales Transactions screen.
2. Enter the first Customer No to include on the list. If you leave this field blank, it defaults to
ALL and Macola ES skips over the Ending Customer No. field.
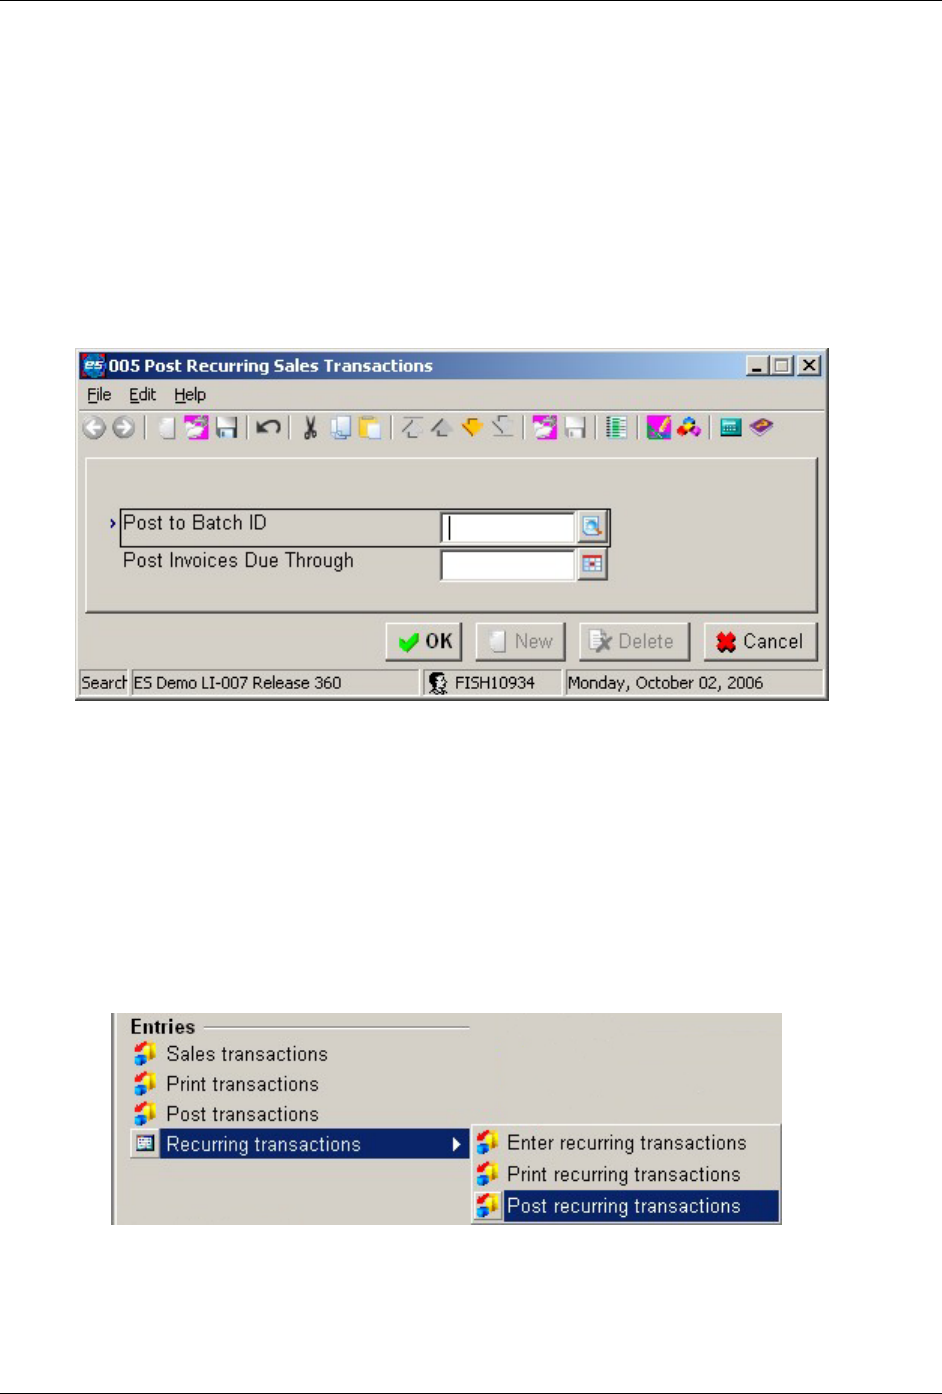
Chapter 4: Using Accounts Receivable
128 Accounts Receivable User Guide
3. Enter the last customer number (To) to include on the list. This field defaults to the value of
the Starting Customer No field.
4. Click OK. Macola ES displays the Print Options screen.
5. Select the desired output device.
6. Click OK.
7. Click Cancel to close the screen.
Posting Recurring Transactions
Use the Post Recurring Transactions screen to post the recurring transactions. When you post
recurring transactions, Macola ES transfers the recurring transactions to the A/R Transaction
table. Once you post the recurring sales transactions, Macola ES treats the recurring transactions
as regular A/R transactions. You can edit the recurring transactions using the Enter Transactions
screen. You then need to post these transactions to the General Ledger using the Post Sales
Transactions screen.
Posting a Recurring Transaction
1. On the A/R menu, under the Entries heading, select Recurring Transactions, Post Recurring
Transactions. This opens the Post Recurring Transactions screen.
2. Enter the Post To Batch ID for the batch of recurring transactions you want to generate and
post to the A/R Sales Transaction file.
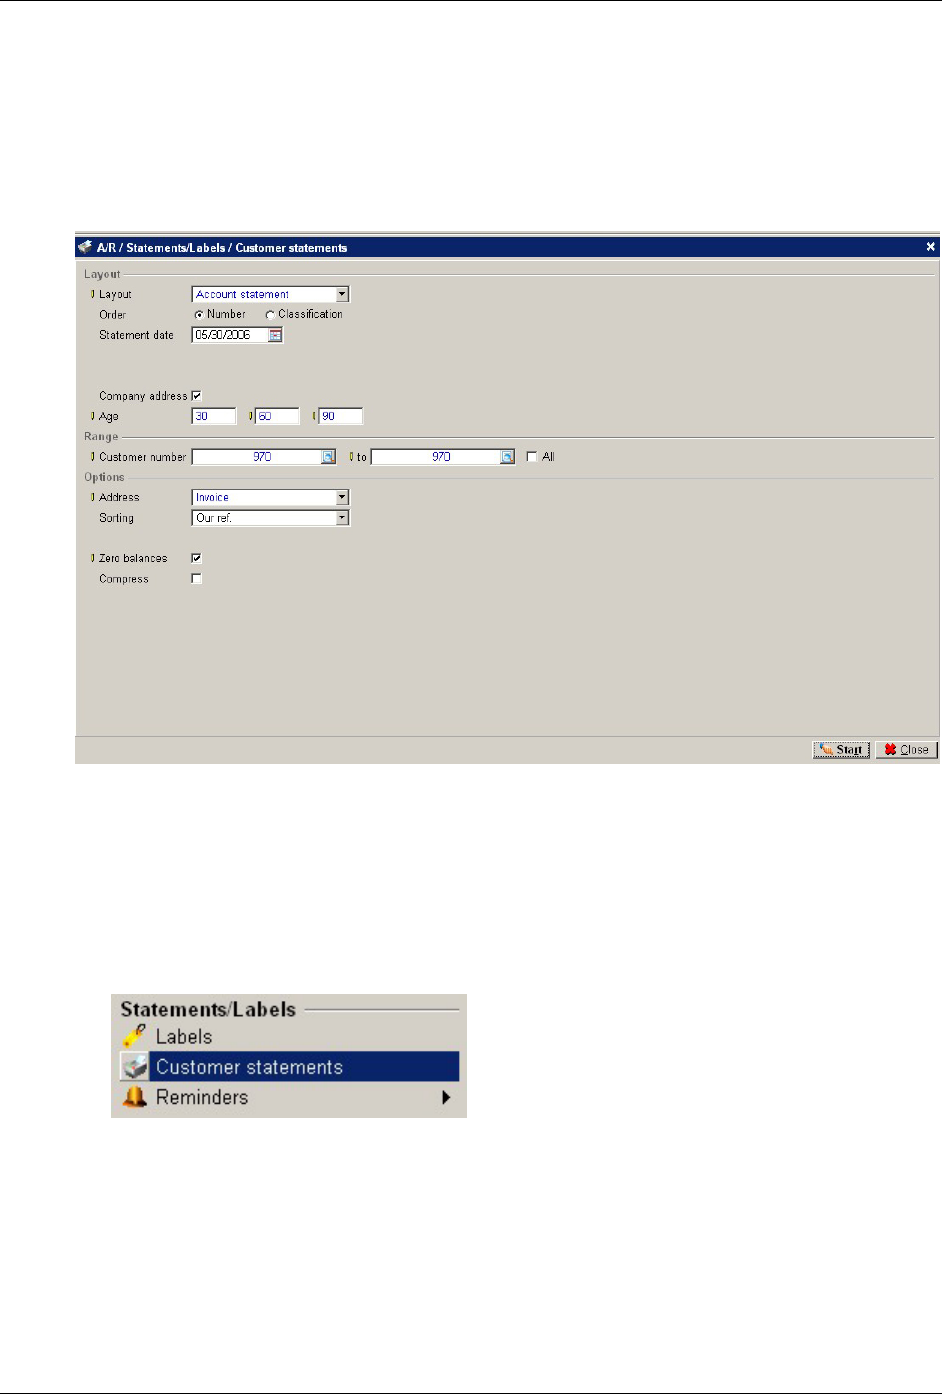
Chapter 4: Using Accounts Receivable
lAccounts Receivable User Guide 129
3. Enter the due date for the recurring sales invoices you want to post through (Post Invoices
Due Through).
4. Click OK. Macola ES posts the recurring transactions to the A/R Sales Transaction table.
Customer Statements
Customer statements show the invoices that are due on a customerʹs account. You can send these
to your customers so they know which invoices have not been paid. The customer can verify with
their records to verify whether they agree or determine if they have sent payments that you have
not recorded against their account.
Printing Customer Statements
1. On the A/R menu, under the Statements/Labels heading, select Customer statements.
2. Select the Layout: (The layout you select can reveal or hide fields on the screen.)
Payables -- This layout allows you to choose whether to age the invoices by invoice date or
due date.
Account Statement -- This layout allows you to compress transactions before a certain date or
certain period into a one line balance so you do not have to see all the detail of the
outstanding transactions.
Currency data -- This layout is similar to the Account Statement layout but shows the invoice

Chapter 4: Using Accounts Receivable
130 Accounts Receivable User Guide
currency amount and the default currency amount if a customer has a different currency.
User-defined -- This selection reveals the Layout field, which you can use to select a pre-
defined layout.
3. Select the Order to print the statements: The order determines the range you can select to
print. See step 8.
Number -- Allows you to select to print statements for a range of customers based on
customer number.
Classification -- Allows you to select to print statements for a range of classifications.
4. Enter the Statement date. This is the date printed on the statement. The aging of the items is
based on this date.
5. Select to print a Trial statement or the Final Statement by clicking the Trial or Final fields. If
you select Final and then print the statement to the printer, the Last Printed date is updated
in the customer statement section of the Financial tab in customer maintenance and the last
seq no field in customer maintenance is updated with the statement number.
Note: This option is available when printing the Payables layout or the User-defined layout.
6. Select the Company address check box if you want to print your company address at the top
of the statement. (Your company address is defined on the Company Settings screen.)
7. Enter the aging periods in the Age fields. Enter three numbers greater than zero for the aging
periods. For example you can enter 15 days in the first field, 30 days in the second field, and
45 days in the third field. These would place the invoices in separate columns on the report
based on their invoice date or due date depending on your selection and the reference date.
The first number must be greater than zero, the second number must be greater than the first
number, and the third number must be greater than the second number. When you enter
numbers in these fields, the aging period fields for the Receivables Report, the Customer
Balance List, the Aging Analysis, and the Accounts Receivable Setup are changed. All of
these use the same aging numbers.
8. This field depends on the Order selected in step 3.
Enter a beginning and ending Customer number, or select the All check box.
or
Enter a beginning and ending Classification, or select the All check box.
9. Select which customer Address to print on the statements. Choose from Invoice address,
Postal address, Delivery address, or Visiting address.
10. Select the Aging date:
Invoice date
Due date
Note: This option is available when printing the Payables layout or the User-defined layout.
11. Choose the Sorting order for the transactions on the statement:
Our ref.
Invoice date
Due date

Chapter 4: Using Accounts Receivable
lAccounts Receivable User Guide 131
12. Select the Zero balances check box to include invoices that have been paid on the statement.
13. Select the Compress check box to compress some transactions into one balance line instead of
showing each individual transaction on the statement. You can compress by date or by
period.
Period -- compresses all transactions before a certain period.
Enter the Year and the period number that you want to compress all previous transactions
into. For example, if you are printing statements for the month of December 2002 (and
December is set up in your period-date calendar as the 12th period) and you do not want the
individual transactions for the previous months to print on the statement enter 2002 for the
year and 12 for the period.
Date -- compresses all transactions before a certain date.
Enter the date that you want to compress all previous transactions. For example, if you want
to compress all transactions before 01/10/03 into one balance line enter 1/10/03.
Note: The compress check box is not available when printing the Payables layout.
14. Click Start.
Commission Due Reports
The Commission Due Reports list commissions that are due to each salesperson. You can print
the Commission Due Report based on invoices or on cash receipts. When sales transactions are
posted to A/R, Macola ES updates the commissions due to reflect the commission amounts that
each sales person has earned.
Note: Macola ES calculates commissions due based on Amount 1 (the sale amount) of an invoice only. It
does not include Amount 2 (the total of the miscellaneous charges, the freight charges, and the taxes) when
calculating commissions.
If you are also using Order Entry, A/R automatically calculates the amount of the salesperson
commission, but you can override the calculated amount. After you invoice orders in O/E, they
generate Open Item transactions in the A/R package, and the commissions due information is
also passed along.

Chapter 4: Using Accounts Receivable
132 Accounts Receivable User Guide
Based on Cash Receipts
The Commissions Due Report Based On Cash Receipts includes only those invoice records that
are in both the commissions due and the open items and only when a payment exists in the open
items that has not been updated in the commissions due. To appear on this report, credit memo
records must also be in both. If you have paid all commissions for all payments received, there
will be no records for this report to print.
On this report, the commission amount to pay column always shows the amount of the current
commissions payment less the commission amount owed to the salesperson from the latest cash
receipt, even after you have updated the commissions due to show that you have actually paid
the salesperson. The commission amount paid column shows the total amount that you have
paid (after updating the commissions due to show that you have actually paid the salesperson)
for all payments on for this invoice.
If you are printing this report based on cash receipts and you use open item accounting, the
payment received must apply to the invoice that you are paying. If the apply to numbers do not
match, Macola ES will not calculate the commission amount to pay correctly.
A specific situation requires a detailed explanation: You create an invoice using a salesperson
that is not the default salesperson for that customer. You then receive a payment or create a credit
memo and apply it to 0 for the default salesperson. Using the To Be Matched screen, you match
the payment or the credit memo to the invoice. In this situation, Macola ES keeps the default
salesperson on that payment or credit memo record, and it creates a commission due record for
that default salesperson. (It does not create a commission due record for the salesperson used on
the invoice.)

Chapter 4: Using Accounts Receivable
lAccounts Receivable User Guide 133
Printing a Commission Due Report Based on Cash
Receipts
1. On the A/R menu, under the Statistics heading, select Commission Due, Based On Cash
Receipt. Macola ES opens the Commission Due Based on Cash Receipt screen.
2. Enter a beginning and ending Cash Receipt Date, or select the All check box for all cash
receipt dates. The system records the dates for cash receipts as the cash receipts are entered
on the Cash Flow menu.
3. Enter a beginning and ending Salesperson Number, or select the All check box for all sales
people.
4. Click Start. Macola ES generates the report in Microsoft Excel.
The report shows the sales person number and name, customer number and name, the
document number (this is the Our Ref number), the document type, the cash receipt date, the
your ref number, the commission amount due, the sales amount, the invoice total, credit
memos and debit memos, and the total receipts.
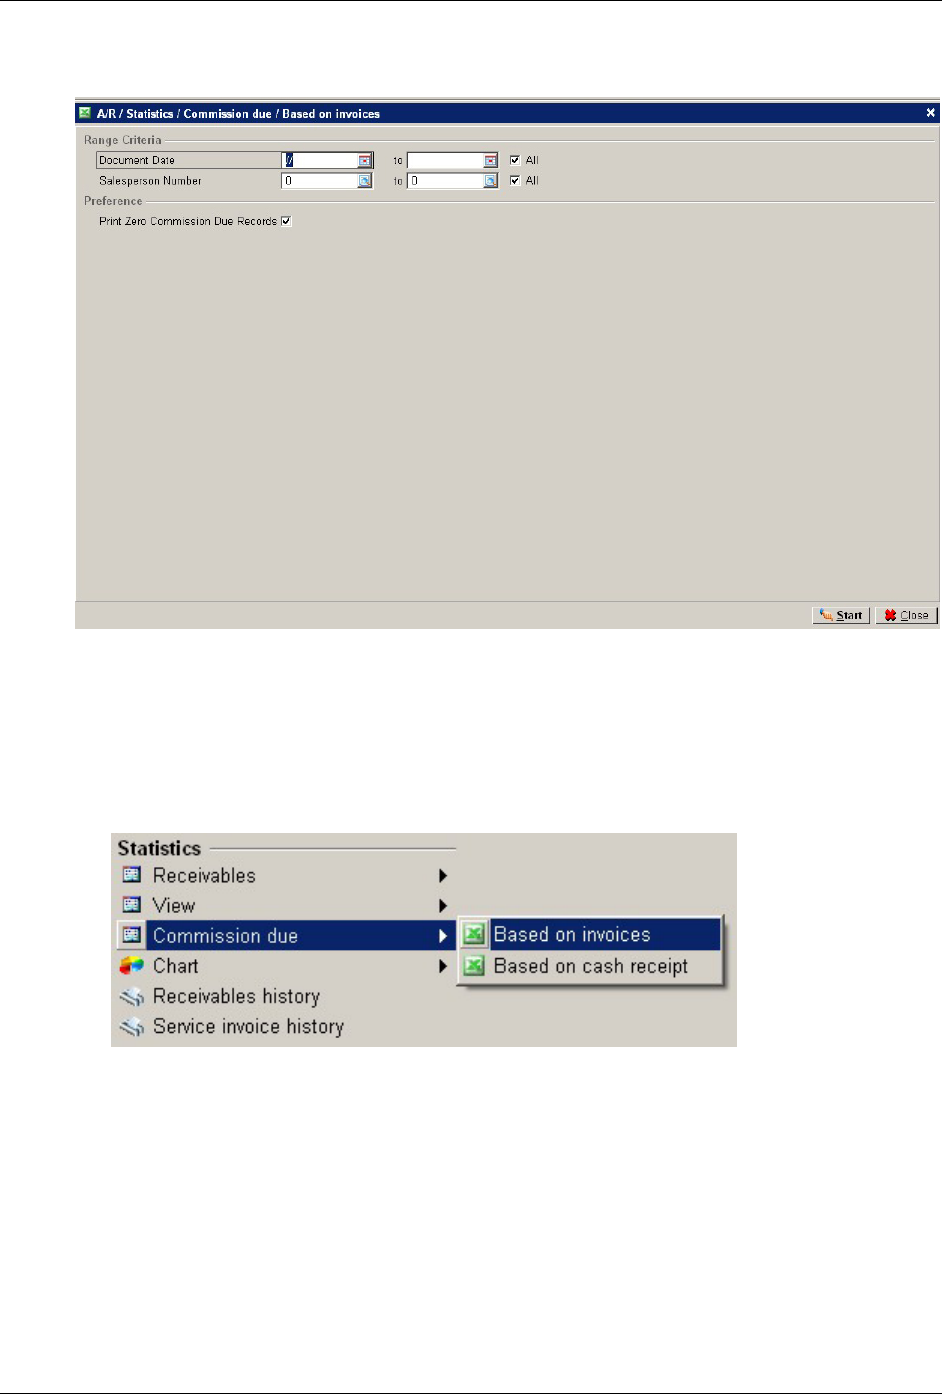
Chapter 4: Using Accounts Receivable
134 Accounts Receivable User Guide
Based on Invoices
The Commission Due Report Based On Invoices includes all invoices in the Commission Due
table.
Printing a Commission Due Report Based on Invoices
1. On the A/R menu, under the Statistics heading, select Commission Due, Based On Invoices.
Macola ES opens the Commission Due Based On Invoices screen.
2. Enter a Document Date, a range of document dates, or select the All check box to include all
dates.
3. Enter a Salesperson number, a range of salesperson numbers, or select the All check box to
include all salespeople.
4. To include on the report salespeople who have no commission due, select the Print Zero
Commission Due Records check box.
5. Click the Start button. The commission due report opens in Microsoft Excel as a spreadsheet.

Chapter 4: Using Accounts Receivable
lAccounts Receivable User Guide 135
Printing Sales Transactions
Use the Sales Edit List to verify transactions, dates, and amounts before posting. You should print
a Sales Transaction List before you post transactions.
When you enter an invoice it goes into a temporary Sales Transaction table. The transaction list is
a printout of what you have entered. If you need to make corrections, you can make them before
the transactions become permanent, upon posting. When you post the transactions, Macola ES
removes them from the temporary table and posts them to the general ledger.
Printing Transactions
1. On the A/R menu, under the Entries heading, select Print Transactions. This opens the Print
Sales Transactions screen.
2. Enter the starting Batch for the range to include on the list.
3. Enter the ending batch (To) for the range to include on the list.
4. Select the Criteria for the report:
Summary
Detail
5. Click OK. A/R generates the report.
6. Review, Export, or Print the report.
7. When finished, click Close.

Chapter 4: Using Accounts Receivable
136 Accounts Receivable User Guide
8. Click Close to close the report screen.
Posting Sales Transactions
The Post Sales Transactions screen transfers all transactions that you entered using the Enter
Sales Transactions screen to the general ledger. Posting automatically adjusts the balance that a
given customer owes your business.
When you post, Macola ES prints a report of all transactions that were posted and records
distributions you entered during data entry to the General Ledger.
Posting a Transaction
1. On the A/R menu, under the Entries heading, select Post Transactions. This opens the Post
Sales Transactions screen.
2. Enter the starting Batch for the range to post.
3. Enter the ending batch (To) for the range to post.
4. Click Criteria for the posting report:
Detail
Summary
5. Click OK. A/R generates the report.
6. Review, Export, or Print the report.
7. When finished, click Close.
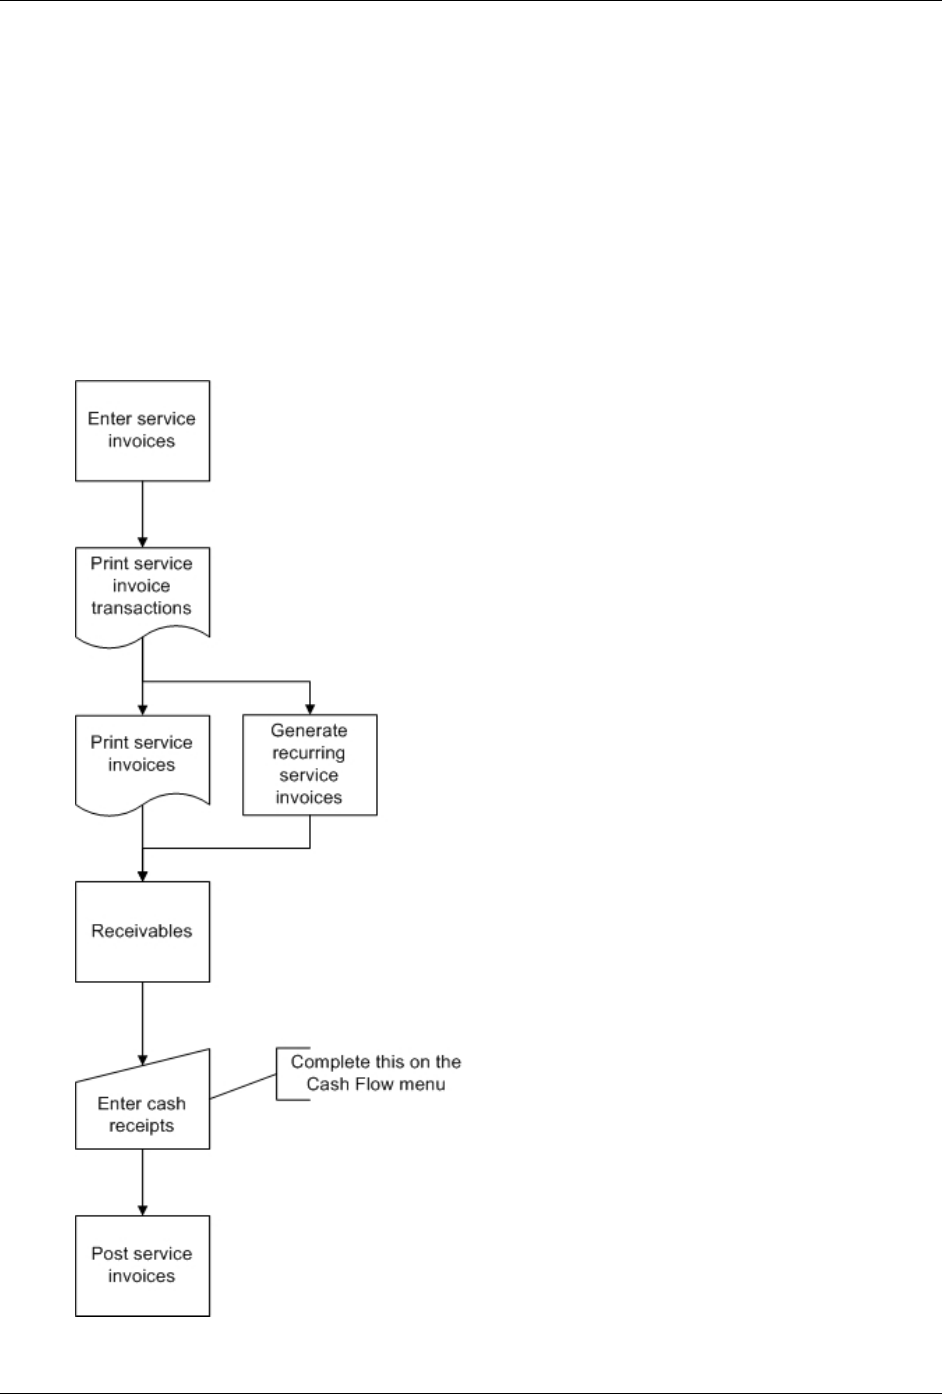
Chapter 4: Using Accounts Receivable
lAccounts Receivable User Guide 137
Entering and Processing Service
Invoices
A/R Service Invoices Process Flow

Chapter 4: Using Accounts Receivable
138 Accounts Receivable User Guide
Batch Control
A batch is a group of transactions with a common identification code. Macola ES supports the use
of batches during transaction entry, printing, and posting. Macola ES refers to the identification
code as the Batch ID. All transactions require a Batch ID.
The transaction edit lists can be printed in Batch ID order, thereby allowing data entry personnel
to verify the accuracy of their own transactions. In addition, the posting routines allow users to
post by Batch ID.
Macola ES also provides greater control over batch transaction entry through the use of the Batch
Control By User check box on the Accounts Receivable Setup screen. When the check box is
selected, Macola ES records the name of the user along with the Batch ID for every transaction.
Macola ES restricts access to a particular batch (whether being printed on an edit list or posted) to
the user who entered the batch.
Finally, Macola ES allows you to specify a user that can override Batch Control. The Override
Username is a user name that is granted access to any batch when the Batch Control by User
check box is selected. The override name is commonly the department manager or supervisor in
charge of the transaction data entry team.
Service Transaction Types
Use credit memos to credit your customerʹs account with a transaction other than a payment.
Use invoices or recurring invoices to charge or bill a customerʹs account for services rendered. If
the service is rendered on a regular schedule, then use a recurring invoice type transaction to bill
the service. The recurring invoice can occur every month or at an interval of a certain number of
days.
Use quote transactions to produce a printed quotation of the proposed services. If your customer
decides to accept your quote then you can change the quote to an invoice for billing. If your
customer decides not to accept your quote, then you can delete the transaction.
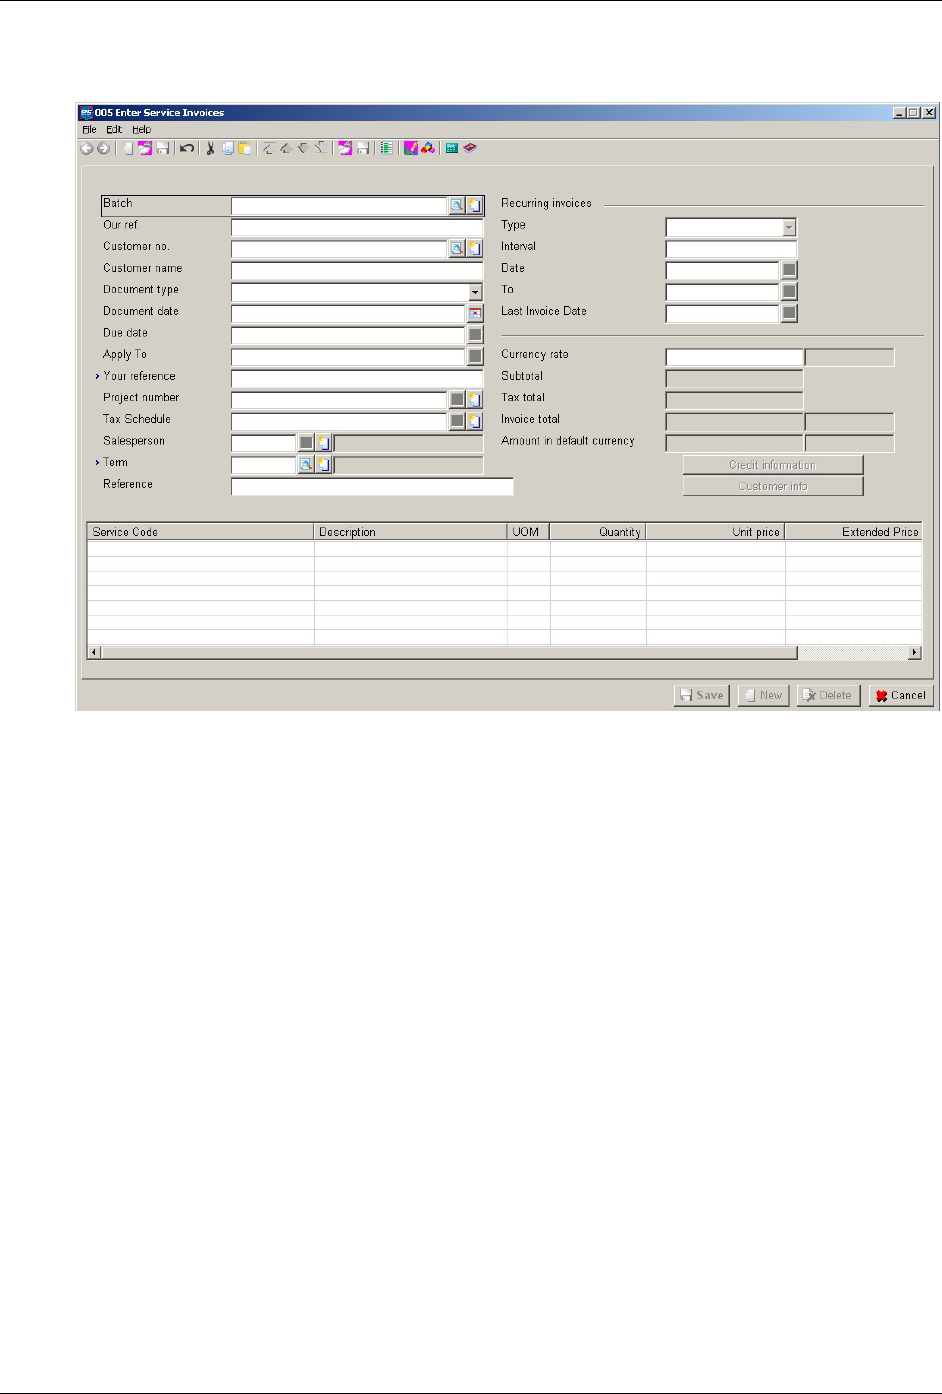
Chapter 4: Using Accounts Receivable
lAccounts Receivable User Guide 139
Entering Invoices
Use the Enter Service Invoices screen to generate customer invoices for services performed for
customers. You can enter the following types of Service Transactions:
• credit memo
• invoice
• quote
• recurring invoice
Note: In some cases, upon leaving the service number and description columns, the service number or
description may be truncated. The service number or description will be exploded to its original size when
the arrow key or field number selection is positioned at the appropriate column.
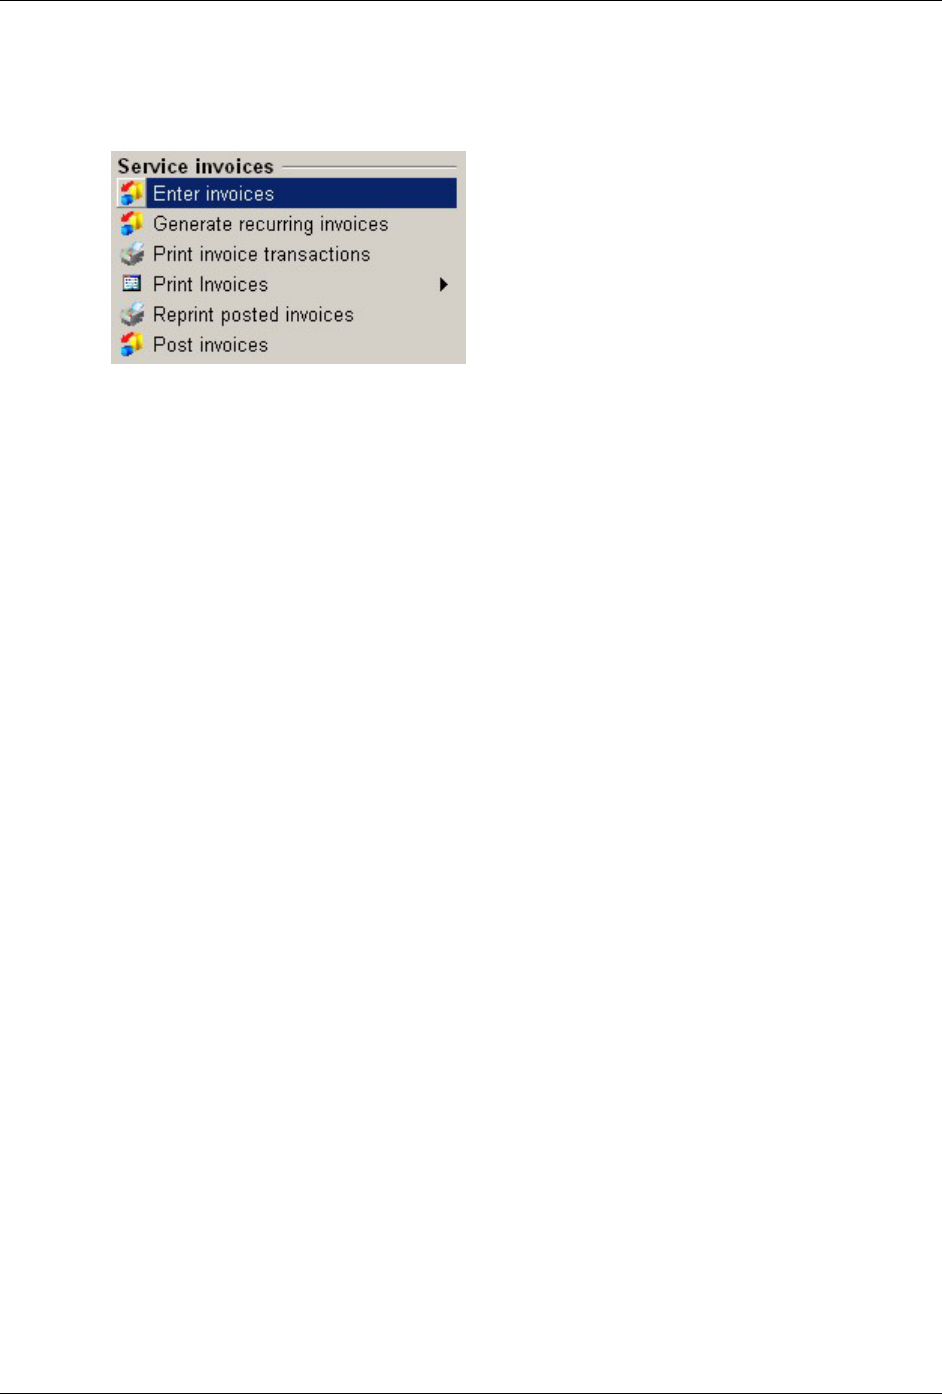
Chapter 4: Using Accounts Receivable
140 Accounts Receivable User Guide
Entering an Invoice
1. On the A/R menu, under the Service Invoices heading, select Enter Invoices. This opens the
Enter Service Invoices screen.
2. Enter the Batch for the transaction.
3. Enter the document number (Our ref) or press the F5 key for the next sequential number.
4. Enter the Customer No. You press the F7 key to search.
When you enter a valid customer number, Macola ES displays the customerʹs name.
5. Select the Document Type of the service transaction:
C = Credit Memo
I = Invoice
Q = Quote
R = Recurring invoice
Macola ES defaults the field to I=Invoice, but you can change it during transaction entry.
6. Enter a Document Date. This field defaults to the system date.
7. Enter a Due Date or press the Tab key to default date calculated from the terms code entered
for the customer (this is in the Payment condition field on the Basics tab on the Maintain
Customers screen). You can change the due date.
8. If entering a credit memo, and if the customer uses open item accounting, enter an apply to
number (Apply To No.). The apply to number is the document number this transaction
applies to. This field is available only if this is a credit memo transaction type.
You can apply the invoice without specifying a document number. Press the Tab key to
display the message ʺApply-To does not exist. Is this OK?ʺ Click Yes, if you do not want to
apply this credit memo to an existing invoice. Click No, if you need to enter a valid apply to
number for this credit memo.
9. Enter Your reference for this invoice. This field is required.
10. If you are using projects, enter the Project number that applies to the transaction.
11. Accept the default Tax Schedule or enter one. This field is not available if the Tax Schedule
Usage field is set to Not Used on the Accounts Receivable Setup screen. If the Tax Schedule
Usage field is set to Enforced, you must enter a tax schedule. If the Tax Schedule Usage field
is set to Optional, you do not have to enter a tax schedule if you assigned a tax detail code to
this customer.

Chapter 4: Using Accounts Receivable
lAccounts Receivable User Guide 141
Note: If you assigned a tax detail code to a customer, Macola ES calculates tax based on that tax
detail code if you marked the service code as taxable.
If you use Unit Price Taxation with minimum/maximum limits, you must use a tax schedule.
Refer to Special Tax Calculations for details on using Unit Price Taxation.
12. The Salesperson number field defaults to the salesperson that is assigned to the customer.
Macola ES automatically displays the salespersonʹs name. You can change this field by
entering a new salesperson number.
13. Enter the Terms code for this customer. This defaults to the Payment condition defined on
the Basics tab of the Maintain Customers screen.
14. The Reference field displays the reference ʺSV Inv:ʺ followed by the invoice number. You can
change the reference. You can enter up to 45 alpha-numeric characters in this field.
15. If you are entering a recurring invoice, you need to enter information in the Recurring
Invoice group area of the screen; otherwise, proceed to step 16.
a. Select the Recurring Type:
Monthly invoice
Number of days between invoices
b. If you selected the recurring type; ʺMʺ, enter the number of months between each invoice
in the Interval field. If you selected the recurring type ʺNʺ, enter the number of days
between invoices.
c. Enter the start Date that you want to issue the first invoice on.
d. Enter the end date (To) for the last invoice you want to issue.
e. If entering a new invoice, leave the Last Invoice Date field blank. Macola ES uses this
field to keep track of the last invoice posted from the recurring invoice. The next invoice
will be issued after the date entered in the Last Date field. When the last date field is
blank the first invoice is issued on the start date.
If you want Macola ES to skip a service invoice, set the Last Invoice Date to the date of
the last invoice that you want to skip. This tells the system that invoices were already
issued up to this date.
16. Enter a Service Code. Macola ES displays the corresponding service name in the Description
field. You can override this field.
To create a line item with just a description and a zero balance, Macola ES allows you to tab
through the Service No field to the description field. Enter a description, and then press
Enter to produce a blank line on the service invoice. This line may be used as a memo line or
for spacing purposes.
Note: In some cases, upon leaving the service number and description columns, the service number or
description may be truncated. The service number or description will be exploded to its original size when
the arrow key or field number selection is positioned at the appropriate column.
17. The UOM field defines the unit of measurement for the service. This field defaults to the Cost
Unit of Measure defined on the Service Codes Maintenance screen. For example, if a service

Chapter 4: Using Accounts Receivable
142 Accounts Receivable User Guide
is sold by the hour, Macola ES automatically defaults to the hour designation. You can
override this field to meet any special requirements of a given transaction.
18. Enter the number of units sold or provided (Quantity).
19. Enter the price of each unit provided or sold (Unit Price). This defaults to the Unit Price
defined for the service code. The system displays the Extended Price (quantity times unit
price).
20. The tax schedule defaults to the tax schedule defined for the service code. You can enter a
different tax schedule. This field is not available if the Tax Schedule Usage field is set as Not
Used on the Accounts Receivable Setup screen or if you assigned a tax detail code to this
customer. If the Tax Schedule Usage field is set as Enforced, you must enter a tax schedule.
Tax schedules are maintained on the G/L menu.
Note: If the tax schedule for the line item and the tax schedule for the header (step 11) are different, Macola
ES performs a matching process to determine if any of the tax detail codes in the tax schedules match. If a
code is in both tax schedules, taxes are calculated based on that tax detail code. If there are no matching tax
detail codes, then no tax is calculated.
21. Select the Dsp Tax check box to open the Sales Tax Display screen. This shows the sales tax
for a line item. Click Cancel to close the screen. To see this field, the customer must have a
tax schedule.
22. Click Save.
23. Continue adding service codes, or click Cancel to exit.
Customer Info and Credit History Windows
The Enter Invoices screen has two buttons: Customer Information and Credit History. Each of
these display different types of information. Both are display-only pop-up windows.
The Customer Information window shows basic customer information. This window displays
the customer address, phone, comments, and amount of credit remaining. For more information
on this view, see View Customer Information.
The Credit History window shows basic customer credit information including credit limit,
credit rating, and customer balance. For more information on this view, see View Customer
Credit History Information.
Deleting Service Invoices
Deleting a Service Invoice
1. On the A/R menu, under the Service invoices heading, select Enter Invoices.
2. Enter the Batch for the transaction that you want to delete.
3. Enter the document number (Our ref) that you want to delete.
4. Click the Delete button.
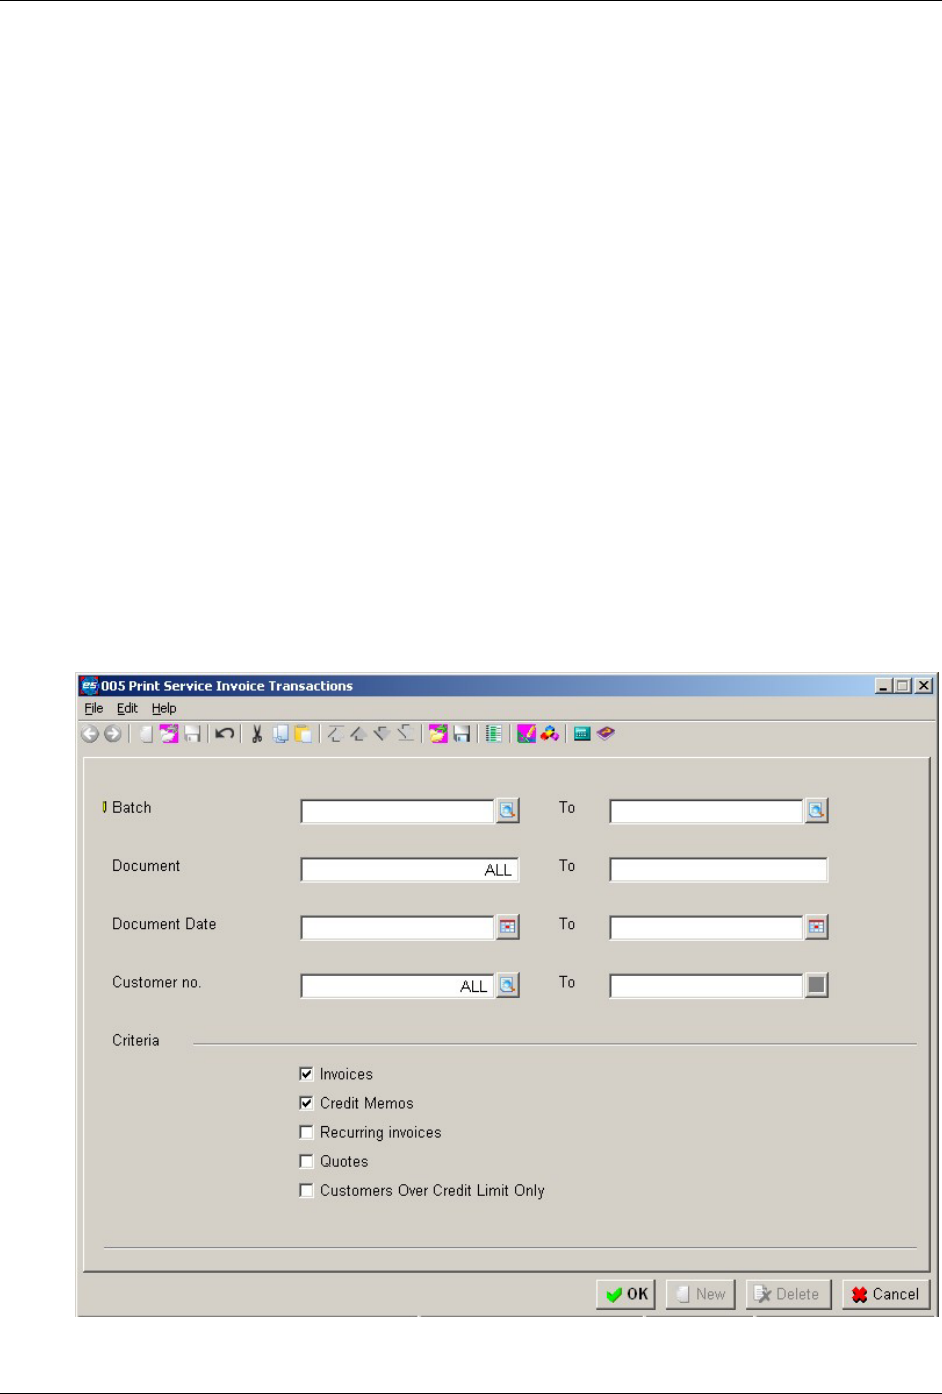
Chapter 4: Using Accounts Receivable
lAccounts Receivable User Guide 143
5. The Delete Trx or Batch screen opens.
Click the Delete Transaction button if you want to delete only this transaction.
Click the Delete Batch button if you want to delete all transactions in this batch.
6. Click the Cancel button to exit the enter invoices screen.
Deleting All Service Invoice Transactions in a Batch
1. On the A/R menu, under the Entries heading, select Sales Transactions.
2. Enter the Batch that you want to delete.
3. Enter a document number (Our ref) for this batch number.
4. Click the Delete button.
5. The Delete Trx or Batch screen opens.
Click the Delete Transaction button if you want to delete only this transaction.
Click the Delete Batch button if you want to delete all transactions in this batch.
6. Click the Cancel button to exit the enter invoices screen.
Printing Invoice Transactions
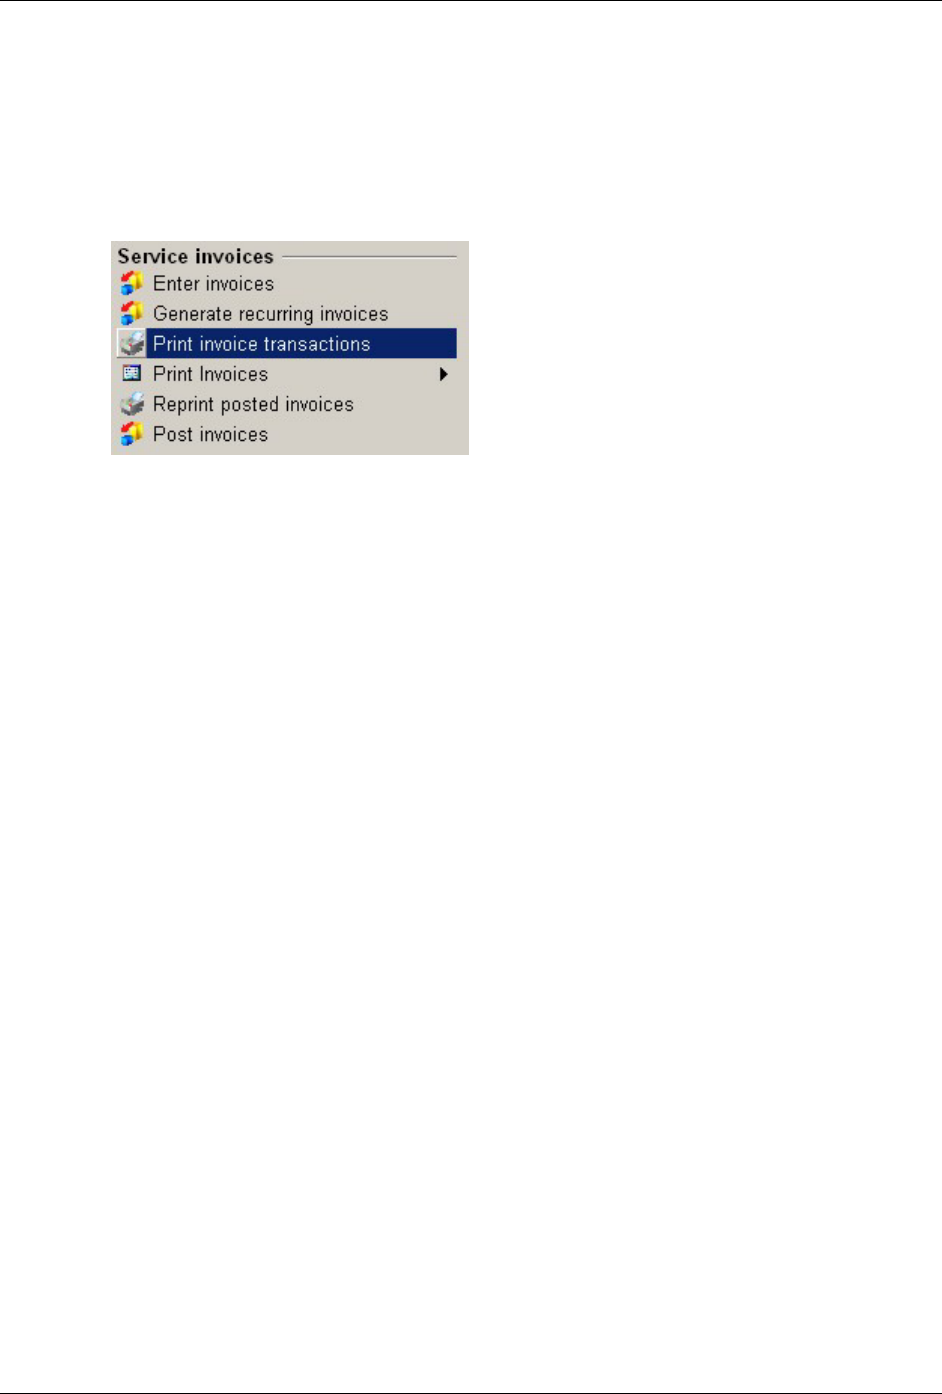
Chapter 4: Using Accounts Receivable
144 Accounts Receivable User Guide
The Invoice Transaction List allows you to verify service invoice transaction data entry and
shows which invoices will print when you are ready to print invoices.
Printing Invoice Transactions
1. On the A/R menu, under the Service invoices heading, select Print Invoice Transactions. This
opens the Print Service Invoice Transactions screen.
2. Enter the first Batch for the range to include on the list. If you leave this field blank, it
defaults to ALL, and Macola ES skips over the To field.
3. Enter the last batch (To) for the range to include on the list. This field defaults to the value
entered in the starting Batch field.
4. Enter the first Document for the range to include on the list. If you leave this field blank, it
defaults to ALL and Macola ES skips over the To field.
5. Enter the last document number (To) for the range to include on the list. This field defaults to
the value entered in the starting Document field.
6. Enter the first Document Date for the range to include on the list. If left blank, this field
defaults to ALL, and Macola ES skips over the To field.
7. Enter the last document date (To) for the range to include on the list. This field defaults to the
value entered in the starting Document Date field.
8. Enter the first Customer No for the range to include on the list. If left blank, this field
defaults to ALL, and Macola ES skips over the To field.
9. Enter the last customer number (To) for the range to include on the list. This field defaults to
the value entered in the starting Customer No. field.
10. To include invoices on the list, select the Invoices check box.
11. To include credit memos on the list, select the Credit Memos check box.
12. To include recurring invoices on the list, select the Recurring Invoices check box.
13. To include quotes on the list, select the Quotes check box.
14. To include only customers who have exceeded their credit limit, select the Show Customers
Over Credit Limit Only check box.
15. Click OK. Macola ES displays the Print Options screen.
16. Select the desired output device.
17. Click OK. Macola ES prints the list.
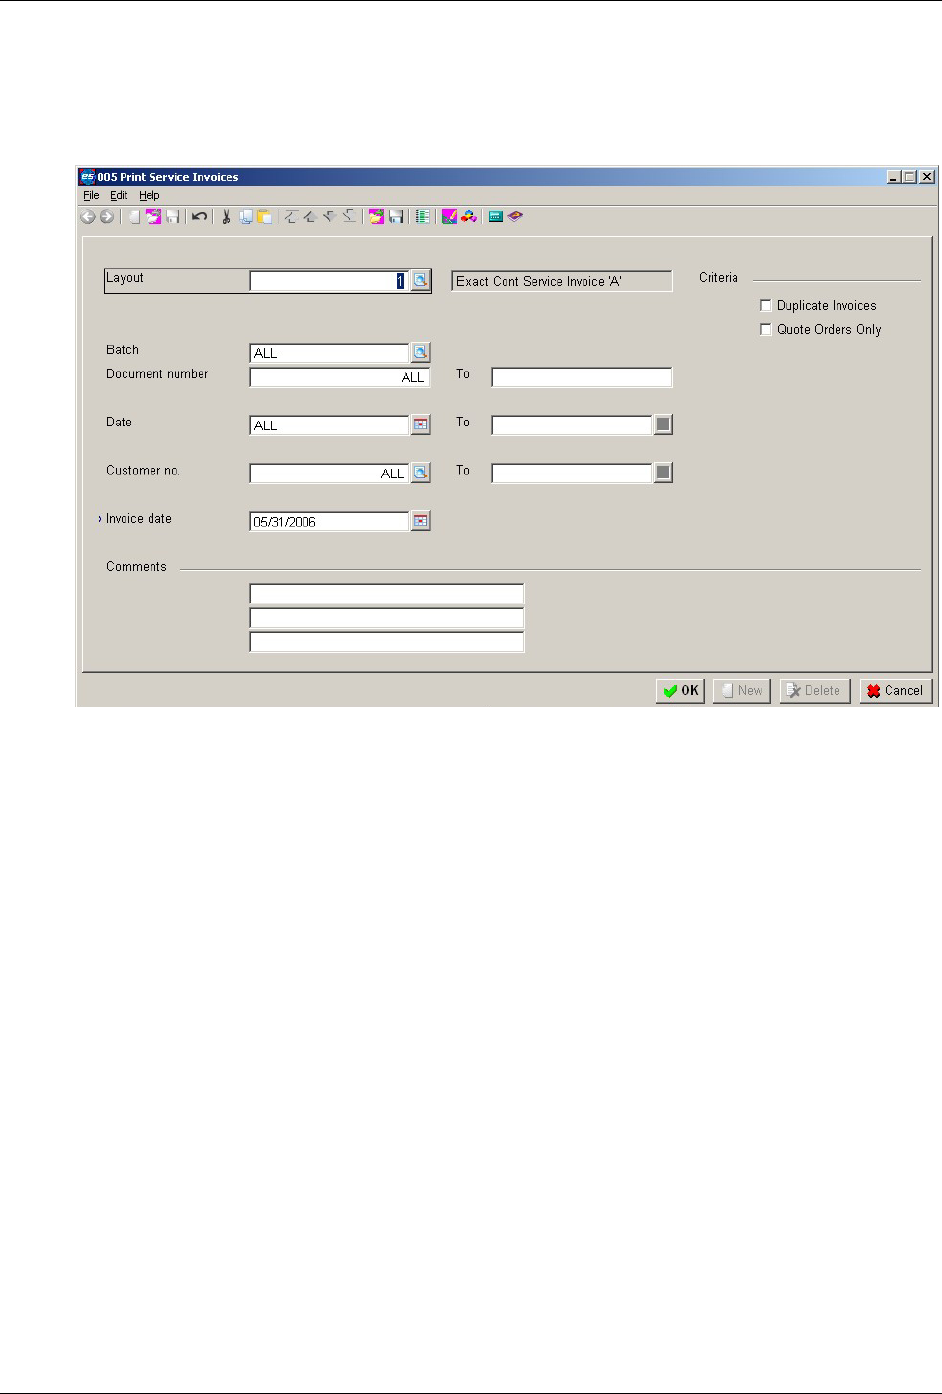
Chapter 4: Using Accounts Receivable
lAccounts Receivable User Guide 145
18. Click Cancel to exit.
Printing Invoices
Use the Print Service Invoices screen to print previously entered invoices.
Unless you set up your own customized forms in the System Manager Form Designer, the system
prints invoices on the standard Macola ES invoice form. You can customize the existing Macola
ES forms or to design your own forms to meet your business needs.
Printing Invoices from Multiple Workstations
Invoices are printed by batch. This means that invoices can be printed from multiple
workstations simultaneously as long as they are in different batches.
Macola ES does not allow more than one workstation to print the same Batch ID at the same time.
If one workstation is printing ALL batch IDs, no other workstations can print any invoices until
the first workstation is done printing. If any workstation is printing a single batch, no other
workstation can select to print ALL invoices until the first workstation is done printing.
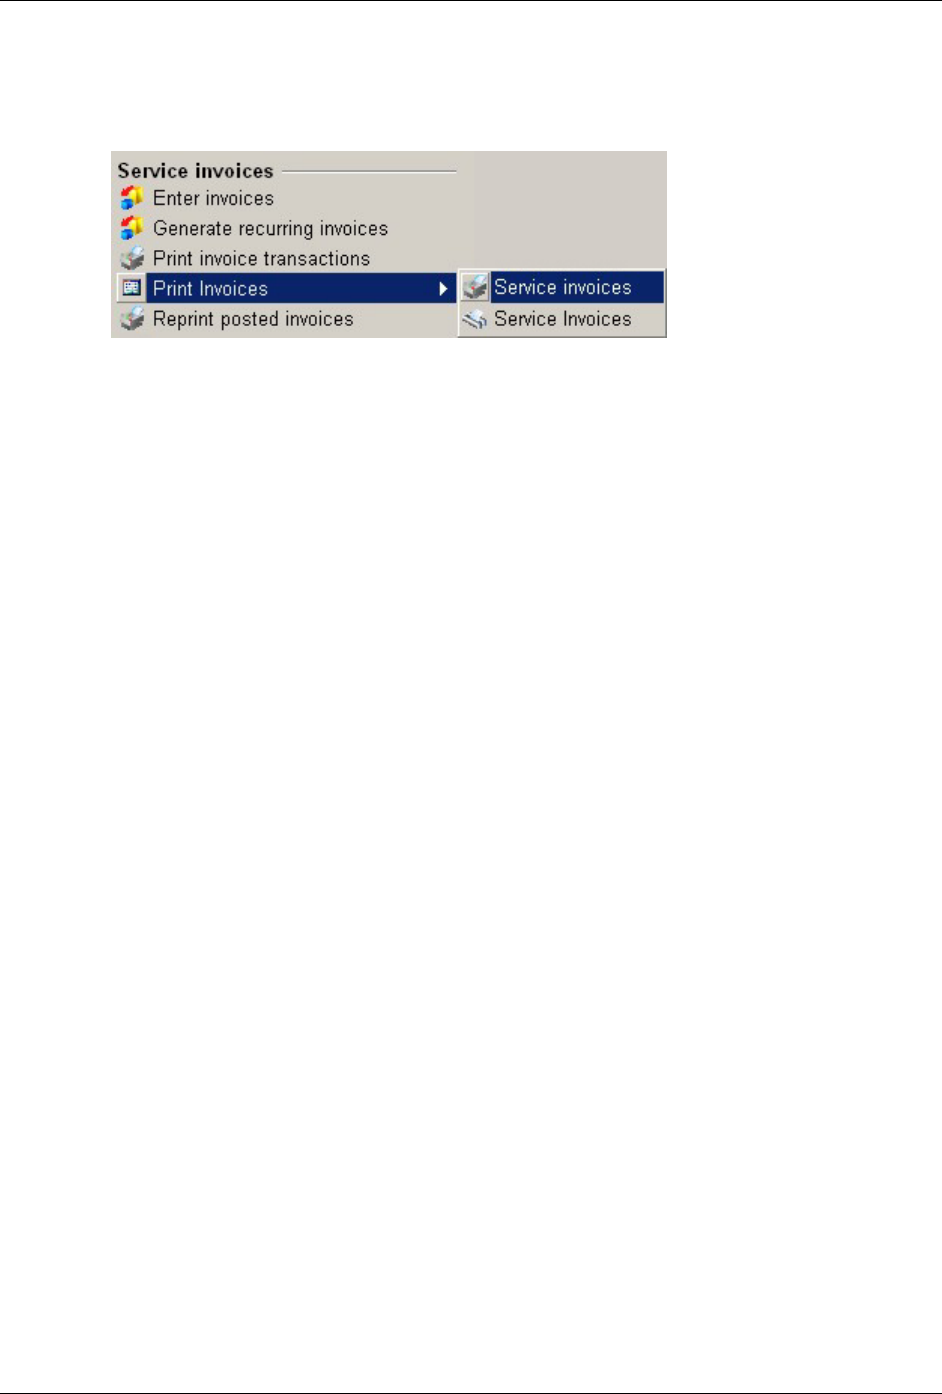
Chapter 4: Using Accounts Receivable
146 Accounts Receivable User Guide
Printing an Invoice
1. On the A/R menu, under the Service invoices heading, select Print Invoices, Service Invoices.
This opens the Print Service Invoices screen.
2. Enter a Layout for the service invoices.
3. Specify the correct Serial Code on the Print Service Invoices screen. The correct serial code
will be the one that you specified in the Serialized Document Control application for this
document type. (This field is available only when the Use Serial Docs check box is selected on
the Accounts Receivable Setup screen.) Macola ES displays the next serial number.
4. Enter the Batch for the service invoices you want to print. To print all service invoices,
regardless of the Batch ID, tab through this field and it defaults to ALL. Macola ES does not
allow more than one workstation to print the same Batch ID at the same time. If one
workstation is printing ALL batch IDs, no other workstations can print any invoices until the
first workstation is done printing. If any workstation is printing a single batch, no other
workstation can select to print ALL invoices until the first workstation is done printing.
5. Enter the first Document No for the range of service invoices to print. If this field is left
blank, it defaults to ALL and Macola ES skips over the To field.
When you enter an A/R service invoice while using Serialized Document Control and you
press the F5 key to select the next document number, the number that displays on the screen
defaults from the Starting Invoice No field on the Accounts Receivable Setup screen, as it
normally does. However, when you print service invoices and specify the correct serial code,
Macola ES uses the next document number associated with that serial code, so the service
invoices print with the correct, serialized numbers.
6. Enter the last document number (To) for the range of service invoices to print. This field
defaults to the value entered in the starting Document No. field.
7. Enter the first document Date for the range of service invoices to print. If this field is left
blank, it defaults to ALL and Macola ES skips over the To field.
8. Enter the last document date (To) for the range of service invoices to print. This field defaults
to the value entered in the starting Date field.
9. Enter the first Customer No for the range to include on the list. If left blank, this field defaults
to ALL, and Macola ES skips over the To field.
10. Enter the last customer number (To) for the range to include on the list. This field defaults to
the value entered in the starting Customer No. field.
11. Enter the Invoice Date to appear on the forms. This field defaults to the system date.
12. To print duplicate invoices, select the Print Duplicate Invoices check box.
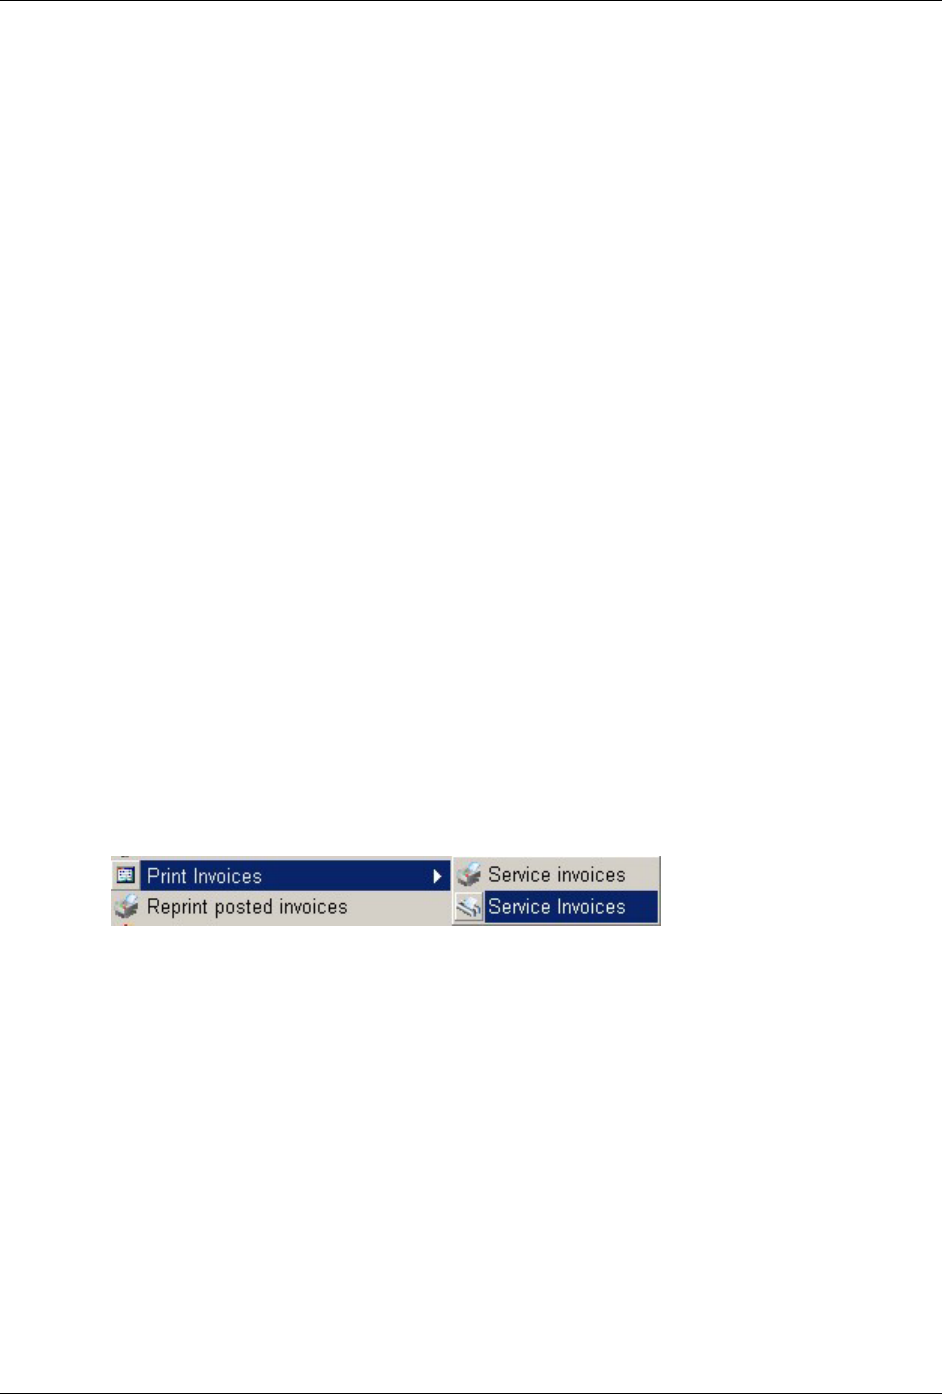
Chapter 4: Using Accounts Receivable
lAccounts Receivable User Guide 147
Note: The Print Duplicate Invoices check box allows you to reprint invoices that have been printed but
not posted. This check box needs to be selected only to reprint invoices that were marked as printed when
you answered Yes to the prompt ʺDid the invoices print correctlyʺ. If you answered the prompt with a No,
the invoice can be printed again without selecting this check box.
When using Serialized Document Control, this check box is not available. The purpose of serialized
document control is to have one document (invoice) number per document, therefore you cannot print a
duplicate invoice.
13. To print only quotes, select the Quote Orders Only check box.
14. You can enter up to three lines of 35 characters each to print on the invoices in the Default
Comments.
15. Click OK. The only print device available is the printer.
16. Click OK. Macola ES prints the invoices.
When the service invoices have been printed, Macola ES prompts, ʺDid the invoices print
correctly?ʺ If you are using serialized documents, Macola ES writes a record to the serial
history whether you select Yes or No. If you select Yes, the status is P (Printed); if you select
No, the status is V (Void). This prevents serialized document numbers from being used again
and keeps track of what happened to each serialized document.
When service invoices with serialized document numbers are posted, Macola ES uses the
number that they were printed with; the document number that appeared on the Enter
Service Invoices screen is no longer used.
Printing an Invoice (Crystal Reports Option)
1. On the A/R menu, under the Service Invoices heading, select Print Invoices, Service Invoices.
2. Enter a beginning and ending Batch number, or select the All check box. Macola ES does not
allow more than one workstation to print the same Batch ID at the same time. If one
workstation is printing ALL batch IDs, no other workstations can print any invoices until the
first workstation is done printing. If any workstation is printing a single batch, no other
workstation can select to print ALL invoices until the first workstation is done printing.
3. Enter a beginning and ending Document No, or select the All check box. When you enter an
A/R service invoice while using Serialized Document Control and you press the F5 key to
select the next document number, the number displayed defaults from Starting Invoice No
field on the Accounts Receivable Setup screen, as it normally does. However, when you print
service invoices and specify the correct serial code, Macola ES uses the next document
number associated with that serial code, so the service invoices print with the correct
serialized numbers.
4. Enter a beginning and ending Date, or select the All check box.

Chapter 4: Using Accounts Receivable
148 Accounts Receivable User Guide
5. Enter a beginning and ending Customer No, or select the All box.
6. To print additional or duplicate invoices, select the Duplicate Invoices check box.
7. To print invoices for only quote orders, select the Quote Orders Only check box.
8. Enter the Invoice Date to appear on the invoices.
9. In the Comments fields, you can enter up to three lines of 35 characters each to print on the
invoices.
10. Click Start.
Generating Recurring Invoices
Use service invoices to bill your customers for services performed. Use the recurring invoice type
to bill your customers for services performed on a regularly scheduled basis, either monthly or
every certain number of days.
Each recurring invoice type has a starting date and an ending date. The starting date is the date
the first invoice is generated. The ending date is the date the last invoice will be generated.
Once you set up the recurring invoice type transactions you must generate recurring invoices to
create the invoices to print. Entering a recurring service invoice provides a template for the
service invoices you will generate. Once the last date is updated to the ending date, service
invoices will not be generated for that recurring invoice.
When you generate recurring invoices you select the date to generate recurring invoices through.
Any recurring invoice type transaction that has a last date prior to that date and has an invoice
due to generate, based on the interval and date, will have a service invoice generated. Even if
recurring invoices are not generated on a regular basis, invoices are not missed. The Generate
Recurring Invoices application will generate all invoices due since the last generation, you do not
have to generate recurring invoices on a regular schedule. You can generate the invoices in
advance and print them when you want to send them.
Generating Recurring Invoices
1. On the A/R menu, under the Service Invoices heading, select Generate Recurring Invoices.
2. Enter a Generate Recurring Invoices Through date. This is the date through which Macola
ES will generate recurring invoices during this process. For example: If you generate invoices
once a month through the end of the month, enter the last day of the month. If invoices are
due to be generated by the date entered, invoices will be generated. For example, if you have
entered a new recurring invoice with a start date of 09/01, and you have already generated
invoices through 9/30, you can generate again for 09/01 and only the new invoice will be
generated.
3. When you generate recurring invoices, the last date field is updated on the recurring invoice
record so that you will not generate a duplicate invoice. Even if you generate using the same
through date again, only recurring invoices due to be generated based on Type, Interval, and
last date will be generated.
Click the OK button.
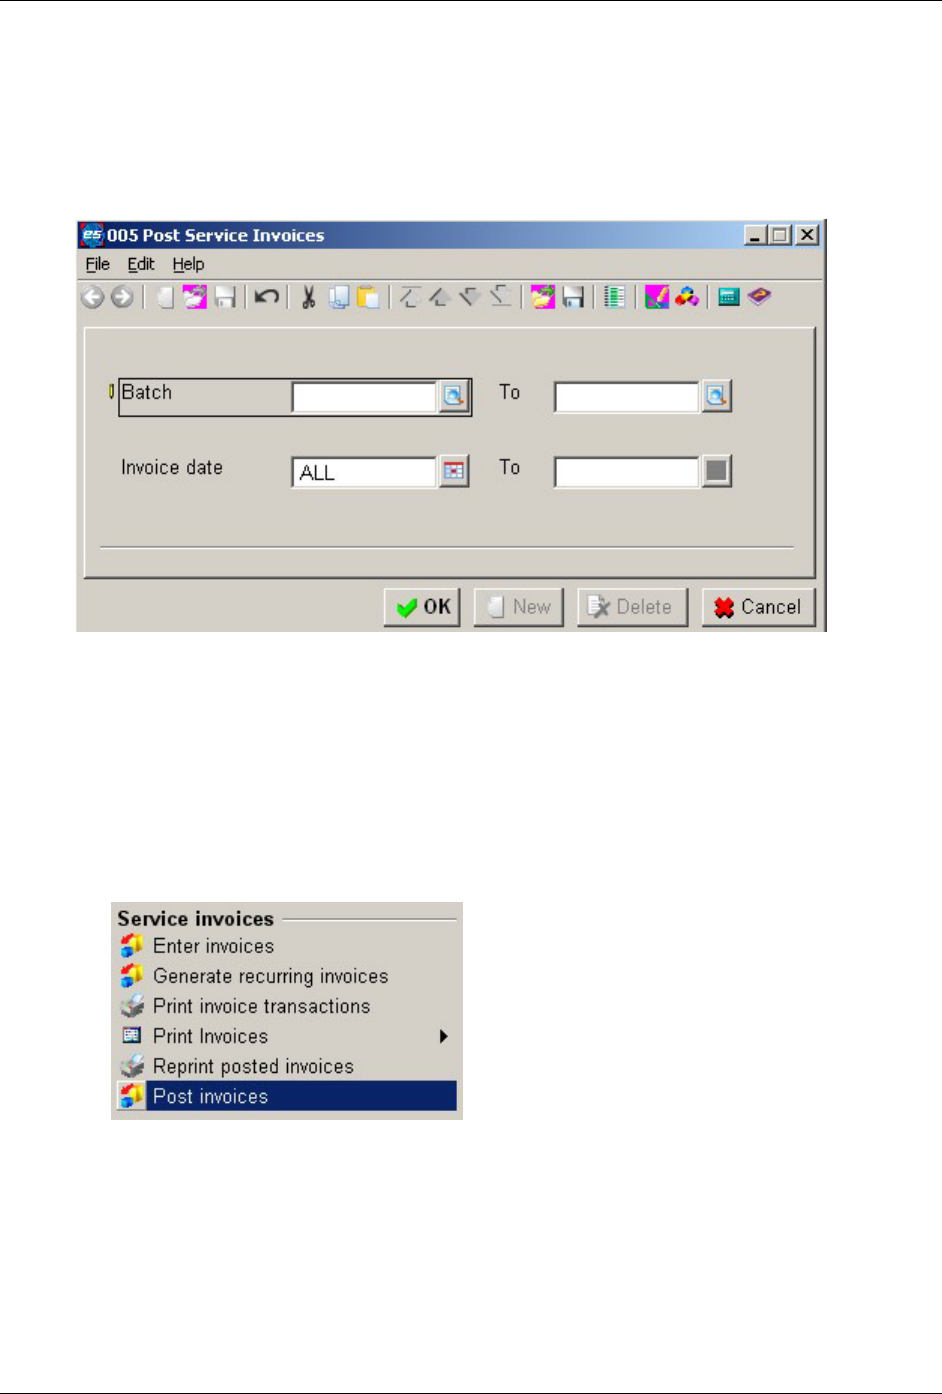
Chapter 4: Using Accounts Receivable
lAccounts Receivable User Guide 149
4. At the prompt ʺAre you sure you wish to do this?ʺ --
Click Yes to generate the invoices.
Click No to exit the application.
Posting Invoices
Once you have printed the invoices, you can post them. Posting the invoices automatically
adjusts the balance that a customer owes your business for services rendered, period to date
sales, and other related variables.
When post, Macola ES prints a journal of all invoices posted.
Posting an Invoice
1. On the A/R menu, under the Service Invoices heading, select Post Invoices. This opens the
Post Service Invoices screen.
2. Enter the first Batch for the range of service invoices to post. If left blank, this field defaults to
ALL and Macola ES skips over the To field.
3. Enter the last batch (To) for the range of service invoices to post. This field defaults to the
value of the starting Batch field.
4. Enter the first Invoice Date for the range of service invoices to post. If left blank, this field
defaults to ALL and Macola ES skips over the Ending Invoice Date field.

Chapter 4: Using Accounts Receivable
150 Accounts Receivable User Guide
5. Enter the last invoice date (To) for the range of service invoices to post. This field defaults to
the value of the Starting Invoice Date field.
6. Click OK. Macola ES displays the Print Options screen.
7. Select the desired output device.
8. Click OK. Macola ES posts the invoices and prints a journal.
Reprinting Posted Invoices
Occasionally it may be necessary to reprint a service invoice that you have already posted. This
may be due to the customer losing the original, the originals being damaged before mailing, etc.
Note: This option is for Service Invoices only.
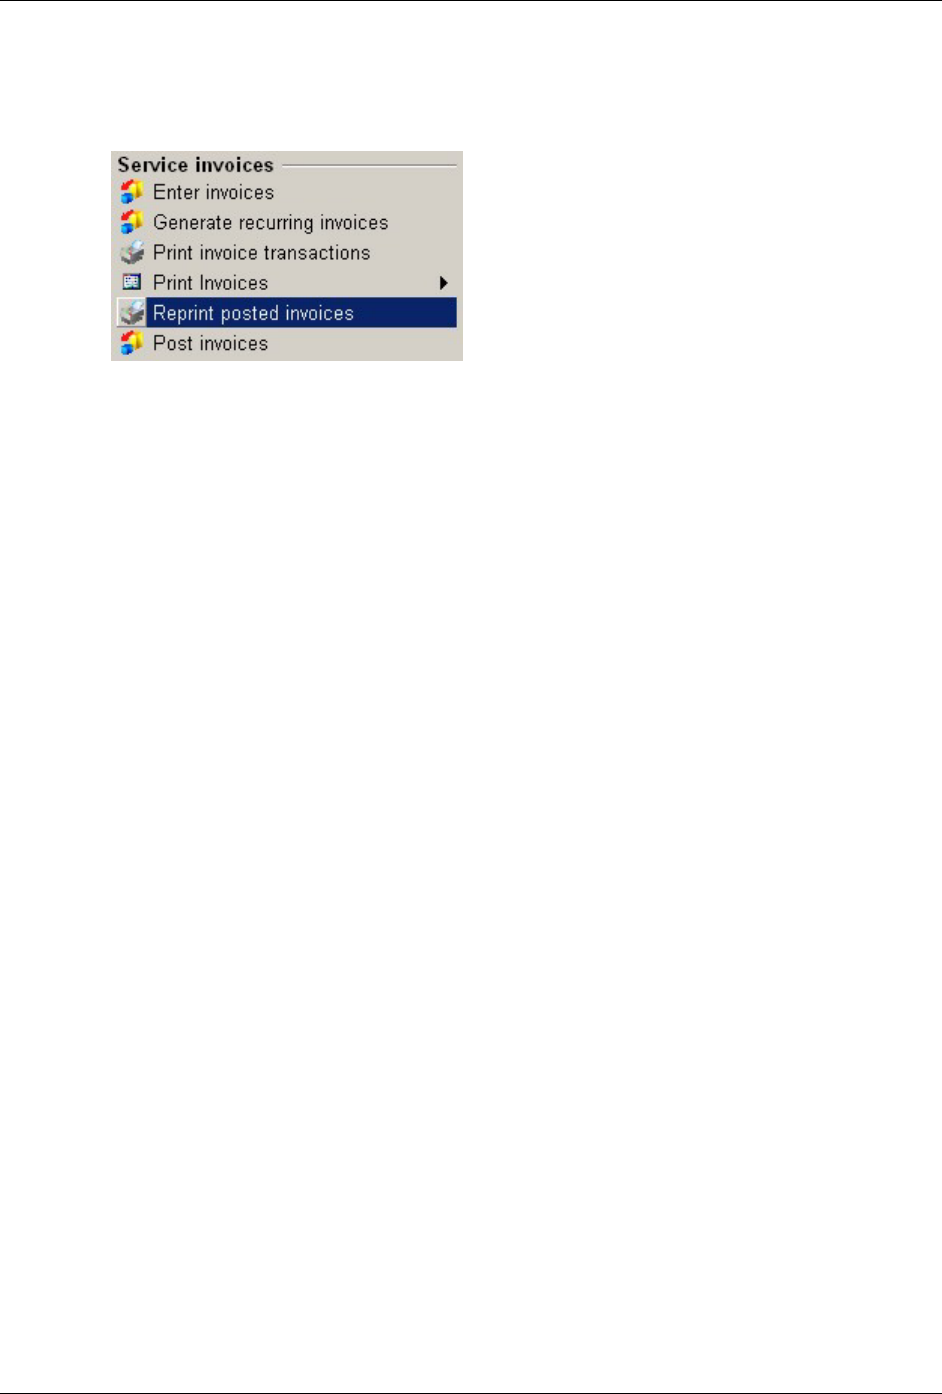
Chapter 4: Using Accounts Receivable
lAccounts Receivable User Guide 151
Reprinting a Posted Invoice
1. On the A/R menu, under the Service Invoices heading, select Reprint Posted Invoices. The
Reprint Posted Invoices screen opens.
2. Select the Layout you want to print. Macola ES automatically displays the layout description.
3. Enter the first Document number for the range of service invoices to print. If you leave this
field blank, it defaults to ALL and Macola ES skips over the To field.
4. Enter the last document number (To) for the range of service invoices to print. This field
defaults to the value of the starting Document field.
5. Enter the first Date for the range of services invoices to print. If you leave this field blank, it
defaults to ALL and Macola ES skips over the To field.
6. Enter the last date (To) for the range of service invoices to print. This field defaults to the
value of the starting Date field.
7. Enter the date for the invoices (Invoice Date).
8. Enter any Comments to print on the invoice.
9. Click OK. Macola ES displays the Print Options screen.
10. Select the desired output device.
11. Click OK.
12. At the prompt ʺPrint alignments?ʺ --
Click Yes to print a sample to check alignments. If the sample printed correctly, click No on
the next prompt to print the invoices.
Click No to print the invoices.
13. Click Cancel to close the screen.
Creating and Printing Statements, Labels, and
Reminders
Customer Labels
The Company settings screen has a Documents tab that allows you select a layout for customer
labels, modify an existing layout, or create a new layout. You can select a layout when you print
customer labels.
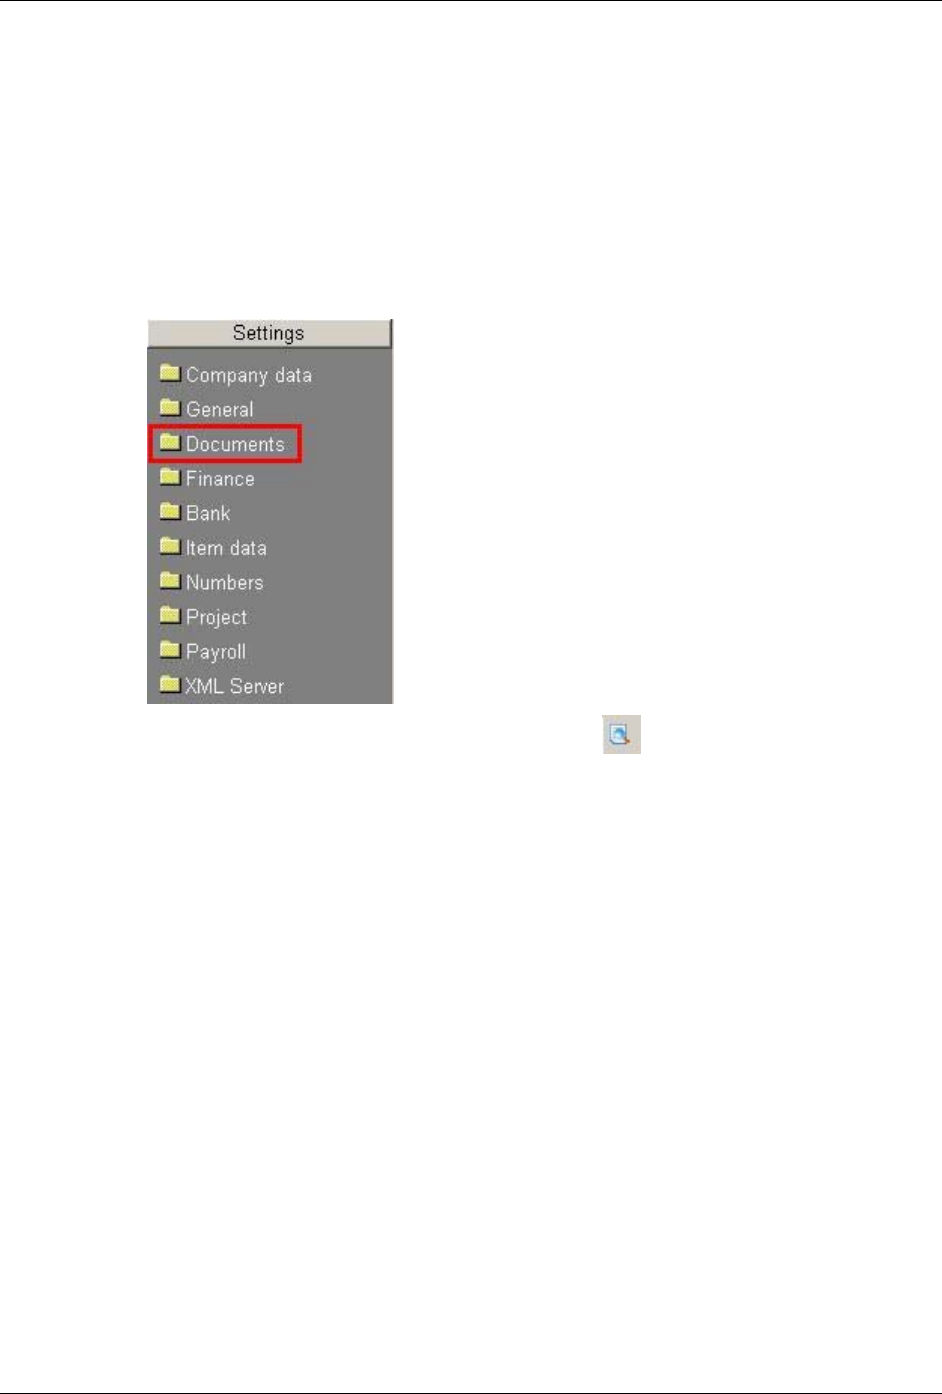
Chapter 4: Using Accounts Receivable
152 Accounts Receivable User Guide
You can use Customer Labels as address labels for correspondence with customers, as labels for
files, or for any other purpose. Typically, the customer label includes the customer name and
address. The Customer Labels screen allows you to edit the label layouts or create new ones. You
can change the default layout, XXEXACT1, but you cannot delete the layout.
Creating a Customer Label Layout
1. On the System menu, under the Company heading, select Company settings.
2. Click the Documents tab.
3. Beside the Customer labels field, click the Select button . This opens the Layout selection
screen.
4. Click New. The Layout window opens with a blank customer label layout.
5. Use the menu options from the Edit, Insert menu to add database fields, text, frames, or
graphics. See Layout Menu Selections and Definitions for a description of each menu option.
6. When you have completed the design of your label, click the Save toolbar button. The system
displays the Layout description dialog.
7. Enter a Layout description of the layout you have created. This description should help
identify this layout from all other layouts.
8. Enter a unique Name for the layout.
Note: Click Browse if you want to save this layout as a preexisting name and description. This will
overwrite the existing layout.
9. Click OK. The system displays the name and description in the Layout window.
10. Select File, Close to close the layout.
11. Click Cancel to close the Label layout screen.
Chapter 4: Using Accounts Receivable
lAccounts Receivable User Guide 153
Layout Menu Selections and Definitions
Menu Option Toolbar
Button
Shortcut
Keys
Description
File, New Y Ctrl+N Opens a new layout window.
File, Open Y Ctrl+O Opens an existing layout. This option displays the
Layout dialog with a list of the available layouts.
File, Close Closes the active layout.
File, Save Y Ctrl+S Saves the active layout. This option overwrites the
existing layout.
File, Save as Saves an existing layout using a different name.
This option allows you change a layout without
overwriting the existing layout.
File, Import Imports a layout file.
File, Export Exports the layout.
File, Delete
Layout
Deletes a layout. You cannot delete the default
layout, XXEXACT1.
File, Print Y Ctrl+P Prints the active layout. The print out displays the
database field names.
File, Print
Preview
Y Displays how the form will look when printed.
File, Exit Exits the application. The system prompts you to
save changes before exiting.
Edit, Cut Y Ctrl+X Cuts selected text to the clipboard.
Edit, Copy Y Ctrl+C Copies selected text to the clipboard.
Edit, Paste Y Ctrl+V Pastes text from the clipboard.
Edit, Change
field
Displays the database field dialog allowing you to
edit the length, alignment, introductory, and
subsequent text, and the color of the text.
Edit, Block
settings
Not applicable
Edit, Layout
settings
Not applicable
Edit, Delete Deletes a selected object from the layout.
Edit, Original
size
Not applicable
Edit, Show
underlying field
Not applicable
Edit, Mark all Ctrl+M Select all objects on the layout.
Insert,
Database field
Inserts a field on the layout.
Insert, Text
field
Inserts text to print on the layout.
Insert,
Calculation field
Not applicable
Insert, Frame Creates a frame around an object on the layout.
Insert, Image Inserts an image on the layout. You can size and
move the image.
View, Visibility Allows you to select which sections display on the
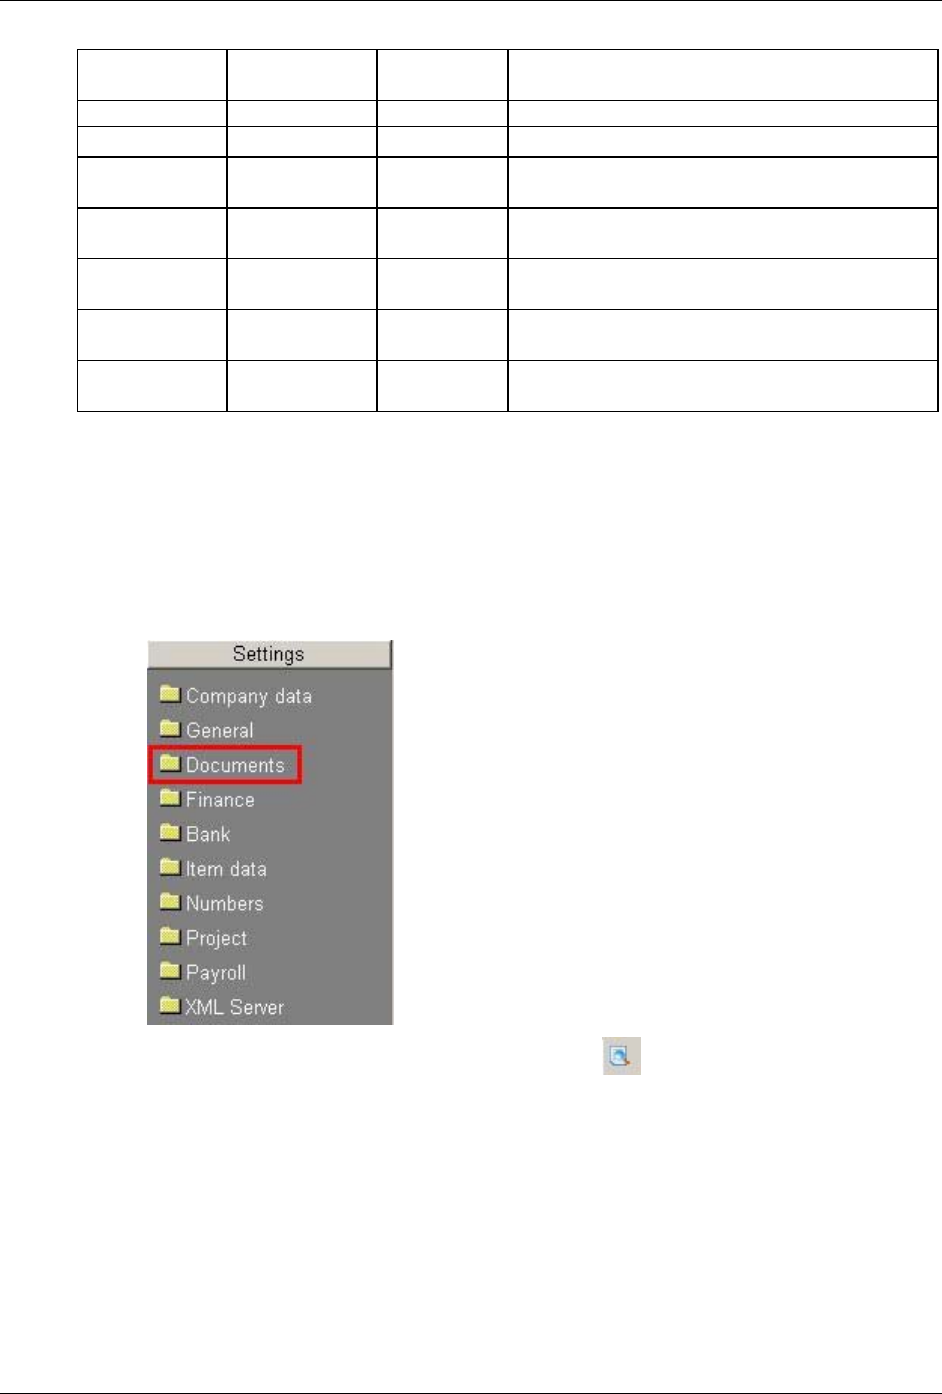
Chapter 4: Using Accounts Receivable
154 Accounts Receivable User Guide
Menu Option Toolbar
Button
Shortcut
Keys
Description
layout.
View, Grid: Use Not applicable
View, Grid:
Draw
Displays a grid to help align the objects on the
layout.
Window,
Cascade
Arranges all open layout windows, cascaded.
Window, Show
all
Arranges all open layout windows horizontally.
Window,
Arrange icons
Arranges the minimized layout windows in a
straight line at the bottom of the screen.
Help, Exact
Help
Y F1 Displays available help topics for this screen.
Printing a Customer Label Layout
Note: You can also use Print Preview to view how the layout will look when printed. The Print Preview
mode allows you to zoom in, zoom out, and provides options to print the layout or close Print Preview.
1. On the System menu, under the Company heading, select Company settings.
2. Click the Documents tab.
3. Beside the Customer labels field, click the Select button .
4. Select the layout you want to preview and print, and click the Preview button.
5. Click the Print button to print the layout.
6. Click Close to close the preview screen. The leaves the Layout screen open.
7. Make any desired changes to the layout, or select File, Exit to close the Layout screen.
8. Click the Cancel button to close the Layout select screen.

Chapter 4: Using Accounts Receivable
lAccounts Receivable User Guide 155
Editing a Customer Label Layout
1. On the System menu, under the Company heading, select Company settings.
2. Click the Documents tab.
3. Beside the Customer labels field, click the Select button . This opens the Layout selection
screen.
4. Highlight the customer label layout you want to edit.
5. Click Edit. The Layout window displays with the customer label layout.
6. You can now edit, add, or remove the objects on the layout. Use the Insert menu options to
add database fields, text, frames, or graphics; or use the Edit menu options to delete or
change the existing objects. See Layout Menu Selections and Definitions for a description of
each menu option.
7. When you have completed the design of your label, click the Save toolbar button to save the
changes to the existing layout file or click Save as to display the Layout definition dialog.
If necessary, complete Steps 7 through 9 for the Layout definition dialog. Otherwise, skip to
Step 10.
8. Enter a Layout description of the layout you have created. This description should help
identify this layout from all other layouts.
9. Enter a unique Name for the layout.
Note: Click Browse if you want to save this layout as a preexisting name and description. This will
overwrite the existing layout.
10. Click OK. The system displays the name and description in the Layout window.
11. Select File, Close to close the layout.
12. Click Cancel to close the Label layout screen.
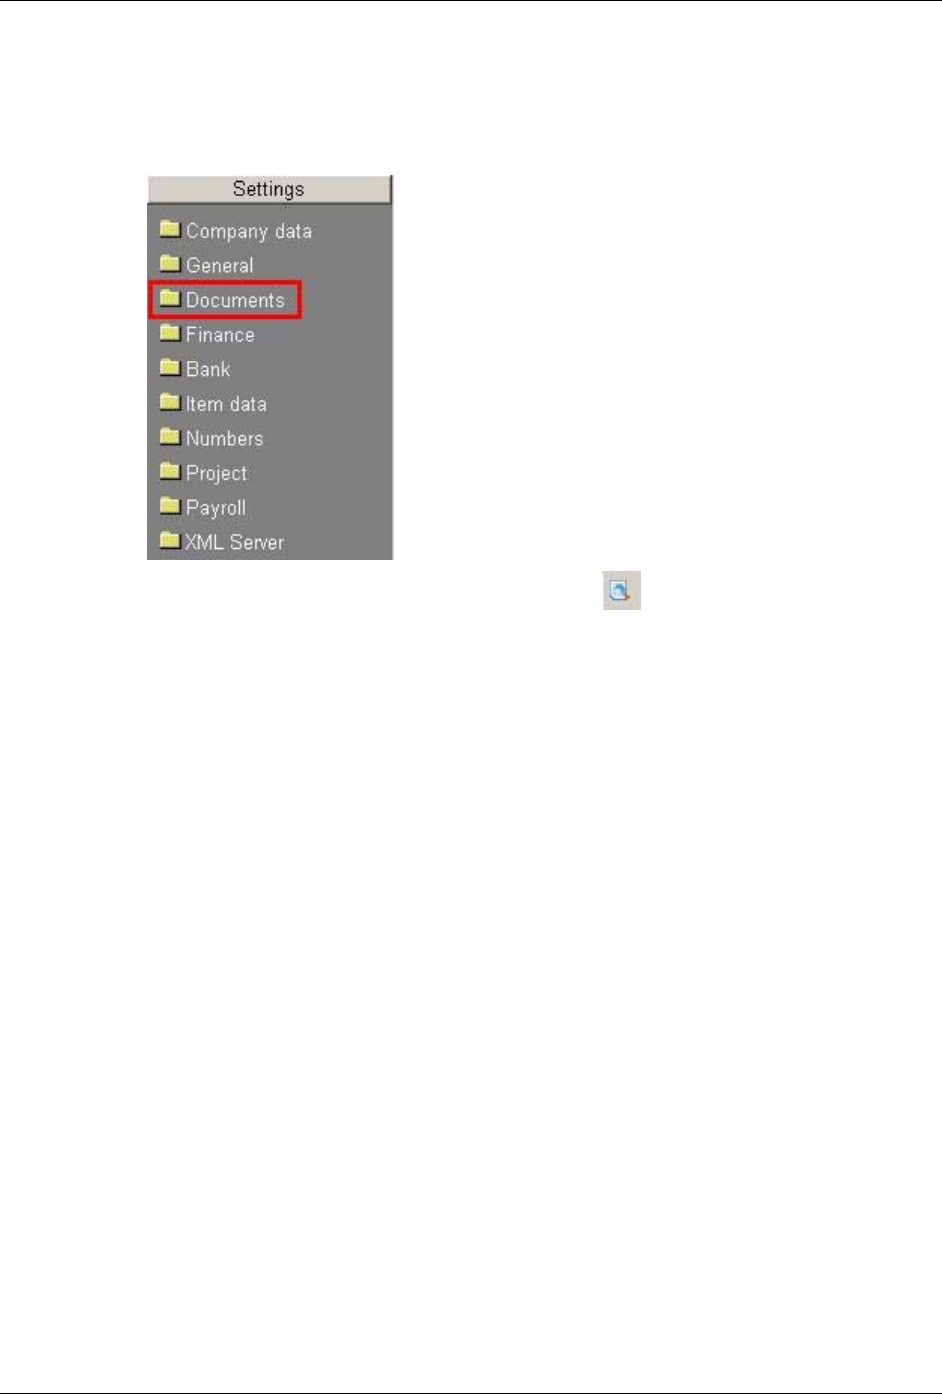
Chapter 4: Using Accounts Receivable
156 Accounts Receivable User Guide
Deleting a Customer Label Layout
1. On the System menu, under the Company heading, select Company settings.
2. Click the Documents tab.
3. Beside the Customer labels field, click the Select button . This opens the Layout selection
screen.
4. Select the customer label you want to delete, and click the Delete button.
Note: You cannot delete the default customer label XXEXACT1.
5. Highlight the layout you want to delete.
6. Click Delete.
7. Continue deleting layouts, or click Close to exit the Delete layout dialog.
8. Click Cancel to close the Layout selection screen.
Importing a Customer Label Layout
1. On the System menu, under the Company heading, select Company settings.
2. Click the Documents tab.
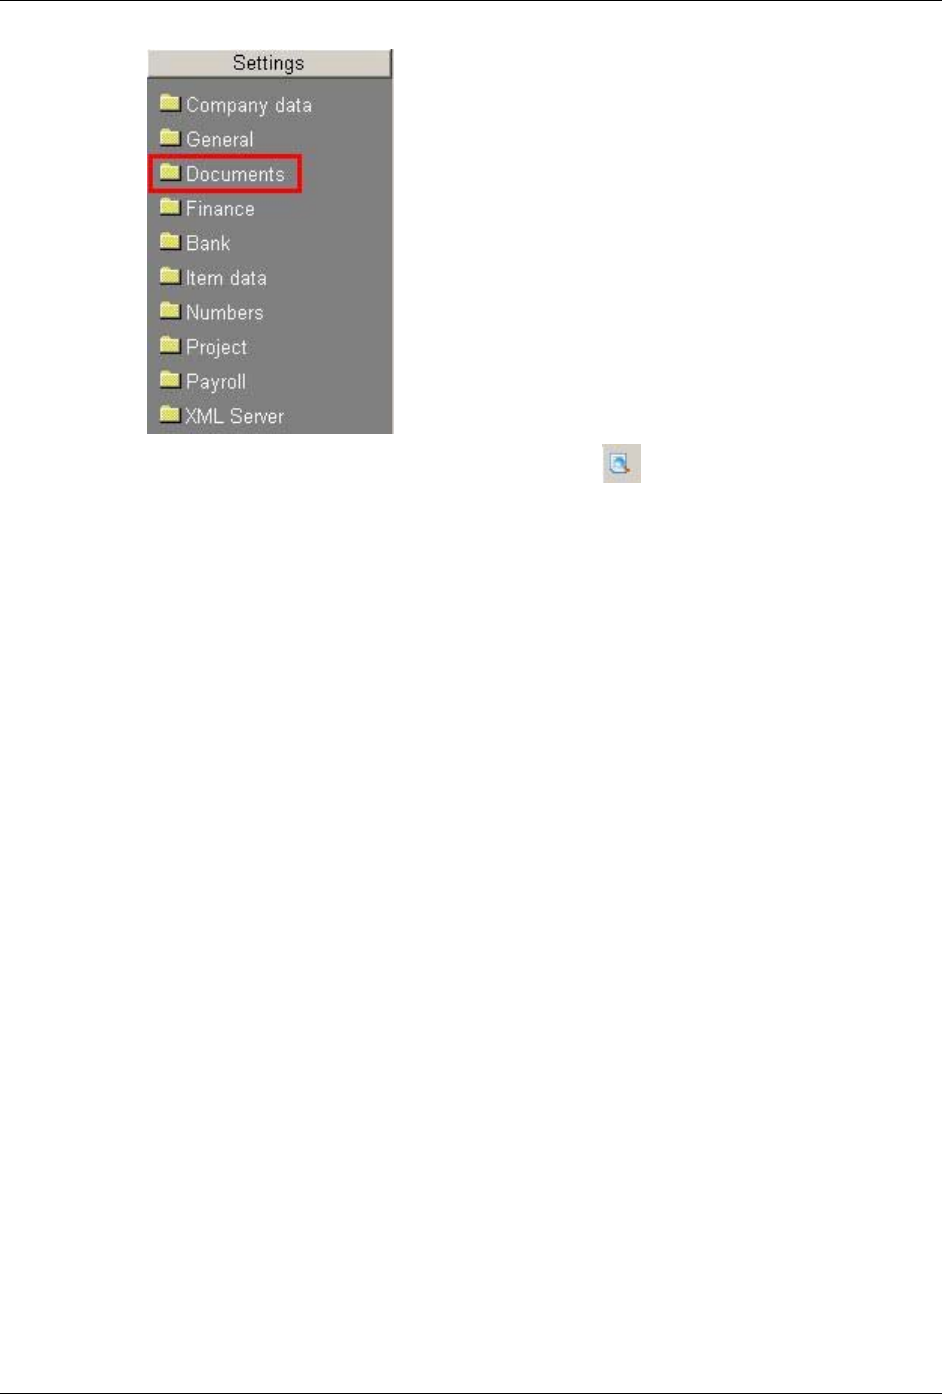
Chapter 4: Using Accounts Receivable
lAccounts Receivable User Guide 157
3. Beside the Customer labels field, click the Select button . This opens the Layout selection
screen.
4. Click New.
5. Select File, Import. The File Open dialog opens.
6. Browse to the file that you want to import. Customer layout files have an extension of .cel.
7. Highlight the layout file that you want to import.
8. Click Open. The layout displays in a Layout window.
9. Select File, Save as to change the existing Layout description or Name of the layout.
Select File, Save to save the file with its current name and description.
Note: If the Layout description and Name are the same as a preexisting layout, the system will overwrite a
preexisting layout in the original file with the layout in the imported file.
10. Select File, Close to close the layout.
11. Click Close to close the Layout selection screen.
Exporting a Customer Label Layout
1. On the System menu, under the Company heading, select Company settings.
2. Click the Documents tab.

Chapter 4: Using Accounts Receivable
158 Accounts Receivable User Guide
3. Beside the Customer labels field, click the Select button . This opens the Layout selection
screen.
4. Highlight the customer label layout that you want to export, and click Edit.
5. Select File, Export. The File Save As dialog appears.
6. Navigate to the appropriate location for the file to be exported to.
7. Enter the File name: for the exported file. This file has a .cel extension.
8. Click Save.
9. Select File, Close to close the layout.
10. Click Cancel to close the Layout selection screen.
Chapter 4: Using Accounts Receivable
lAccounts Receivable User Guide 159
Customer Statements
Customer statements show the invoices that are due on a customerʹs account. You can send these
to your customers so they know which invoices have not been paid. The customer can verify with
their records to verify whether they agree or determine if they have sent payments that you have
not recorded against their account.
Printing Customer Statements
1. On the A/R menu, under the Statements/Labels heading, select Customer statements.
2. Select the Layout: (The layout you select can reveal or hide fields on the screen.)
Payables -- This layout allows you to choose whether to age the invoices by invoice date or
due date.
Account Statement -- This layout allows you to compress transactions before a certain date or
certain period into a one line balance so you do not have to see all the detail of the
outstanding transactions.
Currency data -- This layout is similar to the Account Statement layout but shows the invoice
currency amount and the default currency amount if a customer has a different currency.
User-defined -- This selection reveals the Layout field, which you can use to select a pre-
defined layout.
3. Select the Order to print the statements: The order determines the range you can select to
print. See step 8.

Chapter 4: Using Accounts Receivable
160 Accounts Receivable User Guide
Number -- Allows you to select to print statements for a range of customers based on
customer number.
Classification -- Allows you to select to print statements for a range of classifications.
4. Enter the Statement date. This is the date printed on the statement. The aging of the items is
based on this date.
5. Select to print a Trial statement or the Final Statement by clicking the Trial or Final fields. If
you select Final and then print the statement to the printer, the Last Printed date is updated
in the customer statement section of the Financial tab in customer maintenance and the last
seq no field in customer maintenance is updated with the statement number.
Note: This option is available when printing the Payables layout or the User-defined layout.
6. Select the Company address check box if you want to print your company address at the top
of the statement. (Your company address is defined on the Company Settings screen.)
7. Enter the aging periods in the Age fields. Enter three numbers greater than zero for the aging
periods. For example you can enter 15 days in the first field, 30 days in the second field, and
45 days in the third field. These would place the invoices in separate columns on the report
based on their invoice date or due date depending on your selection and the reference date.
The first number must be greater than zero, the second number must be greater than the first
number, and the third number must be greater than the second number. When you enter
numbers in these fields, the aging period fields for the Receivables Report, the Customer
Balance List, the Aging Analysis, and the Accounts Receivable Setup are changed. All of
these use the same aging numbers.
8. This field depends on the Order selected in step 3.
Enter a beginning and ending Customer number, or select the All check box.
or
Enter a beginning and ending Classification, or select the All check box.
9. Select which customer Address to print on the statements. Choose from Invoice address,
Postal address, Delivery address, or Visiting address.
10. Select the Aging date:
Invoice date
Due date
Note: This option is available when printing the Payables layout or the User-defined layout.
11. Choose the Sorting order for the transactions on the statement:
Our ref.
Invoice date
Due date
12. Select the Zero balances check box to include invoices that have been paid on the statement.
13. Select the Compress check box to compress some transactions into one balance line instead of
showing each individual transaction on the statement. You can compress by date or by
period.
Period -- compresses all transactions before a certain period.

Chapter 4: Using Accounts Receivable
lAccounts Receivable User Guide 161
Enter the Year and the period number that you want to compress all previous transactions
into. For example, if you are printing statements for the month of December 2002 (and
December is set up in your period-date calendar as the 12th period) and you do not want the
individual transactions for the previous months to print on the statement enter 2002 for the
year and 12 for the period.
Date -- compresses all transactions before a certain date.
Enter the date that you want to compress all previous transactions. For example, if you want
to compress all transactions before 01/10/03 into one balance line enter 1/10/03.
Note: The compress check box is not available when printing the Payables layout.
14. Click Start.
Checklist
Use this to generate a report of outstanding items. This report shows the activity (payments,
invoices, and credits) for a customer or a range of customers. There is a subtotal for each
customer and a grand total for all on the report.
Reminders
A reminder is a letter you send to your customers to remind them of any outstanding items. You
can select up to nine reminder layouts. Reminders are printed on the A/R menu.
Note: These fields are updated only when the Final option is selected on the Print Reminders screen and
are updated by the system. You cannot manually update these fields.
The layout entered in the Layout 1 field is used first. You can assign different layouts to each
number so that the correct reminder type is printed depending on how many reminders have
been sent for to the customer for the outstanding item.
There are three places to select layouts:
1. On the Maintain Customers screen, on the Financial tab (read Maintaining Customers). If a
customer has reminder layouts selected, these override any other layout selections.
2. On the Link Layouts to ISO Language screen. If a language code has reminder layouts
selected, these override the reminder layouts selected on the Company Setup Documents
screen. To use these reminder layouts for a customer, enter the language code on the Basics
tab on the Maintain Customers screen.
3. On the Company Setting Documents screen. If there are no reminder layouts selected for a
customer or language code, the system uses the layouts selected on this screen (read
Document Settings).
The system stores the reminder layout number on the individual transaction not by customer.
When you print a reminder, the layout used is determined by the previous reminder layout
number on the transaction. The allows the system to print different reminders as needed based
on the age of the transaction. For example, if you print seven reminders for a customer invoice,

Chapter 4: Using Accounts Receivable
162 Accounts Receivable User Guide
the next reminder for the invoice will use layout eight. A reminder printed for a new invoice will
use layout one.
Layouts on the Company Settings Document Screen
1. To see the reminders screen, open the Company Setting screen.
2. Click the Documents tab.
3. Click the Zoom button beside the Reminder field.
Layout 1 -- Enter the default layout for the first reminder to be sent to customers with
outstanding items. This defaults to XXEXACT1 but can be changed. Reminders are printed from
the Print Reminders screen. The Selection field allows you to select whether you want the system
to automatically select the layout to use or if you want to manually enter the layout to use. If this
field is set to Automatically, the system uses the reminder layouts entered in this field and the
Layout 2 through Layout 9 fields. The layout entered in the Layout 1 field is used first.
Layout 2 -- Enter the default layout for the second reminder to be sent to customers with
outstanding items. This defaults to XXEXACT2 but can be changed.
Layout 3 -- Enter the default layout for the third reminder to be sent to customers with
outstanding items. This defaults to XXEXACT3 but can be changed.
Layout 4 -- Enter the default layout for the fourth reminder to be sent to customers with
outstanding items. This defaults to XXEXACT4 but can be changed.
Layout 5 -- Enter the default layout for the fifth reminder to be sent to customers with
outstanding items. This defaults to XXEXACT5 but can be changed.
Layout 6 -- Enter the default layout for the sixth reminder to be sent to customers with
outstanding items. This defaults to XXEXACT6 but can be changed.
Layout 7 -- Enter the default layout for the seventh reminder to be sent to customers with
outstanding items. defaults to XXEXACT7 but can be changed.
Layout 8 -- Enter the default layout for the eighth reminder to be sent to customers with
outstanding items. This defaults to XXEXACT8 but can be changed.
Layout 9 -- Enter the default layout for the ninth reminder to be sent to customers with
outstanding items. This defaults to XXEXACT9 but can be changed.
Processing of Reminders
If the due date of an outstanding item has passed, you should check why a customer has not
paid. If the customer has already received an overview of outstanding items and still does not
pay within the agreed time, your company might senda reminder. Before you can send
reminders, define reminder layouts in the customerʹs language and indicate for each customer
whether or not reminders should be sent. Before printing the final reminders, print a checklist of
all the customers for whom reminders might be printed. Use this list to determine which
outstanding items should be included and which excluded when you actually print the
reminders.

Chapter 4: Using Accounts Receivable
lAccounts Receivable User Guide 163
Printing Reminders
Before you can print reminders, you must define the reminder layouts (read Reminders Settings)
and select the Reminders check box on the Maintain Customers screen Financials tab. Read
Documents Settings for information.
1. On the A/R menu, under the Statements/Labels heading, select Reminders, Print.
2. Enter a Reminder date.
3. Enter a customer Type:
All
Associate
Customer
Employee
Reseller
4. If needed, click the Classification button to select a classification. The default is all.
Classifications are used to organize your contacts. A customer classification is set up on the
Basics tab on the Customer Maintenance screen.
5. Enter a beginning and ending Customer number, or select the All check box.
6. If you clicked the Advanced button, enter a beginning and ending Language, or select the All
check box to include customers with all languages. A customer language is set up on the
Basics tab on the Customer Maintenance screen.
7. Select a Sort by order. This is the order for the lines shown on the Reminders screen when
you click Display.
Customer (number)
(customer) Name
Address
Zip code
City
8. Select an Outstanding item sorting order:
Invoice number
Invoice date
9. Enter a beginning and ending Due date, or select the All check box. This is the due date for
the invoice. For example, to print reminders for invoices due in June, enter 06/01 to 06/30.
10. Enter the No. days since last reminder.
11. Enter the Last reminder date:
Outstanding item
Customer
12. If you clicked the Advanced button, select a Scenario:
All
Normal
Complaints
Payment agreement
Transferred
Chapter 4: Using Accounts Receivable
164 Accounts Receivable User Guide
13. If you clicked the Advanced button, you can include blocked items by selecting the Include
blocked items check box.
14. If you clicked the Advanced button, enter a Minimum amount.
15. If you clicked the Advanced button, you can include collection items by selecting the Include
collection items check box.
16. If you clicked the Advanced button, enter a Maximum amount.
17. If you clicked the Advanced button, enter an Interest rate.
18. Click Display. This opens the Reminders screen and shows each customer with an invoice
that meets the search criteria.
The Reminders screen shows the age of the oldest invoice; the outstanding amount; the overdue
amount; the amount paid; any unmatched payments; the account representative; and the
customer address. The screen also has the following buttons:
Select all Selects all lines on the screen
Deselect all De-selects all lines on the screen
Zoom Select a single customer and click Zoom to show each open invoice. Using this,
you can select and process individual invoices.
Card Select a single customer and click Card to open the customer card screen.
Activity
Process Opens the Reminders: Output screen, which allows you to print reminders for all
open invoices for the selected customer.
Reminders: Output
Selection Automatically: the system selects the next layout reminder (layout 1 through
layout 9) for each open invoice.
The system determines the layout to use from three fields in the general ledger
transaction table (gbkmut). The gbkmut.ReminderCount stores the number of
times a reminder has been final printed for the customer. The
gbkmut.ReminderLayout stores the sequence number of the next layout to be
used. Lastly, the gbkmut.LastReminderDate stores the date when you printed the
last reminder for the customer. The system uses these fields to determine if the
customer should receive a reminder and what reminder layout should be used.
These fields are updated only when you choose Process: Final. You cannot
manually update the reminder count, reminder layout number, or the last reminder
date.
Manually: allows you to select the layout.
Put all items on one reminder: puts all open invoices on one reminder.
Process Trial: Allows you to print a reminder without updating the Last Reminder Date on
the Maintain Customers screen and without advancing to the next layout the next
time reminders are printed.
Final: Prints a reminder; updates the Last Reminder Date on the Maintain
Customers screen; and advances to the next reminders layout the next time
reminders are printed.
Output Printer: This is the only option when you select Process Trial.
E-mail: When you select Process Final, you can choose to print the reminder to
the selected printer or to send it by e-mail to the customer's e-mail address.
Group by Invoice total
Terms
Chapter 4: Using Accounts Receivable
lAccounts Receivable User Guide 165
This is a grouping option for the invoices on the reminder.
Include:
Unmatched
Payments
Select to print unmatched payments on the reminder. Clear to leave un-matched
payments off the reminder.
Start Click Start to generate a preview of the reminder that you can print.
Cancel Close the screen without printing.
Printing a Report of Outstanding Items
The reminders checklist prints a list of customers that have invoices due so that you can
determine which ones should receive reminders.
1. On the A/R menu, under the heading Statements / Labels, select Reminders Checklist. This
opens the A/R / Statements/Labels / Checklist screen.
2. Select the Output Amounts:
Invoice currency
Original currency
3. To include terms, select the Terms check box.
4. To include payments, select the Payments check box. This is disabled unless the Terms check
box is selected.
5. To include outstanding items, select the Outstanding items check box. This is disabled unless
the Terms check box is selected.
6. To include unmatched payments, select the Unmatched payments check box.
7. Select the Type of customers to include:
(all)
Associate
Bank
Customer
Division
Employee
Not validated
Prospect
Reseller
Supplier
8. Select the Status to include:
(all)
Active
Blocked
Inactive
Pilot
Reference
Passive
9. Enter a beginning and ending Customer number, or select the All check box for all
customers.
10. Enter a beginning and ending Classification, or select the All check box.

Chapter 4: Using Accounts Receivable
166 Accounts Receivable User Guide
11. Enter a beginning and ending Language, or select the All check box.
12. Select an order to Sort by:
Customer
Name
Address
ZIP code
City
13. Enter a Due date range.
14. Enter the No days since last reminder.
15. For more filtering options, click the Advanced button.
a. Select a Scenario:
All
Normal
Complaints
Payment agreement
Transferred
b. Enter a Minimum amount.
c. Enter a Maximum amount.
d. For blocked items, select the Include blocked items check box.
e. For collection items, select the Include collections items check box.
f. Click Close.
16. Click Start. This generates the report.
17. After reviewing or printing the report, click Close.
18. Click Close.

Chapter 4: Using Accounts Receivable
lAccounts Receivable User Guide 167
Viewing A/R Information
Macola ES allows you to review information that you have previously entered or that is derived
from data processing. This information is accessible through various view screens. These views
provide quick, efficient access to the information you need to use the Accounts Receivable
package effectively.
All view screens are display-only screens. New information cannot be entered on these screens.
Typically view screens are used by those who do not have permission to enter new data into the
system but need access to data entered into the system. For example, shop floor workers may
need access to information about a particular order, even though they have not originally entered
that information in Macola ES.
To use a view screen, enter information in or select information from the required fields that are
used to filter the data for which you are searching. For example, to view information about an
item, you will first have to enter the item number in the view screen. Once you have entered data
for the required fields, Macola ES displays the remaining information.
Customer History View
The Customer History View screen shows posted activity on a customerʹs account. Use this to
view information about posted invoices.
Use the Customer History View option to use the Macola ES drill down inquiry feature. Drill
down is the ability to enter a customer number and have Macola ES drill down to the record and
display important information pertaining to the requested customer transaction.
Use the series of buttons on the screen to drill down to additional information for the selected
transaction.
1. On the A/R menu, under the Statistics heading, select View, Customer history view.
2. Enter the customer number (Customer No.) for the account you want to view.
3. Enter the starting and ending document date in the range you want to view. If left blank, this
field defaults to ALL and the system skips the Ending date field.
4. Enter the starting and ending document number in the range you want to view. If left blank,
this field defaults to ALL and the system skips the Ending Document No field.
The following options are then available:
Click Cancel to end the inquiry.
Select a new transaction to view.
Click one of the six buttons to drill down to additional information for the selected
transaction.

Chapter 4: Using Accounts Receivable
168 Accounts Receivable User Guide
Viewing Credit History Information
1. On the A/R menu, under the Statistics heading, select View, Customer history view.
2. Enter a Customer No.
3. Enter a range of dates, or tab through the Date and To field for all dates.
4. Enter a Document number, or tab through the Document and To fields for all documents.
5. Click the Credit Information button to display the Credit History screen and the following
information:
Credit Limit -- The credit limit for this customer
Credit Rating -- The credit rating for this customer
Credit Hold -- Displays a Y if this customer is on credit hold or an N if this customer is not
on credit hold
Account Date -- The date this customerʹs account was established
Balance -- The current account balance for this customer
6. Click Cancel to return to the previous screen.
7. Click Cancel to clear the Customer History screen.
8. Click Cancel to close the Customer History screen.
Viewing Customer Information Using the Customer
Info Button
1. On the A/R menu, under the Statistics heading, select View, Customer history view.
2. Enter a Customer No.
3. Enter a range of dates, or tab through the Date and To fields for all dates.
4. Enter a range of documents, or tab through the Document and To fields for all documents.
5. Click the Customer Info button to display the following information:
Customer No. -- The customer number and name description
Address -- The customerʹs street address
City -- The city where the customer is located
State -- The state where the customer is located
Zip -- The postal zip code for this customer
Country -- The country where this customer is located
Phone No. -- The phone number for this customer
Salesperson -- The salesperson responsible for this transaction
Taxable -- Displays a Y if this customer is taxable or an N if this customer is not taxable
Tax Schedule -- The tax schedule for this customer
Tax Codes -- The tax codes, tax code percentages, and tax code descriptions for this customer
Balance Method -- The balance method used for this transaction
Terms -- The credit for this customer
Discount % -- The discount percentage for this customer
Customer Type -- The customer type
Credit Remaining -- The amount of credit under the credit terms for this customer

Chapter 4: Using Accounts Receivable
lAccounts Receivable User Guide 169
Comments -- Any comments about this customer
E-mail -- Customerʹs email address
URL -- Customerʹs Web site address
6. Click the Extra tab to display user defined fields and note fields.
7. Click Cancel to close the Customer Information screen.
8. Click Cancel to clear the Customer History screen.
9. Click Cancel to close the screen.

Chapter 4: Using Accounts Receivable
170 Accounts Receivable User Guide
Clearing PTD and YTD Tax Accumulators
The Sales, Miscellaneous Charges, and Tax Amount accumulate on taxable sales. You can view
these accumulators for each tax detail code. There are fields for Period to Date, Sales,
Miscellaneous Charges, and Taxes on the accumulator tab of the tax detail code. The system
updates these fields when you post taxable sales transactions. These fields are not used to
produce the tax analysis reports. You can print a list of the tax detail codes, which include the
accumulator fields. Before clearing the accumulators you should print a copy of the list, so you
have a copy of the information.
Clearing PTD/YTD Tax Accumulators
1. On the G/L menu, under the Taxes heading, select Clear PTD/YTD tax accumulators.
2. Select the Period To Date check box to clear the Sales, Miscellaneous Charges, and Taxes
Period to Date accumulators.
3. Select the Year-To-Date check box to clear the Sales, Miscellaneous Charges, and Taxes Year
to Date accumulators.
4. Click the OK button.
5. The system displays the message, ʺAre you sure you wish to do this?ʺ
Click Yes to clear the accumulators.
Click No to cancel.
6. Click the Cancel button to exit the screen when the process is complete.

Chapter 5: Reporting in A/R
Accounts Receivable User Guide 171
Chapter 5: Reporting in A/R

Chapter 5: Reporting in A/R
172 Accounts Receivable User Guide
Accounts Receivable Balance List
The balance list shows the customerʹs aged balance in summary, which includes the total balance
for each aging period. You can select to see the invoices that make up the balance by selecting to
group by details instead of customer. You can also export this information to Microsoft Excel.
1. On the A/R menu, under the Reports heading, select Balance list.
2. Select the information to show:
Open invoices -- This shows a total of open items by customer; you see the full amount of the
invoice regardless of any discounts that may be available.
Invoice list -- This shows each open invoice for each customer; you see the full amount of
each invoice regardless of any discount that may be available.
To be invoiced -- This shows items that still need to be invoiced.
3. Select an order to Group by:
Details
Payment reference
Customer
PO/SO
4. Enter a Payment date, or select the All check box to include all dates.
5. Enter an Invoice date, or select the All check box.
6. Select a Payment method:
All
On credit
Check
Cash
Debt collection
Letter of credit
7. Select a Transaction type for the report:
All
Sales invoice
Sales credit note
Other
8. Select the Type of accounts you want to see:
All
Customer
Reseller
These are the types you selected for the customers in customer maintenance.
9. Select the Account Code to enter a customer number or Name to enter a customer name.
Chapter 5: Reporting in A/R
lAccounts Receivable User Guide 173
10. Click the Search button to search for a specific account, by code or name, depending on your
selection in the previous step.
11. Select the Exclude unknown debtor check box to exclude any unallocated cash receipts,
which could show a negative balance for the unknown customer.
12. Click the Additional Criteria button:
a. Select the accountʹs Status to select only accounts with a specific status - All, Active,
Blocked, Inactive, Not validated, Pilot, Reference, or Passive.
b. Enter the accountʹs Classification to select only accounts with a specific classification.
Enter a range of classifications or select the All check box to include all classifications.
c. Enter a beginning and ending Account, or select the All check box to include all accounts.
d. Enter a Due date, due date range, or select the All check box to include invoices with any
due date.
e. Select the Cash flow, In includes invoices from customers, Out includes invoices due to
vendors, All includes invoices to customers and invoices due to vendors.
f. Enter a Bank account to only include transactions for a specific bank account.
g. Select whether to include Blocked transactions. All - includes blocked and non-blocked
transactions, Yes - includes only blocked transactions, No - does not include blocked
transactions.
h. Select a Payments in transit status:
Including
Payments in transit
Excluding
i. Select the To be matched check box to include transactions to be matched.
j. Select the Only show zero balances check box to display the status column on the screen.
k. Click the Close button to return to the Accounts Receivable Balance List selection criteria
screen.
13. Click the Display button to view the terms screen, which lists the customersʹ balance.
14. Select a Group by to view the transactions by:
Details -- displays each individual transaction
Payment Reference -- groups all transactions with the same payment reference into one line
Customer -- groups all transactions for the same customer into one line
Our ref. -- groups all transactions that have the same Our ref. into one line
Your ref. -- groups all transactions that have the same Your ref. into one line
15. The buttons available at the bottom of screen depend on the group by selected:
Button Available when
Group by:
Description
Export Customer, Details,
Payment
reference, Our ref.,
Your ref., PO/SO
Exports information to a Microsoft Excel spreadsheet
Match Customer, Details,
Payment
reference, Our ref.,
Opens the Matching screen.
Chapter 5: Reporting in A/R
174 Accounts Receivable User Guide
Button Available when
Group by:
Description
Your ref., PO/SO
Card Customer, Details,
Payment
reference, Our ref.,
Your ref., PO/SO
Displays the customer card for the customer of the highlighted
transaction.
Maintain Customer, Details,
Payment
reference, Our ref.,
Your ref., PO/SO
Displays the customer maintenance screen for the customer of the
highlighted transaction
Our ref. Details, Our ref. Displays the GL entries for all transactions with the same our ref as
the highlighted transaction.
Your ref. Details, Your ref. Displays the GL entries for all transactions with the same your ref
as the highlighted transaction.
PO/SO Details, Our ref. Opens the Transactions screen showing the sale invoice or
purchase order transactions.
Match
Automatically
Customer Selects the transactions shown and displays the message "Match
Automatically?"
If you select Yes, and there is a 0 (dollar) amount shown, the
system matches vouchers and payments with the same Our ref
and amounts. (If the system cannot automatically match any
transactions, the match screen opens so you can manually match
transactions.)
If you select No, the matching screen opens so you can manually
match vouchers and payments.
Close Customer, Details,
Payment
reference, Our ref.,
Your ref.
Closes the terms screen.
Sections of the AR Distribution to GL Report
There are three sections to the A/R Distribution to G/L Report:
1. Income -- The Income section of the report contains postings from these sources:
Sales Distributions
Freight Charges
Miscellaneous Charges
Sales Tax
Finance Charges
2. Cash Receipts -- The Cash Receipts section contains postings from these sources:
Cash
Discounts
Allowances
Non-A/R Cash Accounts Credited
3. Net Change to A/R -- The A/R Net Change section of the report shows every change to the
total amount of the companyʹs A/R.

Chapter 5: Reporting in A/R
lAccounts Receivable User Guide 175
Whenever a transaction is posted in A/R, at least two transactions are posted to G/L to keep the
General Ledger in balance. For example, every time an invoice is posted for a sale on a customer
account, an increase is posted to an income account, and an increase is posted to an A/R account.
When a payment is received, typically these two transactions are generated: one recording the
increase to the Bank Account and one recording the decrease in the accounts receivable account.
There can also be transactions for freight, miscellaneous charges, and taxes recorded.
AR Sales Analysis Report
The A/R Sales Analysis report shows the Sales, Cost of Sales, and Profit from sales for the period
to date and year to date, along with the percent of sales and percent of profit for the period to
date and the year to date. You can print this report by salesperson number, salesperson name (in
order by salespersonʹs first name), customer type, or customer number. The AR Sales Analysis
report is exported to Microsoft Excel spreadsheet. You can run the report from within Macola ES
or from within Microsoft Excel using the Macola ES Excel Add-In.
Printing the AR Sales Analysis Report
1. On the A/R menu, under the Reports heading, select AR Sales Analysis or Open Microsoft
Excel, select Macola Enterprise Suite, Reports, AR Sales Analysis.
2. Enter a beginning and ending salesperson number (salesperson no.), or select the All check
box to include all salespeople.
3. Enter a beginning and ending Customer Type, or select the All check box to include all
customer types.
4. Enter a beginning and ending Customer Number, or select the All check box to include all
customers.
5. Select an order to Sort By:
Salesperson No. -- Prints one line for each salesperson, in salesperson number order
Salesperson Name -- Prints one line for each salesperson, in order of the salespersonʹs first
name
Customer Type -- Prints one line for each customer type, in customer type order
Customer No. -- Prints one line for each customer number, in customer number order
6. Click the Start button.
Serialized Document History Report
The Serialized Document History Report lists invoices and credit memos associated with
specified serial codes.
When you print invoices using serialized document control, once an invoice has been printed, the
system prompts, ʺDid the invoices print correctly?ʺ
If you are using serialized documents, Macola ES writes a record to the serial history whether
you select Yes or No. If you select Yes, the status is P (Printed); if you select No, the status is V
(Void). This prevents serialized document numbers from being used again and keeps track of

Chapter 5: Reporting in A/R
176 Accounts Receivable User Guide
what happened to each serialized document. You can use the Serialized Document History
Report as a reference tool to track the status of each document you have printed, whether you
voided them or not.
Printing a Serialized Document History Report
1. On the A/R menu, under the Reports heading, select Serialized doc history. This opens the
Serialized Document History Report screen.
2. Enter the Starting Serial Code you would like to print. If you leave this field blank, it
defaults to ALL and the system skips over the Ending Serial Code to the Code Options field.
3. Enter the Ending Serial Code you would like to print. This field defaults to the value of the
Starting Serial Code.
4. Select one of the Code Options you would like to print:
A = All
N = No blank codes
O = Only blank codes
5. Click OK. The Print Options dialog opens.
6. Select the desired output device.
7. Click OK. Macola ES prints the report.
8. Click Cancel to close the screen.
A/R Aging Analysis
The A/R Aging Analysis report displays the customerʹs balance by aging period. You can print a
detailed list of the invoices for each customer, or you can print the total for each aging period per
customer.
The Accounts Receivables Aging Analysis Report is always displayed in the default currency.
The report also shows the foreign currency equivalent for each transaction as well as the default
currency. This allows additional analysis based on different currencies. The option to select a
different currency is the Invoice currency field. This field shows each active currency.
When you run the report by due date (select Due Date in the Age field) and select all items (All in
the Items field), some transactions will come back with negative days aged. This is because any
transaction after the reference date will appear on the report. For example, if you run the report
for a date of 7/15 and have an invoice with a due date of 8/15, it will be returned with an aging of
-30 days.
The report has various detail amounts depending on the selections in the Invoice currency field
and the Summarize check box:
Invoice currency field = All – Default currency and Summarized check box selected
This report shows amounts in the default currency for each aging period, a total of all periods for
each customer, and an average age of the unpaid invoices.

Chapter 5: Reporting in A/R
lAccounts Receivable User Guide 177
Invoice currency field = All – Invoice currency and Summarized check box selected
This report shows amounts in the default currency and invoice currency for each aging period
and a total of all periods in the default currency and the invoice currency.
Invoice currency field = All – Default currency and Summarized check box cleared
This report shows each unpaid invoice for each customer, amount in the default currency for
each aging period, a total of all periods for each customer, and an average age of the invoices.
Invoice currency field = All – Invoice currency and Summarized check box cleared
This report shows each unpaid invoice for each customer, the amount in the default currency for
the invoices, the amount in the invoice currency for the invoices, and an average age of the
invoices.
If you select any currency other than your default currency, the Foreign Currency Summary field
is disabled. The Foreign Currency Summary adds a summary of the foreign currency at the end
of the report.
Printing the A/R Aging Analysis Report
1. On the A/R menu, under the Statistics heading, select Receivables, Aging Analysis.
2. Select a Sorting order. You can sort the report by Customer code, Name, Zip code,
Classification, or Due date.
3. Select the Summarize check box to print a summary of the customerʹs aged balance. This
prints the total balance for each customer for each aging period. This does not show each
individual item on the customerʹs account.
4. Select to Age the invoices by Invoice date or Due date.
Note: The Age field works with the Reference date field to determine which invoices show on the report and
what date the aging is based upon. If you select to age by invoice date, you will see invoices entered with the
reference date, with an age of zero (0). If you select to age by due date, you will not see invoices entered
with the reference date, because they are not yet due. They will not display until the reference date you
enter is equal to or greater than their due date. For example, if you enter an invoice on 2/4/2002 that is due
on 3/6/2002 and you print the aging analysis by due date with a reference date of 2/4/2002, the invoice will
not appear on the report. You must use a reference date of 3/6/2002 or later to see that invoice on the
report.
5. Enter a Minimum age if you want to include only items in the balance that are past due by a
certain number of days. For example, if you only want to include items that are 30 days past
the date (invoice or due date depending on the age field), enter 30 in the minimum age field.
6. Select the Customer data check box to include the customer address, contact, phone number,
payment method, and bank account. This field is not enabled if you selected the Summarize
check box.
7. Select the New page every customer check box to have each customer start on a separate
page. This field is not enabled if you selected the Summarize check box.
8. Select the Only with notes check box to include only transactions that have notes.

Chapter 5: Reporting in A/R
178 Accounts Receivable User Guide
9. Select the Exclude unknown debtor check box to exclude transactions that are for an
unknown customer (debtor). You may have transactions related to an unknown customer if
you are using the unknown customer code for miscellaneous customers or if you upgraded
to Macola ES.
10. Enter the aging periods in the Age fields. Enter three numbers greater than zero for the aging
periods. For example you may enter 15 days in the first field, 30 days in the second field, and
45 days in the third field. These would place the invoices in separate columns on the report
based on their invoice date or due date depending on your selection and the reference date.
The first number must be greater than zero, the second number must be greater than the first
number, and the third number must be greater than the second number. When you enter
numbers in these fields, the aging period fields for the Receivables Report, the Customer
Balance List, the Customer Statements, and the Accounts Receivable Setup are changed. Each
of these use the same aging numbers.
11. Select the Invoice currency: All- Default currency; All - Invoice currency; or your default
currency. This also shows any additional active currency. Any selection other than All -
Default currency disables the Summary: Foreign currency check box and the Exchange Rate
field.
12. Enter the Reference date. This date determines which invoices appear on the report and in
which aging period they appear.
Note: The Reference date field works with the Age field to determine which invoices show on the report. If
you select to age by invoice date you will see invoices entered with the reference date, with an age of zero
(0). If you select to age by due date you will not see invoices entered with the reference date, because they
are not yet due. They will not display until the reference date you enter is equal to or greater than their due
date. For example, if you enter an invoice on 2/4/2002 that is due on 3/6/2002 and you print the aging
analysis by due date with a reference date of 2/4/2002, the invoice will not appear on the report. You must
use a reference date of 3/6/2002 or later to see that invoice on the report.
13. Select the Status of customers to include on the report:
All
Active
Blocked
Inactive
Not validated
Pilot
Reference
Passive
14. Enter a Customer code, Name, Zip code, Classification, or Due date, a range of Customer
codes, Names, Zip codes, Classifications, or Due dates, or select the All check box. (The literal
for this field depends on the selection you made in the Sorting field.)
15. Enter an Account employee, a range of employees, or select the All check box to include all
account employees.
16. Select the Items to include: All or Due.
Note: Whether you select to age the report based on invoice date or due date, if you select to view only
items that are due, you will only see the invoices that are due based on the reference date.

Chapter 5: Reporting in A/R
lAccounts Receivable User Guide 179
17. Macola ES does not use the Intermediary field.
18. Macola ES does not use the Scenario field.
19. Select All, Yes, or No from the Blocked field. All includes blocked and unblocked invoices,
Yes, includes only blocked invoices, and No, includes only invoices that are not blocked.
20. Select the Payment Method of the invoices you want to include on the report.
21. Select the Summary: Foreign currency check box for a summary of the foreign currencies
included on the report.
22. Select whether you want the Exchange rate for items to be the original, current, or historical.
If you select historical, enter the Date of the exchange rate, you wish to use.
23. Click Start.
Accounts Receivables Report
The receivables report shows the open invoices on a customerʹs account. This report also includes
the open payments on the customerʹs account (payments that have not been applied to an
invoice). This report can be used as an aging report; it shows the age of the invoice in number of
days since the invoice date and displays the invoices balance in the proper aging bucket on the
report if you select the Aging check box. Select a reference date when printing the receivables
report to determine the last invoice date that displays on the report. The age of the invoice is
based on the invoice date and the reference date selected. For example, if the invoice date is 4/1
and the reference date is 4/30 the age of the invoice is 29 days and the total displays in the aging
bucket that contains 29 days.
The Accounts Receivables Report is always displayed in the default currency. The report can
show the foreign currency equivalent for each transaction as well as the default currency. This
allows additional analysis based on different currencies. The option to select a different currency
is the Invoice currency field. This field shows each active currency.
Printing the Receivables Report
1. On the A/R menu, under the Statistics heading, select Receivables, Receivables. This opens
the Receivables report filter screen.
2. From the Report field (in the Layout section), select how you want to display the Receivables
report. Select Details to print transaction details or select List to print a simplified list of
receivables.
3. From the Sorting field (in the Criteria section), select the sort order of the report: Customer
code, Name, Zip code, Classification, or Due date.
Note: The Sorting you select determines which fields you can select in the Range section of the screen. For
example, if you select to sort on customer code, you can select to print the report for a specific customer, a
range of customers, or all customers. If you select to sort on Classification, you can print the report for a
specific classification, a range of classifications, or all classifications.
4. Select the Customer data check box if you want to print the customerʹs address, contact,
telephone number, payment method, bank account number and credit line on the report. If

Chapter 5: Reporting in A/R
180 Accounts Receivable User Guide
you do not select the Customer data check box, only the customer name and number print on
the report.
5. Select a Group method for the report: None, Our ref., or Due date. Grouping by Our ref
displays the transactions with the same our ref number beneath each other and displays a
total amount for that our ref.
6. Select the New page every customer check box to have each customer print on a separate
page.
7. Select the Exchange rate difference check box to display the amount based on the current
exchange rate; the amount based on the original exchange rate; and the difference.
8. Select the Compress check box to group all records with the same our ref into one line
showing the balance. This will show any partially paid invoice and the payment grouped
together in one line showing the balance remaining on the invoice. If you clear this check box,
the invoice and payment will appear on separate lines.
9. Select the Only with notes check box to display only transactions that have notes attached.
10. Select the Exclude unknown debtor check box to exclude transactions that are for an
unknown customer (debtor). You may have transactions related to an unknown customer if
you are using the unknown customer code for miscellaneous customers or if you upgraded
to Macola ES.
11. Select the Aging check box to display the totals for each invoice in the proper aging period.
You can print the aging detail only if you have selected to group by Our ref. This allows you
to see the invoice and any partial payment or credit memo that is applied and displays the
net balance in the aging period.
12. Select the Invoice currency: All - Default currency; All - currency; or your default currency.
This also shows any additional active currency. Any selection other than All- Default
currency disables the Summary: Foreign currency check box and the Exchange rate field.
13. In the Reference date field (in the Range section), enter the reference date for transactions to
include in the report. This is the invoice through date and the aging date. Only invoices dated
with this date or prior will print on the report and the age is based on the number of days
between the invoice date and the reference date.
14. Select the Status of customers to print on the report: All, Active, Blocked, Inactive, Pilot,
Reference, or Passive. The Receivables report will include receivables only from customers
whose status matches the value selected in this field.
15. Enter a beginning and ending Customer number (or Name, Zip code, Classification, or Due
date depending on the value you selected in the Sorting field), or select the All check box to
print the Receivables report for all customers, names, zip codes, classifications, or dues dates.
16. Select the Items to see on the report. All displays transactions with an invoice date before the
Reference date. Due displays transactions with a due date before the Reference date.
17. Macola ES does not use the Intermediary field.
18. Macola ES does not use the Scenario field.

Chapter 5: Reporting in A/R
lAccounts Receivable User Guide 181
19. Select whether to show Blocked invoices. Select All to print all (blocked or not) invoices on
the report. Blocked invoices will have an asterisk beside the our ref field. Select Yes to print
only the blocked invoices. Select No to print only the invoices that are not blocked.
20. Select the Payment method. The Receivables report will include only those transactions with
a payment method matches the values selected in this field:
All
On credit
Cash
Credit card
Check
Letter of credit
Collection
Debt collection
Factoring
Payment on delivery
21. Select the Summary: Foreign currency check box to include a summary of foreign currencies
on the report.
22. Select the Exchange rate: Original, Current, or Historical.
23. If you selected Historical from the Exchange rate field, enter the Date of the exchange rate to
use on the report.
24. Click Start to generate the Outstanding Items Customers report.
Accounts Receivable Chart
Macola ES includes a chart of the accounts receivable, which you can use to create a column or
pie chart of the outstanding receivables by aging category, or a line chart of the outstanding
receivables by date. The chart is created in Microsoft Excel, and you can use the Excel chart
functionality to add labels or modify the chart.
Printing the Accounts Receivable Chart by Date
1. On the A/R menu, under the Statistics heading select Chart, Receivables.
2. Enter a beginning and ending Customer, or select the All check box to include all customers.
3. Enter a beginning and ending Classification, or select the All check box to include all
classifications.
4. Select the Unprocessed check box to include all customer transactions entered through
general ledger entries that have not been posted. This check box does not apply to customer
transactions entered through Accounts Receivable transactions. Accounts Receivable
transactions are not included on the chart until they are posted.
5. Click Start.

Chapter 5: Reporting in A/R
182 Accounts Receivable User Guide
Printing the Accounts Receivable Chart by Receivables
Age
1. On the A/R menu, under the Statistics heading select Chart, Receivables.
2. Enter a beginning and ending Customer, or select the All check box to include all customers.
3. Enter a beginning and ending Category, or select the All check box to include all categories.
4. Select whether to include Blocked transactions:
All -- includes blocked and non blocked transactions
Yes -- includes only blocked transactions
No -- includes only non blocked transactions
5. Select the type of Graph to display: Columns or Pie.
6. Click Start.
Commission Due Reports
The Commission Due Reports list commissions that are due to each salesperson. You can print
the Commission Due Report based on invoices or on cash receipts. When sales transactions are
posted to A/R, Macola ES updates the commissions due to reflect the commission amounts that
each sales person has earned.
Note: Macola ES calculates commissions due based on Amount 1 (the sale amount) of an invoice only. It
does not include Amount 2 (the total of the miscellaneous charges, the freight charges, and the taxes) when
calculating commissions.
If you are also using Order Entry, A/R automatically calculates the amount of the salesperson
commission, but you can override the calculated amount. After you invoice orders in O/E, they
generate Open Item transactions in the A/R package, and the commissions due information is
also passed along.
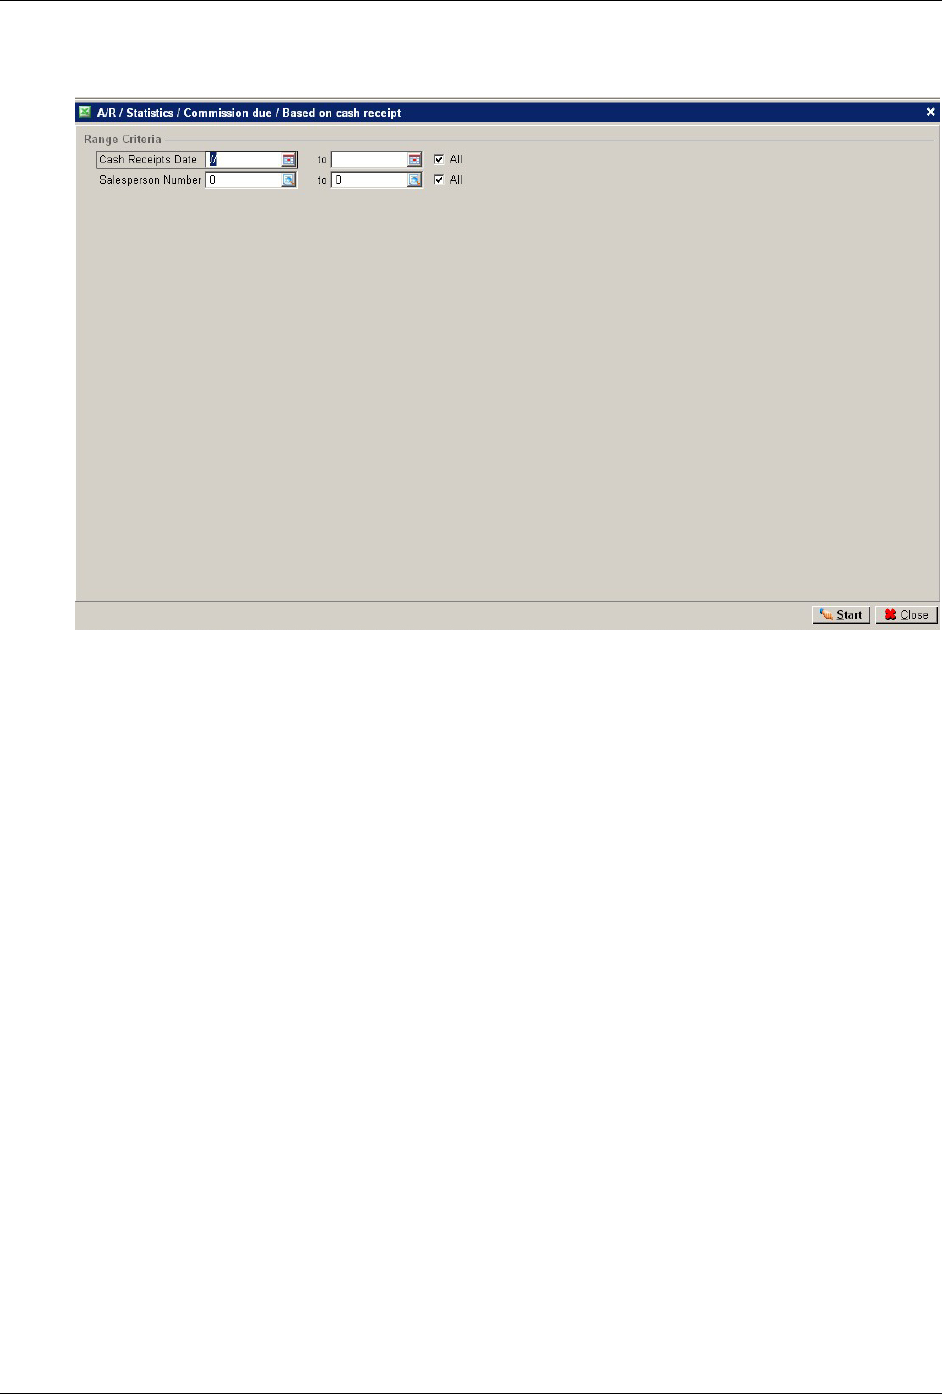
Chapter 5: Reporting in A/R
lAccounts Receivable User Guide 183
Based on Cash Receipts
The Commissions Due Report Based On Cash Receipts includes only those invoice records that
are in both the commissions due and the open items and only when a payment exists in the open
items that has not been updated in the commissions due. To appear on this report, credit memo
records must also be in both. If you have paid all commissions for all payments received, there
will be no records for this report to print.
On this report, the commission amount to pay column always shows the amount of the current
commissions payment less the commission amount owed to the salesperson from the latest cash
receipt, even after you have updated the commissions due to show that you have actually paid
the salesperson. The commission amount paid column shows the total amount that you have
paid (after updating the commissions due to show that you have actually paid the salesperson)
for all payments on for this invoice.
If you are printing this report based on cash receipts and you use open item accounting, the
payment received must apply to the invoice that you are paying. If the apply to numbers do not
match, Macola ES will not calculate the commission amount to pay correctly.
A specific situation requires a detailed explanation: You create an invoice using a salesperson
that is not the default salesperson for that customer. You then receive a payment or create a credit
memo and apply it to 0 for the default salesperson. Using the To Be Matched screen, you match
the payment or the credit memo to the invoice. In this situation, Macola ES keeps the default
salesperson on that payment or credit memo record, and it creates a commission due record for
that default salesperson. (It does not create a commission due record for the salesperson used on
the invoice.)
Chapter 5: Reporting in A/R
184 Accounts Receivable User Guide
Based on Invoices
The Commission Due Report Based On Invoices includes all invoices in the Commission Due
table.
How Macola ES Calculates Commission Amount or
Percent
When you enter a sales transaction in O/E, Macola ES uses the following to determine the
commission. These are presented in the order of their priority.
• The commission percentage for the order (as specified in the Commission Pct field on the O/E
Billing Information screen or in the Commission field on the A/R Enter Sales Transactions
screen for an invoice)
• The commission method for each ordered item (as specified in the Method field on the I/M
Item Master screen) and the amount or percent (as specified in the Amt/Pct field on the I/M
Item Master screen)
• The Customer Type of the customer placing the order (as specified in the Customer Type
fields on the A/R Salesperson Maintenance screen) and the commission percent (as specified
in the Comm % fields on the A/R Salesperson Maintenance screen)
Chapter 5: Reporting in A/R
lAccounts Receivable User Guide 185
The following is an example of how the commission to be paid amount is calculated for open
item customers:
Date Invoice
Amt
Comm
Due
Payments
Received
Comm
To Pay
9/10/95 $1000 $100 $500 $50
9/15/95 $2000 $200 $600 $60
9/20/95 $500 $50 $000 $00
TOTAL: $3500 $350 $1100 $110
Calculating Salesperson Commission
How Macola ES calculates commission depends on the Macola ES packages you are using.
If you are using Macola ES A/R only:
Macola ES calculates commission based on the customer type and commission percentage
information set up on the Salesperson Maintenance screen:
When you enter a sales transaction in A/R, Macola ES matches the customer type on the sales
transaction with the customer type associated with the sales person on the sales transaction; it
uses the corresponding commission percentage to calculate commission.
If Macola ES does not find a matching customer type, it calculates commission as zero. You can
override the commission field on the A/R Enter Sales Transactions screen.
If you are using Macola ES A/R, I/M, and O/E:
If you are using Macola ES A/R, I/M, and O/E, how Macola ES calculates commission depends
upon the value selected in the Calc Commission Method field on the Order Entry Setup screen.
If the Calc Commission Method field is I = Itm Pct/Amt
Macola ES calculates commission based on the Commission Method field and Commission
Amount/Pct field on the I/M Item Master Maintenance screen for each item on a sales order
entered in O/E.
If Macola ES finds no commission for an item, it will calculate commission for that item as zero.
When the Calc Commission Method field is set to I = Itm Pct/Amt, you cannot change the
Commission Percent field on the O/E Billing Information screen. This is because the commission
is calculated based on the item commission percent and not the total amount of the item order.
If the Calc Commission Method field is M = Sale Amt - Cst Amt
Macola ES calculates commission based on the total gross margin (sale amount - cost amount) for
the order.
When you enter a sales order in O/E, Macola ES matches the customer type on the order with the
customer type associated with the sales person on the order; it uses the corresponding
commission percentage.
If Macola ES does not find a matching customer type, it calculates commission as zero. You can
override the commission amount field on the O/E Billing Information screen.

Chapter 5: Reporting in A/R
186 Accounts Receivable User Guide
If the Calc Commission Method field is S = Total Sale Amt
Macola ES calculates commission based on the total sale amount for the order.
When you enter a sales order in O/E, Macola ES matches the customer type on the order with the
customer type associated with the sales person on the order; it uses the corresponding
commission percentage.
If Macola ES does not find a matching customer type, it calculates commission as zero. You can
override the commission amount field on the O/E Billing Information screen.
Charting Sales Transactions
The Sales Transaction report generates a pivot table and chart in Microsoft Excel. This report is
for processed or unprocessed sales transactions for a range of customers, categories, resources,
and items for a product line.
You can derive report variations by dragging and dropping items in the pivot table onto the
pivot chart or the X-axis of the graph.
The following example illustrates how this works:
1. Enter an order in O/E.
2. Run the Sales Transaction report with the O/E order included in the range.
3. Choose an item from the Pivot Table Field List; drag the item to the chart; and drop it on the
chart. Excel re-generates the report including the new field.
Generating a Sales Transaction Chart
1. On the A/R menu, under the Statistics heading, select Chart, Sales transactions.
2. Enter a beginning and ending Date, or select the All check box.
3. Enter a beginning and ending Customer, or select the All check box.
4. Enter a beginning and ending Category, or select the All check box.
5. Enter a beginning and ending Resource, or select the All check box.
6. Enter a beginning and ending Item, or select the All check box.
7. Select a Product Line.
8. To include unposted sales transactions, select the Unprocessed check box.
9. Click Start.
Receivables History
Use this screen to generate a report of receivables history. When running this report, enter a
range of customers and documents. The report shows the invoice date and number, due date,
reference, and amount for each invoice for each customer. There is a total for each customer and a
grand total of all customers on the report.

Chapter 5: Reporting in A/R
lAccounts Receivable User Guide 187
Printing a Receivables History Report
1. On the A/R menu, under the Statistics heading, select Receivables history. This opens the A/R
/ Statistics / Receivables history screen.
2. Enter a beginning and ending Document No, or select the All check box.
3. Enter a beginning and ending Customer No, or select the All check box.
4. For distributions, select the Print Distributions check box.
5. Click Start. The generates and displays the report.
6. After reviewing or printing the report, click Close.
7. Click Close.
Service Invoice History Report
The Service Invoice History Report shows invoices from the Service Invoice History. The report is
printed in document order for a specified range of dates.
Printing a Service Invoice History Report
1. On the A/R menu, under the Statistics heading, select Service Invoice History. This opens the
Service Invoice History Report screen.
2. Enter a Document No., a range of document numbers, or select the All check box to include
all documents.
3. Enter a Document Date, a range or dates, or select the All check box to include all dates.
4. Click Start. A/R generates the report.
5. Review, Export, or Print the report
6. When finished, click Close.
7. Click Close to close the screen.

Chapter 5: Reporting in A/R
188 Accounts Receivable User Guide

lAccounts Receivable User Guide 189
Glossary

Glossary
190 Accounts Receivable User Guide
A
A/D: Assets and Depreciation
A/P: Accounts Payable
A/R: Accounts Receivable
account number: An account is a location in an accounting system used to record and summarize the
increases and decreases in each type of revenue, expense, asset, liability, or ownerʹs equity item. An
account number is a three part number (Main, Cost Unit, Cost Center) used in General Ledger to identify
a particular account. All account numbers are defined in the Chart of Accounts.
ACH: automatic clearing house
ATP: available to promise
B
B/C: Bar Code
BOM: Bill of Material
C
CPO: computer planned order
Creditor: vendor
D
Debtor: customer
E
EDI: Electronic Data Interchange
EFT: electronic funds transfer
F
FIFO: first in first out
FLSA: Fair Labor Standards Act
FPO: firm planned order

Glossary
lAccounts Receivable User Guide 191
G
G/L: General Ledger
H
HR: Human Resources
HRM: Human Resource Management
I
I/M: Inventory Management
ID: identification
L
L/P: Labor Performance
LIFO: last in first out
M
M/S: Master Scheduling
MCA: Manufacturing Cost Accounting
MFG: manufacturing
MRB: material review board
MRP: Material Requirements Planning
O
O/E: Order Entry
OEM: original equipment manufacturer
Our Ref: The our ref is typically an invoice number or document number used by your company to track
a financial entry throughout the system
P
P&IC: product and inventory control
P/O: Purchase Order

Glossary
192 Accounts Receivable User Guide
POP: Production Order Processing
PPV: purchase price variance
PR: Payroll
Process: In Macola ES financials, this means post.
PTD: period to date
Q
Q/E: Quoting and Estimating
R
RFQ: Request for Quote
RMA: Return Material Authorization
S
S/C: Standard Costing
SFC: Shop Floor Control
SPR: Standard Product Routing
T
Terms: a payment condition
U
UOM: unit of measure - expresses the unit of quantitative data for an item; for example, each (EA),
pounds (LB), feet (FT), etc.
UPC: universal product code
W
WIP: work in process
WMS: Warehouse Management System
Y

Glossary
lAccounts Receivable User Guide 193
Your Ref: The your ref is typically a document number a vendor uses such as an invoice, purchase order,
or voucher number.
YTD: year to date

Glossary
194 Accounts Receivable User Guide

Index
Accounts Receivable User Guide 195
Index

Index
Accounts Receivable User Guide 196
0
01/01/1753...............................................................41
A
A/R
aging analysis .................................................176
distribution to G/L report .............................174
sales analysis...................................................175
A/R sales transactions
entering............................................................109
account number
field type ...........................................................21
account number ....................................................21
accounts receivable
balance list.......................................................172
chart
printing...............................................181, 182
chart .................................................................181
setup...................................................................83
accounts receivables report ...............................179
adding
a notes button to a field...................................29
information on-the-fly.....................................20
adding ....................................................................20
aging analysis
print ...........................................................88, 176
aging analysis........................................................88
aging analysis......................................................176
allowances..............................................................62
appending
spooled reports.................................................49
application shortcuts
creating..............................................................19
deleting..............................................................19
renaming ...........................................................19
AR
using with OE...................................................60
authentication, Windows.......................................7
average number of days to pay
how AR calculates............................................61
average number of days to pay...........................61
B
balance list
accounts receivable........................................172
batch control................................................108, 138
before you begin .....................................................3
browser
action bar...........................................................31
customizing search screen ........................32, 33
search fields ......................................................31
using search ................................................33, 34
buttons
push buttons ...............................................26, 27
radio...................................................................26
buttons....................................................................26
buttons....................................................................27
C
calculating
average number of days to pay......................61
Canadian and European taxes .....................106
salesperson commission..................61, 184, 185
calculating..............................................................61
calendar
date.....................................................................40
Canadian taxes....................................................106
canceling a print job .............................................50
carrier code
adding................................................................68
deleting..............................................................69
carrier mode
adding................................................................70
deleting..............................................................71
changing
Crystal report options .....................................54
chart
sales transactions............................................186
charts ....................................................................182
check boxes............................................................26
checklist................................................................161
checklist of outstanding items ..........................165
combo boxes ..........................................................26
commission
calculating.........................................61, 184, 185
commission............................................................61
commission..........................................................185
commission due reports
based on cash receipts
printing...............................................118, 133
based on cash receipts ...................................117
based on cash receipts ...................................132

Index
lAccounts Receivable User Guide 197
based on cash receipts ...................................183
based on invoices
printing...............................................119, 134
based on invoices ...........................................119
based on invoices ...........................................134
based on invoices ...........................................184
commission due reports.....................................116
commission due reports.....................................131
commission due reports.....................................182
company
deleting................................................................9
opening................................................................8
setup.....................................................................3
concepts and terms
accounts receivable..........................................60
creating
a record
from a field level search .............................36
from a search................................................34
application shortcuts .......................................19
customer label layouts...................................152
role bar group...................................................19
credit history .......................................................142
crystal report viewer ............................................53
crystal reports
network button.................................................51
print preview screen........................................53
printer settings option.....................................50
settings button..................................................51
customer accounts
viewing............................................................103
customer addresses ..............................................96
customer history view........................................167
customer info.......................................................142
customer labels
layout
creating .......................................................152
deleting .......................................................156
editing.........................................................155
exporting ....................................................157
importing....................................................156
printing.......................................................154
customer labels....................................................151
customer maintenance .........................................88
customer type
defining .............................................................80
deleting..............................................................81
customers
deleting..............................................................96
editing addresses .............................................97
master list
printing.......................................................102
customizing
search screen
at the field level ...........................................35
search screen...............................................32, 33
D
data
entering
on-the-fly ......................................................20
saving.................................................................21
viewing..............................................................38
data entry line .......................................................38
date calendar .........................................................40
dates
calendar entry...................................................40
field type ...........................................................21
restriction ..........................................................41
defaults
accounts.............................................................83
forms..................................................................83
values.................................................................23
defaults...................................................................23
deferring printing ...........................................45, 48
deleting
application shortcuts .......................................19
company..............................................................9
customer label layout ....................................156
customer records..............................................96
distributions....................................................126
distributions from recurring sales
transactions ................................................126
distributions from sales transactions...........113
record
browser search.............................................34
recurring sales transactions ..........................127
role bar group...................................................20
sales transactions............................................112
sales transactions, entire batch.....................112
salesperson records..........................................68
service invoices...............................................142
service invoices by batch...............................143
discounts ................................................................62
distributions to GL................................................83
document fields.....................................................24

Index
198 Accounts Receivable User Guide
document types...................................................108
DRM documents.....................................................3
E
editing
customer address information .......................97
customer label layouts...................................155
distributions....................................................126
enhance.wri file.......................................................3
entering
a date using the date calendar........................40
a field from a search.........................................36
data and saving ................................................21
data on the fly...................................................20
distributions....................................................126
service invoices.......................................139, 140
environment
operating .............................................................5
European taxes....................................................106
explorer menu tabs...............................................16
exporting
customer label layout ....................................157
F
field level notes .....................................................29
field level searches
creating a record...............................................36
opening a record ..............................................36
field types...............................................................21
fields
buttons...............................................................27
check boxes .......................................................26
combo boxes .....................................................26
default values ...................................................23
document ..........................................................24
grouping............................................................21
list boxes............................................................38
note...............................................................27, 28
push buttons ...............................................26, 27
radio buttons.....................................................26
required.............................................................23
types...................................................................21
user defined ......................................................23
fields .......................................................................21
fields .......................................................................23
files
enhance.wri.........................................................3
macdde.mac........................................................3
version#up.wri ...................................................3
filter criteria fields.................................................30
forms
defaults..............................................................83
printing..............................................................41
setting printer settings.....................................51
G
generating
recurring service invoices .............................148
generating ............................................................148
grouping fields......................................................21
GST taxes .............................................................106
H
help
Progression help.................................................3
resource ...............................................................3
screen level..........................................................3
help ...........................................................................3
I
icons
menu and application......................................12
tabs.....................................................................39
identifying your operating environment.............5
importing
customer label layout ....................................156
information resources ............................................3
insert key................................................................38
installing
a new package with an existing Macola ES
system .............................................................3
installation CD....................................................3
installation instructions.....................................3
prerequisites .......................................................3
update CD...........................................................3
installing...................................................................3
invoice
entering in A/R ...............................................140
invoices
printing............................................................145
recurring service.............................................148
service..............................................................139
invoices.................................................................145
J
job numbers ...........................................................60

Index
lAccounts Receivable User Guide 199
L
layout menu selections and definitions ...........153
license
updating..............................................................6
list boxes
data entry line...................................................38
using ..................................................................38
list boxes.................................................................37
list field type..........................................................21
M
macdde.mac file ......................................................3
Macola ES
menu style...................................................12, 14
opening company ..............................................8
printing
Crystal reports to file ..................................56
Crystal reports to printer............................55
Crystal reports to screen.................53, 54, 55
standard reports print options ..................42
standard reports to email...........................49
standard reports to screen..........................47
reference guides .................................................3
shell, using ..................................................12, 14
toolbar and menu selections.............................9
user guides..........................................................3
Macola website........................................................3
maintain
customers ..........................................................88
menu and application icons ................................12
menu and toolbar selections..................................9
menu style
classic.................................................................14
explorer
menu tabs .....................................................16
opening a Macola ES application..............15
selecting a main level menu.......................15
panel ..................................................................14
menu style..............................................................12
menu style..............................................................14
Microsoft Excel............................................172, 181
N
network button......................................................51
note field ..........................................................27, 28
notes button
adding to a field ...............................................29
field level...........................................................29
toolbar level ......................................................28
notes button.....................................................27, 28
numeric field type.................................................21
O
on the fly
entering data.....................................................20
on the fly ................................................................20
online help
resource ...............................................................3
onscreen help...........................................................3
opening
a record
from a field level search .............................36
from a search................................................33
Macola ES application from the menu tree ..15
Macola ES company...........................................8
operating
environment........................................................5
system requirements..........................................5
order entry
using with AR...................................................60
outstanding items
report, printing...............................................165
overview
setting up and maintaining ............................66
OW tabs..................................................................39
P
performing a browser search ..............................33
performing a field level search ...........................36
post
sales transactions in A/R .......................121, 136
posted service invoices
reprinting ........................................................151
posted service invoices.......................................151
posting
recurring service invoices .............................149
service invoices...............................................149
prerequisites
for running Macola ES.......................................3
print job/canceling ................................................50
print preview menu and toolbars.......................53
print to file
spooled reports.................................................49
printer settings option..........................................50
printing

Index
200 Accounts Receivable User Guide
a report or form................................................41
accounts receivable chart ......................181, 182
aging analysis .................................................176
canceling a print job.........................................50
Crystal reports
to file .............................................................56
to printer.......................................................55
to screen............................................53, 54, 55
customer label layout ....................................154
customer master list.......................................102
deferring......................................................45, 48
invoices
from multiple workstations .....................145
service .........................................................145
receivables history report .............................187
receivables report...........................................179
report of outstanding items ..........................165
serialized document history .........................175
serialized document history reports............176
service invoice ................................................146
service invoice history report .......................187
setting form printer settings...........................51
standard reports
print options.................................................42
to email .........................................................49
to screen........................................................47
project numbers ....................................................60
PST taxes ..............................................................106
PTD and YTD tax accumulators
clearing ............................................................170
purging
commission due file...............................119, 134
push buttons....................................................26, 27
Q
question field type ................................................21
R
radio buttons .........................................................26
receivables history report
printing............................................................187
receivables history report ..................................186
receivables report
printing............................................................179
receivables report................................................179
record specific fields.............................................30
recurring
sales transactions
deleting .......................................................127
posting ........................................................128
printing.......................................................127
service invoices
generating...................................................148
posting ........................................................149
printing a list of .........................................143
recurring sales transactions
entering............................................................124
recurring transactions
print .................................................................127
reference guides
Macola ES............................................................3
reference guides......................................................3
reminders
printing............................................................163
renaming
application shortcuts .......................................19
role bar group...................................................20
report preview and toolbar .................................53
report screen options............................................47
reports
commission due
based on cash receipts ..............117, 132, 183
based on invoices ......................119, 134, 184
commission due .............................................116
commission due .............................................131
commission due .............................................182
printing..............................................................41
printing Crystal
to file .............................................................56
to printer.......................................................55
to screen............................................53, 54, 55
printing standard
print options.................................................42
to email .........................................................49
to screen........................................................47
serialized document history .........................175
sql date restriction............................................41
reprinting posted service invoices............150, 151
required fields .......................................................23
requirements
operating system................................................5
resources
information .........................................................3
resources ..................................................................3
displaying ..............................................................19
role bar

Index
lAccounts Receivable User Guide 201
displaying..........................................................19
role bar
application shortcuts .......................................19
role bar
group .................................................................19
role bar
group .................................................................20
role bar
group .................................................................20
S
sale amount if you distribute sales.....................63
sales
amounts
freight............................................................63
invoice...........................................................63
miscellaneous charges ................................63
amounts.............................................................63
tax account ........................................................63
sales.........................................................................63
sales analysis .......................................................175
sales edit list
printing....................................................120, 135
sales edit list ........................................................120
sales edit list ........................................................135
sales transactions
deleting............................................................112
deleting entire batch ......................................112
entering in A/R ...............................................109
posting.....................................................121, 136
printing....................................................120, 135
sales transactions chart ......................................186
salesperson records
calculating commission...........................61, 185
deleting..............................................................68
setting up...........................................................67
salesperson records ..............................................61
salesperson records ............................................185
saving
your work..........................................................21
saving .....................................................................21
screen level notes ..................................................28
search
support super .....................................................3
searches
browser action bar ...........................................31
browser filter criteria fields ............................30
browser record specific fields.........................30
browser search fields.......................................31
customizing search screen ........................32, 33
customizing search screen at field level........35
field level
creating a record..........................................36
opening a record..........................................36
selecting a record.........................................36
using ............................................................33, 34
using browser.............................................33, 34
using field level ..........................................35, 36
searching
for a record in a Crystal report.......................55
sections
AR distribution...............................................174
selecting
a main level menu............................................15
a record to enter in the field ...........................36
print options .....................................................42
serialized document
history report..................................................175
service codes
defining .............................................................77
deleting..............................................................78
service invoice history report
printing............................................................187
service invoice history report............................187
service invoices
deleting............................................................142
deleting by batch............................................143
entering....................................................139, 140
posting.............................................................149
printing............................................................145
printing a list of ..............................................144
printing from multiple workstations...........145
recurring
generating...................................................148
reprinting posted ...................................150, 151
service transaction types....................................138
setting up
accounts receivable..........................................83
salesperson records..........................................67
settings button.......................................................51
setup
accounts receivable..........................................66
company..............................................................3
shell
Macola ES................................................9, 12, 14
ship via codes

Index
202 Accounts Receivable User Guide
defining .............................................................72
deleting..............................................................73
signed field type....................................................21
SM
installation...........................................................3
SM .............................................................................3
spooled reports
appending .........................................................49
SQL date restriction in reports............................41
statement/labels
checklist...........................................................161
statements
setting default form number ..........................83
support
CD files ................................................................3
super search........................................................3
technical...............................................................3
technotes..............................................................3
support .....................................................................3
T
tabs
icons ...................................................................39
OW .....................................................................39
user defined ......................................................40
tax detail codes
and tax schedules
for AR transactions .....................................62
assigning to customers....................................96
tax schedules
assigning to customers....................................96
taxes
Canadian (PST/GST)......................................106
European (VAT).............................................106
taxes......................................................................106
technical support
support plans......................................................3
technotes..............................................................3
technical support ....................................................3
technotes ..................................................................3
terms codes
defining .............................................................75
deleting..............................................................76
toolbar
and menu selections ..........................................9
transaction distributions
deleting............................................................113
transaction document types ..............................108
transactions
recurring sales
deleting .......................................................127
posting ........................................................128
printing.......................................................127
recurring service invoices
generating...................................................148
posting ........................................................149
printing a list of .........................................143
service invoices
posting ........................................................149
printing.......................................................145
printing a list of .........................................144
reprinting posted.......................................151
U
update CD................................................................3
upper lowercase alphanumeric field type.........21
uppercase alphanumeric field type....................21
use font dialog.......................................................45
use print dialog .....................................................43
user defined fields ................................................23
user defined tabs...................................................40
user guides
Macola ES............................................................3
user guides...............................................................3
using
browser search............................................33, 34
field level search.........................................35, 36
Macola ES shell.......................................9, 12, 14
OE with AR.......................................................60
V
values
default................................................................23
values......................................................................23
VAT taxes.............................................................106
version#up.wri file..................................................3
viewing
credit history...................................................168
customer accounts..........................................103
customer information
using the customer info button ...............168
customer information....................................168
viewing.................................................................168
W
web site.....................................................................3

Index
lAccounts Receivable User Guide 203
welcome
accounts receivable..........................................60
Windows authentication........................................7
www.exactsoftwarena.com...................................3
X
XXEXACT1 ..................................................151, 156
