Installation Guide Adaptiva
User Manual: Pdf
Open the PDF directly: View PDF ![]() .
.
Page Count: 24

Revision 1.01
February 12, 2014
Adaptiva
OneSite & Client
Health
Installation Guide

Adaptiva OneSite & Client Health · Installation Guide
Page 2
Introduction
Adaptiva products are known for their simplicity and ease of installation. This guide explains how to
install the OneSite and Client Health server components – including the server service and the
management workbench – as well as the Adaptive client agent. The installation is the same for both
products. The installer installs components shared between Client Health and OneSite; installing a
valid license will enable the features of one or both. The server should be installed first, followed by
the workbench and finally the clients.
The products also uninstall cleanly and leave no files behind so you can feel confident in installing the
product for evaluation purposes.
Client Health may be installed on Systems Management Server (SMS) 2003 and System Center
Configuration Manager (ConfigMgr) 2007 & 2012. OneSite is available for ConfigMgr 2007 & 2012.
Before Installation
The following sections detail architectural pre-requisites and recommendations for the deployment of
OneSite and Client Health into your environment. Details given are for the most common scenarios,
but other possibilities may exist. In general, the Keep It Simple Silly (KISS) philosophy should be used as
your guiding principal.
ConfigMgr Hierarchy Considerations
For Client Health, the Adaptiva Server can be installed on any primary site and can
perform health checks on any collections that the site has valid permissions to manage.
Ideally, the server should be installed as high in the hierarchy as possible. The Adaptiva
server does not need to be installed on all sites in the hierarchy though because child sites
can be managed from parent sites.
For OneSite, the Adaptiva Server should be installed on all primary sites. Note that primary sites
eliminated by the introduction of OneSite do not need to have the Adaptiva Server installed.
In all cases, we recommend installing the Adaptiva Server on the primary site server itself. If
installation on the primary site server is not possible (for technical or political reasons) you should
install on a server within close proximity (network-wise) to the primary site server.
Database Location
The Adaptiva Server uses its own SQL Server database. This can be co-located with your
ConfigMgr DB in the same SQL Server instance, on the same SQL server in a different
instance, or on a completely different SQL Server. For simplicity, it is best to use the same
instance of SQL Server that ConfigMgr is using. Note that SQL server must be properly
licensed for whatever configuration that you choose.
Because the Adaptiva server uses a separate database, it is necessary to create a link between the
ConfigMgr database and the Adaptiva database to enable cross-database reporting. The Adaptiva

Adaptiva OneSite & Client Health · Installation Guide
Page 3
Server setup (discussed below in the “Server” section) will create the necessary links in two of the
three possible cases:
1. Adaptiva and ConfigMgr databases share same SQL Server instance: The Adaptiva server setup will
create the link automatically; the created link is named “LocalLinkServer.”
2. Adaptiva and ConfigMgr databases share same SQL Server but use separate instance: The Adaptiva
server setup will create two links, one in each instance linking to the other instance. The links will be
named using the fully qualified domain name (FQDN) of the SQL Server system hosting the default
instance or the instance name for a named instance; e.g., if the FQDN of the server is SQL-
123.MyOrg.MyDomain.com, and the default instance is used then the link in the other instance will
be named “SQL-123. MyOrg.MyDomain.com.” Likewise if the database is in an instance named
“Instance1” on the SQL-123 server described earlier, then the link in the other instance will be named
“SQL-123. MyOrg.MyDomain.com\Instance1.”
3. Adaptiva and ConfigMgr databases hosted by separate SQL Servers: Links must be manually created
in each instance of SQL Server prior to installing the Adaptiva server. The linked server name on
ServerA must be the FQDN (with instance name if needed) of the other SQL Server, and vice versa.
Server setup will verify link existence and proper permissions before installation is successfully
completed. To create a link, follow the directions on MSDN at http://msdn.microsoft.com/en-
us/library/ff772782.aspx ensuring that Collation Compatible is set to True.
Service Accounts and Permissions
As with most software, Adaptiva Server installation requires local administrator
permissions on the chosen system. By default, the local SYSTEM account is used for the
Adaptiva Server service account – if installed on the primary site server this account
already has sufficient permissions and nothing more needs to be done unless you plan on
using SQL Server Reporting Services (see below). Alternatively, you can configure the Adaptiva Server
service use a domain user account; i.e., service account.
Adaptiva OneSite & Client Health · Installation Guide
Page 4
The following table summarizes the permissions that must be granted to any service account:
Table 1: Service Account Permissions
Entity
Service Account Permissions Required
SQL Server, ConfigMgr Site DB
Create, read, write, and delete permission on all
SQL tables
SQL functions
Create, read, delete permission on all
SQL views
Create, read, execute, and delete permission on all
Stored Procedures
(The above permissions can all be granted using T-SQL and GRANT SELECT.)
SQL Server, instance hosting
Adaptiva Server DB
Create DB
SQL Server, Adaptiva Server
DB
db_datareader
db_datawriter
db_ddladmin
The GRANT EXECUTE permission also needs to be given to the account for
all stored procedures on the Adaptiva database.
Primary Site Server
Local Administrator
ConfigMgr
Class permissions for the following objects:
Collection – Create, Delete, Delete resource, modify, modify collection
setting,
read, read resource
Package – Create, Delete, Distribute, Modify, Read
Advertisement – Create, Delete, Modify, Read
Status message – Create, Delete, Read
Site – Read, Modify
Query – Create, Delete, Modify, Read
Report – Create, Delete, Modify, Read
Deployment Package – Create, Delete, Distribute, Modify, Read
SQL Server Reporting Services
To enable reporting using SQL Server Reporting Services (SSRS) and the SQL Reporting
Service Point (SRP) introduced in ConfigMgr 2007 R2 you must grant the db_datareader
role on the Adaptiva DB to the SRP execution account.
Adaptiva OneSite & Client Health · Installation Guide
Page 5
Firewall, Antivirus and Communication Ports
As a network application facilitating activity between the server and its clients, certain
ports must be open or allowed between the server and client to enable communication.
Please refer to “AdaptivaPortDetail.xlsx” in the product download for the list of all TCP/IP
ports need to be enabled in any intervening firewalls. The ports listed should be excluded
from any network filtering or intervening network security devices to prevent a disruption in network
communication Adaptiva setup creates rules for these ports automatically in the Windows firewall
“Public Networks” if it is being used. If you customize the ports used by the Adaptiva server, client, or
workbench, or use other firewalls or security software between the server, workbench or clients, then
you must manually configure these exceptions or rules to enable communication.
For OneSite and content distribution, anti-virus scanning should be performed on the package source
files to mitigate the risk of distributing malware. OneSite directly acquires content from the package
source files and uses a secure hash to ensure content is not tampered with or corrupted in transit or
when stored.
Server Exceptions: For systems running the Adaptiva server, the following anti-virus exceptions are
recommended:
Table 1: Server Folder Exclusions
Description
Folder Exclusion
Server Installation Folder
Default path on 32-bit systems: C:\Program Files (x86)\Adaptiva
Default path on 64-bit systems: C:\Program Files\Adaptiva
Adaptiva Content Library
(If moved from default
location)
The new location of the Adaptiva content library
Workstation Exceptions: For systems running the Adaptiva client, the following anti-virus exceptions
are recommended:
Table 2: Client Folder Exclusions
Description
Folder Exclusion
Client Installation
Folder
Default path on 32-bit systems: C:\Program Files (x86)\Adaptiva
Default path on 64-bit systems: C:\Program Files\Adaptiva
Adaptiva Content
Cache
\AdaptivaCache (exists at the root of every fixed logical drive by default)
SCCM Cache
Default SCCM 2007 path on 32-bit: C:\Windows\System32\CCM\Cache
Default SCCM 2007 path on 32-bit: C:\Windows\SysWOW64\CCM\Cache
Default SCCM 2012 path: C:\Windows\CCMCache
Adaptiva OneSite & Client Health · Installation Guide
Page 6
Installation
The following three sections describe how to install the different required components into your
environment. Local administrator privileges are assumed for each along with the information
presented in the Before Installation section above.
The installers for all three pieces are contained in the compressed (.zip) distribution file.
Server
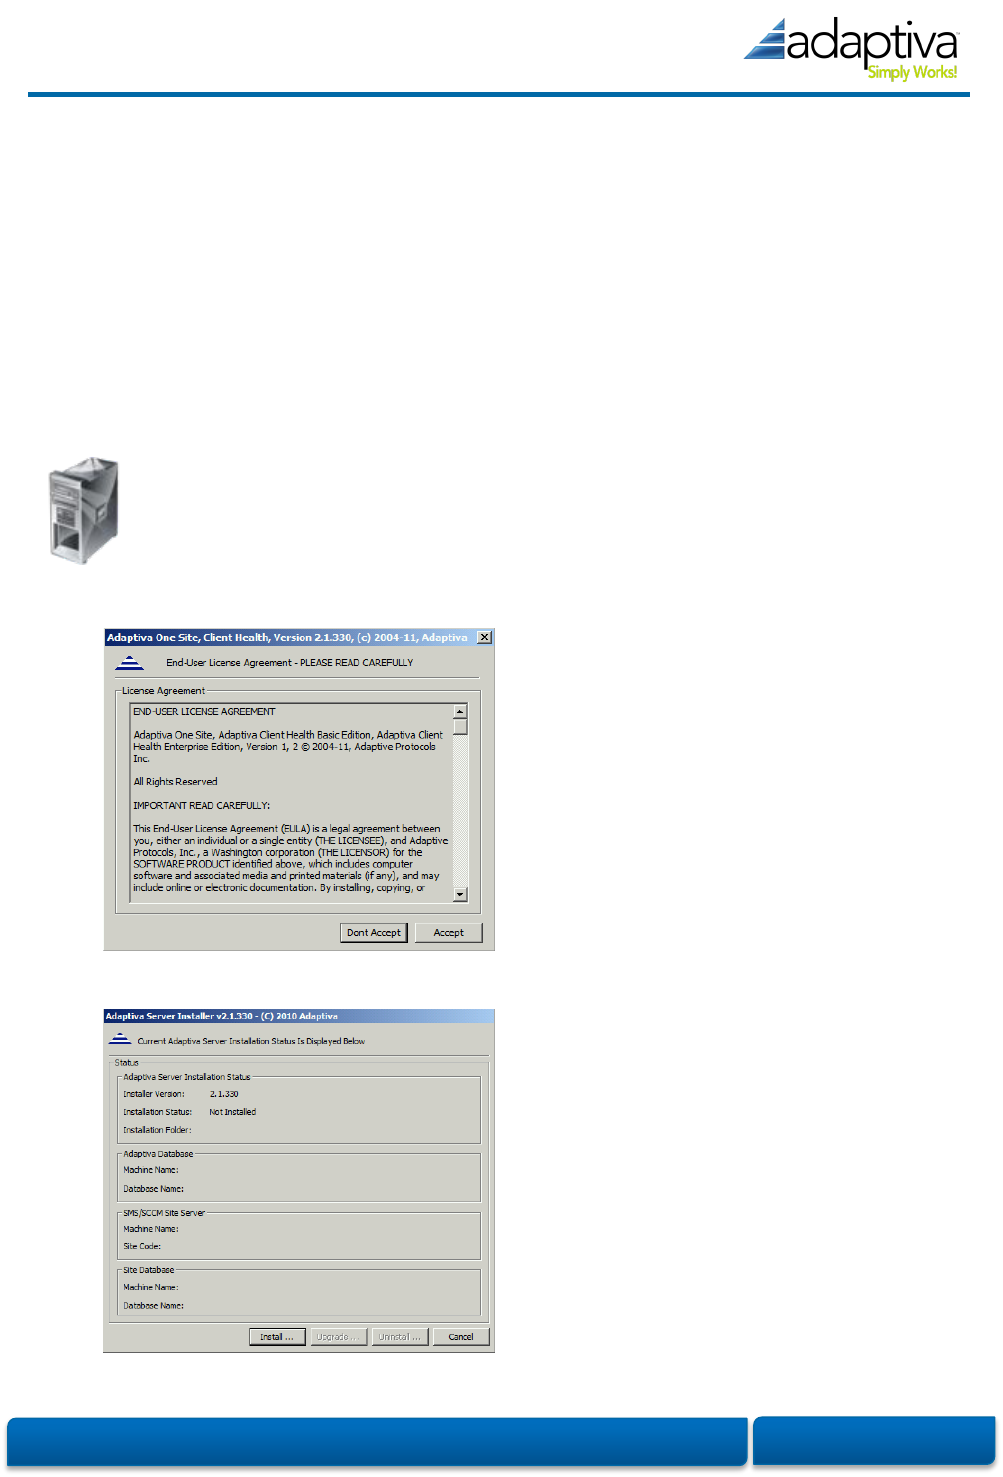
1. There are two installers, depending on which operating system edition you have. Run
the AdaptivaServerSetup.exe executable to start the interactive installation on a 64-bit
operating system. The AdaptivaServerSetup32.exe installer is for installing on 32-bit
operating systems. The setup executable must be run with elevated privileges.
2. Accept the End-Use License Agreement.
3. Click Install …
Adaptiva OneSite & Client Health · Installation Guide
Page 7
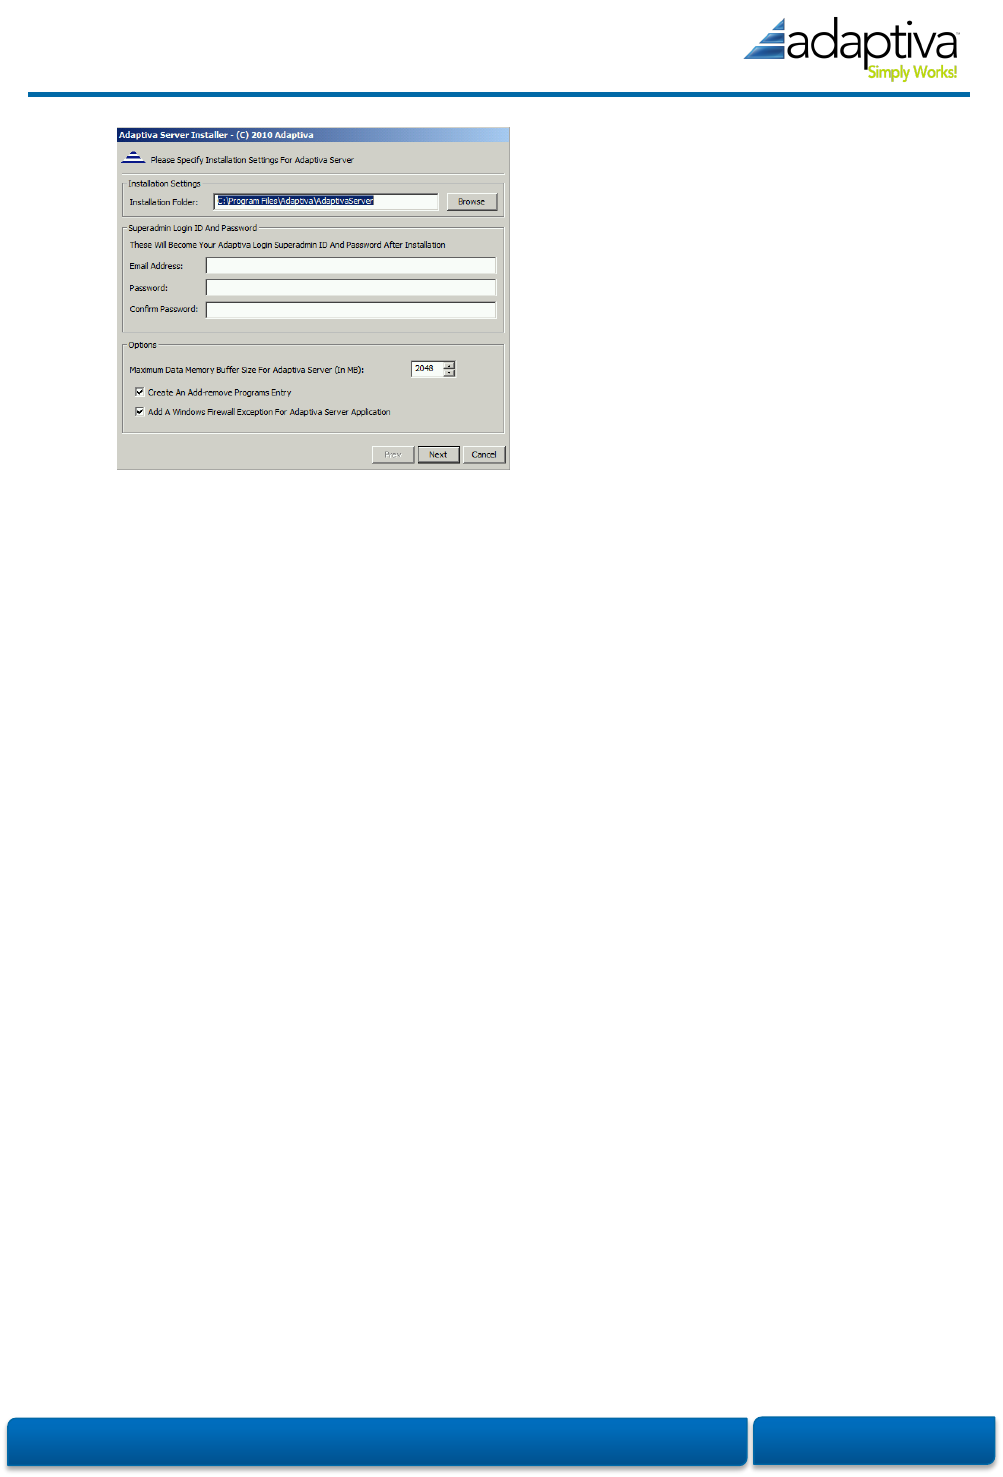
4. Installation Settings. On this page, enter the basic server installation information.
Installation Folder – The local path where you want the server components installed.
Note that the internal content library (where OneSite stores all published packages)
will be in this folder by default so ensure the drive specified has adequate free space.
If you are upgrading from a 32-bit version of Adaptiva to a 64-bit version, you may
want to change the installation folder from Program Files(x86) to Program Files. If you
do this, and the content library is in the default location it will be automatically moved.
Email Address – This will become the login ID for the Adaptiva Server’s Superadmin.
Password – The password for the Superadmin account.
Maximum Data Memory Buffer –This value defines an internal buffer size in RAM for
the Adaptiva Server’s exclusive use. On a 32-bit operating system this should be at
least 512MB. On a 64-bit OS it should be set to at least 2048MB.
Create an Add/Remove Programs Entry – This creates an entry in Add/Remove
Programs (Windows Server 2003) or Programs and Features (Windows Server 2008
and later) enabling you to uninstall the Adaptiva server installation from there.
Add a Windows Firewall Exception – Automatically adds local exceptions in the
Windows firewall for the default server ports (see table 2 in the Communication Ports
section above). Note that existing domain-based group policies that configure or
restrict Windows firewall rules or rule creation may prevent or override the client
agent installation’s creation of these firewall exceptions.
Adaptiva OneSite & Client Health · Installation Guide
Page 8
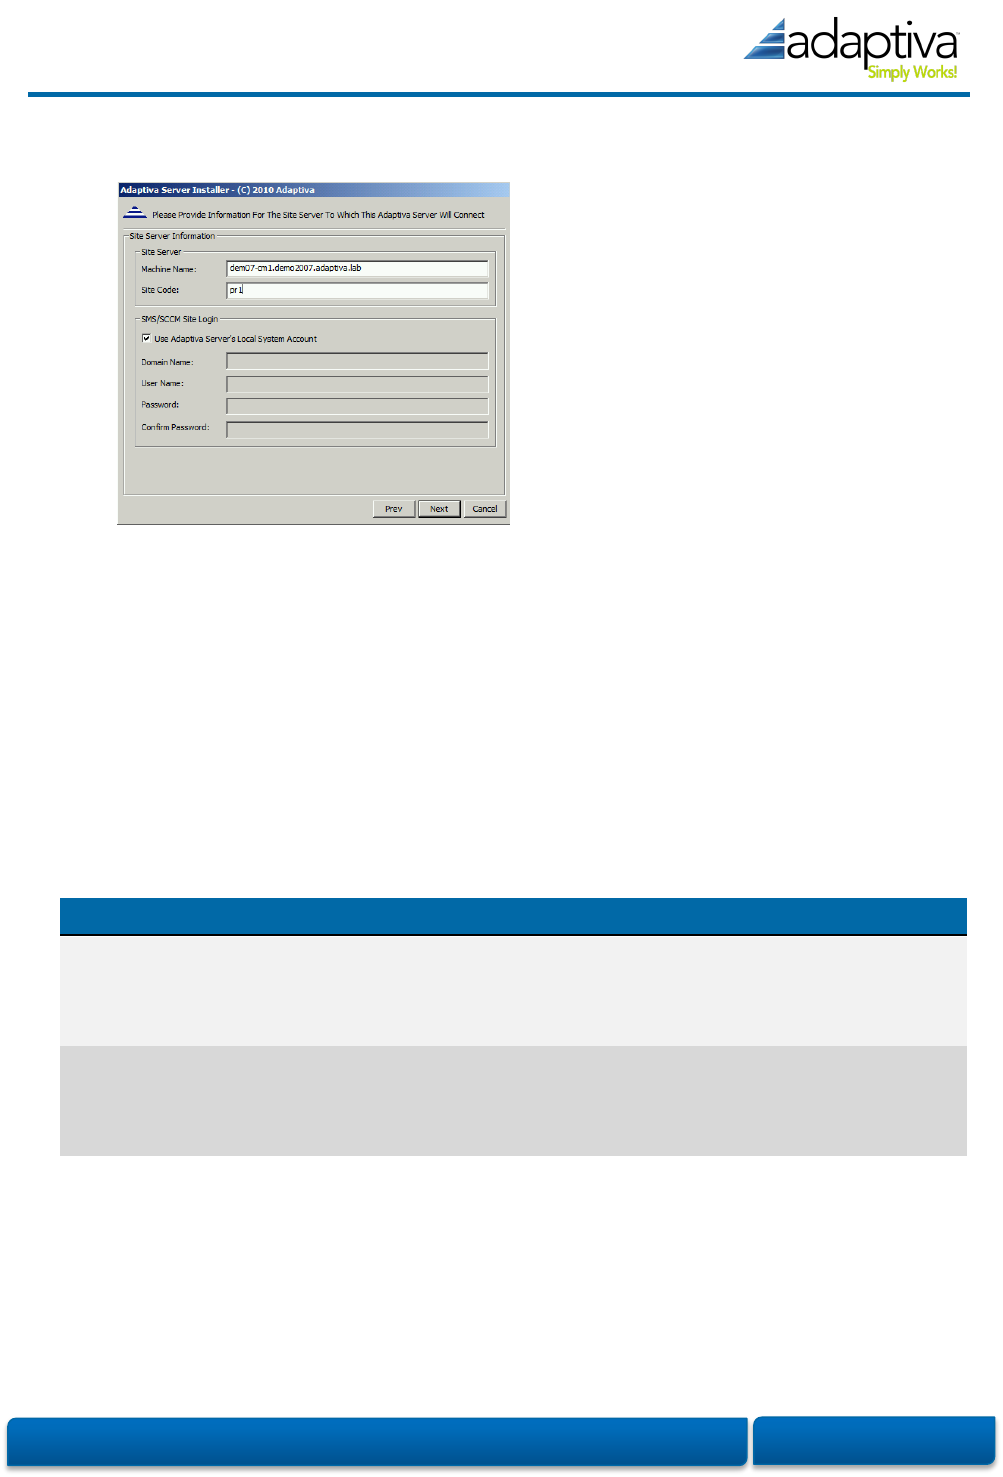
5. ConfigMgr Site Server. On this page, enter the details for connecting to your ConfigMgr site.
Machine Name – The fully-qualified domain name (FQDN) of the ConfigMgr system
hosting the SMS Provider for the site you are installing the Adaptiva server for.
Site Code – The three character site code specifying the ConfigMgr site code for the
site you are installing the Adaptiva server.
Use Adaptiva Server’s Local System Account – Leaving this option selected is the
simplest method of authentication for connecting to the ConfigMgr site database. If
the Adaptiva server is co-located with the SMS Provider, then no additional action
needs to be taken. A summary of necessary permissions and combinations of account
is listed in Table 5 below.
Table 2: Adaptiva Server Site Login Permissions
Local to SMS Provider
Remote from SMS Provider
Local
SYSTEM
Account
No action needed
Grant permissions specified in the
ConfigMgr section from Table 1 to the
Active Directory computer account for
the system hosting the Adaptiva Server.
Domain
User
Account
Grant permissions specified in the ConfigMgr
section from Table 1 to the Active Directory domain
account. If Kerberos authentication will be used,
proper SPNs must be created in Active Directory.
Grant permissions specified in the
ConfigMgr section from Table 1 to the
Active Directory domain account.
Adaptiva OneSite & Client Health · Installation Guide
Page 9
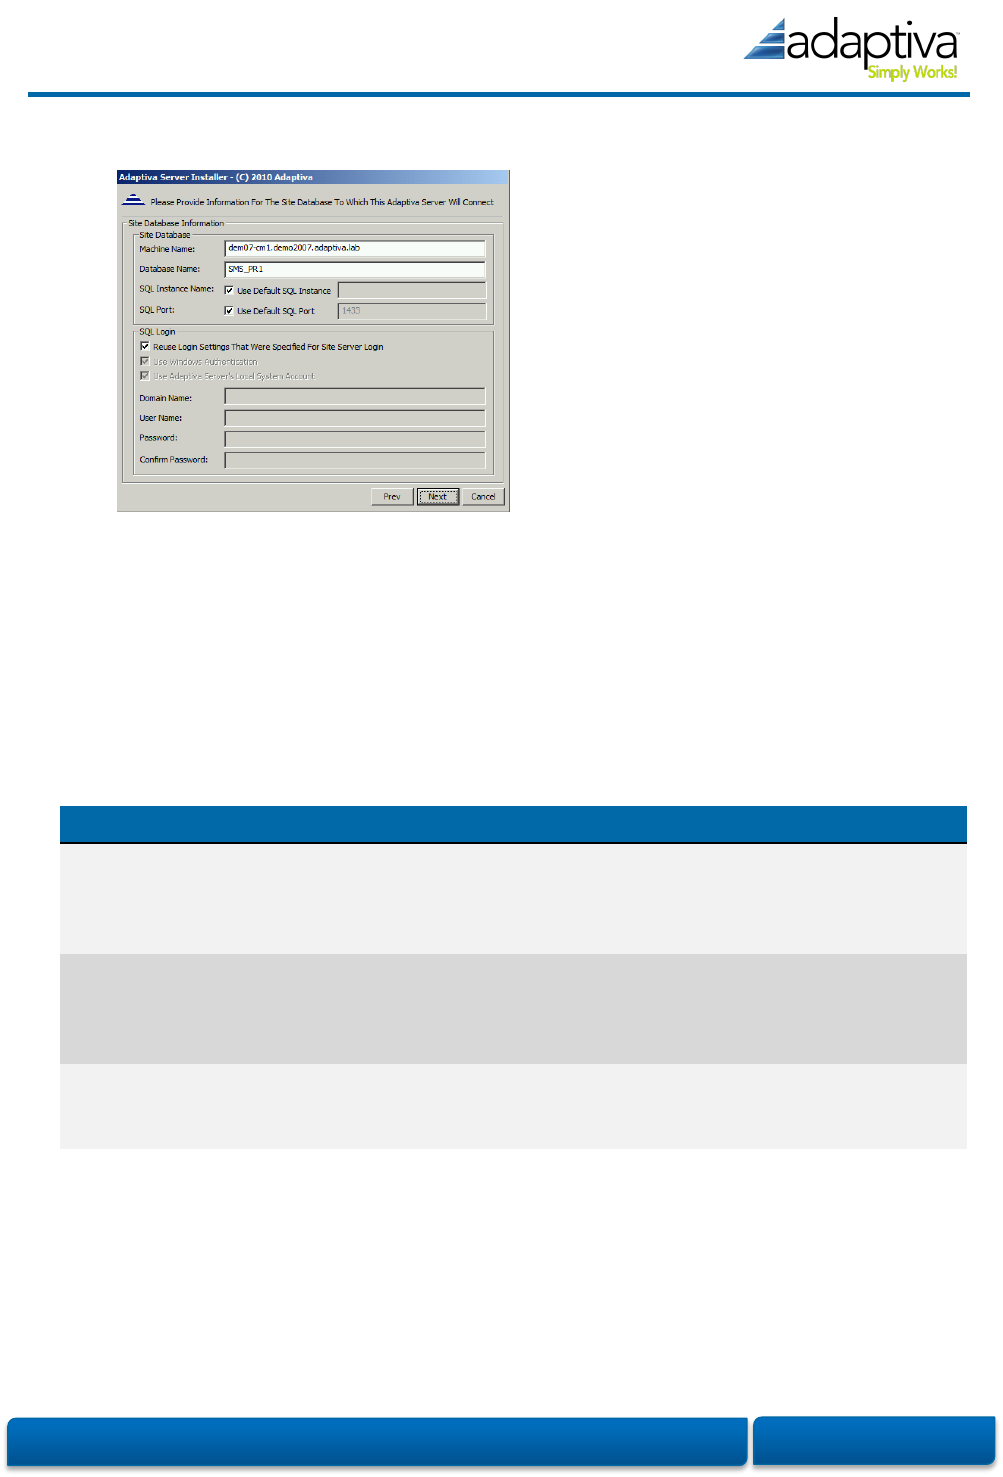
6. ConfigMgr Site Database. In addition to connecting to ConfigMgr using the SMS Provider, the
Adaptiva server directly queries the site database for real-time information.
Machine Name – This is the FQDN of the system hosting your site’s database.
Database Name – The database name for your site’s database.
SQL Instance name – The name of SQL Server instance hosting the site database.
SQL Login – The account used to connect to SQL Server. Table 6 summarizes
permissions necessary. Note that disabling Windows Authentication and using a local
SQL Server account is not recommended.
Table 3: Adaptiva Server SQL Login Permissions
Local to SMS Provider
Remote from SMS Provider
Local
SYSTEM
Account
No action needed
Grant permissions specified in the SQL Server,
ConfigMgr Site DB section from Table 1 to the
Active Directory computer account for the system
hosting the Adaptiva Server.
Domain
User
Account
Grant permissions specified in the SQL
Server, ConfigMgr Site DB section from
Table 1 to the Active Directory domain
account.
Grant permissions specified in the SQL Server,
ConfigMgr Site DB section from Table 1 to the
Active Directory domain account.
Local SQL
Account
Grant permissions specified in the SQL
Server, ConfigMgr Site DB section from
Table 1 to the local SQL account.
Grant permissions specified in the SQL Server,
ConfigMgr Site DB section from Table 1 to the local
SQL account.
Adaptiva OneSite & Client Health · Installation Guide
Page 10
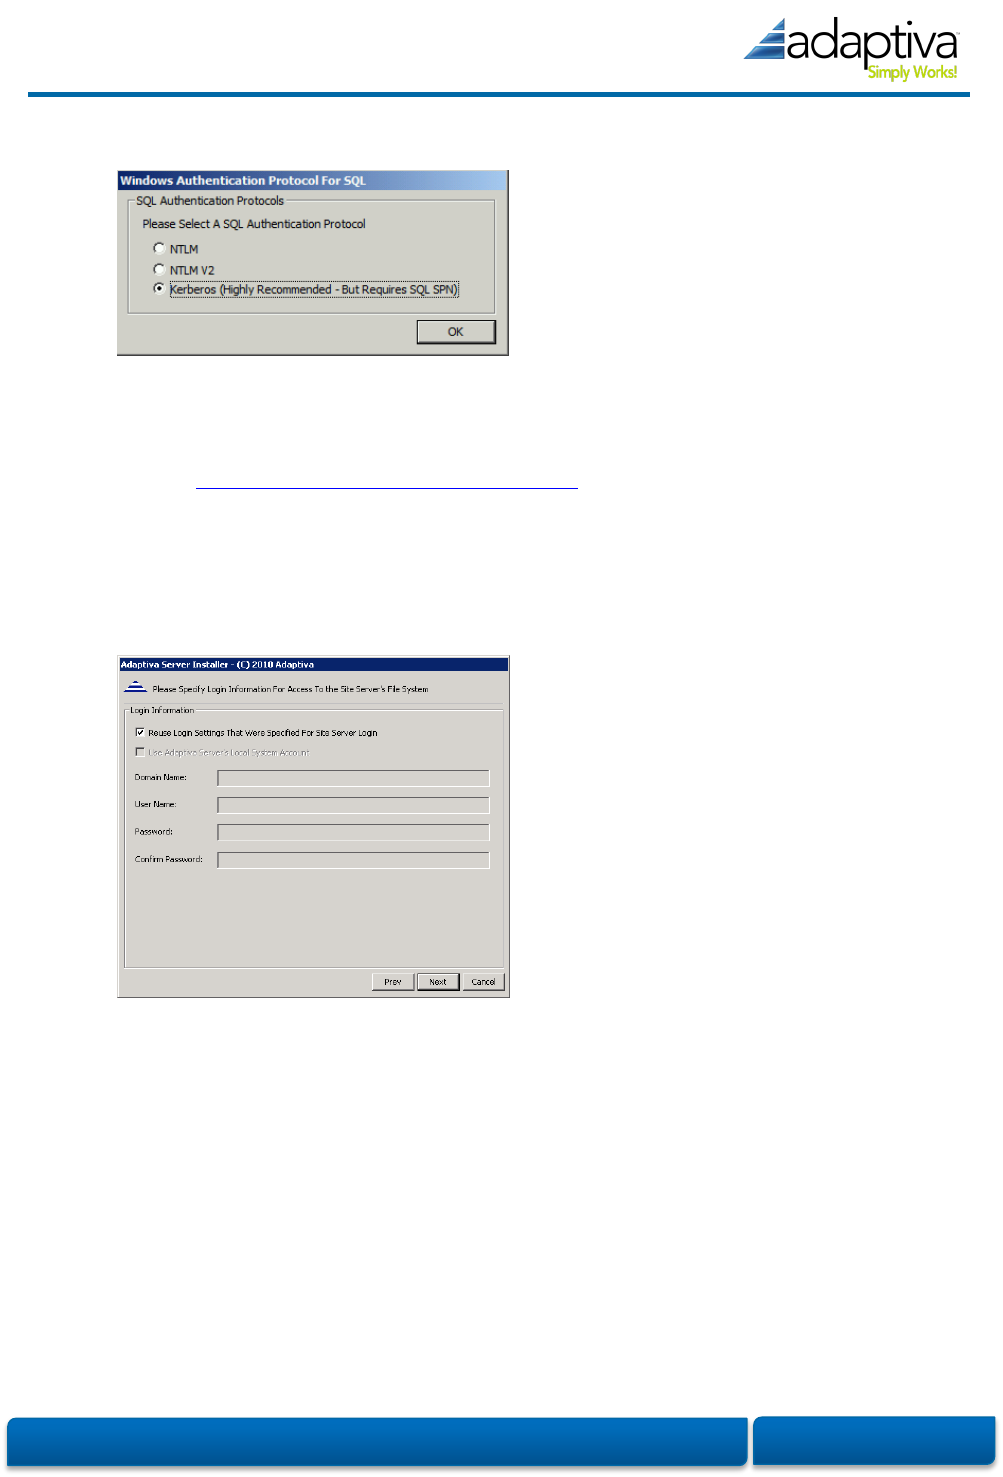
7. SQL Server authentication method. This dialog is where you will select the authentication
method that will be used to connect to the ConfigMgr Site Database:
Kerberos is the default authentication method, and is required for deployments where the
Adaptiva and SCCM databases are on separate SQL Servers. Make sure the Service Principal
Names (SPNs) are created properly in Active Directory. The guidelines in this article are
helpful: http://support.microsoft.com/kb/2443457.
If separate SQL Servers will not be used for the Adaptiva and SCCM databases, NTLM
authentication can be used.
8. File System Access. On this page, specify credentials to access the local file system on the
Adaptiva server.
Adaptiva OneSite & Client Health · Installation Guide
Page 11
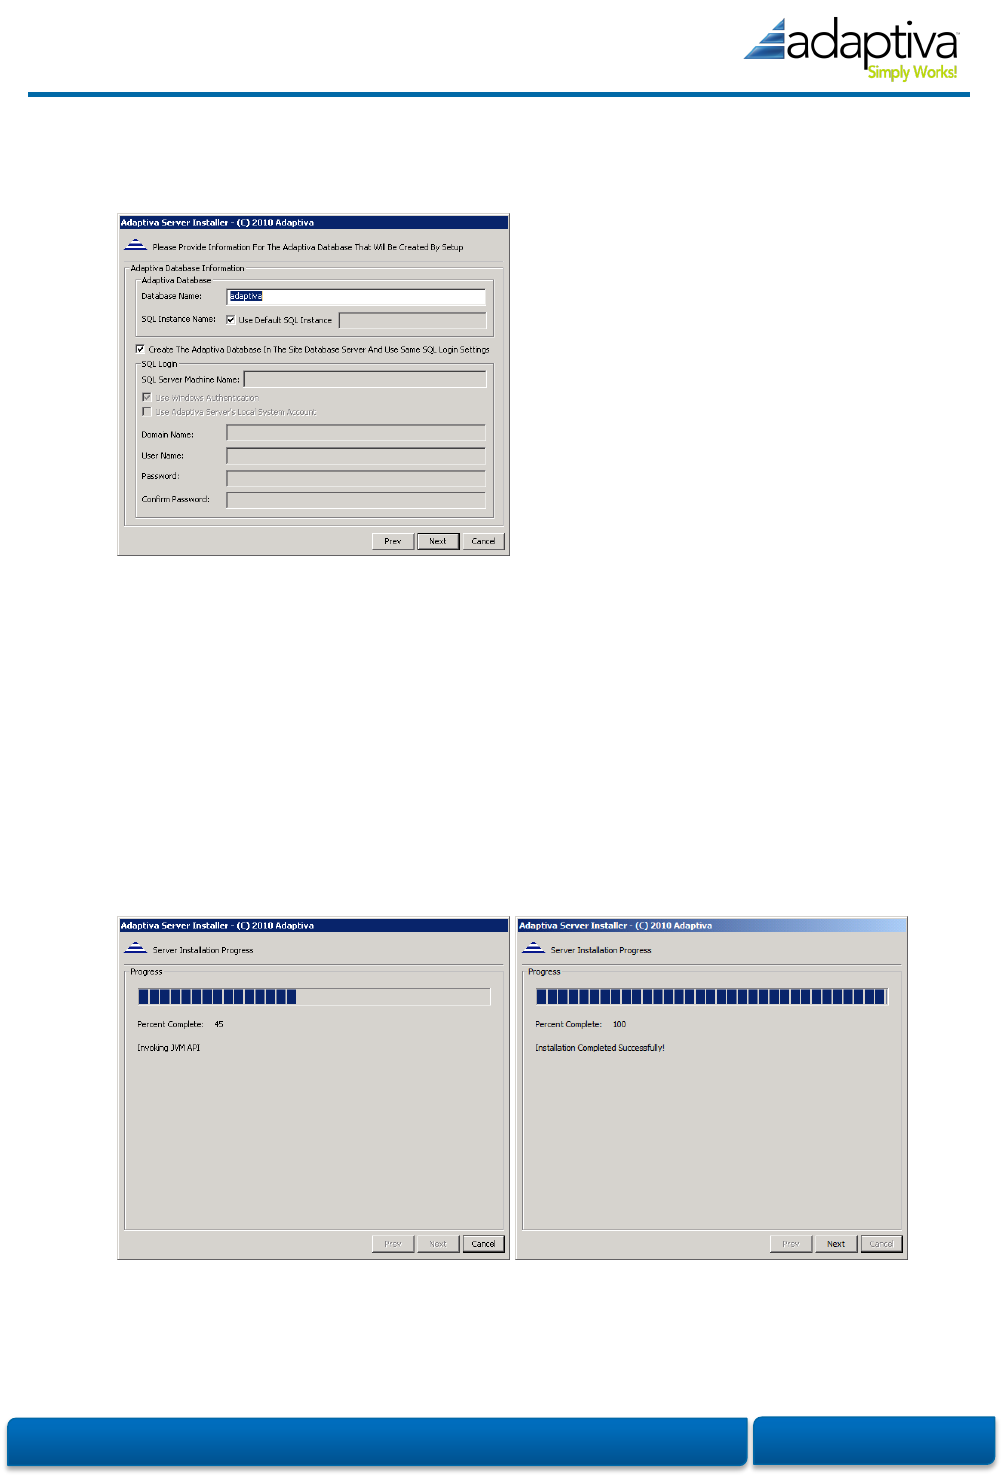
9. Adaptiva Database. On this page specify the information for the Adaptiva database; setup will
create this database according to these parameters.
Clicking Next on this page will again take you to the SQL authentication dialog, this time for
authentication to the server that will host the Adaptiva database. After selecting the
authentication method and clicking OK, setup will immediately begin the server installation.
NOTE: The Adaptiva server provides a lot of flexibility allowing you to specify separate
accounts for Site, SQL and file system access. With this flexibility comes complexity though;
i.e., just because you can doesn’t mean you should. In general, we always recommend that
you adhere to the “Keep It Simple Silly” philosophy and use the server’s local SYSTEM account
for all activity just like ConfigMgr does. If you are unable to do this, use a single domain-based
“service” account for these three activities.
Setup will now proceed to install the Adaptiva server using the options specified.
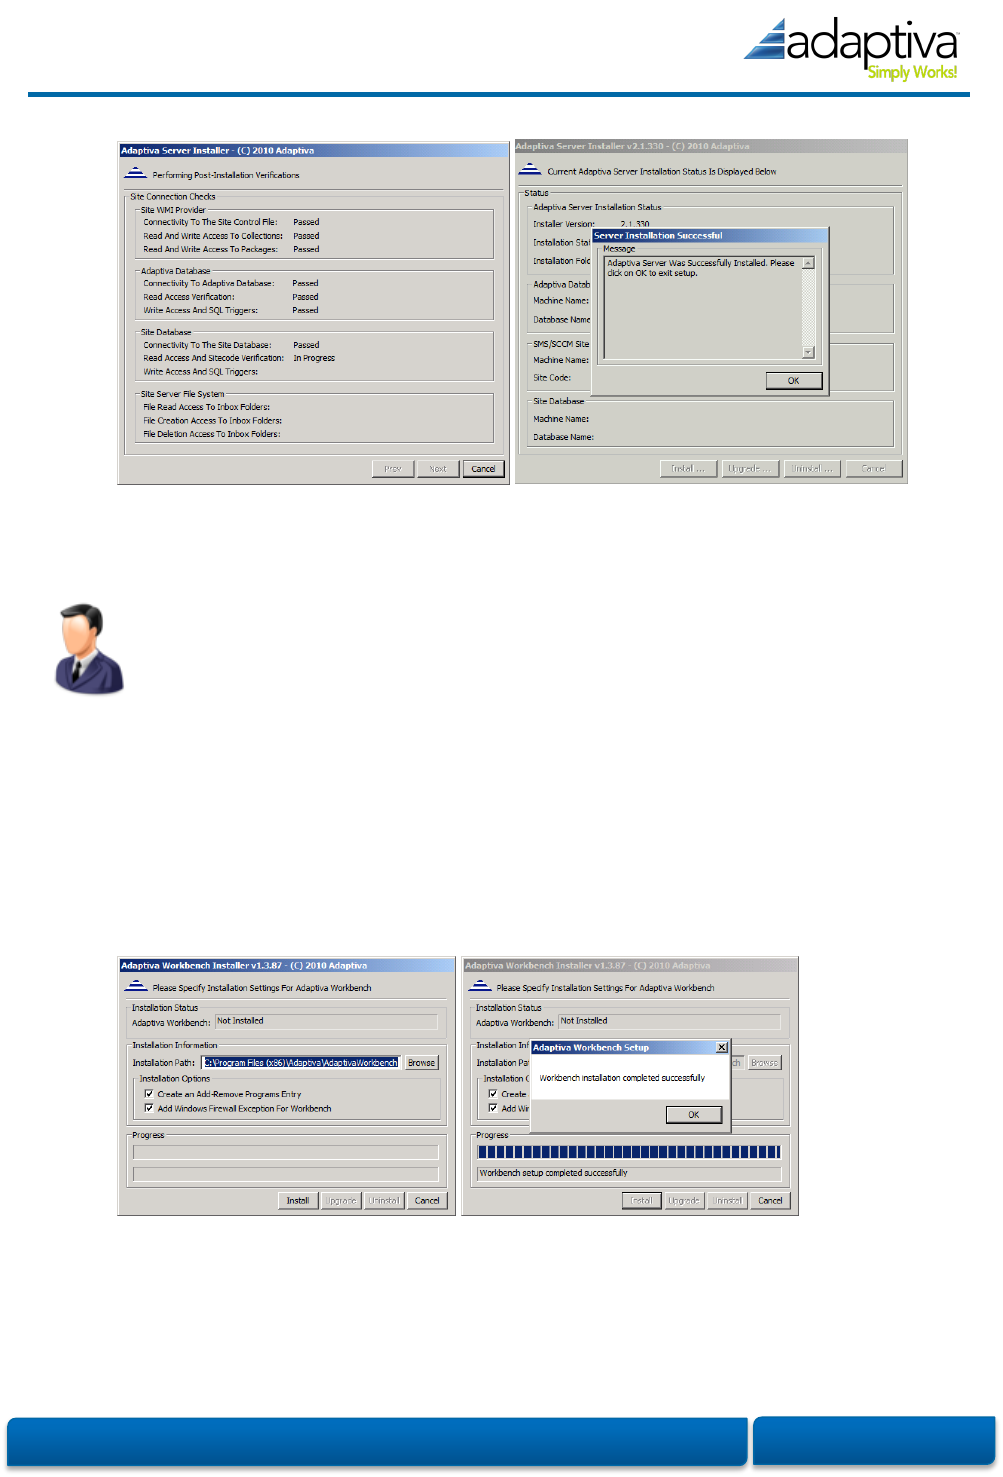
Adaptiva OneSite & Client Health · Installation Guide
Page 12
A post-installation verification will run verifying all of the chosen accounts and settings.
Workbench
The Adaptiva Workbench is the GUI for communicating with the Adaptiva Server and
performing configuration of OneSite and Client Health. The workbench can be installed on
any machine with network connectivity to the Adaptiva Server. It can also be installed on
as many machines as you would like. In most cases, it makes sense for Administrators to
install the workbench on their local machines.
To install the Adaptiva Workbench:
1. Run the AdaptivaWorkbenchSetup.exe executable to start the interactive installation.
2. Accept the End-Use License Agreement.
3. Installation Settings. On this page, enter the basic workbench installation information and click
Install; workbench installation will begin immediately after clicking Install.
Adaptiva OneSite & Client Health · Installation Guide
Page 13
Client
The Adaptiva client needs to be installed on every SMS 2003, or ConfigMgr 2007 or 2012
client system that you wish to manage. The installer can be run both in interactive mode
as well as silent mode using the command-line switches.
For initial deployment in a working ConfigMgr environment, deployment using Software
Distribution is preferred. To ensure complete coverage, the client agent setup should also be added to
a GPO enforced startup script, your OS deployment process and/or deployed using the peer to peer
MSI (described below).
Note: An Adaptiva client should always be installed on the Adaptiva server system. You may also install
more clients in the same subnet as the Adaptiva server for load sharing.
Manual Installation
Use this method on a one-off basis during test, initial rollout or to supplement automatic deployment.
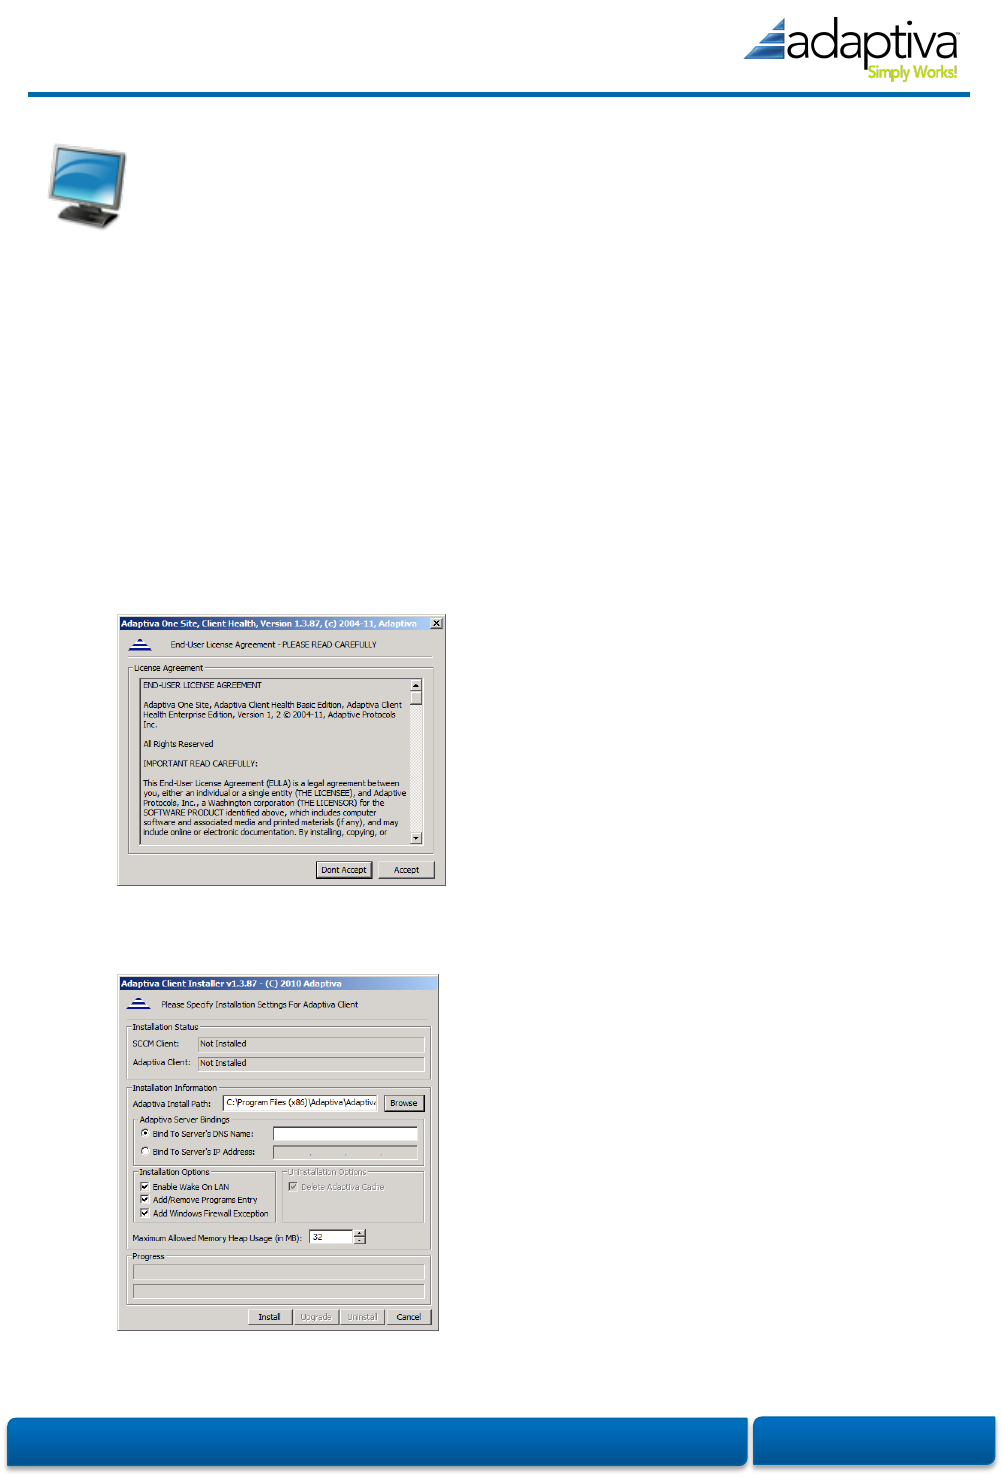
1. Run the AdaptivaClientSetup.exe application.
2. Accept the End User License Agreement.
3. Installation Settings. On this page, enter the following information. Pressing Install will
immediately begin installation.
Adaptiva OneSite & Client Health · Installation Guide
Page 14
Adaptiva Install Path – Directory where you would like to install Adaptiva client.
Adaptiva Server Bindings – Specify one of the following
i. Adaptiva Server’s DNS Name
ii. Adaptiva Server’s IP Address
Enable Wake On LAN – Allows the client to be woken up using peer-to-peer WoL.
Add/Remove Programs Entry – Adds an entry allowing for uninstallation of the client
agent from the Control Panel.
Add Windows Firewall Exception – Adds exceptions to the local Windows Firewall for
the default client ports (see Table 3 for a list of these ports).
Maximum Allowed Memory Heap Usage – This is an internal performance
optimization value. Changing this is not recommended.
ConfigMgr Software Distribution
Using the power of ConfigMgr is a great way to go for large-scale, production deployment of the
Adaptiva Client.
Creating the PDF Package for silent distribution
As with all Software Distribution in ConfigMgr, the first step is to create a Package and Program(s). To
facilitate this, the server installation includes a ConfigMgr Package Definition File called
AdaptivaClientSetupSilent.sms, located in the <ADAPTIVAServerInstallDir>\config folder.
1. Create a new folder in your package source file repository per you organization standards. Copy the
AdaptivaClientSetup.exe file from the installation files to this folder.
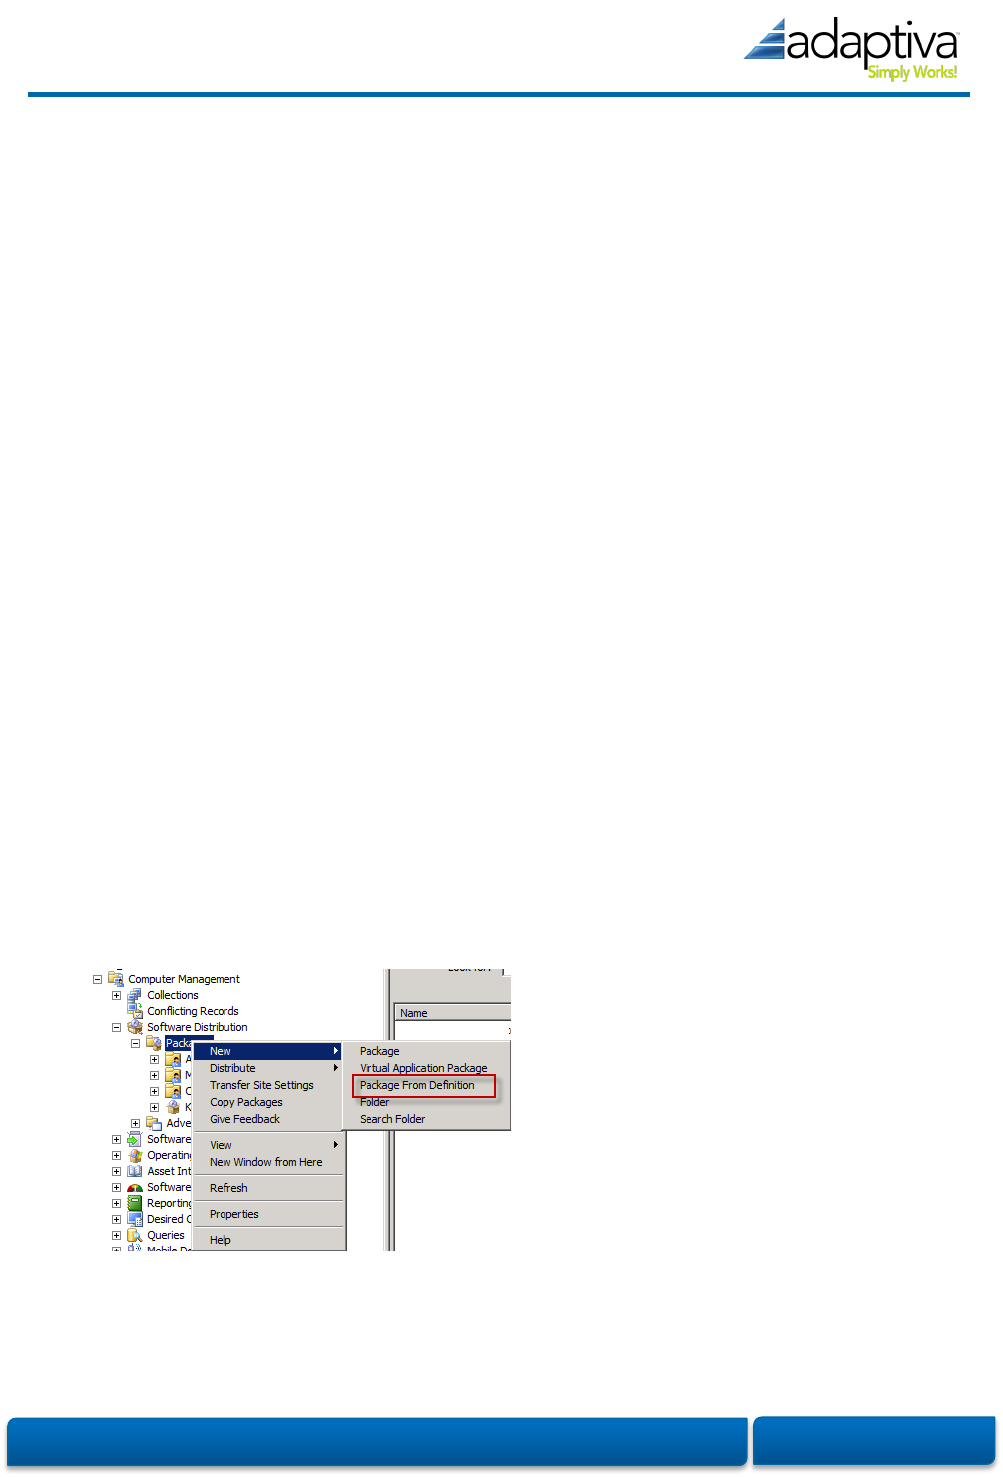
2. Right click on the Site Database→Computer Management→Software Distribution→Packages node
(or a sub-folder per your organization standards and conventions) in the ConfigMgr Console and
select the New→Package From Definition menu option.

Adaptiva OneSite & Client Health · Installation Guide
Page 15
3. On the Welcome page of the Create Package from Definition wizard, click the Next button.
4. On the Package Definition page, click the Browse button, browse to
<ADAPTIVAServerInstallDir>\config, and choose the AdaptivaClientSetupSilent.sms file. Make sure
that Adaptiva is displayed in the Publisher drop box, choose the correct version of the
AdaptivaClient in the Package definition list box and click Next.
Adaptiva OneSite & Client Health · Installation Guide
Page 16
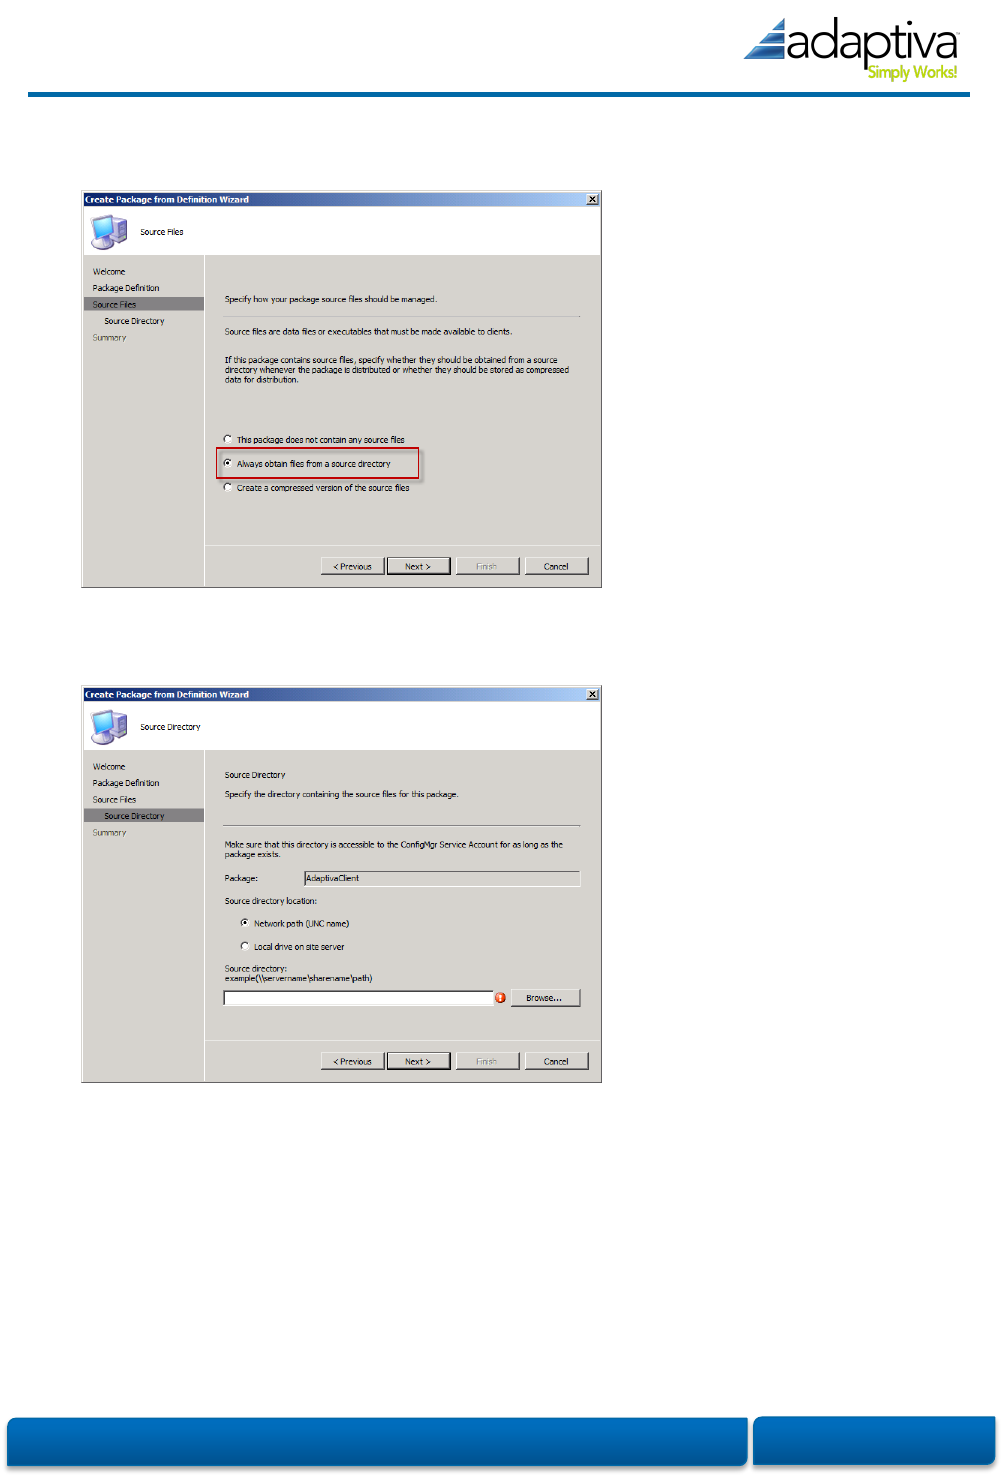
5. On the Source Files page, choose Always obtain files from a source directory and click Next.
6. On the Source Directory page, choose the correct location type and enter or browse to the folder
created in step 1 and click Next.
7. Click Finish on the Summary page.
The above procedure creates a package names Adaptiva AdaptivaClient <version> ALL. This package
contains three programs:
Clean Install – Uninstalls the existing client installation and cleanly installs a new copy of the
client.
InstallOrUpgrade – Installs the Adaptiva client or upgrades the existing one in place.
Uninstall – Uninstalls the Adaptiva client.
Adaptiva OneSite & Client Health · Installation Guide
Page 17
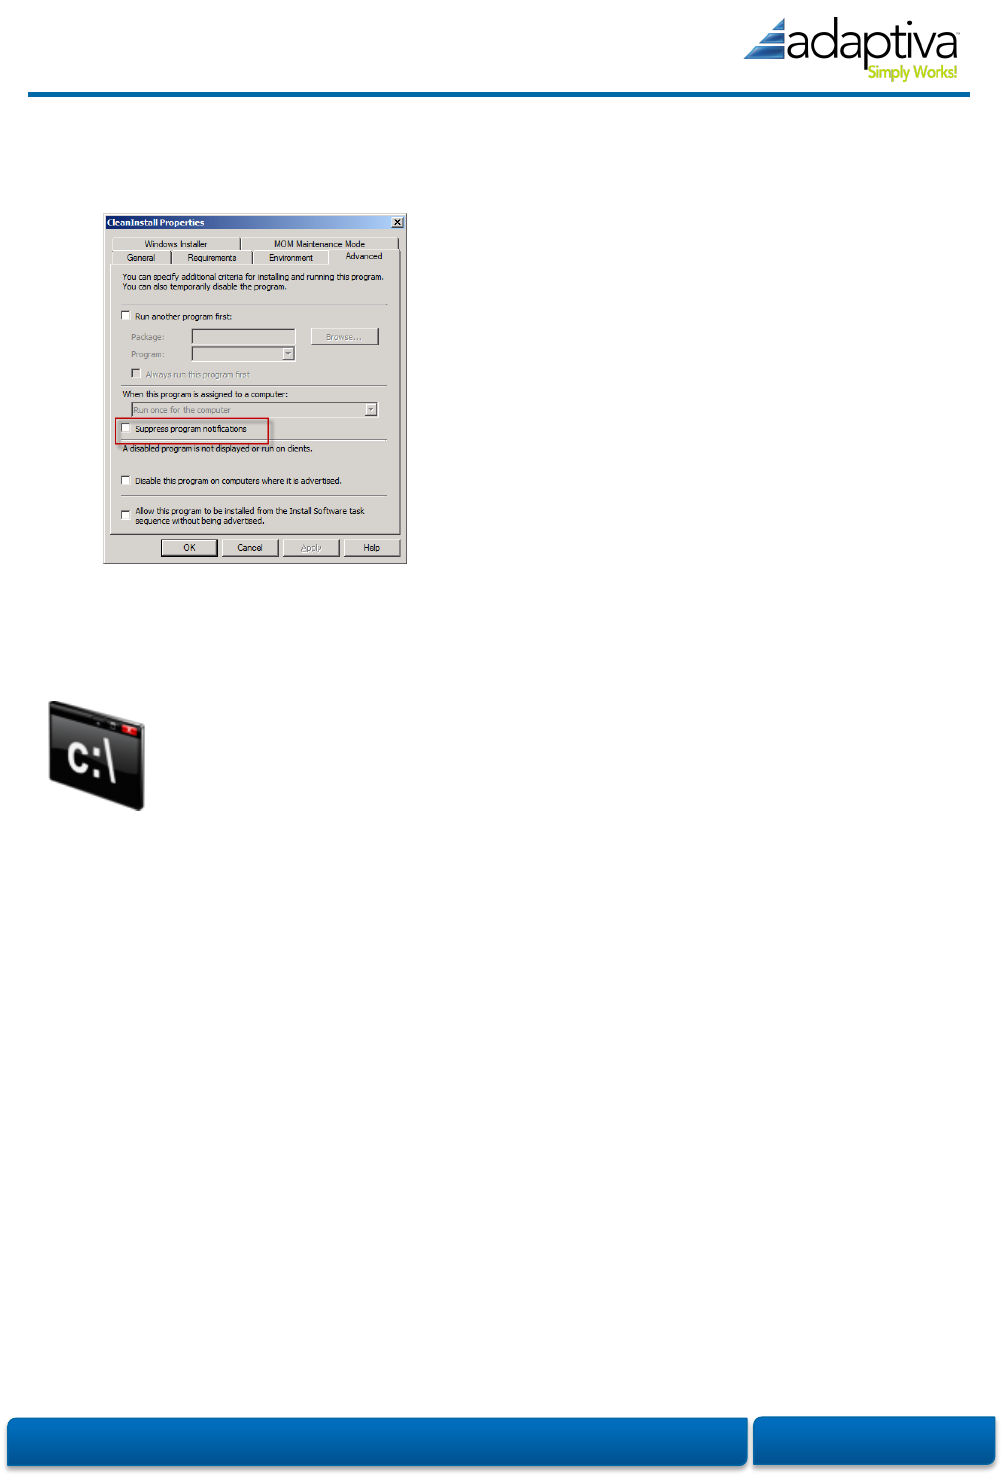
To suppress client side notifications on any of these programs, right-click the program and select
Properties. Go to the Advanced tab and select Suppress program notifications.
You can now advertise the desired program to the desired collections and systems in your
environment according to your organization’s standards and practices.
Command-line Options
The following command-line options are available for use during a scripted install, a
manual install from the command-line or to create new programs in ConfigMgr.
Display Help
AdaptivaClientSetup -help
Clean Install or new install
AdaptivaClientSetup <-cleaninstall | -installorupgrade> <-servername <servername> | -serverip
<serverip>> [-folder<destination>] [-nofirewall] [-noarp] [-nomif] [-nowol] [-mem <MB>] [-nologging]
Upgrade
AdaptivaClientSetup -installorupgrade
Uninstall
AdaptivaClientSetup -uninstall
-help – Shows available command-line options.
-cleaninstall – Installs a fresh client, removing previous installation if any.
-installorupgrade – Installs or upgrades the client as appropriate.
-uninstall – Uninstalls the existing client.

Adaptiva OneSite & Client Health · Installation Guide
Page 18
-folder <destination> – The desired installation path (default: %ProgramFiles%\AdaptivaClient)
-servername <hostname> – Host name of the Adaptiva Server.
-serverip <ipaddress> – IP Address of the Adaptiva Server.
-nofirewall – By default, the Adaptiva Client configures windows firewall to allow network traffic.
-noarp – Do not add entry to Add-Remove Programs.
-nomif – Do not send ConfigMgr mif status file in case of any errors found during installation.
-nowol – By default, the Adaptiva Client enables Windows Wake on LAN settings on all the network
cards installed in the machine. Specify this option to disable Wake on LAN.
-mem – Maximum Java heap size, in MB (default: 32).
-nologging – Decreases the level of detail in the Adaptiva Client logs.
Peer-to-Peer (P2P) MSI
The Adaptiva client P2P MSI installer helps administrators in achieving 100% distribution of the
Adaptiva client. In most common scenarios, ConfigMgr will be able to install the Adaptiva client onto
most systems in an enterprise, but it is often difficult to ensure complete coverage. Using the Adaptiva
client P2P MSI installer, the Adaptiva client can be pushed using a group policy, a startup script, psexec
(from SysInternals) or any other remote execution method available.
Once executed, the Adaptiva P2P Client MSI installs the full Adaptiva Client agent. The MSI doesn’t
actually contain the full client installation though. Instead, the MSI – which is specific to a particular
version of the Adaptiva client agent – first looks for the Adaptiva Client on a peer system in the same
subnet with the correct version. If it finds one, it retrieves the setup from that local client and installs
the Adaptiva Client from that setup. If it cannot find a peer with the correct version, the MSI retrieves
the setup from a UNC path specified as command line option. If multiple systems run the MSI
simultaneously and none of them find the correct version of the client locally, an election takes place
among these clients. Only the “winner” of the election downloads the setup from UNC path and it then
makes the setup available to the other client systems.
Note that Adaptiva P2P Client MSI is not an interactive installer; it is a completely silent installer with
no user-interaction ever.
The P2P installer file is named AdaptivaP2PClientInstaller.msi and is in the compressed product
distribution file.
Public Properties
The following MSI public properties are valid for the P2P client installer:
TARGETDIR – The installation folder of the Adaptiva Client. By Default it is
%SystemDrive\Program Files\Adaptiva OR %SystemDrive%\Program
Files(x86)\Adaptiva

Adaptiva OneSite & Client Health · Installation Guide
Page 19
SERVERIP | SERVERNAME* – The Adaptiva server that this client will report to. SERVERIP takes
precedence over SERVER if both are specified.
SOURCEUNCPATH* – The location to download the client installer from if it cannot be found in the
local office.
ARPSYSTEMCOMPONENT – Suppresses the creation of an Add/Remove Program entry for the actual
Adaptiva client. The P2P MSI never creates an Add/Remove Program entry for itself.
1: suppresses creation
0: does not suppress creation (default)
CLEANINSTALL – The type of client installation to perform.
1: performs a clean installation
0: perform an InstallOrUpgrade installation (default)
UNINSTALL – Ignores all other properties and performs an uninstallation of the Adaptiva client.
1: performs an uninstallation
0: performs an installation (default)
NOFIREWALL – Disables creating exceptions in the Windows Firewall for the Adaptiva client.
1: does not create any firewall exceptions
0: creates firewall exception (default)
NOWOL – Disables Wake-on-LAN.
1: disables WoL
0: enables WoL (default)
MEM – The amount of memory in MB to be used by the Adaptiva client. Default: 32 MB.
NOCACHEDEL – Preserves the Adaptiva client cache after uninstallation. This property is only valid
when used in conjunction with the UNINSTALL.
1: cache is preserved
0: cache is deleted during uninstallation (default)
WANBYTESPERSECOND – The maximum download speed that will be used while downloading the
Adaptiva client Installer exe over the WAN from the SOURCEUNCPATH.
X: bytes per second
0: Unlimited (default)
WAITFORCOMPLETION – Specifies whether the Adaptiva P2P Client Installer MSI will wait until
installation will be completed.
Adaptiva OneSite & Client Health · Installation Guide
Page 20
1: the MSI installer waits the client installation to finish
0: the MSI will not wait for Adaptiva Client installation to be completed (default)
NOLOGGING – Disabled default client logging.
1: only FATAL errors are logged, but no other logging is done (this option is helpful if the client
system uses shared storage and you want minimal logging)
0: normal INFO logging (default)
* Options marked with an asterisk (*) are mandatory.
Usage
Configuration Manager
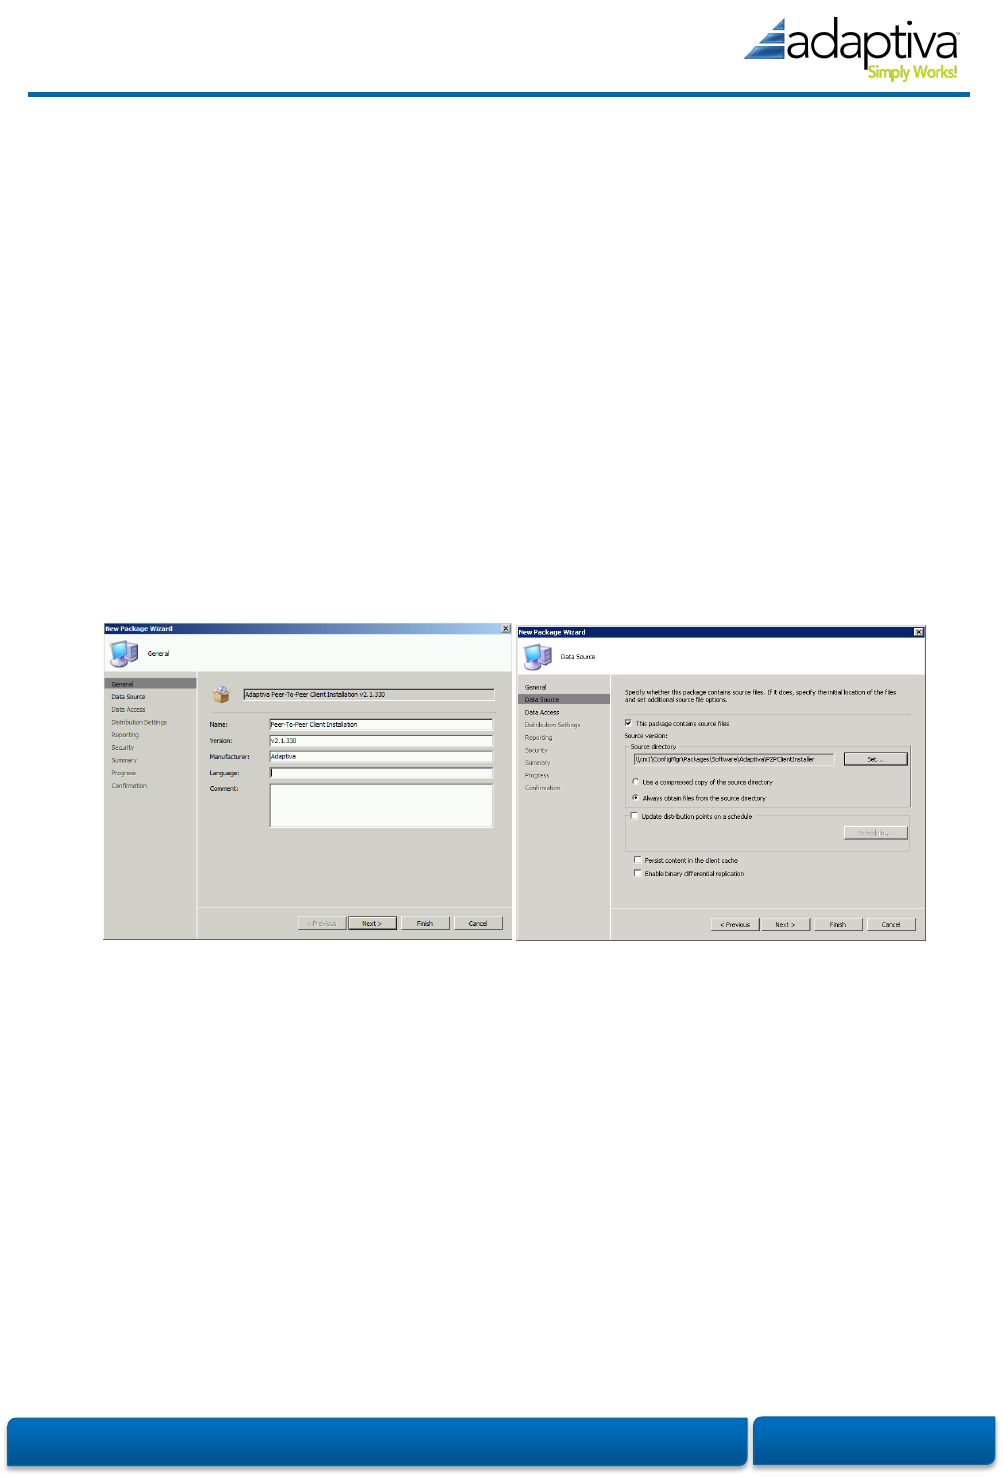
1. Place the P2P Client Installation MSI in a dedicated folder in your ConfigMgr source repository.
2. Create a new ConfigMgr package using the New -> Package option browsing to the dedicated
directory used in step 1 when prompted during the wizard for the source file location. Accept
all other default values or configure as desired for your environment.
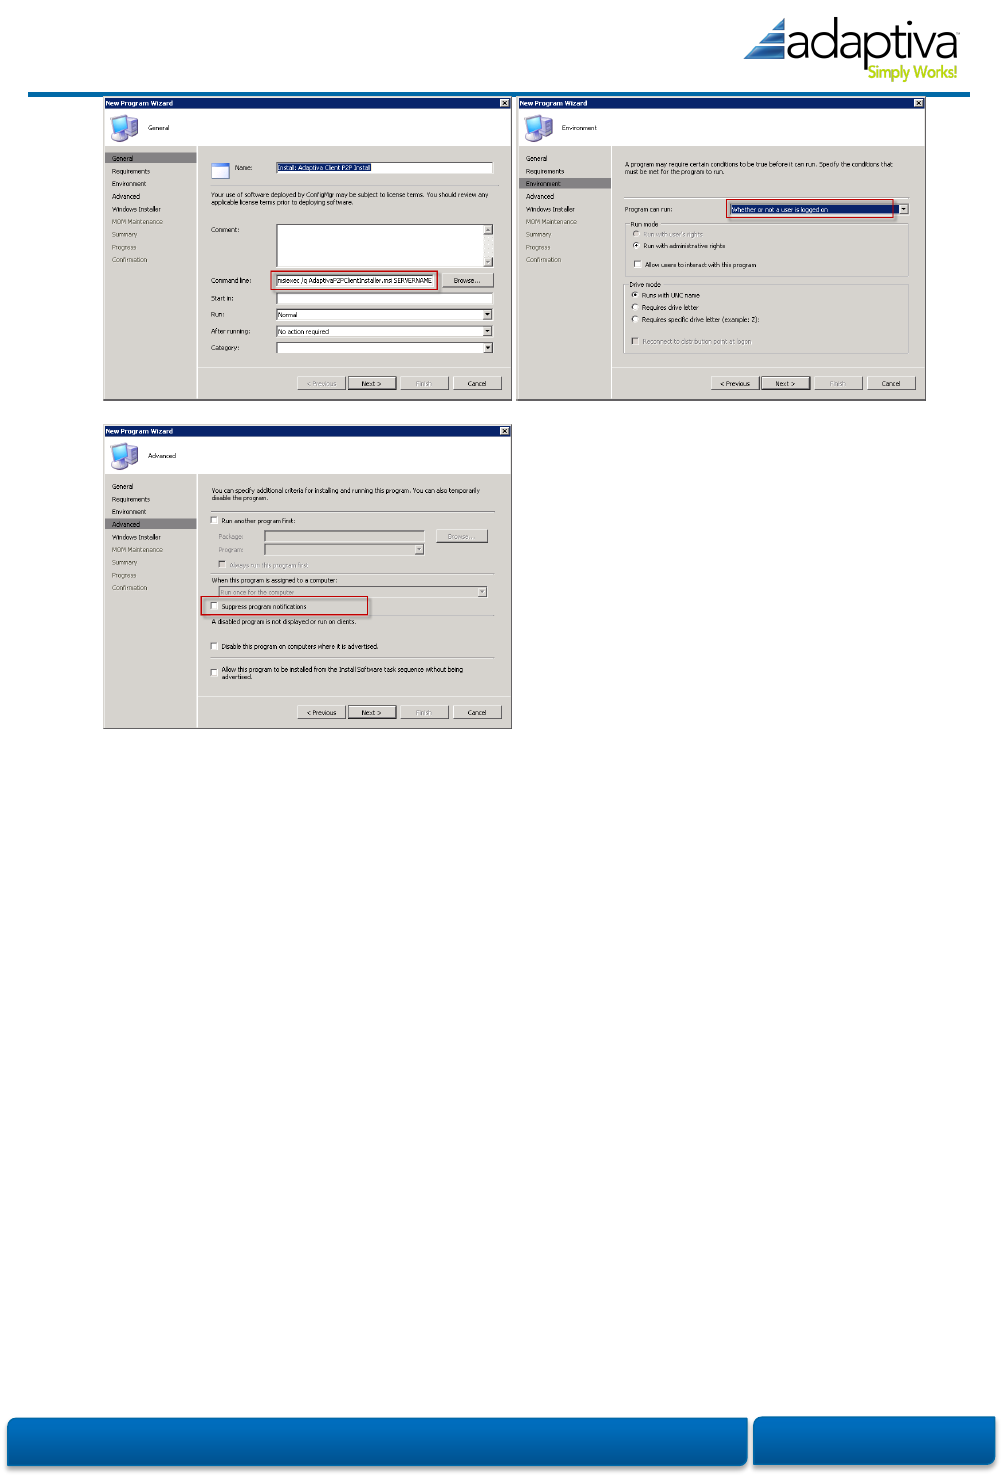
3. Create two programs using the New Program Wizard launched by right-clicking the Programs
node under the newly created package and selecting New -> Program having the below
command-lines, running Whether or not a user is logged on, and checking the Suppress
program notification option (if desired) – all other default options in the wizard are
appropriate.
Adaptiva OneSite & Client Health · Installation Guide
Page 21
Install:
msiexec /I AdaptivaP2PClientInstaller.msi /q
SERVERNAME=AdaptivaServer
SOURCEUNCPATH=\\<path>\AdaptivaClientSetup.exe
WAITFORCOMPLETION=1
Uninstall:
msiexec /I AdaptivaP2PClientInstaller.msi /q
UNINSTALL=1 WAITFORCOMPLETION=1
Note that this command line uninstalls any version of the Adaptiva client. Using
the normal Windows Installer uninstall parameter (/x) only uninstalls the
version of the Adaptiva client corresponding to the version of the MSI – the MSI
packaged with each version of the product is specific to that client version of the
product.
Group Policy
To set or customize the properties specified above, you must create a Microsoft Transform (MST). A
variety of tools are available that you can use for this. Orca is a free tool available from Microsoft and
is part of the Windows Installer SDK.
Adaptiva OneSite & Client Health · Installation Guide
Page 22
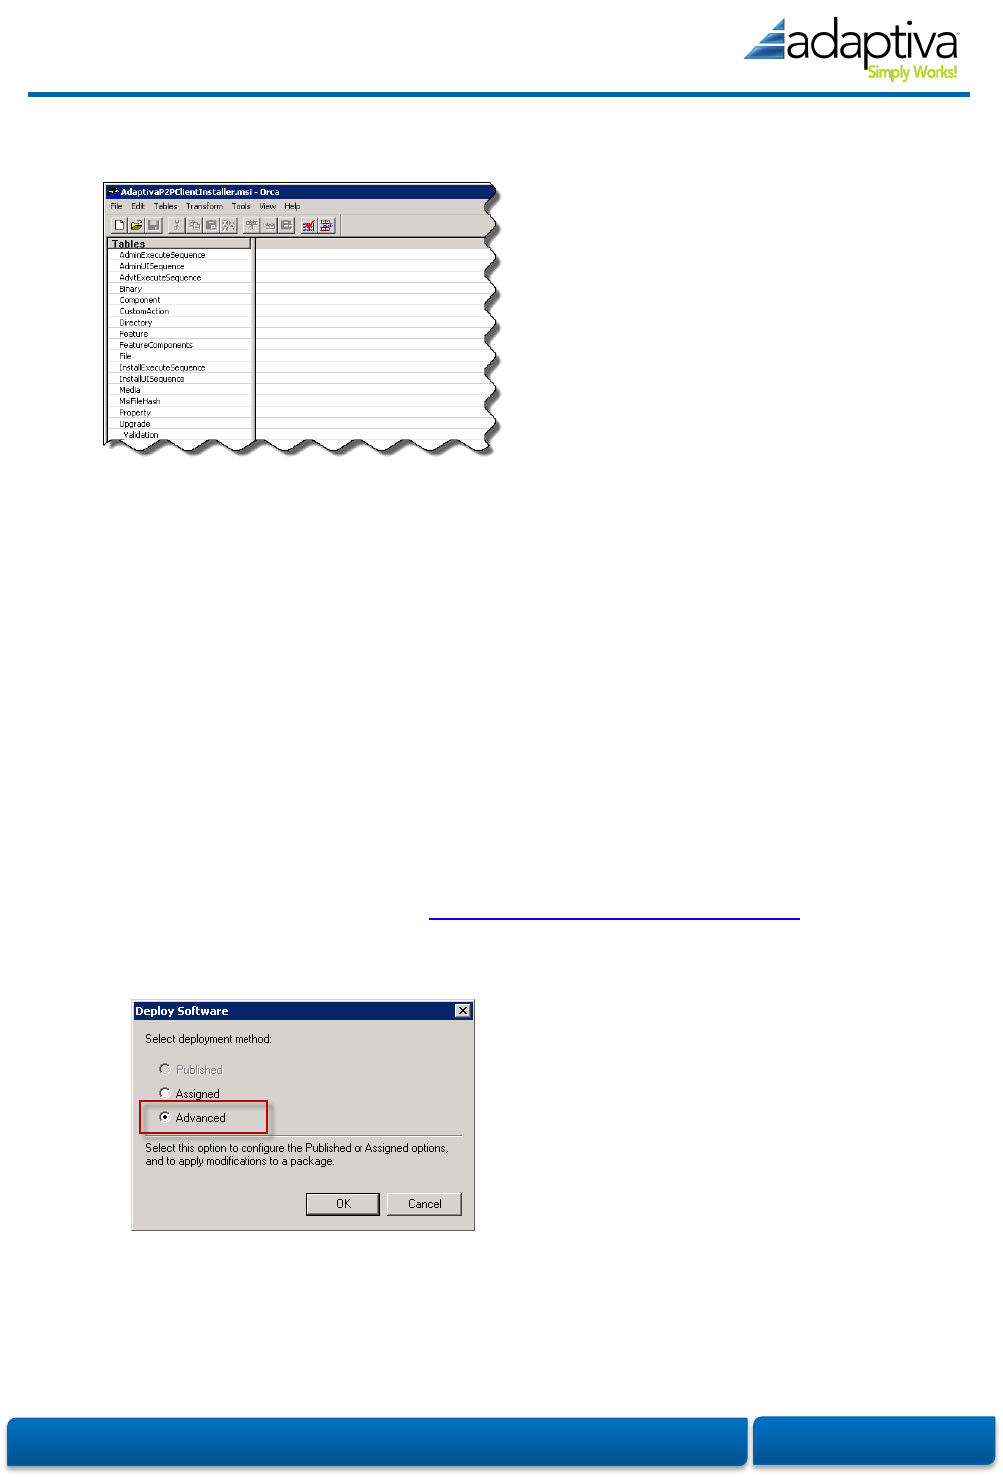
To create the MST with Orca, follow these steps:
1. Open AdaptivaP2PClientInstaller.msi using File -> Open or the Open icon from the toolbar.
2. Select Transform -> New Transform to create a new transform.
3. Select the Property table in the Tables list on the left.
4. Modify the desired properties according to list in the “Public Properties” section above. At a
minimum, you must modify SOURCEUNCPATH and either SERVERIP or SERVERNAME. Any
properties that you modify will have a green outline.
5. Select Transform -> Generate Transform… to create the MST file. Do not save changes to the
MSI if prompted.
To create the actual group policy, follow these steps:
1. Place the MSI and MST in a shared location accessible to all systems that will be targeted by
the group policy being created – this location is referred to as a distribution point but this is
not the same thing as a ConfigMgr distribution point – it is simply a location to serve the MSI
and MST from.
2. See Microsoft KB article 816102 (http://support.microsoft.com/kb/816102) for a detailed
description of configuring a Software Installation Group Policy; when prompted, choose
Advanced.
3. On the Modifications tab, add the MST created above by clicking the Add… button.
4. Target the group policy appropriately.

Adaptiva OneSite & Client Health · Installation Guide
Page 23
Other (including psexec or startup script)
Use an appropriate Windows Installer command-line and the public properties specified above in the
“Public Properties” section to initiate the peer to peer installation of the Adaptiva client.
Client Logs
For troubleshooting client installation or normal operation, all client logs are located in
<ClientInstallDir>\AdaptivaClient\logs\.
For troubleshooting P2P MSI Client Installation, the log is named AdaptivaP2PClientSetup.log and is
located in AdaptivaP2PClient installer logs are created in %WINDIR%\AdaptivaSetuplogs\Client\.
Upgrade
To upgrade the components, run the corresponding setup executable for the new
version of the component on the appropriate system and choose the Upgrade option.
No further settings need to be specified. The current configuration and all settings will
be preserved.
The order of the upgrade is important and should follow the top-down methodology that upgrading
ConfigMgr also requires: Adaptiva Servers first, workbench next, and finally the clients.
Note that you can use the P2P Client MSI Installer to perform a client upgrade also as described above.
Uninstallation
To completely remove Adaptiva OneSite or Client Health from your environment or
individual components, simply run the corresponding component’s setup executable and
select the Uninstall option. To run the uninstallation silently, run the corresponding
installation executable with a -uninstall switch on the command-line. Uninstallation
should be bottom-up starting with the clients, the workbench, and then the Adaptiva Server instances.
Note that you can use the P2P Client MSI Installer to perform a client uninstallation also as described
above.
Support
Adaptiva products are fully supported by Adaptiva’s world-class support staff during your
evaluation process and post sales. We promise quick resolution ensuring that the product
performs flawlessly in your environment. When requesting support, please have the
following information present in the message:
1. A detailed description of the problem including:
a. Expected behavior

Adaptiva OneSite & Client Health · Installation Guide
Page 24
b. Desired behavior
c. User Experience
2. Environmental factors that may be unique to your environment including:
a. Client firewalls
b. System lockdown
c. Anything else that you may think contributes
3. Steps to reproduce the problem
If you are experiencing trouble installing the product components, please include the following log
files:
%windir%\AdaptivaSetupLogs\<Server|Client|Workbench>*.log
If you are experiencing trouble running product component, please include the following log files:
[InstallationPath]\Adaptiva<Server|Client|Workbench>\logs\*.err
[InstallationPath]\Adaptiva<Server|Client|Workbench>\logs\*.log
For live assistance, 24x7
Phone 425.823.4500, option 4 (WA, USA) or toll-free at 855.378.5222
Email support@adaptiva.com
Copyright 2011-2012, Adaptiva, Inc. All rights reserved.
