Android NDK Beginner's Guide (2nd Ed.) [Ratabouil 2015 04 30]
ANDROID_NDK_BEGINNERS_GUIDE_SECOND_EDITION
Android%20NDK%20Beginner's%20Guide%20(2nd%20ed.)%20%5BRatabouil%202015-04-30%5D
ANDROID%20NDK%20BEGINNERS%20GUIDE%20NDK
ANDROID%20NDK%20BEGINNERS%20GUIDE%20NDK
ANDROID%20NDK%20BEGINNERS%20GUIDE%20NDK
User Manual: Pdf
Open the PDF directly: View PDF ![]() .
.
Page Count: 494 [warning: Documents this large are best viewed by clicking the View PDF Link!]
- Cover
- Copyright
- Credits
- About the Author
- About the Reviewers
- www.PacktPub.com
- Table of Contents
- Preface
- Chapter 1: Setting Up Your Environment
- Getting started with Android development
- Time for action – preparing Windows for Android development
- Time for action – installing Android SDK and NDK on Windows
- Time for action – preparing OS X for Android development
- Time for action – installing Android SDK and NDK on OS X
- Time for action – preparing Ubuntu for Android development
- Time for action – installing Android SDK and NDK on Ubuntu
- Time for action – installing Eclipse with ADT on your OS
- Time for action – creating an Android virtual device
- Time for action – setting up an Android device
- Summary
- Chapter 2: Starting a Native Android Project
- Building NDK sample applications
- Time for action – compiling and deploying San Angeles sample
- Creating your first native Android project
- Time for action – creating a native Android project
- Interfacing Java with C/C++
- Time for action – calling C code from Java
- Debugging native Android applications
- Time for action – debugging a native Android application
- Analyzing native crash dumps
- Time for action – analyzing a native crash dump
- Setting up a Gradle project to compile native code
- Time for action – creating a native Android project
- Time for action – using your own Makefiles with Gradle
- Summary
- Chapter 3: Interfacing Java and C/C++ with JNI
- Initializing a native JNI library
- Time for action – defining a simple GUI
- Time for action – initializing the native store
- Converting Java strings in native code
- Time for action – handling strings in the native store
- Passing Java primitives to native code
- Time for action – handling primitives in the native store
- Referencing Java objects from native code
- Time for action – saving references to Objects in native Store
- Managing Java arrays
- Time for action – handling Java arrays in native Store
- Raising and checking Java exceptions
- Time for action – raising & catching exceptions in native Store
- Summary
- Chapter 4: Calling Java Back from Native Code
- Calling Java back from native code
- Time for action – determining JNI method signatures
- Time for action – calling back Java from native code
- Time for action – allocating an object with JNI
- Time for action – running and synchronizing a thread
- Processing bitmaps natively
- Time for action – decoding a camera's feed
- Time for action – processing pictures with the Bitmap API
- Summary
- Chapter 5: Writing a Fully Native Application
- Creating a native Activity
- Time for action – creating a basic native Activity
- Handling Activity events
- Time for action – stepping the event loop
- Time for action – handling Activity events
- Accessing window surface natively
- Time for action – displaying raw graphics
- Measuring time natively
- Time for action – animating graphics with a timer
- Summary
- Chapter 6: Rendering Graphics with OpenGL ES
- Initializing OpenGL ES
- Time for action – initializing OpenGL ES
- Time for action – clearing and swapping buffers
- An insight into the OpenGL pipeline
- Loading textures using the Asset manager
- Time for action – reading assets with the Asset manager
- Time for action – compiling and embedding libpng module
- Time for action – loading a PNG image
- Time for action – generating an OpenGL texture
- Drawing 2D sprites
- Time for action – initializing OpenGL ES
- Rendering particle effects
- Time for action – rendering a star field
- Adapting graphics to various resolutions
- Time for action – adapting resolution with off-screen rendering
- Summary
- Chapter 7: Playing Sound with OpenSL ES
- Chapter 8: Handling Input Devices and Sensors
- Interacting with touch events
- Time for action – handling touch events
- Detecting keyboard, D-Pad, and Trackball events
- Time for action – handling keyboard, D-Pad, and trackball events natively
- Probing device sensors
- Time for action – handling accelerometer events
- Time for action – turning an Android device into a Joypad
- Summary
- Chapter 9: Porting Existing Libraries to Android
- Activating the Standard Template Library
- Time for action – activating GNU STL in DroidBlaster
- Time for action – read files with STL stream
- Time for action – using STL containers
- Porting Box2D to Android
- Time for action – compiling Box2D on Android
- Time for action – running Box2D physics engine
- Prebuilding Boost on Android
- Time for action – prebuilding Boost static library
- Time for action – compiling an executable linked to Boost
- Mastering module Makefiles
- Summary
- Chapter 10: Intensive Computing with RenderScript
- What is RenderScript ?
- Executing a predefined Intrinsic
- Time for action – creating a Java UI
- Time for action – running RenderScript Blur intrinsic
- Writing a custom Kernel
- Time for action – writing a luminance threshold filter
- Combining scripts together
- Time for action – combining Intrinsics and scripts together
- Summary
- Afterword
- Index
[ 1 ]

Android NDK Beginner's Guide
Second Edition
Discover the nave side of Android and inject the power
of C/C++ in your applicaons
Sylvain Ratabouil
BIRMINGHAM - MUMBAI
Android NDK Beginner's Guide
Second Edition
Copyright © 2015 Packt Publishing
All rights reserved. No part of this book may be reproduced, stored in a retrieval system,
or transmied in any form or by any means, without the prior wrien permission of the
publisher, except in the case of brief quotaons embedded in crical arcles or reviews.
Every eort has been made in the preparaon of this book to ensure the accuracy of the
informaon presented. However, the informaon contained in this book is sold without
warranty, either express or implied. Neither the author, nor Packt Publishing, and its dealers
and distributors will be held liable for any damages caused or alleged to be caused directly
or indirectly by this book.
Packt Publishing has endeavored to provide trademark informaon about all of the
companies and products menoned in this book by the appropriate use of capitals.
However, Packt Publishing cannot guarantee the accuracy of this informaon.
First published: January 2012
Second Edion: April 2015
Producon reference: 1240415
Published by Packt Publishing Ltd.
Livery Place
35 Livery Street
Birmingham B3 2PB, UK.
ISBN 978-1-78398-964-5
www.packtpub.com

Credits
Author
Sylvain Ratabouil
Reviewers
Guy Cole
Krzysztof Fonał
Sergey Kosarevsky
Raimon Ràfols
Commissioning Editor
Ashwin Nair
Acquision Editor
Vinay Argekar
Content Development Editor
Rohit Singh
Technical Editor
Ryan Kochery
Copy Editors
Hiral Bhat
Adithi Shey
Sameen Siddiqui
Project Coordinator
Mary Alex
Proofreaders
Simran Bhogal
Sas Eding
Indexer
Monica Ajmera Mehta
Graphics
Disha Haria
Producon Coordinator
Conidon Miranda
Cover Work
Conidon Miranda
About the Author
Sylvain Ratabouil is an IT consultant, experienced in Android, Java, and C/C++. He has
contributed to the development of digital and mobile applicaons for large companies as
well as industrial projects for the space and aeronaucs industries. As a technology lover,
he is passionate about mobile technologies and cannot live without his Android smartphone.
About the Reviewers
Guy Cole is a veteran Silicon Valley contractor with engagements in many well-known
companies such as Facebook, Cisco, Motorola, Cray Research, Hewle-Packard, Wells Fargo
Bank, Barclays Global Investments, DHL Express, and many smaller, less-famous companies.
You can contact him via LinkedIn for your next project.
Krzysztof Fonał is passionate about computer science. He fell in love with this eld when
he was eleven. He strongly believes that technology doesn't maer; problem solving skills
maers, as well as the passion to absorb knowledge. He currently works with Trapeze Group,
which is a world leader in providing IT soluons. He plans to work with machine learning
books and also on the Corona SDK.
Sergey Kosarevsky is a soware engineer with experience in C++ and 3D graphics. He
worked for mobile industry companies and was involved in mobile projects at SPB Soware,
Yandex, and Layar. He has more than 12 years of soware development experience and more
than 6 years of Android NDK experience. Sergey earned his PhD in the eld of mechanical
engineering from St.Petersburg Instute of Machine-Building in Saint-Petersburg, Russia.
He is a coauthor of Android NDK Game Development Cookbook. In his spare me, Sergey
maintains and develops an open source mulplaorm gaming engine, Linderdaum Engine
(http://www.linderdaum.com), and a mul-plaorm open source le manager, WCM
Commander (http://wcm.linderdaum.com).

Raimon Ràfols has been developing for mobile devices since 2004. He has experience
in developing on several technologies, specializing in UI, build systems, and client-server
communicaons. He is currently working as a mobile soware engineering manager
at Imaginaon Technologies near London. In his spare me, he enjoys programming,
photography, and giving talks at mobile conferences about Android performance
opmizaon and Android custom views.
I would like to express my gratude to my beloved girlfriend, Laia, for her
support and understanding.

www.PacktPub.com
Support les, eBooks, discount offers, and more
For support les and downloads related to your book, please visit www.PacktPub.com.
Did you know that Packt oers eBook versions of every book published, with PDF and ePub
les available? You can upgrade to the eBook version at www.PacktPub.com and as a print
book customer, you are entled to a discount on the eBook copy. Get in touch with us at
service@packtpub.com for more details.
At www.PacktPub.com, you can also read a collecon of free technical arcles, sign up
for a range of free newsleers and receive exclusive discounts and oers on Packt books
and eBooks.
TM
https://www2.packtpub.com/books/subscription/packtlib
Do you need instant soluons to your IT quesons? PacktLib is Packt's online digital book
library. Here, you can search, access, and read Packt's enre library of books.
Why subscribe?
Fully searchable across every book published by Packt
Copy and paste, print, and bookmark content
On demand and accessible via a web browser
Free access for Packt account holders
If you have an account with Packt at www.PacktPub.com, you can use this to access PacktLib
today and view 9 enrely free books. Simply use your login credenals for immediate access.

[ i ]
Table of Contents
Preface vii
Chapter 1: Seng Up Your Environment 1
Geng started with Android development 2
Seng up Windows 2
Time for acon – preparing Windows for Android development 3
Installing Android development kits on Windows 8
Time for acon – installing Android SDK and NDK on Windows 8
Seng up OS X 13
Time for acon – preparing OS X for Android development 13
Installing Android development kits on OS X 16
Time for acon – installing Android SDK and NDK on OS X 17
Seng up Linux 22
Time for acon – preparing Ubuntu for Android development 23
Installing Android development kits on Linux 25
Time for acon – installing Android SDK and NDK on Ubuntu 25
Installing the Eclipse IDE 30
Time for acon – installing Eclipse with ADT on your OS 30
Seng up the Android emulator 35
Time for acon – creang an Android virtual device 35
Developing with an Android device 39
Time for acon – seng up an Android device 39
More about ADB 42
Summary 43
Chapter 2: Starng a Nave Android Project 45
Building NDK sample applicaons 46
Time for acon – compiling and deploying San Angeles sample 46
Generang project les with Android manager 49
Compiling nave code with NDK-Build 51

Table of Contents
[ ii ]
Building and packaging an applicaon with Ant 52
Deploying an applicaon package with Ant 52
Launching an applicaon with ADB Shell 53
More about Android tooling 54
Creang your rst nave Android project 55
Time for acon – creang a nave Android project 55
Introducing Dalvik and ART 59
Interfacing Java with C/C++ 60
Time for acon – calling C code from Java 61
Debugging nave Android applicaons 64
Time for acon – debugging a nave Android applicaon 64
Dening NDK applicaon-wide sengs 67
NDK-GDB day-to-day 68
Analyzing nave crash dumps 69
Time for acon – analyzing a nave crash dump 69
Deciphering crash dumps 71
Seng up a Gradle project to compile nave code 73
Time for acon – creang a nave Android project 74
Time for acon – using your own Makeles with Gradle 78
Summary 80
Chapter 3: Interfacing Java and C/C++ with JNI 81
Inializing a nave JNI library 82
Time for acon – dening a simple GUI 82
Time for acon – inializing the nave store 88
Converng Java strings in nave code 91
Time for acon – handling strings in the nave store 91
Nave character encoding 97
JNI String API 98
Passing Java primives to nave code 99
Time for acon – handling primives in the nave store 99
Referencing Java objects from nave code 103
Time for acon – saving references to Objects in nave Store 103
Local references 107
Global references 109
Weak references 110
Managing Java arrays 112
Time for acon – handling Java arrays in nave Store 112
Primive arrays 121
Object arrays 124
Raising and checking Java excepons 124

Table of Contents
[ iii ]
Time for acon – raising & catching excepons in nave Store 125
Execung code in Excepon state 128
Excepon handling API 130
Summary 130
Chapter 4: Calling Java Back from Nave Code 133
Calling Java back from nave code 134
Time for acon – determining JNI method signatures 134
Time for acon – calling back Java from nave code 138
More on the JNI Reecon API 142
Debugging JNI 143
Synchronizing Java and nave threads 144
Time for acon – allocang an object with JNI 144
Time for acon – running and synchronizing a thread 151
Synchronizing Java and C/C++ with JNI Monitors 155
Aaching and detaching nave threads 156
Processing bitmaps navely 157
Time for acon – decoding a camera's feed 158
Time for acon – processing pictures with the Bitmap API 165
Registering nave methods manually 171
JNI in C versus JNI in C++ 171
Summary 172
Chapter 5: Wring a Fully Nave Applicaon 173
Creang a nave Acvity 174
Time for acon – creang a basic nave Acvity 174
More about the Nave App Glue 180
Handling Acvity events 182
Time for acon – stepping the event loop 182
Time for acon – handling Acvity events 187
Accessing window surface navely 193
Time for acon – displaying raw graphics 193
Measuring me navely 204
Time for acon – animang graphics with a mer 204
Summary 215
Chapter 6: Rendering Graphics with OpenGL ES 217
Inializing OpenGL ES 218
Time for acon – inializing OpenGL ES 219
Time for acon – clearing and swapping buers 223
An insight into the OpenGL pipeline 225
Loading textures using the Asset manager 226

Table of Contents
[ iv ]
Time for acon – reading assets with the Asset manager 227
More about the Asset Manager API 229
Time for acon – compiling and embedding libpng module 232
Time for acon – loading a PNG image 234
Time for acon – generang an OpenGL texture 240
More about textures 244
Drawing 2D sprites 247
Time for acon – inializing OpenGL ES 247
Vertex Arrays versus Vertex Buer Object 268
Rendering parcle eects 269
Time for acon – rendering a star eld 270
Programming shaders with GLSL 280
Adapng graphics to various resoluons 282
Time for acon – adapng resoluon with o-screen rendering 282
Summary 289
Chapter 7: Playing Sound with OpenSL ES 291
Inializing OpenSL ES 292
Time for acon – creang OpenSL ES engine and output 293
More on OpenSL ES philosophy 298
Playing music les 299
Time for acon – playing background music 299
Playing sounds 306
Time for acon – creang and playing a sound buer queue 307
Using callbacks to detect sound queue events 320
Low latency on Android 321
Recording sounds 322
Creang and releasing the recorder 324
Recording a sound 325
Recording a callback 326
Summary 326
Chapter 8: Handling Input Devices and Sensors 327
Interacng with touch events 328
Time for acon – handling touch events 329
Detecng keyboard, D-Pad, and Trackball events 340
Time for acon – handling keyboard, D-Pad, and trackball events navely 341
Probing device sensors 347
Time for acon – handling accelerometer events 348
Time for acon – turning an Android device into a Joypad 355
More on sensors 362
Summary 363

Table of Contents
[ v ]
Chapter 9: Porng Exisng Libraries to Android 365
Acvang the Standard Template Library 366
Time for acon – acvang GNU STL in DroidBlaster 366
Time for acon – read les with STL stream 369
Time for acon – using STL containers 373
Porng Box2D to Android 382
Time for acon – compiling Box2D on Android 383
Time for acon – running Box2D physics engine 387
Diving into the Box2D world 402
More on collision detecon 403
Collision modes and ltering 404
Going further with Box2D 406
Prebuilding Boost on Android 407
Time for acon – prebuilding Boost stac library 407
Time for acon – compiling an executable linked to Boost 413
Mastering module Makeles 417
Makele variables 417
Enabling C++ 11 support and the Clang compiler 420
Makele Instrucons 421
CPU Architectures (ABI) 424
Advanced instrucon sets (NEON, VFP, SSE, MSA) 424
Summary 426
Chapter 10: Intensive Compung with RenderScript 427
What is RenderScript ? 428
Execung a predened Intrinsic 429
Time for acon – creang a Java UI 429
Time for acon – running RenderScript Blur intrinsic 432
Wring a custom Kernel 440
Time for acon – wring a luminance threshold lter 440
Combining scripts together 448
Time for acon – combining Intrinsics and scripts together 449
Summary 457
Aerword 459
Index 463

[ vii ]
Preface
Android NDK is all about injecng high performance and portable code into your mobile
apps by exploing the maximum speed of these mobile devices. Android NDK allows you
to write fast code for intensive tasks and port exisng code to Android and non-Android
plaorms. Alternavely, if you have an applicaon with mulple lines of C code, using NDK
can considerably reduce the project development process. This is one of the most ecient
operang systems for mulmedia and games.
This Beginner's Guide will show you how to create applicaons enabled by C/C++ and
integrate them with Java. By using this praccal step-by-step guide, and gradually praccing
your new skills using the tutorials, ps, and tricks, you will learn how to run C/C++ code
embedded in a Java applicaon or in a standalone applicaon.
The books starts by teaching you how to access nave API and port libraries used in some
of the most successful Android applicaons. Next, you will move on to create a real nave
applicaon project through the complete implementaon of a nave API and porng
exisng third-party libraries. As we progress through the chapters, you will gain a detailed
understanding of rendering graphics and playing sound with OpenGL ES and OpenSL ES,
which are becoming the new standard in mobility. Moving forward, you will learn how to
access the keyboard and input peripherals, and read accelerometer or orientaon sensors.
Finally, you will dive into more advanced topics, such as RenderScript.
By the end of the book, you will be familiar enough with the key elements to start exploing
the power and portability of nave code.

Preface
[ viii ]
What this book covers
Chapter 1, Seng Up Your Environment, covers all the prerequisite packages installed on
our system. This chapter also covers installing the Android Studio bundle, which contains
both the Android Studio IDE and the Android SDK.
Chapter 2, Starng a Nave Android Project, discusses how to build our rst sample
applicaon using command-line tools and how to deploy it on an Android device. We
also create our rst nave Android projects using Eclipse and Android Studio.
Chapter 3, Interfacing Java and C/C++ with JNI, covers how to make Java communicate with
C/C++. We also handle Java object references in nave code using Global references, and
we learn the dierences of Local references. Finally, we raise and check Java excepons
in nave code.
Chapter 4, Calling Java Back from Nave Code, calls Java code from nave code with the
JNI Reecon API. We also process bitmaps navely with the help of JNI and decode a
video feed by hand.
Chapter 5, Wring a Fully Nave Applicaon, discusses creang NativeActivity that
polls acvity events to start or stop nave code accordingly We also access the display
window navely, such as a bitmap to display raw graphics. Finally, we retrieve me to
make the applicaon adapt to device speed using a monotonic clock.
Chapter 6, Rendering Graphics with OpenGL ES, covers how to inialize an OpenGL ES
context and bind it to an Android window. Then, we see how to turn libpng into a
module and load a texture from a PNG asset.
Chapter 7, Playing Sound with OpenSL ES, covers how to inialize OpenSL ES on Android.
Then, we learn how to play background music from an encoded le and in-memory sounds
with a sound buer queue. Finally, we discover how to record and play a sound in a way that
is thread-safe and non-blocking.
Chapter 8, Handling Input Devices and Sensors, discusses mulple ways to interact with
Android from nave code. More precisely, we discover how to aach an input queue to
the Nave App Glue event loop.
Chapter 9, Porng Exisng Libraries to Android, covers how to acvate the STL with a simple
ag in the NDK makele system. We port the Box2D library into an NDK module that is
reusable among Android projects.
Chapter 10, Intensive Compung with RenderScript, introduces RenderScript, an advanced
technology to parallelize intensive computaon tasks. We also see how to use predened
RenderScript with built-in Intrinsics, which is currently mainly dedicated to image processing.

Preface
[ ix ]
What you need for this book
To run the examples in the book, the following soware will be required:
System: Windows, Linux or Mac OS X
JDK: Java SE Development Kit 7 or 8
Cygwin: On Windows only
Who this book is for
Are you an Android Java programmer who needs more performance? Are you a C/C++
developer who doesn't want to bother with the complexity of Java and its out-of-control
garbage collector? Do you want to create fast, intensive mulmedia applicaons or games?
If you've answered yes to any of these quesons, then this book is for you. With some
general knowledge of C/C++ development, you will be able to dive head rst into nave
Android development.
Sections
In this book, you will nd several headings that appear frequently (Time for acon,
What just happened?, Pop quiz, and Have a go hero).
To give clear instrucons on how to complete a procedure or task, we use these secons
as follows:
Time for action – heading
1. Acon 1
2. Acon 2
3. Acon 3
Instrucons oen need some extra explanaon to ensure they make sense, so they are
followed with these secons:

Preface
[ x ]
What just happened?
This secon explains the working of the tasks or instrucons that you just completed.
You will also nd some other learning aids in the book, for example:
Have a go hero – heading
These are praccal challenges that give you ideas to experiment with what you have learned.
Conventions
You will also nd a number of text styles that disnguish between dierent kinds of
informaon. Here are some examples of these styles and an explanaon of their meaning.
Code words in text, database table names, folder names, lenames, le extensions,
pathnames, dummy URLs, user input, and Twier handles are shown as follows: "Finally,
create a new Gradle task ndkBuild that will manually trigger the ndk-build command."
A block of code is set as follows:
#include <unistd.h>
…
sleep(3); // in seconds
When we wish to draw your aenon to a parcular part of a code block, the relevant lines
or items are set in bold:
if (mGraphicsManager.start() != STATUS_OK) return STATUS_KO;
mAsteroids.initialize();
mShip.initialize();
mTimeManager.reset();
return STATUS_OK;
Any command-line input or output is wrien as follows:
adb shell stop
adb shell setprop dalvik.vm.checkjni true
Preface
[ xi ]
New terms and important words are shown in bold. Words that you see on the screen, in
menus or dialog boxes for example, appear in the text like this: "If everything works properly,
a message Late-enabling – Xcheck:jni appears in the Logcat when your applicaon starts."
Warnings or important notes appear in a box like this.
Tips and tricks appear like this.
Reader feedback
Feedback from our readers is always welcome. Let us know what you think about this
book—what you liked or disliked. Reader feedback is important for us as it helps us
develop tles that you will really get the most out of.
To send us general feedback, simply e-mail feedback@packtpub.com, and menon
the book's tle in the subject of your message.
If there is a topic that you have experse in and you are interested in either wring or
contribung to a book, see our author guide at www.packtpub.com/authors.
Customer support
Now that you are the proud owner of a Packt book, we have a number of things to help
you to get the most from your purchase.
Downloading the example code
You can download the example code les from your account at http://www.packtpub.com
for all the Packt Publishing books you have purchased. If you purchased this book elsewhere,
you can visit http://www.packtpub.com/support and register to have the les e-mailed
directly to you.

Preface
[ xii ]
Errata
Although we have taken every care to ensure the accuracy of our content, mistakes do happen.
If you nd a mistake in one of our books—maybe a mistake in the text or the code—we
would be grateful if you could report this to us. By doing so, you can save other readers from
frustraon and help us improve subsequent versions of this book. If you nd any errata, please
report them by vising http://www.packtpub.com/submit-errata, selecng your book,
clicking on the Errata Submission Form link, and entering the details of your errata. Once your
errata are veried, your submission will be accepted and the errata will be uploaded to our
website or added to any list of exisng errata under the Errata secon of that tle.
To view the previously submied errata, go to https://www.packtpub.com/books/
content/support and enter the name of the book in the search eld. The required
informaon will appear under the Errata secon.
Piracy
Piracy of copyrighted material on the Internet is an ongoing problem across all media.
At Packt, we take the protecon of our copyright and licenses very seriously. If you come
across any illegal copies of our works in any form on the Internet, please provide us with
the locaon address or website name immediately so that we can pursue a remedy.
Please contact us at copyright@packtpub.com with a link to the suspected
pirated material.
We appreciate your help in protecng our authors and our ability to bring you
valuable content.
Questions
If you have a problem with any aspect of this book, you can contact us at questions@
packtpub.com, and we will do our best to address the problem.
[ 1 ]
1
Setting Up Your Environment
Are you ready to take up the mobile challenge? Is your computer switched on,
mouse and keyboard plugged in, and screen illuminating your desk? Then let's
not wait a minute more!
Developing Android applications requires a specific set of tools. You may
already know about the Android Software Development Kit for pure Java
applications. However, getting full access to the power of Android devices
requires more: the Android Native Development Kit.
Seng up a proper Android environment is not that complicated, however it can be rather
tricky. Indeed, Android is sll an evolving plaorm and recent addions, such as Android
Studio or Gradle, are not well supported when it comes to NDK development. Despite these
annoyances, anybody can have a ready-to-work environment in an hour.
In this rst chapter, we are going to:
Install prerequisites packages
Set up an Android development environment
Launch an Android emulator
Connect an Android device for development
Seng Up Your Environment
[ 2 ]
Getting started with Android development
What dierenates mankind from animals is the use of tools. Android developers, the
authenc species you belong to, are no dierent!
To develop applicaons on Android, we can use any of the following three plaorms:
Microso Windows (XP and later)
Apple OS X (Version 10.4.8 or later)
Linux (distribuons using GLibc 2.7 or later, such as latest versions of Ubuntu)
These systems are supported on x86 plaorms (that is, PCs with processors such as Intel or
AMD) in both 32- and 64-bit versions, except for Windows XP (32-bit only).
This is a good start but, unless you are able to read and write binary code as well as speak
your mother tongue, having a raw OS is not enough. We also need soware dedicated to
Android development:
A JDK (Java Development Kit)
An Android SDK (Soware Development Kit)
An Android NDK (Nave Development Kit)
An IDE (Integrated Development Environment) such as Eclipse or Visual Studio (or
vi for hard-core coders). Android Studio and IntelliJ are not yet well-suited for NDK
development, although they provide basic support for nave code.
A good old command-line shell to manipulate all these tools. We will use Bash.
Now that we know what tools are necessary to work with Android, let's start with the
installaon and setup process.
The following secon is dedicated to Windows. If you are a Mac or Linux user,
you can jump to Seng up an OS X or Seng up Linux secon.
Setting up Windows
Before installing the necessary tools, we need to set up Windows to host our Android
development tools properly. Although it is not the most natural t for Android development,
Windows sll provides a fully funconal environment.
The following secon explains how to set up the prerequisite packages on Windows 7. The
process is the same for Windows XP, Vista, or 8.
Chapter 1
[ 3 ]
Time for action – preparing Windows for Android development
To develop with the Android NDK on Windows, we need to set up a few prerequisites:
Cygwin, a JDK, and Ant.
1. Go to http://cygwin.com/install.html and download the Cygwin setup
program suitable for your environment. Once downloaded, execute it.
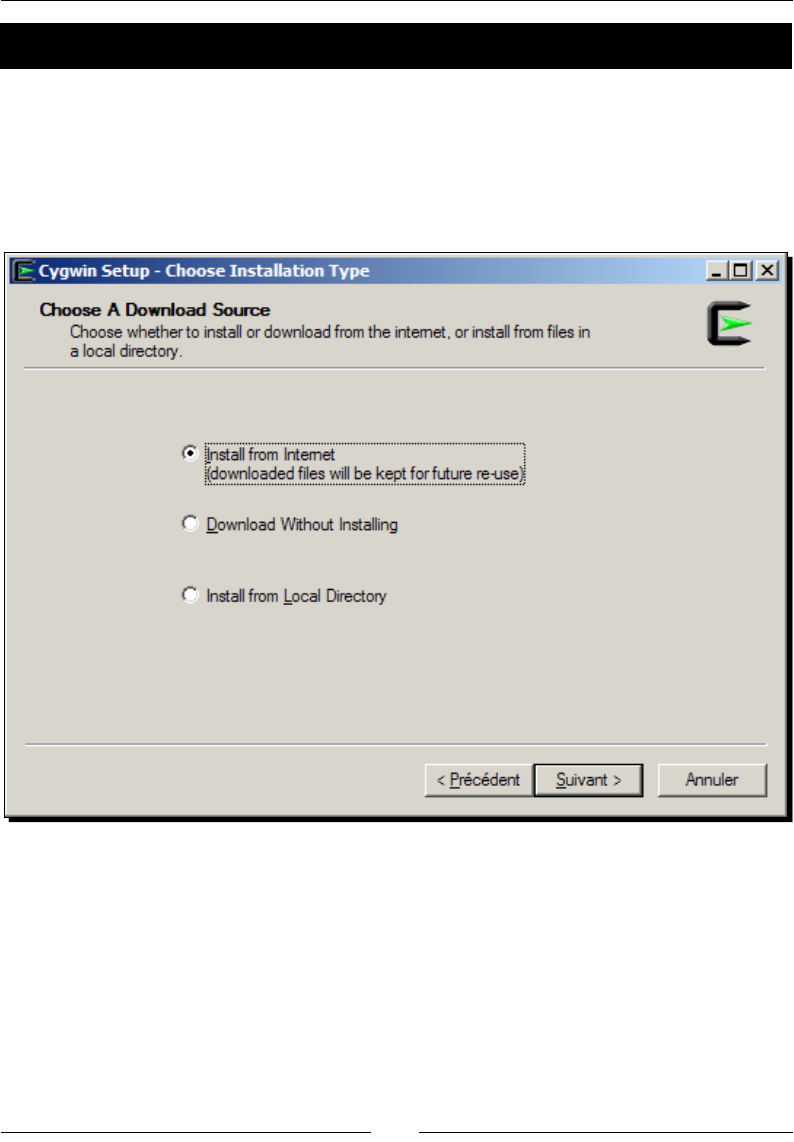
2. In the installaon window, click on Next and then Install from Internet.
Follow the installaon wizard screens. Consider selecng a download site from
where Cygwin packages are downloaded in your country.
Seng Up Your Environment
[ 4 ]
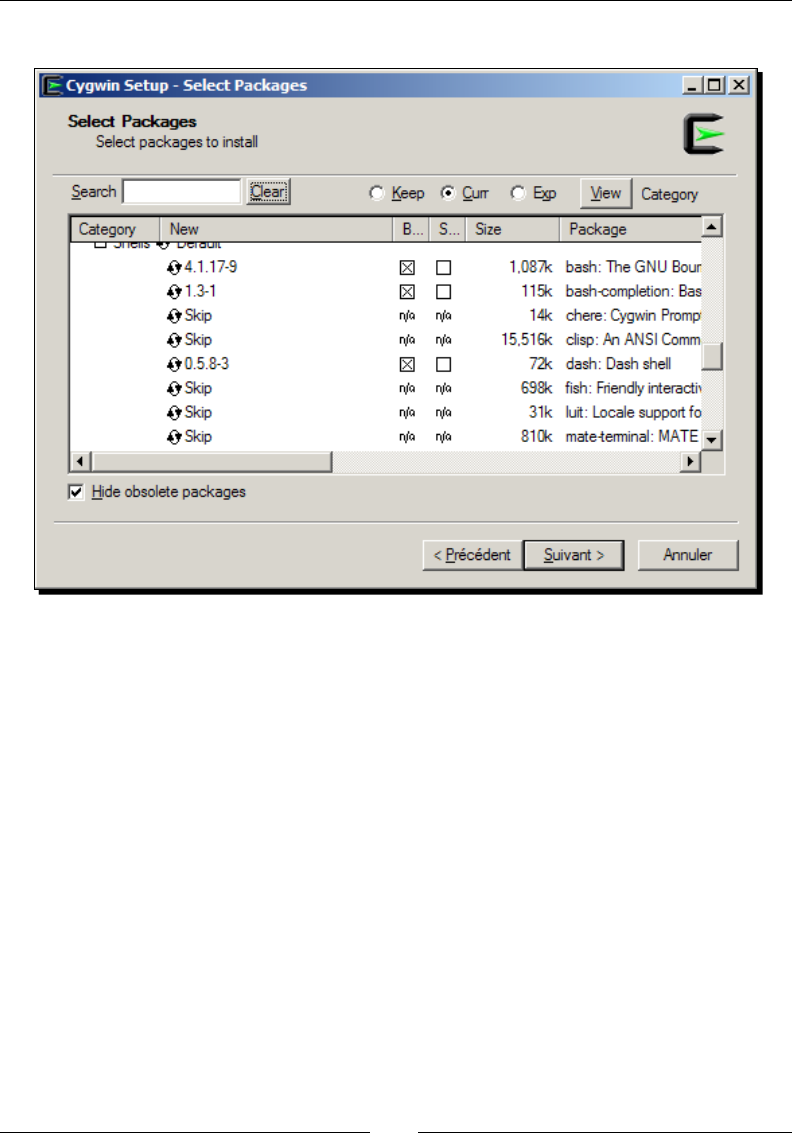
Then, when proposed, include the Devel, Make, Shells, and bash packages:
Follow the installaon wizard unl the end. This may take some me depending on
your Internet connecon.
3. Download Oracle JDK 7 from the Oracle website at http://www.oracle.com/
technetwork/java/javase/downloads/index.html (or JDK 8, although it
is not ocially supported at the me this book is wrien). Launch and follow the
installaon wizard unl the end.
4. Download Ant from its website at http://ant.apache.org/bindownload.cgi
and unzip its binary package in the directory of your choice (for example, C:\Ant).
5. Aer installaon, dene JDK, Cygwin, and Ant locaons in environment variables. To
do so, open Windows Control Panel and go to the System panel (or right-click on the
Computer item in the Windows Start menu and select Properes).
Then, go to Advanced system sengs. The System Properes window appears.
Finally, select the Advanced tab and click on the Environment Variables buon.

Chapter 1
[ 5 ]
6. In the Environment Variables window, inside the System variables list, add:
The CYGWIN_HOME variable with the Cygwin installation directory as the
value (for example, C:\Cygwin)
The JAVA_HOME variable with the JDK installation directory as the value
The ANT_HOME variable with the Ant installation directory as the value (for
example, C:\Ant)
Prepend %CYGWIN_HOME%\bin;%JAVA_HOME%\bin;%ANT_HOME%\bin;, all
separated by a semicolon, at the beginning of your PATH environment variable.
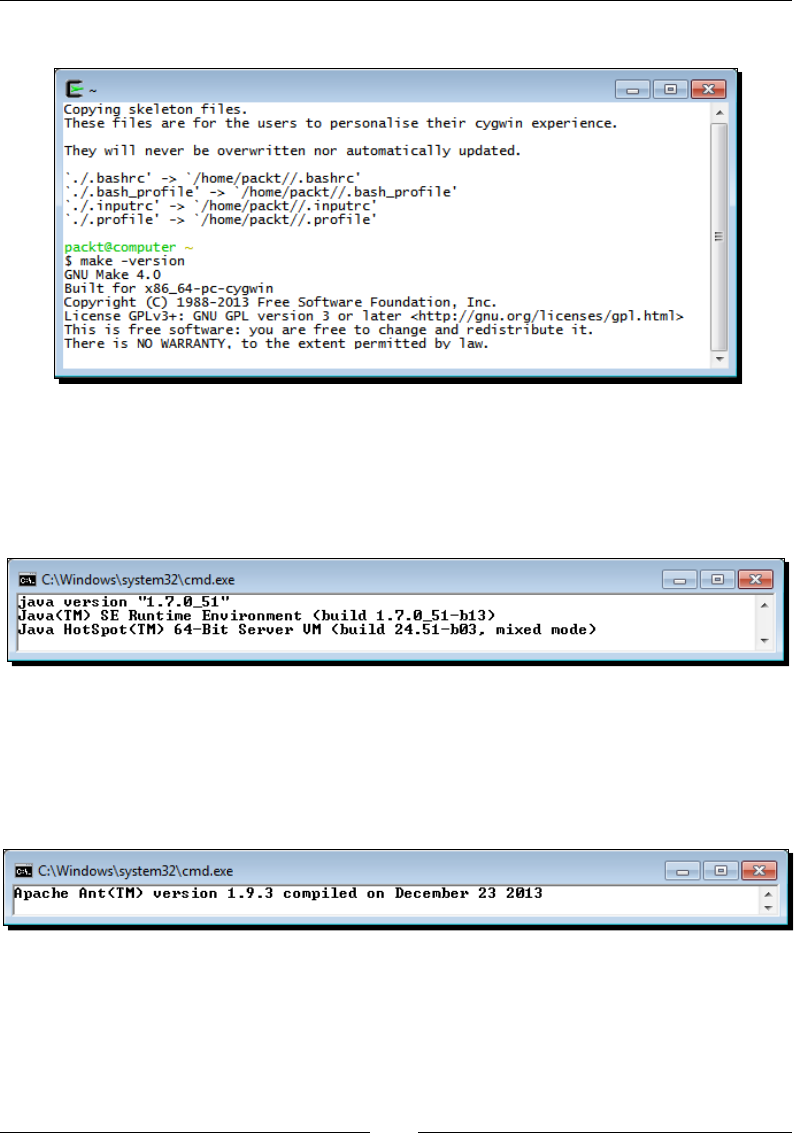
7. Finally, launch a Cygwin terminal. Your prole les get created on the rst launch.
Check the make version to ensure Cygwin works:
make –version
Seng Up Your Environment
[ 6 ]
You will see the following output:
8. Ensure JDK is properly installed by running Java and checking its version. Check
carefully to make sure the version number corresponds to the newly installed JDK:
java –version
You will see the following output on the screen:
9. From a classic Windows terminal, check the Ant version to make sure it is
properly working:
ant -version
You will see the following on the terminal:
Chapter 1
[ 7 ]
What just happened?
Windows is now set up with all the necessary packages to host Android development tools:
Cygwin, which is an open source soware collecon, allows the Windows plaorm
to emulate a Unix-like environment. It aims at navely integrang soware based
on the POSIX standard (such as Unix, Linux, and so on) into Windows. It can be
considered as an intermediate layer between applicaons originated from Unix/
Linux (but navely recompiled on Windows) and the Windows OS itself. Cygwin
includes Make, which is required by the Android NDK compilaon system to build
nave code.
Even if Android NDK R7 introduced native Windows
binaries, which does not require a Cygwin runtime, it is still
recommended to install the latter for debugging purpose.
A JDK 7, which contains the runme and tools necessary to build Java applicaons
on Android and run the Eclipse IDE as well as Ant. The only real trouble that you may
encounter when installing a JDK is some interferences from a previous installaon,
such as an exisng Java Runme Environment (JRE). Proper JDK use can be enforced
through the JAVA_HOME and PATH environment variables.
Defining the JAVA_HOME environment variable is not
required. However, JAVA_HOME is a popular convention
among Java applications, Ant being one of them. It first looks
for the java command in JAVA_HOME (if defined) before
looking in PATH. If you install an up-to-date JDK in another
location later on, do not forget to update JAVA_HOME.
Ant, which is a Java-based build automaon ulity. Although not a requirement,
it allows building Android applicaons from the command line, as we will see in
Chapter 2, Starng a Nave Android Project. It is also a good soluon to set up a
connuous integraon chain.
The next step consists of seng up the Android development kits.
Seng Up Your Environment
[ 8 ]
Installing Android development kits on Windows
Android requires specic development kits to develop applicaons: the Android SDK and
NDK. Hopefully, Google has thought about the developer community and provides all the
necessary tools for free.
In the following part, we will install these kits to start developing nave Android applicaons
on Windows 7.
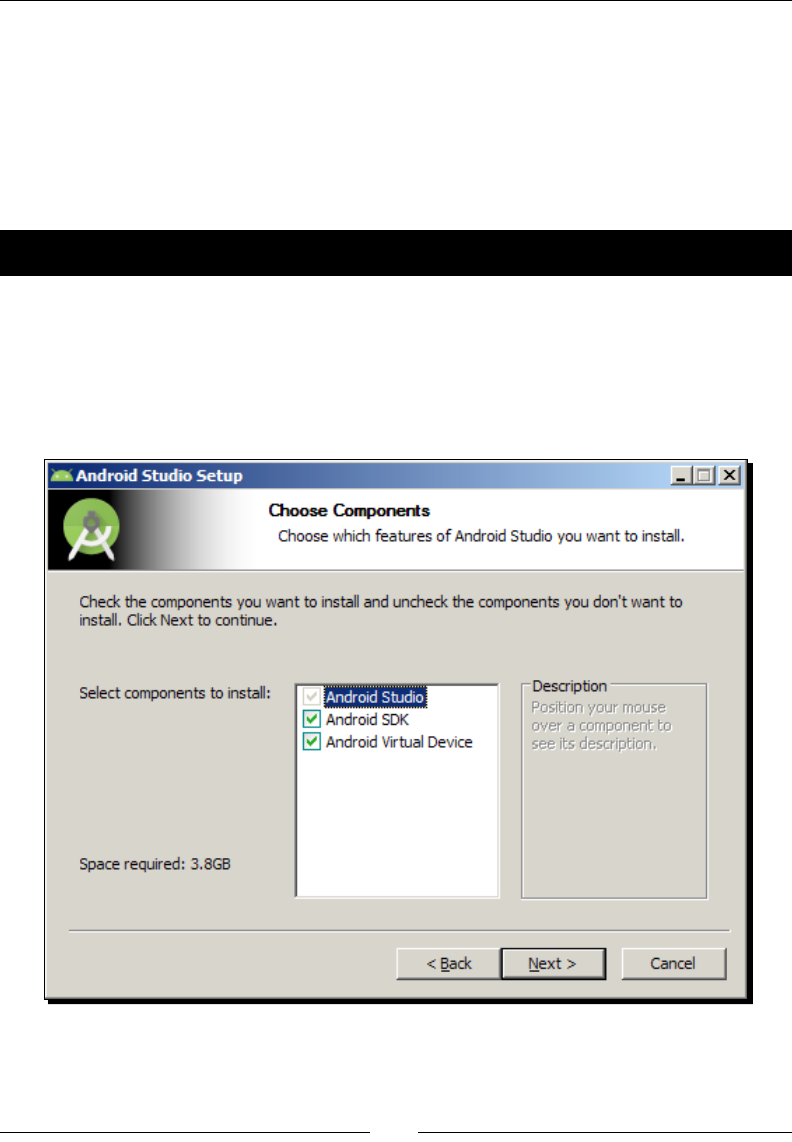
Time for action – installing Android SDK and NDK on Windows
The Android Studio bundle already contains the Android SDK. Let's install it.
1. Open your web browser and download the Android Studio bundle from http://
developer.android.com/sdk/index.html.
Run the downloaded program and follow the installaon wizard. When requested,
install all Android components.
Then, choose the installaon directories for Android Studio and the Android SDK (for
example, C:\Android\android-studio and C:\Android\sdk).
Chapter 1
[ 9 ]
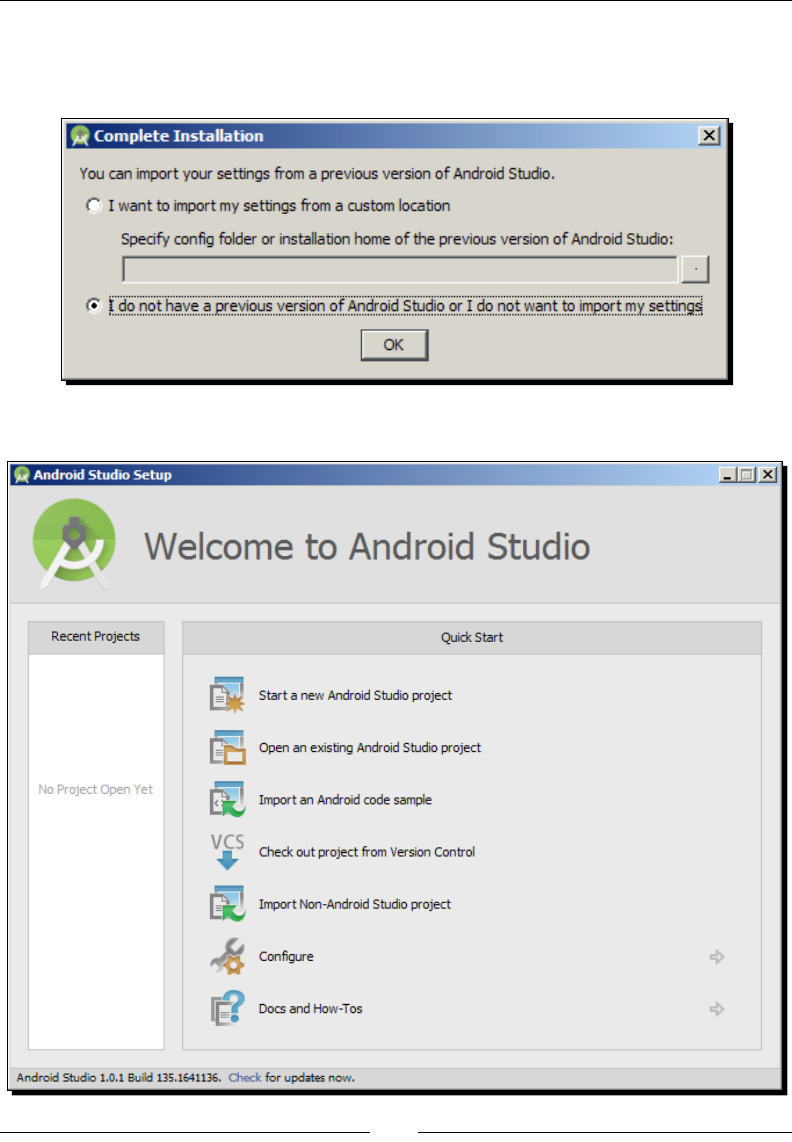
2. Launch Android Studio to ensure it is properly working. If Android Studio proposes
to import sengs from a previous installaon, select your preferred opon and click
on OK.
The Android Studio welcome screen should then appear. Close it.
Seng Up Your Environment
[ 10 ]
3. Go to http://developer.android.com/tools/sdk/ndk/index.html and
download the Android NDK (not SDK!) suitable for your environment. Extract the
archive inside the directory of your choice (for example, C:\Android\ndk).
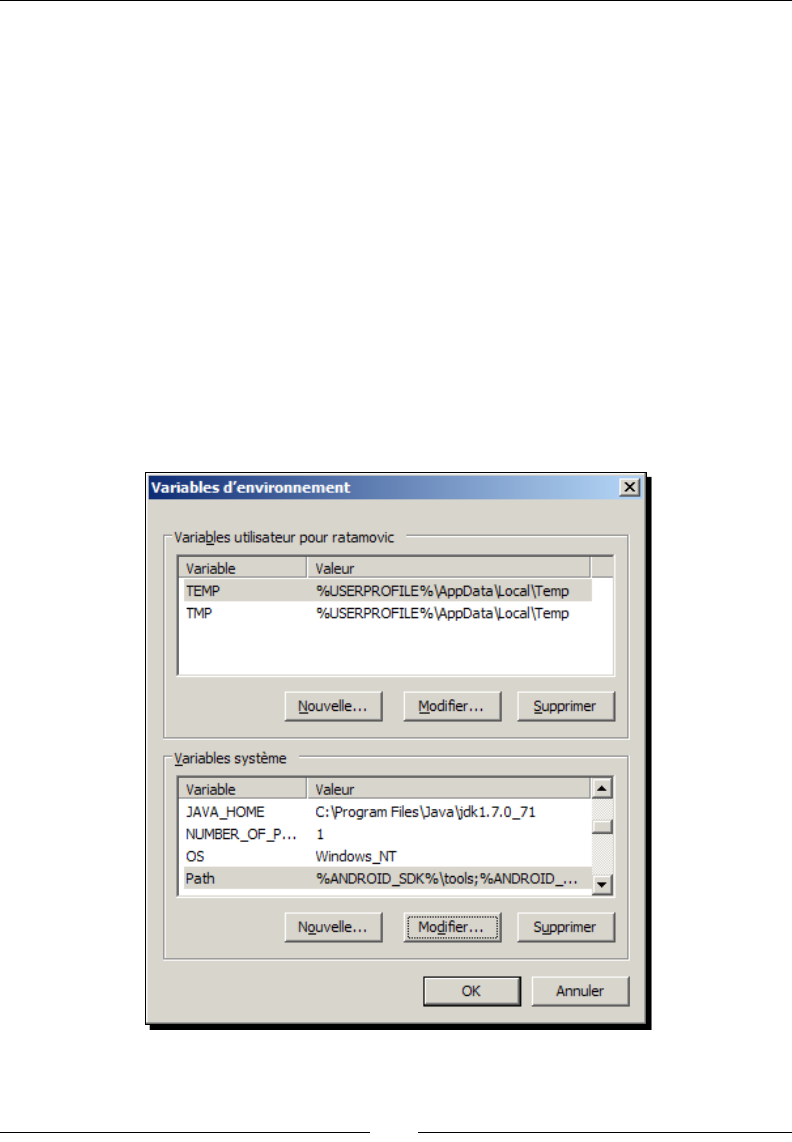
4. To easily access Android ulies from the command line, let's declare the Android
SDK and NDK as environment variables. From now on, we will refer to these
directories as $ANDROID_SDK and $ANDROID_NDK.
Open the Environment Variables system window, as we did previously. Inside the
System variables list, add the following:
The ANDROID_SDK variable with the SDK installation directory (for example,
C:\Android\sdk)
The ANDROID_NDK variable with the NDK installation directories (for
example, C:\Android\ndk)
Prepend %ANDROID_SDK%\tools;%ANDROID_SDK%\platform-
tools;%ANDROID_NDK%;, all separated by a semicolon, at the beginning of your
PATH environment variable.
Chapter 1
[ 11 ]
5. All Windows environment variables should be imported automacally by Cygwin
when launched. Open a Cygwin terminal and list the Android devices connected
to your computer (even if none are currently) with adb to check whether SDK is
working. No error should appear:
adb devices
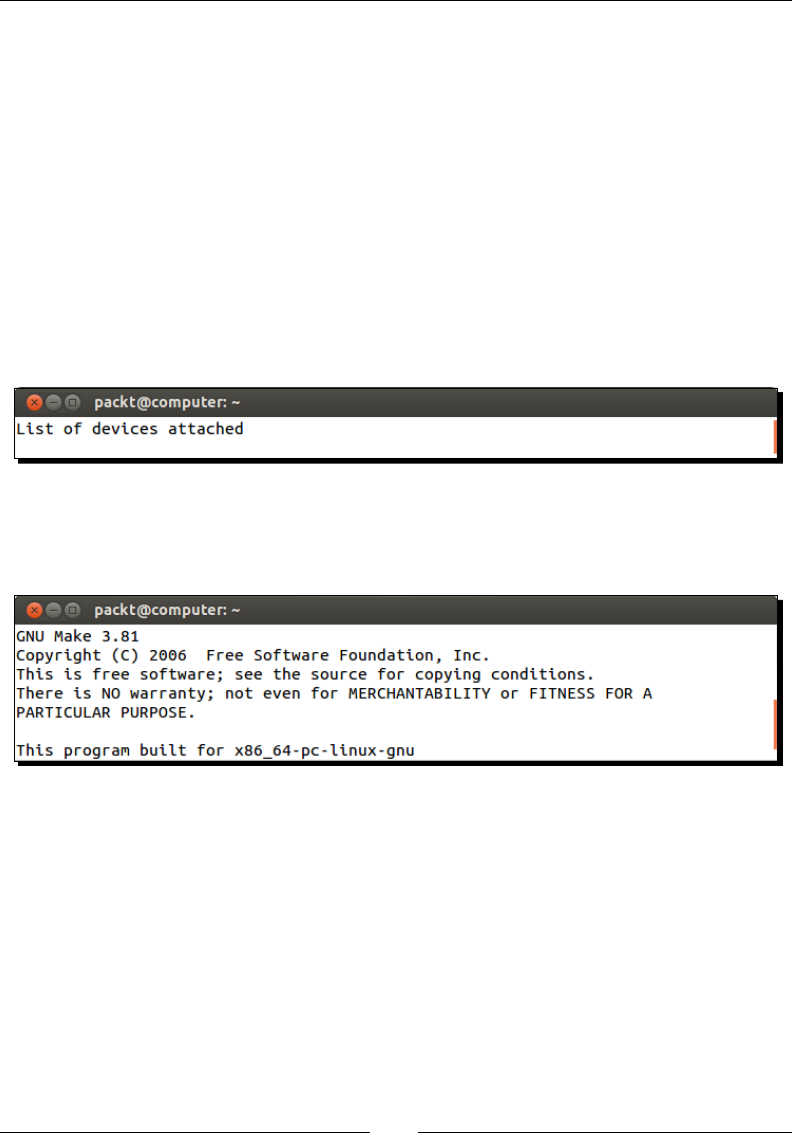
6. Check the ndk-build version to ensure that NDK is working. If everything works,
the Make version should appear:
ndk-build -version
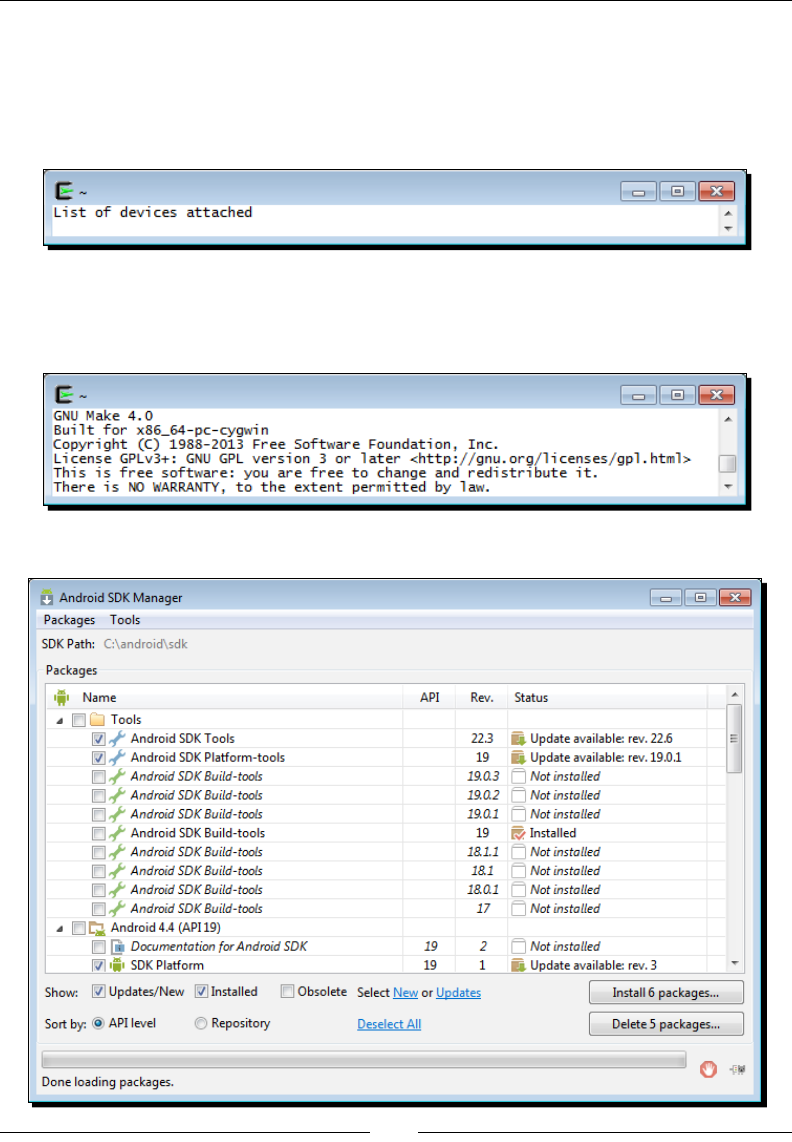
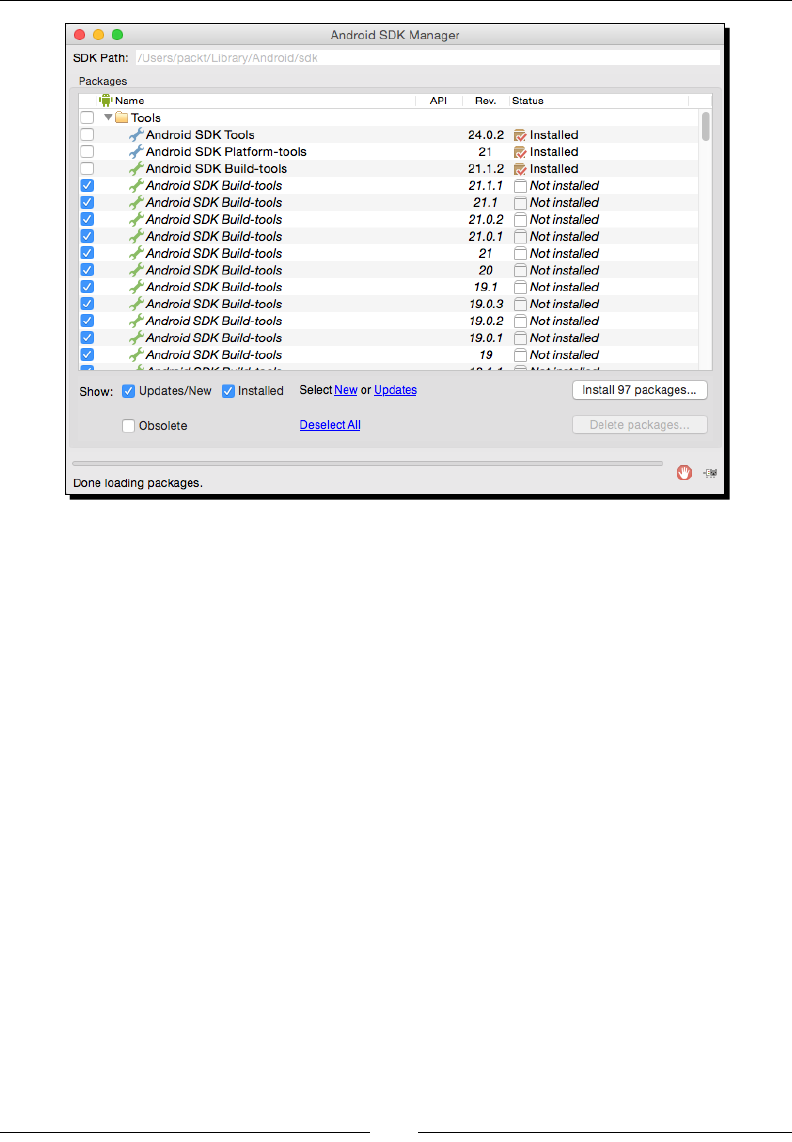
7. Open Android SDK Manager, located in the ADB bundle directory's root.

Seng Up Your Environment
[ 12 ]
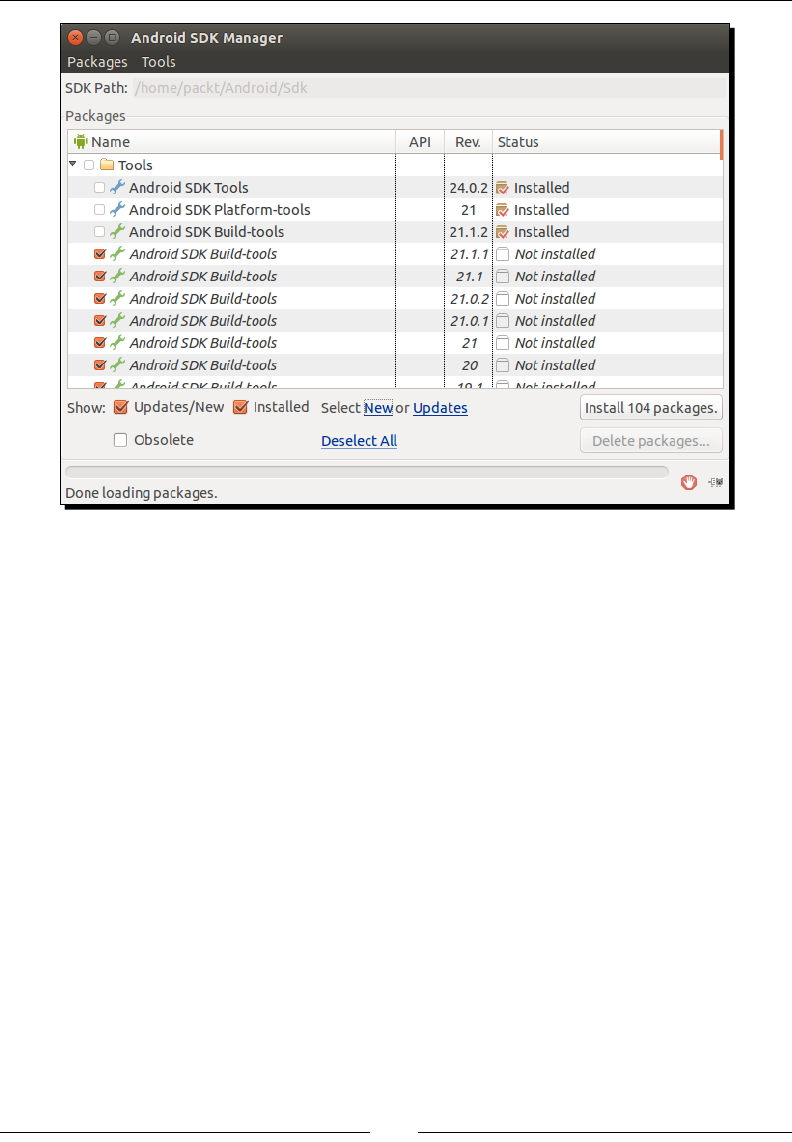
In the opened window, click on New to select all the packages and then click on the
Install packages... buon. Accept the licenses in the popup that appears and start
the installaon of Android development packages by clicking on the Install buon.
Aer a few long minutes, all packages are downloaded and a conrmaon message
indicang that the Android SDK manager has been updated appears.
Validate and close the manager.
What just happened?
Android Studio is now installed on the system. Although it is now the ocial Android IDE,
we are not going to use it much throughout the book because of its lack of support of the
NDK. It is, however, absolutely possible to use Android Studio for Java development, and
command line or Eclipse for C/C++.
The Android SDK has been set up through the Android Studio package. An alternave
soluon consists of manually deploying the SDK standalone package provided by Google.
On the other hand, the Android NDK has been deployed manually from its archive. Both
the SDK and NDK are made available through the command line thanks to a few
environment variables.
To get a fully funconal environment, all Android packages have been downloaded thanks to
the Android SDK manager, which aims at managing all the plaorms, sources, samples, and
emulaon features available through the SDK. This tool greatly simplies the update of your
environment when new SDK API and components are released. There is no need to reinstall
or overwrite anything!
However, the Android SDK Manager does not manage the NDK, which explains why we
downloaded it separately, and why you will need to update it manually in the future.
Chapter 1
[ 13 ]
Installing all Android packages is not strictly necessary. Only the SDK
plaorm (and possibly Google APIs) releases targeted by your applicaon
are really required. Installing all packages may avoid troubles when
imporng other projects or samples though.
The installaon of your Android development environment is not over yet. We sll need one
more thing to develop comfortably with the NDK.
This is the end of the secon dedicated to the Windows setup. The following
secon is dedicated to OS X.
Setting up OS X
Apple computers have a reputaon for being simple and easy to use. I must say that this
adage is rather true when it comes to Android development. Indeed, as a Unix-based system,
OS X is well adapted to run the NDK toolchain.
The following secon explains how to set up the prerequisite packages on Mac OS X Yosemite.
Time for action – preparing OS X for Android development
To develop with the Android NDK on OS X, we need to set up a few prerequisites: a JDK,
Developer Tools, and Ant.
1. A JDK is preinstalled on OS X 10.6 Snow Leopard and below. On these systems,
Apple's JDK is in version 6. Since this version is deprecated, it is advised to install
an up-to-date JDK 7 (or JDK 8, although it is not ocially supported at the me this
book is wrien).
On the other hand, OS X 10.7 Lion and above does not have a default JDK installed.
Installing the JDK 7 is thus mandatory.
Seng Up Your Environment
[ 14 ]
To do so, download Oracle JDK 7 from the Oracle website at http://www.oracle.
com/technetwork/java/javase/downloads/index.html. Launch the DMG
and follow the installaon wizard unl the end.
Check the Java version to ensure that the JDK is properly installed.
java -version
Chapter 1
[ 15 ]
To know if a JDK 6 is installed, check Java Preferences.app located by going
to Applications | Utilities on your Mac. If you have JDK 7, check whether
you have the Java icon under System Preferences.
2. All Developer Tools are included in the XCode installaon package (Version 5, at the
me this book is wrien). XCode is provided on the AppStore for free. Starng from
OS X 10.9, the Developer Tools package can be installed separately from a terminal
prompt with the following command:
xcode-select --install
Then, from the popup window that appears, select Install.
3. To build nave code with the Android NDK, whether XCode or the single Developer
Tools package is installed, we need Make. Open a terminal prompt and check the
Make version to ensure that it correctly works:
make –version
4. On OS X 10.9 and later, Ant must be installed manually. Download Ant from its
website at http://ant.apache.org/bindownload.cgi and unzip its binary
package in the directory of your choice (for example, /Developer/Ant).
Then, create or edit the le ~/.profile and make Ant available on the system
path by appending the following:
export ANT_HOME="/Developer/Ant"
export PATH=${ANT_HOME}/bin:${PATH}
Seng Up Your Environment
[ 16 ]
Log out from your current session and log in again (or restart your computer)
and check whether Ant is correctly installed by checking its version from the
command line:
ant –version
What just happened?
Our OS X system is now set up with the necessary packages to host Android
development tools:
A JDK 7, which contains the runme and tools necessary to build Java applicaons
on Android and to run the Eclipse IDE as well as Ant.
Developer Tools package, which packages various command-line ulies. It
includes Make, which is required by the Android NDK compilaon system to build
nave code.
Ant, which is a Java-based build automaon ulity. Although not a requirement,
it allows building Android applicaons from the command line, as we will see in
Chapter 2, Starng a Nave Android Project. It is also a good soluon to set up a
connuous integraon chain.
The next step consists of seng up the Android Development Kit.
Installing Android development kits on OS X
Android requires specic development kits to develop applicaons: the Android SDK and
NDK. Hopefully, Google has thought about the developer community and provides all the
necessary tools for free.
In the following part, we are going to install these kits to start developing nave Android
applicaons on Mac OS X Yosemite.
Chapter 1
[ 17 ]
Time for action – installing Android SDK and NDK on OS X
The Android Studio bundle already contains the Android SDK. Let's install it.
1. Open your web browser and download the Android Studio bundle from http://
developer.android.com/sdk/index.html.
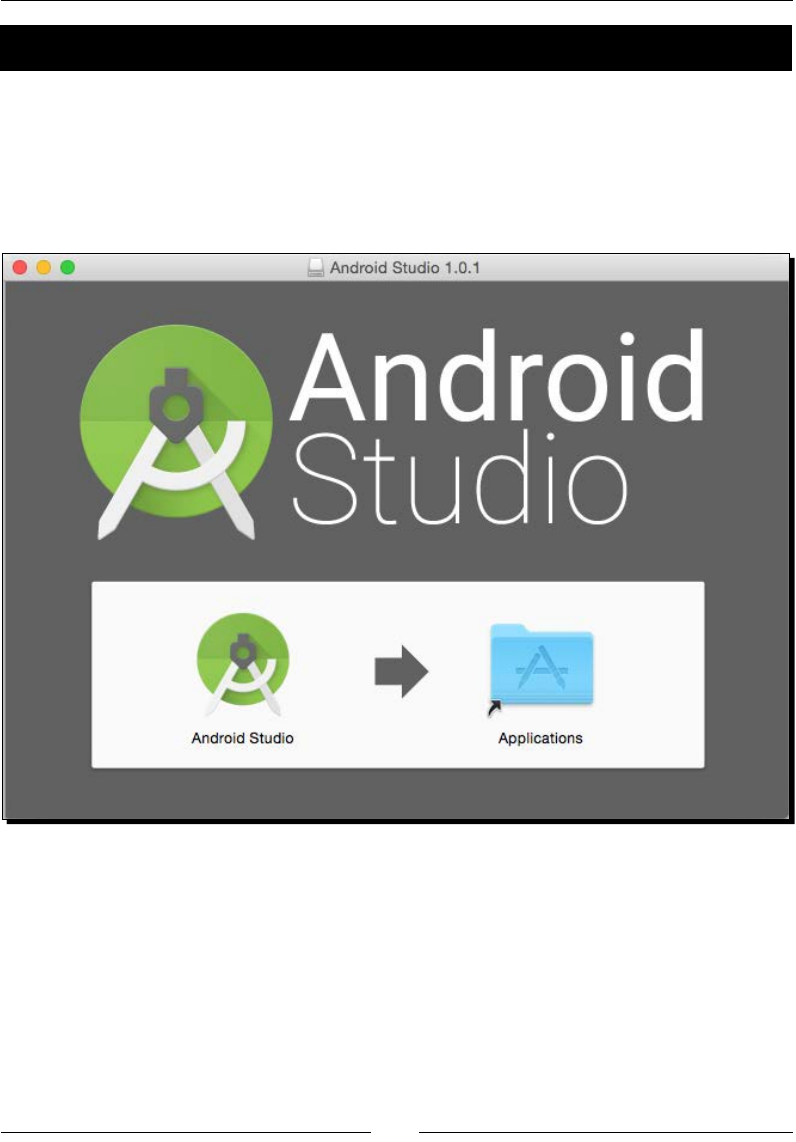
2. Run the downloaded DMG le. In the window that appears, drag the Android Studio
icon into Applicaons and wait for Android Studio to be fully copied on the system.
3. Run Android Studio from Launchpad.
If an error Unable to nd a valid JVM appears (because Android Studio cannot nd
a suitable JRE when launched), you can run Android Studio from the command line
as follows (using the appropriate JDK path):
export
STUDIO_JDK=/Library/Java/JavaVirtualMachines/jdk1.7.0_71.jdk
open /Applications/Android\ Studio.apps
Seng Up Your Environment
[ 18 ]
To solve the Android Studio startup issue, you can also install the
former JDK 6 package provided by Apple. Beware! This version is
outdated and thus, deprecated.
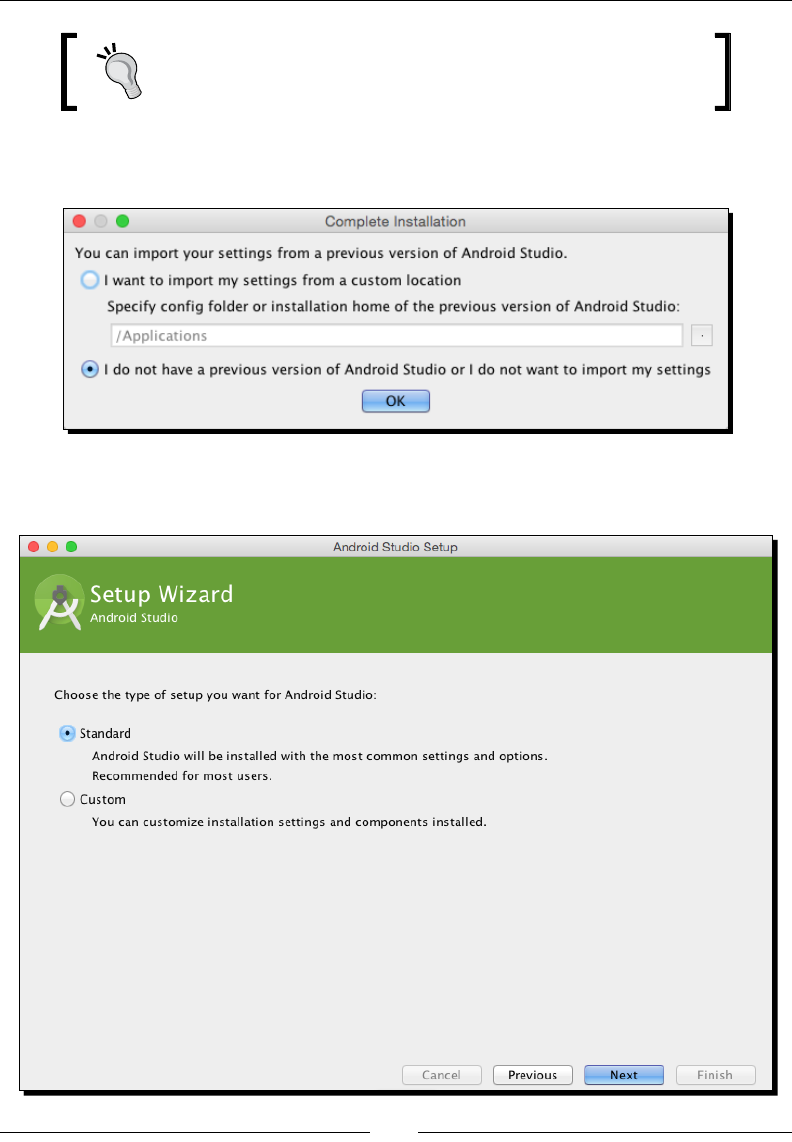
If Android Studio proposes to import sengs from a previous installaon, select
your preferred opon and click on OK.
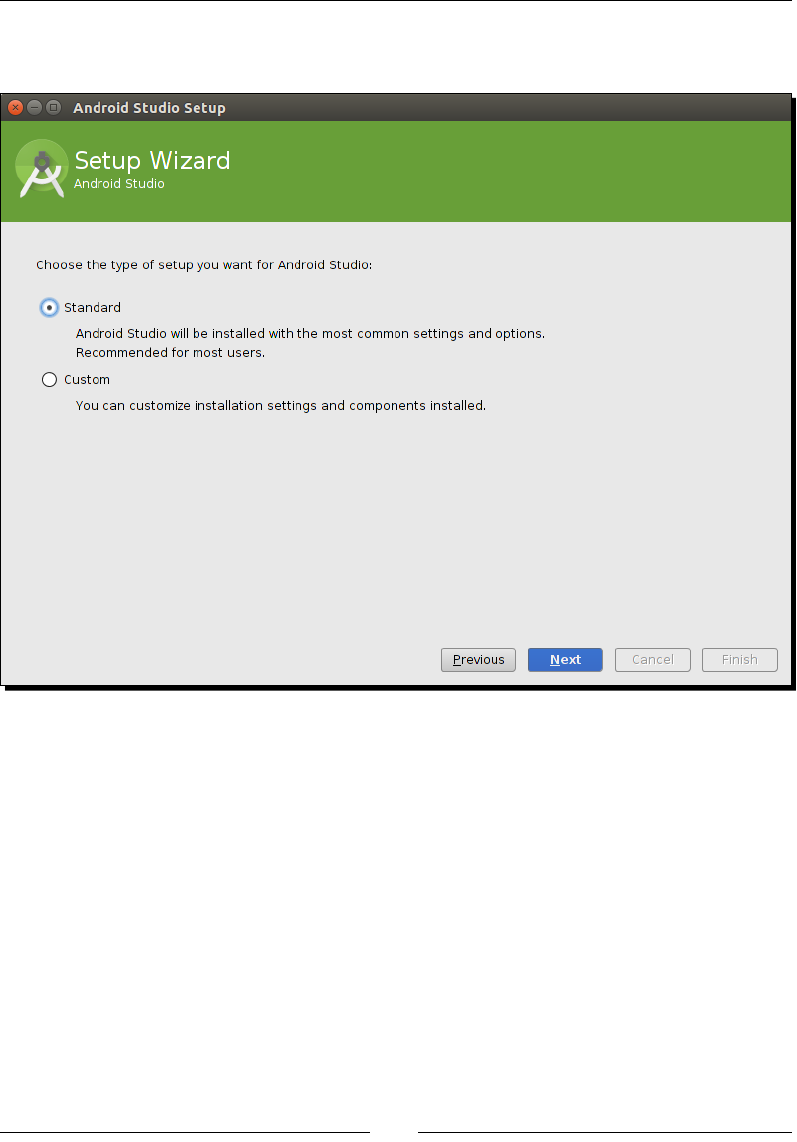
In the next Setup Wizard screen that appears, select the Standard installaon type
and connue the installaon.
Chapter 1
[ 19 ]
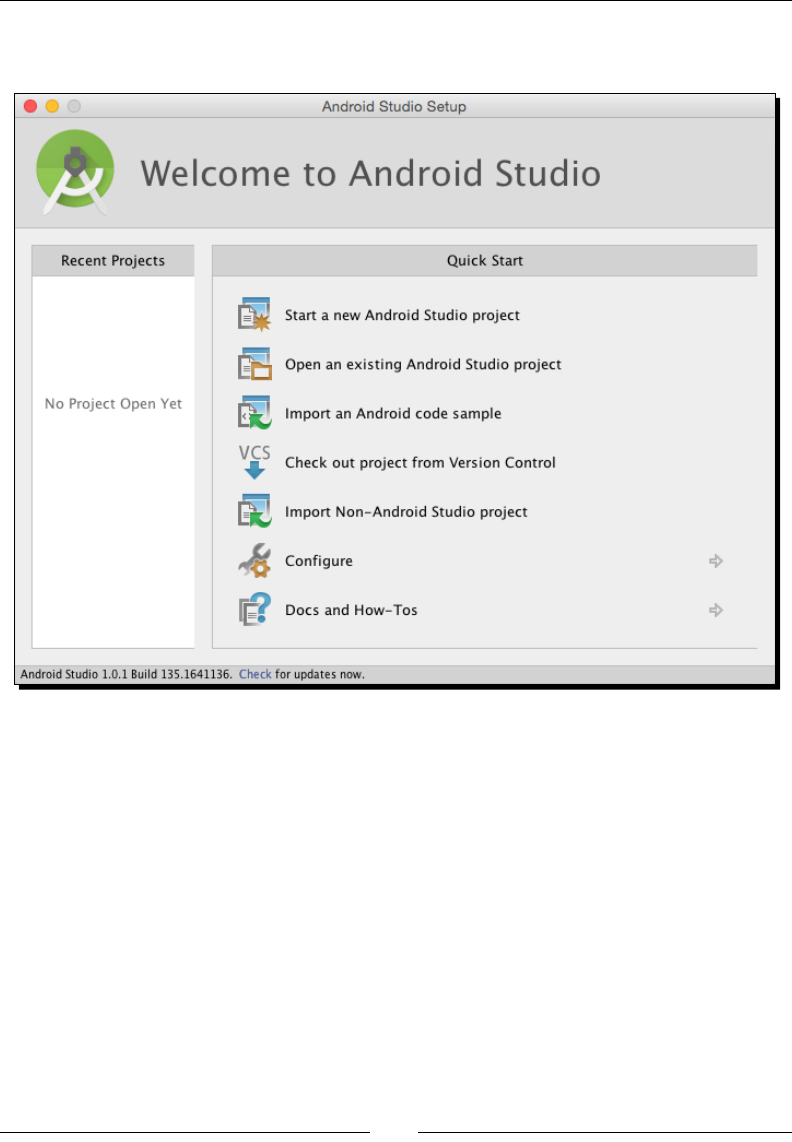
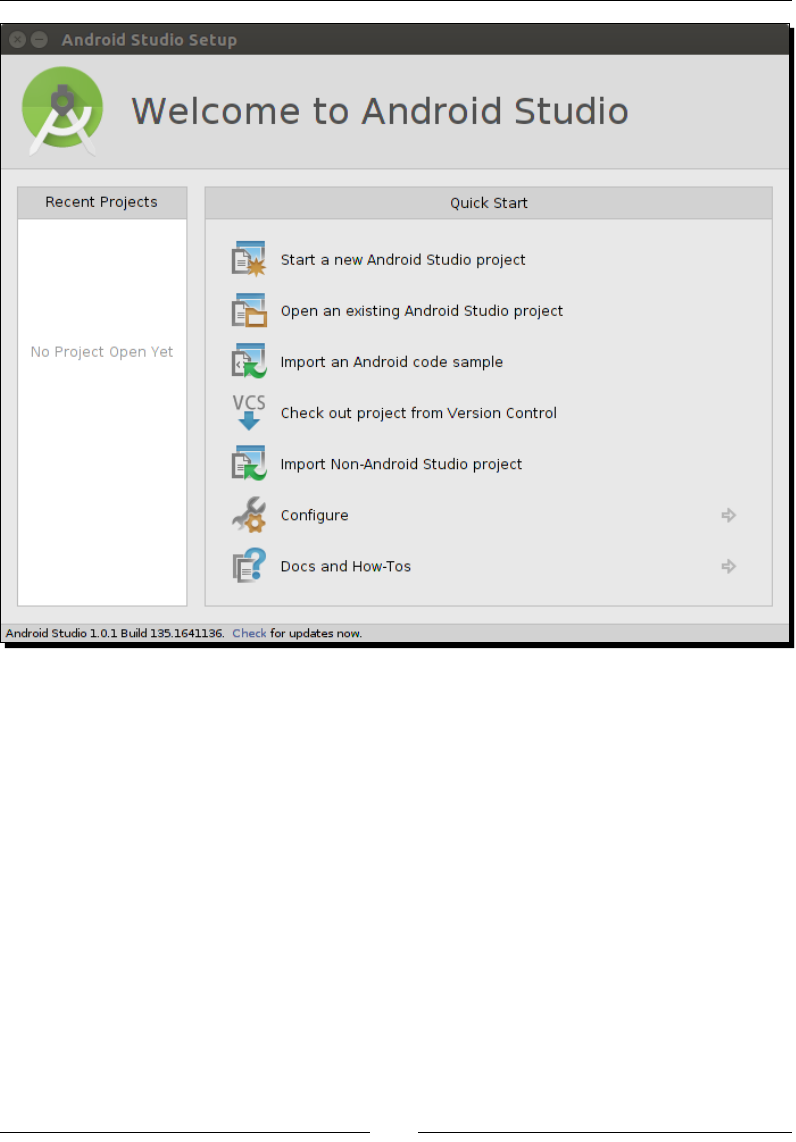
Complete the installaon unl the Android Studio welcome screen appears. Then,
close Android Studio.
4. Go to http://developer.android.com/tools/sdk/ndk/index.html and
download the Android NDK (not SDK!) archive suitable for your environment. Extract
it inside the directory of your choice (for example, ~/Library/Android/ndk).
5. To easily access Android ulies from the command line, let's declare the Android
SDK and NDK as environment variables. From now on, we will refer to these
directories as $ANDROID_SDK and $ANDROID_NDK. Assuming you use the default
Bash command-line shell, create or edit .profile (which is a hidden le!) in your
home directory and append the following instrucons (adapt paths according to
your installaon):
export ANDROID_SDK="~/Library/Android/sdk"
export ANDROID_NDK="~/Library/Android/ndk"
export PATH="${ANDROID_SDK}/tools:${ANDROID_SDK}/platform-
tools:${ANDROID_NDK}:${PATH}"
Seng Up Your Environment
[ 20 ]
6. Log out from your current session and log in again (or restart your computer). List
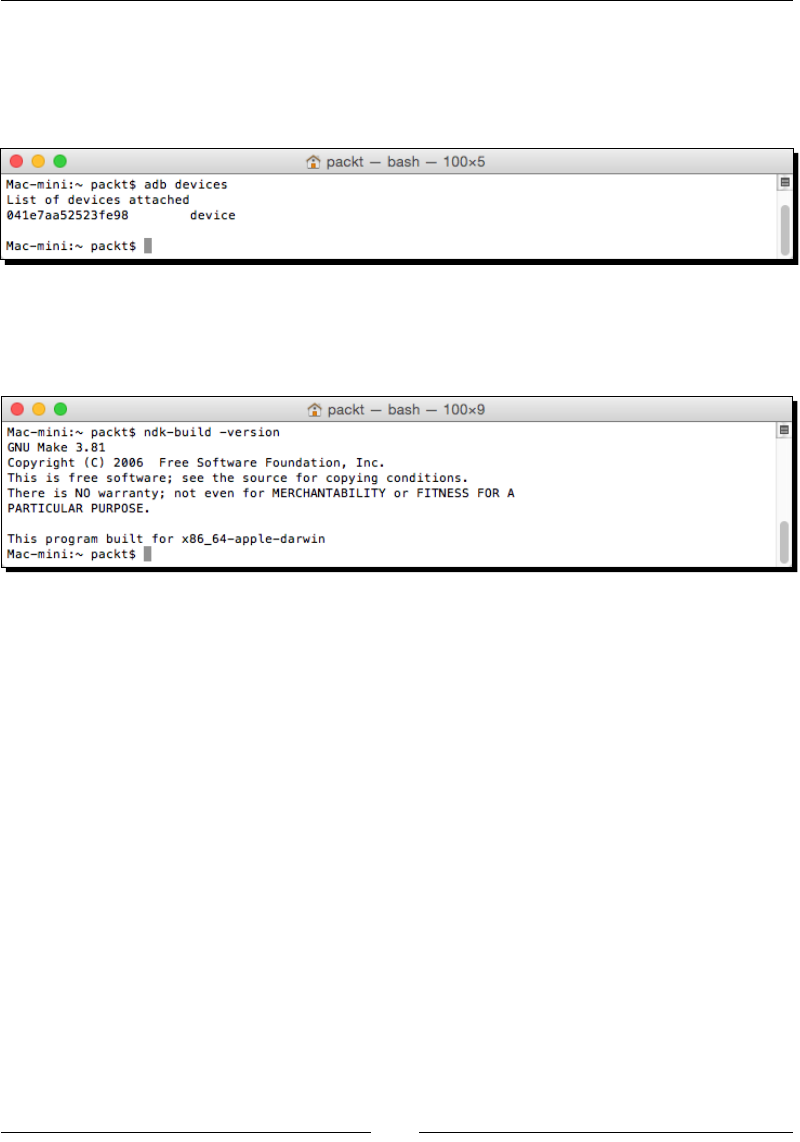
the Android devices connected to your computer (even if none currently are) with
adb to check whether Android SDK is working. No error should appear:
adb devices
7. Check the ndk-build version to ensure that NDK is working. If everything works,
the Make version should appear:
ndk-build -version
8. Open a terminal and start the Android SDK manager with the following command:
android
Chapter 1
[ 21 ]
In the opened window, click on New to select all the packages and then click on the
Install packages... buon. Accept the licenses in the popup that appears and start
the installaon of all Android packages by clicking on the Install buon.
Aer a few long minutes, all packages are downloaded and a conrmaon message
indicang that the Android SDK manager has been updated appears.
Validate and close the manager.
What just happened?
Android Studio is now installed on the system. Although it is now the ocial Android IDE,
we will not use it much through the book because of its lack of support of the NDK. It is,
however, absolutely possible to use Android Studio for Java development, and command line
or Eclipse for C/C++.
The Android SDK has been set up through the Android Studio package. An alternave soluon
consists of manually deploying the SDK standalone package provided by Google. On the other
hand, the Android NDK has been deployed manually from its archive. Both the SDK and NDK
are made available through the command line, thanks to a few environment variables.

Seng Up Your Environment
[ 22 ]
OS X is tricky when it comes to environment variables. They can be easily
declared in .profile for applicaons launched from a terminal, as we
just did. They can also be declared using an environment.plist le
for GUI applicaons, which are not launched from Spotlight.
To get a fully funconal environment, all Android packages have been downloaded thanks to
the Android SDK manager, which aims at managing all the plaorms, sources, samples, and
emulaon features available through the SDK. This tool greatly simplies the update of your
environment when new SDK API and components are released. There is no need to reinstall
or overwrite anything!
However, the Android SDK manager does not manage the NDK, which explains why we
downloaded it separately, and why you will need to update it manually in the future.
Installing all Android packages is not strictly necessary. Only the SDK
plaorm (and possibly Google APIs) releases targeted by your applicaon
are really required. Installing all packages may avoid troubles imporng
other projects or samples though.
The installaon of your Android development environment is not over yet. We sll need one
more thing to develop comfortably with the NDK.
This is the end of the secon dedicated to the OS X setup. The following
secon is dedicated to Linux.
Setting up Linux
Linux is naturally suited for Android development as the Android toolchain is Linux-based.
Indeed, as a Unix-based system, Linux is well adapted to run the NDK toolchain. Beware,
however, that commands to install packages may vary depending on your Linux distribuon.
The following secon explains how to set up the prerequisite packages on Ubuntu 14.10
Utopic Unicorn.
Chapter 1
[ 23 ]
Time for action – preparing Ubuntu for Android development
To develop with the Android NDK on Linux, we need to set up a few prerequisites: Glibc,
Make, OpenJDK, and Ant.
1. From Command Prompt, check whether Glibc (the GNU C standard library) 2.7 or
later, usually shipped with Linux systems by default, is installed:
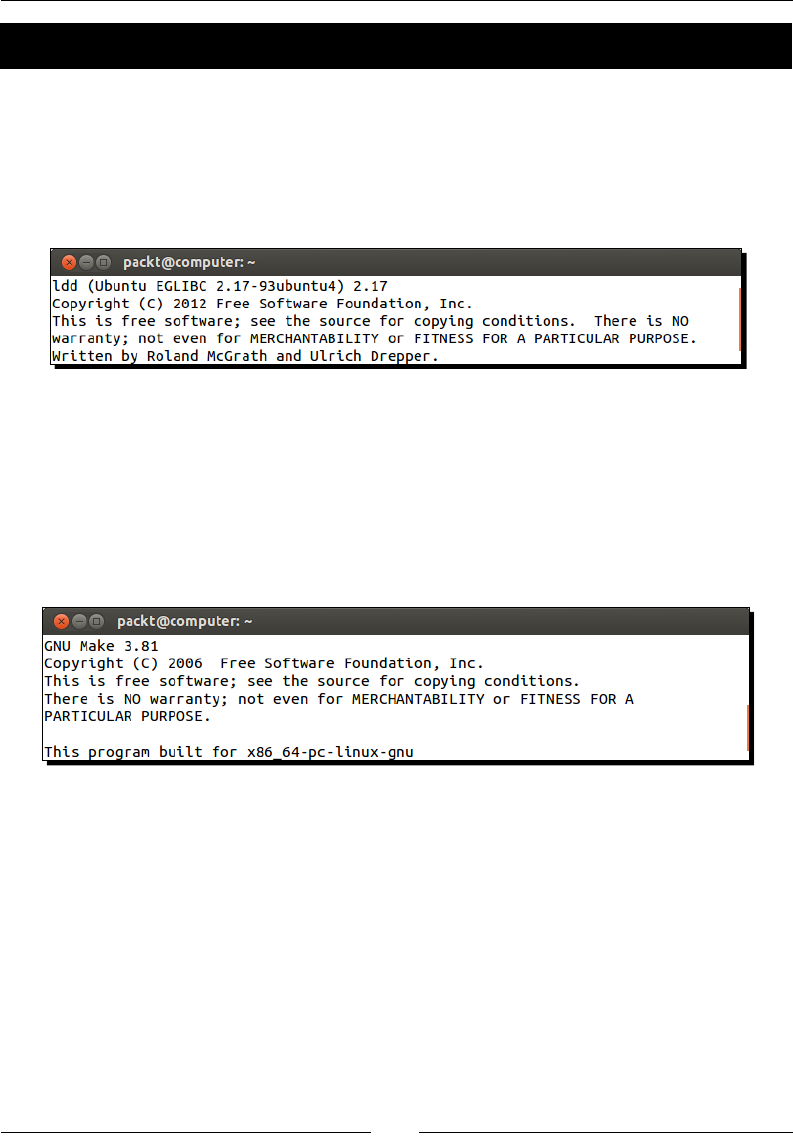
ldd -–version
2. Make is also required to build nave code. Install it from the build-essenal package
(requires administrave privilege):
sudo apt-get install build-essential
Run the following command to ensure Make is correctly installed, in which case its
version is displayed:
make –version
3. On 64-bit Linux systems, install the 32-bit libraries compability package, as Android
SDK has binaries compiled for 32 bits only. To do so on Ubuntu 13.04 and earlier,
simply install the ia32-libs package:
sudo apt-get install ia32-libs
On Ubuntu 13.10 64 bits and later, this package has been removed. So, install the
required packages manually:
sudo apt-get install lib32ncurses5 lib32stdc++6 zlib1g:i386 libc6-
i386
Seng Up Your Environment
[ 24 ]
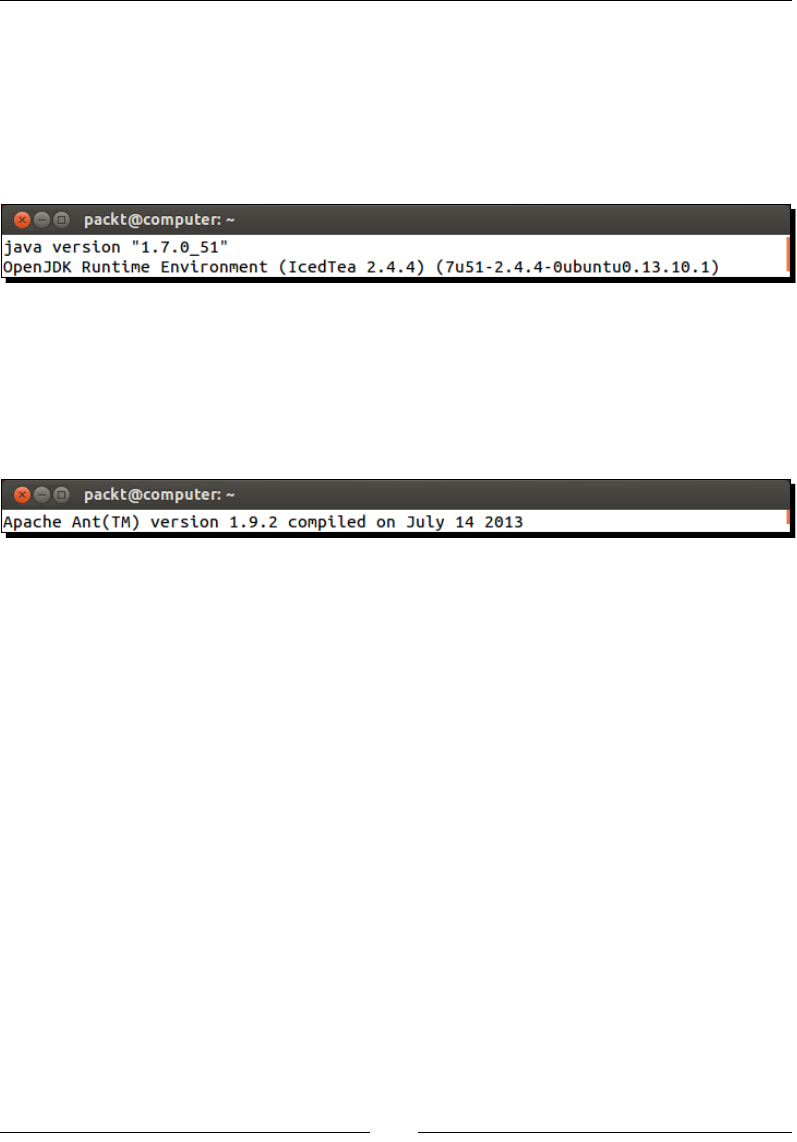
4. Install Java OpenJDK 7 (or JDK 8, although it is not ocially supported at the me
this book is wrien). Oracle JDK is also ne:
sudo apt-get install openjdk-7-jdk
Ensure JDK is properly installed by running Java and checking its version:
java –version
5. Install Ant with the following command (requires administrave privilege):
sudo apt-get install ant
Check whether Ant is properly working:
ant -version
What just happened?
Our Linux system is now prepared with the necessary packages to host Android
development tools:
The build-essenal package, which is a minimal set of tools for compilaon and
packaging on Linux Systems. It includes Make, which is required by the Android NDK
compilaon system to build nave code. GCC (the GNU C Compiler) is also included
but is not required as Android NDK already contains its own version.
32-bit compability libraries for 64-bit systems, since the Android SDK sll uses
32-bit binaries.
A JDK 7, which contains the runme and tools necessary to build Java applicaons
on Android and run the Eclipse IDE as well as Ant.
Ant, which is a Java-based build automaon ulity. Although not a requirement,
it allows building Android applicaons from the command line, as we will see in
Chapter 2, Starng a Nave Android Project. It is also a good soluon to set up a
connuous integraon chain.
The next step consists of seng up the Android development kits.
Chapter 1
[ 25 ]
Installing Android development kits on Linux
Android requires specic development kits to develop applicaons: the Android SDK and
NDK. Hopefully, Google has thought about the developer community and provides all the
necessary tools for free.
In the following part, we will install these kits to start developing nave Android applicaons
on Ubuntu 14.10 Utopic Unicorn.
Time for action – installing Android SDK and NDK on Ubuntu
The Android Studio bundle already contains the Android SDK. Let's install it.
1. Open your web browser and download the Android Studio bundle from http://
developer.android.com/sdk/index.html. Extract the downloaded archive in
the directory of your choice (for example, ~/Android/Android-studio).
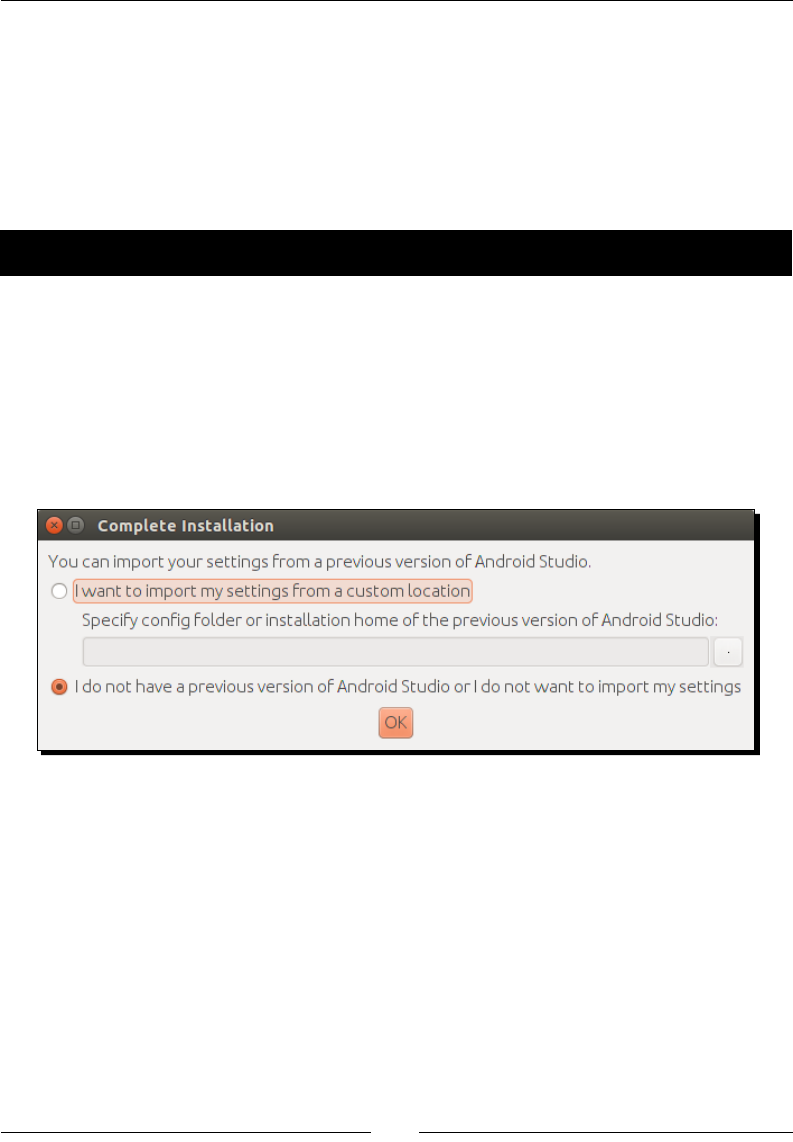
2. Run the Android Studio script bin/studio.sh. If Android Studio proposes to
import sengs from a previous installaon, select your preferred opon and click
on OK.
Seng Up Your Environment
[ 26 ]
In the next Setup Wizard screen that appears, select a Standard installaon type
and connue installaon.
Complete installaon unl the Android Studio welcome screen. Then, close
Android Studio.
Chapter 1
[ 27 ]
3. Go to http://developer.android.com/tools/sdk/ndk/index.html and
download the Android NDK (not SDK!) archive suitable for your environment. Extract
it inside the directory of your choice (for example, ~/Android/Ndk).
Seng Up Your Environment
[ 28 ]
4. To easily access Android ulies from the command line, let's declare the Android
SDK and NDK as environment variables. From now on, we will refer to these
directories as $ANDROID_SDK and $ANDROID_NDK. Edit your .profile le
(beware since this is a hidden le!) in your home directory and add the following
variables at the end (adapt their path according to your installaon directories):
export ANDROID_SDK="~/Android/Sdk"
export ANDROID_NDK="~/Android/Ndk"
export PATH="${ANDROID_SDK}/tools:${ANDROID_SDK}/platform-
tools:${ANDROID_NDK}:${PATH}"
5. Log out from your current session and log in again (or restart your computer). List
the Android devices connected to your computer (even if none currently are) with
adb to check whether Android SDK is working. No error should appear:
adb devices
6. Check the ndk-build version to ensure that NDK is working. If everything works,
the Make version should appear:
ndk-build -version
7. Open a terminal and start the Android SDK manager with the following command:
android
Chapter 1
[ 29 ]
In the opened window, click on New to select all the packages, and then click on the
Install packages... buon. Accept the licenses in the popup that appears and start
the installaon of all Android package by clicking on the Install buon.
Aer a few long minutes, all packages are downloaded and a conrmaon message
indicang that the Android SDK manager has been updated appears.
Validate and close the manager.
What just happened?
Android Studio is now installed on the system. Although it is now the ocial Android IDE,
we are not going to use it much throughout the book because of its lack of support of the
NDK. It is, however, absolutely possible to use Android Studio for Java development, and the
command line or Eclipse for C/C++.
The Android SDK has been set up through the Android Studio package. An alternave soluon
consists of manually deploying the SDK standalone package provided by Google. On the other
hand, the Android NDK has been deployed manually from its archive. Both the SDK and NDK
are made available through the command line, thanks to a few environment variables.
Seng Up Your Environment
[ 30 ]
To get a fully funconal environment, all Android packages have been downloaded thanks to
the Android SDK manager, which aims at managing all the plaorms, sources, samples, and
emulaon features available through the SDK. This tool greatly simplies the update of your
environment when new SDK API and components are released. There is no need to reinstall
or overwrite anything!
However, the Android SDK manager does not manage the NDK, which explains why we
downloaded it separately, and why you will need to update it manually in the future.
Installing all Android packages is not strictly necessary. Only the SDK
plaorm (and possibly Google APIs) releases targeted by your applicaon
are really required. Installing all packages may avoid trouble when
imporng other projects or samples though.
The installaon of not or Android development environment is not over yet. We sll need
one more thing to develop comfortably with the NDK.
This is the end of the secon dedicated to the Linux setup. The following
secon is for all operang systems.
Installing the Eclipse IDE
Because of Android Studio limitaons, Eclipse is sll one of the most appropriate IDEs to
develop nave code on Android. Using an IDE is not required though; command-line lovers
or vi fanacs can skip this part!
In the following secon, we will see how to set up Eclipse.
Time for action – installing Eclipse with ADT on your OS
Since the latest Android SDK releases, Eclipse and its plugins (ADT and CDT) need to be
installed manually. To do so execute the following steps:
1. Go to http://www.eclipse.org/downloads/ and download Eclipse for Java
developers. Extract the downloaded archive in the directory of your choice (for
example, C:\Android\eclipse on Windows, ~/ Android/Eclipse on Linux,
and ~/Library/Android/eclipse on Mac OS X).
Chapter 1
[ 31 ]
Then, run Eclipse. If Eclipse asks for a workspace (which contains Eclipse sengs and
projects) when starng up, dene the directory of your choice or leave the default
sengs and then click on OK.
When Eclipse has nished loading, close the welcome page. The following window
should appear:
Seng Up Your Environment
[ 32 ]
2. Go to Help | Install New Soware…. Enter https://dl-ssl.google.com/
android/eclipse in the Work with: eld and validate. Aer a few seconds, a
Developer Tools plugin appears. Select it and click on the Next buon.
In case this step fails while accessing update sites, check your Internet
connection. You may be either disconnected or connected behind a
proxy. In the latter case, you can download the ADT plugin as a separate
archive from the ADT web page and install it manually, or configure
Eclipse to connect through a proxy.
Follow the wizard and accept condions when asked. On the last wizard page, click
on Finish to install ADT. A warning may appear indicang that the plugin content is
unsigned. Ignore it and click on OK. When nished, restart Eclipse as requested.
Chapter 1
[ 33 ]
3. Go back to Help | Install New Soware…. Open the Work with combobox and
select the item containing the Eclipse version name (here, Luna). Then, check the
Show only soware applicable to target environment opon. Find Programming
Languages in the plugin tree and unfold it. Finally, check all C/C++ plugins and click
on Next.
Follow the wizard and accept condions when asked. On the last wizard page, click
on Finish. Wait unl the installaon is complete and restart Eclipse.
Seng Up Your Environment
[ 34 ]
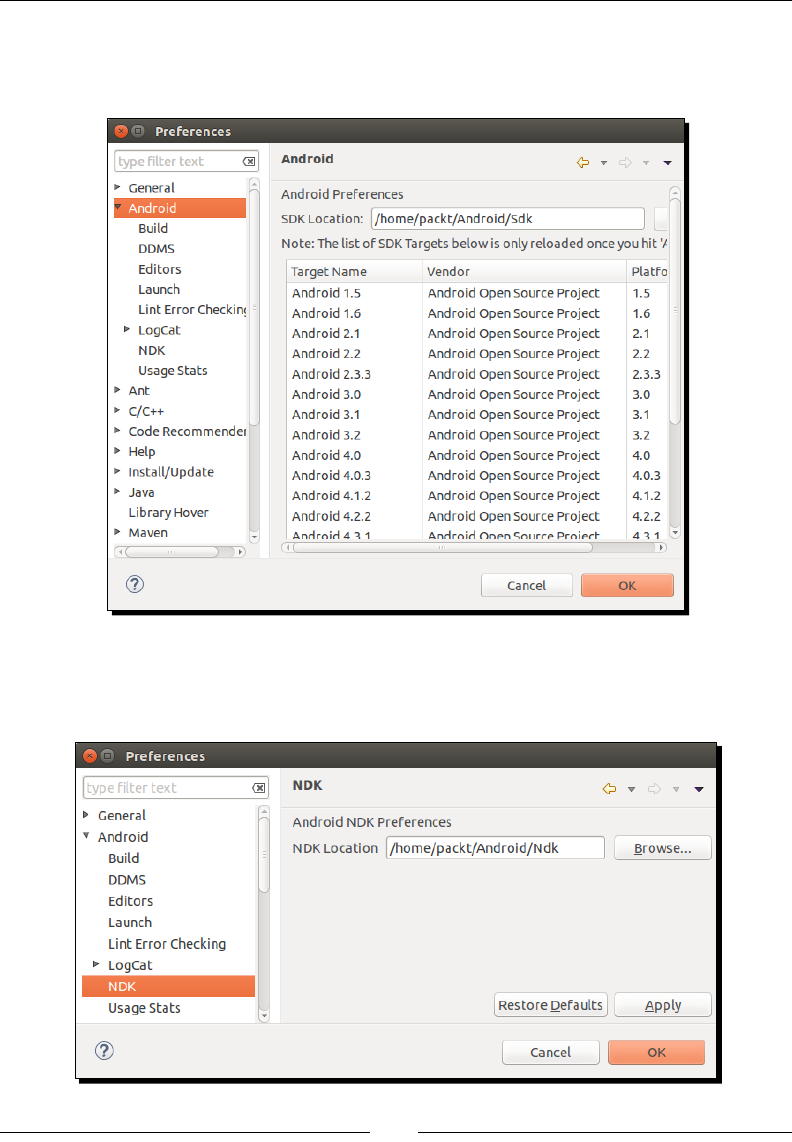
4. Go to Windows | Preferences... (Eclipse | Preferences... on Mac OS X) and then
select Android on the le tree. If everything is ne, the SDK Locaon should be lled
with the Android SDK path.
Then, on the same window, go to Android | NDK. The NDK Locaon eld should be
empty. Fill it with the Android NDK path and validate. If the path is wrong, Eclipse
complains that the directory is not valid.

Chapter 1
[ 35 ]
What just happened?
Eclipse is now up and running with the appropriate SDK and NDK conguraon. Since the
ADT package is no longer provided by Google, the Android development plugin ADT and the
C/C++ Eclipse plugin CDT have to be installed manually in Eclipse.
Please note that Eclipse has been deprecated by Google and replaced by Android Studio.
Sadly, Android Studio C/C++ and NDK support is rather limited for the moment. The only way
to build nave code is through Gradle, the new Android build system, whose NDK features
are sll unstable. If a comfortable IDE is essenal to you, you can sll use Android Studio for
Java development and Eclipse for C/C++ though.
If you work on Windows, maybe you are Visual Studio adept. In that case, I advise you that a
few projects, shown as follows, bring Android NDK development to Visual Studio:
Android++, which is a free extension for Visual Studio that can be found at http://
android-plus-plus.com/. Although sll in Beta at the me this book is wrien,
Android++ looks quite promising.
NVidia Nsight, which can be downloaded with a developer account from the Nvidia
developer website at https://developer.nvidia.com/nvidia-nsight-
tegra (if you have a Tegra device). It packages together the NDK, a slightly
customized version of Visual Studio, and a nice debugger.
VS-Android, which can be found at https://github.com/gavinpugh/vs-
android, is an interesng Open Source project, which brings NDK tools to
Visual Studio.
Our development environment is now almost ready. The last piece is missing though: an
environment to run and test our applicaons.
Setting up the Android emulator
The Android SDK provides an emulator to help developers who want to speed up their
deploy-run-test cycle or want to test, for example, dierent kinds of resoluons and OS
versions. Let's see how to set it up.
Time for action – creating an Android virtual device
The Android SDK provides everything we need to easily create a new emulator Android
Virtual Device (AVD):
1. Open Android SDK Manager from a terminal by running the following command:
android

Seng Up Your Environment
[ 36 ]
2. Go to Tools | Manage AVDs.... Alternavely, click on the dedicated Android Virtual
Device Manager buon in the main toolbar of Eclipse.
Then, click on the New buon to create a new Android emulator instance. Fill the
form with the following informaon and click on OK:
3. The newly created virtual device now appears in the Android Virtual Device
Manager list. Select it and click on Start....
If you get an error related to libGL on Linux, open a
command prompt and run the following command to install
the Mesa graphics library: sudo apt-get install
libgl1-mesa-dev.
Chapter 1
[ 37 ]
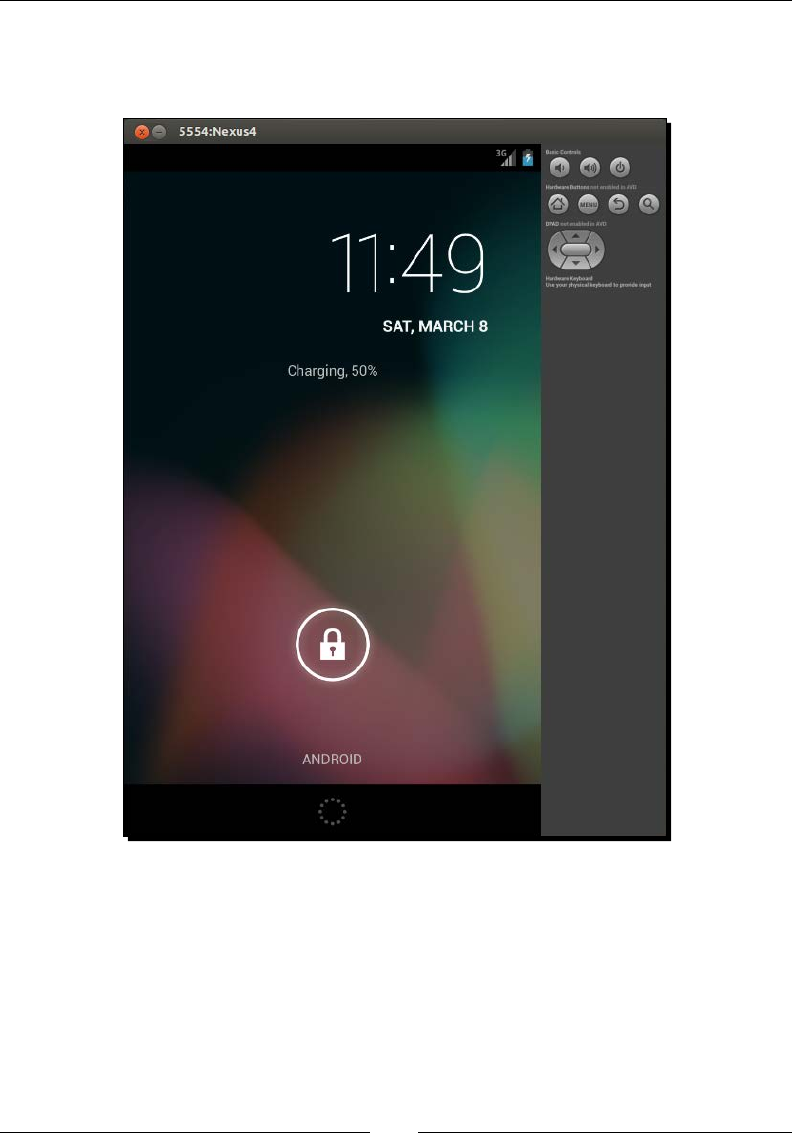
4. The Launch Opons window appears. Tweak the display size depending on your
screen size if needed and then click on Launch. The emulator starts up and aer
some me, your virtual device is loaded:
5. By default, the emulator SD card is read only. Although this is oponal, you can set it
in write mode by issuing the following command from a prompt:
adb shell
su
mount -o rw,remount rootfs /
chmod 777 /mnt/sdcard
exit

Seng Up Your Environment
[ 38 ]
What just happened?
Android emulators can be easily managed through the Android Virtual Device manager.
We are now able to test the applicaons we will develop in a representave environment.
Even beer, we can now test them in several condions and resoluons without requiring
a costly device. However, if emulators are useful development tools, take into account
that emulaon is not always perfectly representave and lacks some features, especially
hardware sensors, which can be parally emulated.
Android Virtual Device manager is not the only place where we can manage emulators. We
can also use the command-line tool emulator provided with the Android SDK. For example,
to launch the Nexus4 emulator created earlier directly from a terminal prompt, enter the
following:
emulator -avd Nexus4
While creang the Nexus4 AVD, acute readers might have been surprised to see we set CPU/
ABI to Intel Atom (x86), whereas most Android devices run on ARM processors. Indeed, since
Windows, OS X, and Linux all run on x86, only x86 Android emulator images can benet from
hardware and GPU acceleraon. On the other hand, ARM ABI can run rather slow without it,
but it may be more representave of the devices your applicaon may run on.
To benet from full hardware acceleraon with an X86 AVD, you will need to
install the Intel Hardware Accelerated Execuon Manager (HAXM) on your
Windows or Mac OS X system. On Linux, you can install KVM instead. These
programs can work only if your CPU benets from a Virtualizaon Technology
(which is the case most of the me nowadays).
Acuter readers may be even more surprised that we have not selected the latest Android
plaorm. The reason is simply that x86 images are not available for all Android plaorms.
The Snapshot opon allows saving the emulator state before closing it.
Sadly, this open is incompable with GPU acceleraon. You have to select
either one.
As a nal note, know that customizing addional opons, such as the presence of a GPS,
camera, and so on, is also possible when creang an AVD to test an applicaon in limited
hardware condions. The screen orientaon can be switched with Ctrl + F11 and Ctrl + F12
shortcuts. For more informaon on how to use and congure the emulator, check out the
Android website at http://developer.android.com/tools/devices/emulator.
html.

Chapter 1
[ 39 ]
Developing with an Android device
Although emulators can be of help, they are obviously nothing compared to a real device. So,
take your Android device in hand, switch it on and let's try to connect it to our development
plaorm. Any of the following steps may change depending on your manufacturer and
phone language. So, please refer to your device documentaon for specic instrucons.
Time for action – setting up an Android device
Device conguraon is dependent on your target OS. To do so:
1. Congure your device driver on your OS if applicable:
If you use Windows, installation of a development device is manufacturer-
specific. More information can be found at http://developer.
android.com/tools/extras/oem-usb.html with a full list of
device manufacturers. If you have a driver CD with your Android device,
you can use it. Note that the Android SDK also contains some Windows
drivers under $ANDROID_SDK\extras\google\usb_driver. Specific
instructions are available for Google development phones, Nexus One, and
Nexus S at http://developer.android.com/sdk/win-usb.html.
If you use OS X, simply connecting your development device to your Mac
should be enough to get it working! Your device should be recognized
immediately without installing anything. Mac's ease of use is not a legend.
If you are a Linux user, connecting your development device to your
Distribution (at least on Ubuntu) should be enough to get it working too!
2. If your mobile device runs Android 4.2 or later, from the applicaon list screen, go
to Sengs | About phone and tap several mes on Build Number at the end of the
list. Aer some eorts, Developer opons will magically appear in your applicaon
list screen.
On Android 4.1 devices and earlier, Developer opons should be visible by default.
3. Sll on your device, from the applicaon list screen, go to Sengs | Developer
opons and enable Debugging and Stay awake.
4. Plug your device into your computer using a data connecon cable. Beware! Some
cables are charge-only cables and will not work for development! Depending on
your device manufacturer, it may appear as a USB disk.
On Android 4.2.2 devices and later, a dialog Allow USB debugging? appears on
the phone screen. Select Always allow from this computer to permanently allow
debugging and then click on OK.
Seng Up Your Environment
[ 40 ]
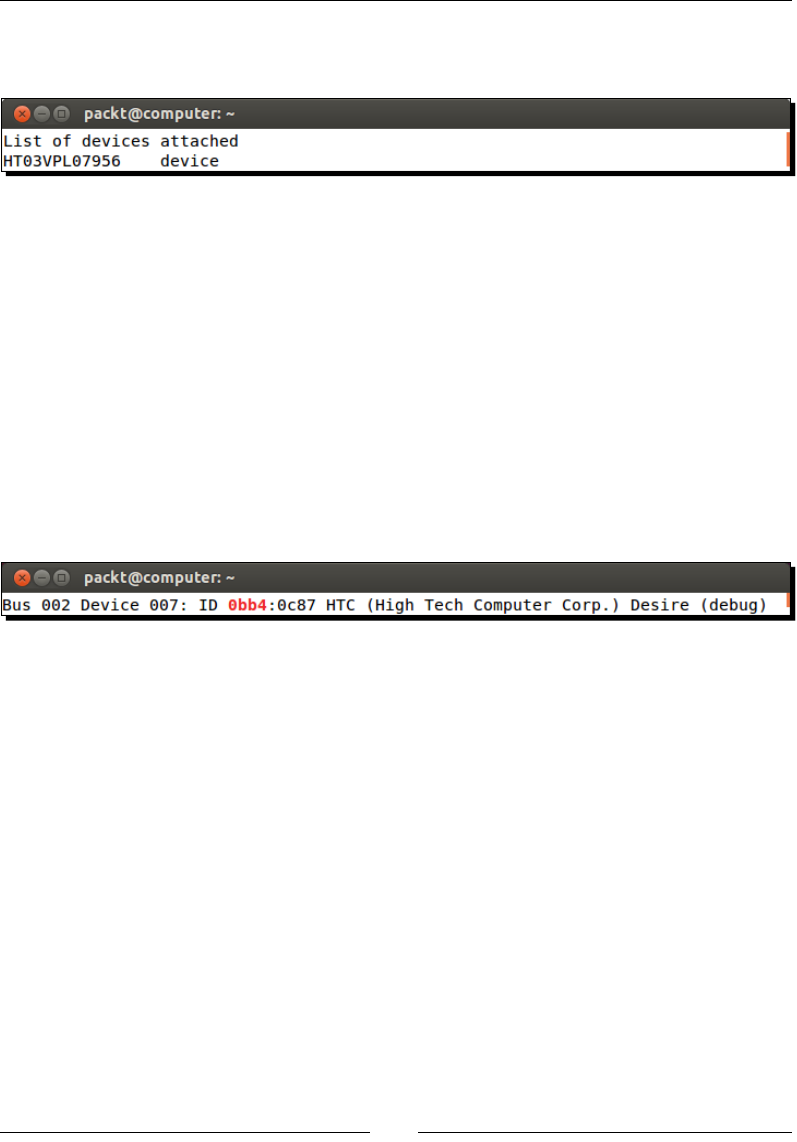
5. Open Command Prompt and execute the following:
adb devices
On Linux, if ????????? appears instead of your device name (which is likely), then
adb does not have proper access rights. A soluon might be to restart adb as root
(at your own risk!):
sudo $ANDROID_SDK/platform-tools/adb kill-server
sudo $ANDROID_SDK/platform-tools/adb devices
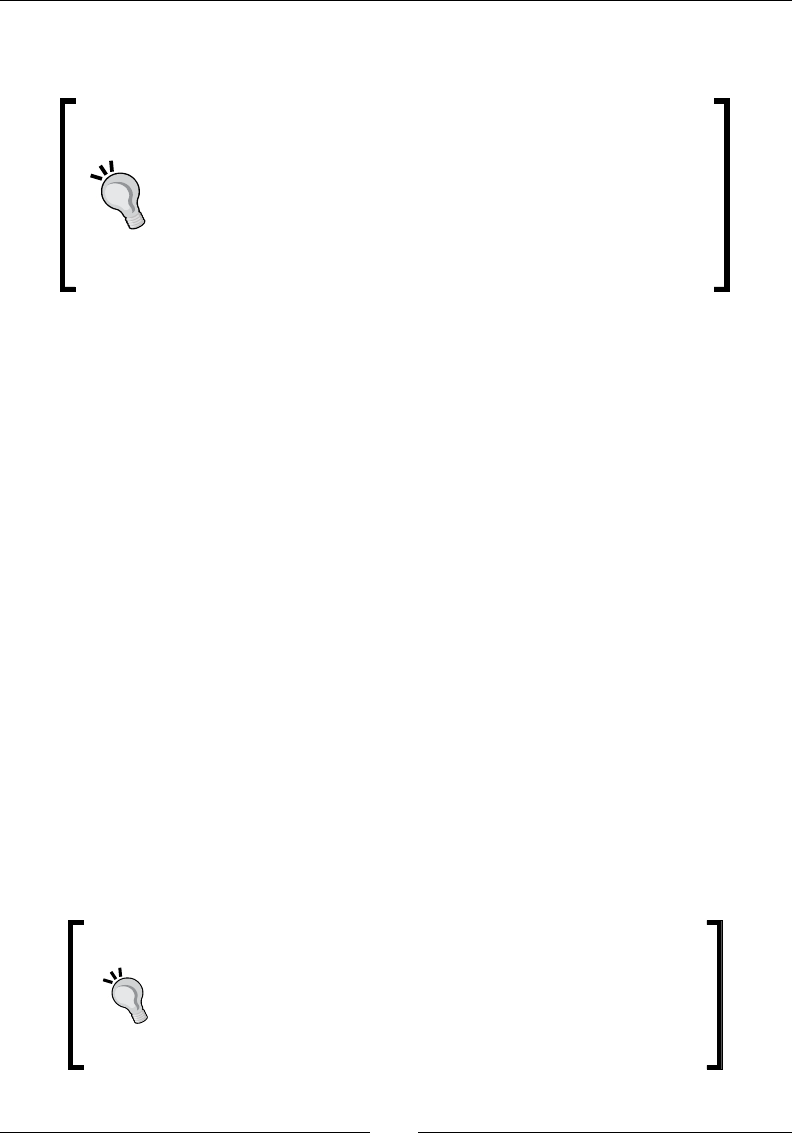
Another soluon to nd your Vendor ID and Product ID may be needed. Vendor ID
is a xed value for each manufacturer that can be found on the Android developer
website at http://developer.android.com/tools/device.html (for
example, HTC is 0bb4). The device's Product ID can be found using the result of the
lsusb command in which we look for the Vendor ID (for example, here 0c87 is HTC
Desire product ID):
lsusb | grep 0bb4
Then, with root privilege, create a le /etc/udev/rules.d/51-android.rules
with your Vendor ID and Product ID and change le rights to 644:
sudo sh -c 'echo SUBSYSTEM==\"usb\", SYSFS{idVendor}==\"<Your
Vendor ID>\", ATTRS{idProduct}=\"<Your Product ID>\",
GROUP=\"plugdev\", MODE=\"0666\" > /etc/udev/rules.d/52-
android.rules'
sudo chmod 644 /etc/udev/rules.d/52-android.rules
Finally, restart the udev service and adb:
sudo service udev restart
adb kill-server
adb devices
Chapter 1
[ 41 ]
6. Launch Eclipse and open the DDMS perspecve (Window | Open Perspecve |
Other...). If working properly, your phone should be listed in the Devices view.
Eclipse is a compound of many views, such as the Package Explorer
View, the Debug View, and so on. Usually, most of them are already
visible, but sometimes they are not. In that case, open them
through the main menu by navigating to Window | Show View |
Other…. Views in Eclipse are grouped in Perspectives, which store
workspace layout. They can be opened by going to Window | Open
Perspective | Other…. Beware that some contextual menus may be
available only in some perspectives.
What just happened?
Our Android device has been switched into development mode and connected to our
workstaon through the Android Debug Bridge daemon. ADB gets started automacally the
rst me it is called, either from Eclipse or the command line.
We also enabled the Stay awake opon to stop automac screen shutdown when the phone
charges, or when developing with it! And, more important than anything, we discovered
that HTC means High Tech Computer! Jokes apart, connecon process can be tricky on Linux,
although lile trouble should be encountered nowadays.
Sll having trouble with a reluctant Android device? That could mean any of the following:
ADB is malfunconing. In that case, restart the ADB deamon or execute it with
administrave privilege.
Your development device is not working properly. In that case, try restarng your
device or disabling and re-enabling development mode. If that sll does not work,
then buy another one or use the emulator.
Your host system is not properly set up. In that case, check your device
manufacturer instrucons carefully to make sure the necessary driver is correctly
installed. Check hardware properes to see whether it is recognized and turn on
USB storage mode (if applicable) to see whether it is properly detected. Please refer
to your device documentaon.
When the charge-only mode is activated, SD card files and
directories are visible to the Android applications installed on
your phone but not to your computer. On the opposite side, when
disk drive mode is activated, those are visible only from your
computer. Check your connection mode when your application
cannot access its resource files on an SD card.
Seng Up Your Environment
[ 42 ]
More about ADB
ADB is a mul-facet tool which is used as a mediator between the development environment
and devices. It is composed of:
A background process running on emulators and devices to receive orders or
requests from your workstaon.
A background server on your workstaon communicang with connected devices
and emulators. When lisng devices, the ADB server is involved. When debugging,
the ADB server is involved. When any communicaon with a device happens, the
ADB server is involved!
A client running on your workstaon and communicang with devices through the
ADB server. The ADB client is what we interacted with to list devices.
ADB oers many useful opons among which some are in the following table:
Command Description
adb help To get an exhaustive help with all options
and flags available
adb bugreport To print the whole device state
adb devices To list all Android devices currently
connected including emulators
adb install [-r] <apk path> To install an application package. Append
-r to reinstall an already deployed
application and keep its data
adb kill-server To terminate the ADB daemon
adb pull <device path> <local path> To transfer a file to your computer
adb push <local path> <device path> To transfer a file to your device or
emulator
adb reboot To restart an Android device
programmatically
adb shell To start a shell session on an Android
device (more on this in Chapter 2, Starting
a Native Android Project)
adb start-server To launch the ADB daemon
adb wait-for-device To sleep until a device or emulator is
connected to your computer (for example,
in a script)
Chapter 1
[ 43 ]
ADB also provides oponal ags to target a specic device when several are connected
simultaneously:
-s <device id> To target a specific device by its name (device name can
be found with adb devices)
-d To target the current physical device if only one is
connected (or an error message is raised)
-e To target the currently running emulator if only one is
connected (or an error message is raised)
For example, to dump the emulator state when a device is connected at the same me,
execute the following command:
adb -e bugreport
This is only an overview of what ADB can do. More informaon can be found on the Android
developer website at http://developer.android.com/tools/help/adb.html.
Summary
Seng up our Android development plaorm is a bit tedious but is hopefully performed
once and for all!
In summary, we installed all the prerequisite packages on our system. Some of them are
specic to the target OS, such as Cygwin on Windows, Developer Tools on OS X, or build-
essenal packages on Linux. Then, we installed the Android Studio bundle, which contains
both the Android Studio IDE and the Android SDK. The Android NDK has to be downloaded
and set up separately.
Even if we will not use it much throughout this book, Android Studio remains one of the best
choices for pure Java development. It is guaranteed to be maintained by Google and may
become a good choice when Gradle NDK's integraon gets more mature.
Meanwhile, the simplest soluon is to go with Eclipse for NDK development. We installed
Eclipse with the ADT and CDT plugin. These plugins integrate well together. They allow
combining the power of Android Java and nave C/C++ code into one single IDE.
Seng Up Your Environment
[ 44 ]
Finally, we launched an Android emulator and connected an Android device to our
development plaorm through the Android Debug Bridge.
With the Android NDK being "open", anybody can build its own version. The
Crystax NDK is a special NDK package built by Dmitry Moskalchuk. It brings
advanced features unsupported by the NDK (latest toolchains, Boost out
of the box… excepons were rst supported by the CrystaxNDK). Advanced
users can nd it on the Crystax website at https://www.crystax.
net/en/android/ndk.
We now have the necessary tools in our hands to shape our mobile ideas. In the next
chapter, we will tame them to create, compile, and deploy our rst Android project!
[ 45 ]
2
Starting a Native Android Project
A man with the most powerful tools in hand is unarmed without the knowledge
of their usage. Make, GCC, Ant, Bash, Eclipse…—any new Android programmer
needs to deal with this technological ecosystem. Luckily, some of these names
may already sound familiar. Indeed, Android is based on many open source
components, laid together by the Android Development Kits and their specific
tool-set: ADB, AAPT, AM, NDK-Build, NDK-GDB... Mastering them will give us
the power to create, build, deploy and debug our own Android applications.
Before diving deeper into nave code in the next chapter, let's discover these tools by
starng a new concrete Android project that includes nave C/C++ code. Despite Android
Studio being the new ocial Android IDE, its lack of support for nave code encourages us
to focus mainly on Eclipse.
Therefore, in this chapter, we are going to:
Build an ocial sample applicaon and deploy it on an Android device
Create our rst nave Android project using Eclipse
Interface Java with C/C++ using Java Nave Interfaces
Debug a nave Android applicaon
Analyze a nave crash dump
Set up a Gradle project with nave code
By the end of this chapter, you should know how to start a new nave Android project on
your own.
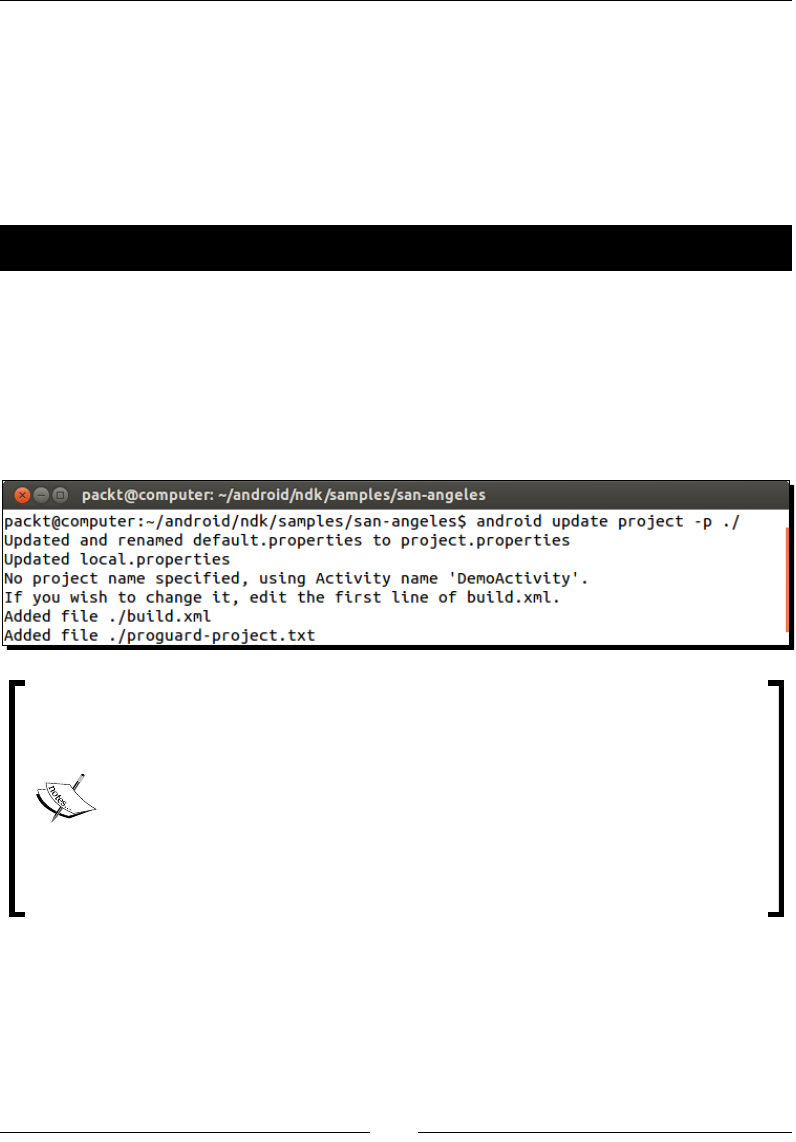
Starng a Nave Android Project
[ 46 ]
Building NDK sample applications
The simplest way to get started with your new Android development environment is to
compile and deploy some of the samples provided with the Android NDK. A possible (and
polygonful!) choice is the San Angeles demo, created in 2004 by Jetro Lauha and later
ported to OpenGL ES (more informaon at http://jet.ro/visuals/4k-intros/san-
angeles-observation/).
Time for action – compiling and deploying San Angeles sample
Let's use Android SDK and NDK tools to build a working APK:
1. Open a command-line prompt and go to the San Angeles sample directory inside the
Android NDK. All further steps have to be performed from this directory.
Generate San Angeles project les with the android command:
cd $ANDROID_NDK/samples/san-angeles
android update project -p ./
You may get the following error upon executing this command:
Error: The project either has no target set or the target is
invalid.
Please provide a --target to the 'android update' command.
This means that you have not installed all the Android SDK platforms as specified
in Chapter 1, Setting Up Your Environment. In which case, either install them
using the Android manager tool or specify your own project target, for
example, android update project --target 18 -p ./.
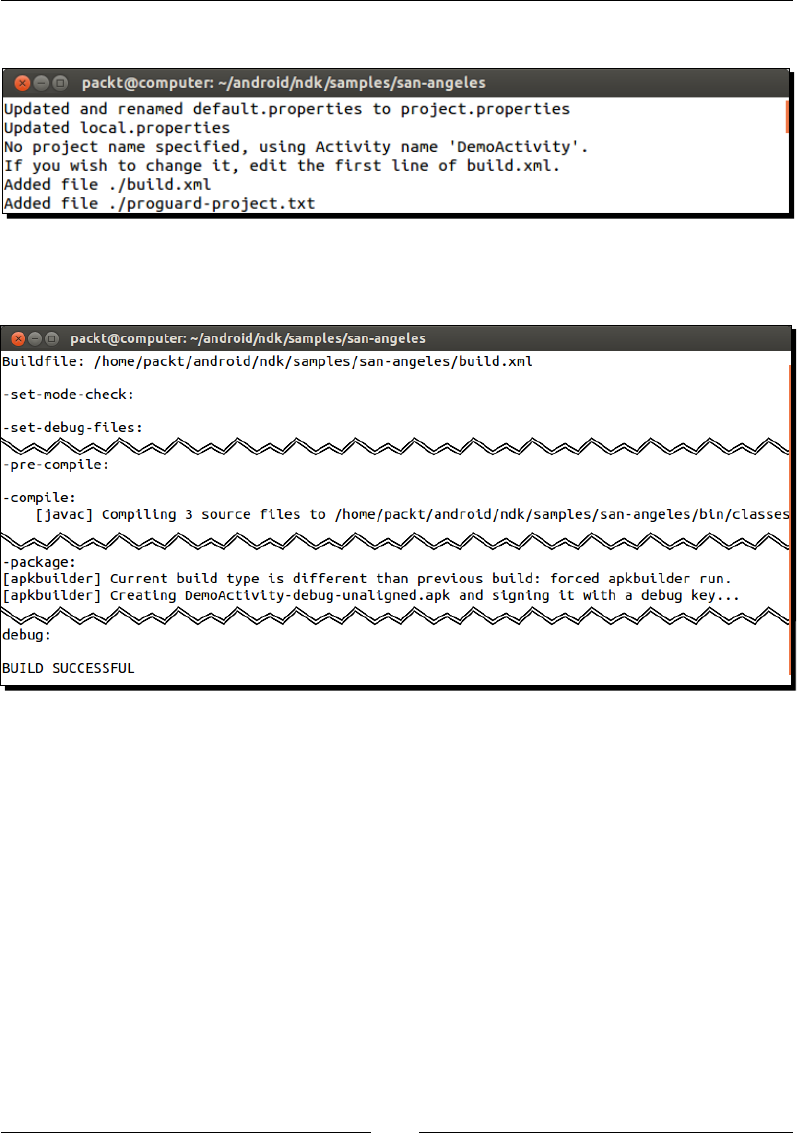
Chapter 2
[ 47 ]
2. Compile San Angeles nave library with ndk-build:
3. Build and package San Angeles applicaon in Debug mode:
ant debug
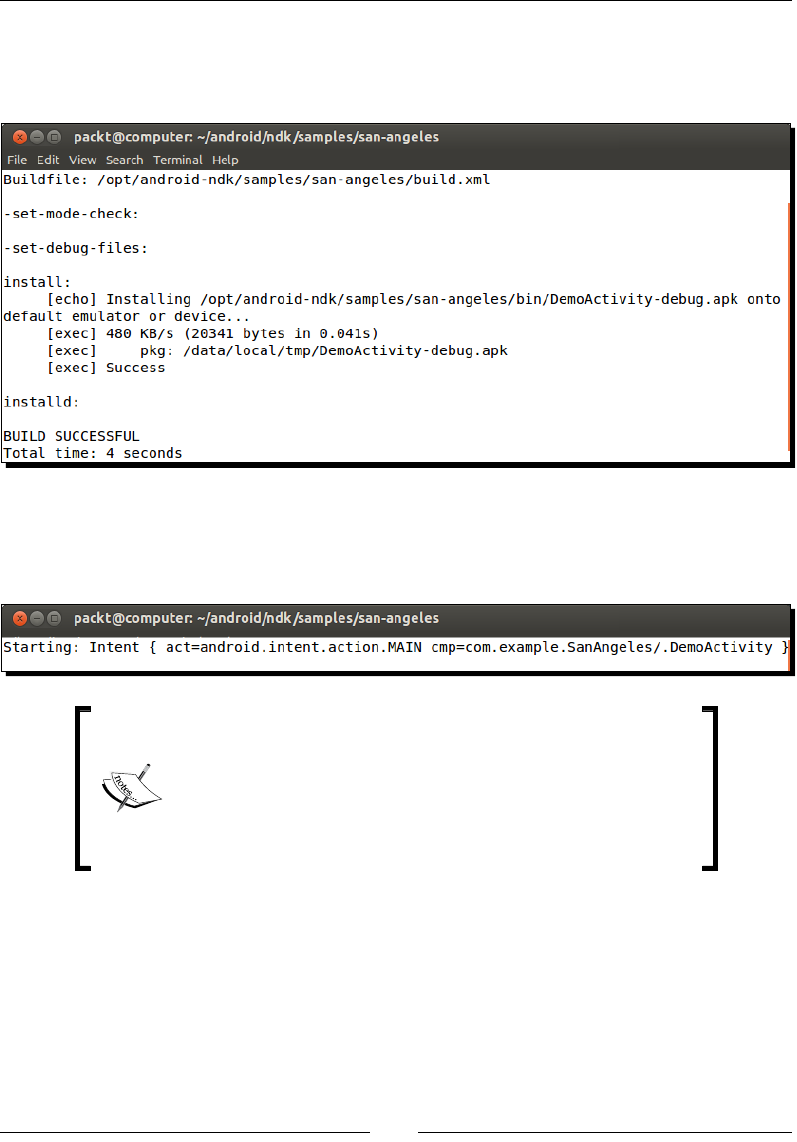
Starng a Nave Android Project
[ 48 ]
4. Make sure your Android device is connected or the emulator is started. Then deploy
the generated package:
ant installd
5. Launch SanAngeles applicaon on your device or emulator:
adb shell am start -a android.intent.action.MAIN -n
com.example.SanAngeles/com.example.SanAngeles.DemoActivity
Downloading the example code
You can download the example code files from your account at
http://www.packtpub.com for all the Packt Publishing
books you have purchased. If you purchased this book
elsewhere, you can visit http://www.packtpub.com/
support and register to have the files e-mailed directly to you.
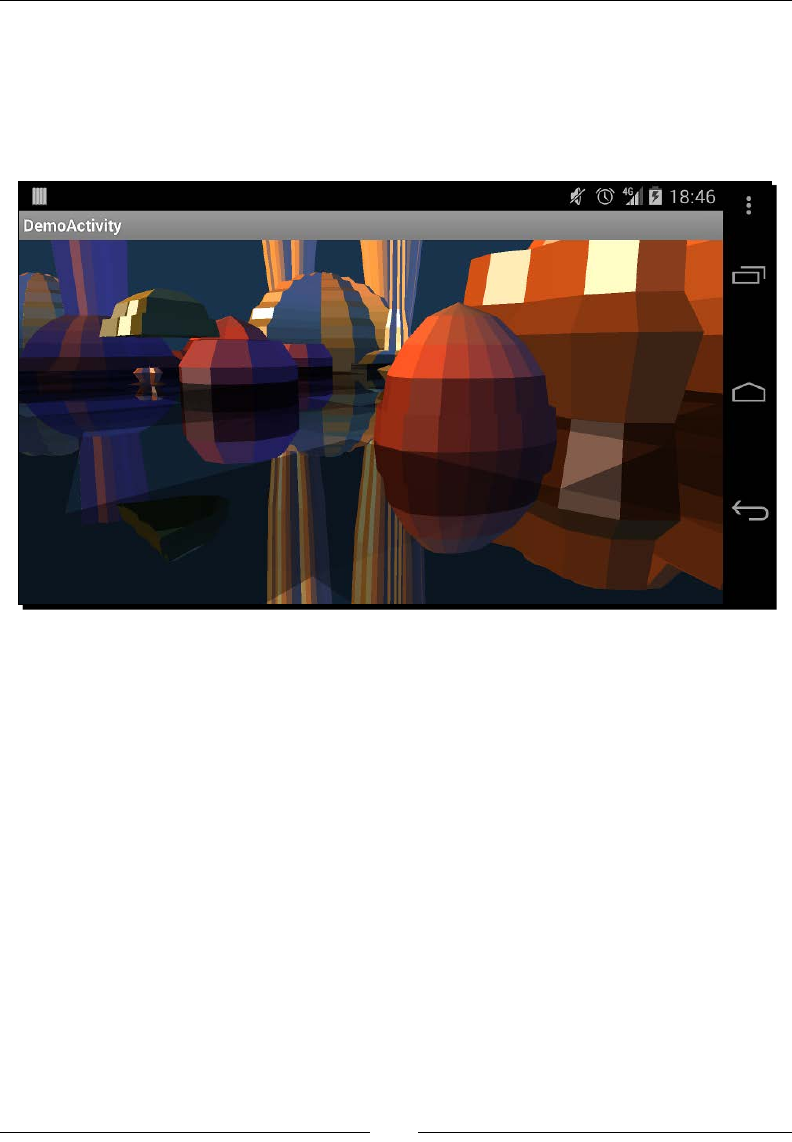
Chapter 2
[ 49 ]
What just happened?
The old-school San Angeles demo, full of at-shaded polygons and nostalgia, is now running
on your device. With only a few command lines, involving most of the tools needed for the
Android development, a full applicaon including nave C/C++ code has been generated,
compiled, built, packaged, deployed, and launched.
Let's see this process in detail.
Generating project les with Android manager
We generated project les from an exisng code base thanks to the Android manager. The
following bullet points give more informaon regarding this process:
build.xml: This is the Ant le that describes how to compile and package the
nal applicaon APK le (which stands for Android PacKage). This build le contains
mainly links to properes and core Android Ant build les.
local.properties: This le contains the Android SDK locaon. Every me your
SDK locaon changes, this le should be regenerated.
proguard-project.txt: This le contains a default conguraon for Proguard,
a code opmizer and obfuscator for Java code. More informaon about it can be
found at http://developer.android.com/tools/help/proguard.html.
Starng a Nave Android Project
[ 50 ]
project.properties: This le contains the applicaon target Android SDK
version. This le is generated by default from a pre-exisng default.properties
le in the project directory. If no default.properties exists, then an
addional –target <API Target> ag (for example, --target 4 for Android 4
Donut) must be appended to the android create command.
Target SDK version is dierent from the minimum SDK version. The rst
version describes the latest Android version for which an applicaon
is built, whereas the laer indicates the minimum Android version on
which the applicaon is allowed to run. Both can be declared oponally
in AndroidManifest.xml le (clause <uses-sdk>) but only the
target SDK version is "duplicated" in project.properties.
When creang an Android applicaon, choose carefully the minimum
and target Android API you want to support, as this can dramacally
change your applicaon capabilies as well as your audience wideness.
Indeed, as a result of fragmentaon, targets tend to move a lot and
faster in Android!
An applicaon that does not target the latest Android version does not
mean it will not run on it. However, it will not have access to all the
latest features nor all of the latest opmizaons.
The Android manager is the main entry point for an Android developer. Its responsibilies
are bound to SDK version updates, virtual devices management, and projects management.
They can be listed exhausvely from the command line by execung android –help.
Since we have already looked at SDK and AVD management in Chapter 1, Seng Up Your
Environment, let's focus on its project management capabilies:
1. android create project allows creang new Android projects ex-nihilo from
the command line. Generated projects contain only Java les but no NDK-related
les. A few addional opons must be specied to allow for proper generaon,
such as:
Option Description
-a Main activity name
-k Application package
-n Project name
-p Project path
-t Target SDK version
-g and -v To generate Gradle build file instead of
Ant and specifying its plugin version
Chapter 2
[ 51 ]
An example of command line to create a new project is as follows:
android create project -p ./MyProjectDir -n MyProject -t android-8
-k com.mypackage -a MyActivity
2. android update project creates project les from exisng sources, as shown in
the previous tutorial. However, if they already exist it can also upgrade the project
target to new SDK versions (that is, the project.properties le) and update the
Android SDK locaon (that is, the local.properties le). The available ags are
slightly dierent:
Option Description
-l Library projects to add
-n Project name
-p Project path
-t Target SDK version
-s To update projects in subfolders
We can also append a new library project with the -l ag, for example:
android update project -p ./ -l ../MyLibraryProject
3. android create lib-project and android update lib-project manage
library projects. These kinds of projects are not well adapted for nave C/C++
development, especially when it comes to debugging, since NDK has its own way of
reusing nave libraries.
4. android create test-project, android update test-project, and
android create uitest-project manage unit test and UI test projects.
More details about all these opons can be found on the Android developer website at
http://developer.android.com/tools/help/android.html.
Compiling native code with NDK-Build
Aer generang project les, we then compile our rst nave C/C++ library (also called
module) using ndk-build. This command, the most essenal one to know for NDK
development, is basically a Bash script, which:
Sets up the Android nave compilaon toolchain based on either GCC or CLang.
Wraps Make to control nave code construcon with the help of user-dened
Makefiles: Android.mk and oponal Application.mk. By default, NDK-
Build looks for in the jni project directory, where nave C/C++ are oen located
by convenon.

Starng a Nave Android Project
[ 52 ]
NDK-Build generates intermediate object les from C/C++ source les (in the obj directory)
and produces the nal binary library (.so) in the libs directory. NDK-related build les can
be erased with the following command:
ndk-build clean
For more informaon about NDK-Build and Makeles, see Chapter 9, Porng Exisng
Libraries to Android.
Building and packaging an application with Ant
An Android applicaon is not composed of nave C/C++ code only, but also of Java code.
Thus, we have:
Built Java sources located in the src directory with Javac(Java Compiler).
Dexed generated Java bytecode, that is, transforming it into Android Dalvik or ART
bytecode with DX. Indeed, both Dalvik and ART Virtual Machines (more about these
later in this chapter) operate on a specic bytecode, which is stored in an opmized
format called Dex.
Packaged Dex les, Android manifest, resources (images, and so on), and
nave libraries in the nal APK le with AAPT, also known as the Android Asset
Packaging Tool.
All these operaons are summarized in one call to Ant: ant debug. The result is an APK
packaged in debug mode and generated in the bin directory. Other build modes are
available (for example, release mode) and can be listed with ant help. If you would like to
erase temporary Java-related build les (for example, the Java .class), then simply run
the following command line:
ant clean
Deploying an application package with Ant
A packaged applicaon can be deployed as is with Ant through ADB. The available opons
for deployment are as follows:
ant installd for debug mode
ant installr for release mode
Beware that an APK cannot overwrite an older APK of the same applicaon if they come
from a dierent source. In such a case, remove the previous applicaon rst by execung
the following command line:
ant uninstall
Chapter 2
[ 53 ]
Installaon and uninstallaon can also be performed directly through ADB, for example:
adb install <path to applicaon APK>: For installing an applicaon for the rst
me (for example, bin/DemoActivity-debug.apk for our sample).
adb install -r <path to applicaon APK>: For reinstalling an applicaon and to
keep its data stored on the device.
adb uninstall <applicaon package name>: For uninstalling an applicaon
idened by its Applicaon package name (for example, com.example.
SanAngeles for our sample).
Launching an application with ADB Shell
Finally, we launched the applicaon thanks to the Acvity Manager (AM). AM command
parameters that are used to start San Angeles come from the AndroidManifest.xml le:
com.example.SanAngeles is the applicaon package name (the same we use to
uninstall an applicaon as previously shown).
com.example.SanAngeles.DemoActivity is the launched Acvity canonical
class name (that is, a simple class name concatenated to its package). Here is a brief
example of how these are used:
<?xml version="1.0" encoding="utf-8"?>
<manifest xmlns:android="http://schemas.android.com/apk/res/android"
package="com.example.SanAngeles"
android:versionCode="1"
android:versionName="1.0">
...
<activity android:name=".DemoActivity"
android:label="@string/app_name">
Because it is located on your device, AM needs to be run through ADB. To do so, the laer
features a limited Unix-like shell, which features some classic commands such as ls, cd, pwd,
cat, chmod, or ps as well as a few Android specic ones as shown in the following table:
am The Activity Manager which not only starts Activities but
can also kill them, broadcast intent, start/stop profiler, and
so on.
dmesg To dump kernel messages.
dumpsys To dump the system state.
logcat To display device log messages.
Starng a Nave Android Project
[ 54 ]
run-as <user
id> <command>
To run a command with the user id privilege. user
id can be an application package name, which gives
access to application files (for example, run-as com.
example.SanAngeles ls).
sqlite3 <db
file>
To open an SQLite Database (it can be combined with
run-as).
ADB can be started in one of the following ways:
With a command in parameter, as shown in step 5 with AM, in which case Shell runs
a single command and immediately exits.
With the adb shell command without a parameter, in which case you can use it as
a classic Shell (and, for example, call am and any other command).
ADB Shell is a real 'Swiss Army knife', which allows advanced manipulaons on your device,
especially with the root access. For example, it becomes possible to observe applicaons
deployed in their "sandbox" directory (that is, the /data/data directory) or to list and kill
the currently running processes. Without root access to your phone, possible acons are
more limited. For more informaon, have a look at http://developer.android.com/
tools/help/adb.html.
If you know a bit about the Android ecosystem, you may have heard about
rooted phones and non-rooted phones. Roong a phone means geng
administrave privilege, generally using hacks. Roong a phone is useful to
install a custom ROM version (opmized or modied, for example, Cyanogen)
or to perform any sort of (especially dangerous) manipulaons that a root
user can do (for example, accessing and deleng any le). Roong is not an
illegal operaon as such, as you are modifying YOUR device. However, not all
manufacturers appreciate this pracce, which usually voids the warranty.
More about Android tooling
Building San Angeles sample applicaon gives you a glimpse of what Android tools can do.
However, behind their somewhat 'rusc' look, more is possible. Informaon can be found
on the Android developer website at http://developer.android.com/tools/help/
index.html.
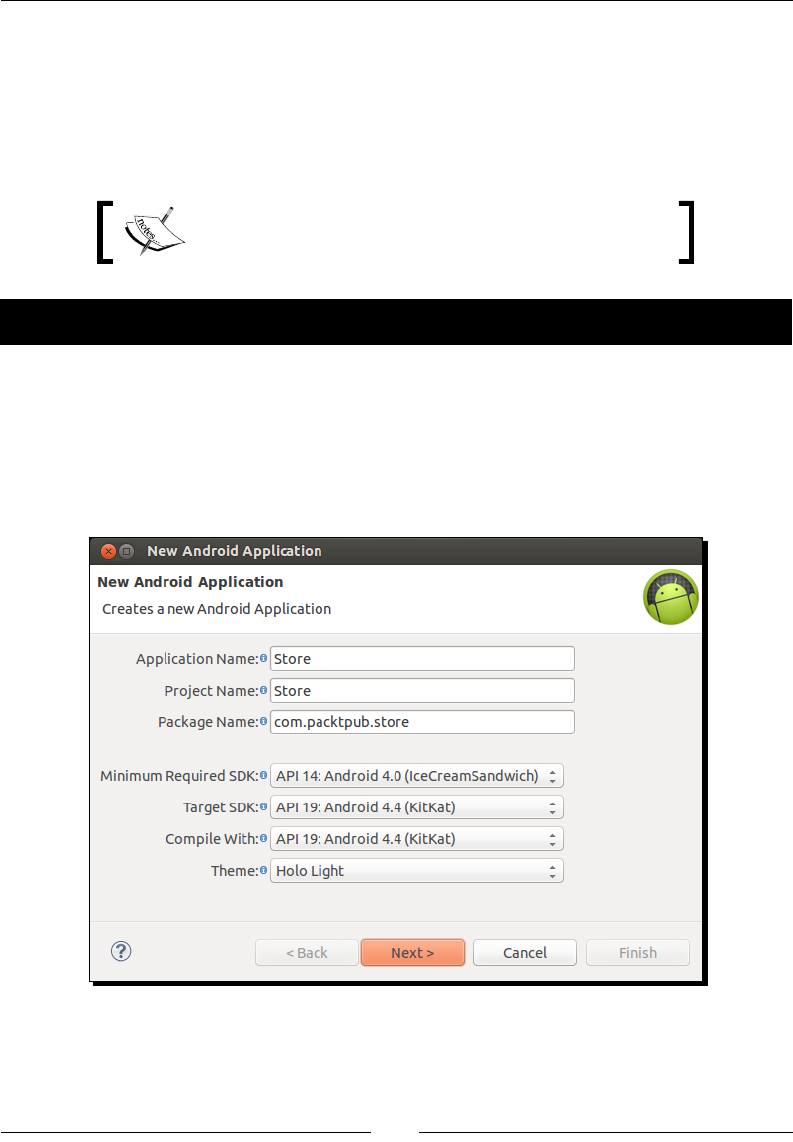
Chapter 2
[ 55 ]
Creating your rst native Android project
In the rst part of the chapter, we saw how to use Android command-line tools. However,
developing with Notepad or VI is not really aracve. Coding should be fun! And to make
it so, we need our preferred IDE to perform boring or unpraccal tasks. So now we will see
how to create a nave Android project using Eclipse.
The resulng project is provided with this book under the
name Store_Part1.
Time for action – creating a native Android project
Eclipse provides a wizard to help us set up our project:
1. Launch Eclipse. In the main menu, go to File | New | Project….
2. Then, in the opened New project wizard, go to Android | Android Applicaon
Project and click on Next.
3. In the next screen, enter project properes as follows and click on Next again:

Starng a Nave Android Project
[ 56 ]
4. Click on Next twice, leaving default opons, to go to the Create acvity wizard
screen. Select Blank acvity with Fragment and click on Next.
5. Finally, in the Blank Acvity screen, enter acvity properes as follows:
6. Click on Finish to validate. Aer a few seconds, the wizard disappears and the
project Store is displayed in Eclipse.
7. Add nave C/C++ support to the project. Select the project Store in the Package
Explorer view and from its right-click context menu, go to Android Tools | Add
Nave Support....
8. In the opened Add Android Nave Support popup, set the library name to
com_packtpub_store_Store and click on Finish.

Chapter 2
[ 57 ]
9. The jni and obj directories are created in the project directory. The rst directory
contains one makele Android.mk and one C++ source le com_packtpub_
store_Store.cpp.
After adding native support, Eclipse may automatically switch
your perspective to C/C++. Therefore, in case your development
environment does not look as usual, simply check your perspective
in the Eclipse's top-right corner. You can work on an NDK project
from either a Java or C/C++ perspective without any trouble.
10. Create a new Java class Store in src/com/packtpub/store/Store.java. From
within a stac block, load the com_packtpub_store_Store nave library:
package com.packtpub.store;
public class Store {
static {
System.loadLibrary("com_packtpub_store_Store");
}
}
11. Edit src/com/packtpub/store/StoreActivity.java. Declare and inialize
a new instance of Store in acvity's onCreate(). Since we do not need them,
remove the onCreateOptionsMenu() and onOptionsItemSelected()
methods that may have been created by the Eclipse project creaon wizard:
package com.packtpub.store;
...
public class StoreActivity extends Activity {
private Store mStore = new Store();
@Override
protected void onCreate(Bundle savedInstanceState) {
super.onCreate(savedInstanceState);
setContentView(R.layout.activity_store);
if (savedInstanceState == null) {
getFragmentManager().beginTransaction()
.add(R.id.container,
new PlaceholderFragment())
.commit();
}
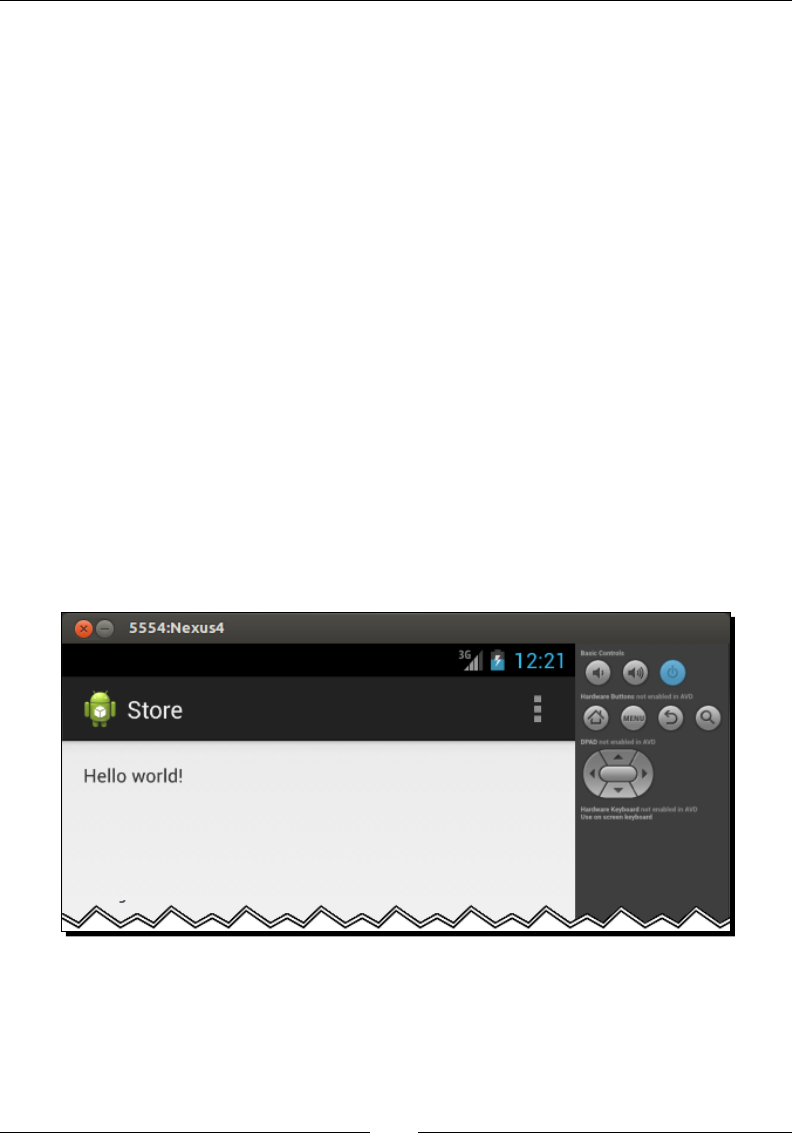
Starng a Nave Android Project
[ 58 ]
}
public static class PlaceholderFragment extends Fragment {
public PlaceholderFragment() {
}
@Override
public View onCreateView(LayoutInflater inflater,
ViewGroup container,
Bundle savedInstanceState)
{
View rootView = inflater.inflate(R.layout.fragment_store,
container, false);
return rootView;
}
}
}
12. Connect your device or emulator and launch the applicaon. Select Store in the
Package Explorer view and then navigate to Run | Run As | Android Applicaon
from the Eclipse main menu. Alternavely, click on the Run buon in the
Eclipse toolbar.
13. Select the applicaon type Android Applicaon and click on OK to get the
following screen:

Chapter 2
[ 59 ]
What just happened?
In only a few steps, our rst nave Android project has been created and launched thanks
to Eclipse.
1. The Android project creaon wizard helps get you started quickly. It generates the
minimum code for a simple Android applicaon. However, by default, new Android
projects support Java and only Java.
2. With the help of ADT, an Android Java project is easily turned into a hybrid project
with nave C/C++ support. It generates the minimum les necessary for an
NDK-Build to compile a nave library:
Android.mk is a Makele describing which source les to compile and how to
generate the nal nave library.
com_packtpub_store_Store.cpp is an almost empty le containing a single
include. We are going to explain this in the next part of this chapter.
3. Once the project is set up, dynamically loading a nave library is done in a single
call to System.loadLibrary(). This is easily done in a stac block, which ensures
that the library is loaded once and for all, before a class is inialized. Beware that
this works only if the container class is loaded from a single Java ClassLoader (which
is usually the case).
Working with an IDE like Eclipse really oers a huge producvity boost and makes
programming much more comfortable! But if you are a command-line acionado or would
like to train your command-line skills, the rst part, Building NDK sample applicaons, can
easily be applied here.
Introducing Dalvik and ART
It is not possible to talk about Android without menoning a few words about Dalvik
and ART.
Dalvik is a Virtual Machine on which the Dex bytecode is interpreted (not nave code!). It
is at the core of any applicaon running on Android. Dalvik has been conceived to t the
constrained requirements of mobile devices. It is specically opmized to use less memory
and CPU. It sits on top of the Android kernel, which provides the rst layer of abstracon
over the hardware (process management, memory management, and so on).
Starng a Nave Android Project
[ 60 ]
ART is the new Android runme environment, which has replaced Dalvik since the Android
5 Lollipop. It has improved performances a lot compared to Dalvik. Indeed, where Dalvik
interprets bytecode Just-In-Time upon applicaon startup, ART, on the other hand,
precompiles bytecode Ahead-Of-Time into nave code during applicaon installaon. ART
is backward compable with applicaons packaged for former Dalvik VMs.
Android has been designed with speed in mind. Because most users do not want to
wait for their applicaon to be loaded while others are sll running, the system is able
to instanate mulple Dalvik or ART VMs quickly, thanks to the Zygote process. Zygote,
(whose name comes from the very rst biologic cell of an organism from which daughter
cells get reproduced), starts when the system boots up. It preloads (or "warms up") all
core libraries shared among applicaons as well as the Virtual Machine instance. To launch
a new applicaon, Zygote is simply forked and the inial Dalvik instance gets copied as a
consequence. Memory consumpon is lowered by sharing as many libraries as possible
between processes.
Dalvik and ART are themselves made of nave C/C++ code compiled for the target Android
plaorm (ARM, X86, and so on). This means that interfacing these VMs with nave C/C++
libraries is easily possible provided that it is compiled with the same Applicaon Binary
Interface (ABI) (which basically describes the applicaon or library binary format). This is
the role devoted to the Android NDK. For more informaon, have a look at the Android
Open Source Project (AOSP), that is, the Android source code at https://source.
android.com/.
Interfacing Java with C/C++
Nave C/C++ code has the ability to unleash the power of your applicaon. To do so, Java
code needs to invoke and run its nave counterpart. In this part, we are going to interface
Java and nave C/C++ code together.
The resulng project is provided with this book under the
name Store_Part2.

Chapter 2
[ 61 ]
Time for action – calling C code from Java
Let's create our rst nave method and call it from the Java side:
1. Open src/com/packtpub/store/Store.java and declare one nave method
to query the Store. This method returns int with the number of entries in it. There
is no need to dene a method body:
package com.packtpub.store;
public class Store {
static {
System.loadLibrary("com_packtpub_store_Store");
}
public native int getCount();
}
2. Open src/com/packtpub/store/StoreActivity.java and inialize the store.
Use its getCount() method value to inialize the applicaon tle:
public class StoreActivity extends Activity {
...
public static class PlaceholderFragment extends Fragment {
private Store mStore = new Store();
...
public PlaceholderFragment() {
}
@Override
public View onCreateView(LayoutInflater inflater,
ViewGroup container,
Bundle savedInstanceState)
{
View rootView = inflater.inflate(R.layout.fragment_store,
container, false);
updateTitle();
return rootView;
}
private void updateTitle() {
int numEntries = mStore.getCount();
getActivity().setTitle(String.format("Store (%1$s)",
numEntries));
}
}
}
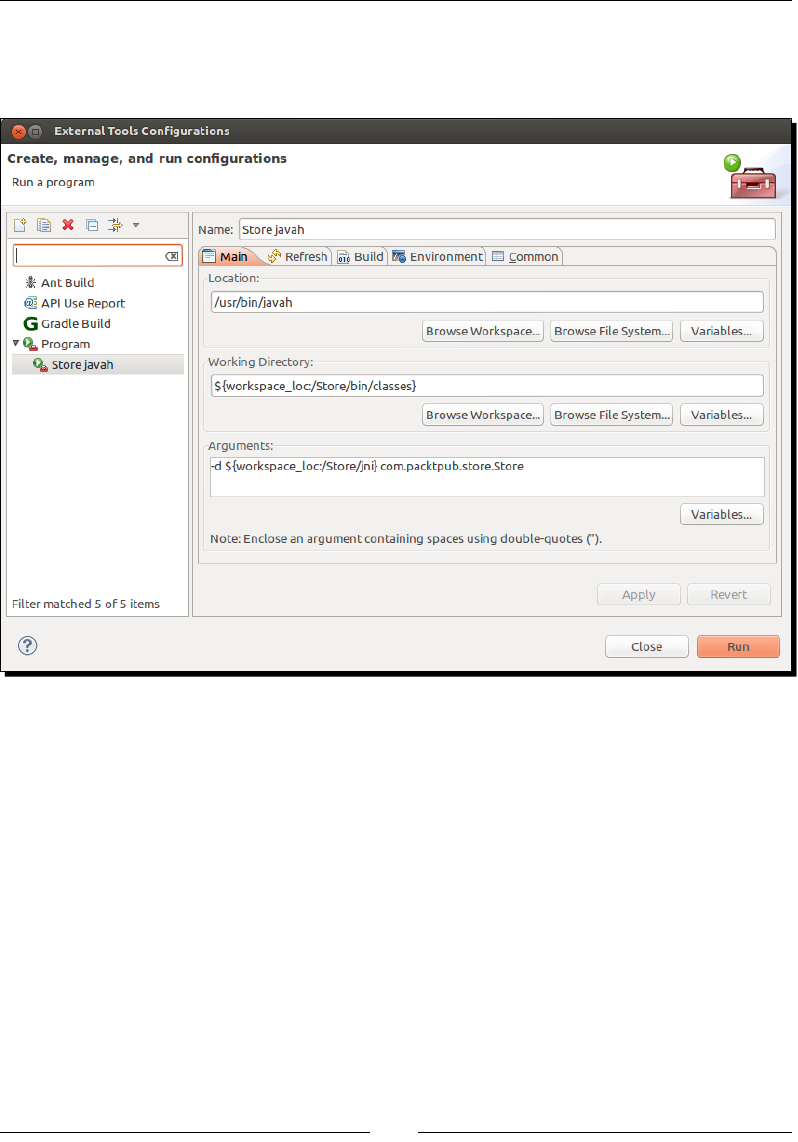
Starng a Nave Android Project
[ 62 ]
3. Generate a JNI header le from the Store class. Go to the Eclipse main menu and
go to Run | External Tools | External Tools Conguraons…. Create a new Program
conguraon with the following parameters described in the following screenshot:
Locaon refers to the javah absolute path, which is OS specic. On Windows, you
can enter ${env_var:JAVA_HOME}\bin\javah.exe. On Mac OS X and Linux, it is
usually /usr/bin/javah.
4. In the Refresh tab, check Refresh resources upon compleon and select Specic
resources. Using the Specify Resources… buon, select the jni folder. Finally, click
on Run to execute javah. A new le jni/com_packtpub_store_Store.h will
then be generated. This contains a prototype for the nave method getCount()
expected on the Java side:
/* DO NOT EDIT THIS FILE - it is machine generated */
#include <jni.h>
/* Header for class com_packtpub_store_Store */
#ifndef _Included_com_packtpub_store_Store

Chapter 2
[ 63 ]
#define _Included_com_packtpub_store_Store
#ifdef __cplusplus
extern "C" {
#endif
/*
* Class: com_packtpub_store_Store
* Method: getCount
* Signature: ()I
*/
JNIEXPORT jint JNICALL Java_com_packtpub_store_Store_getCount
(JNIEnv *, jobject);
#ifdef __cplusplus
}
#endif
#endif
5. We can now implement jni/com_packtpub_store_Store.cpp so that it returns
0 when invoked. The method signature originates from the generated header le
(you can replace any previous code) except that the parameter names have been
explicitly specied:
#include "com_packtpub_store_Store.h"
JNIEXPORT jint JNICALL Java_com_packtpub_store_Store_getCount
(JNIEnv* pEnv, jobject pObject) {
return 0;
}
6. Compile and run the applicaon.
What just happened?
Java now talks C/C++! In the previous part, we created a hybrid Android project. In this part,
we interfaced Java with nave code. This cooperaon is established through Java Nave
Interfaces (JNI). JNI is the bridge, which binds Java to C/C++. This occurs in three main steps.
Dening nave method prototypes on the Java side, marked with the nave keyword.
Such methods have no body, like an abstract method, because they are implemented on
the nave side. Nave methods can have parameters, a return value, visibility (private,
protected, package protected, or public), and can be stac: such as the usual Java methods.
Starng a Nave Android Project
[ 64 ]
Nave methods can be called from anywhere in Java code, provided that containing a nave
library has been loaded before they are called. Failure to do so results in an excepon of type
java.lang.UnsatisfiedLinkError, which is raised when the nave method is invoked
for the rst me.
Using javah to generate a header le with corresponding nave C/C++ prototypes. Although
it is not compulsory, the javah tool provided by the JDK is extremely useful to generate
nave prototypes. Indeed, the JNI convenon is tedious and error-prone (more about this in
Chapter 3, Interfacing Java and C/C++ with JNI). The JNI code is generated from the .class
le, which means your Java code must be compiled rst.
Wring nave C/C++ code implementaon to perform expected operaons. Here, we
simply return 0 when the Store library is queried. Our nave library is compiled in the
libs/armeabi directory (the one for ARM processors) and is named libcom_packtpub_
store_Store.so. Temporary les generated during compilaon are located in the obj/
local directory.
Despite its apparent simplicity, interfacing Java with C/C++ is much more involved than what
it seems supercially. How to write JNI code on the nave side is explored in more detail in
Chapter 3, Interfacing Java and C/C++ with JNI.
Debugging native Android applications
Before diving deeper into JNI, there is one last important tool that any Android developer
needs to know how to use: the Debugger. The ocial NDK one is the GNU Debugger also
known as GDB.
The resulng project is provided with this book under the
name Store_Part3.
Time for action – debugging a native Android application
1. Create le jni/Application.mk with the following content:
APP_PLATFORM := android-14
APP_ABI := armeabi armeabi-v7a x86
These are not the only ABIs provided by the NDK; more processor
architectures such as MIPS or variants such as 64 bits or hard
floats exist. The ones used here are the main ones you should be
concerned with. They can easily be tested on an emulator.

Chapter 2
[ 65 ]
2. Open Project Properes, go to C/C++ Build, uncheck Use default build command
and enter ndk-build NDK_DEBUG=1:
3. In jni/com_packtpub_store_Store.cpp, place a breakpoint inside the
Java_com_packtpub_store_Store_getCount()method by double-clicking
on the Eclipse editor guer.
4. Select the Store project in the Package Explorer or Project Explorer view and go to
Debug As | Android Nave Applicaon. The applicaon starts, but you will probably
nd that nothing happens. Indeed, the breakpoint is likely to be reached before the
GDB Debugger could aach to the applicaon process.
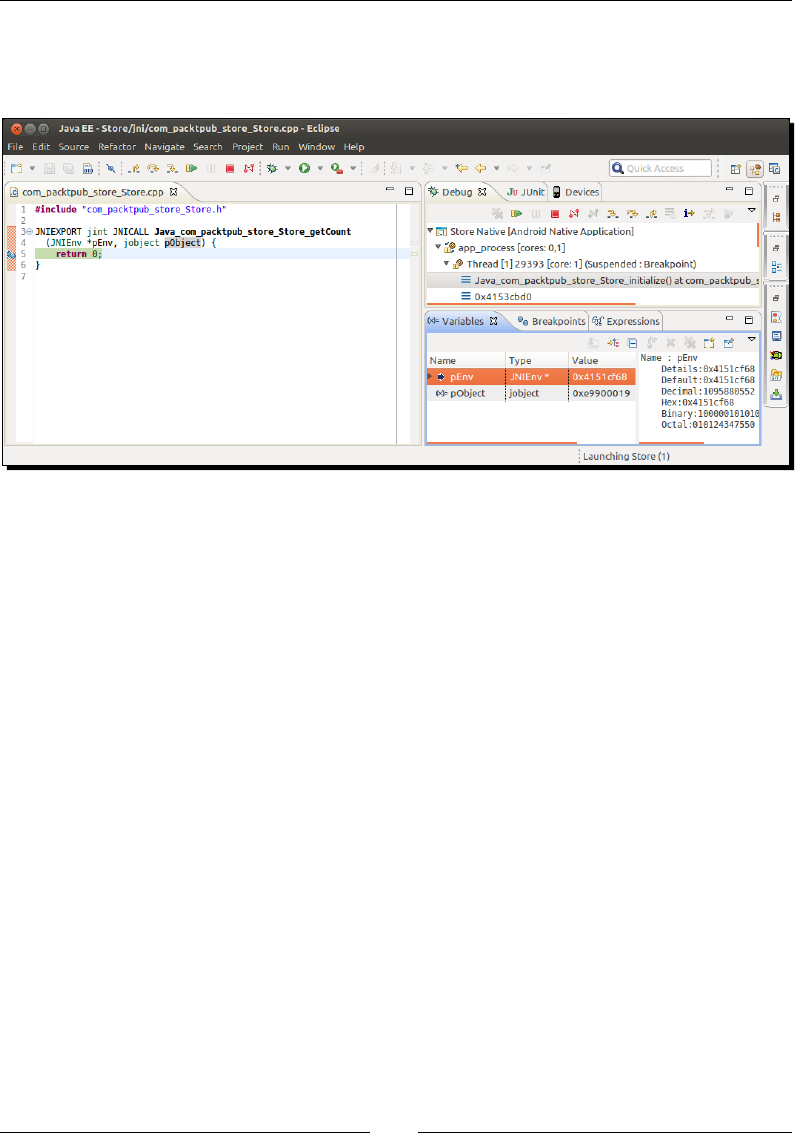
Starng a Nave Android Project
[ 66 ]
5. Leave the applicaon and reopen it from your device applicaon menu. This me,
Eclipse stops at the nave breakpoint. Look at your device screen. The UI should be
frozen because the main applicaon thread is paused in nave code.
6. Inspect variables in the Variables view and check the call stack in the Debug view. In
the Expressions view, enter *pEnv.functions and open result expression to see
the various funcons provided by the JNIEnv object.
7. Step Over current instrucon from the Eclipse toolbar or with the shortcut,
F6 (you can also use Step Into with the shortcut, F7). The following instrucons
will be highlighted:
Resume the execution from the Eclipse toolbar or with the shortcut, F8.
The application screen is displayed on your device again.
Terminate the application from the Eclipse toolbar or with the shortcut,
Ctrl+F2. The application is killed and the Debug view is emptied.
What just happened?
This useful producvity tool that is a debugger is now an asset in our toolbox. We can
easily stop or resume program execuon at any point, step into, over or out of nave
instrucons, and inspect any variable. This ability is made available to developers thanks to
NDK-GDB, which is a wrapper script around the command-line debugger GDB (which can be
cumbersome to use by hand). Hopefully, GDB is supported by Eclipse CDT and by extension
Eclipse ADT.
Chapter 2
[ 67 ]
On Android, and more generally on embedded devices, GDB is congured in client/server
mode, while a program runs on a device as a server (gdbserver, which is generated by
NDK-Build in the libs directory). A remote client, that is, a developer's workstaon with
Eclipse, connects and sends remote debugging commands to it.
Dening NDK application-wide settings
To help NDK-Build and NDK-GDB do their work, we created a new Application.mk le.
This le should be considered as a global Makele dening applicaon-wide compilaon
sengs, such as the following:
APP_PLATFORM: Android API that the applicaon targets. This informaon should
be a duplicaon of minSdkVersion in the AndroidManifest.xml le.
APP_ABI: CPU architectures that the applicaon targets. An Applicaon Binary
Interface species the binary code format (instrucon set, calling convenons, and
so on) that makes executable and library binaries. ABIs are thus strongly related to
processors. ABI can be tweaked with addional sengs such as LOCAL_ARM_CODE.
The main ABIs that are currently supported by the Android NDK are as shown in the
following table:
armeabi This is the default option, which should be compatible with all
ARM devices. Thumb is a special instruction set that encodes
instructions on 16 bits instead of 32 to improve code size
(useful for devices with constrained memory). The instruction
set is severely restricted compared to ArmEABI.
armeabi
with LOCAL_ARM_CODE = arm
(Or Arm v5) Should run on all ARM devices. Instructions are
encoded on 32 bits but may be more concise than Thumb
code. Arm v5 does not support advanced extensions such as
floating point acceleration and is thus slower than Arm v7.
armeabi-v7a Supports extensions such as Thumb-2 (similar to Thumb
but with additional 32-bit instructions) and VFP, plus some
optional extensions such as NEON. Code compiled for Arm V7
will not run on Arm V5 processors.
armeabi-v7a-hard This ABI is an extension of the armeabi-v7a that supports
hardware floats instead of soft floats.
arm64-v8a This is dedicated to the new 64-bit processor architecture.
64-bit ARM processors are backward compatible with
older ABIs.

Starng a Nave Android Project
[ 68 ]
x86 and x86_64 For "PC-like" processor architectures (that is, Intel/AMD).
These are the ABIs used on the emulator in order to get
hardware acceleration on a PC. Although most Android
devices are ARM, some of them are now X86-based. The
x86 ABI is for 32-bit processors and x86_64 is for 64-bit
processors.
mips and mips 64 For processors made by MIPS Technologies, now property
of Imagination Technologies well-known for the PowerVR
graphics processors. Almost no device uses these at the time
of writing this book. The mips ABI is for 32-bit processors and
mips64 is for 64-bit processors.
all, all32 and all64 This is a shortcut to build an ndk library for all 32-bit or
64-bit ABIs.
Each library and intermediate object le is recompiled for each ABI. They are stored in their
own respecve directory which can be found in the obj and libs folders.
A few more ags can be used inside Application.mk. We will discover more about this in
detail in Chapter 9, Porng Exisng Libraries to Android.
The Application.mk ags are not the only ones necessary to ensure the NDK debugger
work; NDK_DEBUG=1 must also be passed manually to NDK-Build so that it compiles Debug
binaries and generates GDB setup les (gdb.setup and gdbserver) correctly. Note that
this should probably be considered more as a defect in Android development tools rather
than a real conguraon step, since it should normally handle the debugging ag
automacally.
NDK-GDB day-to-day
Debugger support in the NDK and Eclipse is quite recent and has improved a lot among NDK
releases (for example, debugging purely nave threads was not working before). However,
although it is now quite usable, debugging on Android can somemes be buggy, unstable,
and rather slow (because it needs to communicate with the remote Android device).
NDK-GDB might somemes appear crazy and stop at a breakpoint with a
completely unusual stack trace. This could be related to GDB not being able
to correctly determine current ABI while debugging. To x this issue, put
only your corresponding device ABI in the APP_ABI clause and remove or
comment any other.
Chapter 2
[ 69 ]
NDK Debugger can also be tricky to use, such as when debugging nave startup code.
Indeed, GDB does not start fast enough to acvate breakpoints. A simple way to overcome
this problem is to make nave code sleep for a few seconds when an applicaon starts. To
leave GDB enough me to aach an applicaon process, we can do, for example,
the following:
#include <unistd.h>
…
sleep(3); // in seconds.
Another soluon is to launch a Debug session and then simply leave and re-launch the
applicaon from your device, as we have seen in the previous tutorial. This is possible
because the Android applicaon life cycle is such that an applicaon survives when it is in
the background, unl the memory is needed. This trick only works if your applicaon does
not crash during startup though.
Analyzing native crash dumps
Every developer has one day experienced an unexpected crash in its applicaon. Do not be
ashamed, it has happened to all of us. And as a newcomer in Android nave development,
this situaon will happen again, many mes. Debuggers are a tremendous tool to look for
problems in your code. Sadly, however they work in "real-me", when a program runs. They
become sterile with fatal bugs that cannot be reproduced easily. Hopefully, there is a tool for
that: NDK-Stack. NDK-Stack helps you read a crash dump to analyze an applicaon's stack-
trace at the moment it crashed.
The resulng project is provided with this book under the
name Store_Crash.
Time for action – analyzing a native crash dump
Let's make our applicaon crash to see how to read a crash dump:
1. Simulate a fatal bug in jni/com_packtpub_store_Store.cpp:
#include "com_packtpub_store_Store.h"
JNIEXPORT jint JNICALL Java_com_packtpub_store_Store_getCount
(JNIEnv* pEnv, jobject pObject) {
pEnv = 0;
return pEnv->CallIntMethod(0, 0);
}
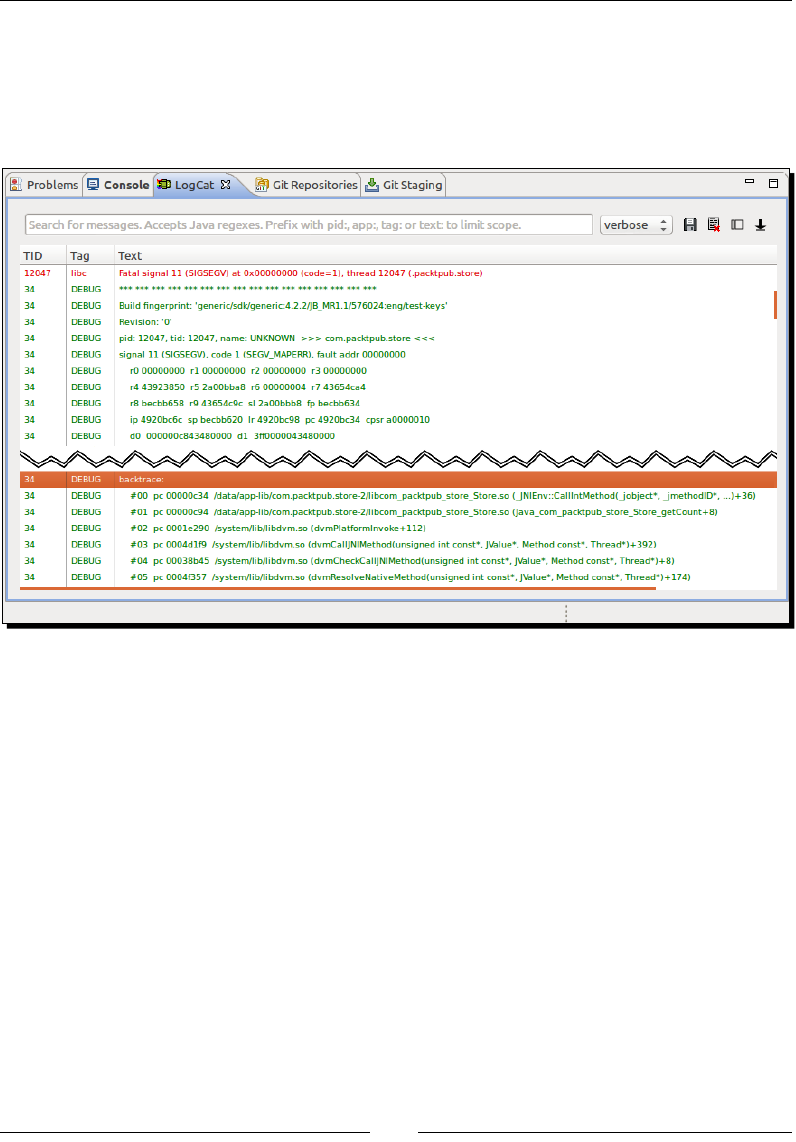
Starng a Nave Android Project
[ 70 ]
2. Open the LogCat view in Eclipse, select the All Messages (no lter) opon, and then
run the applicaon. A crash dump appears in the logs. This is not prey! If you look
carefully through it, you should nd a backtrace secon with a snapshot of the
call-stack at the moment the applicaon crashed. However, it does not give the line
of code involved:
3. From a command-line prompt, go to the project directory. Find the line of code
implied in the crash by running NDK-Stack with logcat as the input. NDK-Stack
needs the obj les corresponding to the device ABI on which the applicaon
crashed, for example:
cd <projet directory>
adb logcat | ndk-stack -sym obj/local/armeabi-v7a

Chapter 2
[ 71 ]
What just happened?
NDK-Stack ulity provided with the Android NDK can help you locate the source of an
applicaon crash. This tool is an inesmable help and should be considered as your rst-aid
kit when a bad crash happens. However, if it can point you toward the where, it is another
kele of sh to nd out the why.
Stack-trace is only a small part of a crash dump. Deciphering the rest of a dump is rarely
necessary but understanding its meaning is good for general culture.
Deciphering crash dumps
Crash dumps are not only dedicated to overly talented developers seeing a red-dressed girl
in binary code, but also to those who have a minimum knowledge of assemblers and the
way processors work. The goal of this trace is to give as much informaon as possible on the
current state of the program at the me it crashed. It contains:
1st line: Build Fingerprint is a kind of idener indicang the device/Android release
currently running. This informaon is interesng when analyzing dumps from
various origins.
3rd line: The PID or process idener uniquely idenes an applicaon on the Unix
system, and the TID, which is the thread idener. The thread idener can be the
same as the process idener when a crash occurs on the main thread.
4th line: The crash origin represented as a Signal is a classic segmentaon
fault (SIGSEGV).

Starng a Nave Android Project
[ 72 ]
Processor Register values. A register holds values or pointers on which the
processor can work immediately.
Backtrace (that is the stack-trace) with the method calls that lead to the crash.
Raw stack is similar to the backtrace but with stack parameters and variables.
Some Memory Words around the main register (provided for ARM processors only).
The rst column indicates memory-line locaons, while others columns indicate
memory values represented in hexadecimal.
Processor registers are dierent between processor architectures and versions. ARM
processors provide:
rX Integer Registers where a program puts values it works on.
dX Floating Point Registers where a program puts values it works on.
fp (or r11) Frame Pointer holds the current stack frame location during a routine call (in
conjunction with the Stack Pointer).
ip (or r12) Intra Procedure Call Scratch Register may be used with some sub-routine calls;
for example, when the linker needs a veneer (a small piece of code) to aim at a
different memory area when branching. Indeed, a branch instruction to jump
somewhere else in memory requires an offset argument relative to the current
location, allowing a branching range of a few MB only, not the full memory.
sp (or r13) Stack Pointer holds the location of the top of the stack.
lr (or r14) Link Register saves a program counter value temporarily so that it can restore it
later. A typical example of its use is as a function call, which jumps somewhere in
the code and then goes back to its previous location. Of course, several chained
sub-routine calls require the Link Register to be stacked.
pc (or r15) Program Counter holds the address of the next instruction to be executed. The
program counter is just incremented when executing a sequential code to fetch
the next instruction but it is altered by branching instructions (if/else, a C/C++
function calls, and so on).
cpsr Current Program Status Register contains a few flags about the current processor
working mode and some additional bit flags for condition codes (such as N for an
operation that resulted in a negative value, Z for a 0 or equality result, and so on),
interrupts, and instruction sets (Thumb or ARM).
Remember that the use of registers is mainly a convenon. For example,
Apple iOS uses r7 as a Frame Pointer instead of r12 on ARMs. So always
be very careful when wring or reusing assembly code!
Chapter 2
[ 73 ]
On the other hand, X86 processors provide:
eax Accumulator Register is used, for example, for arithmetic or I/O operations.
ebx Base Register is a data pointer for memory access.
ecx Counter Register is used for iterative operations such as loop counter.
edx Data Register is a secondary Accumulator Register used in conjunction with eax.
esi Source Index Register is used for memory array copying in conjunction with edi.
edi Destination Index Register is used for memory array copying in conjunction with esi.
eip Instruction Pointer holds offset of the next instruction.
ebp Base Pointer holds the current stack frame location during a routine call (in
conjunction with the Stack Pointer).
esp Stack Pointer holds the location of the top of the stack.
xcs Code Segment helps in addressing the memory segment in which the program runs.
xds Data Segment helps addressing a data memory segment.
xes Extra Segment is an additional register to address a memory segment.
xfs Additional Segment which is a general purpose data segment.
xss Stack segment holds the Stack memory segment.
Many X86 registers are a legacy, which means that they lost the
inial purpose they were created for. Take their descripons with
some cauon.
Deciphering stack-traces is not an easy task and requires me and experse. Don't bother
too much if you do not understand every part of it yet. This is necessary as a last resort only.
Setting up a Gradle project to compile native code
Android Studio is now the new ocially supported Android IDE, in place of Eclipse. It comes
with Gradle, which is the new ocial Android build system. Gradle introduces a Groovy-based
specic language to dene the project conguraon easily. Although its support of the NDK is
sll preliminary, it keeps improving and is becoming more and more useable.
Let's now see how to create an Android Studio project with Gradle that compiles nave code.
The resulng project is provided with this book under the
name Store_Gradle_Auto.

Starng a Nave Android Project
[ 74 ]
Time for action – creating a native Android project
Gradle-based projects can be created easily through Android Studio:
1. Launch Android Studio. On the welcome screen, select New Project… (or go to
File | New Project… if a project is already opened).
2. From the New Project wizard, enter the following conguraon and click on Next:
3. Then, select the minimum SDK (for example, API 14: Ice Scream Sandwich) and click
on Next.
4. Select Blank Acvity with Fragment and click on Next.
5. Finally, enter Acvity Name and Layout Name names as follows and click on Finish:
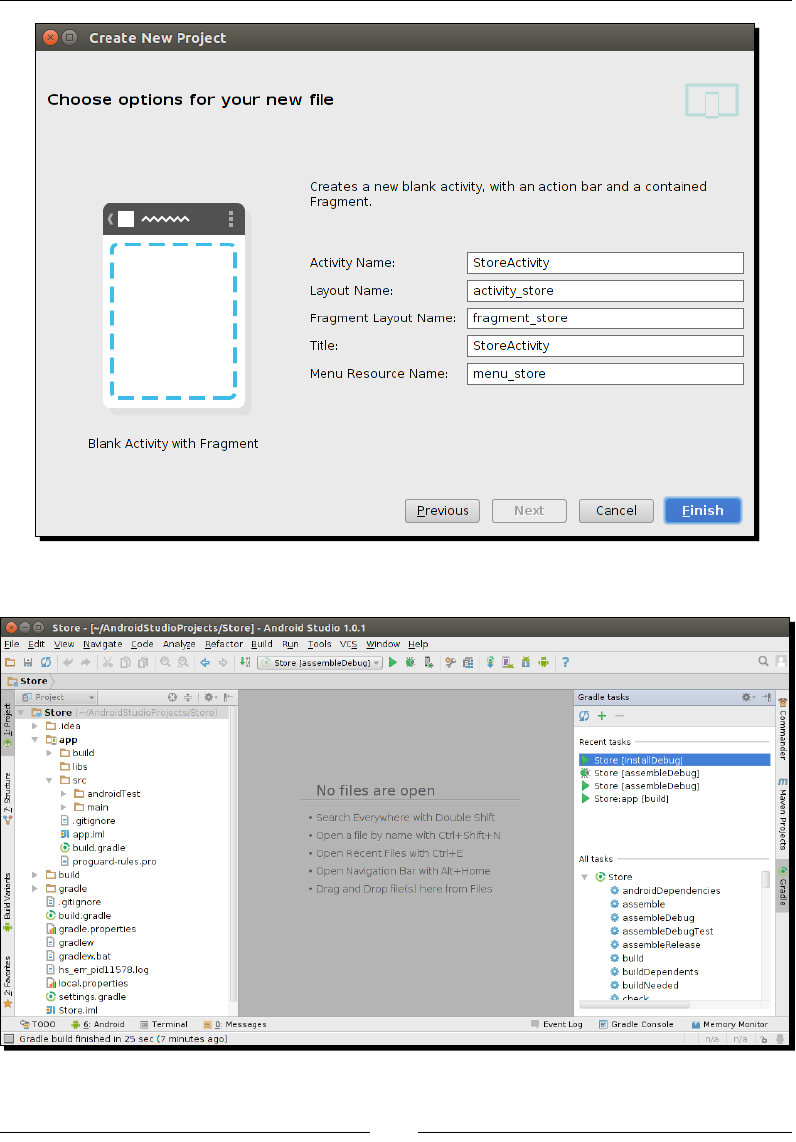
Chapter 2
[ 75 ]
6. Android Studio should then open the project:

Starng a Nave Android Project
[ 76 ]
7. Modify StoreActivity.java and create Store.java in the same way as we did
in the Interfacing Java with C/C++ secon in this chapter (Step 1 and 2).
8. Create the app/src/main/jni directory. Copy the C and Header les we created
in the Interfacing Java with C/C++ secon in this chapter (Step 4 and 5).
9. Edit app/build.gradle that has been generated by Android Studio. In
defaultConfig, insert a ndk secon to congure the module (that is, a library)
name:
apply plugin: 'com.android.application'
android {
compileSdkVersion 21
buildToolsVersion "21.1.2"
defaultConfig {
applicationId "com.packtpub.store"
minSdkVersion 14
targetSdkVersion 21
versionCode 1
versionName "1.0"
ndk {
moduleName "com_packtpub_store_Store"
}
}
buildTypes {
release {
minifyEnabled false
proguardFiles getDefaultProguardFile('proguard-android.
txt'), 'proguard-rules.pro'
}
}
}
dependencies {
compile fileTree(dir: 'libs', include: ['*.jar'])
compile 'com.android.support:appcompat-v7:21.0.3'
}
10. Compile and install the project on your device by clicking on installDebug in the
Gradle tasks view of Android Studio.
Chapter 2
[ 77 ]
If Android Studio complains that it cannot find the NDK, make
sure the local.properties file in the project's root
directory contains both sdk.dir and ndk.dir properties
that can point to your Android SDK and NDK location.
What just happened?
We created our rst Android Studio project that compiles nave code through Gradle. NDK
properes are congured in a secon specic to ndk in the build.gradle le (for example,
the module name).
Mulple sengs are available as shown in the following table:
Property Description
abiFilter The list of ABIs to compile for; by default, all.
cFlags Custom flags to pass to the compiler. More about this in Chapter 9,
Porting Existing Libraries to Android.
ldLibs Custom flags to pass to the linker. More about this in Chapter 9,
Porting Existing Libraries to Android.
moduleName This is the name of the module to be built.
stl This is the STL library to use for compilation. More about this in
Chapter 9, Porting Existing Libraries to Android.
You might have noced that we have not reused the Android.mk and Application.mk
les. This is because Gradle generates the build les automacally if given an input to ndk-
build at compilaon me. In our example, you can see the generated Android.mk for the
Store module in the app/build/intermediates/ndk/debug directory.
NDK automac Makele generaon makes it easy to compile nave NDK code on simple
projects. However, if you want more control on your nave build, you can create your own
Makeles like the ones created in the Interfacing Java with C/C++ secon in this chapter.
Let's see how to do this.
The resulng project is provided with this book under the
name Store_Gradle_Manual.
Starng a Nave Android Project
[ 78 ]
Time for action – using your own Makeles with Gradle
Using your own handmade makeles with Gradle is a bit tricky but not too complicated:
1. Copy the Android.mk and Application.mk les we created in the Interfacing
Java with C/C++ secon in this chapter into the app/src/main/jni directory.
2. Edit app/build.gradle.
3. Add an import for the OS "Class" and remove the rst ndk secon we created in
the previous secon:
import org.apache.tools.ant.taskdefs.condition.Os
apply plugin: 'com.android.application'
android {
compileSdkVersion 21
buildToolsVersion "21.1.2"
defaultConfig {
applicationId "com.packtpub.store"
minSdkVersion 14
targetSdkVersion 21
versionCode 1
versionName "1.0"
}
buildTypes {
release {
minifyEnabled false
proguardFiles getDefaultProguardFile('proguard-android.
txt'), 'proguard-rules.pro'
}
}
4. Sll in the android secon of app/build.gradle., insert a sourceSets.main
secon with the following:
jniLibs.srcDir, which defines where Gradle will find the
generated libraries.
jni.srcDirs, which is set to an empty array to disable native code
compilation through Gradle.
...
sourceSets.main {
jniLibs.srcDir 'src/main/libs'
jni.srcDirs = []
}

Chapter 2
[ 79 ]
5. Finally, create a new Gradle task ndkBuild that will manually trigger the
ndk-build command, specifying the custom directory src/main as the
compilaon directory.
Declare a dependency between the ndkBuild task and the Java compilaon
task to automacally trigger nave code compilaon:
...
task ndkBuild(type: Exec) {
if (Os.isFamily(Os.FAMILY_WINDOWS)) {
commandLine 'ndk-build.cmd', '-C', file('src/main').absolutePath
} else {
commandLine 'ndk-build', '-C', file('src/main').absolutePath
}
}
tasks.withType(JavaCompile) {
compileTask -> compileTask.dependsOn ndkBuild
}
}
dependencies {
compile fileTree(dir: 'libs', include: ['*.jar'])
compile 'com.android.support:appcompat-v7:21.0.3'
}
6. Compile and install the project on your device by clicking on installDebug in the
Gradle tasks view of Android Studio.
What just happened?
The Makele generaon and nave source compilaon performed by the Android Gradle
plugin can easily be disabled. The trick is to simply indicate that no nave source directory is
available. We can then use the power of Gradle, which allows dening easily custom build tasks
and dependencies between them, to execute the ndk-build command. This trick allows using
our own NDK makeles, giving us more exibility in the way we build nave code.

Starng a Nave Android Project
[ 80 ]
Summary
Creang, compiling, building, packaging, and deploying an applicaon project are not
the most excing tasks, but they cannot be avoided. Mastering them will allow you to be
producve and focused on the real objecve: producing code.
In summary, we built our rst sample applicaon using command-line tools and deploying
it on an Android device. We also created our rst nave Android project using Eclipse and
interfaced Java with C/C++ using Java Nave Interfaces. We debugged a nave Android
applicaon with NDK-GDB and analyzed a nave crash dump to nd its origin in the source
code. Finally, we created a similar project using Android Studio and built it with Gradle.
This rst experiment with the Android NDK gives you a good overview of the way nave
development works. In the next chapter, we are going to focus on the code and dive more
deeply into the JNI protocol.
[ 81 ]
3
Interfacing Java and C/C++ with JNI
Android is inseparable from Java. Its kernel and core libraries are native, but
the Android application framework is almost entirely written in Java or at least
wrapped inside a thin layer of Java. Do not expect to build your Android GUI
directly in C/C++! Most APIs are available only from Java. At best, we can hide
it under the cover... Thus, native C/C++ code on Android would be nonsense if it
was not possible to tie Java and C/C++ together.
This role is devoted to the Java Native Interface API. JNI is a standardized
specification allowing Java to call native code and native code to call Java back.
It is a two-way bridge between the Java and native side; the only way to inject
the power of C/C++ into your Java application.
Thanks to JNI, one can call C/C++ functions from Java like any Java method,
passing Java primitives or objects as parameters and receiving them as result
of native calls. In turn, native code can access, inspect, modify, and call Java
objects or raise exceptions with a reflection-like API. JNI is a subtle framework
which requires care as any misuse can result in a dramatic ending…
In this chapter, we will implement a basic key/value store to handle various data types. A
simple Java GUI will allow dening an entry composed of a key (a character string), a type (an
integer, a string, and so on), and a value related to the selected type. Entries are retrieved,
inserted, or updated (remove will not be supported) inside a simple xed size array of
entries, which will reside on the nave side.
Interfacing Java and C/C++ with JNI
[ 82 ]
To implement this project, we are going to:
Inialize a nave JNI library
Convert Java Strings in nave code
Pass Java primives to nave code
Handle Java object references in nave code
Manage Java Arrays in nave code
Raise and check Java excepons in nave code.
By the end of this chapter, you should be able perform nave calls with any Java type and
use excepons.
JNI is a very technical framework that requires care, as any misuse can result in a dramac
ending. This chapter does not pretend to cover it exhausvely but rather focuses on the
essenal knowledge to bridge the gap between Java and C++.
Initializing a native JNI library
Before accessing their nave methods, nave libraries must be loaded through a Java call
to System.loadLibrary(). JNI provides a hook, JNI_OnLoad(), to plug your own
inializaon code. Let's override it to inialize our nave store.
The resulng project is provided with this book under the
name Store_Part4.
Time for action – dening a simple GUI
Let's create a Java Graphical User Interface for our Store and bind it to the nave store
structure that we will create:
1. Rewrite the res/fragment_layout.xml layout to dene the graphical interface
as follows. It denes:
A Key TextView label and EditText to enter the key
A Value TextView label and EditText to enter the value matching the key
A Type TextView label and Spinner to define the type of the value

Chapter 3
[ 83 ]
A Get Value and a Set Value Button to retrieve and change a value in
the store
<LinearLayout
xmlns:a="http://schemas.android.com/apk/res/android"
xmlns:tools="http://schemas.android.com/tools"
a:layout_width="match_parent" a:layout_height="match_parent"
a:orientation="vertical"
tools:context="com.packtpub.store.StoreActivity$PlaceholderFrag
ment">
<TextView
a:layout_width="match_parent"
a:layout_height="wrap_content"
a:text="Save or retrieve a value from the store:" />
<TableLayout
a:layout_width="match_parent"
a:layout_height="wrap_content"
a:stretchColumns="1" >
<TableRow>
<TextView a:id="@+id/uiKeyLabel" a:text="Key : " />
<EditText a:id="@+id/uiKeyEdit" ><requestFocus
/></EditText>
</TableRow>
<TableRow>
<TextView a:id="@+id/uiValueLabel" a:text="Value : " />
<EditText a:id="@+id/uiValueEdit" />
</TableRow>
<TableRow>
<TextView a:id="@+id/uiTypeLabel"
a:layout_height="match_parent"
a:gravity="center_vertical" a:text="Type : " />
<Spinner a:id="@+id/uiTypeSpinner" />
</TableRow>
</TableLayout>
<LinearLayout
a:layout_width="wrap_content"
a:layout_height="wrap_content"
a:layout_gravity="right" >
<Button a:id="@+id/uiGetValueButton"
a:layout_width="wrap_content"
a:layout_height="wrap_content" a:text="Get Value" />
<Button a:id="@+id/uiSetValueButton" a:layout_width="wrap_
content"
a:layout_height="wrap_content" a:text="Set Value" />
</LinearLayout>
</LinearLayout>
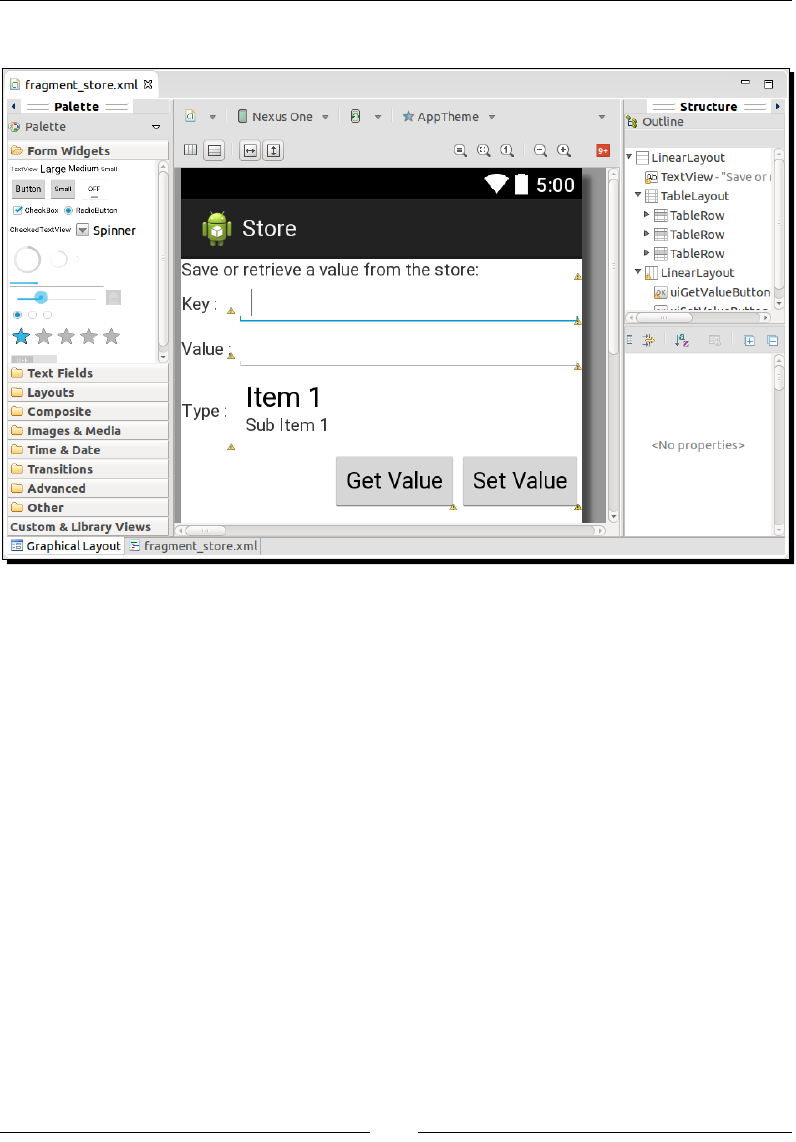
Interfacing Java and C/C++ with JNI
[ 84 ]
The end result should look as follows:
2. Create a new class in StoreType.java with an empty enumeraon:
package com.packtpub.store;
public enum StoreType {
}
3. The GUI and nave store need to be bound together. This is the role undertaken by
the StoreActivity class. To do this, when PlaceholderFragment is created
in onCreateView(), inialize all the GUI components dened earlier in the
layout le:
public class StoreActivity extends Activity {
...
public static class PlaceholderFragment extends Fragment {
private Store mStore = new Store();
private EditText mUIKeyEdit, mUIValueEdit;
private Spinner mUITypeSpinner;

Chapter 3
[ 85 ]
private Button mUIGetButton, mUISetButton;
private Pattern mKeyPattern;
...
@Override
public View onCreateView(LayoutInflater inflater,
ViewGroup container,
Bundle savedInstanceState)
{
View rootView =
inflater.inflate(R.layout.fragment_store,
container, false);
updateTitle();
// Initializes text components.
mKeyPattern = Pattern.compile("\\p{Alnum}+");
mUIKeyEdit = (EditText) rootView.findViewById(
R.id.uiKeyEdit);
mUIValueEdit = (EditText) rootView.findViewById(
R.id.uiValueEdit);
4. Spinner content is bound to the StoreType enum. Use ArrayAdapter to bind
together the Spinner and enum values.
...
ArrayAdapter<StoreType> adapter =
new ArrayAdapter<StoreType>(getActivity(),
android.R.layout.simple_spinner_item,
StoreType.values());
adapter.setDropDownViewResource(
android.R.layout.simple_spinner_dropdown_item);
mUITypeSpinner = (Spinner) rootView.findViewById(
R.id.uiTypeSpinner);
mUITypeSpinner.setAdapter(adapter);
...
5. The Get Value and Set Value buons trigger the private methods onGetValue()
and onSetValue(), which respecvely pull data from and push data to the store.
Use OnClickListener to bind buons and methods together:
...
mUIGetButton = (Button) rootView.findViewById(
R.id.uiGetValueButton);
mUIGetButton.setOnClickListener(new OnClickListener() {
public void onClick(View pView) {
onGetValue();

Interfacing Java and C/C++ with JNI
[ 86 ]
}
});
mUISetButton = (Button) rootView.findViewById(
R.id.uiSetValueButton);
mUISetButton.setOnClickListener(new OnClickListener() {
public void onClick(View pView) {
onSetValue();
}
});
return rootView;
}
...
6. In PlaceholderFragment, dene the onGetValue()method, which will retrieve
entries from the store according to StoreType selected in the GUI. Leave the
switch empty as it will not handle any kind of entries for now:
...
private void onGetValue() {
// Retrieves key and type entered by the user.
String key = mUIKeyEdit.getText().toString();
StoreType type = (StoreType) mUITypeSpinner
.getSelectedItem();
// Checks key is correct.
if (!mKeyPattern.matcher(key).matches()) {
displayMessage("Incorrect key.");
return;
}
// Retrieves value from the store and displays it.
// Each data type has its own access method.
switch (type) {
// Will retrieve entries soon...
}
}
...
7. Then, sll in PlaceholderFragment, dene the onSetValue()method in
StoreActivity to insert or update entries in the store. If the value format is
incorrect, a message is displayed:
...
private void onSetValue() {
// Retrieves key and type entered by the user.
String key = mUIKeyEdit.getText().toString();

Chapter 3
[ 87 ]
String value = mUIValueEdit.getText().toString();
StoreType type = (StoreType) mUITypeSpinner
.getSelectedItem();
// Checks key is correct.
if (!mKeyPattern.matcher(key).matches()) {
displayMessage("Incorrect key.");
return;
}
// Parses user entered value and saves it in the store.
// Each data type has its own access method.
try {
switch (type) {
// Will put entries soon...
}
} catch (Exception eException) {
displayMessage("Incorrect value.");
}
updateTitle();
}
...
8. Finally, a lile helper method displayMessage() in PlaceholderFragment
will help warn the user when a problem occurs. It displays a simple Android
Toast message:
...
private void displayMessage(String pMessage) {
Toast.makeText(getActivity(), pMessage, Toast.LENGTH_LONG)
.show();
}
}
}
What just happened?
We created a basic Graphical User Interface in Java with a few visual components from the
Android framework. As you can see, there is nothing specic to the NDK here. The moral of
the story is that nave code can be integrated with any exisng Java code.
Obviously, we sll have some work to do to make our nave code perform some useful
things for the Java applicaon. Let's now switch to the nave side.

Interfacing Java and C/C++ with JNI
[ 88 ]
Time for action – initializing the native store
We need to create and inialize all the structures we will use for the next secon of
the chapter:
1. Create the jni/Store.h le, which denes store data structures:
The StoreType enumeration will reflect the corresponding Java
enumeration. Leave it empty for now.
The StoreValue union will contain any of the possible store values. Leave
it empty for now too.
The StoreEntry structure contains one piece of data in the store. It is
composed of a key (a raw C string made from char*), a type (StoreType),
and a value (StoreValue).
Note that we will see how to set up and use
C++ STL strings in Chapter 9, Porting Existing
Libraries to Android.
Store is the main structure that defines a fixed size array of entries and a
length (that is, the number of allocated entries):
#ifndef _STORE_H_
#define _STORE_H_
#include <cstdint>
#define STORE_MAX_CAPACITY 16
typedef enum {
} StoreType;
typedef union {
} StoreValue;
typedef struct {
char* mKey;
StoreType mType;
StoreValue mValue;
} StoreEntry;
typedef struct {
Chapter 3
[ 89 ]
StoreEntry mEntries[STORE_MAX_CAPACITY];
int32_t mLength;
} Store;
#endif
Include guards (that is, #ifndef, #define, and #endif), which
ensure that a header file is included only once during compilation,
and can be replaced by the non-standard (but widely supported)
preprocessor instruction, #pragma once.
2. In jni/com_packtpub_Store.cpp, implement the JNI_OnLoad() inializaon
hook. Inside, inialize the unique instance of the Store data structure store into a
stac variable:
#include "com_packtpub_store_Store.h"
#include "Store.h"
static Store gStore;
JNIEXPORT jint JNI_OnLoad(JavaVM* pVM, void* reserved) {
// Store initialization.
gStore.mLength = 0;
return JNI_VERSION_1_6;
}
...
3. Update the nave store getCount() method accordingly to reect the store
allocated entry count:
...
JNIEXPORT jint JNICALL Java_com_packtpub_store_Store_getCount
(JNIEnv* pEnv, jobject pObject) {
return gStore.mLength;
}
What just happened?
We built the foundaon of our store project with a simple GUI and a nave in-memory data
array. The containing nave library is loaded with either a call to:
System.load(), which takes the library full path in parameter.
System.loadLibrary(), which requires only the library name without the path,
prex (that is, lib), or extension.

Interfacing Java and C/C++ with JNI
[ 90 ]
The nave code inializaon occurs in the JNI_OnLoad() hook, which is called only once
during the lifeme of the nave code. It is a perfect place to inialize and cache global
variables. JNI elements (classes, methods, elds, and so on) are also oen cached in
JNI_OnLoad() to improve the performance. We will see more about this throughout this
chapter and the next one.
Please note that the pendent call JNI_OnUnload() dened in the JNI specicaon is
almost useless in Android since there is no way to guarantee that a library is unloaded before
process terminaon.
The JNI_OnLoad() signature is systemacally dened as follows:
JNIEXPORT jint JNICALL JNI_OnLoad(JavaVM* vm, void* reserved);
What makes JNI_OnLoad() so useful is its JavaVM parameter. From it, you can retrieve the
JNIEnv interface pointer as follows:
JNIEXPORT jint JNI_OnLoad(JavaVM* pVM, void* reserved) {
JNIEnv *env;
if (pVM->GetEnv((void**) &env, JNI_VERSION_1_6) != JNI_OK) {
abort();
}
...
return JNI_VERSION_1_6;
}
The JNI_OnLoad() denion in a JNI library is oponal. However, if
omied, you may noce that a warning No JNI_OnLoad found in <mylib>.
so is displayed in the Logcat when you start your applicaon. This has
absolutely no consequence and can be safely ignored.
JNIEnv is the main entry point for all JNI calls, which explains why it is passed to all nave
methods. It provides a set of methods to access Java primives and arrays from nave code.
It is complemented with a reecon-like API to give full access to Java objects from nave
code. We are going to discover its features in more detail throughout this chapter and the
next one.
The JNIEnv interface pointer is thread-specic. You must not share it between
threads! Use it only on the thread it was retrieved from. Only a JavaVM element
is thread-safe and can be shared among threads.
Chapter 3
[ 91 ]
Converting Java strings in native code
The rst kind of entry we will handle is strings. Strings, which are represented as (almost)
classic objects in Java, can be manipulated on the nave side and translated to nave strings,
that is, raw character arrays, thanks to JNI. Strings are a rst-class cizen despite their
complexity inherent to their heterogeneous representaons.
In this part, we will send Java strings to the nave side and translate them to their nave
counterpart. We will also convert them back to a Java string.
The resulng project is provided with this book under the
name Store_Part5.
Time for action – handling strings in the native store
Let's handle String values in our store:
1. Open StoreType.java and specify the new String type our store handles in the
enumeraon:
public enum StoreType {
String
}
Open Store.java and define the new functionalities our native key/
value store provides (for now, only strings):
public class Store {
...
public native int getCount();
public native String getString(String pKey);
public native void setString(String pKey, String pString);
}
2. In StoreActivity.java, retrieve string entries from the nave Store in the
onGetValue() method. Do it according to the type StoreType currently selected
in the GUI (even if there is only one possible type for now):
public class StoreActivity extends Activity {
...
public static class PlaceholderFragment extends Fragment {
...
private void onGetValue() {
...
switch (type) {

Interfacing Java and C/C++ with JNI
[ 92 ]
case String:
mUIValueEdit.setText(mStore.getString(key));
break;
}
}
...
3. Insert or update string entries in the store in the onSetValue() method:
...
private void onSetValue() {
...
try {
switch (type) {
case String:
mStore.setString(key, value);
break;
}
} catch (Exception eException) {
displayMessage("Incorrect value.");
}
updateTitle();
}
...
}
}
4. In jni/Store.h, include a new header jni.h to access the JNI API.
#ifndef _STORE_H_
#define _STORE_H_
#include <cstdint>
#include "jni.h"
...
5. Next, integrate strings into the nave StoreType enumeraon and the
StoreValue union:
...
typedef enum {
StoreType_String
} StoreType;
typedef union {
char* mString;
} StoreValue;
...
Chapter 3
[ 93 ]
6. Terminate by declaring ulity methods to check, create, nd, and destroy entries.
JNIEnv and jstring are JNI types dened in the jni.h header:
...
bool isEntryValid(JNIEnv* pEnv, StoreEntry* pEntry, StoreType pType);
StoreEntry* allocateEntry(JNIEnv* pEnv, Store* pStore, jstring pKey);
StoreEntry* findEntry(JNIEnv* pEnv, Store* pStore, jstring pKey);
void releaseEntryValue(JNIEnv* pEnv, StoreEntry* pEntry);
#endif
7. Create a new le jni/Store.cpp to implement all these ulity methods.First,
isEntryValid() simply checks whether an entry is allocated and has the
expected type:
#include "Store.h"
#include <cstdlib>
#include <cstring>
bool isEntryValid(JNIEnv* pEnv, StoreEntry* pEntry, StoreType pType) {
return ((pEntry != NULL) && (pEntry->mType == pType));
}
...
8. The findEntry() method compares the key passed as a parameter with every key
in the store unl a match is found. Instead of working with classic nave strings (that
is, a char*), it receives a jstring parameter, which is the direct representaon of
a Java String on the nave side.
9. To recover a nave string from a Java String, use GetStringUTFChars()
from the JNI API to get a temporary character buer containing the converted
Java string. Its content can then be manipulated using standard C rounes.
GetStringUTFChars() must be systemacally coupled with a call to
ReleaseStringUTFChars() to release the temporary buer allocated in
GetStringUTFChars():
Java strings are stored in memory as UTF-16 strings. When
their content is extracted in native code, the returned buffer
is encoded in Modified UTF-8. Modified UTF-8 is compatible
with standard C String functions, which usually works on
string buffers composed of 8 bits per characters.
...
StoreEntry* findEntry(JNIEnv* pEnv, Store* pStore, jstring pKey) {
StoreEntry* entry = pStore->mEntries;
Interfacing Java and C/C++ with JNI
[ 94 ]
StoreEntry* entryEnd = entry + pStore->mLength;
// Compare requested key with every entry key currently stored
// until we find a matching one.
const char* tmpKey = pEnv->GetStringUTFChars(pKey, NULL);
while ((entry < entryEnd) && (strcmp(entry->mKey, tmpKey) != 0)) {
++entry;
}
pEnv->ReleaseStringUTFChars(pKey, tmpKey);
return (entry == entryEnd) ? NULL : entry;
}
...
JNI does not forgive any mistakes. If, for example, you pass NULL
as the first parameter in GetStringUTFChars(), VM will
abort immediately. In addition, Android JNI does not respect JNI
specification perfectly. Although the JNI Specification indicates
that GetStringUTFChars() might return NULL if the
memory could not be allocated, Android VMs will simply abort in
such cases.
10. Implement allocateEntry(), which either creates a new entry (that is,
increments the store length and returns the last element) or returns an exisng one
if the key already exists (aer releasing its previous value).
If the entry is a new one, convert its key to a nave string that can be kept in the
memory. Indeed, raw JNI objects live for the duraon of a nave method call and
must not be kept outside its scope:
...
StoreEntry* allocateEntry(JNIEnv* pEnv, Store* pStore, jstring pKey) {
// If entry already exists in the store, releases its content
// and keep its key.
StoreEntry* entry = findEntry(pEnv, pStore, pKey);
if (entry != NULL) {
releaseEntryValue(pEnv, entry);
}
// If entry does not exist, create a new entry
// right after the entries already stored.
else {
entry = pStore->mEntries + pStore->mLength;
// Copies the new key into its final C string buffer.
const char* tmpKey = pEnv->GetStringUTFChars(pKey, NULL);

Chapter 3
[ 95 ]
entry->mKey = new char[strlen(tmpKey) + 1];
strcpy(entry->mKey, tmpKey);
pEnv->ReleaseStringUTFChars(pKey, tmpKey);
++pStore->mLength;
}
return entry;
}
...
11. Write the last method releaseEntryValue(), which frees the memory allocated
for a value if needed:
...
void releaseEntryValue(JNIEnv* pEnv, StoreEntry* pEntry) {
switch (pEntry->mType) {
case StoreType_String:
delete pEntry->mValue.mString;
break;
}
}
12. Refresh the JNI header le jni/com_packtpub_Store.h with javah as seen in
the previous chapter. You should see two new methods Java_com_packtpub_
store_Store_getString() and Java_com_packtpub_store_Store_
setString() in it.
13. In jni/com_packtpub_Store.cpp, insert the cstdlib header le:
#include "com_packtpub_store_Store.h"
#include <cstdlib>
#include "Store.h"
...
14. With the help of the previously generated JNI header, implement the nave method
getString(). This method looks for the key passed to the store and returns its
corresponding string value. If any problem occurs, a default NULL value is returned.
15. Java strings are not real primives. Types jstring and char* cannot be used
interchangeably as we already saw. To create a Java String object from a nave
string, use NewStringUTF() from the JNI API:
...
JNIEXPORT jstring JNICALL Java_com_packtpub_store_Store_getString
(JNIEnv* pEnv, jobject pThis, jstring pKey) {
StoreEntry* entry = findEntry(pEnv, &gStore, pKey);

Interfacing Java and C/C++ with JNI
[ 96 ]
if (isEntryValid(pEnv, entry, StoreType_String)) {
// Converts a C string into a Java String.
return pEnv->NewStringUTF(entry->mValue.mString);
} else {
return NULL;
}
}
...
16. Then, implement the setString() method, which allocates an entry (that is,
creates a new entry in the store or reuses an exisng one if it has the same key) and
stores the converted Java string value in it.
17. The string value is translated from a Java string directly to our own string buer
using the GetStringUTFLength() and GetStringUTFRegion() methods from
the JNI API. This is an alternave to GetStringUTFChars() used earlier. Finally,
we must not forget to append the null character, which is the standard for a
raw C string:
...
JNIEXPORT void JNICALL Java_com_packtpub_store_Store_setString
(JNIEnv* pEnv, jobject pThis, jstring pKey, jstring pString) {
// Turns the Java string into a temporary C string.
StoreEntry* entry = allocateEntry(pEnv, &gStore, pKey);
if (entry != NULL) {
entry->mType = StoreType_String;
// Copy the temporary C string into its dynamically allocated
// final location. Then releases the temporary string.
jsize stringLength = pEnv->GetStringUTFLength(pString);
entry->mValue.mString = new char[stringLength + 1];
// Directly copies the Java String into our new C buffer.
pEnv->GetStringUTFRegion(pString, 0, stringLength,
entry->mValue.mString);
// Append the null character for string termination.
entry->mValue.mString[stringLength] = '\0'; }
}
18. Finally, update the Android.mk le to compile Store.cpp:
LOCAL_PATH := $(call my-dir)
include $(CLEAR_VARS)
LOCAL_MODULE := com_packtpub_store_Store
LOCAL_SRC_FILES := com_packtpub_store_Store.cpp Store.cpp
include $(BUILD_SHARED_LIBRARY)

Chapter 3
[ 97 ]
What just happened?
Run the applicaon. Try to save a few entries with dierent keys and values. Then try to
get them back from the nave store. We managed to pass and retrieve strings from Java
to C/C++. These values are saved in a nave memory as nave strings. Entries can then be
retrieved as Java strings from the store according to their key.
Java and C strings are completely dierent beasts. Java strings need a concrete conversion to
nave strings to allow processing of their content using standard C string rounes. Indeed,
jstring is not a representaon of a classic char* array but of a reference to a Java String
object, accessible from the Java code only.
We discovered two ways to convert Java strings to nave strings in this part:
By pre-allocang a memory buer in which the converted Java string is copied.
By retrieving a converted Java string in a memory buer managed by JNI.
Choosing either soluon depends on how memory is handled by the client code.
Native character encoding
JNI provides two kinds of methods to deal with strings:
The ones with UTF in their name that work with Modied UTF-8 strings
The ones without UTF in their name that work with UTF-16 encoding
Modied UTF-8 and UTF-16 strings are two dierent character encodings:
Modied UTF-8 is a slightly dierent avor of UTF-8 specic to Java. This encoding
can represent standard ASCII characters (each on one byte) or can grow up to 4
bytes to represent extended characters (Ararbic, Cyrilic, Greek, Hebrew, and so on).
The dierence between standard UTF-8 and Modied UTF-8 resides in the dierent
representaon of the null character, which simply does not exist in the laer
encoding. In this way, such strings can be processed with a standard C roune for
which the null character is used as an ending sennel.
UTF-16 is the real encoding employed for Java strings. Each character is represented
with two bytes, hence the Java char size. As a consequence, it is more ecient
to work with UTF-16 in nave code rather than Modied UTF-8 since they do not
require conversion. The drawback is that classic C string rounes will not work with
them since they are not null terminated.
Character encoding is a complex subject for which you can nd more informaon at http://
www.oracle.com/technetwork/articles/javase/supplementary-142654.html
and in the Android documentaon at http://developer.android.com/training/
articles/perf-jni.html#UTF_8_and_UTF_16_strings.
Interfacing Java and C/C++ with JNI
[ 98 ]
JNI String API
JNI provides several methods to handle a Java string on the nave side:
GetStringUTFLength() computes the Modied UTF-8 string length in byte
(indeed UTF-8 strings have varying character sizes), whereas GetStringLength()
computes UTF-16 string number of characters (not bytes, since UTF-16 characters
are of a xed size):
jsize GetStringUTFLength(jstring string)
jsize GetStringLength(jstring string)
GetStringUTFChars() and GetStringChars() allocate a new memory buer
managed by JNI to store the result of Java to nave (respecvely Modied UTF-8
and UTF-16) string conversion. Use it when you want to convert an enre string
without bothering with memory allocaon. The last parameter isCopy, when not
null, indicates whether the string has been internally copied by JNI or whether
the returned buer points to the real Java string memory. In Android, the returned
isCopy value is generally JNI_TRUE for GetStringUTFChars() and JNI_FALSE
for GetStringChars() (indeed the laer does not require encoding conversion):
const char* GetStringUTFChars(jstring string, jboolean* isCopy)
const jchar* GetStringChars(jstring string, jboolean* isCopy)
Although JNI specification indicates that
GetStringUTFChars() can return NULL (which means that
the operation has failed because, for example, memory could not
be allocated), in practice, this check is useless because the Dalvik
or ART VMs generally abort in this case. So simply avoid getting
into that situation! You should still keep NULL-checks if your code
aims at being portable to other Java Virtual Machines.
ReleaseStringUTFChars() and ReleaseStringChars() free the memory
buer allocated by GetStringUTFChars() and GetStringChars() when the
client has nished processing it. These methods must always be called in pairs:
void ReleaseStringUTFChars(jstring string, const char* utf)
void ReleaseStringChars(jstring string, const jchar* chars)
GetStringUTFRegion() and GetStringRegion() retrieve all or only a region
of the Java string. It works on a string buer provided and managed by the client
code. Use it when you want to manage memory allocaon (for example, to reuse an
exisng memory buer) or need to access small secons of a string:
void GetStringRegion(jstring str, jsize start, jsize len, jchar* buf)
void GetStringUTFRegion(jstring str, jsize start, jsize len, char* buf)
Chapter 3
[ 99 ]
GetStringCritical() and ReleaseStringCritical() are similar to
GetStringChars() and ReleaseStringChars() but are only available for
UTF-16 strings. According to the JNI specicaon, GetStringCritical() is more
likely to return a direct pointer without making any copy. In exchange, the caller
must not perform blocking or JNI calls and should not hold the string for a long me
(like a crical secon with threads). In pracce, Android seems to behave similarly
whether you use crical funcons or not (but this may change):
const jchar* GetStringCritical(jstring string, jboolean* isCopy)
void ReleaseStringCritical(jstring string, const jchar* carray)
This is the essenal knowledge you need to know to deal with Java strings through JNI.
Passing Java primitives to native code
The simplest kinds of elements we can handle with JNI are Java primive types. Indeed, both
the Java and nave side use praccally the same representaon for this kind of data which,
does not require any specic memory management.
In this part, we will see how to pass integers to the nave side and send them back to the
Java side.
The resulng project is provided with this book under the
name Store_Part6.
Time for action – handling primitives in the native store
1. In StoreType.java, add the newly managed integer type to the enumeraon:
public enum StoreType {
Integer,
String
}
2. Open Store.java and dene the new integer funconalies our nave
store provides:
public class Store {
...
public native int getCount();
public native int getInteger(String pKey);

Interfacing Java and C/C++ with JNI
[ 100 ]
public native void setInteger(String pKey, int pInt);
public native String getString(String pKey);
public native void setString(String pKey, String pString);
}
3. In the StoreActivity class, update the onGetValue() method to retrieve
integer entries from the store when they are selected in the GUI:
public class StoreActivity extends Activity {
...
public static class PlaceholderFragment extends Fragment {
...
private void onGetValue() {
...
switch (type) {
case Integer:
mUIValueEdit.setText(Integer.toString(mStore
.getInteger(key)));
break;
case String:
mUIValueEdit.setText(mStore.getString(key));
break;
}
}
...
4. Also, insert or update integer entries in the store in the onSetValue() method.
The entry data needs to be parsed before being passed to the nave side:
...
private void onSetValue() {
...
try {
switch (type) {
case Integer:
mStore.setInteger(key, Integer.parseInt(value));
break;
case String:
mStore.setString(key, value);
break;
}
} catch (Exception eException) {
displayMessage("Incorrect value.");

Chapter 3
[ 101 ]
}
updateTitle();
}
...
}
}
5. In jni/Store.h, append the integer type in the nave StoreType enumeraon
and the StoreValue union:
...
typedef enum {
StoreType_Integer,
StoreType_String
} StoreType;
typedef union {
int32_t mInteger;
char* mString;
} StoreValue;
...
6. Refresh the JNI header le jni/com_packtpub_Store.h with javah. Two new
methods Java_com_packtpub_store_Store_getInteger() and Java_com_
packtpub_store_Store_getInteger() should appear.
7. In jni/com_packtpub_Store.cpp, implement getInteger() with the help of
the generated JNI header. This method simply returns the integer value of an entry
without doing any specic conversion other than an implicit cast from int32_t to
jint. If any problem occurs, during retrieval, a default value is returned:
...
JNIEXPORT jint JNICALL Java_com_packtpub_store_Store_getInteger
(JNIEnv* pEnv, jobject pThis, jstring pKey) {
StoreEntry* entry = findEntry(pEnv, &gStore, pKey);
if (isEntryValid(pEnv, entry, StoreType_Integer)) {
return entry->mValue.mInteger;
} else {
return 0;
}
}
...

Interfacing Java and C/C++ with JNI
[ 102 ]
8. The second method setInteger() stores the given integer value in the allocated
entry. Note how here too that the passed JNI integer can be reversely cast to a C/
C++ integer:
...
JNIEXPORT void JNICALL Java_com_packtpub_store_Store_setInteger
(JNIEnv* pEnv, jobject pThis, jstring pKey, jint pInteger) {
StoreEntry* entry = allocateEntry(pEnv, &gStore, pKey);
if (entry != NULL) {
entry->mType = StoreType_Integer;
entry->mValue.mInteger = pInteger;
}
}
What just happened?
Run the applicaon. Try to save a few entries with dierent keys, types, and values. Then
try to get them back from the nave store. We have this me managed to pass and retrieve
integer primives from Java to C/C++.
Integer primives wear several dresses during nave calls; rst, int in Java code, then jint
during transfer from/to Java code, and nally, int or int32_t in nave code. Obviously, we
could have kept the JNI representaon jint in nave code if we wanted to, since all of these
types are simply equivalent. In other words, jint is simply an alias.
The int32_t type is typedef introduced by the C99 standard library with
the aim at more portability. The dierence with the standard int type is that
its size-in-bytes is xed for all compilers and plaorms. More numeric types
are dened in stdint.h (in C) or cstdint (in C++).
All primive types have their proper alias in JNI:
Java type JNI type C type Stdint C type
boolean Jboolean unsigned char uint8_t
byte Jbyte signed char int8_t
char Jchar unsigned short uint16_t
double Jdouble double N/A
float jfloat float N/A
int jint Int int32_t
long jlong long long int64_t
short jshort Short int16_t

Chapter 3
[ 103 ]
You can use them exactly the same way we used integers in this part. More informaon
about primive types in JNI can be found at http://docs.oracle.com/javase/6/
docs/technotes/guides/jni/spec/types.html
Have a go hero – passing and returning other primitive types
The current store deals only with integers and strings. Based on this model, try to implement
store methods for other primive types: boolean, byte, char, double, float, long,
and short.
The resulng project is provided with this book under the
name Store_Part6_Full.
Referencing Java objects from native code
We know from the previous secon that a string is represented in JNI as jstring, which
is in fact a Java object, which means that it is possible to exchange any Java object through
JNI! However, because nave code cannot understand or access Java directly, all Java objects
have the same representaon, jobject.
In this part, we will focus on how to save an object on the nave side and how to send it
back to Java. As an example, we will work with a custom object Color, although any other
type of object would work too.
The resulng project is provided with this book under the
name Store_Part7.
Time for action – saving references to Objects in native Store
1. Create a new Java class com.packtpub.store.Color encapsulang an integer
representaon of a color. This integer is parsed from String containing HTML code
(for example, #FF0000) thanks to the android.graphics.Color class:
package com.packtpub.store;
import android.text.TextUtils;
public class Color {
private int mColor;

Interfacing Java and C/C++ with JNI
[ 104 ]
public Color(String pColor) {
if (TextUtils.isEmpty(pColor)) {
throw new IllegalArgumentException();
}
mColor = android.graphics.Color.parseColor(pColor);
}
@Override
public String toString() {
return String.format("#%06X", mColor);
}
}
2. In StoreType.java, append the new Color data type to the enumeraon:
public enum StoreType {
Integer,
String,
Color
}
3. In the Store class, append two new nave methods to retrieve and save a
Color object:
public class Store {
...
public native Color getColor(String pKey);
public native void setColor(String pKey, Color pColor);
}
4. Open StoreActivity.java and update methods onGetValue() and
onSetValue() to parse and display Color instances:
public class StoreActivity extends Activity {
...
public static class PlaceholderFragment extends Fragment {
...
private void onGetValue() {
...
switch (type) {
...
case Color:
mUIValueEdit.setText(mStore.getColor(key)
.toString());
break;
}
}

Chapter 3
[ 105 ]
private void onSetValue() {
...
try {
switch (type) {
...
case Color:
mStore.setColor(key, new Color(value));
break;
}
} catch (Exception eException) {
displayMessage("Incorrect value.");
}
updateTitle();
}
...
}
}
5. In jni/Store.h, append the new color type to the StoreType enumeraon
and add a new member to the StoreValue union. But what type should you use,
Color is an object known only from Java? In JNI, all java objects have the same
type; jobject, an (indirect) object reference:
...
typedef enum {
...
StoreType_String,
StoreType_Color
} StoreType;
typedef union {
...
char* mString;
jobject mColor;
} StoreValue;
...
6. Regenerate the JNI header le jni/com_packtpub_Store.h with javah. You
should see two new methods Java_com_packtpub_store_Store_getColor()
and Java_com_packtpub_store_Store_setColor() in it.

Interfacing Java and C/C++ with JNI
[ 106 ]
7. Open jni/com_packtpub_Store.cpp and implement the two freshly generated
methods getColor() and setColor(). The rst one simply returns the Java Color
object kept in the store entry as shown in the following code:
...
JNIEXPORT jobject JNICALL Java_com_packtpub_store_Store_getColor
(JNIEnv* pEnv, jobject pThis, jstring pKey) {
StoreEntry* entry = findEntry(pEnv, &gStore, pKey);
if (isEntryValid(pEnv, entry, StoreType_Color)) {
return entry->mValue.mColor;
} else {
return NULL;
}
}
...
The real subtlees are introduced in the second method setColor(). Indeed, at
rst sight, simply saving the jobject value in the store entry would seem sucient.
However, this assumpon is wrong. Objects passed in parameters or created inside
a JNI method are Local references. Local references cannot be kept in nave code
outside of the nave method scope (such as for strings).
8. To be allowed to keep a Java object reference in nave code aer nave method
returns, they must be turned into Global references in order to inform the Dalvik
VM that they must not be garbage collected. To do so, the JNI API provides the
NewGlobalRef() method:
...
JNIEXPORT void JNICALL Java_com_packtpub_store_Store_setColor
(JNIEnv* pEnv, jobject pThis, jstring pKey, jobject pColor) {
// Save the Color reference in the store.
StoreEntry* entry = allocateEntry(pEnv, &gStore, pKey);
if (entry != NULL) {
entry->mType = StoreType_Color;
// The Java Color is going to be stored on the native side.
// Need to keep a global reference to avoid a potential
// garbage collection after method returns.
entry->mValue.mColor = pEnv->NewGlobalRef(pColor);
}
}

Chapter 3
[ 107 ]
9. In Store.cpp, modify releaseEntryValue() to delete the global
reference when the entry is replaced by a new one. This is done with the
DeleteGlobalRef() method, which is the counterpart of NewGlobalRef():
...
void releaseEntryValue(JNIEnv* pEnv, StoreEntry* pEntry) {
switch (pEntry->mType) {
case StoreType_String:
delete pEntry->mValue.mString;
break;
case StoreType_Color:
// Unreferences the object for garbage collection.
pEnv->DeleteGlobalRef(pEntry->mValue.mColor);
break;
}
}
What just happened?
Run the applicaon. Enter and save a color value such as #FF0000 or red, which is a
predened value allowed by the Android color parser. Get the entry back from the store. We
managed to reference a Java object on the nave side! Java objects are not and cannot be
converted to C++ objects. Both are inherently dierent. Thus, to keep Java objects on the
nave side, we must keep references to them using the JNI API.
All objects coming from Java are represented by jobject, even jstring (which is in fact a
typedef over jobject internally). A jobject is just a dumb "pointer" without any smart
garbage collecon mechanism (aer all, we want to get rid of Java, at least parally). It does
not give you a direct reference to the Java object memory but rather an indirect one. Indeed,
Java objects do not have a xed locaon in memory on the opposite to C++ objects. They
may be moved during their lifeme. Regardless, it would be a bad idea to mess with a Java
object representaon in the memory.
Local references
Nave calls have a scope limited to a method, which means that as soon as a nave method
ends, the VM becomes in charge again. The JNI specicaon uses this fact to its advantage
in order to keep object references local to method boundaries. This means that jobject
can only be used safely inside the method it was given to. Once nave method returns, the
Dalvik VM has no way to know if nave code sll holds object references and can decide to
collect them at any me.
Interfacing Java and C/C++ with JNI
[ 108 ]
These kinds of references are called Local references. They are automacally freed (the
reference, not the object although the garbage collector might too) when nave method
returns to allow proper garbage collecon later in the Java code. For example, the following
piece of code should be strictly prohibited. Keeping such a reference outside the JNI method
will eventually lead to an undened behavior (a memory corrupon, a crash, and so on):
static jobject gMyReference;
JNIEXPORT void JNICALL Java_MyClass_myMethod(JNIEnv* pEnv,
jobject pThis, jobject pRef) {
gMyReference = pRef;
...
}
// Later on...
env->CallVoidMethod(gMyReference, ...);
Objects are passed to nave methods as Local references. Every jobject
returned by JNI funcons (except NewGlobalRef()) is a Local reference.
Just remember that everything is a Local reference by default.
JNI provides several methods for managing Local references:
1. NewLocalRef() to create one explicitly (from a Global references, for example),
although this is rarely needed in pracce:
jobject NewLocalRef(jobject ref)
2. DeleteLocalRef() to delete one when it is no longer needed:
void DeleteLocalRef(jobject localRef)
Local references cannot be used outside the method scope
and cannot be shared between threads, even during a single
nave call!
You are not required to delete Local references explicitly. However, according to the JNI
specicaon, a JVM is only required to store 16 Local references at the same me and may
refuse to create more (this is implementaon-specic). It is thus good pracce to release
unused Local references as soon as possible, especially when working with arrays.
Chapter 3
[ 109 ]
Hopefully, JNI provides a few more methods to help working with Local references.
1. EnsureLocalCapacity() informs the VM that it needs more Local references.
This method return -1 and throws a Java OutOfMemoryError when it cannot
guarantee the requested capacity:
jint EnsureLocalCapacity(jint capacity)
2. PushLocalFrame() and PopLocalFrame() oer a second way to allocate
more Local references. It can be understood as a way to batch Local slot allocaon
and Local references deleon. This method also returns -1 and throws a Java
OutOfMemoryError when it cannot guarantee the requested capacity:
jint PushLocalFrame(jint capacity)
jobject PopLocalFrame(jobject result)
Until Android 4.0 Ice Cream Sandwich, Local references were
actually direct pointers, which means they could be kept beyond
their natural scope and still be working. This is not the case
anymore and such buggy code must be avoided.
Global references
To be able to use an object reference outside the method scope or keep it for a long period
of me, references must be made Global. Global references also allow sharing objects
between threads, which is not the case with Local references.
JNI provides two methods for this purpose:
1. NewGlobalRef() to create Global references prevenng garbage collecon of the
pointed object and allowing it to be shared between threads. It is possible for two
references for the same object to be dierent:
jobject NewGlobalRef(jobject obj)
2. DeleteGlobalRef() to delete Global references when they are no longer needed.
Without it, the Dalvik VM would consider that objects are sll referenced and would
never collect them:
void DeleteGlobalRef(jobject globalRef)
Interfacing Java and C/C++ with JNI
[ 110 ]
3. IsSameObject() to compare two object references, instead of using ==, which is
not a correct way to compare references:
jboolean IsSameObject(jobject ref1, jobject ref2)
Never forget to pair New<Reference Type>Ref() with
Delete<Reference Type>Ref(). Failure to do so
results in a memory leak.
Weak references
Weak references are the last kind of reference available in JNI. They are similar to Global
references in that they can be kept between JNI calls and shared between threads. However,
unlike Global references, they do not prevent garbage collecon. Thus, this kind of reference
must be used with care as it can become invalid at any moment, unless you create a Global
or Local reference from them before use each me you need it (and release it right aer!).
When used appropriately, Weak references are useful to prevent memory
leaks. If you have already done some Android development, you may
already know one of the most common leaks: keeping a "hard" reference to
an Acvity from a background thread (typically, an AsyncTask) to nofy
the Acvity later on when processing is over. Indeed, the Acvity might
be destroyed (because the user rotated the screen, for example) before a
nocaon is sent. When using a Weak reference, the Acvity can sll be
garbage collected and memory freed.
NewWeakGlobalRef() and DeleteWeakGlobalRef() are the only methods necessary to
create and delete a Weak reference:
jweak NewWeakGlobalRef(JNIEnv *env, jobject obj);
void DeleteWeakGlobalRef(JNIEnv *env, jweak obj);
These methods return a jweak reference, which can be cast to the input object if needed
(for example, if you create a reference to jclass, then the returned jweak can be cast into
jclass or jobject).
Chapter 3
[ 111 ]
However, you should not use it directly but rather pass it to NewGlobalRef() or
NewLocalRef() and use their result as usual. To ensure a local or Global reference
issued from a Weak reference is valid, simply check whether the reference returned by
NewGlobalRef() or NewLocalRef() is NULL. Once you are nished with the object,
you can delete the Global or Local reference. Restart the process every me you work
with that Weak object again. For example:
jobject myObject = ...;
// Keep a reference to that object until it is garbage collected.
jweak weakRef = pEnv->NewWeakGlobalRef(myObject);
...
// Later on, get a real reference, hoping it is still available.
jobject localRef = pEnv->NewLocalRef(weakRef);
if (!localRef) {
// Do some stuff...
pEnv->DeleteLocalRef(localRef);
} else {
// Object has been garbage collected, reference is unusable...
}
...
// Later on, when weak reference is no more needed.
pEnv->DeleteWeakGlobalRef(weakRef);
To check whether a Weak reference itself points to an object, compare jweak to NULL using
IsSameObject() (do not use ==):
jboolean IsSameObject(jobject ref1, jobject ref2)
Do not try to check the Weak reference state before creang a Global or Local reference
because the pointed object might be collected concurrently.
Prior to Android 2.2 Froyo, Weak references simply did not exist. Unl
Android 4.0 Ice Cream Sandwich, they could not be used in JNI calls
except NewGlobalRef() or NewLocalRef(). Although this is not an
obligaon anymore, using weak references directly in other JNI calls should
be considered a bad pracce.
For more informaon on the subject, have a look at the JNI specicaon at http://docs.
oracle.com/javase/6/docs/technotes/guides/jni/spec/jniTOC.html.
Interfacing Java and C/C++ with JNI
[ 112 ]
Managing Java arrays
There is one last type of data we have not talked about yet: arrays. Arrays have a specic
place in Java as well as in JNI. They have their proper types and APIs, although Java arrays are
also objects at their root.
In this part, we will improve our store by leng users enter a set of values simultaneously
in an entry. This set is going to be communicated to the nave store as a Java array, which in
turn is going to be stored as a classic C array.
The resulng project is provided with this book under the
name Store_Part8.
Time for action – handling Java arrays in native Store
To help us handle operaons on arrays, let's download a helper library, Google Guava
(release 18.0 at the me of wring this book) available at http://code.google.com/p/
guava-libraries/. Guava oers many useful methods to deal with primives and arrays,
and perform "pseudo-funconal" programming.
Copy guava jar in the project libs directory. Open the Properes project and go to Java
Build Path | Libraries. Reference Guava jar by clicking on the Add JARs... buon and validate.
1. Edit the StoreType.java enumeraon and add three new values:
IntegerArray, StringArray, and ColorArray:
public enum StoreType {
...
Color,
IntegerArray,
StringArray,
ColorArray
}
2. Open Store.java and add new methods to retrieve and save int, String, and
Color arrays:
public class Store {
...
public native int[] getIntegerArray(String pKey);
public native void setIntegerArray(String pKey, int[] pIntArray);
public native String[] getStringArray(String pKey);
public native void setStringArray(String pKey,
String[] pStringArray);

Chapter 3
[ 113 ]
public native Color[] getColorArray(String pKey);
public native void setColorArray(String pKey,Color[] pColorArray);
}
3. Edit StoreActivity.java to connect nave methods to the GUI.
Modify the onGetValue() method so that it retrieves an array from the store
depending on its type, concatenates its values with a semicolon separator (thanks to
Guava joiners), and nally, displays them:
public class StoreActivity extends Activity {
...
public static class PlaceholderFragment extends Fragment {
...
private void onGetValue() {
...
switch (type) {
...
case IntegerArray:
mUIValueEdit.setText(Ints.join(";", mStore
.getIntegerArray(key)));
break;
case StringArray:
mUIValueEdit.setText(Joiner.on(";").join(
mStore.getStringArray(key)));
break;
case ColorArray:
mUIValueEdit.setText(Joiner.on(";").join(mStore
.getColorArray(key)));
break; case IntegerArray:
}
}
...
4. Improve onSetValue() to convert a list of values into an array before transming
it to Store (thanks to the Guava transformaon feature):
...
private void onSetValue() {
...
try {
switch (type) {
...
case IntegerArray:
mStore.setIntegerArray(key, Ints.toArray(
stringToList(new Function<String, Integer>() {

Interfacing Java and C/C++ with JNI
[ 114 ]
public Integer apply(String pSubValue) {
return Integer.parseInt(pSubValue);
}
}, value)));
break;
case StringArray:
String[] stringArray = value.split(";");
mStore.setStringArray(key, stringArray);
break;
case ColorArray:
List<Color> idList = stringToList(
new Function<String, Color>() {
public Color apply(String pSubValue) {
return new Color(pSubValue);
}
}, value);
mStore.setColorArray(key, idList.toArray(
new Color[idList.size()]));
break;
}
} catch (Exception eException) {
displayMessage("Incorrect value.");
}
updateTitle();
}
...
5. Write a helper method stringToList() to help you convert a string into a list of
the target type:
...
private <TType> List<TType> stringToList(
Function<String, TType> pConversion,
String pValue) {
String[] splitArray = pValue.split(";");
List<String> splitList = Arrays.asList(splitArray);
return Lists.transform(splitList, pConversion);
}
}
}

Chapter 3
[ 115 ]
6. In jni/Store.h, add the new array types to the StoreType enumeraon. Also,
declare the new elds mIntegerArray, mStringArray, and mColorArray in the
StoreValue union. Store arrays are represented as raw C arrays (that is, a pointer):
...
typedef enum {
...
StoreType_Color,
StoreType_IntegerArray,
StoreType_StringArray,
StoreType_ColorArray
} StoreType;
typedef union {
...
jobject mColor;
int32_t* mIntegerArray;
char** mStringArray;
jobject* mColorArray;
} StoreValue;
...
7. We also need to remember the length of these arrays. Enter this informaon in a
new eld mLength in StoreEntry:
...
typedef struct {
char* mKey;
StoreType mType;
StoreValue mValue;
int32_t mLength;
} StoreEntry;
...
8. In jni/Store.cpp, insert cases in releaseEntryValue() for the new arrays
types. Indeed, allocated arrays have to be freed when the corresponding entry is
released. As colors are Java objects, delete the Global references saved within each
array item, else garbage collecon will never happen (causing a memory leak):
void releaseEntryValue(JNIEnv* pEnv, StoreEntry* pEntry) {
switch (pEntry->mType) {
...
case StoreType_IntegerArray:
delete[] pEntry->mValue.mIntegerArray;
break;
case StoreType_StringArray:
// Destroys every C string pointed by the String array

Interfacing Java and C/C++ with JNI
[ 116 ]
// before releasing it.
for (int32_t i = 0; i < pEntry->mLength; ++i) {
delete pEntry->mValue.mStringArray[i];
}
delete[] pEntry->mValue.mStringArray;
break;
case StoreType_ColorArray:
// Unreferences every Id before releasing the Id array.
for (int32_t i = 0; i < pEntry->mLength; ++i) {
pEnv->DeleteGlobalRef(pEntry->mValue.mColorArray[i]);
}
delete[] pEntry->mValue.mColorArray;
break;
}
}
...
9. Regenerate the JNI header jni/com_packtpub_Store.h with Javah. In jni/
com_packtpub_Store.cpp, implement all these new methods. To do so, rst add
the csdtint include.
#include "com_packtpub_store_Store.h"
#include <cstdint>
#include <cstdlib>
#include "Store.h"
...
10. Then, cache the String and Color JNI Classes to be able to create, in the following
steps, object arrays of these types. Classes are accessible by reecon from JNIEnv
itself, and are retrievable from the JavaVM given to JNI_OnLoad().
We need to check whether the found classes are null in case they cannot be loaded.
If that happens, an excepon is raised by the VM so that we can return immediately:
...
static jclass StringClass;
static jclass ColorClass;
JNIEXPORT jint JNI_OnLoad(JavaVM* pVM, void* reserved) {
JNIEnv *env;
if (pVM->GetEnv((void**) &env, JNI_VERSION_1_6) != JNI_OK) {
abort();
}
// If returned class is null, an exception is raised by the VM.
jclass StringClassTmp = env->FindClass("java/lang/String");
if (StringClassTmp == NULL) abort();

Chapter 3
[ 117 ]
StringClass = (jclass) env->NewGlobalRef(StringClassTmp);
env->DeleteLocalRef(StringClassTmp);
jclass ColorClassTmp = env->FindClass("com/packtpub/store/Color");
if (ColorClassTmp == NULL) abort();
ColorClass = (jclass) env->NewGlobalRef(ColorClassTmp);
env->DeleteLocalRef(ColorClassTmp);
// Store initialization.
gStore.mLength = 0;
return JNI_VERSION_1_6;
}
...
11. Write a getIntegerArray() implementaon. A JNI array of integers is
represented with the jintArray type. If an int is equivalent to jint, an int*
array is absolutely not equivalent to jintArray. The rst is a pointer to a memory
buer, whereas the second is a reference to an object.
Thus, to return jintArray here, instanate a new Java integer array with the
NewIntArray() JNI API method. Then, use SetIntArrayRegion() to copy the
nave int buer content into jintArray:
...
JNIEXPORT jintArray JNICALL
Java_com_packtpub_store_Store_getIntegerArray
(JNIEnv* pEnv, jobject pThis, jstring pKey) {
StoreEntry* entry = findEntry(pEnv, &gStore, pKey);
if (isEntryValid(pEnv, entry, StoreType_IntegerArray)) {
jintArray javaArray = pEnv->NewIntArray(entry->mLength);
pEnv->SetIntArrayRegion(javaArray, 0, entry->mLength,
entry->mValue.mIntegerArray);
return javaArray;
} else {
return NULL;
}
}
...
12. To save a Java array in nave code, the inverse operaon GetIntArrayRegion()
exists. The only way to allocate a suitable memory buer is to measure the array size
with GetArrayLength():
...
JNIEXPORT void JNICALL Java_com_packtpub_store_Store_setIntegerArray
(JNIEnv* pEnv, jobject pThis, jstring pKey,
jintArray pIntegerArray) {
StoreEntry* entry = allocateEntry(pEnv, &gStore, pKey);

Interfacing Java and C/C++ with JNI
[ 118 ]
if (entry != NULL) {
jsize length = pEnv->GetArrayLength(pIntegerArray);
int32_t* array = new int32_t[length];
pEnv->GetIntArrayRegion(pIntegerArray, 0, length, array);
entry->mType = StoreType_IntegerArray;
entry->mLength = length;
entry->mValue.mIntegerArray = array;
}
}
...
Java object arrays are dierent than Java primive arrays. They are instanated with a class
type (here, the cached String jclass) because Java arrays are monotype. Object arrays
themselves are represented with the jobjectArray type and can be created with the
NewObjectArray() JNI API method.
Unlike primive arrays, it is not possible to work on all elements at the same me. Instead,
objects are set one by one with SetObjectArrayElement(). Here, the nave array is
lled with String objects stored on the nave side, which keeps Global references to them.
So there is no need to delete or create any reference here except the reference to the newly
allocated string.
...
JNIEXPORT jobjectArray JNICALL
Java_com_packtpub_store_Store_getStringArray
(JNIEnv* pEnv, jobject pThis, jstring pKey) {
StoreEntry* entry = findEntry(pEnv, &gStore, pKey);
if (isEntryValid(pEnv, entry, StoreType_StringArray)) {
// An array of String in Java is in fact an array of object.
jobjectArray javaArray = pEnv->NewObjectArray(entry->mLength,
StringClass, NULL);
// Creates a new Java String object for each C string stored.
// Reference to the String can be removed right after it is
// added to the Java array, as the latter holds a reference
// to the String object.
for (int32_t i = 0; i < entry->mLength; ++i) {
jstring string = pEnv->NewStringUTF(
entry->mValue.mStringArray[i]);
// Puts the new string in the array
pEnv->SetObjectArrayElement(javaArray, i, string);
// Do it here to avoid holding many useless local refs.
pEnv->DeleteLocalRef(string);
}

Chapter 3
[ 119 ]
return javaArray;
} else {
return NULL;
}
}
...
In setStringArray(), array elements are retrieved one by one with
GetObjectArrayElement(). Returned references are local and should be made global to
store them safely on the nave side.
...
JNIEXPORT void JNICALL Java_com_packtpub_store_Store_setStringArray
(JNIEnv* pEnv, jobject pThis, jstring pKey,
jobjectArray pStringArray) {
// Creates a new entry with the new String array.
StoreEntry* entry = allocateEntry(pEnv, &gStore, pKey);
if (entry != NULL) {
// Allocates an array of C string.
jsize length = pEnv->GetArrayLength(pStringArray);
char** array = new char*[length];
// Fills the C array with a copy of each input Java string.
for (int32_t i = 0; i < length; ++i) {
// Gets the current Java String from the input Java array.
// Object arrays can be accessed element by element only.
jstring string = (jstring)
pEnv->GetObjectArrayElement(pStringArray, i);
jsize stringLength = pEnv->GetStringUTFLength(string);
array[i] = new char[stringLength + 1];
// Directly copies the Java String into our new C buffer.
pEnv->GetStringUTFRegion(string,0,stringLength, array[i]);
// Append the null character for string termination.
array[i][stringLength] = '\0';
// No need to keep a reference to the Java string anymore.
pEnv->DeleteLocalRef(string);
}
entry->mType = StoreType_StringArray;
entry->mLength = length;
entry->mValue.mStringArray = array;
}
}
Implement the same operaons for colors, starng with getColorArray(). Since strings
and colors are both objects on the Java side, the returned array can be created in the same
way with NewObjectArray().

Interfacing Java and C/C++ with JNI
[ 120 ]
Place each Color reference saved inside the array using the JNI method
SetObjectArrayElement(). Since colors have been stored on the nave side as
global Java references, no Local reference needs to be created or deleted:
...
JNIEXPORT jobjectArray JNICALL
Java_com_packtpub_store_Store_getColorArray
(JNIEnv* pEnv, jobject pThis, jstring pKey) {
StoreEntry* entry = findEntry(pEnv, &gStore, pKey);
if (isEntryValid(pEnv, entry, StoreType_ColorArray)) {
// Creates a new array with objects of type Id.
jobjectArray javaArray = pEnv->NewObjectArray(entry->mLength,
ColorClass, NULL);
// Fills the array with the Color objects stored on the native
// side, which keeps a global reference to them. So no need
// to delete or create any reference here.
for (int32_t i = 0; i < entry->mLength; ++i) {
pEnv->SetObjectArrayElement(javaArray, i,
entry->mValue.mColorArray[i]);
}
return javaArray;
} else {
return NULL;
}
}
...
In setColorArray(), color elements are also retrieved one by one with
GetObjectArrayElement(). Here, again, returned references are local and should be
made global to store them safely on the nave side:
...
JNIEXPORT void JNICALL Java_com_packtpub_store_Store_setColorArray
(JNIEnv* pEnv, jobject pThis, jstring pKey,
jobjectArray pColorArray) {
// Saves the Color array in the store.
StoreEntry* entry = allocateEntry(pEnv, &gStore, pKey);
if (entry != NULL) {
// Allocates a C array of Color objects.
jsize length = pEnv->GetArrayLength(pColorArray);
jobject* array = new jobject[length];
// Fills the C array with a copy of each input Java Color.
for (int32_t i = 0; i < length; ++i) {
// Gets the current Color object from the input Java array.

Chapter 3
[ 121 ]
// Object arrays can be accessed element by element only.
jobject localColor = pEnv->GetObjectArrayElement(
pColorArray, i);
// The Java Color is going to be stored on the native side
// Need to keep a global reference to avoid a potential
// garbage collection after method returns.
array[i] = pEnv->NewGlobalRef(localColor);
// We have a global reference to the Color, so we can now
// get rid of the local one.
pEnv->DeleteLocalRef(localColor);
}
entry->mType = StoreType_ColorArray;
entry->mLength = length;
entry->mValue.mColorArray = array;
}
}
What just happened?
We transmied Java arrays from the Java to the nave side and vice versa. Java arrays are
Java objects that can only be manipulated through a dedicated JNI API. They cannot be cast
into nave C/C++ arrays and are not usable the same way.
We also saw how to leverage the JNI_OnLoad() callback to cache JNI class descriptors.
Class descriptors, of type jclass (which is also jobject behind the scenes), are equivalent
to Class<?> in Java. They allow to dene the type of array we want, a bit like the reecon
API in Java. We will come back to this subject in the next chapter.
Primitive arrays
Primives array types available are jbooleanArray, jbyteArray, jcharArray,
jdoubleArray, jfloatArray, jlongArray, and jshortArray. These types represent
references to real Java arrays.
These arrays can be manipulated with several methods provided by JNI:
1. New<Primitive>Array() to create a new Java array:
jintArray NewIntArray(jsize length)
2. GetArrayLength() retrieves the length of an array:
jsize GetArrayLength(jarray array)

Interfacing Java and C/C++ with JNI
[ 122 ]
3. Get<Primitive>ArrayElements() retrieves a whole array into a memory buer
allocated by JNI. The last parameter isCopy, when not null, indicates whether an
array has been internally copied by JNI or it has returned buer points to the real
Java string memory:
jint* GetIntArrayElements(jintArray array, jboolean* isCopy)
4. Release<Primitive>ArrayElements() releases the memory buer allocated
by Get<Primitive>ArrayElements(). Always use both in pairs. The last
parameter mode is related to the isCopy parameter and indicates the following:
If 0, then JNI should copy the modified array back into the initial Java
array and tell JNI to release its temporary memory buffer. This is the most
common flag.
If JNI_COMMIT, then JNI should copy the modified array back into the
initial array but without releasing the memory. That way, the client code
can transmit the result back to Java while still pursuing its work on the
memory buffer.
If JNI_ABORT, then JNI must discard any change made in the memory
buffer and leave the Java array unchanged. This will not work correctly if the
temporary native memory buffer is not a copy.
void ReleaseIntArrayElements(jintArray array, jint* elems, jint
mode)
5. Get<Primitive>ArrayRegion() retrieves all or part of an array into a memory
buer allocated by the client code. For example for integers:
void GetIntArrayRegion(jintArray array, jsize start, jsize len,
jint* buf)
6. Set<Primitive>ArrayRegion() inializes all or part of a Java array from a
nave buer managed by the client code. For example for integers:
void SetIntArrayRegion(jintArray array, jsize start, jsize len,
const jint* buf)
7. Get<Primitive>ArrayCritical() and Release<Primitive>ArrayCriti
cal() are similar to Get<Primitive>ArrayElements() and Release<Primi
tive>ArrayElements() but are only available to provide a direct access to the
target array (instead of a copy). In exchange, the caller must not perform blocking
or JNI calls and should not hold the array for a long me (like a crical secon with
threads). Not that the same two methods are featured for all primives:
void* GetPrimitiveArrayCritical(jarray array, jboolean* isCopy)
void ReleasePrimitiveArrayCritical(jarray array, void* carray,
jint mode)
Chapter 3
[ 123 ]
Have a go hero – handling other array types
With the knowledge freshly acquired, you can implement store methods for other array
types: jbooleanArray, jbyteArray, jcharArray, jdoubleArray, jfloatArray,
jlongArray, and jshortArray.
As an example, you can write the setBooleanArray() method for the jbooleanArray
type using GetBooleanArrayElements() and ReleaseBooleanArrayElements()
instead of GetBooleanArrayRegion(). The result should look like the following, with
both methods called in a pair with memcpy() in between:
...
JNIEXPORT void JNICALL Java_com_packtpub_store_Store_setBooleanArray
(JNIEnv* pEnv, jobject pThis, jstring pKey,
jbooleanArray pBooleanArray) {
// Finds/creates an entry in the store and fills its content.
StoreEntry* entry = allocateEntry(pEnv, &gStore, pKey);
if (entry != NULL) {
entry->mType = StoreType_BooleanArray;
jsize length = pEnv->GetArrayLength(pBooleanArray);
uint8_t* array = new uint8_t[length];
// Retrieves array content.
jboolean* arrayTmp = pEnv->GetBooleanArrayElements(
pBooleanArray, NULL);
memcpy(array, arrayTmp, length * sizeof(uint8_t));
pEnv->ReleaseBooleanArrayElements(pBooleanArray,
arrayTmp, 0);
entry->mType = StoreType_BooleanArray;
entry->mValue.mBooleanArray = array;
entry->mLength = length;
}
}
...
The resulng project is provided with this book under the
name Store_Part8_Full.

Interfacing Java and C/C++ with JNI
[ 124 ]
Object arrays
Object arrays are named jobjectArray in JNI and represent a reference to a Java Object
array. Objects arrays are specic because unlike primive arrays, each array element is a
reference to an object. As a consequence, a new Global reference is automacally registered
each me an object is inserted in the array. That way, when nave calls end, references do
not get garbage collected. Note that object arrays cannot be converted to "nave" arrays
like primives.
Object arrays can be manipulated with several methods provided by JNI:
1. NewObjectArray() creates a new object array instance:
jobjectArray NewObjectArray(jsize length, jclass elementClass,
jobject initialElement);
2. GetArrayLength() retrieves the length of an array (same method as primives):
jsize GetArrayLength(jarray array)
3. GetObjectArrayElement() retrieves one single object reference from a Java
array. The returned reference is Local:
jobject GetObjectArrayElement(jobjectArray array, jsize index)
4. SetObjectArrayElement() puts one single object reference into a Java array. A
Global reference is created implicitly:
void SetObjectArrayElement(jobjectArray array, jsize index,
jobject value)
See http://docs.oracle.com/javase/6/docs/technotes/guides/jni/spec/
functions.html for a more exhausve list of JNI funcons.
Raising and checking Java exceptions
Error handling in the Store project is not really sasfying. If the requested key cannot be
found or if the retrieved value type does not match the requested type, a default value is
returned. Do not even try with a Color entry. We denitely need a way to indicate that an
error occurred! And what beer way to indicate an error than an excepon?
JNI provides the necessary API to raise an excepon at the JVM level. These excepons are
the ones you can then catch in Java. They have nothing in common, neither the syntax nor
the ow, with the usual C++ excepons you can nd in other programs (we will see more
about them in Chapter 9, Porng Exisng Libraries to Android).
Chapter 3
[ 125 ]
In this part, we will see how to raise JNI excepons from the nave to the Java side.
The resulng project is provided with this book under the
name Store_Part9.
Time for action – raising & catching exceptions in native Store
1. Create the Java excepon com.packtpub.exception.InvalidTypeException
of type Exception as follows:
package com.packtpub.exception;
public class InvalidTypeException extends Exception {
public InvalidTypeException(String pDetailMessage) {
super(pDetailMessage);
}
}
Repeat the operaon for two other excepons: NotExistingKeyException of
type Exception and StoreFullException of type RuntimeException.
2. Open Store.java and declare thrown excepons on getInteger() in class
Store (StoreFullException is RuntimeException and does not need
declaraon):
public class Store {
...
public native int getInteger(String pKey)
throws NotExistingKeyException, InvalidTypeException;
public native void setInteger(String pKey, int pInt);
...
Repeat the operaon for all other geer prototypes (strings, colors, and so on).
3. These excepons need to be caught. Catch NotExistingKeyException and
InvalidTypeException in onGetValue():
public class StoreActivity extends Activity {
...
public static class PlaceholderFragment extends Fragment {
...
private void onGetValue() {
...
try {
switch (type) {
...

Interfacing Java and C/C++ with JNI
[ 126 ]
}
// Process any exception raised while retrieving data.
catch (NotExistingKeyException eNotExistingKeyException) {
displayMessage(eNotExistingKeyException.getMessage());
} catch (InvalidTypeException eInvalidTypeException) {
displayMessage(eInvalidTypeException.getMessage());
}
}
4. Catch StoreFullException in onSetValue() in case the entry cannot be
inserted because the store capacity is exhausted:
private void onSetValue() {
...
try {
...
} catch (NumberFormatException eNumberFormatException) {
displayMessage("Incorrect value.");
} catch (StoreFullException eStoreFullException) {
displayMessage(eStoreFullException.getMessage());
} catch (Exception eException) {
displayMessage("Incorrect value.");
}
updateTitle();
}
...
}
}
5. Open jni/Store.h created in previous parts and dene three new helper methods
to throw excepons:
...
void throwInvalidTypeException(JNIEnv* pEnv);
void throwNotExistingKeyException(JNIEnv* pEnv);
void throwStoreFullException(JNIEnv* pEnv);
#endif

Chapter 3
[ 127 ]
6. Edit the jni/Store.cpp le to throw NotExistingKeyException and
InvalidTypeException when geng an inappropriate entry from the store. A
good place to raise them is when checking an entry with isEntryValid():
...
bool isEntryValid(JNIEnv* pEnv, StoreEntry* pEntry, StoreType pType) {
if (pEntry == NULL) {
throwNotExistingKeyException(pEnv);
} else if (pEntry->mType != pType) {
throwInvalidTypeException(pEnv);
}
return !pEnv->ExceptionCheck();
}
...
7. StoreFullException is obviously raised when a new entry is inserted. Modify
allocateEntry() in the same le to check entry inserons:
...
StoreEntry* allocateEntry(JNIEnv* pEnv, Store* pStore, jstring pKey) {
// If entry already exists in the store, releases its content
// and keep its key.
StoreEntry* entry = findEntry(pEnv, pStore, pKey);
if (entry != NULL) {
releaseEntryValue(pEnv, entry);
}
// If entry does not exist, create a new entry
// right after the entries already stored.
else {
// Checks store can accept a new entry.
if (pStore->mLength >= STORE_MAX_CAPACITY) {
throwStoreFullException(pEnv);
return NULL;
}
entry = pStore->mEntries + pStore->mLength;
// Copies the new key into its final C string buffer.
...
}
return entry;
}
...

Interfacing Java and C/C++ with JNI
[ 128 ]
Implement throwNotExistingException(). To throw a Java excepon, the rst task
is to nd the corresponding class (like with the Java reecon API). Since we can assume
these excepons will not be raised frequently, we can keep from caching class reference.
Then, raise the excepon with ThrowNew(). Once we no longer need the excepon class
reference, we can get rid of it with DeleteLocalRef():
...
void throwNotExistingKeyException(JNIEnv* pEnv) {
jclass clazz = pEnv->FindClass(
"com/packtpub/exception/NotExistingKeyException");
if (clazz != NULL) {
pEnv->ThrowNew(clazz, "Key does not exist.");
}
pEnv->DeleteLocalRef(clazz);
}
Repeat the operaon for the two other excepons. The code is idencal (even to throw a
runme excepon) and only the class name changes.
What just happened?
Launch the applicaon and try to get an entry with a non-exisng key. Repeat the operaon
with an entry, which exists in the store but with a dierent type than the one selected in
the GUI. In both cases, there is an error message. Try to save more than 16 references in
the store and you will get an error again. In each case, an excepon has been raised on the
nave side and caught on the Java side.
Raising excepons in nave code is not a complex task, but it is not trivial either. An
excepon is instanated with a class descriptor of type jclass. This class descriptor is
required by JNI to instanate the proper kind of excepon. JNI excepons are not declared
on JNI method prototypes since they are not related to C++ excepons (excepons which
cannot be declared in C anyway). This explains why we have not regenerated the JNI header
to accommodate the changes in the Store.java file.
Executing code in Exception state
Once an excepon is raised, be really careful with the JNI call you make. Indeed, any
subsequent call fails unl either of the following events occur:
1. The method is returned and an excepon is propagated.
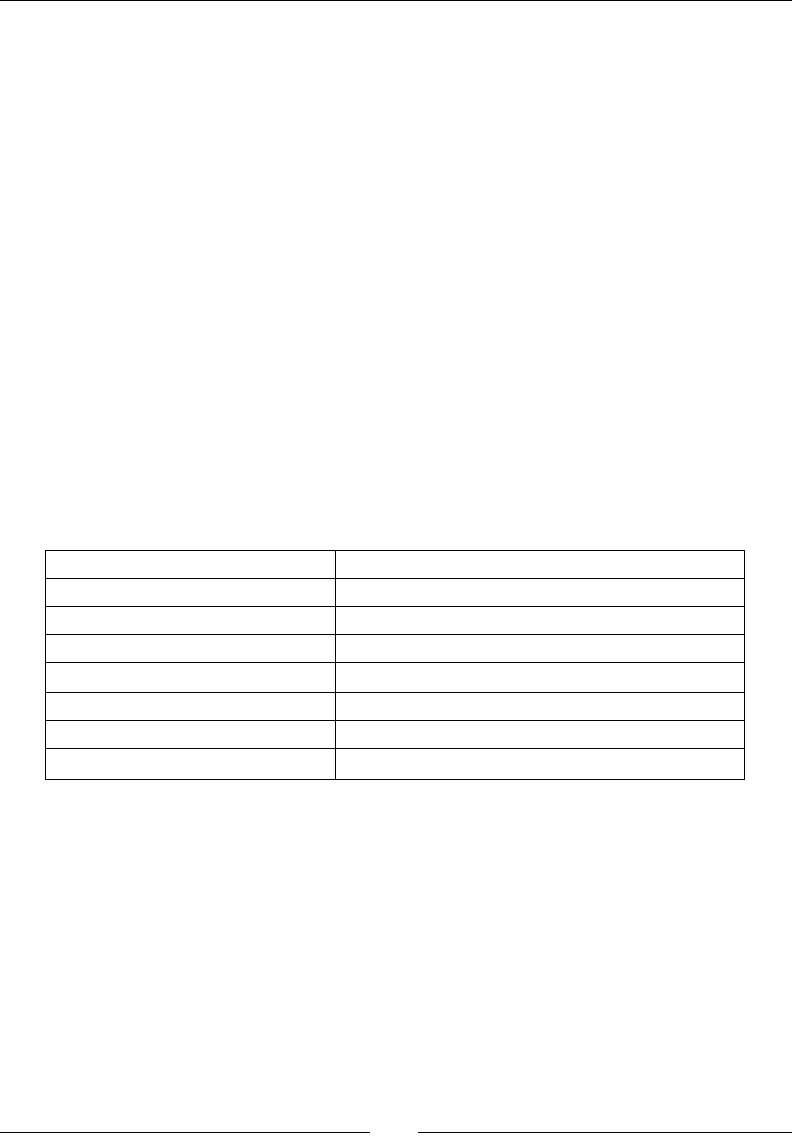
Chapter 3
[ 129 ]
2. The excepon is cleared. Clearing an excepon means that the excepon is handled
and thus not propagated to Java. For example:
// Raise an exception
jclass clazz = pEnv->FindClass("java/lang/RuntimeException");
if (clazz != NULL) {
pEnv->ThrowNew(clazz, "Oups an exception.");
}
pEnv->DeleteLocalRef(clazz);
...
// Detect and catch the exception by clearing it.
jthrowable exception = pEnv->ExceptionOccurred();
if (exception) {
// Do something...
pEnv->ExceptionDescribe();
pEnv->ExceptionClear();
pEnv->DeleteLocalRef(exception);
}
Only a few JNI methods are sll safe to call aer an excepon is raised:
DeleteGlobalRef PopLocalFrame
DeleteLocalRef PushLocalFrame
DeleteWeakGlobalRef Release<Primitive>ArrayElements
ExceptionCheck ReleasePrimitiveArrayCritical
ExceptionClear ReleaseStringChars
ExceptionDescribe ReleaseStringCritical
ExceptionOccurred ReleaseStringUTFChars
MonitorExit
Do not try to call any other JNI method. Nave code should clean its resources and give
control back to Java as soon as possible (or handle the excepon itself). Indeed, JNI
excepons have nothing in common with C++ excepons. Their execuon ow is completely
dierent. When a Java excepon is raised from nave code, the laer can sll pursue its
processing. However, as soon as nave call returns hand back to the Java VM, the laer
propagates the excepon as usual. In other words, JNI excepons raised from nave code
aect Java code only (and JNI calls others then the one listed previously).

Interfacing Java and C/C++ with JNI
[ 130 ]
Exception handling API
JNI oers several methods to manage excepons among which:
1. ThrowNew() to raise the excepon itself, allocang a new instance:
jint ThrowNew(jclass clazz, const char* message)
2. Throw() to raise an excepon that has already been allocated (for example, to
rethrow):
jint Throw(jthrowable obj)
3. ExceptionCheck() to check whether an excepon is pending, whoever raised
it (nave code or a Java callback). A simple jboolean is returned, which makes it
appropriate for simple checks:
jboolean ExceptionCheck()
4. ExceptionOccurred() to retrieve a jthrowable reference to the raised
excepon:
jthrowable ExceptionOccurred()
5. ExceptionDescribe() is equivalent to printStackTrace() in Java:
void ExceptionDescribe()
6. An excepon can be marked as caught on the nave side with ExceptionClear():
void ExceptionClear()
It is essenal to learn how to use these methods to write robust code, especially when
calling back Java from nave code. We will learn more about this subject in the next chapter.
Summary
In this chapter, we saw how to make Java communicate with C/C++. Android is now almost
bilingual! Java can call C/C++ code with any type of data or object.
We rst inialized a nave JNI library using the JNI_OnLoad hook. Then, we converted
Java Strings inside nave code and saw the dierence between Modied UTF-8 and UTF-16
character encoding. We also passed Java primives to nave code. Each of these primives
has their C/C++ equivalent type they can be cast to.

Chapter 3
[ 131 ]
We also handled Java object references in nave code using Global references and learned
the dierence between these and Local references. The rst must be carefully deleted to
ensure proper garbage collecon, while the laer has nave method scope and must be
managed with care as their number is limited by default.
We also discussed how to manage Java arrays in nave code so that we could access their
content as nave arrays. Arrays may or may not be copied by the VM when manipulated in
nave code. This performance penalty has to be taken into account.
Finally, we raised and checked Java excepons in nave code. We saw that they have a
dierent ows from the standard C++ excepons. When an excepon occurs, only a few
cleaning JNI methods are safe to call. JNI excepons are JVM-level excepons, which means
their ow is completely dierent from standard C++ excepons.
However, there is sll more to come. Any Java object, method, or eld can be called or
retrieved by nave code. Let's see how to call Java from C/C++ code in the next chapter.
[ 133 ]
4
Calling Java Back from Native Code
To reach its full potential, JNI allows calling back Java code from C/C++. "Back"
because native code is first invoked from Java, which in turn calls it back.
Such calls are performed through a reflective API, which allows doing almost
anything that can be done directly in Java.
Another important matter to consider with JNI is threading. Native code can be
run on a Java thread, managed by the Dalvik VM, and also from a native thread
created with standard POSIX primitives. Obviously, a native thread cannot call
JNI code unless it is turned into a managed Java thread! Programming with
JNI necessitates knowledge of all these subtleties. This chapter will guide you
through the main ones.
The last topic, which is specific to Android and not JNI, other: the Android-
specific Bitmap API aims at giving full processing power to graphics applications
running on these tiny (but powerful) devices.
The Android NDK also proposes a new API to access natively an important type of
object: bitmaps. The Bitmap API, which is Android-specific, gives full processing
power to graphics applications running on these tiny (but powerful) devices.
The Store project we started in the previous chapter is going to be our canvas to demonstrate
JNI callbacks and synchronizaon. To illustrate Bitmap processing, we are going to create a new
project that decodes a device's camera feed inside nave code.

Calling Java Back from Nave Code
[ 134 ]
To summarize, in this chapter, we are going to learn how to:
Call Java back from nave code
Aach a nave thread to the Dalvik VM and handle synchronizaon with
Java threads
Process Java bitmaps in nave code
By the end of this chapter, you should be able to make Java and C/C++ communicate and
synchronize reciprocally.
Calling Java back from native code
In the previous chapter, we discovered how to get a Java class descriptor with the JNI
method FindClass(). However, we can get much more! Actually, if you are a regular Java
developer, this should remind you of something: the Java Reecon API. JNI is similar in
that it can modify Java object elds, run Java methods, and access stac members, but from
nave code!
For this last part with the Store project, let's enhance our store applicaon so that it
noes Java when an entry has been successfully inserted.
The resulng project is provided with this book under the
name Store_Part10.
Time for action – determining JNI method signatures
Let's dene a Java interface that nave C/C++ code will call back through JNI:
1. Create a StoreListener.java, which contains an interface dening a few
callbacks, one for integers, one for strings, and one for colors, as follows:
package com.packtpub.store;
public interface StoreListener {
void onSuccess(int pValue);
void onSuccess(String pValue);
void onSuccess(Color pValue);
}

Chapter 4
[ 135 ]
2. Open Store.java and make a few changes.
Declare a member delegate StoreListener, to which success callbacks
are sent
Change the Store constructor to inject the delegate listener, which is going
to be StoreActivity
Public class Store implements StoreListener {
private StoreListener mListener;
public Store(StoreListener pListener) {
mListener = pListener;
}
...
Finally, implement the StoreListener interface and its corresponding methods,
which simply forwards calls to the delegate:
...
public void onSuccess(int pValue) {
mListener.onSuccess(pValue);
}
public void onSuccess(String pValue) {
mListener.onSuccess(pValue);
}
public void onSuccess(Color pValue) {
mListener.onSuccess(pValue);
}
}
3. Open StoreActivity.java and implement the StoreListener interface in
PlaceholderFragment.
Also, change the Store construcon accordingly:
public class StoreActivity extends Activity {
...
public static class PlaceholderFragment extends Fragment
implements StoreListener {
private Store mStore = new Store(this);
...
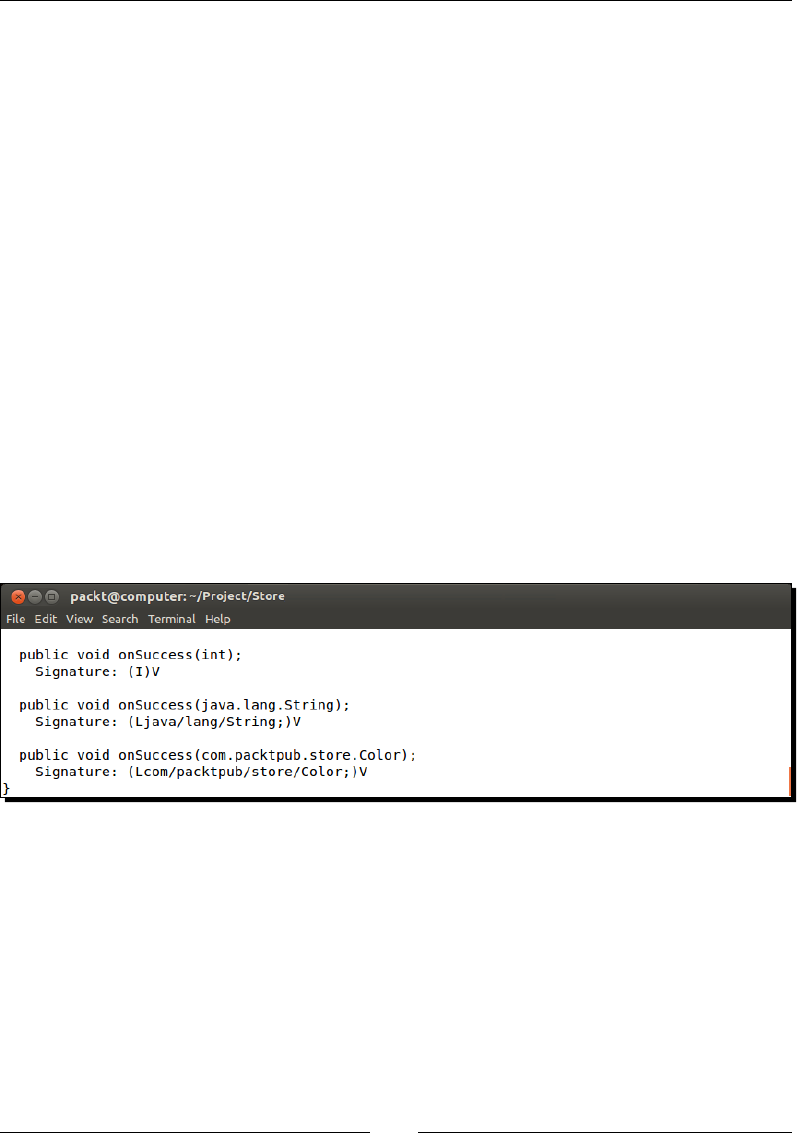
Calling Java Back from Nave Code
[ 136 ]
When a success callback is received, a simple toast message is raised:
...
public void onSuccess(int pValue) {
displayMessage(String.format(
"Integer '%1$d' successfuly saved!", pValue));
}
public void onSuccess(String pValue) {
displayMessage(String.format(
"String '%1$s' successfuly saved!", pValue));
}
public void onSuccess(Color pValue) {
displayMessage(String.format(
"Color '%1$s' successfuly saved!", pValue));
}
}
}
4. Open a terminal in the Store project's directory and run the javap command to
determine method signatures.
javap –s -classpath bin/classes com.packtpub.store.Store
What just happened?
Calling back Java methods with the JNI API requires descriptors, as we will see in the next
part. To determine a Java method descriptor, we need a signature. Indeed, methods in Java
can be overloaded, which means that there can be two methods with the same name but
dierent parameters. This is why a signature is required.
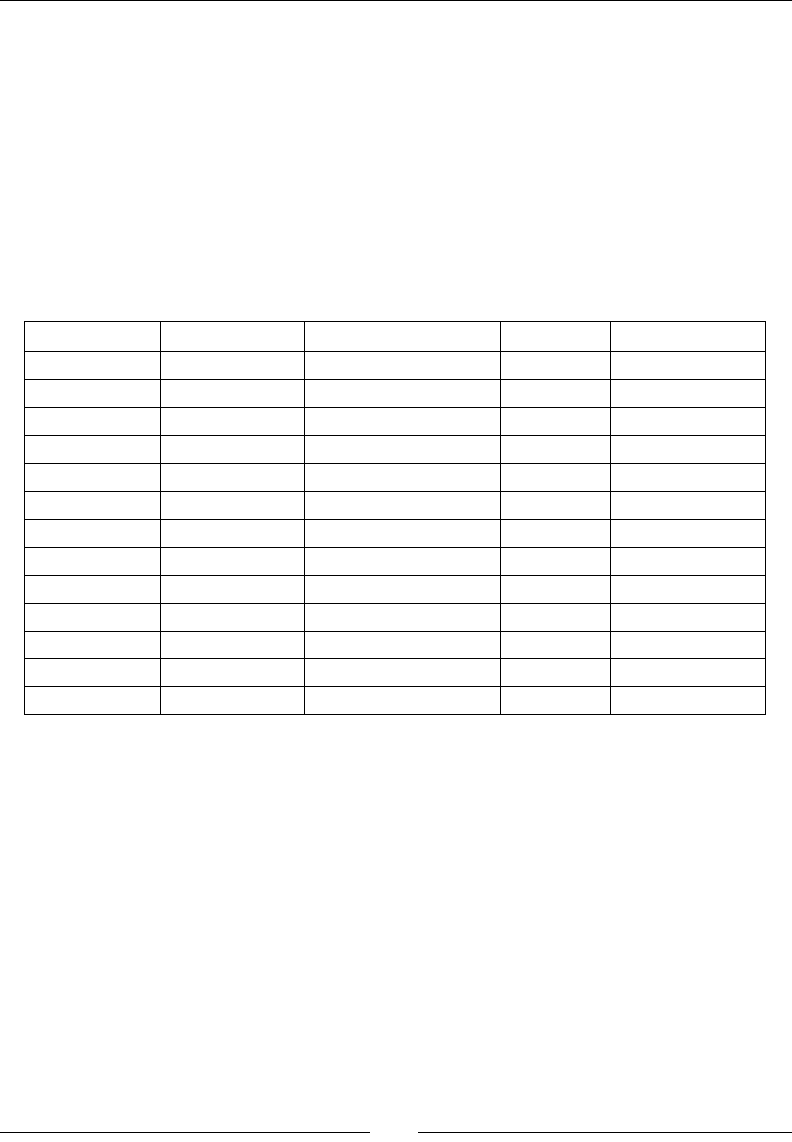
Chapter 4
[ 137 ]
We can determine a method's signature with javap, a JDK ulity to disassemble .class
les. This signature can then be given to the JNI Reecon API. Formally speaking, a
signature is declared in the following way:
(<Parameter 1 Type Code>[<Parameter 1 Class>];...)<Return Type Code>
For example, the signature for the method boolean myFunction(android.view.View
pView, int pIndex) would be (Landroid/view/View;I)Z. Another example, (I)
V, means an integer is expected and a void is returned. A last example, (Ljava/lang/
String;)V, means a String is passed in parameter.
The following table summarizes the various types available in JNI with their code:
Java type Native type Native array type Type code Array type code
boolean jboolean jbooleanArray Z [Z
byte jbyte jbyteArray B [B
char jchar jcharArray C [C
double jdouble jdoubleArray D [D
float jfloat jfloatArray F [F
int jint jintArray I [I
long jlong jlongArray J [J
Short jshort jshortArray S [S
Object jobject jobjectArray L [L
String jstring N/A L [L
Class jclass N/A L [L
Throwable jthrowable N/A L [L
void void N/A V N/A
All these values correspond to the one dumped by javap. For more informaon about
descriptors and signatures, have a look at the Oracle documentaon at http://docs.
oracle.com/javase/specs/jvms/se7/html/jvms-4.html#jvms-4.3.
Now that we have the proper signature, we can start calling Java from C/C++.

Calling Java Back from Nave Code
[ 138 ]
Time for action – calling back Java from native code
Let's connue our Store by calling back the interface we dened from nave code:
1. In com_packtpub_store_Store.cpp, declare method descriptors with type
jmethodID for each callback, which is going to be cached:
...
static Store gStore;
static jclass StringClass;
static jclass ColorClass;
static jmethodID MethodOnSuccessInt;
static jmethodID MethodOnSuccessString;
static jmethodID MethodOnSuccessColor;
...
2. Then, cache all the callback descriptors in JNI_OnLoad(). This can be done in two
main steps:
Geng a Class descriptor with the JNI method FindClass(). One can nd a
class descriptor, thanks to its absolute package path, here: com./packtpub/
store/Store.
Retrieving a method descriptor from the class descriptor with GetMethodID().
To dierenate several overloaded methods, the signatures retrieved earlier with
javap must be specied:
...
JNIEXPORT jint JNI_OnLoad(JavaVM* pVM, void* reserved) {
JNIEnv *env;
if (pVM->GetEnv((void**) &env, JNI_VERSION_1_6) != JNI_OK) {
abort();
}
...
// Caches methods.
jclass StoreClass = env->FindClass("com/packtpub/store/Store");
if (StoreClass == NULL) abort();
MethodOnSuccessInt = env->GetMethodID(StoreClass, "onSuccess",
"(I)V");

Chapter 4
[ 139 ]
if (MethodOnSuccessInt == NULL) abort();
MethodOnSuccessString = env->GetMethodID(StoreClass, "onSuccess",
"(Ljava/lang/String;)V");
if (MethodOnSuccessString == NULL) abort();
MethodOnSuccessColor = env->GetMethodID(StoreClass, "onSuccess",
"(Lcom/packtpub/store/Color;)V");
if (MethodOnSuccessColor == NULL) abort();
env->DeleteLocalRef(StoreClass);
// Store initialization.
gStore.mLength = 0;
return JNI_VERSION_1_6;
}
...
3. Nofy the Java Store (that is, pThis) when an integer is successfully inserted
in setInteger(). To invoke a Java method on a Java object, simply use
CallVoidMethod() (which means that the called Java method returns void).
To do so, we need:
An object instance
A method signature
Effective parameters to pass, if applicable (here, an integer value)
...
JNIEXPORT void JNICALL Java_com_packtpub_store_Store_setInteger
(JNIEnv* pEnv, jobject pThis, jstring pKey, jint pInteger) {
StoreEntry* entry = allocateEntry(pEnv, &gStore, pKey);
if (entry != NULL) {
entry->mType = StoreType_Integer;
entry->mValue.mInteger = pInteger;
pEnv->CallVoidMethod(pThis, MethodOnSuccessInt,
(jint) entry->mValue.mInteger);
}
}
...

Calling Java Back from Nave Code
[ 140 ]
4. Repeat the operaon for strings. There is no need to generate a Global reference
when allocang the returned Java string as it is used immediately in the Java
callback. We can also destroy the Local reference to this string right aer usage, but
JNI will take care of that when returning from the nave callback:
...
JNIEXPORT void JNICALL Java_com_packtpub_store_Store_setString
(JNIEnv* pEnv, jobject pThis, jstring pKey, jstring pString) {
// Turns the Java string into a temporary C string.
StoreEntry* entry = allocateEntry(pEnv, &gStore, pKey);
if (entry != NULL) {
entry->mType = StoreType_String;
...
pEnv->CallVoidMethod(pThis, MethodOnSuccessString,
(jstring) pEnv->NewStringUTF(entry->mValue.mString));
}
}
...
5. Finally, repeat the operaon for colors:
...
JNIEXPORT void JNICALL Java_com_packtpub_store_Store_setColor
(JNIEnv* pEnv, jobject pThis, jstring pKey, jobject pColor) {
// Save the Color reference in the store.
StoreEntry* entry = allocateEntry(pEnv, &gStore, pKey);
if (entry != NULL) {
entry->mType = StoreType_Color;
entry->mValue.mColor = pEnv->NewGlobalRef(pColor);
pEnv->CallVoidMethod(pThis, MethodOnSuccessColor,
(jstring) entry->mValue.mColor);
}
}
...
Chapter 4
[ 141 ]
What just happened?
Launch the applicaon and insert an integer, a string, or color entry. A successful message
is displayed with the inserted value. The nave code called the Java side thanks to the JNI
Reecon API. This API is not only useful to execute a Java method, it is also the only way
to process jobject parameters passed to a nave method. However, if calling C/C++ code
from Java is rather easy, performing Java operaons from C/C++ is a bit more involving!
Although a bit repeve and verbose, calling any Java method should always be as trivial
as this:
Retrieve the class descriptor from those we want to call methods (here, the Store
Java object):
jclass StoreClass = env->FindClass("com/packtpub/store/Store");
Retrieve the method descriptors for the callback we want to call (such as the
Method class in Java). These method descriptors are retrieved from the class
descriptor, which owns it (like a Class in Java):
jmethodID MethodOnSuccessInt = env->GetMethodID(StoreClass,
"onSuccess", "(I)V");
Oponally, cache the descriptors so that they can be used immediately in future
nave calls. Again, JNI_OnLoad() makes it easy to cache JNI descriptors before any
nave call is made. Descriptors whose names end with Id, such as jmethodID, can
be freely cached. They are not references that can be leaked, or have to be made
global on the opposite to jclass descriptors.
Caching descriptors is definitely good practice, as retrieving
Fields or Methods through the JNI reflection may cause
some overhead.
Invoke methods with the necessary parameters on an object. The same method
descriptor can be reused on any object instance of the corresponding class:
env->CallVoidMethod(pThis, MethodOnSuccessInt, (jint) myInt);
Whatever method you need to call on a Java object, the same process always applies.

Calling Java Back from Nave Code
[ 142 ]
More on the JNI Reection API
Once you know the Reecon API, you know most of the JNI. Here are some of the provided
methods that may be useful:
FindClass() retrieves a (Local) reference to a Class descriptor object according
to its absolute path:
jclass FindClass(const char* name)
GetObjectClass() has the same purpose, except that FindClass() nds class
denions according to their absolute path, whereas the other nds the class
directly from an object instance (such as getClass() in Java):
jclass GetObjectClass(jobject obj)
The following methods allow you to retrieve JNI descriptors for methods and
elds, and either stac or instance members. These descriptors are IDs and not
references to Java objects. There is no need to turn them into Global references.
These methods require the method or eld name and a signature to dierenate
overloads. Constructor descriptors are retrieved in the same way as methods, except
that their name is always <init> and they have a void return value:
jmethodID GetMethodID(jclass clazz, const char* name,
const char* sig)
jmethodID GetStaticMethodID(jclass clazz, const char* name,
const char* sig)
jfieldID GetStaticFieldID(jclass clazz, const char* name,
const char* sig)
jfieldID GetFieldID(jclass clazz, const char* name, const char* sig)
There is a second set of methods to retrieve eld values using their corresponding
descriptors. There is one geer and one seer method per primive type, plus
another for objects:
jobject GetObjectField(jobject obj, jfieldID fieldID)
<primitive> Get<Primitive>Field(jobject obj, jfieldID fieldID)
void SetObjectField(jobject obj, jfieldID fieldID, jobject value)
void Set<Primitive>Field(jobject obj, jfieldID fieldID,
<jprimitive> value)
The same goes for methods according to their return values:
jobject CallObjectMethod(JNIEnv*, jobject, jmethodID, ...)
<jprimitive> Call<Primitive>Method(JNIEnv*, jobject, jmethodID, ...);

Chapter 4
[ 143 ]
Variants of these methods exist with an A and V posix. The behavior is idencal,
except that arguments are specied respecvely using a va_list (that is, variable
argument list) or jvalue array (jvalue being a union of all JNI types):
jobject CallObjectMethodV(JNIEnv*, jobject, jmethodID, va_list);
jobject CallObjectMethodA(JNIEnv*, jobject, jmethodID, jvalue*);
Have a look at jni.h in the Android NDK include directory to see all the possibilies by
the JNI reecve API.
Debugging JNI
The goal of JNI calls is oen performance. Thus, JNI does not perform advanced checking
when its API methods are invoked. Hopefully, there exists an extended checking mode,
which performs advanced checks and gives feedback in the Android Logcat.
To acvate it, run the following command from a command prompt:
adb shell setprop debug.checkjni 1
The extended checking mode is available for applicaons started aer this ag is set, unl
it is set to 0, or unl the device is rebooted. For rooted devices, the whole device can be
started with this mode with the following commands:
adb shell stop
adb shell setprop dalvik.vm.checkjni true
adb shell start
If everything works properly, a message Late-enabling – Xcheck:jni appears in the Logcat
when your applicaon starts. Then, check the Logcat regularly to nd its JNI warning or error.

Calling Java Back from Nave Code
[ 144 ]
Synchronizing Java and native threads
Parallel programming is a mainstream subject nowadays. Android makes no excepon since
the introducon of mulcore processors. You can do the threading enrely on the Java side
(with the Java Thread and Concurrency APIs), on the nave side (with the POSIX PThread
API, which is provided by the NDK), and, more interesngly, between the Java and nave
side using JNI.
In this part, we will create a background thread, the watcher, which keeps a constant eye on
what is inside the data store. It iterates through all entries and then sleeps for a xed amount
of me. When the watcher thread nds a key of a specic type predened in the code, it acts
accordingly. For this rst part, we are just going to clip integer values to a predened range.
Of course, threads need synchronizaon. The nave thread is going to access and update the
store only when a user understands the UI thread, and does not modify it. The nave thread
is created in C/C++ but the UI thread is a Java thread. We are going to use JNI monitors to
synchronize both of them.
Time for action – allocating an object with JNI
Let's dene a background Watcher that will use an object shared between Java and C/C++ as
a lock:
1. In Store.java, add two new methods to start and stop a watcher thread. These
methods respecvely return and take a long as parameter. This value helps us hold
a nave pointer on the Java side:
public class Store implements StoreListener {
...
public native long startWatcher();
public native void stopWatcher(long pPointer);
}
2. Create a new le, StoreThreadSafe.java. The StoreThreadSafe class inherits
from the Store class and aims at making the Store instances thread-safe using
synchronized Java blocks. Declare a stac member eld LOCK of type Object and
dene a default constructor:
package com.packtpub.store;
import com.packtpub.exception.InvalidTypeException;

Chapter 4
[ 145 ]
import com.packtpub.exception.NotExistingKeyException;
public class StoreThreadSafe extends Store {
protected static Object LOCK;
public StoreThreadSafe(StoreListener pListener) {
super(pListener);
}
...
3. Override the Store methods, such as getCount(), getInteger(), and
setInteger() using Java blocks synchronized with the LOCK object:
...
@Override
public int getCount() {
synchronized (LOCK) {
return super.getCount();
}
}
...
@Override
public int getInteger(String pKey)
throws NotExistingKeyException, InvalidTypeException
{
synchronized (LOCK) {
return super.getInteger(pKey);
}
}
@Override
public void setInteger(String pKey, int pInt) {
synchronized (LOCK) {
super.setInteger(pKey, pInt);
}
}
...

Calling Java Back from Nave Code
[ 146 ]
4. Do the same for all other methods, such as getString(), setString(),
getColor(), setColor(), etc., and the stopWatcher() method. Do not
override the onSuccess callbacks and the startWatcher() method:
...
@Override
public void stopWatcher(long pPointer) {
synchronized (LOCK) {
super.stopWatcher(pPointer);
}
}
}
Do not override the onSuccess callbacks and the startWatcher() method.
5. Open StoreActivity.java and replace the previous Store instance with an
instance of StoreThreadSafe. Also, create a member eld of type long to hold
a nave pointer to the watcher thread. When the fragment is resumed, start the
watcher thread and save its pointer. When the fragment is paused, stop the watcher
thread with the previously saved pointer:
public class StoreActivity extends Activity {
...
public static class PlaceholderFragment extends Fragment
implements StoreListener {
private StoreThreadSafe mStore = new StoreThreadSafe(this);
private long mWatcher;
private EditText mUIKeyEdit, mUIValueEdit;
private Spinner mUITypeSpinner;
private Button mUIGetButton, mUISetButton;
private Pattern mKeyPattern;
...
@Override
public void onResume() {
super.onResume();
mWatcher = mStore.startWatcher();
}
@Override
public void onPause() {
super.onPause();
mStore.stopWatcher(mWatcher);
}
...
}
}

Chapter 4
[ 147 ]
6. Edit jni/Store.h and include a new header pthread.h:
#ifndef _STORE_H_
#define _STORE_H_
#include <cstdint>
#include <pthread.h>
#include "jni.h"
7. The watcher works on a Store instance updated at regular intervals of me.
It needs:
The instance of the Store structure it watches
A JavaVM, which is the only object safely shareable among threads and
from which JNIEnv can be safely retrieved
A Java object to synchronize on (corresponding to the LOCK object we
defined on the Java side)
A pthread variable dedicated to native thread management
An indicator to stop the watcher thread
...
typedef struct {
Store* mStore;
JavaVM* mJavaVM;
jobject mLock;
pthread_t mThread;
int32_t mRunning;
} StoreWatcher;
...
8. Finally, dene three methods to start and stop the watcher thread, run its main
loop, and process an entry:
...
StoreWatcher* startWatcher(JavaVM* pJavaVM, Store* pStore,
jobject pLock);
void stopWatcher(StoreWatcher* pWatcher);
void* runWatcher(void* pArgs);
void processEntry(StoreEntry* pEntry);
#endif

Calling Java Back from Nave Code
[ 148 ]
9. Refresh the JNI header le jni/com_packtpub_Store.h with javah. You should
see two new methods, Java_com_packtpub_store_Store_startWatcher()
and Java_com_packtpub_store_Store_stopWatcher(), in it.
In com_packtpub_store_Store.cpp, create a new stac variable gLock that is
going to hold the Java synchronizaon object.
...
static Store gStore;
static jobject gLock;
...
10. Create an instance of the Object class in JNI_OnLoad() using the JNI
Reecon API:
First, find its Object constructor with GetMethodID(). Constructors in JNI
are named <init> and have no result.
Then, invoke the constructor to create an instance and make it global.
Finally, remove local references when they become useless:
JNIEXPORT jint JNI_OnLoad(JavaVM* pVM, void* reserved) {
JNIEnv *env;
if (pVM->GetEnv((void**) &env, JNI_VERSION_1_6) != JNI_OK) {
abort();
}
...
jclass ObjectClass = env->FindClass("java/lang/Object");
if (ObjectClass == NULL) abort();
jmethodID ObjectConstructor = env->GetMethodID(ObjectClass,
"<init>", "()V");
if (ObjectConstructor == NULL) abort();
jobject lockTmp = env->NewObject(ObjectClass, ObjectConstructor);
env->DeleteLocalRef(ObjectClass);
gLock = env->NewGlobalRef(lockTmp);
env->DeleteLocalRef(lockTmp);
...
11. Save the created Object instance in the StoreThreadSafe.LOCK eld. This
object is going to be used during the lifeme of the applicaon to synchronize:
First, retrieve the StoreThreadSafe class and its LOCK field using the JNI
Reflection methods FindClass() and GetStaticFieldId()
Then, save the value into the LOCK static field with the JNI method
SetStaticObjectField(), which requires a field signature (such
as methods)

Chapter 4
[ 149 ]
Finally, remove the local reference to the StoreThreadSafe class when it
becomes useless:
...
jclass StoreThreadSafeClass = env->FindClass(
"com/packtpub/store/StoreThreadSafe");
if (StoreThreadSafeClass == NULL) abort();
jfieldID lockField = env->GetStaticFieldID(StoreThreadSafeClass,
"LOCK", "Ljava/lang/Object;");
if (lockField == NULL) abort();
env->SetStaticObjectField(StoreThreadSafeClass, lockField, gLock);
env->DeleteLocalRef(StoreThreadSafeClass);
return JNI_VERSION_1_6;
}
...
12. Implement startWatcher(), which calls the corresponding method dened
earlier. It requires JavaVM, which can be retrieved from the JNIEnv object with
GetJavaVM(). The pointer (that is, the memory address) to the created Store is
returned as a long value to the Java side, which can then store it for alter use:
...
JNIEXPORT jlong JNICALL
Java_com_packtpub_store_Store_startWatcher
(JNIEnv *pEnv, jobject pThis) {
JavaVM* javaVM;
// Caches the VM.
if (pEnv->GetJavaVM(&javaVM) != JNI_OK) abort();
// Launches the background thread.
StoreWatcher* watcher = startWatcher(javaVM, &gStore, gLock);
return (jlong) watcher;
}
...
13. Terminate by implemenng stopWatcher(), which casts the given long value
back to a nave pointer. Pass it to the corresponding method:
...
JNIEXPORT void JNICALL
Java_com_packtpub_store_Store_stopWatcher
(JNIEnv *pEnv, jobject pThis, jlong pWatcher) {
stopWatcher((StoreWatcher*) pWatcher);
}

Calling Java Back from Nave Code
[ 150 ]
What just happened?
We used JNI to allocate a Java object from nave code and save it in a stac Java eld. This
example shows the power of the JNI Reecon API; almost anything that can be done in
Java, can be done from nave code with JNI.
To allocate Java objects, JNI provides the following methods:
NewObject() to instanate a Java object using the specied constructor method:
jobject NewObject(jclass clazz, jmethodID methodID, ...)
Variants of this method exist with an A and V posix. Behavior is idencal, except
that arguments are specied respecvely using a va_list or a jvalue array:
jobject NewObjectV(jclass clazz, jmethodID methodID, va_list args)
jobject NewObjectA(jclass clazz, jmethodID methodID, jvalue* args)
AllocObject() allocates a new object but does not invoke its constructor. A
possible usage would be the allocaon of many of the objects, which does not
require inializaon to get some performance gains. Use it only if you know what
you are doing:
jobject AllocObject(jclass clazz)
In the previous chapter, we used stac variables for the nave store because its life cycle
was ed to the applicaon. We want to remember values unl the applicaon exits. If a
user leaves the acvity and comes back to it later, values are sll available while the process
remains alive.
For the watcher thread we used a dierent strategy because its life cycle is ed to the
acvity. When the acvity gains focus, the thread is created and started. When acvity loses
focus, the thread is stopped and destroyed. Since this thread may need me to stop, several
occurrences may run temporarily at the same me (if you turn the screen quickly mulple
mes in the Store example).
Thus, it is not safe to use stac variables as it could be concurrently overwrien (leading
to a memory leak), or, even worse, released (leading to memory corrupon). These kind of
problems can also arise when an acvity starts another one. In that case, onStop() and
onDestroy() of the rst acvity occurs aer onCreate() and onStart() of the second
acvity, as dened in the Android Acvity life cycle.
Chapter 4
[ 151 ]
Instead, a beer soluon to handle this situaon is to allow the Java side to manage the
nave memory. In our example, a pointer to a nave structure allocated on the nave side is
returned to the Java side as a long value. Any further JNI calls must be performed with this
pointer as a parameter. This pointer can then be given back to the nave side when the life
cycle of this piece of data ends.
The use of a long value (represented on 64-bit) to save a nave pointer
is necessary in order to remain compable with 64-bit versions of Android
(with 64-bit memory addresses) that arrived with Android Lollipop.
To summarize, use nave stac variables with care. If your variables are ed to the
applicaon life cycle, stac variables are ne. If your variables are ed to the acvity
lifecycle, you should allocate an instance of them in your acvity and manage them from
there to avoid problems.
Now that we have a shared lock between the Java and the nave side, let's connue our
example by implemenng the Watcher thread.
Time for action – running and synchronizing a thread
Let's create a nave thread using the POSIX PThread API and aach it to the VM:
1. In Store.cpp, include unistd.h, which gives access to the sleep() funcon:
#include "Store.h"
#include <cstdlib>
#include <cstring>
#include <unistd.h>
...
Implement startWatcher(). This method is executed from the UI thread. To do
so, rst instanate and inialize a StoreWatcher structure.
2. Then, inialize and launch a nave thread with the pthread POSIX API:
StoreWatcher* startWatcher(JavaVM* pJavaVM, Store* pStore,
jobject pLock) {
StoreWatcher* watcher = new StoreWatcher();
watcher->mJavaVM = pJavaVM;
watcher->mStore = pStore;
watcher->mLock = pLock;
watcher->mRunning = true;
...

Calling Java Back from Nave Code
[ 152 ]
Then, inialize and launch a nave thread with the PThread POSIX API:
pthread_attr_init() initializes the necessary data structure
pthread_create() starts the thread
...
pthread_attr_t lAttributes;
if (pthread_attr_init(&lAttributes)) abort();
if (pthread_create(&watcher->mThread, &lAttributes,
runWatcher, watcher)) abort();
return watcher;
}
...
3. Implement stopWatcher(), which turns o the running indicator to request the
watcher thread to stop:
...
void stopWatcher(StoreWatcher* pWatcher) {
pWatcher->mRunning = false;
}
...
4. Implement the thread's main loop in runWatcher(). Here, we are not on the UI
thread anymore, but on the watcher thread.
So first, attach the thread as a daemon to the Dalvik VM using
AttachCurrentThreadAsDaemon(). This operation returns JNIEnv
from the given JavaVM. This gives us direct access to the Java side from
this new thread. Remember that JNIEnv is thread-specific and cannot be
shared between threads directly.
Then, make this thread loop and take a nap for a few seconds during each
iteration using sleep():
...
void* runWatcher(void* pArgs) {
StoreWatcher* watcher = (StoreWatcher*) pArgs;
Store* store = watcher->mStore;
JavaVM* javaVM = watcher->mJavaVM;
JavaVMAttachArgs javaVMAttachArgs;
javaVMAttachArgs.version = JNI_VERSION_1_6;
javaVMAttachArgs.name = "NativeThread";
javaVMAttachArgs.group = NULL;
JNIEnv* env;

Chapter 4
[ 153 ]
if (javaVM->AttachCurrentThreadAsDaemon(&env,
&javaVMAttachArgs) != JNI_OK) abort();
// Runs the thread loop.
while (true) {
sleep(5); // In seconds.
...
5. While in a loop iteraon, delimit a crical secon (where only one thread can go at
the same me) with JNI methods MonitorEnter() and MonitorExit(). These
methods require an object to synchronize on (like a synchronized block in Java).
Then, you can safely:
Check whether the thread should be stopped, and leave the loop in
that case
Process each entry from the store
...
// Critical section beginning, one thread at a time.
// Entries cannot be added or modified.
env->MonitorEnter(watcher->mLock);
if (!watcher->mRunning) break;
StoreEntry* entry = watcher->mStore->mEntries;
StoreEntry* entryEnd = entry + watcher->mStore->mLength;
while (entry < entryEnd) {
processEntry(entry);
++entry;
}
// Critical section end.
env->MonitorExit(watcher->mLock);
}
...
Before exing, detach the thread when it is going to end and exit. It is very
important to always detach an aached thread so that the Dalvik or ART VM stop
managing it.
6. Finally, terminate the thread using the pthread_exit() API method:
...
javaVM->DetachCurrentThread();
delete watcher;
pthread_exit(NULL);
}
...
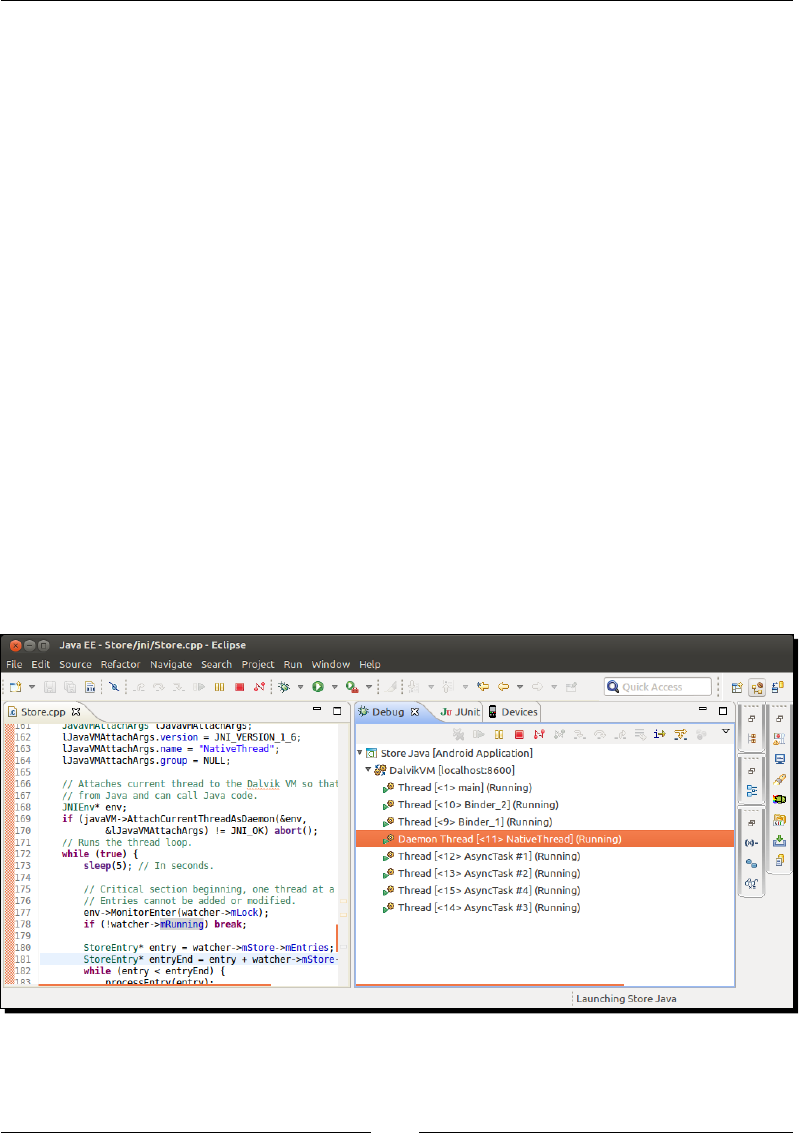
Calling Java Back from Nave Code
[ 154 ]
7. Finally, write the processEntry() method, which does nothing more than
check the boundaries of integer entries and limit them to the arbitrary range
[-100000,100000]. You can also process any of the other entries you wish:
...
void processEntry(StoreEntry* pEntry) {
switch (pEntry->mType) {
case StoreType_Integer:
if (pEntry->mValue.mInteger > 100000) {
pEntry->mValue.mInteger = 100000;
} else if (pEntry->mValue.mInteger < -100000) {
pEntry->mValue.mInteger = -100000;
}
break;
}
}
What just happened?
Compile and run the applicaon in Debug mode using the Eclipse Java debugger (not
the nave one). When the applicaon starts, a nave background thread is created and
aached to the Dalvik VM. You can see it in the Debug view. Then, the UI thread and the
nave background thread are synchronized together with the JNI Monitor API to handle
concurrency issues properly. Finally, when leaving the applicaon, the background thread is
detached and destroyed. Thus, it disappears from the Debug view:
Chapter 4
[ 155 ]
Now, from the Store interface on your Android device, dene a key and enter an integer
value greater than 100,000. Wait a few seconds and retrieve the value using the same key.
It should appear clamped to 100,000 by the Watcher thread. This Watcher looks for each
value in the store and changes it if needed.
The Watcher is running on a nave thread (that is, not created directly by the Java VM).
The NDK allows creang nave threads using the PThread POSIX API. This API is a standard
used commonly on Unix systems for multhreading. It denes a set of funcons and data
structures, all prexed with pthread_, to create not only threads, but also Mutexes
(which stands for Mutual Exclusion) or Condion variables (to make a thread wait for a
specic condion).
The PThread API is a whole subject in itself and is outside the scope of this book. You will
need to know it to master nave multhreading on Android. For more informaon on this
subject, have a look at https://computing.llnl.gov/tutorials/pthreads/ and
http://randu.org/tutorials/threads/.
Synchronizing Java and C/C++ with JNI Monitors
On the Java side, we synchronize threads using synchronized blocks with an arbitrary lock
object. Java also allows methods, whether nave or not, to be synchronized. The lock
object, in that case, is implicitly the one on which nave methods are dened. For example,
we could dene a nave method as follows:
public class MyNativeClass {
public native synchronized int doSomething();
...
}
This would not have worked in our case, since there is a single stac instance of the store on
the nave side. We need a single stac instance of our lock object.
Please note that the paern used here, that is, making StoreThreadSafe
inherit from the Store class, override its methods and use stac variables,
should not be considered specically as the best pracce. It has been used
for simplicity purposes in this book because the Store and the lock object
are stac.
Calling Java Back from Nave Code
[ 156 ]
On the nave side, synchronizaon is performed with a JNI monitor, which is equivalent to
the synchronized keyword in Java:
MonitorEnter() delimits the start of a crical secon. The monitor is associated
with an object, which can be considered as a kind of idener. Only one thread at a
me can go inside the secon dened by this object:
jint MonitorEnter(jobject obj)
MonitorExit() delimits the end of a crical secon. It must be called, along with
MonitorEnter(), to ensure the monitor is released and other threads can go:
jint MonitorExit(jobject obj)
Because Java threads are based on POSIX primives internally, it is also possible to
implement thread synchronizaon enrely navely with the POSIX API. You can nd more
informaon about it at https://computing.llnl.gov/tutorials/pthreads/.
Java and C/C++ are dierent languages with similar, but somewhat
dierent semancs. Thus, always be careful not to expect C/C++ to behave
like Java. As an example, the volale has a dierent semanc in Java and C/
C++, since both follow a dierent memory model.
Attaching and detaching native threads
By default, the Dalvik VM is unaware of the nave threads that run in the same process.
In return, the nave threads cannot access the VM either... unless it is aached to it. The
aachment is handled in JNI with the following methods:
AttachCurrentThread() to tell the VM to manage the current thread. Once
aached, a pointer to the JNIEnv for the current thread is returned at the
specied locaon:
jint AttachCurrentThread(JNIEnv** p_env, void* thr_args)
AttachCurrentThreadAsDaemon() to aach a thread as a daemon. Java
specicaon denes that the JVM does not have to wait for a daemon thread to exit
before leaving, the opposite to normal threads. This disncon has no real meaning
on Android, since an applicaon can be killed at any me by the system:
jint AttachCurrentThreadAsDaemon(JNIEnv** p_env, void* thr_args)
Chapter 4
[ 157 ]
DetachCurrentThread() indicates to the VM that a thread does not need to be
managed anymore. An aached thread like the Watcher thread must be eventually
unaached before exing. Dalvik detects threads that are not detached and reacts
by aborng and leaving a dirty crash dump in your logs! When geng detached, any
monitor held is released, and any waing thread is noed:
jint DetachCurrentThread()
Since Android 2.0, a technique to make sure a thread is
systematically detached is to bind a destructor callback to
the native thread with pthread_key_create() and call
DetachCurrentThread() in it. A JNIEnv instance can be
saved into thread local storage with pthread_setspecific()
to pass it as an argument to the destructor.
Aer a thread is aached, the ClassLoader JNI uses Java classes to correspond to the rst
object it nds on the call stack. For purely nave threads, no ClassLoader might be found.
In that case, JNI uses the system ClassLoader, which might not be able to nd your own
applicaon classes, that is, FindClass() fails. In that case, either cache the necessary
JNI elements globally in JNI_OnLoad() or share an applicaon class loader with the
needing thread.
Processing bitmaps natively
The Android NDK proposes an API dedicated to bitmap processing, which gives direct access
to the surface of Android bitmaps. This API is specic to Android and is not related to the
JNI specicaon. However, bitmaps are Java objects and will need to be treated as such in
nave code.
To see more concretely how bitmaps can be modied from nave code, let's try to decode a
camera feed from nave code. Raw video frames recorded on Android are generally encoded
in a specic format, YUV, which is not compable with classic RGB images. This is a situaon
where nave code comes to the rescue to help us decode such images. In the following
example, we are going to extract each color component (that is, red, green, and blue) into a
separate bitmap.
The resulng project is provided with this book under the
name LiveCamera.

Calling Java Back from Nave Code
[ 158 ]
Time for action – decoding a camera's feed
Let's write the necessary Java code to record and display pictures in a fresh new project:
1. Create a new hybrid Java/C++ project as shown in Chapter 2, Starng a Nave
Android Project:
Name it LiveCamera
The main package is com.packtpub.livecamera
The main activity is LiveCameraActivity
The main activity layout name is activity_livecamera
Use the Blank Activity template
2. Once created, turn the project into a nave project as already seen. In the
AndroidManifest.xml le, request access permission to the camera. Then,
set the acvity style to fullscreen and its orientaon to landscape.
Landscape orientaon avoids most camera orientaon problems that are met
on Android devices:
<?xml version="1.0" encoding="utf-8"?>
<manifest xmlns:android="http://schemas.android.com/apk/res/android"
package="com.packtpub.livecamera"
android:versionCode="1" android:versionName="1.0" >
<uses-sdk android:minSdkVersion="14" android:targetSdkVersion="19"/>
<uses-permission android:name="android.permission.CAMERA" />
<application
android:allowBackup="false"
android:icon="@drawable/ic_launcher"
android:label="@string/app_name" >
<activity
android:name=".LiveCameraActivity"
android:label="@string/app_name"
android:screenOrientation="landscape"
android:theme="@android:style/Theme.NoTitleBar.Fullscreen" >
<intent-filter>
<action android:name="android.intent.action.MAIN" />
<category android:name="android.intent.category.LAUNCHER" />
</intent-filter>
</activity>
</application>
</manifest>

Chapter 4
[ 159 ]
3. Dene the activity_livecamera.xml layout as follows. It represents a 2x2 grid
containing one TextureView and three ImageView elements:
<?xml version="1.0" encoding="utf-8"?>
<LinearLayout
xmlns:a="http://schemas.android.com/apk/res/android"
a:baselineAligned="true" a:orientation="horizontal"
a:layout_width="fill_parent" a:layout_height="fill_parent" >
<LinearLayout
a:layout_width="fill_parent" a:layout_height="fill_parent"
a:layout_weight="1" a:orientation="vertical" >
<TextureView
a:id="@+id/preview" a:layout_weight="1"
a:layout_width="fill_parent"
a:layout_height="fill_parent" />
<ImageView
a:id="@+id/imageViewR" a:layout_weight="1"
a:layout_width="fill_parent" a:layout_height="fill_parent" />
</LinearLayout>
<LinearLayout
a:layout_width="fill_parent" a:layout_height="fill_parent"
a:layout_weight="1" a:orientation="vertical" >
<ImageView
a:id="@+id/imageViewG" a:layout_weight="1"
a:layout_width="fill_parent" a:layout_height="fill_parent" />
<ImageView
a:id="@+id/imageViewB" a:layout_weight="1"
a:layout_width="fill_parent" a:layout_height="fill_parent" />
</LinearLayout>
</LinearLayout>
4. Open LiveCameraActivity.java and implement it as follows:
First, extend SurfaceTextureListener, which is going to help us
initialize and close the camera feed
Then, extend the PreviewCallback interface to listen for new
camera frames
Do not forget to load the nave stac library, as follows:
package com.packtpub.livecamera;
...
public class LiveCameraActivity extends Activity implements
TextureView.SurfaceTextureListener, Camera.PreviewCallback {
static {
System.loadLibrary("livecamera");
}
...

Calling Java Back from Nave Code
[ 160 ]
5. Create a few member variables:
mCamera is the Android camera API
mTextureView displays the raw camera feed
mVideoSource captures camera frames into a byte buffer
mImageViewR, G, and B display processed images, one for each
color component
mImageR, G, and B are the bitmaps backing the ImageView (the
"back buffers")
...
private Camera mCamera;
private TextureView mTextureView;
private byte[] mVideoSource;
private ImageView mImageViewR, mImageViewG, mImageViewB;
private Bitmap mImageR, mImageG, mImageB;
...
In onCreate(), specify the layout dened in the previous step.
Then, retrieve the views to show images.
6. Finally, listen for TextureView events with setSurfaceTextureListener().
You can ignore some of the callbacks that are not necessary in this example:
...
@Override
protected void onCreate(Bundle savedInstanceState) {
super.onCreate(savedInstanceState);
setContentView(R.layout.activity_livecamera);
mTextureView = (TextureView) findViewById(R.id.preview);
mImageViewR = ((ImageView)findViewById(R.id.imageViewR));
mImageViewG = ((ImageView)findViewById(R.id.imageViewG));
mImageViewB = ((ImageView)findViewById(R.id.imageViewB));
mTextureView.setSurfaceTextureListener(this);
}
@Override
public void onSurfaceTextureSizeChanged(SurfaceTexture pSurface,
int pWidth, int pHeight) {}
@Override
public void onSurfaceTextureUpdated(SurfaceTexture pSurface) {}
...

Chapter 4
[ 161 ]
7. The onSurfaceTextureAvailable() callback in LiveCameraActivity.java
is triggered aer the TextureView surface is created. This is the place where
surface dimensions and pixel formats get known.
So, open the Android camera and set up TextureView as its preview target. Listen
for new camera frames with setPreviewCallbackWithBuffer():
...
@Override
public void onSurfaceTextureAvailable(SurfaceTexture pSurface,
int pWidth, int pHeight) {
mCamera = Camera.open();
try {
mCamera.setPreviewTexture(pSurface);
mCamera.setPreviewCallbackWithBuffer(this);
// Sets landscape mode to avoid complications related to
// screen orientation handling.
mCamera.setDisplayOrientation(0);
...
8. Then, call findBestResolution(), which we will implement next to nd a
suitable resoluon for the camera feed. Set up the laer accordingly with the
YCbCr_420_SP format (which should be the default on Android).
...
Size size = findBestResolution(pWidth, pHeight);
PixelFormat pixelFormat = new PixelFormat();
PixelFormat.getPixelFormatInfo(mCamera.getParameters()
.getPreviewFormat(), pixelFormat);
int sourceSize = size.width * size.height
* pixelFormat.bitsPerPixel / 8;
// Set-up camera size and video format.
// should be the default on Android anyway.
Camera.Parameters parameters = mCamera.getParameters();
parameters.setPreviewSize(size.width, size.height);
parameters.setPreviewFormat(PixelFormat.YCbCr_420_SP);
mCamera.setParameters(parameters);
...
9. Aer that, set up the video buer and the bitmaps that display camera frames:
...
mVideoSource = new byte[sourceSize];
mImageR = Bitmap.createBitmap(size.width, size.height,
Bitmap.Config.ARGB_8888);

Calling Java Back from Nave Code
[ 162 ]
mImageG = Bitmap.createBitmap(size.width, size.height,
Bitmap.Config.ARGB_8888);
mImageB = Bitmap.createBitmap(size.width, size.height,
Bitmap.Config.ARGB_8888);
mImageViewR.setImageBitmap(mImageR);
mImageViewG.setImageBitmap(mImageG);
mImageViewB.setImageBitmap(mImageB);
...
Finally, enqueue the video frame buer and start the camera preview:
...
mCamera.addCallbackBuffer(mVideoSource);
mCamera.startPreview();
} catch (IOException ioe) {
mCamera.release();
mCamera = null;
throw new IllegalStateException();
}
}
...
10. Sll in LiveCameraActivity.java, implement findBestResolution(). An
Android camera can support various resoluons, which are highly dependent on the
device. As there is no rule on what could be the default resoluon, we need to look
for a suitable one. Here, we select the biggest resoluon that ts the display surface,
or the default one if none can be found.
...
private Size findBestResolution(int pWidth, int pHeight) {
List<Size> sizes = mCamera.getParameters()
.getSupportedPreviewSizes();
// Finds the biggest resolution which fits the screen.
// Else, returns the first resolution found.
Size selectedSize = mCamera.new Size(0, 0);
for (Size size : sizes) {
if ((size.width <= pWidth)
&& (size.height <= pHeight)
&& (size.width >= selectedSize.width)
&& (size.height >= selectedSize.height)) {
selectedSize = size;
}
}
// Previous code assume that there is a preview size smaller
// than screen size. If not, hopefully the Android API

Chapter 4
[ 163 ]
// guarantees that at least one preview size is available.
if ((selectedSize.width == 0) || (selectedSize.height == 0)) {
selectedSize = sizes.get(0);
}
return selectedSize;
}
...
11. Release the camera when the TextureView surface is destroyed in
onSurfaceTextureDestroyed(), as it is a shared resource. Bitmap buers
can also be recycled and nullied to ease garbage collector work.
...
@Override
public boolean onSurfaceTextureDestroyed(SurfaceTexture pSurface)
{
// Releases camera which is a shared resource.
if (mCamera != null) {
mCamera.stopPreview();
mCamera.release();
// These variables can take a lot of memory. Get rid of
// them as fast as we can.
mCamera = null;
mVideoSource = null;
mImageR.recycle(); mImageR = null;
mImageG.recycle(); mImageG = null;
mImageB.recycle(); mImageB = null;
}
return true;
}
...
12. Finally, decode raw video frames in onPreviewFrame(). This handler is triggered
by the Camera class each me a new frame is ready.
Raw video bytes are passed to the nave method decode(), along with the backing
bitmap, and a lter to select each color component.
Once decoded, invalidate the surface to redraw it.
Finally, "re-enqueue" the raw video buer to request the capture of a new
video frame.
...
@Override
public void onPreviewFrame(byte[] pData, Camera pCamera) {
// New data has been received from camera. Processes it and

Calling Java Back from Nave Code
[ 164 ]
// requests surface to be redrawn right after.
if (mCamera != null) {
decode(mImageR, pData, 0xFFFF0000);
decode(mImageG, pData, 0xFF00FF00);
decode(mImageB, pData, 0xFF0000FF);
mImageViewR.invalidate();
mImageViewG.invalidate();
mImageViewB.invalidate();
mCamera.addCallbackBuffer(mVideoSource);
}
}
public native void decode(Bitmap pTarget, byte[] pSource,
int pFilter);
}
What just happened?
We captured live images from our device's camera thanks to the Android Camera API. Aer
seng up the camera capture format and denion, we created all the necessary capture
buer and output images to display onscreen. Captures are saved in a buer enqueued by
the applicaon when it requires a new frame. Then, this buer is given with a bitmap to
a nave method, which we will write in the next secon. Finally, the output image is
displayed onscreen.
The video feed is encoded in the YUV NV21 format. YUV is a color format originally invented
in the old days of electronics to make black and white video receivers compable with color
transmissions and is sll commonly used nowadays. The default frame format is guaranteed
by the Android specicaon to be YCbCr 420 SP (or NV21) on Android.
Although YCbCr 420 SP is the default video format on Android, the
emulator only supports YCbCr 422 SP. This defect should not cause
much trouble as it basically swaps colors. This problem should not
occur on real devices.
Now that our live image is captured, let's process it on the nave side.

Chapter 4
[ 165 ]
Time for action – processing pictures with the Bitmap API
Let's connue our applicaon by decoding and ltering images on the nave side by the
color channel:
1. Create nave C source, jni/CameraDecoder.c (not a C++ le, so that we can see
the dierence with JNI code wrien in C++).
Include android/bitmap.h, which denes the NDK bitmap processing API and
stdlib.h (not cstdlib as this le is wrien in C):
#include <android/bitmap.h>
#include <stdlib.h>
...
Write a few ulity macros to help decode a video.
toInt() converts a jbyte to an integer, erasing all useless bits with a mask
max() gets the maximum between two values
clamp() clamps a value inside a defined interval
color() builds an ARGB color from each color component
...
#define toInt(pValue) \
(0xff & (int32_t) pValue)
#define max(pValue1, pValue2) \
(pValue1 < pValue2) ? pValue2 : pValue1
#define clamp(pValue, pLowest, pHighest) \
((pValue < 0) ? pLowest : (pValue > pHighest) ? pHighest : pValue)
#define color(pColorR, pColorG, pColorB) \
(0xFF000000 | ((pColorB << 6) & 0x00FF0000) \
| ((pColorG >> 2) & 0x0000FF00) \
| ((pColorR >> 10) & 0x000000FF))
...
2. Implement the nave method decode().
First, retrieve bitmap informaon and check whether its pixel format is a 32-bit
RGBA. Then, lock it to allow drawing operaons.

Calling Java Back from Nave Code
[ 166 ]
Aer this, gain access to the input video frame content passed as a Java byte array
with GetPrimitiveArrayCritical():
...
void JNICALL decode(JNIEnv * pEnv, jclass pClass, jobject pTarget,
jbyteArray pSource, jint pFilter) {
// Retrieves bitmap information and locks it for drawing.
AndroidBitmapInfo bitmapInfo;
uint32_t* bitmapContent;
if (AndroidBitmap_getInfo(pEnv,pTarget, &bitmapInfo) < 0) abort();
if (bitmapInfo.format != ANDROID_BITMAP_FORMAT_RGBA_8888) abort();
if (AndroidBitmap_lockPixels(pEnv, pTarget,
(void**)&bitmapContent) < 0) abort();
// Accesses source array data.
jbyte* source = (*pEnv)->GetPrimitiveArrayCritical(pEnv,
pSource, 0);
if (source == NULL) abort();
...
3. Decode the raw video frame into the output bitmap. The video frame is encoded in
the YUV format, which is quite dierent from RGB. The YUV format encodes a color
in three components:
One luminance component, that is, the grayscale representation of a color.
Two chrominance components, which encode the color information (also
called Cb and Cr as they represent the blue-difference and red-difference).
There are many frame formats based on YUV colors. Here, we convert
frames by following the YCbCr 420 SP (or NV21) format. This kind of image
frame is composed of a buffer of 8-bit Y luminance samples, followed by a
second buffer of interleaved 8-bit V and U chrominance samples. The VU
buffer is subsampled, which means that there are less U and V samples
compared to Y samples (1 U sample and 1 V sample for 4 Y samples). The
following algorithm processes each pixel and converts each YUV pixel to
RGB using the appropriate formula (see http://www.fourcecc.org/
fccyvrgb.php for more information):
...
int32_t frameSize = bitmapInfo.width * bitmapInfo.height;
int32_t yIndex, uvIndex, x, y;
int32_t colorY, colorU, colorV;
int32_t colorR, colorG, colorB;
int32_t y1192;
// Processes each pixel and converts YUV to RGB color.

Chapter 4
[ 167 ]
// Algorithm originates from the Ketai open source project.
// See http://ketai.googlecode.com/.
for (y = 0, yIndex = 0; y < bitmapInfo.height; ++y) {
colorU = 0; colorV = 0;
// Y is divided by 2 because UVs are subsampled vertically.
// This means that two consecutives iterations refer to the
// same UV line (e.g when Y=0 and Y=1).
uvIndex = frameSize + (y >> 1) * bitmapInfo.width;
for (x = 0; x < bitmapInfo.width; ++x, ++yIndex) {
// Retrieves YUV components. UVs are subsampled
// horizontally too, hence %2 (1 UV for 2 Y).
colorY = max(toInt(source[yIndex]) - 16, 0);
if (!(x % 2)) {
colorV = toInt(source[uvIndex++]) - 128;
colorU = toInt(source[uvIndex++]) - 128;
}
// Computes R, G and B from Y, U and V.
y1192 = 1192 * colorY;
colorR = (y1192 + 1634 * colorV);
colorG = (y1192 - 833 * colorV - 400 * colorU);
colorB = (y1192 + 2066 * colorU);
colorR = clamp(colorR, 0, 262143);
colorG = clamp(colorG, 0, 262143);
colorB = clamp(colorB, 0, 262143);
// Combines R, G, B and A into the final pixel color.
bitmapContent[yIndex] = color(colorR,colorG,colorB);
bitmapContent[yIndex] &= pFilter;
}
}
...
To nish, release the Java byte buer acquired earlier and unlock the backing bitmap.
...
(*pEnv)-> ReleasePrimitiveArrayCritical(pEnv,pSource,source,0);
if (AndroidBitmap_unlockPixels(pEnv, pTarget) < 0) abort();
}
...

Calling Java Back from Nave Code
[ 168 ]
4. Instead of relying on a naming convenon to nd nave methods, JNI allows nave
methods to be registered manually in JNI_OnLoad().
So, dene a table that describes the nave methods to register their name,
signature, and address. Here, only decode() needs to be specied.
Then, in JNI_OnLoad(), nd the Java on which the nave method decode() is
declared (here, LiveCameraActivity), and tell JNI which method to use with
RegisterNatives():
...
static JNINativeMethod gMethodRegistry[] = {
{ "decode", "(Landroid/graphics/Bitmap;[BI)V", (void *) decode }
};
static int gMethodRegistrySize = sizeof(gMethodRegistry)
/ sizeof(gMethodRegistry[0]);
JNIEXPORT jint JNI_OnLoad(JavaVM* pVM, void* reserved) {
JNIEnv *env;
if ((*pVM)->GetEnv(pVM, (void**) &env, JNI_VERSION_1_6) != JNI_OK)
{ abort(); }
jclass LiveCameraActivity = (*env)->FindClass(env,
"com/packtpub/livecamera/LiveCameraActivity");
if (LiveCameraActivity == NULL) abort();
(*env)->RegisterNatives(env, LiveCameraActivity,
gMethodRegistry, 1);
(*env)->DeleteLocalRef(env, LiveCameraActivity);
return JNI_VERSION_1_6;
}
5. Write the Application.mk makele as follows:
APP_PLATFORM := android-14
APP_ABI := all
6. Write the Android.mk makele as follows (link it to the jnigraphics module,
which denes the Android Bitmap API):
LOCAL_PATH := $(call my-dir)
include $(CLEAR_VARS)
LOCAL_MODULE := livecamera
LOCAL_SRC_FILES := CameraDecoder.c
LOCAL_LDLIBS := -ljnigraphics
include $(BUILD_SHARED_LIBRARY)
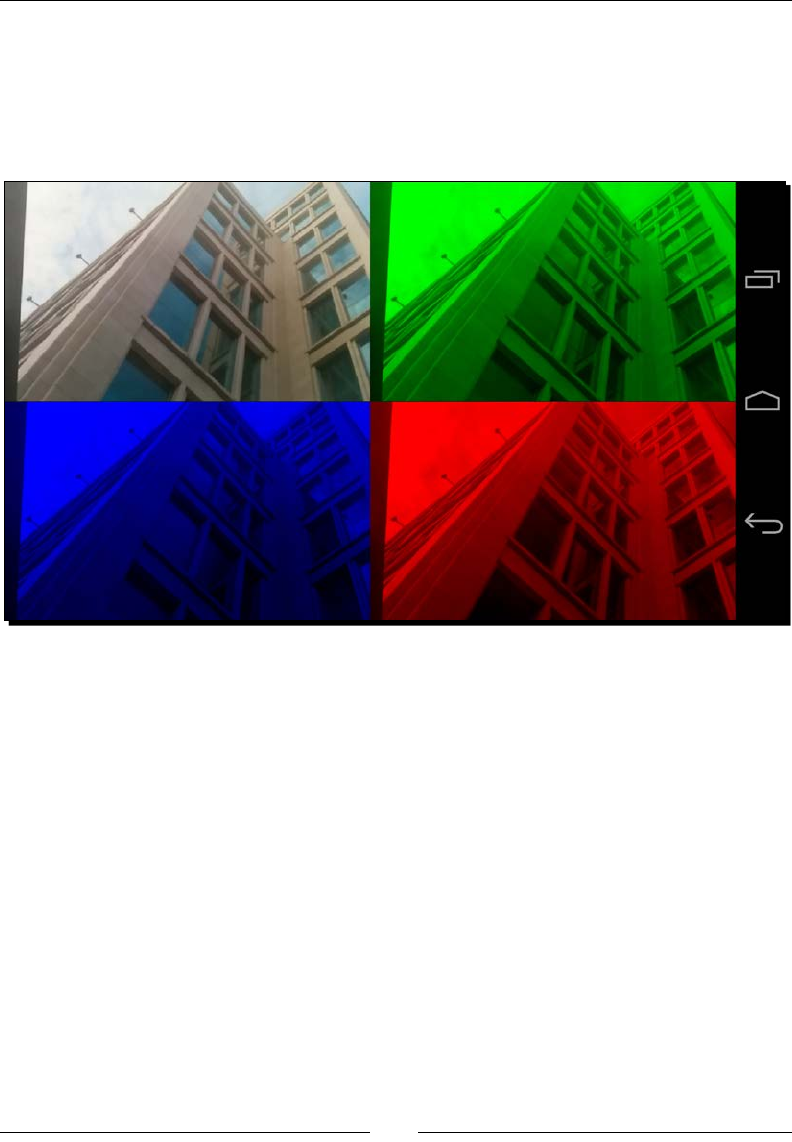
Chapter 4
[ 169 ]
What just happened?
Compile and run the applicaon. The raw video feed is displayed in the top-le corner
without any transformaon. The raw video frame is decoded in nave code and each color
channel is extracted into three Java bitmaps. These bitmaps are displayed inside three
ImageView elements in each of the corners of the screen.
The algorithm used to decode the YUV frame originates from the Ketai open source project, an
image and sensor processing library for Android. See http://ketai.googlecode.com/ for
more informaon. Beware that YUV to RGB is an expensive operaon that is likely to remain
a point of contenon in your program (RenderScript, which we will discover in Chapter 10,
Intensive Compung with RenderScript, can help in that task).
The code presented here is far from being opmal (the decoding algorithm can be opmized,
the video frames, captured with mulple buers, memory accesses can be reduced, and
code can be multhreaded) but it gives an overview of how bitmap can be processed
navely with the NDK.

Calling Java Back from Nave Code
[ 170 ]
Nave code is given direct access to the bitmap surface thanks to the Android NDK Bitmap
API dened in the jnigraphics module. This API, which can be considered as an Android
specic extension to JNI, denes the following methods:
AndroidBitmap_getInfo() to retrieve bitmap informaon. The returned value is
negave when a problem occurs, or else 0:
int AndroidBitmap_getInfo(JNIEnv* env, jobject jbitmap,
AndroidBitmapInfo* info);
Bitmap informaon is retrieved in the AndroidBitmapInfo structure, which is
dened as follows:
typedef struct {
uint32_t width; // Width in pixels
uint32_t height; // Height in pixels
uint32_t stride; // Number of bytes between each line
int32_t format; // Pixel structure (see AndroidBitmapFormat)
uint32_t flags; // Unused for now
} AndroidBitmapInfo;
AndroidBitmap_lockPixels() gives exclusive access to the bitmap while
processing it. The returned value is negave when a problem occurs, or else 0:
int AndroidBitmap_lockPixels(JNIEnv* env, jobject jbitmap, void**
addrPtr);
AndroidBitmap_unlockPixels() releases the exclusive lock on the bitmap. The
returned value is negave when a problem occurs, or else 0:
int AndroidBitmap_unlockPixels(JNIEnv* env, jobject jbitmap);
Drawing operaons on any bitmap occurs systemacally in three main steps:
1. First, the bitmap surface is acquired.
2. Then, bitmap pixels are modied. Here, video pixels are converted to RGB and
wrien to the bitmap surface.
3. Finally, the bitmap surface is released.
Bitmaps must be systemacally locked and then unlocked when accessed navely. Drawing
operaons must occur imperavely between a lock/unlock pair. Have a look at the
bitmap.h header le for more informaon.

Chapter 4
[ 171 ]
Registering native methods manually
In our store example, nave method prototypes have been generated automacally by
Javah using a specic name and parameter convenon. The Dalvik VM can then load them
at runme by "guessing" their names. However, this convenon is easy to break and has no
runme exibility. Hopefully, JNI lets you manually register nave methods that are going to
be called from Java. And what beer place than JNI_OnLoad() to do that?
Registraon is performed with the following JNI method:
jint RegisterNatives(jclass clazz, const JNINativeMethod* methods,
jint nMethods)
jclass is a reference to the Java class hosng the nave method. We will see more
about it through this chapter and the next one.
methods is an array of JNINativeMethod, a structure describing the nave
methods to register.
nMethods indicates how many methods are described inside the methods array.
The JNINativeMethod structure is dened as follows:
typedef struct {
const char* name;
const char* signature;
void* fnPtr;
} JNINativeMethod;
The rst and second elements are name and signature of the corresponding Java method,
and the third parameter fnPtr, is a pointer to the corresponding method on the nave
side. That way, you can get rid of javah and its annoying naming convenon and choose at
runme which method to call.
JNI in C versus JNI in C++
The NDK allows wring applicaons in either C (like our LiveCamera example) or C++ (like
our Store example). So does JNI.
C is not an object-oriented language but C++ is. This is why you do not write JNI in C like in
C++. In C, JNIEnv is in fact a structure containing funcon pointers. Of course, when JNIEnv
is given to you, all these pointers are inialized so that you can call them a bit like an object.
However, this parameter, which is implicit in an object-oriented language, is given as the rst
parameter in C (env in the following code). Also, JNIEnv needs to be dereferenced the rst
me to run a method:
JNIEnv *env = ...;
(*env)->RegisterNative(env, ...);

Calling Java Back from Nave Code
[ 172 ]
The C++ code is more natural and simple. This parameter is implicit, and there is no need to
dereference JNIEnv, as methods are not declared as funcon pointers anymore, but as real
member methods:
JNIEnv *env = ...;
env->RegisterNative(env, ...);
Thus, despite being really similar, you do not write JNI code in C in exactly the same way you
write it in C++.
Summary
Thanks to JNI, Java and C/C++ can be ghtly integrated together. Android is now fully
bilingual! Java can call C/C++ code with any type of data or object, and nave code can call
Java back.
We also discovered how to call Java code from nave code with the JNI Reecon API.
Praccally any Java operaon can be performed from nave code thanks to it. However,
for best performance, class, method, or eld descriptors must be cached.
We also saw how to aach and detach a thread to the VM and synchronize Java and nave
threads together with JNI monitors. Multhreaded code is probably one of the most dicult
subjects in programming. Do it with care!
Finally, we also navely processed bitmaps thanks to JNI, and decoded a video feed by hand.
However, an expensive conversion is needed from the default YUV format (which should be
supported on every device according to Android specicaons) to RGB.
When dealing with nave code on Android, JNI is almost always in the way. It is a verbose
and very technical API, not to menon cumbersome, which requires care. Its subtlees
would require a whole book for an in-depth understanding. Instead, this chapter has
given you the essenal knowledge to integrate your own C/C++ module in your own
Java applicaon.
In the next chapter, we will see how to create a fully nave applicaon, which completely
gets rid of JNI.
[ 173 ]
5
Writing a Fully Native Application
In previous chapters, we have breached Android NDK's surface using JNI. But
there is much more to find inside! The NDK includes its own set of specific
features, one of them being Native Activities. Native activities allow creating
applications based only on native code, without a single line of Java. No more
JNI! No more references! No more Java!
In addition to native activities, the NDK brings some APIs for native access to
Android resources, such as display windows, assets, device configuration…
These APIs help in getting rid of the tortuous JNI bridge often necessary to
embed native code. Although there is a lot still missing, and not likely to
be available (Java remains the main platform language for GUIs and most
frameworks), multimedia applications are a perfect target to apply them...
This chapter iniates a nave C++ project developed progressively throughout this book:
DroidBlaster. Based on a top-down viewpoint, this sample scrolling shooter will feature 2D
graphics, and, later on, 3D graphics, sound, input, and sensor management. In this chapter,
we will create its base structure and main game components.
Let's now enter the heart of the Android NDK by:
Creang a fully nave acvity
Handling main acvity events
Accessing display window navely
Retrieving me and calculang delays
Wring a Fully Nave Applicaon
[ 174 ]
Creating a native Activity
The NativeActivity class provides a facility to minimize the work necessary to create a
nave applicaon. It lets the developer get rid of all the boilerplate code to inialize and
communicate with nave code and concentrate on core funconalies. This glue Acvity is
the simplest way to write applicaons, such as games without a line of Java code.
The resulng project is provided with this book under the
name DroidBlaster_Part1.
Time for action – creating a basic native Activity
We are now going to see how to create a minimal nave acvity that runs an event loop.
1. Create a new hybrid Java/C++ project, as shown in Chapter 2, Starng a Nave
Android Project.
Name it DroidBlaster.
Turn the project into a native project, as already seen in the previous
chapter. Name the native module droidblaster.
Remove the native source and header files that have been created by ADT.
Remove the reference to the Java src directory in Project Properties | Java
Build Path | Source. Then, remove the directory itself on disk.
Get rid of all layouts in the res/layout directory.
Get rid of jni/droidblaster.cpp if it has been created.
2. In AndroidManifest.xml, use Theme.NoTitleBar.Fullscreen as the
applicaon theme.
Declare a NativeActivity that refers to the nave module named
droidblaster (that is, the nave library we will compile) using the meta-data
property android.app.lib_name:
<?xml version="1.0" encoding="utf-8"?>
<manifest xmlns:android="http://schemas.android.com/apk/res/android"
package="com.packtpub.droidblaster2d" android:versionCode="1"
android:versionName="1.0">
<uses-sdk
android:minSdkVersion="14"
android:targetSdkVersion="19"/>
<application android:icon="@drawable/ic_launcher"
android:label="@string/app_name"

Chapter 5
[ 175 ]
android:allowBackup="false"
android:theme
="@android:style/Theme.NoTitleBar.Fullscreen">
<activity android:name="android.app.NativeActivity"
android:label="@string/app_name"
android:screenOrientation="portrait">
<meta-data android:name="android.app.lib_name"
android:value="droidblaster"/>
<intent-filter>
<action android:name ="android.intent.action.MAIN"/>
<category
android:name="android.intent.category.LAUNCHER"/>
</intent-filter>
</activity>
</application>
</manifest>
3. Create the le jni/Types.hpp. This header will contain common types and the
header cstdint:
#ifndef _PACKT_TYPES_HPP_
#define _PACKT_TYPES_HPP_
#include <cstdint>
#endif
4. Let's write a logging class to get some feedback in the Logcat.
Create jni/Log.hpp and declare a new class Log.
Define the packt_Log_debug macro to allow the activating or
deactivating of debug messages with a simple compile flag:
#ifndef _PACKT_LOG_HPP_
#define _PACKT_LOG_HPP_
class Log {
public:
static void error(const char* pMessage, ...);
static void warn(const char* pMessage, ...);
static void info(const char* pMessage, ...);
static void debug(const char* pMessage, ...);
};
#ifndef NDEBUG
#define packt_Log_debug(...) Log::debug(__VA_ARGS__)

Wring a Fully Nave Applicaon
[ 176 ]
#else
#define packt_Log_debug(...)
#endif
#endif
5. Implement the jni/Log.cpp le and implement the info() method. To write
messages to Android logs, the NDK provides a dedicated logging API in the
android/log.h header, which can be used similarly as printf() or vprintf()
(with varArgs) in C:
#include "Log.hpp"
#include <stdarg.h>
#include <android/log.h>
void Log::info(const char* pMessage, ...) {
va_list varArgs;
va_start(varArgs, pMessage);
__android_log_vprint(ANDROID_LOG_INFO, "PACKT", pMessage,
varArgs);
__android_log_print(ANDROID_LOG_INFO, "PACKT", "\n");
va_end(varArgs);
}
...
Write other log methods, error(), warn(), and debug(), which are almost
idencal, except the level macro, which are respecvely ANDROID_LOG_ERROR,
ANDROID_LOG_WARN, and ANDROID_LOG_DEBUG instead.
6. Applicaon events in NativeActivity can be processed with an event loop. So,
create jni/EventLoop.hpp to dene a class with a unique method run().
Include the android_native_app_glue.h header, which denes the android_
app structure. It represents what could be called an applicave context, where
all the informaon is related to the nave acvity; its state, its window, its event
queue, and so on:
#ifndef _PACKT_EVENTLOOP_HPP_
#define _PACKT_EVENTLOOP_HPP_
#include <android_native_app_glue.h>
class EventLoop {

Chapter 5
[ 177 ]
public:
EventLoop(android_app* pApplication);
void run();
private:
android_app* mApplication;
};
#endif
7. Create jni/EventLoop.cpp and implement the acvity event loop in the run()
method. Include a few log events to get some feedback in Android logs.
During the whole acvity lifeme, the run() method loops connuously over
events unl it is requested to terminate. When an acvity is about to be destroyed,
the destroyRequested value in the android_app structure is changed internally
to indicate to the client code that it must exit.
Also, call app_dummy() to ensure the glue code that es nave code to
NativeActivity is not stripped by the linker. We will see more about this in
Chapter 9, Porng Exisng Libraries to Android.
#include "EventLoop.hpp"
#include "Log.hpp"
EventLoop::EventLoop(android_app* pApplication):
mApplication(pApplication)
{}
void EventLoop::run() {
int32_t result; int32_t events;
android_poll_source* source;
// Makes sure native glue is not stripped by the linker.
app_dummy();
Log::info("Starting event loop");
while (true) {
// Event processing loop.
while ((result = ALooper_pollAll(-1, NULL, &events,
(void**) &source)) >= 0) {
// An event has to be processed.
if (source != NULL) {
source->process(mApplication, source);
}

Wring a Fully Nave Applicaon
[ 178 ]
// Application is getting destroyed.
if (mApplication->destroyRequested) {
Log::info("Exiting event loop");
return;
}
}
}
}
8. Finally, create jni/Main.cpp to dene the program entry point android_main(),
which runs the event loop in a new le Main.cpp:
#include "EventLoop.hpp"
#include "Log.hpp"
void android_main(android_app* pApplication) {
EventLoop(pApplication).run();
}
9. Edit the jni/Android.mk le to dene the droidblaster module (the LOCAL_
MODULE direcve).
Describe the C++ les to compile the LOCAL_SRC_FILES direcve with the help
of the LS_CPP macro (more about this in Chapter 9, Porng Exisng Libraries to
Android).
Link droidblaster with the native_app_glue module (the LOCAL_STATIC_
LIBRARIES direcve) and android (required by the Nave App Glue module),
as well as the log libraries (the LOCAL_LDLIBS direcve):
LOCAL_PATH := $(call my-dir)
include $(CLEAR_VARS)
LS_CPP=$(subst $(1)/,,$(wildcard $(1)/*.cpp))
LOCAL_MODULE := droidblaster
LOCAL_SRC_FILES := $(call LS_CPP,$(LOCAL_PATH))
LOCAL_LDLIBS := -landroid -llog
LOCAL_STATIC_LIBRARIES := android_native_app_glue
include $(BUILD_SHARED_LIBRARY)
$(call import-module,android/native_app_glue)
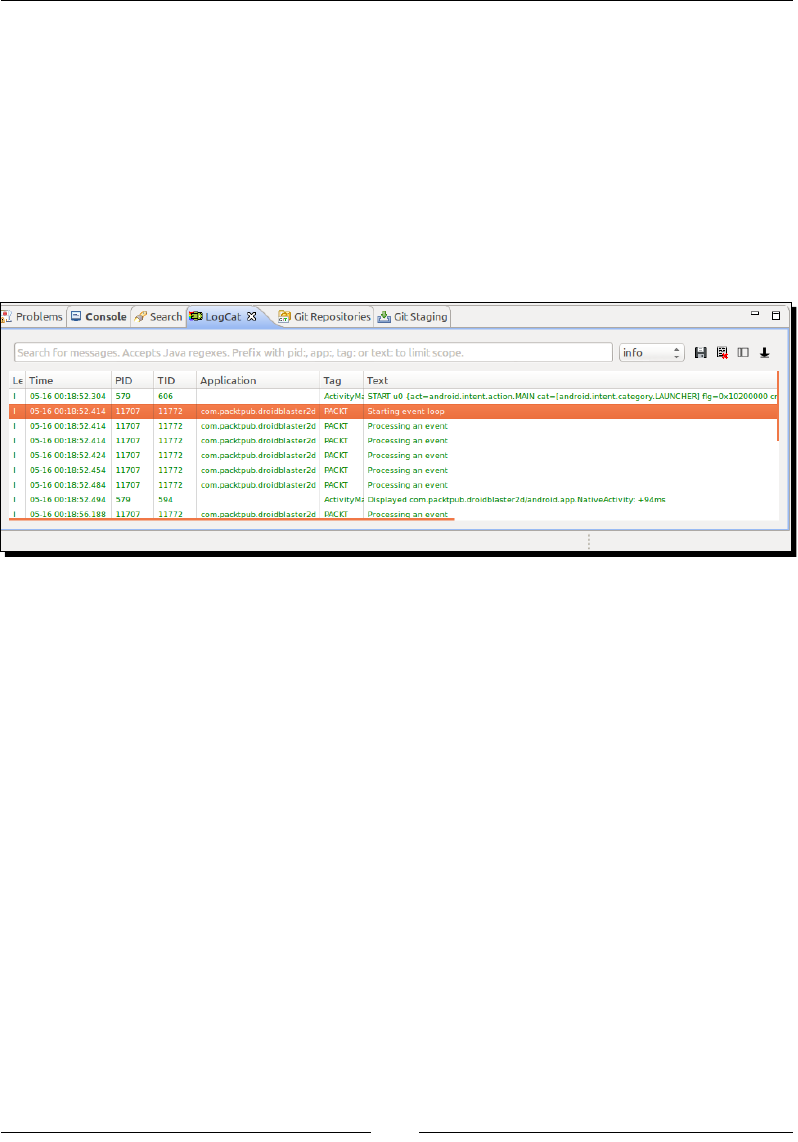
Chapter 5
[ 179 ]
10. Create jni/Application.mk to compile the nave module for mulple ABIs. We
will use the most basic ones, as shown in the following code:
APP_ABI := armeabi armeabi-v7a x86
What just happened?
Build and run the applicaon. Of course, you will not see anything tremendous when starng
this applicaon. Actually, you will just see a black screen! However, if you look carefully at the
LogCat view in Eclipse (or the adb logcat command), you will discover a few interesng
messages that have been emied by your nave applicaon in reacon to acvity events:
We iniated a Java Android project without a single line of Java code! Instead of
referencing a child of Activity in AndroidManifest, we referenced the android.app.
NativeActivity class provided by the Android framework.
NativeActivity is a Java class, launched like any other Android acvity and interpreted
by the Dalvik Virtual Machine like any other Java class. However, we never faced it directly.
NativeActivity is in fact a helper class provided with Android SDK, which contains all
the necessary glue code to handle applicaon events (lifecycle, input, sensors, and so on)
and broadcasts them transparently to nave code. Thus, a nave acvity does not eliminate
the need for JNI. It just hides it under the cover! However, the nave C/C++ module run by
NativeActivity is executed outside Dalvik boundaries in its own thread, enrely navely
(using the Posix Thread API)!
NativeActivity and nave code are connected together through the native_app_glue
module. The Nave App Glue has the responsibility of:
Launching the nave thread, which runs our own nave code
Receiving events from NativeActivity
Roung these events to the nave thread event loop for further processing

Wring a Fully Nave Applicaon
[ 180 ]
The Native glue module code is located in ${ANDROID_NDK}/sources/android/
native_app_glue and can be analyzed, modied, or forked at will (see Chapter 9,
Porng Exisng Libraries to Android, for more informaon). The headers related to nave
APIs such as, looper.h, can be found in ${ANDROID_NDK}/platforms/<Target
Platform>/<Target Architecture>/usr/include/android/. Let's see in more
detail how it works.
More about the Native App Glue
Our own nave code entry point is declared inside the android_main() method,
which is similar to the main methods in desktop applicaons. It is called only once when
NativeActivity is instanated and launched. It loops over applicaon events unl
NativeActivity is terminated by the user (for example, when pressing a device's back
buon) or unl it exits by itself (more about this in the next part).
The android_main() method is not the real nave applicaon entry point. The real
entry point is the ANativeActivity_onCreate() method hidden in the android_
native_app_glue module. The event loop we implemented in android_main() is
in fact a delegate event loop, launched in its own nave thread by the glue module. This
design decouples nave code from the NativeActivity class, which is run on the UI
thread on the Java side. Thus, even if your code takes a long me to handle an event,
NativeActivity is not blocked and your Android device sll remains responsive.
The delegate nave event loop in android_main() is itself composed, in our example,
of two nested while loops. The outer one is an innite loop, terminated only when acvity
destrucon is requested by the system (indicated by the destroyRequested ag). It
executes an inner loop, which processes all pending applicaon events.
...
int32_t result; int32_t events;
android_poll_source* source;
while (true) {
while ((result = ALooper_pollAll(-1, NULL, &events,
(void**) &source)) >= 0) {
if (source != NULL) {
source->process(mApplication, source);
}
if (mApplication->destroyRequested) {
return;
}
}
}
...
Chapter 5
[ 181 ]
The inner For loop polls events by calling ALooper_pollAll(). This method is part of the
Looper API, which can be described as a general-purpose event loop manager provided by
Android. When meout is set to -1, like in the preceding example, ALooper_pollAll()
remains blocked while waing for events. When at least one is received, ALooper_
pollAll() returns and the code ow connues.
The android_poll_source structure describing the event is lled and is then used by
client code for further processing. This structure looks as follows:
struct android_poll_source {
int32_t id; // Source identifier
struct android_app* app; // Global android application context
void (*process)(struct android_app* app,
struct android_poll_source* source); // Event processor
};
The process() funcon pointer can be customized to process applicaon events manually,
as we will see in the next secon.
As we saw in this part, the event loop receives an android_app structure in parameter.
This structure, described in android_native_app_glue.h, contains some contextual
informaon as shown in the following table:
void* userData Pointer to any data you want. This is essential in giving some
contextual information to the activity or input event callbacks.
void (*pnAppCmd)
(…) and int32_t
(*onInputEvent)(…)
These member variables represent the event callbacks triggered
by the Native App Glue when an activity or an input event
occurs. We will see more about this in the next section.
ANativeActivity*
activity
Describes the Java native activity (its class as a JNI object, its
data directories, and so on) and gives the necessary information
to retrieve a JNI context.
AConfiguration*
config
Describes the current hardware and system state, such as the
current language and country, the current screen orientation,
density, size, and so on.
void* savedState
size_t and
savedStateSize
Used to save a buffer of data when an activity (and thus its
native thread) is destroyed and later restored.
AInputQueue*
inputQueue
Provides input events (used internally by the native glue). We
will see more about input events in Chapter 8, Handling Input
Devices and Sensors.
ALooper* looper Allows attaching and detaching event queues used internally
by the native glue. Listeners poll and wait for events sent on a
communication pipe.
Wring a Fully Nave Applicaon
[ 182 ]
ANativeWindow* window
and ARect contentRect
Represents the "drawable" area on which graphics can be
drawn. The ANativeWindow API, declared in native_
window.h, allows retrieval of the window width, height, and
pixel format, and the changing of these settings.
int activityState Current activity state, that is, APP_CMD_START, APP_CMD_
RESUME, APP_CMD_PAUSE, and so on.
int destroyRequested When equal to 1, it indicates that the application is about
to be destroyed and the native thread must be terminated
immediately. This flag has to be checked in the event loop.
The android_app structure also contains some addional data for internal use only, which
should not be changed.
Knowing all these details is not essenal to program nave programs but can help you
understand what's going on behind your back. Let's now see how to handle these
acvity events.
Handling Activity events
In the rst part, a nave event loop was run, which ushes events without really processing
them. In this second part, we are going to discover more about these events occurring
during the acvity lifecycle, and how to process them, spending the remaining me stepping
our applicaon.
The resulng project is provided with this book under the name
DroidBlaster_Part2.
Time for action – stepping the event loop
Let's extend the previous example to step our applicaon when events are processed.
1. Open jni/Types.hpp and dene a new type status to represent return codes:
#ifndef _PACKT_TYPES_HPP_
#define _PACKT_TYPES_HPP_
#include <cstdlib>
typedef int32_t status;
const status STATUS_OK = 0;

Chapter 5
[ 183 ]
const status STATUS_KO = -1;
const status STATUS_EXIT = -2;
#endif
2. Create the jni/ActivityHandler.hpp header and dene an "interface" to observe
nave acvity events. Each possible event has its own handler method: onStart(),
onResume(), onPause(), onStop(), onDestroy(), and so on. However, we are
generally interested in three specic moments in the acvity life cycle:
onActivate(), invoked when the activity is resumed and its window is
available and focused
onDeactivate(), invoked when the activity is paused or the display
window loses its focus or is destroyed
onStep(), invoked when no event has to be processed and computations
can take place
#ifndef _PACKT_ACTIVITYHANDLER_HPP_
#define _PACKT_ACTIVITYHANDLER_HPP_
#include "Types.hpp"
class ActivityHandler {
public:
virtual ~ActivityHandler() {};
virtual status onActivate() = 0;
virtual void onDeactivate() = 0;
virtual status onStep() = 0;
virtual void onStart() {};
virtual void onResume() {};
virtual void onPause() {};
virtual void onStop() {};
virtual void onDestroy() {};
virtual void onSaveInstanceState(void** pData, size_t* pSize) {};
virtual void onConfigurationChanged() {};
virtual void onLowMemory() {};
virtual void onCreateWindow() {};
virtual void onDestroyWindow() {};
virtual void onGainFocus() {};
virtual void onLostFocus() {};
};
#endif

Wring a Fully Nave Applicaon
[ 184 ]
3. Enhance jni/EventLoop.hpp with the following methods:
activate() and deactivate(), executed when an activity
availability changes
callback_appEvent(), which is static and routes events to
processActivityEvent()
Also, dene some member variables as follows:
mActivityHandler observes activity events. This instance is
given as a constructor parameter and requires the inclusion of
ActivityHandler.hpp
mEnabled saves the application state when the application is active/paused
mQuit indicates the event loop needs to exit
#ifndef _PACKT_EVENTLOOP_HPP_
#define _PACKT_EVENTLOOP_HPP_
#include "ActivityHandler.hpp"
#include <android_native_app_glue.h>
class EventLoop {
public:
EventLoop(android_app* pApplication,
ActivityHandler& pActivityHandler);
void run();
private:
void activate();
void deactivate();
void processAppEvent(int32_t pCommand);
static void callback_appEvent(android_app* pApplication,
int32_t pCommand);
private:
android_app* mApplication;
bool mEnabled;
bool mQuit;
ActivityHandler& mActivityHandler;
};
#endif

Chapter 5
[ 185 ]
4. Edit jni/EventLoop.cpp. The constructor inializaon list itself is trivial
to implement. Then, ll the android_app applicaon context with
addional informaon:
userData points to any data you want. It is the only information accessible
from callback_appEvent() declared previously. In our case, this is the
EventLoop instance (that is, this).
onAppCmd points to an internal callback triggered each time an
event occurs. In our case, this is the role devoted to the static method
callback_appEvent().
#include "EventLoop.hpp"
#include "Log.hpp"
EventLoop::EventLoop(android_app* pApplication,
ActivityHandler& pActivityHandler):
mApplication(pApplication),
mEnabled(false), mQuit(false),
mActivityHandler(pActivityHandler) {
mApplication->userData = this;
mApplication->onAppCmd = callback_appEvent;
}
...
Update the run() main event loop. Instead of blocking when there is no
more activity event to process, ALooper_pollAll() must let the program
flow continue to perform the recurrent processing. Here, processing
is performed by the listener in mActivityHandler.onStep(). This
behavior is obviously only needed when the application is enabled.
Also, allow the activity to be terminated programmatically using the
AnativeActivity_finish() method.
...
void EventLoop::run() {
int32_t result; int32_t events;
android_poll_source* source;
// Makes sure native glue is not stripped by the linker.
app_dummy();
Log::info("Starting event loop");

Wring a Fully Nave Applicaon
[ 186 ]
while (true) {
// Event processing loop.
while ((result = ALooper_pollAll(mEnabled ? 0 : -1,
NULL,
&events, (void**) &source)) >= 0) {
// An event has to be processed.
if (source != NULL) {
Log::info("Processing an event");
source->process(mApplication, source);
}
// Application is getting destroyed.
if (mApplication->destroyRequested) {
Log::info("Exiting event loop");
return;
}
}
// Steps the application.
if ((mEnabled) && (!mQuit)) {
if (mActivityHandler.onStep() != STATUS_OK) {
mQuit = true;
ANativeActivity_finish(mApplication->activity);
}
}
}
}
...
What just happened?
We changed our event loop to update our applicaon, instead of blocking uselessly, when
there are no more events to process. This behavior is specied in ALooper_pollAll() by
its rst parameter, meout:
When meout is -1, as dened previously, call is blocking unl events are received.
When meout is 0, call is non-blocking so that, if nothing remains in the queue, the
program ow connues (the inner while loop is terminated) and makes it possible to
perform recurrent processing.
When meout is greater than 0, we have a blocking call, which remains unl an
event is received or the duraon is elapsed.

Chapter 5
[ 187 ]
Here, we want to step the acvity (that is, perform computaons) when it is in acve state
(mEnabled is true); in that case, meout is 0. When the acvity is in deacvated state
(mEnabled is false), events are sll processed (for example, to resurrect the acvity) but
nothing needs to get computed. The thread has to be blocked to avoid consuming baery
and processor me uselessly; in that case, meout is -1.
Once all pending events are processed, the listener is stepped. It can request the
applicaon to be terminated, for example, if the game is nished. To leave the applicaon
programmacally, the NDK API provides the AnativeActivity_finish() method to
request acvity terminaon. Terminaon does not occur immediately but aer the last few
events (pause, stop, and so on) are processed.
Time for action – handling Activity events
We are not done yet. Let's connue our example to handle acvity events and log them to
the LogCat view:
1. Connue eding jni/EventLoop.cpp. Implement activate() and
deactivate().Check both acvity states before nofying the listener (to
avoid unmely triggering). We consider an acvity as acvated only if a
display window is available:
...
void EventLoop::activate() {
// Enables activity only if a window is available.
if ((!mEnabled) && (mApplication->window != NULL)) {
mQuit = false; mEnabled = true;
if (mActivityHandler.onActivate() != STATUS_OK) {
goto ERROR;
}
}
return;
ERROR:
mQuit = true;
deactivate();
ANativeActivity_finish(mApplication->activity);
}
void EventLoop::deactivate() {
if (mEnabled) {
mActivityHandler.onDeactivate();

Wring a Fully Nave Applicaon
[ 188 ]
mEnabled = false;
}
}
...
Route activity events from the static callback callback_appEvent() to
the member method processAppEvent().
To do so, retrieve the EventLoop instance, thanks to the userData pointer
(this being unavailable from a static method). Effective event processing
is then delegated to processAppEvent(), which brings us back to the
object-oriented world. The command, that is the activity event, given by the
native glue is passed at the same time.
...
void EventLoop::callback_appEvent(android_app* pApplication,
int32_t pCommand) {
EventLoop& eventLoop = *(EventLoop*) pApplication->userData;
eventLoop.processAppEvent(pCommand);
}
...
2. Process the forwarded events in processAppEvent(). The pCommand parameter
contains an enumeraon value (APP_CMD_*), which describes the occurring event
(APP_CMD_START, APP_CMD_GAINED_FOCUS, and so on).
Depending on the event, acvate or deacvate the event loop and nofy
the listener:
Acvaon occurs when the acvity gains focus. This event is always the last event
that occurs aer the acvity is resumed and the window is created. Geng focus
means that the acvity can receive input events.
Deacvaon occurs when the window loses focus or the applicaon is paused (both
can occur rst). For security, deacvaon is also performed when the window is
destroyed, although this should always occur aer the focus is lost. Losing focus
means that the applicaon does not receive input events anymore.
...
void EventLoop::processAppEvent(int32_t pCommand) {
switch (pCommand) {
case APP_CMD_CONFIG_CHANGED:
mActivityHandler.onConfigurationChanged();
break;
case APP_CMD_INIT_WINDOW:
mActivityHandler.onCreateWindow();
Chapter 5
[ 189 ]
break;
case APP_CMD_DESTROY:
mActivityHandler.onDestroy();
break;
case APP_CMD_GAINED_FOCUS:
activate();
mActivityHandler.onGainFocus();
break;
case APP_CMD_LOST_FOCUS:
mActivityHandler.onLostFocus();
deactivate();
break;
case APP_CMD_LOW_MEMORY:
mActivityHandler.onLowMemory();
break;
case APP_CMD_PAUSE:
mActivityHandler.onPause();
deactivate();
break;
case APP_CMD_RESUME:
mActivityHandler.onResume();
break;
case APP_CMD_SAVE_STATE:
mActivityHandler.onSaveInstanceState(
&mApplication->savedState, &mApplication->savedStateSize);
break;
case APP_CMD_START:
mActivityHandler.onStart();
break;
case APP_CMD_STOP:
mActivityHandler.onStop();
break;
case APP_CMD_TERM_WINDOW:
mActivityHandler.onDestroyWindow();
deactivate();
break;
default:
break;
}
}
A few events, such as APP_CMD_WINDOW_RESIZED, are available but
never triggered. Do not listen to them unless you are ready to stick your
hands in the glue.

Wring a Fully Nave Applicaon
[ 190 ]
3. Create jni/DroidBlaster.hpp, which implements the ActivityHandler
interface and all its methods (some have been skipped here for conciseness). This
class will run the game logic as follows:
#ifndef _PACKT_DROIDBLASTER_HPP_
#define _PACKT_DROIDBLASTER_HPP_
#include "ActivityHandler.hpp"
#include "EventLoop.hpp"
#include "Types.hpp"
class DroidBlaster : public ActivityHandler {
public:
DroidBlaster(android_app* pApplication);
void run();
protected:
status onActivate();
void onDeactivate();
status onStep();
void onStart();
...
private:
EventLoop mEventLoop;
};
#endif
4. Implement jni/DroidBlaster.cpp with all the required handlers. To keep this
introducon to the acvity lifecycle simple, we are just going to log each event that
occurs. Use onStart() as a model for all the handlers that have been skipped in
the following code.
Steps are limited to a simple thread sleep (to avoid ooding the Android log), which
requires the inclusion of unistd.h.
Note that the event loop is now run directly by the DroidBlaster class:
#include "DroidBlaster.hpp"
#include "Log.hpp"
#include <unistd.h>
DroidBlaster::DroidBlaster(android_app* pApplication):
mEventLoop(pApplication, *this) {

Chapter 5
[ 191 ]
Log::info("Creating DroidBlaster");
}
void DroidBlaster::run() {
mEventLoop.run();
}
status DroidBlaster::onActivate() {
Log::info("Activating DroidBlaster");
return STATUS_OK;
}
void DroidBlaster::onDeactivate() {
Log::info("Deactivating DroidBlaster");
}
status DroidBlaster::onStep() {
Log::info("Starting step");
usleep(300000);
Log::info("Stepping done");
return STATUS_OK;
}
void DroidBlaster::onStart() {
Log::info("onStart");
}
...
5. Finally, inialize and run the DroidBlaster game in the android_main()
entry point:
#include "DroidBlaster.hpp"
#include "EventLoop.hpp"
#include "Log.hpp"
void android_main(android_app* pApplication) {
DroidBlaster(pApplication).run();
}
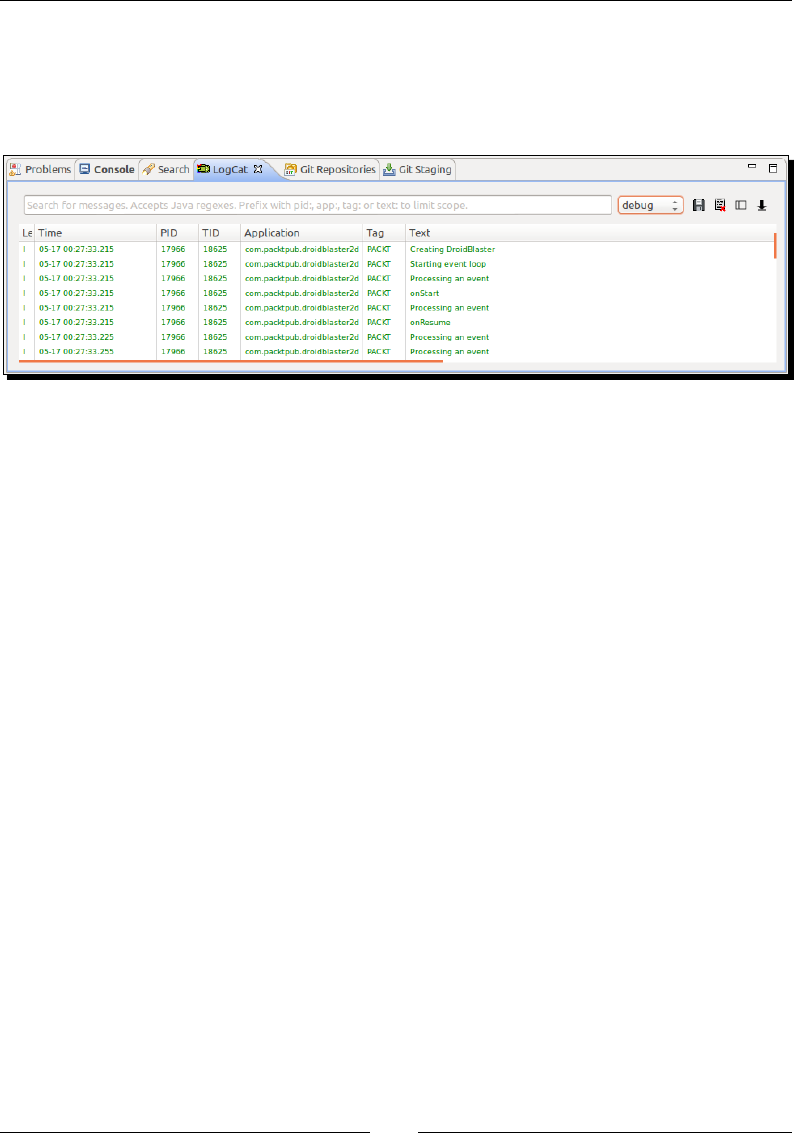
Wring a Fully Nave Applicaon
[ 192 ]
What just happened?
If you like a black screen, you are served! Again, this me, everything happens in the Eclipse
LogCat view. All messages that have been emied in reacon to applicaon events are
displayed here, as shown in the following screenshot:
We created a minimalist framework, which handles applicaon events in the nave thread
using an event-driven approach. Events (which are named commands) are redirected to a
listener object, which performs its own specic computaons.
Nave acvity events correspond mostly to classic Java acvity events. Events are a crical
and rather tricky point that any applicaon needs to handle. They occur generally in pairs,
such as start/stop, resume/pause, create/destroy, create window/destroy
window, or gain/lose focus. Although they occur most of the me in a predetermined
order, some specic cases may cause dierent behaviors, for example:
Leaving the applicaon using the back buon destroys the acvity and
nave thread.
Leaving the applicaon using the home buon stops the acvity and releases the
window. The nave thread is kept on hold.
Pressing the device's home buon for a long me and then geng back should
cause a loss and gain of focus only. The nave thread is kept on hold.
Shung down the phone screen and switching it back should terminate and
reinialize the window right aer the acvity is resumed. The nave thread is
kept on hold.
When changing screen orientaon (not applicable here), the whole acvity may not
lose its focus, although the recreated acvity will regain it.
Understanding the acvity lifecycle is essenal to develop Android applicaons. Have a look
at http://developer.android.com/reference/android/app/Activity.html in
the ocial Android documentaon for a detailed descripon.
Chapter 5
[ 193 ]
The Nave App Glue gives you a chance to save your acvity state before it is
destroyed by triggering APP_CMD_SAVE_STATE. The state must be saved in
the android_app structure in savedState, which is a pointer to a memory
buer to save, and in savedStateSize, which is the size of the memory
buer to save. The buer must be allocated by ourselves, using malloc()
(deallocaon being automac), and must not contain pointers, only "raw" data.
Accessing window surface natively
Applicaon events are essenal to understand, but not very excing. An interesng feature
of the Android NDK is the ability to access the display window navely. With this privileged
access, applicaons can draw any graphics they want onscreen.
We will now exploit this feature to get a graphic feedback in our applicaon: a red square on
screen. This square is going to represent the spaceship the user will control during the game.
The resulng project is provided with this book under the name
DroidBlaster_Part3.
Time for action – displaying raw graphics
Let's make DroidBlaster more interacve with some graphics and game components.
1. Edit jni/Types.hpp and create a new structure Location to hold enty
posions. Also, dene a macro to generate a random value in the requested range
as follows:
#ifndef _PACKT_TYPES_HPP_
#define _PACKT_TYPES_HPP_
...
struct Location {
Location(): x(0.0f), y(0.0f) {};
float x; float y;
};
#define RAND(pMax) (float(pMax) * float(rand()) /
float(RAND_MAX))
#endif

Wring a Fully Nave Applicaon
[ 194 ]
2. Create a new le, jni/GraphicsManager.hpp. Dene a structure
GraphicsElement, which contains the locaon and dimensions of the
graphical element to display:
#ifndef _PACKT_GRAPHICSMANAGER_HPP_
#define _PACKT_GRAPHICSMANAGER_HPP_
#include "Types.hpp"
#include <android_native_app_glue.h>
struct GraphicsElement {
GraphicsElement(int32_t pWidth, int32_t pHeight):
location(),
width(pWidth), height(pHeight) {
}
Location location;
int32_t width; int32_t height;
};
...
Then, in the same le, dene a GraphicsManager class as follows:
getRenderWidth() and getRenderHeight() to return the display size
registerElement() is a GraphicsElement factory method that tells
the manager what element to draw
start() and update()initialize the manager and render the screen
for each frame respectively
A few member variables are needed:
mApplication stores the application context needed to access the
display window
mRenderWidth and mRenderHeight for the display size
mElements and mElementCount for a table of all the elements to draw
...
class GraphicsManager {
public:
GraphicsManager(android_app* pApplication);
~GraphicsManager();
int32_t getRenderWidth() { return mRenderWidth; }

Chapter 5
[ 195 ]
int32_t getRenderHeight() { return mRenderHeight; }
GraphicsElement* registerElement(int32_t pHeight, int32_t
pWidth);
status start();
status update();
private:
android_app* mApplication;
int32_t mRenderWidth; int32_t mRenderHeight;
GraphicsElement* mElements[1024]; int32_t mElementCount;
};
#endif
3. Implement jni/GraphicsManager.cpp, starng with the constructor, destructor,
and registraon methods. They manage the list of GraphicsElement to update:
#include "GraphicsManager.hpp"
#include "Log.hpp"
GraphicsManager::GraphicsManager(android_app* pApplication) :
mApplication(pApplication),
mRenderWidth(0), mRenderHeight(0),
mElements(), mElementCount(0) {
Log::info("Creating GraphicsManager.");
}
GraphicsManager::~GraphicsManager() {
Log::info("Destroying GraphicsManager.");
for (int32_t i = 0; i < mElementCount; ++i) {
delete mElements[i];
}
}
GraphicsElement* GraphicsManager::registerElement(int32_t pHeight,
int32_t pWidth) {
mElements[mElementCount] = new GraphicsElement(pHeight, pWidth);
return mElements[mElementCount++];
}
...

Wring a Fully Nave Applicaon
[ 196 ]
4. Implement the start() method to inialize the manager.
First, use the ANativeWindow_setBuffersGeometry() API method to force
the window depth format to 32 bits. The two zeros passed in parameters are
the required window width and height. They are ignored unless inialized with a
posive value. In such a case, the requested window area dened by width and
height is scaled to match the screen size.
Then, retrieve all the necessary window dimensions in an ANativeWindow_
Buffer structure. To ll this structure, the window must be rst locked
with ANativeWindow_lock(), and then unlocked with AnativeWindow_
unlockAndPost() once done.
...
status GraphicsManager::start() {
Log::info("Starting GraphicsManager.");
// Forces 32 bits format.
ANativeWindow_Buffer windowBuffer;
if (ANativeWindow_setBuffersGeometry(mApplication->window,
0, 0,
WINDOW_FORMAT_RGBX_8888) < 0) {
Log::error("Error while setting buffer geometry.");
return STATUS_KO;
}
// Needs to lock the window buffer to get its properties.
if (ANativeWindow_lock(mApplication->window,
&windowBuffer, NULL) >= 0) {
mRenderWidth = windowBuffer.width;
mRenderHeight = windowBuffer.height;
ANativeWindow_unlockAndPost(mApplication->window);
} else {
Log::error("Error while locking window.");
return STATUS_KO;
}
return STATUS_OK;
}
...

Chapter 5
[ 197 ]
5. Write the update()method, which renders raw graphics each me an applicaon
is stepped.
The window surface must be locked before any draw operaon takes place with
AnativeWindow_lock(). Again, the AnativeWindow_Buffer structure is lled
with window informaon for width and height, but more importantly, the stride
and bits pointer.
The stride gives the distance in "pixels" between two successive pixel
lines in the window.
The bits pointer gives direct access to the window surface, in much the
same way as the Bitmap API, as seen in the previous chapter.
With these two pieces of informaon, any pixel-based operaons can be
performed navely.
For example, clear the window memory area with 0 to get a black background. A
brute-force approach using memset() can be applied for that purpose.
...
status GraphicsManager::update() {
// Locks the window buffer and draws on it.
ANativeWindow_Buffer windowBuffer;
if (ANativeWindow_lock(mApplication->window,
&windowBuffer, NULL) < 0) {
Log::error("Error while starting GraphicsManager");
return STATUS_KO;
}
// Clears the window.
memset(windowBuffer.bits, 0, windowBuffer.stride *
windowBuffer.height * sizeof(uint32_t*));
...
Once cleared, draw all elements registered with GraphicsManager. Each
element is represented as a red square onscreen.
First, compute the coordinates (upper-left and bottom-right corners) of the
elements to draw.

Wring a Fully Nave Applicaon
[ 198 ]
Then, clip their coordinates to avoid drawing outside the window memory
area. This operation is rather important as going beyond window limits
might result in a segmentation fault:
...
// Renders graphic elements.
int32_t maxX = windowBuffer.width - 1;
int32_t maxY = windowBuffer.height - 1;
for (int32_t i = 0; i < mElementCount; ++i) {
GraphicsElement* element = mElements[i];
// Computes coordinates.
int32_t leftX = element->location.x - element->width / 2;
int32_t rightX = element->location.x + element->width / 2;
int32_t leftY = windowBuffer.height - element->location.y
- element->height / 2;
int32_t rightY = windowBuffer.height - element->location.y
+ element->height / 2;
// Clips coordinates.
if (rightX < 0 || leftX > maxX
|| rightY < 0 || leftY > maxY) continue;
if (leftX < 0) leftX = 0;
else if (rightX > maxX) rightX = maxX;
if (leftY < 0) leftY = 0;
else if (rightY > maxY) rightY = maxY;
...
6. Aer that, draw each pixel of the element on screen. The line variable points to
the beginning of the rst line of pixels on which the element is drawn. This pointer
is computed using the stride (distance between two lines of pixels) and the top Y
coordinate of the element.
Then, we can loop over window pixels to draw a red square represenng the
element. Start from the le X coordinate to the right X coordinate of the element,
switching from one pixel line to another (that is, on the Y axis) when the end of
each is reached.
...
// Draws a rectangle.
uint32_t* line = (uint32_t*) (windowBuffer.bits)
+ (windowBuffer.stride * leftY);
for (int iY = leftY; iY <= rightY; iY++) {
for (int iX = leftX; iX <= rightX; iX++) {

Chapter 5
[ 199 ]
line[iX] = 0X000000FF; // Red color
}
line = line + windowBuffer.stride;
}
}
...
Finish drawing operaons with ANativeWindow_unlockAndPost() and pend call
to pendANativeWindow_lock(). These must always be called in pairs:
...
// Finshed drawing.
ANativeWindow_unlockAndPost(mApplication->window);
return STATUS_OK;
}
7. Create a new component jni/Ship.hpp that represents our spaceship.
We will handle inializaon only for now, using initialize().
Ship is created with the factory method registerShip().
The GraphicsManager and the ship GraphicsElement are needed to inialize
the ship properly.
#ifndef _PACKT_SHIP_HPP_
#define _PACKT_SHIP_HPP_
#include "GraphicsManager.hpp"
class Ship {
public:
Ship(android_app* pApplication,
GraphicsManager& pGraphicsManager);
void registerShip(GraphicsElement* pGraphics);
void initialize();
private:
GraphicsManager& mGraphicsManager;
GraphicsElement* mGraphics;
};
#endif

Wring a Fully Nave Applicaon
[ 200 ]
8. Implement jni/Ship.cpp. The important part is initialize(), which posions
the ship on the lower quarter of the screen, as shown in the following code:
#include "Log.hpp"
#include "Ship.hpp"
#include "Types.hpp"
static const float INITAL_X = 0.5f;
static const float INITAL_Y = 0.25f;
Ship::Ship(android_app* pApplication,
GraphicsManager& pGraphicsManager) :
mGraphicsManager(pGraphicsManager),
mGraphics(NULL) {
}
void Ship::registerShip(GraphicsElement* pGraphics) {
mGraphics = pGraphics;
}
void Ship::initialize() {
mGraphics->location.x = INITAL_X
* mGraphicsManager.getRenderWidth();
mGraphics->location.y = INITAL_Y
* mGraphicsManager.getRenderHeight();
}
9. Append the newly created manager and component to jni/DroidBlaster.hpp:
...
#include "ActivityHandler.hpp"
#include "EventLoop.hpp"
#include "GraphicsManager.hpp"
#include "Ship.hpp"
#include "Types.hpp"
class DroidBlaster : public ActivityHandler {
...
private:
...
GraphicsManager mGraphicsManager;
EventLoop mEventLoop;
Ship mShip;
};
#endif

Chapter 5
[ 201 ]
10. Finally, update the jni/DroidBlaster.cpp constructor:
...
static const int32_t SHIP_SIZE = 64;
DroidBlaster::DroidBlaster(android_app* pApplication):
mGraphicsManager(pApplication),
mEventLoop(pApplication, *this),
mShip(pApplication, mGraphicsManager) {
Log::info("Creating DroidBlaster");
GraphicsElement* shipGraphics = mGraphicsManager.registerElement(
SHIP_SIZE, SHIP_SIZE);
mShip.registerShip(shipGraphics);
}
...
11. Inialize GraphicsManager and the Ship component in onActivate():
...
status DroidBlaster::onActivate() {
Log::info("Activating DroidBlaster");
if (mGraphicsManager.start() != STATUS_OK) return
STATUS_KO;
mShip.initialize();
return STATUS_OK;
}
...
12. Finally, update the manager in onStep():
...
status DroidBlaster::onStep() {
return mGraphicsManager.update();
}

Wring a Fully Nave Applicaon
[ 202 ]
What just happened?
Compile and run DroidBlaster. The result should be a simple red square represenng our
spaceship in the rst quarter of the screen, as follows:
Graphical feedback is provided through the ANativeWindow API, which gives nave access
to the display window. It allows manipulang its surface like a bitmap. Similarly, accessing
the window surface requires locking and unlocking both before and aer processing.
The AnativeWindow API is dened in android/native_window.h and android/
native_window_jni.h. It provides the following:
ANativeWindow_setBuffersGeometry() inializes the Pixel format (or Depth format)
and size of the window buer. The possible Pixel formats are:
WINDOW_FORMAT_RGBA_8888 for 32-bit colors per pixel, 8 bits for each of the Red,
Green, Blue, and Alpha (for transparency) channels.
WINDOW_FORMAT_RGBX_8888 is the same as the previous one, except that the
Alpha channel is ignored.
WINDOW_FORMAT_RGB_565 for 16-bit colors per pixel (5 bits for Red and Blue,
and 6 for the Green channel).

Chapter 5
[ 203 ]
If the supplied dimension is 0, the window size is used. If it is non-zero, then the window
buer is scaled to match window dimensions when displayed onscreen:
int32_t ANativeWindow_setBuffersGeometry(ANativeWindow* window, int32_t
width, int32_t height, int32_t format);
ANativeWindow_lock() must be called before performing any drawing operaons:
int32_t ANativeWindow_lock(ANativeWindow* window, ANativeWindow_Buffer*
outBuffer,
ARect* inOutDirtyBounds);
ANativeWindow_unlockAndPost() releases the window aer drawing
operaons are done and sends it to the display. It must be called in a pair with
ANativeWindow_lock():
int32_t ANativeWindow_unlockAndPost(ANativeWindow* window);
ANativeWindow_acquire() gets a reference, in the Java way, on the specied
window to prevent potenal deleon. This might be necessary if you do not have
ne control on the surface life cycle:
void ANativeWindow_acquire(ANativeWindow* window);
ANativeWindow_fromSurface() associates the window with the given Java
android.view.Surface. This method automacally acquires a reference to the
given surface. It must be released with ANativeWindow_release() to avoid
memory leaks:
ANativeWindow* ANativeWindow_fromSurface(JNIEnv* env, jobject surface);
ANativeWindow_release() removes an acquired reference to allow freeing
window resources:
void ANativeWindow_release(ANativeWindow* window);
The following methods return the width, height (in pixels), and the format of the
window surface. The returned value is negave incase an error occurs. Note that
these methods are tricky to use because their behavior is a bit inconsistent. Prior to
Android 4, it is preferable to lock the surface once to get reliable informaon (which
is already provided by ANativeWindow_lock()):
int32_t ANativeWindow_getWidth(ANativeWindow* window);
int32_t ANativeWindow_getHeight(ANativeWindow* window);
int32_t ANativeWindow_getFormat(ANativeWindow* window);
We now know how to draw. However, how do we animate what is drawn? A key is needed in
order to do this: me.
Wring a Fully Nave Applicaon
[ 204 ]
Measuring time natively
Those who talk about graphics also need to talk about ming. Indeed, Android devices have
dierent capabilies, and animaons should be adapted to their speed. To help us in this
task, Android gives access to me primives, thanks to its good support of Posix APIs.
To experiment with these capabilies, we will use a mer to move asteroids onscreen
according to me.
The resulng project is provided with this book under the
name DroidBlaster_Part4.
Time for action – animating graphics with a timer
Let's animate the game.
1. Create jni/TimeManager.hpp with the time.h manager and dene the
following methods:
reset() to initialize the manager.
update() to measure game step duration.
elapsed() and elapsedTotal() to get game step duration and game
duration. They are going to allow the adaptation of the application behavior
to the device speed.
now() is a utility method to recompute the current time.
Dene the following member variables:
mFirstTime and mLastTime to save a time checkpoint in order to
compute elapsed() and elapsedTotal()
mElapsed and mElapsedTotal to save computed time measures
#ifndef _PACKT_TIMEMANAGER_HPP_
#define _PACKT_TIMEMANAGER_HPP_
#include "Types.hpp"
#include <ctime>
class TimeManager {

Chapter 5
[ 205 ]
public:
TimeManager();
void reset();
void update();
double now();
float elapsed() { return mElapsed; };
float elapsedTotal() { return mElapsedTotal; };
private:
double mFirstTime;
double mLastTime;
float mElapsed;
float mElapsedTotal;
};
#endif
2. Implement jni/TimeManager.cpp. When reset, TimeManager saves the current
me computed by the now() method.
#include "Log.hpp"
#include "TimeManager.hpp"
#include <cstdlib>
#include <time.h>
TimeManager::TimeManager():
mFirstTime(0.0f),
mLastTime(0.0f),
mElapsed(0.0f),
mElapsedTotal(0.0f) {
srand(time(NULL));
}
void TimeManager::reset() {
Log::info("Resetting TimeManager.");
mElapsed = 0.0f;
mFirstTime = now();
mLastTime = mFirstTime;
}
...
Wring a Fully Nave Applicaon
[ 206 ]
3. Implement update() which checks:
elapsed time since last frame in mElapsed
elapsed time since the very first frame in mElapsedTotal
Note that it is important to work with double types
when handling the current me to avoid losing
accuracy. Then, the resulng delay can be converted
back to oat for the elapsed me, since the me
dierence between the two frames is quite low.
...
void TimeManager::update() {
double currentTime = now();
mElapsed = (currentTime - mLastTime);
mElapsedTotal = (currentTime - mFirstTime);
mLastTime = currentTime;
}
...
4. Compute the current me in the now() method. Use the Posix primive clock_
gettime() to retrieve the current me. A monotonic clock is essenal to ensure
that the me always goes forward and is not subject to system changes (for
example, if the user travels around the world):
...
double TimeManager::now() {
timespec timeVal;
clock_gettime(CLOCK_MONOTONIC, &timeVal);
return timeVal.tv_sec + (timeVal.tv_nsec * 1.0e-9);
}
5. Create a new le, jni/PhysicsManager.hpp. Dene a structure PhysicsBody to
hold asteroid locaon, dimensions, and velocity:
#ifndef PACKT_PHYSICSMANAGER_HPP
#define PACKT_PHYSICSMANAGER_HPP
#include "GraphicsManager.hpp"
#include "TimeManager.hpp"
#include "Types.hpp"
struct PhysicsBody {
PhysicsBody(Location* pLocation, int32_t pWidth, int32_t pHeight):
location(pLocation),

Chapter 5
[ 207 ]
width(pWidth), height(pHeight),
velocityX(0.0f), velocityY(0.0f) {
}
Location* location;
int32_t width; int32_t height;
float velocityX; float velocityY;
};
...
6. Dene a basic PhysicsManager. We need a reference to TimeManager to adapt
bodies of movements to me.
Dene a method update() to move asteroids during each game step. The
PhysicsManager stores the asteroids to update in mPhysicsBodies and
mPhysicsBodyCount:
...
class PhysicsManager {
public:
PhysicsManager(TimeManager& pTimeManager,
GraphicsManager& pGraphicsManager);
~PhysicsManager();
PhysicsBody* loadBody(Location& pLocation, int32_t pWidth,
int32_t pHeight);
void update();
private:
TimeManager& mTimeManager;
GraphicsManager& mGraphicsManager;
PhysicsBody* mPhysicsBodies[1024]; int32_t
mPhysicsBodyCount;
};
#endif
7. Implement jni/PhysicsManager.cpp, starng with the constructor, destructor,
and registraon methods:
#include "PhysicsManager.hpp"
#include "Log.hpp"
PhysicsManager::PhysicsManager(TimeManager& pTimeManager,
GraphicsManager& pGraphicsManager) :
mTimeManager(pTimeManager), mGraphicsManager(pGraphicsManager),

Wring a Fully Nave Applicaon
[ 208 ]
mPhysicsBodies(), mPhysicsBodyCount(0) {
Log::info("Creating PhysicsManager.");
}
PhysicsManager::~PhysicsManager() {
Log::info("Destroying PhysicsManager.");
for (int32_t i = 0; i < mPhysicsBodyCount; ++i) {
delete mPhysicsBodies[i];
}
}
PhysicsBody* PhysicsManager::loadBody(Location& pLocation,
int32_t pSizeX, int32_t pSizeY) {
PhysicsBody* body = new PhysicsBody(&pLocation, pSizeX, pSizeY);
mPhysicsBodies[mPhysicsBodyCount++] = body;
return body;
}
...
8. Move asteroids in update() according to their velocity. The computaon is
performed according to the amount of me between the two game steps:
...
void PhysicsManager::update() {
float timeStep = mTimeManager.elapsed();
for (int32_t i = 0; i < mPhysicsBodyCount; ++i) {
PhysicsBody* body = mPhysicsBodies[i];
body->location->x += (timeStep * body->velocityX);
body->location->y += (timeStep * body->velocityY);
}
}
9. Create the jni/Asteroid.hpp component with the following methods:
initialize() to set up asteroids with random properties when the
game starts
update() to detect asteroids that get out of game boundaries
spawn() is used by both initialize() and update() to set up one
individual asteroid
We also need the following members:
mBodies and mBodyCount to store the list of asteroids to be managed

Chapter 5
[ 209 ]
A few integer members to store game boundaries
#ifndef _PACKT_ASTEROID_HPP_
#define _PACKT_ASTEROID_HPP_
#include "GraphicsManager.hpp"
#include "PhysicsManager.hpp"
#include "TimeManager.hpp"
#include "Types.hpp"
class Asteroid {
public:
Asteroid(android_app* pApplication,
TimeManager& pTimeManager, GraphicsManager&
pGraphicsManager,
PhysicsManager& pPhysicsManager);
void registerAsteroid(Location& pLocation, int32_t pSizeX,
int32_t pSizeY);
void initialize();
void update();
private:
void spawn(PhysicsBody* pBody);
TimeManager& mTimeManager;
GraphicsManager& mGraphicsManager;
PhysicsManager& mPhysicsManager;
PhysicsBody* mBodies[1024]; int32_t mBodyCount;
float mMinBound;
float mUpperBound; float mLowerBound;
float mLeftBound; float mRightBound;
};
#endif
10. Write the jni/Asteroid.cpp implementaon. Start with a few constants, as well
as the constructor and registraon method, as follows:
#include "Asteroid.hpp"
#include "Log.hpp"
static const float BOUNDS_MARGIN = 128;

Wring a Fully Nave Applicaon
[ 210 ]
static const float MIN_VELOCITY = 150.0f, VELOCITY_RANGE = 600.0f;
Asteroid::Asteroid(android_app* pApplication,
TimeManager& pTimeManager, GraphicsManager&
pGraphicsManager,
PhysicsManager& pPhysicsManager) :
mTimeManager(pTimeManager),
mGraphicsManager(pGraphicsManager),
mPhysicsManager(pPhysicsManager),
mBodies(), mBodyCount(0),
mMinBound(0.0f),
mUpperBound(0.0f), mLowerBound(0.0f),
mLeftBound(0.0f), mRightBound(0.0f) {
}
void Asteroid::registerAsteroid(Location& pLocation,
int32_t pSizeX, int32_t pSizeY) {
mBodies[mBodyCount++] = mPhysicsManager.loadBody(pLocation,
pSizeX, pSizeY);
}
...
11. Set up boundaries in initialize(). Asteroids are generated above the top of
screen (in mMinBound, the maximum boundary mUpperBound is twice the height
of the screen). They move from the top to the boom of the screen. Other
boundaries correspond to screen edges padded with a margin (represenng twice
the size of an asteroid).
Then, inialize all asteroids using spawn():
...
void Asteroid::initialize() {
mMinBound = mGraphicsManager.getRenderHeight();
mUpperBound = mMinBound * 2;
mLowerBound = -BOUNDS_MARGIN;
mLeftBound = -BOUNDS_MARGIN;
mRightBound = (mGraphicsManager.getRenderWidth() +
BOUNDS_MARGIN);
for (int32_t i = 0; i < mBodyCount; ++i) {
spawn(mBodies[i]);
}
}
...

Chapter 5
[ 211 ]
12. During each game step, check the asteroids that get out of bounds and
reinialize them:
...
void Asteroid::update() {
for (int32_t i = 0; i < mBodyCount; ++i) {
PhysicsBody* body = mBodies[i];
if ((body->location->x < mLeftBound)
|| (body->location->x > mRightBound)
|| (body->location->y < mLowerBound)
|| (body->location->y > mUpperBound)) {
spawn(body);
}
}
}
...
13. Finally, inialize each asteroid in spawn(), with velocity and locaon being
generated randomly:
...
void Asteroid::spawn(PhysicsBody* pBody) {
float velocity = -(RAND(VELOCITY_RANGE) + MIN_VELOCITY);
float posX = RAND(mGraphicsManager.getRenderWidth());
float posY = RAND(mGraphicsManager.getRenderHeight())
+ mGraphicsManager.getRenderHeight();
pBody->velocityX = 0.0f;
pBody->velocityY = velocity;
pBody->location->x = posX;
pBody->location->y = posY;
}
14. Add the newly created managers and components to jni/DroidBlaster.hpp:
#ifndef _PACKT_DROIDBLASTER_HPP_
#define _PACKT_DROIDBLASTER_HPP_
#include "ActivityHandler.hpp"
#include "Asteroid.hpp"
#include "EventLoop.hpp"
#include "GraphicsManager.hpp"
#include "PhysicsManager.hpp"
#include "Ship.hpp"

Wring a Fully Nave Applicaon
[ 212 ]
#include "TimeManager.hpp"
#include "Types.hpp"
class DroidBlaster : public ActivityHandler {
...
private:
TimeManager mTimeManager;
GraphicsManager mGraphicsManager;
PhysicsManager mPhysicsManager;
EventLoop mEventLoop;
Asteroid mAsteroids;
Ship mShip;
};
#endif
15. Register asteroids with GraphicsManager and PhysicsManager in the jni/
DroidBlaster.cpp constructor:
...
static const int32_t SHIP_SIZE = 64;
static const int32_t ASTEROID_COUNT = 16;
static const int32_t ASTEROID_SIZE = 64;
DroidBlaster::DroidBlaster(android_app* pApplication):
mTimeManager(),
mGraphicsManager(pApplication),
mPhysicsManager(mTimeManager, mGraphicsManager),
mEventLoop(pApplication, *this),
mAsteroids(pApplication, mTimeManager, mGraphicsManager,
mPhysicsManager),
mShip(pApplication, mGraphicsManager) {
Log::info("Creating DroidBlaster");
GraphicsElement* shipGraphics = mGraphicsManager.registerElement(
SHIP_SIZE, SHIP_SIZE);
mShip.registerShip(shipGraphics);
for (int32_t i = 0; i < ASTEROID_COUNT; ++i) {

Chapter 5
[ 213 ]
GraphicsElement* asteroidGraphics =
mGraphicsManager.registerElement(ASTEROID_SIZE,
ASTEROID_SIZE);
mAsteroids.registerAsteroid(
asteroidGraphics->location, ASTEROID_SIZE,
ASTEROID_SIZE);
}
}
...
16. Inialize the newly added classes in onActivate() properly:
...
status DroidBlaster::onActivate() {
Log::info("Activating DroidBlaster");
if (mGraphicsManager.start() != STATUS_OK) return STATUS_KO;
mAsteroids.initialize();
mShip.initialize();
mTimeManager.reset();
return STATUS_OK;
}
...
Finally, update managers and components for each game step:
...
status DroidBlaster::onStep() {
mTimeManager.update();
mPhysicsManager.update();
mAsteroids.update();
return mGraphicsManager.update();
}
...
Wring a Fully Nave Applicaon
[ 214 ]
What just happened?
Compile and run the applicaon. This me it should be a bit more animated! Red squares
represenng asteroids cross the screen at a constant rhythm. The TimeManger helps with
seng the pace.
Timers are essenal to display animaons and movement at the correct speed. They can be
implemented with the POSIX method clock_gettime(), which retrieves me with a high
precision, theorecally to the nanosecond.
In this tutorial, we used the CLOCK_MONOTONIC ag to set up the mer. A monotonic clock
gives the elapsed clock me from an arbitrary starng point in the past. It is unaected by
potenal system date change, and thus cannot go back in the past like other opons. The
downside with CLOCK_MONOTONIC is that it is system-specic and it is not guaranteed to be
supported. Hopefully Android supports it, but care should be taken when porng Android
code to other plaorms. Another point specic to Android to be aware of is that monotonic
clocks stop when the system is suspended.
An alternave, that is less precise and aected by changes in the system me (which may or
may not be desirable), is gettimeofday(), which is also provided in ctime. The usage is
similar but the precision is in microseconds instead of nanoseconds. The following could be a
usage example that could replace the current now() implementaon in TimeManager:
double TimeManager::now() {
timeval lTimeVal;
gettimeofday(&lTimeVal, NULL);
return (lTimeVal.tv_sec * 1000.0) + (lTimeVal.tv_usec / 1000.0);
}

Chapter 5
[ 215 ]
For more informaon, have a look at the Man-pages at http://man7.org/linux/man-
pages/man2/clock_gettime.2.html.
Summary
The Android NDK allows us to write fully nave applicaons without a line of Java code.
NativeActivity provides a skeleton to implement an event loop that processes
applicaon events. Associated with the Posix me management API, the NDK provides the
required base to build complex mulmedia applicaons or games.
In summary, we created NativeActivity that polls acvity events to start or stop nave
code accordingly. We accessed the display window navely, like a bitmap, to display raw
graphics. Finally, we retrieved me to make the applicaon adapt to device speed using a
monotonic clock.
The basic framework iniated here will form the base of the 2D/3D game that we will
develop throughout this book. However, although the at design is in fashion nowadays,
we need something a bit fancier than red squares!
In the next chapter, we will discover how to render advanced graphics with OpenGL ES 2
for Android.

[ 217 ]
6
Rendering Graphics with OpenGL ES
Let's face the fact that one of the main interests of Android NDK is to write
multimedia applications and games. Indeed, these programs consume lots of
resources and need responsiveness. That is why one of the first available APIs
(and almost the only one until recently) in Android NDK is an API for graphics:
the Open Graphics Library for Embedded Systems (abbreviated as OpenGL ES).
OpenGL is a standard API created by Silicon Graphics and is now managed by
the Khronos Group (see http://www.khronos.org/). OpenGL provides a
common interface for all standard GPUs (Graphics Processing Unit like your
graphics card, and so on) on desktops. OpenGL ES is a derivative API available
on many embedded platforms, such as Android or iOS. It is your best hope to
write portable and efficient graphics code. OpenGL can render both 2D and
3D graphics.
There are three main releases of OpenGL ES currently supported by Android:
OpenGL ES 1.0 and 1.1 are supported on all Android devices (except 1.1, which is
supported on a few very old devices). It oers an old school graphic API with a xed
pipeline (that is, a xed set of congurable operaons to transform and render
geometry). Specicaon is not completely implemented, but most features are
available. This could sll be a good choice for simple 2D or 3D graphics or to port
legacy OpenGL code.
Rendering Graphics with OpenGL ES
[ 218 ]
OpenGL ES 2 is supported on almost all phones nowadays, even older ones, starng
from API Level 8. It replaces the xed pipeline with a modern programmable
pipeline with Vertex and Fragment Shaders. It is a bit more complex but also
more powerful. It is a good choice for the more complex 2D or 3D games, while
sll maintaining a very good compability. Note that OpenGL ES 1.X is frequently
emulated by an OpenGL 2 implementaon behind the scenes.
OpenGL ES 3.0 is available on modern devices starng from API Level 18, and
OpenGL ES 3.1 is available starng from API Level 21 (not all devices at these
API level may support it though). They bring a set of new improvements to GLES
2 (Texture Compression as a standard feature, Occlusion Queries, Instanced
Rendering, and others for 3.0, Compute Shaders, Indirect Draw commands, and
others for 3.1) and a beer compability with the desktop version of OpenGL. It is
backward compable with OpenGL ES 2.
This chapter teaches you how to create some basic 2D graphics using OpenGL ES 2. More
specically, you are going to discover how to:
Inialize OpenGL ES
Load a texture from a PNG le packaged in the assets
Draw sprites using vertex and fragment shaders
Render a parcle eect
Adapt graphics to various resoluons
With OpenGL ES, and graphics in general, being a wide subject, this chapter covers only the
basics to being with.
Initializing OpenGL ES
The rst step to create awesome 2D and 3D graphics is to inialize OpenGL ES. Although not
terribly complex, this task requires some boilerplate code to bind a rendering context to an
Android window. These pieces are glued together with the help of the Embedded-System
Graphics Library (EGL), a companion API of OpenGL ES.
For this rst secon, we are going to replace the raw drawing system implemented in the
previous chapter with OpenGL ES. A black to white fading eect will demonstrate that the
EGL inializaon works properly.
The resulng project is provided with this book under the name
DroidBlaster_Part5.

Chapter 6
[ 219 ]
Time for action – initializing OpenGL ES
Let's rewrite our GraphicsManager to inialize an OpenGL ES context:
1. Modify jni/GraphicsManager.hpp by performing the following:
Include EGL/egl.h to bind OpenGL ES to the Android platform and
GLES2/gl2.h to render graphics
Add a method stop() to unbind the OpenGL rendering context and free
graphics resources when you're leaving the activity
Define EGLDisplay, EGLSurface, and EGLContext member variables,
which represent handles to system resources, as shown here:
...
#include "Types.hpp"
#include <android_native_app_glue.h>
#include <GLES2/gl2.h>
#include <EGL/egl.h>
...
class GraphicsManager {
public:
...
status start();
void stop();
status update();
private:
...
int32_t mRenderWidth; int32_t mRenderHeight;
EGLDisplay mDisplay; EGLSurface mSurface; EGLContext mContext;
GraphicsElement* mElements[1024]; int32_t mElementCount;
};
#endif

Rendering Graphics with OpenGL ES
[ 220 ]
2. Reimplement jni/GraphicsManager.cpp by replacing the previous code
based on Android raw graphics API with OpenGL-based code. Start by adding new
members to the constructor inializaon list:
#include "GraphicsManager.hpp"
#include "Log.hpp"
GraphicsManager::GraphicsManager(android_app* pApplication) :
mApplication(pApplication),
mRenderWidth(0), mRenderHeight(0),
mDisplay(EGL_NO_DISPLAY), mSurface(EGL_NO_CONTEXT),
mContext(EGL_NO_SURFACE),
mElements(), mElementCount(0) {
Log::info("Creating GraphicsManager.");
}
...
3. The hard work must be done in the method start():
First, declare some variables. Note how EGL defines its own types and
re-declares primitive types EGLint and EGLBoolean to favor platform
independence.
Then, define the needed OpenGL configuration in constant attribute lists.
Here, we want OpenGL ES 2 and a 16 bit surface (5 bits for red, 6 bits for
green, and 5 bits for blue). We could also choose a 32 bit surface for better
color fidelity (but less performance on some devices). The attribute lists are
terminated by EGL_NONE sentinel:
...
status GraphicsManager::start() {
Log::info("Starting GraphicsManager.");
EGLint format, numConfigs, errorResult; GLenum status;
EGLConfig config;
// Defines display requirements. 16bits mode here.
const EGLint DISPLAY_ATTRIBS[] = {
EGL_RENDERABLE_TYPE, EGL_OPENGL_ES2_BIT,
EGL_BLUE_SIZE, 5, EGL_GREEN_SIZE, 6, EGL_RED_SIZE, 5,
EGL_SURFACE_TYPE, EGL_WINDOW_BIT,
EGL_NONE
};
// Request an OpenGL ES 2 context.
const EGLint CONTEXT_ATTRIBS[] = {
EGL_CONTEXT_CLIENT_VERSION, 2, EGL_NONE
};
...

Chapter 6
[ 221 ]
4. Connect to the default display, that is, the Android main window, with
eglGetDisplay() and eglInitialize(). Then, nd an appropriate framebuer
(An OpenGL term referring to the rendering surface, and possibly addional buers,
such as Z-buer or Stencil buer) conguraon with eglChooseConfig() as the
display. Conguraons are selected according to the requested aributes:
...
mDisplay = eglGetDisplay(EGL_DEFAULT_DISPLAY);
if (mDisplay == EGL_NO_DISPLAY) goto ERROR;
if (!eglInitialize(mDisplay, NULL, NULL)) goto ERROR;
if(!eglChooseConfig(mDisplay, DISPLAY_ATTRIBS, &config, 1,
&numConfigs) || (numConfigs <= 0)) goto ERROR;
...
5. Recongure the Android window with the selected conguraon (retrieved with
eglGetConfigAttrib()). This operaon is Android-specic and performed with
the Android ANativeWindow API.
Aer that, create the display surface and the OpenGL context using the display and
conguraon selected previously. A context contains all data related to OpenGL
state (enabled sengs, disabled sengs, and so on):
...
if (!eglGetConfigAttrib(mDisplay, config,
EGL_NATIVE_VISUAL_ID, &format)) goto ERROR;
ANativeWindow_setBuffersGeometry(mApplication->window, 0, 0,
format);
mSurface = eglCreateWindowSurface(mDisplay, config,
mApplication->window, NULL);
if (mSurface == EGL_NO_SURFACE) goto ERROR;
mContext = eglCreateContext(mDisplay, config, NULL,
CONTEXT_ATTRIBS);
if (mContext == EGL_NO_CONTEXT) goto ERROR;
...
6. Acvate the created rendering context with eglMakeCurrent(). Finally,
dene the display viewport according to the surface aributes retrieved with
eglQuerySurface(). The Z-buer is not needed and can be disabled:
...
if (!eglMakeCurrent(mDisplay, mSurface, mSurface, mContext)
|| !eglQuerySurface(mDisplay, mSurface, EGL_WIDTH, &mRenderWidth)

Rendering Graphics with OpenGL ES
[ 222 ]
|| !eglQuerySurface(mDisplay, mSurface, EGL_HEIGHT, &mRenderHeight)
|| (mRenderWidth <= 0) || (mRenderHeight <= 0)) goto ERROR;
glViewport(0, 0, mRenderWidth, mRenderHeight);
glDisable(GL_DEPTH_TEST);
return STATUS_OK;
ERROR:
Log::error("Error while starting GraphicsManager");
stop();
return STATUS_KO;
}
...
7. When the applicaon stops running, unbind the applicaon from the Android
window and release the EGL resources:
...
void GraphicsManager::stop() {
Log::info("Stopping GraphicsManager.");
// Destroys OpenGL context.
if (mDisplay != EGL_NO_DISPLAY) {
eglMakeCurrent(mDisplay, EGL_NO_SURFACE, EGL_NO_SURFACE,
EGL_NO_CONTEXT);
if (mContext != EGL_NO_CONTEXT) {
eglDestroyContext(mDisplay, mContext);
mContext = EGL_NO_CONTEXT;
}
if (mSurface != EGL_NO_SURFACE) {
eglDestroySurface(mDisplay, mSurface);
mSurface = EGL_NO_SURFACE;
}
eglTerminate(mDisplay);
mDisplay = EGL_NO_DISPLAY;
}
}
...
Chapter 6
[ 223 ]
What just happened?
We have inialized and connected both OpenGL ES and the Android nave window system
together with EGL. Thanks to this API, we have queried a display conguraon that matches
our expectaons and creates a framebuer to render our scene on. EGL is a standard API
specied by the Khronos group (like OpenGL). Plaorms oen implement their own variant
(haphazardly, EAGL on iOS and so on) so that the display window inializaon remains OS-
specic. Thus, portability is quite limited in pracce.
This inializaon process results in the creaon of an OpenGL context, which is the rst
step to enable the OpenGL graphics pipeline. Special care should be taken with OpenGL
contexts, which are frequently lost on Android: when you're leaving or going back to the
home screen, when a call is received, when devices go to sleep, when you're switching to
another applicaon, and so on. As a lost context becomes unusable, it is important to release
graphics resources as soon as possible.
The OpenGL ES specicaon supports the creaon of mulple contexts
for one display surface. This allows dividing rendering operaons among
threads or rendering to several windows. However, it is not well supported
on Android hardware and should be avoided.
OpenGL ES is now inialized but nothing will show up unless we start rendering some
graphics on the display screen.
Time for action – clearing and swapping buffers
Let's clear the display buers with a color fading from black to white:
1. While sll being in jni/GraphicsManager.cpp, refresh the screen during each
update step with eglSwapBuffers().
To have a visual feedback, change the display background color gradually with the
help of glClearColor() before erasing the Framebuer with glClear():
...
status GraphicsManager::update() {
static float clearColor = 0.0f;
clearColor += 0.001f;
glClearColor(clearColor, clearColor, clearColor, 1.0f);
glClear(GL_COLOR_BUFFER_BIT);
if (eglSwapBuffers(mDisplay, mSurface) != EGL_TRUE) {
Log::error("Error %d swapping buffers.", eglGetError());

Rendering Graphics with OpenGL ES
[ 224 ]
return STATUS_KO;
} else {
return STATUS_OK;
}
}
2. Update the Android.mk le to link the EGL and GLESv2 libraries:
LOCAL_PATH := $(call my-dir)
include $(CLEAR_VARS)
LS_CPP=$(subst $(1)/,,$(wildcard $(1)/*.cpp))
LOCAL_MODULE := droidblaster
LOCAL_SRC_FILES := $(call LS_CPP,$(LOCAL_PATH))
LOCAL_LDLIBS := -landroid -llog -lEGL -lGLESv2
LOCAL_STATIC_LIBRARIES := android_native_app_glue
include $(BUILD_SHARED_LIBRARY)
$(call import-module,android/native_app_glue)
What just happened?
Launch the applicaon. If everything works ne, your device screen will progressively fade
from black to white. Instead of clearing the display with a raw memset(), or seng pixels
one by one as seen in the previous chapter, we invoke ecient OpenGL ES drawing primives.
Note that the eect appears only the rst me the applicaon starts because the clear color is
stored in a stac variable. To make it appear again, kill the applicaon and relaunch it.
Rendering a scene requires clearing the framebuer and swapping the display buer. The
laer operaon is triggered when eglSwapBuffers() is invoked. Swapping on Android is
synchronized with the screen refresh rate to avoid image Tearing; this is a VSync. The refresh
rate is variable depending on the device. A common value is 60 Hz but some devices have
dierent refresh rates.
Internally, rendering is performed on a back buer which is swapped with the front buer
shown to the user. The front buer becomes the back buer and vice versa (the pointers
are switched). This technique is more commonly referred to as page ipping. According to
the driver implementaon, the swapping chain can be extended with a third buer. In this
situaon, we talk about Triple Buering.
Our OpenGL pipeline is now properly inialized and able to display graphics on the screen.
However, you may sll nd this concept of "pipeline" a bit nebulous. Let's see what is hidden
behind it.
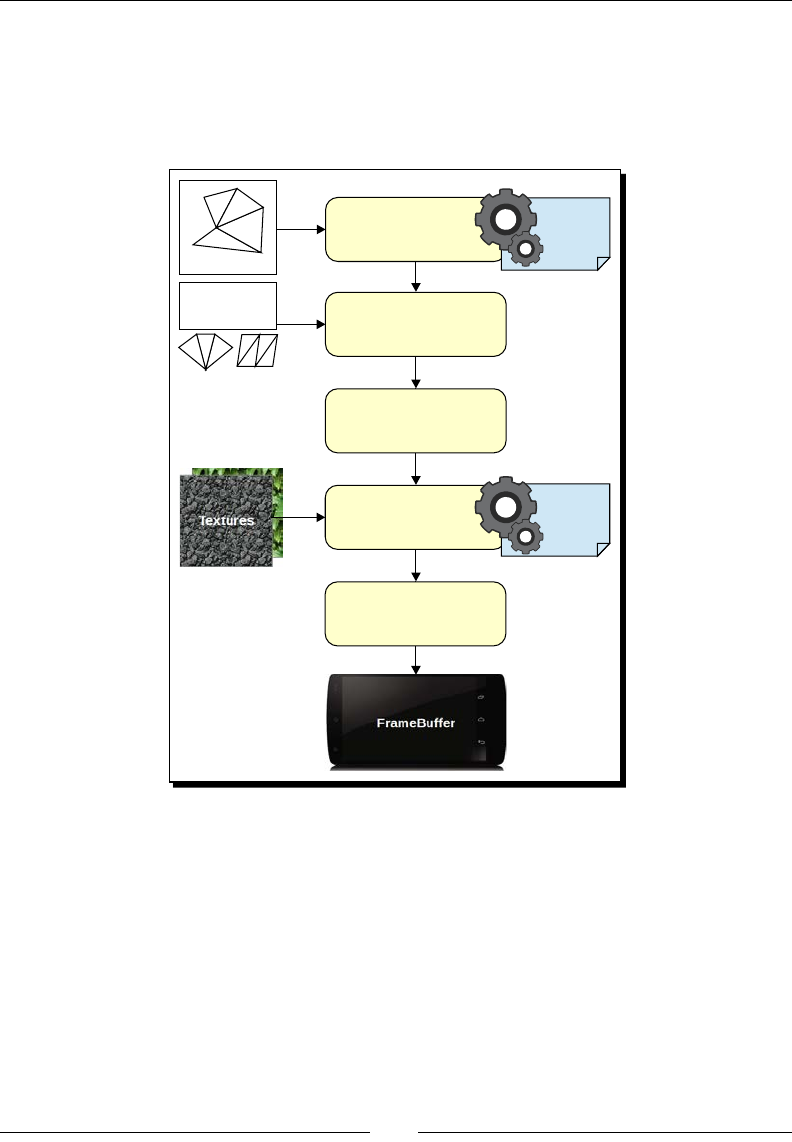
Chapter 6
[ 225 ]
An insight into the OpenGL pipeline
We talk about pipeline because the graphics data goes through a series of steps in which
it is transformed. The following diagram shows a simplied representaon of the
OpenGL ES 2 pipeline:
0 1 2 0 3 4
2 4 5 6 . . .
Indices
Vertices
Fans Strips
Vertex Processing
Primitive Assembly
Rasterization
Fragment Processing
Pixel Processing
Vertex
Shader
Fragment
Shader
Vertex Processing: An input mesh of verces, given as a vertex buer object or a
vertex array, is transformed vertex by vertex in a vertex shader. The vertex shader
can, for example, move or rotate single verces, project them onto the screen,
adapt texture coordinates, compute lighng, and so on. It generates an output
vertex that can be processed further in the pipe.

Rendering Graphics with OpenGL ES
[ 226 ]
Primive Assembly: Individual verces are connected together into triangles,
points, lines, and so on. More connecon informaon is specied by the client
code when the draw call is sent. It can take the form of an index buer (each index
points to a vertex through its rank) or a predened rule, such as stripping or fanning.
Transformaons such as back face culling or clipping are done at this stage.
Rasterizaon: Primives are interpolated into fragments, which is a term covering
all the data associated with one pixel to render (such as color, normals, and so on).
One fragment is related to one pixel. These fragments feed the fragment shader.
Fragment Processing: The fragment shader is a program which processes each
fragment to compute the pixel to display. This is the stage where texture mapping,
using the coordinates computed by the vertex shader and interpolated by the
rasterizer, is applied. Dierent shading algorithms can be computed to render
specic eects (for example, Toon shading).
Pixel Processing: The fragment shader outputs pixels which have to be merged in
the exisng framebuer (the rendering surface), where some pixels may be already
drawn. Transparency eects or blending is applied at this stage.
The vertex and fragment shaders are programmable in the GL Shading Language (GLSL).
They are available only in OpenGL ES 2 and 3. OpenGL ES 1 provides a xed funcon pipeline
with a predened set of possible transformaons.
This is only a brief overview of all the processing done by the OpenGL rendering pipeline.
To nd more informaon about it, have a look at the OpenGL.org wiki at http://www.
opengl.org/wiki/Rendering_Pipeline_Overview.
Loading textures using the Asset manager
I guess you need something more consistent than just changing the screen color! But before
showing awesome graphics in our applicaon, we need to load some external resources.
In this second part, we are going to load a texture into OpenGL ES thanks to the Android
Asset manager, an API provided since NDK R5. It allows programmers to access any resources
stored in the assets folder in their project. Assets stored there are then packaged into
the nal APK archive during applicaon compilaon. Asset resources are considered as raw
binary les that your applicaon needs to interpret and access using their lename relave
to the assets folder (a le assets/mydir/myfile can be accessed with mydir/myfile
path). Files are available in the read-only mode and might be compressed.
Chapter 6
[ 227 ]
If you have already wrien some Java Android applicaon, then you know that Android also
provides resources accessible through compile-me generated IDs inside the res project
folder. This is not directly available on the Android NDK. Unless you are ready to use a JNI
bridge, assets are the only way to package resources in your APK.
We are now going to load a texture encoded in one of the most popular picture formats used
nowadays, the Portable Network Graphics (PNG). For this, we are going to integrate libpng
in a NDK module.
The resulng project is provided with this book under the name
DroidBlaster_Part6.
Time for action – reading assets with the Asset manager
Let's create a class to read the Android asset les:
1. Create jni/Resource.hpp to encapsulate the access to asset les. We are going
to use the AAsset API dened in android/asset_manager.hpp (which is already
included in android_native_app_glue.h).
Declare the three main operaons: open(), close(), and read(). We also need
to retrieve the resource's path in getPath().
The Android Asset management API entry point is an AAsetManager opaque
structure. We can access asset les, represented by a second opaque structure
AAsset, from it:
#ifndef _PACKT_RESOURCE_HPP_
#define _PACKT_RESOURCE_HPP_
#include "Types.hpp"
#include <android_native_app_glue.h>
class Resource {
public:
Resource(android_app* pApplication, const char* pPath);
const char* getPath() { return mPath; };
status open();

Rendering Graphics with OpenGL ES
[ 228 ]
void close();
status read(void* pBuffer, size_t pCount);
bool operator==(const Resource& pOther);
private:
const char* mPath;
AAssetManager* mAssetManager;
AAsset* mAsset;
};
#endif
2. Implement the class Resource in jni/Resource.cpp.
The Asset manager is provided by the Nave App Glue module in its
android_app->activity structure:
#include "Resource.hpp"
#include <sys/stat.h>
Resource::Resource(android_app* pApplication, const char*
pPath):
mPath(pPath),
mAssetManager(pApplication->activity->assetManager),
mAsset(NULL) {
}
...
3. The Asset manager opens assets with AassetManager_open(). This is the sole
responsibility of this method, apart from lisng folders. We use the default open
mode AASSET_MODE_UNKNOWN (more about this soon):
...
status Resource::open() {
mAsset = AAssetManager_open(mAssetManager, mPath,
AASSET_MODE_UNKNOWN);
return (mAsset != NULL) ? STATUS_OK : STATUS_KO;
}
...

Chapter 6
[ 229 ]
4. Like les in classic applicaons, an opened asset must be closed when nished with
AAsset_close() so that any resource allocated by the system is released:
...
void Resource::close() {
if (mAsset != NULL) {
AAsset_close(mAsset);
mAsset = NULL;
}
}
...
5. Finally, the code operates on asset les with AAsset_read() to read data. This is
quite similar to what you can nd with the standard Posix le API. Here, we try to
read the pCount data in a memory buer and retrieve the amount of data that was
eecvely read (in case we reach the end of the asset):
...
status Resource::read(void* pBuffer, size_t pCount) {
int32_t readCount = AAsset_read(mAsset, pBuffer, pCount);
return (readCount == pCount) ? STATUS_OK : STATUS_KO;
}
bool Resource::operator==(const Resource& pOther) {
return !strcmp(mPath, pOther.mPath);
}
What just happened?
We have seen how to call the Android Asset API to read a le stored in the assets directory.
Android assets are read-only and should be used to hold stac assets only. The Android Asset
API is dened in the android/assert_manager.h including le.
More about the Asset Manager API
The Android Asset manager provides a small set of method to access directories:
AAssetManager_openDir() gives the possibility to explore an asset directory.
Use it in conjuncon with AAssetDir_getNextFileName() and AAssetDir_
rewind(). An opened directory must be closed with AAssetDir_close():
AAssetDir* AAssetManager_openDir(AAssetManager* mgr,
const char* dirName);

Rendering Graphics with OpenGL ES
[ 230 ]
AAssetDir_getNextFileName() lists all the les available in the specied asset
directory. One lename is returned each me you call it, or NULL is returned when
all les have been listed:
const char* AAssetDir_getNextFileName(AAssetDir* assetDir);
AAssetDir_rewind() gives the possibility to restart the le iteraon process with
AAssetDir_getNextFileName() from the beginning of the process:
void AAssetDir_rewind(AAssetDir* assetDir);
AAssetDir_close() frees all the resources allocated when the directory has been
opened. This method must be called in pair with AAssetManager_openDir():
void AAssetDir_close(AAssetDir* assetDir);
Files can be opened with an API similar to the POSIX le API:
AAssetManager_open() opens an asset le to read its content, retrieve its
content as a buer, or access its le descriptor. An opened asset must be closed with
AAsset_close():
AAsset* AAssetManager_open(AAssetManager* mgr,
const char* filename, int mode);
AAsset_read() aempts to read the requested number of bytes in the provided
buer. The number of bytes actually read is returned or a negave value is returned
in case an error occurs:
int AAsset_read(AAsset* asset, void* buf, size_t count);
AAsset_seek() moves directly to the specied oset in the le, ignoring the
previous data:
off_t AAsset_seek(AAsset* asset, off_t offset, int whence);
AAsset_close() closes the asset and frees all the resources allocated when the
le has been opened. This method must be called in pair with AAssetManager_
open():
void AAsset_close(AAsset* asset);
AAsset_getBuffer() returns a pointer to a memory buer containing the whole
asset content or NULL if a problem occurs. The buer might be memory mapped.
Beware, as Android compresses some assets (depending on their extension) so that
the buer might not be directly readable:
const void* AAsset_getBuffer(AAsset* asset);
Chapter 6
[ 231 ]
AAsset_getLength() gives the total asset size in bytes. This method might be
useful to preallocate a buer of the right size before reading an asset:
off_t AAsset_getLength(AAsset* asset);
Aasset_getRemainingLength() is similar to AAsset_getLength() except that
it does take into account the bytes already read:
off_t AAsset_getRemainingLength(AAsset* asset);
AAsset_openFileDescriptor() returns a raw Unix le descriptor. This is used in
OpenSL to read a music le:
int AAsset_openFileDescriptor(AAsset* asset, off_t* outStart,
off_t* outLength);
AAsset_isAllocated() indicates if the buer returned by the asset is
memory mapped:
int AAsset_isAllocated(AAsset* asset);
We will see more about these methods in the subsequent chapters.
The modes available to open asset les are:
AASSET_MODE_BUFFER: This helps to perform fast small reads
AASSET_MODE_RANDOM: This helps to read chunks of data forward and backward
AASSET_MODE_STREAMING: This helps to read data sequenally with occasional
forward seeks
AASSET_MODE_UNKNOWN: This helps to keep the system default sengs
Most of the me AASSET_MODE_UNKNOWN will be the way to go.
Installing, large APK can be problemac even when they are deployed on an
SD card (see the installLocation opon in the Android manifest). Thus,
a good strategy to deal with tons of megabytes of assets is to keep only the
essenal ones in your APK. Download the remaining les to the SD card at
runme or package them within a second APK.
Now that we have the PNG asset les to read, let's load them using libpng.
Rendering Graphics with OpenGL ES
[ 232 ]
Time for action – compiling and embedding libpng module
Let's load an OpenGL texture from a PNG le in DroidBlaster.
1. Go to the website http://www.libpng.org/pub/png/libpng.html and
download the libpng source package (which is Version 1.6.10 in this book).
The original libpng 1.6.10 archive is provided with this book
in the Libraries/libpng folder.
Create a folder named libpng inside $ANDROID_NDK/sources/. Move all les
from the libpng package into this.
Copy the le libpng/scripts/pnglibconf.h.prebuilt into the root folder
libpng with other source les. Rename it as pnglibconf.h.
The folder $ANDROID_NDK/sources is a special folder
considered as a module folder by default. It contains reusable
libraries. See Chapter 9, Porting Existing Libraries to Android,
for more information.
2. Write the $ANDROID_NDK/sources/libpng/Android.mk le with the content
given in the following code:
LOCAL_PATH:= $(call my-dir)
include $(CLEAR_VARS)
LS_C=$(subst $(1)/,,$(wildcard $(1)/*.c))
LOCAL_MODULE := png
LOCAL_SRC_FILES := \
$(filter-out example.c pngtest.c,$(call LS_C,$(LOCAL_PATH)))
LOCAL_EXPORT_C_INCLUDES := $(LOCAL_PATH)
LOCAL_EXPORT_LDLIBS := -lz
include $(BUILD_STATIC_LIBRARY)
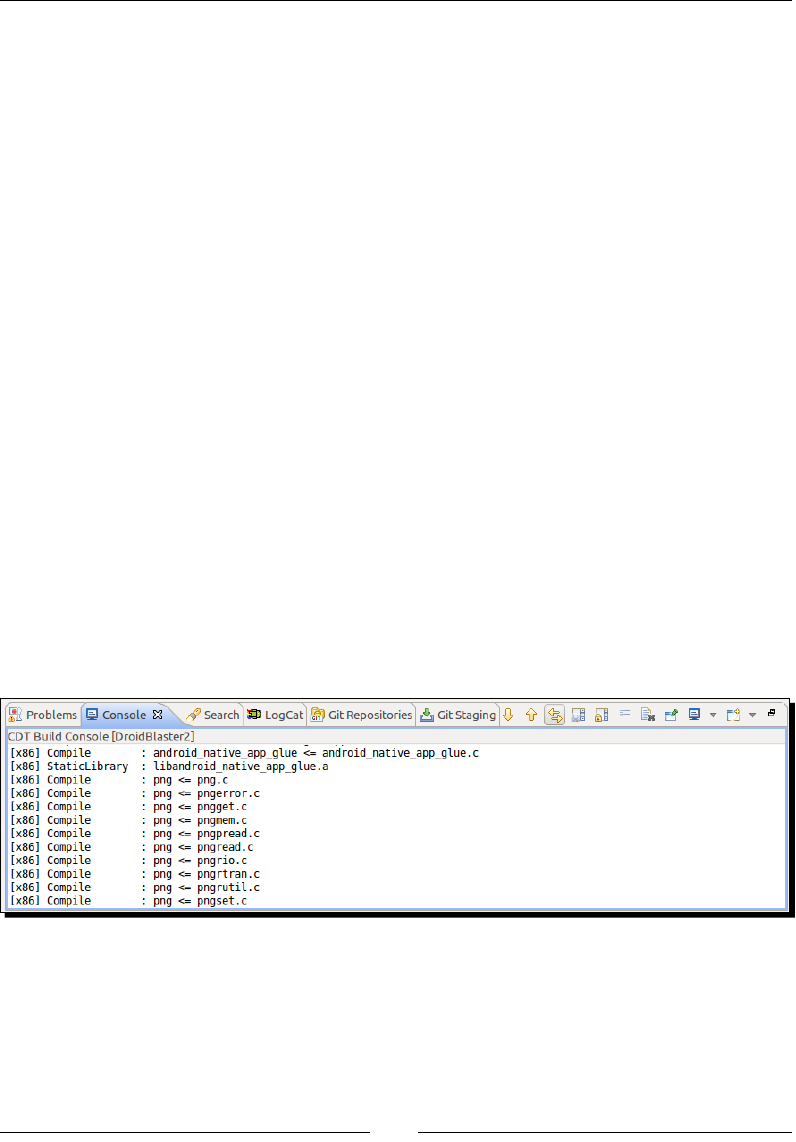
Chapter 6
[ 233 ]
3. Now, open jni/Android.mk in the DroidBlaster directory.
Link and import libpng with the help of the LOCAL_STATIC_LIBRARIES and
import-module direcves. This is similar to what we have done with the Nave
App Glue module:
LOCAL_PATH := $(call my-dir)
include $(CLEAR_VARS)
LS_CPP=$(subst $(1)/,,$(wildcard $(1)/*.cpp))
LOCAL_MODULE := droidblaster
LOCAL_SRC_FILES := $(call LS_CPP,$(LOCAL_PATH))
LOCAL_LDLIBS := -landroid -llog -lEGL -lGLESv2
LOCAL_STATIC_LIBRARIES := android_native_app_glue png
include $(BUILD_SHARED_LIBRARY)
$(call import-module,android/native_app_glue)
$(call import-module,libpng)
What just happened?
In the previous chapter, we embedded the exisng Nave App Glue module to create a fully
nave applicaon. This me we have created our rst nave reusable module to integrate
libpng. Ensure that it works by compiling DroidBlaster. If you look at the Console view
of the libpng source les, it should get compiled for each target plaorm. Note that NDK
provides incremental compilaon and will not recompile the already compiled sources:
A nave library module (here, libpng) is dened in a Makele located at the root of its
own directory. It is then referenced from another Makele module, typically the applicaon
module (here Droidblaster).

Rendering Graphics with OpenGL ES
[ 234 ]
Here, the libpng library Makele selects all the C les with the help of a custom macro LS_C.
This macro is invoked from the LOCAL_SRC_FILES direcve. We exclude example.c and
pngtest.c, which are just test les, using the standard "Make" funcon filter-out().
All the prerequisites include les that are made available to client modules with the direcve
LOCAL_EXPORT_C_INCLUDES, which refers to the source directory LOCAL_PATH here. The
prerequisite libraries like libzip (opon -lz) are also provided to the client modules using
the LOCAL_EXPORT_LDLIBS direcve this me. All direcves containing the _EXPORT_
term exports direcves that are appended to the client module's own direcves.
For more informaon about Makeles, direcves, and standard funcons, have a look at
Chapter 9, Porng Exisng Libraries to Android.
Time for action – loading a PNG image
Now that libpng is compiled, let's read a real PNG le with it:
1. Edit jni/GraphicsManager.hpp and include the Resource header le.
Create a new structure named TextureProperties containing:
A resource representing the texture asset
An OpenGL texture identifier (which is a kind of handle)
A width and a height
...
#include "Resource.hpp"
#include "Types.hpp"
...
struct TextureProperties {
Resource* textureResource;
GLuint texture;
int32_t width;
int32_t height;
};
...
2. Append a method loadTexture() to the GraphicsManager to read a PNG and
load it into an OpenGL texture.
Textures are saved in an mTextures array to cache and nalize them.
...
class GraphicsManager {

Chapter 6
[ 235 ]
public:
...
status start();
void stop();
status update();
TextureProperties* loadTexture(Resource& pResource);
private:
...
int32_t mRenderWidth; int32_t mRenderHeight;
EGLDisplay mDisplay; EGLSurface mSurface; EGLContext mContext;
TextureProperties mTextures[32]; int32_t mTextureCount;
GraphicsElement* mElements[1024]; int32_t mElementCount;
};
#endif
3. Edit jni/GraphicsManager.cpp to include a new header named png.h and
update the constructor inializaon list:
#include "GraphicsManager.hpp"
#include "Log.hpp"
#include <png.h>
GraphicsManager::GraphicsManager(android_app* pApplication) :
mApplication(pApplication),
mRenderWidth(0), mRenderHeight(0),
mDisplay(EGL_NO_DISPLAY), mSurface(EGL_NO_CONTEXT),
mContext(EGL_NO_SURFACE),
mTextures(), mTextureCount(0),
mElements(), mElementCount(0) {
Log::info("Creating GraphicsManager.");
}
...
4. Free the texture-related resources when GraphicsManager stops using
glDeleteTetxures(). This funcon can delete several textures at once, which
explains why this method expects an ordinal and an array. But we will not use this
possibility here:
...
void GraphicsManager::stop() {
Log::info("Stopping GraphicsManager.");

Rendering Graphics with OpenGL ES
[ 236 ]
for (int32_t i = 0; i < mTextureCount; ++i) {
glDeleteTextures(1, &mTextures[i].texture);
}
mTextureCount = 0;
// Destroys OpenGL context.
if (mDisplay != EGL_NO_DISPLAY) {
...
}
}
...
5. To be fully independent from the data source, libpng provides a mechanism to
integrate custom-read operaons. This takes the form of a callback and reads the
requested quanty of data into a buer provided by libpng.
Implement this callback in conjuncon with the Android Asset API to access the read
data from applicaon assets. The asset le is read through a Resource instance
given by png_get_io_ptr() as an untyped pointer. This pointer is going to be
provided by us while seng up the callback funcon (using png_set_read_fn()).
We will see how this is done in the next steps:
...
void callback_readPng(png_structp pStruct,
png_bytep pData, png_size_t pSize) {
Resource* resource = ((Resource*) png_get_io_ptr(pStruct));
if (resource->read(pData, pSize) != STATUS_OK) {
resource->close();
}
}
...
6. Implement loadTexture(). First, look for the texture in the cache. Textures are
expensive in terms of memory and performance and should be managed with care
(like all OpenGL resources in general):
...
TextureProperties* GraphicsManager::loadTexture(Resource&
pResource) {
for (int32_t i = 0; i < mTextureCount; ++i) {
if (pResource == *mTextures[i].textureResource) {
Log::info("Found %s in cache", pResource.getPath());
return &mTextures[i];
}
}
...

Chapter 6
[ 237 ]
7. If you could not nd the texture in the cache, let's read it. Dene a few variables
needed to read the PNG le rst.
Then, open the image using the AAsset API and check the image signature (the rst 8
bytes of the le) to ensure that the le is a PNG (note that it might sll be corrupted):
...
Log::info("Loading texture %s", pResource.getPath());
TextureProperties* textureProperties; GLuint texture; GLint format;
png_byte header[8];
png_structp pngPtr = NULL; png_infop infoPtr = NULL;
png_byte* image = NULL; png_bytep* rowPtrs = NULL;
png_int_32 rowSize; bool transparency;
if (pResource.open() != STATUS_OK) goto ERROR;
Log::info("Checking signature.");
if (pResource.read(header, sizeof(header)) != STATUS_OK)
goto ERROR;
if (png_sig_cmp(header, 0, 8) != 0) goto ERROR;
...
8. Allocate all the structures necessary to read a PNG image. Aer that, prepare
reading operaons by passing our callback_readPng(), implemented earlier in
this tutorial, to libpng, along with our Resource reader. Resource pointer is the
one retrieved in the callback with png_get_io_ptr().
Also, set up error management with setjmp(). This mechanism allows jumping
in code like a goto but through the call stack. If an error occurs, the control ow
comes back at the point where setjmp() has been called rst but enters the if
block instead (here goto ERROR). This is the moment where we can provide the
following script:
...
Log::info("Creating required structures.");
pngPtr = png_create_read_struct(PNG_LIBPNG_VER_STRING,
NULL, NULL, NULL);
if (!pngPtr) goto ERROR;
infoPtr = png_create_info_struct(pngPtr);
if (!infoPtr) goto ERROR;
// Prepares reading operation by setting-up a read callback.
png_set_read_fn(pngPtr, &pResource, callback_readPng);
// Set-up error management. If an error occurs while reading,
// code will come back here and jump
if (setjmp(png_jmpbuf(pngPtr))) goto ERROR;
...

Rendering Graphics with OpenGL ES
[ 238 ]
9. Ignore the rst 8 bytes from the signature, which have already been read, for le
signatures with png_set_sig_bytes() and png_read_info():
Start reading the PNG le header with png_get_IHDR():
...
// Ignores first 8 bytes already read.
png_set_sig_bytes(pngPtr, 8);
// Retrieves PNG info and updates PNG struct accordingly.
png_read_info(pngPtr, infoPtr);
png_int_32 depth, colorType;
png_uint_32 width, height;
png_get_IHDR(pngPtr, infoPtr, &width, &height,
&depth, &colorType, NULL, NULL, NULL);
...
10. The PNG les can be encoded in several formats: RGB, RGBA, 256 colors with a
palee, grayscale, and so on. R, G, and B color channels can be encoded up to
16 bits. Hopefully, libpng provides transformaon funcons to decode unusual
formats and transforms them into more classical RGB and luminance formats (with 8
bits per channel, with or without an alpha channel).
Select the right transformaon using png_set funcons. Transformaons are
validated with png_read_update_info().
At the same me, select the corresponding OpenGL texture format:
...
// Creates a full alpha channel if transparency is encoded as
// an array of palette entries or a single transparent color.
transparency = false;
if (png_get_valid(pngPtr, infoPtr, PNG_INFO_tRNS)) {
png_set_tRNS_to_alpha(pngPtr);
transparency = true;
}
// Expands PNG with less than 8bits per channel to 8bits.
if (depth < 8) {
png_set_packing (pngPtr);
// Shrinks PNG with 16bits per color channel down to 8bits.
} else if (depth == 16) {
png_set_strip_16(pngPtr);
}
// Indicates that image needs conversion to RGBA if needed.
switch (colorType) {
case PNG_COLOR_TYPE_PALETTE:
png_set_palette_to_rgb(pngPtr);

Chapter 6
[ 239 ]
format = transparency ? GL_RGBA : GL_RGB;
break;
case PNG_COLOR_TYPE_RGB:
format = transparency ? GL_RGBA : GL_RGB;
break;
case PNG_COLOR_TYPE_RGBA:
format = GL_RGBA;
break;
case PNG_COLOR_TYPE_GRAY:
png_set_expand_gray_1_2_4_to_8(pngPtr);
format = transparency ? GL_LUMINANCE_ALPHA:GL_LUMINANCE;
break;
case PNG_COLOR_TYPE_GA:
png_set_expand_gray_1_2_4_to_8(pngPtr);
format = GL_LUMINANCE_ALPHA;
break;
}
// Validates all transformations.
png_read_update_info(pngPtr, infoPtr);
...
11. Allocate the necessary temporary buer to hold image data and a second one
with the address of each output image row for libpng. Note that the row order
is inverted because OpenGL uses a dierent coordinate system (the rst pixel is at
boom-le) than PNG (rst pixel at top-le).
...
// Get row size in bytes.
rowSize = png_get_rowbytes(pngPtr, infoPtr);
if (rowSize <= 0) goto ERROR;
// Ceates the image buffer that will be sent to OpenGL.
image = new png_byte[rowSize * height];
if (!image) goto ERROR;
// Pointers to each row of the image buffer. Row order is
// inverted because different coordinate systems are used by
// OpenGL (1st pixel is at bottom left) and PNGs (top-left).
rowPtrs = new png_bytep[height];
if (!rowPtrs) goto ERROR;
for (int32_t i = 0; i < height; ++i) {
rowPtrs[height - (i + 1)] = image + i * rowSize;
}
...

Rendering Graphics with OpenGL ES
[ 240 ]
12. Then, start reading the image content with png_read_image().
Finally, when it's nished, release all temporary resources:
...
// Reads image content.
png_read_image(pngPtr, rowPtrs);
// Frees memory and resources.
pResource.close();
png_destroy_read_struct(&pngPtr, &infoPtr, NULL);
delete[] rowPtrs;
13. Finally, when it's nished, release all temporary resources:
...
ERROR:
Log::error("Error loading texture into OpenGL.");
pResource.close();
delete[] rowPtrs; delete[] image;
if (pngPtr != NULL) {
png_infop* infoPtrP = infoPtr != NULL ? &infoPtr: NULL;
png_destroy_read_struct(&pngPtr, infoPtrP, NULL);
}
return NULL;
}
What just happened?
Combining our nave library module libpng with the Asset manager API gives us the power
to load PNG les packaged in the assets directory. PNG is a relavely simple image format
that is rather easy to integrate. In addion, it supports compression, which is good to limit
the size of your APKs. Please note that once loaded, the PNG image buer is uncompressed
and can consume a lot of memory. So, release them as soon as you can. For detailed
informaon about the PNG format, see http://www.w3.org/TR/PNG/.
Now that our PNG image is loaded, we can generate an OpenGL texture from it.
Time for action – generating an OpenGL texture
The image buer lled by libpng now contains raw texture data. The next step is to
generate a texture from it:
1. Let's connue our previous method which is
GraphicsManager::loadTexture().
Generate a new texture idener with glGenTextures().

Chapter 6
[ 241 ]
Indicate that we are working on a texture with glBindTexture().
Congure texture parameters with glTexParameteri() to specify the way a
texture is ltered and wrapped. Use GL_NEAREST, as smoothing is not essenal for
a 2D game without zoom eects. Texture repeon is also not necessary and can be
prevented with GL_CLAMP_TO_EDGE:
...
png_destroy_read_struct(&pngPtr, &infoPtr, NULL);
delete[] rowPtrs;
GLenum errorResult;
glGenTextures(1, &texture);
glBindTexture(GL_TEXTURE_2D, texture);
// Set-up texture properties.
glTexParameteri(GL_TEXTURE_2D, GL_TEXTURE_MIN_FILTER,
GL_NEAREST);
glTexParameteri(GL_TEXTURE_2D, GL_TEXTURE_MAG_FILTER,
GL_NEAREST);
glTexParameteri(GL_TEXTURE_2D, GL_TEXTURE_WRAP_S,
GL_CLAMP_TO_EDGE);
glTexParameteri(GL_TEXTURE_2D, GL_TEXTURE_WRAP_T,
GL_CLAMP_TO_EDGE);
...
2. Push the image data into OpenGL texture with glTexImage2D().
This unbinds the texture to put OpenGL pipeline back in its previous state. This is not
strictly necessary, but it helps to avoid conguraon mistakes in future draw calls
(that is, drawing with an unwanted texture).
Finally, do not forget to free the temporary image buer.
You can check that the texture has been created properly with glGetError():
...
// Loads image data into OpenGL.
glTexImage2D(GL_TEXTURE_2D, 0, format, width, height, 0, format,
GL_UNSIGNED_BYTE, image);
// Finished working with the texture.
glBindTexture(GL_TEXTURE_2D, 0);
delete[] image;
if (glGetError() != GL_NO_ERROR) goto ERROR;
Log::info("Texture size: %d x %d", width, height);
...

Rendering Graphics with OpenGL ES
[ 242 ]
3. Finally, cache the texture before returning it:
...
// Caches the loaded texture.
textureProperties = &mTextures[mTextureCount++];
textureProperties->texture = texture;
textureProperties->textureResource = &pResource;
textureProperties->width = width;
textureProperties->height = height;
return textureProperties;
ERROR:
...
}
...
4. In jni/DroidBlaster.hpp, include the Resource header and dene two
resources, of which one is for the ship and another is for the asteroids:
...
#include "PhysicsManager.hpp"
#include "Resource.hpp"
#include "Ship.hpp"
#include "TimeManager.hpp"
#include "Types.hpp"
class DroidBlaster : public ActivityHandler {
...
private:
...
EventLoop mEventLoop;
Resource mAsteroidTexture;
Resource mShipTexture;
Asteroid mAsteroids;
Ship mShip;
};
#endif
5. Open jni/DroidBlaster.cpp and inialize the texture resources in
the constructor.
...
DroidBlaster::DroidBlaster(android_app* pApplication):
mTimeManager(),
mGraphicsManager(pApplication),
Chapter 6
[ 243 ]
mPhysicsManager(mTimeManager, mGraphicsManager),
mEventLoop(pApplication, *this),
mAsteroidTexture(pApplication, "droidblaster/asteroid.png"),
mShipTexture(pApplication, "droidblaster/ship.png"),
mAsteroids(pApplication, mTimeManager, mGraphicsManager,
mPhysicsManager),
mShip(pApplication, mGraphicsManager) {
...
}
...
6. To ensure that the code is working, load textures in onActivate(). The textures
can be loaded only aer OpenGL is inialized by GraphicsManager:
...
status DroidBlaster::onActivate() {
Log::info("Activating DroidBlaster");
if (mGraphicsManager.start() != STATUS_OK) return STATUS_KO;
mGraphicsManager.loadTexture(mAsteroidTexture);
mGraphicsManager.loadTexture(mShipTexture);
mAsteroids.initialize();
mShip.initialize();
mTimeManager.reset();
return STATUS_OK;
}
...
Before running DroidBlaster, add asteroid.png and ship.png into the
droidblaster/assets directory (create it if it's necessary).
The PNG les are provided with this book in the
DroidBlaster_Part6/assets directory.
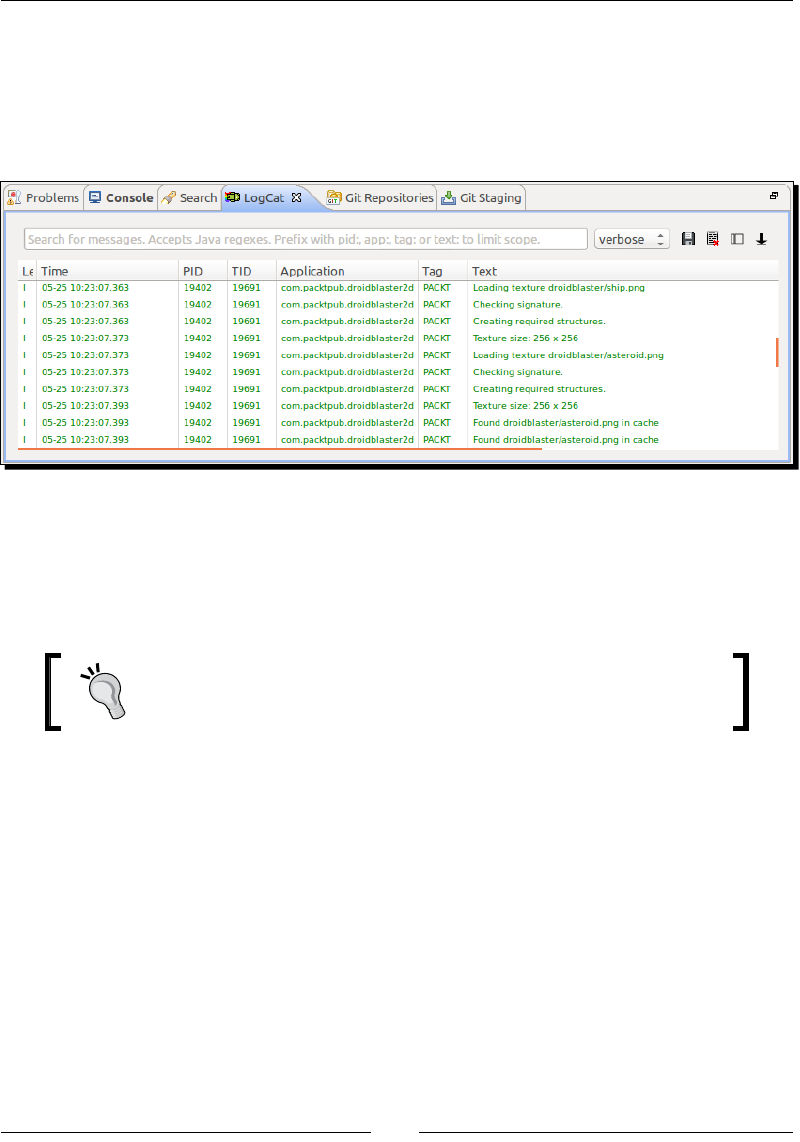
Rendering Graphics with OpenGL ES
[ 244 ]
What just happened?
Run the applicaon and you should not see much dierence. Indeed, we have loaded two
PNG textures, but we are not actually rendering them. However, if you check the logs, you
should see traces showing that the textures are properly loaded and retrieved from the
cache, as shown in the following screenshot:
Textures in OpenGL are objects (in the OpenGL way) which are in the form of an array of
memory allocated on the Graphical Processing Unit (GPU) to store specic data. Storing
graphics data in the GPU memory provides faster memory access than if it was stored in the
main memory, which is a bit like a cache on a CPU. This eciency comes at a price: texture
loading is costly and must be performed as much as possible during startup.
The pixels of a texture are named Texels. Texel is the contracon of
"Texture Pixel". Textures, and thus Texels, are projected on 3D objects
during scene rendering.
More about textures
An important requirement to remember while dealing with textures is their dimensions;
OpenGL textures must have a power of two dimensions (for example, 128 or 256 pixels).
Other dimensions will fail on most devices. These dimensions ease a technique called
MIPmapping (Multum In Parvo (MIP), which mean much in lile). MIPmaps are smaller
versions of the same texture (see the following gure) applied selecvely depending on the
rendered object distance. They increase performance and reduce aliasing arfacts.

Chapter 6
[ 245 ]
The texture conguraon is set with glTexParameteri(). They need to be specied at the
texture creaon me only. The following two main kinds of parameters can be applied:
Texture Filtering with GL_TEXTURE_MAG_FILTER and GL_TEXTURE_MIN_FILTER.
These parameters control the way texture magnicaon and minicaon are
performed, that is, the processing applied when texture is respecvely smaller or
bigger than the rasterized primive. Two values are possible in this, as shown in the
next gure.
GL_LINEAR interpolates textures drawn onscreen based on the closest texel colors
(also known as Bilinear ltering). This calculaon results in a smooth eect.GL_
NEAREST displays the closest texel color without any interpolaon. This value gives
slightly beer performance than GL_LINEAR.
There exist variants that can be used in conjuncon with MIPmaps to indicate how
to apply minicaon; some of these variants are GL_NEAREST_MIPMAP_NEAREST,
GL_LINEAR_MIPMAP_NEAREST, GL_NEAREST_MIPMAP_LINEAR and GL_LINEAR_
MIPMAP_LINEAR (this one is beer known as Trilinear ltering).

Rendering Graphics with OpenGL ES
[ 246 ]
Texture Wrapping with GL_TEXTURE_WRAP_S and GL_TEXTURE_WRAP_T.
These parameters control the way textures are repeated when texture coordinates
go outside the range [0.0, 1.0]. S represents the X axis and T, the Y axis. Their
dierent naming is used to avoid any confusion with posion coordinates. They are
oen referred to as U and V. The following gure shows some of the possible values
and their eect:
A few good pracces to remember while dealing with textures are:
Switching textures is an expensive operaon, so avoid OpenGL pipeline state
changes as much as possible (binding a new texture and changing an opon with
glEnable() are examples of state changes).
Textures are probably the most memory and bandwidth consuming resources.
Consider using compressed texture formats to greatly improve performances. Sadly,
texture compression algorithms are rather ed to the hardware.
Create big textures to pack, as much data as you can, even from mulple objects.
This is known as Texture Atlas. For example, if you look at the ship and asteroid
texture, you will nd that several sprite images are packed in them (we could even
pack more):
Chapter 6
[ 247 ]
This introducon to textures gives a slight overview of what OpenGL ES can achieve. For
more informaon about texturing, have a look at the OpenGL.org wiki at http://www.
opengl.org/wiki/Texture.
Drawing 2D sprites
2D games are based on sprites, which are pieces of images composited onscreen. They can
represent an object, a character, a stac, or an animated element. Sprites can be displayed
with a transparency eect using the alpha channel of an image. Typically, an image will
contain several frames for a sprite, each frame represenng a dierent animaon step or
dierent objects.
If you need a powerful mulplaorm image editor, consider using GNU
Image Manipulaon Program (GIMP). This program is available on Windows,
Linux, and Mac OS X, and is a powerful and open source. You can download it
from http://www.gimp.org/.
Several techniques exist to draw sprites using OpenGL. One of these is called Sprite Batch.
This is one of the most ecient ways to create 2D games with OpenGL ES 2. It is based
on a vertex array (stored in main memory) that is regenerated during each frame with all
the sprites to render. Rendering is performed with the help of a simple vertex shader that
projects 2D coordinates onto the screen and a fragment shader that outputs the raw sprite
texture color.
We are now going to implement a sprite batch to render the ship and mulple asteroids
onscreen in DroidBlaster.
The resulng project is provided with this book under the name
DroidBlaster_Part7.
Time for action – initializing OpenGL ES
Let's now see how to implement a sprite batch in DroidBlaster:
1. Modify jni/GraphicsManager.hpp. Create the class GraphicsComponent,
which denes a common interface for all rendering techniques starng with sprite
batches. Dene a few new methods such as:
getProjectionMatrix() which provides an OpenGL matrix to project 2D
graphics on screen

Rendering Graphics with OpenGL ES
[ 248 ]
loadShaderProgram() to load a vertex and fragment shader and link
them together into an OpenGL program
registerComponent() which records a list of GraphicsComponent to
initialize and render
Create the RenderVertex private structure represenng the structure of an
individual sprite vertex.
Also, declare a few new member variables such as:
mProjectionMatrix to store an orthographic projection (as opposed to a
perspective projection used in 3D games).
mShaders, mShaderCount, mComponents, and mComponentCount to
keep trace of all resources.
Finally, get rid of all the GraphicsElement stu used in the previous chapter to
render raw graphics, as shown in the following code:
...
class GraphicsComponent {
public:
virtual status load() = 0;
virtual void draw() = 0;
};
...
2. Then, dene a few new methods in GraphicsManager:
getProjectionMatrix() which provides an OpenGL matrix to project 2D
graphics on screen
loadShaderProgram() to load a vertex and fragment shader and link
them together into an OpenGL program
registerComponent() which records a list of GraphicsComponent to
initialize and render
Create the RenderVertex private structure represenng the structure of an
individual sprite vertex.
Also, declare a few new member variables such as:
mProjectionMatrix to store an orthographic projection (as opposed to a
perspective projection used in 3D games)
mShaders, mShaderCount, mComponents, and mComponentCount to
keep trace of all resources.

Chapter 6
[ 249 ]
Finally, get rid of all the GraphicsElement stu used in the previous chapter to
render raw graphics:
...
class GraphicsManager {
public:
GraphicsManager(android_app* pApplication);
~GraphicsManager();
int32_t getRenderWidth() { return mRenderWidth; }
int32_t getRenderHeight() { return mRenderHeight; }
GLfloat* getProjectionMatrix() { return mProjectionMatrix[0]; }
void registerComponent(GraphicsComponent* pComponent);
status start();
void stop();
status update();
TextureProperties* loadTexture(Resource& pResource);
GLuint loadShader(const char* pVertexShader,
const char* pFragmentShader);
private:
struct RenderVertex {
GLfloat x, y, u, v;
};
android_app* mApplication;
int32_t mRenderWidth; int32_t mRenderHeight;
EGLDisplay mDisplay; EGLSurface mSurface; EGLContext mContext;
GLfloat mProjectionMatrix[4][4];
TextureProperties mTextures[32]; int32_t mTextureCount;
GLuint mShaders[32]; int32_t mShaderCount;
GraphicsComponent* mComponents[32]; int32_t mComponentCount;
};
#endif
3. Open jni/GraphicsManager.cpp.
Update the constructor inializaon list and the destructor. Again, get rid of
everything related to GraphicsElement.
Rendering Graphics with OpenGL ES
[ 250 ]
Also implement registerComponent() in place of registerElement():
...
GraphicsManager::GraphicsManager(android_app* pApplication) :
mApplication(pApplication),
mRenderWidth(0), mRenderHeight(0),
mDisplay(EGL_NO_DISPLAY), mSurface(EGL_NO_CONTEXT),
mContext(EGL_NO_SURFACE),
mProjectionMatrix(),
mTextures(), mTextureCount(0),
mShaders(), mShaderCount(0),
mComponents(), mComponentCount(0) {
Log::info("Creating GraphicsManager.");
}
GraphicsManager::~GraphicsManager() {
Log::info("Destroying GraphicsManager.");
}
void GraphicsManager::registerComponent(GraphicsComponent* pComponent)
{
mComponents[mComponentCount++] = pComponent;
}
...
4. Amend onStart() to inialize the Orthographic projecon matrix array with
display dimensions (we will see how to compute matrices more easily using GLM in
Chapter 9, Porng Exisng Libraries to Android) and load components.
A projection matrix is a mathematical way to project 3D objects
composing a scene into a 2D plane, which is the screen. In
orthographic projection, a projection is perpendicular to the display
surface. That means that an object has exactly the same size
whether it is close or far away from the point of view. Orthographic
projection is appropriate for 2D games. Perspective projection, in
which objects look smaller the farther they are, is rather used for
3D games.
For more information, have a look at http://en.wikipedia.
org/wiki/Graphical_projection.
...
status GraphicsManager::start() {
...
glViewport(0, 0, mRenderWidth, mRenderHeight);

Chapter 6
[ 251 ]
glDisable(GL_DEPTH_TEST);
// Prepares the projection matrix with viewport dimesions.
memset(mProjectionMatrix[0], 0, sizeof(mProjectionMatrix));
mProjectionMatrix[0][0] = 2.0f / GLfloat(mRenderWidth);
mProjectionMatrix[1][1] = 2.0f / GLfloat(mRenderHeight);
mProjectionMatrix[2][2] = -1.0f; mProjectionMatrix[3][0] = -1.0f;
mProjectionMatrix[3][1] = -1.0f; mProjectionMatrix[3][2] = 0.0f;
mProjectionMatrix[3][3] = 1.0f;
// Loads graphics components.
for (int32_t i = 0; i < mComponentCount; ++i) {
if (mComponents[i]->load() != STATUS_OK) {
return STATUS_KO;
}
}
return STATUS_OK;
...
}
...
5. Free any resources loaded with loadShaderProgram() in stop().
...
void GraphicsManager::stop() {
Log::info("Stopping GraphicsManager.");
for (int32_t i = 0; i < mTextureCount; ++i) {
glDeleteTextures(1, &mTextures[i].texture);
}
mTextureCount = 0;
for (int32_t i = 0; i < mShaderCount; ++i) {
glDeleteProgram(mShaders[i]);
}
mShaderCount = 0;
// Destroys OpenGL context.
...
}
...

Rendering Graphics with OpenGL ES
[ 252 ]
6. Render any registered components in update() aer the display is cleared but
before it is refreshed:
...
status GraphicsManager::update() {
glClear(GL_COLOR_BUFFER_BIT);
for (int32_t i = 0; i < mComponentCount; ++i) {
mComponents[i]->draw();
}
if (eglSwapBuffers(mDisplay, mSurface) != EGL_TRUE) {
...
}
...
7. Create the new method loadShader(). Its role is to compile and load the given
shaders passed as a human-readable GLSL program. To do so:
Generate a new vertex shader with glCreateShader().
Upload the vertex shader source into OpenGL with glShaderSource().
Compile the shader with glCompileShader() and check the compilation
status with glGetShaderiv(). The compilation errors can be read with
glGetShaderInfoLog().
Repeat the operaon for the given fragment shader:
...
GLuint GraphicsManager::loadShader(const char* pVertexShader,
const char* pFragmentShader) {
GLint result; char log[256];
GLuint vertexShader, fragmentShader, shaderProgram;
// Builds the vertex shader.
vertexShader = glCreateShader(GL_VERTEX_SHADER);
glShaderSource(vertexShader, 1, &pVertexShader, NULL);
glCompileShader(vertexShader);
glGetShaderiv(vertexShader, GL_COMPILE_STATUS, &result);
if (result == GL_FALSE) {
glGetShaderInfoLog(vertexShader, sizeof(log), 0, log);
Log::error("Vertex shader error: %s", log);
goto ERROR;
}
// Builds the fragment shader.

Chapter 6
[ 253 ]
fragmentShader = glCreateShader(GL_FRAGMENT_SHADER);
glShaderSource(fragmentShader, 1, &pFragmentShader, NULL);
glCompileShader(fragmentShader);
glGetShaderiv(fragmentShader, GL_COMPILE_STATUS, &result);
if (result == GL_FALSE) {
glGetShaderInfoLog(fragmentShader, sizeof(log), 0, log);
Log::error("Fragment shader error: %s", log);
goto ERROR;
}
...
8. Once compiled, link the compiled vertex and fragment shaders together. To do so:
Create a program object with glCreateProgram().
Specify the shaders to use glAttachShader().
Link them together with glLinkProgram() to create the final program.
Shader consistencies and compatibility with the hardware is checked at that
point. The result can be checked with glGetProgramiv().
Finally, get rid of the shaders as they are useless once linked in a program.
...
shaderProgram = glCreateProgram();
glAttachShader(shaderProgram, vertexShader);
glAttachShader(shaderProgram, fragmentShader);
glLinkProgram(shaderProgram);
glGetProgramiv(shaderProgram, GL_LINK_STATUS, &result);
glDeleteShader(vertexShader);
glDeleteShader(fragmentShader);
if (result == GL_FALSE) {
glGetProgramInfoLog(shaderProgram, sizeof(log), 0, log);
Log::error("Shader program error: %s", log);
goto ERROR;
}
mShaders[mShaderCount++] = shaderProgram;
return shaderProgram;
ERROR:
Log::error("Error loading shader.");
if (vertexShader > 0) glDeleteShader(vertexShader);
if (fragmentShader > 0) glDeleteShader(fragmentShader);
return 0;
}
...

Rendering Graphics with OpenGL ES
[ 254 ]
9. Create jni/Sprite.hpp, which denes a class with all the necessary data to
animate and draw a single sprite.
Create a Vertex structure which denes the content of a sprite vertex. We need a
2D posion and texture coordinates which delimit the sprite picture.
Then, dene a few methods:
Sprite animation can be updated and retrieved with setAnimation() and
animationEnded(). Location is publicly available for simplicity purposes.
Give privileged access to a component that we are going to define later,
named SpriteBatch. It can load() and draw() sprites.
#ifndef _PACKT_GRAPHICSSPRITE_HPP_
#define _PACKT_GRAPHICSSPRITE_HPP_
#include "GraphicsManager.hpp"
#include "Resource.hpp"
#include "Types.hpp"
#include <GLES2/gl2.h>
class SpriteBatch;
class Sprite {
friend class SpriteBatch;
public
struct Vertex {
GLfloat x, y, u, v;
};
Sprite(GraphicsManager& pGraphicsManager,
Resource& pTextureResource, int32_t pHeight, int32_t pWidth);
void setAnimation(int32_t pStartFrame, int32_t pFrameCount,
float pSpeed, bool pLoop);
bool animationEnded() { return mAnimFrame > (mAnimFrameCount-1); }
Location location;
protected:
status load(GraphicsManager& pGraphicsManager);
void draw(Vertex pVertex[4], float pTimeStep);
...

Chapter 6
[ 255 ]
10. Finally, dene a few properes:
A texture containing the sprite sheet and its corresponding resource
Sprite frame data: mWidth and mHeight, horizontal, vertical, and total
number of frames in mFrameXCount, mFrameYCount, and mFrameCount
Animation data: first and total number of frames of an animation
in mAnimStartFrame and mAnimFrameCount, animation speed in
mAnimSpeed, the currently shown frame in mAnimFrame, and a looping
indicator in mAnimLoop:
...
private:
Resource& mTextureResource;
GLuint mTexture;
// Frame.
int32_t mSheetHeight, mSheetWidth;
int32_t mSpriteHeight, mSpriteWidth;
int32_t mFrameXCount, mFrameYCount, mFrameCount;
// Animation.
int32_t mAnimStartFrame, mAnimFrameCount;
float mAnimSpeed, mAnimFrame;
bool mAnimLoop;
};
#endif
11. Write the jni/Sprite.cpp constructor and inialize the members to
default values:
#include "Sprite.hpp"
#include "Log.hpp"
Sprite::Sprite(GraphicsManager& pGraphicsManager,
Resource& pTextureResource,
int32_t pHeight, int32_t pWidth) :
location(),
mTextureResource(pTextureResource), mTexture(0),
mSheetWidth(0), mSheetHeight(0),
mSpriteHeight(pHeight), mSpriteWidth(pWidth),
mFrameCount(0), mFrameXCount(0), mFrameYCount(0),
mAnimStartFrame(0), mAnimFrameCount(1),
mAnimSpeed(0), mAnimFrame(0), mAnimLoop(false)
{}
...

Rendering Graphics with OpenGL ES
[ 256 ]
12. Frame informaon (horizontal, vercal, and total number of frames) needs to be
recomputed in load() as texture dimensions are known only at load me:
...
status Sprite::load(GraphicsManager& pGraphicsManager) {
TextureProperties* textureProperties =
pGraphicsManager.loadTexture(mTextureResource);
if (textureProperties == NULL) return STATUS_KO;
mTexture = textureProperties->texture;
mSheetWidth = textureProperties->width;
mSheetHeight = textureProperties->height;
mFrameXCount = mSheetWidth / mSpriteWidth;
mFrameYCount = mSheetHeight / mSpriteHeight;
mFrameCount = (mSheetHeight / mSpriteHeight)
* (mSheetWidth / mSpriteWidth);
return STATUS_OK;
}
...
13. An animaon starts from a given in the sprite sheet and ends aer a certain
amount of frames, whose number changes according to speed. An animaon can
loop to restart from the beginning when it is over:
...
void Sprite::setAnimation(int32_t pStartFrame,
int32_t pFrameCount, float pSpeed, bool pLoop) {
mAnimStartFrame = pStartFrame;
mAnimFrame = 0.0f, mAnimSpeed = pSpeed, mAnimLoop = pLoop;
mAnimFrameCount = pFrameCount;
}
...
14. In draw(), rst update the frame to draw according to the sprite animaon and
the me spent since the last frame. What we need is the indices of the frame in
the spritesheet:
...
void Sprite::draw(Vertex pVertices[4], float pTimeStep) {
int32_t currentFrame, currentFrameX, currentFrameY;
// Updates animation in loop mode.
mAnimFrame += pTimeStep * mAnimSpeed;
if (mAnimLoop) {
currentFrame = (mAnimStartFrame +
int32_t(mAnimFrame) % mAnimFrameCount);
} else {
// Updates animation in one-shot mode.

Chapter 6
[ 257 ]
if (animationEnded()) {
currentFrame = mAnimStartFrame + (mAnimFrameCount-1);
} else {
currentFrame = mAnimStartFrame + int32_t(mAnimFrame);
}
}
// Computes frame X and Y indexes from its id.
currentFrameX = currentFrame % mFrameXCount;
// currentFrameY is converted from OpenGL coordinates
// to top-left coordinates.
currentFrameY = mFrameYCount - 1
- (currentFrame / mFrameXCount);
...
15. A sprite is composed of four verces drawn in an output array, pVertices. Each
of these verces is composed of a sprite posion (posX1, posY1, posX2, posY2)
and texture coordinates (u1, u2, v1, v2). Compute and generate these verces
dynamically in the memory buer, pVertices, provided in the parameter. This
memory buer will be given later to OpenGL to render the sprite:
...
// Draws selected frame.
GLfloat posX1 = location.x - float(mSpriteWidth / 2);
GLfloat posY1 = location.y - float(mSpriteHeight / 2);
GLfloat posX2 = posX1 + mSpriteWidth;
GLfloat posY2 = posY1 + mSpriteHeight;
GLfloat u1 = GLfloat(currentFrameX * mSpriteWidth)
/ GLfloat(mSheetWidth);
GLfloat u2 = GLfloat((currentFrameX + 1) * mSpriteWidth)
/ GLfloat(mSheetWidth);
GLfloat v1 = GLfloat(currentFrameY * mSpriteHeight)
/ GLfloat(mSheetHeight);
GLfloat v2 = GLfloat((currentFrameY + 1) * mSpriteHeight)
/ GLfloat(mSheetHeight);
pVertices[0].x = posX1; pVertices[0].y = posY1;
pVertices[0].u = u1; pVertices[0].v = v1;
pVertices[1].x = posX1; pVertices[1].y = posY2;
pVertices[1].u = u1; pVertices[1].v = v2;
pVertices[2].x = posX2; pVertices[2].y = posY1;
pVertices[2].u = u2; pVertices[2].v = v1;
pVertices[3].x = posX2; pVertices[3].y = posY2;
pVertices[3].u = u2; pVertices[3].v = v2;
}

Rendering Graphics with OpenGL ES
[ 258 ]
16. Specify jni/SpriteBatch.hpp with methods such as:
registerSprite() to add a new sprite to draw
load() to initialize all the registered sprites
draw() to effectively render all the registered sprites
We are going to need member variables:
A set of sprites to draw in mSprites and mSpriteCount
mVertices, mVertexCount, mIndexes, and mIndexCount, which define
a vertex and an index buffer
A shader program identified by mShaderProgram
The vertex and fragment shader parameters are:
aPosition, which is one of the sprite corner positions.
aTexture, which is the sprite corner texture coordinate. It defines the
sprite to display in the sprite sheet.
uProjection, is the orthographic projection matrix.
uTexture, contains the sprite picture.
#ifndef _PACKT_GRAPHICSSPRITEBATCH_HPP_
#define _PACKT_GRAPHICSSPRITEBATCH_HPP_
#include "GraphicsManager.hpp"
#include "Sprite.hpp"
#include "TimeManager.hpp"
#include "Types.hpp"
#include <GLES2/gl2.h>
class SpriteBatch : public GraphicsComponent {
public:
SpriteBatch(TimeManager& pTimeManager,
GraphicsManager& pGraphicsManager);
~SpriteBatch();
Sprite* registerSprite(Resource& pTextureResource,
int32_t pHeight, int32_t pWidth);
status load();

Chapter 6
[ 259 ]
void draw();
private:
TimeManager& mTimeManager;
GraphicsManager& mGraphicsManager;
Sprite* mSprites[1024]; int32_t mSpriteCount;
Sprite::Vertex mVertices[1024]; int32_t mVertexCount;
GLushort mIndexes[1024]; int32_t mIndexCount;
GLuint mShaderProgram;
GLuint aPosition; GLuint aTexture;
GLuint uProjection; GLuint uTexture;
};
#endif
17. Implement the jni/SpriteBach.cpp constructor to inialize the default values.
The component must register with GraphicsManager to be loaded and rendered.
In the destructor, the allocated sprites must be freed when the component
is destroyed.
#include "SpriteBatch.hpp"
#include "Log.hpp"
#include <GLES2/gl2.h>
SpriteBatch::SpriteBatch(TimeManager& pTimeManager,
GraphicsManager& pGraphicsManager) :
mTimeManager(pTimeManager),
mGraphicsManager(pGraphicsManager),
mSprites(), mSpriteCount(0),
mVertices(), mVertexCount(0),
mIndexes(), mIndexCount(0),
mShaderProgram(0),
aPosition(-1), aTexture(-1), uProjection(-1), uTexture(-1)
{
mGraphicsManager.registerComponent(this);
}
SpriteBatch::~SpriteBatch() {
for (int32_t i = 0; i < mSpriteCount; ++i) {
delete mSprites[i];
}
}
...

Rendering Graphics with OpenGL ES
[ 260 ]
18. The index buer is rather stac. We can precompute its content when a sprite is
registered. Each index points to a vertex in the vertex buer (0 represenng the
very rst vertex, 1 the 2nd, and so on). As a sprite is represented by 2 triangles of 3
verces (to form a quad), we need 6 indexes per sprite:
...
Sprite* SpriteBatch::registerSprite(Resource& pTextureResource,
int32_t pHeight, int32_t pWidth) {
int32_t spriteCount = mSpriteCount;
int32_t index = spriteCount * 4; // Points to 1st vertex.
// Precomputes the index buffer.
GLushort* indexes = (&mIndexes[0]) + spriteCount * 6;
mIndexes[mIndexCount++] = index+0;
mIndexes[mIndexCount++] = index+1;
mIndexes[mIndexCount++] = index+2;
mIndexes[mIndexCount++] = index+2;
mIndexes[mIndexCount++] = index+1;
mIndexes[mIndexCount++] = index+3;
// Appends a new sprite to the sprite array.
mSprites[mSpriteCount] = new Sprite(mGraphicsManager,
pTextureResource, pHeight, pWidth);
return mSprites[mSpriteCount++];
}
...
19. Write the GLSL vertex and fragment shaders as constant strings.
The shader code is wrien inside a main() funcon similar to what can be coded
in C. As any normal computer program, shaders require variables to process data:
aributes (per-vertex data like the posion), uniforms (global parameters per draw
call), and varying (values interpolated per fragment like the texture coordinates).
Here, texture coordinates are passed to the fragment shader in vTexture. The
vertex posion is transformed from a 2D vector to a 4D vector into a predened
GLSL variable gl_Position. The fragment shader retrieves interpolated texture
coordinates in vTexture. This informaon is used as an index in the predened
funcon texture2D() to access the texture color. Color is saved in the predened
output variable gl_FragColor, which represents the nal pixel:
...
static const char* VERTEX_SHADER =
"attribute vec4 aPosition;\n"
"attribute vec2 aTexture;\n"
"varying vec2 vTexture;\n"

Chapter 6
[ 261 ]
"uniform mat4 uProjection;\n"
"void main() {\n"
" vTexture = aTexture;\n"
" gl_Position = uProjection * aPosition;\n"
"}";
static const char* FRAGMENT_SHADER =
"precision mediump float;\n"
"varying vec2 vTexture;\n"
"uniform sampler2D u_texture;\n"
"void main() {\n"
" gl_FragColor = texture2D(u_texture, vTexture);\n"
"}";
...
20. Load the shader program and retrieve the shader aributes and uniform ideners
in load(). Then, inialize sprites, as shown in the following code:
...
status SpriteBatch::load() {
GLint result; int32_t spriteCount;
mShaderProgram = mGraphicsManager.loadShader(VERTEX_SHADER,
FRAGMENT_SHADER);
if (mShaderProgram == 0) return STATUS_KO;
aPosition = glGetAttribLocation(mShaderProgram, "aPosition");
aTexture = glGetAttribLocation(mShaderProgram, "aTexture");
uProjection = glGetUniformLocation(mShaderProgram,"uProjection");
uTexture = glGetUniformLocation(mShaderProgram, "u_texture");
// Loads sprites.
for (int32_t i = 0; i < mSpriteCount; ++i) {
if (mSprites[i]->load(mGraphicsManager)
!= STATUS_OK) goto ERROR;
}
return STATUS_OK;
ERROR:
Log::error("Error loading sprite batch");
return STATUS_KO;
}
...
Rendering Graphics with OpenGL ES
[ 262 ]
21. Write draw(), which executes the OpenGL sprite rendering logic.
First, select the sprite shader and pass its parameters: the matrix and the
texture uniforms:
...
void SpriteBatch::draw() {
glUseProgram(mShaderProgram);
glUniformMatrix4fv(uProjection, 1, GL_FALSE,
mGraphicsManager.getProjectionMatrix());
glUniform1i(uTexture, 0);
...
Then, indicate to OpenGL how the posion and UV coordinates are
stored in the vertex buer with glEnableVertexAttribArray() and
glVertexAttribPointer(). These calls basically describe the mVertices
structure. Note how vertex data is linked to shader aributes:
...
glEnableVertexAttribArray(aPosition);
glVertexAttribPointer(aPosition, // Attribute Index
2, // Size in bytes (x and y)
GL_FLOAT, // Data type
GL_FALSE, // Normalized
sizeof(Sprite::Vertex),// Stride
&(mVertices[0].x)); // Location
glEnableVertexAttribArray(aTexture);
glVertexAttribPointer(aTexture, // Attribute Index
2, // Size in bytes (u and v)
GL_FLOAT, // Data type
GL_FALSE, // Normalized
sizeof(Sprite::Vertex), // Stride
&(mVertices[0].u)); // Location
...
Acvate transparency using a blending funcon to draw sprites over the
background, or other sprites:
...
glEnable(GL_BLEND);
glBlendFunc(GL_SRC_ALPHA, GL_ONE_MINUS_SRC_ALPHA);
...
For more information about the blending modes provided
by OpenGL, have a look at https://www.opengl.org/
wiki/Blending.

Chapter 6
[ 263 ]
22. We can now start the rendering loop to render all sprites in a batch.
The rst outer loop basically iterates over textures. Indeed, the pipeline state
changes in OpenGL are costly. Methods like glBindTexture() should be called
as lile as possible to guarantee performance:
...
const int32_t vertexPerSprite = 4;
const int32_t indexPerSprite = 6;
float timeStep = mTimeManager.elapsed();
int32_t spriteCount = mSpriteCount;
int32_t currentSprite = 0, firstSprite = 0;
while (bool canDraw = (currentSprite < spriteCount)) {
// Switches texture.
Sprite* sprite = mSprites[currentSprite];
GLuint currentTexture = sprite->mTexture;
glActiveTexture(GL_TEXTURE0);
glBindTexture(GL_TEXTURE_2D, sprite->mTexture);
...
The inner loop generates verces for all sprites with the same texture:
...
// Generate sprite vertices for current textures.
do {
sprite = mSprites[currentSprite];
if (sprite->mTexture == currentTexture) {
Sprite::Vertex* vertices =
(&mVertices[currentSprite * 4]);
sprite->draw(vertices, timeStep);
} else {
break;
}
} while (canDraw = (++currentSprite < spriteCount));
...
23. Each me the texture changes, render the bunch of sprites with glDrawElements().
The vertex buer specied earlier is combined with the index buer given here to
render the right sprites with the right texture. At this point, draw calls are sent to
OpenGL, which executes the shader program:
...
glDrawElements(GL_TRIANGLES,
// Number of indexes
(currentSprite - firstSprite) * indexPerSprite,
GL_UNSIGNED_SHORT, // Indexes data type

Rendering Graphics with OpenGL ES
[ 264 ]
// First index
&mIndexes[firstSprite * indexPerSprite]);
firstSprite = currentSprite;
}
...
When all sprites are rendered, restore the OpenGL state:
...
glUseProgram(0);
glDisableVertexAttribArray(aPosition);
glDisableVertexAttribArray(aTexture);
glDisable(GL_BLEND);
}
24. Update jni/Ship.hpp with the new sprite system. You can remove the previous
GraphicsElement stu:
#include "GraphicsManager.hpp"
#include "Sprite.hpp"
class Ship {
public:
...
void registerShip(Sprite* pGraphics);
...
private:
GraphicsManager& mGraphicsManager;
Sprite* mGraphics;
};
#endif
The le jni/Ship.cpp does not change much apart from the Sprite type:
...
void Ship::registerShip(Sprite* pGraphics) {
mGraphics = pGraphics;
}
...
Include the new SpriteBatch component in jni/DroidBlaster.hpp:
...
#include "Resource.hpp"
#include "Ship.hpp"
#include "SpriteBatch.hpp"

Chapter 6
[ 265 ]
#include "TimeManager.hpp"
#include "Types.hpp"
class DroidBlaster : public ActivityHandler {
...
private:
...
Asteroid mAsteroids;
Ship mShip;
SpriteBatch mSpriteBatch;
};
#endif
25. In jni/DroidBlaster.cpp, dene some new constants with animaon properes.
Then, use the SpriteBatch component to register the ship and asteroids graphics.
Remove the previous stu related to GraphicsElement again:
...
static const int32_t SHIP_SIZE = 64;
static const int32_t SHIP_FRAME_1 = 0;
static const int32_t SHIP_FRAME_COUNT = 8;
static const float SHIP_ANIM_SPEED = 8.0f;
static const int32_t ASTEROID_COUNT = 16;
static const int32_t ASTEROID_SIZE = 64;
static const int32_t ASTEROID_FRAME_1 = 0;
static const int32_t ASTEROID_FRAME_COUNT = 16;
static const float ASTEROID_MIN_ANIM_SPEED = 8.0f;
static const float ASTEROID_ANIM_SPEED_RANGE = 16.0f;
DroidBlaster::DroidBlaster(android_app* pApplication):
...
mAsteroids(pApplication, mTimeManager, mGraphicsManager,
mPhysicsManager),
mShip(pApplication, mGraphicsManager),
mSpriteBatch(mTimeManager, mGraphicsManager) {
Log::info("Creating DroidBlaster");
Sprite* shipGraphics = mSpriteBatch.registerSprite(mShipTexture,
SHIP_SIZE, SHIP_SIZE);
shipGraphics->setAnimation(SHIP_FRAME_1, SHIP_FRAME_COUNT,
SHIP_ANIM_SPEED, true);

Rendering Graphics with OpenGL ES
[ 266 ]
mShip.registerShip(shipGraphics);
// Creates asteroids.
for (int32_t i = 0; i < ASTEROID_COUNT; ++i) {
Sprite* asteroidGraphics = mSpriteBatch.registerSprite(
mAsteroidTexture, ASTEROID_SIZE,
ASTEROID_SIZE);
float animSpeed = ASTEROID_MIN_ANIM_SPEED
+ RAND(ASTEROID_ANIM_SPEED_RANGE);
asteroidGraphics->setAnimation(ASTEROID_FRAME_1,
ASTEROID_FRAME_COUNT, animSpeed, true);
mAsteroids.registerAsteroid(
asteroidGraphics->location, ASTEROID_SIZE,
ASTEROID_SIZE);
}
}
...
26. We do not need to load textures manually in onActivate() anymore. Sprites will
handle this for us.
Finally, release the graphic resources in onDeactivate():
...
status DroidBlaster::onActivate() {
Log::info("Activating DroidBlaster");
if (mGraphicsManager.start() != STATUS_OK) return STATUS_KO;
// Initializes game objects.
mAsteroids.initialize();
mShip.initialize();
mTimeManager.reset();
return STATUS_OK;
}
void DroidBlaster::onDeactivate() {
Log::info("Deactivating DroidBlaster");
mGraphicsManager.stop();
}
...
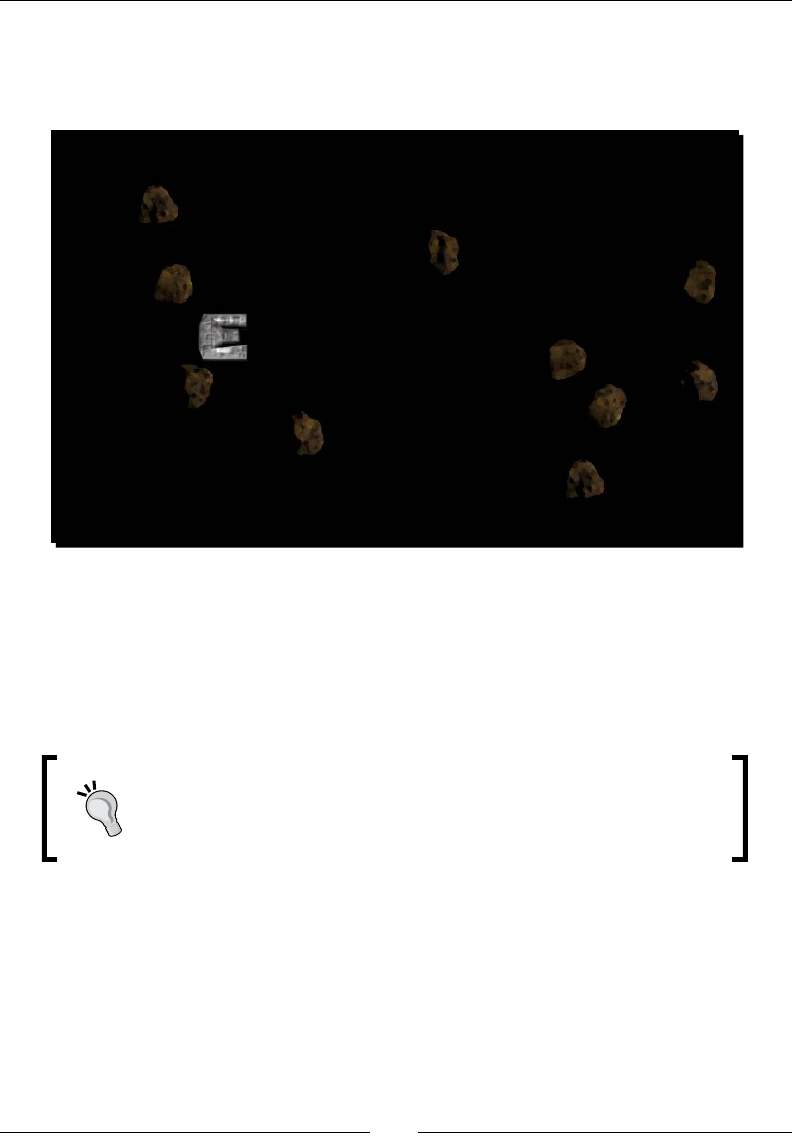
Chapter 6
[ 267 ]
What just happened?
Launch DroidBlaster. You should now see an animated ship surrounded by frightening
rotang asteroids:
In this part, we have seen how to draw a sprite eciently with the help of the Sprite Batch
technique. Indeed, a common cause of bad performance in OpenGL programs lies in state
changes. Changing the OpenGL device state (for example, binding a new buer or texture,
changing an opon with glEnable(), and so on) is a costly operaon and should be
avoided as much as possible. Thus, a good pracce to maximize OpenGL performance is to
order draw calls and change only the needed states.
One of the best OpenGL ES documentaon is available from the Apple
developer site at https://developer.apple.com/library/
IOS/documentation/3DDrawing/Conceptual/OpenGLES_
ProgrammingGuide/.
But rst, let's see more about the way OpenGL stores verces in memory and the basics of
OpenGL ES shaders.

Rendering Graphics with OpenGL ES
[ 268 ]
Vertex Arrays versus Vertex Buffer Object
Vertex Arrays (VA) and Vertex Buer Objects (VBO) are the two main ways to manage
verces in OpenGL ES. Like with textures, mulple VAs/VBOs can be bound simultaneously
to one vertex shader.
There are two main ways to manage verces in OpenGL ES:
In main memory (that is, in RAM), we talk about Vertex Arrays (abbreviated VA).
Vertex arrays are transmied from the CPU to the GPU for each draw call. As a
consequence, they are slower to render, but also much easier to update. Thus, they
are appropriate when a mesh of verces is changing frequently. This explains the
decision to use a vertex array to implement sprite batches; each sprite is updated
each me a new frame is rendered (posion, as well as texture coordinates, to
switch to a new frame).
In driver memory (generally in GPU memory or VRAM), we talk about Vertex Buers
Objects. Vertex buers are faster to draw but more expensive to update. Thus, they
are oen used to render stac data that never changes. You can sll transform it
with vertex shaders, which we are going to see in the next part. Note that some
hints can be provided to the driver during inializaon (GL_DYNAMIC_DRAW) to
allow fast updates but at the price of more complex buer management (that is,
mulple buering).
Aer transformaon, the verces are connected together during the primive assembly
stage. They can be assembled in the following ways:
As lists 3 by 3 (which can lead to vertex duplicaon), in fans, in strips, and so on; in
which case, we use glDrawArrays().
Using an index buers which species 3 by 3, where verces are connected together.
Index buers are oen the best way to achieve beer performance. Indices need to
be sorted to favor caching. Indices are drawn with their associated VBO or VA using
glDrawElements().
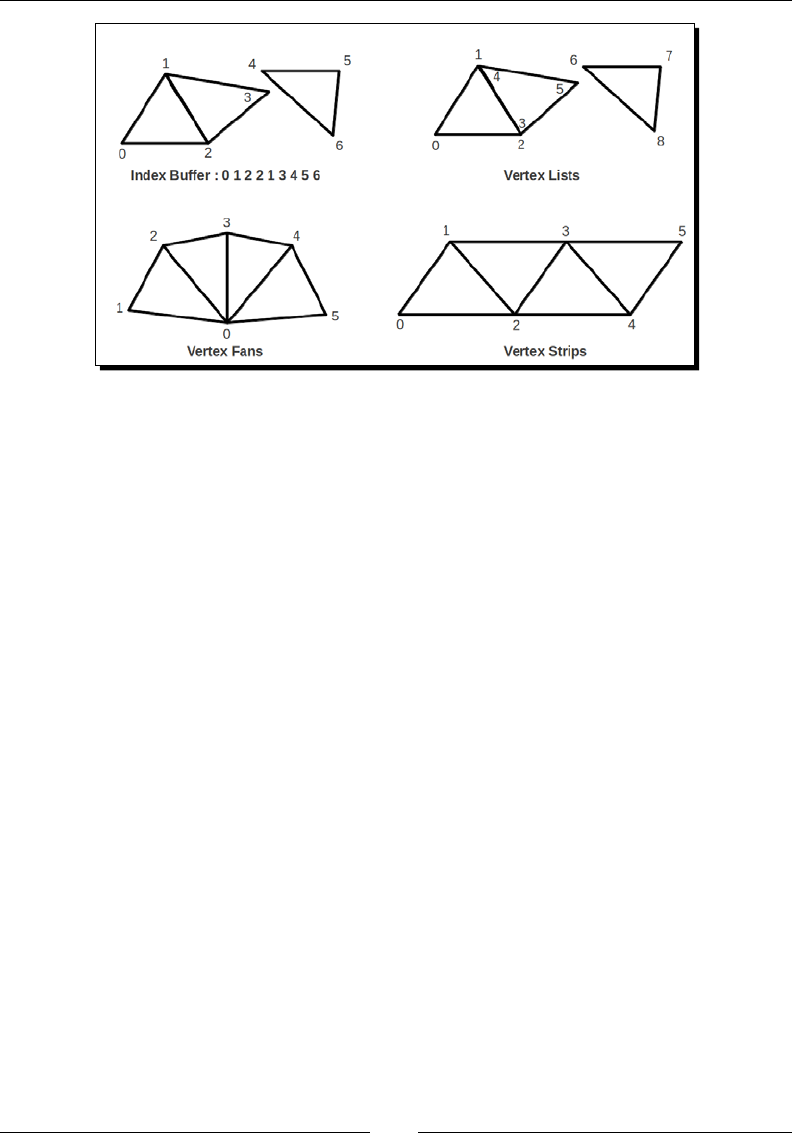
Chapter 6
[ 269 ]
Some good pracces to remember when you're dealing with verces are:
Pack as many verces in each buer as you can, even from mulple meshes. Indeed,
switching from one set of verces to another, either a VA or a VBO, is slow.
Avoid updang stac vertex buers at runme.
Make vertex structure the size of a power of 2 (in bytes) to favor data alignment. It
is oen preferred to pad data rather than to transmit unaligned data because of the
way GPU processes it.
For more informaon about vertex management, have a look at the OpenGL.org wiki at
http://www.opengl.org/wiki/Vertex_Specification and http://www.opengl.
org/wiki/Vertex_Specification_Best_Practices.
Rendering particle effects
DroidBlaster needs a background to make it more pleasant-looking. As the acon is located
in space, what about a falling star to give an impression of speed?
Such an eect can be simulated in several ways. One possible choice consists of showing a
parcle eect, where each parcle corresponds to a star. OpenGL provides such a feature
through Point Sprites. A point sprite is a special kind of element that requires only one
vertex to draw a sprite. Combined with a whole vertex buer, many sprites can be drawn at
the same me eciently.

Rendering Graphics with OpenGL ES
[ 270 ]
Point sprites are usable with vertex and fragment shaders. To be even more ecient, we can
use their power to process parcle movement directly inside the shaders. Thus, we will not
need to regenerate the vertex buer each me a parcle changes, like we have to do with
sprite batches.
The resulng project is provided with this book under the name
DroidBlaster_Part8.
Time for action – rendering a star eld
Let's now see how to apply this parcle eect in DroidBlaster:
1. In jni/GraphicsManager.hpp, dene a new method to load a vertex buer.
Add an array to store vertex buer resources:
...
class GraphicsManager {
public:
...
GLuint loadShader(const char* pVertexShader,
const char* pFragmentShader);
GLuint loadVertexBuffer(const void* pVertexBuffer,
int32_t pVertexBufferSize);
private:
...
GLuint mShaders[32]; int32_t mShaderCount;
GLuint mVertexBuffers[32]; int32_t mVertexBufferCount;
GraphicsComponent* mComponents[32]; int32_t
mComponentCount;
};
#endif
2. In jni/GraphicsManager.cpp, update the constructor inializaon list and free
vertex buer resources in stop():
...
GraphicsManager::GraphicsManager(android_app* pApplication) :
...
mTextures(), mTextureCount(0),
mShaders(), mShaderCount(0),
mVertexBuffers(), mVertexBufferCount(0),

Chapter 6
[ 271 ]
mComponents(), mComponentCount(0) {
Log::info("Creating GraphicsManager.");
}
...
void GraphicsManager::stop() {
Log::info("Stopping GraphicsManager.");
...
for (int32_t i = 0; i < mVertexBufferCount; ++i) {
glDeleteBuffers(1, &mVertexBuffers[i]);
}
mVertexBufferCount = 0;
// Destroys OpenGL context.
...
}
...
3. Create the new method loadVertexBuffer() to upload the data from the given
memory locaon into an OpenGL vertex buer. As opposed to the SpriteBatch
example, which uses a dynamic vertex buer in computer memory, the following
vertex buer is stac and located in GPU memory. This makes it faster but quite
inexible too. To do so:
Generate a buffer identifier with glGenBuffers().
Indicate that we are working on a vertex buffer with glBindBuffer().
Push the vertex data from the given memory location into OpenGL vertex
buffer with glBufferData().
Unbind the vertex buffer to put OpenGL back in its previous state. This is
not strictly necessary, like for textures, but it helps avoiding configuration
mistakes in future draw calls.
You can check that the vertex buffer has been created properly
with glGetError():
...
GLuint GraphicsManager::loadVertexBuffer(const void* pVertexBuffer,
int32_t pVertexBufferSize) {
GLuint vertexBuffer;
// Upload specified memory buffer into OpenGL.
glGenBuffers(1, &vertexBuffer);
glBindBuffer(GL_ARRAY_BUFFER, vertexBuffer);

Rendering Graphics with OpenGL ES
[ 272 ]
glBufferData(GL_ARRAY_BUFFER, pVertexBufferSize, pVertexBuffer,
GL_STATIC_DRAW);
// Unbinds the buffer.
glBindBuffer(GL_ARRAY_BUFFER, 0);
if (glGetError() != GL_NO_ERROR) goto ERROR;
mVertexBuffers[mVertexBufferCount++] = vertexBuffer;
return vertexBuffer;
ERROR:
Log::error("Error loading vertex buffer.");
if (vertexBuffer > 0) glDeleteBuffers(1, &vertexBuffer);
return 0;
}
...
4. Dene the new StarField component in jni/StarField.hpp.
Override the GraphicsComponent methods, as done previously.
Dene a specic Vertex structure with 3 coordinates x, y, and z.
A star eld is characterized by the number of stars in mStarCount and a texture
that represents a single one in mTextureResource.
We will need some OpenGL resources: a vertex buer, a texture, and a shader
program with its variables:
aPosition, which is the star position.
uProjection, which is the orthographic projection matrix.
uTime, which is the total elapsed time given by TimeManager. This is
necessary to simulate the movement of stars.
uHeight, which is the height of the display. The stars are going to be
recycled when they reach the screen boundaries.
uTexture, which contains the star picture.
#ifndef _PACKT_STARFIELD_HPP_
#define _PACKT_STARFIELD_HPP_
#include "GraphicsManager.hpp"
#include "TimeManager.hpp"
#include "Types.hpp"
#include <GLES2/gl2.h>
class StarField : public GraphicsComponent {

Chapter 6
[ 273 ]
public:
StarField(android_app* pApplication, TimeManager& pTimeManager,
GraphicsManager& pGraphicsManager, int32_t pStarCount,
Resource& pTextureResource);
status load();
void draw();
private:
struct Vertex {
GLfloat x, y, z;
};
TimeManager& mTimeManager;
GraphicsManager& mGraphicsManager;
int32_t mStarCount;
Resource& mTextureResource;
GLuint mVertexBuffer; GLuint mTexture; GLuint mShaderProgram;
GLuint aPosition; GLuint uProjection;
GLuint uTime; GLuint uHeight; GLuint uTexture;
};
#endif
5. Create jni/StarField.cpp and implement its constructor:
#include "Log.hpp"
#include "StarField.hpp"
StarField::StarField(android_app* pApplication,
TimeManager& pTimeManager, GraphicsManager& pGraphicsManager,
int32_t pStarCount, Resource& pTextureResource):
mTimeManager(pTimeManager),
mGraphicsManager(pGraphicsManager),
mStarCount(pStarCount),
mTextureResource(pTextureResource),
mVertexBuffer(0), mTexture(-1), mShaderProgram(0),
aPosition(-1),
uProjection(-1), uHeight(-1), uTime(-1), uTexture(-1) {
mGraphicsManager.registerComponent(this);
}
...

Rendering Graphics with OpenGL ES
[ 274 ]
6. The star eld logic is mostly implemented in the vertex shader. Each star,
represented by a single vertex, is moved from top to boom according to me,
speed (which is constant), and star distance. The farther it is (distance being
determined by the z vertex component), the slower it scrolls.
The GLSL funcon mod, which stands for modulo, resets the star posion when it has
reached the boom of the screen. The nal star posion is saved in the predened
variable gl_Position.
The star size on screen is also a funcon of its distance. The size is saved in the
predened variable gl_PointSize in pixel units:
...
static const char* VERTEX_SHADER =
"attribute vec4 aPosition;\n"
"uniform mat4 uProjection;\n"
"uniform float uHeight;\n"
"uniform float uTime;\n"
"void main() {\n"
" const float speed = -800.0;\n"
" const float size = 8.0;\n"
" vec4 position = aPosition;\n"
" position.x = aPosition.x;\n"
" position.y = mod(aPosition.y + (uTime * speed * aPosition.z),"
" uHeight);\n"
" position.z = 0.0;\n"
" gl_Position = uProjection * position;\n"
" gl_PointSize = aPosition.z * size;"
"}";
...
The fragment shader is much simpler and only draws the star texture onscreen:
...
static const char* FRAGMENT_SHADER =
"precision mediump float;\n"
"uniform sampler2D uTexture;\n"
"void main() {\n"
" gl_FragColor = texture2D(uTexture, gl_PointCoord);\n"
"}";
...

Chapter 6
[ 275 ]
7. In the load() funcon, generate the vertex buer with the help of the
loadVertexBuffer() method implemented in GraphicsManager. Each star
is represented by a single vertex. The posion on screen and depth are generated
randomly. Depth is determined on a [0.0, 1.0] scale. Once this is done, release the
temporary memory buer holding the star eld data:
...
status StarField::load() {
Log::info("Loading star field.");
TextureProperties* textureProperties;
// Allocates a temporary buffer and populate it with point data:
// 1 vertices composed of 3 floats (X/Y/Z) per point.
Vertex* vertexBuffer = new Vertex[mStarCount];
for (int32_t i = 0; i < mStarCount; ++i) {
vertexBuffer[i].x = RAND(mGraphicsManager.getRenderWidth());
vertexBuffer[i].y = RAND(mGraphicsManager.getRenderHeight());
vertexBuffer[i].z = RAND(1.0f);
}
// Loads the vertex buffer into OpenGL.
mVertexBuffer = mGraphicsManager.loadVertexBuffer(
(uint8_t*) vertexBuffer, mStarCount * sizeof(Vertex));
delete[] vertexBuffer;
if (mVertexBuffer == 0) goto ERROR;
...
8. Then, load the star texture and generate the program from the shaders dened
above. Retrieve their aribute and uniform ideners:
...
// Loads the texture.
textureProperties =
mGraphicsManager.loadTexture(mTextureResource);
if (textureProperties == NULL) goto ERROR;
mTexture = textureProperties->texture;
// Creates and retrieves shader attributes and uniforms.
mShaderProgram = mGraphicsManager.loadShader(VERTEX_SHADER,
FRAGMENT_SHADER);
if (mShaderProgram == 0) goto ERROR;
aPosition = glGetAttribLocation(mShaderProgram, "aPosition");
uProjection = glGetUniformLocation(mShaderProgram,"uProjection");
uHeight = glGetUniformLocation(mShaderProgram, "uHeight");

Rendering Graphics with OpenGL ES
[ 276 ]
uTime = glGetUniformLocation(mShaderProgram, "uTime");
uTexture = glGetUniformLocation(mShaderProgram, "uTexture");
return STATUS_OK;
ERROR:
Log::error("Error loading starfield");
return STATUS_KO;
}
...
9. Finally, render the star eld by sending the stac vertex buer, the texture, and the
shader program together in one draw call. To do so:
Disable blending, that is, the management of transparency. Indeed, the star
"particles" are small, sparse, and drawn over a black background.
Select the vertex buffer first with glBindBuffer(). This call is necessary
when a static vertex buffer has been generated at load time.
Indicate how vertex data is structured with glVertexAttribPointer(),
and to which shader attributes it relates with
glEnableVertexAttribArray(). Note that the last parameter of
glVertexAttribPointer() is not a pointer to a buffer this time but an
index within the vertex buffer. Indeed, the vertex buffer is static, and in GPU
memory, so we do not know its address.
Select the texture to draw with glActiveTexture() and
glBindTexture().
Select the shader program with glUseProgram().
Bind the program parameters with glUniform function variants.
Finally, send the draw call to OpenGL with glDrawArrays().
You can then restore the OpenGL pipeline state:
...
void StarField::draw() {
glDisable(GL_BLEND);
// Selects the vertex buffer and indicates how data is stored.
glBindBuffer(GL_ARRAY_BUFFER, mVertexBuffer);
glEnableVertexAttribArray(aPosition);
glVertexAttribPointer(aPosition, // Attribute Index
3, // Number of components

Chapter 6
[ 277 ]
GL_FLOAT, // Data type
GL_FALSE, // Normalized
3 * sizeof(GLfloat), // Stride
(GLvoid*) 0); // First vertex
// Selects the texture.
glActiveTexture(GL_TEXTURE0);
glBindTexture(GL_TEXTURE_2D, mTexture);
// Selects the shader and passes parameters.
glUseProgram(mShaderProgram);
glUniformMatrix4fv(uProjection, 1, GL_FALSE,
mGraphicsManager.getProjectionMatrix());
glUniform1f(uHeight, mGraphicsManager.getRenderHeight());
glUniform1f(uTime, mTimeManager.elapsedTotal());
glUniform1i(uTexture, 0);
// Renders the star field.
glDrawArrays(GL_POINTS, 0, mStarCount);
// Restores device state.
glBindBuffer(GL_ARRAY_BUFFER, 0);
glUseProgram(0);
}
10. In jni/DroidBlaster.hpp, dene the new StarField component along with a
new texture resource:
...
#include "Ship.hpp"
#include "SpriteBatch.hpp"
#include "StarField.hpp"
#include "TimeManager.hpp"
#include "Types.hpp"
class DroidBlaster : public ActivityHandler {
...
private:
...
Resource mAsteroidTexture;
Resource mShipTexture;
Resource mStarTexture;
Asteroid mAsteroids;

Rendering Graphics with OpenGL ES
[ 278 ]
Ship mShip;
StarField mStarField;
SpriteBatch mSpriteBatch;
};
#endif
11. Instanate it in the jni/DroidBlaster.cpp constructor with 50 stars:
...
static const int32_t STAR_COUNT = 50;
DroidBlaster::DroidBlaster(android_app* pApplication):
mTimeManager(),
mGraphicsManager(pApplication),
mPhysicsManager(mTimeManager, mGraphicsManager),
mEventLoop(pApplication, *this),
mAsteroidTexture(pApplication, "droidblaster/asteroid.png"),
mShipTexture(pApplication, "droidblaster/ship.png"),
mStarTexture(pApplication, "droidblaster/star.png"),
mAsteroids(pApplication, mTimeManager, mGraphicsManager,
mPhysicsManager),
mShip(pApplication, mGraphicsManager),
mStarField(pApplication, mTimeManager, mGraphicsManager,
STAR_COUNT, mStarTexture),
mSpriteBatch(mTimeManager, mGraphicsManager) {
Log::info("Creating DroidBlaster");
...
}
Before running DroidBlaster, add droidblaster/star.png into the assets directory.
These les are provided with this book in the DroidBlaster_Part8/assets directory.
What just happened?
Run DroidBlaster. The star eld should look as shown in the following screenshot, when
scrolling through the screen at a random pace:
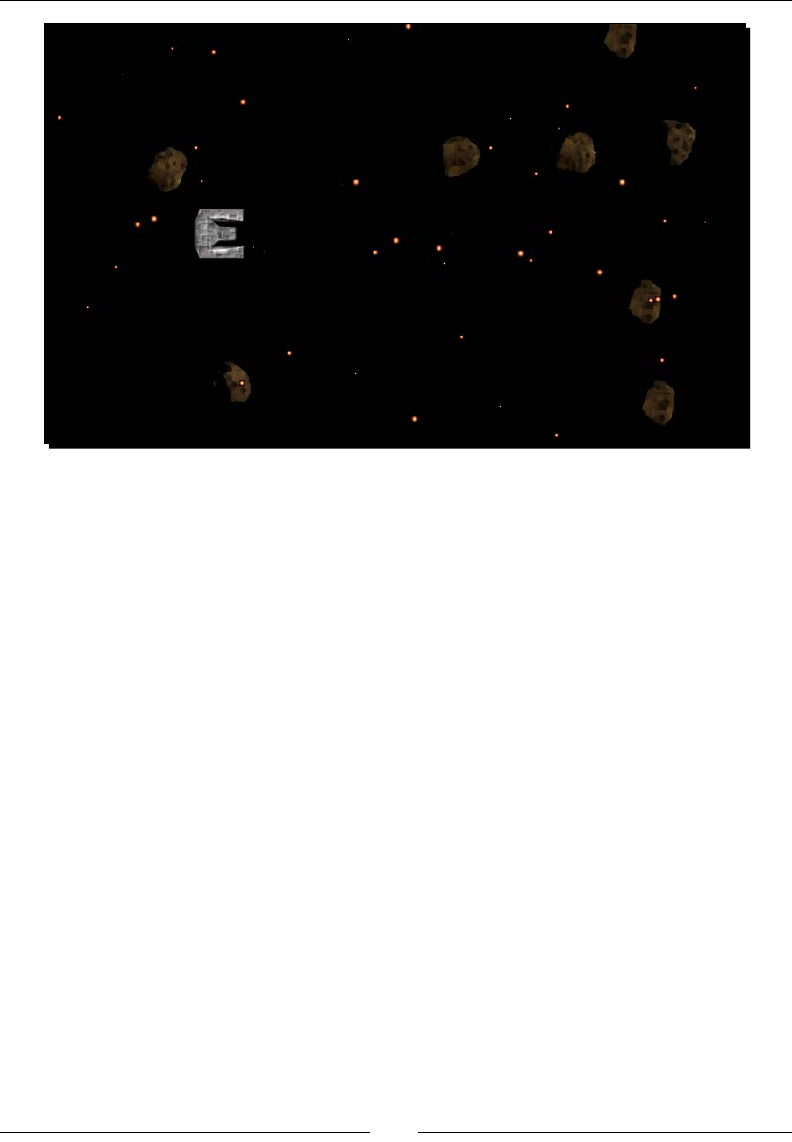
Chapter 6
[ 279 ]
All of these stars are rendered as point sprites, where each point represents a quad
determined by:
A posion on screen: The posion represents the center of the point sprite
A point size: The size denes implicitly the point sprite quad
Point sprites are an interesng way to create parcle eects, but, they have a few
drawbacks, which are:
Their possible size is more or less limited depending on the hardware capabilies.
You can nd the maximum size by querying GL_ALIASED_POINT_SIZE_RANGE
with glGetFloatv(); look at the following example for this:
float pointSizeRange[2];
glGetFloatv(GL_ALIASED_POINT_SIZE_RANGE, pointSizeRange);
If you draw bigger point sprites, you will noce that the parcles are clipped (that is,
masked) at their center and the whole sprite boundaries don't get out of screen.
Thus, depending on your needs, it might be more appropriate to use classic verces.
Rendering Graphics with OpenGL ES
[ 280 ]
Talking about verces, you may have noced that we have not created a vertex array but
a vertex buer object. Indeed, point sprites are evaluated completely in the vertex shader.
This opmizaon allows us to use a stac geometry (glBufferData() with the hint
GL_STATIC_DRAW) which can be managed eciently by the driver. Note that vertex buer
objects can also be marked as being subject to updates using the hint GL_DYNAMIC_DRAW
(which means buer will change frequently) or GL_STREAM_DRAW (which means buer will
be used once and thrown). The process of creang a VBO is similar to the process of creang
any other kind of object in OpenGL, and involves generang a new idener, selecng it, and
nally uploading data in driver memory. If you understand this process, you understand the
way OpenGL works.
Programming shaders with GLSL
Shaders are wrien in GLSL, a (relavely) high-level programming language which allows
dening funcons (with in, out, and inout parameters), condionals, loops, variables, arrays,
structures, arithmec operators, and so on. It abstracts as much as possible hardware
specicies. GLSL allows the following kind of variables to be used:
attributes These contain per-vertex data, such as vertex position or texture coordinates. Only
one vertex is processed each time the shader executes.
const It represents compile-time constants or read-only function parameters.
uniforms These are a kind of global parameter that can be changed per primitive (that is,
per draw call). It has the same value for a whole mesh. An example of this could be
a model-view matrix (for a vertex shader) or a texture (for a fragment shader).
varying These are per-pixel interpolated values computed according to the vertex shader
output. They are an output parameter in vertex shaders and an input parameter
in fragment shaders. In OpenGL ES 3, the "varying" parameters have a new syntax:
out in a vertex shader and in in a pixel shader.
The main types of parameters allowed to declare such variables are shown in the
following table:
void This is for function result only.
bool This is a boolean value.
float This is a floating point value.
int This is a signed integer value.
vec2, vec3, vec4 This is a floating point vector. Vectors exist for other types such as bvec
for booleans or ivec for signed integer.
mat2, mat3, mat4 These are 2x2, 3x3, and 4x4 floating point matrices.
sampler2D This gives access to 2D texture texels.
Chapter 6
[ 281 ]
Note that the GLSL specicaon provides some predened variables, such as the ones shown
in the following table:
highp vec4 gl_Position Vertex shader Output This is the transformed vertex
position.
mediump float gl_PointSize Vertex shader Output This is the size of a point sprite
in pixels (more about this will be
discussed in the next part).
mediump vec4 gl_FragCoord Fragment shader Input These are the coordinates of the
fragment within framebuffer.
mediump vec4
gl_FragColor
Fragment shader Output This is the color to display for the
fragment.
Numerous funcons, mostly arithmec, are also provided, such as sin(), cos(),
tan(), radians(), degrees(), mod(), abs(), floor(), ceil(), dot(), cross(),
normalize(), texture2D(), and so on.
These are some of the best pracces to remember while dealing with shaders:
Do not compile or link shaders at runme.
Beware of dierent hardware that has dierent capabilies and, more specically, a
limited number of variables allowed.
Find a good trade-o between performance and accuracy while dening precision
speciers (for example, highp, medium, or lowp). Do not hesitate to redene them
to get consistent behavior. Note that a float precision specier should be dened
in the GLES fragment shaders.
Avoid condional branches as much as possible.
For more informaon, have a look at OpenGL.org wiki at http://www.opengl.org/wiki/
OpenGL_Shading_Language, http://www.opengl.org/wiki/Vertex_Shader and
http://www.opengl.org/wiki/Fragment_Shader.
Beware, as the content of these pages is applicable to OpenGL but not necessarily to GLES.
Rendering Graphics with OpenGL ES
[ 282 ]
Adapting graphics to various resolutions
A complex subject to handle while wring a game is the Android screen size fragmentaon.
Low-end phones have resoluons of a few hundred pixels, whereas some high-end devices
provide resoluons of more than two thousand.
There exist several ways to handle various screen sizes. We can adapt graphic resources, use
black bands around the screen, or apply and adapt responsive designs to games.
Another simple soluon consists of rendering the game scene o-screen with a xed size.
The o-screen framebuer is then copied onto the screen and scaled to an appropriate size.
This one size ts all technique does not provide the best quality and might be a bit slow on
low-end devices (especially if they have a lower resoluon than the o-screen framebuer).
However, it is quite simple to apply.
The resulng project is provided with this book under the name
DroidBlaster_Part9.
Time for action – adapting resolution with off-screen rendering
Let's render the game scene o-screen:
1. Change jni/GraphicsManager.hpp, followed by these steps:
Define new getter methods for the screen width and height with their
corresponding member variables
Create a new function initializeRenderBuffer(), which creates an
off-screen buffer to render the scene:
...
class GraphicsManager {
public:
...
int32_t getRenderWidth() { return mRenderWidth; }s
int32_t getRenderHeight() { return mRenderHeight; }
int32_t getScreenWidth() { return mScreenWidth; }
int32_t getScreenHeight() { return mScreenHeight; }
GLfloat* getProjectionMatrix() { return mProjectionMatrix[0]; }
...

Chapter 6
[ 283 ]
2. While sll being in the same le, follow these steps:
Declare a new RenderVertex structure with four components - x, y, u,
and v
Define the OpenGL resources necessary for the framebuffer, namely, the
texture, the vertex buffer, the shader program, and its variables:
...
private:
status initializeRenderBuffer();
struct RenderVertex {
GLfloat x, y, u, v;
};
android_app* mApplication;
int32_t mRenderWidth; int32_t mRenderHeight;
int32_t mScreenWidth; int32_t mScreenHeight;
EGLDisplay mDisplay; EGLSurface mSurface; EGLContext mContext;
GLfloat mProjectionMatrix[4][4];
...
// Rendering resources.
GLint mScreenFrameBuffer;
GLuint mRenderFrameBuffer; GLuint mRenderVertexBuffer;
GLuint mRenderTexture; GLuint mRenderShaderProgram;
GLuint aPosition; GLuint aTexture;
GLuint uProjection; GLuint uTexture;
};
#endif
3. Update the jni/GraphicsManager.cpp constructor inializaon list to inialize
default values:
#include "GraphicsManager.hpp"
#include "Log.hpp"
#include <png.h>
GraphicsManager::GraphicsManager(android_app* pApplication) :
...
mComponents(), mComponentCount(0),
mScreenFrameBuffer(0),
mRenderFrameBuffer(0), mRenderVertexBuffer(0),

Rendering Graphics with OpenGL ES
[ 284 ]
mRenderTexture(0), mRenderShaderProgram(0),
aPosition(0), aTexture(0),
uProjection(0), uTexture(0) {
Log::info("Creating GraphicsManager.");
}
...
4. Change start() method to save the display surface width and height respecvely
in mScreenWidth and mScreenHeight.
Then, call initializeRenderBuffer():
...
status GraphicsManager::start() {
...
Log::info("Initializing the display.");
mSurface = eglCreateWindowSurface(mDisplay, config,
mApplication->window, NULL);
if (mSurface == EGL_NO_SURFACE) goto ERROR;
mContext = eglCreateContext(mDisplay, config, NULL,
CONTEXT_ATTRIBS);
if (mContext == EGL_NO_CONTEXT) goto ERROR;
if (!eglMakeCurrent(mDisplay, mSurface, mSurface, mContext)
|| !eglQuerySurface(mDisplay, mSurface, EGL_WIDTH, &mScreenWidth)
|| !eglQuerySurface(mDisplay, mSurface, EGL_HEIGHT, &mScreenHeight)
|| (mScreenWidth <= 0) || (mScreenHeight <= 0)) goto ERROR;
// Defines and initializes offscreen surface.
if (initializeRenderBuffer() != STATUS_OK) goto ERROR;
glViewport(0, 0, mRenderWidth, mRenderHeight);
glDisable(GL_DEPTH_TEST);
...
}
...
5. Dene a vertex and fragment shader for o-screen rendering. This is similar to what
we have seen unl now:
...
static const char* VERTEX_SHADER =
"attribute vec2 aPosition;\n"
"attribute vec2 aTexture;\n"

Chapter 6
[ 285 ]
"varying vec2 vTexture;\n"
"void main() {\n"
" vTexture = aTexture;\n"
" gl_Position = vec4(aPosition, 1.0, 1.0 );\n"
"}";
static const char* FRAGMENT_SHADER =
"precision mediump float;"
"uniform sampler2D uTexture;\n"
"varying vec2 vTexture;\n"
"void main() {\n"
" gl_FragColor = texture2D(uTexture, vTexture);\n"
"}\n";
...
6. In initializeRenderBuffer(), create a predened array of a vertex that is
going to be loaded into OpenGL. It represents a single quad with a full texture
rendered on it.
Compute the new render height based on a xed target width of 600 pixels.
Retrieve the current screen framebuer from the locaon where the
nal scene is rendered using glGetIntegerv() and the special value
GL_FRAMEBUFFER_BINDING:
...
const int32_t DEFAULT_RENDER_WIDTH = 600;
status GraphicsManager::initializeRenderBuffer() {
Log::info("Loading offscreen buffer");
const RenderVertex vertices[] = {
{ -1.0f, -1.0f, 0.0f, 0.0f },
{ -1.0f, 1.0f, 0.0f, 1.0f },
{ 1.0f, -1.0f, 1.0f, 0.0f },
{ 1.0f, 1.0f, 1.0f, 1.0f }
};
float screenRatio = float(mScreenHeight) / float(mScreenWidth);
mRenderWidth = DEFAULT_RENDER_WIDTH;
mRenderHeight = float(mRenderWidth) * screenRatio;
glGetIntegerv(GL_FRAMEBUFFER_BINDING, &mScreenFrameBuffer);
...

Rendering Graphics with OpenGL ES
[ 286 ]
7. Create a texture for o-screen rendering, like we have seen previously. In
glTexImage2D(), pass a NULL value as the last parameter to create only the
surface without inializing its content:
...
glGenTextures(1, &mRenderTexture);
glBindTexture(GL_TEXTURE_2D, mRenderTexture);
glTexParameteri(GL_TEXTURE_2D, GL_TEXTURE_MAG_FILTER, GL_LINEAR);
glTexParameteri(GL_TEXTURE_2D, GL_TEXTURE_MIN_FILTER, GL_LINEAR);
glTexParameteri(GL_TEXTURE_2D, GL_TEXTURE_WRAP_S,
GL_CLAMP_TO_EDGE);
glTexParameteri(GL_TEXTURE_2D, GL_TEXTURE_WRAP_T,
GL_CLAMP_TO_EDGE);
glTexImage2D(GL_TEXTURE_2D, 0, GL_RGB, mRenderWidth,
mRenderHeight, 0, GL_RGB, GL_UNSIGNED_SHORT_5_6_5, NULL);
...
8. Then, create an o-screen framebuer with glGenFramebuffers().
Aach the previous texture to it with glBindFramebuffer().
Terminate by restoring the device state:
...
glGenFramebuffers(1, &mRenderFrameBuffer);
glBindFramebuffer(GL_FRAMEBUFFER, mRenderFrameBuffer);
glFramebufferTexture2D(GL_FRAMEBUFFER, GL_COLOR_ATTACHMENT0,
GL_TEXTURE_2D, mRenderTexture, 0);
glBindTexture(GL_TEXTURE_2D, 0);
glBindFramebuffer(GL_FRAMEBUFFER, 0);
...
9. Create the shader program used to render texture to screen and retrieve its
aributes and uniforms:
...
mRenderVertexBuffer = loadVertexBuffer(vertices,
sizeof(vertices));
if (mRenderVertexBuffer == 0) goto ERROR;
mRenderShaderProgram = loadShader(VERTEX_SHADER, FRAGMENT_SHADER);
if (mRenderShaderProgram == 0) goto ERROR;
aPosition = glGetAttribLocation(mRenderShaderProgram,"aPosition");
aTexture = glGetAttribLocation(mRenderShaderProgram, "aTexture");

Chapter 6
[ 287 ]
uTexture = glGetUniformLocation(mRenderShaderProgram,"uTexture");
return STATUS_OK;
ERROR:
Log::error("Error while loading offscreen buffer");
return STATUS_KO;
}
...
10. Do not forget to release allocated resources in stop() when the acvity nishes:
...
void GraphicsManager::stop() {
...
if (mRenderFrameBuffer != 0) {
glDeleteFramebuffers(1, &mRenderFrameBuffer);
mRenderFrameBuffer = 0;
}
if (mRenderTexture != 0) {
glDeleteTextures(1, &mRenderTexture);
mRenderTexture = 0;
}
// Destroys OpenGL context.
...
}
...
11. Finally, use the new o-screen framebuer to render the scene. To do so, you need to:
Select the framebuer with glBindFramebuffer().
Specify the rendering viewport, which has to match the o-screen framebuer
dimensions, as shown here:
...
status GraphicsManager::update() {
glBindFramebuffer(GL_FRAMEBUFFER, mRenderFrameBuffer);
glViewport(0, 0, mRenderWidth, mRenderHeight);
glClear(GL_COLOR_BUFFER_BIT);
// Render graphic components.
for (int32_t i = 0; i < mComponentCount; ++i) {
mComponents[i]->draw();
}
...

Rendering Graphics with OpenGL ES
[ 288 ]
12. Once it's rendered, restore the normal screen framebuer and the correct
viewport dimensions.
Then, select as a source the following parameters:
The off-screen texture which is attached to the off-screen framebuffer
The shader program, which does basically nothing apart from projecting
vertices and scaling texture, on the screen framebuffer
The vertex buffer, which contains a single quad with texture coordinates, as
shown in the following code:
...
glBindFramebuffer(GL_FRAMEBUFFER, mScreenFrameBuffer);
glClear(GL_COLOR_BUFFER_BIT);
glViewport(0, 0, mScreenWidth, mScreenHeight);
glActiveTexture(GL_TEXTURE0);
glBindTexture(GL_TEXTURE_2D, mRenderTexture);
glUseProgram(mRenderShaderProgram);
glUniform1i(uTexture, 0);
// Indicates to OpenGL how position and uv coordinates are stored.
glBindBuffer(GL_ARRAY_BUFFER, mRenderVertexBuffer);
glEnableVertexAttribArray(aPosition);
glVertexAttribPointer(aPosition, // Attribute Index
2, // Number of components (x and y)
GL_FLOAT, // Data type
GL_FALSE, // Normalized
sizeof(RenderVertex), // Stride
(GLvoid*) 0); // Offset
glEnableVertexAttribArray(aTexture);
glVertexAttribPointer(aTexture, // Attribute Index
2, // Number of components (u and v)
GL_FLOAT, // Data type
GL_FALSE, // Normalized
sizeof(RenderVertex), // Stride
(GLvoid*) (sizeof(GLfloat) * 2)); // Offset
...
13. Terminate by rendering the o-screen buer into the screen.
You can then restore the device state again, like this:
...
glDrawArrays(GL_TRIANGLE_STRIP, 0, 4);

Chapter 6
[ 289 ]
glBindBuffer(GL_ARRAY_BUFFER, 0);
// Shows the result to the user.
if (eglSwapBuffers(mDisplay, mSurface) != EGL_TRUE) {
...
}
...
What just happened?
Launch the applicaon on several devices. Every device should display a proporonally
similar scene. Indeed, graphics are now rendered to an o-screen framebuer aached to
a texture. The result is then scaled according to the target screen resoluon to provide the
same experience across dierent devices. This simple and cheap soluon comes with a price,
which is that the low-end devices might suer depending on the chosen xed resoluon,
whereas high-end devices will look blurry.
Handling various screen resoluons is one thing. Managing their various aspect
raos is another. Several soluons exist for this problem, such as using black
stripes, stretching the screen, or dening a minimum and maximum displayable
area with only the rst one containing important informaon.
More generally, the rendering of a scene o-screen is oen referred to as Render to Texture.
This technique is commonly used to implement shadows, reecon, or postprocessing
eects. Mastering this technique is a key in implemenng high quality games.
Summary
OpenGL, and graphics in general, is a complex and highly technical API. One book is not
enough to cover it enrely, but drawing 2D graphics with textures and buer objects opens
the door to much more advanced stu!
In more detail, you have learned how to inialize an OpenGL ES context and bind it to an
Android window. Then, you have seen how to turn libpng into a module and load a texture
from a PNG asset. We have used this texture and then combined it with vertex buers and
shaders to render sprites and parcles. Finally, we have found a soluon to the Android
resoluon fragmentaon issue with a simple o-screen and scaling rendering technique.

Rendering Graphics with OpenGL ES
[ 290 ]
OpenGL ES is a complex API that requires an in-depth understanding to get the best
performance and quality. This is even true with OpenGL ES 3, which we have not covered
here, that is available since Android KitKat. Do not hesitate to have a look at:
The Openg ES and GLSL specicaon at http://www.khronos.org/registry/
gles/
The Android Developer website at http://developer.android.com/guide/
topics/graphics/opengl.html
With the knowledge acquired here, the road to OpenGL ES 2 or 3 is at a perfectly walkable
distance! So now, let's discover how to reach the fourth dimension, the musical one, with
OpenSL ES in our next chapter.

[ 291 ]
7
Playing Sound with OpenSL ES
Multimedia is not only about graphics, it is also about sound and music.
Applications in this domain are among the most popular in the Android
market. Indeed, music has always been a strong engine for mobile device
sales and music lovers are a target of choice. This is why an OS like Android
could probably not go far without some musical talent! Open Sound Library
for Embedded Systems, more frequently called OpenSL ES, is the pendant of
OpenGL for sound. Although rather low-levewl, it is a first-class API for all
sound-related tasks, either input or output.
When talking about sound on Android, we should disnguish Java from the nave world.
Indeed, both sides feature completely dierent APIs: MediaPlayer, SoundPool, AudioTrack,
and JetPlayer on one hand, and OpenSL ES on the other hand:
MediaPlayer is more high level and easy to use. It handles not only music but also
video. It is the way to go when a simple le playback is sucient.
SoundPool and AudioTrack are more low level and closer to low latency when
playing sound. AudioTrack is the most exible but also complex to use. It allows
sound buer modicaons on the y (by hand!).
JetPlayer is more dedicated to the playback of MIDI les. This API can be interesng
for dynamic musing synthesis in a mulmedia applicaon or game (see the JetBoy
example provided with Android SDK).
OpenSL ES aims at oering a cross-plaorm API to manage audio on embedded
systems; in other words, the OpenGL ES for audio. Like GLES, its specicaon is led
by the Khronos group. On Android, OpenSL ES is in fact implemented on top of the
AudioTrack API.
Playing Sound with OpenSL ES
[ 292 ]
OpenSL ES was rst released on Android 2.3 Gingerbread and was not available in previous
releases (Android 2.2 and lower). While there is a profusion of APIs in Java, OpenSL ES is the
only one provided on the nave side and is exclusively available on it.
However, OpenSL ES is sll immature. The OpenSL specicaon is sll incompletely
supported and several limitaons shall be expected. In addion, the OpenSL specicaon
is implemented in its version 1.0.1 on Android, although version 1.1 is already out. Thus,
some breaking changes can be expected in the future since the OpenSL ES implementaon
is sll evolving.
3D Audio features are available through OpenSL ES only for devices whose system is
compiled with the appropriate prole. Indeed, the current OpenSL ES specicaon provides
three dierent proles, Game, Music, and Phone for dierent types of devices. At the me
this book is wrien, none of these proles are supported.
However, OpenSL ES has qualies. First, it may be easier to integrate in the architecture of
a nave applicaon, since it is itself wrien in C/C++. It does not have to carry a garbage
collector on its back. Nave code is not interpreted and can be opmized in-depth through
assembly code. These are some of the many reasons to consider it.
This chapter is an introducon to the musical capabilies of OpenSL ES on the Android NDK.
We are about to discover how to do the following:
Inialize OpenSL ES on Android
Play background music
Play sounds with a sound buer queue
Record sounds and play them
Audio and, more specically, real-me audio is a highly technical subject. This chapter covers
the basics to embed sound and music in your own applicaons.
Initializing OpenSL ES
OpenSL will not be very useful if we do not inialize it rst. As usual, this step requires some
boilerplate code. The verbosity of OpenSL does not improve the situaon. Let's start this
chapter by creang a new SoundManager to wrap OpenSL ES-related logic.
The resulng project is provided with this book under the name
DroidBlaster_Part10.

Chapter 7
[ 293 ]
Time for action – creating OpenSL ES engine and output
Let's create a new manager dedicated to sounds:
1. Create a new le jni/SoundManager.hpp.
First, include the OpenSL ES standard header SLES/OpenSLES.h. The two laer
dene objects and methods and are specically created for Android. Then, create
the SoundManager class to do the following:
Initialize OpenSL ES with the start() method
Stop the sound and release OpenSL ES with the stop() method
There are two main kinds of pseudo-object structures (that is, containing funcon
pointers applied on the structure itself, such as a C++ object with this) in OpenSL ES:
Objects: These are represented by SLObjectItf, which provides a few
common methods to get allocated resources and object interfaces. This
could be roughly compared to an object in Java.
Interfaces: These give access to object features. There can be several
interfaces for an object. Depending on the host device, some interfaces
may or may not be available. These are very roughly comparable to
interfaces in Java.
In SoundManager, declare two SLObjectItf instances, one for the OpenSL ES
engine and an other for the speakers. Engines are available through a SLEngineItf
interface:
#ifndef _PACKT_SoundManager_HPP_
#define _PACKT_SoundManager_HPP_
#include "Types.hpp"
#include <android_native_app_glue.h>
#include <SLES/OpenSLES.h>
class SoundManager {
public:
SoundManager(android_app* pApplication);
status start();

Playing Sound with OpenSL ES
[ 294 ]
void stop();
private:
android_app* mApplication;
SLObjectItf mEngineObj; SLEngineItf mEngine;
SLObjectItf mOutputMixObj;
};
#endif
2. Implement SoundManager in jni/SoundManager.cpp with its constructor:
#include "Log.hpp"
#include "Resource.hpp"
#include "SoundManager.hpp"
SoundManager::SoundManager(android_app* pApplication) :
mApplication(pApplication),
mEngineObj(NULL), mEngine(NULL),
mOutputMixObj(NULL) {
Log::info("Creating SoundManager.");
}
...
3. Write the method start(), which is going to create an OpenSL Engine object and
an Output Mix object. We need three variables per object to inialize:
The number of interfaces to support for each object (engineMixIIDCount
and outputMixIIDCount).
An array of all the interfaces objects should support (engineMixIIDs and
outputMixIIDs), for example SL_IID_ENGINE for the engine.
An array of Boolean values to indicate whether the interface is required or
optional for the program (engineMixReqs and outputMixReqs).
...
status SoundManager::start() {
Log::info("Starting SoundManager.");
SLresult result;
const SLuint32 engineMixIIDCount = 1;
const SLInterfaceID engineMixIIDs[] = {SL_IID_ENGINE};
const SLboolean engineMixReqs[] = {SL_BOOLEAN_TRUE};
const SLuint32 outputMixIIDCount = 0;
const SLInterfaceID outputMixIIDs[] = {};
const SLboolean outputMixReqs[] = {};
...

Chapter 7
[ 295 ]
4. Connue the method start():
Initialize the OpenSL ES engine object (that is, the basic type SLObjectItf)
with the slCreateEngine() method. When we create an OpenSL ES
object, the specific interfaces we are going to use have to be indicated. Here,
we request the SL_IID_ENGINE interface, which allows creating other
OpenSL ES objects. The engine is the central object of the OpenSL ES API.
Then, invoke Realize() on the engine object. Any OpenSL ES object needs
to be realized to allocate the required internal resources before use.
Finally, retrieve SLEngineItf-specific interface.
The engine interface gives us the possibility to instantiate an audio output
mix with the CreateOutputMix() method. The audio output mix defined
here delivers sound to the default speakers. It is autonomous (the played
sound is sent automatically to the speaker), so there is no need to request
any specific interface here.
...
// Creates OpenSL ES engine and dumps its capabilities.
result = slCreateEngine(&mEngineObj, 0, NULL,
engineMixIIDCount, engineMixIIDs, engineMixReqs);
if (result != SL_RESULT_SUCCESS) goto ERROR;
result = (*mEngineObj)->Realize(mEngineObj,SL_BOOLEAN_FALSE);
if (result != SL_RESULT_SUCCESS) goto ERROR;
result = (*mEngineObj)->GetInterface(mEngineObj, SL_IID_ENGINE,
&mEngine);
if (result != SL_RESULT_SUCCESS) goto ERROR;
// Creates audio output.
result = (*mEngine)->CreateOutputMix(mEngine, &mOutputMixObj,
outputMixIIDCount, outputMixIIDs, outputMixReqs);
result = (*mOutputMixObj)->Realize(mOutputMixObj,
SL_BOOLEAN_FALSE);
return STATUS_OK;
ERROR:
Log::error("Error while starting SoundManager");
stop();
return STATUS_KO;
}
...

Playing Sound with OpenSL ES
[ 296 ]
5. Write the stop() method to destroy what has been created in start():
...
void SoundManager::stop() {
Log::info("Stopping SoundManager.");
if (mOutputMixObj != NULL) {
(*mOutputMixObj)->Destroy(mOutputMixObj);
mOutputMixObj = NULL;
}
if (mEngineObj != NULL) {
(*mEngineObj)->Destroy(mEngineObj);
mEngineObj = NULL; mEngine = NULL;
}
}
6. Edit jni/DroidBlaster.hpp and embed our new SoundManager:
...
#include "Resource.hpp"
#include "Ship.hpp"
#include "SoundManager.hpp"
#include "SpriteBatch.hpp"
#include "StarField.hpp"
...
class DroidBlaster : public ActivityHandler {
...
private:
TimeManager mTimeManager;
GraphicsManager mGraphicsManager;
PhysicsManager mPhysicsManager;
SoundManager mSoundManager;
EventLoop mEventLoop;
...
};
#endif
7. Create, start, and stop the sound service in jni/DroidBlaster.cpp:
...
DroidBlaster::DroidBlaster(android_app* pApplication):
mTimeManager(),
mGraphicsManager(pApplication),
mPhysicsManager(mTimeManager, mGraphicsManager),

Chapter 7
[ 297 ]
mSoundManager(pApplication),
mEventLoop(pApplication, *this),
...
mShip(pApplication, mTimeManager, mGraphicsManager) {
...
}
...
status DroidBlaster::onActivate() {
Log::info("Activating DroidBlaster");
if (mGraphicsManager.start() != STATUS_OK) return STATUS_KO;
if (mSoundManager.start() != STATUS_OK) return STATUS_KO;
mAsteroids.initialize();
...
}
void DroidBlaster::onDeactivate() {
Log::info("Deactivating DroidBlaster");
mGraphicsManager.stop();
mSoundManager.stop();
}
8. Finally, link to libOpenSLES.so in the jni/Android.mk le:
...
LS_CPP=$(subst $(1)/,,$(wildcard $(1)/*.cpp))
LOCAL_MODULE := droidblaster
LOCAL_SRC_FILES := $(call LS_CPP,$(LOCAL_PATH))
LOCAL_LDLIBS := -landroid -llog -lEGL -lGLESv2 -lOpenSLES
LOCAL_STATIC_LIBRARIES := android_native_app_glue png
...
What just happened?
Run the applicaon and check that no error is logged. We inialized the OpenSL ES library,
which gives us access to ecient sound handling primives directly from the nave code.
The current code does not perform anything apart from inializaon. No sound comes out of
the speakers yet.
The entry point to OpenSL ES here is SLEngineItf, which is mainly an OpenSL ES object
factory. It can create a channel to an output device (a speaker or anything else), as well as
sound players or recorders (and even more!), as we will see later in this chapter.

Playing Sound with OpenSL ES
[ 298 ]
The SLOutputMixItf is the object represenng the audio output. Generally, this will be
the device speaker or headset. Although the OpenSL ES specicaon allows enumerang
the available output (and also input) devices, NDK implementaon is not mature enough to
obtain or select a proper one (SLAudioIODeviceCapabilitiesItf, the ocial interface
to obtain such informaon). So, when dealing with output and input device selecon (only
input device for recorders needs to be specied currently), it is preferable to sck to default
values, SL_DEFAULTDEVICEID_AUDIOINPUT and SL_DEFAULTDEVICEID_AUDIOOUTPUT
dened in SLES/OpenSLES.h.
The current Android NDK implementaon allows only one engine per applicaon (this should
not be an issue) and, at most, 32 created objects. Beware, however, that the creaon of any
object can fail, as this is dependent on the available system resources.
More on OpenSL ES philosophy
OpenSL ES is dierent from its graphics compatriot GLES, partly because it does not have a
long history to carry. It is constructed on (more or less) an object-oriented principle based on
objects and interfaces. The following denions come from the ocial specicaon:
An object is an abstracon of a set of resources, assigned for a well-dened set
of tasks, and the state of these resources. An object has a type determined on its
creaon. The object type determines the set of tasks that an object can perform.
This can be considered similar to a class in C++.
An interface is an abstracon of a set of related features that a certain object
provides. An interface includes a set of methods, which are funcons of the
interface. An interface also has a type, which determines the exact set of methods
of the interface. We can dene the interface itself as a combinaon of its type and
the object to which it is related.
An interface ID idenes an interface type. This idener is used within the source
code to refer to the interface type.
An OpenSL ES object is set up in a few steps as follows:
1. Instanang it through a build method (which usually belongs to the engine).
2. Realizing it to allocate the necessary resources.
3. Retrieving object interfaces. A basic object only has a very limited set of operaons
(Realize(), Resume(), Destroy(), and so on). Interfaces give access to real
object features and describes what operaons can be performed on an object, for
example, a Play interface to play or pause a sound.

Chapter 7
[ 299 ]
Any interfaces can be requested but only the one supported by the object is going to be
successfully retrieved. You cannot retrieve the record interface for an audio player because
it returns (somemes annoyingly!) SL_RESULT_FEATURE_UNSUPPORTED (error code 12). In
technical terms, an OpenSL ES interface is a structure containing funcon pointers (inialized
by the OpenSL ES implementaon) with a self-parameter to simulate C++ objects and this,
for example:
struct SLObjectItf_ {
SLresult (*Realize) (SLObjectItf self, SLboolean async);
SLresult (*Resume) ( SLObjectItf self, SLboolean async);
...
}
Here, Realize(), Resume(), and so on are object methods that can be applied on an
SLObjectItf object. The approach is idencal for interfaces.
For more detailed informaon on what OpenSL ES can provide, refer to the specicaon on
the Khronos website http://www.khronos.org/opensles, as well as the OpenSL ES
documentaon in the Android NDK docs directory. Android implementaon does not fully
respect the specicaon, at least for now. So, do not be disappointed when discovering that
only a limited subset of the specicaon (especially sample codes) works on Android.
Playing music les
OpenSL ES is inialized, but the only thing coming out of speakers is silence! So what about
nding a nice piece of Background Music (BGM) and playing it navely with Android NDK?
OpenSL ES provides the necessary stu to read music les such as MP3 les.
The resulng project is provided with this book under the name
DroidBlaster_Part11.
Time for action – playing background music
Let's open and play an MP3 music le with OpenSL ES:
1. MP3 les are opened by OpenSL using a POSIX le descriptor poinng to the chosen
le. Improve jni/ResourceManager.cpp created in the previous chapters by
dening a new structure ResourceDescriptor and appending a new method
descriptor():
...
struct ResourceDescriptor {
int32_t mDescriptor;

Playing Sound with OpenSL ES
[ 300 ]
off_t mStart;
off_t mLength;
};
class Resource {
public:
...
status open();
void close();
status read(void* pBuffer, size_t pCount);
ResourceDescriptor descriptor();
bool operator==(const Resource& pOther);
private:
...
};
#endif
2. Implement jni/ResourceManager.cpp. Of course, makes use of the asset
manager API to open the descriptor and ll a ResourceDescriptor structure:
...
ResourceDescriptor Resource::descriptor() {
ResourceDescriptor lDescriptor = { -1, 0, 0 };
AAsset* lAsset = AAssetManager_open(mAssetManager, mPath,
AASSET_MODE_UNKNOWN);
if (lAsset != NULL) {
lDescriptor.mDescriptor = AAsset_openFileDescriptor(
lAsset, &lDescriptor.mStart, &lDescriptor.mLength);
AAsset_close(lAsset);
}
return lDescriptor;
}
...
3. Go back to jni/SoundManager.hpp and dene two methods playBGM() and
stopBGM() to play/stop a background MP3 le.
Declare an OpenSL ES object for the music player, along with the following interfaces:
SLPlayItf plays and stops music files

Chapter 7
[ 301 ]
SLSeekItf controls position and looping
...
#include <android_native_app_glue.h>
#include <SLES/OpenSLES.h>
#include <SLES/OpenSLES_Android.h>
class SoundManager {
public:
...
status start();
void stop();
status playBGM(Resource& pResource);
void stopBGM();
private:
...
SLObjectItf mEngineObj; SLEngineItf mEngine;
SLObjectItf mOutputMixObj;
SLObjectItf mBGMPlayerObj; SLPlayItf mBGMPlayer;
SLSeekItf mBGMPlayerSeek;
};
#endif
4. Start implemenng jni/SoundManager.cpp.
Include Resource.hpp to get access to asset le descriptors.
Inialize new members in the constructor and update stop() to stop the
background music automacally (or some users are not going to be happy!):
#include "Log.hpp"
#include "Resource.hpp"
#include "SoundManager.hpp"
SoundManager::SoundManager(android_app* pApplication) :
mApplication(pApplication),
mEngineObj(NULL), mEngine(NULL),
mOutputMixObj(NULL),
mBGMPlayerObj(NULL), mBGMPlayer(NULL), mBGMPlayerSeek(NULL) {

Playing Sound with OpenSL ES
[ 302 ]
Log::info("Creating SoundManager.");
}
...
void SoundManager::stop() {
Log::info("Stopping SoundManager.");
stopBGM();
if (mOutputMixObj != NULL) {
(*mOutputMixObj)->Destroy(mOutputMixObj);
mOutputMixObj = NULL;
}
if (mEngineObj != NULL) {
(*mEngineObj)->Destroy(mEngineObj);
mEngineObj = NULL; mEngine = NULL;
}
}
...
5. Implement playBGM() to enrich the manager with playback features.
First, describe our audio setup through two main structures, SLDataSource and
SLDataSink. The rst describes the audio input channel and the second, the audio
output channel.
Here, we congure the data source as a MIME source so that the le type gets
detected automacally from the le descriptor. The le descriptor is, of course,
opened with a call to ResourceManager::descriptor().
The data sink (that is, the desnaon channel) is congured with the OutputMix
object created in the rst part of this chapter while inializing the OpenSL ES engine
(and refers to the default audio output, that is, speakers or headset):
...
status SoundManager::playBGM(Resource& pResource) {
SLresult result;
Log::info("Opening BGM %s", pResource.getPath());
ResourceDescriptor descriptor = pResource.descriptor();
if (descriptor.mDescriptor < 0) {
Log::info("Could not open BGM file");
return STATUS_KO;
}
SLDataLocator_AndroidFD dataLocatorIn;
dataLocatorIn.locatorType = SL_DATALOCATOR_ANDROIDFD;

Chapter 7
[ 303 ]
dataLocatorIn.fd = descriptor.mDescriptor;
dataLocatorIn.offset = descriptor.mStart;
dataLocatorIn.length = descriptor.mLength;
SLDataFormat_MIME dataFormat;
dataFormat.formatType = SL_DATAFORMAT_MIME;
dataFormat.mimeType = NULL;
dataFormat.containerType = SL_CONTAINERTYPE_UNSPECIFIED;
SLDataSource dataSource;
dataSource.pLocator = &dataLocatorIn;
dataSource.pFormat = &dataFormat;
SLDataLocator_OutputMix dataLocatorOut;
dataLocatorOut.locatorType = SL_DATALOCATOR_OUTPUTMIX;
dataLocatorOut.outputMix = mOutputMixObj;
SLDataSink dataSink;
dataSink.pLocator = &dataLocatorOut;
dataSink.pFormat = NULL;
...
6. Then, create the OpenSL ES audio player. As always, with OpenSL ES objects,
instanate it through the engine rst and then realize it. Two interfaces, SL_IID_
PLAY and SL_IID_SEEK, are imperavely required:
...
const SLuint32 bgmPlayerIIDCount = 2;
const SLInterfaceID bgmPlayerIIDs[] =
{ SL_IID_PLAY, SL_IID_SEEK };
const SLboolean bgmPlayerReqs[] =
{ SL_BOOLEAN_TRUE, SL_BOOLEAN_TRUE };
result = (*mEngine)->CreateAudioPlayer(mEngine,
&mBGMPlayerObj, &dataSource, &dataSink,
bgmPlayerIIDCount, bgmPlayerIIDs, bgmPlayerReqs);
if (result != SL_RESULT_SUCCESS) goto ERROR;
result = (*mBGMPlayerObj)->Realize(mBGMPlayerObj,
SL_BOOLEAN_FALSE);
if (result != SL_RESULT_SUCCESS) goto ERROR;
result = (*mBGMPlayerObj)->GetInterface(mBGMPlayerObj,
SL_IID_PLAY, &mBGMPlayer);

Playing Sound with OpenSL ES
[ 304 ]
if (result != SL_RESULT_SUCCESS) goto ERROR;
result = (*mBGMPlayerObj)->GetInterface(mBGMPlayerObj,
SL_IID_SEEK, &mBGMPlayerSeek);
if (result != SL_RESULT_SUCCESS) goto ERROR;
...
7. Finally, using the play and seek interfaces, switch the playback in loop mode (that
is, the music keeps playing) from the track's beginning (that is, 0 milliseconds) unl
its end (SL_TIME_UNKNOWN), and then start playing (SetPlayState() with
SL_PLAYSTATE_PLAYING).
...
result = (*mBGMPlayerSeek)->SetLoop(mBGMPlayerSeek,
SL_BOOLEAN_TRUE, 0, SL_TIME_UNKNOWN);
if (result != SL_RESULT_SUCCESS) goto ERROR;
result = (*mBGMPlayer)->SetPlayState(mBGMPlayer,
SL_PLAYSTATE_PLAYING);
if (result != SL_RESULT_SUCCESS) goto ERROR;
return STATUS_OK;
ERROR:
Log::error("Error playing BGM");
return STATUS_KO;
}
...
8. Terminate with the last method stopBGM() to stop and destroy the player:
...
void SoundManager::stopBGM() {
if (mBGMPlayer != NULL) {
SLuint32 bgmPlayerState;
(*mBGMPlayerObj)->GetState(mBGMPlayerObj,
&bgmPlayerState);
if (bgmPlayerState == SL_OBJECT_STATE_REALIZED) {
(*mBGMPlayer)->SetPlayState(mBGMPlayer,
SL_PLAYSTATE_PAUSED);
(*mBGMPlayerObj)->Destroy(mBGMPlayerObj);
mBGMPlayerObj = NULL;
mBGMPlayer = NULL; mBGMPlayerSeek = NULL;
}
}
}

Chapter 7
[ 305 ]
9. Add a resource poinng to the music le in jni/DroidBlaster.hpp:
...
class DroidBlaster : public ActivityHandler {
...
private:
...
Resource mAsteroidTexture;
Resource mShipTexture;
Resource mStarTexture;
Resource mBGM;
...
};
#endif
10. Finally, in jni/DroidBlaster.cpp, start playing the music right aer
SoundManager is started:
...
DroidBlaster::DroidBlaster(android_app* pApplication):
...
mAsteroidTexture(pApplication, "droidblaster/asteroid.png"),
mShipTexture(pApplication, "droidblaster/ship.png"),
mStarTexture(pApplication, "droidblaster/star.png"),
mBGM(pApplication, "droidblaster/bgm.mp3"),
...
mSpriteBatch(mTimeManager, mGraphicsManager) {
...
}
...
status DroidBlaster::onActivate() {
Log::info("Activating DroidBlaster");
if (mGraphicsManager.start() != STATUS_OK) return STATUS_KO;
if (mSoundManager.start() != STATUS_OK) return STATUS_KO;
mSoundManager.playBGM(mBGM);
mAsteroids.initialize();
mShip.initialize();
mTimeManager.reset();
return STATUS_OK;
}
...
Playing Sound with OpenSL ES
[ 306 ]
Copy an MP3 le into the droidblaster's assets directory and name it bgm.mp3.
The BGM le is provided with this book in the
DroidBlaster_Part11/assets directory.
What just happened?
We discovered how to play a music clip from an MP3 le. Playback loops unl the game is
terminated. When using a MIME data source, the le type is auto-detected. Several formats
are currently supported in Gingerbread, including Wave PCM, Wave alaw, Wave ulaw,
MP3, Ogg Vorbis, and so on. The MIDI playback is currently not supported. Have a look at
$ANDROID_NDK/docs/opensles/index.html for more informaon.
The way the sample code is presented here is typical of how OpenSL ES works. The OpenSL
ES engine object, which is basically an object factory, creates an AudioPlayer. In its raw
state, this object cannot do much. First, it needs to be realized to allocate the necessary
resources. However, that is not enough. It needs to retrieve the right interfaces, like the SL_
IID_PLAY interface to change the audio player state to playing/stopped. Then, the OpenSL
API can be eecvely used.
That is quite some work, taking into account result vericaon (as any call is suscepble to
fail), which kind of cluers the code. Geng inside this API can take a lile bit more me
than usual, but once understood, these concepts become rather easy to deal with.
You may be surprised to see that startBGM() and stopBGM() recreates and destroys
the audio player respecvely. The reason is that there is currently no way to change an
MIME data source without completely recreang the OpenSL ES AudioPlayer object.
So, although this technique is ne to play a long clip, it is not suitable to play a short
sound dynamically.
Playing sounds
The technique presented to play BGM from a MIME source is very praccal but, sadly, not
exible enough. Recreang an AudioPlayer object is not necessary and accessing asset
les each me is not good in terms of eciency.
So, when it comes to playing sounds quickly in response to an event and generang them
dynamically, we need to use a sound buer queue. Each sound is preloaded or generated
in a memory buer, and placed into a queue when the playback is requested. No need to
access a le at runme!
Chapter 7
[ 307 ]
A sound buer, in the current OpenSL ES Android implementaon, can contain PCM data.
Pulse Code Modulaon (PCM) is a data format dedicated to the representaon of digital
sounds. It is the format used in CD and in some Wave les. A PCM can be Mono (the same
sound on all speakers) or Stereo (dierent sounds for le and right speakers if available).
PCM is not compressed and is not ecient in terms of storage (just compare a musical CD
with a data CD full of MP3). However, this format is lossless and oers the best quality.
Quality depends on the sampling rate: analog sounds are represented digitally as a series of
measure (that is, sample) of the sound signal.
A sound sample at 44100 Hz (that is 44100 measures per second) has beer quality
but also takes place more than a sound sampled at 16000 Hz. Also, each measure can be
represented with a more or less ne degree of precision (the encoding). On current
Android implementaon:
Sounds can use 8000 Hz, 11025 Hz, 12000 Hz, 16000 Hz, 22050 Hz, 24000 Hz, 32000
Hz, 44100 Hz, or 48000 Hz sampling,
Samples can be encoded on 8-bit unsigned or 16-bit signed (ner precision) in
lile-endian or big-endian.
In the following step-by-step tutorial, we will use a raw PCM le encoded over 16-bit in
lile-endian.
The resulng project is provided with this book under the
name DroidBlaster_Part12.
Time for action – creating and playing a sound buffer queue
Let's use OpenSL ES to play an explosion sound stored in a memory buer:
1. Update jni/Resource.hpp again to add a new method getLength(), which
provides the size in bytes of an asset le:
...
class Resource {
public:
...
ResourceDescriptor descriptor();
off_t getLength();
...
};
#endif

Playing Sound with OpenSL ES
[ 308 ]
2. Implement this method in jni/Resource.cpp:
...
off_t Resource::getLength() {
return AAsset_getLength(mAsset);
}
...
3. Create jni/Sound.hpp to manage a sound buer.
Dene a method load() to load a PCM le and unload() to release it.
Also, dene the appropriate geers. Hold the raw sound data in a buer along
with its size. The sound is loaded from a Resource:
#ifndef _PACKT_SOUND_HPP_
#define _PACKT_SOUND_HPP_
class SoundManager;
#include "Resource.hpp"
#include "Types.hpp"
class Sound {
public:
Sound(android_app* pApplication, Resource* pResource);
const char* getPath();
uint8_t* getBuffer() { return mBuffer; };
off_t getLength() { return mLength; };
status load();
status unload();
private:
friend class SoundManager;
Resource* mResource;
uint8_t* mBuffer; off_t mLength;
};
#endif

Chapter 7
[ 309 ]
4. Sound loading implementaon done in jni/Sound.cpp is quite simple; it creates a
buer with the same size as the PCM le and loads all the raw le content in it:
#include "Log.hpp"
#include "Sound.hpp"
#include <SLES/OpenSLES.h>
#include <SLES/OpenSLES_Android.h>
Sound::Sound(android_app* pApplication, Resource* pResource) :
mResource(pResource),
mBuffer(NULL), mLength(0)
{}
const char* Sound::getPath() {
return mResource->getPath();
}
status Sound::load() {
Log::info("Loading sound %s", mResource->getPath());
status result;
// Opens sound file.
if (mResource->open() != STATUS_OK) {
goto ERROR;
}
// Reads sound file.
mLength = mResource->getLength();
mBuffer = new uint8_t[mLength];
result = mResource->read(mBuffer, mLength);
mResource->close();
return STATUS_OK;
ERROR:
Log::error("Error while reading PCM sound.");
return STATUS_KO;
}
status Sound::unload() {
delete[] mBuffer;
mBuffer = NULL; mLength = 0;
return STATUS_OK;
}

Playing Sound with OpenSL ES
[ 310 ]
5. Create jni/SoundQueue.hpp to encapsulate the creaon of a player object and its
queue. Create three methods to:
Initialize the queue when the application starts to allocate
OpenSL resources
Finalize the queue to release OpenSL resources
Play a sound buffer of a predefined length
A sound queue can be manipulated through the SLPlayItf and
SLBufferQueueItf interfaces:
#ifndef _PACKT_SOUNDQUEUE_HPP_
#define _PACKT_SOUNDQUEUE_HPP_
#include "Sound.hpp"
#include <SLES/OpenSLES.h>
#include <SLES/OpenSLES_Android.h>
class SoundQueue {
public:
SoundQueue();
status initialize(SLEngineItf pEngine, SLObjectItf pOutputMixObj);
void finalize();
void playSound(Sound* pSound);
private:
SLObjectItf mPlayerObj; SLPlayItf mPlayer;
SLBufferQueueItf mPlayerQueue;
};
#endif
6. Implement jni/SoundQueue.cpp:
#include "Log.hpp"
#include "SoundQueue.hpp"
SoundQueue::SoundQueue() :
mPlayerObj(NULL), mPlayer(NULL),
mPlayerQueue() {
}
...

Chapter 7
[ 311 ]
7. Write initialize(), beginning with SLDataSource and SLDataSink to
describe the input and output channel. Use a SLDataFormat_PCM data format
(instead of SLDataFormat_MIME), which includes sampling, encoding, and
endianness informaon. Sounds need to be mono (that is, only one sound channel
for both le and right speakers when available). The queue is created with the
Android-specic extension SLDataLocator_AndroidSimpleBufferQueue():
...
status SoundQueue::initialize(SLEngineItf pEngine,
SLObjectItf pOutputMixObj) {
Log::info("Starting sound player.");
SLresult result;
// Set-up sound audio source.
SLDataLocator_AndroidSimpleBufferQueue dataLocatorIn;
dataLocatorIn.locatorType =
SL_DATALOCATOR_ANDROIDSIMPLEBUFFERQUEUE;
// At most one buffer in the queue.
dataLocatorIn.numBuffers = 1;
SLDataFormat_PCM dataFormat;
dataFormat.formatType = SL_DATAFORMAT_PCM;
dataFormat.numChannels = 1; // Mono sound.
dataFormat.samplesPerSec = SL_SAMPLINGRATE_44_1;
dataFormat.bitsPerSample = SL_PCMSAMPLEFORMAT_FIXED_16;
dataFormat.containerSize = SL_PCMSAMPLEFORMAT_FIXED_16;
dataFormat.channelMask = SL_SPEAKER_FRONT_CENTER;
dataFormat.endianness = SL_BYTEORDER_LITTLEENDIAN;
SLDataSource dataSource;
dataSource.pLocator = &dataLocatorIn;
dataSource.pFormat = &dataFormat;
SLDataLocator_OutputMix dataLocatorOut;
dataLocatorOut.locatorType = SL_DATALOCATOR_OUTPUTMIX;
dataLocatorOut.outputMix = pOutputMixObj;
SLDataSink dataSink;
dataSink.pLocator = &dataLocatorOut;
dataSink.pFormat = NULL;
...

Playing Sound with OpenSL ES
[ 312 ]
8. Then, create and realize the sound player. We are going to need its SL_IID_
PLAY and SL_IID_BUFFERQUEUE interface, available thanks to the data locator
congured in the previous step:
...
const SLuint32 soundPlayerIIDCount = 2;
const SLInterfaceID soundPlayerIIDs[] =
{ SL_IID_PLAY, SL_IID_BUFFERQUEUE };
const SLboolean soundPlayerReqs[] =
{ SL_BOOLEAN_TRUE, SL_BOOLEAN_TRUE };
result = (*pEngine)->CreateAudioPlayer(pEngine, &mPlayerObj,
&dataSource, &dataSink, soundPlayerIIDCount,
soundPlayerIIDs, soundPlayerReqs);
if (result != SL_RESULT_SUCCESS) goto ERROR;
result = (*mPlayerObj)->Realize(mPlayerObj, SL_BOOLEAN_FALSE);
if (result != SL_RESULT_SUCCESS) goto ERROR;
result = (*mPlayerObj)->GetInterface(mPlayerObj, SL_IID_PLAY,
&mPlayer);
if (result != SL_RESULT_SUCCESS) goto ERROR;
result = (*mPlayerObj)->GetInterface(mPlayerObj,
SL_IID_BUFFERQUEUE, &mPlayerQueue);
if (result != SL_RESULT_SUCCESS) goto ERROR;
...
9. Finally, start the queue by seng it in the playing state. This does not actually mean
that a sound is played. The queue is empty so that would not be possible. However,
if a sound gets enqueued, it is automacally played:
...
result = (*mPlayer)->SetPlayState(mPlayer,
SL_PLAYSTATE_PLAYING);
if (result != SL_RESULT_SUCCESS) goto ERROR;
return STATUS_OK;
ERROR:
Log::error("Error while starting SoundQueue");
return STATUS_KO;
}
...

Chapter 7
[ 313 ]
10. OpenSL ES objects need to be released when we no longer need them:
...
void SoundQueue::finalize() {
Log::info("Stopping SoundQueue.");
if (mPlayerObj != NULL) {
(*mPlayerObj)->Destroy(mPlayerObj);
mPlayerObj = NULL; mPlayer = NULL; mPlayerQueue = NULL;
}
}
...
11. Finally, write playSound(), which rst stops any sound being played and then
enqueue the new sound buer to be played. This is the simplest strategy to play a
sound immediately:
...
void SoundQueue::playSound(Sound* pSound) {
SLresult result;
SLuint32 playerState;
(*mPlayerObj)->GetState(mPlayerObj, &playerState);
if (playerState == SL_OBJECT_STATE_REALIZED) {
int16_t* buffer = (int16_t*) pSound->getBuffer();
off_t length = pSound->getLength();
// Removes any sound from the queue.
result = (*mPlayerQueue)->Clear(mPlayerQueue);
if (result != SL_RESULT_SUCCESS) goto ERROR;
// Plays the new sound.
result = (*mPlayerQueue)->Enqueue(mPlayerQueue, buffer,
length);
if (result != SL_RESULT_SUCCESS) goto ERROR;
}
return;
ERROR:
Log::error("Error trying to play sound");
}

Playing Sound with OpenSL ES
[ 314 ]
12. Open jni/SoundManager.hpp and include the newly created headers.
Create two new methods:
registerSound() to load and manage a new sound buffer
playSound() to send a sound buffer to the sound play queue
Dene a SoundQueue array so that up to four sounds may be played
simultaneously.
Sound buers are stored in a xed-size C++ array:
...
#include "Sound.hpp"
#include "SoundQueue.hpp"
#include "Types.hpp"
...
class SoundManager {
public:
SoundManager(android_app* pApplication);
~SoundManager();
...
Sound* registerSound(Resource& pResource);
void playSound(Sound* pSound);
private:
...
static const int32_t QUEUE_COUNT = 4;
SoundQueue mSoundQueues[QUEUE_COUNT]; int32_t mCurrentQueue;
Sound* mSounds[32]; int32_t mSoundCount;
};
#endif
13. Update the constructor in jni/SoundManager.cpp and create a new destructor to
release resources:
...
SoundManager::SoundManager(android_app* pApplication) :
mApplication(pApplication),
mEngineObj(NULL), mEngine(NULL),
mOutputMixObj(NULL),
mBGMPlayerObj(NULL), mBGMPlayer(NULL), mBGMPlayerSeek(NULL),

Chapter 7
[ 315 ]
mSoundQueues(), mCurrentQueue(0),
mSounds(), mSoundCount(0) {
Log::info("Creating SoundManager.");
}
SoundManager::~SoundManager() {
Log::info("Destroying SoundManager.");
for (int32_t i = 0; i < mSoundCount; ++i) {
delete mSounds[i];
}
mSoundCount = 0;
}
...
14. Update start() to inialize the SoundQueue instances. Then, load sound
resources registered with registerSound():
...
status SoundManager::start() {
...
result = (*mEngine)->CreateOutputMix(mEngine, &mOutputMixObj,
outputMixIIDCount, outputMixIIDs, outputMixReqs);
result = (*mOutputMixObj)->Realize(mOutputMixObj,
SL_BOOLEAN_FALSE);
Log::info("Starting sound player.");
for (int32_t i= 0; i < QUEUE_COUNT; ++i) {
if (mSoundQueues[i].initialize(mEngine, mOutputMixObj)
!= STATUS_OK) goto ERROR;
}
for (int32_t i = 0; i < mSoundCount; ++i) {
if (mSounds[i]->load() != STATUS_OK) goto ERROR;
}
return STATUS_OK;
ERROR:
...
}
...

Playing Sound with OpenSL ES
[ 316 ]
15. Finalize the SoundQueue instances when the applicaon stops to release OpenSL ES
resources. Also, release the sound buers:
...
void SoundManager::stop() {
Log::info("Stopping SoundManager.");
stopBGM();
for (int32_t i= 0; i < QUEUE_COUNT; ++i) {
mSoundQueues[i].finalize();
}
// Destroys audio output and engine.
...
for (int32_t i = 0; i < mSoundCount; ++i) {
mSounds[i]->unload();
}
}
...
16. Save and cache the sounds in registerSound():
...
Sound* SoundManager::registerSound(Resource& pResource) {
for (int32_t i = 0; i < mSoundCount; ++i) {
if (strcmp(pResource.getPath(), mSounds[i]->getPath()) == 0) {
return mSounds[i];
}
}
Sound* sound = new Sound(mApplication, &pResource);
mSounds[mSoundCount++] = sound;
return sound;
}
...
17. Finally, write playSound(), which sends the buer to play to a SoundQueue. Use
a simple round-robin strategy to play several sounds simultaneously. Send each new
sound to play next in the queue (which is more likely to be available). Obviously, this
playing strategy is subopmal for sounds of various lengths:
...
void SoundManager::playSound(Sound* pSound) {
int32_t currentQueue = ++mCurrentQueue;
SoundQueue& soundQueue = mSoundQueues[currentQueue % QUEUE_COUNT];
soundQueue.playSound(pSound);
}

Chapter 7
[ 317 ]
18. We will play a sound when the DroidBlaster ship collides with an asteroid. Since the
collision is not yet managed (see Chapter 10, Intensive Compung with RenderScript
for collision handling with Box2D), we will simply play a sound when the ship is
inialized.
To do so, in jni/Ship.hpp, retrieve a reference to SoundManager in the
constructor and a collision sound buer to play in registerShip():
...
#include "GraphicsManager.hpp"
#include "Sprite.hpp"
#include "SoundManager.hpp"
#include "Sound.hpp"
class Ship {
public:
Ship(android_app* pApplication,
GraphicsManager& pGraphicsManager,
SoundManager& pSoundManager);
void registerShip(Sprite* pGraphics, Sound* pCollisionSound);
void initialize();
private:
GraphicsManager& mGraphicsManager;
SoundManager& mSoundManager;
Sprite* mGraphics;
Sound* mCollisionSound;
};
#endif
19. Then, in jni/Ship.cpp, aer having stored all the necessary references, play the
sound when the ship is inialized:
...
Ship::Ship(android_app* pApplication,
GraphicsManager& pGraphicsManager,
SoundManager& pSoundManager) :
mGraphicsManager(pGraphicsManager),
mGraphics(NULL),
mSoundManager(pSoundManager),

Playing Sound with OpenSL ES
[ 318 ]
mCollisionSound(NULL) {
}
void Ship::registerShip(Sprite* pGraphics, Sound* pCollisionSound) {
mGraphics = pGraphics;
mCollisionSound = pCollisionSound;
}
void Ship::initialize() {
mGraphics->location.x = INITAL_X
* mGraphicsManager.getRenderWidth();
mGraphics->location.y = INITAL_Y
* mGraphicsManager.getRenderHeight();
mSoundManager.playSound(mCollisionSound);
}
20. In jni/DroidBlaster.hpp, dene a reference to a le, which contains a collision
sound:
...
class DroidBlaster : public ActivityHandler {
...
private:
...
Resource mAsteroidTexture;
Resource mShipTexture;
Resource mStarTexture;
Resource mBGM;
Resource mCollisionSound;
...
};
#endif
21. Finally, in jni/DroidBlaster.cpp, register the new sound and pass it to the Ship
class:
#include "DroidBlaster.hpp"
#include "Sound.hpp"
#include "Log.hpp"
...
DroidBlaster::DroidBlaster(android_app* pApplication):
...
mAsteroidTexture(pApplication, "droidblaster/asteroid.png"),
mShipTexture(pApplication, "droidblaster/ship.png"),

Chapter 7
[ 319 ]
mStarTexture(pApplication, "droidblaster/star.png"),
mBGM(pApplication, "droidblaster/bgm.mp3"),
mCollisionSound(pApplication, "droidblaster/collision.pcm"),
mAsteroids(pApplication, mTimeManager, mGraphicsManager,
mPhysicsManager),
mShip(pApplication, mGraphicsManager, mSoundManager),
mStarField(pApplication, mTimeManager, mGraphicsManager,
STAR_COUNT, mStarTexture),
mSpriteBatch(mTimeManager, mGraphicsManager) {
Log::info("Creating DroidBlaster");
Sprite* shipGraphics = mSpriteBatch.registerSprite(mShipTexture,
SHIP_SIZE, SHIP_SIZE);
shipGraphics->setAnimation(SHIP_FRAME_1, SHIP_FRAME_COUNT,
SHIP_ANIM_SPEED, true);
Sound* collisionSound =
mSoundManager.registerSound(mCollisionSound);
mShip.registerShip(shipGraphics, collisionSound);
...
}
...
What just happened?
We discovered how to preload sounds in a buer and play them as needed. What
dierenates the sound playing technique from the BGM one seen earlier is the use of a
buer queue. A buer queue is exactly what its name reveals: a First In, First Out (FIFO)
collecon of sound buers played one aer the other. Buers are enqueued for playback
when all the previous buers are played.
Buers can be recycled. This technique is essenal in combinaon with streaming les: two
or more buers are lled and sent to the queue. When the rst buer has nished playing,
the second one starts while the rst buer is lled with new data. As soon as possible, the
rst buer is enqueued before the queue gets empty. This process repeats forever unl the
playback is over. In addion, buers are raw data and can thus be processed or ltered on
the y.

Playing Sound with OpenSL ES
[ 320 ]
In the present tutorial, because DroidBlaster does not need to play more than one sound
at once and no form of streaming is necessary, the buer queue size is simply set to one
buer (step 7, dataLocatorIn.numBuffers = 1;). In addion, we want new sounds to
pre-empt older ones, which explains why the queue is systemacally cleared. Your OpenSL
ES architecture should, of course, be adapted to your needs. If it becomes necessary to play
several sounds simultaneously, several audio players (and therefore buer queues) should
be created.
Sound buers are stored in the PCM format, which does not self-describe its internal format.
Sampling, encoding, and other format informaon needs to be selected in the applicaon
code. Although this is ne for most of them, a soluon, if that is not exible enough, can be
to load a Wave le, which contains all the necessary header informaon.
A great open source tool to lter and sequence sounds is Audacity. It
allows altering the sampling rate and modifying channels (Mono/Stereo).
Audacity is able to export as well as import sound as raw PCM data.
Using callbacks to detect sound queue events
It is possible to detect when a sound has nished playing using callbacks. A callback can
be set up by calling the RegisterCallback() method on a queue (but other types of
objects can also register callbacks). For example, the callback can receive this, that is, a
SoundManager self-reference, to allow processing with any contextual informaon if
needed. Although this is facultave, an event mask is set up to ensure that the callback is
called only when the SL_PLAYEVENT_HEADATEND (player has nished playing the buer)
event is triggered. A few others play events are available in OpenSLES.h:
...
void callback_sound(SLBufferQueueItf pBufferQueue, void
*pContext) {
// Context can be casted back to the original type.
SoundService& lService = *(SoundService*) pContext;
...
Log::info("Ended playing sound.");
}
...
status SoundService::start() {
...
result = (*mEngine)->CreateOutputMix(mEngine, &mOutputMixObj,
outputMixIIDCount, outputMixIIDs, outputMixReqs);

Chapter 7
[ 321 ]
result = (*mOutputMixObj)->Realize(mOutputMixObj,
SL_BOOLEAN_FALSE);
// Registers a callback called when sound is finished.
result = (*mPlayerQueue)->RegisterCallback(mPlayerQueue,
callback_sound, this);
if (result != SL_RESULT_SUCCESS) goto ERROR;
result = (*mPlayer)->SetCallbackEventsMask(mPlayer,
SL_PLAYEVENT_HEADATEND);
if (result != SL_RESULT_SUCCESS) goto ERROR;
Log::info("Starting sound player.");
...
}
...
Now, when a buer nishes playing, a message is logged. Operaons such as, enqueuing a
new buer (to handle streaming for example) can be performed.
Low latency on Android
Callbacks are like system interrupons or applicaon events, their processing must be short
and fast. If advanced processing is necessary, it should not be performed inside the callback
but on another thread- nave threads being perfect candidates.
Indeed, callbacks are emied on a system thread, dierent than the one requesng OpenSL
ES services (that is, the NativeActivity nave thread in our case). Of course, with
threads, arises the problem of thread-safety when accessing your own variables from the
callback. Although protecng code with mutexes is tempng, they are not the best way
to deal with real-me audio. Their eect on scheduling (inversion of priority issues for
example) can cause glitches during playback.
So, prefer using thread-safe techniques, like a lock-free queue to communicate with
callbacks. Lock-free techniques can be implemented using GCC built-in atomic funcons
such as __sync_fetch_and_add() (which does not require any include le). For more
informaon about atomic operaons with the Android NDK, have a look at, ${ANDROID_
NDK}/docs/ANDROID-ATOMICS.html.

Playing Sound with OpenSL ES
[ 322 ]
Although proper lock-free code is essenal to achieve low-latency on Android, another
important point to consider is that not all Android plaorms and devices are suited for it!
Indeed, low latency support came quite late in Android, starng from OS Version 4.1/4.2.
If you are in the need for low latency, you can check its support with the following piece of
Java code:
import android.content.pm.PackageManager;
...
PackageManager pm = getContext().getPackageManager();
boolean claimsFeature = pm.hasSystemFeature(PackageManager.FEATURE_AUDIO_
LOW_LATENCY);
However, beware! Many devices, even with the latest system versions, cannot achieve low
latencies because of driver issues.
Once you know that the target plaorm supports low-latency, take care of using the proper
sampling rate and buer size. Indeed, the Android audio system provides a "fast path", which
does not apply any resampling, when using the opmal conguraon. To do so, from API
level 17 or higher, use android.media.AudioManager.getProperty() from the
Java side:
import android.media.AudioManager;
...
AudioManager am = (AudioManager) getSystemService(Context.AUDIO_SERVICE);
String sampleRateStr =
am.getProperty(AudioManager.PROPERTY_OUTPUT_SAMPLE_RATE);
int sampleRate = !TextUtils.isEmpty(sampleRateStr) ?
Integer.parseInt(sampleRateStr) : -1;
String framesPerBufferStr =
am.getProperty(AudioManager.PROPERTY_OUTPUT_FRAMES_PER_BUFFER);
int framesPerBuffer = !TextUtils.isEmpty(framesPerBufferStr) ?
Integer.parseInt(framesPerBufferStr) : -1;
For more informaon on this subject, have a look at the High Performance Audio talk at
https://developers.google.com/events/io/sessions/325993827.
Recording sounds
Android devices are all about interacons. Interacons can come not only from touches and
sensors, but also from audio input. Most Android devices provide a microphone to record
sound and allow an applicaon such as the Android desktop search to oer vocal features to
record queries.
Chapter 7
[ 323 ]
If the sound input is available, OpenSL ES gives nave access to the sound recorder. It
collaborates with a buer queue to take data from the input device and ll an output sound
buer from it. The setup is prey similar to what has been done with AudioPlayer, except
that data source and data sink are permuted.
Have a go hero – recording and playing a sound
To discover how recording works, record a sound when an applicaon starts and play it when
it has nished recording. Turning SoundManager into a recorder can be done in four steps:
1. Using status startSoundRecorder() to inialize the sound recorder. Invoke it
right aer startSoundPlayer().
2. With void recordSound(), start recording a sound buer with device micro.
Invoke this method at instances such as when the applicaon is acvated in
onActivate() aer the background music playback starts.
3. A new callback stac void callback_recorder(SLAndroidSimpleBufferQ
ueueItf, void*) to be noed of the record queue events. You have to register
this callback so that it is triggered when a recorder event happens. Here, we are
interested in buer full events, that is, when the sound recording is nished.
4. void playRecordedSound() to play a sound once recorded. Play it at instances
such as when the sound has nished being recorded in callback_recorder().
This is not technically correct because of potenal race condions but is ne for
an illustraon.
The resulting project is provided with this book under
the name DroidBlaster_PartRecorder.
Before going any further, recording requires a specic Android permission and, of course,
an appropriate Android device (you would not like an applicaon to record your secret
conversaons behind your back!). This authorizaon has to be requested in the
Android manifest:
<?xml version="1.0" encoding="utf-8"?>
<manifest xmlns:android="http://schemas.android.com/apk/res/android"
package="com.packtpub.droidblaster2d" android:versionCode="1"
android:versionName="1.0">
...
<uses-permission android:name="android.permission.RECORD_AUDIO"/>
</manifest>

Playing Sound with OpenSL ES
[ 324 ]
Creating and releasing the recorder
Sounds are recorded with a recorder object created from the OpenSL ES engine, as usual.
The recorder oers two interesng interfaces:
SLRecordItf: This interface is used to start and stop recording. The idener is
SL_IID_RECORD.
SLAndroidSImpleBufferQueueItf: This manages a sound queue for the
recorder. This is an Android extension provided by NDK because the current OpenSL
ES 1.0.1 specicaon does not support recording to a queue. The idener is SL_
IID_ANDROIDSIMPLEBUFFERQUEUE:
const SLuint32 soundRecorderIIDCount = 2;
const SLInterfaceID soundRecorderIIDs[] =
{ SL_IID_RECORD, SL_IID_ANDROIDSIMPLEBUFFERQUEUE };
const SLboolean soundRecorderReqs[] =
{ SL_BOOLEAN_TRUE, SL_BOOLEAN_TRUE };
SLObjectItf mRecorderObj;
(*mEngine)->CreateAudioRecorder(mEngine, &mRecorderObj,
&dataSource, &dataSink,
soundRecorderIIDCount, soundRecorderIIDs,
soundRecorderReqs);
To create the recorder, you will need to declare your audio source and sink, similar to
the following one. The data source is not a sound but a default recorder device (such as
a microphone). On the other hand, the data sink (that is, the output channel) is not a
speaker but a sound buer in the PCM format (with the requested sampling, encoding, and
endianness). The Android extension SLDataLocator_AndroidSimpleBufferQueue must
be used to work with a recorder since the standard OpenSL buer queues will not:
SLDataLocator_AndroidSimpleBufferQueue dataLocatorOut;
dataLocatorOut.locatorType =
SL_DATALOCATOR_ANDROIDSIMPLEBUFFERQUEUE;
dataLocatorOut.numBuffers = 1;
SLDataFormat_PCM dataFormat;
dataFormat.formatType = SL_DATAFORMAT_PCM;
dataFormat.numChannels = 1;
dataFormat.samplesPerSec = SL_SAMPLINGRATE_44_1;
dataFormat.bitsPerSample = SL_PCMSAMPLEFORMAT_FIXED_16;
dataFormat.containerSize = SL_PCMSAMPLEFORMAT_FIXED_16;
dataFormat.channelMask = SL_SPEAKER_FRONT_CENTER;
dataFormat.endianness = SL_BYTEORDER_LITTLEENDIAN;
SLDataSink dataSink;
Chapter 7
[ 325 ]
dataSink.pLocator = &dataLocatorOut;
dataSink.pFormat = &dataFormat;
SLDataLocator_IODevice dataLocatorIn;
dataLocatorIn.locatorType = SL_DATALOCATOR_IODEVICE;
dataLocatorIn.deviceType = SL_IODEVICE_AUDIOINPUT;
dataLocatorIn.deviceID = SL_DEFAULTDEVICEID_AUDIOINPUT;
dataLocatorIn.device = NULL;
SLDataSource dataSource;
dataSource.pLocator = &dataLocatorIn;
dataSource.pFormat = NULL;
When an applicaon ends, do not forget to release the recorder object as all other OpenSL objects.
Recording a sound
To record a sound, you need to create a sound buer with an appropriate size according to
the duraon of your recording. You can adapt the Sound class to allow the creaon of an
empty buer with a given size. The size depends on the sampling rate. For example, for a
record of 2 seconds with a sampling rate of 44100 Hz and 16-bit quality, the sound buer
size would look like the following:
recordSize = 2 * 44100 * sizeof(int16_t);
recordBuffer = new int16_t[mRecordSize];
In recordSound(), rst stop the recorder, thanks to SLRecordItf, to ensure it is not
already recording. Then, clear the queue to ensure your record buer is used immediately.
Finally, you can enqueue a new buer and start recording:
(*mRecorder)->SetRecordState(mRecorder, SL_RECORDSTATE_STOPPED);
(*mRecorderQueue)->Clear(mRecorderQueue);
(*mRecorderQueue)->Enqueue(mRecorderQueue, recordBuffer,
recordSize * sizeof(int16_t));
(*mRecorder)->SetRecordState(mRecorder,SL_RECORDSTATE_RECORDING);
It is perfectly possible to enqueue new sound buers so that any current
recording is processed to its end. This allows creang a connuous chain
of recording or, in other words, streaming the recording. The sound being
enqueued will be processed only once the previous is lled.

Playing Sound with OpenSL ES
[ 326 ]
Recording a callback
You eventually need to know when your sound buer has nished recording. To do so,
register a callback triggered when a recorder event happens (for example, a buer has been
lled). An event mask should be set to ensure that callback is called only when a buer has
been lled (SL_RECORDEVENT_BUFFER_FULL). A few others are available in OpenSLES.h,
but not all are supported (SL_RECORDEVENT_HEADATLIMIT, and so on):
(*mRecorderQueue)->RegisterCallback(mRecorderQueue,
callback_recorder, this);
(*mRecorder)->SetCallbackEventMask(mRecorder,
SL_RECORDEVENT_BUFFER_FULL);
Finally, when callback_recorder() is triggered, stop recording and play the recorded
buer with playRecordedSound(). The recorded buer needs to be enqueued in the
audio player's queue for playback, as we did in the previous secon. You can use a specic
SoundQueue to play the sound for simplicity purposes.
Summary
In summary, we saw in this chapter how to inialize OpenSL ES on Android. The engine
object is the main entry point to manage all OpenSL objects. Objects in OpenSL follow
a specic lifecycle of creaon, realizaon, and destrucon. Then, we saw how to play
background music from an encoded le and in-memory sounds with a sound buer queue.
Finally, we discovered how to record and then play a sound in a way that is thread-safe and
non-blocking.
Do you prefer OpenSL ES over Java APIs? If all you need is a nice high-level API, Java APIs
may suit your requirements beer. If you need ner playback or recording control, there is
no signicant dierence between low-level Java APIs and OpenSL ES. In this case, the choice
should be architectural. If your code is mainly Java, you should probably go with Java.
If you need to reuse an exisng sound-related library, opmize the performance, or perform
intense computaons, such as sound ltering on the y, OpenSL ES is probably the right
choice. OpenSL ES is also the way to go to low-latency, although Android is not quite there
yet (fragmentaons, device-specic issues, and so on). At the least, this verbose API is
probably the one that is going to give the best performance. There is no garbage collector
overhead and aggressive opmizaon is favored in the nave code.
Whatever choice you make, know that the Android NDK has a lot more to oer. Aer dealing
with Chapter 6, Rendering Graphics with OpenGL ES and Chapter 7, Playing Sound with
OpenSL ES, the next chapter will take care of handling input navely: keyboard, touches,
and sensors.
[ 327 ]
8
Handling Input Devices and Sensors
Android is all about interaction. Admittedly, that means feedback, through
graphics, audio, vibrations, and so on. But there is no interaction without input!
The success of today's smartphones takes its root in their multiple and modern
input possibilities: touchscreens, keyboard, mouse, GPS, accelerometer, light
detector, sound recorder, and so on. Handling and combining them properly is a
key to enrich your application and to make it successful.
Although Android handles many input peripherals, the Android NDK has long been very
limited in its support (not to say the very least), unl the release of R5! We can now access it
directly through a nave API. Examples of available devices are:
Keyboard, either physical (with a slide-out keyboard) or virtual (which appears
on screen)
Direconal pad (up, down, le, right, and acon buons), oen abbreviated
as D-Pad.
Trackball, opcal ones included
Touchscreen, which has made modern smart-phones successful
Mouse or Track Pad (since NDK R5, but available on Honeycomb devices only)

Handling Input Devices and Sensors
[ 328 ]
We can also access hardware sensors, which are as follows:
Accelerometer, which measures the linear acceleraon applied to a device.
Gyroscope, which measures the angular velocity. It is oen combined with the
magnetometer to compute orientaon accurately and quickly. Gyroscope has been
introduced recently and is not available on most devices yet.
Magnetometer, which gives the ambient magnec eld and consequently the
cardinal direcon.
Light sensor, for example, to automacally adapt to screen luminosity.
Proximity sensor, for example, to detect ear distance during a call.
In addion to hardware sensors, "soware sensors" have been introduced with Gingerbread.
These sensors are derived from the hardware sensor's data:
Gravity sensor, to measure the gravity direcon and magnitude
Linear acceleraon sensor, which measures device "movement" excluding gravity
Rotaon vector, which indicates device orientaon in space
The gravity sensor and the linear acceleraon sensor are derived from the accelerometer. On
the other hand, rotaon vector is derived from the magnetometer and the accelerometer.
Because these sensors are generally computed over me, they usually incur a slight delay in
geng up-to-date values.
To familiarize ourselves more deeply with input devices and sensors, this chapter teaches
how to:
Handle screen touches
Detect keyboard, D-Pad, and trackball events
Turn the accelerometer sensor into a joypad
Interacting with touch events
The most emblemac innovaon of today's smart phones is the touchscreen, which has
replaced the now anque mice. A touchscreen detects, as its name suggests, touches made
with ngers or styluses on a device's surface. Depending on the quality of the screen,
several touches (also referred to as cursors in Android) can be handled, de-mulplying
interacon possibilies.
So let's start this chapter by handling touch events in DroidBlaster. To keep the example
simple, we will only handle a single "touch". The goal is to move the ship in the direcon of
touch. The farther the touch, the faster the ship goes. Beyond a predened range TOUCH_
MAX_RANGE, the ship's speed reaches its speed limit, as shown in the following gure:

Chapter 8
[ 329 ]
Strong move
Little move
TOUCH_MAX_RANGE
The resulng project is provided with this book under the name
DroidBlaster_Part13.
Time for action – handling touch events
Let's intercept touch events in DroidBlaster:
1. In the same way that we created ActivityHandler to process applicaon events
in Chapter 5, Wring a Fully Nave Applicaon, create jni/InputHandler.
hpp to process input events. The input API is declared in android/input.h.
Create onTouchEvent() to handle touch events. These events are packaged in
an AInputEvent structure. Other input peripherals will be described later in this
chapter:
#ifndef _PACKT_INPUTHANDLER_HPP_
#define _PACKT_INPUTHANDLER_HPP_
#include <android/input.h>
class InputHandler {

Handling Input Devices and Sensors
[ 330 ]
public:
virtual ~InputHandler() {};
virtual bool onTouchEvent(AInputEvent* pEvent) = 0;
};
#endif
2. Modify the jni/EventLoop.hpp header le to include and handle an
InputHandler instance.
In a similar way, to acvity events, dene an internal method
processInputEvent(), which is triggered by a stac callback callback_
input():
...
#include "ActivityHandler.hpp"
#include "InputHandler.hpp"
#include <android_native_app_glue.h>
class EventLoop {
public:
EventLoop(android_app* pApplication,
ActivityHandler& pActivityHandler,
InputHandler& pInputHandler);
...
private:
...
void processAppEvent(int32_t pCommand);
int32_t processInputEvent(AInputEvent* pEvent);
static void callback_appEvent(android_app* pApplication,
int32_t pCommand);
static int32_t callback_input(android_app* pApplication,
AInputEvent* pEvent);
...
ActivityHandler& mActivityHandler;
InputHandler& mInputHandler;
};
#endif
3. We need to process input events in the jni/EventLoop.cpp source le and nofy
the associated InputHandler.
Chapter 8
[ 331 ]
First, connect the Android input queue to callback_input(). The EventLoop
itself (that is, this) is passed anonymously through the userData member of the
android_app structure. That way, callback is able to delegate input processing back
to our own object, that is, to processInputEvent():
...
EventLoop::EventLoop(android_app* pApplication,
ActivityHandler& pActivityHandler, InputHandler& pInputHandler):
mApplication(pApplication),
mActivityHandler(pActivityHandler),
mEnabled(false), mQuit(false),
mInputHandler(pInputHandler) {
mApplication->userData = this;
mApplication->onAppCmd = callback_appEvent;
mApplication->onInputEvent = callback_input;
}
...
int32_t EventLoop::callback_input(android_app* pApplication,
AInputEvent* pEvent) {
EventLoop& eventLoop = *(EventLoop*) pApplication->userData;
return eventLoop.processInputEvent(pEvent);
}
...
4. Touchscreen events are of the type MotionEvent (as opposed to key events). They
can be discriminated according to their source (AINPUT_SOURCE_TOUCHSCREEN)
thanks to the Android nave input API (here, AinputEvent_getSource()):
Note how callback_input() and by extension
processInputEvent() return an integer value (which is
intrinsically a Boolean value). This value indicates that an input event
(for example, a pressed button) has been processed by the application
and does not need to be processed further by the system. For
example, 1 is returned when the back button is pressed to stop event
processing and prevent the activity from getting terminated.
...
int32_t EventLoop::processInputEvent(AInputEvent* pEvent) {
if (!mEnabled) return 0;
int32_t eventType = AInputEvent_getType(pEvent);
switch (eventType) {

Handling Input Devices and Sensors
[ 332 ]
case AINPUT_EVENT_TYPE_MOTION:
switch (AInputEvent_getSource(pEvent)) {
case AINPUT_SOURCE_TOUCHSCREEN:
return mInputHandler.onTouchEvent(pEvent);
break;
}
break;
}
return 0;
}
5. Create jni/InputManager.hpp to handle touch events and implement our new
InputHandler interface.
Dene the methods as follows:
start() to perform the necessary initialization.
onTouchEvent() to update the manager state when a new event
is triggered.
getDirectionX() and getDirectionY() to indicate the ship direction.
setRefPoint() refers to the ship position. Indeed, the direction is defined
as the vector between the touch point and the ship location (that is, the
reference point).
Also, declare the necessary members and more specically mScaleFactor, which
contains the proper rao to convert the input event from screen coordinates to
game coordinates (remember that we use a xed size).
#ifndef _PACKT_INPUTMANAGER_HPP_
#define _PACKT_INPUTMANAGER_HPP_
#include "GraphicsManager.hpp"
#include "InputHandler.hpp"
#include "Types.hpp"
#include <android_native_app_glue.h>
class InputManager : public InputHandler {
public:
InputManager(android_app* pApplication,
GraphicsManager& pGraphicsManager);
float getDirectionX() { return mDirectionX; };

Chapter 8
[ 333 ]
float getDirectionY() { return mDirectionY; };
void setRefPoint(Location* pRefPoint) { mRefPoint = pRefPoint; };
void start();
protected:
bool onTouchEvent(AInputEvent* pEvent);
private:
android_app* mApplication;
GraphicsManager& mGraphicsManager;
// Input values.
float mScaleFactor;
float mDirectionX, mDirectionY;
// Reference point to evaluate touch distance.
Location* mRefPoint;
};
#endif
6. Create jni/InputManager.cpp, starng with the constructor:
#include "InputManager.hpp"
#include "Log.hpp"
#include <android_native_app_glue.h>
#include <cmath>
InputManager::InputManager(android_app* pApplication,
GraphicsManager& pGraphicsManager) :
mApplication(pApplication), mGraphicsManager(pGraphicsManager),
mDirectionX(0.0f), mDirectionY(0.0f),
mRefPoint(NULL) {
}
...
7. Write the start() method to clear members and compute the scale factor. The
scale factor is necessary because, as seen in Chapter 6, Rendering Graphics with
OpenGL ES, we need to convert screen coordinates provided in input events (which
depends on the device) into game coordinates:
...
void InputManager::start() {
Log::info("Starting InputManager.");
mDirectionX = 0.0f, mDirectionY = 0.0f;

Handling Input Devices and Sensors
[ 334 ]
mScaleFactor = float(mGraphicsManager.getRenderWidth())
/ float(mGraphicsManager.getScreenWidth());
}
...
8. The eecve event processing comes in onTouchEvent(). Horizontal and vercal
direcons are computed according to the distance between the reference point
and the touch point. This distance is restricted by TOUCH_MAX_RANGE to an
arbitrary range of 65 units. Thus, a ship's maximum speed is reached when the
reference-to-touch point distance is beyond TOUCH_MAX_RANGE pixels.
Touch coordinates are retrieved thanks to AMotionEvent_getX() and
AMotionEvent_getY() when you move your nger. The direcon vector is
reset to 0 when no more touch is detected:
...
bool InputManager::onTouchEvent(AInputEvent* pEvent) {
static const float TOUCH_MAX_RANGE = 65.0f; // In game units.
if (mRefPoint != NULL) {
if (AMotionEvent_getAction(pEvent)
== AMOTION_EVENT_ACTION_MOVE) {
float x = AMotionEvent_getX(pEvent, 0) * mScaleFactor;
float y = (float(mGraphicsManager.getScreenHeight())
- AMotionEvent_getY(pEvent, 0)) * mScaleFactor;
// Needs a conversion to proper coordinates
// (origin at bottom/left). Only moveY needs it.
float moveX = x - mRefPoint->x;
float moveY = y - mRefPoint->y;
float moveRange = sqrt((moveX * moveX) + (moveY * moveY));
if (moveRange > TOUCH_MAX_RANGE) {
float cropFactor = TOUCH_MAX_RANGE / moveRange;
moveX *= cropFactor; moveY *= cropFactor;
}
mDirectionX = moveX / TOUCH_MAX_RANGE;
mDirectionY = moveY / TOUCH_MAX_RANGE;
} else {
mDirectionX = 0.0f; mDirectionY = 0.0f;
}
}
return true;
}

Chapter 8
[ 335 ]
9. Create a simple component jni/MoveableBody.hpp, whose role is to move
PhysicsBody according to input events:
#ifndef _PACKT_MOVEABLEBODY_HPP_
#define _PACKT_MOVEABLEBODY_HPP_
#include "InputManager.hpp"
#include "PhysicsManager.hpp"
#include "Types.hpp"
class MoveableBody {
public:
MoveableBody(android_app* pApplication,
InputManager& pInputManager, PhysicsManager& pPhysicsManager);
PhysicsBody* registerMoveableBody(Location& pLocation,
int32_t pSizeX, int32_t pSizeY);
void initialize();
void update();
private:
PhysicsManager& mPhysicsManager;
InputManager& mInputManager;
PhysicsBody* mBody;
};
#endif
10. Implement this component in jni/MoveableBody.cpp.
InputManager and the body are bound in registerMoveableBody():
#include "Log.hpp"
#include "MoveableBody.hpp"
MoveableBody::MoveableBody(android_app* pApplication,
InputManager& pInputManager, PhysicsManager&
pPhysicsManager) :
mInputManager(pInputManager),
mPhysicsManager(pPhysicsManager),
mBody(NULL) {
}
PhysicsBody* MoveableBody::registerMoveableBody(Location& pLocation,
int32_t pSizeX, int32_t pSizeY) {
mBody = mPhysicsManager.loadBody(pLocation, pSizeX, pSizeY);

Handling Input Devices and Sensors
[ 336 ]
mInputManager.setRefPoint(&pLocation);
return mBody;
}
...
11. Inially, the body has no velocity.
Then, each me it is updated, the velocity mirrors the current input state. This
velocity is taken in input by PhysicsManager created in Chapter 5, Wring a
Fully Nave Applicaon, to update the enty's posion:
...
void MoveableBody::initialize() {
mBody->velocityX = 0.0f;
mBody->velocityY = 0.0f;
}
void MoveableBody::update() {
static const float MOVE_SPEED = 320.0f;
mBody->velocityX = mInputManager.getDirectionX() * MOVE_SPEED;
mBody->velocityY = mInputManager.getDirectionY() * MOVE_SPEED;
}
Reference the new InputManager and MoveableComponent in jni/
DroidBlaster.hpp:
...
#include "EventLoop.hpp"
#include "GraphicsManager.hpp"
#include "InputManager.hpp"
#include "MoveableBody.hpp"
#include "PhysicsManager.hpp"
#include "Resource.hpp"
...
class DroidBlaster : public ActivityHandler {
...
private:
TimeManager mTimeManager;
GraphicsManager mGraphicsManager;
PhysicsManager mPhysicsManager;
SoundManager mSoundManager;
InputManager mInputManager;
EventLoop mEventLoop;
...
Asteroid mAsteroids;
Ship mShip;

Chapter 8
[ 337 ]
StarField mStarField;
SpriteBatch mSpriteBatch;
MoveableBody mMoveableBody;
};
#endif
12. Finally, adapt the jni/DroidBlaster.cpp constructor to instanate
InputManager and MoveableComponent.
Append InputManager to EventLoop, which dispatches input events, at
construcon me.
The spaceship is the enty being moved. So, pass a reference to its locaon to the
MoveableBody component:
...
DroidBlaster::DroidBlaster(android_app* pApplication):
mTimeManager(),
mGraphicsManager(pApplication),
mPhysicsManager(mTimeManager, mGraphicsManager),
mSoundManager(pApplication),
mInputManager(pApplication, mGraphicsManager),
mEventLoop(pApplication, *this, mInputManager),
...
mAsteroids(pApplication, mTimeManager, mGraphicsManager,
mPhysicsManager),
mShip(pApplication, mGraphicsManager, mSoundManager),
mStarField(pApplication, mTimeManager, mGraphicsManager,
STAR_COUNT, mStarTexture),
mSpriteBatch(mTimeManager, mGraphicsManager),
mMoveableBody(pApplication, mInputManager, mPhysicsManager) {
...
Sprite* shipGraphics = mSpriteBatch.registerSprite(mShipTexture,
SHIP_SIZE, SHIP_SIZE);
shipGraphics->setAnimation(SHIP_FRAME_1, SHIP_FRAME_COUNT,
SHIP_ANIM_SPEED, true);
Sound* collisionSound =
mSoundManager.registerSound(mCollisionSound);
mMoveableBody.registerMoveableBody(shipGraphics->location,
SHIP_SIZE, SHIP_SIZE);
mShip.registerShip(shipGraphics, collisionSound);
// Creates asteroids.
...
}
...

Handling Input Devices and Sensors
[ 338 ]
13. Inialize and update MoveableBody and InputManager in the
corresponding methods:
...
status DroidBlaster::onActivate() {
Log::info("Activating DroidBlaster");
if (mGraphicsManager.start() != STATUS_OK) return STATUS_KO;
if (mSoundManager.start() != STATUS_OK) return STATUS_KO;
mInputManager.start();
mSoundManager.playBGM(mBGM);
mAsteroids.initialize();
mShip.initialize();
mMoveableBody.initialize();
mTimeManager.reset();
return STATUS_OK;
}
...
status DroidBlaster::onStep() {
mTimeManager.update();
mPhysicsManager.update();
mAsteroids.update();
mMoveableBody.update();
return mGraphicsManager.update();
}
...
What just happened?
We created a simple example of an input system, based on touch events. The ship ies
toward the touch point at a speed dependent on the touch distance. The touch event
coordinates are absolute. Their origin is in the upper-le corner of the screen, on the
opposite of OpenGL, which is on the lower-le corner. If screen rotaon is permied by an
applicaon, then the screen origin remains on the upper-le corner from the user's point of
view, whether the device is in portrait or landscape mode.
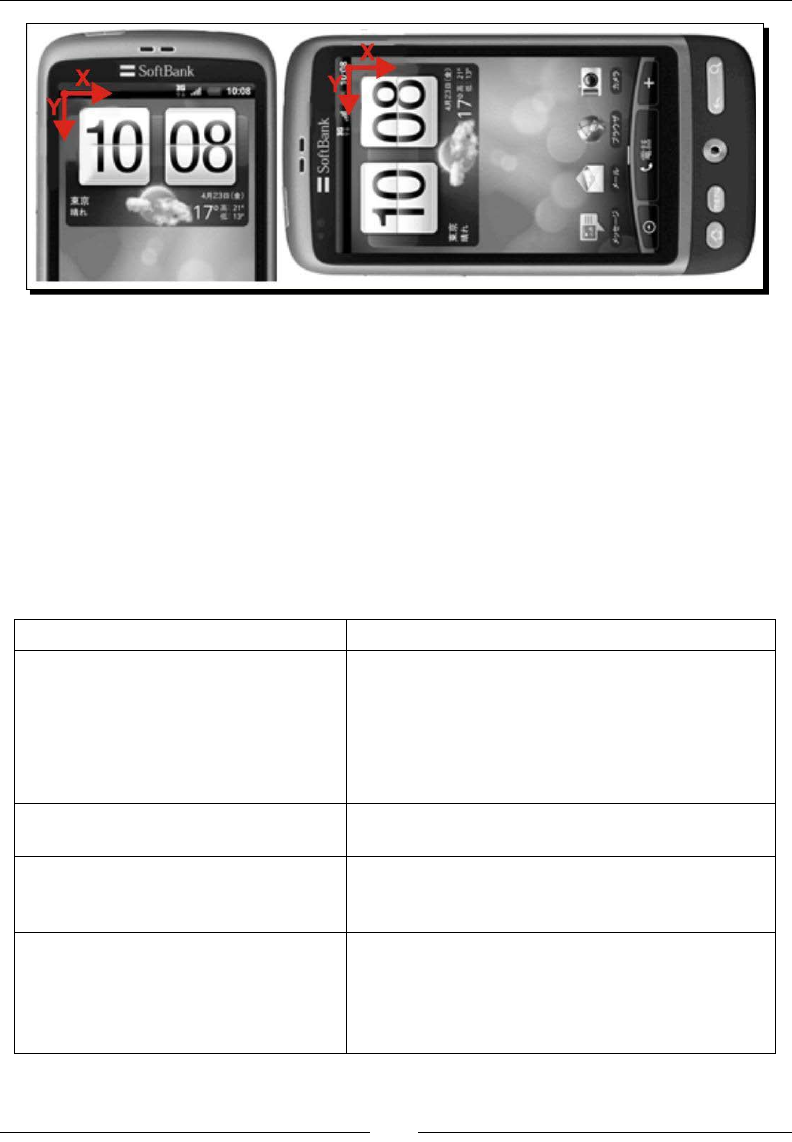
Chapter 8
[ 339 ]
To implement this new feature, we connected our event loop to the input event queue
provided by the native_app_glue module. This queue is internally represented as a UNIX
pipe, like the acvity event queue. Touchscreen events are embedded in an AInputEvent
structure, which stores other kinds of input events. Input events are handled with the
AInputEvent and AMotionEvent API declared in android/input.h. The AInputEvent
API is necessary to discriminate input event types using AInputEvent_getType() and
AInputEvent_getSource() methods. The AMotionEvent API provides methods to
handle touch events only.
The touch API is rather rich. Many details can be requested as shown in the following table
(non-exhausvely):
Method Description
AMotionEvent_getAction() To detect whether a finger makes contact with the
screen, leaving it, or moving over the surface.
The result is an integer value composed of the event
type (on byte 1, for example, AMOTION_EVENT_
ACTION_DOWN) and a pointer index (on byte 2, to
know which finger the event refers to).
AMotionEvent_getX()
AMotionEvent_getY()
To retrieve touch coordinates on screen, expressed
in pixels as a float (sub-pixel values are possible).
AMotionEvent_getDownTime()
AMotionEvent_getEventTime()
To retrieve how much time a finger has been sliding
over the screen and when the event was generated
in nanoseconds.
AMotionEvent_getPressure()
AMotionEvent_getSize()
To detect the pressure intensity and zone. Values
usually range between 0.0 and 1.0 (but may
exceed it). Size and pressure are generally closely
related. The behavior can vary greatly and be noisy,
depending on hardware.

Handling Input Devices and Sensors
[ 340 ]
Method Description
AMotionEvent_
getHistorySize()
AMotionEvent_
getHistoricalX()
AMotionEvent_
getHistoricalY()
Touch events of type AMOTION_EVENT_ACTION_
MOVE can be grouped together for efficiency
purposes. These methods give access to these
historical points that occurred between previous and
current events.
Have a look at android/input.h for an exhausve list of methods.
If you look more deeply at the AMotionEvent API, you will noce that some events have
a second parameter pointer_index, which ranges between 0 and the number of acve
pointers. Indeed, most touchscreens today are mul-touch! Two or more ngers on a screen
(if hardware supports it) are translated in Android by two or more pointers. To manipulate
them, look at the following table:
Method Description
AMotionEvent_
getPointerCount()
To know how many fingers touch the screen.
AMotionEvent_getPointerId() To get a pointer unique identifier from a pointer index.
This is the only way to track a particular pointer (that is,
finger) over time, as its index may change when fingers
touch or leave the screen.
If you followed the story of the (now prehistoric!) Nexus One, then you
know that it came out with a hardware defect. Pointers were oen
geng mixed up, two of them exchanging one of their coordinates. So
always be prepared to handle hardware specicies or hardware that
behaves incorrectly!
Detecting keyboard, D-Pad, and Trackball events
The most common input device among all is the keyboard. This is true for Android too. An
Android keyboard can be physical: in the device front face (like tradional Blackberries) or
on a slide-out screen. However, a keyboard is more commonly virtual, that is, emulated on
the screen at the cost of a large poron of space taken. In addion to the keyboard itself,
every Android device must include a few physical or emulated buons such as Menu, Home,
and Tasks.
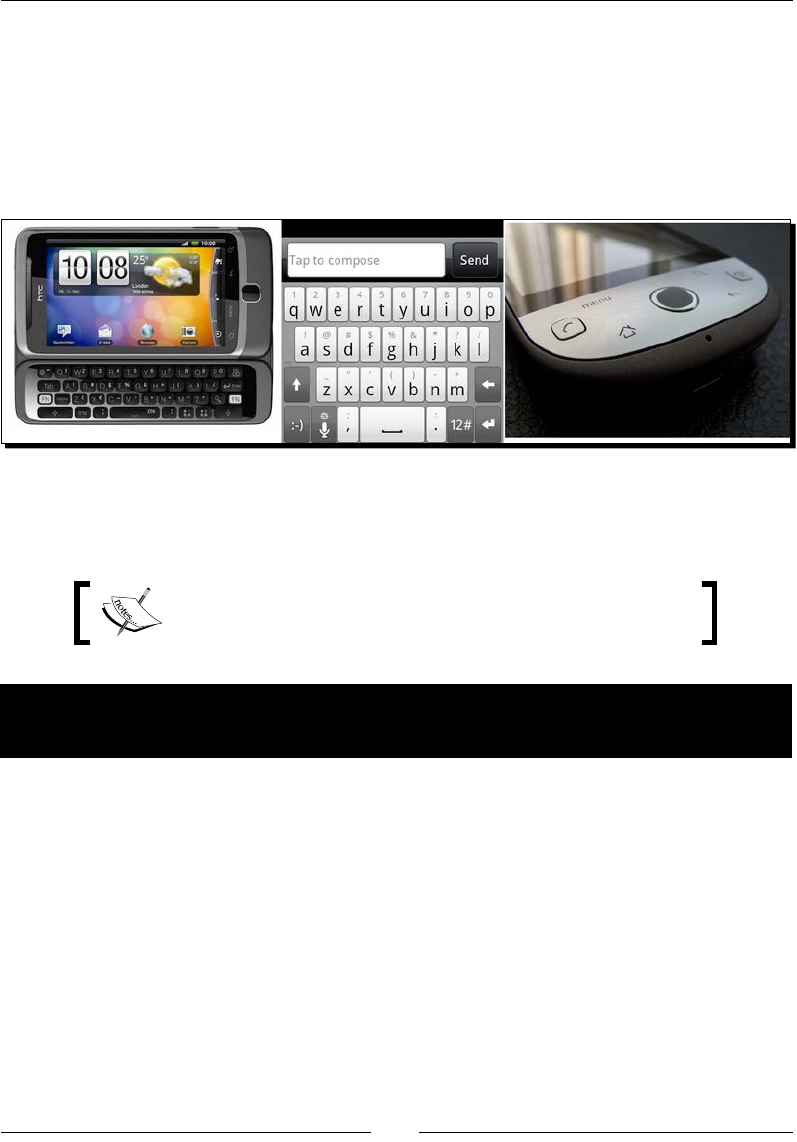
Chapter 8
[ 341 ]
A much less common type of input device is the Direconal-Pad. A D-Pad is a set of physical
buons to move up, down, le, or right and a specic acon/conrmaon buon. Although
they oen disappear from recent phones and tablets, D-Pads remain one of the most
convenient ways to move across text or UI widgets. D-Pads are oen replaced by trackballs.
Trackballs behave similarly to a mouse (the one with a ball inside) that would be upside
down. Some trackballs are analogical, but others (for example, opcal ones) behave as a
D-Pad (that is, all or nothing).
To see how they work, let's use these peripherals to move our space ship in DroidBlaster.
The Android NDK now allows handling all these input peripherals on the nave side. So, let's
try them!
The resulng project is provided with this book under the name
DroidBlaster_Part14.
Time for action – handling keyboard, D-Pad, and trackball events
natively
Let's extend our new Input system with more event types:
1. Open jni/InputHandler.hpp and add the keyboard and trackball event handlers:
#ifndef _PACKT_INPUTHANDLER_HPP_
#define _PACKT_INPUTHANDLER_HPP_
#include <android/input.h>
class InputHandler {

Handling Input Devices and Sensors
[ 342 ]
public:
virtual ~InputHandler() {};
virtual bool onTouchEvent(AInputEvent* pEvent) = 0;
virtual bool onKeyboardEvent(AInputEvent* pEvent) = 0;
virtual bool onTrackballEvent(AInputEvent* pEvent) = 0;
};
#endif
2. Update the method processInputEvent() inside the exisng le jni/
EventLoop.cpp to redirect the keyboard and trackball events to InputHandler.
Trackballs and touch events are assimilated to moon events and can be
discriminated according to their source. On the opposite side, key events are
discriminated according to their type. Indeed, there exists two dedicated APIs for
MotionEvents (the same for trackballs and touch events) and for KeyEvents
(idencal for keyboard, D-Pad, and so on):
...
int32_t EventLoop::processInputEvent(AInputEvent* pEvent) {
if (!mEnabled) return 0;
int32_t eventType = AInputEvent_getType(pEvent);
switch (eventType) {
case AINPUT_EVENT_TYPE_MOTION:
switch (AInputEvent_getSource(pEvent)) {
case AINPUT_SOURCE_TOUCHSCREEN:
return mInputHandler.onTouchEvent(pEvent);
break;
case AINPUT_SOURCE_TRACKBALL:
return mInputHandler.onTrackballEvent(pEvent);
break;
}
break;
case AINPUT_EVENT_TYPE_KEY:
return mInputHandler.onKeyboardEvent(pEvent);
break;
}
return 0;
}
...

Chapter 8
[ 343 ]
3. Modify the jni/InputManager.hpp le to override these new methods:
...
class InputManager : public InputHandler {
...
protected:
bool onTouchEvent(AInputEvent* pEvent);
bool onKeyboardEvent(AInputEvent* pEvent);
bool onTrackballEvent(AInputEvent* pEvent);
...
};
#endif
4. In jni/InputManager.cpp, process the keyboard events in
onKeyboardEvent() using:
AKeyEvent_getAction() to get the event type (that is, pressed or not).
AKeyEvent_getKeyCode() to get the button identity.
In the following code, when le, right, up, or down buons are pressed,
InputManager calculates the direcon and saves it into mDirectionX and
mDirectionY. The movement starts when the buon is down and stops when
it is up.
Return true when the key has been consumed and false when it has not. Indeed,
if a user has pressed, for example, the back buon (AKEYCODE_BACK) or volume
buons (AKEYCODE_VOLUME_UP, AKEYCODE_VOLUME_DOWN), then we let the
system react appropriately for us:
...
bool InputManager::onKeyboardEvent(AInputEvent* pEvent) {
static const float ORTHOGONAL_MOVE = 1.0f;
if (AKeyEvent_getAction(pEvent) == AKEY_EVENT_ACTION_DOWN) {
switch (AKeyEvent_getKeyCode(pEvent)) {
case AKEYCODE_DPAD_LEFT:
mDirectionX = -ORTHOGONAL_MOVE;
return true;
case AKEYCODE_DPAD_RIGHT:
mDirectionX = ORTHOGONAL_MOVE;
return true;
case AKEYCODE_DPAD_DOWN:
mDirectionY = -ORTHOGONAL_MOVE;
return true;
case AKEYCODE_DPAD_UP:
mDirectionY = ORTHOGONAL_MOVE;

Handling Input Devices and Sensors
[ 344 ]
return true;
}
} else {
switch (AKeyEvent_getKeyCode(pEvent)) {
case AKEYCODE_DPAD_LEFT:
case AKEYCODE_DPAD_RIGHT:
mDirectionX = 0.0f;
return true;
case AKEYCODE_DPAD_DOWN:
case AKEYCODE_DPAD_UP:
mDirectionY = 0.0f;
return true;
}
}
return false;
}
...
5. Similarly, process trackball events in a new method onTrackballEvent().
Retrieve the trackball magnitude with AMotionEvent_getX() and
AMotionEvent_getY(). Because some trackballs do not oer a gradated
magnitude, the movements are quaned with plain constants. The possible
noise is ignored with an arbitrary trigger threshold:
...
bool InputManager::onTrackballEvent(AInputEvent* pEvent) {
static const float ORTHOGONAL_MOVE = 1.0f;
static const float DIAGONAL_MOVE = 0.707f;
static const float THRESHOLD = (1/100.0f);
if (AMotionEvent_getAction(pEvent) == AMOTION_EVENT_ACTION_MOVE) {
float directionX = AMotionEvent_getX(pEvent, 0);
float directionY = AMotionEvent_getY(pEvent, 0);
float horizontal, vertical;
if (directionX < -THRESHOLD) {
if (directionY < -THRESHOLD) {
horizontal = -DIAGONAL_MOVE;
vertical = DIAGONAL_MOVE;
} else if (directionY > THRESHOLD) {
horizontal = -DIAGONAL_MOVE;
vertical = -DIAGONAL_MOVE;

Chapter 8
[ 345 ]
} else {
horizontal = -ORTHOGONAL_MOVE;
vertical = 0.0f;
}
} else if (directionX > THRESHOLD) {
if (directionY < -THRESHOLD) {
horizontal = DIAGONAL_MOVE;
vertical = DIAGONAL_MOVE;
} else if (directionY > THRESHOLD) {
horizontal = DIAGONAL_MOVE;
vertical = -DIAGONAL_MOVE;
} else {
horizontal = ORTHOGONAL_MOVE;
vertical = 0.0f;
}
} else if (directionY < -THRESHOLD) {
horizontal = 0.0f;
vertical = ORTHOGONAL_MOVE;
} else if (directionY > THRESHOLD) {
horizontal = 0.0f;
vertical = -ORTHOGONAL_MOVE;
}
...
6. When using a trackball that way, the ship moves unl a "counter-movement" (for
example, requesng to go to the right when going le) or acon buon is pressed
(the last else secon):
...
// Ends movement if there is a counter movement.
if ((horizontal < 0.0f) && (mDirectionX > 0.0f)) {
mDirectionX = 0.0f;
} else if ((horizontal > 0.0f) && (mDirectionX < 0.0f)) {
mDirectionX = 0.0f;
} else {
mDirectionX = horizontal;
}
if ((vertical < 0.0f) && (mDirectionY > 0.0f)) {
mDirectionY = 0.0f;
} else if ((vertical > 0.0f) && (mDirectionY < 0.0f)) {
mDirectionY = 0.0f;

Handling Input Devices and Sensors
[ 346 ]
} else {
mDirectionY = vertical;
}
} else {
mDirectionX = 0.0f; mDirectionY = 0.0f;
}
return true;
}
What just happened?
We extended our input system to handle the keyboard, D-Pad, and trackball events. D-Pad
can be considered as a keyboard extension and is processed the same way. Indeed, D-Pad
and keyboard events are transported in the same structure (AInputEvent) and handled by
the same API (prexed with AKeyEvent).
The following table lists the main key event methods:
Method Description
AKeyEvent_getAction() Indicates whether the button is down (AKEY_EVENT_
ACTION_DOWN) or released (AKEY_EVENT_ACTION_
UP). Note that multiple key actions can be emitted in
batch (AKEY_EVENT_ACTION_MULTIPLE).
AKeyEvent_getKeyCode() To retrieve the actual button being pressed (defined in
android/keycodes.h), for example, AKEYCODE_
DPAD_LEFT for the left button.
AKeyEvent_getFlags() Key events can be associated with one or more flags that
give various kinds of information on the event, such as
AKEY_EVENT_LONG_PRESS, AKEY_EVENT_FLAG_
SOFT_KEYBOARD for the event originated from an
emulated keyboard.
AKeyEvent_getScanCode() Is similar to a key code except that this is the raw key ID,
dependent and different from device to device.
AKeyEvent_getMetaState() Meta states are flags that indicate whether some modifier
keys, such as Alt or Shift, are pressed simultaneously (for
example, AMETA_SHIFT_ON, AMETA_NONE, and so on).
AKeyEvent_
getRepeatCount()
Indicates how many times the button event occurred,
usually when you leave the button down.
AKeyEvent_getDownTime() To know when a button was pressed.
Chapter 8
[ 347 ]
Although some of them (especially opcal ones) behave like a D-Pad, trackballs do not use
the same API. Actually, trackballs are handled through the AMotionEvent API (such as
touch events). Of course, some informaon provided for touch events is not always available
on trackballs. The most important funcons to look at are as follows:
AMotionEvent_getAction() To know whether an event represents a move action
(as opposed to a press action).
AMotionEvent_getX()
AMotionEvent_getY()
To get trackball movement.
AKeyEvent_getDownTime() To know whether the trackball is pressed (such as the
D-Pad action button). Currently, most trackballs use
an all-or-nothing pressure to indicate the press event.
A tricky point to keep in mind when dealing with trackballs is that no event is generated
to indicate that the trackball is not moving. Moreover, trackball events are generated as a
"burst", which makes it harder to detect when the movement is nished. There is no easy
way to handle this, except using a manual mer and checking regularly that no event has
happened for a sucient amount of me.
Never expect peripherals to behave exactly the same on all phones. Trackballs
are a very good example; they can either indicate a direcon like an analogical
pad or a straight direcon like a D-Pad (for example, opcal trackballs). There
is currently no way to dierenate device characteriscs from the available
APIs. The only soluons are to either calibrate the device or congure it at
runme or save a kind of device database.
Probing device sensors
Handling input devices is essenal to any applicaon, but probing sensors is important
for the smartest one! The most spread sensor among Android game applicaons is
the accelerometer.
An accelerometer, as its name suggests, measures the linear acceleraon applied to a device.
When moving a device up, down, le, or right, the accelerometer gets excited and indicates
an acceleraon vector in 3D space. Vector is expressed in relaon to the screen's default
orientaon. The coordinate system is relave to the device's natural orientaon:
X axis points to the right
Y points up
Z points from back to front
Handling Input Devices and Sensors
[ 348 ]
Axes become inverted if the device is rotated (for example, Y points le if the device is
rotated 90 degrees clockwise).
A very interesng feature of accelerometers is that they undergo a constant acceleraon:
gravity, around 9.8m/s2 on earth. For example, when lying at on a table, acceleraon vector
indicates -9.8 on the Z-axis. When straight, it indicates the same value on Y axis. So assuming
the device posion is xed, device orientaon on two axes in space can be deduced from the
gravity acceleraon vector. A magnetometer is sll required to get full device orientaon in
3D space.
Remember that accelerometers work with linear acceleraon. They allow
detecng the translaon when the device is not rotang and paral
orientaon when the device is xed. However, both movements cannot be
combined without a magnetometer and/or gyroscope.
So we can use the device orientaon deduced from the accelerometer to compute a
direcon. Let's now see how to apply this process in DroidBlaster.
The resulng project is provided with this book under the name
DroidBlaster_Part15.
Time for action – handling accelerometer events
Let's handle accelerometer events in DroidBlaster:
1. Open jni/InputHandler.hpp and add a new method
onAccelerometerEvent(). Include the android/sensor.h ocial header
for sensors:
#ifndef _PACKT_INPUTHANDLER_HPP_
#define _PACKT_INPUTHANDLER_HPP_
#include <android/input.h>
#include <android/sensor.h>
class InputHandler {
public:
virtual ~InputHandler() {};
virtual bool onTouchEvent(AInputEvent* pEvent) = 0;
virtual bool onKeyboardEvent(AInputEvent* pEvent) = 0;

Chapter 8
[ 349 ]
virtual bool onTrackballEvent(AInputEvent* pEvent) = 0;
virtual bool onAccelerometerEvent(ASensorEvent* pEvent) = 0;
};
#endif
2. Create new methods in jni/EventLoop.hpp:
activateAccelerometer() and deactivateAccelerometer() to
enable/disable the accelerometer sensor when the activity starts and stops.
processSensorEvent() retrieves and dispatches sensor events.
The callback callback_input() static method is bound to the Looper.
Also, dene the following members:
mSensorManager, of type ASensorManager, is the main "object" to
interact with sensors.
mSensorEventQueue is ASensorEventQueue, which is a structure
defined by the Sensor API to retrieve occurring events.
mSensorPollSource is android_poll_source defined in the Native
Glue. This structure describes how to bind the native thread Looper to the
sensor callback.
mAccelerometer, declared as an ASensor structure, represents the
sensor used:
#ifndef _PACKT_EVENTLOOP_HPP_
#define _PACKT_EVENTLOOP_HPP_
#include "ActivityHandler.hpp"
#include "InputHandler.hpp"
#include <android_native_app_glue.h>
class EventLoop {
...
private:
void activate();
void deactivate();
void activateAccelerometer();
void deactivateAccelerometer();
void processAppEvent(int32_t pCommand);
int32_t processInputEvent(AInputEvent* pEvent);

Handling Input Devices and Sensors
[ 350 ]
void processSensorEvent();
static void callback_appEvent(android_app* pApplication,
int32_t pCommand);
static int32_t callback_input(android_app* pApplication,
AInputEvent* pEvent);
static void callback_sensor(android_app* pApplication,
android_poll_source* pSource);
...
InputHandler& mInputHandler;
ASensorManager* mSensorManager;
ASensorEventQueue* mSensorEventQueue;
android_poll_source mSensorPollSource;
const ASensor* mAccelerometer;
};
#endif
3. Update constructor inializaon list in jni/EventLoop.cpp:
#include "EventLoop.hpp"
#include "Log.hpp"
EventLoop::EventLoop(android_app* pApplication,
ActivityHandler& pActivityHandler, InputHandler& pInputHandler):
mApplication(pApplication),
mActivityHandler(pActivityHandler),
mEnabled(false), mQuit(false),
mInputHandler(pInputHandler),
mSensorPollSource(), mSensorManager(NULL),
mSensorEventQueue(NULL), mAccelerometer(NULL) {
mApplication->userData = this;
mApplication->onAppCmd = callback_appEvent;
mApplication->onInputEvent = callback_input;
}
...
4. Create the sensor event queue, through which all sensor events are noed.
Bind it to callback_sensor(). Note here that we use the LOOPER_ID_USER
constant provided by the Nave App Glue to aach a user-dened queue.
Then, call activateAccelerometer() to inialize the accelerometer sensor:
...
void EventLoop::activate() {
if ((!mEnabled) && (mApplication->window != NULL)) {
mSensorPollSource.id = LOOPER_ID_USER;

Chapter 8
[ 351 ]
mSensorPollSource.app = mApplication;
mSensorPollSource.process = callback_sensor;
mSensorManager = ASensorManager_getInstance();
if (mSensorManager != NULL) {
mSensorEventQueue = ASensorManager_createEventQueue(
mSensorManager, mApplication->looper,
LOOPER_ID_USER, NULL, &mSensorPollSource);
if (mSensorEventQueue == NULL) goto ERROR;
}
activateAccelerometer();
mQuit = false; mEnabled = true;
if (mActivityHandler.onActivate() != STATUS_OK) {
goto ERROR;
}
}
return;
ERROR:
mQuit = true;
deactivate();
ANativeActivity_finish(mApplication->activity);
}
...
5. When an acvity is disabled or terminated, disable the running accelerometer to
avoid consuming baery needlessly.
Then, destroy the sensor event queue:
...
void EventLoop::deactivate() {
if (mEnabled) {
deactivateAccelerometer();
if (mSensorEventQueue != NULL) {
ASensorManager_destroyEventQueue(mSensorManager,
mSensorEventQueue);
mSensorEventQueue = NULL;
}
mSensorManager = NULL;
mActivityHandler.onDeactivate();
mEnabled = false;
}
}
...

Handling Input Devices and Sensors
[ 352 ]
6. callback_sensor() is triggered when event loop is polled. It dispatches events
to processSensorEvent() on the EventLoop instance. We only care about
ASENSOR_TYPE_ACCELEROMETER events:
...
void EventLoop::callback_sensor(android_app* pApplication,
android_poll_source* pSource) {
EventLoop& eventLoop = *(EventLoop*) pApplication->userData;
eventLoop.processSensorEvent();
}
void EventLoop::processSensorEvent() {
ASensorEvent event;
if (!mEnabled) return;
while (ASensorEventQueue_getEvents(mSensorEventQueue,
&event, 1) > 0) {
switch (event.type) {
case ASENSOR_TYPE_ACCELEROMETER:
mInputHandler.onAccelerometerEvent(&event);
break;
}
}
}
...
7. Acvate the sensor in activateAccelerometer() in three main steps:
Get a sensor of a specific type with AsensorManager_
getDefaultSensor().
Then, enable it with ASensorEventQueue_enableSensor() so that the
sensor event queue gets filled with related events.
Set the desired event rate with ASensorEventQueue_setEventRate().
For a game, we typically want measures close to real time. The minimum
delay can be queried with ASensor_getMinDelay() (setting it to a lower
value might result in a failure).
Obviously, we should perform this setup only when the sensor event queue is ready:
...
void EventLoop::activateAccelerometer() {
mAccelerometer = ASensorManager_getDefaultSensor(
mSensorManager, ASENSOR_TYPE_ACCELEROMETER);
if (mAccelerometer != NULL) {
if (ASensorEventQueue_enableSensor(
mSensorEventQueue, mAccelerometer) < 0) {

Chapter 8
[ 353 ]
Log::error("Could not enable accelerometer");
return;
}
int32_t minDelay = ASensor_getMinDelay(mAccelerometer);
if (ASensorEventQueue_setEventRate(mSensorEventQueue,
mAccelerometer, minDelay) < 0) {
Log::error("Could not set accelerometer rate");
}
} else {
Log::error("No accelerometer found");
}
}
...
8. Sensor deacvaon is easier and only requires a call to the method
AsensorEventQueue_disableSensor():
...
void EventLoop::deactivateAccelerometer() {
if (mAccelerometer != NULL) {
if (ASensorEventQueue_disableSensor(mSensorEventQueue,
mAccelerometer) < 0) {
Log::error("Error while deactivating sensor.");
}
mAccelerometer = NULL;
}
}
What just happened?
We created an event queue to listen to sensor events. Events are wrapped in an
ASensorEvent structure, dened in android/sensor.h. This structure provides
the following:
Sensor event origin, that is, which sensor produced this event.
Sensor event occurrence me.
Sensor output value. This value is stored in a union structure, that is, you
can use either one of the inside structures (here, we are interested in the
acceleration vector).
typedef struct ASensorEvent {
int32_t version;
int32_t sensor;
int32_t type;

Handling Input Devices and Sensors
[ 354 ]
int32_t reserved0;
int64_t timestamp;
union {
float data[16];
ASensorVector vector;
ASensorVector acceleration;
ASensorVector magnetic;
float temperature;
float distance;
float light;
float pressure;
};
int32_t reserved1[4];
} ASensorEvent;
The same ASensorEvent structure is used for any Android sensor. In the case of the
accelerometer, we retrieve a vector with three coordinates x, y, and z, one for each axis:
typedef struct ASensorVector {
union {
float v[3];
struct {
float x;
float y;
float z;
};
struct {
float azimuth;
float pitch;
float roll;
};
};
int8_t status;
uint8_t reserved[3];
} ASensorVector;
In our example, the accelerometer is set up with the lowest event rate possible, which may
vary between devices. It is important to note that the sensor event rate has a direct impact
on baery saving! So, use a rate that is sucient for your applicaon. The ASensor API
oers some methods to query the available sensors and their capabilies, such as ASensor_
getName(), ASensor_getVendor(), ASensor_getMinDelay(), and so on.
Now that we can retrieve sensor events, let's use them to compute a ship's direcon.

Chapter 8
[ 355 ]
Time for action – turning an Android device into a Joypad
Let's nd the device orientaon and properly determine the direcon.
1. Write a new le jni/Configuration.hpp to help us get device informaon, and
more specically device rotaon (dened as screen_rot).
Declare findRotation() to discover the device orientaon with the help of JNI:
#ifndef _PACKT_CONFIGURATION_HPP_
#define _PACKT_CONFIGURATION_HPP_
#include "Types.hpp"
#include <android_native_app_glue.h>
#include <jni.h>
typedef int32_t screen_rot;
const screen_rot ROTATION_0 = 0;
const screen_rot ROTATION_90 = 1;
const screen_rot ROTATION_180 = 2;
const screen_rot ROTATION_270 = 3;
class Configuration {
public:
Configuration(android_app* pApplication);
screen_rot getRotation() { return mRotation; };
private:
void findRotation(JNIEnv* pEnv);
android_app* mApplication;
screen_rot mRotation;
};
#endif

Handling Input Devices and Sensors
[ 356 ]
2. Retrieve conguraon details in jni/Configuration.cpp.
First, in the constructor, use the AConfiguration API to dump conguraon
properes, such as the current language, country, screen size, screen orientaon.
This informaon may be interesng, but is not sucient to properly analyze
accelerometer events:
#include "Configuration.hpp"
#include "Log.hpp"
#include <stdlib.h>
Configuration::Configuration(android_app* pApplication) :
mApplication(pApplication),
mRotation(0) {
AConfiguration* configuration = AConfiguration_new();
if (configuration == NULL) return;
int32_t result;
char i18NBuffer[] = "__";
static const char* orientation[] = {
"Unknown", "Portrait", "Landscape", "Square"
};
static const char* screenSize[] = {
"Unknown", "Small", "Normal", "Large", "X-Large"
};
static const char* screenLong[] = {
"Unknown", "No", "Yes"
};
// Dumps current configuration.
AConfiguration_fromAssetManager(configuration,
mApplication->activity->assetManager);
result = AConfiguration_getSdkVersion(configuration);
Log::info("SDK Version : %d", result);
AConfiguration_getLanguage(configuration, i18NBuffer);
Log::info("Language : %s", i18NBuffer);
AConfiguration_getCountry(configuration, i18NBuffer);
Log::info("Country : %s", i18NBuffer);
result = AConfiguration_getOrientation(configuration);
Log::info("Orientation : %s (%d)", orientation[result], result);
result = AConfiguration_getDensity(configuration);
Log::info("Density : %d dpi", result);
result = AConfiguration_getScreenSize(configuration);
Chapter 8
[ 357 ]
Log::info("Screen Size : %s (%d)", screenSize[result], result);
result = AConfiguration_getScreenLong(configuration);
Log::info("Long Screen : %s (%d)", screenLong[result], result);
AConfiguration_delete(configuration);
...
Then, aach the current nave thread to the Android VM.
If you have carefully read Chapter 4, Calling Java Back from
Native Code, you know that this step is necessary to get access
to the JNIEnv object (which is thread-specific). The JavaVM
itself can be retrieved from the android_app structure.
3. Aer that, call findRotation() to retrieve the current device rotaon.
Finally, we can detach the thread from Dalvik as we will not use JNI any more.
Remember that an aached thread should always be detached before terminang
the applicaon:
...
JavaVM* javaVM = mApplication->activity->vm;
JavaVMAttachArgs javaVMAttachArgs;
javaVMAttachArgs.version = JNI_VERSION_1_6;
javaVMAttachArgs.name = "NativeThread";
javaVMAttachArgs.group = NULL;
JNIEnv* env;
if (javaVM->AttachCurrentThread(&env,
&javaVMAttachArgs) != JNI_OK) {
Log::error("JNI error while attaching the VM");
return;
}
// Finds screen rotation and get-rid of JNI.
findRotation(env);
mApplication->activity->vm->DetachCurrentThread();
}
...
4. Implement findRotation(), which basically executes the following Java code
through JNI:
WindowManager mgr = (InputMethodManager)
myActivity.getSystemService(Context.WINDOW_SERVICE);
int rotation = mgr.getDefaultDisplay().getRotation();

Handling Input Devices and Sensors
[ 358 ]
Obviously, this is slightly more complex to write in JNI.
First, retrieve JNI classes, then methods, and finally, fields
Then, perform the JNI calls
Finally, release the allocated JNI references
The following code has been voluntarily simplied to avoid extra checks (that is,
FindClass() and GetMethodID() return value and excepon checks for each
method call):
...
void Configuration::findRotation(JNIEnv* pEnv) {
jobject WINDOW_SERVICE, windowManager, display;
jclass ClassActivity, ClassContext;
jclass ClassWindowManager, ClassDisplay;
jmethodID MethodGetSystemService;
jmethodID MethodGetDefaultDisplay;
jmethodID MethodGetRotation;
jfieldID FieldWINDOW_SERVICE;
jobject activity = mApplication->activity->clazz;
// Classes.
ClassActivity = pEnv->GetObjectClass(activity);
ClassContext = pEnv->FindClass("android/content/Context");
ClassWindowManager = pEnv->FindClass(
"android/view/WindowManager");
ClassDisplay = pEnv->FindClass("android/view/Display");
// Methods.
MethodGetSystemService = pEnv->GetMethodID(ClassActivity,
"getSystemService",
"(Ljava/lang/String;)Ljava/lang/Object;");
MethodGetDefaultDisplay = pEnv->GetMethodID(
ClassWindowManager, "getDefaultDisplay",
"()Landroid/view/Display;");
MethodGetRotation = pEnv->GetMethodID(ClassDisplay,
"getRotation", "()I");
// Fields.
FieldWINDOW_SERVICE = pEnv->GetStaticFieldID(
ClassContext, "WINDOW_SERVICE", "Ljava/lang/String;");
// Retrieves Context.WINDOW_SERVICE.

Chapter 8
[ 359 ]
WINDOW_SERVICE = pEnv->GetStaticObjectField(ClassContext,
FieldWINDOW_SERVICE);
// Runs getSystemService(WINDOW_SERVICE).
windowManager = pEnv->CallObjectMethod(activity,
MethodGetSystemService, WINDOW_SERVICE);
// Runs getDefaultDisplay().getRotation().
display = pEnv->CallObjectMethod(windowManager,
MethodGetDefaultDisplay);
mRotation = pEnv->CallIntMethod(display, MethodGetRotation);
pEnv->DeleteLocalRef(ClassActivity);
pEnv->DeleteLocalRef(ClassContext);
pEnv->DeleteLocalRef(ClassWindowManager);
pEnv->DeleteLocalRef(ClassDisplay);
}
5. Manage the new accelerometer sensor in jni/InputManager.hpp.
Accelerometer axes are transformed in toScreenCoord().
This transformaon implies that we keep track of device rotaon:
...
#include "Configuration.hpp"
#include "GraphicsManager.hpp"
#include "InputHandler.hpp"
...
class InputManager : public InputHandler {
...
protected:
bool onTouchEvent(AInputEvent* pEvent);
bool onKeyboardEvent(AInputEvent* pEvent);
bool onTrackballEvent(AInputEvent* pEvent);
bool onAccelerometerEvent(ASensorEvent* pEvent);
void toScreenCoord(screen_rot pRotation,
ASensorVector* pCanonical, ASensorVector* pScreen);
private:
...
float mScaleFactor;
float mDirectionX, mDirectionY;
// Reference point to evaluate touch distance.
Location* mRefPoint;
screen_rot mRotation;
};
#endif

Handling Input Devices and Sensors
[ 360 ]
6. In jni/InputManager.hpp, read the current screen rotaon sengs with the
help of the new Configuration class. Since DroidBlaster forces portrait mode,
we can store rotaon once and for all:
...
InputManager::InputManager(android_app* pApplication,
GraphicsManager& pGraphicsManager) :
mApplication(pApplication), mGraphicsManager(pGraphicsManager),
mDirectionX(0.0f), mDirectionY(0.0f),
mRefPoint(NULL) {
Configuration configuration(pApplication);
mRotation = configuration.getRotation();
}
...
7. Let's compute a direcon from the accelerometer sensor values.
First, convert accelerometer values from canonical to screen coordinates to handle
portrait and landscape devices.
Then, compute a direcon from the captured accelerometer values. In the following
code, the X and Z axis express the roll and pitch, respecvely. Check for both axes
whether the device is in a neutral orientaon (that is, CENTER_X and CENTER_Z)
or is sloping (MIN_X, MIN_Z, MAX_X, and MAX_Z). Note that Z values need to be
inverted for our needs:
...
bool InputManager::onAccelerometerEvent(ASensorEvent* pEvent) {
static const float GRAVITY = ASENSOR_STANDARD_GRAVITY / 2.0f;
static const float MIN_X = -1.0f; static const float MAX_X = 1.0f;
static const float MIN_Z = 0.0f; static const float MAX_Z = 2.0f;
static const float CENTER_X = (MAX_X + MIN_X) / 2.0f;
static const float CENTER_Z = (MAX_Z + MIN_Z) / 2.0f;
// Converts from canonical to screen coordinates.
ASensorVector vector;
toScreenCoord(mRotation, &pEvent->vector, &vector);
// Roll tilt.
float rawHorizontal = pEvent->vector.x / GRAVITY;
if (rawHorizontal > MAX_X) {
rawHorizontal = MAX_X;
} else if (rawHorizontal < MIN_X) {
rawHorizontal = MIN_X;
}

Chapter 8
[ 361 ]
mDirectionX = CENTER_X - rawHorizontal;
// Pitch tilt. Final value needs to be inverted.
float rawVertical = pEvent->vector.z / GRAVITY;
if (rawVertical > MAX_Z) {
rawVertical = MAX_Z;
} else if (rawVertical < MIN_Z) {
rawVertical = MIN_Z;
}
mDirectionY = rawVertical - CENTER_Z;
return true;
}
...
8. In the toScreenCoord() helper, swap or invert accelerometer axes depending
on screen rotaon, so that X and Z axes point toward the same direcon, whatever
device you use when playing DroidBlaster in portrait mode:
...
void InputManager::toScreenCoord(screen_rot pRotation,
ASensorVector* pCanonical, ASensorVector* pScreen) {
struct AxisSwap {
int8_t negX; int8_t negY;
int8_t xSrc; int8_t ySrc;
};
static const AxisSwap axisSwaps[] = {
{ 1, -1, 0, 1}, // ROTATION_0
{ -1, -1, 1, 0}, // ROTATION_90
{ -1, 1, 0, 1}, // ROTATION_180
{ 1, 1, 1, 0}}; // ROTATION_270
const AxisSwap& swap = axisSwaps[pRotation];
pScreen->v[0] = swap.negX * pCanonical->v[swap.xSrc];
pScreen->v[1] = swap.negY * pCanonical->v[swap.ySrc];
pScreen->v[2] = pCanonical->v[2];
}
What just happened?
The accelerometer is now a Joypad! Android devices can be naturally portrait-oriented
(mainly smartphones and smaller tablets) or landscape-oriented (mainly tablets). This has an
impact on applicaons, which receive accelerometer events. Axes are not aligned the same
way between these types of devices and depending on the way they are rotated.

Handling Input Devices and Sensors
[ 362 ]
Indeed, the screen can be oriented in four dierent ways: 0, 90, 180, and 270 degrees. 0
degree is the device's natural orientaon. Accelerometer X axis always points right, Y points
up, and Z points towards the front. On a phone, Y points up in portrait mode, whereas on
most tables, Y points up in landscape mode. When the device is oriented at 90 degrees, the
axes orientaon obviously changes (X points up, and so on). This situaon may also happen
with a tablet (where 0 degree corresponds to landscape mode) that is used in portrait mode.
There is sadly no way to get device rotaon relave to a screen's natural orientaon with
nave APIs. Thus, we need to rely on JNI to get accurate device rotaon. Then, we can easily
deduce a direcon vector from this like done in onAccelerometerEvent().
More on sensors
Each Android sensor has a unique idener, dened in android/sensor.h. These
ideners are the same across all Android devices:
ASENSOR_TYPE_ACCELEROMETER
ASENSOR_TYPE_MAGNETIC_FIELD
ASENSOR_TYPE_GYRISCOPE
ASENSOR_TYPE_LIGHT
ASENSOR_TYPE_PROXIMITY

Chapter 8
[ 363 ]
Addional sensors may exist and be available, even if they are not named in the android/
sensor.h header. On Gingerbread, we have the same case with:
Gravity sensor (idener 9)
Linear acceleraon sensor (idener 10)
Rotaon vector (idener 11).
The rotaon vector sensor, successor of the now deprecated orientaon vector, is essenal
in the Augmented Reality applicaon. It gives you device orientaon in 3D space.
Combined with the GPS, it allows locang any object through the eye of your device. The
rotaon sensor provides a data vector, which can be translated to an OpenGL view matrix,
thanks to the android.hardware.SensorManager class (see its source code). That way,
you can directly materialize device orientaon into screen content, linking together real and
virtual life.
Summary
In this chapter, we covered mulple ways to interact with Android from nave code. More
precisely, we discovered how to aach an input queue to the Native App Glue event
loop. Then, we handled touch events and processed key events from keyboards and D-Pads
or moon events from trackballs. Finally, we turned the accelerometer into a Joypad.
Because of Android fragmentaon, expect specicies in an input device's behavior and be
prepared to tweak your code. We have already been far in the capabilies of Android NDK in
terms of applicaon structure, graphics, sound, input, and sensors. However, reinvenng the
wheel is not a soluon!
In the next chapter, we will unleash the real power of the NDK by porng exisng C/C++
libraries to Android.
[ 365 ]
9
Porting Existing Libraries to Android
There are two main reasons why one would be interested in the Android NDK:
first, for performance, and, second, for portability. In the previous chapters, we
saw how to access the main native Android APIs from native code for efficiency
purposes. In this chapter, we will bring the whole C/C++ ecosystem to Android,
well, at least discovering the path, as decades of C/C++ development would be
difficult to fit the limited memory of mobile devices anyway! Indeed, C and C++
are still some of the most widely used programming languages nowadays.
In previous NDK releases, portability was limited due to the partial support of
C++, especially Exceptions and Run-Time Type Information (RTTI, a basic C++
reflection mechanism to get data types at runtime such as instanceof in
Java). Any library requiring them could not be ported without modifying their
code or installing a custom NDK (the Crystax NDK, rebuilt by the community
from official sources, and available at http://www.crystax.net/).
Hopefully, many of these restrictions have been lifted since (except wide
character support).
Although not necessarily dicult, porng an exisng library is not a trivial process. A few
APIs might be missed (despite good POSIX support), some #define direcves have to be
tweaked, some dependencies have to be ported, as well as dependencies of dependencies.
Some libraries will be easy to port, while some other will involve more eort.
Porng Exisng Libraries to Android
[ 366 ]
In this chapter, in order to port exisng code to Android, we are going to learn how to do the
following code:
Acvate the Standard Template Library (STL)
Port the Box2D physics engine
Prebuild and use the Boost framework
Discover more in-depth how to write NDK module Makeles
By the end of this chapter, you should understand the nave building process and know how
to use Makeles appropriately.
Activating the Standard Template Library
The Standard Template Library is a normalized library of containers, iterators, algorithms,
and helper classes to ease most common programming operaons, such as dynamic
arrays, associave arrays, strings, sorng, and so on. This library gained recognion among
developers over the years and is widely spread. Developing in C++ without the STL is like
coding with one hand behind your back!
In this rst part, let's embed GNU STL in DroidBlaster to ease collecon management.
Resulng project is provided with this book under the name
DroidBlaster_Part16.
Time for action – activating GNU STL in DroidBlaster
Let's acvate and make use of the STL in DroidBlaster. Edit the jni/Application.mk le
beside jni/Android.mk and write the following content. That's it! Your applicaon is now
STL-enabled, thanks to this single line:
APP_ABI := armeabi armeabi-v7a x86
APP_STL := gnustl_static
What just happened?
In only a single line of code, we have acvated GNU STL in the Application.mk le! This
STL implementaon, selected through the APP_STL variable, replaces the default NDK C/C++
runme. The following three STL implementaons are currently supported:
GNU STL (more commonly libstdc++), the ocial GCC STL: This is oen the preferred
choice when using the STL on an NDK project. Excepons and RTTI are supported.

Chapter 9
[ 367 ]
STLport (a mulplaorm STL): This implementaon is not acvely maintained and
lacks some features. Choose it as a last resort. Excepons and RTTI are supported.
Libc++: This is part of LLVM (the technology behind the Clang compiler) and aims
to provide a funconal C++ 11 runme. Note that this library is now becoming
the default STL on OS-X and may gain popularity in the future. Excepons and
RTTI are supported. Libc++ support is sll incomplete and experimental. Libc++ is
oen chosen in conjuncon with the Clang compiler (read more about this in the
Mastering module Makeles secon).
Android also provides two other C++ runmes:
System: This is the default NDK runme when no STL implementaon is acvated.
Its code name is Bionic and it provides a minimalist set of headers (cstdint,
cstdio, cstring, and so on). Bionic does not provide STL features, as well as
excepons and run-me type informaon (RTTI). For more details about its
limitaons, have a look at $ANDROID_NDK/docs/system/libc/OVERVIEW.html.
Gabi: This is similar to the System runme, except that it supports excepons
and RTTI.
We will see in the part dedicated to Boost in this chapter how to enable excepons and RTTI
during compilaon.
Each runme is linkable either stacally or dynamically (at the notable excepon of the
default system C/C++ runme). Dynamically loaded runmes are posts xed with _shared,
and stacally loaded ones with _static. The full list of runme ideners you can pass to
APP_STL is as follows:
system
gabi++_static and gabi++_shared
stlport_static and stlport_shared
gnustl_static and gnustl_shared
c++_static and c++_shared
Remember that shared libraries need to be loaded manually at runme. If you forget to load
a shared library, an error is raised at runme as soon as dependent libraries modules are
loaded. As the compiler cannot predict in advance which funcons are going to be called,
libraries are loaded enrely in memory, even if most of their contents remain unused.
Porng Exisng Libraries to Android
[ 368 ]
On the other hand, stac libraries are in fact loaded with dependent libraries. Indeed,
stac libraries do not really exist as such at runme. Their content is copied into dependent
libraries at compile me when they are linked. Since the linker knows precisely which part of
the library gets called from the embedding module, it can strip its code and keep only what
is needed.
Stripping is the process of discarding unnecessary symbols from binaries.
This helps reducing (potenally a lot!) binary size aer linkage. This can be
somewhat compared to the Proguard shrinking post processing in Java.
However, linking results in binary code duplicaon if a stac library is included more than
once. Such a situaon can potenally lead to a waste of memory or, more worryingly, issues
related to, for example, global variable duplicaon. However, stac C++ constructors in
shared libraries are called only once.
Remember that you should avoid using stac libraries that are included
more than once in a project unless you know what you are doing.
Another point to consider is that Java applicaons can load shared libraries only, which can
themselves be linked against either shared or stac libraries. For example, the main library
of NativeActivity is a shared library, specied through the android.app.lib_name
manifest property. Shared libraries referenced from another library must be loaded manually
before. The NDK does not do it itself.
Shared libraries can be loaded easily, using System.loadLibrary() in a JNI applicaons,
but NativeActivity are "transparent" acvies. So, if you decide to use shared libraries,
the only soluon is to write your own Java acvity, inhering from NativeActivity
and invoking the appropriate loadLibrary() direcves. For instance, below is what
DroidBlaster acvity would look like, if we were using gnustl_shared instead:
package com.packtpub.DroidBlaster
import android.app.NativeActivity
public class MyNativeActivity extends NativeActivity {
static {
System.loadLibrary("gnustl_shared");
System.loadLibrary("DroidBlaster");
}
}
Chapter 9
[ 369 ]
If you prefer to load your nave library directly from nave code, you can
use the system call dlopen(), which is also provided by the NDK.
Now that the STL is enabled, let's employ it in DroidBlaster.
Time for action – read les with STL stream
Let's use the STL to read resources from the SD card instead of the applicaon asset
directory, as shown in the following steps:
1. Obviously, enabling the STL is useless if we do not acvely use it in our code. Let's
take advantage of this opportunity to switch from asset les to external les (on a
sdcard or internal memory).
Open the exisng le, jni/Resource.hpp, and do the following:
Include the fstream and string STL headers.
Use a std::string object for the file name and replace the Asset
management members with an std::ifstream object (that is, an input
file stream).
Change the getPath() method to return a C string from the new
string member.
Remove the descriptor() method and the ResourceDescriptor class
(descriptors work with the Asset API only) , as shown in the following:
#ifndef _PACKT_RESOURCE_HPP_
#define _PACKT_RESOURCE_HPP_
#include "Types.hpp"
#include <android_native_app_glue.h>
#include <fstream>
#include <string>
...
class Resource {
public:
Resource(android_app* pApplication, const char* pPath);
const char* getPath() { return mPath.c_str(); };
status open();

Porng Exisng Libraries to Android
[ 370 ]
void close();
status read(void* pBuffer, size_t pCount);
off_t getLength();
bool operator==(const Resource& pOther);
private:
std::string mPath;
std::ifstream mInputStream;
};
#endif
2. Open the corresponding implementaon le jni/Resource.cpp. Replace the
previous implementaon, based on the asset management API with STL streams
and strings. Files will be opened in binary mode, as follows:
#include "Resource.hpp"
#include <sys/stat.h>
Resource::Resource(android_app* pApplication, const char* pPath):
mPath(std::string("/sdcard/") + pPath),
mInputStream(){
}
status Resource::open() {
mInputStream.open(mPath.c_str(), std::ios::in | std::ios::binary);
return mInputStream ? STATUS_OK : STATUS_KO;
}
void Resource::close() {
mInputStream.close();
}
status Resource::read(void* pBuffer, size_t pCount) {
mInputStream.read((char*)pBuffer, pCount);
return (!mInputStream.fail()) ? STATUS_OK : STATUS_KO;
}
...
3. To read the le length, we can use the stat() POSIX primive from the sys/
stat.h header:
...
off_t Resource::getLength() {
struct stat filestatus;

Chapter 9
[ 371 ]
if (stat(mPath.c_str(), &filestatus) >= 0) {
return filestatus.st_size;
} else {
return -1;
}
}
...
4. Finally, we can use STL string comparison operator to compare two
Resource objects:
...
bool Resource::operator==(const Resource& pOther) {
return mPath == pOther.mPath;
}
5. These changes to the reading system should be almost transparent, except for the
BGM, whose content was played through an asset le descriptor.
Now, we need to provide a real le. So, in jni/SoundService.cpp, change
the data source by replacing the SLDataLocator_AndroidFD structure with
SLDataLocation_URI, as shown in the following:
#include "Log.hpp"
#include "Resource.hpp"
#include "SoundService.hpp"
#include <string>
...
status SoundManager::playBGM(Resource& pResource) {
SLresult result;
Log::info("Opening BGM %s", pResource.getPath());
// Set-up BGM audio source.
SLDataLocator_URI dataLocatorIn;
std::string path = pResource.getPath();
dataLocatorIn.locatorType = SL_DATALOCATOR_URI;
dataLocatorIn.URI = (SLchar*) path.c_str();
SLDataFormat_MIME dataFormat;
dataFormat.formatType = SL_DATAFORMAT_MIME;
...
}
...
Porng Exisng Libraries to Android
[ 372 ]
6. In the AndroidManifest.xml le, add the permission to read SD card les
as follows:
<?xml version="1.0" encoding="utf-8"?>
<manifest xmlns:android="http://schemas.android.com/apk/res/android"
package="com.packtpub.droidblaster2d" android:versionCode="1"
android:versionName="1.0">
<uses-permission
android:name="android.permission.READ_EXTERNAL_STORAGE" />
...
</manifest>
Copy all asset resources from the asset directory to your device SD card (or internal memory,
depending on your device) in /sdcard/droidblaster.
What just happened?
We have seen how to access binary les located on the SD card with STL streams. We have
also switched the OpenSL ES player from a le descriptor to a le name locator. The le
name itself is created here from an STL string. STL strings are a real benet as they allow us
to get rid of complex C string manipulaon primives.
Almost all Android devices can store les in an addional storage locaon
mounted in directory /sdcard. ""Almost"" is the important word here.
Since the rst Android G1, the meaning of ""sdcard"" has changed. Some
recent devices have an external storage that is in fact internal (for example,
ash memory on some tablets), and some others have a second storage
locaon at their disposal (although in most cases, the second storage is
mounted inside /sdcard). Moreover, the /sdcard path itself is not
engraved into the marble. So, to detect safely the addional storage locaon,
the only soluon is to rely on JNI by calling android.os.Environment.
getExternalStorageDirectory(). You can also check that storage
is available with getExternalStorageState(). Note that the word
""External"" in API method name is here for historical reasons only. Also, the
permission WRITE_EXTERNAL_STORAGE in manifest is required.
The STL provides much more features than Files and Strings. The most popular among them
are probably STL containers. Let's see some usage examples in DroidBlaster.

Chapter 9
[ 373 ]
Time for action – using STL containers
Let's now replace raw arrays with standard STL containers by following these steps:
1. Open the jni/GraphicsManager.hpp header and include the headers:
Vector, which defines an STL container encapsulating C arrays (with a few
more interesting features such as dynamic resizing)
Map, which encapsulates the equivalent of a Java HashMap (that is, an
associative array)
Then, remove the textureResource member in the TextureProperties
structure. Use a map container instead of a raw array for mTextures (prexed
with the std namespace). The rst parameter is the key type and the second the
value type.
Finally, replace all the other raw arrays with a vector, as shown in the following:
...
#include <android_native_app_glue.h>
#include <GLES2/gl2.h>
#include <EGL/egl.h>
#include <map>
#include <vector>
...
struct TextureProperties {
GLuint texture;
int32_t width;
int32_t height;
};
class GraphicsManager {
...
// Graphics resources.
std::map<Resource*, TextureProperties> mTextures;
std::vector<GLuint> mShaders;
std::vector<GLuint> mVertexBuffers;
std::vector<GraphicsComponent*> mComponents;
// Rendering resources.
...
};
#endif

Porng Exisng Libraries to Android
[ 374 ]
2. Edit jni/GraphicsManager.cpp and inialize the new STL containers in the
constructor inializaon list as follows:
#include "GraphicsManager.hpp"
#include "Log.hpp"
#include <png.h>
GraphicsManager::GraphicsManager(android_app* pApplication) :
...
mProjectionMatrix(),
mTextures(), mShaders(), mVertexBuffers(), mComponents(),
mScreenFrameBuffer(0),
mRenderFrameBuffer(0), mRenderVertexBuffer(0),
... {
Log::info("Creating GraphicsManager.");
}
...
3. Use the vector::push_back() method to insert components into the
mComponents list when they get registered, as shown in the following:
...
void GraphicsManager::registerComponent(GraphicsComponent* pComponent)
{
mComponents.push_back(pComponent);
}
...
4. In start(), we can iterate through the vector using an iterator to inialize each
registered component, as shown in the following:
...
status GraphicsManager::start() {
...
mProjectionMatrix[3][3] = 1.0f;
// Loads graphics components.
for (std::vector<GraphicsComponent*>::iterator
componentIt = mComponents.begin();
componentIt < mComponents.end(); ++componentIt) {
if ((*componentIt)->load() != STATUS_OK) return STATUS_KO;
}
return STATUS_OK;
...
}
...

Chapter 9
[ 375 ]
5. In stop(), we can iterate through the map (with second represenng entry's value)
and vector collecons to release each allocated OpenGL resource this me, as
shown in the following:
...
void GraphicsManager::stop() {
Log::info("Stopping GraphicsManager.");
// Releases textures.
std::map<Resource*, TextureProperties>::iterator textureIt;
for (textureIt = mTextures.begin(); textureIt != mTextures.end();
++textureIt) {
glDeleteTextures(1, &textureIt->second.texture);
}
// Releases shaders.
std::vector<GLuint>::iterator shaderIt;
for (shaderIt = mShaders.begin(); shaderIt < mShaders.end();
++shaderIt) {
glDeleteProgram(*shaderIt);
}
mShaders.clear();
// Releases vertex buffers.
std::vector<GLuint>::iterator vertexBufferIt;
for (vertexBufferIt = mVertexBuffers.begin();
vertexBufferIt < mVertexBuffers.end(); ++vertexBufferIt) {
glDeleteBuffers(1, &(*vertexBufferIt));
}
mVertexBuffers.clear();
...
}
...
6. Also iterate over components stored to render them in update(), as shown in
the following:
...
status GraphicsManager::update() {
// Uses the offscreen FBO for scene rendering.
glBindFramebuffer(GL_FRAMEBUFFER, mRenderFrameBuffer);
glViewport(0, 0, mRenderWidth, mRenderHeight);
glClear(GL_COLOR_BUFFER_BIT);
// Render graphic components.
std::vector<GraphicsComponent*>::iterator componentIt;

Porng Exisng Libraries to Android
[ 376 ]
for (componentIt = mComponents.begin();
componentIt < mComponents.end(); ++componentIt) {
(*componentIt)->draw();
}
// The FBO is rendered and scaled into the screen.
glBindFramebuffer(GL_FRAMEBUFFER, mScreenFrameBuffer);
...
}
...
7. Since textures are expensive resources, use the map to check if a texture has already
been loaded before loading and caching a new instance, as shown in the following:
...
TextureProperties* GraphicsManager::loadTexture(Resource& pResource) {
// Looks for the texture in cache first.
std::map<Resource*, TextureProperties>::iterator textureIt =
mTextures.find(&pResource);
if (textureIt != mTextures.end()) {
return &textureIt->second;
}
Log::info("Loading texture %s", pResource.getPath());
...
Log::info("Texture size: %d x %d", width, height);
// Caches the loaded texture.
textureProperties = &mTextures[&pResource];
textureProperties->texture = texture;
textureProperties->width = width;
textureProperties->height = height;
return textureProperties;
...
}
...
8. Use the dened vector objects to save shaders and vertex buers. Use push_
back() again to add an element to the vector, as shown in the following:
...
GLuint GraphicsManager::loadShader(const char* pVertexShader,
const char* pFragmentShader) {
...
if (result == GL_FALSE) {
glGetProgramInfoLog(shaderProgram, sizeof(log), 0, log);

Chapter 9
[ 377 ]
Log::error("Shader program error: %s", log);
goto ERROR;
}
mShaders.push_back(shaderProgram);
return shaderProgram;
...
}
GLuint GraphicsManager::loadVertexBuffer(const void* pVertexBuffer,
int32_t pVertexBufferSize) {
...
if (glGetError() != GL_NO_ERROR) goto ERROR;
mVertexBuffers.push_back(vertexBuffer);
return vertexBuffer;
...
}
9. Now, open jni/SpriteBatch.hpp.
Here again, include and use vector objects instead of raw arrays:
...
#ifndef _PACKT_GRAPHICSSPRITEBATCH_HPP_
#define _PACKT_GRAPHICSSPRITEBATCH_HPP_
#include "GraphicsManager.hpp"
#include "Sprite.hpp"
#include "TimeManager.hpp"
#include "Types.hpp"
#include <GLES2/gl2.h>
#include <vector>
class SpriteBatch : public GraphicsComponent {
...
TimeManager& mTimeManager;
GraphicsManager& mGraphicsManager;
std::vector<Sprite*> mSprites;
std::vector<Sprite::Vertex> mVertices;
std::vector<GLushort> mIndexes;
GLuint mShaderProgram;

Porng Exisng Libraries to Android
[ 378 ]
GLuint aPosition; GLuint aTexture;
GLuint uProjection; GLuint uTexture;
};
#endif
10. In jni/SpriteBatch.cpp, replace the usage of raw arrays with vectors, as shown
in the following:
...
SpriteBatch::SpriteBatch(TimeManager& pTimeManager,
GraphicsManager& pGraphicsManager) :
mTimeManager(pTimeManager),
mGraphicsManager(pGraphicsManager),
mSprites(), mVertices(), mIndexes(),
mShaderProgram(0),
aPosition(-1), aTexture(-1), uProjection(-1), uTexture(-1)
{
mGraphicsManager.registerComponent(this);
}
SpriteBatch::~SpriteBatch() {
std::vector<Sprite*>::iterator spriteIt;
for (spriteIt = mSprites.begin(); spriteIt < mSprites.end();
++spriteIt) {
delete (*spriteIt);
}
}
Sprite* SpriteBatch::registerSprite(Resource& pTextureResource,
int32_t pHeight, int32_t pWidth) {
int32_t spriteCount = mSprites.size();
int32_t index = spriteCount * 4; // Points to 1st vertex.
// Precomputes the index buffer.
mIndexes.push_back(index+0); mIndexes.push_back(index+1);
mIndexes.push_back(index+2); mIndexes.push_back(index+2);
mIndexes.push_back(index+1); mIndexes.push_back(index+3);
for (int i = 0; i < 4; ++i) {
mVertices.push_back(Sprite::Vertex());
}
// Appends a new sprite to the sprite array.
mSprites.push_back(new Sprite(mGraphicsManager,
pTextureResource, pHeight, pWidth));
return mSprites.back();
}
...

Chapter 9
[ 379 ]
11. During the loading and drawing process, loop over the vector. You can use an
iterator (here in load()), as shown in the following:
...
status SpriteBatch::load() {
...
uTexture = glGetUniformLocation(mShaderProgram, "u_texture");
// Loads sprites.
std::vector<Sprite*>::iterator spriteIt;
for (spriteIt = mSprites.begin(); spriteIt < mSprites.end();
++spriteIt) {
if ((*spriteIt)->load(mGraphicsManager)
!= STATUS_OK) goto ERROR;
}
return STATUS_OK;
ERROR:
Log::error("Error loading sprite batch");
return STATUS_KO;
}
void SpriteBatch::draw() {
...
// Renders all sprites in batch.
const int32_t vertexPerSprite = 4;
const int32_t indexPerSprite = 6;
float timeStep = mTimeManager.elapsed();
int32_t spriteCount = mSprites.size();
int32_t currentSprite = 0, firstSprite = 0;
while (bool canDraw = (currentSprite < spriteCount)) {
Sprite* sprite = mSprites[currentSprite];
...
}
...
}
12. Finally, declare a std::vector in jni/Asteroid.hpp as follows:
#ifndef _PACKT_ASTEROID_HPP_
#define _PACKT_ASTEROID_HPP_
#include "GraphicsManager.hpp"
#include "PhysicsManager.hpp"

Porng Exisng Libraries to Android
[ 380 ]
#include "TimeManager.hpp"
#include "Types.hpp"
#include <vector>
class Asteroid {
public:
...
PhysicsManager& mPhysicsManager;
std::vector<PhysicsBody*> mBodies;
float mMinBound;
float mUpperBound; float mLowerBound;
float mLeftBound; float mRightBound;
};
#endif
13. Use the vector to insert and iterate over bodies in jni/Asteroid.cpp, as shown in
the following code:
#include "Asteroid.hpp"
#include "Log.hpp"
static const float BOUNDS_MARGIN = 128;
static const float MIN_VELOCITY = 150.0f, VELOCITY_RANGE = 600.0f;
Asteroid::Asteroid(android_app* pApplication,
TimeManager& pTimeManager, GraphicsManager& pGraphicsManager,
PhysicsManager& pPhysicsManager) :
mTimeManager(pTimeManager),
mGraphicsManager(pGraphicsManager),
mPhysicsManager(pPhysicsManager),
mBodies(),
mMinBound(0.0f),
mUpperBound(0.0f), mLowerBound(0.0f),
mLeftBound(0.0f), mRightBound(0.0f) {
}
void Asteroid::registerAsteroid(Location& pLocation,
int32_t pSizeX, int32_t pSizeY) {
mBodies.push_back(mPhysicsManager.loadBody(pLocation,
pSizeX, pSizeY));

Chapter 9
[ 381 ]
}
void Asteroid::initialize() {
mMinBound = mGraphicsManager.getRenderHeight();
mUpperBound = mMinBound * 2;
mLowerBound = -BOUNDS_MARGIN;
mLeftBound = -BOUNDS_MARGIN;
mRightBound = (mGraphicsManager.getRenderWidth() + BOUNDS_MARGIN);
std::vector<PhysicsBody*>::iterator bodyIt;
for (bodyIt = mBodies.begin(); bodyIt < mBodies.end(); ++bodyIt) {
spawn(*bodyIt);
}
}
void Asteroid::update() {
std::vector<PhysicsBody*>::iterator bodyIt;
for (bodyIt = mBodies.begin(); bodyIt < mBodies.end(); ++bodyIt) {
PhysicsBody* body = *bodyIt;
if ((body->location->x < mLeftBound)
|| (body->location->x > mRightBound)
|| (body->location->y < mLowerBound)
|| (body->location->y > mUpperBound)) {
spawn(body);
}
}
}
...
What just happened?
There has been a use of STL containers throughout the applicaon to replace raw C arrays.
For example, we have managed a set of Asteroid game objects inside an STL container
vector instead of a raw C array. We have also replaced the texture cache using an STL map
container. STL containers have many advantages, such as automacally handling memory
management (array resizing operaons and so on), to alleviate our burden.
STL is denitely a huge improvement that avoids repeve and error-prone code. Many
open source libraries require it and it can now be ported without much trouble. More
documentaon about it can be found at http://www.cplusplus.com/reference/stl
and on SGI's website (publisher of the rst STL) at http://www.sgi.com/tech/stl.
Porng Exisng Libraries to Android
[ 382 ]
When developing for performance, standard STL containers are not always the best choice,
especially in terms of memory management and allocaon. Indeed, STL is an all-purpose
library, wrien for common cases. Alternave libraries might be considered for
performance-crical code. A few examples are as follows:
EASTL: This is an STL replacement developed by Electronic Arts with gaming in mind.
An extract is available in the repository at https://github.com/paulhodge/
EASTL. A must-read paper detailing EASTL technical details can be found on the
Open Standards website at http://www.open-std.org/jtc1/sc22/wg21/
docs/papers/2007/n2271.html.
Bitsquid Foundaon library: This is another STL replacement targeng games and
can be found at https://bitbucket.org/bitsquid/foundation/.
RDESTL: This is an open source subset of the STL, based on the EASTL technical
paper, which was published several years before EASTL code release. The code
repository can be found at http://code.google.com/p/rdestl/.
Google SparseHash: This is for a high performance associave array library (note
that RDESTL is also quite good at that).
This is far from exhausve. Just dene your exact needs to make the most appropriate choice.
STL is sll the best choice for most applicaons or libraries. Before going away
from it, prole your source code and make sure it is really necessary.
Porting Box2D to Android
With the STL in our basket, we are ready to port almost any library to Android. Actually,
many third-party libraries are already ported and many more are coming. However, when
nothing is available, you have to rely on our own skills.
To see how to handle this situaon, we are now going to port Box2D with the NDK. Box2D is
a highly popular physics simulaon engine iniated by Erin Cao in 2006. Many 2D games,
either amateur or professional like Angry Birds, embed this powerful open source library. It is
available in several languages, including Java, though its primary language is C++.
Box2D is an answer to the complex subject, that is, physics simulaon. Maths, numerical
integraon, soware opmizaon, and so on are some of the mulple techniques applied to
simulate rigid body movements and collisions in a 2D environment. Bodies are the essenal
element of Box2D and are characterized by the following:
A geometrical shape (polygons, circles, and so on)
Physics properes (such as density, fricon, restuon, and so on)
Chapter 9
[ 383 ]
Movement constraints and joints (to link bodies together and restrict
their movement)
All these bodies are orchestrated inside a World that steps simulaon according to me.
So, now that you know the very basics of Box2D, let's port and integrate it in DroidBlaster to
simulate collisions.
Resulng project is provided with this book under the name
DroidBlaster_Part17.
Time for action – compiling Box2D on Android
First, let's port Box2D on the Android NDK following these steps:
Box2D 2.3.1 archive is provided with this book in directory Libraries/box2d.
1. Unzip Box2D source archive (2.3.1 in this book) into ${ANDROID_NDK}/sources/
(beware directory must be named box2d).
Create and open an Android.mk le in the root of the box2d directory.
First, save the current directory inside the LOCAL_PATH variable. This step is always
necessary because an NDK build system may switch to another directory at any me
during compilaon.
2. Aer this, list all Box2D source les to compile, as shown in the following. We are
interested in source le name only, which can be found in ${ANDROID_NDK}/
sources/box2d/Box2D/Box2D. Use the LS_CPP helper funcon to avoid copying
each lename.
LOCAL_PATH:= $(call my-dir)
LS_CPP=$(subst $(1)/,,$(wildcard $(1)/$(2)/*.cpp))
BOX2D_CPP:= $(call LS_CPP,$(LOCAL_PATH),Box2D/Collision) \
$(call LS_CPP,$(LOCAL_PATH),Box2D/Collision/Shapes) \
$(call LS_CPP,$(LOCAL_PATH),Box2D/Common) \
$(call LS_CPP,$(LOCAL_PATH),Box2D/Dynamics) \
$(call LS_CPP,$(LOCAL_PATH),Box2D/Dynamics/Contacts) \
$(call LS_CPP,$(LOCAL_PATH),Box2D/Dynamics/Joints) \
$(call LS_CPP,$(LOCAL_PATH),Box2D/Rope)
...

Porng Exisng Libraries to Android
[ 384 ]
3. Then, write the Box2D module denion for a stac library. First, call the $(CLEAR_
VARS) script. This script has to be included before any module denion to remove
any potenal change made by other modules, and to avoid any unwanted side
eects. Then, dene the following sengs:
Module name in LOCAL_MODULE: The module name is suffixed with
_static to avoid a name collision with the shared version we are going
to define right after.
Module source files in LOCAL_SRC_FILES (using BOX2D_CPP
defined previously).
Header file directory exported to client modules in LOCAL_EXPORT_C_
INCLUDES.
Header file used internally for module compilation in LOCAL_C_INCLUDES.
Here, the headers used for Box2D compilation and the headers needed for
the client module are the same (and are often the same in other libraries).
So, reuse LOCAL_EXPORT_C_INCLUDES, as defined previously, in the
following way:
...
include $(CLEAR_VARS)
LOCAL_MODULE:= box2d_static
LOCAL_SRC_FILES:= $(BOX2D_CPP)
LOCAL_EXPORT_C_INCLUDES := $(LOCAL_PATH)
LOCAL_C_INCLUDES := $(LOCAL_EXPORT_C_INCLUDES)
...
Finally, request Box2D module compilation as a static library
as follows:
...
include $(BUILD_STATIC_LIBRARY)
...
Optionally, the same process can be repeated to build a shared
version of the same library by selecting a different module
name and invoking $(BUILD_SHARED_LIBRARY) instead, as shown in
the following:
...
include $(CLEAR_VARS)
LOCAL_MODULE:= box2d_shared
LOCAL_SRC_FILES:= $(BOX2D_CPP)
LOCAL_EXPORT_C_INCLUDES := $(LOCAL_PATH)
LOCAL_C_INCLUDES := $(LOCAL_EXPORT_C_INCLUDES)
include $(BUILD_SHARED_LIBRARY)

Chapter 9
[ 385 ]
The Android.mk archive is provided in the Libraries/
box2d directory.
4. Open DroidBlaster Android.mk and link against box2d_static by appending it to
LOCAL_STATIC_LIBRARIES. Indicate which Android.mk module le to include
with the import-module direcve. Remember that modules are found, thanks to
the NDK_MODULE_PATH variable, which points by default to ${ANDROID_NDK}/
sources, as shown in the following:
LOCAL_PATH := $(call my-dir)
include $(CLEAR_VARS)
LS_CPP=$(subst $(1)/,,$(wildcard $(1)/*.cpp))
LOCAL_MODULE := droidblaster
LOCAL_SRC_FILES := $(call LS_CPP,$(LOCAL_PATH))
LOCAL_LDLIBS := -landroid -llog -lEGL -lGLESv1_CM -lOpenSLES
LOCAL_STATIC_LIBRARIES:=android_native_app_glue png \
box2d_static
include $(BUILD_SHARED_LIBRARY)
$(call import-module,android/native_app_glue)
$(call import-module,libpng)
$(call import-module,box2d)
Oponally, acvate include le resoluon in Eclipse if you see warnings about Box2D
including les. To do so, in Eclipse Project properes, navigate to the C/C++ General/
Paths and Symbols secon and then the Includes tab, and add the Box2d directory ${env_
var:ANDROID_NDK}/sources/box2d.
What just happened?
Launch the DroidBlaster compilaon. Box2D is compiled without errors. We have ported
our second open source library (aer libpng) to Android thanks to the NDK! We can nally
reuse one of the many wheels already created by the community! Porng a nave library
to Android involves mainly wring an Android.mk module makele to describe source
les, dependencies, compilaon ags, and so on, as we have done unl now for our main
module DroidBlaster.

Porng Exisng Libraries to Android
[ 386 ]
We have seen some of the most essenal variables to use in a module, and they are
as follows:
LOCAL_MODULE: This declares a unique module name where the nal library name
depends on its value
LOCAL_SRC_FILES: This lists all the les to compile relave to the module's root
LOCAL_C_INCLUDES: This denes include le directories
LOCAL_EXPORT_C_INCLUDES: This denes include le directories but for
including modules this me
The order to build Box2D module build is given by one of the following direcves:
BUILD_STATIC_LIBRARY: This compiles the module as a stac library
BUILD_SHARED_LIBRARY: This also compiles the module but as a shared library
this me
A module can be compiled as a stac or shared library in the same way as the STL.
Compilaon is performed dynamically (that is, on-demand) each me a client applicaon
imports the module or changes its compilaon sengs. Hopefully, the NDK is able to
compile sources incrementally.
To create a module for a header only library, such as parts of Boost or GLM
(a library for OpenGL ES matrix calculaons), dene a module without
LOCAL_SRC_FILES dened. Only LOCAL_MODULE and LOCAL_
EXPORT_C_INCLUDES are necessary.
From the client Android.mk perspecve (that is the DroidBlaster makele in our
case), the NDK import-module direcve triggers, roughly speaking, include sub-module
Android.mk les. Without it, the NDK will not be able to discover dependent modules,
compile them, and include their headers. All the modules, the main module as well as the
sub-modules, are produced in <PROJECT_DIR>/libs, and intermediate binary les are in
<PROJECT_DIR>/obj for the main applicaon module.
The import-module direcve should be located at the end of the le
to avoid altering module denion.

Chapter 9
[ 387 ]
The following are the three ways to link against "sub-module" libraries in the main
Android.mk Makele:
Stac libraries must be listed in the LOCAL_STATIC_LIBRARIES variable (as we
have done for Box2D)
Shared libraries need to be listed in the LOCAL_SHARED_LIBRARIES variable
Shared system libraries should be listed in LOCAL_LDLIBS (as we have done for
OpenGL ES, for example)
For more informaon about Makeles, see the Mastering module Makeles secon.
Wring a Makele is an important part of the porng process. However, it is not always
sucient. Porng a library can be slightly more involved, depending on its originang
plaorms. For example, a piece code already ported to iOS is oen easier to port to Android.
In more complex cases, it may become necessary to patch code to make it behave properly
on Android. When you are condemned to such a hard and non-trivial task, which is honestly
quite frequent, always consider the following:
Make sure required libraries exist, and port them rst if not.
Look for the main conguraon header le if one is provided with your library (as
this is oen the case). It is a good place to tweak enabled or disabled features,
remove unwanted dependencies, or dene new Macros.
Give aenon to system-related macros (that is, #ifdef _LINUX ...), which are one
of the rst places to look for changes to make in the code. Generally, one will need
to dene macros, such as _ANDROID_, and insert them where appropriate.
Comment non-essenal code to check if the library can compile and if its core
features can possibly work. Indeed, do not bother xing everything if you are unsure
yet whether it will work.
Hopefully, Box2D was not ght to a specic plaorm, as it relies mainly on pure C/C++
computaon and not on external APIs. In such cases, porng code becomes much easier.
Now that Box2D is compiled, let's run it in our own code.
Time for action – running Box2D physics engine
Let's rewrite the DroidBlaster physics engine with Box2D with the following steps:
1. Open the jni/PhysicsManager.hpp header and insert the Box2D include le.
Dene a constant PHYSICS_SCALE to convert the body posion from physics to
game coordinates. Indeed, Box2D uses its own scale for a beer precision.

Porng Exisng Libraries to Android
[ 388 ]
Then, replace PhysicsBody with a new structure, PhysicsCollision, that will
indicate which bodies entered in collision, as shown in the following:
#ifndef PACKT_PHYSICSMANAGER_HPP
#define PACKT_PHYSICSMANAGER_HPP
#include "GraphicsManager.hpp"
#include "TimeManager.hpp"
#include "Types.hpp"
#include <Box2D/Box2D.h>
#include <vector>
#define PHYSICS_SCALE 32.0f
struct PhysicsCollision {
bool collide;
PhysicsCollision():
collide(false)
{}
};
...
2. Then, make PhysicsManager inherit from b2ContactListener. A contact
listener gets noed about new collisions each me the simulaon is updated. Our
PhysicsManager inherits one of its method's named BeginContact(), used to
react to collisions.
We will need three more methods, which are as follows:
loadBody() to create a new entity within the physics engine
loadTarget() to create an entity that moves toward a target
(our spaceship)
start() to initialize the engine when the game starts
Also, dene member variables, which are as follows:
mWorld represents the whole Box2D simulation which contains all the
bodies we are going to create
mBodies is the list of all the physics entities we have registered
mLocations contains a copy of the b2Body position in game coordinates
(instead of physics coordinates which have a different scale)

Chapter 9
[ 389 ]
mBoundsBodyObj defines the boundaries in which our space ship will be
able to move
...
class PhysicsManager : private b2ContactListener {
public:
PhysicsManager(TimeManager& pTimeManager,
GraphicsManager& pGraphicsManager);
~PhysicsManager();
b2Body* loadBody(Location& pLocation, uint16 pCategory,
uint16 pMask, int32_t pSizeX, int32_t pSizeY,
float pRestitution);
b2MouseJoint* loadTarget(b2Body* pBodyObj);
void start();
void update();
private:
PhysicsManager(const PhysicsManager&);
void operator=(const PhysicsManager&);
void BeginContact(b2Contact* pContact);
TimeManager& mTimeManager;
GraphicsManager& mGraphicsManager;
b2World mWorld;
std::vector<b2Body*> mBodies;
std::vector<Location*> mLocations;
b2Body* mBoundsBodyObj;
};
#endif
3. Implement jni/PhysicsManager.cpp.
Iteraon constants determine the simulaon accuracy. Here, Box2D is going to handle
mainly collisions and simple movements. So, xing velocity and posion iteraons to 6
and 2, respecvely, is sucient (more about their meaning a bit later).
Inialize the new PhysicsManager members and let it listen to collision events
with SetContactListener() on the mWorld object, as shown in the following:
#include "PhysicsManager.hpp"
#include "Log.hpp"
static const int32_t VELOCITY_ITER = 6;

Porng Exisng Libraries to Android
[ 390 ]
static const int32_t POSITION_ITER = 2;
PhysicsManager::PhysicsManager(TimeManager& pTimeManager,
GraphicsManager& pGraphicsManager) :
mTimeManager(pTimeManager), mGraphicsManager(pGraphicsManager),
mWorld(b2Vec2_zero), mBodies(),
mLocations(),
mBoundsBodyObj(NULL) {
Log::info("Creating PhysicsManager.");
mWorld.SetContactListener(this);
}
PhysicsManager::~PhysicsManager() {
std::vector<b2Body*>::iterator bodyIt;
for (bodyIt = mBodies.begin(); bodyIt < mBodies.end(); ++bodyIt) {
delete (PhysicsCollision*) (*bodyIt)->GetUserData();
}
}
...
4. Inialize Box2D world boundaries when the game starts. These boundaries match
the display window size converted into physics system coordinates. Indeed, the
physics system uses its own predened scale to preserve oat-point value accuracy.
We need four edges to dene these boundaries, as shown in the following:
...
void PhysicsManager::start() {
if (mBoundsBodyObj == NULL) {
b2BodyDef boundsBodyDef;
b2ChainShape boundsShapeDef;
float renderWidth = mGraphicsManager.getRenderWidth()
/ PHYSICS_SCALE;
float renderHeight = mGraphicsManager.getRenderHeight()
/ PHYSICS_SCALE;
b2Vec2 boundaries[4];
boundaries[0].Set(0.0f, 0.0f);
boundaries[1].Set(renderWidth, 0.0f);
boundaries[2].Set(renderWidth, renderHeight);
boundaries[3].Set(0.0f, renderHeight);
boundsShapeDef.CreateLoop(boundaries, 4);
mBoundsBodyObj = mWorld.CreateBody(&boundsBodyDef);
mBoundsBodyObj->CreateFixture(&boundsShapeDef, 0);
}
}

Chapter 9
[ 391 ]
5. Inialize and register asteroid or ship physics bodies in loadBody().
The body denion describes a dynamic body (as opposed to stac), awake (that
is, acvely simulated by Box2D), and which cannot rotate (a property especially
important for polygon shapes, meaning that it is always poinng upward).
Also note how we save a PhysicsCollision self-reference in the userData eld,
in order to access it later inside Box2D callbacks.
Dene the body shape, which we approximate to a circle. Note that Box2D requires
a half dimension, from the object's center to its borders, as shown in the following
code snippet:
b2Body* PhysicsManager::loadBody(Location& pLocation,
uint16 pCategory, uint16 pMask, int32_t pSizeX, int32_t pSizeY,
float pRestitution) {
PhysicsCollision* userData = new PhysicsCollision();
b2BodyDef mBodyDef;
b2Body* mBodyObj;
b2CircleShape mShapeDef; b2FixtureDef mFixtureDef;
mBodyDef.type = b2_dynamicBody;
mBodyDef.userData = userData;
mBodyDef.awake = true;
mBodyDef.fixedRotation = true;
mShapeDef.m_p = b2Vec2_zero;
int32_t diameter = (pSizeX + pSizeY) / 2;
mShapeDef.m_radius = diameter / (2.0f * PHYSICS_SCALE);
...
6. Body xture is the "glue" that es together body denion, shape, and physical
properes. We also use it to set the body's category and mask, and to lter collisions
between objects (for instance, asteroids can collide with the ship but not between
themselves in DroidBlaster). One bit represents one category.
Finally, eecvely instanate your body inside the Box2D physical world, as shown
in the following code:
...
mFixtureDef.shape = &mShapeDef;
mFixtureDef.density = 1.0f;
mFixtureDef.friction = 0.0f;
mFixtureDef.restitution = pRestitution;
mFixtureDef.filter.categoryBits = pCategory;

Porng Exisng Libraries to Android
[ 392 ]
mFixtureDef.filter.maskBits = pMask;
mFixtureDef.userData = userData;
mBodyObj = mWorld.CreateBody(&mBodyDef);
mBodyObj->CreateFixture(&mFixtureDef);
mBodyObj->SetUserData(userData);
mLocations.push_back(&pLocation);
mBodies.push_back(mBodyObj);
return mBodyObj;
}
...
7. Implement the loadTarget() method that creates a Box2D mouse joint to
simulate spaceship movements. Such a Joint denes an empty target toward
which the body (here specied in parameter) moves, like a kind of elasc. The
sengs used here (maxForce, dampingRatio, and frequencyHz) control
how the ship reacts and can be determined by tweaking them, as shown in the
following code:
...
b2MouseJoint* PhysicsManager::loadTarget(b2Body* pBody) {
b2BodyDef emptyBodyDef;
b2Body* emptyBody = mWorld.CreateBody(&emptyBodyDef);
b2MouseJointDef mouseJointDef;
mouseJointDef.bodyA = emptyBody;
mouseJointDef.bodyB = pBody;
mouseJointDef.target = b2Vec2(0.0f, 0.0f);
mouseJointDef.maxForce = 50.0f * pBody->GetMass();
mouseJointDef.dampingRatio = 0.15f;
mouseJointDef.frequencyHz = 3.5f;
return (b2MouseJoint*) mWorld.CreateJoint(&mouseJointDef);
}
...
8. Write the update() method.
First, clear any collision flag buffered in BeginContact() during
previous iteration.
Then, perform simulation by calling Step(). The time period specifies
how much time must be simulated. Iterations constants determine
simulation accuracy.

Chapter 9
[ 393 ]
Finally, loop over all of the physics bodies to extract their coordinates,
convert them from Box2D to game coordinates, and store the result into
our own Location object, as shown in the following code:
...
void PhysicsManager::update() {
// Clears collision flags.
int32_t size = mBodies.size();
for (int32_t i = 0; i < size; ++i) {
PhysicsCollision* physicsCollision =
((PhysicsCollision*) mBodies[i]->GetUserData());
physicsCollision->collide = false;
}
// Updates simulation.
float timeStep = mTimeManager.elapsed();
mWorld.Step(timeStep, VELOCITY_ITER, POSITION_ITER);
// Caches the new state.
for (int32_t i = 0; i < size; ++i) {
const b2Vec2& position = mBodies[i]->GetPosition();
mLocations[i]->x = position.x * PHYSICS_SCALE;
mLocations[i]->y = position.y * PHYSICS_SCALE;
}
}
...
9. Finish with the BeginContact() method inherited by b2ContactListener.
This callback noes new collisions between bodies, two at a me (named A
and B). Event informaon is stored in a b2contact structure, which contains
various properes, such as fricon, restuon, and the two bodies, involved
through their xture. These xtures contain in themselves a reference to
our own PhysicsCollision. We can use the following link to switch the
PhysicsCollision collision ag when Box2D detects one contact:
...
void PhysicsManager::BeginContact(b2Contact* pContact) {
void* userDataA = pContact->GetFixtureA()->GetUserData();
void* userDataB = pContact->GetFixtureB()->GetUserData();
if (userDataA != NULL && userDataB != NULL) {
((PhysicsCollision*)userDataA)->collide = true;
((PhysicsCollision*)userDataB)->collide = true;
}
}

Porng Exisng Libraries to Android
[ 394 ]
10. In jni/Asteroid.hpp, replace the usage of PhysicsBody with Box2D b2Body
structure, as shown in the following code:
...
class Asteroid {
...
private:
void spawn(b2Body* pBody);
TimeManager& mTimeManager;
GraphicsManager& mGraphicsManager;
PhysicsManager& mPhysicsManager;
std::vector<b2Body*> mBodies;
float mMinBound;
float mUpperBound; float mLowerBound;
float mLeftBound; float mRightBound;
};
#endif
11. In jni/Asteroid.cpp, scale constants and boundaries to the physics
coordinate system:
#include "Asteroid.hpp"
#include "Log.hpp"
static const float BOUNDS_MARGIN = 128 / PHYSICS_SCALE;
static const float MIN_VELOCITY = 150.0f / PHYSICS_SCALE;
static const float VELOCITY_RANGE = 600.0f / PHYSICS_SCALE;
...
void Asteroid::initialize() {
mMinBound = mGraphicsManager.getRenderHeight() / PHYSICS_SCALE;
mUpperBound = mMinBound * 2;
mLowerBound = -BOUNDS_MARGIN;
mLeftBound = -BOUNDS_MARGIN;
mRightBound = (mGraphicsManager.getRenderWidth() / PHYSICS_SCALE)
+ BOUNDS_MARGIN;
std::vector<b2Body*>::iterator bodyIt;
for (bodyIt = mBodies.begin(); bodyIt < mBodies.end(); ++bodyIt) {
spawn(*bodyIt);
}
}
...

Chapter 9
[ 395 ]
12. Then, update the way an asteroid body is registered. Register physics properes
with a category and mask. Here, asteroids are declared as belonging to category 1
(0X1 in hexadecimal notaon), and only bodies in group 2 (0X2 in hexadecimal) are
considered when evaluang collisions:
...
void Asteroid::registerAsteroid(Location& pLocation,
int32_t pSizeX, int32_t pSizeY) {
mBodies.push_back(mPhysicsManager.loadBody(pLocation,
0X1, 0x2, pSizeX, pSizeY, 2.0f));
}
...
Replace and update the remaining code to accommodate the use of the new
b2Body structure instead of the PhysicsBody one:
...
void Asteroid::update() {
std::vector<b2Body*>::iterator bodyIt;
for (bodyIt = mBodies.begin(); bodyIt < mBodies.end(); ++bodyIt) {
b2Body* body = *bodyIt;
if ((body->GetPosition().x < mLeftBound)
|| (body->GetPosition().x > mRightBound)
|| (body->GetPosition().y < mLowerBound)
|| (body->GetPosition().y > mUpperBound)) {
spawn(body);
}
}
}
...
13. Finally, also update spawn() code to inialize the PhysicsBody, as shown in the
following code:
...
void Asteroid::spawn(b2Body* pBody) {
float velocity = -(RAND(VELOCITY_RANGE) + MIN_VELOCITY);
float posX = mLeftBound + RAND(mRightBound - mLeftBound);
float posY = mMinBound + RAND(mUpperBound - mMinBound);
pBody->SetTransform(b2Vec2(posX, posY), 0.0f);
pBody->SetLinearVelocity(b2Vec2(0.0f, velocity));
}

Porng Exisng Libraries to Android
[ 396 ]
14. Open jni/Ship.hpp to turn it into a Box2D body.
Add a new b2Body parameter to the registerShip() method.
Then, dene the following two addional methods:
update(), which contains some new game logic to destroy the ship when
it collides with asteroids
isDestroyed() to indicate if the ship has been destroyed
Declare the following necessary variables:
mBody to manage the ship representation in Box2D
mDestroyed and mLives for the game logic
...
#include "GraphicsManager.hpp"
#include "PhysicsManager.hpp"
#include "SoundManager.hpp"
...
class Ship {
public:
Ship(android_app* pApplication,
GraphicsManager& pGraphicsManager,
SoundManager& pSoundManager);
void registerShip(Sprite* pGraphics, Sound* pCollisionSound,
b2Body* pBody);
void initialize();
void update();
bool isDestroyed() { return mDestroyed; }
private:
GraphicsManager& mGraphicsManager;
SoundManager& mSoundManager;
Sprite* mGraphics;
Sound* mCollisionSound;
b2Body* mBody;
bool mDestroyed; int32_t mLives;
};
#endif

Chapter 9
[ 397 ]
15. Declare a few new constants in jni/Ship.cpp.
Then, inialize the new member variables properly. Note that you don't need to play
the collision sound anymore in initialize():
#include "Log.hpp"
#include "Ship.hpp"
static const float INITAL_X = 0.5f;
static const float INITAL_Y = 0.25f;
static const int32_t DEFAULT_LIVES = 10;
static const int32_t SHIP_DESTROY_FRAME_1 = 8;
static const int32_t SHIP_DESTROY_FRAME_COUNT = 9;
static const float SHIP_DESTROY_ANIM_SPEED = 12.0f;
Ship::Ship(android_app* pApplication,
GraphicsManager& pGraphicsManager,
SoundManager& pSoundManager) :
mGraphicsManager(pGraphicsManager),
mGraphics(NULL),
mSoundManager(pSoundManager),
mCollisionSound(NULL),
mBody(NULL),
mDestroyed(false), mLives(0) {
}
void Ship::registerShip(Sprite* pGraphics, Sound* pCollisionSound,
b2Body* pBody) {
mGraphics = pGraphics;
mCollisionSound = pCollisionSound;
mBody = pBody;
}
void Ship::initialize() {
mDestroyed = false;
mLives = DEFAULT_LIVES;
b2Vec2 position(
mGraphicsManager.getRenderWidth() * INITAL_X / PHYSICS_SCALE,
mGraphicsManager.getRenderHeight() * INITAL_Y / PHYSICS_SCALE);
mBody->SetTransform(position, 0.0f);
mBody->SetActive(true);
}
...

Porng Exisng Libraries to Android
[ 398 ]
16. In update(), check if the ship body has collided with an asteroid. To do so, check
the PhysicsCollision structure stored in the ship b2Body custom user data.
Remember that its content is set in the PhysicsManager::BeginContact()
method
When the ship collides, we can decrease its life and play a collision sound.
If it has no more life, we can start playing a destrucon animaon. The body should
be inacve when this happens to avoid further collision with asteroids.
When ship is fully destroyed, we can save its state so that the game loop can act
appropriately, as shown in the following code:
...
void Ship::update() {
if (mLives >= 0) {
if (((PhysicsCollision*) mBody->GetUserData())->collide) {
mSoundManager.playSound(mCollisionSound);
--mLives;
if (mLives < 0) {
Log::info("Ship has been destroyed");
mGraphics->setAnimation(SHIP_DESTROY_FRAME_1,
SHIP_DESTROY_FRAME_COUNT, SHIP_DESTROY_ANIM_SPEED,
false);
mBody->SetActive(false);
} else {
Log::info("Ship collided");
}
}
}
// Destroyed.
else {
if (mGraphics->animationEnded()) {
mDestroyed = true;
}
}
}
17. Update the jni/MoveableBody.hpp component so that it returns a b2Body
structure in registerMoveableBody().
Add the following two new members:
mBody for the physical body

Chapter 9
[ 399 ]
mTarget for the mouse joint:
#ifndef _PACKT_MOVEABLEBODY_HPP_
#define _PACKT_MOVEABLEBODY_HPP_
#include "InputManager.hpp"
#include "PhysicsManager.hpp"
#include "Types.hpp"
class MoveableBody {
public:
MoveableBody(android_app* pApplication,
InputManager& pInputManager, PhysicsManager& pPhysicsManager);
b2Body* registerMoveableBody(Location& pLocation,
int32_t pSizeX, int32_t pSizeY);
void initialize();
void update();
private:
PhysicsManager& mPhysicsManager;
InputManager& mInputManager;
b2Body* mBody;
b2MouseJoint* mTarget;
};
#endif
18. Adapt jni/MoveableBody.cpp constants to the new scale and inialize new
members in the constructor:
#include "Log.hpp"
#include "MoveableBody.hpp"
static const float MOVE_SPEED = 10.0f / PHYSICS_SCALE;
MoveableBody::MoveableBody(android_app* pApplication,
InputManager& pInputManager, PhysicsManager& pPhysicsManager) :
mInputManager(pInputManager),
mPhysicsManager(pPhysicsManager),
mBody(NULL), mTarget(NULL) {
}
b2Body* MoveableBody::registerMoveableBody(Location& pLocation,
int32_t pSizeX, int32_t pSizeY) {
mBody = mPhysicsManager.loadBody(pLocation, 0x2, 0x1, pSizeX,
pSizeY, 0.0f);

Porng Exisng Libraries to Android
[ 400 ]
mTarget = mPhysicsManager.loadTarget(mBody);
mInputManager.setRefPoint(&pLocation);
return mBody;
}
...
19. Then, set up and update the physicsbody so that it follows the ship's target. The
target moves according to user input, as shown in the following code:
...
void MoveableBody::initialize() {
mBody->SetLinearVelocity(b2Vec2(0.0f, 0.0f));
}
void MoveableBody::update() {
b2Vec2 target = mBody->GetPosition() + b2Vec2(
mInputManager.getDirectionX() * MOVE_SPEED,
mInputManager.getDirectionY() * MOVE_SPEED);
mTarget->SetTarget(target);
}
20. Finally, edit jni/DroidBlaster.cpp and change the ship registraon code to
accommodate the new changes, as shown in the following code:
...
DroidBlaster::DroidBlaster(android_app* pApplication):
... {
Log::info("Creating DroidBlaster");
Sprite* shipGraphics = mSpriteBatch.registerSprite(mShipTexture,
SHIP_SIZE, SHIP_SIZE);
shipGraphics->setAnimation(SHIP_FRAME_1, SHIP_FRAME_COUNT,
SHIP_ANIM_SPEED, true);
Sound* collisionSound =
mSoundManager.registerSound(mCollisionSound);
b2Body* shipBody = mMoveableBody.registerMoveableBody(
shipGraphics->location, SHIP_SIZE, SHIP_SIZE);
mShip.registerShip(shipGraphics, collisionSound, shipBody);
// Creates asteroids.
...
}
...

Chapter 9
[ 401 ]
21. Don't forget to start the PhysicsManager in onActivate(), as shown in the
following code:
...
status DroidBlaster::onActivate() {
Log::info("Activating DroidBlaster");
// Starts managers.
if (mGraphicsManager.start() != STATUS_OK) return STATUS_KO;
if (mSoundManager.start() != STATUS_OK) return STATUS_KO;
mInputManager.start();
mPhysicsManager.start();
...
}
...
22. Terminate by updang and checking ship state in onStep(). When it is destroyed,
exit the game loop as follows:
...
status DroidBlaster::onStep() {
mTimeManager.update();
mPhysicsManager.update();
// Updates modules.
mAsteroids.update();
mMoveableBody.update();
mShip.update();
if (mShip.isDestroyed()) return STATUS_EXIT;
return mGraphicsManager.update();
}
...
What just happened?
We have created a physical simulaon using the Box2D physics engine. More specically,
we have seen how to do the following:
Create a Box2D world to describe the physical simulaon
Dene a physical representaon of enes (ships and asteroids)
Step a simulaon
Filter and detect collisions between enes
Extract simulaon state (that is, coordinates) to feed the graphical representaon

Porng Exisng Libraries to Android
[ 402 ]
Box2D uses its own allocators to opmize memory management. So, to create and destroy
Box2D objects, one needs to systemacally use the provided factory methods (CreateX(),
DestroyX()). Most of the me, Box2D will manage memory automacally for you. When
an object is destroyed, all related child objects get destroyed (for instance, the bodies are
destroyed when the world is destroyed). But, if you need to get rid of your objects earlier,
and thus manually, always destroy the bodies.
Box2D is a complex piece of code and is quite hard to tune properly. Let's dive a bit deeper
into the way its world is described and how to handle collision.
Diving into the Box2D world
The central point of access in Box2D is the b2World object, which stores a collecon of
physical bodies to simulate. A Box2D body is composed of the following:
b2BodyDef: This denes the body type (b2_staticBody, b2_dynamicBody,
and so on) and inial properes, such as its posion, angle (in radians), and so on.
b2Shape: This is used for collision detecon and to derive body mass from its
density. It can be a b2PolygonShape, b2CircleShape, and so on.
b2FixtureDef: This links together a body shape, a body denion, and its physical
properes, such as density.
b2Body: This is a body instance in the world (that is, one per game object). It is
created from a body denion, a shape, and a xture.
Bodies are characterized by a few physical properes, which are as follows:
Shape: This represents a circle in DroidBlaster, although a polygon or box could also
be used.
Density: This is expressed in kg/m2 to compute body mass depending on its shape
and size. Value should be greater or equal to 0.0. A bowling ball has a bigger
density than a soccer ball.
Fricon: This indicates how much a body slides on another (for example, a car on
a road or on an icy path). Values are typically in the range 0.0 to 1.0, where 0.0
implies no fricon and 1.0 implies strong fricon.
Restuon: This indicates how much a body reacts to a collision, for example, a
bouncing ball. Value 0.0 means no restuon and 1.0 means full restuon.

Chapter 9
[ 403 ]
When running, bodies are subject to the following:
Forces: This makes bodies move linearly.
Torques: This represents rotaonal force applied on a body.
Damping: This is similar to fricon, although it does not only occur when a body is in
contact with another. Consider it as the eect of drag slowing down a body.
Box2D is tuned for worlds containing objects at a scale from 0.1 to 10 (unit in meters). When
used outside this range, again, numerical approximaon can make simulaon inaccurate. Thus,
it is very necessary to scale coordinates from the Box2D referenal, where objects should to be
kept in the (rough) range [0.1, 10], and to the game, or directly to the graphics referenal. This
is why we have dened SCALE_FACTOR to scale coordinate transformaon.
More on collision detection
Several ways of detecng and handling collisions exist in Box2D. The most basic one consists
of checking all contacts stored in the world or in a body aer they are updated. However, this
can result in missed contacts that happen surrepously during Box2D internal iteraons.
A beer way we have seen to detect contacts is the b2ContactListener, which can be
registered on the world object. The following four callbacks can be overridden:
BeginContact (b2Contact): This detects when two bodies enter in collision.
EndContact(b2Contact): This is a counterpart of BeginContact(), which
indicates when bodies are not in collision any more. A call to BeginContact() is
always followed by a matching EndContact().
PreSolve (b2Contact, b2Manifold): This is called aer a collision is detected
but before collision resoluon, that is, before impulse resulng from the collision
is computed. The b2Manifold structure holds informaon about contact points,
normals, and so on in a single place.
PostSolve(b2Contact, b2ContactImpulse): This is called aer actual
impulse (that is, physical reacon) has been computed by Box2D.
The rst two callbacks are interesng to trigger game logic (for example, enty destrucon).
The last two are interesng to alter physics simulaon (more specically to ignore some
collisions by disabling a contact) while it is being computed, or to get more accurate details
about it. For instance, use PreSolve() to create a one-sided plaorm to which an enty
collides only when it falls from above (not when it jumps from below). Use PostSolve() to
detect collision strength and calculate damages accordingly.
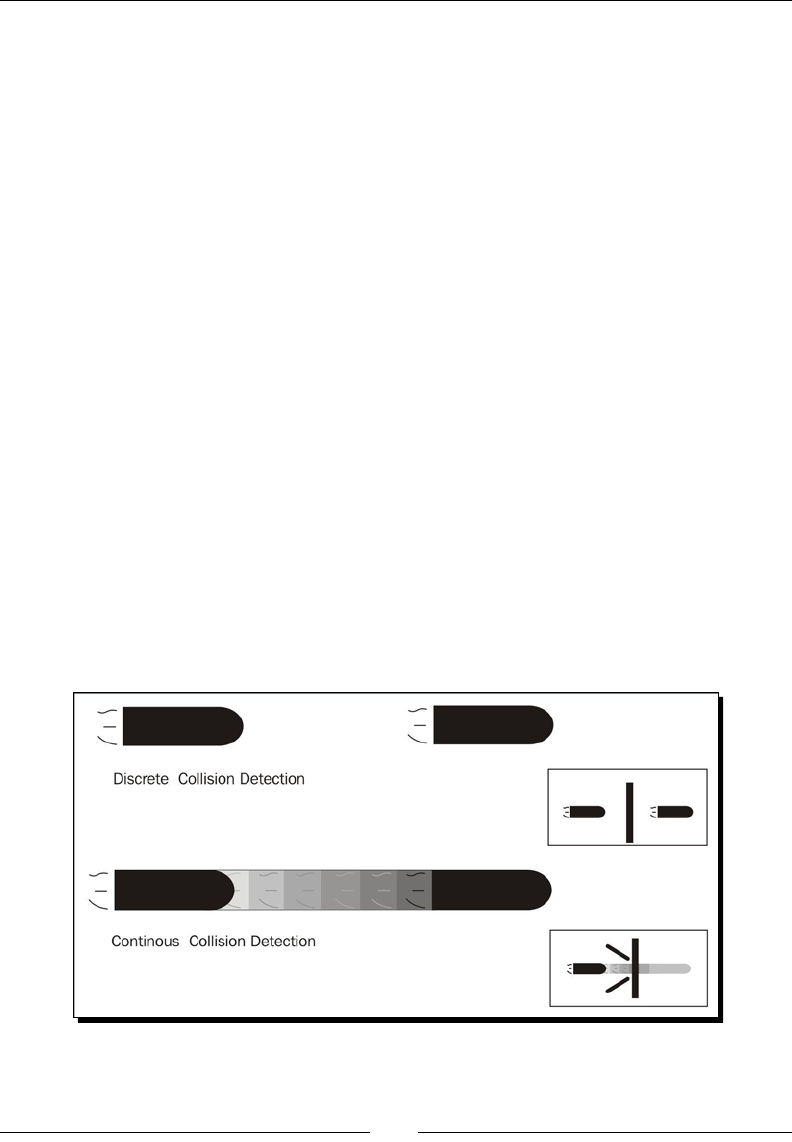
Porng Exisng Libraries to Android
[ 404 ]
The PreSolve() and PostSolve() methods can be called several mes between
BeginContact() and EndContact(), which can be called themselves from zero to
several mes during one world update. A contact can begin during one simulaon step and
terminate aer several steps. In that case, event-solving callbacks occur connuously during
"in-between" steps. As many collisions can occur while stepping simulaon. Thus, callbacks
can be called a lot of mes and should be as ecient as possible.
When analyzing collisions inside the BeginContact() callback, we buered a collision ag.
This is necessary because Box2D reuses the b2Contact parameter passed when a callback
is triggered. In addion, as these callbacks are called while simulaon is computed, physics
bodies cannot be destroyed at that instant, only aer simulaon stepping is over. Thus, it is
highly advised to copy any informaon gathered there for postprocessing (for example,
to destroy enes).
Collision modes and ltering
I would like to point out that Box2D oers a so-called bullet mode that can be acvated on
a body denion using corresponding Boolean member:
mBodyDef.bullet = true;
The bullet mode is necessary for fast moving objects like bullets! By default, Box2D uses
Discrete Collision Detecon, which considers bodies at their nal posion for collision
detecon, missing any body located between inial and nal posions. However, for a fast
moving body, the whole path followed should be considered. This is more formally called
Connuous Collision Detecon (CCD). Obviously, CCD is expensive and should be used with
parsimony. Please refer to the following gure:
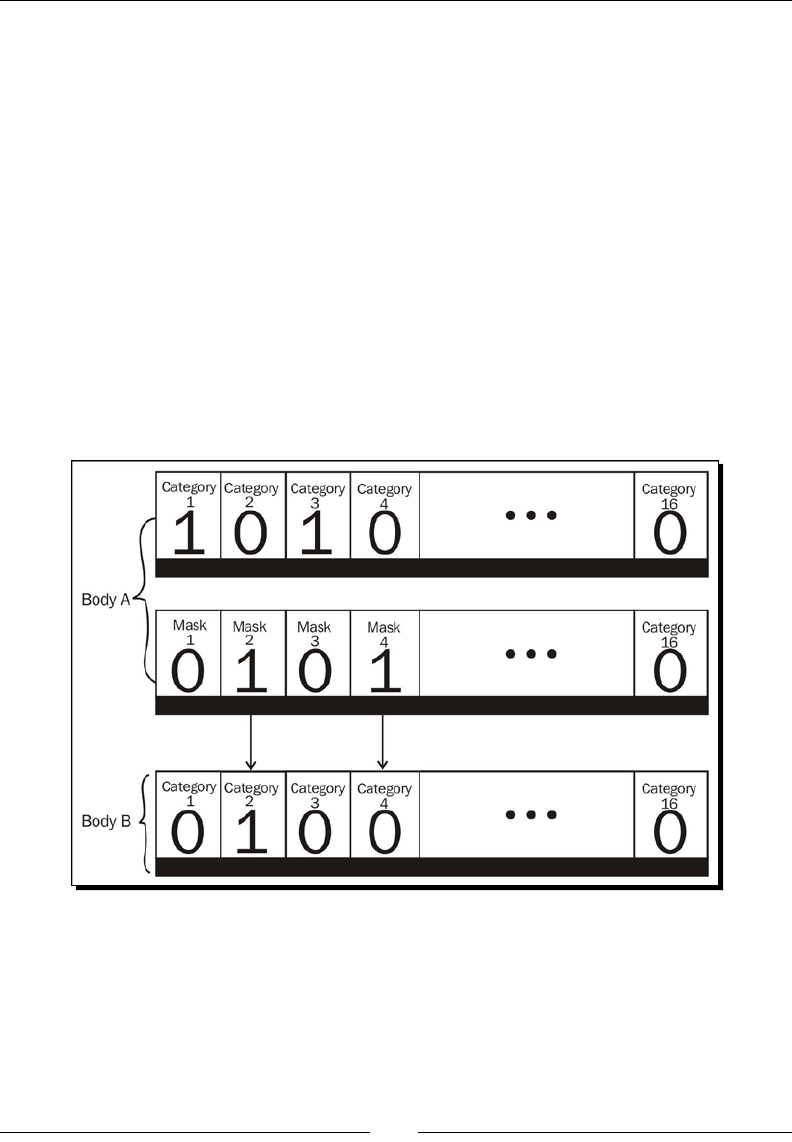
Chapter 9
[ 405 ]
We somemes want to detect when bodies overlap without generang collisions (like a
car reaching the nish line): this is called a sensor. A sensor can be easily set by seng the
isSensor Boolean member to true in the xture as follows:
mFixtureDef.isSensor = true;
A sensor can be queried with a listener through BeginContact() and EndContact() or
by using the IsTouching() shortcut on a b2Contact class.
Another important aspect of collision is not colliding or, more precisely, ltering collisions.
A kind of ltering can be performed in PreSolve() by disabling contacts. This is the most
exible and powerful soluon, but also the most complex.
But, as we have seen it, ltering can be performed in a more simple way by using a
categories and masks technique. Each body is assigned one or more category (each being
represented by one bit in a short integer, the categoryBits member) and a mask
describing categories of the body they can collide with (each ltered category being
represented by a bit set to 0, the maskBits member), as shown in the following gure:
In the preceding gure, Body A is in categories 1 and 3, and collides with bodies in
categories 2 and 4, which is the case for this poor Body B, unless its mask lters collision
with Body A categories (that is, 1 and 3). In other words, both bodies A and B must agree
to collide!
Porng Exisng Libraries to Android
[ 406 ]
Box2D also has a noon of collision groups. A body has a collision group set to any of
the following:
Posive integer: This means others bodies with the same collision group value
can collide
Negave integer: This means others bodies with the same collision group value
are ltered
Using collision groups could have also been a soluon to avoid collision between asteroids
in DroidBlaster, although it is less exible than categories and masks. Note that groups are
ltered before categories.
A more exible soluon than category and group lters is the b2ContactFilter class. This
class has a ShouldCollide(b2Fixture, b2Fixture) method that you can customize to
perform your own ltering. Actually, category/group ltering are themselves implemented
that way.
Going further with Box2D
This short introducon to Box2D gives you only an overview of what Box2D is capable of!
The following non-exhausve list has been le in the shadow:
Joints to link two bodies together
Raycasng to query a physics world (for example, which locaon is a gun
poinng toward)
Contact properes: normals, impulses, manifolds, and so on
Box2D has now a lile brother called LiquidFun, which is used
to simulate uids. You can download and see it in acon at
http://google.github.io/liquidfun/.
Box2D has a really nice documentaon with useful informaon that can be found at
http://www.box2d.org/manual.html. Moreover, Box2D is packaged with a test bed
directory (in Box2D/Testbed/Tests) featuring many use cases. Have a look at them to
get a beer understanding of its capabilies. Because physics simulaons can somemes be
rather tricky, I also encourage you to visit Box2D forum, which is quite acve, at http://
www.box2d.org/forum/.
Chapter 9
[ 407 ]
Prebuilding Boost on Android
If STL is the most common framework among C++ programs, Boost probably comes second.
A real Swiss army knife! This toolkit contains a profusion of ulies to handle most common
needs, and even more.
Most Boost features are provided as header-only code, which means that we do not need to
compile it. Including headers is enough of an advantage to use it. This is the case of the most
popular features of Boost: Smart Pointers, a reference-counng pointer class that handles
memory allocaon and de-allocaon automacally. They avoid most memory leaks and
pointer misuse for almost free.
However, a few parts of Boost require compilaon rst, such as the threading or the unit test
library. We are now going to see how to build them with the Android NDK and compile a unit
test executable.
Resulng project is provided with this book under the name
DroidBlaster_Part18.
Time for action – prebuilding Boost static library
Let's prebuild Boost for Android as a stac library with the following steps:
1. Download Boost from http://www.boost.org/ (Version 1.55.0, in this book).
Unzip the archive into ${ANDROID_NDK}/sources. Name the directory boost.
Open a command line window and go to the boost directory. Launch bootstrap.
bat on Windows or ./bootstrap.sh on Linux and Mac OS X to build b2. This
program, previously named BJam, is a custom building tool similar to Make.
Boost 1.55.0 archive is provided with this book in the
Libraries/boost directory.
Change the NDK build command in DroidBlaster to generate verbose compilaon logs.
To do so, in Eclipse Project properes, navigate to the C/C++ Build secon. There, you
should see the following build command: ndk-build NDK_DEBUG=1. Change it to
build NDK_DEBUG=0 V=1 to compile in release mode with verbose logs.

Porng Exisng Libraries to Android
[ 408 ]
2. Rebuild DroidBlaster (you might need to clean your project rst). If you look, for
example, at the following compilaon extract, you should see some logs similar to
the extract below. This log, although barely readable, gives all the informaon about
the commands run to build DroidBlaster.
The toolchain used to build DroidBlaster (arm-linux-androideabi-4.6)
The system on which DroidBlaster is built (linux-x86_64)
The compiler executable (arm-linux-androideabi-g++)
The archiver executable (arm-linux-androideabi-ar)
Also all the compilation flags passed to them (here for ARM processors)
We can use the following as an inspiraon source to determine Boost compilaon
ags (in this ag soup!):
...
/opt/android-ndk/toolchains/arm-linux-androideabi-4.6/prebuilt/
linux-x86_64/bin/arm-linux-androideabi-g++ -MMD -MP -MF ./obj/
local/armeabi/objs/DroidBlaster/Asteroid.o.d -fpic -ffunction-
sections -funwind-tables -fstack-protector -no-canonical-prefixes
-march=armv5te -mtune=xscale -msoft-float -fno-exceptions -fno-rtti
-mthumb -Os -g -DNDEBUG -fomit-frame-pointer -fno-strict-aliasing
-finline-limit=64 -I/opt/android-ndk/sources/android/native_app_glue
-I/opt/android-ndk/sources/libpng -I/opt/android-ndk/sources/box2d
-I/opt/android-ndk/sources/cxx-stl/gnu-libstdc++/4.6/include -I/opt/
android-ndk/sources/cxx-stl/gnu-libstdc++/4.6/libs/armeabi/include -I/
opt/android-ndk/sources/cxx-stl/gnu-libstdc++/4.6/include/backward
-Ijni -DANDROID -Wa,--noexecstack -Wformat -Werror=format-security
-I/opt/android-ndk/platforms/android-16/arch-arm/usr/include -c jni/
Asteroid.cpp -o ./obj/local/armeabi/objs/DroidBlaster/Asteroid.o
...
/opt/android-ndk/toolchains/arm-linux-androideabi-4.6/prebuilt/
linux-x86_64/bin/arm-linux-androideabi-ar crsD ./obj/local/armeabi/
libandroid_native_app_glue.a ./obj/local/armeabi/objs/android_native_
app_glue/android_native_app_glue.o
...
3. In the boost directory, open the tools/build/v2/user-config.jam le. This
le, like its name suggests, is a conguraon le that can be set up to customize
Boost compilaon. Inial content contains only comments and can be erased. Start
including the following content:
import feature ;
import os ;
if [ os.name ] = CYGWIN || [ os.name ] = NT {
androidPlatform = windows ;

Chapter 9
[ 409 ]
} else if [ os.name ] = LINUX {
if [ os.platform ] = X86_64 {
androidPlatform = linux-x86_64 ;
} else {
androidPlatform = linux-x86 ;
}
} else if [ os.name ] = MACOSX {
androidPlatform = darwin-x86 ;
}
...
4. Compilaon is performed stacally. BZip is deacvated because it is unavailable, by
default, on Android (we could however compile it separately):
...
modules.poke : NO_BZIP2 : 1 ;
...
5. Retrieve the android_ndk environment variable which points to the NDK locaon
on disk.
Declare what we could call a "conguraon" android4.6_armeabi.
Then, recongure Boost to use the NDK ARM GCC toolchain (g++, ar, and ranlib)
in stac mode, the archiver being in charge of creang the stac library. We can use
the informaon found in the log in step 2 to ll their respecve paths.
The sysroot direcve indicates which Android API release to compile and link
against. The specied directory, located in the NDK, contains include les and
libraries specic to this release, as shown in the following code:
...
android_ndk = [ os.environ ANDROID_NDK ] ;
using gcc : android4.6_armeabi :
$(android_ndk)/toolchains/arm-linux-androideabi-4.6/
prebuilt/$(androidPlatform)/bin/arm-linux-androideabi-g++ :
<archiver>$(android_ndk)/toolchains/arm-linux-androideabi-4.6/
prebuilt/$(androidPlatform)/bin/arm-linux-androideabi-ar
<ranlib>$(android_ndk)/toolchains/arm-linux-androideabi-4.6/
prebuilt/$(androidPlatform)/bin/arm-linux-androideabi-ranlib
<compileflags>--sysroot=$(android_ndk)/platforms/android-16/arch-
arm
<compileflags>-I$(android_ndk)/sources/cxx-stl/gnu-libstdc++/4.6/
include
<compileflags>-I$(android_ndk)/sources/cxx-stl/gnu-libstdc++/4.6/
libs/armeabi/include
...

Porng Exisng Libraries to Android
[ 410 ]
6. Boost needs excepons and RTTI. Enable them with the –fexceptions
and –frtti ags, as shown in the following code:
...
<compileflags>-fexceptions
<compileflags>-frtti
...
7. A few opons have to be dened to tweak Boost compilaon. This is where
we can take inspiraon from the compilaon ags discovered in step 2, such as
the following:
-march=armv5te to specify the target platform
-mthumb, which indicates that generated code should use thumb
instructions (-marm could also be used to use ARM instructions instead)
-0s to enable compiler optimizations
-DNDEBUG to request compilation in release mode
Also include or tweak addional ones, such as the following:
-D__arm__, -D__ARM_ARCH_5__, and so on, which help to determine the
target platform from code
-DANDROID, -D__ANDROID__, which help to determine the target OS
-DBOOST_ASIO_DISABLE_STD_ATOMIC to disable the use std::atomic,
which is buggy on Android (something that can be learnt only through
(bad) "experience"…).
<compileflags>-march=armv5te
<compileflags>-mthumb
<compileflags>-mtune=xscale
<compileflags>-msoft-float
<compileflags>-fno-strict-aliasing
<compileflags>-finline-limit=64
<compileflags>-D__arm__
<compileflags>-D__ARM_ARCH_5__
<compileflags>-D__ARM_ARCH_5T__
<compileflags>-D__ARM_ARCH_5E__
<compileflags>-D__ARM_ARCH_5TE__
<compileflags>-MMD
<compileflags>-MP
<compileflags>-MF
<compileflags>-fpic
<compileflags>-ffunction-sections
<compileflags>-funwind-tables
Chapter 9
[ 411 ]
<compileflags>-fstack-protector
<compileflags>-no-canonical-prefixes
<compileflags>-Os
<compileflags>-fomit-frame-pointer
<compileflags>-fno-omit-frame-pointer
<compileflags>-DANDROID
<compileflags>-D__ANDROID__
<compileflags>-DNDEBUG
<compileflags>-D__GLIBC__
<compileflags>-DBOOST_ASIO_DISABLE_STD_ATOMIC
<compileflags>-D_GLIBCXX__PTHREADS
<compileflags>-Wa,--noexecstack
<compileflags>-Wformat
<compileflags>-Werror=format-security
<compileflags>-lstdc++
<compileflags>-Wno-long-long
;
8. From a terminal poinng located in the boost directory, launch the compilaon
using the following command line. We need to exclude the Python module, which
requires addional libraries not available on the NDK by default.
./b2 --without-python toolset=gcc-android4.6_armeabi link=static
runtime-link=static target-os=linux architecture=arm --
stagedir=android-armeabi threading=multi
Final stac libraries are generated in android-armeabi/lib/.
Repeat the same steps for the ArmV7 and X86 plaorms, creang a new conguraon for
each of them. The staging directory must be armeabi-v7a for ArmV7 and android-x86
for X86.
Final user-config.jam is provided with this book in the
Libraries/boost directory.
What just happened?
We have customized the Boost conguraon to use the raw Android GCC toolchain as a
standalone compiler (that is, without the NDK wrappers). We have declared various ags to
adapt compilaon to Android target plaorms. Then, we have built Boost manually using its
dedicated building tool b2. Now, every me Boost is updated or modied, code has to be
manually compiled again with b2.

Porng Exisng Libraries to Android
[ 412 ]
We have also forced NDK-Build to generate verbose logs with the V=1 argument. This is
helpful to either troubleshoot compilaon issues or to get feedback on what and how NDK-
Build is compiling.
Finally, we have enabled release compilaon mode, that is, with code opmizaons, by
switching NDK_DEBUG to 0. This could have also been done by seng APP_OPTIM :=
release in jni/Application.mk. There are ve main opmizaon levels in GCC, and
they are as follows:
-O0: This disables any opmizaon. This is automacally set by the NDK when
APP_OPTIM is set to debug (more about this in the last part about Makeles in
this chapter).
-O1: This allows basic opmizaons without increasing compilaon me too much.
These opmizaons do not require any speed-space tradeos, which mean that
they produce faster code without increasing executable size.
-O2: This allows advanced opmizaon (including -O1), but at the expense
of compilaon me. Like –O1, these opmizaons do not require speed-space
tradeos.
-O3: This performs aggressive opmizaons (including -O2), which can increase
executable size, such as funcon inlining. This is generally protable but,
somemes, counterproducve (for example, increasing memory usage can also
increase cache misses).
-Os: This opmizes compiled code size (a subset of –O2) before speed.
Although -Os or –O2 is generally the way to go for release mode, -O3 can also be considered
for performance-crical code. The -0x ags being shortcuts for the various GCC opmizaon
ags, enabling –O2 and appending addional "ne-grain" ags (for example, -finline-
functions), are an opon too. Whatever opon you choose, the best way to nd the best
choice is simply by performing benchmarking! To get more informaon about the numerous
GCC opmizaon opons, have a look at http://gcc.gnu.org/.
Now that the Boost module is prebuilt, we can embed any of its libraries in our applicaon.
Chapter 9
[ 413 ]
Time for action – compiling an executable linked to Boost
Let's use the Boost unit test library to build our own unit test executable through the
following steps:
1. Sll in the boost directory, create a new Android.mk le to declare the newly
prebuilt libraries as Android modules and make them available to NDK applicaons.
This le needs to contain one module declaraon per library. For example, dene
one module boost_unit_test_framework:
LOCAL_SRC_FILES reference the static library libboost_unit_test_
framework.a we have built with b2.
Use the $(TARGET_ARCH_ABI) variable to determine the right path to use, which
depends on the target plaorm. Its value can be armeabi, armeabi-v7a, or x86.
If you compile DroidBlaster for X86, the NDK will look for libboost_unit_test_
framework.a in androidx86/lib.
LOCAL_EXPORT_C_INCLUDES automatically appends boost root directory
to the include file directory list of the including module.
Indicate that this module is a prebuilt library with the $(PREBUILT_
STATIC_LIBRARY) directive:
LOCAL_PATH:= $(call my-dir)
include $(CLEAR_VARS)
LOCAL_MODULE:= boost_unit_test_framework
LOCAL_SRC_FILES:= android-$(TARGET_ARCH_ABI)/lib/libboost_unit_
test_framework.a
LOCAL_EXPORT_C_INCLUDES := $(LOCAL_PATH)
include $(PREBUILT_STATIC_LIBRARY)
More modules can be declared in the same le with the same set of lines (for
example, boost_thread).
Final user-config.jam is provided with this book in the
Libraries/boost directory.

Porng Exisng Libraries to Android
[ 414 ]
2. Go back to the DroidBlaster project and create a new directory test containing
the unit test le test/Test.cpp. Write a test to check the behavior, for example,
of the TimeManager, as shown in the following code:
#include "Log.hpp"
#include "TimeManager.hpp"
#include <unistd.h>
#define BOOST_TEST_MODULE DroidBlaster_test_module
#include <boost/test/included/unit_test.hpp>
BOOST_AUTO_TEST_SUITE(suiteTimeManager)
BOOST_AUTO_TEST_CASE(testTimeManagerTest_elapsed)
{
TimeManager timeManager;
timeManager.reset();
sleep(1);
timeManager.update();
BOOST_REQUIRE(timeManager.elapsed() > 0.9f);
BOOST_REQUIRE(timeManager.elapsed() < 1.2f);
sleep(1);
timeManager.update();
BOOST_REQUIRE(timeManager.elapsed() > 0.9f);
BOOST_REQUIRE(timeManager.elapsed() < 1.2f);
}
BOOST_AUTO_TEST_SUITE_END()
3. To include Boost in an applicaon, we need to link it with an STL implementaon
supporng excepons and RTTI. Enable them globally in the Application.mk le,
as shown in the following code:
APP_ABI := armeabi armeabi-v7a x86
APP_STL := gnustl_static
APP_CPPFLAGS := -fexceptions –frtti
4. Finally, open DroidBlaster jni/Android.mk and create a second module named
DroidBlaster_test before the import-module secon. This module compiles
the addional test/Test.cpp test le and must be linked to the Boost unit test
library. Build this module as an executable, and not a shared library, with $(BUILD_
EXECUTABLE).

Chapter 9
[ 415 ]
Finally, import the Boost module itself in the import-module secon, as shown in
the following code:
...
include $(BUILD_SHARED_LIBRARY)
include $(CLEAR_VARS)
LS_CPP=$(subst $(1)/,,$(wildcard $(1)/*.cpp))
LS_CPP_TEST=$(subst $(1)/,,$(wildcard $(1)/../test/*.cpp))
LOCAL_MODULE := DroidBlaster_test
LOCAL_SRC_FILES := $(call LS_CPP,$(LOCAL_PATH)) \
$(call LS_CPP_TEST,$(LOCAL_PATH))
LOCAL_LDLIBS := -landroid -llog -lEGL -lGLESv2 -lOpenSLES
LOCAL_STATIC_LIBRARIES := android_native_app_glue png box2d_static \
libboost_unit_test_framework
include $(BUILD_EXECUTABLE)
$(call import-module,android/native_app_glue)
$(call import-module,libpng)
$(call import-module,box2d)
$(call import-module,boost)
5. Build the project. If you look into the libs folder, you should see one
droidblaster_test le in addion to the shared library. This is an executable
le that we can run on an emulator or a rooted device (given you have the right to
deploy and change permission on a le). Deploy this le and run it (here on an Arm
V7 emulator instance):
adb push libs/armeabi-v7a/droidblaster_test /data/data/
adb shell /data/data/droidblaster_test

Porng Exisng Libraries to Android
[ 416 ]
What just happened?
We have created a fully nave executable using a Boost prebuilt module and can run it on
Android. Boost prebuilt stac libraries have been "published" from the Boost Android.mk
module le in the Boost directory.
Indeed, there exist four main ways to build a nave library. We have already seen BUILD_
STATIC_LIBRARY and BUILD_SHARED_LIBRARY in the Box2D part. Two more opons
coexist, which are as follows:
PREBUILT_STATIC_LIBRARY to use an exisng (that is, prebuilt) binary
stac library
PREBUILT_SHARED_LIBRARY to use an exisng binary shared library
These direcves indicate that libraries are ready for linking.
Inside the main module le, as we have seen for Box2D, submodules linked need to be
listed in:
LOCAL_SHARED_LIBRARIES for shared libraries
LOCAL_STATIC_LIBRARIES for stac libraries
The same rule applies whether the library is prebuilt or not. Modules, whether they are
stac, shared, prebuilt, or built on-demand, must be imported in the nal main module using
the NDK import-module direcve.
When a prebuilt library is linked to a main module, source les are not necessary. Include
les are obviously sll required. Thus, prebuilt libraries are an appropriate choice if you
want to provide a library to third pares without releasing sources. On the other hand, on-
demand compilaon allows tweaking compilaon ags on all included libraries (such as
opmizaon ags, the ARM mode, and so on) from your main Application.mk project le.
To properly link with Boost, we have also enabled excepons and RTTI on the whole project.
Excepons and RTTI are acvated very easily by appending -fexceptions and -frtti to
either the APP_CPPFLAGS direcve in the Application.mk le or the LOCAL_CPPFLAGS
le of the concerned library. By default, Android compiles with -fno-exceptions and
-fno-rtti ags.
Chapter 9
[ 417 ]
Indeed, excepons have the reputaon of making the compiled code bigger and less
ecient. They prevent the compiler from performing some clever opmizaons. However,
whether excepons are worse than error checking, or even no check at all, is a highly
debatable queson. In fact, Google's engineers dropped them in the rst releases because
GCC 3.x generated a poor excepon handling code for ARM processors. However, the build
chain now uses GCC 4.x, which does not suer from this aw. Compared to manual error
checking and handling of exceponal cases, this penalty might not be so signicant most of
the me. Thus, the choice of excepons is up to you (and your embedded libraries)!
Excepon handling in C++ is not easy and imposes a strict discipline! They
must be used strictly for exceponal cases and require carefully designed
code. Have a look at the Resource Acquision Is Inializaon (RAII) idiom
to properly handle them. For more informaon, have a look at http://
en.wikipedia.org/wiki/Resource_Acquisition_Is_
Initialization.
Obviously, Boost provides much more interesng features than unit tests. Discover its full
richness in its ocial documentaon at http://www.boost.org/doc/libs. Beware,
Boost is subject to regular breaking changes or bugs on Android since it is not very acvely
maintained and tested on that plaorm. Be prepared to invesgate and x problems directly
in its code.
Now that we have seen in pracce how to write module Makeles, let's learn more
about them.
Mastering module Makeles
Android Makeles are an essenal piece of the NDK building process. Thus, to build and
manage a project properly, it is important to understand the way they work.
Makele variables
Compilaon sengs are dened through a set of predened NDK variables. We have already
seen the three most important ones: LOCAL_PATH, LOCAL_MODULE, and LOCAL_SRC_
FILES, but many others exist. We can dierenate the following four types of variables,
each with a dierent prex:
LOCAL_ variables: These are dedicated to individual module compilaon and are
dened in Android.mk les.
APP_ variables: These refer to applicaon-wide opons and are set in
Application.mk.
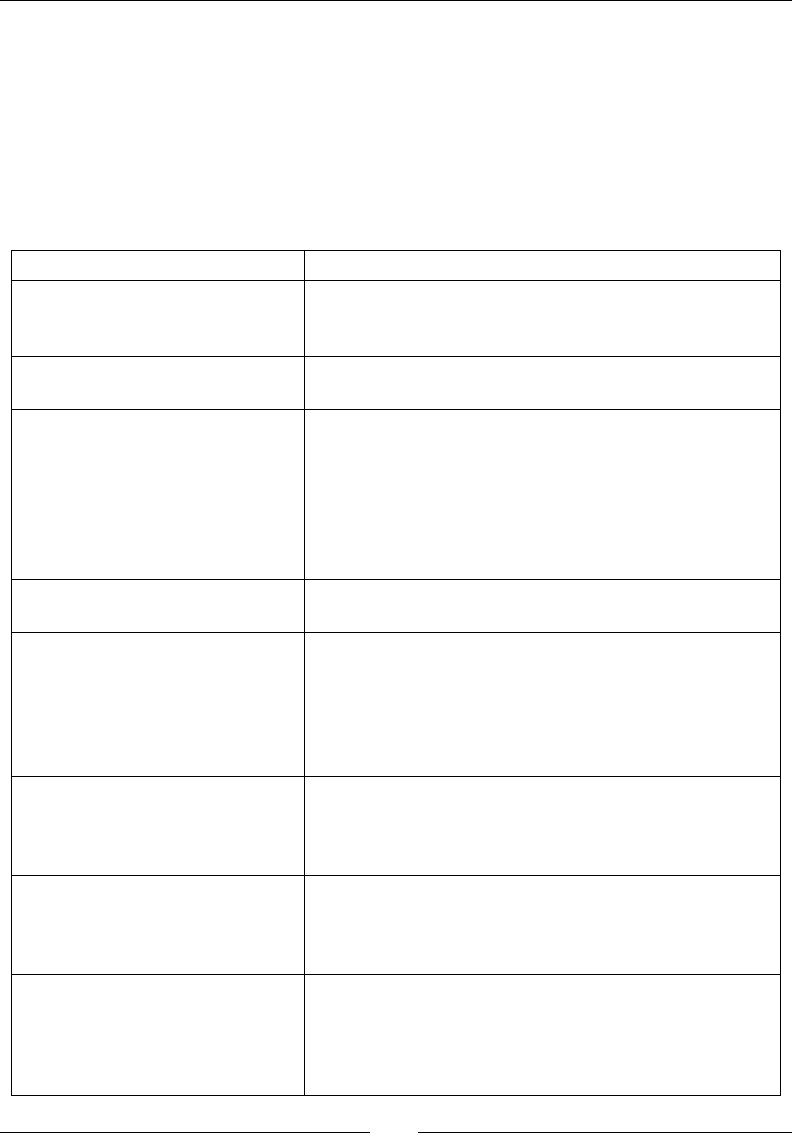
Porng Exisng Libraries to Android
[ 418 ]
NDK_ variables: These are mainly internal variables that usually refer to environment
variables (for example, NDK_ROOT, NDK_APP_CFLAGS, or NDK_APP_CPPFLAGS).
There are two notable excepons: NDK_TOOLCHAIN_VERSION and NDK_
APPLICATION_MK. The laer can be passed to the NDK-Build in parameter to dene
a dierent Application.mk locaon.
PRIVATE_ prexed variables: These are for NDK internal use only.
The following table contains a non-exhausve list of LOCAL variables:
Variable Description
LOCAL_PATH
To specify the root location of source files. Must be
defined at the beginning of the Android.mk file before
include $(CLEAR_VARS).
LOCAL_MODULE To define module name, it must be unique among
all modules.
LOCAL_MODULE_FILENAME
To override default name of the compiled module, which
is:
- lib<module name>.so for shared libraries.
- lib<module name>.a for static libraries.
No custom file extensions can be specified so that
.so or.a remains appended.
LOCAL_SRC_FILES To define the list of source files to compile, each separated
by a space and relative to LOCAL_PATH.
LOCAL_C_INCLUDES
To specify header file directories for both C and
C++ languages. The directory can be relative to the
${ANDROID_NDK} directory, but unless you need to
include a specific NDK file, you are advised to use absolute
paths (which can be built from Makefile variables such as
$(LOCAL_PATH)).
LOCAL_CPP_EXTENSION
To change default C++ file extension, that is, .cpp (for
example, .cc or .cxx). A list of file extensions separated
by a space, can be specified. Extensions are necessary for
GCC to determine which file is related to which language.
LOCAL_CFLAGS, LOCAL_
CPPFLAGS, LOCAL_LDLIBS
To specify any options, flags, or macro-definitions for
compilation and linking. The first one works for both C and
C++, the second one is for C++ only, and the last one is for
the linker.
LOCAL_SHARED_LIBRARIES,
LOCAL_STATIC_LIBRARIES
To declare a dependency with other modules (not
system libraries), shared and static modules, respectively.
LOCAL_SHARED_LIBRARIES manage dependencies
whereas LOCAL_LDLIBS should be used for declaring
system libraries.

Chapter 9
[ 419 ]
Variable Description
LOCAL_ARM_MODE, LOCAL_
ARM_NEON, LOCAL_DISABLE_
NO_EXECUTE, LOCAL_FILTER_
ASM
Advanced variables dealing with processors and
assembler/binary code generation. They are not necessary
for most programs.
LOCAL_EXPORT_C_INCLUDES,
LOCAL_EXPORT_CFLAGS,
LOCAL_EXPORT_CPPFLAGS,
LOCAL_EXPORT_LDLIBS
To define additional options or flags in import modules
that should be appended to client module options. For
example, if a module A defines
LOCAL_EXPORT_LDLIBS := -llog
because it needs an Android logging module. Then,
module B, that depends on module A, will be
automatically linked to –llog.
LOCAL_EXPORT_ variables are not used when compiling
the module that exports them. If required, they also need
to be specified in their LOCAL counterpart.
Documentaon about these variables can be found at ${ANDROID_NDK}/docs/ANDROID-
MK.html.
The following table contains a non-exhausve list of the APP variables (all are oponal):
Variable Description
APP_PROJECT_PATH To specify the root of your application project.
APP_MODULES
The list of modules to compile with their identifier. Dependent
modules are also included. This can be used, for example, to force the
generation of a static library.
APP_OPTIM
Set to release or debug to adapt compilation settings to the type
of build you want. When not specified explicitly, the NDK determines
the build type using the debuggable flag in the AndroidManifest.
APP_CFLAGS
APP_CPPFLAGS
APP_LDFLAGS
To globally specify any options, flags, or macro-definitions for
compilation and linking. The first one works for both C and C++, the
second one is for C++ only, and the last one is for the linker.
APP_BUILD_SCRIPT To redefine the location of the Android.mk file (by default in project's
jni directory).
APP_ABI
List of ABI (that is, "CPU architectures") supported by the application,
separated by a space. Currently supported values are armeabi,
armeabi-v7a, x86, mips, or all. Each module is recompiled
once per ABI. So, the more ABI you support, the more time it will get
to build.
APP_PLATFORM Name of the target Android platform. This information is found by
default in the project.properties file.
Porng Exisng Libraries to Android
[ 420 ]
Variable Description
APP_STL
The C++ runtime to use. Possible values are system, gabi++_
static, gabi++_shared, stlport_static, stlport_
shared, gnustl_static, gnustl_shared, c++_static,
and c++_shared.
Documentaon about these variables can be found at ${ANDROID_NDK}/docs/
APPLICATION-MK.html.
Enabling C++ 11 support and the Clang compiler
The NDK_TOOLCHAIN_VERSION variable can be redened in the Application.mk le to
explicitly select the compilaon toolchain. Possible values for the NDK R10 are 4.6 (now
deprecated), 4.8, and 4.9, which simply correspond to GCC versions. Possible version
numbers might change in future releases of the NDK. To nd them, have a look at the
$ANDROID_NDK/toolchains directory.
The Android NDK provides C++ 11 support, starng with the GCC 4.8 toolchain. You can enable
it by appending the -std=c++11 compilaon ag and acvang GNU STL (STL Port is not
supported and Libc++ only parally supported at the me this book was wrien) to get proper
C++11 support. The following is an example of an Android.mk extract with C++11 acvated:
...
NDK_TOOLCHAIN_VERSION := 4.8
APP_CPPFLAGS += -std=c++11
APP_STL := gnustl_shared
...
Switching to GCC4.8 and C++11 might not feel like a breeze. Indeed, the
compiler, let's say, is a bit less permissive than before. In case you run
into trouble when compiling legacy code with this new toolchain, try the
–fpermissive ag (or rewrite your code!).
Moreover, beware, although C++11 support is quite large, you might sll
encounter a few problems or missing features.
To enable Clang, the LLVM-based compiler (famous for being used by Apple), in place of GCC,
simply set NDK_TOOLCHAIN_VERSION to clang. You can also specify compiler version, such
as clang3.4 or clang3.5. Again, possible version numbers might change in future releases
of the NDK. To nd them, have a look at the $ANDROID_NDK/toolchains directory.
Chapter 9
[ 421 ]
Makele Instructions
Makele is a real language with programming instrucons and funcons.
Makeles can be broken down into several sub-Makeles, included with the include
instrucon. Variable inializaon comes in the following two avors:
Simple aectaon (operator :=), which expands variables at the me they are
inialized
Recursive aectaon (operator =), which re-evaluates the aected expression
each me it is called
The following condional and loop instrucons are available: ifdef/endif, ifeq/endif,
ifndef/endif, and for…in/do/done. For example, to display a message only when a
variable is dened, do:
ifdef my_var
# Do something...
endif
More advanced stu, such as funconal if, and, or, and so on, are at your disposal, but
are rarely used. Makeles also provide some useful built-in funcons, which are given in the
following table:
$(info <message>)
Allows printing messages to the standard output. This is the
most essential tool when writing Makefiles! Variables inside
information messages are allowed.
$(warning <message>),
$(error <message>)
Allows printing a warning or a fatal error that stops
compilation. These messages can be parsed by Eclipse.
$(foreach <variable>,
<list>, <operation>)
Performs an operation on a list of variables. Each element
of the list is expanded in the first argument variable, before
the operation is applied to it.
$(shell <command>)
Executes a command outside of Make. This brings all the
power of Unix Shell into Makefiles but is heavily system-
dependent. Avoid it if possible.
$(wildcard <pattern>) Selects files and directory names according to a pattern.
$(call <function>)
Allows evaluating a function or macro. One macro we
have seen is my-dir, which returns the directory path
of the last executed Makefile. This is why LOCAL_PATH
:= $(call my-dir) is systematically written at the
beginning of each Android.mk file to save in the current
Makefile directory.
Porng Exisng Libraries to Android
[ 422 ]
Custom funcons can easily be wrien with the call direcve. These funcons look
somewhat similar to recursively aected variables, except that the arguments can be
dened: $(1) for rst argument, $(2) for second argument, and so on. A call to a funcon
can be performed in a single line, as shown in the following code:
my_function=$(<do_something> ${1},${2})
$(call my_function,myparam)
Strings and les manipulaon funcons are available too, as shown in the following table:
$(join <str1>, <str2>) Concatenates two strings.
$(subst <from>,
<replacement>,<string>),
$(patsubst <pattern>,
<replacement>,<string>)
Replaces each occurrence of a substring by
another. The second one is more powerful
because it allows using patterns (which must
start with "%").
$(filter <patterns>, <text>)
$(filter-out <patterns>, <text>)
Filter strings from a text matching patterns.
This is useful for filtering files. For example,
the following line filters any C file:
$(filter %.c, $(my_source_
list))
$(strip <string>) Removes any unnecessary whitespace.
$(addprefix <prefix>,<list>),
$(addsuffix <suffix>, <list>)
Append a prefix and suffix, respectively, to
each element of the list, each element being
separated by a space.
$(basename <path1>, <path2>, ...) Returns a string from which file extensions
are removed.
$(dir <path1>, <path2>),
$(notdir <path1>, <path2>)
Extracts the directory and the filename in a
path respectively.
$(realpath <path1>, <path2>,
...),
$(abspath <path1>, <path2>, ...)
Return both canonical paths of each path
argument, except that the second one does
not evaluate symbolic links.
This is just really an overview of what Makeles are capable of. For more informaon, refer
to the full Makele documentaon available at http://www.gnu.org/software/make/
manual/make.html. If you are allergic to Makeles, have a look at CMake. CMake is a
simplied Make system, already building many open source libraries on the market. A port of
CMake on Android is available at http://code.google.com/p/android-cmake.

Chapter 9
[ 423 ]
Have a go hero – mastering Makeles
We can play in a variety of ways with Makeles:
Try the aectaon operator. For example, write down the following piece of code,
which uses the := operator, in your Android.mk le:
my_value := Android
my_message := I am an $(my_value)
$(info $(my_message))
my_value := Android eating an apple
$(info $(my_message))
Watch the result when launching compilaon. Then, perform the same using =. Print
current opmizaon mode. Use APP_OPTIM and the internal variable, NDK_APP_
CFLAGS, and observe the dierence between the release and debug modes:
$(info Optimization level: $(APP_OPTIM) $(NDK_APP_CFLAGS))
Check that variables are properly dened, for example:
ifndef LOCAL_PATH
$(error What a terrible failure! LOCAL_PATH not defined...)
endif
Try to use the foreach instrucon to print the list of les and directories
inside the project's root directory and its jni folder (and make sure to use
recursive aectaon):
ls = $(wildcard $(var_dir))
dir_list := . ./jni
files := $(foreach var_dir, $(dir_list), $(ls))
Try to create a macro to log a message to the standard output and its me:
log=$(info $(shell date +'%D %R'): $(1))
$(call log,My message)
Finally, test the my-dir macro-behavior, to understand why LOCAL_PATH :=
$(call my-dir) is systemacally wrien at the beginning of each Android.mk
le:
$(info MY_DIR =$(call my-dir))
include $(CLEAR_VARS)
$(info MY_DIR =$(call my-dir))

Porng Exisng Libraries to Android
[ 424 ]
CPU Architectures (ABI)
Compiled nave C/C++ code on current Android ARM devices follows an Applicaon Binary
Interface (ABI). An ABI species the binary code format (instrucon set, calling convenons,
and so on). GCC translates code into this binary format. ABIs are thus strongly related to
processors. The target ABI can be selected in the Application.mk le with the APP_ABI
variable. There exist ve main ABIs supported on Android, which are as follows:
thumb: This is the default opon, which should be compable with all ARM devices.
Thumb is a special instrucon set which encodes instrucons on 16 bit, instead
of 32 bit, to improve code size (useful for devices with constrained memory). The
instrucon set is severely restricted compared to ArmEABI.
armeabi (Or Arm v5): This should run on all ARM devices. Instrucons are encoded on
32 bit but may be more concise than Thumb code. Arm v5 does not support advanced
extensions such as oang point acceleraon and is thus slower than Arm v7.
armeabi-v7a: This supports extensions such as Thumb-2 (similar to Thumb but
with addional 32-bit instrucons) and VFP, plus some oponal extensions, such as
NEON. Code compiled for Arm V7 will not run on Arm V5 processors.
x86: This is for "PC-like" architectures (that is, Intel/AMD) and, more specically,
Intel Atom processors. This ABI provides specic extensions, such as MMX or SSE.
mips: This is for MIPS processors developed by Imaginaon Technologies (which also
produce the PowerVR graphics processors). Only a few devices exist at the me this
book was wrien.
By default, the compiled binaries of each ABI are embedded in the APK. The most
appropriate is selected at installaon me. Google Play also supports the upload of dierent
APKs for each ABI to limit applicaon size.
Advanced instruction sets (NEON, VFP, SSE, MSA)
If you are reading this book, code performance is probably one of your main criteria. To
achieve this, ARM created a SIMD instrucon set (acronym Single Instrucon Mulple Data,
that is, process several data in parallel with one instrucon) called NEON, which has been
introduced along with the VFP (oang point accelerated) unit. NEON is not available on
all chips (for example, Nvidia Tegra 2 does not support it), but is quite popular in intensive
mulmedia applicaons. They are also a good way to compensate the weak VFP unit of some
processors (for example, Cortex-A8).
Chapter 9
[ 425 ]
A NEON code can be wrien in a separate assembler le in a dedicated asm
volatile block with assembler instrucons, or in a C/C++ le or as intrinsics
(NEON instrucons encapsulated in a GCC C roune). Intrinsics should be used
with much care as GCC is oen unable to generate ecient machine code (or
requires lots of tricky hints). Wring real assembler code is generally advised.
X86 CPUs have their own set of extensions that are dierent from the ARM ones: MMX, SSE,
SSE2, and SSE3. SSE instrucon sets are the Intel equivalent of NEON SIMS instrucons. The
latest SSE4 instrucons are generally not supported on current X86 processors. Obviously,
SSE and NEON are not compable, which means that a code specically wrien for NEON
needs to be rewrien for SSE and reciprocally.
Android provides a cpu-features.h API (with the android_
getCpuFamily()and android_getCpuFeatures() methods) to
detect available features on the host device at runme. It helps in detecng the
CPU (ARM, X86) and its capabilies (ArmV7 support, NEON, VFP, and so on).
NEON, SSE, and modern processors in general are not easy to master. The Internet is full
of examples to get inspiraon from. Reference technical documentaon can be found on
the ARM website at http://infocenter.arm.com/ and the Intel developer manuals at
http://www.intel.com/.
MIPS also has its own SIMD instrucon set named MSA. It provides features such as vector
arithmecs and branching operaons, or conversion between integer and oang-point values.
For more informaon, have a look at http://www.imgtec.com/mips/architectures/
simd.asp.
All this stu is interesng but it does not answer the queson you are probably asking
yourself: how hard it is to port code from ARM to X86 (or reciprocally)? The answer is
"it depends":
If you use pure C/C++ nave code, without specic instrucon set, code should be
portable simply by appending x86 or mips to the APP_ABI variable.
If your code contains assembly code, you will need to rewrite the corresponding
part for other ABI or provide a fallback.
If your code contains specic instrucon sets such as NEON (using C/C++ intrinsics
or assembly code), you will need to rewrite corresponding part for other ABIs or
provide a fallback.
If your code depends on specic memory alignment, you might need to use
explicit alignment. Indeed, when you compile a data structure, the compiler might
use padding to align data in memory appropriately for faster memory accesses.
However, alignment requirements are dierent depending on the ABI.
Porng Exisng Libraries to Android
[ 426 ]
For example, 64-bit variables on ARM are aligned to 8, which means, for example, that
double must have a memory address, which is a mulple of 8. X86 memory can be more
densely packed.
Data alignment is not an issue the vast majority of the me, except
if you explicitly depend on data locaon (for example, if you use
serializaon). Even if you have no alignment issues, it is always
interesng to tweak or opmize structure layouts to avoid useless
padding and get beer performances.
So, most of the me, porng code from one ABI to another should be rather simple. In
specic cases, provide fallbacks when specic CPU features or assembly code is necessary.
Finally, beware, some memory alignment issues might arise in some rare cases.
As we have seen in the Prebuilding Boost part, each ABI has its own
compilaon ags to opmize compilaon. Although the default GCC opons
used by the NDK are an appropriate basis, tweaking them can improve
eciency and performance. For example, you can use -mtune=atom
-mssse3 -mfpmath=sse to opmize release code on X86 plaorms.
Summary
This chapter introduced a fundamental aspect of the NDK: portability. Thanks to the recent
improvements in the building toolchain, the Android NDK can now take advantage of the
vast C/C++ ecosystem. It unlocks the door of a producve environment, where code is shared
with other plaorms with the aim of creang new cung-edge applicaons eciently.
More specically, you learned how to acvate the STL with a simple ag in the NDK makele
system. We have ported the Box2D library into an NDK module that is reusable among
Android projects. You also saw how to prebuild Boost using the raw NDK toolchain, without
any wrapper. We have enabled excepons and RTTI and discovered in depth how to write
module makeles.
We have highlighted the path toward the creaon of professional applicaons using the
NDK as a leverage. But do not expect all C/C++ libraries to be ported so easily. Talking about
paths, we are almost at the end. At least, this was the last chapter about DroidBlaster.
The next and last chapters will introduce RenderScript, an advanced technology to maximize
your Android app performance.

[ 427 ]
10
Intensive Computing with
RenderScript
If the NDK is one of the best tools to get a high performance on Android. It
gives low-level access to the machine, gives you control on memory allocation,
provides access to advanced CPU instruction-sets, and even more.
This power comes with a price: to get maximum performance on a key piece
of code, ones need to optimize code for the many devices and platforms in
the world. Sometimes, it is more appropriate to use CPU SIMD instructions,
and other times, to perform computation on the GPU. You had better be
experienced and have plenty of devices and time in front of you! This is the
reason Google introduced RenderScript on Android.
RenderScript is a programming language specic to Android wrien with one goal in mind:
performance. Let's be clear, applicaons cannot be enrely wrien in RenderScript. However,
the crical parts, requiring intensive computaons, should be! RenderScript can be executed
from either Java or C/C++.
In this chapter, we will discuss these basics and concentrate our eort on its NDK binding.
We will create a new project to demonstrate RenderScript capabilies by ltering images.
More precisely, we will see how to:
Execute the predened Intrinsics
Create your own custom Kernels
Combine Intrinsics and Kernels together
By the end of this chapter, you should be able to create your own RenderScript programs and
bind them into your nave code.

Intensive Compung with RenderScript
[ 428 ]
What is RenderScript ?
RenderScript was introduced in Honeycomb in 2011 with a strong focus on graphics
capabilies, hence the name. The graphics engine part of RenderScript has, however, been
deprecated since Android 4.1 JellyBean. Although it has kept its name, RenderScript has
deeply evolved to emphasize its "compute engine". It is similar to technologies such as
OpenCL and CUDA, with an emphasis on portability and usability.
More specically, RenderScript tries to abstract hardware specicies from the programmer
and extract the maximum raw power from it. Instead of taking the least common
denominator, it opmizes code according to the plaorm it executes on at runme. The
nal code can run on either the CPU or GPU, with an advantage of automac parallelizaon
managed by RenderScript.
The RenderScript framework is composed of a few elements:
A C-like language based on C99, which provides variables, funcons, structures,
and so on
A low level virtual machine (LLVM) based compiler on the developer machine that
produces intermediate code
A RenderScript library and runme that translates intermediate code to machine
code only when the nal program runs on the device
A Java and NDK binding API to execute and chain computaon tasks
Computaon tasks are obviously the center of RenderScript. There are two kinds of tasks:
Kernels, which are user-created scripts that perform a computaon task using the
RenderScript language
Intrinsics, which are built-in Kernels to perform some common tasks such as
blurring pixels
Kernels and Intrinsics can be combined together, the output of a program being linked
to the input of another. From the complex graphs of computaon tasks emerge fast and
powerful programs.
However, for the moment, let's see what Intrinsics are and how they work.
Chapter 10
[ 429 ]
Executing a predened Intrinsic
RenderScript provides a few built-in funcons, mainly dedicated to Image processing,
called Intrinsics. With these, blending images, such as in Photoshop, blurring them, or even
decoding raw YUV images from the camera, (see Chapter 4, Calling Java Back from Nave
Code, for a slower alternave) becomes simple and highly ecient. Indeed, Intrinsics are
highly opmized and can be considered as one of the best implementaons in their domain.
To see how Intrinsics work, let's create a new project that takes an input image and applies a
blur eect to it.
The resulng project is provided with this book under the
name RenderScript_Part1.
Time for action – creating a Java UI
Let's create a new Java project with a JNI module.
1. Create a new hybrid Java/C++ project as shown in Chapter 2, Starng a Nave
Android Project:
Name it RenderScript.
The main package is com.packtpub.renderscript.
minSdkVersion is 9 and targetSdkVersion is 19.
Define the android.permission.WRITE_EXTERNAL_STORAGE
permission in the AndroidManifest.xml file.
Turn the project into a native project as already seen.
Remove the native source and header files that have been created by ADT.
Name the main Activity RenderScriptActivity and its layout
activity_renderscript.xml.
2. Dene the project.properties le as follows. These lines acvate the
RenderScript support library, which allows porng code to older devices
unl API 8:
target=android-20
renderscript.target=20
renderscript.support.mode=true
sdk.buildtools=20

Intensive Compung with RenderScript
[ 430 ]
3. Modify res/activity_renderscript.xml to make it look as follows. We
will need:
A SeekBar to define the blur radius
A Button to apply the blur effect
Two ImageView elements to display the image before and after the effect
is applied.
<?xml version="1.0" encoding="utf-8"?>
<LinearLayout
xmlns:a="http://schemas.android.com/apk/res/android"
a:layout_width="fill_parent" a:layout_height="fill_parent"
a:layout_weight="1" a:orientation="vertical" >
<LinearLayout
a:orientation="horizontal"
a:layout_width="fill_parent" a:layout_height="wrap_content" >
<SeekBar a:id="@+id/radiusBar" a:max="250"
a:layout_gravity="center_vertical"
a:layout_width="128dp" a:layout_height="wrap_content" />
<Button a:id="@+id/blurButton" a:text="Blur"
a:layout_width="wrap_content" a:layout_height="wrap_content"/>
</LinearLayout>
<LinearLayout
a:baselineAligned="true" a:orientation="horizontal"
a:layout_width="fill_parent" a:layout_height="fill_parent" >
<ImageView
a:id="@+id/srcImageView" a:layout_weight="1"
a:layout_width="fill_parent" a:layout_height="fill_parent" />
<ImageView
a:id="@+id/dstImageView" a:layout_weight="1"
a:layout_width="fill_parent" a:layout_height="fill_parent" />
</LinearLayout>
</LinearLayout>
4. Implement RenderScriptActivity as shown below.
Load the RSSupport module, which is the RenderScript support library, and the
renderscript module, which we are about to create in a stac block.
Then, in onCreate(), load a 32-bit bitmap from an image placed in drawable
resources (here, named picture) and create a second empty bitmap of the same
size. Assign these bitmaps to their respecve ImageView component. Also, dene
OnClickListener on the Blur buon:
package com.packtpub.renderscript;
...
public class RenderScriptActivity extends Activity

Chapter 10
[ 431 ]
implements OnClickListener {
static {
System.loadLibrary("renderscript");
}
private Button mBlurButton;
private SeekBar mBlurRadiusBar, mThresholdBar;
private ImageView mSrcImageView, mDstImageView;
private Bitmap mSrcImage, mDstImage;
@Override
protected void onCreate(Bundle savedInstanceState) {
super.onCreate(savedInstanceState);
setContentView(R.layout.activity_renderscript);
BitmapFactory.Options options = new BitmapFactory.Options();
options.inPreferredConfig = Bitmap.Config.ARGB_8888;
mSrcImage = BitmapFactory.decodeResource(getResources(),
R.drawable.picture, options);
mDstImage = Bitmap.createBitmap(mSrcImage.getWidth(),
mSrcImage.getHeight(),
Bitmap.Config.ARGB_8888);
mBlurButton = (Button) findViewById(R.id.blurButton);
mBlurButton.setOnClickListener(this);
mBlurRadiusBar = (SeekBar) findViewById(R.id.radiusBar);
mSrcImageView = (ImageView) findViewById(R.id.srcImageView);
mDstImageView = (ImageView) findViewById(R.id.dstImageView);
mSrcImageView.setImageBitmap(mSrcImage);
mDstImageView.setImageBitmap(mDstImage);
}
...
5. Create a nave funcon, blur, which takes in the parameter:
The application cache directory for the RenderScript runtime
The source and destination bitmaps
The blur effect radius to determine the blur strength

Intensive Compung with RenderScript
[ 432 ]
Call this method from the onClick() handler using the seek bar value to
determine the blur radius. The radius must be in the range [0, 25].
...
private native void blur(String pCacheDir, Bitmap pSrcImage,
Bitmap pDstImage, float pRadius);
@Override
public void onClick(View pView) {
float progressRadius = (float) mBlurRadiusBar.getProgress();
float radius = Math.max(progressRadius * 0.1f, 0.1f);
switch(pView.getId()) {
case R.id.blurButton:
blur(getCacheDir().toString(), mSrcImage, mDstImage,
radius);
break;
}
mDstImageView.invalidate();
}
}
Time for action – running RenderScript Blur intrinsic
Let's create the nave module that will generate our new eect.
1. Create a new le jni/ RenderScript.cpp. We will need the following:
android/bitmap.h header to manipulate bitmaps.
jni.h for JNI strings.
RenderScript.h, which is the main RenderScript header file. This is
the only one you should need. RenderScript is written in C++ and is defined
in the android::RSC namespace.
#include <android/bitmap.h>
#include <jni.h>
#include <RenderScript.h>
using namespace android::RSC;
...

Chapter 10
[ 433 ]
2. Write two ulity methods to lock and unlock Android bitmaps as seen in Chapter 4,
Calling Java Back from Nave Code:
...
void lockBitmap(JNIEnv* pEnv, jobject pImage,
AndroidBitmapInfo* pInfo, uint32_t** pContent) {
if (AndroidBitmap_getInfo(pEnv, pImage, pInfo) < 0) abort();
if (pInfo->format != ANDROID_BITMAP_FORMAT_RGBA_8888) abort();
if (AndroidBitmap_lockPixels(pEnv, pImage,
(void**)pContent) < 0) abort();
}
void unlockBitmap(JNIEnv* pEnv, jobject pImage) {
if (AndroidBitmap_unlockPixels(pEnv, pImage) < 0) abort();
}
...
3. Implement the nave method blur() using the JNI convenon.
Then, instanate the RS class. This class is the main interface, which controls
RenderScript inializaon, resource management, and object creaon. Wrap it with
the sp helper class provided by RenderScript, which represents a smart pointer.
Inialize it with the cache directory given in parameter, converng the string
appropriately with JNI:
...
extern "C" {
JNIEXPORT void JNICALL
Java_com_packtpub_renderscript_RenderScriptActivity_blur
(JNIEnv* pEnv, jobject pClass, jstring pCacheDir, jobject pSrcImage,
jobject pDstImage, jfloat pRadius) {
const char * cacheDir = pEnv->GetStringUTFChars(pCacheDir, NULL);
sp<RS> rs = new RS();
rs->init(cacheDir);
pEnv->ReleaseStringUTFChars(pCacheDir, cacheDir);
...
4. Lock the bitmaps we are working on using the ulity methods we just wrote:
...
AndroidBitmapInfo srcInfo; uint32_t* srcContent;
AndroidBitmapInfo dstInfo; uint32_t* dstContent;
lockBitmap(pEnv, pSrcImage, &srcInfo, &srcContent);
lockBitmap(pEnv, pDstImage, &dstInfo, &dstContent);
...

Intensive Compung with RenderScript
[ 434 ]
5. Now comes the interesng part. Create a RenderScript Allocaon from the source
bitmap. This ALLOCATION represents the whole input memory area whose
dimensions are dened by Type. The Allocaon is composed of "individual" Elements;
in our case, 32-bit RGBA pixels are dened as Element::RGBA_8888. Since the
bitmap is not used as a texture, we have no need for Mipmaps (see Chaper 6,
Rendering Graphics with OpenGL ES, about OpenGL ES for more informaon).
Repeat the same operaon for the output ALLOCATION created from the
output bitmap:
...
sp<const Type> srcType = Type::create(rs, Element::RGBA_8888(rs),
srcInfo.width, srcInfo.height, 0);
sp<Allocation> srcAlloc = Allocation::createTyped(rs, srcType,
RS_ALLOCATION_MIPMAP_NONE,
RS_ALLOCATION_USAGE_SHARED | RS_ALLOCATION_USAGE_SCRIPT,
srcContent);
sp<const Type> dstType = Type::create(rs, Element::RGBA_8888(rs),
dstInfo.width, dstInfo.height, 0);
sp<Allocation> dstAlloc = Allocation::createTyped(rs, dstType,
RS_ALLOCATION_MIPMAP_NONE,
RS_ALLOCATION_USAGE_SHARED | RS_ALLOCATION_USAGE_SCRIPT,
dstContent);
...
6. Create a ScriptIntrinsicBlur instance and the kind of elements it works on,
which is again RGBA pixels. An Intrinsic is a predened RenderScript funcon, which
implements a common operaon, such as a blur eect in our case. The Blur Intrinsic
takes a radius as an input parameter. Set it with setRadius().
Then, specify the blur Intrinsic input, that is the source Allocaon with setInput().
Apply the Intrinsic on each of its elements with forEach() and save it to the
output Allocaon.
Finally, copy the result to the desnaon bitmap with copy2DRangeTo().
...
sp<ScriptIntrinsicBlur> blurIntrinsic =
ScriptIntrinsicBlur::create(rs, Element::RGBA_8888(rs));
blurIntrinsic->setRadius(pRadius);
blurIntrinsic->setInput(srcAlloc);
blurIntrinsic->forEach(dstAlloc);
dstAlloc->copy2DRangeTo(0, 0, dstInfo.width, dstInfo.height,
dstContent);
...

Chapter 10
[ 435 ]
7. Don't forget to unlock the bitmap aer the eect is applied!
...
unlockBitmap(pEnv, pSrcImage);
unlockBitmap(pEnv, pDstImage);
}
}
8. Create a jni/Application.mk le targeng the ArmEABI V7 and X86 plaorms.
Indeed, RenderScript currently does not support older ArmEABI V5. STLPort, and
is also required by the RenderScript nave library.
APP_PLATFORM := android-19
APP_ABI := armeabi-v7a x86
APP_STL := stlport_static
9. Create a jni/Android.mk le dening our renderscript module and lisng
RenderScript.cpp for compilaon.
Make LOCAL_C_INCLUDES point to the appropriate RenderScript, including the le
directory in the NDK plaorm directory. Also, append the RenderScript precompiled
libraries directory to LOCAL_LDFLAG.
Finally, link against dl, log, and RScpp_static, which are required
for RenderScript:
LOCAL_PATH := $(call my-dir)
include $(CLEAR_VARS)
LOCAL_MODULE := renderscript
LOCAL_C_INCLUDES += $(TARGET_C_INCLUDES)/rs/cpp \
$(TARGET_C_INCLUDES)/rs
LOCAL_SRC_FILES := RenderScript.cpp
LOCAL_LDFLAGS += -L$(call host-path,$(TARGET_C_INCLUDES)/../lib/rs)
LOCAL_LDLIBS := -ljnigraphics -ldl -llog -lRScpp_static
include $(BUILD_SHARED_LIBRARY)
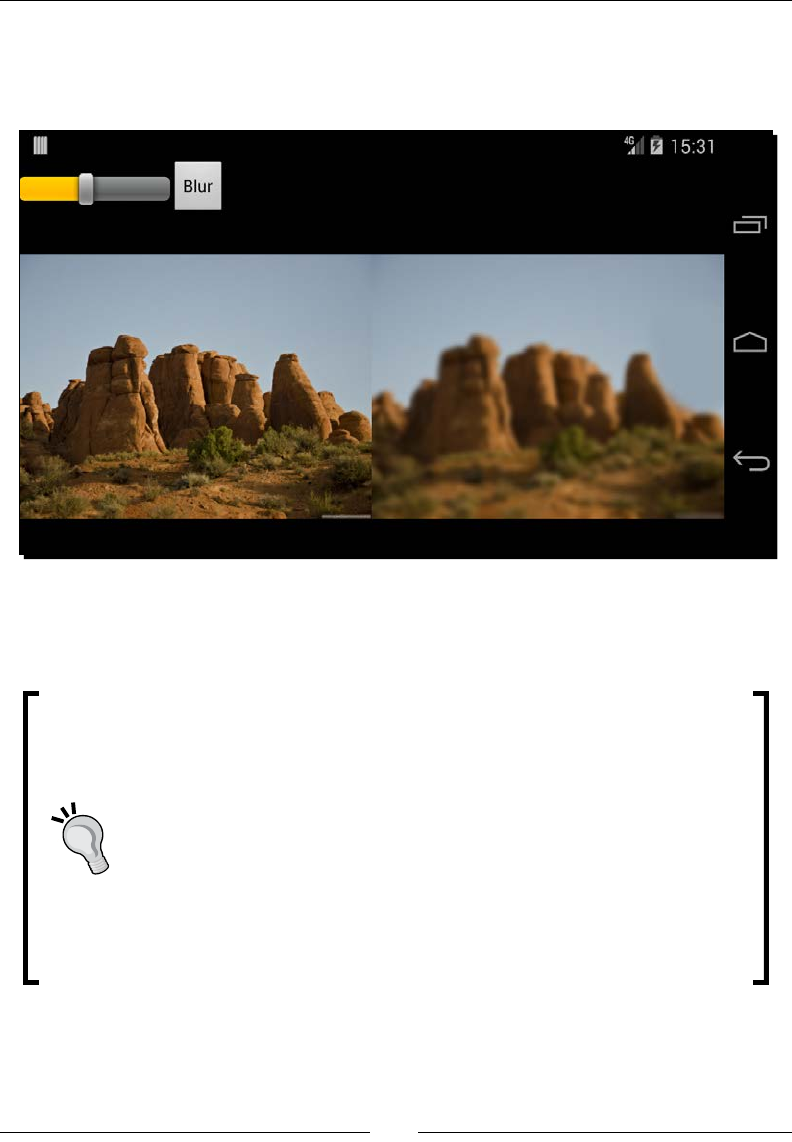
Intensive Compung with RenderScript
[ 436 ]
What just happened?
Run the project, increase the SeekBar value, and click on the Blur buon. The output
ImageView should display the ltered picture as follows:
We embedded the RenderScript compability library in our project, giving us access to
RenderScript down to the API 8 Froyo. On older devices, RenderScript is "emulated" on
the CPU.
If you decide to use RenderScript from the NDK but do not want to use
the compability library, you will need to embed the RenderScript runme
manually. To do so, remove all the stu we added in the project.
properties le in step 2 and include the following piece of code at the
end of your Android.mk les:
...
include $(CLEAR_VARS)
LOCAL_MODULE := RSSupport
LOCAL_SRC_FILES := $(SYSROOT_LINK)/usr/lib/rs/lib$(LOCAL_
MODULE)$(TARGET_
SONAME_EXTENSION)
include $(PREBUILT_SHARED_LIBRARY)
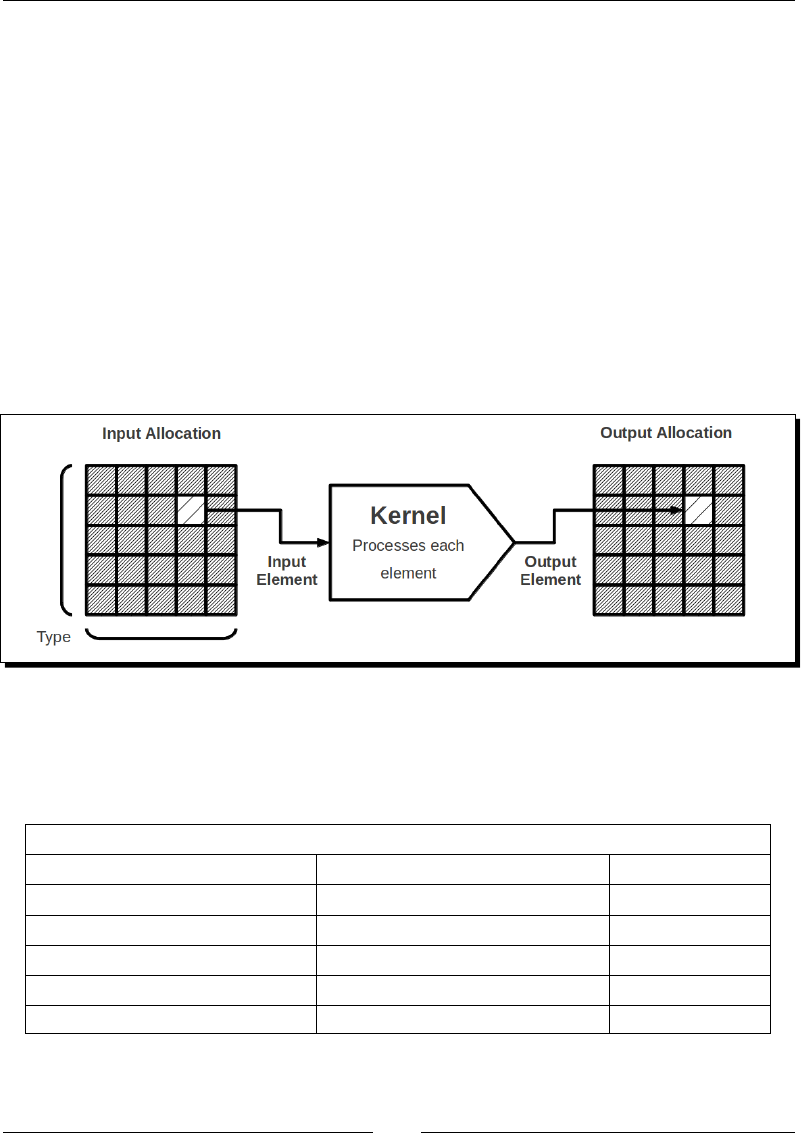
Chapter 10
[ 437 ]
Then, we executed our rst RenderScript Intrinsic that applies a blur eect as eciently
as possible. Intrinsic execuon follows a simple and repeve paern that you will
see repeatedly:
1. Ensure that the input and output memory areas are exclusively available, for
example, by locking bitmaps.
2. Create or reuse the appropriate input and output Allocaon.
3. Create and set up the Intrinsic parameters.
4. Set the input Allocaon and apply the Intrinsic to an output Allocaon.
5. Copy the result from the output Allocaon to the target memory area.
To understand this process beer, let's dive a bit more into the way RenderScript works.
RenderScript follows a simple model. It takes some data as the input and processes it to
an output memory area:
As a compung soluon, RenderScript works with any type of data stored in-memory. This is
an Allocaon. An Allocaon is composed of individual Elements. For an Allocaon poinng
to a bitmap, an element would typically be a pixel (which is itself a set of 4 uchar values).
Among the large list of Elements available, we can cite:
Possible Allocation Elements
U8, U8_2, U8_3, U8_4 I8, I8_2, I8_3, I8_4 RGBA_8888
U16, U16_2, U16_3, U16_4 I16, I16_2¸ I16_3, I16_4 RGB_565
U32, U32_2, U32_3, U32_4 I32, I32_2¸ I32_3¸ I32_4 RGB_888
U64, U64_2, U64_3, U64_4 I64, I64_2, I64_3, I64_4 A_8
F32, F32_2, F32_3, F32_4 F64, F64_2, F64_3¸ F64_4 YUV
MATRIX_2X2 MATRIX_3X3 MATRIX_4X4
Intensive Compung with RenderScript
[ 438 ]
U = unsigned integer, I = signed integer, F = oat
8, 16, 32, 64 = byte count. For example I8 = 8-bits signed int (that is, a signed char)
_2, _3, _4 = Number of elements for vectors (I8_3 means vector of 3 signed int)
A_8 represents an Alpha channel (with each pixel represented as an unsigned char).
Internally, Elements are described with a DataType (such as UNSIGNED_8 for an unsigned
char) and a DataKind (such as PIXEL_RGBA for a pixel). The DataKind is used with something
called Samplers for graphics data that is interpreted on the GPU (see Chapter 6, Rendering
Graphics with OpenGL ES, about OpenGL ES to beer understand what is a Sampler).
DataType and DataKind are for more advanced usage and should be transparent to you
most of the me. You can have a look at the full list of elements at http://developer.
android.com/reference/android/renderscript/Element.html.
Knowing the type of input/output Element is not enough. Their number is also essenal, as
this determines the whole Allocaon size. This is the role of Type, which can be set up with
1 dimension, 2 dimensions (typically for bitmaps), or 3 dimensions. Some other informaon
is also supported, such as the YUV format (NV21 being the default in Android as seen in
Chapter 4, Calling Java Back from Nave Code). So, in other words, Type describes a mul-
dimensional array.
Allocaons have a specic ag to control how Mipmaps are generated. By default, most
Allocaons will not need one (RS_ALLOCATION_MIPMAP_NONE). However, when used
as the input of a graphics texture, Mipmaps are either created in script memory (RS_
ALLOCATION_MIPMAP_FULL) or when uploaded to the GPU (RS_ALLOCATION_MIPMAP_
ON_SYNC_TO_TEXTURE).
Once we create the Allocaon from a Type and an Element, we can take care of creang and
seng up Intrinsics. RenderScript provides a few of them, which are not many, but mainly
focused on image processing:
Intrinsic Description
ScriptIntrinsicBlend To blend two Allocations together, for example, two
images (we will see additive blending in the last part of
this chapter).
ScriptIntrinsicBlur To apply a blur effect on a Bitmap.
ScriptIntrinsicColorMatrix To apply a color matrix to an Allocation (for example, to
adjust image hue, change colors, and so on).
ScriptIntrinsicConvolve3x3 To apply a convolve matrix of size 3 to an Allocation
(many image filters can be implemented with a
convolve matrix, including blurring).
Chapter 10
[ 439 ]
Intrinsic Description
ScriptIntrinsicConvolve5x5 This is the same as
ScriptIntrinsicConvolve3x3 but with a
matrix of size 5.
ScriptIntrinsicHistogram This is used to apply a histogram filter (for example, to
improve the image contrast).
ScriptIntrinsicLUT This is used to apply a "Lookup Table" per channel (for
example, to translate a given red value in a pixel to
another predefined value in the table).
ScriptIntrinsicResize This is used to resize a 2D Allocation (for example, to
scale an image).
ScriptIntrinsicYuvToRGB To translate YUV images coming, for example, from
a camera to an RGB image (like we did in Chapter 4,
Calling Java Back from Native Code). The binding of this
Intrinsic in the NDK is bugged and, thus, unusable at the
time this book was written. If you really need it, apply it
from Java.
Each of these Intrinsics requires its own specic parameters (for example, the radius for a
blur eect). Full Intrinsics documentaon can be found at http://developer.android.
com/reference/android/renderscript/package-summary.html.
Intrinsics require an input and output Allocaon. It is technically possible to use an input as
an output if the kind of funcon applied is appropriate. This is not the case, for example,
ScriptIntrinsicBlur as a blurred pixel could be wrien at the same me it is read to
blur other pixels.
Once Allocaons are set, an Intrinsic is applied and performs its work. Aer that, the
result must be copied to the output memory area with one of the copy***To() methods
(copy2DRangeTo() for a bitmap, which has two dimensions or copy2DStridedTo() if
there are gaps in the target area). Data copying is a prerequisite step before making use of
the computaon result.
Some problems have been reported on some devices when the size of an
image Allocaon was not a mulple of 4. This will probably remind you of
OpenGL textures, which have the same requirements. So, try to sck with
dimensions that are mulples of 4.
Although the Intrinsics provided by RenderScript are really useful, you may want more
exibility. Maybe you need your own custom image lter, or a blur eect of more than 25
pixels, or maybe you do not want to process images at all. Then, RenderScript Kernels might
be the right answer for you.

Intensive Compung with RenderScript
[ 440 ]
Writing a custom Kernel
RenderScript gives you the ability to develop small custom "scripts" instead of the built-in
Intrinsics. These programs are called Kernels and are wrien in a C-like language. They are
compiled to an intermediate language by the RenderScript LLVM-based compiler at build
me. Finally, they are translated to machine code at runme. RenderScript takes care of
plaorm-dependent opmizaons.
Let's now see how to create such a Kernel by implemenng a custom image eect that lters
pixels according to their luminosity.
The resulng project is provided with this book under the name
RenderScript_Part2.
Time for action – writing a luminance threshold lter
Let's append a new component to our UI and implement the new image lter.
1. Add a new Threshold SeekBar and Button in res/activity_renderscript.
xml:
<?xml version="1.0" encoding="utf-8"?>
<LinearLayout
xmlns:a="http://schemas.android.com/apk/res/android"
a:layout_width="fill_parent" a:layout_height="fill_parent"
a:layout_weight="1" a:orientation="vertical" >
<LinearLayout
a:orientation="horizontal"
a:layout_width="fill_parent" a:layout_height="wrap_content" >
...
<SeekBar a:id="@+id/thresholdBar" a:max="100"
a:layout_gravity="center_vertical"
a:layout_width="128dp" a:layout_height="wrap_content" />
<Button a:id="@+id/thresholdButton" a:text="Threshold"
a:layout_width="wrap_content" a:layout_height="wrap_content"/>
</LinearLayout>
<LinearLayout
a:baselineAligned="true" a:orientation="horizontal"
a:layout_width="fill_parent" a:layout_height="fill_parent" >
...
</LinearLayout>
</LinearLayout>

Chapter 10
[ 441 ]
2. Edit RenderScriptActivity and bind the Threshold SeekBar and Button to a
new nave method threshold(). This method is similar to blur(), except that it
takes a threshold oat parameter in the range [0, 100].
...
public class RenderScriptActivity extends Activity
implements OnClickListener {
...
private Button mBlurButton, mThresholdButton;
private SeekBar mBlurRadiusBar, mThresholdBar;
private ImageView mSrcImageView, mDstImageView;
private Bitmap mSrcImage, mDstImage;
@Override
protected void onCreate(Bundle savedInstanceState) {
...
mBlurButton = (Button) findViewById(R.id.blurButton);
mBlurButton.setOnClickListener(this);
mThresholdButton = (Button)findViewById(R.id.thresholdButton);
mThresholdButton.setOnClickListener(this);
mBlurRadiusBar = (SeekBar) findViewById(R.id.radiusBar);
mThresholdBar = (SeekBar) findViewById(R.id.thresholdBar);
...
}
@Override
public void onClick(View pView) {
float progressRadius = (float) mBlurRadiusBar.getProgress();
float radius = Math.max(progressRadius * 0.1f, 0.1f);
float threshold = ((float) mThresholdBar.getProgress())
/ 100.0f;
switch(pView.getId()) {
...
case R.id.thresholdButton:
threshold(getCacheDir().toString(), mSrcImage, mDstImage,
threshold);
break;
}

Intensive Compung with RenderScript
[ 442 ]
mDstImageView.invalidate();
}
...
private native void threshold(String pCacheDir, Bitmap pSrcImage,
Bitmap pDstImage, float pThreshold);
}
3. Now, let's write our own jni/threshold.rs lter using the RenderScript
language. First, use pragma direcves to declare:
The script language version (currently, only 1 is possible)
The Java package name the script is associated with
#pragma version(1)
#pragma rs java_package_name(com.packtpub.renderscript)
...
4. Then, declare an input parameter thresholdValue of type float.
We also to need two constant vectors of 3 oats (float3):
The first value represents a BLACK color
The second value a predefined LUMINANCE_VECTOR
...
float thresholdValue;
static const float3 BLACK = { 0.0, 0.0, 0.0 };
static const float3 LUMINANCE_VECTOR = { 0.2125, 0.7154, 0.0721 };
...
5. Create the root funcon of the script named threshold(). It takes a vector of
4 unsigned char, that is, an RGBA pixel in input, and returns a new one in output.
Prepend __attribute__((kernel)) to indicate that this funcon is the main
script funcon, that is, the "Kernel's Root". The funcon works as follows:
It converts the input pixel from a vector of char, with each color component
in the range [0, 255], to a vector of float value with each component in the
range [0.0, 1.0]. This is the role of the function rsUnpackColor8888().
Now that we have a float vector, some of the many mathematical functions
provided by RenderScript can be applied. Here, a dot product with a
predefined luminosity vector for the RGBA color space returns the relative
luminosity of a pixel.
With this information, the function checks whether a pixel's luminosity is
sufficient according to the given threshold. If not, the pixel is set to black.

Chapter 10
[ 443 ]
Finally, it converts a pixel's color from a float vector to an unsigned char
vector with rsPackColor8888(). This value will then be copied by
RenderScript into the final Bitmap as we will see.
...
uchar4 __attribute__((kernel)) threshold(uchar4 in) {
float4 pixel = rsUnpackColor8888(in);
float luminance = dot(LUMINANCE_VECTOR, pixel.rgb);
if (luminance < thresholdValue) {
pixel.rgb = BLACK;
}
return rsPackColorTo8888(pixel);
}
6. To compile our new threshold.rs script, list it in the Android.mk le.
During the compilaon process, ScriptC_threshold.h and ScriptC_
threshold.cpp is generated in obj/local/armeabi-v7a/objs-debug/
renderscript. These les contain the code to bind our code with the Threshold
Kernel executed by RenderScript. So, we also need to append the directory to the
LOCAL_C_INCLUDES directory:
LOCAL_PATH := $(call my-dir)
include $(CLEAR_VARS)
LOCAL_MODULE := renderscript
LOCAL_C_INCLUDES += $(TARGET_C_INCLUDES)/rs/cpp \
$(TARGET_C_INCLUDES)/rs \
$(TARGET_OBJS)/$(LOCAL_MODULE)
LOCAL_SRC_FILES := RenderScript.cpp threshold.rs
LOCAL_LDFLAGS += -L$(call host-path,$(TARGET_C_INCLUDES)/../lib/rs)
LOCAL_LDLIBS := -ljnigraphics -ldl -llog -lRScpp_static
include $(BUILD_SHARED_LIBRARY)
7. Include the generated header in jni/RenderScript.cpp.
#include <android/bitmap.h>
#include <jni.h>
#include <RenderScript.h>
#include "ScriptC_threshold.h"
using namespace android::RSC;
...

Intensive Compung with RenderScript
[ 444 ]
8. Then, implement the new method threshold(), respecng the JNI naming
convenon. This method is similar to blur().
However, instead of instanang a predened Intrinsic, we instanate a Kernel
generated by RenderScript. This Kernel is named ScriptC_threshold according
to our RenderScript lename.
The input parameter thresholdValue dened in our script can be inialized
with set_thresholdValue() generated by RenderScript. Then, the main
method threshold() can be applied using the generated method forEach_
threshold().
Once the Kernel has been applied, the result can be copied on the target bitmap,
such as with Intrinsics, using copy2DRangeTo():
...
JNIEXPORT void JNICALL
Java_com_packtpub_renderscript_RenderScriptActivity_threshold
(JNIEnv* pEnv, jobject pClass, jstring pCacheDir, jobject pSrcImage,
jobject pDstImage, jfloat pThreshold) {
const char * cacheDir = pEnv->GetStringUTFChars(pCacheDir, NULL);
sp<RS> rs = new RS();
rs->init(cacheDir);
pEnv->ReleaseStringUTFChars(pCacheDir, cacheDir);
AndroidBitmapInfo srcInfo;
uint32_t* srcContent;
AndroidBitmapInfo dstInfo;
uint32_t* dstContent;
lockBitmap(pEnv, pSrcImage, &srcInfo, &srcContent);
lockBitmap(pEnv, pDstImage, &dstInfo, &dstContent);
sp<const Type> srcType = Type::create(rs, Element::RGBA_8888(rs),
srcInfo.width, srcInfo.height, 0);
sp<Allocation> srcAlloc = Allocation::createTyped(rs, srcType,
RS_ALLOCATION_MIPMAP_NONE,
RS_ALLOCATION_USAGE_SHARED | RS_ALLOCATION_USAGE_SCRIPT,
srcContent);
sp<const Type> dstType = Type::create(rs, Element::RGBA_8888(rs),
dstInfo.width, dstInfo.height, 0);
sp<Allocation> dstAlloc = Allocation::createTyped(rs, dstType,
RS_ALLOCATION_MIPMAP_NONE,
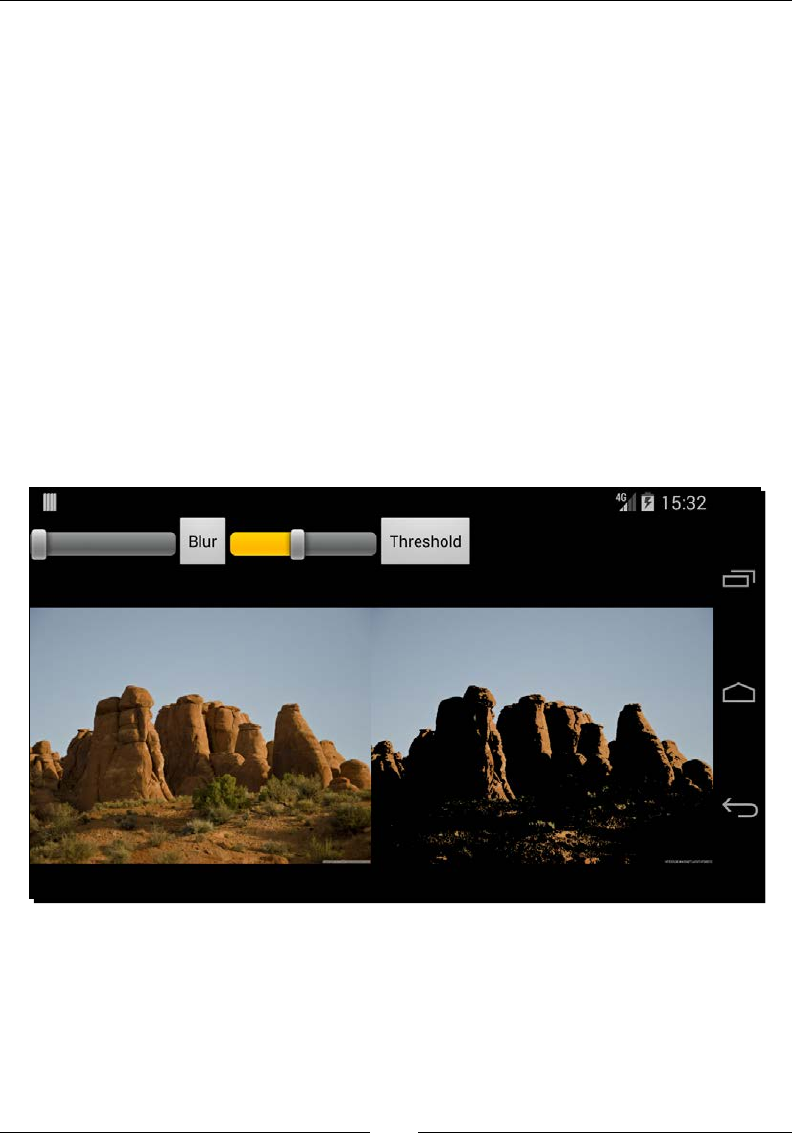
Chapter 10
[ 445 ]
RS_ALLOCATION_USAGE_SHARED | RS_ALLOCATION_USAGE_SCRIPT,
dstContent);
sp<ScriptC_threshold> thresholdKernel = new ScriptC_threshold(rs);
thresholdKernel->set_thresholdValue(pThreshold);
thresholdKernel->forEach_threshold(srcAlloc, dstAlloc);
dstAlloc->copy2DRangeTo(0, 0, dstInfo.width, dstInfo.height,
dstContent);
unlockBitmap(pEnv, pSrcImage);
unlockBitmap(pEnv, pDstImage);
}
}
What just happened?
Run the project, increase the new SeekBar, and click on the Threshold buon. The output
ImageView should display the ltered picture with only luminous pixels as follows:
Intensive Compung with RenderScript
[ 446 ]
We have wrien and compiled our rst RenderScript Kernel. Kernel scripts have a .rs
extension and are wrien in a language inspired by C99. Their content starts with pragma
denions that bring addional "meta" informaon about them: the language version
(which can be only 1) and the Java package. We can also use them to tweak the oang
point precision for calculaons with pragma direcves (#pragma rs_fp_full, #pragma
rs_fp_relaxed, or #pragma rs_fp_imprecise).
The Java package is important for the RenderScript runme, which needs
to resolve compiled Kernels during execuon. When using the RenderScript
Compability library, scripts compiled with the NDK (that is stored in the jni
folder) might not get resolved. In that case, a possible soluon is to make a
copy of the .rs les in the Java src folder in the appropriate package.
Kernels are, in a way similar, to Intrinsics. Indeed, once compiled, the same process applies
to them: creang the allocaons, the Kernel, seng everything up, applying, and nally,
copying the result. When executed, a Kernel funcon is applied on each Element of the input
and returned in the corresponding output allocaon Element, in parallel.
You can set up a Kernel through the NDK binding API and an addional binding layer (more
commonly called the reected layer), which is generated at compile me. Each compiled
script is "reected" by a C++ class, whose name is dened according to the script lename
prexed with ScriptC_. The nal code is generated in the eponym header and the source
les in the obj directory, one for each per ABI. The reected classes are your only interface
with the script le, as a kind of wrapper. They perform some runme checks on the kind of
Allocaon passed in the input or output of the Kernel to ensure their Element type matches
what is declared in the script le. Have a look at the generated ScriptC_threshold.cpp
in the project obj directory for a concrete example.
Kernel input parameters are passed from the reected layer to the script le through global
variables. Global variables correspond to all the non-static and non-const variables,
for example:
float thresholdValue;
They are declared outside funcons such as a C variable. Global variables are made available
in the reected layer through seers. In our project, the thresholdValue global variable
is passed through the generated method set_thresholdValue(). Variables do not have
to be primive types. They can also be pointers, in which case the reected method name
is prexed with bind_. and expects an Allocaon. Geers are also provided in the
generated classes.

Chapter 10
[ 447 ]
On the other hand, stac variables, declared in the same scope as global variables, are
not accessible in the NDK reected layer and cannot be modied outside of the script.
When marked const, they are obviously treated as constants, like the luminance vector
in our project:
static const float3 LUMINANCE_VECTOR = { 0.2125, 0.7154, 0.0721 };
The main Kernel funcons, more commonly called root funcons, are declared like a C
funcon except that they are marked with __attribute__((kernel)). They take as
parameter the Element type of the input Allocaon and return the type of Element of the
output Allocaon. Both the input parameter and return value are oponal but at least one
of them must be present. In our example, the input parameter and the output return value
is a pixel Element (that is, a vector of 4 unsigned char; 1 byte for each color channel):
uchar4 __attribute__((kernel)) threshold(uchar4 in) {
...
}
RenderScript root funcons can be also given addional index parameters that represent
Element posion (or "coordinates") within its Allocaon. For example, we can declare two
addional uint32_t parameters to get pixel Element coordinates in threshold():
uchar4 __attribute__((kernel)) threshold(uchar4 in, uint32_t x,
uint32_t y) {
...
}
Mulple root funcons with dierent names can be declared in one script. Aer compilaon,
they are reected in the generated class as funcons prexed with forEach_, for example:
void forEach_threshold(android::RSC::sp<const android::RSC::Allocation>
ain, android::RSC::sp<const android::RSC::Allocation> aout);
Before __attribute__((kernel)) was introduced, RenderScript les could only contain
one main funcon named root. This form is sll allowed nowadays. Such funcons take a
pointer to the input, output Allocaon in parameters, and do not allow return values. So the
threshold() funcon rewrien as a tradional root method would look like the following:
void root(const uchar4 *in, uchar4 *out) {
float4 pixel = rsUnpackColor8888(*in);
float luminance = dot(LUMINANCE_VECTOR, pixel.rgb);
if (luminance < thresholdValue) {
pixel.rgb = BLACK;
}
*out = rsPackColorTo8888(pixel);
Intensive Compung with RenderScript
[ 448 ]
In addion to the root() funcon, a script can also contain an init() funcon with no
parameter and return value. This funcon is called only once when the script is instanated.
void init() {
...
}
Obviously, the possibilies of the RenderScript language are more limited and constrained
than tradional C. We cannot:
Allocate resources directly. The memory must be allocated by the client applicaon
before running the Kernel.
Write low-level assembly code or do fancy C stu. However, hopefully, plenty of
familiar elements of the C language are available, such as struct, typedef, enum
and so on; even pointers!
Use C libraries or runme. However, RenderScript provides a full "runme"
library with plenty of math, conversion, atomic funcons, and so on. Have a look
at http://developer.android.com/guide/topics/renderscript/
reference.html for more details about them.
A method provided by RenderScript that you may find
particularly useful is rsDebug(), which prints debug
log to ADB.
Even with those limitaons, RenderScript constraints are sll quite relaxed. A consequence
is that some scripts might not benet from maximum acceleraon, for example, on the GPU,
which is quite restricng. To overcome this issue, a limited subset of RenderScript called
FilterScript was designed to favor opmizaon and compability. Consider it if you need
maximum performance.
For more informaon about the RenderScript language capabilies, have a look at http://
developer.android.com/guide/topics/renderscript/advanced.html.
Combining scripts together
Unity is strength could not be truer than with RenderScript. Intrinsics and Kernels alone
are powerful features. However, combined together, they give its full strength to the
RenderScript framework.

Chapter 10
[ 449 ]
Let's now see how to combine the Blur and Luminosity threshold lters together with a
blending Intrinsic to create a great-looking image eect.
The resulng project is provided with this book under the name
RenderScript_Part3.
Time for action – combining Intrinsics and scripts together
Let's improve our project to apply a new combined lter.
1. Add a new Combine Button in res/activity_renderscript.xml, as follows:
<?xml version="1.0" encoding="utf-8"?>
<LinearLayout
xmlns:a="http://schemas.android.com/apk/res/android"
a:layout_width="fill_parent" a:layout_height="fill_parent"
a:layout_weight="1" a:orientation="vertical" >
<LinearLayout
a:orientation="horizontal"
a:layout_width="fill_parent" a:layout_height="wrap_content" >
...
<Button a:"d="@+id/thresholdBut"on" a:te"t="Thresh"ld"
a:layout_wid"h="wrap_cont"nt" a:layout_heig"t="wrap_cont"nt"/>
<Button a:"d="@+id/combineBut"on" a:te"t="Comb"ne"
a:layout_wid"h="wrap_cont"nt" a:layout_heig"t="wrap_cont"nt"/>
</LinearLayout>
<LinearLayout
a:baselineAlign"d="t"ue" a:orientati"n="horizon"al"
a:layout_wid"h="fill_par"nt" a:layout_heig"t="fill_par"nt" >
...
</LinearLayout>
</LinearLayout>
2. Bind the Combine buon to a new nave method combine(), which has the
parameters of both blur() and threshold():
...
public class RenderScriptActivity extends Activity
implements OnClickListener {
...
private Button mThresholdButton, mBlurButton, mCombineButton;
private SeekBar mBlurRadiusBar, mThresholdBar;

Intensive Compung with RenderScript
[ 450 ]
private ImageView mSrcImageView, mDstImageView;
private Bitmap mSrcImage, mDstImage;
@Override
protected void onCreate(Bundle savedInstanceState) {
...
mBlurButton = (Button) findViewById(R.id.blurButton);
mBlurButton.setOnClickListener(this);
mThresholdButton = (Button) findViewById(R.id.thresholdButton);
mThresholdButton.setOnClickListener(this);
mCombineButton = (Button)findViewById(R.id.combineButton);
mCombineButton.setOnClickListener(this);
...
}
@Override
public void onClick(View pView) {
float progressRadius = (float) mBlurRadiusBar.getProgress();
float radius = Math.max(progressRadius * 0.1f, 0.1f);
float threshold = ((float) mThresholdBar.getProgress())
/ 100.0f;
switch(pView.getId()) {
case R.id.blurButton:
blur(getCacheDir().toString(), mSrcImage, mDstImage,
radius);
break;
case R.id.thresholdButton:
threshold(getCacheDir().toString(), mSrcImage, mDstImage,
threshold);
break;
case R.id.combineButton:
combine(getCacheDir().toString(), mSrcImage, mDstImage,
radius, threshold);
break;
}
mDstImageView.invalidate();

Chapter 10
[ 451 ]
}
...
private native void combine(String pCacheDir,
Bitmap pSrcImage, Bitmap pDstImage,
float pRadius, float pThreshold);
}
3. Edit jni/RenderScript.cpp and add the new combine() method, following the
JNI convenon again. The method performs similarly to what we saw previously:
The RenderScript engine is initialized
Bitmaps are locked
The appropriate Allocation is created for the input and output bitmaps
...
JNIEXPORT void JNICALL
Java_com_packtpub_renderscript_RenderScriptActivity_combine
(JNIEnv* pEnv, jobject pClass, jstring pCacheDir, jobject pSrcImage,
jobject pDstImage, jfloat pRadius, jfloat pThreshold) {
const char * cacheDir = pEnv->GetStringUTFChars(pCacheDir, NULL);
sp<RS> rs = new RS();
rs->init(cacheDir);
pEnv->ReleaseStringUTFChars(pCacheDir, cacheDir);
AndroidBitmapInfo srcInfo; uint32_t* srcContent;
AndroidBitmapInfo dstInfo; uint32_t* dstContent;
lockBitmap(pEnv, pSrcImage, &srcInfo, &srcContent);
lockBitmap(pEnv, pDstImage, &dstInfo, &dstContent);
sp<const Type> srcType = Type::create(rs, Element::RGBA_8888(rs),
srcInfo.width, srcInfo.height, 0);
sp<Allocation> srcAlloc = Allocation::createTyped(rs, srcType,
RS_ALLOCATION_MIPMAP_NONE,
RS_ALLOCATION_USAGE_SHARED | RS_ALLOCATION_USAGE_SCRIPT,
srcContent);
sp<const Type> dstType = Type::create(rs, Element::RGBA_8888(rs),
dstInfo.width, dstInfo.height, 0);
sp<Allocation> dstAlloc = Allocation::createTyped(rs, dstType,
RS_ALLOCATION_MIPMAP_NONE,
RS_ALLOCATION_USAGE_SHARED | RS_ALLOCATION_USAGE_SCRIPT,
dstContent);
...

Intensive Compung with RenderScript
[ 452 ]
4. We will also need a temporary memory area to store the result of computaons.
Let's create a temporary allocaon backed by a memory buer tmpBuffer:
...
sp<const Type> tmpType = Type::create(rs, Element::RGBA_8888(rs),
dstInfo.width, dstInfo.height, 0);tmpType->getX();
uint8_t* tmpBuffer = new uint8_t[tmpType->getX() *
tmpType->getY() * Element::RGBA_8888(rs)- >getSizeBytes()];
sp<Allocation> tmpAlloc = Allocation::createTyped(rs, tmpType,
RS_ALLOCATION_MIPMAP_NONE,
RS_ALLOCATION_USAGE_SHARED | RS_ALLOCATION_USAGE_SCRIPT,
tmpBuffer);
...
5. Inialize the Kernels and Intrinsics we need for the combined lter:
The Threshold Kernel
The Blur Intrinsic
An additional Blend Intrinsic that does not require parameters
...
sp<ScriptC_threshold> thresholdKernel = new ScriptC_threshold(rs);
sp<ScriptIntrinsicBlur> blurIntrinsic =
ScriptIntrinsicBlur::create(rs, Element::RGBA_8888(rs));
blurIntrinsic->setRadius(pRadius);
sp<ScriptIntrinsicBlend> blendIntrinsic =
ScriptIntrinsicBlend::create(rs, Element::RGBA_8888(rs));
thresholdKernel->set_thresholdValue(pThreshold);
...
6. Now, combine the mulple lters together:
First, apply the Threshold filter and save the result into the
temporary allocation.
Second, apply the Blur filter on the temporary Allocation and save the
result in the target bitmap Allocation.
Finally, blend both the source and the filtered bitmap using an additive
operation to create the final image. Blending can be done "in-place",
without an additional Allocation, since each pixel is read and written only
once (to the opposite of the blur filter).
...
thresholdKernel->forEach_threshold(srcAlloc, tmpAlloc);
blurIntrinsic->setInput(tmpAlloc);
blurIntrinsic->forEach(dstAlloc);
blendIntrinsic->forEachAdd(srcAlloc, dstAlloc);
...
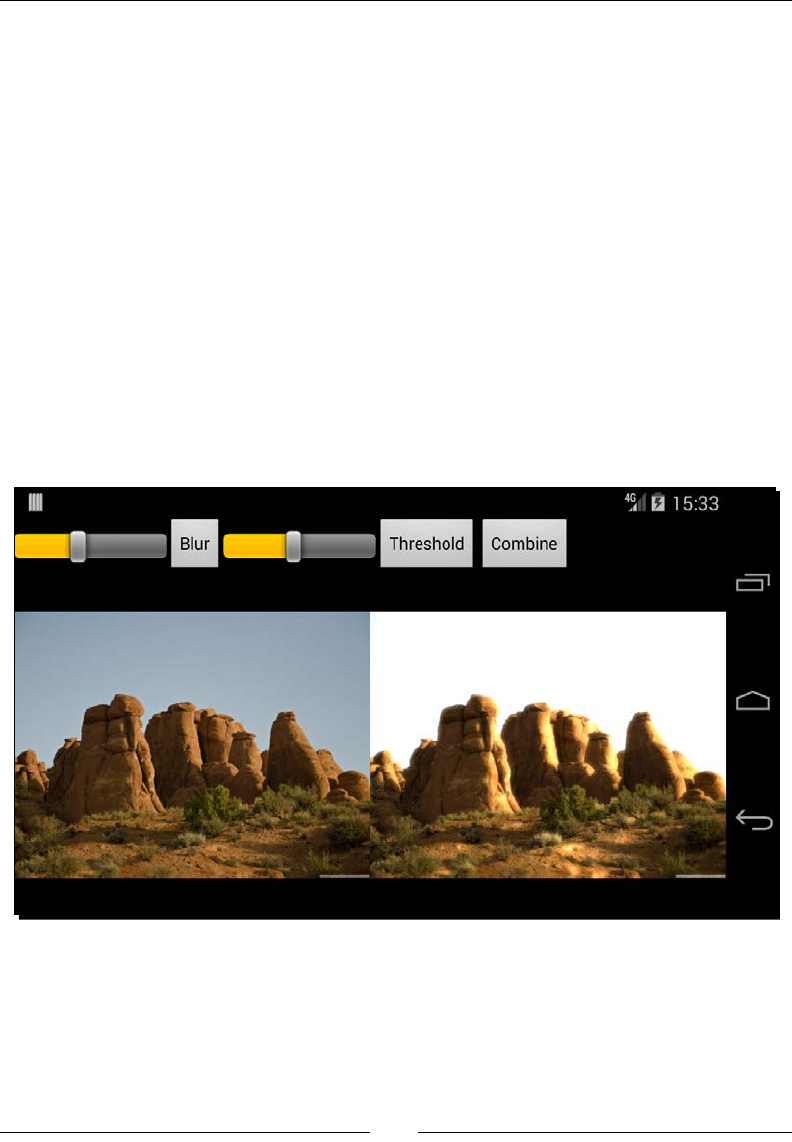
Chapter 10
[ 453 ]
7. Finally, save the result and free resources. All values wrapped in a sp<> (that is, a
smart pointer) template, such as tmpAlloc, are freed automacally:
...
dstAlloc->copy2DRangeTo(0, 0, dstInfo.width, dstInfo.height,
dstContent);
unlockBitmap(pEnv, pSrcImage);
unlockBitmap(pEnv, pDstImage);
delete[] tmpBuffer;
}
...
What just happened?
Run the project, tweak the SeekBar components, and click on the Combine buon.
The output ImageView should display a "remastered" picture, where the luminous parts
are highlighted:
Intensive Compung with RenderScript
[ 454 ]
We chained mulple Intrinsics and Kernels together to apply a Combine lter to an image.
Such a chain is easy to put in place; we basically need to connect the output Allocaon of
one script to the input Allocaon of the next. Copying data to the output memory area is
really only necessary at the end.
It's really sad but script grouping features are not yet available on the Android
NDK API, only on the Java side. With the script grouping feature, a full "graph"
of scripts can be dened allowing RenderScript to opmize the code further. If
you need this feature, then you can either wait or go back to Java.
Hopefully, Allocaons can be reused if necessary in mulple scripts, to avoid allocang
useless memory. It is even possible to reuse the same Allocaon in input and output, if the
script allows "in-place" modicaons. This is not the case, for example, of the Blur lter,
which would rewrite blurred pixels while they are read to blur other pixels, resulng in
weird visual artefacts.
Speaking of reuse, it is good pracce to reuse RenderSript objects (that is the
RS context object, Intrinsics, Kernels, and so on) between execuons. This
is even more important if you repeatedly perform a computaon, such as
processing images from the camera.
Memory is an important aspect of RenderScript performance. Used badly, it can decrease
eciency. In our project, we provided a pointer to the Allocaons we created it. This means
that the Allocaons we created in our project are "backed" with nave memory, in our case,
the bitmap content:
...
sp<Allocation> srcAlloc = Allocation::createTyped(rs, srcType,
RS_ALLOCATION_MIPMAP_NONE,
RS_ALLOCATION_USAGE_SHARED | RS_ALLOCATION_USAGE_SCRIPT,
srcContent);
...
However, data can also be copied before processing from the input memory area into the
allocaon using the copy***From() methods, which are the pendant of the copy***To()
methods. This is especially useful with the Java binding side, which does not always allow the
use of "backed Allocaon". The NDK binding is more exible and input data copying can be
avoided most of the me.
Chapter 10
[ 455 ]
RenderScript provides others mechanisms to communicate data from a script. The rst ones
are the methods rsSendToClient() and rsSendToClientBlocking(). They allow
a script to communicate a "command", oponally with some data, to the calling side. The
laer method is obviously a bit more dangerous in terms of performances, and should
be avoided.
Data can also be communicated through pointers. Pointers are dynamic memory that allows
bi-direconal communicaon between the Kernel and the caller. As indicated previously,
they are reected in the generated classes with a method prexed with bind_. The
appropriate geers and seers should be generated in the reected layer at compile me.
However, the NDK RenderScript framework does not reect structures declared in
RenderScript les yet. So declaring a pointer to struct dened in a script le will not work
for now. Pointers to primive types work using Allocaons though. Thus, expect annoying
limitaons on the NDK side on this subject.
Let's end on the subject of memory by saying that in case you need more than one input or
output Allocaons for a script, there is a soluon, an rs_allocation, which represents an
Allocaon reected through a geer and seer. You can have as many of them as you want.
Then, you can access dimensions and elements through the rsAllocationGetDim*(),
rsGetElementAt*(), rsSetElementAt*() methods, and so on.
For example, the threshold() method could be rewrien the following way:
Note that since we do not pass an input Allocaon in parameter,
return one as usual
The for loops are not implicit like it would be with an Allocaon passed
in parameter
The threshold() funcon cannot be a Kernel root. It is perfectly possible to use
input Allocaon in conjuncon with rs_allocation though.
#pragma version(1)
#pragma rs java_package_name(com.packtpub.renderscript)
float thresholdValue;
static const float3 BLACK = { 0.0, 0.0, 0.0 };
static const float3 LUMINANCE_VECTOR = { 0.2125, 0.7154, 0.0721 };
rs_allocation input;

Intensive Compung with RenderScript
[ 456 ]
rs_allocation output;
void threshold() {
uint32_t sizeX = rsAllocationGetDimX(input);
uint32_t sizeY = rsAllocationGetDimY(output);
for (uint32_t x = 0; x < sizeX; ++x) {
for (uint32_t y = 0; y < sizeY; ++y) {
uchar4 rawPixel = rsGetElementAt_uchar4(input, x, y);
// The algorithm itself remains the same.
float4 pixel = rsUnpackColor8888(rawPixel);
float luminance = dot(LUMINANCE_VECTOR, pixel.rgb);
if (luminance < thresholdValue) {
pixel.rgb = BLACK;
}
rawPixel = rsPackColorTo8888(pixel);
rsSetElementAt_uchar4(output, rawPixel, x, y);
}
}
}
Also, the Kernel would be called in the following way. Note how the method that applies the
eect is prexed with invoked_ (instead of forEach_). This is because the threshold()
funcon is not a Kernel root:
...
thresholdKernel->set_input(srcAlloc);
thresholdKernel->set_output(dstAlloc);
thresholdKernel->invoke_threshold();
dstAlloc->copy2DRangeTo(0, 0, dstInfo.width, dstInfo.height,
dstContent);
...
For more informaon about the RenderScript language capabilies, have a look at http://
developer.android.com/guide/topics/renderscript/advanced.html.

Chapter 10
[ 457 ]
Summary
This chapter introduced RenderScript, an advanced technology to parallelize intensive
computaon tasks. More specically, we saw how to use predened RenderScript built-in
Intrinsics, which are currently mainly dedicated to image processing. We also discovered how
to implement our own Kernels with the RenderScript custom language inspired by C. Finally,
we saw an example of an Intrinsics and Kernels combinaon to perform computaons that
are more complex.
RenderScript is available from either the Java or the nave side. However, let's be clear, apart
from the excepon of Allocaons backed by memory buers (a rather important feature for
performance though), RenderScript is sll more useable through its Java API. Grouping is not
available, struct is not reected yet, and some other features are sll buggy (for example
YUV Intrinsics).
Indeed, RenderScript aims at giving tremendous compung power to the developers who
neither have the me nor the knowledge to follow the nave path. Thus, the NDK is not
well-served yet. Although that will probably change in the future, you should be ready to
keep at least parts of your RenderScript code on the Java side.

[ 459 ]
Afterword
Throughout this book, you learned the essenals to get started and overlooked the paths to
follow to go further. You now know the key elements to tame these lile powerful monsters
and start exploing their full power. However, there is sll a lot to learn, but the me and
space is not enough. Anyway, the only way to master a technology is to pracce and pracce
again. I hope you enjoy the journey and that you feel armed for the mobile challenge. So my
best advice now is to gather your fresh knowledge and all your amazing ideas, beat them up
in your mind, and bake them with your keyboard!
Where we have been
We have seen concretely how to create nave projects with Eclipse and the NDK. We learned
how to embed a C/C++ library in Java applicaons through JNI and how to run nave code
without wring a line of Java.
We tested mulmedia capabilies of the Android NDK with OpenGL ES and OpenSL ES,
which are becoming a standard in mobility (of course, aer oming Windows Mobile).
We have even interacted with our phone input peripherals and apprehended the world
through its sensors.
Moreover, the Android NDK is not only related to performance but also portability. Thus,
we reused the STL framework, its best companion Boost, and ported third-party libraries
almost seamlessly.
Finally, we saw how to opmize intensive compung tasks with the RenderScript technology.

Aerword
[ 460 ]
Where you can go
The C/C++ ecosystem has existed for several decades now and is full of richness. We ported
some libraries, but a lot more are out there and waing to get ported. Actually, many of
them, which are listed as follows, work without the need of a full code revamp:
Bullet (http://bulletphysics.org/) is an example of a physics engine that can
be ported right away in a few minutes
Irrlicht (http://irrlicht.sourceforge.net/) is one of the many 3D engines
that can run on Android
OpenCV (http://opencv.org/) is a computer vision and machine-learning library,
which allows your applicaon to "see" and understand the outside world through
the camera
GLM (http://glm.g-truc.net/) is a useful library for OpenGL ES 2 to handle
matrix calculaons in a fully C++ way
Intel Threading Building Block library (https://www.
threadingbuildingblocks.org/), or more commonly TBB, is an interesng
library for those who need massive parallelizaon with their nave code
Some libraries have been specically designed for mobile devices such as:
Unity (http://unity3d.com/), which is a great editor and framework that you
should denitely have a look at if you want to write mobile games
Unreal Engine (https://www.unrealengine.com/) is one of the most powerful
engines and is now freely available
Cocos2D-X (http://www.cocos2d-x.org/), which is a highly popular game
engine used in many 2D games
Vuforia (https://www.qualcomm.com/products/vuforia), which is an
augmented reality SDK from Qualcomm
For those who would be tempted to get their hands dirty in the guts of Android, I encourage
you to have a look at the Android plaorm code itself, which is available at http://
source.android.com/. It is not a piece of cake to download, compile, or even deploy,
but this is the only way to get an in-depth understanding of the Android internals, and also
somemes the only way to nd out where these annoying bugs are coming from!

Appendix
[ 461 ]
Where to nd help
The Android community is really acve, and following are the places to nd useful
informaon:
The Android Google group (http://groups.google.com/group/android-
developers) and the Android NDK group (http://groups.google.com/
group/android-ndk), where you can get some help, somemes from the
Android team member.
The Android Developer BlogSpot (http://android-developers.blogspot.
com/), where you can nd fresh and ocial informaon about Android
development.
Google IO (https://www.google.com/events/io) for some of the best
Android video talks.
The Intel Developer Site (https://software.intel.com/en-us/android)
is full of interesng resources related to the NDK on x86
The NVidia Developer Centre (http://developer.nvidia.com/category/
zone/mobile-development) for Tegra but also general resources about Android
and the NDK.
The Qualcomm Developer Network (https://developer.qualcomm.com/) to
nd informaon about the NVidia main competor. The Qualcomm's Augmented
Reality SDK is especially promising.
Stack Overow (http://stackoverflow.com/), which is not dedicated to
Android but you can ask quesons and get accurate answers.
GitHub (http://github.com/), which is full of NDK libraries and samples.
This is just the beginning
Creang an applicaon is only part of the process. Publishing and selling is another.
This is, of course, outside the scope of this book but handling fragmentaon and
tesng compability with various target devices can be a real diculty that needs
to be taken seriously.

Aerword
[ 462 ]
Beware! Problems start occurring when you start dealing with hardware specicies
(and there are lots of them) like we saw with input devices. These issues are, however,
not specic to the NDK. If incompabilies exist in a Java applicaon, then the nave code
will not do beer. Handling various screen sizes, loading appropriately-sized resources,
and adapng to device capabilies are things that you will eventually need to deal with.
However, that should be manageable.
In short, there are a lot of marvelous but also painful surprises to be discovered. However,
Android and mobility are sll a fallow land that needs to be modeled. Look at the evoluon
of Android from its earliest version to the latest one to be convinced. Revoluon does not
take place every day so do not miss it!
Good luck!
Sylvain Ratabouil

[ 463 ]
Index
Symbols
2D sprites
drawing 247
A
ABIs 67, 68
accelerometer events
handling 348-354
acvity events
handling 182, 187-192
lifecycle, URL 192
loop, stepping 182-187
Acvity Manager (AM) 53
ADB
about 42, 43
URL 43
ADB Shell 53, 54
ADT
on OS, Eclipse installing with 30-35
AMoonEvent API
about 339, 340
AKeyEvent_getDownTime() funcon 347
AMoonEvent_getAcon() funcon 347
AMoonEvent_getX() funcon 347
AMoonEvent_getY() funcon 347
Android
Boost, prebuilding 407
Box2D, compiling 383-387
Box2D, porng 382, 383
low latency 321, 322
Android++
URL 35
Android Asset Packaging Tool 52
Android Developer
URL 290
Android development
about 2
applicaons, developing 2
installing, on Windows 8
OS X, preparing for 13-16
soware 2
Ubuntu, preparing for 23, 24
Windows, preparing 3-7
Windows, seng up 2
Android development kits
installing, on Linux 25
installing, on OS X 16
Android device
developing 39
seng up 39-41
turning, into Joypad 355-361
URL 39, 40
Android documentaon
URL 97
Android emulator
seng up 35
URL 38
Android NDK
installing, on OS X 17-22
installing, on Ubuntu 25-30
installing, on Windows 8-12
URL 10

[ 464 ]
Android Open Source Project (AOSP) 60
Android SDK
installing, on OS X 17-22
installing, on Ubuntu 25-30
installing, on Windows 8-12
URL 10
Android source code
URL 60
Android Studio bundle
URL 8, 25
Android Studio project
creang, with Gradle 73
Android virtual device
creang 35-38
Ant
URL 4, 15
Applicaon Binary Interface (ABI) 60, 424
applicave context 176
ARM
URL 425
ARM processors 72
ART 60
Asset manager
used, for loading textures 226
used, for reading assets 227-229
Asset Manager API
about 229-231
libpng module, compiling 232-234
libpng module, embedding 232-234
OpenGL Texture, generang 240-244
PNG image, loading 234-240
assets
reading, Asset manager used 227-229
AudioTrack 291
AVD. See Android virtual device
B
Background Music (BGM) 299
Backtrace 72
Bitmaps
cameras feed, decoding 158-164
pictures, processing with Bitmap API 165-170
processing navely 157
Bitsquid Foundaon library
URL 382
BJam 407
Blur Intrinsic 434
Boost
executable linked, compiling 413-417
prebuilding, on Android 407
prebuilding, on Android as stac
library 407-412
URL 407, 417
Box2D
about 406
body 402
body, properes 402
collision, detecng 403, 404
compiling, on Android 383-387
form, URL 406
physics engine, running 387-401
porng, to Android 382, 383
URL 406
Box2D, body
b2Body 402
b2BodyDef 402
b2FixtureDef 402
b2Shape 402
Box2D, body properes
density 402
fricon 402
restuon 402
shape 402
Build Fingerprint 71
C
C
JNI 171, 172
C++
JNI 171, 172
C++ 11 support
enabling 420
callbacks
used, for detecng sound queue
events 320, 321
C/C++
Java, synchronizing with 155, 156
synchronizing, with JNI Monitors 155, 156
character encoding
URL 97

[ 465 ]
character encoding, nave
Modied UTF-8 97
UTF-16 97
Clang compiler
enabling 420
CMake
URL 422
collision, Box2D
detecng 403, 404
modes 404-406
condion variables 155
Connuous Collision Detecon (CCD) 404
crash dump
deciphering 71
C++ runmes
Gabi 367
System 367
Crystax
URL 44
Crystax NDK
URL 365
Cyanogen 54
Cygwin
URL 3
D
Dalvik 59
DataKind 438
DataType 438
Debugger 64
descriptors
about 136
URL 137
device sensors
accelerometer events, handling 348-354
Android device, turning into Joypad 355-362
probing 347, 348
Discrete Collision Detecon 404
D-Pad
detecng 340
handling 341-345
E
EASTL
URL 382
Eclipse
installing, with ADT on OS 30-35
URL 30
Eclipse IDE
installing 30
Embedded-System Graphics Library (EGL) 218
F
les
reading, with STL stream 369-372
funcon inlining 412
G
GCC
opmizaons 412
URL 412
Global references 109
GL Shading Language (GLSL)
about 226
shaders, programming with 280, 281
GNU Debugger (GDB) 64
GNU Image Manipulaon Program (GIMP)
URL 247
GNU STL
about 366
acvang, in DroidBlaster 366
Google Guava 112
Google SparseHash
URL 382
Gradle project
about 73
seng up 73
Graphical Processing Unit (GPU)
about 217
generang 244
graphics
adapng, to various resoluons 282
GraphicsManager class 194
member variables 194
raw graphics, displaying 193-203
H
High Performance Audio talk
URL 322

[ 466 ]
I
IDE (Integrated Development Environment) 2
instrucon sets 424-426
Intel developer manuals
URL 425
Intrinsics
and scripts, combining 449-455
URL 439
J
Java
and nave threads, synchronizing 144
calling back, from nave code 134, 138-141
JNI method signatures, determining 134-137
synchronizing, with JNI Monitors 155, 156
Java arrays
in nave store, handling 112-120
managing 112
Java excepons
about 124, 125
catching, in nave store 125-128
code, execung in Excepon state 128, 129
handling API 130
raising, in nave store 125-128
Java, interfacing with C/C++ code
about 60
C code, calling from Java 61, 62
Java Nave Interfaces (JNI) 63
Java objects
referencing, from nave code 103
Java primives
in nave store, handling 99-102
passing 103
passing, to nave code 99
returning 103
types, URL 103
Java strings
converng, in nave code 91
Java UI
creang 429-431
JetPlayer 291
JNI
debugging 143
in C 171, 172
in C++ 171, 172
methods 150
Object, allocang with 144-151
types 137
JNI library
nave JNI library, inializing 82
nave store, inializing 88-90
simple GUI, dening 82-87
JNI method signatures
determining 134-137
JNI Monitors
Java, synchronizing with 155, 156
JNI Reecon API 142, 143
JNI specicaon
URL 111
JNI String API 98, 99
Joypad
Android device, turning into 355-362
JRE (Java Runme Environment) 7
K
Kernel
custom Kernel, wring 440
luminance threshold lter, wring 440-448
Ketai
URL 169
keyboard
detecng 340
handling 341-345
key event methods
AKeyEvent_getAcon() 346
AKeyEvent_getDownTime() 346
AKeyEvent_getFlags() 346
AKeyEvent_getKeyCode() 346
AKeyEvent_getMetaState() 346
AKeyEvent_getRepeatCount() 346
AKeyEvent_getScanCode() 346
Khronos
URL 217, 299
L
legacy 73
Libc++ 367
Linux
seng up 22

[ 467 ]
LiquidFun
URL 406
Local references 107-109
low level virtual machine (LLVM) 428
M
Make 407
Makeles
about 417
instrucons 421, 422
mastering 423
using, with Gradle 78, 79
variables 417-419
Makeles, variables
APP_ variables 417-419
LOCAL_ variables 417, 418
NDK_ variables 418
PRIVATE_ prexed variables 418
Man-pages
URL 215
MediaPlayer 291
Memory Words 72
MIPmapping (Multum In Parvo) 244
Modied UTF-8 97
MSA 425
music les
background music, playing 299-306
playing 299
Mutexes (Mutual Exclusion) 155
N
nave Acvity
about 173
basic nave Acvity, creang 174-179
creang 174
Nave App Glue 180-182
nave Android project
about 45
ART 60
creang 55-59
creang, with Gradle 74-77
Dalvik 59
debugging 64-67
NDK applicaon-wide sengs, dening 67, 68
NDK-GDB 68, 69
Nave App Glue
about 180
android_nave_app_glue.h 181, 182
nave code
compiling, Gradle used 73
Java, calling back from 134, 138-141
Java objects, referencing 103
Java primives, passing 99
Java strings, converng 91
nave crash dumps
analyzing 69, 70
nave methods
manual registraon 171
nave store
excepons, catching 125-128
excepons, raising 125-128
inializing 88, 89
Java arrays, handling 112-120
Java strings, handling 91-97
primives, handling 99-102
references, saving to Objects 103-106
nave threads
and Java, synchronizing 144
AachCurrentThread() 156
AachCurrentThreadAsDaemon() 156
aaching 156, 157
DetachCurrentThread() 157
detaching 156, 157
Object, allocang with JNI 144-151
running 151-155
synchronizing 151-155
NDK-Build 52
NDK properes 77
NDK sample applicaons
Android applicaon, building with Ant 52
Android tooling 54
applicaon, launching with ADB Shell 53, 54
applicaon package, deploying with Ant 52, 53
building 46
les, generang with Android manager 49, 50
nave code, compiling with NDK-Build 51, 52
San Angeles sample, compiling 46-48
San Angeles sample, deploying 46-48
NDK-Stack 69, 71
NEON 424
NVidia Nsight
URL 35

[ 468 ]
O
Object arrays 124
Objects
references, saving in nave store 103-107
o-screen rendering
used, for adapng resoluon 282-288
OpenGL ES
and GLSL specicaon, URL 290
buers, clearing 223, 224
buers, swapping 223, 224
documentaon, URL 267
inializing 218-223, 247-267
releases 217, 218
OpenGL pipeline
about 225, 226
Fragment Processing 226
Pixel Processing 226
Primive Assembly 226
Rasterizaon 226
Vertex Processing 225
OpenGL Texture
generang 240-243
Open Graphics Library for Embedded Systems.
See OpenGL ES
OpenSL ES
about 291
inializing 292
output, creang 293-298
OpenSL ES engine
creang 293-298
philosophy 298, 299
Oracle JDK 7
URL 4, 14
orthographic projecon
URL 250
OS X
Android NDK, installing 17-21
Android SDK, installing 17-22
preparing, for Android development 13-16
seng up 13
P
parcle eects
rendering 269, 270
star eld, rendering 270-280
PID 71
PNG format
URL 240
PNG image
loading 234-240
point sprite 269
Portable Network Graphics (PNG) 227
predened Intrinsic
execung 429
Primive arrays
about 121, 122
other array types, handling 123
processor registers 72
Proguard 49
project les, NDK sample applicaons
build.xml 49
local.properes 49
proguard-project.txt 49
project.properes 50
project management capabilies, NDK sample
applicaons
android create lib-project 51
android create project 50
android create test-project 51
android create uitest-project 51
android update lib-project 51
android update project 51
android update test-project 51
Pulse Code Modulaon (PCM) 307
R
raw stack 72
raycasng 406
RDESTL
URL 382
references
saving, to Objects in nave store 103-107
reected layer 446
rendering pipeline
OpenGL.org wiki, URL 226
RenderScript
about 169, 427, 428
elements 428
language capabilies, URL 448, 456
tasks 428
URL 448

[ 469 ]
RenderScript Blur intrinsic
running 432-438
Render to Texture 289
resoluon
adapng, o-screen rendering used 282-288
Resource Acquision Is Inializaon (RAII)
URL 417
root funcons 447
roong 54
Run-Time Type (RTTI) 365
S
Samplers 438
scripts
and Intrinsics, combining 449-456
sensors 362, 363
shaders
programming, with GLSL 280, 281
URL 281
Signal 71
signatures
URL 137
Smart Pointers 407
sound buer queue
creang 307-320
playing 307-320
SoundPool 291
sound queue events
detecng, callbacks used 320, 321
sounds
callbacks, recording 326
playing 306, 323
recorder, creang 324
recorder, releasing 324, 325
recording 322-325
Sprite Batch 247
SSE 425
stack-trace 71
Standard Template Library (STL)
acvang 366
GNU STL, acvang in DroidBlaster 366-368
star eld
rendering 270-278
Stencil buer 221
STL containers
URL 381
using 373-381
STLport 367
STL stream
used, for reading les 369-376
strings
in nave store, handling 91-97
stripping 368
T
Texture Atlas 246
textures
about 244, 245
ltering 245
loading, Asset manager used 226, 227
wrapping 246
URL 247
Threshold Kernel 443
TID 71
me
graphics, animang with mer 204-214
measuring, navely 204
touch events
handling 329-339
interacng with 328
trackball events
detecng 341
handling 341-346
Trilinear ltering 245
Triple Buering 224
U
Ubuntu
Android NDK, installing 25-30
Android SDK, installing 25-30
preparing, for Android development 23, 24
UTF-16 97
V
Vertex Arrays (VA)
versus Vertex Buer Object (VBO) 268, 269
vertex management
URL 269

[ 470 ]
VFP 425
Virtual Machine 59
VS-Android
URL 35
W
Weak references 110, 111
Windows
Android development kit, installing 8
Android NDK, installing 8-12
Android SDK, installing 8-12
preparing, for Android development 3-7
window surface
accessing, navely 193
dimensions 203
Pixel format 202, 203
raw graphics, displaying 193-203
X
X86 425
X86 processors 73
Y
YUV 157
Z
Z-buer 221

Thank you for buying
Android NDK Beginner's Guide
Second Edition
About Packt Publishing
Packt, pronounced 'packed', published its rst book, Mastering phpMyAdmin for Eecve
MySQL Management, in April 2004, and subsequently connued to specialize in publishing
highly focused books on specic technologies and soluons.
Our books and publicaons share the experiences of your fellow IT professionals in adapng
and customizing today's systems, applicaons, and frameworks. Our soluon-based books
give you the knowledge and power to customize the soware and technologies you're
using to get the job done. Packt books are more specic and less general than the IT books
you have seen in the past. Our unique business model allows us to bring you more focused
informaon, giving you more of what you need to know, and less of what you don't.
Packt is a modern yet unique publishing company that focuses on producing quality,
cung-edge books for communies of developers, administrators, and newbies alike.
For more informaon, please visit our website at www.packtpub.com.
About Packt Open Source
In 2010, Packt launched two new brands, Packt Open Source and Packt Enterprise, in order
to connue its focus on specializaon. This book is part of the Packt Open Source brand,
home to books published on soware built around open source licenses, and oering
informaon to anybody from advanced developers to budding web designers. The Open
Source brand also runs Packt's Open Source Royalty Scheme, by which Packt gives a royalty
to each open source project about whose soware a book is sold.
Writing for Packt
We welcome all inquiries from people who are interested in authoring. Book proposals
should be sent to author@packtpub.com. If your book idea is sll at an early stage and
you would like to discuss it rst before wring a formal book proposal, then please contact
us; one of our commissioning editors will get in touch with you.
We're not just looking for published authors; if you have strong technical skills but no wring
experience, our experienced editors can help you develop a wring career, or simply get
some addional reward for your experse.

Android NDK Game Development Cookbook
ISBN: 978-1-78216-778-5 Paperback: 320 pages
Over 70 excing recipes to help you develop mobile
games for Android in C++
1. Tips and tricks for developing and debugging mobile
games on your desktop.
2. Enhance your applicaons by wring multhreaded
code for audio playback, network access, and
asynchronous resource loading.
3. Enhance your game development skills by using
modern OpenGL ES and develop applicaons
without using an IDE.
Android Native Development Kit Cookbook
ISBN: 978-1-84969-150-5 Paperback: 346 pages
A step-by-step tutorial with more than 60 concise
recipes on Android NDK development skills
1. Build, debug, and prole Android NDK apps.
2. Implement part of Android apps in nave
C/C++ code.
3. Opmize code performance in assembly with
Android NDK.
Please check www.PacktPub.com for information on our titles

Android 4: New Features for Application
Development
ISBN: 978-1-84951-952-6 Paperback: 166 pages
Develop Android applicaons using the new features
of Android Ice Cream Sandwich
1. Learn new APIs in Android 4.
2. Get familiar with the best pracces in developing
Android applicaons.
3. Step-by-step approach with clearly explained
sample codes.
Unity Android Game Development by Example
Beginner's Guide
ISBN: 978-1-84969-201-4 Paperback: 320 pages
Learn how to create excing games using Unity 3D
for Android with the help of hands-on examples
1. Enter the increasingly popular mobile market
and create games using Unity 3D and Android.
2. Learn opmizaon techniques for ecient
mobile games.
3. Clear, step-by-step instrucons for creang a
complete mobile game experience.
Please check www.PacktPub.com for information on our titles
