Aura Starting Guide
User Manual: Pdf
Open the PDF directly: View PDF ![]() .
.
Page Count: 31

Table Of Contents
Table Of Contents 1
About Aura 5
TL;DR; 5
Overview 7
Glossary 8
Getting Started 9
Set the Aura Main Component 9
Add Aura Lights 10
Add Aura Volumes 10
Aura Main Component 12
Base Injection Tab 12
Ambient Injection 12
Ambient Density 12
Ambient Anisotropy 12
Ambient Light 12
Ambient Light Strength 12
Settings Tab 13
Grid 13
Horizontal/Vertical/Depth 13
Range 13
Contribution 13
Experimental Features 13
Enable Occlusion Culling 13
Occlusion Culling Accuracy 13
Enable Reprojection 13
Reprojector factor 13
Aura Lights 13
Base Parameters Tab 15
Strength 15
Override Color 15
Enable Shadows 15
Enable Cookie 15
Additional Parameters Tab (Directional Light) 15
Enable Out-Of-Phase Color 15
Strength 15
1

Additional Parameters Tab
(Spot Light) 16
Angular Attenuation 16
Threshold 16
Exponent 16
Distance Attenuation 16
Threshold 16
Exponent 16
Distance Attenuation 16
Threshold 16
Exponent 16
Cookie Fade-In Attenuation 16
Fade-In Thresholds 16
Exponent 16
Additional Parameters Tab
(Point Light) 17
Distance Attenuation 17
Threshold 17
Exponent 17
Aura Volumes 17
Settings Tab 18
Volume Shape 19
Shape of the Volume 19
Parameters 19
Falloff Exponent 19
Noise Mask 19
Enable 19
Speed 19
Offset 19
Transform 19
Texture Mask 19
Enable 20
Texture 20
Transform 20
Warp Mode 20
Filter Mode 20
Clip on Alpha 20
Clipping Threshold 20
Density Tab 20
Enable 21
Strength 21
Texture Mask Levels (if Texture Mask) 21
2

Levels Thresholds 21
Contrast 21
Output Low Value 21
Output High Value 21
Noise Mask Levels (if Noise Mask) 21
Levels Thresholds 21
Contrast 21
Output Low Value 21
Output High Value 21
Color Tab 21
Enable 21
Strength 22
Texture Mask Levels (if Texture Mask) 22
Levels Thresholds 22
Contrast 22
Output Low Value 22
Output High Value 22
Noise Mask Levels (if Noise Mask) 22
Levels Thresholds 22
Contrast 22
Output Low Value 22
Output High Value 22
Anisotropy Tab 22
Enable 23
Strength 23
Texture Mask Levels (if Texture Mask) 23
Levels Thresholds 23
Contrast 23
Output Low Value 23
Output High Value 23
Noise Mask Levels (if Noise Mask) 23
Levels Thresholds 23
Contrast 23
Output Low Value 23
Output High Value 23
Illuminate/Fog Particles 24
Using Aura in your Shaders 25
Requirements 25
Acknowledgement 27
Special Thanks 27
3

License 27
TL;DR; 28
FAQ 28
Why releasing Aura for free? 29
Can we make donations? 29
Will Aura’s development be continued? 29
Will Aura support the Scriptable Render Pipeline? 29
Does Aura work on Unity xxx? 29
Does Aura support VR? 29
Why did it take so long? 30
How can we help you developing Aura? 30
How can I keep updated about Aura? 30
4
About Aura
TL;DR;
What Aura is :
● a local (within a defined distance from the camera) simulation of the light scattering
into the surrounding medium
What Aura is not:
● an atmospheric scattering simulation
● a cloud simulator
Aura is an open source volumetric lighting solution for Unity.
The development is hosted on GitHub and the latest package is published on the Asset
Store.
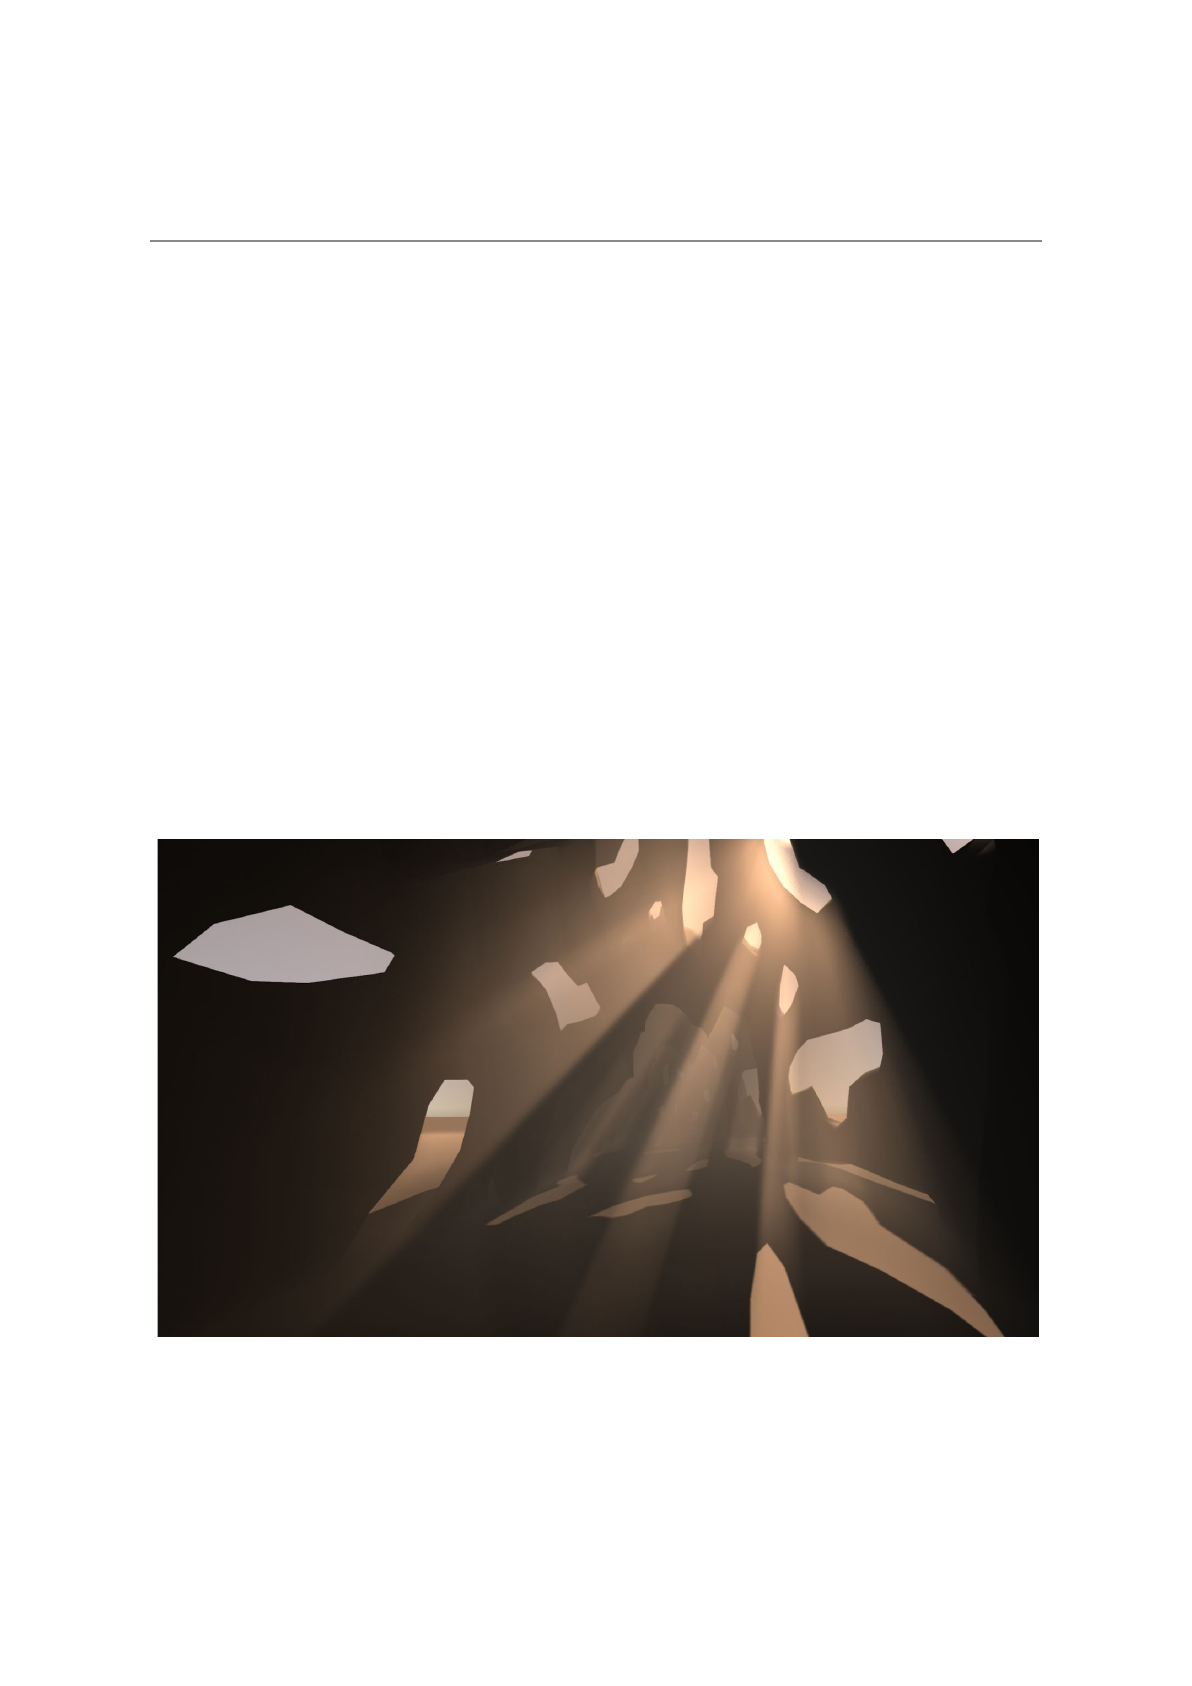
Aura simulates the scattering of the light in the environmental medium and the illumination of
micro-particles that are present in this environment but invisible to the eye/camera.
This effect is also called “volumetric fog”.
The directional light is scattered into the air and illuminates the invisible micro-particles.
Aura uses a globalist approach that makes every lights and injection volumes
interconnected. This means that when you locally modify the environment somewhere, it will
5

automatically affect all the lights and injection volumes. No boring and redundant
per-instance setup ...
Also, all lights and injection volumes are dynamic and then, can be created, modified or
destroyed at runtime.
Aura packs a bunch of features such as full lighting support, injection volumes and particles
illumination.
Click here to view the recap of all the features of Aura (on YouTube).
6
Overview
Aura relies on Bart Wronski (@BartWronsk)’s Presentation and particularly the idea that the
volumetric lighting could be solely computed in the frustum and pre-integrated in a 3D
texture.
Starting from that, 7 additional points were targeted :
1. Dynamic quality (not fixed ones)
2. Ease of use (not hours of integration or many parameters to struggle with)
3. Make it cascaded (for further range) -> Not implemented yet but bases are set
4. Use Unity’s full lighting system (not only one directional light)
5. Use injection volumes (locally modify the density, lighting and scattering)
6. Illuminate Unity’s particles (to have macro and micro particles volumetric lighting)
7. Plug other processes (so we could have volumetric GI, custom smoke, …)
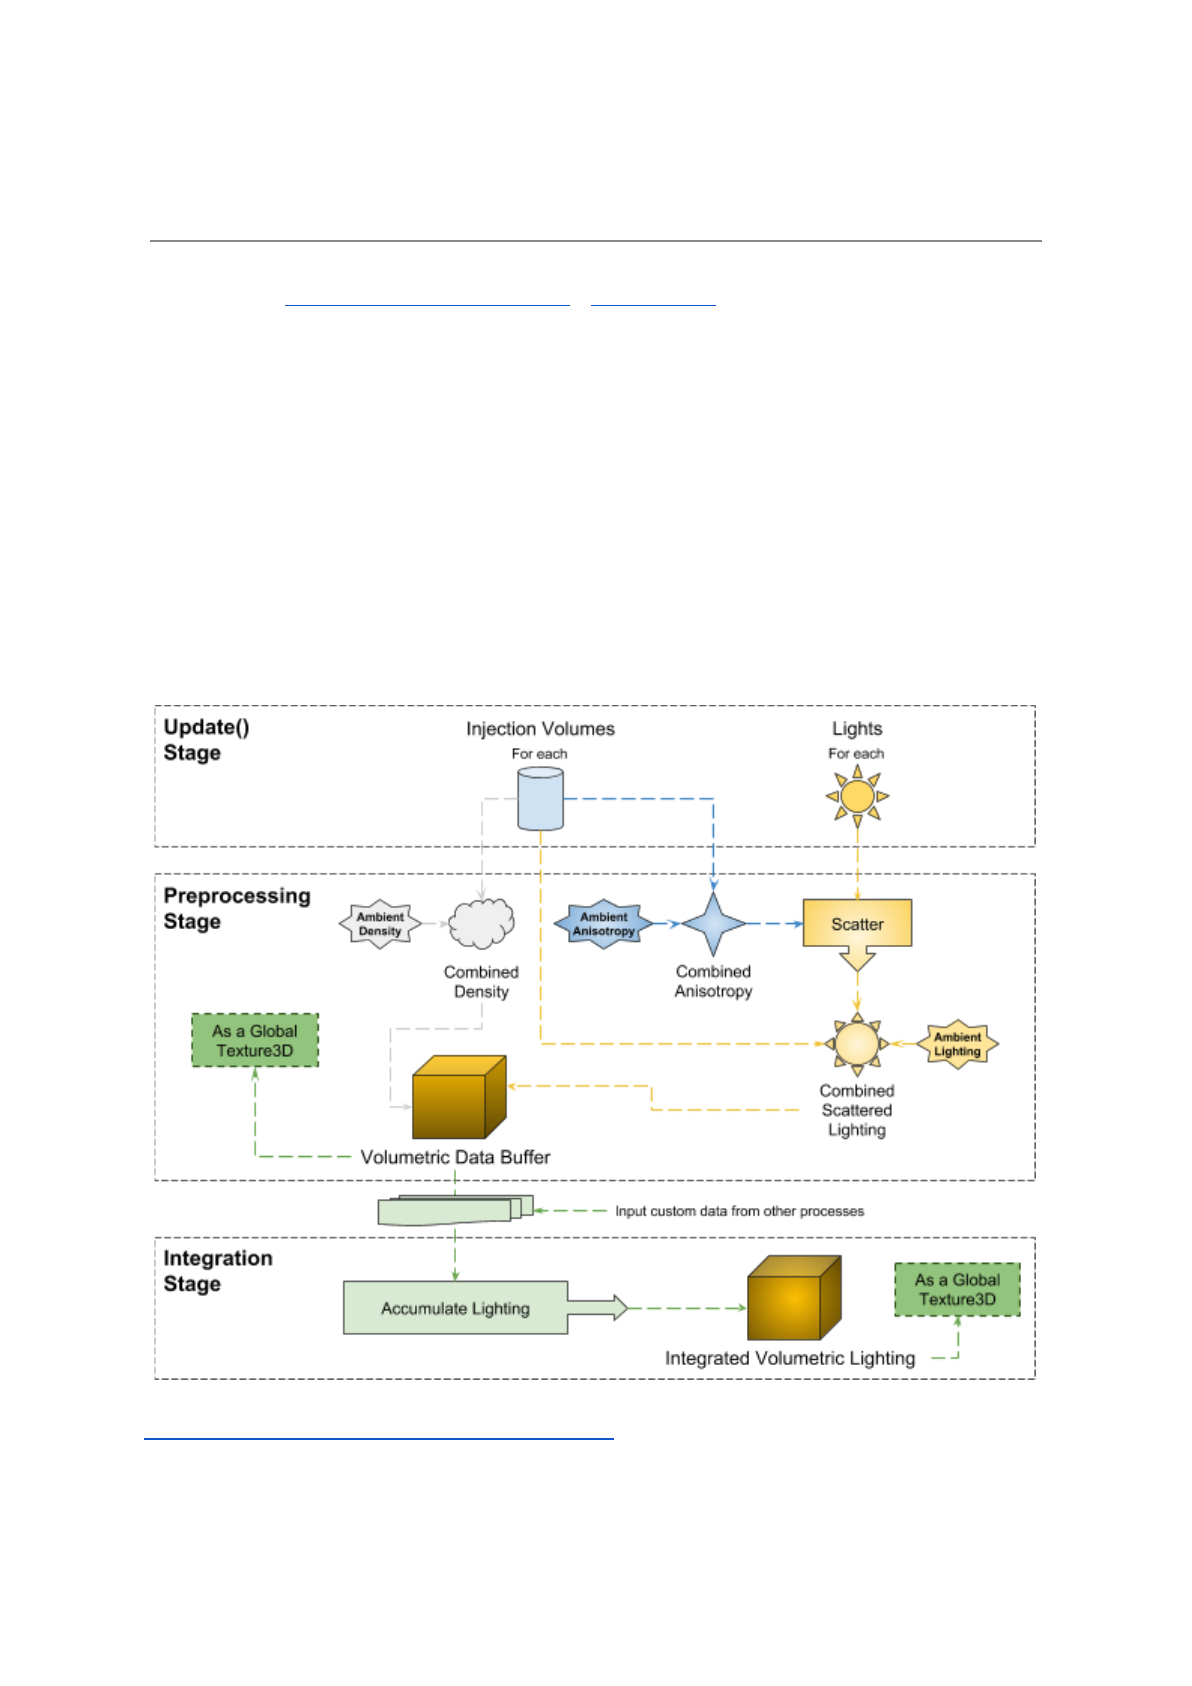
Here’s the schematic overview of Aura’s internal process :
Click here to visit the online API Documentation.
Please note that Aura is meant to be an evolving project. Importing updates might require
re-tweaking, re-assigning Aura components or deleting the asset’s folder prior importing.
7

Glossary
This document will often refer to specific words that worth a bit of contextualization.
Medium
The environmental matter that fills the environment and which the lights will scatter in.
Typically it will be air, water or glass; but can be more exotic gases/liquids/solids in your
convenience.
Density
This is the amount of invisible micro-particles that fill the medium.
It can also be understood as the “fog factor”.
Color (or Light Color)
The tint and intensity of volumetric light that is in a particular point.
Anisotropy
This represent the scattering factor the light will undergo from its emission through the
camera.
0 means that there is no scattering and that the light will travel straight to the camera without
loss. 1 means that the light will be totally scattered in all directions before reaching the
camera.
In other words, it controls how much the volumetric lighting concentrate around the light
source.
Tips : This can practically be useful to simulate the amount of humidity of the medium (0 =
dry medium, no scattering; 1 = humid medium, maximum scattering). Note that this is not a
general rule, just an interpretation tip. The best way is always to try.
8
Getting Started
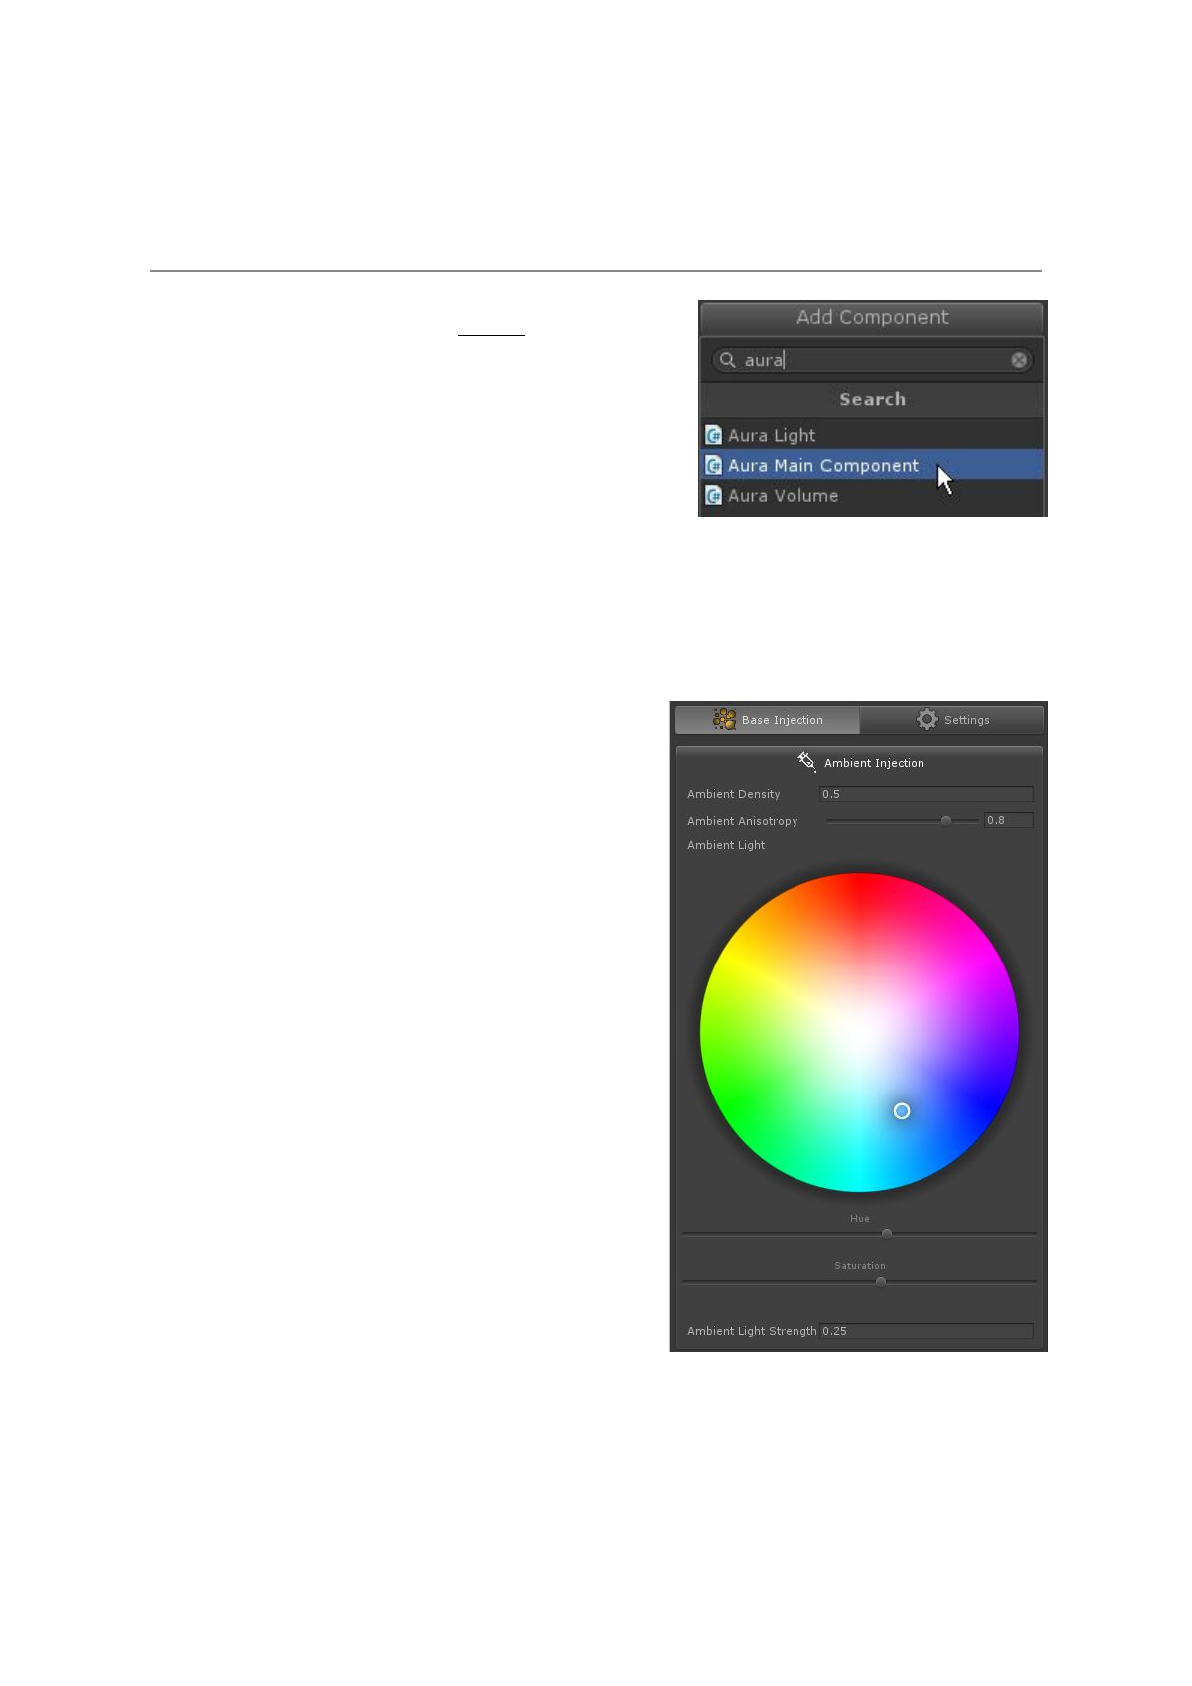
Set the Aura Main Component
Always set the Aura Main Component on the Camera GameObject (see Aura Main
Component section).
The default values are purely for visual feedback.
The process should be thought as iterative, adding one element after another.
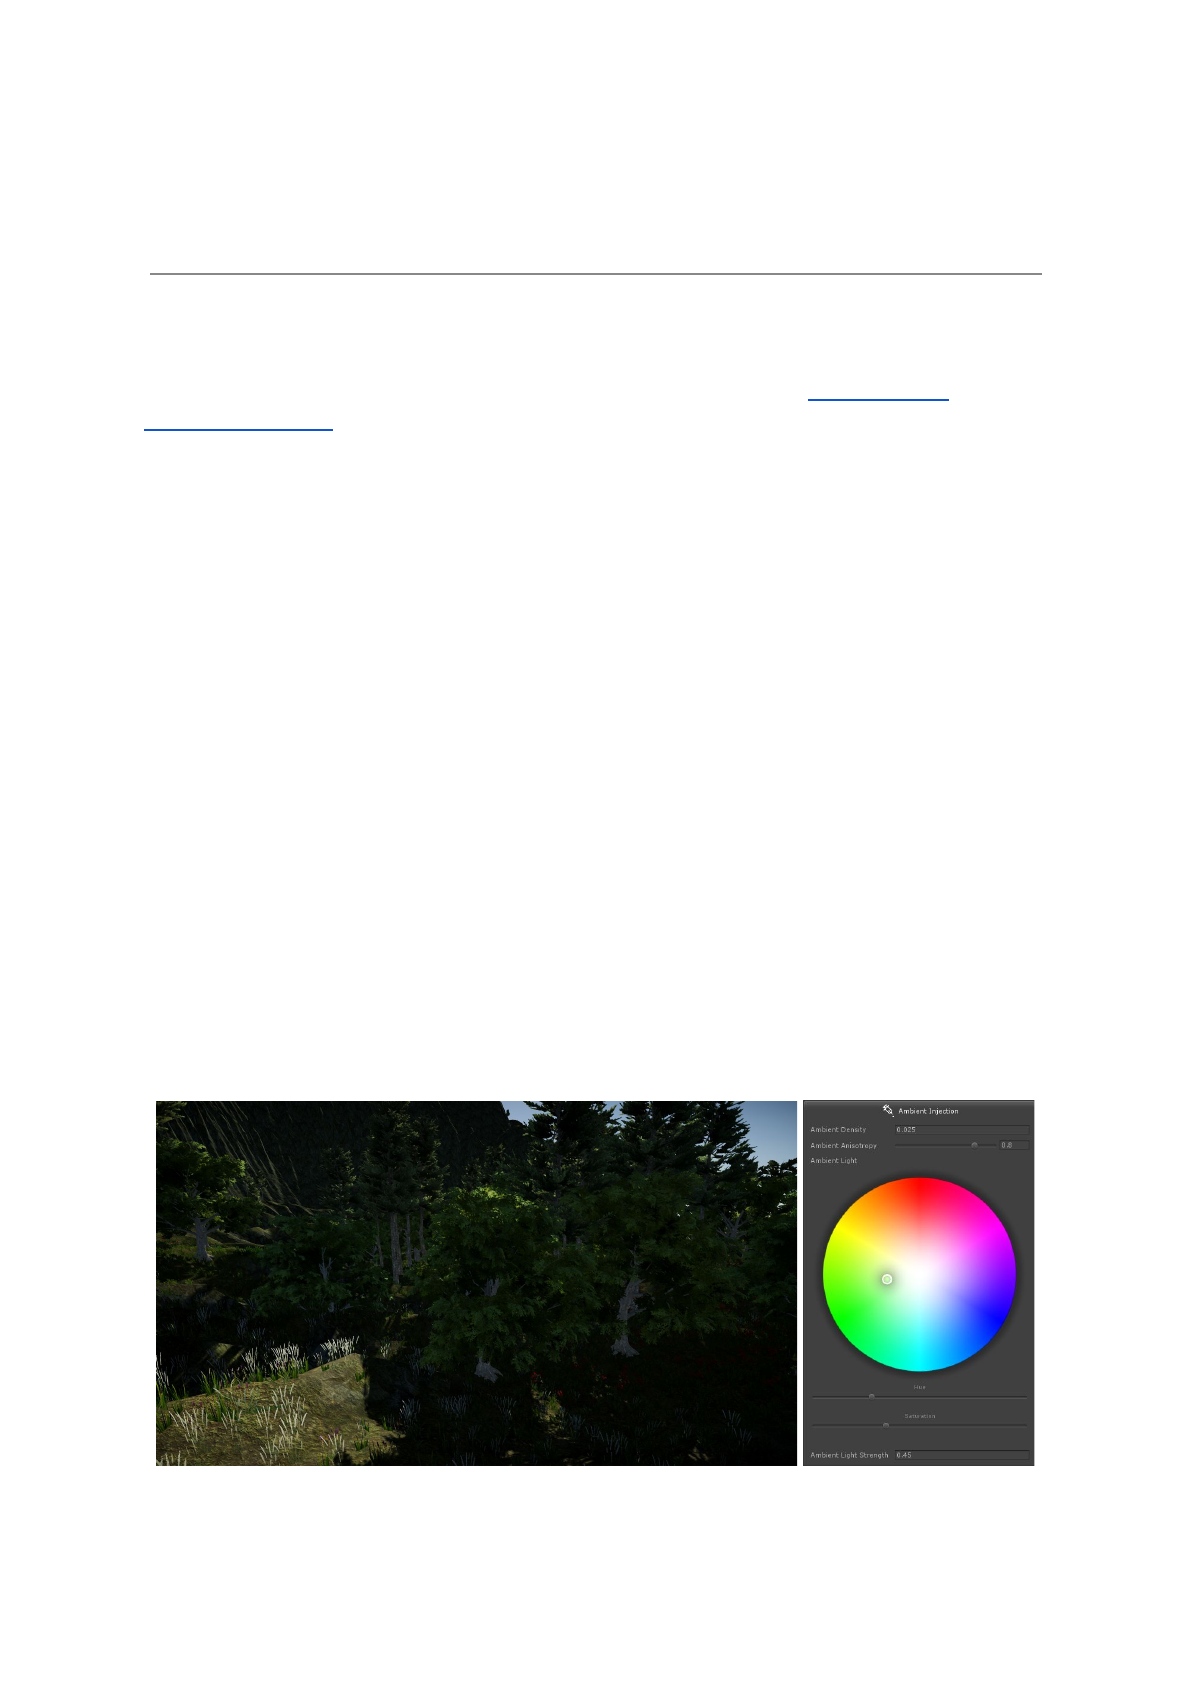
Following that guideline, the ambient data should be set as low as the medium would be.
For example, if we want to simulate air, starting with a very low Ambient Density factor is a
good starting point as, often, surrounding air is not much foggy.
Let’s set it to 0.025.
Then, we will evaluate the wetness of the air and express it through the Ambient Anisotropy
factor. This can range from (nearly) 0 very dry air like in deserts, to (nearly) 1 very humid like
in a dampy cave.
Let’s set it to 0.8.
Finally, we will have to assess the Ambient Color and its Strength, in other terms, the
minimum lighting value in the medium.
Pretty much like the usual ambient lighting, this can be thought as the lighting that will be in
the shadows.
For our example, being in a forest-ish environment, we will set the color to a low saturated
green and the strength to a small value as it’s supposed to be in the shadows, 0.45 will do.
9
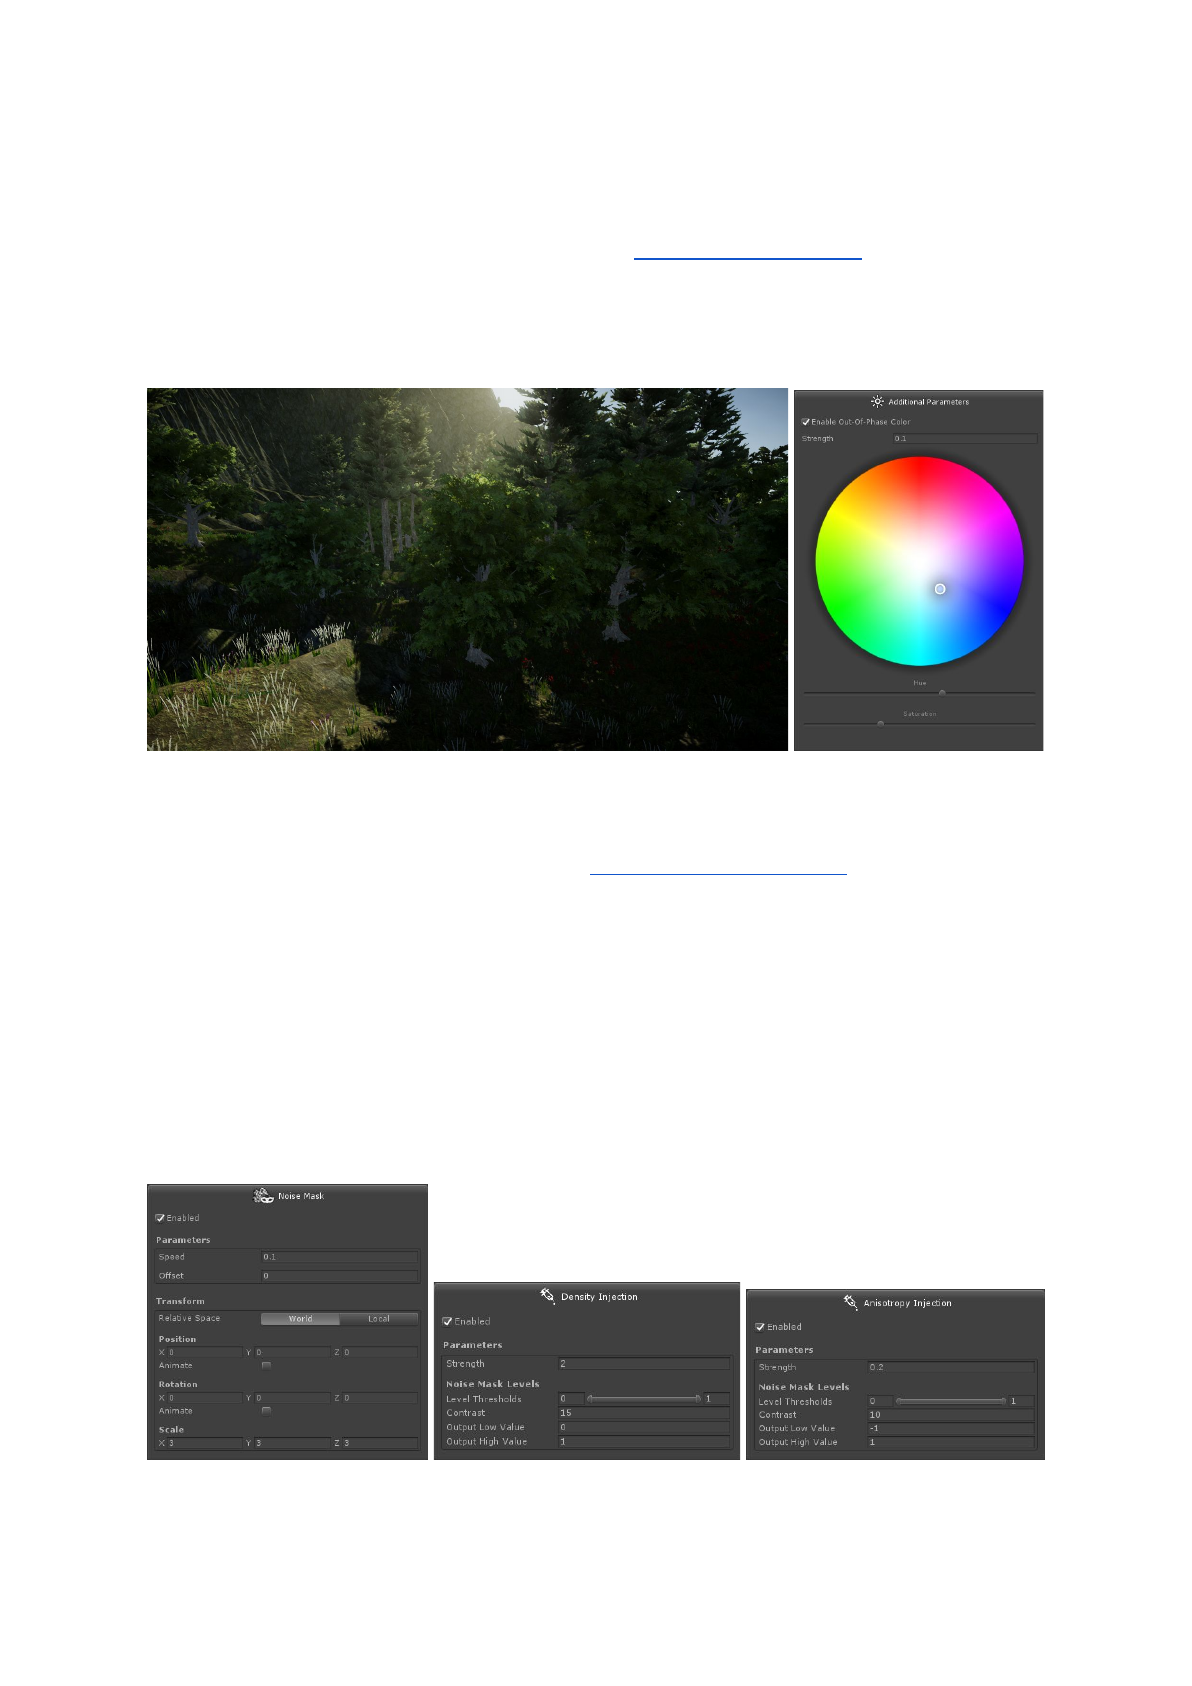
Add Aura Lights
We can now add/assign Aura Lights in the scene (see Aura Lights section).
In our example, we will just modify the out-of-phase color in order to tint the light to a bluish
color when the light is scattered (or when the light ray is not around the light source).
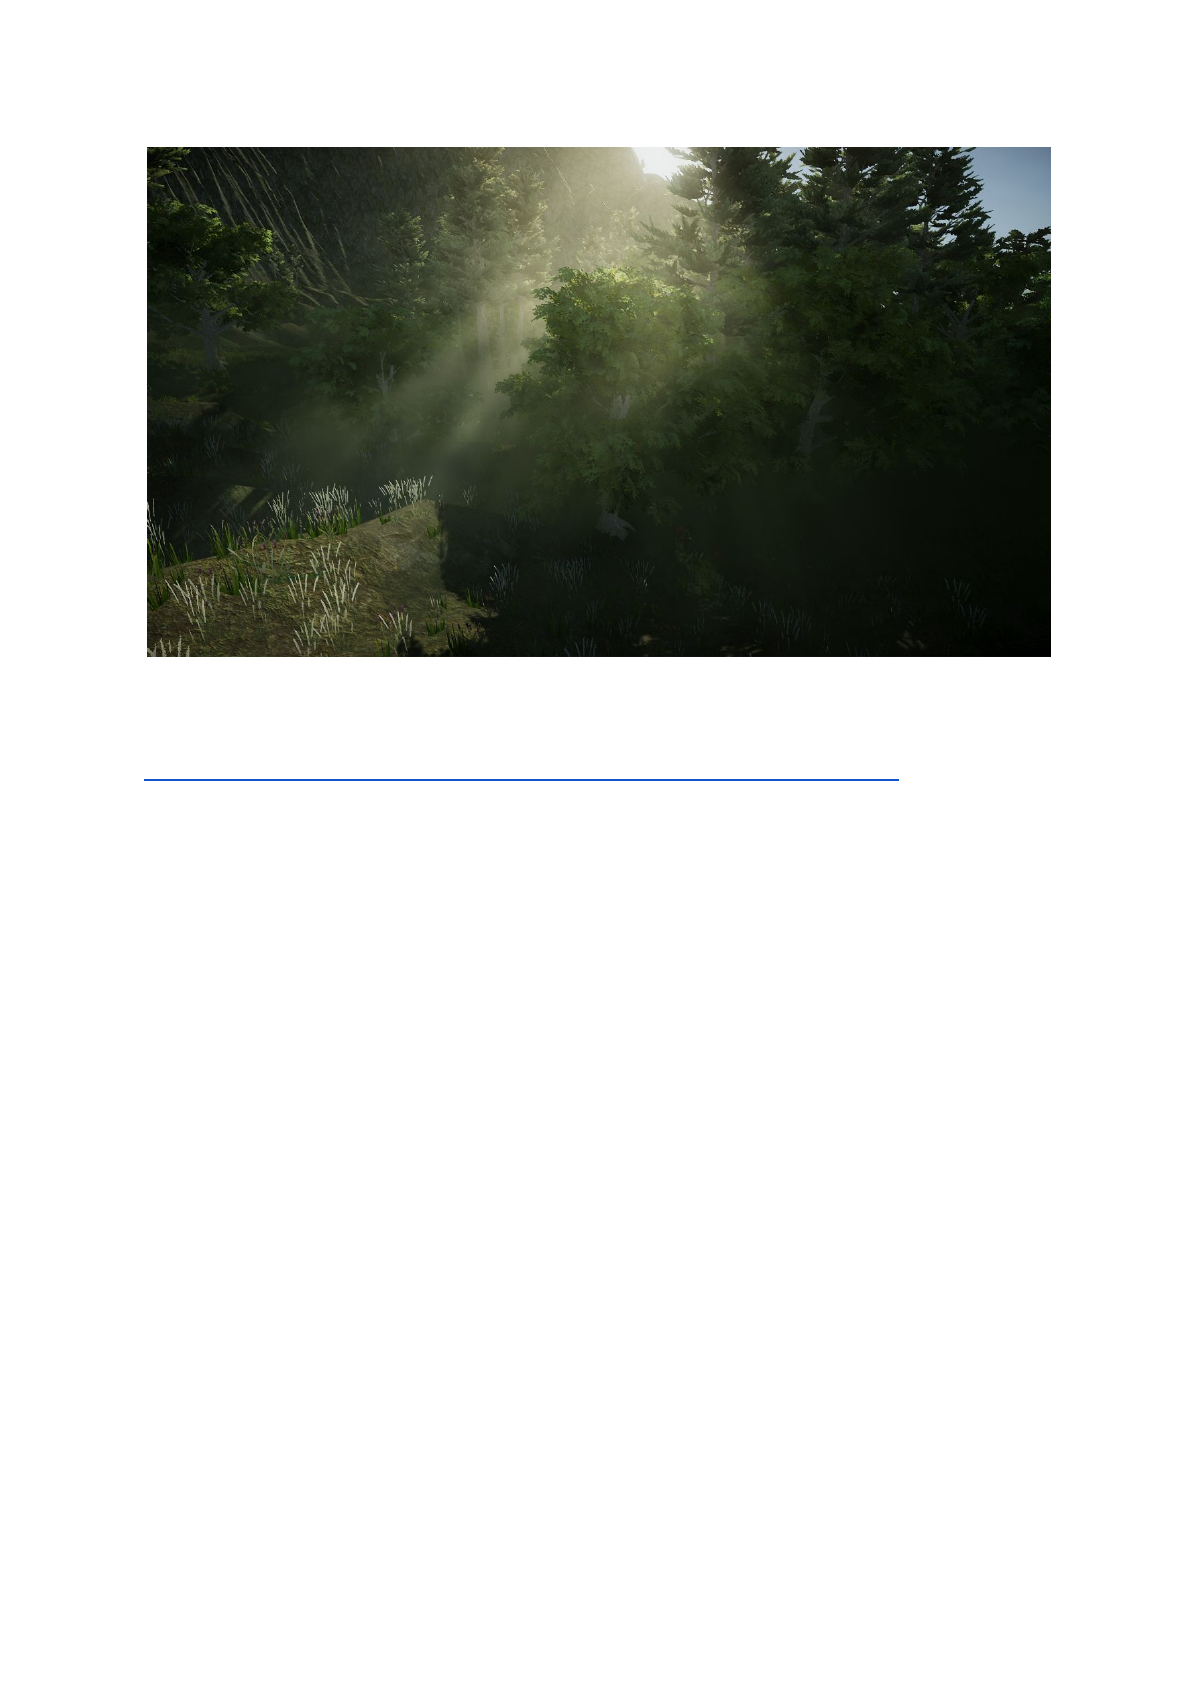
Add Aura Volumes
We can also add Aura Volumes in the scene (see Aura Volumes section).
In our example, we will put one Aura Planar Volume to add more fog down the hill, in the
woods.
To do so, we will add Density (the amount of fog) and modify the Anisotropy (to simulate
variations of humidity and catch the eye).
On top of that we will use a Noise Mask so it doesn’t look like a solid block but more like a
smoky/cloudy place.
10
Aura Main Component
First thing to do to get started is always to set the Aura
Main Component on the Camera GameObject.
This will start the whole volumetric computation
process and set the ambient data for the volumetric
lighting.
After having assigned the Aura Main Component, any amount of Aura Light or Aura Volume
can be added in no particular order.
The Aura Main Component is composed of two tabs of parameters.
Base Injection Tab
Ambient Injection
The "Ambient Injection" parameters set the starting
Density, Color and Anisotropy of the environment.
Ambient Density
The starting amount of fog in the medium.
Ambient Anisotropy
The starting light scattering factor of the medium.
Ambient Light
The tint of the starting volumetric lighting of the
medium.
Ambient Light Strength
The intensity of the Ambient Light.
12
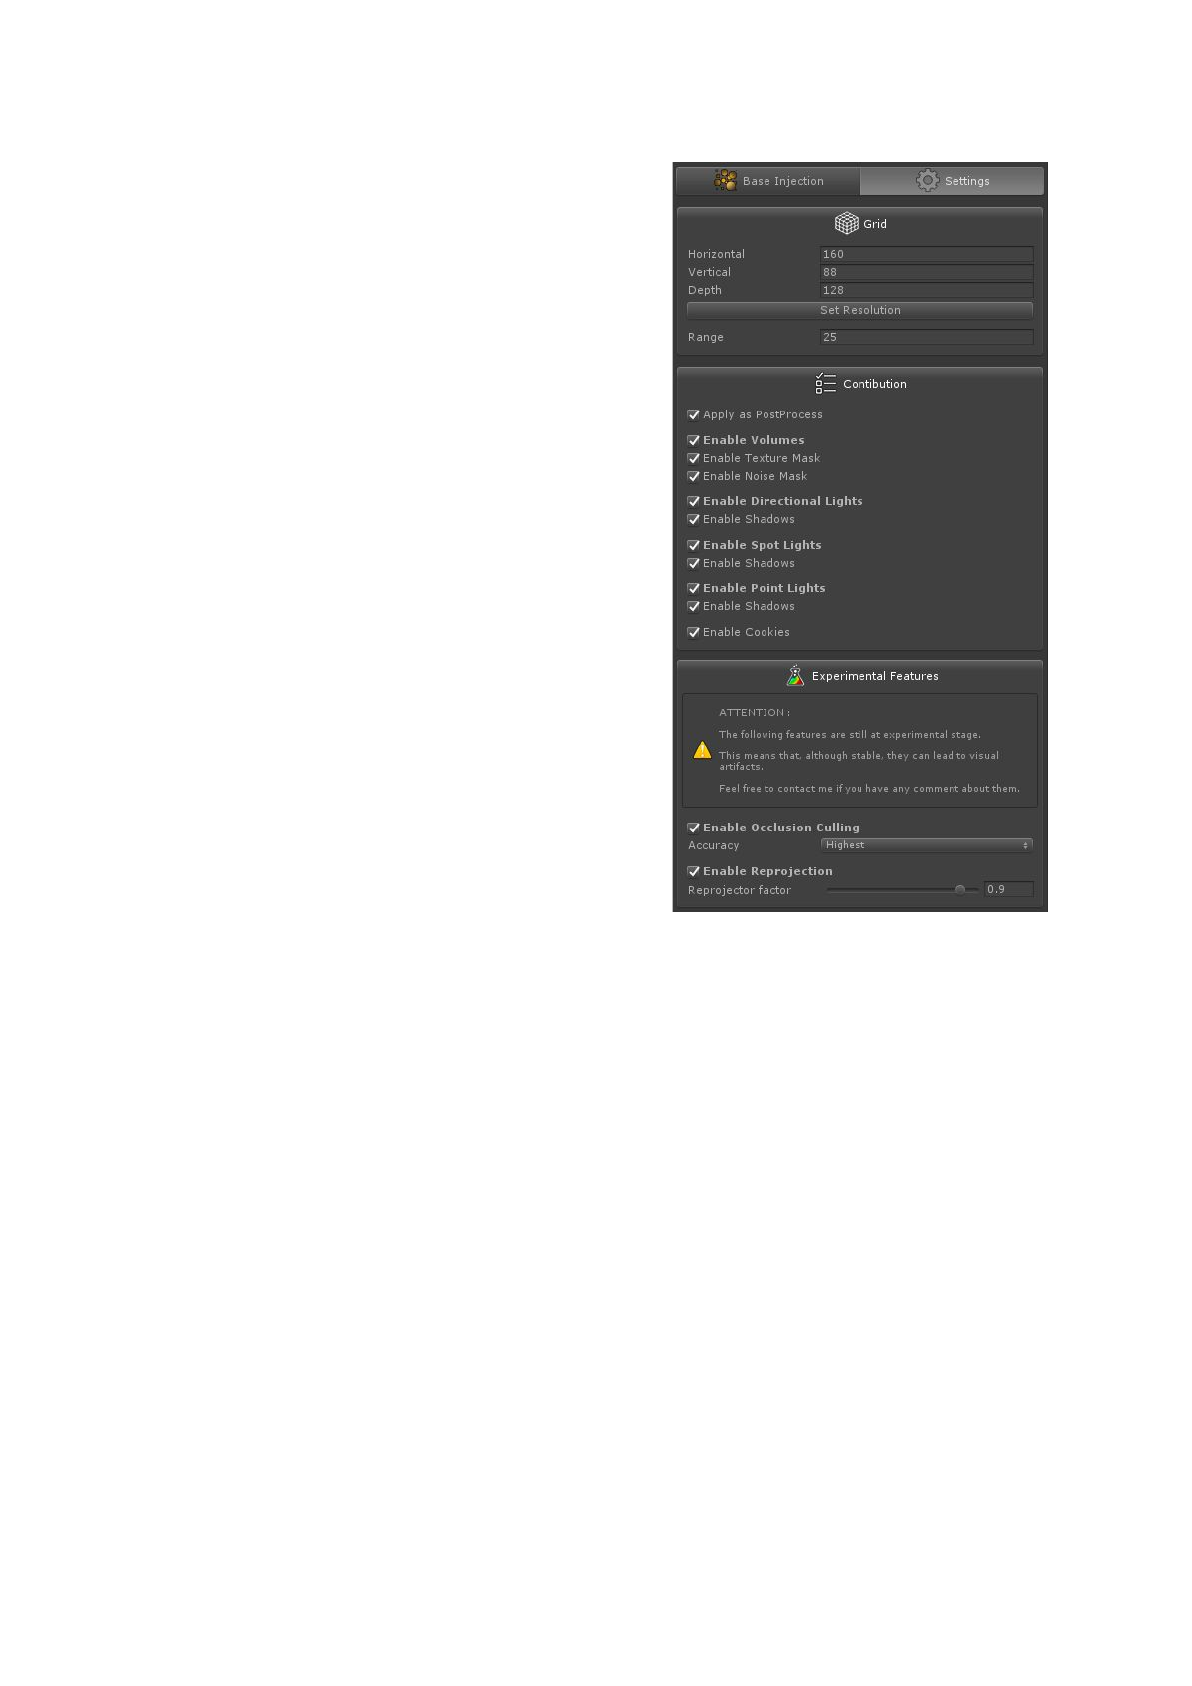
Settings Tab
Grid
Allows to determine the density of cells used to
compute the volumetric lighting.
Horizontal/Vertical/Depth
The resolution of the grid.
Range
The maximum distance within which the volumetric
lighting will be computed.
Contribution
Allows to enable/disable what type of contribution
will be computed.
Note that the existence of the different contributions
are handled by the system at runtime.
Experimental Features
These features are still at experimental stage.
This means that, although stable, they can lead to
visual artifacts.
Enable Occlusion Culling
Allows to compute the maximum visible depth of the frustum grid.
This leads to avoid computing cells that are invisible to the camera because hidden behind
objects.
Occlusion Culling Accuracy
The precision used to determine the maximum visible depth.
Enable Reprojection
Allows to blend the current (jittered) computed frame with the previous one.
This leads to a smoother volumetric lighting, especially with a low resolution grid.
Reprojector factor
Controls the scale and amount of reprojection.
13

Aura Lights
The Aura Light components can be assigned on the
Lights you want to be taken into account into the
volumetric lighting computation.
Aura Lights can also be
directly created using
the GameObjects menu.
The default value of the Aura Light components are normalized to fit Unity’s lighting system.
Therefore, leaving a strength factor of 1 for the volumetric lighting will closely fit the strength
of the surface lighting of Unity’s lighting system.
The Aura Light component is composed of two tabs. One for the common parameters,
whatever the type of light; one with additional parameters that will change regarding the type
of the light.
14
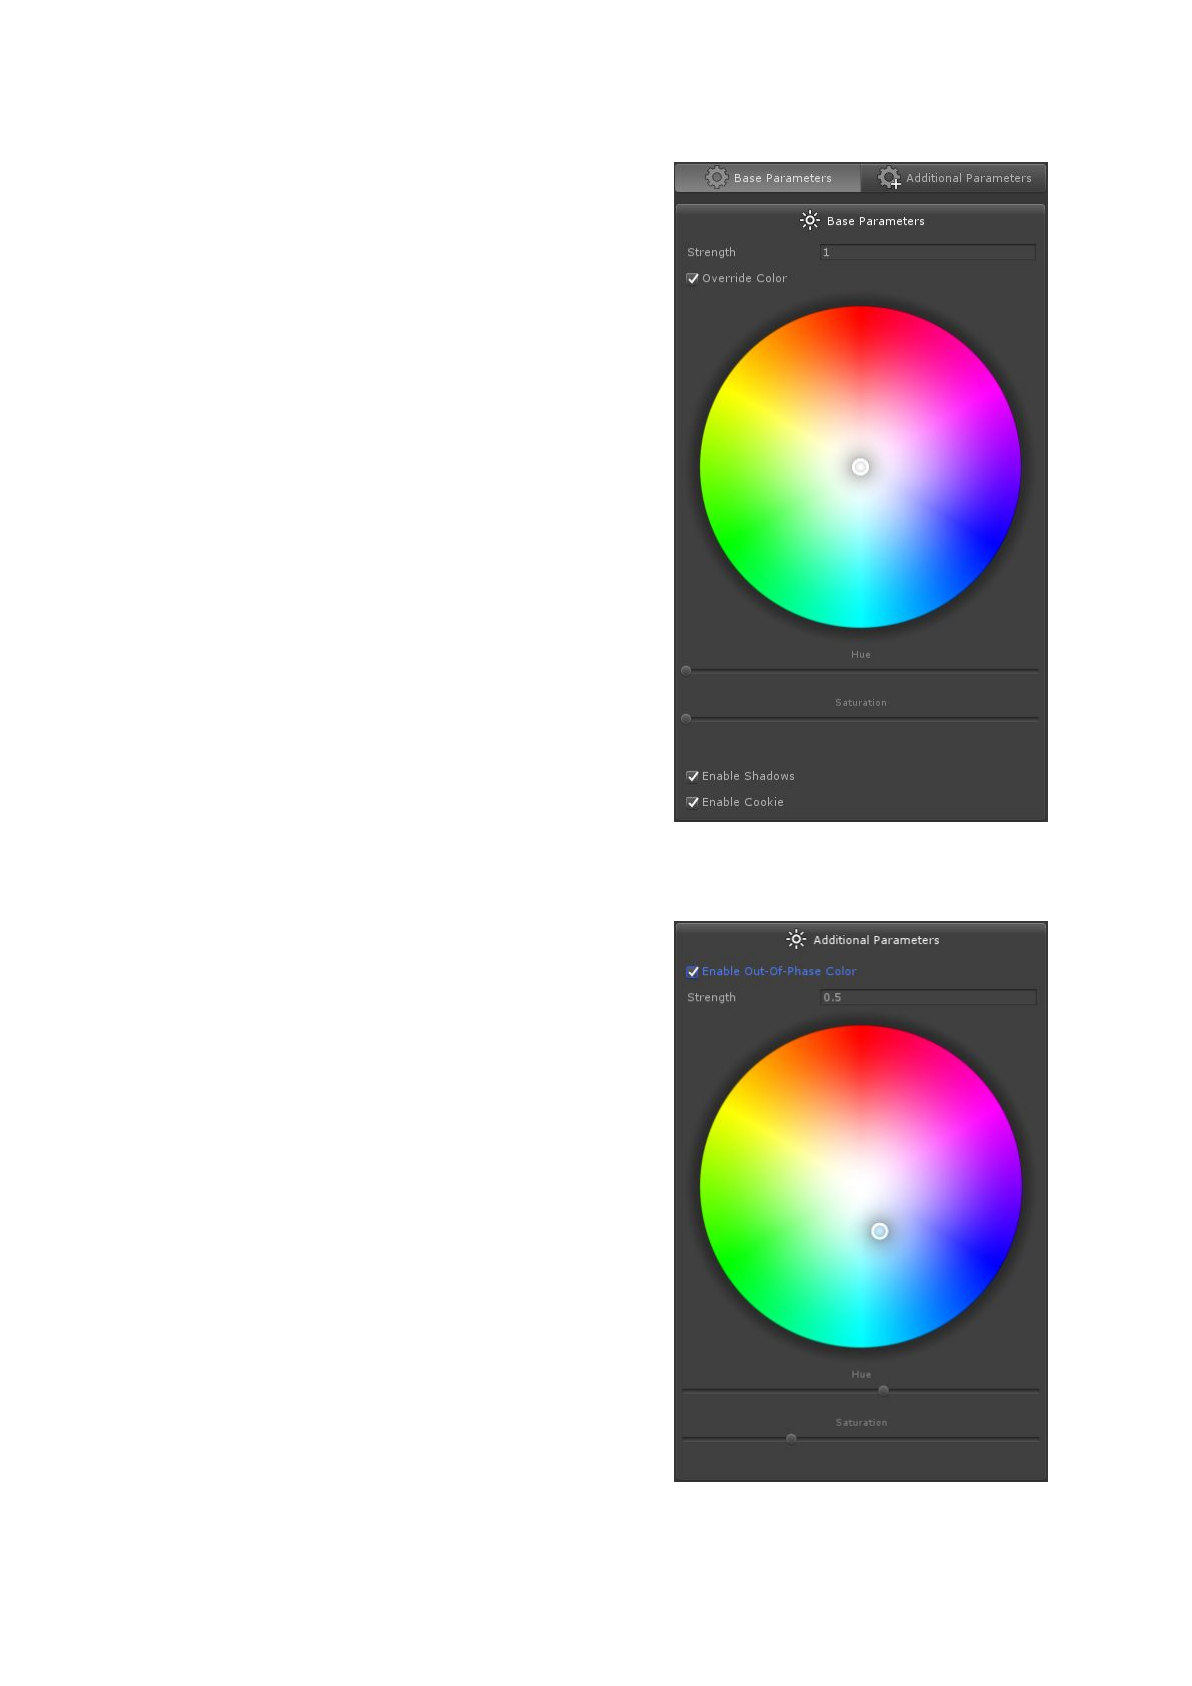
Base Parameters Tab
Strength
The intensity of the volumetric lighting computed
from the light.
Override Color
Allows to ignore and replace the color of the light for
the volumetric lighting.
Enable Shadows
Enables the computation of the shadows of the light
in the volumetric lighting (if the light casts shadows).
Enable Cookie
Enables the computation of the cookie of the light in
the volumetric lighting (if the light has a cookie).
Additional Parameters Tab
(Directional Light)
Enable Out-Of-Phase Color
Allows to cancel the extinction of the light when it
goes scattered and replace it with a color.
Strength
The intensity of the Out-Of-Phase Color.
15
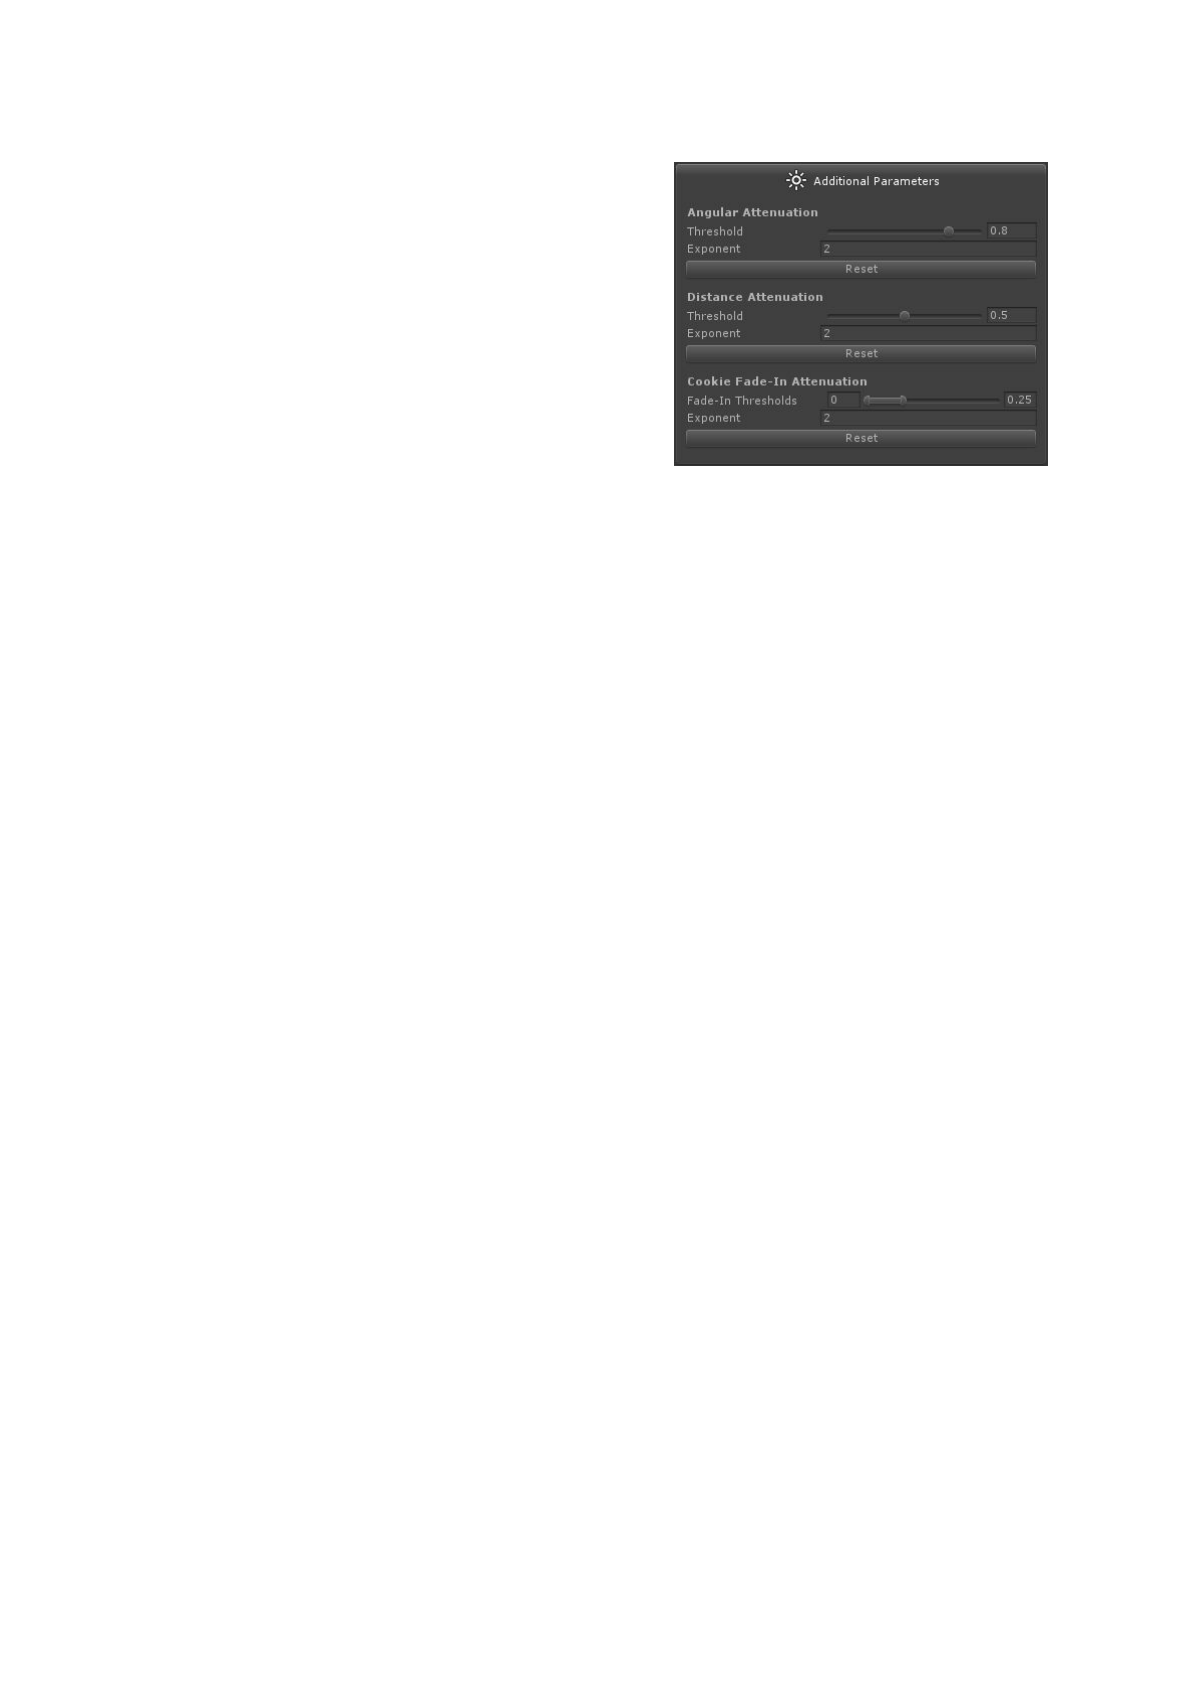
Additional Parameters Tab
(Spot Light)
Angular Attenuation
Allows to tweak the fade-out of the light from the
center to the outer border of the cone.
Threshold
Normalized angle when the fade will start, until 1.
Exponent
Curve of the fading.
Distance Attenuation
Allows to tweak the fade-out of the light within its range.
Threshold
Normalized distance when the fade will start, until 1.
Exponent
Curve of the fading.
Distance Attenuation
Allows to tweak the fade-out of the light within its range.
Threshold
Normalized distance when the fade will start, until 1.
Exponent
Curve of the fading.
Cookie Fade-In Attenuation
Allows to tweak the fade-in of the light’s cookie within its range.
Fade-In Thresholds
Normalized range where the cookie will fade in.
Exponent
Curve of the fading.
16
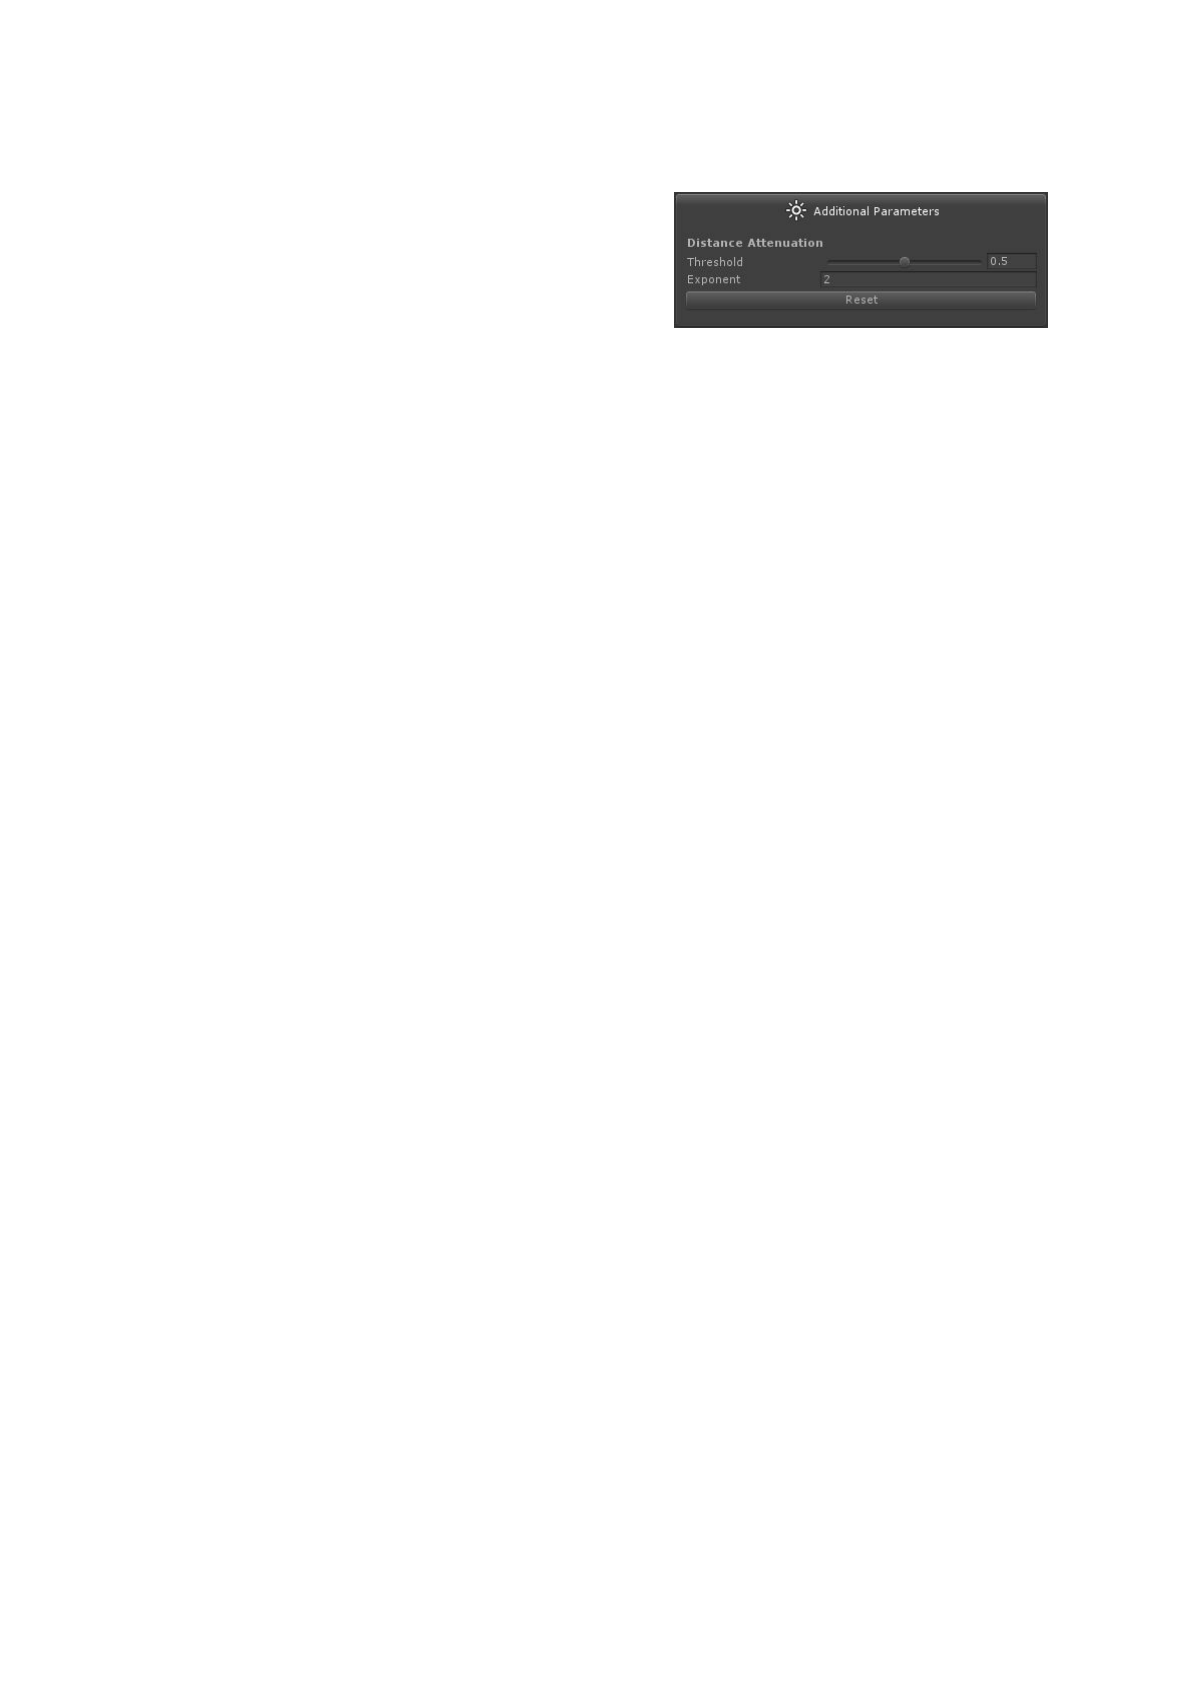
Additional Parameters Tab
(Point Light)
Distance Attenuation
Allows to tweak the fade-out of the light within its range.
Threshold
Normalized distance when the fade will start, until 1.
Exponent
Curve of the fading.
17
Aura Volumes
Aura Volumes can be added into the scenes to locally modify one or several of the base
ingredients of Aura’s system (Density, Color and Anisotropy).
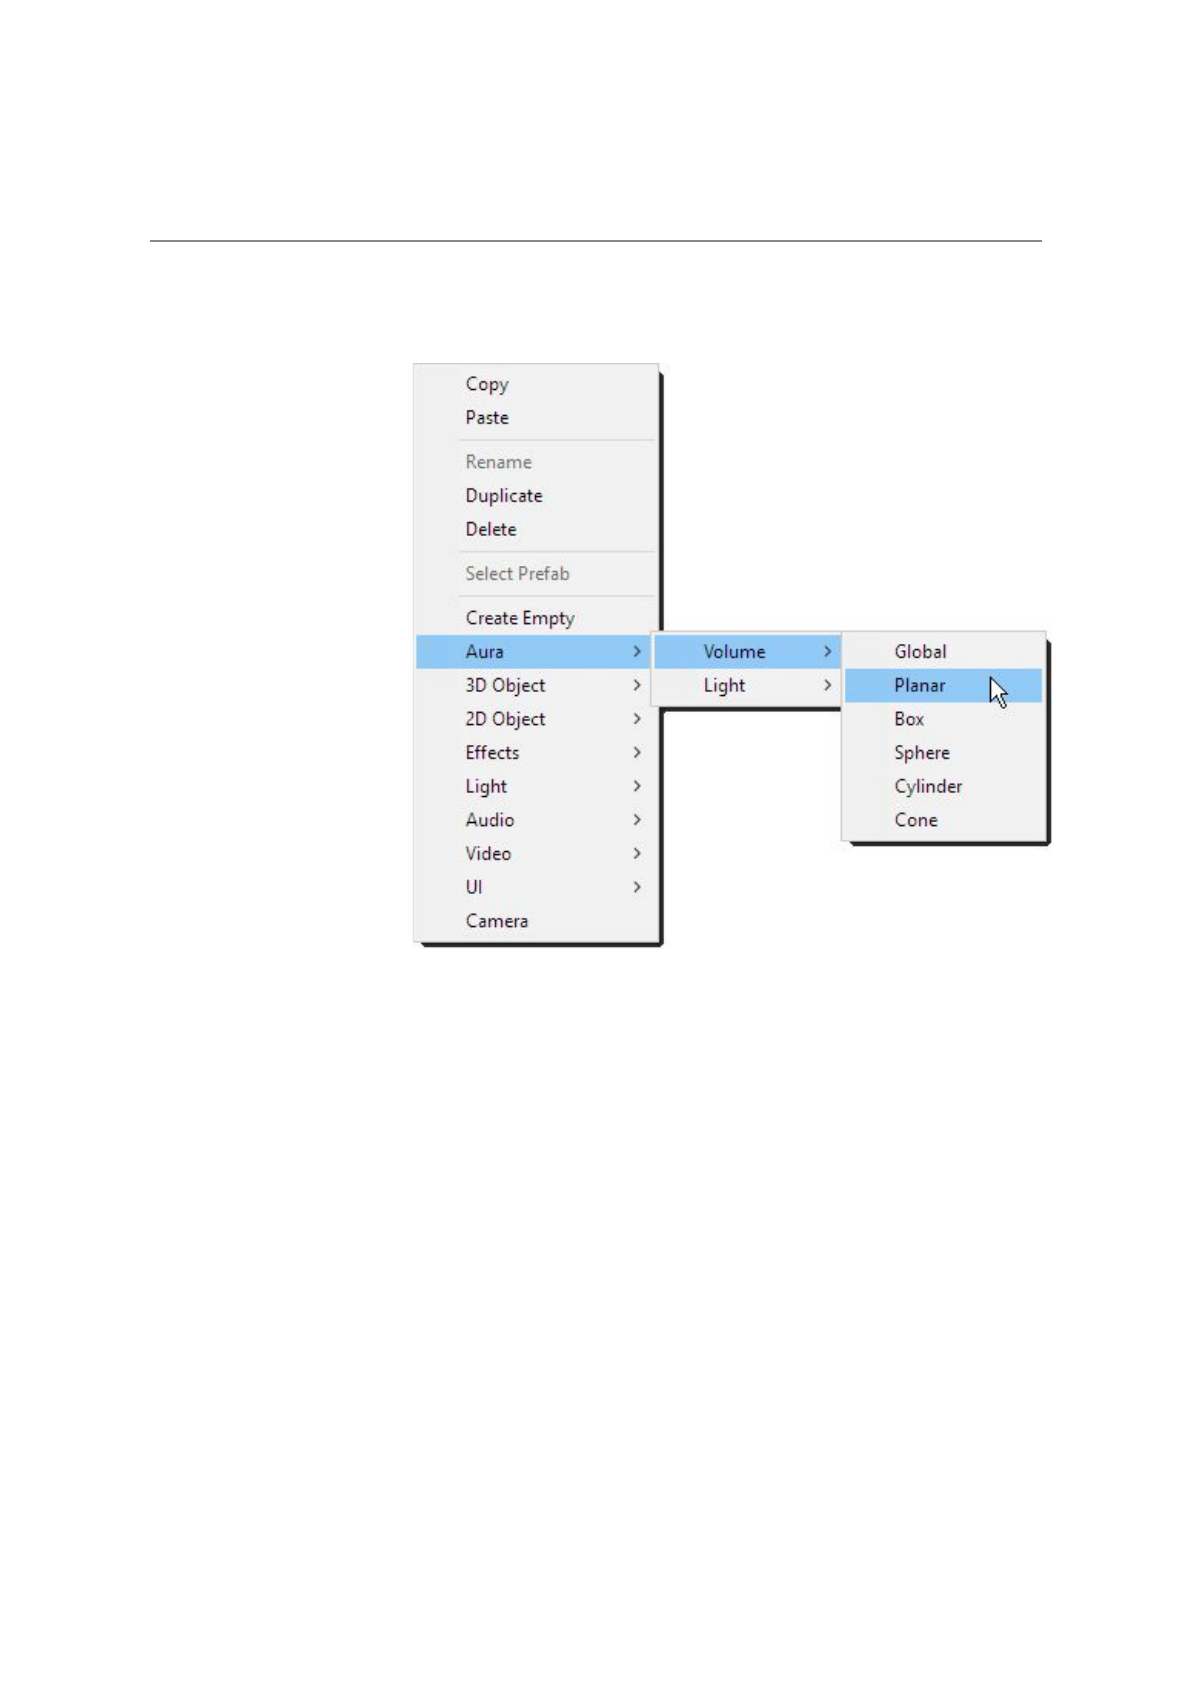
Aura Volumes can be
directly created using the
GameObjects menu.
The Aura Volume component is composed of four tabs.
18
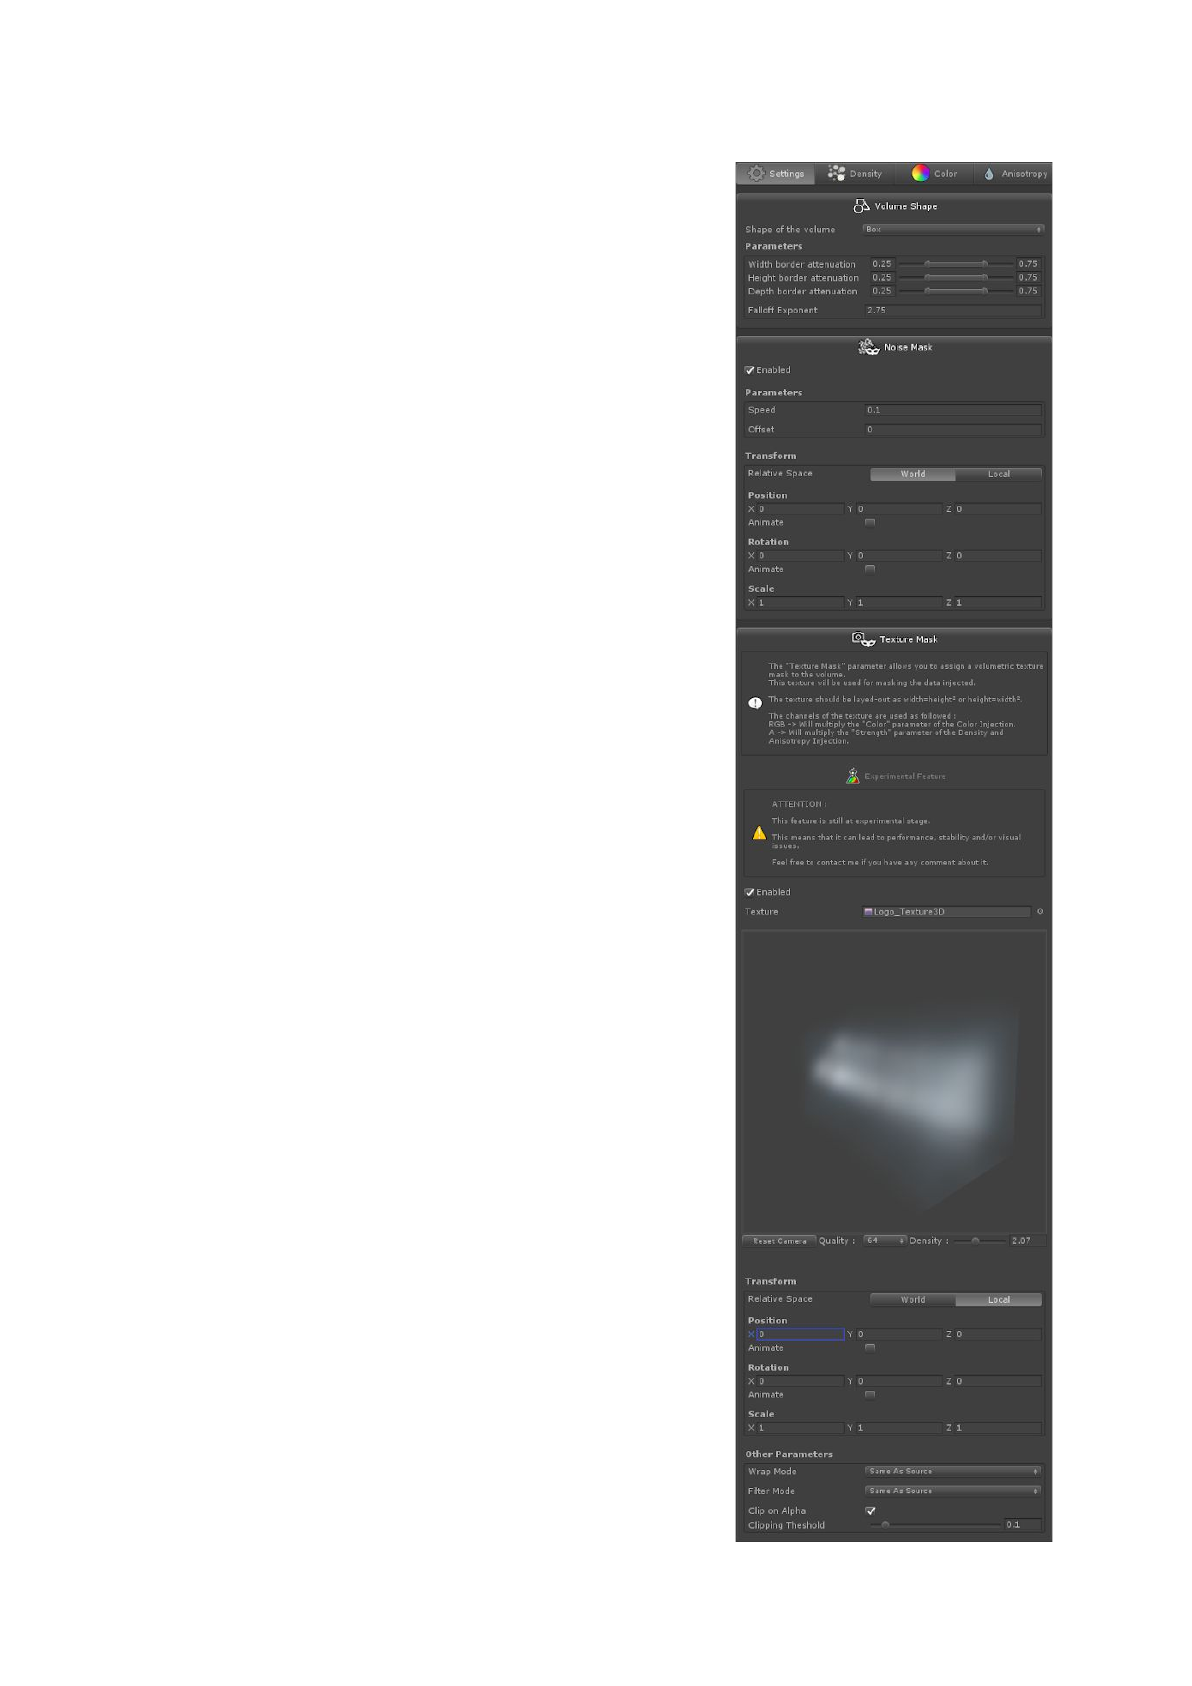
Settings Tab
The settings tab will allow to tweak the shape and the
border attenuations of the Volume.
Noise and Texture masks can also be enabled to
modulate the injections parameters.
Volume Shape
Shape of the Volume
Select the volumetric shape of the Volume between :
● Global
● Planar
● Box
● Sphere
● Cylinder
● Cone
Parameters
Allow to tweak the fading on the borders of the shape,
allowing a smooth transition between the inside and the
outside of the volume.
Falloff Exponent
Curve of the fade-out attenuations.
Noise Mask
Enable
Activates the dynamic noise mask and applies it on the
Density, Color and Anisotropy injections.
Speed
Speed of the morphing effect.
Offset
Offset of the morphing effect, in order to desynchronize
noise that have the same speed.
Transform
Allows to set (and animate) the position, rotation and scale
of the noise.
19

Texture Mask
Enable
Activates the volumetric texture mask and applies the RGB channels data on the Color
injection and the Alpha channel on the Density and Anisotropy injections.
Texture
The source Texture3D to use.
Transform
Allows to set (and animate) the position, rotation and scale of the volumetric texture.
Warp Mode
Sets how the texture should warp outside the 0-1 coordinates range.
Filter Mode
Set how the volumetric texture should be filtered when displayed.
Clip on Alpha
Allows to bypass computation of the Volume cell based on the Alpha channel.
Clipping Threshold
Threshold under which the Volume cell will be bypassed.
20
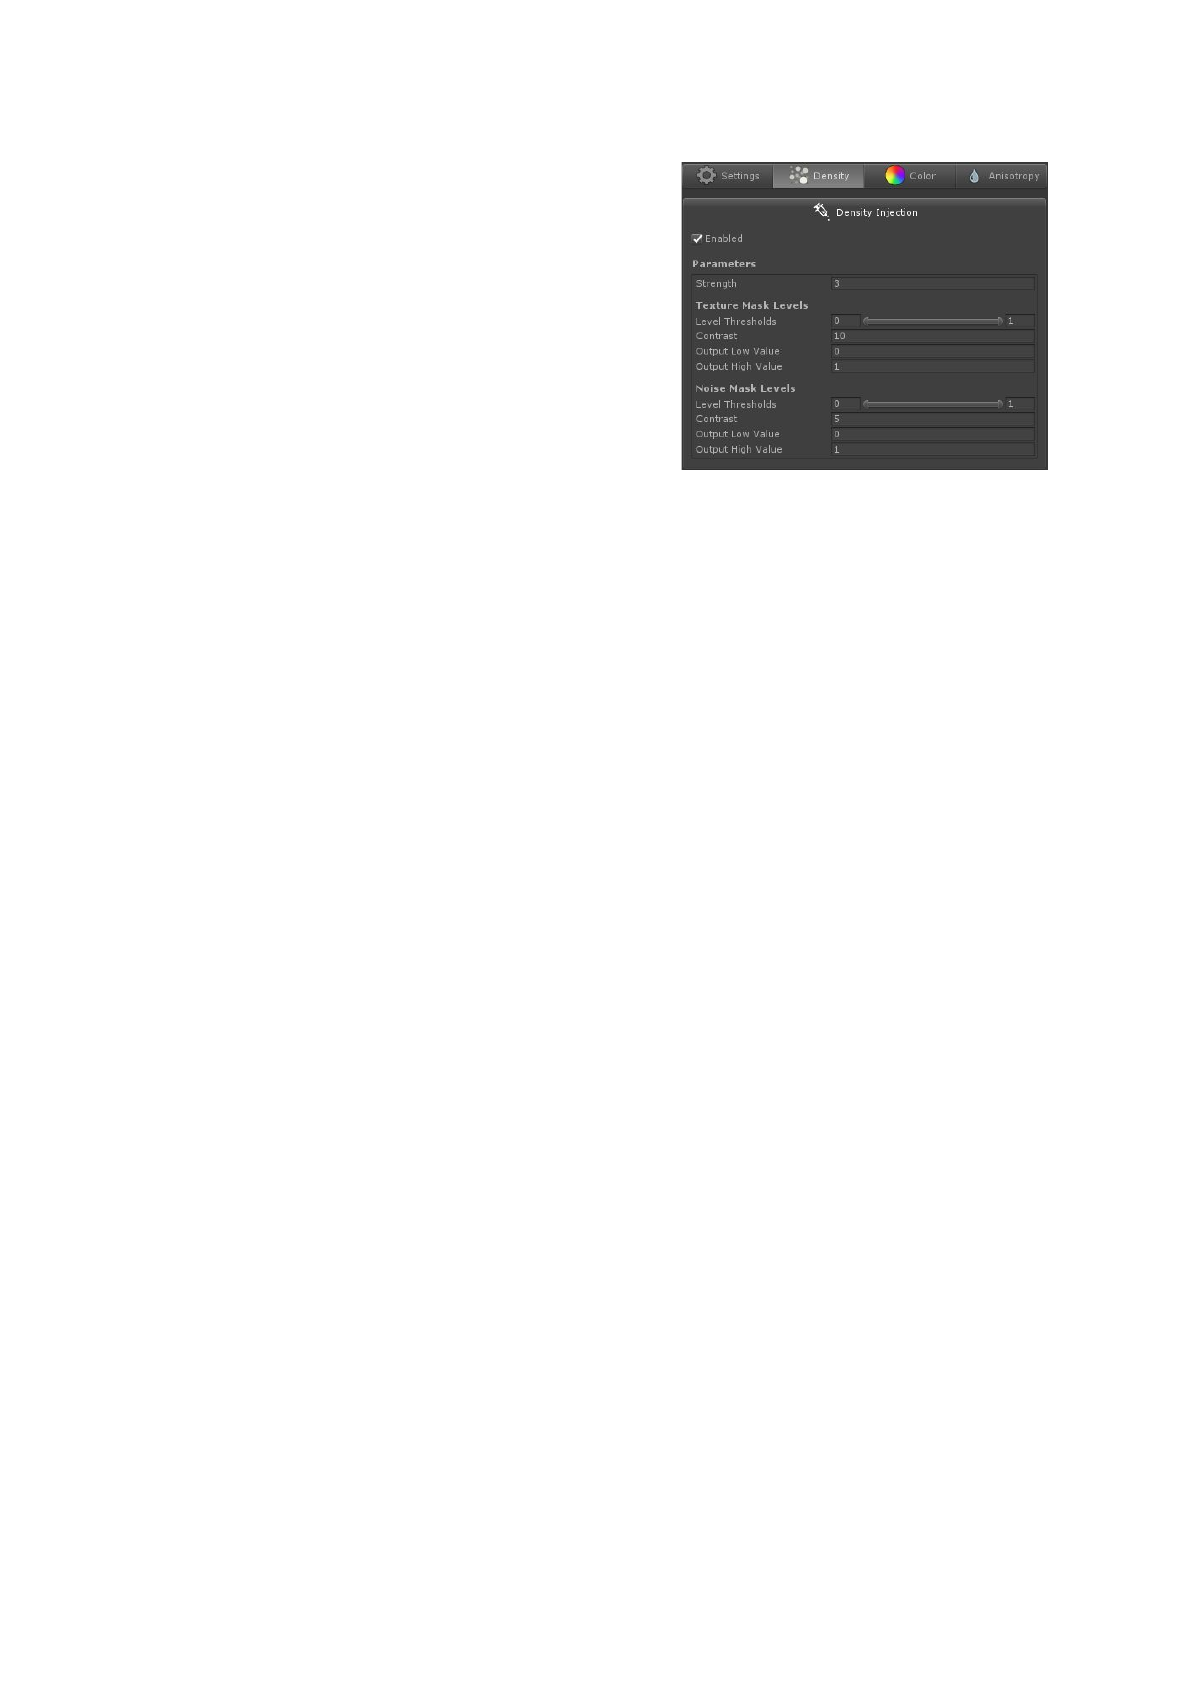
Density Tab
Enable
Allows to add/remove fog inside the Volume.
Strength
The amount of fog to be added.
This value can be negative, meaning that fog can be
removed.
Texture Mask Levels (if Texture Mask)
Remaps and contrasts the texture mask value.
Levels Thresholds
Clamps the lower and upper range of the value.
Contrast
Contrasts the clamped value.
Output Low Value
Remap the upper threshold of the value to a new value.
Output High Value
Remap the lower threshold of the value to a new value.
Noise Mask Levels (if Noise Mask)
Remaps and contrasts the noise mask value.
Levels Thresholds
Clamps the lower and upper range of the value.
Contrast
Contrasts the clamped value.
Output Low Value
Remap the upper threshold of the value to a new value.
Output High Value
Remap the lower threshold of the value to a new value.
21
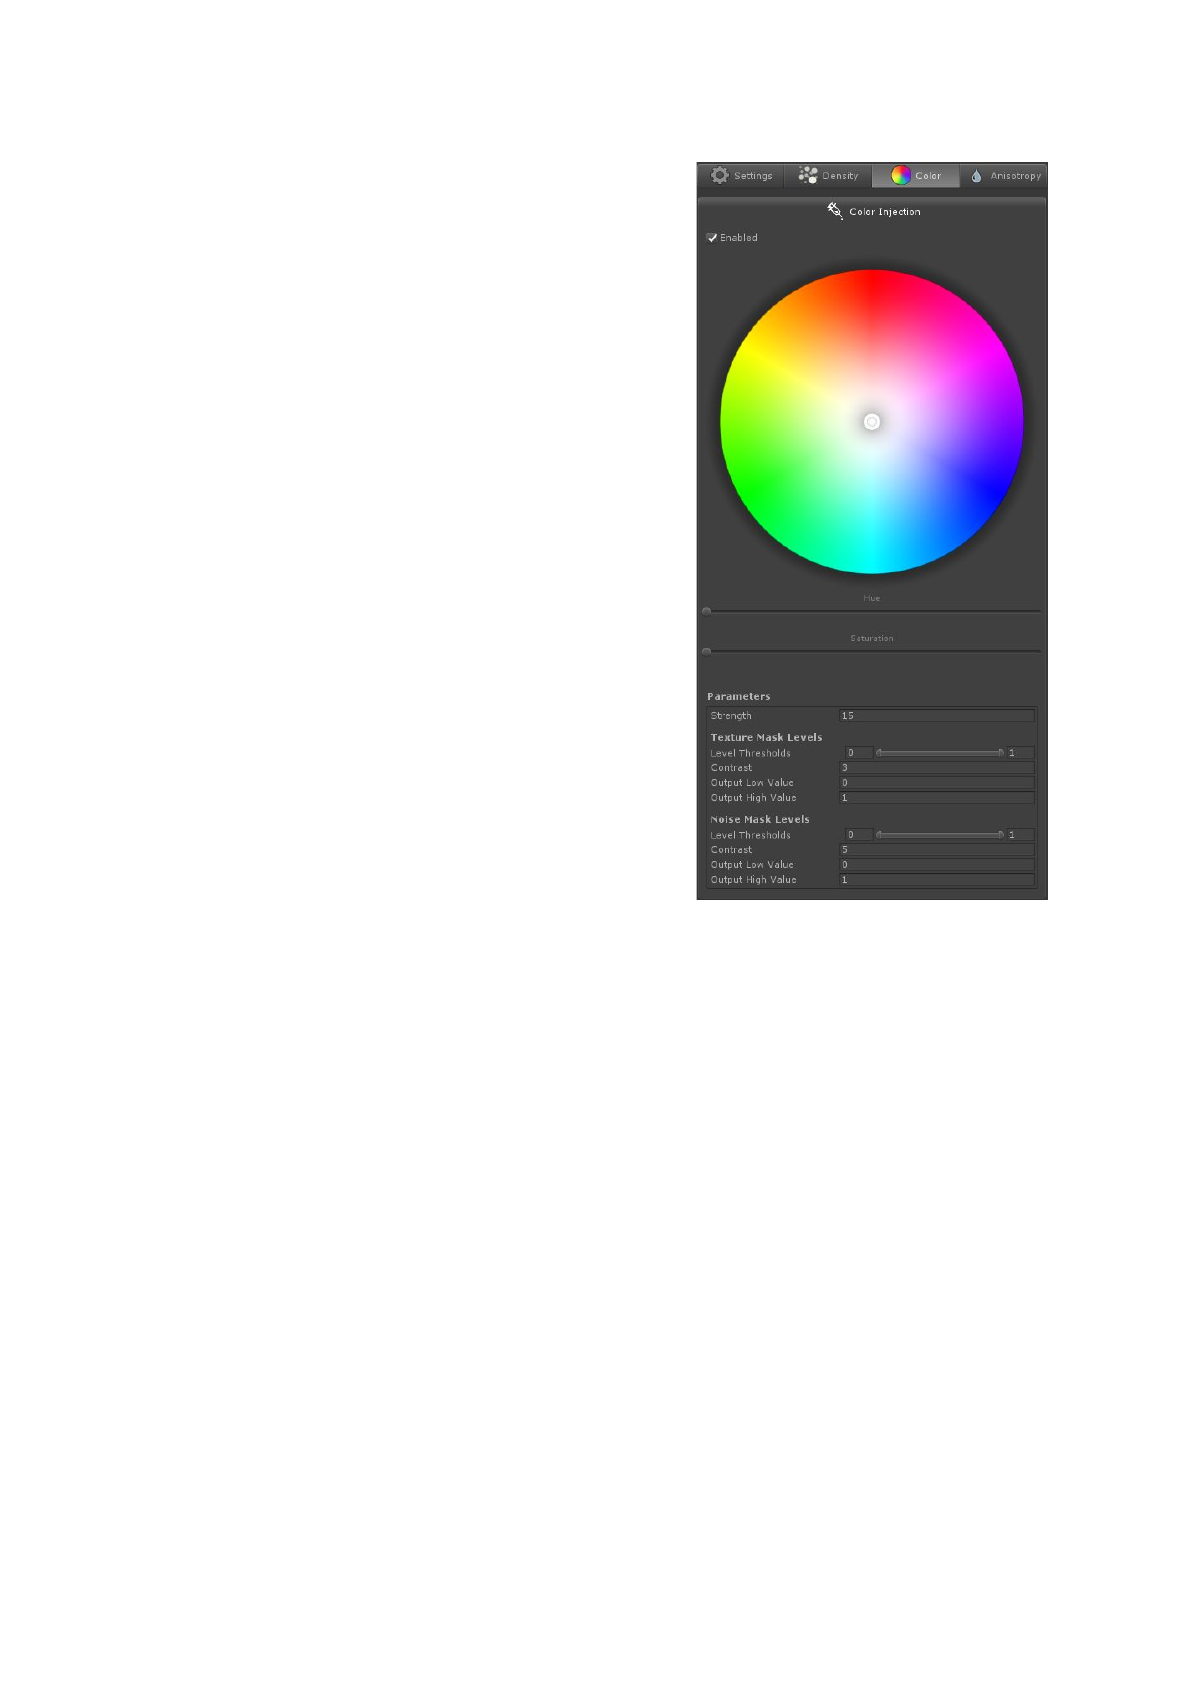
Color Tab
Enable
Allows to add/remove light inside the Volume.
Strength
The intensity of the light to be added.
This value can be negative, meaning that light can be
removed.
Texture Mask Levels (if Texture Mask)
Remaps and contrasts the texture mask value.
Levels Thresholds
Clamps the lower and upper range of the value.
Contrast
Contrasts the clamped value.
Output Low Value
Remap the upper threshold of the value to a new
value.
Output High Value
Remap the lower threshold of the value to a new value.
Noise Mask Levels (if Noise Mask)
Remaps and contrasts the noise mask value.
Levels Thresholds
Clamps the lower and upper range of the value.
Contrast
Contrasts the clamped value.
Output Low Value
Remap the upper threshold of the value to a new value.
Output High Value
Remap the lower threshold of the value to a new value.
22
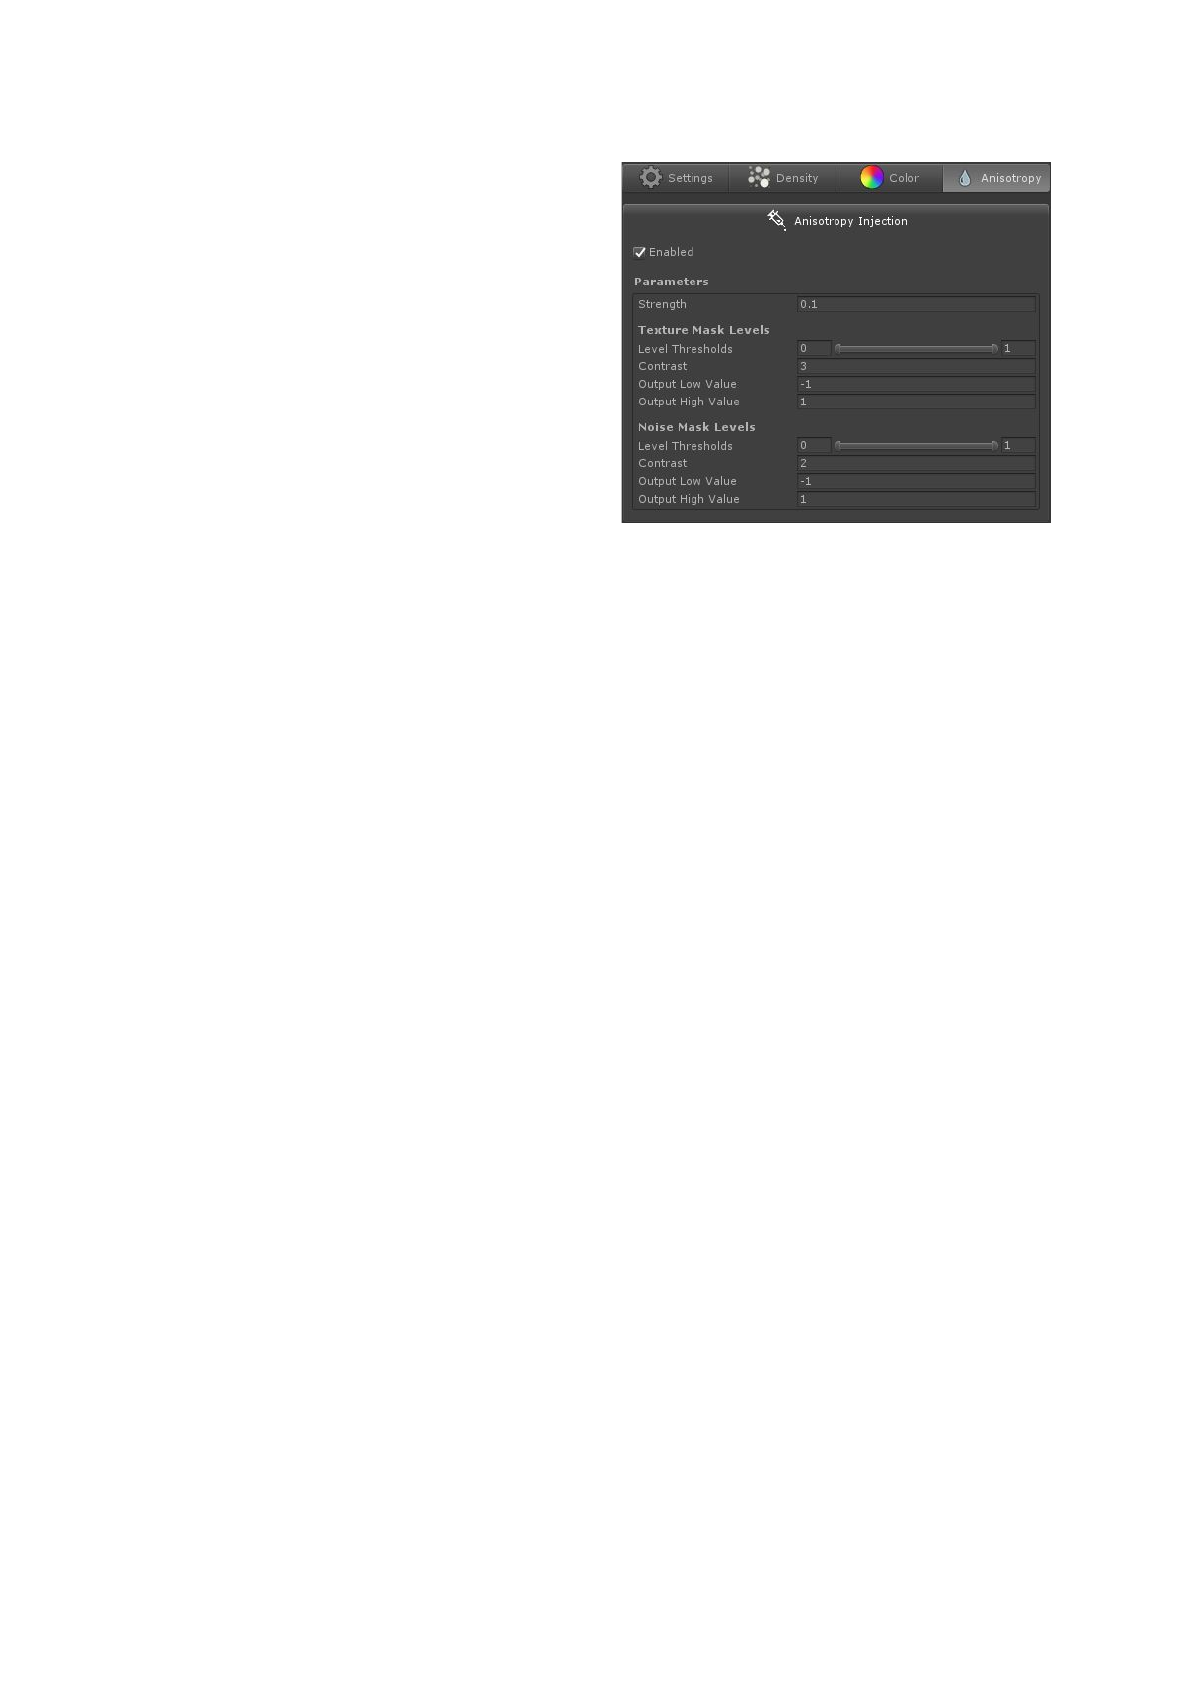
Anisotropy Tab
Enable
Allows to add/remove anisotropy inside the
Volume.
Strength
The amount of anisotropy to be added.
This value can be negative, meaning that
anisotropy can be removed.
Texture Mask Levels (if Texture Mask)
Remaps and contrasts the texture mask value.
Levels Thresholds
Clamps the lower and upper range of the value.
Contrast
Contrasts the clamped value.
Output Low Value
Remap the upper threshold of the value to a new value.
Output High Value
Remap the lower threshold of the value to a new value.
Noise Mask Levels (if Noise Mask)
Remaps and contrasts the noise mask value.
Levels Thresholds
Clamps the lower and upper range of the value.
Contrast
Contrasts the clamped value.
Output Low Value
Remap the upper threshold of the value to a new value.
Output High Value
Remap the lower threshold of the value to a new value.
23
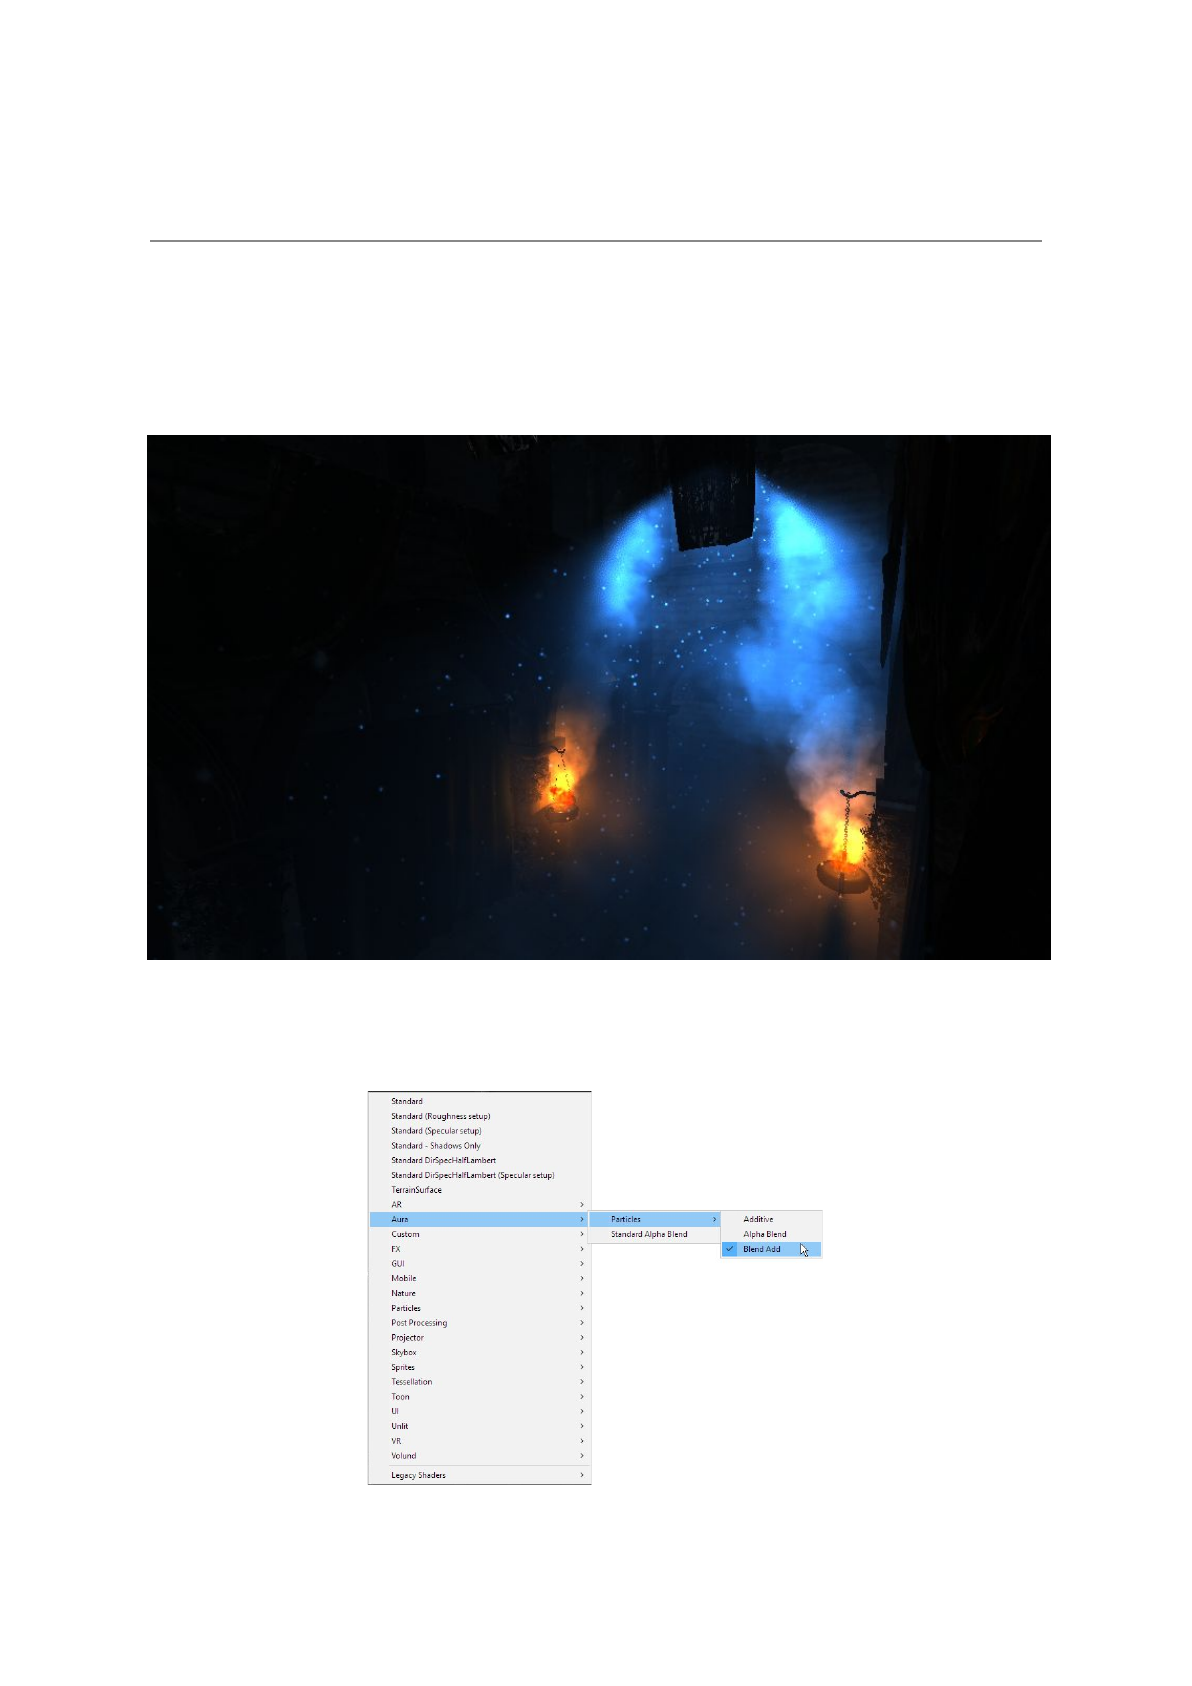
Illuminate/Fog Particles
Since Aura stores and sends the punctual and accumulated volumetric lighting as global
buffers, it is easy to retrieve them if we know the element’s position inside the frustum.
That is how the particles illumination and fog work with Aura.
If you want to illuminate/fog your particles with Aura, you can choose between the provided
shaders or make your own, following the provided ones as examples.
24
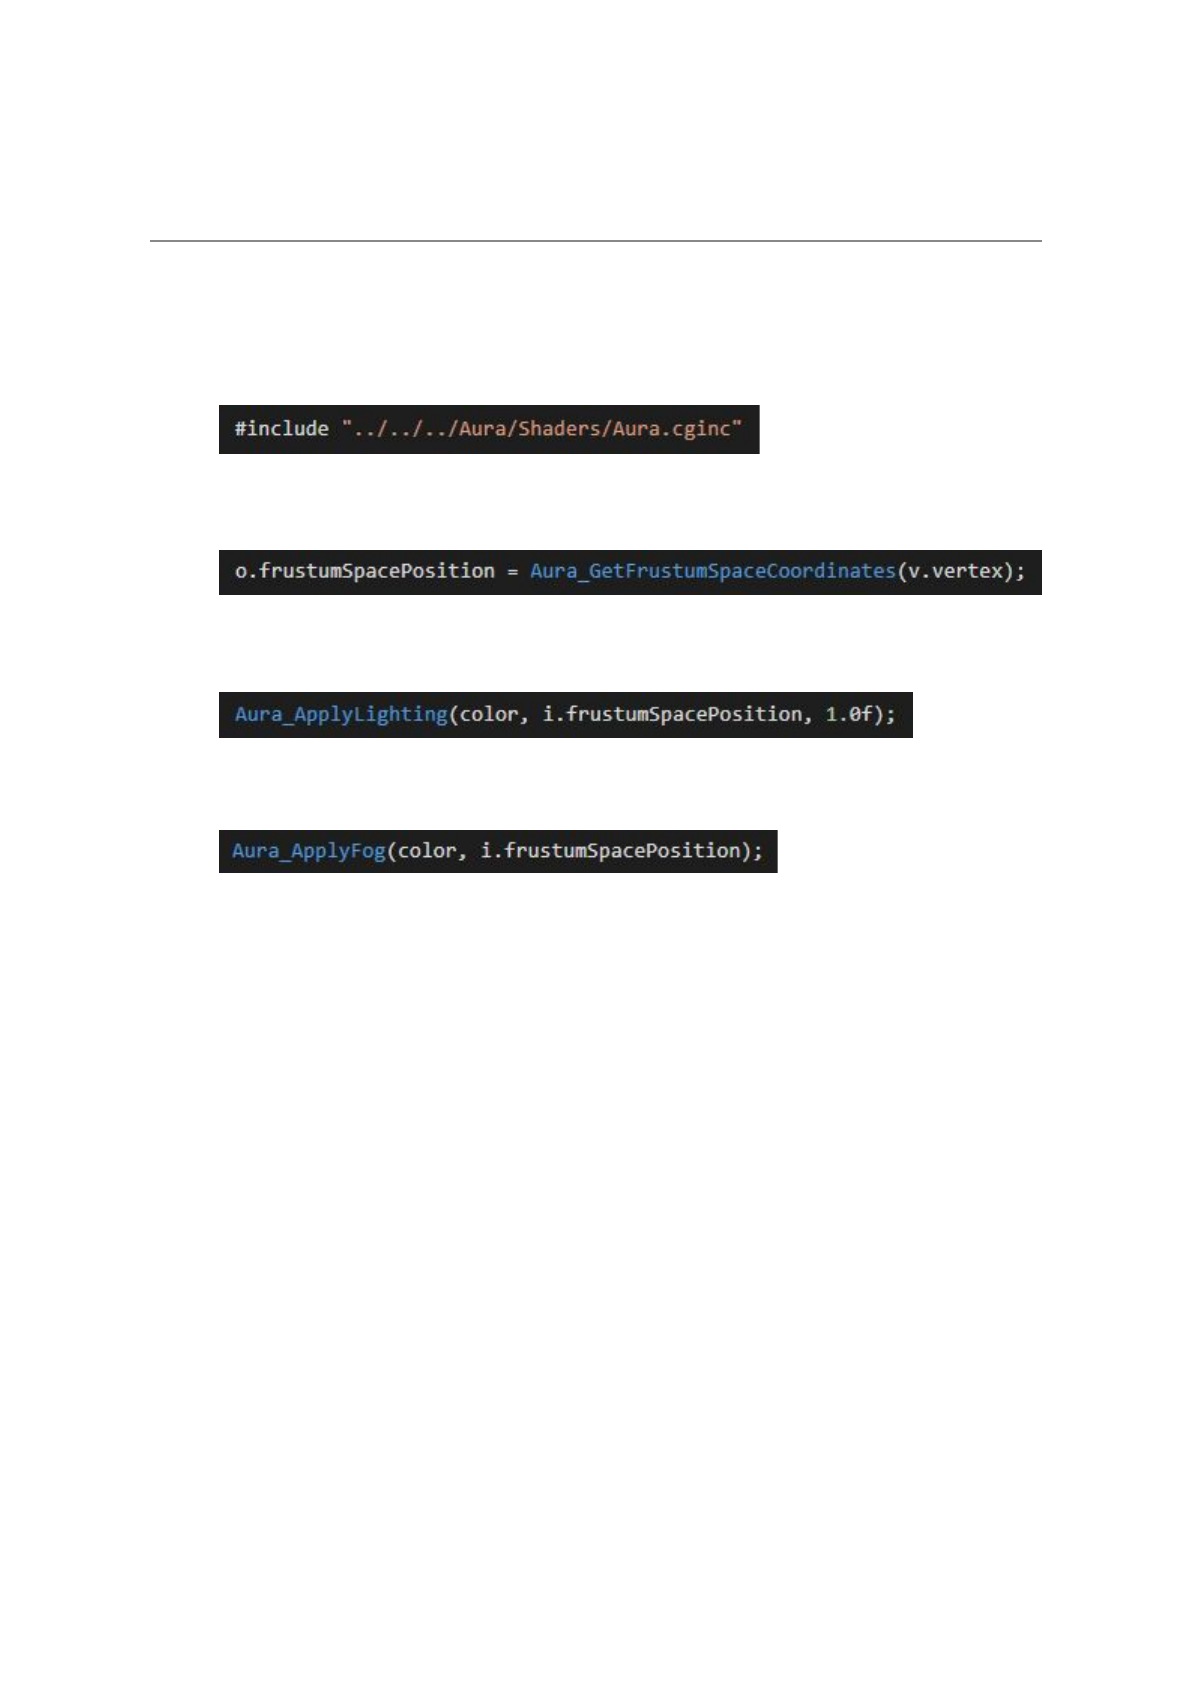
Using Aura in your Shaders
In the same idea as the particles illumination/fogging, Aura can be implemented in your own
custom shaders (transparent or not) in 3 very piece-of-cake steps.
1. Include “Aura.cginc” located in the “Aura/Shaders/” folder.
2. In the Vertex Shader, compute the position inside the Aura frustum with
void Aura_ApplyLighting(inout float3 colorToApply, float3 screenSpacePosition, float lightingFactor)
3. You can now apply the volumetric lighting with the following method
void Aura_ApplyLighting(inout float3 colorToApply, float3 screenSpacePosition, float lightingFactor)
and/or apply the fog with the following overloads
void Aura_ApplyFog(inout float3 colorToApply, float3 screenSpacePosition)
void Aura_ApplyFog(inout float4 colorToApply, float3 screenSpacePosition)
25

Requirements
Aura strictly requires full support of the following elements to work :
● RenderTextures (3D as well)
● Texture2DArrays
● ComputeShaders
Please verify that the support of these elements is not limited especially on lower platforms.
Aura release was targeted for Unity 2017.2 :
- older version will not be supported (although I can help making it work ;-) )
- newer version will be supported with updates if necessary
Historically, Texture2DArrays were introduced in Unity 5.4 which makes it the lowest version
compatible with Aura.
However, multi-threaded ComputeShaders compilation was introduced in Unity 2017.2
which makes it the advised minimum version (as the main ComputeShader in looong to
compile with its many variants).
26

Acknowledgement
Aura uses the following works :
● Bartlomiej Wronski (@BartWronsk)’s presentation : “Volumetric Fog : Unified
compute shader based solution to atmospheric scattering”
● Sebastien Hillaire (@SebHillaire)’s integration formula : “Physically Based and
Unified Volumetric Rendering in Frostbite”
● Ashima Arts’s 4D Simplex Noise : https://github.com/ashima/webgl-noise
About the provided demo scene :
●Marko Dabrovic’s Sponza scene : http://hdri.cgtechniques.com/~sponza/files/
● Unity Lab’s smoke spritesheet : “VFX Image Sequences & Flipbooks”
Please let me know if I forgot any reference.
Special Thanks
For their time and help, I would like to cheerfully thank :
● Bartlomiej Wronski (@BartWronsk)
● Florent Guinier (@FlorentGuinier)
● Sebastien Lagarde (@SebLagarde)
● Gil Damoiseaux (@Gaxil)
● All the people that helped me by testing Aura, and kept me motivated with their
constructive feedbacks and their kind words.
27

License
Aura is released under MIT License.
Please refer to the license.txt file located in the Aura/License folder for the full license.
TL;DR;
- You can sell and make money with your projects that use Aura (or any derived form)
- You can do whatever you want with Aura but not sell Aura (or any derived form)
- You must propagate this license
- There is no warranty of any kind
- Please consider crediting Aura (or any derived form) in your projects, with the
provided logo if relevant
28

FAQ
Why releasing Aura for free?
For several reasons :
● Aura was actually never meant to be sold. It was a personal challenge I set to myself.
When people asked me about its price, I was just answering that such a solution
would be worth around 40$.
● I am a self learner. Half of the knowledge I have is from dissecting sources from
people that shared them. I wanted to give this opportunity back to the community. As
a Teacher I really feel like this is a good deed.
● I just want to make the Unity community thrive and make Unity better on my own
level.
Can we make donations?
I didn’t expect that, thank you!
You can click on the following button or the button on the GitHub front page.
Will Aura’s development be continued?
Hopefully yes! At least until Unity drops the legacy lighting system. Furthermore, I still have a
bunch of feature ideas to implement, fixes and todos.
Will Aura support the Scriptable Render Pipeline?
Anyhow, all this work cannot stop with the end of the legacy pipeline. So yes, my plan is to
make it work with the SRP for the long term continuation. It may however be part of another
branch/repository.
Does Aura work on Unity xxx?
The technical requirement for Aura are specified in the Requirements section.
The minimum version possible for Aura is Unity 5.4 but the release is targeted for 2017.2.
Does Aura support VR?
I did not test it myself but apparently Aura works out-of-hands with multi-view VR.
Single-pass doesn't work for now but is under investigation.
29

Why did it take so long?
Aura was a personal project, a challenge for myself. It was developed during my free time.
I am a full-time Technical Art Teacher and aside, we released our game (Outcast Second
Contact) a few months ago. This, combined with my family life gives a pretty good idea of
the amount of time I was able to manage for Aura.
How can we help you developing Aura?
There are many ways you can help me facilitating the development of Aura :
● You can spread the words about Aura.
● You can branch the repo, improve the code, develop new features, fix bugs, ...
I’ll merge with the Master if relevant.
● You can share your work made with Aura (on my Twitter) or tips using Aura.
● You can make a demo scene and send it to me. (Make sure to own the content of it
so I can publish it in the package)
● You can make a donation, like previously said.
● Anything that can help making Aura a great project!
How can I keep updated about Aura?
Two sure possibilities :
●Follow me on Twitter (@RaphErnaelsten)
● Wait for the updates of the package on the Asset Store.
30
