Ava Tax API Developer Guide
User Manual: Pdf
Open the PDF directly: View PDF ![]() .
.
Page Count: 122 [warning: Documents this large are best viewed by clicking the View PDF Link!]
- Chapter 1 - Getting Started with AvaTax
- Chapter 2 - Transactions
- Chapter 3 - Customizing Your Transactions
- Chapter 4 - Reconciliation
- Chapter 5 - Product Taxability
- Chapter 6 - Discounts and Overrides
- 6.1 - Tax Overrides
- Test Case 6.1.1 - Tax Override
- Test Case 6.1.2 - TaxDate Override
- Test Case 6.1.3 - Line Level Tax Override
- 6.2 - Discounting a Transaction
- Test Case 6.2.1 - Price Reduction Discount
- Test Case 6.2.2 - Negative Amount Line Items
- Test Case 6.2.3 - Automatically Distributed Discounts
- Test Case 6.2.4 - Manufacturer Discount TaxCode
- 6.3 Summary
- Chapter 7 - Shipping and Handling
- 7.1 - Taxability of Shipping Charges
- Test Case 7.1.1 - Simple Transcaction Including Shipping Charges
- Test Case 7.1.2 - Shipping a Non-taxable Transaction
- Test Case 7.1.3 - Shipping Items with Different Taxability
- 7.2 - Taxability of Handling Charges
- Test Case 7.2.1 - Handling Charges Taxability
- 7.3 Chapter Summary
- Chapter 8 - Exemptions
- 8.1 - Reasons Tax Can Be Zero
- Test Case 8.1.1 - Companies without Nexus
- Test Case 8.1.2 - NOMAD Tax
- 8.2 - Exemption Certificate
- Test Case 8.2.1 - Finding and Creating Customer Records
- Test Case 8.2.2 - No Certificate
- Test Case 8.2.3 - Certificate Status
- Test Case 8.2.4 - CertExpressInvitation
- Test Case 8.2.5 - Uploading Certificates
- Test Case 8.2.6 - Reseller Exemption
- Test Case 8.2.7 - Testing an Exemption Certificate
- Test Case 8.2.8 - Testing an Exemption Certificate
- 8.3 - Exemptions for Usage
- Test Case 8.3.1 - Custom Integration
- 8.4 Chapter Summary
- Chapter 9 - Locations
- Chapter 10 - Consumer Use Tax
- Chapter 11 - Calculating Tax Offline

AvaTax Developer Guide

AvaTax Developer Guide • 1
Chapter 1 - Getting Started with AvaTax
Welcome to the AvaTax Developer Guide! This document will introduce you to AvaTax, a powerful and easy-to-use
API that provides tax calculations for financial applications. AvaTax can help your business automate the hard work
of calculating, storing, auditing and reporting on transactional taxes.
The AvaTax developer guide will help you learn how to use all the powerful features of the AvaTax API to design
your integration. We will teach you all the core concepts you need to understand, and a list of test cases you can
use to ensure that your software behaves correctly when faced with common problems and challenges. At the end
of this document, you’ll have a full, accurate, responsive, and resilient implementation that handles tax correctly.
In this chapter, you will learn:
• How to obtain an AvaTax account to begin development
• What software development kits are available
• How to authenticate against the AvaTax API
Let’s begin by getting you connected to AvaTax.
1.1 - Connecting to the API
To get started, you’ll need an AvaTax account. Avalara provides free trial accounts you can use to begin developing
against AvaTax. This trial account will allow you to use advanced AvaTax functionality in the U.S. and Canada in an
environment called Sandbox.
You can begin by signing up for a free 60-day AvaTax sandbox account online, or you can contact sales to
purchase a production account. Once your 60-day trial is up, you can continue using our Free TaxRates API or
contact sales to upgrade to a full account.
The AvaTax Website and Tax Profiles
When your account is provisioned, you will receive an email inviting you to log onto the AvaTax website for sand-
box. You should begin by visiting this website and following the helpful walk-through steps to set up an account
and configure its tax profile. A tax profile helps AvaTax know where your company does business and where you
have nexus.
It’s important to understand the concept of nexus. You can think of it as “a list of places where I must collect tax;”
— this is an important concept for all AvaTax developers. If you do not declare any nexus, your account will not
calculate any tax! We’ll cover this topic in more detail in Chapter 8.1 - Reasons Tax Can Be Zero.
This nexus concept may seem strange at first, but it helps you separate your tax software from your tax profile.
When integrating tax into your program, you want to write the code once and test it once. Your code doesn’t
need to know where you have nexus; AvaTax takes care of that for you. As a programmer, your job is to make the
software reliable and accurate; your accounting team will then manage your company’s nexus settings on an on-
going basis. By using a concept of nexus separate from your software, you won’t have to go back and rewrite your
program later when your company’s nexus changes.
If you are building an AvaTax integration for your company, you’ll probably need to work with your tax team to
ensure that your account and tax profile are set up correctly before you start developing software. If you forget to
set up a tax profile, you may find that your tax calculations keep coming back with a rate of zero, because the tax
profile doesn’t require you to collect tax!
If you’re building an integration to an accounting system or storefront system — a connector — the companies
that purchase your connector will need to set up their own tax profile. This means that you can develop your
AvaTax Developer Guide • 2
software without having to know anything about your customers’ tax profile. As long as you follow the AvaTax cer-
tification guidelines in this developer guide, a customer that purchases your connector will be able to set up their
own tax profiles and get accurate tax results.
What is Sandbox?
Next, let’s explain what we mean by Sandbox. Avalara provides two different environments for AvaTax: Sandbox
and Production. Each environment is completely separate, and each has its own credentials. If you have a Sandbox
account, you cannot use that account to log onto Production; and vice versa.
When you receive credentials for AvaTax, it’s important to write down the account’s environment name. We keep
Sandbox and Production credentials separate to help you test your software in Sandbox without the risk of acci-
dentally affecting production data.
You may want to share your sandbox credentials with developers, and reserve production credentials for accoun-
tants. Keeping accounts separate helps avoid the risk of reporting test data to a tax authority.
Let’s spend a few minutes explaining how Sandbox and Production relate to each other.
SANDBOX PRODUCTION
AvaTax API URL https://sandbox-rest.avwatax.com https://rest.avatax.com
AvaTax Website URL https://admin-development.avalara.net https://admin-avatax.avalara.net
Tax Content Always kept up to date Always kept up to date
Monitoring 24/7 Monitoring 24/7 Monitoring
Data All Sandbox data is fully separate from
Production data.
All Production data is fully separate
from Sandbox data.
Credentials Production credentials will not work on
Sandbox, so you can’t accidentally save a
real transaction into the sandbox environ-
ment with a production account.
Sandbox credentials will not work on
Production, so you can’t accidentally
create a test transaction in produc-
tion with a sandbox account.
Tax Filing Sandbox data is never reported to a tax
authority; so you can test your transac-
tions without worrying about accidentally
reporting transactions.
Transactions that are marked Com-
mitted in production can be report-
ed on a tax filing using the Avalara
Managed Returns Service.
Updates Generally updates a few days earlier
than Production, so that customers can
experiment with new releases before they
go live.
Updated a few days to a week after
Sandbox, so that customers can
preview the new release on Sandbox
before it is live.
For more information on Sandbox and the AvaTax release schedule, please read The AvaTax Release Schedule.
AvaTax Developer Guide • 3
AvaTax Software Development Kits
You don’t have to write all your code from scratch! Our team has built AvaTax Software Development Kits for a va-
riety of popular programming languages to help you get started more quickly. The AvaTax SDK includes shortcuts
to help set up authentication, call API methods, and parse results so you can focus on the valuable business logic.
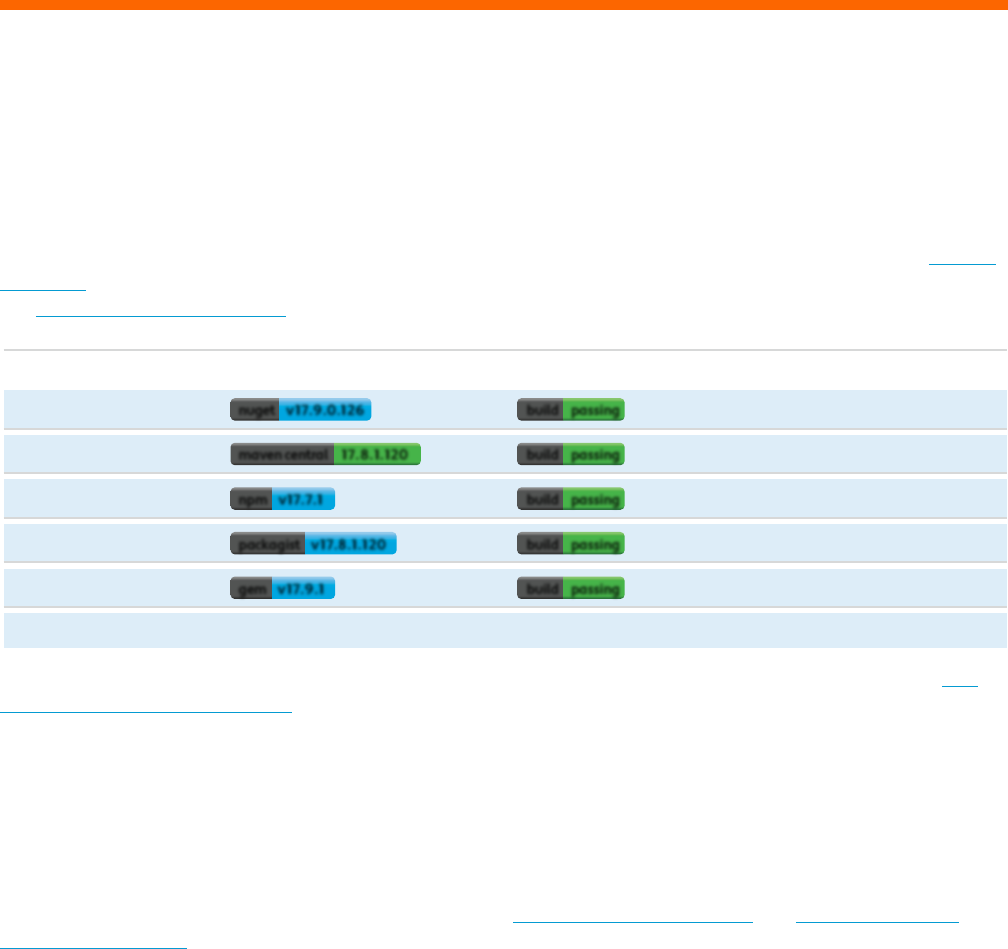
The AvaTax SDK is fully open source, and you can download source code for a myriad of languages and frame-
works. You will find officially supported libraries and those that are contributed by our community on the AvaTax
SDK page. We welcome your feedback. If you wish to report a bug or submit a question, please contact us using
our community support forums or submit a pull request directly to the GitHub repository for each SDK.
LANGUAGE VERSION STATUS GITHUB
C# AvaTax-REST-V2-DotNet-SDK
Java / Scala / JRE AvaTax-REST-V2-JRE-SDK
JavaScript AvaTax-REST-V2-JS-SDK
PHP AvaTax-REST-V2-PHP-SDK
Ruby AvaTax-REST-V2-Ruby-SDK
IBM | RPG AvaTax-REST-V2-RPGLE-SDK
nuget
v17.9.0.126
build passing
maven central
17.8.1.120
build passing
npm
v17.7.1
build passing
packagist
v17.8.1.120
build passing
gem
v17.9.1
build passing
If you choose, you can always write your own code to contact the AvaTax API directly. We publish all of our API
reference documentation online, and every API has an interactive ‘Try-It-Now’ feature so you can get familiar
with our service. Our internal developers use the exact same documentation that we publish to our partners and
customers, so you know you’ll always see the latest information online.
Now that we’ve got the basics out of the way, let’s set up authentication and start using the API!
1.2 - Authentication
AvaTax uses existing HTTP authentication standards: both basic HTTP authentication and OAuth 2.0 bearer
token authentication. Both of these standards are well documented and have been in existence for a long time
— which also means that over the past decades, many different people have implemented the standard in many
different ways. Let’s describe exactly how to authenticate your API calls in AvaTax.
For HTTP Basic authentication, AvaTax supports two options:
• Your AvaTax username and password
• Your AvaTax account number and license key
Which style of authentication should you choose?
• If you are building a connector that customers will set up and use on their premises, use Account ID/License
Key authentication.
• If you are building a web portal with direct AvaTax integration, please contact business development to see if
bearer token authentication is the preferred approach.
• Otherwise, use Username/Password authentication.
Let’s review each approach.
AvaTax Developer Guide • 4
Username and Password Authentication
The simplest type of authentication uses a username and a password. If you use an AvaTax SDK, this encoding is
done for you transparently. Just provide your credentials and the SDK will do all the work! For example, here’s how
the AvaTax SDK for C# implements username/password authentication:
// Create a client and set up authentication
var Client = new AvaTaxClient(“MyTestApp”, “1.0”, Environment.MachineName, AvaTaxEnvironment.
Sandbox)
.WithSecurity(“MyUsername”, “MyPassword”);
If you are writing your own code, here’s how to construct an authentication token for AvaTax using your username
and password:
TASK RESULT
Start with the word Basic followed by username, a
colon, and password. There are no spaces between
any values.
Basic username:password
Replace username with your username, and pass-
word with your password. Ensure that there are no
whitespace characters unless those characters are
part of your username or password.
Basic bob@example.org:bobspasswordgoeshere
Now use your favorite Base64 encoding program to
encode the right hand side of the string.
Basic Ym9iQGV4YW1wbGUub3JnOmJvYnNwYX-
Nzd29yZGdvZXNoZXJl
Add this to the Authorization header in your HTTP
request.
Authorization: Basic Ym9iQGV4YW1wbGUub-
3JnOm JvYnNwYXNzd29yZGdvZXNoZXJl
Basic username and password authentication has a number of advantages and disadvantages:
Advantages
• An auditor can uniquely identify the user that executed every API call.
• Allows different users to have different privilege levels.
• Basic authentication does not expire.
• All basic authentication headers are protected by strong SSL encryption in transit to Avalara.
Disadvantages
• Usernames and passwords can be stolen or forgotten.
• Insecure passwords can be guessed by brute force. To prevent this, Avalara enforces a limit: if you fail to au-
thenticate multiple times in a row, your account may be locked out.
Basic username and password authentication is recommended for individual users who are calling APIs within
AvaTax, or for users who have limited access rights.
It’s worth restating here: A Sandbox username will not work in Production, and a Production username will not
work on Sandbox. If you get a login failure, please check your username by logging onto the AvaTax website for

AvaTax Developer Guide • 5
sandbox or AvaTax website for production. That will help you determine which environment you should use.
Legacy License Key Authentication
Each AvaTax account has one (and only one!) legacy license key. Since each account is tied to one environment,
this means a customer will typically have two license keys: one license key for sandbox, and one license key for
production.
A license key is generated by an account administrator on the AvaTax website, or by calling the AccountResetLi-
censeKey API. For the moment, let’s focus on how to get a license key through the AvaTax website. Here’s how to
generate a license key:
• Log on to the AvaTax website for the appropriate environment.
• Click on Settings
• Click on Reset License Key
As you’ll notice, this page is restricted to only account administrators. Keep in mind that you only have one license
key and Avalara is unable to recover this key!
When you generate a new license key, all older license keys are immediately revoked and no longer usable. This is
helpful because if your license key is lost or stolen you can revoke it instantly. However, generating a new key is a
risk because this may affect existing systems using the AvaTax calculation engine.
Let’s construct an authorization using an Avalara License Key:
TASK RESULT
Start with the word Basic followed
by accountid and licensekey.
Basic accountid:licensekey
Replace accountid with your ac-
count ID number, and licensekey
with the lice nsekey you generated
above. Ensure that there are no
whitespace characters — an ac-
count ID and license key will never
have whitespace characters of any
kind.
Basic 123456789:123456789ABCDEF123456789ABCDEF
Now use your favorite Base64 en-
coding program to encode the right
hand side of the string.
Basic MTIzNDU2Nzg5OjEyMzQ1Njc4OUFCQ0RFRjEyMzQ1Njc4OUFC-
Q0RFRg==
Add this to the Authorization
header in your HTTP request.
Authorization: Basic MTIzNDU2Nzg5OjEyMzQ1Njc4OUFCQ0RFR-
jEyMzQ1Njc4OUFCQ0RFRg==
Account ID/license key and username/password authentication are very similar in practice. So why would you
choose one over the other? Let’s look at the advantages and disadvantages of license key authentication.

AvaTax Developer Guide • 6
Advantages
• License keys have much stronger entropy when compared to a username/password, and are harder to attack.
• Account ID / License Key authentication is not user-specific and will not expire if one user resets their pass-
word.
• All basic authentication headers are protected by strong SSL encryption in transit to Avalara.
Disadvantages
• There is only one license key for each company.
• Revoking your license key will cause all API calls with the old license key to fail.
• It is not possible to identify individual users taking an action when license key authentication is used.
Avalara recommends using account ID / License Key authentication when implementing connectors. Your software
should have a configuration page or file that allows a customer to type in their account ID and license key when
they set up your connector; then all API calls made through your connector will use these credentials.
Bearer Token Authentication
AvaTax is currently implementing support for OAuth 2.0 based bearer token authentication. This feature is avail-
able to select partners. To make use of the OAuth bearer token feature, please contact your account manager.
1.3 - Troubleshooting
Whenever AvaTax is unable to respond to your API call, the software will present you with an AvaTax error code.
Each error code contains a hyperlink to a web page with more information about the error. As you learn the Av-
aTax API, it’s important that you understand how to read and interpret these error codes.
Handling Error Messages
We’ve designed the AvaTax error messages to clearly tell you what went wrong, what you can do about it, and
how to proceed. You can read a list of all AvaTax REST error codes on the developer website. Each error message
contains within it a hyperlink to the page for that specific error. Our community forums team monitors all com-
ments on the developer website, so if you see anything confusing, write us a comment — we’d love to improve our
documentation!
When an AvaTax API call produces an error, it responds using the standard HTTP error response codes. Response
codes between 400 and 499 are called Client Errors, and they indicate that you made a mistake in your API call.
Response codes between 500 and 599 refer to internal errors within AvaTax itself; each internal error is automati-
cally logged and reported to our development team for triage.
If your program gets an HTTP response code between 400 and 499, here’s how to proceed:
• Parse the error message using a JSON parsing engine.
• Display the summary of the error to the user.
• Link the user to the documentation page that explains the error.
• Allow the user to make a change to their request, or retry their action.
For example, let’s examine how to handle an authentication error. If a developer forgets to pass authentication
credentials to an AvaTax API, they will probably see the error message AuthenticationIncomplete:

AvaTax Developer Guide • 7
Request: GET /api/v2/companies/
Response: 401 Unauthorized
{
“e r r o r ”: {
“code”: “AuthenticationIncomplete”,
“message”: “Authentication Incomplete.”,
“target”: “HttpRequestHeaders”,
“d et ails”: [
{
“code”: “AuthenticationIncomplete”,
“ n u m b er ”: 3 4,
“message”: “Authentication Incomplete.”,
“description”: “You must provide an Authorization header of the type Basic or
Bearer to authenticate correctly. “,
“faultCode”: “Client”,
“helpLink”: “/avatax/errors/AuthenticationIncomplete”,
“severity”: “Exception”
}
]
}
}
Your next step should be to display an error message in your product:
• Begin by displaying the value error.message in your user interface. This helps the user understand the con-
text of the problem without taking up too much space.
• If your user interface has room for more details, display the value contained in error.details[0].descrip-
tion and the error.details[0].helpLink. This would allow the user to see the link “You must provide an
Authorization header of the type Basic or Bearer to authenticate correctly.”
• Some API calls can include more than one error. For example, if a user is creating a transaction with ten
invoice lines, you will receive a list of error messages, one per mistake. Depending on your user interface, you
may wish to parse and display all error messages, or only display the top one.
In the case of an error, it’s critical to handle the error and enable the software to continue. If your program has a
user interface, you should allow the user to retry or cancel the API call. Your customers may be working offline or
with an interrupted Internet connection, and they need to get their work done even if they can’t use AvaTax at the
moment. We’ll cover offline behavior more in Chapter 11 - Calculating Tax Offline, but for the moment let’s review
how to properly handle error messages.
Here’s a test case that causes an error message to occur. We will call the QueryCompanies API with an incorrect
filter, which produces an error message. Try this API call and make sure your program can display the error mes-
sage correctly:
Test Case 1.3.1 - Handling Errors
Setup
• Call QueryCompanies with the following parameters:
°$filter = id = ‘abc’

AvaTax Developer Guide • 8
Assertions
• You will receive an error message:
°Title: “Error parsing $include parameter.”
°Message: “The field named ‘CompanyId’ is type System.Int32 and cannot be compared
to ‘abc’”.
• Your product will display an error message showing this error message.
• The error message should make it clear to a user that they have attempted to filter on a numeric value but
have instead provided an alphabetic string.
Expected API Call
Create Transaction:
GET https://sandbox-rest.avatax.com/api/v2/companies?$filter=id = ‘abc’w
Now that your software is able to display the error message correctly, let’s discuss how to solve common prob-
lems.
Identifying a Firewall or Proxy Server Problem
If your software is unable to contact AvaTax, pretty much any API call you make will produce an error. So let’s
begin by explaining how we can identify whether a connection problem exists.
First, please visit the AvaTax API server from your desktop computer or mobile phone. You should try both of
these two URLs, one for sandbox and one for production:
Sandbox Environment: https://sandbox-rest.avatax.com
Production Environment: https://rest.avatax.com
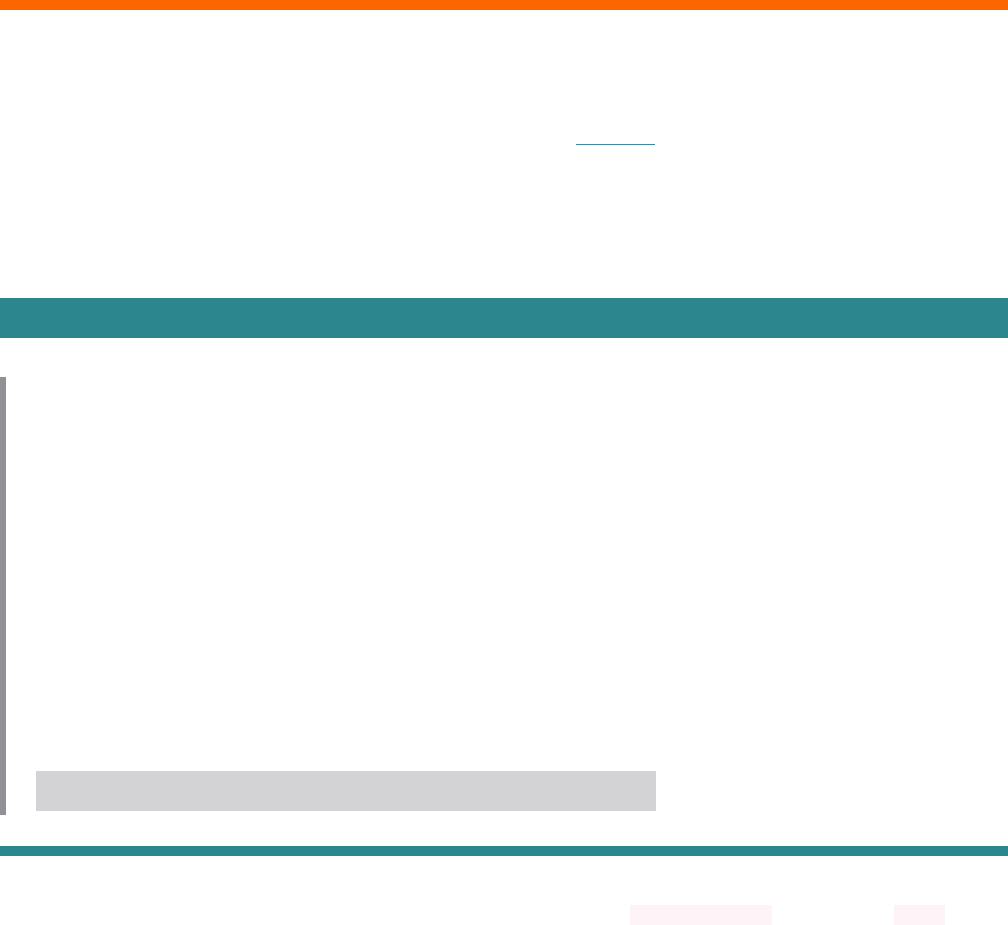
If your connection is working correctly, you should see a web page similar to the following:
If you can’t see this page on your desktop computer at work, but you can see this web page from a mobile phone
on the public Internet, you may have a networking issue. There’s a chance your office has a firewall or proxy server
that enforces some limits on your network connectivity. Contact your corporate IT department for more informa-
tion.
AvaTax Developer Guide • 9
Testing Authentication
If you receive an authentication error, a good place to start is the Ping API. You can call this API whenever your
program starts, to check to ensure that it can contact the AvaTax server — because ping will never return an error
message even if you don’t provide any authentication. If your Ping call fails, you know you are having trouble with
your internet connection.
Here’s how to use ping:
Test Case 1.3.2 – Ping API
Setup
• Call the AvaTax Ping API
Assertions
• The Ping API returns a JSON object with the following information:
• version: A string similar to “1 7. 9. 0.1 2 0 ” indicating the version of the AvaTax server.
• authenticated: A boolean value indicating whether your API call was successfully authenticated.
• authenticationType: A string with information about the authentication method you used, if any.
If your API call was successfully authenticated, information about the authenticated user will appear in the
fields authenticatedUserName, authenticatedUserId, and authenticatedAccountId.
Expected API Call
Ping:
GET https://sandbox-rest.avatax.com/api/v2/utilities/ping
When your program detects that a ping call has failed, it should notify the user that it can’t reach AvaTax, and ask
them to check their Internet connection. If the ping call returns but the authenticated field is set to false, the
user has probably mistyped their username or password and they should retry.
Before we move on, let’s look at a few other common troubleshooting steps you may encounter as you begin
development:
AvaTax Developer Guide • 10
Other Common Problems
PROBLEM TYPE STEPS TO DIAGNOSE
Routing Problems Do your routers have the latest software? Have they been rebooted recently, or are
there too many hops between your network and the outside world?
• If your network is using a direct connection with a local internet service provid-
er, does your connection reset regularly?
• If the connection is permanent or business-class, does your ISP offer metrics to
help you measure response time?
• If you have a more advanced network using Border Gateway Protocol routing,
you would need to talk to your network engineering team. BGP issues are very
challenging to review and are beyond the scope of this article.
Due to security issues, Avalara’s servers do not respond to ping requests. This
means that network traces from software like traceroute or tracert are not able to
provide accurate route timings.
Authentication Problems Try using the Ping API, or switch to using an AvaTax SDK which has prebuilt and
tested authentication code.
Firewall Problems To use AvaTax, you must enable access to all IP addresses identified by these DNS
names:
• Sandbox Environment: https://sandbox-rest.avatax.com
• Production Environment: https://rest.avatax.com
AvaTax is a dynamic product and its IP addresses may change regularly. AvaTax does
not support firewalls that filter on individual IP addresses.
Ethernet Problems Check the quality of your wiring and the auto-negotiate settings on your ethernet
devices. Bad wiring or devices with mismatched speed settings are easy to overlook!
You can run netstat -s on a windows machine or ifconfig -a on a linux machine
to detect whether an unusual number of bad packets are coming through your net-
work. If you have a performance mismatch, try checking with your network adminis-
trator to see if the cabling can be improved.
Host Files / IP Address
Hardcoding / DNS Cach-
ing
AvaTax does not support hard coded IP addresses or host files. To use AvaTax, you
must resolve DNS names dynamically. Your DNS server should respect the DNS
time-to-live (TTL) values; Avalara publishes DNS TTL values designed to permit our
operations team to adjust our connectivity in response to changing network condi-
tions.
Proxy Server Problems AvaTax is not designed for environments using proxy servers. Proxy servers can
cause latency and connectivity problems when calling high performance APIs like
AvaTax. If your company policy requires a proxy server by policy, please consult your
proxy provider for how to correctly configure the proxy to work with AvaTax.
AvaTax Developer Guide • 11
DNS Time-To-Live Avalara makes changes to our domain name system records periodically. Your
software should ensure that you respect the DNS time-to-live values, and that your
software periodically contacts DNS to update its name lookups. Some software,
including some Java JRE versions, may need to be updated to ensure the “ttl” or
“time-to-live” values are correctly handled. If you experience problems with occa-
sional DNS changes, please check the documentation for your operating system,
programming language, or development environment to ensure your software
handles TTL values correctly.
Need SSL Certificate
Verification
Some web clients (such as CURL for Windows) will require you to download the
Avalara AvaTax SSL public keychain and install it into your client’s keychain reposito-
ry. If the client program requests that you specifically accept and trust Avalara’s web
certificate, here’s how to proceed:
1. Go to VeriSign Root CA and follow the instructions. [PROBLEM]
2. Save the file in your preferred directory named like “certs-ca-bundle.crt”.
3. Register that file following your standard certificate store process.
1.4 - Configure Your Account
To use AvaTax, you must configure your company and set up your tax profile. You can configure your company on
the AvaTax website or by using the API directly.
If you are building a connector that links up to AvaTax, you don’t have to do any work to setup a company. Your
customers will log onto AvaTax and follow the company setup steps themselves. No work necessary!
To continue with this developer guide, let’s set up a test company right now. This company will allow us to finish all
the test cases within the AvaTax Developer Guide using a company with a known tax profile.
To set up a company quickly, AvaTax provides the CompanyInitialize API call, which does most of the work:
Test Case 1.4.1 - Configure a Company
Setup
• Call CompanyInitialize with these values:
°Name: Developer Guide Company
°CompanyCode: DEVGUIDE
°Taxpayer ID number: 12-3456789
• Address:
°2000 Main Street. Irvine, CA 92614 [one line okay?]
• Contact:
°Name: Bob Example
°Email: bob @ example.org
°Primary Phone: 714 555 2121
°Mobile Phone: 714 555 2121 [Okay to add based on assertions?]
Assertions
• Company should be created with Bob Example with his relevant contact information:
°Email: bob @ example.org
°Primary phone number: (714) 555-2121
°Mobile phone number: (714) 555-1212

AvaTax Developer Guide • 12
°Company name: “Developer Guide”
°Business location: 2000 Main Street, Irvine, CA 92614
°Tax Payer ID: 12-3456789
Expected API Call
Co m p anyInitialize:
{
“name”: “Developer Guide Company”,
“companyCode”: “DEVGUIDE”,
“taxpayerIdNumber”: “12-3456789”,
“line1”: “2000 Main Street”,
“c it y ”: “Ir v in e”,
“r e gio n ”: “ C A”,
“ p o st alC o d e ”: “ 92 6 14”,
“country”: “US”,
“firstName”: “Bob”,
“lastName”: “Example”,
“title”: “Owner”,
“e m ail”: “ b o b @ e x a m ple.o r g ”,
“phoneNumber”: “714 555-2121”,
“mobileNumber”: “714 555-1212”
}
After this API call has completed, you will see that this company, with the companyCode value set to “DEVGUIDE”, is
ready for use!
Congratulations! You have successfully initialized your first AvaTax company.
1.5 Chapter Summary
In this chapter you’ve learned how you can get started using the AvaTax API
• How to get Authenticated with AvaTax via the REST API.
• Where you can download AvaTax SDKs.
• How to troubleshoot connectivity issues and common problems.
• Configuring your account.

AvaTax Developer Guide • 13
Certification Requirements
AvaTax Configuration: The AvaTax Configuration Dialog window must allow the user to specify the
configuration/connection information.
• Account Number
• License Key
• Service URL
• Company Code
Test Connection button: Tests the connection to the AvaTax service and verifies the AvaTax creden-
tials. This is an important element to allow for successful troubleshooting of the AvaTax service. Optional
– display license key expiration date upon successful connection response.
Tests in this chapter:
• 1.3.1 - Handling Errors
• 1.3.2 - Ping API
• 1.4.1 - Configure a Company

AvaTax Developer Guide • 14
Chapter 2 - Transactions
Now that you’ve made it through Chapter 1 - Getting Started with AvaTax, we’re going to get into the real meat
and potatoes of what AvaTax does – calculating tax on transactions.
This chapter will help you understand all the information you need to gather in order to produce accurate, fast,
reliable tax calculations. At its core, AvaTax is designed to help you calculate taxes on a sales transaction between
two parties; all the parameters in the API call help you ensure your tax calculation is correct. We’ll show you how
to interpret the results you receive back from the API, and to display them to your customer.
By the end of this chapter, you will have learned how to create a basic transaction. Don’t worry, though – we’ll go
over some more complicated scenarios in Chapter 3 - Customizing Your Transaction.
2.1 - A Simple Transaction
Transactions can be very simple, very complex, or anywhere in between. The AvaTax CreateTransaction API sup-
ports a wide variety of features and functionality that enables businesses of any size to accurately reflect their tax
liability.
To learn AvaTax, it’s best to start small — so let’s look at the minimum information required to calculate a transac-
tion, and why that information is required:
• The companyCode of the company that recorded the transaction. If you have multiple companies within your
account, you need to specify which one is creating this transaction. For this example, we’ll use the DEVGUIDE
company you set up in Chapter 1 - Getting Started with AvaTax.
• The code field or “Document Code” refers to a unique reference to a transaction. For example, an invoice
number generated by your ERP would be mapped to code. Be careful not to use a duplicate code, since this
could generate document collisions and return DocStatus errors.
• The type of the transaction — for example, sales are recorded as a SalesInvoice, which is a permanent
transaction that can be reported to a tax authority. For this example, we’ll get a tax estimate using the type
SalesOrder, which is not recorded and won’t be reported on a tax filing.
• The date when the transaction took place.
• The customerCode of the customer requesting the transaction. This feature is necessary to allow customers
who have exemption certificates to be exempted from sales tax correctly — we’ll cover that more in Chapter
8 - Exemptions.
• The list of addresses involved in the transaction. For this example, we’ll use a singleLocation address
element, which means our entire transaction took place at a single location and that no shipments or phone
orders were included. We will cover multi-address transactions in Chapter 3 - Customizing Your Transactions.
• For each of the lines in the invoice, we’ll need to know the total dollar amount of the line.
Here’s what the smallest possible transaction looks like:

AvaTax Developer Guide • 15
POST /api/v2/transactions/create
{
“companyCode”: “DEVGUIDE”,
“code”: “1001”,
“type”: “SalesOrder”,
“date”: “2017-06-15”,
“customerCode”: “EXAMPLECUSTOMER”,
“addresses”: {
“singleLocation”: {
“line1”: “100 Ravine Lane NE”,
“city”: “Bainbridge Island”,
“r e gio n ”: “ W A”,
“country”: “US”,
“ p o s t alC o d e”: “9 8 110 ”
}
},
“ lin e s”: [
{
“amount”: 100
}
]
}
You will probably have questions about this transaction. For example, how does AvaTax know what type of prod-
uct I am selling? How do I report a transaction that I shipped from a warehouse to the customer’s home? How do I
calculate tax on shipping and handling?
We’ll begin to answer these questions over the next few chapters. For the moment, let’s understand why AvaTax
requires these key fields.
Company Code
The companyCode value determines what tax rules govern a transaction. In AvaTax, each Company can have its
own tax profile — it can declare nexus in different locations; it can create custom tax rules, overrides, and other
behavior. Each AvaTax account can have as many companies as necessary to accurately reflect a business struc-
ture. Each company is identified by its own unique companyCode value — that’s the value you specify when you
call the CreateTransaction API.
If you forget to identify the companyCode, AvaTax will automatically assume that you want to use the default com-
pany. Every AvaTax account has a default company — but since a complex business can have dozens of companies,
it is considered best practice to always include the companyCode value.
As a connector developer, most of your users will have a simple company structure. It’s considered best practice
to provide a drop-down list of companies in your user interface, but to automatically display (and highlight) the
company with the isDefault flag set to true. To retrieve the list of available companies for your user interface, call
the QueryCompanies API.
Document Type
AvaTax can handle multiple different types of transactions, including Sales, Purchases, Returns, and Inventory
Transfer transactions. We use the type field — often called DocumentType or TransactionType — to differen-

AvaTax Developer Guide • 16
tiate between these types of transactions. Many connectors will only ever work with Sales transactions; but if you
are developing a plugin for an accounting system, you should expect to handle all different types of transactions.
Some DocumentTypes are temporary estimates and others are permanent transactions that will be stored and
eventually reported to the tax authority. In AvaTax, estimates are called Orders and permanent transactions are
called Invoices. This means that a temporary sales estimate is a SalesOrder, whereas a permanent sale is a Sales-
Invoice.
If you forget to include the type field in the CreateTransaction API, AvaTax will assume you want a temporary
estimate and use the value SalesOrder, which will not be recorded in AvaTax.
Document Code
In the above example, we did not provide a value for the code field. The code field is an optional code that identi-
fies this transaction. When we do not provide one, AvaTax assigns each transaction a Globally Unique Identifier,
often called a GUID.
Connector developers may want to use a code value that ties transactions in AvaTax to the transactions in your
underlying software. For example, you can use the ID field of your sale as it is known in your accounting system.
These code values must be unique within each company — if you attempt to create two transactions with the
same code for the same company, AvaTax will assume you want to modify the existing transaction and report an
error.
After you have created the transaction, you will use this code value to identify it when calling CommitTransaction,
AdjustTransaction, or VoidTransaction. Whatever value you provide, make sure to store it or link to it.
Document Date
The date field indicates the calendar day on which the transaction occurred. Note that transactions are calculated
by the calendar day and are not affected by time zones. Whatever the calendar day is locally when you create the
transaction, tax will be calculated as of the tax laws in effect on that calendar day.
Since the date value is essential to correctly determine the tax rules for a transaction, and since it is easy to mis-in-
terpret calendar days when a transaction occurs close to a time zone boundary, this field is a required field.
Customer Code
The customerCode value identifies the customer who is transacting with the company. Since a transaction is legal-
ly defined as a transaction between a buyer and a seller, the customerCode and companyCode values identify the
two parties involved in the transaction.
For example, if the transaction type is a SalesInvoice, the transaction is deemed to be a sale made by the compa-
ny identified by companyCode sold to the buyer identified by the customerCode.
This determination is necessary in order for our software to correctly handle exemption certificates. AvaTax re-
quires this field so that exemptions will work correctly when the user begins working with certificates. We’ll cover
this in more detail in Chapter 8 - Exemptions.
Addresses
Addresses are a crucial part of the sales tax calculation process. There are a number of factors that go into sales
tax calculation, but addresses are probably the most important. The total sales tax rate that you pay is generally
made up of several smaller rates, and each of those is allocated to a different taxing jurisdiction (think state, coun-
ty, city).
AvaTax determines the correct taxing jurisdictions based on the addresses provided. This may seem fairly straight-

AvaTax Developer Guide • 17
forward, but there are a huge number of different taxing jurisdictions, and the boundaries aren’t always clean or
simple to determine. Avalara has a content research team that does the legwork on this so you don’t have to – you
just need to give us the address, and we’ll determine the correct taxing jurisdictions for you.
The two address types that factor into sales tax calculation are origin addresses and destination addresses. For
example, if you live in Washington and you are selling a mug to someone in California, your origin address (of type
ShipFrom) would be Washington and your destination address (of type ShipTo) would be California.
The simplest type of transaction is a retail point of sale transaction, where the origin address and the destination
address are the same. This type of transaction uses address type SingleLocation, which you’ll see in our example
above. In this scenario, a customer makes a purchase in a retail location and takes possession of the product(s) at
that location. This is the type of transaction that we’ll focus on for the rest of this chapter, but we’ll discuss how to
calculate tax for transactions with multiple addresses in Chapter 3 - Customizing Your Transaction.
While only the city, state, and postal code are required for calculation, it’s best practice to provide as much ad-
dress information as you have available. This will help to ensure the most accurate tax calculation possible.
Resolving Addresses
We recommend validating/resolving addresses against Avalara’s address-validation system using the ResolveAd-
dress API. When you call this API, Avalara will report back a result indicating whether the address can be found
or whether any errors or typos have been detected — and your users may appreciate this help when typing in an
address. Here’s how to do it:
• When the user types data into an address field, call ResolveAddress with as much information as the user has
provided.
• If the ResolveAddress function reports that ResolutionQuality is External or NotCoded, this indicates that
AvaTax cannot identify the address the user has typed in. You should give your user a warning and ask if the
address is correct.
• If the user chooses to accept an incorrect address, it is possible to specify line1 = “GENERAL DELIVERY”. This
is a special code recognized by the USPS that allows non-recognized addresses to be processed even if auto-
mated address validation does not identify the correct location. For more information, see the USPS website
on General Delivery.
Here’s how your code would use ResolveAddress to correct a minor error in zip codes:
Test Case 2.1.1 - Resolving Addresses
Setup
• Call the ResolveAddress API with an invalid address:
°Line1: 2000 Main Street
°City: Irvine
°State: CA
°Postal Code: 92615
°Note that this postal code is actually for Huntington Beach.
°The correct postal code for this address in Irvine is 92614.
Assertions
• The ValidatedAddresses section of the result contains the correct zip code - 92614.
• The ResolutionQuality of the result is set to “Intersection”.
° This indicates that AvaTax was able to find the address and you should offer to update the customer’s
mistyped address to match the validated address.

AvaTax Developer Guide • 18
Expected API Call
{
“textCase”: “Upper”,
“line1”: “1000 Main Street”,
“c it y ”: “Ir v in e”,
“r e gio n ”: “ C A”,
“country”: “US”,
“ p o s t alC o d e”: “92615”
}
Now that we’ve reviewed all the essential parts of the transaction, let’s look at what information is required for
each line on an invoice.
2.2 - Invoice Lines
To accurately calculate tax, you’ll need to provide some details about what is being sold. There are a number of
options which will be covered in greater detail next chapter, but at minimum you will need to send the details of
one line item.
• number: AvaTax automatically numbers lines on your invoice starting with 1. If you prefer to use your own line
numbers, please specify them in this value.
• quantity: This is the quantity of goods or services being sold. Note that this value does not affect any totals;
to determine the price-per-each, divide the amount value by the quantity value. If you do not provide quan-
tity, the value will be assumed to be one. Although this field is optional, some taxes are affected by dol-
lar-amount thresholds and caps per item, and AvaTax uses the quantity and amount values to calculate this
correctly. We strongly recommend providing the correct quantity for each line.
• amount: This is the total price of goods or services for this line item. This is the total, fully extended value. For
example, if you specify a quantity of 2 and an amount of 10, this means that you have sold two $5 items for a
total price of $10.
• taxCode: This is how you specify the type of good or service that is being sold. If you omit the taxCode value,
AvaTax defaults to treating the item as taxable Tangible Personal Property using the tax code P0000000. We’ll
go into detail on tax codes in Chapter 5 - Product Taxability. For now, it’s enough to know that each line de-
faults to tangible personal property.
• addresses: Each invoice line can have its own custom addresses. If we make one sale that includes multiple
separate shipments, we can attach the correct address to each line. If the addresses field on a line is null or
missing, the line will be assumed to use the addresses from the document level; but if the value is non-null,
the line will have its own custom addresses and will not inherit any addresses from the document level.
Now that we’ve covered these additional fields, let’s take a look at a more fleshed-out version of a single location
transaction. You can see that we’ve included a code value at the document level and added the number and quan-
tity for each line. The additional fields are not strictly required, but it’s good practice to include them. Likewise, a
full street address is not strictly required, but providing as much address information as is available helps to ensure
that you receive the most accurate sales tax calculation.
Test Case 2.2.1 - Simple Transaction
Setup
• In your connector, create the following transaction:

AvaTax Developer Guide • 19
°Document Type: SalesOrder
°Document Code: Chapter-2-Test-2
°Company Code: DEVGUIDE
°Document Date: 2017-0 6-15
°Customer Code: TESTCUSTOMER
• Addresses:
°SingleLocation: 100 Ravine Lane NE, Bainbridge Island, WA, US 98110
• Lines:
° First Line:
°Number: A
°Quantity: 10
°Amount: 5 6 7.8 9
° Second Line:
°Number: B
°Quantity: 2
°Amount: 46.80
• Calculate tax for your transaction using AvaTax.
Assertions
• Your transaction is created.
• The code value is set to Chapter-2-Test-2
• The date of the transaction is 2 01 7-0 6 -15 .
• The customerCode of the transaction is TESTCUSTOMER.
• The first line of the invoice has lineNumber = A and quantity = 10.
• The second line of the invoice has lineNumber = B and quantity = 2.
Expected API Call
{
“type”: “SalesOrder”,
“code”: “Chapter-2-Test-2”,
“companyCode”: “DEVGUIDE”,
“date”: “2017-06-15”,
“customerCode”: “TESTCUSTOMER”,
“addresses”: {
“singleLocation”: {
“line1”: “100 Ravine Lane NE”,
“city”: “Bainbridge Island”,
“r e gio n ”: “ W A”,
“country”: “US”,
“ p o s t alC o d e”: “9 8 110 ”
}
},
“ lin e s”: [
{
“ n u m b e r ”: “A”,
“quantity”: 10,
“amount”: 567.89
},{
“number”: “B”,
“quantity”: 2,
AvaTax Developer Guide • 20
“amount”: 46.80
}
]
}
As you can see, the CreateTransaction API grows as your transactions increase in complexity. But let’s ask — how
can I make a transaction permanent, and report it to the tax authority?
2.3 - Should I Commit?
Both transactions we created in the previous section were SalesOrder transactions, meaning they were tempo-
rary estimates that weren’t recorded to the AvaTax website. This is great for showing a shopping cart, are oth-
ers where you’ll want to actually record the transaction. In this section, we’ll take a look at how the com mit field
works.
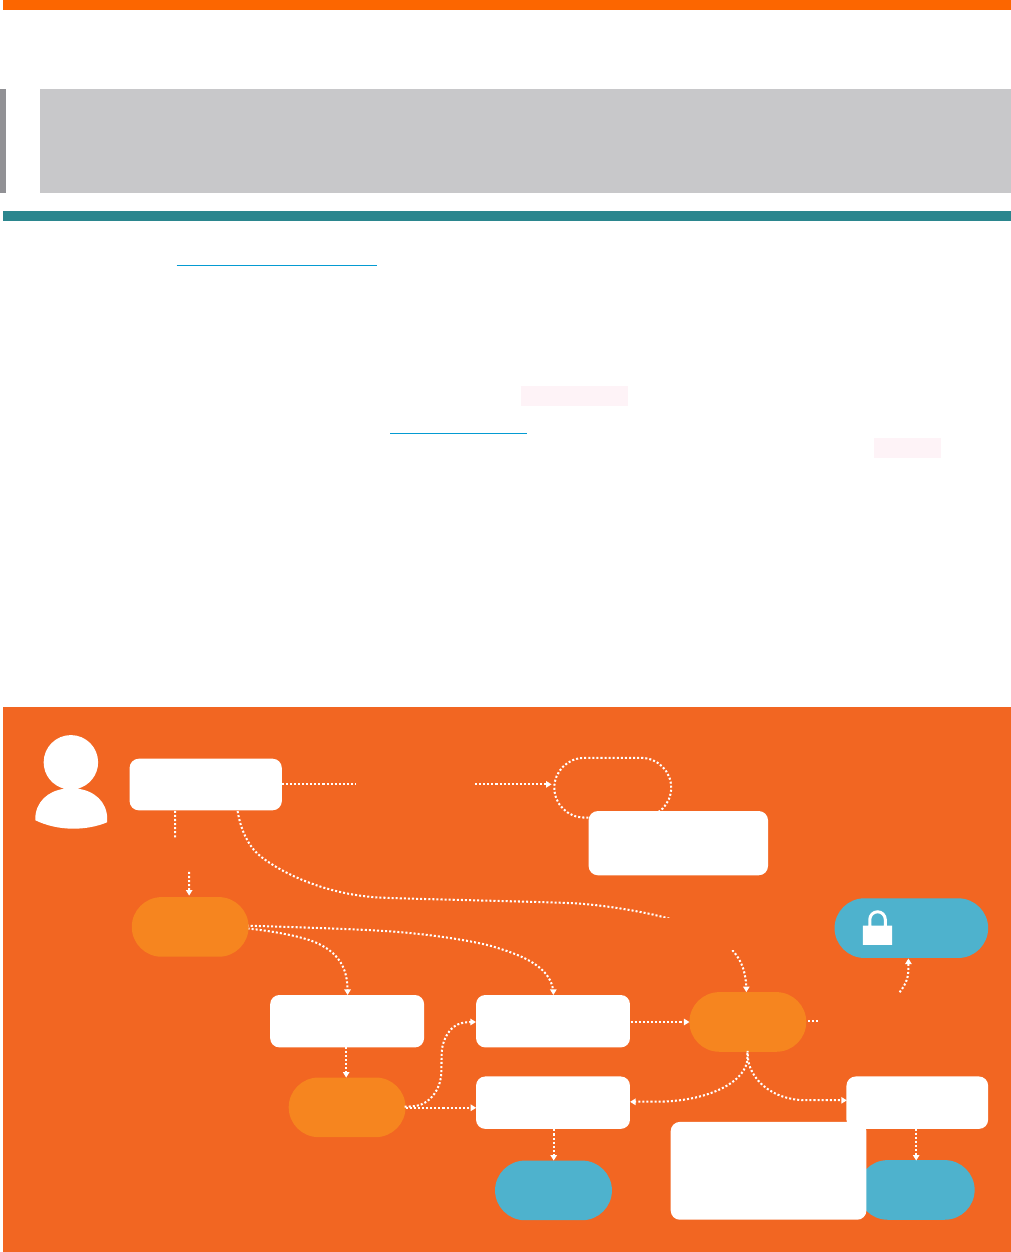
The Transaction State Diagram
When you create a transaction, the information about that transaction is referred to as a “Document”. You will
see many comments or articles that refer to “Documents” rather than transactions — it helps if you think of the
“Transaction” as the API call and the “Document” as the data that is stored on disk.
Once created, a document moves through a few different states before it is collected and reported on a tax re-
turn:
ADJUSTED
type = SalesOrder
type = SalesInvoice
commit = true
Filed via Avalara
Managed Returns
type = SalesInvoice
commit = false
TEMPORARY
CREATE TRANSACTION
A temporary transaction
is not saved - it’s
considered an estimate.
VERIFY TRANSACTION COMMIT TRANSACTION
VOID TRANSACTION
POSTED
COMMITTED
SAVED
API CUSTOMER
LOCKED
ADJUST TRANSACTION
Adjusting the transaction
marks the old transaction
as “adjusted”, and creates
a new transaction with the
same code.
CANCELLED
As you can see from the lifecycle document above, a transaction can go through a number of steps before it is fi-
nalized. We have designed these steps to be flexible enough to solve problems for a variety of different customers
and different types of tax processes. Let’s start with a few common use cases.
In an online store, your first task is to provide a sales tax estimate for the user casually browsing through your
website. These casual visitors have not purchased anything yet, but by giving them an accurate tax estimate you

AvaTax Developer Guide • 21
can show off your store’s high quality and commitment to accuracy. To help out this customer, you call Cre-
ateTransaction with the transaction type set to SalesOrder. This gives you an accurate estimate of tax (assuming
the customer put in their address correctly!), but it won’t record any tax data yet because the customer hasn’t
bought anything.
When the customer chooses to finish their transaction, your storefront should call CreateTransaction again, but
this time you should set the transaction type to SalesInvoice and the com mit value to true. These two values
cause the transaction to be recorded into AvaTax, and it can then be collected and filed on a tax return.
The reason you have to contact the API a second time may not be immediately obvious — but the customer may
have waited long enough that the tax rates might have changed, or their address may have changed, or your com-
pany configuration may have changed. Any one of these small changes can affect the accuracy of a tax calculation,
especially when an online storefront is still capable of selling to customers at 11:59 PM on the night before a sales
tax holiday!
Let’s take a look at an example API call to create a committed transaction:
Test Case 2.3.1 - Create a Committed Transaction
Setup
• In your connector, create the following transaction:
°Document Type: SalesInvoice
°Document Code: Chapter-2-Test-4
°Company Code: DEVGUIDE
°Document Date: 2017-0 6-15
°Customer Code: TESTCUSTOMER
• Addresses:
°SingleLocation: 100 Ravine Lane NE, Bainbridge Island, WA, US 98110
• Lines:
°Number: 1
°Quantity: 1
°Amount: 100
• Commit: True
• Calculate tax for your transaction using AvaTax.
Assertions
• Since this is a ‘SalesInvoice’ transaction with “Co m mit” set to “True”, the transaction will be recorded
and visible on the AvaTax website.
• You can log onto the AvaTax website and find this transaction. The transaction is in status: Co m mitte d.
Expected API Call
{
“type”: “SalesInvoice”,
“code”: “Chapter-2-Test-4”,
“companyCode”: “DEVGUIDE”,
“date”: “2017-06-15”,
“customerCode”: “TESTCUSTOMER”,
“addresses”: {
“singleLocation”: {
“line1”: “100 Ravine Lane NE”,
AvaTax Developer Guide • 22
“city”: “Bainbridge Island”,
“r e gio n ”: “ W A”,
“country”: “US”,
“ p o s t alC o d e”: “9 8 110 ”
}
},
“ lin e s”: [
{
“ n u m b e r ”: “ 0 1”,
“quantity”: 1,
“amount”: 100
}
],
“commit”: true
}
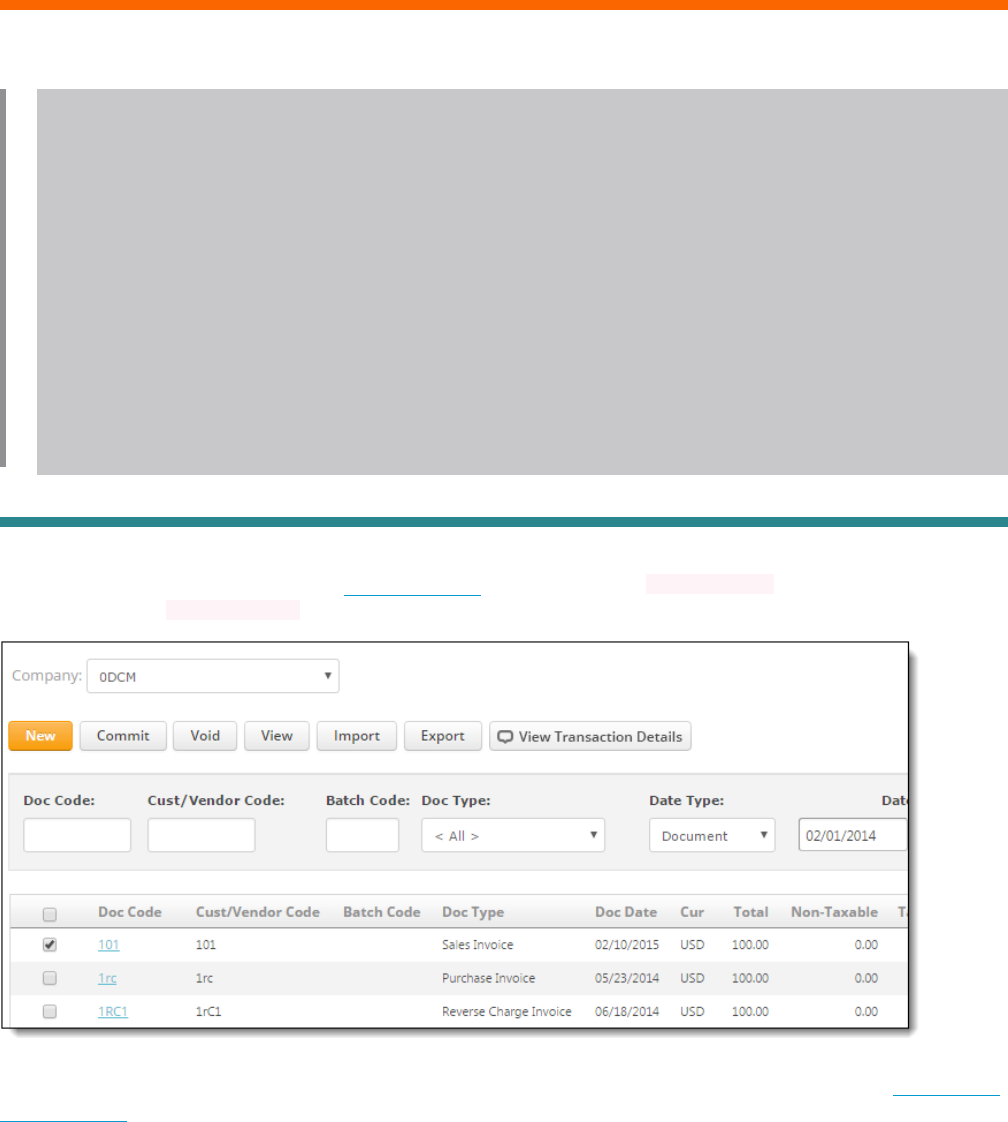
Now we’ll take a look at how the transaction we just created looks in AvaTax. To view this transaction, please
navigate to your development account AvaTax website and then click the Transactions tab. You search for the
transaction by the DocumentCode you used. If you don’t find any results, check your Date Range options.
You can use the AvaTax website to review and reconcile transactions — we’ll cover that topic more in Chapter 4 -
Reconciliation. For now, let’s continue onwards to learn about other types of transactions besides sales.
AvaTax Developer Guide • 23
2.4 - Document Types
We’ve already touched on the differences between the SalesOrder and SalesInvoice document types, but it’s
worth delving into more details about these and the other document types.
AvaTax is a full-service engine for calculating transactional taxes, including sales, use, VAT, and many other tax
types. In order to properly calculate taxes in these different circumstances, AvaTax must also support a wide vari-
ety of transaction types. Let’s continue by reviewing the differences between these transactions types and how to
map them to your business processes.
Transaction Types
AvaTax supports four basic transaction types - an inventory transfer, a purchase, a return (often called a refund or
a reverse transaction), and a sale. Each transaction type is available in two forms: an invoice form that is perma-
nent, and an order form that is a temporary estimate.
When you combine those together, you get these eight transaction types:
TRANSACTION TYPE LIFETIME EXAMPLE
InventoryTransferInvoice Permanent A finalized shipment of inventory from one
location to another
InventoryTransferOrder Temporary An estimate for shipping inventory from one
location to another
PurchaseInvoice Permanent A purchase made from a vendor
PurchaseOrder Temporary A quote for identifying estimated tax to pay to
a vendor
ReturnInvoice Permanent A finalized refund given to a customer
ReturnOrder Temporary A quote for a refund to a customer
SalesInvoice Permanent A finalized sale made to a customer
SalesOrder Temporary A quote for a potential sale
Let’s discuss how all these eight types are different.
Orders vs Invoices
Our customers require both the ability to estimate tax for a transaction, and to record the actual tax for that
transaction. Many customers use AvaTax as a way to predict taxes before taking action — for example, showing
“Estimated Tax” on a web storefront. Other customers use AvaTax to calculate taxes only at the moment the
transaction occurs — for example when recording a sale in their accounting system.
In AvaTax, an “Order” represents a temporary transaction that is not saved, whereas an “Invoice” represents a
permanent transaction that will be maintained. Think about these documents like you are a salesperson:
• You begin by speaking to a customer and obtaining information about what they would like to purchase. With
this information, you construct a CreateTransaction request.
• First, you calculate that transaction in AvaTax using a SalesOrder transaction type. This becomes a quote (or
lead, or opportunity) that you can share with the customer. The quote is as accurate as the information you

AvaTax Developer Guide • 24
have on hand, but you know that the customer will review the quote before making a decision to purchase, so
we do not record it in our accounting ledger yet.
• The customer then reviews the quote and may or may not request changes. It could be that the customer
wants to purchase one more line item, or maybe they want the shipping address changed, or maybe they have
an exemption certificate they want to provide to change their taxable use conditions. These changes can be
recalculated by resubmitting the transaction to AvaTax, each time using the SalesOrder transaction type.
• If the customer decides to cancel the order, or not to make a purchase, no action is required. You do not need
to cancel a SalesOrder — because it has not been recorded as a permanent transaction yet.
• When the customer does choose to make a purchase, you can then recalculate the transaction in AvaTax
using the SalesInvoice transaction type. The SalesInvoice transaction type represents a transaction that
has occurred, and can then be recorded, queried, reported on, and eventually filed in a tax return to a taxing
authority.
Because every type of transaction must be able to follow this same pattern, AvaTax supports all transaction
types as both Orders and Invoices. It’s worth noting that the Invoice transaction types provide a key compatibility
between Avalara’s tax calculation API and the Avalara Managed Returns Service. The Managed Returns Service
supports filing taxes calculated with AvaTax — but you can only file taxes that were recorded using invoice types!
Anything you calculated using an order type is considered a temporary estimate and won’t be reported.
Because order transaction types are temporary documents, it’s also worth noting that your transaction will not
be retrievable later. All order transactions will have ID numbers that are -1, indicating that they cannot be fetched
back using the API. Invoice transactions have positive ID numbers and can be retrieved back.
Next, let’s describe the various types of transactions and see how they work.
Sales Transactions
A SalesOrder or SalesInvoice transaction represents a sale that your company made to a customer. This is by
far the most common type of transaction that AvaTax handles. As usual, a SalesOrder is an estimate and a Sales-
Invoice is a record of a transaction that occurred. Sales transactions are typically used to represent web shopping
cart calculations, sales recorded through an accounting or ledger system, or service contracts signed on a particu-
lar date for future delivery.
In the case of a Sales transaction, a positive currency value means that your company received money from the
customer; and a negative currency value means that your company paid the customer. It is generallyExpected that
sales transactions are reported as positive currency values.
Sales transactions are generallyExpected to be recorded as they occur. For example, if you calculate an estimate
for a customer using a SalesOrder on the 11th of the month, then convert it to a SalesInvoice on the 20th of
the month, it is customary to choose the transaction date as the 20th. The AvaTax API natively supports this date
behavior — just provide the date field on the CreateTransaction API and your transaction will be recorded on that
date.
Return Transactions
When a customer changes their mind and asks for a refund, you can process that refund by specifying a Re-
turnOrder or ReturnInvoice transaction, or you can call the RefundTransaction API. This transaction type
refers to a reversal of the charges that occurred when you originally made the sale. As usual, the ReturnOrder can
be used for estimating and the ReturnInvoice is a permanent record.
A return transaction with a negative currency value refers to money that your company refunded to your custom-
er; a return transaction with a positive currency value represents money the customer gives to your company. It is
generallyExpected that return transactions are reported as negative currency values.

AvaTax Developer Guide • 25
Unlike sales transactions, return transactions have two dates. The first date is the date when the return occurred,
and the second date is the date when the original purchase was made. Two dates are needed because the tax rate
may have changed since the customer made the original purchase! Here’s how to refund the customer the exact
amount they paid originally:
• The date field of your ReturnInvoice is the date when the customer received the refund. If you are filing tax
returns using Avalara’s Managed Returns Service, this date controls when the refund will be reported to the
tax authority.
• To specify the date when the original sale occurred, you use a TaxOverride object in the CreateTransaction
API. Set the type of the tax override to TaxDate, and set the taxDate field to the date when the original
purchase occurred. This will tell AvaTax to calculate the tax amount returned to the customer as of the tax
override date.
• If the customer’s original purchase was recorded in AvaTax as a SalesInvoice, you can use the RefundTrans-
action API to automatically refund the exact amount they paid originally. This API takes care of all the hard
work of setting up the tax overrides for you.
Purchase Transactions
A purchase transaction represents a purchase made by your company from a vendor. A PurchaseOrder rep-
resents a quote you request from a vendor, and a PurchaseInvoice represents a finalized purchase transaction.
In the United States, most vendors will automatically charge and remit transactional taxes on your behalf. How-
ever, some companies choose to use AvaTax to identify any discrepancies between the tax rate you were charged
by a vendor and the correct tax rate for a product or service. This calculation can assist a company in recovering
overpaid taxes, or in identifying any cases where their vendor relationships are not in full compliance with tax laws.
You may use a PurchaseOrder to get an estimate of the tax that you should pay on a transaction, and you may
choose to use a PurchaseInvoice to record a transaction that occurred. When reporting a PurchaseInvoice, you
may specify the tax amount that you were charged by the vendor and have Avalara calculate the actual tax dis-
crepancy. This allows you to correctly report Consumer Use Tax via Avalara’s Managed Returns Service — we’ll
delve further into Consumer Use Tax in Chapter 10 - Consumer Use Tax.
Inventory Transfer Transactions
Inventory transfers are another way of tracking transactions that have Con sumer Use Tax implications. For com-
panies with multiple warehouses and offices, there are tax implications involved in shifting inventory from one
location to another.
As with the other document types, an InventoryTransferOrder represents an estimate and an Inventory-
TransferInvoice represents a permanent transaction. We’ll discuss Consumer Use Tax further in Chapter 10 -
Consumer Use Tax.
2.5 Chapter Summary
In this chapter you’ve learned how to create basic single-location transactions, as well as the differences between
the available document types. Creating transactions is the core of the AvaTax service, so it’s important to have a
solid understanding of the basics. You should be able to:
• Create a transaction with the minimum required fields
• Create an estimate using the SalesOrder transaction type
• Create a SalesInvoice transaction and view it in the AvaTax website
• In the event of a pop-quiz, answer questions on the differences between a SalesInvoice and a PurchaseIn-
voice

AvaTax Developer Guide • 27
Chapter 3 - Customizing Your Transactions
This chapter is all about customizing your transactions to expand on the capabilities of your application. By the
end of this chapter, you will learn the following:
• How the document level properties apply to the transaction, and the impact of line level adjustments.
• How to use multiple addresses at both the document and line levels.
• How reference codes and other user managed meta data can be used for tracking and reporting.
There are a multitude of use cases and scenarios that exist. This chapter is about exposing ways in which you can
shape your application to meet those needs.
3.1 - Using Address Types
Address types are used to help determine tax for a given transaction in a given situation. A retail transaction and
an eCommerce transaction are not that much different: they both use addresses, but while the retail location gen-
erally uses SingleLocation most eCommerce transactions will use the ShipFrom and ShipTo address types.
You can specify addresses at either the document level or the line level:
• A transaction, as a whole, uses the document level addresses as a default. If a transaction does not have any
addresses at the line level, each line will be assumed to use the addresses from the document level.
• Line level addresses represent individual separate shipments. Any time you set a value on the addresses
field on an invoice line, that line will ignore all document-level addresses.
Using Document Level Addresses
When you record a single transaction and all invoice lines on the transaction have the same addresses, you only
need to set your address values once at the root level of your transaction, no matter how many invoice lines you
are calculating.
For this next test, let’s create a single transaction with multiple line items that were shipped from the same origin
to the same destination. Here’s how to construct this transaction:
Let’s try building a transaction that uses two different addresses and a single line item:
Test Case 3.1.1 - Document Level Addresses
Setup
• Your DEVGUIDE company should have nexus in California and Washington.
• In your connector, create the following transactions
° Document Type: SalesInvoice
° Document Code: Chapter-3-Test-1
° Company Code: DEVGUIDE
° Document Date: 2 017- 0 6-1 5
° Customer Code: TESTCUSTOMER
• Addresses:
° ShipFrom
100 Ravine Lane NE, Bainbridge Island, WA 98110
° ShipTo
18300 Von Karman Ave, Irvine, CA 92612

AvaTax Developer Guide • 28
• Line #1:
° Amount $100
• Line #2:
° Amount $50
• Calculate tax for your transaction using AvaTax.
Assertions
• The taxable amount should be $150.00 with a total tax amount of $11.63.
• The document should be sourced in California with the following jurisdictions:
• California State
• Orange County
• Orange County District Tax/Special Tax
• Orange County Local Tax/Special Tax
Expected API Call
{
“type”: “SalesInvoice”,
“code”: “Chapter-3-Test-1”,
“companyCode”: “DEVGUIDE”,
“date”: “2017-06-15”,
“customerCode”: “TESTCUSTOMER”,
“addresses”: {
“shipFrom”: {
“line1”: “100 Ravine Lane NE”,
“city”: “Bainbridge Island”,
“r e gio n ”: “ W A”,
“country”: “US”,
“ p o s t alC o d e”: “9 8 110 ”
},
“s h ipTo”: {
“line1”: “18300 Von Karman Ave”,
“c it y ”: “Ir v in e”,
“r e gio n ”: “ C A”,
“country”: “US”,
“ p o s t alC o d e”: “9261 2 ”
}
},
“ lin e s”: [
{
“ n u m b e r ”: “ 1”,
“amount”: 100
},
{
“ n u m b e r ”: “ 2 ”,
“amount”: 50
}
]
}

AvaTax Developer Guide • 29
Using Line Level Address Types
Next, let’s describe how you can create a transaction where more than one separate shipment occurred. In this
case, each separate line can have its own addresses — or they can inherit their addresses from the document.
You can mix and match these options on as many lines as necessary.
For the next example, let’s review how to sell two separate products when each must be shipped from a separate
warehouse. One product will ship from a warehouse in Aberdeen, WA; the other will come from a Bainbridge
Island warehouse.
• First set the Bainbridge address at the document level. With this address at the document level, all lines will
automatically inherit that address as its default.
• Next set the addresses value for the custom line item. Because this value is set at the line level, it no longer
inherits any addresses from the root document level, which means you must set both the ShipFrom and Ship-
To values for that line.
Here’s what a line-level transaction looks like:
Test Case 3.1.2 - Line Level Addresses
Setup
• Your DEVGUIDE company should have nexus in California and Washington.
• In your connector, create the following transactions:
° Document Type: SalesInvoice
° Document Code: Chapter-3-Test-2
° Company Code: DEVGUIDE
° Document Date: 2 017- 0 6-1 5
° Customer Code: TESTCUSTOMER
• Addresses:
° ShipFrom
100 Ravine Lane NE, Bainbridge Island, WA 98110
° ShipTo
18300 Von Karman Ave, Irvine, CA 92612
• Line #1:
° Amount $65
° TaxCode P0000000
°ShipFrom
422 S F St., Aberdeen, WA, US 98520
° ShipTo
18300 Von Karman Ave, Irvine, CA 92612
• Line #2:
° Amount $35
° TaxCode P0000000
• Calculate tax for your transaction using AvaTax.
Assertions
• The taxable amount should be $100.00 with a total tax amount of $7.76.
• Line1 should have a total tax amount of $5.04, while Line 2 has 2.72.
• Both lines should be sourced in California with the following jurisdictions:
° California State
° Orange County

AvaTax Developer Guide • 30
° Orange County District Tax/Special Tax
° Orange County Local Tax/Special Tax
Expected API Call
{
“type”: “SalesInvoice”,
“code”: “Chapter-3-Test-2”,
“companyCode”: “DEVGUIDE”,
“date”: “2017-06-15”,
“customerCode”: “TESTCUSTOMER”,
“addresses”: {
“shipFrom”: {
“line1”: “100 Ravine Lane NE”,
“city”: “Bainbridge Island”,
“r e gio n ”: “ W A”,
“country”: “US”,
“ p o s t alC o d e”: “9 8 110 ”
},
“s h ipTo”: {
“line1”: “18300 Von Karman Ave”,
“c it y ”: “Ir v in e”,
“r e gio n ”: “ C A”,
“country”: “US”,
“ p o s t alC o d e”: “9261 2 ”
}
},
“ lin e s”: [
{
“ n u m b e r ”: “ 1”,
“amount”: 65,
“taxCode”: “P0000000”,
“addresses”: {
“shipFrom”: {
“line1”: “422 S F St.”,
“c it y ”: “A b e r d e e n ”,
“r e gio n ”: “ W A”,
“country”: “US”,
“postalCode”: “98520”
},
“s h ipTo”: {
“line1”: “21068 Bake Pkwy”,
“city”: “Lake Forest”,
“r e gio n ”: “ C A”,
“country”: “US”,
“postalCode”: “92630”
}
}
},
{
“ n u m b e r ”: “ 2 ”,

AvaTax Developer Guide • 31
“amount”: 35,
“taxCode”: “P0000000”
}
]
}
Address Types
Most developers instinctively understand the meaning of the address types ShipFrom and ShipTo, but often have
questions about the “Point Of Order” address types. It’s worth taking a brief moment to explain address types in
more detail.
ADDRESS TYPE ALSO KNOWN AS USAGE
ShipFrom Origin The origination address where the products were shipped
from, or from where the services originated.
ShipTo Destination The destination address where the products were shipped
to, or where the services were delivered.
Point of Order Origin The place of business where you receive the customer’s
order. This address type is valid in the United States only and
only applies to tangible personal property.
Point of Order Acceptance The place of business where you accept/approve the cus-
tomer’s order, thereby becoming contractually obligated to
make the sale. This address type is valid in the United States
only and only applies to tangible personal property.
In the United States, some jurisdictions have passed laws that require consideration of the point of order address-
es. Please confer with your tax professional before using these address types.
If you are operating a retail point of presence, and you are physically selling goods and services in person, you can
instead opt to use the SingleLocation address type. When you use SingleLocation, you are asserting that only
one address was ever involved in the transaction.
3.2 - Using Reference Fields
AvaTax provides a number of user reference fields for your convenience. For example, the referenceCode field
is an optional field that can be used to tie your transaction back to your accounting system or to link to another
transaction.
The referenceCode field exists at the document level, and other fields are available at the line level. Taken togeth-
er, all of these reference fields can help you store extra information about the transaction in ways that are appro-
priate for your accounting system.
All of these fields are optional and are not required. Some connectors make use of all of these fields, others keep
transactions extremely simple. It’s really up to you how much of this functionality you wish to implement.
Let’s look at each of these fields, and some ideas for how to make use of them. As a reminder, there is no data
structure to this field, you can put anything you want!

AvaTax Developer Guide • 32
Document Level Reference Fields
The following reference fields are available for your use at the document level. This means that they will only occur
once in a transaction.
FIELD NAME IDEAS FOR USAGE
ReferenceCode This field can link to the unique ID number of the invoice in your existing accounting
system.
PurchaseOrderNo Intended to match to your customer’s purchase order number, if one was provided.
SalespersonCode When tracking performance by salesperson, or identifying orders written by certain
sales team members, this code can help you identify the author of the invoice.
Description A general purpose description of the invoice or transaction, or a comment explaining the
transaction.
PosLaneCode If this transaction was made at a retail cash register, this code can be used to identify
which cash register made the transaction.
Email The email address of the customer who requested the sale.
Line Level Reference Fields
Below is a list of the available reference fields available for customizing your transaction at the line level. Each line
in your transaction can have its own values for each of these fields.
FIELD NAME IDEAS FOR USAGE
Description Field provided to describe the item/service/shipping
method for that given line. NOTE: If you participate
in Streamlined Sales Tax, this field is required to be an
accurate description of the product. Otherwise, it is
optional and has no requirements.
RevenueAccount If your user wished to track this line item to a specific
revenue account number in their accounting system,
you could specify the revenue account number here.
Ref1 A user-supplied reference code for this line.
Ref2 A user-supplied reference code for this line.
Using Reference Fields
Let’s build out final test transaction using everything that we’ve covered in this chapter:

AvaTax Developer Guide • 33
Test Case 3.2.1 - Reference Fields
Setup
• Your DEVGUIDE company should have nexus in California and Washington.
• In your connector, create the following transactions:
°Document Type: SalesInvoice
°Document Code: Chapt er-3-Test-3
°Document Date: 2017-0 6-15
°Customer Code: TESTCUSTOMER
°Reference Code: SalesOrder 123456
°Sales Person Code: SA8675309
°Purchase Order: PO6-5000
• Addresses:
°ShipFrom: 100 Ravine Lane NE, Bainbridge Island, WA, 98110
°ShipTo: 18300 Von Karman Ave, Irvine, CA 92612
• Line #1:
°Amount: $65
°TaxCode: P0000000
°Description: “A bundle of assorted yarn colors”
°Ref1: “Item out of stock in Bainbridge Island distribution center. ShipFrom Aberdeen
distribution center.”
°Ref2: “Customer would like the item to ShipTo a secondary address.”
°ShipFrom: 422 S F St., Aberdeen, WA, US 98520
°ShipTo: 21068 Bake Pkwy, Lake Forest, CA 92630
• Line #2:
°Amount: $35
°TaxCode: P0000000
°Description: “A single bolt of wool.”
• Calculate tax for your transaction using AvaTax.
Assertions
• The taxable amount should be $100.00 with a total tax amount of $7.76.
• Line1 should have a total tax amount of $5.04, while Line 2 has 2.72.
• Both lines should be sourced in California with the following jurisdictions:
° California State
° Orange County
° Orange County District Tax/Special Tax
° Orange County Local Tax/Special Tax
• Sourcing destination should be 21068 Bake Pkwy, Lake Forest, CA 92630.
• Sourcing origin should be 422 S F St., Aberdeen, WA, US 98520.
• Document level properties:
° Reference Code field should list “SalesOrder 123456”
° Sales Person should show as SA8675309
° PO6-5000 should be listed as the Purchase Order
• Line level properties:
° Line 1: The Description field should state “A bundle of assorted yarn colors”
° Line 2: The Description field should state “A single bolt of wool”
Expected API Call
{

AvaTax Developer Guide • 34
“type”: “SalesInvoice”,
“co de”: “Chapter-3-Test-3”,
“companyCode”: “DEVGUIDE”,
“date”: “2017-06-15”,
“customerCode”: “TESTCUSTOMER”,
“referenceCode”: “SalesOrder 123456”,
“salespersonCode”: “SA8675309”,
“purchaseOrderNo”: “PO2376500”,
“addresses”: {
“shipFrom”: {
“line1”: “100 Ravine Lane NE”,
“city”: “Bainbridge Island”,
“r e gio n ”: “ W A”,
“country”: “US”,
“ p o s t alC o d e”: “9 8 110 ”
},
“s h ipTo”: {
“line1”: “18300 Von Karman Ave”,
“c it y ”: “Ir v in e”,
“r e gio n ”: “ C A”,
“country”: “US”,
“postalCode”: “92630”
}
},
“ lin e s”: [
{
“ n u m b e r ”: “ 1”,
“amount”: 65,
“taxCode”: “P0000000”,
“ref1”: “Item out of stock in Bainbridge Island distribution center. ShipFrom Aber-
deen distribution center.”,
“ref2”: “Customer would like the item to ShipTo a secondary address.”,
“description”: “A bundle of assorted yarn colors”,
“addresses”: {
“shipFrom”: {
“line1”: “422 S F St.”,
“c it y ”: “A b e r d e e n ”,
“r e gio n ”: “ W A”,
“country”: “US”,
“postalCode”: “98520”
},
“s h ipTo”: {
“line1”: “21068 Bake Pkwy”,
“city”: “Lake Forest”,
“r e gio n ”: “ C A”,
“country”: “US”,
“postalCode”: “92630”
}
}
},
{

AvaTax Developer Guide • 35
“ n u m b e r ”: “ 2 ”,
“amount”: 35,
“taxCode”: “P0000000”,
“description”: “A single bolt of wool.”
}
]
}
3.3 Chapter Summary
In this chapter you’ve learned ways in which you can customize your transactions.
• How document and line level properties work.
• The importance of origin and destination address, and how they apply at the line level.
• How reference fields apply and how to use them correctly.
• What other meta data can be managed and used within your transaction.
Certification Requirements
AvaTax Certified Connectors must include the following information when calling the service for a tax
calculation. The connector must show the following:
Header level data elements
• Document number
• Customer code
• Document date
• Tax calculation date
• Document type
• Destination address
• Origin address
• Location Code
Line level data elements
• Line number
• Item code
• Item description
• Quantity
• Amount (extended)
• Tax Code

AvaTax Developer Guide • 36
Tests that are in this chapter:
• 3.1.1 - Document Level Addresses
• 3.1.2. - Line Level Addresses
• 3.2.1 - Reference Fields
These items will come into play in later chapters and are critical in expanding the capabilities of your integration.
Though not all accounting systems allow full use of certain fields and properties, developers are free to use the
ones we make available to fit the needs of end users and customers.

AvaTax Developer Guide • 37
Chapter 4 - Reconciliation
Now that you’ve calculated tax on your transaction, your next step is to ensure that your transactions are record-
ed and reconciled correctly. Reconciliation is necessary in order to ensure that you report the correct transactions
in each jurisdiction and on each tax form. In the event of an audit, most jurisdictions will ask you to demonstrate
that your sales transaction data fully matches the data reported on your tax form, and reconciliation support will
ensure that you can answer those questions.
We will look at how to address the following:
• Reporting an estimate as a transaction
• Reporting a single transaction more than once
• Reporting a transaction that should have been canceled
• Mis-reporting a transaction that was adjusted
• Refunding the wrong tax amount to a customer
• Modifying a transaction after it has been reported
• Failing to report a valid transaction
To address these challenges, AvaTax separates transactions into those that are Uncom mitted, those that are Com-
mitted, and those that have been Locked for Reporting. Here’s a brief description of how to use these statuses:
• Uncom mitted transactions cannot be reported to a tax authority. They can be reviewed, reconciled, modified,
and voided. They must be committed before they will be reported to a tax authority.
• Com mitted transactions are waiting to be reported, and can still be adjusted or voided. All committed trans-
actions for the filing period will automatically be locked for reporting when you approve your next filing using
Avalara’s Managed Returns Service.
• Locked for Reporting transactions have been attached to an approved tax filing. They can no longer be modi-
fied, adjusted, or voided.
This chapter will explain how to make use of the reconciliation features in AvaTax to ensure that your transactions
are reported correctly.
4.1 - Committing a Transaction
The concept of committing a transaction is necessary to separate preliminary estimates from final sales. Many
types of connectors exist, for example:
• A direct sales store might commit all transactions immediately and declare that all sales are final. Adjustments
are handled by refunding all or part of the transaction.
• A simple accounting system might only commit transactions after they have been verified. This allows a
salesperson to quickly write transactions, which will then be double-checked by a back office employee before
fulfillment. Adjustments are handled by modifying the transaction before it is locked for reporting.
• A complex accounting system might provide multiple stages of verification. A transaction can be marked Post-
ed after the first verification step, and Committed after the second. Adjustments are handled by modifying the
transaction before it is reported.
Here’s how to implement com mit for each of these scenarios.

AvaTax Developer Guide • 38
Direct Commit
For software that considers all transactions final, you will create a transaction directly using the “c o m m it”:
“true” flag in the CreateTransaction API call.
Creating transactions directly in Com mitted status is covered in Chapter 2 - Transactions.
One Stage Reconciliation
For software that permits transactions to be verified after creation, transactions are created with the Commit flag
set to false. Transactions that have not been committed are stored with the status code Saved. They are consid-
ered to be provisional; they will not be reported to a tax authority until they have been verified.
Your back-end system should provide a way for your management team to review Saved transactions and perform
reconciliation. A good way to design a verification process for a back-end systems team is to call ListTransac-
tionsByCompany and pass in the parameter $filter=status eq Saved. This API call will list all transactions for your
company that have not yet finished reconciliation, and you can use this to display a queue of transactions to be
reconciled.
When a transaction has been reconciled and is final, your software will use the CommitTransaction API call to
mark the transaction as committed. Here’s how to commit a transaction:
Test Case 4.1.1 - Committing a Transaction
Setup
• In your connector, create the following transaction:
°Document Type: SalesInvoice
°Document Code: Chapter-4-Test-1
°Company Code: DEVGUIDE
°Document Date: 2017-0 6-15
°Customer Code: TESTCUSTOMER
• Addresses:
°SingleLocation: 100 Ravine Lane NE, Bainbridge Island, WA, 98110
• Line #1:
°Amount: 100
°TaxCode: P0000000
• Set the commit flag to false.
• Calculate tax for your transaction.
• Next, trigger a call to CommitTransaction with the following options:
°Company Code: DEVGUIDE
°Transaction Code: Chapter-4-Test-1
°Commit: “true”
Assertions
• The transaction’s status will be “Co m mitted”.
Expected API Call
CreateTransaction:
{
“type”: “SalesInvoice”,
“code”: “Chapter-4-Test-1”,

AvaTax Developer Guide • 39
“companyCode”: “DEVGUIDE”,
“date”: “2017-06-15”,
“customerCode”: “TESTCUSTOMER”,
“commit”: “false”,
“addresses”: {
“singleLocation”: {
“line1”: “100 Ravine Lane NE”,
“city”: “Bainbridge Island”,
“r e gio n ”: “ W A”,
“country”: “US”,
“ p o s t alC o d e”: “9 8 110 ”
}
},
“ lin e s”: [
{
“ n u m b e r ”: “ 1”,
“amount”: 100,
“taxCode”: “P0000000”
}
]
}
Co m mitTransaction:
{
“commit”: “true”
}
Two Stage Reconciliation
Some companies prefer to have multiple stages of reconciliation. In this case, a transaction can go through three
statuses: Saved, Posted, and Com mitted.
The three stages work as follows:
• Create a transaction in the status Saved following the same process as for one-stage reconciliation.
• Display a queue of transactions that are in the first stage of reconciliation using ListTransactionsByCompany
with the parameter $filter=status eq Saved.
• When a transaction is ready to move out of the first stage of reconciliation, update it by calling VerifyTransac-
tion. The transaction’s new status will be Posted.
• Display a queue of transactions that are in the second stage of reconciliation using ListTransactionsByCompa-
ny with the parameter $filter=status eq Posted.
• When a transaction is ready to move out of the second stage of reconciliation, update it by calling Com-
mitTransaction as above. The transaction’s new status will be Com mitted.
In the two-stage reconciliation process, additional verification features are available. When you call VerifyTransac-
tion, you can optionally choose to assert that the transaction’s amount matches an amount in a different ledger.
Here’s how the VerifyTransaction API call works:
AvaTax Developer Guide • 40
POST https://sandbox-rest.avatax.com/api/v2/companies/DEVGUIDE/transactions/MYTRANSACTION-
CODE/verify [link still doesn’t work]
{
“verifyTransactionDate”: “2017-06-15”,
“verifyTotalAmount”: 100,
“verifyTotalTax”: 6.25
}
Your system can maintain and verify these fields if desired, but it is not required. If your system does not maintain
all three values (date, amount, and tax), it is acceptable to verify only one or two of them.
When you provide this information, the API will test the transaction and report an error if any fields do not match.
This feature allows you to perform automated reconciliation of transactions, and to detect discrepancies pro-
grammatically. Your software can call VerifyTransaction on all entries in your accounting system ledger every
evening, and assert that the amounts match expectations. Any transactions that fail to verify can be escalated for
human oversight.
The ListTransactionsByCompany API is intended to help you display a list of transactions that are in any particular
stage of the reconciliation process. You can use it to examine any stage for transactions that need human review.
Let’s examine how a two-stage verification process would work:
Test Case 4.1.2 - Two-Stage Verification
Setup
• In your connector, create the following transaction:
°Document Type: SalesInvoice
°Document Code: Chapter-4-Test-2
°Company Code: DEVGUIDE
°Customer Code: TESTCUSTOMER
°Document Date: 2017-0 6-15
• Addresses:
°SingleLocation: 100 Ravine Lane NE, Bainbridge Island, WA, 98110
• Line #1:
°Amount: 100
°TaxCode: P0000000
• Set the commit flag to false.
• Calculate tax for your transaction.
• Next, trigger a call to VerifyTransaction with the following options:
°Company Code: DEVGUIDE
°Transaction Code: Chapter-4-Test-1
°VerifyTransactionDate: 2017-0 6-15
°VerifyTotalAmount: 100
Assertions
• The transaction’s status will be “Posted”.
Expected API Call

AvaTax Developer Guide • 41
CreateTransaction:
{
“type”: “SalesInvoice”,
“code”: “Chapter-4-Test-2”,
“companyCode”: “DEVGUIDE”,
“date”: “2017-06-15”,
“customerCode”: “TESTCUSTOMER”,
“commit”: “false”,
“addresses”: {
“singleLocation”: {
“line1”: “100 Ravine Lane NE”,
“city”: “Bainbridge Island”,
“r e gio n ”: “ W A”,
“country”: “US”,
“ p o s t alC o d e”: “9 8 110 ”
}
},
“ lin e s”: [
{
“ n u m b e r ”: “ 1”,
“amount”: 100,
“taxCode”: “P0000000”
}
]
}
VerifyTransaction:
{
“verifyTransactionDate”: “2017-06-15”,
“verifyTotalAmount”: 100.00,
“ v e r ifyTot alTa x ”: 9.0 0
}
Locked Transactions
The purpose of committing a transaction is to indicate that the transaction is ready to be reported to a tax au-
thority. For customers using Avalara’s Managed Returns Service, our software will automatically prepare a liability
worksheet for you every filing period and notify you to approve the tax filing. When you approve the tax filing,
all transactions included on that filing are automatically Locked. A transaction that is locked cannot be changed
further — it is considered a permanent part of your company’s accounting record, and must be preserved as is for
audit circumstances.
You can determine which transactions are locked by calling the ListTransactionsByCompany API with the parame-
ter $filter=locked eq true.
Any attempt to modify a locked transaction will fail with an error.

AvaTax Developer Guide • 42
4.2 - Modifying a Transaction
During the reconciliation process, if you discover that a transaction is not correct, you can fix the transaction in
one of three ways: you can Adjust, Void, or Refund the transaction.
Adjust
To keep a transaction intact, but make a change or correction, you would adjust the transaction using the Adjust-
Transaction API. When you call the API, two things will happen:
• The existing transaction will be marked as Adjusted, and
• A new transaction will be created in the appropriate status (either Saved or Com mitted).
A commonly asked question about the Adjust API is “Why can’t I just change one field on the transaction object?”
Unfortunately, tax laws often have complex interdependencies, and it is not guaranteed that a transaction would
still be valid if only one field changes. Tax authorities occasionally create tax laws that affect the behavior of line
items based on the presence of other line items in the same transaction, on the classification of items, on the
quantity of items, or on threshold values. As a result, the AdjustTransaction API call will re-create your transaction
completely in order to ensure that it meets the AvaTax standard of accuracy.
If you need to make a small change to your transaction, you may choose to reconstruct the original data you
submitted to the CreateTransaction API call using the AuditTransaction API. This API allows you to rebuild the
CreateTransactionModel data structure that you used when you originally created the object. You can then make
a small change to the transaction and submit it to the AdjustTransaction API.
If you are looking to make a small change to an existing transaction, you can consider calling AddLines or Delete-
Lines. These methods will allow you to add lines to an existing transaction or remove lines from an existing trans-
action. Internally, these API calls use the same method as AdjustTransaction and they will still behave the same as
if you called AdjustTransaction directly.
Here’s how you can modify a transaction to correct an error:
Test Case 4.2.1 - Modifying a Transaction to Correct an Error
Setup
• In your connector, create the following transaction:
°Document Type: SalesInvoice
°Document Code: Chapter-4-Test-3
°Company Code: DEVGUIDE
°Document Date: 2017-0 6-15
°Customer Code: TESTCUSTOMER
• Addresses:
° SingleLocation: 100000000000000 Ravine Lane NE, Bainbridge Island, WA, 98110
• Line #1:
°Amount: 100
°TaxCode: P0000000
• Set the commit flag to false.
• Calculate tax for your transaction.
• Next, trigger a call to AdjustTransaction with all information the same, except using the corrected address:
°line1: 100 Ravine Lane NE, Bainbridge Island, WA, 98110

AvaTax Developer Guide • 43
Assertions
Two transactions exist:
• Chapter-4-Test-3
°status: Adjusted
°line1: 100000000000000 Ravine Lane NE
• Chapter-4-Test-3
°status: Com mitted
°line1: 100 Ravine Lane NE
°“adjustmentReason”: “Other”
°“adjustmentDescription”: “Correct shipping address”
Expected API Call
CreateTransaction:
{
“type”: “SalesInvoice”,
“code”: “Chapter-4-Test-3”,
“companyCode”: “DEVGUIDE”,
“date”: “2017-06-15”,
“customerCode”: “TESTCUSTOMER”,
“commit”: “true”,
“addresses”: {
“singleLocation”: {
“line1”: “100000000000000 Ravine Lane NE”,
“city”: “Bainbridge Island”,
“r e gio n ”: “ W A”,
“country”: “US”,
“ p o s t alC o d e”: “9 8 110 ”
}
},
“ lin e s”: [
{
“ n u m b e r ”: “ 1”,
“amount”: 100,
“taxCode”: “P0000000”
}
]
}
AdjustTransaction:
{
“adjustmentReason”: “Other”,
“adjustmentDescription”: “Correct shipping address”,
“newTransaction”: {
“type”: “SalesInvoice”,
“code”: “Chapter-4-Test-3”,
“companyCode”: “DEVGUIDE”,
“date”: “2017-06-15”,
“customerCode”: “TESTCUSTOMER”,
“commit”: “true”,

AvaTax Developer Guide • 44
“addresses”: {
“singleLocation”: {
“line1”: “100 Ravine Lane NE”,
“city”: “Bainbridge Island”,
“r e gio n ”: “ W A”,
“country”: “US”,
“ p o s t alC o d e”: “9 8 110 ”
}
},
“ lin e s”: [
{
“ n u m b e r ”: “ 1”,
“amount”: 100,
“taxCode”: “P0000000”
}
]
}
}
Note that transactions that are locked cannot be adjusted.
Void
To remove a transaction that is not valid, you use the VoidTransaction API. When you call this API, the transaction
will be moved to the status Cancelled. Transactions in the Cancelled status will no longer be used for reporting
purposes and will not be included in reports unless specifically requested.
To void a transaction, you must provide a reason code. The reasons available are:
• Unspecified
• PostFailed
• DocDeleted
• DocVoided
• AdjustmentCancelled
These codes are available for you to use to help distinguish between a variety of different types of reasons for
voiding a transaction, but they do not have different behavior within AvaTax. You are free to use whichever reason
code is appropriate for your task.
Here’s how to void a transaction:
Test Case 4.2.2 - Voiding a Transaction
Setup
• In your connector, create the following transaction:
°Transaction Type: SalesInvoice
°Transaction Code: Chapter-4-Test-4
°Company Code: DEVGUIDE
°Document Date: 2017-0 6-15

AvaTax Developer Guide • 45
°Customer Code: TESTCUSTOMER
• Addresses:
°SingleLocation: 100 Ravine Lane NE, Bainbridge Island, WA, 98110
• Line #1:
°Amount: 100
°TaxCode: P0000000
°Set the commit flag to false.
• Calculate tax for your transaction.
• Next, trigger a call to VoidTransaction with the following reason:
°code: DocVoided
Assertions
• One transaction exist: Chapter-4-Test-4
°status: Cancelled
°Amount: 100
Expected API Call
CreateTransaction:
{
“type”: “SalesInvoice”,
“code”: “Chapter-4-Test-4”,
“companyCode”: “DEVGUIDE”,
“date”: “2017-06-15”,
“customerCode”: “TESTCUSTOMER”,
“commit”: “true”,
“addresses”: {
“singleLocation”: {
“line1”: “100 Ravine Lane NE”,
“city”: “Bainbridge Island”,
“r e gio n ”: “ W A”,
“country”: “US”,
“ p o s t alC o d e”: “9 8 110 ”
}
},
“ lin e s”: [
{
“ n u m b e r ”: “ 1”,
“amount”: 100,
“taxCode”: “P0000000”
}
]
}
VoidTransaction:
{
“code”: “DocVoided”
}
Note that transactions that are locked cannot be voided.

AvaTax Developer Guide • 46
Refund
A transaction refund is sometimes called a return or a reverse charge invoice. To match commonly used language,
we have chosen to call this the RefundTransaction API.
When you refund a transaction, you are technically creating a ReturnInvoice with values that are the negative.
These negative values indicate that money is being returned from the seller to the purchaser. This corresponds to
the accounting concept of a positive and negative journal entries that cancel each other out.
You can choose to use the RefundTransaction API in a few different ways:
• You can refund the entire transaction by setting “refu ndTy pe”: “Full”.
• You can refund specific lines from a transaction by specifying “refundType”: “Partial”, and setting a list of
lines to refund using the refundLines parameter to the list of line numbers of the lines that are being refunded.
• If your customer originally paid sales tax on the transaction, and they later provided a resale exemption certifi-
cate, you can call set the “refundType”: “TaxOnly”.
• If you wish to give a customer a percentage refund, perhaps for a discount, you can specify “refundType”:
“Percentage”.
You should ensure that the refundDate value is set to the correct date for the refund. The tax rates that will be
used are the correct rates from the previous transaction.
Here’s how to use RefundTransaction to return a customer’s money:
Test Case 4.2.3 - Refunding a Customer’s Money
Setup
• In your connector, create the following transaction:
°Document Type: SalesInvoice
°Document Code: Chapter-4-Test-5
°Company Code: DEVGUIDE
°Document Date: 2017-0 6-15
°Customer Code: TESTCUSTOMER
• Addresses:
° SingleLocation
100 Ravine Lane NE, Bainbridge Island, WA, 98110
• Line #1:
°Amount: 100
°TaxCode: P0000000
• Set the commit flag to false.
• Calculate tax for your transaction.
• Next, trigger a call to RefundTransaction with the following reason:
°refundTransactionCode: Chapter-4-Test-5-Refund
°refundType: Full
°refundDate: 2017-0 6-22
°referenceCode: Refund of Chapter-4-Test-5 - Returned after 7 days.
Assertions
One transaction exist:
• Chapter-4-Test-5
°status: Com mitted
°Amount: 100

AvaTax Developer Guide • 47
• Chapter-4-Test-5-Refund
°status: Com mitted
°Amount: -10 0
Expected API Call
CreateTransaction:
{
“type”: “SalesInvoice”,
“code”: “Chapter-4-Test-5”,
“companyCode”: “DEVGUIDE”,
“date”: “2017-06-15”,
“customerCode”: “TESTCUSTOMER”,
“commit”: “true”,
“addresses”: {
“singleLocation”: {
“line1”: “100 Ravine Lane NE”,
“city”: “Bainbridge Island”,
“r e gio n ”: “ W A”,
“country”: “US”,
“ p o s t alC o d e”: “9 8 110 ”
}
},
“ lin e s”: [
{
“ n u m b e r ”: “ 1”,
“amount”: 100,
“taxCode”: “P0000000”
}
]
}
VoidTransaction:
{
“refu nd TransactionCo de”: “Chapt er-4-Test-5-Refu nd”,
“refundType”: “Full”,
“refundDate”: “2017-06-22”,
“referenceCode”: “Refund of Chapter-4-Test-5 - Returned after 7 days.”
}
For customers using Avalara’s Managed Returns Service, it may not always be possible to report ReturnInvoice
transactions on every tax filing. Avalara works with tax authorities around the world to ensure that we handle
negative values correctly in each jurisdiction; some jurisdictions have requirements that must be met in order to
correctly report a ReturnInvoice transaction. This means that a ReturnInvoice transaction may potentially be “car-
ried-forward” from one filing to another until it meets the tax authority’s requirements for filing.
To list all ReturnInvoice transactions that have not yet been reported to a tax authority, please call the ListTrans-
actionsByCompany API with the parameter $filter=type eq ReturnInvoice and status eq Committed. If
a return invoice transaction has not been able to be reported for more than six months, we recommend contact-
ing Avalara’s Compliance department to request an amended tax return which will allow the refund value to be
claimed directly.

AvaTax Developer Guide • 48
4.3 Chapter Summary
In this chapter, you’ve seen all the features available in AvaTax for designing a transaction reconciliation process.
You can choose which process best fits your company.
• For a simple web store, you may prefer to use a direct-commit process, and refund any transaction if an error
is discovered. This process only uses two API calls: CreateTransaction and RefundTransaction.
• For a small accounting system, you may prefer to use a one-stage commit process, and void any transactions
when an error is discovered. This process would also use CommitTransaction and VoidTransaction.
• More complex processes will use all available APIs, including VerifyTransaction, ListTransactionByCompany,
and AdjustTransaction.
Certification Requirements
AvaTax Certified Connectors must ensure that transactions are processed through a logical document
lifecycle.
• Ensure that invoices are posted/committed for reporting appropriately.
• When invoices are deleted/cancelled, the transaction is updated to reflect the status.
• Ensure that Credit Memos are posted/committed for reporting appropriately.
• When Credit Memos are deleted/cancelled, the transaction is updated to reflect the status.
Tests in this chapter:
• 4.1.1 - Committing a Transaction
• 4.1.2 - Two-Stage Verification
• 4.2.1 - Modifying a Transaction to Correct an Error
• 4.2.2 - Voiding a Transaction
• 4.2.3 - Refunding a Customer’s Money
Connector developers are free to customize the use of the reconciliation API suite to match their business pro-
cesses.

AvaTax Developer Guide • 49
Chapter 5 - Product Taxability
Now that you’ve learned all the ins and outs of a transaction, let’s discuss how to handle more complex types of
tax. When certain types of products are taxed at different rates, how does AvaTax know which rate to use?
In AvaTax, we represent different types of products using a TaxCode. This TaxCode is a short string that uniquely
identifies a type of product and helps to classify it for tax purposes. Here are a few sample tax codes:
• TaxCode PF050112 represents carbonated soft drinks
• TaxCode PC040413 represents ski boots
• TaxCode SB070700 represents boat repairs
You can find many more examples through Avalara’s online tax code website. Try searching through to find some-
thing you like to buy — Avalara has a full list of tax codes covering nearly all variants on the products and services
you purchase every day.
Inside AvaTax, these TaxCodes have built in logic to represent the applicable sales tax regulations for each state.
This means you can get the correct tax rates for boat repairs by adding an invoice line item with the property
“taxCode”: “SB070700” within the transaction. The tax code helps to identify what tax rules and rates apply
to the transaction. Our content team monitors governments around the world and tracks whenever the tax rate
changes and taxability rules for each particular type of product or service.
In this chapter, you’ll learn how to find the appropriate tax code for your product, and how to use that tax code
correctly in an AvaTax transaction.
5.1 - Finding a Tax Code
So far in the developer guide, your code has left the taxCode field empty. In this case, AvaTax assumes you are
creating transactions that refer to general Tangible Personal Property, which is represented by the default tax
code P0000000.
As long as you continue using a null tax code, AvaTax will treat your products the same. However, many products
are taxed differently in different jurisdictions. Finding the correct tax code will ensure that AvaTax treats your
product correctly everywhere.
You can find the correct tax code for your product in one of two ways:
• Look on Avalara’s tax code site
• Or you could call the ListTaxCodes API to list available tax codes
When you use tax codes correctly in AvaTax, you will get the correct tax rate for your transaction. Some custom-
ers will choose to enter a tax code directly when creating a transaction.
Other customers may wish to search for tax codes directly through the ListTaxCodes API. A common use case is
to show a drop down text box. When a customer starts typing the word C, your program can call ListTaxCodes to
find all tax codes that begin with the letters that the customer has typed. Here’s how to call ListTa xCodes:
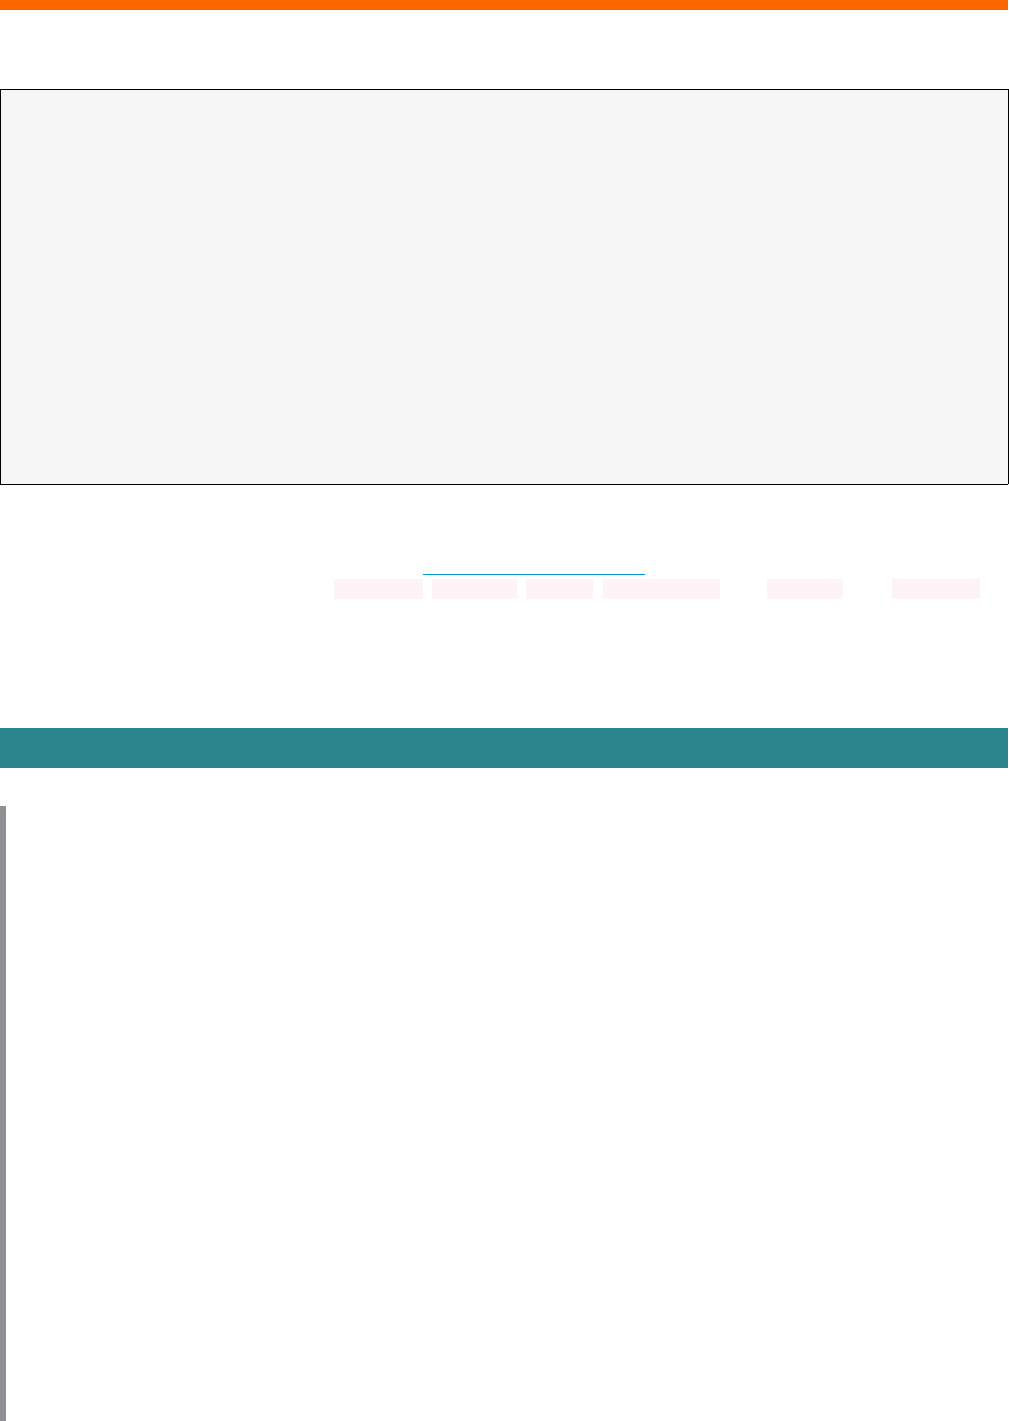
AvaTax Developer Guide • 50
GET /api/v2/definitions/taxcodes/$filter=description startswith C
{
“id”: 56789,
“companyId”: 12345,
“taxCode”: “PF050101”,
“taxCodeTypeId”: “P”,
“description”: “Carbonated beverages”,
“parentTaxCode”: “PF050001”,
“isPhysical”: true,
“goodsServiceCode”: 0,
“entityUseCode”: “”,
“isActive”: true,
“isSSTCertified”: true
}
Adding TaxCodes to your Transaction
On the document line level you can pass via the CreateTransactionModel. There are a few properties that allow
you to identify your line categories of Ite mCode, Quantity, Amount, Description, and TaxCode. The Ite m Code
are generally the value passed by your integration or web service to represent a part number, SKU or product ID
for the said products or services.
Here’s what a transaction looks like when you add tax codes to a line:
Test Case 5.1.1 - Finding a Tax Code
Setup
• Carbonated Beverages are considered exempt in Washington State.
• The TaxCode for a Carbonated Beverage is PF050101.
• In your connector, create the following transaction:
°Document Type: SalesInvoice
°Document Code: Chapter-5-Test-1
°Company Code: DEVGUIDE
°Document Date: 2017-0 6-15
°Customer Code: TESTCUSTOMER
• Addresses:
°SingleLocation: 100 Ravine Lane NE, Bainbridge Island, WA, 98110
• Line #1:
°Amount: 100
°TaxCode: PH405370 (gift items)
• Calculate tax for your transaction using AvaTax.
Assertions
° The tax for line 1 should be $9.00.
° The Taxable amount for line 1 should be $100.00.

AvaTax Developer Guide • 51
Expected API Call
{
“type”: “SalesInvoice”,
“code”: “Chapter-5-Test-1”,
“companyCode”: “DEVGUIDE”,
“date”: “2017-06-15”,
“customerCode”: “TESTCUSTOMER”,
“addresses”: {
“singleLocation”: {
“line1”: “100 Ravine Lane NE”,
“city”: “Bainbridge Island”,
“r e gio n ”: “ W A”,
“country”: “US”,
“ p o s t alC o d e”: “9 8 110 ”
}
},
“ lin e s”: [
{
“ n u m b e r ”: “ 1”,
“amount”: 100,
“taxCode”: “PH405370”
}
]
}
As you can see, this transaction now has different taxability rules based on the type of product being sold.
5.2 - TaxCodes and Exemptions
Tax codes can change the rates charged on a transaction — but did you know they also affect a product’s taxabili-
ty?
Some jurisdictions choose not to tax certain types of products or services. In those cases, the transactions will
flag certain line items as nontaxable.
Generally speaking, items are nontaxable and customers are exempt. When a tax authority has decided that a
type of product is “exempt” from a tax, this actually means this type of product is nontaxable. Transactions are
only exempt when a customer has provided an exemption certificate and flagged as exempt.
The word “exempt” is often confusing here. Some jurisdictions use the terminology “exempt” when referring to
products and services, whereas others use the word “deductible” or “non-taxable”, or they may simply say that
the tax rate is zero for that particular product. In each case, the end result is the same: this product or service
does not have transactional tax applied to it.
Jurisdiction Taxability
Some jurisdictions may have regulations pertaining to quantity and amount values. For example, in certain jurisdic-
tions in New York clothing items under $110.00 can be non-taxable.
In Tennessee, a special tax applied when the value of a single physical item (Quantity of 1) has a value exceeding

AvaTax Developer Guide • 52
$1,600, up to the value of $3,200.
Examples:
• No sales tax on an item of clothing or footwear that costs less than $110
• Tennessee single article tax cap
Keep in mind that items and tax codes represent the production taxability. Other factors like the exempt status of
customer and the client’s tax profile generally would place higher in a hierarchy sense to the product. Meaning if
your customer is exempt, referencing a taxable tax code will still generate a zero tax result. Same of nexus and tax
rules. If you are getting a gettax result for a jurisdiction that you have not identified in the Avalara Nexus settings,
regardless of the item or tax code passed the result will be non-taxable. The application of these three levels re-
sults in the tax calculation you see returned by the API and/or recorded in AvaTax.
Let’s examine how two different jurisdictions handle carbonated beverages.
Carbonated Beverages in Washington
The state of Washington does not have a tax for carbonated juice beverages as of June 15th, 2017. This tax rule
may change in the future! Even if you know that a particular product is exempt from tax, it is important to provide
the correct tax code. Many states will choose to audit companies that fail to report exempt transactions correctly;
so please encourage your customers to correctly categorize and report all lines on the transaction.
Test Case 5.2.1 - TaxCodes and Exemptions - Washington State
Setup
• Carbonated Beverages are considered exempt in Washington State.
• The TaxCode for a Carbonated Beverage is PF050101.
• In your connector, create the following transaction:
°Document Type: SalesInvoice
°Document Code: Chapter-5-Test-2
°Company Code: DEVGUIDE
°Document Date: 2017-0 6-15
°Customer Code: TESTCUSTOMER
• Addresses:
°SingleLocation: 100 Ravine Lane NE, Bainbridge Island, WA, 98110
• Line #1:
°Amount: 100
°TaxCode: P0000000
• Line #2:
°Amount: 75
°TaxCode: PF050101
• Calculate tax for your transaction using AvaTax.
Assertions
• The tax for line 1 should be $9.00.
• The Taxable amount for line 1 should be $100.00.
• The Exempt amount for line 1 should be $0.00.
• The tax for line 2 should be $0.00.
• The Taxable amount for line 2 should be $0.00.
• The Exempt amount for line 2 should be $75.00.

AvaTax Developer Guide • 53
Expected API Call
{
“type”: “SalesInvoice”,
“code”: “Chapter-5-Test-2”,
“companyCode”: “DEVGUIDE”,
“date”: “2017-06-15”,
“customerCode”: “TESTCUSTOMER”,
“addresses”: {
“singleLocation”: {
“line1”: “100 Ravine Lane NE”,
“city”: “Bainbridge Island”,
“r e gio n ”: “ W A”,
“country”: “US”,
“ p o s t alC o d e”: “9 8 110 ”
}
},
“ lin e s”: [
{
“ n u m b e r ”: “ 1”,
“amount”: 100,
“taxCode”: “P0000000”
},
{
“ n u m b e r ”: “ 2 ”,
“amount”: 75,
“taxCode”: “PF050101”
}
]
}
Carbonated Beverages in New York
Let’s now try that same transaction in a different address. The state of New York has taxes for carbonated juice
beverages, so this time we will see the transaction producing tax for both lines.
Test Case 5.2.2 - TaxCodes and Exemptions - New York
Setup
• Re-create the transaction in step 2, but this time change it as follows:
°Transaction Code: Chapter-5-Test-3
• Addresses:
°SingleLocation: 14 Wall Street, New York, NY 10005
• Calculate tax for your transaction using AvaTax.
Assertions
• The tax for line 1 should be $8.88.
• The Taxable amount for line 1 should be $100.00.

AvaTax Developer Guide • 54
• The Exempt amount for line 1 should be $0.00.
• The tax for line 2 should be $6.66.
• The Taxable amount for line 2 should be $75.00.
• The Exempt amount for line 2 should be $0.00.
Expected API Call
{
“type”: “SalesInvoice”,
“code”: “Chapter-5-Test-3”,
“companyCode”: “DEVGUIDE”,
“date”: “2017-06-15”,
“customerCode”: “TESTCUSTOMER”,
“addresses”: {
“singleLocation”: {
“line1”: “14 Wall Street”,
“city”: “New York”,
“region”: “NY”,
“country”: “US”,
“postalCode”: “10005”
}
},
“ lin e s”: [
{
“ n u m b e r ”: “ 1”,
“amount”: 100,
“taxCode”: “P0000000”
},
{
“ n u m b e r ”: “ 2 ”,
“amount”: 75,
“taxCode”: “PF050101”
}
]
}
5.3 - Mapping Items to TaxCodes
Some customers prefer to go further — to actually create a product catalog and use AvaTax’s ItemCode feature
to classify their products and link them with TaxCodes. Using this feature, it’s possible to build your connector or
website without worrying about mapping products to TaxCodes at all.
This feature is entirely optional and is not required for certification of your AvaTax connector — but it may be
useful if you prefer not to allow users to select tax codes in your product. Using Items, you can send your users
directly to the AvaTax website and have them do their own data entry.
Here’s how it works:
• AvaTax contains a database called the Item database. Any user of AvaTax can define a list of items using the
CreateItems API or on the AvaTax website.

AvaTax Developer Guide • 55
• Each Ite m in the AvaTax database can be linked to a TaxCode or to custom TaxRule using a friendly web inter-
face.
• Your connector can simply identify each line on the invoice using an Ite m Code in the CreateTransaction API
call - AvaTax will look up its tax codes and tax rules for you.
You can read more about mapping items to tax codes on the Avalara Help Center.
Using the Items API
AvaTax includes a suite of APIs to manage your items database: for example, a good place to start is the Create-
Items API. Here’s how to call the CreateItems API to create a single custom item — note that the API allows you to
create as many items as you want with a single API call:
POST /api/v2/companies/1345/items
[
{
“companyId”: 1345,
“itemCode”: “8987987”,
“taxCode”: “DC010500”,
“description”: “My Custom Item”
}
]
Once you have created items, you can then use the Item Code from each item in your CreateTransaction API call.
AvaTax will lookup each item and use the corresponding tax code at the time of your CreateTransaction API call.
This means that the user can visit the AvaTax website anytime and modify their item catalog — the changes will
take effect without any code changes.
It’s worth mentioning that, if your business is part of the Streamlined Sales Tax (SST) program, you will be re-
quired to send both an Ite m Code and Description for each product line on your orders. The Description is an
SST requirement — it’s not listed as a required field for the API. Yet, sending a description is a best practice for all
clients, not just those companies participating in SST program. In general, the Description field is used to specify
additional details about the product, like a name, color, size, etc.
AvaTax Developer Guide • 56
5.4 Chapter Summary
In this chapter, you’ve learned how to identify your products by type and ensure that customers get the correct
tax rate and taxability regardless of what products or services they sell.
Certification Requirements
As a connector developer, you are required to do the following:
•Item Code: Identify item/service/charge code (number, ID) to pass to the AvaTax service. If the cus-
tomer has access to UPC, they should be able to prepend UPC to the code and have it come across
in the item code field. If there is no UPC, it should fall back to SKU.
•Item Description: Identify item/service/charge description to pass to the AvaTax service with a
human-readable description or item name.
•AvaTax tax code mapping (Item Code/SKU): Association of an item or item group to an AvaTax
Tax Code to describe the taxability group (e.g. Clothing-Shirts – B-to-C). If possible, this should be
assigned at the item category level as well as the item level.
You may optionally also allow your customers to search through TaxCodes interactively using the List-
TaxCodesbyCompany API. This is considered a best practice, but is not required of all connector devel-
opers.
Tests in this chapter:
• 5.1.1 - Finding a Tax Code
• 5.2.1 - TaxCodes and Exemptions - Washington State
• 5.2.2 - TaxCodes and Exemptions - NewYork

AvaTax Developer Guide • 57
Chapter 6 - Discounts and Overrides
In this chapter, we’ll explain how to use Overrides and Discounts in AvaTax.
• An override is used when your transaction overrides normal behavior of the AvaTax engine. It can be used to
change the tax amount or tax date for a transaction.
• Discount is a reduction of the price on your item/service. There are several ways you can handle a discount
with the AvaTax engine.
By the end of this chapter, you will be familiar with how to process both Tax A m o unt and TaxDate overrides as well
as understand the various methods used to handle discounts.
6.1 - Tax Overrides
There are two types of overrides supported in AvaTax: Tax A m o un t and TaxDate. The TaxAmount Override
[c h e c k], will do just that, override the tax amount on the transaction. This is particularly helpful if you need to
record transactions to AvaTax which had the tax calculated in another system. The TaxDate override, allows you
to specify what tax date to use in the calculation. By default, the AvaTax engine will use the document date as the
TaxDate. The common use-case for this override is processing refunds, as you want to calculate the refund tax
credit using the same information that the original sale used. Let’s take a closer look at each method.
Overriding the Tax Amount
A tax amount override is when you override the tax amount of a transaction rather than having AvaTax calculate it.
This feature is available so that you can import transactions where you’ve already calculated the tax amount prior
to using AvaTax. An example would be when you are importing data from an older system so that you can keep
all your data in AvaTax. Other customers may choose to use this feature to import data from partner sales — for
example, if you were selling via a merchant platform and you want to import your data into AvaTax.
Tax amount overrides can also be used to determine the difference between tax paid to a vendor and consumer
use tax due to an authority. This is covered in more detail in Chapter 10 - Consumer Use Tax.
Test Case 6.1.1 - Tax Override
Setup
• You calculated tax for a transaction using your old tax software, and you are importing this transaction
into AvaTax.
• The tax calculated by your old tax software was $5.67.
• In your connector, create the following transaction:
°Document Type: SalesInvoice
°Document Code: Chapter-6-Test-1
°Company Code: DEVGUIDE
°Document Date: 2017-0 6-15
°Customer Code: TESTCUSTOMER
• Addresses:
°SingleLocation: 100 Ravine Lane NE, Bainbridge Island, WA, 98110
• Line #1:
°Amount: 100
°TaxCode: P0000000

AvaTax Developer Guide • 58
• Add a TaxOverride to set the TaxAmount to $5.67, and specify the reason as “Importing tax calculated by
previous tax software”
• Calculate tax for your transaction using AvaTax.
Assertions
• The totalTax amount for the transaction should be $5.67. This is the amount you calculated in your previ-
ous tax software.
• The totalTaxCalculated amount should be $9.00. This is the amount that AvaTax determined is correct.
Expected API Call
{
“type”: “SalesInvoice”,
“code”: “Chapter-6-Test-1”,
“companyCode”: “DEVGUIDE”,
“date”: “2017-06-15”,
“customerCode”: “TESTCUSTOMER”,
“addresses”: {
“singleLocation”: {
“line1”: “100 Ravine Lane NE”,
“city”: “Bainbridge Island”,
“r e gio n ”: “ W A”,
“country”: “US”,
“ p o s t alC o d e”: “9 8 110 ”
}
},
“ lin e s”: [
{
“ n u m b e r ”: “ 1”,
“amount”: 100,
“taxCode”: “P0000000”
}
],
“taxOverride”: {
“type”: “taxAmount”,
“taxAmount”: 5.67,
“reason”: “Importing tax calculated by previous tax software”
}
}
Overriding the Tax Date
TaxDate overrides are used when you want to calculate tax on a date different than the date of a document. For
example, if you are returning a product, the tax date of the transaction would be the date of the original transac-
tion, rather than the date of the refund.
Let’s say Alice purchases a new chair from the store on May 1st. She discovers that the chair doesn’t fit in her
home office, and she decides to return the chair on June 1st. If you calculate tax on the June 1st date, you might
refund a different amount of tax to Alice than she paid on May 1st. So you use a TaxDate override to ensure that
the tax rates are calculated as of May 1st.

AvaTax Developer Guide • 59
Test Case 6.1.2 - TaxDate Override
Setup
• In your connector, create the following transaction:
°Document Type: SalesInvoice
°Document Code: Chapter-6-Test-2
°Document Date: 2017-0 6-15
°Company Code: TESTCUSTOMER
• Addresses:
°SingleLocation: 100 Ravine Lane NE, Bainbridge Island, WA, 98110
• Line #1:
° Amount: 100
° TaxCode: P0000000
• Add a TaxOverride to set the TaxAmount to $5.67, and specify the reason as “Importing tax calculated by
previous tax software”
• Calculate tax for your transaction using AvaTax.
Assertions
• The document level TaxDate should now show 5/01/2017
• The totalTaxCalculated amount should be $9.00. This is the amount that AvaTax determined is correct.
Expected API Call
{
“type”: “ReturnInvoice”,
“code”: “Chapter-6-Test-2”,
“companyCode”: “DEVGUIDE”,
“date”: “2017-06-15”,
“customerCode”: “TESTCUSTOMER”,
“addresses”: {
“singleLocation”: {
“line1”: “100 Ravine Lane NE”,
“city”: “Bainbridge Island”,
“r e gio n ”: “ W A”,
“country”: “US”,
“ p o s t alC o d e”: “9 8 110 ”
}
},
“ lin e s”: [
{
“ n u m b e r ”: “ 1”,
“amount”: 100,
“taxCode”: “P0000000”
}
],
“taxOverride”: {
“type”: “taxDate”,
“taxDate”: “2017-05-01”,
“reason”: “Refund for purchase of chair”
}
}

AvaTax Developer Guide • 60
Line Level Overrides
The examples we have used so far have all shown the Tax A m ou nt/Ta xDat e overrides at the document level. It is
also important to note that these overrides can also be applied at the line level.
Test Case 6.1.3 - Line Level Tax Override
Setup
• In your connector, create the following transaction:
°Document Type: SalesInvoice
°Document Code: Chapter-6-Test-3
°Company Code: DEVGUIDE
°Document Date: 2017-0 6-15
°Customer Code: TESTCUSTOMER
• Addresses:
°SingleLocation: 100 Ravine Lane NE, Bainbridge Island, WA, 98110
• Line #1:
°Amount: 100
°TaxCode: P0000000
• Add a TaxOverride to the line object and set the TaxDate to 2017-05-01 and specify the reason as “Refund
for purchase of chair”
• Calculate tax for your transaction using AvaTax.
Assertions
• The Line 1 TaxDate should now show 5/01/2017.
• The totalTaxCalculated amount should be $9.00. This is the amount that AvaTax determined is correct.
Expected API Call
{
“type”: “ReturnInvoice”,
“code”: “Chapter-6-Test-3”,
“companyCode”: “DEVGUIDE”,
“date”: “2017-06-15”,
“customerCode”: “TESTCUSTOMER”,
“addresses”: {
“singleLocation”: {
“line1”: “100 Ravine Lane NE”,
“city”: “Bainbridge Island”,
“r e gio n ”: “ W A”,
“country”: “US”,
“ p o s t alC o d e”: “9 8 110 ”
}
},
“ lin e s”: [
{
“ n u m b e r ”: “ 1”,
“amount”: 100,
“taxCode”: “P0000000”,
“taxOverride”: {
“type”: “taxDate”,

AvaTax Developer Guide • 61
“taxDate”: “2017-05-01”,
“reason”: “Refund for purchase of chair”
}
}
]
}
Consumer Use Tax Overrides
The Tax Override function is also used for verification of merchant charged tax in a Use Tax scenario. This will be
explained in more detail in Chapter 10 - Consumer Use Tax.
6.2 - Discounting a Transaction
You have several options for handling discounts with AvaTax. However, before we get to into the details we need
to call out the different types of discounts you can apply as each is handled differently. Vendor discounts are
simply a price reduction in the sale amount of an item or service. Whereas 3rd party (manufacturer) discounts are,
generally speaking, a price reduction sponsored by the manufacturer where the vendor is compensated for the
reduced price.
When dealing with discounts, there are four basic ways to represent a discount:
• A reduction in the sale price
• A line item with a negative amount
• A discount to distribute among lines
• A line item using the Manufacturer Discount TaxCode
Let’s review each of these in turn.
Price Reduction Discounts
For this first discount exercise, we are going to perform the discount before sending the request to AvaTax for a
tax calculation. So, if the item has a cost of $100 and you are applying a $10 discount, the GetTax request should
have an amount of $90. This is the simplest method for handling a discount as it does not involve any additional
fields or lines in the GetTax request.
Test Case 6.2.1 - Price Reduction Discount
Setup
• You would like to provide a $10 discount on a $100 chair.
• In your connector, create the following transaction:
°Document Type: SalesInvoice
°Document Code: Chapter-6-Test-4
°Company Code: DEVGUIDE
°Document Date: 2017-0 6-15
°Customer Code: TESTCUSTOMER
• Addresses:
°SingleLocation: 100 Ravine Lane NE, Bainbridge Island, WA, 98110
• Line #1:

AvaTax Developer Guide • 62
° Amount 100
° TaxCode P0000000
• Calculate tax for your transaction using AvaTax.
Assertions
• The totalTaxCalculate d amount should be $8.10. This is the amount that AvaTax determined is correct.
• Notice that, in the transaction, there is no way to determine that a discount has been applied — you only
know the discounted sale price of the transaction.
• Some customers may choose to use Reference Fields to keep track of discounts applied as a price reduc-
tion. See Chapter 3 - Customizing Your Transaction for more information about reference fields.
Expected API Call
{
“type”: “SalesInvoice”,
“code”: “Chapter-6-Test-4”,
“companyCode”: “DEVGUIDE”,
“date”: “2017-06-15”,
“customerCode”: “TESTCUSTOMER”,
“addresses”: {
“singleLocation”: {
“line1”: “100 Ravine Lane NE”,
“city”: “Bainbridge Island”,
“r e gio n ”: “ W A”,
“country”: “US”,
“ p o s t alC o d e”: “9 8 110 ”
}
},
“ lin e s”: [
{
“ n u m b e r ”: “ 1”,
“amount”: 90,
“taxCode”: “P0000000”
}
]
}
Negative Amount Line Items
With this, exercise you will simply add an additional line that contains the discounted amount as a negative extend-
ed amount. Please be sure to use the same taxCode on the discount line as the item being discounted. This will
ensure that any taxability rules applied to the product/service are also applied to the discount.

AvaTax Developer Guide • 63
Test Case 6.2.2 - Negative Amount Line Items
Setup
• You would like to provide a $10 discount on a $100 T-Shirt.
• In your connector, create the following transaction:
°Document Type: SalesInvoice
°Document Code: Chapter-6-Test-5
°Company Code: DEVGUIDE
°Document Date: 2017-0 6-15
°CustomerCode: TESTCUSTOMER
• Addresses:
°SingleLocation: 100 Ravine Lane NE, Bainbridge Island, WA, 98110
• Line #1:
°Amount: 100
°TaxCode: PC040100
• Line #2:
°Amount: -10
°TaxCode: PC040100
°Calculate tax for your transaction using AvaTax.
Assertions
• The totalTaxCalculated amount should be $8.10. This is the amount that AvaTax determined is correct.
• The taxCode for the discount line should match the line being discounted.
Expected API Call
{
“type”: “ReturnInvoice”,
“code”: “Chapter-6-Test-5”,
“companyCode”: “DEVGUIDE”,
“date”: “2017-06-15”,
“customerCode”: “TESTCUSTOMER”,
“addresses”: {
“singleLocation”: {
“line1”: “100 Ravine Lane NE”,
“city”: “Bainbridge Island”,
“r e gio n ”: “ W A”,
“country”: “US”,
“ p o s t alC o d e”: “9 8 110 ”
}
},
“ lin e s”: [
{
“ n u m b e r ”: “ 1”,
“amount”: 100,
“taxCode”: “P0000000”
},
{
“ n u m b e r ”: “ 2 ”,
“amount”: -10,
“taxcode”: “P0000000”
AvaTax Developer Guide • 64
}
]
}
Automatically Distributed Discounts
With this exercise you will pass the complete discounted amount in the discount field then identify the lines that
are participating in the discount by setting the discounted field to ‘True’. Unlike the other methods, you will enter
the total discount as a positive integer with this approach. If no lines have the discounted set to ‘True’, then the
discount will NOT be applied.
Test Case 6.2.3 - Automatically Distributed Discounts
Setup
• You would like to provide a $10 discount on a $100 T-Shirt only.
• In your connector, create the following transaction:
°Document Type: SalesInvoice
°Document Code: Chapter-6-Test-6
°Company Code: DEVGUIDE
°Document Date: 2017-0 6-15
°CustomerCode: TESTCUSTOMER
°Discount: 10
• Addresses:
°SingleLocation: 100 Ravine Lane NE, Bainbridge Island, WA, 98110
• Line #1:
°Amount: 100
°TaxCode: PC040100
°Discounted: True
• Line #2:
°Amount: 75
°TaxCode: P0000000
°Discounted: False
• Calculate tax for your transaction using AvaTax.
Assertions
• The discountAmount for Line 1 should be $10.
• The taxableAmount for Line 1 should be $90
• The TaxCalculated for Line 1 should be $8.10. This is the amount that AvaTax determined is correct.
• The discountAmount for Line 2 should be $0.
• The taxableAmount for Line 1 should be $75
• The TaxCalculated for Line 1 should be $6.75. This is the amount that AvaTax determined is correct.
Expected API Call
{
“type”: “SalesInvoice”,
“code”: “Chapter-6-Test-6”,
“companyCode”: “DEVGUIDE”,
“date”: “2017-06-15”,

AvaTax Developer Guide • 65
“customerCode”: “TESTCUSTOMER”,
“discount”: “10”,
“addresses”: {
“singleLocation”: {
“line1”: “100 Ravine Lane NE”,
“city”: “Bainbridge Island”,
“r e gio n ”: “ W A”,
“country”: “US”,
“ p o s t alC o d e”: “9 8 110 ”
}
},
“ lin e s”: [
{
“ n u m b e r ”: “ 1”,
“amount”: 100,
“taxCode”: “P0000000”,
“discounted”: “true”
},
{
“ n u m b e r ”: “ 2 ”,
“amount”: 75,
“taxcode”: “P0000000”,
“discounted”: “false”
}
]
}
Manufacturer Discount TaxCode
When working with discounts provided by a 3rd party (ex. manufacturer coupon) the process is very similar to the
discount method of adding a line with a negative amount. However in this case, instead of using the same tax code
as the item being discounted, you will use the tax code for Coupons (third party) - OC030000. Check out Chapter
5 - Product Taxability for more information on tax codes and their function.
Test Case 6.2.4 - Manufacturer Discount TaxCode
Setup
• You would like to provide a $10 discount on a $100 T-Shirt.
• In your connector, create the following transaction:
°Document Type: SalesInvoice
°Document Code: Chapter-6-Test-7
°Company Code: DEVGUIDE
°Document Date: 2017-0 6-15
°Customer Code: TESTCUSTOMER
• Addresses:
°SingleLocation: 100 Ravine Lane NE, Bainbridge Island, WA, 98110
• Line #1:
°Amount: 100

AvaTax Developer Guide • 66
°TaxCode: PC040100
• Line #2:
°Amount: -10
°TaxCode: OC030000
• Calculate tax for your transaction using AvaTax
Assertions
• The totalTaxCalculated amount should be $9.00. This is the amount that AvaTax determined is correct.
Expected API Call
{
“type”: “SalesInvoice”,
“code”: “Chapter-6-Test-7”,
“companyCode”: “DEVGUIDE”,
“date”: “2017-06-15”,
“customerCode”: “TESTCUSTOMER”,
“addresses”: {
“singleLocation”: {
“line1”: “100 Ravine Lane NE”,
“city”: “Bainbridge Island”,
“r e gio n ”: “ W A”,
“country”: “US”,
“ p o s t alC o d e”: “9 8 110 ”
}
},
“ lin e s”: [
{
“ n u m b e r ”: “ 1”,
“amount”: 100,
“taxCode”: “P0000000”
},
{
“ n u m b e r ”: “ 2 ”,
“amount”: -10,
“taxcode”: “OC030000”
}
]
}
6.3 Summary
In summary, you should be able to:
• Create a transaction with a Tax A m o unt Override.
• Create a transaction with a TaxDate Override.
• Create a transaction with either a Tax A m ou nt or TaxDate override at the line level.
• Create a transaction with a post discount amount.
• Create a transaction with a discount line item.
• Create a transaction with a discount at the header level.

AvaTax Developer Guide • 67
• Create a transaction with a 3rd party (Manufacturer) discount.
Certification Requirements
AvaTax Certified Connectors must handle discounts appropriately by using one of the methods outlined
in this chapter. To have your integration certified AvaTax for Refunds/Credit Memos: you will need to
demonstrate that credit memo transactions send the current transaction date as the docuemnt date, as
well as the original transaction sale date as the TaxOverride/TaxDate. Please note, the RefundTransaction
API automates much of this process.
Tests in this chapter
• 6.1.1 - Tax Override
• 6.1.2 - TaxDate Override
• 6.1.3 - Line Level Tax Override
• 6.2.1 - Price Reduction Discount
• 6.2.2 - Negative Amount Line Items
• 6.2.3 - Automatically Distributed Discounts
• 6.2.4 - Manufacturer Discount TaxCode

AvaTax Developer Guide • 68
Chapter 7 - Shipping and Handling
In this chapter we will take a look at how you can incorporate shipping and handling charges into your transac-
tion. We will build on the lessons learned in Chapter 3 - Customizing Your Transaction and Chapter 5 - Product
Taxability.
Often relegated to a single notation on an invoice, shipping and handling charges play an important role in the tax
calculation of a document. So, how should you include the shipping/handling charge in a tax request? The answer
may surprise you, shipping/handling is treated just like any other line item on an invoice.
7.1 - Taxability of Shipping Charges
Because we treat freight/shipping just like any other line item on the document, you can associate a tax code to
your freight/shipping line item. The taxability of freight/shipping will vary from jurisdiction to jurisdiction. Depend-
ing on how you ship your goods, via USPS, FedEx or UPS may have different taxability than if you ship via your own
company truck. We have quite a few different freight tax codes to choose from, make sure that you select a code
that is representative of how you ship your goods. Take a look at our tax code lookup utility.
Address Types
By now, you’ve become familiar with SingleLocation, ShipTo, and ShipFrom address types. Let’s recap what each
address type means and introduce two additional address types that are available for use within AvaTax, PointO-
fOrderOrigin and PointOfOrderAcceptance:
• SingleLocation – Origin and Destination in which an item was purchased and accepted.
• ShipFrom – Origin location from where the item is being shipped
• ShipTo Destination location where the item is being delivered
• PointOfOrderOrigin – Origin location from which the order was placed
• PointOfOrderAcceptance – Destination location from which the seller accepted the order
For most users, including ShipFrom and ShipTo in your transactions will be sufficient. You’ll want to consider what
will benefit your needs and your customers’ needs and address them as needed.
Putting It All Together
Now, let’s take a look at a simple transaction with shipping charges included. We will be using the taxability code
FR020100 for our shipping charge. This code is defined as “Shipping via common carrier FOB destination”.
Test Case 7.1.1 - Simple Transcaction Including Shipping Charges
Setup
• You are shipping an item from Washington to Florida.
• In your connector, create the following transaction:
°Document Type: SalesInvoice
°Document Code: Chapter-7-Test-1
°Company Code: DEVGUIDE
°Document Date: 2017-0 6-15
°Customer Code: TESTCUSTOMER
• Addresses:
°ShipFrom: 100 Ravine Lane NE, Bainbridge Island, WA 98110

AvaTax Developer Guide • 69
°ShipTo: 3500 Pan American Dr., Miami FL 33133
• Line #1:
° Quantity: 10
° Amount 100
° TaxCode P0000000
° Item Code: Widgets
° Description: Taxable Gizmo
• Line #2:
° Quantity: 1
° Amount 5
° TaxCode FR020100
° Item Code: Shipping
• Calculate tax for your transaction using AvaTax.
Assertions
• The totalTax should be $7.35.
• The tax amount for Shipping should be $0.35.
Expected API Call
{
“type”: “SalesInvoice”,
“code”: “Chapter-7-Test-1”,
“companyCode”: “DEVGUIDE”,
“date”: “2017-06-15”,
“customerCode”: “TESTCUSTOMER”,
“addresses”: {
“shipFrom”: {
“line1”: “100 Ravine Lane NE”,
“city”: “Bainbridge Island”,
“r e gio n ”: “ W A”,
“country”: “US”,
“ p o s t alC o d e”: “9 8 110 ”
},
“s h ipTo”: {
“line1”: “3500 Pan American Dr.”,
“city”: “Miami”,
“r e gio n ”: “F L”,
“country”: “US”,
“postalCode”: “33133”
}
},
“ lin e s”: [
{
“ n u m b e r ”: “ 1”,
“quantity”: 10,
“amount”: 100,
“taxCode”: “P0000000”,
“itemCode”: “Widgets”,
“description”: “Taxable Gizm o”
},
{
AvaTax Developer Guide • 70
“ n u m b e r ”: “ 2 ”,
“quantity”: 1,
“amount”: 5,
“taxCode”: “FR020100”,
“itemCode”: “Shipping”
}
]
}
So you can see that adding a freight charge to a transaction is no different from adding another item to the
transaction. One item to consider is how you will associate the freight tax code with the freight charge within your
application. For certified integrations, the merchant must be able to update this tax code, depending on how they
ship their goods.
Now let’s take a look at the transaction when we ship an item that is non-taxable in Florida:
Test Case 7.1.2 – Shipping a Non-taxable Transaction
Setup
• You are shipping an item from Washington to Florida.
• In your connector, create the following transaction:
°Document Type: SalesInvoice
°Document Code: Chapter-7-Test-2
°Document Date: 2017-0 6-15
°Customer Code: TESTCUSTOMER
• Addresses:
°ShipFrom: 100 Ravine Lane NE, Bainbridge Island, WA 98110
°ShipTo: 3500 Pan American Dr., Miami FL 33133
• Line #1:
°Quantity: 10
°Amount: 100
°TaxCode: NT
°Item Code: Widgets
°Description: “Non-Taxable Gizmo”
Line #2:
°Quantity: 1
°Amount: 5
°TaxCode: FR020100
°Item Code: Shipping
• Calculate tax for your transaction using AvaTax.
Assertions
• The totalTax amount for the transaction should be $0.
• The tax of the shipping line item followed the taxability of the items being shipped.
Expected API Call
{

AvaTax Developer Guide • 71
“type”: “SalesInvoice”,
“code”: “Chapter-7-Test-2”,
“companyCode”: “DEVGUIDE”,
“date”: “2017-06-15”,
“customerCode”: “TESTCUSTOMER”,
“addresses”: {
“shipFrom”: {
“line1”: “18300 Von Karman Ave”,
“c it y ”: “Ir v in e”,
“r e gio n ”: “ C A”,
“country”: “US”,
“ p o s t alC o d e”: “9261 2 ”
},
“s h ipTo”: {
“line1”: “3500 Pan American Dr.”,
“city”: “Miami”,
“r e gio n ”: “F L”,
“country”: “US”,
“postalCode”: “33133”
}
},
“ lin e s”: [
{
“ n u m b e r ”: “ 1”,
“quantity”: 10,
“amount”: 100,
“taxCode”: “NT”,
“itemCode”: “Widgets”,
“description”: “Non-Taxable Gizmo”
},
{
“ n u m b e r ”: “ 2 ”,
“quantity”: 1,
“amount”: 5,
“taxCode”: “FR020100”,
“itemCode”: “Shipping”
}
]
}
In the previous example the freight was taxable, however this time the freight was exempt. This is because in this
particular jurisdiction the taxability of the freight will follow the taxability of the items on the invoice. So, if the
items being shipped are exempt, so is the freight.
Now, let’s take a look a the behavior when we have more than one item being shipped and the taxability of the
items is different:

AvaTax Developer Guide • 72
Test Case 7.1.3 – Shipping Items with Different Taxability
Setup
• You are shipping an item from Washington to Florida.
• In your connector, create the following transaction:
°Document Type: SalesInvoice
°Document Code: Chapter-7-Test-3
°Company Code: DEVGUIDE
°Document Date: 2017-0 6-15
°Customer Code: TESTCUSTOMER
• Addresses:
°ShipFrom: 100 Ravine Lane NE, Bainbridge Island, WA 98110
°ShipTo: 3500 Pan American Dr., Miami FL 33133
• Line #1:
°Quantity: 100
°Amount: 100
°TaxCode: P0000000
°Item Code: Widgets
°Description: Taxable Gizm o
• Line #2:
°Quantity: 10
°Amount: 100
°TaxCode: NT
°Item Code: Widgets
°Description: Non-Taxable Gizmo
• Line #3:
°Quantity: 1
°Amount: 5
°Tax Code: FR020100
°Item Code: Shipping
• Calculate tax for your transaction using AvaTax.
Assertions
• The totalTax amount should be $7.18.
• Line 2 should have a tax amount of $0.00.
Expected API Call
{
“type”: “SalesInvoice”,
“code”: “Chapter-7-Test-3”,
“companyCode”: “DEVGUIDE”,
“date”: “2017-06-15”,
“customerCode”: “TESTCUSTOMER”,
“addresses”: {
“shipFrom”: {
“line1”: “100 Ravine Lane NE”,
“city”: “Bainbridge Island”,
“r e gio n ”: “ W A”,
“country”: “US”,
“ p o s t alC o d e”: “9 8 110 ”

AvaTax Developer Guide • 73
},
“s h ipTo”: {
“line1”: “3500 Pan American Dr.”,
“city”: “Miami”,
“r e gio n ”: “F L”,
“country”: “US”,
“postalCode”: “33133”
}
},
“ lin e s”: [
{
“ n u m b e r ”: “ 1”,
“quantity”: 10,
“amount”: 100,
“taxCode”: “P0000000”,
“itemCode”: “Widgets”,
“description”: “Taxable Gizm o”
},
{
“ n u m b e r ”: “ 2 ”,
“quantity”: 10,
“amount”: 100,
“taxCode”: “NT”,
“itemCode”: “Widgets”,
“description”: “Non-Taxable Gizmo”
},
{
“number”: “3”,
“quantity”: 1,
“amount”: 5,
“taxCode”: “FR020100”,
“itemCode”: “Shipping”
}
]
}
7.2 - Taxability of Handling Charges
Depending on how you show the handling charge on your document, it may be included with your freight/shipping
line item, or it can be a line itself on the transaction. In the case where your handling charge is combined with
freight/shipping, you do not need a separate line, there is a tax code that covers this scenario, FR030000. When
your handling charge is separately stated from the freight/shipping charge, you just need to treat the handling
charge as another line. Let’s take a look at our transaction again, this time with handling separately stated:

AvaTax Developer Guide • 74
Test Case 7.2.1 – Handling Charges Taxability
Setup
• You are shipping an item from Washington to Florida.
• In your connector, create the following transaction:
°Document Type: SalesInvoice
°Document Code: Chapter-7-Test-4
°Company Code: DEVGUIDE
°Document Date: 2017-0 6-15
°Customer Code: TESTCUSTOMER
• Addresses:
°ShipFrom: 100 Ravine Lane NE, Bainbridge Island, WA 98110
°ShipTo: 3500 Pan American Dr., Miami FL 3133
• Line #1:
• Quantity
°Amount: 100
°TaxCode: P0000000
°Item Code: Widgets
°Description: Taxable Gizm o
• Line #2:
°Quantity: 10
°Amount: 100
°TaxCode: NT
°Item Code: Widgets
°Description: Non-Taxable Gizmo
• Line #3:
°Quantity: 1
°Amount: 5
°TaxCode: FR020100
°Item Code: Shipping
• Line #4:
°Quantity: 1
°Amount: 3
°Tax Code: OH010000
°Item Code: Handling
• Calculate tax for your transaction using AvaTax.
Assertions
• The totalTax amount should be $7.29
• Line 2 should have a tax amount of $0.00
• Your 4th line should now include your handling
Expected API Call
{
“type”: “SalesInvoice”,
“code”: “Chapter-7-Test-4”,
“companyCode”: “DEVGUIDE”,
“date”: “2017-06-15”,
“customerCode”: “TESTCUSTOMER”,
“addresses”: {

AvaTax Developer Guide • 75
“shipFrom”: {
“line1”: “100 Ravine Lane NE”,
“city”: “Bainbridge Island”,
“r e gio n ”: “ W A”,
“country”: “US”,
“ p o s t alC o d e”: “9 8 110 ”
},
“s h ipTo”: {
“line1”: “3500 Pan American Dr.”,
“city”: “Miami”,
“r e gio n ”: “F L”,
“country”: “US”,
“postalCode”: “33133”
}
},
“ lin e s”: [
{
“ n u m b e r ”: “ 1”,
“quantity”: 10,
“amount”: 100,
“taxCode”: “P0000000”,
“itemCode”: “Widgets”,
“description”: “Taxable Gizm o”
},
{
“ n u m b e r ”: “ 2 ”,
“quantity”: 10,
“amount”: 100,
“taxCode”: “NT”,
“itemCode”: “Widgets”,
“description”: “Non-Taxable Gizmo”
},
{
“number”: “3”,
“quantity”: 1,
“amount”: 5,
“taxCode”: “FR020100”,
“itemCode”: “Shipping”
},
{
“ n u m b e r ”: “4”,
“quantity”: 1,
“amount”: 3,
“taxCode”: “OH010000”,
“itemCode”: “Handling”
}
]
}

AvaTax Developer Guide • 76
7.3 Chapter Summary
In this chapter you’ve learned how to account for shipping and handling charges, as well the implication they can
have on tax determinations depending on the jurisdictions you’re shipping to and from.
We recommend that a connector provide the following functionality:
• If you have a native built-in function for shipping or freight charges for the user interface to allow for that sec-
tion of the platform to show a tax code box where a customer can input any of our shipping tax codes.
• If your platform doesn’t have a native built-in function for shipping and the customer is instructed to simply
add shipping as a separate charge or line of the order, they should be able to create a misc charge item or
freight item within their inventory/services management and map it to a shipping tax code so that they can
select the appropriate shipping method when invoicing their clients.
Optionally, you can include additional features if you choose:
• Use the GET Tax Code Definitions method of the API in order to build a search of our tax codes within the
application, so that the customer can search by keyword within the application for the appropriate shipping
tax code without having to exit the application itself.
These optional features are available but are not required for certified connectors.
Certification Requirements
Freight Items must be transmitted separately — Freight Items must be sent to AvaTax as a separate line
item with appropriate tax code.
Tests you can use to verify that your connector is working correctly:
• 7.1.2 - Shipping a Non-taxable Transaction
• 7.1.3 - Shipping Items with Different Taxability
• 7.2.1 - Handling Charges Taxability

AvaTax Developer Guide • 77
Chapter 8 - Exemptions
This chapter is about exemptions - in other words, the reasons that certain transactions are not taxed. By the end
of this chapter, you will learn the following:
• All the factors that could cause tax on a transaction to be zero
• Which factors are company-related, which are product-related, and which are transaction-related
• How to allow a customer to choose these factors correctly in your user interface
• Test cases that must be understood to correctly handle tax exemptions
One of the most common questions asked about tax software is, “Why is there no tax on this transaction?” Since
a tax calculation involves many different factors, let’s begin by analyzing all the reasons that a transaction could be
calculated to have zero tax. In some cases, the tax on a transaction is correctly zero; in other cases, a customer is
considered exempt from tax.
Let’s begin by looking at the reasons why tax could be zero on a transaction.
8.1 - Reasons Tax Can Be Zero
There are a few key reasons why the tax on a transaction can be zero.
• In the United States, a company may not be compelled to collect tax. For example, this will occur if the compa-
ny is selling a product in a jurisdiction where they do not have Nexus. In this case, it is legally the responsibility
of the buyer to remit Consumer Use Taxes, but the seller is not required to charge taxes on the transaction.
• Some states in the United States have zero sales or use tax rates.
• A product may be non-taxable, or exempt, or have its tax rate set to zero. Some jurisdictions use the phrase
“Nontaxable” to refer to product-taxability, while others refer to this as an “Exemption” or a “Zero-Rate”. This
use case is fully described in Chapter 5 - Product Taxability.
Companies Without Nexus
The most common reason that tax could be zero is if your company does not have Nexus, and is not obligated to
collect tax.
This definition of the word Nexus comes from the United States, where a legal ruling by the Supreme Court es-
tablished that a company must only collect tax if they have sufficient “Nexus” in a jurisdiction. Unfortunately, the
specific definition of Nexus is complex and changes when new laws are passed or when new legal precedents are
established.
When using AvaTax, your company must decide where it has nexus, and where it does not. This selection is used
to determine whether you are obligated to collect taxes. For example, if your company has nexus in the state of
Massachusetts, but you do not have nexus in the state of Rhode Island, in general a tax calculation for a customer
in Rhode Island will result in zero tax. According to legal precedents in the United States, this zero tax means that
it is the responsibility of the buyer, instead, to determine the correct tax to pay to the taxing authority. This tax
obligation is called “Consumer Use Tax”.
Please be careful not to misuse information about nexus. Even if a company does not have nexus in a jurisdiction,
that company must still call AvaTax to record its transactions. The Avalara Managed Returns Service reports trans-
actions as well as exempt dollar amounts based on legal filing requirements. Even jurisdictions where a company
does not have nexus may sometimes require tax reporting. Additionally, companies can change their nexus decla-
rations at any time — so you must always call CreateTransaction even if you believe the company has not declared
nexus in a particular jurisidiction.

AvaTax Developer Guide • 78
Here’s a test that helps show how a company’s nexus settings affect tax calculations:
Test Case 8.1.1 – Companies without Nexus
Set Up
• Your DEVGUIDE company should have nexus in Washington State, but not in Rhode Island.
• In your connector, create the following transaction:
°Transaction Type: SalesInvoice
°Transaction Code: Chapter-8-Test-1
°Document Date: 2017-0 6-15
°Customer Code: TESTCUSTOMER
• Addresses:
°SingleLocation: 468 Angell Street, Providence, RI 02906
• Line #1
°Amount: 100
°TaxCode: P0000000
°Calculate tax for your transaction using AvaTax.
Assertions
• The tax for line 1 should be $0.00.
• The Taxable amount for line 1 should be $0.00.
• The Exempt amount for line 1 should be $100.00.
Expected API Call
{
“type”: “SalesInvoice”,
“code”: “Chapter-8-Test-1”,
“companyCode”: “DEVGUIDE”,
“date”: “2017-06-15”,
“customerCode”: “TESTCUSTOMER”,
“addresses”: {
“singleLocation”: {
“line1”: “468 Angell Street”,
“city”: “Providence”,
“r e gio n ”: “R I”,
“country”: “US”,
“postalCode”: “02906”
}
},
“ lin e s”: [
{
“ n u m b e r ”: “ 1”,
“amount”: 100,
“taxCode”: “P0000000”
}
]
}

AvaTax Developer Guide • 79
States Without Sales Tax
Some states or tax authorities in the United States do not collect sales, use, or transactional taxes. In this case,
transactions will correctly show zero tax, unless they trigger special excise taxes or other functionality.
Let’s look briefly at the status of sales tax in a few notable states. These states are often called the “NOMAD”
states, after an acronym that lists the state names: New Hampshire, Oregon, Montana, Alaska, and Delaware.
• The state of Alaska does not have a state sales tax. However, Alaska is also what is known as a “Home Rule”
state, where individual cities and counties are granted the authority to levy and administer their own sales
taxes. This means that, although you will generally not calculate state sales tax in Alaska, local jurisdictions
within Alaska may request that you pay sales, seller’s use, or consumer use tax if you have nexus within that
jurisdiction. Because of this Home Rule designation, it is necessary for companies to correctly declare their
nexus within Alaska and within local jurisdictions within the state of Alaska even though the state itself does
not charge sales tax.
• Delaware doesn’t have a sales tax, but it does impose other taxes on businesses based on their gross sales.
These taxes are not calculated transactionally, which means they will not show up on your AvaTax transactions.
• Montana, New Hampshire, and Oregon prohibit local jurisdictions within the state from levying sales taxes. As
a result, these three states do not have any sales tax either at a local or state level.
Although these states do not charge sales tax, it is important that your connector still record tax correctly. Avalara
Certified Connectors must record transactions in AvaTax even if the transaction is within these NOMAD states.
This is necessary because:
•Laws can change – Avalara continually researches tax laws and updates our software promptly as soon as
any changes affect correct tax calculation. If any state changes its tax laws, your customers should not have to
update their connector.
•Sourcing rules can change – Some states can change their tax rules to determine the origin or destination
of a transaction differently based on other factors such as the billing address or the call center address of a
transaction. In this case, a transaction that was previously nontaxable based on a NOMAD state law may be-
come taxable based on the origination of the shipment.
•Tax types can change – Depending on your customer’s subscriptions, Avalara provides support for excise,
telecommunications, E-Waste, bottle taxes, and more. These tax types may not always be exempt in NOMAD
states.
To ensure that your connector correctly sends NOMAD tax, you must be able to demonstrate that the tax transac-
tion in the test case below is correctly recorded in AvaTax.
Test Case 8.1.2 - NOMAD Tax
Set Up
• In your connector, create the following transaction:
°Transaction Type: SalesInvoice
°Transaction Code: Chapter-8-Test-1
°Document Date: 2017-0 6-15
°Customer Code: TESTCUSTOMER
• Addresses
°SingleLocation: 720 SW Broadway, Portland, OR 97205
• Line #1
°Amount: 100
°TaxCode: P0000000

AvaTax Developer Guide • 80
• Commit set to “true”
• Calculate tax for your transaction using AvaTax.
• Calculate tax for your transaction using AvaTax.
Assertions
• The tax for line 1 should be $0.00.
• The Taxable amount for line 1 should be $0.00.
• The Exempt amount for line 1 should be $100.00.
• The transaction’s Status should be “Committed”.
Expected API Call
{
“type”: “SalesInvoice”,
“code”: “Chapter-8-Test-1”,
“companyCode”: “DEVGUIDE”,
“date”: “2017-06-15”,
“customerCode”: “TESTCUSTOMER”,
“commit”: “true”,
“addresses”: {
“singleLocation”: {
“line1”: “720 SW Broadway”,
“city”: “Portland”,
“region”: “OR”,
“country”: “US”,
“postalCode”: “97205”
}
},
“ lin e s”: [
{
“ n u m b e r ”: “ 1”,
“amount”: 100,
“taxCode”: “P0000000”
}
]
}
Tax Rate of Zero for a Product
Transactions can also have zero tax if they involve products that are not taxable. Some jurisdictions may choose
not to tax certain products, or to tax them only in certain conditions. The jurisdiction may choose to call the prod-
uct “exempt from tax”, or “nontaxable”, or simply a product with a zero tax rate. AvaTax will determine the taxabili-
ty of the product based on the TaxCode you provide.
Product taxability and TaxCode are discussed in more detail in Chapter 5 - Product Taxability.
Tax Override of Zero
If you are using a tax override to import tax calculated by a different tax engine, AvaTax may assign zero tax to your
transaction in order to match the functionality of your older software.

AvaTax Developer Guide • 81
Tax Overrides are discussed in more detail in Chapter 6 - Discounts and Overrides.
8.2 - Exemption Certificate
An Exemption Certificate provides information about the buyer or customer, and their tax status. The two most
common reasons why a customer might be exempt from collecting sales tax are
• If they have a resale exemption certificate; or
• If they have a direct pay certificate.
In these cases, the seller must document the exemption certificate and be able to produce information about that
certificate in the event of an audit. The AvaTax Certificate APIs provide an easy way to manage exemption certifi-
cates — and they will automatically link to your CertCapture and CertExpress accounts!
Exemption Certificate User Interface
In the B2B world, salespeople need to enter exemption certificates all the time! Let’s make their user interface as
easy as possible. Our goals are to:
• Help the salesperson find the right Customer record.
• Tell the salesperson whether the Customer has a Certificate on file.
• If the salesperson sees that no Certificate is on file, we’ll offer to send the customer a CertExpressInvite.
CertExpress is a friendly web site that allows a customer to upload their exemption certificates directly - it can
save the salesperson a lot of work!
• If the salesperson wants to enter a Certificate while they’re writing the sales invoice, your software can
upload a PDF or JPG file directly to the API.
Exemption Certificates are commonly used in accounting software sales order entry, but are not often seen in a
web storefront. A web storefront may want to provide a CertExpress link on their “Account Profile” page, for
example.
Let’s look at the APIs available to help with each of these tasks.
Find or Create Customer Records
First, when a user fills out a SalesOrder or SalesInvoice document, they will beExpected to select the cus-
tomerCode of the customer placing the transaction. This customerCode value was first explained in Chapter 2 -
Transactions— but here is where we discover how it works.
You can call the ListCustomers API [check] to review a list of all the customers that have been entered. Many
accounting systems prefer to provide a drop-down list of customers to choose from to help the user select the
correct customer code. You might want to filter the list of customers by using the pagination features of the
ListCustomers API [check] to show a small number of customers at a time, or to allow the user to search for a
customer by its name.
When a salesperson user selects a customer from the drop-down list, you may want to offer to load the custom-
er’s address into the “ShipTo” address. This should be considered optional; many businesses have different ship-
ping addresses for every transaction.
If the user doesn’t find the customer they want, you can call the CreateCustomers API to define a customer re-
cord directly in your user interface. This customer record is necessary in order to allow the customer to upload an
exemption certificate.

AvaTax Developer Guide • 82
Test Case 8.2.1 - Finding and Creating Customer Records
Setup
• Call CreateCustomers with the following options:
°CompanyId set to the company ID of your DEVGUIDE company
°CustomerCode: RESELLER
°Name: Alice Example
°Address: 100 Ravine Lane, Bainbridge Island, WA 98110
°Phone number: 949 555 1212
°Email address: alice @ example.org
Assertions
• Customer record is created.
• The record has a valid ID number.
• The record has the customer code RESELLER.
Expected API Call
[
{
“companyId”: 12345,
“customerCode”: “RESELLER”,
“name”: “Alice Example”,
“line1”: “100 Ravine Lane”,
“city”: “Bainbridge Island”,
“r e gio n ”: “ W A”,
“ p o st alC o d e ”: “ 9 8 110 ”,
“country”: “US”,
“phoneNumber”: “(206) 555-1212”,
“emailAddress”: “alice@ exam ple.org”
}
]
Test Case 8.2.2 – No Certificate
Setup
• Call CreateCustomers with the following options:
°CompanyId set to the company ID of your DEVGUIDE company
°CustomerCode:NOCERTIFICATE
°Name: Bob Example
°Address: 1000 Main Street, Irvine, CA 92614
°Phone number: 949 555 1212
°Email address: bob @ example.org
Assertions
• Customer record is created.
• The record has a valid ID number.

AvaTax Developer Guide • 83
• The record has the customer code NOCERTIFICATE.
Expected API Call
[
{
“companyId”: 12345,
“customerCode”: “NOCERTIFICATE”,
“name”: “Bob Example”,
“line1”: “1000 Main Street”,
“c it y ”: “Ir v in e”,
“r e gio n ”: “ C A”,
“ p o st alC o d e ”: “ 92 6 14”,
“country”: “US”,
“phoneNumber”: “(949) 555-1212”,
“emailAddress”: “bob@example.org”
}
]
Certificate Status
When the user has selected a Customer and a ShipTo address for the transaction, you can check to see if the
customer has an exemption certificate on file. Once a customer has been selected, you can determine if the cus-
tomer has an exemption certificate on file by calling ListValidCertificatesForCustomer using the Country and
Region values from the ShipTo address. This API determines if a customer has an exemption certificate on file for
that state.
If the API reports that a certificate is on file, you can call the DownloadCertificateImage API to retrieve a JPG or
PDF of the certificate if the user wishes to preview the document.
If there is no certificate on file, you have two options to help the customer correctly report their certificate: you
can send them an invitation to CertExpress, or you can allow the salesperson to upload a certificate image directly.
Test Case 8.2.3 – Certificate Status
Setup
• Call ListValidCertificatesForCustomer with the following options:
°CustomerCode: RESELLER
°Country: US
°Region: WA
Assertions
• The result has the value Status: NotExempt.
• The “Certificates” array in the result should be null.
Expected API Call
GET /api/v2/co m panies/12345/custom ers/RESELLER /certificates/US/WA

AvaTax Developer Guide • 84
CertExpress Invitations
The CertExpress website is a friendly, step-by-step method of reporting an exemption certificate. When you send
an invitation to CertExpress, the customer making a purchase can visit the website on their own time and upload
an exemption certificate and all the necessary information themselves.
Unfortunately, if the customer doesn’t respond to the CertExpressInvitation quickly enough, the certificate
won’t be available when they make a purchase; which is why a salesperson working hard to close a sale should
always be able to choose either a CertExpress invitation or a direct upload of a certificate.
To send a CertExpress invitation to a customer, call CreateCertExpressInvitation. You will be asked to choose
whether you want an email, download, or facsimile invitation. You can check the status of an invitation, or load an
invitation you created previously, by calling ListCertExpressInvitations.
When creating a CertExpress invitation, you are free to select a cover letter from the available list of prebuilt
cover letters. A cover letter will make an email or facsimile invitation more readable to a customer. You can either
choose the value STANDARD_REQUEST, or call the ListCoverLetters API for a list of available prebuilt cover letters.
If you wish, you can display the hyperlink from the CertExpress invitation directly in your user interface. This allows
a salesperson or customer to click the link and directly jump to the friendly introduction page on CertExpress so
that they can begin uploading an exemption certificate directly.
Note that CertExpress invitations take a few moments to build a custom welcome page for your customer. When
you create a CertExpress invite, check the status value of the result. If the value says “InProgress,” the welcome
page is currently being built. You must delay for a few seconds and fetch back the invitation using GetCertEx-
pressInvitation before the URL will be ready.
Test Case 8.2.4 - CertExpressInvitation
Setup
• Call CreateCertExpressInvitation with the following options:
°CustomerCode: RESELLER
°Recipient: alice @example.org
°CoverLetterTitle: STANDARD_REQUEST
°Delivery method: EMAIL
Assertions
• The status value of the invitation is InProgress.
• The invitation has an ID number.
• The recipient email address is alice@example.org.
• The DeliveryMethod value of the result is set to “email”.
Expected API Call
[
{
“recipient”: “alice @ example.org”,
“coverLetterTitle”: “STANDARD_REQUEST”,
“deliveryMethod”: “Email”
}
]

AvaTax Developer Guide • 85
Uploading Certificates
If a salesperson chooses, they can take a snapshot or a scanned image of an exemption certificate and create
one or more certificate directly using the CreateCertificates API. Certificates created by this API are available for
exemption use after a short processing delay; please make sure to accommodate a short time between creating a
certificate and using the certificate.
Test Case 8.2.5 - Uploading Certificates
Setup
• Call the CreateCertificates API using the following information:
°SignedDate: 2016-02-01
°ExpirationDate: 2020-12-31
°Filename: “exemptCert.pdf”
°Valid: “true”
°ExemptPercentage: 100
°IsSingleCertificate: false
°ExemptReason: EXPOSURE
• Customers record
°Set the CompanyId to the ID of your DEVGUIDE company
°CompanyCode value: RESELLER
Exposure Zone
• Set the name of the exposure zone to Washington
Assertions
• The exemption certificate is created and is valid in Washington
Expected API Call
[
{
“signedDate”: “2016-02-01”,
“expirationDate”: “2020-12-31”,
“filename”: “exemptCert.pdf”,
“valid”: true,
“exemptPercentage”: 100,
“isSingleCertificate”: false,
“exemptionReason”: {
“name”: “EXPOSURE”
},
“c us t o m er s”: [
{
“companyId”: 7370914,
“customerCode”: “RESELLER”
}
],
“exposureZone”: {
“name”: “Washington”
}
}
AvaTax Developer Guide • 86
]
Test Case 8.2.6 - Reseller Exemption
Setup
• Call ListValidCertificatesForCustomer with the following options:
°CustomerCode: RESELLER
°Country: US
°Region: WA
Assertions
°The result has the value Status: Exempt.
°The “Certificates” array in the result should contain the certificate created in step #1.
Expected API Call
GET /api/v2/co m panies/12345/custom ers/RESELLER /certificates/US/WA
Testing Exemption Certificates
Once you have created a customer and uploaded an exemption certificate, you can create a transaction and apply
this exemption certificate to the transaction:
Test Case 8.2.7 - Testing an Exemption Certificate
Setup
• In your connector, create the following transaction:
°Transaction Type: SalesInvoice
°Transaction Code: Chapter-8-Test-7
°Document Date: 2017-0 6-15
°CompanyCode, Date set to reasonable default values.
°CustomerCode set for RESELLER
• Addresses:
°SingleLocation: 100 Ravine Lane NE, Bainbridge Island, WA, 98110
• Line #1:
°Amount 100
°TaxCode P0000000
• Calculate tax for your transaction using AvaTax.
• Assertions
°The tax for line 1 should be $0.00.
°The Taxable amount for line 1 should be $0.00.
°The Exempt amount for line 1 should be $100.00.

AvaTax Developer Guide • 87
Expected API Call
{
“type”: “SalesInvoice”,
“code”: “Chapter-8-Test-1”,
“companyCode”: “DEVGUIDE”,
“date”: “2017-06-15”,
“customerCode”: “RESELLER”,
“addresses”: {
“singleLocation”: {
“line1”: “100 Ravine Lane NE”,
“city”: “Bainbridge Island”,
“r e gio n ”: “ W A”,
“country”: “US”,
“ p o s t alC o d e”: “9 8 110 ”
}
},
“ lin e s”: [
{
“ n u m b e r ”: “ 1”,
“amount”: 100,
“taxCode”: “P0000000”
}
]
}
Test Case 8.2.8 - Testing an Exemption Certificate
Setup
• Repeat the above transaction:
• All values are the same, except
°Use the CustomerCode NOCERTIFICATE
Assertions
• The tax for line 1 should be $0.00.
• The Taxable amount for line 1 should be $100.00.
• The Exempt amount for line 1 should be $0.00.
Expected API Call
{
“type”: “SalesInvoice”,
“code”: “Chapter-8-Test-1”,
“companyCode”: “DEVGUIDE”,
“date”: “2017-06-15”,
“customerCode”: “NOCERTIFICATE”,
“addresses”: {
“singleLocation”: {
“line1”: “100 Ravine Lane NE”,
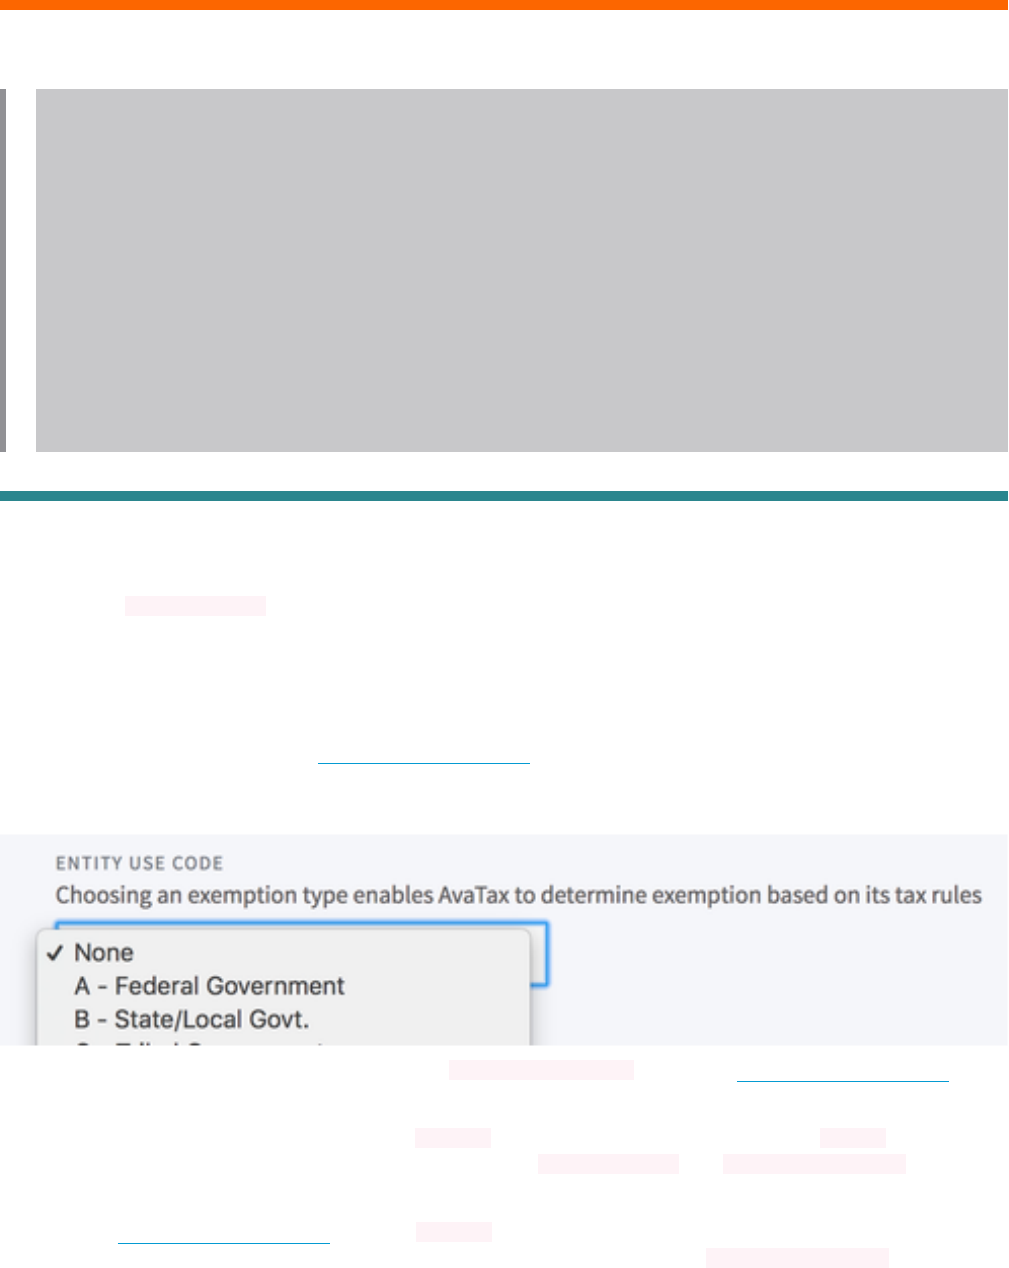
AvaTax Developer Guide • 88
“city”: “Bainbridge Island”,
“r e gio n ”: “ W A”,
“country”: “US”,
“ p o s t alC o d e”: “9 8 110 ”
}
},
“ lin e s”: [
{
“ n u m b e r ”: “ 1”,
“amount”: 100,
“taxCode”: “P0000000”
}
]
}
8.3 - Exemptions for Usage
In AvaTax, the EntityUseCode field provides information about how a transaction will be used by the customer,
and information about the type of customer making the purchase. For example, a purchase made by the US feder-
al government would be designated for government use, and it would generally be exempt or non-taxable for that
specific use.
Entity Use Codes are generally displayed in the user interface of a connector as a dropdown, combo box, or selec-
tion element. This element uses the ListEntityUseCodes API to retrieve the list of available choices, and displays it
as a list of values in a dropdown. The default value should be NULL, indicating that by default a transaction does
not have a custom entity use code.
The value of the customer’s choice is placed in the custo m erUsageTyp e field in the CreateTransctionModel ele-
ment. Here’s how to find the values and put them into your transaction.
First, call the ListEntityUseCodes API. The field “code” is the value you will use, and the field “name” is the de-
scription you will show to the customer. You can either show “code - name”, like “A - FEDERAL GOV”, or you
can just show the name field.
First, call the ListEntityUseCodes API. The field “code” is the value you will use, and the field “name” is the de-
scription you will show to the customer. You can either show “code - name”, like “A - FEDERAL GOV”, or you can
just show the name field.
AvaTax Developer Guide • 89
{
“@recordsetCount”: 17,
“ v alu e”: [
{
“c o d e”: “A”,
“ n a m e ”: “F ED E R A L G OV ”,
“description”: “ ”,
“validCountries”: [
“US”
]
},
{
“c o d e”: “ B”,
“ n a m e ”: “STATE GOV”,
“decription”: “”,
“validCountries”: [
“US”
]
},
]
}
If the customer makes a choice, put that value in the custo merUsageTyp e field on the CreateTransactionModel
element:
{
“ t y p e”: “SalesInvoice”,
“companyCode”: “DEFAULT”,
“d a t e”: “2 017- 0 6-16 ”,
...
“customerUsageType”: “A”,
...
}
If the customer does not make a choice, omit the custom erUsageTyp e element entirely, or set its value to null.
Since changing this value can make an entire transaction exempt, this field is not generally displayed when building
a web storefront. Developers are encouraged instead to ask their customers for an exemption certificate or other
documentation that can validate the claim that the customer is an exempt buyer.
Custom Integration
It’s suggested for a custom integration to implement entity use codes, if the application supports Tax Exempt
sales.
Test Case 8.3.1 - Custom Integration
Setup
• Transactions sold with an EntityUseCode of “D” are considered sold for foreign diplomatic use.
• In the United States, foreign diplomatic sales are legally exempt from sales taxes.
• In your connector, create the following transaction:

AvaTax Developer Guide • 90
°Transaction Type: SalesInvoice
°Transaction Code: Chapter-8-Test-2
°Document Date: 2017-0 6-15
°CompanyCode, Date set to reasonable default values.
°CustomerCode Set to DEF
°CustomerUsageType: D
• Addresses:
°SingleLocation: 100 Ravine Lane NE, Bainbridge Island, WA, 98110
• Line #1:
°Amount: 100
°TaxCode: P0000000
• Calculate tax for your transaction using AvaTax.
Assertions
• The tax for line 1 should be $0.00.
• The Taxable amount for line 1 should be $0.00.
• The Exempt amount for line 1 should be $100.00.
Expected API Call
{
“type”: “SalesInvoice”,
“code”: “Chapter-8-Test-2”,
“companyCode”: “DEVGUIDE”,
“date”: “2017-06-15”,
“customerCode”: “TESTCUSTOMER”,
“customerUsageType”: “D”,
“addresses”: {
“singleLocation”: {
“line1”: “100 Ravine Lane NE”,
“city”: “Bainbridge Island”,
“r e gio n ”: “ W A”,
“country”: “US”,
“ p o s t alC o d e”: “9 8 110 ”
}
},
“ lin e s”: [
{
“ n u m b e r ”: “ 1”,
“amount”: 100,
“taxCode”: “P0000000”
}
]
}
8.4 Chapter Summary
Because you have read this chapter, you should now know:
• All the factors that could cause tax on a transaction to be zero

AvaTax Developer Guide • 91
• Which factors are company-related, which are product-related, and which are transaction-related
• How to allow a customer to choose these factors correctly in your user interface
Document Management Requirements
Customer Code: Identify customer code (number, ID) to pass to the AvaTax service. Typically this is an
account name, customer name, or email address on file for the customer.
Customer Creation: Creation of an exempt customer record triggers the creation of a customer record
in CertCapture.
Customer Updates: When exempt customer records are updated in the application, those same up-
dates are applied to the customer record in CertCapture.
Request new Certificate: As exemption certificates expire, a function to send the customer a request
for a new exemption certificate is required.
Retrieve Customer Exemption Status: Retrieve and display exemption certificate information associ-
ated with a customer record.
View Exemption Certificate: View an exemption certificate associated with customer record.
Certification Requirements
•Exemption Number – Customer record field populating exemption number in an AvaTax transac-
tion. This is used for tracking those customers who have tax exempt transactions.
•Entity/Use Code – This is a group of codes that indicate the type of exemption. See the standard
codes, but be aware that users are able to create custom codes as well. It is best to manage this value
in your application’s Customer record and pass it to AvaTax as CustomerUsageType at either the doc-
ument or line level, whichever is applicable. Note that either Exemption Number or Entity/Use code is
required (not both). Entity/Use Code is preferred.
Test cases that must be understood to correctly handle tax exemptions, including testing
for:
• 8.1.1 - Companies without Nexus
• 8.1.2 - NOMAD Tax
• 8.2.1 - Finding and Creating Customer Records
• 8.2.2 - No Certificate
• 8.2.3 - Certificate Status
• 8.2.4 - CertExpressInvitation
• 8.2.5 - Uploading Certificates
• 8.2.6 - Reseller Exemption
• 8.2.7 - Testing an Exemption Certificate
• 8.2.8 - Testing an Exemption Certificate
• 8.3.1 - Custom Integration

AvaTax Developer Guide • 92
Chapter 9 - Locations
Some companies with many different places of business within a state are required to participate in location-based
reporting. In general, a small business will often not need to make use of location-based reporting, however, this
feature becomes very critical for large businesses or franchised businesses with many retail locations.
Because this feature is required by many tax authorities for larger businesses, Avalara-certified connectors must
support location-based reporting. Online storefronts and custom web shopping carts only need to implement
location-based reporting if they have been requested to file location-based tax returns by a tax authority.
In this chapter, we’ll discuss Locations - which in AvaTax are a record of the physical presence of a company or its
personnel. By the end of this chapter, you will learn the following:
• What is location-based reporting
• How to create and manage locations
• Using location codes in transactions
Let’s begin by understanding location-based reporting.
9.1 - About Location Based Reporting
Over time, tax authorities have gradually added more reporting requirements for businesses filing sales and trans-
actional taxes. These reporting requirements have gradually grown to include such information as transactions by
location. Some states such as California and Texas require that sellers file information about the volume of trans-
actions that occur at each place of business where the company has a presence within the state. These forms are
considered location-based reporting forms.
In order to file these forms correctly, you must set up your company as follows:
1. Define all places of business within the jurisdiction that has the location-based reporting requirement.
• If there is any doubt as to the boundaries of this jurisdiction, it’s safest to define all locations within that
state.
2. Define a Default Location, which will be used to report any transactions that are not tagged to a location.
• Your connector must indicate, on each transaction, which location will be used for reporting purposes.
3. This is done by filling out the field reportingLocationCode on the transaction.
Based on the laws and rules of your tax authority, you may need to consider storefronts, offices, retail locations,
warehouses, field sales offices, or home offices locations. For more information on requirements, please check
with your tax authority. Once you have this list it’s time to begin editing - please consult the Avalara Help Center
on how to add, edit, or import locations into AvaTax using the AvaTax website.
As you edit locations in the web portal, you will be asked to uniquely identify each location with a unique location
code. This location code is for your convenience; it does not need to follow any state issued format. When you
create locations within AvaTax, you will be prompted to answer additional questions if the state requires any addi-
tional information about each location.
Once you have added company locations in AvaTax and tagged transactions with the correct reportingLoca-
tionCode, the Avalara Managed Returns service will use those location codes during tax calculation to report on
sales by individual location.

AvaTax Developer Guide • 93
9.2 - Using Locations
To use the Location API in your connector, you must first identify what your system considers “locations”. Does
your accounting system or tax platform store any of the following:
•Addresses of warehouses – If your platform tracks warehouses, this would be a natural fit for locations in
AvaTax. It’s typically a short code that represents a specific warehouse that is managed within the platform
itself.
•Addresses of retail sales locations or field sales team members – Many platforms track locations
where sales occur. These are also a good fit for locations.
•Manual Data Entry – Avalara Certified connectors do not need to allow manual data entry for locations. If
you would like to allow your users to enter locations for reporting purposes, we encourage you to provide a
link to the Avalara AvaTax administration website where the customer can enter their locations directly.
If your platform stores information about locations and you wish to sync this data with AvaTax, you can use the
CreateLocations API and the UpdateLocation API to store and maintain this data in AvaTax.
For the purposes of this chapter, let us create a new location within Texas, a state that sometimes requires loca-
tion based reporting via the TX 01-115 form. Here’s how to use the CreateLocations API call to create a location
within Texas:
Test Case 9.2.1 – Creating a New Location
Setup
• Call the CreateLocations API call with the following information:
°locationCode: TEXASWAREHOUSE
°Description: “Texas Warehouse Chapter-9-Test-1”
°addressTypeId: “Location”
°addressCategoryId: “Warehouse”
• Addresses:
°600 Congress Avenue, Austin, TX 78101
°dbaName: Developer Guide Texas Warehouse
°outletName: Texas Warehouse
°registeredDate: Jan 1 2015
Assertions
• Your location is created.
• The location code matches the value you sent in.
• The address matches the value you sent in.
Expected API Call
[
{
“locationCode”: “TEXASWAREHOUSE”,
“description”: “Chapter-9-Test-1”,
“addressTypeId”: “Location”,
“addressCategoryId”: “MainOffice”,
“line1”: “600 Congress Avenue”,
“c it y ”: “A u s tin ”,
“region”: “TX”,

AvaTax Developer Guide • 94
“country”: “US”,
“ p o st alC o d e ”: “ 78101”,
“isDefault”: false,
“isRegistered”: false,
“dbaName”: “Developer Guide Texas Warehouse”,
“outletName”: “Texas Warehouse”,
“registeredDate”: “2015-01-01T00:00:00”
}
]
Designating Transactions for a Reporting Location
For companies that must use location-based reporting, all transactions must be tied to either a reporting location
code or to a default location.
You should allow your customer to choose a reporting location code using a drop-down or multi-select inter-
face. You can retrieve a list of valid locations by calling the ListLocationsByCompany API. You should present the
friendly name of the location in the drop-down or multi-select box. If your user interface permits multi-line select
boxes, please also include the address of the location. The user interface box for this drop-down or multi-select
box should be “Reporting Location”. The default value of this box should be “None”.
If the user chooses “None”, you should set the reportingLocationCode value of your transaction to null. If the
user selects a location, you should instead set the reportingLocationCode value to be the location code value
from the location object.
Here’s how to create a transaction tied to a reporting location:
Test Case 9.2.2 - Designating a Reporting Location
Setup
• In your connector, create the following transaction:
°Document Date: 2017-0 6-15
°Customer Code: TESTCUSTOMER
°reportingLocationCode: TEXASWAREHOUSE
• Addresses:
°SingleLocation: Send only the ZIP code 92612
• Lines:
°Amount: 100
°Calculate tax for your transaction using AvaTax.
°Assertions
• The created transaction should have reportingLocationCode = TEXASWAREHOUSE. [Correct or need #]
Expected API Call
{
“date”: “2017-06-15”,
“customerCode”: “TESTCUSTOMER”,
“reportingLocationCode”: “TEXASWAREHOUSE”,
“addresses”: {
“singleLocation”: {

AvaTax Developer Guide • 95
“ p o s t alC o d e”: “9261 2 ”
}
},
“ lin e s”: [
{
“amount”: 100
}
]
}
Shortcut for Addresses
Optionally, you can present your customers with a convenient shortcut for choosing addresses for their trans-
actions. Similar to choosing a value for reporting location code, you can allow customers to chose an address
location code as follows.
• The customer can either hand-type an address, or they can select an existing location.
• If the customer selects an existing location, the location’s address will be used instead of whatever you type in.
Now that you’ve created a Locations successfully it’s time to use that Location data for reporting purposes on a
transaction.
Test Case 9.2.3 – Creating Address Shortcuts
Setup
• Create a transaction using the following settings:
°Type: SalesInvoice
°Code: Chapter-9-Test-3
°Addresses:
°Type: SingleLocation
°LocationCode: TEXASWAREHOUSE
• Lines:
°1 line with amount: 100
°Create the transaction using your connector.
Assertions
• The transaction is created as follows:
°Address: 600 Congress Avenue, Austin, TX 78101
Expected API Call
{
“type”: “SalesInvoice”,
“code”: “Chapter-9-Test-3”,
“companyCode”: “DEVGUIDE”,
“date”: “2017-06-15”,
“customerCode”: “TESTCUSTOMER”,
“addresses”: {
“SingleLocation”: {
AvaTax Developer Guide • 96
“locationCode”: “TEXASWAREHOUSE”
}
},
“ lin e s”: [
{
“amount”: 100
}
]
}
9.3 Chapter Summary
In this chapter, you’ve learned how to use location codes to enable your software to use locations for tax transac-
tion reporting.
Certification Requirements
Avalara-certified connectors must support the ability to set a reporting location code on a transaction.
We recommend that a connector provide the following functionality:
• A link from your connector to launch the Avalara AvaTax website so that the customer can quickly review and
edit locations online.
• A drop-down user interface that allows a customer to select a reporting location code from a list of defined
locations.
Optionally, you can include additional features if you choose:
• You can allow customers to synchronize their location database between your platform and the AvaTax data-
base using the CreateLocations / UpdateLocation API.
• You can allow customers to fill out addresses for their transactions rapidly using the locationCode parameter
of the CreateTransaction Model.
These optional features are available but are not required for certified connectors.
Tests in this chapter
• 9.2.1 - Creating a New Location
• 9.2.2 - Designating a Reporting Location
• 9.2.3 - Creating Address Shortcuts

AvaTax Developer Guide • 97
Chapter 10 - Consumer Use Tax
In the previous chapters, we have been looking at transactions from the perspective of the sellers. With consum-
er use tax we are taking the role of the purchaser. This chapter will be of interest to you if you are creating an
integration to the Accounts Payable module of your accounting software. Don’t worry, the lessons you learned in
the previous chapters still apply to calculating Consumer Use Tax. In fact, the API request is not altogether much
different from a regular sales tax calculation.
What is Use Tax?
In general, use tax is imposed on transactions that are subject to sales tax, but for which sales tax is not charged.
The intent is to capture tax on tangible items and certain services that are sold or purchased by a company or
person located out-of-state, particularly if that person or company plans to use, donate, store or consume those
items out of state.
Unlike sales tax, which is normally paid by the consumer, use tax can be levied against a seller or consumer.
Why should you worry about calculating tax on purchases? Companies may have a Direct Pay Certificate, which
authorizes the holder to purchase any tangible personal property, digital property, or certain services without
payment of sales and use tax to vendors. Instead, a business with a direct pay permit assumes responsibility for
payment of all applicable taxes directly to the tax authority. Additionally, not all vendors use AvaTax to calculate
their sales tax, by verifying the tax on your vendor invoices will ensure that you are remitting the correct amount.
10.1 - Consumer and Sellers Use Tax
Sales tax is collected from the buyer at the point of sale and paid by the retailer to the state government that has
authority over the area in the transaction is located.
Sellers use tax is the same as sales tax, the distinction here is that sellers use tax is imposed on vendors located
outside of the state, but are registered to collect tax in the state. This may also be referred to as retails use or
vendors use tax.
Consumer use tax (sometimes called compensating use tax) applies to your purchase, even if sales tax does not.
You’ll need to pay and report the use tax when you file state income tax returns.
In addition, a use tax needs to be paid on inventory purchased sans sales tax if that inventory is later used or bar-
tered by the company that bought it. For example, ACME computer sales purchased a lot of keyboards and did not
pay sales tax on the purchase. ACME will, however, collect sales tax when the keyboards are sold to customers. If
ACME takes a keyboard intended for retail sale off its shelves and either uses it during the course of daily opera-
tions or uses the keyboard to barter with the company next door, ACME will need to self-assess a use tax.
10.2 - Putting It All Together
In this section we will look at three of the most common use tax transactions:
• How to calculate Use Tax on a PurchaseOrder
• How to calculate Use Tax for a PurchaseInvoice sent to a vendor where no tax was calculated
• How to calculate/verify Use Tax for a PurchaseInvoice sent to a vendor with a tax calculation
Creating a Purchase Order
In this first example, we are working in the procurement department and we need to purchase some widgets for
our business to use in the office. We will provide our vendor with a purchase order, which will include an estimated

AvaTax Developer Guide • 98
tax calculation. You’ll notice that the structure of the request looks very similar to the Sales Tax requests from the
previous chapters. That’s because when providing a Purchase Order to a vendor we want to simulate the sales or-
der that your vendor would send to you. There are some key differences that you should take into consideration:
• The Origin Address on the transaction should represent the address of your Vendor.
• The Destination Address on the transaction should represent the location where the goods will be consumed.
• The Document Type should be set to SalesOrder
Test Case 10.2.1 - Creating a Purchase Order
Setup
• In your connector, create the following transaction:
°Document Type: SalesOrder
°Document Code: Ch ap t er-10-Te s t-1
°Company Code: DEVGUIDE
°Document Date: 2017-0 6-15
°Customer Code: ACME
°Commit: False
• Addresses:
°ShipFrom (Vendor Address): 18300 Von Karman Ave, Irvine, CA 92612 US
°ShipTo (Location where product will be consumed): 100 Ravine, Bainbridge Island, WA 98110
US
• Line #1:
°Amount: 100
°TaxCode: P0000000
• Calculate tax for your transaction using AvaTax.
Assertions
• The totalTaxCalculated amount should be $9.00. This is the amount that AvaTax determined is correct.
Expected API Call
{
“type”: “SalesOrder”,
“c o d e”: “C h a p t er-10-Te s t-1”,
“companyCode”: “DEVGUIDE”,
“date”: “2017-06-15”,
“customerCode”: “ACME”,
“commit”: “false”,
“addresses”: {
“shipFrom”: {
“line1”: “18300 Von Karman Ave”,
“c it y ”: “Ir v in e”,
“r e gio n ”: “ C A”,
“country”: “US”,
“ p o s t alC o d e”: “9261 2 ”
},
“s h ipTo”: {
“line1”: “100 Ravine”,
“city”: “Bainbridge Island”,
“r e gio n ”: “ W A”,

AvaTax Developer Guide • 99
“country”: “US”,
“ p o s t alC o d e”: “9 8 110 ”
}
},
“ lin e s”: [
{
“ n u m b e r ”: “ 1”,
“quantity”: 10,
“amount”: 100,
“taxCode”: “P0000000”,
“itemCode”: “Widget”,
“description”: “Test Widget”
}
]
}
With the calculated tax amount, you can send your vendor a complete purchase, including theExpected sales tax.
When sales tax is properly charged by vendor/supplier on its invoice, the buying company fulfills its statutory obli-
gation to local and state taxing authorities.
Purchase Invoice - No Vendor Assessed Tax
Ok, so let’s jump ahead to when you’ve received your widgets along with the invoice from your vendor. Looking at
the invoice, you note that tax was not assessed on the order and this item is to be consumed at your location so
UseTax is applicable. So, let’s take a look at how to calculate Use Tax on this transaction. Again, here are some key
differences that you should take into account:
• The Origin Address on the transaction should represent the address of your Vendor.
• The Destination Address on the transaction should represent the location where the goods will be consumed.
• The Document Type should be set to PurchaseInvoice
Test Case 10.2.2 - Purchase Invoice - No Vendor Assessed Tax
Setup
• In your connector, create the following transaction:
°Document Type: PurchaseInvoice
°Document Code: Chapter-10-Test-2
°Company Code: DEVGUIDE
°Document Date: 2017-0 6-15
°Customer Code: ACME
°Commit: False
• Addresses:
°ShipFrom (Vendor Address): 18300 Von Karman Ave, Irvine, CA 92612 US
°ShipTo (Location where product will be consumed): 100 Ravine, Bainbridge Island, WA 98110
US
• Line #1:
°Amount: 100
°TaxCode: P0000000

AvaTax Developer Guide • 100
• Calculate tax for your transaction using AvaTax.
Assertions
• The totalTaxCalculated amount should be $9.00. This is the amount that AvaTax determined is correct.
Expected API Call
{
“type”: “PurchaseInvoice”,
“code”: “Chapter-10-Test-2”,
“companyCode”: “DEVGUIDE”,
“date”: “2017-06-15”,
“customerCode”: “ACME”,
“commit”: “false”,
“addresses”: {
“ShipFrom”: {
“line1”: “18300 Von Karman Ave”,
“c it y ”: “Ir v in e”,
“r e gio n ”: “ C A”,
“country”: “US”,
“ p o s t alC o d e”: “9261 2 ”
},
“ S h ipTo ”: {
“line1”: “100 Ravine”,
“city”: “Bainbridge Island”,
“r e gio n ”: “ W A”,
“country”: “US”,
“ p o s t alC o d e”: “9 8 110 ”
}
},
“ lin e s”: [
{
“ n u m b e r ”: “ 1”,
“quantity”: 10,
“amount”: 100,
“taxCode”: “P0000000”,
“itemCode”: “Widget”,
“description”: “Test Widget”
}
]
}
Payment of sales/use tax is the responsibility of the company making any taxable purchase. When the buying com-
pany makes a purchase and the supplier/vendor does not charge sales tax on a taxable purchase, it becomes the
buying company’s responsibility to assess/calculate, verify, accrue, and file/remit the tax due in the form of use tax.
Purchase Invoice - With Vendor Assessed Tax
This time, let’s imagine that your widget vendors invoice did note some sales tax. However, it may not be the value
you are expecting, let’s take a look at how you can check the calculation to determine if it is correct. Like the previ-
ous example, here are the key differences that you should take into account:

AvaTax Developer Guide • 101
• The Origin Address on the transaction should represent the address of your Vendor.
• The Destination Address on the transaction should represent the location where the goods will be consumed.
• The Document Type should be initially set to PurchaseOrder
• The Vendor Assessed Tax should be noted as a TaxOverride/Ta x A mo unt.
Test Case 10.2.3 - Purchase Invoice with Vendor Assessed Tax
Setup
• In your connector, create the following transaction:
°Document Type: PurchaseInvoice
°Document Code: Chapter-10-Test-3
°Company Code: DEVGUIDE
°Document Date: 2017-0 6-15
°Customer Code: ACME
°Commit: False
• Addresses:
°ShipFrom (Vendor Address): 18300 Von Karman Ave, Irvine, CA 92312 US
°ShipTo (Location where product will be consumed): 100 Ravine, Bainbridge Island, WA 98110
US
• Line #1:
°Amount: 100
°TaxCode: P0000000
°TaxOverride/TaxAmount -$8 [Is this negative $8 or $8?]
• Calculate tax for your transaction using AvaTax.
Assertions
• The totalTax returned is $8
• This is the tax charged by the vendor on the Invoice
• The totalTaxCalculated is $9
• This is the tax amount calculated by AvaTax for this transaction.
• The documentType is set to PurchaseOrder, meaning this is a temporary document and not recorded to
AvaTa x
Expected API Call
{
“type”: “PurchaseOrder”,
“code”: “Chapter-10-Test-3”,
“companyCode”: “DEVGUIDE”,
“date”: “2017-06-15”,
“customerCode”: “ACME”,
“commit”: “false”,
“addresses”: {
“ShipFrom”: {
“line1”: “18300 Von Karman Ave”,
“c it y ”: “Ir v in e”,
“r e gio n ”: “ C A”,
“country”: “US”,
“ p o s t alC o d e”: “9261 2 ”
},

AvaTax Developer Guide • 102
“ S h ipTo ”: {
“line1”: “100 Ravine”,
“city”: “Bainbridge Island”,
“r e gio n ”: “ W A”,
“country”: “US”,
“ p o s t alC o d e”: “9 8 110 ”
}
},
“ lin e s”: [
{
“ n u m b e r ”: “ 1”,
“quantity”: 10,
“amount”: 100,
“taxCode”: “P0000000”,
“itemCode”: “Widget”,
“description”: “Test Widget”,
“taxOverride”:{
“type”: “taxAmount”,
“taxAmount”: 8,
“reason”: “Vendor assessed tax”
}
}
]
}
Now, let’s take a closer look at the returned results, here we can get a good look at the accuracy of your vendor’s
tax calculation:
There are two key fields that we need to look at in the returned results, totalTax and totalTaxCalculated. The
totalTax field will display the tax that was assessed by the vendor, in our case this was $8. The totalTaxCalcu-
lated will display the tax amount calculated by AvaTax, in our case AvaTax returned $9 in tax.
Now, with this information the user can make an informed decision. They can either accept the AvaTax calculated
Use Tax in total, accept the difference between AvaTax calculated Use Tax and the vendor charged tax (only if the
AvaTax Calculated amount is larger than the vendor charged tax) or edit the Use Tax amount to a desired amount,
including $0.00.
Once the user has determined the correct Use Tax to be applied to this order, the transaction can be recorded to
AvaTax. Similar to the sales document workflow, you will need to update the Type field from PurchaseOrder to
PurchaseInvoice for the transaction to be recorded to AvaTax.
Once again, payment of sales/use tax is the responsibility of the company making any taxable purchase. When the
buying company makes a purchase and the supplier/vendor does not charge the appropriate sales tax on a taxable
purchase, it becomes the buying company’s responsibility to assess/calculate, verify, accrue, and file/remit the tax
due in the form of use tax.
10.3 Chapter Summary
In summary, you should be able to:
• Identify the difference between Consumer Use Tax and Sellers Use tax.
AvaTax Developer Guide • 103
• Calculate tax correctly on a Purchase Order.
• Calculate tax on a vendor invoice that does not have tax.
• Verify the tax on a vendor invoice and make an informed decision recording the liability.
Certification Requirements
Please see the following link for a comprehensive listing of requirements for Use Tax Certification.
Tests
• 10.2.1 - Creating a Purchase Order
• 10.2.2 - Purchase Invoice - No Vendor Assessed Tax
• 10.2.3 - Purchase Invoice with Vendor Assessed Tax

AvaTax Developer Guide • 104
Chapter 11 - Calculating Tax Offline
Designing robust software means planning for every eventuality. To create a world-class product using AvaTax, you
need to be prepared for when things go wrong - and one of the problems you may face is the loss of your Internet
connection. Fortunately, there are ways to write your software to gracefully handle a dropped connection.
It’s first important to identify a few different types of connection issues:
•Temporary Outage – Your connection has gone offline, and you need to be able to process transactions for
a short period of time until the connection is restored. In this case, the biggest challenge is ensuring that your
software keeps track of all calculations handled offline and reconciles them when you come back online. An
example of a temporary outage would be when your network router loses power and needs a few minutes to
reboot.
•Intermittent Connection– Your connection works most of the time, but its behavior is unpredictable. In
this case, you need to be able to handle a timeout problem or a connection interruption problem gracefully
and still perform tax calculation as precisely as possible. An example of an intermittent connection would be
mobile cellular internet service for a remote cash register at a city park.
•Unable to Reach AvaTax – If your connection is up, but you are unable to reach AvaTax, there may be a
more complex problem - there could be a routing problem, or a denial-of-service attack on an Internet service
provider, or AvaTax could be temporary offline due to an outage. In this case, you need to continue to provide
tax determination for your customers and store transactions for later reconciliation.
These three types of outages have similar characteristics, so it’s straightforward to design a single process to han-
dle all of them. Here is how we handle a broken connection:
• Detect the dropped connection and prevent a crash
• Retry the transaction, or fallback to a default tax rate
• Reconcile offline transactions after the outage
Let’s look at each of these challenges separately.
11.1 - Detecting a Dropped Connection
In Chapter 1.3 - Troubleshooting, we briefly explained how to handle AvaTax error messages. Errors related to
offline tax calculation can be more complex because sometimes you may receive an error from AvaTax and in
other times you may receive an error from your operating system or software development suite indicating that a
connection has been dropped.
When you receive an error message from AvaTax, the best practice is to display that error to the operator or visi-
tor and allow them to determine how to proceed. For example, if you receive the error EntityNotFoundError from
the API, you have searched for a document that does not exist. This error should be shown to the user; it will help
them determine how to proceed. They may have mistyped the document code.

AvaTax Developer Guide • 105
{
“e r r o r ”: {
“code”: “EntityNotFoundError”,
“message”: “Document with ID ‘TESTINGCO - 100’ not found.”,
“target”: “HttpRequest”,
“d et ails”: [
{
“code”: “EntityNotFoundError”,
“ n u m b er ”: 4,
“message”: “Document with ID ‘TESTINGCO - 100’ not found.”,
“faultCode”: “Client”,
“helpLink”: “/avatax/errors/EntityNotFoundError”,
“severity”: “Error”
}
]
}
}
If you receive an error message that indicates that your API call has failed, or your connection has been broken,
or there has been a timeout, your error message may come from the operating system rather than AvaTax. For
example, using the AvaTax SDK in C#, this code will catch errors sent from AvaTax:
TransactionModel t;
try {
t = Client.CreateTransaction(model);
} catch (AvaTaxError err) {
... code to respond to the error ...
}
A dropped connection will produce a different kind of error - for example, AspNetCore produces an WinHttp-
Exception when a connection is dropped using HttpClient. Our task is to identify how our operating system or
programming language exposes a connection error. Once you have identified this error, your code must trap the
exception and ensure that you can respond correctly and prevent the exception from being exposed to the end
user.
But how do we test this code? If a connection interruption is an unpredictable occurrence, how can you evaluate
it? AvaTax provides an interesting feature called ForceTimeout. This feature is intended to allow you to fine-tune
your client-side timeout logic, and reliably cause a timeout that you can use for integration testing.
When you use the ForceTimeout feature, AvaTax will do the following:
• Delay for 30 seconds
• Throw an error of type ForceTimeoutError
We recommend that your application should select an appropriate timeout value for your needs. We cannot tell
you exactly what timeout value is best for you; but in our experience, interactive web applications tend to have a
shorter timeout and desktop accounting programs tend to have a longer timeout. Here’s the test you should be
able to execute:

AvaTax Developer Guide • 106
Test Case 11.1.1 - Detecting a Dropped Connection
Setup
• Call CreateTransaction with the option $include=ForceTimeout
Assertions
• If your code has a timeout value selected, you should receive an operating system or programming lan-
guage specific error message related to the timeout of this API call.
Now that you’ve simulated a timeout in your application, the next step is to decide whether to retry your transac-
tion or fallback to a default tax rate calculation.
11.2 - Retry or Fallback
After your application detects a timeout, it must next make a decision whether to retry the transaction or fallback
to a default tax rate. We cannot recommend which specific approach will be right for your program, but we can
encourage you to consider a few key risks when retrying a transaction:
• Some programs attempt to reuse HTTP connections. In the event that you experience a connection disrup-
tion, we encourage you to create a completely new connection for the next attempt.
• If you experienced a timeout, you don’t know whether AvaTax received your original API call. The API call may
have been received and processed successfully, but the response was not received by your code. If you were
creating a permanent document such as a SalesInvoice, you should retry your transaction using CreateOr-
AdjustTransaction. This API call will work correctly in either case: if the original API call failed, the document
will be created; if the original API call succeeded, the transaction will be adjusted.
If you decide instead to fallback to a default rate, you have a different set of concerns:
• For transactions shipped around the country, a customer may not be obligated to collect tax in each jurisdic-
tion if they do not have nexus in a jurisdiction. If you collect tax in a jurisdiction, you are legally obligated to
remit it.
• Tax rates vary by product type, sourcing rules, and other considerations. If you use a default tax rate that hap-
pens to be higher than the actual final tax rate, you are obligated to remit the “OverCollected” amount.
AvaTax provides the TaxContent APIs for you to determine sensible default tax rates for your locations. These
TaxContent APIs will give you more precise tax rates for a variety of locations around the United States and is es-
pecially useful for programmers developing a retail point-of-sale (POS) based solution. The API produces a file that
contains tax rates and rules for items and locations that can be used to correctly calculate tax in the event a POS
device is not able to reach AvaTax.
Here’s how the TaxContent API works:
• Use the CreateLocation API to create one location record for each physical retail presence you have.
• Determine all the TaxCodes appropriate to products sold by your business.
• On startup, your program should call the BuildTaxContentFile API to download default tax rates for the ma-
trix of locations and tax codes for today.
This data file will help ensure more accuracy in your tax calculation. It is not a perfect substitute for calling Cre-
ateTransaction directly, but it is more precise than using a default rate for a postal code.

AvaTax Developer Guide • 107
Test Case 11.2.1 - Retry or Fallback
Setup
• Create a location using CreateLocation
°LocationCode: 01
°Address: 100 Ravine Lane, Bainbridge Island, WA 98110
• Create a location using CreateLocation
°LocationCode: 02
°Address: 18300 Von Karman Ave, Irvine, CA 92612
• Call the BuildTaxContentFile API
°TaxCodes: PC040100 (Clothing) and PF050112 (Soft Drinks)
°LocationCodes: 01 and 02
Assertions
• You should receive back four lines:
°Tax rates for clothing in Irvine, CA
°Tax rates for soft drinks in Irvine, CA
°Tax rates for clothing on Bainbridge Island, WA
°Tax rates for soft drinks on Bainbridge Island, WA
Expected API Call
{
“companyCode”: “DEFAULT”,
“documentDate”: “2017-06-27T18:18:44.8781843Z”,
“responseType”: “Json”,
“taxCodes”: [
“PC040100”,
“PF050112”
],
“ lo c a t io nC o d e s”: [
“ 0 1”,
“02”
],
“includeJurisCodes”: true
}
Another approach to fallback tax is to use a postal code rates table. Avalara provides the DownloadTaxRatesByZ-
ipCode API which you can use to determine the sales tax rate for tangible personal property in a jurisdiction. This
approach produces a very simple rate value, however it overlooks much of the complexity of tax law.
Whatever approach you select, please be aware that the cardinal rule of tax auditors is what whatever amount of
tax you collect, you must remit. If you accidentally overcollect tax you must still remit the amount you collected.
If you collect tax in a jurisdiction where you are not registered as a business, you must choose to either register
your business and begin filing taxes or refund the tax collected to the customer. For specific advice on tax over-
collection policies, please contact Avalara’s Professional Services team for advice suitable to your business - this
developer guide is not a substitute for obtaining professional compliance advice.
Next, let’s look at how you can reconcile a transaction after your outage is resolved and you are back online.

AvaTax Developer Guide • 108
11.3 - Tax Content API
The Tax Content API Response
Avalara’s Tax Content API provides businesses with the content required to calculate tax locally in a disconnected
environment. The Content API response includes tax jurisdiction, tax rate, and product/service taxability informa-
tion for each Tax Code and storefront Location configured in your AvaTax account. To begin, let’s take a look at
the fields included in a Tax Content API response.
Here are the details for each field included in a Tax Content API response:
SCENARIOID FIELD DESCRIPTION SAMPLE DATA
ScenarioId This field is used to group tax scenarios together.
A tax scenario will consist of a single Location and
single Tax Code
1
EffDate The date the tax information becomes effective 4/1/2011 12:00:00 AM
EndDate The date the tax information is no longer effec-
tive. Tax data is effective on this date, but is not
effective on the following date
12/31/9999 12:00:00 AM
LocationCode Unique location identifier 001
TaxCode Avalara System Tax Code or Custom Tax Code P0000000
ShipToCity The ship-to city Durham
ShipToCounty The ship-to county DURHAM
ShipToState The ship-to state NC
ShipToPostalCode Postal code associated with the location address 27707-1764
ShipToCountry The ship-to country US
JurisType The jurisdiction type. There are five supported
values - Country, State, County, City, Special
State
JurisCode Unique numeric, alpha, or alphanumeric code
identifying a jurisdiction. This field is optional
001, EKTF0
JurisName The name of the jurisdiction that corresponds to
this tax record
NORTH CAROLINA
TaxType The tax type associated with the rate Sales
Tax_Description The description of the tax NC STATE TAX
Ta x _Rate The tax rate. “0.03” corresponds to 3%. Exempt
records will have a rate of 0.
0.03
AvaTax Developer Guide • 109
Cap Applies a cap to the taxable amount. Amounts up
to the cap are taxable. Amounts over the cap are
non-taxable. The tax rate applies to the taxable
amount.
0
Threshold Applies a threshold to the taxable amount.
Amounts up to and including the threshold are
non-taxable. Amounts over the threshold are tax-
able. The tax rate applies to the taxable amount.
100
TaxRuleOptions Applies a special tax scenario rule to the trans-
action. There is only one supported value at this
time: TaxAll. With a threshold, this rule taxes the
entire amount once the total is over the thresh-
old
Tax All
TaxApplicationLevel This field is not used at this time, but will be
leveraged for tax-on-tax scenarios in the future.
This field will define the order in which taxes are
applied in a tax-on-tax scenario and the tax base
for each individual tax
N/A
Consuming Tax Content
In order to calculate tax locally, you’ll need to implement logic in your native POS application that can correctly
interpret and calculate tax using the data from the Tax Content API. The next sections will review common uses
cases for leveraging the Tax Content API results to calculate tax locally.
Thresholds & Caps
This section is about interpreting Cap & Threshold values included in Tax Content API results. By the end of this
section, you will learn the following
• How to interpret Threshold and Cap values
• How to interpret TaxRule Options associated with Cap and Threshold values
Assertions
• Address: 82 Smith St, Providence, RI 02903-1105
• Tax Code(s): PC040100
AvaTax Developer Guide • 110
Expected API Result
[
{
“ S ce na r ioId ”: 1,
“EffDate”: “12/1/2013 12:00:00 AM”,
“EndDate”: “12/31/9999 12:00:00 AM”,
“LocationCode”: “RI001”,
“TaxCode”: “PC040100”,
“ShipToCity”: “Providence”,
“ShipToCounty”: “PROVIDENCE”,
“ShipToState”: “RI”,
“ShipToPostalCode”: “02903-1105”,
“ShipToCountry”: “US”,
“JurisType”: “State”,
“JurisName”: “RHODE ISLAND”,
“TaxType”: “Sales”,
“Tax_Description”: “RI STATE TAX”,
“ Ta x _ R a t e ”: 0 .0 7,
“ C a p ”: “ 0 ”,
“Threshold”: “250.000000”,
“TaxRuleOptions”: “”,
“Tax ApplicationLevel”: “”
}
]
As noted in Chapter 1, the Threshold field applies a threshold to the taxable amount. Amounts up to and including
the threshold are non-taxable. Amounts over the threshold are taxable. The tax rate included in the API response
applies to the taxable amount. In this example, the Threshold value is $250, meaning the products you associate
with Tax Code PC040100 for this Location would not become taxable until they were sold for more than $250.
Let’s look at a transaction where the LineAmount is $200.00
JURISDICTIONNAME LINEAMOUNT TAX BASE RATE TAX
RHODE ISLAND $200.00 $0.00 0.07 $0.00
No tax should be calculated because the LineAmount is below the $250.00 threshold state in the Tax Content API
results.
Now, let’s look at a transaction where the LineAmount is $300.00
JURISDICTIONNAME LINEAMOUNT TAX BASE RATE TAX
RHODE ISLAND $300.00 $50.00 0.07 $3.50
Tax was calculated against $50.00 of the LineAmount because that is the amount that exceeded the $250.00
threshold stated in the Tax Content API results.
Thresholds and TaxAll TaxRuleOption
Assertions
• Location Address: 50 5th Ave, New York, NY 10118
Tax Code(s): PC040100

AvaTax Developer Guide • 111
Expected API Result
Assuming nexus is configured for the state of New York, the Tax Content API will produce the following response
for the asserted Address and Tax Code. The Tax Content API will return three records that share a single Scenari-
oId. These results represent the taxing jurisdictions and their associated tax rules and rates that are applicable to
the Location and TaxCode specified in the results. These results should be used in conjunction with one another
for the specified LocationCode and TaxCode.
[
{
“ S ce na r ioId ”: 1,
“EffDate”: “4/1/2011 12:00:00 AM”,
“EndDate”: “12/31/9999 12:00:00 AM”,
“LocationCode”: “NY001”,
“TaxCode”: “PC040100”,
“ShipToCity”: “New York”,
“ShipToCounty”: “NEW YORK”,
“ShipToState”: “NY”,
“ShipToPostalCode”: “10118-0110”,
“ShipToCountry”: “US”,
“JurisType”: “City”,
“JurisName”: “NEW YORK CITY”,
“TaxType”: “Sales”,
“Tax_Description”: “NY CITY TAX”,
“ Ta x _ R at e”: 0.0 45,
“ C a p ”: “ 0 ”,
“Threshold”: “110.000000”,
“TaxRuleOptions”: “TaxAll”,
“Tax ApplicationLevel”: “”
},
{
“ S ce na r ioId ”: 1,
“EffDate”: “4/1/2012 12:00:00 AM”,
“EndDate”: “12/31/9999 12:00:00 AM”,
“LocationCode”: “NY001”,
“TaxCode”: “PC040100”,
“ShipToCity”: “New York”,
“ShipToCounty”: “NEW YORK”,
“ShipToState”: “NY”,
“ShipToPostalCode”: “10118-0110”,
“ShipToCountry”: “US”,
“JurisType”: “State”,
“JurisName”: “NEW YORK”,
“TaxType”: “Sales”,
“Tax_Description”: “NY STATE TAX”,
“ Ta x _ R at e”: 0.0 4,
“ C a p ”: “ 0 ”,
“Threshold”: “110.000000”,
“TaxRuleOptions”: “TaxAll”,
“Tax ApplicationLevel”: “”
},
{
AvaTax Developer Guide • 112
“ S ce na r ioId ”: 1,
“EffDate”: “4/1/2012 12:00:00 AM”,
“EndDate”: “12/31/9999 12:00:00 AM”,
“LocationCode”: “NY001”,
“TaxCode”: “PC040100”,
“ShipToCity”: “New York”,
“ShipToCounty”: “NEW YORK”,
“ShipToState”: “NY”,
“ShipToPostalCode”: “10118-0110”,
“ShipToCountry”: “US”,
“JurisType”: “Special”,
“JurisName”: “METROPOLITAN COMMUTER TRANSPORTATION DISTRICT”,
“TaxType”: “Sales”,
“Tax_Description”: “NY SPECIAL TAX”,
“Tax_Rate”: 0.00375,
“ C a p ”: “ 0 ”,
“Threshold”: “110.000000”,
“TaxRuleOptions”: “TaxAll”,
“Tax ApplicationLevel”: “”
}
]
In this example, the Threshold value is $110 for all three records meaning the products associated with PC040100
for this LocationCode would not become taxable until they were sold for $110.00 or more. Additionally, TaxRule-
Options field includes the “TaxAll” value. With TaxAll, the entire LineAmount becomes taxable once the threshold
is met. This is different from the Rhode Island example in the previous section where the amount up to and includ-
ing the Threshold was bucketed as exempt, while any amount over the Threshold was bucketed as taxable.
Let’s look at a transaction where the LineAmount is $100.00.
JURISDICTIONNAME LINEAMOUNT TAX BASE RATE TA X
NEW YORK $100.00 $0.00 0.04 $0.00
NEW YORK CITY $100.00 $0.00 0.045 $0.00
METROPOLITAN COMMUTER
TRANSPORTATION DISTRICT
$100.00 $0.00 0.00375 $0.00
No tax was calculated because the LineAmount was below the $110.00 threshold state in the Tax Content API
results.
Now, let’s look at a transaction where the LineAmount is $125.
JURISDICTIONNAME LINEAMOUNT TAX BASE RATE TAX
NEW YORK $125.00 $125.00 0.04 $5.00
NEW YORK CITY $125.00 $125.00 0.045 $5.63
METROPOLITAN COMMUTER
TRANSPORTATION DISTRICT
$125.00 $125.00w 0.00375 $0.47
Tax was calculated against the entire LineAmount because the LineAmount exceeded the Threshold value and the

AvaTax Developer Guide • 113
TaxAll TaxRuleOption was applicable.
Caps
Assertions
• Location Address: 201 Criser Hall, Gainsville, FL 32611
Tax Code(s): P0000000
Expected API Result
Assuming nexus is configured for the state of Florida, the Tax Content API will produce the following response for
the asserted Address and Tax Code. The Tax Content API will return two records that share a single ScenarioId.
These results represent the taxing jurisdictions and their associated tax rules and rates that are applicable to the
Location and TaxCode specified in the results. These results should be used in conjunction with one another for
the specified LocationCode and TaxCode.
[
{
“ S ce na r ioId ”: 1,
“EffDate”: “1/1/2017 12:00:00 AM”,
“EndDate”: “12/31/9999 12:00:00 AM”,
“LocationCode”: “FL”,
“TaxCode”: “P0000000”,
“ShipToCity”: “GAINESVILLE”,
“ShipToCounty”: “ALACHUA”,
“ShipToState”: “FL”,
“ShipToPostalCode”: “32611-4000”,
“ShipToCountry”: “US”,
“JurisType”: “County”,
“JurisName”: “ALACHUA”,
“TaxType”: “Sales”,
“Tax_Description”: “FL COUNTY TAX”,
“ Ta x _ R at e”: 0.0 05,
“Cap”: “5000.000000”,
“Threshold”: “0.000000”,
“TaxRuleOptions”: “”,
“Tax ApplicationLevel”: “”
},
{
“ S ce na r ioId ”: 1,
“EffDate”: “1/1/2017 12:00:00 AM”,
“EndDate”: “12/31/9999 12:00:00 AM”,
“LocationCode”: “FL”,
“TaxCode”: “P0000000”,
“ShipToCity”: “GAINESVILLE”,
“ShipToCounty”: “ALACHUA”,
“ShipToState”: “FL”,
“ShipToPostalCode”: “32611-4000”,
“ShipToCountry”: “US”,
“JurisType”: “State”,
“JurisName”: “FLORIDA”,
“TaxType”: “Sales”,
AvaTax Developer Guide • 114
“Tax_Description”: “FL STATE TAX”,
“ Ta x _ R at e”: 0.0 6,
“Cap”: “0.000000”,
“Threshold”: “0.000000”,
“TaxRuleOptions”: “”,
“Tax ApplicationLevel”: “”
}
]
JURISDICTIONNAME LINEAMOUNT TAX BASE RATE TA X
FLORIDA $4,500.00 $4,500.00 0.06 $270.00
ALACHUA $4,500.00 $4,500.00 0.005 $22.50
Tax was calculated on the full LineAmount for the State because there was no Cap stated in the Tax Content API
results.
Tax was calculated on the full LineAmount for the County because the LineAmount was below the $5,000 Cap
stated in the Tax Content API results.
Now, let’s look at a transaction where the LineAmount is $7,000.
JURISDICTIONNAME LINEAMOUNT TAX BASE RATE TA X
FLORIDA $7,000.00 $7,000.00 0.06 $420.00
ALACHUA $7,000.00 $5,000.00 0.005 $25.00
Tax was again calculated on the full LineAmount for the State because there was no Cap stated in the Tax Content
API results.
Tax was only calculated on the first $5,000 for the county because the LineAmount exceeded the $5,000 Cap
stated in the Tax Content API results.
Sales Tax Holidays
Many states offer annual sales tax holidays, providing a reduction or elimination of sales tax on specific categories
of products for a short period of time. This section is about interpreting Tax Content API results for Sales Tax Holi-
days. By the end of this section, you will learn the following:
• How to interpret Sales Tax Holidays results
• How to differentiate between Sales Tax Holiday results and normal tax content results
Sales Tax Holiday Results
Assertions
• Address: 2501 4th Ave, Canyon, TX 79016-0001
• Tax Code(s): PC040100
• DocumentDate: 8/10/2017, 8/11/2017
Expected API Result
Assuming nexus is configured for the state of Texas, the Tax Content API will produce the following responses for
the asserted Address, Tax Code, and DocumentDates. The Tax Content API will return two records in each re-
sponse that share a single ScenarioId. These results represent the taxing jurisdictions and their associated tax rules

AvaTax Developer Guide • 115
and rates that are applicable to the Location and TaxCode specified in the results. These results should be used in
conjunction with one another for the specified LocationCode and TaxCode.
DocumentDate: 8/10/2017
[
{
“ S ce na r ioId ”: 1,
“EffDate”: “8/1/2010 12:00:00 AM”,
“EndDate”: “12/31/9999 12:00:00 AM”,
“LocationCode”: “TX”,
“TaxCode”: “PC040100”,
“ShipToCity”: “Canyon”,
“ShipToCounty”: “RANDALL”,
“ShipToState”: “TX”,
“ShipToPostalCode”: “79016-0001”,
“ShipToCountry”: “US”,
“JurisType”: “City”,
“JurisName”: “CANYON”,
“TaxType”: “Sales”,
“Tax_Description”: “TX CITY TAX”,
“ Ta x _ R at e”: 0.0 2,
“ C a p ”: “ 0 ”,
“Threshold”: “0”,
“TaxRuleOptions”: “”,
“Tax ApplicationLevel”: “”
},
{
“ S ce na r ioId ”: 1,
“EffDate”: “8/1/2010 12:00:00 AM”,
“EndDate”: “12/31/9999 12:00:00 AM”,
“LocationCode”: “TX”,
“TaxCode”: “PC040100”,
“ShipToCity”: “Canyon”,
“ShipToCounty”: “RANDALL”,
“ShipToState”: “TX”,
“ShipToPostalCode”: “79016-0001”,
“ShipToCountry”: “US”,
“JurisType”: “State”,
“JurisName”: “TEXAS”,
“TaxType”: “Sales”,
“Tax_Description”: “TX STATE TAX”,
“ Ta x _ R at e”: 0.0 62 5,
“ C a p ”: “ 0 ”,
“Threshold”: “0”,
“TaxRuleOptions”: “”,
“Tax ApplicationLevel”: “”
}
]

AvaTax Developer Guide • 116
DocumentDate: 8/11/2017
[
{
“ S ce na r ioId ”: 1,
“EffDate”: “8/11/2017 12:00:00 AM”,
“EndDate”: “8/13/2017 12:00:00 AM”,
“LocationCode”: “TX”,
“TaxCode”: “PC040100”,
“ShipToCity”: “Canyon”,
“ShipToCounty”: “RANDALL”,
“ShipToState”: “TX”,
“ShipToPostalCode”: “79016-0001”,
“ShipToCountry”: “US”,
“JurisType”: “City”,
“JurisName”: “CANYON”,
“TaxType”: “Sales”,
“Tax_Description”: “TX CITY TAX”,
“ Ta x _ R at e”: 0.0 2,
“ C a p ”: “ 0 ”,
“Threshold”: “100.000000”,
“TaxRuleOptions”: “TaxAll”,
“Tax ApplicationLevel”: “”
},
{
“ S ce na r ioId ”: 1,
“EffDate”: “8/11/2017 12:00:00 AM”,
“EndDate”: “8/13/2017 12:00:00 AM”,
“LocationCode”: “TX”,
“TaxCode”: “PC040100”,
“ShipToCity”: “Canyon”,
“ShipToCounty”: “RANDALL”,
“ShipToState”: “TX”,
“ShipToPostalCode”: “79016-0001”,
“ShipToCountry”: “US”,
“JurisType”: “State”,
“JurisName”: “TEXAS”,
“TaxType”: “Sales”,
“Tax_Description”: “TX STATE TAX”,
“ Ta x _ R at e”: 0.0 62 5,
“ C a p ”: “ 0 ”,
“Threshold”: “100.000000”,
“TaxRuleOptions”: “TaxAll”,
“Tax ApplicationLevel”: “”
}
]
In this example, we have two API calls, one with a DocumentDate of 8/10/2017 and another with a DocumentDate
of 8/11/2017. You’ll notice, the results of these API calls are different. Specifically, the range of the Effective and End
Dates of the second API result fall in between the Effective and End Dates of the first.
AvaTax Developer Guide • 117
If a transaction occurred on or before 8/10/2017, the first response would be applicable because it falls outside of
the date range for the SalesTax Holiday Content.
EFFDATE ENDDATE JURISNAME TAX _ RATE CAP THRESHOLD TAXRULEOPTIONS
8/1/2010 12/31/9999 TEXAS 0.0625 0 0
8/1/2010 12/31/9999 CANYON 0.002 0 0
8/11/2017 08/13/2017 TEXAS 0.0625 0100.00 Tax All
8/11/2017 08/13/2017 CANYON 0.0625 0100.00 Tax All
If a transaction occurred between 8/11/2017 and 8/13/2017, the second response would be applicable and the
Threshold and TaxRuleOptions should be applied.
EFFDATE ENDDATE JURISNAME TAX _ RATE CAP THRESHOLD TAXRULEOPTIONS
8/1/2010 12/31/9999 TEXAS 0.0625 0 0
8/1/2010 12/31/9999 CANYON 0.002 0 0
8/11/2017 08/13/2017 TEXAS 0.0625 0100.00 Tax All
8/11/2017 08/13/2017 CANYON 0.0625 0100.00 Tax All
If a transaction occurred after 8/14/2017, the first response would again be applicable because it falls outside of the
date range for the SalesTax Holiday Content.
EFFDATE ENDDATE JURISNAME TAX _ RATE CAP THRESHOLD TAXRULEOPTIONS
8/1/2010 12/31/9999 TEXAS 0.0625 0 0
8/1/2010 12/31/9999 CANYON 0.002 0 0
8/11/2017 08/13/2017 TEXAS 0.0625 0100.00 Tax All
8/11/2017 08/13/2017 CANYON 0.0625 0100.00 Tax All
The Tax Content API only supports a single DocumentDate per API call, but users are able to call the API with a
post-dated DocumentDate to retrieve content that will be effective in the future.
11.4 - Reconcile Transactions After Outage
If you used a fallback tax rate for a permanent transaction, you must reconcile the transaction after your applica-
tion comes back online. Temporary transactions such as SalesOrder tax estimates do not need to be reconciled;
similarly, if you retry a transaction one or more times using CreateOrAdjustTransaction and the API call eventually
succeeds, you also do not need to reconcile the transaction.
The necessary steps to reconcile transactions after an outage is as follows:
• Save the original API call (e.g the CreateTransactionModel object), along with the tax amount you used as a
fallback.
• Apply a TaxOverride of type Ta x A mo unt to your CreateTransactionModel.

AvaTax Developer Guide • 118
• Call the CreateOrAdjustTransaction API to reconcile the transaction correctly regardless of whether the origi-
nal API call succeeded.
Here’s how this task works:
Test Case 11.4.1 - Reconcile Transactions After Outage
Setup
• Call CreateOrAdjustTransaction with these parameters:
°Date: 2017 06 15
°Address - SingleLocation: 100 Ravine Lane NE, Bainbridge Island, WA 98110
• Lines
°qty: 1
°TaxCode: P0000000
°amount: 100
• TaxOverride
°Type: Tax Am ount
°Amount: 10
Assertions
• There is a difference between the TaxCollected and Tax value
• The Tax value is 10
• The TaxCalculated value is 9.
• The difference between Tax and TaxCalculated means that AvaTax determined that you overcollected by
$1.
• For customers using Avalara Managed Returns, this overcollect amount will be automatically reported on
your next tax filing.
• Customers filing returns outside of Avalara must ensure that this overcollection amount is correctly re-
ported.
Expected API Call
{
“ lin e s”: [
{
“amount”: 100,
“taxCode”: “P0000000”
}
],
“type”: “SalesInvoice”,
“companyCode”: “DEFAULT”,
“date”: “2017-06-15”,
“customerCode”: “ABC”,
“addresses”: {
“singleLocation”: {
“line1”: “100 Ravine Lane NE”,
“city”: “Bainbridge Island”,
“r e gio n ”: “ W A”,
“country”: “US”,
“ p o s t alC o d e”: “9 8 110 ”
}
AvaTax Developer Guide • 119
},
“taxOverride”: {
“type”: “taxAmount”,
“taxAmount”: 10.0,
“reason”: “Tax calculated offline”
}
}
You have now enabled your software to respond gracefully to a temporary outage in connectivity, and to prepare
your transaction correctly.
Consuming sales tax related services can be considered mission-critical, especially when making calculation que-
ries through the AvaTax product. As a cloud-based Software-as-a-Service provider, Avalara understands the need
to ensure that our services are available continuously and respond in a timely manner. Avalara’s Server Status can
be viewed publicly at status.avalara.com. This page outlines the availability of the service, current performance in
terms of response time and a historical view of the availability for the past week.
Certification Requirements
Your software must be able to handle a timeout and retry the transaction.
If your software allows fallback to a default tax rate, your program must store transactions for later rec-
onciliation using a TaxOverride.
Your software should be able to pass these integration tests:
• 11.1.1- Detecting a Dropped Connection
• 11.2.1 - Retry or Fallback
• 11.4.1 - Reconcile Transactions After Outage

AvaTax Developer Guide • 120
Credits
Writers
Ted Spence, AvaTax Core Engine
• Chapter 4 - Reconciliation
• Chapter 8 - Exemptions
• Chapter 11 - Calculating Tax Offline
Bob Erdman, Project Manager, Partner Launch
• Chapter 6 - Discounts and Overrides
• Chapter 7 - Shipping and Handling
• Chapter 10 - Consumer Use Tax
Aaron Robles, Partner Launch Coordinator
• Chapter 8 - Exemptions
• Chapter 9 - Locations
Jason McAlister, Implementation Engineer
• Chapter 1 - Getting Started with AvaTax
• Chapter 11 - Calculating Tax Offline
Elijah Kull, Technical Account Manager
• Chapter 2 - Transactions
Charlie Morrisette, Program and Connector Manager, Connector Dev
• Chapter 3 - Customizing Your Transactions
Brad Elms, Implementation Engineer
• Chapter 5 - Product Taxability
Publisher
Madison Snyder, Intern - Connector Development
Editors
Ted Spence, Director, AvaTax Core Engine
Charlie Morrisette, Program Manager, Connector Dev
Certification Requirements
Bob Erdman, Project Manager, Partner Launch
Aaron Robles, Partner Launch Coordinator
Special Thanks
Kyrstin Robbins, Tax Analyst, Reconciliations
John Horsley, Software Engineer
Angel Person, Director, Efficiency & Accountability Engineering
Nigel Drinkwater, Director of Technical Assistance Center
Garin Pangburn, Director of Implementation Services

Tax compliance done right.
www.avalara.com
