Introduction BIFF Instrumentation Framework User Guide
User Manual: Pdf
Open the PDF directly: View PDF ![]() .
.
Page Count: 215 [warning: Documents this large are best viewed by clicking the View PDF Link!]

1 Revision 18.02 Board Instrumentation Framework
BIFF User Guide
Board Instrumentation Framework
Flexible, data agnostic instrumentation

2 Revision 18.02 Board Instrumentation Framework
Legal
Copyright © 2018 Intel Corporation
Licensed under the Apache License, Version 2.0 (the "License");
You may not use this file except in compliance with the License.
You may obtain a copy of the License at
http://www.apache.org/licenses/LICENSE-2.0
Unless required by applicable law or agreed to in writing, software distributed under the
License is distributed on an "AS IS" BASIS, WITHOUT WARRANTIES OR CONDITIONS OF
ANY KIND, either express or implied.
See the License for the specific language governing permissions and limitations under the
License.

3 Revision 18.02 Board Instrumentation Framework
Revisions
Date
Revision
Description
April 2016
16.04
Initial Release
June 2016
16.06
Added Peekaboo Options
July 2016
16.07
Fixed <Modifier> section. Added experimental
SyncFile. Added ProcessThread.
August 2016
16.08
Added note on Multi-Source widgets
Added <Plugin> for DynamicWidgets
Added <Synchronized> for charts.
September 2016
16.09
Added –altSplash option for Marvin. Added new
entry to trouble shooting.
Added new feature to <Operator>Average.
Added <Bound> option for collectors
Added MinValue and MaxValue operators
October 2016
16.10
Added <Oscar> settings to Marvin <Network>
for dynamic connections.
Operator <Input> added DefaultValue.
Added <Import> and <DefaultAlias> for Marvin
Alias’s, SVG widget, PrevRowAlias and
PrevColumnAlias. Added <AutoAdvance> for
dynamic Grids and Images.
December 2016
16.12
Added <Shunt> capability in Oscar
Added Stepped to TaskList
Added DataPulse and Mathematic Task
Added Case Conditional
Added MarvinLocalData application option
January 2017
17.01
Added PDF_Reader widget
Added <BITW> In Oscar
%(Namespace,ID) for Tasks in Marvin added
Added Marvin <If>then-else ability
February 2017
17.02
Can now use OscarTask to load and playback
file in one command.
Added MarvinMath
Changed Name
Added <ToolTip> and <SelectedStyle>to Marvin
March 2017
17.03
Added <Transition> to DynamicImage
April 2017
17.04
Added Marvin Ability to loop through files in a
directory as part of<For>
Deprecated <Repeat> in favor of <For> for
looping.

4 Revision 18.02 Board Instrumentation Framework
Added ‘LegacyMode’ for application padding.
May 2017
17.05
Added info about updated collectors – libvirt,
ovsdb, ipmi, SystemInfo, IPC
Added <Format> tag to Text widget.
July 2017
17.07
Doc cleanup and more troubleshooting info
September 2017
17.10
Added <SplitToken> to DynamicCollector. Note
about Java 9 support.
December 2017
17.12
Added <ClickThroughTransparent> ability for all
widgets/grids. Added % for dimensions.
Added <MonitorNumber> and
$(CANVAS_WIDTH),$(CANVAS_HEIGHT),$(SCR
EEN_H2W_RATIO),$(SCREEN_W2H_RATIO)
January 2018
18.01
Added GridMacro ability. Hgap and vgap can be
% for dimenstions.
Added ability to specify dimensions and
stylesheet for prompts.
Added WORKING_DIR (in Minion too) and
WORKING_DIR_URI aliases.
Added ExcludeForAutoActions to DynamicGrid
February 2018
18.02
Added Tasks for individual video files if clicked.
Added blurb for Linux_CPU collector.

5 Revision 18.02 Board Instrumentation Framework
Contents
1 Introduction ................................................................................ 17
1.1 History and Design Goals .......................................................................... 17
1.2 Coding .................................................................................................... 17
1.3 Versioning ............................................................................................... 18
2 High Level Overview ..................................................................... 19
3 System Requirements ................................................................... 20
3.1 Installing Python ...................................................................................... 20
3.2 Installing Java ......................................................................................... 20
4 Minion ......................................................................................... 21
4.1 Invoking Minion ....................................................................................... 21
4.1.1 One-and-done ........................................................................... 22
4.1.2 Using Alias File........................................................................... 22
4.2 Configuration File ..................................................................................... 22
4.2.1 <Minion> .................................................................................. 23
4.2.2 <Namespace> ........................................................................... 23
4.2.2.1 <Name> .................................................................... 23
4.2.2.2 <TargetConnection> ................................................... 23
4.2.2.3 <DefaultFrequency> ................................................... 24
4.2.2.4 <DefaultPrecision> ...................................................... 24
4.2.2.5 <IncomingConnection> ............................................... 25
4.3 <Collector> ............................................................................................ 25
4.3.1 Attributes .................................................................................. 26
4.3.1.1 ID ............................................................................. 26
4.3.1.2 OverrideID ................................................................. 26
4.3.1.3 Frequency .................................................................. 26
4.3.1.4 OnlySendOnChange ..................................................... 27
4.3.1.5 SendOnlyOnChange ..................................................... 27
4.3.1.6 DoNotSend ................................................................. 27
4.3.1.7 Scale ......................................................................... 27
4.3.1.8 ProcessThread ............................................................ 27
4.3.2 <Executable> ............................................................................ 28
4.3.3 <Bound> .................................................................................. 28
4.3.4 <Param> .................................................................................. 28
4.3.4.1 Example ..................................................................... 28
6 Revision 18.02 Board Instrumentation Framework
4.3.5 Using another Collector as a <Param> .......................................... 29
4.3.6 <Normalize> ............................................................................. 29
4.3.6.1 SyncFile Attribute ........................................................ 29
4.3.7 <Precision> ............................................................................... 30
4.3.8 Example .................................................................................... 30
4.4 <Group> ................................................................................................ 30
4.4.1.1 Frequency .................................................................. 31
4.4.1.2 Example ..................................................................... 31
4.5 <DynamicCollector> ................................................................................ 31
4.5.1 Attributes .................................................................................. 32
4.5.1.1 Frequency .................................................................. 32
4.5.1.2 OnlySendOnChange ..................................................... 33
4.5.1.3 DoNotSend ................................................................. 33
4.5.1.4 Prefix ......................................................................... 33
4.5.1.5 Suffix......................................................................... 33
4.5.2 <File> ...................................................................................... 33
4.5.2.1 Example ..................................................................... 33
4.5.3 <SplitToken> ............................................................................ 34
4.5.3.1 Example ..................................................................... 34
4.5.4 <Normalize> ............................................................................. 34
4.5.4.1 Example ..................................................................... 34
4.5.5 <LockFile> ................................................................................ 36
4.5.6 <Modifier> ................................................................................ 36
4.5.7 Attributes .................................................................................. 37
4.5.8 <Normalize> ............................................................................. 37
4.5.9 <Precision> ............................................................................... 37
4.5.10 <Plugin>................................................................................... 37
4.5.10.1 <PythonFile> .............................................................. 38
4.5.10.2 <EntryPoint> .............................................................. 38
4.6 <ProcessThread> .................................................................................... 38
4.7 Aliases .................................................................................................... 39
4.7.1 Reading Alias From external File .................................................. 40
4.7.2 ComputerName Alias .................................................................. 40
4.7.3 Usage ....................................................................................... 40
4.8 Build-In Collectors.................................................................................... 42
4.8.1 FileCollector............................................................................... 42
4.8.1.1 ReadFromFile .............................................................. 42
4.8.1.2 ReadFromFileWithLock ................................................. 42
7 Revision 18.02 Board Instrumentation Framework
4.8.1.3 ParseFile .................................................................... 43
4.8.1.4 ParseFileWithLock ....................................................... 44
4.8.2 Network .................................................................................... 45
4.8.2.1 GetNetworkRx ............................................................ 45
4.8.2.2 GetNetworkTx ............................................................. 46
4.8.3 CPU .......................................................................................... 46
4.8.3.1 GetCPU_Percentage ..................................................... 46
4.8.3.2 GetCPU_Core_Percentage ............................................ 46
4.8.4 PowerShell ................................................................................ 47
4.8.5 RandomVal ................................................................................ 47
4.8.6 Parrot ....................................................................................... 48
4.8.7 IPC_Linux ................................................................................. 48
4.8.8 OVSdb ...................................................................................... 49
4.8.9 LibVirt ....................................................................................... 49
4.8.10 Collectd .................................................................................... 49
4.8.11 IPMI ......................................................................................... 50
4.8.12 SystemInfo - Linux ..................................................................... 50
4.8.13 LinuxNetwork ............................................................................ 50
4.9 Operator Collectors .................................................................................. 51
4.9.1 Operator <Input> ...................................................................... 52
4.9.1.1 Default Value .............................................................. 52
4.9.2 Operator Addition ....................................................................... 52
4.9.3 Operator Average ....................................................................... 53
4.9.4 Operator MakeList ...................................................................... 53
4.9.5 Operator Duplicate ..................................................................... 53
4.9.6 Compare Operators .................................................................... 53
4.9.7 Operator Compare_EQ ................................................................ 53
4.9.8 Operator Compare_NE ................................................................ 54
4.9.9 Operator Compare_GT ................................................................ 54
4.9.10 Operator Compare_GE ................................................................ 54
4.9.11 Operator Compare_LT ................................................................. 54
4.9.12 Operator Compare_LE................................................................. 54
4.9.13 Greatest .................................................................................... 54
4.9.14 Least ........................................................................................ 54
4.9.15 MaxValue .................................................................................. 55
4.9.16 MinValue ................................................................................... 55
4.9.17 UserDefined............................................................................... 55
4.9.18 Looping for Input ....................................................................... 56
4.10 Making your own collectors ....................................................................... 57
4.10.1 Python ...................................................................................... 57
4.10.2 Considerations ........................................................................... 57
8 Revision 18.02 Board Instrumentation Framework
4.11 Mute Collector ......................................................................................... 58
4.12 <Actor> (Tasks) ...................................................................................... 58
4.12.1 Attributes .................................................................................. 58
4.12.1.1 ID ............................................................................. 58
4.12.2 <Executable> ............................................................................ 58
4.12.3 <Param> .................................................................................. 59
4.12.4 Example .................................................................................... 59
4.13 Using Additional Files ............................................................................... 59
5 Oscar .......................................................................................... 60
5.1 Running Oscar ......................................................................................... 60
5.2 The configuration file ................................................................................ 61
5.2.1 <Oscar> ................................................................................... 61
5.2.2 <IncomingMinionConnection> ..................................................... 62
5.2.2.1 Attributes ................................................................... 62
5.2.2.2 IP .............................................................................. 62
5.2.2.3 Port ........................................................................... 62
5.2.3 <TargetConnection> .................................................................. 62
5.2.3.1 Attributes ................................................................... 62
5.2.3.2 IP .............................................................................. 63
5.2.3.3 Port ........................................................................... 63
5.2.4 <IncomingMarvinConnection> ..................................................... 63
5.2.4.1 Attributes ................................................................... 63
5.2.4.2 IP .............................................................................. 63
5.2.4.3 Port ........................................................................... 63
5.2.5 <MarvinAutoConnect> ................................................................ 63
5.2.6 <Shunt> ................................................................................... 64
5.2.6.1 Attributes ................................................................... 64
5.2.7 <BITW> ................................................................................... 64
5.3 Using Oscar ............................................................................................. 65
5.3.1 Live Data .................................................................................. 65
5.3.2 Recording Data feed ................................................................... 65
5.3.3 Playing back Recorded Data......................................................... 66
6 Marvin ........................................................................................ 67
6.1 General Components ................................................................................ 67
6.1.1 Grids ........................................................................................ 68
6.1.2 Grids within Grids ....................................................................... 69
6.2 Running Marvin ....................................................................................... 69
6.2.1 External Alias File ....................................................................... 70
6.3 Configuration File ..................................................................................... 71
9 Revision 18.02 Board Instrumentation Framework
6.3.1 <Marvin> .................................................................................. 72
6.3.2 <Application> ............................................................................ 72
6.3.2.1 Attributes ................................................................... 72
6.3.2.2 <Title> ...................................................................... 73
6.3.2.3 <RefreshInterval> ...................................................... 73
6.3.2.4 <MonitorNumber> ...................................................... 73
6.3.2.5 <Network> ................................................................ 73
6.3.2.6 <CreationSize> .......................................................... 74
6.3.2.7 Attributes ................................................................... 75
6.3.2.8 Padding ..................................................................... 75
6.3.2.9 StyleSheet ................................................................. 75
6.3.2.10 IgnoreWebCerts .......................................................... 76
6.3.2.11 Heartbeat ................................................................... 76
6.3.2.12 Tasks ......................................................................... 76
6.3.2.13 MainMenu .................................................................. 76
6.3.2.14 Tabs .......................................................................... 77
6.3.2.15 <UnregisteredData>.................................................... 77
6.3.3 Tab .......................................................................................... 79
6.3.3.1 Attributes ................................................................... 80
6.3.3.2 Title........................................................................... 81
6.3.3.3 Padding/PaddingOverride ............................................. 81
6.3.3.4 StyleOverride ............................................................. 81
6.3.3.5 Widget ....................................................................... 81
6.3.3.6 Grid ........................................................................... 81
6.3.4 AliasList .................................................................................... 81
6.3.4.1 Scope ........................................................................ 82
6.3.4.2 Using ......................................................................... 82
6.3.4.3 Environment Variables ................................................. 82
6.3.4.4 Creating Alias when Specifying External File ................... 82
6.3.4.5 Automatically Generated Alias’ ...................................... 83
6.3.4.6 <Import> .................................................................. 83
6.3.4.7 <DefaultAlias> ........................................................... 84
6.3.5 TaskList .................................................................................... 84
6.3.6 <For> option ............................................................................. 84
6.3.6.1 Count – Option to iterate through files ........................... 85
10 Revision 18.02 Board Instrumentation Framework
6.3.7 $(CurrentRowAlias), $(CurrentColumnAlias) etc. ............................ 86
6.3.8 <If> then-else ........................................................................... 86
6.3.9 MarvinMath ............................................................................... 87
7 Widgets ...................................................................................... 89
7.1 Widgets .................................................................................................. 90
7.1.1 Dials ......................................................................................... 91
7.1.2 Indicators .................................................................................. 92
7.1.3 Charts ...................................................................................... 92
7.1.4 Images ..................................................................................... 93
7.1.5 Media ....................................................................................... 93
7.1.6 Other ........................................................................................ 94
7.2 Directory Structure .................................................................................. 95
7.3 Common Application Settings .................................................................... 95
7.3.1 Attributes .................................................................................. 95
7.3.1.1 File ............................................................................ 95
7.3.1.2 Row ........................................................................... 95
7.3.1.3 Column ...................................................................... 95
7.3.1.4 Rowspan .................................................................... 96
7.3.1.5 Colspan...................................................................... 96
7.3.1.6 Align .......................................................................... 96
7.3.1.7 Width ........................................................................ 96
7.3.1.8 Height ....................................................................... 96
7.3.1.9 Width and Height as percentages .................................. 96
7.3.1.10 Task .......................................................................... 97
7.3.2 MinionSrc .................................................................................. 97
7.3.3 ClickThroughTransparent............................................................. 97
7.3.4 StyleOverride ............................................................................ 97
7.3.4.1 Attributes ................................................................... 98
7.3.4.2 Item .......................................................................... 98
7.3.5 Peekaboo .................................................................................. 98
7.3.5.1 Attributes ................................................................... 99
7.3.5.2 Peekaboo Options ..................................................... 100
7.3.6 Peekaboo – Marvin ................................................................... 100
7.3.6.1 Set New Title ............................................................ 100
7.3.6.2 Change Style ............................................................ 101
7.3.7 <ValueRange> ........................................................................ 101
7.3.7.1 Attributes ................................................................. 101
11 Revision 18.02 Board Instrumentation Framework
7.3.8 <ToolTip> ............................................................................... 101
7.3.9 <SelectedStyle> ...................................................................... 102
7.4 Common Widget Definition File Definitions ................................................ 102
7.4.1 Type Attribute.......................................................................... 102
7.4.2 Style ...................................................................................... 102
7.4.3 ClickThroughTransparent........................................................... 102
7.5 How to understand the following sections .................................................. 103
7.6 Dials .................................................................................................... 103
7.6.1 SteelGauge ............................................................................. 103
7.6.1.1 Definition File ........................................................... 103
7.6.1.2 Application Settings ................................................... 106
7.6.2 SteelGauge180 ........................................................................ 107
7.6.2.1 Definition File ........................................................... 107
7.6.2.2 Application Settings ................................................... 108
7.6.3 SteelSimpleGauge .................................................................... 108
7.6.3.1 Definition File ........................................................... 108
7.6.3.2 Application Settings ................................................... 109
7.6.4 SteelGaugeRadial ..................................................................... 110
7.6.4.1 Definition File ........................................................... 110
7.6.4.2 Application Settings ................................................... 112
7.6.5 SteelGaugeRadialSteel .............................................................. 113
7.6.5.1 Definition File ........................................................... 113
7.6.5.2 Application Settings ................................................... 115
7.6.6 Bar Gauge ............................................................................... 116
7.6.6.1 Definition File ........................................................... 116
7.6.6.2 Application Settings ................................................... 117
7.6.7 Double Bar Gauge .................................................................... 118
7.6.7.1 Definition File ........................................................... 118
7.6.7.2 Application Settings ................................................... 118
7.7 Indicators ............................................................................................. 119
7.7.1 ProgressBar ............................................................................. 119
7.7.1.1 Definition File ........................................................... 119
7.7.1.2 Application Settings ................................................... 120
7.7.2 ProgressIndicator ..................................................................... 120
7.7.2.1 Definition File ........................................................... 120
7.7.2.2 Application Settings ................................................... 120
7.7.3 LEDBargraph ........................................................................... 121
12 Revision 18.02 Board Instrumentation Framework
7.7.3.1 Definition File ........................................................... 121
7.7.3.2 Application Settings ................................................... 122
7.8 Charts & Graphs .................................................................................... 122
7.8.1 MultiSourceAreaChart ............................................................... 123
7.8.1.1 Definition File ........................................................... 123
7.8.1.2 Application Settings ................................................... 124
7.8.2 AreaChart ............................................................................... 126
7.8.2.1 Definition File ........................................................... 126
7.8.2.2 Application Settings ................................................... 127
7.8.3 MultiSourceStackedAreaChart .................................................... 128
7.8.3.1 Definition File ........................................................... 129
7.8.3.2 Application Settings ................................................... 130
7.8.4 StackedAreaChart .................................................................... 132
7.8.4.1 Definition File ........................................................... 132
7.8.4.2 Application Settings ................................................... 133
7.8.5 MultiSourceLineChart ................................................................ 134
7.8.5.1 Definition File ........................................................... 134
7.8.5.2 Application Settings ................................................... 136
7.8.6 LineChart ................................................................................ 137
7.8.6.1 Definition File ........................................................... 137
7.8.6.2 Application Settings ................................................... 138
7.8.7 PieChart .................................................................................. 140
7.8.7.1 Definition File ........................................................... 140
7.8.7.2 Application Settings ................................................... 140
7.8.8 Bar Chart ................................................................................ 141
7.8.8.1 Definition File ........................................................... 142
7.8.8.2 Application Settings ................................................... 142
7.8.9 StackedBarChart ...................................................................... 146
7.8.9.1 Definition File ........................................................... 146
7.8.9.2 Application Settings ................................................... 147
7.9 Images/Video/Sound .............................................................................. 149
7.9.1 StaticImage ............................................................................. 149
7.9.1.1 Definition File ........................................................... 149
7.9.1.2 Application Settings ................................................... 149
7.9.2 DynamicImage ........................................................................ 150
7.9.2.1 Definition File ........................................................... 150
13 Revision 18.02 Board Instrumentation Framework
7.9.2.2 Application Settings ................................................... 151
7.9.2.3 AutoAdvance ............................................................ 151
7.9.2.4 <Transition> ............................................................ 152
7.9.3 VideoPlayer ............................................................................. 152
7.9.3.1 Supported File Types: ................................................ 152
7.9.3.2 Definition File ........................................................... 152
7.9.3.3 Application Settings ................................................... 153
7.9.4 AudioPlayer ............................................................................. 155
7.9.4.1 Supported Audio File Types: ....................................... 156
7.9.4.2 Definition File ........................................................... 156
7.9.4.3 Application Settings ................................................... 156
7.10 Text Display Widgets .............................................................................. 159
7.10.1 Text ....................................................................................... 159
7.10.1.1 Definition File ........................................................... 159
7.10.1.2 Application Settings ................................................... 159
7.10.2 SVG ................................................ Error! Bookmark not defined.
7.10.2.1 Definition File ........................................................... 160
7.10.3 SteelLCD ................................................................................. 160
7.10.3.1 Definition File ........................................................... 160
7.10.3.2 Application Settings ................................................... 161
7.11 Web Widget .......................................................................................... 162
7.11.1.1 Definition File ........................................................... 162
7.11.1.2 Application Settings ................................................... 163
7.12 QuickView Widget .................................................................................. 163
7.12.1.1 Definition File ........................................................... 164
7.12.1.2 Application Settings ................................................... 165
7.13 QuickViewLCD Widget ............................................................................. 167
7.14 Other ................................................................................................... 167
7.14.1 Button .................................................................................... 167
7.14.1.1 Definition File ........................................................... 168
7.14.1.2 Application Settings ................................................... 168
7.14.2 PDF_Reader Widget .................................................................. 168
7.14.2.1 Definition File ........................................................... 169
7.14.2.2 Application Settings ................................................... 169
7.14.3 Spacer .................................................................................... 169
7.14.4 FlipPanel ................................................................................. 170
14 Revision 18.02 Board Instrumentation Framework
7.14.4.1 Definition File ........................................................... 170
7.14.4.2 Application Settings ................................................... 172
7.14.4.3 Flipping the Panel ...................................................... 173
7.15 Grid ..................................................................................................... 173
7.15.1.1 Attributes ................................................................. 174
7.15.1.2 PaddingOverride/Padding ........................................... 175
7.15.1.3 StyleOverride ........................................................... 175
7.15.1.4 Widget ..................................................................... 175
7.15.1.5 <Grid> .................................................................... 176
7.15.1.6 <Peekaboo> ............................................................. 176
7.16 GridMacro ............................................................................................. 176
7.17 DynamicGrid ......................................................................................... 176
7.17.1 Attributes of <GridFile> ............................................................ 177
7.17.2 Transitions .............................................................................. 177
7.17.3 Peekaboo ................................................................................ 178
7.17.4 AutoAdvance ........................................................................... 179
8 Tasks ........................................................................................ 180
8.1 Defining a Task ...................................................................................... 180
8.1.1 Attributes ................................................................................ 180
8.1.1.1 StyleOverride ........................................................... 181
8.2 Calling/Executing a Task ......................................................................... 181
8.3 Minion Task ........................................................................................... 182
8.3.1 Defining a Minion Task in Marvin ................................................ 182
8.3.2 Minion Task Parameters ............................................................ 183
8.3.3 Mixing Minion Task Parameters .................................................. 183
8.3.4 Using a MinionSrc as a Parameter .............................................. 184
8.4 Oscar Task ............................................................................................ 184
8.4.1 LoadFile .................................................................................. 185
8.4.2 Playback ................................................................................. 185
8.4.2.1 Speed ...................................................................... 186
8.4.2.2 Repeat ..................................................................... 186
8.4.2.3 Loop ........................................................................ 186
8.4.2.4 File .......................................................................... 187
8.4.3 StopPlayback ........................................................................... 187
8.4.4 PausePlayback ......................................................................... 187
8.4.5 StopLive ................................................................................. 188
8.4.6 StartLive ................................................................................. 188
8.4.7 StartRecording ......................................................................... 188
15 Revision 18.02 Board Instrumentation Framework
8.4.8 StopRecording ......................................................................... 188
8.5 Marvin Task .......................................................................................... 189
8.6 Marvin Admin Task ................................................................................. 190
8.6.1 SetActiveTab ........................................................................... 190
8.6.2 SetTabVisibility ........................................................................ 191
8.7 Remote Marvin Task ............................................................................... 191
8.8 Chained Task......................................................................................... 192
8.9 Random Task ........................................................................................ 193
8.10 DataPulse Task ...................................................................................... 193
8.11 Mathematic Task .................................................................................... 193
8.12 Desktop Task ........................................................................................ 194
8.13 LaunchProgram Task .............................................................................. 194
8.14 Running a Task at Startup ....................................................................... 194
8.15 User Prompts ........................................................................................ 195
8.15.1 Defining a Prompt .................................................................... 195
8.15.1.1 ListBox Prompt ......................................................... 196
8.15.1.2 InputBox Prompt ....................................................... 197
8.15.2 Prompting the user ................................................................... 198
8.16 Postponing Task Action ........................................................................... 199
8.16.1 Random Postpone Time............................................................. 199
9 Conditionals ............................................................................... 200
9.1 Defining a Conditional ............................................................................ 200
9.1.1 Type ....................................................................................... 200
9.1.2 CaseSensitive .......................................................................... 201
9.1.3 <MinionSrc> ........................................................................... 201
9.1.4 <Value> ................................................................................. 201
9.1.5 <Then> .................................................................................. 201
9.1.6 <Else> ................................................................................... 201
9.2 CASE .................................................................................................... 202
10 Connectivity Overview ................................................................ 203
10.1 Secondary communication Channels ......................................................... 203
11 Advanced Tactics........................................................................ 205
11.1 Widget Stacking ..................................................................................... 205
11.2 Show Current Computer Name ................................................................ 205
11.3 Changing the Images being shown ........................................................... 206
12 Support..................................................................................... 207
13 Summary .................................................................................. 208
14 Troubleshooting ......................................................................... 209
14.1 Stack overflow error ............................................................................... 209
14.2 Getting Audio and Video working in a VM .................................................. 209
16 Revision 18.02 Board Instrumentation Framework
14.3 Connectivity Problems ............................................................................ 210
14.4 The Dynamic type Widget isn’t working .................................................... 210
14.5 The Web Widget isn’t working all the time ................................................. 211
14.6 Slow network performance, tasks not getting run in a timely manner ........... 211
14.7 Collector Data not showing up in Oscar or Marvin ...................................... 211
14.8 Multi-Source Widgets not Updating properly .............................................. 211
14.9 Error: Could not find or load main class kutch.biff.marvin.Marvin ................. 212
14.10 java.lang.UnsupportedOperationException: Unable to open DISPLAY ............ 212
14.11 The fonts on one system do not look the same as on another ...................... 212
14.12 My images and goodies don’t look right on another computer ...................... 213
14.13 My widgets don’t line up anymore ............................................................ 213
14.14 Marvin does not work when using Java 9. ................................................. 213
15 Thanx and Recognitions .............................................................. 214
16 About Me .................................................................................. 215

17 Revision 18.02 Board Instrumentation Framework
1 Introduction
This document serves as a guide to the various components of the BIFF Instrumentation
Framework project.
It is intended to provide an overview of the various components as well as provide technical
details on the XML configuration files that are at the heart of its flexibility.
1.1 History and Design Goals
I set out to create a flexible framework that could be used for demonstrations. Years ago I
wrote a fairly simple Java application to demonstrate the power of SR-IOV (you can see it in
action here: https://www.youtube.com/watch?v=bOMB9RsQfo4&list=WL&feature=mh_lolz)
This little application helped the industry understand what SR-IOV is and what it can do for
them. It helped take something fairly complex and put it into simple understandable dials.
Years later and I still get requests for updates to this tool for in-house demos.
Now I am working on new things that are even more complicated, so I set out to create a
way of demonstrating not just Ethernet traffic as my first application did, but anything that
could be instrumented.
The first founding principle of this framework is that you can display any data you wish. If
you can gather a piece of information somehow, this framework should be able to display it,
whether it be CPU utilization, network bandwidth, temperature, voltage or the number of
users on a system.
The second design goal is that the framework should know nothing about the data it is
collecting and displaying. It is agnostic to the data, could be string, could be an integer
could be a real number, Gigabits per/second, I/O operations per second, power usage etc.
The framework does not know anything about this.
The last major design goal is that it be completely configurable via external files that
describe how to gather data and how to display it. You should be able to put a Dial on the
screen with a few lines in a text file and with a few more lines in another file describe how
to go get the data to feed that dial.
So in summary the design goals are:
If you can instrument it, the framework can display it
Framework is agnostic to the data being collected and displayed
Changes to data being collected and displayed can be achieved via external text files
1.2 Coding
Minion and Oscar are written in Python while Marvin is written in Java. I could have written
all in Java, however I had never done any Python it seemed like a good opportunity to learn
it.
18 Revision 18.02 Board Instrumentation Framework
As it turns out, Python is a very good choice for Minion as it provides a great framework for
the data collection and is available in all Linux distros.
This entire project has been and continues to be very organic. I had an idea of what I
wanted and just started coding (and learning). As such, the code is much more erratic and
spaghetti like than I would have preferred, but it does work even if it is a bit hard to follow.
A quick note on my coding style, especially for the Java purists – if you don’t like it
(especially my indentation style), then suck it up I’m a dinosaur and that’s the coding
style I learned nearly 30 years ago and it works for me. If you can’t read it, use the pretty-
printer in your editor to make it how you like. Note though that if you push updates to my
repository, I reserve the right to pretty-print it myself if I tweak it.
Also note that this was my first attempt at coding in Python – not my most elegant work.
1.3 Versioning
I have chosen to version all the components of BIFF, including this document much in the
same way Ubuntu does its versioning, where the version number is the Year and Month of
the release. Followed possibly by the day of the month and a build #.
19 Revision 18.02 Board Instrumentation Framework
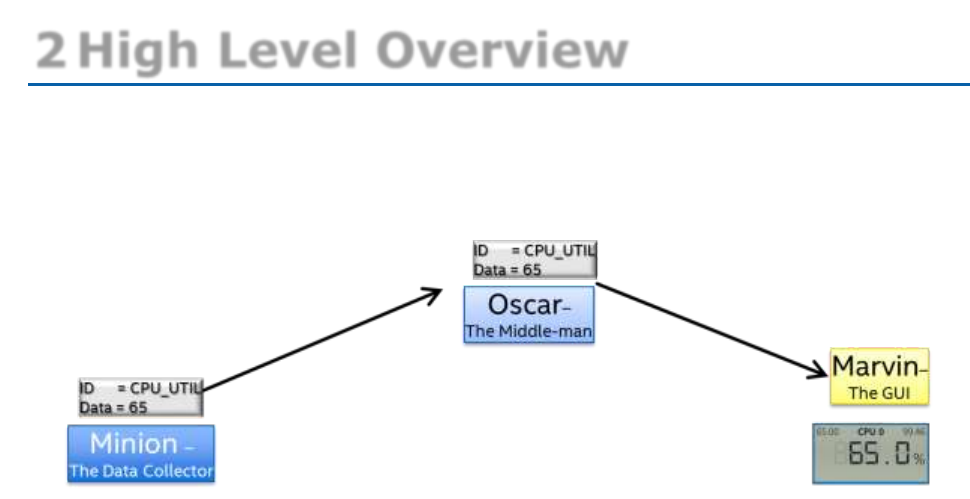
2 High Level Overview
The BIFF Instrumentation Framework project has three components:
1. Minion - the data collector
2. Oscar – The orchestrator
3. Marvin – The display GUI
Figure 1 Components of Instrumentation Framework
The operation is fairly straight forward, the Minion framework collects data (as defined and
described in an external XML file) associated an ID with it (also defined in the XML file) and
passes it to Oscar over a UDP socket in XML format.
Oscar receives data from one or more Minions and simply passes it on to one or more
Marvin GUI’s. Additionally Oscar can save the incoming data to a file and play it back at a
later time.
The GUI, named Marvin receives the data originally sent by a Minion and after validating it,
pushes it to one or more ‘Widgets’ (dial, graph, text etc.) for displaying. The association of
a data point ID with a widget, as well as the location, size, color and more for a widget is
defined in an external XML file.
All of these components can exist on a single computer or on separate ones. It makes no
difference to the framework.
20 Revision 18.02 Board Instrumentation Framework
3 System Requirements
Minion and Oscar are written in Python and require Python v3.3 or later. I chose Python 3.3
because my initial development was on a Microsoft Windows system, and I just grabbed the
latest version, unaware that most Linux distros come with a 2.x release.
Marvin is written in Java 8 and needs it to run. Specifically Java 8 update 20 or later. Note
that Java 9 is NOT supported at this time – changes in some package location in Java 9
break the Enzo library used.
Note: I have successfully converted Minion to python 2 using the python 3to2 package, and
even have some build-in support in Minion for 2.x
3.1 Installing Python
https://www.python.org/download/.
Note: Make sure you select Add Python to Path during install or manual add Python to your
environment path if installing on a Windows platform.
3.2 Installing Java
https://java.com/en/download/index.jsp
21 Revision 18.02 Board Instrumentation Framework
4 Minion
Minion, the data collection portion of the BIFF Instrumentation Framework project is written
in Python. It is a command line application with no GUI components.
It is designed to be a light-weight framework that collects data at defined intervals,
packages it up and sends it to an Oscar.
The basic operation of Minion is that it will call an external application (defined in an XML
file) at a given interval (also defined in the XML file), take the output of that external
application, assign an ID (again, defined in the XML file) then send it to an Oscar (whose IP
and port are in the XML file).
Minion itself knows nothing about how to collect the data, it simply calls the external
application (or script), takes the output, tags it with an ID and sends it on its way.
The Minion framework can call as many external applications (or scripts) as you define in
the XML file.
Minion supports normalization of data (averaging it to a per second basis) if so configured in
the XML file.
There are two ‘bundles’ for Minion. One that works with Python 2.x and the other that
works with Python 3.x.
4.1 Invoking Minion
Running minion is the same as launching any other Python application, by running Python
with the parameter of Minion.py.
Minion itself requires a parameter to specify the application definition file, which is an XML
file. An example invocation is:
python Minion.py –i MinionConfig.xml
Minion can also be invoked with additional parameters.
Parameter
Description / Use
-i <filename>
Application XML definition file
-h | -help
Show the help information
-v # -verbose #
Prints out debug information as it runs at a level 1-4
-r or -runonce
Runs each of the collectors once and only once and then exit
-a | -aliasfile
22 Revision 18.02 Board Instrumentation Framework
4.1.1 One-and-done
There is an additional Minion command line parameter –r or –runonce. This parameter will
run each of the collectors once and only once and then exit.
The usage for this is that you could setup a Task to call a script that in turn launches a
minion with a –r option in which the configuration file might send default/initial values for all
dials as a kind of ‘reset’.
4.1.2 Using Alias File
-a | -aliasfile
The Alias file is a simple AliasName=AliasValue. Where each Alias is on a different line. For
example:
NumberOfCores=72
TimeZone=New Zealand
Author=Patrick Kutch
If these are in an alias file and used, then within the configuration file, the aliases of
$(NumberOfCores), $(TimeZone) and $(Author) would be available.
4.2 Configuration File
The XML configuration file is where you will define what data you want to collect, how often
to collect it, the ID to tag it with and where to send it.
The basic hierarchy for the XML file is as follows:
<Minion>
<Namespace>
<Name><Name>
<TargetConnection></TargetConnection>
<Collector>
</Collector>
...
<Collector>
</Collector>
</Namespace>
<Namespace>
<Name><Name>
<TargetConnection></TargetConnection>
<Collector>
</Collector>
...
<Collector>
</Collector>
</Namespace>
.....
<Namespace>
23 Revision 18.02 Board Instrumentation Framework
</Namespace>
</Minion>
Where <Minion> is the root XML node and there are one or more <Namespace> nodes –
though in most cases there is only one <Namespace>
Note: Since Linux is case-sensitive it is important to use the same case in the Minion xml
and both Oscar and Marvin definition files.
4.2.1 <Minion>
The Minion Tag (the root) can take a single optional attribute which determines the
threading model Minion uses. Each collector can be run in its own thread, or all collectors
within a single <Namespace> can be run in a single thread.
This is an experimental setting for testing purposes.
The attribute is SingleThreading and can be either True or False, or not there at all, which is
the same as False.
4.2.2 <Namespace>
A Namespace can be thought of as a container or an identifier. In most cases it is used to
identify the computer from which the data is being gathered.
The Namespace and ID for a data point are used for a unique identifier for a Widget. In this
way one could use the same minion configuration file on multiple different systems to
gather the same data (such CPU Utilization) and the ID for the collectors would be the same
(say CPU_UTIL) but the namespace would be different to reflect the different computers
from where the data was collected.
4.2.2.1 <Name>
This is the name of the Namespace, it must be unique per instance of a minion. It can be
repeated in other Minions, but not within the same XML configuration file.
Example
<Minion>
<Namespace>
<Name>Workload_Server</Name>
</Namespace>
</Minion>
4.2.2.2 <TargetConnection>
The TargetConnection tag defines where the target Oscar can be found on the network.
Attributes
The <TargetConnection> tag supports the following attributes, which are case sensitive.
Attribute
M/O
Comments
IP
M
Target IP Address or FQDM or DNS Name
24 Revision 18.02 Board Instrumentation Framework
PORT
M
Target UDP Port Number
IP
IP address of the target Oscar. This can be a DNS name or an IP address.
Note: If the target Oscar does not have a static IP address and uses DHCP to set the IP
Address it is recommended to use the Full Qualified Domain Name (FQDM).
Additionally, if the target Oscar is not in a permanent location or the IP address
changes it may take some time for the DNS name resolution to point to the new IP
address.
Port
Port on which the target Oscar is listening
Example
<Minion>
<Namespace>
<TargetConnection IP="localhost" PORT="3232"/>
</Namespace>
</Minion>
Note: Verify that the UDP Port is not already assigned and that it is not blocked by Firewalls
or Routers such as firewalld or iptables in Linux.
4.2.2.3 <DefaultFrequency>
This is the default frequency, in milliseconds for which the Minion framework will call every
Collector within this Namespace, unless the Collector specifies its own frequency.
Note: The faster the DefaultFrequency (Lower number) the more often the Collectors will
run which may impact system performance and increase network traffic between
Minion and Oscar. Using a slower DefaultFrequency (Higher number) will increase the
amount of time between data collection for all Collectors. Setting the
DefaultFrequency between 3000-5000 (3-5 seconds) and then specifying 1000 (1
second) Frequency on individual collectors is a good way to balance data collection
and system performance.
Example
This example specifies a default frequency of 1.5 seconds (1500ms).
<Minion>
<Namespace>
<DefaultFrequency>1500</ DefaultFrequency >
</Namespace>
</Minion>
4.2.2.4 <DefaultPrecision>
This is the default precision for numeric values collected within the namespace. The default
in two decimal places. With this setting you can change the default for all collectors in the
Namespace.
25 Revision 18.02 Board Instrumentation Framework
The default precision can be overridden in any individual collector using the <Precision>
capability.
Example
This example specifies a default precision of 4. With this if a collector has a value of 1.25,
the value sent will be 1.2500.
<Minion>
<Namespace>
<DefaultPrecision>4</ DefaultPrecision >
</Namespace>
</Minion>
4.2.2.5 <IncomingConnection>
The IncomingConnection tag defines a socket where Minion will listen for incoming data
packets. This connection point will be for performing Tasks and other data exchanges.
This tag is optional, if you do not have it, the framework will listen on all interfaces and pick
a random port.
Attributes
The <IncomingConnection> tag supports the following attributes, which are case sensitive.
Attribute
M/O
Comments
IP
O
Local IP Address
PORT
O
Local UDP Port
IP
IP address for Minion to listen on. If not specified, it will listen on all available interfaces
Port
UDP Port on which the minion will listen for incoming data. If not specified a random,
unused UDP port number will be chosen. Example
<Minion>
<Namespace>
<IncomingConnection IP="192.168.1.10" PORT="6032"/>
</Namespace>
</Minion>
4.3 <Collector>
Each namespace contains one or more collector. A collector can be thought of as a plugin
that is responsible for going and gathering a desired piece of data. The Collector calls the
specified executable program and takes the result, tags it with the given ID and sends it to
Oscar.

26 Revision 18.02 Board Instrumentation Framework
4.3.1 Attributes
The <Collector> tag supports the following attributes, which are case sensitive.
Attribute
M/O
Comments
ID
M
The ID the resulting data is tagged with
Frequency
O
How often, in milliseconds, to collect data or OnDemand, or
RunOnce
OnlySendOnChange
O
Boolean (Default is False)
SendOnlyOnChange
O
Boolean (Default is False)
DoNotSend
O
Boolean (Default is False)
Scale
O
Multiplier for the collected value (Default is 1)
OverrideID
O
Different ID to use when sent to Marvin.
ProcessThread
O
Specify an ID of a separate worker thread group
4.3.1.1 ID
This is the ID the collected data will be tagged with, the Widget in the GUI uses the
Namespace + ID as an identifier. The ID must be unique within the Namespace.
4.3.1.2 OverrideID
This was added to accommodate Compare <Operator>s. Every collector must have a
unique ID within the namespace, however you may want different compare operators to
send data to the same ID. In this case you can use the OverrideID. The Minion
demonstration has an example in the AdditionalFile.xml file for LCD.Override.
4.3.1.3 Frequency
How often to call this collector, in milliseconds. If Frequency is not specified for a Collector,
then the DefaultFrequency for the Namespace is used.
If you specify “OnDemand” for the frequency, then the collector will only collect when it
receives a task from Marvin.
“OnDemand” Frequency
If you specify this value, then the Collector will act more like a task than a collector. The
difference being that a task does not return data, an OnDemand collector will. In order to
activate the OnDemand collector, Marvin sends a Task with the approprate TaskID, which is
the ID of the Collector and the corresponding Namespace, along with any optional
parameters you wish to add to the Collector. The collector can have its own list of
parameters defined in the config file, and an OnDemand one can also have additional
parameters sent from Marvin as part of the task.
27 Revision 18.02 Board Instrumentation Framework
“RunOnce” Frequency
If you specify this value, then the collector will run at the default frequency once and only
once.
4.3.1.4 OnlySendOnChange
This Attribute can have a value of “True” or “False”. If True, then the data collected is only
sent to Oscar if it has changed since the last time it was sent.
This can be useful for things such as a flag indicating if a test has finished or not. For
example if you have a FileCollector reading a status every 200ms that updates an image in
Marvin, it may not be desirable to send an update every 200ms when the data may not
change for several minutes.
Note: In order to ensure that the GUI gets all data when it starts up, it sends a message to
Oscar, which in turn sends a message to all Minion to an update from all collectors,
even if it is marked as OnlySendOnChange.
4.3.1.5 SendOnlyOnChange
Is the same as OnlySendOnChange – added this because I kept typing it in instead of
OnlySendOnChange
4.3.1.6 DoNotSend
This Attribute can have a value of “True” or “False”. If True, then the data collected but not
sent. The default value is False, which is the same as not specifying DoNotSend, and the
data will be sent.
This can be useful for Operators that can take data from other collectors and do something
with them. Say for example you want to use the average operator that averages the data
from several collectors – you may not need or want the data from the individual collectors
to be sent, in such a case use the DoNotSend attribute.
4.3.1.7 Scale
If you specify the Scale=”value” value then the resulting numeric value from the collection
(or Normalization if you do that) will be multiplied by the value specified.
4.3.1.8 ProcessThread
The collection process is done sequentially in the order you specify within the configuration
files. Some collectors may take a relatively long time to perform. You can create a new
ProcessThread group using the ‘ProcessThread’ attribute for a collector, or the
<ProcessThread> tag.
When you use the ‘ProcessThread’ attribute or Tag you specify an ID that you create. Each
unique ID you specify will place the Collector in a process that only processes collectors with
that ProcessThread ID. In this way you can place ‘slow’ collectors in their own process.
Specifying a ProcessThread is pretty flexible, and is case sensitive. So if you specify an ID
of ‘Foo’ on one collector and create a <ProcessThread> tag for a group of collectors with an
ID of ‘foo’ they will be in different processes; if you however specify ‘Foo’ for both, they will

28 Revision 18.02 Board Instrumentation Framework
all run in the same process/worker thread.
Example:
<Collector ID="RX-1" ProcessThread=”MyOtherWorker”>
<Executable>Collectors/Network2.py</Executable>
</Collector>
4.3.2 <Executable>
This specifies the external program to be launched that will return the data to be sent to
Oscar. The Minion framework will use the exact case that is provided in the XML file, as
such if the OS and or program you are calling is case sensitive, take care.
When the external program is launched, it is done so in an external process, this is not very
fast and does take resources. Please view section 4.10.2 for more information.
Note that I’ve done some interesting work that allows Python collectors to be dynamically
loaded into the Minion process, rather than launching a separate process. Please refer to
section 4.10.1 for more details.
4.3.3 <Bound>
Optional
This tag allows you to specify a range to bound the numeric data in and what to do if the
data falls outside that range.
Example:
<Bound Max="20000" Min="15555" Action="set"/>
The <Bound> allows you to specify a minimum or maximum, or both and what to do if the
collected value is outside those. The values must be numeric, they can be integer or float
values.
Valid Actions are:
Drop – drop the data, do not send it
Set – change the collected value to the bound which it passed
RepeatLast – re-send the last value sent that falls within the bounds.
Set is the default Action if you do not specify one. You must specify either Min or Max or
both.
4.3.4 <Param>
The <Executable> specified may need parameters. You may put one or more <Param>
nodes in a collector to provide the parameters.
4.3.4.1 Example
The following is an example of a collector that is written in Python, it will be called every
250ms. Note that the name of the executable is Python.exe and the parameters are the
29 Revision 18.02 Board Instrumentation Framework
actual Python file to run (GetProgress.py).
<Collector ID="Progress" Frequency="250">
<Executable>Python.exe</Executable>
<Param>GetProgress.py </Param>
</Collector>
4.3.5 Using another Collector as a <Param>
You may wish to use the output of another collector or operator as a <Param> to a
collector. To do this, you specify the ID of the collector wrapped in @() as the parameter:
<Collector ID="ProcessProgress" Frequency="250">
<Executable>MyBashScript.sh</Executable>
<Param>@(Progress)</Param>
</Collector>
In this collector, we call an external script called “MyBashScript.sh” and pass the value of
the data collected from the ‘Progress’ Collector.
The two collectors must be in the same Namespace. If the ‘ProcessProgress” collector is run
before the ‘Progress” collector has actually collected any data, then the ‘ProcessProgress’
collector will not collect anything.
4.3.6 <Normalize>
Sometimes the data being collected is desired to be in a per second or per time period
basis. Network throughput for example is usually in a Megabits Per Second or Gigabits Per
Second resolution.
A Collector may go out and read the current # of Bytes that have been send or received
over a given network interface every second. However that is raw data not normalized (or
averaged).
If you specify a Normalization factor the framework will do some calculations to determine
the difference from the last time the data was collected and normalize it to a per second
basis.
The <Normalize> number is a float value, it should be a positive non-zero number.
A value of 1, will simply normalize the data to a per second value.
However if you wish to do other calculations, you can specify a different value. For example
the build-in Network Collectors return BytesPerSecond. This is not the way most customers
in the networking world think, they are used to Megabits Per Second. To convert from
Bytes to second to Bits per second, a Normilize value of 0.00000008. (1Byte per second =
0.00000008 Mbps)
4.3.6.1 SyncFile Attribute
Experimental
Normalization is a data rate over calculated based upon the time between collections that is
factored into a rate per second value and then scaled with whatever number you provide.
The time between collections is done within the Minion framework. You can use the
30 Revision 18.02 Board Instrumentation Framework
timestamp of a file as the time between collections instead if you like:
<Collector ID="TX-1" Frequency="250">
<Executable>Collectors/Network.py</Executable>
<Param>GetNetTx</Param>
<Param>Local Area Connection</Param>
<Normalize SyncFile=”NetworkIo.txt”>0.00000008<Normalize>
</Collector>
Here you gather some data and instead of using the current system time and comparing it
to the last time the collection was run as part of the normalization factoring, it uses the
current timestamp on the NetworkIo.txt file and compares to the last time the collection
was run and it checked the timestamp on the same file.
This type of calculation likely has limited value and maybe most suited for
DynamicCollectors.
4.3.7 <Precision>
Many times the data collected, normalized and scaled is a float value. The <Precision> tag
specifies how many digits to the right of the decimal you wish the data to have. The default
is to leave the precision as none, meaning as many decimal places as was provided by the
collector.
4.3.8 Example
The following example calls a built-in collector to read the network TX bytes from the ‘Local
Area Connection’ LAN Port. Note the <Normalize> tag and value. The resulting value will
have a single digit to the right of the decimal place via the <Precision> tag.
<Collector ID="TX-1" Frequency="250">
<Executable>Collectors/Network.py</Executable>
<Param>GetNetTx</Param>
<Param>Local Area Connection</Param>
<Normalize>0.00000008<Normalize>
<Precision>1</Precision>
</Collector>
4.4 <Group>
The <Group> tag allows you to group a bunch of collectors together. The collectors
<Collector> listed within a <Group> tag are all collected in sequential order and the results
from all the collectors are packaged up into a single network packet and sent.
This could be useful if you are charting many individual pieces of data within one chart – it
makes sure they all arrive at the same time.
Attribute
M/O
Comments
Frequency
O
Frequency to collect data – for ALL collectors within the
group

31 Revision 18.02 Board Instrumentation Framework
4.4.1.1 Frequency
How often to call this group of collectors, in milliseconds. If Frequency is not specified for a
group, then the DefaultFrequency for the Namespace is used. Any frequencies listed on an
individual Collector within the group will be ignored.
4.4.1.2 Example
<Group Frequency="300">
<Collector ID="TX" Frequency="250">
<Executable>Collectors\FileCollector.py</Executable>
<Param>ParseFile</Param>
<Param>BX_Simulator.txt</Param>
<Param>TX</Param>
<Param>=</Param>
<Param>1</Param>
</Collector>
<Collector ID="RX" Frequency="250">
<Executable>Collectors\FileCollector.py</Executable>
<Param>ParseFile</Param>
<Param>BX_Simulator.txt</Param>
<Param>RX</Param>
<Param>=</Param>
<Param>1</Param>
</Collector>
<Collector ID="BX" Frequency="250">
<Executable>Collectors\FileCollector.py</Executable>
<Param>ParseFile</Param>
<Param>BX_Simulator.txt</Param>
<Param>BX</Param>
<Param>=</Param>
<Param>1</Param>
</Collector>
</Group>
4.5 <DynamicCollector>
A DynamicCollector reads the contents of a text file containing one or more lines and ID and
DATA pairing such as:
Temp=75
NumCPUs=4
NumCores=16
It will read this text file at the period defined by the Namespace Frequency, or one specified
for the DynamicCollector itself.
When it reads the file, it will make a <Collector> for each ID found in the file and assign the
32 Revision 18.02 Board Instrumentation Framework
value associated with it. If new IDs are added to the file, they will dynamically be added as
well.
As the DynamicCollector runs, it will update the data associated with each <Collector> it
adds to the framework, and the data for those collectors will be sent onwards.
The key point is that the DynamicCollector is the piece that creates other Collectors based
upon it doing something – usually reading the contents of a file.
Note: There is no ID associated with the <DynamicCollector>
Note: If you have a large file as your source (many data points) you are likely to get an OS
level error something like: Minion - WARNING - Error sending data :[WinError 10040]
A message sent on a datagram socket was larger than the internal message buffer or
some other network limit, or the buffer used to receive a datagram into was smaller
than the datagram itself.
This is because the single packet it attempted to create as too huge for the network
to handle. If can happen if you put the <DynamicCollector> in a group.
4.5.1 Attributes
The <DynamicCollector> tag supports the following attributes, which are case sensitive.
Attribute
M/O
Comments
Frequency
O
How often, in milliseconds, to collect data or OnDemand
OnlySendOnChange
O
Boolean (Default is False)
DoNotSend
O
Boolean (Default is False)
Prefix
O
Text to prepend to the ID
Suffix
O
Text to append to the ID
4.5.1.1 Frequency
How often to call this collector, in milliseconds. If Frequency is not specified for a Collector,
then the DefaultFrequency for the Namespace is used.
If you specify “OnDemand” for the frequency, then the collector will only collect when it
receives a task from Marvin.
Keep in mind that this collector goes and reads a file and creates <Collector>s based upon
the data within the file which in turn sends data. It does not send data itself.
“OnDemand” Frequency
This has not been tested for the <DynamicCollector>, it will most likely work just fine, just
be aware that it won’t update the resulting <Collector>s data until you active this collector.
See the <Collector> OnDemand for an explanation on how it work.

33 Revision 18.02 Board Instrumentation Framework
4.5.1.2 OnlySendOnChange
This Attribute can have a value of “True” or “False”. If True, then the data collected is only
sent to Oscar if it has changed since the last time it was sent. In the case of the
<DynamicCollector> it will pass this flag down to any <Collector>s it creates.
4.5.1.3 DoNotSend
This Attribute can have a value of “True” or “False”. If True, then the data collected but not
sent. The default value is False, which is the same as not specifying DoNotSend, and the
data will be sent.
In the case of the <DynamicCollector> it will pass this flag down to any <Collector>s it
creates.
4.5.1.4 Prefix
The DynamicCollector makes the ID for the resulting collector from the data within the
specified file. If you specify a Prefix, it will prepend that to the ID string found in the file.
So if in the file you have:
Temp=75
And you specify Prefix=”CPU.” The resulting data ID will be “CPU.Temp”
4.5.1.5 Suffix
The DynamicCollector makes the ID for the resulting collector from the data within the
specified file. If you specify a Suffix it will append that to the ID string found in the file.
4.5.2 <File>
This specifies the external text file that the <DynamicCollector> is to go read. This is
required, unless you are making your own DynamicCollector and using the <Plugin>
capability.
4.5.2.1 Example
The following is an example of a dynamic collector, it reads the file ‘perfdata.txt’ and I
specify a prefix of ‘Wow’.
<DynamicCollector Prefix=”Wow.” OnlySendOnChange="True">
<File>perfdata.txt</File>
</DynamicCollector>
Let’s assume the file looks like this:
Temp=75
NumCPUs=4
NumCores=16
It will create three collectors with ID’s of:
Wow.Temp

34 Revision 18.02 Board Instrumentation Framework
Wow.NumCPUs
Wow.NumCores
As it reads the file, it will re-read those ID and values and update the values within those
Collectors
4.5.3 <SplitToken>
You may specify one or more of these to indicate the string you wish to use to determine
the ID from the value. The defaults used are '=','= ',': ',':',' '
Note that these are specified in order of priority, the 1st token that works is used
4.5.3.1 Example
<DynamicCollector Prefix=”Wow.” OnlySendOnChange="True">
<File>perfdata.txt</File>
<SplitToken>=</SplitToken>
<SplitToken>= </SplitToken>
</DynamicCollector>
This make it so the only two tokens used to split the data is an equal or an equal followed
by a space.
4.5.4 <Normalize>
Sometimes the data being collected is desired to be in a per second or per timeperiod basis.
Network throughput for example is usually in a MegabitsPer Second or Gigabits Per Second
resolution.
A Collector may go out and read the current # of Bytes that have been send or received
over a given network interface every second. However that is raw data not normalized (or
averaged).
If you specify a Normilization factor the framework will do some calculations to determine
the difference from the last time the data was collected and normalize it to a per second
basis.
The <Normalize> number is a float value, it should be a positive non-zero number.
A value of 1, will simply normalize the data to a per second value.
However if you wish to do other calculations, you can specify a different value. For example
the build-in Network Collectors return BytesPerSecond. This is not the way most customers
in the networking world think, they are used to Megabits Per Second. To convert from
Bytes to second to Bits per second, a Normilize value of 0.00000008. (1Byte per second =
0.00000008 Mbps)
4.5.4.1 Example
The following example calls a built-in collector to read the network TX bytes from the ‘Local

35 Revision 18.02 Board Instrumentation Framework
Area Connection’ LAN Port. Note the <Normalize> tag and value.
<Collector ID="TX-1" Frequency="250">
<Executable>Collectors/Network.py</Executable>
<Param>GetNetTx</Param>
<Param>Local Area Connection</Param>
<Normalize>0.00000008</Normalize>

36 Revision 18.02 Board Instrumentation Framework
4.5.5 <LockFile>
This optional tag allows you to specify a lockfile to be used when the file collector is running.
It acts as a semaphore or lock. While the file exist this collector does not run. When the
file is not present, it creates the file, reads the data from the file specified in <File> and
creates/updates the collectors. When finished it deletes the lockfile. In this way an
external program that is generating the file can use the lockfile in the same way to prevent
reading only a partially updated file.
4.5.6 <Modifier>
Sometimes the data being collected in a DynamicCollector is something you may want to
have treated differently than the rest of the data collected. Say for example the dynamic
collector collects some data that you don’t care about so you don’t want to send it to Oscar,
or you want to change the precision, scale or normalization of a data point. You can use a
modifier.
Example:
<DynamicCollector DoNotSend=”True”>
<File>foo.txt</File>
<Normalize>1</Normalize>
<Precision>2</Normalize>
<Modifier ID=”ErrorCount_TX” DoNotSend=”False” SendOnlyOnChange=”True”>
<Normalize>0</Normalize>
<Precision>0</Precision>
</Modifier>
<Modifier ID=”ErrorCount_BX” DoNotSend=”False” SendOnlyOnChange=”True”>
<Normalize>0</Normalize>
<Precision>0</Precision>
</Modifier>
<Modifier ID=”ErrorCount_RX” DoNotSend=”False” SendOnlyOnChange=”True”>
<Normalize>0</Normalize>
<Precision>0</Precision>
</Modifier>
</DynamicCollector>
So in this example, the DynamicCollector goes and reads data from the foo.txt file and
creates dynamic collects from it. For each of those it normalizes them to a per second value
(with Normalize = 1) and it sets the Precision to 2 decimal places, in addition the
DynamicCollector itself specifies not to send any of the data it collects (which can be useful
if it gathers 100’s of pieces of data but you only care about say 1 of them).
So then we add a Modifier (you can add as many as you like). In this case I say for the
ErrorCount_TX collector (read from the foo.txt file) I want you to send the data, but only if
it changes from collection to collection, I want a precision of zero and I don’t want the data
normalized.
I do the same with the ErrorCount_BX and ErrorCount_RX collectors.
37 Revision 18.02 Board Instrumentation Framework
An interesting feature (if I do say so myself) is that I made it so you can specify a RegEx
filter for the ID. So you could specify an ID of ErrorCount_(*.) once and be done in order to
accomplish what was above:
<DynamicCollector DoNotSend=”True”>
<File>foo.txt</File>
<Normalize>1</Normalize>
<Precision>2</Normalize>
<Modifier ID=”ErrorCount_(.*)” DoNotSend=”False” SendOnlyOnChange=”True”>
<Normalize>0</Normalize>
<Precision>0</Precision>
</Modifier>
</DynamicCollector>
4.5.7 Attributes
The <Modifier> tag supports the following attributes, which are case sensitive.
Attribute
M/O
Comments
SendOnlyOnChange
O
Boolean (Default is False)
OnlySendOnChange
O
Boolean (Default is False)
Scale
O
Float value
4.5.8 <Normalize>
See <Normalize>
4.5.9 <Precision>
See <Precision>
4.5.10 <Plugin>
The DynamicCollector by default reads information from a file (as specified in the <File>
tag, and creates collectors based upon what is in the file.
Rather than specifying a file, you can specify a plugin where you identify a specific function
to call within a python file to run. This function then can dynamically create and update
Collectors using ‘callback’ object passed as a required parameter to the function.
All the other capabilities of a DynamicCollector remain the same, except you replace <File>
with <Plugin> and the tags it requires.
Example:
<DynamicCollector Frequency="1000">
38 Revision 18.02 Board Instrumentation Framework
<Plugin>
<PythonFile>Collectors/Collectd.py</PythonFile>
<EntryPoint SpawnThread="True">CollectionThread</EntryPoint>
<Param>localhost</Param>
<Param>3232</Param>
</Plugin>
4.5.10.1 <PythonFile>
Specifies the external python file where the function to call resides. Only python is
supported currently.
4.5.10.2 <EntryPoint>
Specifies the function within the python file to execute. The function specified must have at
least one parameter, the first parameter will always be a frameworkInterface object that the
function can use to add new collectors. Other parameters can also be added per <Param>
tags.
This Tag has an option attribute of SpawnThread (case sensitive) and it takes a boolean
string (“True” or “False”). If it is True, then the framework will create a new thread to run
your custom DynamicCollector in. It is up to you to implement it in a thread-safe manner.
The frameworkInterface object passes along a lot of useful things, including a function
(KillThreadSignalled) that you can call each loop to see if you should gracefully exit.
For example the function signature for the Collectd plugin collector looks like:
def CollectionThread(frameworkInterface, IP, Port):
frameworkInterface object
This object is the 1st parameter passed to your function, and it contains functions and
information you need for your own custom DynamicCollector.
frameworkInterface.DoesCollectorExist(ID) # does a collector with ID already exist
frameworkInterface.AddCollector(ID) # Add a new collectr
frameworkInterface.SetCollectorValue(ID,Value,ElapsedTime) # Assign the collector a
new value, along with how
long since last update
frameworkInterface.KillThreadSignalled() # returns True if signalled to end your
worker thread, else False
frameworkInterface.LockFileName() ockfile name for dynamic collector, if specified
frameworkInterface.Interval() # the frequency from the config file
For the function SetCollectorValue() if you do not provide the optional ElapsedTime
parameter, the framework will automatically calculate this for you.
4.6 <ProcessThread>
You can specify that a group of collectors/groups etc. all reside within a ProcessThread,
which will create a new worker thread to process all of those
The <ProcessThread> tag supports the following attributes, which are case sensitive.
39 Revision 18.02 Board Instrumentation Framework
Attribute
M/O
Comments
Name
M
How often, in milliseconds, to collect data or OnDemand
Example:
<ProcessThread Name=”MyWorker”>
Collector ID="TX-1" Frequency="250">
<Executable>Collectors/Network.py</Executable>
</Collector>
<Collector ID="RX-1"
<Executable>Collectors/Network2.py</Executable>
</Collector>
</ProcessThread>
See ProcessThread attribute for more information.
4.7 Aliases
I added the ability to have Aliases within the configuration XML file. Aliases come from two
places, a global <AliasList> section in the XML file (per file, not per Namespace) and also all
environment variables are automatically added as Aliases.
Why would you use an Alias you may ask? An easy example is from Section 4.3.8 where a
numeric value of 0.00000008 was used as a normalization value. This could be defined as
an Alias and used to make it much more readable and easy to change throughout the file:
<Alias BytesPerSec2MBPS=".00000008"/>
...
<Collector ID="TX-1" Frequency="250">
<Normalize>$(BytesPerSec2MBPS)</Normalize>
<Executable>Collectors/Network.py</Executable>
<Param>GetNetTx</Param>
<Param>Local Area Connection</Param>
</Collector>
The use of an alias can be anywhere that you would provide a piece of data, such as
Frequency, ID, Parameters etc. They are bounded by “$()”
When defining an Alias it must be within the <AliasList> tag. Each Alias is define as:
<Alias YourDesiredAlias=”Value to be substituted”/>
Another example is as follows:
<AliasList>
<Alias BytesPerSec2MBPS=".00000008"/>
<Alias ButesPerSec2GBPS=".000000008"/>
<Alias MyFreq="500"/>
<Alias NS="$(COMPUTERNAME)"/>
<Alias Test="$(NS).$(MyFreq)"/>
</AliasList>
40 Revision 18.02 Board Instrumentation Framework
You may use one alias within the definition of another, so long as it has already been
defined, as seen in this example:
<Alias NS="$(COMPUTERNAME)"/>
Here I create an alias of NS and associate it with the COMPUTERNAME alias – which in this
case came from the environment variable on my Windows box.
You can also combine aliases:
<Alias Test="$(NS).$(MyFreq)"/>
This creates an alias of Test that results in the NS and MyFreq aliases being combined with
a period between the two, which would be “Patrick-Laptop.500”. This is a silly example,
however it illustrates the feature.
4.7.1 Reading Alias From external File
The AliasList tag can take an optional File attribute. You can specify an external file to load
additional aliases from.
<AliasList File=”MyAliasList.txt”>
<Alias.......
</AliasList>
You can specify an AliasList and therefore an external Alias File for every xml file used for
Minion configuration. See <ExternalFile> for more information.
4.7.2 ComputerName Alias
On a Microsoft Windows system, the Computername environment variable exits. However
there is no environment variable under Linux for this. So I create one. The
$(CompuerName) alias is available under both Linux and Windows.
4.7.3 WORKING_DIR Alias
The current working directory of where the Minion.py file is running from.
4.7.4 Usage
It may be desirable to send a Minion with some pre-defined collectors to somebody to
gather say Network statistics, you can create scripts to be called that take as a parameter
the Network device that return such things as data rate, errors, packet count, queue count
etc.
However you will not know what the actual system name for the port you want that person
to gather data on is. For example in Windows the default name is “Local Area Connection”,
however the user could have changed it to something more useful for them such as “IT
Connection” or “Test Network”. You can create an Alias that can be changed in one place:
<Alias NIC="Test Network”/>
<Collector ID="TX-1" Frequency="250">
<Normalize>$(BytesPerSec2MBPS)</Normalize>
<Executable>Collectors/Network.py</Executable>

41 Revision 18.02 Board Instrumentation Framework
<Param>GetNetTx</Param>
<Param>$(NIC)</Param>
</Collector>
You could even get fancy and based upon some environment variable call different scripts
depending on the OS you are running, one set for Windows and another for Linux.
42 Revision 18.02 Board Instrumentation Framework
4.8 Build-In Collectors
I have provided a small yet growing library of build in collectors that can be used and
modeled after if you wish to make your own based upon Python. They are located in the
Collectors directory.
Note: New collectors provided in releases of Minion may not be reflected here in the
documentation; best to go and take a peek in there once in a while.
4.8.1 FileCollector
Located in the Collectors\FileCollector.py file. The File Collectors provide an easy
mechanism to read a value from a file and use it as the dataset to be sent to Oscar.
This can be useful if you are running a long test and want to occasionally write the progress
of that test to a file, you can define a collector to go read that file and send the value
(presumably 0 to 100) to some Widget in the GUI.
There are two functions defined within the Collectors\FileCollector.py:
4.8.1.1 ReadFromFile
Takes a single parameter, the filename to open and read. If the file does not exist or
cannot be opened, “Error” will be returned.
Example
The following example calls the ReadFromFile function from the FileCollector.py source file
with the parameter of “Demonstration\ServerName.txt”, which is the name of the file to go
read the data from.
This collector also uses the OnlySendOnChange attribute.
<Collector ID="ServerName" OnlySendOnChange="True">
<Executable>Collectors\FileCollector.py</Executable>
<Param>ReadFromFile</Param>
<Param>Demonstration\ServerName.txt</Param>
</Collector>
4.8.1.2 ReadFromFileWithLock
Takes two parameters, the first is the filename to open and read. If the file does not exist
or cannot be opened, “Error” will be returned. The second is a semaphore file to be used for
exclusivity. How this works is if the file exists, then the data file is assumed to be in the
process of being updated by something else and the collector will wait for up to 1 second for
the lock file to not be present.
Once the lockfile is not present, it will then create it, read the datafile, close the lockfile and
return the contents of the datafile.
The algorithm another process should use to update the datafile is as follows:
While (Lockfile Exists)
{
Wait
43 Revision 18.02 Board Instrumentation Framework
}
Create Lockfile
Open Datafile
Write data to Datafile
Close Datafile
Delete Lockfile
Example
The following example calls the ReadFromFileWithLock function from the FileCollector.py
source file with the parameter of “Demonstration\ServerName.txt”, which is the name of
the file to go read the data from and the lock file is “TempDir\ServerNameLockFile.txt”
<Collector ID="ServerName">
<Executable>Collectors\FileCollector.py</Executable>
<Param>ReadFromFileWithLock</Param>
<Param>Demonstration\ServerName.txt</Param>
<Param>TempDir\ServerNameLockFile.txt</Param>
</Collector>
4.8.1.3 ParseFile
I’ve provided a kinda cool collector that will allow you to parse a file. Let’s say for example
that you have a worker script that is always running that is every 100ms dumping the
output from Ethtool to a file. You can use this collector to specify which individual piece of
data you want from that file!
Example file resulting from piping Ethtool –S:
NIC statistics:
rx_bytes: 1124739465
rx_error_bytes: 0
tx_bytes: 12467736
tx_error_bytes: 0
rx_ucast_packets: 198836
rx_mcast_packets: 686
rx_bcast_packets: 10546993
tx_ucast_packets: 130518
tx_mcast_packets: 8
tx_bcast_packets: 2097
tx_mac_errors: 0
tx_carrier_errors: 0
rx_crc_errors: 0
rx_align_errors: 0
tx_single_collisions: 0
tx_multi_collisions: 0
tx_deferred: 0
tx_excess_collisions: 0
tx_late_collisions: 0
tx_total_collisions: 0
rx_fragments: 0

44 Revision 18.02 Board Instrumentation Framework
rx_jabbers: 0
rx_undersize_packets: 0
rx_oversize_packets: 0
rx_64_byte_packets: 8662169
rx_65_to_127_byte_packets: 1416121
rx_128_to_255_byte_packets: 135089
rx_256_to_511_byte_packets: 255267
rx_512_to_1023_byte_packets: 101485
rx_1024_to_1522_byte_packets: 176384
rx_1523_to_9022_byte_packets: 0
tx_64_byte_packets: 13332
tx_65_to_127_byte_packets: 104450
tx_128_to_255_byte_packets: 4689
tx_256_to_511_byte_packets: 10152
tx_512_to_1023_byte_packets: 0
tx_1024_to_1522_byte_packets: 0
tx_1523_to_9022_byte_packets: 0
rx_xon_frames: 0
rx_xoff_frames: 0
tx_xon_frames: 0
tx_xoff_frames: 0
rx_mac_ctrl_frames: 0
rx_filtered_packets: 11408451
rx_ftq_discards: 0
rx_discards: 0
rx_fw_discards: 0
You specify the File to open, the pattern you are searching for (such as ‘rx_bytes’), the
tokens to use to break the line where the pattern is found up into an array of individual
string, and the index of the string you want from the resulting array, zero based.
Example
The following example calls the Parse function from the FileCollector.py source file with the
parameter of “Demonstration\ethtool.txt”, which is the name of the file to go read the data,
searching for the rx_65_to_127_byte_packets statistic, tokenized by a colon and a space,
and you want the string[1] result. Per the above example, it will return 1416121
<Collector ID="ParseTest" Frequency="250">
<Executable>Collectors\FileCollector.py</Executable>
<Param>ParseFile</Param>
<Param>Demonstration\ethtool.txt</Param>
<Param>rx_65_to_127_byte_packets</Param>
<Param>: </Param>
<Param>1</Param>
</Collector>
4.8.1.4 ParseFileWithLock
This performs the same thing as ParseFile, with the addition of a lock file, as discussed in
ReadFromFileWithLock.

45 Revision 18.02 Board Instrumentation Framework
You specify the File to open, the lockfile, the pattern you are searching for (such as
‘rx_bytes’), the tokens to use to break the line where the pattern is found up into an array
of individual string, and the index of the string you want from the resulting array, zero
based.
Example
The following example calls the Parse function from the FileCollector.py source file with the
parameter of “Demonstration\ethtool.txt”, which is the name of the file to go read the
data,the lockfile “Demonstration\ethtool.txt.lock” searching for the
rx_65_to_127_byte_packets statistic, tokenized by a colon and a space, and you want the
string[1] result. Per the above example, it will return 1416121
<Collector ID="ParseTest" Frequency="250">
<Executable>Collectors\FileCollector.py</Executable>
<Param>ParseFileWithLock</Param>
<Param>Demonstration\ethtool.txt</Param>
<Param>Demonstration\ethtool.txt.lock</Param>
<Param>rx_65_to_127_byte_packets</Param>
<Param>: </Param>
<Param>1</Param>
</Collector>
4.8.2 Network
Note: If gathering data on a Linux system, better to use LinuxNetwork collector.
The Collectors\Network.py file contains two routines, one to read the Network Tx data for a
device and another to read the Network Rx data for a device.
This Collector file uses the PSUTIL library that is available for both Windows and LINUX
based system. If you wish to use the collector, you must install PSUTIL on the system
where it will be used. See http://code.google.com/p/psutil/ for details.
4.8.2.1 GetNetworkRx
Takes a single parameter, the name of the network device to go read data from. This will
be OS and possibly system specific. Examples are ETH0, eth0, Local Network Connection.
The data returned will be in Total Bytes Received on that interface. Using the Normalization
capability of the Minion framework, this can be converted to Bytes/Sec, Bits/Sec, Mbps,Gbps
etc.
Example
This example reads the network RX data from the ‘Local Area Connection’ device and
normalizes it to Gbps.
<Collector ID="RX-1" Frequency="250">
<Executable>Collectors/Network.py</Executable>
<Param>GetNetworkRx</Param>
<Param>Local Area Connection</Param>
<Normalize>0.00000008<Normalize>
</Collector>
46 Revision 18.02 Board Instrumentation Framework
4.8.2.2 GetNetworkTx
Takes a single parameter, the name of the network device to go read data from. This will
be OS and possibly system specific. Examples are ETH0, eth0, Local Network Connection.
The data returned will be in Total Bytes Received on that interface. Using the Normalization
capability of the Minion framework, this can be converted to Bytes/Sec, Bits/Sec, Mbps,Gbps
etc.
Example
This example reads the network RX data from the ‘Local Area Connection’ device and
normalizes it to Gbps.
<Collector ID="RX-1" Frequency="250">
<Executable>Collectors/Network.py</Executable>
<Param>GetNetworkTx</Param>
<Param>Local Area Connection</Param>
<Normalize>0.00000008<Normalize>
</Collector>
4.8.3 CPU
Note: If gathering data on a Linux system, better to use Linux_CPU collector.
The Collectors\CPU.py file contains two routines, one to read the overall CPU Utilization
percentage and another to read for a specific core.
This Collector file uses the PSUTIL library that is available for both Windows and LINUX
based system. If you wish to use the collector, you must install PSUTIL on the system
where it will be used. See http://code.google.com/p/psutil/ for details.
4.8.3.1 GetCPU_Percentage
Takes no parameters, it simply reads the overall CPU utilization for ¼ of a second and
returns the utilization value percentage.
Example
This example reads the overall CPU utilization.
<Collector ID="CPU" >
<Executable>Collectors/CPU.py</Executable>
<Param>GetCPU_Percentage</Param>
</Collector>
4.8.3.2 GetCPU_Core_Percentage
Takes a single parameter – the core # to read the utilization from, it reads the CPU
utilization for the specified cor for ¼ of a second and returns the utilization value
percentage.
Example
This example reads the l CPU utilization for core 12.
<Collector ID="CPU_Core_12" >

47 Revision 18.02 Board Instrumentation Framework
<Executable>Collectors/CPU.py</Executable>
<Param>GetCPU_Core_Percentage</Param>
<Param>12</Param>
</Collector>
4.8.4 Linux_CPU
The Collectors\Linux_CPU.py file contains two real functions of use. The First is
CreateUtilizationList, which creates a comma separated list of CPU utilization for every core
– useful for feeding a bar chart in Marvin.
Usage in Minion:
<Collector ID="CPU_Utilization_List" >
<Executable>Collectors/Linux_CPU.py</Executable>
<Param>CreateUtilizationList</Param>
</Collector>
If you require more details (essentially all the info linux ‘top’ will give you) then you can use
the dynamic collector function CollectStatsFunction like so:
<DynamicCollector>
<Plugin>
<PythonFile>Collectors/Linux_CPU.py</PythonFile>
<EntryPoint SpawnThread="True">CollectStatsFunction</EntryPoint>
</Plugin>
</DynamicCollector>
4.8.5 PowerShell
This collector allows you to call a PowerShell script. Not used it much.
4.8.6 RandomVal
This collector is used for testing or simulating a data feed when a feed is not available. The
RandomVal collector can generate a single integer, floating point or a comma separated
integer list between a defined min and max value.
GetBoundedRandomValue(min,max) This will return a random integer between the two
values, not inclusive of second value. The collector below will create a single value of 3
through 14 every second.
<Collector ID="StackedTx_Server1" Frequency="1000">
<Executable>Collectors\RandomVal.py</Executable>
<Param>GetBoundedRandomValue</Param>
<Param>3</Param> <!-- Min -->
<Param>15</Param> <!-- Max -->
</Collector>
GetBoundedRandomList(min,max,listSize) Returns a comma separated list of random
integer between the two values, not inclusive of second value. Size of list is determined by
48 Revision 18.02 Board Instrumentation Framework
the fourth param. The collector below will create a 20 list with integer values of 1 through 9
every 250 milliseconds.
<Collector ID="RandomList" Frequency="250">
<Executable>Collectors\RandomVal.py</Executable>
<Param>GetBoundedRandomList</Param>
<Param>1</Param> <!-- Min -->
<Param>10</Param> <!-- Max -->
<Param>20</Param> <!-- List Size -->
</Collector>
GetScaledBoundedRandomValue(min,max,scale) Returns a scaled random value. So if you
want values of 1.0 to 100.0 send min=10,max=100,scale=0.1 to get the float value.
<Collector ID="RandomList" Frequency="250">
<Executable>Collectors\RandomVal.py</Executable>
<Param>GetScaledBoundedRandomValue</Param>
<Param>10</Param> <!-- Min -->
<Param>100</Param> <!-- Max -->
<Param>0.1</Param> <!-- Scale -->
</Collector>
4.8.7 Parrot
This collector is used for testing, not much use in a real environment. All it does is return
the string you send to it as the parameter. Is useful for testing a widget, or doing
something like sending the ComputerName to the Gui by using an environment variable
Alias for the single parameter.
Maybe something like:
<Collector ID="Computer_Name" >
<Executable>Collectors/Parrot.py</Executable>
<Param>Echo </Param>
<Param>$(ComputerName)</Param>
</Collector>
4.8.8 IPC_Linux
This collector is now a plugin collector. It will call one or more of the programs that is part
of the Intel Performance Counter Monitor. It will actually call those executables for you and
parse the output. The result is potentially > 1000 data points.
<DynamicCollector SendOnlyOnChange="True">
<Plugin>
<PythonFile>Collectors/IPC_Linux.py</PythonFile>
<EntryPoint SpawnThread="True">PCM_Collector</EntryPoint>
<Param>pcm,core,memory,numa,pcie</Param>
<Param>1.0</Param>
</Plugin>
</DynamicCollector>
49 Revision 18.02 Board Instrumentation Framework
This config example says to go run the PCM_Collector function in the IPC_Linux.py file, give
it its own worker thread. The Parameters are a list of the names of the IPC programs
(currently pcm,pcm-core,pcm-memory,pcm-numa and pcm-pcie). And to call each one of
them for 1 second in order to gather data. Do not make the value of the 2nd param less
than 1.0. The names in the list are as in the example – the order does’t matter, only the
spelling. If you only want one of them, then don’t enter the others.
The programs will be called sequentially, so this collector example will take a bit over 5
seconds to loop through and collect data from all of the programs.
4.8.9 OVSdb
This collector will connect to an OVSdb to gather information. You must have configured
OVSdb to accept json socket calls.
Example:
<DynamicCollector SendOnlyOnChange="True">
<Plugin>
<PythonFile>Collectors/OVSdb.py</PythonFile>
<EntryPoint SpawnThread="True">OVSDB_Collector</EntryPoint>
<Param>sut ip or dns name </Param>
<Param>6640</Param>
<Param>False</Param>
</Plugin>
</DynamicCollector>
The three params are the location of the OVSdb (could be local or remote), the port it is
listening on and lastly a Boolean (True or False) flag to indicate that the collector should
gather a minimal dataset (True) or everything (False).
4.8.10 LibVirt
This collector will connect to an libvirt to gather information about virtualization. It
theoretically could connect to a libvirt on another system – have not yet tested that.
Example:
<DynamicCollector SendOnlyOnChange="False">
<Plugin>
<PythonFile>Collectors/LibVirt.py</PythonFile>
<EntryPoint SpawnThread="True">LibVirt_Collector</EntryPoint>
<Param>qemu:///system</Param>
</Plugin>
The single parameter is the location of the libvirt service.
4.8.11 Collectd
This collector will listen for data from collectd (which needs to be configured to send data
over the network).
Example:

50 Revision 18.02 Board Instrumentation Framework
<DynamicCollector SendOnlyOnChange="True">
<Plugin>
<PythonFile>Collectors/Collectd.py</PythonFile>
<EntryPoint SpawnThread="True">CollectionThread</EntryPoint>
<Param>127.0.0.1</Param>
<Param>4444</Param>
</Plugin>
</DynamicCollector>
The Parameters indicate where to listen for incoming collectd data.
4.8.12 IPMI
This collector will run ipmitool locally and gather data from the local BMC. ipmitool must be
installed and configured.
Example:
<DynamicCollector SendOnlyOnChange="True">
<Plugin>
<PythonFile>Collectors/ipmitoolParser.py</PythonFile>
<EntryPoint SpawnThread="True">CollectIPMI_Info</EntryPoint>
</Plugin>
</DynamicCollector>
4.8.13 SystemInfo - Linux
This collector will go gather a bunch of linux information, such as cpu utilization, BIOS
version, system manufacturer etc. Uses the dmidecode application, so it must be present.
Example:
<DynamicCollector SendOnlyOnChange="True">
<Plugin>
<PythonFile>Collectors/SystemInfo_Linux.py</PythonFile>
<EntryPoint SpawnThread="True">CollectSystemInfo_Linux</EntryPoint>
</Plugin>
4.8.14 LinuxNetwork
This collector will go and mine data from the /sys/class/net file system. It is capable of
getting data from ALL devices in that tree, or a specific device (depending on which function
you call). It can gather all details, or just data about data rates – again depending on
parameters.
Example – Single device:
<DynamicCollector DoNotSend="False" SendOnlyOnChange="True">
<Plugin>
<PythonFile>Collectors/LinuxNetwork.py</PythonFile>
<EntryPoint SpawnThread="True">CollectDevice</EntryPoint>
<Param>eth0</Param>

51 Revision 18.02 Board Instrumentation Framework
<Param>False</Param>
</Plugin>
</DynamicCollector>
This example will collect a ton of data available for eth0 by mining the /sys/class/net/eth0
directory structure. The 1st Param indicates the device, the second indicates if the collector
should gather a ‘slim data set’ (only rx/tx information) or not. Value of false gathers a
great deal more data.
Example – All devices:
<DynamicCollector DoNotSend="False" SendOnlyOnChange="True">
<Plugin>
<PythonFile>Collectors/LinuxNetwork.py</PythonFile>
<EntryPoint SpawnThread="True">CollectAllDevices</EntryPoint>
<Param>False</Param>
</Plugin>
</DynamicCollector>
Note that this example calls a different Entry Point function. It will gather data from all
devices in /sys/class/net. The 2nd parameters is the same as the previous example, for a
slim data set or not.
4.9 Operator Collectors
There are times when you might like to take the results of two collectors and perform an
operation on them. A good example is that you can easily go read the RX and TX bytes on
a Linux system by using the build in FileCollector to read the /sys/class/net/device/statistics
files. However if you want the BX (Bidirectional Value), there is no file to go read that. So I
created Operators that will allow you to manipulate data from other collectors within the
same namespace.
An Operator looks the same as a Collector, has an ID, and a frequency however instead of
an <Executable> tag, there is an <Operator> tag, followed by 1 or more <Input> tags
(instead of <Param>).
Here is an example:
<Group Frequency="500">
<Collector ID="Eth1.TX.bytes">
<Executable>Collectors\FileCollector.py</Executable>
<Normalize>$(BytesPerSec2GBPS)</Normalize>
<Param>ReadFromFile</Param>
<Param>/sys/class/net/eth1/statistics/tx_bytes</Param>
</Collector>
<Collector ID="Eth1.RX.bytes">
<Executable>Collectors\FileCollector.py</Executable>
<Normalize>$(BytesPerSec2GBPS)</Normalize>
<Param>ReadFromFile</Param>
<Param>/sys/class/net/eth1/statistics /rx_bytes</Param>
</Collector>

52 Revision 18.02 Board Instrumentation Framework
<Collector ID="Eth1.BX.bytes">
<Operator>Addition</Operator>
<Input>Eth1.TX.bytes</Input>
<Input>Eth1.RX.bytes</Input>
</Collector>
</Group>
This example read the RX and TX bytes from standard linux files, then gives you the BX
bytes by doing an Addition Operator on the data collected from the RX and TX collectors.
4.9.1 Operator <Input>
All of the Operators take 1 or more <Input>s. The inputs can be either the ID of another
collector in the same namespace, or a constant value. The ID of anther collector can be a
the ID from a Dynamic Collector and as such it may not be created at the time of the
application initialization, if this is true then a message will be logged about the missing
Collector ID.
Example:
<Input>Eth1.RX.bytes</Input>
<Input Constant=”True”>52.5<Input>
The above example has two inputs, one is from a collector with the ID of Eth1.rx.bytes and
the second is a constant value.
Example:
<Collector ID=”QueueAverage”>
<Operator>Averate</Operator>
<Input DefaultValue=”0”>Queue_0_tx</Input>
<Input DefaultValue=”0”>Queue_1_tx</Input>
</Collector>
Here the Average operator will try to read the data from the collectors with IDs of
Queue_0_tx and Queue_1_tx. If those collectors have already been collected their values
will be used, otherwise they will use the default value of 0 for their calculations.
4.9.1.1 Default Value
An <Input> is either a Constant as shown above, or another collector ID. However
sometimes the input collector specified by the ID is not yet available (meaning the Collector
has not run yet, or the value hasn’t been created yet by say a DynamicCollector). Yet you
will want the Operator to be run. You can specify a DefaultValue to use until the collector
becomes valid.:
4.9.2 Operator Addition
This Operator will take 2 or more <Input>s and sum them up. They must be numeric
values.

53 Revision 18.02 Board Instrumentation Framework
4.9.3 Operator Average
This Operator will take 1 or more <Input>s and average them. They must be numeric
values.
If you specify but a single <Input> then the Operator will keep a history of up to 100 values
for averaging.
Note: Might make it configurable for how long to keep history for single input
4.9.4 Operator MakeList
This Operator will make a comma separated list from <Input>s. This can be useful for
making charts.
4.9.5 Operator Duplicate
This Operator will simply duplicate the <Input> provided. This may not sound too useful,
but consider a collector that collects data say every 5 seconds, but you want to make a
chart update every seconds. You could use the Duplicate Operator to accomplish this.
4.9.6 Compare Operators
There are several compare Operators that take 3 or 4 <Inputs>. The first two <Input>s
are compared and if the result of the comparison operation is True, then the result of
<Input> 3 is sent. If the result is False and <Input> 4 was specified, it is sent. If
<Input> 4 is not specified, nothing is sent.
Example:
<Collector ID="TestRunning">
<Operator>Compare_EQ</Operator>
<Input>StatusCollector</Input> <!—If StatusCollector == ‘True’ -->
<Input Constant="True">Running</Input>
<Input Constant=”True”>Yes</Input> <!—then send ‘Yes’ -->
<Input Constant="True">No</Input> <!—else send ‘No’ -->
</Collector>
Supported Compare Operators are:
Compare_EQ
Compare_NE
Compare_GT
Compare_GE
Compare_LT
Compare_LE
4.9.7 Operator Compare_EQ
Provides a mechanism to compare two Inputs, if they equal, it will send the value indicated
in the 3rd <Input>. If they are not equal, and there is a 4th <Input> specified, it will send
that value. This make an if-then-else ability.

54 Revision 18.02 Board Instrumentation Framework
Example:
<Collector ID="TestRunning">
<Operator>Compare_Eq</Operator>
<Input>StatusCollector</Input> <!—If StatusCollector == ‘True’ -->
<Input Constant="True">Running</Input>
<Input Constant=”True”>Yes</Input> <!—then send ‘Yes’ -->
<Input Constant="True">No</Input> <!—else send ‘No’ -->
</Collector>
4.9.8 Operator Compare_NE
Compare Operator that checks for Not Equal (!=) between the 1st two <Input>s, if result is
true then the <Input> 3 is sent, else if specified <Input> 4 is sent.
4.9.9 Operator Compare_GT
Compare Operator that checks for Greater Than (>). Compare Operator that checks for Not
Equal (!=) between the 1st two <Input>s, if result is true then the <Input> 3 is sent, else if
specified <Input> 4 is sent.
4.9.10 Operator Compare_GE
Compare Operator that checks for Greater Than or Equal (>=).Compare Operator that
checks for Not Equal (!=) between the 1st two <Input>s, if result is true then the <Input> 3
is sent, else if specified <Input> 4 is sent.
4.9.11 Operator Compare_LT
Compare Operator that checks for Less Than (<).Compare Operator that checks for Not
Equal (!=) between the 1st two <Input>s, if result is true then the <Input> 3 is sent, else if
specified <Input> 4 is sent.
4.9.12 Operator Compare_LE
Compare Operator that checks for Less Than or Equal (<=).Compare Operator that checks
for Not Equal (!=) between the 1st two <Input>s, if result is true then the <Input> 3 is
sent, else if specified <Input> 4 is sent.
4.9.13 Greatest
Sends the greatest <Input> value for a list of <Input>s. If all values are numeric it will
send the highest numeric value, otherwise it will be a string compare.
4.9.14 Least
Sends the least <Input> value for a list of <Input>s. If all values are numeric it will send
the smallest numeric value, otherwise it will be a string compare

55 Revision 18.02 Board Instrumentation Framework
4.9.15 MaxValue
Keeps track of the numeric data sent for the <Input> collectors (1 or more) and always
sends the maximum value that has been collected amongst that list since collection began.
4.9.16 MinValue
Keeps track of the numeric data sent for the <Input> collectors (1 or more) and always
sends the minimum value that has been collected amongst that list since collection begain.
4.9.17 UserDefined
Pretty stoked about this one.
This is an interesting Operator that is a hybrid between a Collector and an Operator. It
takes an <Executable> and <Param>s as well as <Input>s used for using data from other
collectors.
This can be very useful of your own logic. Take for example you want to display a
DyanmicImage in the GUI based upon a state machine that has 4 inputs that are all
available via Collectors. With this Operator you can send those inputs to your own
externally defined operator and return an state machine state value that corresponds to the
appropriate image to be displayed in the GUI.
Example:
<Collector ID="BX" Frequency="250">
<Normalize>2</Normalize>
<Operator>Addition</Operator>
<Input>TX</Input>
<Input>RX</Input>
</Collector>
<Collector ID="dymmyList">
<Operator>MakeList</Operator>
<Repeat Count="72">
<Input Constant="True">CORE$(CurrentValueAlias).Utilization</Input>
</Repeat>
</Collector>
<Collector ID="foo">
<Operator>UserDefined</Operator>
<Executable>Test.py</Executable>
<Param>Perftest5</Param>
<Param>P1</Param>
<Param>P2</Param>
<Input>dymmyList</Input>
<Input Constant="True">const val</Input>
<Input>BX</Input>
</Collector>

56 Revision 18.02 Board Instrumentation Framework
The above example ‘foo’ Collector uses the UserDefined Operator that calls the user
supplied Perftest5 Function within the user supplied Test.py file, and passes 5 parameters to
the function.
The 1st,2nd and 4th parameters are constant value. The 3rd and 5th are all values from other
Collectors.
4.9.18 Looping for Input
There are times when you might have a lot of input for a given Operator. Say you wanted
to use the MakeList Operator to make a list of CPU utilization for all of the CPU’s in your
system, and you have 72 of them. You could do something like this:
<Collector ID="CPU.UTIL.LIST ">
<Operator>MakeList</Operator>
<Input>CORE0.Utilization</Input>
<Input>CORE1.Utilization</Input>
<Input>CORE2.Utilization</Input>
<Input>CORE3.Utilization</Input>
<Input>CORE4.Utilization</Input>
….
<Input>CORE71.Utilization</Input>
</Collector>
And that would work just fine. But can get tedious and not flexible. Instead you can use
the <Repeat> ability (currently just for Operator <Input>s)
<Collector ID="CPU.UTIL.LIST ">
<Operator>MakeList</Operator>
<Repeat Count=”72”>
<Input>CORE$(CurrentValueAlias).Utilization</Input>
</Repeat>
</Collector>
When you use Repeat, you must specify count. There is automatically going to be two
aliases created:
CurrentValueAlias – as used above, range is 0-71
CurrentCountAlias – as used above, range is 0-71
There is another options you can specify which is “StartValue”, which indicates the starting
# to begin counting at. Final number will be StartValue + Count.
<Collector ID="CPU.UTIL.LIST ">
<Operator>MakeList</Operator>
<Repeat “Count=36” StartValue=”36”>
<Input>CORE$(CurrentValueAlias).Utilization</Input>
</Repeat>
</Collector>
In this example, CurrentValueAlias has the range of 36-71 and CurrentCountAlias has range
of 0-36.

57 Revision 18.02 Board Instrumentation Framework
4.10 Making your own collectors
While I’ve provided a few basic collectors, different demos and tests will likely want a much
broader range of data to collect. The basic rule is if you create a runnable ‘thing’ that can
be called by the framework, and that thing returns (if it is Python) or prints to stdout a data
point the Minion framework can call it and send the data.
The collectors can be executables, .BAT files, script files, Python, Perl, bash, etc. It matters
not.
For example, a .BAT version of the Parrot collector could look like:
Parrot.bat:
echo %1
4.10.1 Python
Python scripts can be called just like any other script, making the Python executable the
<Executable> part of the collector.
However I’ve also made it so the Minion framework will try to dynamically load the specified
python script into its own process space, rather than launching a completely new process.
See Section 4.10.2 for information about performance considerations.
If you make a python script that simply runs on its own (as if it has a main()) then the
dynamic load will fail. The script will still run and be launched, however it will be done so in
a separate process.
In order to make your own Python script that will be dynamically loaded into the process
space of the Minion framework, the script must be made up of functions, and those
functions called in the framework. Refer to the build-in-collectors provided for examples.
4.10.2 Considerations
While the Minion framework is robust enough to allow you to call any external program or
script you create to gather the data you wish to be displayed, each time this external
program or script is run, it is done so in a completely separate process. Think of it as
opening a new DOS Box, or Terminal each time you need to gather data. It works fine, but
is not very efficient.
The exception to this is if you make Python scripts that can be dynamically loaded into the
Minion framework process space as discussed in Section 4.10.1.
To prevent running out of memory, each Collector can only have one active instance at a
time. What this means is if your collector takes say 1 second to run, yet the Frequency for
the collector is set to say ½ a second, the framework will wait for the previous instance to
run before launching the next one.
If the framework did not do this, it would quickly open up so many processes that the
system ran out of memory and compute power.
If you need to create many collectors that gather data that are launched in a separate
process (for example a bash script, or a binary executable), it may have a noticeable effect
on system resources – that could skew the desired test/demo results. If this is the case,

58 Revision 18.02 Board Instrumentation Framework
consider making your data gathering app/script/etc. run on its own and instead of printing
the data to be sent to the GUI to standard out, write it to a file and then use a File Collector
to read the data. It may prove much more efficient.
Note: To see a comparison of performance differences between an internally called
(dynamically loaded python script) vs. launching an external script, run both the
DemoConfig.xml and DemoConfig_DynaLoad.xml config files and compare the CPU
utilizing of the system under test.
4.11 Mute Collector
There are times when you may want to perform a task at a regular interval, but not send
any data to the GUI or Oscar. To accommodate this, make a regular collector but instead of
returning a piece of data, return the string “HelenKeller” (very case sensitive). Helen may
be the most famous of all mute people in history – even though in reality she was not mute
and learned to speak.
4.12 <Actor> (Tasks)
The Minion framework is capable of also performing tasks – which means it is capable of
executing external applications to go perform tasks on demand as opposed to on a regular
basis.
A Task is initiated by a GUI (such as Marvin) to go do something. For example if you want
to go start a performance test of some kind. You can manually start a script from a
command line, or you can assign a task to a Widget in the GUI and a message will be sent
to the Minion framework to go do that task.
Tasks are defined in the configuration XML file in a manor very similar to that of a collector;
there is no frequency (as it is done on demand) and since the tasks do not return any data,
there is no normalization.
4.12.1 Attributes
The <Actor> tag supports the following attributes, which are case sensitive.
Attribute
M/O
Comments
ID
M
The ID the Task to be performed
4.12.1.1 ID
This is the ID the actor to call. As with the ID for a Collector, the ID+Namespace of an
Actor should be unique within a Minion Config file.
4.12.2 <Executable>
This is nearly the same as the <Executable> tag for a Collector. The exception being that if
the external program called as a Task returns any data, it is ignored and NOT sent back to
the GUI.

59 Revision 18.02 Board Instrumentation Framework
4.12.3 <Param>
The <Executable> specified may need parameters. You may put one or more <Param>
nodes in a collector to provide the parameters.
Parameters can also be sent from Marvin as part of the Task Request. Any Paramaters sent
from Marvin will be added to the invocation after the ones listed in the Minion configuration
file.
4.12.4 Example
The following is an example Actor entry into the Minion configuration XML file that when
invoked will run the ‘launchCoreWorkload.sh’ script and pass it a parameter of ‘0’.
<Actor ID="RunWorkLoadTask_Core_0">
<Executable>launchCoreWorkload.sh</Executable>
<Param>0</Param>
</Actor>
4.13 Using Additional Files
One might want to create a library of files in which you define a common set of collectors.
You can do this using the <ExternalFile> tag.
Within a namespace, you simply add this tag. Here is an example (from the
DemoConfig.xml file):
<!-- Some others are defined externally, and use some aliases-->
<ExternalFile Rate1="250" Rate2="500">Demonstration/AdditionalFile.xml</ExternalFile>
Within an external file you can create an alias list (which is only valid for that file, and any
files it may load externally) and additional collectors. You cannot create new Actors. All
collectors will be part of the Namespace which the <ExternalFile> tag is listed within.
You can pass ‘parameters’ to an external file as shown above. It is really an Alias that is
created just before the file is parsed, and removed when it is done parsing. So this means
in the example above, Rate1 and Rate2 are aliases used within the ‘AdditionalFile.xml’, but
they do not exist outside of that.

60 Revision 18.02 Board Instrumentation Framework
5 Oscar
In addition to being a character from my early youth, Oscar is the name I’ve given the
‘middle’ layer of the BIFF Instrumentation Framework project. Oscar receives data from
one or more Minions and sends that data onto one or Marvin. Oscar has the ability to save
and playback the data received from minions.
Oscar can now (as of version Beta 1.20) accept input from other Oscars as well – allowing
you to chain them. Be careful though, no protection is in place for circular connections
Oscar is written in Python and has a GUI written in tkinter. As of Beta 1.20 you can run
Oscar in a session with no gui. If it fails to load a GUI, it will default to command no Gui.
Figure 2 Oscar
5.1 Running Oscar
To run Oscar you simply type:
python Oscar.py
This will start up Oscar with the default configuration file of OscarConfig.xml.
There are many optional command line parameters when you invoke Oscar:
Parameter
Description / Usage
-i | --input filename
Specify a specific configuration filename
-v | --verbose
Print debug information to console and log file
61 Revision 18.02 Board Instrumentation Framework
-l | --logfile
Logfile name – default is OscarLog.txt
-p | --playback
Loads and plays the specified file
-rp
Repeat mode – replays the specified playback file
-lp
Loop mode – repeats data in specified file from points
Specified by –b and –e options
-b | --begin
Data packet # in playback file to begin playback, used with –
e option
-e | --end
Data packet # to stop at before returing to –begin # when
looping
-s | --speed
Playback speed, only used with –p option
-r | --record filename
Records and when done recording, saves to specified file
-t | --time
Runs for specifed time (minutes) before exiting. Used with –r
option mostly
-m | --minimize
Launches gui minimized
5.2 The configuration file
Example
<?xml version="1.0" encoding="utf-8"?>
<Oscar ID="Oscar1">
<IncomingMinionConnection IP="localhost" PORT ="3232"/>
<TargetConnection IP="localhost" PORT="3234"/>
<TargetConnection IP="patrick-pc" PORT="3234"/>
<TargetConnection IP="javabox" PORT="3234"/>
<SendStatus>True</SendStatus>
</Oscar>
5.2.1 <Oscar>
The Oscar tag is the root for the configuration file. It takes a required ID. This is used to
identify the specific Oscar. This is because you can actually have more than one Oscar
feeding data to Marvin(s). Since Marvin(s) need to send data to Oscar(s) this provided a
mechanism by which to identify Oscar(s).
The Oscar ID needs to be different for each Oscar connected to a specific Marvin –
otherwise undesired results are likely.
62 Revision 18.02 Board Instrumentation Framework
5.2.2 <IncomingMinionConnection>
The IncomingMinionConnection tag defines a socket where Oscar will listen for incoming
data packets from one or more minions. This connection point will be for receiving data
from minions that will then be sent to Marvin.
This tag is required. This is the connection point that you specify in your Minion
configuration file <TargetConnection> tag.
5.2.2.1 Attributes
The <IncomingMinionConnection> tag supports the following attributes, which are case
sensitive.
Attribute
M/O
Comments
IP
M
Local IP Address to listen for data from Minion(s)
PORT
M
Local UDP Port to listen for data from Minion(s)
5.2.2.2 IP
IP Address for Oscar to listen on.
5.2.2.3 Port
Port on which the Oscar will listen for incoming data.
5.2.3 <TargetConnection>
You specify one or more <TagetConnection> tags, each one points to a Marvin Gui. You
can run multiple Marvins at the same IP, but they will need different ports. What you
specify in the Oscar <TargetConnection> tag should match the Marvin <Network>
information.
Note: Oscar will scan the configuration file for changes while it is running. Any NEW targets
added to the configuration file will be added while it is running. Only additions can be
made while running. If you wish to remove a target, you must re-start the
application.
5.2.3.1 Attributes
The <TargetConnection> tag supports the following attributes, which are case sensitive.
Attribute
M/O
Comments
IP
M
Remote IP Address to send data to a Marvin
PORT
M
Remote UDP Port to send data to a Marvin
63 Revision 18.02 Board Instrumentation Framework
5.2.3.2 IP
Remote Address to send data to a Marvin or a downstream Oscar.
5.2.3.3 Port
Remote Address to send data to a Marvin
5.2.4 <IncomingMarvinConnection>
Marvin needs to communicate with Oscar, to send Tasks as well as a heartbeat.
If you do not specify the <IncomingMarvinConnection> tag, Oscar will randomly choose a
port and listen on all interfaces. If you specify all or part of <IncomingMarvinConnection>
that will be used.
Oscar will send a message to Marvin informing Marvin of where to send data to Oscar.
5.2.4.1 Attributes
The <TargetConnection> tag supports the following attributes, which are case sensitive.
Attribute
M/O
Comments
IP
O
IP address for Oscar to listen for Marvin messages on. If not
specified, will listen on all devices
PORT
O
UDP Port to listen for Marvin messages on. If not specified, a
random port will be chosen
5.2.4.2 IP
IP address to listen for Marvin messages on.
5.2.4.3 Port
UDP Port to listen for Marvin messages on.
5.2.5 <MarvinAutoConnect>
The <MarvinAutoConnect> key is an optional way that a Marvin can automatically connect
to an Oscar. This is opposed to the ‘normal’ mechanism by which the Oscar must explicitly
point to a Marvin for Marvin to get data.
Using the MarvinAutoConnect feature a Marvin can point to an Oscar and connect
automatically upon startup.
Example
<MarvinAutoConnect Key="PatrickKutchKey"/>
If a Marvin is configured for automatic connections it will upon startup (and only upon
startup) send a message to Oscar with a hash of the key it has been configured with. If
those keys match, then Oscar will add that Marvin to its list of targets to send data to.
Note:
64 Revision 18.02 Board Instrumentation Framework
If you specify a Marvin as a traditional target via <TargetConnection> and that target also
connects via MarvinAutoConnect, that Marvin will receive each data point twice. So
take care.
5.2.6 <Shunt>
EXPERIMENTAL: This has not been fully tested
The Shunt option allows you to write specific data sets to files. You can use Regular
Expressions for both the Namespace and ID used in selecting the data. Additionally you can
specify how the data is written – it can be written to a file in a DynamicCollector format, or
it can be written in a historical manner where the file is appended with latest value.
5.2.6.1 Attributes
The <Shunt> tag supports the following attributes, which are case sensitive.
Attribute
M/O
Comments
Namespace
M
Namespace of the dataset to filter on. Can be a RegEx.
ID
M
ID of the dataset to filter on. Can be a RegEx.
Type
O
Current only valid option is ‘History’, which will append the
data to the specified file. Default option is to overwrite the
data within the file on every update.
Example:
<Shunt Namespace=".*" ID="Systime" Type="History">HistoricalData.txt</Shunt>
<Shunt Namespace=”DemoNamespace" ID="Brazil">BrazilData.txt</Shunt>
The 1st one will match on any incoming Namespace and an ID of SysTime. The data will be
written to the HistoricalData.txt file, all changes are appended to the file.
The 2nd one matches on DemoNamespace for the Namespace and any data with the string
Brazil will be written to the BrazilData.txt file in a Namespace.DataID=Value format.
5.2.7 <BITW>
EXPERIMENTAL: This has not been fully tested
This is Bump In The Wire. It allows you to change the namespace of data before it is
transmitted. Consider the case where you instrument you server or a bunch of VMs or
whatever, you run your tests and record the results using Oscar. Then you go and modify
the settings on the system run the tests again and record them. Now you have two sets of
recorded data and you would like to show them side-by-side in the GUI. You could have 2
instances of Oscar running to play the two recordings – but the Namespace and ID’s of the
data in both files is the same.
With BITW, you can change the namespace/s from one set of data before it is sent.
Example: <BITW>

65 Revision 18.02 Board Instrumentation Framework
<BITW>
<Input Namespace="(.*)"/>
<Output Namespace=".newNamespace"/>
<Mode>Append</Mode>
</BITW>
You can specify more than one <BITW> section. Each section must have an Input
namespace and out Output Namespace as shown above. The <BITW>, <Input>, <Output>
and optional <Mode> tags are case sensitive.
<Input> specifies the namespace to search for. It can be a literal, or a regular expression.
In the example above, it is match on ALL.
<Output> is the new namespace to use, or the one to append to the existing, depending on
<Mode>
<Mode> by default is Replace. Which will replace the matched namespace with the one
specified. If Mode is ‘Append’, then the string specified in <Output> will be appended to
the matched namespace. In the example above, all namespaces will have the string
“.newNamespace” appended to them.
<BITW>
<Input Namespace="VM18"/>
<Output Namespace="VM18.SecondTest"/>
</BITW>
In this example, all data points with the Namespace of VM18 and replace it with
“VM18.SecondTest”.
Note that the Namespaces themselves are not case dependent, so in this example it will
also match on Vm18, vm18 and vM18.
Bump In The wire should work with Saved data, live data and chained data.
5.3 Using Oscar
5.3.1 Live Data
Once Oscar has started up, you can press the Start button to start receiving data from
Minion(s) and sending it to Marvin(s).
The stop button will stop the live feed.
5.3.2 Recording Data feed
Once you have pressed the Start button, you will start to receive data from Minion(s).
Pressing the record button will keep a copy of the incoming data in memory while also
sending it to Marvin(s). It will keep doing so until you press ‘Stop’. At which time you can
then playback the recorded data with the panel on the right, or you can save the recorded
data for playback. Using the File menu.
You can save the data to either an Oscar file for playback later, or you can save it to a CSV
formatted file for using in Excel.
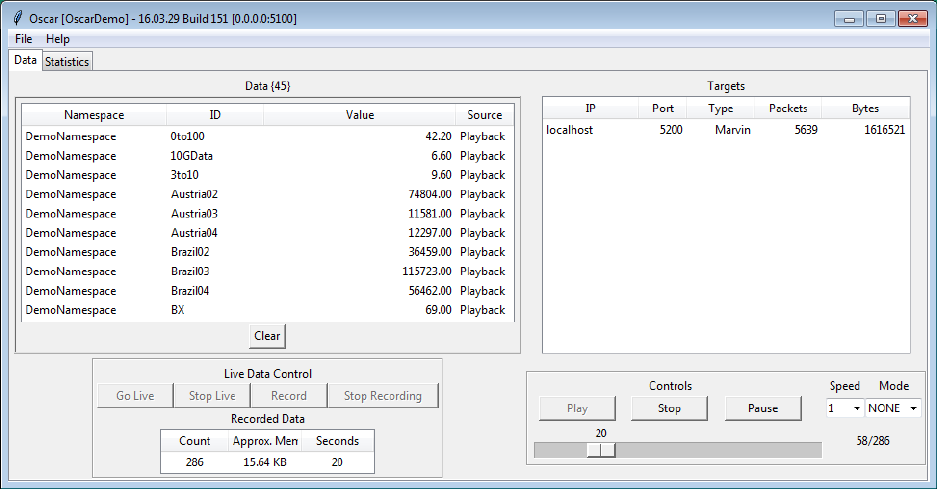
66 Revision 18.02 Board Instrumentation Framework
Note: If you exit the app without saving your data, you will not be prompted, it will be
gone.
5.3.3 Playing back Recorded Data
Figure 3 Oscar with Playback Pane
Once you have recorded live data as described above, or loaded a saved recorded session
using the File menu, the Playback tab will appear. It works very much like A CD player.
There are some options to repeat the playback (will loop through all the data repeatedly)
and to change the speed at which the playback occurs.
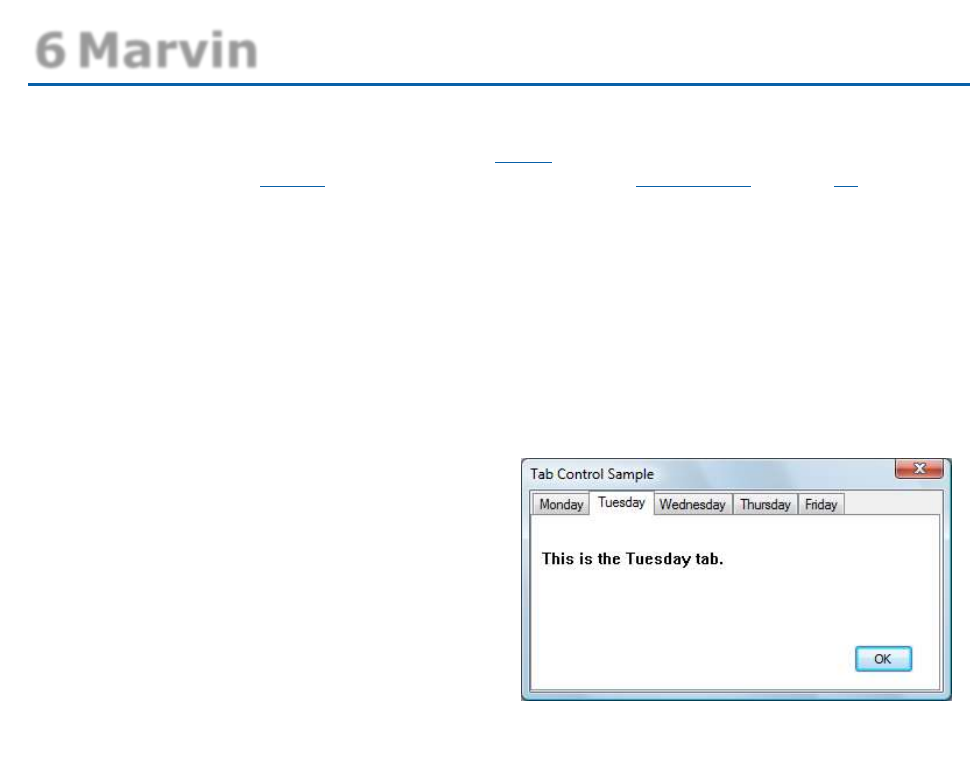
67 Revision 18.02 Board Instrumentation Framework
6 Marvin
Marvin is the code name for the Java 8 based GUI that is part of the BIFF Instrumentation
Framework . It receives a piece of data from Oscar that can be either live data or recorded
that originated from a Minion. Each data packet contains a Namespace and an ID, these are
used to ‘connect’ a data point to a ‘Widget’ (GUI component) to be displayed in Marvin.
Marvin has been designed to be highly configurable; everything is configurable via XML files.
This includes what you display as well as how it is displayed. The what is a collection of
Widgets and the how is determined by stylesheets (CSS Files). Furthermore, Marvin is
designed to be agnostic to the data it is displaying – it knows nothing about the kind of data
it is getting, could be CPU Utilization, network throughput or the name of the computer.
6.1 General Components
Marvin will have on or more Tabs, similar to
what is shown in Figure 1. On each Tab you
can place as many Widgets as you like.
Widgets are placed into Grids. Grids are very
similar (pretty much idential) to HTML tables.
When adding a widget to a Tab, you specify
which grid position the widget should be
placed.
You can layer widgets on top of each other,
there is no restriction on this. You can do
some advanced features doing this as
discussed in Section 11.1.
Figure 4 Tab Control
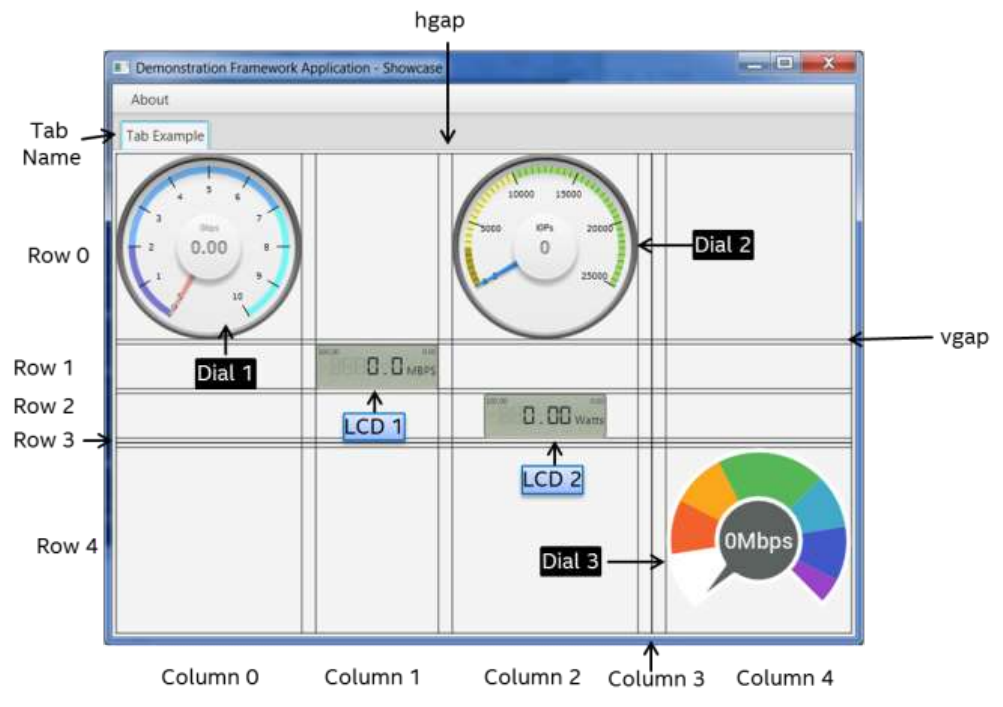
68 Revision 18.02 Board Instrumentation Framework
6.1.1 Grids
Grids are the basis of layouts for displaying your Widgets. Figure 5 shows a simple example
of a Grid within a Tab.
Figure 5 Sample Grid
Grid rows and columns start numbering at 0. The width and height of an individual Grid cell
is determined by the largest height and width of widgets within its row and column. If there
is no widget placed into a row or column, its size will be 0. The above figure features both a
row and column in which no widgets are placed, thus resulting in a size of 0; this would be
row 3 and column3.
In between rows and columns there are configurable gaps; hgap is for horizontal spacing
(gap) between columns while vgap is the spacing between row. In the above example the
hgap is set to 15 and the vgap is set to 5.
Note in Figure 5 how the width of column 0 is determined by the width of the Dial 1 Widget.
The same is true for both the height or Row 1 – it is the height of the LCD 1 widget; while
the width of Column 1 is the width of the LCD 1 widget.
Note how the height of rows 1 and 2 are the same, but how LCD 2 is not as wide as the
column it is in.
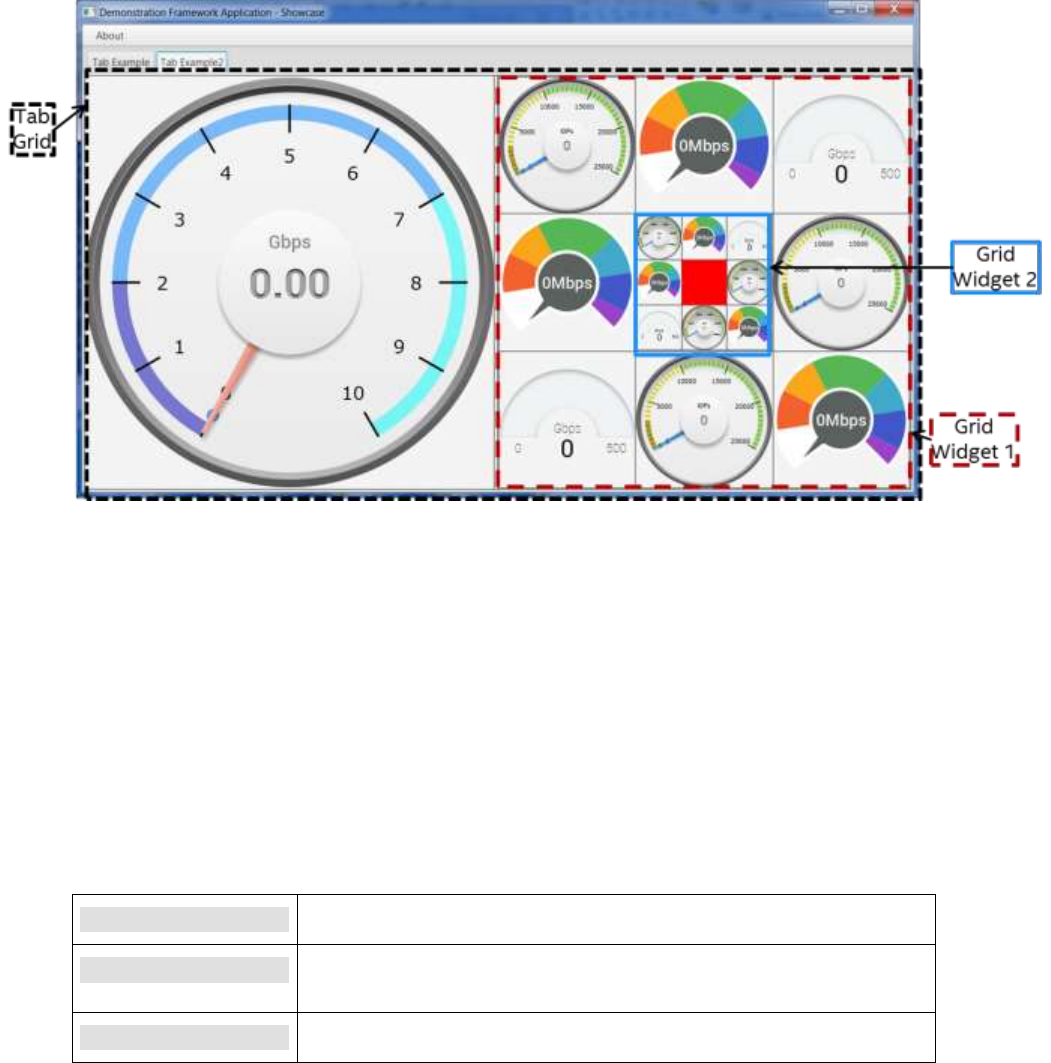
69 Revision 18.02 Board Instrumentation Framework
6.1.2 Grids within Grids
Each Tab that you define has a grid automatically placed in it by default. You can add more
grids within this ‘base’ grid in order to achieve desired layouts. The following figure provides
an example of a tab with multiple grids.
Figure 6 Grids
The standard grid, or Tab Grid, is where the large dial is placed, at location 0,0
(row,column). Next there is a Grid Widget placed at location 0,1 within the Tab Grid.
Within this grid widget, 8 dials are placed. Then finally another Grid Widget is placed in grid
location 1,1 (the center) of the first Grid Widget and a simple colored pane placed with it.
Using Grids within grids you can achieve very sophisticated layouts – though it will take
practice; I suggest reading up on best practices on HTML tables.
6.2 Running Marvin
The working directory from where you launch Marvin must be the directory where the
BIFF.Marvin.jar file exists.
Command line options are:
Parameter
Description / Usage
-i
Specify application configuration file, default is
Application.xml
-v,-vv,-vvv,-vvvv
Different verbosity levels for debugging
70 Revision 18.02 Board Instrumentation Framework
-log
Specify the name of the log file. Default is MarvinLog.html
-aliasfile
Specify an external file (See Section 6.2.1)
-dumpalias
Dumps all aliases at the root (main application level)
-dumpWidgetInfo
Dumps dimensions of widgets, and all files used to create
app (tab and grid files)
-altSplash
Specifies an alternate splash image file to use
Example:
java –jar BIFF.Marvin.jar –i demo\DemoApp.xml
6.2.1 External Alias File
Note: No spaces between –aliasfile=inputfile
If you use the –aliasfile command line parameter you can specify an external file will be
turned into aliases. The format text of the file is pretty simple:
Aliasname=aliasvalue
You can use the # sign for comments.
This is useful if you want to create a generic tab with alias values for namespaces and ID’s,
that are defined externally.
See the MyAliasList.txt file packaged with the example app.

71 Revision 18.02 Board Instrumentation Framework
6.3 Configuration File
The XML configuration file is where the magic happens for Marvin, it is where you define
what data gets displayed, how it is displayed and what Tasks you might like to perform
when you click on a widget.
The default XML file used by Marvin is “Application.xml” in the same directory as the .jar
file. You can specify a different XML file, see Section 6.2 for details.
The basic hierarchy for the XML file is as follows:
<Marvin>
<Application>
<Network>< /Network >
<Title></Title>
<Tabs>
<Tab ID=”tab-1”/>
...
<Tab ID=”tab-n”/>
</Tabs>
</ Application >
<Tab ID=”tab-1>
<Widget></Widget>
...
<Widget></Widget>
</Tab>
....
<Tab ID=”tab-n>
<Widget></Widget>
...
<Widget></Widget>
</Tab>
</Namespace>
.....
<TaskList ID=”TaskList-1”>
<TaskItem></TaskItem>
...
<TaskItem></TaskItem>
</TaskList>
....
<TaskList ID=”TaskList-n”>
<TaskItem></TaskItem>
...
<TaskItem></TaskItem>
</TaskList>
<AliasList>
<Alias Foo=”Hi Bob” Bar=”Bye Bob/>
</AliasList>
</Marvin>
72 Revision 18.02 Board Instrumentation Framework
6.3.1 <Marvin>
This is the root node for the application XML configuration file. It has no attributes.
6.3.2 <Application>
The <Application> section of the XML configuration file defined what components will be
used in composing the resulting GUI. This includes the title, look and feel, network
connections, tabs etc.
6.3.2.1 Attributes
The <Application> tag supports the following attributes.
Attribute
M/O
Comments
ID
O
ID of the Marvin
Mode
O
Debug or Kiosk
Scale
O
Global size change for widgets
Height
O
Width
O
EnableScrollBars
O
MarvinLocalData
O
Creates some local data points
ID
The attribute provide an ID for the specific instance of the Marvin. It is used for
RemoteMarvinTasks.
Mode
If ‘Debug’ is specified then the gridlines in the grids will appear – very helpful for working on
layouts. Additionally Spacer widgets will be red by default instead of invisible. Logging will
also be at higher level.
In Debug mode, if you press shift and click on a Widget, the log file will contain information
about that Widget, including the Minion Source associated with it.
If ‘Kiosk’ is specified, no tasks will be performed. If you have a task associated with a menu
item or a Widget, nothing will happen. This is designed to be used at a kiosk or some sort
of location where people can play with the Gui and look at stuff, but not manipulate
anything directly.
In Debug mode, if you press shift and click on a widget, it will log that widget’s information.
If you are pressing CTRL and click on a widget (again Debug mode), the background and
border will change, makes it easier to see the different grids within grids.
Scale
Experimental setting that will grow or shrink sizes of widgets based upon a float value (ex
73 Revision 18.02 Board Instrumentation Framework
0.75 or 1.25 to shrink or grow by %25)
There is a way to automatically scale the widgets. Rather than specifying a value for the
Scale attribute, set it to “Auto”: Scale=”Auto”, and use the <CreationSize> tag to try
automatically scaling.
NOTE: At this time the scaling of charts and graphs does not work.
Height
Height of main window. Note if not specified, will grow to the size of the screen.
Width
Width of main window. Note if not specified, will grow to the size of the screen.
EnableScrollBars
If “True”, will add scroll bars to the application on every tab. Default is False.
MarvinLocalData
If set to ‘Enabled’, Marvin will automatically generate several MinionSrc datapoints that are
completely local to that instance of Marvin. They will all have the namespace of
‘MarvinLocalNamespace’. Id’s are as follows:
Datapoints - Number of unique datapoints (Namespace+ID)
DataUpdateCount - Number of times data has come in
LocalTime
MarvinID - ID, if set in application config
RuntimeFormatted - days,hours,minutes,secs Marvin has been running
RuntimeSecs - seconds Marvin has been running
TaskCount - Number of tasks created
TasksExecutedCount - number of tasks Run
UnassignedDatapointCount – Number of unique datapoints received, but not used
WidgetCount - # of widgets/grids in app
6.3.2.2 <Title>
This specifies the title to be displayed in the title bar of the GUI.
6.3.2.3 <RefreshInterval>
Is really a debug type setting that is optional. Specifices the interval in milliseconds at
which the widgets should be re-drawn. Default is 350 which is 350ms.
6.3.2.4 <MonitorNumber>
Optional setting where you can specify a monitor number that is the application will launch
on. Monitor numbering stats at 1.
Example:
<MonitorNumber>2</MonitorNumber>
6.3.2.5 <Network>
The Network tag defines where the application should be listening for incoming data coming
from one or more Oscars.

74 Revision 18.02 Board Instrumentation Framework
Attributes
The <Network> tag supports the following attributes, which are case sensitive.
Attribute
M/O
Comments
IP
O
Target IP Address
Port
M
Target UDP Port
IP
IP Address that Marvin will bind to for listening for data on the specified port. If not
specified, it will listen on ALL interfaces on the specified port.
Port
Port on which the Marvin is listening for data.
Example
<Marvin>
<Application>
<Network IP="localhost" Port="3232"/>
</Application>
</Marvin>
Oscar Settings
The <Network> Settings can include any number of additional <Oscar> Tags as in the blow
example:
<Network Port="5200">
<Oscar IP="MyOscarBox.kutch.com " Port="6200" Key="PatrickKutchKey"/>
</Network>
In this example Marvin is listening on port 5200 on all interfaces for data from one or more
Oscars. It also has an <Oscar> tag that points to a specific Oscar IP and Port as well as an
identifying Key. The Oscar IP and Port are the <IncomingMinionConnection> IP and port for
a specific Oscar. Using this information, upon startup Marvin will send a ‘quick message’ to
that location with the Marvin connection information so that the Oscar so that the Oscar
may in turn perform a ‘dyamic connection’ to this Marvin.
They Key provided is a minor security measure. A hash of the key is sent along with the
message from Marvin to Oscar. If Oscar has been configured with this same Key then it
allows the ‘dynamic’ session to be created. It also logs the connection.
Using this feature you can provide a user or a customer a copy of Marvin and have it point
to a specific Oscar somewhere with a specific Key. Your customer can then remotely view
your demo using a local GUI and you can see when they ran the demo (again, Oscar will log
it) and you can control access by removing that supported Key from the Oscar configuration
file.
6.3.2.6 <CreationSize>
CreationSize is an optional tag you can put in that will help automatically scale your widgets
75 Revision 18.02 Board Instrumentation Framework
and still maintain the correct relative dimensions.
If you put in the Height and Width of the screen you use to create you GUI (the about box
will tell you the Java dimensions. If you use the Scale=”Auto” setting, then the framework
will attempt to automatically determine a scaling factor based upon the <CreationSize>
dimensions and the current screen resolution.
6.3.2.7 Attributes
The <CreationSize> tag supports the following attributes, which are not case sensitive.
Attribute
M/O
Comments
Height
O
Height of screen used when you laid out the widgets
Width
O
Wiedht of screen used when you laid out the widgets
6.3.2.8 Padding
Defines global padding for the space between the edge of a grid and the placement of the
Widget. For example if you place a dial, and there is no padding, it will (likely) fill to the
size of the grid cell it is in. If you specify a padding, then the specified spacing will be
within the grid cell. This is the global default, that may be overridden on a per tab and grid
basis.
Attributes
The <Padding> tag supports the following attributes, which are case sensitive.
Attribute
M/O
Comments
Top
O
Default global padding on top of cell grid, in pixels
Bottom
O
Default global padding on bottom of cell grid, in pixels
Left
O
Default global padding on left of cell grid, in pixels
Right
O
Default global padding on right of cell grid, in pixels
LegacyMode
O
I changed the way padding is not ‘inherited’ from the
application <Padding> setting for grids (it now works as it
should), but setting this flag to true will go back to old way, as
to not break existing apps.
6.3.2.9 StyleSheet
Specifies the optional external stylesheet that can be provided to change the look and feel
for the entire application.

76 Revision 18.02 Board Instrumentation Framework
6.3.2.10 IgnoreWebCerts
This Tag is for when you are using the Web widget and you point it towards a page that has
security certificates that are not installed on your system (like most KVM systems in our
labs). Since the Web Widget is basically a home-grown browser, I have not implemented
support to prompt to continue for this type of situation. So you can use this tag and put in
a value of True to ignore them.
<IgnoreWebCerts>True</IgnoreWebCerts>
This tag is optional.
6.3.2.11 Heartbeat
This is the rate (in seconds) in which Marvin will send an ‘I’m Here’ message to all of the
Oscars sending data. This allows the Oscars to stop sending data if a Marvin goes away –
prevents the sending of large amounts of data on the network when nobody is listening.
6.3.2.12 Tasks
This tag allows one to configure if Tasks will be allowed or not. Is similar to kiosk mode.
Attributes
The <Tasks> tag supports the following attributes, which are case sensitive.
Attribute
M/O
Comments
Enabled
O
Either True or False Default is True
6.3.2.13 MainMenu
Marvin provides a mechanism by which you can create menu’s where a menu item is
associated with a Task. Note that this feature is used with the <Tasks> tag. The MainMenu
is made up of one or more Menu’s.
Attributes
The <MainMenu> tag supports the following attributes, which are case sensitive.
Attribute
M/O
Comments
Show
O
Either True or False, if false hides the menu, default is True
Menu
This is a menu to be displayed in the menu bar (MainMenu). It contains a title and a list of
menu items.
Attributes
The <Menu> tag supports the following attributes, which are case sensitive.
Attribute
M/O
Comments
Title
M
Text to be displayed on menu bar
77 Revision 18.02 Board Instrumentation Framework
MenuItem
This is the definition of the menu item. It contains two parts, the Text (what to display in
the menu and the Task to be performed.
Example
<MainMenu Show="True">
<Menu Title="Test">
<MenuItem Text="Remote Dir" Task="RunDir"/>
</Menu>
</MainMenu>
6.3.2.14 Tabs
The <Tabs> section of the <Application> definition contains the list of Tab ID’s to be
displayed. The definition of what is in each Tab is defined in a different location in the
configuration file. See Section 6.3.3 for details on defining and individual Tab.
The <Tabs> tag can take an optional attribute of ‘Side’, which allows you to specify a
location for the tabs to be placed on the screen. Valid options are ‘Top’ (the default),
‘Bottom’,’Left’ and ‘Right’
The <Tabs> tag contains no attributes, only a list of one or more <Tab> tags. The Tabs
will be displayed in the order listed within this section.
Tab
Defines the Tab to be displayed, based upon the ID provided. The <Tab> tag contains but
a single mandatory Attribute of ID. The ID must have a corresponding Tab definition later
in the file.
Example
<Tabs Side=”Right”>
<Tab ID="DemoTab-Dials"/>
<Tab ID="DemoTab-Indicators"/>
<Tab ID="DemoTab-LCD"/>
<Tab ID="DemoTab-Charts"/>
<Tab ID="DemoTab-Charts2"/>
<Tab ID="DemoTab-Images"/>
<Tab ID="DemoTab-Grids"/>
<Tab ID="DemoTab-Playback"/>
<Tab ID="DemoTab-Demo"/>
</Tabs>
6.3.2.15 <UnregisteredData>
There are times when you may be capturing data from Minion but not yet setup a Widget to
display that widget. Or you may simply want it displayed as text for a quick visual.
To accommodate this you can fill out the <UnregisteredData> section in the <Application>.
If the feature is enabled, then a new tab will be automatically created in the Application at
runtime for each Namespace for which there is unregistered data. All unregistered data for
that namespace will be displayed as text within that tab. The data will be sorted in
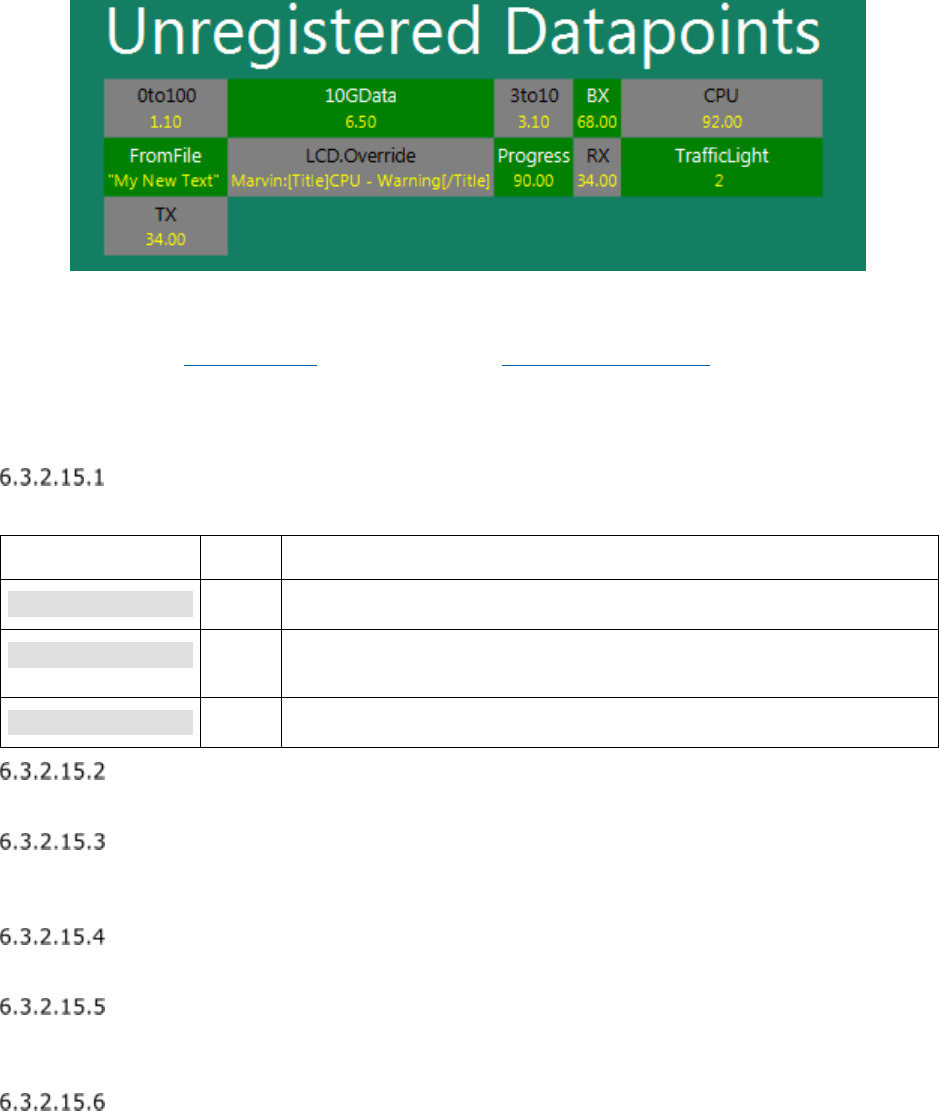
78 Revision 18.02 Board Instrumentation Framework
Alphabetical order by the ID.
Example:
Figure 7 UnregisteredData Example
In the example above, there are nearly 300 data points being automatically displayed. This
example uses the IPC_Linux.py Collector and the <DynamicCollector> to quickly gather a
great deal of performance data from the system under test.
Other than the ‘Enabled’ attribute, everything else has a default value that can be
overridden to change the visual attributes of the feature.
Attributes
The <Menu> tag supports the following attributes, which are case sensitive.
Attribute
M/O
Comments
Width
0
Maximum # of items to display in a single row. Default is 5
Enabled
O
True or False, default is False. Must be True to enable the
feature
Title
O
Sets the title at top of page. Overrides the default.
<TitleStyle>
Override the display style of the Title, using standard CSS string.
<EvenStyle>
The data points are designed so that you can have alternating styles to differentiate the
data points. EvenStyle defines one of the alternating styles.
<Background>
Override the background CSS style, using standard CSS string.
<ID>
Override the CSS style of the ID portion of the data set to be displayed, using standard CSS
string.
<Value>
Override the CSS style of the Value portion of the data set to be displayed, using standard
79 Revision 18.02 Board Instrumentation Framework
CSS string.
<OddStyle>
The data points are designed so that you can have alternating styles to differentiate the
data points. OddStyle defines one of the alternating styles.
<Background>
Override the background CSS style, using standard CSS string.
<ID>
Override the CSS style of the ID portion of the data set to be displayed, using standard CSS
string.
<Value>
Override the CSS style of the Value portion of the data set to be displayed, using standard
CSS string.
<Example>
This example is what was used for the data displayed in Figure 7.
<UnregisteredData Width="13" Enabled="True" Title="System Info">
<TitleStyle>-fx-font-size: 3.5em;</TitleStyle>
<EvenStyle>
<Background>-fx-background-color:green</Background>
<ID>-fx-font-size: 1.0em;</ID>
<Value>-fx-font-size: .9em;-fx-text-fill:yellow</Value>
</EvenStyle>
<OddStyle>
<Background>-fx-background-color:grey</Background>
<ID>-fx-font-size: 1.0em;-fx-text-fill:black</ID>
<Value>-fx-font-size: .9em;-fx-text-fill:yellow</Value>
</OddStyle>
</UnregisteredData>
6.3.3 Tab
The <Tab> section of the XML configuration file defines/describes what should appear on a
Tab screen.
There are several components to a Tab including layout, look and feel and of course the
widgets to display within the Tab.
The contents of a <Tab> may be defined wholly within the application XML configuration
file, or it may also be defined in another external XML file, using the File attribute. In
general, unless doing a very simple GUI, it is recommended to use an external file for each
Tab to keep things simple and modular. Additionally one could create a ‘library’ of tab to
use as needed.
Note that you may define a Tab, but not use it – meaning you can define a <Tab> section,
but if you do not specify the Tab within the <Tabs> it will not be displayed. Also note that
the order of the <Tab> definitions is not relevant to how they are displayed, tab display
order is defined by the order listed in <Tabs>.
80 Revision 18.02 Board Instrumentation Framework
Each Tab is a separate application ‘screen’. Each can have its own layout, color scheme,
padding, Alias’s etc. As mentioned in Section 6.1.1, each Tab has a built-in grid in which to
place widgets.
Within the <Tab></Tab> tag is where you will place your widget
6.3.3.1 Attributes
The <Tab> tag supports the following attributes, which are case sensitive.
Attribute
M/O
Comments
ID
M
ID of the Tab, must be unique.
Align
O
Where within application the
File
O
Specifies external file which defines widgets within the tab
hgap
O
Horizontal gap within the tab grid, default is 0
vgap
O
vertical gap within the tab grid, default is 0
ID
This is the ID of the Tab, it must be unique within the XML configuration file. This ID
corresponds to the ID in the <Tabs> section.
Align
Specifies where in the tab the tab grid should appear. Valid options are (points on a
compass):
Center
N
NE
E
SE
S
SW
W
NW
File
Specifies an additional external file where the contents of the tab are specified. As with all
additional external files, the root of the XML scheme for the external file is
<MarvinExternalFile>. Widgets will then be required to be defined within the <Tab> tag.
<AliasList> and <TaskList> tags are at same level as <Tab>
hgap
Specifies the horizontal gap to be inserted in between each column in the grid.
Can be specified as a % of application size, or parent grid size, just like height and width.
See Section 7.3.1.9 for details.

81 Revision 18.02 Board Instrumentation Framework
vgap
Specifies the vertical gap to be inserted in between each row in the grid.
Can be specified as a % of application size, or parent grid size, just like height and width.
See Section 7.3.1.9 for details.
6.3.3.2 Title
Specifies the Title of the Tab – the text to be displayed at in the Tab control near the top of
the application.
6.3.3.3 Padding/PaddingOverride
Allows you to override the application global setting for the padding described in Section
6.3.2.6. You can use either <Padding> or <PaddingOverride>
Attributes
The <PaddingOverride> tag supports the following attributes, which are case sensitive.
Attribute
M/O
Comments
Top
O
Default Tab padding on top of cell grid, in pixels
Bottom
O
Default Tab padding on bottom of cell grid, in pixels
Left
O
Default Tab padding on left of cell grid, in pixels
Right
O
Default Tab padding on right of cell grid, in pixels
6.3.3.4 StyleOverride
Allows you to change the style of the tab. For example the background is the background
color of the Tab frame or Grid that this grid is within. You can change that here, or add a
picture etc.
6.3.3.5 Widget
One or more widgets can be placed within a Tab. See Section on widgets information
6.3.3.6 Grid
You may place grids within grids in order to achieve various layouts. See Section 7.15.1.5
for information about Grids. Widgets are then placed within grids.
6.3.4 AliasList
Like the Alias in Minion, Marvin provides a mechanism by which you can create an Alias.
Aliases can be created in the main application XML configuration file, external Tab and
external Grid files. They must be created at same level as the Tab or Grid (not within a Grid
or Tab definition).
Aliases are read before the rest of the file, so you can use them in the top portion of the file,

82 Revision 18.02 Board Instrumentation Framework
even if not defined until the end of the file.
Example AliasList
<AliasList>
<Alias DownloadFont="Bold-Italic-title"/>
<Alias TextCSS="MyText.css"/>
</AliasList>
The Alias will be propagated all the way down to a Wiget definition file. So if you create
your own MyTextWidget.xml file and in that specify the <Style> as $(TextCSS), it will result
in using MyText.css.
6.3.4.1 Scope
The scope of an alias is within the file where it is created and any external files called from
within that file. So for example you can define an Alias in an external Tab file, and from
within that file you can have multiple external Grid files. The alias you create in the Tab file
will propagate to each of the Grid files. However it does not propagate to other Tab files –
unless you define the alias in the main application XML file from where you call the external
Tab Files.
This scoping also works for overriding an Alias. So if you say within one of these external
Grid files you redefine the Alias, it will be available within that Grid file, and any subsequent
external Grid files called from within that Grid file as well as any widgets placed within these
grids that may have an Alias used within them.
6.3.4.2 Using
Using an Alias is pretty easy and is just like using in the Minion definition file – except that
Marvin has multiple files that you can use the alias in, such as the main configuration file,
external Tab files, external Grid files and Widget definition files.
Usage is simple, $(AliasName). A dollar sign followed by the alias name in parenthesis. It
can be used within any Tag or Attribute, but cannot be used as the Tag or attribute itself.
This applies to any .XML file within the entire project.
You can do some pretty cool things with aliases and external files.
You can also combine Aliases. Such as $(ComputerName).TxRate.$(NIC). If
ComputerName=”Server2” and NIC=”Eth0” the resulting string will be Server2.TxRate.Eth0.
6.3.4.3 Environment Variables
By default, the environment variables of where Marvin is running is automatically sucked in
and made an Alias. So for example if you are running Marvin on a Microsoft® Windows
system, there will be at your disposal an $(ComputerName) alias available for your use.
You could pass this as a parameter to a MinionTask that would then write this data to a file,
which the a Minion Collector would read and send back to be displayed as a text value. You
could also achieve the same thing with a Marvin task that is run on startup. See Section
8.14 for details.
6.3.4.4 Creating Alias when Specifying External File
You can specify external files for Tabs and Grids. I have added the ability to also specify an

83 Revision 18.02 Board Instrumentation Framework
alias that becomes available within the file you specify.
Example:
<Tab ID="DemoTab-Grids" Align="Center" File="Demo\DemoTab_Grids.xml"
Color3="blue"/>
Here the Alias of Color3 is set to “blue”. This Alias is available when processing the
DemoTab_Grids.xml file and any files that it subsequently references.
You can create as many aliases in this way when specify an external file as you like. This
only works when calling external Tab and Grid files.
You might wonder how useful this is. Consider that you want to display the same pieces of
data from 5 different servers. You could create a Tab definition file that takes an Alias for
the Namespace. Then in your application xml file when you specify the external tab file,
you specify the same exact external file for each, but create an alias for namespace that is
passed. Then in the Tab definition file, each widget you place uses this alias for the
<MinionSrc> namespace.
6.3.4.5 Automatically Generated Alias’
I create several aliases that are useful for some.
$(TabID) – the Id of the current <Tab> being constructed
$(CurrentFileAlias) – Name of the current XML file being parsed
$(CurrentFileWithPathAlias) – same as previous, but with full path
$(CurrentConfigFilename) –?
$(CANVAS_WIDTH) & $(CANVAS_HEIGHT) - Alias of screen width and height that
the app will run on
$(SCREEN_H2W_RATIO) & $(SCREEN_W2H_RATIO)
$(WORKING_DIR) – the directory from where Marvin is running
$(WORKING_DIR_URI) – same as above but in URI form (file:/// bla)
$(DEBUG_STYLE) – This is the default style when in debug mode. You can override
this for any widget or grid to help differentiate them when debugging things.
6.3.4.6 Using an Alias in the name of an Alias
A rare corner case can arise where you want to define an Alias, and use another Alias as
part of the name for the alias to be created. Using the Symbols $,( and ) breaks XML
syntax. So what I did was make a keyword REPLACE be searched for and replaced by, and
only by the case sensitive REPLACE value. Must be in the same <Alias> Tag. REPLACE
must be case sensitive for both, otherwise will be used as a normal string.
<Alias Alias.REPLACE.Name=”MyTitle” REPLACE=”$(AlreadyDefinedAlias)”/>
6.3.4.7 <Import>
Within <AliasList> you can specify another XML file to import that has an <AliasList> within
it. If you do this then the framework will only go and read the Aliases from that file, it will
do no other processing.
Example:
84 Revision 18.02 Board Instrumentation Framework
<MarvinExternalFile>
<AliasList>
<Import>OtherAliases.xml</Import>
<Alias Title=”MyTitle”/>
</AliasList>
</MarvinExternalFile>
Note: Be careful of circular imports – the framework makes no checks for this
6.3.4.8 <DefaultAlias>
<DefaultAlias> works just like defining an <Alias> and has the same scope. The difference
is that if the Alias ID specified already exists it will not create the alias. You can do some
powerful overrides this way.
Example:
<AliasList>
<DefaultAlias DownloadFont="Bold-Italic-title"/>
<Alias FontToUse=”$(DownloadFont)”/>
</AliasList>
So in the example above, the Alias FontToUse will be set to the alias defined by
DownloadFont. If a level above this definition set the ‘DownloadFont’ alias then that value
will be used, otherwise if it wasn’t, the value set by DefaultAlias will be used.
6.3.5 TaskList
Being able to display instrumented data is very useful and powerful. However it isn’t the
complete capability that you really need. What one needs is the ability to press a button on
the GUI and have it go run some script on the other end where Minion is running to go start
the workload, or to change some hardware config and start a workload, or to stop the
workload. This is where Tasks come in.
There are several kinds of Tasks:
Minion Task – Sends a message to a Minion to have it run a Minion Task (Actor)
Oscar Task – Allows a remote control of Oscar
Marvin Task – Can insert data into the incoming <MinionSrc> datastream
MarvinAdminTask – Special things you can do in Marvin
RemoteMarvinTask – allows one Marvin to execute a Task within another Marvin
ChainedTask –Allows defining a task that calls another defined task.
A task can be defined in the main application configuration file, an external Grid or external
Tab file. The scope of this definition is global – so you can define it in one file and use it in
another and the order does not matter; you can use it in the 1st file and define it in another
file that isn’t loaded until later. You can also of course use an Alias in the tasks.
Section 8 provides details on Tasks.
6.3.6 <For> option
Note: As of April 2017, <Repeat> has been deprecated and no longer supported.

85 Revision 18.02 Board Instrumentation Framework
I found that there are times when you may want to repeat something many times. Such as
putting down a text widget. You can certainly cut and paste, however I created a <For>
option that allows you to repeat things easily for widgets and grids:
<For Count=”10” StartValue=”20”>
<Widget File=”Text/Text.xml row=”$(CurrentValueAlias)” column=”1”>
<InitialValue>$(CurrentCountAlias)</InitialValue>
</Widget>
</For>
The above lines will create 10 Text Widgets, each on a separate line, start at line 20, in
column1, with a value from 0 to 9.
Attribute
Description / Usage
Count
[required] The number of times to iterate through the repeat.
StartValue
[Optional default is 0] The Start value to use
CurrentValueAlias
automatically generated Alias, = Start + plus loop number
CurrentCountAlias
current loop #
Both CurrentValueAlias and CurrentCountAlias are automatically generated for you, however
you can change those names to be something else (in case you want to nest repeats):
<For Count=”10” StartValue=”20” CurrentValueAlias=”MyVar”>
<Widget File=”Text/Text.xml row=”$(MyVar)” column=”1”>
<InitialValue>$(CurrentCountAlias)</InitialValue>
</Widget>
6.3.6.1 Count – Option to iterate through files
EXPERIMENTAL
If you specify Count as Count=”[DirScan:dir:ext1:ext2]” it will iterate through each of the
files in ‘dir’ and use the optional ext as file extension filters. A new alias of
‘CurrentFileAlias’ as well as a ‘CurrentFileWithPathAlias’ will be available. All other things
such as start value etc. remain valid.
<For Count=”[DirScan:$(AppDir):xml:jpg:gif]” >
<Widget File=”Text/Text.xml row=”$(NextRowAlias)” column=”1”>
<InitialValue>$(CurrentFileAlias)</InitialValue>
</Widget>
</For>
86 Revision 18.02 Board Instrumentation Framework
6.3.7 $(CurrentRowAlias),
$(CurrentColumnAlias) etc.
I noticed that it can become tedious when you are placing a bunch of widgets in rows and
columns and you need to go back and insert a new widget, to help with that, I automatically
create some new Aliases for you. They are scoped to Tabs and grids.
Attribute
Description / Usage
CurrentRowAlias
The last Row value used, changes only when you use a different
value.
NextRowAlias
Increments CurrentRowAlias every time you use it, is the
CurrentRowAlias +1
CurrentColumnAlias
The last column value used, changes only when you use a
different value.
NextColumnAlias
Increments CurrentColumnAlias every time you use it, is the
CurrentColumnAlias + 1
PrevRowAlias
Decrements CurrentRowAlias
PrevColumnAlias
CurrentColumnAlias
6.3.8 <If> then-else
Sometimes you may want to do place or define things in your xml configuration files based
upon some variable. You should be able to use this mechanism in pretty much anyplace
within the document. If you use an Alias as part of an if input that Alias must be defined
within a previous <AliasList> block (you can do an <If> within an <AliasList> block, but an
alias you use within the <If> must have been declared previously.
<If Value1=”$(ShowAlternateDials)” Compare=”IF_EQ” Value2=”True”>
<Then>
<Grid File=”MyAltertateDialsGrid.xml” row=”0” column=”0”/>
</Then>
</If>
An If statement must have Value1, Compare, Value2 and <Then>, <Else> is optional.
Value1 and Value2 are compared using the Compare comparison, of which the following are
valid:
If_EQ - If Equal (==)
If_NE - If Not Equal (!=)
If_GT - If Greater Than (>)
If_GE - If Greater Than or Equal (>=)

87 Revision 18.02 Board Instrumentation Framework
If_LT - If Less Than (<)
If_LE - If Less Than or Equal (<=)
Marvin will attempt a numeric comparison first, if that fails it will do a case insensitive string
compare.
If the compare evaluation results in a true value the items in <Then> are used. These can
be anything, grids, widgets, repeats, more <If> statements.
If it is not true and you have an <Else> section those will be used. If no Else section is
present then nothing is added. See the example below.
<If Value1=”$(ShowAlternateDials)” Compare=”IF_EQ” Value2=”True”>
<Then>
<Grid File=”MyAltertateDialsGrid.xml” row=”0” column=”0”/>
</Then>
<Else>
<Grid File=”MyNormalDialsGrid.xml” row=”0” column=”0”/>
</Then>
</If>
6.3.9 MarvinMath
MarvinMath allows you to do simple math calculations that result in a value. It is only at
load time, not run time and only in XML statements. It can be used anywhere an Alias can
be used (so pretty much in any XML content except the tag names).
A MarvinMath statement has 4 parts, the declarator with is the case insensitive string
‘MarvinMath’ and a set of parenthesis. Within the parenthesis is a value and operator and
another value.
Example:
ID=”MyTask.MarvinMath(2,*,2)”
Will result in the ID being “MyTask.4”.
This simple example does not really do anything, however you can replace any of the values
for an Alias, which can allow some interesting things.
Valid operators are:
‘+’,‘Add
‘-‘,’Subtract’,’Sub’
‘*’,’Multiply’,Mul’
‘Divide’,’Div’
‘Maximum’,’Max’ – returns the larger of the 2 values
‘Minimum’,’Min’ - returns the smaller of the 2 values

88 Revision 18.02 Board Instrumentation Framework
You may also embed MarvinMath statements within each other:
ID="MyOtherTask.Marvinmath(2,*,MarvinMaTh(MarvinMath(1,ADD,1),-,1))"
Will result in ID=”MyOtherTask.2”
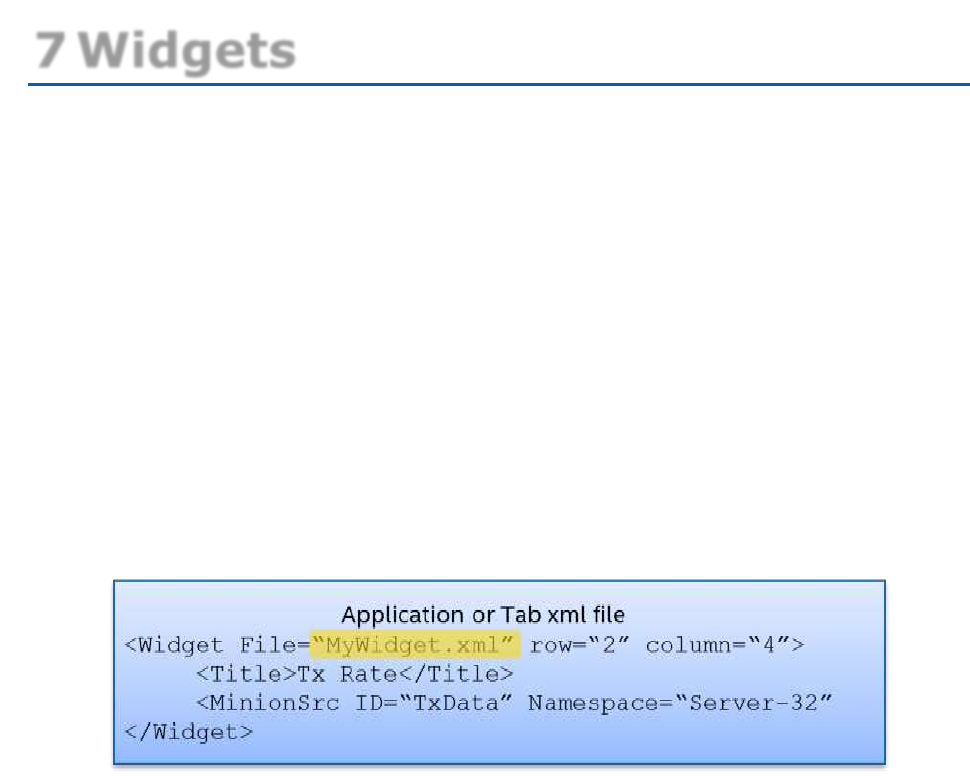
89 Revision 18.02 Board Instrumentation Framework
7 Widgets
Widget is the term I use to refer to something that gets placed on the screen. There is a
growing library of widgets available for you to use.
In general you place a widget in a specific location in a Tab/grid and usually you assign a
data source (originating from a Minion) to it.
All widgets have some common attributes (such as row and column) and some have some
unique settings.
To place a widget, at the minimum you specify a widget definition file and where to place
the widget.
The widgets themselves are described in the Widget Definition file. These files contain the
necessary information to describe the parameters for the widget. For example a Dial widget
– the definition file describes (among other things) what the minimum and maximum values
to display are. If you need a different range, then copy an existing widget definition file and
make the changes you need, and then specify the new file in your application.
We provide a growing library of widgets and corresponding definition files; if your needs
differ from what we provide then you simply make a new definition file that suits your
needs.
Figure 8 Placing a Widget in a Grid or Tab
Figure 8 shows a simplified example of placing a widget in a tab or a grid. It specifies a
Widget definition file (MyWidget.xml”), where to place the widget (row and column) as well
as the title for the widget (might be a dial) and the remote data source from where the data
will be fed its values.
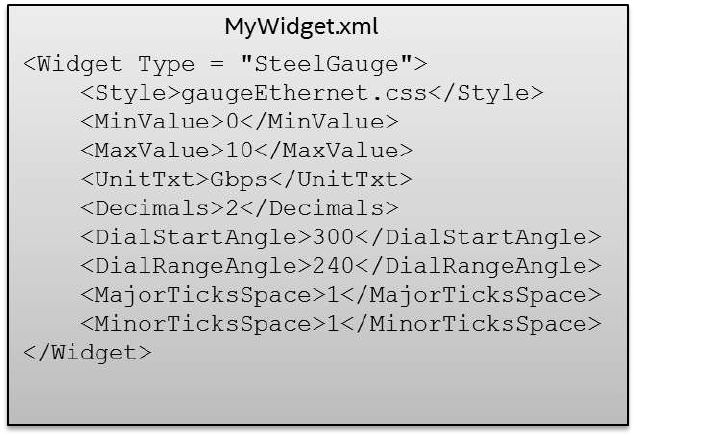
90 Revision 18.02 Board Instrumentation Framework
Figure 9 Sample Widget Definition File
Figure 9 provides a sample (not valid) Widget configuration file. In this case it is for a
SteelGauge Widget (as specified by the Type attribute. This configuration file describes the
display requirements for the widget, including an external stylesheet, the min and max
value to be displayed etc.
This sample widget file is for showing 0 to 10 Gbps of data. If you wanted 0 to 40 Gbps, or
changed from 0 to 1000 Mbps you could change the widget definition file to reflect your
needs. Or you could copy it to another name and modify it and create a library (as we have
started for you).
The Type attribute is what determines what the actual widget to be displayed is, and the
rest of the file is specific to that widget type – for example a Text Widget does not have
angels or ticks.
7.1 Widgets
Below you will find examples of the various widgets. Click on the example to jump to the
details.
Note: I might not always remember to update this section with images of new widgets, so
read below or look in the Table of Contents.
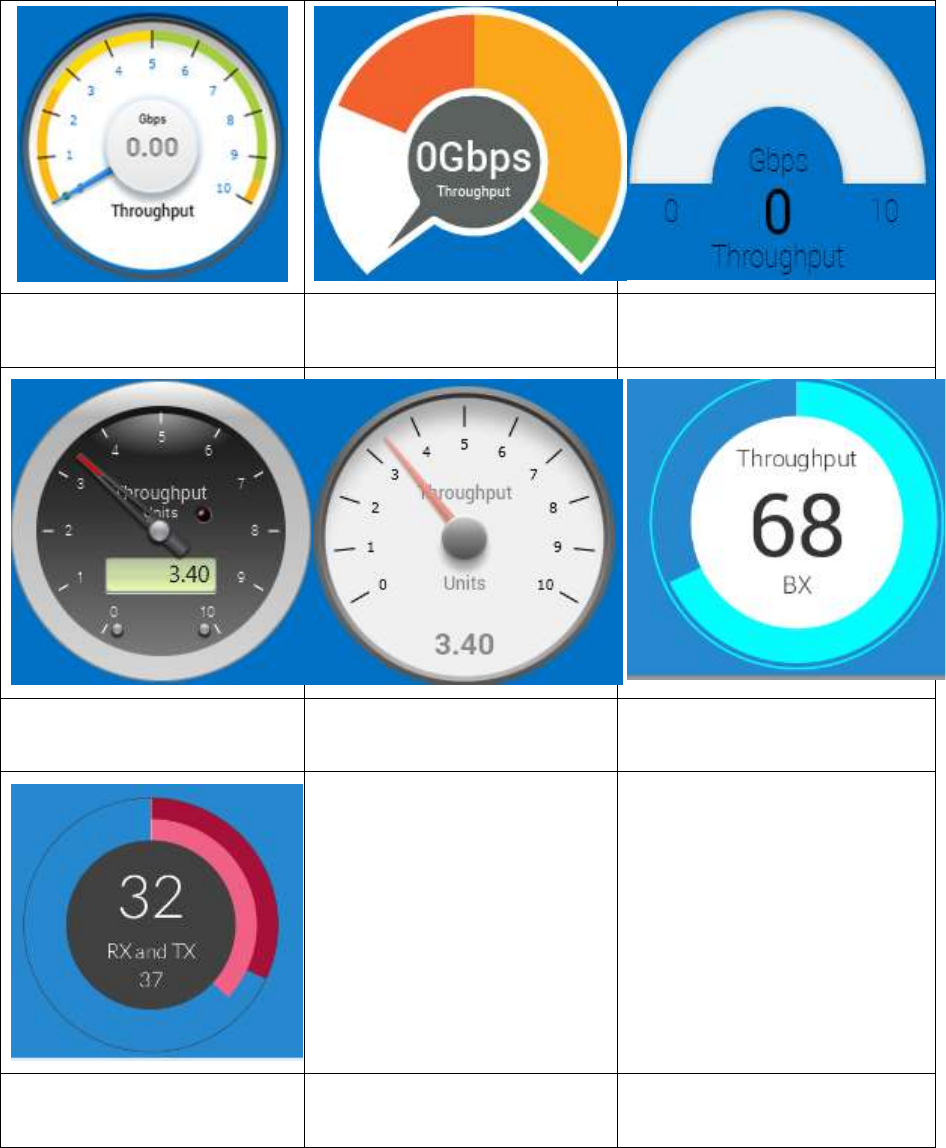
91 Revision 18.02 Board Instrumentation Framework
7.1.1 Dials
Figure 10 Steel Gauge
Figure 11 Steel Gauge
Simple
Figure 12 Steel Gauge
180
Figure 13 Steel Gauge
Radial
Figure 14 Steel Radial
Steel Gauge
Figure 15 Bar Gauge
Figure 16 Double Bar
Gauge
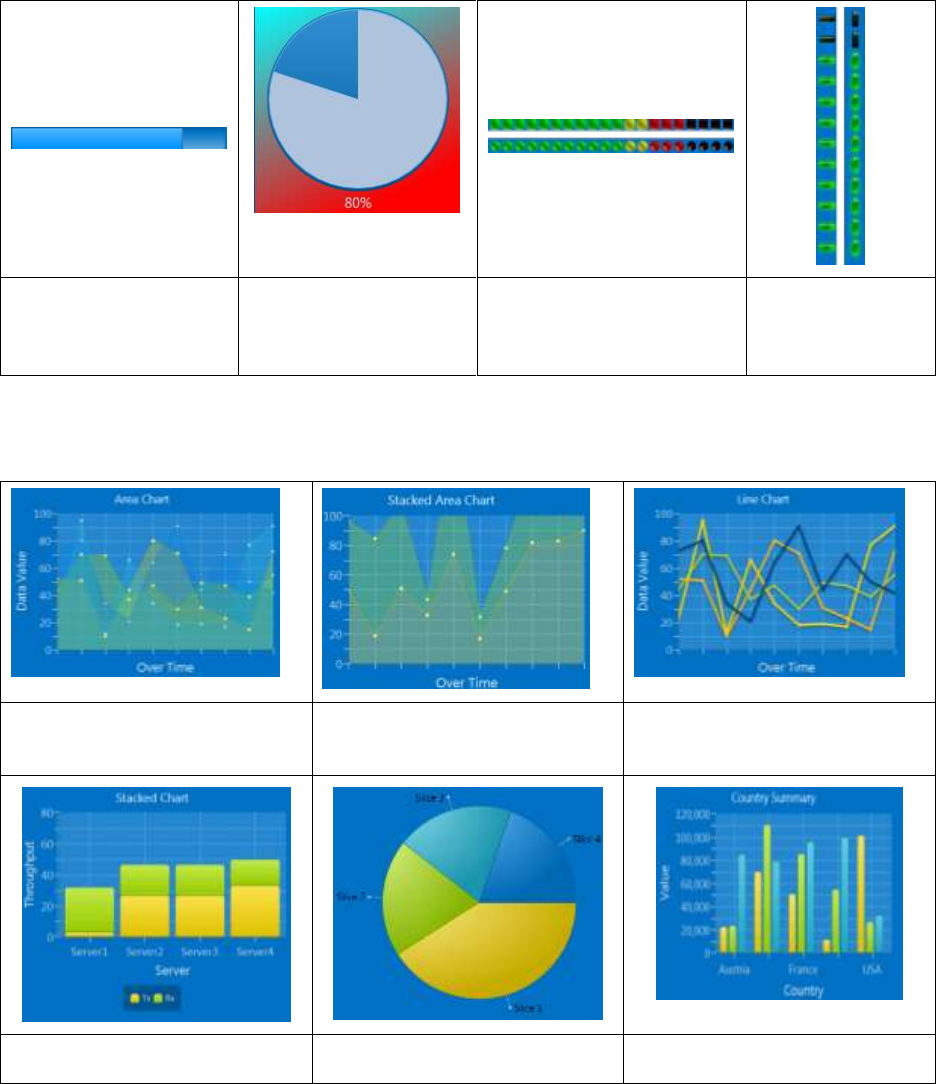
92 Revision 18.02 Board Instrumentation Framework
7.1.2 Indicators
Figure 17 Progress
Bar
Figure 18 Progress
Indicator
Figure 19 Horzontal
LED Bar
Figure 20
Vertical LED
Bar
7.1.3 Charts
Figure 21 Area Chart
Figure 22 Stacked Area
Chart
Figure 23 Line Chart
Figure 24 Stacked Chart
Figure 25 Pie Chart
Figure 26 Bar Graph
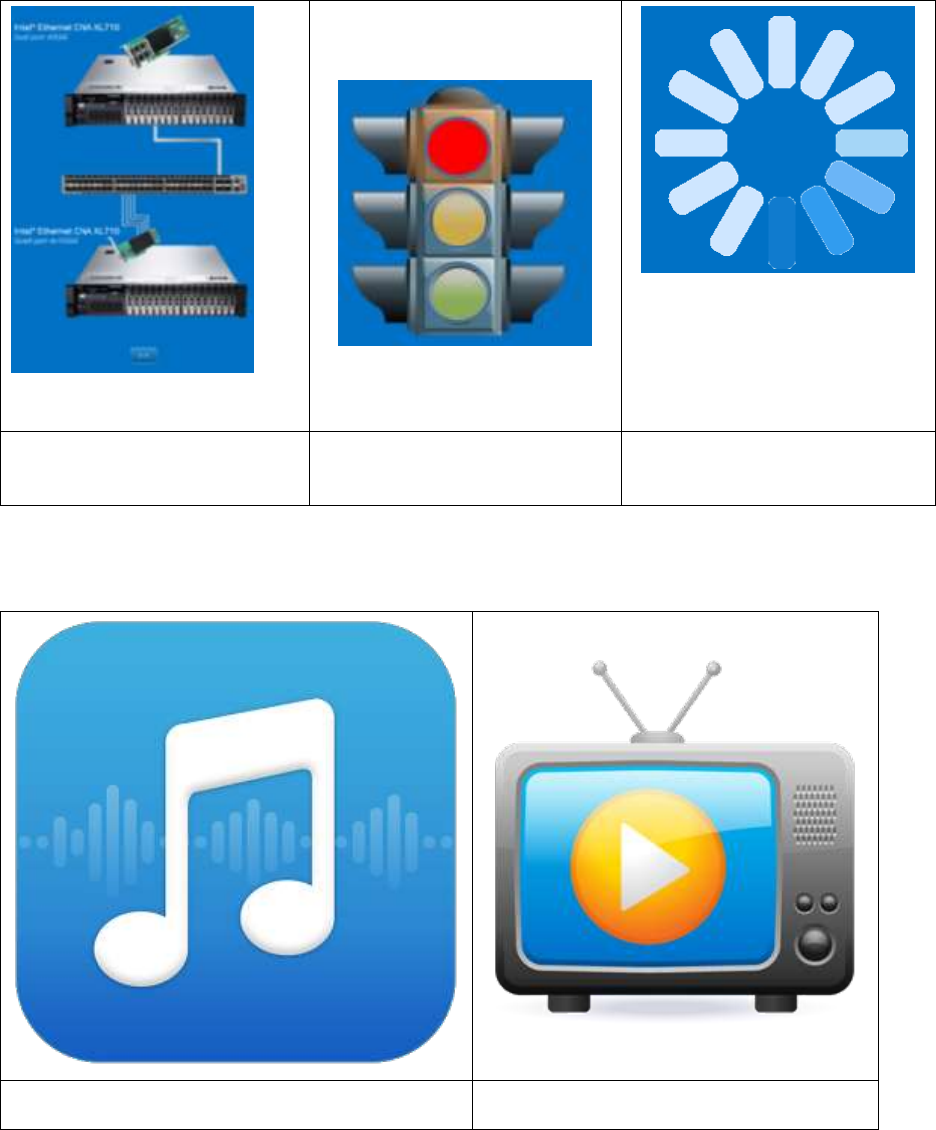
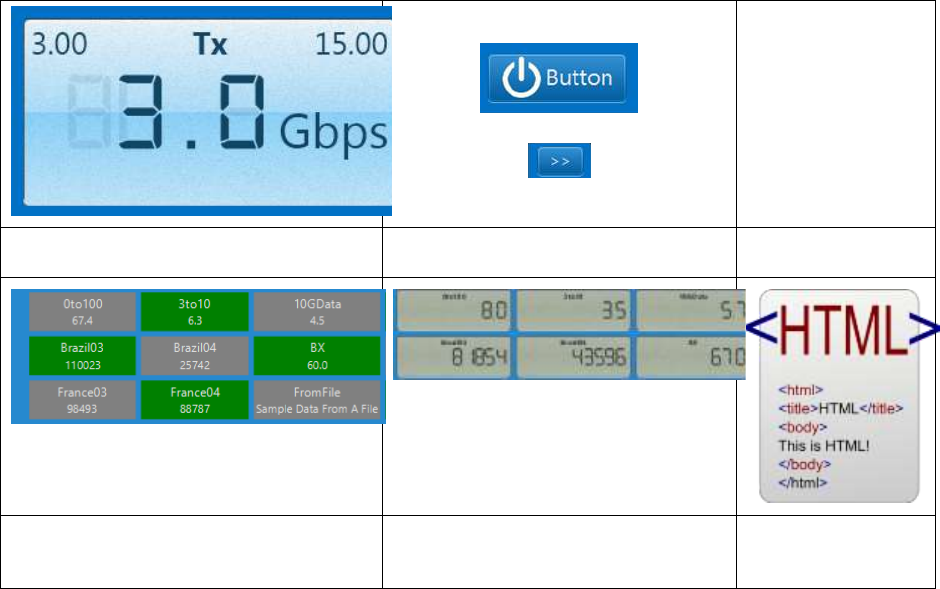

95 Revision 18.02 Board Instrumentation Framework
7.2 Directory Structure
The default location for widgets is in the ‘Widget’ directory one level below where the
BIFF.Marvin.jar file exists. It is expected that the working directory is where the
BIFF.Marvin.jar file exists. You may optionally specify a full path to a widget file. This
option is useful for making a self-contained project with custom widgets.
CSS files must exist in the same directory where the widgets are found.
Widgets can exist in a sub-directory off of the Widget directory, such as ./Widgets/Demo.
In this case any .CSS files used by any widgets in the Demo directory must also reside in
the Demo directory.
7.3 Common Application Settings
7.3.1 Attributes
The <Widget> tag supports the following attributes, which are case sensitive.
Attribute
M/O
Comments
File
M
Specifies the widget definition file
Row
M
The row within a grid where the widget is to be placed
Column
M
The column within a grid where the widget is to be placed
Rowspan
O
The number of rows the widget should span – default is 1
Colspan
O
The number of columns the widget should span – default is 1
Align
O
Where within the grid cell to align the widget
Width
O
‘Preferred’ width of the widget
Height
O
‘Preferred’ Height of the widget
Task
O
ID of task to be performed when the widget is clicked
7.3.1.1 File
Specified the widget definition file. This file contains the description of the Widget itself.
7.3.1.2 Row
Zero based row number of where in the grid to place the Widget.
7.3.1.3 Column
Zero based column number of where in the grid to place the Widget.

96 Revision 18.02 Board Instrumentation Framework
7.3.1.4 Rowspan
A widget by default takes up a single cell which is in a specific row and column within a grid.
Rowspan allows you to have a widget span more than one row. Used for making nice
layouts.
7.3.1.5 Colspan
A widget by default takes up a single cell which is in a specific row and column within a grid.
Colspan allows you to have a widget span more than one column. Used for making nice
layouts.
7.3.1.6 Align
Using the Align attribute you can determine where within the grid cell the Widget will be
placed.
Valid options are (points on a compass):
Center
N
NE
E
SE
S
SW
W
NW
7.3.1.7 Width
The Width attribute specifies the ‘preferred’ width for the widget. Desired is in quotes
because this width is more of a suggestion to the underlying Java framework than a hard
rule. It (Java – not Marvin itself) will try to make it this width; however there are other
factors such as the size of other widgets within the same row and column etc. Also the size
of the widgets can shrink and grow depending on resizing of the application.
7.3.1.8 Height
The Height attribute specifies the ‘preferred’ height for the widget. Desired is in quotes
because this width is more of a suggestion to the underlying Java framework than a hard
rule. It (Java – not Marvin itself) will try to make it this height; however there are other
factors such as the size of other widgets within the same row and column etc. Also the size
of the widgets can shrink and grow depending on resizing of the application.
7.3.1.9 Width and Height as percentages
You can specify either Width our Height as a percentage of the application size, or as a % of
the grid whatever you are specifying is within.
Say you specify: Width=”80%” then the Width of whatever you are placing is going to be
80% of the width of your application.
It does not matter where the % is – could be %80 or 80%.

97 Revision 18.02 Board Instrumentation Framework
You can also do a percentage of the height or width of the grid you are placing the
widget/grid within by having a ‘g’ after the % sign. So Width=”25%g” says the width of
whatever you are placing is to be 25% of the width of the grid you are placing it within.
The requirement is that the grid, or one of its ‘parents’ must have a specific dimension set
somewhere.
7.3.1.10 Task
Specifies a Task ID for a tasklist to be executed when the widget is clicked. This is most
commonly used with a button however there is no limitation on this, you can assign a task
to any widget.
7.3.2 MinionSrc
Optional
The MinionSrc tag is where you connect a data source to a widget.
Example:
<Widget File="Gauge\GaugeRadial.xml " row="1" column="1">
<MinionSrc ID="10GTx" Namespace="MyTestServer-2"/>
</Widget>
The ID and Namespace attributes of the MinionSrc Tag corresponds EXACTLY to the ID and
Namespace from a Minion.
Note
7.3.3 ClickThroughTransparent
This optional setting (which can also be defined in most Widget Definition files) allows you
to stack widgets/grids etc. atop each other, and still be able to click on tasks on things that
are not on the top most level, provided the region you are clicking on is transparent.
Example:
<ClickThroughTransparent>False</ClickThroughTransparent>
The default is false (unless specified in the widget definition file). Valid options are ‘true/ or
‘false’ and is not case sensitive.
If the widget you specify this for is a GRID, then you can put in an attribute of Propagate
that is a Boolean. If you set Propagate to True then it will force all widgets within that grid
to use the ClickThroughTransparent option you specified for the grid.
<ClickThroughTransparent Propagate=”faLsE”>False</ClickThroughTransparent>
7.3.4 StyleOverride
Optional
The StyleOverride tag provides you with a very powerful mechanism to override and add to
the stylesheet associated with the widget and in some cases the application.
You can specify a different stylesheet, or a new stylesheet ID number for a brand new
98 Revision 18.02 Board Instrumentation Framework
layout, or you may override/add new styles.
7.3.4.1 Attributes
The <StyleOverride> tag supports the following attributes, which are case sensitive.
Attribute
M/O
Comments
File
O
Specifies a new stylesheet file to apply to the Widget
ID
O
Specifies a new style ID that is in the stylesheet to use
File
Specify a new stylesheet file to apply to the widget. If you just specify a .CSS file, it will
search for that file in the same directory where the Widget definition file is located. If it is
an alternate path, it will search that path.
ID
ID of style in either default stylesheet or within new stylesheet to apply to the widget. See
the LCD.css file for a good example.
7.3.4.2 Item
The <Item> tag within the <StyleOverride> tag allows you to apply different/new
stylesheet settings to a Widget. These are STANDARD stylesheet settings and the format
for them is per the standard.
There can be more than one <Item>, each will be applied to the widget. Note that if any of
the <Items> are incorrect in any way, none will be applied. This is beyond the Marvin
application and part of Java itself. The log file should provide some hints as to the reason
for failure.
Example 1:
<StyleOverride >
<Item>-fx-rotate:-90</Item>
<Item>-fx-font-size:2.5em</Item>
</StyleOverride>
You may also combine the individual lines into a single one, separated by a semi-color.
Example 2:
<StyleOverride >
<Item>-fx-rotate:-90; >-fx-font-size:2.5em </Item>
</StyleOverride>
Example 3:
<StyleOverride ID=”RedBackground”/>
7.3.5 Peekaboo
Optional

99 Revision 18.02 Board Instrumentation Framework
Peekaboo is a feature I added so we can dynamically hide and show widgets based upon a
Minion Collector. This allows you to stack widgets on top of each other and hide and show
as needed for interesting results.
For example you may have two LCD Panel Widgets both receiving data from a Minion
collecting CPU utilization. One panel may have a stylesheet that makes it the familiar
green-gray LCD background and the 2nd may have a bright red background. You can place
both widgets at the same location, with the red one placed second (and therefore on top of
the green-gray one). You can assign a peekaboo to the red one and have it hidden. Then
when the CPU utilization gets above a certain threshold, say 90% a collector can show the
red one, giving the appearance that the LCD pane turned red upon reaching a threshold.
The <Peekaboo> has the ID and Namespace attributes just like <MinionSrc>, however
instead of displaying data, the Peekaboo will look for a specific string as the data to either
hide or show a widget. The expected data to either hide or show the widget are ‘Hide’ and
‘Show’.
In addition to hiding and showing a widget. Most widgets (where it makes sense) now
support pausing and resuming widgets getting updated. If you send a ‘Pause’ string as the
data in a Peekaboo packet, the widget(s) will pause, just as if you send a ‘Resume’ string
they will resume. Not all widgets support this (buttons for example) as I could not think of
a good reason to add support to all of them. If you have a need to ‘pause’ a button, then
let me know. This is likely most useful for a MarvinTask that will pause a Widget(s).
The Sample application has a demo of this under the Test menu.
Note: You can assign multiple <Peekaboo>’s to a widget. In this way you can for example
modify an individual Widget (say change the Title) and also manipulate a group of
Widgets by giving them all the same Peekaboo settings. There will only be one
‘default’ action, no matter how many you put in, the same goes for the Hide and
Show alternate strings, only the last one specified will be used.
7.3.5.1 Attributes
The <Peekaboo> tag supports the following attributes, which are case sensitive.
Attribute
M/O
Comments
ID
M
ID to identify peekaboo action
Namespace
M
Namespace to identify peekaboo action
Default
O
“Hide” or “Show” – determines initial state, default is Show
Hide
O
Additional string to “Hide” string you can use if you like
Show
O
Additional string to “Show” string you can use if you like
Example:
<Widget File="Gauge\GaugeSimple.xml" row="2" column="2">
<Title>Throughput</Title>
<MinionSrc ID="Port1_RX_" Namespace="Hadoop_Server1"/>
<Peekaboo ID="AltDials" Namespace="LocalNamespace" Default="Hide"/>
</Widget>

100 Revision 18.02 Board Instrumentation Framework
Note that as with the MinionSrc, you can have many widgets associated with the same
Peekaboo. In this way you can hide and show many widgets at the same time.
7.3.5.2 Peekaboo Options
You can do many things with Peekaboo by sending a specific String to it:
Hide - Hides the widget
Show - Shows the widget if hidden
Remove - Removes the widget from the Grid
Insert - Re-adds a removed Widget back to the grid
Disable - Some widgets (like buttons) can be disabled from tasks working
Enable - Re-enables disabled widgets
Pause - Pauses data feed for widget
Resume - Resumes data feed for a paused widget
Select - Applies an alternate CSS style see <SelectedStyle>
Deselect - Applies default/original CSS style see <SelectedStyle>
7.3.6 Peekaboo – Marvin
I’ve recently added some functionality by which data that comes in via Peekaboo can
change some visual attributes of a Widget while visible. Presently that includes specify a
new Title for the Widget and a new stylesheet.
Example of string send from a Minion to change the Title:
Marvin:[Title]New Widget Title[/Title]
The data following ‘Marvin:’ is a modified XML, where the ‘<>’ characters are replaced with
‘[]’. This is needed because of the way XML works, you can’t easily encode an XML payload
within and XML document.
7.3.6.1 Set New Title
You can change a Widget in Marvin that has registered for Peekaboo messages during
runtime with this mechanism. Most, but not all Widgets have a Title that can be
dynamically updated using this method.
The source of this data can be from either a Minion data feed, or a Marvin Task.
Format:
The string sent to a Peekaboo listener to modify the Title must start with the text ‘Marvin:’
and be followed by [Title]New Title[/Title].
Example to change the Title:
Marvin:[Title]New Widget Title[/Title]
Note The format of the data following ‘Marvin:’ is a modified XML, where the ‘<>’ characters
are replaced with ‘[]’. This is needed because of the way XML works, you can’t easily
encode an XML payload within and XML document.
101 Revision 18.02 Board Instrumentation Framework
7.3.6.2 Change Style
You can change the Style of a Widget in Marvin that has registered for Peekaboo messages
during runtime with this mechanism. Most, but not all Widgets have a Style that can be
dynamically updated using this method.
The source of this data can be from either a Minion data feed, or a Marvin Task.
Format:
The string sent to a Peekaboo listener to modify the Style must start with the text ‘Marvin:’
and be followed by the same format as is available in <StyleOverride> in the application
xml, except that the ‘<>’ is replaced by ‘[]’. This includes new CSS file, ID and [Item]s.
Example to change the Style ID of a LCD (this is from the AdditionalFile.xml file in Minion
Demo):
Marvin:[StyleOverride ID="lcd-red"][/StyleOverride]
Note The format of the data following ‘Marvin:’ is a modified XML, where the ‘<>’ characters
are replaced with ‘[]’. This is needed because of the way XML works, you can’t easily
encode an XML payload within and XML document.
7.3.7 <ValueRange>
Optional
Many (but not all) widgets have the ability to specify the range of valid values when you
place them. This will override the settings within the widget definition file. In general,
charts and gauges have this feature.
7.3.7.1 Attributes
The <ValueRange> tag supports the following attributes, which are case insensitive.
Attribute
M/O
Comments
Min
O
Specifies the minimum value for the widget
Max
O
Specifies the maximum value for the widget
7.3.8 <ToolTip>
Optional
This allows you to add a tooltip to a widget. You may optionally also set the style of the
tooltips.
Simple form:
<ToolTip>My Tool Tip</ToolTip>
Customizable form:
<ToolTip>
<DisplayString>My Other Tool Tip</DisplayString>
<StyleOverride><Item>-fx-background-color:blue</Item></StyleOverride>

102 Revision 18.02 Board Instrumentation Framework
</ToolTip>
7.3.9 <SelectedStyle>
Optional
This Tag has all the same exact features of the <StyleOverride> tag, this includes ID, File
and <Item>s. This tag is used in conjunction with <Peekaboo> to Select and Deselect a
widget. Essentially it allows you to have 2 sets of Styles for a widget and you can go back
and forth between them by ‘Selecting’ and ‘Deselecting’.
7.4 Common Widget Definition File
Definitions
This section describes the settings that are common to all widget definition files.
Example:
<Widget Type = "Button">
<Style ID=”#default”>Button.css</Style>
</Widget>
7.4.1 Type Attribute
In the Widget definition file, the Type attribute is that actually specifies the type of Widget is
defined in the rest of the file. The above example is a widget definition file for a Button.
7.4.2 Style
The <Style> Tag is where you specify the default external stylesheet for the widget. In this
example we specify the Button.css stylesheet. In addition there is an optional ID attribute
that can be added to specify the style ID within the specified stylesheet to apply.
Take a peek at the Button.css file to get a better understanding.
7.4.3 ClickThroughTransparent
This optional setting (which can also be defined when you place a widget) allows you to
stack widgets/grids etc. atop each other, and still be able to click on tasks on things that are
not on the top most level, provided the region you are clicking on is transparent.
Example:
<ClickThroughTransparent>False</ClickThroughTransparent>
The default is false. Valid options are ‘true/ or ‘false’ and is not case sensitive.
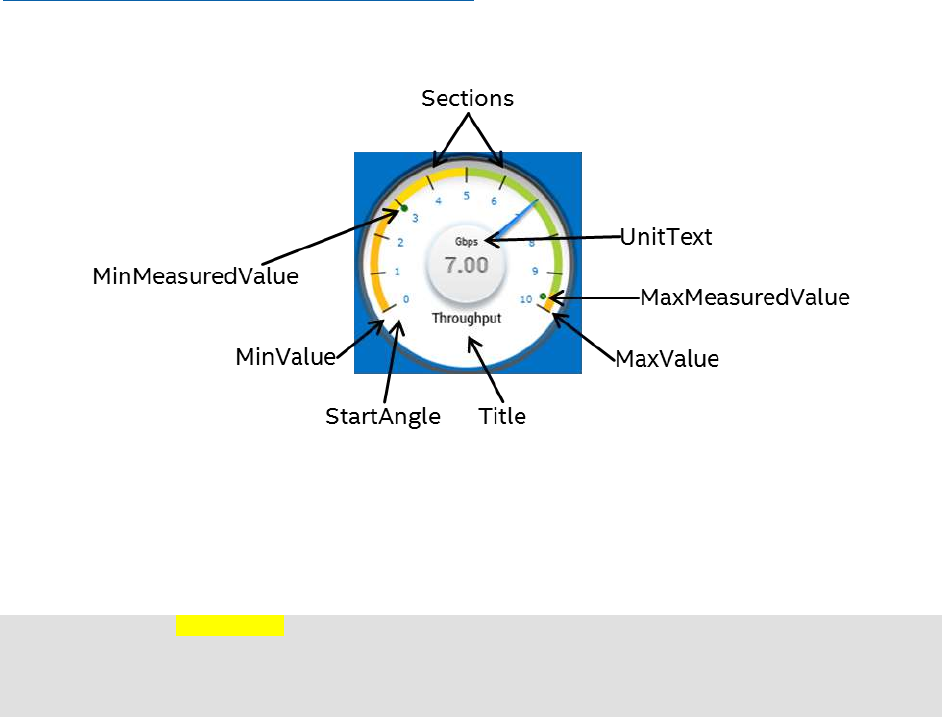
103 Revision 18.02 Board Instrumentation Framework
7.5 How to understand the following
sections
Since you can create your own widget definition files and modify them to suit your needs it
doesn’t make much sense to detail specific widget definition files as a way of describing
them. So I will take the approach of providing an image example of the widget, an example
widget definition file and details on each part of it and finally any widget specific options
that may be used within the application configuration XML file when you add the widget to
your app.
7.6 Dials
I used an open source package for all the dials. This package was originally called Steel,
the author has subsequently renamed and updated the package, however I kept the name
for the Widgets.
The open source package I use is called Enzo and it is available here:
https://bitbucket.org/hansolo/enzo/wiki/Home
7.6.1 Gauge
Figure 38 Gauge
7.6.1.1 Definition File
This section discusses what the contents of a Gauge Widget definition file contains.
Example:
<Widget Type = "SteelGauge">
<Style>gaugeEthernet.css</Style>
<MinValue>0</MinValue>
<MaxValue>10</MaxValue>
104 Revision 18.02 Board Instrumentation Framework
<UnitText>Gbps</UnitText>
<Decimals>2</Decimals>
<DialStartAngle>300</DialStartAngle>
<DialRangeAngle>240</DialRangeAngle>
<MajorTicksSpace>1</MajorTicksSpace>
<MinorTicksSpace>1</MinorTicksSpace>
<TickLableOrientation>Horizontal</TickLableOrientation>
<EnhancedRateText>True</EnhancedRateText>
<Shadowed>True</Shadowed>
<ShowMaxMeasuredValue>True</ShowMaxMeasuredValue>
<ShowMinMeasuredValue>True</ShowMinMeasuredValue>
<Sections>
<Section start="0" end="4" />
<Section start="2.5" end="5" />
<Section start="5" end="9.5" />
<Section start="9.5" end="10" />
</Sections>
</Widget>
<MinValue>
Required
The minimum value that can be displayed on the dial. Usually zero, but can be whatever
you like.
<MaxValue>
Required
The maximum value that can be displayed on the dial.
<UnitText>
Required
The kind of data you are wanting to display, such as Gbps, Ghz, RPM etc.
<Decimals>
Required
The number of decimal places to be available for the current value # displayed in the middle
of the dial.
<DialStartAngle>
Required
This specifies where the numbering on the dial begins, it is in degrees. 180 will start at the
bottom of the dial, while 270 will be at 9:00 on a clock.
<DialRangeAngle>
Required
The angle range that the dial should utilize, in degrees.
<MajorTicksSpace>
Required
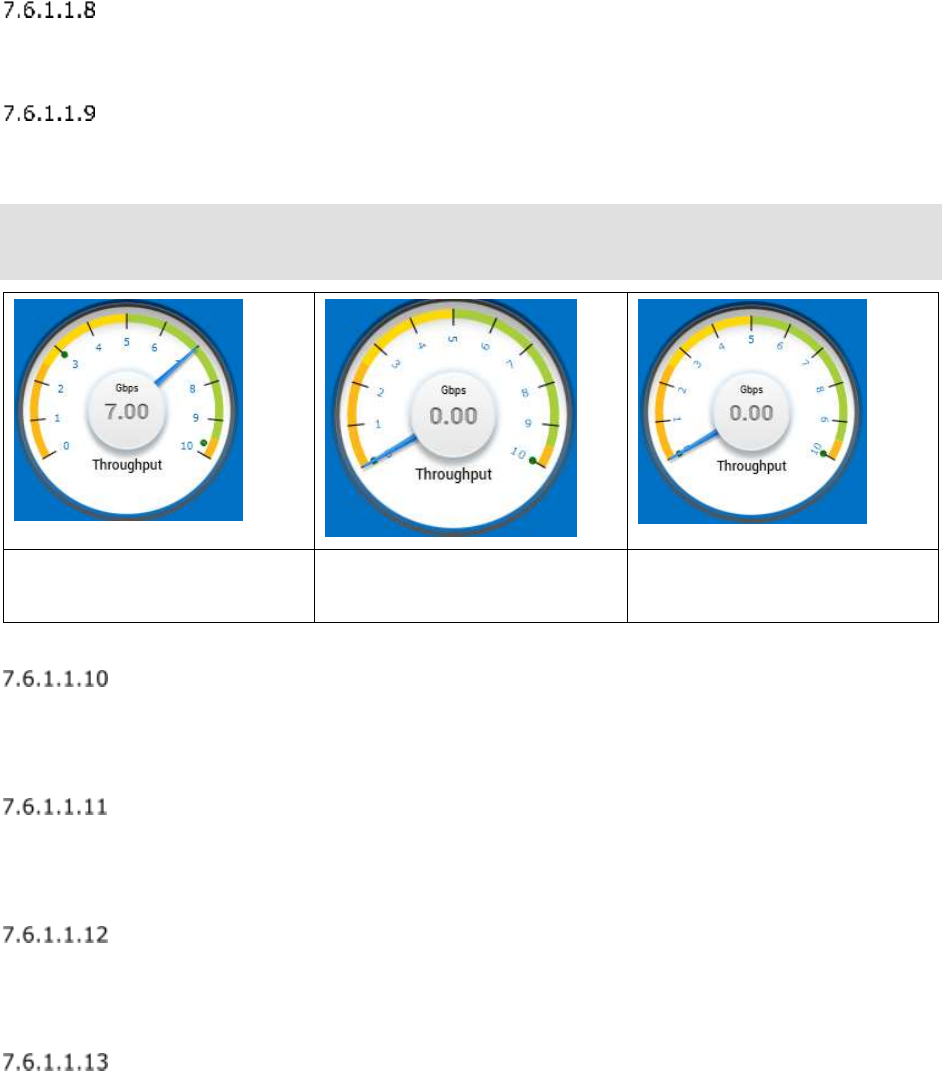
105 Revision 18.02 Board Instrumentation Framework
Numeric interval that a major Tick should be shown on the dial.
<MinorTicksSpace>
Required
Numeric interval that a minor Tick should be shown on the dial.
<TickLableOrientation>
Required
Determines the way in which the numbers on the dial are drawn. Valid values are:
Horizontal
Orthogonal
Tangent
Figure 39 Horizontal
Orientation
Figure 40 Tangent
Orientation
Figure 41 Orthogonal
Orientation
<EnhancedRateText>
Required
Is a Boolean value (either True or False) that determines if the value text in the middle of
the dial is displayed with shadowing or not.
<Shadowed>
Required
Is a Boolean value (either True or False) that determines if the dial will be displayed with a
shadow effect or not.
<ShowMaxMeasuredValue>
Required
Is a Boolean value (either True or False) that determines a small dot will appear on the dial
that indicates the maximum value that has been received thus far.
<ShowMinMeasuredValue>
Required
Is a Boolean value (either True or False) that determines a small dot will appear on the dial
that indicates the minimum value that has been received thus far.
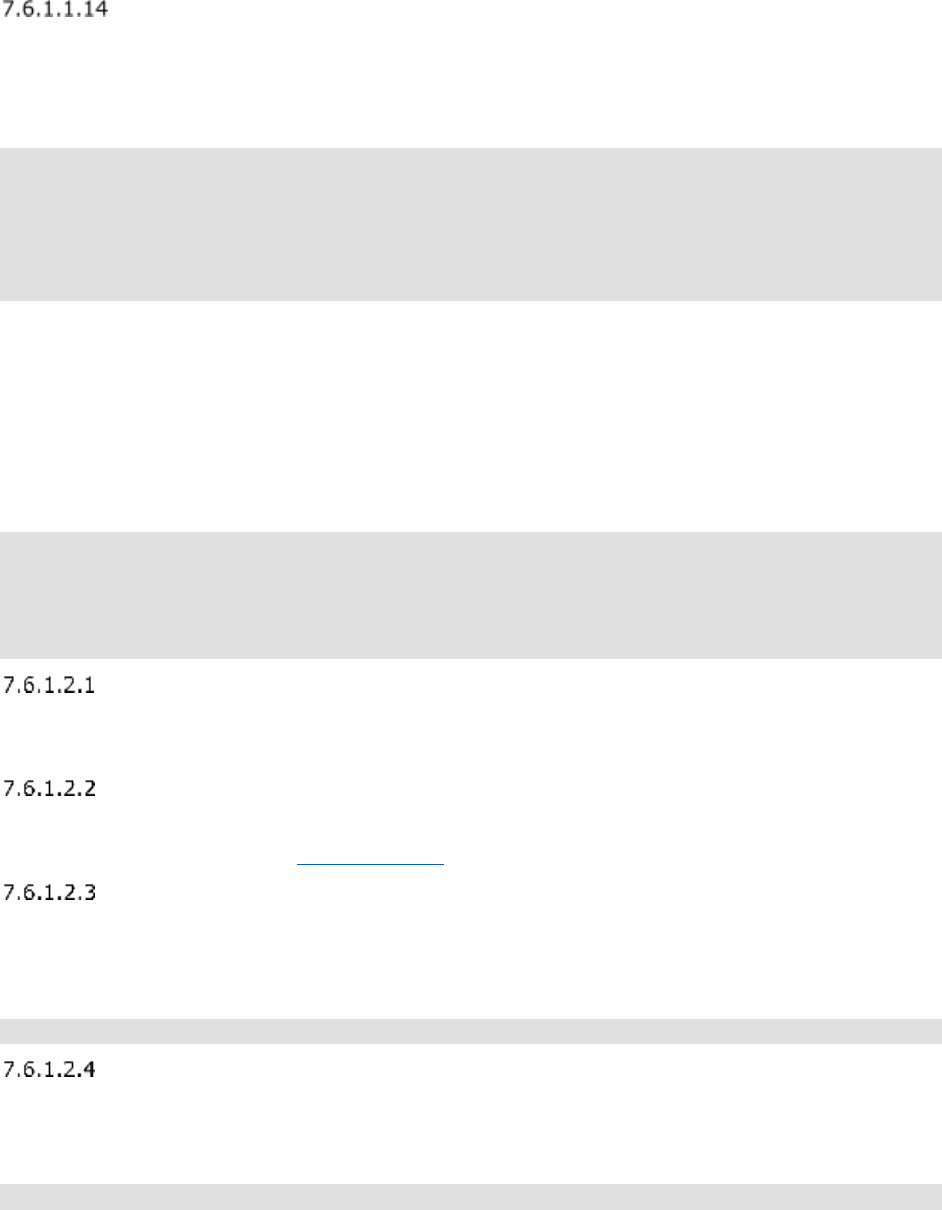
106 Revision 18.02 Board Instrumentation Framework
<Sections>
Optional
You may create as many sections as you like (by adding a <Section> tag within the
<Sections> tag. Each section will be displayed around the edge of the dial in the range you
specify. All of the examples in this section of the document have Sections defined as:
<Sections>
<Section start="0" end="4" />
<Section start="2.5" end="5" />
<Section start="5" end="9.5" />
<Section start="9.5" end="10" />
</Sections>
Which contains 4 colored sections. These are only for display purposes and are optional.
Note that the color of the sections is defined within the stylesheet.
7.6.1.2 Application Settings
This section discusses the settings used to add a SteelGauges dial in the application
configuration XML file.
Example:
<Widget File="Gauge\Gauge.xml" row="1" column="1">
<Title>Throughput</Title>
<UnitsOverride>Mb per sec</UnitsOverride>
<MinionSrc ID="3to10" Namespace="DemoNamespace"/>
</Widget>
<Title>
Optional
Sets the title of the Dial, shown at the bottom.
<UnitsOverride>
Optional
Allows you to use a different units type text than what is defined in the widget definition file.
<ValueRange>
Optional
Allows you to override the min and max set in the widget definition file.
Example:
<ValueRange Min=”1” Max=”10”/>
<TickCount>
Optional sub-tag of ValueRange
You can use this tag to specify how many Major Ticks and Minor Ticks are displayed on the
gauge. In the definition file you specify the interval. This will override it.
<ValueRange>
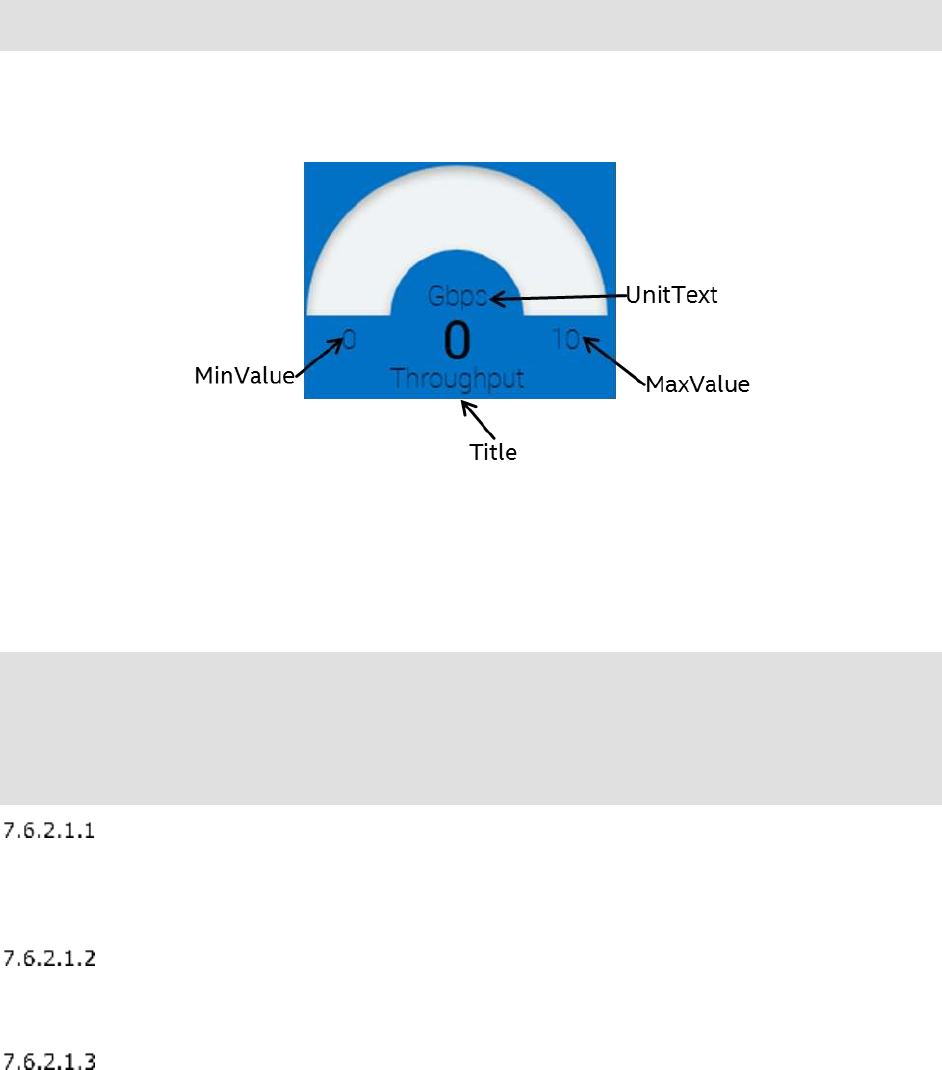
107 Revision 18.02 Board Instrumentation Framework
<TickCount Major=”10” Minor=”20”/>
</ValueRange>
Will have 10 Major ticks, and 20 Minor.
7.6.2 SteelGauge180
Figure 42 SteelGauge180
7.6.2.1 Definition File
This section discusses what the contents of a SteelGauge180 Widget definition file contains.
Example:
<Widget Type = "Steel180Gauge">
<Style>oneeightygauge.css</Style>
<MinValue>0</MinValue>
<MaxValue>500</MaxValue>
<UnitText>Gbps</UnitText>
</Widget>
<MinValue>
Required
The minimum value that can be displayed on the dial. Usually zero, but can be whatever
you like.
<MaxValue>
Required
The maximum value that can be displayed on the dial.
<UnitText>
Required
The kind of data you are wanting to display, such as Gbps, Ghz, RPM etc.
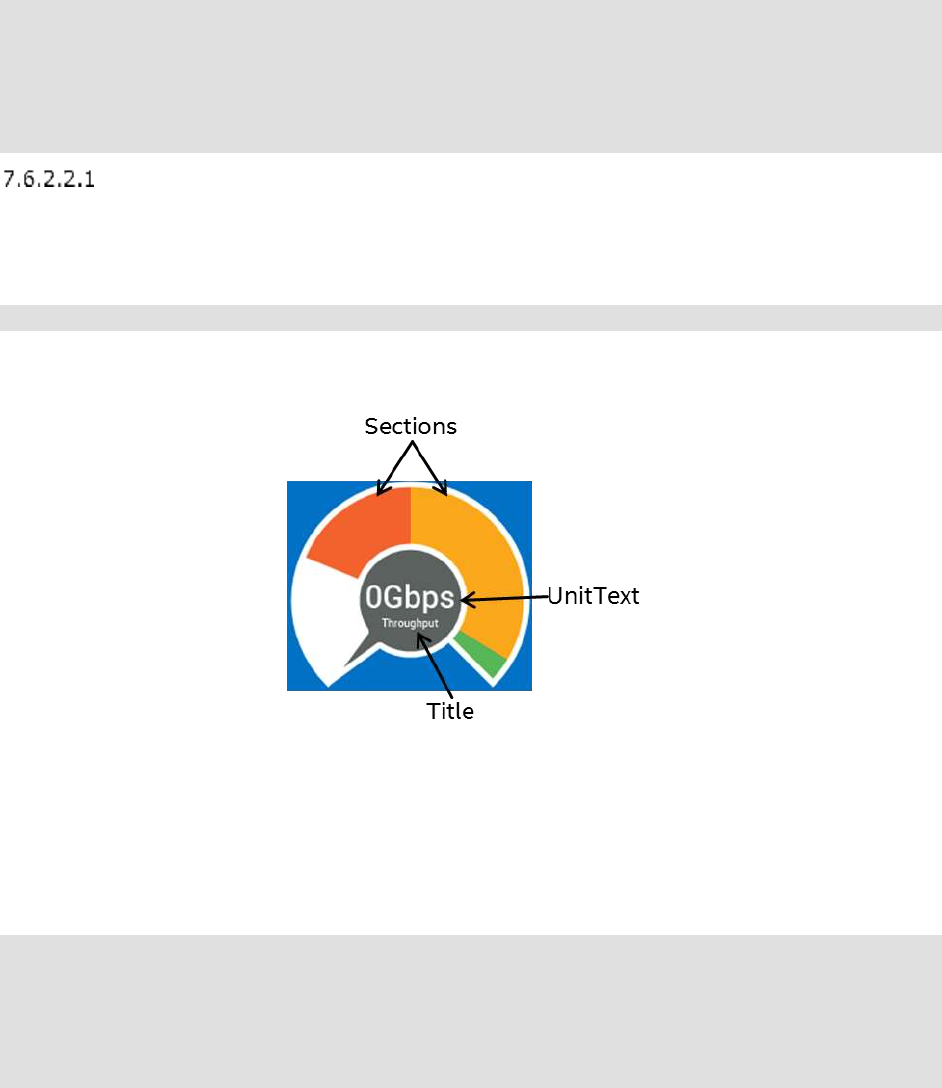
108 Revision 18.02 Board Instrumentation Framework
7.6.2.2 Application Settings
This section discusses the settings used to add a SteelGauge180 dial in the application
configuration XML file.
Example:
<Widget File="Gauge\GaugeOneEigty.xml" row="1" column="1">
<Title>Throughput</Title>
<UnitsOverride>Mb per sec</UnitsOverride>
<MinionSrc ID="3to10" Namespace="DemoNamespace"/>
</Widget>
<ValueRange>
Optional
Allows you to override the min and max set in the widget definition file.
Example:
<ValueRange Min=”1” Max=”10”/>
7.6.3 SteelSimpleGauge
Figure 43 SteelSimpleGauge
7.6.3.1 Definition File
This section discusses what the contents of a SteelSimpleGauge Widget definition file
contains.
Example:
<Widget Type = "SteelSimpleGauge">
<Style>SimpleGauge.css</Style>
<MinValue>0</MinValue>
<MaxValue>500</MaxValue>
<Decimals>0</Decimals>
<UnitText>Mbps</UnitText>
109 Revision 18.02 Board Instrumentation Framework
<Sections>
<Section start="0" end="20" />
<Section start="20" end="100" />
<Section start="100" end="200" />
<Section start="250" end="500" />
</Sections>
</Widget>
<MinValue>
Required
The minimum value that can be displayed on the dial. Usually zero, but can be whatever
you like.
<MaxValue>
Required
The maximum value that can be displayed on the dial.
<UnitText>
Required
The kind of data you are wanting to display, such as Gbps, Ghz, RPM etc.
<Decimals>
Required
The number of decimal places to be available for the current value # displayed in the middle
of the dial.
<UnitText>
Required
The kind of data you are wanting to display, such as Gbps, Ghz, RPM etc.
<Sections>
Optional
You may create as many sections as you like (by adding a <Section> tag within the
<Sections> tag. Each section will be displayed around the edge of the dial in the range you
specify. All of the examples in this section of the document have Sections defined as:
<Sections>
<Section start="0" end="20" />
<Section start="20" end="100" />
<Section start="100" end="200" />
<Section start="250" end="500" />
</Sections>
Which contains 4 colored sections. These are only for display purposes and are optional.
Note that the color of the sections is defined within the stylesheet.
7.6.3.2 Application Settings
This section discusses the settings used to add a SteelSimpleGauge dial in the application
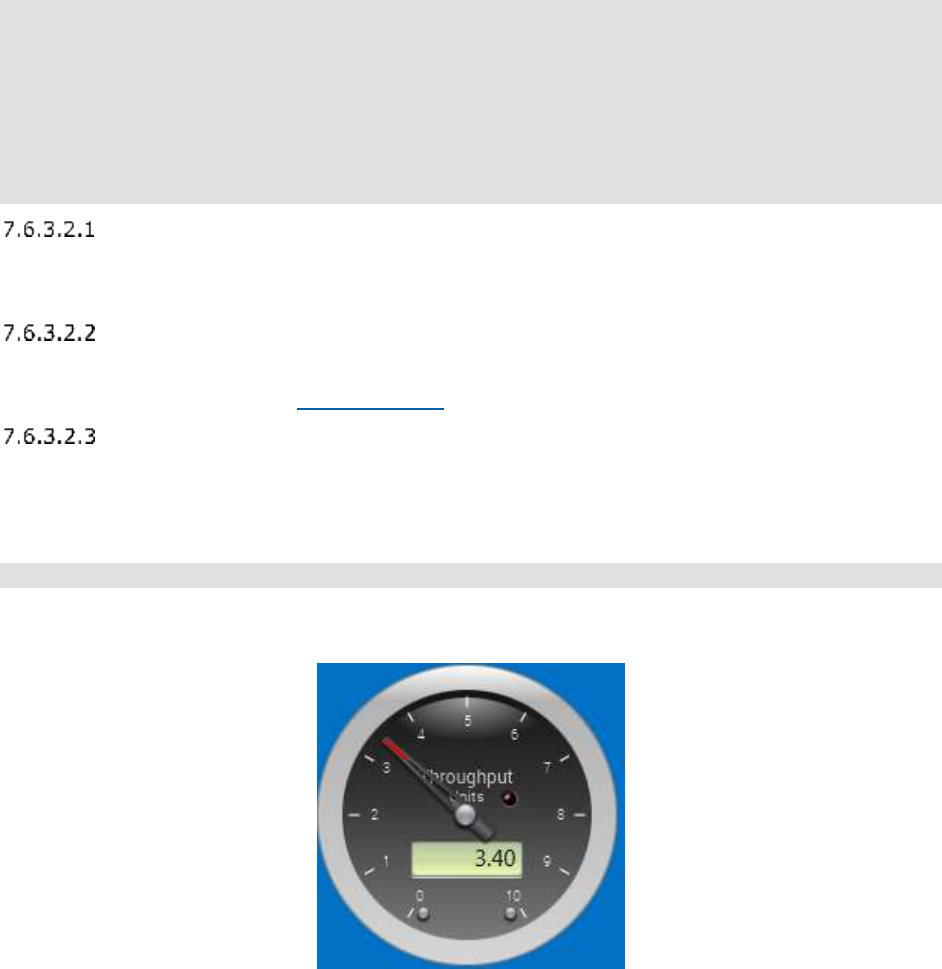
110 Revision 18.02 Board Instrumentation Framework
configuration XML file.
Example:
<Widget File="Gauge\GaugeSimple.xml.xml" row="1" column="2" >
<Title>Throughput</Title>
<UnitsOverride>Bytes Per Sec </UnitsOverride>
<MinionSrc ID="Eth0_BiDir_Data" Namespace="MadeupServer"/>
<Size>
<Minimum Width=”100”/>
</Size>
</Widget>
<Title>
Optional
Sets the title of the Dial, shown at the bottom.
<UnitsOverride>
Optional
Allows you to use a different units type text than what is defined in the widget definition file.
<ValueRange>
Optional
Allows you to override the min and max set in the widget definition file.
Example:
<ValueRange Min=”1” Max=”10”/>
7.6.4 SteelGaugeRadial
Figure 44 SteelGaugeRadial
7.6.4.1 Definition File
This section discusses what the contents of a SteelRadialGauge Widget definition file
contains.
111 Revision 18.02 Board Instrumentation Framework
Example:
<Widget Type = "SteelGaugeRadial">
<Style>GaugeRadial.css</Style>
<MinValue>0</MinValue>
<MaxValue>10</MaxValue>
<UnitText>Gbps</UnitText>
<Decimals>2</Decimals>
<DialStartAngle>300</DialStartAngle>
<DialRangeAngle>240</DialRangeAngle>
<MajorTicksSpace>1</MajorTicksSpace>
<MinorTicksSpace>1</MinorTicksSpace>
<TickLableOrientation>Horizontal</TickLableOrientation>
<EnhancedRateText>True</EnhancedRateText>
</Widget>
<MinValue>
Required
The minimum value that can be displayed on the dial. Usually zero, but can be whatever
you like.
<MaxValue>
Required
The maximum value that can be displayed on the dial.
<UnitText>
Required
The kind of data you are wanting to display, such as Gbps, Ghz, RPM etc.
<Decimals>
Required
The number of decimal places to be available for the current value # displayed in the middle
of the dial.
<DialStartAngle>
Optional
This specifies where the numbering on the dial begins, it is in degrees. 180 will start at the
bottom of the dial, while 270 will be at 9:00 on a clock.
NOTE: The open source project for this widget does not yet use this field, so I ignore it.
<DialRangeAngle>
Required
The angle range that the dial should utilize, in degrees.
NOTE: The open source project for this widget does not yet use this field, so I ignore it.
<MajorTicksSpace>
Required
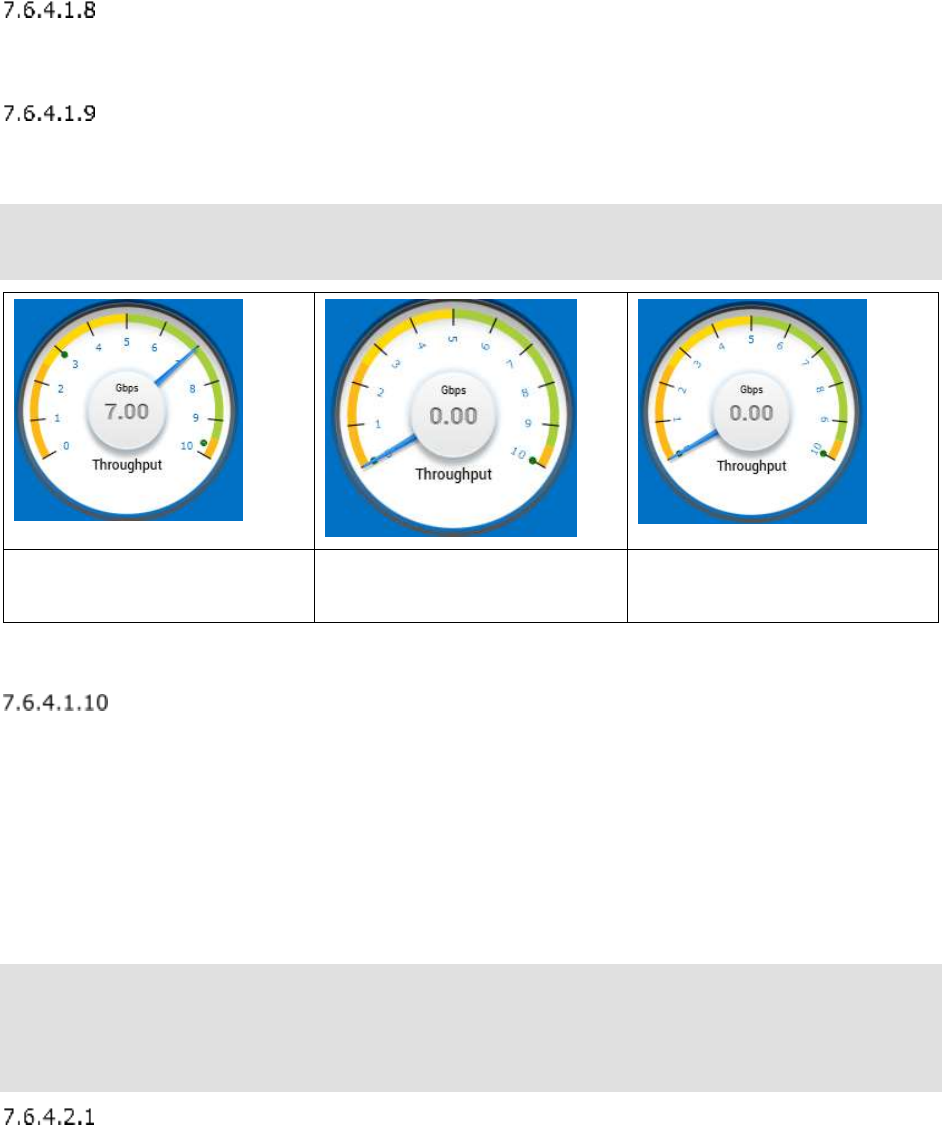
112 Revision 18.02 Board Instrumentation Framework
Numeric interval that a major Tick should be shown on the dial.
<MinorTicksSpace>
Required
Numeric interval that a minor Tick should be shown on the dial.
<TickLableOrientation>
Required
Determines the way in which the numbers on the dial are drawn. Valid values are:
Horizontal
Orthogonal
Tangent
Figure 45 Horizontal
Orientation
Figure 46 Tangent
Orientation
Figure 47 Orthogonal
Orientation
Note: I know – was lazy and re-used the graphic from a previous widget. However the
meanings of the settings are the same.
<EnhancedRateText>
Required
Is a Boolean value (either True or False) that determines if the value text in the middle of
the dial is displayed with shadowing or not.
7.6.4.2 Application Settings
This section discusses the settings used to add a SteelRadialGauge dial in the application
configuration XML file.
Example:
<Widget File="Gauge\GaugeRadial.xml" row="1" column="1">
<Title>Throughput</Title>
<UnitsOverride>Mb per sec</UnitsOverride>
<MinionSrc ID="3to10" Namespace="DemoNamespace"/>
</Widget>
<Title>
Optional
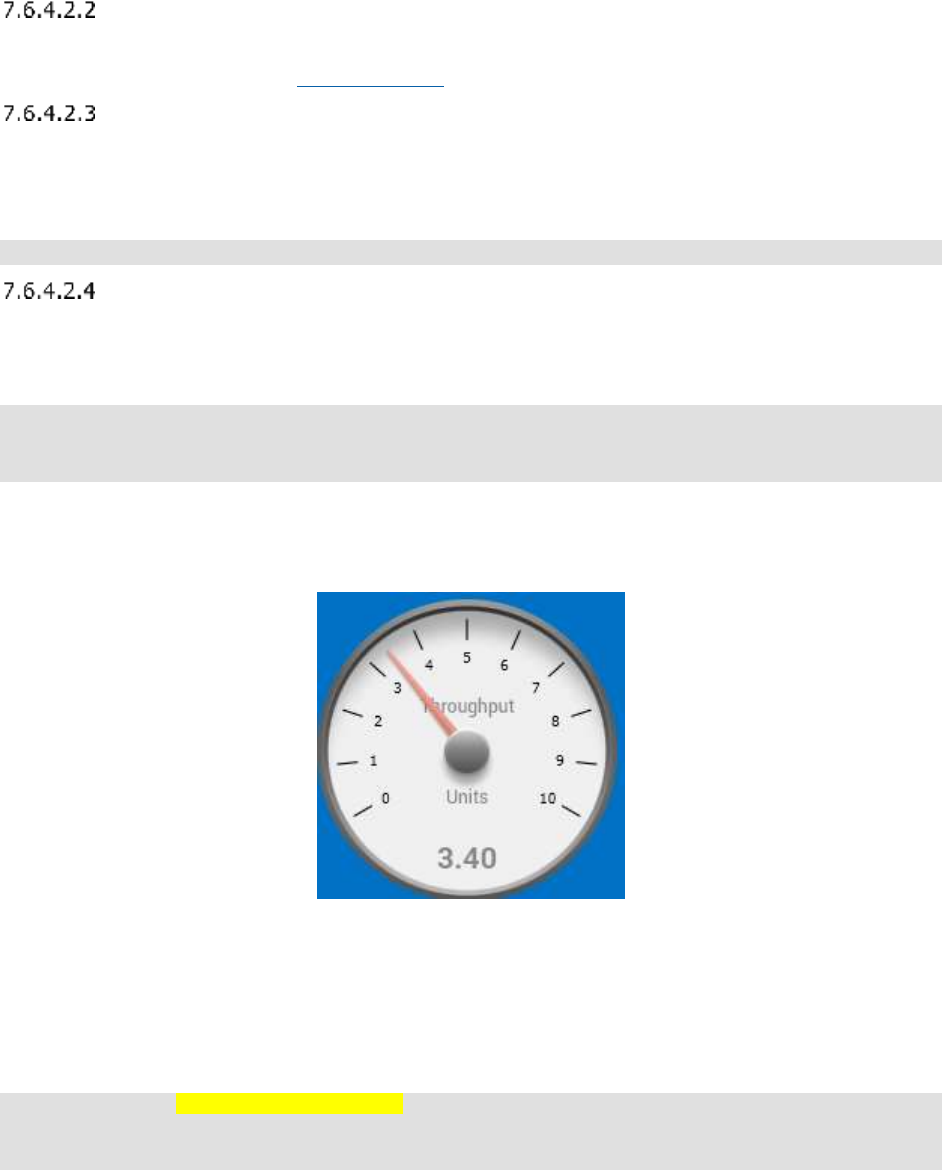
113 Revision 18.02 Board Instrumentation Framework
Sets the title of the Dial, shown at the bottom.
<UnitsOverride>
Optional
Allows you to use a different units type text than what is defined in the widget definition file.
<ValueRange>
Optional
Allows you to override the min and max set in the widget definition file.
Example:
<ValueRange Min=”1” Max=”10”/>
<TickCount>
Optional sub-tag of ValueRange
You can use this tag to specify how many Major Ticks and Minor Ticks are displayed on the
gauge. In the definition file you specify the interval. This will override it.
<ValueRange>
<TickCount Major=”10” Minor=”20”/>
</ValueRange>
Will have 10 Major ticks, and 20 Minor.
7.6.5 SteelGaugeRadialSteel
Figure 48 SteelGaugeRadialSteel
7.6.5.1 Definition File
This section discusses what the contents of a SteelRadialSteelGauge Widget definition file
contains.
Example:
<Widget Type = "SteelGaugeRadialSteel">
<Style>GaugeRadialSteel.css</Style>
<MinValue>0</MinValue>
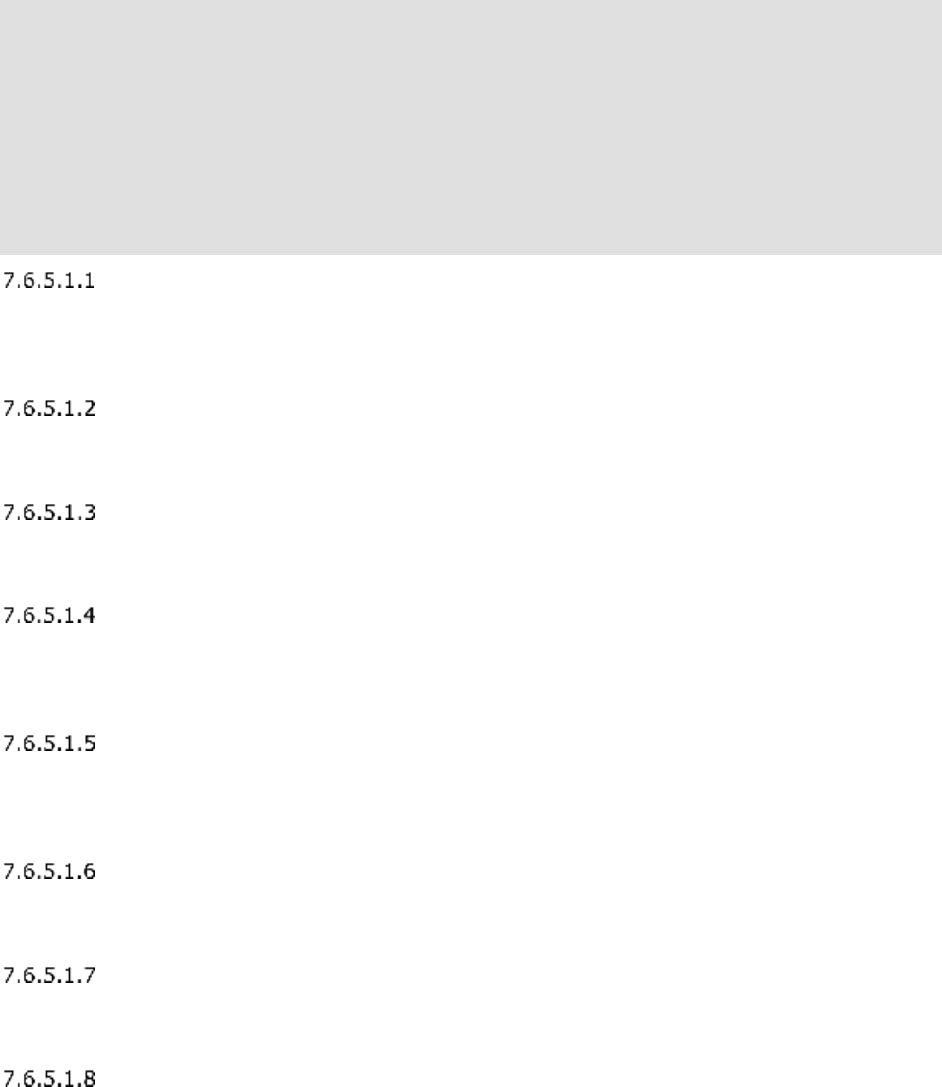
114 Revision 18.02 Board Instrumentation Framework
<MaxValue>10</MaxValue>
<UnitText>Gbps</UnitText>
<Decimals>2</Decimals>
<DialStartAngle>300</DialStartAngle>
<DialRangeAngle>240</DialRangeAngle>
<MajorTicksSpace>1</MajorTicksSpace>
<MinorTicksSpace>0</MinorTicksSpace>
<TickLableOrientation>Orthoginal</TickLableOrientation>
<EnhancedRateText>True</EnhancedRateText>
</Widget>
<MinValue>
Required
The minimum value that can be displayed on the dial. Usually zero, but can be whatever
you like.
<MaxValue>
Required
The maximum value that can be displayed on the dial.
<UnitText>
Required
The kind of data you are wanting to display, such as Gbps, Ghz, RPM etc.
<Decimals>
Required
The number of decimal places to be available for the current value # displayed in the middle
of the dial.
<DialStartAngle>
Optional
This specifies where the numbering on the dial begins, it is in degrees. 180 will start at the
bottom of the dial, while 270 will be at 9:00 on a clock.
<DialRangeAngle>
Required
The angle range that the dial should utilize, in degrees.
<MajorTicksSpace>
Required
Numeric interval that a major Tick should be shown on the dial.
<MinorTicksSpace>
Required
Numeric interval that a minor Tick should be shown on the dial.
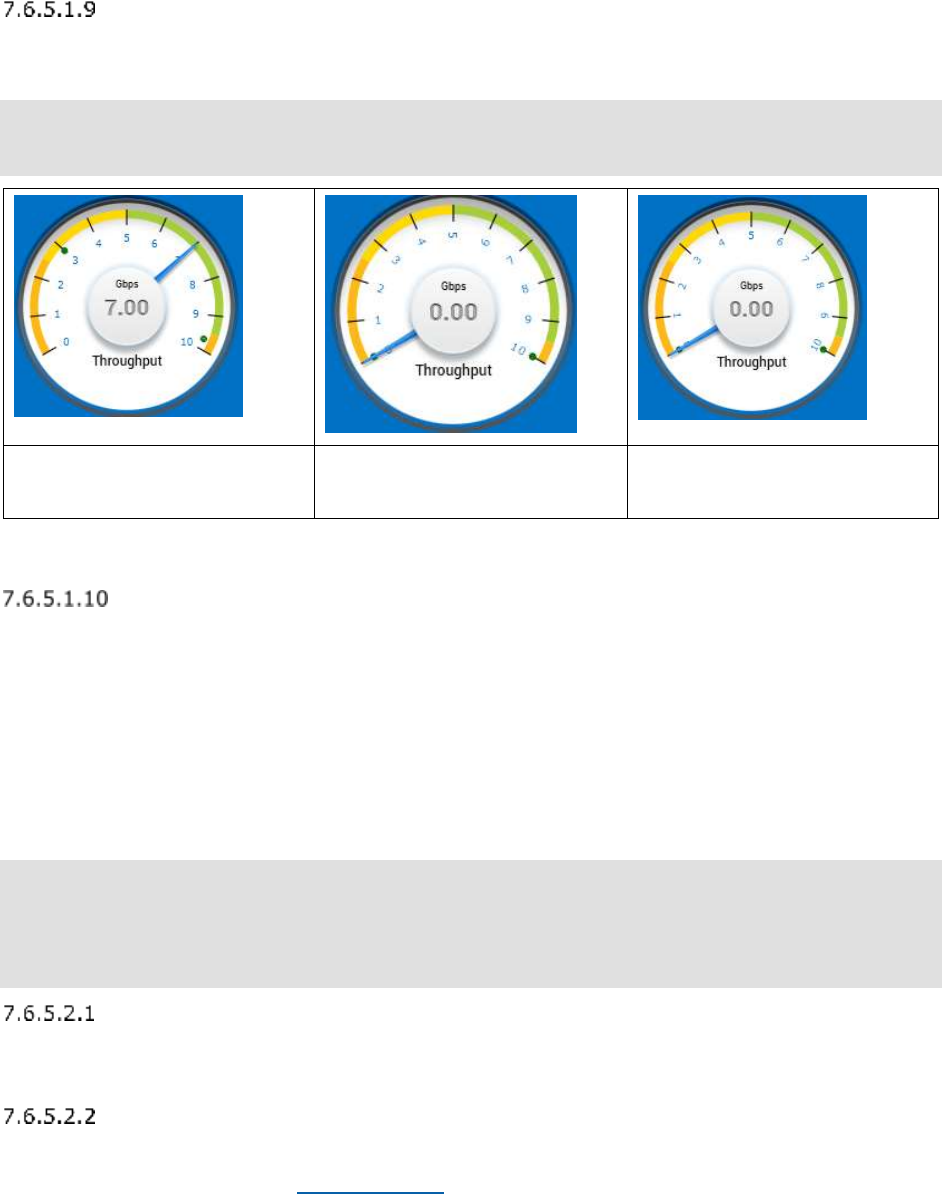
115 Revision 18.02 Board Instrumentation Framework
<TickLableOrientation>
Required
Determines the way in which the numbers on the dial are drawn. Valid values are:
Horizontal
Orthogonal
Tangent
Figure 49 Horizontal
Orientation
Figure 50 Tangent
Orientation
Figure 51 Orthogonal
Orientation
Note: I know – was lazy (again) and re-used the graphic from a previous widget. However
the meanings of the settings are the same.
<EnhancedRateText>
Required
Is a Boolean value (either True or False) that determines if the value text in the middle of
the dial is displayed with shadowing or not.
7.6.5.2 Application Settings
This section discusses the settings used to add a SteelGauges dial in the application
configuration XML file.
Example:
<Widget File="Gauge\GaugeRadialSteel.xml" row="1" column="1">
<Title>Throughput</Title>
<UnitsOverride>Mb per sec</UnitsOverride>
<MinionSrc ID="3to10" Namespace="DemoNamespace"/>
</Widget>
<Title>
Optional
Sets the title of the Dial, shown at the bottom.
<UnitsOverride>
Optional
Allows you to use a different units type text than what is defined in the widget definition file.

116 Revision 18.02 Board Instrumentation Framework
<ValueRange>
Optional
Allows you to override the min and max set in the widget definition file.
Example:
<ValueRange Min=”1” Max=”10”/>
<TickCount>
Optional sub-tag of ValueRange
You can use this tag to specify how many Major Ticks and Minor Ticks are displayed on the
gauge. In the definition file you specify the interval. This will override it.
<ValueRange>
<TickCount Major=”10” Minor=”20”/>
</ValueRange>
Will have 10 Major ticks, and 20 Minor.
7.6.6 Bar Gauge
Figure 52 Bar Gauge
7.6.6.1 Definition File
This section discusses what the contents of a BarGauge Widget definition file contains.
Example:
<Widget Type = "BarGauge">
<Style>GaugeBar.css</Style>
<MinValue>0</MinValue>
<MaxValue>100</MaxValue>
<UnitText>Gbps</UnitText>
<Decimals>2</Decimals>
</Widget>
<MinValue>
Required
117 Revision 18.02 Board Instrumentation Framework
The minimum value that can be displayed on the dial. Usually zero, but can be whatever
you like.
<MaxValue>
Required
The maximum value that can be displayed on the dial.
<UnitText>
Required
The kind of data you are wanting to display, such as Gbps, Ghz, RPM etc.
<Decimals>
Optional
The number of decimal places to be available for the current value # displayed in the middle
of the dial.
7.6.6.2 Application Settings
This section discusses the settings used to add a BarGauge dial in the application
configuration XML file.
Example:
<Widget File="Gauge\GaugeBar.xml" row="1" column="1">
<Title>Throughput</Title>
<UnitsOverride>Mb per sec</UnitsOverride>
<MinionSrc ID="3to10" Namespace="DemoNamespace"/>
</Widget>
<Title>
Optional
Sets the title of the Dial, shown at the bottom.
<UnitsOverride>
Optional
Allows you to use a different units type text than what is defined in the widget definition file.
<ValueRange>
Optional
Allows you to override the min and max set in the widget definition file.
Example:
<ValueRange Min=”1” Max=”10”/>
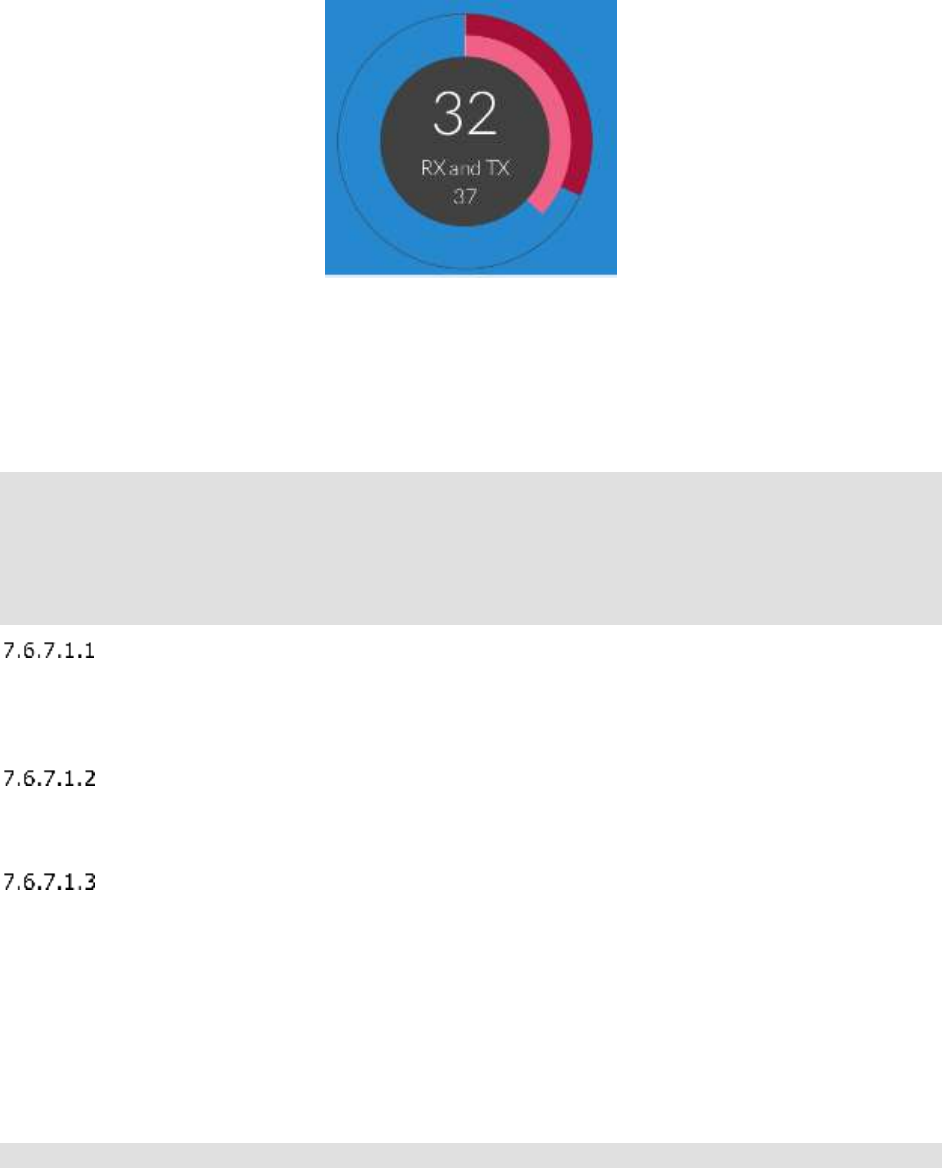
118 Revision 18.02 Board Instrumentation Framework
7.6.7 Double Bar Gauge
Figure 53 Double Bar Gauge
7.6.7.1 Definition File
This section discusses what the contents of a DoubleBarGauge Widget definition file
contains.
Example:
<Widget Type = "DoubleBarGauge">
<Style>DoubleGaugeBar.css</Style>
<MinValue>0</MinValue>
<MaxValue>100</MaxValue>
<Decimals>2</Decimals>
</Widget>
<MinValue>
Required
The minimum value that can be displayed on the dial. Usually zero, but can be whatever
you like.
<MaxValue>
Required
The maximum value that can be displayed on the dial.
<Decimals>
Optional
The number of decimal places to be available for the current value # displayed in the middle
of the dial.
7.6.7.2 Application Settings
This section discusses the settings used to add a DoubleBarGauge dial in the application
configuration XML file.
Example:
<Widget File="Gauge\GaugeDoubleBar.xml" row="1" column="1">
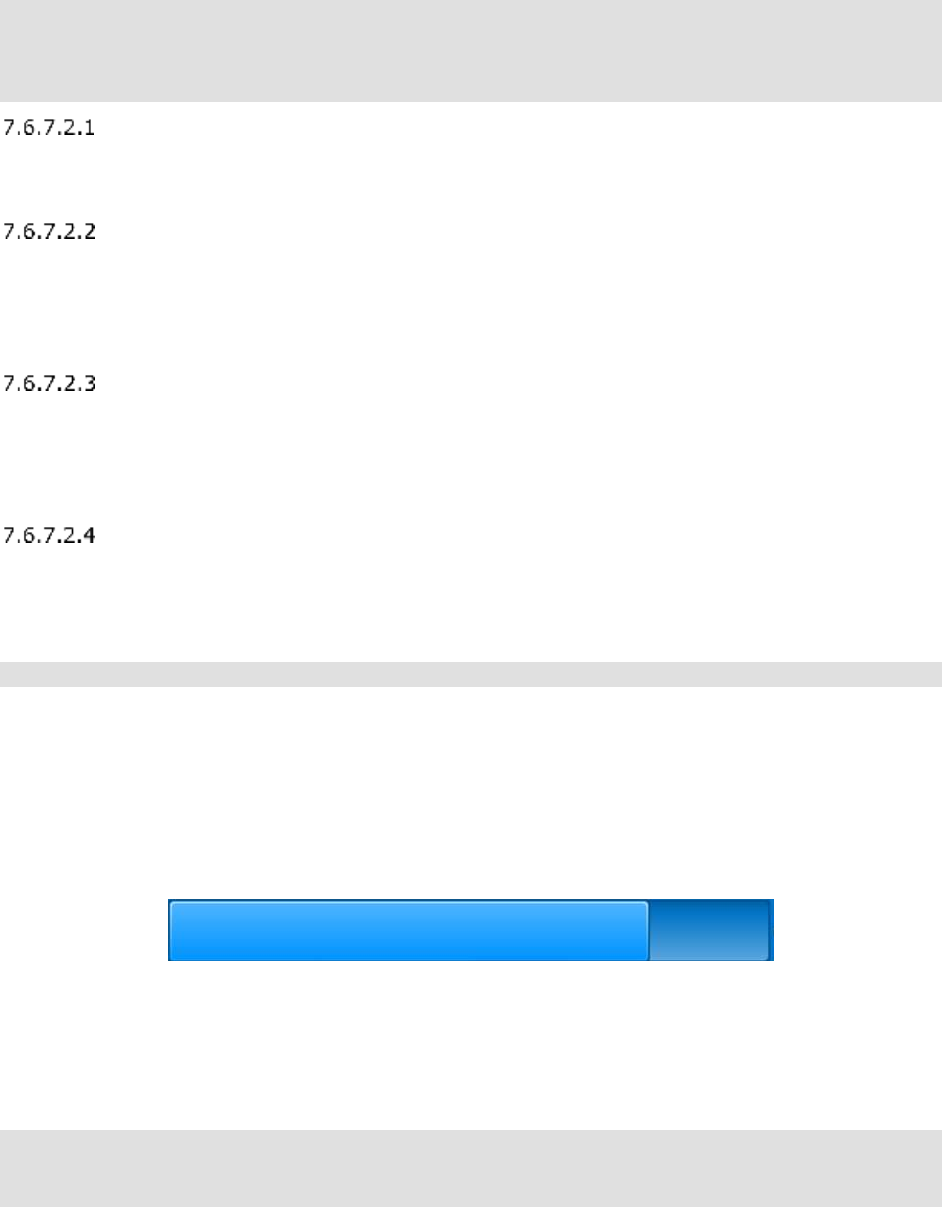
119 Revision 18.02 Board Instrumentation Framework
<Title>Throughput</Title>
<InnerMinionSrc ID="RX" Namespace="DemoNamespace"/>
<OuterMinionSrc ID="TX" Namespace="DemoNamespace"/>
/Widget>
<Title>
Optional
Sets the title of the Dial, shown at the bottom.
<InnerMinionSrc>
Required
Most Widgets have a MinionSrc. This widget has two sources, one for the inner bar and out
for the outer bar. This one is for the Inner bar, and works the same was a <MinionSrc> but
with a different name.
<OuterMinionSrc>
Required
Most Widgets have a MinionSrc. This widget has two sources, one for the inner bar and out
for the outer bar. This one is for the Outer bar, and works the same was a <MinionSrc> but
with a different name.
<ValueRange>
Optional
Allows you to override the min and max set in the widget definition file.
Example:
<ValueRange Min=”1” Max=”10”/>
7.7 Indicators
Indicators are very simple widgets that take as data a value between 0 and 1. If any value
is sent greater than 1, it is repeatedly divided by 10 until <= 1.
7.7.1 ProgressBar
Figure 54 ProgressBar Widget
7.7.1.1 Definition File
This section discusses what the contents of a ProgressBar Widget definition file contains.
Example:
<Widget Type = "ProgressBar">
<Style ID = "default">ProgressBar.css</Style>
</Widget>
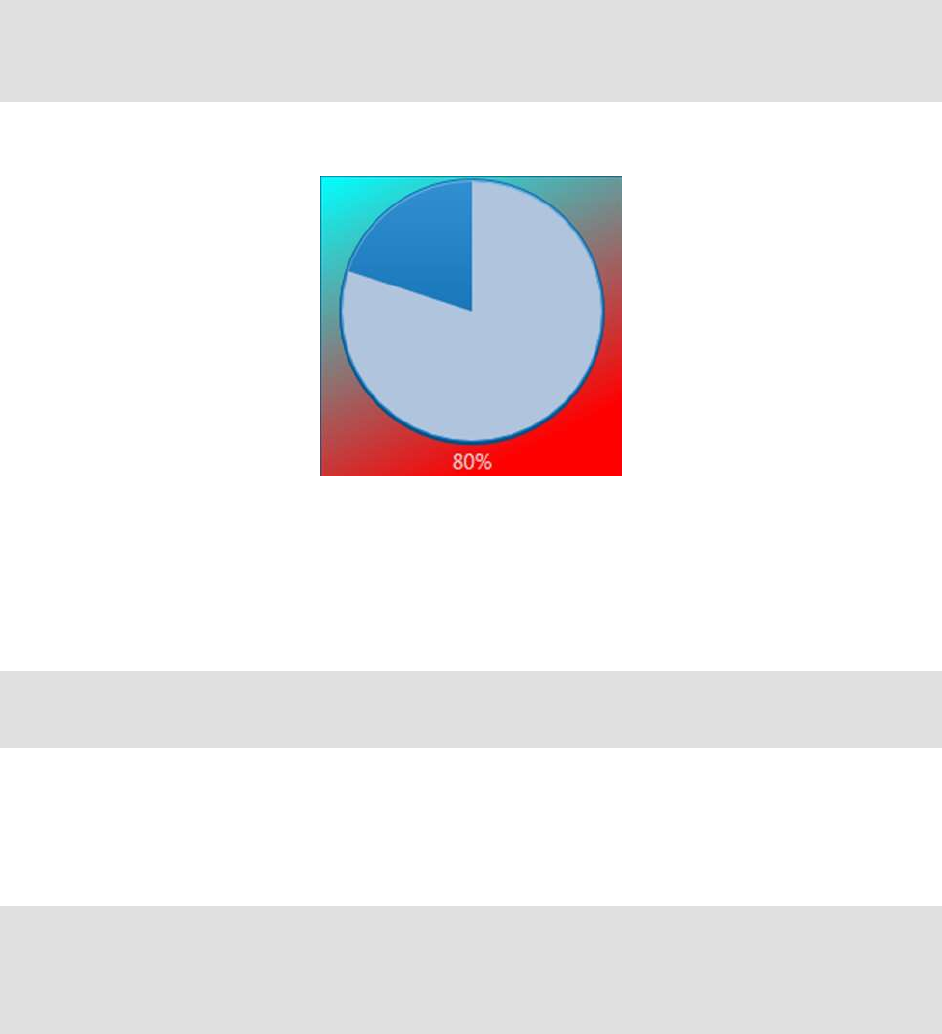
120 Revision 18.02 Board Instrumentation Framework
7.7.1.2 Application Settings
This section discusses the settings used to add a ProgressBar dial in the application
configuration XML file.
Example:
<Widget File="Indicator\ProgressBar.xml" row="1" column="1" Width="400" Height="40"
colSpan="2">
<MinionSrc ID="TestProgress" Namespace="SR-IOVSystem1"/>
</Widget>
7.7.2 ProgressIndicator
Figure 55 ProgressIndicator Widget
7.7.2.1 Definition File
This section discusses what the contents of a ProgressIndicator Widget definition file
contains.
Example:
<Widget Type = "ProgressIndicator">
<Style ID = "default">ProgressIndicator.css</Style>
</Widget>
7.7.2.2 Application Settings
This section discusses the settings used to add a ProgressIndicator dial in the application
configuration XML file.
Example:
<Widget File="Indicator\ProgressIndicator.xml" row="2" column="2" Width="200"
Height="200">
<StyleOverride ID="red"/>
<MinionSrc ID="Progress" Namespace="DemoNamespace"/>
</Widget>
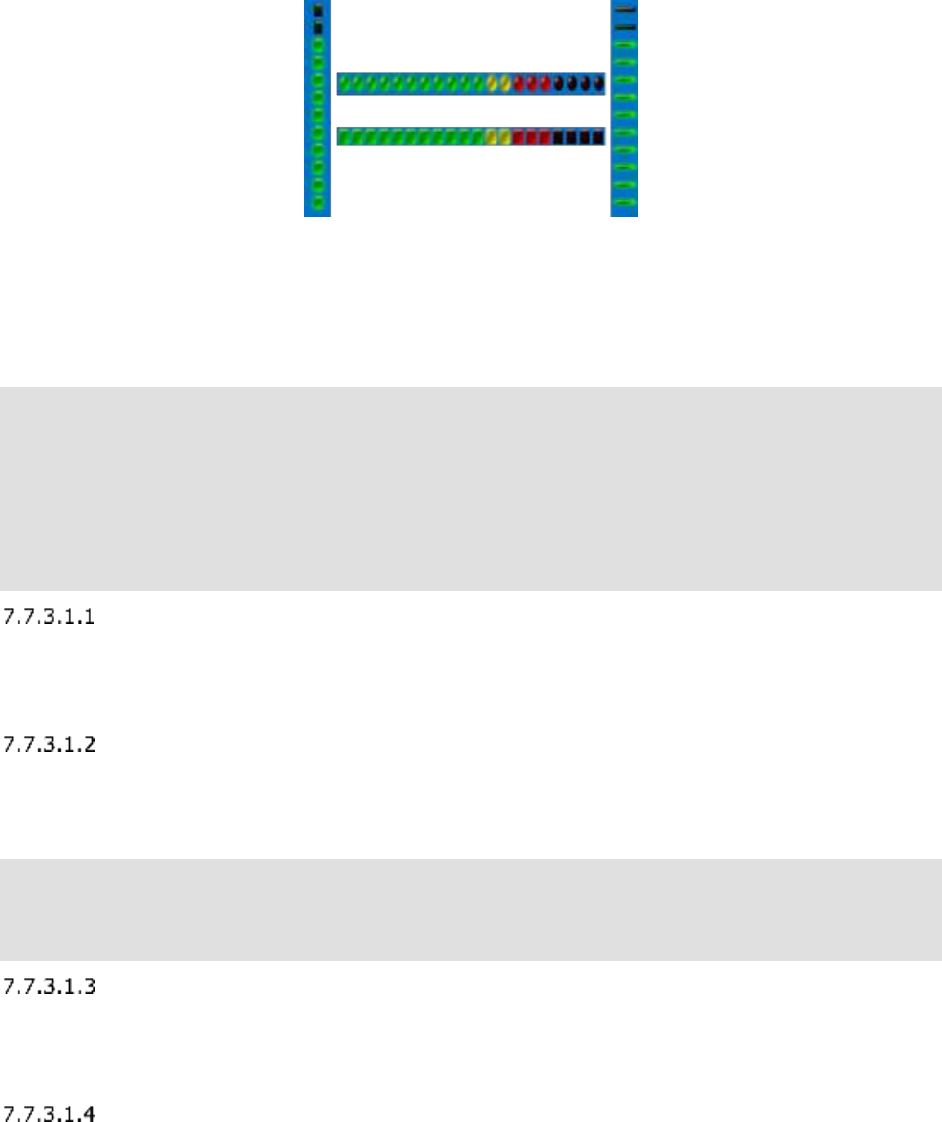
121 Revision 18.02 Board Instrumentation Framework
7.7.3 LEDBargraph
Figure 56 LEDBarGraph Widget
7.7.3.1 Definition File
This section discusses what the contents of a LEDBargraph Widget definition file contains.
Example:
<Widget Type = "LedBargraph">
<Style>ledbargraph.css</Style>
<Orientation>Vertical</Orientation>
<LedType>Vertical</LedType>
<ShowPeakValue>False</ShowPeakValue>
<NumberOfLeds>12</NumoberLeds>
<SizeOfLeds>20</SizeOfLeds>
</Widget>
Orientation
Required
Specifies if the LEDBarGraph widget is drawn Horizontal or Vertical. Valid values are
“Horizontal” and “Vertical”. See above figure for examples.
LedType
Required
Allows you to configure how the LED’s should appear. Valid options (which can be seen in
the above figure) are:
Horizontal
Vertical
Round
Square
ShowPeakValue
Required
Is a boolean value (True or False). If true, the peak value LED will remain lit for a little
while before turning off when the value drops.
NumberOfLeds
Required
122 Revision 18.02 Board Instrumentation Framework
Specifies the number of LED’s to display in the LEDBarGraph widget.
SizeOfLeds
Required
Specifies the size of each of the LED’s to display in the LEDBarGraph widget.
7.7.3.2 Application Settings
This section discusses the settings used to add a LEDBarGraph dial in the application
configuration XML file.
Example:
<Widget File="LED\BarGraphLED.xml" row="3" column="1" Align="Center">
<MinionSrc ID="Progress" Namespace="DemoNamespace"/>
</Widget>
Note: The LEDBarGraph widget is a great example of how you can use one widget type to
create multiple different looking widgets to display by having different definition files.
You can one a definition file for a vertical+round LedBarGraph and another for a
horizontal+square one, etc.
7.8 Charts & Graphs
Java 8 comes with a rich library of charts and graphs. I’ve incorporated many of them into
the Marvin Gui.
Some of these widgets can have what I refer to as ‘Single Source’ inputs – which is a
comma separated array of values from a single <MinionSrc> as well as separate values for
each series that comes from individual <MinionSrc> entries. In general I’ve found the
single source to be easier to use and of more value.
Most charts have what I call a Series. Series will have a Label (like a key). Most charts also
have a xAxis and yAxix with a label.
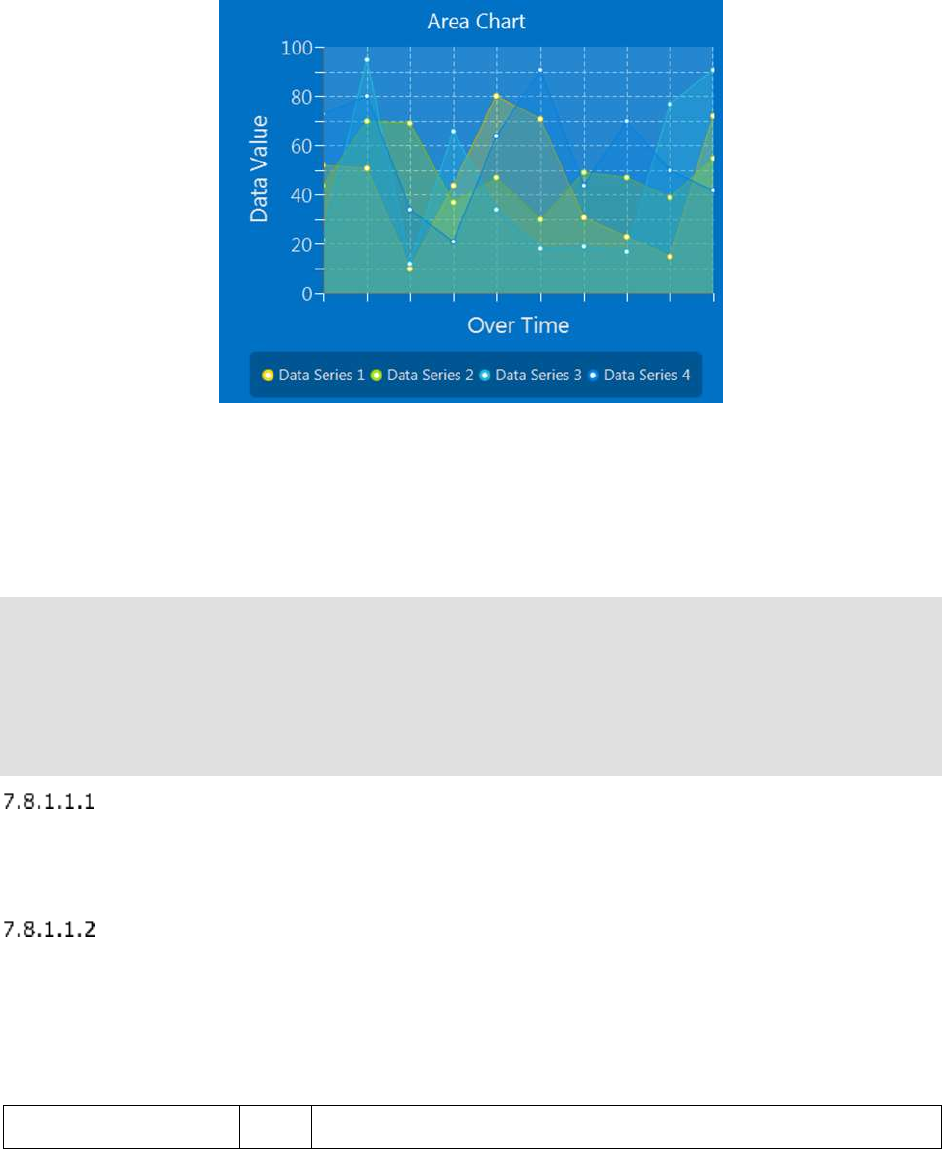
123 Revision 18.02 Board Instrumentation Framework
7.8.1 MultiSourceAreaChart
Figure 57 Area Chart
7.8.1.1 Definition File
This section discusses what the contents of a MultiSourceAreaChart Widget definition file
contains.
Example:
<Widget Type = "MultiSourceAreaChart">
<Style>LineChart.css</Style>
<Animated>False</Animated>
<Synchronized MaxSyncWait="0">True</Synchronized>
<yAxis MajorTickInterval="10" MinorTickInterval="5" TickLabelVisible="True"/>
<xAxis MajorTickInterval="1" MinorTickInterval="0" TickLabelVisible="False"/>
</Widget>
< Animated >
Required
Determines if the chart will show the drawing and moving of datapoints. I usually have it
off. It is a Boolean (true or false) value.
< xAxis>
Required
Determines look of the xAxis on the chart.
Attributes
The < xAxis > tag supports the following attributes, which are case sensitive.
Attribute
M/O
Comments
124 Revision 18.02 Board Instrumentation Framework
MajorTickInterval
M
Numeric interval for Major Ticks on xAxis
MinorTickInterval
M
Numeric interval for Minor Ticks on xAxis
TickLabelVisible
M
Boolean – display the value on major ticks
< yAxis>
Required
Determines look of the yAxis on the chart.
Attributes
The < yAxis > tag supports the following attributes, which are case sensitive.
Attribute
M/O
Comments
MajorTickInterval
M
Numeric interval for Major Ticks on yAxis
MinorTickInterval
M
Numeric interval for Minor Ticks on yAxis
TickLabelVisible
M
Boolean – display the value on major ticks
< Synchronized>
Optional
For charts with multiple data sources, this option allows you to specify that the chart will not
be updated until all of the data sources have sent data. It takes a Boolean value (true or
false). The default is true.
Attributes
The < Synchronized > tag supports the following attributes, which are case sensitive.
Attribute
M/O
Comments
MaxSyncWait
0
MAX time in milliseconds to wait for all data to synchronize
before updating chart. A value of 0 (zero) will wait
indefinitely. Default value is 0.
Note: Default values are TRUE and a MaxSyncWait is 0. This means if you have say 4
minions feeding a single chart and one of them is currently down, the chart will never
update.
7.8.1.2 Application Settings
This section discusses the settings used to add a MultiSrcAreaChart in the application
configuration XML file.
Example:
<Widget File="Chart\ChartMultiSrcArea.xml" row="1" column="0">
125 Revision 18.02 Board Instrumentation Framework
<Title>Area Chart - Multisourced</Title>
<xAxis Label="Over Time" MaxEntries="10"/>
<yAxis Label="Data Value" MaxValue="100" MinValue=”0”/>
<Series Label="Data Series 1">
<MinionSrc ID="GraphSource1" Namespace="DemoNamespace"/>
</Series>
<Series Label="Data Series 2">
<MinionSrc ID="GraphSource2" Namespace="DemoNamespace"/>
</Series>
<Series Label="Data Series 3">
<MinionSrc ID="GraphSource3" Namespace="DemoNamespace"/>
</Series>
<Series Label="Data Series 4">
<MinionSrc ID="GraphSource4" Namespace="DemoNamespace"/>
</Series>
</Widget>
<Title>
Optional
Sets the title of the chart, shown at the top.
<xAxis>
Required
Defines how the xAxis should be handled. Has two attributes, Label and MaxEntries. Label
is the label to display on the chart. MaxEntries specifies how many series to display before
starting to scroll to the left when new data comes in.
<yAxis>
Required
Defines how the yAxis should be handled. Has two attributes, Label and MaxValue. Label is
the label to display on the chart. MaxValue specifies the maximum value to be displayed.
MinValue is optional, defaults to 0.0. Is the bottom of the chart, can be negative value.
<Series>
Required
The Series defines the Source of the data for a series. This is a mulit-src chart, so each
series has its own MinionSrc. A Series has a Label Attribute (the name of the series to be
displayed) and a MinionSrc:
<Series Label="Data Series 1">
<MinionSrc ID="GraphSource1" Namespace="DemoNamespace"/>
</Series>
You must specify a Series for each expected MinionSrc. The example above has 4.
Note: Muliti-Source charts can be problematic unless used with care. Each data source is
an independent stream and even if the collector is run with the same interval, the
traffic is UDP and not guaranteed, so it can be dropped. If the collectors feeding the
Widget are all from the same Minion, I recommend using the <Group> capability – it
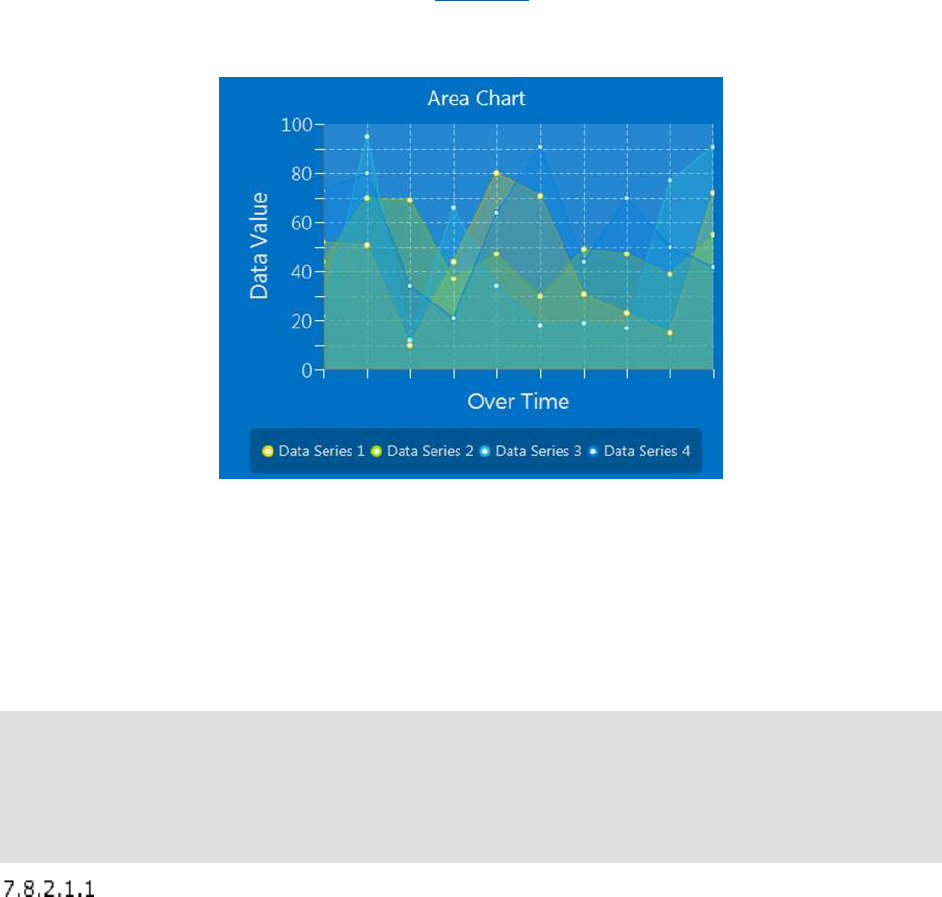
126 Revision 18.02 Board Instrumentation Framework
is why it was invented.
If your data is coming from different Minions and feeding the same chart/graph then you
will almost certainly see update issues. This is simply because you have separate
data sources sending data over a network and they are not synchronized. As solving
this issue is beyond the scope of BIFF (at this time anyhow) I recommend you
coordinate the data collection into a single Minion for that Widget. Use a file share or
some other mechanism to collect the desired data into a single comma separated
source, or into multiple sources in a <Group>, but from a single Minion.
7.8.2 AreaChart
Figure 58 Area Chart
The AreaChart widget is nearly identical to the MultiSourceAreaChart, except that there is a
single <MinionSrc> that is expected to send data in a comma separated string.
7.8.2.1 Definition File
This section discusses what the contents of a AreaChart Widget definition file contains.
Example:
<Widget Type = "AreaChart">
<Style>LineChart.css</Style>
<Animated>False</Animated>
<yAxis MajorTickInterval="10" MinorTickInterval="5" TickLabelVisible="True"/>
<xAxis MajorTickInterval="1" MinorTickInterval="0" TickLabelVisible="False"/>
</Widget>
< Animated >
Required
Determines if the chart will show the drawing and moving of datapoints. I usually have it
127 Revision 18.02 Board Instrumentation Framework
off. It is a Boolean (true or false) value.
< xAxis>
Required
Determines look of the xAxis on the chart.
Attributes
The < xAxis > tag supports the following attributes, which are case sensitive.
Attribute
M/O
Comments
MajorTickInterval
M
Numeric interval for Major Ticks on xAxis
MinorTickInterval
M
Numeric interval for Minor Ticks on xAxis
TickLabelVisible
M
Boolean – display the value on major ticks
< yAxis>
Required
Determines look of the yAxis on the chart.
Attributes
The < yAxis > tag supports the following attributes, which are case sensitive.
Attribute
M/O
Comments
MajorTickInterval
M
Numeric interval for Major Ticks on yAxis
MinorTickInterval
M
Numeric interval for Minor Ticks on yAxis
TickLabelVisible
M
Boolean – display the value on major ticks
7.8.2.2 Application Settings
This section discusses the settings used to add a MultiSrcAreaChart in the application
configuration XML file.
Example:
<Widget File="Chart\ChartArea.xml" row="1" column="0">
<Title>Area Chart - Multisourced</Title>
<xAxis Label="Over Time" MaxEntries="10"/>
<yAxis Label="Data Value" MaxValue="100"/>
<MinionSrc ID=”CombinedSource” Namespace=”DemoNamespace”/>
<Series Label="Data Series 1"/>
<Series Label="Data Series 2"/>
<Series Label="Data Series 3"/>
<Series Label="Data Series 4"/>
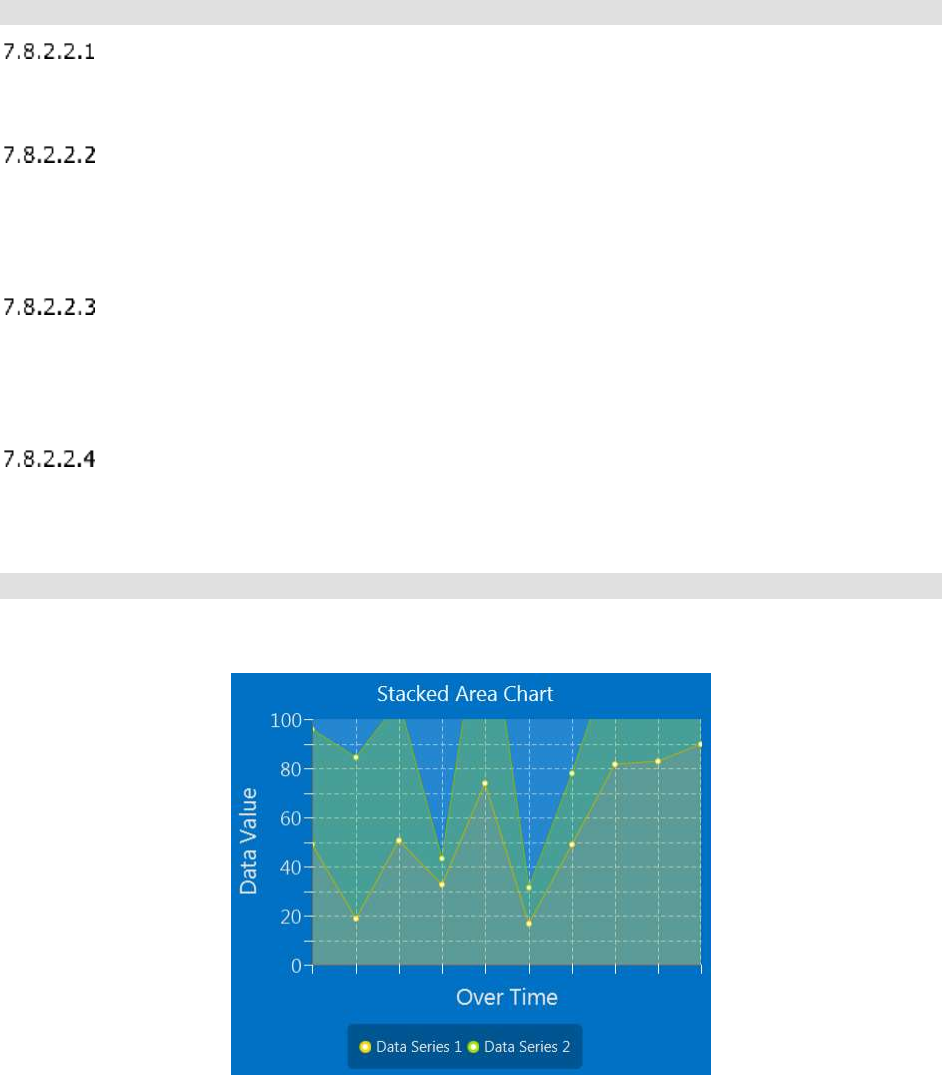
128 Revision 18.02 Board Instrumentation Framework
</Widget>
<Title>
Optional
Sets the title of the chart, shown at the top.
<xAxis>
Required
Defines how the xAxis should be handled. Has two attributes, Label and MaxEntries. Label
is the label to display on the chart. MaxEntries specifies how many series to display before
starting to scroll to the left when new data comes in.
<yAxis>
Required
Defines how the yAxis should be handled. Has two attributes, Label and MaxValue. Label is
the label to display on the chart. MaxValue specifies the maximum value to be displayed.
MinValue is optional, defaults to 0.0. Is the bottom of the chart, can be negative value.
<Series>
Required
The Series defines how many datapoints are to be expected from each update from the
MinionSrc. It also defines the name of each series for display purposes.
<Series Label="Data Series 1"/>
7.8.3 MultiSourceStackedAreaChart
Figure 59 Area Chart
The MultiSourcedStackedArea chart is nearly exactly the same as the
MultSourcedAreaChart. The only difference being that the data points are ‘stacked’ rather
than displayed at a specify y value.
129 Revision 18.02 Board Instrumentation Framework
Note: These charts can be useful, however if you have multiple <MinionSrc> they can easily
get out of sync and the chart can look ‘messy’.
7.8.3.1 Definition File
This section discusses what the contents of a MultiSourcedStackedArea Widget definition file
contains.
Example:
<Widget Type = "MultiSourceStackedAreaChart">
<Style>LineChart.css</Style>
<Animated>False</Animated>
<yAxis MajorTickInterval="10" MinorTickInterval="5" TickLabelVisible="True"/>
<xAxis MajorTickInterval="1" MinorTickInterval="0" TickLabelVisible="False"/>
</Widget>
< Animated >
Required
Determines if the chart will show the drawing and moving of datapoints. I usually have it
off. It is a Boolean (true or false) value.
< xAxis>
Required
Determines look of the xAxis on the chart.
Attributes
The < xAxis > tag supports the following attributes, which are case sensitive.
Attribute
M/O
Comments
MajorTickInterval
M
Numeric interval for Major Ticks on xAxis
MinorTickInterval
M
Numeric interval for Minor Ticks on xAxis
TickLabelVisible
M
Boolean – display the value on major ticks
< yAxis>
Required
Determines look of the yAxis on the chart.
Attributes
The < yAxis > tag supports the following attributes, which are case sensitive.
Attribute
M/O
Comments
MajorTickInterval
M
Numeric interval for Major Ticks on yAxis
130 Revision 18.02 Board Instrumentation Framework
MinorTickInterval
M
Numeric interval for Minor Ticks on yAxis
TickLabelVisible
M
Boolean – display the value on major ticks
< Synchronized>
Optional
For charts with multiple data sources, this option allows you to specify that the chart will not
be updated until all of the data sources have sent data. It takes a Boolean value (true or
false). The default is true.
Attributes
The < Synchronized > tag supports the following attributes, which are case sensitive.
Attribute
M/O
Comments
MaxSyncWait
0
MAX time in milliseconds to wait for all data to synchronize
before updating chart. A value of 0 (zero) will wait
indefinitely. Default value is 0.
Note: Default values are TRUE and a MaxSyncWait is 0. This means if you have say 4
minions feeding a single chart and one of them is currently down, the chart will never
update.
7.8.3.2 Application Settings
This section discusses the settings used to add a MultiSrcAreaChart in the application
configuration XML file.
Example:
<Widget File="Chart\ChartMultiSrcStackedArea.xml" row="2" column="0">
<Title>Stacked Area Chart - Multisourced</Title>
<xAxis Label="Over Time" MaxEntries="10"/>
<yAxis Label="Data Value" MaxValue="100"/>
<Series Label="Data Series 1">
<MinionSrc ID="GraphSource1" Namespace="DemoNamespace"/>
</Series>
<Series Label="Data Series 2">
<MinionSrc ID="GraphSource2" Namespace="DemoNamespace"/>
</Series>
</Widget>
<Title>
Optional
Sets the title of the chart, shown at the top.
<xAxis>
Required
Defines how the xAxis should be handled. Has two attributes, Label and MaxEntries. Label
131 Revision 18.02 Board Instrumentation Framework
is the label to display on the chart. MaxEntries specifies how many series to display before
starting to scroll to the left when new data comes in.
<yAxis>
Required
Defines how the yAxis should be handled. Has two attributes, Label and MaxValue. Label is
the label to display on the chart. MaxValue specifies the maximum value to be displayed.
MinValue is optional, defaults to 0.0. Is the bottom of the chart, can be negative value.
<Series>
Required
The Series defines the Source of the data for a series. This is a mulit-src chart, so each
series has its own MinionSrc. A Series has a Label Attribute (the name of the series to be
displayed) and a MinionSrc:
<Series Label="Data Series 1">
<MinionSrc ID="GraphSource1" Namespace="DemoNamespace"/>
</Series>
You must specify a Series for each expected MinionSrc. The example above has 2.
Note: Muliti-Source charts can be problematic unless used with care. Each data source is
an independent stream and even if the collector is run with the same interval, the
traffic is UDP and not guaranteed, so it can be dropped. If the collectors feeding the
Widget are all from the same Minion, I recommend using the <Group> capability – it
is why it was invented.
If your data is coming from different Minions and feeding the same chart/graph then you
will almost certainly see update issues. This is simply because you have separate
data sources sending data over a network and they are not synchronized. As solving
this issue is beyond the scope of BIFF (at this time anyhow) I recommend you
coordinate the data collection into a single Minion for that Widget. Use a file share or
some other mechanism to collect the desired data into a single comma separated
source, or into multiple sources in a <Group>, but from a single Minion.
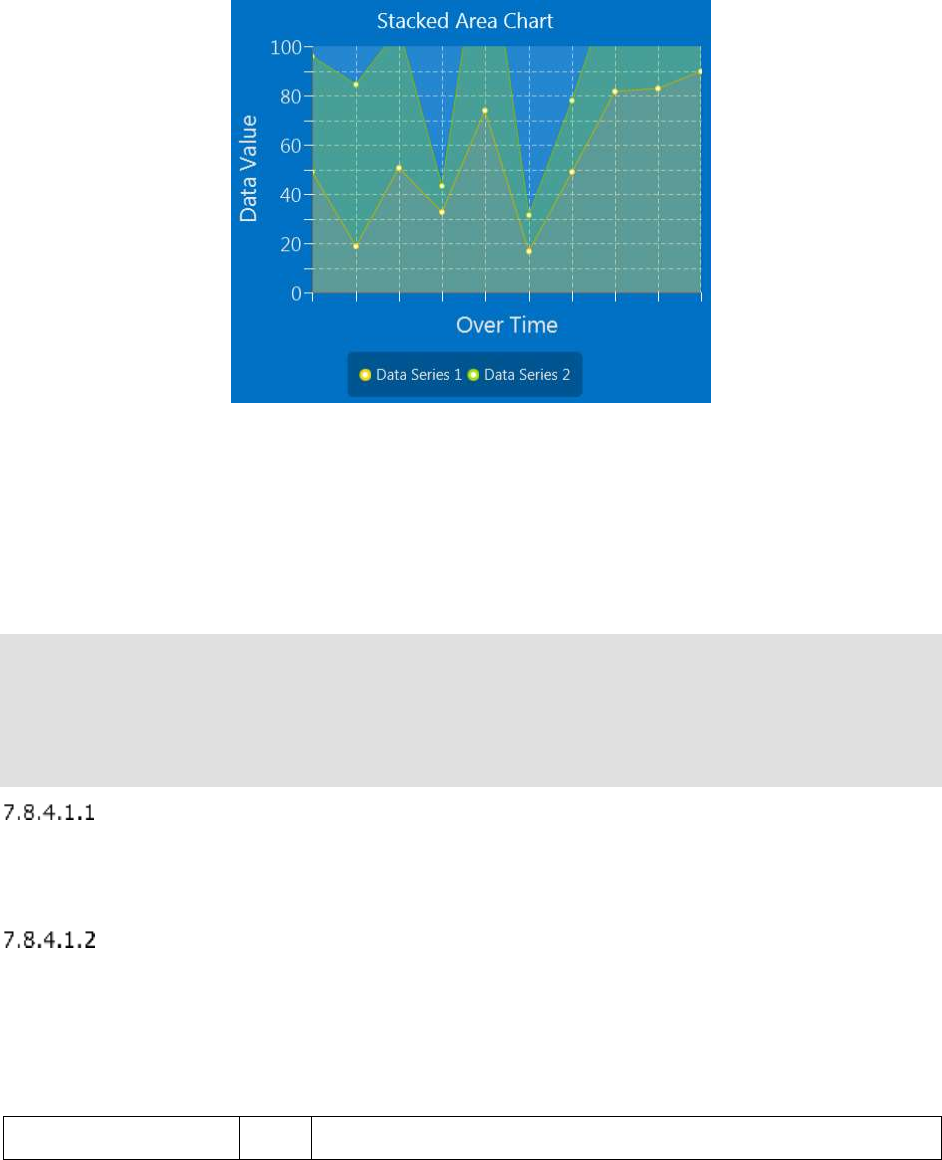
132 Revision 18.02 Board Instrumentation Framework
7.8.4 StackedAreaChart
Figure 60 Area Chart
The StackedArea chart is nearly exactly the same as the AreaChart. The only difference
being that the data points are ‘stacked’ rather than displayed at a specify y value.
7.8.4.1 Definition File
This section discusses what the contents of a StackedArea Widget definition file contains.
Example:
<Widget Type = "StackedAreaChart">
<Style>LineChart.css</Style>
<Animated>False</Animated>
<yAxis MajorTickInterval="10" MinorTickInterval="5" TickLabelVisible="True"/>
<xAxis MajorTickInterval="1" MinorTickInterval="0" TickLabelVisible="False"/>
</Widget>
< Animated >
Required
Determines if the chart will show the drawing and moving of datapoints. I usually have it
off. It is a Boolean (true or false) value.
< xAxis>
Required
Determines look of the xAxis on the chart.
Attributes
The < xAxis > tag supports the following attributes, which are case sensitive.
Attribute
M/O
Comments
133 Revision 18.02 Board Instrumentation Framework
MajorTickInterval
M
Numeric interval for Major Ticks on xAxis
MinorTickInterval
M
Numeric interval for Minor Ticks on xAxis
TickLabelVisible
M
Boolean – display the value on major ticks
< yAxis>
Required
Determines look of the yAxis on the chart.
Attributes
The < yAxis > tag supports the following attributes, which are case sensitive.
Attribute
M/O
Comments
MajorTickInterval
M
Numeric interval for Major Ticks on yAxis
MinorTickInterval
M
Numeric interval for Minor Ticks on yAxis
TickLabelVisible
M
Boolean – display the value on major ticks
7.8.4.2 Application Settings
This section discusses the settings used to add a MultiSrcAreaChart in the application
configuration XML file.
Example:
<Widget File="Chart\ChartStackedArea.xml" row="2" column="0">
<Title>Stacked Area Chart - Singlesourced</Title>
<xAxis Label="Over Time" MaxEntries="10"/>
<yAxis Label="Data Value" MaxValue="100"/>
<MinionSrc ID=”TwoDataPts” Namespace=”DemoNamespace”\>
<Series Label="Data Series 1"/>
<Series Label="Data Series 2"/>
</Widget>
<Title>
Optional
Sets the title of the chart, shown at the top.
<xAxis>
Required
Defines how the xAxis should be handled. Has two attributes, Label and MaxEntries. Label
is the label to display on the chart. MaxEntries specifies how many series to display before
starting to scroll to the left when new data comes in.
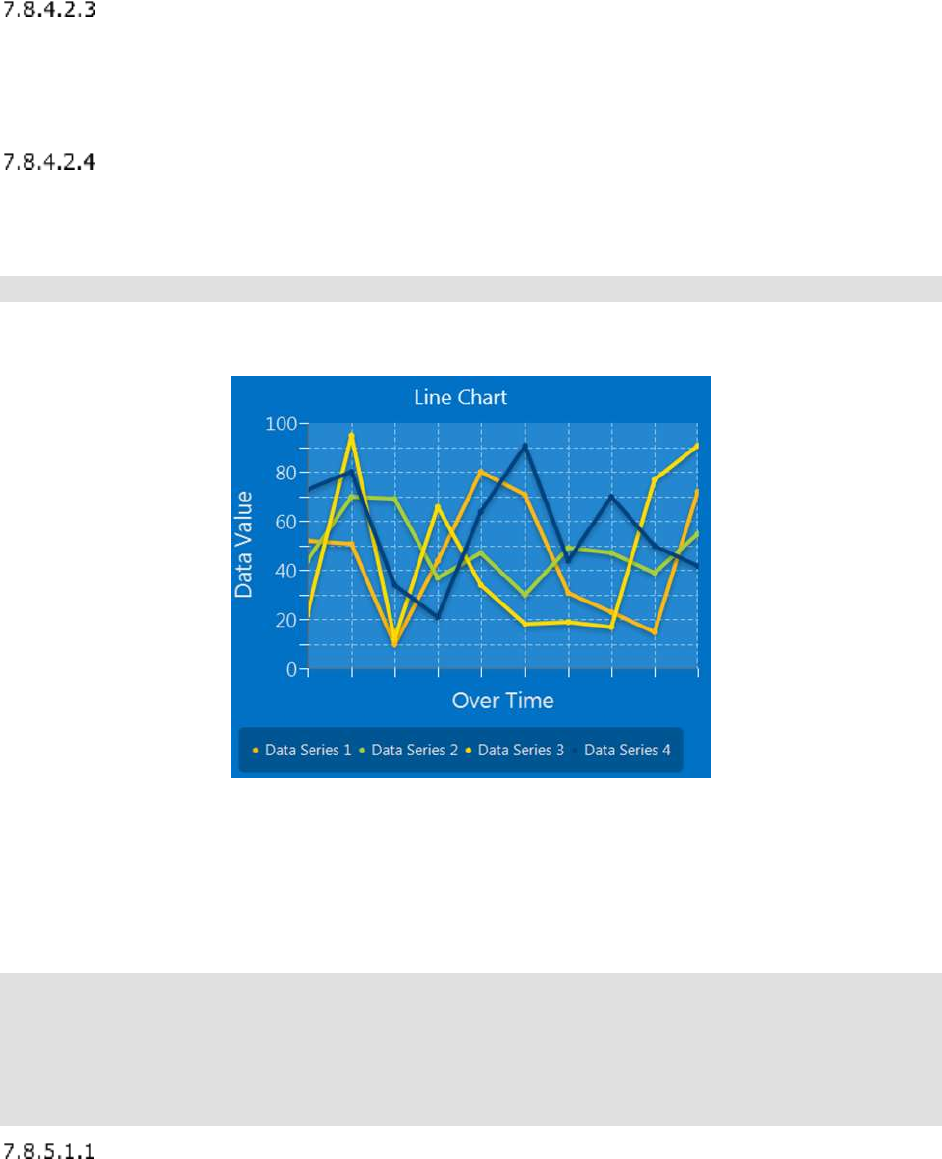
134 Revision 18.02 Board Instrumentation Framework
<yAxis>
Required
Defines how the yAxis should be handled. Has two attributes, Label and MaxValue. Label is
the label to display on the chart. MaxValue specifies the maximum value to be displayed.
MinValue is optional, defaults to 0.0. Is the bottom of the chart, can be negative value.
<Series>
Required
The Series defines the Source of the data for a series. This is a single-src chart, so each
series has only the label.
<Series Label="Data Series 1"/>
7.8.5 MultiSourceLineChart
Figure 61 Line Chart
7.8.5.1 Definition File
This section discusses what the contents of a MultiSourceLineChart Widget definition file
contains.
Example:
<Widget Type = "MultiSourceLineChart">
<Style>LineChart.css</Style>
<Animated>False</Animated>
<yAxis MajorTickInterval="10" MinorTickInterval="5" TickLabelVisible="True"/>
<xAxis MajorTickInterval="1" MinorTickInterval="0" TickLabelVisible="False"/>
</Widget>
< Animated >
Required
135 Revision 18.02 Board Instrumentation Framework
Determines if the chart will show the drawing and moving of datapoints. I usually have it
off. It is a Boolean (true or false) value.
< xAxis>
Required
Determines look of the xAxis on the chart.
Attributes
The < xAxis > tag supports the following attributes, which are case sensitive.
Attribute
M/O
Comments
MajorTickInterval
M
Numeric interval for Major Ticks on xAxis
MinorTickInterval
M
Numeric interval for Minor Ticks on xAxis
TickLabelVisible
M
Boolean – display the value on major ticks
< yAxis>
Required
Determines look of the yAxis on the chart.
Attributes
The < yAxis > tag supports the following attributes, which are case sensitive.
Attribute
M/O
Comments
MajorTickInterval
M
Numeric interval for Major Ticks on yAxis
MinorTickInterval
M
Numeric interval for Minor Ticks on yAxis
TickLabelVisible
M
Boolean – display the value on major ticks
< Synchronized>
Optional
For charts with multiple data sources, this option allows you to specify that the chart will not
be updated until all of the data sources have sent data. It takes a Boolean value (true or
false). The default is true.
Attributes
The < Synchronized > tag supports the following attributes, which are case sensitive.
Attribute
M/O
Comments
MaxSyncWait
0
MAX time in milliseconds to wait for all data to synchronize
before updating chart. A value of 0 (zero) will wait
136 Revision 18.02 Board Instrumentation Framework
indefinitely. Default value is 0.
Note: Default values are TRUE and a MaxSyncWait is 0. This means if you have say 4
minions feeding a single chart and one of them is currently down, the chart will never
update.
7.8.5.2 Application Settings
This section discusses the settings used to add a MultiSrcAreaChart in the application
configuration XML file.
Example:
<Widget File="Chart\ChartMultiSrcLine.xml" row="1" column="1">
<Title>Line Chart - Multisourced</Title>
<xAxis Label="Over Time" MaxEntries="10"/>
<yAxis Label="Data Value" MaxValue="100" MinValue=”0”/>
<Series Label="Data Series 1">
<MinionSrc ID="GraphSource1" Namespace="DemoNamespace"/>
</Series>
<Series Label="Data Series 2">
<MinionSrc ID="GraphSource2" Namespace="DemoNamespace"/>
</Series>
<Series Label="Data Series 3">
<MinionSrc ID="GraphSource3" Namespace="DemoNamespace"/>
</Series>
<Series Label="Data Series 4">
<MinionSrc ID="GraphSource4" Namespace="DemoNamespace"/>
</Series>
</Widget>
<Title>
Optional
Sets the title of the chart, shown at the top.
<xAxis>
Required
Defines how the xAxis should be handled. Has two attributes, Label and MaxEntries. Label
is the label to display on the chart. MaxEntries specifies how many series to display before
starting to scroll to the left when new data comes in.
<yAxis>
Required
Defines how the yAxis should be handled. Has two attributes, Label and MaxValue. Label is
the label to display on the chart. MaxValue specifies the maximum value to be displayed.
MinValue is optional, defaults to 0.0. Is the bottom of the chart, can be negative value.
<Series>
Required
The Series defines the Source of the data for a series. This is a mulit-src chart, so each
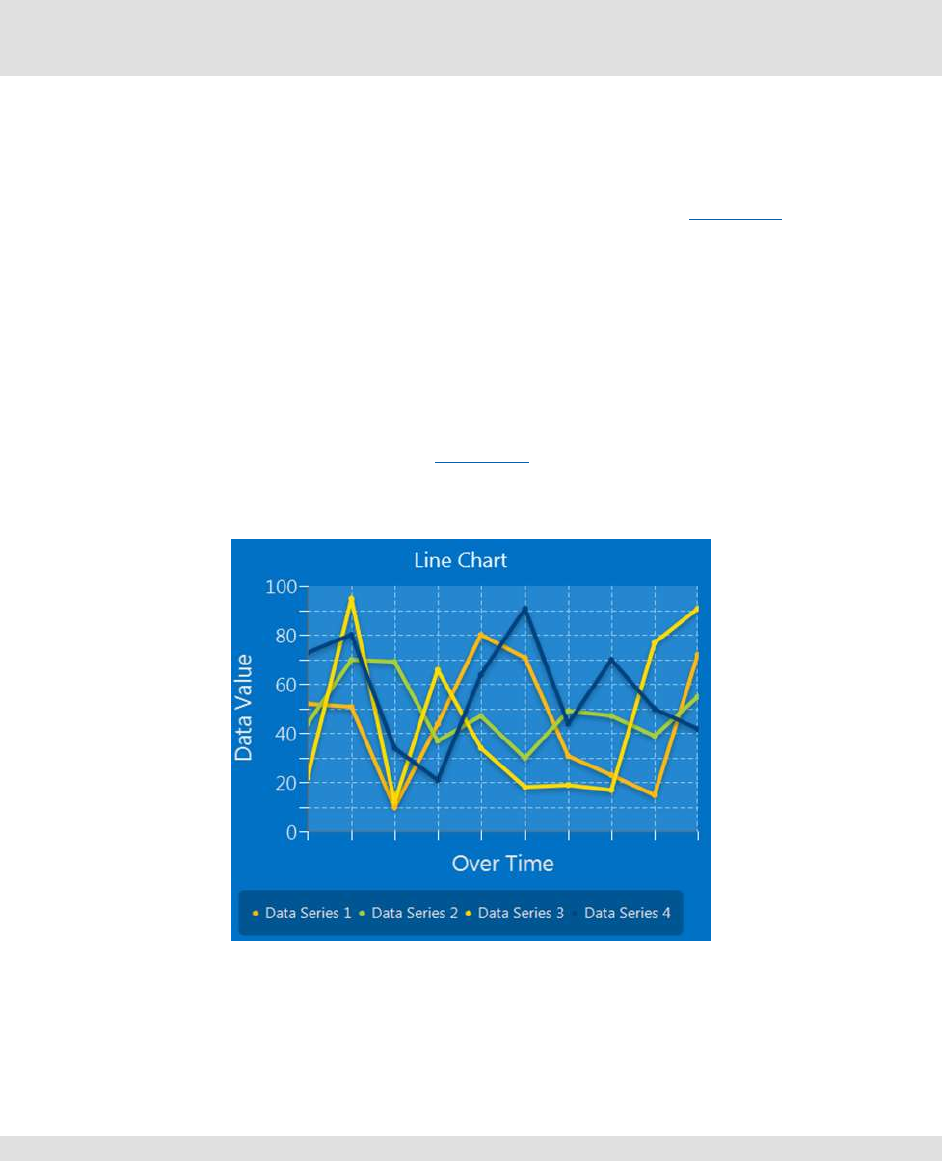
137 Revision 18.02 Board Instrumentation Framework
series has its own MinionSrc. A Series has a Label Attribute (the name of the series to be
displayed) and a MinionSrc:
<Series Label="Data Series 1">
<MinionSrc ID="GraphSource1" Namespace="DemoNamespace"/>
</Series>
You must specify a Series for each expected MinionSrc. The example above has 4.
Note: Muliti-Source charts can be problematic unless used with care. Each data source is
an independent stream and even if the collector is run with the same interval, the
traffic is UDP and not guaranteed, so it can be dropped. If the collectors feeding the
Widget are all from the same Minion, I recommend using the <Group> capability – it
is why it was invented.
If your data is coming from different Minions and feeding the same chart/graph then you
will almost certainly see update issues. This is simply because you have separate
data sources sending data over a network and they are not synchronized. As solving
this issue is beyond the scope of BIFF (at this time anyhow) I recommend you
coordinate the data collection into a single Minion for that Widget. Use a file share or
some other mechanism to collect the desired data into a single comma separated
source, or into multiple sources in a <Group>, but from a single Minion.
7.8.6 LineChart
Figure 62 Line Chart
7.8.6.1 Definition File
This section discusses what the contents of a LineChart Widget definition file contains – it is
pretty much identical to the other charts.
Example:
<Widget Type = "LineChart">
138 Revision 18.02 Board Instrumentation Framework
<Style>LineChart.css</Style>
<Animated>False</Animated>
<yAxis MajorTickInterval="10" MinorTickInterval="5" TickLabelVisible="True"/>
<xAxis MajorTickInterval="1" MinorTickInterval="0" TickLabelVisible="False"/>
</Widget>
< Animated >
Required
Determines if the chart will show the drawing and moving of datapoints. I usually have it
off. It is a Boolean (true or false) value.
< xAxis>
Required
Determines look of the xAxis on the chart.
Attributes
The < xAxis > tag supports the following attributes, which are case sensitive.
Attribute
M/O
Comments
MajorTickInterval
M
Numeric interval for Major Ticks on xAxis
MinorTickInterval
M
Numeric interval for Minor Ticks on xAxis
TickLabelVisible
M
Boolean – display the value on major ticks
< yAxis>
Required
Determines look of the yAxis on the chart.
Attributes
The < yAxis > tag supports the following attributes, which are case sensitive.
Attribute
M/O
Comments
MajorTickInterval
M
Numeric interval for Major Ticks on yAxis
MinorTickInterval
M
Numeric interval for Minor Ticks on yAxis
TickLabelVisible
M
Boolean – display the value on major ticks
7.8.6.2 Application Settings
This section discusses the settings used to add a MultiSrcAreaChart in the application
configuration XML file.
Example:
139 Revision 18.02 Board Instrumentation Framework
<Widget File="Chart\ChartMultiSrcLine.xml" row="1" column="1">
<Title>Line Chart - Multisourced</Title>
<xAxis Label="Over Time" MaxEntries="10"/>
<yAxis Label="Data Value" MaxValue="100"/>
<MinionSrc ID="CPU_LineChart" Namespace="DemoNamespace"/>
<Series Label="Data Series 1"/>
<Series Label="Data Series 2"/>
<Series Label="Data Series 3"/>
<Series Label="Data Series 4"/>
</Widget>
<Title>
Optional
Sets the title of the chart, shown at the top.
<xAxis>
Required
Defines how the xAxis should be handled. Has two attributes, Label and MaxEntries. Label
is the label to display on the chart. MaxEntries specifies how many series to display before
starting to scroll to the left when new data comes in.
<yAxis>
Required
Defines how the yAxis should be handled. Has two attributes, Label and MaxValue. Label is
the label to display on the chart. MaxValue specifies the maximum value to be displayed.
MinValue is optional, defaults to 0.0. Is the bottom of the chart, can be negative value.
<Series>
Required
The Series defines the number and name of the series data to be sent from a single
<MinionSrc> as a comma separated string.
<Series Label="Data Series 1"/>
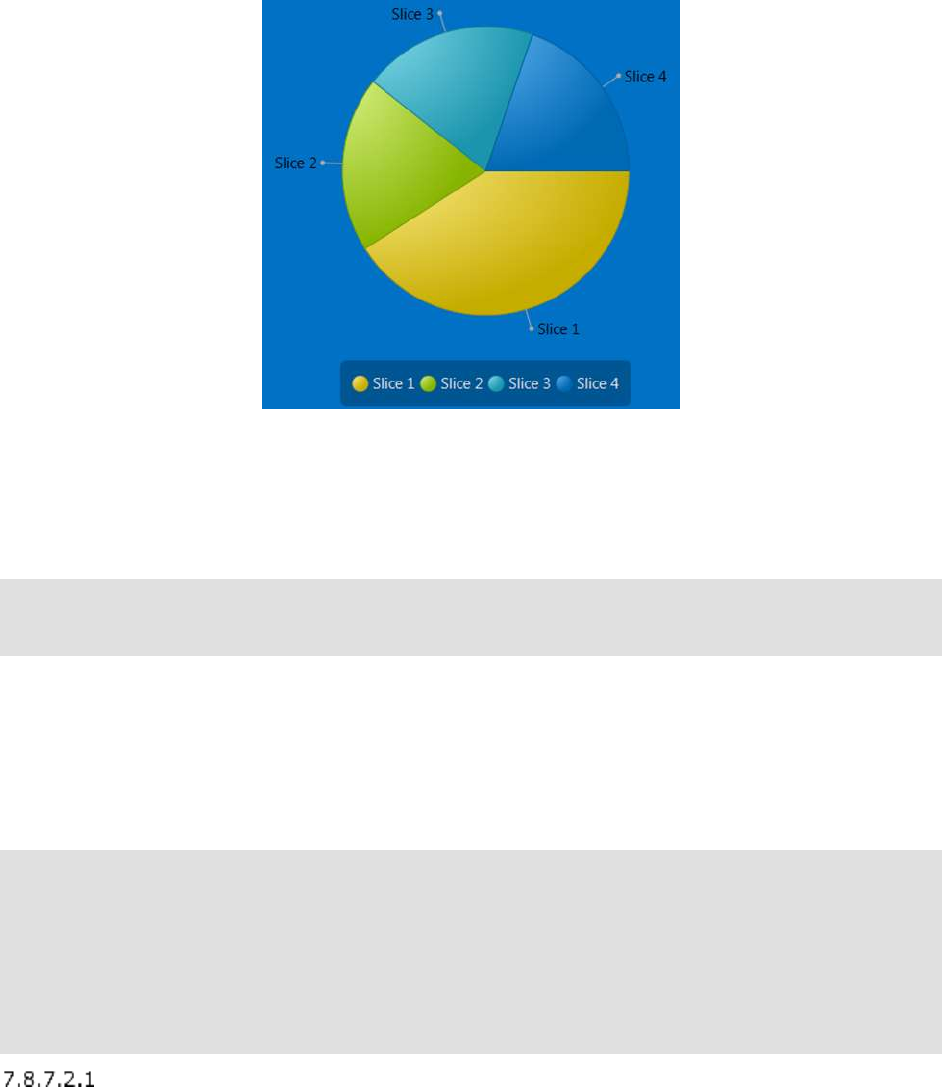
140 Revision 18.02 Board Instrumentation Framework
7.8.7 PieChart
Figure 63 Pie Chart
7.8.7.1 Definition File
This section discusses what the contents of a PieChart Widget definition file contains.
Example:
<Widget Type = "PieChart">
<Style>PieChart.css</Style>
</Widget>
Very simple definition file.
7.8.7.2 Application Settings
This section discusses the settings used to add a Pie Chart dial in the application
configuration XML file.
Example:
<Widget File="Chart\ChartPie.xml" row="3" column="1">
<Title>Pie Chart</Title>
<MinionSrc ID="PieSource" Namespace="DemoNamespace"/>
<Slice Label="Slice 1"/>
<Slice Label="Slice 2"/>
<Slice Label="Slice 3"/>
<Slice Label="Slice 4"/>
</Widget>
<Title>
Optional
Sets the title of the chart, shown at the top.
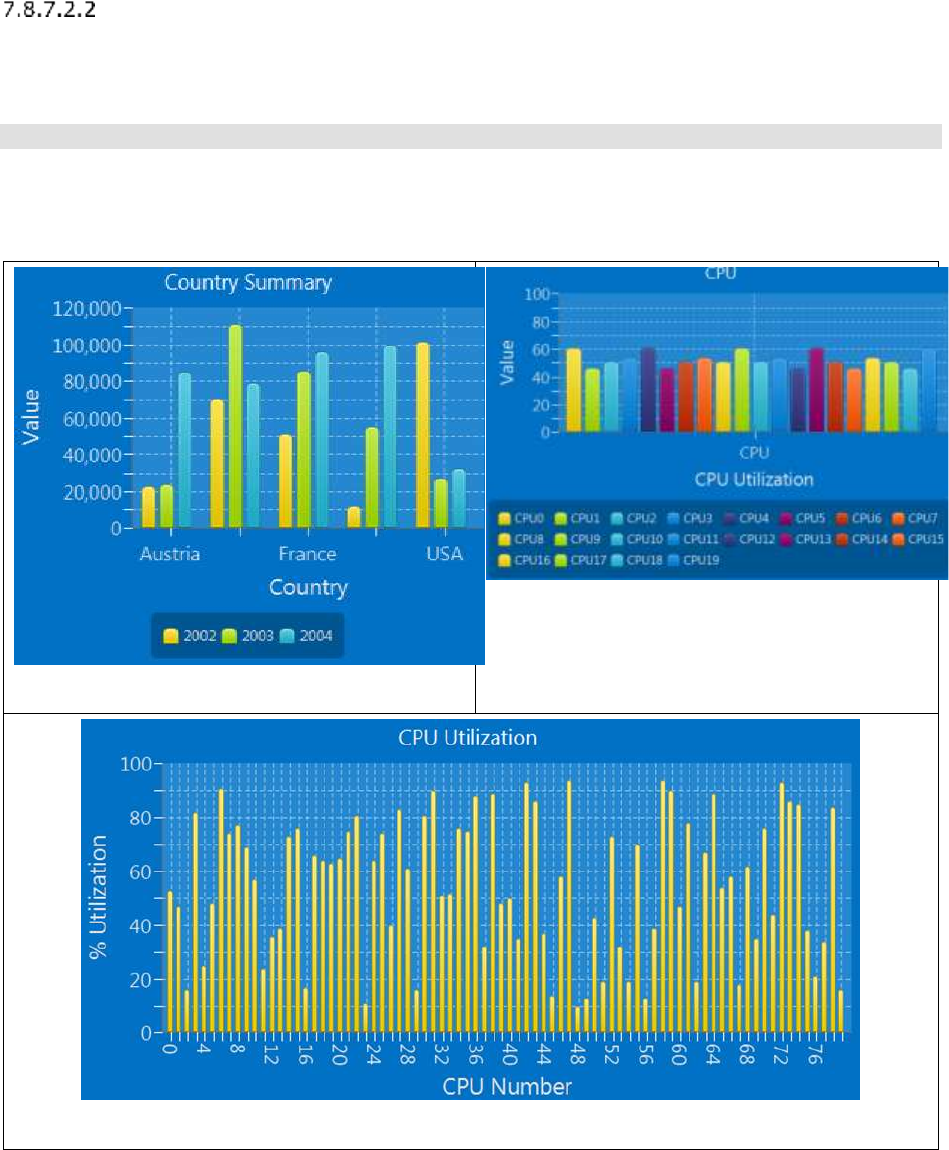
141 Revision 18.02 Board Instrumentation Framework
<Series>
Required
The Series defines the number and name of the series data to be sent from a single
<MinionSrc> as a comma separated string.
<Series Label="Slice 1"/>
In the above example there are 4.
7.8.8 Bar Chart
Figure 64 Multi Series Bar Chart
Figure 65 Bar Chart
Figure 66 Bar Chart
The BarChart was the last chart widget I created. As such, it works a bit differently than
142 Revision 18.02 Board Instrumentation Framework
the others. Rather than have multi-src and single source widgets, there is a single widget
that gets instantiated differently in the application configuration xml file. The three figures
above are all BarChart widgets, but declared differently.
7.8.8.1 Definition File
This section discusses what the contents of a BarChart Widget definition file contains.
Example:
<Widget Type = "BarChart">
<Style>BarChart.css</Style>
<Animated>True</Animated>
<yAxis MajorTickInterval="10" MinorTickInterval="0" TickLabelVisible="True"/>
</Widget>
< Animated >
Required
Determines if the chart will show the drawing and moving of datapoints. I usually have it
off. It is a Boolean (true or false) value.
< yAxis>
Required
Determines look of the yAxis on the chart.
Attributes
The < yAxis > tag supports the following attributes, which are case sensitive.
Attribute
M/O
Comments
MajorTickInterval
M
Numeric interval for Major Ticks on yAxis
MinorTickInterval
M
Numeric interval for Minor Ticks on yAxis
TickLabelVisible
M
Boolean – display the value on major ticks
7.8.8.2 Application Settings
This section discusses the settings used to add a Pie Chart dial in the application
configuration XML file.
Example1:
<Widget File="Chart\ChartBar.xml" row="1" column="1">
<Title>Country Summary</Title>
<xAxis Label="Country"/>
<yAxis Label="Value" MaxValue="120000"/>
<Series ID="Series1" Label="2002"/>
<Series ID="Series2" Label="2003"/>
<Series ID="Series3" Label="2004"/>
<SeriesSet Title="Austria">

143 Revision 18.02 Board Instrumentation Framework
<MinionSrc ID="Austria02" Namespace="DemoNamespace" SeriesID="Series1"/>
<MinionSrc ID="Austria03" Namespace="DemoNamespace" SeriesID="Series2"/>
<MinionSrc ID="Austria04" Namespace="DemoNamespace" SeriesID="Series3"/>
</SeriesSet>
<SeriesSet Title="Brazil">
<MinionSrc ID="Brazil02" Namespace="DemoNamespace" SeriesID="Series1"/>
<MinionSrc ID="Brazil03" Namespace="DemoNamespace" SeriesID="Series2"/>
<MinionSrc ID="Brazil04" Namespace="DemoNamespace" SeriesID="Series3"/>
</SeriesSet>
<SeriesSet Title="France">
<MinionSrc ID="France02" Namespace="DemoNamespace" SeriesID="Series1"/>
<MinionSrc ID="France03" Namespace="DemoNamespace" SeriesID="Series2"/>
<MinionSrc ID="France04" Namespace="DemoNamespace" SeriesID="Series3"/>
</SeriesSet>
<SeriesSet Title="Italy">
<MinionSrc ID="Italy02" Namespace="DemoNamespace" SeriesID="Series1"/>
<MinionSrc ID="Italy03" Namespace="DemoNamespace" SeriesID="Series2"/>
<MinionSrc ID="Italy04" Namespace="DemoNamespace" SeriesID="Series3"/>
</SeriesSet>
<SeriesSet Title="USA">
<MinionSrc ID="USA02" Namespace="DemoNamespace" SeriesID="Series1"/>
<MinionSrc ID="USA03" Namespace="DemoNamespace" SeriesID="Series2"/>
<MinionSrc ID="USA04" Namespace="DemoNamespace" SeriesID="Series3"/>
</SeriesSet>
</Widget>
Example2:
<Title>CPU</Title>
<xAxis Label="CPU Utilization"/>
<yAxis Label="Value" MaxValue="100"/>
<Series Label = "CPU0" ID="Series1"/>
<Series Label = "CPU1" ID="Series2"/>
<Series Label = "CPU2" ID="Series3"/>
<Series Label = "CPU3" ID="Series4" />
<Series Label = "CPU4" ID="Series5" />
<Series Label = "CPU5" ID="Series6" />
<Series Label = "CPU6" ID="Series7" />
<Series Label = "CPU7" ID="Series8" />
<Series Label = "CPU8" ID="Series9" />
<Series Label = "CPU9" ID="Series10" />
<Series Label = "CPU10" ID="Series11" />
<Series Label = "CPU11" ID="Series12" />
<Series Label = "CPU12" ID="Series13" />
<Series Label = "CPU13" ID="Series14" />
<Series Label = "CPU14" ID="Series15" />
<Series Label = "CPU15" ID="Series16" />
<Series Label = "CPU16" ID="Series17" />
<Series Label = "CPU17" ID="Series18" />

144 Revision 18.02 Board Instrumentation Framework
<Series Label = "CPU18" ID="Series19" />
<Series Label = "CPU19" ID="Series20" />
<SeriesSet Title="CPU">
<MinionSrc ID="GraphSource1" Namespace="DemoNamespace" SeriesID="Series1"/>
<MinionSrc ID="GraphSource2" Namespace="DemoNamespace" SeriesID="Series2"/>
<MinionSrc ID="GraphSource3" Namespace="DemoNamespace" SeriesID="Series3"/>
<MinionSrc ID="GraphSource4" Namespace="DemoNamespace" SeriesID="Series4"/>
<MinionSrc ID="GraphSource3" Namespace="DemoNamespace" SeriesID="Series3"/>
<MinionSrc ID="GraphSource4" Namespace="DemoNamespace" SeriesID="Series4"/>
<MinionSrc ID="GraphSource1" Namespace="DemoNamespace" SeriesID="Series5"/>
<MinionSrc ID="GraphSource2" Namespace="DemoNamespace" SeriesID="Series6"/>
<MinionSrc ID="GraphSource3" Namespace="DemoNamespace" SeriesID="Series7"/>
<MinionSrc ID="GraphSource4" Namespace="DemoNamespace" SeriesID="Series8"/>
<MinionSrc ID="GraphSource3" Namespace="DemoNamespace" SeriesID="Series9"/>
<MinionSrc ID="GraphSource1" Namespace="DemoNamespace" SeriesID="Series10"/>
<MinionSrc ID="GraphSource3" Namespace="DemoNamespace" SeriesID="Series11"/>
<MinionSrc ID="GraphSource4" Namespace="DemoNamespace" SeriesID="Series12"/>
<MinionSrc ID="GraphSource2" Namespace="DemoNamespace" SeriesID="Series13"/>
<MinionSrc ID="GraphSource1" Namespace="DemoNamespace" SeriesID="Series14"/>
<MinionSrc ID="GraphSource3" Namespace="DemoNamespace" SeriesID="Series15"/>
<MinionSrc ID="GraphSource2" Namespace="DemoNamespace" SeriesID="Series16"/>
<MinionSrc ID="GraphSource4" Namespace="DemoNamespace" SeriesID="Series17"/>
<MinionSrc ID="GraphSource3" Namespace="DemoNamespace" SeriesID="Series18"/>
<MinionSrc ID="GraphSource2" Namespace="DemoNamespace" SeriesID="Series19"/>
<MinionSrc ID="GraphSource1" Namespace="DemoNamespace" SeriesID="Series20"/>
</SeriesSet>
</Widget>
Example3:
<Widget File="BarChart.xml" row="1" column="2">
<Title> CPU Utilization</Title>
<xAxis Label="CPU Number" Count="80"/>
<yAxis Label="% Utilization" MaxValue="100"/>
<MinionSrc ID="CPU_LIST" Namespace="DemoNamespace"/>
<StyleOverride>
<Item>-fx-legend-visible:false;-fx-bar-gap:1;-fx-category-gap:1;</Item>
</StyleOverride>
</Widget>
<Title>
Optional
Sets the title of the chart, shown at the top.
<xAxis>
Required
Defines how the xAxis should be handled. Has two attributes, Label and MaxEntries. Label
is the label to display on the chart. MaxEntries specifies how many bars to display if you
don’t specify any series, as in Exampl3, which matches Figure 66.
145 Revision 18.02 Board Instrumentation Framework
<yAxis>
Required
Defines how the yAxis should be handled. Has two attributes, Label and MaxValue. Label is
the label to display on the chart. MaxValue specifies the maximum value to be displayed.
<Series>
Optional
The Series defines the Source of the data for a series. A Series has a Label Attribute (the
name of the series to be displayed, which is optional) and an ID:
<Series ID="Series1" Label="2002"/>
<SeriesSet>
Series set is where you can make a grouping of series, such as in Figure 64. Each Series
Set has a Title Attribute that is the title of the Series. It also has a <MinionSrc> for each
dataset in that series, with each <MinionSrc> having a new Attribute of SeriesID, that
corresponds to the ID in the <Series> tag described above.
Example:
<Series ID="Series1" Label="2002"/>
<Series ID="Series2" Label="2003"/>
<Series ID="Series3" Label="2004"/>
<SeriesSet Title="Austria">
<MinionSrc ID="Austria02" Namespace="DemoNamespace" SeriesID="Series1"/>
<MinionSrc ID="Austria03" Namespace="DemoNamespace" SeriesID="Series2"/>
<MinionSrc ID="Austria04" Namespace="DemoNamespace" SeriesID="Series3"/>
</SeriesSet>
You can define a Single SeriesSet as in Figure 65 or many as in Figure 64.
Or you can do as in Example3 above and define no series, but define in the xAxis how many
datapoints you expect (with a comma separated list of values coming from your Minion
Collector). Very useful for many cores
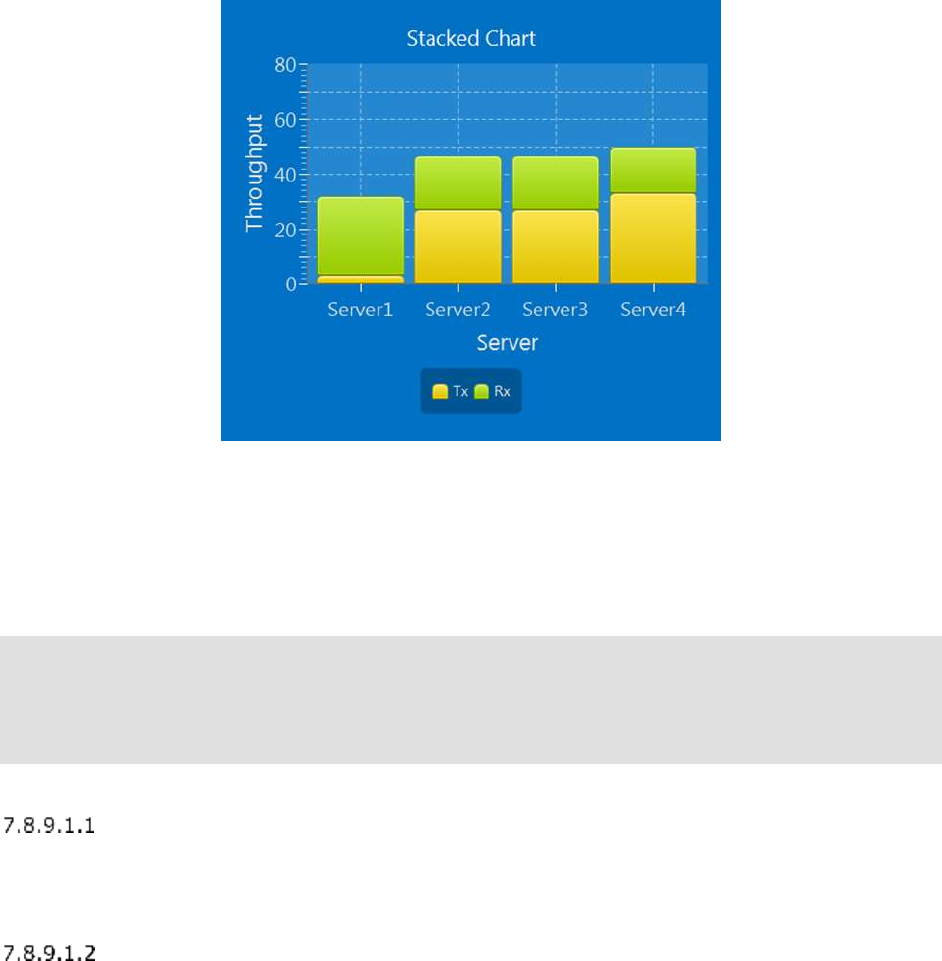
146 Revision 18.02 Board Instrumentation Framework
7.8.9 StackedBarChart
Figure 67 StackedBarChart
7.8.9.1 Definition File
This section discusses what the contents of a StackedBarChart Widget definition file
contains.
Example:
<Widget Type = "Chart\ChartStackedBar">
<Style>BarChart.css</Style>
<Animated>True</Animated>
<yAxis MajorTickInterval="10" MinorTickInterval="5" TickLabelVisible="True"/>
</Widget>
Very simple definition file.
< Animated >
Required
Determines if the chart will show the drawing and moving of datapoints. I usually have it
off. It is a Boolean (true or false) value.
< yAxis>
Required
Determines look of the yAxis on the chart.
Attributes
The < yAxis > tag supports the following attributes, which are case sensitive.
147 Revision 18.02 Board Instrumentation Framework
Attribute
M/O
Comments
MajorTickInterval
M
Numeric interval for Major Ticks on yAxis
MinorTickInterval
M
Numeric interval for Minor Ticks on yAxis
TickLabelVisible
M
Boolean – display the value on major ticks
7.8.9.2 Application Settings
This section discusses the settings used to add a StackedBarChart in the application
configuration XML file.
Example:
<Widget File="StackedBarChart.xml" row="1" column="1">
<Title>Stacked Chart</Title>
<xAxis Label="Server"/>
<yAxis Label="Throughput" MaxValue="80"/>
<Series ID="Series1" Label="Tx"/>
<Series ID="Series2" Label="Rx"/>
<SeriesSet Title="Server1">
<MinionSrc ID="StackedTx_Server1" Namespace="DemoNamespace" SeriesID="Series1"/>
<MinionSrc ID="StackedRx_Server1" Namespace="DemoNamespace" SeriesID="Series2"/>
</SeriesSet>
<SeriesSet Title="Server2">
<MinionSrc ID="StackedTx_Server2" Namespace="DemoNamespace" SeriesID="Series1"/>
<MinionSrc ID="StackedRx_Server2" Namespace="DemoNamespace" SeriesID="Series2"/>
</SeriesSet>
<SeriesSet Title="Server3">
<MinionSrc ID="StackedTx_Server3" Namespace="DemoNamespace" SeriesID="Series1"/>
<MinionSrc ID="StackedRx_Server3" Namespace="DemoNamespace" SeriesID="Series2"/>
</SeriesSet>
<SeriesSet Title="Server4">
<MinionSrc ID="StackedTx_Server4" Namespace="DemoNamespace" SeriesID="Series1"/>
<MinionSrc ID="StackedRx_Server4" Namespace="DemoNamespace" SeriesID="Series2"/>
</SeriesSet>
</Widget>
<Title>
Optional
Sets the title of the chart, shown at the top.
Optional
The Series defines the Source of the data for a series. A Series has a Label Attribute (the
name of the series to be displayed, which is optional) and an ID:
<Series ID="Series1" Label="2002"/>
148 Revision 18.02 Board Instrumentation Framework
<SeriesSet>
Series set is where you can make a grouping of series, such as in Figure 64. Each Series
Set has a Title Attribute that is the title of the Series. It also has a <MinionSrc> for each
dataset in that series, with each <MinionSrc> having a new Attribute of SeriesID, that
corresponds to the ID in the <Series> tag described above.
Example:
<SeriesSet>
<Series ID="Series1" Label="Tx"/>
<Series ID="Series2" Label="Rx"/>
<SeriesSet Title="Server1">
<MinionSrc ID="StackedTx_Server1" Namespace="DemoNamespace" SeriesID="Series1"/>
<MinionSrc ID="StackedRx_Server1" Namespace="DemoNamespace" SeriesID="Series2"/>
</SeriesSet>
Just as with the BarGraph widget, you can define a single or multiple <SeriesSet>s.
Note: Muliti-Source charts can be problematic unless used with care. Each data source is
an independent stream and even if the collector is run with the same interval, the
traffic is UDP and not guaranteed, so it can be dropped. If the collectors feeding the
Widget are all from the same Minion, I recommend using the <Group> capability – it
is why it was invented.
If your data is coming from different Minions and feeding the same chart/graph then you
will almost certainly see update issues. This is simply because you have separate
data sources sending data over a network and they are not synchronized. As solving
this issue is beyond the scope of BIFF (at this time anyhow) I recommend you
coordinate the data collection into a single Minion for that Widget. Use a file share or
some other mechanism to collect the desired data into a single comma separated
source, or into multiple sources in a <Group>, but from a single Minion.
149 Revision 18.02 Board Instrumentation Framework
7.9 Images/Video/Sound
7.9.1 StaticImage
Figure 68 Static Image
A static image is just that. You can place an image (.bmp,.jpg,.gif,.tiff, etc.) in a grid.
7.9.1.1 Definition File
This section discusses what the contents of a StaticImage Widget definition file contains.
Example:
<Widget Type = "StaticImage">
<PreserveRatio>True</PreserveRatio>
<ScaleToFit>True</ScaleToFit>
</Widget>
< PreserveRatio>
Optional
Value is either True or False. If True, the image will grow in change size in both height and
width if you specify only one value when placing the Widget.
< ScaleToFit>
Optional
TBD - Experimental
7.9.1.2 Application Settings
This section discusses the settings used to add a StaticImage in the application
configuration XML file.
Example:
150 Revision 18.02 Board Instrumentation Framework
<Widget File="Image\ImageScale.xml" row="1" column="1" >
<Source>Demo\Images\ajax_loader_blue_256.gif</Source>
<ClickThroughTransparent>False</ClickThroughTransparent>
</Widget>
The Source Tag points to the image to load. Pretty easy.
The optional <ClickThroughTransparent> tag takes either True or False, and defaults to
True. This is used if you want to put up an image that you assign a task to and ignore clicks
to any area of the image that is transparent.
7.9.2 DynamicImage
Figure 69 Dynamic Image
The DynamicImage widget allows you to control which image to display at a location
depending on a string that comes from a Minion collector.
A good example is when you go start a test, the collector (could be a file collector reading
status from a file) sends an ID to make the image one that indicates test is starting. Then
when the test if finished, the string ID associated with the ‘finished test’ image is sent and
the image is changed.
In addition to the ID of the specific image you wish to display, you can also send ‘Next’ or
‘Previous’, and the next or previous image in the list will be displayed. When using ‘Next’ or
‘Previous’ the list is considered to be circular.
7.9.2.1 Definition File
This section discusses what the contents of a DynamicImage Widget definition file contains.
Example:
<Widget Type = "DynamicImage">
<PreserveRatio>True</PreserveRatio>
<ScaleToFit>False</ScaleToFit>
</Widget>
< PreserveRatio>
Optional
Value is either True or False. If True, the image will grow in change size in both height and
width if you specify only one value when placing the Widget.
< ScaleToFit>
Optional
TBD - Experimental

151 Revision 18.02 Board Instrumentation Framework
7.9.2.2 Application Settings
This section discusses the settings used to add a DynamicImage in the application
configuration XML file.
Example:
<Widget File="Image\DynamicImage.xml" row="3" column="1" Task=”ClickedOnAnyButRedTask”
>
<MinionSrc ID="TrafficLight" Namespace="DemoNamespace"/>
<Image Source="Demo\Images\yellowlight.png" ID="2"/>
<Image Source="Demo\Images\greenlight.png" ID="1"/>
<Image Source="Demo\Images\redlight.png" ID="3" Task=”ClickedOnRedTask”/>
<Initial ID="1"/>
<Size>
<Minimum Height="250"/>
</Size>
</Widget>
The widget has three unique Tags, Image and Initial. Image takes as Attributes a Source,
that points to a file containing the image and an ID. The ID is a string that the collector
(identified by the MinionSrc) sends to change the image. You may also specify a task to be
run for all images if clicked on, by specifying a task at the <Widget> level. Additionally you
can specify a task for individual images by adding a Task attribute for each Image Source
tag.
Initial indicates what image to display at startup.
The Optional <ClickThroughTransparent> tag takes either True or False, and defaults to
True. This is used if you want to put up an image that you assign a task to and ignore clicks
to any area of the image that is transparent. This is the same as StaticImage.
7.9.2.3 AutoAdvance
You may wish to automatically advance through all of the images within a DynamicImage
rather than issuing a <Peekaboo> “next” repeatedly with say a task, you can configure it
for <AutoAdvance>.
<Widget File="Image\DynamicImage.xml" row="3" column="1" >
<AutoAdvance Frequency='1000' Loop='True'/>
<MinionSrc ID="TrafficLight" Namespace="DemoNamespace"/>
<Image Source="Demo\Images\yellowlight.png" ID="2"/>
<Image Source="Demo\Images\greenlight.png" ID="1"/>
<Image Source="Demo\Images\redlight.png" ID="3"/>
<Initial ID="1"/>
<Size>
<Minimum Height="250"/>
</Size>
</Widget>

152 Revision 18.02 Board Instrumentation Framework
<AutoAdvance> takes two attributes – the frequency in milliseconds of how often to
advance to the next image, and Loop boolean attribute. If True then after going through
the entire list of images, it will begin again with the first one.
7.9.2.4 <Transition>
You may now add transitions between the images, just as you can with <DynamicGrids>.
The syntax is the same, you just use it on an <Image> rather than GridFile:
<Image Source="$(AppDir)\Media\Images\Other\Optimizations.png" ID="Optimizations">
<Transition Duration="1750">CUBE</Transition>
</Image>
7.9.3 VideoPlayer
The VideoPlayer widget allows you play video files. Formats include MP4 and FLV. WMV is
not supported.
NOTE: you must have the ability to play videos installed in your OS, as the VideoPlayer
widget uses that underlying technology.
The most likely used for a VideoPlayer widget is to have a tab where you can have different
videos be selected to talk about different technologies or example. However there is
nothing to prevent you from having a VideoPlayer widget the ‘pops’ up to show a little video
indicating that your test is running, or finished etc.
The VideoPlayer, using a mechanism similar <Peekaboo> (using the <PlaybackControl>
tag) provides the abilitiy to Start,Stop and Pause a video. Additionally you can specify a
playback volume and seek to a location in the video.
The VideoPlayer widget is very similar to the DynamicImage Widget, where you specify a
list of things to be displayed and an ID for each of them, then the incoming <MinionSrc>
data would specify which ID to display.
In addition to the ID of the specific video you wish to display, you can also send ‘Next’ or
‘Previous’, and the next or previous video in the list will be displayed. When using ‘Next’ or
‘Previous’ the list is considered to be circular.
7.9.3.1 Supported File Types:
Java doesn’t support all video types. See the Java support for the list of supported types:
http://docs.oracle.com/javafx/2/api/javafx/scene/media/package-
summary.html#SupportedMediaTypes
7.9.3.2 Definition File
This section discusses what the contents of a VideoPlayer Widget definition file contains.
Example:
<Widget Type = "VideoPlayer">
<AutoStart>True</AutoStart>
<InitialVolume>50</InitialVolume>
<Repeat Mode="Single">False</Repeat>
<PreserveRatio>True</PreserveRatio>
153 Revision 18.02 Board Instrumentation Framework
</Widget>
<AutoStart>
Optional
Value is either True or False. If True, the video will begin as soon as selected/loaded –
which could be when your app starts.
<InitialVolume>
Optional
Sets the initial volume level when the VideoPlayer starts. Expressed in range of 0 to 100.
<Repeat>
Optional
Allows the video playing to be automatically repeated or not.
The Mode attribute can be either “Single” (default mode), which, if <Repeat> is True, would
repeat the current video over and over. Or it could be “LoopList”, in which case if there is a
list of video files, it will cycle through them repeatedly.
< PreserveRatio>
Optional
Value is either True or False. If True, the video will grow in change size in both height and
width if you specify only one value when placing the Widget.
NOTE: This is currently experimental and may not work
7.9.3.3 Application Settings
This section discusses the settings used to add a VideoPlayer in the application configuration
XML file.
Note: Unlike most other widgets, the <Size> tags will be IGNORED for a video widget. You
can specify the Height and Width attributes however.
Example:
<Widget File="Media\VideoPlayer.xml" row="3" column="1" >
<Video Source="Demo\Media\barsandtone.flv" ID="Video_1"/>
<Video Source="Demo\media\how2.mp4" ID="Video_2" Task=”NormalTask”/>
<Video Source="Demo\media\Sintel.mp4" ID="Video_3">
<Task Marker=’1500’>MyTask</Task>
<Task Marker=”50%’”>MyOtherTask</Task>
</Video>
<Video Source="Demo\Media\20051210-w50s.flv" ID="Video_4"/>
<Initial ID="Video_3"/>
<PlaybackControl ID="Video.PlaybackControl.ID"
Namespace="Video.PlaypackControl.NS"/>
<MinionSrc ID="Vid_ID" Namespace="Vid_NS"/>
<AutoStart>False</AutoStart>
<Repeat Mode="Single">True</Repeat>
</Widget>
154 Revision 18.02 Board Instrumentation Framework
<MinionSrc>
Optional
The expected incoming data would get a string indicating the ID of the video to load and
automatically play if <AutoStart> is configured for doing so.
<Video>
Optional
You should have at least one of these . Specifies the video file to play via the Source
attribute, and the ID of that video.
<Task>
You can specify a standard task to be run if you click on the video with the Task= attribute,
or you can specify one or more tasks to be run at different times during the playback. If
you specify more than one task to be run at the same time, only the last one specified will
be run.
When specify a task, you must specify the Marker, which is the location within the playback
you want the task to occur, and the task itself, such as below:
<Video Source="Demo\media\Sintel.mp4" ID="Video_3">
<Task Marker=’1500’>MyTask</Task>
<Task Marker=”50%’”>MyOtherTask</Task>
</Video>
The Task specified is the same as all other tasks. The Marker indicates where in the
playback to perform the Task. It can be any of the following:
Atrribute
Description / Usage
Begin
Start of playback
End
End of Playback
Milliseconds
How many milliseconds into playback to run task
Percentage
At what percentage of playback to run the task
Note: The playback must occur over these points in order to initiate the task. If you ‘skip’
or jump past using the <PlaybackControl> a Marker, the associated Task will not be
run.
Optional
You should have
<Initial>
Optional
The ID attribute specifies the ID of the video (as defined in the <Video> tag) to be the first
loaded.
155 Revision 18.02 Board Instrumentation Framework
<PlaybackControl>
Optional
This is a special tag. You specify a namespace and ID used specifically for controlling the
widget. With it you can Play,Pause,Stop, control volume and seek. The supported data
format is:
Atrribute
Description / Usage
“Play”
Plays the video / resumes from pause
“Stop”
Stops the video and rewinds to the beginning
“Pause”
Pauses playback
“JumpTo:###”
Jumps to a location in the video. The ### indicates the percentage of
the video to skip to. So a string of “JumpTo: 25” jumps to the point in
the video equal to 25% of the total playback time
“Volume:###”
Sets the playback volume. ### indicates a % of the maximum volume.
So a string of “Volume: 50” sets the volume at 50% of maximum
<AutoStart>
Optional
Value is either True or False. If True, the video will begin as soon as selected/loaded –
which could be when your app starts.
<Repeat>
Optional
Allows the video playing to be automatically repeated or not.
The Mode attribute can be either “Single” (default mode), which, if <Repeat> is True, would
repeat the current video over and over. Or it could be “LoopList”, in which case if there is a
list of video files, it will cycle through them repeatedly.
7.9.4 AudioPlayer
The AudioPlayer widget allows you play Audio files. Formats include MP3 and others.
NOTE: you must have the ability to play videos installed in your OS, as the AudioPlayer
widget uses that underlying technology.
There is no visual component to the AudioPlayer.
You can use this to play a short audio clip to indicate the success or failure of a test, or just
listen to your favorite tunes!
The AudioPlayer, using a mechanism similar <Peekaboo> (using the <PlaybackControl>
tag) provides the abilitiy to Start,Stop and Pause a video. Additionally you can specify a
playback volume and seek to a location in the sound clip.
The AudioPlayer widget is very similar to the DynamicImage Widget, where you specify a
156 Revision 18.02 Board Instrumentation Framework
list of things to be displayed and an ID for each of them, and then the incoming
<MinionSrc> data would specify which ID to play.
In addition to the ID of the specific audio file you wish to play, you can also send ‘Next’ or
‘Previous’, and the next or previous audio file in the list will be used. When using ‘Next’ or
‘Previous’ the list is considered to be circular.
7.9.4.1 Supported Audio File Types:
Java doesn’t support all audio types. See the Java support for the list of supported types:
http://docs.oracle.com/javafx/2/api/javafx/scene/media/package-
summary.html#SupportedMediaTypes
7.9.4.2 Definition File
This section discusses what the contents of a AudioPlayer Widget definition file contains.
Example:
<Widget Type = "AudioPlayer">
<AutoStart>True</AutoStart>
<InitialVolume>50</InitialVolume>
<Repeat Mode="Single">False</Repeat>
</Widget>
<AutoStart>
Optional
Value is either True or False. If True, the audio will begin as soon as selected/loaded –
which could be when your app starts.
<InitialVolume>
Optional
Sets the initial volume level when the AudioPlayer starts. Expressed in range of 0 to 100.
<Repeat>
Optional
Allows the audio playing to be automatically repeated or not.
The Mode attribute can be either “Single” (default mode), which, if <Repeat> is True, would
repeat the current audio over and over. Or it could be “LoopList”, in which case if there is a
list of video files, it will cycle through them repeatedly.
7.9.4.3 Application Settings
This section discusses the settings used to add a AudioPlayer in the application configuration
XML file.
Note: All size components, are ignored.
Example:
<Widget File="Media\AudioPlayer.xml" row="3" column="1" >
<Audio Source="Demo\Media\01 - Heartbreaker.mp3" ID="Audio_1"/>
157 Revision 18.02 Board Instrumentation Framework
<Audio Source="Demo\Media\song.mp3" ID="Audio_2"/>
<Audio Source="Demo\Media\02 - We Live For Love.mp3" ID="Audio_3"/>
<Audio Source="Demo\Media\04 - Hell Is For Children.mp3" ID="Audio_4"/>
<Audio Source="Demo\Media\03 - Hit Me With Your Best Shot.mp3" ID="HitME"/>
<Repeat Mode="LoopList">True</Repeat>
<Initial ID="HitME"/>
<PlaybackControl ID="Audio.PlaybackControl.ID" Namespace="Audio.PlaypackControl.NS"/>
<MinionSrc ID="Audio_ID" Namespace="Audio_NS"/>
<AutoStart>False</AutoStart>
<Repeat Mode="Single">True</Repeat>
</Widget>
<MinionSrc>
Optional
The expected incoming data would get a string indicating the ID of the audio to load and
automatically play if <AutoStart> is configured for doing so.
<Audio>
Optional
You should have at least one of these . Specifies the audio file to play via the Source
attribute, and the ID of that audio file.
<Task>
You can specify one or more tasks to be run at different times during the playback. If you
specify more than one task to be run at the same time, only the last one specified will be
run.
When specify a task, you must specify the Marker, which is the location within the playback
you want the task to occur, and the task itself, such as below:
<Audio Source="Demo\media\DingDong.mp3" ID="Audio_3">
<Task Marker=’1500’>MyTask</Task>
<Task Marker=”50%’”>MyOtherTask</Task>
</Audio>
The Task specified is the same as all other tasks. The Marker indicates where in the
playback to perform the Task. It can be any of the following:
Atrribute
Description / Usage
Begin
Start of Playback
End
End of Playback
Milliseconds
How many milliseconds into playback to run task
Percentage
At what percentage of playback to run the task
Note: The playback must occur over these points in order to initiate the task. If you ‘skip’
or jump past using the <PlaybackControl> a Marker, the associated Task will not be
158 Revision 18.02 Board Instrumentation Framework
run.
Note: There seems to be an issue with trying to run a Task in the last few hundred
milliseconds of an audio file. For this reason if any specified Task is less than 300ms
from the end of the media (including specifying ‘End’) then the task Marker will be set
at the end – 300ms. In this case if you have a Marker at ‘end’ and a Marker at say
100ms before the end, they will end of up at the same Marker location and only the
last one specified will be run.
<Initial>
Optional
The ID attribute specifies the ID of the audio file (as defined in the <Audio> tag) to be the
first loaded.
<PlaybackControl>
Optional
This is a special tag. You specify a namespace and ID used specifically for controlling the
widget. With it you can Play,Pause,Stop, control volume and seek. The supported data
format is:
Atrribute
Description / Usage
“Play”
Plays the video / resumes from pause
“Stop”
Stops the video and rewinds to the beginning
“Pause”
Pauses playback
“JumpTo:###”
Jumps to a location in the audio file. The ### indicates the percentage
of the video to skip to. So a string of “JumpTo: 25” jumps to the point in
the video equal to 25% of the total playback time
“Volume:###”
Sets the playback volume. ### indicates a % of the maximum volume.
So a string of “Volume: 50” sets the volume at 50% of maximum
<AutoStart>
Optional
Value is either True or False. If True, the audio will begin as soon as selected/loaded –
which could be when your app starts.
<Repeat>
Optional
Allows the video playing to be automatically repeated or not.
The Mode attribute can be either “Single” (default mode), which, if <Repeat> is True, would
repeat the current audio over and over. Or it could be “LoopList”, in which case if there is a
list of audio files, it will cycle through them repeatedly.
159 Revision 18.02 Board Instrumentation Framework
7.10 Text Display Widgets
7.10.1 Text
The Text widget allows you to place text in anyplace. This text can be associated with a
<MinionSrc> and therefore change, or it can be static and never change (by not putting a
<MinionSrc> when you insert the Widget.
7.10.1.1 Definition File
This section discusses what the contents of a TextWidget definition file contains.
Example:
<Widget Type="Text">
<Style ID="default_text">Text.css</Style>
<ScaleToShape>False</ScaleToShape>
</Widget>
Note: ScaleToShape is an experimental setting at this time.
7.10.1.2 Application Settings
This section discusses the settings used to add a Text widget in the application configuration
XML file.
Example:
<Widget File="Text\Text.xml" row="0" column="0" colSpan="3">
<InitialValue> Various Indicator and Progress Widgets</InitialValue>
<StyleOverride ID="Title"/>
</Widget>
The optional <InitialValue> tag is used to provide the text to display at startup. If you
don’t specify a <MinionSrc>, then this is the only text that will be displayed for this widget.
<Format>
You can modify how a text string is displayed by specifying a type and even a suffix string
to be added. The types supported are:
Number (Adds commas)
Percent (Adds commas and % sign)
Money (Adds commas and $)
Example:
<Widget File="Text.xml" row="0" column="0" colSpan="3">
<InitialValue>10000 </InitialValue>
<Format Type=”Number” />
</Widget>
In addition to the Type attribute, you can specify a ‘Suffix’ attribute of the Format tag.
Whatever string you specify will be added to the string displayed.
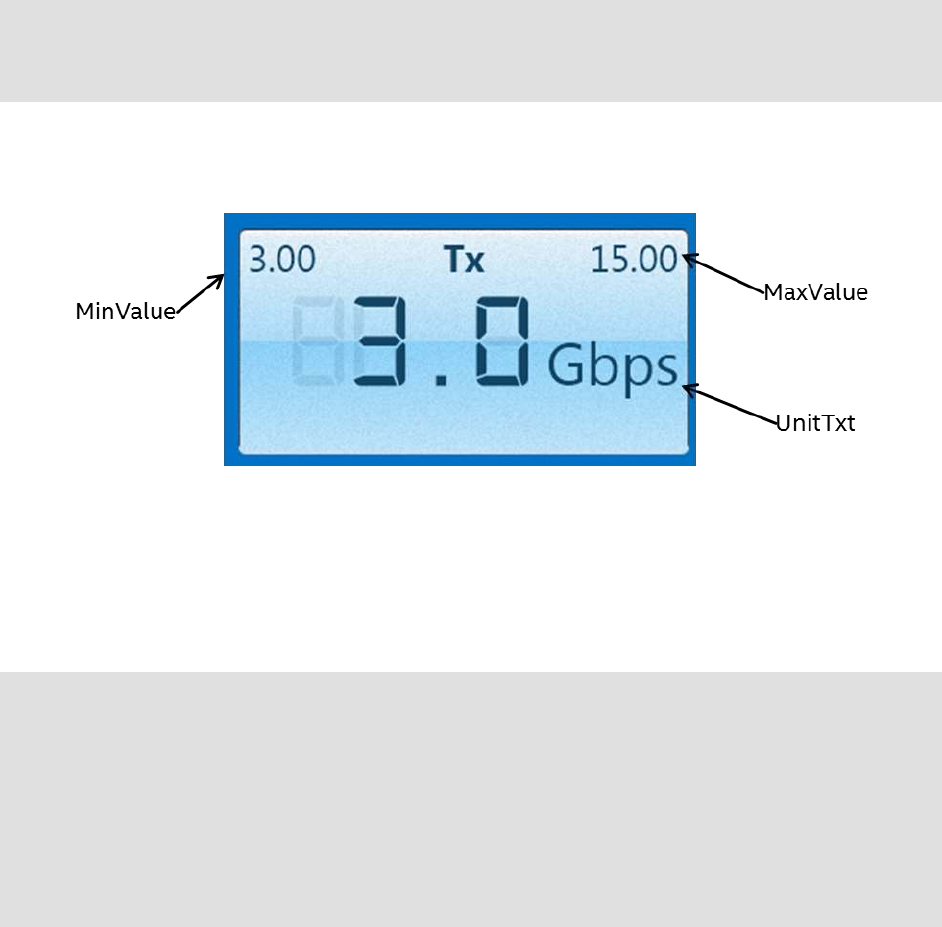
160 Revision 18.02 Board Instrumentation Framework
7.10.2 Scalable Vector Graphic Widget (SVG)
The SVG widget is an extension of the Text widget, with the same settings in .XML. The
Application settings however takes a <Shape> tag in which you specify a SVG (Scalable
Vector Graphic) shape for the widget.
7.10.2.1 Definition File
This section discusses what the contents of a TextWidget definition file contains.
Example:
<Widget File="SVG/ScalableVectorGraphic.xml" row="0" column="0">
<Shape>M 0 0 h 100 v -20 h -100 z </Shape>
<InitialValue>SVG Text</InitialValue>
</Widget>
7.10.3 SteelLCD
Figure 70 LCD Widget
7.10.3.1 Definition File
This section discusses what the contents of a SteelLCD definition file contains.
Example:
<Widget Type = "SteelLCD">
<Style ID="lcd-standard">lcd.css</Style>
<Decimals>1</Decimals>
<MinValue>0</MinValue>
<MaxValue>1000</MaxValue>
<UnitText>MBPS</UnitText>
<KeepAspectRatio>True</KeepAspectRatio>
<ShowMaxMeasuredValue>True</ShowMaxMeasuredValue>
<ShowMinMeasuredValue>True</ShowMinMeasuredValue>
</Widget>
161 Revision 18.02 Board Instrumentation Framework
< Decimals >
Required
Determines how many decimals places the widet will display.
< MinValue>
Required
The minimum value displayed by the Widget.
< MaxValue>
Required
The maxiumum value displayed by the Widget.
< UnitText>
Required
The units text to be displayed in the widget. Can be overridden in application config.
<ShowMaxMeasuredValue>
Required
Is a Boolean value (either True or False) that determines a small dot will appear on the dial
that indicates the maximum value that has been received thus far.
<ShowMinMeasuredValue>
Required
Is a Boolean value (either True or False) that determines a small dot will appear on the dial
that indicates the minimum value that has been received thus far.
<KeepAspectRatio>
Optional
Is a Boolean value (either True or False) that determines if the aspect ratio the developer
specified is maintained. Prevents you from specifying any ole height and width, should be a
ratio of 2.75. Default is true.
With this value set, if you specify a Width of any kind for the widget, it will automatically
calculate the Height.
If you do not specify a Width (preferred, minimum or maximum) but you do specify a
Height, then the Width will be automatically calculated for you. If both Width and Height
are specified, Width will be used and Height automatically re-calculated.
7.10.3.2 Application Settings
This section discusses the settings used to add a SteelLCD widget in the application
configuration XML file.
Example:
<Widget File="LCD\LCD.xml" row="1" column="2" Width="400">
<MinionSrc ID="CPU" Namespace="DemoNamespace"/>
<UnitsOverride>%</UnitsOverride>
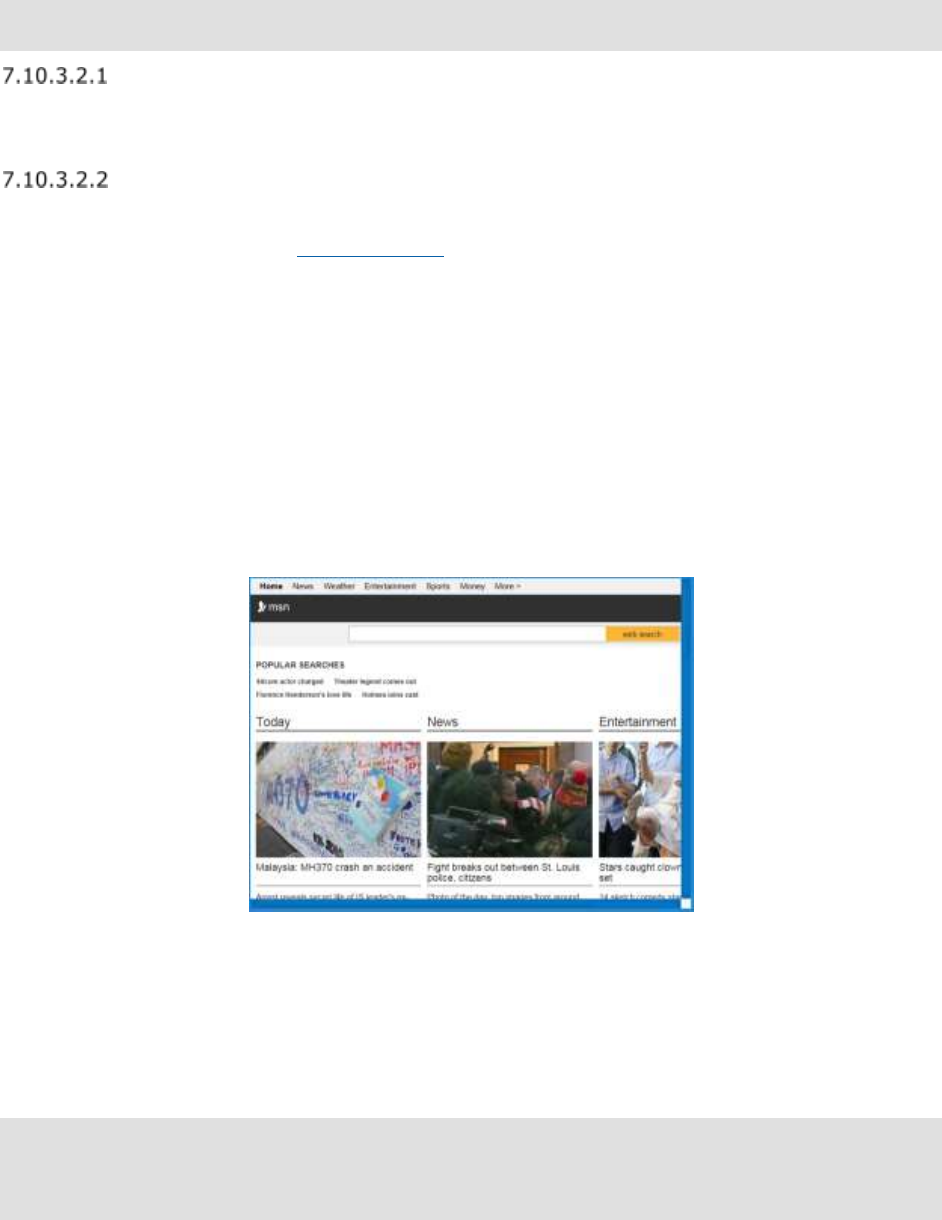
162 Revision 18.02 Board Instrumentation Framework
<Title>CPU 0</Title>
</Widget>
<Title>
Optional
Sets the title of the LCD Panel, shown at the top.
<UnitsOverride>
Optional
Allows you to use a different units type text than what is defined in the widget definition file.
7.11 Web Widget
The Web widget will render HTML web pages. The MinionSrc can take as data a HTML link,
or it can receive the HTML content. This allows you to via a Collector generate a detailed
HTML page and then send it to Marvin without the need for a web server.
Note: If you want to send your own HTML page, the entire contents of that page needs to
be wrapped in a CDATA wrapper – otherwise the XML parsers in Oscar and Marvin will
try to parse the HTML data and complain because most HTML isn’t properly formed
XML.
Figure 71 Web Widget
7.11.1.1 Definition File
This section discusses what the contents of a SteelLCD definition file contains.
Example:
<Widget Type = "Web">
<Style ID="default">Web.css</Style>
<ReverseContent>False</ReverseContent> <!-- fun thing, set it to true.... -->
</Widget>

163 Revision 18.02 Board Instrumentation Framework
7.11.1.2 Application Settings
This section discusses the settings used to add a SteelLCD widget in the application
configuration XML file.
Example:
<Widget File="Web\Web.xml" Width = "800" row="0" column="0">
<InitialValue>http://google.com</InitialValue>
<MinionSrc=”URL” Namespace=”DemoNamespace”/>
</Widget>
You can pass a URL, or you can point to a file with a fully qualified path name by putting
“file:” before the filename. (For files local to Marvin, you can specify a path relative to
where Marvin is running). You may also send an entire HTML document wrapped in CDATA
format.
Note: This is a fully baked Web Engine. As such if Marvin is behind a firewall or proxy, you
will need to configure the proxy information. This is done via command-line
parameters when you launch Marvin:
java -Dhttp.proxyHost=proxy.myproxy.company.com -Dhttp.proxyPort=911 -jar
BIFF.Marvin.jar
using the –Dhttp.proxyHost and –Dhttp.proxyPort settings.
You can also use the http.nonProxyHosts option (-D http.nonProxyHosts=) to create a list of
subnets that would not use the proxy.
You may need to enable the < IgnoreWebCerts> option.
7.12 QuickView Widget
The QuickView widget allows you to specify a Regular Expression (RegEx) for the ID,
allowing you to easily display many data points from a single Namespace. The data is
displayed in alternating Styles for easier viewing.
1
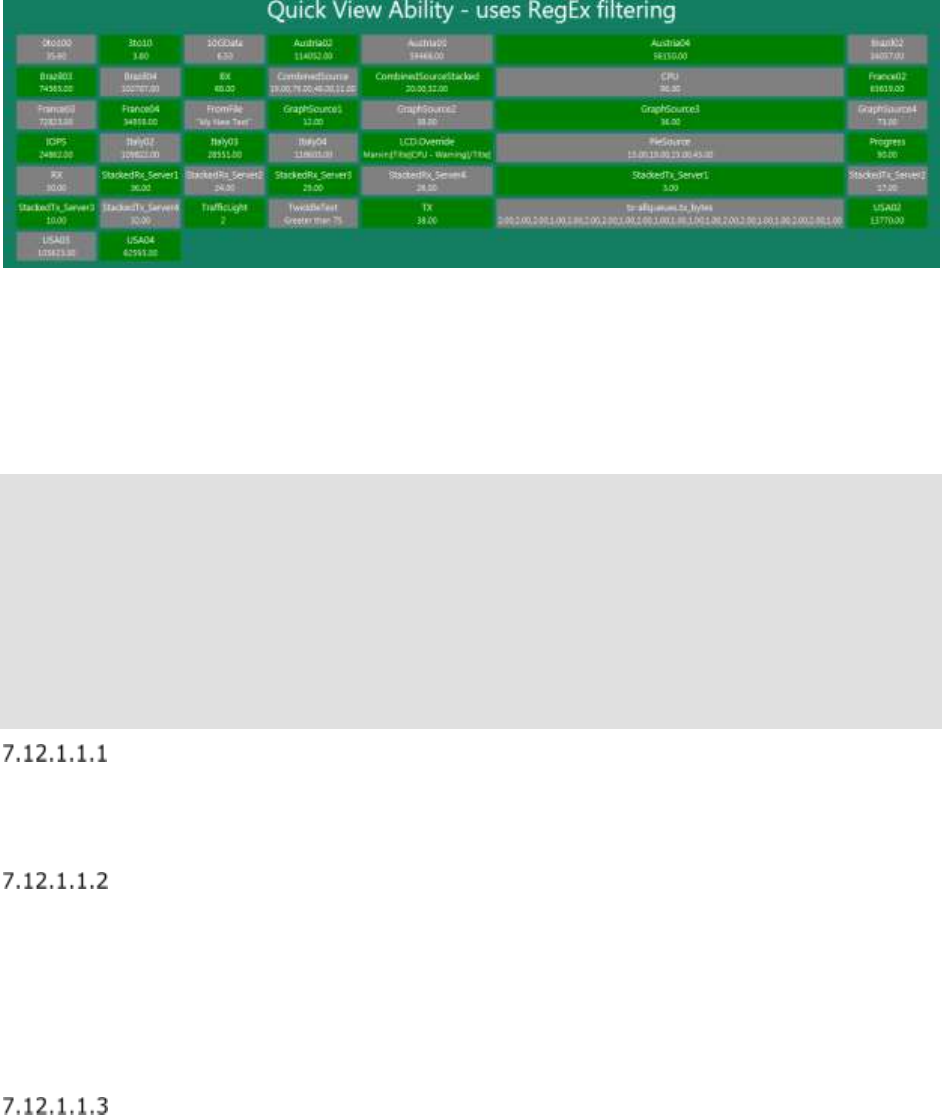
164 Revision 18.02 Board Instrumentation Framework
Figure 72 QuickView Widget
7.12.1.1 Definition File
This section discusses what the contents of a QuickView definition file contains.
Example:
<Widget Type = "QuickView">
<RowWidth>7</RowWidth>
<Order>Ascending</Order>
<EvenBackgroundStyle>-fx-background-color:green</EvenBackgroundStyle>
<EvenIDStyle>-fx-font-size: 1em</EvenIDStyle>
<EvenDataStyle>-fx-font-size: .9em</EvenDataStyle>
<OddBackgroundStyle>-fx-background-color:grey</OddBackgroundStyle>
<OddIDStyle>-fx-font-size: 1em</OddIDStyle>
<OddDataStyle>-fx-font-size: .9em</OddDataStyle>
</Widget>
< RowWidth >
Optional
The number of values to be displayed in a row before starting a new row. If not specified a
default value will be used.
< Order >
Optional
Specifies the order the data is to be displayed. Valid options are:
Ascending
Descending
None - Displayed in order received
If not specified a default value will be used.
< ShowID >
Optional
Boolean value. If False then the ID text is not shown. Default is True.
165 Revision 18.02 Board Instrumentation Framework
< EvenBackgroundStyle >
Optional
Background style to specify for every other datapoint displayed. Is a CSS string. If not
specified a default value will be used.
< EvenIDStyle >
Optional
Style to specify for every other datapoint ID displayed. Is a CSS string. If not specified a
default value will be used.
< EvenDataStyle >
Optional
Style to specify for every other datapoint value displayed. Is a CSS string. If not specified a
default value will be used.
< OddBackgroundStyle >
Optional
Background style to specify for every other datapoint displayed. Is a CSS string. If not
specified a default value will be used.
< OddIDStyle >
Optional
Style to specify for every other datapoint ID displayed. Is a CSS string. If not specified a
default value will be used.
< OddDataStyle >
Optional
Style to specify for every other datapoint value displayed. Is a CSS string. If not specified a
default value will be used.
7.12.1.2 Application Settings
This section discusses the settings used to add a QuickView widget in the application
configuration XML file.
There is an optional <ExcludeList> tag you can use to filter out specific ID’s that may be
caught by your RegEx expression. Enter as many entries as you like in this list, separated
by semi-colons.
Example1:
<Widget File="Quick\QuickView.xml" row="2" column="1" >
<MinionSrc Namespace = "CSX-61" ID="(.*)Socket0(.*)"/>
<ExcludeList>Core0.Socket0.sleep</ExcludeList>
</Widget>
This is a very easy simple example. It is the exact settings used to generate Widget shown
in Figure 72.
It specifies it wants all Data from Namespace = CSX-61 that matches the RegEx pattern of
"(.*)Socket0(.*)".
166 Revision 18.02 Board Instrumentation Framework
Example2:
<Widget File="Quick\QuickView.xml" row="2" column="3" >
<MinionSrc Namespace = "CSX-61" ID="(.*)Socket1(.*)"/>
<RowWidth>5</RowWidth>
<Order>Descending</Order>
<ShowID>True</ShowID>
<EvenBackgroundStyle>-fx-background-color:blue</EvenBackgroundStyle>
<EvenIDStyle>-fx-font-size: .7em</EvenIDStyle>
<EvenDataStyle>-fx-font-size: .6em</EvenDataStyle>
<OddBackgroundStyle>-fx-background-color:grey</OddBackgroundStyle>
<OddIDStyle>-fx-font-size: .7em</OddIDStyle>
<OddDataStyle>-fx-font-size: .6em</OddDataStyle>
</Widget>
This is a more complicated example where the application can override any of the settings
defined in the Widget definition file.
< RowWidth >
Optional
The number of values to be displayed in a row before starting a new row.
< Order >
Optional
Specifies the order the data is to be displayed. Valid options are:
Ascending
Descending
None - Displayed in order received
<ShowID>
Optional
Takes a value of “True” or “False”. Default is True. If set to False, only the value
associated with the RegEx ID will be displayed. The ID itself will not be shown.
< EvenBackgroundStyle >
Optional
Background style to specify for every other datapoint displayed. Is a CSS string.
< EvenIDStyle >
Optional
Style to specify for every other datapoint ID displayed. Is a CSS string.
< EvenDataStyle >
Optional
Style to specify for every other datapoint value displayed. Is a CSS string.

167 Revision 18.02 Board Instrumentation Framework
< OddBackgroundStyle >
Optional
Background style to specify for every other datapoint displayed. Is a CSS string.
< OddIDStyle >
Optional
Style to specify for every other datapoint ID displayed. Is a CSS string.
< OddDataStyle >
Optional
Style to specify for every other datapoint value displayed. Is a CSS string.
7.13 QuickViewLCD Widget
The QuickLCD is very similar to the QuickView Widget, allowing you to specify a Regular
Expression (RegEx) for the ID. Has all the same settings for both application and widget
definition. See the sample application for an example.
Figure 73 QuickView LCD Widget
7.14 Other
7.14.1 Button
Figure 74 Button Widget
168 Revision 18.02 Board Instrumentation Framework
7.14.1.1 Definition File
This section discusses what the contents of a Button definition file contains.
Example:
<Widget Type = "Button">
<Style>Button.css</Style>
</Widget>
Not much to this one
7.14.1.2 Application Settings
This section discusses the settings used to add a Button widget in the application
configuration XML file.
Example:
<Widget File="Button\Button.xml" row="3" column="2" Task="ShowHiddenDials">
<Title> Click me!</Title>
<Image Height="40" Width="40">Demo/Images/PlayerControl/LiveBtn1.png</Image>
</Widget>
Note the Task!
<Title>
Optional
This is the text to be displayed in the button.
<Image>
Optional
You can put an image in the button. This is where you point to the image file. You may
also optionally specify a Height and Width for the image as shown above. If you don’t
specify, the actual height and width of the image will be used.
7.14.2 PDF_Reader Widget
NOTE: This widget has been removed for licensing contamination.
This Widget will read a PDF file and display a page at a time. Is useful if you want to
convert a PPT presentation to a PDF and then you can move through the pages with tasks,
or have it automatically rotate through the pages.
The PDF_Reader widget uses the very cool OpenViewerFX library to decode the PDF files.
This is the free version and not as robust as an Adobe reader, so you may not see all the
text show up (I think this is a font thing). The license for this is available at
https://github.com/IDRSolutions/maven-OpenViewerFX-src
If you want to use this for PPT presentations – I recommend you save the PPT presentation
as a Powerpoint Picture Presentation, then save that presentation as a PDF. This will get rid
169 Revision 18.02 Board Instrumentation Framework
of font issues.
7.14.2.1 Definition File
This section discusses what the contents of a PDF_Reader definition file contains. Which is
nothing .
Example:
<Widget Type = "PDF_Reader">
</Widget>
Not much to this one
7.14.2.2 Application Settings
This section discusses the settings used to add a Button widget in the application
configuration XML file.
Example:
<Widget File="PDF.xml" row="3" column="2">
<MinionSrc ID=”PDF” Namespace=”PDF”/>
<AutoAdvance Frequency='1000' Loop='True'/>
<Source>https://www.irs.gov/pub/irs-pdf/f1040.pdf</Source>
</Widget>
<MinionSrc>
Optional
Standard MinionSrc. However instead of taking a value to display, it can take 3 possible
values:
‘Next’ – moves to next page
‘Previous’ – moves to previous page
Numeric values – moves to that page
<AutoAdvance>
You may wish to automatically advance through all of the pages within a PDF rather than
issuing a <MinionSrc> “next” repeatedly with say a task, you can configure it for
<AutoAdvance>.
<AutoAdvance> takes two attributes – the frequency in milliseconds of how often to
advance to the next page, and Loop boolean attribute. If True then after going through the
entire document pages, it will begin again with the first one.
7.14.3 Spacer
The spacer widget is so simple it is almost not worth explaining. It is simple, but without it,
making advanced looking interfaces would be nearly impossible.

170 Revision 18.02 Board Instrumentation Framework
Spacers are invisible (except when Mode=Debug), or you do a <StyleOverride> to give it a
color.
Since the Marvin GUI uses grids for all widget layouts, if there is nothing placed in a row or
column within a grid, it will have no height or width. Sometimes you really need a blank
width or height to get things to align the way you want in other columns. Use the Spacer
widget for this.
Example Usage
<Widget File="Spacer.xml" row="0" column="1" Width="50" Height="50">
<StyleOverride>
<Item>-fx-background-color: white</Item>
</StyleOverride>
</Widget>
Note the override
7.14.4 FlipPanel
Note: FlipPanels are still supported, but have a better option is DynamicGrids with
Transitions.
A flip panel is a special kind of grid that can ‘flip over’. Is kinda cool and has uses such as
simplified data on one side and detailed on the other, or it can have speaker notes on the
back.
The FlipPanel widget has a front and a back, that are actually grids and you place your
widgets within the <Front> and the <Back> tags.
The FlipPanel will have a button on each side, which is of course can be styled and can be
placed in 8 different possible locations. When the button is pressed, the panel will flip over.
It can flip either horizontally or vertically, as configured.
Using StyleOverride you can change the background of the FlipPanel, just as with any other
<Grid>.
7.14.4.1 Definition File
This section discusses what the contents of a FlipPanel definition file contains.
Example:
<Widget Type = "FlipPanel">
<Style>FlipPanel.css</Style>
<RotationDirection>Vertical</RotationDirection>
<AnimationDuration>500</AnimationDuration>
<FrontButton Text=">" Position="NE">
<Style>FlipPanelBtn.css</Style>
</FrontButton>
<BackButton Text=">" Position="SW">
<Style>FlipPanelBtn.css</Style>
</BackButton>
</Widget>
171 Revision 18.02 Board Instrumentation Framework
<RotationDirection>
Required
Determines which direction the panel will rotate. Valid options are Vertical and Horizontal.
This can be overridden in the application configuration XML file with the <RotationOverride>
tag.
<AnimationDuration>
Optional
Determines the animation time (in ms) it takes to perform the flip. Valid range is 100 to
2000. Default is 700.
<FrontButton>
Optional
Places a button with specified text at the specified location on the panel. Valid options are
(points on a compass):
N
NE
E
SE
S
SW
W
NW
There is also an ability to specify the stylesheet associated with the button. As with all
stylesheet declarations in Marvin, you can specify a stylesheet and/or and ID.
When this front button is pressed, the panel will flip the direction specified by
<RotationDirection> to the back side.
<BackButton>
Optional
Places a button with specified text at the specified location on the panel. Valid options are
(points on a compass):
N
NE
E
SE
S
SW
W
NW
There is also an ability to specify the stylesheet associated with the button. As with all
stylesheet declarations in Marvin, you can specify a stylesheet and/or and ID.
172 Revision 18.02 Board Instrumentation Framework
When this front button is pressed, the panel will flip the direction specified by
<RotationDirection> back to the front side.
7.14.4.2 Application Settings
This section discusses the settings used to add a FlipPanel widget in the application
configuration XML file.
Example:
<Widget File="FlipPanel\FlipPanelWithButtons.xml" row="1" column="3">
<RotationOverride>Horizontal</RotationOverride>
<Front>
<PaddingOverride bottom="50" top="50" left="50" right="50" />
<Widget File="xxx” row="1" column="1"/>
</Widget>
…
<Widget File="yyy” row="3" column="6"/>
</Widget>
</Front>
<Back Align="Center">
<Widget File="LineChart.xml" row="1" column="2">
<Title>Line Chart</Title>
<xAxis Label="Over Time" MaxEntries="10"/>
<yAxis Label="Data Value" MaxValue="100" Count="4"/>
<MinionSrc ID="CombinedSource" Namespace="DemoNamespace"/>
</Widget>
</Back>
</Widget>
<RotationOverride>
Optional
This allows you to change the direction the flip panel flips from what is defined in the widget
definition file. Valid options are ‘Horizontal’ and ‘Vertical’.
<AnimationDuration>
Optional
Determines the animation time (in ms) it takes to perform the flip. Valid range is 100 to
2000.
<Front>
Required
This is where you put all the widgets on the front of the panel. The <Front> tag can have
all the same sub-tags as a <Grid>; this includes PaddingOverride, <StyleOverride> etc.
<Back>
Required

173 Revision 18.02 Board Instrumentation Framework
This is where you put all the widgets on the front of the panel. The <Back> tag can have
all the same sub-tags as a <Grid>; this includes PaddingOverride, <StyleOverride> etc.
7.14.4.3 Flipping the Panel
If your widget definition file includes the <FrontButton> and <BackButton> then the
buttons to flip the panel are already built in.
However this is another way to flip the panel. The FlipPanel can take a <MinionSrc> which
is how you will flip the panel. Valid flip (case insensitive) strings are:
Flip
Flip:Horizontal
Flip:Vertical
Front
Front:Horizontal
Front:Vertical
Back
Back:Horizontal
Back:Vertical
Those with a ‘:’ allow you to override for that flip the flip direction.
Additionally you can place a button somewhere else and assign a MarvinTask to it that will
result in a flip. You can even, via a MarvinTask and a RemoteMarvinTask flip it from a
different computer running Marvin!
7.15 Grid
A grid isn’t really a Widget as it is invisible (unless Mode=Debug), however it is the thing
that all widgets actually are placed into. Each Tab and FlipPanel come equipped with a grid
for your use (the FlipPanel actually has two, on on each side). In these instances you do
not need to create a <Grid> tag in the XML file, it is already there.
Where you would use a <Grid> is for specific layouts. If you are familiar with HTML tables,
it is the same basic principle.
A Grid is placed in a Tab, FlipPanel or another Grid just as you would any other widget, with
the same options including Row, Column, StyleOverride etc. (There is no <MinionSrc> for a
Grid though).
With a grid you can specify the hgap,vgap, alignment just as you can with a Tab. Like a
Tab you can also specify a Grid to be defined in an external file. This will allow you to do
some very interesting things, such as create a library of Grids filled with widgets that you
can plop anywhere you like.
174 Revision 18.02 Board Instrumentation Framework
7.15.1.1 Attributes
The <Grid> tag supports the following attributes, which are case sensitive.
File
O
Specifies the external file where contents for grid are defined
Row
M
The row within a grid where this grid is to be placed
Column
M
The column within a grid where this grid is to be placed
Rowspan
O
The number of rows the grid should span – default is 1
Colspan
O
The number of columns the grid should span – default is 1
Align
O
Where within the parent grid cell to align this grid
Height
O
Width
O
Task
O
Hgap
O
Vgap
O
Note: RowSpan,ColSpan,Height,Width,Task,hgap,vgap can all be defined within the opening
<Grid> statement of the xternal file, and also when specified (called) in the XML file
indicating the external file. With the latter having precedence. Row and Column are
ignored in the opening <Grid> tag of external file. Meaning if you specify Width
within the external Grid File, and you specify it when you ‘call’ that external grid file,
the Width specified when you call it will be used.
Align
Specifies where in the tab the tab grid should appear. Valid options are (points on a
compass):
Center
N
NE
E
SE
S
SW
W
NW

175 Revision 18.02 Board Instrumentation Framework
File
Specifies an additional external file where the contents of the grid are specified. As with all
additional external files, the root of the XML scheme for the external file is
<MarvinExternalFile>. Widgets will then be required to be defined within the <Grid> tag.
<AliasList> and <TaskList> tags are at same level as <Grid>
Note: you can combine both an external file and widgets when defining a grid with your
application configuration file.
<Grid File=”ExternalGrid.xml” row=”3” column=”2” colspan=”4”>
<Widget File=”Gauge\GaugeSteel.xml” row=”1” column=”1”>
<MinionSrc ID=”CPU_Core1” NameSpace=”Server1”/>
<Title>Core 0</Title>
</Widget>
</Grid>
hgap
Specifies the horizontal gap to be inserted in between each column in the grid.
vgap
Specifies the vertical gap to be inserted in between each row in the grid.
7.15.1.2 PaddingOverride/Padding
Allows you to override the application global setting for the padding described in Section
6.3.2.6.
Attributes
The <PaddingOverride> or <Padding> tag supports the following attributes, which are case
sensitive.
Attribute
M/O
Comments
Top
O
Default Tab padding on top of cell grid, in pixels
Bottom
O
Default Tab padding on bottom of cell grid, in pixels
Left
O
Default Tab padding on left of cell grid, in pixels
Right
O
Default Tab padding on right of cell grid, in pixels
7.15.1.3 StyleOverride
Allows you to change the style of the grid. For example the background is the background
color of the Tab or Grid that this grid is within. You can change that here, or add a picture
etc.
7.15.1.4 Widget
One or more widgets can be placed within a Grid. See Section on widgets for more
information.
176 Revision 18.02 Board Instrumentation Framework
7.15.1.5 <Grid>
You may place grids within grids in order to achieve various layouts.
7.15.1.6 <Peekaboo>
A grid can have a <Peekaboo> that works just like a Widget <Peekaboo>, though you
cannot ‘Pause’ and ‘Resume’.
7.16 GridMacro
A GridMacro is a container for a grid that you can use as a MACRO, as you would an
external grid file. It has the same scoping rules as alias’s.
Example:
Definition of the macro.
<GridMacro Name="My Macro Grid">
<Widget File="Text\Text.xml" row="0" column="0">
<InitialValue>$(My_Text)</InitialValue>
</Widget>
</GridMacro>
The later and in scope of the macro:
<Grid Macro="My Macro Grid" row=”3” Column=”0” MyText=”Patrick was”/>
<Grid Macro="My Macro Grid" row=”3” Column=”1” MyText=”Here”/>
This is just a very simple example. GridMacro can be used within other grids, including
DynamicGrid.
7.17 DynamicGrid
The DynamicGrid is just like the <Grid>, except that it also allows you to specify a list of
other grids (defined in external grid files, or GridMacros) with an associated ID, then select
which one is visible. This works along the same way as the DynamicImage widget.
<DynamicGrid row="1" column="0">
<GridFile Source="Demo/DemoTab_FlipGrid1.xml" ID="0" Color="Yellow" />
<GridFile Source="Demo/DemoTab_FlipGrid2.xml" ID="1" Color="Green TaskOnActivate=”RunTest"/>
<GridFile Source="Demo/DemoTab_FlipGrid3.xml" ID="2" Color="Blue" hGap=”5” vGap=”10” />
<Initial ID="0"/>
<MinionSrc ID="DynaGrid" Namespace="DynaGrid"/>
</DynamicGrid>
The list of external grid files is specified by having multiple <GridFile> tags, each of which
has a required Source attribute which must point to an external <Grid> file.
As you can see in the above example, you can also pass aliases (parameters) to the grid
files.
The <Initial> tag work just like the <DynamicImage>, it indicates the default grid to be
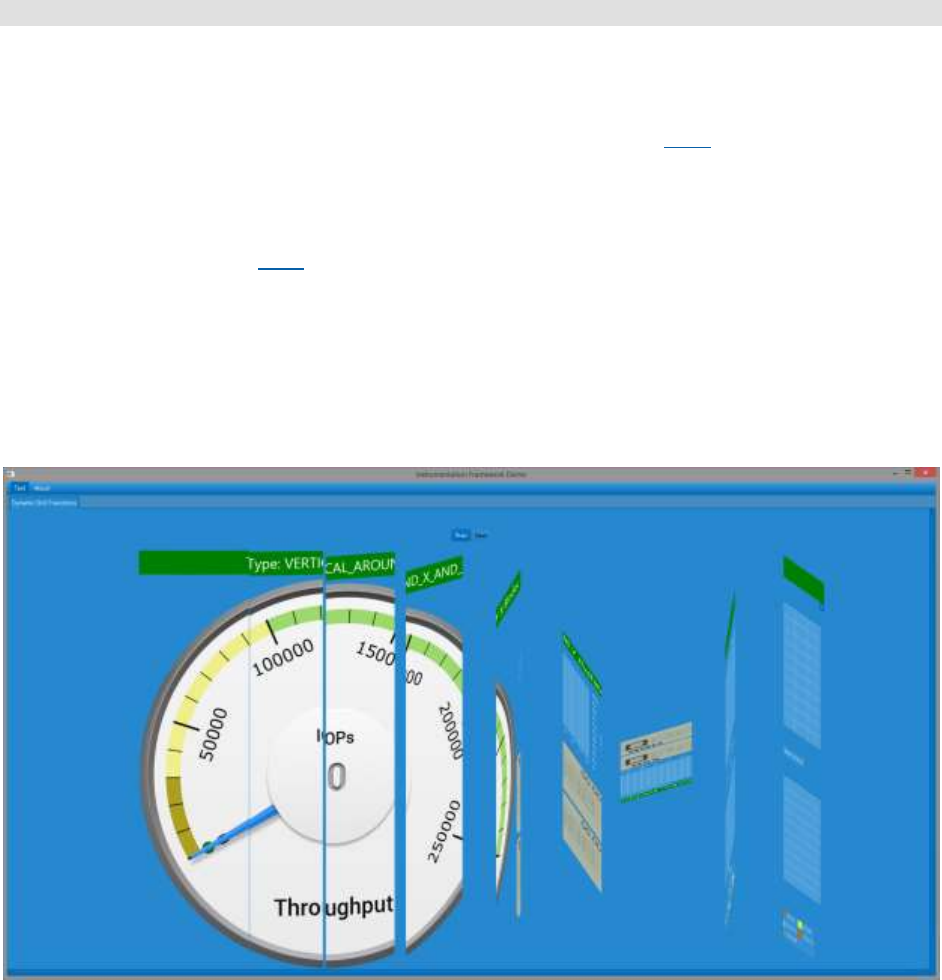
177 Revision 18.02 Board Instrumentation Framework
visible.
In addition to the ID of the specific grid you wish to display, you can also send ‘Next’ or
‘Previous’, and the next or previous grid in the list will be displayed. When using ‘Next’ or
‘Previous’ the list is considered to be circular.
Example of using a MacroGrid for a DynamicGrid GridFile:
<GridFile Macro=" My Macro Grid " ID="PK_Test"/>
7.17.1 Attributes of <GridFile>
As you can see in the example above you can specify things other than just the external
GridFile. Anything specified other than what is listed below is an Alias passed to the Grid.
The following are reserved attributes when specifying a Grid within the dynamic grid:
hGap – Just like any grid, can specify horizontal gap within the grid
vGap – Just like any grid, can specify vertical gap within the grid
TaskOnActivate – Task to perform when the Grid becomes the active Grid. Does
NOT apply to the initial grid when the application first begins.
ExcludeForAutoActions– Optional boolean (‘True’ or ‘False’). If true, then using the
‘next’ or ‘previous’ actions will skip that specific grid.
Task – just a normal Task. If you do not specify a task for an individual grid, if you
have specified a task for the DynamicGrid widget itself, that one will be run.
7.17.2 Transitions
Figure 75 Example Transition
178 Revision 18.02 Board Instrumentation Framework
Optional
I thought it would be fun to have the ability to have transition effects when you go from one
dynamic grid to another. Much like going from one slide to another in a presentation using
PowerPoint or other such application.
To do this, there is a <Transition> tag you can add to the <GridFile> declaration.
<GridFile Source="Demo/Grid2.xml" ID="1">
<Transition>VERTICAL_AROUND_X</Transition>
</GridFile>
The specified transition is what the transition to that grid will be – regardless of what the
previous grid was.
<Transition> Attributes
There are default values for all of these, however you can change the way each of the
individual transitions look. You can achieve some interesting results by the modification of
these settings.
Attribute
M/O
Comments
xGrids
O
Number of columns to divide the transition effect into
yGrids
O
Number of rows to divide the transition effect into
Duration
O
Time for each of the individual animations to run
Delay
O
Time to wait after one animation begins until the next
starts
Note: Not all transitions use both xGrids and yGrids.
Transition Types
The <Transition> Tag needs an actual Transition to use. The following are valid transitions:
VERTICAL_AROUND_X
VERTICAL_AROUND_Y
VERTICAL_AROUND_X_AND_Y
HORIZONTAL_AROUND_X
HORIZONTAL_AROUND_Y
HORIZONTAL_AROUND_X_AND_Y
RECTANGULAR_AROUND_X
RECTANGULAR_AROUND_Y
RECTANGULAR_AROUND_X_AND_Y
DISSOLVING_BLOCKS
CUBE
FLIP_HORIZONTAL
FLIP_VERTICAL
7.17.3 Peekaboo
If you send the text “Next” or “Previous” to the DynamicGrid peekaboo, it will move to the

179 Revision 18.02 Board Instrumentation Framework
appropriate grid.
7.17.4 AutoAdvance
You may wish to automatically advance through all of the grids within a DynamicGrid rather
than issuing a <Peekaboo> “next” repeatedly with say a task, you can configure it for
<AutoAdvance>.
<DynamicGrid row="1" column="0">
<AutoAdvance Frequency='1000' Loop='True'/>
<GridFile Source="Demo/DemoTab_FlipGrid1.xml" ID="0" Color="Yellow" />
<GridFile Source="Demo/DemoTab_FlipGrid2.xml" ID="1" Color="Green TaskOnActivate=”RunTest"/>
<GridFile Source="Demo/DemoTab_FlipGrid3.xml" ID="2" Color="Blue" hGap=”5” vGap=”10” />
<Initial ID="0"/>
<MinionSrc ID="DynaGrid" Namespace="DynaGrid"/>
</DynamicGrid>
<AutoAdvance> takes two attributes – the frequency in milliseconds of how often to
advance to the next grid, and Loop boolean attribute. If True then after going through the
entire list of grids, it will begin again with the first one.
180 Revision 18.02 Board Instrumentation Framework
8 Tasks
This section provided details on Tasks defined in Marvin.
8.1 Defining a Task
Tasks are defined at the same XML level as Tab ,Grid and AliasList. You cannot define a
task within any of those tags, must be at the same level.
Each Task definition is created within a <TaskList> Tag, and contains a <TaskItem> Tag.
Each Task has a required ID.
Example Task Definition
<TaskList ID = "HideX_21">
<TaskItem Type="Marvin">
<DataToInsert ID="x_21" Namespace="DemoTicTacToe" Data="Hide"/>
</TaskItem>
</TaskList>
The above example is from the DemoTab_Grids.xml file. The TaskList has an ID that must
be unique within the scope of the running application, and 1 or more TaskItems. You can
define multiple things to happen when this task is run. The example above only performs a
single task, which is a Marvin task and it inserts some data into the datastream for
processing by the GUI.
Another Example
<TaskList ID="ResetPressed">
<TaskItem Type="OtherTask" ID="ShowBlank_00"/>
<TaskItem Type="OtherTask" ID="HideX_00"/>
<TaskItem Type="OtherTask" ID="HideO_00"/>
<TaskItem Type="OtherTask" ID="ShowBlank_01"/>
<TaskItem Type="OtherTask" ID="HideX_01"/>
<TaskItem Type="OtherTask" ID="HideO_01"/>
<TaskItem Type="OtherTask" ID="ShowBlank_02"/>
<TaskItem Type="OtherTask" ID="HideX_02"/>
<TaskItem Type="OtherTask" ID="HideO_02"/>
<TaskItem Type="OtherTask" ID="HideO_22"/>
</TaskList>
This example shows multiple actions to be performed when the ‘RestPresssed’ task is
executed. They all happened to be the same kind (ChainedTask) in this example, however
it could be any kind of task.
8.1.1 Attributes
The <Tag> tag supports the following attributes.
181 Revision 18.02 Board Instrumentation Framework
Attribute
M/O
Comments
PerformOnStartup
O
See Running a Task at Startup
Stepped
O
Boolean. Runs the tasks consecutively, one at a time, one
per call to the tasklist ID
LoopTasks
O
Boolean, if Stepped=True, will repeatedly loop through all
listed tasks when end reached. Default is True.
8.1.1.1 StyleOverride
Allows you to change the style of the grid. For example the background is the background
color of the Tab or Grid that this grid is within. You can change that here, or add a picture
etc.
8.2 Calling/Executing a Task
Every widget has the ability to specify a Task to be run when clicked. So if you add a
Button and assign a Task to it, when that button is pressed the corresponding Task will be
run. The task you specify in the Task attribute of the Widget is the ID defined above.
Example:
<Widget File="Button.xml" row="3" column="2" Task="ShowHiddenDials">
<Title> Click me!</Title>
</Widget>
Here is an example from the DemoTab_Dials.xml file. A Button widget is placed and a Task
is associated with it. When this button is clicked the task with ID “ShowHiddenDials” is run.
A Task can also be set to execute from a MenuItem.
Note: You can associate the same Task with as many widgets as you like!

182 Revision 18.02 Board Instrumentation Framework
8.3 Minion Task
Figure 76 Minion Task Flow
A Minion task is one in which you want to run some external program/script where the
Minion is running. When you execute a MinionTask (by clicking a Widget, or a MenuItem)
the Marvin framework will send that TaskID to the Minion. The Minion in turn looks up the
Task ID (Actor) and executes the task associated.
Example:
<TaskList ID=”EnableFD_On_2_Servers”>
<TaskItem Type=”Minion”>
<Actor Namespace=”Server-22” ID=”EnableFD”/>
</TaskItem>
<TaskItem Type=”Minion”>
<Actor Namespace=”Server-11” ID=”EnableFD”/>
</TaskItem>
</TaskList>
The above example has a Task with an ID of EnableFD_On_2_Servers that you might assign
to a Button, MenuItem or any other widget. When pressed, the framework will send two
packets to Oscar, who in turn will send it to every minion using the namspaces of Server-22
or Server-11.
If a minion receives a task to perform that hasn’t been defined for it, it will log it and ignore
– no response is ever sent from a task.
Note: Care should be taken when defining the namespace of your Minions. You can have
them all with the same namespace, however that could lead to complications,
especially when doing tasks.
8.3.1 Defining a Minion Task in Marvin
<TaskList ID=”EnableRSSTask”>
183 Revision 18.02 Board Instrumentation Framework
<TaskItem Type=”Minion”>
<Actor Namespace=”Server-22” ID=”EnableFD”/>
</TaskItem>
The TaskItem tag requires the ‘Type’ attribute. A minion task has a type of “Minion”. A
minion task also requires an <Actor> tag.
The <Actor> tag takes a Namespace and ID. These correspond to the Namespace in the
Minion and the Actor ID in the configuration file.
Note: Again – the definition of the Task can occur in any of the Marvin configuration files
except for a Widget definition file.
Scope of Minion Task
Keep in mind that there can be multiple Oscars connected to Marvin, and each Oscar can
have multiple Minions, and further, each Minion can have multiple Namespaces. Oscar
keeps track of the Namespaces of each Minion, when it receives a Minion Task, it will send
the task to all Minions matching the Namespace you define in the <Actor > as described
above.
8.3.2 Minion Task Parameters
As discussed in Section 4.12.3, when you define an Actor for a Minion (in Marvin it is a
Minion Task) the Actor can have parameters assigned to it that will be used when invoking
the Actor script.
You can also pass parameters from Marvin when it sends the Minion Task:
Example
<TaskList ID=”EnableRSSTask”>
<TaskItem Type=”Minion”>
<Actor Namespace=”Server-22” ID=”EnableFD”/>
<Param>eth0</Param>
</TaskItem>
When Minion receives this and invokes the Actor associated with the ID of “EnableFD”, it will
pass the ‘eth0’ parameter to the externally invoked script.
8.3.3 Mixing Minion Task Parameters
A minion Actor can define parameters to send to the external script when invoked. Likewise
a <MinionTask> definition in Marvin allows you to send parameters that are used when
invoking the script.
You can utilize both methods to invoke a script. All parameters defined within the minion
Actor (in the Minion configuration file) are used first, in the defined order, followed by any
and all parameters defined in the <MinionTask> definition in the Marvin configuration files.

184 Revision 18.02 Board Instrumentation Framework
8.3.4 Using a MinionSrc as a Parameter
You may want to use a piece of data collected from a collector as an input to a <Task>. To
do that you can Define your <Param> as follows:
<Param Namespace=”MinionSrcNamespace” ID=”MinionSrcID”/>
The example above will use a single MinionSrc data point as a parameter. You may also
want to use multiple to create a complex string, as you can with Aliases. To do this you use
the following format:
%(Namespace,ID)
The ‘%’ followed by a comma separated Namespace and ID within parens signals Marvin to
go look for a Minsrc with that namespace and ID and use the current value.
For example the following, if SUT_NS,Test1ID datapoint = “PK_TEST” and
SUT_NS,INTERFACE1 = ETH0 the following
<Param>Recordinig.%(SUT_NS,Test1ID).%(SUT_NS,INTERFACE1).biff</Param>
Would be ‘Recording.PK_TEST.ETH0.biff’.
8.4 Oscar Task
Figure 77 Oscar Task Flow
Oscar Tasks allow you to do things such as start and stop live data capture, load a saved
file, start, pause, restart, stop playback of a Oscar from the Gui.
Oscar Tasks have a TaskItem Type of “Oscar”. Each Task requires a OscarID and a task to
be performed and may take parameters.
Example Task Definition:
<TaskItem Type="Oscar">
<Task OscarID="Oscar1">Load File</Task>
<Param> SaveFile8.biff</Param>
</TaskItem>
An Oscar Task requires a <Task> tag that must have a OscarID attribute and the task to be
performed. The OscarID corresponds to the ID within the Oscar configuration file. It is

185 Revision 18.02 Board Instrumentation Framework
recommended that each Oscar connected to a Marvin have its own ID, otherwise each will
be sent the same task, which may nor not be desirable.
Valid Oscar Tasks, defined by the <Task> tag currently are:
LoadFile
StartPlayback
Playback
PausePlayback
StartLive
StopLive
StartRecording
StopRecording
Note: Marvin does no verification what you place in the <Task>. It will send whatever task
you specify with whatever Parameters to the Oscar(s). Oscar will be the one that
verifies what it receives. Oscar will never send back a response, only log unknown or
invalid requests.
8.4.1 LoadFile
Example:
<TaskItem Type="Oscar">
<Task OscarID="Oscar1">LoadFile</Task>
<Param>c:\MyDemoFiles\BetterTogetherDemo.biff</Param>
</TaskItem>
The LoadFile Oscar Task takes a single parameters, which is file to load. Oscar will receive
this, and load the specified file. If it is a bad or incorrect filename, it will fail to load and no
indication will be sent to Marvin.
8.4.2 Playback
The Playback task is the most powerful of the Oscar Tasks. Is has a great number of
options to perform the kind of playback you desire.
Example:
<TaskItem Type="Oscar">
<Task OscarID="Oscar1">Playback</Task>
<Param>speed=2</Param>
</TaskItem>
The Play Oscar task takes a OscarID and Task of ‘Playback’. It will play the currently loaded
file.
The Playback command can also take optional parameters:
Speed - specifies the playback speed

186 Revision 18.02 Board Instrumentation Framework
Repeat - play the entire file again when end reached
Loop - repeatedly play between the start and end packets
Start - used with ‘loop’ option, is packet to start playing at, if not
specified, will be zero
End - used with ‘loop’ option, is packet to stop playing at, if not
specified, will be last packet available
File - specify a file to load and play along with the other options
Example:
<TaskItem Type="Oscar">
<Task OscarID="Oscar1">Playback</Task>
<Param>speed=10</Param>
<Param>loop</Param>
<Param>start=230</PAram>
<Param>end=1230</PAram>
</TaskItem>
8.4.2.1 Speed
Indicates the playback speed. Can be a real (with decimals) value >0 and <= 100.
Indicates a multiplier of how fast to play the data. So a value of .25 will play at ¼ speed. A
value of 10.0 will playback at 10x speed.
Example:
<TaskItem Type="Oscar">
<Task OscarID="Oscar1">Playback</Task>
<Param>speed=2</Param>
</TaskItem>
Notice that the speed parameter indicates the speed with an equals sign.
8.4.2.2 Repeat
This indicates that the playback should repeat the entire dataset in an endless loop until told
to stop. It will do so at the specified speed (default is 0).
Example:
<TaskItem Type="Oscar">
<Task OscarID="Oscar1">Playback</Task>
<Param>speed=0.75</Param>
<Param>repeat</Param>
</TaskItem>
8.4.2.3 Loop
Loop is similar to Repeat, except that it takes a start and stop location within the dataset to
loop.
Example:
TaskItem Type="Oscar">

187 Revision 18.02 Board Instrumentation Framework
<Task OscarID="OscarDemo">Playback</Task>
<Param>loop</Param>
<Param>start=123</Param>
<Param>end=750</Param>
<Param>speed=10</Param>
</TaskItem>
Note start and end are like the optional speed parameter, number is indicated with an
equals sign. The start and end values indicate data packet # within the dataset.
If you do not specify a start value, the start default is packet 0. Similarly if you do not
specify an end value the default is the last packet in the dataset.
8.4.2.4 File
Specifies the file to load and run automatically – saves a step, you no longer need to load
and then run. Note that you need file=.
Example:
TaskItem Type="Oscar">
<Task OscarID="OscarDemo">Playback</Task>
<Param>loop</Param>
<Param>start=123</Param>
<Param>end=750</Param>
<Param>speed=10</Param>
<Param>File=MySaveFile.biff</Param>
</TaskItem>
8.4.3 StopPlayback
Example:
<TaskItem Type="Oscar">
<Task OscarID="Oscar1">StopPlayback</Task>
</TaskItem>
The StopPlayback Oscar task will stop playback of the current file. Starting it again will
restart from starting point.
8.4.4 PausePlayback
Example:
<TaskItem Type="Oscar">
<Task OscarID="Oscar1">PausePlayback</Task>
</TaskItem>
The Pause Oscar task will pause the playback of a loaded file. Starting again (with just a
playback task) will resume from current position.

188 Revision 18.02 Board Instrumentation Framework
8.4.5 StopLive
Example:
<TaskItem Type="Oscar">
<Task OscarID="Oscar1">StopLive</Task>
</TaskItem>
The StopLive Oscar task will stop reading live data.
8.4.6 StartLive
Example:
<TaskItem Type="Oscar">
<Task OscarID="Oscar1">StartLive</Task>
</TaskItem>
The StartLive task will stop playing a loaded file and start receiving live data from Minions or
other Oscars.
8.4.7 StartRecording
Example:
<TaskItem Type="Oscar">
<Task OscarID="Oscar1">StartRecording</Task>
</TaskItem>
The StartRecording task will begin recording the live data feed. It will continue recording
until the app ends or you indicate it should stop.
8.4.8 StopRecording
Example:
<TaskItem Type="Oscar">
<Task OscarID="Oscar1">StartRecording</Task>
<Param>File=C:\MyRecordings\Session1.biff</Param>
</TaskItem>
The StopRecording task will stop an active recording session and save it to the file specified
by the File parameter.

189 Revision 18.02 Board Instrumentation Framework
8.5 Marvin Task
A Marvin Task is a way to achieve some interesting visual things locally to your GUI. To
understand how it works, I need to explain a bit of the internals of how I handle incoming
data.
Figure 78 Data Handling
When Marvin receives a piece of data from Oscar, it hands it off to the Data Manager
component, which in turn updates all of the widgets that are registered for the Namespace
and ID that was associated with the data that was received.
This is the same way both data for <MinionSrc> and <Peekaboo> are handled.
A Marvin Task is a way of inserting data into the Data Manager yourself, without the need
for a Oscar at all. In this way you can set some local text, set the value of a dial, hide and
show (using <Peekaboo>) widgets. For example you want to have a button you press to go
start a script via a Minion Task, you might also have the <TaskList> have a task that will
show a big image saying ‘Test Running’ using <Peekaboo> to show the image that was
previously hidden.
A good example of this can be seen in the DemoTab_Images.xml file, where by clicking a
button you seem to go through a series of images. In reality what happens is there are
many many different Image and Button widgets that using <Peekaboo> get hidden and
shown to give the appearance of displaying different images.
Example:
<TaskList ID="TestTask">
<TaskItem Type="Marvin">
<DataToInsert ID="3to10" Namespace="DemoNamespace" Data="3.4"/>
</TaskItem>
</TaskList>
The example above shows that a Marvin Task required a Type of “Marvin” and a
<DataToInsert> tag which has 3 attributes:
ID - <MinionSrc> and <Peekaboo> ID
Namespace - <MinionSrc> and <Peekaboo> Namespace

190 Revision 18.02 Board Instrumentation Framework
Data - The data you wish to insert.
Note that Data can be either an Element as shown above, or a Tag within the
<DataToInsert> tag as show here:
<TaskList ID="TestTask">
<TaskItem Type="Marvin">
<DataToInsert ID="3to10" Namespace="DemoNamespace">
<Data>3.4</Data>
</DataToInsert>
</TaskItem>
</TaskList>
Note: under a single MarvinTask, you can create many data points:
<TaskList ID="TestTask"> fun -->
<TaskItem Type="Marvin">
<DataToInsert ID="3to10" Namespace="DemoNamespace" Data="3.4"/>
<DataToInsert ID="a" Namespace="testNS" Data="2.8"/>
<DataToInsert ID="b" Namespace="testNS" Data="2.7"/>
<DataToInsert ID="c" Namespace="testNS" Data="2.7"/>
<DataToInsert ID="f" Namespace="testNS" Data="7.7"/>
</TaskItem>
</TaskList>
8.6 Marvin Admin Task
Marvin Admin Task is an EXPERIMENTAL mechanism to do some manipulation of the GUI.
Currently it allows you to, via a task, change the active Tab being displayed in the GUI, and
allows you to hide and show a Tab.
8.6.1 SetActiveTab
Examples:
<TaskList ID="TabSwitch-1" >
<TaskItem Type="MarvinAdmin">
<Task ID="SetActiveTab" Data="StartTab"/>
</TaskItem>
</TaskList>
<TaskList ID="TabSwitch-2">
<TaskItem Type="MarvinAdmin">
<Task ID="SetActiveTab" Data="DemoTab"/>
</TaskItem>
</TaskList>
The above two examples create a <TaskItem> with Type=”MarvinAdmin”. The Marvin
Admin task takes a <Task> Tag that has two required Attributes:
ID – the type of Task to do,

191 Revision 18.02 Board Instrumentation Framework
Data – In this case (only one implemented) it is the Tab ID to switch to.
A MarvinAdmin Task isn’t too exciting or of great use by itself. One usage is that you can
use the PerformOnStartup option to set the default Tab to be displayed when your
application starts.
8.6.2 SetTabVisibility
Examples:
<TaskList ID="Hide Charts1Tab">
<TaskItem Type="MarvinAdmin">
<Task ID="SetTabVisibility" Data="DemoTab-Charts:False"/>
</TaskItem>
</TaskList>
<TaskList ID="Show Charts1Tab">
<TaskItem Type="MarvinAdmin">
<Task ID="SetTabVisibility" Data="DemoTab-Charts:True"/>
</TaskItem>
<TaskItem Type="MarvinAdmin">
<Task ID="SetActiveTab" Data="StartTab"/>
</TaskItem>
</TaskList>
The above two examples create two tasks, one that hides a tab, with ID of ‘DemoTabl-
Charts’ and one that will show the same tab. The ID is the Marvin action to take, in this
case SetTabVisibility.
The usage is that the Data portion has the name of the Tab (DemoTab-Charts in this case)
followed by a color and a Boolean (True or False) value that indicates to make that tab
visible or invisible.
8.7 Remote Marvin Task
This task is very interesting, and extremely powerful. It allows you to send a message from
a Marvin application to all other Marvin’s connected to the same Oscar and tell them to
perform a specific task. If the remote Marvin doesn’t have that task defined it will ignore
the request ; if however it has defined the task, it will perform that task, no matter what
kind of task it is. This would be the same as pressing a Button widget with a task
associated with it.
Example:
<TaskItem Type="RemoteMarvinTask">
<MarvinID>MainMarvin</MarvinID>
<Task ID="TabSwitch-1"/>
</TaskItem>
The TaskItem Type = “RemoteMarvinTask” The <Task> tag takes but a single Attribute,

192 Revision 18.02 Board Instrumentation Framework
the ID of the task to be run on the remote Marvin(s).
The <MarvinID> tag identifies the specific Marvin to target the task to. The task will be
sent to all Marvins, and each Marvin will check to see if it matches the ID of the Marvin as
defined in the ID attribute of the <Application> tag. Optionally you can also use
BROADCAST as the Marvin ID :
<TaskItem Type="RemoteMarvinTask">
<MarvinID>Broadcast</MarvinID>
<Task ID="TabSwitch-1"/>
</TaskItem>
And it will send the message to all Marvins, and any that have a Task defined as TabSwich-
1, will run that task.
This can be very powerful. Consider you have two Marvins running, one on a giant display
behind you at a conference, the 2nd on a Tablet. From the tablet you can have buttons that
allow you to change the displayed tab on the giant display using the Marvin Admin Task.
Take a peek at the RemoteDemo_Controller.xml and RemoteDemo_Controlee.xml files for
examples.
8.8 Chained Task
Say you have a Task (<TaskList> defined to zero out all of your widgets (using Marvin
Tasks) and another one to hide a bunch of Widgets when your demo was over. You may
have two different Buttons for MenuItems for these. There may be a time when you want
to run both of these tasks together and other times you want to run them independently.
Rather than having 3 separate <TaskList>s, one for zeroing out things, one for hinding and
one that does both, you can reuse the 1st two in the 3rd one using Chained Tasks.
Note: the name Chained isn’t very good, and is not even what I call it in the config file, may
change/update later, but for now it works
Example:
<TaskList ID="ResetPressed">
<TaskItem Type="OtherTask" ID="ShowBlank_00"/>
<TaskItem Type="OtherTask" ID="HideX_00"/>
<TaskItem Type="OtherTask" ID="HideO_00"/>
<TaskItem Type="OtherTask" ID="ShowBlank_01"/>
</TaskList>
The above is a snippet from the DemoTab_Grids.xml file where I created a Tic-Tac-Toe
game. When you click on a square successively I use Tasks to hide/show ‘X’ ‘O’ and Blank
images in a square. Each square has a hide and show task for each of the three possible
images to show in that square.
There is also a Button widget that has a task of ‘ResetPressed’ ID. This is the task defined
above, that in turn will call already defined tasks. In this case to go hide all but the blank
images.

193 Revision 18.02 Board Instrumentation Framework
Take a look at the DemoTab_Grids.xml for an example.
The chained task takes a TaskItem with a Type of “Other Task” an ID of the other task to
run. Can even be another chained task, or a Marvin Task, or Remote Marvin task etc.
8.9 Random Task
A Random task task is one in which you provide a list of <Task>s (which are other Task
IDs) that will be chosen at random when the task is run.
Example:
<TaskList ID="Twinkle" PerformOnStartup="True">
<TaskItem Type="Random" postpone="500:2000">
<Task>Twinkle.FirstBlink</Task>
<Task Weight=”75”>Twinkle.SecondBlink</Task>
<Task>Twinkle.ThirdBlink</Task>
<Task>Twinkle.FourthBlink</Task>
</TaskItem>
</TaskList>
Each task by default has an even chance of being chosen. You can skew this by providing
the optional Weight attribute. In the example above the TwinkleSecondBlink has a 75%
chance of being selected, while the other 3 have an 8% change of being selected – which is
an even distribution of the remaining 25% left after TwinkleSecondBlink.
8.10 DataPulse Task
Conditionals are only ‘executed’ when the associated data (a MinionSrc) is updated.
Sometimes you may want to cause the conditional to run even though there has not been a
real update. You can ‘pulse’ the data to make this occur.
<TaskItem Type="DataPulse">
<MarvinDataPoint ID="MyDataID" Namespace="PK Laptop"/>
</TaskItem>
The above TaskItem simply ‘refreshes’ the data with Id MyDataID and Namespace of ‘PK
Laptop’.
8.11 Mathematic Task
Likely not to be used often, this task will take a data point, perform a mathematical
operation on it, and then store the result.
<TaskItem Type="Mathematic ">
<MarvinDataPoint ID="MyData" Namespace="PK Laptop"/>
<Operation Value="1">Add</Operation>
</TaskItem>
Valid operations are:
Add
194 Revision 18.02 Board Instrumentation Framework
Subtract
Multiply
Value attribute indicates the other value to be used in the operation.
8.12 Desktop Task
This task allows you to specify a document or a file on your local system to be opened in the
default application for that document type.
The document to open is specified in the <Document> Tag.
<TaskItem Type="Desktop">
<Document>c:\users\patrick\changelog.txt</Document>
</TaskItem>
The example above (when placed in a TaskList) automatically opens the specified file in
NotePad on my system.
There is an optional Action attribute of Action where you can specify other possible actions:
<TaskItem Type="Desktop">
<Document
Action="Browse">https://www.google.com/intl/en/chrome/browser/welcome.html</Document>
</TaskItem>
The example above will open a web browser with the specified url.
The default Action is ‘Open’, which opens the application associated with the file type
specified.
Currently only ‘Open’ and ‘Browse’ are supported. May in the future include ‘Email’, ‘and
Print’.
8.13 LaunchProgram Task
This task allows you run the specified external Application.
The program to run is specified in the <Application> Tag.
<TaskItem Type="LaunchProgram">
<Application>notepad</Application>
<Param>MyFile.txt</Param>
</TaskItem>
The example above (when placed in a TaskList) runs notepad and tries to open the
MyFile.txt file as indicated by the optional Param tag. You can have multiple Param tags.
8.14 Running a Task at Startup
A recent addition is when you create a Task, you can specify that it be run when your
application starts. This is done with an additional attribute to the <TaskList> tag of
PerformOnStartup and it takes a value of either “True” or “False”. If you do not specify this

195 Revision 18.02 Board Instrumentation Framework
attribute it is the same as specifying False.
Example:
<TaskList ID="TestTask" PerformOnStartup="true">
<TaskItem Type="Marvin">
<DataToInsert ID="3to10" Namespace="DemoNamespace" Data="3.4"/>
</TaskItem>
</TaskList>
The above example is a Marvin Task that sets some dials (listing for MinionSrc with
ID=3to10 and Namespace=DemoNamespace) to a value of 3.4. This task is done as soon
as the application is up and running.
You do not even need to assign this task to a Widget, it will run automatically. Take a look
at the DemoTab_Dials.xml for an example.
Note: Tasks that are performed on startup are really done on startup. The network
communication between Marvin and Oscar are likely to not have occurred yet. As
such it is not recommend to rely on performing any tasks other than local ones such
as Marvin and Marvin Admin tasks using the PerformOnStartup ability.
8.15 User Prompts
I added the ability to prompt the user for input. This is envisioned to be mostly useful for
Tasks, where you want to say send a parameter value as a task that isn’t always hard-
coded in your XML file somewhere, or if it is, it comes from a list of possibilities.
There are two type of prompt methods. One where the user is presented with a list of items
to select from and another where an input box is presented and whatever the user types in
is used.
8.15.1 Defining a Prompt
Prompt methods are similar to Tasks. They must be defined and given an ID before they
can be used. As with tasks, once a prompt is defined, it is global.
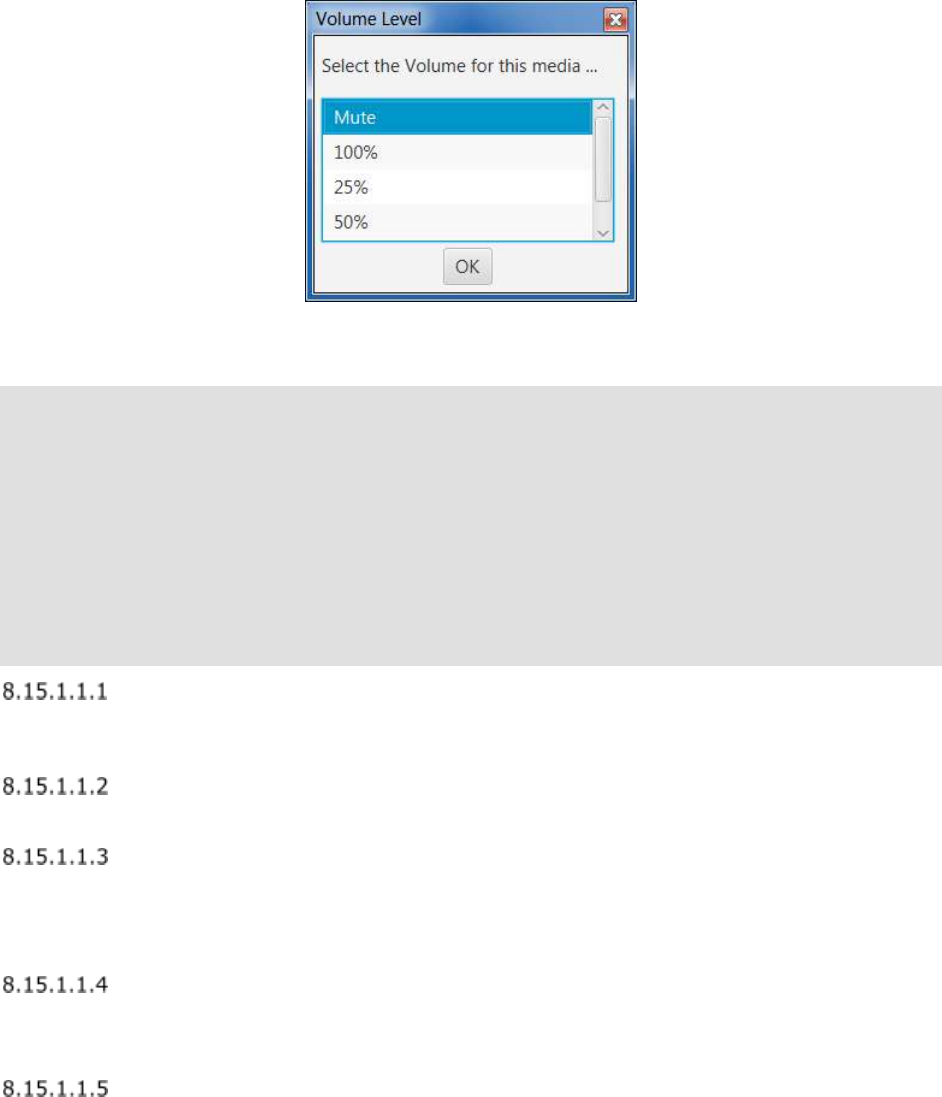
196 Revision 18.02 Board Instrumentation Framework
8.15.1.1 ListBox Prompt
Figure 79: Example of a ListBox Prompt
Example definition:
<Prompt ID="Volume Selection" Type="ListBox">
<Title>Volume Level</Title>
<Message>Select the Volume for this media player</Message>
<List>
<Item Text="Mute">Volume:0</Item>
<Item Text="100%">Volume:100</Item>
<Item Text="25%">Volume:25</Item>
<Item Text="50%">Volume:50</Item>
<Item Text="75%">Volume:75</Item>
</List>
</Prompt>
ID
Specifies the unique ID of the prompt. If used again, a warning will be logged, and the new
ID ignored.
Type
Specifies the type of the prompt, currently only “ListBox” and “InputBox” are supported.
Height and Width
Optional
You can optionally specify a height and width for the input box as an attribute of the
<Prompt line. They can use the percentage options just as with widgets.
<Title>
Optional
Specifies the Title of the listox.
<Message>
Optional
Explanatory message to be displayed.
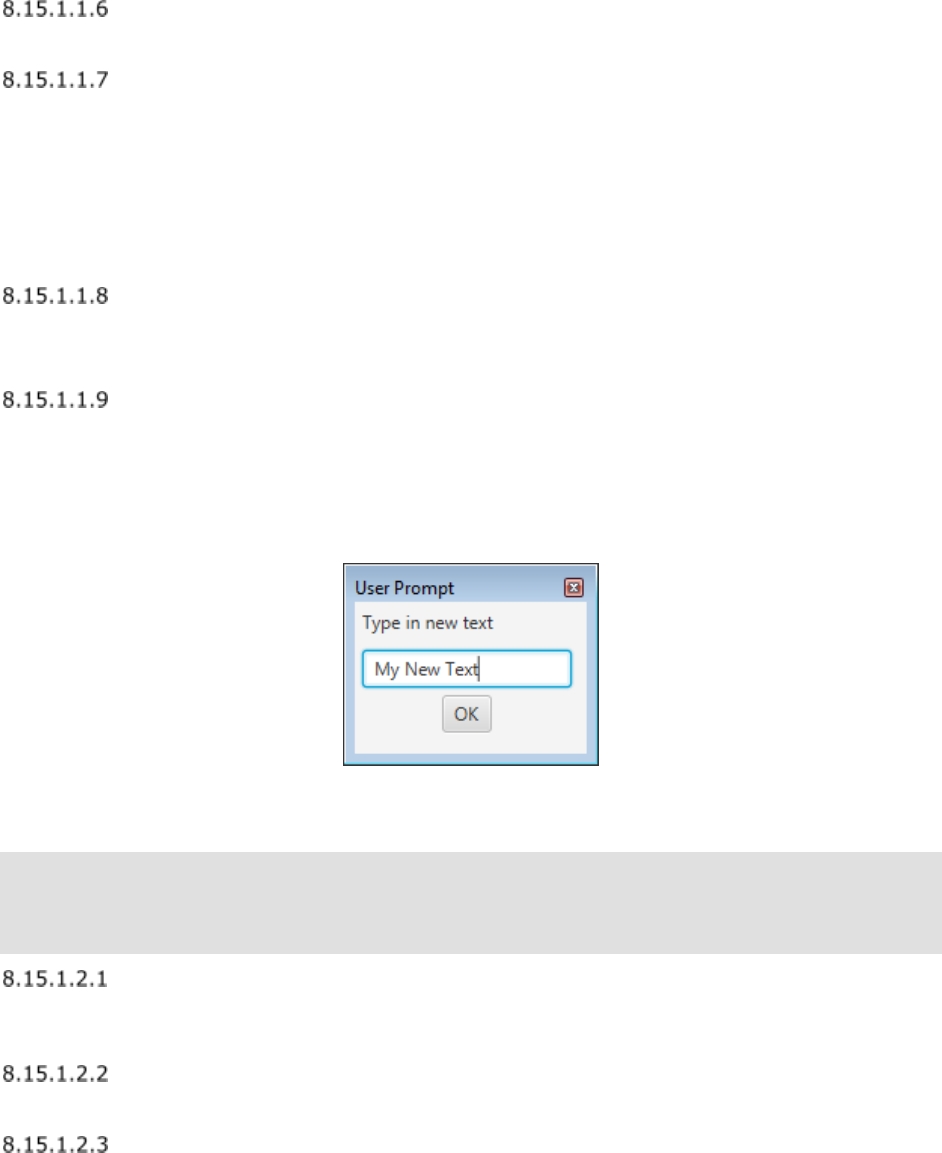
197 Revision 18.02 Board Instrumentation Framework
<List>
This is where you define the <Items> to be displayed in the list.
<Item>
One or more Items should be defined as part of the <List>.
The value of the Item is what is returned to the framework. So in the above example, if the
first item in the list is selected by the user, the string “Volume:0” will be returned.
The optional “Text” attribute provides a mechanism by which you can put a more user-
friendly string to be displayed in the listbox. If the Text attribute is not used, then the
string used with the <Item> will be displayed.
<StyleSheet>
Optional
Can specify a specific .css file to be used for the style, default will be the one the app uses.
<StyleOverride>
Optional
Can apply style override <Item>s like most other things. You cannot specify an alternate
ID or File here though, only items.
8.15.1.2 InputBox Prompt
Figure 80: Example of an InputBox Prompt
Example definition:
<Prompt ID="NewTextPrompt" Type="InputBox">
<Title>User Prompt</Title>
<Message>Type in new text</Message>
</Prompt>
ID
Specifies the unique ID of the prompt. If used again, a warning will be logged, and the new
ID ignored.
Type
Specifies the type of the prompt, currently only “ListBox” and “InputBox” are supported.
<Title>
Optional
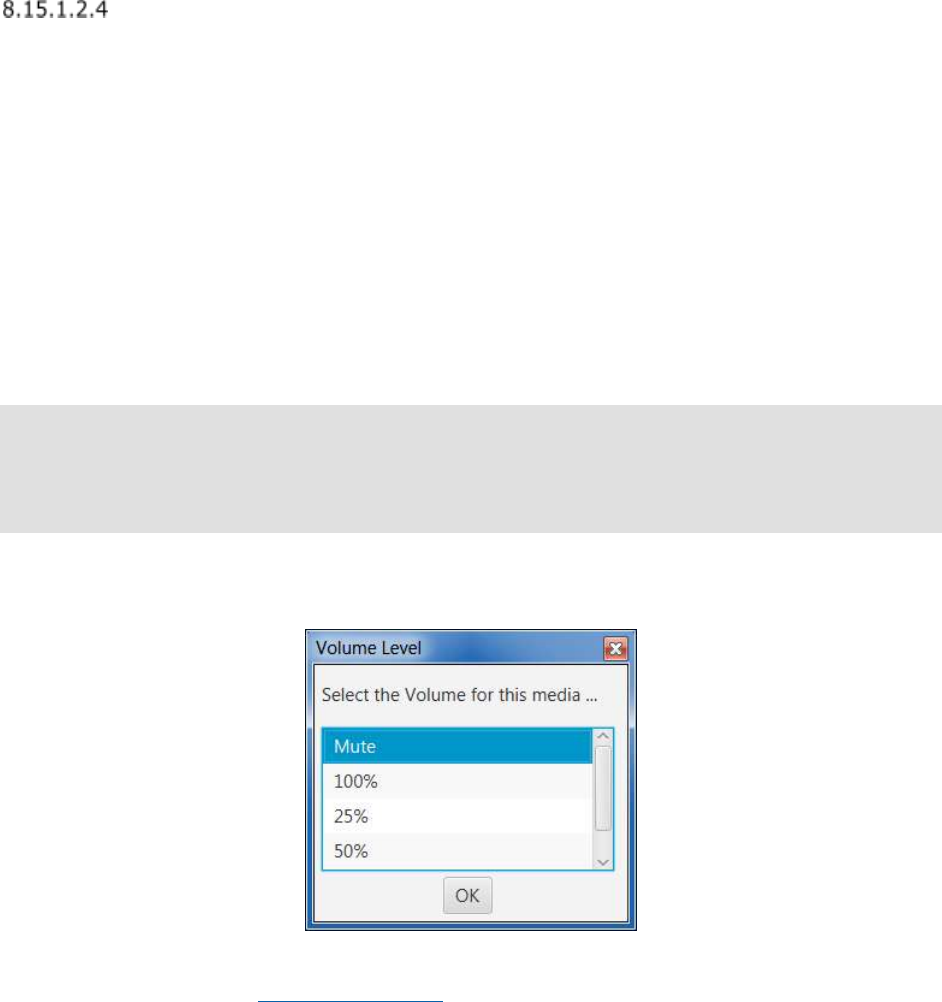
198 Revision 18.02 Board Instrumentation Framework
Specifies the Title of the listox.
<Message>
Optional
Explanatory message to be displayed.
8.15.2 Prompting the user
Now that you have defined a prompt of some kind, you need to use it.
You can use a prompt for any part of a Task. Be it <MinionSrc> or parameters etc.
The usage is pretty simple, just use the ampersand (@) symbol in front of the piece of data
you want to prompt for.
As an example:
<TaskList ID = "Video_Volume_Control">
<TaskItem Type="Marvin">
<DataToInsert ID="VidPlayer" Namespace="VidPlayerNS" Data="@Volume Selection"/>
</TaskItem>
</TaskList>
If you associate the TaskID with a button, then click on that button, it will see that the
Prompt with ID Volume Selection has been requested (the @). The framework will display
the following list box:
Figure 81: Example listbox
If the Video Player has a <PlaybackContol> with ID="VidPlayer" and
Namespace="VidPlayerNS" , then the desired volume setting will be sent to it and changed
as requested.

199 Revision 18.02 Board Instrumentation Framework
8.16 Postponing Task Action
There may be times when you want to click on a button and have a task take place just a
bit later. For example you may want to reveal an image by removing a series of covering
panels in a sequential way (See the demo application, Flipping tab).
This can be accomplished by adding a Postpone attribute to the TaskItem declaration and
giving it a value, which is a postpone time in milliseconds.
<TaskList ID="FlipIt">
<TaskItem Type="Marvin" Postpone="500">
<DataToInsert ID="FlipItPanel" Namespace="local" Data="DummyData"/>
</TaskItem>
</TaskList>
In the example above, the Marvin Task will be executed to flip a flip panel. The task will be
executed approximately 500ms after the task was initiated.
8.16.1 Random Postpone Time
You may want some things to occur at pseudo ‘random’ times. Do accomplish this you can
specify a range for the Postpone value separated by a colon.
Example:
<TaskItem Type="Marvin" Postpone="500:60000">
Will postpone for a random time between ½ a second (500) and a minute (60000).
200 Revision 18.02 Board Instrumentation Framework
9 Conditionals
This section provided details on Conditionals defined in Marvin. A Conditional is a ‘If-Then-
Else’ mechanism that you can create that will compare a MinionSrc value with another
value, if the comparison evaluates to True it will execute the task associated with the then,
otherwise if defined it will execute the task associated with the else.
9.1 Defining a Conditional
Conditionals are defined at the same XML level as Tab, Grid and AliasList. You cannot
define a task within any of those tags, must be at the same level.
Each Task definition is created within a <Conditional> Tag. There is no ID associated with a
Conditional, so you could define the same Conditional repeatedly.
Just like Tasks, Conditionals can define in external files, grids etc, however once defined has
a global scope.
Example Conditional Definition
<Conditional Type="IF_GT" CaseSensitive=”True”>
<MinionSrc ID="CPU" Namespace="DemoNamespace"/>
<Value>75</Value>
<Then>greater</Then>
<Else>less</Else>
</Conditional>
The above example results in the following (in pseudocode):
Whenever the MinionSrc data with ID=”CPU” & Namespace of “DemoNamespace” is updated,
check to see if it is greater than (>) the value of 75. If it is, then go execute the
task with the ID of ‘greater’, otherwise execute the task with the ID of ‘less’.
Note: There is an example of this in the Widget Demonstration, the LCD tab.
9.1.1 Type
Required
Every conditional require a type to be specified. Supported types are:
If_EQ - If Equal (==)
If_NE - If Not Equal (!=)
If_GT - If Greater Than (>)
If_GE - If Greater Than or Equal (>=)
If_LT - If Less Than (<)
If_LE - If Less Than or Equal (<=)
CASE - CASE statement

201 Revision 18.02 Board Instrumentation Framework
9.1.2 CaseSensitive
Optional
The CaseSensitive attribute is optional. The default is FALSE. If you set this to true, then
all comparisons for the Conditional will be performed with case sensitivity, else it won’t.
9.1.3 <MinionSrc>
Required
This is the same as <MinionSrc> used for widgets. This is the data source that when
updated triggers the conditional to be evaluated.
9.1.4 <Value>
Required
This is the value to be compared against the <MinionSrc>. It can be a constant value as
below:
<Conditional Type="IF_GT">
<MinionSrc ID="CPU" Namespace="DemoNamespace"/>
<Value>75</Value>
<Then>greater</Then>
<Else>less</Else>
</Conditional>
Or it can be another <MinionSrc> (declared inside the <Value> tag) as below:
<Conditional Type="IF_GE">
<MinionSrc ID="CPU" Namespace="DemoNamespace"/>
<Value><MinionSrc ID=”WarningLevel” Namespace=”DemoNamespace”/></Value>
<Then>greater</Then>
<Else>less</Else>
</Conditional>
In this example the Value is a Minion Src. You could have a Minion collector that sets this
value depending on the system configuration.
9.1.5 <Then>
Required
Identifies the Task to be executed if the conditional evaluates to True.
9.1.6 <Else>
Optional
Identifies the Task to be executed if the conditional evaluates to False. If not defined then
the conditional will do nothing.

202 Revision 18.02 Board Instrumentation Framework
9.2 CASE
You can setup a conditional CASE statement that looks something like:
<Conditional Type="CASE">
<MinionSrc Namespace="MyNamespace" ID="StateVar" />
<Case Value="0">MyTask</Value>
<Case Value="1">MyTask1</Value>
<Case Value="2">MyTask2</Value>
<Default>myDefTask</Default>
</Conditional>
Where you have the MinionSrc as is required for all conditionals, followed by one ore more
Case entries, where each Case has a constant value to compare against. If the value
matches then the defined task (for example MyTask) is run.
If none of the defined Case values match, you may optionally put in a <Default> task to
run.
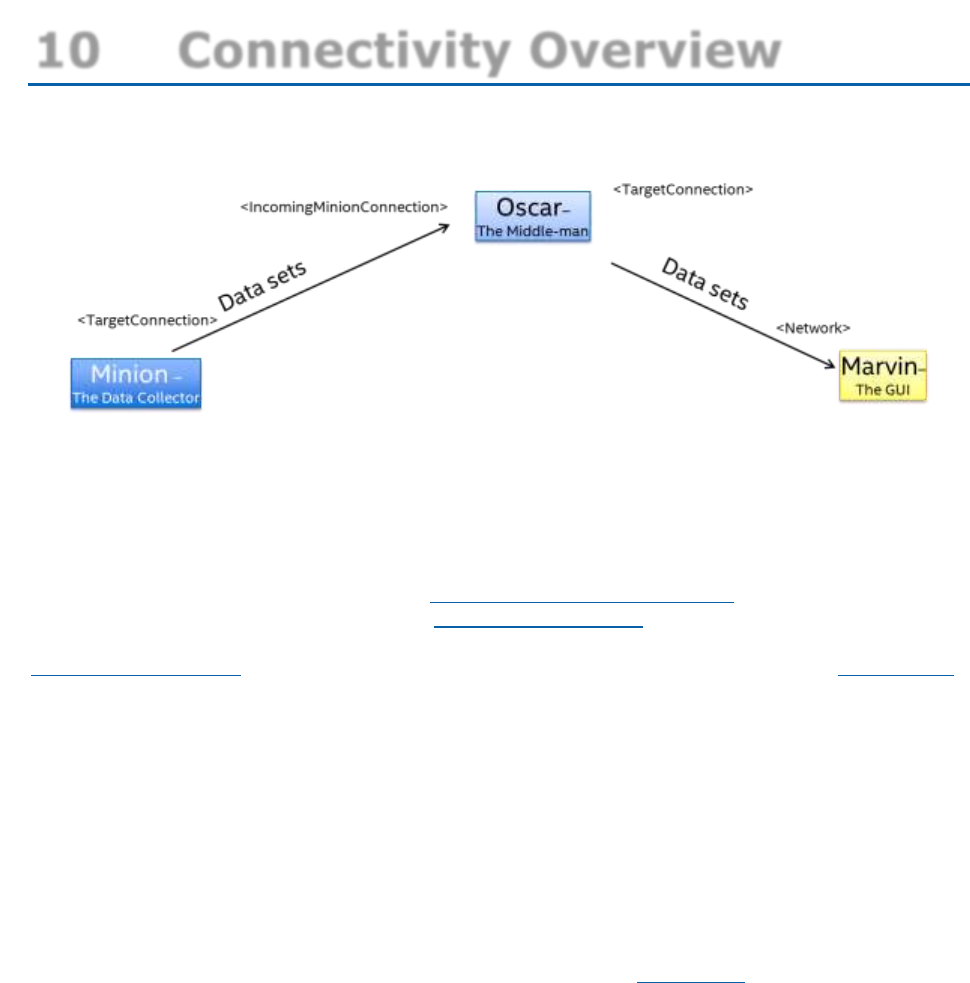
203 Revision 18.02 Board Instrumentation Framework
10 Connectivity Overview
This section describes the various network connections used amongst Minion,Oscar and
Marvin. I add this section mostly for my own reference, it gets confusing sometimes.
Figure 82 Primary Communication Channels
Figure 82 shows the primary communication paths between Minion and Oscar and between
Oscar and Marvin.
Oscar has two primary channels, the path between itself and Minion and between itself and
Marvin. Both are defined within the Oscar configuration file and are required. The Oscar-
Minion connection is defined within the <IncomingMinionConnection> tag. What you put in
here must match what you place in the <TargetConnection> tag in the Minion config file.
Oscar’s second primary channel (I know that didn’t sound right) is defined in the
<TargetConnection> tag within the Oscar configuration file. It must match the <Network>
settings within the Marvin configuration file.
These primary channels provide the data from Minion to Oscar, which in turn re-packages
and sends it on to Marvin.
10.1 Secondary communication
Channels
As shown in Figure 83 there is a 2nd set of communication channels used by the BIFF
Instrumentation Framework.
This secondary channel is used to send information such as heartbeats from Marvin (to keep
Oscar from blasting data to a system not running Marvin). Tasks are also sent over this
channel.
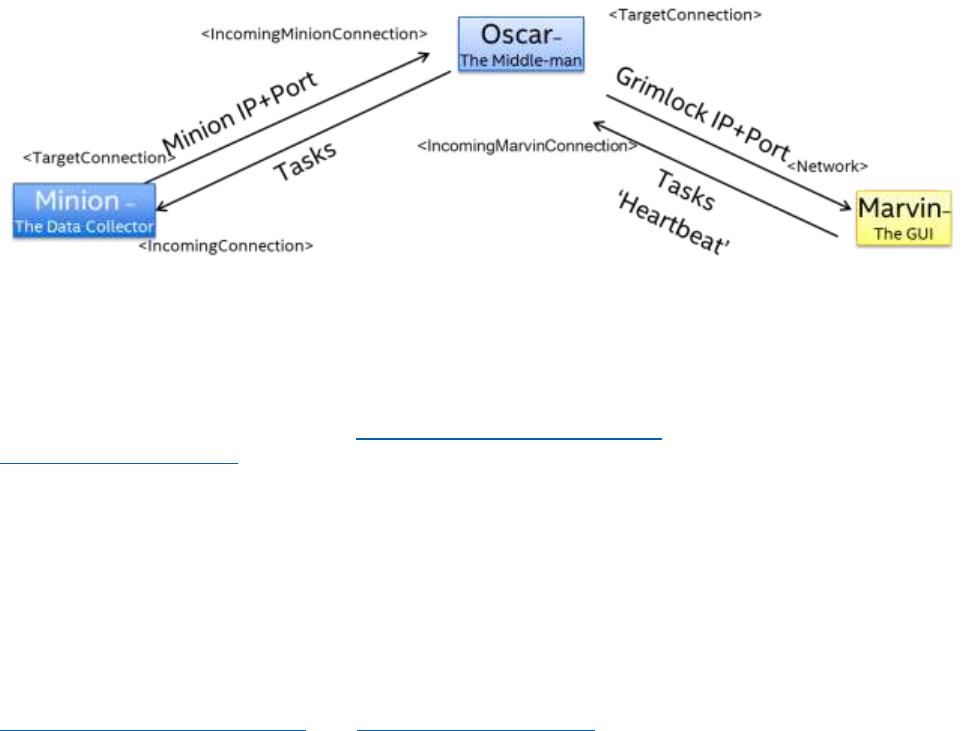
204 Revision 18.02 Board Instrumentation Framework
Figure 83 Secondary Channel
Both Minion and Oscar create network connections for use the secondary channels. Both
Oscar and Minion can create these channels automatically, or can be specified within the
configuration files. Oscar uses the <IncomingMarvinConnection> tag and Marvin uses the
<IncomingConnection> tag. Both of these are optional, if you don’t use the tags the IP and
ports will be automatically selected.
You may note that Oscar does not have a configuration as to the secondary channel for
Minion, nor does Marvin have any configuration to know where to send Tasks and
heartbeats to Oscar. This is because they are ‘told’ this information over the primary
channels. Minion periodically sends a message to Oscar indicating the IP and Port that it is
listening for Tasks on, in addition to its namespace. Likewise Oscar periodically sends a
message to Marvin informing it what IP and Port (along with the Oscar ID) it is listening for
Heartbeats and tasks on.
If you are having troubles with firewalls, you might want to specify
<IncomingMarvinConnection> and <IncomingConnection> to ease network debugging
issues, or to open specific ports in the firewall.
205 Revision 18.02 Board Instrumentation Framework
11 Advanced Tactics
11.1 Widget Stacking
You can place as many widgets in the same location as you like. You may not like the
results though
One thing you can do is to stack widgets but selectively hide and show them as needed to
achieve some interesting effects. For example, if you look in the DemoTab_LCD.xml file you
may see that there are two widgets placed in the same location:
<Widget File="LCD.xml" row="1" column="2" Height="200" Width="400">
<MinionSrc ID="CPU" Namespace="DemoNamespace"/>
<UnitsOverride>%</UnitsOverride>
<Title>CPU 0</Title>
</Widget>
<Widget File="LCD.xml" row="1" column="2" Height="200" Width="400">
<MinionSrc ID="CPU" Namespace="DemoNamespace"/>
<UnitsOverride>%</UnitsOverride>
<Title>CPU 0 - Warning</Title>
<StyleOverride ID="lcd-red"/>
<Peekaboo ID="ShowWarning" Namespace="DemoNamespace_LCD" Default="Hide"/>
</Widget>
Both LCD widgets have the same <MinionSrc>, which is showing CPU utilization. The 2nd
one has a slightly different title (adds ‘Warning’) and changes the LCD color to red. It also
has a <Peekaboo> associated with it and by default is hidden.
I’ve setup a task to show the 2nd widget when I press a button. Since the 2nd LCD widget is
defined after the 1st one, it will be displayed on top of the 1st one when made visible.
Using this technique you could, on your Minion side have two Collectors always running.
One that is constantly feeding the <MinionSrc> for both of these LCD widgets and another
that when the CPU utilization is below a certain threshold always sends the <Peekaboo>
with the data of “Hide”. However when the CPU utilization goes above a certain level, it will
send “Show”, which would then cause the red LCD widget to be visible and give a very
noticeable change to the appearance of your application.
11.2 Show Current Computer Name
Using the Alias ability of Marvin and the fact that I suck in all of the environment variables
in the system as Aliases, you could display the name of the computer running Marvin:
<Widget File="Text.xml" row="2" column="1" >
<InitialValue>$(ComputerName)</InitialValue>
</Widget>
206 Revision 18.02 Board Instrumentation Framework
11.3 Changing the Images being shown
TBD

207 Revision 18.02 Board Instrumentation Framework
12 Support
Despite my best efforts to document the pieces of the BIFF Instrumentation Framework
project – I know that it is a complicated beast. It was designed to be ‘stupid’ (not know
anything about what it is processing) and highly flexible – both of which make it actually
kinda complicated
If you have bugs that you have found or questions (after reading this doc) please contact
me and I will do my best to help as time allows.
Please keep in mind that this is my ‘spare time’ project and not what I get paid me to do.
So plese be patient.

208 Revision 18.02 Board Instrumentation Framework
13 Summary
So here we are near the end of the doc that I think has more lines than both Minion and
Oscar. If you made it this far – thank you!
The overriding design strategy for this ‘shot from the hip’, ‘make it up as I go’ project was
to make it ignorant and agnostic to where the data is coming from. This includes
everything from Minion to Marvin. I think that goal was met pretty well. The other goal
was to make the GUI completely configurable from a text file (XML File) and be very
versatile. While there are a few widgets that harder to use and understand than others
(some of the charts), in general I think it’s pretty flexible.
Flexibility comes at a cost of complexity in both code and configuration files. Hopefully this
document will help some with the configuration files. The code – well if I had it to do over
and know what I know now, or if I had done this as a real sanctioned project rather than a
‘hmm, what could I do’ skunk-works project it would be better. As it is, it works and does
everything I’ve wanted it to do thus far.
This organic project will, I truly hope continue to grow with new features and refinements
over time.
I hope you find the BIFF Instrumentation Framework project useful and have as much fun
using it as I did writing it.

209 Revision 18.02 Board Instrumentation Framework
14 Troubleshooting
This section will try and cover known issues and challenges.
14.1 Stack overflow error
Symptom: you have a pretty complex GUI with a lot (hundreds) of Widgets. When you run
the app you get a stackoverflow error. The app may or may not still run.
This is because Java only reserves a certain amount of memory by default for such gui
components. You need to tell Java that you need more memory. To do this add the –Xss
option to the invocation of the application, and specify more memory.
Try:
Java –Xss1M –jar BIFF.Marvin.jar
That will reserve one MB of ram for threads and such. If this is not enough, increase the
number. Only pick enough to get it to run, you pick too much and it will be a waste of
system memory.
If you need more than 2GB of heap/stack (say you have tons of videos or images) then you
MUST use a 64bit JVM.
14.2 Getting Audio and Video working
in a VM
If you are trying to get the GUI working in a Hyper-V VM, you need to specify in the VM
settings to get Desktop Experience.

210 Revision 18.02 Board Instrumentation Framework
Figure 84: Allowing Video and Sound for a VM
14.3 Connectivity Problems
Sometimes you may see that Marvin gets data for about a minute before it stops getting
updated. This is usually an indicator that there is a firewall blocking communication from
Marvin to Oscar. Marvin periodically sends a message to Oscar it is a ‘heartbeat’ indicating
to Oscar that there is actually something consuming the data it is sending. If Oscar does
not get a notification every 60 seconds, it will nearly stop sending data until a Marvin
responds with a heartbeat. If a firewall is blocking the response, you will see data blast for
60 seconds in Marvin right after you start transmitting from Oscar. To test this, exit Oscar
and restart. If you get data in Marvin for a short while and then nothing despite Oscar
showing new data arriving from Minion then it is likely a firewall problem.
See Section 9 for more details on the various connectivity channels.
14.4 The Dynamic type Widget isn’t
working
So you have a Dynamic Image or Dynamic Grid etc. type of Widget and your collector is
sending the ID that looks correct (you can see it in Oscar), but the widget isn’t changing in
Marvin.
One possible reason for this is that you are using the ‘built-in’ FileCollector to read some file
that would contain the ID for your widget. The File collector read the entire file, including
any interesting OS specific CR/LF characters. If the widget is looking for and ID of ‘foo’ and
the collector sends ‘foo’ + and invisible character, the comparison will fail.

211 Revision 18.02 Board Instrumentation Framework
14.5 The Web Widget isn’t working all
the time
The Web widget may need proxy information configured. This is done via command-line
arguments to the Java VM (JVM) as shown below:
java -Dhttp.proxyHost=proxy.myproxycom -Dhttp.proxyPort=911 -jar BIFF.Marvin.jar
using the –Dhttp.proxyHost and –Dhttp.proxyPort settings.
14.6 Slow network performance, tasks
not getting run in a timely manner
We recently found a frustrating, yet interesting problem. For a demo we were
instrumenting > 12,000 data points and also running some tasks to start and stop
workloads. The systems under test were located in a lab and the demo was running off of
the corporate network. We found very poor and bursty performance. It turned out to be a
mis-alignment of MTU between the systems under test, the switch in the lab and the main
network. Once we set them all to the standard 1500 on the systems under test and lab
switch, these issues went away.
14.7 Collector Data not showing up in
Oscar or Marvin
Sometimes you can create a collector that sends a lot of data (for example the
FileCollector), or you can <Group> a bunch of collectors together. If the resulting packet
size is too large (greater than the MTU) the packet will likely not make it to the destination.
If logging is turned on, then you should get a warning message about the specific Collector
that is possibly having the problem.
14.8 Multi-Source Widgets not Updating
properly
Muliti-Source Widgets can be problematic unless used with care. Each data source is an
independent stream and even if the collector is run with the same interval, the traffic is UDP
and not guaranteed, so it can be dropped. This can result in data being out of sync and
looking poorly.
This is why I added the <Synchronized> capability to the multi-source charts/graphs. The
default settings for this option is to synchronize the data and wait for all data sources to

212 Revision 18.02 Board Instrumentation Framework
send a data update before updating the chart. The problem with this is if you have a data
source that is ‘dead’ (say a minion that isn’t running) then the chart will never update. To
get around this set <Synchronized> to false, or change the MaxSyncWait time to something
reasonable for the data rate to have the data that is coming in synchronized.
14.9 Error: Could not find or load main
class kutch.biff.marvin.Marvin
This usually occurs if you are trying to run a non-Oracle version of Java 8, usually OpenJDK.
OpenJDK does not include the JavaFX features, which is a requirement for Marvin.
For example doing a java –version will tell you what is going on:
# java -version
openjdk version "1.8.0_91"
OpenJDK Runtime Environment (build 1.8.0_91-8u91-b14-3ubuntu1~16.04.1-b14)
OpenJDK 64-Bit Server VM (build 25.91-b14, mixed mode
Try installing openjfx. Using apt-get it would look like:
sudo apt-get install openjfx
That should get you moving forward.
14.10 java.lang.UnsupportedOperationEx
ception: Unable to open DISPLAY
You most likely get this kind of exception when you try to launch Marvin on a Linux OS via a SSH session.
Try using VNC, should have much better results.
14.11 The fonts on one system do not
look the same as on another
You may find that you develop your Marvin application on your PC and it all looks great.
Then you give it to a friend, or put it on another system and things don’t line-up properly or
the fonts no longer fit.
Could be a couple of things, one you may be using a font on the 1st system that is not on
the other.
The other and more common reason is that the fonts in the application are based upon the
system default font size. It is kinda technical and I don’t know how to explain it very well,
just know that you should set your font size settings the same on all systems you want to
show this on. In windows the settings page looks like:
213 Revision 18.02 Board Instrumentation Framework
Make sure that all systems you want to use have the same settings of either smaller,
medium or larger if you want to ensure they all look the same when you run the gui.
14.12 My images and goodies don’t look
right on another computer
Marvin has an auto-scaling ability that should re-size your images and widgets if you run
the application on a computer with different screen dimensions than the one where you
created the application. However you must set CreationSize propery.
14.13 My widgets don’t line up anymore
I changed the way Grid padding works, it now properly does not inherit the setting from the
parent application the default is 0. If you want to use it ‘old’ way, look at ‘LegacyMode’
option in application Padding section.
14.14 Images don’t always appear
I’ve noticed that if you use CSS code to put in images (say background) and the path to the
image (such as the directory of your application) have spaces in it, it will fail to load the
image and Java engine (outside of what Marvin can see) will spit out a error message and
ignore the image.

214 Revision 18.02 Board Instrumentation Framework
15 Thanx and Recognitions
Brian Johnson has been instrumental in this project. While he doesn’t write code, he has
been my tester and provided more ideas than I can name. Most of which I rejected as
idiotic before I took a moment and realized it was a great idea. He also has taught himself
a lot about CSS styling and provided a lot of the fun styles.
Gerrit Grunwald (http://harmoniccode.blogspot.com/) has been somewhat of an inspiration
for me. I leverage his awesome gauges (https://bitbucket.org/hansolo/enzo/wiki/Home) for
a great number of my Widgets. I muddle through his code to learn new things every
chance I get.

215 Revision 18.02 Board Instrumentation Framework
16 About Me
I enjoy fishing, reading, video games and getting schooled at basketball by my 13 year old.
I still have a passion for writing code; I just don’t get to do it for pay anymore. Thus
another reason I decided to write this project during my off time.
This project has been my passion for years now.
I hope you find it of use.
Thanx,
Patrick Kutch
October 2017
