Bonita BPM 7 What's New In Exercises Training WNEW7 En US V7 1.0.1 Instructions
User Manual: Pdf
Open the PDF directly: View PDF ![]() .
.
Page Count: 78
- Bonita BPM 7
- Table of Contents
- Chapter 1. Create a business data
- Chapter 2. Create contracts and forms
- Chapter 3. UIDesigner - Create a new form
- Chapter 4. Build a custom page to list vacation requests
- Chapter 5. Create a custom application
- Chapter 6. Build an Extension API to request data to an external database
- 6.1. Objective
- 6.2. Instructions
- 6.3. How-to
- 6.3.1. Export the REST API extension example from the portal.
- 6.3.2. Develop the API Extension Sql Datasource.
- 6.3.3. Set the security.
- 6.3.4. Publish the API Extension Sql Datasource in the portal.
- 6.3.5. Import the API Extension diagram into your workspace..
- 6.3.6. Test the API Extension running the process.
- 6.4. Correction
- Chapter 7. Create a new connector
Bonita BPM 7
What's new in Bonita BPM 7 exercises

Bonita BPM 7: What's new in Bonita BPM 7 exercises
Copyright © 2015 Bonitasoft

iii
1. Create a business data .................................................................................................................. 1
1.1. Objective ............................................................................................................................... 1
1.2. Instructions ............................................................................................................................ 1
1.3. How-to .................................................................................................................................. 1
1.3.1. BDM definition ............................................................................................................ 1
1.3.2. Add reference to business data ................................................................................... 1
1.4. Correction ............................................................................................................................. 2
2. Create contracts and forms ........................................................................................................... 4
2.1. Prerequisites ......................................................................................................................... 4
2.2. Objective ............................................................................................................................... 4
2.3. Instructions ............................................................................................................................ 4
2.4. How-to .................................................................................................................................. 4
2.4.1. Generate contract ....................................................................................................... 4
2.4.2. Use contract to define business variable default value ................................................... 5
2.4.3. Generate a form based on a contract definition ............................................................ 6
2.4.4. Display business data in forms .................................................................................... 6
2.5. Correction ............................................................................................................................. 7
3. UIDesigner - Create a new form ................................................................................................... 10
3.1. Objective ............................................................................................................................. 10
3.2. Instructions .......................................................................................................................... 10
3.3. Correction ............................................................................................................................ 10
4. Build a custom page to list vacation requests ............................................................................. 33
4.1. Objective ............................................................................................................................. 33
4.2. Instructions .......................................................................................................................... 33
4.3. How-to ................................................................................................................................ 33
4.3.1. Create a custom page using the UI designer. ............................................................. 33
4.3.2. Test a custom page using the preview feature. ........................................................... 33
4.4. Correction ............................................................................................................................ 33
5. Create a custom application ......................................................................................................... 38
5.1. Objective ............................................................................................................................. 38
5.2. Instructions .......................................................................................................................... 38
5.3. Correction ............................................................................................................................ 38
6. Build an Extension API to request data to an external database .................................................. 55
6.1. Objective ............................................................................................................................. 55
6.2. Instructions .......................................................................................................................... 55
6.3. How-to ................................................................................................................................ 55
6.3.1. Export the REST API extension example from the portal. ............................................ 55
6.3.2. Develop the API Extension Sql Datasource. ............................................................... 55
6.3.3. Set the security. ........................................................................................................ 55
6.3.4. Publish the API Extension Sql Datasource in the portal. .............................................. 55
6.3.5. Import the API Extension diagram into your workspace.. .............................................. 56
6.3.6. Test the API Extension running the process. .............................................................. 56
6.4. Correction ............................................................................................................................ 56
7. Create a new connector ............................................................................................................... 64

Bonita BPM 7
iv
7.1. Objective ............................................................................................................................. 64
7.2. Prerequisites ....................................................................................................................... 64
7.3. Instructions .......................................................................................................................... 64
7.4. Correction ............................................................................................................................ 64

1
Chapter 1. Create a business data
1.1. Objective
The objective of this exercise is to continue the provided Vacation Request process implementation, adding
data management.
1.2. Instructions
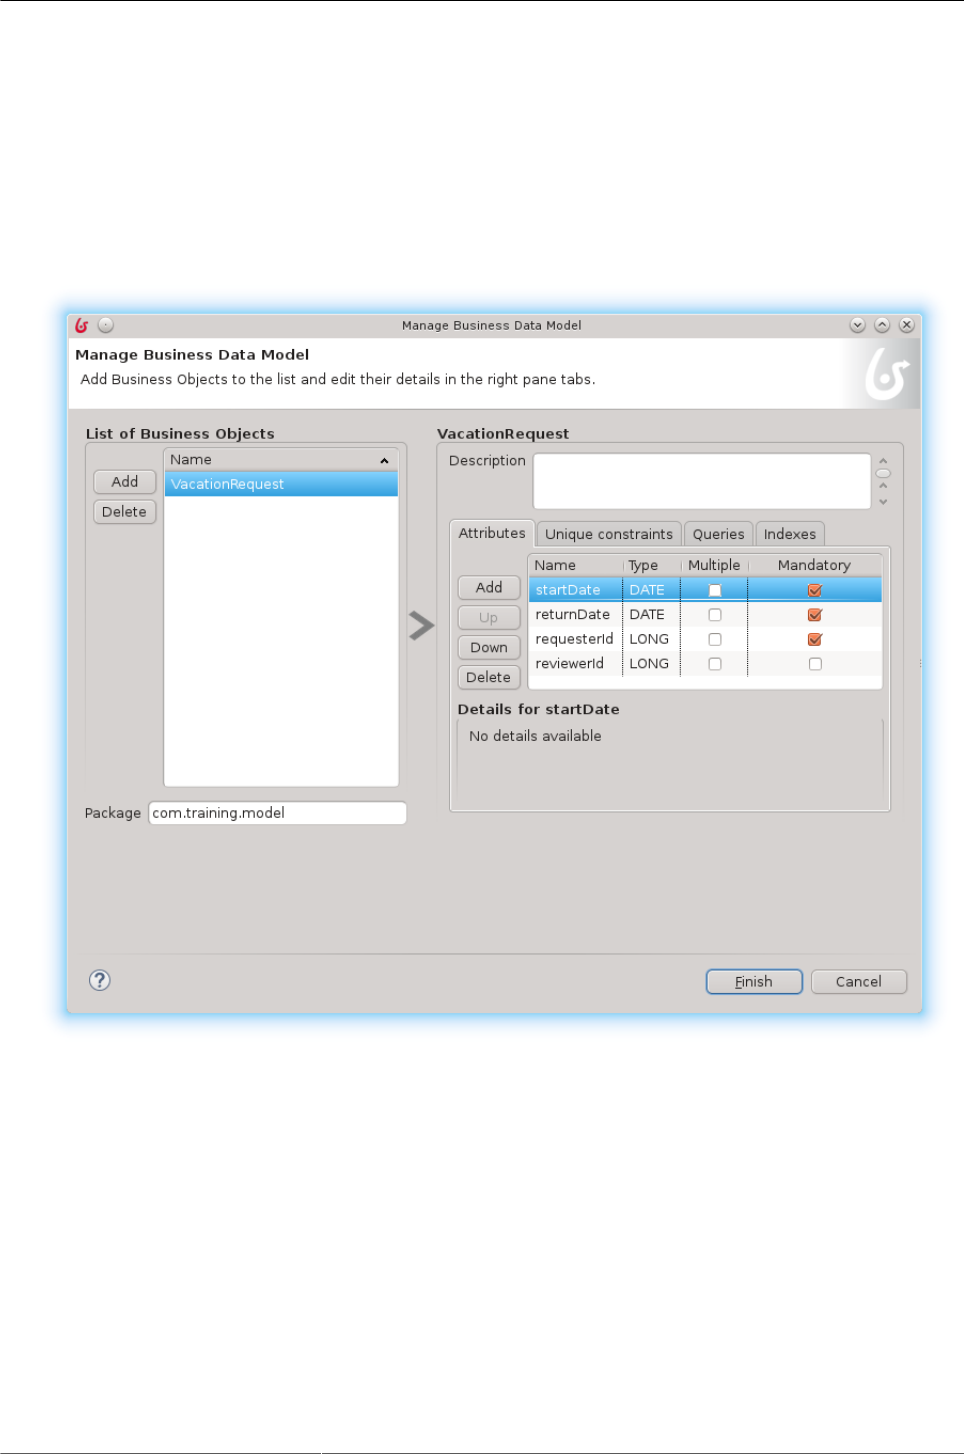
• Define a new business data model (BDM) with a new business object "VacationRequest" having 4 attributes:
startDate, returnDate (both as DATE), requesterId (LONG) and reviewerId (LONG).
• Add a reference to a single instance of this business object at pool level. Name this reference "vacationRe-
quest".
1.3. How-to
1.3.1. BDM definition
To create and edit a BDM go to Development Business Data Model Manage...
Note that when you click on Finish button the new version of the Business Data Model will be published in test
platform embedded with Bonita BPM Studio.
1.3.2. Add reference to business data
For a process to be able to interact with business data (create, read, update, delete) the process definition
needs to include references to business data. Such references are call "business variables". To declare them
you need to:
• Select the pool
• Go to Data tab, Pool variables sub-tab and click on the Add... button in the Business variables section
• Define a name and select the type in the Business Object drop down list (in this exercise you will have only
one Business Object defined: "VacationRequest").
• Optionally you can define a default value. Default value of the business data variable can be either a new
object created using Groovy script and contract data (we will use this option; define default value once you
generate the contract) or a query that will search for an existing business data value stored in database.
Note that contract can be generated based on the business data variable you are currently declaring (see
next section).
Create a business data
2
1.4. Correction
1. Define a business data model (BDM).
In Bonita BPM Studio menu bar, hit the Development menu, then select Business Data Model and Manage...
On the left panel (list of business object), click on Add . This will create a new Business Object definition.
Rename it to "VacationRequest".
Select the "VacationRequest" object. On the right panel, in the attribute tab, click on Add button. A new
attribute is created. Rename it to "startDate". Change its type to "Date" and make it mandatory.
Add a second attribute. Call it "returnDate", change its type to "Date" and make it mandatory.
Check the package name at the bottom left. Change it to com.training.model .
Click on Finish . The BDM will be deployed to the embedded test environment, then the BDM window will
be closed.

Create a business data
3
2. Reference this business object on the pool level.
A BDM has been created, along with the definition of a business object (i.e. a Java class) "VacationRequest".
We will now add a reference on our process so that it knows it will manipulate a "VacationRequest".
Select the "Vacation Request" pool. In the context panel, open the Data tab. In Pool variables section, click
the Add... button next to the Business variables list .
Add a new business data reference called "vacationRequest", set the Business Object to "VacationRequest"
and click on Finish button.

4
Chapter 2. Create contracts and forms
2.1. Prerequisites
You must have successfully achieved previous exercises or import the correction into your workspace.
2.2. Objective
The objective of this exercise is to continue the Vacation Request process implementation, adding simple forms.
Once completed, the process will be runnable, with a simple form to make a request, and another one to
review it.
2.3. Instructions
In order to create a backup, export the previous version of the diagram: go to Diagram, Export..., select the
location where you want to save the file and click on Finish button. Update your diagram and pool name to
version 2.0.
• Generate a process contract (named it "vacationRequestContract") based on the reference to VacationRe-
quest in order to tell the user interface that a startDate and an returnDate are expected to create a new
process instance.
• Use contract inputs and Bonita Engine variables to define the default value of the VacationRequest business
variable.
• Create a simple instantiation form to allow a user to make a request based on a start date and a return date.
• Create the step form to allow a manager to view the request in a read-only mode. Don't care yet about
implementing manager decision.
2.4. How-to
2.4.1. Generate contract
You can use the business data variable to generate a contract or you can define the contract manually. In this
exercise we will use contract generation and in next exercise we will manually define the contract.
Once you declare your business data variable, do the following step to generate a process contract:
• Select the pool
• Go to Execution tab, Contract sub-tab and click on Add from data... button
• Select the business data variable you want to use for contract generation (e.g. "vacationRequest")

Create contracts and forms
5
• Click on Next button
• Select attributes of your business data you want to include in your contract (e.g. startDate and returnDate)
• Optionally customize the contract Input name (e.g. to "vacationRequest")
• Click on Finsih button
2.4.2. Use contract to define business variable default value
You can use the contract input to define a new instance of your business object and at the same time point
your process instance toward it.
To do that, edit the business data variable default value and use a Groovy script. The Groovy script will in-
stantiate the Java object that represent your business object and set the value of his attributes using contract
inputs values:
import org.bonitasoft.engine.bpm.process.ProcessInstance;
import com.bonitasoft.engine.api.ProcessAPI;
import com.training.model.VacationRequest;
// Create a new instance of the VacationRequest Java class
VacationRequest vr = new VacationRequest();
// Get the start date from the contract input (a Map that map
// together BMD attribute names and values) and use it to set
// the attribute value of the Java object
vr.setStartDate(vacationRequestContract.get("startDate"));
vr.setReturnDate(vacationRequestContract.get("returnDate"));
// Get the id of the user who initiate the process using Engine API and variable "processInstanceId"
ProcessAPI processAPI = apiAccessor.getProcessAPI();
ProcessInstance processInstance = processAPI.getProcessInstance(processInstanceId);
long startedByUserId = processInstance.getStartedBy();
vr.setRequesterId(startedByUserId);
// Return the new Java object that will be used to initialize
// the business data variable
return vr;
In the example, "VacationRequest" is the name of the business object as defined in the BDM, "vacationRe-
questContract" is the name of the contract input as we defined it when generating the contract and "startDate"
and "returnDate" are the name of business object attributes.
We also need to use in the Groovy script Bonita Engine variable (processInstanceId) and API (ProcessAPI) to
get the process instance initiator user id (getStartedBy).
Note that it is recommended to choose a naming convention for your Groovy scripts names to be able to locate
them easily. For example you might want to use the "init" prefix when purpose of a Groovy script is to set the
initial value of a variable.
Create contracts and forms
6
2.4.3. Generate a form based on a contract definition
Once you define a contract you can automatically generate a form definition out of it. The generated form will
include widget that allow end user to provide values required by contract (e.g. vacation start date and return
date using date picker widgets).
To define the case start form, select the process pool, go to the Execution section tab
and Contract section. Click on the UI generator link on the right side of the detail panel.
You get a form with a set of widget bind to an auto-generated date (named sentData ). This data is also bind
to the Submit button and will lead to generation of JSON content that match contract expecation.
Warning
Form generated based on contract definition only includes widgets for user inputs. It does not
includes widgets for displaying data in read only mode. This is the expected behaviour as con-
tract declared data expected from the form in order to instantiate process or execute tasks but
does not declared the data expected by a form for display.
Important
When you load or submit a form errors might occurs: we are still in development phase. To
detect errors and identify causes we recommend to use the web browser console (enable it with
F12 key). You usually have a "Console" tab that list JavaScript errors and a "Network" tab that
can provide valuable information. For example you get a server error 500 if you try to submit
data that does not match contract definition. Details about the error can be found in the request
response.
2.4.4. Display business data in forms
In order to display data in a form you will need to:
• Have an existing form
• Declare a form data
• Initialize the form data using a REST API call to BDM API
• Add widgets to the step form. Configure the widgets to be read-only
• Bind the data to widgets
If you need to create a form that is not based on a contract, you can select a task, go to Execution tab, Form
sub-tab and in the Target form drop down list click on the Create a new form... link.

Create contracts and forms
7
To declare a data, click on the Create a new variable , give it a name (e.g. "vacationrequestBDM")
and select the "External API" and define the API URL to call. API URL should be for example: /boni-
ta/{{context.vacationRequest_ref.link}} where vacationRequest is the name of business data vari-
able as declared in your process definition.
To bind your data to the widget (for read only use case), add the widget to your form, go to Value configuration
field of the widget and set for example: {{ vacationrequestBDM.startDate }} . "vacationrequestBDM" is
the name of the form data initialize with a call to BDM REST API and "startDate" is the name of the business
object attribute.
2.5. Correction
1. Rename previous exercise diagram to have a version 2.0.
With the "Vacation request diagram (1.0)" opened, click in an empty area of the diagram in order to have no
element selected and go to General tab Diagram sub-tab and click on Edit... button.
Update diagram AND pool version number and click on OK button.
2. Define a initialization contract.
We will add a contract on the pool level, so that the process could be initialized with some data. This contract
define the set of data expected from the case start form so that the process can start from it.
Select the "Vacation Request" pool.
In the detail panel, select the Execution tab and then select the Contract sub-tab. Click on the Add from
data... button, select the "vacationRequest" variable and click on Next button. Keep "startDate" and "return-
Date" selected (we expect that both will be provided by requester) and rename the Input name to "vacation-
RequestContract" and click on Finish button.
Submit vacation request form creation
The form to submit a new vacation request is an instantiation form. The form needs to allow user to submit
a start date and a return date.
To create the form, go to the Execution section tab and Instantiation form sub-tab
Click on the pencil icon on the right side of the Target form drop down list.
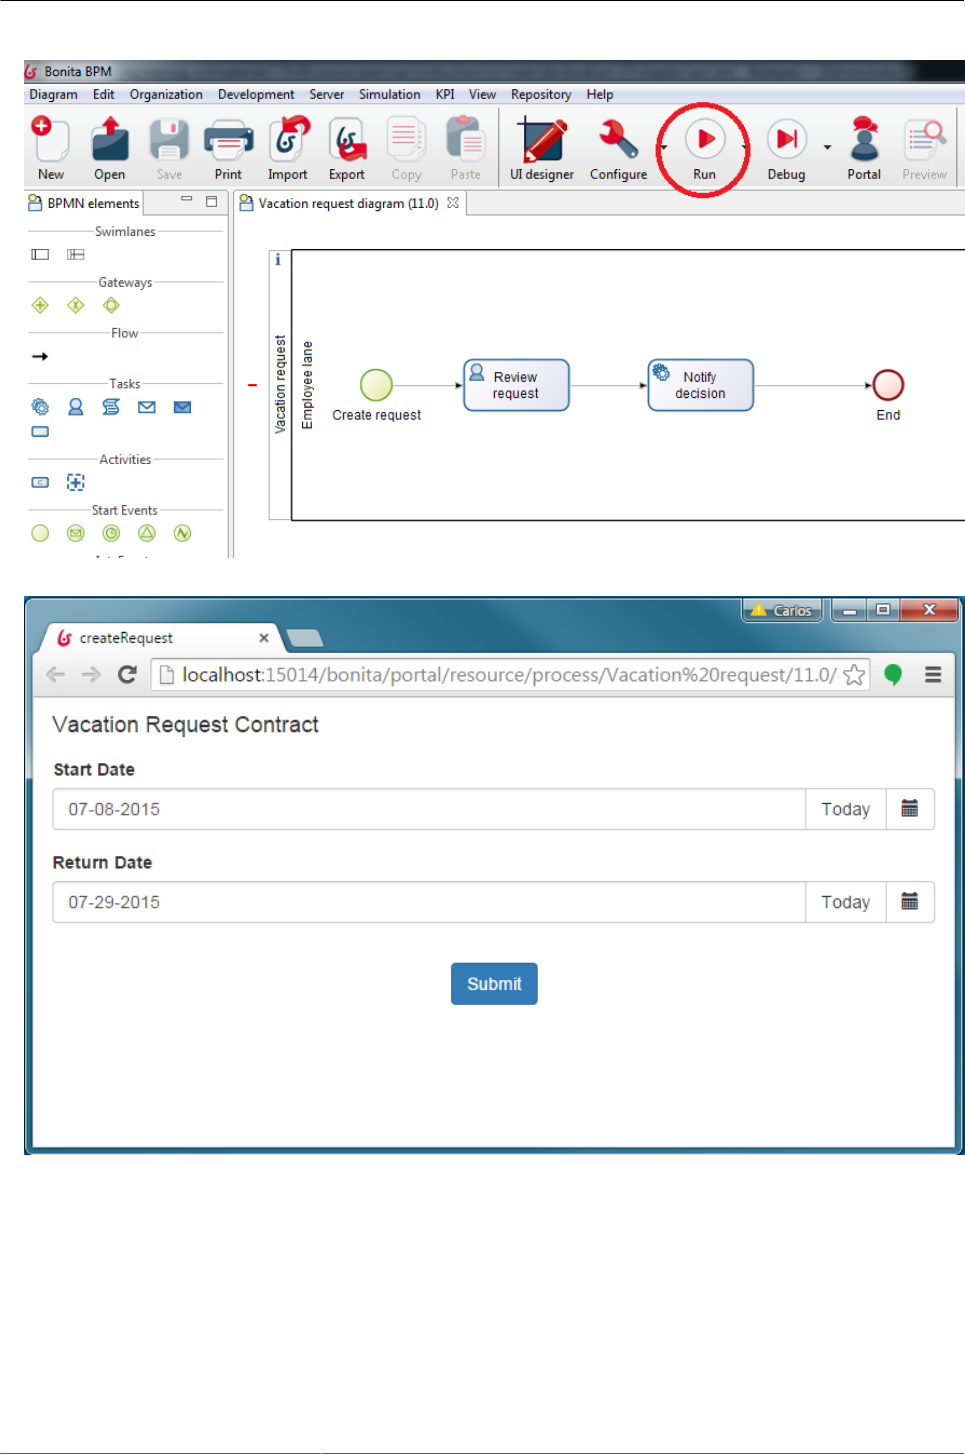
This opens the UI designer in a web browser. Two fields already exists, as specified in the contract: Start
Date and Return Date.
Rename the form to a more meaningful name, such as "createRequest".
Save the form by clicking on the Save button on top of the form.

Create contracts and forms
8
Optionnaly you can edit the formInput form data to set startDate and returnDate default value to null
instead of 0 to avoid any default value in the widget.
The instantiation form is now ready to submit a Start Date and an Return date.
Define business data default variable using contract inputs.
We will now use those contract information to initialize our BDM vacationRequest object.
Go back to the Data tab, Pool variables. Select the "vacationRequest" object and click on Edit... button.
A small popup window opens: click on the pencil at the bottom right of it to edit the Default value , aka the
value the variable will take upon process instantiation.
Another popup window opens: in this expression editor, we will initialize the "vacationRequest" with a new
value created based on contract inputs.
Edit the script name it "initVacationRequest": each Groovy script has a unique technical name, to simplify
maintenance and evolution, don't forget to use a meaningful name.
Then write (or copy-paste) the following code (note that here "vacationRequest" refer to the name of the
contract input):
import org.bonitasoft.engine.bpm.process.ProcessInstance;
import com.bonitasoft.engine.api.ProcessAPI;
import com.training.model.VacationRequest;
// Create a new instance of the VacationRequest Java class
VacationRequest vr = new VacationRequest();
// Get the start date from the contract input (a Map that map
// together BMD attribute names and values) and use it to set
// the attribute value of the Java object
vr.setStartDate(vacationRequestContract.get("startDate"));
vr.setReturnDate(vacationRequestContract.get("returnDate"));
// Get the id of the user who initiate the process using Engine API and variable "processInstanceId"
ProcessAPI processAPI = apiAccessor.getProcessAPI();
ProcessInstance processInstance = processAPI.getProcessInstance(processInstanceId);
long startedByUserId = processInstance.getStartedBy();
vr.setRequesterId(startedByUserId);
// Return the new Java object that will be used to initialize
// the business data variable
return vr;

Create contracts and forms
9
Make sure that Groovy script Return type is set to VacationRequest. If not use the Browse... button and
search for "VacationRequest".
Then click on OK to validate the Groovy script edition, and click a second time on OK to validate the new
"vacationRequest" object default value.
Tip: You may like to use ctrl-space or other Eclipse-like shortcut in this text editor.
Our vacationRequest is now bind to the contract so that once a startDate and an returnDate are provided,
it will create a new BDM object instance with the chosen values.
Create a simple form to review the value from the current request
We now need to add a "Review" form on the "Review Request" step so that the manager can view the
requested vacation date.
Select the "Review request" task, and in the detail panel, in the Execution tab, select the Form sub-tab, then
in the Target form drop down list click on the Create a new form... link.
The UI designer appear in the browser. Edit the name of the form from "newForm" to "reviewRequest".
Add a title to the form, by selecting the title widget and adding it to the form. Change its "text" attribute to
"Review vacation request".
We will initialize formInput variable with the business data using the reference available in form context
(context data is avaialble by default on step forms). Click on the pencil icon on the formInput line and in Type
select "External API" as type and write ../{{context.vacationRequest_ref.link}} as URL parameter
name and click on Save button.
Now add two date picker widget using drag and drop from the left side column.
Select the first one and, using the right side column, rename its Label as Start date. Change its Read-only
option to yes. Scroll down the right column to the bottom, and set the Value to: formInput.startDate .
Do the same for the "Return date" field.
Save the form.
Save the process.
Run the process.

10
Chapter 3. UIDesigner - Create a new
form
3.1. Objective
This exercise shows you the way to create a new form using the UIDesigner.
3.2. Instructions
• Create a BDM.
• Create the structure.
• Fulfill the value.
• Test a REST API.
• Bypass the security check.
• Create a process.
• Create the contract.
• Create the page.
• Create variables and first widgets.
• Manage the list of products.
• Finish the header.
• Save the data from the form.
3.3. Correction
1. Create a BDM.
Create the following BDM structure.
Table 3.1. BDM Objects
Business Object
Name
Attributes Type Multiple Mandatory
Customer Constraint on
Code

UIDesigner - Create a new form
11
Business Object
Name
Attributes Type Multiple Mandatory
Code String(255) Yes
Name String(255) Yes
Product Constraint on
Code
Code String(255) Yes
Name String(255) Yes
Amount Double
InvoiceLine
Product Product
UnitPrice Double Yes
Discount Double
Quantity Integer
TotalLine Double
Invoice Constraint on num-
ber
Customer Customer Yes
Number String(255) Yes
Line InvoiceLine Yes
TotalAmount Double Yes
2. Fulfill the value.
The issue is now to create a simple database. Only process can create BDM Variable.
Create a simple process.
UIDesigner - Create a new form
12
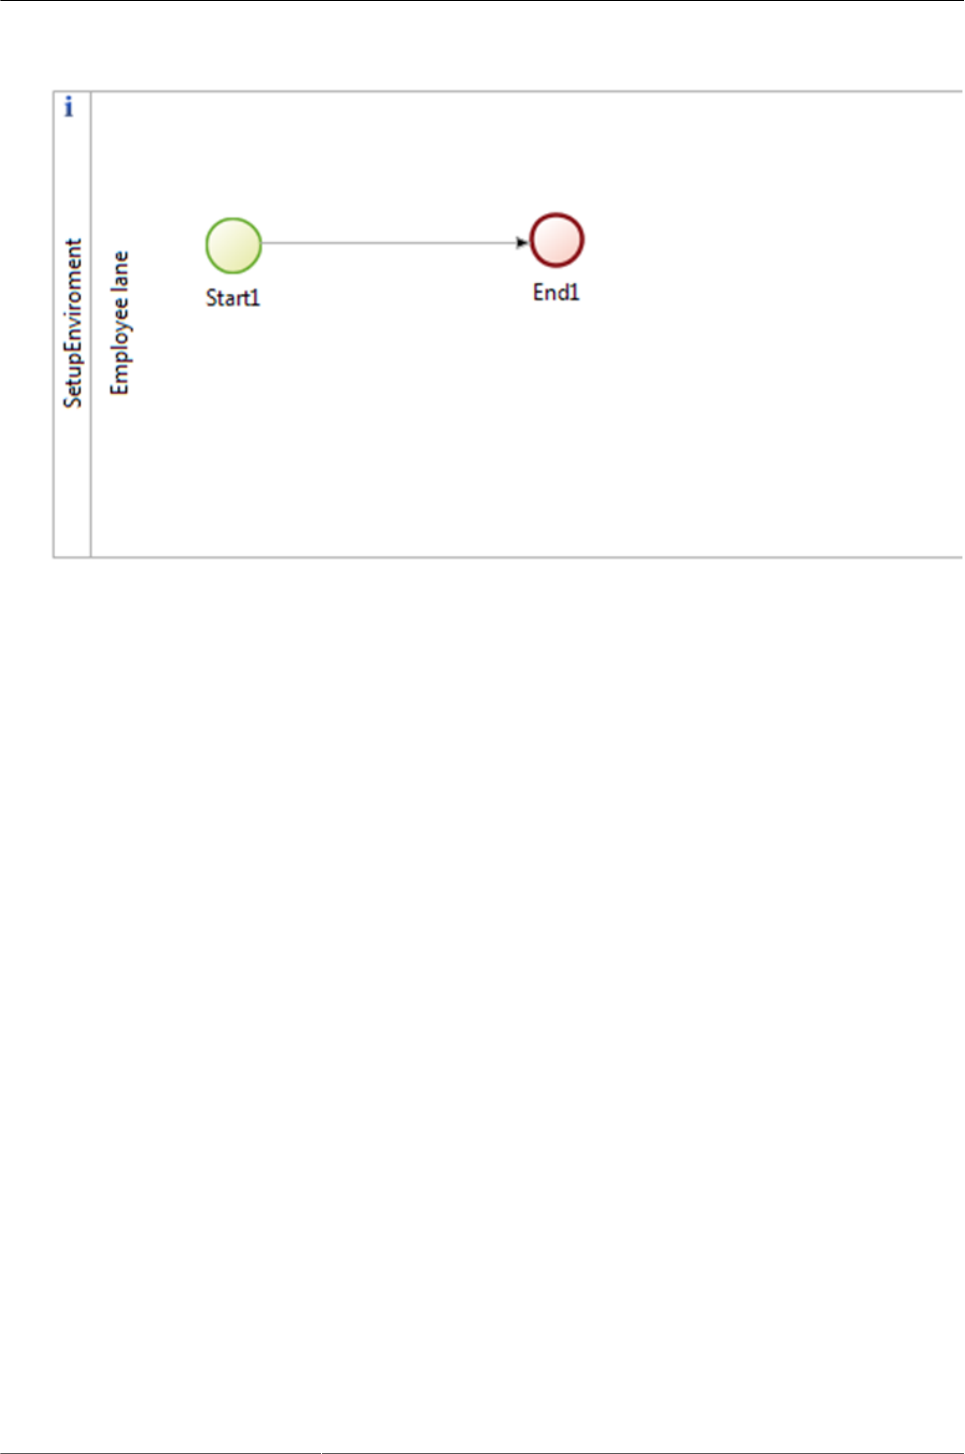
Create a Bdm variable “createCustomers”, set is as “Is Multiple”.
UIDesigner - Create a new form
13
And give the default value:
import com.company.model.Customer;
def l = [];
int i = 1;
String[] listNames = ["Pablo Alonso de Linaje","Domenico Giordano","Fabrice Rosito","Enrico
Curiotto","Daniel Vallar","Mehdi Kettani","Carlos Moya","Emmanuel Rias","Karim Ben Salem","Kamel Sidi
Boumedine","Mihai Coucy", "Renaud Pichot", "Ronak Shah","Pierre-Yves Monnet","Pierrick Voulet","Declan
McGarry","Lionel Palacin","Anne-Laure du Fou","Elodie Jacques","Victor Garcia","Haris Subasic","Luis
Lino","Olivier Delcroix","Barry Valentine"];
for (String name : listNames)
{
Customer c = new Customer();
c.setCode(""+i);
c.setName( name );
l.add(c);
i++;
}
return l;
UIDesigner - Create a new form
14
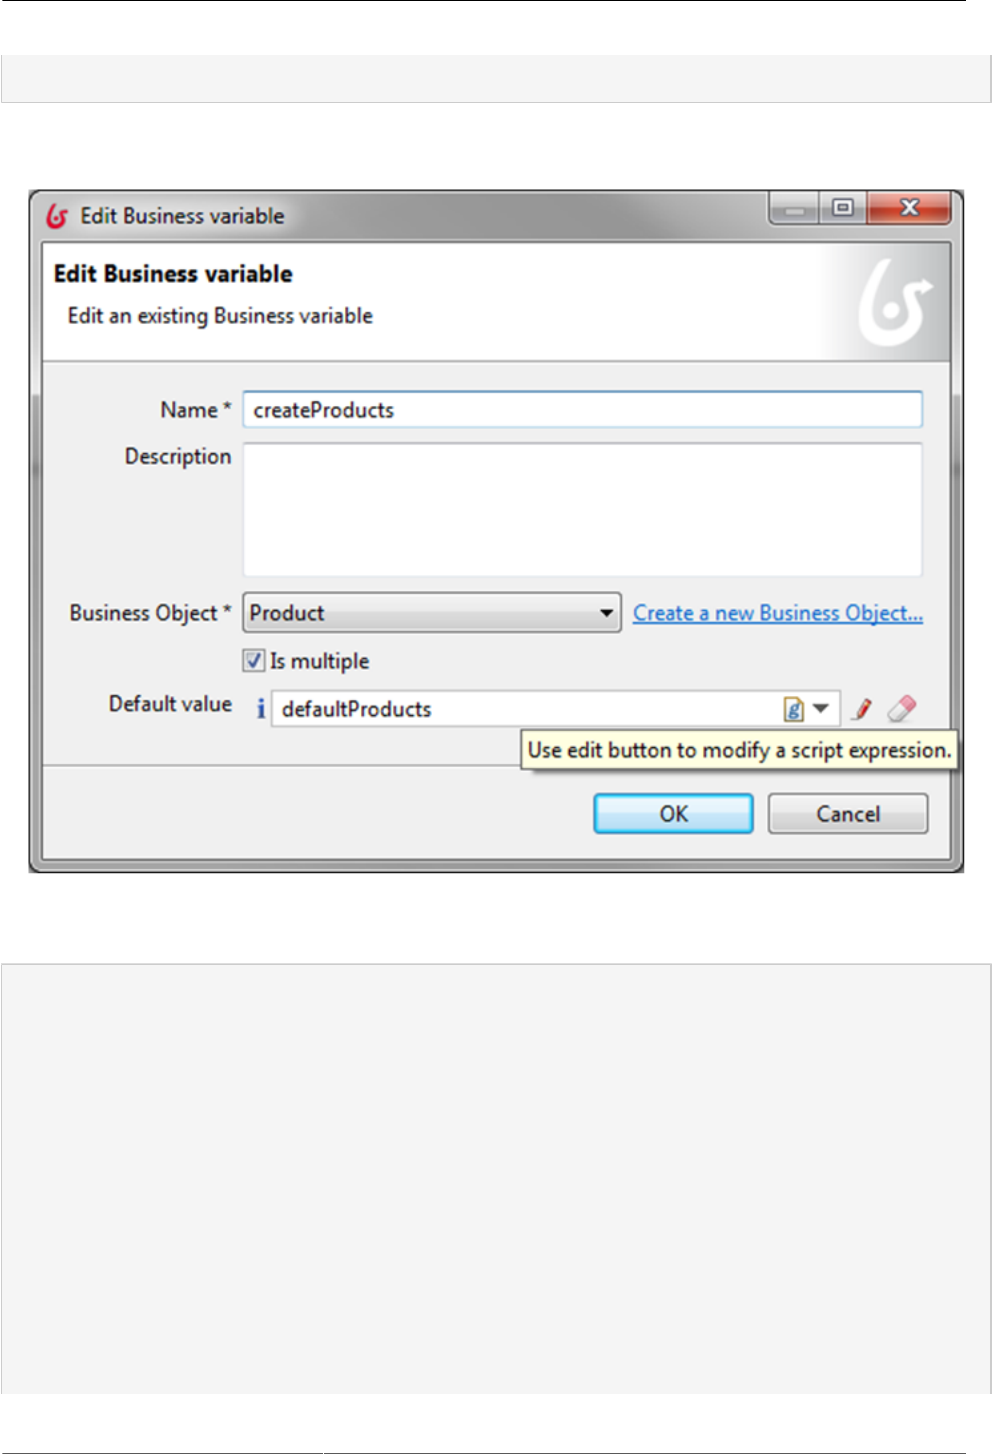
Create a Bdm variable “createProducts”..
The default value is:
import com.company.model.Product;
def l = [];
int i = 1;
String[] listNames = ["BPAD Training","AI Training","ADMIN Training", "PROM Training","Expertise",
"Teamwork Suscription","Efficiency Suscription","Performance Suscription"];
for (String name : listNames)
{
Product p = new Product();
p.setCode(""+i);
p.setName( name );
p.setAmount(new Double(1800 + i*100));
l.add(p);
i++ ;

UIDesigner - Create a new form
15
}
return l;
And then run the process one time to fulfill the database.
Test a REST API.
You will use a lot of REST API in the UI Designer. In fact, all the development are now on the BROWSER,
and not anymore on the SERVER (for example, the default value is now calculated on the BROWSER so
in JavaScript, and not anymore on the server, so in JAVA and the Contingencies is now executed on the
client, without any interaction with the server).
To test a REST api, you can use RESTLET on Firefox. Issue is with the login, so the procedure is:
a. Open a new tab, and connect in the new tab to the Bonita Portal
b. Then, a Cookie is now generated on the browser, and the session is open on the server. Use directly
RESTLET plug-in: the cookie is joined automatically to the REST call
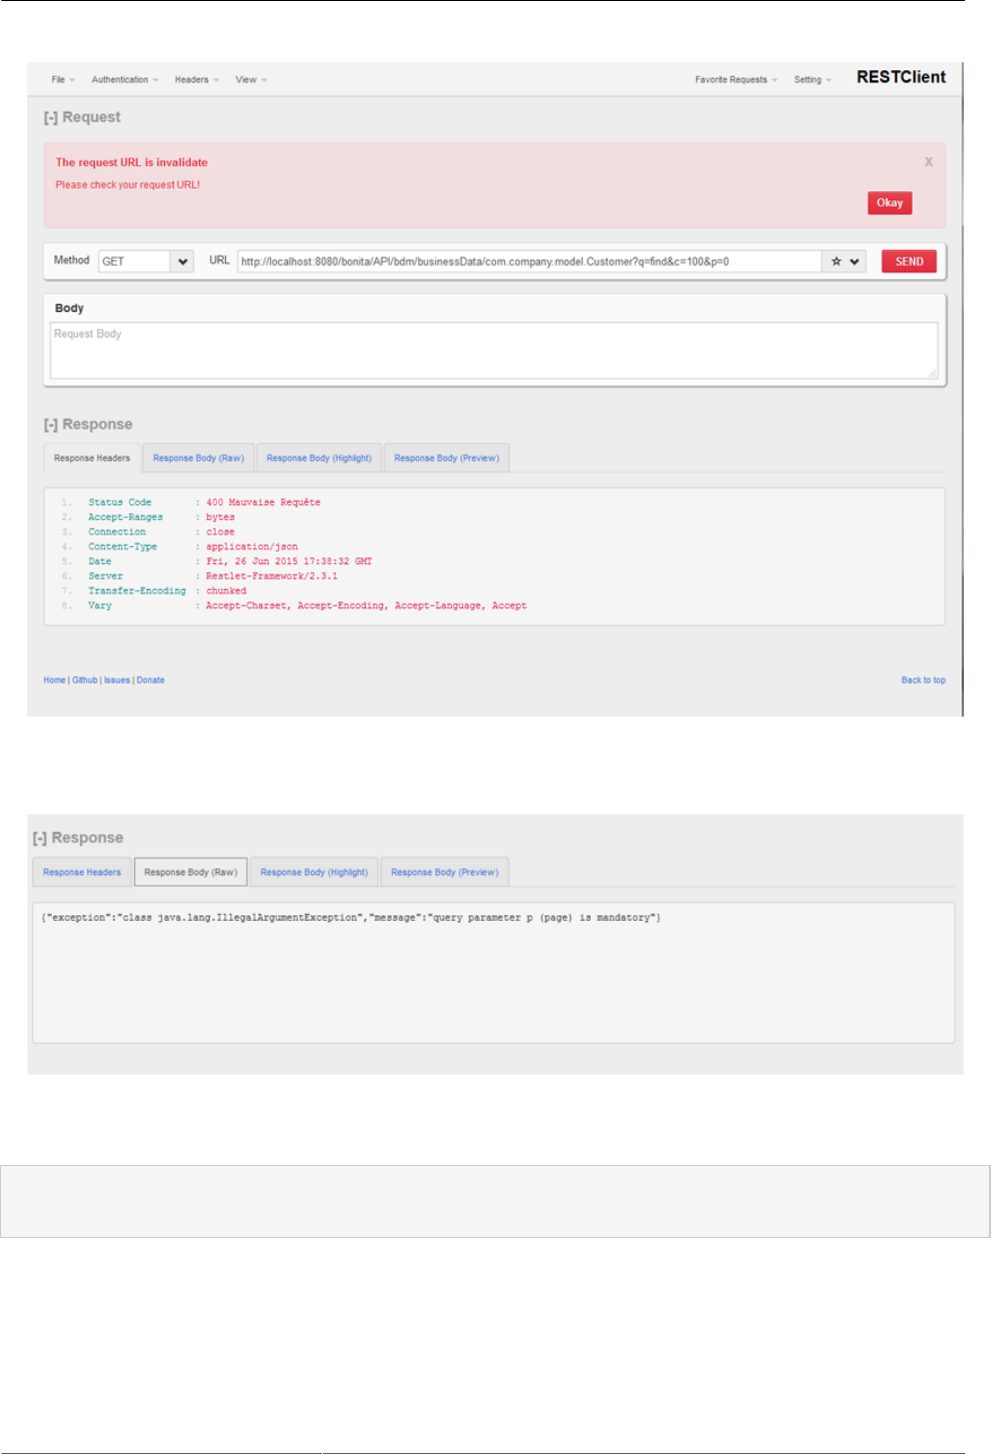
For example, test the call:
http://localhost:8080/bonita/API/bdm/businessData/com.company.model.Customer?q=find&c=100
You get an error 400 “bad request”:
UIDesigner - Create a new form
16
Go to the Response Body, and see the message:
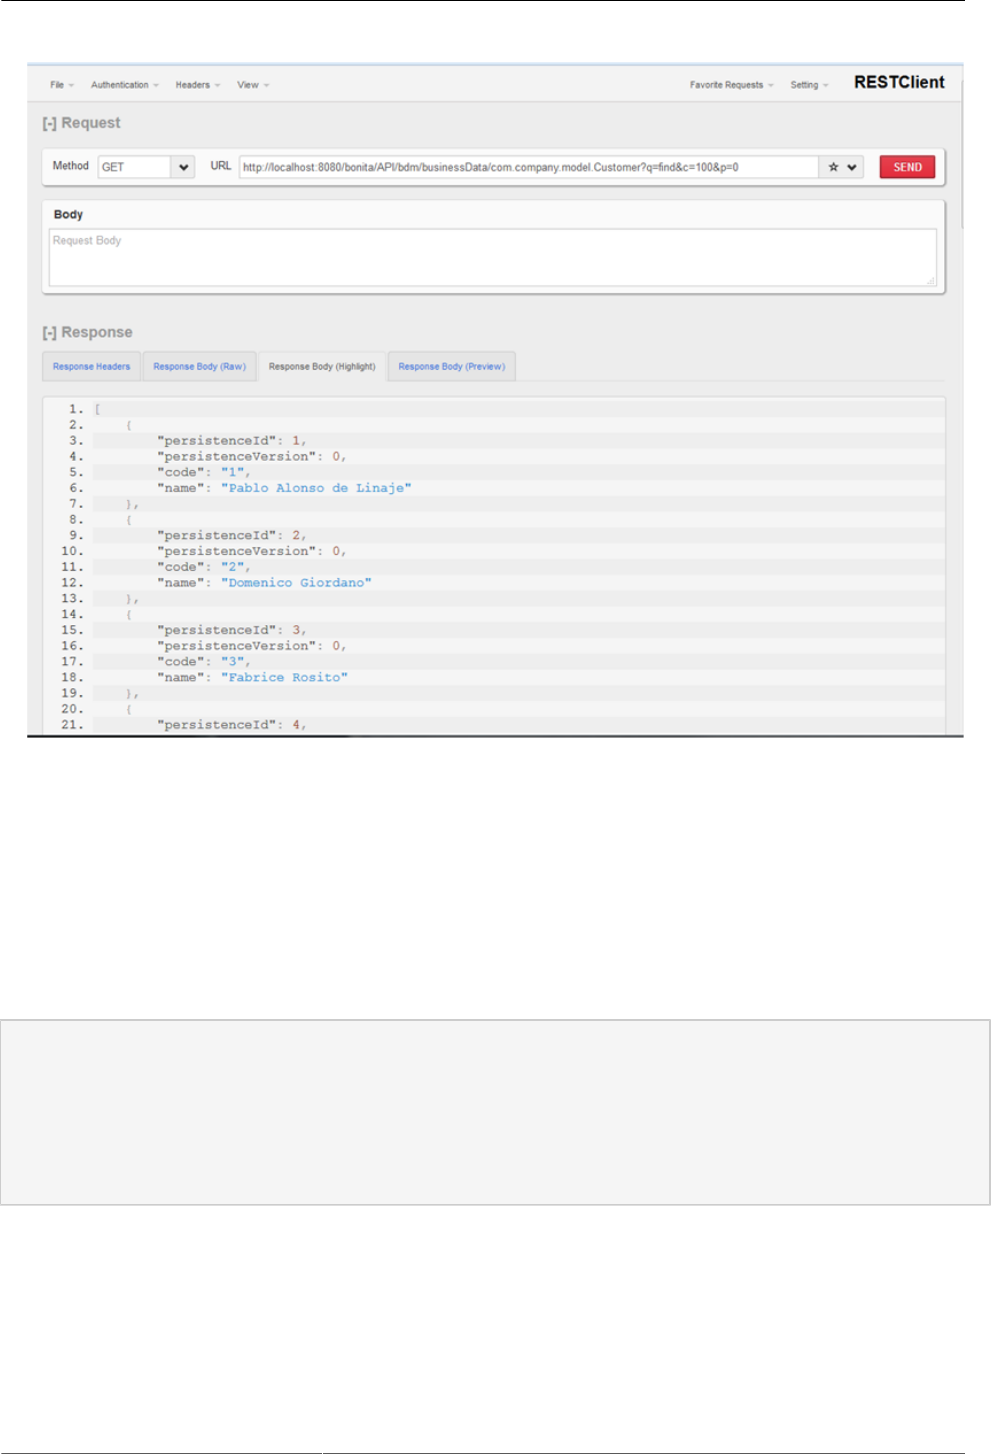
Add now to the URL the query parameter
&p=0
, and then run again:
UIDesigner - Create a new form
17
Security : bypass the check.
The page calls the REST API on the BDM, and these properties should be added in the page properties
manually.
To bypass the check in the first time, change the properties file:
in BONITA_HOME/client/tenants/1/conf/security-config.properties.
security.rest.api.authorizations.check.enabled false
#Set this value to true to reload the properties files and groovy classes every time they change
(you sill need to logout and login if you add new custom permissions to a user)
security.rest.api.authorizations.check.debug true
Restart the server.
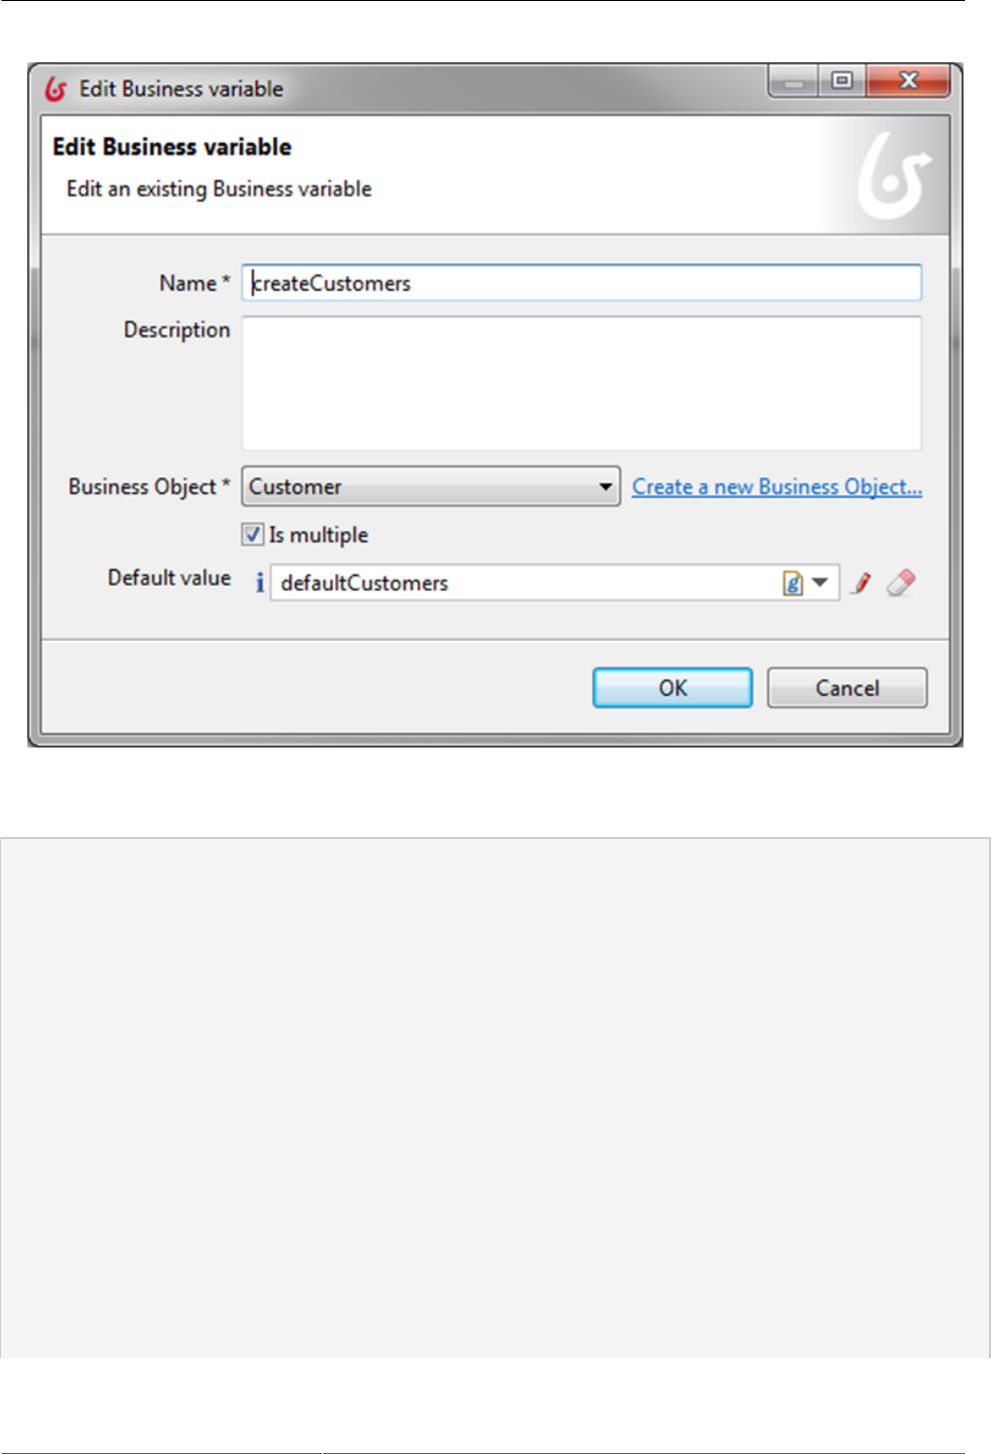
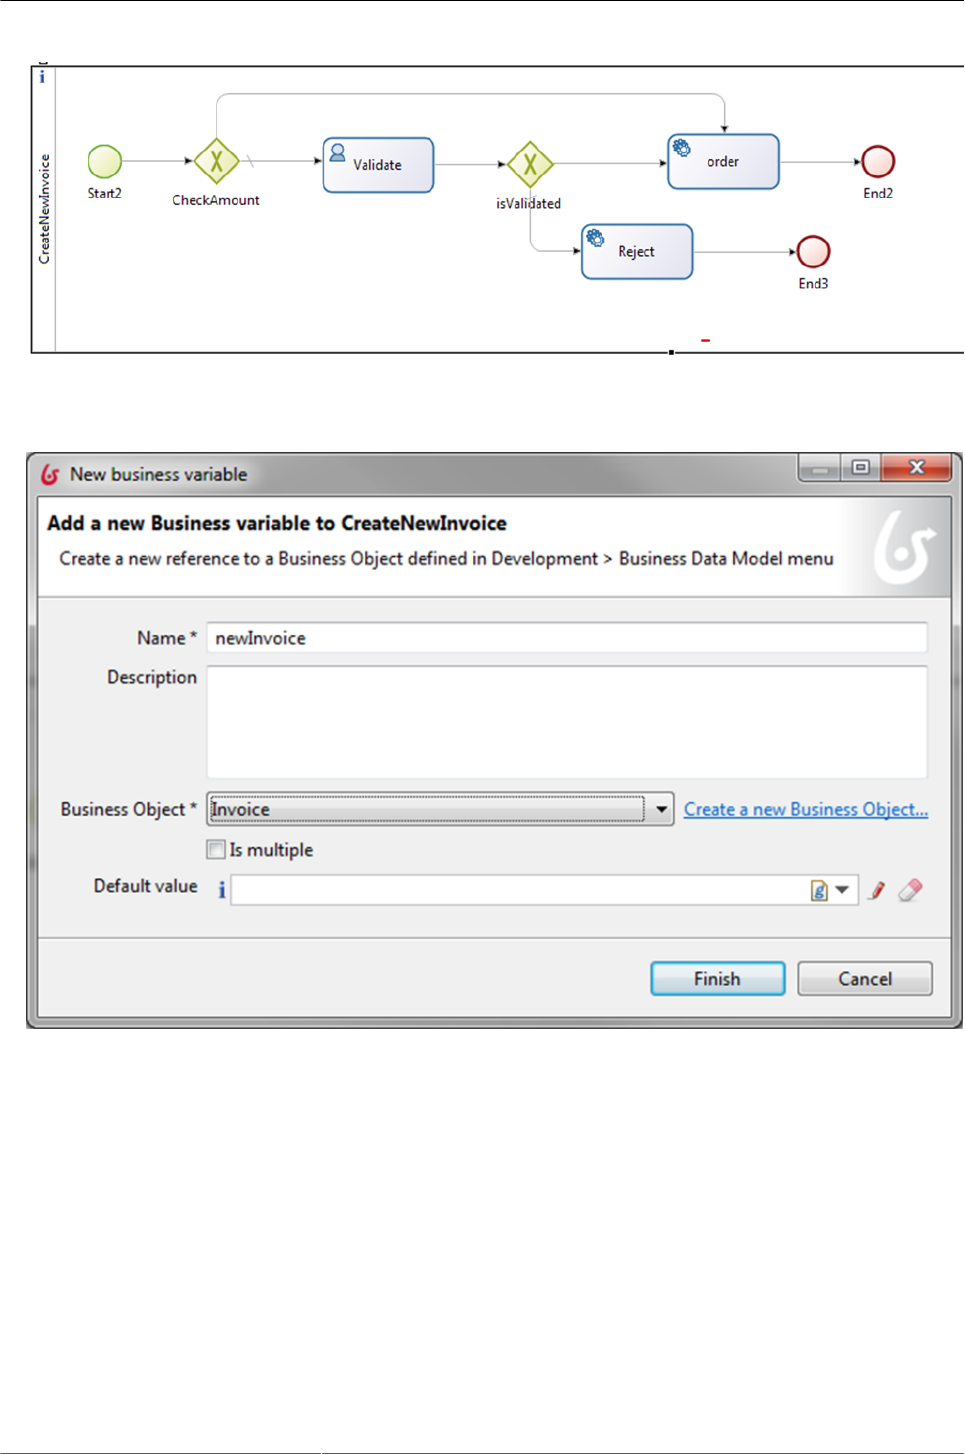
Create a process.
Create the following process:
UIDesigner - Create a new form
18
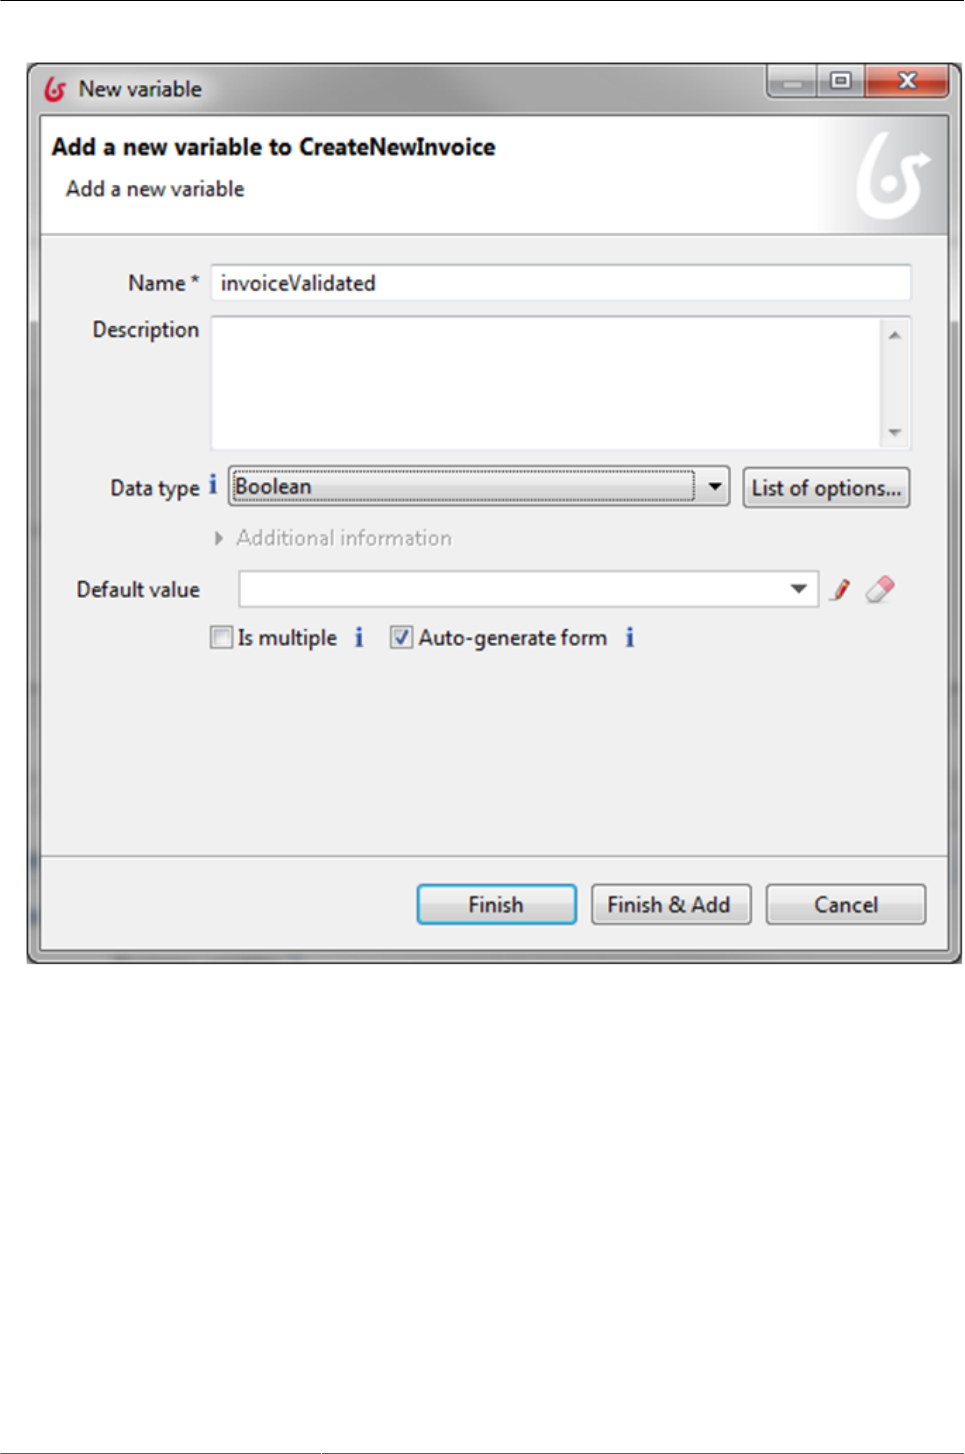
Add a business data variable:
And a process variable:
UIDesigner - Create a new form
19
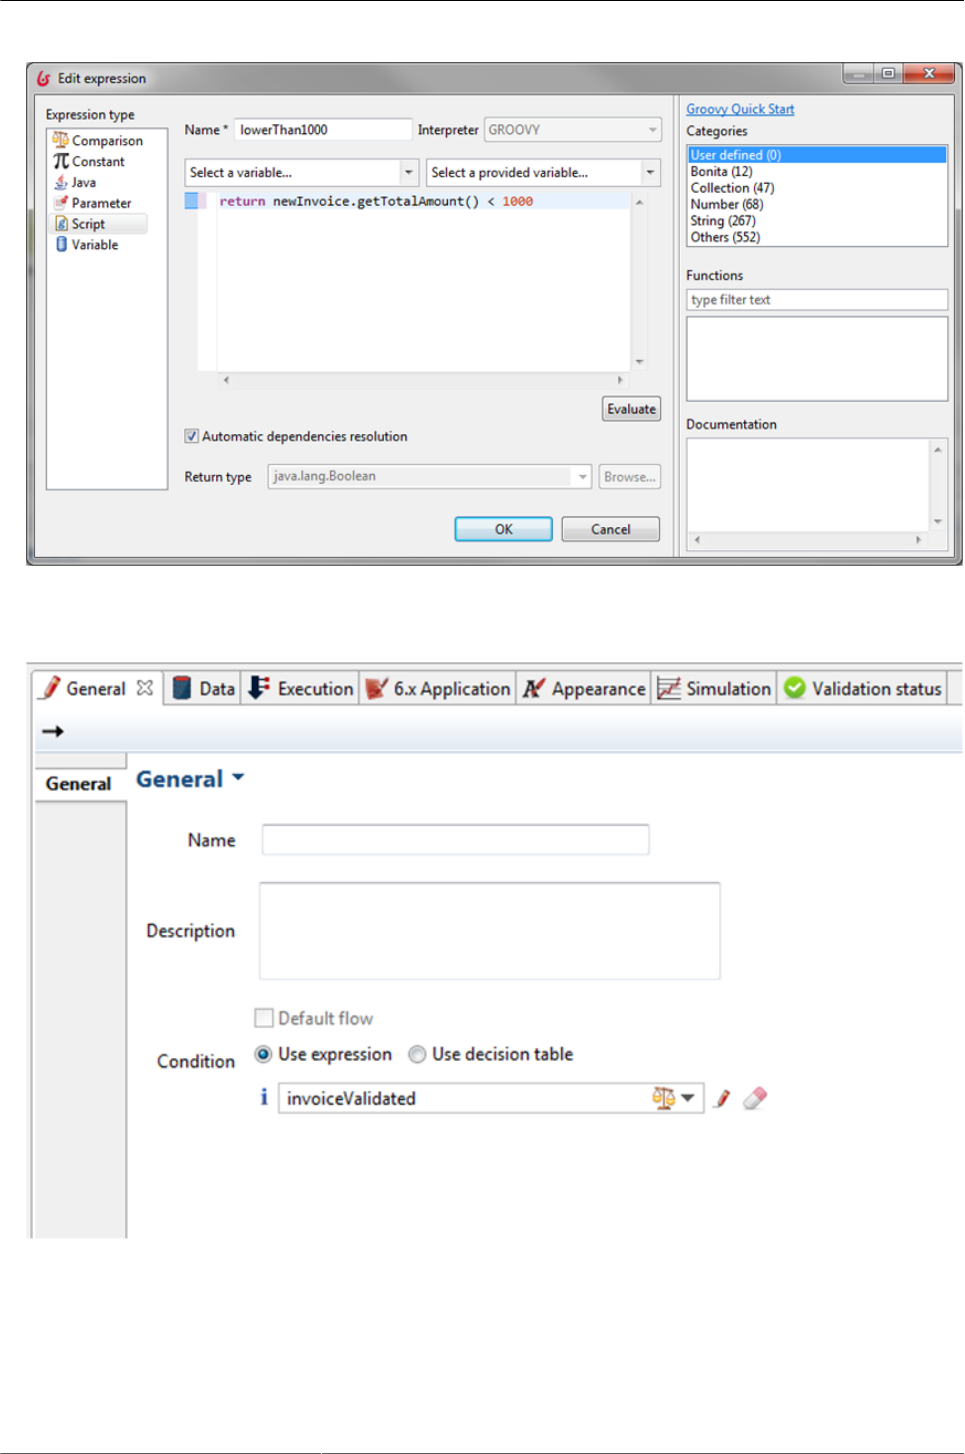
The condition on CheckAmount is:
UIDesigner - Create a new form
20
The condition on isValidated is branch on the invoiceValidated Boolean:
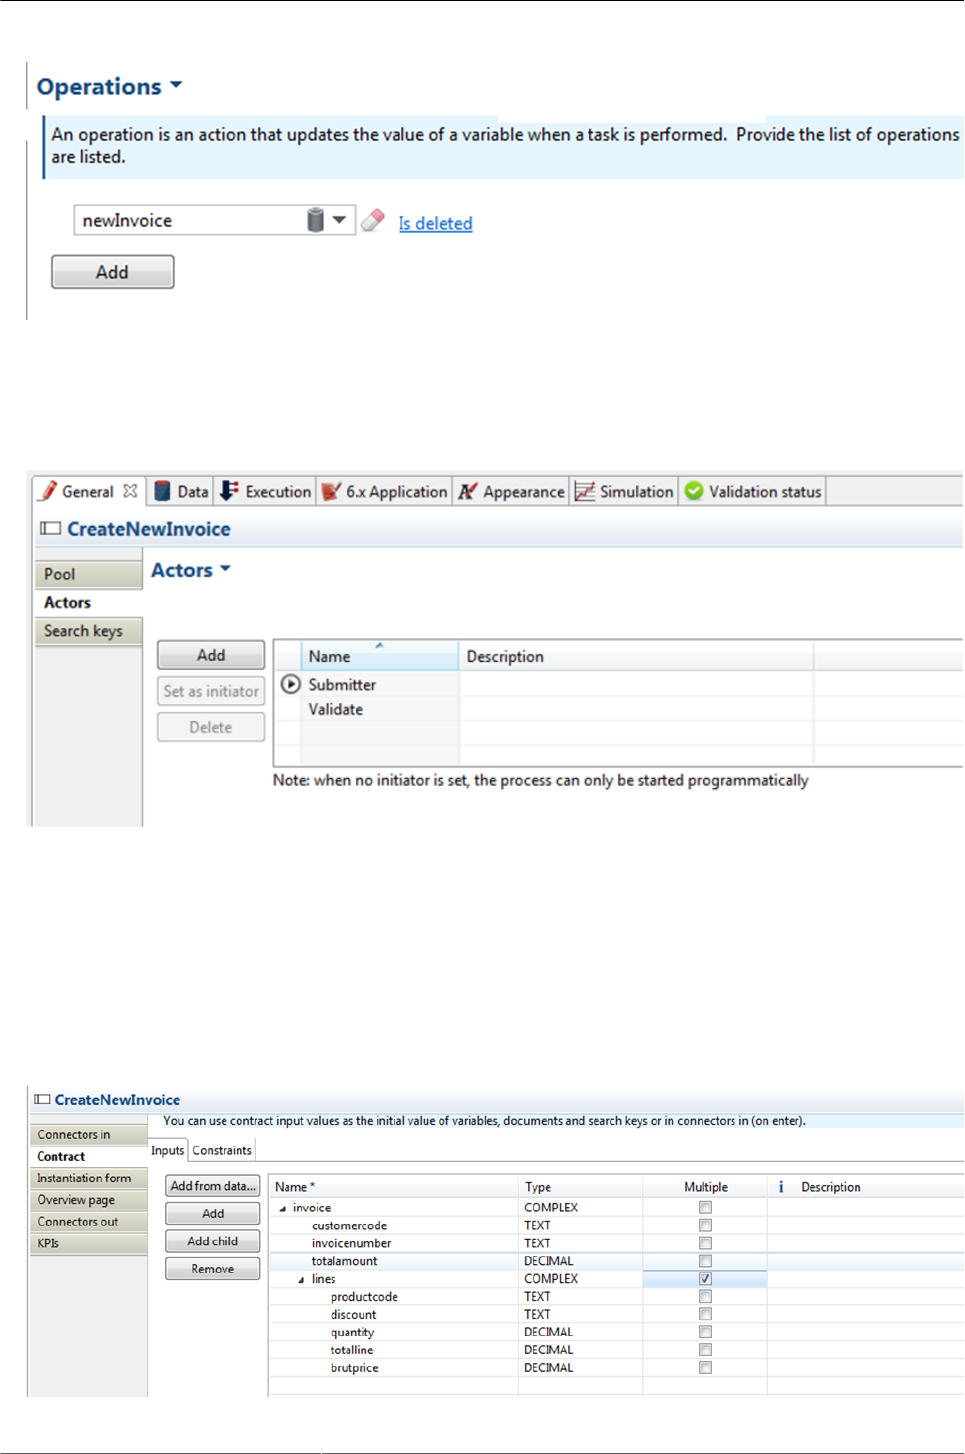
On the task "Reject", add an operation:
UIDesigner - Create a new form
21
The “isDeleted” delete the value in the DAO.
Create two actors:
And set the actor Validate on the task Validate.
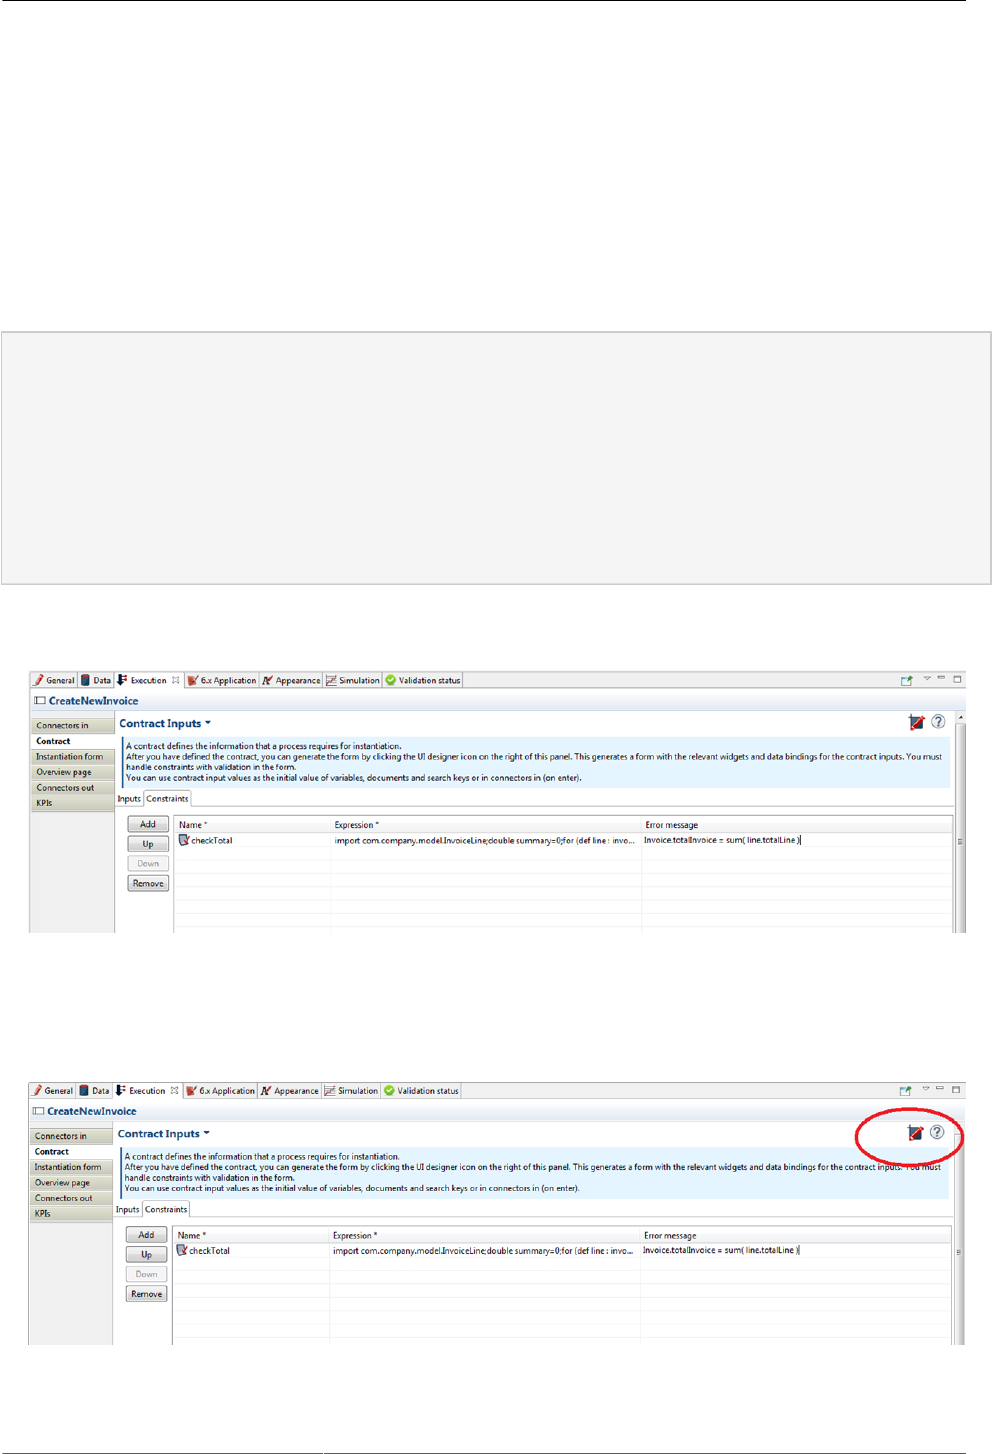
Front form, the contract
Build the contract on the Front form. First, you have to set inputs.
Note: do not try to “add from data”, but use the “Add” and “Add child” button.
UIDesigner - Create a new form
22
We give different names than the BDM here: it’s “customercode” in the input, where in the BDM the invoice
is link to a Customer, and the field in the customer is “code”. Then we can see the separate layer between
the input and the BDM.
Note that:
Double is called DECIMAL, String is called TEXT.
Now, build a constraint called "checkTotal" with the content bellow:
import com.company.model.InvoiceLine;
double summary=0;
for (def line : invoice.lines) {
summary += line.totalline;
}
return summary == invoice.totalamount;
The result is:
Front form, the page
Click on the UI designer on the Contract
Start changing the name
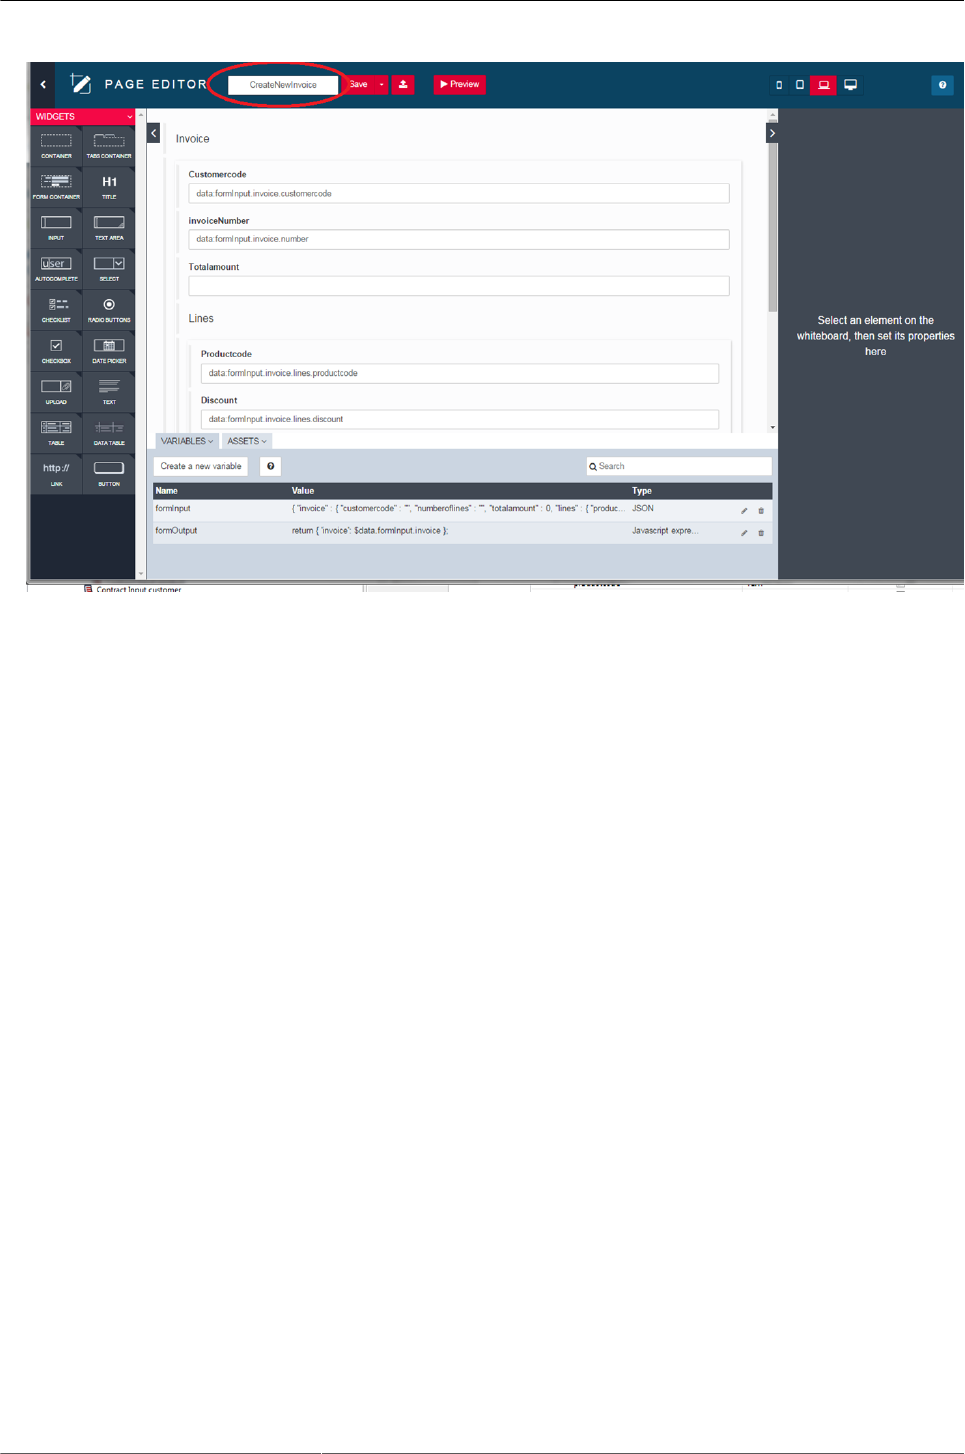
UIDesigner - Create a new form
23
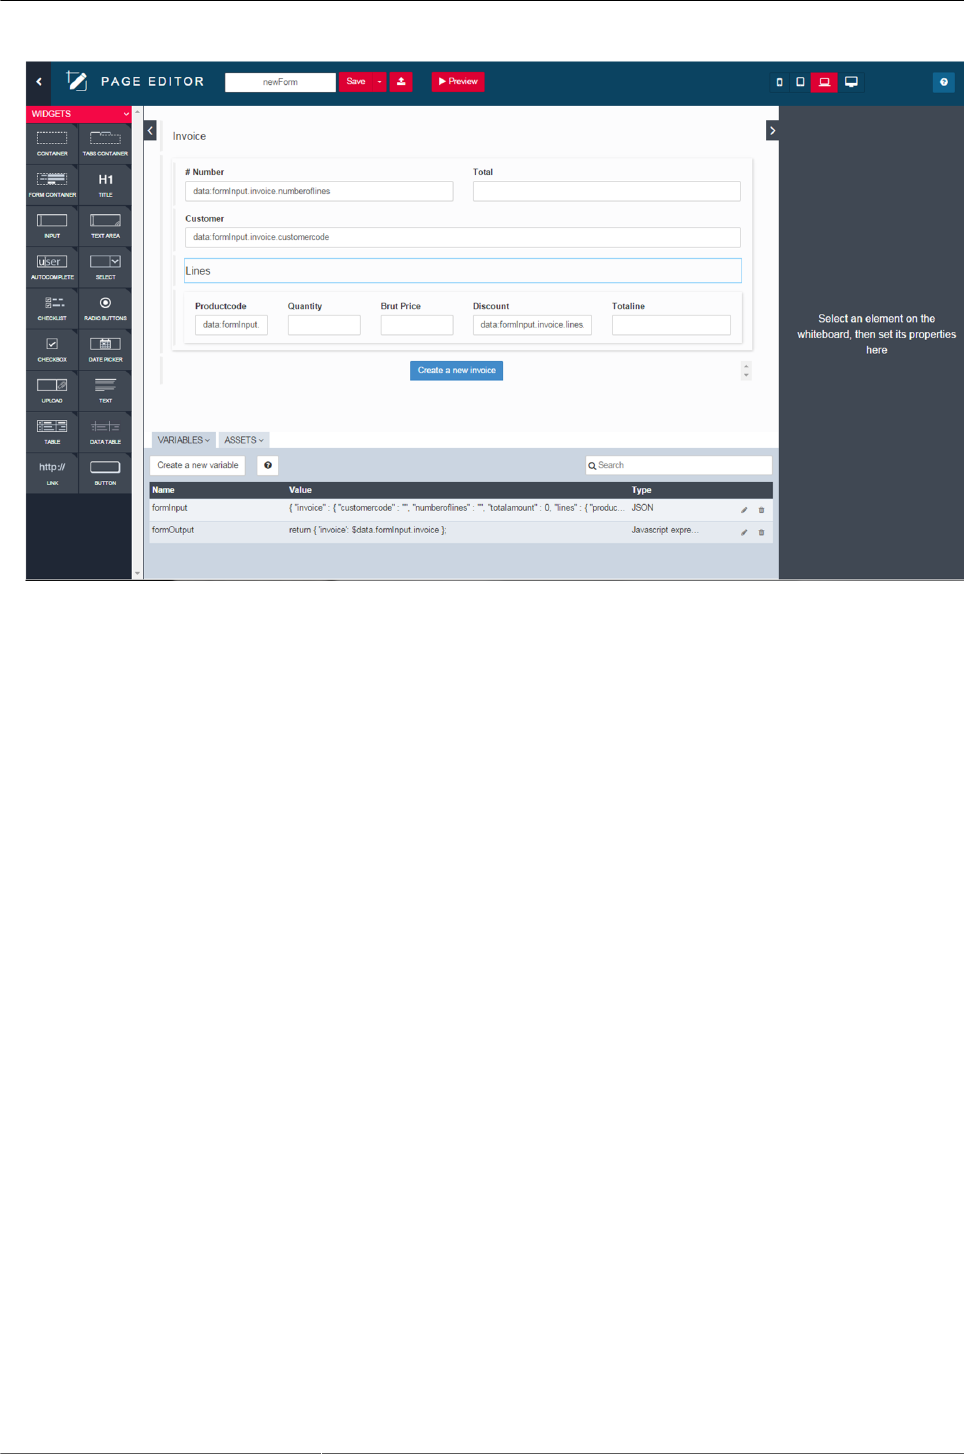
First transformations:
a. Set the InvoiceNumber at top and rename it
b. Set the totalAmount at the top
c. On the line, add all on one line
d. Change the label on the submit button
UIDesigner - Create a new form
24
Create variables and first widgets
Variables are in fact all variables manipulate by AngularJS
UIDesigner - Create a new form
25
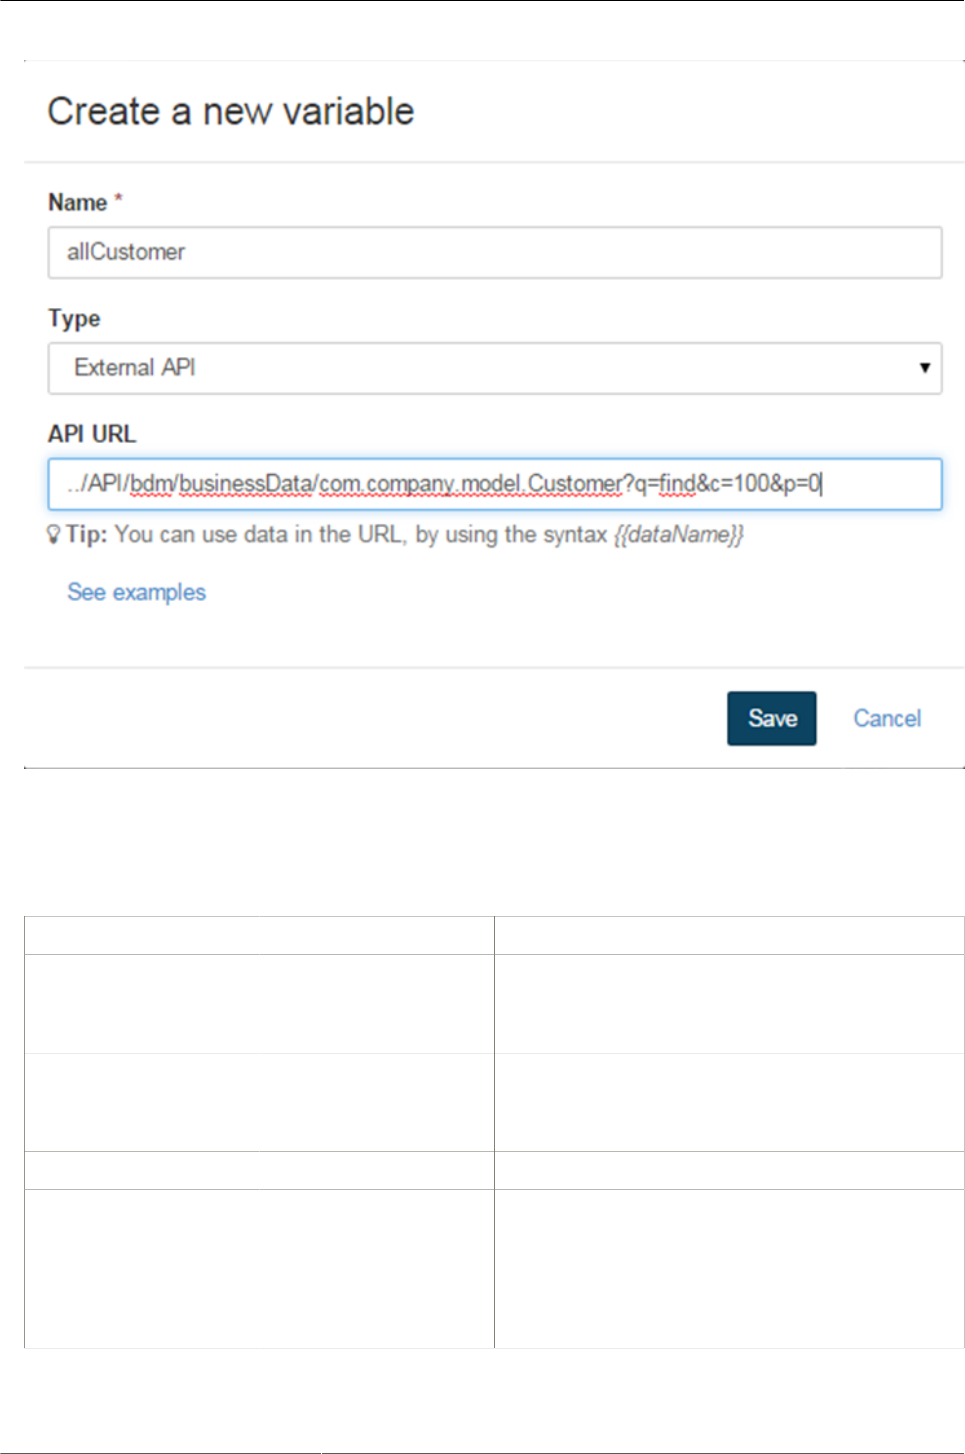
Creates all these variables.
Table 3.2. Variables
Variable Name Type Value
allCustomers External API ../API/bdm/businessDa-
ta/com.company.model.Customer?
q=find&c=100&p=0
allProduct External API ../API/bdm/businessDa-
ta/com.company.model.Product?
q=find&c=100&p=0
Customer JSON {"code":"", "name":""}
Calcultotal JavascriptExpression var total = 0; var temp;
$data.formInput.invoice.lines.forEach( function
(item) { temp = item.totalline; total += temp?
temp:0 ; }) $data.formInput.invoice.totalamount =
total; return total;
UIDesigner - Create a new form
26
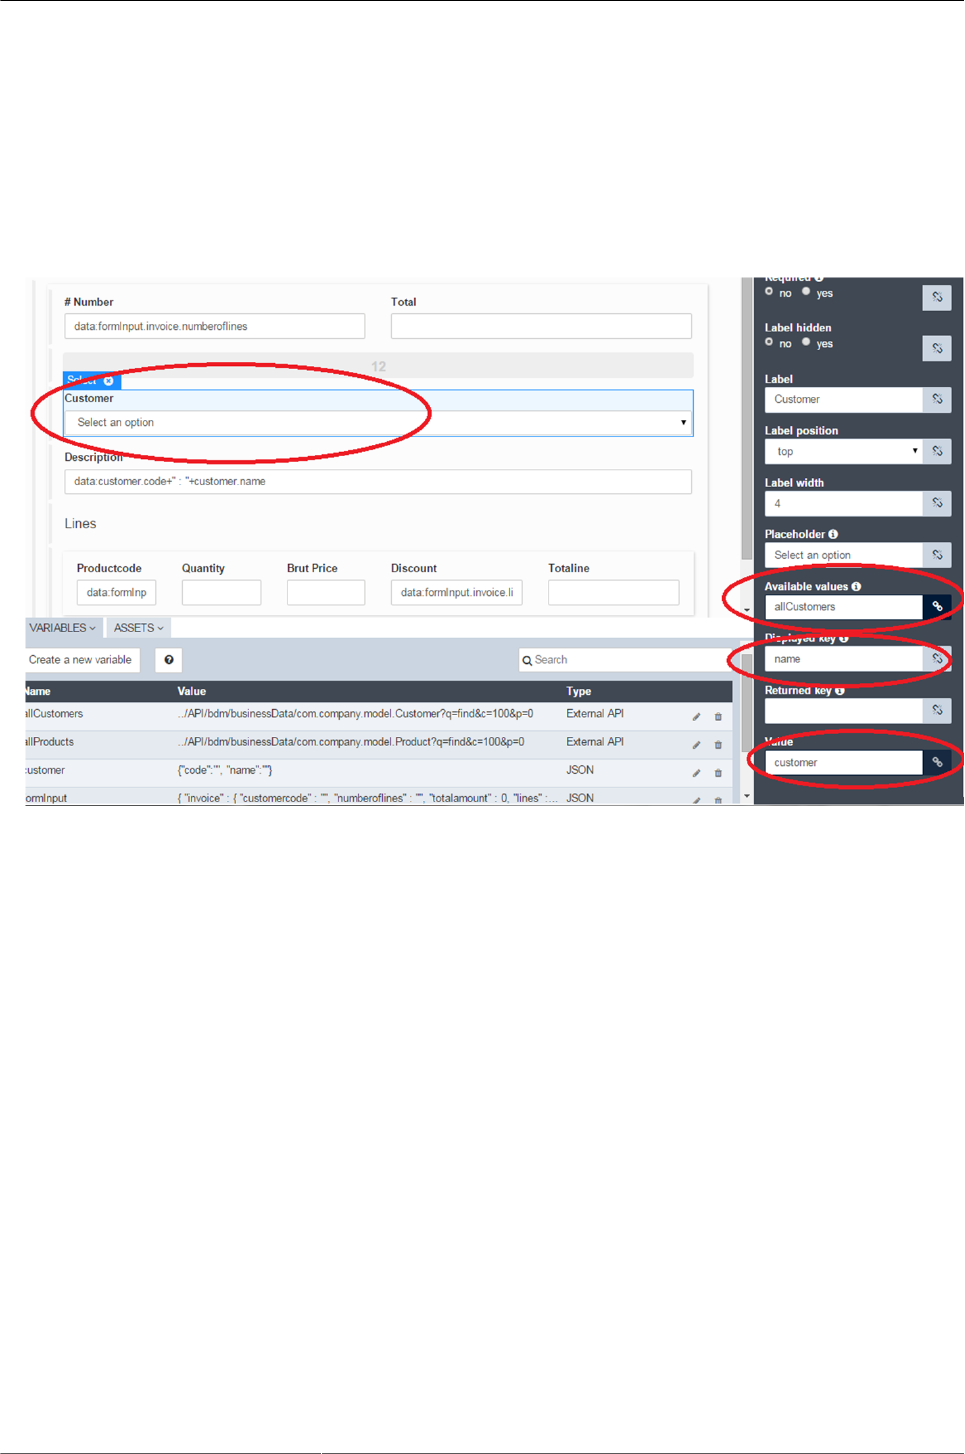
Add a select widget before the widget customer.
a. The available value is allCustomer.
b. The displayd key is name
c. The value is "customer"
Add a Description variable (Input Widget)
a. Read Only for the properties
b. Value is customer.code + “ : “+customer.name
On the description, the value is now “customer.code + " : "+ customer.name”. Set the widget in Read Only.
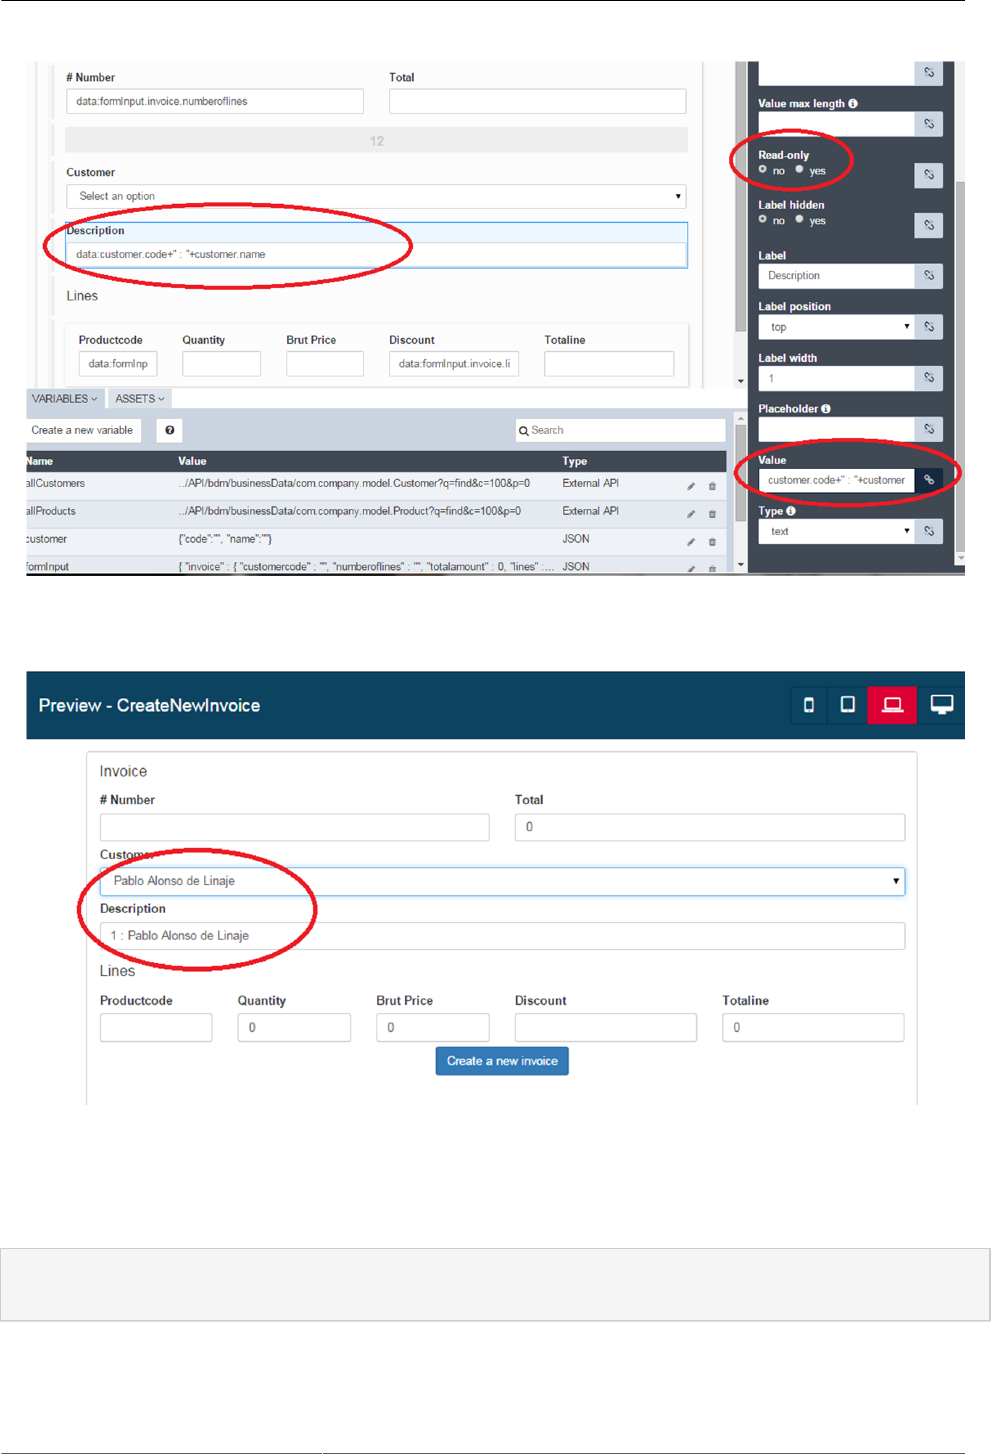
UIDesigner - Create a new form
27
Let’s test that! Click on preview. Select a customer, and then the description is automatically updated.
How to debug? What’s happen if you make a mistake?
Try to set the initial variable allCustomer with
../API/bdm/businessData/com.company.model.Customer?q=find&c=100
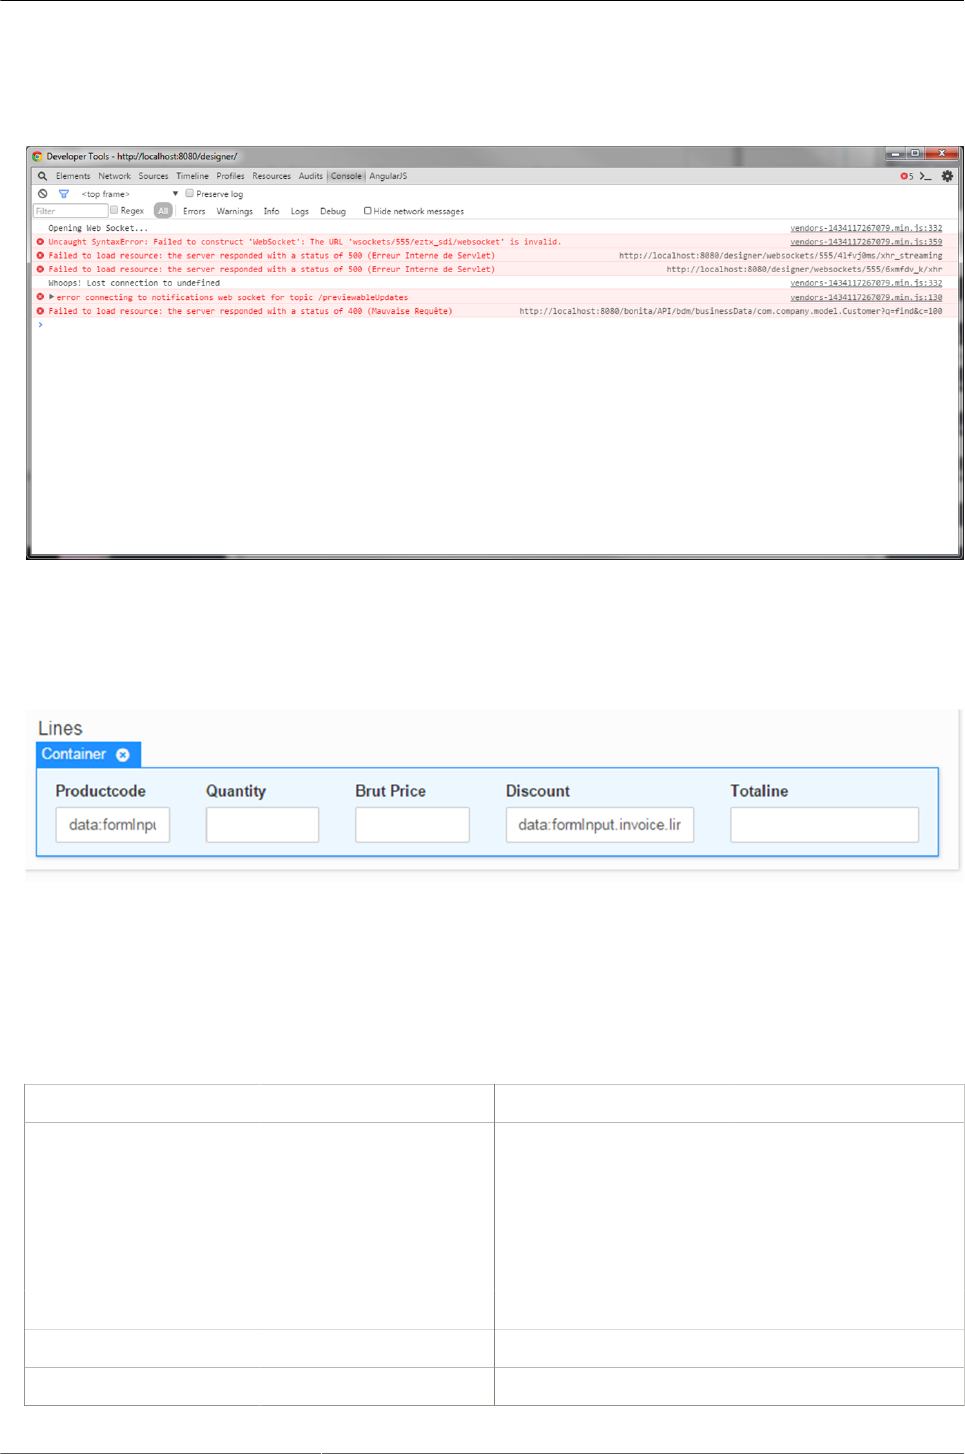
UIDesigner - Create a new form
28
Then, run it. The list of customer is empty: you can see the error by using F12 on the preview. Not this kind
of error is visible only on the client; the server does not log any error in that case.
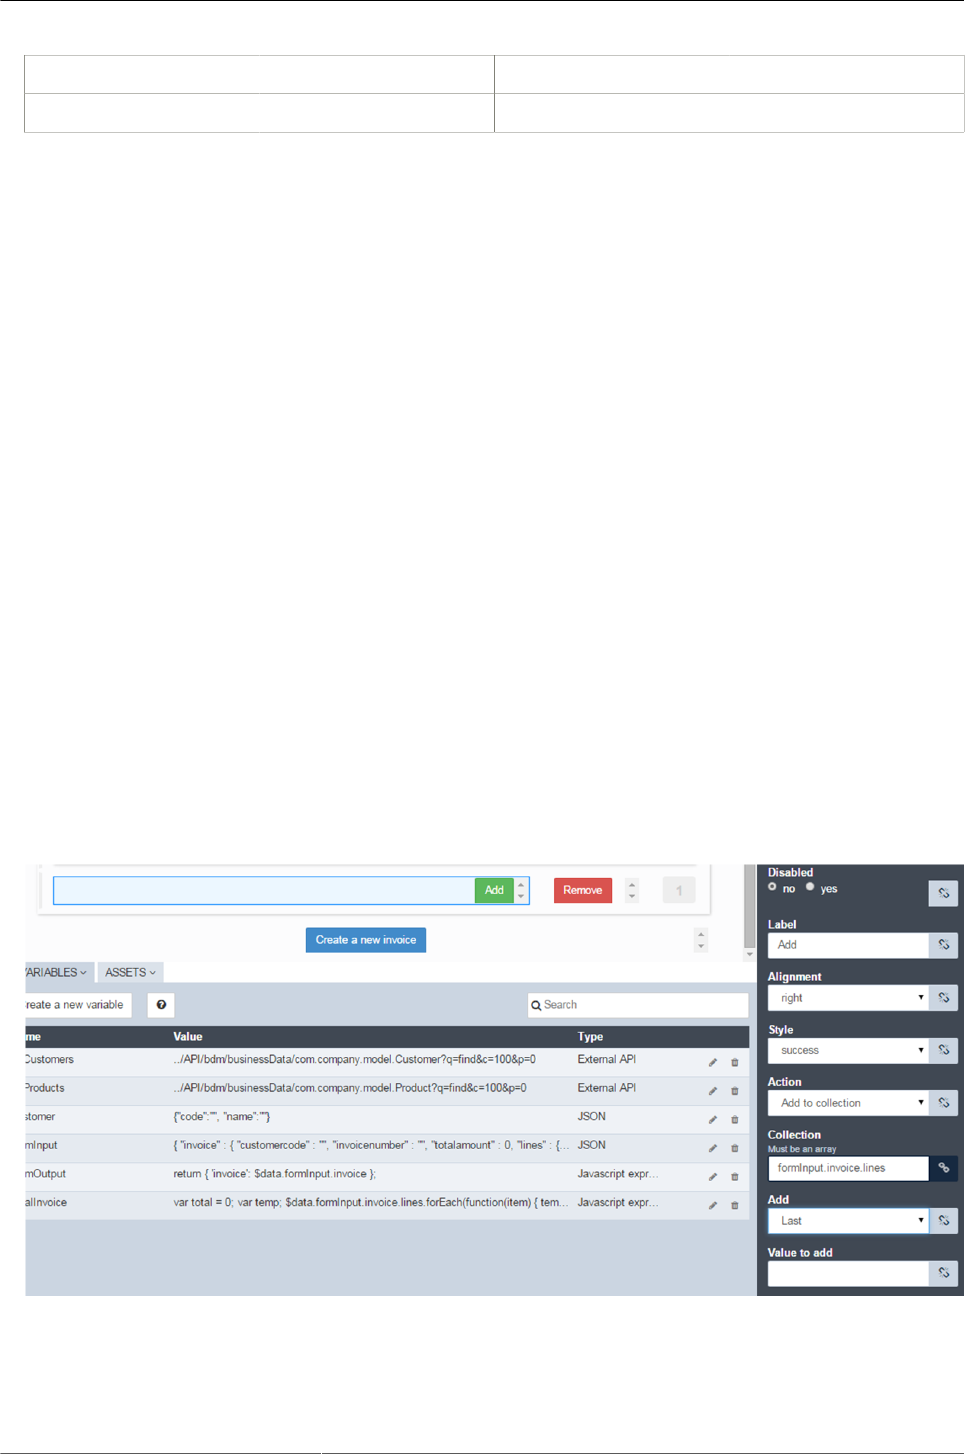
Let’s manage the list of products
Create a container to loop on the lines:
In Repeat contents, set formInput.invoice.lines.
Then in the container, add the different widget.
Table 3.3. Widgets in line
Widget Type Properties Value
productCode Select Available values: all-
Products
Displayed key: name
Returned key: code
$item.productcode
Quantity Number $item.quantity
Brut price Number $item.brutprice
Discount Number $item.discount
UIDesigner - Create a new form
29
Widget Type Properties Value
Total Number $item.totalline
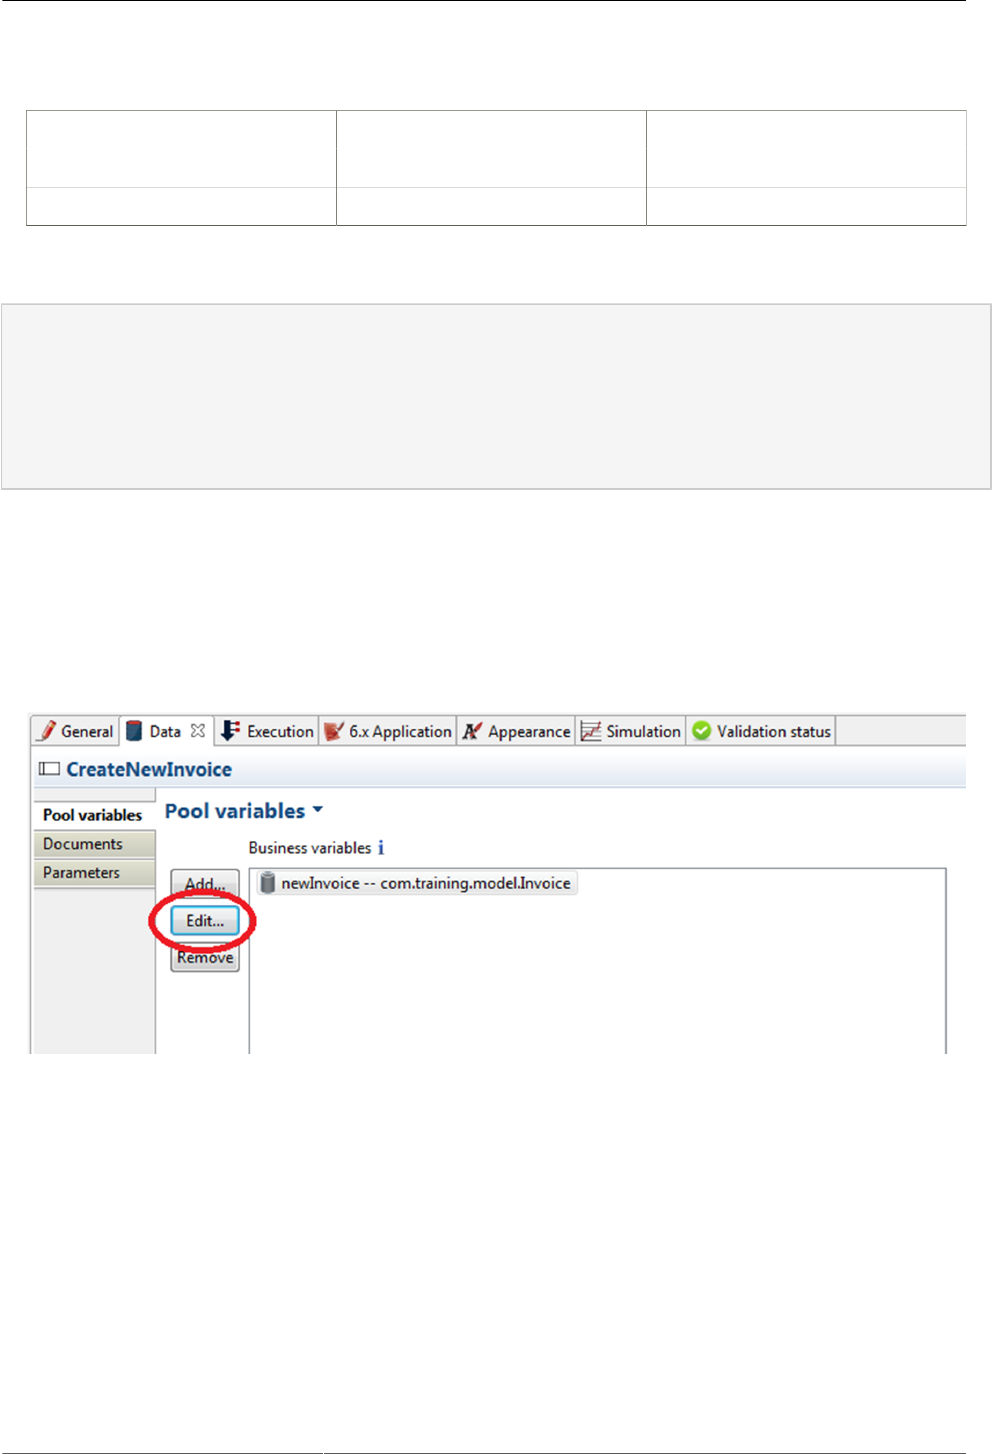
Then add two submit button. Rename it Add and Remove. To arrange then, you must:
a. Reduce the columns on the "Remove" button to two columns
b. Then increase the number of column to 9 on the "Add" button
c. Set the alignment to Rigth on the "Add" button.
Then on button "Add"
a. Choose the style "success"
b. Select the action "Add to collection"
c. Set the collection to "formInput.invoice.lines"
On button "Remove"
a. Choose the style "danger"
b. Set the action to "Remove to collection"
c. Set the collection "formInput.invoice.lines"
You should have this:
Finish the header
Check the first widget:
UIDesigner - Create a new form
30
Table 3.4. Widgets in header
Widget value properties
Number formInput.invoice.invoicenumber
Total formInput.invoice.invoicenumber Read only
Change the formOutput
$data.formInput.invoice.customercode=$data.customer.code;
return {
'invoice': $data.formInput.invoice
};
Saving the data
In order to save the data sent by the form we need to store it in the new invoice variable using the property
"Default value" (in the tasks we should use operations).
Select the variable "newInvoice" and click on the button "Edit"
Click on the pencil to edit the default value
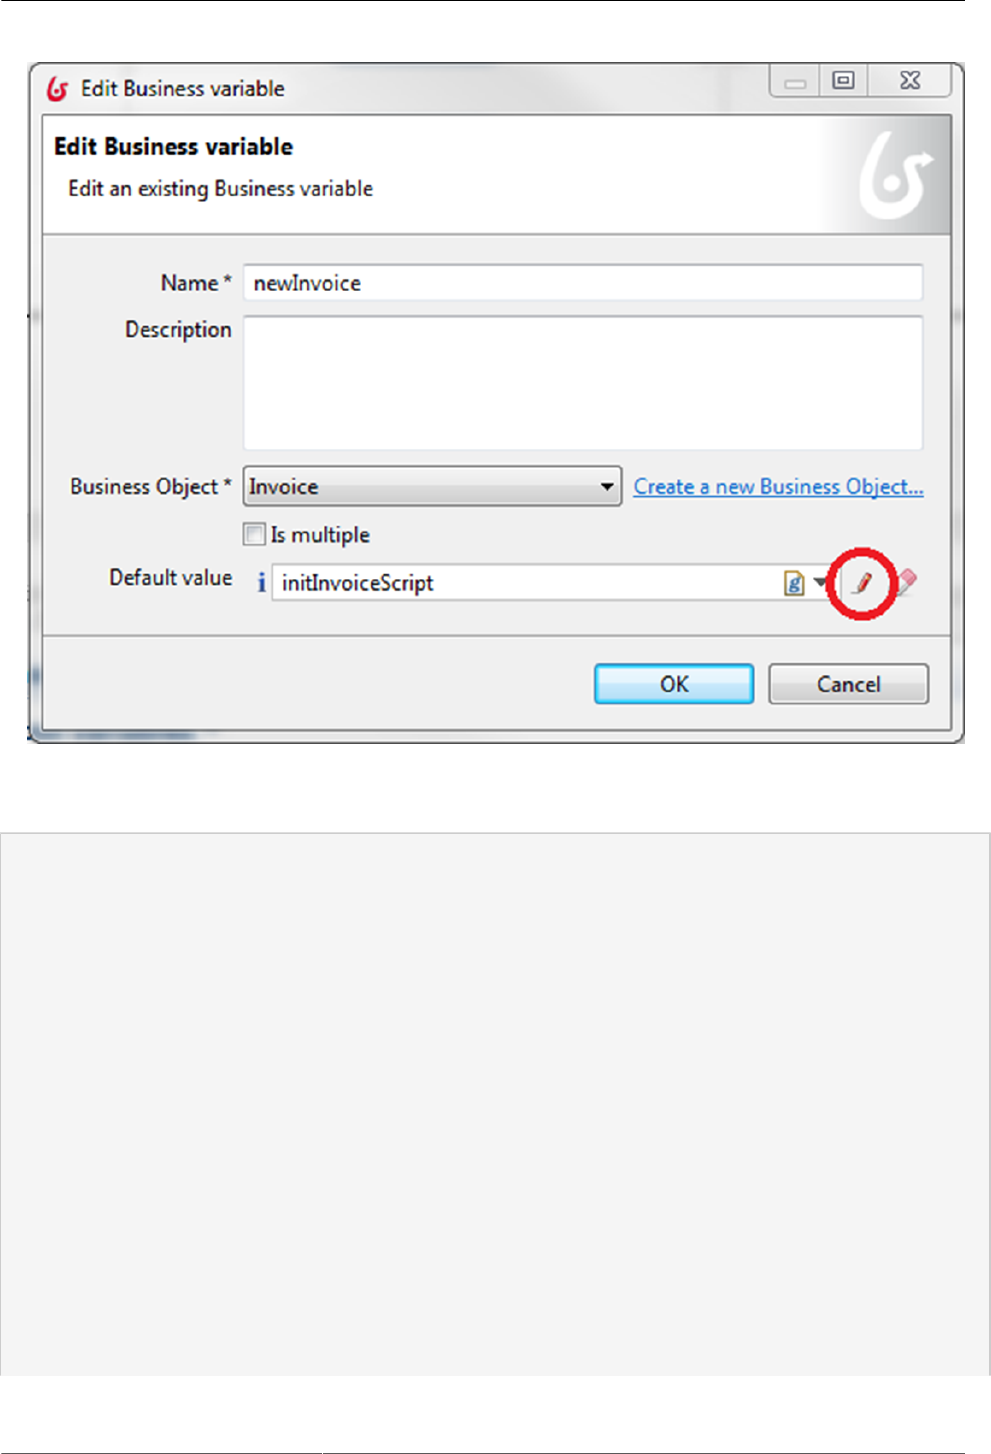
UIDesigner - Create a new form
31
Create a script named initInvoiceScript with the content below:
import com.company.model.Customer;
import com.company.model.Invoice;
import com.company.model.InvoiceLine;
import com.company.model.Product;
Invoice invoiceBdm = new Invoice();
Customer customer = customerDAO.findByCode(invoice.get("customercode"), 0, 1).get(0);
invoiceBdm.setNumber(invoice.get("invoicenumber"));
invoiceBdm.setTotalAmount(invoice.get("totalamount"));
invoiceBdm.setCustomer(customer);
List lines = invoice.get("lines");
if (lines != null && lines.size()>0) {
List<InvoiceLine> invoiceLineList = new ArrayList<InvoiceLine>();
for (Map line : lines) {
InvoiceLine invoiceLine = new InvoiceLine();
invoiceLine.setProduct(productDAO.findByCode(line.get("productcode"),0,1).get(0));

UIDesigner - Create a new form
32
invoiceLine.setQuantity(line.get("quantity"));
invoiceLine.setDiscount(line.get("discount"));
invoiceLine.setUnitPrice(line.get("brutprice"));
invoiceLine.setTotalLine(line.get("totalline"));
invoiceLineList.add(invoiceLine);
}
invoiceBdm.setLine(invoiceLineList);
}
return invoiceBdm;
Run the process

33
Chapter 4. Build a custom page to list
vacation requests
4.1. Objective
The goal of this exercise is to build a custom page using the UI designer. The idea is to use that custom page
to list the vacation requests that the currently logged user have issued.
4.2. Instructions
• Import the vacation request diagram into your workspace.
• Initialize your business database with a couple of requests by running the process.
• Develop the custom page using the UI designer.
• Test the custom page using the preview button.
4.3. How-to
4.3.1. Create a custom page using the UI designer.
To create the custom page click on the UI designer button in the Studio . Give the custom page a new name,
and click on the "+" button.
4.3.2. Test a custom page using the preview feature.
To test a custom page from the UI designer, you can use the preview feature. You must first have a valid
session in the portal.
4.4. Correction
1. Install the process diagram of the BPAD exercise # 12.0
2. Run the process a couple of times in order to populate the business database.
In order to display a list of vacation requests that the user initiated, the process Vacation request have to
be executed a couple of times. Click on the Run button in the middle of the studio Coolbar.
Build a custom page to list vacation requests
34
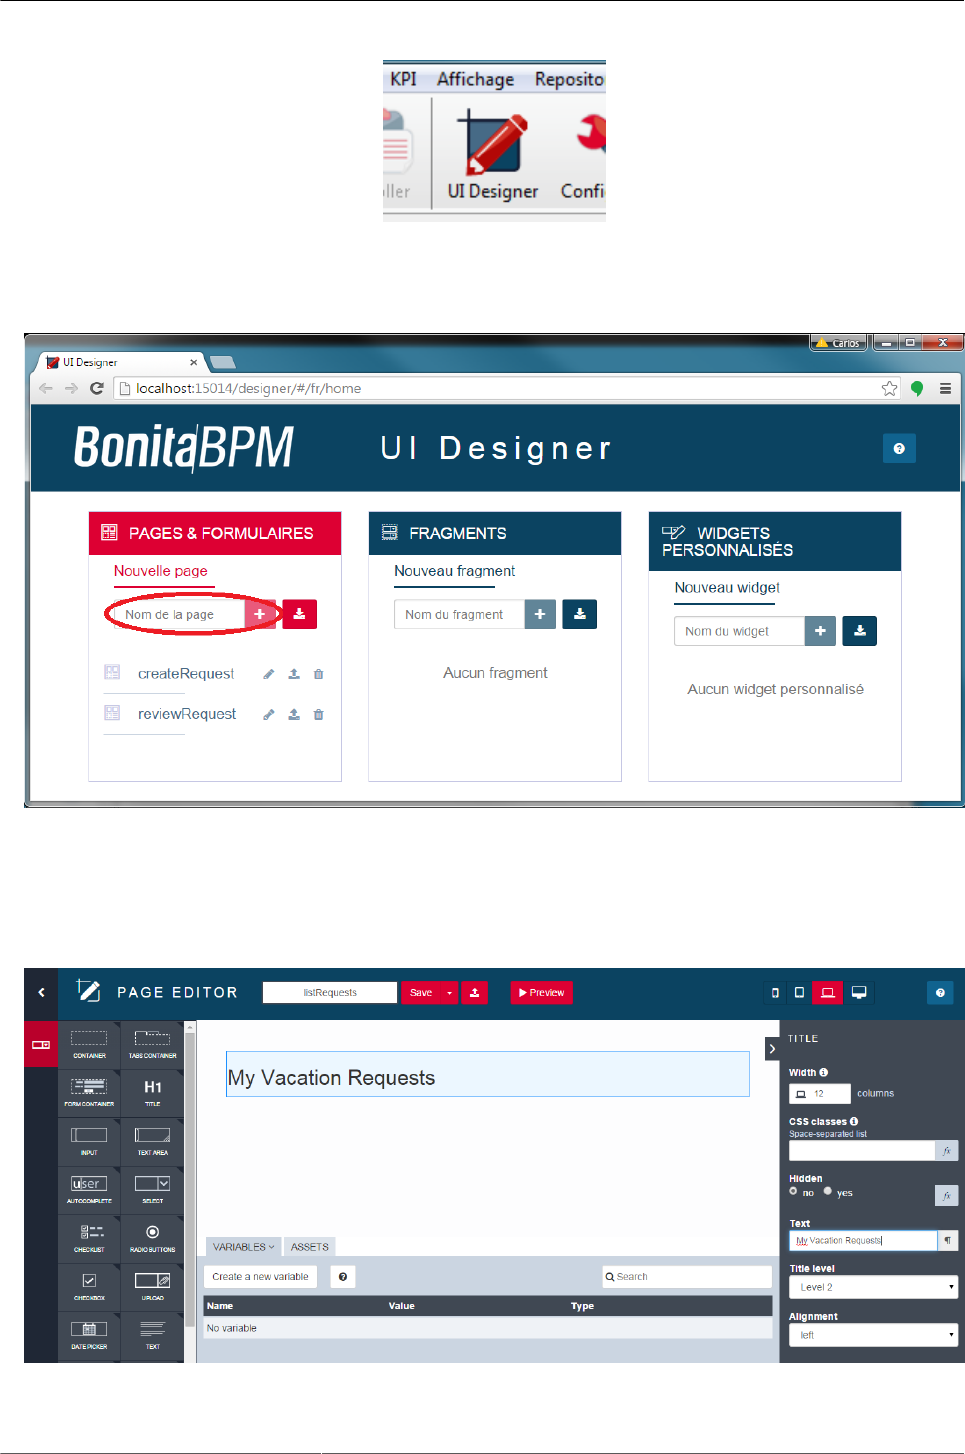
3. Create the vacation request list custom page
Click on the UI designer button in the middle of the studio Coolbar. This will bring up the UI designer in
your favorite Web browser.
Build a custom page to list vacation requests
35
We will name our custom page "listRequests". Type this name in the "Page Name" input and then click on
the + button.
4. Add widgets to the vacation request list custom page
Our custom page is empty for the moment. Let's add a title widget at the top, and name it "My Vacation
Requests".
Build a custom page to list vacation requests
36
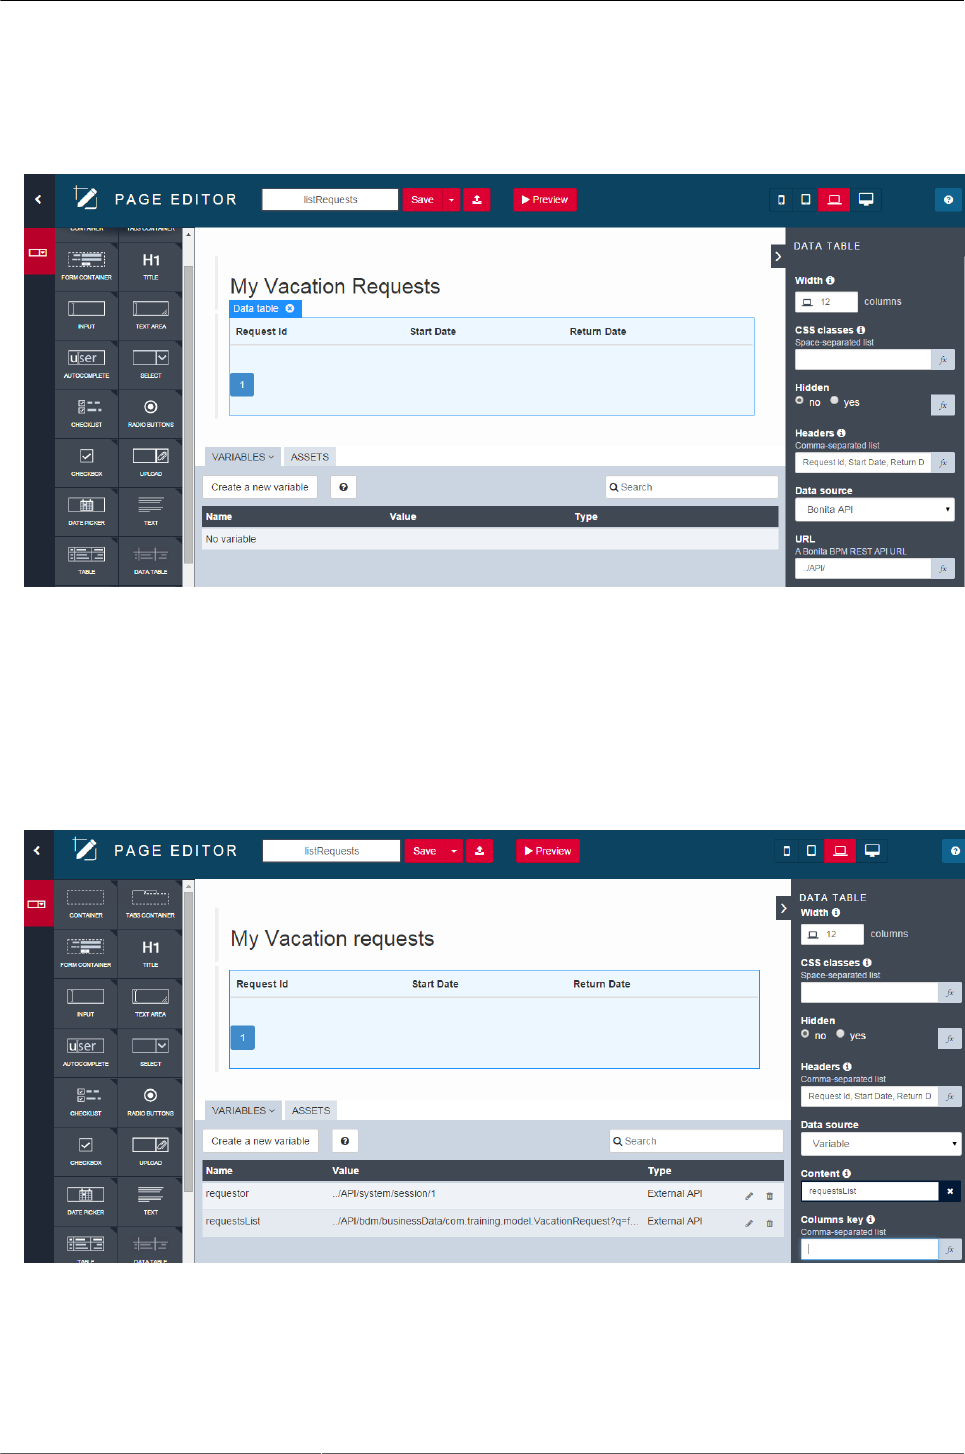
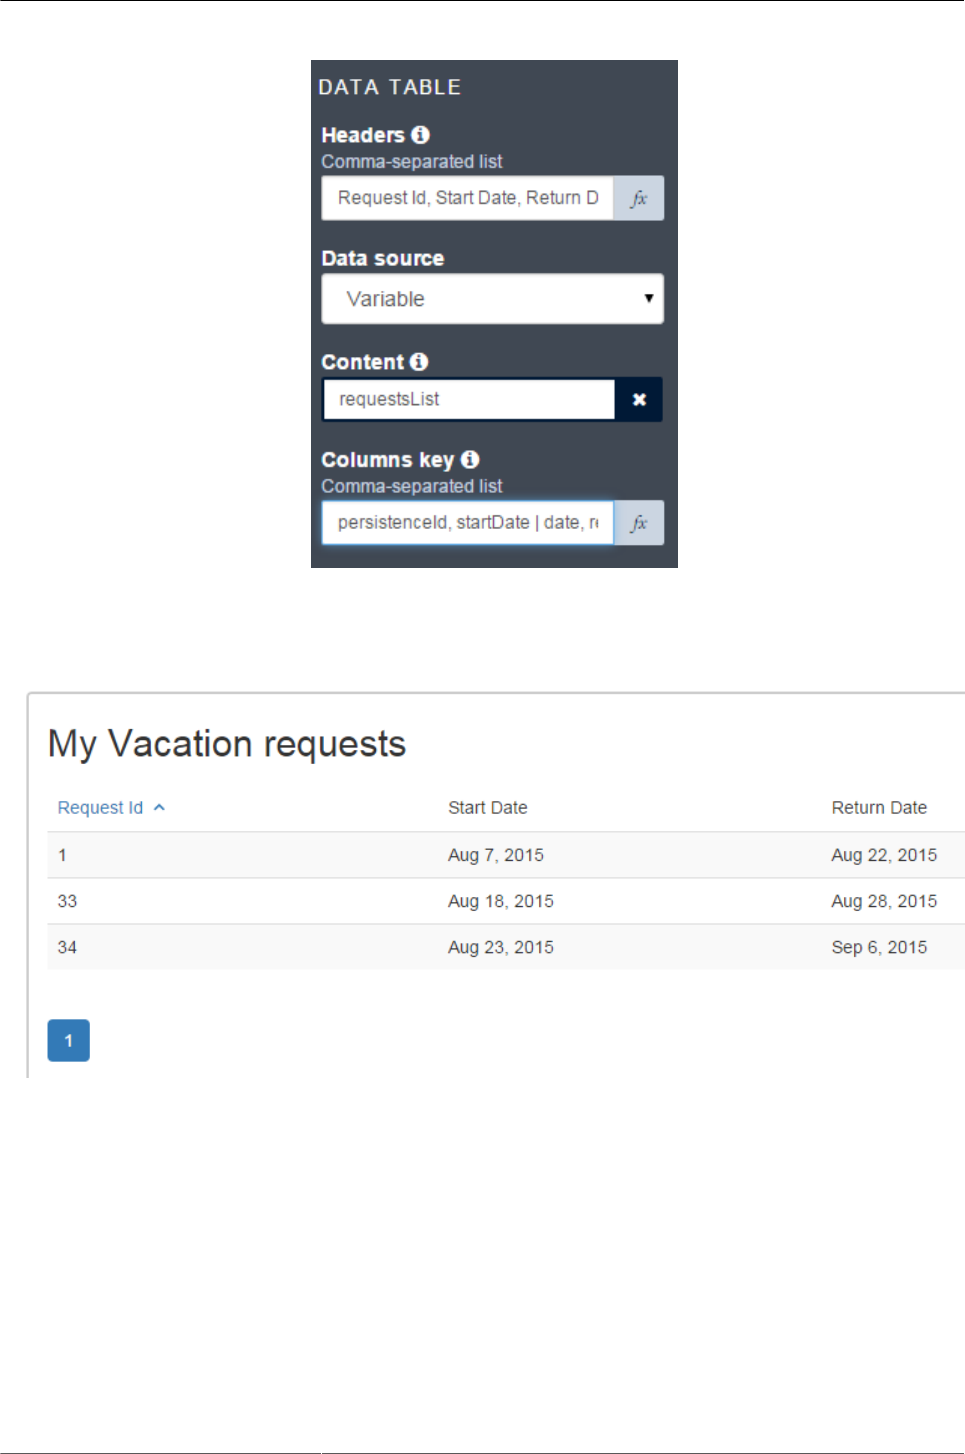
The next widget to add is the Data Table that will display our vacation request list. Drag and drop a data
datable widget below the title. Change the headers of the data table to the following : "Request Id, Start
Date, Return Date"
Create two External API variables. Name the first one "requestor" and set it's val-
ue to "../API/system/session/1". This variable contains the user currently logged in boni-
ta portal. The second variable will be named "requestsList" and it's value should
contain the following Rest call : "../API/bdm/businessData/com.training.model.VacationRequest?
q=findByRequestorId&p=0&c=10&f=requestorId={{requestor.user_id}}". Change the Data table data source
attribute from Bonita API to Variable and bind the content attribute to the "requestsList" variable.
Set the Columns key parameter of the data table to : "persistenceId, startDate | date, returnDate | date". We
use the date filter on both dates in order to display dates in a fancier way.
Build a custom page to list vacation requests
37
Once all the configuration is done, you can test your custom page by pressing the preview button in the
middle top of your custom page.

38
Chapter 5. Create a custom application
5.1. Objective
The goal of this exercise is to be able to create a custom application that provides internal services such as
a page to look up your vacation requests.
5.2. Instructions
• Export custom page developed during previous exercise.
• Import custom page as a new resource through Bonita Portal.
• Create a new custom application.
• Edit custom application and add the custom page imported above.
• Create a new navigation menu including a default home page and the custom page.
• Access to the new application through the web context ../apps/[app sub-context]
5.3. Correction
1. If you didn't do it yet, from the UI Designer, export the custom page developed during previous
exercise.
From UI Designer, "PAGES & FORMS" section, look for "listRequests" page and then click on export button
A "page-listRequests.zip" file will be automatically downloaded.
2. Import custom page as a resource through Bonita Portal.
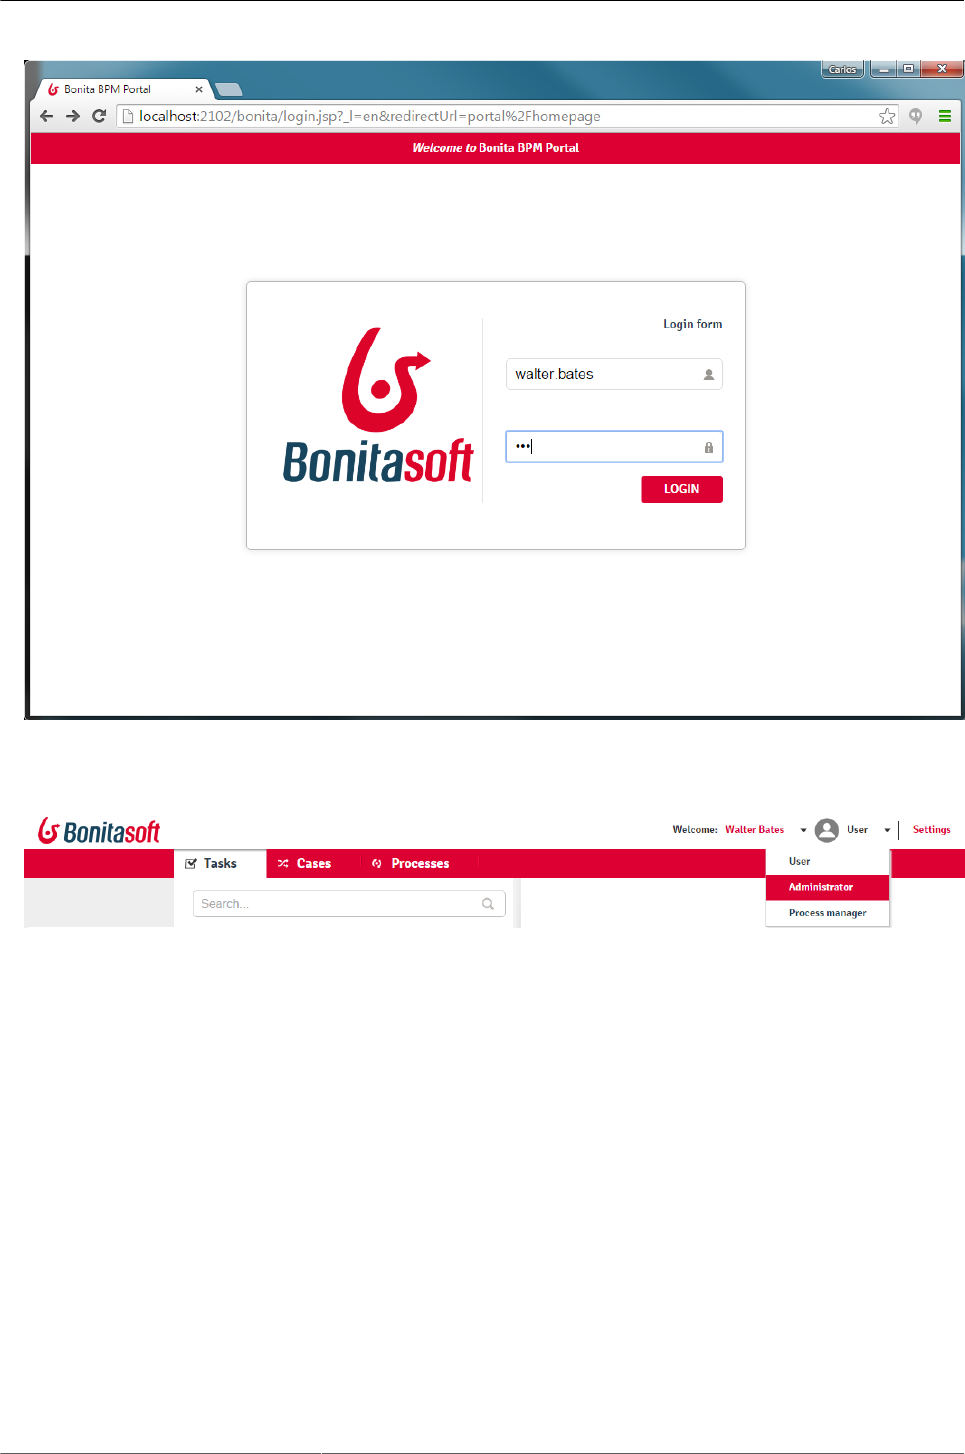
Do login in Bonita Portal with an user account having "Administrator" profile.
Create a custom application
39
If after login, the current profile is not "Administrator", from the toolbar chose "Administrator" profile.
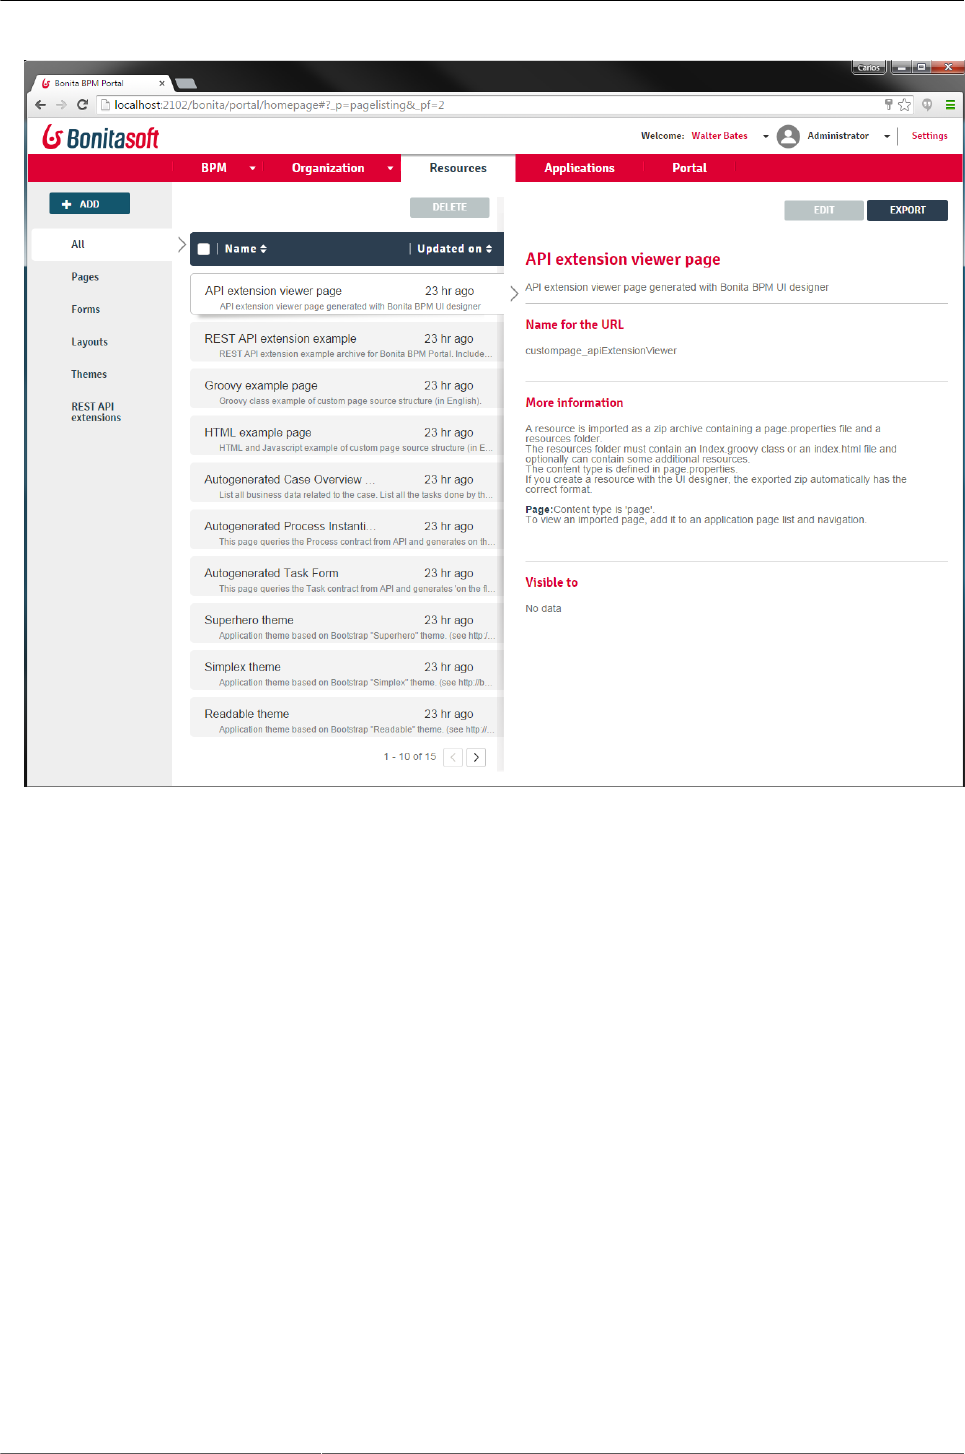
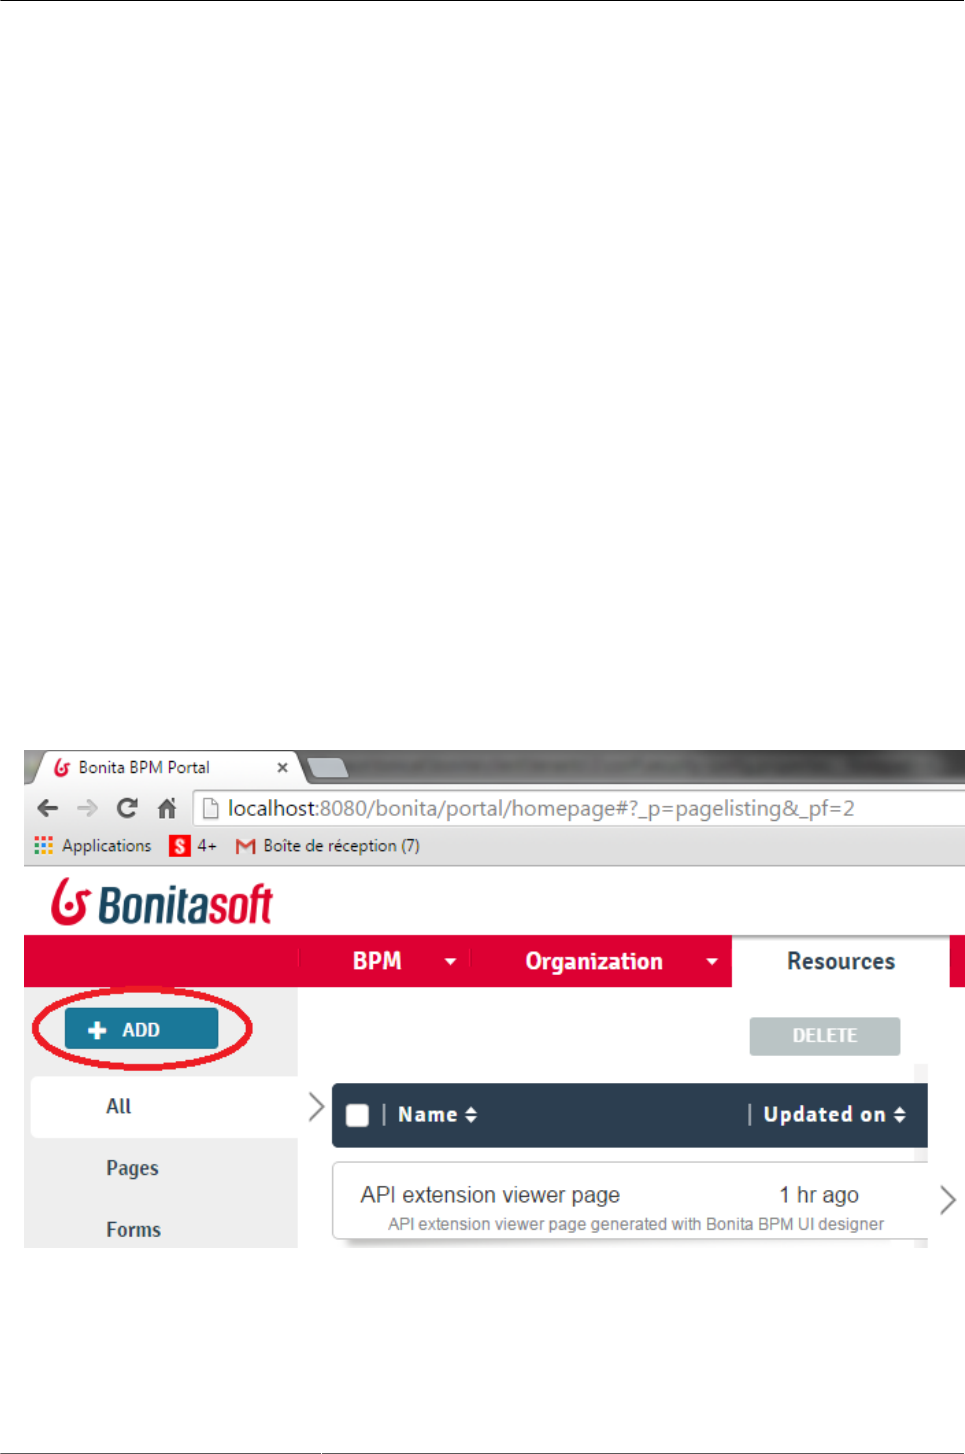
From horizontal menu, click on "Resources" option in order to access to the current resources deployed in
the Bonita instance.
Create a custom application
40
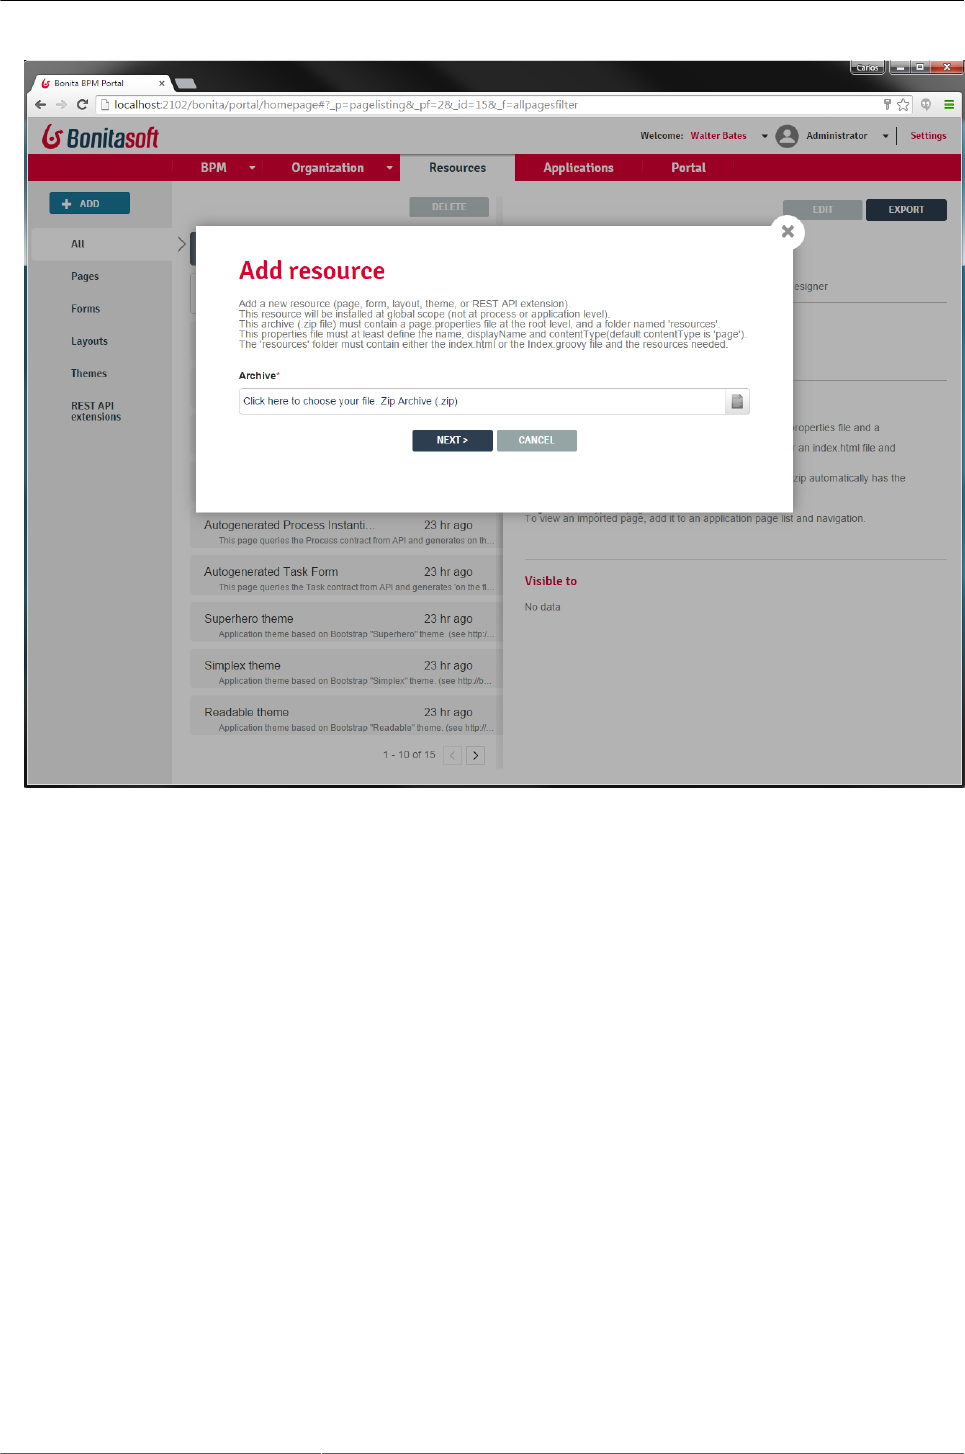
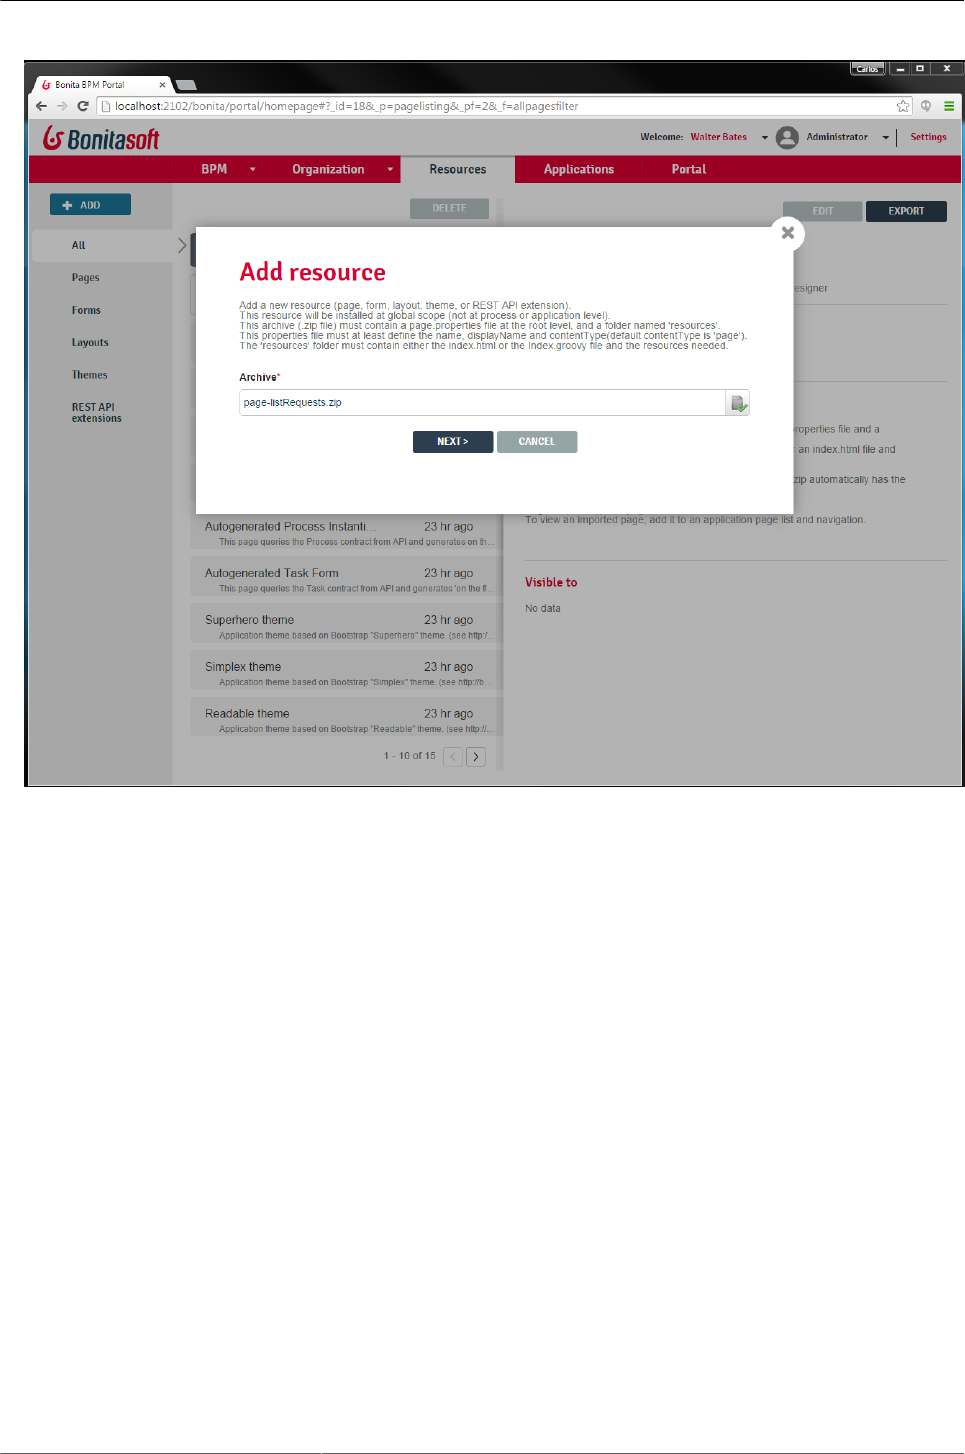
From "Resources" window, click on "ADD" button to import the custom page.
Create a custom application
41
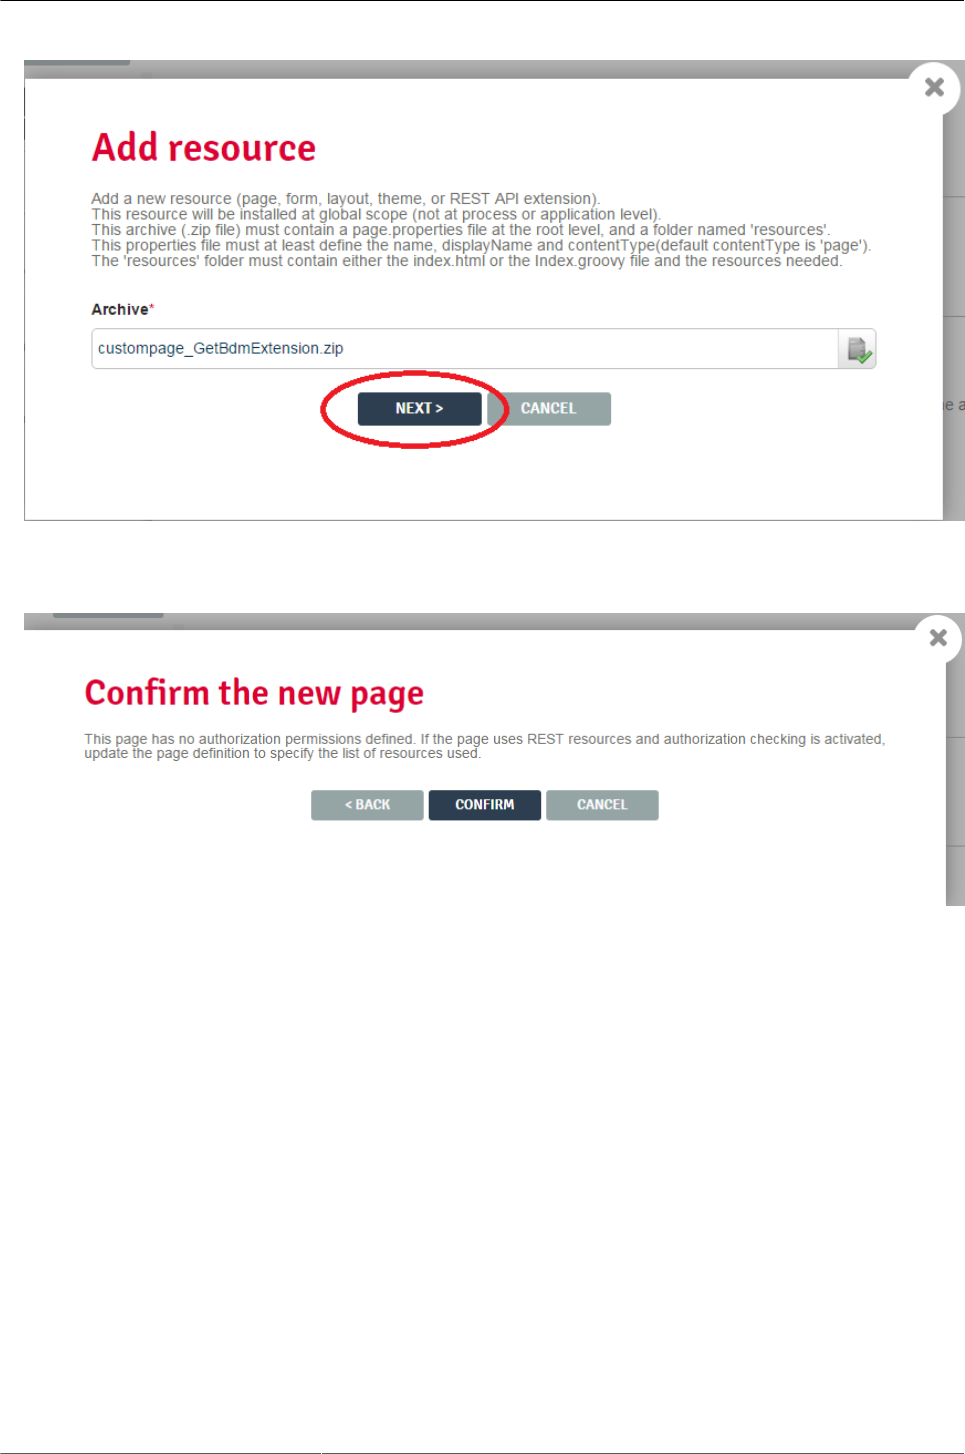
Select "page-listRequests.zip" file from your filesystem and click on button "NEXT>".
Create a custom application
42
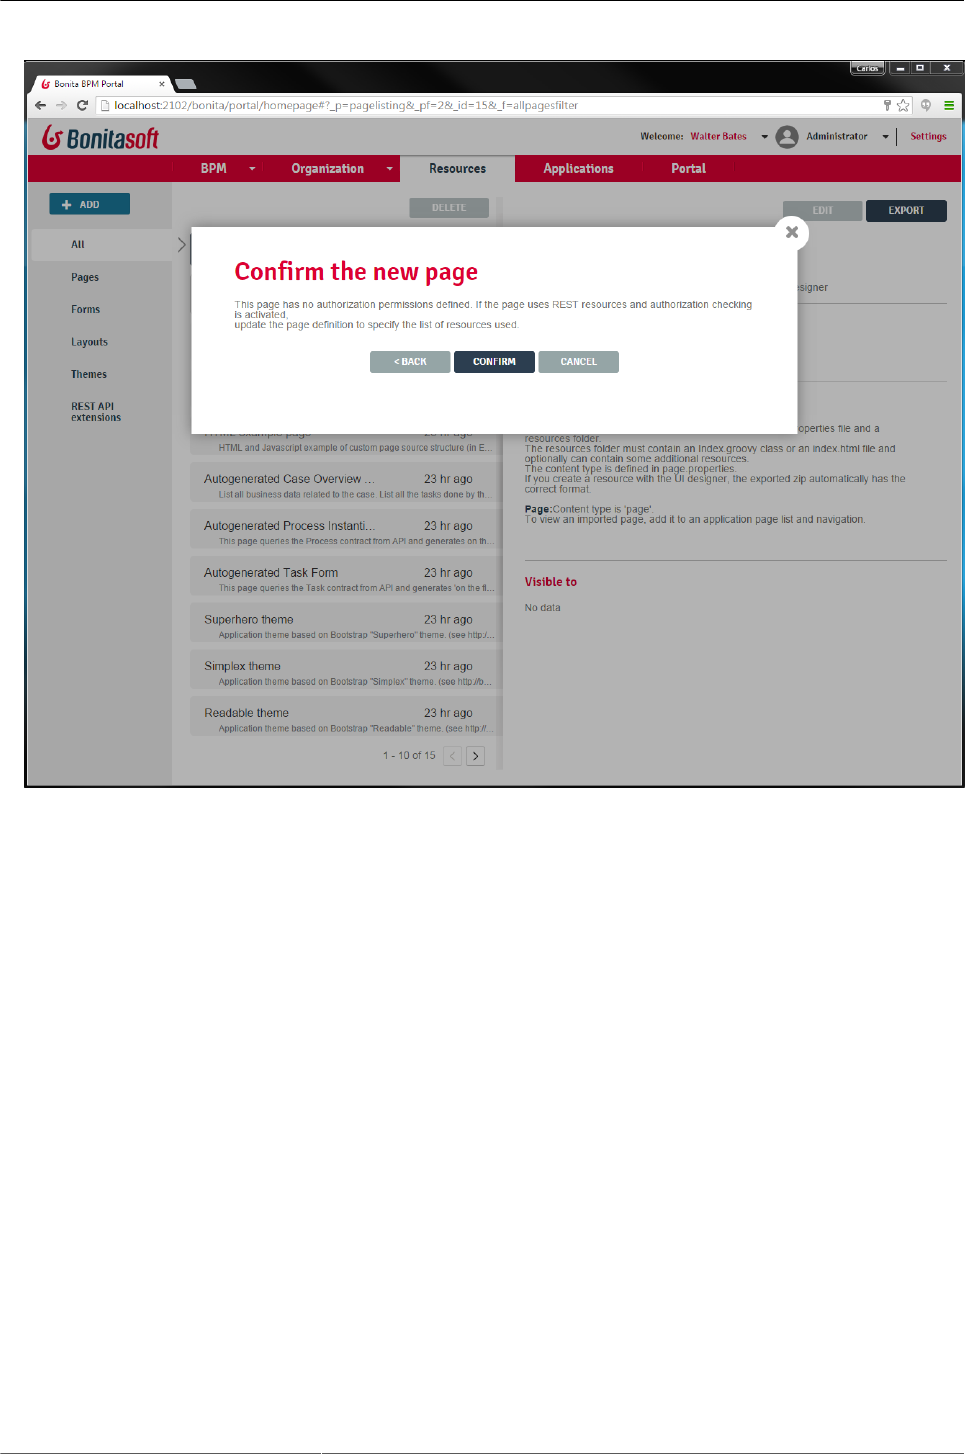
From "Confirm" window, click on "CONFIRM" button to finish importing the custom page.
Create a custom application
43
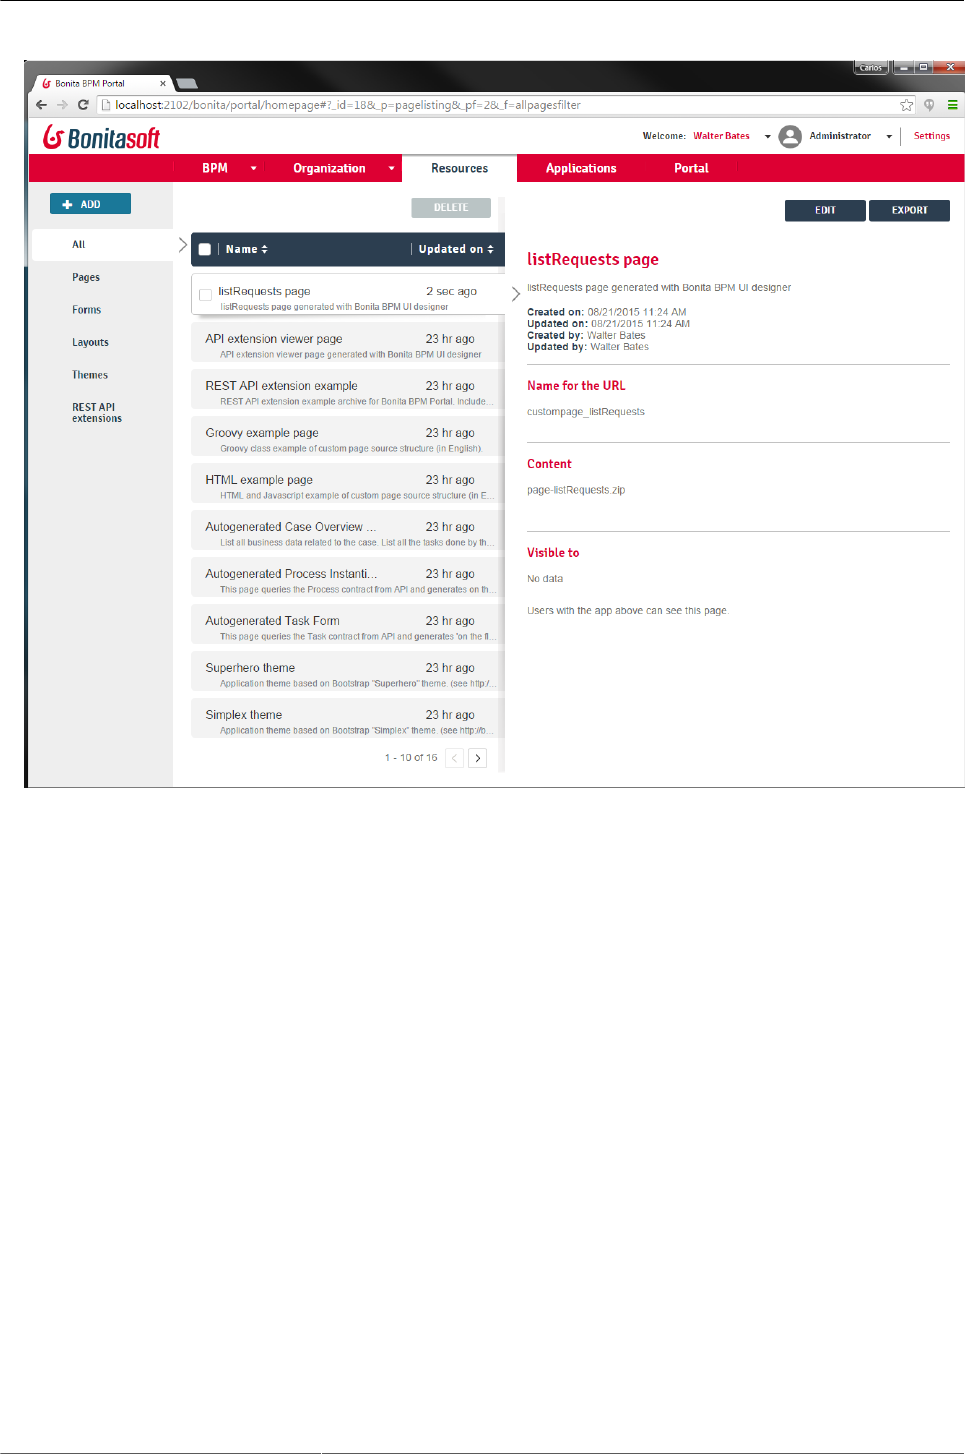
Check if the custom page is currently on the resources list.
Create a custom application
44
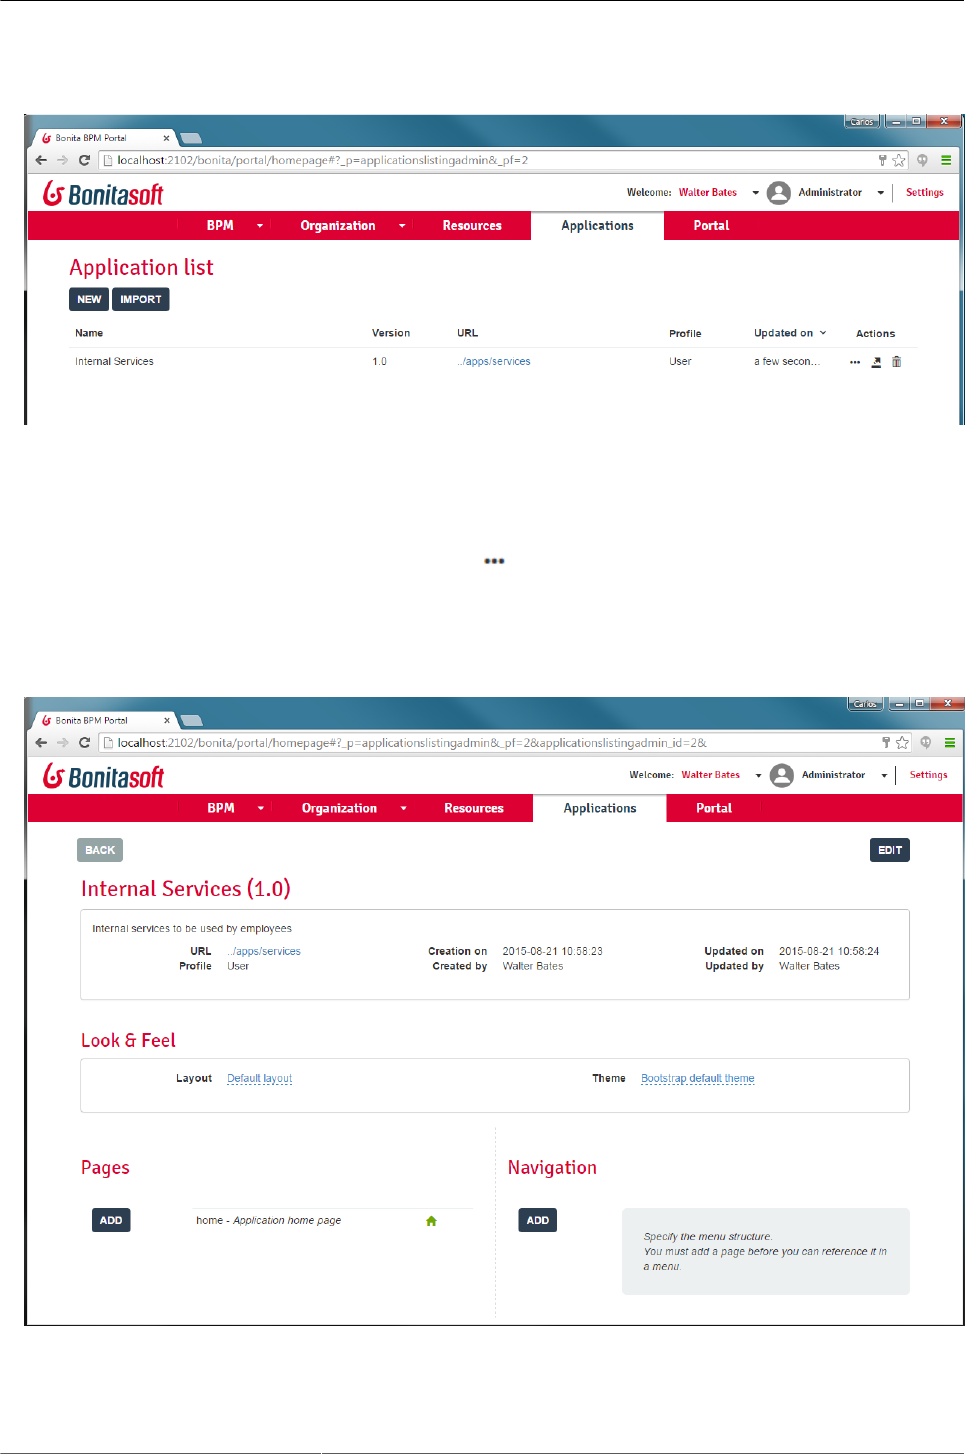
3. Once custom page has been imported, create a new custom application.
From main menu, click on "Applications" to access to existing applications list. Click on "NEW" button to
create a new application.
Create a custom application
45
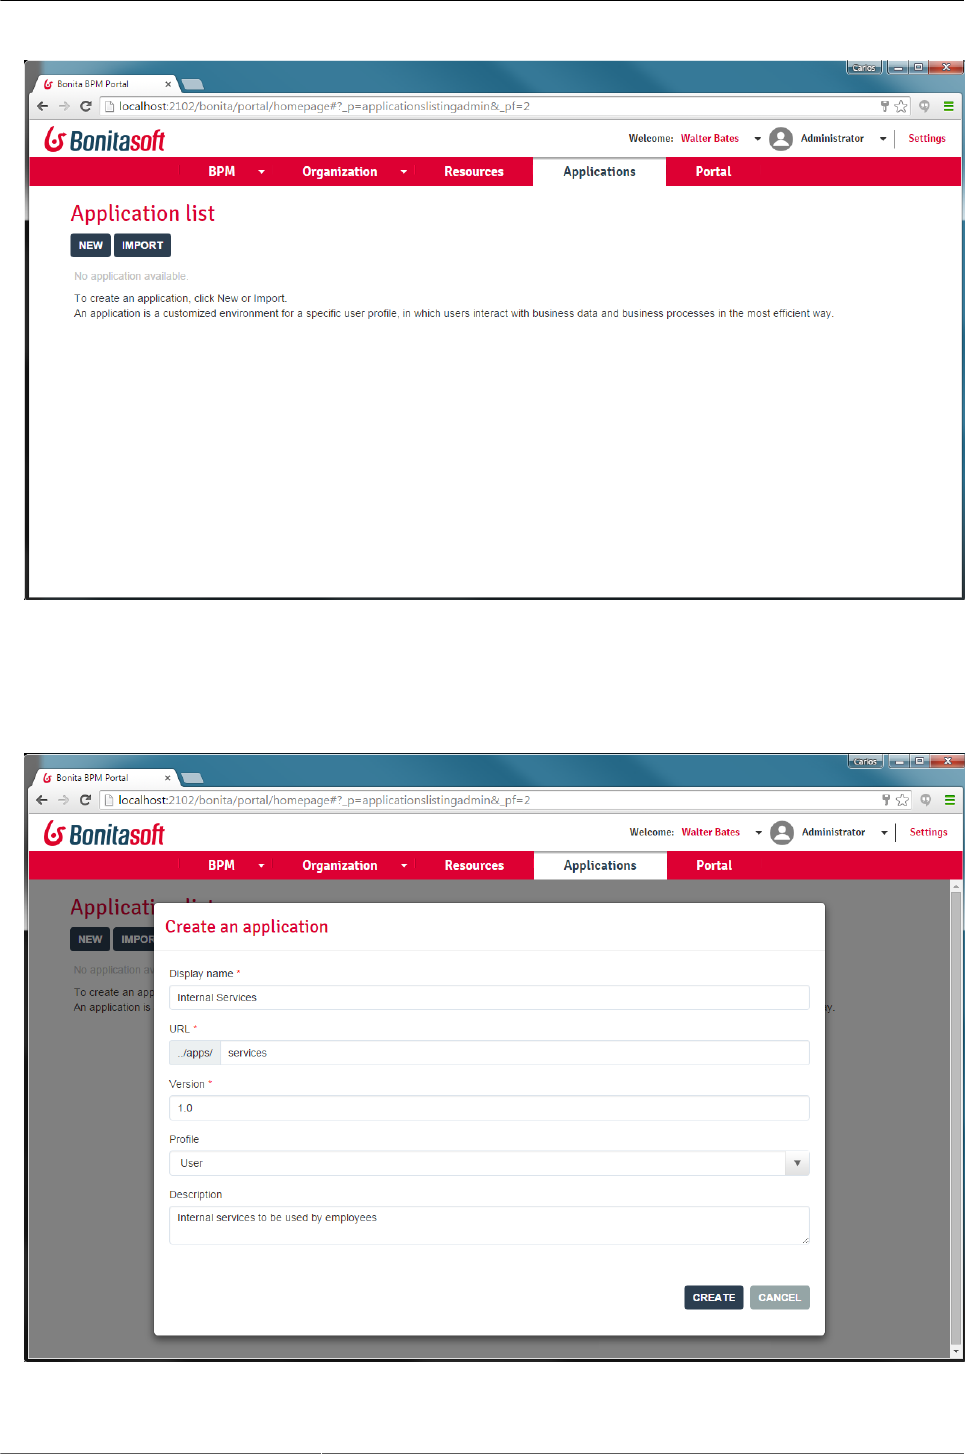
Enter a name, a web sub-context and a version for the new custom application. Also select the user profile to
have access to this new custom application. Finally, introduce a optional description and click on "CREATE"
button.
Create a custom application
46
Check that the new application is now available from the applications list.
4. Edit the new custom application to add the custom page.
From "Applications" window, click on "Edit" icon from "Actions" column
for the custom application we just created.
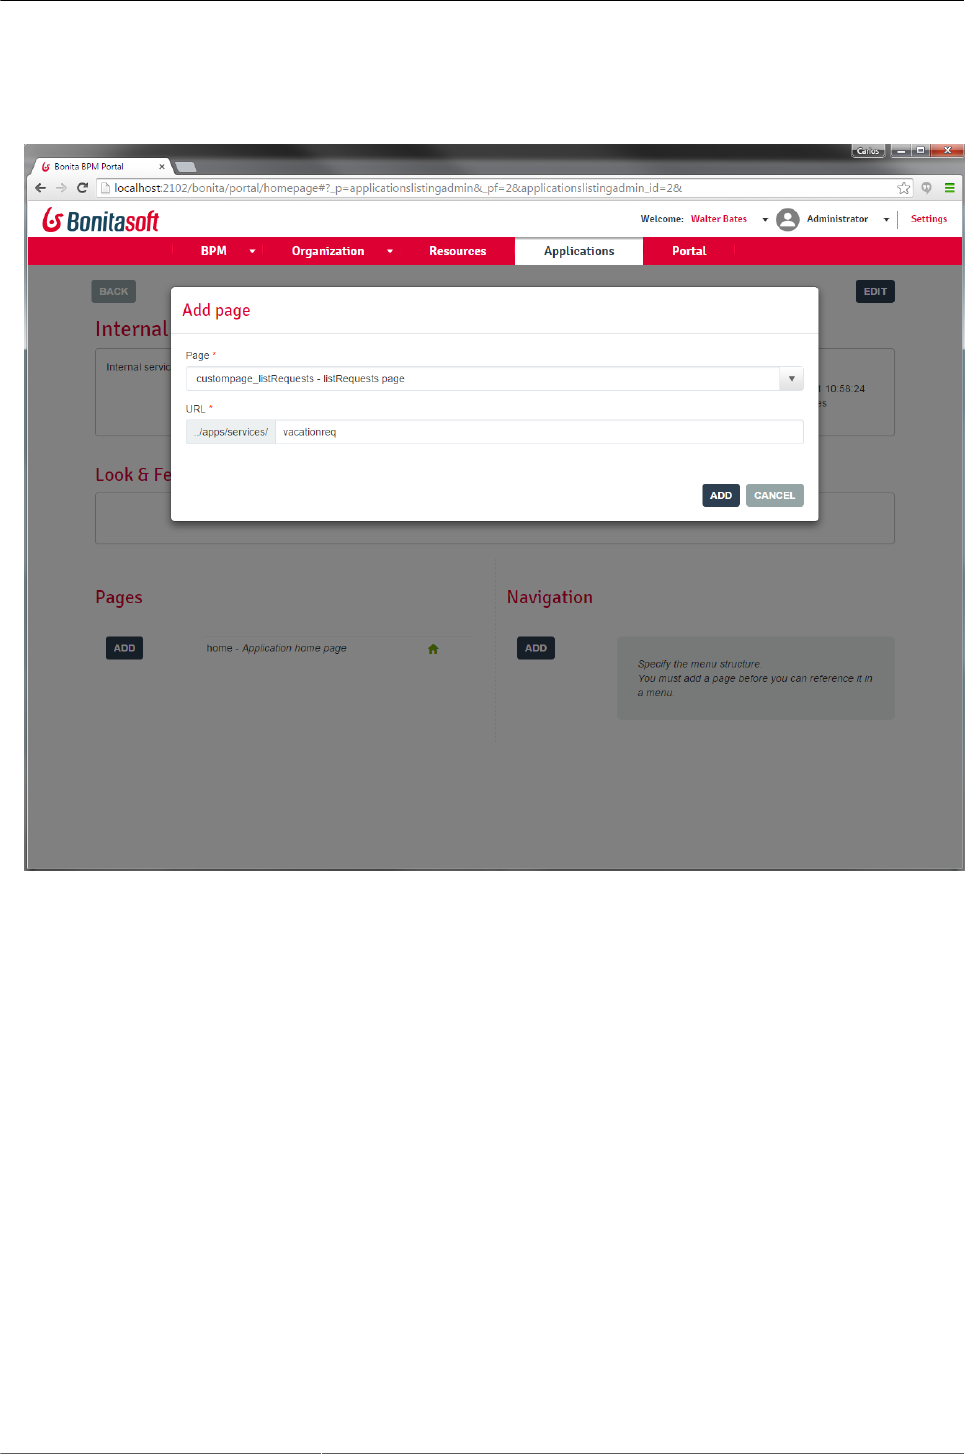
From application edit window, click on "ADD" button from "Pages" section in order to add a new custom page.
Create a custom application
47
From "Add page" window, select "custompage_listRequests - listRequests" page and introduce an URL sub-
context to access to the page.
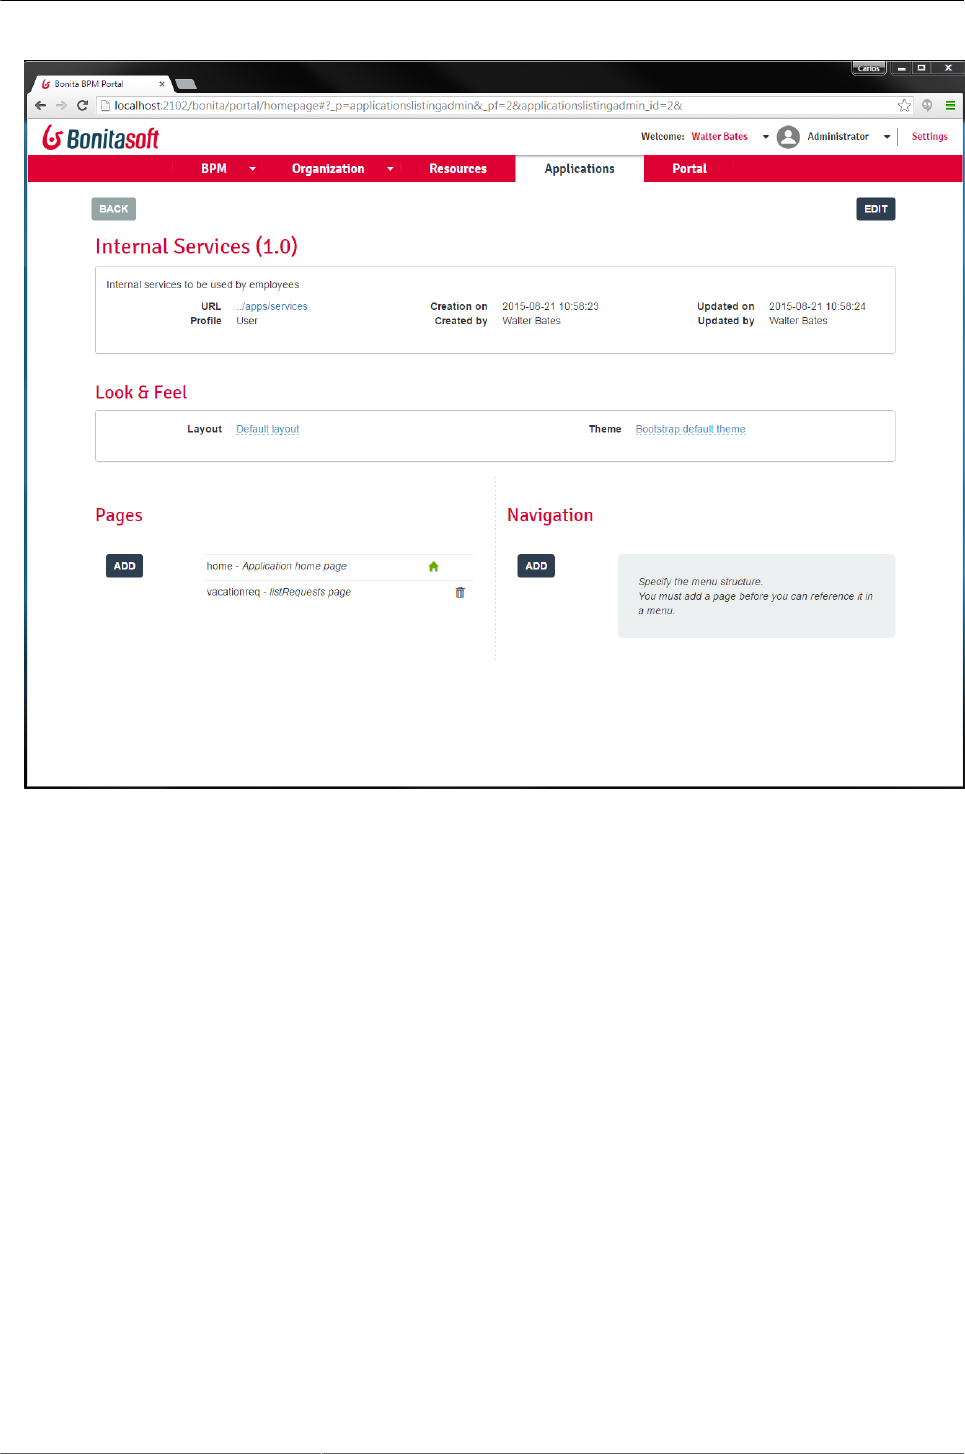
Check that the page is now available on the section "Pages".
Create a custom application
48
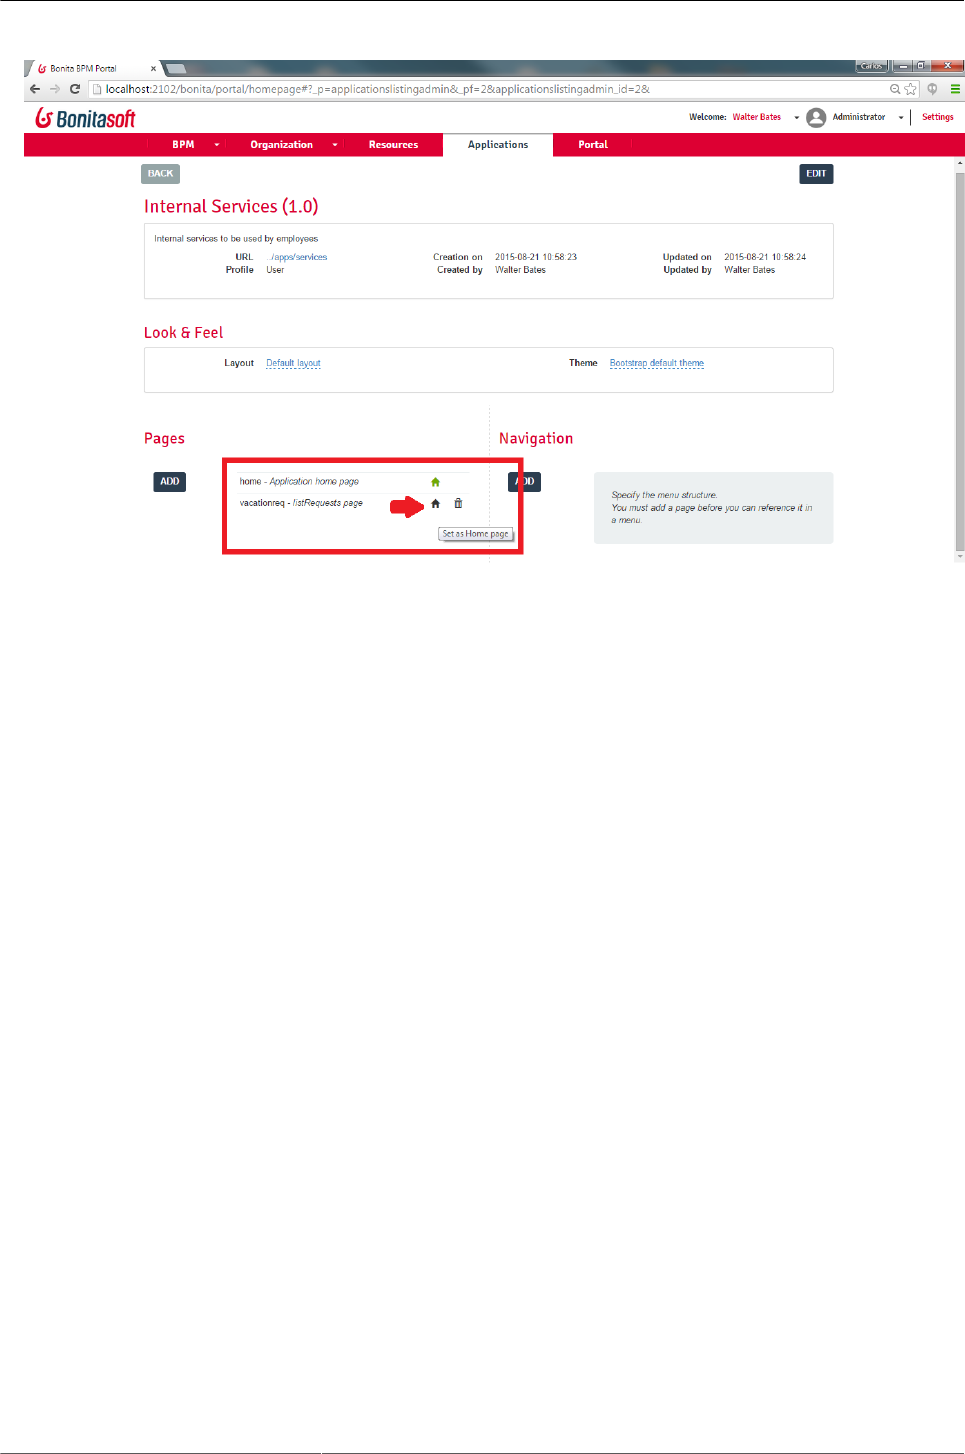
If we want set the new page as Home page, just click on the "Set as Home page" icon.
Create a custom application
49
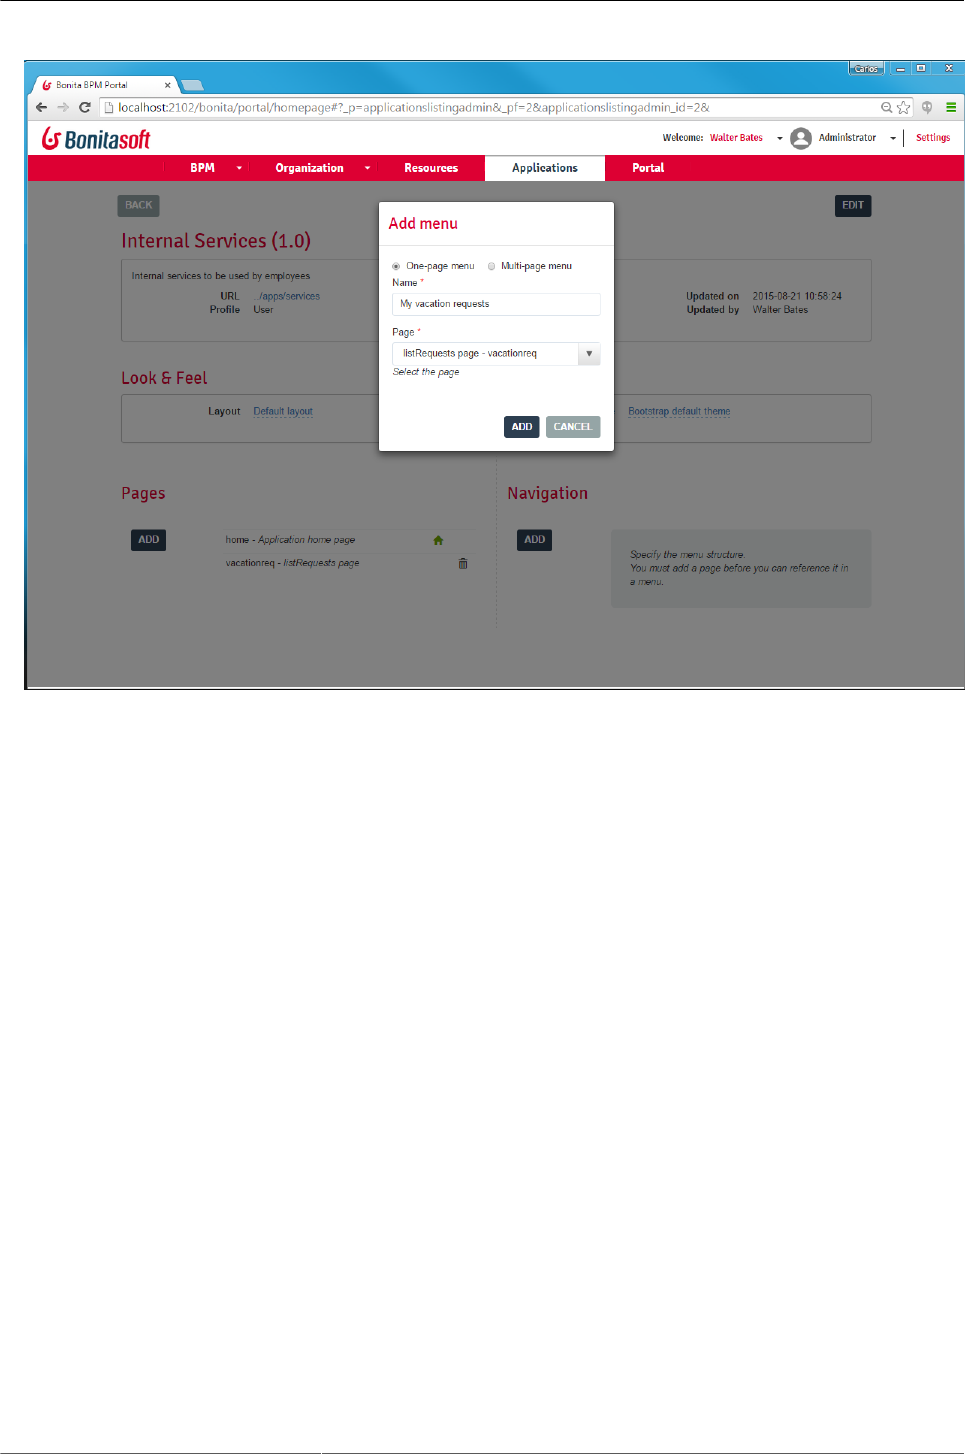
5. Once custom application has been created, we configure the navigation.
From application edit window, click on "ADD" button in "Navigation" section.
From "Add menu" window, select the type of menu:
• One-page: page link will appear as an independent option in the menu.
• Multi-page: a dropdown menu with options
For the example we choose One-page menu. We provide a name for the menu option and we select a page
from the list of pages available in our custom application. We do the same operation for both the home and
requests list pages.
Create a custom application
50
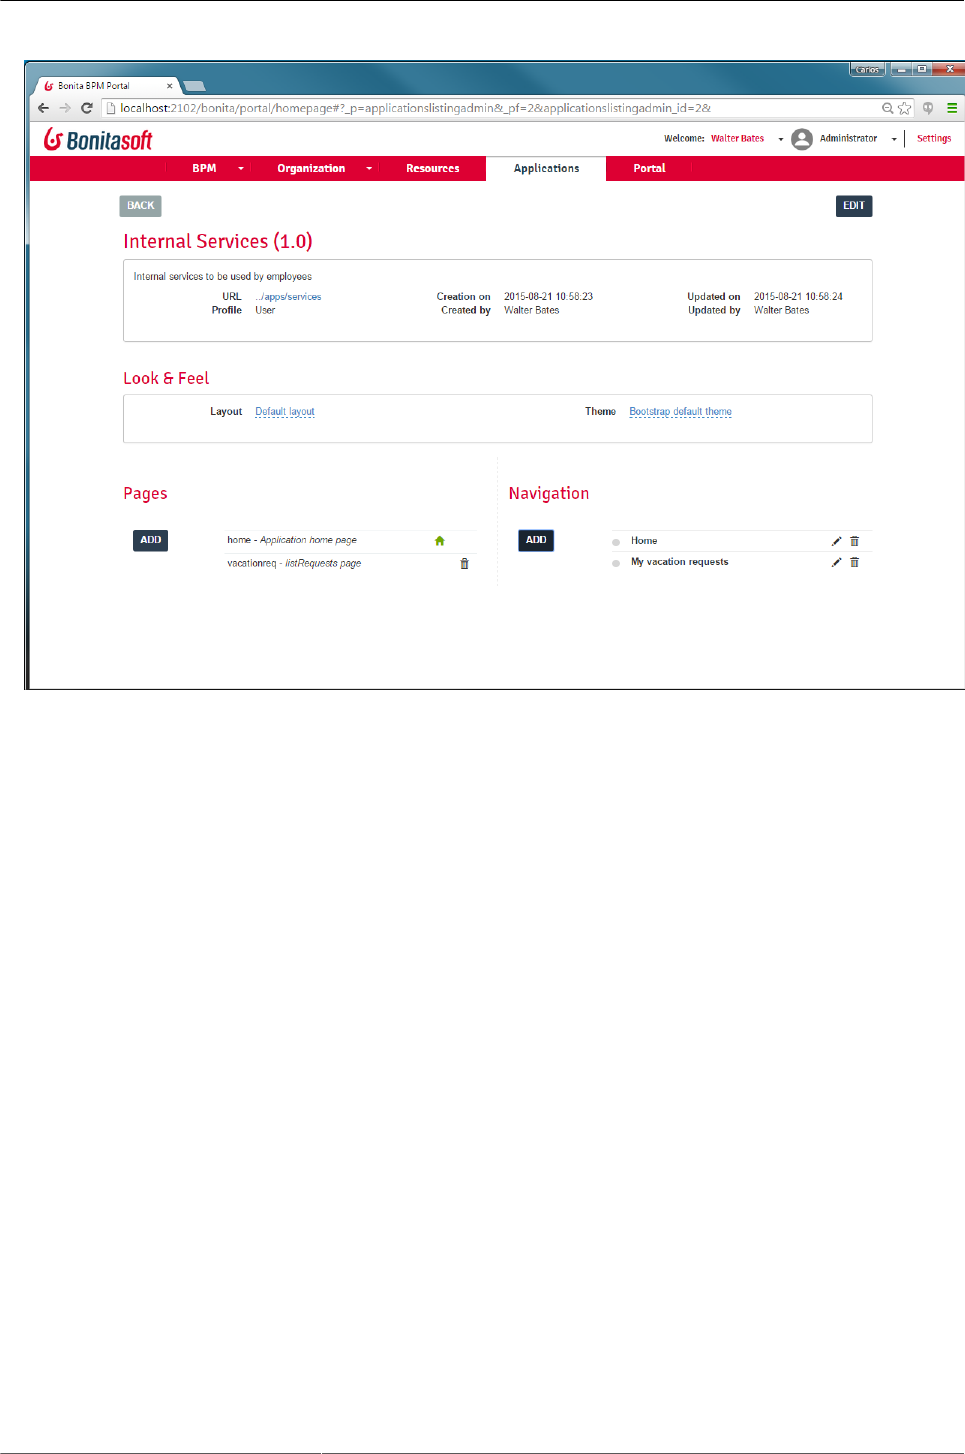
Check that the new options are now present in the "Navigation" section.
Create a custom application
51
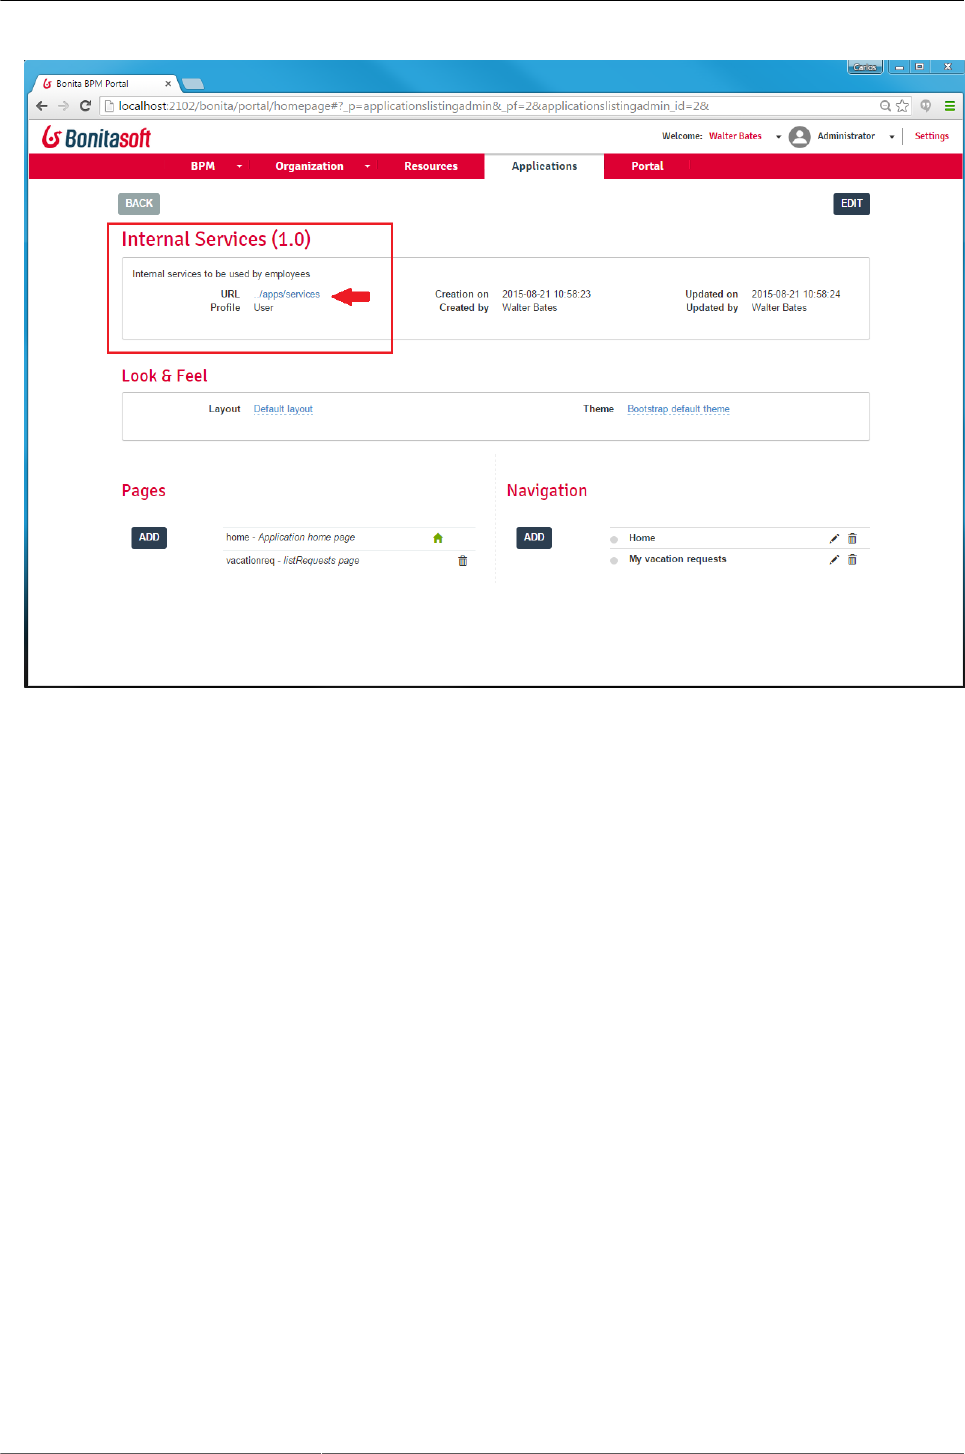
6. Accessing to the new custom application.
From the application edit window, click on the URL link in the application global properties section.
You can also enter the URL directly in the address bar of your favorite browser.
Create a custom application
52
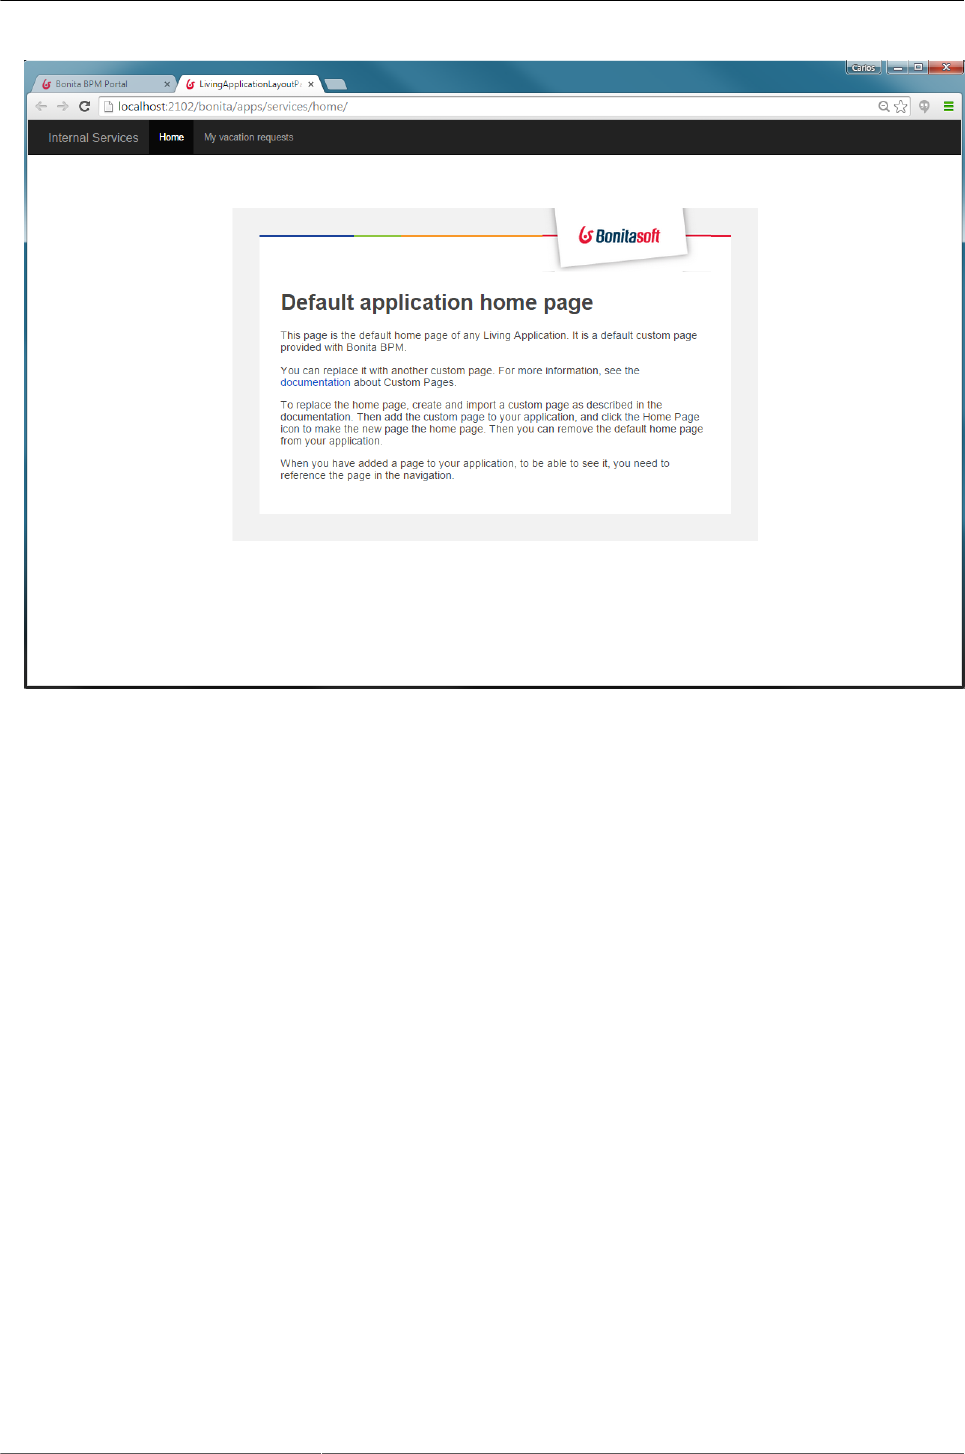
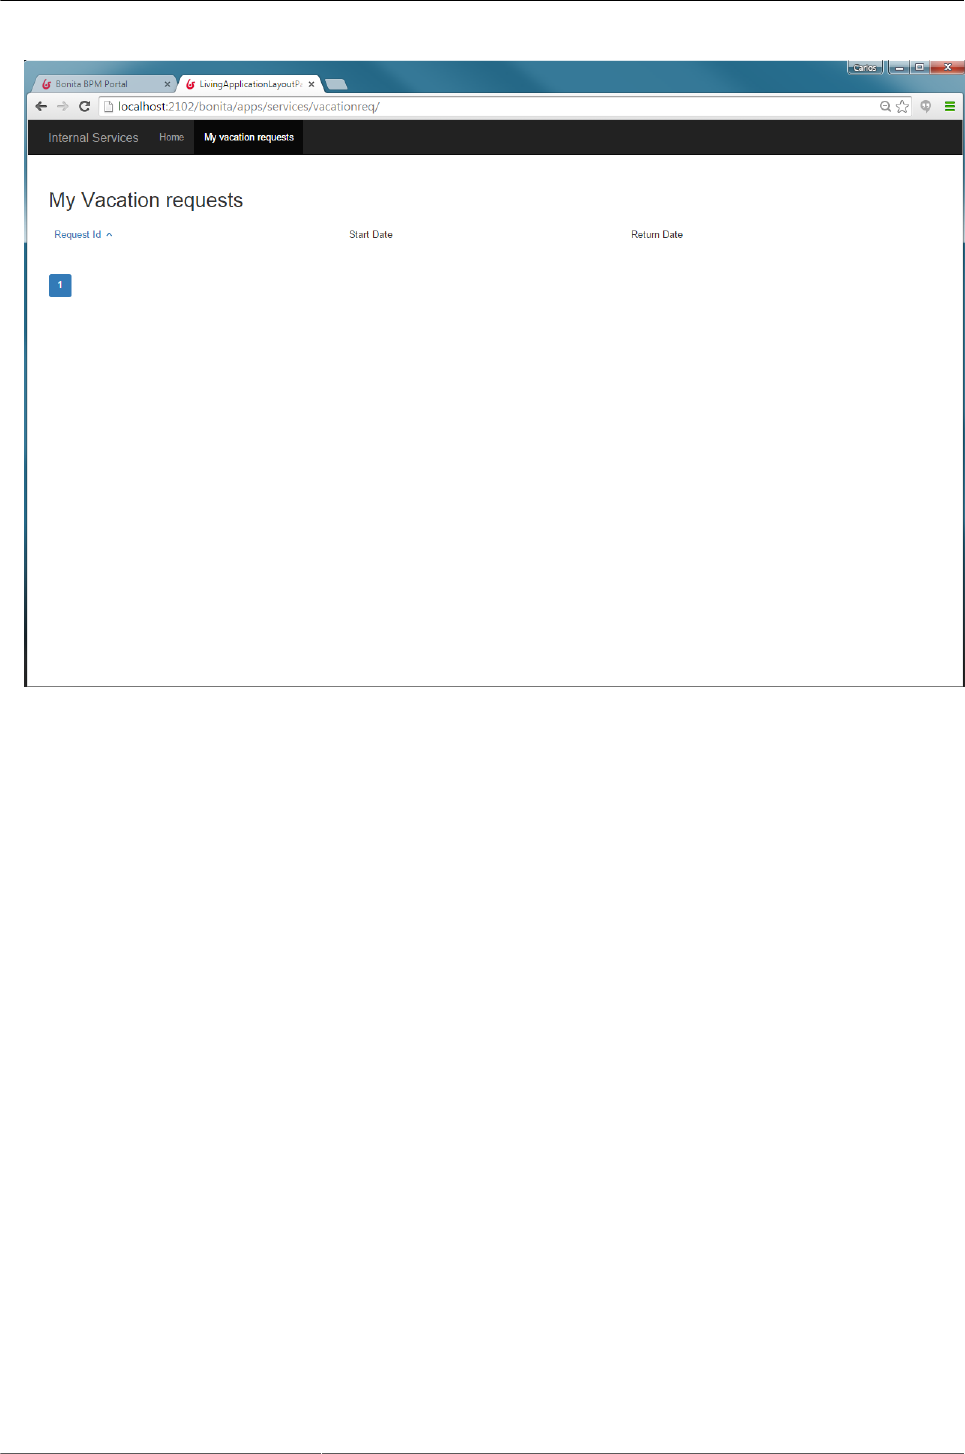
If we didn't change it, you will see the default home page.
Create a custom application
53
From the horizontal menu, click on "My vacation requests" to go to your vacation requests page.
Create a custom application
54

55
Chapter 6. Build an Extension API to
request data to an external database
6.1. Objective
the goal of this exercise is to build an Extension API to request data of an external database.
6.2. Instructions
• Export the REST API extension example from the portal.
• Develop the API Extension Sql Datasource.
• Publish the API Extension Sql Datasource in the portal.
• Import the API Extension diagram into your workspace.
• Test the API Extension running the process.
6.3. How-to
6.3.1. Export the REST API extension example from the portal.
In order to export the REST API Extension you should log in the Bonita Portal and change the profile as
Administrator. In the tab Resources you can choose, in the left tabs, the REST API Extension example. Click
on the Button EXPORT to download the zip file containing all the necessary’s files.
6.3.2. Develop the API Extension Sql Datasource.
To develop the API you need to create a new groovy page and fill the property page with the correct parameters.
For this exercise you need to connect to a database using a server’s datasource and retrieve the resultset
in JSON format.
6.3.3. Set the security.
Declare the security permission of your new page in the file "resources-permissions-mapping.properties". Don't
forget to declare who can use it in the file "custom-permissions-mapping.properties".
6.3.4. Publish the API Extension Sql Datasource in the portal.
Publish your new API Extension. Just log in the Bonita Portal and change the profile as Administrator. In the
tab Resources you should click on the ADD button and select the zip file containing your API.
Build an Extension API to request data to an external database
56
6.3.5. Import the API Extension diagram into your workspace..
To import the file APIExtensionExercise-1.0.bos provided just click on the button Import in the Studio’s cool
bar and choose the bos file.
6.3.6. Test the API Extension running the process.
Execute the Test process APIExtensionExercise clicking on the button Run in the Studio’s cool bar.
6.4. Correction
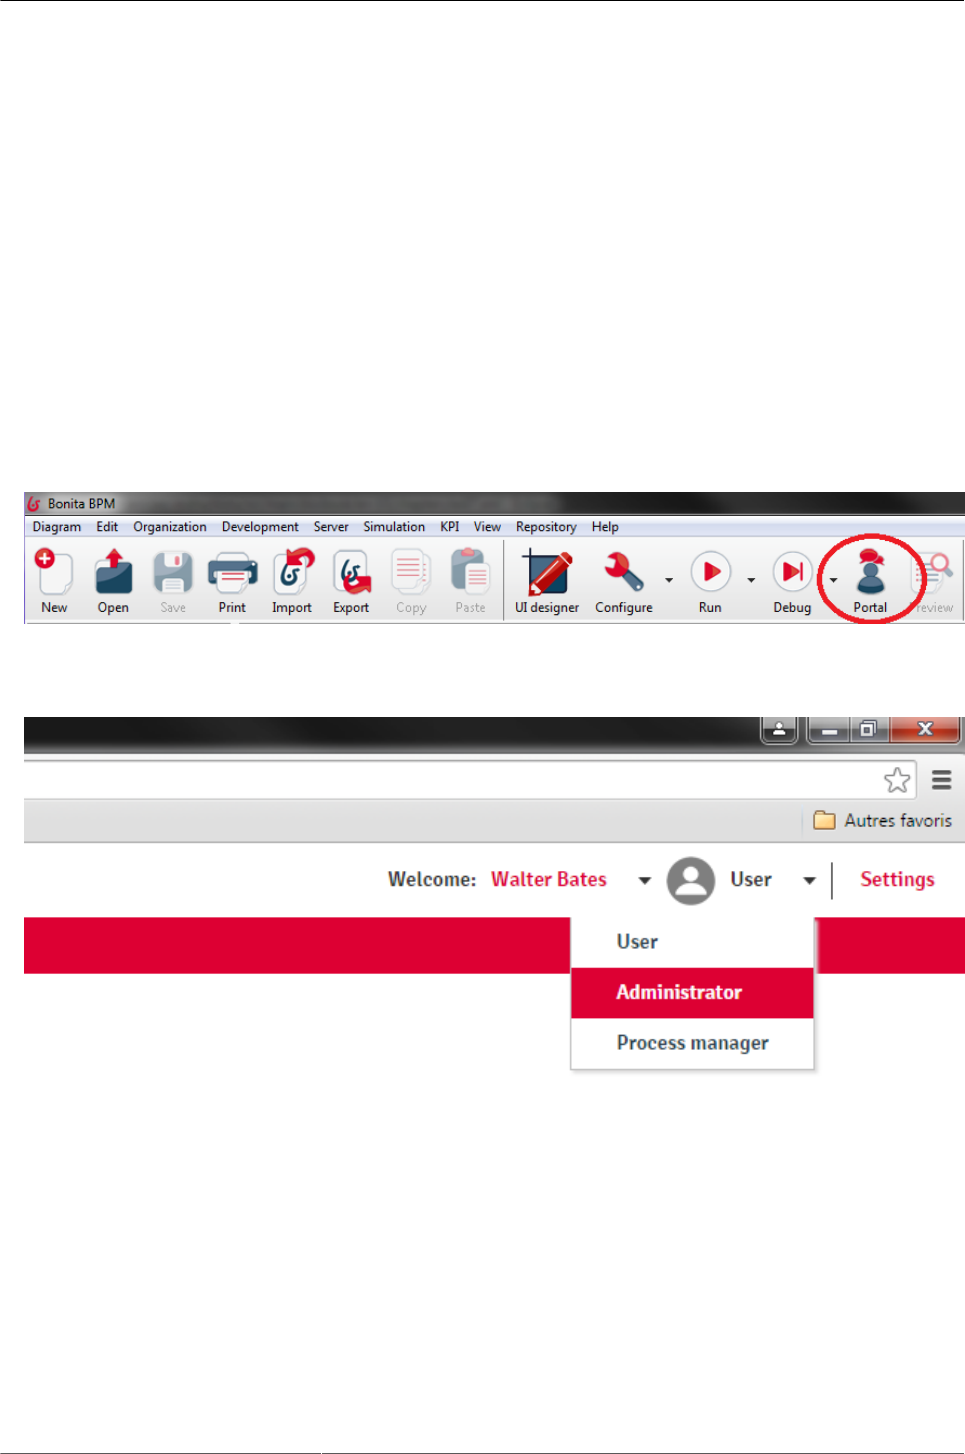
1. In the Studio, click on the Portal button to open the Bonita Portal.
Change the profile to Administrator.
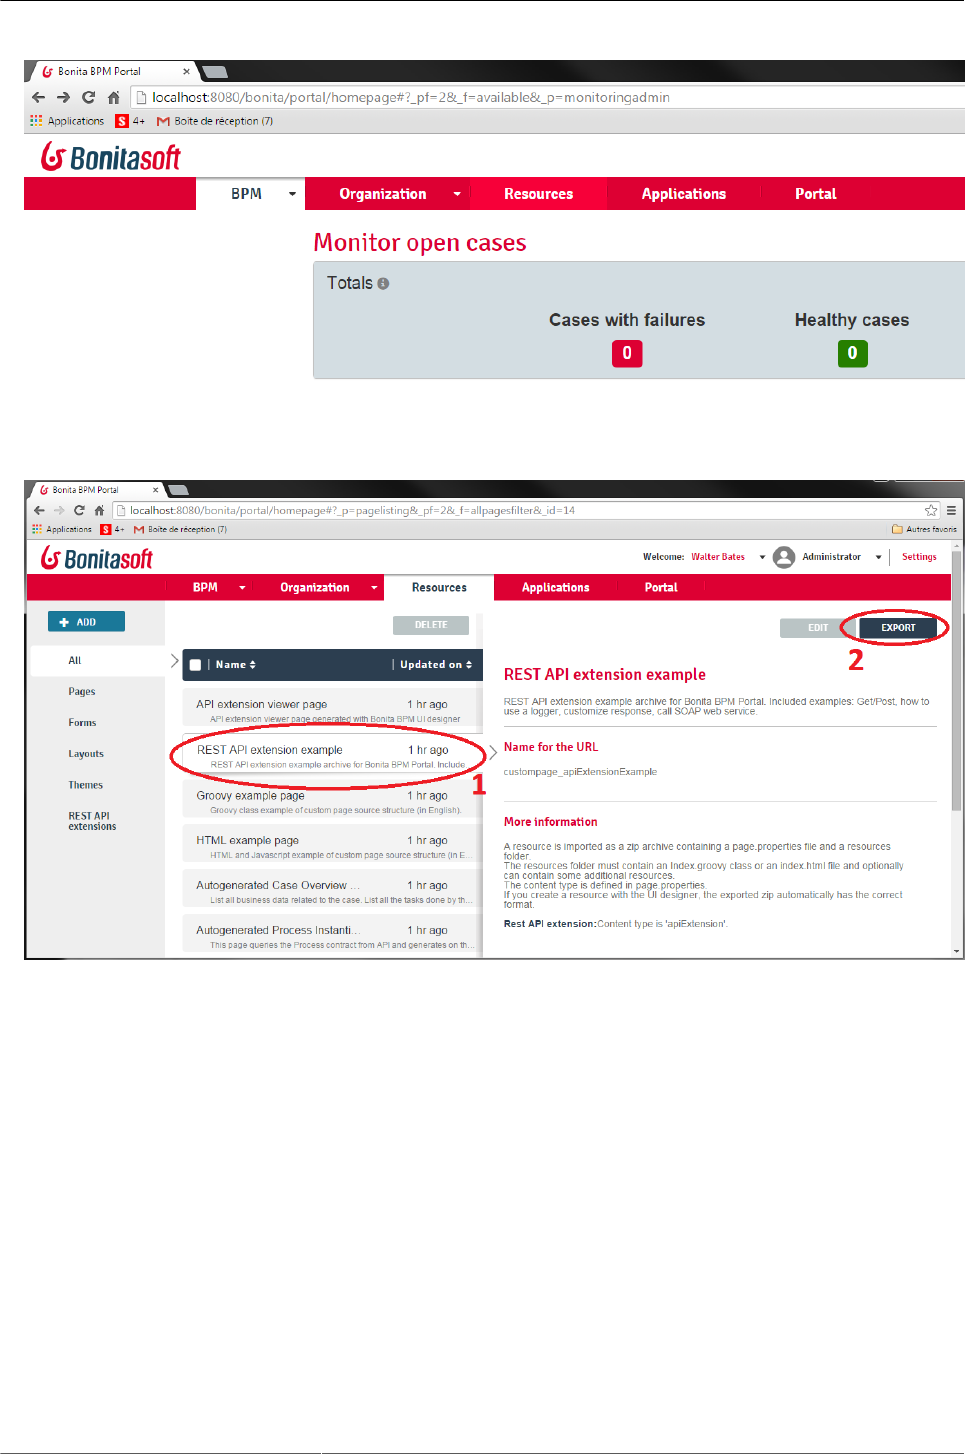
2. Click on the Resources’ tab.
Build an Extension API to request data to an external database
57
Select the tab REST API extension example (1) and click on the button Export (2).
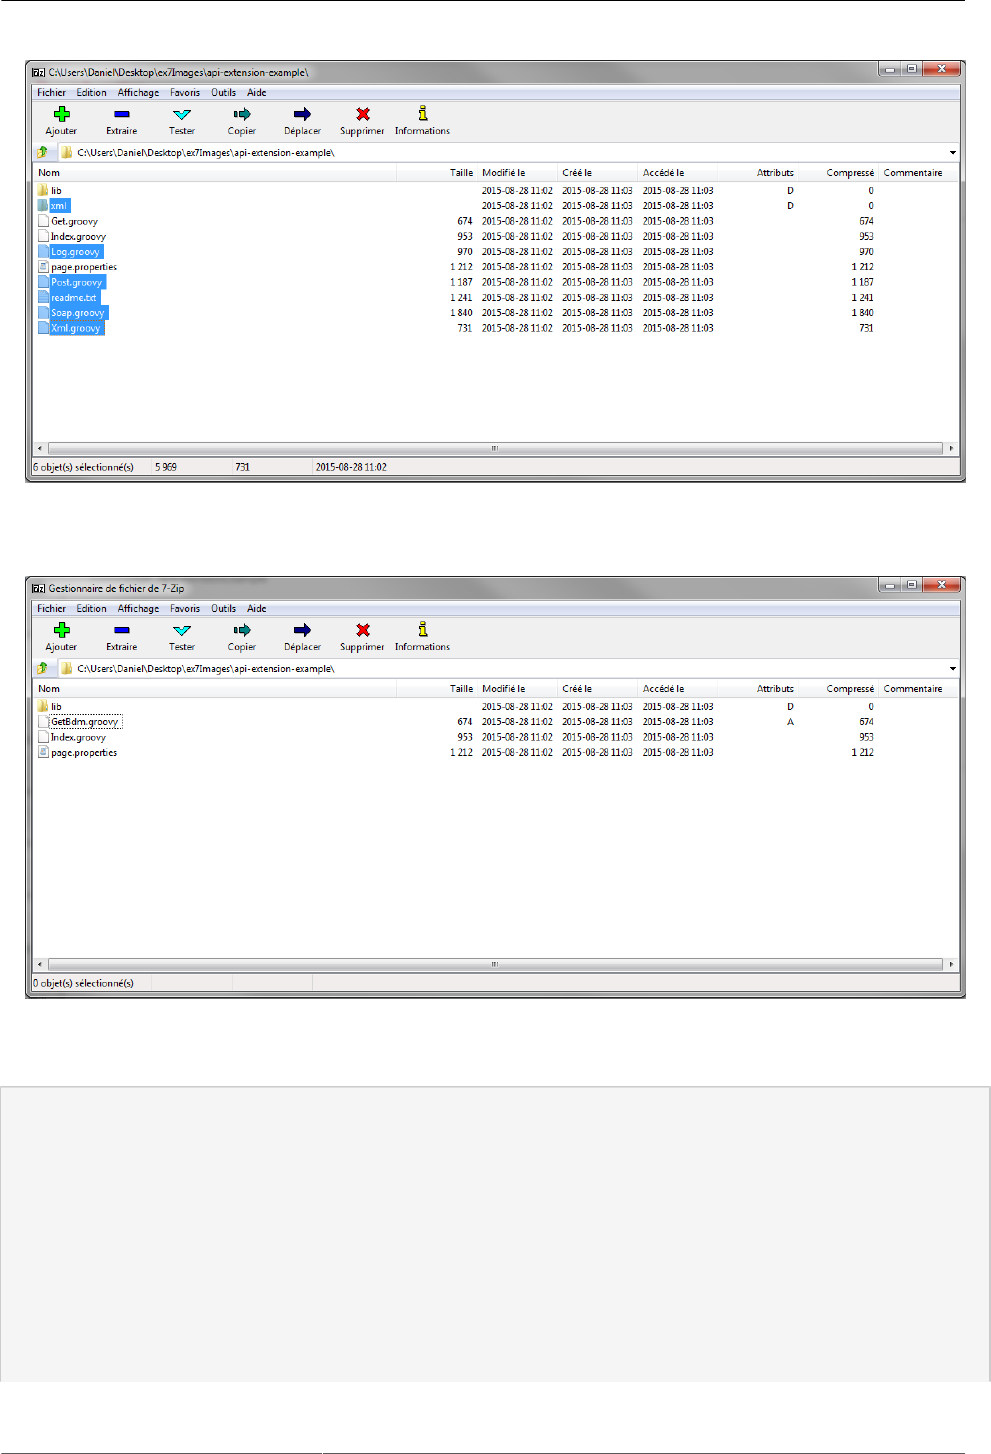
3. Unzip the file api-extension-example, erase the folder xml and the files Log.groovy, Post.groovy,
readme.txt, Soap.groovy, Xml.groovy.
Build an Extension API to request data to an external database
58
4. Rename the file Get.groovy to GetBdm.groovy.
5. The content of the file GetBdm.groovy should be:
import groovy.json.JsonBuilder
import groovy.sql.Sql
import org.bonitasoft.console.common.server.page.*
import javax.naming.Context
import javax.naming.InitialContext
import javax.servlet.http.HttpServletRequest
import javax.servlet.http.HttpServletResponse
import javax.sql.DataSource
import java.util.logging.Logger

Build an Extension API to request data to an external database
59
public class Get implements RestApiController {
private static final String getClients = "SELECT FIRST_NAME, LAST_NAME, CITY, COUNTRY FROM CLIENT_EX07"
private static final String getClientsByCountry = "SELECT FIRST_NAME, LAST_NAME, CITY, COUNTRY FROM
CLIENT_EX07 WHERE COUNTRY =:country"
@Override
RestApiResponse doHandle(HttpServletRequest request, PageResourceProvider pageResourceProvider,
PageContext pageContext, RestApiResponseBuilder apiResponseBuilder, RestApiUtil restApiUtil) {
String queryName = (String) request.getParameter("queryName")
if (queryName == null || (!queryName.equals("getClients") && !
queryName.equals("getClientsByCountry"))) {
restApiUtil.logger.severe "the parameter queryName is invalid"
Map<String, String> response = [:]
response.put("error", "the parameter queryName is invalid:" + queryName)
apiResponseBuilder.withResponseStatus(HttpServletResponse.SC_BAD_REQUEST)
return buildResponse(apiResponseBuilder, response)
}
String query = queryName.equals("getClients") ? getClients : getClientsByCountry
Map<String, String> params = [:]
for (String parameterName : request.getParameterNames()) {
params.put(parameterName, request.getParameter(parameterName))
}
params.remove("queryName")
Context ctx = new InitialContext()
DataSource dataSource = (DataSource) ctx.lookup("java:comp/env/NotManagedBizDataDS")
Sql sql = new Sql(dataSource)
try {
def rows = params.isEmpty() ? sql.rows(query) : sql.rows(query, params)
JsonBuilder builder = new JsonBuilder(rows)
String table = builder.toPrettyString()
return buildResponse(apiResponseBuilder, table)
} finally {
sql.close()
}
}
protected RestApiResponse buildResponse(RestApiResponseBuilder apiResponseBuilder, Serializable
response) {
apiResponseBuilder.with {
withResponse(response)
build()
}
}
}
The implementation receives a main parameter queryName to select the query to use and the para-
meter country to use with the query getClientsByCountry.
6. The content of the file page.properties should be:
Build an Extension API to request data to an external database
60
#Exercise DataSource – The name to display in the Bonita Portal
displayName=Rest API extension
#The internal name, should start with custompage_
name=custompage_GetBdmExtension
#Exercise DataSource – The description to display in tne Bonita Portal
description=Rest API extension
#zip is a rest api extension
contentType=apiExtension
#list of api extension in zip
apiExtensions = datasource
#The method of the page, in this case GET
datasource.method = GET
#The path to call the page after ../API/extension/, in this case .. /API/extension/sqlExercise
datasource.pathTemplate = sqlExercise
#The groovy’s file that contains the implementation
datasource.classFileName = GetBdm.groovy
#The permission to attribute to access
datasource.permissions = sqlExercisePermission
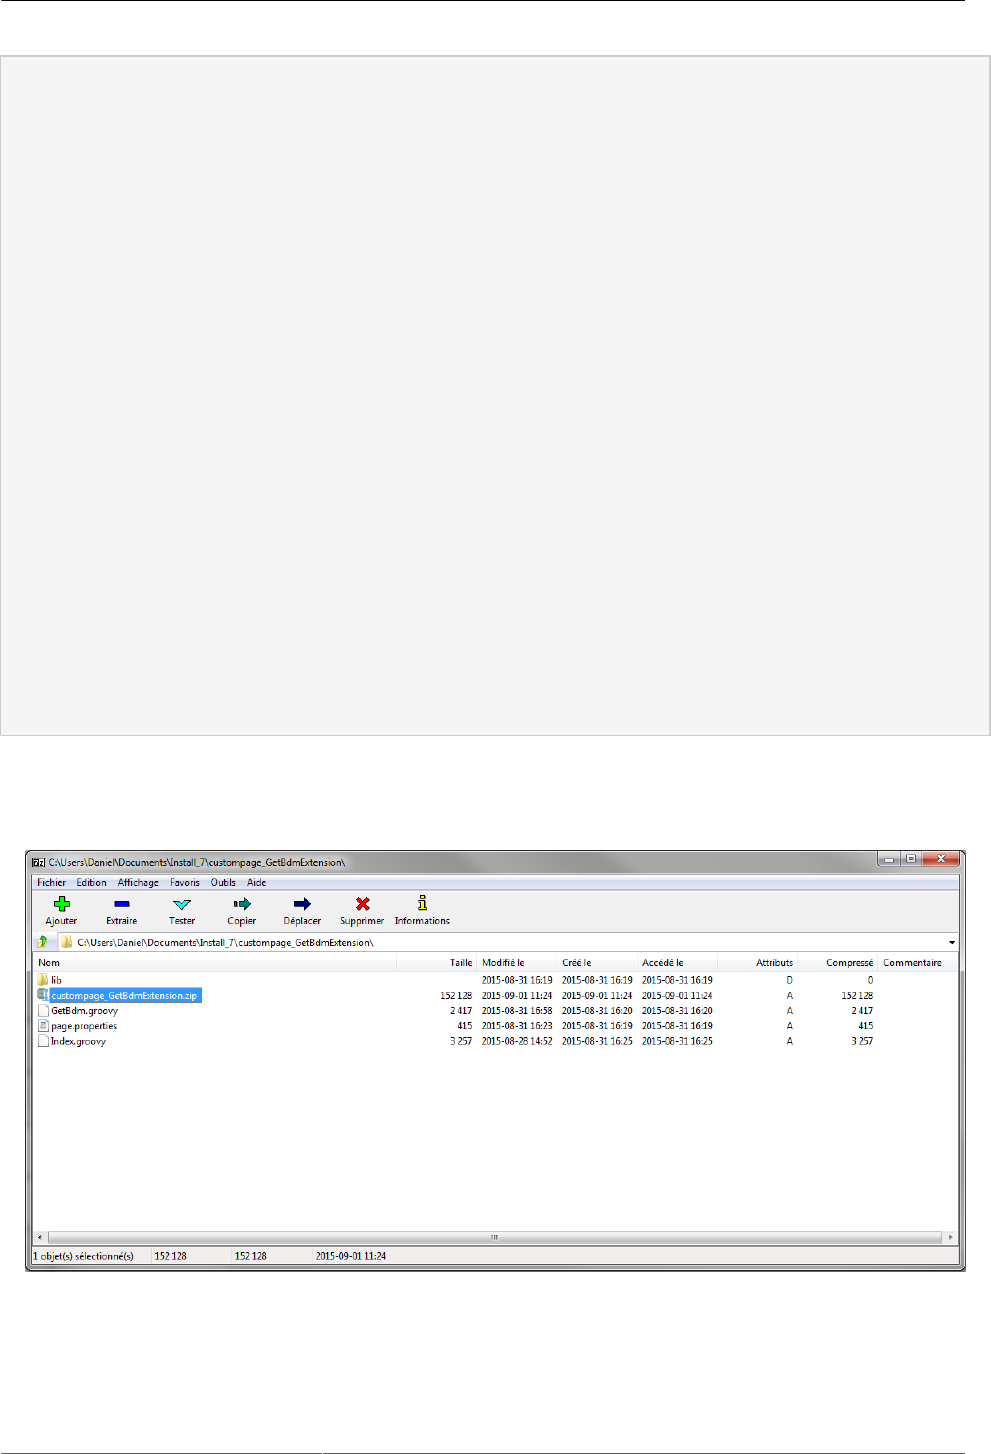
7. Rename the container folder to custompage_GetBdmExtension and zip the content maintaining the
same name.
8. Set the security in the Portal.
Build an Extension API to request data to an external database
61
You need to declare the permission given in the "page.properties" (sqlExercisePermission). To do that, open
the folder "BONITA_STUDIO"/workspace/tomcat/bonita/client/tenants/1/conf, where "BONITA_STUDIO" is
your Bonita's installation root directory.
a. Edit the file "resources-permissions-mapping.properties"
b. Add the line "GET|extension/sqlExercise=[sqlExercisePermission]"
c. Save the file.
d. Edit the file "custom-permissions-mapping.properties"
e. Add the line "profile|User=[sqlExercisePermission]"
f. Save the file.
g. Restart the web server in order to update the new specifications. In the studio, menu "Server" click un
"Restart web server".
*Note: When you close your Studio all changes will be lost. Set the security in the Portal. If you need to
keep this parameters in the Studio, just edit also the same files in the directory "BONITA_STUDIO/work-
space/tomcat/bonita/client/platform/tenant-template/conf"
9. In order to install the new api, on the portal, still in the resources tab, click on the button "ADD".
10.Select the generated custompage_GetBdmExtension.zip and click next.
Build an Extension API to request data to an external database
62
Click on the button "CONFIRM" to finish the installation..
11.Install the process APIExtensionExercise.bos. This process contain a connector that will create a
new table named CLIENT_EX07 and fill with four records. The task Use Extension API contains a
form that will allow testing the two queries implemented in the GetBdm.groovy.

Build an Extension API to request data to an external database
63
12.In the tab 1 we have a container that uses the API with the parameter getClients. In the tab 2 we use
the parameter getClientsByCountry passing the selected country as a parameter. We can then see
the result of both API calls in the same form. When submitted, the task will finish the process and
drop the table CLIENT_EX07 from the database.

64
Chapter 7. Create a new connector
7.1. Objective
The goal of this exercise is to build a new connector using the Connector Development Toolkit.
7.2. Prerequisites
To develop and test a Bonita BPM connector with the toolkit, you need the following software installed:
• Java 7 or later
• Maven 3.2.x or later
7.3. Instructions
• Download and install the development connector toolkit.
• Create connector definition and implementation.
• Use and test the new connector in a process.
7.4. Correction
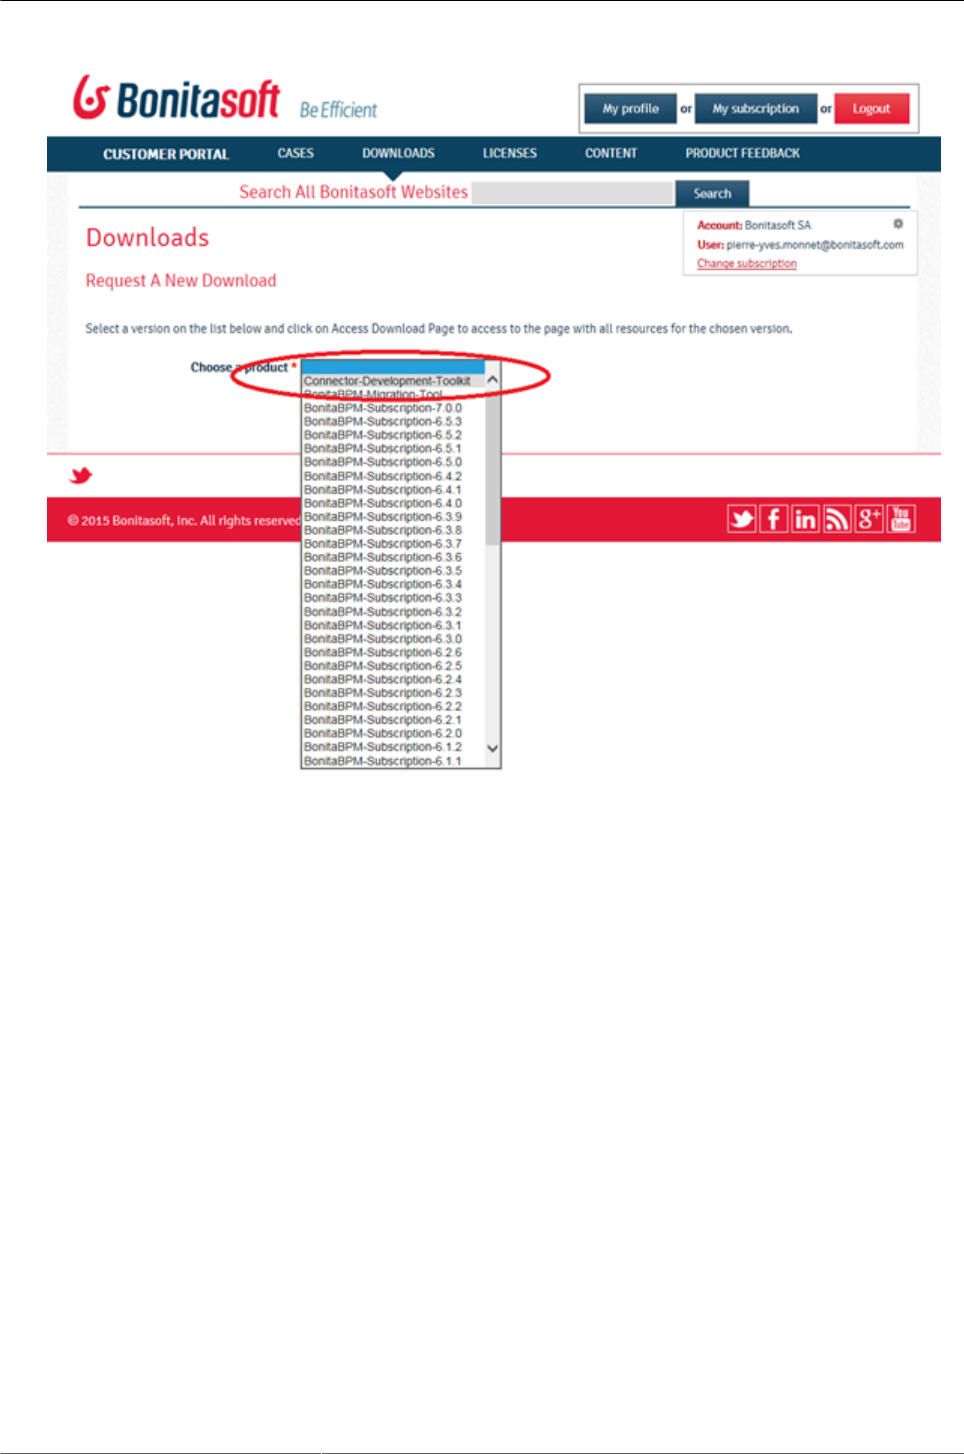
1. Download the Development Connector Toolkit from customer portal.
Unzip the toolkit file into a temporary installation folder and run "install.bat" command.
Create a new connector
65
2. Open a command window and navigate to the folder that will hold your connector definition.
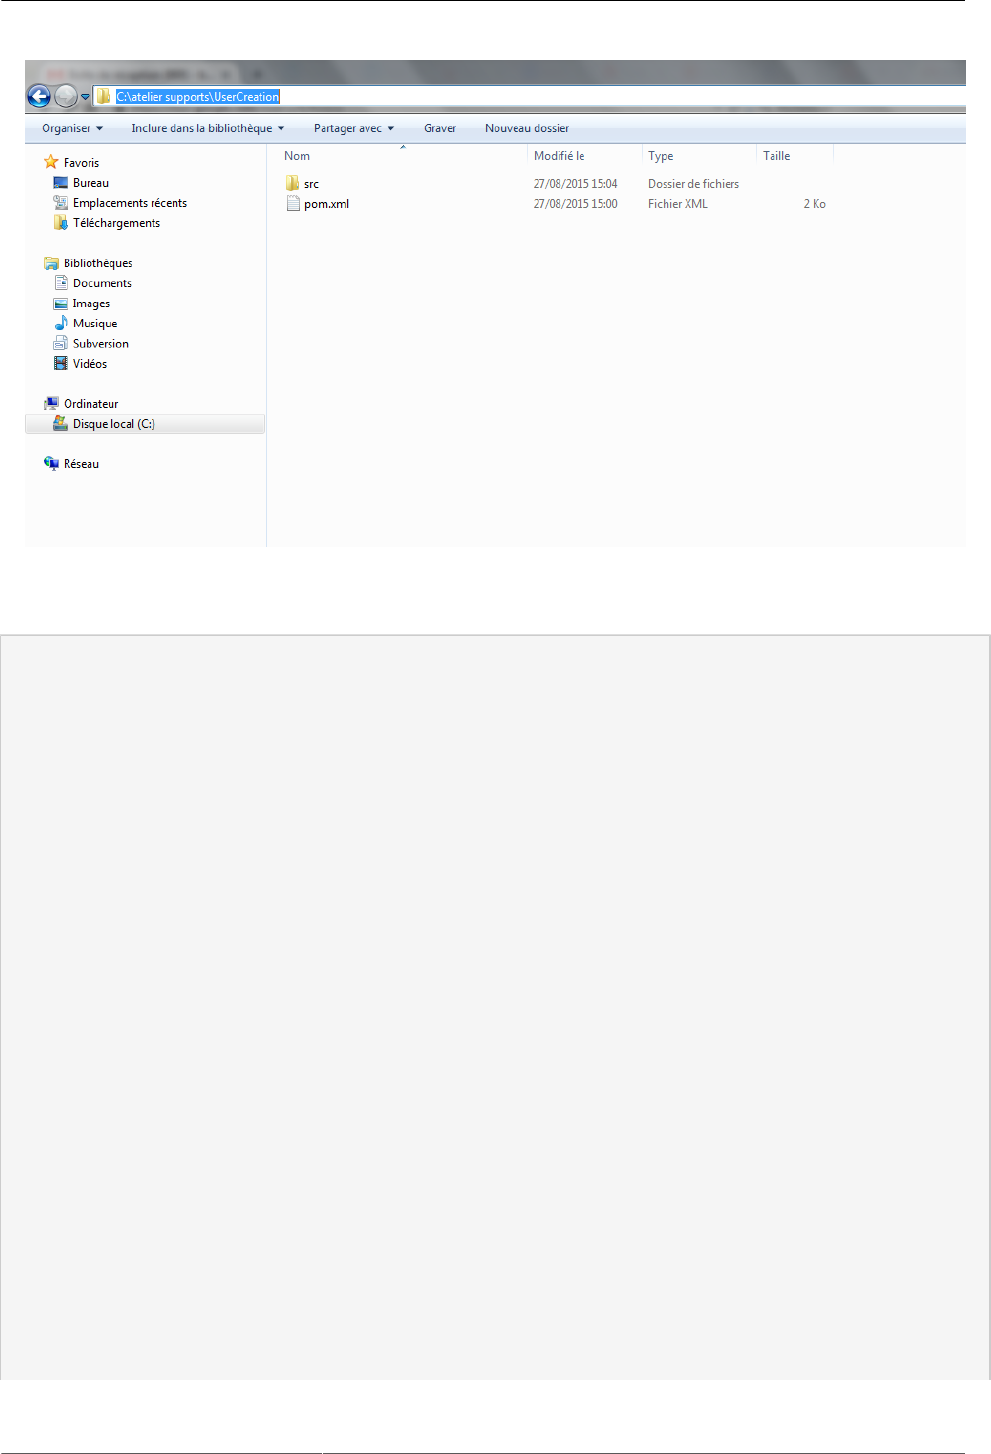
run the following command: mvn archetype:generate -DinteractiveMode=false -
DarchetypeGroupId=com.bonitasoft.connector.definition -DarchetypeArtifactId=bonita-connector-defini-
tion-archetype -DarchetypeVersion=1.0 -DgroupId=com.bonitasoft.connectors -DartifactId=userCreation -
Dversion=1.0.0
If the result is success, a new directory named UserCreation should be created.
Create a new connector
66
Edit the file src/main/resources/connector_definition.xml. Change the content of this file as the following:
<?xml version="1.0" encoding="UTF-8" standalone="yes"?>
<ConnectorDefinition xmlns:xsi="http://www.w3.org/2001/XMLSchema-instance">
<_package>com.bonitasoft.connectors</_package>
<id>UserCreation</id>
<version>1.0.0</version>
<label>user creation connector</label>
<description>UserCreation 1.0.0</description>
<icon>connector-icon.png</icon>
<category>
<id>MyCategory</id>
<icon>category-icon.png</icon>
</category>
<!-- Configure the version of your Bonita Engine -->
<bonitaVersion>7.0.2</bonitaVersion>
<!-- connector Wizard pages configuration -->
<pages>
<page>
<id>userData</id>
<title>User Data</title>
<description>User Data description</description>
<!-- an ordered set of one or more widget tags contained inside a page -->
<widgets>
<widget>
<id>Username</id>
<label>Username</label>
<!-- widget types: [Text, Password, TextArea, Checkbox, RadioGroup,
Select, Array, ScriptEditor, List, Group] -->
<widgetType>Text</widgetType>
<javaType>java.lang.String</javaType>

Create a new connector
67
<mandatory>true</mandatory>
<defaultValue></defaultValue>
<description>The username</description>
</widget>
<widget>
<id>Password</id>
<label>Password</label>
<!-- widget types: [Text, Password, TextArea, Checkbox, RadioGroup,
Select, Array, ScriptEditor, List, Group] -->
<widgetType>Password</widgetType>
<javaType>java.lang.String</javaType>
<mandatory>true</mandatory>
<defaultValue></defaultValue>
<description>The password</description>
</widget>
</widgets>
</page>
</pages>
<!-- the 'outputs' configuration tag is optional and responsible for defining -->
<!-- connector outputs -->
<outputs>
<output>
<id>userId</id>
<javaType>java.lang.Long</javaType>
</output>
</outputs>
</ConnectorDefinition>
3. Open a command windows, navigate to UserCreation folder and run
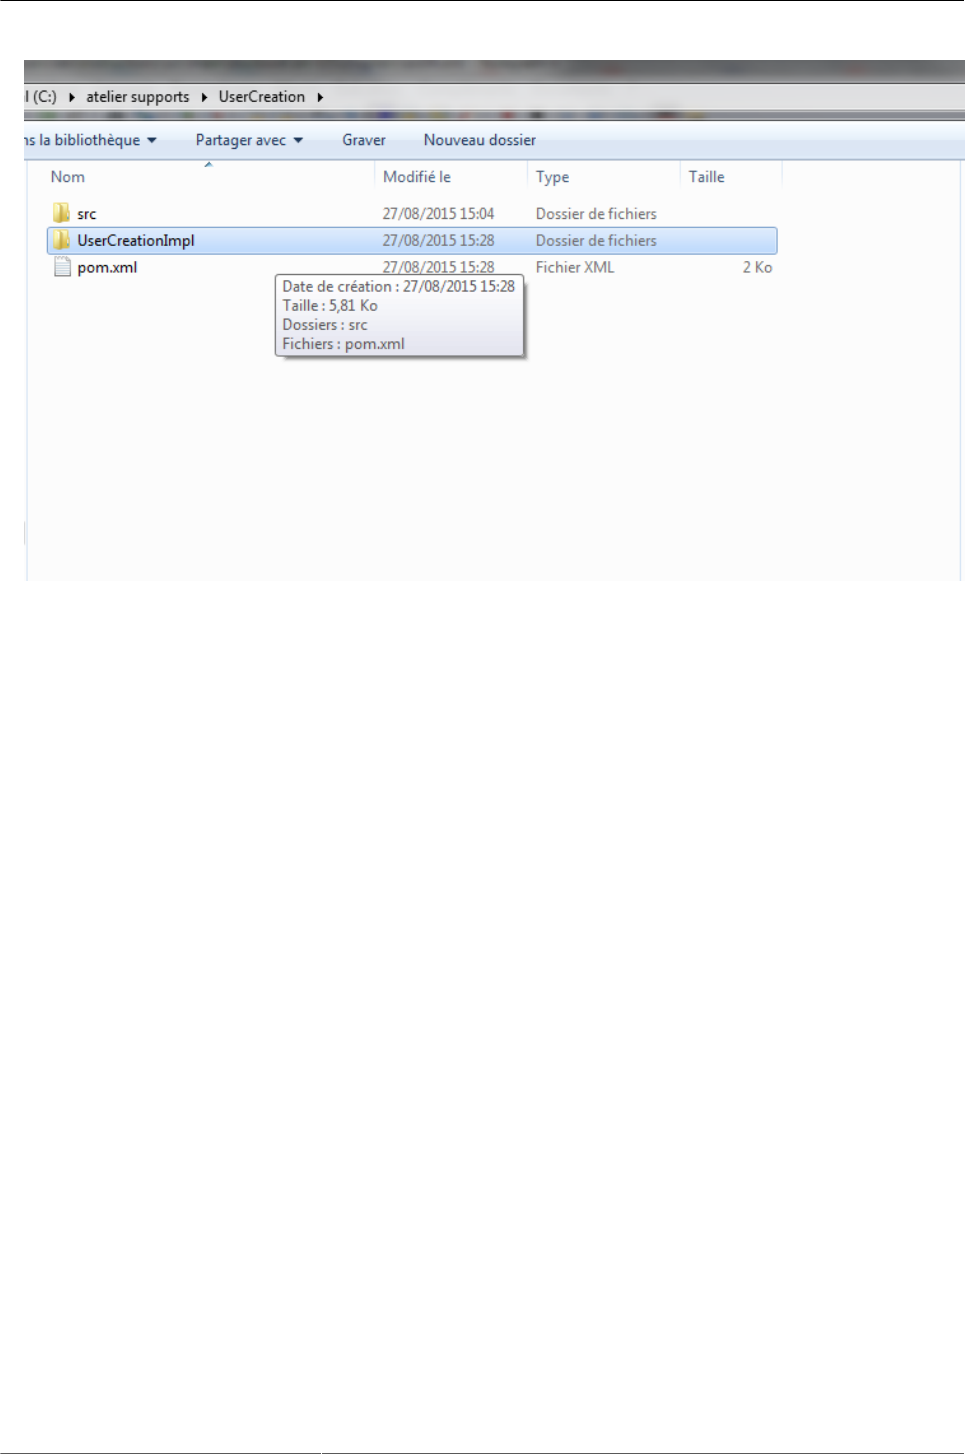
the following command: mvn archetype:generate -DinteractiveMode=false -
DarchetypeGroupId=com.bonitasoft.connector.implementation -DarchetypeArtifactId=bonita-con-
nector-implementation-archetype -DarchetypeVersion=1.0 -DgroupId=com.bonitasoft.connectors -
DartifactId=userCreationImpl -Dversion=1.0.0 -DdefinitionId=userCreation -DdefinitionVersion=1.0.0
If the result of build is success, a directory named "UserCreationImpl" containing the connector implemen-
tation project will be created.
Create a new connector
68
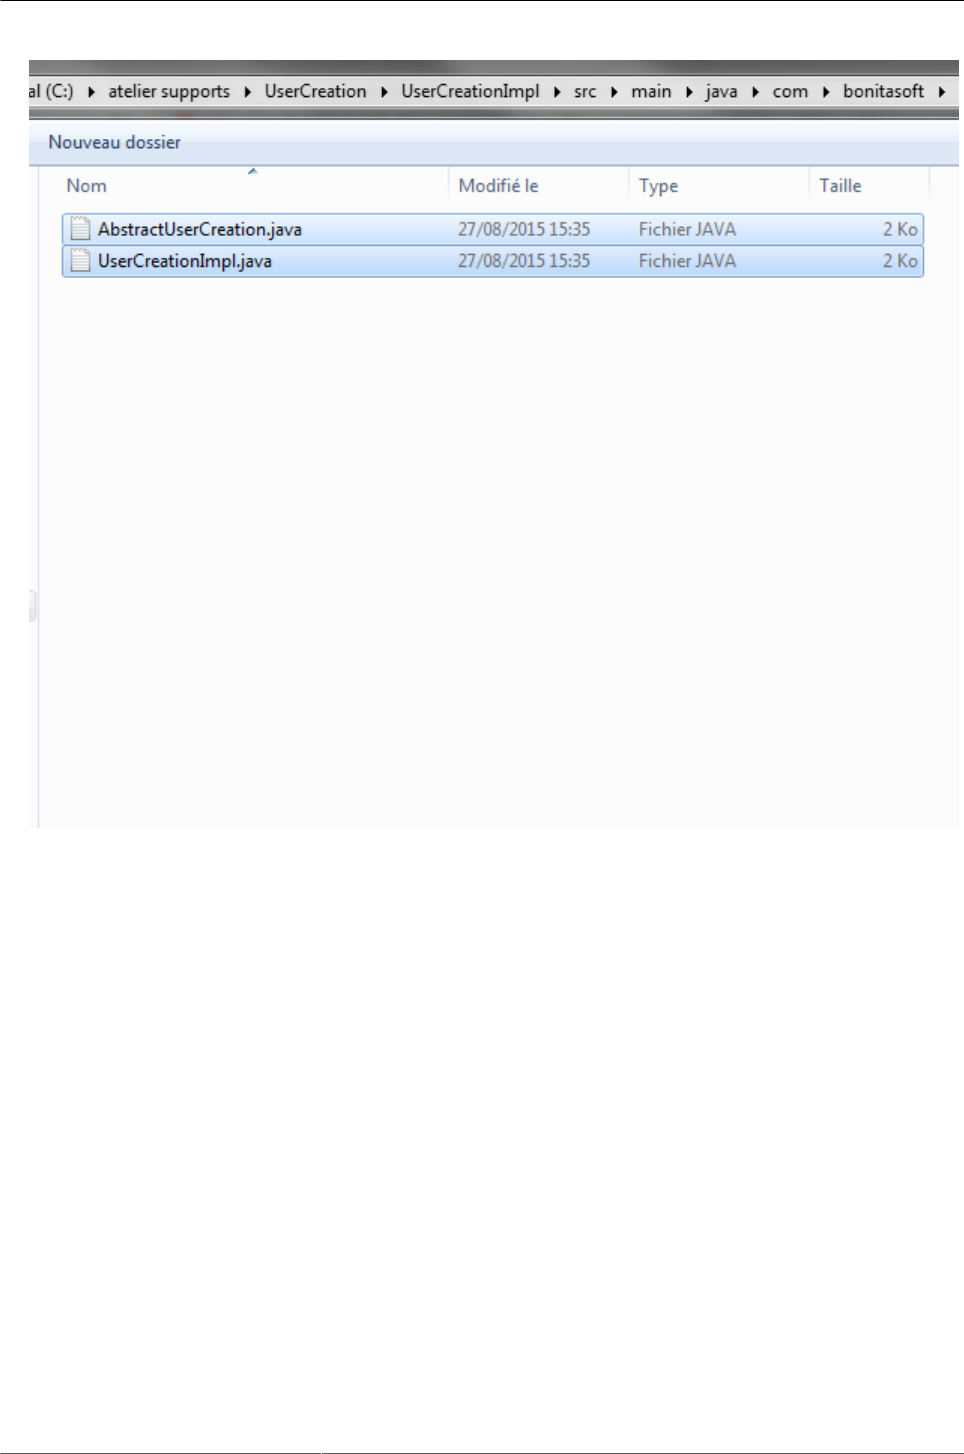
run the following command: cd UserCreationImpl
run the following command: mvn bonita-connector-definition:generate
run the following command: mvn bonita-connector-implementation:generate
After these commands, an abstract class named "AbstractUserCreation.java" and a stub of the connector
implementation named "UserCreationImpl.java" will be created.
Create a new connector
69
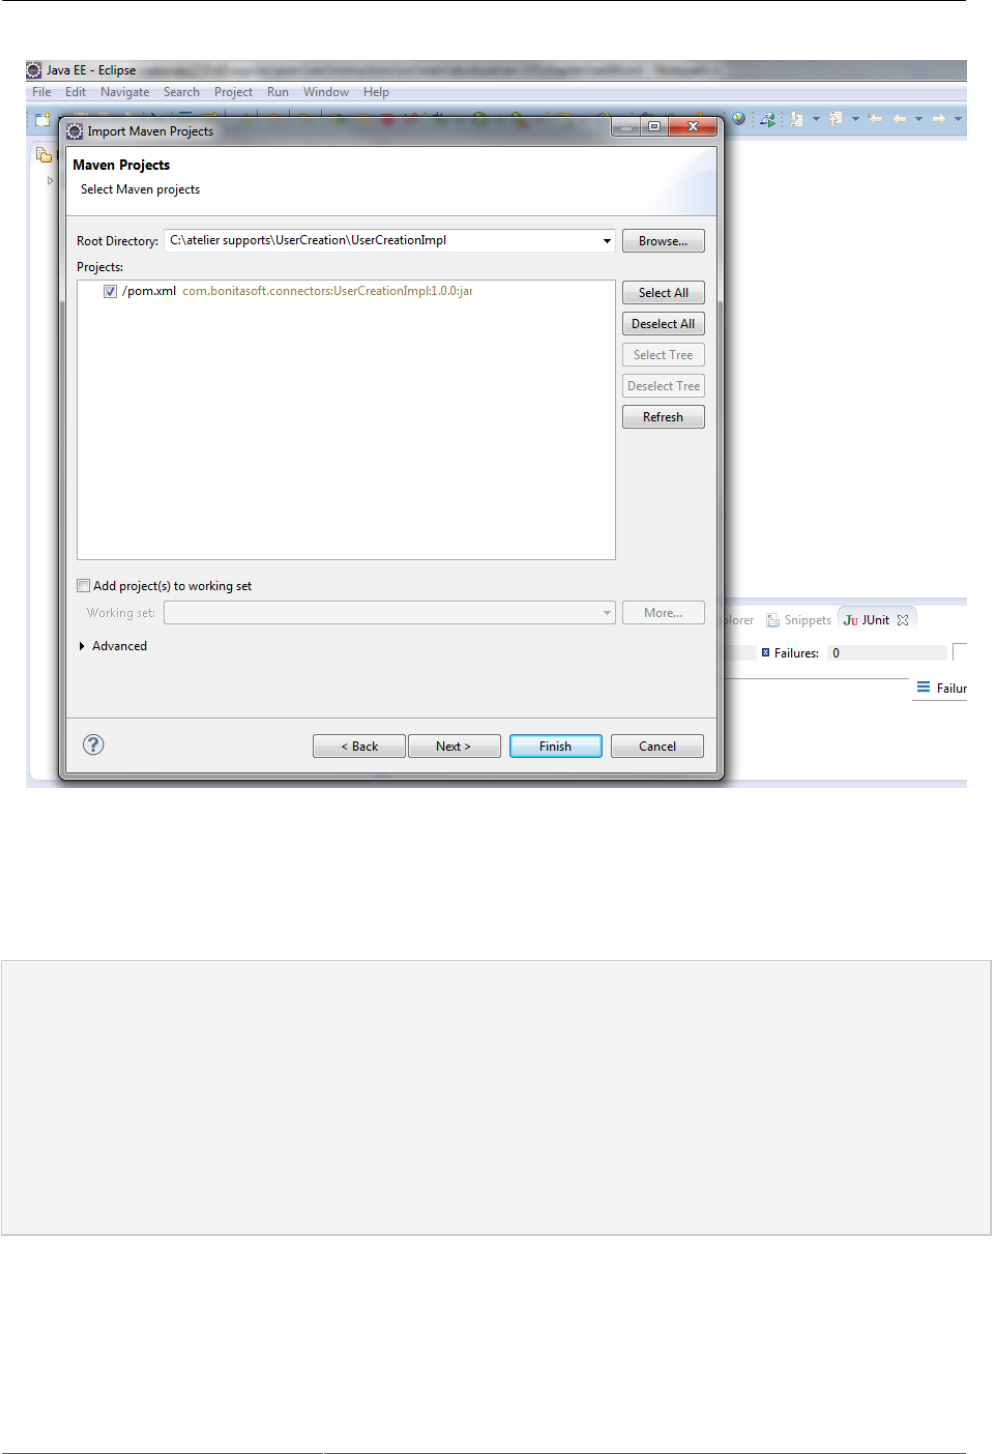
4. Launch Eclipse and import the maven project
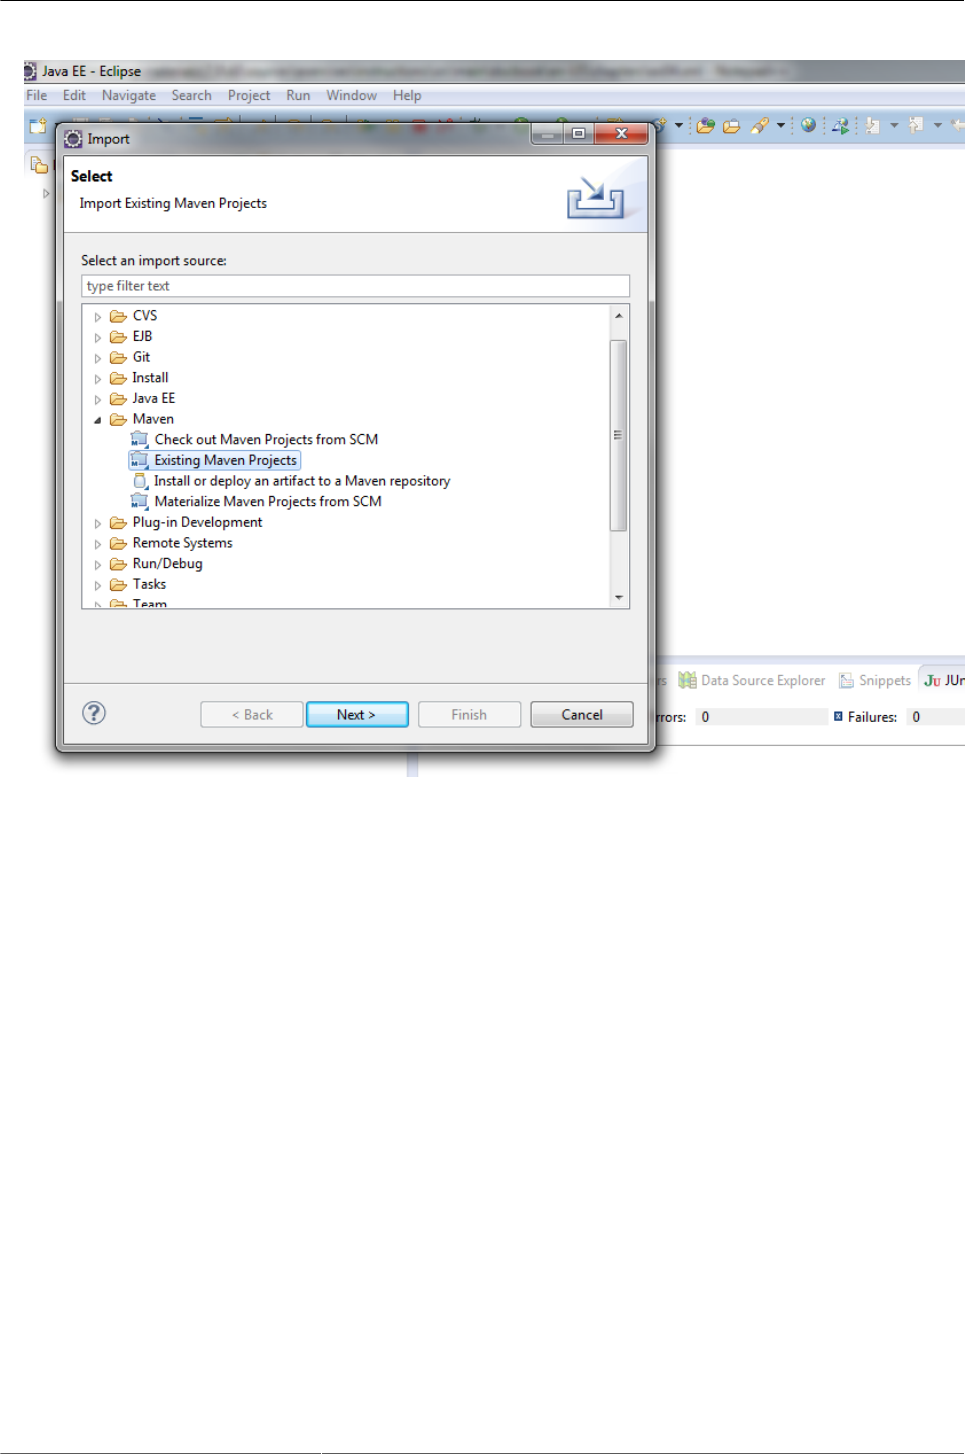
Create a new connector
70
Select "pom.xml" file located under UserCreationImpl directory
Create a new connector
71
Click on Finish. This operation add one project in Eclipse.
5. Complete your connector implementation. Open "UserCreationImpl" class and modify the method
"executeBusinessLogic" with the following code:
IdentityAPI identityAPI = getAPIAccessor().getIdentityAPI();
try {
// Execute the delegate object business logic. Provide identityAPI reference.
User newUser = identityAPI.createUser(getUsername(), getPassword());
setUserId(Long.valueOf(newUser.getId()));
} catch (Exception e) {
throw new ConnectorException(e);
}
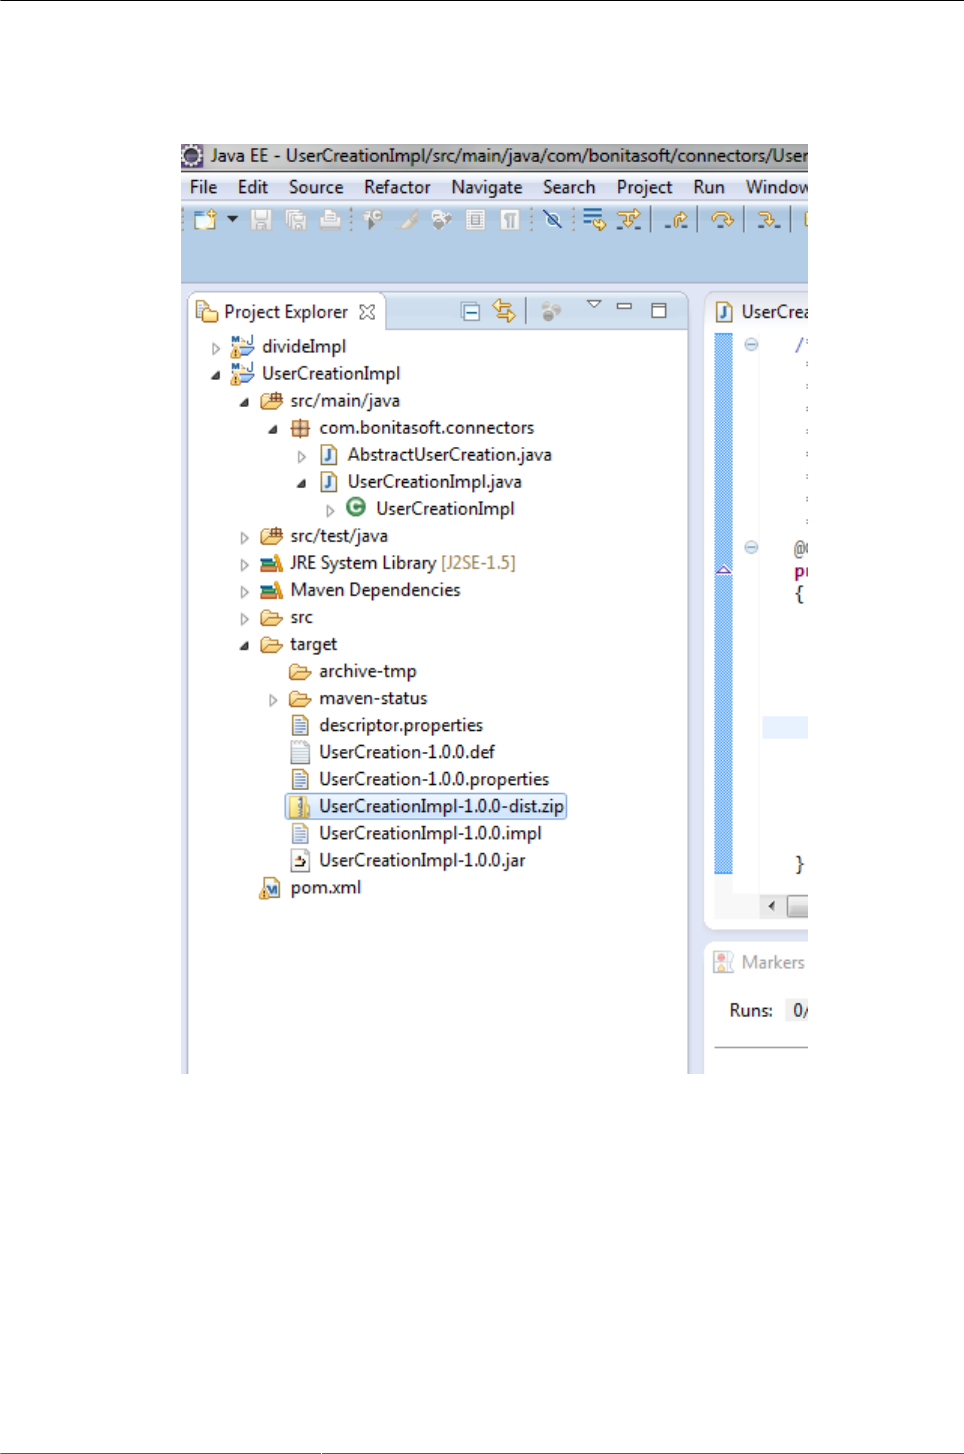
Generate the connector
In the command prompt, go to "UserCreation" directory and execute the following command: mvn package
Create a new connector
72
The connector is now generated and packaged in zip file under "UserCreation/UserCreationImpl/target"
directory
6. Import the zip file generated in the previous step in Bonita studio

Create a new connector
73
Import "UserCreationDiagram.bos" from provided_files folder

Create a new connector
74
Create a connector in the "Create new user" activity.
The username and password connector inputs are mapped to the username and password process data.
The bonitaUserId process data will hold the value of the output variable bonitaUserId.
The UserCreationError thrown by the connector when it fails should be catch by the catch error boundary
event.
