Building Notepad++ From Source A Beginners Guide
User Manual: Pdf
Open the PDF directly: View PDF ![]() .
.
Page Count: 10

How to Build Notepad++ from Source:
A Beginner’s Guide
Current Date: 5/16/2018
Revision: 1
2
Introduction
Participation in an open source project can be a rewarding and gratifying experience.
This is particularly so when engaging software that one both admires and uses regularly,
and that is held in the highest esteem by the software community at large (such as
Notepad++). It can also be a very challenging experience, especially for those less
experienced. This document is designed to provide a step-by-step guide for building a
working Notepad++ executable from its source code, as available here:
https://github.com/notepad-plus-plus/notepad-plus-plus/. (As such, it chronicles one
particular methodology for completing this end, and does not represent an exclusive
path for successful compilation.)
Requirements
• Visual Studio 2017 (or 2015) AND Visual Studio 2013
- Yes, you need both for this instruction set.
▪ Try as he did, the author was unable to build successfully using just one or the other.
▪ See step 5 notes for additional information.
- Visual Studio 2015 should work in place of 2017.
▪ “Should” because the author did not verify this directly, but is confident it will work.
- Visual Studio Community 2013 and 2015 can be downloaded directly from Microsoft and
do not require a product key: https://www.visualstudio.com/vs/older-downloads/
▪ See here for VS2017 system requirements
▪ See here for VS2015 system requirements
▪ See here for VS2013 system requirements
• Git Bash
- Or a similar means of downloading the Notepad++ repository from github.
- Git (which includes Git Bash) can be downloaded here: https://git-scm.com/downloads.
- If you have a github account, downloading the Notepad++ repository can also be
accomplished using github desktop, found here: https://desktop.github.com/.
▪ If you don’t have a github account, you should probably get one, here: https://github.com/.
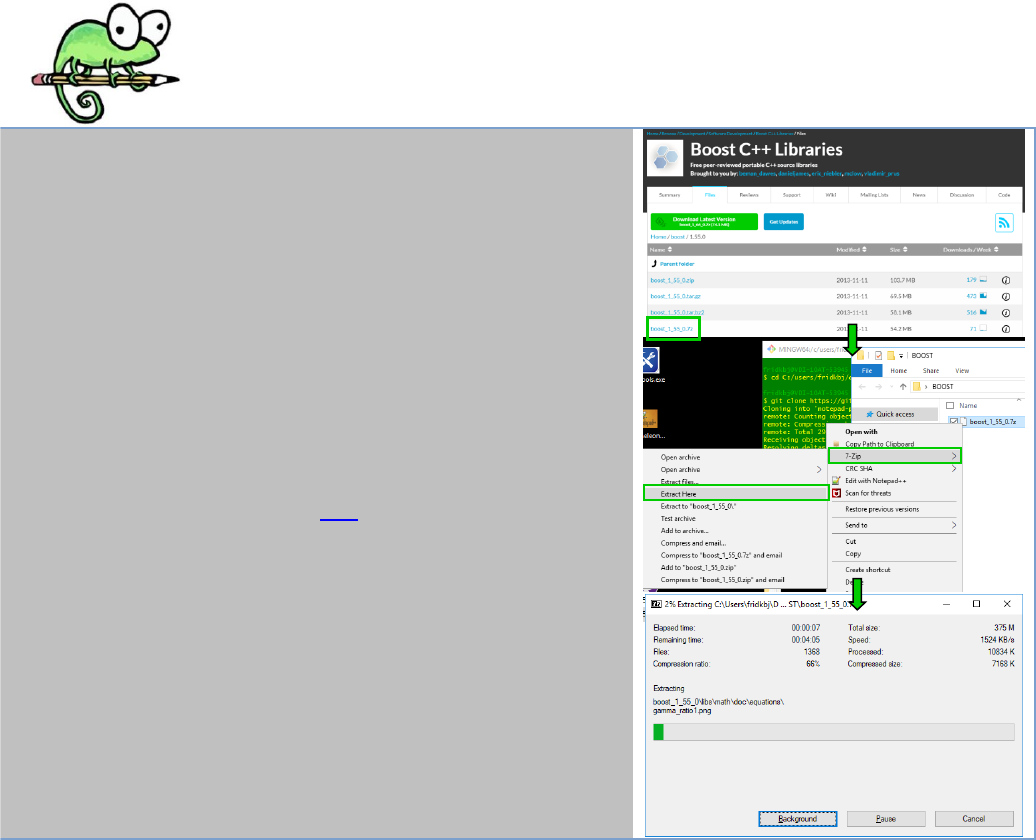
• Boost 1_55_0
- Available here: https://sourceforge.net/projects/boost/files/boost/1.55.0/.
▪ Available in .zip or .7z format. .7z is recommended, but will require 7zip
for extraction, available here: https://www.7-zip.org/download.html
Time Commitment
• Approximately 30-90 minutes, depending on proficiency and hardware.
Assumptions
This document assumes that the target audience is at least marginally proficient in the use of
Windows, and has at least minimal exposure to basic computer programming fundamentals, C++,
and (of course) Notepad++.
3
Tip: If screenshots appear too small for viewing, using a “zoom” feature such as that offered by
Windows or Adobe Acrobat can be helpful!
Follow Steps:
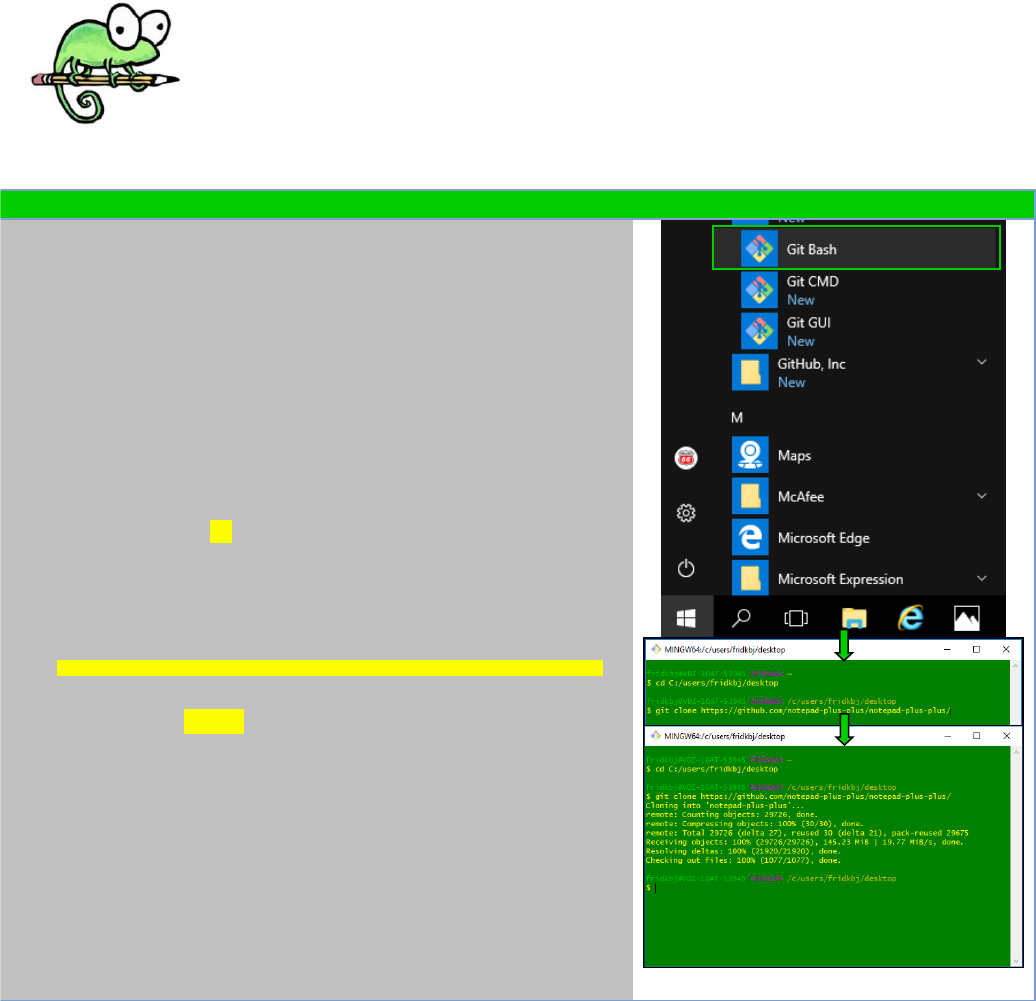
1. GET NOTEPAD++ REPOSITORY
a) Open Git Bash.*
b) Change to the directory you wish to save the Notepad++
repository.
- Use the cd command to change directory.
- Note Git Bash uses slash (/) rather than backslash (\) for
pathways.
c) Type
git clone https://github.com/notepad-plus-plus/notepad-plus-plus/.
Then hit enter. Wait for the cloning process to finish.
*Git Bash may not be available in the Windows start menu as shown in the screenshot,
depending on your installation configuration. If it is not shown there, locate it or
download it as necessary in order to launch. Note also that this step may be
completed using an alternate means, such as Github Desktop, as mentioned in the
requirements section above.
5
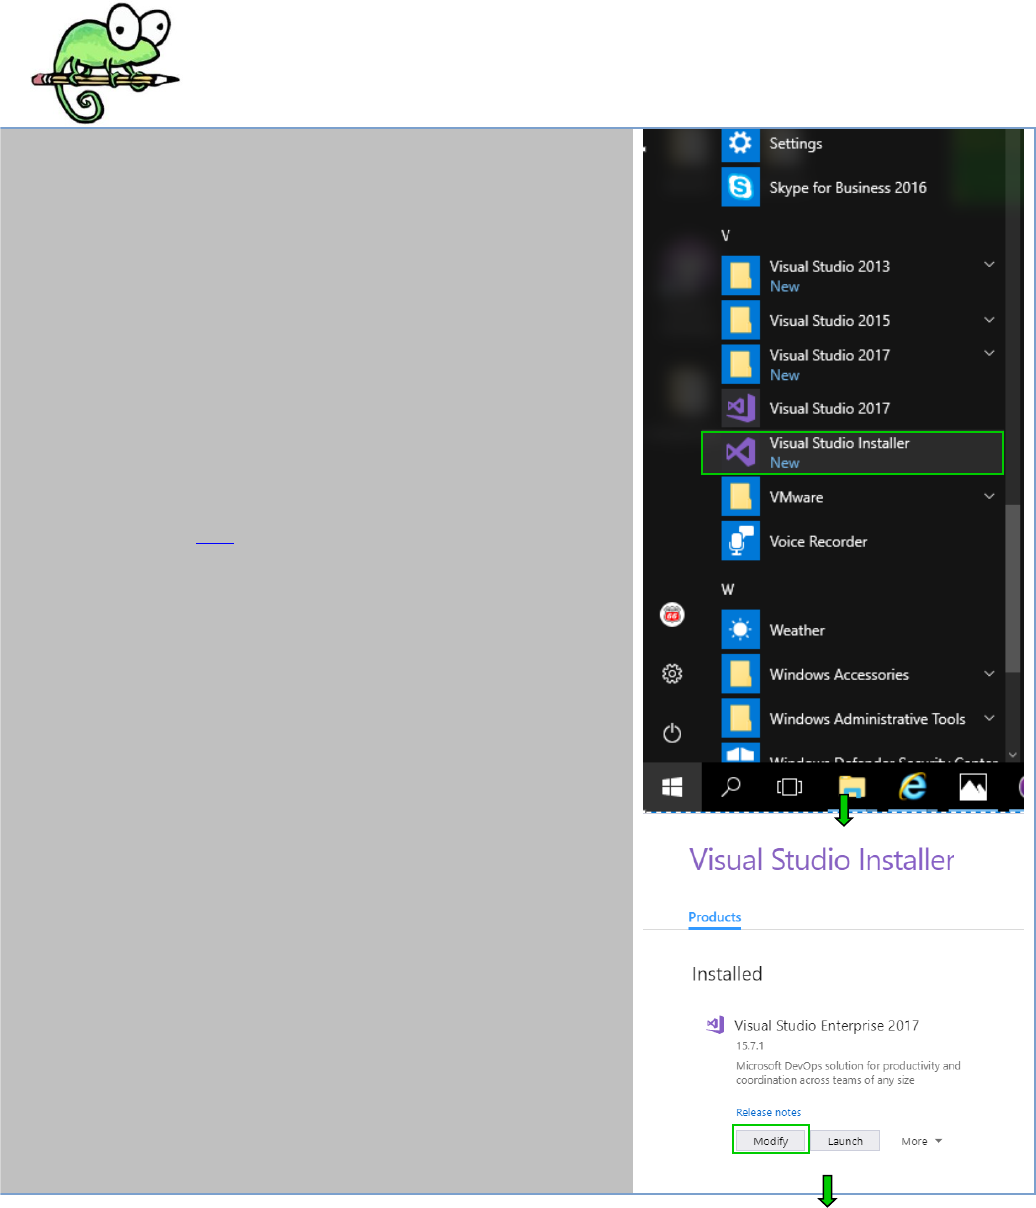
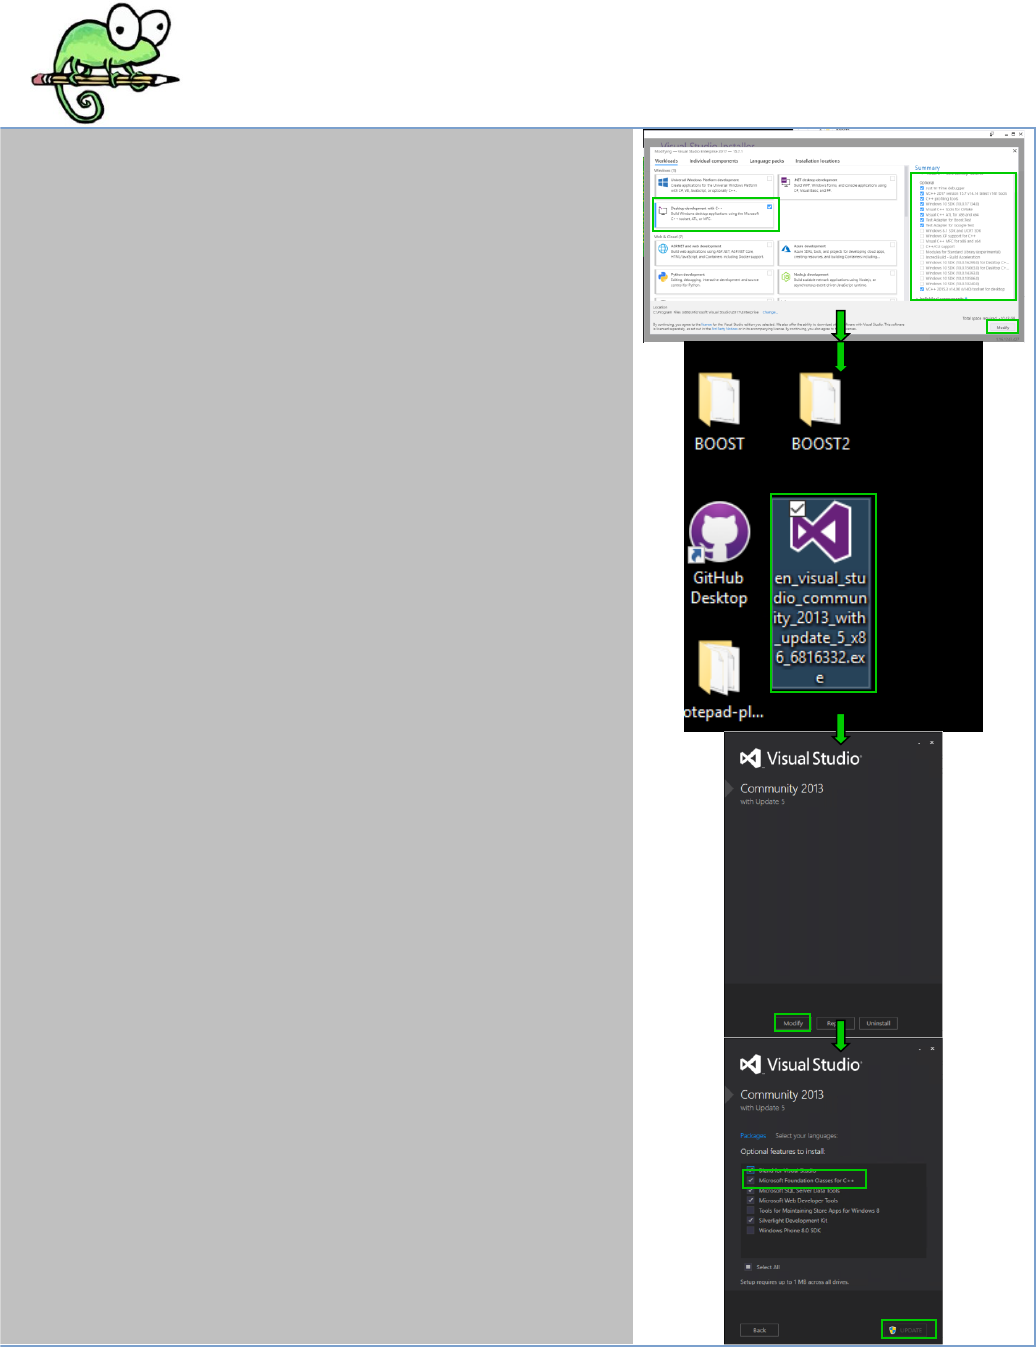
3. ESTABLISH VISUAL STUDIO C++ DEPENDENCIES
a) Both Visual Studio 2013 and 2017 (or 2015*) must be
installed with C++ compiling tools. Open the installers
(available here) for each to check if these tools are already
installed.
b) Once opened, click “Modify” to check the status of installed
toolsets. Make sure “Desktop development with C++” is
selected, with all default options checked. If using VS2017,
add the following additional option (under “Summary->Desktop
development with C++->Optional”) if not already selected:
▪ VC++ 2015.3 v14.00 (V140) toolset for desktop
c) If changes are required, click “Modify” again (or “Update” for
VS2013), and wait for installation to complete.
*Screenshots for VS2015 are not shown, and VS2015 appearance
may differ accordingly.
6
7
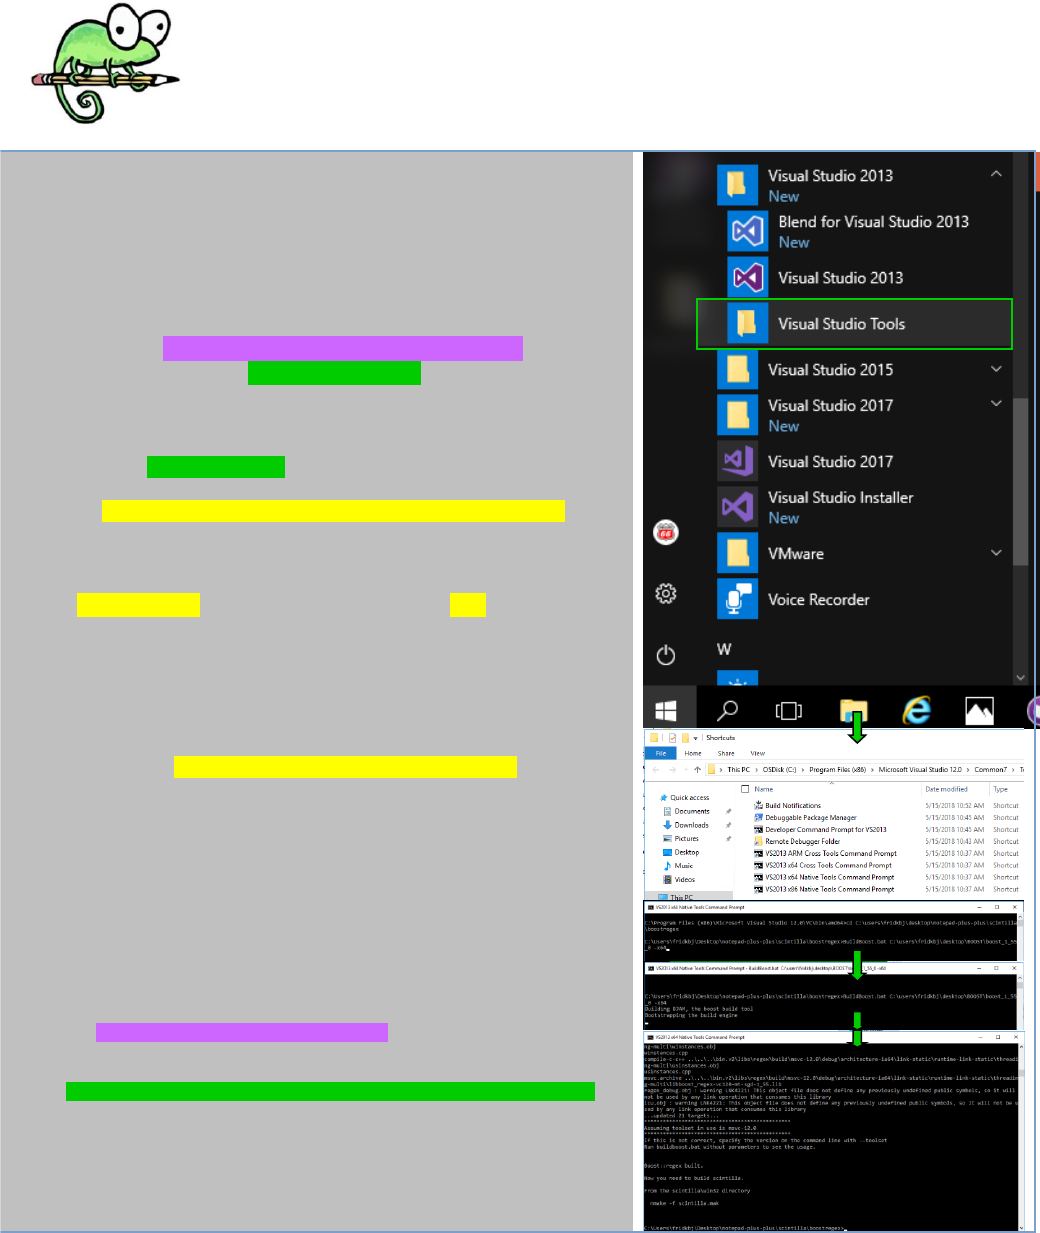
4. BUILD SCILEXER.DLL
a) Open VS2013 x64 Native Tools Command Prompt*. Change
the directory to \scintilla\boostregex within the Notepad++
repository cloned in step 1.
e.g. If your Notepad++ repository is located at
C:\users\me\np++, then use command
cd C:\users\me\np++\notepad-plus-plus\scintilla\boostregex
b) Type
BuildBoost.bat ~pathway to boost_1_55_0~ -x64,
Where ~pathway to boost_1_55_0~ is where you extracted
boost_1_55_0 in step 2.
e.g. If you extracted boost_1_55_0 in C:\sources, then type
BuildBoost.bat C:\sources\boost_1_55_0 -x64
c) Wait for script to finish. If successful, you will see
“Now you need to build scintilla.”
followed by instructions for doing so at the end of the
console output (as shown in the final screenshot for this
step).
*If VS2013 x64 Native Tools Command Prompt is not available in the Windows
start menu (as shown in the screenshot), try this location:
C:\Program Files (x86)\Microsoft Visual Studio 12.0\Common7\Tools\Shortcuts
8
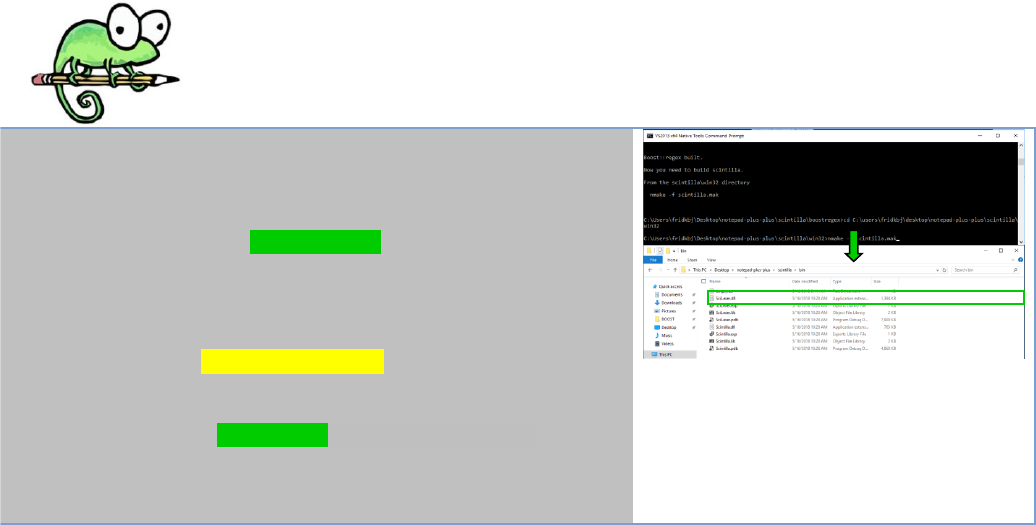
d) Change directory to \scintilla\win32 (within Notepad++ repository: see
a) for example, but replace “boostregex” with “win32”).
e) Type
nmake -f scintilla.mak
Wait for make process to complete. Upon completion, you should
see SciLexer.dll in \scintilla\bin (within Notepad++ repository).
9
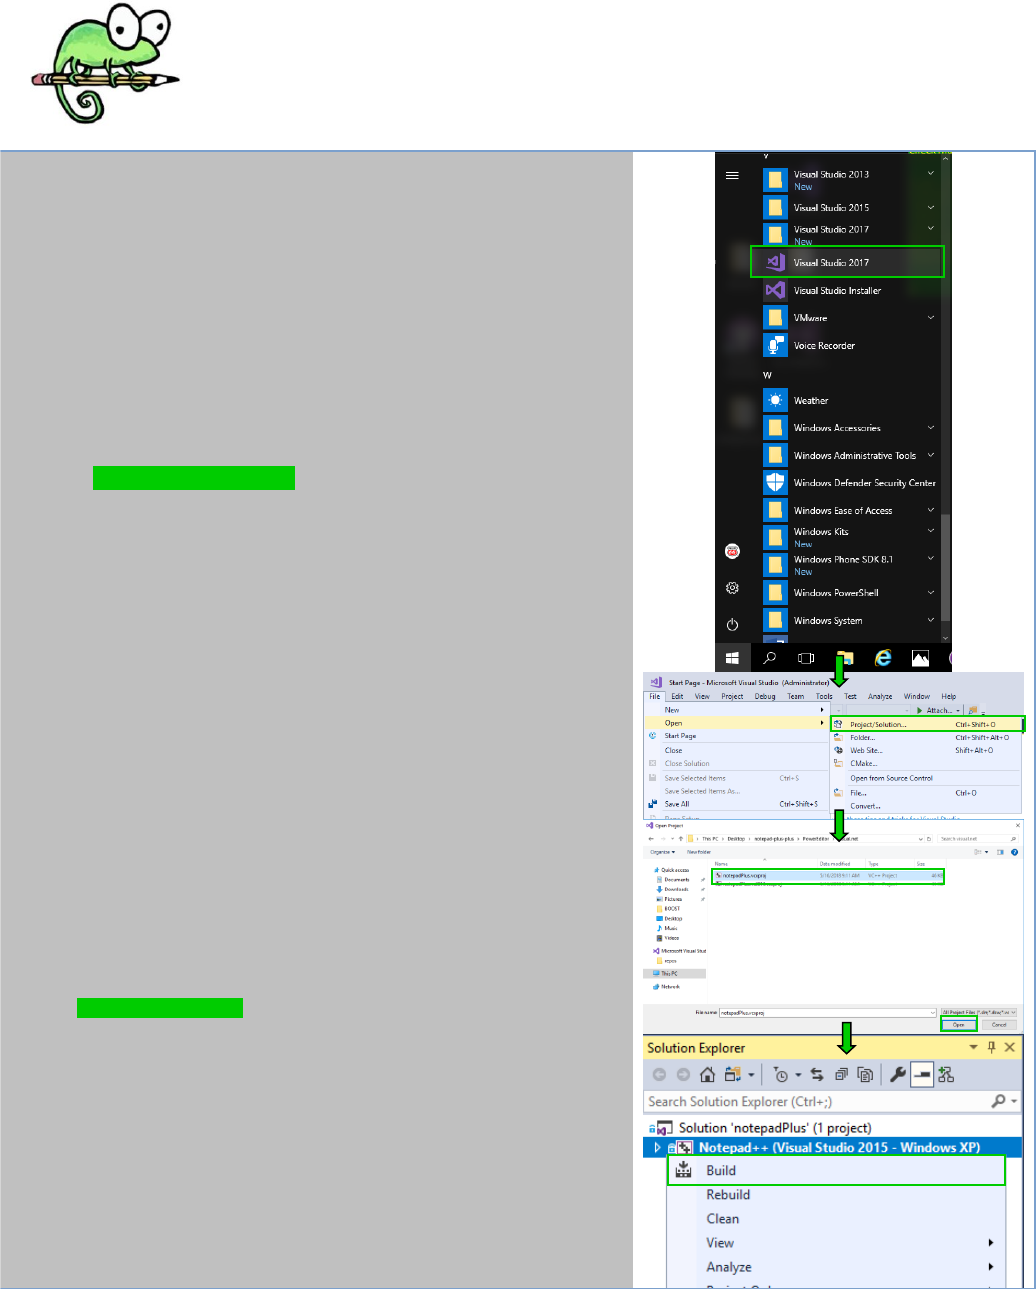
5. BUILD NOTEPAD++.EXE*
a) Launch Visual Studio 2017 or 2015 (screenshots show 2017).
Open “notepadPlus.vcxproj”, located at
\PowerEditor\visual.net (within the Notepad++ repository).
Click OK on VS “Source Control-Git” popup. (Screenshot not shown).
b) If desired, make a test change so that once the working
executable is created, you can ensure it is from your build. For
instance, you can change the text in the popup that results
from attempting to close an unsaved file (or close the program
with an unsaved file open) by modifying line 1850 of
Notepad_plus.cpp. (Screenshots not shown.)
c) Build the solution.
Three ways to build:
▪ Right-click on Notepad++ in the Solution Explorer and
select “Build”.
▪ Under the “Build” top-menu options, select “Build
Solution”.
▪ Use shortcut Ctrl + Shift + B
*The Notepad++ repository also contains “notepadPlus.vs2013.vcxproj” (also at
\PowerEditor\visual.net). The author of this document was unable to successfully
build notepad++.exe using notepadPlus.vs2013.vcxproj and VS2013. However, if
one can successfully do so, this procedure can otherwise be completed using
VS2013 exclusively.

10
6. LAUNCH
The final step is to copy SciLexer.dll from \scintilla\bin (within the
Notepad++ repository) to \PowerEditor\visual.net\x64\Unicode
Debug (within the Notepad++ repository).
Once completed, launch your own build of notepad++.exe!
▪ The VS build of notepad++.exe is also found in:
\PowerEditor\visual.net\x64\Unicode Debug
▪ If you move notepad++.exe to a different directory, you must
move SciLexer.dll with it.
