Building A Web Application With PHP And MariaDB: Reference Guide Maria DB
User Manual: Pdf
Open the PDF directly: View PDF ![]() .
.
Page Count: 200 [warning: Documents this large are best viewed by clicking the View PDF Link!]
- Cover
- Copyright
- Credits
- About the Author
- About the Reviewers
- www.PacktPub.com
- Table of Contents
- Preface
- Chapter 1: CRUD Operations, Sorting, Filtering, and Joins
- Chapter 2: Advanced Programming with MariaDB
- Chapter 3: Advanced Programming with PHP
- Chapter 4: Setting Up Student Portal
- Chapter 5: Working with Files and Directories
- Chapter 6: Authentication and Access Control
- Chapter 7: Caching
- Chapter 8: REST API
- Chapter 9: Security
- Chapter 10: Performance Optimization
- Index

Building a Web Application
with PHP and MariaDB:
A Reference Guide
Build fast, secure, and interactive web applications
using this comprehensive guide
Sai Srinivas Sriparasa
BIRMINGHAM - MUMBAI
Building a Web Application with PHP and MariaDB:
A Reference Guide
Copyright © 2014 Packt Publishing
All rights reserved. No part of this book may be reproduced, stored in a retrieval
system, or transmitted in any form or by any means, without the prior written
permission of the publisher, except in the case of brief quotations embedded in
critical articles or reviews.
Every effort has been made in the preparation of this book to ensure the accuracy
of the information presented. However, the information contained in this book is
sold without warranty, either express or implied. Neither the author, nor Packt
Publishing, and its dealers and distributors will be held liable for any damages
caused or alleged to be caused directly or indirectly by this book.
Packt Publishing has endeavored to provide trademark information about all of the
companies and products mentioned in this book by the appropriate use of capitals.
However, Packt Publishing cannot guarantee the accuracy of this information.
First published: June 2014
Production Reference: 1090614
Published by Packt Publishing Ltd.
Livery Place
35 Livery Street
Birmingham B3 2PB, UK.
ISBN 978-1-78398-162-5
www.packtpub.com
Cover Image by Artie Ng (artherng@yahoo.com.au)

Credits
Author
Sai Srinivas Sriparasa
Reviewers
Dario Grd
Nikolai Lifanov
Esteban De La Fuente Rubio
Commissioning Editor
Kunal Parikh
Acquisition Editor
Mohammad Rizvi
Content Development Editor
Shaon Basu
Technical Editors
Mrunmayee Patil
Aman Preet Singh
Copy Editors
Janbal Dharmaraj
Sayanee Mukherjee
Project Coordinator
Sageer Parkar
Proofreaders
Simran Bhogal
Stephen Copestake
Indexers
Hemangini Bari
Mariammal Chettiyar
Mehreen Deshmukh
Tejal Soni
Production Coordinator
Nitesh Thakur
Cover Work
Nitesh Thakur

About the Author
Sai Srinivas Sriparasa is a web developer and an open-source evangelist living
in the Atlanta area. He was the lead developer for building Dr. Oz's website and
currently works on predictive analysis algorithms for News Distribution Network
(NDN). He has previously led teams for companies such as Sprint Nextel, West
Interactive, Apple, and SAC Capital. His repertoire includes PHP, Python, MySQL,
MariaDB, MongoDB, Hadoop, JavaScript, HTML5, Responsive Web Development,
ASP.NET, C#, Silverlight, and so on. He has worked on books such as JavaScript and
JSON Essentials, Packt Publishing.
I want to convey my sincere thanks to the team at Packt Publishing
for making this book possible: Shaon, Sageer, and Sumeet in
particular. This is my second book, so I want to thank all of the
readers in advance for taking time to read my book. Please contact
me on my LinkedIn prole, http://www.linkedin.com/in/
saisriparasa, for networking or any questions that you have.
My acknowledgement section will not be complete unless I thank
my mom, dad, and my sister for all their patience and support
throughout my life. I hope you all enjoy this book as much as I did
and wish me luck for my next book.
About the Reviewers
Dario Grd is a web developer with 7 years of experience in various technologies.
He works with programming languages such as PHP, Java, Groovy, and .NET.
He loves working with frameworks such as Symfony, Grails, jQuery, and Bootstrap.
He nished his master's degree in Informatics at the Faculty of Organization and
Informatics, University of Zagreb. After getting the degree, he started working as a
programmer at a company specialized in developing banking information systems,
where he became a web team leader. Currently, he is working at the Faculty of
Organization and Informatics as an expert assistant in Higher Education and
Science System at Application Development Centre.
He works on various European and freelance projects. He developed a
new Content Management System (CMS) from scratch and is very proud of it.
Other than programming, he is also interested in web server administration and
is currently managing a hosting server. When he is not working, you can nd
him on the soccer eld or playing table tennis. He plays futsal for a local team
and competes in an amateur table tennis league. You can follow him at
http://dario-grd.iz.hr/en.
Nikolai Lifanov hacks systems. This means doing things that aren't meant to be
done to create a useful effect in a hurry. Over the last decade, he has had experience
in everything from running HA infrastructures on donated prefail hardware to
dealing with emergency spikes in service demand by padding the infrastructure
with cloud services within hours. He had roles ranging from that of a full-stack
engineer to a developer, but feels most in his element focusing on essential system
infrastructure. He builds robust and observable systems that are hard to break
and easy to x with a strong focus on self-healing, security, and reducing essential
ongoing maintenance. He has built solutions from Linux and BSD systems, from
creating immutable live cd NetBSD hypervisors (a la SmartOS) to founding a hosting
business based on DragonFly. He tries to be active in the open source community
and enjoys old-school roguelike games. His hobbies include researching obscure
ancient arcane Unix lore and retro computing.
Esteban De La Fuente Rubio is a programmer with experience mainly in the
PHP language. He worked in his earlier years developing small websites and by
now, 10 years later, he is the author of the SowerPHP framework on GitHub. In the
last 6 years, he has worked for various Chilean companies developing software
for supporting their process. He also contributed to the free software community
developing small applications and tools to make life easier (more details on this can
be found at his GitHub account, namely, https://github.com/estebandelaf).

www.PacktPub.com
Support les, eBooks, discount offers, and more
You might want to visit www.PacktPub.com for support les and downloads related
to your book.
Did you know that Packt offers eBook versions of every book published, with PDF and
ePub les available? You can upgrade to the eBook version at www.PacktPub.com and
as a print book customer, you are entitled to a discount on the eBook copy. Get in touch
with us at service@packtpub.com for more details.
At www.PacktPub.com, you can also read a collection of free technical articles, sign up
for a range of free newsletters and receive exclusive discounts and offers on Packt books
and eBooks.
TM
http://PacktLib.PacktPub.com
Do you need instant solutions to your IT questions? PacktLib is Packt's online digital
book library. Here, you can access, read and search across Packt's entire library of books.
Why subscribe?
• Fully searchable across every book published by Packt
• Copy and paste, print and bookmark content
• On demand and accessible via web browser
Free access for Packt account holders
If you have an account with Packt at www.PacktPub.com, you can use this to access
PacktLib today and view nine entirely free books. Simply use your login credentials for
immediate access.

Table of Contents
Preface 1
Chapter 1: CRUD Operations, Sorting, Filtering, and Joins 7
String datatypes 9
Number datatypes 10
Date datatypes 11
The students table 15
The courses table 17
The students_courses table 18
Inserting data 19
Retrieving data 23
Sorting data 24
Filtering data 26
Updating data 29
Deleting data 29
Joins 30
Summary 33
Chapter 2: Advanced Programming with MariaDB 35
Enhancing the existing tables 35
Working with stored procedures 43
Working with stored routines 51
Working with triggers 53
Summary 59
Chapter 3: Advanced Programming with PHP 61
New features in PHP 5.4 and 5.5 61
Updated array declaration 62
The array dereferencing function 63
The list() function in the foreach statement 64
Table of Contents
[ ii ]
Availability of $this in closures 66
Class member access on instantiation 67
Generators 69
Traits 71
Addition of the nally block to exception handling 73
Unit testing 75
Installing PHPUnit 76
Working with MariaDB 80
PHP – mysqli 81
PHP – PDO 83
Summary 86
Chapter 4: Setting Up Student Portal 87
Setting up the nuts and bolts of our application 88
Setting up URL rewrite 88
Setting up MVC 91
Adding a student 96
Listing all students 100
Adding a course 102
Listing all courses 105
Registering a student to a course 106
Viewing all registrations 109
Summary 112
Chapter 5: Working with Files and Directories 113
Data imports 113
Data exports 118
Logging 119
Summary 122
Chapter 6: Authentication and Access Control 123
Authentication 123
Access controls 130
User roles 134
Summary 138
Chapter 7: Caching 139
Introduction to caching 139
Caching in the database 140
Caching in the application 144
Advanced caching techniques 146
Summary 147

Table of Contents
[ iii ]
Chapter 8: REST API 149
What is REST? 149
Generating XML feeds 153
Generating JSON feeds 154
Summary 155
Chapter 9: Security 157
Securing the Apache web server 157
Hiding server information 158
Server conguration limits 159
Securing MariaDB 160
Password-protected access 161
Building views to restrict access 161
Creating users and granting access 162
Securing PHP 164
Summary 165
Chapter 10: Performance Optimization 167
Performance optimization for the Apache web server 168
Disabling unused modules 168
Using compression 170
Caching 171
Performance optimization for MariaDB 171
Best practices for data retrieval 172
Understanding query execution 173
Query optimization and indexing 173
Performance optimization for PHP 175
CDN, reverse proxy, and database replication 176
Summary 177
Index 179
Preface
In the age of the Internet, building a web application is no longer a tough task,
but building the web application in the right way is not a trait mastered by many.
Building a Web Application with PHP and MariaDB: A Reference Guide is aimed at taking
readers to the next level and to transform them from beginner-level programmers to
intermediate or advanced-level programmers. Building a Web Application with PHP
and MariaDB: A Reference Guide is a well thought out guide that begins with the basics
of PHP and MariaDB and covers complex topics such as caching, security, building
a REST API, and performance optimization. Building a web application that will be
secure, scale well under pressure, and have an API available to different subscribers
is not a simple task, but this book will make this a simple, easy-to-learn, and a
memorable journey.
What this book covers
Chapter 1, CRUD Operations, Sorting, Filtering, and Joins, deals with introducing
readers to basic SQL operations such as create, read, update, and delete. We then
go to the next step by discussing sorting, ltering, and end by discussing the
concept of joining tables.
Chapter 2, Advanced Programming with MariaDB, deals with various data
manipulation operations such as alter and drop. After a clear understanding
of the DML operations, we will discuss the more advanced concepts such as
stored procedures, stored routines, and triggers.
Chapter 3, Advanced Programming with PHP, introduces readers to more advanced
programming concepts such as unit testing and exception handling. We also discuss
the new features that have been added to PHP 5.4 and 5.5.
Chapter 4, Setting Up Student Portal, deals with using all the concepts encompassed
in the last few chapters to build a student portal.

Preface
[ 2 ]
Chapter 5, Working with Files and Directories, deals with the introduction and
implementation of le imports, le uploads, and application logging using
les in our student portal application.
Chapter 6, Authentication and Access Control, deals with the introduction and
implementation of authentication and access controls for our student
portal application.
Chapter 7, Caching, introduces the readers to the concept of caching. We later discuss
the different types of caching and how each method of caching is implemented.
Chapter 8, REST API, introduces readers to the concept of REST architecture,
followed by building a REST API for our student portal.
Chapter 9, Security, deals with an introduction to the different security optimizations
that can be performed for Apache, MariaDB, and PHP to secure the web application.
Chapter 10, Performance Optimization, deals with the introduction of different
performance optimization techniques that can be used to scale the application
more effectively.
Bonus chapter 1, Installation of PHP, MariaDB, and Apache, deals with the installation
and conguration of PHP, MariaDB, and Apache. This chapter is not present in
the book but is available for download at https://www.packtpub.com/sites/
default/files/downloads/Bonus_chapter_1.pdf.
Bonus chapter 2, Object-oriented Programming with PHP, deals with introducing the
readers to the concept of Object Oriented Programming (OOP) with PHP and we
continue by discussing various OOP features such as inheritance, encapsulation,
polymorphism, interfaces, and abstract classes. We end this chapter by discussing
a few popular design patterns. This chapter is not present in the book but is available
for download at https://www.packtpub.com/sites/default/files/downloads/
Bonus_chapter_2.pdf.
What you need for this book
This book deals with building web applications; so, to successfully host a web
application, you will need the Apache web server. Once the request is received
by the web server, it will forward that request to the server-side program, and we
will be using PHP for our server-side scripting. We will be using MariaDB as
our database server to store our data. We are using Memcache for memory caching.
The software needed are: PHP, MariaDB, Apache server, cURL, and Memcache.

Preface
[ 3 ]
Who this book is for
This book has been designed to cater to the needs of developers at all levels. This book
contains numerous examples, tips, and recommendations that will guide the readers
from the installation and conguration phase to deployment phase. Prior knowledge
of PHP, MariaDB, and/or Apache web server will be very helpful, but not required.
Conventions
In this book, you will nd a number of styles of text that distinguish between
different kinds of information. Here are some examples of these styles, and an
explanation of their meaning.
Code words in text, database table names, folder names, lenames, le extensions,
pathnames, dummy URLs, user input, and Twitter handles are shown as follows:
"Upon executing the show databases; command, the list of existing databases
will be outputted to the screen"
A block of code is set as follows:
<?php
/**
* Array declaration before PHP 5.4
*
*/
$arr = array(1,2,3,4);
//Print an element to the screen
echo $arr[0];
/**
* Array declaration with PHP 5.4 or greater
*
*/
$arr2 = [1,2,3,4];
//Print an element to the screen
echo $arr2[0];
?>
Any command-line input or output is written as follows:
phpunit --version
Preface
[ 4 ]
New terms and important words are shown in bold. Words that you see on the
screen, in menus or dialog boxes for example, appear in the text like this: "Now that
the database has been successfully changed, note that the database name reects in
between the brackets next to MariaDB, which denotes the current database."
Warnings or important notes appear in a box like this.
Tips and tricks appear like this.
Reader feedback
Feedback from our readers is always welcome. Let us know what you think about
this book—what you liked or may have disliked. Reader feedback is important for
us to develop titles that you really get the most out of.
To send us general feedback, simply send an e-mail to feedback@packtpub.com,
and mention the book title via the subject of your message.
If there is a topic that you have expertise in and you are interested in either writing
or contributing to a book, see our author guide on www.packtpub.com/authors.
Customer support
Now that you are the proud owner of a Packt book, we have a number of things
to help you to get the most from your purchase.
Downloading the example code
You can download the example code les for all Packt books you have purchased
from your account at http://www.packtpub.com. If you purchased this book
elsewhere, you can visit http://www.packtpub.com/support and register to
have the les e-mailed directly to you.

Preface
[ 5 ]
Errata
Although we have taken every care to ensure the accuracy of our content, mistakes do
happen. If you nd a mistake in one of our books—maybe a mistake in the text or the
code—we would be grateful if you would report this to us. By doing so, you can save
other readers from frustration and help us improve subsequent versions of this book.
If you nd any errata, please report them by visiting http://www.packtpub.com/
submit-errata, selecting your book, clicking on the errata submission form link,
and entering the details of your errata. Once your errata are veried, your submission
will be accepted and the errata will be uploaded on our website, or added to any list of
existing errata, under the Errata section of that title. Any existing errata can be viewed
by selecting your title from http://www.packtpub.com/support.
Piracy
Piracy of copyright material on the Internet is an ongoing problem across all media.
At Packt Publishing, we take the protection of our copyright and licenses very
seriously. If you come across any illegal copies of our works, in any form, on the
Internet, please provide us with the location address or website name immediately
so that we can pursue a remedy.
Please contact us at copyright@packtpub.com with a link to the suspected
pirated material.
We appreciate your help in protecting our authors, and our ability to bring
you valuable content.
Questions
You can contact us at questions@packtpub.com if you are having a problem
with any aspect of the book, and we will do our best to address it.

CRUD Operations, Sorting,
Filtering, and Joins
Data storage and management have been a very powerful trait for a long time, and
as a server-side web developer, it is of paramount importance to have a thorough
understanding of the available data storage options. The data that we might be
dealing with could be user information, company data, order data, product data, or
personal data, and so on. Data in its raw form needs to be processed, cleared, and
organized to generate information. Text les and spreadsheets can be used by web
applications for storing data but, as the amount of data grows in size, it becomes
very hard to store all the data in a single le, as the burgeoning size takes its toll
on the speed of retrieval, insertion, and constant updates to the le. Numerous
websites store the users' access information in daily or weekly logles in the text
format, which ends up with a large number of logles. The common problem with
data storage in this fashion is conserving the data integrity, an example being the
process of weeding out duplicate records when data spanned across multiple les
becomes cumbersome. A few other problems with data storage in les is the process
of managing updates to the le, logging the information about what the updates
were or who made them, and applying the necessary le locks when multiple users
access and update les at the same time. These are a few reasons why there has
always been a need to look for other data storage and management solutions.
An alternate data storage solution, the method that we will rely upon for the most
part of this book, is to store the data in a database. A database is an integrated
collection of data, and the rules pertaining to that data. A database relies upon
a database management system to store the data in an organized manner, to
implement the rules that guard the data, and to make the operations such as
data retrieval, data modication, and data management simple.

CRUD Operations, Sorting, Filtering, and Joins
[ 8 ]
A Database Management System (DBMS) is a software or a collection of
programs that manage a single database or multiple databases, and provide
critical functionality for data administration, data access, and efcient data
security. An example of a database management system is a bookshelf, which
is an enclosed space that can be used for storing books in an organized manner.
There are multiple vendors who provide different database management systems
and we will focus on MariaDB.
Continuing with the bookshelf example, the content of a book is divided into
chapters; similarly, the data in a database is stored in tables. A table can be
described as the fundamental building block of the database. Data can only
be stored inside a table, if there are no tables in the database; the database is
devoid of data. Every table is identied by a unique name, meaning that the same
database cannot have two tables with the same name. The data in a table is stored
and is represented in a two-dimensional format as rows and columns. MariaDB is
a RDBMS and follows the theory of relational-models proposed by Edgar F Codd.
The term relational is applied in two ways, the rst is the relation between one or
more tables in the same database and the second is the relationship between the
columns within a table.
Tables carry certain characteristics and are built based on a specic structure
(or a layout) that denes how the data will be stored. These characteristics are
a unique name for the column and the type of data that will be stored in the
column. A row would store the smallest unit of information that can be stored in
a table and each column in the table will store a piece of relevant data for a single
record. We can have a table with all our users' data, a table with all our orders
information, and a table with all our product information. Here, each row in the
users table would represent a user record, each row in the orders table would
represent an order record, and each row in the products table would represent
a product record. In the users table, the columns could be username, address,
city, state, and zip code; all these columns provide certain data about the user.
Each column is associated with a datatype that denes the type of data that can
be stored in the column. Datatypes restrict the type of data that can be stored in
a column, which allows for a more efcient storage of data. Based on the type of
data that is expected to be stored, datatypes can be broadly categorized into
numeric, string, and date-time datatypes.

Chapter 1
[ 9 ]
String datatypes
Let us look at the following main datatypes:
Datatype Explanation Comments
CHAR(L) This stores a fixed-length string
between 0 and 255 bytes.
Trailing spaces are removed.
VARCHAR(L) This stores a variable-length
string between 0 and 65,535
characters.
65,535 is the effective
maximum row size for table.
TEXT This stores character data and the
maximum length of a text column
is 65,535 characters.
Length need not be specified.
TINYTEXT This stores the text column
with a maximum length of 255
characters.
MEDIUMTEXT This stores the text column with
a maximum length of 16,777,215
characters.
LONGTEXT This stores the text column with a
maximum length of 4,294,967,295
characters.
BLOB This stores binary data and the
maximum length of a text column
is 65,535 bytes.
Binary Large Objects are
used to store binary data
such as images.
TINYBLOB The BLOB datatype column with a
maximum length of 255 bytes.
MEDIUMBLOB This stores the text column with
a maximum length of 16,777,215
bytes.
LONGBLOB This stores the text column with a
maximum length of 4,294,967,295
bytes.
ENUM This provides a list of strings from
which a value can be chosen.
A list of 65,535 values can
be inserted into the ENUM
datatype.
SET This is similar to the ENUM
datatype. It provides a list of
strings from which zero or more
values can be chosen.
Can have a maximum of 64
distinct values.

CRUD Operations, Sorting, Filtering, and Joins
[ 10 ]
Number datatypes
Let us now look at the following main number datatypes:
Datatype Explanation Comments
tinyint This stores integer values. -128 to 127, Signed
0 to 255, Unsigned
Smallint This stores integer values. -32768 to 32767, Signed
0 to 65535, Unsigned
Mediumint This stores integer values. -8388608 to 8388607, Signed
0 – 16777215, Unsigned
int(l) This stores integer values
and takes the size of the
number.
-2147483648 to 2147483647, Signed
0 – 4294967295, Unsigned
Bigint This stores integer values. -9223372036854775808 to
9223372036854775807, Signed
0 to 18446744073709551615, Unsigned
Float(l,d) This stores floating point
numbers and allows us to
define the display length
(l) and the number of digits
after the decimal point (d).
The default values for l, d
are 10 and 2, respectively.
This uses 4-byte single precision and
can display from 0 to 23 digits after
the decimal.
Double(l,d) This is similar to FLOAT,
and uses 8-byte double
precision. The default
values for l, d are 16 and 4,
respectively.
The DOUBLE datatype can display
from 24 to 53 results. Both the FLOAT
and DOUBLE datatypes are commonly
used for storing the results from
scientific calculations.
decimal(l,d) This stores the exact
numeric data values and
allows us to define the
display length (l) and the
number of digits after
decimal point (d).
This is used for precision mathematics
that deals with extremely accurate
results. The DECIMAL datatype
is commonly used to store
monetary data.

Chapter 1
[ 11 ]
Date datatypes
Let us now look at the following main date datatypes:
Datatype Explanation Comments
Date This stores the date in YYYY-MM-
DD format.
The supported range is from
1000-01-01 to 9999-12-31.
Time This stores the time in HHH:MM:SS
format.
The supported range is from
-838:59:59 to 838:59:59.
datetime This stores both the date and time in
YYYY-MM-DD HH:MM:SS format.
The supported range is
from 1000-01-01 00:00:00 to
9999-12-31 23:59:59.
Timestamp This stores both the date and time. The supported range is from
1970-01-01 00:00:01 UTC to
2038-01-19 03:14:07 UTC.
year (L) This stores the year in either a
2-digit or a 4-digit format. The
length of the year can be specified
during declaration. The default is a
4-digit year.
The supported range for
a 4-digit year is from 1901
to 2155.
Now that we have discussed the available datatypes for building columns,
we will use SQL to build our rst table. Structured Query Language (SQL) is
a multipurpose programming language that allows us to communicate with the
database management system to manage and perform operations on the data.
SQL operations can be divided into three groups: Data Denition Language (DDL),
Data Manipulation Language (DML), and Data Control Language (DCL).
These three groups are explained in the following table:
Groups Explanation Operations
DDL Data Definition Language can be
used to create a table or alter the
structure of a table once it is built,
drop the table if it is deemed to
be unnecessary, and to perform
operations such as truncating the
data in a table and creating and
dropping indexes on columns.
• CREATE
• ALTER
• DROP
• TRUNCATE
• RENAME
CRUD Operations, Sorting, Filtering, and Joins
[ 12 ]
Groups Explanation Operations
DML Data Manipulation Language is
used to perform insert, update,
delete, and select operations on
the data.
• SELECT
• INSERT
• UPDATE
• DELETE
• CALL
• REPLACE
• LOAD DATA INFILE
DCL Data Control Language is used for
managing the access to the data.
DCL can be used to work with
MariaDB's complex security model.
• GRANT
• REVOKE
Other
administration
and utility
statements
Other SQL commands that are
often used but do not come under
DDL, DML, or DCL.
• EXPLAIN
• SHOW
• DESCRIBE
• HELP
• USE
Now that we have discussed the basics of Database Management System and SQL,
let us connect to our MariaDB server. MariaDB is shipped with a few pre-existing
databases that are used by MariaDB itself to store metadata such as information
about databases, tables, columns, users, privileges, logs, and so on (yes, MariaDB
stores its own data in MariaDB tables).
For more information about the installation procedures for PHP,
MariaDB, and Apache, please refer to the Bonus chapter 1, Installation of
PHP, MariaDB, and Apache present online on the Packt Publishing website.
Chapter 1
[ 13 ]
As we have installed MariaDB and have root access to the server, we will be able
to view all this metadata information. To retrieve the metadata information that
is currently on MariaDB, we will use the SHOW utility command and, as we are
interested in retrieving the list of existing databases, we will append DATABASES
to our SHOW command:
SQL commands are case-insensitive, so the case of the SQL command
does not matter.
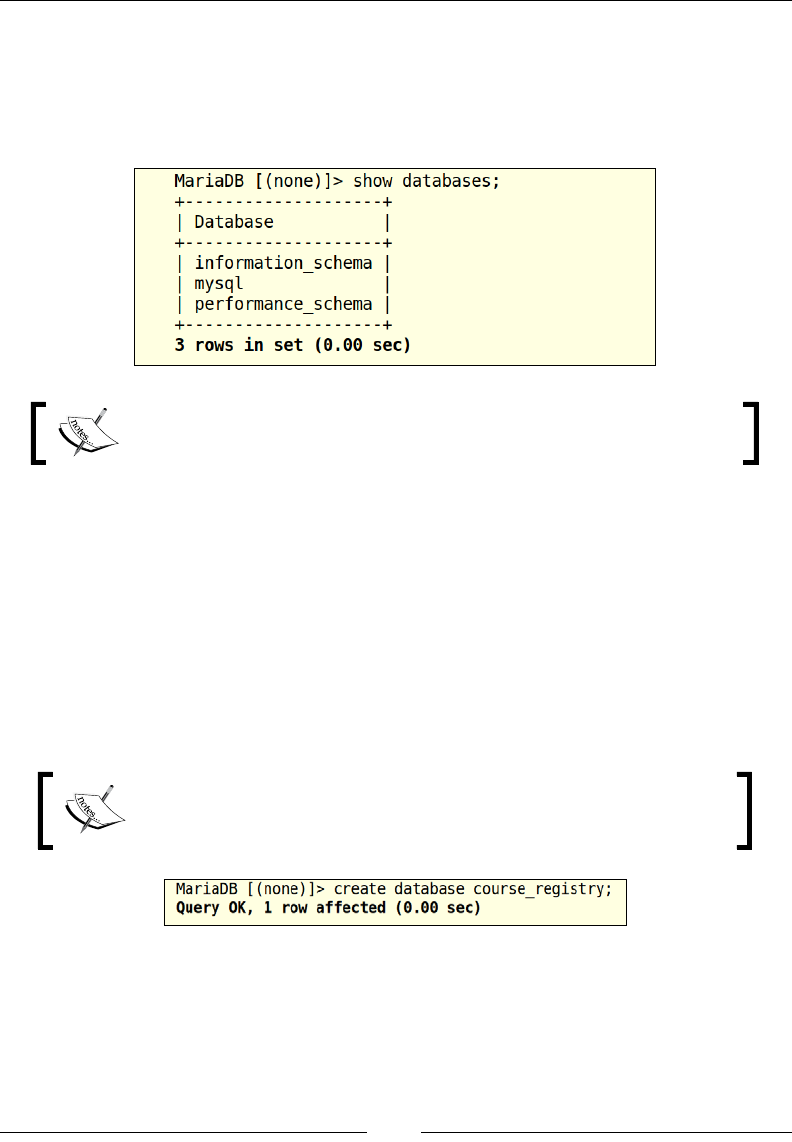
Upon executing the show databases; command, the list of existing databases
will be outputted to the screen. These databases are reserved to store congurations
and necessary metadata (yes, MariaDB stores its data on MariaDB itself), so it is
advised to avoid using these databases for storing other data. For storing other
data, we will have to create our own database. We will use the SQL commands
that are part of DDL to create new databases. For creating a new database, the
CREATE DDL command is appended with DATABASE and then the name of the
database to be created is added. Let us create a simple course registry database
that keeps a track of student records, the available courses, and the courses for
which the students have registered.
MariaDB is very particular about statement terminators, a
semicolon ; is the default statement terminator and, unless the
statement terminator is given, the SQL command is not executed.
CRUD Operations, Sorting, Filtering, and Joins
[ 14 ]
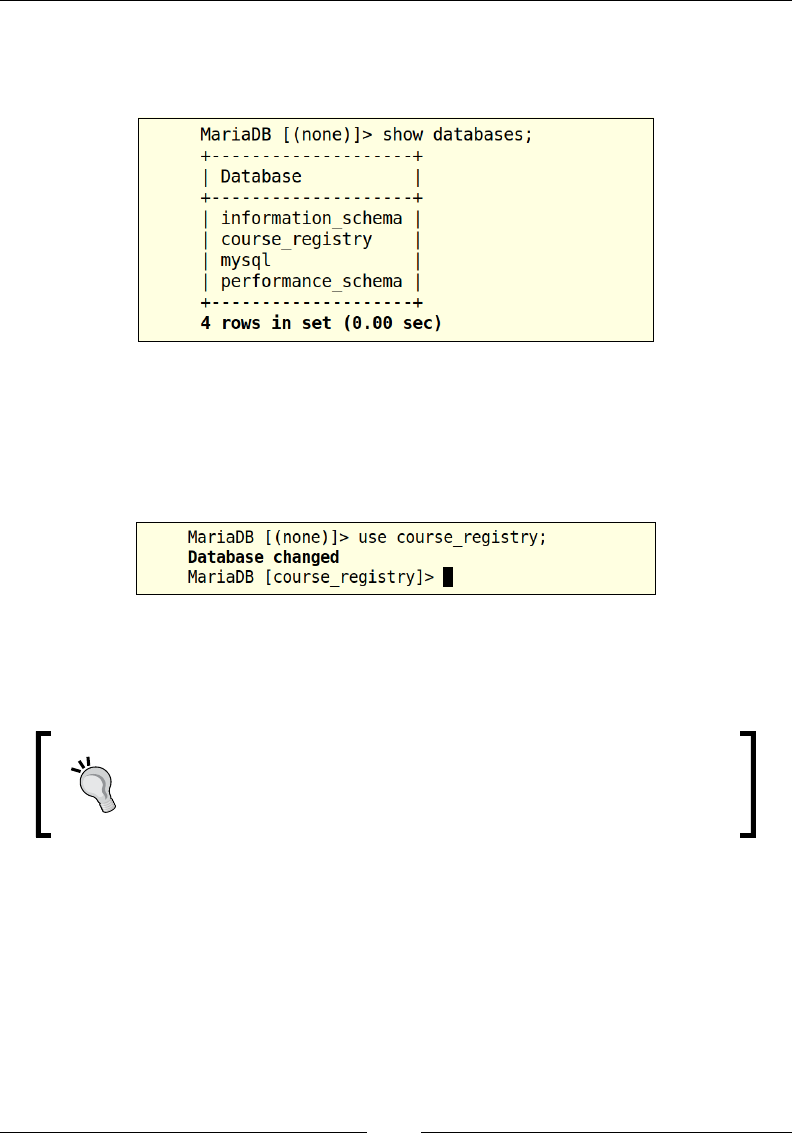
We have successfully created our rst database. To verify that we have created
this database, let us run the show databases; command one more time to see
if our new database is reected in the list of existing databases:
Now that we have veried that our new database is available in the list of existing
databases, let us access the database and build tables in the course_registry
database. For accessing a database, we will utilize the USE utility command. The USE
command has to be followed with the name of an existing database to avoid an error,
once this command has been executed.
Now that the database has been successfully changed, note that the database
name reects in between the brackets next to MariaDB, which denotes the
current database.
Another way of nding the current database is to use the select
database(); statement and print it out to the console; if the
output is null, this means that no database has been selected.
Now that we have chosen the course_registry database, let us take a brief look
at the data that has to be housed in this database. The course_registry database
keeps a track of student records, the available courses, and the courses for which the
students have registered. We could do this by putting the students and the courses
that they have registered for in a single table. However, the problems with this
approach, similar to a spreadsheet, are twofold. The rst problem is that the student
information would keep repeating when a student registers for multiple courses,
thereby causing unnecessary redundancy.

Chapter 1
[ 15 ]
The second problem will be about data inconsistency, assuming that the student
information was wrong. Either we will be using this erroneous information another
time, or we might be employing another data entry process that allows the user
to enter different data as user information, which causes data inconsistency.
To avoid this, we are splitting our data into three tables; they are students,
courses, and students_courses.
The student records will be stored in the students table, the data about the available
courses will be stored in the courses table, and the data about the courses that the
students have registered for will be stored in the students_courses table. The
students_courses table will be an association table that contains common elds
from the students and the courses tables. This table can also be referred to as a bridge
table, paired table, or cross reference table. By using the students_courses table, we can
accommodate a common case where one student can register for more than one course.
Before we begin building our tables, it is always important to understand the type
data that will be housed in this table and based on the data that will be housed in
that table, we will have to decide on the column names and the datatypes for those
columns. Column names have to be intuitive in order to help others such as system
administrators, auditors, and fellow developers to easily understand the kind of
data that can be or is currently being stored in those columns, and the respective
datatypes of those columns will explain the type that can be housed in a column.
Let us begin with our students table.
The students table
Let us take a look at the following elds in the table and what work they perform:
Column name Datatype Comments
student_id Int This stores the unique identifier for
a student
first_name Varchar(60) This stores the first name of the student
last_name Varchar(60) This stores the last name of the student
address Varchar(255) This stores the address of the student
city Varchar(45) This stores the name of the city
state Char(2) This stores the two letter abbreviation for
states in the United States
zip_code Char(5) This stores the five digit zip code for an
address in the United States
CRUD Operations, Sorting, Filtering, and Joins
[ 16 ]
It is advised to use a character datatype for elds such as zip codes or
SSNs. Though the data is going to be a number, integer datatypes are
notorious for removing preceding zeroes, so if there is a zip code that
starts with a zero, such as 06909, of an integer datatype, the zip code
would end up in the column as 6909.
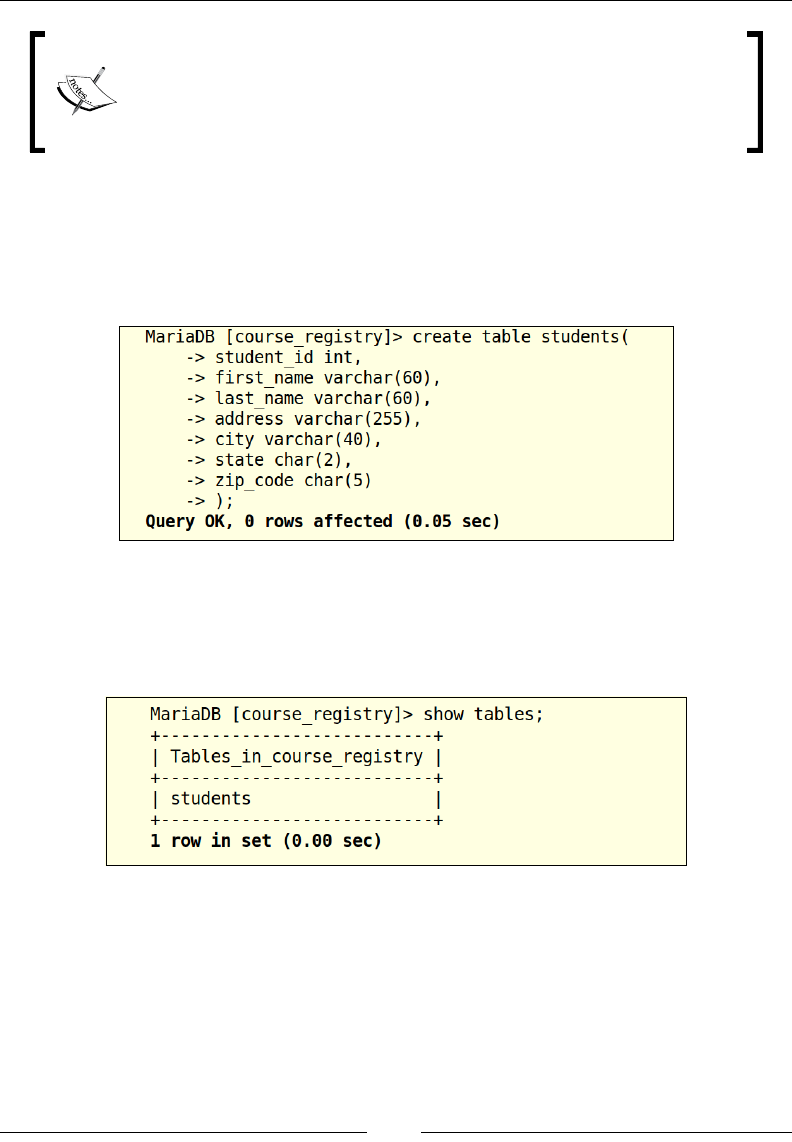
Now let us convert this table structure into executable SQL, to create our table,
we will be using the CREATE DDL command, followed by TABLE and then append it
with the table structure. In SQL, the column description is done by mentioning the
column name rst and then adding the datatype of the column. The STUDENTS table
has multiple columns, and the column information has to be separated by a comma (,).
Now that the query has been executed, the students table has been created.
To verify if the students table has been successfully built, and to view a list
of existing tables that are in the current database, we can use the SHOW utility
command and append that with TABLES:
We have successfully used the show tables; command SQL statement to retrieve
a list of existing tables, and have veried that our students table exists in our
course_registry database. Now, let us verify if our students table has the
same table structure as we originally intended it to have. We will use the DESCRIBE
utility command followed by the table name to understand the table structure:
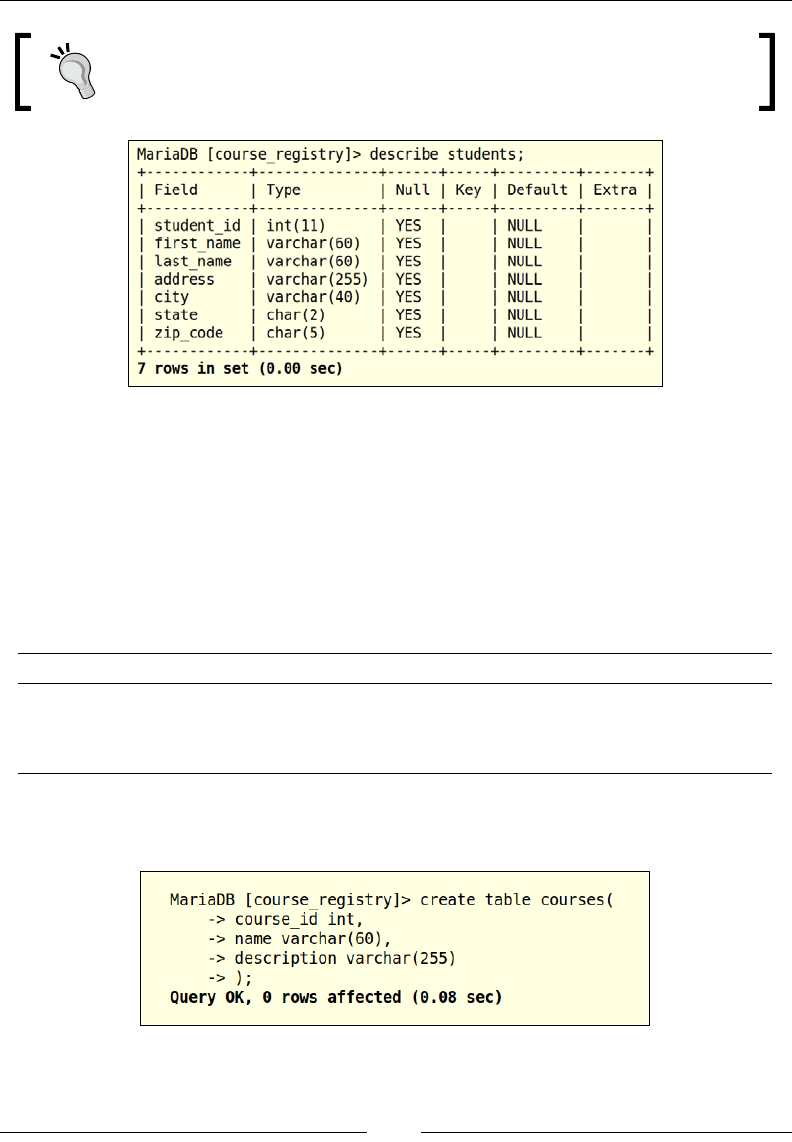
Chapter 1
[ 17 ]
The DESCRIBE and DESC commands can be used interchangeably,
both the commands would need the table name to return their structure.
Now let us move on to the courses table, this table will house all the available
courses for which a student can register. The courses table will contain a unique
identier for the course (course_id), the name of the course (course_name),
and a brief description of the course (course_description).
The courses table
Let us now look at the elds and the type of values they are storing:
Column name Datatype Comments
course_id int This stores the unique identifier for a course.
name varchar(60) This stores the title of the course.
description varchar(255) This stores the description of a course.
Now let us convert this table structure into executable SQL to create our
courses table:
CRUD Operations, Sorting, Filtering, and Joins
[ 18 ]
Now that the query has been executed, let us run the SHOW TABLES command to
verify if the courses table has been created:
The output from the SHOW TABLES command returns the list of current tables,
and the courses table is one of them. Now that we have built the students table
and the courses table, let us build the bridge table that would hold the association
between the two tables. This table would contain the data about the students who
were enrolled to a particular course.
The students_courses table
Let us now look at the elds in this table and their respective values:
Column name Datatype Comments
course_id int This stores the unique identifier for a course
student_id int This stores the unique identifier for a student
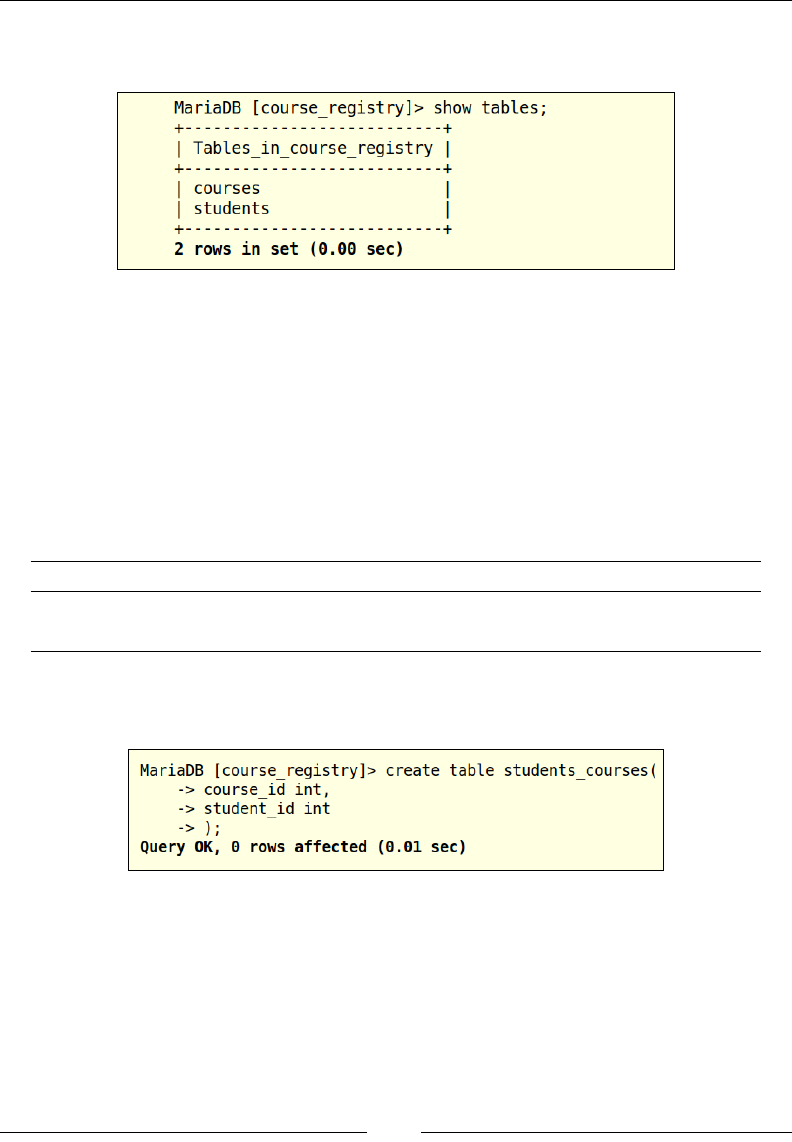
Now, let us convert this table structure into executable SQL, to create our courses
table using the following command:
Chapter 1
[ 19 ]
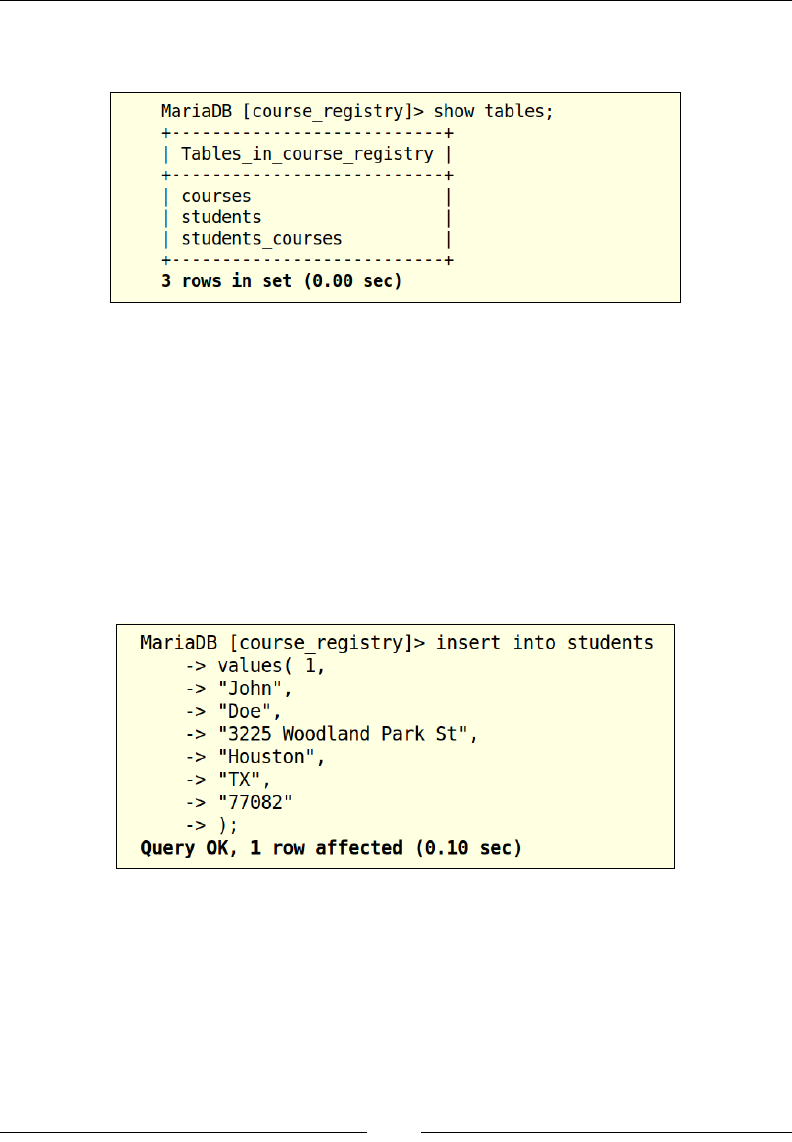
Now that the query has been executed, let us run the SHOW TABLES command to
verify if the courses table has been created:
The output from the SHOW TABLES command returns the list of current tables,
and the students_courses table is one of them.
Inserting data
Now that we have built our tables, it is time to insert records into the tables.
Let us look at a few different methods for inserting a single row of data and inserting
multiple rows of data. For insertion of data into a table, we will use the INSERT DML
command, and supply the table name and the values for the available columns in the
table. Let us begin by inserting student records into the students table:
CRUD Operations, Sorting, Filtering, and Joins
[ 20 ]
In this example, we insert a new student record into the students table; we are
supplying the data for that student record in the VALUES clause. This syntax,
though it appears to be very simple, it is not a very safe method of inserting data.
This INSERT statement is depending upon the order in which the columns were
dened in the table structure, so the data in the VALUES clause will be mapped by
position, 1 would go into the rst column in the table, though it is intended to go
into the student_id column. If the students table is rebuilt locally or on a different
machine, there is no guarantee that the column order would remain the same as the
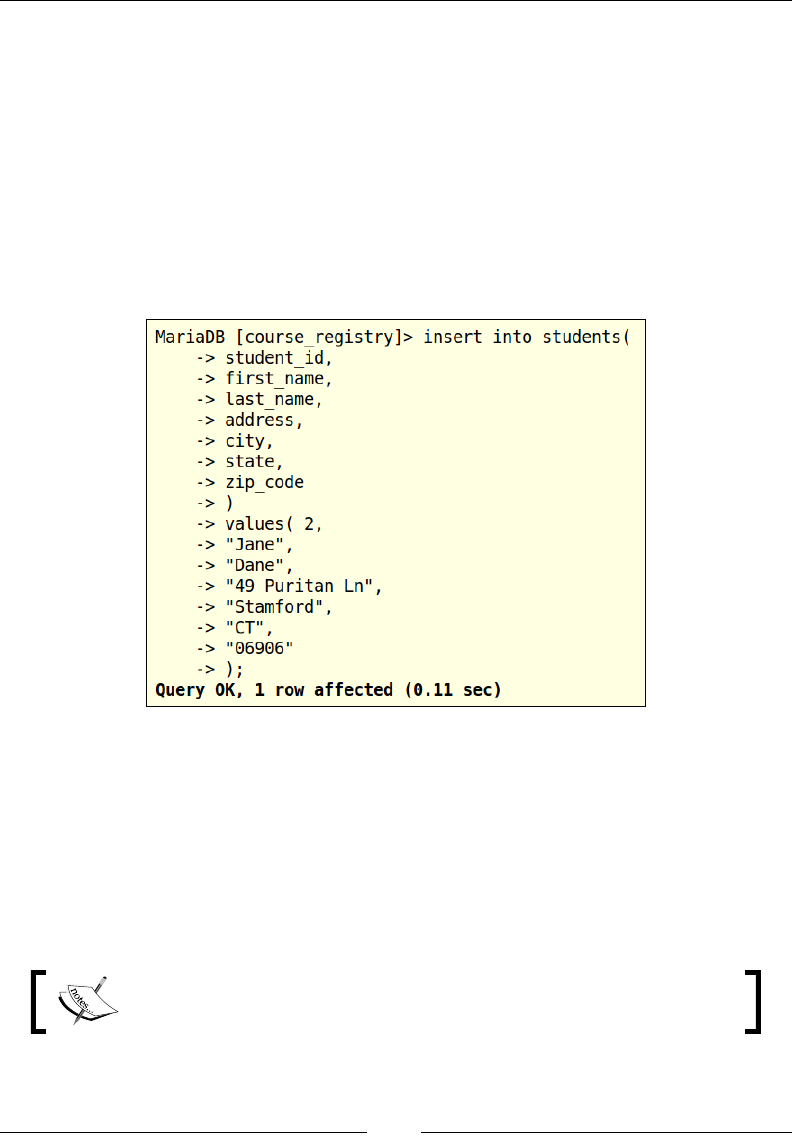
order on the current MariaDB database server. The other approach that is considered
safer when compared to this one is the INSERT statement, where the column names
are explicitly mentioned in the SQL:
Though this might be a bit longer, this would guarantee that data that is being
passed in via the VALUES clause is going into the right column. By using this INSERT
syntax, the order in which the columns are mentioned is no longer important.
When this query is executed, MariaDB matches each item in the columns list with
its respective value in the VALUES list by position. This syntax can also be used for
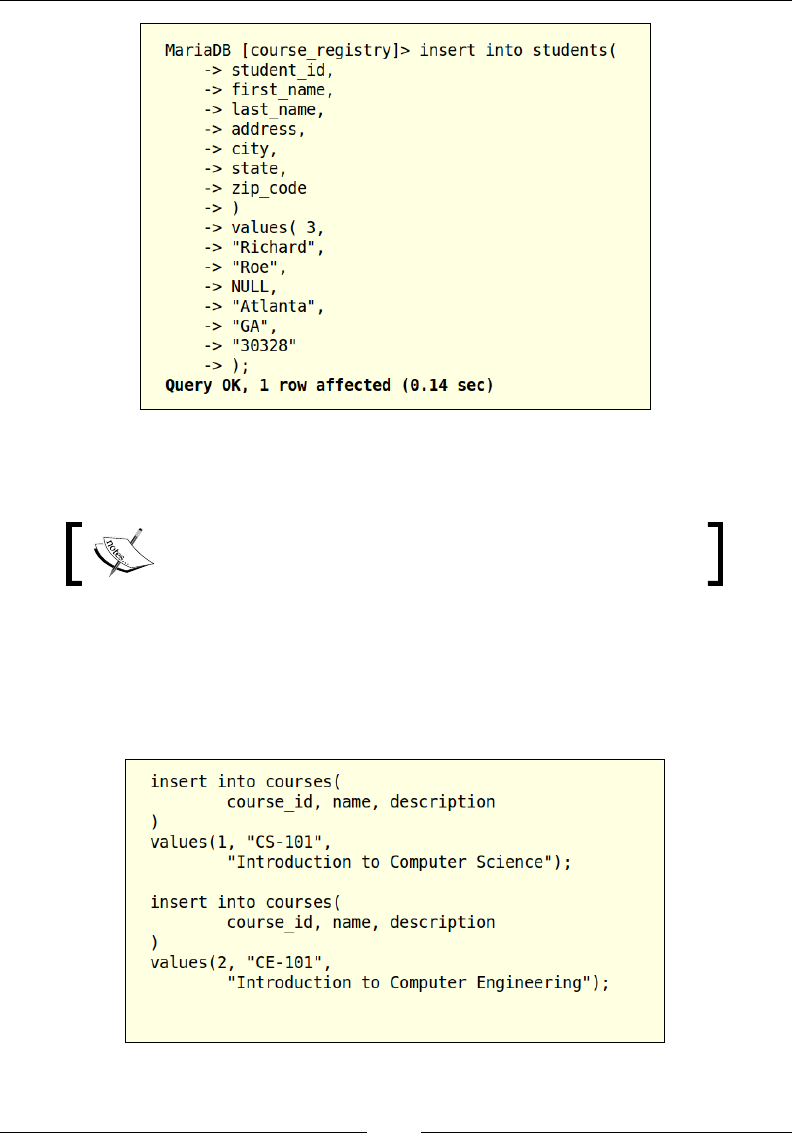
the case where the data is only available for a few columns. Let us come up with an
INSERT statement that has data for a few columns and uses NULL for a column that
does not have any data:
In SQL, the term NULL is used to denote that a value does not exist.
Chapter 1
[ 21 ]
In this example, we are inserting a student record whose address is not known,
so we are using NULL to populate the column.
Columns by default allow NULL values to be populated,
unless it is explicitly mentioned not to allow NULL values.
Now that we have seen the different insertion syntaxes for inserting a single record
row, let us take a step forward and look at how multiple records can be inserted.
There are two ways of inserting multiple records into a table, the rst method
is where INSERT statements are created for each row, and are separated by the
statement terminator (;):
CRUD Operations, Sorting, Filtering, and Joins
[ 22 ]
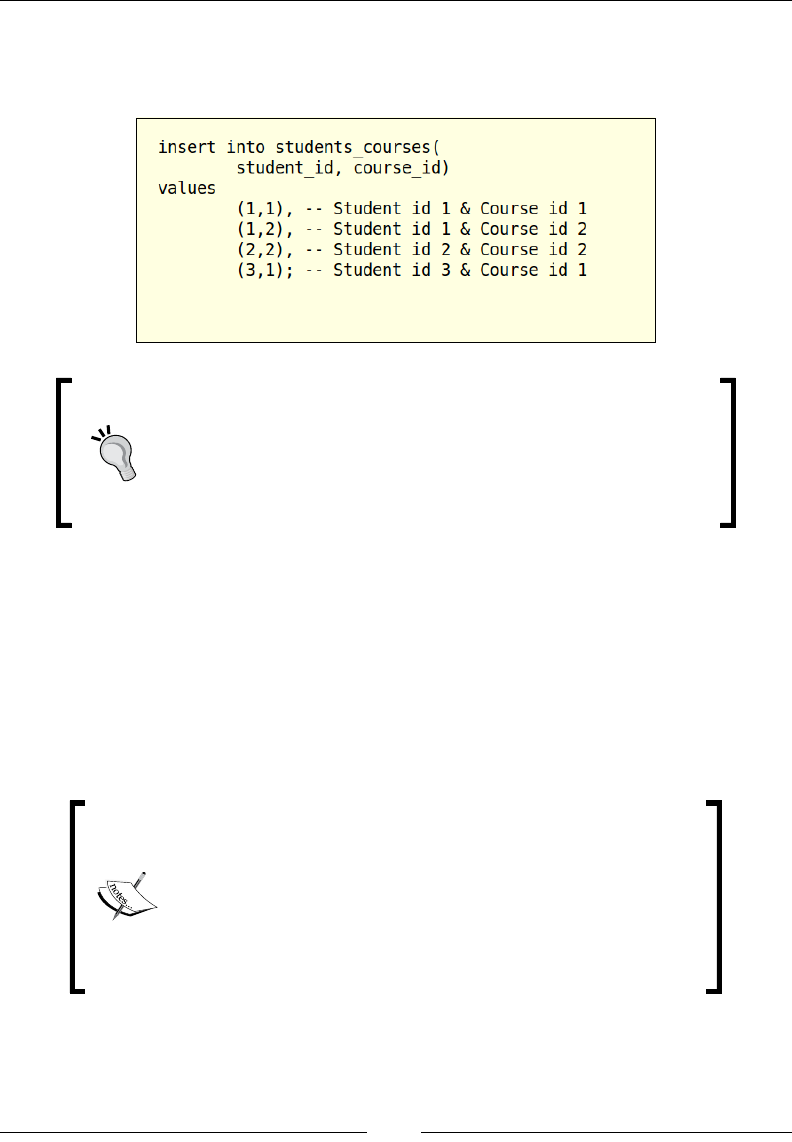
The other way of inserting multiple records is by using a single VALUES clause
while passing in multiple records, separating each record with a comma (,),
and adding a statement terminator at the end of the last record:
We are currently not using any constraints to maintain any
referential integrity among tables, so any integers can be
inserted into the students_courses table. To allow only
existing student IDs and course IDs to be inserted, we will
have to use the primary key and foreign key constraints.
We will be covering constraints in the next chapter.
In this example, we are inserting multiple records into the students_courses table.
On execution of this SQL query, the rst statement inserts an associative record into
the students_courses table and the value for the column student_id is 1, which
maps back to the student record of John Doe, and the value for course_id is 1 that
corresponds to the course record CS-101. The inline comments at the end of each
statement are used to describe the data that is being inserted via this statement.
Though these comments are added to the INSERT statements, they are only intended
to explain the purpose of the statements and will not be processed by MariaDB.
MariaDB also supports multi-line comments. Syntax for
creating multi-line comments is by using /* to start the
comment and ending the comment with */.
/* multiple line
comments
go
here*/
The last method of insertion that we are skipping for now is to insert the data that
has been retrieved on the y from a table. We will be looking at that once we have
covered the methods for retrieving data and ltering data.
Chapter 1
[ 23 ]
Retrieving data
Now that we have inserted data into the students, courses, and students_courses
tables, let us look at the different mechanisms of retrieving data, we will be using the
SELECT command to retrieve the data. The SELECT statement would expect two things
as a minimum, the rst would be what to retrieve and the second would be where to
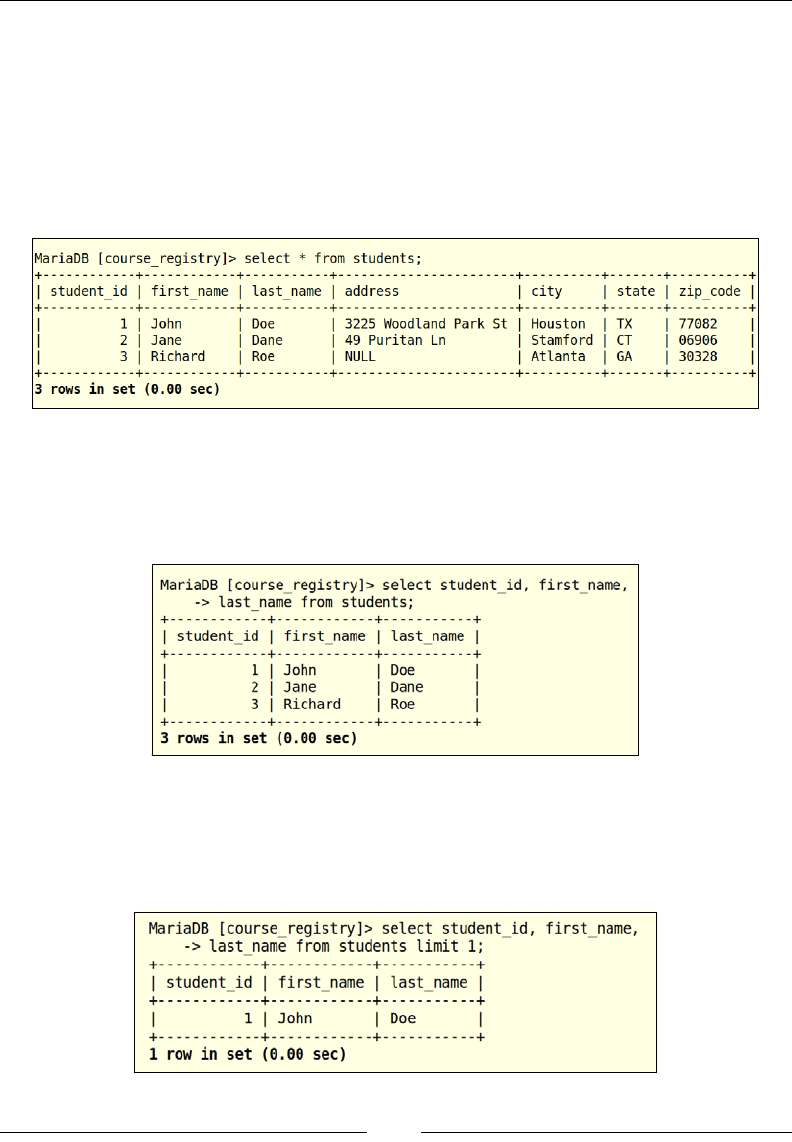
retrieve it. The simplest SELECT command would be to retrieve all the student records
from the students table:
In this query, we are using * to retrieve the data for all the columns from the students
table, this is not a preferred method of retrieving data. The preferred method for data
retrieval is by mentioning the individual columns separated by a comma (,) after the
SELECT clause:
In this query, we are selecting the student_id, first_name, and last_name
columns from the students table. As we are not ltering the data yet, SELECT
statements would return every student record that is in the students table.
We can use the LIMIT clause to retrieve a certain number of records:
CRUD Operations, Sorting, Filtering, and Joins
[ 24 ]
In this query, we are retrieving the data from the students table and we are
retrieving the student_id, first_name, and last_name columns; however, rather
than retrieving all the rows, we are only retrieving a single row. To retrieve the next
row, we could still use the limit, but we would use LIMIT clause accompanied by
the OFFSET clause. The OFFSET clause determines the starting point as to where the
records should start from, while the LIMIT clause determines the number of records
that would be retrieved.
Sorting data
Now that we have looked at different techniques of retrieving the data, let us look
at how the data can be represented in a more ordered way. When we execute a
SELECT statement, the data is retrieved in the order in which it exists in the database.
This would be the order in which the data is stored; therefore, it is not a good idea to
depend upon MariaDB's default sorting. MariaDB provides an explicit mechanism
for sorting data; we can use the ORDER BY clause with the SELECT statement and
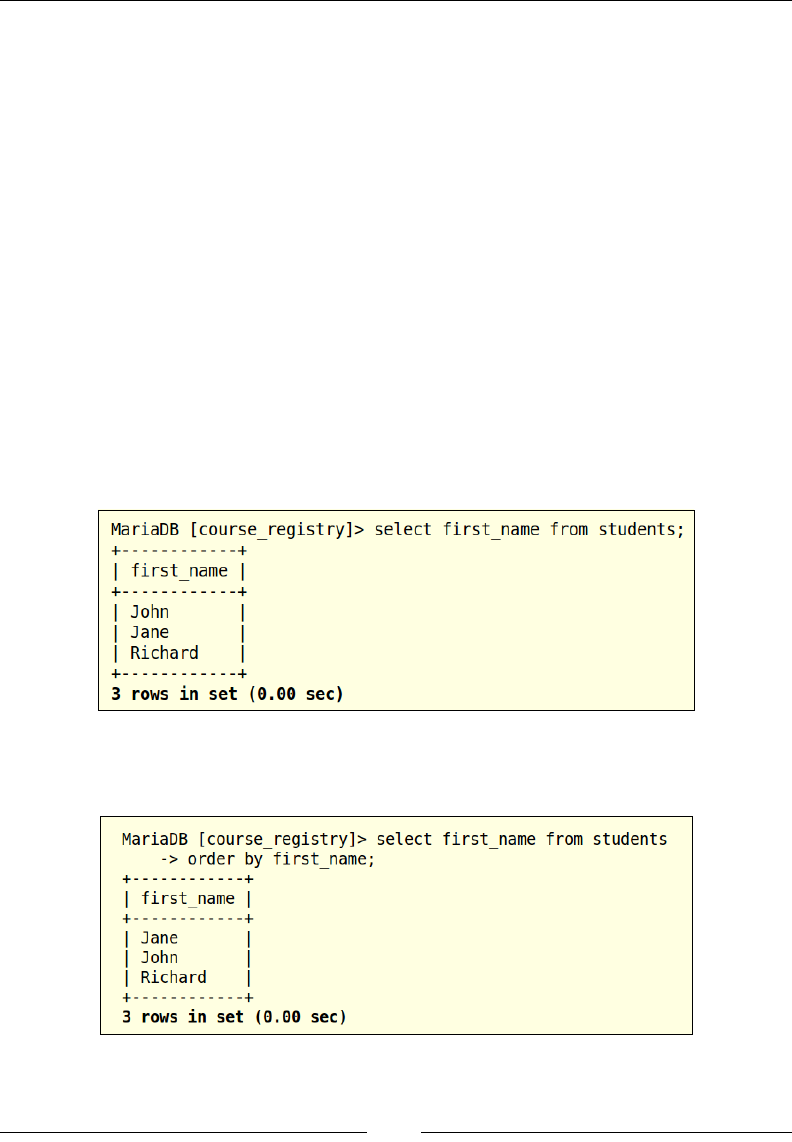
sort the data as needed. To understand how sorting can be of help, let us begin by
querying the students table and only retrieving the first_name column:
In the rst example, we are going by MariaDB's default sort, and this would give us
the data that is being returned based on the order of the insert:

Chapter 1
[ 25 ]
In this example, we are ordering the data based on the first_name column.
The ORDER BY clause by default sorts in ascending order, so the data would be
sorted in an ascending alphabetical order and if the rst character of one or more
strings is the same, then the data is sorted by the second character, which is why
Jane comes before John. To explicitly mention the sort order as ascending, we can
use the keyword asc after the column name:
In this example, we are again ordering the data based on the first_name column and
the ORDER BY clause has been supplied with desc, we are setting the sort direction
to descending, which denotes that the data has been sorted in a descending order.
MariaDB also provides a multi-column sort, which is a sort within a sort. To perform
a multi-column sort, we would specify the column names after the ORDER BY clause
separated by comma (,). The way the multi-column works is, the data would be rst
sorted by the rst column that is mentioned in the ORDER BY clause, and then the
dataset that has already been sorted by the rst column is again sorted by the next
column and the data is returned back. As a muti-column sort performs sorting on
multiple levels, the order of columns will determine the way the data is ordered. To
perform this example, let us insert another row with the student name John Dane and
the student ID being 4, the reason for using John Dane is to make sure that there are
more than one students that share the rst name of John (John Doe and John Dane)
and the last name of Dane (Jane Dane and John Dane) exclusively:
CRUD Operations, Sorting, Filtering, and Joins
[ 26 ]
In this example, we are retrieving the last_name and first_name columns from the
students table and are rst ordering the data by "last_name" and then reordering
the previously ordered dataset by first_name. We are not restricted by the ORDER
BY clause to use only the columns being used for the sort. This will only help us sort
the data in the correct direction.
Filtering data
Until now, we have dealt with data retrieval where all the data in the students
table is being retrieved, but seldom do we need all that data. We have used the LIMIT
and OFFSET clauses that have allowed us to limit the amount of data were retrieved.
Now let us use MariaDB's ltering mechanism to retrieve the data by supplying
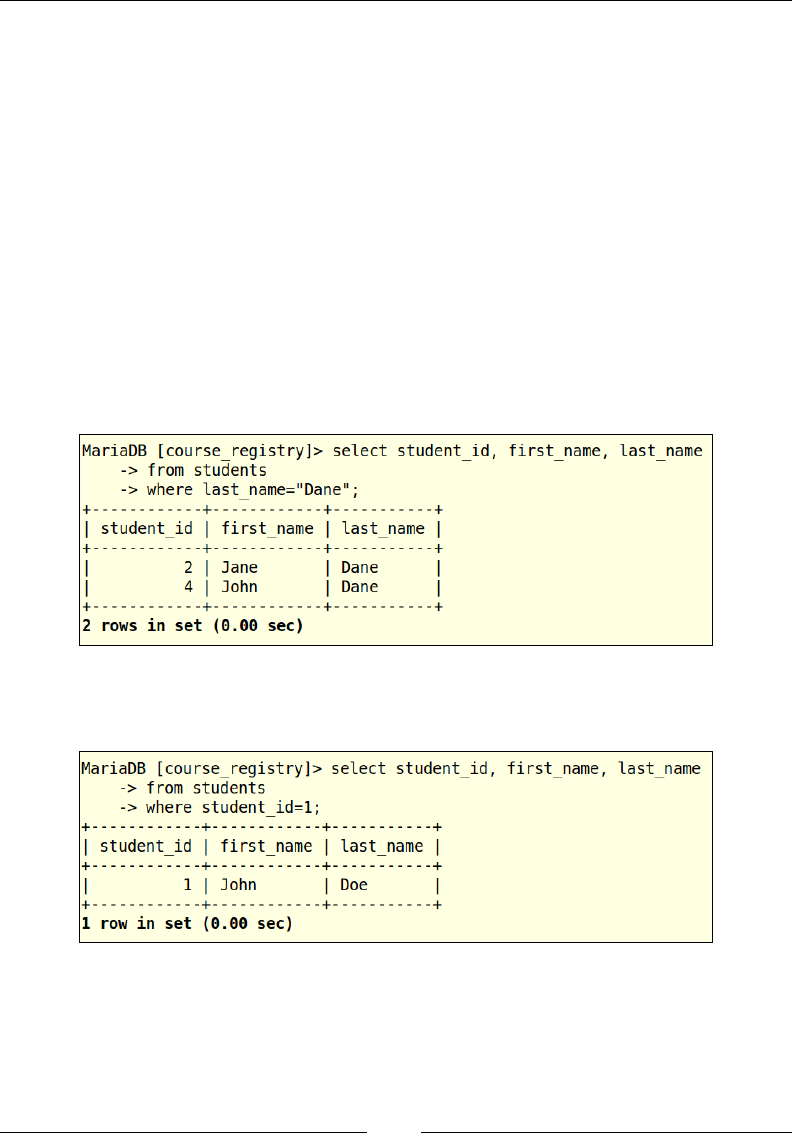
search criteria. To perform a search in a SQL statement, we will use the WHERE clause.
The WHERE clause can be used with the SELECT statement, or it can be even used with
the UPDATE and DELETE statements, which will be discussed in the next section:
In the preceding example, we are selecting the students' records whose last_name
is Dane.
Chapter 1
[ 27 ]
In the preceding example, we are selecting the students' records whose
student_id is 1.
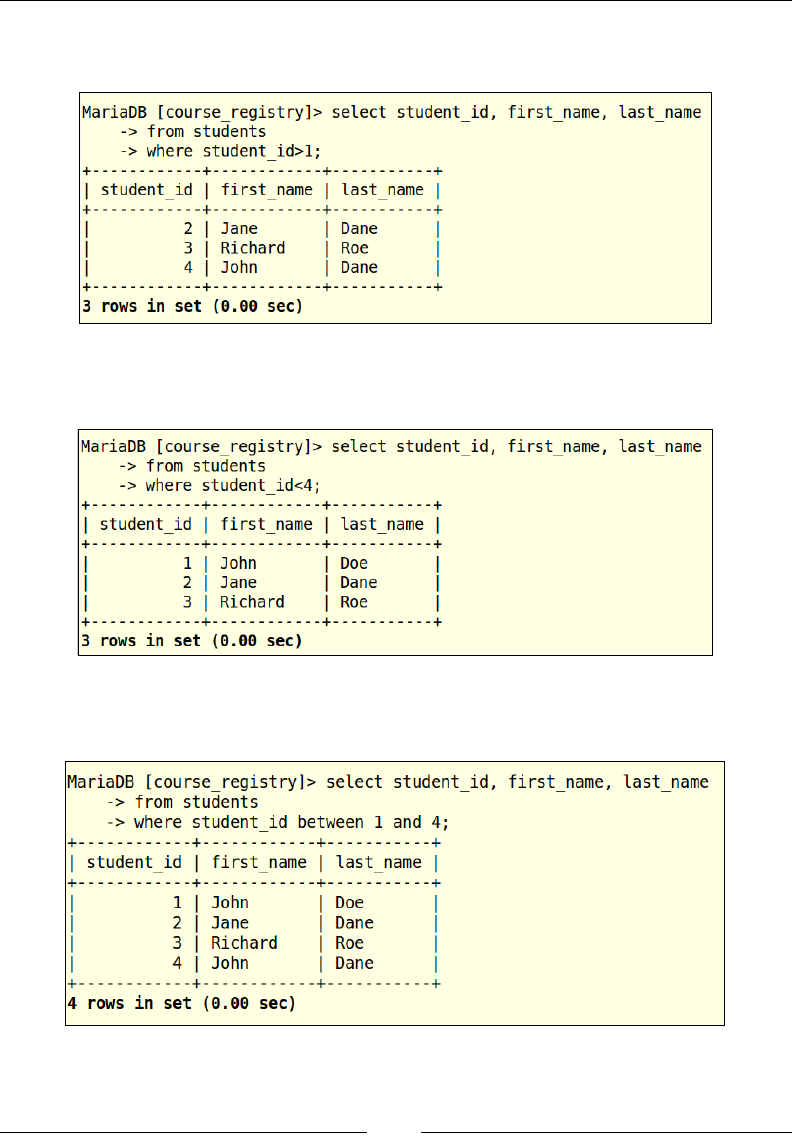
In the preceding example, we are selecting the students' records whose
student_id is greater than 1.
In the preceding example, we are selecting the students' records whose
student_id is less than 4.

CRUD Operations, Sorting, Filtering, and Joins
[ 28 ]
In the preceding example, we are selecting the students' records whose student_id
is between 1 and 4, the between clause is inclusive, so the records with student_id
1 and 4 are also retrieved. The following table lists the common operators that can
be used for data ltering:
Operator Explanation Comment
=Filters and returns data where the
criterion has an exact match.
!= Filters and returns data where the
criterion doesn't have an exact
match.
<> Filters and returns data where
the criterion doesn't have an
exact match.
This is same as above, based on
preference, either notations can
be used for inequality.
>Filters and returns data where the
data is greater than the value in
the criterion.
>= Filters and returns data where the
data is greater than or equal to the
value in the criterion.
<Filters and returns data where the
data is lesser than the value in the
criterion.
<= Filters and returns data where the
data is lesser than or equal to the
criterion.
IS NULL Filters and returns the rows where
the specified column has no data.
IS NOT NULL Filters and returns the rows where
the specified column has some
data.
BETWEEN Filters and returns data where the
data is part of the specified range.
This uses the keywords
BETWEEN, and AND.
Data can also be ltered by utilizing multiple search criteria by using the AND
and OR operators, by employing multiple column search criteria, by using wildcard
ltering, by using the IN operator, and so on. As this chapter will only deal with
basic ltering, we will not be covering these advanced ltering concepts. The
basic ltering in this chapter can be used as a foundation to delve deeper into
understanding the advanced concepts of ltering.
Chapter 1
[ 29 ]
Updating data
Until now, we have worked with the creation of databases, tables, data, and retrieval of
data. Now let us go over the process of updating data, once the data has been added to
the table, there will be different cases where the data has to be updated, such as a typo
while adding the student's name, or if the student's address changes after they have
registered for the course, and so on. We will use the UPDATE DML statement to modify
the data. The UPDATE statement requires a minimum of three details, the rst is the
name of the table on which this operation will be performed, the second is the name
of the column, and the third is the value that the column to has to be assigned to. We
can also use the UPDATE statement to modify more than one column at a time. There
are two cases where the UPDATE statement can be used. The rst case is where all the
records in the table will be updated, and this has to be done very carefully as this could
cause the loss of existing data. The second scenario when using the UPDATE statement
is in combination with the WHERE clause. By using the WHERE clause, we are targeting a
very specic set of records based on the lter criteria.
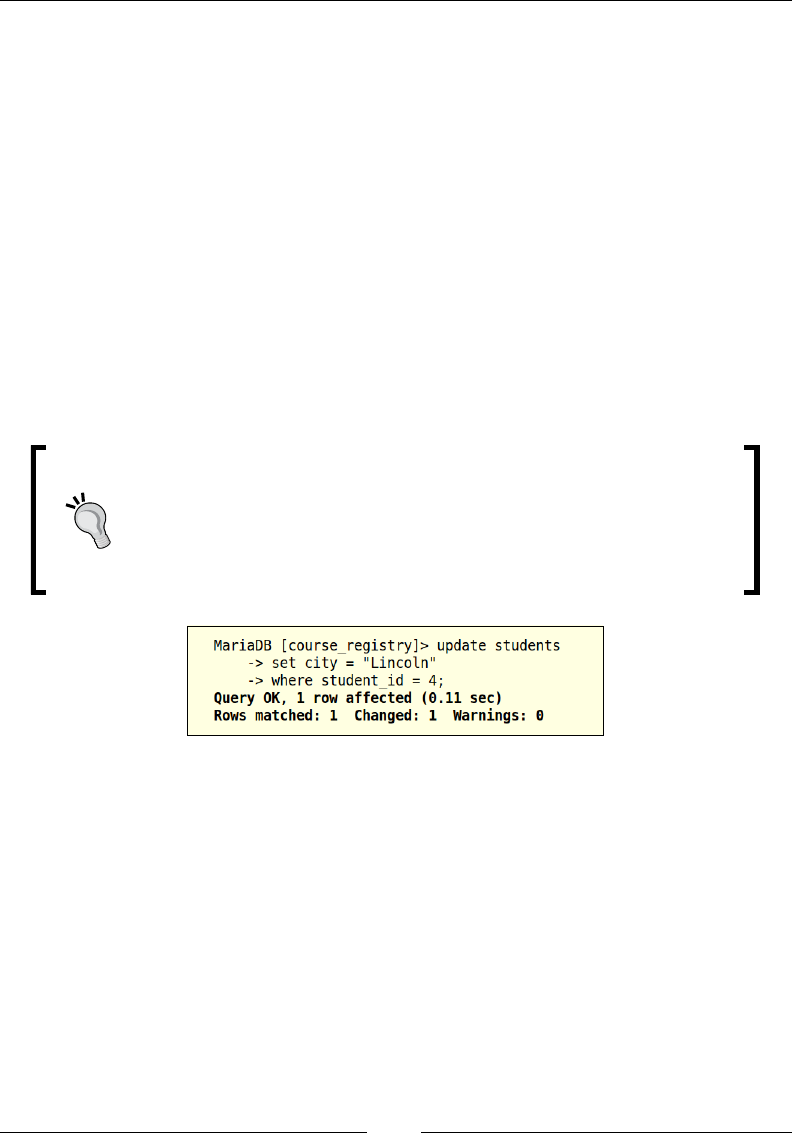
It is recommended to execute the lter criteria with a SELECT
statement, so that we can verify the dataset on which our UPDATE
statement would run, in order to make any required changes if the
lter criterion does not reect the expected results. Another way of
handling such scenarios is to use a transaction, which will allow us
to rollback any changes that we have made.
In the preceding example, we have updated John Dane's current city to Nebraska by
using his student ID. We can also verify this by looking at the output on the query
console, it returns that the lter criterion was matched for one row, and the update
statement was applied for that one row.
Deleting data
We will use the DELETE DML statement for deletion of data. The DELETE statement
at a minimum expects the name of the table. Similar to the UPDATE statement, it is
recommended that the DELETE statement is always used with lter criteria to avoid
loss of data.
CRUD Operations, Sorting, Filtering, and Joins
[ 30 ]
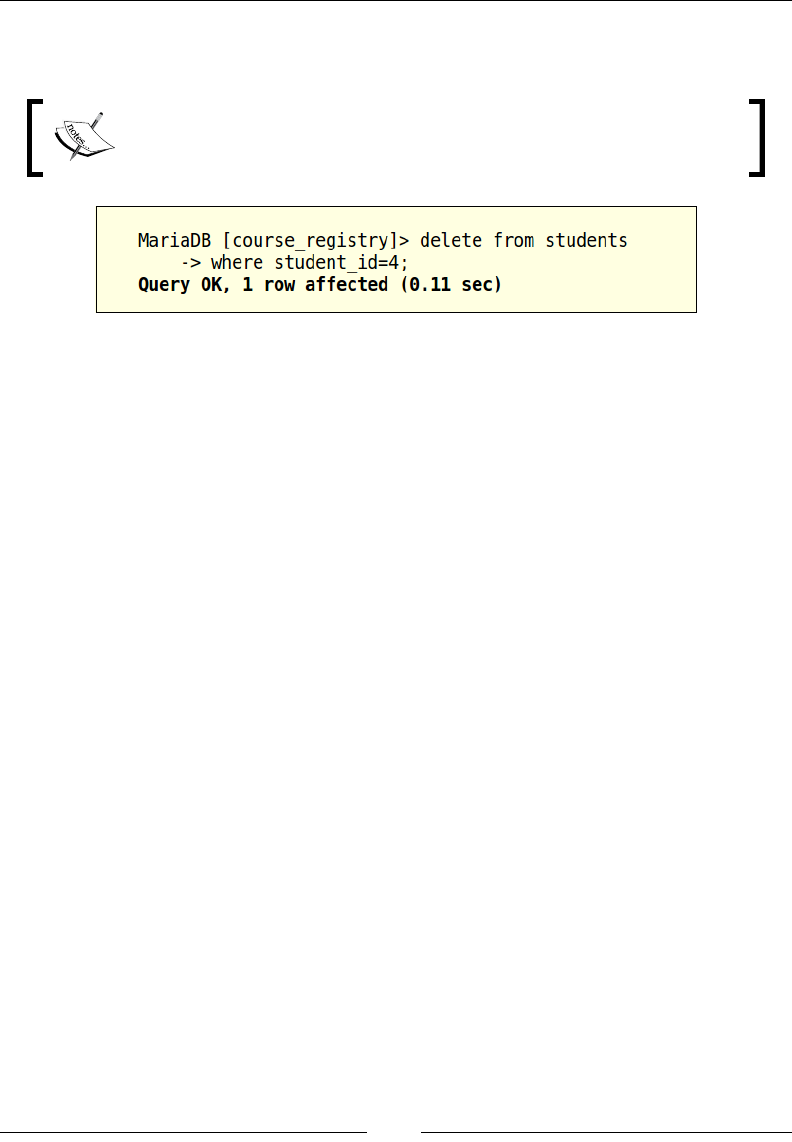
The DELETE statement should be used when a record has to be permanently removed
from the table.
To avoid permanent loss or deletion of data Boolean ags are used to
determine if a record is active or inactive (1 or 0). These are called soft
deletes and help us retain data in the long run.
In the preceding example, we are deleting the records from the students table
that match the criterion of student_id equal to 4. As there is only one record that
matches that criterion, that record has been deleted. The recommendations that were
made above about how to use the lter criterion apply for the DELETE statement too.
Joins
Until now, we have coupled our SELECT statements with various ltering and
sorting techniques to query the student information extensively. As we are operating
in a relational-model of data storage and since our data is stored in different tables,
we are yet to gure out how our SELECT statements can be red across multiple
tables. In our case, this would help us nd out what course or courses a student
has registered for, or to nd our which course has the most number of students.
Following the relational-model of data allows us to store data in a more efcient
manner, allows us to independently manipulate the data in different tables, and
allows for greater scalability; however, querying the data across multiple tables
is going to be difcult when compared to retrieving records from a single table.
We will use JOINS to associate multiple tables, to retrieve, update, or delete data.
A SQL JOIN is a virtual entity and is performed at run time, during the execution
of the SQL statement. Similar to any other SQL statement, the data would only be
available during the query execution and is not implicitly persisted to the disk.
A SQL JOIN can be coupled with a SELECT statement to retrieve data from multiple
tables. Let us go through the most common JOIN: the INNER JOIN, a join based on
the equality comparison on the join-predicate.
Chapter 1
[ 31 ]
Let us look at a few examples that perform SQL INNER JOIN between two or
more tables:
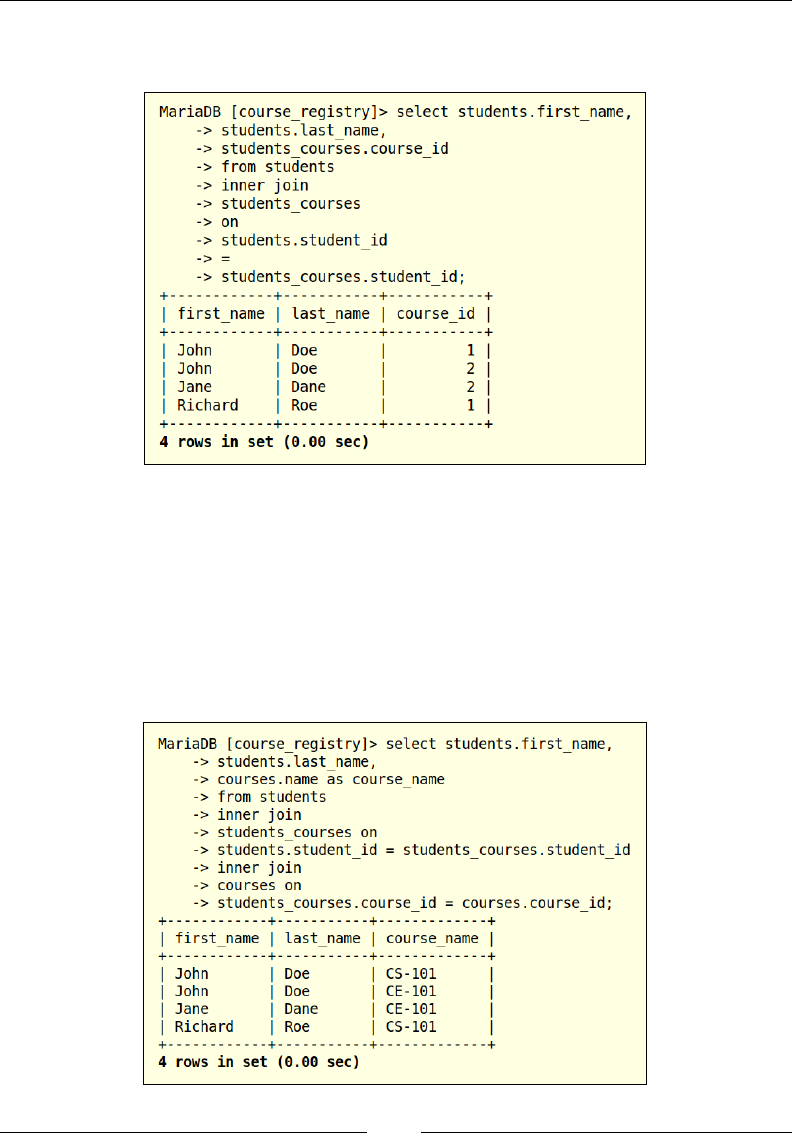
In the preceding example, we are joining the students and students_courses
tables to retrieve a list of all the students who have registered for a course. This is
similar to the SELECT statements that we worked with earlier; a big difference is
that we can now add a column that is part of a different table. We use the INNER
JOIN clause to build the association between students and the students_courses
table where the values for student_id in the students table exist in the students_
courses table; this is referred to as the join-predicate. Now let us join all the
tables and retrieve the names of the courses for which each student has registered.
CRUD Operations, Sorting, Filtering, and Joins
[ 32 ]
In this example, we are creating an alias name for the name column
in the courses table. We are using the AS statement to explicitly
create a temporary alias to make the column name more intuitive.
We can build aliases for tables in a similar manner
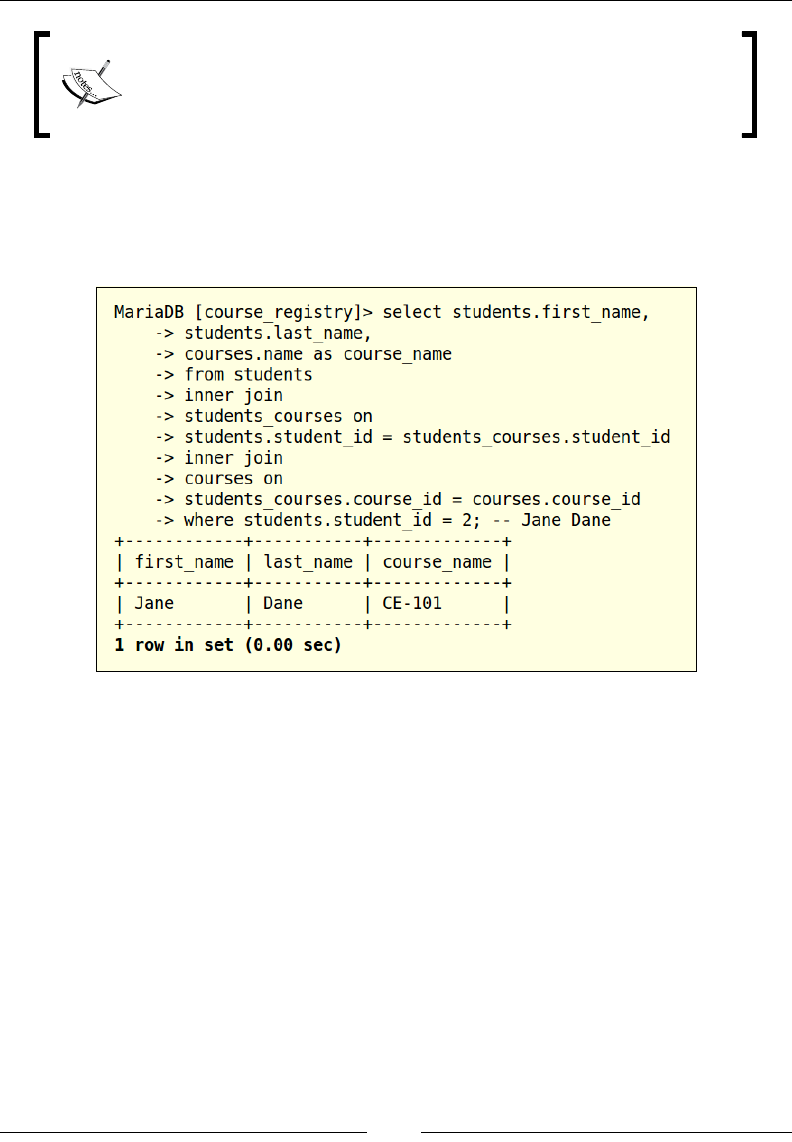
In the previous example, we have joined the three tables that are available in our
course_registry database and are now able to retrieve the list of courses for
which the students have registered. Similar to our previous SELECT statements,
let us add a lter criterion to narrow down our search:
In the preceding example, we are ltering the data by student_id and are searching
for records with student_id equal to 2. We have discussed the most commonly
used form JOIN statement, which is the INNER JOIN or the equi-join. There are
other types of JOIN in SQL that are supported by MariaDB such as OUTER JOIN,
SELF JOIN, and NATURAL JOIN, we will be skipping these JOIN statements.

Chapter 1
[ 33 ]
Summary
In this chapter, we have covered the basics of relational database management
systems with MariaDB. We began by building our rst database, and performed
Create, Read, Update, and Delete (CRUD) operations. We used the SQL SELECT
statement to retrieve data and used the ORDER BY and WHERE statements to sort
and lter the data respectively. Later, we moved on to use the UPDATE and DELETE
statements to modify and remove data respectively. Finally, we used the INNER JOIN
to retrieve data from multiple tables and coupled that with the WHERE statement to
lter that data.
In the next chapter, we will be going over more advanced topics such as creating
calculated elds and building complex views, stored procedures, functions,
and triggers.

Advanced Programming
with MariaDB
In the previous chapter, we have discussed basic operations that can be performed
on MariaDB such as creating databases and tables, adding data, modifying
data, deleting data, and retrieving the data. We have also worked with the basic
techniques of sorting and ltering data in order to work with the targeted and
specic datasets. In this chapter, we will work with the following advanced concepts:
• Indexes
• Stored procedures
• Functions
• Triggers
Enhancing the existing tables
Let's begin by making a few changes to the existing students table. We will be
adding two columns to the students table that would store a student's username
and password. This database will be used to support Student Portal that we will
build at a later point. The information available in the username and password elds
will be used to authenticate and authorize the student to login to the student portal.
There are a couple of ways to facilitate these changes; the rst method is to use the
DROP TABLE DDL command to remove the existing students table and use the
CREATE TABLE DDL command to create a new students table that would have the
extra username and password elds. This method however causes loss of existing
data. The second method is to use the ALTER TABLE DDL command to add new
columns to the existing students table.
Advanced Programming with MariaDB
[ 36 ]
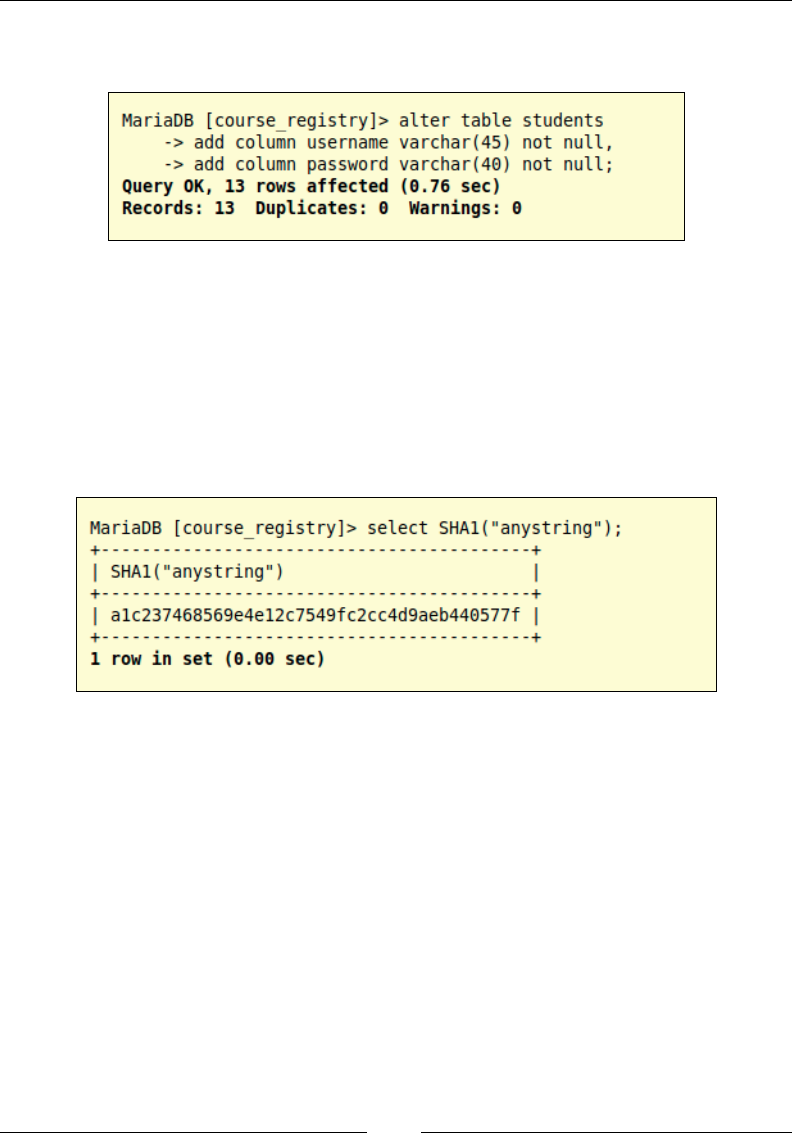
The following screenshot shows the usage of these commands for altering
the students table:
In this example, we have coupled the ALTER TABLE command with the ADD COLUMN
SQL command for adding new columns; we have separated the column denitions
with a comma (,). We are adding NOT NULL to the end of the column denition
to denote that these columns cannot carry null values. Now that we have added
these columns, it's time to populate the usernames and passwords for the existing
students. It is always recommended to store passwords in a hashed state in order to
provide security to the data and the users. We will use the SHA1 hashing algorithm
to hash the passwords, as shown in the following screenshot:
MariaDB provides a built-in function for generating a SHA1 hash value for a string.
As SHA1 is a static algorithm, it will produce the same hash as long as the same
string is provided. As SHA1 is a function by itself, we will have to use subqueries
to retrieve the encrypted string. Let's take a step back and look at an example as to
how to use subqueries as part of the regular SQL statements. Subqueries are SQL
statements that are nested within an existing SQL statement.
Chapter 2
[ 37 ]
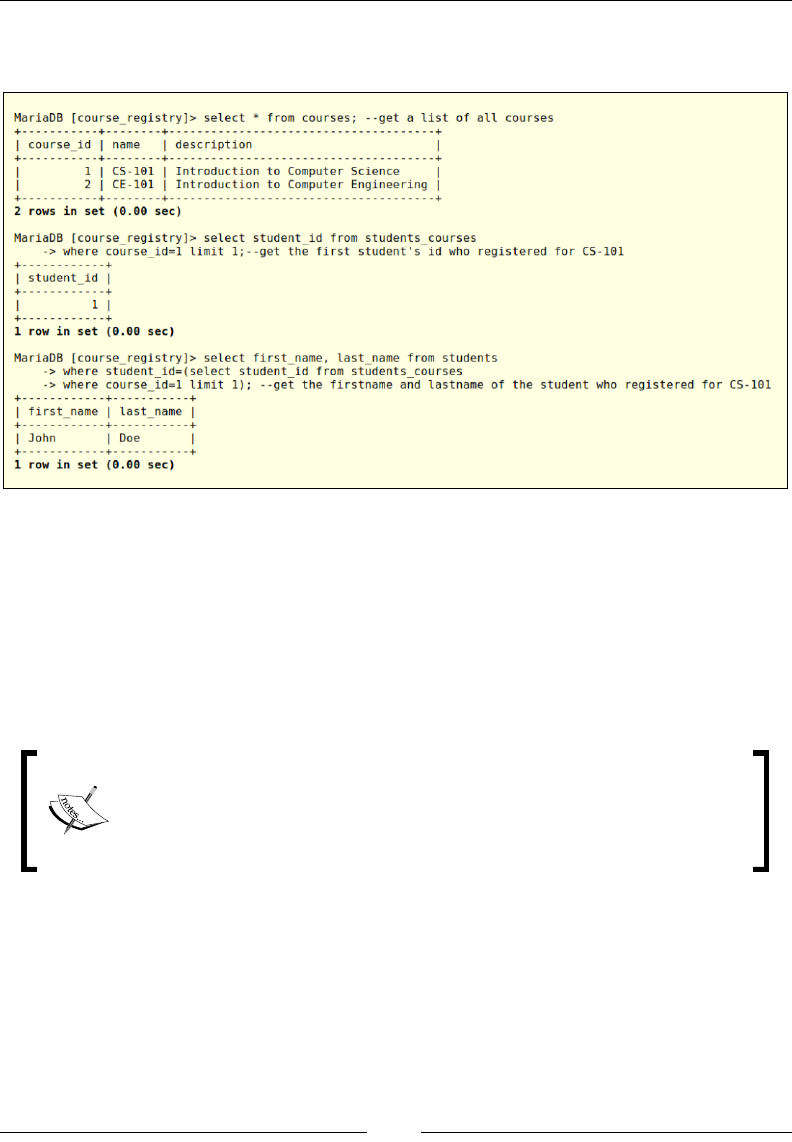
Let's use a subquery to retrieve the rst name and last name of a student who has
registered for the course CS-101 as shown in the following screenshot:
In the preceding example, we start with looking at all the available courses and get
student_id of the rst student registered for the CS-101 course having course_id
as 1. Now we can use the output of this subquery as the value for the lter criterion
on the outer SQL statement. We will use this functionality in our update queries
to add the usernames and passwords for the existing students. We can also use an
INNER JOIN coupled with WHERE to retrieve the output of this query. The purpose of
this example is to introduce the readers to the concept of subqueries that will be used
to execute the SHA1 function.
We will be following the convention of having the "rstname.lastname"
pattern for a username and the "rstnamelastname" pattern for a
password. This pattern for the passwords is being used to keep the
examples simple and is not recommended in real-time scenarios.

Advanced Programming with MariaDB
[ 38 ]
Consider the example as shown in the following screenshot:
We will use the UPDATE DML statement to add the usernames and passwords for
the existing users. As discussed earlier, we are using the SHA1 function to hash the
passwords. Now that we have added the usernames and passwords, let's look at
how the data is stored in the database, as shown in the following screenshot:
In the preceding example, we are using the SELECT statement to retrieve the
first_name, last_name, username, and password elds for the existing users.
As we can see in the preceding screenshot, the username is stored as a string and
follows our "rstname.lastname" pattern, and the password has been successfully
hashed using the SHA1 hashing algorithm.
Chapter 2
[ 39 ]
SHA1 is a one-way hashing algorithm, so the data cannot be converted
back into its original format. For our authentication purposes, we will
take the student's password, hash it using the SHA1 algorithm, and
then compare the password that the student has entered during the
login and the password that is in the database.
From the result set that we have retrieved from the SELECT statement used in the
previous code, we notice that the data in the username eld is unique for all the
available columns, but there is no guarantee that another student cannot choose a
username that already exists. MariaDB allows adding a unique key constraint in
order to maintain the uniqueness of the data that is being inserted into the username
column. The unique key constraint builds an index in the background to keep track
of all the values that are being added to the columns with unique constraints.
As the unique constraints use the unique index, the index looks for
the data to be unique; it can also be null. The null value will only hold
true for one record.
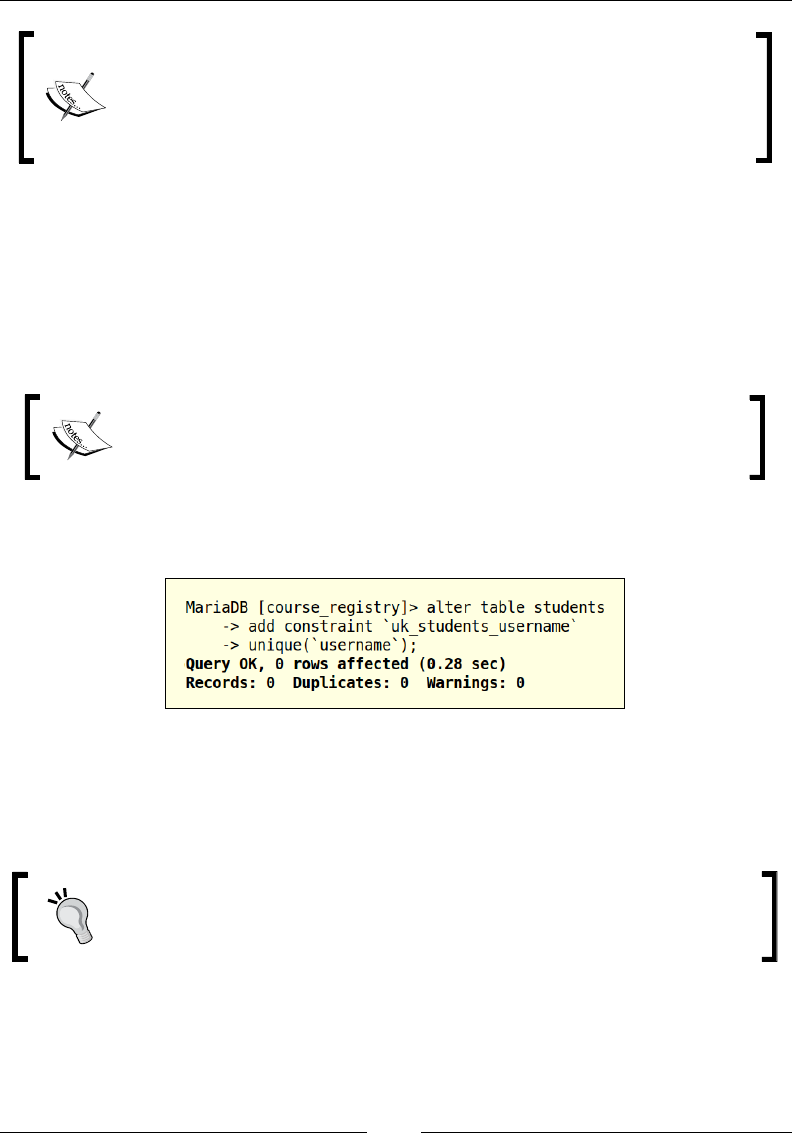
Let's use the ALTER DDL command to add a unique constraint to the username
column in the students table, as shown in the following screenshot:
In the preceding example, we are altering the existing students table and combining
the ADD CONSTRAINT command to give a user-dened name to the constraint, and
then we will be passing the username column to the unique function for creating the
unique constraint.
An alternate method to add a unique index to a column (after the table
has been built) is:
alter table students add unique 'username'('username');
Advanced Programming with MariaDB
[ 40 ]
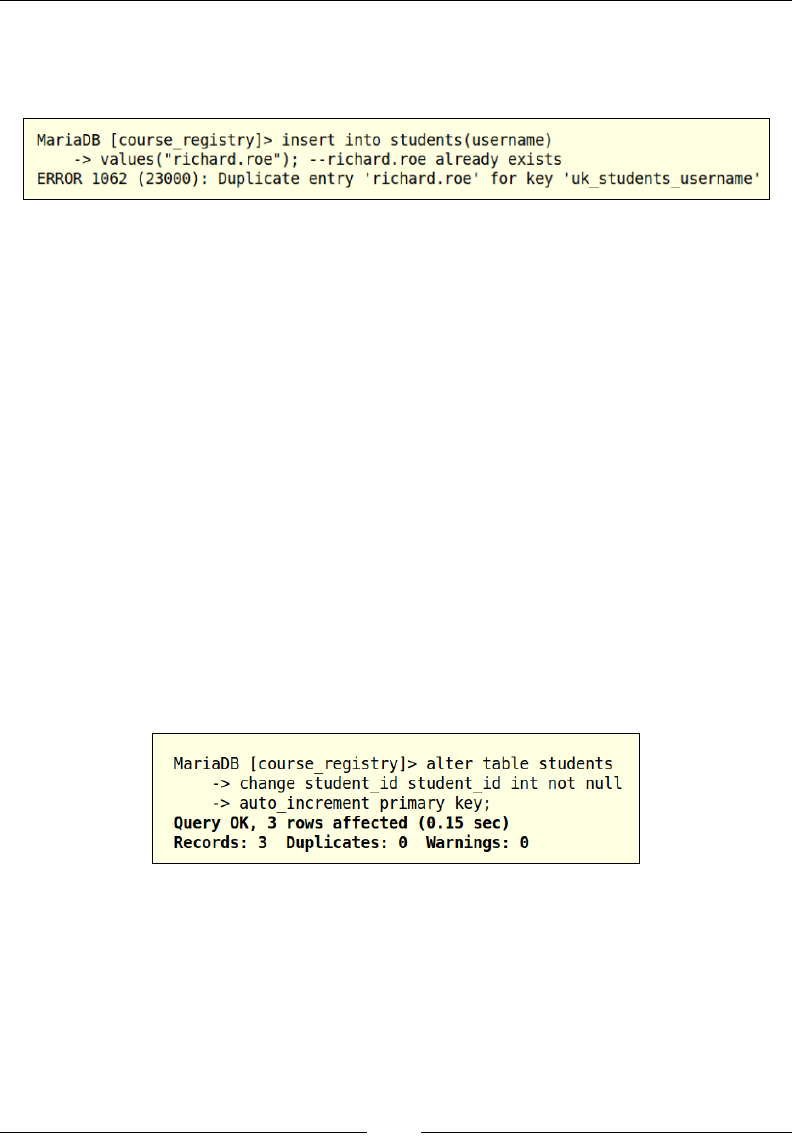
Now that we have created a unique constraint, let's try and see if we can insert a
duplicate record. For this example, let's use the username of the student named
Richard Roe as shown in the following screenshot:
Upon execution of this SQL statement, we will receive an error saying that a duplicate
entry to be inserted into the username column was entered, which is now protected by
the uk_students_username constraint. Assuming that the initial line of SQL code was
correct, we would have a student record with the information available only for the
username column. In the previous chapter, we discussed that student_id is a unique
identier for students. In order to facilitate this, let's make student_id the primary
key of the students table and let MariaDB know that this eld always needs a value.
A primary key is similar to the unique key, except that the primary key does not allow
null values. The reason for having null to be an invalid value is that a primary key
always identies each row in a table uniquely. Primary keys are commonly dened
in one column, as in our case in student_id; but in other cases, multiple columns can
be used to dene a primary key. As in our case, it is common to use the non-changing,
non-repetitive integer values for the primary keys; as new students are added, we add
one to the last student's ID. Currently, we have three students; so, if another student
is added, the ID of that student will be 4. We can either do this manually or MariaDB
provides an auto-increment functionality that keeps on incrementing the value
of the last insert with a default value of 1 or with an incremental value, if the
incremental value is provided. The following screenshot shows the usage of the
auto_increment function:
In the preceding example, we are using the ALTER TABLE DDL command and are
combining that with the CHANGE command that allows us to modify the attributes
of an existing column. The rst change is that the student_id column will not take a
null value. Then we are making this column an AUTO INCREMENT column, which that
will automatically assign the next available number to the student_id column.

Chapter 2
[ 41 ]
Finally, we are creating a primary key on the student_id column to make sure
that the IDs of the students will always be unique and not carry a null value.
The next step will be to alter the table one more time and make sure that the
value for next student_id will be 4, as we already have three students as shown
in the following screenshot:
In the preceding example, we are setting the value of auto_increment to 4,
and MariaDB handles value management for the student_id column from
here on. Let's insert another student but this time let's not insert a value for
the student_id column and see how MariaDB handles this case. The code is
as shown in the following screenshot:
In the preceding example, we are adding another student with the name Patrick
Smith. Let's perform a SELECT query to retrieve the student_id, first_name,
last_name, and username elds as shown in the following screenshot:

Advanced Programming with MariaDB
[ 42 ]
In the preceding example, we are retrieving the student records that are in the
students table, and we can notice that the last record has a student_id of 4.
And from here on, any student record that is added would automatically get
the next available number. We have made a lot of changes to the students table
in this chapter. Let's take a look at how the table structure has changed, as shown
in the following screenshot:
From the preceding result, we can notice all the changes that we have made; the rst
change is the new columns: username and password. The other changes include
the unique key on the username column and the primary key on the student_id
column. Also, notice that the student_id column will not take null values and will
auto-increment the value upon each insert. Most of the SQL statements that we have
worked on until now are simple statements that access one or multiple tables, most
of which can throw SQL errors unless they are handled. When complex operations
that require multiple SQL statements are performed, we can either run each of these
statements one by one, or create a single unit that runs all these SQL statements in a
specied order. One method of creating a single unit of multiple SQL statements is
to use a stored procedure.
Stored procedures build a cache based on the connection that
is being established, which makes it tricky when used in the
client-server architecture. We will research a little more of this
behavior in Chapter 7, Caching.
Chapter 2
[ 43 ]
Working with stored procedures
Using a stored procedure, we can wrap multiple SQL statements into a single
unit that provides the integrity and consistency in which the SQL statements are
executed. Assume that there are multiple developers performing the same set of
tasks again and again, executing the same set of statements one at a time, in the
same or a different order based on the developer's preferences. The process can be
consolidated by putting these statements into a stored procedure. This single unit
can be thoroughly tested for maintaining data integrity and executing consistency
across different scenarios. Another reason why the stored procedures are preferred
over a set of multiple SQL statements is the performance boost that the stored
procedures provide. To build a stored procedure, we would need two things at a
minimum, the rst being the name of the stored procedure and the second being
the body or the content inside the stored procedure. Let's write a simple stored
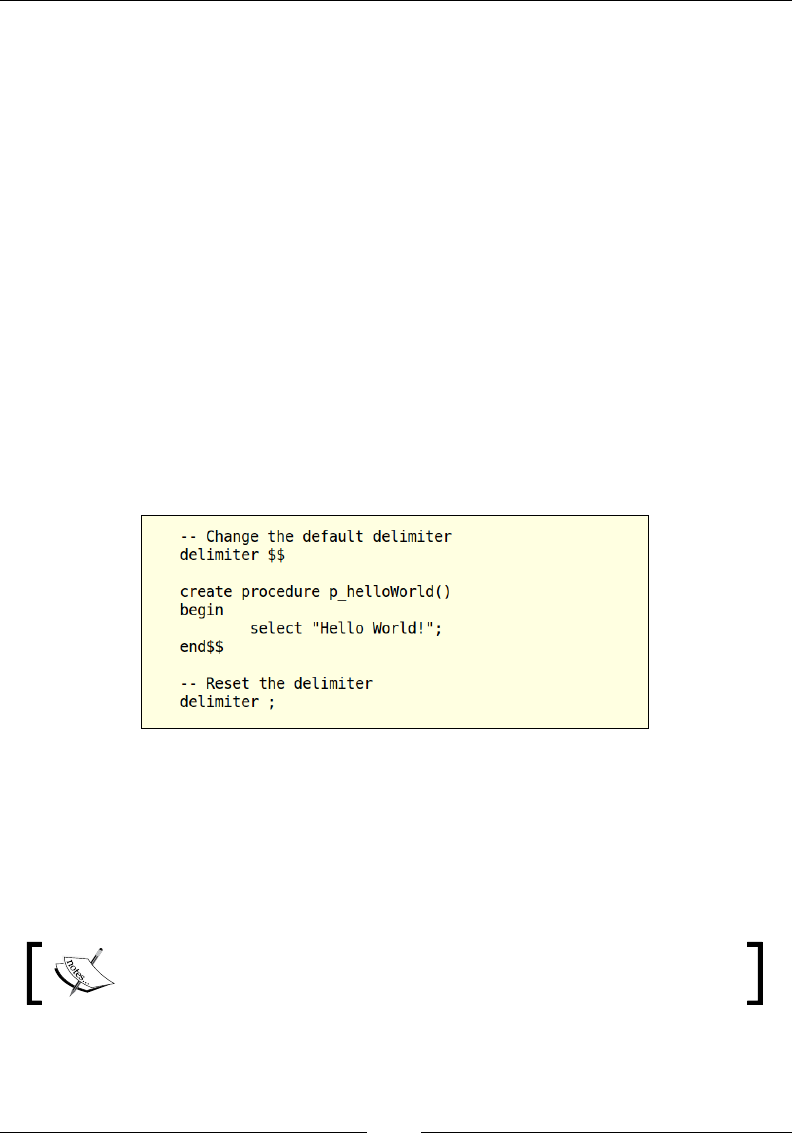
procedure that would print out Hello World!. MariaDB solely depends on the
statement delimiter (;) on when to execute the statements; since we will be dealing
with multiple SQL statements with a stored procedure, we will temporarily switch
the delimiter to something different, create a stored procedure, and then revert back
to the default delimiter, as shown in the following screenshot:
In the preceding example, we begin by changing the statement delimiter from; to
$$; use the CREATE PROCEDURE DDL statement, and provide the name of the stored
procedure. The name of the stored procedure is followed by (); any parameters
for a stored procedure will be placed in these parentheses. We have to use these
parentheses while declaring or calling a stored procedure irrespective of any
parameters for the stored procedure.
We will be using the "p_procedureName" convention for our stored
procedures.
Advanced Programming with MariaDB
[ 44 ]
The content of a stored procedure is placed in between the BEGIN and END
statements. These statements are used to scope the beginning and the end of the
SQL statements for a stored procedure. Once the stored procedure has been dened,
we will use the temporary delimiter to let MariaDB know that the stored procedure
denition is ready for compilation. Once the stored procedure has been compiled, we
reset the delimiter back to ;. We have successfully created our rst stored procedure
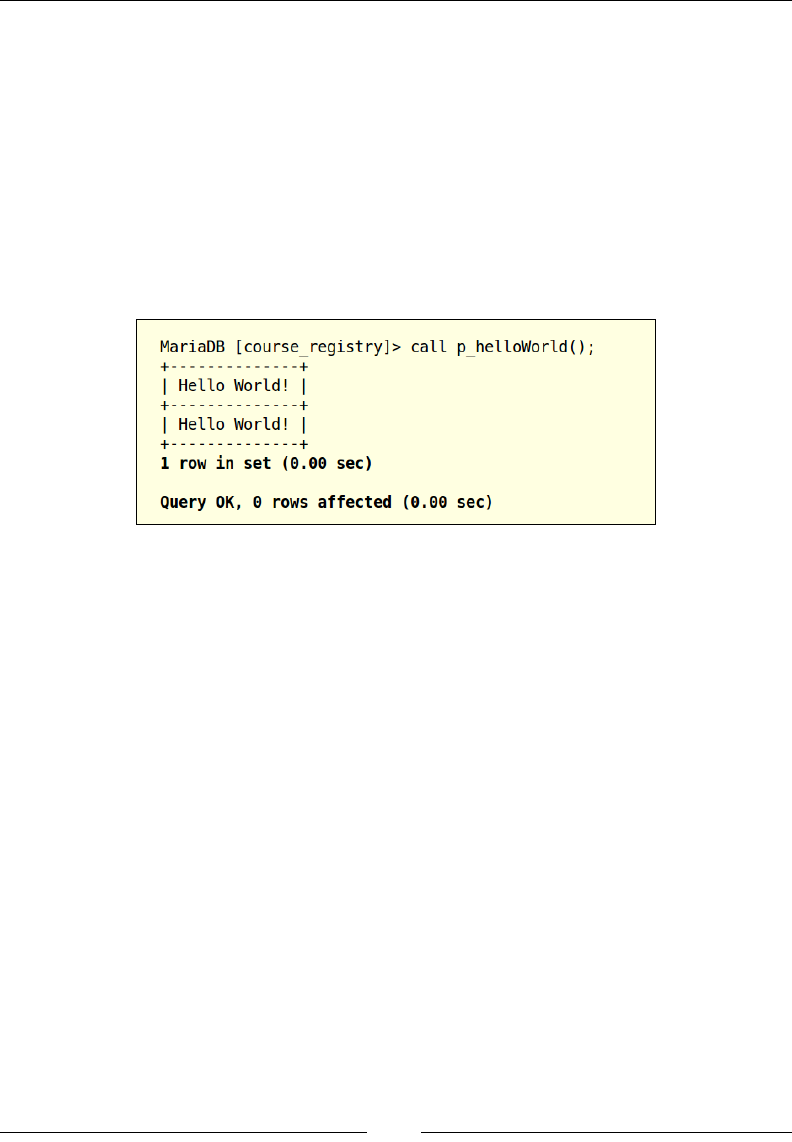
and now is the time to execute it and verify the output. To execute a stored
procedure, we will use the CALL keyword, append it with the name of the stored
procedure, and pass parameters to the stored procedure, if any are required.
When we call our p_helloWorld() procedure, we should receive Hello World!
as the output on the screen, as shown in the following screenshot:
As we can see in the preceding example, we are successfully receiving the Hello
World! output upon execution of the p_helloWorld() procedure. Working with
stored procedures using MariaDB on the command line can get tricky sometimes, so
we have to be very careful while creating and executing the stored procedures. Now
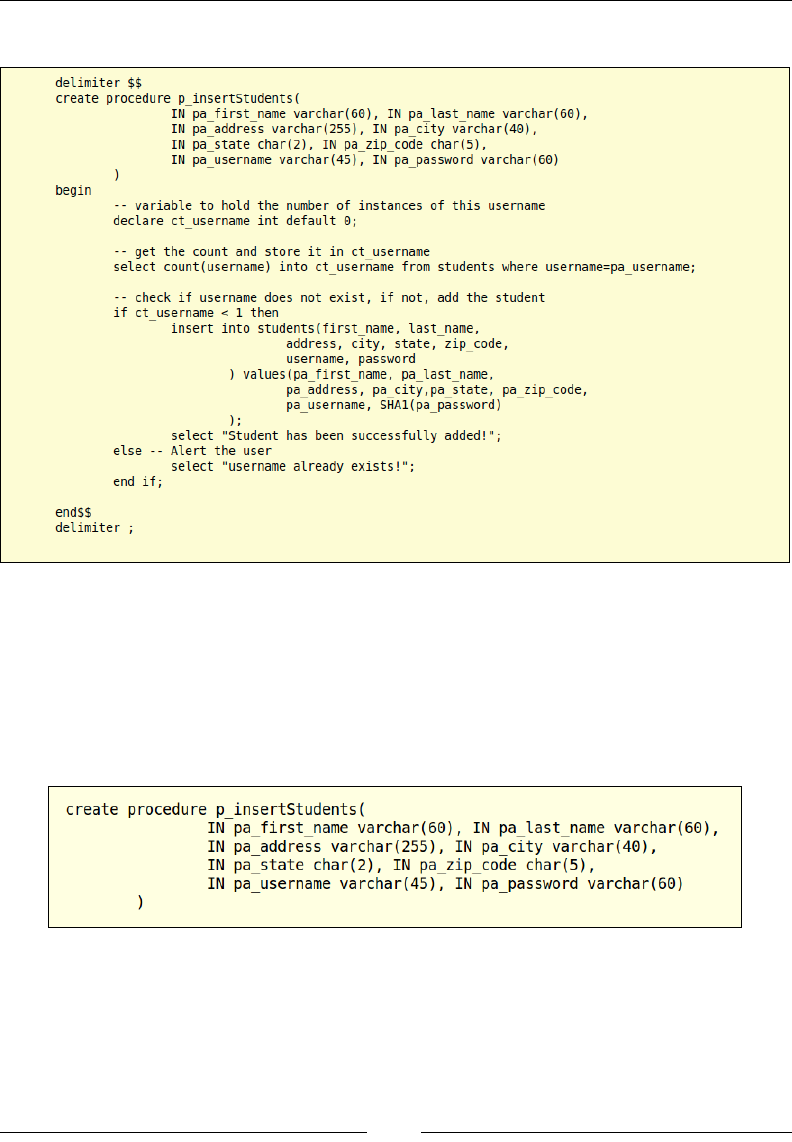
that we have successfully created and executed a simple stored procedure, let's move
on to a slightly more complex example where we will create a stored procedure
that will take the rst name, last name, address, city, state, zip code, username, and
password as input parameters. The stored procedure would be intelligent enough
to check the students table to see if there are any students with a similar username;
if there are any, it would alert the user. If not, the procedure would use these input
parameters to create a new student record.
Chapter 2
[ 45 ]
The code is as shown in the following screenshot:
We will be looking at four new concepts using this stored procedure: the rst is the
concept of dening multiple input parameters that are expected to be passed in by
the user, the second will be declaring a variable inside a stored procedure, the third
will be to store data into that variable, and the fourth concept will be to work with
conditionals based on the value of the variable.
Consider the code in the following screenshot:
Advanced Programming with MariaDB
[ 46 ]
In the preceding code, we are dening our procedure by giving the name of the
stored procedure. This stored procedure accepts eight input parameters that will
be used to create a new student's record.
We will be using the "pa_columnname" convention for our
input parameters.
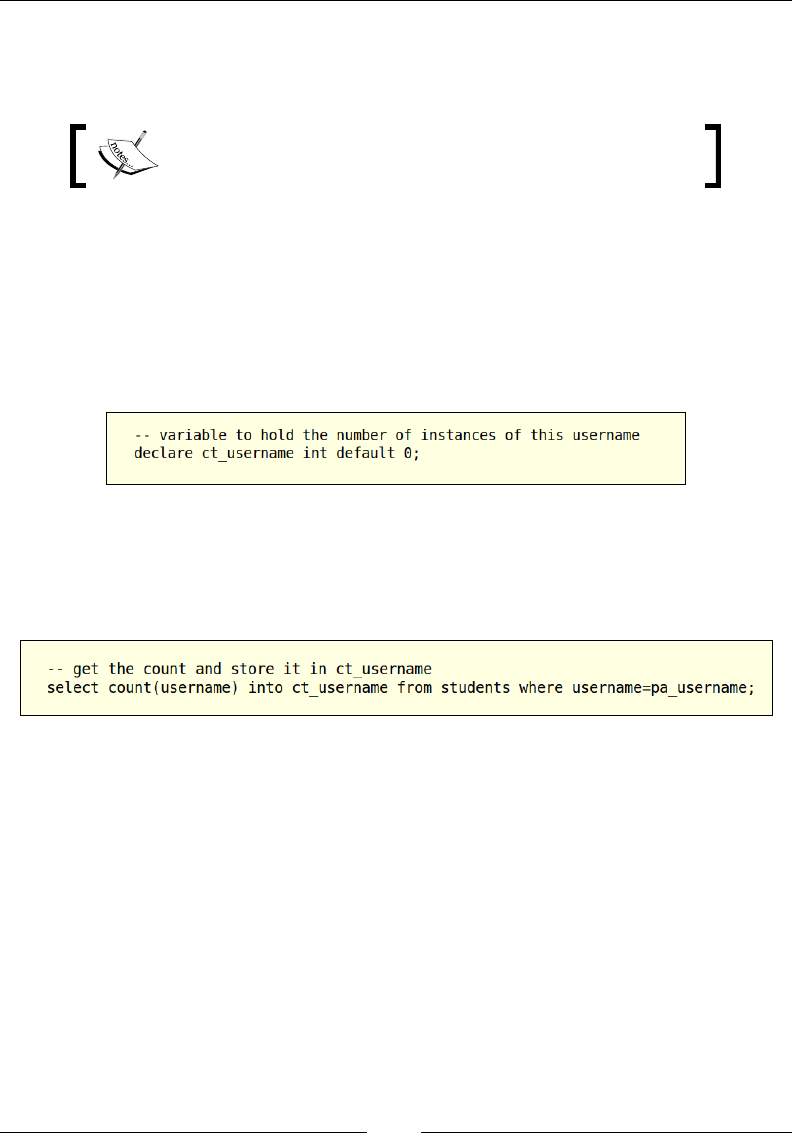
The next snippet of code will deal with the creation of a variable inside a stored
procedure. We will use the DECLARE keyword to create a procedure variable called
ct_username that will keep a track of the count; that is, the number of times a
username has been stored in the students table. As our variable will keep a track
of the count, we will declare the datatype for this variable as an integer. As we are
under the assumption that a new student is being added to our students table, we
will default the value of ct_username to 0, as shown in the following screenshot:
Once we have declared the variable, the next step will be to retrieve the number of
times the username that is being passed in via pa_username has been used in the
students table, and store that username in the ct_username variable as shown in
the following screenshot:
Now that we have the count of the username that is being passed in as a parameter,
we can use the count in the ct_username variable for making an informed decision;
either to create a new record and give the user a success message or, if the username
already exists, send an alert message back to the user. To perform this conditional
check, we will be using the IF THEN, ELSE, and ENDIF constructs. We will begin by
passing in a condition to the IF statement and use the THEN statement to indicate that
when this condition is true, the block of SQL statements pertaining to the success
case have to be executed.
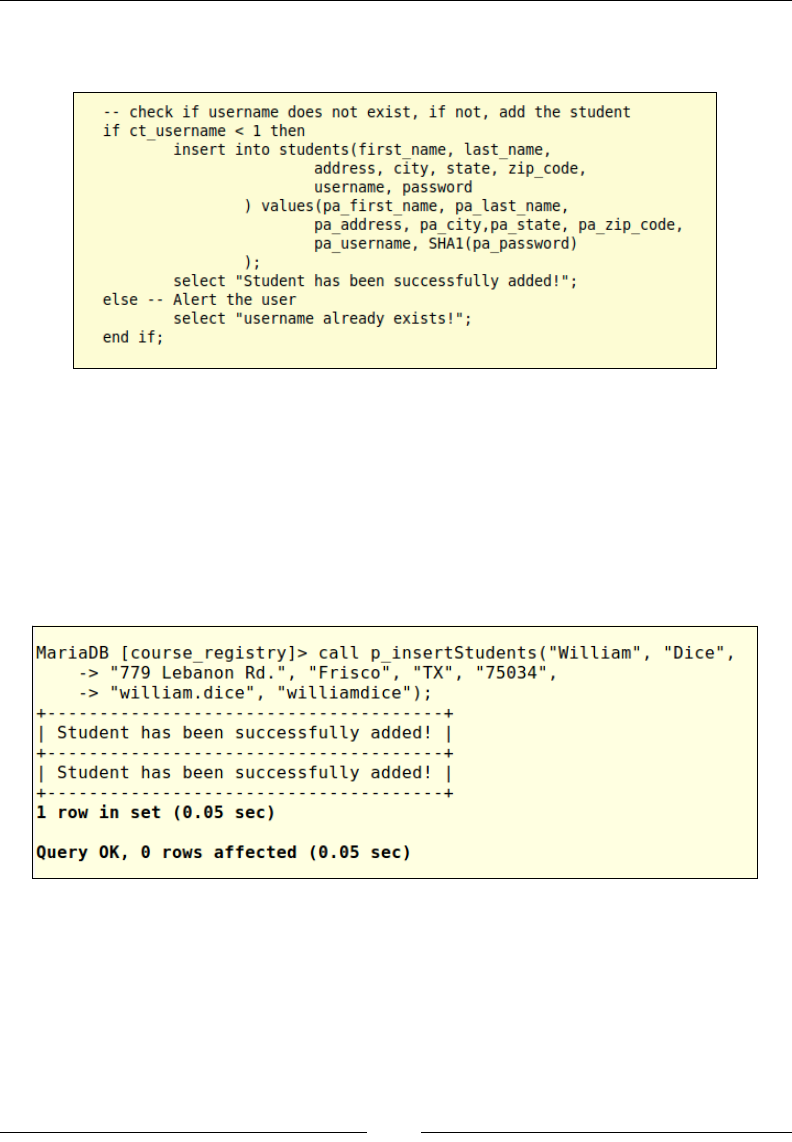
Chapter 2
[ 47 ]
We can also have an optional ELSE block to handle a situation where the IF condition
is false as shown in the following screenshot:
In the preceding code snippet, we are using the ct_username variable that has been
populated in the previous step, and are making sure that there are no occurrences of
that username. If the count that is returned is less than one (that is, zero), then SQL
syntax in the IF block is executed and a new student record is created. If the count
that is returned is not less than one (equal to or greater than one), the SQL statements
in the ELSE block are executed, and the message is displayed onto the console. Let's
take a look at the output when we call this stored procedure and provide the new
student's information as shown in the following screenshot:
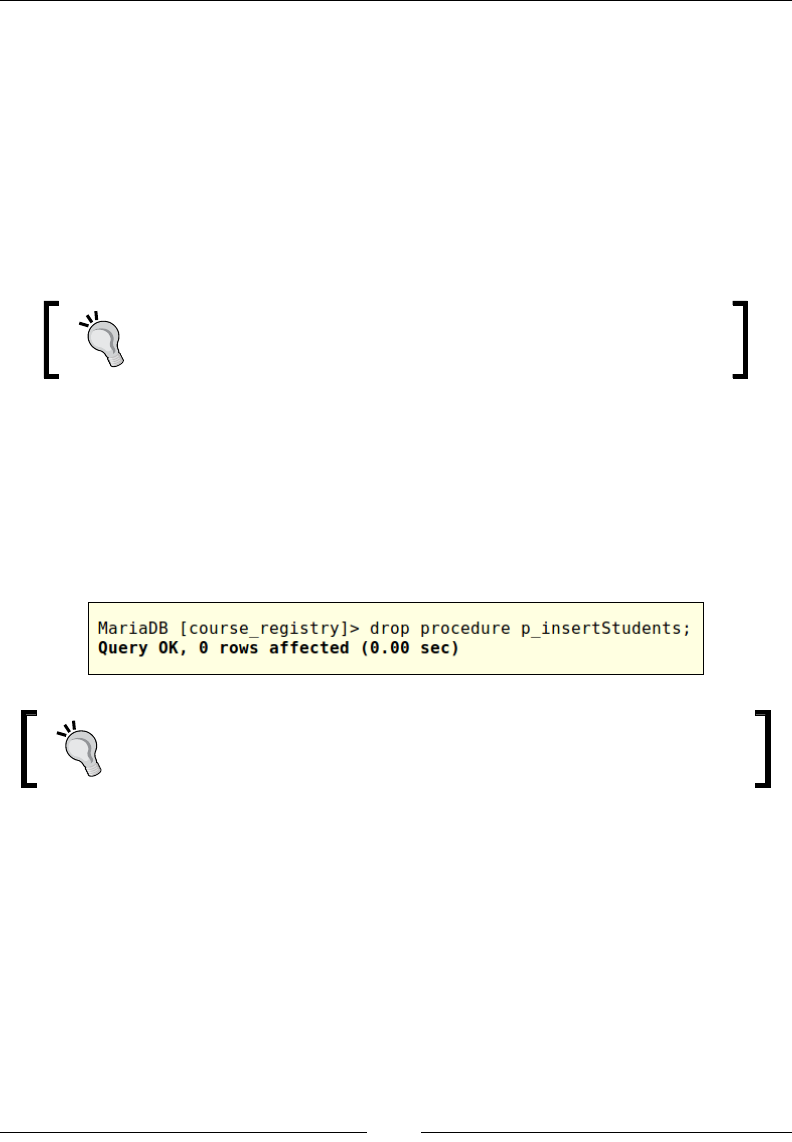
Advanced Programming with MariaDB
[ 48 ]
As seen in the preceding screenshot, we get a success message saying Student has
been successfully added. Now try and run the same call again and this time it
will fail, as there is already a student record with the user william.dice. Whenever
a new record is added to the students table, the AUTO INCREMENT functionality
increments student_id, which is the primary key, by one. Now we know that
student_id for William Dice will be 5, because there were four students ahead
of him. However, when we are dealing with bulk imports, it will become very hard
to manually keep a track of the last student's ID that was added. MariaDB provides
a last_insert_id() function, using which we can retrieve the last successfully
inserted ID for an AUTO INCREMENT column.
Use select last_insert_id(); to print the last inserted ID.
In order to add this to our p_insertStudents() stored procedure, we will have
to drop the existing stored procedure and create a new one with the updated code.
Though MariaDB provides the ALTER PROCEDURE functionality, we can modify
any characteristics of the procedure such as the dener or comment, but we cannot
modify the parameters or the body of the stored procedure. Assuming we have all
the required permissions, let's drop the procedure and rebuild the whole procedure
again as shown in the following screenshot:
It is recommended to use DROP PROCEDURE IF EXISTS
p_procedureName; to avoid an error if the procedure does not exist.
Now, let's make the required changes to the previous p_insertStudents procedure
to add an extra parameter that would send the value of the last inserted ID out of
the stored procedure. We will use the OUT keyword prepended to the parameter to
denote that data will be retrieved out of the procedure using this new parameter as
shown in the following screenshot:
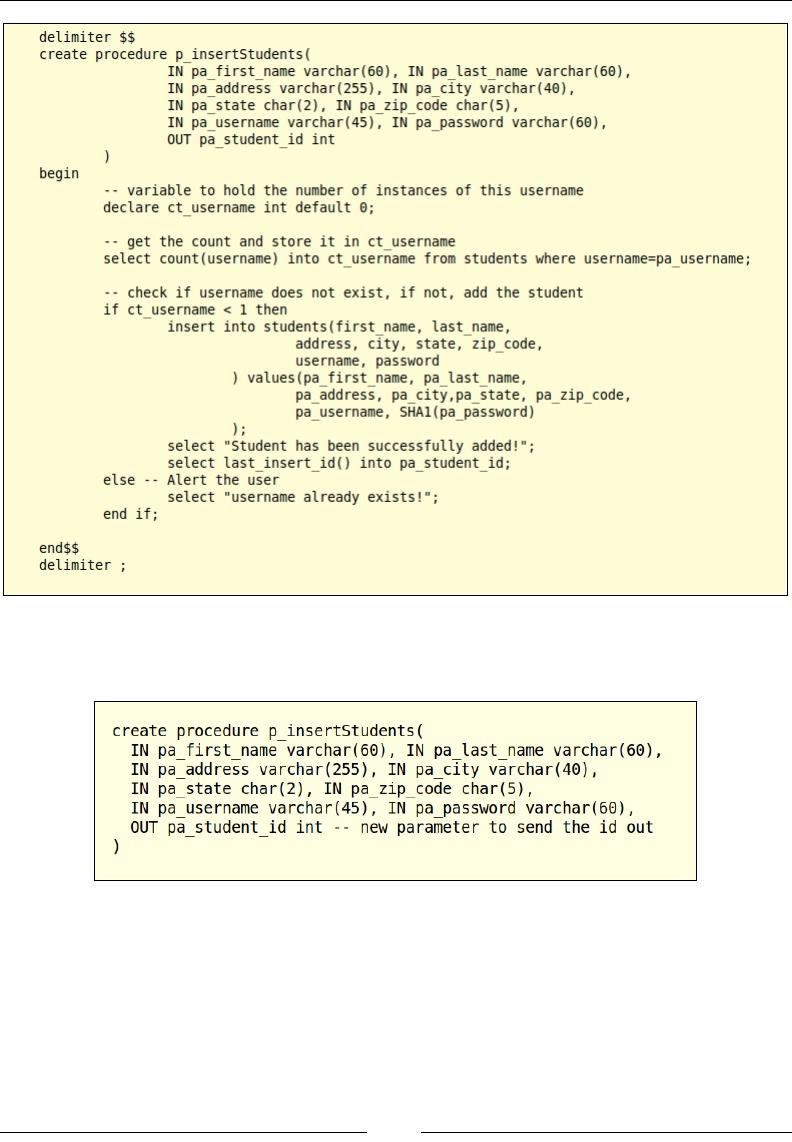
Chapter 2
[ 49 ]
There are two changes that have been made to the previous p_insertStudents
procedure. Let's examine both carefully shown as follows:
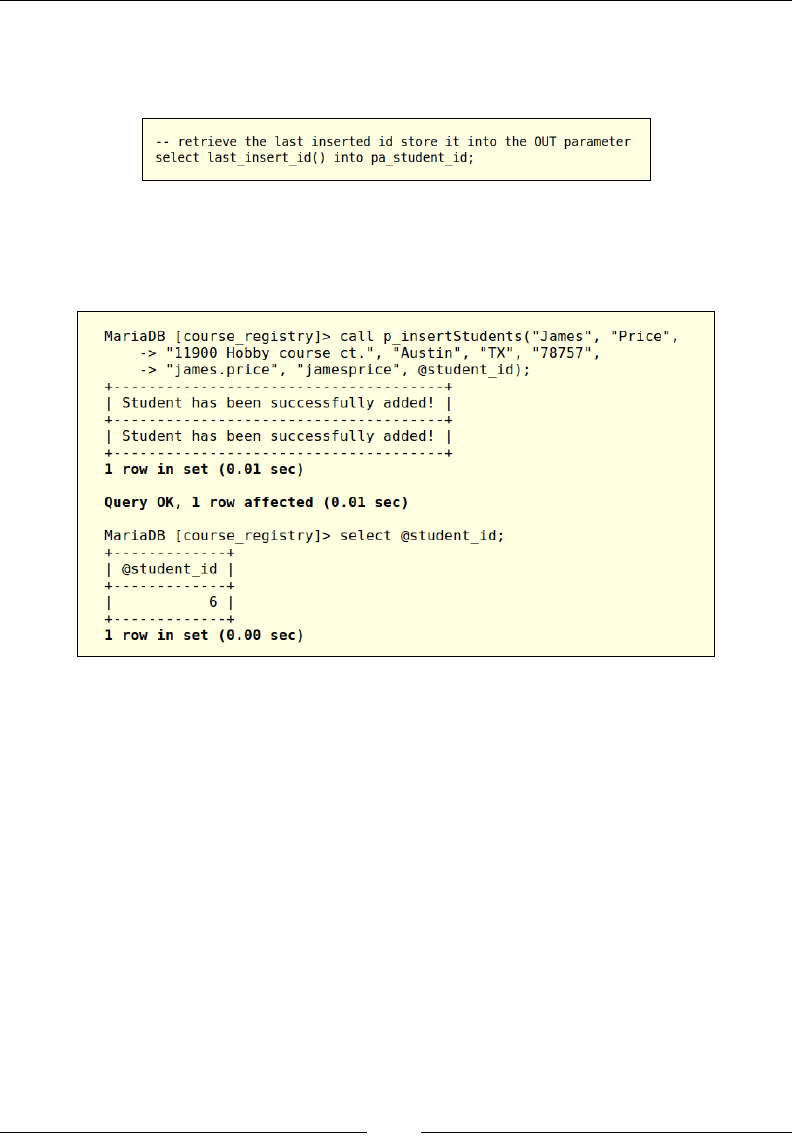
Advanced Programming with MariaDB
[ 50 ]
The rst addition to the procedure is the new OUT parameter of datatype INT.
This parameter will be used to send the last inserted ID out of the stored procedure
shown as follows:
The second change that we have made is to store the last inserted ID into our OUT
parameter, which is pa_student_id. Now let's create this procedure and call it as
shown in the following screenshot:
When working with OUT parameters, we will be using variables that are outside
the stored procedure and are only passed into the stored procedure to retrieve the
data. Session variables begin with a @ symbol unlike procedure variables that are
declared inside stored procedures. While calling the stored procedure, we are giving
the required information about the user and then using the @student_id session
variable to retrieve the student's ID from our stored procedure. Commonly, we
would need to declare the session variable and assign a datatype to that variable
but since this will be used as an OUT parameter, the characteristics such as the
datatype are applied by the stored procedure itself. Once the procedure is executed
successfully, the value is stored in the @student_id variable. We will run the SELECT
command to retrieve the value from this session variable.
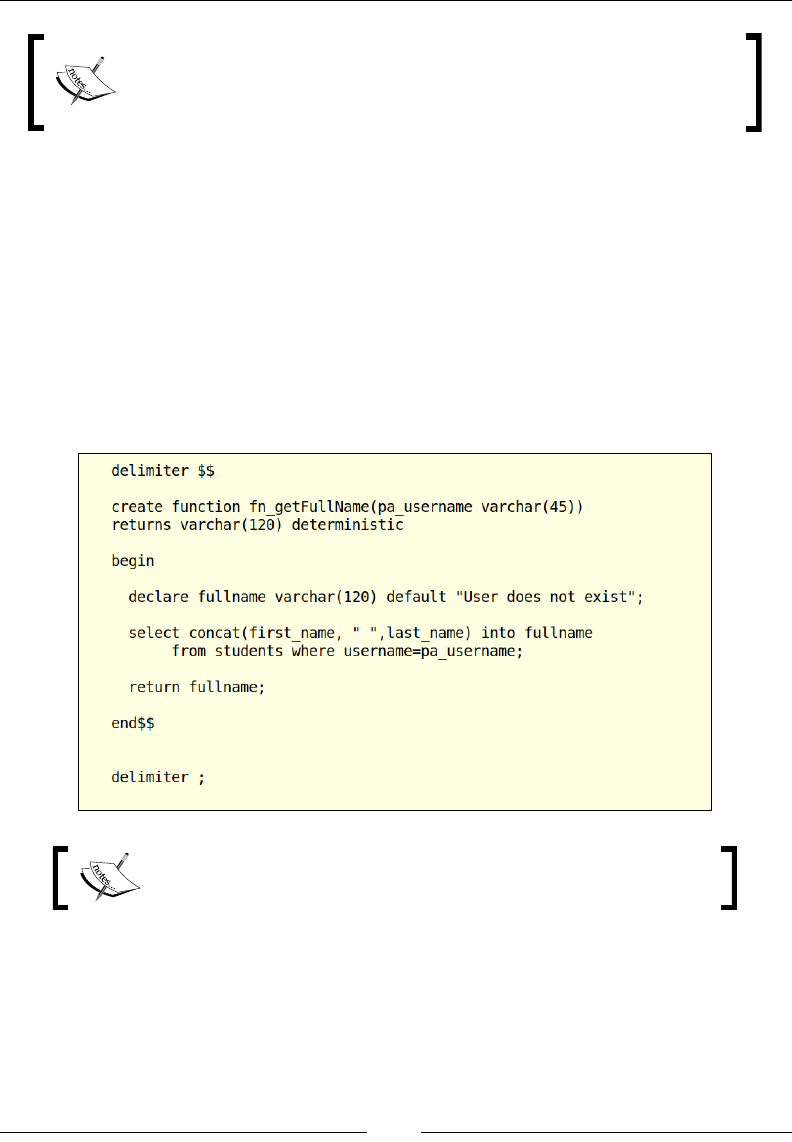
Chapter 2
[ 51 ]
The third type of parameter that can be used with stored procedures
is the INOUT parameter where the parameter that carries that data
can also carry out the modied data.
Working with stored routines
Stored routines are similar to stored procedures; both of them contain a block of
SQL statements. There are a few differences such as a stored routine cannot return a
result set and that a stored routine has to return a value and therefore, not preferred
over stored procedures. Stored routines are invoked using the SELECT statement and
can interchangeably be called as functions. The SHA1 function that we are using is a
system-built stored routine to generate hashes for strings. Let's build a simple stored
routine that would return the full name of the student when a username is passed in
as a parameter, as shown in the following screenshot:
We will be using the fn_functionName convention for our
stored routines.
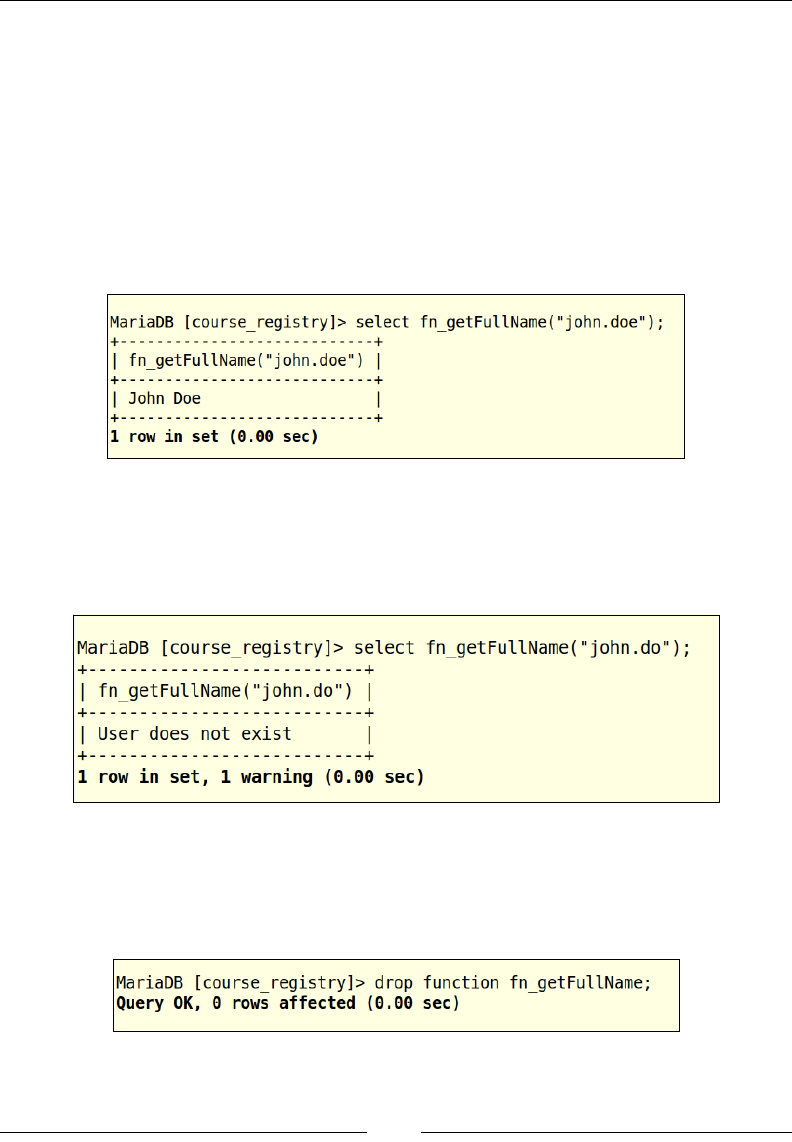
Advanced Programming with MariaDB
[ 52 ]
We begin by using the CREATE FUNCTION DDL command, appended by the name
of the function, to create the function. This function takes the student's username
as a parameter and returns the full name of the student, if the student exists. In the
function, we begin by declaring a function variable called FullName, defaulted to the
User does not exist message, which would be used if no student record is found.
If the student record is found, we would retrieve the rst name and last name of the
student and use the CONCAT function that is provided by MariaDB to concatenate
multiple strings. We are using the return keyword to return the data back, when the
function is invoked. Let's invoke the function and pass a username that exists in the
students table shown as follows:
In the preceding example, we are passing in the username of john.doe who is a
valid student. Upon execution, we retrieve the valid full name of the student; that is,
John Doe. Now, let's test a failure case where we pass in a username that does not
exist in the students table as shown in the following screenshot:
In the preceding example, we have deleted the last character from the original
username of John Doe. Upon execution, we get the default message that says User
does not exist, which is true. The nal example that we will work with in the
stored routines is to drop the stored routine as shown in the following screenshot:
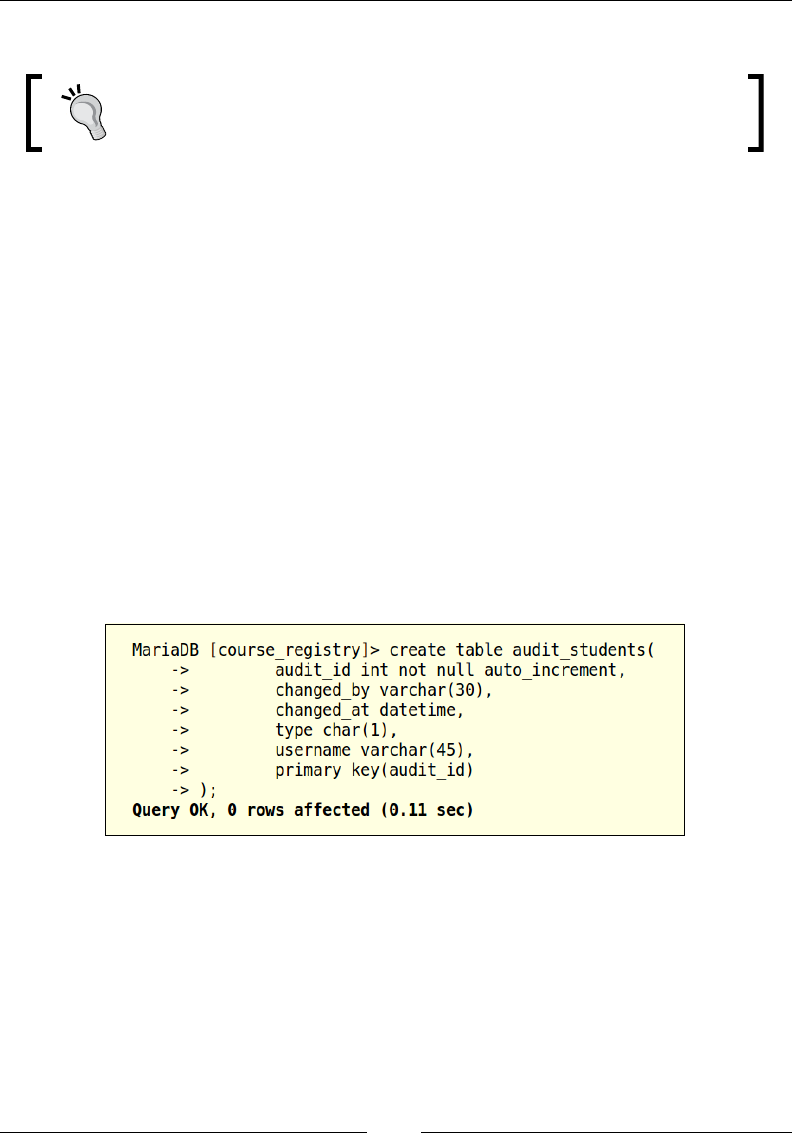
Chapter 2
[ 53 ]
We are using the DROP FUNCTION command to drop a stored routine.
It is recommended to use DROP FUNCTION IF EXISTS
fn_functionName; to avoid an error if the function does not exist.
Working with triggers
In the last few sections, we have looked at different scenarios for adding, updating,
and deleting data. These are considered to be common operations in an everyday
environment. However, what if we would like to watch certain events and use these
events to perform another operation? As in, have an audit table that keeps a track of
the user on whom an operation was performed or, assuming that there is a limit on
the number of students that can register for a course, subtract that number whenever
a student registers for the course. In our case, let's take a look at how an audit table
can be used to keep track of different operations on a user. MariaDB provides the
TRIGGER statement, which is a chain reaction that is set off in response to a SQL DML
operation such as INSERT, UPDATE, or DELETE. To track these changes, let's build an
audit table that would hold the person who performed the operation, the time when
the operation was made, the type of the operation (INSERT, UPDATE, or DELETE),
and the username on which the operation was performed, as shown in the
following screenshot:
We will use the audit_students table to house the information about all the
operations that are made on the students table. We will begin by creating a
trigger that would track the INSERT operations on the students table.
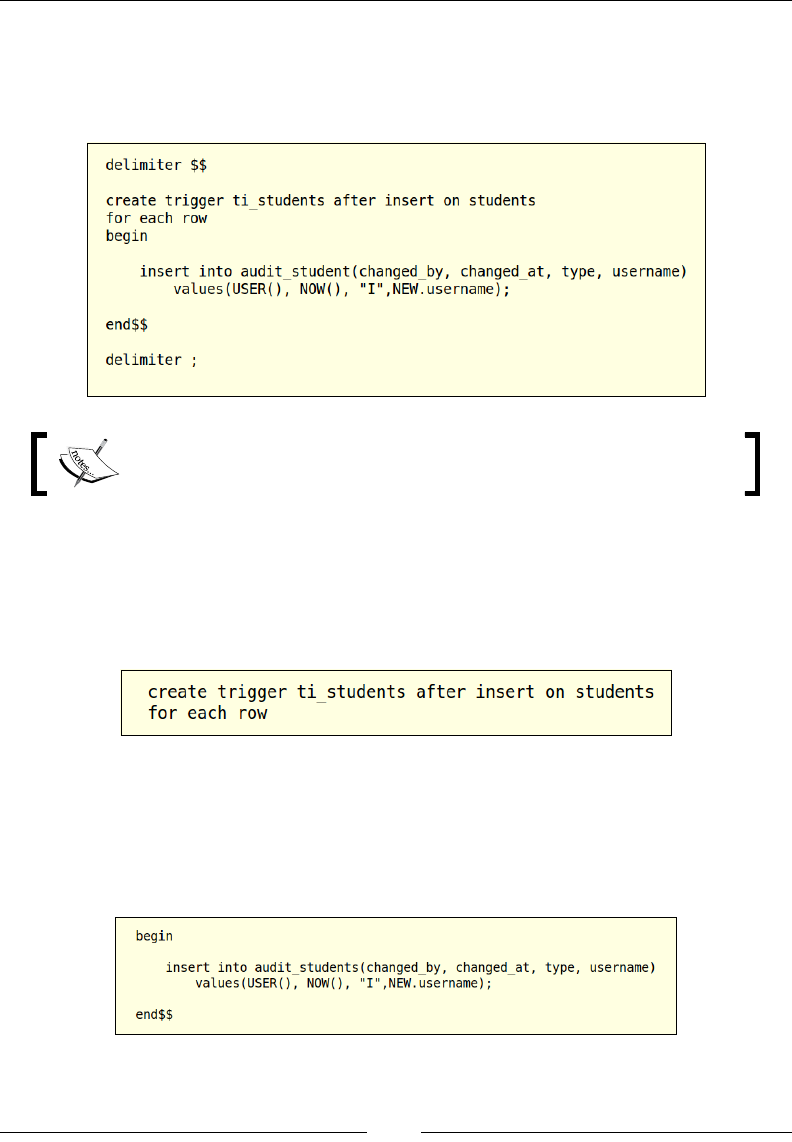
Advanced Programming with MariaDB
[ 54 ]
For successfully creating a trigger, we would need at least four pieces of information;
the rst is the name of the trigger, which has to be unique; the second is the table with
which the trigger will be associated; the third is the operation that res our trigger;
and the fourth is if the trigger is red before or after the operation shown as follows:
We will be using the ti_triggerName convention for our triggers
that will be red upon inserts.
To create a trigger, we will use the CREATE TRIGGER DDL statement and append
this with the name of the trigger. After we give the name for our trigger, we are
mentioning when the trigger will be red, which is after INSERT has been made on
the students table. On the next row, we let MariaDB know how often the trigger
should be red, and will be red on every row, shown as follows:
After this comes the body of the trigger where we will be keeping track of the SQL
user who performed this operation, the time of the operation, the kind of operation,
and nally the student on whom the operation was performed. Similar to a stored
procedure and a stored routine, the body of the trigger will be inside the BEGIN and
END statements, shown as follows:
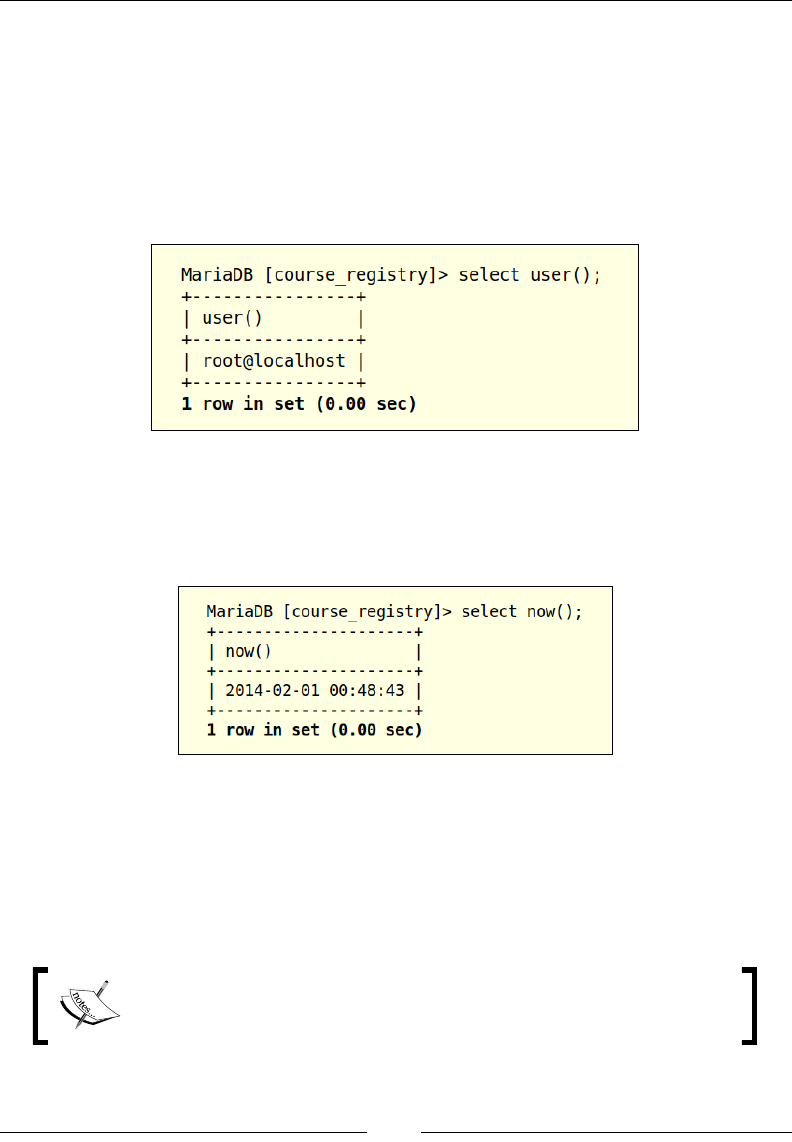
Chapter 2
[ 55 ]
Inside the body of the trigger, we are performing an INSERT statement that would
store the information about this operation, and we are storing that information in
the audit_students table. The changed_by column tracks the SQL user that has
performed this operation. There can be multiple users who have access to login into
the MariaDB system and who are performing different operations based on their
access rights. MariaDB provides the USER() function to retrieve the person who is
currently performing the operation. Let's take a quick look at how this function can
be used, shown as follows:
Now that we know who the SQL user is on MariaDB that is performing this operation,
we will have to retrieve the time when this operation took place. The changed_at
column tracks the time when this operation was performed, MariaDB provides the
NOW() function to retrieve when this operation was made, shown as follows:
Now that we have the user and the time when this operation was made, we will use
the letter I to denote that the operation that was made was an INSERT operation.
MariaDB stores a copy of old or existing data in an alias called OLD and the new data
in another alias called NEW. Since this is an INSERT operation, there will not be any
data in OLD, but NEW will carry the student record that has just been added. We can
use the dot (.) notation to access the data from NEW, so it will be NEW.columnname.
We will use single-letter abbreviations for the operations that we are
making: I for inserts, U for updates, and D for deletes.

Advanced Programming with MariaDB
[ 56 ]
Upon successful creation of the trigger, let's test this trigger by inserting a record into
the students table, shown as follows:
We begin by testing if the audit_students table is empty and then use the INSERT
statement to add a new student record with robert.senna as the username. Once
the INSERT statement has been successfully executed, let's query the audit_students
table to see if our trigger was red after INSERT. Upon querying the audit_students
table, we can see that a record was added after the user was added to the students
table. Now, let's move on to the trigger that will be red when an UPDATE statement is
executed upon a record on the students table, shown as follows:
We will be using the tu_triggerName convention for our triggers
that will be red upon updates.

Chapter 2
[ 57 ]
This trigger is similar to the earlier trigger; we begin by using the CREATE TRIGGER
DDL statement. As part of the creation, we are expecting this trigger to run after a
successful update on the students table. This trigger contains the same query as the
insert trigger because we are only looking for the username on whom the update has
been performed.
It is recommended to store complete record information, as it is hard to
identify the exact column upon which the update was performed.
Once the trigger has been successfully created, let us make an update to the
students table and see if our trigger is red upon the update, shown as follows:
In the preceding example, we are performing an update on the record that has a
first_name as Robert. As we only have a single record with first_name as Robert,
this would only update one record. Upon updating Robert's address, we have
queried the audit_students table and the second record carries the information
about the user who made the update, when this update was made, and on what
record was the update made.
It is always recommended to use the WHERE condition with a
column that has been indexed; in our case, either student_id,
which is the primary key or the username, which has a unique
index. The first_name column has only been used for descriptive
purposes, as this can cause multiple updates if there is more than
one student with Robert as their rst name.
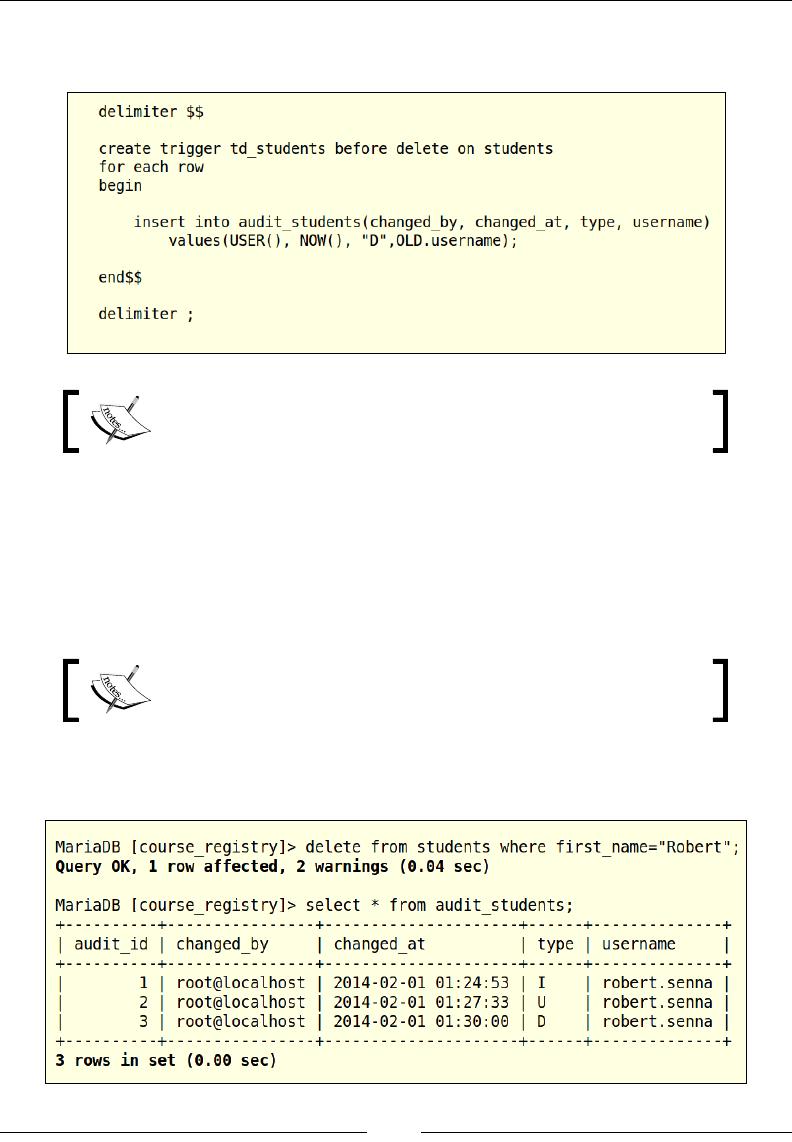
Advanced Programming with MariaDB
[ 58 ]
Now, let's look at our last example that would be the trigger that is red upon
deletion of a student record, shown as follows:
We will be using the td_triggerName convention for our
triggers that will be red upon deletes.
In the preceding example, we are creating a trigger that will be red before a student
record is deleted. This trigger is similar to the earlier triggers; the big difference is
that this trigger will be red when a student record is deleted. The other difference is
that the single letter abbreviation is D to denote deletion; since a student record will
not exist after the delete, the NEW alias here will be empty and we use the OLD alias to
retrieve the required information.
Triggers that are red on UPDATE statements will have both
NEW and OLD aliases populated.
Now the trigger has been successfully created, let's delete a record from the
students table and see if our trigger is red upon the delete, shown as follows:
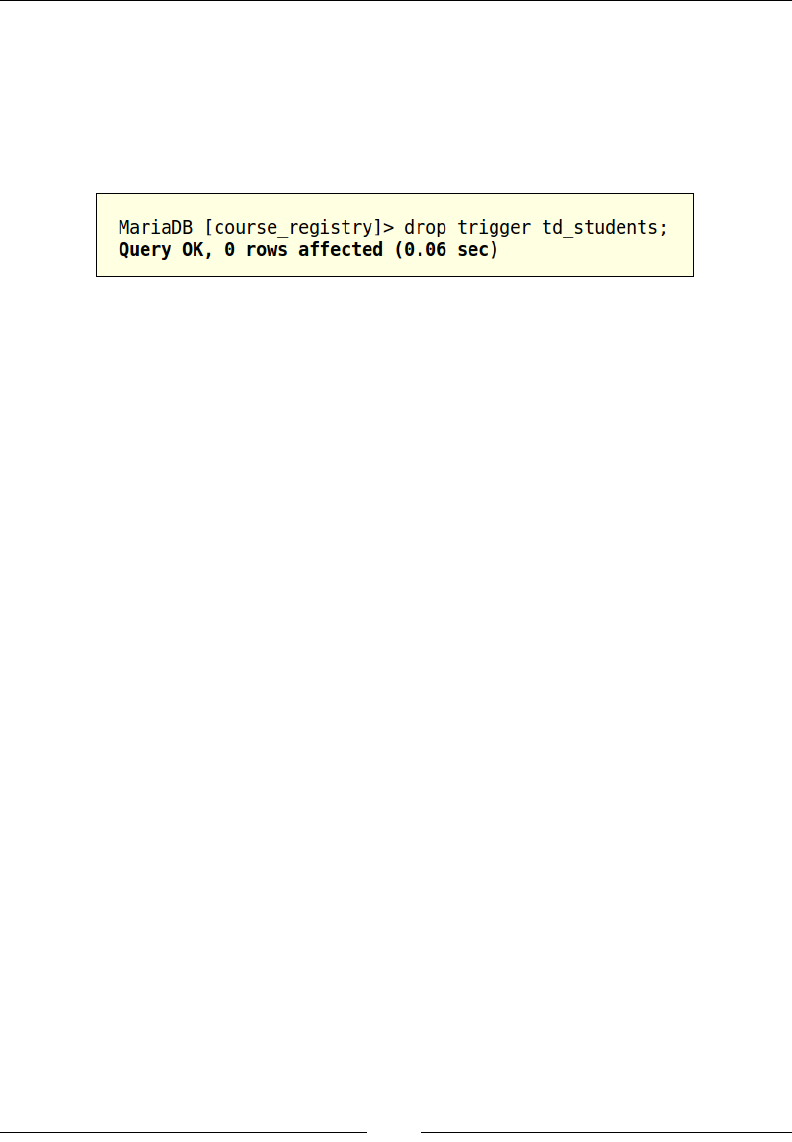
Chapter 2
[ 59 ]
In the preceding example, we are deleting the student record with first_name
as Robert. Upon successful deletion of this record, let's query the audit_students
table; we can see that a third record is added having type as D that denotes
deletion of a record, and the record that has been deleted has a username of
robert.senna. The nal example that we will work with is to drop the trigger.
We will use the DROP TRIGGER DDL command to drop a trigger, shown as follows:
Summary
In this chapter, we have covered a lot of advanced concepts such as altering tables,
working with indexes and column characteristics, working with stored procedures,
working with stored routines, and working with triggers. MariaDB offers many
more advanced concepts and the concepts discussed in this chapter will lay a
good foundation to acquire a better understanding of the more advanced database
concepts. Now that we have talked about a few advanced concepts of MariaDB, let's
switch gears and dive in to understand a popular programming paradigm called
object-oriented programming and understand its implementation in PHP 5.

Advanced Programming
with PHP
The most recognized minor version of PHP 5, in the last few years, is PHP 5.3, which
has been widely accepted and is used currently. After PHP 5.3, two other minor
versions of PHP, PHP 5.4, and PHP 5.5, have been released. Though a lot of hosting
providers are still sticking with PHP 5.3, a few providers have started updating their
PHP version to PHP 5.4. For users who do not depend on hosting providers, we can
use the current version of PHP, PHP 5.5. There are a vast number of resources in
books and on the Internet discussing the features of PHP 5.2 and 5.3, and very few
resources discussing PHP 5.4 and 5.5. We will begin this chapter by learning a few
new features that have been shipped out with PHP 5.4 and PHP 5.5.
For more information about the object-oriented programming with PHP,
please refer to the Bonus chapter 2, Object-oriented Programming with PHP.
New features in PHP 5.4 and 5.5
A lot of new features have been added to PHP with PHP 5.4 and 5.5. Most of these
features were originally part of the PHP 6.0 release, which had to be postponed as
rewriting PHP to support Unicode did not go as planned. Unicode is an industry
standard character encoding set that supports most of the world languages, unlike
ASCII that only encodes the Latin alphabet. One prominent issue that the developers
faced during rewriting languages for Unicode support was that it almost took twice
the runtime memory to execute the scripts. A few new features that have been
shipped with PHP 5.4 and 5.5 are the ability to monitor upload progress, multiple
improvements to arrays, a built-in web server, the password hashing API, the
generators, partial Unicode support, updates to closures, and the powerful traits.
PHP 5.4 and 5.5 arrives with multiple updates that will help us execute scripts faster
and use less memory.

Advanced Programming with PHP
[ 62 ]
Updated array declaration
Short array syntax has been added to PHP 5.4 and we can now use the square
brackets to declare arrays. Prior to this we would have had to use the array()
language construct to declare and add elements to the array.
The following code is available in the array-declaration.php le, present in
the code bundle:
<?php
/**
* Array declaration before PHP 5.4
*
*/
$arr = array(1,2,3,4);
//Print an element to the screen
echo $arr[0]."\n";
/**
* Array declaration with PHP 5.4 or greater
*
*/
$arr2 = [1,2,3,4];
//Print an element to the screen
echo $arr2[0]."\n";
?>
In this example, we begin by looking at how an array declaration is done in the
versions before PHP 5.4. We use the array() language construct and supply the
array elements as arguments. In the second snippet, we are using the square brackets
or the short syntax that has been shipped with PHP 5.4 to create an array. This syntax
has been available in other scripting languages for a good amount of time, and this is
a welcome addition to PHP. Let us execute this script and examine the output.
The output is of the previous code snippet is as follows:
1
1
Both the snippets print the rst element of the array. If this script was executed
with PHP 5.3, we would get a parse error as the engine encounters an unexpected
square bracket.

Chapter 3
[ 63 ]
The array dereferencing function
Array dereferencing has been added to PHP in PHP 5.4. Let us utilize this feature
for retrieving elements from arrays that are returned by functions and/or methods.
Prior to PHP 5.4, we would have had to store the array that is being returned by
a function into a local variable before accessing an element. The following code is
available in the array-dereferencing.php le, present in the code bundle:
<?php
/**
* Return an array of numbers
*
*/
function retArray(){
return ['a', 'b', 'c', 'd'];
}
/*
* Before PHP 5.4
* Assign data to a variable
*
*/
$arr = retArray();
echo $arr[0]."\n";
/*
* With PHP 5.4 or greater
* Use the
*
*/
echo retArray()[0]."\n";
?>

Advanced Programming with PHP
[ 64 ]
In this example, we begin by dening the retArray() function. This function returns
an array of letters when invoked. The rst snippet shows how the rst element can
be retrieved if we are using a PHP version prior to 5.4. In the second snippet, as array
dereferencing for functions has been added in PHP 5.4, we can directly retrieve the
element in a single step. Let us execute this script and examine the output.
The output of the previous code snippet is as follows:
a
a
The list() function in the foreach statement
One of the most common statements used to loop over an array of elements is the
foreach statement. Prior to PHP 5.5, unpacking a nested array would have had to
be done manually by referencing the index of that element. An interesting addition
to PHP 5.5 is the ability to use the list() function to break a nested array into local
variables in a foreach statement. Before we take a look at how the list() function
and the foreach statement can be used together, let us get a quick refresher as to
how the list() function works.
The following code is available in the list.php le, present in the code bundle:
<?php
/*
* Explanation of how list() works
*
*/
list($one, $two, $three) = [1, 2, 3];
echo $one.' '.$two.' '.$three."\n";
?>
The list() function is a language construct used to assign a list of variables in
a single operation. In this example, we begin by assigning an array of numbers
to a list of variables using the list() languages construct. In the next step,
we are echoing these variables to the screen.
The output of the previous code snippet is as follows:
1 2 3
The list() language construct has been around since PHP 4; with PHP 5.5,
we can use it with the foreach statement.

Chapter 3
[ 65 ]
The following code is available in the foreachlist.php le, present in the
code bundle:
<?php
/**
* A list of students
*/
$students = [
[
"John",
"Doe",
101
],
[
"Jane",
"Dane",
102
],
];
//Print student data without list()
foreach($students as $student){
echo $student[0].' '.$student[1].' '.$student[2]."\n";
}
//Print student data using list()
foreach($students as list($first_name, $last_name, $student_id)){
echo $first_name.' '.$last_name.' '.$student_id."\n";
}
?>
In this example, we begin by creating a list of students; each student is a list of
attributes such as the rst name, last name, and age. In the rst snippet, we are not
using the list() construct, so we will have to pick each element from every student
by the index. With PHP 5.5, we can now use the list() construct with the foreach
statement to directly load the values into temporary variables. When we execute this
script, the output will be the same for both of the snippets; the main difference here
is that the second snippet is easier on the eyes as we are dealing with variable names
that represent the data stored in that variable. Let us execute this script and examine
the output.

Advanced Programming with PHP
[ 66 ]
The output of the previous code snippet is as follows:
John Doe 101
Jane Dane 102
John Doe 101
Jane Dane 102
As expected, the output of both the snippets is the same.
Availability of $this in closures
Until PHP 5.4, when closures were declared in a class, they would have been
considered as anonymous functions that would not have access to the surrounding
properties and methods. With PHP 5.4, the anonymous functions will behave as
closures where they will have access to the surrounding properties and methods
via the $this instance variable.
The following code is available in the closures.php le, present in the code bundle:
<?php
/*
* Student class
*
*/
class Student{
private $name = "John Doe";
function getName(){
return function(){
//$this is not available
//inside closures
return $this->name;
};
}
}
$student = new Student();
$name = $student->getName();
echo $name()."\n";
?>

Chapter 3
[ 67 ]
In this example, we are creating a closure to return the value of the $name property.
Prior to PHP 5.4, though closures existed, they did not have access to the $this
instance variable. Let us execute this script and examine the output.
The output of the previous code snippet is as follows:
John Doe
Class member access on instantiation
The next feature that we will be looking at is the ability to access members of a class
upon instantiation. For this example, we will work with the range(), rand(), min(),
and max() functions. The range() function takes a minimum of two values as
parameters to return an array of elements between those values. The rand() function
returns a random number when the minimum and maximum limits are passed in.
The min() and max() functions return the least and the maximum values in an array.
The following code is available in the classMemberAccess.php le, present in
the code bundle:
<?php
/*
* Students class
*
*/
class Students{
private $studentIds;
function __construct(){
$this->studentIds = range(1, 500);
}
function getRandomStudent(){
return rand(min($this->studentIds),
max($this->studentIds));
}
}
Advanced Programming with PHP
[ 68 ]
//Before PHP 5.4
$student = new Students();
echo $student->getRandomStudent()."\n";
//Using PHP 5.4 or greater
echo (new Students())->getRandomStudent()."\n";
?>
In this example, we are creating a Students class. This class carries the $studentIds
property that would store the ID of all the students. For this example, let us populate
this property using the range() function. The aim of this script is to retrieve a
random student and print his/her ID; we will be using the getRandomStudent()
method to retrieve the random student's ID.
We can extend this example to create a system that would assign
a different set of question papers based on the picked student's
ID. This will not be a part of this book, but readers are welcome to
try this example.
In the rst snippet, we are creating an instance of the Students class and are assigning
it to a local variable. After that we use the local variable (an object of that class) to call
the getRandomStudent() method. In the second snippet, we are creating an instance
and then using that instance on-the-y to call the getRandonStudent() method.
Before PHP 5.4, this was a two-step process where we would create an instance
and assign that to a local variable, and then use the local variable to call a method;
however, with PHP 5.4, we can directly call the method in a single step.
The output for the previous code snippet is as follows:
332
224
As we are generating these student's IDs using the rand() function, the IDs
are not the same.

Chapter 3
[ 69 ]
Generators
A generator is very similar to a function that returns an array, the difference being
(as the name suggests) that a generator generates a sequence of values. In PHP, we will
have to implement the Iterator interface for object iteration, which can sometimes get
a little tedious. A generator already implements the Iterator interface, so this reduces
the complexity of building an iterator. The rst difference between a function returning
an array and a generator is that the generator uses the yield keyword.
The following code is available in the student-generator.php le, present in the
code bundle:
<?php
/*
* Generator- yields a student at a time
*/
function students(){
yield "John Doe";
yield "Jane Dane";
yield "Richard Roe";
}
foreach(students() as $student){
echo $student."\n";
}
?>
In this example, we are yielding three students via the student() generator. Later,
we are running our generator through the foreach construct to retrieve one student
at a time. The difference between returning data via a function and yielding the data
with a generator is that a generator will retain the state and yield the next value
when it is used again. This behavior is unlike a function, where it would return the
whole array upon invoking again. Let us execute the script and examine the output.
The output for the previous code snippet is as follows:
John Doe
Jane Dane
Richard Roe
Advanced Programming with PHP
[ 70 ]
Upon execution, the script will print the names of each student on the screen,
but this looks similar to what we would do with a return statement. Generators
are commonly used to perform tasks that apply to large datasets; an example would
be a set of operations on a le that has over a million lines. If we would handle a
le with so much data, a lot of memory would not only be dedicated to store the
le in memory, but also the PHP arrays that would store that data. PHP arrays
are very expensive as they are ordered HashMaps that provide on-demand access
to data, making it resource-intensive. Ordered HashMaps are associative arrays,
which are internally used to store data on the RAM. Let us now look at a real-time
implementation of generators to handle the le operations.
This example is just for demonstration purposes as providing a le
that is over 800 MB is unrealistic.
The following code is available in the file-reader.php le, present in the
code bundle:
<?php
function fileData($fileName) {
$file = fopen($fileName, 'r');
while (($line = fgets($file)) !== false) {
yield $line;
}
fclose($file);
}
foreach (fileData('bigData.csv') as $line) {
//file operations
}
?>
In this example, we are building a generator to return the data from a large le
and then we perform our le operations one line at a time. By using generators,
not only do we save memory but, as the data size gets larger, the execution time
compared to other methods will be far shorter.

Chapter 3
[ 71 ]
Traits
In Bonus chapter 2, Object-oriented Programming with PHP, we discussed object-oriented
concepts in PHP and worked with inheritance to understand how functionality in one
class can be extended to other classes and how common functionality can be shared
among different subclasses. With PHP 5.4, we will go over a new concept called Traits
that facilitates using the functionality from more than one source at a time. If we would
have to achieve this prior to PHP 5.4, we would have ended up duplicating the code
into multiple classes as required by making our code difcult to work with. This is
commonly referred to as horizontal inheritance. To declare a trait, we will use the
trait keyword followed by the name of the trait; the functionality for the trait will be
placed inside the curly braces next to the trait.
The following code is available in the trait.php le, present in the code bundle:
<?php
class BaseClass{
public function helloWorld(){
echo "Hello World from Base Class \n";
}
}
trait MyTrait{
public function helloWorldFromTrait(){
echo "Hello World from Trait\n";
}
}
class SubClass extends BaseClass{
use MyTrait;
}
Advanced Programming with PHP
[ 72 ]
$obj = new SubClass();
$obj->helloWorld();
$obj->helloWorldFromTrait();
?>
In this example, we have two classes and a trait. The subclass is already extending
the functionality of the base class. When a subclass would like to use the functionality
of another entity other than its base class, we can house such reusable functionality
in a trait and let the subclasses use the trait. To use the functionality from a trait,
we will use the keyword use. Let us execute this script and examine the output.
The output of the previous code snippet is as follows:
Hello World from Base Class
Hello World from Trait
To use multiple traits, we will use the comma separator to add more than one
trait to a class.
Here is an example of the syntax to be followed:
class SubClass extends BaseClass{
use Trait1, Trait2, Trait3;
}
This code is only for demonstration purpose and should not be
executed by adding the required class and traits.
Traits are a very powerful feature and help us in making our code more reusable
and object-oriented. A real-time implementation of traits is to create a singleton trait
that can convert any class into a singleton when used. Given the numerous ways of
working with traits, they will certainly be one of the popular additions to PHP 5.4.

Chapter 3
[ 73 ]
Addition of the nally block to exception
handling
In this section, we will take a quick look at exception handling and the addition of
the finally block in PHP 5.5. Exception handling is commonly used to alter the
ow of execution when a specied condition occurs. Exceptions can be caused due
to different events such as a le not being available to be used, a faulty database
connection, or just bad code. By using an exception handling strategy, we will be
able to predict any exceptions that might occur and handle these exceptions in a
graceful method. In PHP, the exceptions are thrown during the code execution and
to catch these exceptions we will use the try block and add our code into the try
block to catch the error. If the exception is not caught and handled, a fatal error will
occur that will halt the execution of our script.
The following code is available in the exceptionHandling.php le, present in the
code bundle:
<?php
function divide($a, $b){
try{
if($b ==0){
throw new Exception("Divide by Zero
Exception");
}
return $a/$b;
}
catch(Exception $ex){
//a good practice to log the exceptions
return $ex->getMessage();
}
}
echo divide(4,0)."\n";
?>

Advanced Programming with PHP
[ 74 ]
In this example, we begin by dening the divide() function that would take two
integers as parameters and recreate the Divide By Zero exception. We will place the
code that is performing the division into the try block. In our code, we are checking
to see if the value of the second parameter that is being used as the denominator is
equal to zero. If the condition is a success, we will throw a new exception and pass
the message. The catch block that is placed right after the try block will catch this
exception and return the exception message back to the execution.
The output of the previous code snippet is as follows:
Divide by Zero Exception
Until now we can either throw an exception or catch an exception; with PHP 5.5,
we can use the finally block to handle any kind of closing operations. The finally
block is executed after the try and catch blocks are executed. One common
example is deleting any le resource links that were created during the try block.
Another example is unlocking tables that have been locked or closing an open
database connection.
The following code is available in the exceptionHandlingWithFinally.php le,
present in the code bundle:
<?php
function divide($a, $b){
try{
if($b ==0){
throw new Exception("Divide by Zero
Exception");
}
echo $a/$b."\n";
}
catch(Exception $ex){
//a good practice to log the exceptions
echo $ex->getMessage()."\n";
}
finally{
//perform clean up operations
echo "executed after try & catch \n";
}
}
divide(4,0);
?>

Chapter 3
[ 75 ]
We are continuing with the example that we used earlier, and have added
the finally block that can be used to perform any sort of clean-up operations
as required.
The output of the previous code snippet is as follows:
Divide by Zero Exception
executed after try & catch
The goal of exception handling is for our application to run without crashing or
throwing errors. Although it is an ideal situation for the application to perform
without crashing, exception handling helps us get our application closer to
performing without crashing. All applications are built with a set of assumptions;
so as long as the users proceed along an expected route, the application will
perform as expected. And when a user performs an unexpected action, the PHP
engine sends an unexpected response back. Exception handling helps us to handle
such unexpected responses in a graceful manner. As good programmers, it is very
important for us to predict and identify such cases.
Unit testing
Now that we understand exception handling, this is a good place to take a look at
the concept of unit testing. As the name suggests, unit testing refers to testing the
application one unit at a time. A unit is an arbitrary term but it is always advised to
divide the code into the smallest independent working fragment and test that unit.
In this section, we will briey go over automated unit tests. Automated unit testing
makes the process of testing the functionality easier as the application grows. Let us
take the example of a student portal. We begin by building a simple portal that will
allow us to add a student. Once we provide the portal to add students, the users of
the portal would need an interface to view the student information that they have
added. Once we provide this interface, they might request the development team for
a lot more features. As we keep adding features, the amount of functionality that has
to be tested will increase, and sometimes the code that has been added to support one
functionality might either break or not coexist with the code of another functionality.
Normally these issues are identied by regression testing, and automated unit testing
helps the developers to understand and predict where a code x might cause issues
at another location. We will be using the PHPUnit testing framework, which is an
instance of the xUnit architecture for unit-testing frameworks.

Advanced Programming with PHP
[ 76 ]
Installing PHPUnit
The installation process for PHPUnit is pretty simple and we will install PHPUnit
v3.7, which was the stable version while writing this book. The installation
commands will be same on all operating systems, as we will use the PHP Extension
and Application Repository (PEAR) to get and install the PHPUnit libraries. PEAR
is a distributed code repository that is used to maintain common code packages, and
other developers and development teams can use the pear command to download
them onto their local environments.
These commands should be run in the terminal window on a
Linux or Mac OS X operating system or in the command prompt
window on the Windows operating system.
Here are the two lines of command we will need here:
pear config-set auto_discover 1
pear install pear.phpunit.de/PHPUnit
Using the rst command we are setting up the conguration to allow PEAR
to automatically discover new channels from the command line or to look for
dependencies that are required while installing a library. With the second command,
we are installing the PHPUnit framework, which also installs other dependencies such
as the File_Iterator library, the PHP_Timer library, and the PHP_CodeCoverage
library. Upon running these commands, the PHPUnit framework and its dependencies
will be successfully installed. To verify the installation, we can run the phpunit
command and add the option to print out the version of PHPUnit that we have
installed. After this, the following code needs to be run:
phpunit --version
This has to be run using the same command-line utility that was used earlier to
install the PHPUnit library.
The output for the previous command line is as follows:
PHPUnit 3.7.32 by Sebastian Bergmann.
Upon execution of the command, the version 3.7.32 will be printed onto the screen.
Sebastian Bergmann is the creator of PHPUnit. Now that we have successfully
installed PHPUnit, we are all set to write our rst test.

Chapter 3
[ 77 ]
The following code is available in the exampleTest.php le, present in the
code bundle:
<?php
class exampleTest extends PHPUnit_Framework_TestCase{
public function testTrue(){
$this->assertTrue(true);
}
public function testCount(){
$array = [1,2,3,4];
$this->assertCount(4, $array);
}
}
?>
There are three important things to note from our test case (exampleTest.php):
• The test case will always inherit from PHPUnit_Framework_TestCase.
• The tests inside the test case will always be public and are named test*.
We can also use the @test annotation in the method's doc block.
• As part of conventions, the name of the test case and the lename carrying
the test should always end with test.
The tests inside a test case will carry an assert method that is used to ensure
that the data that is being passed in matches the expected result. In our tests,
we are looking at two different assert methods; the rst assert method checks
to see if the value being passed in is true, while the second assert method ensures
that the array length is equal to the expected value that has been passed in.
To run a test case, use the phpunit command that we have used
earlier in phpunit exampleTest.php.

Advanced Programming with PHP
[ 78 ]
The output for the previous code snippet is as follows:
PHPUnit 3.7.32 by Sebastian Bergmann.
..
Time: 80 ms, Memory: 1.25Mb
OK (2 tests, 2 assertions)
We have successfully asserted both our tests; when the message says that there are
two tests and two assertions, it means that both of our tests have been asserted or
have passed. Now let us build a custom class with a single method and then come
up with a test case that would have multiple tests focusing on that method. Just to
verify the output message for a failed test, let us add a test that would fail.
The following code is available in the Math.php le, present in the code bundle:
<?php
class Math{
/**
* returns the sum of two numbers
**/
function add($a, $b){
return $a + $b;
}
}
?>
This is a very basic class that has an add() method that takes two numbers
as input and returns their sum. Now let us create a test case for the Math class.
The following code is available in the MathTest.php le, present in the code bundle:
<?php
require_once('Math.php');
class MathTest extends PHPUnit_Framework_TestCase{

Chapter 3
[ 79 ]
public function testAdd(){
$this->assertEquals(5, (new Math())->add(2,3));
}
public function testAdd2(){
$this->assertNotEquals(6, (new Math())->add(2,3));
}
public function testAdd3(){
$this->assertEquals(4, (new Math())->add(2,3));
}
}
?>
In this test case, we have three tests that are passing in numbers two and three to
the add() method and are testing to see if the expected value matches with the
result. The rst two tests will be successful, as the rst test is asserting to see if
the value returned by the method is equal to ve. Upon execution, this will be a
successful test. The second test is asserting to see if the value returned by the method
is not equal to six. Upon execution, this test will be successful too. In the last test,
we are asserting if the value returned by the add() method is equal to four.
This will fail as the value returned will be ve.
The output of the previous code snippet is as follows:
PHPUnit 3.7.32 by Sebastian Bergmann.
..F
Time: 89 ms, Memory: 1.50Mb
There was 1 failure:
1) MathTest::testAdd3
Failed asserting that 5 matches expected 4.
/var/www/UnitTesting/MathTest.php:21
FAILURES!
Tests: 3, Assertions: 3, Failures: 1.

Advanced Programming with PHP
[ 80 ]
As expected, the last assertion failed while the other two were successful. Refactor
the code to remove the last assertion and utilize the documentation available on the
PHPUnit website to discover more about how to implement unit testing in your
projects. Unit testing might appear to add more time in the development of a project
or a feature. However, this will help in reducing the total time taken by us to manually
test the whole application every time a new feature is added. PHPUnit also comes with
multiple other features such as custom bootstrapping that would allow us autoload
the required les rather than using require or require_once; another popular feature
is code coverage that helps us nd dead code. Dead code is code that still exists in
our project but isn't being used. There are numerous features provided by PHPUnit
and a good place to understand and read about these features is the ofcial website of
PHPUnit at http://phpunit.de/manual/current/en/.
Working with MariaDB
So far we have worked with core programming concepts of PHP and we have also
worked with the MariaDB database server in Chapter 1, CRUD Operations, Sorting,
Filtering, and Joins and Chapter 2, Advanced Programming with MariaDB. In this section,
let us focus on setting up communication between PHP and MariaDB. PHP provides
three APIs to connect to MariaDB; they are as follows:
API Description Comment
mysql This is probably the most used API to connect to
MySQL and MariaDB databases. This API has been
around since PHP 2.0. Active development for this
API has been stopped and it is not advised to use
this API in any of new projects.
The mysql API
has been deprecated
since PHP 5.5.0 and
will be removed in
the future.
mysqli MySQL Improved is the new API that has been
introduced with PHP 5. This API is a huge upgrade
over the last API. This API supports features such
as client-side and server-side prepared statements,
stored procedures, and transactions. This API has an
object-oriented interface and a procedural interface.
The mysqli API
stands for MySQL
Improved.
PDO PDO is an object-oriented interface to work with a
database. PDO can support a wide range of databases
as this provides the flexibility to move to other
database management systems at some point in
the future.
The PDO API stands
for PHP Data Objects.

Chapter 3
[ 81 ]
We will go over examples for both mysqli and PDO in this section
and it is recommended to go over the API documentation provided at
http://www.php.net/manual/en/mysqlinfo.api.choosing.php to
make an informed decision.
PHP – mysqli
Though the mysqli API supports both procedural and OOP interfaces, we will
use the OOP interface for this example. To work with this example, let us create
an employee database with a few employee records.
The following code is available in the employees.sql le, present in the
code bundle:
CREATE DATABASE IF NOT EXISTS `employee_db`;
--
-- Database: `employee_db`
--
-- --------------------------------------------------------
USE `employee_db`;
--
-- Table structure for table `employees`
--
CREATE TABLE IF NOT EXISTS `employees` (
`id` int(11) NOT NULL AUTO_INCREMENT,
`first_name` varchar(60) NOT NULL,
`last_name` varchar(60) NOT NULL,
PRIMARY KEY (`id`)
) ENGINE=InnoDB DEFAULT CHARSET=latin1 AUTO_INCREMENT=4 ;
--
-- Dumping data for table `employees`
--
INSERT INTO `employees` (`id`, `first_name`, `last_name`) VALUES
(1, 'John', 'Doe'),
(2, 'Jane', 'Dane'),
(3, 'Richard', 'Roe');

Advanced Programming with PHP
[ 82 ]
Now that we have created the required data in the employee database, let's use
the mysqli API to connect to the database and fetch the employee records.
The following code is available in the php-mysqli.php le, present in the
code bundle:
<?php
//store connection parameters in constants
define("DB_HOST","localhost");
define("DB_NAME","employee_db");
define("DB_USER","root");
define("DB_PASSWORD", "admin");
//establish a database connection
$connection = new mysqli(DB_HOST, DB_USER, DB_PASSWORD, DB_NAME);
if($connection->connect_error) {
trigger_error("Database connection failed: " . $conn->connect_error,
E_USER_ERROR);
}
//query to retrieve employees
$sql = "select id, first_name, last_name from employees;";
//execute the query
$result = $connection->query($sql);
//check if result is valid
if($result === false){
trigger_error("Sql Error, verify SQL", E_USER_ERROR);
}
//iterate over the result
while($row = $result->fetch_assoc()){
echo $row['id']." ".$row['first_name']." ".$row['last_name']."\n";
}
?>

Chapter 3
[ 83 ]
In this example, we begin by storing the connection parameters to the database in the
constants and then we create a mysqli object and use the connection parameters to
establish a connection. In the next step, we verify if the connection was successful.
If this isn't true, we will trigger an error so that appropriate steps can be taken.
In the next step, we will query the database to retrieve the available employee
records and then we will iterate over the retrieved record set to print the
information about each employee.
The output for the previous code is as follows:
1 John Doe
2 Jane Dane
3 Richard Roe
PHP – PDO
In this section, we will use the PDO API to fetch all of the employee records from
the employees table.
The following code is available in the php-pdo.php le, present in the code bundle:
<?php
//store connection parameters in constants
define("DB_HOST","localhost");
define("DB_NAME","employee_db");
define("DB_USER","root");
define("DB_PASSWORD", "admin");
try{
//establish a connection
$connection = new
PDO("mysql:host=".DB_HOST.";dbname=".DB_NAME, DB_USER,
DB_PASSWORD);
//set error mode
$connection->setAttribute(PDO::ATTR_ERRMODE,
PDO::ERRMODE_EXCEPTION);
//query to retrieve employees
$sql = "select id, first_name, last_name from employees";
$data = $connection->query($sql);
foreach($data as list($id, $first_name, $last_name)){
echo $id." ".$first_name." ".$last_name."\n";
}

Advanced Programming with PHP
[ 84 ]
}
catch(Exception $ex){
echo $ex->getMessage();
}
finally{
$connection = null;
}
?>
In the preceding example, we begin by building a PDO object. In the next step,
we are setting the error reporting mode to ERRMODE_EXCEPTION. This will route
the execution to the catch block and an exception of the class PDO_EXCEPTION is
thrown. In the next step, we are executing our select query and we are printing
the results out onto the screen.
The output for the previous code is as follows:
1 John Doe
2 Jane Dane
3 Richard Roe
Now that we have worked with both MariaDB and unit testing, this is a good place
to set up a test case to test the database integrity. A few operations that we can
perform are to create tables and insert data into those tables on-the-y. Once we
have the data in those tables, we can perform the select queries to verify if all the
data has been inserted, or even verify if a specic row was inserted as part of a spot
check. Once our tests are successful, we can drop the tables and continue with our
development. Let us look at a very basic example for testing the data integrity.
The following code is available in the DatabaseTest.php le, present in the
code bundle:
<?php
class DatabaseResult extends PHPUnit_Framework_TestCase{
private $connection;
public function setUp(){
//set up
$this->connection = new
PDO("mysql:host=localhost;dbname=employee_db",
"root", "admin");
$this->connection->setAttribute(PDO::ATTR_ERRMODE,
PDO::ERRMODE_EXCEPTION);

Chapter 3
[ 85 ]
}
public function testData(){
$data = $this->connection->query("select count(*)
as ct from employees where first_name =
'John';")->fetchObject();
$this->assertEquals(1, $data->ct);
}
public function tearDown(){
//clean up
$this->connection = null;
}
}
?>
In this example, we begin by establishing a connection to the database in the setup()
xture, which is used to fetch the data during our test. We are using the setup() and
tearDown() xtures in our example; they are referred to as test xtures in the xUnit
architecture. A test xture is dened as a point where everything that is required to
successfully run a test has to be available. The setup() test xture is commonly used
to create the required resources, while the teardown() xture would clean up all
the resources that were set up. In our example, we are using the setup() xture
to establish a database connection, while we are ending that database connection
in the tearDown() xture.
The output of the previous code snippet is as follows:
PHPUnit 3.7.32 by Sebastian Bergmann.
.
Time: 91 ms, Memory: 1.50Mb
OK (1 test, 1 assertion)
Here we can see that our test was successful.

Advanced Programming with PHP
[ 86 ]
Summary
In this chapter, we have taken a look at a few new features that are available with
PHP 5.4 and PHP 5.5. We have also looked at unit testing, and how it could help us
streamline our software development life cycle by testing individual units of our
application by using PHPUnit's test cases. The last topic that we have discussed is
establishing a connection with our MariaDB database. In the next chapter, we will
begin by discussing how HTML interacts with PHP and move forward with building
our student portal application.

Setting Up Student Portal
In the previous chapter, we went over a few advanced concepts such as the new
features that are part of PHP 5.4 and 5.5, using unit testing to test individual units
of an application, and different methods of connecting to the MariaDB database
server in order to retrieve data. In this chapter, we will use all the concepts that
we have learned in the earlier chapters to build an application. Until now, we have
used PHP CLI to execute most of the scripts that we have worked with. In this
chapter, we will use PHP to build an interactive student portal. Using this student
portal, we can perform the following tasks:
• Setting up the nuts and bolts of our application
• Setting up MVC
• Adding a student
• Listing all students
• Adding a course
• Listing all courses
• Registering a student to a course
• Viewing all registrations
We will use HTML, PHP, and MariaDB to accomplish these tasks.

Setting Up Student Portal
[ 88 ]
Setting up the nuts and bolts of our
application
In Bonus chapter 2, Object-oriented Programming with PHP, we discussed design
patterns and how we can use design patterns to better organize our code. We will
use the MVC design pattern to build our student portal application. The MVC
pattern or the Model-View-Controller pattern is one of the most used patterns to
build web applications. The features of MVC are as follows:
• The model is responsible for data management. The model handles the
common data operations such as retrieving, updating, and deleting data.
• The view is responsible for data presentation. The view will commonly
carry the required HTML that would be responsible for displaying the
data on the browser.
• The controller is responsible for data processing. The controller houses
any application logic that has to be performed on the data that has been
retrieved by the model, before sending it to the view. A controller can
have one or many actions that will serve as a single functional unit of
the application logic. An action is a method in the controller.
In order to build a MVC-based web application, we will need to fulll a few
prerequisites such as activating the rewrite functionality on Apache, and setting up
the directory structure for our application. We will need the rewrite functionality to
implement clean URLs that are easier to read than a complicated query string.
Before using the rewrite functionality, the URL is as follows:
http://student-portal/index.php?url=students
After using the rewrite functionality, the URL changes to:
http://student-portal/students
Setting up URL rewrite
Apache web server is shipped with a number of very useful modules; one of them
is the mod_rewrite module. The mod_rewrite module provides a rule-based
engine to rewrite URLs on-the-y. We can also use this module to redirect one URL
to another URL and to invoke an internal proxy fetch. By using the mod_rewrite
module, we can successfully hide the le system path from users.

Chapter 4
[ 89 ]
The mod_rewrite module is turned off by default and has to be explicitly turned on.
To turn on the mod_rewrite module, we will have to either modify the conguration
les of the Apache web server in a few operating systems or use internal commands
to turn on the module. In Ubuntu, we will use the a2enmod command to turn on the
mod_rewrite module:
sudo a2enmod rewrite
As the mod_rewrite module is turned off by default, the overriding capability of
Apache to override URLs dynamically is also turned off. To turn this back on, we
will look for the apache2.conf le or the httpd.conf le, and search for the string
AllowOverride. It will be set to None by default, and we will have to change it to
All. This change has to be applied only to the document root that we are currently
working with and not anything else, as this could create security issues:
Before
<Directory /var/www/>
Options Indexes FollowSymLinks
AllowOverride None
Require all granted
</Directory>
After
<Directory /var/www/>
Options Indexes FollowSymLinks
AllowOverride all
Require all granted
</Directory>
As we have made the changes to core Apache conguration les, we will have
to restart the Apache web server. To restart the web server, we will use the
restart command:
sudo service apache2 restart
Now that we have added the rewrite functionality, let us go ahead and set up
the folder structure that we will use for building our MVC student application.
This script has to be run in a terminal window and has to be run in the document
root folder. Now, we create a folder structure using the following commands,
in the build.sh script:
mkdir student-portal
cd student-portal
mkdir models
mkdir controllers
mkdir views
mkdir lib

Setting Up Student Portal
[ 90 ]
The build.sh script will create the required folder structure for housing our scripts.
Let us begin by creating the index.php page that would serve as our entry point to
our student portal. We will be using this index.php page as our primary landing
point and router. To set this as our primary router, we will use the .htaccess le
where we will put our web server rules and conditions.
The .htaccess le is commonly used to decentralize the management
of web server congurations. Using the .htaccess le, we will be able
to add in application-specic web server congurations. The .htaccess
le is housed in the directory of the application, and the congurations in
this le override any global web server congurations.
In our .htaccess le, we will begin by turning on the rewrite engine that is
available via the mod_rewrite module and route all the requests to our index.php
page. During this routing process, we will extract the rst part from the URL and
redirect this call to our index.php with url query string parameter.
An example URL request that will be made is as follows:
localhost/student-portal/student
The redirected URL will be as follows:
localhost/student-portal/index.php?url=student
This redirect is done in order to capture the page that was requested and then
process the request from there on. We will use an .htaccess le to facilitate the
redirect that contains the following code:
RewriteEngine On
RewriteCond %{REQUEST_FILENAME} !-f
RewriteCond %{REQUEST_FILENAME} !-d
RewriteCond %{REQUEST_FILENAME} !-l
RewriteRule ^(.*)$ index.php?url=$1 [QSA,L]
This script should be added to the document's root directory and the le should be
saved as .htaccess. Now let us add our index.php and verify if our application
level web server congurations in the .htaccess script have been applied on
request. Add the following code to the index.php le:
<?php
$url = $_GET['url'];
echo '"'.$url.'"'.' is the requested page';
?>
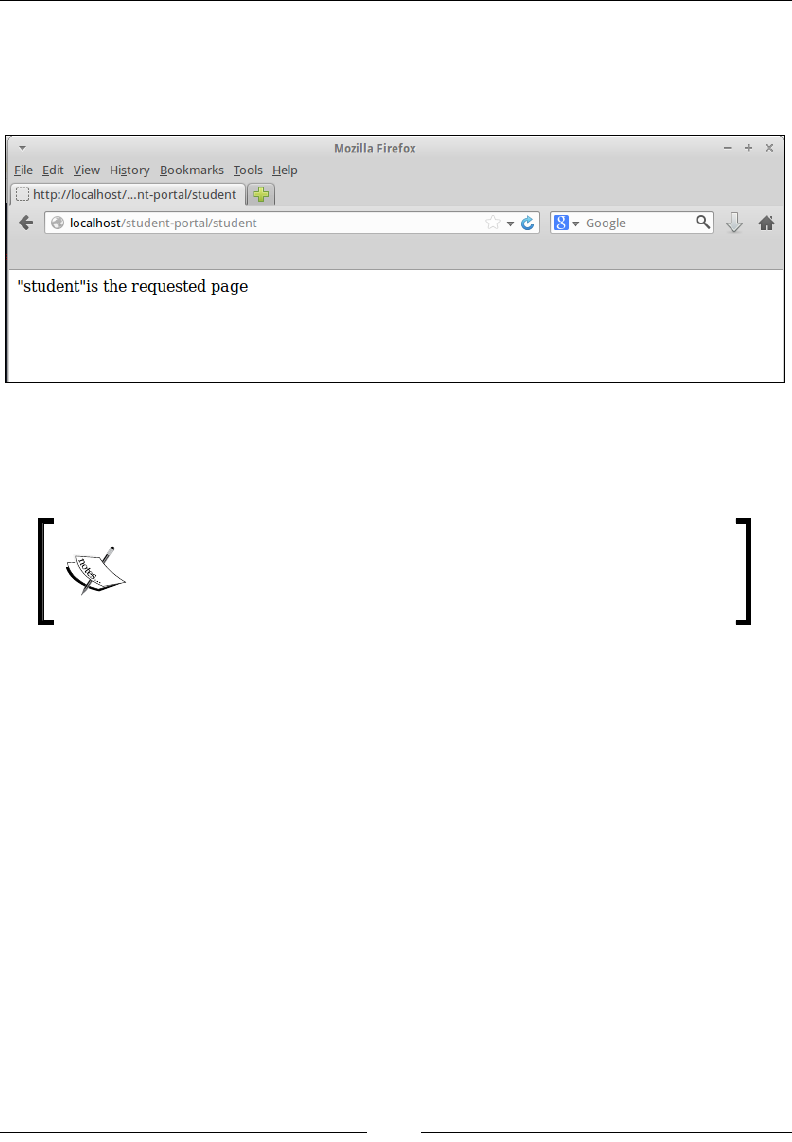
Chapter 4
[ 91 ]
In our index.php le, we are retrieving the value of url that will be populated
during the redirection process.
The output is as follows:
Since "student" is the requested page is printed, we can believe that our redirection
was successful. Now let us continue with our student application and build our rst
form that will allow us to add a student to our course_registry database.
We will be working with the course_registry database that we
built in Chapter 1, CRUD Operations, Sorting, Filtering and Joins on
MariaDB, and Chapter 2, Advanced Programming with MariaDB.
Setting up MVC
Now that we have our folder structure and the rewrite functionality working, we
can begin setting up our MVC-based application. The rst thing that we will have
to focus on would be to bootstrap our application by loading the required classes.
We are storing these required classes in the lib folder and we will use the config.php
le to store the required congurations such as the location of the lib folder, the base
URL for our application, and the database connection information.
<?php
define('LIBRARY', 'lib/');
define('BASE_URL', 'http://localhost/student-portal/');
define('DB_VENDOR','mysql');
define('DB_HOST','localhost');
define('DB_NAME','course_registry');
define('DB_USR','root');
define('DB_PWD','top_secret_pwd');

Setting Up Student Portal
[ 92 ]
Let us add the Bootstrap class in our lib folder. This class will be responsible
for understanding, interpreting, and redirecting the incoming request to the correct
controller. The code to be entered in lib/Bootstrap.php class is as follows:
<?php
class Bootstrap{
public function __construct(){
$url = $_GET['url'];
$url = explode("/",$url);
//should be logged
//if a controller is not mentioned
if(empty($url[0])){
require_once("controllers/students.php");
(new Students())->get();
return false;
}
$file_name = "controllers/".$url[0].".php";
//should be logged
if(!file_exists($file_name)){
//replace the message
//redirect the user to a custom 404 page
echo "File does not exist";
return false;
}
require_once($file_name);
$ct_name = ucfirst($url[0]);
$controller = new $ct_name;
if(empty($url[1])){
$controller->get();
return false;
}
$action_name = isset($url[1]) ? $url[1]:NULL;
if($action_name && method_exists($controller, $action_name)){
if(empty($url[2])){
$controller->{$url[1]}();
}

Chapter 4
[ 93 ]
else{
$controller->{$url[1]}($url[2]);
}
}
else{
//should be logged
//replace the message
//redirect the user to a custom 404 page
echo "Action does not exist";
}
}
}
In the preceding code snippet, we begin by retrieving the data in the url parameter.
We begin by using the explode function to build a list of the incoming data.
Before we go further, let us look at the following examples of our URLs to
understand the URL structure:
URL Controller Action Params
http://localhost/student-
portal/students/add
Students add -
http://localhost/student-
portal/students/get
Students get -
http://localhost/student-
portal/students/delete/1
Students delete 1
From this table, it is clear that the data that will be carried in through the url
parameter will have the controller, action, and optional parameter. Our bootstrap
class will handle all these cases and the cases where enough data is not present.
It is now time to implement this functionality in our index.php page, which is the
entry point to our application. Enter the following code in our index.php le:
<?php
require_once("config.php");
function __autoload($class) {
require LIBRARY . $class .".php";
}
$app = new Bootstrap();
?>

Setting Up Student Portal
[ 94 ]
In the index.php le, we begin by importing the congurations from the config.
php le. Then we are using the _autoload magic function to import all the required
classes in the lib directory. Once the required library les are loaded (including
the Bootstrap.php le), we instantiate a bootstrap object that will take the request
forward. Now that we have our database congurations loaded into the application,
we can create our database library le that will provide the required database
operations. In our case, let us keep our database library le simple and extend
the PDO class.
Enter the following code in our lib/Database.php le:
<?php
class Database extends PDO{
public function __construct($DB_VENDOR, $DB_HOST, $DB_NAME,
$DB_USR, $DB_PWD){
parent::__construct($DB_VENDOR.':host='.$DB_HOST.';
dbname='.$DB_NAME, $DB_USR, $DB_PWD);
}
}
The next thing to set up would be our base model, base view, and base controller
that will carry the base functionality that will be used across models, views,
and controllers. The base model class that we will build will be very simple
and would create a database object and make it available for the controllers
to use it. Let us begin with our base model that would use our database library,
present in the lib/Base_Model.php le:
<?php
abstract class Base_Model{
public function __construct(){
$this->db = new Database(DB_VENDOR, DB_HOST, DB_NAME, DB_USR,
DB_PWD);
}
}
The Base_Model class will be an abstract class as there will not be a need for us to
instantiate this class and we will extend this class whenever we would need the
functionality in it. This class will serve as the parent class for all the models. In this
class, we are instantiating the Database class. Now let us build our base view class that
will carry the functionality that will help us in controller-view interactions and other
view-related functionalities. Enter the following code in our lib/Base_View.php le:
<?php
class Base_View{

Chapter 4
[ 95 ]
public function __construct(){
}
public function render($name){
require_once("views/layout/header.php");
require_once("views/$name.php");
require_once("views/layout/footer.php");
}
}
In our base view library le, we will create the render method that would take
the name of the view as an argument and import a view le. We are also importing
the header and the footer views that are part of the views/layout folder. We have
not created them yet, but these will just be the placeholders while we continue to set
up our MVC application. Now that we have the base view and base model library
les, let us build our base controller library le. Enter the following code in our
lib/Base_Controller.php le:
<?php
abstract class Base_Controller{
public function __construct(){
$this->view = new Base_View();
}
public function loadModel($name) {
$path = 'models/'.$name.'_model.php';
if (file_exists($path)) {
require_once("models/$name_model.php");
$modelName = ucfirst($name)."_Model";
$this->model = new $modelName();
}
}
}
The base controller library le will be quite simple and we will be instantiating an
object of the Base_View class. The view object will be available to all the sub classes
that extend the Base_Controller class, and will thereby be able to use the render
function to call specic views. We also have the loadModel method that takes the
name of the controller and performs a little processing to import the model le.
Once the model is loaded, we can use the model object to query the database.

Setting Up Student Portal
[ 96 ]
Now that we have set up the base libraries for our MVC application, let us build
our rst controller. The rst controller that we will work with is the Students
controller. The Students controller will house all the application logic for the
students. Enter the following code in our controllers/students.php le:
<?php
class Students extends Base_Controller{
public function __construct(){
parent::__construct();
}
public function add(){
}
public function get($id=null){
}
}
We begin with a skeleton of the application logic that will be housed in the Students
controller. We will use the add action to add a student to the database and use the
get action to retrieve one or all of the students in the database.
Adding a student
In this section, we will build our rst view that will allow us to add a student to our
course_registry database. While working with MVC, every action in a controller
should have a separate view. As there can be one or more actions in a controller,
we will create a students subdirectory in the views directory. Once we start
working on the courses controller, we will create another subdirectory in the
views directory for storing the views for the courses controller and add the
folloing code in the views/students/add.php le:
<div id="addStudent">
<?php
if(isset($this->id)){
echo "New user has been successfully added";
}
?>
<form class="Frm" action="add" method="post">
<ul>
<li>
<label>First Name</label>
<input name="first_name" placeholder="Enter First Name">
</li>

Chapter 4
[ 97 ]
<li>
<label>Last Name</label>
<input name="last_name" placeholder="Enter Last Name">
</li>
<li>
<label>Address</label>
<textarea name="address" placeholder="Enter Address">
</textarea>
</li>
<li>
<label>City</label>
<input name="city" placeholder="Enter City">
</li>
<li>
<label>State</label>
<input name="state" placeholder="Enter State">
</li>
<li>
<label>Zipcode</label>
<input name="zip_code" placeholder="Enter Zip Code">
</li>
<li>
<label>User Name</label>
<input name="username" placeholder="Enter User Name">
</li>
<li>
<label>Password</label>
<input name="password" type="password" >
</li>
<li>
<input type="submit" name="submit" value="Add Student">
</li>
</form>
</div>
Now that we have a HTML form to add a student, let us look at the process
of handling form submission once the user clicks on the Add Student button.
One thing to note from this snippet is that the form will post back to the add
action upon submission. Now let us look at how the action renders this form
and how the action will handle the post back. Enter the following code in our
controllers/students.php le:
public function add(){
if(isset($_POST['submit'])){
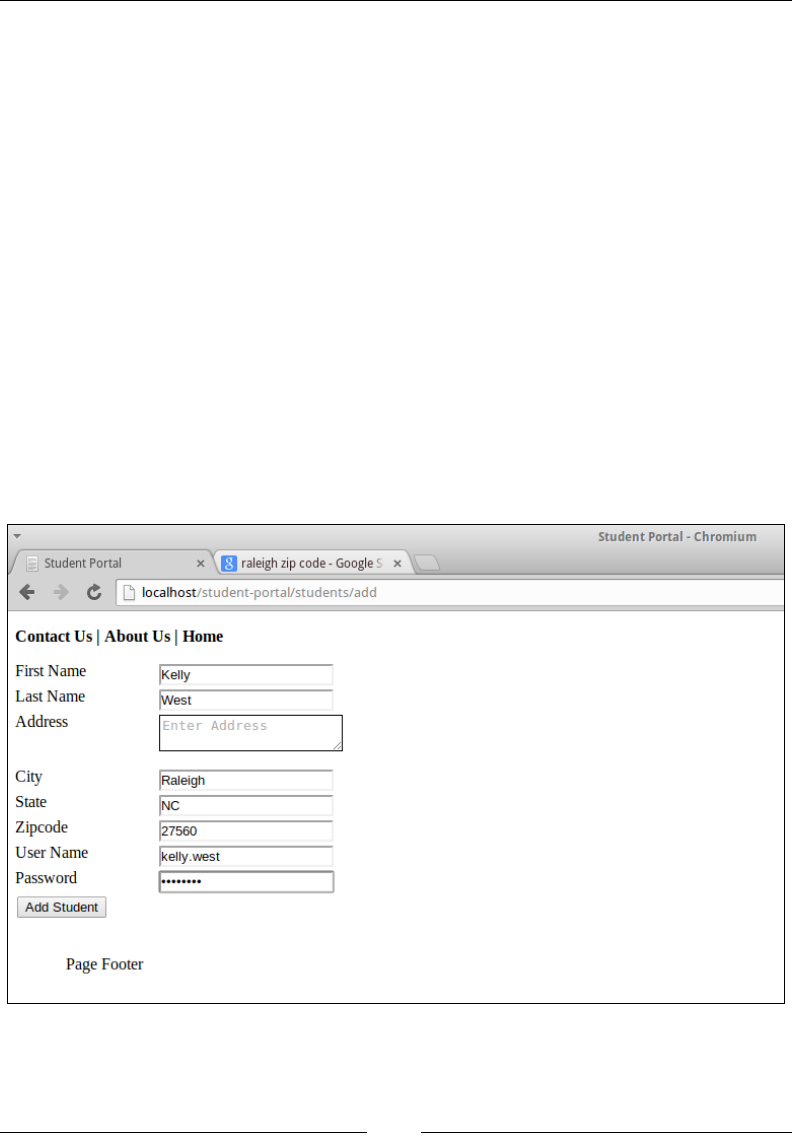
Setting Up Student Portal
[ 98 ]
unset($_POST['submit']);
$this->view->id = $this->model->addStudent($_POST);
}
$this->view->render('students/add');
}
In the previous code snippet, we are adding the add action to the Students
controller. We are doing three things in the add action; they are as follows:
• We begin by checking whether the form has been submitted
• If the form is submitted, we call the addStudent method to add the
student to our database
• Finally, we load the view using the render method that we have created
in the Base_View library
Now let us load the form using a browser, the URL to load this form will be
http://localhost/student-portal/students/add.
The output is as follows:

Chapter 4
[ 99 ]
Now once we click the Add Student button, the data will be posted to the add
action again. Since $_POST['submit'] will be set to Add Student, the execution
will go into the conditional block. Once the post data has been processed, we send
it over to the addStudent method in the Students model. Now let us look at how
we add the data to the database once the data reaches the model, present in the
models/students_model.php le:
<?php
class Students_Model extends Base_Model{
public function __construct(){
parent::__construct();
}
public function addStudent($student){
ksort($student);
$columns = implode(',', array_keys($student));
$values = ':' . implode(', :', array_keys($student));
$stmt = $this->db->prepare("INSERT INTO students
($columns) VALUES($values);");
foreach($student as $key=>$value){
$stmt->bindValue(":$key", $value);
}
$stmt->execute();
return $this->db->lastInsertId();
}
}
In the Students model, we begin by extending the Base_Model class. In the
addStudent method, we begin by sorting the post data according to the key.
We will be using prepared statements to interact with the database. After the key
sort, we go through the process of building the insert query. We use the bindValue
method to bind the values to the statement. Once the statement is prepared and the
values have been bound, we use the execute method to run the query against the
database. After a successful execution, we retrieve the ID of the student that has just
been added using the lastInsertId method and return it back to controller. This
ID is passed across to the view that renders a success message when a student has
successfully been added to the database.
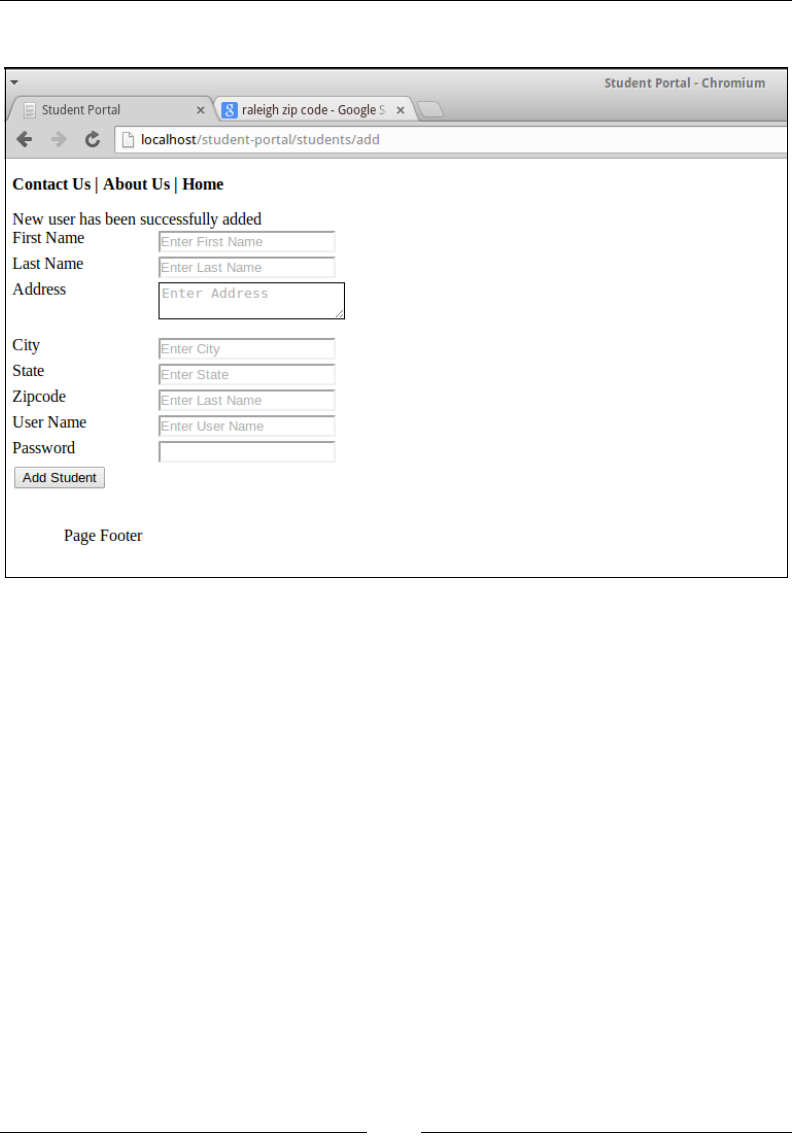
Setting Up Student Portal
[ 100 ]
The output is as follows:
When a user has been successfully added to the database, the New user has been
successfully added message is displayed on the page. Now that we have added
a student to the existing course_registry database, let us retrieve the student ID,
the rst name, and the last name of all of the students.
Listing all students
Let us continue our work on the Students controller and build an action that
would retrieve information about all the students in our students table, present
in the controllers/students.php le:
public function get($id=null){
$this->view->student_data = $this->model->getStudents();
$this->view->render('students/get');
}

Chapter 4
[ 101 ]
In this snippet, we are creating the get action that retrieves student data.
This action can be used to get information about a single student or information
about all students.
We are only handling the case about fetching information about all
students; once the portal handles other prole information of the
student, we can build a view for the student prole.
We are using the getStudents method provided by our Students_model to
fetch the data and pass it on to the get.php view in the students subdirectory.
Now let us take a quick look at the getStudents method, present in the
models/students_model.php le:
public function getStudents(){
return $this->db->query("SELECT student_id, first_name,
last_name FROM students;")->fetchAll(PDO::FETCH_ASSOC);
}
In this snippet, we are querying the database to retrieve the student ID, rst name,
and last name of all the students. We are performing a PDO fetchAll to retrieve
an array of all the rows. Now this data will be passed back to our get action that
forwards it over to the get.php view. Now let us take a quick look to understand
how get.php renders the student data, present in the views/students/get.php le:
<div id="getStudent">
<table>
<tr>
<th>Student Id</th>
<th>First Name</th>
<th>Last Name</th>
</tr>
<?php foreach($this->student_data as $student): ?>
<tr>
<td><?= $student['student_id']?></td>
<td><?= $student['first_name']?></td>
<td><?= $student['last_name']?></td>
</tr>
<?php endforeach; ?>
</table>
</div>
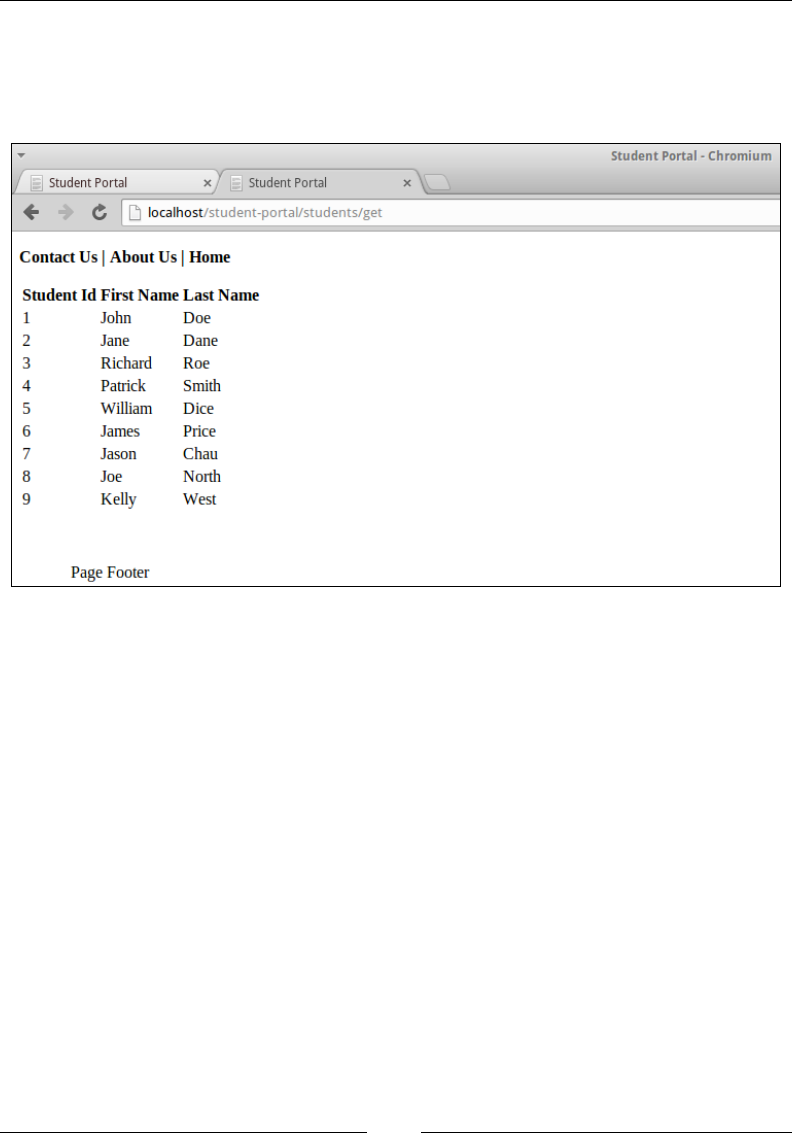
Setting Up Student Portal
[ 102 ]
In the preceding code snippet, we are using the data stored in $this->student_data
and are iterating over the array to print the student ID, rst name, and last name.
Now let us load this page onto the browser. The URL to load this page will be
http://localhost/student-portal/students/get. The output is as follows:
Upon the successful load of this page, we will be able to view the student data in a
list format. Now that we have created actions to successfully add and view students.
Let us implement the functionality of adding a course and listing all the courses.
Adding a course
In this section, we will add the new Courses controller to our controllers'
directory. Our Courses controller will extend the Base_Controller class and,
upon instantiation, we will load the courses model (we are yet to create the model).
The code snippet for the Courses controller will be similar to our Students
controller; this is shown in the following code snippet; in the controllers/
courses.php le:
<?php
class Courses extends Base_Controller{
public function __construct(){
parent::__construct();
$this->loadModel("courses");
}

Chapter 4
[ 103 ]
public function add(){
if(isset($_POST['submit'])){
unset($_POST['submit']);
$this->view->id = $this->model->addCourse($_POST);
}
$this->view->render('courses/add');
}
}
We will be using the add action to create a new course and add it to our courses table.
In our add action, we are passing in the data in the $_POST superglobal over to the
addCourse method provided by our courses model. Now let us look at the addCourse
method in our courses model, present in the models/courses_model.php le:
<?php
class Courses_Model extends Base_Model{
public function __construct(){
parent::__construct();
}
public function addCourse($course){
ksort($course);
$columns = implode(',', array_keys($course));
$values = ':' . implode(', :', array_keys($course));
$stmt = $this->db->prepare("INSERT INTO courses($columns)
VALUES($values);");
foreach($course as $key=>$value){
$stmt->bindValue(":$key", $value);
}
$stmt->execute();
return $this->db->lastInsertId();
}
}
In this snippet, we have the addCourse method that expects the course data as
an argument. Similar to the process of adding a student, we will sort the course
data by key and generate the column data and the value data. Later we prepare
the insert SQL statement to be run on our course_registry database. Upon a
successful insert operation, the last inserted ID is returned back to the controller.
The controller will pass this ID to the view, and the view will print the success
message that the new course has been successfully added.

Setting Up Student Portal
[ 104 ]
Let us now look at our view to add a new course, in the views/courses/add.php le:
<div>
<?php
if(isset($this->id)){
echo "New course has been successfully added";
}
?>
<form class="Frm" action="add" method="post">
<ul>
<li>
<label>Course Name</label>
<input name="name" placeholder="Enter Course Name">
</li>
<li>
<label>Description</label>
<textarea name="description" placeholder=
"Enter Description"></textarea>
</li>
<li>
<input type="submit" name="submit" value="Add Course">
</li>
</form>
</div>
In this snippet, we have an HTML form with two elds for course name and course
description. Upon clicking the Add Course button, the data will be submitted to the
add action. The add action then forwards the data to the addCourse method in the
courses model that adds this new course to the database. The output is as follows:

Chapter 4
[ 105 ]
In the preceding screenshot, we are adding the new course, DS-101, to our database.
In the next section, we will look at how to build a list of all the courses available in
the database.
Listing all courses
In this section, we will focus on listing all the courses in the database on the page.
We will begin by adding the get action to our Courses controller that will use the
getCourses method provided by the courses model. Once the data is retrieved
from the getCourses method, the data is forwarded to the get.php view from
our get action in the controllers/courses.php le:
public function get($id=null){
$this->view->course_data = $this->model->getCourses();
$this->view->render('courses/get');
}
The code of the models/courses_model.php le is as follows:
public function getCourses(){
return $this->db->query("SELECT course_id, name,
description FROM courses;")->fetchAll(PDO::FETCH_ASSOC);
}
The code of the views/courses/get.php le is as follows:
<div id="getCourses">
<table>
<tr>
<th>Course Id</th>
<th>Course Name</th>
<th>Description</th>
</tr>
<?php foreach($this->course_data as $course): ?>
<tr>
<td><?= $course['course_id']?></td>
<td><?= $course['name']?></td>
<td><?= $course['description']?></td>
</tr>
<?php endforeach; ?>
</table>
</div>

Setting Up Student Portal
[ 106 ]
Now let us load this page onto the browser to verify if the DS-101 course is
displayed in this list. The output of the views/courses/get.php le is as follows:
Registering a student to a course
In this section, we will register a student for a course. We will allow the users
to register a student to a course by accepting the student ID and course ID.
We will add the new StudentsCourses controller to our controllers directory
and it will extend the Base_Controller class. Upon instantiation, we will load
the StudentCourses model (similar to other controllers in the application) in the
controllers/studentsCourses.php le:
<?php
class StudentsCourses extends Base_Controller{
public function __construct(){
parent::__construct();
$this->loadModel("studentsCourses");
}
public function register(){
if(isset($_POST['submit'])){
unset($_POST['submit']);
$student_id = $_POST['student_id'];
$course_id = $_POST['course_id'];
$this->view->id = $this->model->registerStudentCourse
($student_id, $course_id);
}

Chapter 4
[ 107 ]
$this->view->render('studentsCourses/register');
}
}
We will be using the register action to register a student for a course and add the
registration information to our student_courses table. In our register action,
we are extracting the student ID and course ID from the $_POST superglobal.
We pass these values to the registerStudentCourse method provided by our
StudentCourses model. Now let us look at the registerStudentCourse method
in our StudentCourses model in the models/studentsCourses_model.php le:
<?php
class StudentsCourses_Model extends Base_Model{
public function __construct(){
parent::__construct();
}
public function registerStudentCourse
($student_id, $course_id){
$stmt = $this->db->prepare("INSERT INTO students_course
(student_id, course_id) VALUES(:student_id, :course_id)");
$stmt->bindValue(":student_id",$student_id);
$stmt->bindValue(":course_id",$course_id);
$stmt->execute();
}
}
In the preceding code snippet, we have the registerStudentCourse method that
expects the student ID and course ID as arguments. Later, we prepare the insert SQL
statement that will register a student for a course. Let us now look at our view to
register a student to a new course, in the views/studentsCourses/register.php le:
<div>
<?php
if(isset($this->id)){
echo "Student has been successfully registered for the
course";
}
?>
<form class="Frm" action="register" method="post">
<ul>
<li>
<label>Course Id</label>

Setting Up Student Portal
[ 108 ]
<input name="course_id" placeholder="Enter Course Id">
</li>
<li>
<label>Student Id</label>
<input name="student_id" placeholder="Enter Student Id"/>
</li>
<li>
<input type="submit" name="submit" value="Register Course">
</li>
</ul>
</form>
</div>
In this snippet, we provide two textboxes for the users to enter the student ID
and the course ID. On clicking the Register Course button, the student will be
registered to the specic course. Now let us load this page onto the browser to view
the output. The URL to load this page will be http://localhost/student-portal/
studentsCourses/register. The output is as follows:
Now that we have this page to register a student for a course, let us look at the screen
to view all the registrations.

Chapter 4
[ 109 ]
Viewing all registrations
In this section, we will build the screen that would retrieve all the current
registrations in our course_registry database. We will begin by adding the get
action to our StudentsCourses controller that will use the getStudentsCourses
method provided by the StudentCourses model. Once the data is retrieved from
the getStudentsCourses method, the data is forwarded to the get.php view from
our get action. Let us add these methods to the existing scripts. The code in the
controllers/studentsCourses.php le is as follows:
public function get(){
$this->view->studentsCourses_data =
$this->model->getStudentsCourses();
$this->view->render('studentsCourses/get');
}
The code in the models/studentsCourses_model.php le is as follows:
public function getStudentsCourses(){
$stmt = $this->db->prepare("SELECT s.first_name, s.last_name,
s.student_id, c.course_id, c.name as course_name
FROM students_courses sc INNER JOIN students s ON
sc.student_id=s.student_id INNER JOIN courses c ON
sc.course_id=c.course_id");
$stmt->execute();
$studentsCourses = [];
while($row = $stmt->fetch(PDO::FETCH_ASSOC)){
$studentsCourses[] = $row;
}
return $studentsCourses;
}
The code in the views/studentsCourses/get.php le is as follows:
<div id="getStudentCourses">
<table>
<tr>
<th>First Name</th>
<th>Last Name</th>
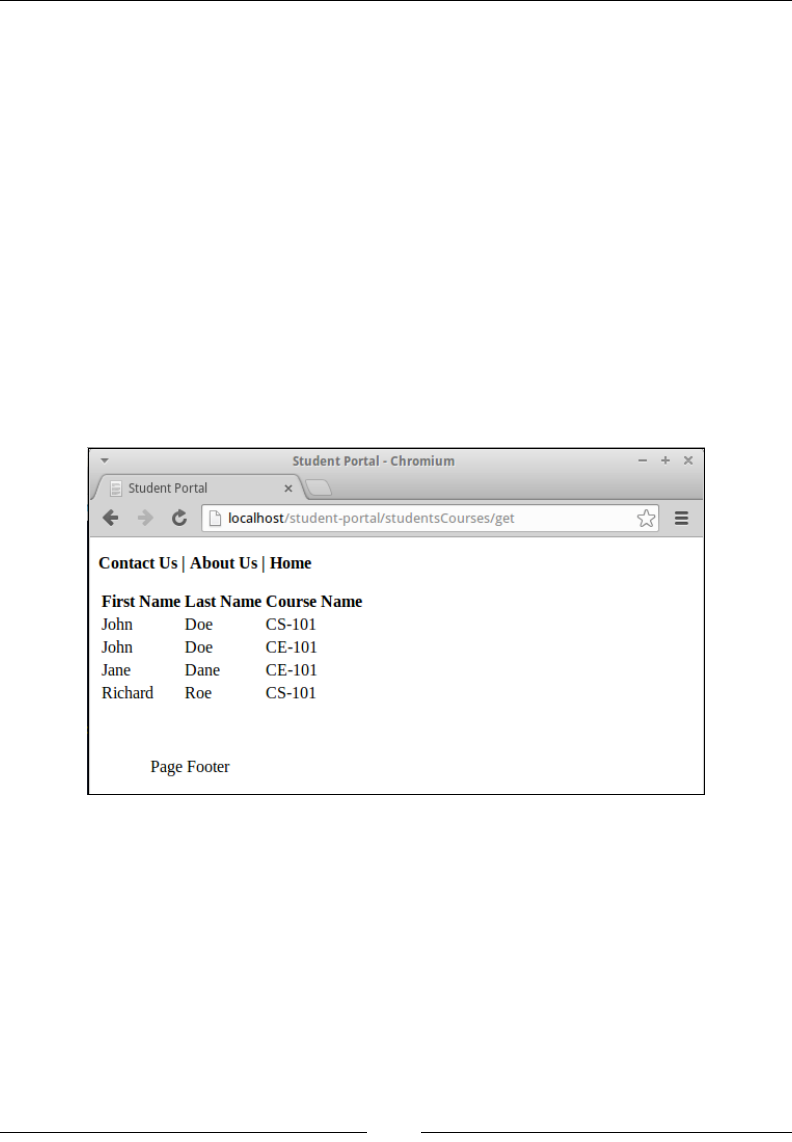
Setting Up Student Portal
[ 110 ]
<th>Course Name</th>
</tr>
<?php foreach($this->studentsCourses_data as $
studentCourseData): ?>
<tr>
<td><?= $studentCourseData['first_name']?></td>
<td><?= $studentCourseData['last_name']?></td>
<td><?= $studentCourseData['course_name']?></td>
</tr>
<?php endforeach; ?>
</table>
</div>
Now that we have added the required scripts to fetch the existing registrations
and to render them onto the browser, let us load this page into the browser.
The URL to load this page onto the browser is http://localhost/student-
portal/studentsCourses/get. The output is as follows:
In the preceding screenshot, we are rendering the list of existing registrations that
are available in our course_registry database. We have covered many tasks for our
student application; a few similar tasks that we will tackle in Chapter 6, Authentication
and Access Control, are as follows:
• Deregistering a student from a course
• Deleting a student
• Deleting a course
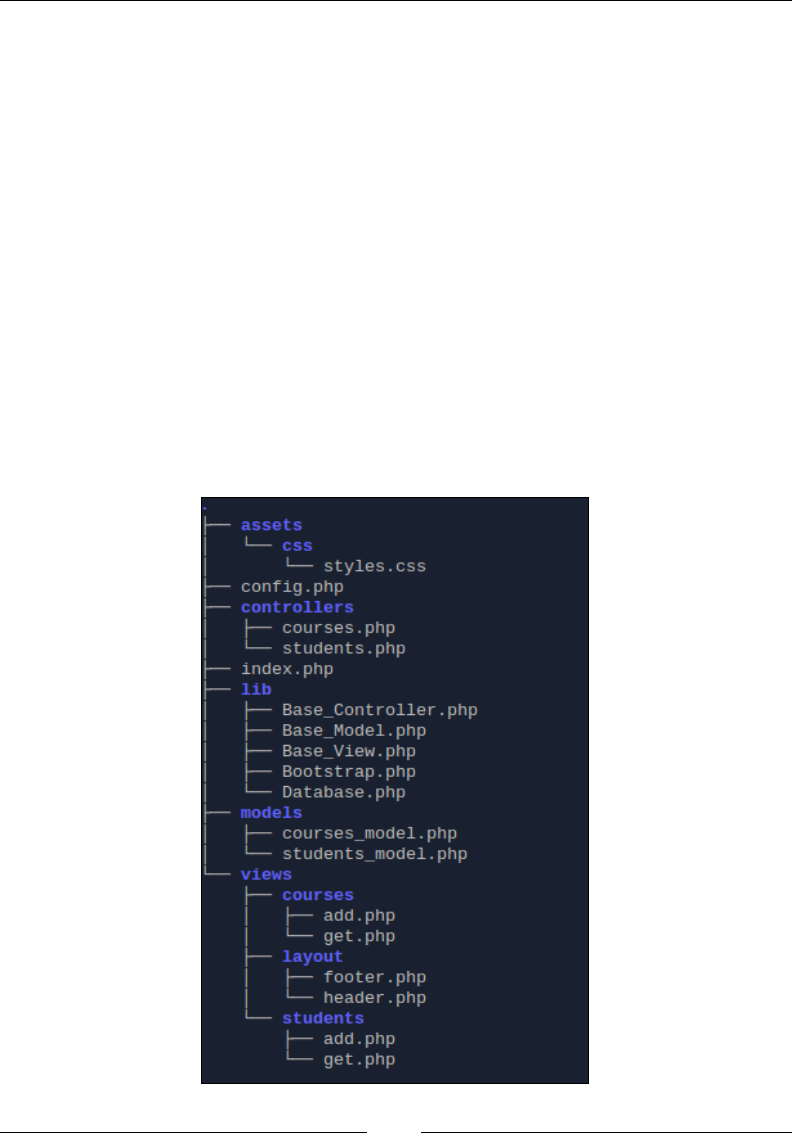
Chapter 4
[ 111 ]
We have successfully laid the foundational work towards building our student
application. Now let us go over a few les that I have mentioned briey but did
not go through in any length. These les are as follows:
• header.php: The header section of all the pages will be coming from this
le. This le can be split further to have a partial view le that will be specic
ally used for holding the navigation system and to dynamically accept a
page-specic title. This le is located in the views/layouts/ subdirectory.
• footer.php: The footer section of all the pages will be coming from this le.
This le is located in the views/layouts/ subdirectory.
• styles.css: This le will be used as the main CSS le for our student portal
application. A good feature to implement is partial- or controller-specic
CSS les. The le is referenced in the header.php le.
Both the header.php and footer.php les are used for view generation, which is
performed by the render method in the Base_View library class. Now let us look
at the folder structure and all the les that will be part of the code bundle for this
chapter, as shown in the following screenshot:

Setting Up Student Portal
[ 112 ]
Summary
In this chapter, we began by building our student portal application that can be
used to add students, view a list of students, add courses, view a list of courses that
are available, register a student to a course, and to view all the registrations in the
database. During this chapter, we built our own MVC framework. There are a lot
of MVC frameworks that are already available; for any application development
purpose, it is advised to use an existing MVC framework as it would be thoroughly
tested and will have been extensively used by others. The MVC framework that
we during this chapter should be used as a reference to understand the nuts and
bolts of existing MVC frameworks. In the next chapter, we will go over common le
operations and how PHP allows us to interact with les.

Working with Files and
Directories
In the last chapter, we discussed the basics of building our student portal
application. In this chapter, we will focus on le interactions and operations.
PHP allows us to work with les that are available both locally and on a remote
server. Files are commonly used to store logs and congurations of an application.
They are also used to carry data from one application to another. In this chapter,
we will begin by working with data imports from les and data exports to les.
Later, we will look at two different types of logging mechanisms that will take
us further with our interaction with les.
Data imports
In real-world applications, data may have to be consumed from multiple sources,
and a lot of applications are still built to use at les for data storage. In this section,
we will work with a le containing data about students, and import that data into
our course_registry database. There are multiple formats that are commonly
used to store data in a at le. These formats use delimiters such as a comma, tab,
or space, to separate one data item from another. The most popular formats are the
CSV (comma separated values) and TSV (tab separated values) formats. We will
work with a comma-separated list of student data that is stored in a at le.
Let's take a quick look at this data.
The following code snippet is contained in the students.csv le:
George,Johnson,3225 Woodland Park Dr,Houston,TX,77087,george.johnson,
6579e96f76baa00787a28653876c6127
Charles,Davis,3225 Woodland Park Dr,Houston,TX,77087,charles.davis,
6579e96f76baa00787a28653876c6127

Working with Files and Directories
[ 114 ]
Edward,Moore,3225 Woodland Park Dr,Houston,TX,77087,edward.moore,
6579e96f76baa00787a28653876c6127
Brian,Anderson,3225 Woodland Park Dr,Houston,TX,77087,brian.anderson,
6579e96f76baa00787a28653876c6127
This le contains the data about four new students that we would like to add to our
existing students table. This data includes the rst names, last names, addresses,
cities, states, zip codes, user names, and the SHA1 hashes of the students' passwords.
To import this le, we need to have at least two things: a form to upload this le and
an action that would take this le, extract the data, and call the appropriate function
in the model to add this data to our course_registry database.
Let's begin by building the form that will allow a user to upload this le. Since the
le import functionality will not be used often, let's make this form toggleable so that
it will appear upon clicking a link. We will add the ImportStudents link, and then
add the toggle functionality to this link, so that the form will appear upon clicking
this link. We will add the link and form to the get.php view.
The following code snippet is contained in the views/students/get.php le:
<div id="getStudent">
<div id="importStudents">
<p>
<a id="importStudentsLink" href="#">Import Students</a>
</p>
<div style="clear:both"></div>
<div id="importStudentsFrm" style="display:none;">
<form action="/student-portal/students/import" method="post"
enctype="multipart/form-data">
<label for="file"></label>
<input type="file" name="file" />
<input type="submit" name="submit" value=
"Import Students" />
</form>
</div>
</div>
<div id="message">
<?php if(isset($this->message)): ?>
<?= $this->message ?>
<?php endif; ?>
</div>
<table>
<tr>
<th>Student Id</th>
<th>First Name</th>
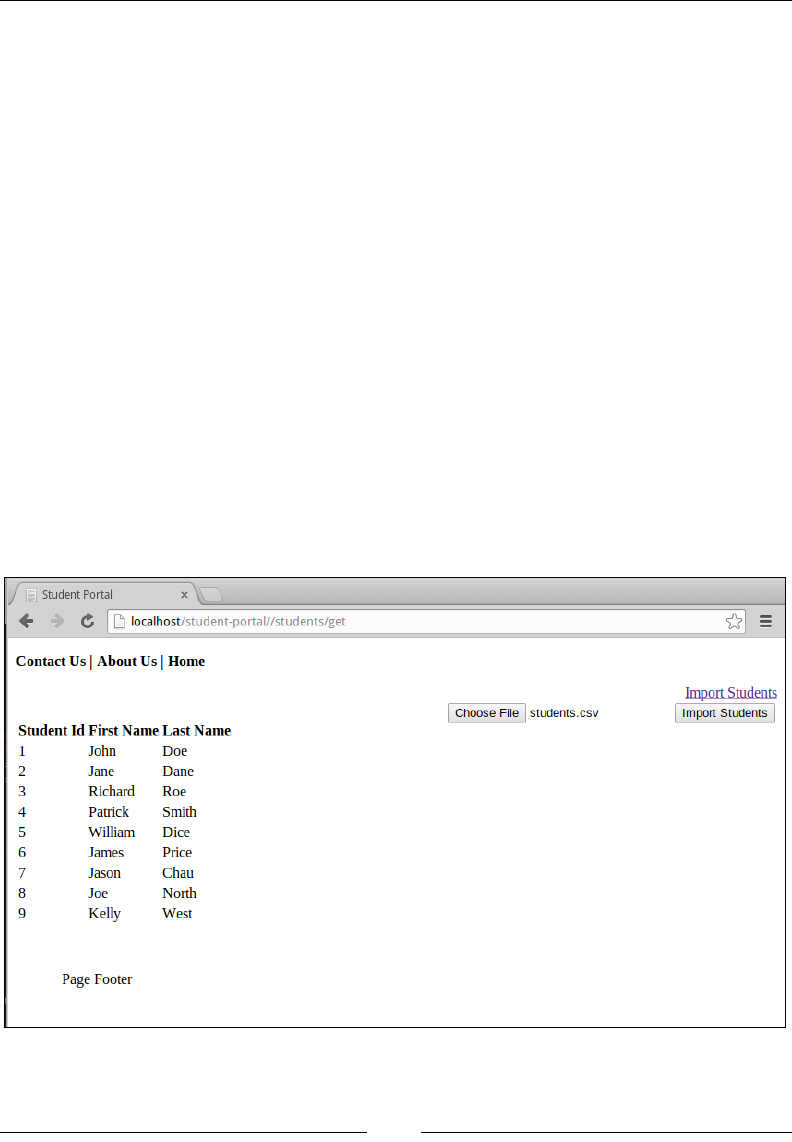
Chapter 5
[ 115 ]
<th>Last Name</th>
</tr>
<?php foreach($this->student_data as $student): ?>
<tr>
<td><?= $student['student_id']?></td>
<td><?= $student['first_name']?></td>
<td><?= $student['last_name']?></td>
</tr>
<?php endforeach; ?>
</table>
</div>
We have made a few changes to the existing get.php view, the rst being the
addition of the Import Students link. We are not giving a value to the href
attribute because this link will only be used to show the upload form that will
allow the user to upload the student data. We use a very simple upload form that
allows the user to pick a le and click on the submit button to upload the le to
the server. We use the HTTP POST method to upload the le, and we mention that
the encoding type should be multipart/form-data that allows the data being
submitted (including the les) to be encoded and sent to the server in the POST body.
We are going to submit this data to our new import action. Let's load this view into
the browser and look at the form now. The output is as follows:
Working with Files and Directories
[ 116 ]
Here we load the page into the browser and click on the Import Students
link to load the upload form. Now, we use the Choose File button to pick the
students.csv le that contains the student data, and upon form submission,
this data is sent to the server.
The students.csv le is part of the code les.
Let's look at how the le handling is performed once the le reaches the server.
The following code needs to be entered in the controllers/students.php le:
public function import(){
if(isset($_POST['submit'])){
if($_FILES['file']['error']==0){
if (($handle = fopen($_FILES['file']['tmp_name'], 'r'))
!== FALSE) {
while (($data = fgetcsv($handle, 1000, ',')) !== FALSE) {
$student['first_name'] = $data[0];
$student['last_name'] = $data[1];
$student['address'] = $data[2];
$student['city'] = $data[3];
$student['state'] = $data[4];
$student['zip_code'] = $data[5];
$student['username'] = $data[6];
$student['password'] = $data[7];
$this->model->addStudent($student);
}
}
header('Location:'.BASE_URL.
'/students/get?message=importSuccess');
}
}
}
In this snippet, we add the import action to the students controller. The import
action will be responsible for parsing the le and extracting the data. In the import
action, we begin by checking if the form was successfully submitted. We then use
the $_FILES superglobal provided by PHP to retrieve the information of the le that
was uploaded. When a le is uploaded via a form, this le is stored in the temporary
directory, and we will normally use the move_uploaded_file function to relocate
the le to a directory that can store the le persistently.
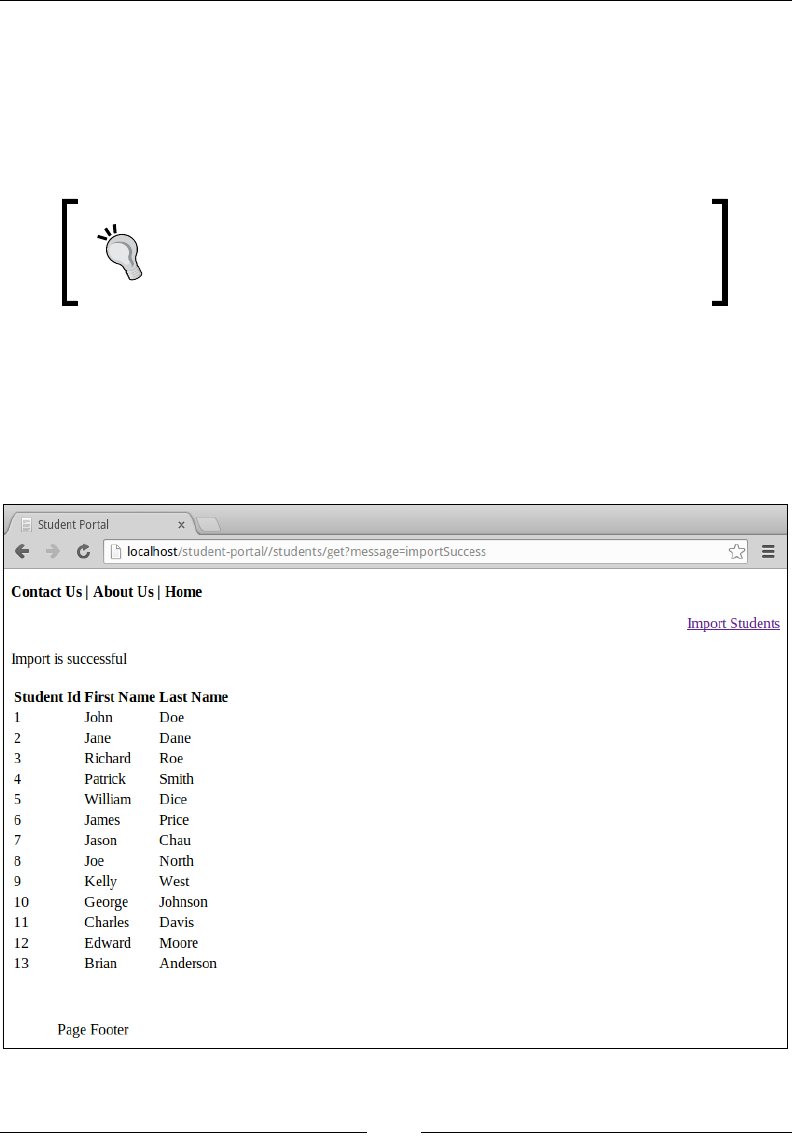
Chapter 5
[ 117 ]
In our case, we are only concerned with extracting the information from the le,
and we will not store the le locally. We will create a le resource to the le in the
temporary directory and open the le in read mode. As we are uploading a CSV le,
we can use the fgetcsv function provided by PHP to extract the information from
the le. Using the fgetcsv function, we read one line at a time and pass the data to
our addStudent function provided by our students model.
It is recommended to verify the le type of the uploaded
le using $_FILES['file']['type'] before using
the fgetcsv function. We are assuming that the student
information is provided in CSV format.
Upon completion of inserting data into the students table, we will use the header
function provided by PHP to redirect the user to the get action. By redirecting the
user to the get action, we allow the user to make sure that the student data has been
successfully added. Now that we understand how the data in the students.csv
le is handled, let's upload the le and verify if the data has been loaded into the
database. The output will be as follows:

Working with Files and Directories
[ 118 ]
Upon a successful import operation, we will receive a success message that says
Import is successful. Now that we can see the list of students, we can verify if
any new student has been added to the database.
Data exports
Now that we have successfully imported data into our database, let's look at the
process for exporting the data. In this section, we will look at two tasks: exporting
the data to a le in the local lesystem and allowing a user to download that
exported le. Let's begin by making a small change to the get.php view to add
a link to export the data, using the following code. We will add the following line
of code to the paragraph tag that contains the Import Students link:
<a id="exportStudentsLink" href="export">Export Students</a>
Here, we set the href attribute to the export action that we will be adding. As the
name suggests, we will use the export action to export the student data into a CSV
le, and allow the users to download this data. Before we go over the export action,
we need to make three updates to the existing code. The rst change will be to add a
constant that will hold the root-working directory to our config.php le that houses
our congurations:
define('ROOT_DIR', dirname(__FILE__));
In this snippet, we use the __FILE__ magic constant to retrieve the name of the
existing le, and then use the dirname function provided by PHP to get the path to
our root directory. The next change that we will make is to modify the getStudents
method in our students_model to return all columns in the students table,
as shown in the following code:
public function getStudents(){
return $this->db->query("SELECT * FROM students;")
->fetchAll(PDO::FETCH_ASSOC);
}
We will nally add the files directory to house the les that our application will
use in the controllers/students.php le, as shown in the following code snippet:
public function export(){
$data = $this->model->getStudents();
$handle = fopen(ROOT_DIR.'/assets/files/students.csv', 'w+');

Chapter 5
[ 119 ]
foreach ($data as $student) {
fputcsv($handle, array($student['student_id'],
$student['first_name'], $student['last_name'],
$student['address'],$student['city'],$student['state']));
}
fclose($handle);
header('Content-Disposition: attachment;
filename="students.csv"');
header('Content-Type:application/csv');
readfile(ROOT_DIR.'/assets/files/students.csv');
}
In this action, we begin by fetching the student data using the getStudents method
from our students model. We use the ROOT_DIR constant to open a new le handle
in the write mode, and use the fputcsv function to add data in the CSV format.
Later, to allow the user to download this le, we will pass HTTP headers that will
denote to the browser that this le is an attachment, and we will set the lename in
that header. The last header that we will pass is to let the browser know about the
content type of the data that is coming over from the server. We will use the readfile
function to retrieve the information from the le and pass it to the browser.
Logging
The last le operation that we will work with is logging. We will begin by looking
at how information can be logged to web server logs and build a simple logging
library that can be used across the application. Let's begin by using the error_log
function provided by PHP to log information into the web server logles. For this
example, let's use the export action that we created in the last section to add a
message that will be logged.
The following codec needs to be added to the controllers/students.php le:
public function export(){
$data = $this->model->getStudents();
$handle = fopen(ROOT_DIR.'/assets/files/students.csv', 'w+');
foreach ($data as $student) {
fputcsv($handle, array($student['student_id'],
$student['first_name'], $student['last_name'],
$student['address'],$student['city'],$student['state']));
}
fclose($handle);

Working with Files and Directories
[ 120 ]
header('Content-Disposition: attachment;
filename="students.csv"');
header('Content-Type:application/csv');
readfile(ROOT_DIR.'/assets/files/students.csv');
error_log('Students.csv has been successfully exported');
}
Now, let's click on the Export Students link again to export the student data.
To view the log messages, we will have to open up the error.log le that is
used by the web server. For an Apache web server, the server logs are stored in
the /var/log/apache2/ directory. The output will be as follows:
[Sun Mar 30 17:25:11.870341 2014] [:error] [pid 5439] [client
127.0.0.1:55111] Students.csv has been successfully exported, referer:
http://localhost/student-portal/students/get
One thing to note is that we do not have a lot of control from the application
over what message is logged to the server logs. Logging is often used with rapid
prototyping and development. If we want to log any debugging information or a
warning, it will be logged as an error when it is not really an error. To gain more
control over the logging structure, let's go ahead and build a simple logger class that
will allow us to log messages and have a clear differentiation between a debugging
information message, a warning, and an error. Before we begin with work on our
logger library le, let's add the path to the directory into which the logles are saved:
define('LOG_PATH',ROOT_DIR.'/logs/');
We use the ROOT_DIR constant that we had set up in the previous section to build
the path to the directory that will house the logs. Now, let's build our logger library,
which will be in the path lib/Logger.php, using the following code snippet:
<?php
class Logger{
public function __construct(){
$this->path = LOG_PATH;
}
private function log($type, $message){
$handle = fopen($this->path."app.log","a+");
fwrite($handle, $type." : ".$message.PHP_EOL);
fclose($handle);

Chapter 5
[ 121 ]
}
public function info($message){
$this->log("info",$message);
}
public function warn($message){
$this->log("warn",$message);
}
public function error($message){
$this->log("error",$message);
}
}
In the Logger library class, we begin with adding a constructor and setting the path
to a class variable. We then move on to our log private method that will be used by
the rest of the public logging methods in our class. This log method will take two
arguments, the rst argument is the type of the log item and the second argument is
the message of the log item. In this method, we begin by opening a le handle that
will open the app.log le in the append mode. We use this le handle to write the
type and message of the log item. Once the log item is written to the le, we will
close the le handle. This log method can now be used by other wrapper methods,
and they will pass in the type and message for the log item. Now that we have our
Logger library, let's use this logger to log a few messages. To access our Logger,
we will create an object to the logger in our Base_Controller library class:
public function __construct(){
$this->view = new Base_View();
$this->logger = new Logger();
}
In this snippet, we create an object for the Logger library class and assign that
to a class variable that will be available for all the classes that will extend the
Base_Controller class. Let's use the $this->logger class variable in the export
action in our students controller. We will replace the existing call to error_log
function with a call to info methods provided by our Logger library, using the
following code snippet:
public function export(){
$data = $this->model->getStudents();
$handle = fopen(ROOT_DIR.'/assets/files/students.csv', 'w+');
foreach ($data as $student) {

Working with Files and Directories
[ 122 ]
fputcsv($handle, array($student['student_id'],
$student['first_name'], $student['last_name']
,$student['address'],$student['city'],$student['state']));
}
fclose($handle);
header('Content-Disposition: attachment;
filename="students.csv"');
header('Content-Type:application/csv');
readfile(ROOT_DIR.'/assets/files/students.csv');
$this->logger->info("Students.csv has been successfully
exported");
}
The only change that has been made to the export action is the replacement of the
call to the error_log function with the info method provided by our Logger library.
Now, let's export the student data one more time and see if the message is logged to
the app.log le located in the logs directory. The output will be as follows:
info : Students.csv has been successfully exported
Now that we have an idea of how a logger library works, it is always recommended
to use a third-party library such as log4php for application-logging purposes.
Summary
In this chapter, we discussed working with le imports and le exports, and then
we looked at how logging can be performed in our application. In the next chapter,
we will go over authentication and access control lists.

Authentication and
Access Control
In the previous chapter, we went over basic le operations such as importing
data from les, exporting information to les, and logging data to les. In this
chapter, we will go over the basics of how authentication and access control can
be implemented into our application. Our student portal application can now
perform three major tasks: the rst is to add a student, the next is to add a course,
and the third is to register a student to a course. Till now, we have a universal user
that can do any of these operations. In this chapter, we will modify this behavior to
set up session handling, access controls, and user roles for these users. We will use
sessions to persist user data and provide a personalized experience when they login.
The topics that we will discuss in this chapter are:
• Authentication
• Access controls
• User roles
Authentication
It is very common to track and store user information in cookies; however, since
cookies are stored on the client side, we will use sessions for storing user information
and making it available across the web application after authenticating the users.
We will still use authentication for determining whether the submitted data
is valid. Upon authentication, we will load the required user information into
session variables and use that information wherever required. For building
authentication for our student portal, let us begin by creating our library les
to support the authentication.

Authentication and Access Control
[ 124 ]
Create the lib/Session.php le with the following code:
<?php
class Session
{
public static function init()
{
session_start();
}
public static function destroy()
{
session_destroy();
}
}
In this snippet, we begin creating the Session library that contains two methods,
init and destroy. The init and destroy functions use the session_start and
session_destroy functions provided by PHP. As the name suggests, a session is
started when the session_start function is executed. A unique session identier is
generated by the web server that is used to identify this session. Whenever a request
is made to get or set a session variable pertaining to that particular session, the web
server would need the session ID to identify this session. The second method in our
Session library is the destroy method that would invoke the session_destroy
function that ends the current session. Now that we know how to create and destroy
a session, let us build utility methods that would set and get session variables:
public static function set($key, $value)
{
$_SESSION[$key] = $value;
}
public static function get($key)
{
if(isset($_SESSION[$key])){
return $_SESSION[$key];
}
else{
return false;
}
}

Chapter 6
[ 125 ]
In the aforementioned snippet, we begin with the set method that will set a
session variable into the $_SESSION superglobal. The session variables are stored
as serialized objects in a le, this le is stored in the /tmp directory by default.
To explicitly specify a directory that should store the sessions, we will have to
make the following conguration change in the /etc/php5/apache2/php.ini le:
session.save_path = "/var/apache2/sessions"
The next method that we will work with is the get method that will retrieve the
values of session variables from the $_SESSION superglobal. The $_SESSION
superglobal carries the session variables and makes the variables available across
the web application. Now that we have built our Session library, let us build our
login controller that will use our Session library to handle the login functionality.
The login controller will contain a landing page to allow the users to submit their
username and password. It will also have utility functions to process logins and
logouts. In the following code snippet, we begin by creating our Login controller
that will extend the Base_Controller class:
<?php
class Login extends Base_Controller {
function __construct() {
parent::__construct();
Session::init();
$this->loadModel('login');
}
function index()
{
$username = Session::get('username');
$this->view->username = $username?$username:'';
$this->view->message = isset($_GET['message'])?
$_GET['message']:'';
$this->view->render('login/index');
}
function runLogout()
{
Session::destroy();

Authentication and Access Control
[ 126 ]
header('Location: ' . BASE_URL .
'login/index?message='.urlencode('logout success'));
}
function runLogin()
{
$username = $_POST['username'];
$password = $_POST['password'];
$this->model->login($username, $password);
}
}
In the constructor of the login.php le, we will use the init method from our
Session library to start the session or continue an existing session. We are also
using the loadModel method to load the login model. In the index action,
we begin by checking to see if a username is part of the session variables.
Now let us look at the index view that we will render for this action:
<h1>Login</h1>
<?php
echo 'This is the username of the logged in user: '.
$this->username;
echo '<br />';
echo 'This is the message: '.$this->message;
echo '<br />';
?>
<form class="Frm" action="runLogin" method="post">
<ul>
<li>
<label>Username</label>
<input name="username" placeholder="Enter User Name">
</li>
<li>
<label>Password</label>
<input name="password" type="password" placeholder=
"Enter Password">
</li>
</ul>
<input type="submit" name="submit" value="Login">
</li>
</form>

Chapter 6
[ 127 ]
The index.php le is a very simple login form that will allow the user to enter
username and password. Upon form submission, the data is posted to the runLogin
method in our Login controller. In the runLogin method, the posted data is retrieved
and is passed to the login method in Login_Model. Let us look at our Login_Model
method to understand how this data is processed to check if the user exists in the
database and if there is a match of the username and password combination. In the
following code snippet, we begin by creating the Login_Model class that carries
the login method. The models/login_model.php le is modied as follows:
<?php
class Login_Model extends Base_Model{
public function __construct(){
parent::__construct();
}
public function login($username, $password){
$st = $this->db->prepare("SELECT username FROM students WHERE
username = :username AND password = :password");
$st->execute(array(
':username' => $username,
':password' => SHA1($password)
));
$data = $st->fetch(PDO::FETCH_ASSOC);
$hasData = $st->rowCount();
if($hasData >0){
Session::set('loggedin',true);
Session::set('username',$data['username']);
header('Location:'. BASE_URL. 'students/get?message=
'.urlencode('login successful'));
}
else{
header('Location:'. BASE_URL.
'login/index?message='.urlencode('login failed'));
}
}
}
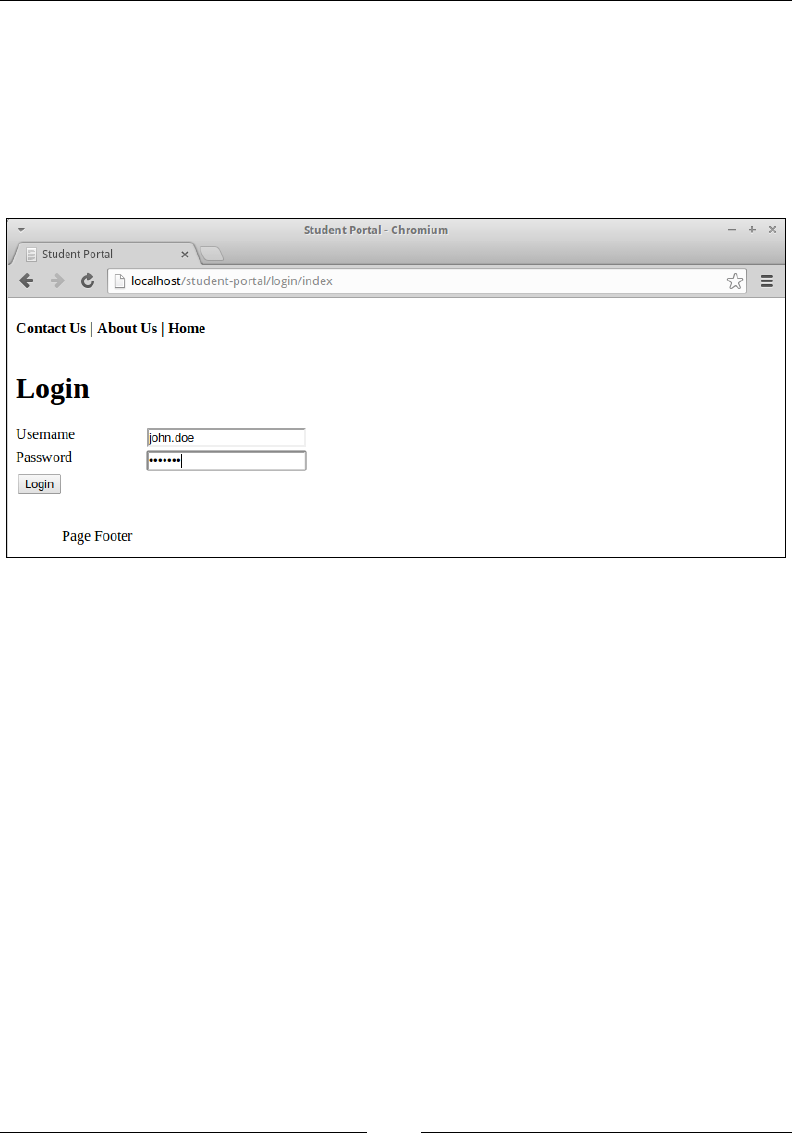
Authentication and Access Control
[ 128 ]
The login method accepts the username and the password for the user. We will begin
by querying the students table with this username and password. If the username
of the user is returned, we will set the username and a ag to denote that the user
is logged-in to the session data. After setting the session variables, we will redirect
the user to the students/get page upon success and redirect the user to the login
page to allow the user to login again. Now let us look at the login page and use the
credentials of John Doe to login. This is shown in the following screenshot:
The nal code change that we'll make will be to the header to add a logout link
that will use our runLogout method, which will invoke the destroy method from
our Session library. In the following snippet, we are adding the username of the
currently logged-in user and the logout link for the user to logout to the header
section. The views/layout/header.php le is modied with the following code:
<header>
<p class="iblk">Contact Us | About Us | Home</p>
<?php if(Session::get("loggedin")): ?>
<p class="iblk log"><?= Session::get("username")." | "?>
<a href=<?= BASE_URL."login/runLogout"?>>Logout</a></p>
<?php endif;?>
</header>
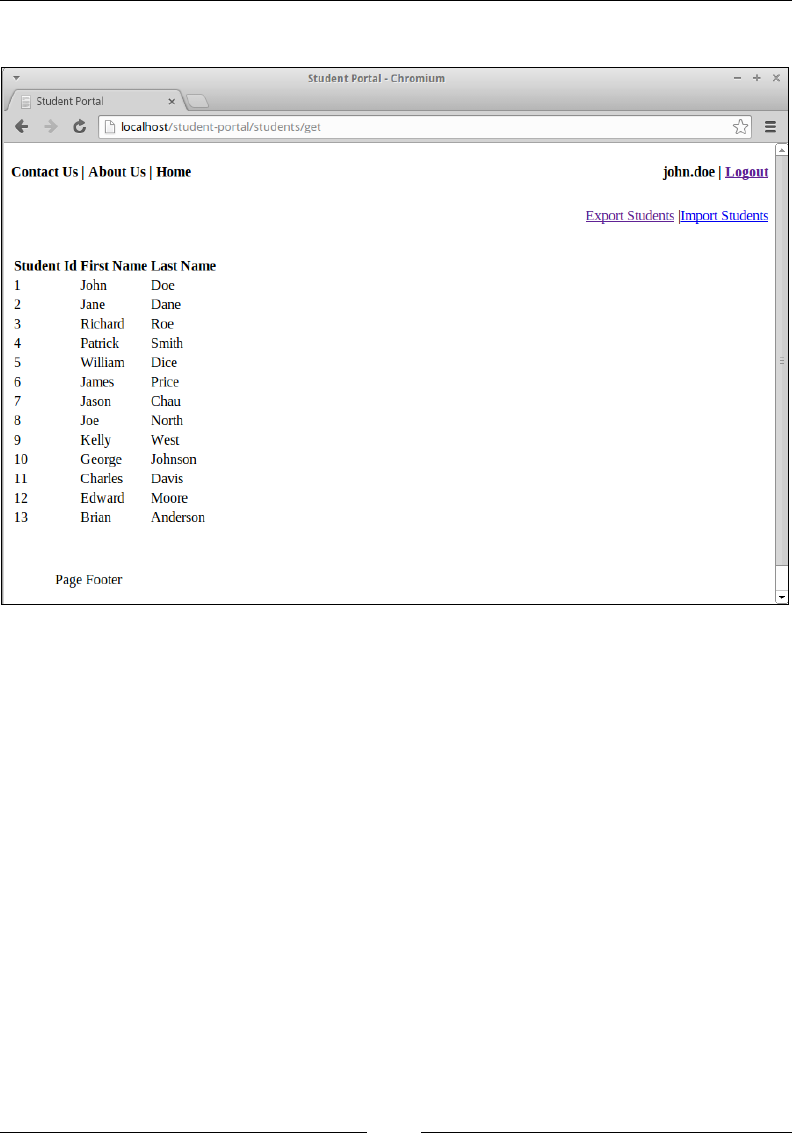
Chapter 6
[ 129 ]
Let us look at the following screenshot once the user is logged in:
Now that we have successfully logged-in as a user, let us start dening the sections
of the application that can be accessed by a user and lock down the access for the rest
of the application. The two examples that we will discuss in the next section are:
• A user logged-in as a student should not be able to add a course
• Students should only be able to register themselves but not anybody else

Authentication and Access Control
[ 130 ]
Access controls
In this section, let us begin by locking down the access for a user logged-in as a
student. We will be making a few changes to facilitate this change. The rst change
will be adding new session variables to carry more information about the user. We
will make this change to the login method in the Login_Model class. In the following
snippet, we have modied the SQL to fetch the username and student ID. We are then
adding the student ID to the session variables in the models/login_model.php le,
as shown in the following code:
public function login($username, $password){
$st = $this->db->prepare("SELECT student_id, username FROM
students WHERE username = :username AND password
= :password");
$st->execute(array(
':username' => $username,
':password' => SHA1($password)
));
$data = $st->fetch(PDO::FETCH_ASSOC);
$hasData = $st->rowCount();
if($hasData >0){
Session::set('loggedin',true);
Session::set('username',$data['username']);
Session::set('role','student');
Session::set('student_id', $data['student_id']);
header('Location:'. BASE_URL. 'students/
get?message='.urlencode('login successful'));
}
else{
header('Location:'. BASE_URL. 'login
/index?message='.urlencode('login failed'));
}
}
The nal change to the login method is to add a role to the session variables. At this
point, we only have a single type of user, a student. Therefore, we can go ahead and
add it directly. We will come back to make this more dynamic in the next section.
Now that we have added this information to the session variables, let us update
the add action in the Courses controller. In the following snippet, we begin by
retrieving the role of the user that is currently logged-in. The changes made in the
controllers/courses.php le are as follows:
public function add(){
$role = Session::get('role');
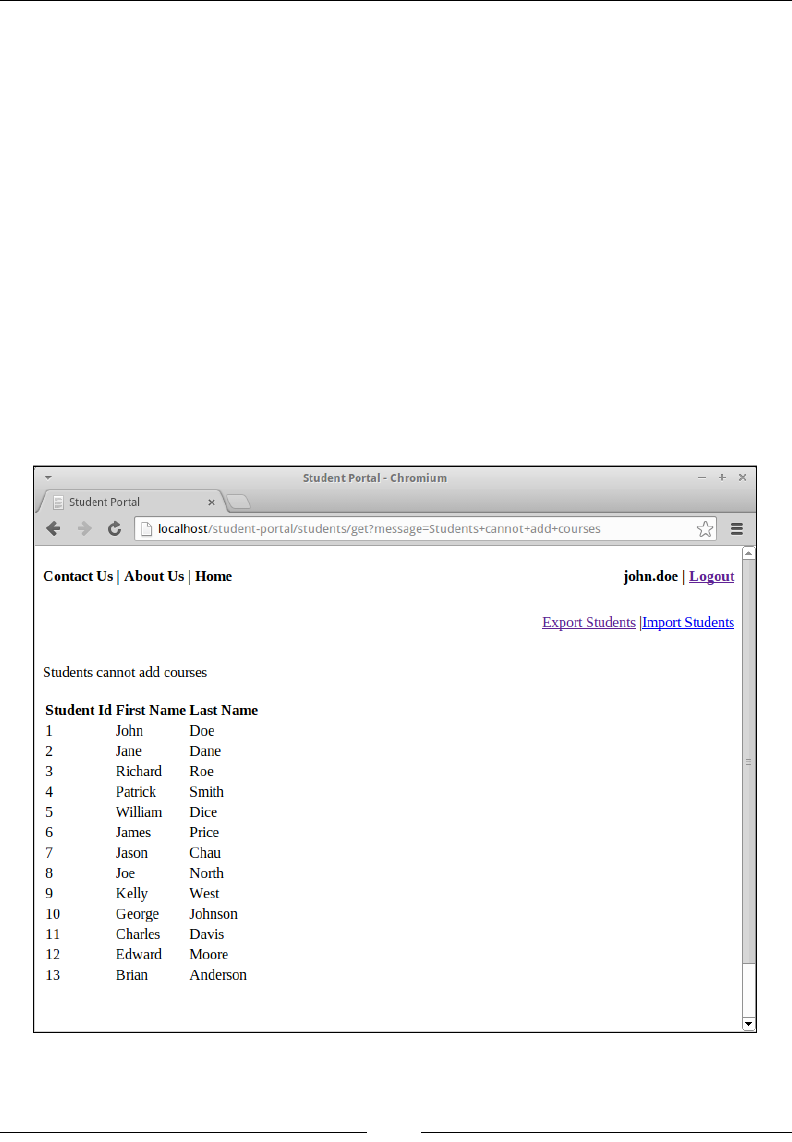
Chapter 6
[ 131 ]
if($role && $role!='student'){
if(isset($_POST['submit'])){
unset($_POST['submit']);
$this->view->id = $this->model->addCourse($_POST);
}
$this->view->render('courses/add');
}
else{
header('Location:'.BASE_URL.'students/get?message='
.urlencode('Students cannot add courses'));
}
}
Our conditional statement veries that the logged-in user is not a student before
rendering the view that allows the user to add a course. If the user is a student,
they will be redirected back to the get action for the Students controller; this
prints the message Students cannot add courses on the screen as shown in the
following screenshot:

Authentication and Access Control
[ 132 ]
From the previous output, we can verify that the user tried to access the add action
of the Courses controller and was redirected to the get action of the Students
controller. Now let us continue to our next task of locking down students from
registering anybody but themselves for a course. In the current application, as we do
not have a lot of access controls, a student can register anyone for a course. By using
their student IDs stored in the session variables, we will be negating this issue. We will
begin by modifying the register action in the StudentsCourses controller. In the
following snippet of the controllers/studentsCourses.php le, we are checking to
retrieve the role of the user from the session:
public function register(){
if(isset($_POST['submit'])){
unset($_POST['submit']);
$student_id = $_POST['student_id'];
$course_id = $_POST['course_id'];
$this->view->id = $this->model->registerStudentCourse
($student_id, $course_id);
}
$role = Session::get('role');
if($role == 'student'){
$this->view->student_id = Session::get('student_id');
}
$this->view->role = $role?$role:'';
$this->view->render('studentsCourses/register');
}
If a role exists in the session variables for this user, the role is returned, if not, false
is returned. After we retrieve the role, we are checking to see if the user is a student;
if it is, we are retrieving the student ID of the user and passing it on to the view.
Now let us look at the changes that we will make to the view in order to restrict a
user from registering anyone else other than themselves. In the following snippet
of the views/studentsCourses/register.php le, we are modifying the script to
render the student ID in a label, thereby not allowing the logged-in user to directly
modify the student ID or register another user for a course:
<div>
<?php
if(isset($this->id)){
echo "Student has been successfully registered
for the course";
}
?>
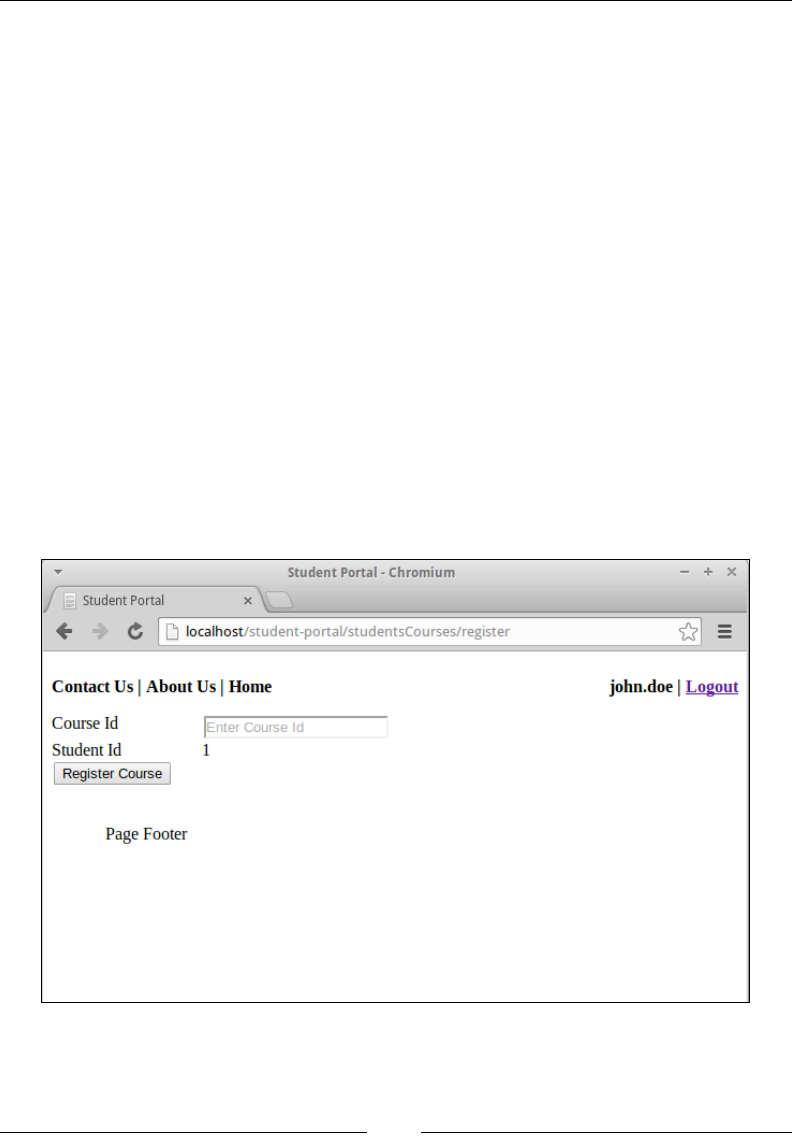
Chapter 6
[ 133 ]
<form class="Frm" action="register" method="post">
<ul>
<li>
<label>Course Id</label>
<input name="course_id" placeholder="Enter Course Id">
</li>
<li>
<label>Student Id</label>
<?php if($this->role != 'student'):?>
<input name="student_id" placeholder="Enter Student Id"/>
<?php else: ?>
<label><?= $this->student_id ?></label>
<input name="student_id" type="hidden" value
=<?= $this->student_id?>/>
<?php endif;?>
</li>
<li>
<input type="submit" name="submit" value="Register Course">
</li>
</ul>
</form>
</div>
Now let's render the following page to verify our changes:

Authentication and Access Control
[ 134 ]
From the output, we can verify that the logged-in users cannot register anybody
apart from themselves as the student ID eld is no longer a textbox.
The student ID eld has been converted from a textbox to hidden
input, so this completely does not prevent the logged-in user
from changing the student ID before registering from a course.
In Chapter 9, Security, we will x this issue by making this check
on the server, rather than on the client.
Now that we have laid down the access rules, let's set up a new user role as an
administrator. The two examples that we will discuss in the next section are:
• Adding courses
• Registering students for courses
User roles
In this section, let's begin by creating administrators who will have access
across the student portal and will be able to perform operations such as adding
courses and registering any student for a course. Let's begin by creating a few
administrators. We will be building an admin table that will store the information
for the administrators. The following script will create the admin table and add a
couple of administrators. The script is saved as the assets/sql/admin.sql le:
CREATE TABLE IF NOT EXISTS 'admin' (
'admin_id' int(11) NOT NULL AUTO_INCREMENT,
'name' varchar(45) NOT NULL,
'username' varchar(45) NOT NULL,
'password' varchar(45) NOT NULL,
PRIMARY KEY ('admin_id')
) ENGINE=InnoDB DEFAULT CHARSET=latin1 AUTO_INCREMENT=3 ;
--
-- Dumping data for table 'admin'
--
INSERT INTO 'admin' ('admin_id', 'name', 'username', 'password')
VALUES
(1, 'admin1', 'admin1', '5f4dcc3b5aa765d61d8327deb882cf99'),
(2, 'admin2', 'admin2', '5f4dcc3b5aa765d61d8327deb882cf99');

Chapter 6
[ 135 ]
Now that we have our administrators, let's begin by modifying our login view
that will allow both students and administrators to login. As we only have two
roles currently in the views/login/index.php le, we can add a checkbox to
allow administrators to set a ag that we will utilize during the login:
<h1>Login</h1>
<?php
if(Session::get("loggedin")){
echo 'This is the username of the logged in user: '.
$this->username;
echo '<br />';
}
if($this->message){
echo 'This is the message: '.$this->message;
echo '<br />';
}
?>
<form class="Frm" action="runLogin" method="post">
<ul>
<li>
<label>Username</label>
<input name="username" placeholder="Enter User Name">
</li>
<li>
<label>Password</label>
<input name="password" type="password" placeholder=
"Enter Password">
</li>
<li>
<label>Admin Login</label>
<input type="checkbox" name="IsAdmin" />
</li>
<li>
<input type="submit" name="submit" value="Login">
</li>
</form>

Authentication and Access Control
[ 136 ]
In the preceding snippet, we are adding another list item to our login form that will
allow the users to login with administrator credentials. If the user is not part of the
admin table, then the user will not be successfully logged in. Now let's update our
Login_Model class to accommodate these changes using the following code snippet
in the models/login_model.php le:
<?php
class Login_Model extends Base_Model{
public function __construct(){
parent::__construct();
}
public function login($username, $password,$type){
$st = $this->db->prepare($this->buildQuery($type));
$st->execute(array(
':username' => $username,
':password' => SHA1($password)
));
$data = $st->fetch(PDO::FETCH_ASSOC);
$hasData = $st->rowCount();
if($hasData >0){
$this->setSessionVariables($data, $type);
header('Location:'. BASE_URL. 'students/get?message=
'.urlencode('login successful'));
}
else{
header('Location:'. BASE_URL. 'login/index?message=
'.urlencode('login failed'));
}
}
private function buildQuery($type){
$id = $type.'_id';
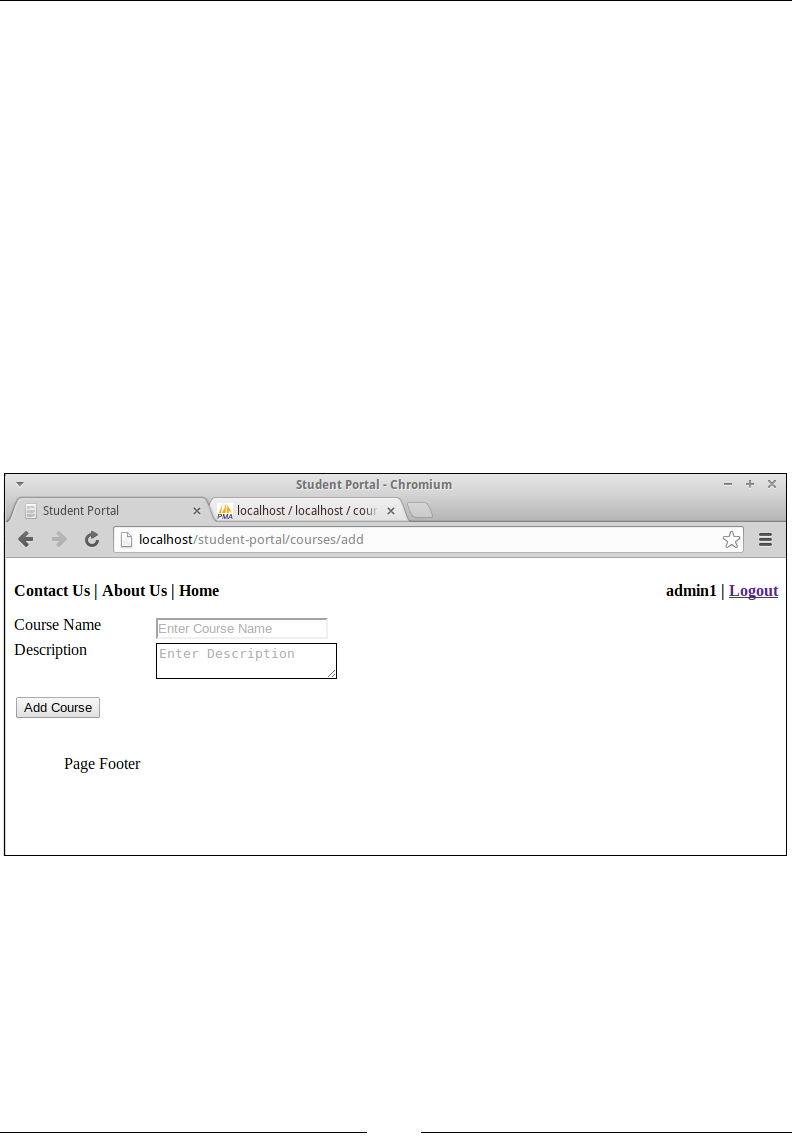
Chapter 6
[ 137 ]
$table = $type;
return "SELECT $id, username FROM $table WHERE username =
:username AND password = :password";
}
private function setSessionVariables($data, $type){
Session::set('loggedin',true);
Session::set('username',$data['username']);
Session::set('role',$type);
Session::set($type.'_id', $data[$type.'_id']);
}
}
In the preceding code snippet, we have refactored the code into multiple
methods to handle the process of dynamically building the query and once
the login is successful, we will set the user information to the session variables.
Now let's verify if we can add a course as an administrator. The output is shown
in the following screenshot:
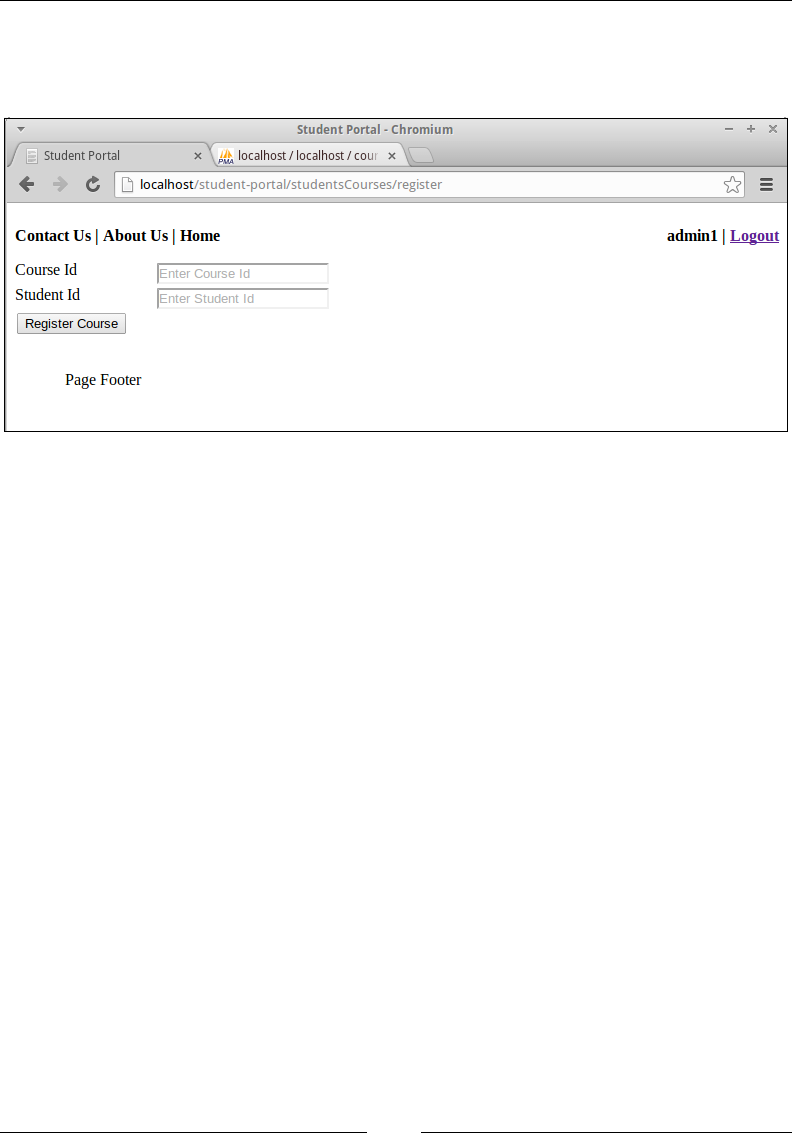
Authentication and Access Control
[ 138 ]
From the output, we can verify that an admin has the access permissions to add a
course. Now let's verify if the admin has access to register any student to a course.
This can be seen in the following screenshot:
From this output, we can verify that an administrator can register any student for a
course and we were able to achieve this with minimal changes. We currently have
two types of users; these sorts of operations can get cumbersome as the number of
types of users increase. It is advised to use Access Control Lists (ACL) to hold this
information. ACLs are commonly stored in the database and are used to gure out
the type of access a user has upon page load or initial login.
Summary
In this chapter, we went over authentication and access controls. We began with
authentication and working with sessions to understand how user information can
be across various pages on the student portal. Then we introduced access controls
where we dened the amount of access for a logged-in user. We continued the
development of our student portal by introducing the concept of user roles where
the access was different for users with different roles. In the next chapter, we will
look at the various types of caching and how caching can help our application.

Caching
In the previous chapter, we went over the basics of authentication and access
control. We started with an understanding of how a user can be authenticated
onto our student portal, and then continued to set up access permissions to users.
We progressed by creating multiple user roles to utilize the access permissions
and restrict access based on the user roles. In this chapter, we will look at different
mechanisms to cache the data that we are working with. We will have to consider
scaling the application since, at some point, the application will grow bigger and the
number of users accessing our student portal will increase. Scaling can be done in
multiple ways, such as:
• By adding more hardware
• By optimizing our network
• By refactoring our code to perform better and giving it some
performance tweaks
• By reducing the number of calls to our database and lesystem
We will cover the last method of scaling in this chapter, while we will go over
the third topic in Chapter 10, Performance Optimization. We will not go over the
rest of the topics since they beyond the scope of this book.
Introduction to caching
Caching can be dened as the process of making popular data highly available by
temporarily storing the data in memory. This allows responding to a request faster
by retrieving data from the memory rather than going onto the disk. There are three
types of caching, as follows:
• Caching in the database
• Caching in the application
• Content caching
Let's begin with database caching.
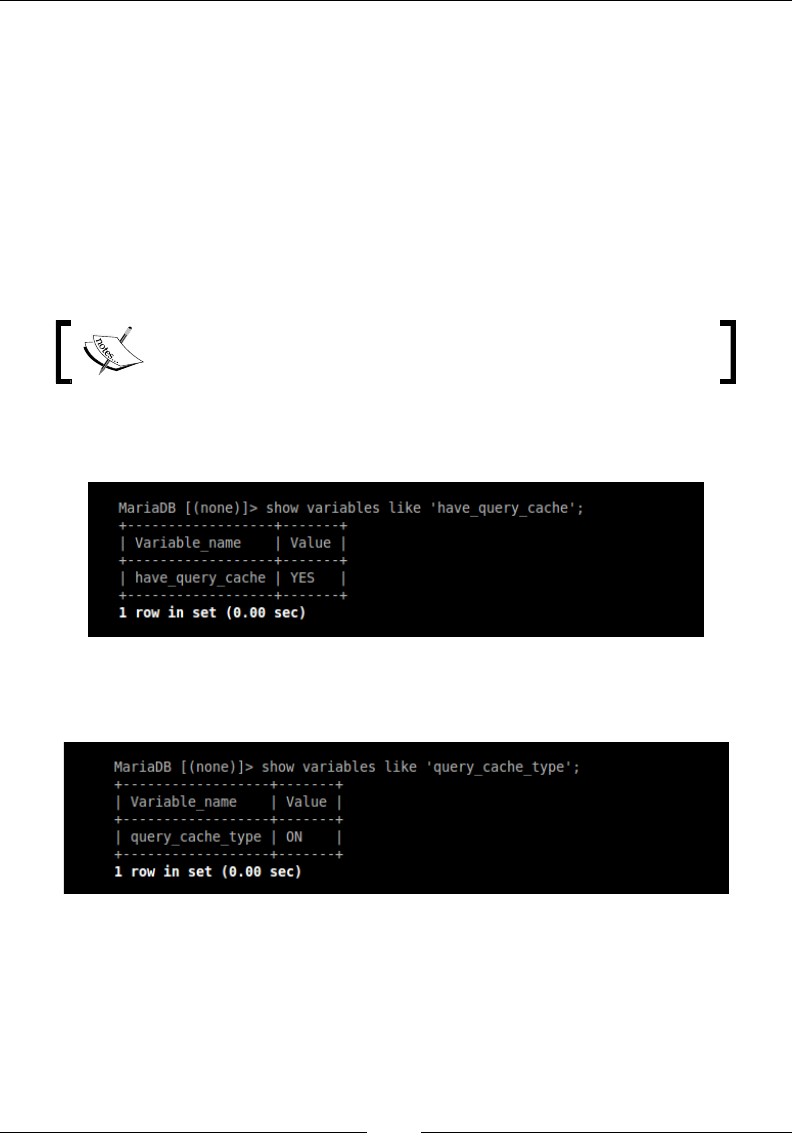
Caching
[ 140 ]
Caching in the database
All the data for our application is stored on MariaDB. When a request is made for
retrieving the list of available students, we run a query on our course_registry
database. Running a single query at a time is simple but as the application gets
popular, we will have more concurrent users. As the number of concurrent
connections to the database increases, we will have to make sure that our database
server is optimized to handle that load. In this section, we will look at the
different types of caching that can be performed in the database. Let's start with
query caching. Query caching is available by default on MariaDB; to verify if the
installation has a query cache, we will use the have_query_cache global variable.
Global variables are a type of system variables that affect the
overall operation of the MariaDB server.
Let's use the SHOW VARIABLES command to verify if the query cache is available on
our MariaDB installation, as shown in the following screenshot:
Now that we have a query cache, let's verify if it is active. To do this, we will use the
query_cache_type global variable, shown as follows:
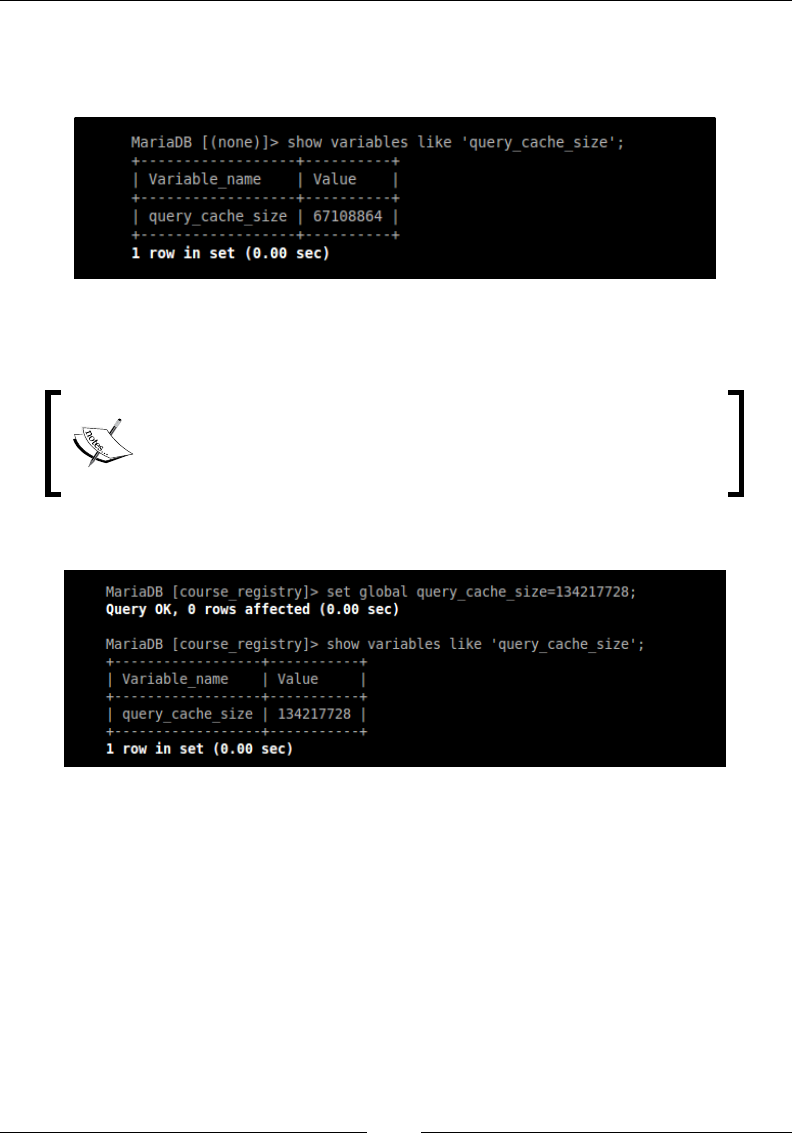
Chapter 7
[ 141 ]
From this query, we can verify that the query cache is turned on. Now, let's
take a look at the memory that is allocated for the query cache by using the
query_cache_size command, shown as follows:
The query cache size is currently set to 64 MB; let's modify our query cache size
to 128 MB.
It is important to understand that the query cache is ushed on
every query update. A really heavy system will benet well with
a bigger cache. Thorough testing will still be needed to determine
the effects of the query cache.
The following screenshot shows the usage of the SET GLOBAL syntax:
We use the SET GLOBAL syntax to set the value for the query_cache_size command,
and we verify this by reloading the value of the query_cache_size command.
Now that we have the query cache turned on and working, let's look at a few
statistics that would give us an idea of how often the queries are being cached.
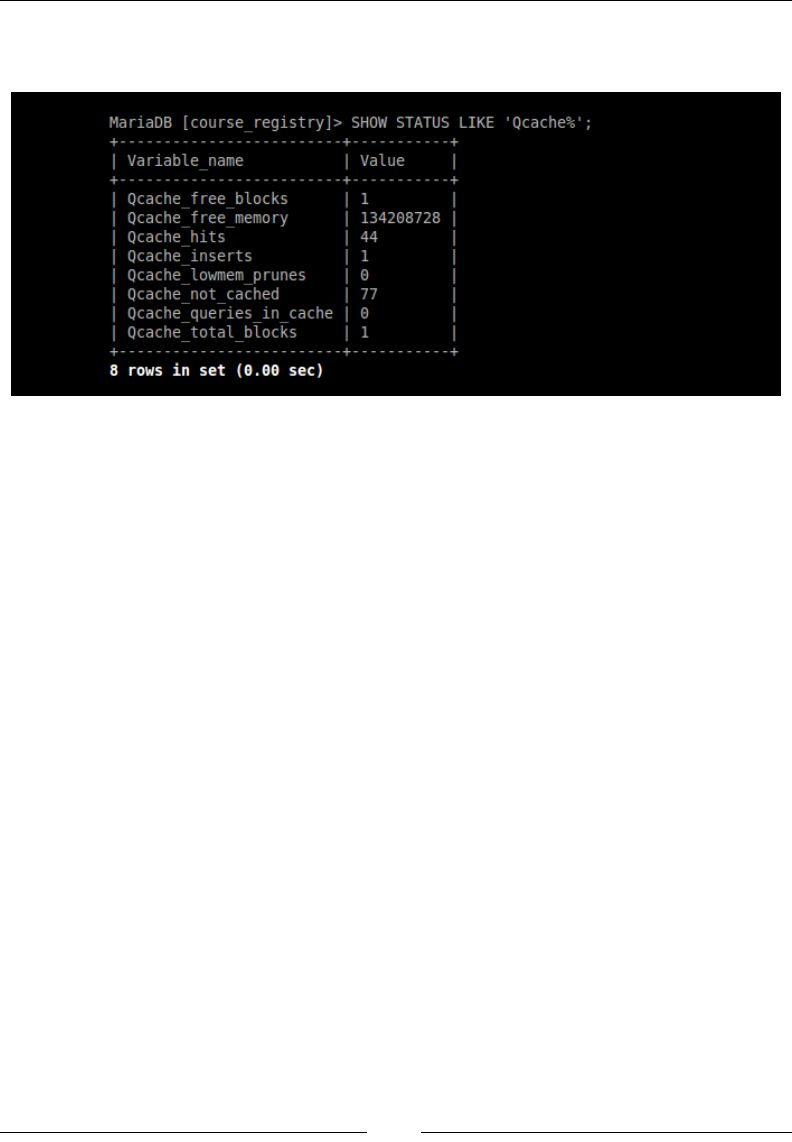
Caching
[ 142 ]
To retrieve this information, we will query the Qcache variable, as shown in the
following screenshot:
From this output, we can verify whether we are retrieving a lot of statistics about the
query cache. One thing to verify is the Qcache_not_cached variable that is high for
our database. This is due to the use of prepared statements. The prepared statements
are not cached by MariaDB. Another important variable to keep an eye on is the
Qcache_lowmem_prunes variable that will give us an idea of the number of queries
that were deleted due to low memory. This will indicate that the query cache size has
to be increased.
From these stats, we understand that for as long as we use the prepared statements,
our queries will not be cached on the database server. So, we should use a
combination of prepared statements and raw SQL statements, depending on our use
cases. Now that we understand a good bit about query caches, let's look at the other
caches that MariaDB provides, such as the table open cache, the join cache, and the
memory storage cache. The table open cache allows us to dene the number of tables
that can be left open by the server to allow faster look-ups. This will be very helpful
where there is a huge number of requests for a table, and so the table need not be
opened for every request. The join buffer cache is commonly used for queries that
perform a full join, wherein there are no indexes to be used for nding rows for the
next table. Normally, indexes help us avoid these problems. We will go over indexes
in Chapter 10, Performance Optimization. The memory storage cache, previously
known as the heap cache, is commonly is used for read-only caches of data from
other tables or for temporary work areas.
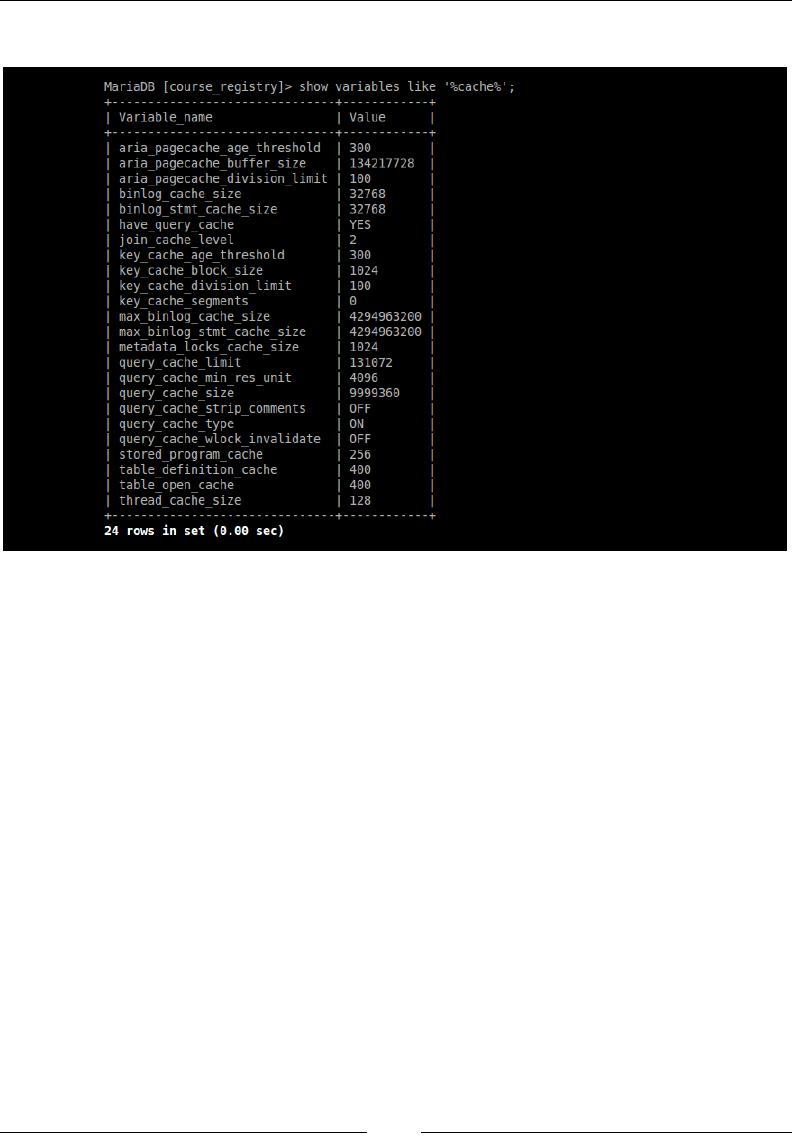
Chapter 7
[ 143 ]
Let's look at the variables that are with MariaDB, as shown in the following screenshot:
Database caching is a very important step towards making our application
scalable. However, it is important to understand when to cache, the correct caching
techniques, and the size for each cache. Allocation of memory for caching has to be
done very carefully as the application can run out of memory if too much space is
allocated. A good method to allocate memory for caching is by running benchmarks
to see how the queries perform, and have a list of popular queries that will run often
so that we can begin by caching and optimizing the database for those queries.
Now that we have a good understanding of database caching, let's proceed to
application-level caching.

Caching
[ 144 ]
Caching in the application
Memory caching is another popular technique for making data available for quick
retrieval. We will use memory caching to avoid roundtrips to the database servers.
As the application grows, we will have to scale it out, and the calls from the web server
to fetch data in the database server will get expensive. Memory caching can be used
to avoid continuous roundtrips by storing data in the memory. Memory caching is
commonly used to store the short-term volatile data, which helps in returning the data
faster as it is stored in the memory. Memory caching should not be used as a solution
to store persistent data, and it should only be used as a data store for volatile data.
Let's dive into the world of memory caching using memcached.
Memcached is a fast, multithreaded, in-memory key-value store that we will use
for storing serialized objects. These serialized objects will contain the output from
our database calls, and they can also be used to store the output of an API call in the
future. They can even store the output of our web pages after they are rendered and
return the page output on subsequent requests, rather than building dynamic views
on the server. To work with memcached, we will have to install the software and
the required connection drivers to work with PHP. In this code snippet, we install
memcached and PHP's driver for memcached:
#! /bin/bash
## installs memcached
sudo apt-get install -y memcached
## installs php's connection driver for memcached
sudo apt-get install -y php5-memcached
## restarts Apache web server
sudo service apache2 restart
Now that we have installed memcached, let's create our caching library to implement
the set and get methods to add and retrieve data from memory, as shown in the
following code snippet from lib/Cache.php:
<?php
class Cache{
public $_cache;
public function __construct(){

Chapter 7
[ 145 ]
$this->_cache = new Memcached();
$this->_cache->addServer('localhost',11211);
}
public function set($key, $value, $expires=600){
return $this->_cache->set($key, $value, $expires);
}
public function get($key){
return $this->_cache->get($key);
}
}
In this snippet, we create our caching library. We begin by creating an object for
Memcached, and then use the addServer method to connect to our local memcache
server. Once we have the connection to memcache, we will pass the object to our set
and get methods. The set method expects a unique key, a value that the unique key
will carry, and the amount of time in seconds by which the data should be stored in
the memory. The get method expects a key and retrieves the data for that key from
the memory; if the key does not exist, it will return false. Now, let's make an object
of this class available to the application. We will create an instance of this class in
Base_Controller to make it available to our controllers, as shown in the following
code from controllers/Base_Controller.php:
public function __construct(){
$this->view = new Base_View();
$this->logger = new Logger();
$this->cache = new Cache();
Session::init();
}
In this snippet, we update the constructor of our Base_Controller class and add an
instance of our caching library. Now that we have added the instance to the caching
library available, let's add our student data to the cache and retrieve it from there,
as shown in the following code snippet from controllers/students.php:
public function get($id=null){
$this->logger->info("get action been requested");
$this->view->message = $_GET['message'];
if(isset($_GET['message']) && $_GET['message']=='importSuccess'){
$this->view->message = 'Import is
successful';

Caching
[ 146 ]
}
$student_data = $this->cache->get('student_data');
if(!$student_data){
$student_data = $this->model-
>getStudents();
$this->cache->set('student_data',
$student_data);
}
$this->view->student_data = $student_data;
$this->view->render('students/get');
}
In this snippet, we update the existing get method in the student controller to use
our cache object to store and retrieve the contents from the memory. We can also
use memcache to store sessions in the memory, which will allow a faster retrieval of
user role and permissions list on a page load. To store the sessions on memcache, we
will modify session.save_handler in our php.ini le, as shown in the following
code from /etc/php5/apache2/php.ini:
session.save_handler = memcache
session.save_path = "127.0.0.1:11211"
In this snippet, we set the path to store the sessions on a local memcache instance;
once the process of scaling out begins, this should be replaced by the host name or
the IP address of the dedicated memcache cluster. Now that we have an idea of how
memcache can be used for the purpose of memory caching, let's take a look at few
other caches that can be used for caching purposes.
Advanced caching techniques
In the last two sections, we discussed database caching and memory caching to store
data for faster retrieval. In this section, we will go over caches such as OpCache and
Varnish. PHP is an interpreter language and the code has to be executed every single
time. The process of execution happens in two steps, where the code is converted
into operational byte code and is then executed. PHP 5.5 arrives with OpCache that
caches the precompiled bytecode present in the memory and executes it. Though
OpCache arrives by default with PHP 5.5, it is not enabled by default. To enable
OpCache, we have to modify our php.ini le, as shown in the following code from
/etc/php5/apache2/php.ini:
opcache.enable=1
opcache.memory_consumption=64
opcache.use_cwd=1

Chapter 7
[ 147 ]
In this snippet, we enable OpCache and allocate 64 MB of memory for storing
the bytecode. We also enable the use_cwd setting to append the current working
directory to the script key. This will avoid any collisions between our cache keys.
Once the changes are made, the web server has to be restarted for the changes to
be applied. To verify the performance gains, we can use a proler such as xhprof
to understand how OpCache helps us by caching the bytecode.
The last type of caching will be page caching using Varnish. Varnish is a reverse
proxy server that shields the web server from a massive trafc spike by storing the
HTML pages in memory. Varnish has a few other competitors, but is considered to
be very good at working as a reverse proxy. The installation and conguration of
Varnish is beyond the scope of discussion here since building a reverse proxy in
itself is a vast topic to cover.
Summary
In this chapter, we began by going over the basics of caching and why caching has
to be implemented into an application. We discussed the different types of caching
that are available and covered database caching with MariaDB, memory caching
with Memcached, and bytecode caching with OpCache. In the next chapter, we will
discuss the basics of the REST architectural design and build a REST API to allow
external applications to interact with our student portal.

REST API
In the last chapter, we discussed different types of caching and implemented
database caching, memory caching, and content caching. Our application currently
allows users to view student and course information. An important thing to note
here is that a user has to access the application to view the data. In this chapter,
let's build an Application Programming Interface (API) that will allow another
application to request for data from our application. An API is a collection of rules
that describes how one application can interact with another application. In our case,
we will build a REST API that will allow an external application to perform add and
fetch operations.
What is REST?
Representational state transfer (REST) is an architectural design for designing
communication and operational channels among networked applications. The
REST design is commonly implemented while building web HTTP APIs. As REST
APIs interact through HTTP requests, they provide heterogeneous interoperability.
RESTful APIs are best used when a single web page has to show data from multiple
partners. Let's take the example of a website that hosts movie reviews. There could
be multiple sections powered by different partners on any review page on that
site. These can be ad partners to display ads, third-party recommendation plugins
to recommend similar movie reviews to the user, and social media plugins for
comments, discussions, and to share the movie review with their friends. This is
only possible due to smooth interaction between various services; implementing a
RESTful API makes it more transparent.
REST API
[ 150 ]
In this section, let's begin by building a RESTful API that will allow an external
application to access our application. A RESTful API can support the GET, POST,
PUT, and DELETE HTTP methods. Before we proceed, let's take a look at the
implementation of how we can translate different actions into URLs based
on HTTP methods, as shown in the following table:
URL Method Description
api/students GET Fetches all the students
api/students POST Adds a student
api/students/1 PUT Updates a student
api/students/1 DELETE Deletes a student
The rst thing to note is the similarity between the URL endpoints that we will
use to perform the various actions. We use api/students to perform all the actions,
but it has to be emphasized that the type of the HTTP method will determine the
action that is performed for a request.
We currently do not support the functionality to update and delete
student information. This is a simple task that can be achieved by
building actions to perform the activity.
Before we begin with building our API, we need to update our Bootstrap library;
as the application grows, we have to move this functionality into a routing library
and save it in the lib/Bootstrap.php le.
$ct_name = ucfirst($url[0]);
//for api
if($ct_name = "api"){
$url[1] = $this->_routeApi();
}
$controller = new $ct_name;
We will add the preceding code to our Bootstrap library to check if the
incoming request is for our API. If the incoming request is for the API,
we will use the _routeApi method to determine the correct method that
should handle this request.

Chapter 8
[ 151 ]
Let's take a look at the processing of the incoming request in the _routeApi method
using the following code snippet, present in the lib/Bootstrap.php le:
private function _routeApi(){
$method = $_SERVER['REQUEST_METHOD'];
$action = "";
switch($method){
case "GET":
$action = "get";
break;
case "POST":
$action = "post";
break;
default:
$action = "";
break;
}
if(strlen($action)>0){
return $action;
}
else{
echo "Action is not available";
}
}
In this snippet, we begin by retrieving the HTTP method for the incoming request
from the $_SERVER super global. We will use the REQUEST_METHOD key to retrieve the
HTTP method, and pass it into our switch block that would determine the correct
action that should handle this request. Once the action is determined, we will return
it. Now that we have implemented the routing for our API, let's build our API,
present in the controllers/api.php le
<?php
class Api extends Base_Controller{
public $name;
public function __construct(){
$this->name = explode("/",$_REQUEST["url"])[1];
}
}

REST API
[ 152 ]
In this snippet, we begin building our API by setting up our Api controller, and we
retrieve the action for the current request. Now that we have the action, let's build
the get and post methods to retrieve and add data using our API, as shown in the
following code, present in the controllers/api.php le:
public function get(){
$method = "";
$this->loadModel($this->name);
switch($this->name){
case "students":
$method = "getStudents";
break;
case "courses":
$method = "getCourses";
break;
default:
break;
}
if(strlen($method)>0){
$data = $this->model->$method();
if(is_array($data) && count($data) >0){
print _r($data);
}
}
}
public function post(){
$method = "";
$this->loadModel($this->name);
switch($this->name){
case "students":
$method = "addStudent";
break;
case "courses":
$method = "addCourse";
break;
default:
break;
}

Chapter 8
[ 153 ]
if(strlen($method)){
$this->model->$method($_POST);
}
}
In this snippet, we build our get and post methods, both of which begin by loading
the required model based on the name of the controller that has been stored in the
$name class variables. We will then pass in the name of the controller into a switch
block that will determine the appropriate method. Based on the request, we will
retrieve the data if it is a GET HTTP request, and add a student or a course if it is a
POST HTTP request. In our get method, we fetch the required data and print it out on
the page. In the next section, we will build a mechanism to generate an XML feed to
send the data out as part of the response.
Generating XML feeds
In the last section, we built our API to fetch the data and print the raw data onto
the page. In this section, we will build methods that will take the data and convert
them into XML feeds. A remote application can then use these XML feeds to ingest
the data. Before we build the XML generation functionality, let's create a class
variable that can be used to hold this XML data using the following code in the
controllers/api.php le:
public $xml;
Now that we have added the class variable, let's add the following XML generation
functionality to our API, present in the controllers/api.php le:
private function _generateXML($root, $data){
$this->xml = new SimpleXMLElement("<$root/>");
foreach($data as $key=>$value){
$this->_generateXMLChild(substr($root, 0, -1), $value);
}
header("HTTP/1.1 200 OK");
header("Content-Type: application/xml; charset=utf-8");
echo $this->xml->asXML();
}
private function _generateXMLChild($type ,$item){
$child = $this->xml->addChild($type);

REST API
[ 154 ]
foreach($item as $key => $value){
$child->addChild($key, $value);
}
}
In this snippet, we create the _generateXML and _generateXMLChild methods to
build the XML feed and print it. We use PHP's SimplXMLElement class to generate
our XML feeds. In the _generateXML method, we expect two arguments: the name
of the root element and the actual data. As the data that we will retrieve will be an
array of arrays, we will have to loop over the parent array to retrieve the child arrays
that carry the student data or course data. The child array is passed as an argument
to the _generateXMLChild, which will be converted into XML. Once all the child
arrays have been converted into XML, we will print this XML onto the page.
To use these methods to generate the XML feed, let's modify the get method
using the following code, present in the controllers/api.php le:
if(strlen($method)>0){
$data = $this->model->$method();
if(is_array($data) && count($data) >0){
$this->_generateXML($this->name,$data);
}
}
In this snippet, we replaced the print_r call with a call to our _generateXML
method. Now that we have generated an XML feed, let's work on generating
a JSON feed.
Generating JSON feeds
In the last section, we used PHP's SimplXMLElement class to generate our XML
feeds. In this section, we will use PHP's json_encode function to generate our
JSON feed. Building a JSON feed is very simple when compared to building the
XML feed. JSON is a very popular data exchange format and is considered
lightweight when compared to XML, as shown in the following code snippet,
present in the controllers/api.php le:
private function _generateJSON($root, $data){
header("HTTP/1.1 200 OK");
header("Content-Type: application/json");
echo json_encode(array($root=>$data));
}

Chapter 8
[ 155 ]
In this snippet, we begin by building our _generateJSON method that will expect
the name of the endpoint and the data that was fetched by the get action. Now, let's
modify the get action to use the _generateJSON method, as shown in the following
code snippet:
if(strlen($method)>0){
$data = $this->model->$method();
if(is_array($data) && count($data) >0){
$this->_generateJSON($this->name,$data);
}
}
In this snippet, we replace the call to the _generateXML method with
the _generateJSON method. Though we are replacing the XML feed with the JSON
feed in this example, it is common to allow both feeds and let the external application
decide which data format to choose. This is normally done by allowing an output
format parameter in the query string, as shown in the following code:
api/students?output=json //generates JSON
api/students?output=xml //generates XML
Summary
In this chapter, we started by going over the concepts of REST architectural design.
We moved forward by building a REST API that would support HTTP's GET and
POST methods. Later, we built methods that would generate XML and JSON feeds
to deliver content. In the next chapter, we will work on optimizing the security for
our student portal. We will secure the application on all three fronts: Apache web
server, PHP, and MariaDB database server.

Security
In the last chapter, we built a REST API that allows an external application to
add and retrieve data to our database. In the earlier chapters, we built a whole
application. However, before we make it accessible to the users, it is very important
to go over the security of the total stack of software that the application is using.
We have already introduced the concept of user authentication that partially helps
with security in Chapter 6, Authentication and Access Control. In this chapter, we will
primarily focus on tightening the security for our application.
This chapter will cover the following topics:
• Securing Apache web server
• Securing MariaDB
• Securing PHP
Securing the Apache web server
In this section, we will work on securing the Apache web server installation that
our application is using. Apache web server is very widely used, and due to its
popularity, there are numerous people who have gured out multiple ways to
intrude into a non-secure Apache web server installation. A few issues that we
will work on in this section are as follows:
• Hiding server information
• Server conguration limits
Let's begin by investigating the type of information leaks that occur while working
with the Apache web server.
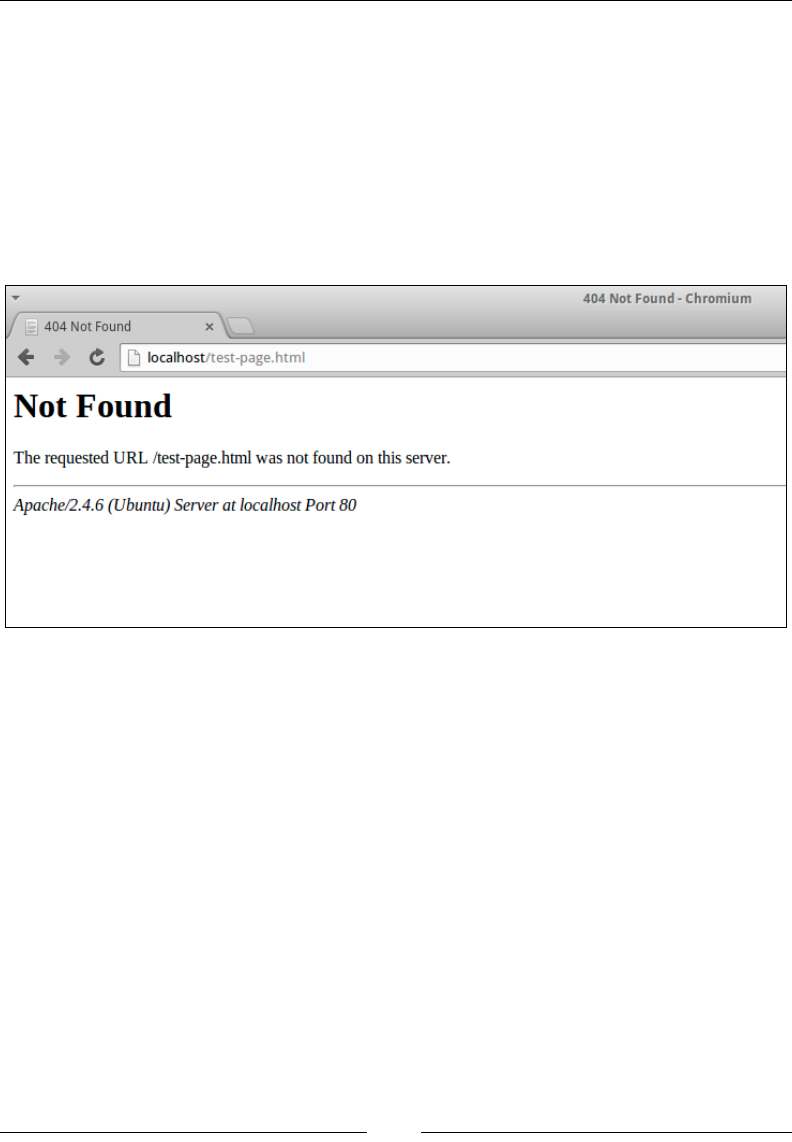
Security
[ 158 ]
Hiding server information
A default installation of Apache web server provides a lot of information about the
web server and the operating system that the server is installed on. Any information
on the web server or the operating system can be used by mischievous users
browsing the application to prepare for an attack on the web application. Exposing
this information may help mischievous users prepare their attack on our web
application. Let's begin by reviewing the information that the web server displayed
to the user. We will test this by loading a page that does not exist and observe the
response. The page appears as shown in the following screenshot:
One thing to observe from this screenshot is that we send the type and
version of the web server. We also send the port and operating system information
back via HTTP response. Now, let's make a few changes to our web server
conguration les to avoid this. On the Ubuntu operating system that we use,
these congurations are stored in the security.conf le. In other operating
systems, these congurations are stored in the apache2.conf or httpd.conf les.
Enter the following code snippet inside the /etc/apache2/conf-available/
security.conf le:
ServerTokens Prod
ServerSignature Off
In the previous snippet, we modied the default values to server conguration
directives. Here, we begin by modifying the value of ServerTokens from Full to
Prod.ServerTokens, which is a directive that can be used to congure the data
that is sent back from the web server as part of the response. ServerSignature
is a server directive that is used to add an optional line containing the server and
operating system information.
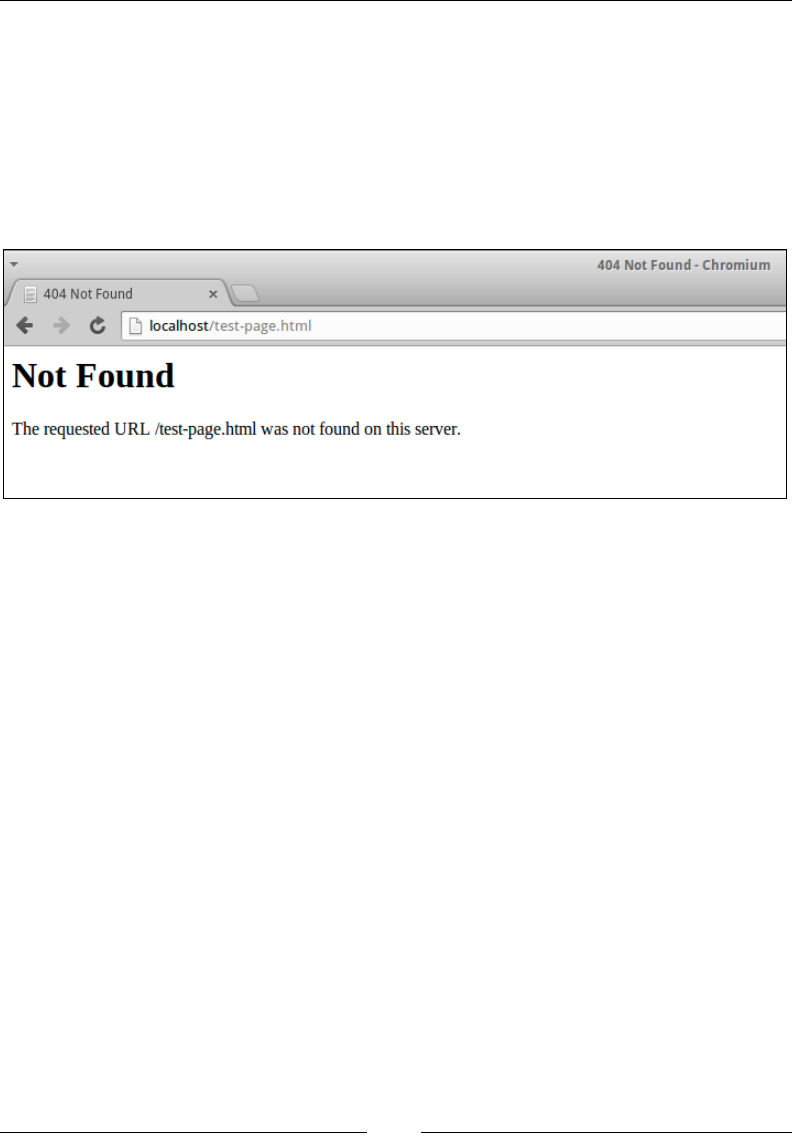
Chapter 9
[ 159 ]
It is set to On by default, and we update it to Off. Now that we have updated the
congurations, we will have to restart the web server using the following command:
service apache2 restart
In this snippet, we restart the web server to apply these directives. Now that we have
applied these directives, let's go ahead and restart the web server again. Now, let's
rerun the previous example to verify if the web server is still sending out the system
information. The web page now appears as shown in the following screenshot:
Upon reloading the page, we can conrm that the web server is not sending out the
system information. Now, let's go ahead and set the server conguration limits to
make sure that our application is not ooded by mischievous requests.
Server conguration limits
The Apache web server comes with predened congurations, and we will go over
a few of these congurations in this section. This section will help you understand
these directives, and this knowledge can be used to ne-tune the web server according
to our requirements. We add the following code snippet in the /etc/apache2/conf-
available/apache2.conf le as per our requirements:
TimeOut 300
KeepAlive On
MaxKeepAliveRequests 100
KeepAliveTimeout 5
MaxClients 256

Security
[ 160 ]
In the previous snippet, we looked at four very common Apache directives that
help us. Here, the rst directive that we will look at is the Timeout directive, which
is used to set the amount of time the web server will wait to disconnect an open
connection. This directive should be used carefully and cannot be generalized.
However, 300 seconds is normally too long to keep a connection open; reducing the
amount of time for timing out a connection should be considered. The next directive
is the directive KeepAlive, which determines if persistent connections can be
allowed. If KeepAlive is turned on, we can set the maximum number of requests to
be allowed during a persistent connection using MaxKeepAliveRequests. The next
directive that we will look at is KeepAliveTimout, which allows us to set the number
of seconds to wait for the next request from the same client for the same connection.
The last directive that we will look as is the MaxClients directive that sets the limit
on the number of simultaneous requests that will be served by our Apache web
server. The number of simultaneous requests should only be reached after thorough
testing and application growth.
There are numerous web server directives that cannot be discussed at length.
A few other recommendations to secure the web server are:
• Update the web server on a regular basis
• Set up mod_security and mod_evasive to build a rewall and
network monitor
• Use name-based virtual hosting to avoid using direct IP addresses
• Regularly monitor access logs to understand and monitor the incoming
trafc to make sure that there is no mischievous activity
• Now that we have looked at a few directives to secure our Apache web
server installation, let's work on securing our MariaDB installation.
Securing MariaDB
In this section, we will cover a few topics that will help us secure our MariaDB
database server. A few issues that we will cover in this section are:
• Password-protected access
• Building views to restrict access
• Creating users and granting access

Chapter 9
[ 161 ]
Password-protected access
During the MariaDB installation process, the user is normally prompted to enter
a password for the root user. It is not required to enter a password; users can hit
escape to avoid entering a password. As we are trying to secure the installation,
let's go over the steps to protect access by adding a password if the password
was not added initially. We will use mysqladmin for this process and enter the
following command:
mysqladmin –u root password <userpassword>
In this snippet, we set the new password of the root user. From here on, we will
need this password to log in as the root user. Now that we have added the password
to the root user, let's log in as the root user and go over the concepts of views.
Building views to restrict access
As our application grows, the number of tables that are needed to power the
application grow too. To fetch data from multiple tables, we will have to perform
certain joins that will make the query big. Views provide a way to hide this
complexity by abstracting that complex query into a simpler query. Views are virtual
tables, and they do not contain any data. Let's build a view in this section that would
provide the data available in the students, courses, and students_courses tables,
using the following command:
select s.student_id as student_id, c.course_id as course_id, s.first_
name, s.last_name, c.name, c.description
from students s
inner join students_courses sc on s.student_id=sc.student_id
inner join courses c on sc.course_id=c.course_id;
Now, let's build a view that will retrieve the data from this query available with a
much simpler query. We will use the CREATE VIEW syntax for this view, as shown
in the following command:
create view sc_view as
select s.student_id as student_id, c.course_id as course_id,
s.first_name, s.last_name, c.name, c.description
from students s inner join
students_courses sc on s.student_id=sc.student_id
inner join courses c on sc.course_id=c.course_id;

Security
[ 162 ]
In this example, we build a view that will dynamically execute this query to generate
the data. We use the CREATE VIEW command to create the view. Now that we have
created the view, we can use the SELECT statement to query the view, as shown in
the following command:
select * from sc_view;
This query will output the same data as the original query that was used to build
this query. Similar to a table, views also have the ALTER and DROP DML statements.
Now that we have added the view, a subset of our users will no longer need to view
all the tables, they will only need access to the view. In the next section, we will
create a user and grant them access only to the view.
Creating users and granting access
In this section, we will continue from the previous section to create a new user who
will only have access to the sc_view table that was created. The MariaDB database
server allows us to provide users with the access to the data they need. Let's
begin by creating a read-only user in the MariaDB database by using the CREATE
USER command:
create user 'ro_user'@'localhost' identified by 'password';
In this snippet, we create a user and provide a password for that user. The password
for a user has to be more stringent when compared to the current password for this
user. Now that we have our user, let's go ahead and provide access permissions to
the view that we created in the last section by using the following command:
grant select on 'course_registry'.'sc_view' to 'ro_user'@'localhost';
We use the GRANT command to provide very specic access to our ro_user on the
sc_view table. Let's verify if our GRANT command was successful by logging in to
our MariaDB server by using the new credentials. The screenshot of the output is
as follows:
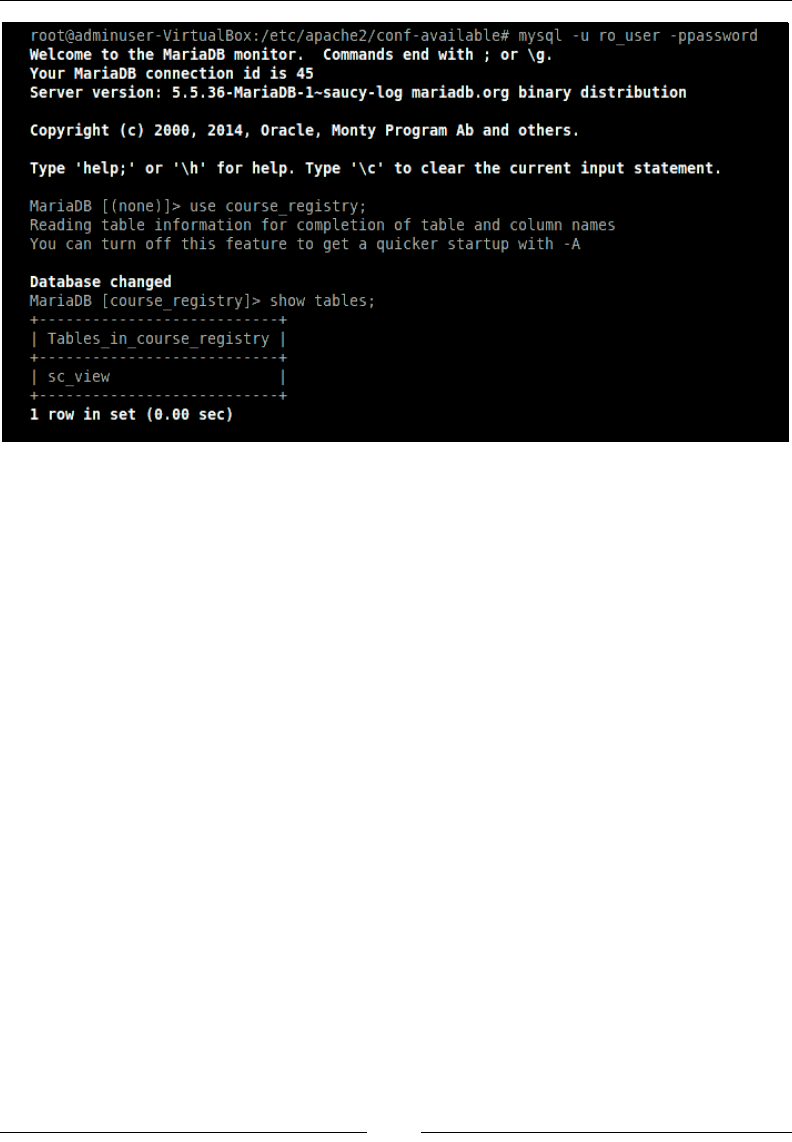
Chapter 9
[ 163 ]
Now that we have logged in and veried that we only have access to sc_view, it
will be a good effort to try to select the data from the view and try to drop the view
to see if we will receive any errors while trying to drop the view. Working with user
privileges can be a little tricky, and it is always recommended to use a tool such as
phpMyAdmin to grant and revoke permissions. Use the following command to install
phpMyAdmin:
sudo apt-get install –y phpmyadmin
Using this snippet, we install phpMyAdmin, and we can now start using it to
perform day-to-day database activities, including controlling the privileges and
permissions. Now that we have worked with the views and access permissions to
secure our MariaDB server installation, let's work on securing our application by
server-side ltering and XSS ltering.

Security
[ 164 ]
Securing PHP
In this section, we will go over the possible security issues on the application side.
It is always recommended to lter the content on the server. The ltering can be
performed at various levels. We can begin by verifying if the type of the input that
we expect is the same as the type of the input we get. We can use PHP's functions
such as is_int, is_numeric, is_float, and is_string, explained as follows:
• is_int: This function is used to verify if the input is an integer
• is_numeric: This function is used to verify if the input is a number
or a numeric string
• is_float: This function is used to verify if the input is a
oating-point number
• is_string: This function is used to verify if the input is a string
Once we verify that the incoming input is same as expected, we can look for any
cross-site scripting vulnerability that the incoming input may carry. To prevent any
cross-site scripting vulnerability from creeping in, it is always advisable to lter the
data before storing it in the database, and also escape the data while rendering it
onto the page. We can use functions such as strip_tags, htmlspecialchars,
and htmlentities to escape data from any script injections, explained as follows:
• strip_tags: This function is used to strip any HTML or PHP tag from
a string (used for data sanitization)
• htmlspecialchars: This function is used to convert special characters
into HTML entities (used for output escaping)
• htmlentities: This function is used to convert all applicable characters
to HTML entities (used for output escaping)
While building applications, we should be very aware of SQL injections, and as
we are using prepared statements, we need not worry about SQL injection attacks.
For applications that don't use prepared statements, it is advisable to use the
mysql_real_escape_string function provided by PHP. The nal x that we will
make as part of this section is to hide the information that we are sending out as part
of the response to the browser. The expose_php directive controls this and is located
in the php.ini le, as shown in the following code:
; Decides whether PHP may expose the fact that it is installed on the
server
; (e.g. by adding its signature to the Web server header). It is no
security

Chapter 9
[ 165 ]
; threat in any way, but it makes it possible to determine whether you
use PHP; on your server or not.
; http://php.net/expose-php
expose_php = Off
By default, changing to Off will no longer expose the information about the PHP
installation. As we are making a change to a PHP conguration, we will have to
reload the web server.
Summary
In this chapter, we focused on securing our web server installation and the
database server installation; we also discussed a few security xes to handle
various exploitation scenarios. This chapter is only intended to give us a basic
platform to begin securing our application and the environment that we are hosting
the application in. Security of an application is a journey rather than a destination,
and it has to be revisited in frequent intervals. In the next chapter, we will discuss
various performance optimization techniques to speed up our application.

Performance Optimization
In the last chapter, we went over different techniques to secure our web server
installation and our database server; we also continued our work by adding ltering
functionality that will help us sanitize the incoming data. In this chapter, we
will go over a few techniques to optimize the performance of our software stack.
Our application has already gained a performance increase due to the introduction
of caching on various levels in Chapter 7, Caching. The aim of this chapter is to
help us become aware of the options that are available for optimization, but not
to implement these techniques from the get-go. Optimizing an application before
thorough proling may adversely affect the application. However, as developers,
it is very important that we are aware of potential best-practice optimization
techniques that are used while building our application. We will begin by discussing
the optimizations that we will put in for our Apache web server and then we will go
over MySQL query optimization and indexing. Finally, we will cover the different
techniques to optimize our PHP code. We will be discussing the performance
optimization techniques for the following topics:
• The Apache web server
• The MariaDB database server
• PHP

Performance Optimization
[ 168 ]
Performance optimization for the Apache
web server
In this section, we will be going over the different steps to optimize our web server
installation. Apache for a good part performs very well out-of-the-box but, as the
application grows, we come across latencies or performance issues as the number
of requests or transactions increases. A few issues that we will be addressing in this
section are:
• Disabling unused modules
• Using compression
• Caching
Disabling unused modules
A default installation of the Apache web server arrives with a huge number of
pre-installed modules. This is commonly very helpful for a variety of new projects
when the main objective is to get hosted and be available to users quickly. A problem
that we would notice as the application grows is the latency in responding to a
request. A common cause of this problem is that the Apache modules are loaded into
the memory and, if there are any modules that are unused, we can deactivate them
and save memory. To get a list of the modules that are enabled, we can use Apache's
command-line control interface. In the following snippet, we are using Apache's
command-line control interface that has been built to help us understand and
control the functioning of Apache daemon:
apache2ctl -M
This command will give us the results on a Debian/Ubuntu operating system.
Another method to get a list of all the modules that have been is to use
PHP's apache_get_modules function:
<?php
echo '<h3>The List of Apache modules that are enabled.</h3>';
foreach(apache_get_modules() as $value){
echo $value."<br />";
}
?>
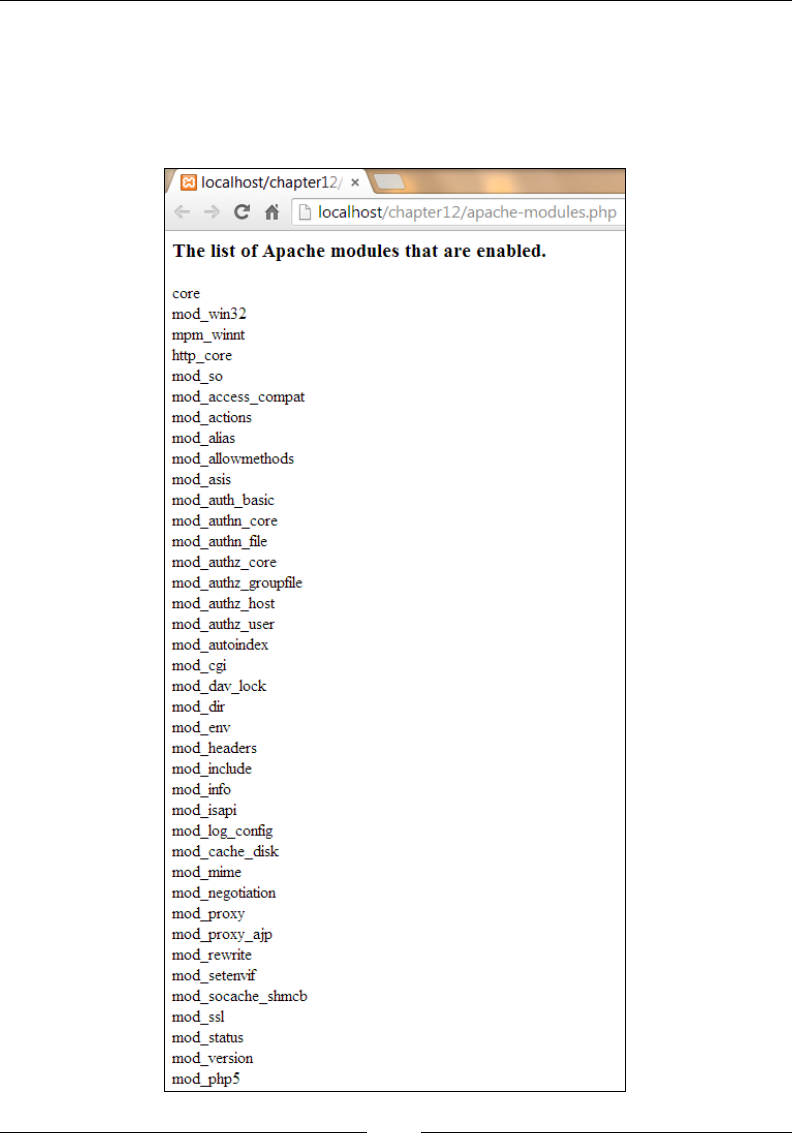
Chapter 10
[ 169 ]
In the preceding code snippet, we are using PHP's apache_get_modules function
to print a list of modules that are enabled on Apache. This script has to be run in
a browser and the script has to be hosted on Apache to retrieve this information.
This script will not work if it is run via command line. The output of the script is
shown in the following screenshot:

Performance Optimization
[ 170 ]
This output gives us a list of the modules that are currently enabled on our
Apache web server. This list might be different based on the applications that we are
running, and our application will not always require all the modules. As an example,
we wouldn't need the autoindex module for our application, so let us disable this
module using the a2dismod command.
When the a2dismod command is executed, it will remove the symlinks within
/etc/apache2/mods-enabled that were generated by the a2enmod command
when the module was enabled. For other operating systems than Ubuntu, the
changes need to be made in the httpd.conf le. In the following snippet, we
begin by disabling the autoindex module using the a2dismod command:
sudo a2dismod autoindex
sudo service apache2 restart
Now that we have disabled a module, we will have to restart the web server in order
to notify about the current enabled modules. Disabling or enabling a module will
always depend on the application at hand and has to be a well-informed decision
performed after extensive testing. Now let us move onto the next optimization
feature that will help us transfer compressed data across the wire, thereby helping
us reduce the amount of the data that has to be transferred.
Using compression
It is always recommended to compress the content before responding to a request
and thereby sending compressed content over the wire. The compressed data is
uncompressed when the response reaches the browser, and once the response is
uncompressed, the browser will render it. The best thing about this is that the end
user will not be able to visibly tell that the response was compressed (unless they
verify the HTTP headers). To compress the content on the server side, we will use
the deflate module as shown in the following command. Currently this module is
enabled but, if this module was disabled, we would use the a2enmod command to
enable it:
sudo a2enmod deflate
sudo service apache2 restart
Another module that is recommended to use with compression is the expires
module that helps us set the Expires HTTP header and max-age directive of the
HTTP header that are part of the web server response. This will reduce the number
of times a call is made to the webserver:
sudo a2enmod expires
sudo service apache2 restart

Chapter 10
[ 171 ]
Similar to any other optimization techniques, both these modules have to be enabled
on a production environment only after thorough testing on a test environment.
It should be clearly documented in the tests if there were any unforeseen CPU
spikes due to compression, and if the CPU spikes could adversely affect the
performance of the web server. The last optimization technique that we will
look at is a caching technique.
Caching
It is always recommended to implement caching in order to reduce the amount of
overhead on the server. We can enable modules, such as the disk_cache module for
disk caching and the mem_cache module for memory caching. It will again depend on
the application that is being hosted and the amount of data that has to be cached will
determine the caching method. Disk caching is preferred when there is a huge amount
of data that has to be cached. It is always recommended to use external SSDs for disk
caching purposes. If the amount of data that has to be cached is not very large, it can
be cached in memory. As with any other optimization technique, it is recommended to
thoroughly test this in a testing environment. A few other optimization techniques that
need to be mentioned but that we will not be going deeply into are:
• The number of Apache processes and children should be limited
• The other background processes running on the same machine as the web
server should be limited
• Piped logging should be the preferred logging method
Performance optimization for MariaDB
In this section, we will be going over the different steps for optimizing MariaDB.
MariaDB already arrives with powerful algorithms that are used internally for
performance optimization. Although the storage engines are optimized to run
queries, we as developers should be aware of a few best practices that will help
us build better queries. A few optimization techniques that we will be discussing
in this section are:
• Best practices for data retrieval
• Understanding query execution
• Query optimization and indexes

Performance Optimization
[ 172 ]
Best practices for data retrieval
In a read-heavy environment, data retrieval will probably be the most common
operation. Data retrieval, if not done correctly, can be a very processing-intensive
process. It is always recommended to lter the data that is being retrieved in order
to reduce the amount of processing that has to be done. The best practices that will
be discussed more for data retrieval are as follows:
• It is recommended to avoid retrieving everything
• Use lters to retrieve what is required
• Limit the amount of data being retrieved
• Use query caching
Retrieving everything is not always good and it is not good while retrieving every
record in a table. This is something that needs to be avoided, unless it is a very small
table and the number of times the whole table is selected is very low. On the same
line, it is always recommended to retrieve only the columns that are required and to
avoid the use of SELECT * in a query. Even though it is required to retrieve all the
columns, it is recommended to add all the required columns by the column name
into the query and avoid the use of SELECT * in a query. Once we lter the number
of columns that are required to retrieve a subset of the data, it is recommended to use
the WHERE clause to lter the data that is being retrieved. Although we apply good
ltering criteria, we might still have a lot of data, so it is recommended to use the
LIMIT clause to only fetch a subset of the ltered data. Even though the paging is
done on the application side, it is not recommended to retrieve all the records in the
table to load them into the memory. It is recommended to use the LIMIT and OFFSET
clauses to limit the amount of targeted data that needs to be retrieved. The last
recommendation will be to always use query caching, so that the same query will not
be executed multiple times. One thing to keep in mind is that MariaDB's query cache
doesn't have a Time To Live feature (TTL) or time to expire feature and is ushed
upon SQL updates. This can lead to data being cached for too long and delivering
stale content; so, to avoid this, the RESET QUERY CACHE command has to be executed.
Now that we know a few best practices for constructing queries, let's dive deeper to
understand the process of query execution.

Chapter 10
[ 173 ]
Understanding query execution
In this section, we will examine the ow in which the query is parsed and data is
returned in a step-by-step manner. When a query is executed against a MariaDB
server, it would rst look to see if the data for this query has been cached in the query
cache, if not, the query is passed onto the query parse. The query parser takes the
query and builds a parse tree by dividing the query into segments. The parse tree
generated by the query parser is then run through the syntactical checks to verify that
the query is syntactically correct. Upon successful syntactical check of the query, it is
passed to the query preprocessor, which in turn veries the details such as whether
the table and columns in the query exist and other ner details if the user executing
the query has enough privileges to access the table. The query passes through the
preprocessor; it is then sent to the query optimizer where the parse tree is converted
into a query plan. A query can be executed in multiple ways to produce the exact
same output and the query optimizer decides what is the best query plan to execute
the current query in the least amount of time. We will go over query optimization and
understand the different steps for the query optimizer in the next section. Once a query
plan is selected from the query optimizer, it is passed to the query execution engine,
which executes the query plan to perform the intended action.
Query optimization and indexing
In this section, we will begin by understanding the different operations performed
by the query optimizer and understand how query optimization can be done.
Later, we will work with a basic example of creating an index. A few of the
different operations that the query optimizer is responsible for are:
• Coming up with the best order for the tables to be joined to make the query
execution as easy as possible
• Applying the required algorithms to optimize the usage of any aggregate
and mathematical rules in the query
• Optimizing the sort operations to use the least amount of resources
• Applying a short circuit for the lter conditions, as in; if the condition is
bound to be false, then the whole query needs to be executed
• Optimizing the use indexes that are available
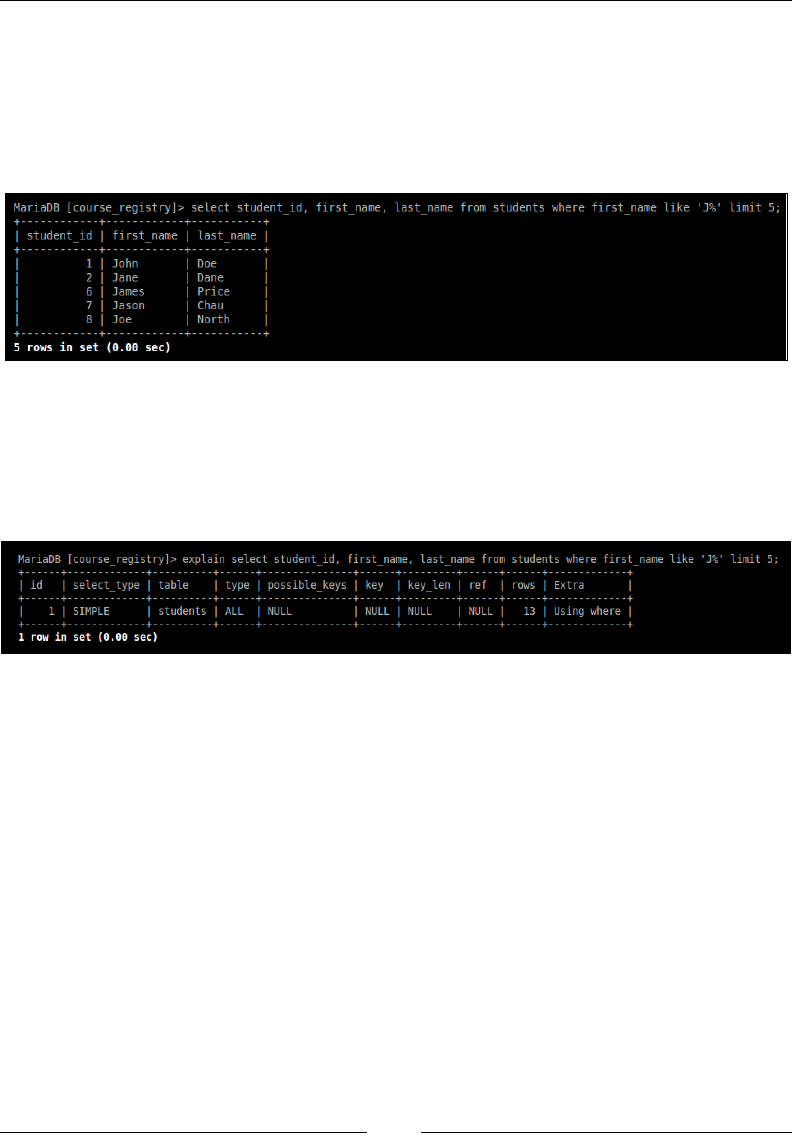
Performance Optimization
[ 174 ]
Now that we understand the process of the query optimization performed by
the MariaDB server query optimizer, let us look at a few steps that we can take to
understand and optimize our queries. Before we dive deep into optimization, let us
pick a sample query for optimizing. We will use the students table and retrieve all
the students whose rst name starts with the letter "J". The output is shown in the
following screenshot:
In this example, we are using a simple query to pull out the student ID, rst name,
and last name of students whose names begin with the letter "J". As part of our
best practices, we are only retrieving the top ve records. Now to get a deeper
understanding about our query, let us use the EXPLAIN keyword. The output is
shown in the following screenshot:
Upon executing the previous query (the EXPLAIN keyword), we get to notice a few
things that point out that our query is not optimized. A point to understand is that,
even though we are using a WHERE clause to lter the data, the engine still has to read
all the rows in the table to retrieve this information. This is called a table scan, and
table scans should be avoided to extract the best performance. The best way to avoid
a table scan is by having an index on the column that is being used for the ltering
purposes. Let us go ahead and create an index to help us optimize our query. In the
following command snippet, we are using the ALTER TABLE DDL command to add
an index on the rst name column in the table:
alter table students add key IX_first_name(first_name);
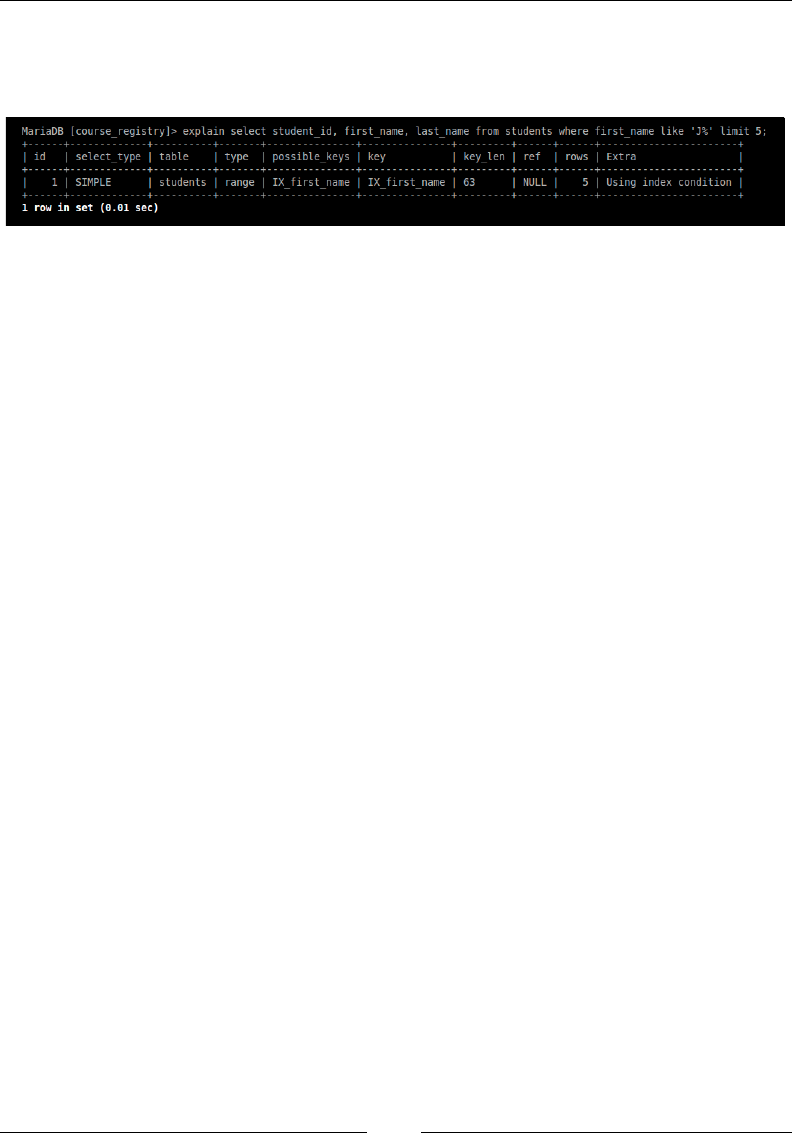
Chapter 10
[ 175 ]
Upon creating an index, let us rerun our previous query with the EXPLAIN keyword
to see if the index is helping us optimize our query. The output is shown in the
following screenshot:
Upon running the previous query after adding an index, we can notice that our
query is no longer performing a table scan but is using the index to pick the students
whose rst name begins with the letter "J". Indexing by itself is a very important
concept that has to be dealt with very carefully, so it is always recommended to test
intensively before building indexes in a production environment. It is important
to keep in mind that indexes can sometimes also slow down the application. Let
us consider the case of a write-heavy environment, for every write to the database,
there will have to be an update to the index. Therefore, it is important to understand
that an index should not be built for every column and should only be built for
columns that will be used for operations such as ltering, aggregating, and sorting.
A good practice is to monitor the slow queries using the slow query log and begin by
optimizing those slow queries. As working with the slow query login itself is a very
big topic, it is beyond the scope of this book to discuss it further. In the next section,
let us look at a few best practices to optimize the performance for our PHP code.
Performance optimization for PHP
Now that we have discussed a good number of optimization techniques for our
Apache web server and MariaDB, let us look at a few best practices that will help
us optimize the performance of our PHP code. In this section, the best practices
that we will go over are as follows:
• Closing any open resource connections
• Reducing the number of calls to the database
• Encouraging the use of JSON data format for data exchange.

Performance Optimization
[ 176 ]
It is always recommended to close out any open resource connections such as
database connections or le handles. The resources can get intensive on the machine
as the number of the requests for database connections and le handles increase.
Therefore, it is not a good idea to keep any of these connections open. The next
technique to help us optimize performance would be to reduce the number of
calls to the database, mainly if the database is not on the same machine as the web
server. Network resources and bandwidth have to be factored into this decision, as
the fewer the calls to the database, the less the use of network resources. The last
optimization recommendation would be application-specic, where it is encouraged
to use JSON data format for delivering data. XML, another popular data format, is
very heavy when compared to the JSON, and encouraging the JSON data format
for exchange will help us save the amount of data that is being transferred across
the wire. These are a few performance optimization recommendations for our
PHP code. In the next section, we will be dealing with very advanced performance
enhancement techniques such as using content delivery networks, reverse proxies for
static caching, and database replication in the master-slave database architecture.
CDN, reverse proxy, and database
replication
In this section, we will be briey introduced to Content Delivery Network (CDN),
reverse proxies, and the concept of database replication. Use of either or all of CDN,
reverse proxies, or database replication is necessary when the application grows
and receives a huge number of requests per second. A CDN is a huge set of servers
that are deployed across multiple geographical locations. The purpose of a CDN is
to deliver content to the end user from the nearest possible server. As an example,
a website hosted in the US gets a request from a user in India. For this request to be
complete, it will take a fair amount of time for the server in the US to process the
response and send it over to the user in India. It would be easier if the content was
housed close-by, so that the amount of time taken to complete the request will be
shorter. CDNs help us solve this problem, where they would store static content on
their servers and serve that content to the end user from the nearest available server.
Reverse proxies are similar to CDNs where they store and deliver static content,
but they are not necessarily available closer to the end user. Reverse proxies that
are popularly used are Varnish and Squid. The nal topic that we will go over for
this chapter is the concept of database replication. As the application grows, it is
very hard for a single database server to handle all the incoming requests. It is very
common for a single master database server to be supported by extra slave nodes
that share the incoming requests. Database replication is used to keep the slave
database servers up-to-date with the master database server.

Chapter 10
[ 177 ]
Summary
In this chapter, we have discussed the different optimization techniques and best
practice methods to work with Apache, MariaDB, and PHP. Performance optimization
is a very important concept but is probably not needed for many websites from the
get-go. However, it is always necessary to keep an eye open and be ready to optimize
the system when required. Application downtime and page load time are very
important for the successful working and progress of a website, and performance
optimization will help avoid application downtime and fasten the page load.
We have covered a variety of topics beginning with the basics of MariaDB
and programming with PHP to advanced topics such as caching, security,
and performance optimization. Web application development is a journey
and not a destination, and this book will help us lay a strong foundation for
building a robust web application.
Index
Symbols
$this variable 66
A
Access Control Lists (ACL) 138
access controls
about 130
controllers/courses.php le 130
controllers/studentsCourses.php le 132
models/login_model.php le 130
views/studentsCourses/register.php
le 132
access, MariaDB
granting 162, 163
advanced caching techniques 146, 147
Apache web server
securing 157
server conguration limits 159
server information, hiding 158
ADD CONSTRAINT command 39
ALTER DDL command 39
ALTER TABLE DDL command 35
API (Application Programming
Interface) 149
array-declaration.php le 62
array dereferencing function 63
authentication
about 123
controllers/login.php le 126
/etc/php5/apache2/php.ini le 125
lib/Session.php le 124
models/login_model.php le 127
views/layout/header.php le 128
C
caches
OpCache 146
Varnish 146, 147
caching
about 139
in application 144-146
in database 140-143
types 139
CHANGE command 40
class member access, on instantiation 67, 68
common operators, data ltering
!= 28
< 28
<= 28
<> 28
= 28
> 28
>= 28
BETWEEN 28
IS NOT NULL 28
IS NULL 28
course, adding to student portal application
controllers/courses.php le 102
models/courses_model.php le 103
views/courses/add.php le 104
courses, student portal application
listing 105
courses table
converting, into executable SQL 17
elds 17
CREATE DDL command 13
CREATE FUNCTION DDL command 52
CREATE TABLE DDL command 35
CSV (comma separated values) 113

[ 180 ]
D
data
deleting 29
ltering 26
inserting 19
retrieving 23
sorting 24
updating 29
database caching 140-143
Database Management System (DBMS) 8
Data Control Language. See DCL
Data Denition Language. See DDL
data exports
working with 118
data imports
controllers/students.php le 116, 118
working with 113-116
Data Manipulation Language. See DML
datatypes
date datatypes 11
number datatypes 10
string datatypes 9
date datatypes
Date 11
datetime 11
Time 11
Timestamp 11
year (L) 11
DCL 12
DDL 11
DELETE DML statement 29
design patterns, student portal application
setting up 88
URL rewrite, setting up 88, 89
DML 12
DROP FUNCTION command 53
DROP TABLE DDL command 35
DROP TRIGGER DDL command 59
E
exception handling 73
existing tables, MariaDB
enhancing 35-42
expose_php directive 164
F
File_Iterator library 76
nally block
adding, to exception handling 73-75
fgetcsv function 117
footer.php 111
G
generator
about 69
using 69, 70
getRandomStudent() method 68
global variables 140
H
header.php 111
horizontal inheritance 71
htmlentities function 164
htmlspecialchars function 164
I
INSERT DML command 19
is_oat function 164
is_int function 164
is_numeric function 164
is_string function 164
J
JOIN. See SQL JOIN
JSON feeds
generating 154
controllers/api.php le 154
L
list() function, in foreach statement 64, 65
logging 119
M
MariaDB
about 8, 12
access, granting 162, 163
connecting, with PHP 80

[ 181 ]
course_registry database 14
database, accessing 14
database, creating 13, 14
existing tables, enhancing 35-42
mysqli API 81
password protected access 161
PDO API 83
securing 160
SHOW utility command, using 13
stored procedures, working with 43-50
stored routines, working with 51-53
students table 15
triggers, working with 53-59
users, creating 162, 163
views, building for access
restriction 161, 162
working with 80
memcached 144
memory caching 144-146
mod_rewrite module 88
MVC, student portal application
Base_Controller.php le 95
Base_Model.php le 94
Bootstrap.php le 93
cong.php le 92
Database.php le 94
lib/Base_View.php le 95
setting up 91
students.php le 96
mysql API 80
mysqli API
about 80, 81
using 81-83
mysql_real_escape_string function 164
N
number datatypes
Bigint 10
decimal(l,d) 10
Double(l,d) 10
Float(l,d) 10
int(l) 10
Mediumint 10
Smallint 10
tinyint 10
O
OpCache 146
P
password protected access, MariaDB 161
PDO API
about 80
using 83-85
PHP
about 146
securing 164, 165
PHP 5.4 and 5.5 features
$this variable, availability in closures 66
about 61
array dereferencing function 63
class member access, on instantiation 67, 68
nally block addition, to exception
handling 73-75
generators 69, 70
list() function, foreach statement 64, 65
traits 72
Traits 71
updated array declaration 62
PHP and MariaDB connection
setting up, APIs used 80
setting up, mysqli API used 81
setting up, PDO API used 83
PHP_CodeCoverage library 76
PHP Extension and Application Repository
(PEAR) 76
PHP_Timer library 76
PHPUnit
features 80
installing 76-79
URL 80
PHPUnit testing framework 75
primary key 40
Q
query cache size 141
query caching 140

[ 182 ]
R
registrations viewing, student portal
application
get.php le 110
Representational state transfer (REST) 149
RESTful API
about 149
building 149, 150
RESTful API, building
controllers/api.php le 152, 153
lib/Bootstrap.php le 150, 151
retArray() function 64
S
scaling 139
SELECT command 23 , 50
server conguration limits, Apache
web server
/etc/apache2/conf-available/apache2.conf
le 160
server information, Apache web server
/etc/apache2/conf-available/security.conf
le 158, 159
hiding 158
SHA1 function 38
SHA1 hashing algorithm
using 36
SQL JOIN 30-32
SQL operations
DCL 11
DDL 11
DML 11
SQL (Structured Query Language) 11
stored procedures, MariaDB
using 43-50
stored routines, MariaDB
about 51
working with 51-53
string datatypes
about 9
BLOB 9
CHAR(L) 9
ENUM 9
LONGBLOB 9
LONGTEXT 9
MEDIUMBLOB 9
MEDIUMTEXT 9
SET 9
TEXT 9
TINYBLOB 9
TINYTEXT 9
VARCHAR(L) 9
strip_tags function 164
student, adding to student
portal application
controllers/students.php le 97
models/students_model.php script 99, 100
views/students/add.php le 96
student, listing on student
portal application
controllers/students.php le 100
models/students_model.php le 101
views/students/get.php le 101
student portal application
course, adding 102
courses, listing 105
design patterns, setting up 88
MVC, setting up 91
setting up 87
student, adding 96
student, registering to course 106
students, listing 100
student registering, student
portal application
controllers/studentsCourses.php le 106
models/studentsCourses_model.php
le 107
views/studentsCourses/register.php
le 107
students_courses table
converting, into executable SQL 18, 19
elds 18
students table
converting, into executable SQL 16
courses table 17, 18
data, deleting 29
data, ltering 26-28
data, inserting 19-22
data, retrieving 23, 24

[ 183 ]
data, sorting 24-26
data, updating 29
elds 15
students_courses table 18
styles.css 111
T
Traits 71
triggers, MariaDB
working with 53-59
TSV (tab separated values) 113
U
unique key constraint 39
unit testing 75
UPDATE DML statement 29
URL rewrite, student portal application
.htaccess script 90
build.sh script 90
index.php le 91
setting up 88, 89
user roles
about 134
assets/sql/admin.sql le 134
models/login_model.php le 136, 137
views/login/index.php le 135
users, MariaDB
creating 162, 163
V
Varnish 146, 147
X
xhprof proler 147
XML feeds
generating 153
XML feeds, generating
controllers/api.php le 153, 154
xUnit 75

Thank you for buying
Building a Web Application with
PHP and MariaDB: A Reference Guide
About Packt Publishing
Packt, pronounced 'packed', published its rst book "Mastering phpMyAdmin for Effective
MySQL Management" in April 2004 and subsequently continued to specialize in publishing
highly focused books on specic technologies and solutions.
Our books and publications share the experiences of your fellow IT professionals in adapting
and customizing today's systems, applications, and frameworks. Our solution based books
give you the knowledge and power to customize the software and technologies you're using
to get the job done. Packt books are more specic and less general than the IT books you have
seen in the past. Our unique business model allows us to bring you more focused information,
giving you more of what you need to know, and less of what you don't.
Packt is a modern, yet unique publishing company, which focuses on producing quality,
cutting-edge books for communities of developers, administrators, and newbies alike.
For more information, please visit our website: www.packtpub.com.
About Packt Open Source
In 2010, Packt launched two new brands, Packt Open Source and Packt Enterprise, in order
to continue its focus on specialization. This book is part of the Packt Open Source brand,
home to books published on software built around Open Source licenses, and offering
information to anybody from advanced developers to budding web designers. The Open
Source brand also runs Packt's Open Source Royalty Scheme, by which Packt gives a royalty
to each Open Source project about whose software a book is sold.
Writing for Packt
We welcome all inquiries from people who are interested in authoring. Book proposals should
be sent to author@packtpub.com. If your book idea is still at an early stage and you would like
to discuss it rst before writing a formal book proposal, contact us; one of our commissioning
editors will get in touch with you.
We're not just looking for published authors; if you have strong technical skills but no writing
experience, our experienced editors can help you develop a writing career, or simply get some
additional reward for your expertise.
Learning FuelPHP for Effective
PHP Development
ISBN: 978-1-78216-036-6 Paperback: 104 pages
Use the exible FuelPHP framework to quickly and
effectively create PHP applications
1. Scaffold with oil - the FuelPHP
command-line tool.
2. Build an administration quickly and effectively.
3. Create your own project using FuelPHP.
Persistence in PHP with
Doctrine ORM
ISBN: 978-1-78216-410-4 Paperback: 114 pages
Build a model layer of your PHP applications
successfully, using Doctrine ORM
1. Develop a fully functional Doctrine-backed
web application.
2. Demonstrate aspects of Doctrine using
code samples.
3. Generate a database schema from your
PHP classes.
Please check www.PacktPub.com for information on our titles
Getting Started with MariaDB
ISBN: 978-1-78216-809-6 Paperback: 100 pages
Learn how to use MariaDB to store your data easily
and hassle-free
1. A step-by-step guide for installing and
conguring MariaDB.
2. Includes real-world examples that help
you learn how to store and maintain data
on MariaDB.
3. Written by someone who has been involved
with the project since its inception.
ASP.NET Web API
Build RESTful web applications and
services on the .NET framework
ISBN: 978-1-84968-974-8 Paperback: 224 pages
Master ASP.NET Web API using .NET Framework
4.5 and Visual Studio 2013
1. Clear and concise guide to the ASP.NET
Web API with plentiful code examples.
2. Learn about the advanced concepts of the
WCF-windows communication foundation.
3. Explore ways to consume Web API services
using ASP.NET, ASP.NET MVC, WPF,
and Silverlight clients.
Please check www.PacktPub.com for information on our titles
