CL New Operating Instructions EN
User Manual: Pdf CL New - Operating Instructions User Guide for Leica Camera, Free Instruction Manual
Open the PDF directly: View PDF ![]() .
.
Page Count: 99

DAS WESENTLICHE.
Leica Camera AG│Am Leitz-Park 5│35578 WETZLAR│DEUTSCHLAND
Telefon +49(0)6441-2080-0│Telefax +49(0)6441-2080-333│www.leica-camera.com
93 789 XI/17/LW/D
LEICA CL
INSTRUCTIONS
31a
31
32a32c
36
32b
33
36a
34
35
37
8
1012 1114 13
96 7 6
1
43 51
2
PLAY
FN
MENU
LEICA CAMERA WETZLAR GERMANY
PLAY
FN
MENU
LEICA CAMERA WETZLAR GERMANY
20 21
23
22
24
28 27
29 30
25
16
15
17
18
19
2626a

ENEN
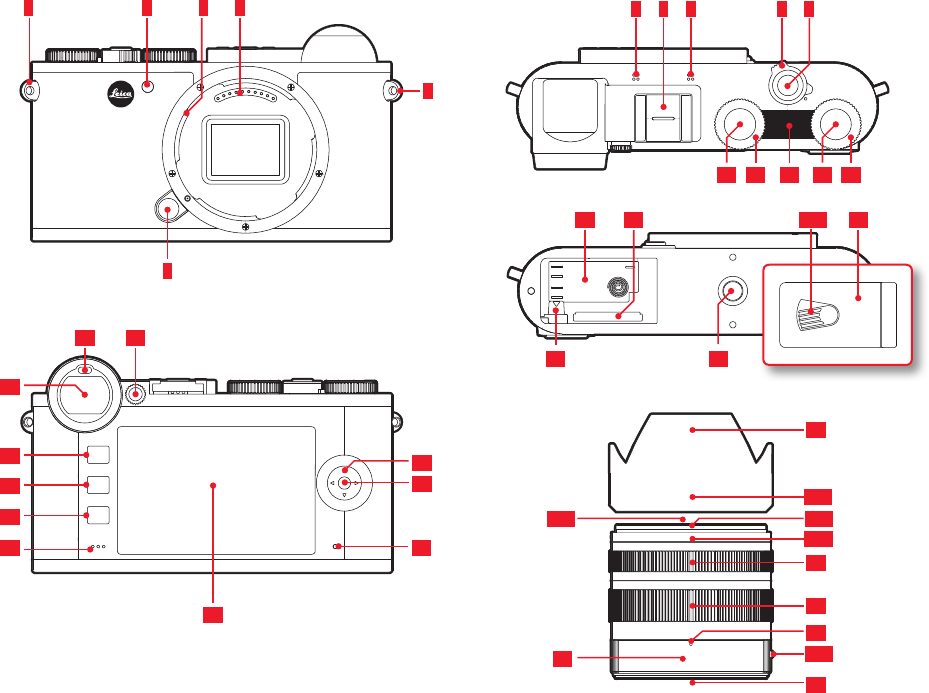
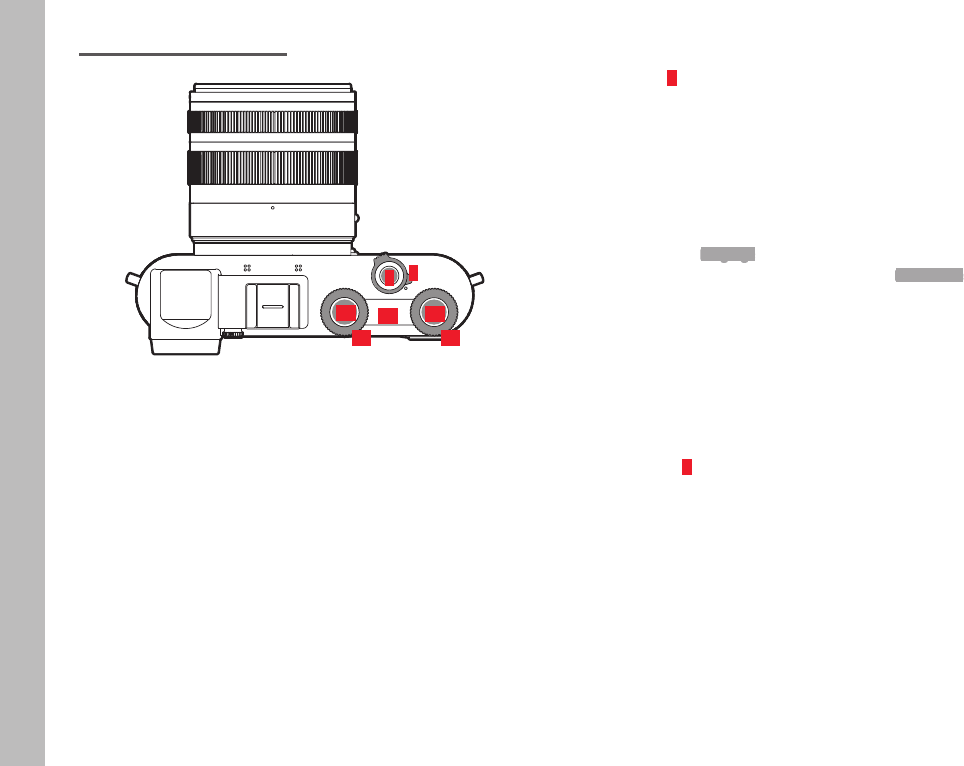
Part Designations
1
PART DESIGNATIONS
Front view
1 Strap lugs
2 Lens release button
3 Self-timer LED / AF assist lamp
4 Bayonet
5 Contact strip
Top view
6 Microphone
7 Accessory shoe
8 Main switch
9 Shutter button
10 Setting wheel
11 Setting wheel button
12 Top display
13 Setting wheel
14 Setting wheel button
Rear view
15 Speaker
16 MENU button
17 FN button
18 PLAY button
19 Viewfinder
20 Eye sensor
21 Diopter dial
22 Directional pad
23 Center button
24 Status LED
25 Screen
Bottom view
26 Cover for battery compartment and memory card slot
a Lock/unlock lever
27 Tripod thread
28 Battery locking latch
29 Battery compartment
30 Memory card slot
Lens
31 Lens hood
a Alignment points
32 Front mount
a Male bayonet for lens hood
b Alignment points for lens hood
c Internal thread for filters
33 Focus setting ring
34 Zoom setting ring
35 Alignment point for focal length
36 Fixed ring
a Red alignment button for lens change
37 Contact strip
EN
2
FOREWORD
Dear Customer,
We are confident that you will enjoy taking photographs with your
new Leica CL. Please read this manual thoroughly to ensurethat
you familiarize yourself with the full scope of functions your Leica
CL has to offer.
The Quick Start Guide introduces the main functions of your new
Leica camera only.
SCOPE OF DELIVERY
Please check that you have all of the accessories before using your
Leica CL for the first time.
a. Lithium-ion battery Leica BP-DC12
b. Battery charger Leica BC-DC12 with replaceable mains cable
c. Carry strap
d. Camera bayonet cover
e. Accessory shoe cover
f. Registration card
ACCESSORY
Please visit the Leica Camera AG website for information on the
extensive range of LeicaCL accessories:
www.leica-camera.com
REPLACEMENT PARTS Order No.
Camera bayonet cover 16 060
Accessory shoe cover 423-116.001-013
Carry strap 439-612.060-000
Lithium-ion battery Leica BP-DC12 19 500
Battery charger Leica BC-DC12 423-116.001-032
Correct disposal of electrical and electronic
equipment
(Applies within the EU and for other European coun-
tries with active waste separation policies.)
This device contains electrical and/or electronic components
which must not be disposed of in general household waste! Make
sure to bring this device to a local disposal collection point for
recycling. This service is free of charge. Any standard or recharge-
able batteries used in this device must be removed and disposed of
separately in accordance with local regulations.
Please contact your local authorities, waste disposal collection
point or the retailer, from whom you purchased the device for more
information on correct waste disposal.
Subject to changes in design and production.

EN
3
Definition of remarks in this manual:
Note:
Additional information
Important:
Failure to comply with these instructions may cause damage to
the camera, accessories or the photos
Attention:
Failure to observe the instructions may cause personal injury
You will find the manufacturing date of your camera on the stickers
in the Guarantee Card and/or on the packaging.
The format is year/month/day.
The specific approvals for this device can be found in the camera
menu.
▸ Select Camera Information in the Main Menu (5th screen page)
▸ Select Regulatory Information in the submenu
LEGAL INFORMATION
• Compliance with copyright laws is mandatory. The recording and
publication of pre-recorded media, e.g. tapes, CDs, or other
published or broadcast material may be in breach of copyright
laws.
• The same applies for all software supplied in the scope of de-
livery.
• The following applies for all video material created with this
camera: This product is governed by the AVC Patent Portfolio
license and is meant for private use by a consumer only. The
device may furthermore be used for purposes for which the
consumer receives no remuneration, e.g. (i) encoding in accor-
dance with the AVC Standard (“AVC Video”) and/or (ii) decoding
of AVC Video that was encoded by a consumer in accordance
with the AVC Standard within the scope of personal use and/or
which the consumer has received from the provider, who is in
possession of a license to offer AVC Video. No license is granted
or implied for any other use. Any other use, including but not
limited to providing AVC video in exchange for remuneration,
may require a separate license agreement with MPEG LA, L.L.C.
For more information please visit the MPEG LA, L.L.C. website
at: www.mpegla.com
• The SD logo is a registered trademark.
• Other names, company and product names mentioned in this
manual are trademarks or registered trademarks of their respec-
tive companies.

EN
4
Safety Remarks
SAFETY REMARKS
• Always store small parts (e.g. the accessory shoe cover) as fol-
lows:
– out of the reach of children
– in a safe location, where they will not get lost or stolen
• State-of-the-art electronic components are sensitive to static
discharge. Since people can easily pick up charges of several
10,000 volts by walking on synthetic carpets, a discharge can
occur when you touch the camera, and especially it is placed on
a conductive surface. A static discharge on the camera housing
poses no risk for the electronics. However, despite built-in safety
circuits, avoid direct contact with external camera contacts like
those in the accessory shoe.
• Do not use a micro-fiber cloth (synthetic) as used for spectacles;
use a cotton or linen cloth instead. Before touching the contacts,
you can make sure you discharge any electrostatic charge by
deliberately touching a heating or water pipe (conductive,
grounded material). Dirt deposits and oxidation on the contacts
can be avoided by storing your camera in a dry location with the
lens cap and flash shoe/viewfinder cap in place.
• Use only the recommended accessories to prevent faults, short
circuits or electric shock.
• Do not attempt to remove parts of the housing (covers) yourself.
Repairs must be done at authorized service centers only.
• Do not use your camera in the immediate vicinity of devices with
powerful magnetic, electrostatic or electromagnetic fields (e.g.
induction ovens, microwave ovens, television sets or computer
monitors, video game consoles, cell phones, broadcasting equip-
ment).
• Image recording may be affected if you place the camera on a
television set or operate the camera near the television set or
mobile phones.
• Strong magnetic fields, e.g. from speakers or large electric mo-
tors, can damage the stored image data or impact the image
quality.
• Switch off the camera, remove the battery and switch the
camera on again if the camera malfunctions due to the effects of
electromagnetic fields. Do not use the camera in the immediate
vicinity of radio transmitters or high-voltage power lines. Their
electromagnetic fields can also interfere with recordings.
• Protect the camera against contact with insect sprays and other
aggressive chemicals. Petroleum spirit, thinner and alcohol must
not be used for cleaning the camera. Some chemicals and fluids
can damage the camera housing or its surface coating.
• Rubber and plastics are known to expel aggressive chemicals
and should therefore not be kept in contact with the camera for
extended periods of time.
• Prevent any sand or dust penetration into the camera, e.g. on
the beach. Be extra careful when inserting or removing the
memory card. Sand and dust can damage the camera and the
memory card.
• Prevent water penetrating the camera, e.g. during snowfall or
rain or on the beach. Moisture can cause malfunctions and irrep-
arable damage to the camera and memory card.
• Wet a soft cloth with tap water, wring it out thoroughly and wipe
the camera clean of any salt water spray. Then wipe it down
thoroughly with a dry cloth.
• Switch off the camera and leave it to stand at room temperature
for approximately an hour if condensation has formed on or in
the camera. The condensation will disappear, once the camera
temperature has reached room temperature.
• Use the carry straps only for their intended purpose on a camera
or on binoculars. Any other use poses the risk of injury and may
possibly result in damage to the carry strap and is therefore not
permitted.

EN
5
Safety Remarks
• Carry straps are usually made of very robust material. You should
therefore keep it out of the reach of children. A carry strap is not
a toy and poses a strangulation risk.
• Carry straps should also not be used for cameras/binoculars
during sports activities with a high risk of getting entangled in
the carry strap (e.g. mountain climbing and similar outdoor activ-
ities).
Disclaimer
• All data, including personal information can be manipulated or
deleted due to incorrect or accidental operation, static dis-
charge, accidents, malfunctions, repairs and other measures.
• Please note that Leica Camera AG will not accept liability for
direct or consequential damage due to the manipulation or de-
struction of data and personal information.
Important
• Only the accessories specified and described in this manual or
by Leica Camera AG must be used with the camera.
• Use only the mains cable provided.
• The mains cable provided must only be used in conjunction with
the supplied charger and must not be used with any other de-
vice.
General remarks about the screen
• Condensation can form on the screen if the camera is exposed
to great temperature fluctuations. Wipe the screen carefully with
a soft, dry cloth.
• The screen image will initially be slightly darker than normal if the
camera is very cold when it is switched on. The normal level of
brightness will be reached as soon as the screen warms up.
• Cosmic radiation (e.g. during flights) may cause pixel defects.
The screen is manufactured in a high-precision process to ensures
that of the total of around 1,040,000 pixels, more than 99.995%
work correctly and only 0.005% remain dark or are always bright.
This is not a malfunction and does not impair the picture or video
playback.

EN
6
Table of Content
CONTENT
PART DESIGNATIONS ............................................................................ 1
FOREWORD ............................................................................................ 2
SCOPE OF DELIVERY .............................................................................. 2
ACCESSORY ............................................................................................ 2
REPLACEMENT PARTS .......................................................................... 2
LEGAL INFORMATION ........................................................................... 3
SAFETY NOTES....................................................................................... 4
PREPARATIONS ...................................................................................... 8
ATTACHING THE CARRY STRAP ............................................................... 8
CHARGING THE BATTERY ........................................................................ 8
CHANGING THE BATTERY/MEMORY CARD ........................................... 11
CHANGING THE LENS ........................................................................... 16
COMPATIBLE LENSES ......................................................................... 17
CAMERA OPERATION .......................................................................... 18
MAIN SWITCH ...................................................................................... 18
SHUTTER BUTTON ................................................................................ 18
SETTING WHEELS/SETTING WHEEL BUTTONS/
TOP DISPLAY ........................................................................................ 19
LOCKING/UNLOCKING THE SETTING WHEEL FUNCTIONS .................. 19
MENU CONTROL .................................................................................. 20
Managing the Favorites menu ........................................................... 23
Direct access to menu function .......................................................... 23
GESTURE CONTROL .............................................................................. 25
BASIC CAMERA SETTINGS .................................................................... 26
MENU LANGUAGE .............................................................................. 26
DATE/TIME ........................................................................................ 26
AUTOMATIC CAMERA SHUTDOWN ...................................................... 27
ACOUSTIC SIGNALS ........................................................................... 27
ADJUSTING THE VIEWFINDER EYEPIECE ............................................. 28
SCREEN/VIEWFINDER SETTINGS ....................................................... 28
Screen brightness ............................................................................. 29
Top display ....................................................................................... 29
Auto power off of all displays .............................................................. 29
Information displays .......................................................................... 29
Selecting additional information and auxiliary displays ........................... 30
Grid (Grid) ........................................................................................ 30
Level display (Horizon) ....................................................................... 30
Histogram ........................................................................................ 31
Clipping ........................................................................................... 31
BASIC PICTURE SETTINGS .................................................................. 32
File format ....................................................................................... 32
JPG Resolution .................................................................................. 32
White balance ................................................................................... 32
ISO sensitivity ................................................................................... 33
JPG image properties (Film Style) ........................................................ 34
Using Leica M and R lenses ................................................................ 35
Image stabilization ............................................................................ 35
Electronic shutter .............................................................................. 36
Single/serial exposures ..................................................................... 36
PICTURE MODE .................................................................................... 38
DISTANCE SETTING(Focusing) ............................................................... 38
AUTOFOCUS ......................................................................................... 38
LIMITING THE AUTOFOCUS SETTING RANGE ....................................... 39
AF ASSIST LAMP ................................................................................ 40
AUTOFOCUS METERING METHODS/OPERATING MODES .................... 40
Spot (Spot)/Field metering (Field) ...................................................... 40
Subject tracking (Tracking) ................................................................ 41
Touch-controlled autofocus (Touch AF) ................................................ 41
Multi-field metering (Multi Point) ........................................................ 42
Face detection .................................................................................. 42
Manual focusing ............................................................................... 43
ASSIST FUNCTION FOR MANUAL FOCUSING ...................................... 43

EN
7
Table of Content
EXPOSURE METERING AND CONTROL .................................................. 45
EXPOSURE METERING METHODS ....................................................... 45
EXPOSURE CONTROL ......................................................................... 46
Setting wheel functions in the modes P, S, A and M ............................. 47
Exposure simulation .......................................................................... 47
Automatic program - P ...................................................................... 48
Scene mode ..................................................................................... 49
Aperture priority mode – A ................................................................ 52
Shutter speed priority – S .................................................................. 53
Metering memory lock ....................................................................... 53
Exposure compensation ..................................................................... 54
Automatic bracketing......................................................................... 54
Manual settings – M .......................................................................... 55
ADDITIONAL PICTURE FUNCTIONS....................................................... 56
Interval shooting ............................................................................... 56
Self-timer ......................................................................................... 58
FLASH PHOTOGRAPHY ......................................................................... 59
COMPATIBLE FLASH UNITS ................................................................ 59
ATTACHING THE FLASH UNIT .............................................................. 59
FLASH MODES ................................................................................... 60
FLASH RANGE .................................................................................... 61
SYNCHRONIZATION TIME POINT ......................................................... 61
FLASH EXPOSURE COMPENSATION .................................................... 61
VIDEO RECORDING ............................................................................... 62
PLAYBACK MODE ................................................................................ 64
SELECTING/SCROLLING THROUGH PICTURES ................................... 65
ENLARGING PICTURES/SIMULTANEOUS DISPLAY OF MULTIPLE
PICTURES .......................................................................................... 66
Magnification.................................................................................... 66
Simultaneous display of 12/30 pictures .............................................. 67
SELECTING AN IMAGE SECTION ......................................................... 68
MARKING/UNMARKING PICTURES .................................................... 68
PLAYBACK MENU ............................................................................... 68
Accessing the playback menu ............................................................. 68
Selecting/accessing menu items ............................................. 68
Exiting the playback menu .................................................................. 68
Deleting pictures ............................................................................... 69
Automatic review .............................................................................. 70
Start playback .................................................................................. 71
Video playback ................................................................................. 71
End playback .................................................................................... 73
Adjusting the volume ......................................................................... 73
MISCELLANEOUS ................................................................................ 76
USER PROFILES ................................................................................. 76
CHANGING FILE NAMES ..................................................................... 79
WIRELESS DATA TRANSMISSION AND REMOTE CONTROL OF THE
CAMERA USING A WLAN CONNECTION .............................................. 80
TRANSFERRING DATA TO A COMPUTER .............................................. 84
DATA STRUCTURE ON THE MEMORY CARD ......................................... 84
FORMATTING ..................................................................................... 84
WORKING WITH RAW DATA (DNG) ....................................................... 84
INSTALLING FIRMWARE UPDATES ....................................................... 85
CARE & USE INSTRUCTIONS .............................................................. 86
MENU OVERVIEW ................................................................................ 88
APPENDIX ............................................................................................. 90
DISPLAYS ON SCREEN/IN THE VIEWFINDER ....................................... 90
Picture mode .................................................................................... 90
Playback mode ................................................................................. 92
Displays on the top display ................................................................. 93
TECHNICAL DATA ................................................................................. 94
LEICA SERVICE ADDRESSES ..............................................................96
EN
8
Preparations
PREPARATIONS
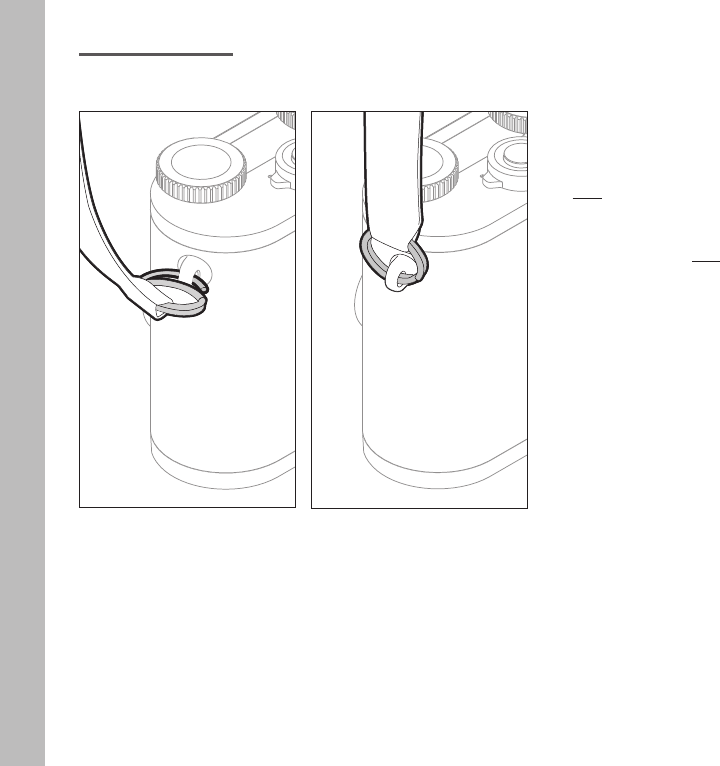
ATTACHING THE CARRY STRAP
CHARGING THE BATTERY
Your LeicaCL is powered by a lithium-ion battery. The battery must
be removed from the camera before charging. The battery must be
removed from the camera before charging.
Attention
• Only the battery types specifi ed and described in this manual
and/or specifi ed and described by Leica Camera AG may be
used in this camera.
• This battery must only be used in the devices for which it is
designed and must only be charged exactly as described. The
use of other chargers not approved by Leica Camera AG can
cause damage to the batteries and, in extreme cases, serious or
life-threatening injuries.
• Improper use of the batteries or the use of unapproved battery
types may result in an explosion.
• Batteries must not be exposed to sunlight, heat, humidity or
condensation for extended periods of time. Batteries must not
be placed in a microwave oven or in a pressurized container as
this may cause an explosion.
• Never throw batteries into a fi re as they might explode!
• Damp or wet batteries must not be charged or used in the
camera under any circumstances.
• Keep the battery contacts clean and easily accessible.

EN
9
Preparations
• Although lithium-ion batteries are secured against short circuits,
they should still be protected against contact with metal objects
like paper clips or jewelry. A short-circuited battery can get very
hot and cause severe burns.
• Check the housing and the contacts immediately for any
damage if a battery is accidentally dropped. A damaged battery
can damage the camera.
• A battery must be removed from the camera or charger immedi-
ately and replaced if it develops noise, becomes discolored,
deformed or overheated, or if it shows any sign of leakage. Con-
tinued use of a damaged battery may cause overheating and
poses a fire and/or explosion hazard.
• Keep batteries away from heat sources if you detect any leakage
or a smell of burning, because the fluid is highly flammable.
• The charger supplied should be used exclusively for charging this
battery type. Do not attempt to use it for other purposes.
• Connect the charger to a freely accessible power socket.
• Heat is generated during charging. Never charge batteries in
small, closed, i.e. unventilated containers.
• Do not open the battery or the charger. Repairs must only be
carried out by authorized service centers.
• Keep batteries out of the reach of children. Swallowing batteries
may lead to suffocation.
Dispose of used batteries in accordance with the relevant
information provided in this manual.
First Aid
• Battery fluid may cause blindness if it comes into contact
with the eyes. Rinse the eyes thoroughly with clean water
immediately. Avoid rubbing. Seek medical attention immedi-
ately.
• Leaked battery fluid poses an injury hazard when it comes in
contact with clothing or skin. Rinse the affected areas thor-
oughly with clean water.

EN
10
Preparations
Notes
• Batteries must be charged before use. The battery is supplied
partially charged ex works, but it should be fully charged before
extended use.
• The battery must have a temperature between 0 °C and 35 °C
(32 °F and 95 °F) for charging, as the charger may otherwise
not switch on, or will automatically switch off.
• Lithium-ion batteries can be charged at any time, regardless of
their current charge level. A partially charged battery will charge
to full capacity faster than a fully discharged one.
• Lithium-ion batteries should only be stored partially charged, i.e.
not fully depleted or fully charged. For very long storage periods,
batteries should be charged for around 15 minutes twice a year
to prevent deep discharge.
• Batteries heat up during the charging process. That is normal
and not a malfunction.
• A new battery only reaches its full capacity after it has been fully
charged and – by using it in the camera – depleted 2 to 3 times.
This depletion process should be repeated roughly every 25
cycles.
• Rechargeable lithium-ion batteries generate power by way of
internal chemical reactions. These reactions are influenced by
ambient temperature and humidity. The service life of the bat-
tery will be maximized if exposure to extreme temperatures over
extended periods of time is avoided, e.g. in a parked car in
summer or winter.
• However, every battery has a limited service life! After several
hundred charging cycles, this limitation will become evident as
the operating times get significantly shorter.
• The replaceable battery supplies another back-up battery that is
built into the camera. This back-up battery ensures that the date
and time settings remain accurate for up to 2 days. Once the
back-up battery is depleted, it must be replenished by inserting
a charged main battery. The back-up battery will recover its full
capacity after approx. 60 hours with the rechargeable battery in
place. The camera will not have to be switched on for this pro-
cess. The date and time settings will, however, have to be cor-
rected.
• Remove the battery if the camera will not be used for an ex-
tended period of time. Make sure to switch the camera off via
the main switch before removing the battery. Leaving the battery
in the camera will result in a deep discharge after a few weeks.
The voltage will drop severely, as the camera still consumes a
small amount of idle current to save your settings while the
camera is switched off.
• The date and time need to be reset after a battery that was left
in the camera has been exhausted, this is usually after a max-
imum of 3 months.
EN
11
Preparations
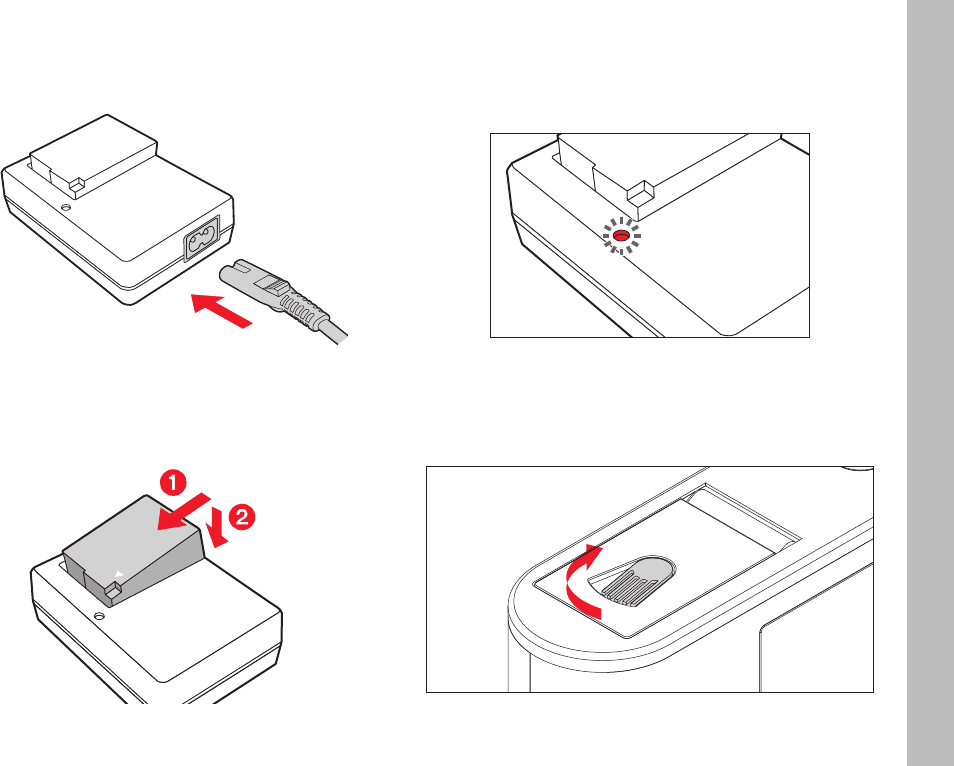
PREPARING THE CHARGER
Use the mains cable with the matching regional plug to connect
the charger to mains electricity.
Note
The charger will automatically adapt to the regional mains voltage.
INSERTING THE BATTERY IN THE CHARGER
CHARGE STATUS DISPLAY
A green status LED will light up to indicate the charging process
has commenced correctly. The battery will be fully charged when
the green LED switches off .
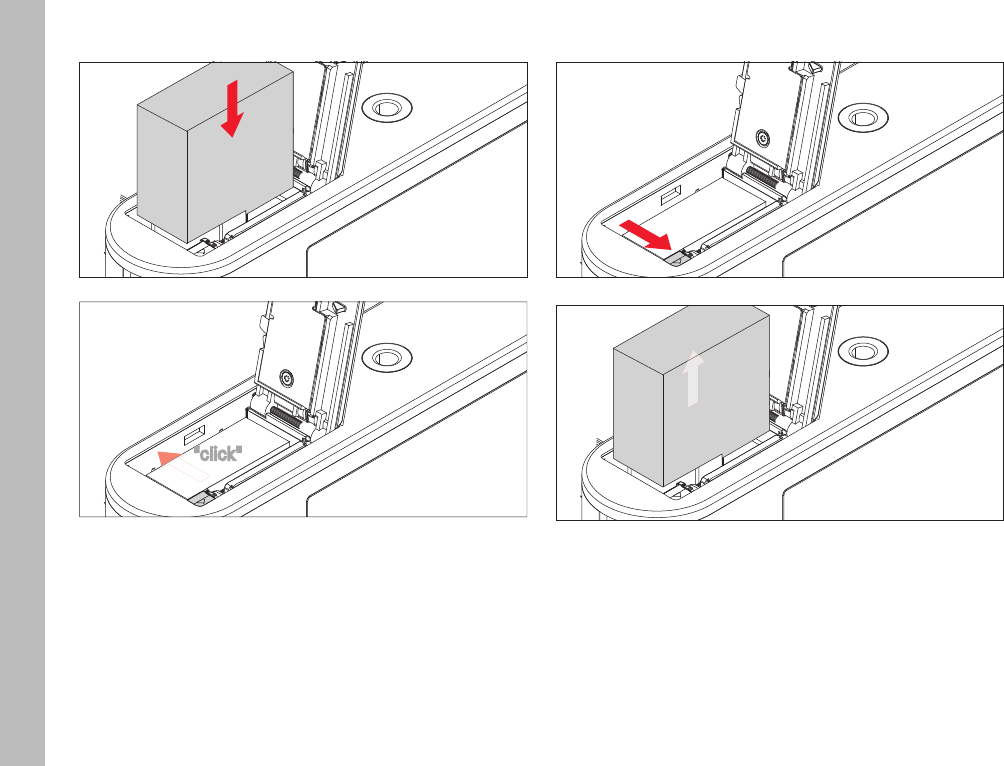
REPLACING THE BATTERY/MEMORY CARD
▸ Switch off the camera (see p. 18)
Remove the battery compartment/memory card slot cover
EN
12
Preparations
Inserting the battery
"click"
Removing the battery
Important
Removing the battery while the camera is switched on may result
in the loss of your camera settings and damage to the memory
card.
Charge level display
The battery charge level is displayed on screen.
(see p. 90 “On screen and viewfi nder displays”)
EN
13
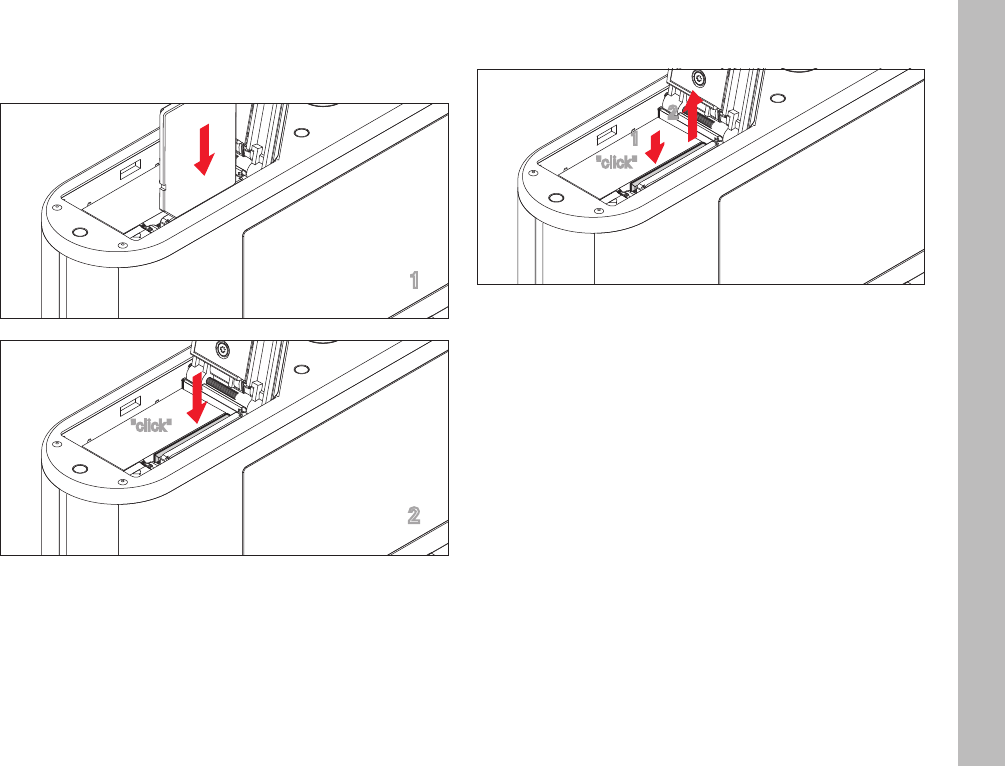
Inserting the memory card
The LeicaCL can accommodate SD, SDHC, or SDXC memory
cards.
1
2
"click"
Removing the memory card
1
2
"click"
Preparations

EN
14
Preparations
Notes
• Do not touch the memory card contacts.
• Make sure the memory card is aligned correctly if you have
difficulties inserting it into the camera.
• The range of available SD/SDHC/SDXC cards on the market is
too great for Leica Camera AG to test all types for compatibility
and quality. Generally, any type of memory card may be used
without any damage to the camera or memory card. As some
"no name" cards may not fully comply with the SD/SDHC/SDXC
standards, Leica Camera AG cannot provide any guarantee of
function.
• Video recordings require a high write speed.
• Do not open the cover or remove the memory card or the bat-
tery while the status LED is lit, which indicates memory access.
Data on the card may otherwise be destroyed and camera mal-
functions may occur.
• We recommend backing up your data on a PC, because electro-
magnetic fields, static electricity and any memory card or
camera defects could result in permanent damage or loss of
your data.
• We furthermore recommend storing your memory card in an anti
static container to protect your card and saved data.
• Proper camera function cannot be guaranteed when using WLAN
memory cards.
• SD, SDHC, and SDXC memory cards come with a write protec-
tion slider to prevent accidental overwriting. This slider is lo-
cated on the non-beveled side of the card. All data on the card
is protected when the slider is set to its lower position, marked
LOCK.
Attention
• Keep memory cards out of the reach of children.
• Swallowing a memory card may cause suffocation.
EN
15
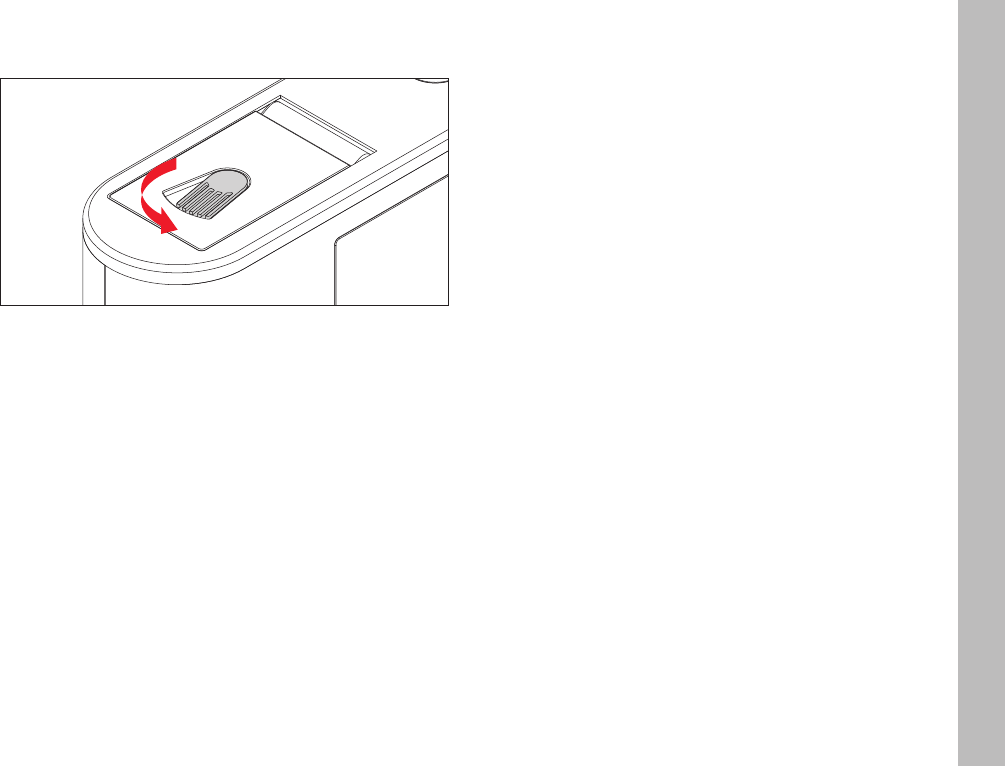
Preparations
Closing the battery compartment/memory card slot cover
EN
16
Preparations
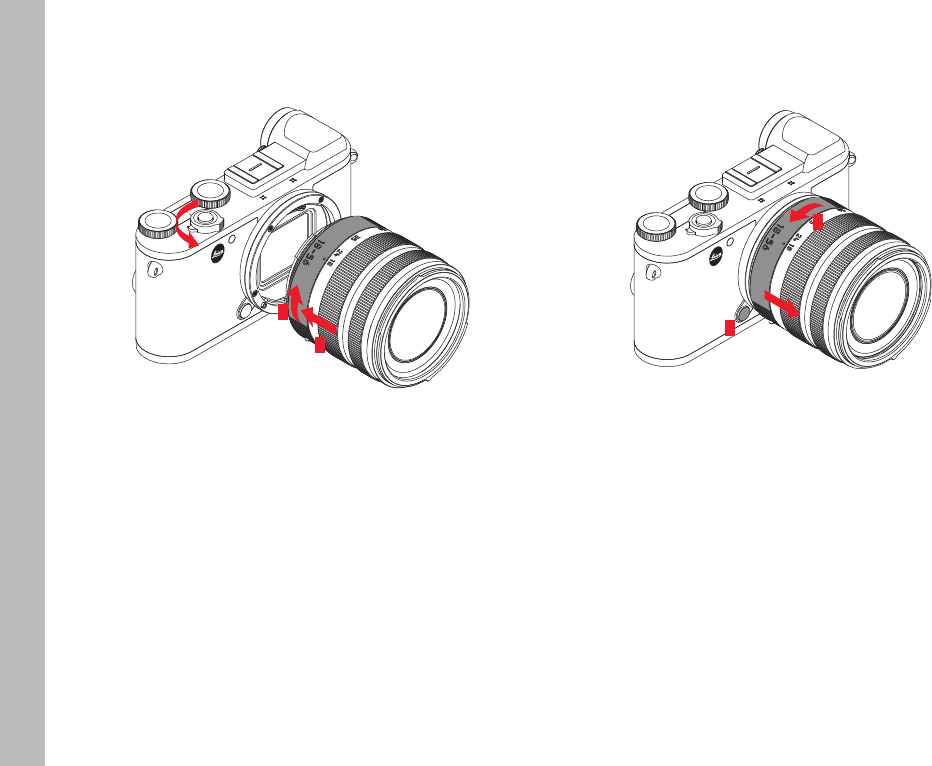
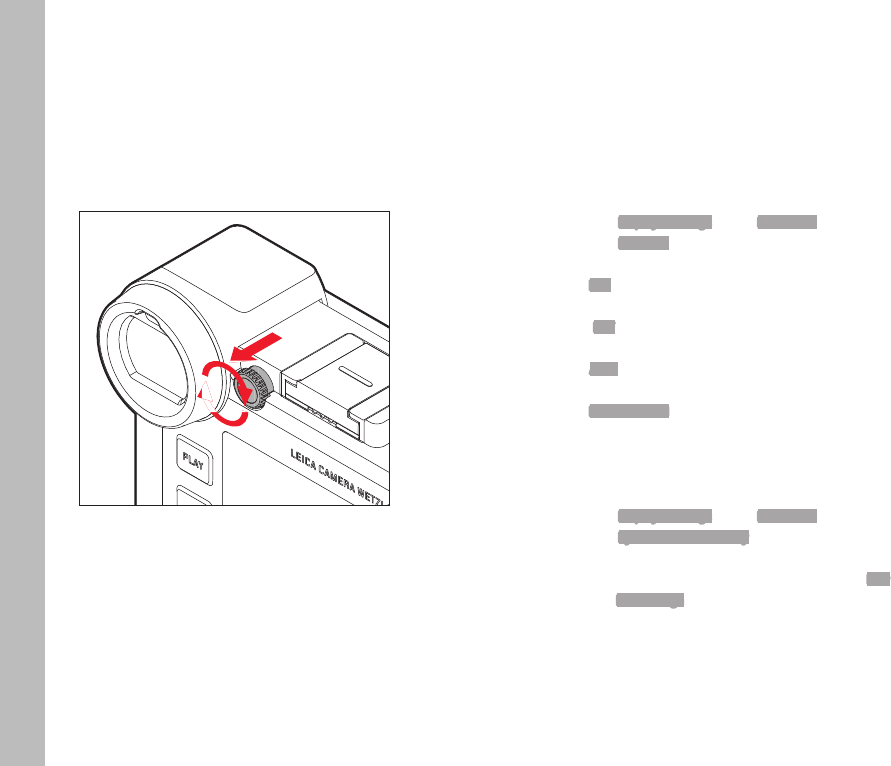
CHANGING THE LENS
Attaching the lens
1
2
▸ Switch off the camera
▸ Hold the lens on the fi xed ring
▸ Position the red alignment button on the lens in line with the
release button on the camera housing.
▸ Insert the lens in this position
▸ Turn the lens clockwise until you hear and feel it click into place
Detaching the lens
1
2
▸ Switch off the camera
▸ Hold the lens on the fi xed ring
▸ Press the release button on the camera housing
▸ Turn the lens counter-clockwise until the red alignment button is
aligned with the release button
▸ Remove the lens
Notes
• Make sure to always have a lens or the camera bayonet cover
attached to prevent dust or other foreign bodies penetrating the
camera.
• That is why you should replace the lens quickly and in a dust-
free environment.
• Never store the camera bayonet cover or the rear lens cover in a
pants pocket, as they will attract lint and dust, which could then
be accidentally be introduced into the camera.

EN
17
Preparations
COMPATIBLE LENSES
All Leica TL lenses share the same basic structure: they have an
external bayonet fi tting for the lens hood, an internal thread for
fi lters, a focus ring, a fi xed ring with a red alignment button for lens
replacement and a contact strip for the transfer of data and control
signals. Leica CL zoom lenses have an additional focal length set-
ting ring with its own index.
In addition to Leica TL lenses, the LeicaCL can also accommodate
Leica SL lenses with full functionality via the L bayonet. Leica M
and R lenses can also be used in conjunction with Leica M/R L
adapters.
Depth of fi eld
Leica SL and TL lenses don’t come with an aperture ring, which
means they don’t off er a depth of fi eld scale. Please look up the
relevant values on the Leica Camera AG website, where tables with
that information are provided.
Exposure metering and exposure control using a Vario lens
Some Leica TL and SL zoom lenses have a variable speed, i.e. the
eff ective aperture opening depends on the confi gured focal length.
Make sure to set the desired focal length before storing the meter
value or changing the shutter speed / aperture combination to
prevent incorrect exposure. Please read the sections "Exposure
metering and exposure control" starting on page 45 for more
information on the subject. Make sure that the aperture setting on
the fl ash unit matches the camera aperture if you are using a non-
system compatible fl ash unit.
Lens hood
Picture
position
Transport
position
LeicaCL lenses are supplied with optimized lens hoods. The sym-
metrical bayonet fi tting can be attached quickly and easily in oper-
ational position, as well as in reverse position for space-saving
storage.
Lens hoods reduce light scatter and refl ection, and protect the
front lens against damage and soiling.
Filter
LeicaCL lenses can accommodate screw-on fi lters. Please read
the technical information provided in the manual of the relevant
lens for the correct fi lter diameter.
EN
18
Camera operation
CAMERA OPERATION
8
13
12
10
11
14
9
MAIN SWITCH
The main switch 8 switches the LeicaCL on and off :
– Red dot visible = Off
– Red dot not visible = On
The screen image appears when the camera is switched on.
Notes
• A welcome video will play on screen when you switch on your
camera for the fi rst time or after factory settings have been
restored. Next, the Language submenu will appear for you to
choose your preferred language, followed by the Date & Time sub-
menu for additional settings. Once you have completed these
basic settings, the picture mode screen will be displayed.
• For the purposes of this manual, all references for the screen
image also apply to the viewfi nder image, as the relevantly active
displays are identical on both.
SHUTTER BUTTON
The shutter button 9 works in two stages. Pressing down half-way
will activate Auto focus, exposure metering and exposure control.
The relevant settings/values are stored. Pressing the shutter
button will activate the camera if it was in standby mode, and the
screen image reappears. Pressing the shutter button all the way
down takes a picture.

EN
19
Camera operation
SETTING WHEELS/SETTING WHEEL BUTTONS/
TOP DISPLAY
The two setting wheels 10 and 13 are used
– mainly for exposure control in picture mode (see p. 45)
– and for the setting of various functions in playback mode
(see p. 29)
– in menu mode, the right setting wheel is used for menu naviga-
tion (see p. 20)
In picture mode, the relevant function of the setting wheel is indi-
cated on screen below the wheel, once the setting wheel is turned
to the next position.
A button (11, 14) is located on each setting wheel that allows the
assignment of alternative functions to the setting wheels in picture
mode.
In menu control mode, the right setting wheel button is used to
select and confirm settings.
A top display 12 is located between the two setting wheels. It
visualizes a number of items.
Note
Please read the relevant sections of this manual for more informa-
tion about how to operate the setting wheels and buttons, and
about what information is shown in the top display.
LOCKING/UNLOCKING THE SETTING WHEEL FUNCTIONS
Both setting wheels can be locked/unlocked.
Using gesture control
▸ Tap the relevant function display until / appears at the
center bottom of the screen (after approx. 2 seconds)
Using menu control
▸ Select Wheel Lock in Live View in the Main Menu (4th screen page)
▸ Select Right Wheel or Left Wheel in the submenu
▸ Activate or deactivate the wheel function in the relevant sub-
menu
A locked setting wheel is indicated by on screen.
EN
20
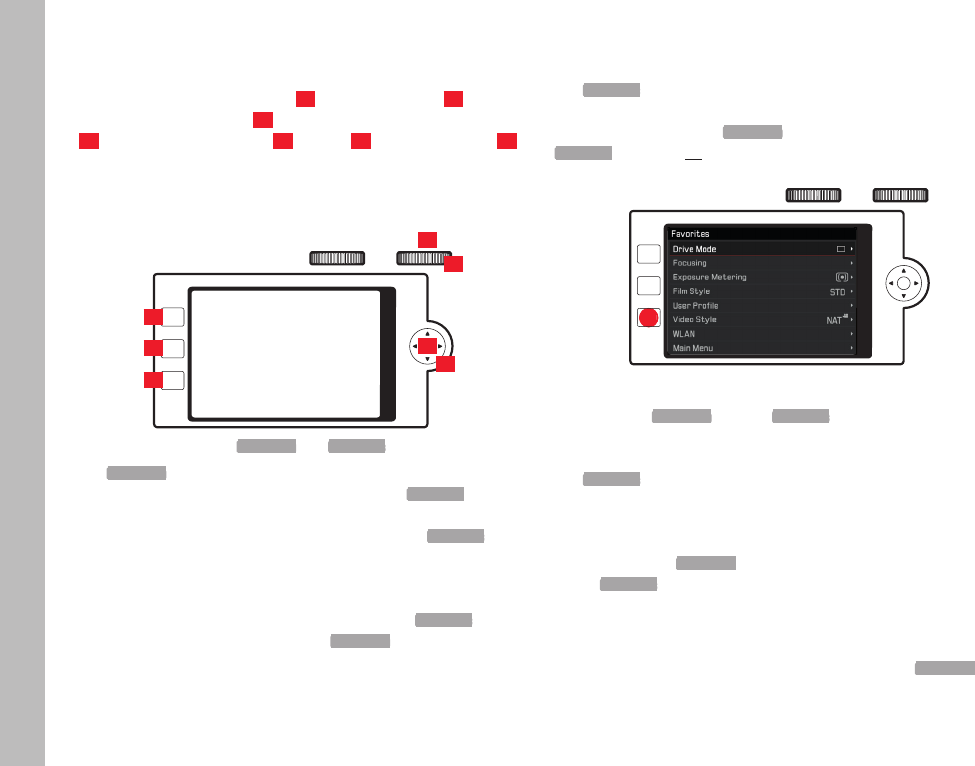
MENU CONTROL
A variety of camera functions are controlled via menu control.
Navigate using the MENU button 16, the center button 23 or the
right setting wheel button 11; alternatively, use the directional pad
22 or the right setting wheel 10. The FN 17 and PLAY buttons 18
are also used in some cases. The relevant settings and setting
steps are clearly displayed on screen when the camera is switched
on.
PLAY
FN
MENU
16
17
18
10
22
23
11
The two menu areas: Main Menu and Favorites
The Main Menu always includes all 37 menu items. Up to 15 of these
menu items can be assigned to the customizable Favorites menu.
That means you can access your most frequently used menu items
much quicker and easier. The factory settings of the Favorites menu
contain 7 menu items. Details about this menu option can be
found on the following pages.
The following applies for both menu areas: A screen page can
contain max. 8 menu items, which means that the Favorites menu
will have 1 or 2 screen pages and the Main Menu will have 5 screen
pages.
Accessing menu control
▸ Press the MENU button 1x
The Favorites menu will appear fi rst if at least one function was
assigned to it. It will be your “home screen” and will allow access
to the menu control. The Main Menu will appear instead if the
Favorites menu has no functions assigned.
PLAY
FN
MENU
MENUMENU
Accessing the Main Menu with the Favorites menu set up:
a. Directly
▸ Press the MENU button 2x
b. Favorites menu is already open
▸ Press the MENU button again 1x
(this function is available from within any open menu item)
or
▸ Select the Main Menu (listed as the last menu item in the
Favorites menu, which means it may be on the 2nd screen
page) with the right setting wheel or by pressing the direc-
tional pad up/down
All three options will open the fi rst screen page of the Main Menu.
Camera operation
EN
21
Camera operation
Menu control elements
PLAY
FN
MENU
BD E
C
A
MENUMENU
A Scrollbar: current position in the menu list
B Menu item designation
C Number of the accessed screen page
D Setting/value of the menu item: The active menu item (white
lettering, dark background, underlined in red).
This applies to all menu levels
E Triangle: additional submenus
Scrolling in the menu list
Line by line:
▸ Press the directional pad up/down, or turn the right setting
wheel
PLAY
FN
MENU
Page by page:
▸ Press the MENU button (repeatedly) until the desired page ap-
pears
PLAY
FN
MENU
MENUMENU
EN
22
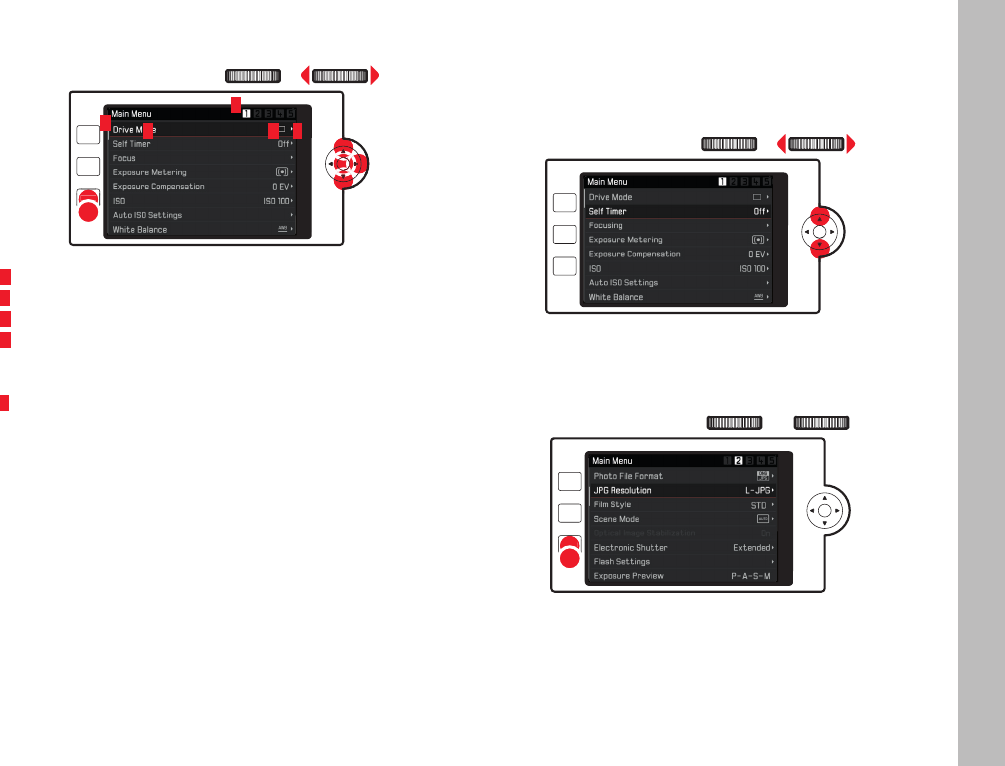
Selecting a setting/value in the submenu
▸ Press the directional pad, the center button, the setting wheel
on the right or the setting wheel button on the right to select a
menu item
In the submenu
a. In a list of settings,
▸ Press the directional pad up/down, or turn the right setting
wheel
The newly selected submenu item is activated.
PLAY
FN
MENU
b. In a setting scale
▸ Set the desired value on the scale by
– turning the right setting wheel
– pressing the directional pad left or right
– tapping the desired value on the row
– dragging to the desired value in the row
PLAY
FN
MENU
Exiting a submenu with setting confi rmation
▸ Press the center button or right setting wheel button
The menu list reappears; the confi rmed (new) setting is displayed
on the right in the active menu item row.
Exiting a submenu without confi rming a setting
▸ Press the directional pad to the left or press the MENU button
The menu list reappears; the unchanged (previous) setting is dis-
played on the right in the active menu item row.
The directional pad is not available for this function in scale-type
submenus.
Or
▸ Press the shutter button
The picture mode screen image appears.
Or
▸ Press the PLAY button
The playback screen image appears.
Camera operation

EN
23
Favorites menu management
For the max. 15 menu items that you can assign to the Favorites
menu, almost all of the menu options of the Main Menu are available
(see p. 88 for a complete list).
▸ Select Customize Control in the Main Menu (4th screen page)
▸ Select Edit Favorites in the submenu
▸ Select the desired menu item
▸ Pressing the directional pad to the right, pressing the center
button or the setting wheel button of the right setting wheel will
add the selected menu item to the Favorites menu (On), or re-
moves the selected menu item (Off)
A warning message will appear if the Favorites menu already con-
tains 15 items and you are trying to add another.
Note
The Favorites menu is activated completely if you deactivate all of
its menu items.
Should that be the case, then the Main Menu will appear immediate-
ly,i. e. when the MENU button is pressed for the first time.
Direct access to menu function
You can assign one menu item each to the right setting wheel
button 11 and to the FN button 17 for extra quick operation via
direct access in picture mode.
The factory settings assign ISO to the setting wheel button on the
right, and Self Timer to the FN button.
Accessing the assigned function
▸ Press the relevant button briefly (≤ 0.7 seconds)
Setting the function/menu item accessed via the relevant
buttons
Most of the menu items/functions accessed directly can be set
using gesture control or the button/setting wheel controls. To
make things easy, the setting variants for each of these items are
displayed running across the bottom of the screen image like on a
conveyor belt.
Other menu items, for which several parameters must be config-
ured, resemble the “standard” menu control in terms of display
and operation.
Baseline for additional settings:
The relevant “conveyor belt” submenu is already open (in this ex-
ample: White Balance).
The currently active setting displayed in the center is highlighted in
yellow.
Camera operation

EN
24
Camera operation
Using gesture control
Note
Functions/values initially outside the screen image can be ac-
cessed by repeatedly tapping accessible functions/values. Swipe
the navigation bar at the outer edge of the screen for bigger navi-
gation steps.
Using button/setting wheel controls
▸ Turn the setting wheel on the right or press the directional pad
right/left
The selected function requires no confi rmation and will be active
immediately.
Notes
• “Conveyor belts” are not on endless loops.
• In playback mode, the FN button has the “single image delete”
function assigned.
Button assignment
You can assign up to 8 menu items/functions to each button via
menu control. A variety of menu items is provided in the Main Menu
for that purpose (see p. 88 for a complete list).
▸ Select Customize Control in the Main Menu (4th screen page)
▸ Select Edit Right Wheel Push in Live View from the submenu or select
Edit Rear FN Button in Live View
▸ Select from the list by turning the right setting wheel
▸ Activate ( On) or deactivate ( Off) a function by pressing the direc-
tional pad to the right or by pushing the center button or the
button on the setting wheel on the right
Note
The available functions are identical for both buttons.
Changing a button function
▸ Press and hold the button (≥ 0.7 seconds)
A list of available functions is displayed.
▸ Use the setting wheel on the right to select the desired function
▸ Confi rm the setting by pressing the center or right setting wheel
button
Notes
• Selecting a function will automatically deselect the previously
selected function.
• Switching the camera off will not aff ect the settings; A complete
camera reset to its factory settings ( Reset) will negate the set-
tings you have chosen.
EN
25
Camera operation
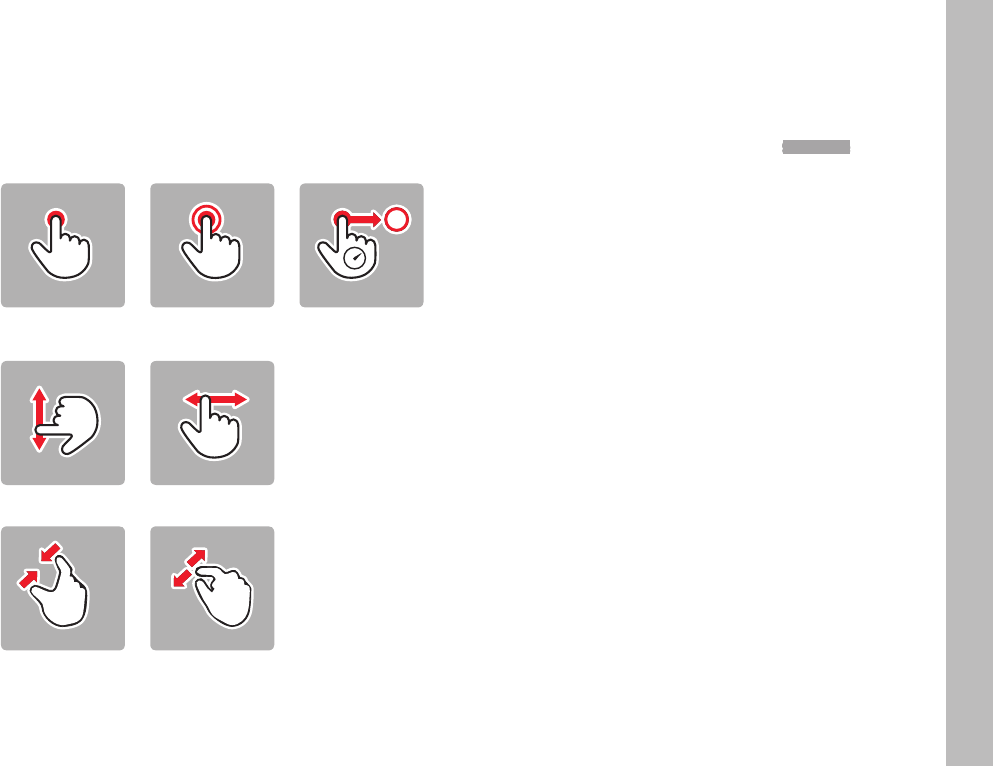
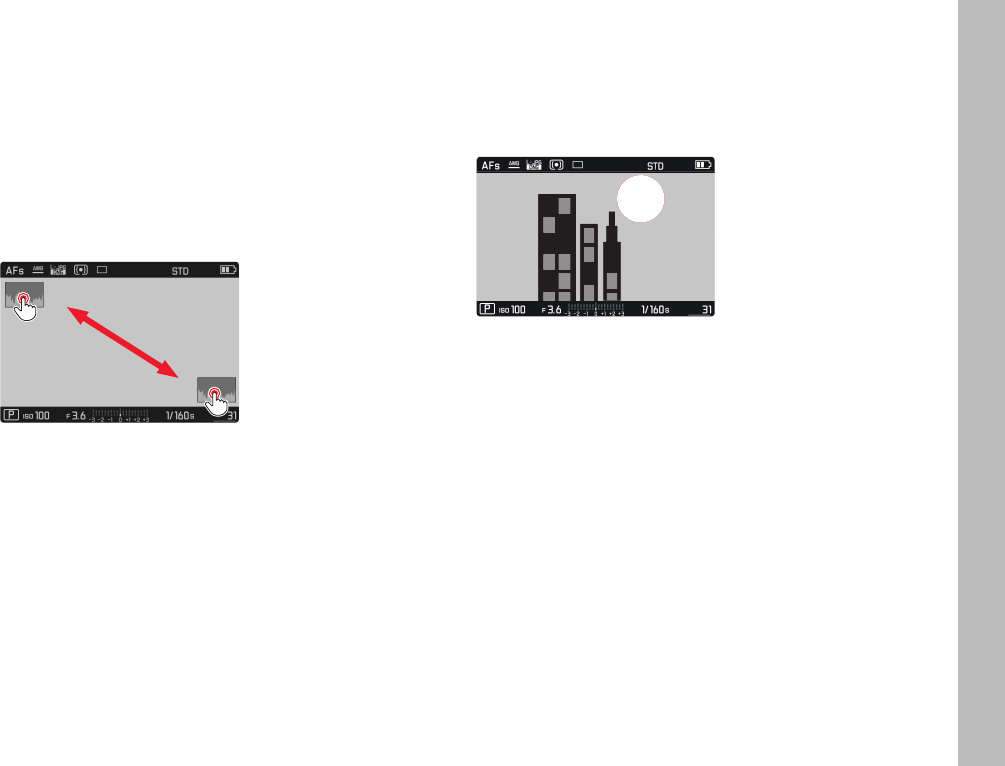
GESTURE CONTROL
As mentioned on the previous pages, some LeicaCL settings can
be controlled using the following gestures on the touch-sensitive
screen.
Note
A light touch is enough, do not press down.
Tap briefly Double tap Long touch,
drag and drop
Swipe Swipe
Two-finger pinch Two-finger spread
General remarks on menu control
• Settings for menu items that differ from the above explanations
or include additional steps are described in the sections dealing
with the relevant options.
• Some menu items may not be available, e.g. because the rele-
vant functions are permanent features of the Scene Mode, or be-
cause the relevant setting can only be configured on an at-
tached and relevantly equipped flash unit. These menu items are
then indicated by gray text (instead of white) and cannot be
selected.
EN
26
Basic camera settings
BASIC CAMERA SETTINGS
MENU LANGUAGE
▸ Select Language in the Main Menu (5th screen page)
▸ Select the desired language
Apart from a few exceptions (button names, short designations),
the language will be changed for all information provided.
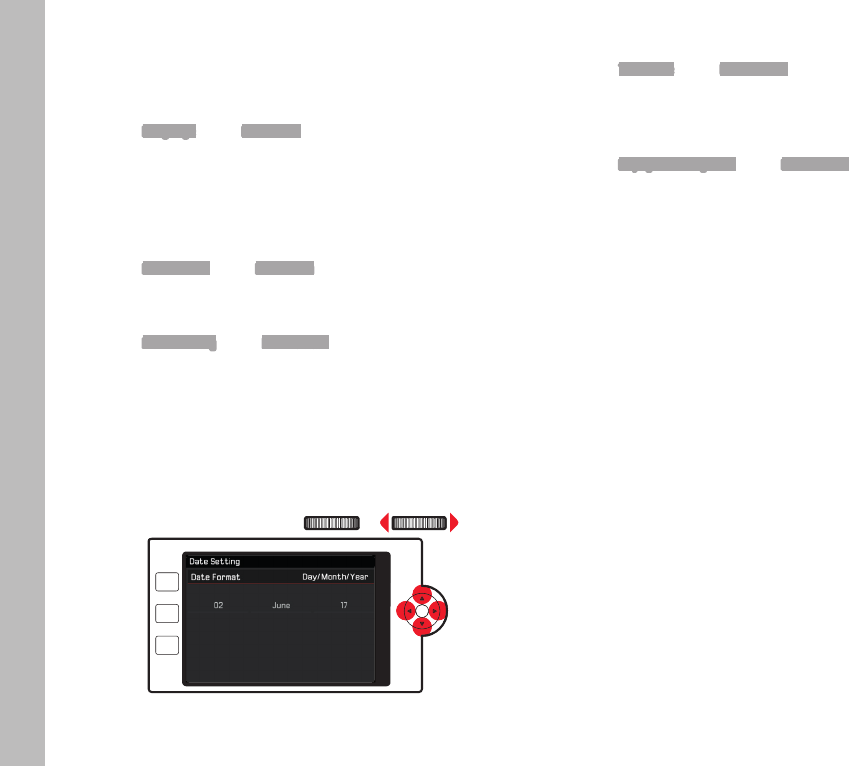
DATE/TIME
▸ Select Date & Time in the Main Menu (5th screen page)
Setting the date/Selecting the date format
▸ Select Date Setting in the Date & Time submenu
Toggling between the setting options:
▸ Press the directional pad to the right/left or turn the setting
wheel on the right
Confi guring the items:
▸ Press the directional pad up/down
PLAY
FN
MENU
Selecting the time zone
▸ Select Time Zone in the Date & Time submenu
▸ Select the desired time zone
Activating/deactivating daylight saving time
▸ Select Daylight Saving Time in the Date & Time submenu
▸ Function activation/deactivation
EN
27
Basic camera settings
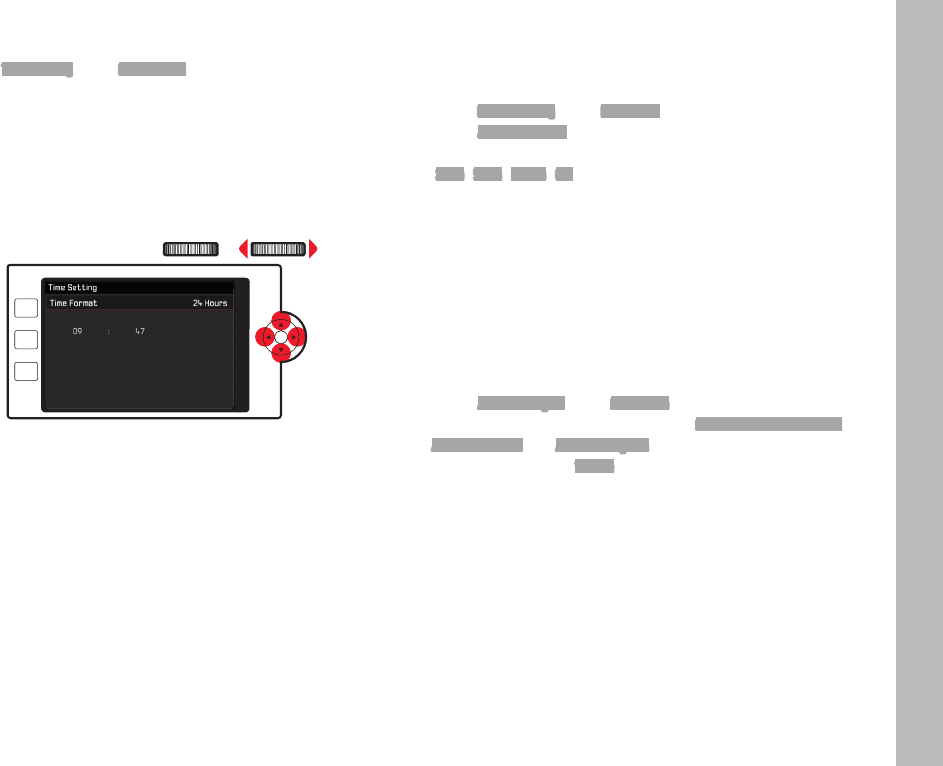
Setting the Time/Selecting the time format
▸ Select Time Setting in the Date & Time submenu
Toggling between the setting options:
▸ Press the directional pad to the right/left or turn the setting
wheel on the right
Confi guring the items:
▸ Press the directional pad up/down
PLAY
FN
MENU
Note
The built in back-up battery will keep the date and time settings
intact for a few days even if no battery is in the camera or if the
battery is depleted. After that, however, the settings will have to be
redone.
AUTOMATIC CAMERA SHUTDOWN
With this function enabled, the camera will switch to standby mode
to extend battery life after a preset time.
▸ Select Power Saving in the Main Menu (4th screen page)
▸ Select Auto Power Off in the submenu
▸ Select the desired setting
( 2 min/ 5 min/ 10 min/ Off)
Note
The camera can be reactivated from standby mode at any time by
pressing the shutter button or by switching the main switch off and
on again.
ACOUSTIC SIGNALS
You can choose to have acoustic signals for camera operations or
to signal a full memory card – or no acoustic signals to take photo-
graphs without additional sounds.
▸ Select Acoustic Signal in the Main Menu (4th screen page)
▸ Activate or deactivate the functions for Electronic Shutter Sound,
AF Confirmation and Acoustic Signals in the relevant submenus and
set the volume in the Volume submenu
EN
28
Basic camera settings
ADJUSTING THE VIEWFINDER EYEPIECE
The viewfi nder can by adjusted from +4 to -4 diopters to match
your vision.
▸ Pull the setting wheel on the right of the eyepiece backward to
unlock
▸ While looking through the viewfi nder, turn the dial until you can
see the image and displayed information clearly.
▸ Push the setting wheel back into the locked position
SCREEN/VIEWFINDER SETTINGS
Toggling between screen and viewfi nder
The displays appearing on screen and in the viewfi nder are iden-
tical. You can, however, specify when and where the displays ap-
pear. The changeover from screen to viewfi nder is automatic in the
factory settings (with the proximity sensor in the eyepiece acti-
vated). You can also specify to have the displays appear only on
screen or only in the viewfi nder:
▸ Select Display Settings in the Main Menu (3rd screen page)
▸ Select EVF-LCD in the submenu
▸ Select the desired function
– LCD: Photographs, playback and menu control always on
screen
– EVF: Photographs, playback and menu control always in the
viewfi nder
– Auto: Screen or viewfi nder selection activated via proximity
sensor
– EVF Extended: Photographs always with viewfi nder, playback or
menu control always on screen
You can adjust sensor sensitivity to ensure that the changeover
functions reliably even if you need to wear glasses:
▸ Select Display Settings in the Main Menu (3rd screen page)
▸ Select Eye Sensor Sensitivity in the submenu
▸ Select the desired setting:
Users without glasses can retain the setting Low, others should
select Medium high.

EN
29
Basic camera settings
Screen brightness
You can adjust screen brightness for best visibility and various
lighting conditions:
▸ Select Display Settings in the Main Menu (3rd screen page)
▸ Select LCD Brightness in the submenu
▸ Select the desired function
With Auto activated, brightness is adjusted automatically.
Top display
The top display between the setting wheels can be switched on or
off:
▸ Select Display Settings in the Main Menu (3rd screen page)
▸ Select Top Display in the submenu
▸ Select the desired function
– On: always on
– Off: always off
– Auto: automatic control, depending on ambient brightness
Auto power off of all displays
This function allows you to set a time after which the top display,
screen and viewfinder are powered down to extend battery life.
▸ Select Power Saving in the Main Menu (4th screen page)
▸ Select All Displays Auto Off in the submenu
▸ Select the desired setting
Information displays
Pressing the center button allows you to adjust the screen displays
incrementally in accordance with the level of information you want
to see:
In picture mode
Factory setting = none of the two lines
Press 1x = header and footer lines
Press 2x = baseline
In playback mode
Factory setting = header and footer lines
Press 1x = none of the two lines
Press 2x = baseline
The options are arranged in an endless loop, meaning they can be
accessed by pressing once or repeatedly.
A detailed listing of the displays can be found on the following
pages.
Notes
• The last display used will be shown when the camera is switched
to picture mode.
• In video mode, both lines are shown at all times.
EN
30
Basic camera settings
Selecting additional information and auxiliary displays
In addition to the information provided in the header and footer
lines, you can choose to have additional information and auxiliary
displays shown.
For picture mode
▸ Select Capture Assistants in the Main Menu (3rd screen page)
▸ Select Grid, Horizon, Histogram or Clipping in the submenu
▸ Activate or deactivate the functions
For playback mode
The settings for Clipping and Histogram under the Main Menu item
Play Mode Setup (4th screen page) are done the same way.
Notes
• The grid display will always appear when activated, i.e. no matter
whether the information in the header and footer are displayed
(see p. 29). With header and footer deactivated, the level
display, histogram and clipping displays will not appear.
• Only the histogram display is available for video recordings.
Grid ( Grid)
The grid divides the image frame into nine equal sections. It helps
with e.g. picture composition and camera orientation.
Level Gauge ( Horizon)
The integrated sensors of the LeicaCL allow it to show its align-
ment. These displays ensure exact camera orientation along the
longitudinal and transverse axes of critical subjects, e.g. architec-
ture.
Two long lines to the left and right of the image center indicate the
longitudinal axis - green when level, red when tilted. The transverse
axis is indicated in level position by two green double-lines immedi-
ately left and right of the image center. When the camera is tilted,
these lines are white and a short red line appears above or below
them.
Note
Display accuracy is ≤1°.
EN
31
Basic camera settings
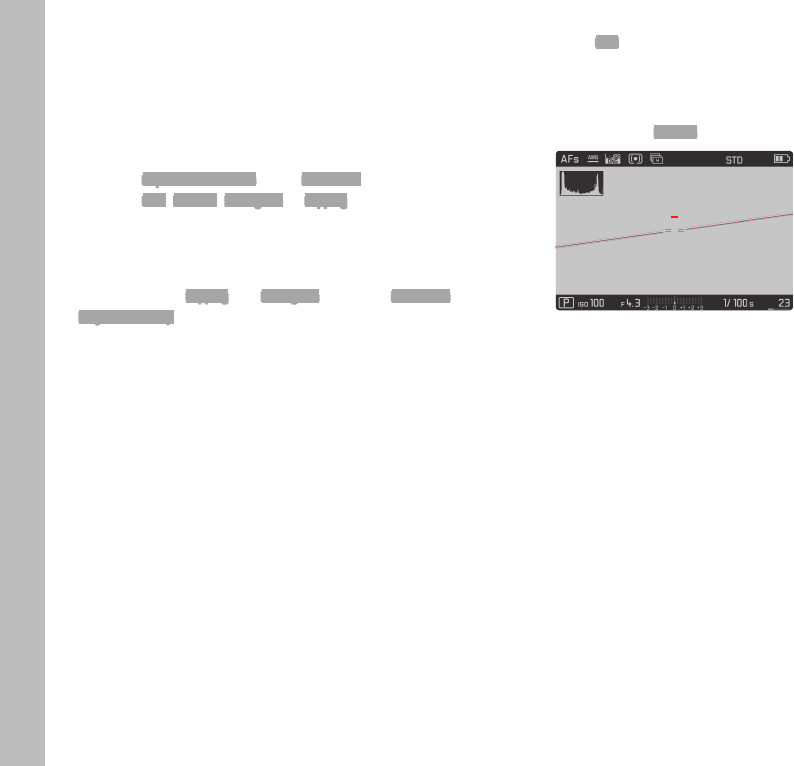
Histogram
The histogram visualizes the brightness distribution in the picture.
The horizontal axis represents tone values from black (left) via gray
to white (right). The vertical axis corresponds to the number of
pixels at each brightness level.
This form of representation – in conjunction with the impression of
the picture itself – provides an additional quick and easy assess-
ment of the exposure setting.
The histogram can also be moved to the bottom right corner of the
screen image.
Notes
• In picture mode, the histogram should be seen as a “trend dis-
play” and not as an exact representation of the pixel numbers.
• For a picture with fl ash, the initial histogram cannot represent
the fi nal exposure as the fl ash is fi red after the values are dis-
played.
• The histogram at the time of playback of an image may vary
slightly from the values displayed before the picture is taken.
• The histogram function is not available for the simultaneous
playback of multiple thumbnails or enlarged pictures.
Clipping
The clipping display marks bright areas in the image lacking defi ni-
tion. These areas will fl ash in black. The clipping function s there-
fore a very simple and exact means for checking and adjusting the
exposure settings as needed.
999-9000
Notes
• The clipping display is not available in video mode.
• The clipping display is available for the playback of the entire
picture and for individual cropped sections, but not for the simul-
taneous playback of 12 or 30 thumbnails.
• The clipping display always refers to the currently shown
cropped section of the image.

EN
32
Basic picture settings
BASIC PICTURE SETTINGS
File format
You can choose between the JPG format JPG and the standardized
raw data format DNG (= digital negative). They can be used individu-
ally or simultaneously.
▸ Select Photo File Format in the Main Menu (2nd screen page)
▸ Select the desired setting
JPG Resolution
With the JPG format selected, you can take pictures with 3 different
resolutions (numbers of pixels). Available are: L-J PG (24 MP), M-JPG
(12 MP) and S-JPG (6 MP) (MP = Mega pixel). This allows you to
adjust the setting precisely to the intended use or to the memory
card capacity available.
▸ Select JPG Resolution in the Main Menu (2nd screen page).
▸ Select the desired setting
Note
The DNG format always functions at maximum resolution regardless
of the JPG settings.
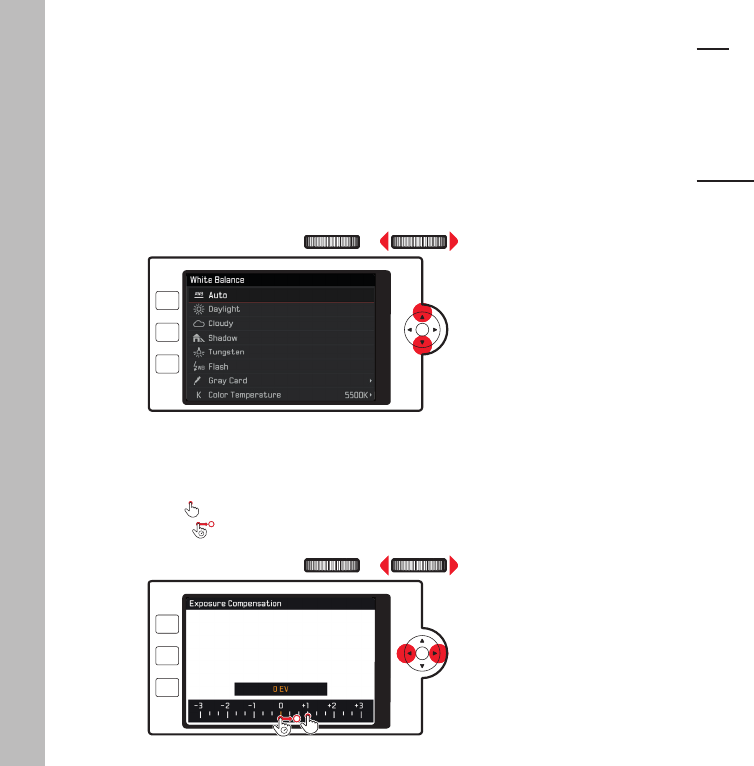
White balance
In digital photography, white balance ensures neutral, i.e. natural
color reproduction in any light. White balance is based on the
camera being preset to reproduce a particular color as white.
You can choose between automatic white balance, various presets,
one custom setting based on specific measurements, and a direct
setting of the color temperature.
1. Automatic (automatic setting)
2. Daylight (for outdoor pictures in sunshine)
3. Cloudy (for outdoor pictures in cloudy conditions)
4. Shadow (for outdoor pictures with the main subject in shadow)
5. Tungsten (for indoor illumination with incandescent light bulbs)
6. Flash (for illumination with electronic flash)
7. Gray Card 1 (memory slot for your custom measurements)
8. Color Temperature (memory slot for fixed setting)
Fixed presets
▸ Select White Balance in the Main Menu (1st screen page)
▸ Select the desired setting

EN
33
Basic picture settings
Manual setting based on measurements taken
▸ Select White Balance in the Main Menu (1st screen page)
▸ Select Gray Card 1 in the submenu
▸ Select next to Gray Card 1 in the submenu
A yellow frame appears in the center of the monitor with an in-
struction below it.
▸ Aim the frame at a uniformly white or gray object that com-
pletely fills the frame
▸ Press the center button to confirm
The camera shutter is triggered, measurements are taken and
stored.
These settings can later be accessed again via Gray Card 1.
Direct color temperature setting
▸ Select White Balance in the Main Menu (1st screen page)
▸ Select Color Temperature in the submenu
▸ Select next to Color Temperature in the submenu
▸ Select the desired value
ISO sensitivity
The ISO setting specifies the available combinations of shutter
speed and aperture at a specific brightness. Higher sensitivities
allow faster shutter speeds and/or smaller apertures (for "freezing"
rapid movements or to increase the depth of field), although this
may also mean more image noise.
▸ Select ISO in the Main Menu (1st screen page)
▸ Select the desired setting
(i.e. Auto ISO for an automatic setting or one of the eleven fixed
settings)
You can limit the sensitivity range to be used (e.g. to control image
noise) via the Auto ISO option. You can also specify the slowest
shutter speed to be used (e.g. to prevent blurred pictures of
moving subjects).
▸ Select Auto ISO Settings in the Main Menu (1st screen page)
▸ Select Maximum Exposure Time and/or Maximum ISO in the submenu
▸ Select the desired settings

EN
34
Basic picture settings
JPG image properties (Film Style)
One of the many advantages of digital photography is that it is very
easy to change critical properties of a picture.
Your LeicaCL allows you to adjust color rendering, contrast, sharp-
ness and color saturation before taking the picture.
Note
The functions and settings described in this section apply for pic-
tures taken in JPG format only. These settings have no effect if the
DNG file format is selected, because image data will in this case
always be saved in its original form.
Color rendering
Choose between Standard, Vivid – for highly saturated colors – and
Natural – for slightly less saturated colors and a somewhat softer
contrast. Two monochrome settings – B&W Natural (natural) and
B&W High Contrast – are additionally available.
▸ Select Film Style in the Main Menu (2nd screen page)
▸ Select the desired setting
Contrast, sharpness, saturation
The following three image properties can also be changed for each
color rendering setting:
– Contrast (i.e. the difference between light and dark image sec-
tions) determines whether an image comes across “flat” or
“brilliant”. Contrast can be therefore influenced by increasing or
reducing this difference, i.e. with a brighter rendering of image
sections with more light, and a darker rendering of image sec-
tions with less light.
– Image sharpness – at least of the main subject – using the cor-
rect distance setting is prerequisite for a great picture. The im-
pression of sharpness in a picture is largely determined by edge
sharpness, i.e. by how small the transition between light/dark is
at edges in the picture. Expanding or reducing these areas will
therefore change the impression of sharpness.
– The saturation factor in color images determines, whether colors
in the picture appear “pale” and pastel-like or “bright” and col-
orful.
▸ Select Film Style in the Main Menu (2nd screen page)
▸ Select Film Style Settings in the submenu
For each of the color rendering variants available in the previous
step, you can change three additional image parameters available
in further submenus:
– Contrast
– Sharpness
– Saturation (not available for the two B/W settings)
The following gradations are available for all of these: Low,
Medium low, Standard, Medium High and High.
▸ Select the desired settings in the relevant submenus
▸ Press the center button to confirm

EN
35
Basic picture settings
Using Leica M and R lenses
The Leica M and R Adapters L accommodate the use of Leica M
and R lenses. There are lens profiles stored in the camera, which
allow the following functions:
– The flash exposure and flash reflector controls utilize the stored
lens data (see “Compatible flash units”).
– The lens data is furthermore written to the EXIF data of the
images. A display of the lens focal length is added to the visual-
ization of the extended image data.
The camera will automatically select the appropriate lens type
settings if the Leica M lens has a 6 bit encoding, or the Leica R
lens has a ROM contact strip. You will have to enter the lens model
manually if the lenses are not relevantly equipped.
▸ Select Lens Profiles in the Main Menu (3rd screen page)
▸ Select automatic lens identification (Auto) in the submenu, or
enter the lens model manually into one of the two lens lists, or
deactivate the function altogether.
If you want to enter the lens model yourself:
▸ M-Lenses or R-Lenses
You can shorten the lens lists by deleting all unnecessary lens
types to simplify operation:
▸ Select Edit List of M-Lenses or Edit List of R-Lenses in the M-Lenses
or R-Lenses submenu.
▸ Activate (On) or deactivate (Off) the lens types you will be using/
not using in the lens lists
Note
This menu item is not available for Leica TL and SL lenses and the
relevant item line is marked unavailable in gray lettering.
Image stabilization
When using Leica SL lenses equipped with OIS, your LeicaCL can
utilize their built-in stabilization function. That means you can
achieve sharp pictures at shutter speeds that would otherwise be
too slow.
▸ Select Optical Image Stab. in the Main Menu (2nd screen page)
▸ Function activation/deactivation
Note
Please read the relevant lens manual for more information about
OIS.

EN
36
Basic picture settings
Electronic shutter
Your LeicaCL comes equipped with a mechanical shutter and a
purely electronic shutter function. The completely silent electronic
shutter function is a great choice for taking photographs inconspic-
uously. This function also extends the available shutter speed
range. You can choose between three function variants:
– Off
Only the mechanical shutter is used. Shutter speed range: 30s
to 1⁄8000s
– Extended
You can add in the electronic shutter functions if you need faster
shutter speeds than can be achieved with the mechanical
shutter. Shutter speed range: 30s - 1⁄8000s + <1⁄8000s - 1⁄25000s
– Always On
Only the electronic shutter function is used. Shutter speed
range: 30s - 1⁄25000s
▸ Select Electronic Shutter in the Main Menu (2nd screen page)
▸ Select the desired setting
Single/serial exposures
The LeicaCL allows single and serial exposures. Three speeds are
available.
▸ Select Drive Mode in the Main Menu (1st screen page)
▸ Select Continuous Low Speed, Continuous Medium Speed,
Continuous High Speed for serial exposure, or Single for single expo-
sures in the submenu
Notes
• Serial exposures with Continuous High Speed are taken at a fre-
quency of up to 10 exposuress1, provided that shutter speeds of
1⁄60s and faster are used.
• Serial exposures are not possible if a flash is used. Only a single
picture will be taken if the flash function is activated.
• Serial exposures are not available in combination with the self-
timer function. Only a single picture will be taken if the self-timer
function is activated.
• The exposure frequency will slow down after max. 33 exposures
(DNG + JPG). This slow-down is due to the time required to transfer
the data from the buffer memory to the card.
• The last picture in the series will be displayed first in playback
mode, regardless of how many pictures are taken in the series.
1 mechanical/electronic shutter

EN
37
Basic picture settings

EN
38
Picture mode
PICTURE MODE
DISTANCE SETTING (focusing)
Your LeicaCL allows automatic as well as manual focusing. There
are two autofocus modes available: AFs (single autofocus) or AFc
(continuous autofocus).
AUTOFOCUS
▸ Select Focusing in the Main Menu (1st screen page)
▸ Select Focus Mode in the submenu
▸ Select the desired setting
The selected function is displayed on screen.
Use the AFs mode if you want to take photos of stationary subjects
or subjects with very little movement. Focus on a specific area,
while applying light pressure to the shutter button (first pressure
point) to create a sharp image. The sharpest focus may no longer
be in the desired image area if the subject moves between
pressing the shutter button to the first pressure point and the time
of exposure.
Use the AFc mode if you want to photograph moving subjects.
Once again, focus on a specific area, while applying light pressure
to the shutter button to the first pressure point. While keeping the
shutter button pressed to the first pressure point, the camera will
keep the selected focus area sharp until the exposure.
A successful AF setting is displayed as follows:
– The color of the rectangle changes to green
– Up to 49 green rectangles appear with multiple field metering
– An acoustic signal is generated (if activated).
Notes
• You can also use the focus setting ring on the lens to manually
change the automatically set focus while the shutter button is
pressed to the first pressure point.
• The sharpness setting is saved along with the exposure setting.
• In some situations, the AF system may be unable to set the
distance correctly, e.g. when:
– the distance to the subject you are aiming at is outside the
setting range of the attached lens, and/or
– the subject is not sufficiently illuminated (see next section).
These situations and subjects are indicated by:
– The color of the rectangle changes to red
– In multiple field metering, the display changes to a single red
rectangle
• Only manual focusing is available when using Leica M or R
lenses with the optional Leica M or R Adapter L.
Important
The shutter button is not locked, regardless of whether the fo-
cusing is correct for the relevant subject.

EN
39
Picture mode
LIMITING THE AUTOFOCUS SETTING RANGE
The autofocus system takes longer to run through the complete
setting range, i.e. from their closest focusing distance to infinity
when focusing macro lenses (with typically very short closest fo-
cusing distance) or with
lenses with a longer focal length.
Some Leica TL lenses1 allow a limiting of their setting ranges to
speed up focusing. This is advisable if you know that you will only
need the close range or only the long range for specific exposures.
Activating the function
▸ Select Focusing in the Main Menu (1st screen page)
▸ Select Focus Limit in the submenu
▸ Function activation/deactivation
Using the function
Whether the Focus Limit function should limit automatic focusing to
close range or long range depends first of all on the current lens
setting. You will still be able to switch between ranges at any time
by turning the focus ring. The following table illustrates the correla-
tions.
1 Version 31.7.2017: Leica APO-Macro-Elmarit-TL 1:2.8/60 ASPH.,
Leica Vario-Elmar-TL 1:3.5-4.5/55-135 ASPH.
Lens
setting
Focus Limit is
activated
Changing the
focus range
(turning the lens focus ring)
working
with shorter
ranges
Autofocus applies
only for set short
range
Focusing “jumps” to
long range
(Autofocus is limited to
long range)
working with
longer ranges
Autofocus applies
only for set long
range
Focusing “jumps” to
short range
(Autofocus is limited to
short range)
Notes
• The Focus Limit function is also available for specific Leica SL
lenses (see relevant manual), but not for lenses attached via an
adapter.
• The On setting of the function is reset to Off if the lens is changed
while the camera is switched on.

EN
40
Picture mode
AF ASSIST LAMP
The built-in AF assist lamp extends the operating range of the AF
system in poor lighting conditions. This light comes on as soon as
the shutter button is pressed, provided the function is activated.
▸ Select Focusing in the Main Menu (1st screen page)
▸ Select AF Assist Lamp in the submenu
▸ Select the desired setting
Note
The AF assist lamp illuminates a range of approximately 4m.
AUTOFOCUS METERING METHODS/OPERATING MODES
Your LeicaCL offers seven AF metering options for optimal adjust-
ment of the AF system to various subjects, situations and your own
image composition ideas.
▸ Select Focusing in the Main Menu (1st screen page)
▸ Select AF Mode in the submenu
▸ Select the desired setting
Spot (Spot)/Field metering (Field)
Both metering methods detect only those parts of the subject
within the relevant AF frames.
• The metering fields are indicated by a small AF frame.
The very small metering range for spot metering allows focusing on
tiny details of the subject.
The slightly larger Field metering range is less critical when fo-
cusing, and therefore easier to handle while still allowing selective
metering.
These metering methods can also be used for serial exposures in
which the part of the subject you want to focus on will always be at
the same off-center position in the image.
In both metering methods you can move the AF frame – which is
usually positioned in the center of the screen – to another position:
▸ Press the directional pad left or right as needed
Note
In both cases, the metering fields remain at their last positions set,
even if the metering method is changed or the camera is switched
off.
EN
41
Picture mode
Subject tracking ( Tracking)
This mode is a variation of Field metering that can help to capture a
sharp image of a moving subject.
Focusing will be automatic, once you have focused on the subject.
▸ Select Tracking in the AF Mode submenu
Procedure
▸ Aim the metering fi eld at the desired subject
▸ Press the shutter button to the 1st pressure point
The metering system locks on to the subject.
▸ Keep the shutter button at the fi rst pressure point and pan the
camera to the desired image section
The AF frame “follows” the saved subject.
▸ Fully press the shutter button to take the picture
Notes
• The metering fi eld can be moved just like in Spot/ Field metering
before the subject is saved.
• The tracking function works the same way in AFs mode or AFc
mode.
• Tracking stops when you release the shutter button. The me-
tering fi eld remains at the last position reached.
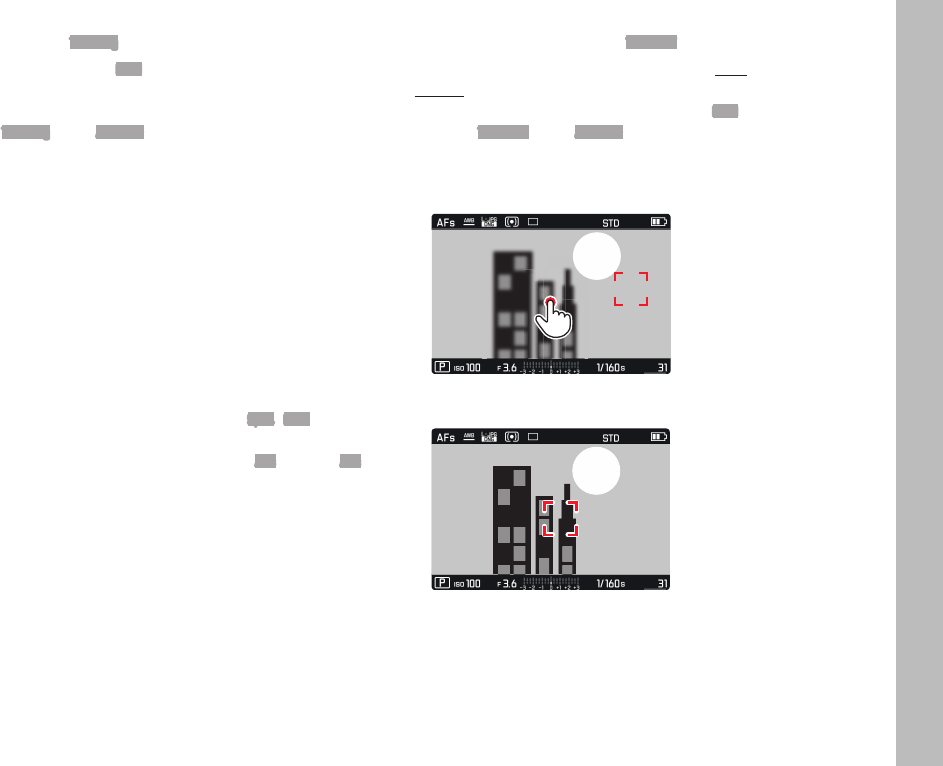
Touch-controlled autofocus ( Touch AF)
In this mode, the AF frame can be moved for each exposure
without the need for additional menu settings. The metering char-
acteristics and metering fi eld size match the Field metering.
▸ Select Touch AF in the AF Mode submenu
Specifying the metering fi eld position
▸ Tap the screen at the desired position in the image fi eld
The AF frame “jumps” to the selected position.
1/80002.8F12500ISO EV
-3 2 1 0 21 3+ 823412MP

EN
42
Picture mode
Touch-controlled shutter release (Touch AF + Release)
The Touch AF + Release function is a variant of Touch AF, allowing
touch-controlled focusing and exposure.
▸ Select Touch AF + Release in the AF Mode submenu
Note
In both touch-controlled modes, the focusing process does not
start when the shutter button is pressed to the first pressure point,
but when the screen is touched instead.
Multiple field metering (Multi Point)
This metering method detects the subject using a total of 49 fields.
Focusing is done automatically on the parts of the subject at the
shortest distance, ensuring maximum reliability for snapshots. The
fields used are indicated by AF frames.
▸ Select Multi Point in the AF Mode submenu
Face detection
Your LeicaCL automatically detects faces in the image field in this
mode. The focus is set automatically on the faces closest to the
camera. Multi-zone metering is used if no faces are detected.
▸ Select Face Detection in the AF Mode submenu

EN
43
Picture mode
MANUAL FOCUSING
Focusing manually may in some situations be a better choice than
autofocus.
Manual focusing is preferable if:
– the same setting is used for several exposures
– it would take longer to use the metering memory lock function
– the setting is to be kept at infinity for landscape pictures
– poor, i.e. very dark lighting conditions prevent AF operation or
would slow it down.
▸ Select Focusing in the Main Menu (1st screen page)
▸ Select Focus Mode in the submenu
▸ Select MF
Manual focusing is done by turning the focus ring on the lens.
The best setting is achieved when the screen image shows the key
part(s) of your subject as you want them to appear.
Note
Manual focusing is possible in auto focus mode as well – with the
shutter button pat the first pressure point.
ASSIST FUNCTION FOR MANUAL FOCUSING
Your LeicaCL offers two useful tools to facilitate settings and im-
prove setting accuracy:
• The enlarged display of a central section:
The larger the details of the subject appear on screen, the better
you can assess their sharpness.
• Marking of clearly focused subjects (focus peaking): Edges of
sharply rendered subject parts are marked in a color, making it
easy to identify the best setting.
Both functions are activated as part of the factory settings. You
can choose to only activate Focus Peaking, or only the enlarge-
ment function – or to deactivate both.
Selecting functions
▸ Select Focusing in the Main Menu (1st screen page)
▸ Select Focus Assist in the submenu
▸ Select the desired setting
You can also select the color to be used for markings in
Focus Peaking to e.g. ensure visibility in various ambient light situa-
tions or for various subject types:
▸ Select Focus Peaking in the Focusing submenu
▸ Select the desired color
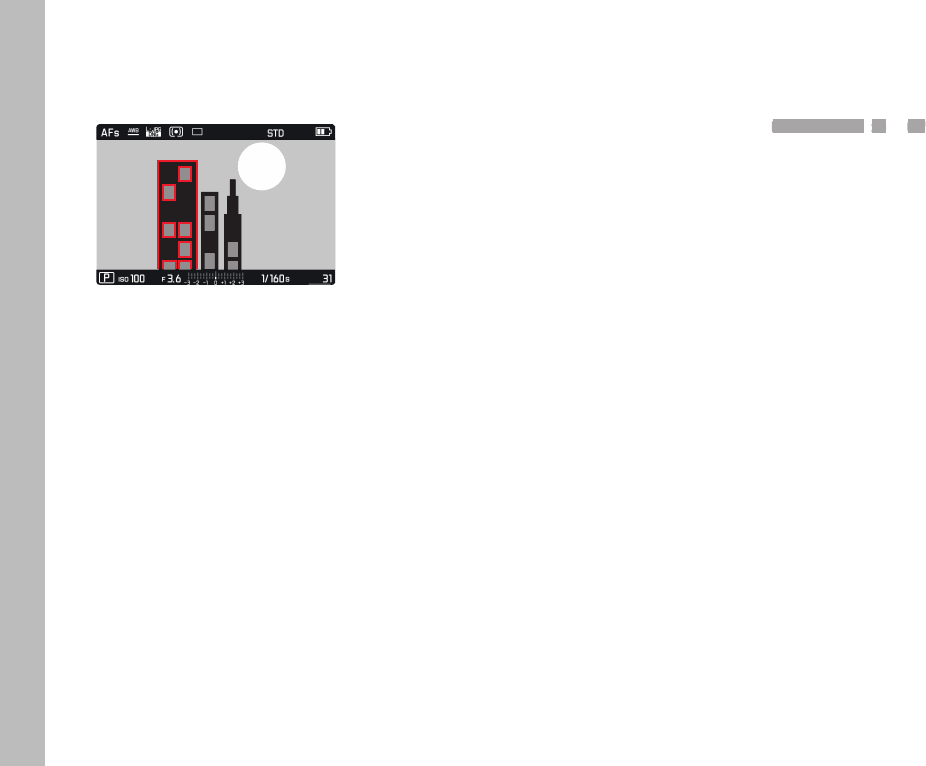
EN
44
Picture mode
Focusing
▸ Specify an image section
▸ Use the focus ring on the lens to focus on the desired subject
details
1/80002.8F12500ISO EV
-3 2 1 0 21 3+ 823412MP
• All subject detail edges in focus are marked in the selected
color.
The rule of thumb is:
– maximum contrast = in focus.
– Alternatively or simultaneously (see previous page), the
screen image switches to an image section at 3x magnifi ca-
tion.
– Another display appears, indicating the current magnifi cation
factor (highlighted in white) and the other available magnifi ca-
tion factors.
– You can increase magnifi cation to 6x or toggle between the
two by pressing the center button. The magnifi cation level
displayed fi rst is the one used last. The camera will switch
back to the original screen image automatically about 5s
after the focusing ring was last moved. You can also get back
to the original screen image at any time by pressing the
shutter button to the fi rst pressure point.
Notes
• Focus peaking is based on subject contrast, i.e. on diff erences
between light and dark.
• If you are using the Leica M- or R-Adapter L, the right setting
wheel assignment changes to Focus Assist x3, x6 or Off.

EN
45
Picture mode
EXPOSURE METERING AND EXPOSURE CONTROL
EXPOSURE METERING METHODS
Your LeicaCL off ers three exposure metering methods to adapt to
prevalent lighting and other conditions like your working methods
or artistic ideas:
▸ Select Exposure Metering in the Main Menu (1st screen page)
▸ Select the desired setting
Multi-fi eld metering –
In this metering method, the camera automatically analyzes the
brightness diff erences in the subject and – by comparing them
with programmed brightness distribution patterns – arrives at the
likely position of the main subject and the relevantly best exposure
setting.
This method is particularly suitable for spontaneous, uncompli-
cated but reliable photography in diffi cult conditions and therefore
a good choice in combination with the automatic mode.
Center-weighted metering –
This metering method allocates the highest weighting to the center
of the image fi eld, but also captures all other areas.
When used in conjunction with metering memory lock, this method
allows the exposure to be selectively adjusted to specifi c sections
of the subject, while simultaneously taking into account the entire
image fi eld.
Spot metering –
This metering method is concentrated exclusively on a small area
in the center of the image. It allows exact measurement of tiny
details for precise exposure – preferably in conjunction with
manual settings.
For backlit pictures, for example, an underexposure of the main
subject due to brighter surroundings must be prevented. The much
smaller metering fi eld in spot metering ensures a targeted evalua-
tion of these subject details.
EN
46
Picture mode
EXPOSURE CONTROL
You can choose from four exposure modes for optimized adjust-
ment to the relevant subject or to suit your preferred working
method: program (P), aperture priority (A) and shutter priority
mode (S), plus manual setting (M) These are selected the same way
as the video mode and the Scene Mode .
Setting the modes
▸ Press the left setting wheel button
The standard information off ered in the top display between the
setting wheels is replaced by the mode icons. The arrows to the
left and right of the larger, central icon indicate how to change
modes. The same arrows also appear next to the mode display in
the footer of the screen image.
▸ Turn the left setting wheel to select a mode
The mode display changes in the top display and on screen.
The selected mode will be applied automatically approx. 2s after
the setting wheel is moved the last time.
To set the selected mode immediately:
▸ Press the left setting wheel button or the shutter button
Notes
• The modes described above are arranged in an endless loop, i.e.
they can be reached by turning the loop in either direction.
• When using Leica M or R lenses with the Leica M Adapter L or
the Leica R Adapter L, only A and M are available, i.e. P, S or the
Scene Mode cannot be selected. If P, S or one of the Scene Mode is
selected, then the camera will automatically switch to A when
the adapter is attached. F0.0 is displayed as the aperture value.
• If a Leica TL or SL lens is attached again later, and you want to
use P, S or a Scene Mode, then the desired mode will have to be
set again.
• Depending on the lighting conditions, the brightness of the
screen image may diff er from that of the actual pictures taken.
The screen image will be signifi cantly darker than the correctly
exposed picture in long exposures of dark subjects. See also
“Exposure simulation” on page 47.
EN
47
Picture mode
Setting wheel functions in the modes P, S, A and M
The two setting wheels are used for setting various functions de-
pending on the exposure mode selected:
P S A M
Mode shift Shutter
speed
Exposure
compensa-
tion
Shutter
speed
Exposure
compensa-
tion
Exposure
compensa-
tion
Aperture Aperture
In addition to its “primary function”, the right setting wheel can
also be used to select other functions (factory setting = ISO sensi-
tivity):
▸ Press the right setting wheel button
• The relevantly set value (instead of the shutter speed) will be
displayed for approx. 4s at the bottom right of the top display
between the two setting wheels.
• The values appear on a “conveyor belt” at the bottom of the
screen. The value in the middle, highlighted in yellow, is the
currently set value.
▸ Turn the right setting wheel
The displays change accordingly. The display switches back to its
original status about 4s after the last operation.
Note
In addition to the factory settings, there are 7 more menu functions
available for direct access via the right setting wheel. Please read
the section “Direct access to menu functions” on page 23 for
more information on the topic and on how to assign specific menu
functions to the button.
Exposure simulation
Ex works, the brightness of the screen image in the three auto-
matic exposure modes P, S and A matches the relevant exposure
settings1.
You can now assess and control the effect of the relevant exposure
setting on the image before taking the picture.
This function is also available for manual exposure control:
▸ Select Exp. Preview in the Main Menu (2nd screen page)
▸ Select P-A-S (only in automatic, aperture priority, and shutter
priority mode) or P-A-S-M (also for manual setting)
1 This will apply as long as the subject brightness and the set exposure don’t
result in excessively low or high brightness values, and as long as the internal
exposure setting is not greater than 1⁄60s.

EN
48
Picture mode
Automatic mode – P
The automatic mode facilitates fast and fully automatic photog-
raphy. The exposure is controlled by an automatic shutter speed
and aperture setting.
Taking a picture
▸ Press the shutter button to the first pressure point
The values for shutter speed and aperture are displayed in white. If
a completely open or closed aperture combined with the longest
shutter speed will result in underexposure, of if a completely closed
aperture combined with the shortest shutter speed will result in
overexposure, then both values will be displayed in red.
If the automatically set pair of values appears to be appropriate for
the intended image composition:
▸ Press the shutter button down to take the picture
Changing the preset shutter speed / Aperture combinations
(Shift)
Changing the preset values using the Shift function combines the
reliability and speed of fully automatic exposure control with the
opportunity to vary the speed/aperture combination selected by
the camera at any time to fit in with your own ideas and intentions.
▸ That is done using the right setting wheel. Turn the wheel to the
left if you prefer to use faster speeds, e.g. for sports shots. Turn
to the right if you prefer a larger depth of field, e.g. for landscape
shots and are prepared to accept the resulting slower shutter
speeds.
• The overall exposure, i.e. the brightness of the image, remains
unchanged. The adjustment range is limited to guarantee correct
exposure.
• Shifted pairs of values are indicated by a + next to the shutter
speed.
• The values will be reset to those specified by the camera after
each picture taken to prevent accidental use and also if expo-
sure metering deactivates automatically after 12s.

EN
49
Picture mode
Scene mode
In addition to the “normal” automatic mode P, the menu item
Scene Mode offers nine other automatic options for particularly easy
and accurate photography. One of these is an automatic “snap-
shot” variant for general use: Auto (factory setting). Eight are cus-
tomized for the specific requirements of common types of sub-
jects; another is reserved for camera mounted permanently on a
spotting scope.
You will also find another three “special” mode variants under the
menu item Scene Mode:
Panorama
Automatic creation of panorama pictures
Miniature Effect
Limitation of the sharpness range to one hori-
zontal or vertical strip within the image field
HDR
Simultaneously optimized exposure of very
bright and very dark subject elements
You will find details about the Panorama, Miniature Effect and HDR
modes on the next few pages.
Selecting the Scene Mode
▸ Press the left setting wheel button
▸ Turn the left setting wheel to select
The selected mode will be applied approx. 2s after the last turn of
the setting wheel.
To apply the selected mode immediately:
▸ Press the left setting wheel button or the shutter button
Setting the Scene Mode
▸ Select Scene Mode in the Main Menu (2nd screen page)
▸ Select the desired scene mode
Taking a picture
Same as in “normal” automatic mode
Notes
• All Scene Mode variants control a range of automatic functions in
addition to shutter speed and aperture.
• The program shift function is not available.
• The two setting wheels have no function in this case.

EN
50
Picture mode
Panorama pictures
Your LeicaCL allows you to create horizontal panorama pictures
with this function.
Setting the function
▸ Select Panorama in the Scene Mode submenu.
The following will appear on the screen:
– a white horizontal line in the center of the picture
– a progression and directional display for the function at the
bottom
To switch between landscape or portrait orientation for the
panorama:
▸ Press the directional pad up or down
Creating a panoramic picture
▸ Aim the camera so that the planned left edge of the panoramic
picture is not quite at the left edge of the screen image,
▸ Press the shutter button and hold it down
▸ Pan the camera steadily in the direction indicated while using
the white line to help keep from drifting up or down too much
Notes
• The camera will stop taking the panoramic picture if it is panned
too slowly or too quickly, and a notification will appear on
screen.
• The less steady the camera is held along the horizontal line, the
smaller will be the overall height of the panorama picture.
• The maximum panning angle is approx. 180°.
Stopping the recording:
▸ Release the shutter button
• Pictures are taken in quick succession, once the shutter is
pressed.
• When the whole series of pictures is taken, the camera will cal-
culate a single panorama image from the individual pictures.
Notes
• Regardless of the current menu setting, panoramic pictures are
always stored in the JPG file format.
• Panoramic pictures cannot be taken with a flash.
• The resolution of a panoramic picture depends on the direction
of the picture and number of pictures taken. Maximum resolu-
tion is approx. 8176x1920pixels.
• Sharpness, white balance and exposure for all pictures are set to
the values of the first picture taken in the series. That is why the
final panorama picture may not be in perfect focus or have ideal
brightness if the distance between camera and subject, as well
as ambient light change while the picture is taken.
• Some subjects in the picture may appear distorted or there may
be visual transitions, because the picture is composed of a se-
ries of individual exposures.
• Panorama pictures cannot be created in the following situations:
– At very slow shutter speeds (longer than 1⁄60s)
– In conjunction with the Interval function

EN
51
Picture mode
• Panorama pictures may not be possible for the following sub-
jects, under the following exposure conditions or transition areas
may not be perfect:
– Single-color subjects or subjects with a uniform pattern
(sky, beach, etc.)
– Moving subjects
(people, pets, vehicles, waves, flowers swaying in the wind, etc.)
– Subjects with changing colors or patterns (e.g. a TV image)
– Dark locations
– Subjects illuminated by uneven, flickering light sources
(e.g. fluorescent lamps, candle light, etc.)
Miniature effect
This function allows you to select specific parts of the image field
you want to have in focus – and most importantly – which should
be out of focus. You can limit the focused areas to either a
horizontal or vertical stripe. You can change the width as well as
the location of this stripe within the image field.
The effect will make the picture look similar to a closeup photo with
its characteristically shallow depth of field.
Setting the function
▸ Select Miniature Effect in the Scene Mode submenu
The following will appear on screen:
– A white rectangle outlining the correctly focused area
– In the middle of the rectangle will be the autofocus metering
field
– Arrows centered above and below, or to the left and right to
indicate how the rectangle can be shifted
– At the top left and right will be displays indicating how the rect-
angle can b modified using the directional pad and one of the
setting wheels
Changing the orientation of the rectangle:
▸ Press left or up 1x on the directional pad (depending on the
baseline)
Changing the location of the rectangle:
▸ Press up as many times as necessary on the directional pad
(differs depending on orientation)
Changing the width of the rectangle:
▸ Turn (any) setting wheel
to the left = smaller, to the right = larger

EN
52
Picture mode
HDR
HDR generates a picture in which the “overlay” of three different
exposures (-2EV/0EV/+2EV) reproduces an improved image of
lighter and darker parts of the subject, i.e. with less overexposure
in the highlights and more definition in the darkest areas.
Due to the consecutive exposures, this operating mode is best
suited for immobile subjects or those with very little movement,
e.g. landscapes. We recommend the use of a tripod for HDR pic-
tures because of the slower shutter speeds and in particular in low
ambient light, e.g. for evening or night time pictures.
Setting the function
▸ Select HDR in the Scene Mode submenu
Taking a HDR picture
▸ Specify the desired image section
▸ Press the shutter button all the way down, hold the camera
steady during the three exposures (see above)
Aperture priority mode – A
Aperture priority mode sets the exposure automatically according
to the manually selected aperture. This mode is suitable for pic-
tures in which the depth of field is a critical compositional element.
By selecting an appropriately low aperture value, you can reduce
the depth of field range, for example to make a face “stand out” in
sharp focus against an unimportant or distracting background.
Conversely, you can use a higher aperture value to increase the
depth of field range, so that everything from the foreground to the
background will be in full focus in a landscape shot.
Taking a picture
▸ Select the desired aperture value with the right setting wheel
▸ Press the shutter button to the first pressure point
Both the set aperture value and the automatically calculated
shutter speed are displayed in white. Both values will be displayed
in red if the fastest or slowest shutter speed combined with the set
aperture will result in under or overexposure.
If the automatically set shutter speed appears appropriate for the
intended composition:
▸ Press the shutter button down to take the picture

EN
53
Picture mode
Shutter priority mode – S
Shutter priority mode sets the exposure automatically depending
on the manually selected shutter speed. It is therefore particularly
suitable for pictures of moving subjects, where the sharpness of
the movement depicted is a critical compositional element.
An appropriately fast shutter speed will avoid undesirable blurring
of the movement, i.e. "freeze" your subject, or you can use a slower
shutter speed to express the dynamic nature of the movement with
a deliberate "blur effect".
Taking a picture
▸ Select the desired shutter speed with the left setting wheel
▸ Press the shutter button to the first pressure point
The set shutter speed and the automatically controlled aperture
value are displayed in white.
Both values are displayed in red if the lowest or highest aperture
value combined with the set shutter speed will result in under or
overexposure.
If the automatically set aperture value appears to be appropriate
for the intended composition:
▸ Press the shutter button down to take the picture
Metering memory lock
For reasons of image composition, it may be beneficial not to have
the main subject in the center of the picture.
In that case, the metering memory lock function allows a metering
of the main subject first, and the relevant settings are retained until
you have determined your final picture section and are ready to
take the picture. This can be done with the exposure modes P, S
and A as well as the AF modes Field and Spot metering, as well as
by tapping.
Taking a picture with this function
▸ Aim the relevant AF frame at the part of your subject to which
you want to adjust the sharpness and exposure.
▸ Press the shutter button to the first pressure point to set and
store the focus and exposure.
▸ Continue holding the shutter button at the first pressure point
and pan the camera to specify the final picture section.
▸ Press the shutter button down to take the picture

EN
54
Picture mode
Exposure compensation
Some subjects consist predominantly of areas of above or below
average brightness, for example areas of snow or full-format dark
subject elements. Using the exposure modes P, S and A, it may be
more convenient to set an appropriate exposure compensation
instead of using the metering memory lock function for each pic-
ture. The same applies if you want to ensure an identical exposure
for multiple pictures. Values of +3 to -3 EV are available in 1⁄3EV
increments.
▸ Select Exposure Compensation in the Main Menu (1st screen page)
▸ Select the desired compensation value
In modes P, S and A, a compensation value can also be directly
entered via one of the setting wheels.
Once a compensation value is set, it is displayed on screen, e.g. as
EV+3. While setting the value, you can see the effect on the screen
image, which becomes darker or lighter.
Notes
• When setting the exposure manually, exposure compensation
can only be done via menu control, or if the function for direct
access was selected (see p. 23).
• A set exposure compensation remains active after any number
of pictures and even after the camera was switched off, until it is
reset to ± 0 (= center of scale).
Automatic bracketing
High contrast subjects that have very bright and very dark areas
can have very different picture effects depending on exposure.
The automatic bracketing function allows you to take a series of
three pictures with stepped exposure. You can then select the best
picture for further use.
Selecting a menu item
▸ Select Drive Mode in the Main Menu (1st screen page)
▸ Select Exposure Bracketing in the submenu
Active bracketing is indicated by on screen. You can watch the
effect of the function on screen while the pictures are taken
(brighter or darker).
At least two parameters must be set for a bracketing series:
– Number of pictures
– Exposure gradation (in full EV increments = Exposure value
steps)
Selecting the number of pictures
▸ Select Frames in the Exposure Bracketing submenu
▸ Select 3 or 5
Setting the exposure gradation
▸ Select Aperture/ EV Steps in the Exposure Bracketing submenu
▸ Select the desired setting

EN
55
Picture mode
Two more settings are optionally available:
– “Shift” – moving the complete bracketing series in the direction
of underexposure/overexposure
The selected exposure compensation value will be applied to the
entire exposure series. This allows you to produce more or only
alternatives with higher or lower exposures.
– Release method for the series
Setting an exposure compensation value
▸ Select Exposure Compensation in the Exposure Bracketing submenu
▸ Select the desired setting
Setting the release method
▸ Select Automatic in the Exposure Bracketing submenu
▸ Select the desired setting
The factory setting On will run the entire exposure series after the
shutter button is pressed once; when the setting is Off, each expo-
sure must be done individually.
Notes
• Depending on the exposure mode chosen, gradations are pro-
duced by changing the shutter speed (P/A/M) or the aperture
(S).
• The sequence of the pictures: correct exposure/underexpo-
sure/overexposure
• Depending on the available shutter speed/aperture combina-
tion, the working range for automatic bracketing may be limited.
• Once set, bracketing remains active after any number of re-
leases and even after the camera was switched off, i.e. until it is
reset to ±0 (= center of scale).
Manual setting – M
A manual setting of shutter speed and aperture may be beneficial if
you want to achieve a specific image effect that is possible only
with a very specific exposure, or if you want to ensure that several
pictures with different image sections have an identical exposure.
Taking a picture
▸ Select the desired aperture value with the right setting wheel
▸ Select the desired shutter speed value with the left setting wheel
▸ Press the shutter button to the first pressure point
The shutter speed and aperture values are displayed in white.
The light balance scale is additionally displayed. It covers a range
of ±3 EV (exposure value) in 1⁄3EV increments.
Settings within ±3 EV are indicated by white lines on the scale,
settings outside this range by red lines.
▸ Adjust the settings for correct exposure so that the central mark
is displayed in white
Once the set values and/or the exposure appear to be appropriate
for the intended composition:
▸ Press the shutter button down to take the picture
Note
The screen image will show an exposure simulation if P-A-S-M is
selected in the menu item Exposure Preview
EN
56
Additional picture functions
ADDITIONAL PICTURE FUNCTIONS
Interval shooting
Your LeicaCL allows you to take pictures of motion sequences over
a long period of time in the form of picture series. You specify the
number of pictures, the intervals between pictures, and the start
time of the series.
Setting the function
▸ Select Drive Mode in the Main Menu (1st screen page)
▸ Select Interval in the submenu
▸ Select Number of Frames in the Interval submenu
▸ Select the desired number of pictures (from 1 to a maximum of
9999) in the relevant keypad submenu
1
2
3
4 5
1 Input line
2 Number pad
3 “Delete” button (deletes the last entered character)
4 “Back” button (brings you back to the Interval submenu level
without confi rming any settings)
5 “Confi rm” button (confi rms settings)
The keypad can be operated in various ways:
Using gesture control
▸ Touch the desired value or “button”
Using button/setting wheel controls
To go left or right (incl. changing lines, endless loop):
▸ Turn the setting wheel on the right or press the directional pad
right/left
To go up or down (only within the same column):
▸ Press the directional pad up/down
To enter a selected number:
▸ Press the center button
To confi rm a fi nished setting:
▸ Select the “Confi rm” button
▸ Press the center button
Note
The setting process starts fresh each time the keypad submenu is
accessed, i.e. any previously set number of pictures is overwritten.

EN
57
Additional picture functions
▸ Select Interval or Countdown
▸ Enter the desired times
(between 1s to a maximum of 59h 59min 59s)
Toggling between the units of time:
▸ Press the directional pad right/left
To set the units of time:
▸ Press the directional pad up/down, or turn the right setting
wheel
Creating an interval picture series
The exposure and focus settings are no different from those for
normal pictures, but you should remember that the lighting condi-
tions may change during the course of the picture series.
The time until the first picture and the number of pictures to be
taken are shown in the upper right corner of the screen image.
Starting interval shooting:
► Press the shutter button
The remaining number of pictures will be displayed briefly between
the pictures and a relevant message will be appear, once the series
is complete.
Notes
• The camera may switch off and on again if “Auto power off” is
set and no other camera operation occurs between the taking of
the individual pictures.
• Interval shooting done over an extended period of time in a cold
location or in a place with high temperature and humidity may
result in malfunctions.
• Use a sufficiently charged battery.
• Interval shooting will be interrupted or stopped in the following
situations:
– if the battery is depleted
– if the camera is switched off
You can continue your interval shooting by replacing the bat-
tery or the memory card while the camera is switched off and
then switching it back on. The pictures taken after the func-
tion interruption be stored in a separate group.
• The function remains active after interval shooting is completed,
and also after the camera is switched off and on again. You will
therefore have to choose the relevant function in the Drive Mode
submenu if you want to return to a standard picture mode.
A prompt will be displayed on screen if the camera is switched
off and on again while the interval shooting function active.
• The pictures of an interval shoot are marked with in playback
mode.
• The availability of this function does not mean that the camera is
suitable for use as a monitoring device.

EN
58
Additional picture functions
Self-timer
You can use the self-timer function to take a picture with a delay of
12s or 2s. This is useful for group photographs in which you want
to be included or if you want to avoid blurring caused by an un-
steady hand.
▸ Select Self Timer in the Main Menu (1st screen page)
▸ Select the desired settings
or will be displayed when the self-timer is activated.
Operation:
▸ Press the shutter button down to take the picture
• Progress is indicated by the flashing self timer LED;
– 12s delay: slowly at first, faster for the last 2s
– 2 s delay: fast flashing
• The remaining time is counted down on screen.
Notes
• A time delay in progress can be restarted at any time by
pressing the shutter button again. The only way to cancel a delay
time in progress is to switch off the camera.
• The self-timer function only accommodates single pictures, i.e.
serial exposures and automatic bracketing cannot be combined
with the self-timer function.
• In self-timer mode, the focus and exposure are not set until right
before the picture is taken, i.e. not when the shutter is pressed
to the first pressure point.
• The self-timer function remains active until it is deactivated via
the menu or the camera is switched off.

EN
59
Additional picture functions
FLASH PHOTOGRAPHY
COMPATIBLE FLASH UNITS
The following fl ash units off er a TTL fl ash metering function and –
depending on the model – a varying number of the functions de-
scribed in this manual.
• Leica system fl ash units SF 40, SF 64 and SF 58
• Other Leica system fl ash units, except Leica SF 20
Other commercially available fl ash units
with a standard fl ash foot and positive center contact1 (X contact)
can also be used, as well as studio fl ash units connected to the
central contact via an adapter and sync cable.
We recommend the use of state-of-the-art thyristor-controlled
electronic fl ashunits.
ATTACHING A FLASH UNIT
▸ Switch off the camera and fl ash unit
▸ Slide back the cover over the accessory shoe on the camera
▸ Slide the foot of the fl ash unit all the way into the accessory
shoe and where available, use the clamping nut to secure it in
place. Movement inside the accessory shoe may interrupt the
necessary contacts and cause malfunctions.
1
Activate the Flash setting if you will be using fl ash units that are not directly
compatible with the camera and will therefore not automatically adjust the white
balance of the camera.
Set the fl ash unit to TTL mode to allow automatic control of the
unit by the camera.
When set to A, subjects with above or below average brightness
may not be exposed correctly.
When set to M, the fl ash exposure must be controlled by manually
setting a fl ash output level appropriate for the aperture and shutter
speed settings determined by the camera.
The display for the set fl ash mode appears in white (see next
pages). The fl ash mode will blink red if the fl ash unit is not fully
charged and therefore not ready.
The camera determines the necessary fl ash power by fi ring one or
more ranging fl ashes, fractions of a second before taking the
actual picture. Immediately after, i.e. during the exposure, the main
fl ash is fi red. All parameters that infl uence the exposure (e.g.
fi lters, changed aperture settings) are automatically considered.
Notes
• A fl ash unit that is not ready to fl ash may cause incorrect expo-
sures or error messages.
• Serial exposures and automatic bracketing with fl ash are not
available. With the camera set to one of these modes, there will
be no fl ash display on screen even if the fl ash unit is attached
and the fl ash will not fi re.
• A fl ash unit and the Leica Visofl ex electronic viewfi nder cannot
be used simultaneously.

EN
60
Additional picture functions
FLASH MODES
Automatic flash activation
That is the default flash mode. An attached and activated flash unit
is fired automatically whenever slower shutter speeds could lead to
blurred pictures in poor lighting conditions.
Manual flash activation
This mode is suitable for backlit pictures in which your main sub-
ject does not fill the entire frame and is in shadow, or in situations
in which you want to moderate high contrasts (e.g. in direct sun-
light) with a fill-in flash. As long as this mode is active, an attached
and switched on flash unit will fire each time you take a shot, what-
ever the prevailing lighting conditions. The flash output depends on
the metered ambient brightness: in poor light it is the same output
as in automatic mode, with output decreasing with increasing
brightness. The flash will then work as a fill-in light, e.g. to light up
dark shadows in the foreground or backlit subjects, and to create
more balanced overall lighting.
Automatic flash activation at slower shutter speeds
This mode generates appropriately lit, i.e. a brighter rendering of
dark backgrounds and a fill-in flash for the foreground. Explanation:
In the other flash modes the shutter speed is not extended beyond
1⁄30s To minimize the risk of blurring. This may mean, however,
that pictures with flash exposure can end up with objects in the
background not illuminated by the flash and therefore being under-
exposed. In this mode, the slower shutter speeds required in these
situations (up to 30s) are available to ensure appropriate consider-
ation of ambient light.
Selecting a mode:
▸ Select Flash Settings in the Main Menu (2nd screen page)
▸ Select Flash Mode in the submenu
▸ Select the desired setting
The relevant mode variant can be selected directly via the left
setting wheel if the function is assigned to it.
The selected mode is displayed on screen.
Notes
• This setting is not available and the function is grayed out if no
system compatible flash unit is attached.
• Depending on the selected Auto ISO Settings, (see p. 33) the
camera may not support slower shutter speeds, because an
increase in ISO sensitivity takes priority.
• The slowest shutter speed can be selected via
Maximum Exposure Time (see p. 33).
• Make sure to hold the camera steady, i.e. prop it up or use a
tripod to prevent blurring with slow shutter speeds. You can
alternatively select a higher sensitivity.

EN
61
Additional picture functions
FLASH RANGE
The usable flash range depends on the aperture and sensitivity
values set manually or calculated by the camera. It is important to
ensure that the subject is within the relevant flash range for suffi-
cient illumination.
SYNCHRONIZATION TIME POINT
Flash photographs are always illuminated by two light sources:
ambient light and the light from the flash. The time at which the
flash is fired determines where the subject elements illuminated
exclusively or predominantly by the flash are shown in the image.
The conventional flash firing point at the start of the exposure
– Start of Exp. – may cause apparent contradictions, e.g. a vehicle
“overtaken” by the light trail from its own tail lights. Your LeicaCL
allows you to choose between this conventional flash firing point
and the end of the exposure – End of Exp.:
▸ Select Flash Settings in the Main Menu (2nd screen page)
▸ Select Flash Sync in the submenu
▸ Select the desired setting
In the second option, the light trail from the tail lights will then
follow the vehicle as expected. This flash technique gives a more
natural impression of movement and dynamics.
Note
When using the flash with faster shutter speeds, there will be
hardly any or only a minor difference in fast movements in the
image between the two flash firing points.
FLASH EXPOSURE COMPENSATION
This function can be used to selectively reduce or strengthen the
flash exposure regardless of the exposure from available light, e.g.
in a picture taken in the evening or to brighten the face of a person
in the foreground while retaining the same lighting ambiance.
▸ Select Flash Settings in the Main Menu (2nd screen page)
▸ Select Flash Exp. Compensation in the submenu
▸ Select the desired setting
Notes
• Flash exposure compensation changes the range of the flash
unit.
• Once set, compensation remains active even after any number
of pictures and even after turning off the camera, until it is reset
to ±0 (= center of scale).
• A compensation value previously set via menu control may be-
come void once a relevantly equipped flash unit is attached to
the camera, e.g. a Leica SF 64., and a compensation value is
entered in that flash unit.
EN
62
Additional picture functions
VIDEO RECORDING
Your LeicaCL can also record video.
There are two methods for toggling between picture preview and
video preview mode:
Using gesture control
VideoPhoto
Using button control
▸ Press the left setting wheel button
▸ Turn the left setting wheel to select
The selected mode will be applied approx. 2s after the last turn of
the setting wheel.
To apply the selected mode immediately:
▸ Press the left setting wheel button or the shutter button
Notes
• The relevantly eff ective focal length is increased, because only
part of the sensor area is used for video recordings. That means
the image sections are reduced accordingly.
• You can record video up to 29minutes without interruption. The
maximum fi le size is 4GB. Once a recording exceeds this limit,
the overrun will be automatically stored in a new fi le.
Starting/ending the recording
Start:
▸ Press the shutter button
A fl ashing red dot indicates active recording mode. The remaining
available recording time is also displayed.
End:
▸ Press the shutter button again
The following functions are available for video recording:
Resolution
Choose one of three resolution levels, one of which off ers two
frame rates:
4K/30fps (3840 x 2160pixels)
Full HD/60fps (1920 x 1080pixels) – Factory setting
Full HD/30fps (1920 x 1080pixels)
HD/30fps (1280 x 720pixels)
▸ Select Video Resolution in the Main Menu (3rd screen page)
▸ Select the desired setting
ISO sensitivity
All settings available in the menu.
Focusing
All variants described on pages 38-43.

EN
63
Additional picture functions
Exposure metering methods
All options described on page 45.
Exposure control
Exposure control for video recording is completely independent of
the exposure mode or the shutter speed and aperture settings for
photos.
– Shutter speed: Depending on the selected Video Resolution
– Aperture: Automatic
– ISO sensitivity will be increased automatically if correct expo-
sure cannot be achieved with the largest aperture – no matter
what values were set manually.
Note
Automatic exposure control takes into account any fluctuations in
brightness. Set the shutter time manually if this is undesirable, e.g.
for landscape recordings or panning.
Color rendering and image properties
You can choose between various color rendering variants for video
recording, just like for photos (described on page 34). You can
additionally change the contrast, saturation and sharpness for each
of these variants.
▸ Select Video Style in the Main Menu (3rd screen page)
All other operation is done as described on pages 34.
Note
The stored values differ from those in menu item Film Style.
Recording level, wind noise damping, stabilization
Three more settings are bundled under the menu item
Video Settings.
– Microphone Gain allows you to adjust the level of the built-in micro-
phone in line with external conditions.
– Wind elimination offers a dampening function to suppress wind
noise during sound recording.
– Video Stabil. helps to remedy unsteady hands.
▸ Select Video Settings in the Main Menu (3rd screen page)
▸ Select the desired function in the submenu
▸ Select the desired gain level in the relevant submenu or acti-
vate/deactivate the function
Notes
• The image section is reduced slightly when using the video stabi-
lization function.
• Sound is recorded in stereo via the built-in microphones.
• Autofocus and focal length adjustments on zoom lenses produce
noise that may be picked up in the recording.
Avoid using either of these functions while recording to prevent
unwanted noise or adjust the focus manually and don’t change
the focal length.
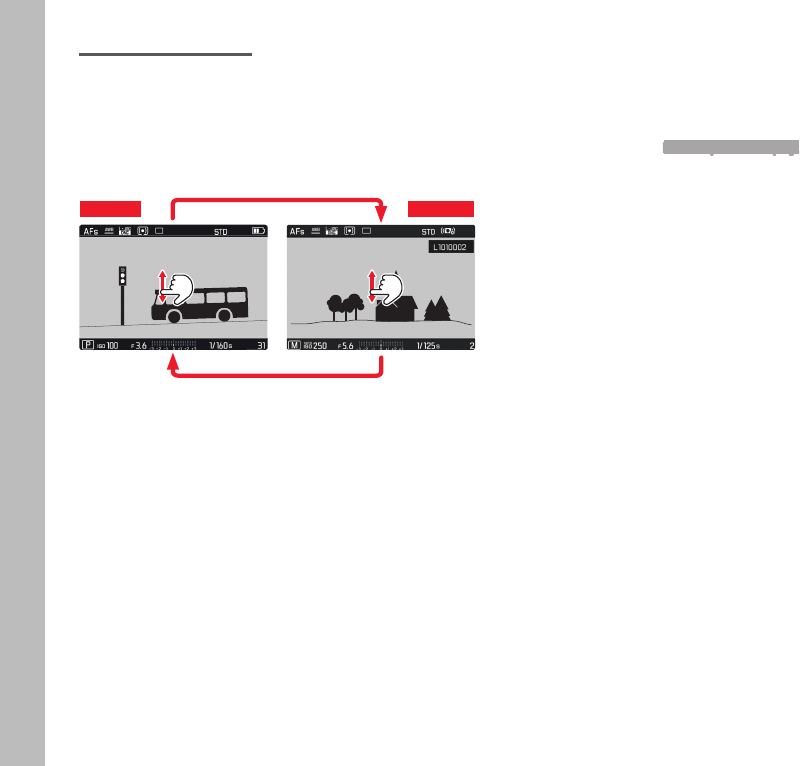
EN
64
Playback mode
PLAYBACK MODE
PLAYBACK
There are two methods for toggling between recording and
playback mode:
Using gesture control
PlaybackPictures
Using button/setting wheel controls
▸ Press the PLAY button
(1x = playback mode, 2x = back to recording mode)
Notes
• Portrait-format recordings are rendered as shot, i.e. the full
screen area will be used.
• You can toggle back from playback mode to recording mode at
any time by tapping the shutter button.
• The message No valid picture to play. will appear if the memory
card contains no image data.
• If you have used the picture series function or automatic brack-
eting, the last or last saved picture in the series is displayed fi rst
– unless the pictures in the series were overwritten by the cam-
era's internal back-up memory in the meantime.
• Files that were not created on this camera may not be render-
able on this device. The screen will remain black and only dis-
play the fi le name.
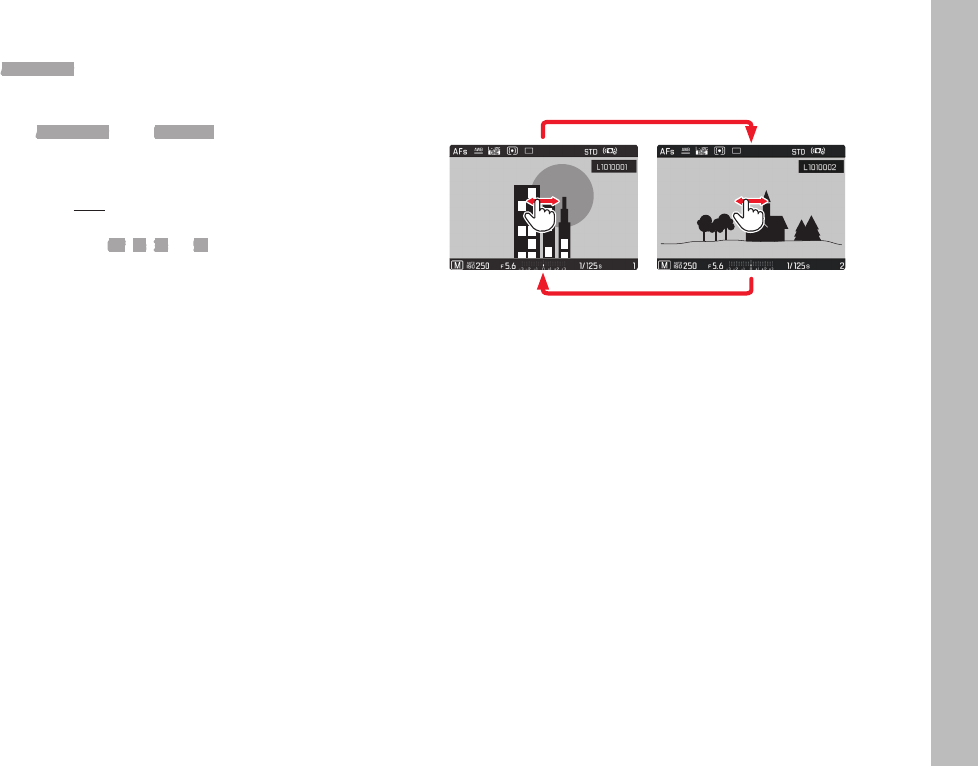
EN
65
Playback mode
Automatic playback
The Auto Review function allows you to view each photo/video right
after it was taken:
▸ Select Auto Review in the Main Menu (3rd screen page)
▸ Select the desired function or duration
Note
As long as you keep the shutter button pressed down completely
after the photo/video was taken, The most recent images will be
played back, even if Off, 1s, 3s, or 5s is set.
SELECTING/SCROLLING THROUGH PICTURES/RECORDINGS
Using gesture control
Using button/setting wheel controls
▸ Turn the left setting wheel or press the directional pad right/
Notes
• Swiping to the right (gesture), turning the setting wheel or
pressing the directional pad will result in a playback of pictures/
recordings with higher numbers; the same commands to the left
will play back the lower numbers.
• The pictures/recordings are displayed in an endless loop in
either direction. Once the last picture/recording is reached, the
fi rst will appear again.
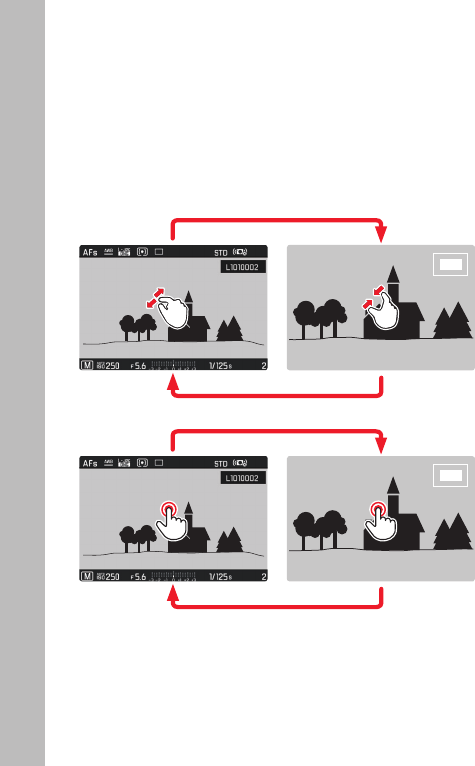
EN
66
Playback mode
ENLARGING PICTURES/SIMULTANEOUS DISPLAY OF
MULTIPLE PICTURES
Playing back an enlarged picture will allow you to better assess the
sharpness.
Magnifi cation
Using gesture control
Using button/setting wheel controls
Step by step:
▸ Turn the right setting wheel to the right, four click-stops = four
magnifi cation levels up to the max. magnifi cation
Accessing the third magnifi cation level directly:
▸ Press the right setting wheel button
(back to standard view: press again)
Notes
• Incremental magnifi cation is available only in standard view, i.e.
not when you have accessed the third magnifi cation level di-
rectly by pressing the button.
• At the max. magnifi cation, one picture pixel equals one screen
pixel.
• You can decide which part of the picture is should be magnifi ed
by tapping the relevant area on screen.
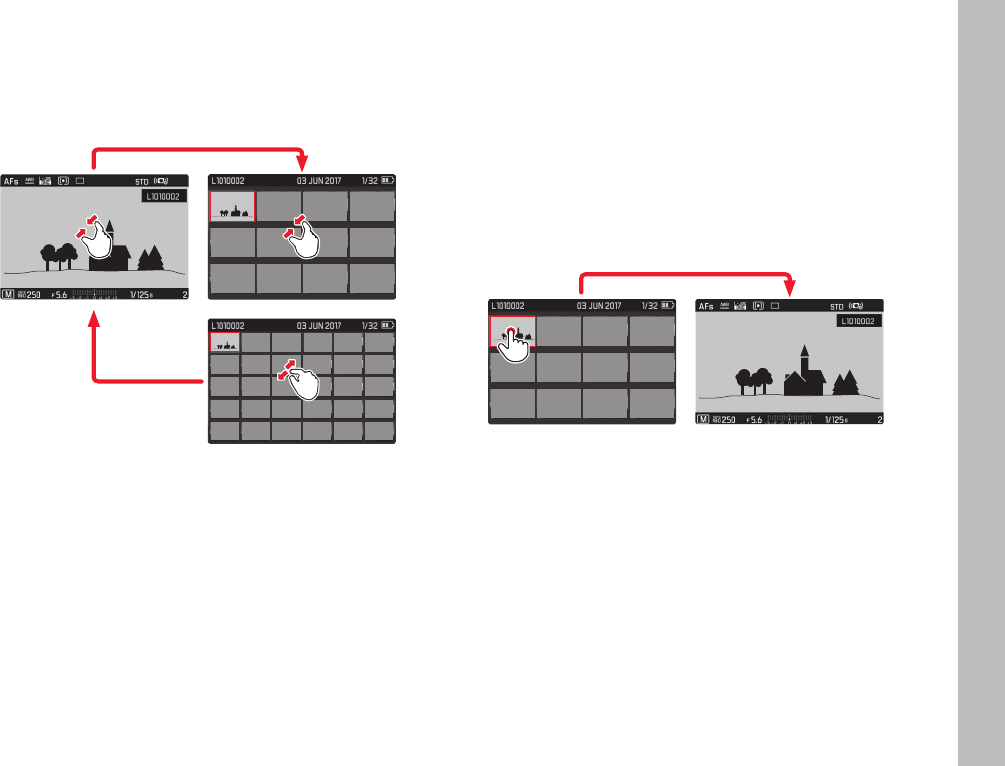
EN
67
Playback mode
Simultaneous display of 12/30 pictures
Displaying a number of thumbnails will give you a better overview
and will allow you to fi nd a specifi c picture faster.
Using gesture control
Using Button/Setting wheel controls
▸ Turn right setting wheel to the left; one click-stop past standard
size = 12 picture display, two click-stop = 30 picture display
The last picture to be shown in standard size is indicated by a red
frame.
Notes
• Video recordings cannot be magnifi ed.
• The display with additional information is not accessible during
magnifi cation/thumbnail view.
• It may not be possible to enlarge pictures taken with other
camera types.
Selecting thumbnails
▸ Press the directional pad left or right to select the desired pic-
ture
The selected picture is marked with a red frame.
Exiting the thumbnail view
Using gesture control
Using Button/Setting wheel controls
▸ Turn the right setting wheel to the right; one click-stop past 30
picture display = 12 picture display, two click-stops = standard
size
Returning to standard size directly:
▸ Press the center or right setting wheel button
EN
68
Playback mode
SELECTING AN IMAGE SECTION
In a magnifi ed picture, you can move the enlarged section away
from the center, e.g. to check subject details outside the center.
Using gesture control
Using Button/Setting wheel controls
▸ Press the directional pad right or left in the direction you want
to move
The approximate position of the image section is indicated by the
rectangle inside the frame.
MARKING PICTURES/UNMARKING PICTURES
You can mark any picture, e.g. to fi nd it again faster or to protect it
against accidental deletion:
▸ Press the left setting wheel button
After pressing the button for the fi rst time, a marked picture
appears in the header on screen on the right. will disappear
after the button is pressed a second time.
PLAYBACK MENU
The playback menu contains the fi ve functions Delete,
Delete Unrated, Delete All, Slideshow and WLAN. Please see next
pages for details on the fi rst four functions. The WLAN submenu is
the same that can be accessed via the Main Menu. Details on the
WLAN settings are provided from page 80 onward.
Accessing the playback menu
▸ Press the MENU button
The playback menu appears
Selecting/accessing menu items
Using gesture control
▸ Tap the desired function line
Using button/setting wheel controls
▸ Turn one of the setting wheels or press the directional pad
up/down
▸ Press the center button
Exiting the playback menu
▸ Press the MENU button again, or press the PLAY button marked
, or press the directional pad left
EN
69
Playback mode
Deleting pictures/recordings
Pictures/videos saved on the memory card can be deleted at any
time: individually – Delete, or all unmarked ones – Delete Unrated,
or all at once - Delete All.
Deleting individual pictures/videos
The following screen appears when Delete is selected:
Note
This screen is also directly accessible:
▸ Press the FN button
Using gesture control
▸ Press the FN button marked again and tap
Using button/setting wheel controls
▸ Press the FN button marked again
Notes
• The “Scroll” and “Magnify” functions continue to be available
when the “Delete” screen is active.
• When a picture/video is deleted, the next one in line appears,
or No valid picture to play. will be shown if no more pictures/
videos are available.
Deleting all unmarked/all pictures/videos
When Delete Unrated or Delete All is selected, a screen message will
appear (see example of Delete Unrated):
Using gesture control
Yes or No
Using button/setting wheel controls
▸ Turn the right setting wheel or press the directional pad
left/right side to select Yes or No
▸ Press the center button
Note
The message No valid picture to play.appears after successful dele-
tion. The same picture is displayed again if deletion was unsuc-
cessful. When deleting several or all pictures/recordings, a notifi -
cation screen may appear for the time needed to process the data.
Important
Once deleted, pictures/videos are no longer retrievable.
EN
70
Playback mode
Automatic playback
You can set your LeicaCL to play back pictures/videos automati-
cally in sequence. Within this Slideshow function, you can specify to
show all pictures/videos ( Play All), only pictures ( Pictures only) or
only videos ( Videos only). You can also select the time span for
which each picture/video is displayed ( Duration). The following
screen appears after Slideshow is selected:
Setting the duration
Using gesture control
▸ Duration
▸ Tap the desired playback duration
Using button/setting wheel controls
▸ Turn the right setting wheel or press the directional pad
up/down to select Duration
▸ Press the center button to access the Duration submenu
▸ Turn the right setting wheel or press the directional pad
up/down to select the desired setting
▸ Press the center button to confi rm your setting
The Slideshow menu reappears.
Note
Your settings in Duration even after the camera is switched off and
on again.
EN
71
Playback mode
Start playback
Using gesture control
▸ Tap the desired mode ( Play All, Pictures only or Videos only)
Using button/setting wheel controls
▸ Turn the right setting wheel, or press the directional pad
up/down to select the desired function
▸ Press the center button
An intermediate screen may appear while the data is prepared for
playback.
The slide show will then run on an endless loop until you end it.
End playback
▸ Press the PLAY button or the shutter button
The camera switches to the relevant mode.
Video playback
PLAY > will appear on screen if you have selected a video fi le for
playback.
Start playback
Using gesture control
Using button/setting wheel controls
▸ Press the center button
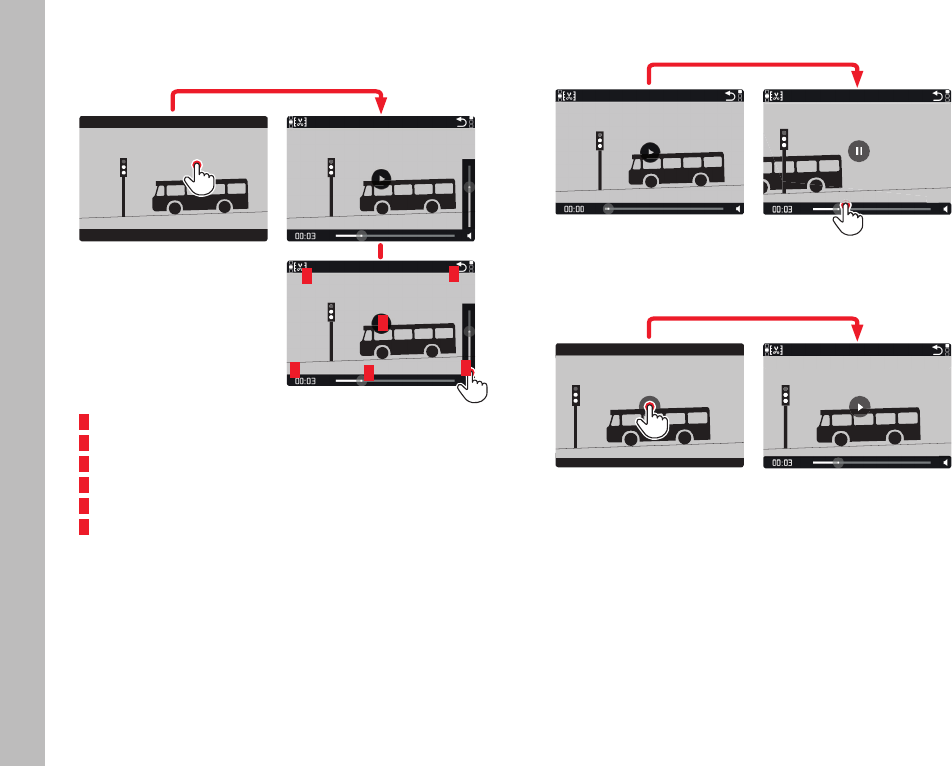
EN
72
Playback mode
Accessing the video and audio control icons
Using gesture control
6
1
5
24
3
INFO
1/80002.8F12500ISO EV
SET
-3 2 1 0 21 3+ 823412MP
1 Elapsed time
2 Scroll bar with touch area
3 Pause
4 Volume
5 Shorten video
6 Back to beginning of the video
Using button/setting wheel controls
▸ Press the center button
Notes
• Accessing the icons will pause playback.
• The icons disappear after approx. 3s.
Playback from any point in the fi le
Pause playback
Using gesture control
16:12
Using button/setting wheel controls
▸ Press the center button
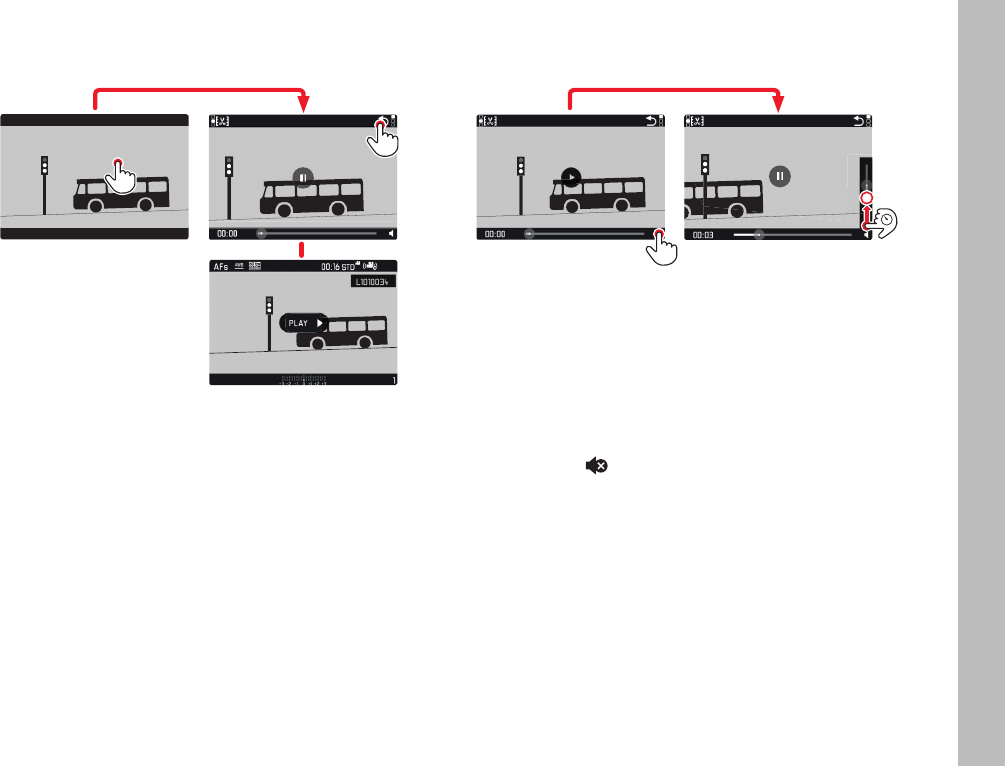
EN
73
Playback mode
End playback
Using gesture control
INFO
1/80002.8F12500ISO EV
SET
-3 2 1 0 21 3+ 823412MP
Using button/setting wheel controls
▸ Press the PLAY button or the center button
Adjusting the volume
Using gesture control
Using Button/Setting wheel controls
▸ Press the directional pad up or down
The volume scrollbar appears.
▸ Press the directional pad up (louder) or down (quieter)
Note
Sound is switched off at the lowest part of the bar and the volume
icon changes to .
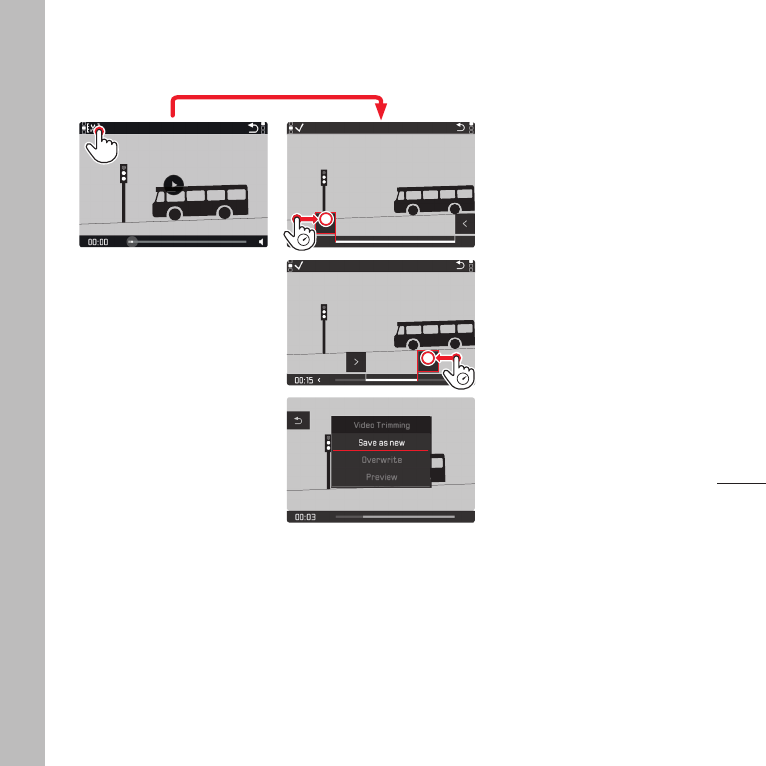
EN
74
Playback mode
Cutting video recordings
Using gesture control
Using button/setting wheel controls
▸ Press the FN button
The video cutting screen appears, the left cutting mark is high-
lighted in red (= active).
Changing and moving cutting points
Changing (only available in the two end positions):
– From the beginning (left) to the end (right)
▸ Turn the right setting wheel one click-stop to the right
– From the end (right) to the beginning (left)
▸ Turn the left setting wheel one click-stop to the left
The selected cutting point is highlighted in red (= active).
Moving:
▸ The cutting point on the left is moved with the left setting wheel,
the one on the right with the right setting wheel
The relevant time stamp and the still image at the selected start
and end points are displayed during the process.
▸ Press the FN button to confirm your cuts
The video cutting submenu appears.
Note
To exit the video screen without executing the configured cuts:
▸ Press the PLAY button
The video playback screen reappears.

EN
75
Playback mode
When cuts were confirmed, further operation will be done by se-
lecting one of the three submenu items. The procedure is identical
in each case:
– Save as new
The new video is additionally saved, i.e. the original video remains
unchanged.
– Overwrite
The newly cut video is saved and the original one is deleted.
– Preview
The new video is played. The newly cut video is not saved and the
original remains unchanged.
In all three cases, a notification screen appears while the data is
being processed. When processing is completed, the first scene of
the new video is played back.
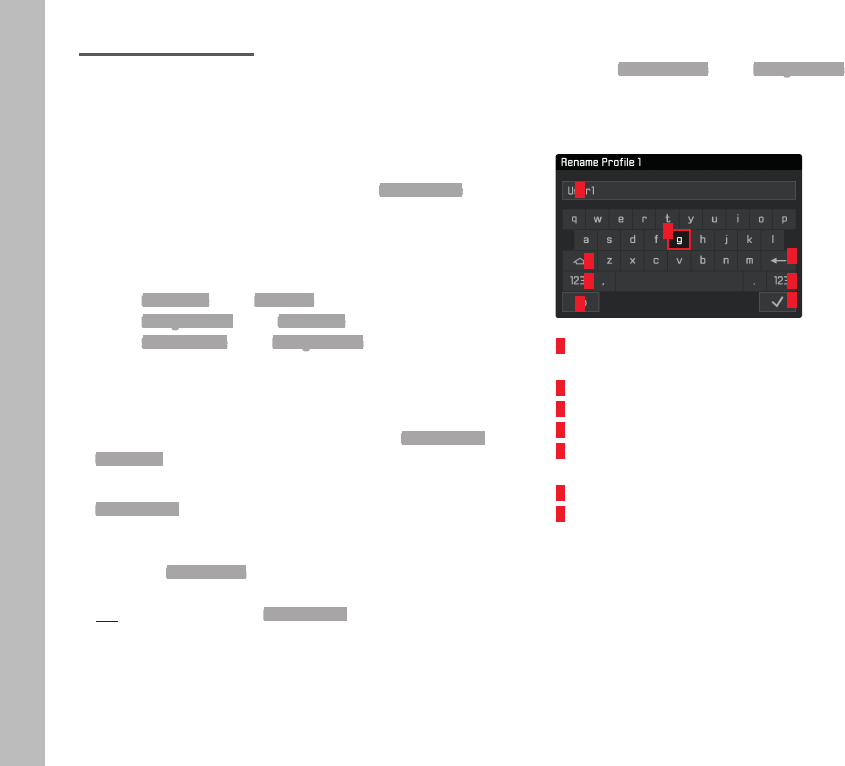
EN
76
Miscellaneous
MISCELLANEOUS
USER PROFILES
Your LeicaCL can permanently store any combination of all menu
settings, which can be useful, as they will then be quickly and
easily accessible for recurring situations/subjects. A total of seven
memory slots are available for these combinations. All menu op-
tions can be restored to the factory settings ( Default Profile) at any
time:
Creating profi les
▸ Set the desired functions in the menu
▸ Select User Profile in the Main Menu (3rd screen page)
▸ Select Manage Profiles in the User Profile submenu
▸ Select Save as Profile in the Manage Profiles submenu
▸ Select the desired memory slot for the profi le
Applying profi les
▸ Select desired memory slot for your profi le or Default Profile in the
User Profile submenu
Notes
• Default Profile will allow you to access the factory settings at any
time, even if menu settings are stored in one or more of the
three profi les.
• Unlike the Reset Camera function described in “Resetting all
custom settings”, your settings for time, date and language will
not be reset by selecting Default Profile.
Renaming profi les
▸ Select Rename Profiles in the Manage Profiles submenu
▸ Select the desired memory slot for the profi le
▸ Enter the new profi le name in the relevant keypad submenu
1
2
3
6
7
6
4
5
1 “Back” button (for returning to the previous menu level without
confi rming any settings)
2 Input line
3 Keypad
4 “Delete” button (deletes the last character entered)
5 “Confi rm” button (confi rms individual characters and fi nished
settings)
6 Changing the character type
7 Shift key

EN
77
Miscellaneous
The keypad can be operated in various ways:
Using gesture control
▸ Tap the desired value or the relevant “button”
Using button/setting wheel controls
To move left or right:
▸ Turn the setting wheel on the right or press the directional pad
right/left
To go up or down:
▸ Press the directional pad up/down
To confirm a value or setting:
▸ Press the center button
Transferring profiles to /
from a memory card
You can copy the profile memory slots to the memory card or copy
them from the memory card to the camera. Both procedures are
performed the same way in principal:
▸ Select Manage Profiles in the User Profile submenu
▸ Select Export Profiles or Import Profiles in the submenu
▸ Confirm the export/import (Yes) or decline (No)
Note
All profile memory slots are imported to the memory card,
including empty profiles. Any existing profiles stored in the camera
will be overwritten, i.e. deleted during the profile import.

EN
78
Miscellaneous
RESETTING ALL CUSTOM SETTINGS
This function allows you to reset all menu settings to restore the
factory settings. You can choose to leave the user profiles, WLAN
settings and/or the reset of the image numbers intact:
▸ Select Reset Camera in the Main Menu (5th screen page)
▸ Confirm deletion of profile settings (Yes)/ decline (No)
and/or
▸ Confirm deletion of WLAN settings (Yes)/decline (No)
and/or
▸ Confirm reset of the image numbers (Yes)/decline (No)
Notes
• You can alternatively reset the image file numbers via the menu
item Reset Image Numbering.
• This reset will also affect the settings for Date & Time and Language.
The welcome video will appear the next time the camera is
switched on. Please read the sections “Menu language“ (page
26) and “Date / Time“ (page 26) for information about
what to do next.
Your LeicaCL saves picture/video files with ascending numbers
and stores them in automatically created folders. The picture file
names are eight digits long: "L“ for the (Leica) camera, three num-
bers to identify the folder and four numbers for the picture/video,
e.g. “L10 0123 4“. You can reset this number assignment at any time:
▸ Select Reset Image Numbering in the Main Menu (4th screen page)
▸ Confirm (Yes) or decline (No)
A new folder is created automatically and the numbering starts
again if you reset the numbering, or if the current folder contains
the picture file number 9999. Example: Last picture/video before
the reset “L1009999“, first picture/video after the reset “L1010001“.
This can be a useful feature to help you sort picture/video files
more clearly.
The folder number will be the next available number; you can have
max. 999 folders.
A warning message will be displayed on screen and you will be
prompted to reset the numbering when all numbers have been
assigned and the count is at “L9999999“.

EN
79
Miscellaneous
Notes
• If the memory card used already contains a picture file with a
higher number than the last number assigned by the camera, the
numbers will then be counted upward from the numbering on
the memory card.
• Format the memory card and reset the picture number right
after to reset the folder number to 100.
CHANGING FILE NAMES
You can replace the first letter of a picture file name with any other
letter:
▸ Select Edit File Name in the Main Menu (4th screen page)
▸ Enter the desired letter in the relevant keypad submenu.
The process is basically the same as renaming a profile
(see p. 76).

EN
80
Miscellaneous
WIRELESS DATA TRANSMISSION AND REMOTE CONTROL OF
THE CAMERA VIA WLAN
You can control your LeicaCL remotely using a smartphone/tablet
or use the smartphone/tablet as an external storage medium. You
will have to install the LeicaCL app on your smartphone first. This
app is available at the Google Play Store™ for Android™ devices
and at the Apple App Store™ for iOS™ devices.
Note
In this section, the term "smartphone" refers to smartphones
as well as tablets.
WLAN function variants
Your first decision will have to be whether you want to establish a
WLAN connection to the camera directly via a smartphone
– Connect to App or via a browser – Web Server. The function Backup
will keep the camera permanently connected or will connect
automatically to your smartphone when it is switched on. Off
deactivates the WLAN function. The connections will allow remote
picture creation and playback and the storing of image/video files
on your smartphone. A connection via browser will additionally
allow saving your pictures in DNG format.
▸ Select WLAN in the Main Menu (4th screen page)
▸ Select Function in the submenu
▸ Select the desired setting
Note
There are two methods for establishing a connection to your
smartphone (see “Selecting a connection method”).
Other operations via the variant Connect to App
▸ Establishing a connection with a smartphone
▸ Select “Camera Control” in the LeicaCL app
▸ Taking pictures
Pictures taken are stored in the camera.
The most important settings are available in the LeicaCL app.
Other operations via the variant Web Server
When Web Server is selected in the Connection submenu, an informa-
tion screen with the information you need for the connection will
appear.
Open a browser window and type in the URL displayed on the
camera to create a connection between your PC or smartphone
and the camera within a WLAN network.

EN
81
Miscellaneous
Selecting a connection method
There are two methods for establishing a connection between your
camera and your smartphone. If you have access to a WLAN net-
work, the Join WLAN method is recommended. In this method, the
camera and smartphone will be in the same WLAN network.
Establishing a connection via Create WLAN may be practical if you
don’t have access to a WLAN network: In this method, the camera
generates an access point (hot spot) via which you can connect to
your smartphone.
▸ Select WLAN in the Main Menu (4th screen page)
▸ Select Connection in the submenu
▸ Select Create WLAN or Join WLAN
Later operation will differ, depending on which option you choose:
Join WLAN
Select a network from a list of available WLAN networks if you want
to establish a network connection.
▸ Select WLAN in the Main Menu (4th screen page)
▸ Select Setup in the submenu
▸ Select the desired setting
An intermediate screen appears briefly while the device searches
for available networks.
The relevant submenu will appear, once the process is completed.
It contains the menu items Scan and Add Network and lists all
networks the camera has found.
Establishing a connection with a smartphone in Join WLAN
mode
▸ Select the desired network from the list
Repeat the search by selecting the menu item Scan if the network
you are looking for is not listed.
Establishing a connection to an invisible WLAN network
▸ Add Network
▸ Enter the SSID/Network Name and the encryption method
(Client Security) in the relevant submenu
Create WLAN
All settings for this menu item are preset ex works. Proceed as
follows if you want to change these settings for some reason:
▸ Select WLAN in the Main Menu (4th screen page)
▸ Select Setupin the submenu
▸ Select SSID/Network Name, Security or Password
▸ You can change the camera name within the network via the
SSID/Network Name keypad submenu.
▸ You can also change the password via the keypad submenu
Password.
The procedure in both keypad submenus is exactly the same as
described in the section “Renaming profiles” on page 76.
We recommend leaving the preset WPA2 encryption method in the
Security submenu unchanged. Use the variant Open only if you are
sure that unauthorized access will be impossible.

EN
82
Miscellaneous
Establishing a connection to a smartphone in Create WLAN
mode
Establishing a connection via QR code:
Using an iOS smartphone (with an operating system version no
higher than 8.3):
▸ Launch the LeicaCL app on your smartphone
▸ Select “Connect via QR Code”
▸ Scan the QR code shown on the camera with the LeicaCL app
▸ Import the “LeicaCL” profile on your smartphone
▸ Select “Install”, then “Install” again, and then “Done”
A message will appear in the web browser on the smartphone.
If a passcode is needed to access the smartphone:
▸ Enter the passcode
▸ Click the “Home” to close the web browser
▸ Select and activate “WLAN” under “Settings” on the smart-
phone
▸ Select the SSID displayed on the camera (default: LeicaCL)
▸ Return to the “Home” screen of your smartphone
▸ Launch the LeicaCL app
Note
Subject to changes in subsequent versions of the operating
system.
Using an Android smartphone:
▸ Launch the LeicaCL app on your smartphone
▸ Select “Connect via QR Code”
▸ Scan the QR code shown on the camera with the LeicaCL app
The next steps are the same for both smartphone types.
Establishing a connection using SSID and password:
▸ Launch the LeicaCL app on your smartphone
▸ Select “WLAN”
▸ Select the SSID displayed on the camera
▸ Enter the password shown on this device (only when establishing
a connection for the first time)

EN
83
Miscellaneous
Notes
• When using devices or computer systems that require more
reliable security than WLAN devices, appropriate measures must
be taken to ensure security and protection against disruptions to
the systems used.
• Leica Camera AG accepts no liability for damage arising from
the use of the camera for purposes other than as a WLAN de-
vice.
• It is assumed that the WLAN function will be used in the coun-
tries where this camera is sold. The use in other countries may
violate local communications transmission provisions. Leica
Camera AG accepts no liability for violations of this kind.
• Please notice that data transmitted and received wirelessly can
be intercepted by third parties. We highly recommend that you
activate the encryption in the wireless access point settings to
ensure data safety.
• Avoid using the camera in the vicinity of magnetic fields, static
electricity or other interferences, e.g. in the vicinity of a micro-
wave oven. The wireless transmissions may otherwise not reach
the camera.
• Using the camera in the vicinity of devices like microwave ovens
or cordless telephones using the 2.4GHz radio frequency wave-
length may negatively impact the performance of both devices.
• Do not connect to wireless networks you are not authorized to
use.
• The device will automatically search for wireless networks when
the WLAN function is activated. Some networks you are not
authorized to use may appear in the list. Do not attempt to con-
nect to such a network, as this could be construed as unautho-
rized access.

EN
84
Miscellaneous
TRANSFERRING DATA TO A COMPUTER
The picture data on a memory card can be transferred to a com-
puter via a card reader for SD /SDHC/SDXC cards.
DATA STRUCTURE ON THE MEMORY CARD
The transfer of data stored on a card onto a computer occurs in
folders, which will be named 100LEICA, 101LEICA, etc.: Each
folder can contain up to 9999 pictures.
FORMATTING
Memory cards that have already been in use will usually not require
formatting. Formatting will, however, be the first step when you are
inserting an unformatted memory card for the first time. The rele-
vant confirmation screen will be displayed automatically.
We recommend formatting memory cards from time to time, be-
cause residual data traces (data pertaining to individual pictures)
may reduce the card’s memory capacity.
▸ Select Format in the Main Menu (4th screen page)
▸ Confirm (Yes) or decline (No)
Notes
• All data stored on a memory card will be lost during formatting.
• We therefore recommend that you make habit of regularly trans-
ferring all your pictures to a secure mass storage medium, e.g.
the hard drive on your computer.
• Never switch off the camera while data transfer is in progress.
• Make sure to reformat the memory card in your camera if it was
originally formatted in another device, e.g. a computer.
• Ask your dealer or the Leica Product Support for advice if the
memory card cannot be formatted.
• Formatting will not be prevented by the deletion protection set
for individual pictures.
WORKING WITH RAW DATA (DNG)
You will need specific software for editing data in DNG format, e.g.
the professional raw data converter Adobe® Photoshop® Light-
room®. This software allows you to convert stored raw data in
excellent quality and also offers quality optimized algorithms for
digital color processing, which also ensure low noise and astonish-
ingly high picture resolution.
During editing, you can adjust parameters like gradation, sharpness
etc. in retrospect to achieve the best possible image quality.

EN
85
Miscellaneous
INSTALLING FIRMWARE UPDATES
Leica is continuously working on the further development and
optimization of its products. As digital cameras have many func-
tions that are controlled solely electronically, some of these im-
provements and function enhancements can be installed on the
camera at a later date. Leica offers firmware updates at irregular
intervals, which you can download from our website.
Leica will notify you of any new updates, once you have registered
your camera.
Find out which firmware version is currently installed:
▸ Select Camera Information in the Main Menu (5th screen page)
▸ Select Firmware in the submenu
Your currently installed firmware version number is shown in the
first line of the submenu.
Please visit the “Customer Service” section of our website at
https://owners.leica-camera.com for more information on how to
register, on firmware updates for your camera, how to do an up-
date, plus changes and additions to this manual
Notes
• The warning message Insufficient battery Update not possible ap-
pears if the battery charge level is insufficient to complete an
update. Please charge the battery fully and then repeat the pro-
cess described above.
• Make sure to follow all the instructions regarding the recommis-
sioning of your camera.
• You will find additional device and country-specific registration
marks and numbers in the Camera Information submenu.
• Installing a firmware update will revert all camera settings back
to the factory settings, which means all your settings will be lost.

EN
86
Instructions for care & use
INSTRUCTIONS FOR CARE & USE
Camera
• Only clean the camera with a soft, dry cloth. Stubborn dirt
should first be moistened with a watered-down detergent and
can then be wiped away with a dry cloth.
• Wipe the camera with a clean, lint-free cloth to remove spots
and fingerprints. Tougher dirt in hard to reach corners of the
camera housing can be removed with a small brush.
• All mechanically operated bearings and sliding surfaces on your
camera are lubricated. Please remember the following if the
camera has not been used for an extended period of time: Op-
erate the camera a few times in three-month intervals to prevent
a hardening of the lubricant. We also recommend repeated
adjustment and use of the setting wheels.
Lenses
• A soft hair brush will usually suffice to remove dust from the
outer lens. Remove more severe soiling with a very clean, soft
cloth that is completely free of foreign matter. Wipe the lens in
circular motions from the inside outward. We recommend using
microfiber cloths (available from photography retailers and opti-
cians) that are stored in a protective container and are ma-
chine-washable up to 40 °C (do not use fabric softener, never
iron!). Do not use spectacle lens cleaning cloths, because they
are soaked in chemicals, which could damage the lens glass.
• The lens hoods supplied protect the lens against accidental
fingerprint smudges and rain.
Battery
Rechargeable lithium-ion batteries generate power by way of in-
ternal chemical reactions. These reactions are influenced by am-
bient temperature and humidity. Very high or very low ambient
temperatures reduce the service life of the battery.
• Always remove the battery if the camera will not be used for an
extended period of time. Leaving the battery in the camera will
result in a deep discharge after a few weeks, which means
voltage levels could drop significantly.
• Lithium-ion batteries should only be stored partially charged, i.e.
not fully depleted or fully charged. During very long storage
periods, the battery should be charged for approx. 15 minutes
twice a year to prevent deep discharge. Always keep the battery
contacts clean and readily accessible. Although lithium-ion bat-
teries are secured against short circuits, they should still be
protected against contact with metal objects like paper clips or
jewelry. A short-circuited battery can get very hot and cause
severe burns.
• The battery must have a temperature between 0 °C and 35 °C
(32 °F and 95 °F) for charging, as the charger may otherwise
not switch on, or will automatically switch off.
• Check the housing and the contacts immediately for any
damage if a battery is accidentally dropped. A damaged battery
can damage the camera.
• Batteries have a limited service life.
• Take your defective batteries to a collection point to ensure
correct recycling.
• Never throw batteries into a fire as they might explode!

EN
87
Instructions for care & use
Charger
• Using the charger in the vicinity of broadcast receivers may
interfere with the reception of the device; Ensure a distance of at
least 1 m (3 ft) between the charger and the receiver.
• When the charger is in use, it may emit a buzzing sound – this is
normal and not a malfunction.
• Disconnect the charger from the mains when it is not in use,
because it consumes some (a very small amount) electricity,
even when no battery is inserted.
• Always keep the charger contacts clean, and never short circuit
them.
Memory cards
• Never remove the memory card during a picture save or card
reading process. The camera must not be switched off or be sub-
jected to impact or vibrations.
• Make sure to store memory cards in their anti-static container
when not in use.
• Do not store memory cards where they will be exposed to high
temperatures, direct sunlight, magnetic fields or static electricity.
• Do not drop or bend memory cards as this will cause damage
and result in the loss of the stored data.
• Always remove the memory card if the camera will not be used
for an extended period of time.
• Do not touch the connections on the reverse of the memory card
and keep them away from dirt, dust and moisture.
• We recommend formatting the memory card from time to time,
because fragmented residual data from deleted files may block
some of the storage capacity of the memory card.
Storage
• Recommendations if the camera will not be used for an extended
period of time:
a. Switch it off,
b. remove the memory card, and
c. remove the battery.
• A camera lens can have the effect of a magnifying glass – espe-
cially when exposed to direct frontal sunlight. Never store the
camera without lens protection. Using the lens cap and keeping
the camera in the shade – ideally in its camera case – will help
prevent damage to the interior of the camera.
• Store the camera in a closed and padded container to prevent
friction damage and protect it against dust accumulation.
• Store the camera in a dry, sufficiently ventilated place, where it
will not be subjected to high temperatures and humidity. When
the camera was used in humid conditions, make sure to remove
all moisture before storing it.
• Camera bags that have gotten wet during use must be emptied
completely to prevent moisture damage to your equipment or
damage from tanning agents released.
• To prevent fungal growth during use in tropical climates, the
camera equipment should be exposed to the sun and air as often
as possible. Storage in airtight containers or cases is recom-
mended only in conjunction with a desiccant like silica gel. The
camera should therefore also not be stored in a leather case for
extended periods of time.
• Moisture can cause malfunctions and irreparable damage to the
camera and memory card.
• Note down the serial number of your LeicaCL. This information
may be very important in case of loss or theft.
EN
88
Miscellaneous
MENU OVERVIEW Favorites Direct access
via the FN/right setting wheel button1
PageFactory settings Available Factory settings Available
Drive Mode ll2l2l236/54
Self Timer lll58
Focusing ll3l438
Exposure Metering l l l l 45
Exposure Compensation l l 54
ISO lll33
Autom. ISO setting l l 33
White Balance l5l l632
Photo File Format lll32
JPG Resolution l l 32
Film Style l l l 33
Scene Mode lll49
Optical Image Stabilization l l 35
Electronic Shutter l l 36
Flash Settings l l 60
Exposure Preview l l 46
User Profile l l l l 76
Video Resolution l l 62
Video Settings 63
EN
89
Miscellaneous
Favorites Direct access
via the FN/right setting wheel button1
PageFactory settings Available Factory settings Available
Video Style l l 63
Capture Assistants 30
Display Settings 28
Auto Review 65
Lens Profiles ll735
Customize Button assignment l123
WLAN l l l 80
Edit File Name 79
Reset Image Numbering 78
Power Saving 29
Acoustic Signals 27
Wheel Lock in Live View l l 19
Play Mode Setup 30
Format Card l84
Camera Information 85
Date & Time 26
Language 26
Reset Camera 76
1 In picture mode
2 Drive Mode menu items Interval and Exposure Bracketing, also available individually
3 Focusing menu items Focus Mode, AF Mode and Focus Assist, also available individually
4 Focusing menu items Focus Mode, Focus Limit (Macro), AF Mode and Focus Assist, also available individually
5 White Balance menu item Gray Card, also available individually
6 White Balance menu items Gray Card and Color Temperature, also available individually
7 Lens Profiles menu items M-Lenses and R-Lenses, also available individually
8 Customize Control menu item Edit Favorites, also available individually
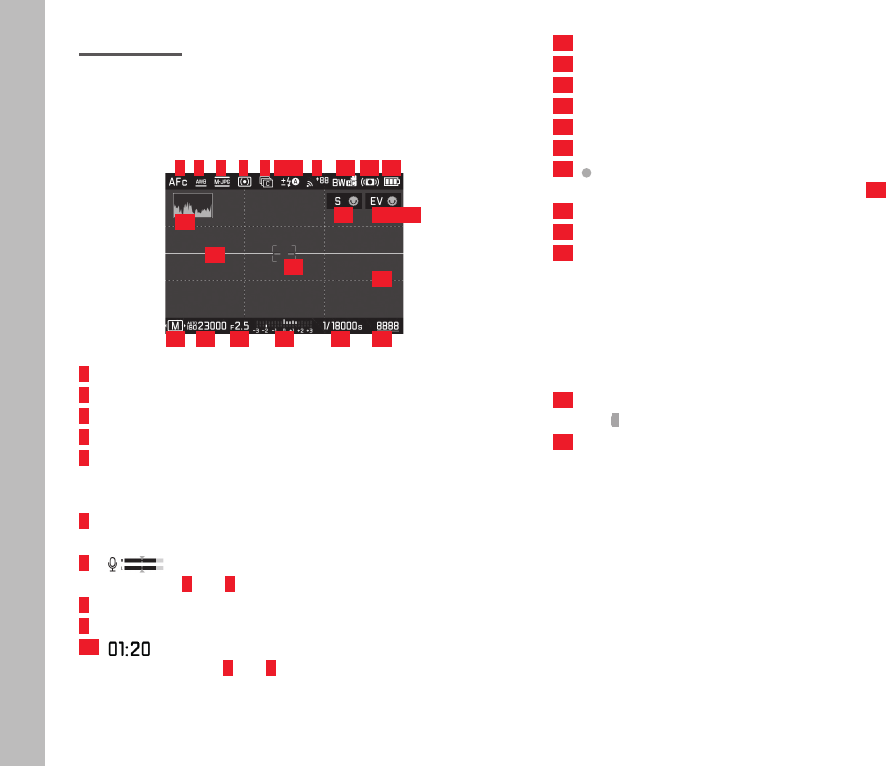
EN
90
Displays on screen/in the viewfi nder
APPENDIX
DISPLAYS ON SCREEN/IN THE VIEWFINDER
Picture mode
1
14 15 16/17
18
212223242526
19
20
2 3 4 5 6/7 811 12 13
1 Focusing mode
2 White balance mode
3 File format/Video resolution/frame rate
4 Exposure metering method
5 Pictures
(Single/serial exposures, time-lapse pictures,
bracketing)
6 Flash exposure mode,
with fl ash compensation as needed
7 Recording level (only in video mode, appears instead
of displays 5 and 6)
8 WLAN activated/Signal strength
9 Data transmission to smartphone incl. remaining pictures
10 Video recording time (only in video mode, appears in-
stead of displays 8 and 9)
11 Color Rendering
12 Stabilization activated
13 Battery charge level
14 Histogram
15 Function of the left setting wheel (short-term when activated)
16 Function of right setting wheel (short-term when activated)
17 Video recording status (gray = video preview, fl ashing red =
video recording appears instead of display 16)
18 Auxiliary grid
19 Autofocus metering fi eld
20 Horizon
Long horizontal lines indicate inclination:
- red = tilted
- green = horizontal
Short horizontal line indicates tilting:
- line visible = tilted
- no line = not tilted
21 Remaining number of pictures/elapsed video recording time
(the 0 fl ashes as a warning if there is no storage capacity)
22 Shutter speed
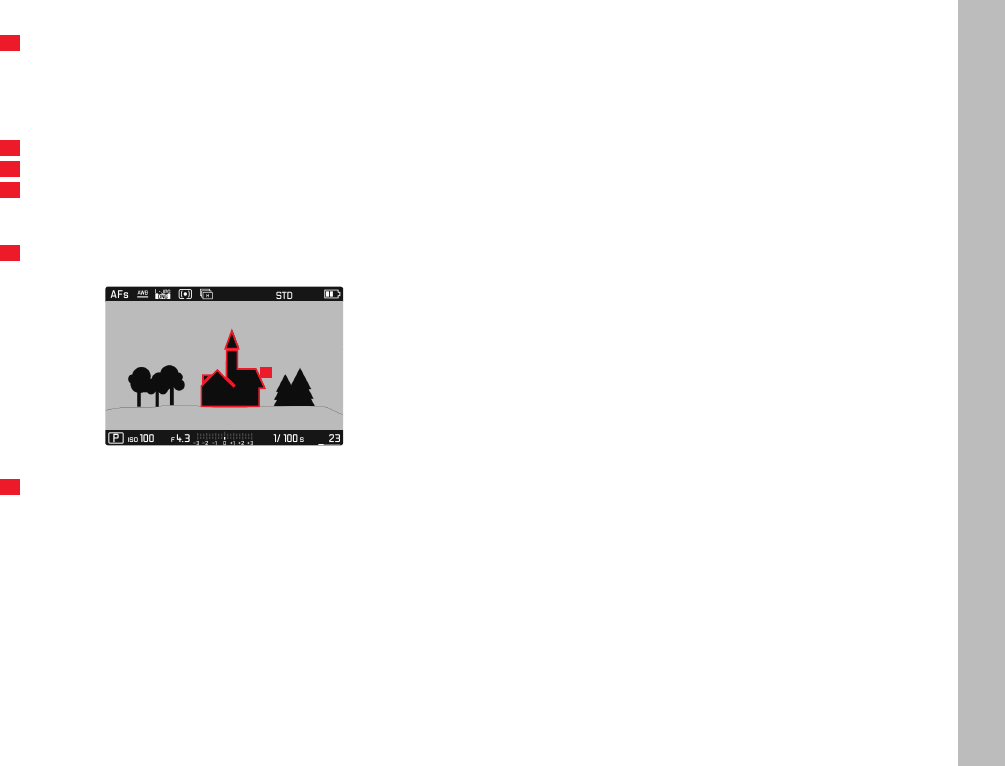
EN
91
Displays on screen/in the viewfinder
23 Light balance
top = exposure indicator/compensation, white lines = expo-
sure fine or difference of up to 3 EV from standard exposure,
red lines = more than 3 EV difference from standard exposure;
bottom = exposure compensation
24 Aperture
25 ISO sensitivity/setting
26 Exposure mode (*= reference to modified shutter speed/aper-
ture combination, appears only in auto mode and after shift)/
scene mode
27 Indication (only when changing exposure modes/scene mode)
28
28 Marking for in-focus edges
(“peaking”, color selectable)
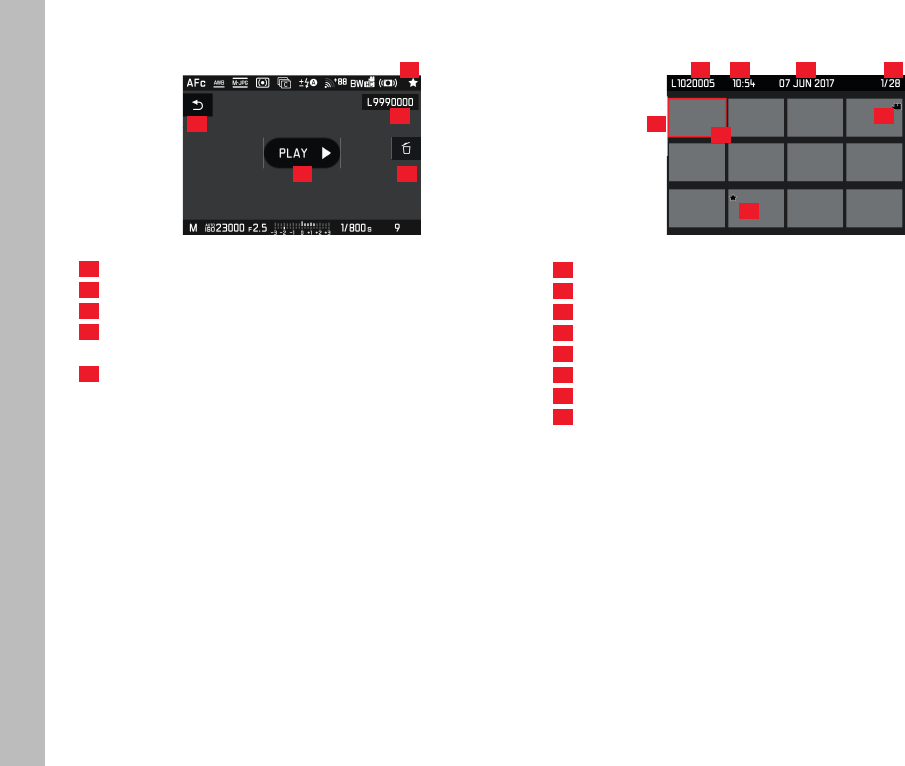
EN
92
Displays on screen/in the viewfi nder
Playback mode
30
29
31 32
33
29 Indication for marked picture/video
30 File number of the picture/video shown
31 Indication for video playback
32 Indication for the use of the center button to delete individual
pictures
33 Indication for the use of the PLAY button to hide individual
picture deletion
40
3835 36 37
41
39
34
34 Scrollbar: for page overview
35 File number of the marked picture/video
36 Recording time of the marked video
37 Recording date of the marked video
38 Picture counter, selected picture/total number of pictures
39 Indicator for selected pictures/videos
40 Video recording
41 Indicator for marked pictures/videos

EN
93
Displays in the top display
42 43
44
454647
48
42 Icon for accessing the video editing function incl. softkey
43 Icon for exiting video playback incl. softkey
44 Volume setting bar
45 Display for audio playback ( = audio playback deactivated)
46 Playback bar
47 Elapsed playback time
48 Icon for resuming playback ( = playback paused)
Displays in the top display
When the camera is switched on
1
2
1 Camera name
2 Battery status
Standard view
3
4
5
3 Aperture
4 Exposure mode
5 Shutter speed
When changing exposure modes
77
6
6 Currently set exposure mode
7 Arrows for the shift direction

EN
94
Technical data
TECHNICAL DATA
Camera name
LeicaCL
Camera type
Digital APS-C system camera
Type No.
7323
Order No.
19 301 (black)
Lens mount
Leica L bayonet with contact strip for communication between lens and
camera
Compatible lenses
Lenses with Leica L bayonet, Leica M/R lenses using the Leica M
Adapter L/Leica R Adapter L
Sensor
APS-C-sized CMOS sensor (23.6 x 15.7 mm) with 24.96/24.24 million
pixels (total/effective), aspect ratio: 3:2
Resolution
Overall pixels: 6088 x 4100 pixels (24.96 MP), effective pixels: 6032 x
4032 pixels (24.32 MP), active pixels: 6024 x 4024 pixels (24.24 MP),
DNG: 6016 x 4014 pixels (24 MP), JPG: optionally 6000 x 4000 pixels
(24 MP), 4272 x 2856 pixels (12 MP) oder 3024 x 2016 pixels (6 MP)
Photo File Format/Compression rate
Optionally: DNG, JPG or DNG + JPG
Video recording format
MP4
Video Resolution/Image Sequence
Selectable: 3840 x 2160p (4 K) 30B/s, 1920 x 1080p (FHD) 60B/s,
1920 x 1080p (FHD) 30fps or 1280 x 720p (HD) 30fps
Duration of Video Recording
You can record video up to 29minutes without interruption, depending
on ambient and camera temperature. The maximum file size is 4GB.
Once a recording exceeds this limit, the overrun will be automatically
stored in a new file.
Storage Media
UHS–II, UHS-I, SD/SDHC/SDXC memory card
ISO Range
Automatic, ISO 100 to ISO 50000
White Balance
Automatic, presets for daylight, cloud, halogen lighting, shadow, flash,
one memory slot for manual settings, manual color temperature set-
tings
Autofocus System
Contrast
Autofocus metering methods
Spot, field, multi-field, face detection, touch-controlled AF function
Exposure modes
Automatic, aperture priority, shutter priority, manual setting, scene
modes: fully automatic, sport, portrait, landscape, night portrait, snow/
beach, fireworks, candlelight, sunset, digiscope, thumbnail, panorama,
HDR
Exposure metering methods
Multi-field, center-weighted, spot
Exposure Compensation
± 3 EV in 1⁄3EV increments
Automatic exposure bracketing
Three or five pictures in gradations up to ± 3 EV, adjustable in 1 EV
increments

EN
95
Technical data
Shutter speed range
30s to 1⁄25000s (up to 1⁄8000s with mechanical, beyond that with elec-
tronic shutter)
Picture series
Max. approx. 10 fps with mechanical shutter, max. approx. 10 fps with
electronic shutter, max. approx. 33 pictures (DNG+JPG) at constant
exposure frequency, then depending on memory card properties
Flash modes
Configurable with attached, system-compatible flash unit
Flash exposure compensation
± 3 EV in 1⁄3EV increments
Flash sync speed
1⁄180s
Viewfinder
Resolution: 1024 x 768 pixels (2.36 MP), magnification: 0.74x, aspect
ratio: 4:3, exit pupil position: 20 mm, configurable ±4dioptres, with
eye sensor for automatic toggling between viewfinder and screen
Top display
Resolution: 128x58 pixels
Screen
3“ TFT LCD, 1.04MP, touch control available
Self-timer
Configurable delay time 2 or 12s
WLAN
Complies with the IEEE 802.11b/g/n standard (standard WLAN pro-
tocol), channel 1-11, encryption method: WLAN-compatible WPA™/
WPA2™, Access method: Infrastructure mode
Interfaces
Accessory shoe with Leica flash interface
Power supply
Leica BP-DC12 lithium-ion battery, rated voltage: 7.2V (7.2V DC),
capacity: 1200mAh, (according to CIPA standard): approx. 220 pic-
tures, charging time (after deep discharge): approx. 140 min, manufac-
turer: Panasonic Energy (Wuxi) Co., Ltd. Made in China
Charger
Leica BC-DC12, input: AC 100–240V, 50/60Hz, automatic swi-
tchover, output: DC 8.4V; 0.65A, manufacturer: Shin Tech Engineering
Ltd., Made in China
Housing
Top and bottom covers: milled and anodized aluminum,
front and rear panels: magnesium
Tripod thread
A 1⁄4 DIN 4503 (1⁄4“)
Dimensions (WxHxD)
approx. 131x78x45 mm
Weight
approx. 403g/353g (with/without battery)
Scope of delivery
Camera housing, camera bayonet cover, carry strap, accessory shoe
cover, battery (Leica BP-DC12), charger (Leica BC-DC12), mains cable
(EU, US, local mains cable)
Software
Leica CL app (remote control and picture transfer, free download from
Apple™ App-Store™/Google™ Play Store™)
Subject to changes in design and production.

EN
96
LEICA SERVICE ADDRESSES
LEICA PRODUCT SUPPORT
The Product Support Department at Leica AG can answer any tech-
nical questions relating to Leica products, including support for the
supplied software in writing, on the phone or by email. It is also
your first point of contact for purchasing advice and manual orders.
Alternatively, you can send us your questions using the contact
form on the Leica Camera AG website.
Leica Camera AG
Product Support/Software Support
Am Leitz-Park 5
35578 Wetzlar, Germany
Telephone: +49(0)6441-2080-111 /-108
Fax: +49(0)6441-2080-490
info@leica-camera.com / software-support@leica-camera.com
LEICA CUSTOMER CARE
The Leica Camera AG Customer Care department or the repair
service provided by authorized Leica agents in your country are
available for service, maintenance and repairs of your Leica equip-
ment (visit the Leica Camera AG website for a list of addresses).
Leica Camera AG
Customer Care
Am Leitz-Park 5
35578 Wetzlar, Germany
Tel.: +49(0)6441-2080-189
Fax: +49(0)6441-2080-339
customer.care@leica-camera.com

DAS WESENTLICHE.
Leica Camera AG│Am Leitz-Park 5│35578 WETZLAR│DEUTSCHLAND
Telefon +49(0)6441-2080-0│Telefax +49(0)6441-2080-333│www.leica-camera.com
93 789 XI/17/LW/D
LEICA CL
INSTRUCTIONS
