CSE 2212 Database Systems Lab Manual
User Manual: Pdf
Open the PDF directly: View PDF ![]() .
.
Page Count: 148 [warning: Documents this large are best viewed by clicking the View PDF Link!]

i
DEPARTMENT OF COMPUTER SCIENCE &
ENGINEERING
CERTIFICATE
This is to certify that Ms./Mr. .…………………...………………………………
Reg. No.: …..………………… Section: …………… Roll No.: ………………...
has satisfactorily completed the lab exercises prescribed for Database Systems Lab
[CSE 2212] of Second Year B.Tech. (Computer Science and Engineering) Degree
at MIT, Manipal, in the academic year 2017-2018.
Date: ……...................................
Signature
Faculty in Charge

ii
iii
CONTENTS
LAB NO. TITLE PAGE NO. REMARKS
COURSE OBJECTIVES AND
OUTCOMES v
EVALUATION PLAN v
INSTRUCTIONS TO THE STUDENTS vi
SAMPLE LAB OBSERVATION NOTE
PREPARATION viii
1. MS ACCESS 1
2. INTRODUCTION TO SQL 6
3. INTERMEDIATE SQL 11
4. INTEGRITY CONSTRAINTS IN SQL 16
5. ADDITIONAL EXERCISES ON SQL 23
6. PL/SQL BASICS 26
7. EXCEPTION HANDLING AND
CURSORS 37
8. ADDITIONAL CURSOR
CONSTRUCTS AND TRANSACTIONS 45
9. PROCEDURES, FUNCTIONS AND
PACKAGES 52
10. TRIGGERS 65
11. MINI PROJECT (PHASE I) 70
12. MINI PROJECT (PHASE II) 71
APPENDIX 73

iv

v
Course Objectives
• To illustrate and explain basic concepts and terminology related to database and
storage management.
• Learn to develop stored procedures, functions and packages.
• To develop an application software with host language interface.
Course Outcomes
At the end of this course, students will have the
• Ability to write queries for design and manipulation of database tables using
ORACLE.
• Ability to understand the effective use of stored procedures, functions and packages.
• Design and develop applications using ORACLE.
Evaluation Plan
• Internal Assessment Marks: 60%
9 Continuous evaluation component (for each experiment):10 marks.
9 The assessment will depend on punctuality, program execution, maintaining the
observation note and answering the questions in viva voce.
9 Total marks for the 10 experiments is 40 Marks.
9 Mini project is for 20 Marks.
• End semester assessment of 2 hour duration: 40%

vi
INSTRUCTIONS TO THE STUDENTS
Pre-Lab Session Instructions
• Students should carry the Lab Manual Book and the required stationery to every lab
session.
• Be in time and follow the institution dress code.
• Must Sign in the log register provided.
• Make sure to occupy the allotted seat and answer the attendance.
• Adhere to the rules and maintain the decorum.
In-Lab Session Instructions
• Follow the instructions on the allotted exercises.
• Show the program and results to the lab Teacher on completion of experiments.
• You must have your lab notebook signed by your lab Teacher before you leave lab
each day. Any pages not signed on the day the experiment was performed will
adversely affect your lab notebook grade.
• Prescribed textbooks and class notes can be kept ready for reference if required.
General Instructions for the exercises in Lab
• Implement the given exercise individually and not in a group.
• The programs should meet the following criteria:
o Programs should perform input validation (Data type, range error, etc.).
o Use meaningful names for variables and functions.
• Plagiarism (copying from others) is strictly prohibited and would invite severe
penalty in evaluation.
• The exercises for each week are divided under two sets:
o Lab Exercises – to be completed during lab hours.

vii
o Additional Exercises – to be completed outside the lab or in the lab to enhance
the skill.
• In case a student misses a lab class, he/she must ensure that the experiment is
completed during the repetition lab with the permission of the faculty concerned but
credit will be given only to one day’s experiment(s).
• Questions for lab tests and examination are not necessarily limited to the questions
in the manual, but may involve some variations and/or combinations of the
questions.
• A sample note preparation is given as a model for observation.
THE STUDENTS SHOULD NOT
• Bring mobile phones or any other electronic gadgets to the lab.
• Go out of the lab without permission.

viii
Sample Lab Observation Note Preparation
LAB NO.: Date:
Title: STRUCTURED QUERY LANGUAGE
1. Implement the Bank Database and execute the given queries/updates
Bank Database Schema:
• ACCOUNT(ACCOUNT_NUMBER, BRANCH_NAME, BALANCE)
• BRANCH(BRANCH_NAME, BRANCH_CITY, ASSETS)
• CUSTOMER(CUSTOMER_NAME CUSTOMER_STREET,
CUSTOMER_CITY)
• LOAN(LOAN_NUMBER, BRANCH_NAME, AMOUNT)
• DEPOSITOR(CUSTOMER_NAME, ACCOUNT_NUMBER)
• BORROWER(CUSTOMER_NAME, LOAN_NUMBER)
• Creating Tables
CREATE TABLE BRANCH
(BRANCH_NAME VARCHAR (15) PRIMARY KEY,
BRANCH_CITY VARCHAR (20),
ASSETS NUMBER (10));
CREATE TABLE ACCOUNT
(ACCOUNT_NUMBER NUMBER (10) PRIMARY KEY,
BRANCH_NAME VARCHAR (15) REFERENCES BRANCH,
BALANCE NUMBER (8));
CREATE TABLE CUSTOMER
(CUSTOMER_NAME VARCHAR (20) PRIMARY KEY,
CUSTOMER_STREETVARCHAR (15),
CUSTOMER_CITY VARCHAR (10));
CREATE TABLE LOAN
(LOAN_NUMBER NUMBER (10) PRIMARY KEY,

ix
BRANCH_NAME VARCHAR (15) REFERENCES BRANCH,
AMOUNT NUMBER (10))
CREATE TABLE DEPOSITOR
(CUSTOMER_NAME VARCHAR (2) REFERENCES CUSTOMER,
ACCOUNT_NUMBER NUMBER (10) REFERENCES ACCOUNT,
PRIMARY KEY (CUSTOMER_NAME, ACCOUNT_NUMBER));
CREATE TABLE BORROWER
(CUSTOMER_NAME VARCHAR(2) REFERENCES CUSTOMER,
LOAN_NUMBER NUMBER(10) REFERENCES LOAN,
PRIMARY KEY(CUSTOMER_NAME,LOAN_NUMBER));
Queries/Update on Bank Database
(Questions followed by SQL statements)
Retrieving records from a table:
1. List all branch names and their assets
SELECT BRANCH_NAME, ASSETS FROM BRANCH;
2. List all accounts of Brooklyn branch
SELECT * FROM ACCOUNT WHERE BRANCH_NAME= ‘BROOKLYN’;
3. List all loans with amount > 1000.
SELECT * FROM LOAN WHERE AMOUNT>1000;
Updating records from a table:
4. Change the assets of Perryridge branch to 340000000.
UPDATE BRANCH SET ASSETS=340000000
WHERE BRANCH_NAME=‘Perryridge’;

x

1
LAB NO.: 1 Date:
MS ACCESS
Objectives:
In this lab, student will be able to do:
• Basic features of MS Access, including tables, queries, forms, and reports.
Creating a table in a new database:
1. Click the Microsoft Office Button, and then click New.
2. In the File Name box, type a file name for the new database.
3. To browse to a different location to save the database, click the folder icon.
4. Click Create.
The new database opens, and a new table named Table 1 is created and opens in
Datasheet view.
Start the Form Wizard:
1. On the Create tab, in the Forms group, click More Forms, and then click Form
Wizard.
2. Follow the directions on the pages of the Form Wizard.
NOTE: If you want to include fields from multiple tables and queries on the form,
do not click Next or Finish after you select the fields from the first table or query
on the first page of the Form Wizard. Instead, repeat the steps to select a table or
query, and then click any additional fields that you want to include on the form.
Then click Next or Finish to continue.
3. On the last page of the wizard, click Finish.
The Form Wizard can create a variety of results depending on the options that you
select. As a result, we recommend that you run the wizard several times,
experimenting with different options each time, until you get the results that you
want.

2
Create a table relationship by using the Relationships window
1. On the File tab, click Open.
2. In the Open dialog box, select and open the database.
3. On the Database Tools tab, in the Relationships group, click Relationships.
4. If you have not yet defined any relationships, the Show Table dialog box
automatically appears. If it does not appear, on the Design tab, in the
Relationships group, click Show Table.
Filter by Selection
1. Start Microsoft Access, and then open the database that you are working with.
2. In a field on a form, a sub-form, a datasheet, or a sub-datasheet, select one instance
of the value that you want to filter by (for example, a name or a number).
3. On the Records menu, point to Filter, and then click Filter by Selection.
4. Repeat steps 2 and 3 until you have the set of records that you are looking for.
NOTE: You can also filter for records that do not have a certain value. After you select
a value, right-click, and then click Filter Excluding Selection.
Filter by Form
1. Open a form in form view, or a table, a query, or a form in Datasheet view. To filter
records in a sub-datasheet, display the sub-datasheet by clicking its expand
indicator.
2. On the Records menu, point to Filter, and then click Filter by Form to switch to the
Filter by Form window.
3. You can specify criteria for the form, the subform, the main datasheet, or any sub-
datasheet that is displayed.
NOTE: If you don’t like the results you get with the Report tool, you can use Layout
view to build a report manually, a process that gives you more control. You drag fields
from a list, arrange them to your liking, and group them.
The Report Wizard is a fast way to create a report with a large number of fields and a
complex layout.
Click the Create tab, and in the Reports group, click Report Wizard.

3
Complete the wizard. As part of that, you select a data source, and then... Select the
fields you want to use, grouping options, a style, and more.
Lab Exercises:
1. Create four tables for the VideoParlour database using Design view. The tables are
Member to hold members details, Video to hold details of videos, VideoForRent to
hold the details of copies of videos for rent, and Rental Agreement to hold the
details of video rentals by members.
The Member table has the following fields (with the data type of each in brackets):
memberNo (AutoNumber), Fname (Text), Lname (Text), gender (Text), DOB
(Date/Time), address (Text), dateJoined (Date/Time), comments (Memo)
The primary key is memberNo.
(Also for this table, set the format property of the gender field to a field size of 1.
Also, set this field with a Validation Rule =“M” or “F” and Validation Text Please
enter M or F. If you do not understand the purpose of the properties associated with
each field, Use the help facility using the F1 key).
The Video table has the following fields (with the data type of each in brackets):
catalogNo (Text), title (Text), category (Text), dailyRental (Currency), price
(Currency), directorNo (Text).
The primary key is catalogNo
The VideoForRent table has the following fields (with the data type of each in
brackets): videoNo (Text), available (Yes/No), catalogNo (Text)
The primary key is videoNo
The RentalAgreement table has the following fields (with the data type of each in
brackets): rentalNo (AutoNumber), dateOut (Date/Time), dateReturn (Date/Time),
memberNo (Number), videoNo(Text)
The primary key is rentalNo
(Also for this table, set the format property for the dateOut and dateReturn fields to
Medium Date format e.g. 10-Oct-00.)

4
2. Open your VideoParlour database. Create a form for your Video table using the
Form Wizard facility and name this form VideoForm1. Use the form to view
records in your Video table. Practice, changing between viewing your Video table
using Form view and Datasheet view.
3. Create relationships between your Member, RentalAgreement, VideoForRent,
Video tables using the Relationship window.
4. Apply filters to the members and video records. For example, create the following
filters to view:
• Only male members of the video shop.
• Only male members of the shop who joined the shop this year in order of last
name and then first name.
• All members born in the 1960s.
• Only videos in the Children category with a daily rental rate of less than 40.00
and sorted according to video title.
• Only videos currently available for rent with a certification of “PG” or “U”.
• Only videos by a certain director.
5. Using the Select Query window, select your Member, RentalAgreement,
VideoForRent, Video tables. Practice joining and deleting the join lines between
your tables. Examine the join properties of the join lines relating your tables.
6. Create a report for your Video table containing the catalogNo, title, category and
certificate fields. Group your records according to the values in the category field
and then sort on the values in the title field.
• Create a report for your Video table containing the category, dailyRental and
price fields. Group your records according to the values in the category field and
then sum the values in the dailyRental and price fields.
• Create a report based on a query that contains the following fields.
memberNo, Fname, Lname, videoNo, title, dateOut and dateReturn. Group your
records according to memberNo and then order by videoNo.
7. Using Access SQL, create simple select queries on the tables of your StayHome
database. For example, create and save the following queries on the Video table.
• List the catalogNo, title and category of the Video table, ordered by video title.

5
• List title, certificate, category and dailyRental of the Video table for videos in
the “Childrens” category with a rental rate less than £4.00.
• List all videos with a certification of “PG” or “18” in the Video table.
Additional Exercise:
1. Modify the field properties of the member table so that the Memberno, FName, and
LName are required fields. FName and LName should not allow zero length
entries. Set the default value for Address to “Manipal”. Set the default value for
DateJoined to today’s date (enter Date ()).
2. Set validation rules (and respective validation texts) for the DOB and DateJoined
fields so that they are always before or equal to today’s date.
3. Set a validation rule and text for the DailyRental field so that it is empty or greater
than zero.
4. Write a query in SQL that displays a video titlealong with video price and its
category.

6
LAB NO.: 2 Date:
INTRODUCTION TO SQL
Objectives:
In this lab, student will be able to:
• Understand the working of DDL/DML commands.
CREATION OF TABLE:
SYNTAX:
create table<tablename>(column1 datatype,column2 datatype...);
EXAMPLE:
SQL>create table STUDENT (sno number (5),sname varchar(20),age number(5),sdob
date,sm1 number (4,2),sm2 number(4,2),sm3 number(4,4));
Table created.
SQL>insert into std values (101, ‘AAA’,16, ‘03-jul-88’,80,90,98);
DDL COMMANDS:
1. The Create Table Command: It defines each column of the table uniquely. Each
column has minimum of three attributes, a name, data type and size.
Syntax:
Create table <table name> (<col1><datatype>(<size>),
<col2><datatype><size>));
Ex.: create table emp(empno number(4) primary key, ename char(10));
2. Modifying the structure of tables
a) Add new columns
Syntax:
Alter table <tablename>add (<new col><datatype (size),<newcol>datatype(size));
Ex.:
alter table emp add(sal number(7,2));
3. Dropping a column from a table
Syntax:
Alter table <tablename> drop column <col>;
Alter table emp drop column sal;

7
4. Modifying existing columns
Syntax: Alter table <tablename>modify (<col><newdatatype>(<newsize>));
Ex.: Alter table emp modify (enamevarchar2 (15));
5. Renaming the tables
Syntax:
Rename <oldtable> to <new table>;
Ex.:
Rename emp to emp1;
6. Truncate the table
Syntax:
Trunc table <tablename>;
Ex.:
Trunc table emp1;
7. Delete the table structure
Syntax:
Drop table <tablename>;
Ex.:
drop table emp;
DML commands (ADDITIONAL EXAMPLES):
1. Inserting Data into Tables: Once a table is created the most natural thing to do is
load this table with data to be manipulated later.
Syntax:
Insert into <tablename> (<col1>,<col2>) values (<exp>,<exp>);
2. Delete Operations
a) Remove all rows
Syntax:
Delete from <tablename>;

8
b) Removal of specified row/s
Syntax:
Delete from <tablename> where <condition>;
3. Updating the contents of a table
a) Updating all rows
Syntax:
Update <tablename> set <col>=<exp>, <col>=<exp>;
b) Updating selected records
Syntax:
Update <tablename> set <col>=<exp>,<col>=<exp>where <condition>;
LAB EXERCISE:
Implement the University Database and execute the given queries/updates
University Database Schema:
Student (ID, name,dept-name, tot-cred)
Instructor (ID, name, dept-name, salary)
Course (Course-id, title,dept-name, credits)
Takes (ID, course-id, sec-id, semester, year, grade)
Classroom (building, room-number, capacity)
Department (dept-name, building, budget)
Section (course-id, section-id, semester, year, building, room-number, time-slot-id)
Teaches (id, course-id, section-id, semester, year)
Advisor (s-id, i-id)
Time-slot (time-slot-id, day, start-time, end-time)
Prereq (course-id, prereq-id)
Queries/Updations on University Database
Retrieving records from a table:
1. List all Students with names and their department names.
2. List all instructors in CSE department.
3. Find the names of courses in CSE department which have 3 credits.
4. For the student with ID 12345 (or any other value), show all course-id and title of
all courses registered for by the student.
5. List all the instructors whose salary is in between 40000 and 90000.

9
Updating records from a table:
6. Change the advisor id of students with id between 100 and 200 to 1001.
7. Transfer all the instructors of IT department to CSE department.
8. Raise the salary of all the instructors by 5%.
Deleting records from a table:
9. Delete the IT department.
10. Waive off perquisite for the course with course id 101.
11. Delete all courses that have never been offered.
Modifying the structure of tables:
12. Add a column date-of-birth to student table.
13. Change the size of the dept-name to varchar (20).
14. Drop the column date-of-birth from student table.
Retrieving records from multiple tables
15. Display the IDs of all instructors who have never taught a course.
16. Find the student names, course names, and the year, for all students those who
have attended classes in room-number 303.
Rename and Tuple Variables (Use as in select and from)
17. For all students who have opted courses in 2015, find their names and course id’s
with the attribute course title replaced by c-name.
18. Find the names of all instructors whose salary is greater than the salary of at least
one instructor of CSE department and salary replaced by inst-salary.
String Operations (Use %, _, LIKE)
19. Find the names of all instructors whose department name includes the substring
‘ch’.
Ordering the display of Tuples (Use ORDER BY ASC DESC)
20. List all the courses with prerequisite courses, then display course id in increasing
order, course name in decreasing order and the prerequisite course names
increasing order.

10
Additional Exercise:
1. Find the names of all departments with instructor, and remove duplicates.
2. For all instructors who have taught some course, find their names and the course
ID of the courses they taught.
3. Find all the instructors with the courses they taught.
4. List all the students with student name, department name, advisor name and the
number of courses registered.

11
LAB NO.: 3 Date:
INTERMEDIATE SQL
Objectives:
In this lab, student will be able to:
• Understand the set operations and intermediate level queries.
SET Operations in SQL:
Multiple queries using the set operators UNION, UNION ALL, INTERSECT,
and MINUS. All set operators have equal precedence. If a SQL statement contains
multiple set operators, then Oracle Database evaluates them from the left to right unless
parentheses explicitly specify another order.
The corresponding expressions in the select lists of the component queries of a
compound query must match in number and must be in the same data type group (such
as numeric or character).
The UNION operator returns only distinct rows that appear in either result.
SELECT product_id FROM order_items
UNION
SELECT product_id FROM inventories;
The following statement combines the results with the INTERSECT operator, which
returns only those rows returned by both queries:
SELECT product_id FROM inventories
INTERSECT
SELECT product_id FROM order_items;
The following statement combines results with the MINUS operator, which returns only
unique rows returned by the first query but not by the second:
SELECT product_id FROM inventories
MINUS
SELECT product_id FROM order_items;

12
Aggregate Functions
Aggregate functions return a single result row based on groups of rows, rather than on
single rows. Aggregate functions can appear in select lists and HAVING clauses. They
are commonly used with the GROUP BY clause in a SELECT statement, where Oracle
Database divides the rows of a queried table or view into groups. In a query containing
a GROUP BY clause, the elements of the select list can be aggregate functions,
GROUP BY expressions, constants, or expressions involving one of these. Oracle
applies the aggregate functions to each group of rows and returns a single result row for
each group.
WITH Clause
The WITH clause may be processed as an inline view or resolved as a temporary table.
The advantage of the latter is that repeated references to the subquery may be more
efficient as the data is easily retrieved from the temporary table, rather than being
re-queried by each reference. The syntax of the WITH clause is as follows.
Syntax:
WITH <temporary table name> AS (
SELECT <attributes>
FROM <table name>
GROUP BY <attribute>)
SELECT <attribute/s> from <tablename/s>
CREATE VIEW Statement
In SQL, a view is a virtual table based on the result-set of an SQL statement. A view
contains rows and columns, just like a real table. The fields in a view are fields from
one or more real tables in the database.

13
SQL CREATE VIEW Syntax
CREATE VIEW view_name AS
SELECT column_name(s)
FROM table_name
WHERE condition;
LAB EXERCISE:
Implement the following Queries on UNIVERSITY Database:
Set Operations
UNION (Use union all to retain duplicates):
21. Find courses that ran in Fall 2009 or in Spring 2010
INTERSECT (Use intersect all to retain duplicates):
22. Find courses that ran in Fall 2009 and in spring 2010
EXCEPT(Minus):
23. Find courses that ran in Fall 2009 but not in Spring 2010
Aggregate Functions (avg, min, max, sum, count) / Group By
24. Find the average salary of instructors in the CSE department.
25. Find the total number of instructors who teach a course in the spring 2010 semester.
26. Find the number of students in each course.
27. Find those departments where the average number of students are greater than 10.
28. Find the total number of courses in each department.
29. Find the names and average salaries of all departments whose average salary is
greater than 42000.
Null values
30. Find the name of the course for which none of the students registered.
Nested Subqueries
Set Membership (in/not in):
31. Find courses offered in Fall 2009 and in Spring 2010.

14
32. Find the total number of students who have taken course taught by the instructor
with ID 10101.
33. Find courses offered in Fall 2009 but not in Spring 2010.
Set Comparison (>some/all)
34. Find names of instructors with salary greater than that of some (at least one)
instructor in the Biology department.
35. Find the names of all instructors whose salary is greater than the salary of all
instructors in the Biology department.
Test for Empty Relations (exists/not exists)
36. Find all courses taught in both the Fall 2009 semester and in the Spring 2010
semester.
37. Find all students who have taken all courses offered in the Biology department.
Test for Absence of Duplicate Tuples
38. Find all courses that were offered at most once in 2009.
39. Find all the students who have opted at least two courses offered by CSE
department.
Complex Queries
Derived Relations
40. Find the maximum total salary across the departments.
41. Find the average instructors’ salaries of those departments where the average salary
is greater than $42,000.
With Clause
42. Find all departments with the maximum budget.
43. Find all departments where the total salary is greater than the average of the total
salary at all departments.
Views
44. Create a view all_courses consisting of course sections offered by Physics
department in the Fall 2009, with the building and room number of each section.
45. Select all the courses from all_courses view.

15
46. Create a view department_total_salary consisting of department name and total
salary of that department.
Modification of the Database
(Use ROLLBACK (and SAVEPOINT) to undo the effect of any modification on
database before COMMIT)
47. Delete all the instructors of Finance department.
48. Delete all courses in CSE department.
49. Transfer all the students from CSE department to IT department.
50. Increase salaries of instructors whose salary is over $100,000 by 3%, and all others
receive a 5% raise.
51. Add all instructors to the student relation with tot_creds set to 0.
52. Delete all instructors whose salary is less than the average salary of instructors.
Additional Exercise:
1. List all the courses for which more than three students registered, retrieve the
course number, the course name, and the number of students registered.
2. For each department that has more than two instructors, retrieve the department
number and the number of its instructors who are making more than $40,000.
3. Find the sum of the salaries of all instructors of the ‘CSE’ department, as well as
the maximum salary, the minimum salary, and the average salary in this
department.
4. Retrieve the name of each student who registered for all the subjects offered by
‘CSE’ department.

16
LAB NO.: 4 Date:
INTEGRITY CONSTRAINTS IN SQL
Objectives:
In this lab, student will be able to:
• Understand the use of integrity constraints.
Integrity Constraints:
Constraints are the rules enforced on data columns on table. These are used to limit the
type of data that can go into a table. This ensures the accuracy and reliability of the
data in the database. Constraints could be column level or table level. Column level
constraints are applied only to one column, whereas table level constraints are applied
to the whole table.
Following are commonly used constraints available in SQL.
• NOT NULL Constraint: Ensures that a column cannot have NULL value.
• DEFAULT Constraint: Provides a default value for a column when none is
specified.
• UNIQUE Constraint: Ensures that all values in a column are different.
• PRIMARY Key: Uniquely identifies each row/record in a database table.
• FOREIGN Key: Uniquely identifies row/record in another database table.
• CHECK Constraint: The CHECK constraint ensures that all values in a column
satisfy certain conditions.
Constraints can be specified when a table is created with the CREATE TABLE
statement or you can use ALTER TABLE statement to create constraints even after the
table is created.
Dropping Constraints:
Any constraint that you have defined can be dropped using the ALTER TABLE
command with the DROP CONSTRAINT option.

17
For example, to drop the primary key constraint in the EMPLOYEES table, you can use
the following command:
ALTER TABLE EMPLOYEES DROP CONSTRAINT EMPLOYEES_PK;
Integrity Constraints Syntax:
• Ensure the uniqueness of the primary key(PRIMARY KEY)
Æ column_name data_type primary key
Æ Primary key(column_name(s))
• Ensure the uniqueness of the candidate key which is not the primary key
Æ column_name data_type unique
• Ensure that child records in related tables have a parent record.
Æ foreign key(column_name) references table_name(column_name)
• Delete child records when the parent record is deleted.
Æ foreign key(column_name) references table_name(column_name) on delete
cascade.
• Ensure that columns always contain a value.
Æ column_name data_type not null
• Ensure that a column contains a value within a set/specific range.
Æ check (column_name in (value1, value2,..))
Æ check (predicate)
• Ensure that a default value is placed in a column.
Æ column_name data_type default (value)
Naming Constraints:
• Constraints can have unique user defined name as given below:
CONSTRAINT <constraint_name> <constraint_definition>
e.g. constraint account_pk primary key(account_number)
• Modifying Constraints:
ALTER TABLE <table_name>
ADD/MODIFY/DROP/DISABLE/ENABLE/VALIDATE/NOVALIDATE
CONSTRAINT <constraint_name>

18
Built-in Functions:
LENGTH (string)
The Oracle/PLSQL LENGTH function returns the length of the specified string.
Syntax:
The syntax for the LENGTH function in Oracle/PLSQL is:
LENGTH(string1)
LOWER (string)
The Oracle/PLSQL LOWER function converts all letters in the specified string to
lowercase. If there are characters in the string that are not letters, they are unaffected by
this function.
Syntax:
• The syntax for the LOWER function in Oracle/PLSQL is:
• LOWER(string)
SUBSTR (string, start, count)
The Oracle/PLSQL SUBSTR functions allows you to extract a substring from a string.
Syntax:
• The syntax for the SUBSTR function in Oracle/PLSQL is:
• SUBSTR(string, start_position [, length])
UPPER (string)
The Oracle/PLSQL UPPER function converts all letters in the specified string to
uppercase. If there are characters in the string that are not letters, they are unaffected by
this function.
Syntax:
• The syntax for the UPPER function in Oracle/PLSQL is:
• UPPER (string)

19
NVL (column name, substitute value)
The Oracle/PLSQL NVL function lets you substitute a value when a null value is
encountered.
Syntax:
The syntax for the NVL function in Oracle/PLSQL is:
NVL (string, replace_with)
ROUND (value, precision)
The Oracle/PLSQL ROUND function returns a number rounded to a certain number of
decimal places.
Syntax:
The syntax for the ROUND function in Oracle/PLSQL is:
ROUND (number [, decimal places])
TO_CHAR (date1, format)
The Oracle/PLSQL TO_CHAR function converts a number or date to a string.
Syntax:
• The syntax for the TO_CHAR function in Oracle/PLSQL is:
• TO_CHAR( value [, format mask] [, nls_language] )
LAST_DAY (date)
The Oracle/PLSQL LAST_DAY function returns the last day of the month based on a
date value.
Syntax:
• The syntax for the LAST_DAY function in Oracle/PLSQL is:
• LAST_DAY(date)
MONTHS_BETWEEN (date1, date2)
The Oracle/PLSQL MONTHS_BETWEEN function returns the number of months
between date1 and date2.

20
Syntax:
The syntax for the MONTHS_BETWEEN function in Oracle/PLSQL is:
MONTHS_BETWEEN (date1, date2)
NEXT_DAY (date1, ‘day’)
The Oracle/PLSQL NEXT_DAY function returns the first weekday that is greater than
a date.
Syntax:
The syntax for the NEXT_DAY function in Oracle/PLSQL is:
NEXT_DAY (date, weekday)
TO_DATE (string, ‘format’)
The Oracle/PLSQL TO_DATE function converts a string to a date.
Syntax:
The syntax for the TO_DATE function in Oracle/PLSQL is:
TO_DATE( string1 [, format_mask] [, nls_language] )
e.g. to_date (‘12021998’, ‘DDMMYYYY’)
LAB EXERCISES:
Consider the following schema:
Employee (EmpNo., EmpName, Sex, Salary, Address, DNo.)
Department (DeptNo., DeptName, Location)
1. Create Employee table with following constraints:
• Make EmpNo. as Primary key.
• Do not allow EmpName, Sex, Salary and Address to have null values.
• Allow Sex to have one of the two values: ‘M’, ‘F’.
• Set the default salary value to Rs. 1000.
2. Create Department table with following:
• Make DeptNo. as Primary key.
• Make DeptName as candidate key.

21
3. Make DNo. of Employee as foreign key which refers to DeptNo. of Department.
4. Insert few tuples into Employee and Department which satisfies the above
constraints.
5. Insert few tuples into Employee and Department which violates some of the above
constraints.
6. Modify/Delete a tuple which violates a constraint.
(e.g. drop a department tuple which has one or more employees)
7. Modify the foreign key constraint of Employee table such that whenever a
department tuple is deleted, the employees belonging to that department will also
be deleted.
Naming Constraints:
8. Repeat some of the examples (1 to 7) with named constraints.
9. Try some more examples with ADD, DROP, DISABLE, ENABLE, VALIDATE
INVALIDATE and NOVALIDATE.
Built-in Functions:
(Use University database for the exercise problems given below)
10. List the student names along with the length of the student names.
11. List the instructor names in lower case.
12. List the department names and 3 characters from 3rd position of each department
name.
13. List the instructor names in upper case.
14. Replace NULL with value1(say 0) for a column in any of the table.
15. List the balance and balance/3 rounded to nearest hundred from account.
(Add data of birth column DOB to Employee Table. Insert appropriate DOB values
for different employees and try the exercise problems given below)
16. Display the birth date of all the employees in the following format:
• ‘DD-MON-YYYY’
• ‘DD-MON-YY’
• ‘DD-MM-YY’

22
17. List the employee names and the year(fully spelled out) in which they are born
• ‘YEAR’
• ‘Year’
• ‘year’
18. List the employee names and the day of the week (fully spelled out) in which they
are born
• ‘DAY’
• ‘Day’
19. List the employee names and the month(fully spelled out) in which they are born
• ‘MONTH’
• ‘Month’
20. Find the last day of the month(and its day of the week) in which employee Mr. X is
born
21. Find the age of all the employees
22. Find the Saturday following the Employee’s 60th birthday
23. List the employees whose birthday falls in the given year X
24. List the employees whose birthday fall between the given years X and Y
25. List the employees who will retire on the given year X.
[Hint: use & with the variable name (e.g. & X) in the SQL query to read the value
from the user]
Additional Exercise:
1. Modify the employee table to check the salary of every employee to be greater than
$5000.
2. Find the quarter of year from the given date.
3. Convert seconds to hours, minutes and seconds format.
4. Find the week of the year from the given date.
23
LAB NO.: 5 Date:
ADDITIONAL EXERCISES ON SQL
Objectives:
In this lab, student will be able to:
• Understand how to convert ER Diagram into SQL Tables.
• Design the database according to customer requirements.
LAB EXERCISES:
Design the database for the following ER Diagram

24
Implement the following queries:
1. Retrieve the birth date and address of the employee(s) whose name is ‘John B.
Smith’.
2. Retrieve the name and address of all employees who work for the ‘Research’
department.
3. For every project located in ‘Stanford’, list the project number, the controlling
department number, and the department manager’s last name, address, and birth
date.
4. Find all distinct salaries of employees.
5. For each employee, retrieve the employee’s first and last name and the first and last
name of his or her immediate supervisor.
6. Make a list of all project numbers for projects that involve an employee whose last
name is ‘Smith’, either as a worker or as a manager of the department that controls
the project.
7. Retrieve all employees who reside in Houston, Texas.
8. Show the resulting salaries if every employee working on the ‘ProductX’ project is
given a 10 percent raise.
9. Retrieve all employees in department 5 whose salary is between $30,000 and
$40,000.
10. Retrieve a list of employees and the projects they are working on, ordered by
department and, within each department, ordered alphabetically by last name, then
first name.
11. Retrieve the names of all employees who do not have supervisors.
12. Retrieve the name of each employee who has a dependent with the same first name
and is the same sex as the employee.
13. Retrieve the names of employees who have no dependents.
14. List the names of managers who have at least one dependent.
15. Retrieve the Social Security numbers of all employees who work on project
numbers 1, 2, or 3.
16. Find the sum of the salaries of all employees, the maximum salary, the minimum
salary, and the average salary.

25
17. Find the sum of the salaries of all employees of the ‘Research’ department, as well
as the maximum salary, the minimum salary, and the average salary in this
department.
18. For each project, retrieve the project number, the project name, and the number of
employees who work on that project.
19. For each project on which more than two employees work, retrieve the project
number, the project name, and the number of employees who work on the project.
20. For each department that has more than five employees, retrieve the department
number and the number of its employees who are making more than $40,000.
Additional Exercise:
1. Find the names of employees who work on all the projects controlled by department
number 5.
2. Find the names of all employees who have a higher salary than some instructor in
‘Research’ department.
3. Find the total number of (distinct) employees who have worked on project
‘ProductX’.

26
LAB NO.: 6 Date:
PL/SQL BASICS
Objectives:
In this lab, student will be able to:
• Understand the need for PL/SQL and its syntax.
• Use basic PL/SQL data types.
• Use PL/SQL Conditional, Iterative and Sequential Control.
PL/SQL
PL/SQL is the Oracle procedural extension of SQL. It is a portable, high-performance
transaction-processing language.
Though SQL is the natural language of Oracle DB, it has some disadvantages when
used as a programming language:
1. SQL does not have any procedural capabilities like condition checking, looping and
branching.
2. SQL statements are passed on to the Oracle engine one at a time. This adds to the
network traffic in a multi-user environment and decreases data processing speed.
3. SQL has no facility for programmed error handling.
Main Features of PL/SQL
1. PL/SQL combines the data-manipulating power of SQL with the processing power
of procedural languages.
2. PL/SQL allows users to declare constants and variables, control program flow,
define subprograms, and trap runtime errors.
3. Complex problems can be broken into easily understandable subprograms, which
can be reused in multiple applications.
4. PL/SQL sends the entire block of SQL to the Oracle engine in one go, reducing
network traffic and leading to faster query processing.
27
5. Variables in PL/SQL blocks can be used to store intermediate result of a query for
later processing.
Generic PL/SQL Block
The basic unit of a PL/SQL source program is the block, which groups related
declarations and statements. The syntax for which is shown in Figure 7.1
COMPONENTS OF A PL/SQL BLOCK
1. Declare Section
Code block starts with a declaration section, in which memory variables and other
Oracle objects can be declared and if required initialized. This section is optional.
2. Begin Section
It consists of a set of SQL and PL/SQL statements. Data manipulation, retrieval,
looping and branching constructs are specified in this section. This is a required section.
3. Exception Section
This section deals with handling of errors that arise during execution of data
manipulation statements in the PL/SQL code block. Errors can arise due to syntax, logic
and/or validation rule violation. The exception section is optional.
4. End Section
This marks the end of PL/SQL block. This is a required section.

28
Example PL/SQL Program
declare
message varchar2(20):='Hello, World!';
begin
dbms_output.put_line(message);
end;
/
Note:
A slash ‘/’ should be added at last line after the end section.
‘Setserveroutput on’ command should be issued before executing the PL/SQL block.
Alternatively, it can be included in the beginning of every PL/SQL block.
SQL DATA TYPES
The default data types that can be declare in PL/SQL are
1. number
2. char
3. date
4. boolean
Null values are allowed for number, char and date but not boolean data type.
%TYPE
PL/SQL can use %Type to declare variables based on column definition in a table.
Hence, if a column’s attribute changes, the variable’s attribute will change as well.
Not Null
‘Not null’ causes creation of a variable or a constant that cannot be assigned ‘null’
value. Attempt to assign null value to such a variable or constant will return an internal
error.
VARIABLES
In PL/SQL a variable name must begin with a character with maximum length of 30.
Space not allowed in variable names. Reserve words cannot be used as variable names
unless enclosed within double quotes. Case is insignificant when declaring variables.

29
Value can be assigned to variable by:
1. Using the assignment operator :=(a colon followed by an ‘equal to’).
2. Selecting or fetching table data values into variables.
Constants can be declared with constant keyword.
E.g.: pi constant number := 3.141592654;
DISPLAYING USER MESSAGES ON SCREEN
dbms_output is a package that includes procedures and functions that accumulate
information in a buffer so that it can be retrieved later.
put_line puts a piece of information in the package buffer and can be used to display
information in the buffer. It expects a single parameter of character data type. To
display messages serveroutput should be set on.
COMMENTS
Comment can be of two forms, as:
1. The comment line begins with a double hypen (--). The entire line is considered as a
comment.
2. The comment line begins with a slash followed by an asterisk (/*) and ends with
asterisk followed by slash (*/). All lines within is considered as comments.
CONDITIONAL CONTROL: If-Then-ElsIf-Else-End If
Syntax:
IF < condition> THEN
<action>
ELSIF <condition> THEN
<action>
ELSE
<action>
END IF;
Example:
DECLARE
grade CHAR(1);
BEGIN
grade := 'B';

30
IF grade = 'A' THEN
DBMS_OUTPUT.PUT_LINE('Excellent');
ELSIF grade = 'B' THEN
DBMS_OUTPUT.PUT_LINE('Very Good');
ELSIF grade = 'C' THEN
DBMS_OUTPUT.PUT_LINE('Good');
ELSIF grade = 'D' THEN
DBMS_OUTPUT. PUT_LINE('Fair');
ELSIF grade = 'F' THEN
DBMS_OUTPUT.PUT_LINE('Poor');
ELSE
DBMS_OUTPUT.PUT_LINE('No such grade');
END IF;
END;
/
Output:
Very Good
ITERATIVE CONTROL: Simple Loop
Syntax:
LOOP
<Sequence of statements>
END LOOP;
Once a loop begins to execute, it will go on forever. A conditional statement to control
the number of times loop executes should accompany the simple loop construct.
Example:
DECLARE
x NUMBER := 0;
BEGIN
LOOP

31
DBMS_OUTPUT.PUT_LINE ('Inside loop: x = ' ||
TO_CHAR(x));
x := x + 1;
IF x > 3 THEN
EXIT;
END IF;
END LOOP;
-- After EXIT, control resumes here
DBMS_OUTPUT.PUT_LINE(' After loop: x = ' || TO_CHAR(x));
END;
Output:
Inside loop: x = 0
Inside loop: x = 1
Inside loop: x = 2
Inside loop: x = 3
After loop: x = 4
ITERATIVE CONTROL: While Loop
Syntax:
WHILE <condition>
LOOP
<Action>
END LOOP;
If the condition is true, the statements run and control returns to the top of the loop,
where condition is evaluated again. If the condition is not true, control transfers to the
statement after the WHILE LOOP statement.
Example:
DECLARE
done BOOLEAN := FALSE;
BEGIN
WHILE done

32
LOOP
DBMS_OUTPUT.PUT_LINE ('This line does not
print.');
done := TRUE; -- This assignment is not made.
END LOOP
WHILE NOT done
LOOP
DBMS_OUTPUT.PUT_LINE ('Hello, world!');
done := TRUE;
END LOOP;
END;
/
Output:
Hello, world!
ITERATIVE CONTROL: For Loop
Syntax:
FOR index IN [ REVERSE ] lower_bound..upper_bound LOOP
statements
END LOOP;
Without REVERSE, the value of index starts at lower_bound and increases by one with
each iteration of the loop until it reaches upper_bound. If lower_bound is greater than
upper_bound, then the statements never run.
With REVERSE, the value of index starts at upper_bound and decreases by one with
each iteration of the loop until it reaches lower_bound. If upper_bound is less than
lower_bound, then the statements never run.

33
Example:
BEGIN
DBMS_OUTPUT.PUT_LINE ('lower_bound<upper_bound');
FOR i IN 1..3 LOOP
DBMS_OUTPUT.PUT_LINE (i);
END LOOP;
DBMS_OUTPUT.PUT_LINE ('lower_bound = upper_bound');
FOR i IN 2..2 LOOP
DBMS_OUTPUT.PUT_LINE (i);
END LOOP;
DBMS_OUTPUT.PUT_LINE ('lower_bound>upper_bound');
FOR i IN 3..1 LOOP
DBMS_OUTPUT.PUT_LINE (i);
END LOOP;
END;
/
Output:
lower_bound<upper_bound
1
2
3
lower_bound = upper_bound
2
lower_bound>upper_bound
SEQUENTIAL CONTROL: GOTO Statement
The GOTO statement transfers control to a label unconditionally. The label must be
unique in its scope and must precede an executable statement or a PL/SQL block. When
run, the GOTO statement transfers control to the labeled statement or block.

34
Syntax:
GOTO Label
The code block is marked using tags
<<Label>>
Example:
DECLARE
p VARCHAR2(30);
n PLS_INTEGER := 37;
BEGIN
FOR j in 2..ROUND(SQRT(n)) LOOP
IF n MOD j = 0 THEN
p := ' is not a prime number';
GOTO print_now;
END IF;
END LOOP;
p := ' is a prime number';
<<print_now>>
DBMS_OUTPUT.PUT_LINE(TO_CHAR(n) || p);
END;
/
Output:
37 is a prime number
EXERCISE
Usage of IF –THEN:
6.1 Write a PL/SQL block to compute all the roots of a quadratic equation.
35
6.2 Input the date of issue and date of return for a book. Calculate and display the fine
with the appropriate message using a PL/SQL block. The fine is charged as per
the table 7.1:
Late period Fine
5 days Rs. 0.50
6 – 10 days Rs. 1.00
Above 10 days Rs. 5.00
After 30 days Rs. 10.00
Table 7.1
Simple LOOP:
6.3 Write a PL/SQL block to print Fibonacci series until a given number.
6.4 Write a PL/SQL block to check if a given number is palindrome.
Usage of WHILE:
6.5
Write a PL/SQL block that takes as input a set of five dates and calculates the next
date and inserts into the table TBL_NEXT_DATE(GIVEN_DATE, NEXT_DATE).
6.6 Write a PL/SQL code block to calculate the volume and surface area of a sphere
for a value of radius varying from 3 to 7. Store the radius and the corresponding
values of calculated Volume and Surface Area in a table SPHERE. SPHERE
(RADIUS, VOLUME, SURFACE AREA).
Usage of FOR:
6.7 Write a PL/SQL block to find the Factorial of a given number.
Usage of GOTO:
6.8 Write a PL/SQL block to calculate the average of a series of numbers. The series
ends when – 1 is entered.

36
ADDITIONAL EXERCISE:
Usage of IF – THEN:
6.9 Write a PL/SQL block to find out if a year is a leap year.
6.10 You went to a video store and rented DVD that is due in 3 days from the rental
date. Input the rental date, rental month and rental year. Calculate and print the
return date, return month, and return year.
Simple LOOP:
6.11 Write a simple loop such that message is displayed when a loop exceeds a
particular value.
6.12 Write a PL/SQL block to print all odd numbers between 1 and 10.
Usage of WHILE:
6.13 Write a PL/SQL block to reverse a given string.
Usage of FOR:
6.14 Write a PL/SQL block of code for inverting a number 5639 or 9365.
Usage of FOR and GOTO:
6.15 Write a PL/SQL block of code to achieve the following: if the price of Product
‘p00001’ is less than 4000, then change the price to 4000. The Price change has to
be recorded in the old_price_table along with Product_no and the date on which
the price was last changed. Tables involved:
Product_master(product_no, sell_price)
Old_price_table(product_no,date_change, Old_price)

37
LAB NO.: 7 Date:
EXCEPTION HANDLING AND CURSORS
Objectives:
In this lab, student will be able to:
• Understand and implement the Error handling capabilities of PL/SQL.
• Understand and use the Cursors: Implicit and Explicit.
ERROR HANDLING:
It is a code block in memory that will attempt to resolve the current exception condition.
Oracle engine can recognize every condition that occurs in memory. To handle very
common and repetitive exception conditions the oracle engine uses Named Exception
Handlers. Oracle has about 20 named exceptions and 20000 numbered exception
handlers identified by 4 digit numbers preceded by hyphen (-1414).
Syntax:
EXCEPTION
WHEN ex_name_1 THEN statements_1 -- Exception handler
WHEN ex_name_2 OR ex_name_3 THEN statements_2 -- Exception
handler
WHEN OTHERS THEN statements_3 -- Exception handler
END;
In the preceding syntax example, ex_name_n is the name of an exception and
statements_n is one or more statements.
When an exception is raised in the executable part of the block, the executable part
stops and control transfers to the exception-handling part. If ex_name_1 was raised,
then statements_1 run. If either ex_name_2 or ex_name_3 was raised, then statements_2
run. If any other exception was raised, then statements_3 run. After an exception
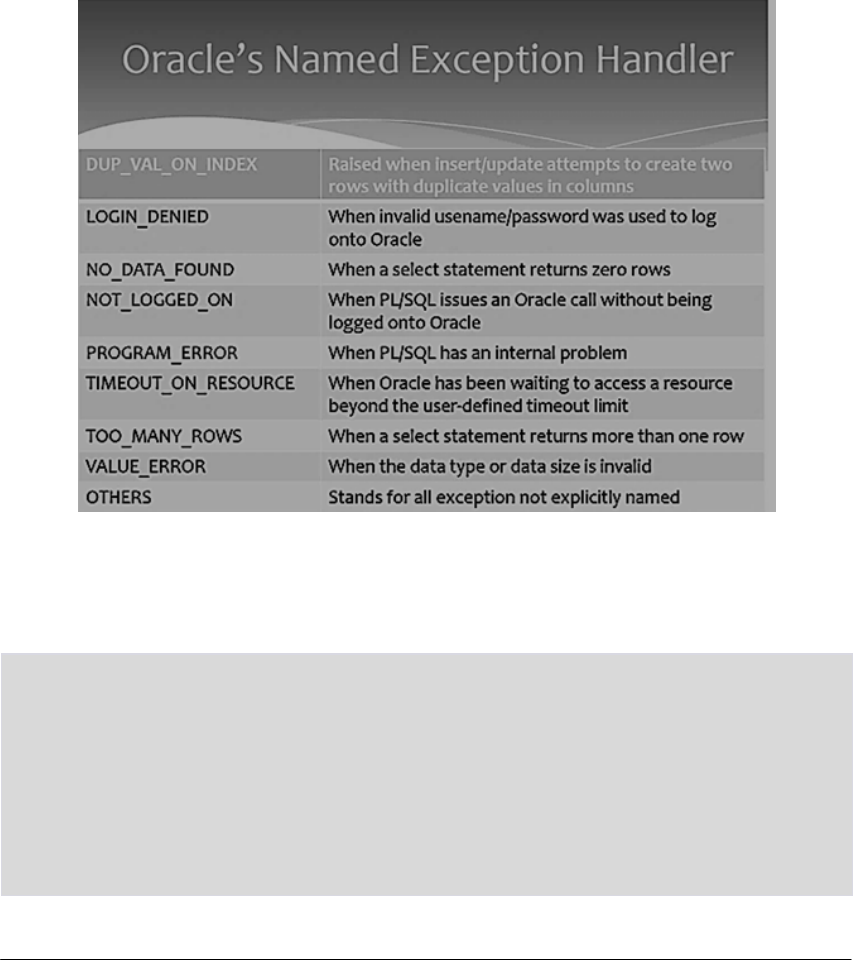
38
handler runs, control transfers to the next statement of the enclosing block. If there is no
enclosing block, then:
• If the exception handler is in a subprogram, then control returns to the invoker, at
the statement after the invocation.
• If the exception handler is in an anonymous block, then control transfers to the host
environment.
Fig. 7.1
Example: Update all accounts with balance less than 0 to 0 in account=
(account_number, balance) table from the Banking schema provided in the appendix.
Declare
BEGIN
update account set balance = 0 where balance<0
EXCEPTION
WHEN NO_DATA_FOUND THEN dbms_output.put_line(“No rows
found”);
END;
39
Output:
If there is no row that matches the update query in account table.
No rows found
CURSORS
A cursor is a pointer to a private SQL area that stores information about processing a
specific SELECT or DML statement. Oracle engine uses a work area for its internal
processing in order to execute a SQL statement. This work area is private to SQL’s
operations. The data stored in a cursor is called Active Data Set.
There are two kinds of cursors:
1. Implicit Cursor: A cursor that is constructed and managed by PL/SQL.
2. Explicit Cursor: A cursor that the user constructs and manages.
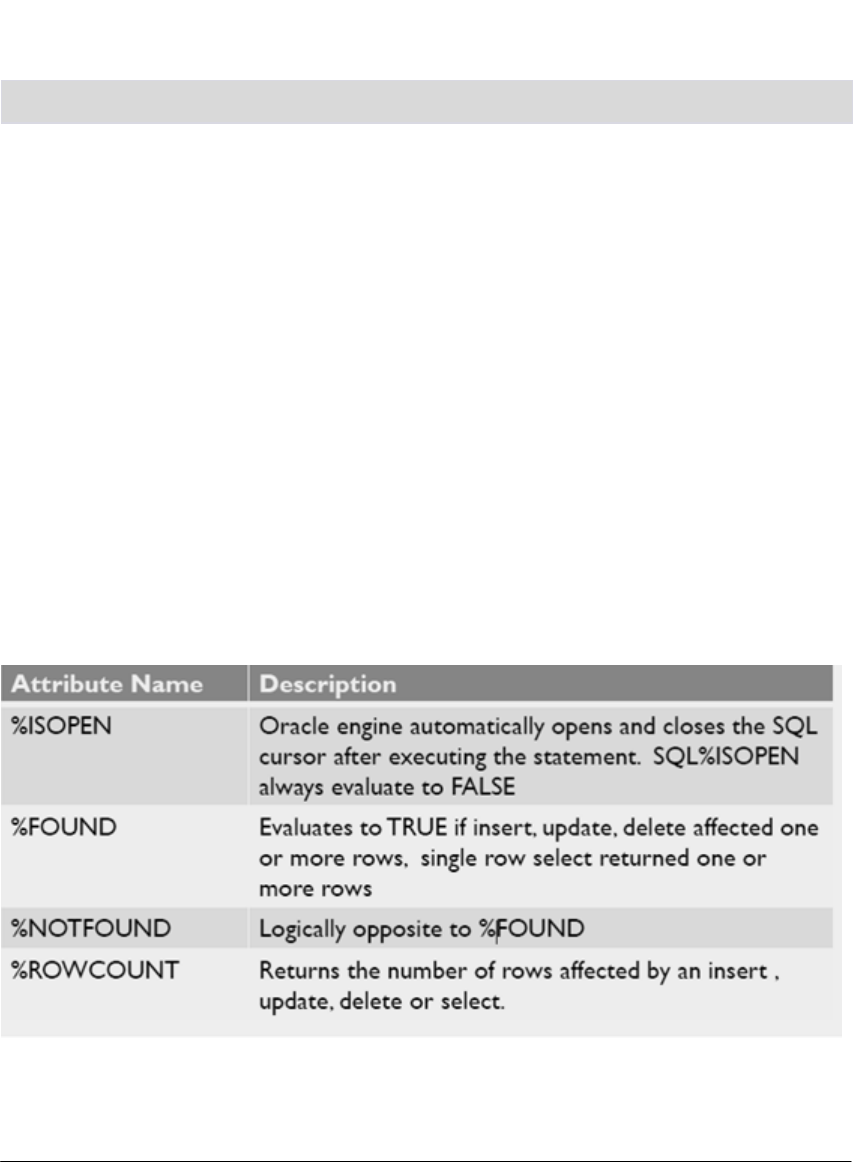
Implicit Cursor:
Oracle engine implicitly opens a cursor on the server to process each SQL statement and
manages space, populates data and releases memory itself. Implicit cursor can be used
to access information about the status of last insert, update, delete or single row select
statements. SQL is the cursor name of the implicit cursor. The attributes of the implicit
cursor are listed in Fig. 7.2.
Fig. 7.2 Implicit Cursor Attributes

40
Example: Based on the HR Schema provided in Appendix, write a PL/SQL block to
delete records with department_id 400 from departments (department_id,
department_name, manager_id, location_id) table.
DECLARE
CONSTANT dept_no : = 400;
BEGIN
DELETE FROM departments WHERE department_id = dept_no;
IF SQL%FOUND THEN
DBMS_OUTPUT.PUT_LINE ('Delete succeeded for department
number '
|| dept_no);
ELSE
DBMS_OUTPUT.PUT_LINE ('No department number ' ||
dept_no);
END IF;
END;
/
Output:
If there is no row that matches the delete query in departments table.
No department number 400
Explicit Cursor:
Steps involved in using an explicit cursor and manipulating data in its active set are:
1. Declare a cursor mapped to a select statement.
2. Open the Cursor.
3. Fetch data from the cursor one row at a time into memory variables.
4. Process the data held in the memory variables as required using a loop.
5. Exit from loop after processing is complete.
6. Close the cursor.
Cursor is defined in the declarative part.

41
Syntax:
CURSOR [ parameter_list ] [ RETURN return_type ]
IS select_statement;
OPEN cursor_name;
Loop
FETCH cursor_name into variable_list;
End Loop
CLOSE cursor_name;
No memory is allocated at this point and only intimation is sent to the engine.
Open defines a private area named by the cursor name, executes the query, retrieves the
data and creates the Active Data Set.
Fetch moves the data held in the active data set into the memory variable. It is placed in
a Loop … End Loop which causes data to be fetched and processed until all rows are
processed.
Close disables the cursor and the active data set becomes undefined. After the fetch
loop is executed the data needs to be closed. Close will release the memory occupied by
the cursor.
Example: Based on the HR Schema provided in Appendix, the following example
fetches the result sets of two explicit cursors one row at a time, using FETCH and
%NOTFOUND inside LOOP statements.
DECLARE
CURSOR c1 IS
SELECT last_name, job_id FROM employees
WHERE REGEXP_LIKE (job_id, 'S[HT]_CLERK')
ORDER BY last_name;
v_lastnameemployees.last_name%TYPE;
-- variable for last_name
v_jobidemployees.job_id%TYPE;
-- variable for job_id
CURSOR c2 IS
SELECT * FROM employees

42
WHERE REGEXP_LIKE (job_id, '[ACADFIMKSA]_M[ANGR]')
ORDER BY job_id;
v_employeesemployees%ROWTYPE;
-- record variable for row of table
BEGIN
OPEN c1;
LOOP
-- Fetches 2 columns into variables
FETCH c1 INTO v_lastname, v_jobid;
EXIT WHEN c1%NOTFOUND;
DBMS_OUTPUT.PUT_LINE( RPAD(v_lastname, 25, ' ') ||
v_jobid );
END LOOP;
CLOSE c1;
DBMS_OUTPUT.PUT_LINE( '-----------------------------------');
OPEN c2;
LOOP
-- Fetches entire row into the v_employees record
FETCH c2 INTO v_employees;
EXIT WHEN c2%NOTFOUND;
DBMS_OUTPUT.PUT_LINE(RPAD(v_employees.last_name, 25, '') ||
v_employees.job_id);
END LOOP;
CLOSE c2;
END;
/
Output:
Atkinson ST_CLERK
Bell SH_CLERK
Bissot ST_CLERK
Walsh SH_CLERK
-------------------------------------
Higgins AC_MGR
Greenberg FI_MGR
Hartstein MK_MAN
Zlotkey S A_MAN

43
Exercise
Error Handling:
7.1 Write a PL/SQL block which displays area for the radius using Areas(radius, area)
table. If no data found then display an error message.
7.2 Based on the University database schema provided in Lab:2, write a PL/SQL block
which displays instructors name for a given Department name. Use exceptions to
show appropriate error message,
i. when one instructor is associated with more than one department and
ii. when there is a department without any instructor.
7.3 Write a PL/SQL block of code such that depending upon the user entered
salesman_no, the commission_amount is calculated and inserted into the
commission_payable table. Salesman_Master (salesman_no, salesman_name,
rate_of_commission, target_sales, total_sales) table records the sales information of
different salesperson. A salesman is eligible for commission only when he achieves
the target sales. When comission is paid, the commission amount, the salesman_no
and the date_of_payment is recorded in commission_payable table. Raise an
exception if the total sales by a salesman is less than the target.
Cursors:
CursorName %ISOPEN/FOUND/NOT FOUND:
7.4 Based on the University schema provided in Lab:2, the HRD manager has decided
to raise the salary for all the Instructors in a given department number by 5%.
Whenever, any such raise is given to the instructor, a record for the same is
maintained in the salary_raise table. It includes the Instuctor Id, the date when the
raise was given and the actual raise amount. Write a PL/SQL block to update the
salary of each Instructor and insert a record in the salary_raise table.
salary_raise(Instructor_Id, Raise_date, Raise_amt.)
CursorName%ROWCOUNT:
7.5 Based on the University schema provided in Lab:2, write a PL/SQL block that will
display the ID, name, dept-name and tot-cred of the first 10 Students with lowest
total credit.

44
ADDITIONAL EXERCISE:
Error Handling:
7.6 Write a PL/SQL block that asks the user to input first number, second number and
an arithmetic operator(+, -, *, /). If the operator is invalid, throw and handle a user-
defined exception. If the second number is zero and the operator is /, handle the
ZERO_DIVIDE predefined server exception.
7.7 Based on the University schema provided in Lab:2, use a PL/SQL block to display
the following:
(building, room-number, course-id, time-slot-id, day, start-time, end-time) and print
appropriate error message when two classes are scheduled in a classroom at the
same time.
Cursors:
7.8 Based on the University schema provided in Lab:2, write a PL/SQL block that will
display the name, department and salary of the top 10 highest paid instructors.
7.9 Based on the University schema provided in Lab:2, write a PL/SQL block that
displays the list of students who have registered for a course taught by his/her
advisor.

45
LAB NO.: 8 Date:
ADDITIONAL CURSOR CONSTRUCTS & TRANSACTIONS
Objectives:
In this lab, student will be able to:
• Use Cursor For Loops and Parametrized Cursors.
• Understand the concept of Transactions using Commit, Rollback and Savepoint.
CURSOR FOR LOOPS
The cursor FOR LOOP statement lets the user run a SELECT statement and then
immediately loop through the rows of the result set. This statement can use either an
implicit or explicit cursor (but not a cursor variable).
The cursor FOR LOOP statement implicitly declares its loop index as a %ROWTYPE
record variable of the type that its cursor returns. This record is local to the loop and
exists only during loop execution. Statements inside the loop can reference the record
and its fields.
After declaring the loop index record variable, the FOR LOOP statement opens the
specified cursor. With each iteration of the loop, the FOR LOOP statement fetches a
row from the result set and stores it in the record. When there are no more rows to fetch,
the cursor FOR LOOP statement closes the cursor. The cursor also closes if a statement
inside the loop transfers control outside the loop or if PL/SQL raises an exception.
Example: Based on the HR Schema, in the following example, an implicit cursor FOR
LOOP statement prints the last name and job ID of every clerk whose manager has an
ID greater than 120.
DECLARE
CURSOR c1 IS
SELECT last_name, job_id FROM employees
WHERE job_id LIKE '%CLERK%' AND manager_id> 120
ORDER BY last_name;
BEGIN
FOR item IN c1
LOOP

46
DBMS_OUTPUT.PUT_LINE
('Name = ' || item.last_name || ', Job = ' ||
item.job_id);
END LOOP;
END;
/
Output:
Name = Atkinson, Job = ST_CLERK
Name = Bell, Job = SH_CLERK
Name = Bissot, Job = ST_CLERK
Name = Walsh, Job = SH_CLERK
WHERE CURRENT OF
It states that the most recent row fetched from the table should be updated or deleted.
Inside a cursor loop, WHERE CURRENT OF allows the current row to be directly
updated. When the sessions opens a cursor with the FOR UPDATE clause, all the rows
in the return set will hold row level locks.When SELECT FOR UPDATE is associated
with an explicit cursor, the cursor is called a FORUPDATE cursor. Only a FOR
UPDATE cursor can appear in the CURRENT OF clause of an UPDATE or DELETE
statement.
Example: In the following example based on the HR schema provided in the appendix,
a FOR UPDATE cursor appears in the CURRENT OF clause of an UPDATE statement.
DECLARE
my_emp_id NUMBER(6);
my_job_idVARCHAR2(10);
my_sal NUMBER(8,2);
CURSOR c1 IS
SELECT employee_id, job_id, salary
FROM employees
FOR UPDATE;
BEGIN
OPEN c1;

47
LOOP
FETCH c1 INTO my_emp_id, my_job_id, my_sal;
IF my_job_id = 'SA_REP' THEN
UPDATE employees
SET salary = salary * 1.02
WHERE CURRENT OF c1;
END IF;
EXIT WHEN c1%NOTFOUND;
END LOOP;
END;
PARAMATERIZED CURSORS
PL/SQL allows parametrized cursor so that the cursor can be generic and the data that is
retrieved from the table be changed according to need. The user can create an explicit
cursor that has formal parameters, and then pass different actual parameters to the
cursor each time it is opened. In the cursor query, a formal cursor parameter can be used
anywhere that a constant is used. Outside the cursor query, formal cursor parameters
cannot be referenced.
Syntax:
CURSOR cursor_name(variable_nameDatatype) is SELECT statement
Example:
Based on the University database schema in Lab:2, the following example uses a
parametrized cursor on the Instructor (ID, name, dept-name, salary) table
DECLARE
cursor c(no number) is select * from Instructorwhere
ID = no;
tmp Instructor%rowtype;
BEGIN
OPEN c(4);
FOR tmp IN c(4) LOOP
dbms_output.put_line('EMP_No: '||tmp.ID);
dbms_output.put_line('EMP_Name: '||tmp.name);
dbms_output.put_line('EMP_Dept: '||tmp.dept-name);
dbms_output.put_line('EMP_Salary:'||tmp.salary);

48
END Loop;
CLOSE c
END
Output:
EMP_No: 4
EMP_Name: Mark
EMP_Dept: Printing
EMP_Salary: 2000
TRANSACTIONS
A series of one or more statements that are logically related are termed as a Transaction.
A transaction begins with the first executable SQL statement after a commit, rollback or
connection made to the oracle engine. A transaction can be closed by using a commit or
a rollback statement.
COMMIT ends the current transaction and makes permanent changes made during the
transaction.
ROLLBACK ends the transaction but undoes any changes made during the transaction.
SAVEPOINT marks and saves the current point in the processing of a
transaction.When a savepoint is used with a ROLLBACK statement, parts of transaction
can be undone.
Syntax: Commit, Rollback & Savpoint
COMMIT;
SAVEPOINT <Savepointname>
ROLLBACK [WORK] TO [SAVEPOINT] <SavepointName>;
Work : Is optional and is provided for ANSI compatibility
SAVEPOINT: Is optional and is used to rollback a transaction
partially as far as the specified savepoint
Savepointname: Is a savepoint created during the current
transaction

49
ROLLBACK can be fired with or without the SAVEPOINT clause. Rollback operation
performed without the SAVEPOINT clause amounts to the following:
1. Ends the transaction.
2. Undoes all the changes in the current transaction.
3. Erases all savepoints in that transaction.
4. Releases the transactional locks.
Example:
Based on the Banking schema in Appendix, using this example, withdraw an amount
2000 and deposit 10000 for all the accounts. If the sum of balance of all accounts
exceeds 200000 then undo the deposit just made.
Declare
Total_bal numeric;
Begin
Update account set balance=balance-2000;
Savepoint deposit;
Update account set balance=balance+10000;
Select sum(balance) into total_bal from account;
If total_bal> 200000 then
Rollback to savepoint deposit;
End if;
Commit;
End;
EXERCISE:
Cursor For Loops; Where Current of:
8.1 Based on the University schema provided in Lab:2, the HRD manager has decided
to raise the salary for all the Instructors in a given department number by 5%.
Whenever, any such raise is given to the employees, a record for the same is
maintained in the salary_raise table. It includes the Instuctor Id, the date when the
raise was given and the actual raise amount. Write a PL/SQL block to update the
salary of each Instructor and insert a record in the salary_raise table.
i. Using cursor for loops. ii. Using where current of.

50
Parameterized Cursors:
8.2 Write a PL/SQL block that would update the Bal_stock in the item_master(Itemid,
Description, Bal_stock) table each time a transaction takes place in the
item_transaction (Itemid, Description, Quantity) table. The change in the
item_master table depends on the itemid. If the itemid is already present in the
item_master table then an update operation is performed to decrease the Bal_stock
by the Quantity specified in the item_transaction table. In case the itemid is not
present in the item_master table then the record is inserted into the item_master
table.
Transactions: COMMIT/ROLLBACK/SAVEPOINT:
8.3 Based on the University schema provided in Lab:2, write a PL/SQL block that
updates the salaries of Srinivasan and Mozart to 150,000 and 100,000 respectively.
Then check to see that the total salary does not exceed 2,000,000. If the total salary
is greater than 2,000,000 then undo the updates made to the salaries of Srinivasan
and Mozart.
ADDITIONAL EXERCISE:
Cursor For Loops; Where Current of:
Based on the University schema provided in Lab:2, write PL/SQL blocks that perform
the following (one for each question):
8.4 Print the Course details and the total number of students registered for each course
along with the course details – (Course-id, title, dept-name, credits,
instructor_name, building, room-number, time-slot-id, tot_student_no.)
8.5 Find all students who take the course with Course-id: CS101 and if he/she has less
than 30 total credit (tot-cred), deregister the student from that course. (Delete the
entry in Takes table)
Parameterized Cursors:
8.6 Based on the University schema provided in Lab:2, write a PL/SQL block to print
the list of Instructors teaching a specified course.

51
Transactions: COMMIT/ROLLBACK/SAVEPOINT:
8.7 Based on the University schema provided in Lab:2, write a PL/SQL block that will
insert a new record in Takes (ID, course-id, sec-id, semester, year, grade) table.
Check the total number of students registered for the course and if it exceeds 30,
then undo the insert made to the Takes table.

52
LAB NO.: 9 Date:
PROCEDURES, FUNCTIONS & PACKAGES
Objectives:
In this lab, student will be able to:
• Understand the different types of subprograms: Procedures and Function.
• Use Procedures and Functions to perform specific tasks.
• Understand the concept of Packages.
Subprograms:
A PL/SQL subprogram is a named PL/SQL block that can be invoked repeatedly. If the
subprogram has parameters, their values can differ for each invocation. PL/SQL has two
types of subprograms,
1. Procedures: is used to perform an action.
2. Functions: is to compute and return a value.
Uses of Subprograms:
• Modularity
• Easier Application Design
• Maintainability
• Packageability
• Reusability
• Better Performance
Since the stored subprograms run in the database server, a single invocation over the
network can start a large job.
Part of a Subprogram:
• Declarative part(optional)
• Executable part(required)
• Exception handling part(optional)

53
PROCEDURE
A procedure is a subprogram that performs a specific action. A procedure invocation (or
call) is a statement. In a procedure a return statement returns the control to the invoker
and we cannot specify any expression. The declarative part of a subprogram does not
begin with the keyword DECLARE, as the declarative part of an anonymous block
does.
Syntax:
CREATE OR REPLACE PROCEDURE procedure_name(parameters list)
is
BEGIN
//statements
END;
/
The procedure can be executed by just calling the procedure name with parameters in
other PL/SQL block. e.g.: procedure_name (actual values for the parameters);
Example: Create a procedure to print Hello world and execute the procedure.
create or replace procedure print_hello is
begin
dbms_output.put_line('Hello World');
end;
/
In another PL/SQL block
declare
begin
print_hello;
end;
/

54
Output:
Hello World
FUNCTIONS
A function has a same structure as a procedure except:
• A function must include a RETURN clause, which specifies the data type of the
value that the function returns (A procedure heading cannot have a RETURN clause)
• In the executable part of a function, every execution path must lead to a RETURN
statement. Otherwise, the PL/SQL compiler issues a compile-time warning.
Syntax:
CREATE OR REPLACE FUNCTION function_name(variable_namedatatype)
RETURN datatype
AS
//declare section
BEGIN
RETURN var2 //variable of the return datatype
END;
/
Example: Create a function to return the sum of two numbers
create or replace function sum_number(a number, b number)
return number as
tot number;
begin
tot := a + b;
return tot;
end;
/

55
In another PL/SQL Block
setserveroutput on;
declare
begin
dbms_output.put_line(sum_number(5,4));
end;
/
Output:
9
PACKAGES
A package is a schema object that groups logically related PL/SQL types, variables,
constants, subprograms, cursors, and exceptions. A package is compiled and stored in
the database, where many applications can share its contents. It is a way of creating
generic, encapsulated, re-usable code.
Components of an Oracle Package:
A package has two components:
1. A specification: declares memory variables, constants, exceptions, cursors and
subprograms that are available in the package as public items.
2. A body: defines queries for public cursors and code for public subprograms. It can
also declare and define private items that cannot be referenced from outside the
package. The body can be changed without changing the specification or the
references to the public items.
Features of Packages:
Modularity: Packages encapsulates logically related types, variables, constants,
subprograms, cursors, and exceptions in named PL/SQL modules.
Easier Application Design: When designing an application, initially only the interface
information is required in the package specifications. The specifications can be coded
and compiled without their bodies.
Information Hiding: Packages lets the user share your interface information in the
package specification, and hide the implementation details in the package body.

56
Added Functionality: Package public variables and cursors can persist for the life of a
session. They can be shared by all subprograms that run in the environment. They allow
maintaining data across transactions without storing it in the database.
Better Performance: The first time when a package subprogram is invoked, Oracle
Database loads the whole package into memory. Subsequent invocations of other
subprograms in same the package require no disk I/O. Packages prevent cascading
dependencies and unnecessary recompiling.
Easier to Grant Roles: The user can grant roles on the package, instead of granting
roles on each object in the package.
Package Specification:
A package specification contains:
• Name of the package
• Names of the data types of any arguments
This declaration is local to the database and global to the package.
Example 1: This example is based on the HR schema provided in the appendix.
CREATE OR REPLACE PACKAGE emp_mgmt AS
FUNCTION hire (last_name VARCHAR2, job_id VARCHAR2, manager_id
NUMBER,
salary NUMBER, commission_pct NUMBER, department_id
NUMBER)
RETURN NUMBER;
FUNCTION create_dept(department_id NUMBER, location_id NUMBER)
RETURN NUMBER;
PROCEDURE remove_emp(employee_id NUMBER);
PROCEDURE remove_dept(department_id NUMBER);

57
PROCEDURE increase_sal(employee_id NUMBER, salary_incr
NUMBER);
PROCEDURE increase_comm(employee_id NUMBER, comm_incr NUMBER);
no_comm EXCEPTION;
no_sal EXCEPTION;
END emp_mgmt;
/
The specification for the emp_mgmt package declares these public program objects:
• The functions hire and create_dept
• The procedures remove_emp, remove_dept, increase_sal, and increase_comm
• The exceptions no_comm and no_sal
Example 2:
CREATE PACKAGE emp_bonus AS
PROCEDURE calc_bonus
(date_hiredemployees.hire_date%TYPE);
END emp_bonus;
/
Note: The package specification in Example 1 requires a Package body which is not
provided in this manual.
Package Body
The body of the package contains the definition of public objects that are declared in the
specification. The body can also contain other object declaration that is private to the
package.

58
Example: This is Package Body corresponding to package specification in example 2.
CREATE OR REPLACE PACKAGE BODY emp_bonus AS
PROCEDURE calc_bonus(date_hiredemployees.hire_date%TYPE) IS
BEGIN
DBMS_OUTPUT.PUT_LINE
('Employees hired on ' || date_hired || 'get
bonus.');
END; END emp_bonus;
/
Invoking a Package
Example: Invoking the ‘calc_bonus’ procedure in ‘emp_bonus’ package
Execute emp_bonus. calc_bonus(“14-Jan-2012”);
[or]
Call emp_bonus. calc_bonus(“14-Jan-2012”);
PL/SQL Subprogram Parameter Modes: IN, OUT, IN OUT
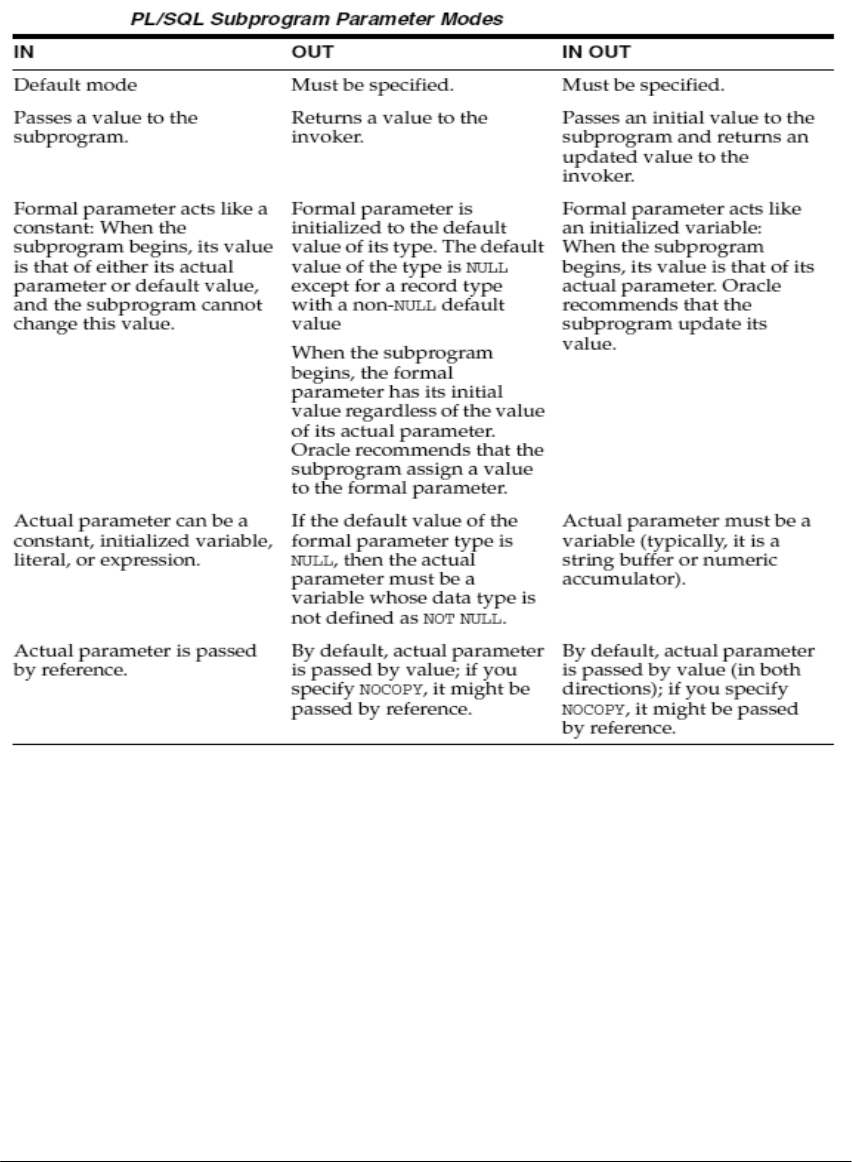
59
Note: Do not use OUT and IN OUT for function parameters. Ideally, a function takes
zero or more parameters and returns a single value. A function with IN OUT parameters
returns multiple values and has side effects.
Regardless of how an OUT or IN OUT parameter is passed:
• If the subprogram exits successfully, then the value of the actual parameter is the
final value assigned to the formal parameter. (The formal parameter is assigned at
least one value—the initial value.)
• If the subprogram ends with an exception, then the value of the actual parameter is
undefined.

60
• Formal OUT and IN OUT parameters can be returned in any order. In this example,
the final values of x and y are undefined:
CREATE OR REPLACE PROCEDURE p (x OUT INTEGER, y OUT INTEGER)
AS
BEGIN
x := 17; y := 93;
END;
/
Example: The procedure p has two IN parameters, one OUT parameter, and one IN
OUT parameter. The OUT and IN OUT parameters are passed by value (the default).
The anonymous block invokes p twice, with different actual parameters. Before each
invocation, the anonymous block prints the values of the actual parameters. The
procedure p prints the initial values of its formal parameters. After each invocation, the
anonymous block prints the values of the actual parameters again.
CREATE OR REPLACE PROCEDURE p (
a PLS_INTEGER, -- IN by default
b IN PLS_INTEGER,
c OUT PLS_INTEGER,
d IN OUT BINARY_FLOAT
) IS
BEGIN
-- Print values of parameters:
DBMS_OUTPUT.PUT_LINE('Inside procedure p:');
DBMS_OUTPUT.PUT('IN a = ');
DBMS_OUTPUT.PUT_LINE(NVL(TO_CHAR(a), 'NULL'));
DBMS_OUTPUT.PUT('IN b = ');
DBMS_OUTPUT.PUT_LINE(NVL(TO_CHAR(b), 'NULL'));
DBMS_OUTPUT.PUT('OUT c = ');
DBMS_OUTPUT.PUT_LINE(NVL(TO_CHAR(c), 'NULL'));
DBMS_OUTPUT.PUT_LINE('IN OUT d = ' || TO_CHAR(d));
-- Can reference IN parameters a and b,
-- but cannot assign values to them.
c := a+10; -- Assign value to OUT parameter
d := 10/b; -- Assign value to IN OUT parameter
END;
/
DECLARE
aa CONSTANT PLS_INTEGER := 1;

61
bb PLS_INTEGER := 2;
cc PLS_INTEGER := 3;
dd BINARY_FLOAT := 4;
ee PLS_INTEGER;
ff BINARY_FLOAT := 5;
BEGIN
DBMS_OUTPUT.PUT_LINE('Before invoking procedure p:');
DBMS_OUTPUT.PUT('aa = ');
DBMS_OUTPUT.PUT_LINE(NVL(TO_CHAR(aa), 'NULL'));
DBMS_OUTPUT.PUT('bb = ');
DBMS_OUTPUT.PUT_LINE(NVL(TO_CHAR(bb), 'NULL'));
DBMS_OUTPUT.PUT('cc = ');
DBMS_OUTPUT.PUT_LINE(NVL(TO_CHAR(cc), 'NULL'));
DBMS_OUTPUT.PUT_LINE('dd = ' || TO_CHAR(dd));
p (aa, -- constant
bb, -- initialized variable
cc, -- initialized variable
dd -- initialized variable
);
DBMS_OUTPUT.PUT_LINE('After invoking procedure p:');
DBMS_OUTPUT.PUT('aa = ');
DBMS_OUTPUT.PUT_LINE(NVL(TO_CHAR(aa), 'NULL'));
DBMS_OUTPUT.PUT('bb = ');
DBMS_OUTPUT.PUT_LINE(NVL(TO_CHAR(bb), 'NULL'));
DBMS_OUTPUT.PUT('cc = ');
DBMS_OUTPUT.PUT_LINE(NVL(TO_CHAR(cc), 'NULL'));
DBMS_OUTPUT.PUT_LINE('dd = ' || TO_CHAR(dd));
DBMS_OUTPUT.PUT_LINE('Before invoking procedure p:');
DBMS_OUTPUT.PUT('ee = ');
DBMS_OUTPUT.PUT_LINE(NVL(TO_CHAR(ee), 'NULL'));
DBMS_OUTPUT.PUT_LINE('ff = ' || TO_CHAR(ff));
p (1, -- literal
(bb+3)*4, -- expression
ee, -- uninitialized variable
ff -- initialized variable
);
DBMS_OUTPUT.PUT_LINE('After invoking procedure p:');
DBMS_OUTPUT.PUT('ee = ');
DBMS_OUTPUT.PUT_LINE(NVL(TO_CHAR(ee), 'NULL'));

62
DBMS_OUTPUT.PUT_LINE('ff = ' || TO_CHAR(ff));
END;
/
Output:
Before invoking procedure p:
aa = 1
bb = 2
cc = 3
dd = 4.0E+000
Inside procedure p:
IN a = 1
IN b = 2
OUT c = NULL
IN OUT d = 4.0E+000
After invoking procedure p:
aa = 1
bb = 2
cc = 11
dd = 5.0E+000
Before invoking procedure p:
ee = NULL
ff = 5.0E+000
Inside procedure p:
IN a = 1
IN b = 20
OUT c = NULL
IN OUT d = 5.0E+000
After invoking procedure p:
ee = 11
ff = 5.0E-001

63
Procedures:
9.1 Write a procedure to display a message “Good Day to You”.
9.2 Based on the University Database Schema in Lab 2, write a procedure which
takes the dept-name as input parameter and lists all the students associated with
the department as well as list all the courses offered by the department. Also,
write an anonymous block with the procedure call.
9.3 Based on the University Database Schema in Lab 2, write a Pl/Sql block of code
that lists the highest paid Instructor in each of the Department. It should make
use of a named procedure department_highest which finds the highest paid
Instructor for the given branch.
9.4 Based on the Banking Schema provided in Appendix, create payment
(loan_number, payment_number, payment_date, amount) table for the Bank
database. (a) Write a procedure to find out loan amount issued and total
payment done by a customer. (b) Write a procedure to find out total deposit and
loan amount for the given branch.
Functions:
9.5 Write a function to return the Square of a given number and call it from an
anonymous block.
9.6 Based on the University Database Schema in Lab 2, write a Pl/Sql block of code
that lists the most popular course (highest number of students take it) for each of
the departments. It should make use of a function course_popular which return
the most popular course by an for the given department.
Packages:
9.7 Based on the University Database Schema in Lab 2, create a package to include
the following:
a) A named procedure to list the instructor_names of given department
b) A function which returns the max salary for the given department
c) Write a PL/SQL block to demonstrate the usage of above package
components
Parameter Modes: IN, OUT, IN OUT
9.8 Write a PL/SQL procedure to return simple and compound interest (OUT
parameters) along with the Total Sum (IN OUT) i.e. Sum of Principle and
Interest taking as input the principle, rate of interest and number of years (IN
parameters). Call this procedure from an anonymous block.

64
ADDITIONAL EXERCISE:
Procedures:
9.9 Based on the Banking Schema provided in Appendix, write a procedure which
takes the branch_name as input parameter and lists the names of all customers
belonging to that branch. Also, write an anonymous block with the procedure
call.
9.10 Based on the Banking Schema provided in Appendix, write a procedure to
calculate the sales made to a particular Customer. (The customer id in the
transaction file, item_transaction, must be selected, the quantity sold must be
multiplied by the price which is in the item_master and this value must be
accumulated for all records of that customer in the Transaction file).
Functions:
9.11 Based on the HR database schema in Appendix, write a function to return the net
salary given the employee number in the employees table and call the same from
an anonymous block.
Parameter Modes: IN, OUT, IN OUT
9.12 Based on the University Database Schema in Lab:2, write PL/SQL procedure
that takes as input the department name (IN) and budget (IN OUT) gives a 10%
hike and returns the new budget. Call this procedure from a function and print
the Department Name and Old budget and New budget.
Department (dept-name, building, budget)

65
LAB NO.: 10 Date:
TRIGGERS
Objectives:
In this lab, student will be able to:
• Use triggers to enforce business logic in a database.
• Use Row triggers to enforce any constraint on a table.
• Understand the usage of “Instead Of” Triggers.
Triggers
A trigger is a named PL/SQL block that is stored in the database and run in response to
an event that occurs in the database. The user can specify the event (insert, update or
delete)
• whether the trigger fires before or after the event
• whether the trigger runs for each event or for each row affected by the event
Uses of Triggers
1. Enforce referential integrity constraints when child and parent tables are on different
nodes of the distributed database.
2. Prevent DML operations on a table after regular business hours.
3. Modify table data when DML statements are issued against views.
4. Enforce complex business rules that you cannot define with constraints.
Triggers vs Constraints
• A trigger applies on new data only while constraint holds true for the entire data Eg.:
a trigger can prevent a DML statement from inserting a NULL but the column could
have null prior.
• Constraints are easier to write and less error prone.
• But triggers can enforce complex business rules that constraints cannot.

66
Syntax:
CREATE OR REPLACE TRIGGER trigger_name
BEFORE(AFTER) INSERT OR UPDATE OF list of columns
OR DELETE on tablename
FOR EACH ROW
begin
CASE
WHEN INSERTING THEN
//set of actions
WHEN UPDATING(column1) THEN
//set of actions
WHEN DELETING THEN
//set of actions
END CASE;
END;
:NEW AND :OLD
• The trigger is fired when DML operations (INSERT, UPDATE, and DELETE
statements) are performed on the table.
• The user can choose what combination of operations should fire the trigger.
• Because the trigger uses BEFORE keyword, it can access the new values before
they go into the table, and can change the values if there is an easily-corrected error
by assigning to :NEW.column_name.
• :NEW.attribute is accessible on insertion and updation.
• :OLD.attribute is accessible on deletion and updation.

67
Example: A trigger to insert the records into the emp_delete table before deleting the
records from the employee table, based on the HR schema provided in the appendix.
CREATE OR REPLACE trigger emp_trigger
BEFORE DELETE ON employee
FOR EACH ROW
BEGIN
insert into emp_delete values(:OLD.emp_id,
:OLD.emp_name,
:OLD.emp_sal);
END;
/
Output:
delete from employee where emp_id=1101;
When you execute the above statement in the terminal the same
record is inserted in the emp_delete table.
INSTEAD OF TRIGGERS:
• It is created to perform data manipulation of views which cannot be performed in
general.
• We cannot perform deletion or insertion on views if the view contains aggregate
functions or joins.
• An INSTEAD OF trigger is the only way to update a view that is not inherently
updatable.
• Consider a view which is joined on tables A and B. A delete operation on the view
is equivalent to deletion on A separately and B separately.
Syntax:
Create or replace trigger trigger_name
INSTEAD OF DELETE on view_name
FOR EACH ROW
BEGIN
//Set of Actions
END;

68
EXERCISE:
Row Triggers
10.1 Based on the University database Schema in Lab 2, write a row trigger that
records along with the time any change made in the Takes (ID, course-id, sec-id,
semester, year, grade) table in log_change_Takes (Time_Of_Change, ID, course-
id, sec-id, semester, year, grade).
10.2 Write a row trigger to update the Bal_Stock in item_master when a new
transaction is entered in the item_transaction.
Database Triggers
10.3 Based on the Banking Schema provided in Appendix; write a database trigger on
Account that checks the following:
• The account for which transaction is performed is a valid account number
• The transaction amount is not zero and is positive
• In case of withdrawal, the amount does not exceed balance for that account
number
Create a transparent audit system for a table Client_master (client_no, name, address,
Bal_due). The system must keep track of the records that are being deleted or updated.
The functionality being when a record is deleted or modified the original record details
and the date of operation are stored in the auditclient (client_no, name, bal_due,
operation, userid, opdate) table, then the delete or update is allowed to go through.
Instead of Triggers
10.4 Based on the University database Schema in Lab 2, create a view
Advisor_Student which is a natural join on Advisor, Student and Instructor tables.
Create an INSTEAD OF trigger on Advisor_Student to enable the user to delete
the corresponding entries in Advisor table.
Additional Exercise:
Row Triggers
10.5 Based on the University database schema in Lab: 2, write a row trigger to insert
the existing values of the Instructor (ID, name, dept-name, salary) table into a new
table Old_ Data_Instructor (ID, name, dept-name, salary) when the salary table is
updated.

69
Instead of Triggers
10.6 Based on the Banking Schema provided in Appendix, create a view all_customers
consisting branches and their customers. Now, create INSTEAD OF trigger on
all_customers to enable you to delete a branch and the associated customers
through view.

70
LAB NO.: 11 Date:
Mini Project (Phase I)
Objective:
• To build an interactive application that uses database to manage data.
Guidelines:
All the students are instructed to form a team of two members in the second week of
lab. The following are the major steps involved in the project:
• Submit one page project proposal in the third week of lab.
Format:
Title
Team members
Abstract
(Refer ‘Project Suggestions’ in Chapter 9, Database System Concepts, Korth, Sixth
Edition)
• Submit Database Design (Intermediate Report) in the sixth week of lab and show
the completion of DB design.
Intermediate Report Format:
Title, Team Members
Abstract (with modifications, if any)
Problem Statement (covering both data and functional requirements)
ER Diagram (using DIA)
Relational Tables along with sample data
Future Work

71
LAB NO.: 12 Date:
MINI PROJECT (PHASE II)
Objectives:
• To build an interactive application that uses database to manage data.
PROJECT REPORT FORMAT
Title, Team Members
Abstract(with modifications, if any)
Problem Statement(covering both data and functional requirements)
ER Diagram(using DIA)
Relational Tables along with sample data
DDL Commands to create table with necessary integrity constraints
List of Queries used
UI Design(include Screenshots)
Pseudocode/Java code for functional design (DB connectivity and access)
References

72
REFERENCES:
1. Silberschatz, Korth, Sudarshan, “Database System Concepts”, McGrawHill,
6th Edition, 2011.
2. Ivan Bayross, “SQL, PL/SQL” 2nd/3rd Edition, BPB Publications.
3. www. docs.oracle.com, “PL/SQL Language Reference”, Oracle Corp.
4. G. Reese, “Database Programming With JDBC And Java”, O’REILLY, Second
edition, 2000.

73
Appendix
BANKING SCHEMA
branch = (branch_name, branch_city, assets)
customer = (customer_id, customer_name, customer_street, customer_city)
loan = (loan_number, amount)
account = (account_number, balance)
employee = (employee_id, employee_name, telephone_number, start_date)
dependent_name = (employee_id, dname)
account_branch = (account_number, branch_name)
loan_branch = (loan_number, branch_name)
borrower = (customer_id, loan_number)
depositor = (customer_id, account_number)
cust_banker = (customer_id, employee_id, type)
works_for = (worker_employee_id, manager_employee_id)
payment = (loan_number, payment_number, payment_date, payment_amount)
savings_account = (account_number, interest_rate)
checking_account = (account_number, overdraft_amount)
74
HR SCHEMA

75
ER Diagram
DIA Software:
Dia is a diagramming application that can be used to make a large variety of
diagrams. Dia is easy to learn and flexible enough to allow users to create highly
customized diagrams. Below are two simple examples of diagrams that can quickly be
created using Dia.
Starting DIA:
You can start Dia by going into the Applications section on the Main Menu and clicking
on the Dia icon. Or, you can type dia in a console window.
Creating Canvas:
All diagrams are drawn in their own canvas. When you first start Dia, a blank canvas is
created automatically. At any time, you can create a new canvas by selecting File->New
Diagram. The canvas may be customized in various ways, such as changing the
background color or grid lines.
Making a Diagram:
A diagram is made up of objects. Objects are shapes or lines that can be different colors
and sizes. Objects can be simple line drawings, text, or full-color pictures. Some objects
allow text to be entered inside the shape. Using Dia to create a diagram is easy. The
Toolbox contains a palette of predefined objects, including simple shapes, lines, and
specialized objects. To add an object to the canvas, simply click on the desired object’s
icon on the Toolbox and then click on the desired point on the canvas. The object will
appear on the canvas where you clicked.
Saving and Printing Your Diagram:
Dia provides the normal save and print options, located on the File menu. Selecting
the File -> Page Setup allows you to set the paper size, orientation, and print margins.
This also allows you to choose whether to print the diagram to scale(entered in percent)
or to fit the diagram to a specific size (in centimeters).
Dia supports exporting to numerous formats for excellent web publishing. Some of
them include:
• Computer Graphics Metafile (.cgm)
• Encapsulated Postscript (.eps)
• Portable Document Format (.pdf)

76
• Portable Network Graphics (.png)
• Scalable Vector Graphics (.svg)
Steps to be followed in creating ER Diagram using DIA:
1. Start Dia Diagram Editor.
2. On the left side of the menu click on the dropdown menu, select “Other sheets” and
click on “ER”.
3. Now the menu consists only of shapes that are relevant to an ER diagram.
4. Choose the “E” icon with a single frame in the shapes menu and click on the
drawing space at the center. A rectangle with the name “Entity” will appear.
5. Double-click on the new entity set and the properties window will show up (or
right-click and choose “Properties”). Change the name of the entity and click “OK”.
The entity sets name will be changed.
6. The entity may consists of several attributes. In the shape menu select the “A” icon
with an oval around it and click near the created entity set. An oval with the name
“Attribute” will appear.
7. Double-click on the attribute and in the properties window change the name.
Suppose the attribute is a primary key, select value for “Key” as “Yes”. Click
“OK”.
8. In the shape menu click on the “Participation” icon and connect the entity set with
the attribute.
9. It is also possible to connect an entity set with an attribute using different
connectors. Choose the appropriate style at the end of a new connector by clicking
on “arrow style at the end of the line new lines”. Select “line (L)” connector.
10. Proceed with the rest of the attributes of the entity set.
11. Create the relationship set between the two entities. In the shape menu select “R”
with a diamond around it and click between the two entity sets in the drawing area.
12. Change the name of relationship.

77
JDBC
An API that lets the user access virtually any tabular data source from the Java
programming language. A tabular data source is virtually any data source, from
relational databases to spreadsheets and flat files.
Basic steps to use a database in Java:
1. Establish a connection
2. Create JDBC Statements
3. Execute SQL Statements
4. GET ResultSet
5. Close connections
Example:
The five basic steps are illustrated using an example.
1. Establish a Connection
• importjava.sql.*;
• Load the vendor specific driver
Class.forName(“oracle.jdbc.driver.OracleDriver”);
Dynamically loads a driver class, for Oracle database
• Make the connection
• Connection con = DriverManager.getConnection(“jdbc:oracle:thin:@oracle-
prod:1521:OPROD”, username, passwd);
• Establishes connection to database by obtaining a Connection object
2. Create JDBC Statement(s)
• Statement stmt = con.createStatement() ;
Creates a Statement object for sending SQL statements to the database

78
3. Executing SQL Statements
• String createLehigh = “Create table Lehigh” + “(SSN Integer not null, Name
VARCHAR(32),” + “Marks Integer)”;
• stmt.executeUpdate(createLehigh);
• String insertLehigh = “Insert into Lehigh values” + “(123456789,abc,100)”;
• stmt.executeUpdate(insertLehigh);
4. Get ResultSet
String queryLehigh = “select * from Lehigh”;
ResultSetrs = Stmt.executeQuery(queryLehigh);
while (rs.next()) {
intssn = rs.getInt(“SSN”);
String name = rs.getString(“NAME”);
int marks = rs.getInt(“MARKS”);
}
5. Close Connection
• stmt.close();
• con.close();
Transactions and JDBC
JDBC allows SQL statements to be grouped together into a single transaction.
Transaction control is performed by the Connection object, default mode is auto-
commit, I.e., each sql Statement is treated as a transaction. We can turn off the auto-
commit mode with
con.setAutoCommit(false);
And turn it back on with
con.setAutoCommit(true);
Once auto-commit is off, no SQL statement will be committed until an explicit is
invoked con.commit(); At this point all changes done by the SQL statements will be
made permanent in the database.

79
Handling Errors with Exceptions
Programs should recover and leave the database in a consistent state. If a statement in
the try block throws an exception or warning, it can be caught in one of the
corresponding catch statements. E.g., the user could rollback the transaction in a catch
{ …} block or close database connection and free database related resources in finally
{…} block.

80
[Space for Writing Observation]

81

82

83

84

85

86

87

88

89

90

91

92

93

94

95

96

97

98

99

100

101

102

103

104

105

106

107

108

109

110

111

112

113

114

115

116

117

118

119

120

121

122

123

124

125

126

127

128

129

130

131

132

133

134

135

136

137

138
