Cloud Ready Installation Instructions
CloudReady_Installation_Instructions
CloudReady_Installation_Instructions
User Manual: Pdf
Open the PDF directly: View PDF ![]() .
.
Page Count: 13
Quick Start Guide
Detailed Installation
Instructions
Configuring
CloudReady
Forums & Support
1 Before you begin - important information
2 EfcientinstructionsforITprofessionals
3 USB installer creation
6 Booting from USB
7 Dual-boot and standalone installation notes
8 Theinstallationprocess
9 General settings
10 Recommended network and proxy settings
11 Enrollment and admin notes
12 HowtogethelpwithCloudReady
Welcome to
CloudReady!
Let’s get started
by

1
Time Required
20 minutes for USB installer creation, 1-2 minutes
per machine to trigger the 20 minute installation
process.
Process Overview
Deploying CloudReady is a 2 step process.
The rst step is to use any computer to create
a CloudReady USB installer from the le you
downloaded. You do not need to create a USB
installer on a machine which you intend to install
with CloudReady. The second step is to boot
from the USB installer on a computer of your
choice, and install CloudReady.
What You’ll Need
You’ll need one or more USB 2.0 drives with 8
or 16 GB of storage. Make sure there is nothing
important on them - this process will completely
erase them! There is no limit on the number of
CloudReady USB installers you can create.
Back up Important Data on All Machines
Installing standalone CloudReady will erase all
data on your machine.
Review Important Computer Model
Information
Every computer is dierent. Some don’t support
dual-boot, and many require specic steps to
enable installation. Please check the unique
information for each model by clicking on its
name.
Prepare your network
To use CloudReady you must whitelist the
following domains entirely on your rewall or
ltering system:
neverware.com (for updates and licensing)
dl-ssl.google.com (for ash updates)
archive.canonical.com (for ash updates)
s3.amazonaws.com/cloudready-runtime/ (for ash updates)
You may also need to allow ”.deb” le types to be
downloaded. Visit https://network.neverware.com
to check connectivity.
Dual-boot or
standalone?
CloudReady can be installed on a computer
in two dierent ways. With a standalone
installation, CloudReady will be installed as the
only operating system on the computer. Any
existing content on the computer’s hard drive
will be erased and overwritten.
With a dual-boot installation, CloudReady will
be installed alongside your existing Windows
operating system. When your computer
starts up, you will be given an option to select
CloudReady or your previous copy of Windows.
Existing content on your computer’s hard drive
will not be overwritten when CloudReady is
installed.
Please note: Not all computer models and
operating system congurations are compatible
with a dual-boot installation of CloudReady.
Please consult page 7 of this guide for more
detailed information.
Before You Begin
2
1. Download your installation .zip le from
Neverware. If you are using a free trial of the
Education version, you will receive a custom
download link at the end of the sign-up process.
The same link will also be emailed to you.
2. Create your USB installer using
the Chromebook Recovery Utility, available on
the Google Chrome Web Store. Open the utility,
click the gear icon, select “use local image” and
then select your .zip le. When prompted, plug
in a USB stick with 8GB or 16GB of storage.
Creating a USB installer take 5-10 minutes.
During the process, it is normal for the utility to
show unusual percentages.
3. Insert your installer and boot from USB on
a machine you wish to install with CloudReady.
CloudReady will live-boot to a setup page - you
do not need to congure any network settings
yet.
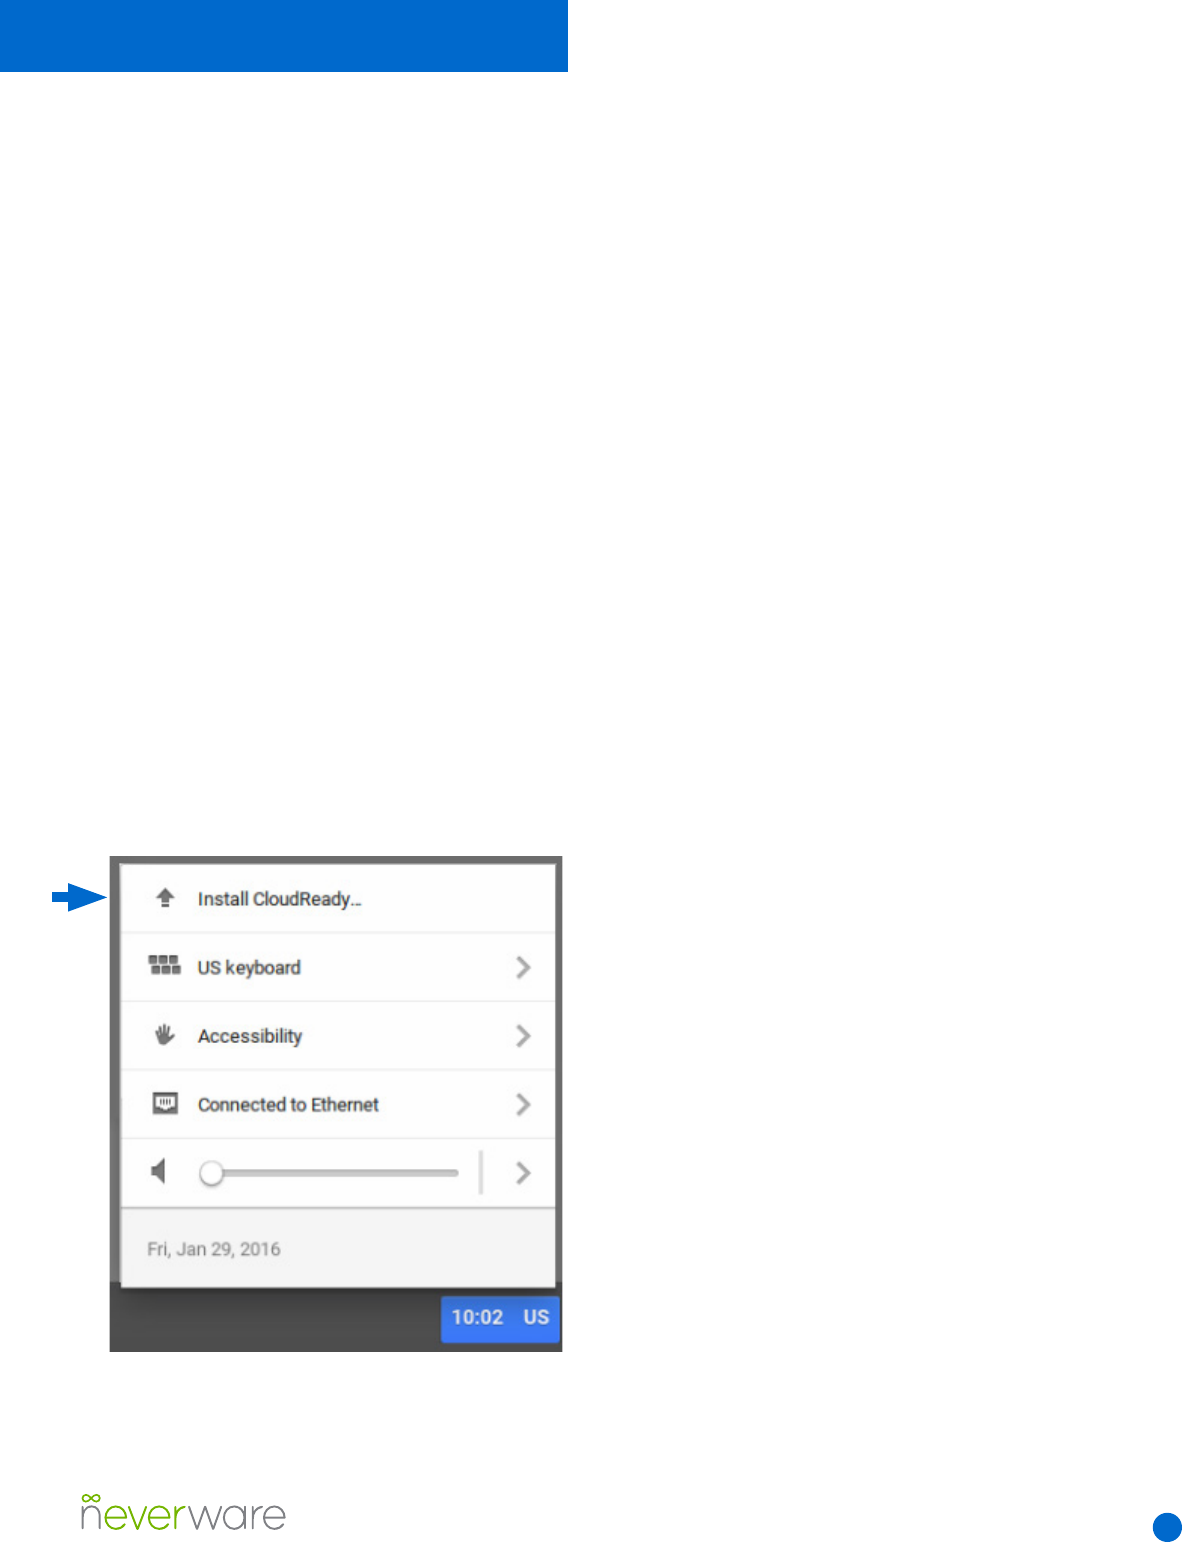
4. Click the bottom-right system tray and choose
“Install CloudReady” as pictured below:
5. A wizard will pop up to guide you in your
installation - you can choose either standalone
or dual-boot install options. A standalone install
will erase your entire hard drive. Dual-boot
installation will not work on all machines - please
see these requirements for more information.
6. When installation is nished, your machine will
shut itself down. You can then unplug your USB
installer, turn the machine back on, and use it!
Quick Start Guide
3
Creating a USB
Installer from Windows
1. Start by downloading your CloudReady
installation le. You should have received a link
for the download when you signed up for a free
trial, or in an email conrmation from Neverware
after purchasing CloudReady. If you have trouble
with the Chromebook Recovery Utility in the next
step, you may want to download 7zip and use it
to unzip the CloudReady installation le.
2. Open the Chrome web browser and install the
Chromebook Recovery Utility plug-in from the
Google Chrome Web Store. To install it, visit the
link and click “Add to Chrome.”
3. After the plug-in has installed, click
“Launch” from the Web Store page to open the
Chromebook Recovery Utility.
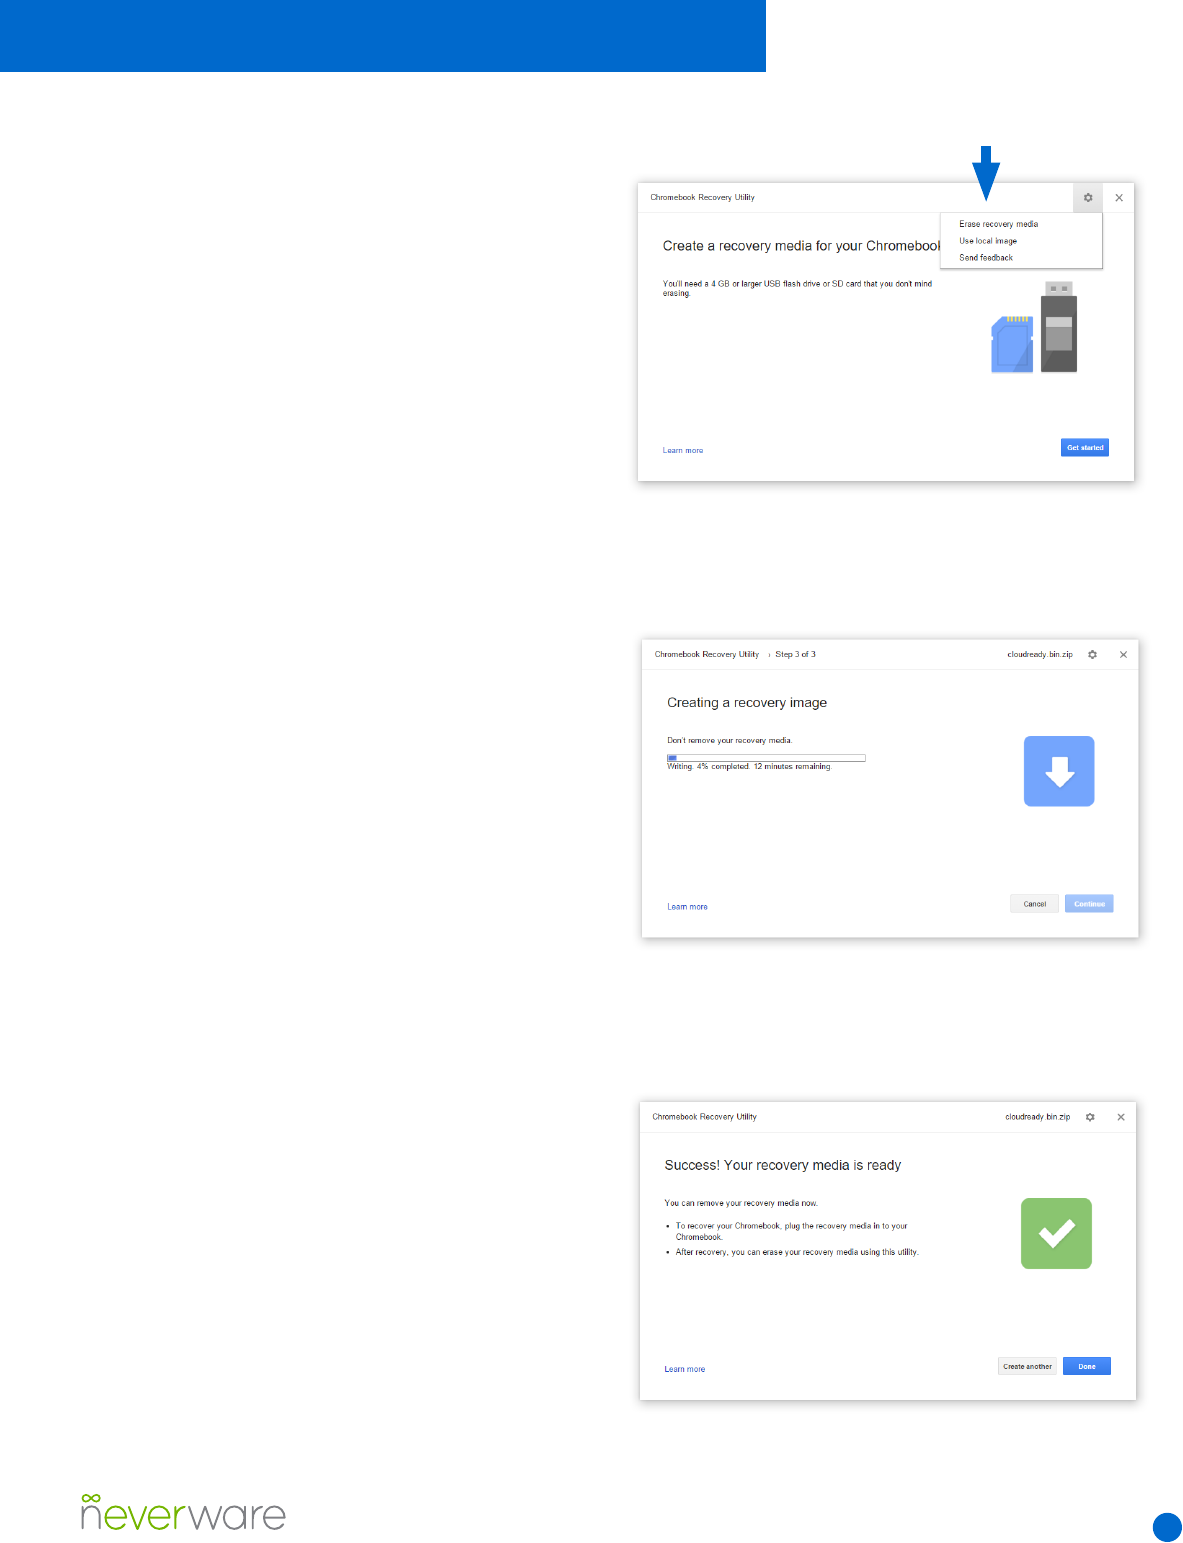
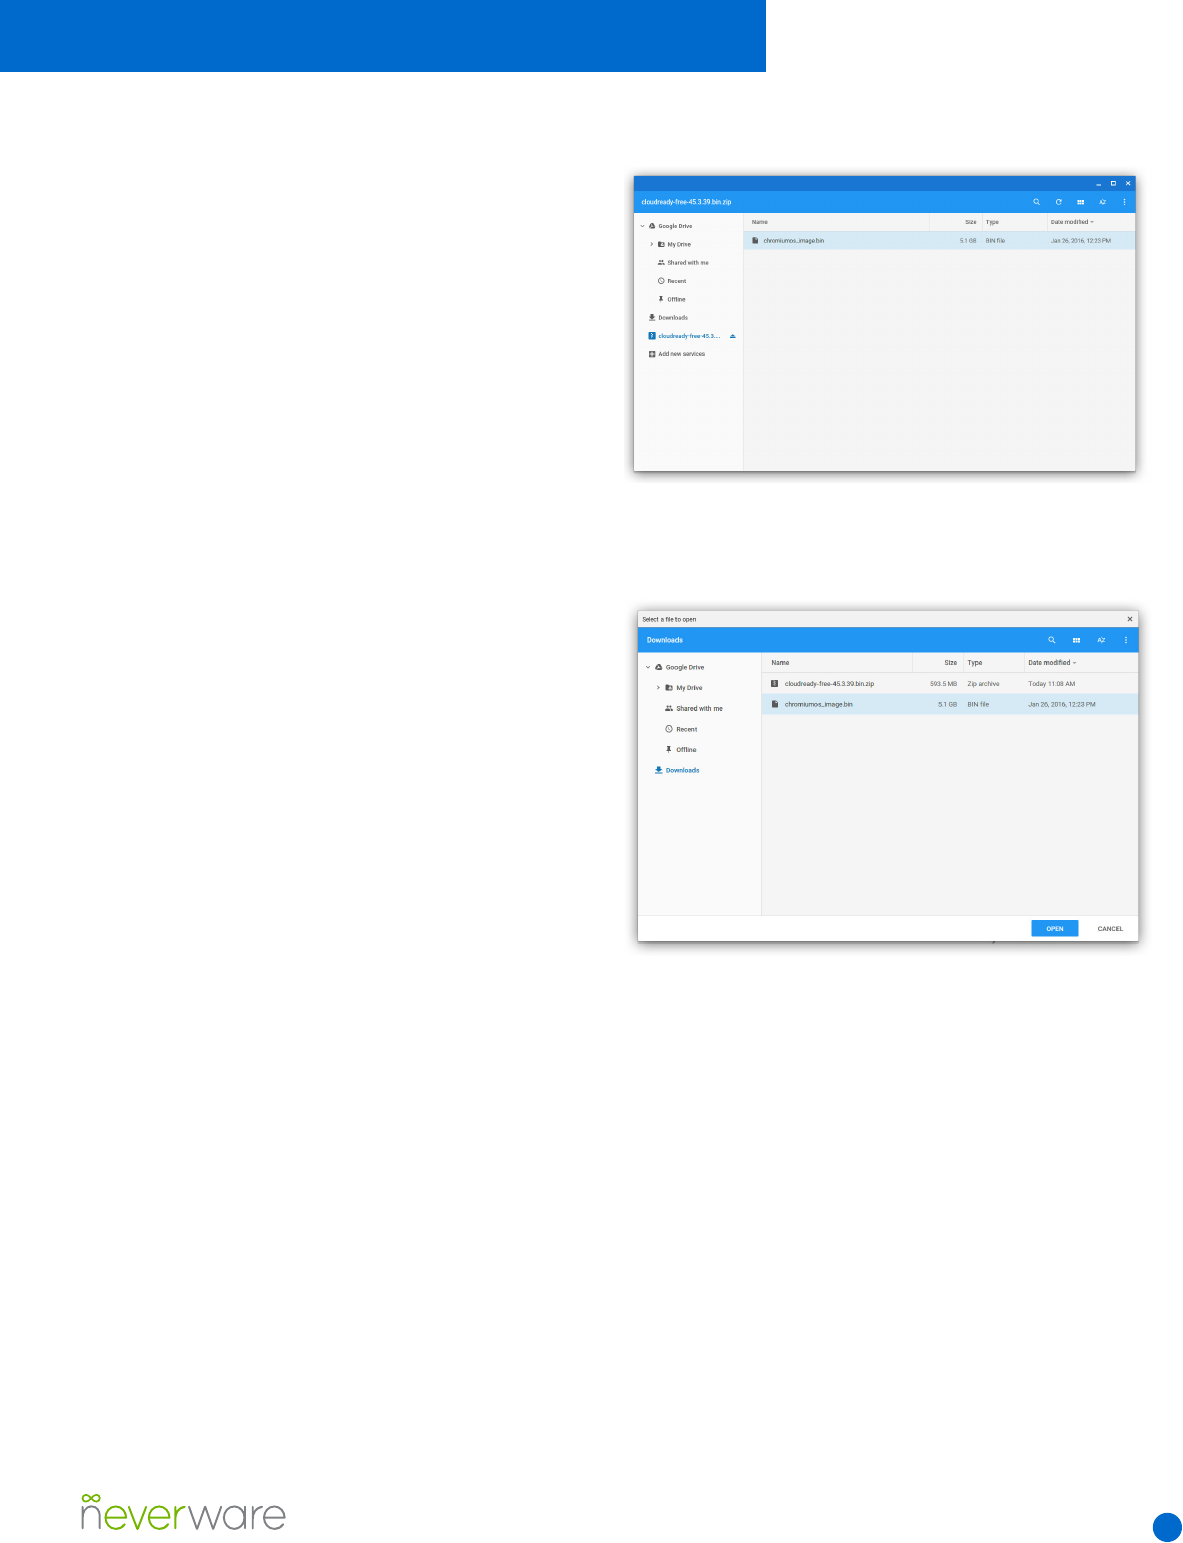
4. In the Recovery Utility, click the gear icon on
the upper right-hand side and select “Use Local
Image” (Fig. 1).
5. Find and select the CloudReady .zip le that
you located in Step 1.
6. When prompted, insert an 8 or 16 GB USB
device that you want to turn into a CloudReady
installer. Make sure it has no important les on
it, as it will be completely erased. Select your
USB drive from the drop-down menu and click
“Continue” and then “Create Now.”
7. The process of creating your CloudReady
USB installer will take around 20 minutes (Fig
2). Some Windows installations may display a
security prompt, click “allow” to let the process
proceed. Note: The progress bar in the Chrome
Recovery Utility may go over 100% and show
incorrect time estimates. This is not a problem.
8. When the process has completed you will see
a green check box (Fig. 3) - you can now remove
your CloudReady USB installer and use it!
Detailed Installation Instructions
Fig. 1 The Chromebook Recovery Utility.
Fig. 2 Creating a CloudReady USB installer.
Fig. 3 You will see this message when the creation of a
CloudReady USB installation stick completes.
4
Creating a USB
Installer from Mac OS
1. Make sure your CloudReady installation le
(ending in .bin.zip) is in your Downloads folder or
a similar location on your machine’s hard drive.
2. Download and install the free
“The Unarchiver” utility. The Unarchiver has been
veried as safe by Apple and is available through
the App Store.
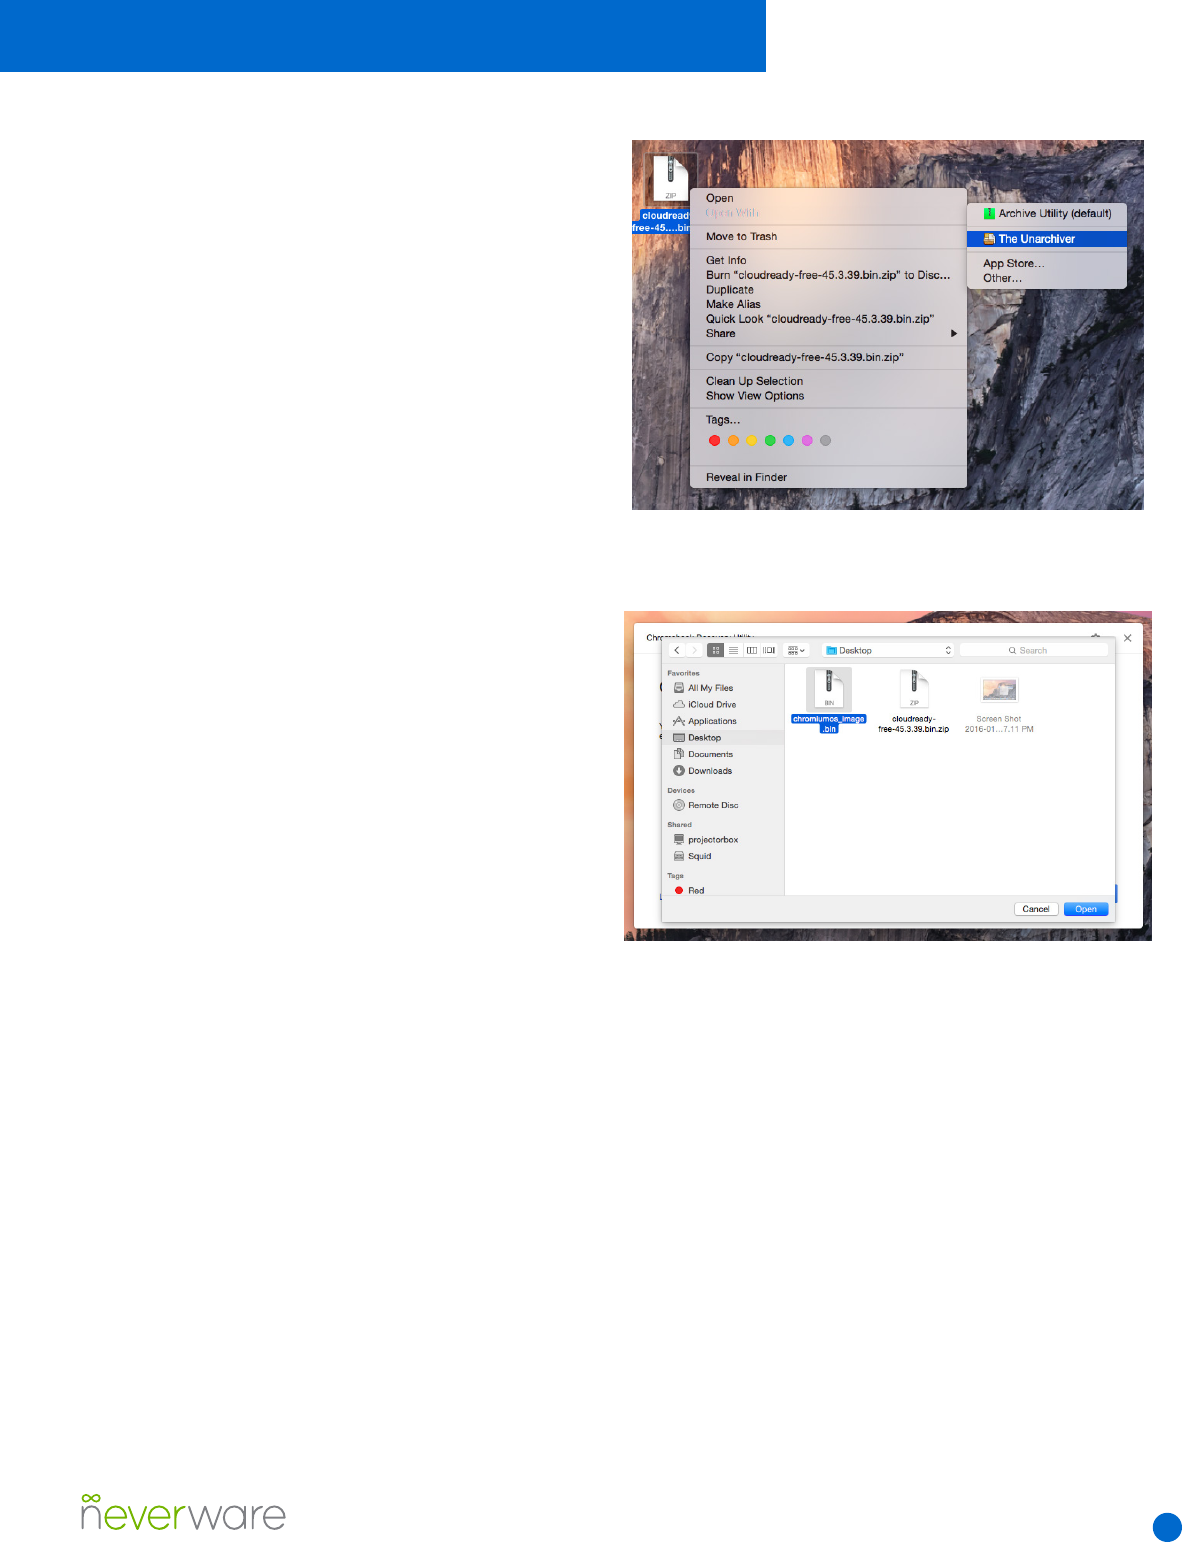
3. Once The Unarchiver is installed, right click
your cloudready .zip le and select “Open
With>The Unarchiver” (Fig. 1). The extracted le
will be a single large le with a “.bin” extension.
4. Proceed with Step 2 onwards in the Windows
install instructions on page 3. In Step 5, select
the “.bin” le instead of the “.zip” le (Fig. 2).
Detailed Installation Instructions
Fig. 1 Extracting the CloudReady .zip le in Mac OS X.
Fig. 2 Selecting the .bin le in the Chromebook Recovery
Utility.
5
Creating a USB
Installer from a
Chromebook
1. Make sure your CloudReady image le
(ending in .bin.zip) is in your Downloads folder or
a similar location on your Chromebook’s internal
storage.
2. Double click the image le so it “mounts” and
shows as a folder on the right-hand side of your
Files app.
3. Enter the mounted folder to and copy
the “.bin” le to your Downloads folder. This
may take a few minutes depending on the
performance of your Chromebook.
4. Proceed with Step 2 onwards in the Windows
install instructions on page 3. In Step 5, select
the “.bin” le instead of the “.zip” le (Fig. 2).
Detailed Installation Instructions
Fig. 1 The mounted .zip le on a Chromebook, with the .bin
le inside.
Fig. 2 Selecting the .bin le in the Chromebook Recovery
Utility.

6
WhatisUSBBooting?
To permanently install CloudReady on the
computers you choose, each computer needs to
start or “boot” from the USB installer you created,
instead of an internal hard disk. This is called
USB booting, and all computer models certied to
work with CloudReady can do it.
USB booting requires that you:
1. Turn o the computer you want to install on.
2. Insert the USB installer you created.
3. Power on the machine while tapping a special
key. The special key you need to tap/hold during
boot up is dierent depending on the machine.
See below for tips on the correct key for various
brands. Machines may not, by default, allow
USB Boot. You may need to access the BIOS in
order to enable USB Boot. If you are trying to
install on an unsupported model, USB booting
may not be possible.
Common USB Boot
Keys
Most Dell models: Tap F12 when the Dell logo is
displayed.
Most HP models: Tap F9 when the HP logo is
displayed.
Most Lenovo models: Tap F12 when the
Lenovo logo is displayed.
Most Apple Mac models: Hold the Option key
when the computer rst turns on.
Other Common Models: Try tapping Esc, F1-12,
or Enter when the machine rst starts
Set Boot Order: On some machines it may be
easier to set boot order in the BIOS to prioritize
USB devices rst.
If USB Boot is Not
Available
Ensure you are using a supported computer
model. Depending on your school’s security
policies, you may need to contact your technical
admin for a BIOS security password, or to enable
USB booting.
OtherCommonIssues
Model-specic Quirks: Ensure you have read
all notes for your supported model. Some
computer models have non-standard methods of
booting from USB.
USB device issues: Certain brands of USB stick
occasionally encounter issues when used as a
CloudReady installer. Try making a new installer
with a dierent USB stick. Make sure you are
using an 8 or 16 GB, USB 2.0 stick.
Blank screen: If booting from USB results in a
blank screen, try toggling UEFI mode to ON in
your computer’s BIOS. You may need to select
EFI File > boot > e > bootx64.e from the boot
menu of your machine.
Errors when booting from USB: Ensure that
“secure boot” and TPM are set to “OFF” or
“Disabled” in your computer’s BIOS.
Detailed Installation Instructions

7
Dual-boot Installation
Considerations
Only models listed on our certication list under
“Dual-boot Certied” are ocially supported
by Neverware to dual-boot with CloudReady.
Computers must have all of the following for
successful dual-boot installation of CloudReady:
1. The ability to use UEFI boot mode. It may
require some exploration of your BIOS to conrm
this. Many computer models will default to UEFI
boot mode when “Legacy boot” or “CSM” is
disabled. Some models refer to UEFI boot mode
as “EFI boot mode”.
2. A preexisting UEFI-mode installation
of Windows 7, 8, 8.1, or 10. Click here for
instructions on verifying whether Windows is
installed in UEFI mode. CloudReady’s dual-boot
feature is not compatible with “Legacy” or “BIOS-
mode” installations of Windows at this time.
3. At least 32 GB of available free space in the
main Windows partition you want to dual-boot
with.
4. On the Windows installation you want to dual-
boot with, you must make the following changes
before performing a dual-boot installation of
CloudReady:
a. Turn OFF “Fast Startup” (in Windows
8 or later) by visiting “Control Panel >
Power Options > Choose what the power
button does > Fast Startup”
b. Turn OFF any encryption
c. Disable hibernation
If your Windows installation is in legacy mode,
but your machine supports UEFI, it will be
necessary to reinstall Windows in UEFI mode in
order to dual-boot with CloudReady.
At this time, Neverware only supports dual-
booting CloudReady alongside Windows 7, 8,
8.1 and 10. We encourage users of sucient
technical ability to experiment with unsupported
congurations of CloudReady, but note that
your data may be at risk of accidental erasure
and Neverware will be unable to assist with any
issues faced in the process.
Standalone Installation
Considerations
• Any computer models listed on our certication
list are supported by Neverware to for standalone
CloudReady use.
• Performing a standalone installation of
CloudReady will completely erase a computer’s
internal storage, including all other operating
systems, user les and software. You should
back up any important information prior to
installation.
• Neverware is unable to provide assistance
with re-imaging installed computers, should you
decide not to continue using CloudReady.
Detailed Installation Instructions
8
TheCloudReady
Installation Process
Once you successfully USB boot, you’re ready to
install. Follow the instructions below, and make
sure to read the specic notes on page 8 of this
document regarding dual-boot or standalone
installations.
Installation Steps:
1. Boot your computer from USB. When your
CloudReady USB installer has nished starting,
you will see a network conguration page. Ignore
the network conguration box at the center of the
screen - you do not need to congure networking
before installing CloudReady.
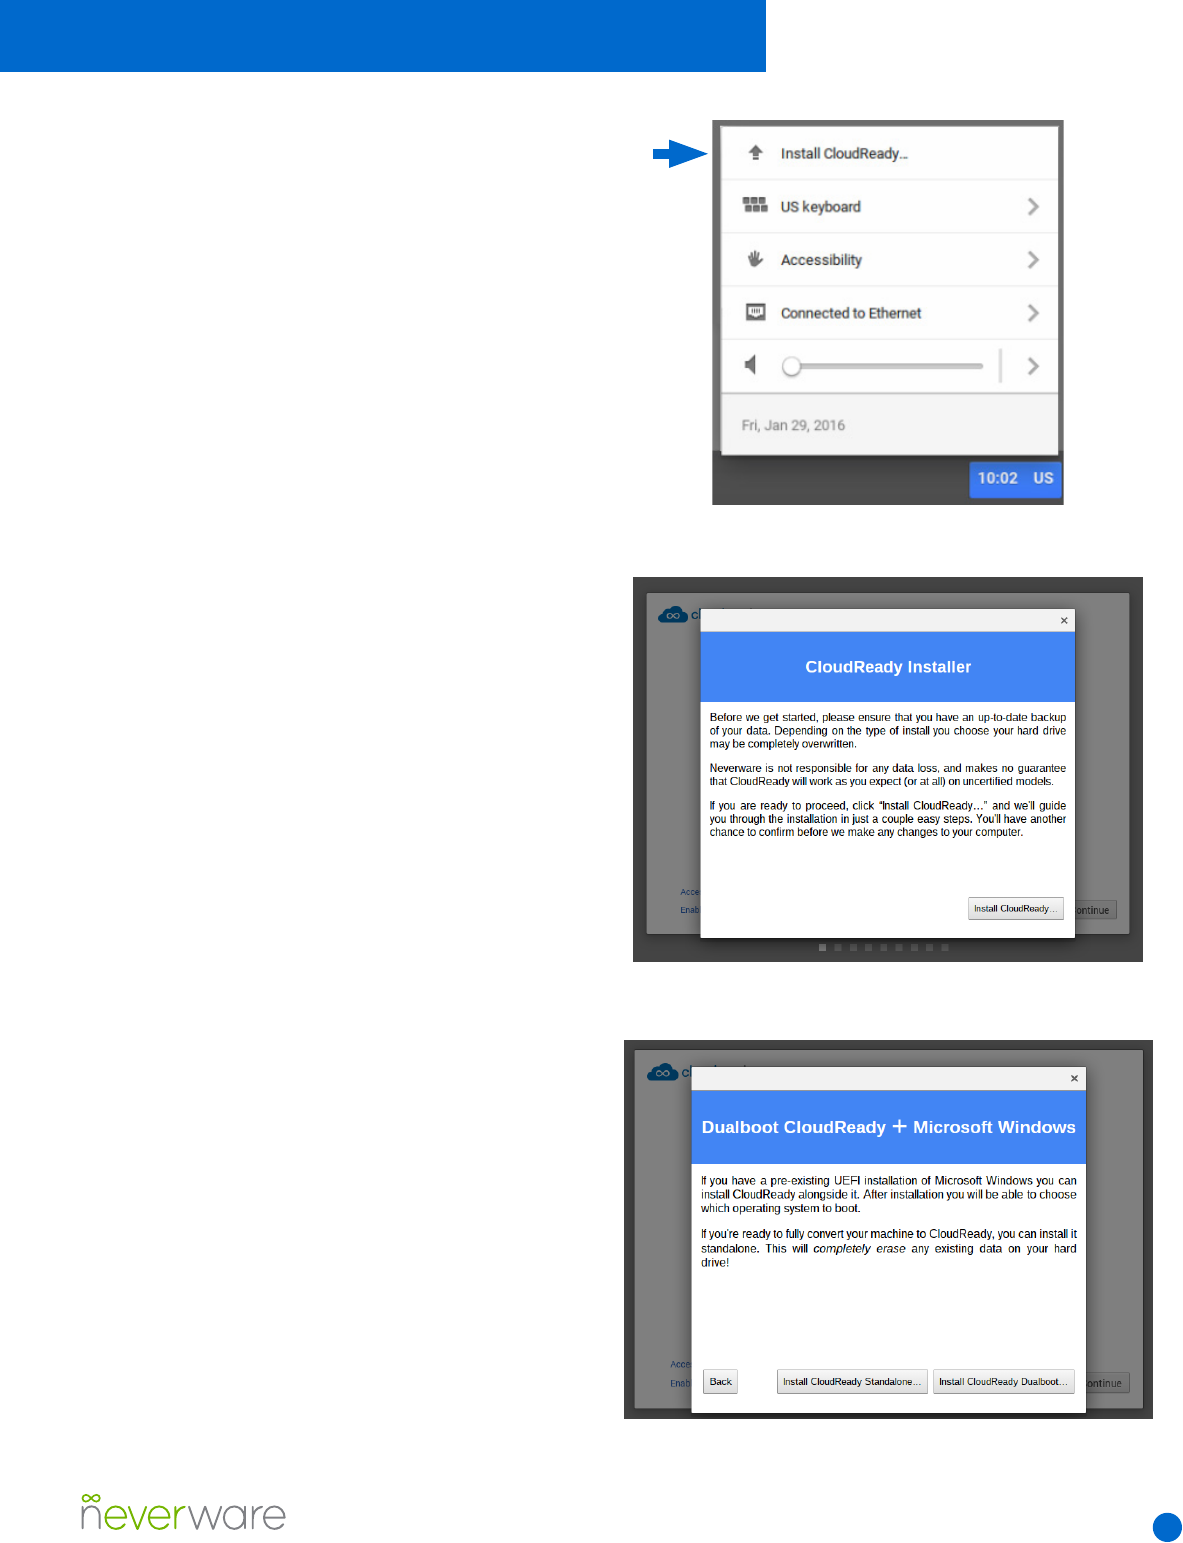
2. Open the system tray by clicking on the
bottom right corner of the screen, where the clock
is. On the menu that appears, click the option
labeled “Install CloudReady” (Fig. 1).
3. An installation wizard will pop up to walk
you through the steps for installation (Fig. 2).
Please read everything carefully - a standalone
installation of CloudReady will erase everything
on a computer. On the second page you can
choose a “Standalone” or a “Dual-boot” install
(Fig. 3).
4. Once you read and agree to all warnings,
install will take 15-30 minutes. When installation
is nished, your machine will shut itself down.
You can then unplug your USB installer, turn the
computer back on, and use it!
Detailed Installation Instructions
Fig. 1 The system tray with “Install CloudReady”
button.
Fig. 2 The rst page of the CloudReady installation
wizard.
Fig. 3 The second page of the CloudReady installation
wizard, with options for standalone or dual-boot installation.
9
General Setup
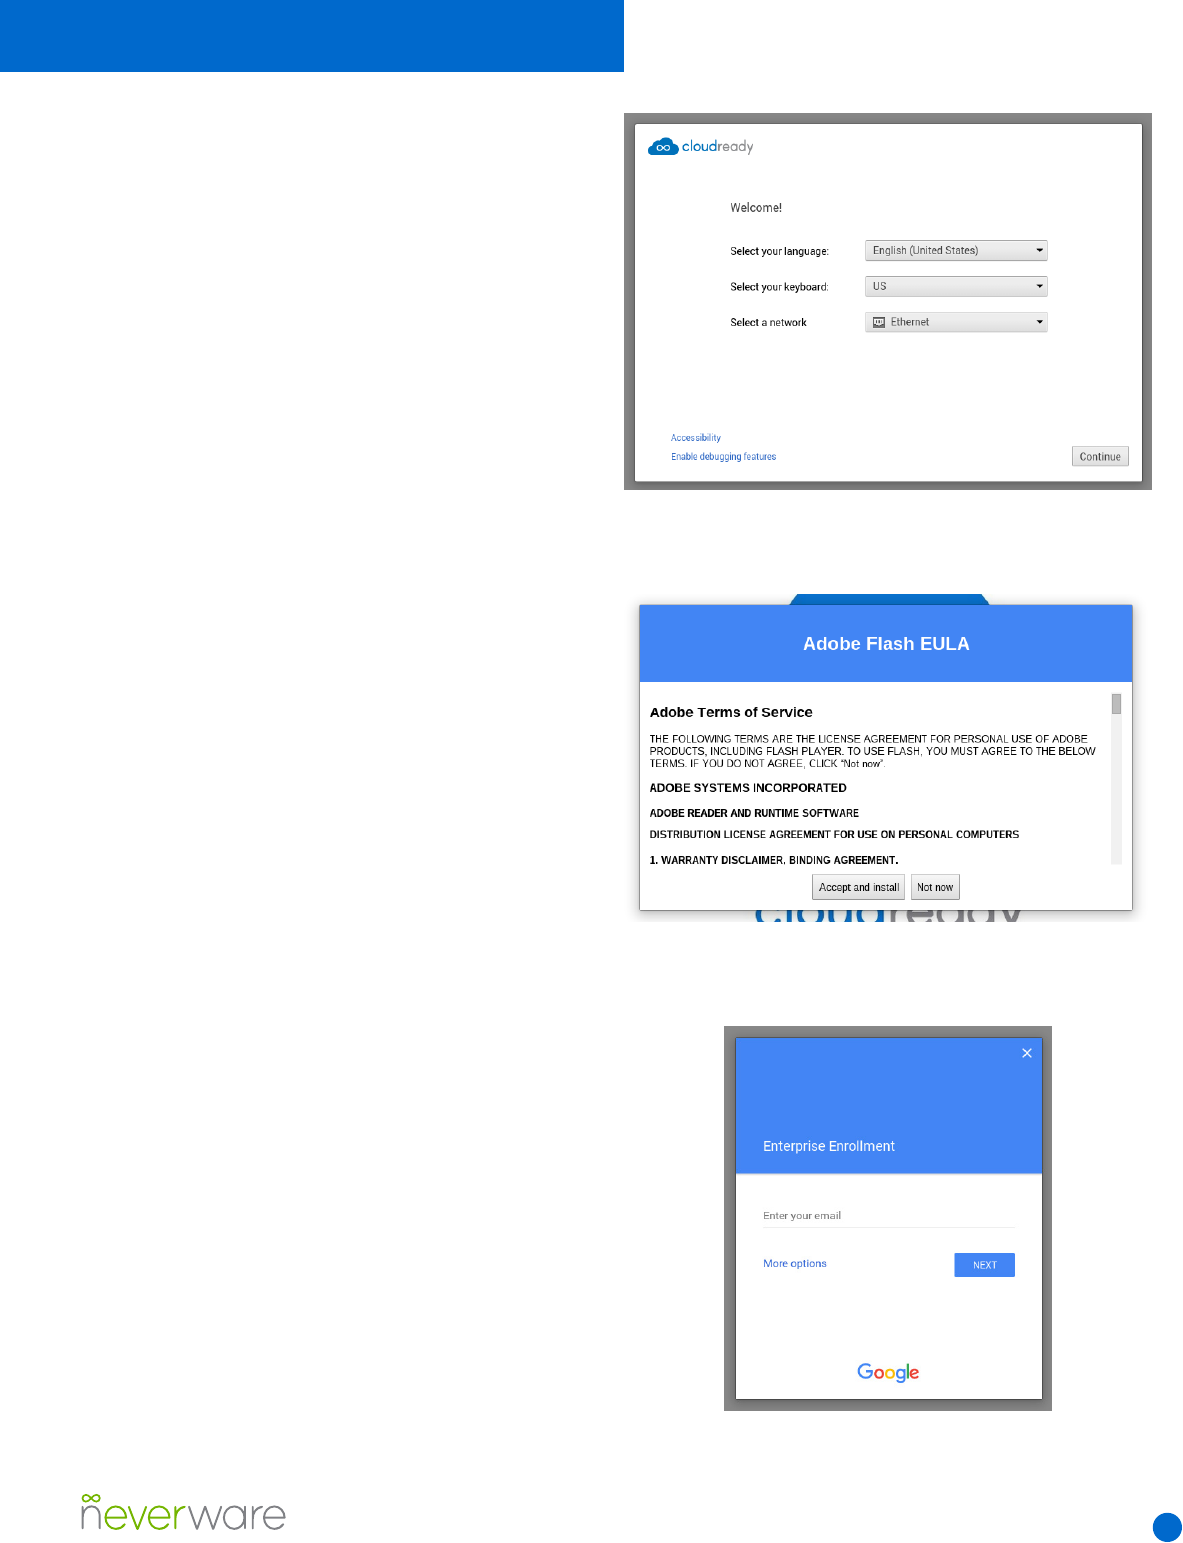
When you boot CloudReady for the rst time after
installation, you will be presented with at a setup
menu where you can set language and network
preferences (Fig. 1).
1. At this point, Google recommends you attach
to an open or unrestricted network in order to
smoothly proceed through conguration.
2. Once connected to unrestricted ethernet
or WiFi network, click “Continue.” You will be
presented with the option to install Adobe Flash
(Fig.2 ), which you can perform immediately or at
any time in the future. Your machine will check
for updates and present you with the Google
login screen.
3. STOP HERE - Do not log in if you wish to
enroll the computer in the Google Management
Console. If you wish to enroll the computer,
press Ctrl+Alt+E. You will be prompted for
credentials for enrollment (Fig. 3). You can
read important notes about enrollment and
management here.
5. Users can now log in. Your username must be
a gmail.com email address or a Google domain
registered through the Google Admin Console.
Configuring CloudReady
Fig. 1 The initial network conguration menu.
Fig. 2 The Adobe Flash installation prompt.
Fig. 3 The Google Admin Console enrollment prompt.

10
WiConguration
Google recommends you attach to an open or
unrestricted network during setup in order to
allow you to enroll your device in the Google
Management Console. Once enrolled, more
restricted and secure network settings in your
Google Admin Console will automatically
download to the machine if they have been
specied.
If you have trouble connecting to wireless
networks after installing CloudReady:
1. If your organization uses Google management,
ensure you are connecting to an unrestricted
network (like WiFi hotspot, guest network or
ethernet network) and then enroll your device
2. If your organization does not use Google
management, make sure to set up any proxy
or special network settings required within your
organization.
3. If your machine shows “WiFi disabled”, OR
shows “Wi is on” but no networks appear,
a. Make sure you are using a certied
computer model, and try restarting your
machine.
b. If the machine is still unable to detect
any wireless networks, try toggling WiFi
o, and then on using the WiFi icon in the
system tray.
c. If there is still no WiFi connectivity,
check for and toggle any physical
WiFi switches on the computer, and verify
that WiFi is enabled in the BIOS.
Using CloudReady
WithProxiesandFilters
As with wireless network settings, Google
recommends you attach to an open or
unrestricted network during setup in order
to allow smooth enrollment in the Google
Management Console. Once enrolled, your
device should automatically download proxy
settings, network passwords, and other security
settings that will make it easier for your to use
your CloudReady device.
• If you do not have an open or unrestricted
network available to you and your organization
requires a proxy for network access:
• Consider connecting to a cellphone WiFi
hotspot for enrollment.
• Set up a proxy manually by clicking “Proxy” in
the networking section of the system tray.
Configuring CloudReady

11
Enrollment Notes
Google recommends you attach to an open or
unrestricted network during setup in order to
allow you to enroll your device in the Google
Management Console. Please keep the following
factors in mind when enrolling CloudReady
machines:
• You can only enroll prior to rst login. If you
have already logged in, you will need to reinstall
CloudReady to enroll your device.
• You can only enroll if your organization already
uses Google Apps or the Google Admin Console.
Google Apps is free to schools and non-Prots,
but carries a subscription cost for businesses and
government.
• Chrome Management Licenses are sold
separately from CloudReady. You can purchase
them from Neverware, or from other Google
resellers of your choice. If you do not enroll
your CloudReady devices, you will be unable
to manage updates, restrict user-access to
machines, or set up secure kiosk mode.
Possible enrollment errors:
“You do not have sucient privileges” - Verify
that the username you are using to enroll is in a
Google Management Console user OU for which
enrollment is allowed.
“You do not have enough licenses” - Verify that
you have purchased Google Device Management
licenses for your CloudReady machines.
For other errors, try reinstalling and enrolling
again. If enrollment still fails, please contact
support.
Admin Notes
• CloudReady licenses are assigned according
to a “Hardware ID” comprised of the computer’s
ethernet MAC address and the word
“CloudReady.” This Hardware ID appears in the
top-right corner of your CloudReady login screen.
Enrolled devices will show up in your Google
Management Console under this name. For
example: “CloudReady-AA:BB:CC:DD:EE:FF.”
You should record the hardware IDs of
CloudReady machines for easy asset
management and transfer of software licenses.
• CloudReady licenses are completely
transferable, so you can move them from device
to device if a piece of hardware breaks. Contact
Support with the Hardware ID of the device you
are no longer using to transfer that license to
another piece of hardware.
• CloudReady software updates work similarly to
Chromebooks, but come out 1-3 months later to
ensure stability and security. You can learn more
about why we do this on our website.
• CloudReady is most easily installed via USB,
but for larger deployments it may be possible to
use a mass deployment or network deployment
tool. Contact our support for more information.
• If you have an issue with a CloudReady
machine and contact support, you should include
the Hardware ID and other info you see in the top
right-hand corner of the machine’s login screen.
This information will help our support team
quickly diagnose your problem.
Configuring CloudReady

12
User Forums
For users of the free version of CloudReady for
individuals, support for CloudReady is available
through our online support community.
Chat Support (paid Education version only)
For paid CloudReady users, online live chat
support is available by clicking the green
Neverware symbol at the bottom right of any
page at neverware.com. The live chat function
is staed by our New York City based team
between 8AM and 5PM Eastern Standard Time.
Phone Support (paid Education version only)
For paid CloudReady users, phone support is
staed between 8AM and 5PM Eastern Standard
Time.
Email Support (paid education version only)
Paid CloudReady users are entitled to support at
any time via cloudready@neverware.com. Our
team aims to reply to all email support requests
within 1 hour or less during weekday business
hours.
Getting Support
855-979-9199
www.neverware.com
go.neverware.com/forums
cloudready@neverware.com
