Dematic Sprocket User Guide
User Manual: Pdf
Open the PDF directly: View PDF ![]() .
.
Page Count: 196 [warning: Documents this large are best viewed by clicking the View PDF Link!]

Sprocket CMMS
User Guide

1 | P a g e
Contents
1.0 Sprocket 3.5 Overview ............................................................................................................................ 4
1.1 What is Sprocket? ............................................................................................................................... 4
1.2 What will I learn from this user guide? ............................................................................................... 5
2.0 Getting Started with Sprocket ................................................................................................................ 5
2.1 System Requirements ......................................................................................................................... 5
2.2 Accessing Sprocket .............................................................................................................................. 6
3.0 Sprocket Features ................................................................................................................................... 8
3.1 Sprocket Navigation ............................................................................................................................ 8
3.2 Sprocket Screen Header ...................................................................................................................... 9
3.2.1 Account Settings .......................................................................................................................... 9
3.2.2 Logging Out ................................................................................................................................ 14
3.3 Auto Lookup Tool .............................................................................................................................. 14
3.4 Sorting Records in Columns .............................................................................................................. 18
3.5 Saved Searches.................................................................................................................................. 19
3.6 Exporting to a Spreadsheet ............................................................................................................... 20
3.7 Dispatch Actions ................................................................................................................................ 21
3.8 Search Criteria ................................................................................................................................... 23
3.8.1 Saved Search Criteria ................................................................................................................. 25
3.8.2 Saved Search Criteria Icons ........................................................................................................ 27
3.9 Information Icon ............................................................................................................................... 29
3.10 Quick Jump Tool .............................................................................................................................. 30
3.11 Quick Edit Tool ................................................................................................................................ 32
4.0 Work Management ............................................................................................................................... 32
4.1 Sprocket Portal .................................................................................................................................. 33
4.2 Manage Overview ............................................................................................................................. 35
4.3 My Requests ...................................................................................................................................... 43
4.4 My Work Orders ................................................................................................................................ 45
4.5 New Work Order ............................................................................................................................... 47

2 | P a g e
4.5.1 New Work Order Menu Panel .................................................................................................... 52
4.5.2 Dispatching Results Window ...................................................................................................... 59
4.6 Time Materials Tab ........................................................................................................................... 62
4.6.1 Materials .................................................................................................................................... 63
4.6.2 Time ........................................................................................................................................... 70
5.0 Work Order Details ............................................................................................................................... 75
5.1 Navigating to Work Order Details ..................................................................................................... 76
5.2 Work Order Notes ............................................................................................................................. 79
5.3 Work Order Details Dispatch Actions ............................................................................................... 84
5.4 Work Order Details Tabs ................................................................................................................... 86
5.4.1 Summary Tab ............................................................................................................................. 87
5.4.2 Details Tab .................................................................................................................................. 87
5.4.3 Materials Tab ............................................................................................................................. 88
5.4.3.1 Reserved Materials ................................................................................................................. 95
5.4.4 Time Tab ..................................................................................................................................... 99
5.4.5 Costs Tab .................................................................................................................................. 103
5.4.6 Inspections Tab ........................................................................................................................ 106
5.4.6.1 Conducting an Inspection from Work Order Details ............................................................ 106
5.4.6.2 Adding an Inspection to a Work Order ................................................................................. 111
5.4.7 Project Tab ............................................................................................................................... 112
5.4.8 Estimates Tab ........................................................................................................................... 114
5.4.8.1 Creating New Estimate ......................................................................................................... 115
5.4.8.2 Estimate Request Email Notifications ................................................................................... 125
5.4.8.3 Estimate Request for Modifications ..................................................................................... 126
5.4.9 History Tab ............................................................................................................................... 129
5.4.10 Saved Files Tab ....................................................................................................................... 130
6.0 Inspections Console ............................................................................................................................ 133
6.1 Inspection Manager ........................................................................................................................ 133
6.2 Inspection Results Search ............................................................................................................... 139

3 | P a g e
7.0 Inventory Console ............................................................................................................................... 143
7.1 Inventory Overview ......................................................................................................................... 144
7.2 Inventory Checkout Search ............................................................................................................. 144
7.2.1 Issuing Items ............................................................................................................................ 147
7.2.2 Returning Items ........................................................................................................................ 150
7.3 Inventory Items ............................................................................................................................... 153
7.3.1 Inventory Items Details Tab ..................................................................................................... 154
7.3.2 Inventory Items Storerooms Tab ............................................................................................. 159
7.3.2.1 Perform Physical Count ......................................................................................................... 161
7.3.2.2 Perform Transfer ................................................................................................................... 162
7.3.3 Inventory Items Equivalent ...................................................................................................... 164
7.3.4 Inventory Items History Tab ..................................................................................................... 167
7.4 Inventory Management .................................................................................................................. 168
7.4.1 Inventory Management Transfer Tab ...................................................................................... 168
7.4.2 Inventory Management Physical Count ................................................................................... 172
7.4.3 Inventory Management Re-Count ........................................................................................... 175
7.4.4 Return to Vendor ..................................................................................................................... 175
7.5 Purchase Requests .......................................................................................................................... 177
7.5.1 New Purchase Request Vendor Tab ......................................................................................... 178
7.5.2 New Purchase Request Items Tab............................................................................................ 180
7.5.2.1 Selecting Products by Product Identifier .............................................................................. 181
7.5.2.2 Selecting Products by Purchase Request Vendor ................................................................. 183
7.5.2.3 Selecting Non-Inventory Items ............................................................................................. 184
7.5.2.4 Inventory Items Grid ............................................................................................................. 188
7.5.3 Purchase Request Print Tab ..................................................................................................... 191
7.5.4 Purchase Request History Tab ................................................................................................. 192
7.6 Purchase Request Details ................................................................................................................ 193
7.7 Purchase Request Save Buttons ...................................................................................................... 194
8.0 Additional Details ................................................................................................................................ 194

4 | P a g e
8.1 Overview ......................................................................................................................................... 195
8.2 Contact Us ....................................................................................................................................... 195
1.0 Sprocket 3.5 Overview
1.1 What is Sprocket?
Sprocket is a work management application that provides an easy-to-use interface with the flexibility to
customize the work management processes to meet your operational processes. This user guide is

5 | P a g e
designed to provide an overview training of the features and functionality. This user guide is a step-by-
step guide that will walk you through the general work management features of Sprocket 3.5.
1.2 What will I learn from this user guide?
The following modules will be covered in this user guide:
Work Management
o Creating Work Orders
o Editing Work Orders
o Viewing Work Orders
o Submitting Estimates
o Time and Materials
o Work Order Details
Time and Materials
o Posting Time and Materials
o Editing Time and Materials Postings
o Deleting Time and Materials
Inventory Management
o Purchase Request
o Inventory Item Checkout
o Physical Counts
Inspections
o Inspection Manager
o Conducting Inspections
o Submitting Results
2.0 Getting Started with Sprocket
2.1 System Requirements
Sprocket 3.5 requires the following system settings:
Computer Process or 1 (GHz) or greater
Memory 2 GB or greater
Monitor Resolution of 1024 x 768.
Username and Password provided by your Sprocket System Administrator
6 | P a g e
2.2 Accessing Sprocket
Sprocket is accessed using one of the following browsers:
Internet Explorer 8
Mozilla Firefox
Opera
Google Chrome
Safari
Note: Popup Blockers may interfere with Sprocket. You should disable your popup blocker when
accessing Sprocket.
7 | P a g e
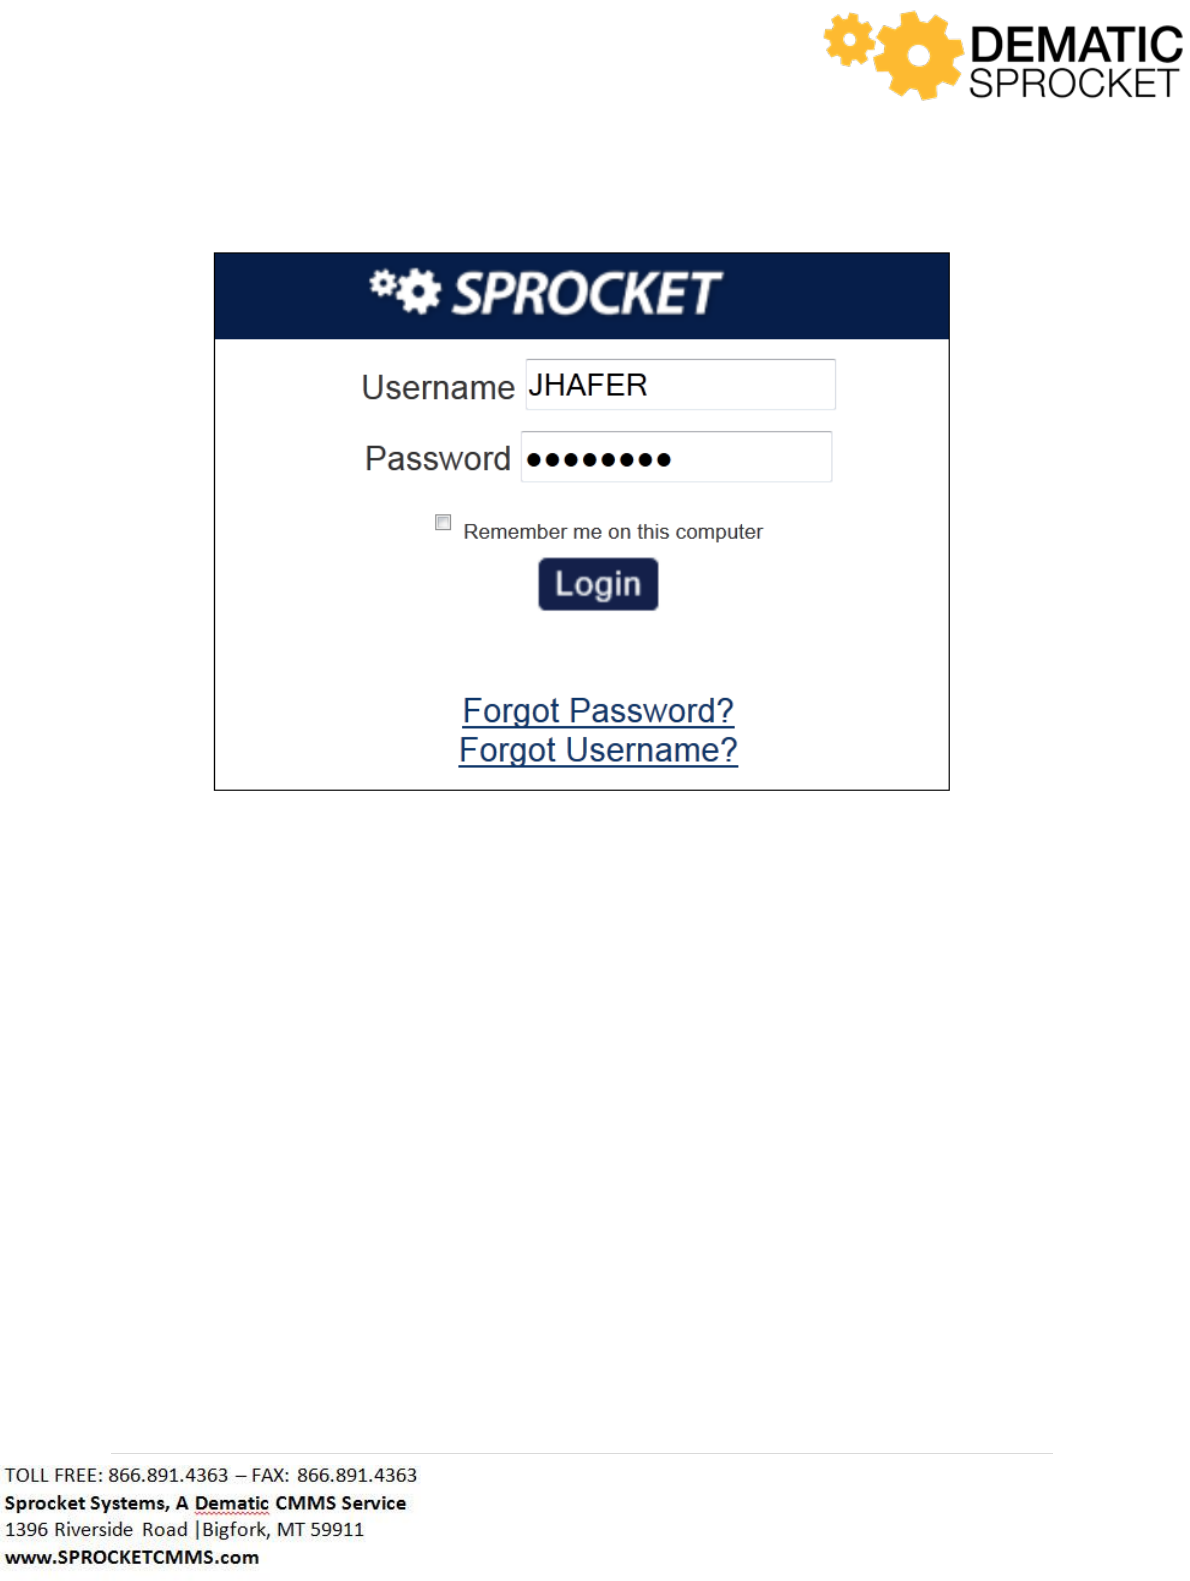
Remember me on this computer:
When this box is checked, Sprocket will not require Username or Password the next time you return
from the same computer. Do not click Logout or Username and Password is required each time. Close
the window or browser to stay logged in.
Forgot Password?:
Use this Link if Password cannot be remembered. Password reset link is emailed to user email address
once the Challenge Question has been answered correctly. This information is stored on the People
record, under the Additional tab.
Forgot Username?:
Use this link if Username cannot be remembered. Enter Email address, and username will be sent via
email.
Once you have entered in your user name and password, select the Log In button to enter Sprocket.
8 | P a g e
3.0 Sprocket Features
3.1 Sprocket Navigation
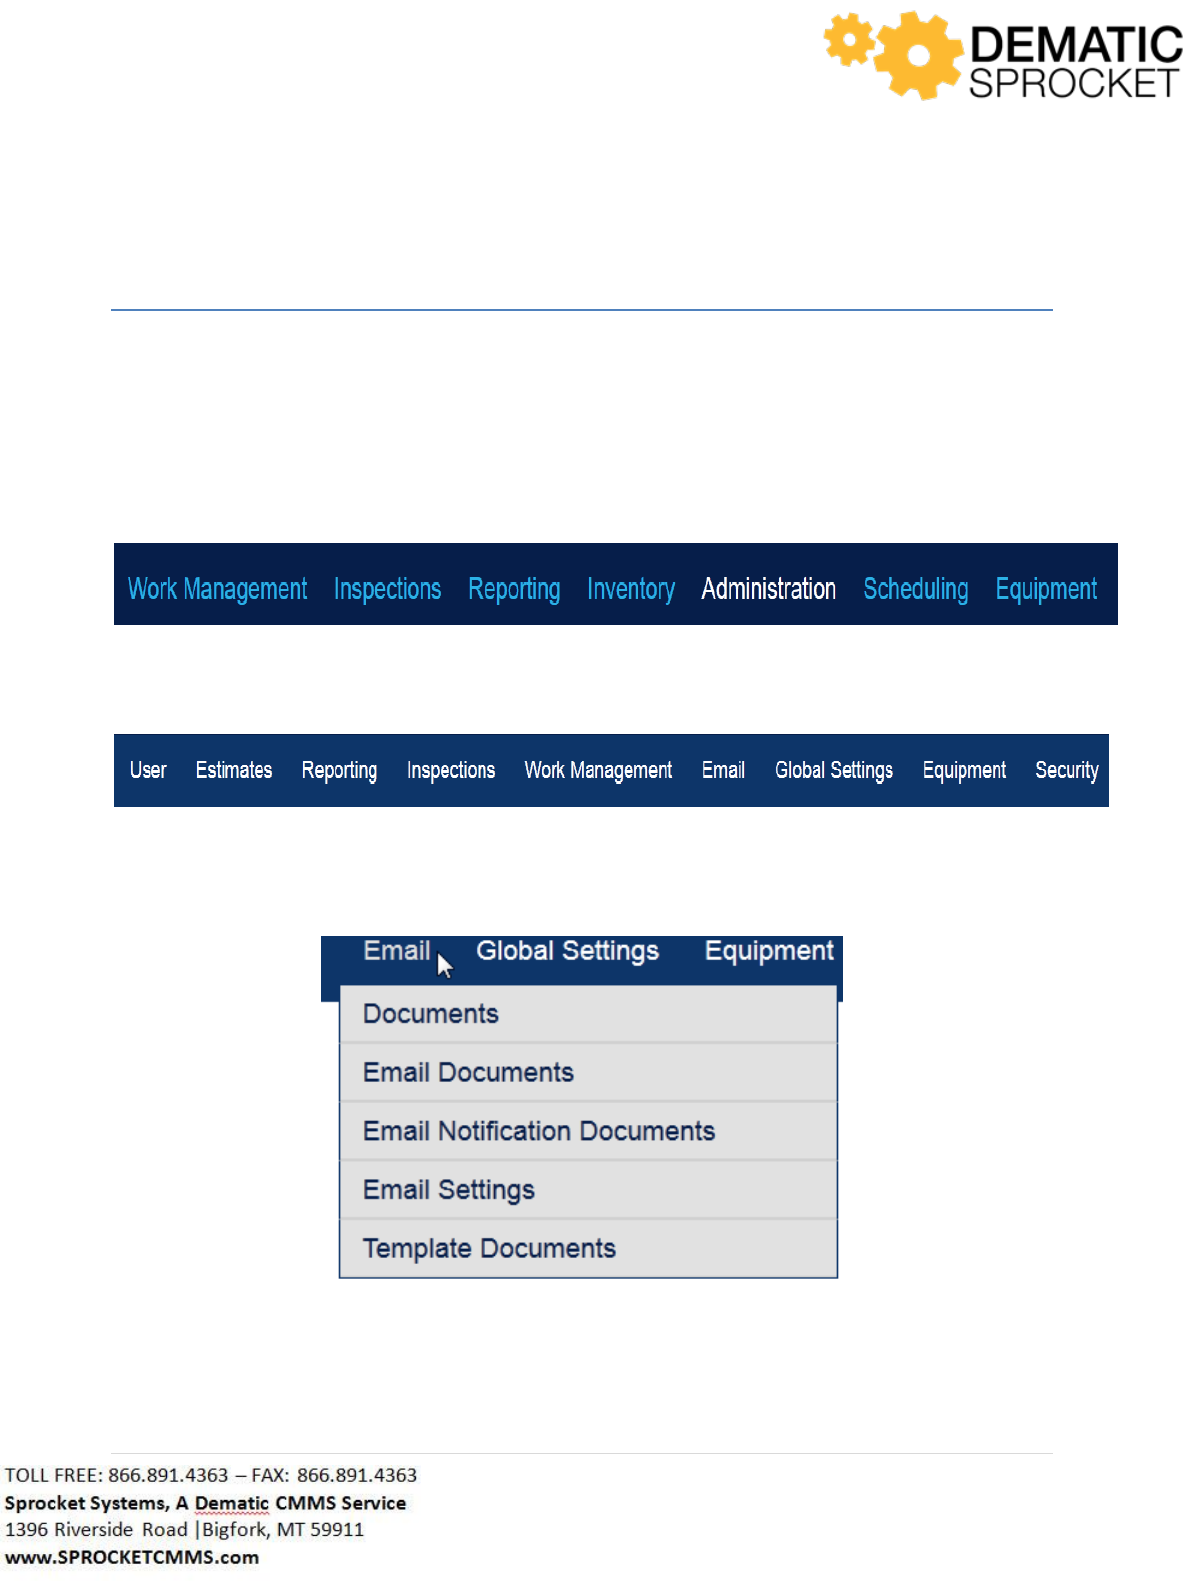
Sprocket modules are sectioned into three categories: Consoles, Tabs, and Screens. When you first log
into Sprocket, the Sprocket Portal tab is displayed under the Work Management console. If you hover
your cursor over the tabs, a menu of screens will be displayed.
Consoles:
Tabs:
Screens:
Note: Sprocket customizes screen settings based on customer needs. Your screen may or may not display
the above Consoles, Tabs, or Screens. Contact your Sprocket Administrator with questions.
9 | P a g e
You will use these Consoles, Tabs, and Screens to navigate through Sprocket. Simply select the desired
Console, Tab, then Screen to navigate to the desired page.
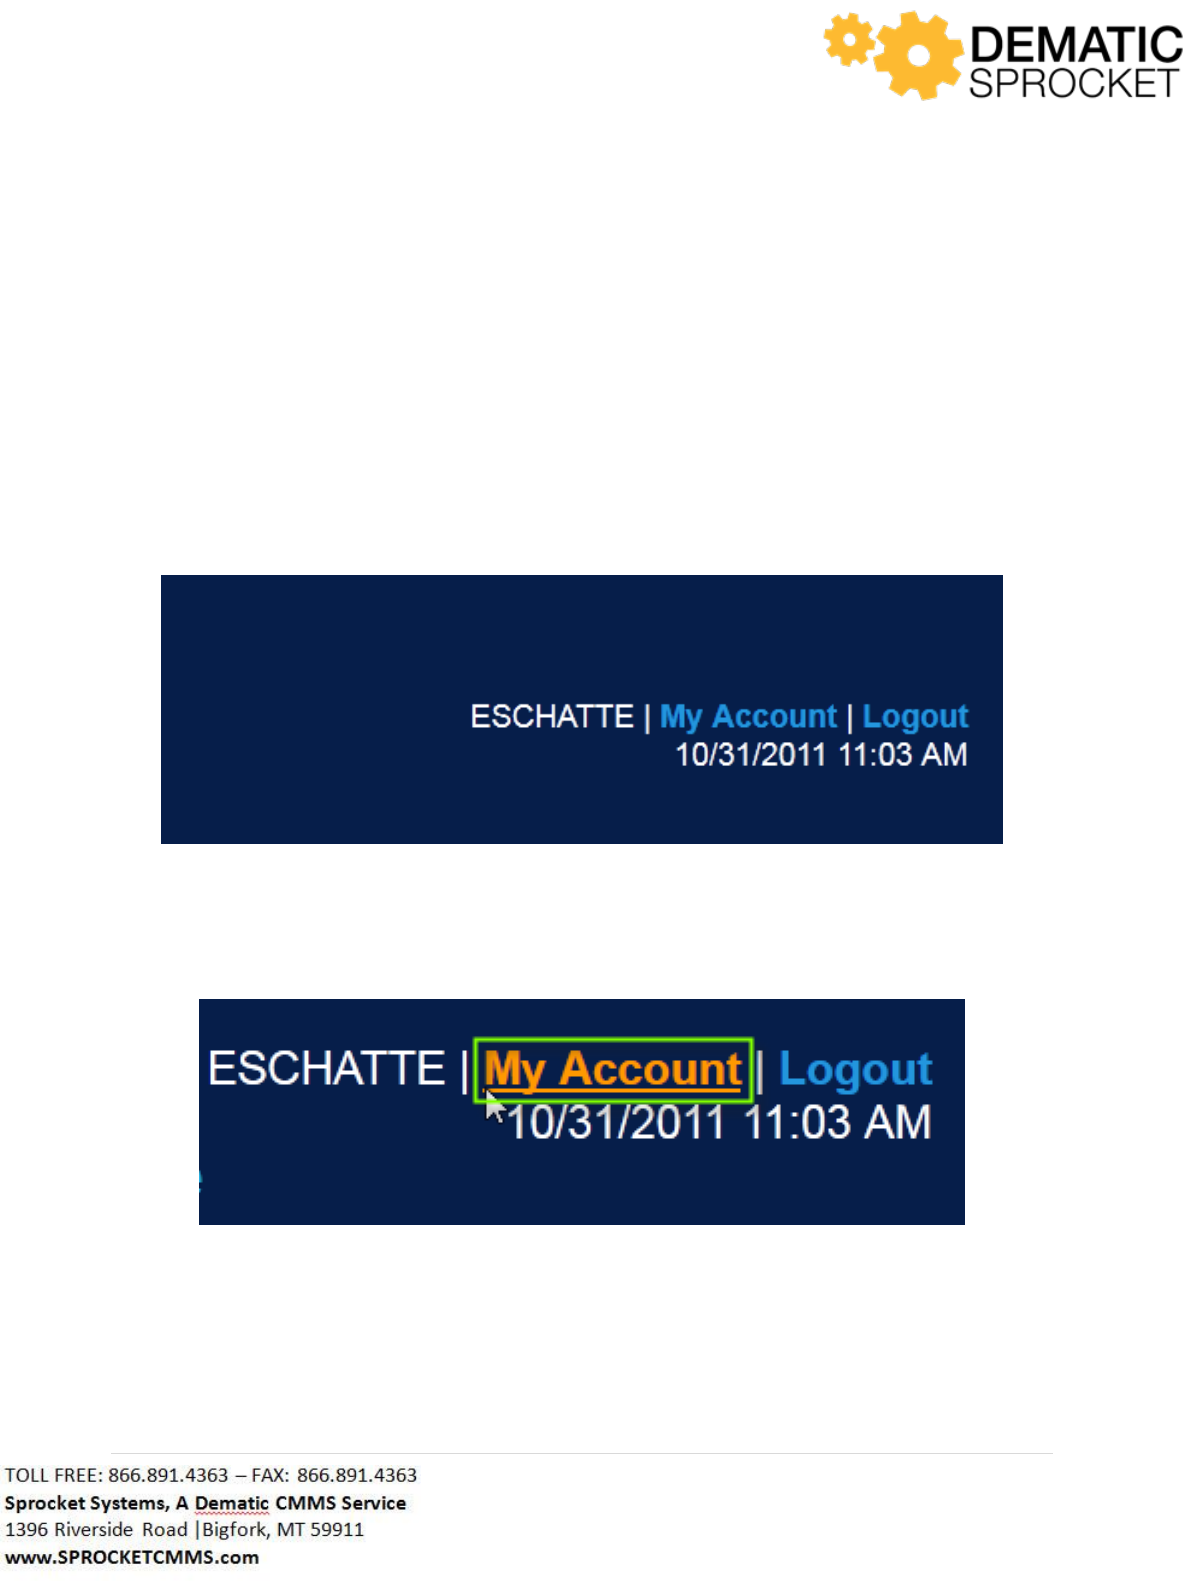
3.2 Sprocket Screen Header
The heading at the top of the screen displays current information such as the current logged in user,
today’s date, and the current time. This also displays the buttons you use to log out and adjust account
settings.
3.2.1 Account Settings
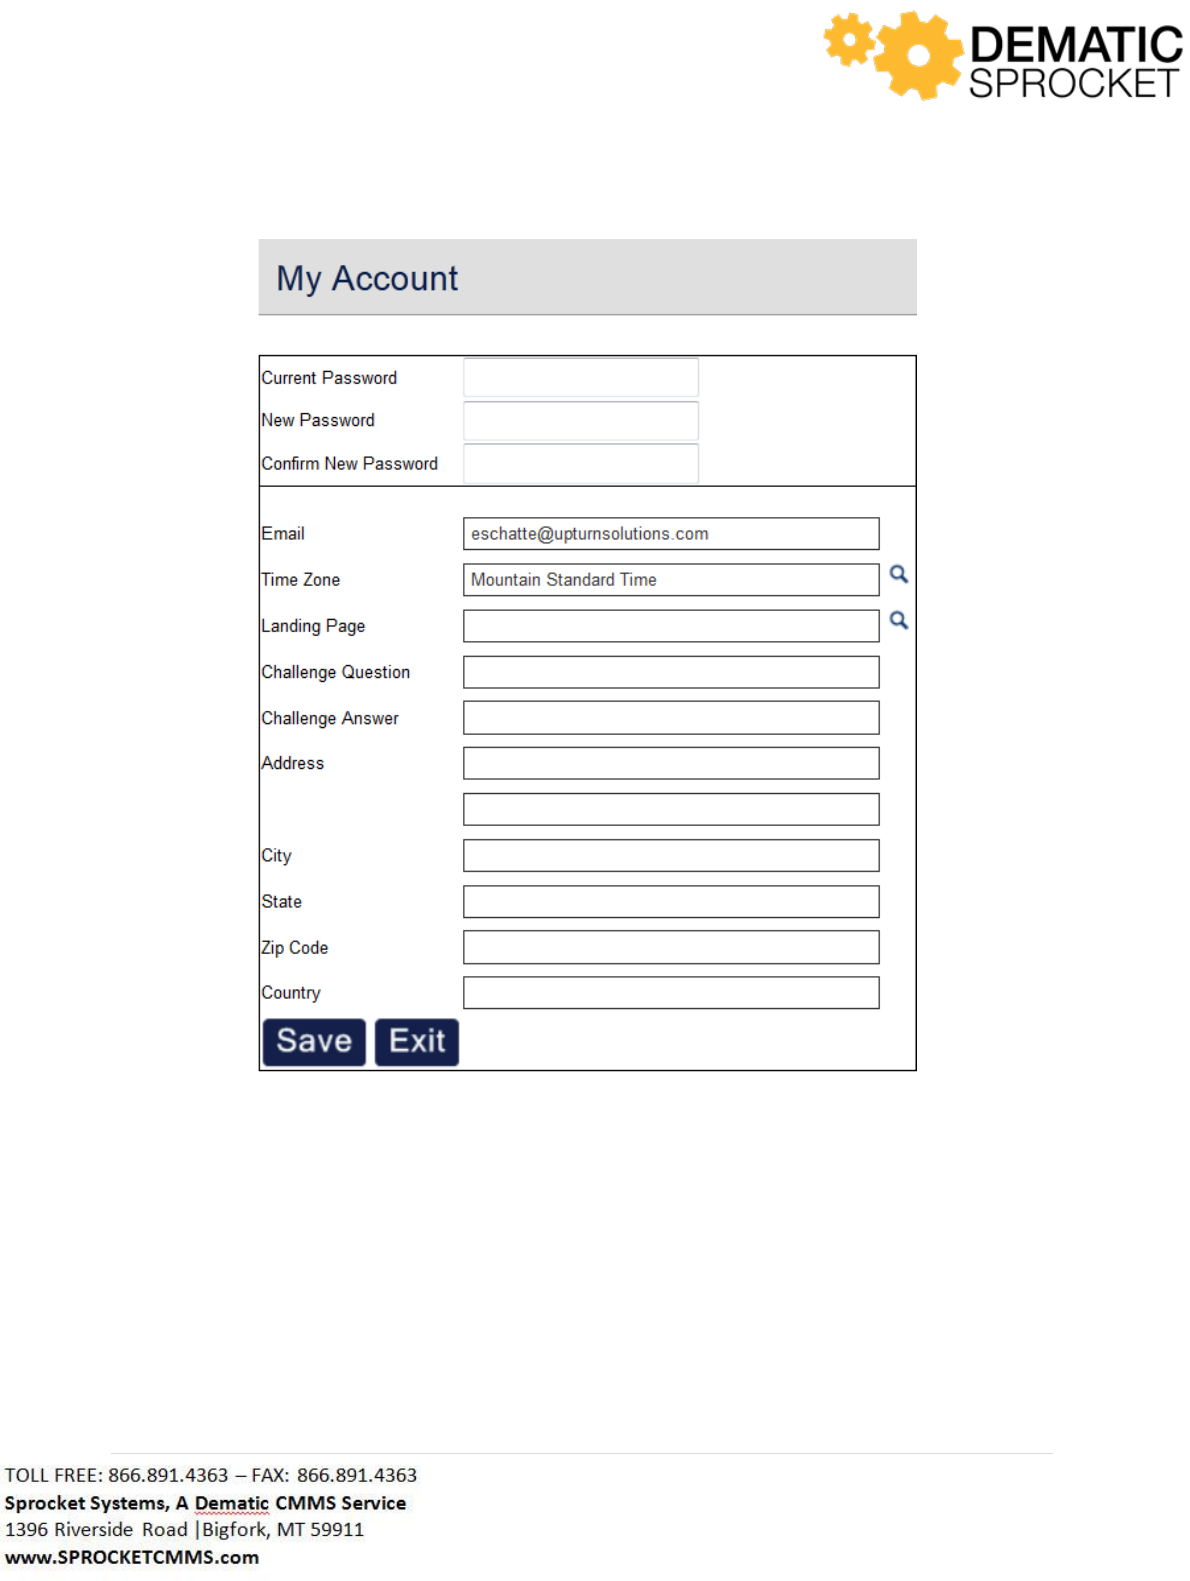
Next to the logged in user’s name, click the My Account button to change account settings.
Clicking this link will bring you to the My Account form where you can change information such as
password or add additional information such street address.
10 | P a g e
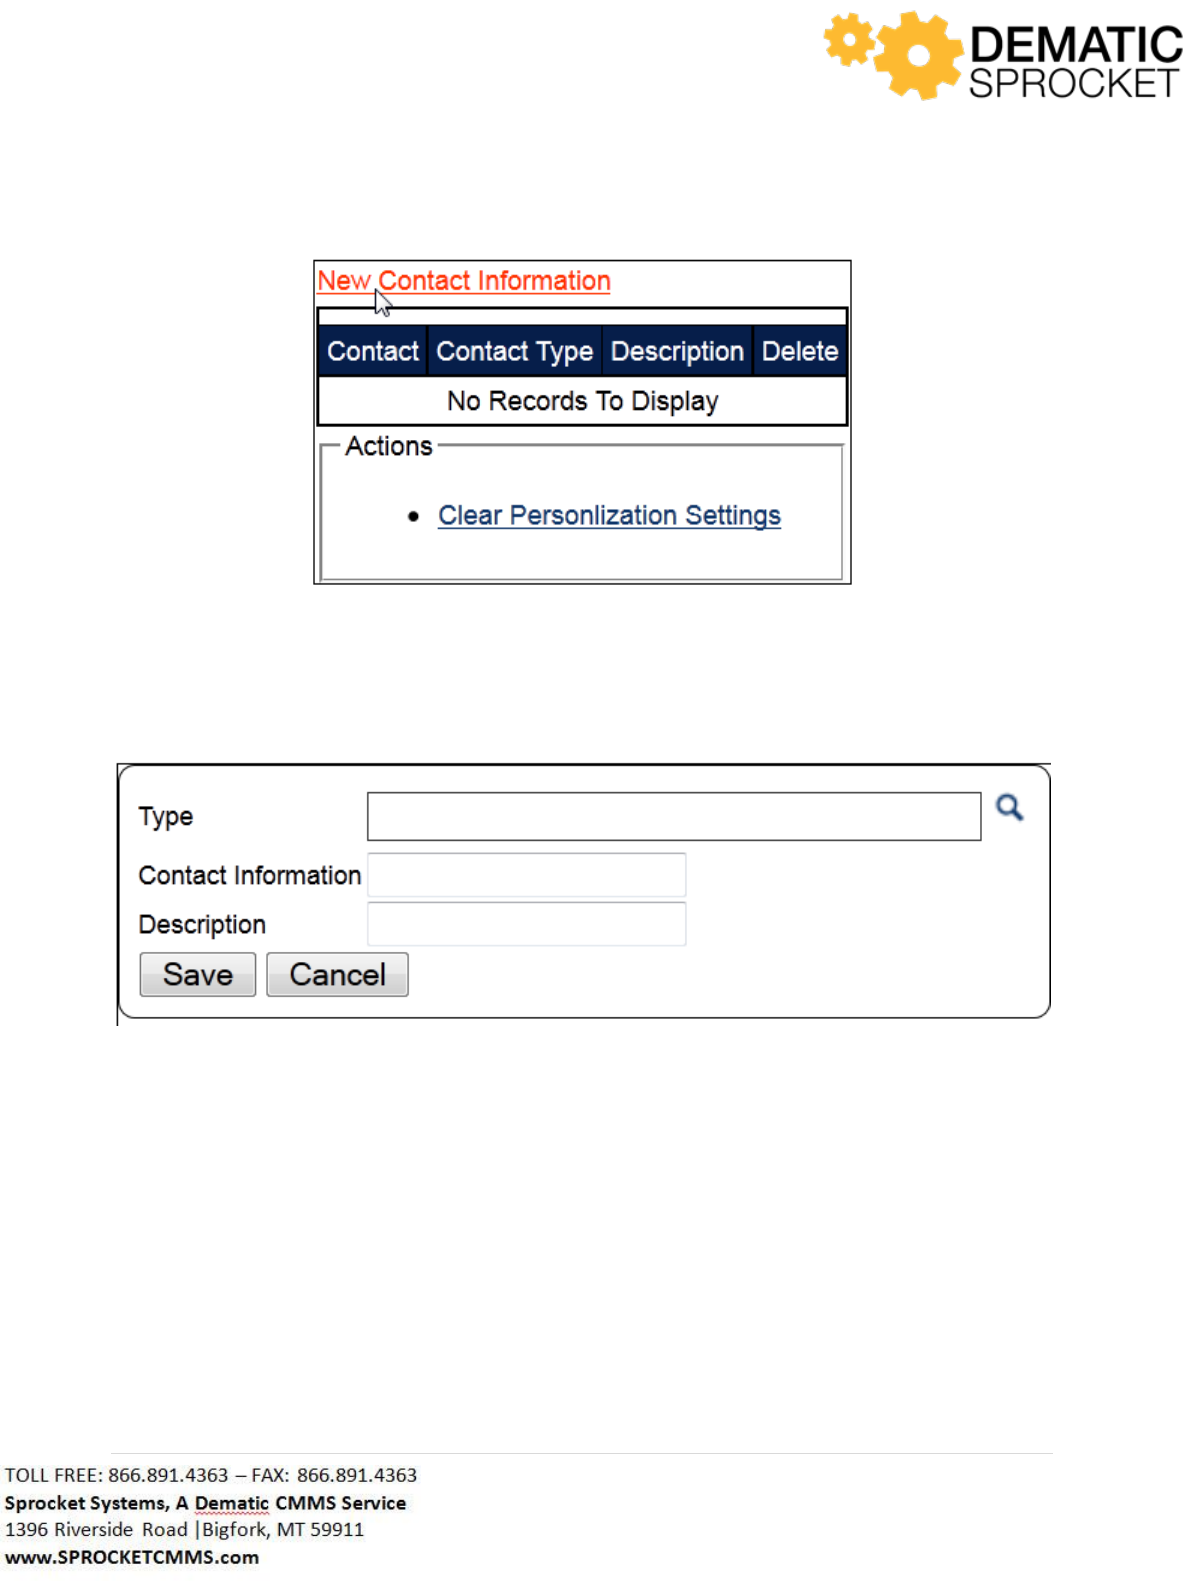
Notice that to the right of the My Account form, there is an additional window where you can add New
Contact Information. Click the New Contact Information link to add additional information to your user
account.
11 | P a g e
A form will appear for you to enter in your additional contact information. Use the fields in this window
to enter in your additional contact information.
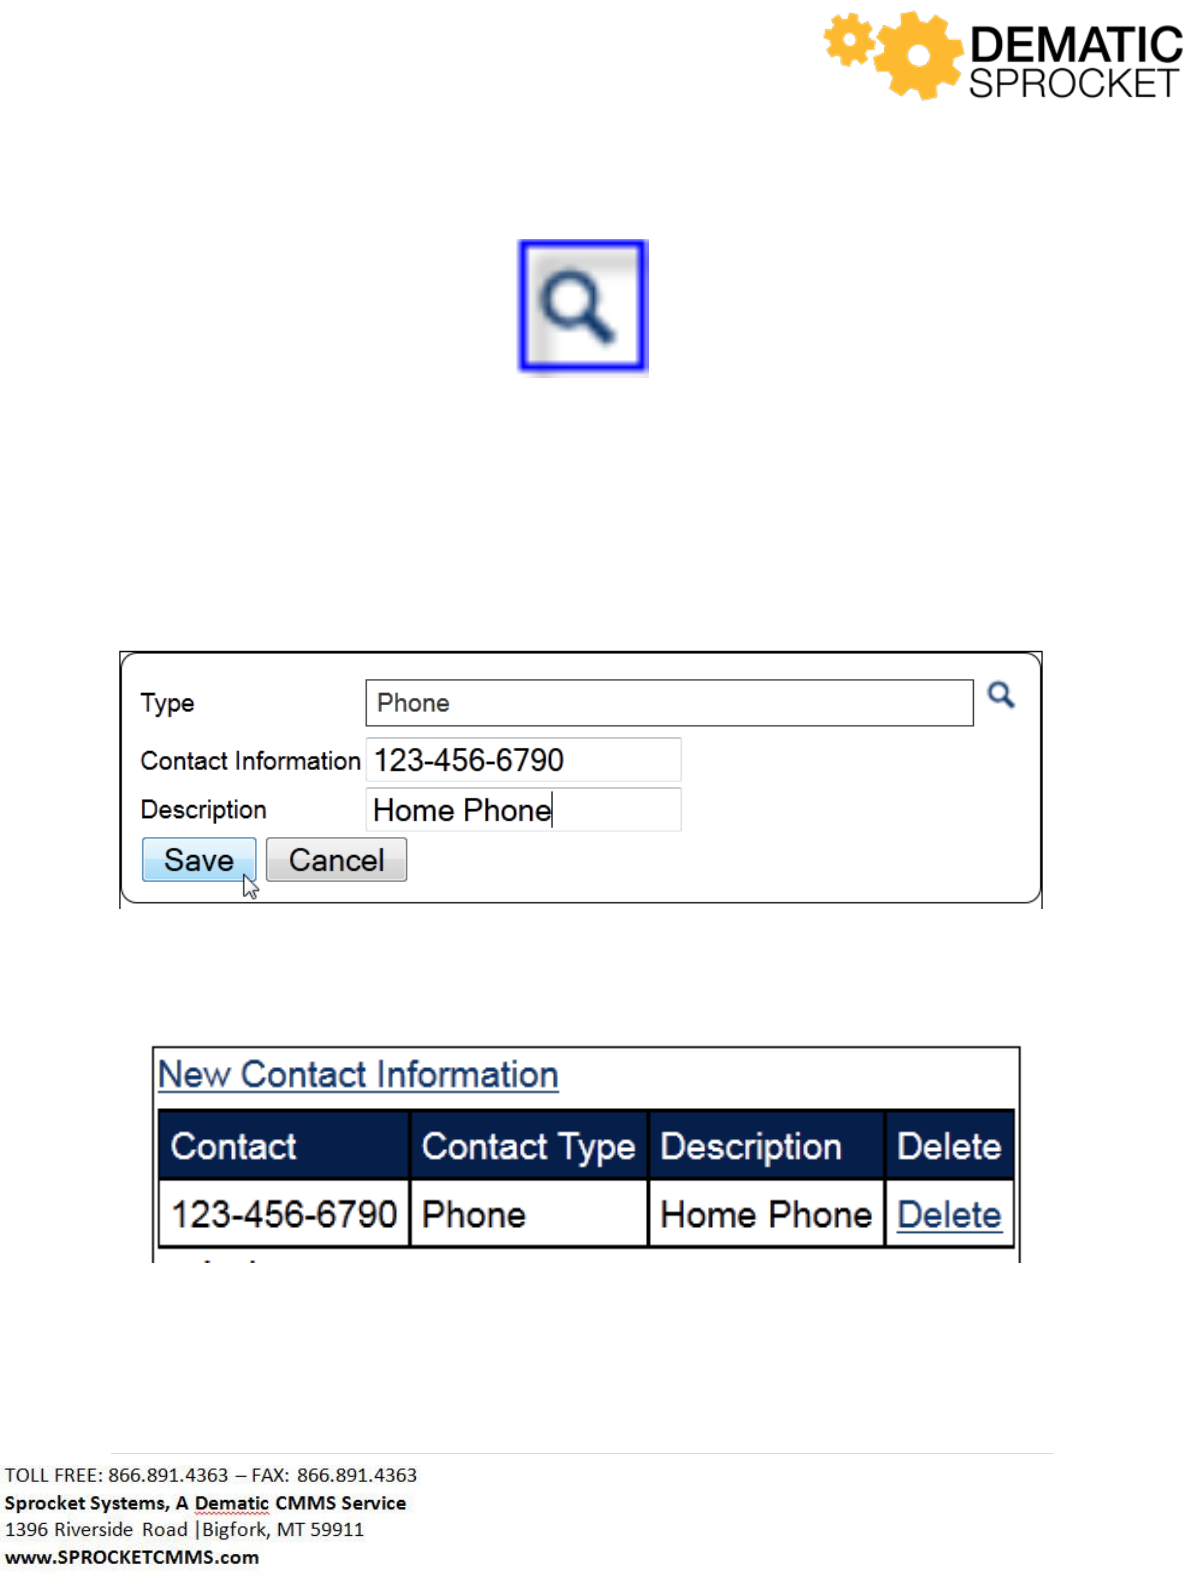
Notice that the Auto Lookup Tool is displayed to the right of the Type field.
12 | P a g e
This indicates that this field allows you to search Sprocket for specific records using this function. The
Auto Lookup Tool will be described in greater details in the next section.
Once you have entered in all of your new contact information, click the Save button to save this to your
account record. If you do not wish to add additional contact information, click the Cancel button to
return to the previous screen.
The page will refresh and a grid will appear that displays your updated information.
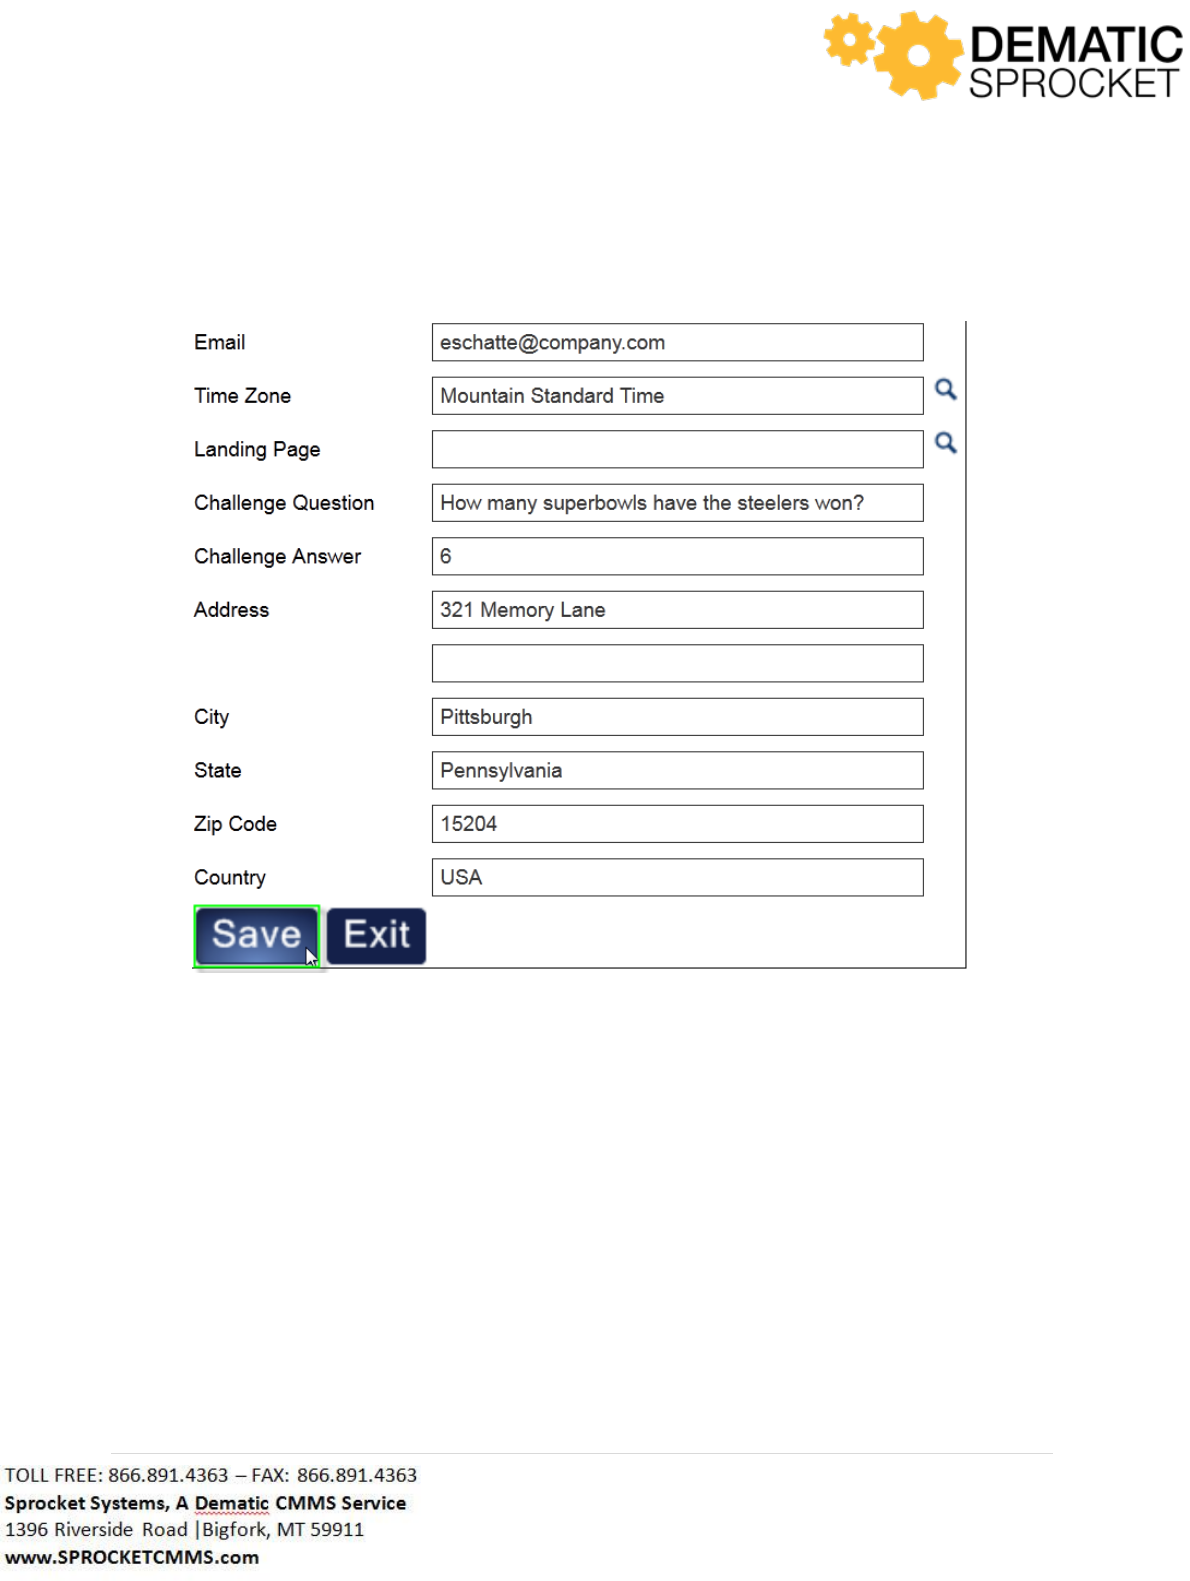
You can add other types of contact information by clicking the New Contact Information button at the
top of the grid at any time. If you ever wish to remove any type of contact information, locate the row
you wish to remove and click the Delete link at the far right of the grid.
13 | P a g e
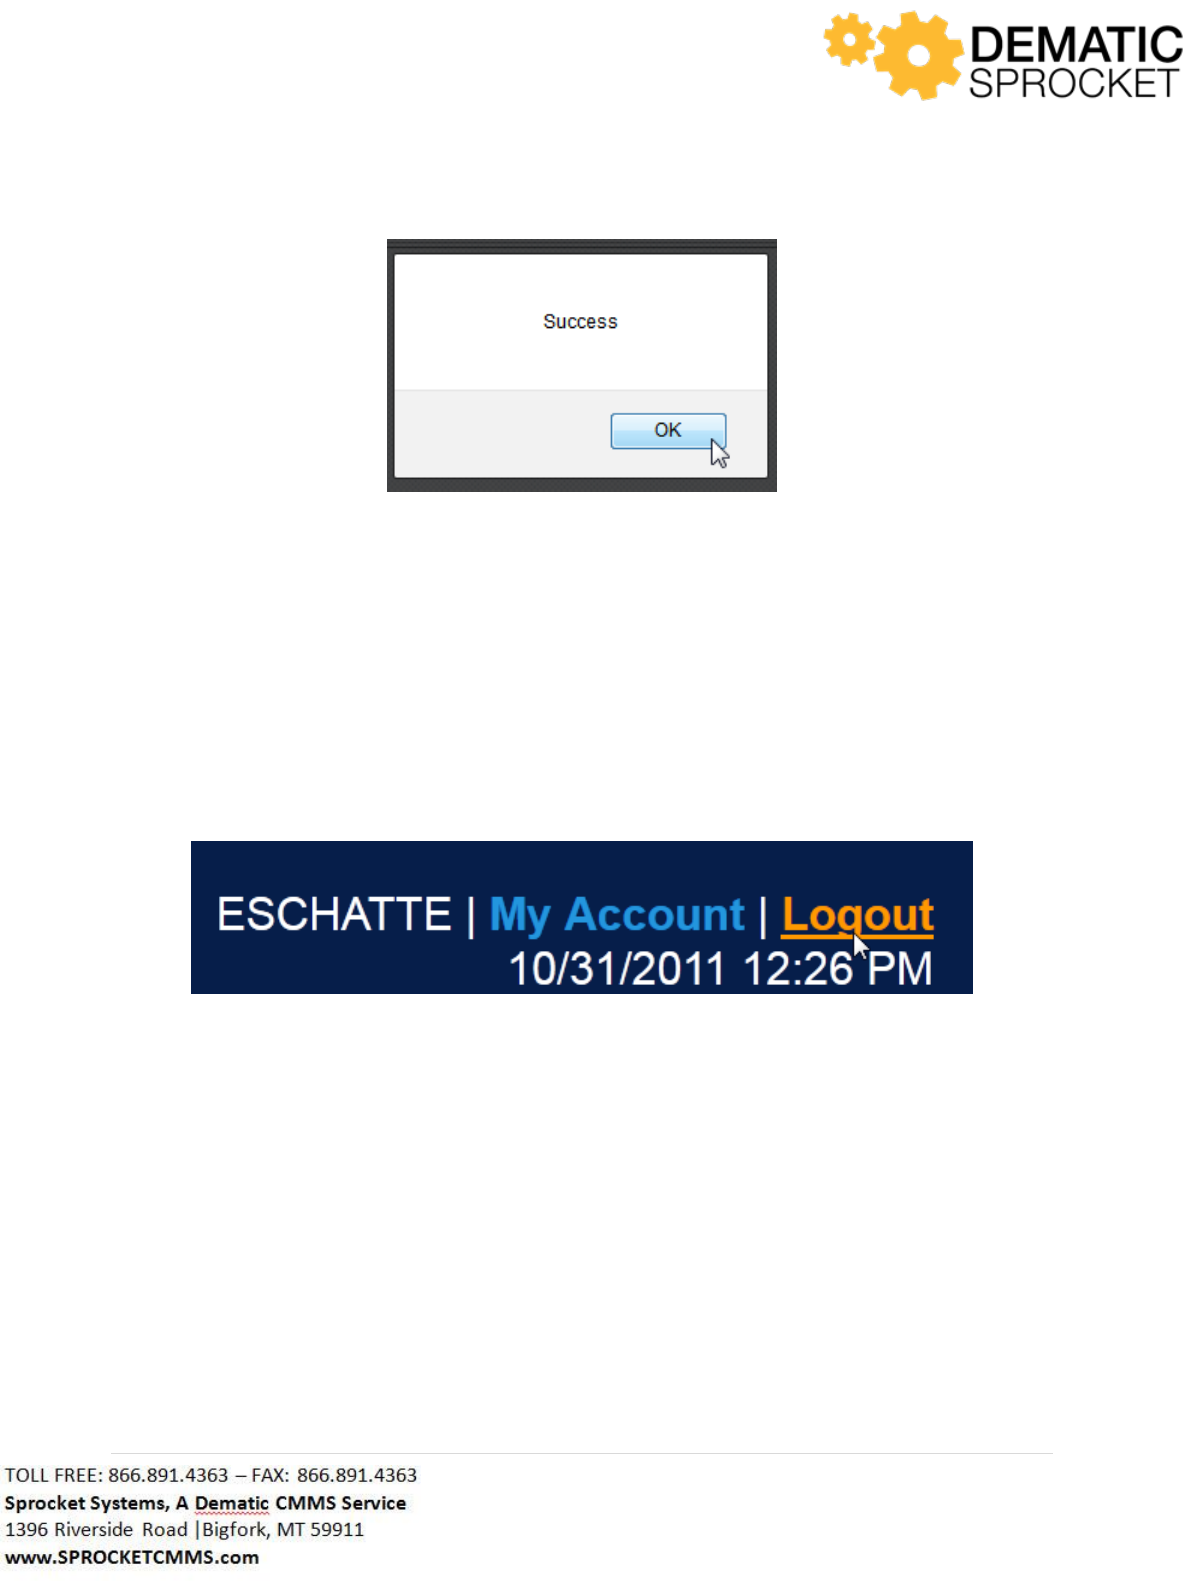
Once you have updated your user account information, click the Save button at the bottom of the page
to update your account.
A window will appear saying Success. Click OK to continue.
14 | P a g e
Now that your account settings have been updated, click the Exit button at the bottom left of the page
to return to your main screen.
3.2.2 Logging Out
Along the header of the Sprocket main page is the log out button located in the upper right hand corner
of the page. Click here when you wish to log out of Sprocket. This will return you to log in page where
you can enter you user name and password to log back into Sprocket.
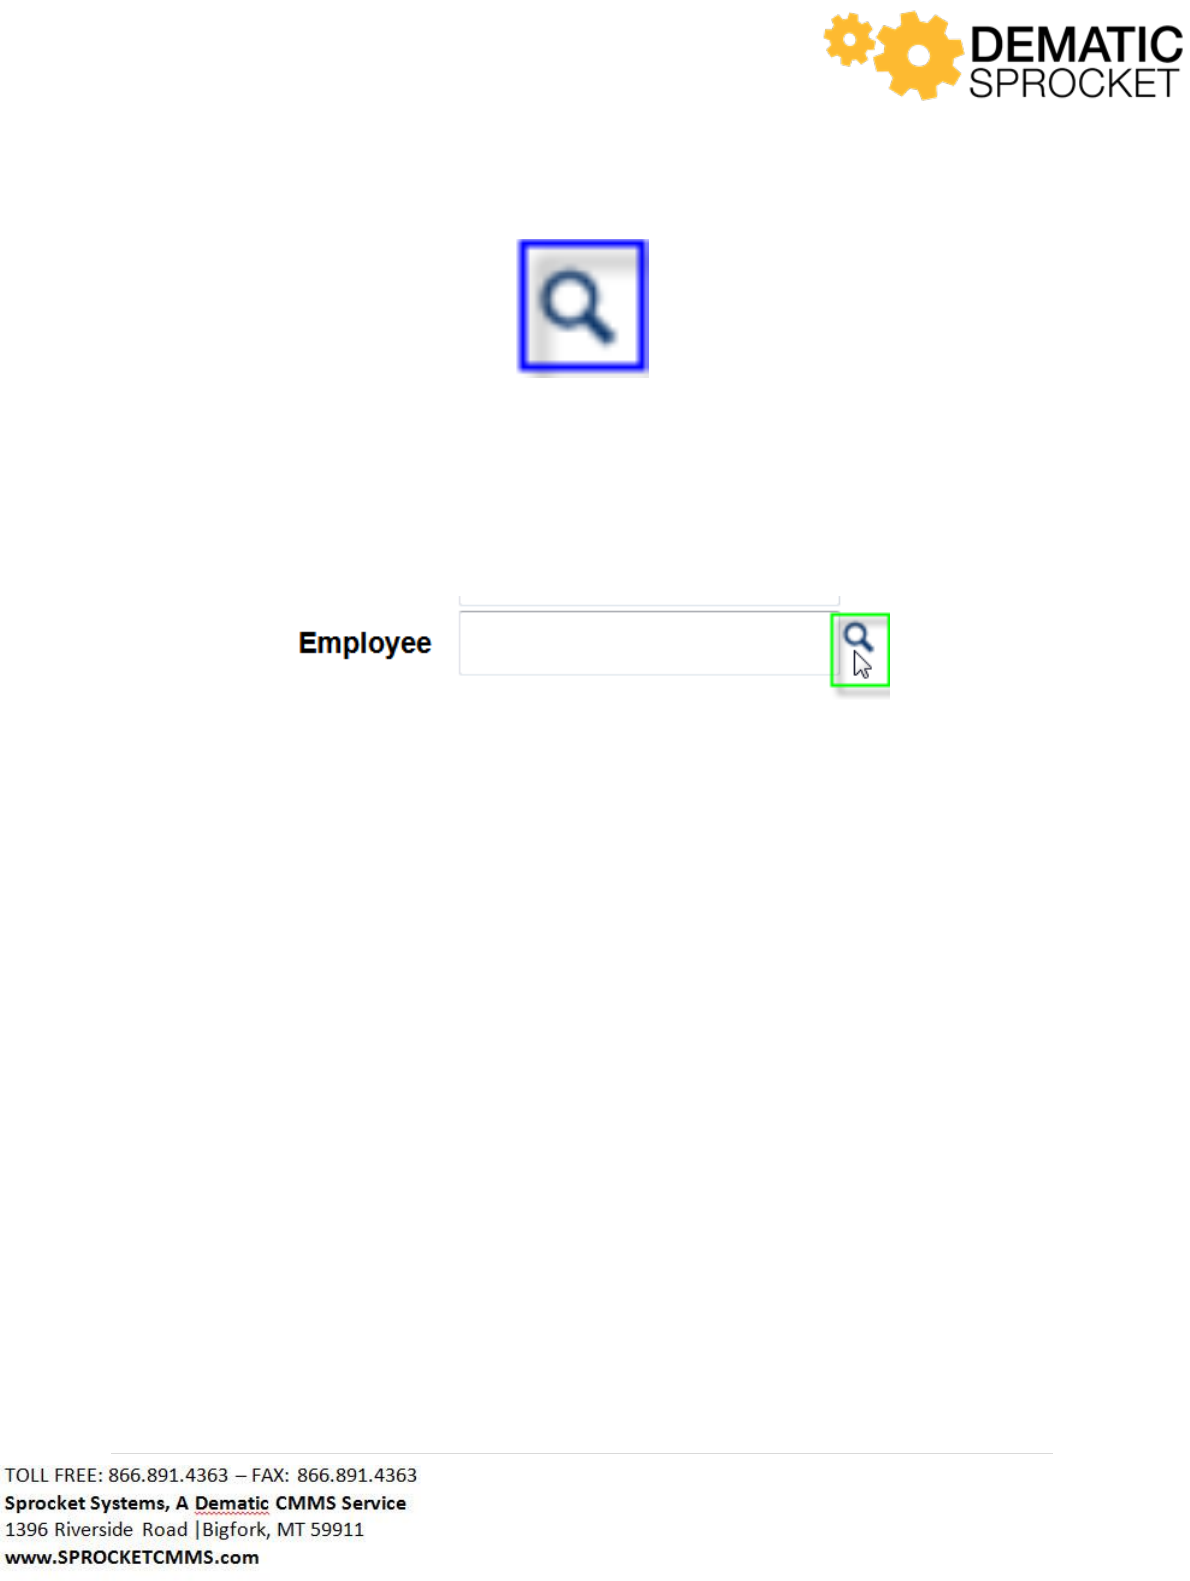
3.3 Auto Lookup Tool
Throughout Sprocket, you will notice that Auto Lookup Tool icon next to certain fields when entering
information into a form or when searching for information.
15 | P a g e
When this function is available, it indicates that you can use it to search for specific records. This tool
can be used in a number of ways. Let’s say you are searching for a particular Employee in Sprocket. One
way the Auto Lookup Tool can help you locate the account would be by simply clicking the Auto Lookup
Tool.
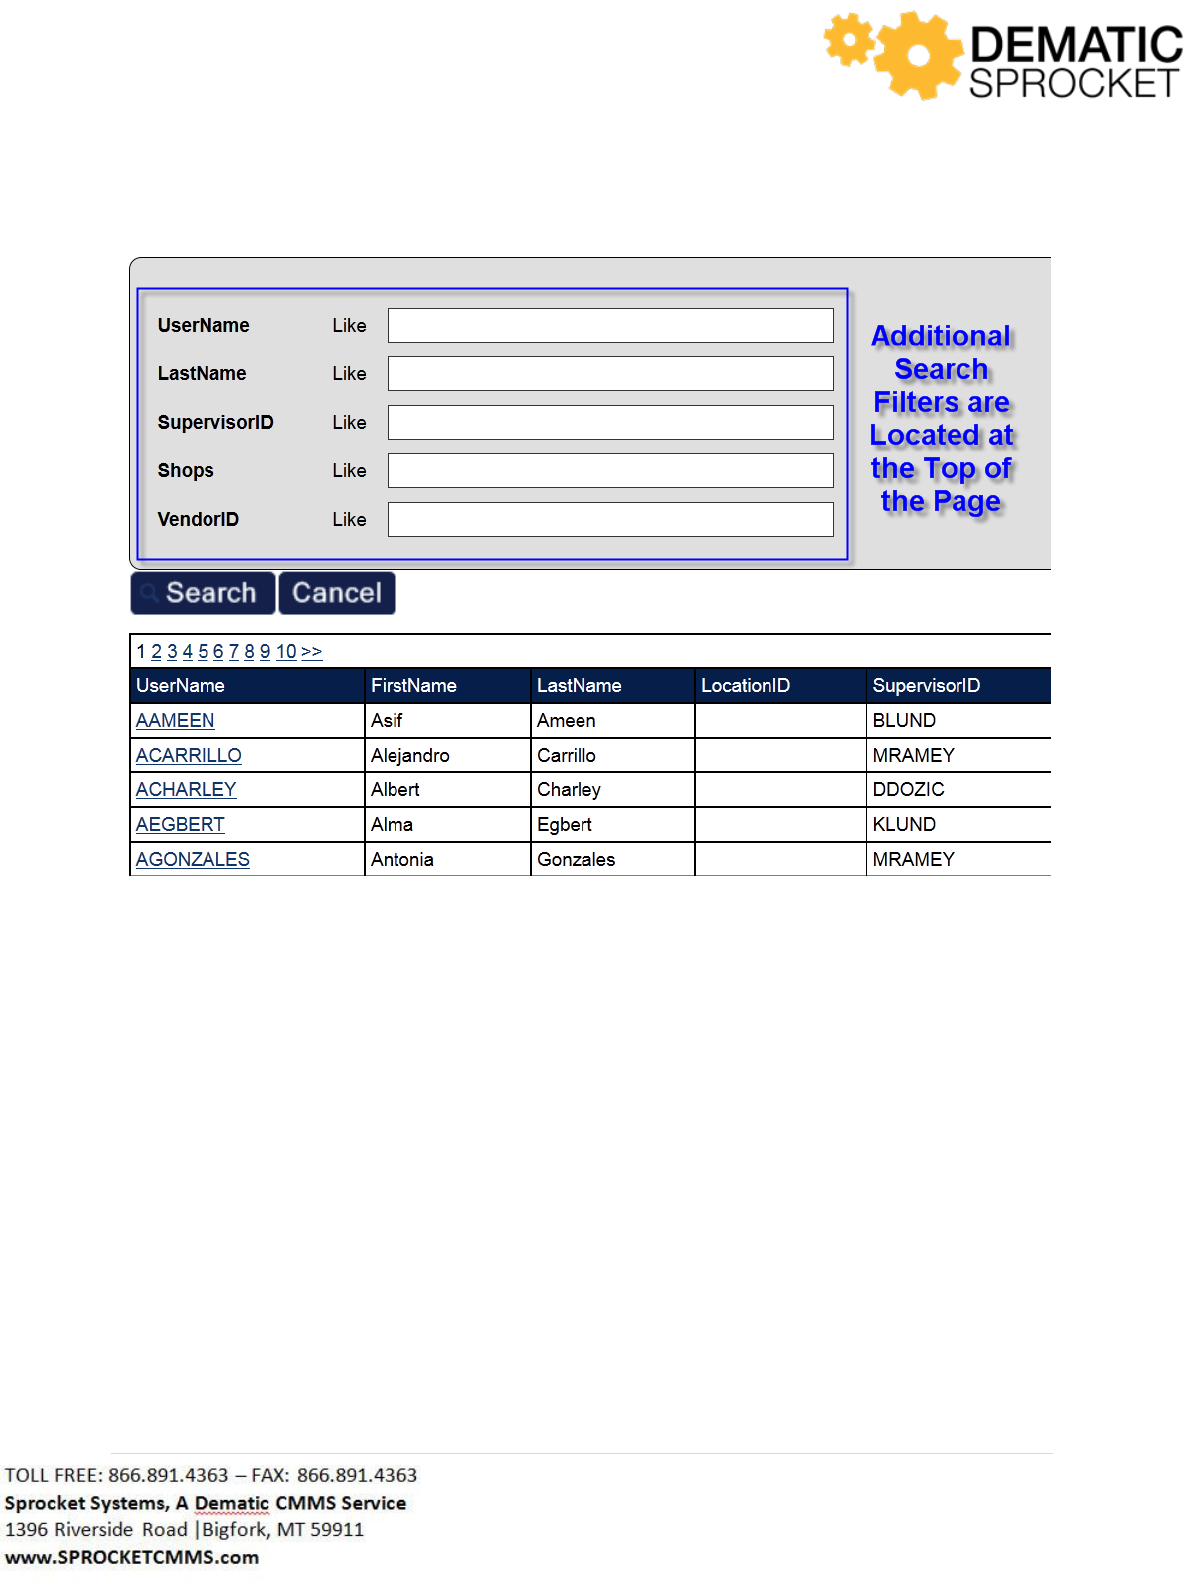
A window will appear displaying all possible employee records. Notice the fields at the top of the page.
You can enter in additional filters to narrow down your search.
16 | P a g e
From here you can scroll through the pages to select the desired employee or use search criteria above
to narrow search results. If you use the search criteria fields above, enter in all or part of the name and
click the Search button at the top left of the grid. You may also click Cancel to return to the previous
screen or click the red X at the top right of your screen to exit out of the search.
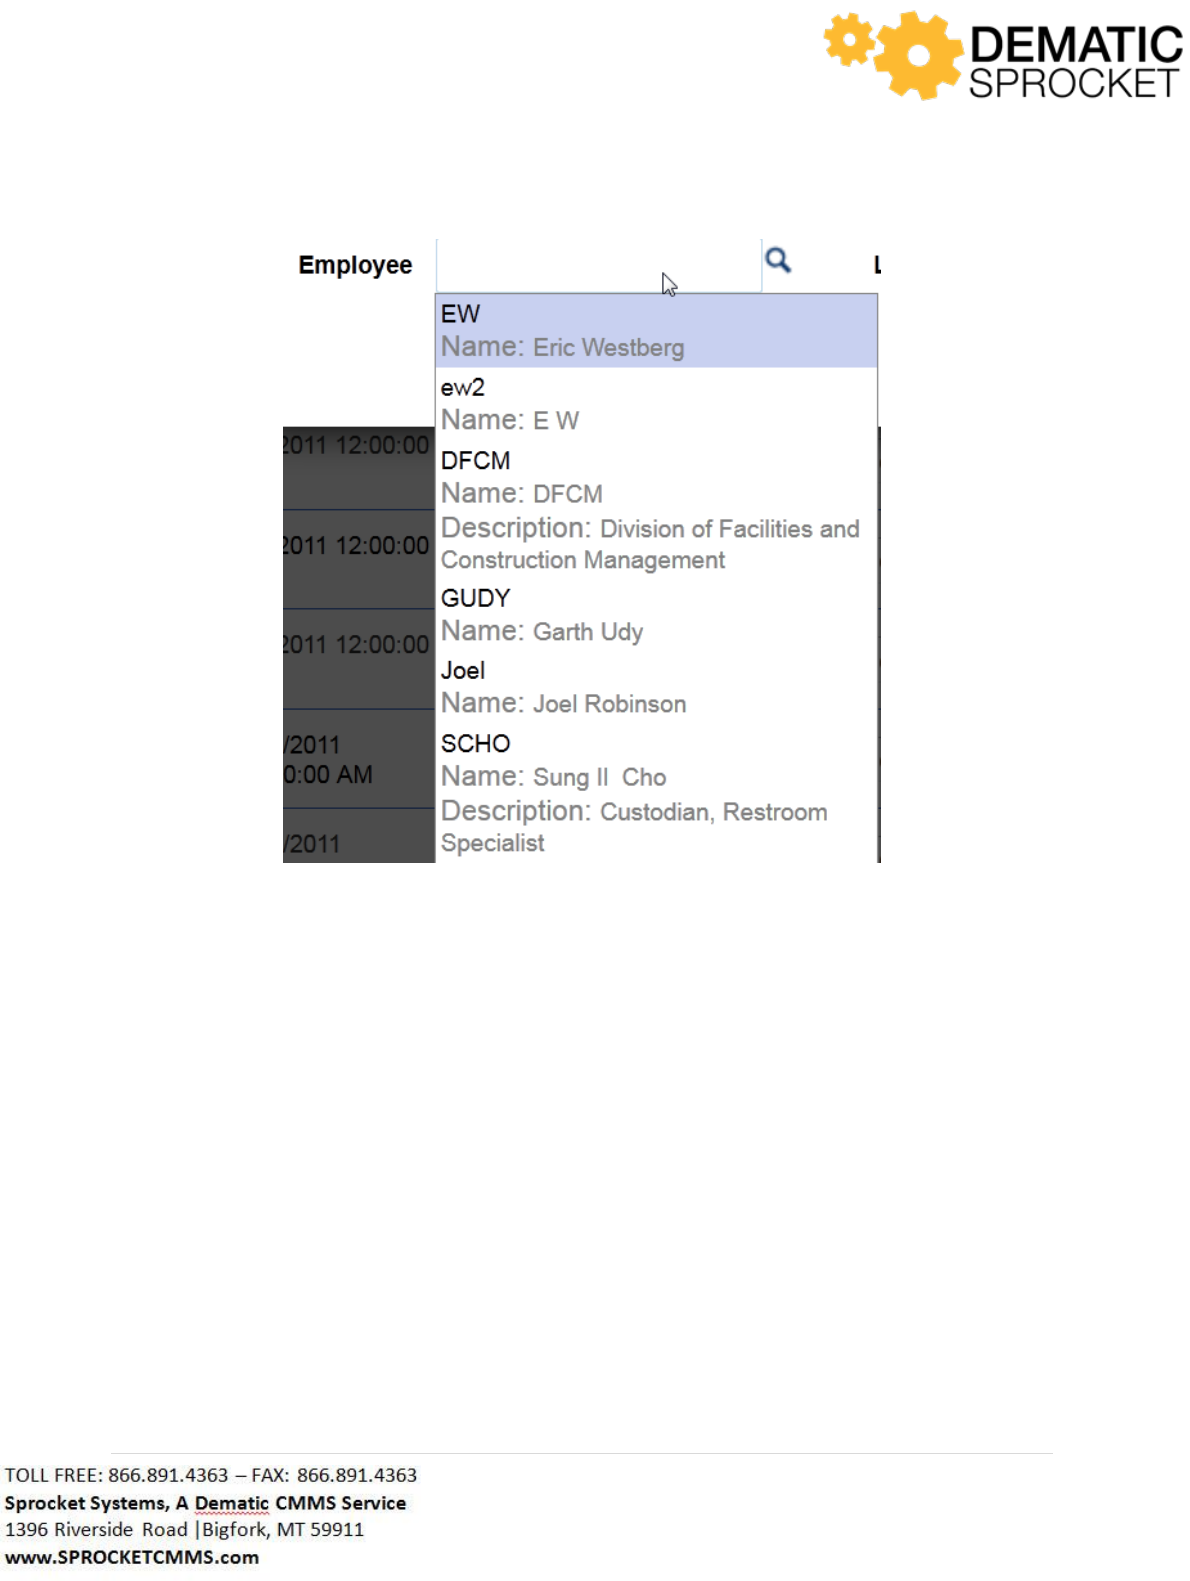
Another way to use the Auto Lookup Tool is to simply click inside the text field. A list will appear
displaying the top ten records for this category.
17 | P a g e
If the desired record still does not appear, click the Auto Lookup Tool icon to return to a list of all
possible records and search for it there.
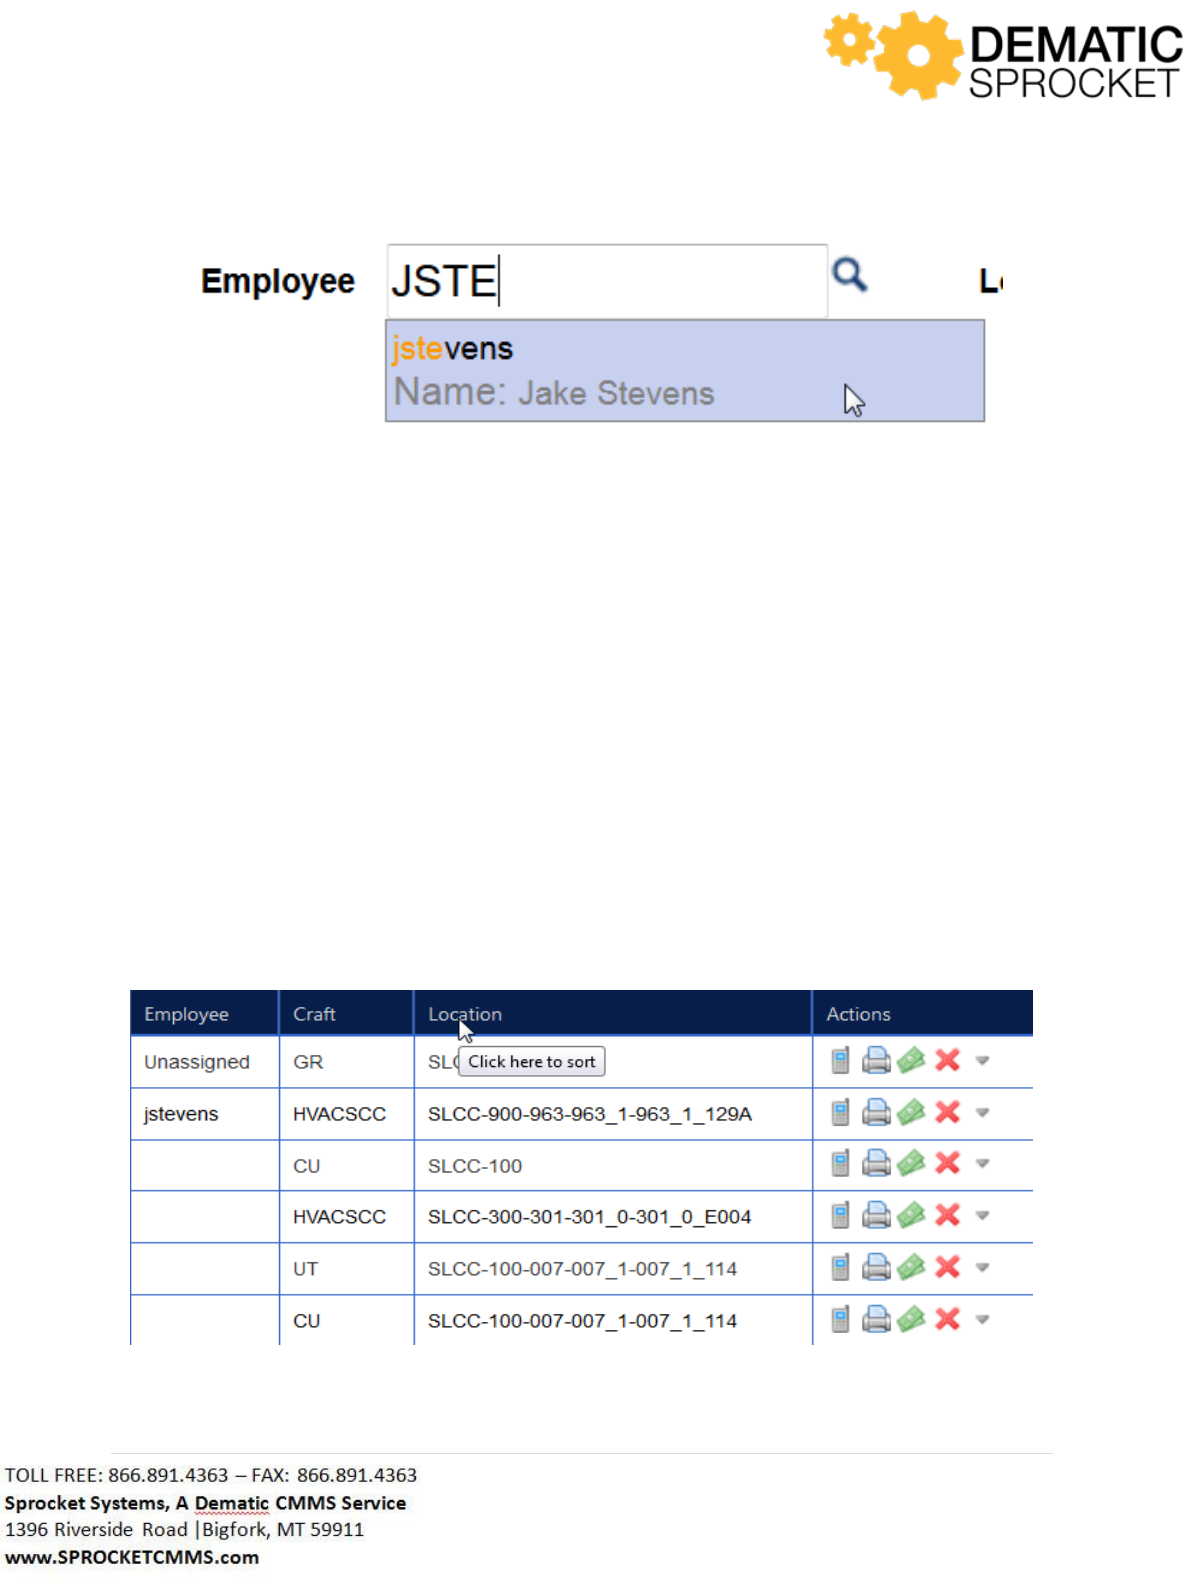
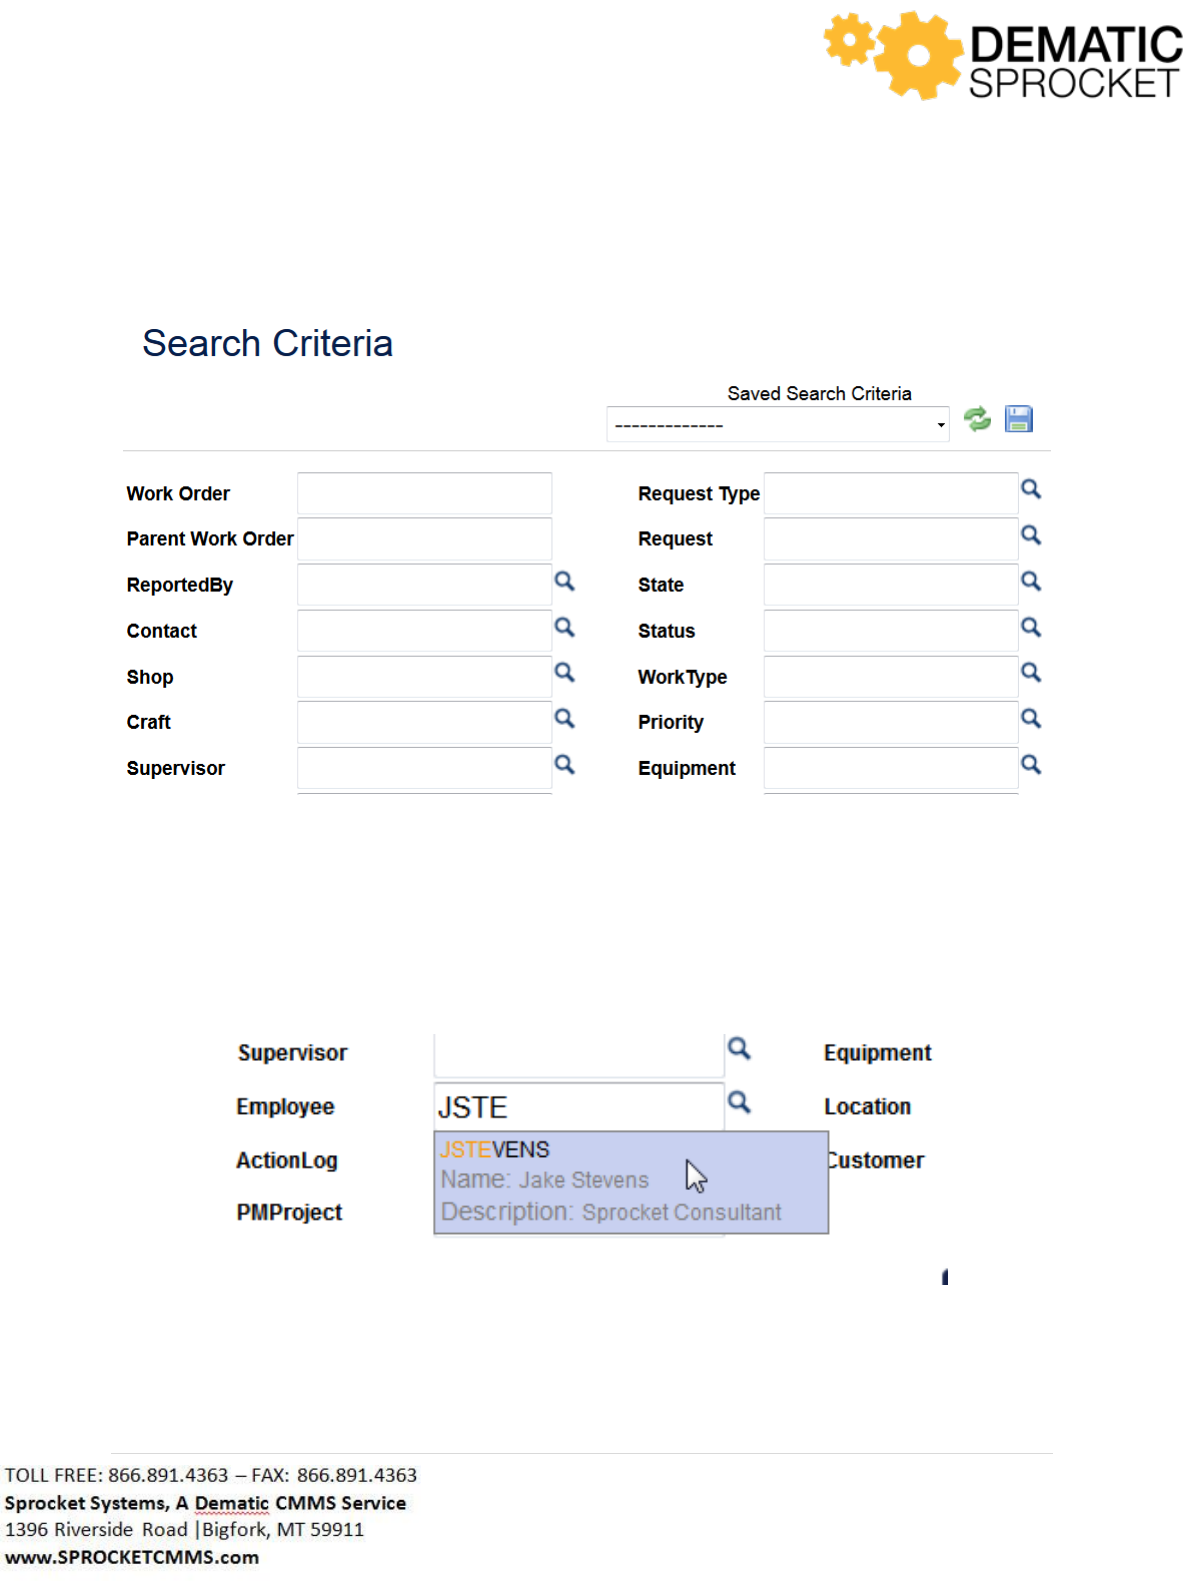
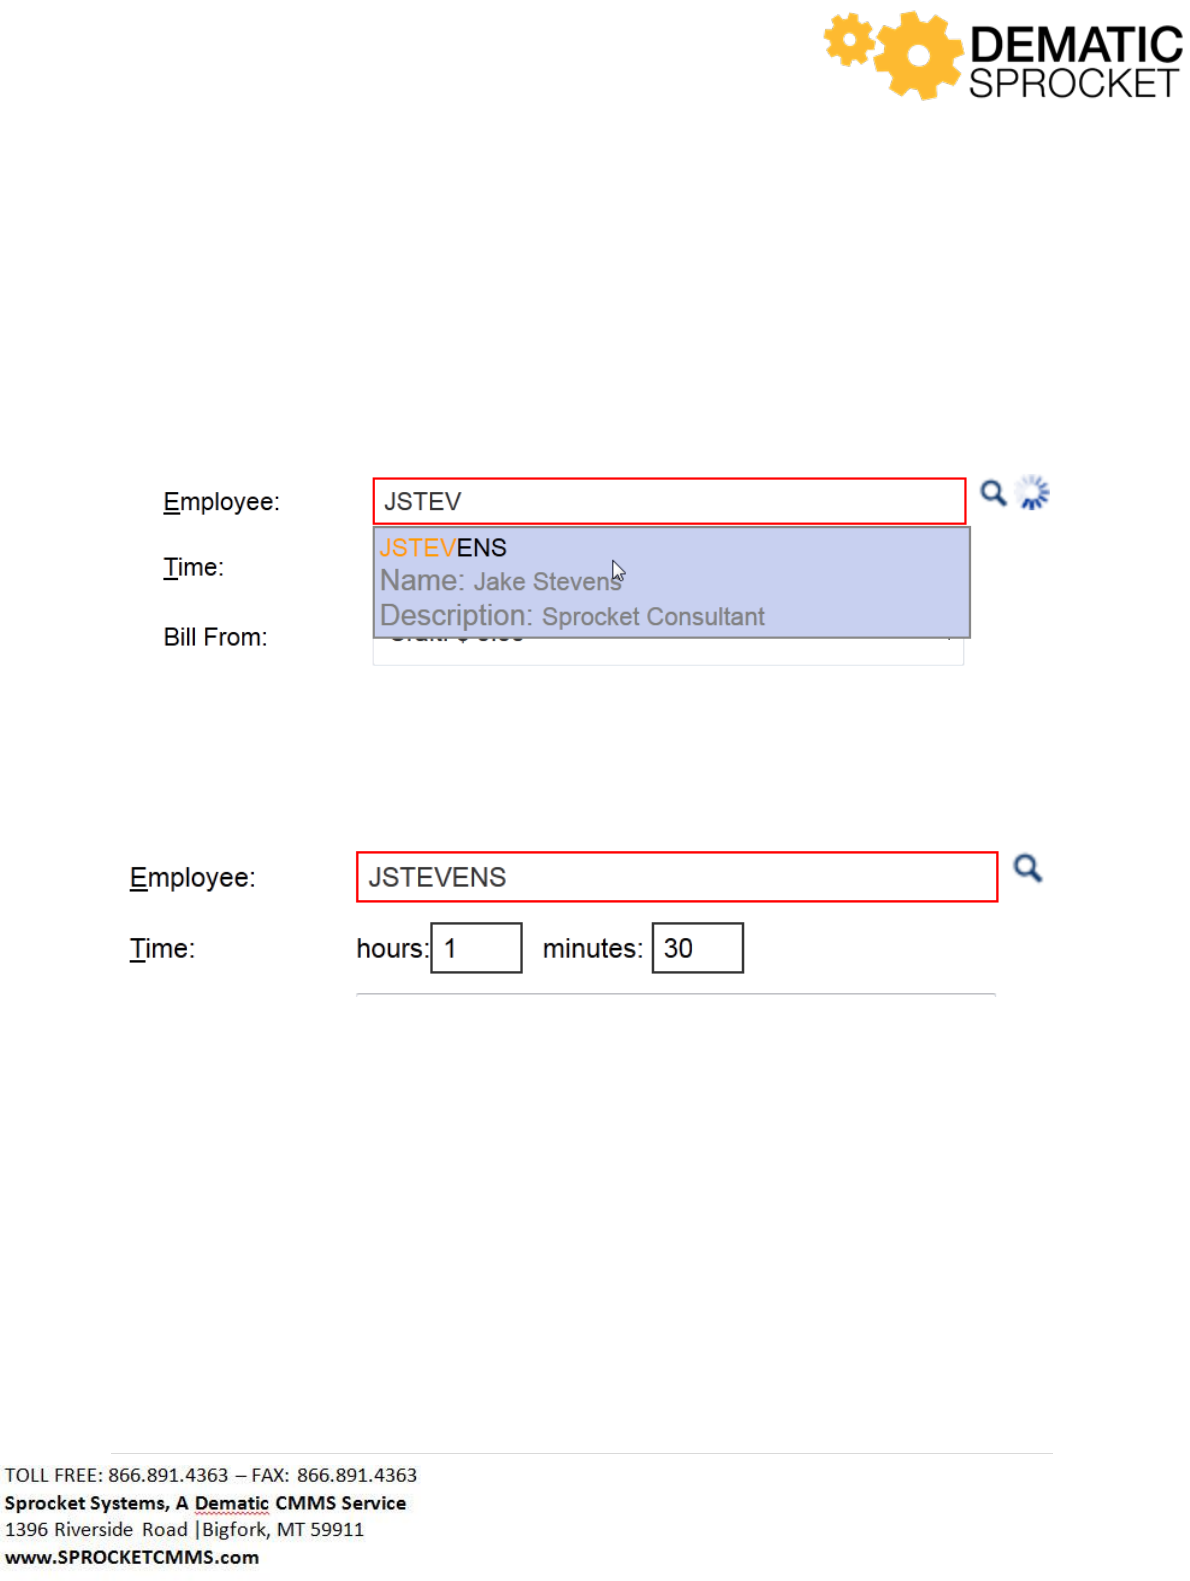
Another way the Auto Lookup Tool can help locate records is through an autocomplete function. This
means that if you begin typing all or part of the name of the record you are searching for, the Auto
Lookup Tool will return the search results with the same name as what was entered. For example, if you
are looking for a record with the user name JSTEVENS, you could type in all or part of this name to locate
the proper record. If you type in JSTE into the field, see what results appear.
18 | P a g e
Notice that the record returns displaying the user name with that same lettering sequence that you
entered in. To select this employee, click the window that appears below the Employee field and the full
user name will be populated into the field.
Now that you know how the Auto Lookup Tool works, you can use it to your advantage when searching
for records in Sprocket. As you learn how to navigate Sprocket, you will you use search function more
frequently to view search results.
3.4 Sorting Records in Columns
When looking at grids and columns in Sprocket, it can be helpful to view them ascending or descending
order alphabetically or numerically. You can sort records in columns by clicking the column header.
Let’s say you are viewing a grid of work orders and you wish to view them alphabetically by Location.
To sort them, simply click the word Location at the top of the column.
Now all of these work orders will be displayed in ascending order by location. Click the word Location
again to sort in descending order. Notice that the column is highlighted in blue, indicated that this
19 | P a g e
column has been sorted. Once you exit this screen and return, it will be reverted to the default ordering
of column information. Columns can also be sorted numerically.
3.5 Saved Searches
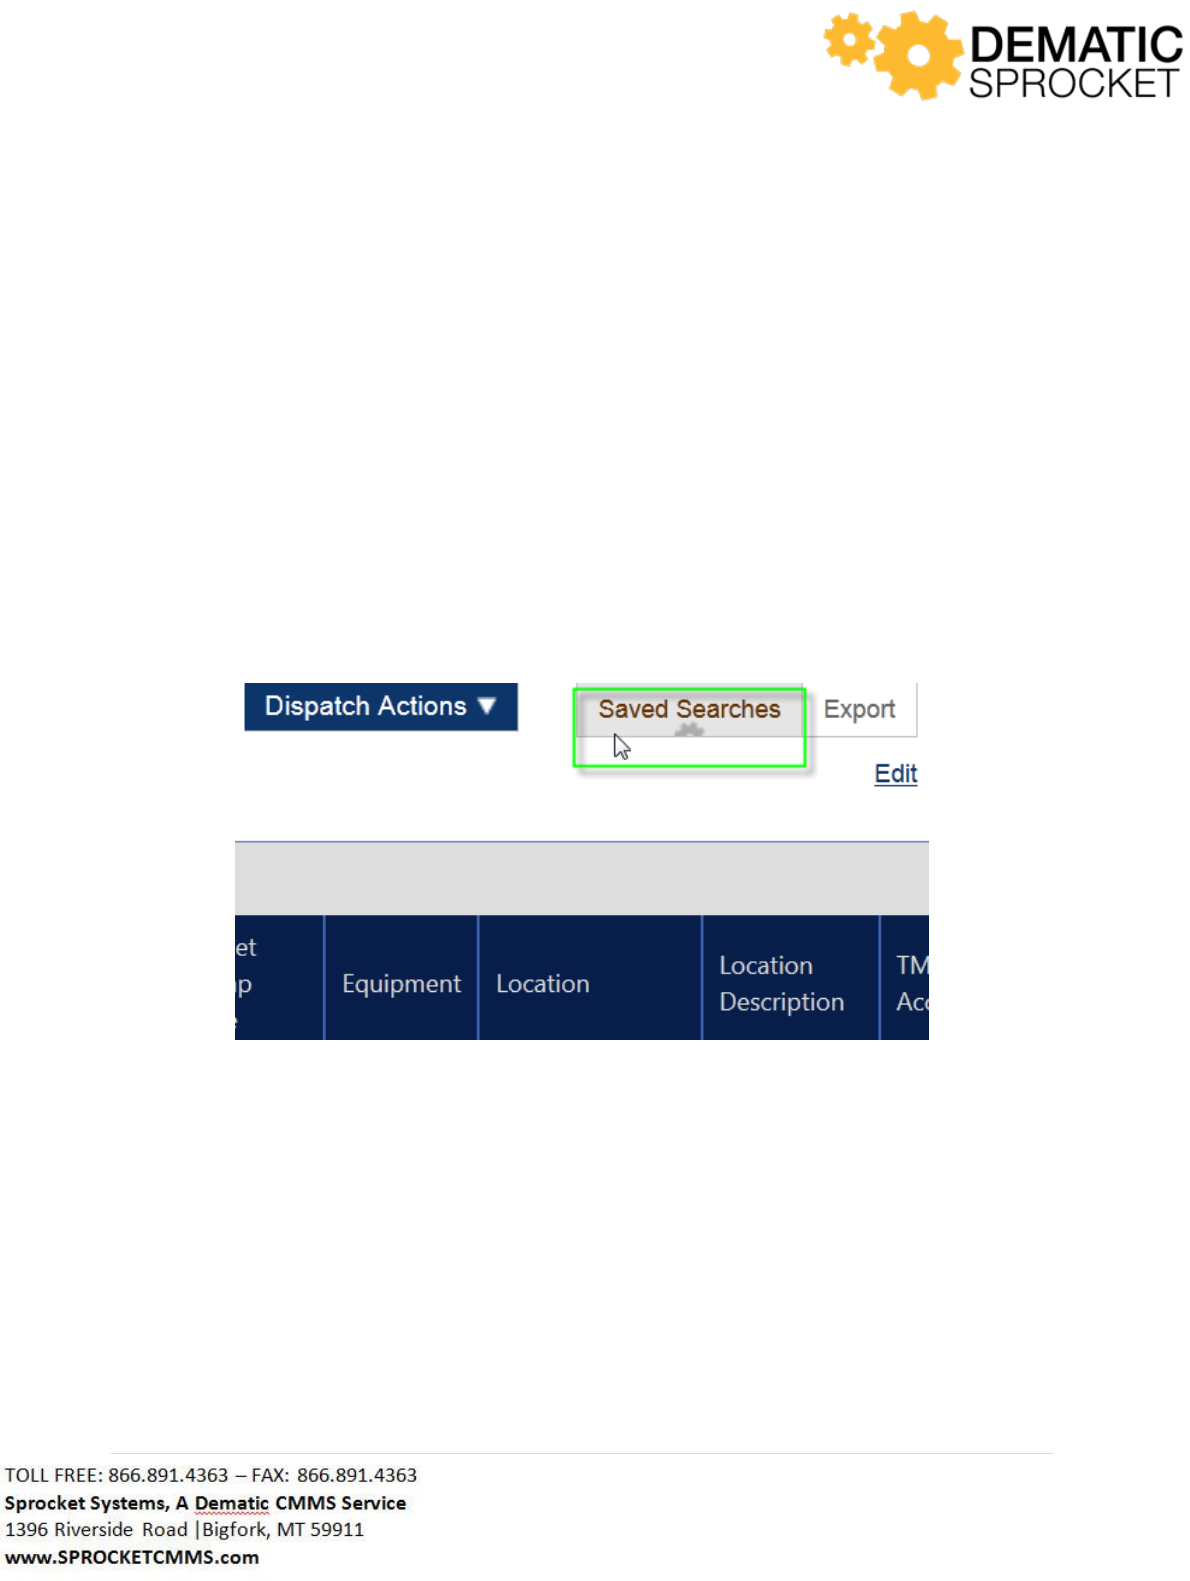
Throughout Sprocket, whenever you are viewing a list of work orders or records, you will notice a button
labeled Saved Searches at the upper right hand corner of your page. A Saved Search is a filtered view of
records in Sprocket. For example, if you wanted to view all the cancelled work orders in Sprocket, you
would select the All Cancelled Saved Search from the list and all the work orders that have been
cancelled would be displayed.
Click here to view Saved Searches.
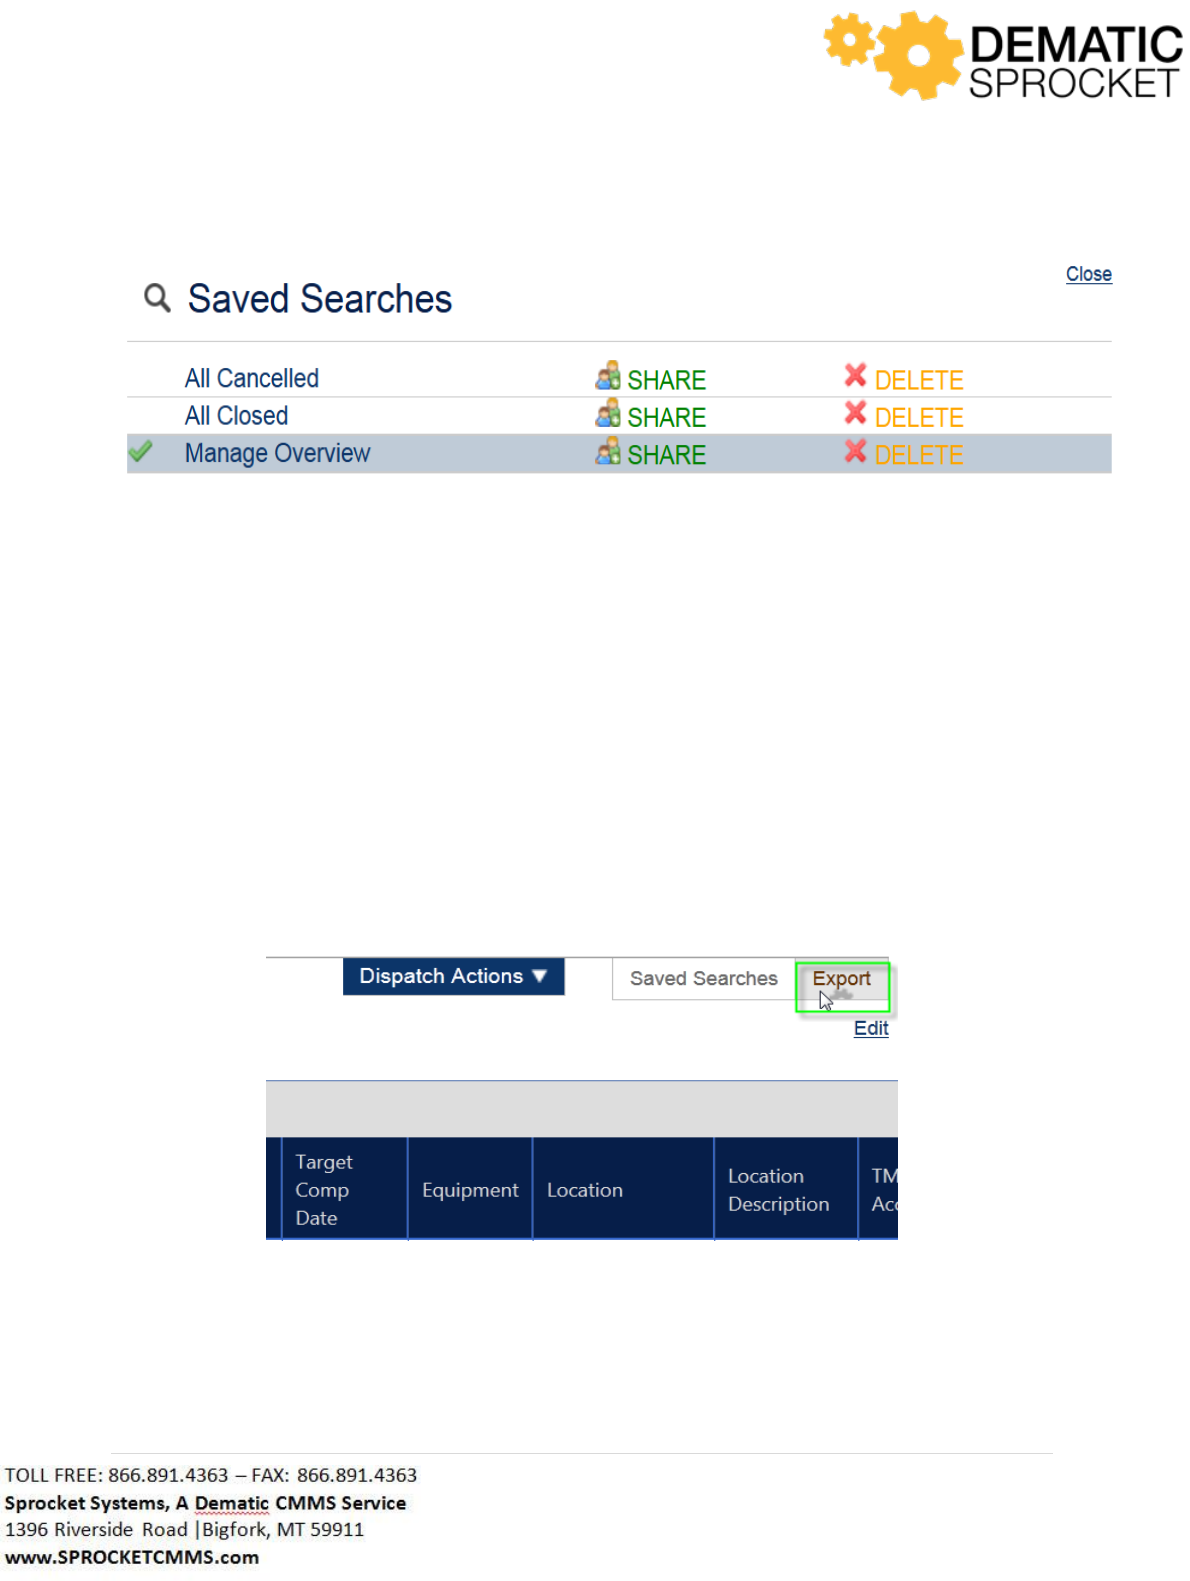
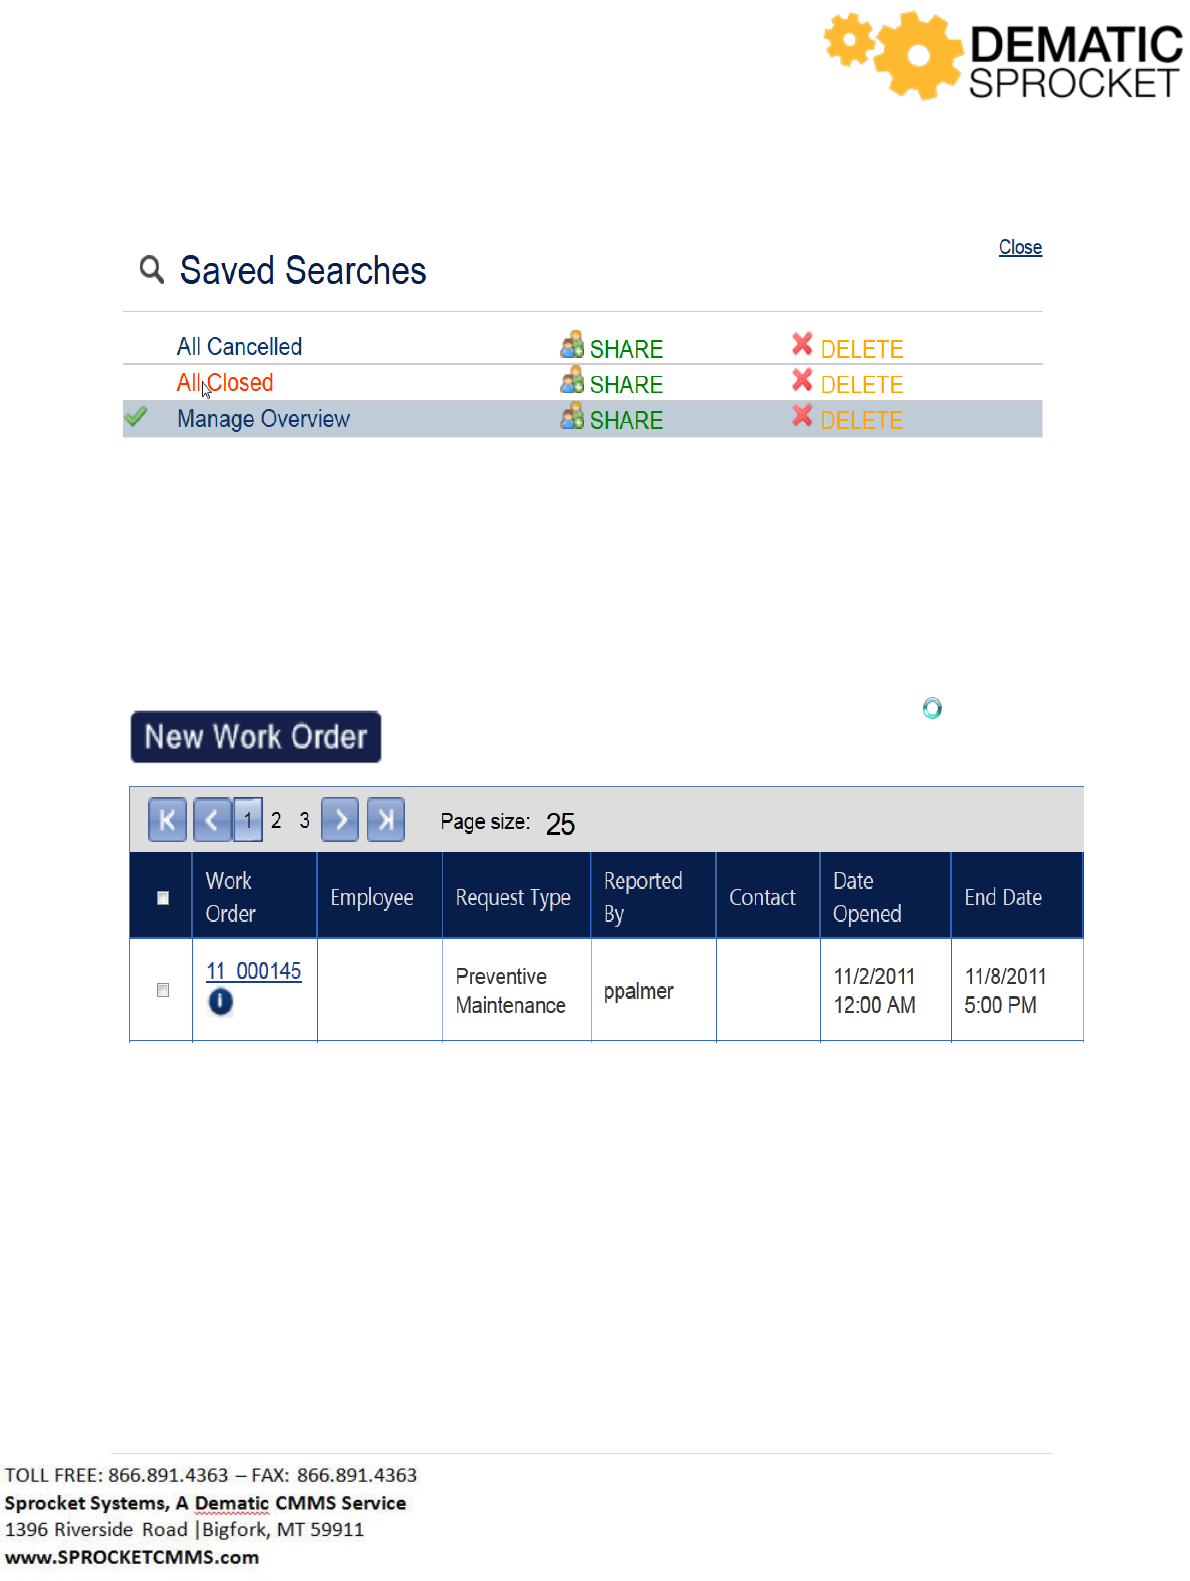
This will show a list of possible Saved Searches or Views you can use to view records in Sprocket. Notice
that using the links to the right of each Saved Search, you can Delete a Saved Search or Share it with
other employees.
20 | P a g e
Note: Sprocket customizes screen settings based on customer needs. Your screen may or may not display
the above Saved Searches. Contact your Sprocket Administrator with questions.
Here can select the view you would like to use to filter records in Sprocket. The Manage Overview saved
search is the most commonly used Saved Search. It is basically a list of all work orders in Sprocket. If
you wanted to view all the cancelled work orders, you would select the All Cancelled Saved Search. The
screen will refresh and a grid will display all of the cancelled work orders.
3.6 Exporting to a Spreadsheet
Sprocket provides the ability to export data to a spreadsheet application such as Microsoft Excel. If you
are viewing a grid of data and would like export to excel, click the Export button at the top right of the
page, next to the Saved Searches button.
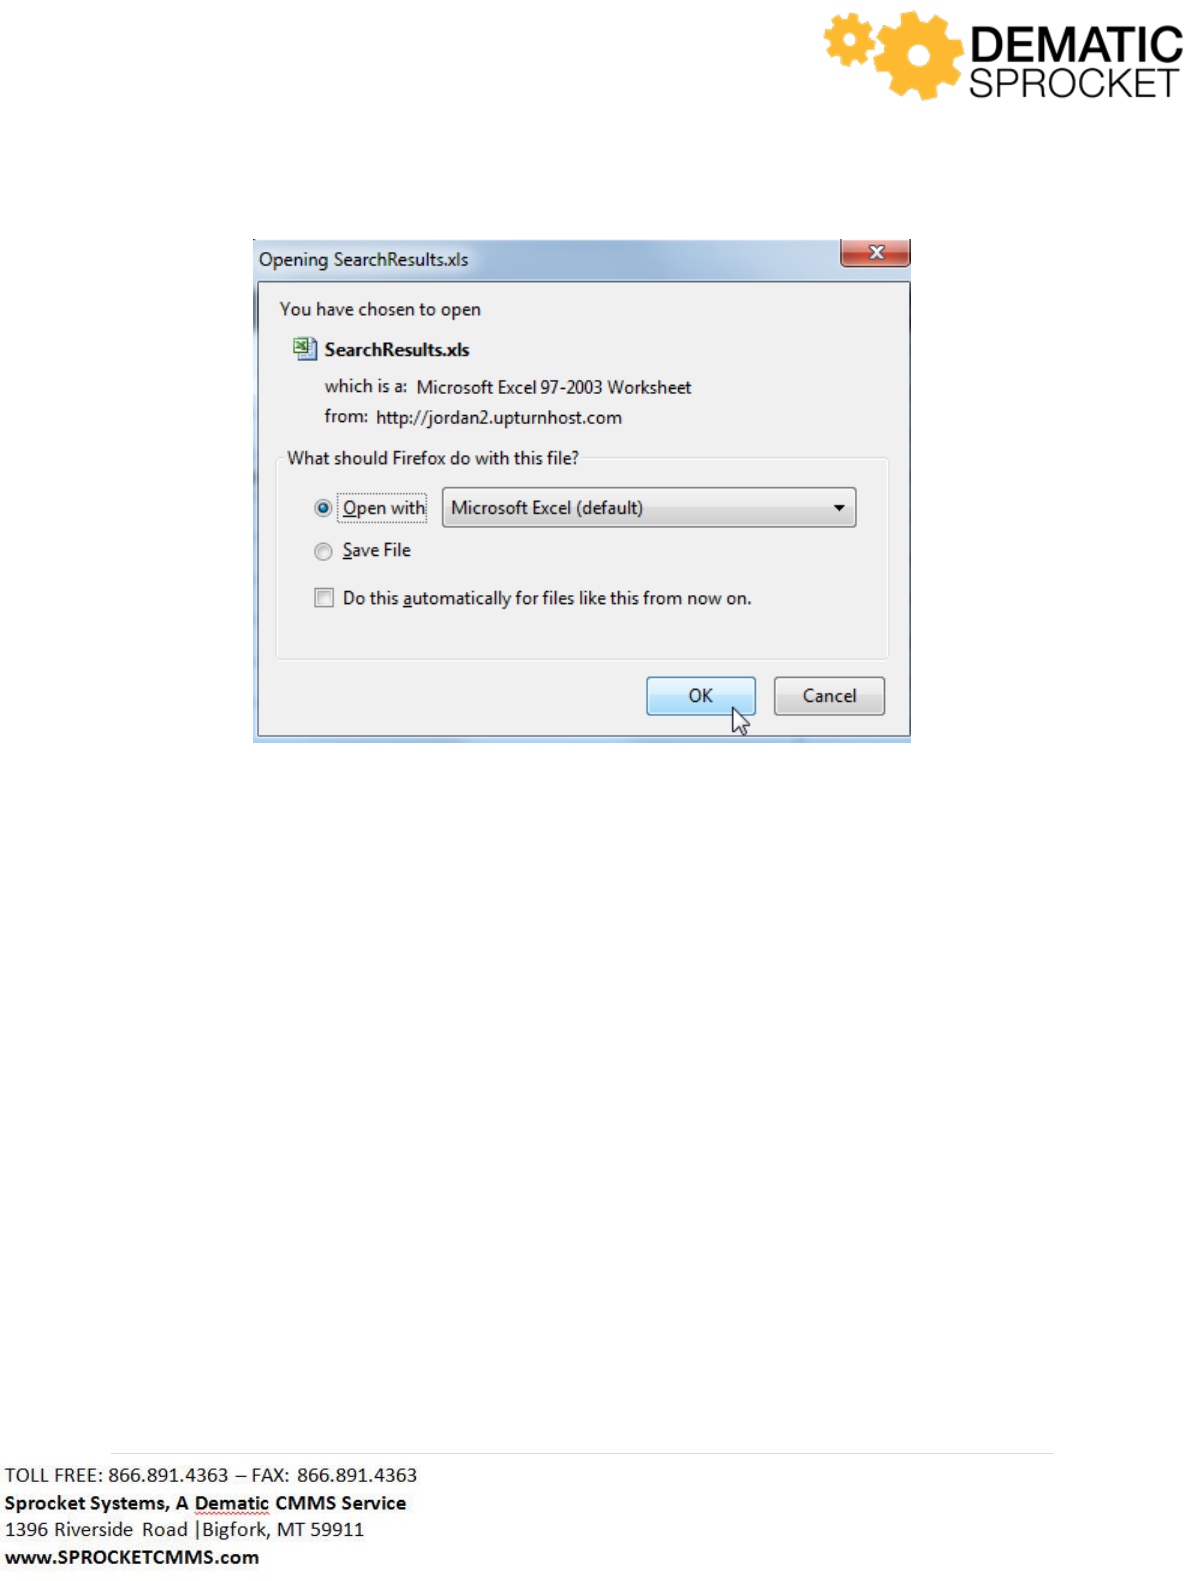
You may be prompted for the file type you wish to export this data to. Most computers have a default
program for spreadsheets. Click OK to continue with the export.
21 | P a g e
Once your data is in the spreadsheet, you can use the built in filters to arrange it as needed. Exporting
and altering data in a spreadsheet will not affect the data in Sprocket.
3.7 Dispatch Actions
Notice on pages with grids there is a Dispatch Actions menu at the top right corner of the page.
Dispatch Actions are used to quickly process work orders to complete work cycles. You will see these

22 | P a g e
actions on Saved Searches, Work Order Details, and Dispatching Results. To view the Dispatch Actions
menu, hover your cursor over the Dispatch Actions button.
Note: Sprocket is customized based on customer needs. Your screen may or may not display the above
dispatch actions. Contact your Sprocket Administrator with questions.
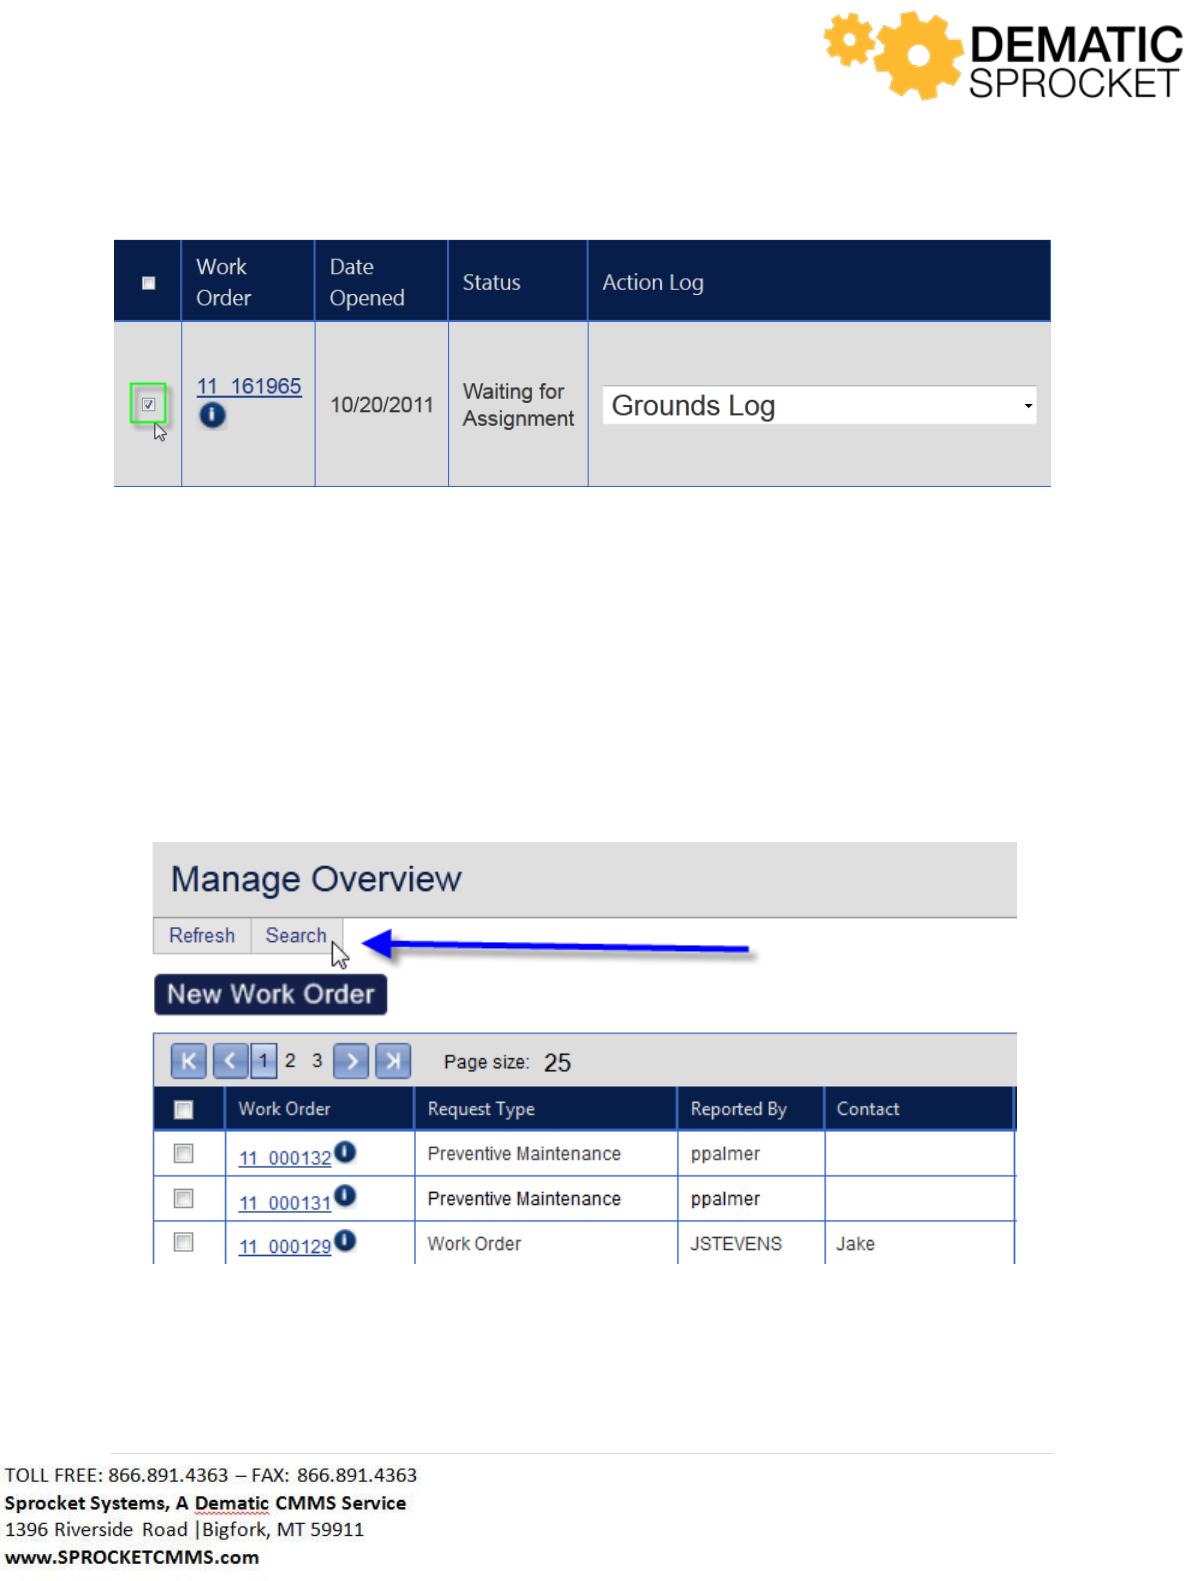
To apply a Dispatch Action to a work order from a Saved Search, select the desired work order(s) from
the grid by clicking the checkbox to the left of each work order. Keep in mind it is possible to select
multiple work orders from a grid and perform a single Dispatch Action on all selected work orders.
23 | P a g e
Once selected, open the Dispatch Action menu and select the appropriate Dispatch Action to apply to
the work order(s). So, if you wanted to assign an employee to a work order, you would select the
desired work order and select the Assign Employee Dispatch Action and fill in the appropriate fields.
You will learn more about Dispatch Actions throughout this guide.
3.8 Search Criteria
When viewing records in Sprocket, you can apply search filters and criteria to narrow the results of the
search. To do this, click the Search button in the upper left hand corner of the page.
24 | P a g e
A window labeled Search Criteria will appear. Here you can enter in particular information you wish to
filter for you search.
Let’s say you wish to search for only work orders with JSTEVENS as the employee. Using the Auto
Lookup Tool, begin typing JSTEVENS into the Employee field. Once the correct results are displayed,
select JSTEVENS to populate the Employee field.
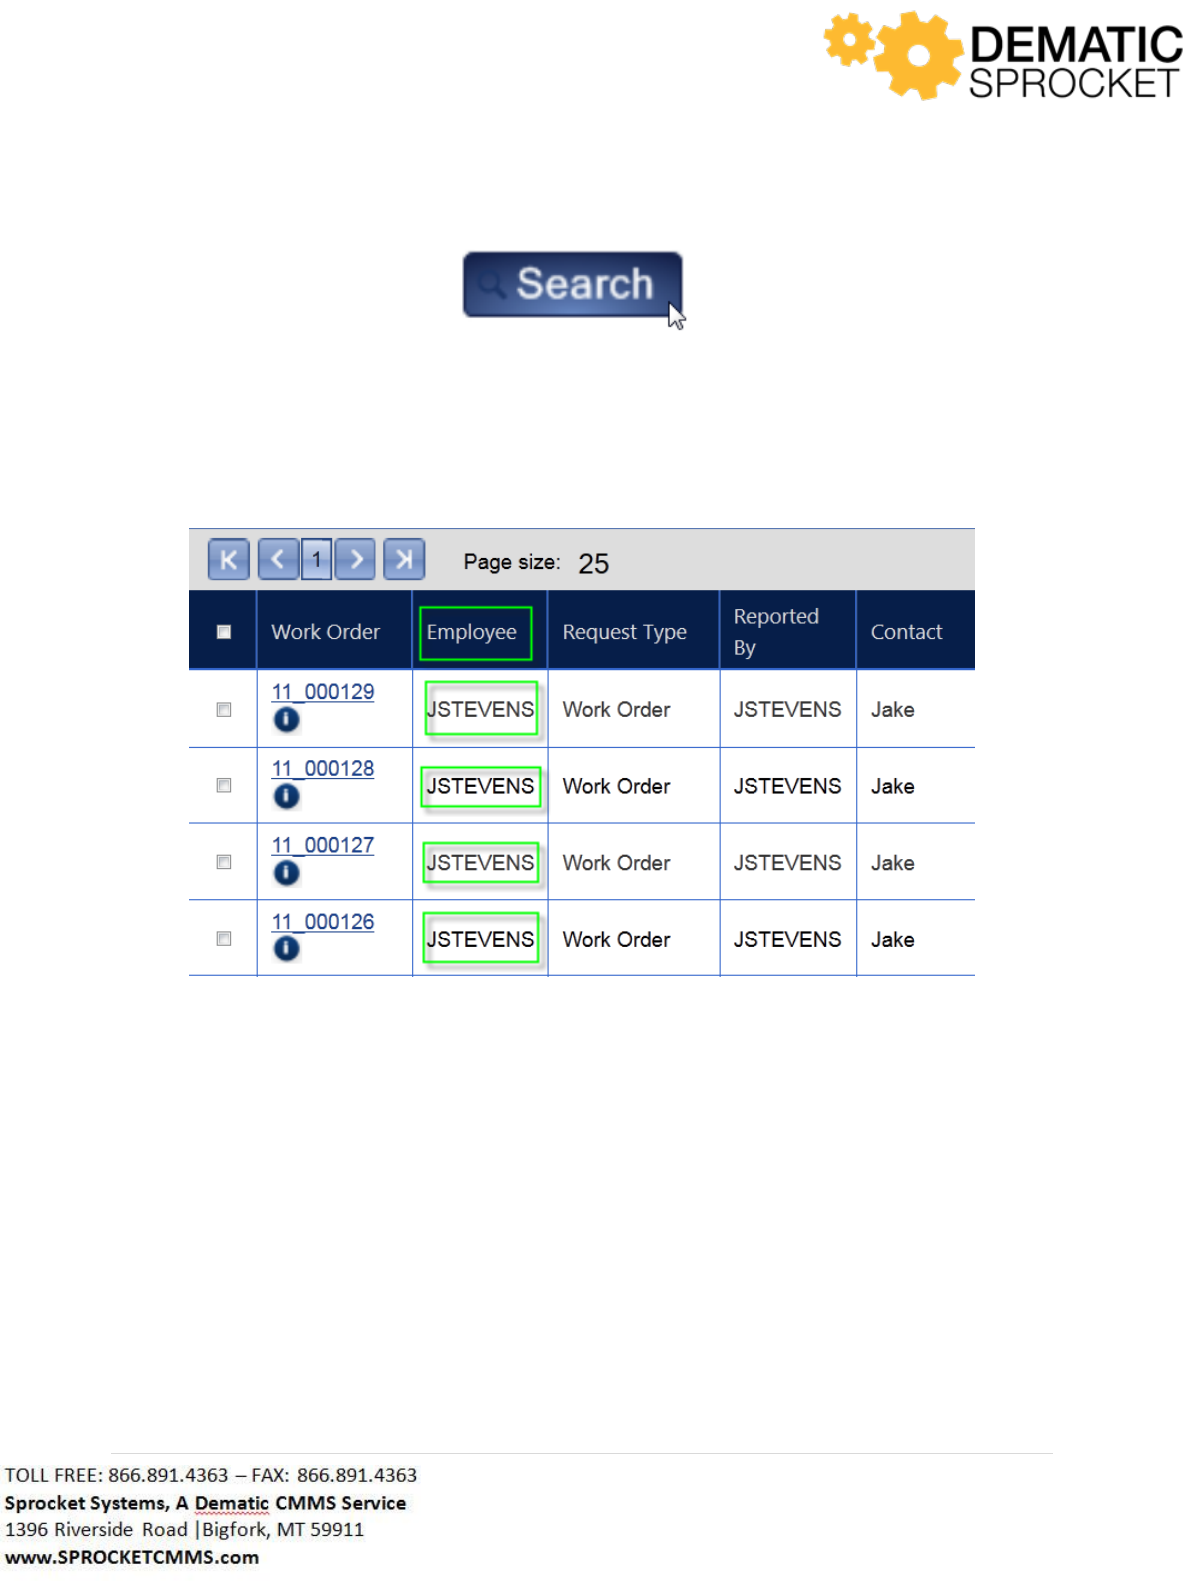
Once you have populated the employee you wish to search for, click the Search button at the bottom of
the search window to view the results.
25 | P a g e
Now all of the work orders that are assigned to JSTEVENS will appear in the grid.
3.8.1 Saved Search Criteria
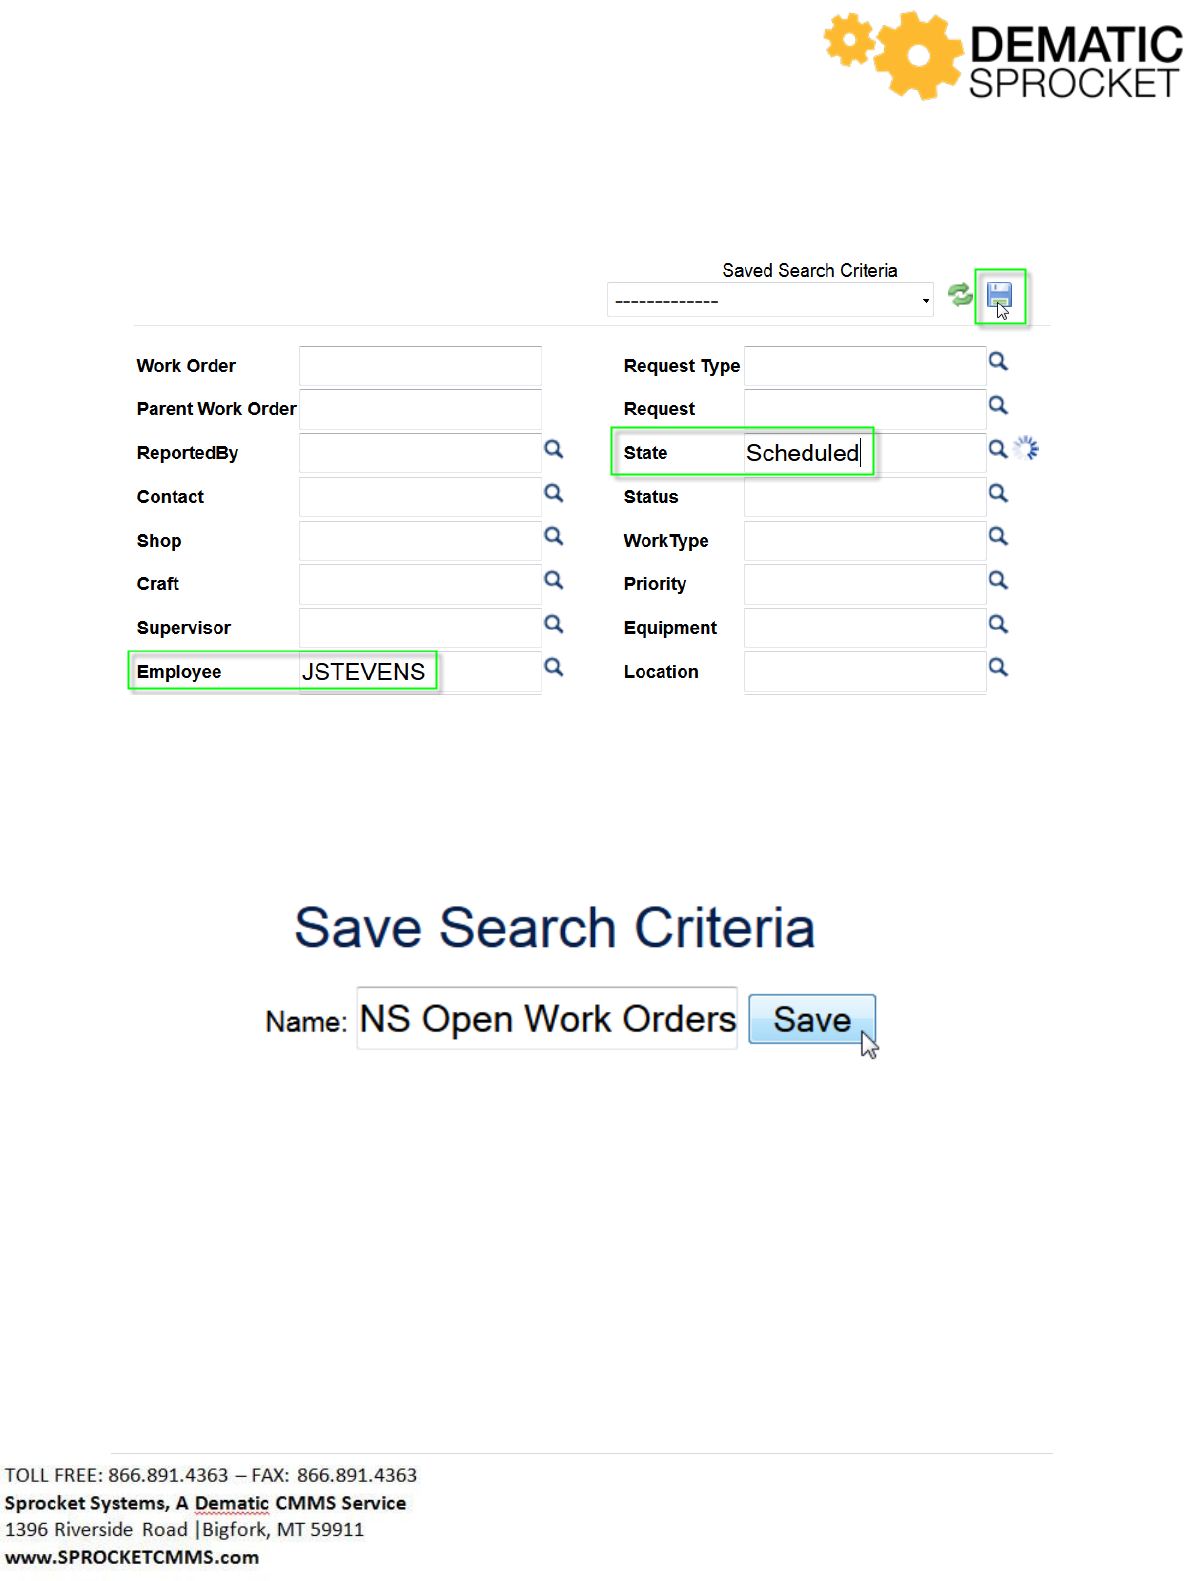
You can also save the criteria you search for. Let’s say you often search for the work orders that
JSTEVENS currently is working on. You can save this criteria and use it to search for this information. To
do this, start by entering the desired filters. So, you would enter JSTEVENS into the Employee field and
enter Scheduled into the State field, meaning it is not closed or cancelled. Once all of the information
has been entered into the Search form, click the disc icon at the top of the window to save this search
criteria.
26 | P a g e
Clicking the disc will open a window with a Name field. Here you can name your saved search criteria.
Let’s name this JSTEVENS Open Work Orders. Once you have entered in the name of your search, click
the Save button to the right of the Name field.
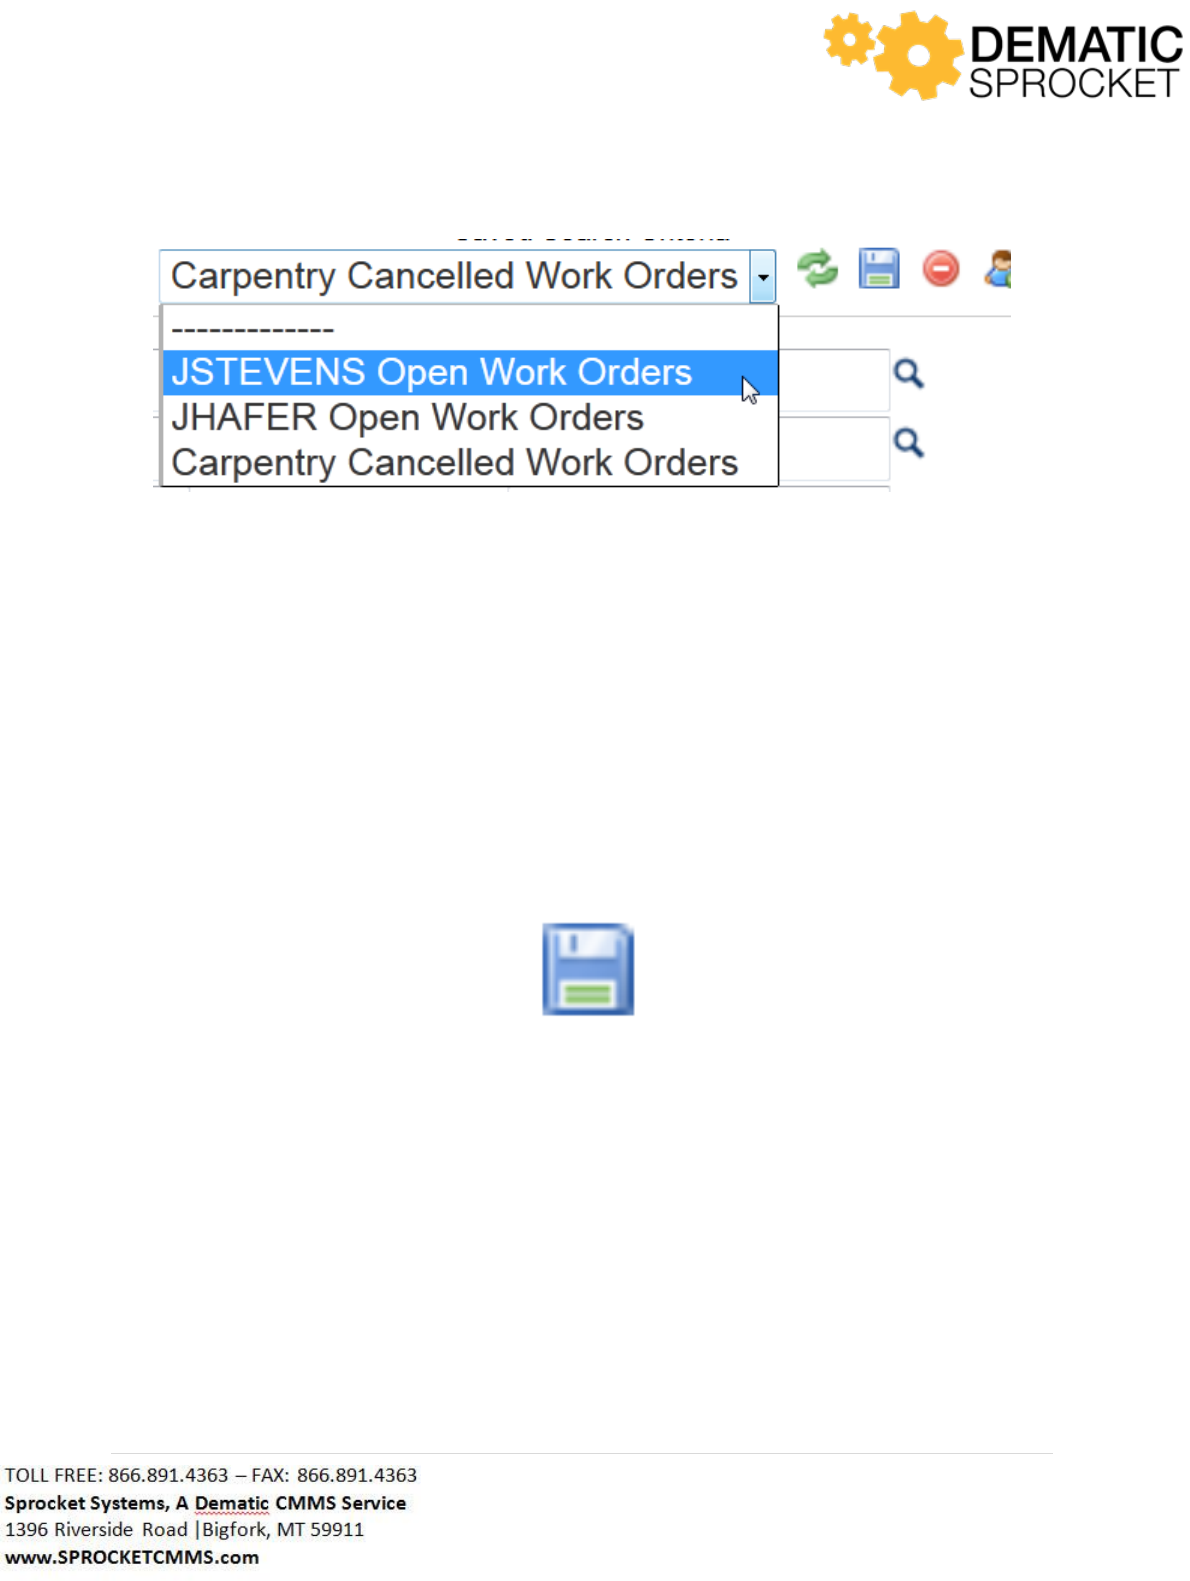
Now, whenever you want to see the open work orders for this employee, the saved search criteria will
be in a drop down menu at the top of the Search Criteria window.
27 | P a g e
By selecting this Saved Search Criteria and clicking the Search button, you will be able view only open
work orders for JSTEVENS.
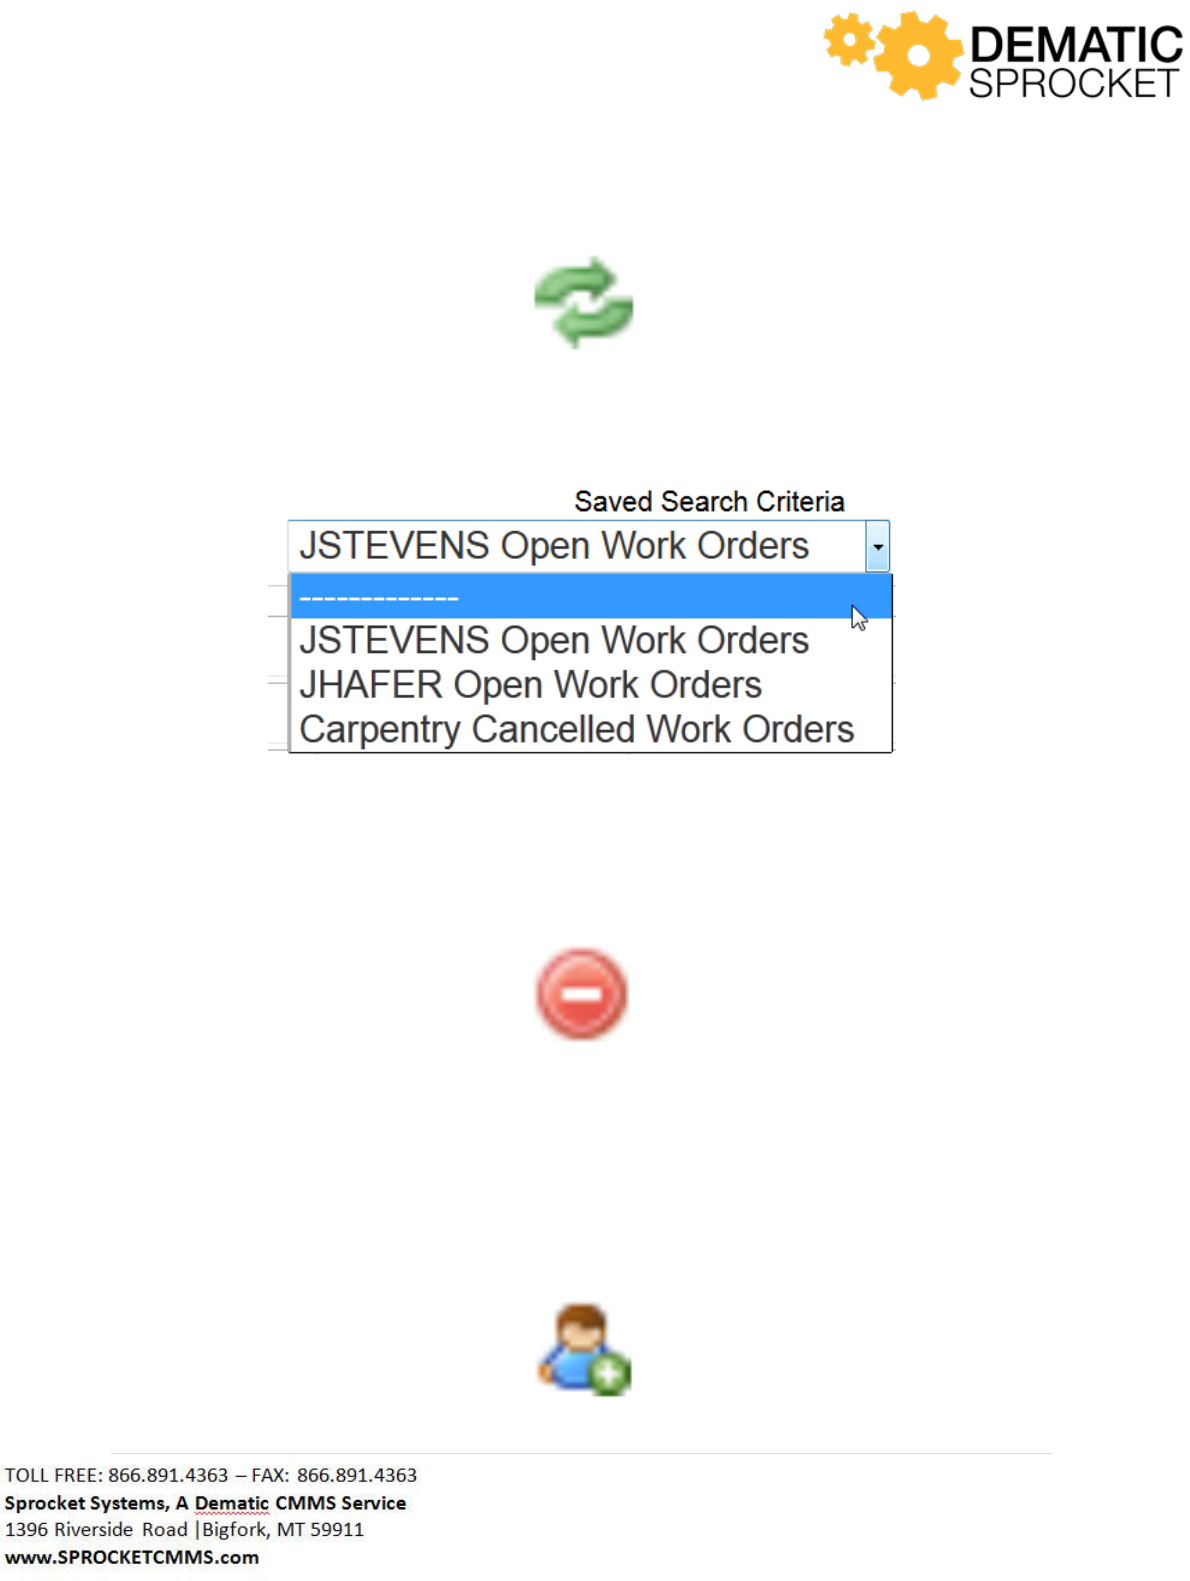
3.8.2 Saved Search Criteria Icons
Notice the new icons that have appeared to the right of the Saved Search Criteria drop down menu. You
already know that the disc icon indicates being able to save criteria and name it. Simply enter in the
fields you wish to search for and click the disc to name your Saved Search Criteria.
Use the green arrows when you want to refresh the search criteria fields. So, if you were searching for
all open work orders for JSTEVENS and you would like to clear the fields and search using different
criteria, click the green arrows to clear all the fields and begin a new search.
28 | P a g e
You can also refresh the Search window by selecting the ----------- from the Saved Search Criteria
drop down menu and your search fields will be refreshed.
If you ever decide you do not need a particular Saved Search Criteria search, you can always delete it
using the red circle. Simply select the desired search from the Saved Search Criteria drop down menu
and click the red circle.
Just like Saved Searches, you can also share your Saved Search Criteria with other employees. To share
your search criteria, select the desired Saved Search Criteria from the drop down menu and click the
people icon to share out Saved Search Criteria with other employees.
29 | P a g e
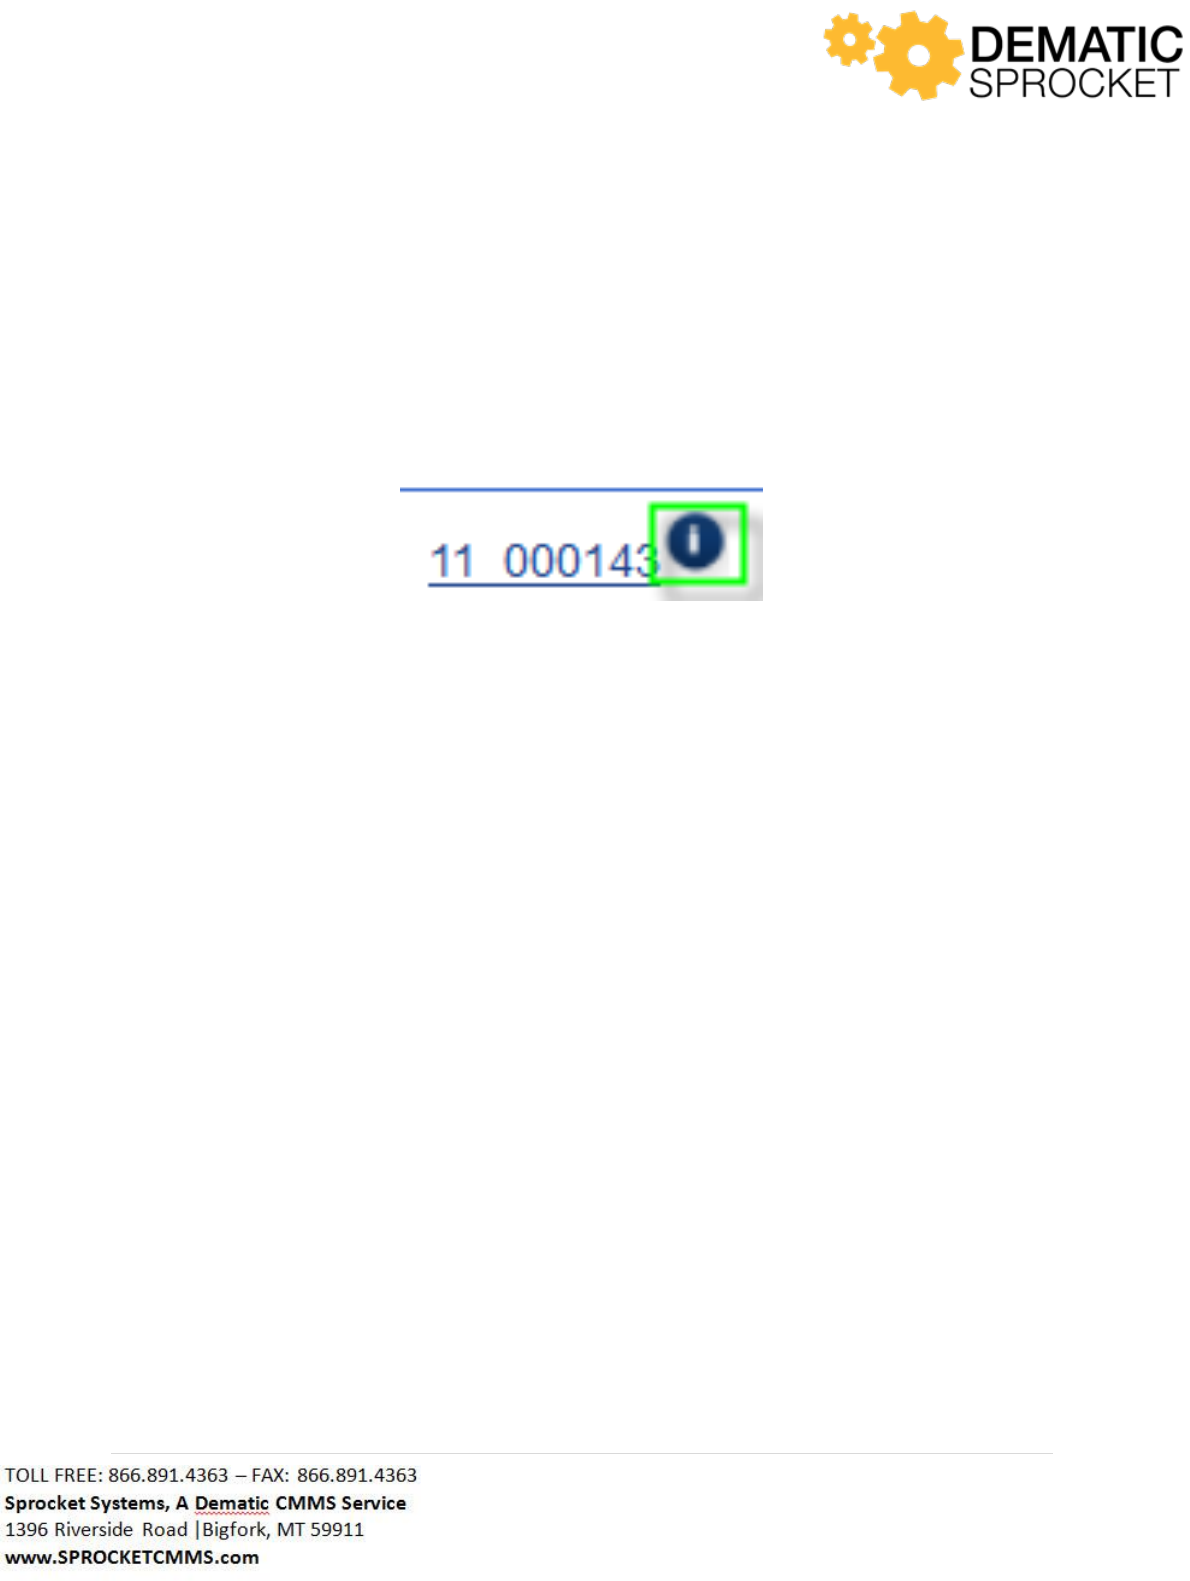
3.9 Information Icon
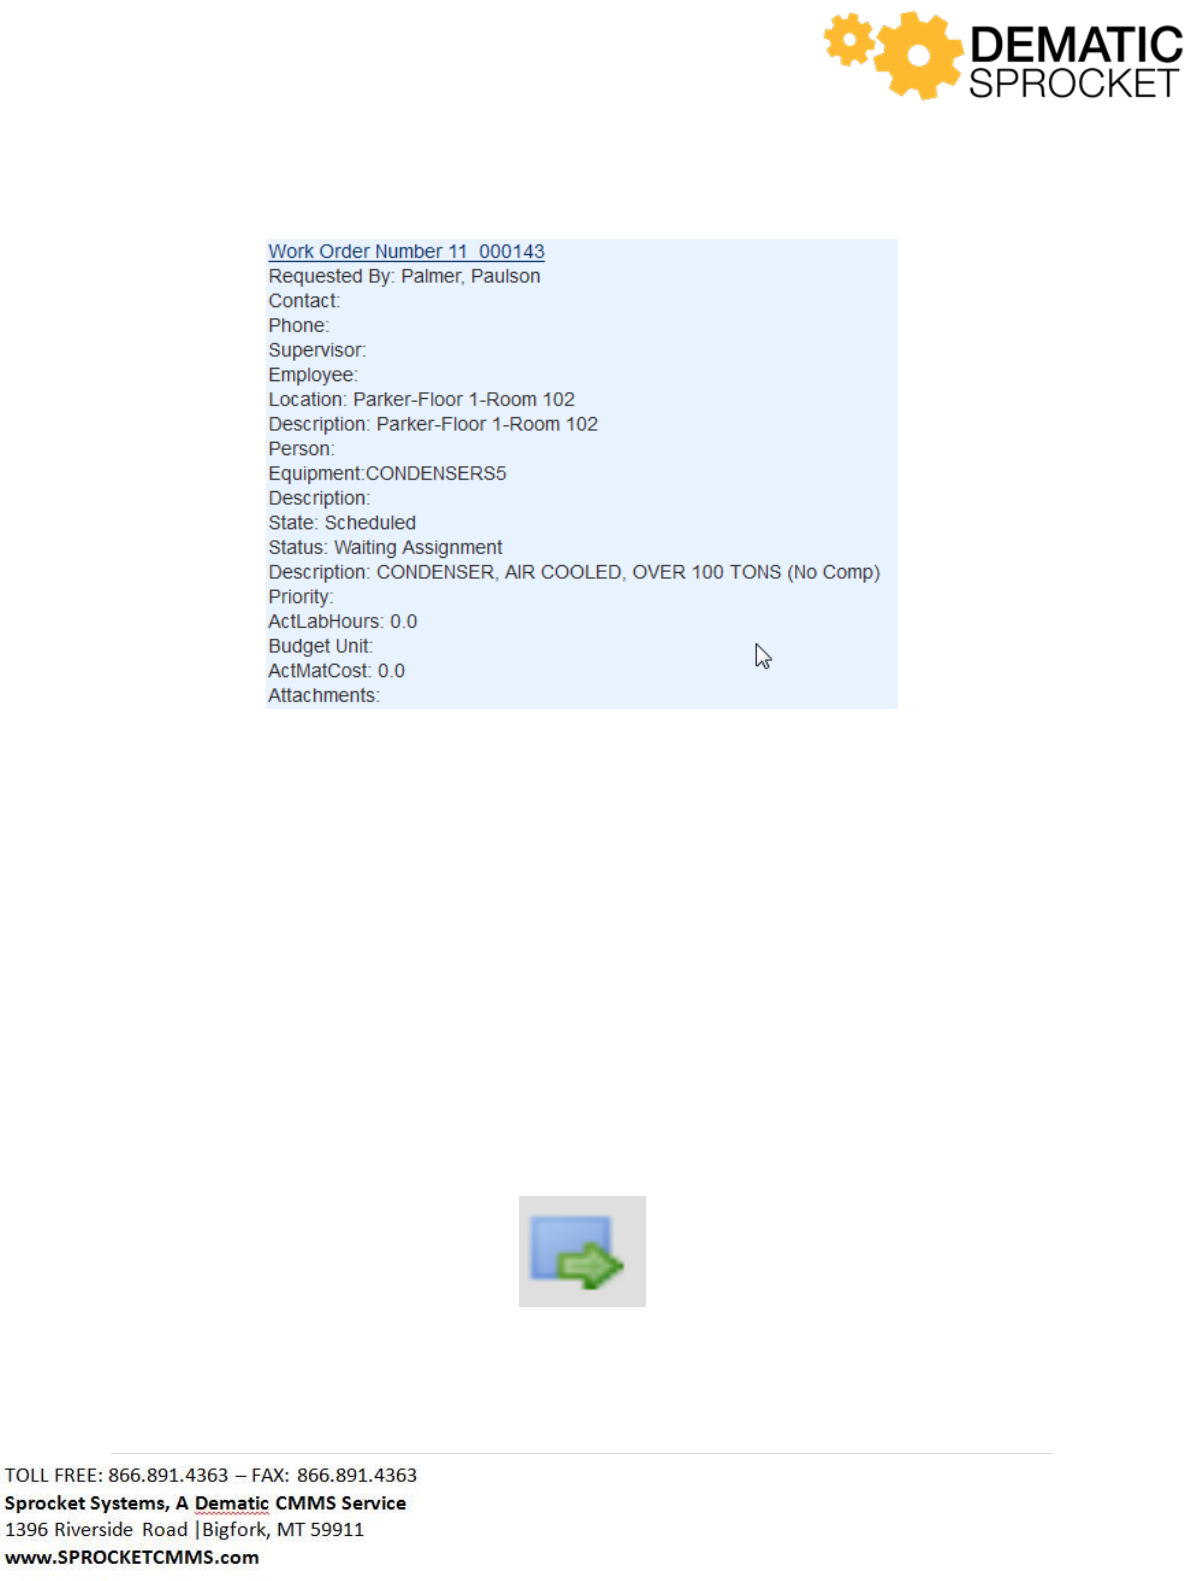
As you navigate throughout Sprocket, you will notice the Information Icon to the right of certain records.
If you click on the icon and drag your cursor into the information pop up window, you can view
additional details about a record. This is a quick and easy way to view details about a specific record in
Sprocket.
30 | P a g e
Note: Sprocket is customized based on customer needs. Your screen may or may not display the above
Work Order Details. Contact your Sprocket Administrator with questions.
The above features described in this section will be displayed all throughout Sprocket. You now have a
better understanding of how to use these functions.
3.10 Quick Jump Tool
You will notice the Quick Jump Tool as you are in Work Order Details or when you are in record grids
such as Equipment or Inventory lists. The Quick Jump Tool is symbolized by a blue box with a green
arrow.
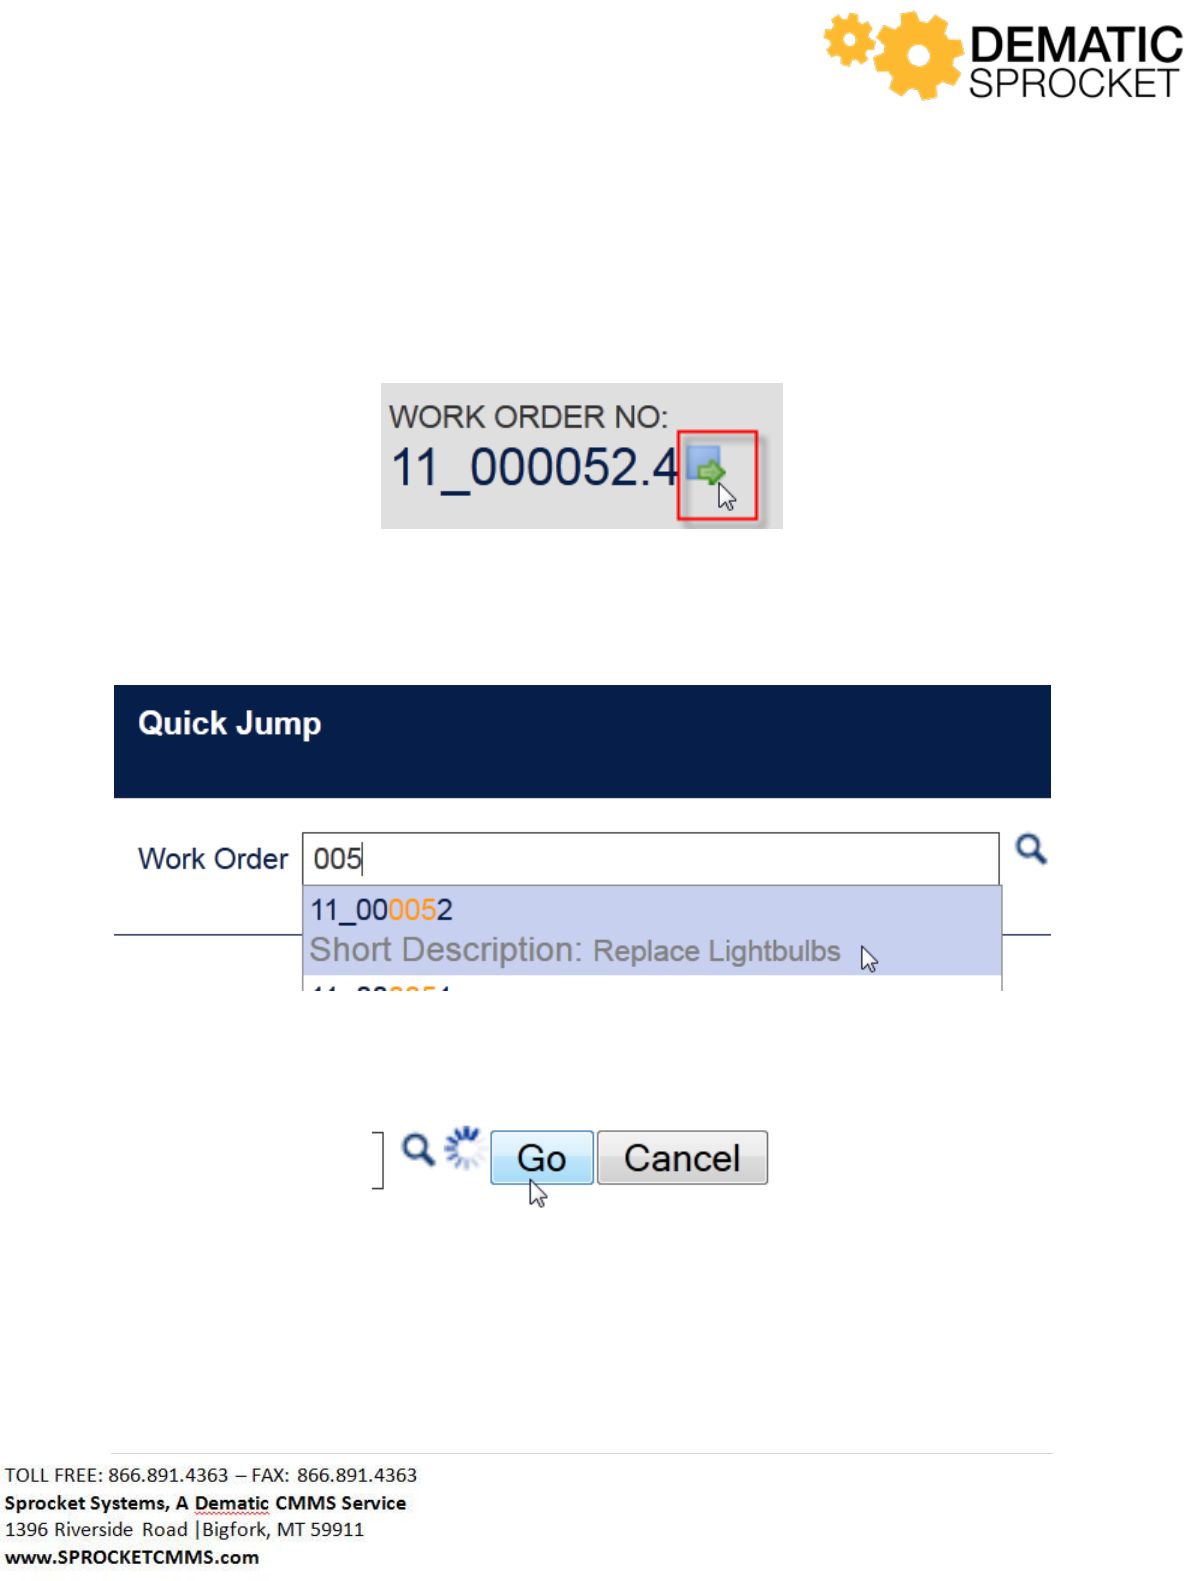
31 | P a g e
Use this tool to quickly navigate from record to record without having to return to Saved Search grids to
sift through records. This icon is always located at the top of the page next to the name of the record
you viewing. To use the Quick Jump, click the icon and enter in the name of the record you wish to
“jump” to.
A field will appear where you can use the Auto Lookup Tool to help locate the correct record. Once the
correct record is returned, select it from the list.
To the right of the window, click Go to navigate to this record or click Cancel to stay on this page.
32 | P a g e
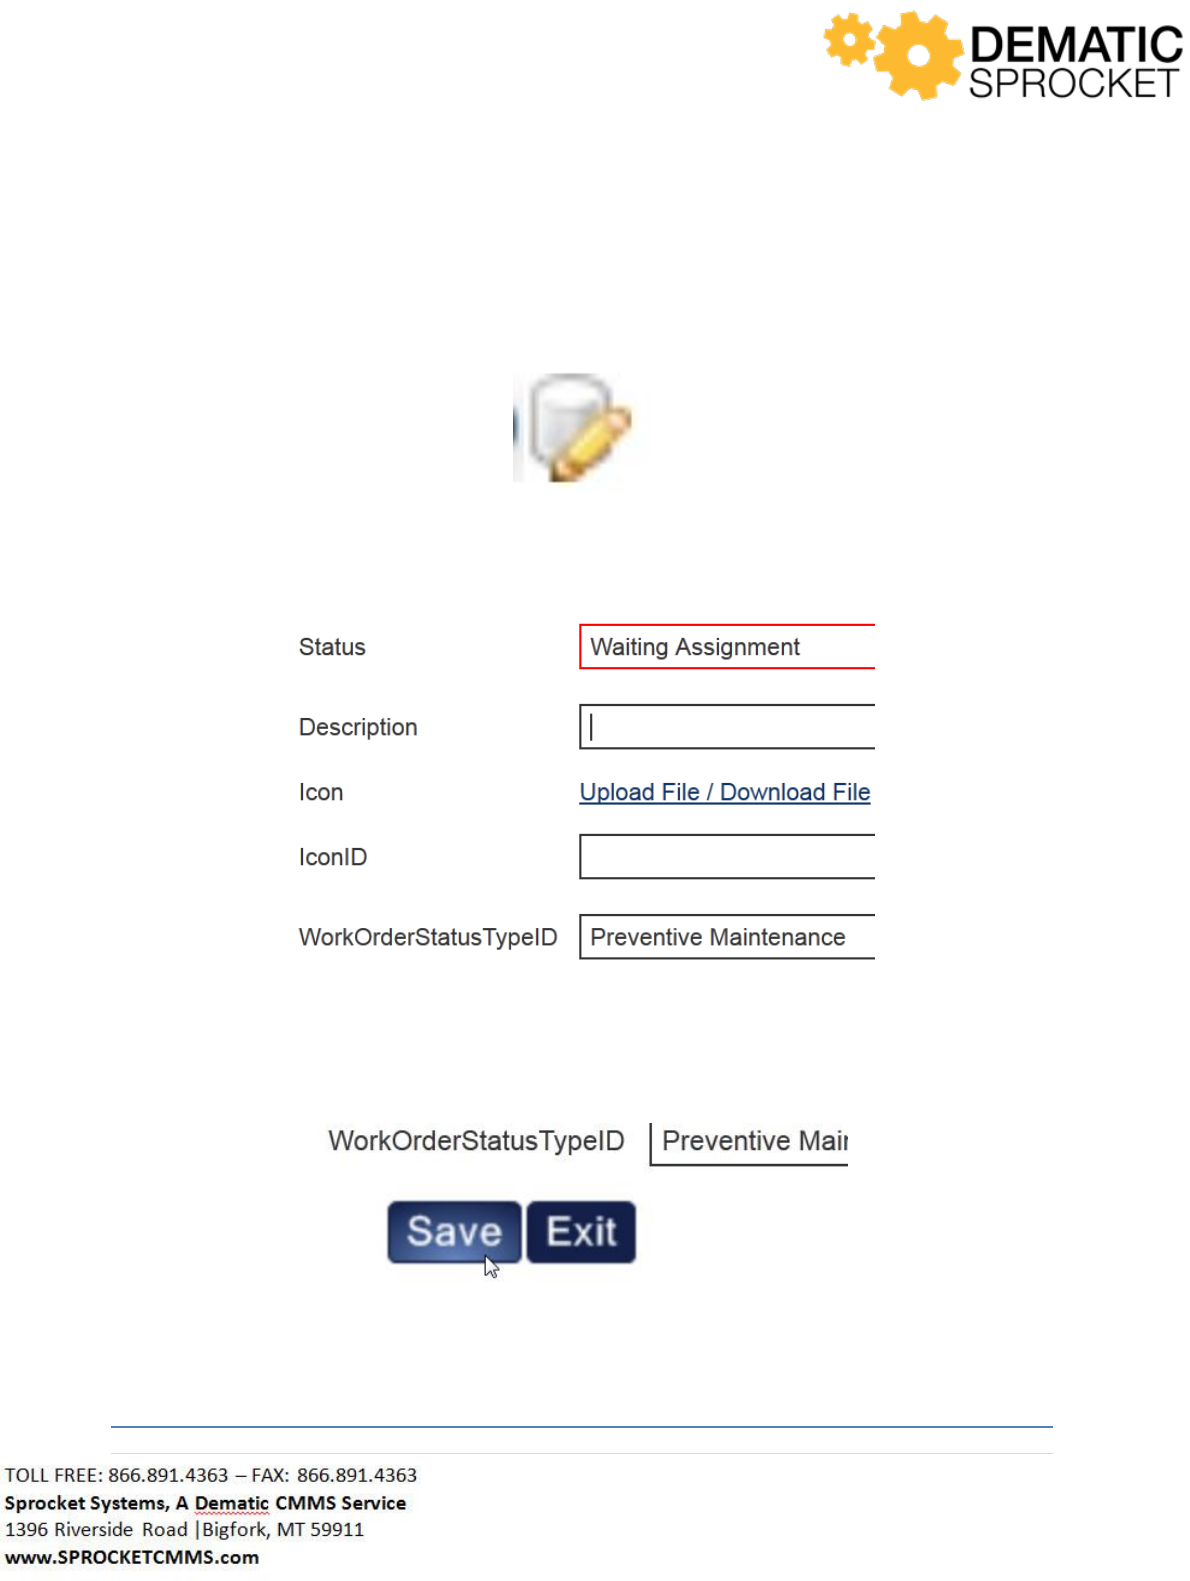
3.11 Quick Edit Tool
Throughout Sprocket, you will notice the Quick Edit Tool. This tool is used to quickly edit or modify
records in Sprocket. It is symbolized by a pencil and eraser.
When you click this icon, you are directed to form with information about the field you are editing. Here
you can change or add information.
To edit or add information to a field, click inside the field and type in the information you wish to add to
this record. Once you have added all information, click the Save button at the bottom left of the page.
Now this record will be updated with your changes.
4.0 Work Management
33 | P a g e
4.1 Sprocket Portal
The first time you log into Sprocket, you will be automatically directed to the Sprocket Portal tab under
the Work Management console. This screen allows users to add customized widgets such as daily
reports or the weather to their user portal.
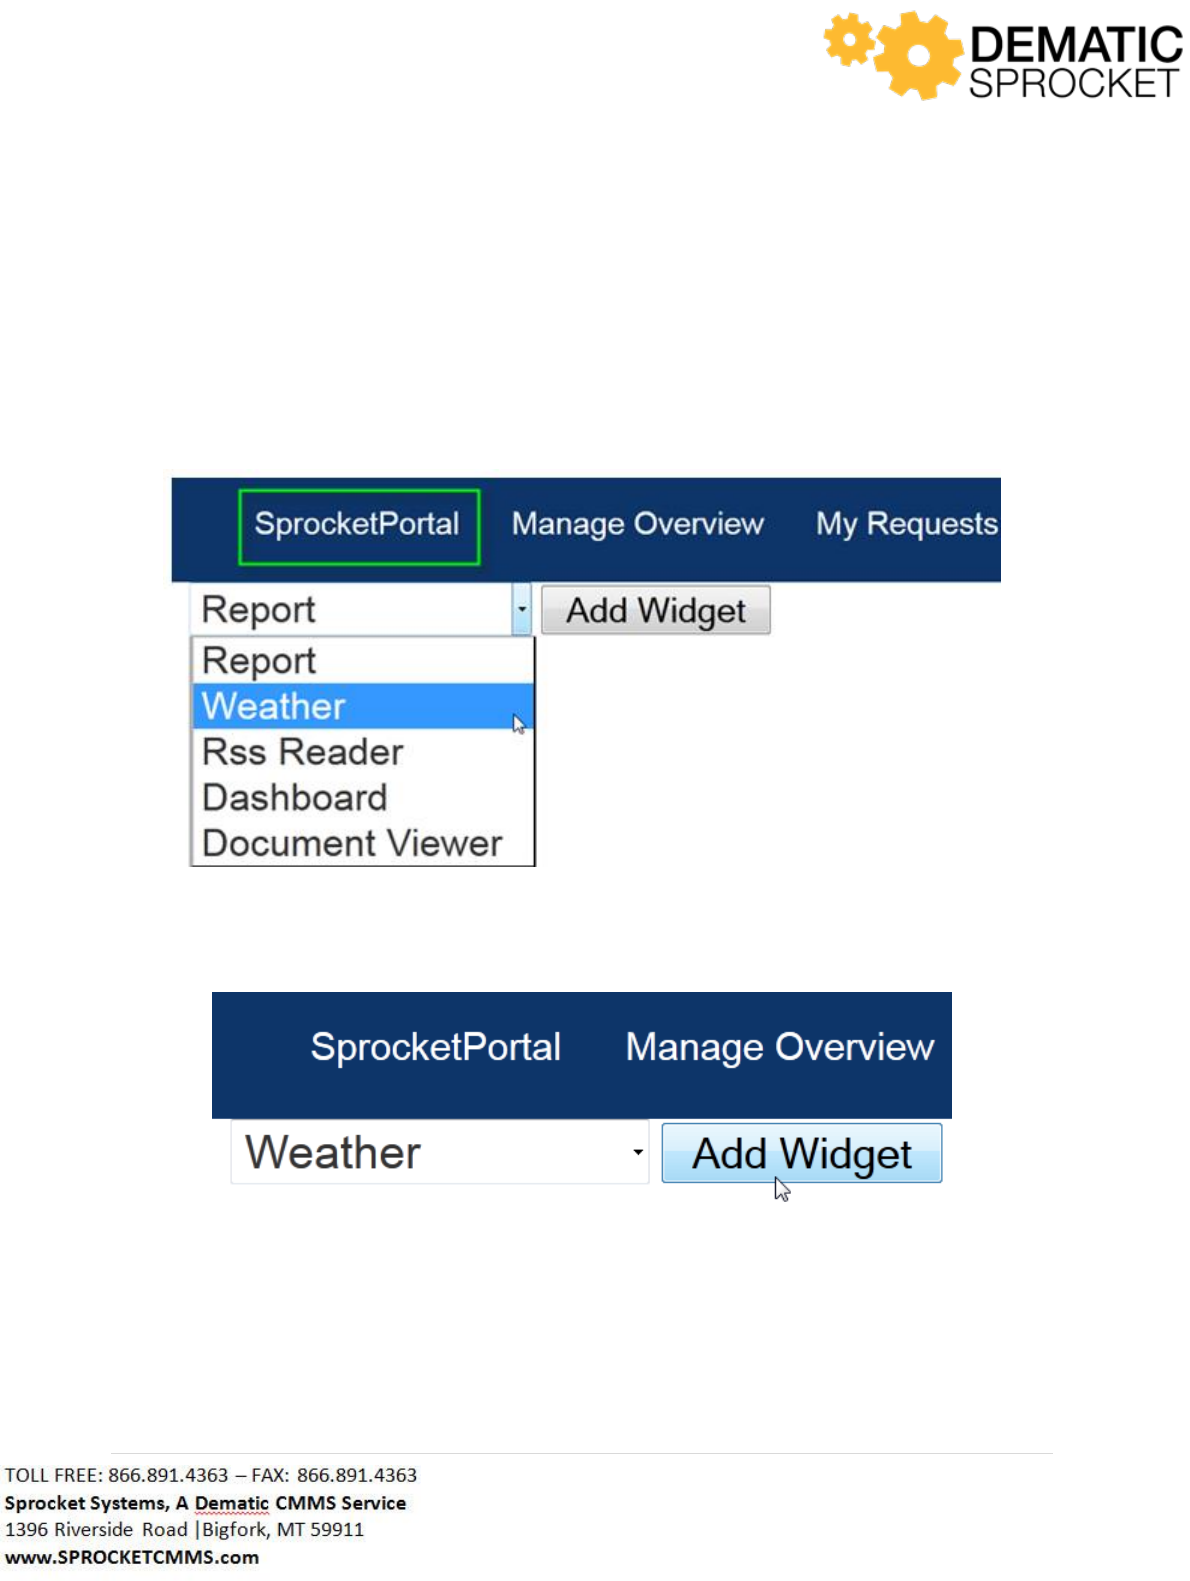
Let’s say you wanted to add a widget that allows you to see today’s weather. When you log into your
Sprocket user portal, click the widget drop down menu and select Weather.
Once selected, click the Add Widget button to the right of the menu.
This widget will prompt you for a zip code. Enter in the zip code and click the Save button.
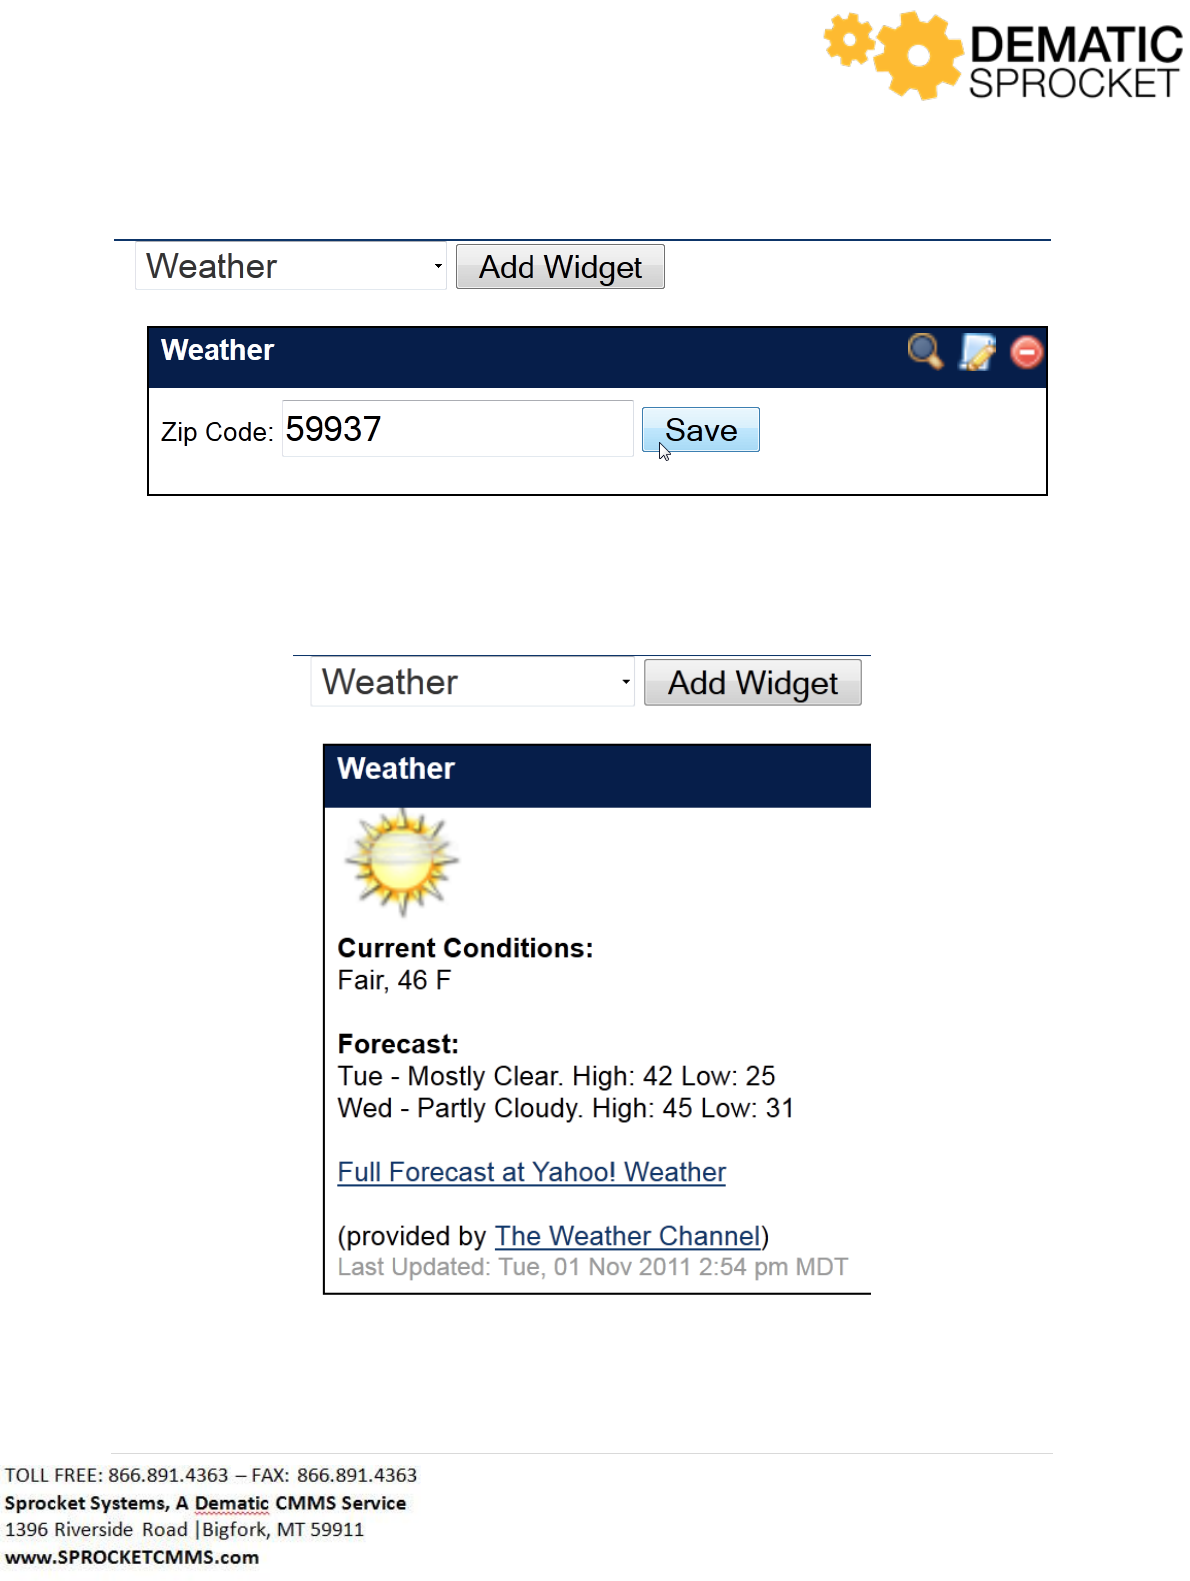
34 | P a g e
Your screen will refresh and the weather widget will be displayed for this user when logged in. Keep in
mind it is possible to have multiple widgets on your Sprocket Portal.
Notice the icons that appear in the right hand corner of your widgets. They appear when you hover
your mouse over the blue bar at the top of the widget window.
The first icon is a magnifying glass. Click this to increase the size of a widget on your Sprocket Portal.
35 | P a g e
The center icon is the Quick Edit link. Click here to make a change to your widget. So, if you have a
weather widget and you decided to apply a different zip code for daily weather, you would click this icon
to apply and save that change.
The icon to the far right should look familiar from the section on Saved Searches. Click this red circle if
you wish to delete a widget from your Sprocket Portal altogether.
4.2 Manage Overview
Next to the Sprocket Portal tab is the Manage Overview Tab. Click here to view and manage work
orders.

36 | P a g e
This screen will automatically display the last Saved Search that was selected from the logged in user’s
last session. So, if the last time you logged in, you were using the All Cancelled Work Orders Saved
Search, this screen will automatically display All Cancelled Work Orders.
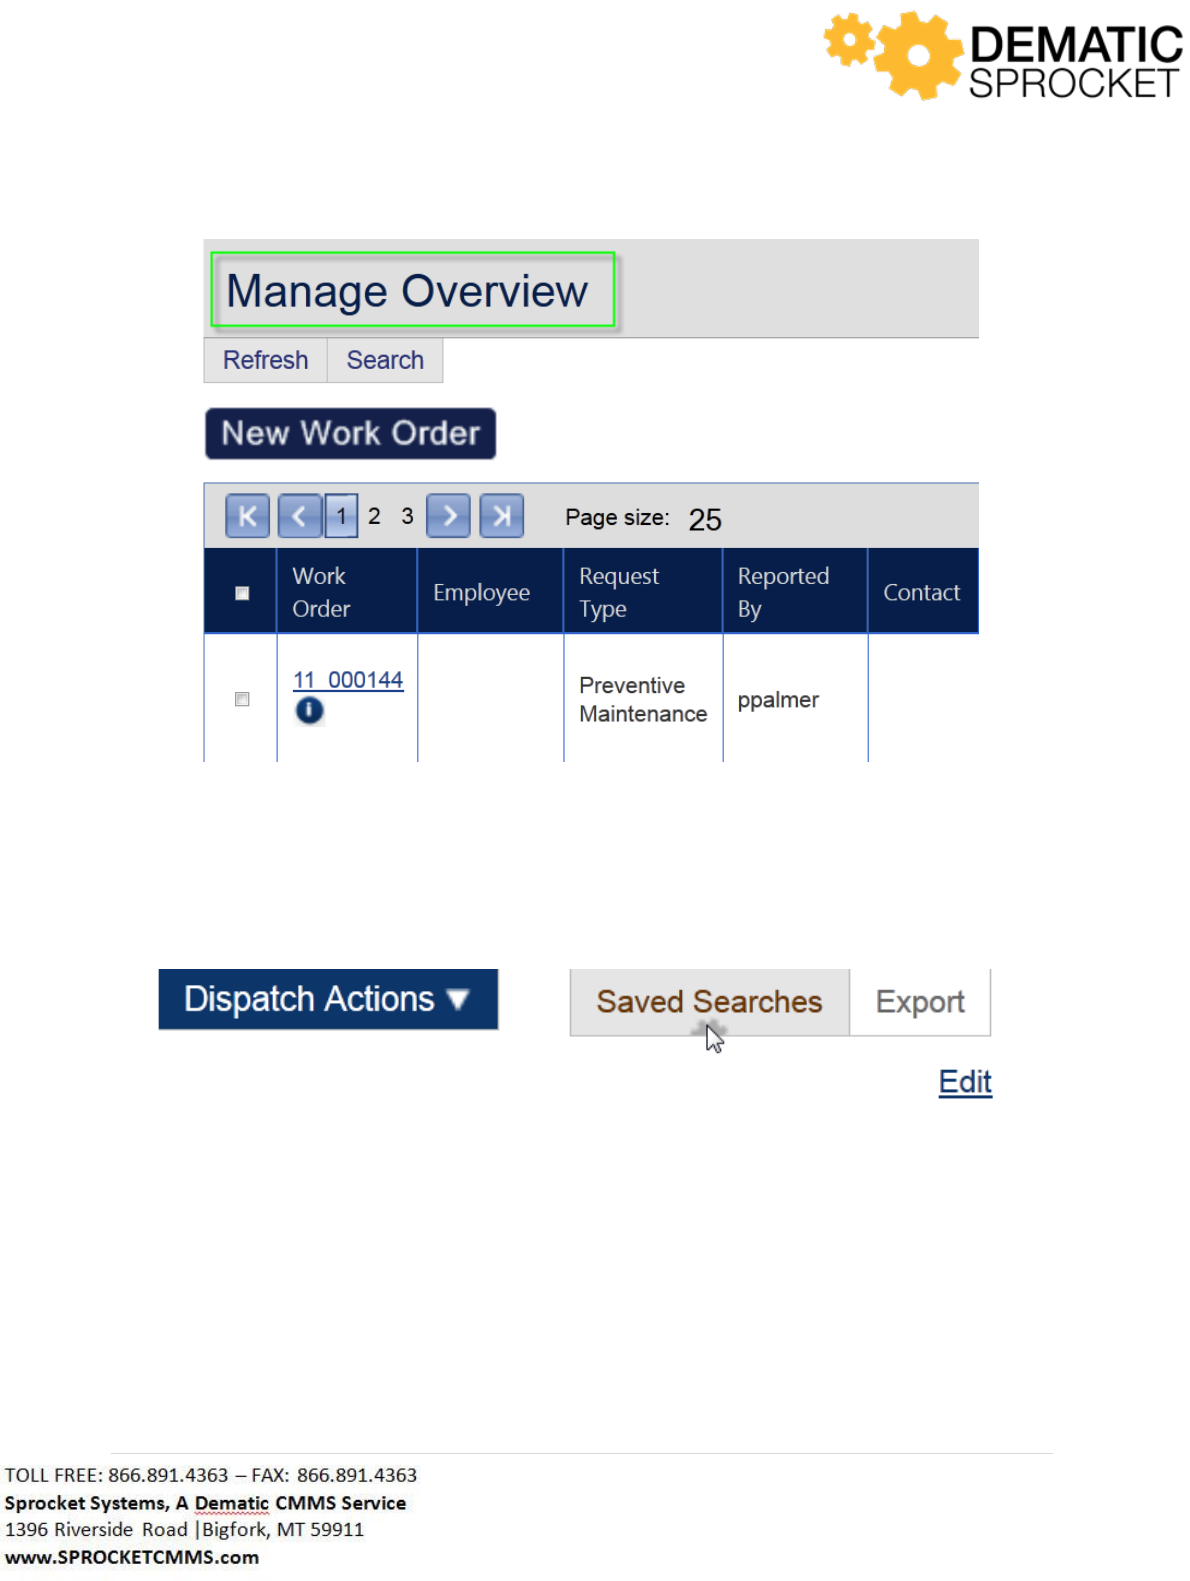
Notice that the name of the Saved Search you are viewing is always displayed at the top left of the page.
So, we are viewing the Manage Overview Saved search.
37 | P a g e
If you ever want to change the Saved Search you are viewing, click the Saved Search button in the upper
right hand corner of your screen.
Notice that the Saved Searches appear and the current Saved Search is highlighted and has a check mark
next to it. Select the name of the desired Saved Search to view a different set of work orders.
38 | P a g e
Note: Sprocket is customized based on customer needs. Your screen may or may not display the above
Saved Searches. Contact your Sprocket Administrator with questions.
Now, take a look at the grid of work orders displayed. Notice the order of the columns and the page
size.
Note: Sprocket is customized based on customer needs. Your screen may or may not display the above
columns or column order. Contact your Sprocket Administrator with questions.
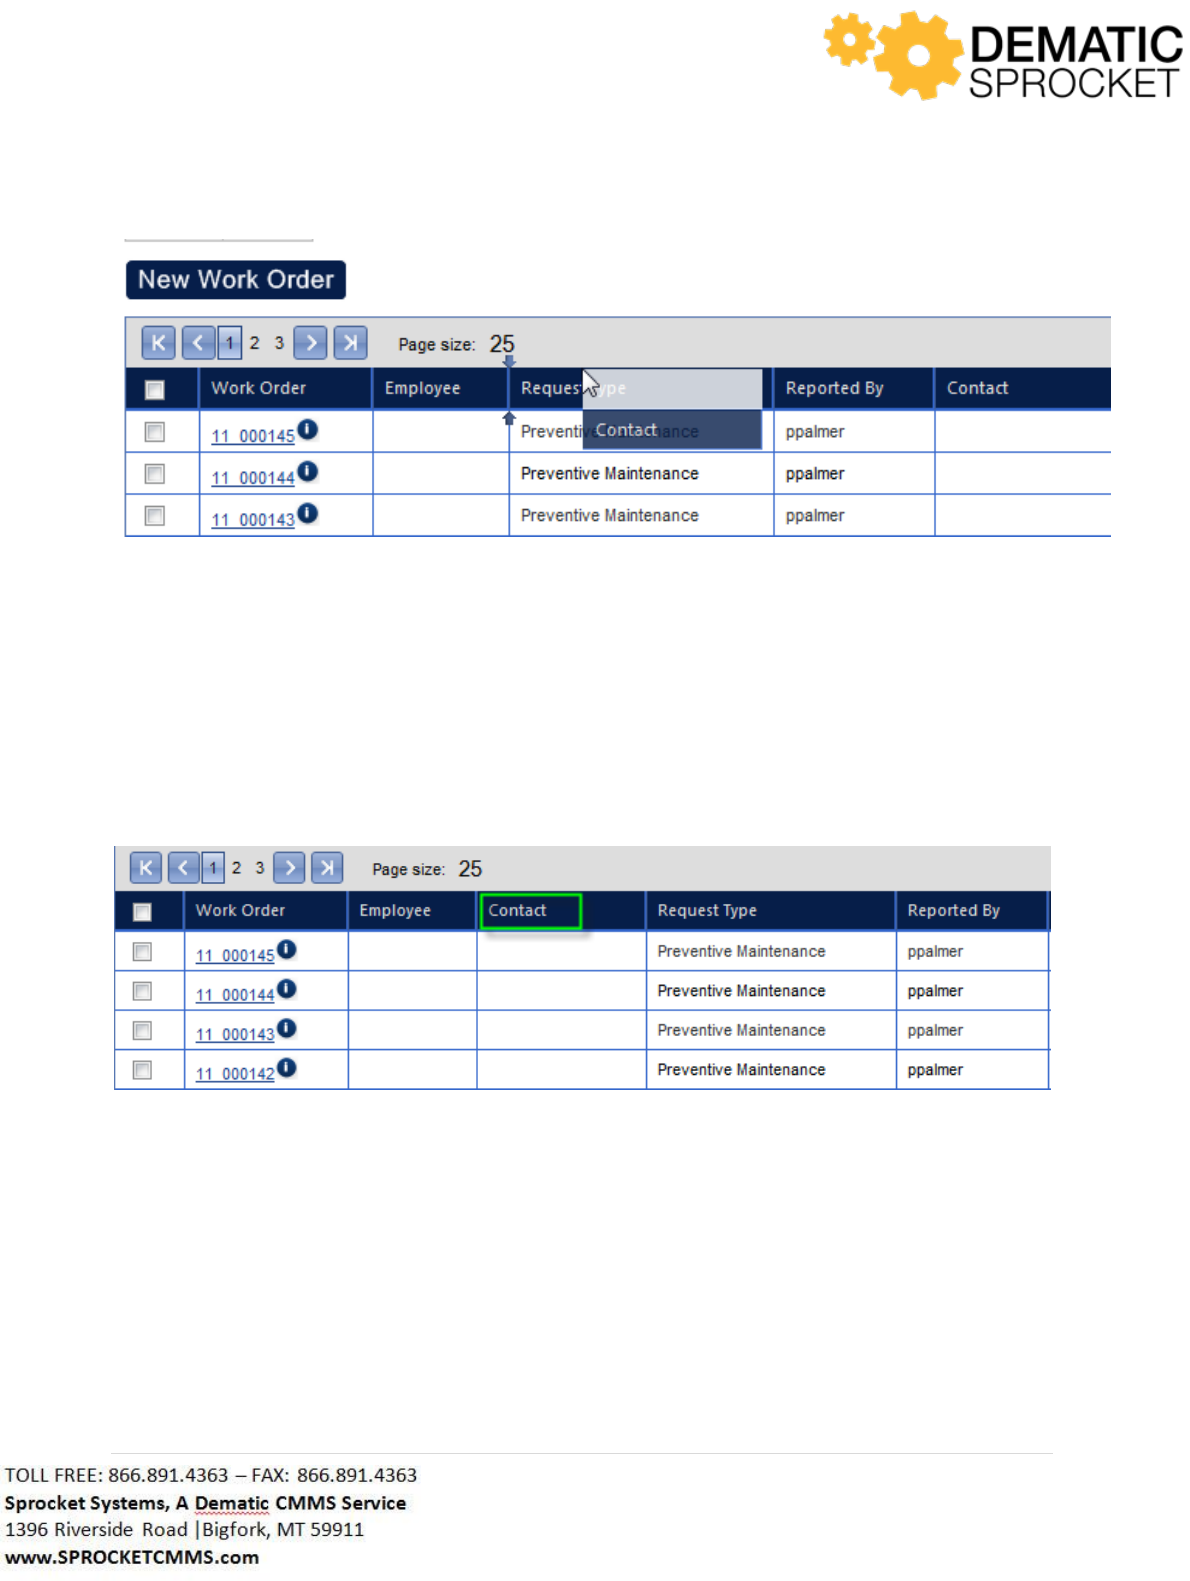
If you wish to change the column order, you can click the column header and drag it to the desired
location. This will automatically save this view for the logged in user.
39 | P a g e
The column will set wherever you “drop” it. This will only change the view for logged in user. Notice
that now the Contact column is located between Employee and Request Type columns.
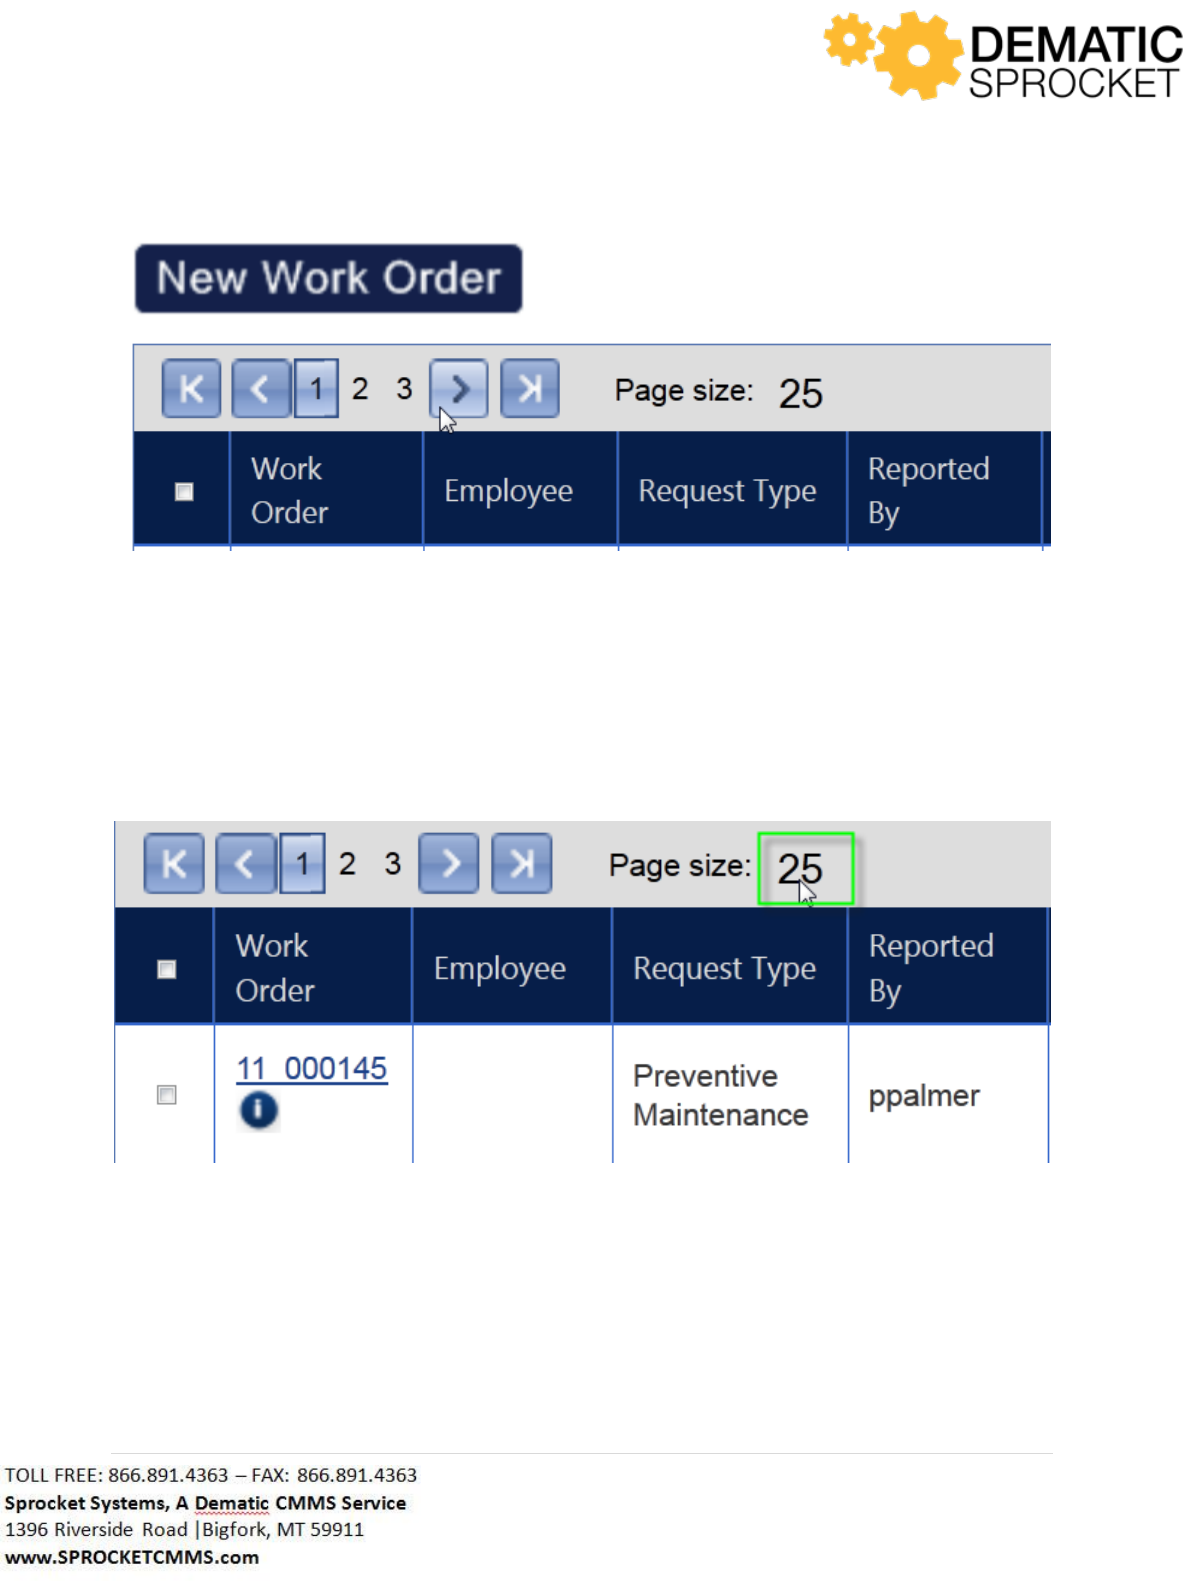
Notice at the top left of the grid, pages 1, 2, and 3 are displayed. This indicates that there are work
orders displayed on three pages. Use the arrows to scroll between pages of work orders.
40 | P a g e
You can also change the amount of work orders you are viewing per page. Notice that next to the page
arrows Page Size: 25 is displayed. This indicates that you are viewing 25 work orders per page. You can
change the amount of work orders you are viewing per page by clicking the number of work orders per
page and selecting the desired amount from the drop down menu.
So, click the number 25 at the top of the work order grid.
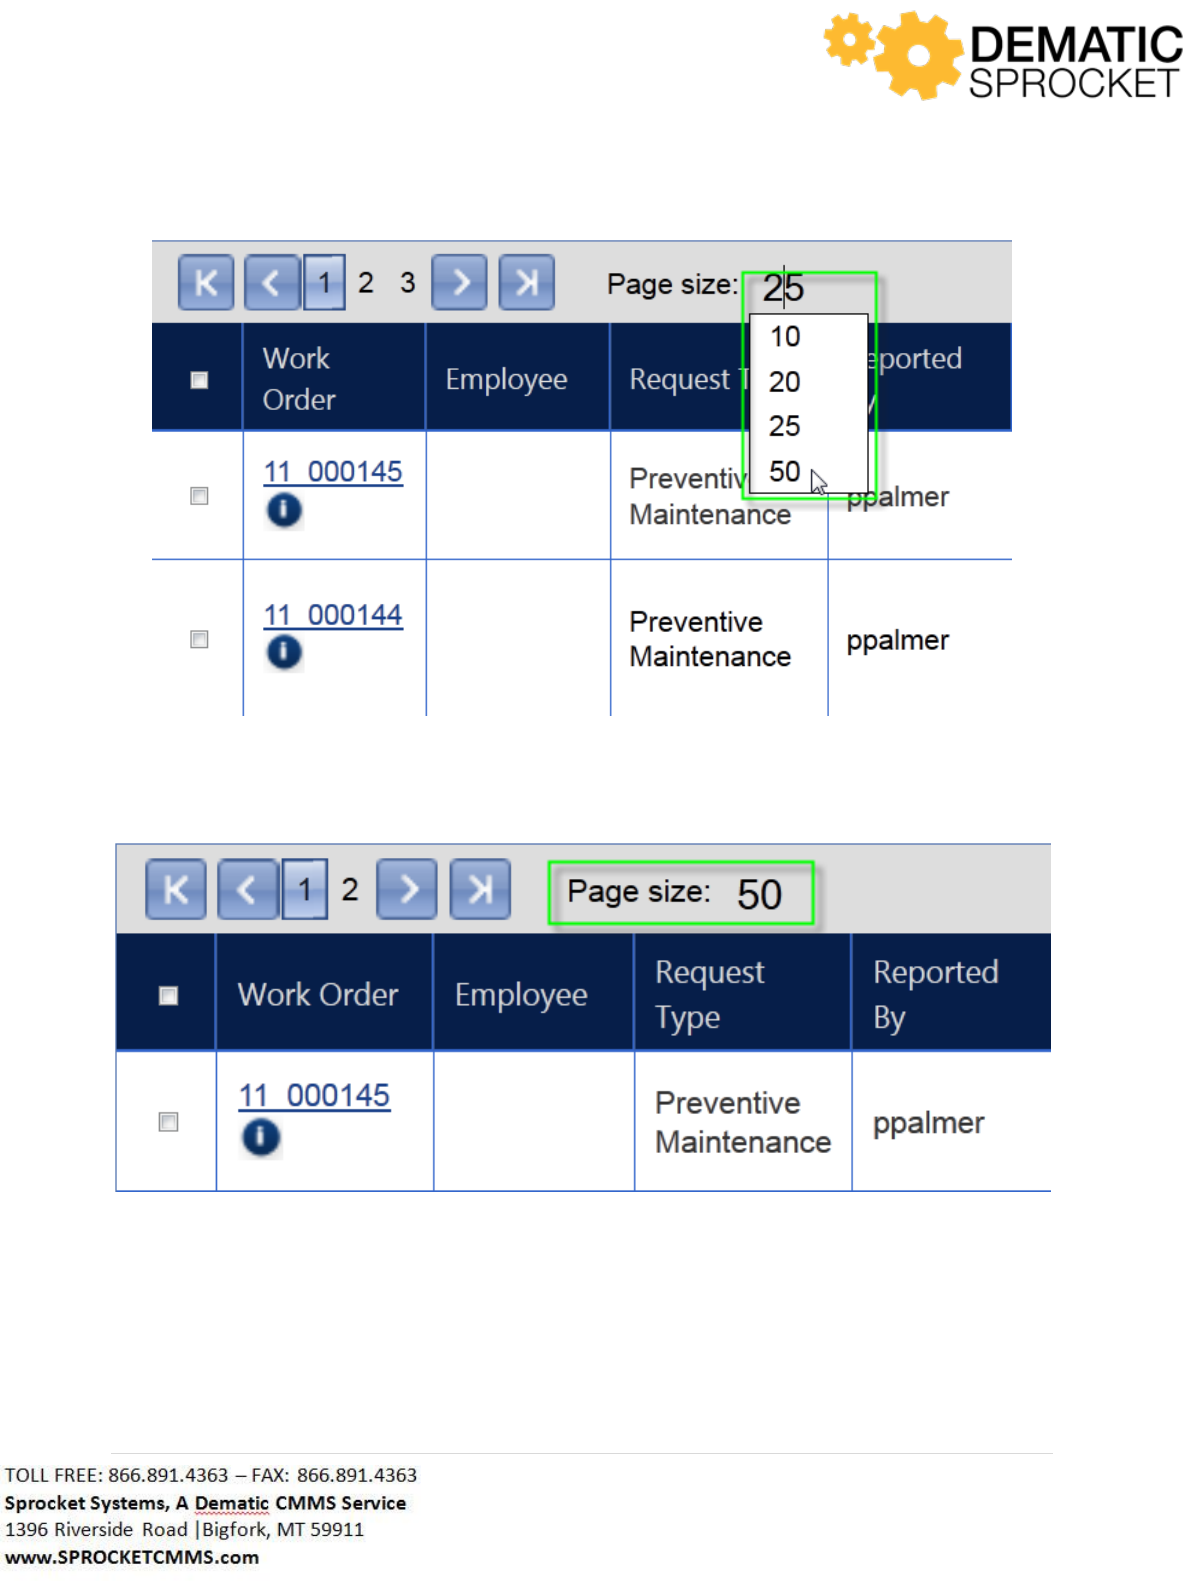
A drop down menu will appear. Select the number of work orders you would like to view per page.
41 | P a g e
The page number will automatically refresh and show the new amount of work orders per page.
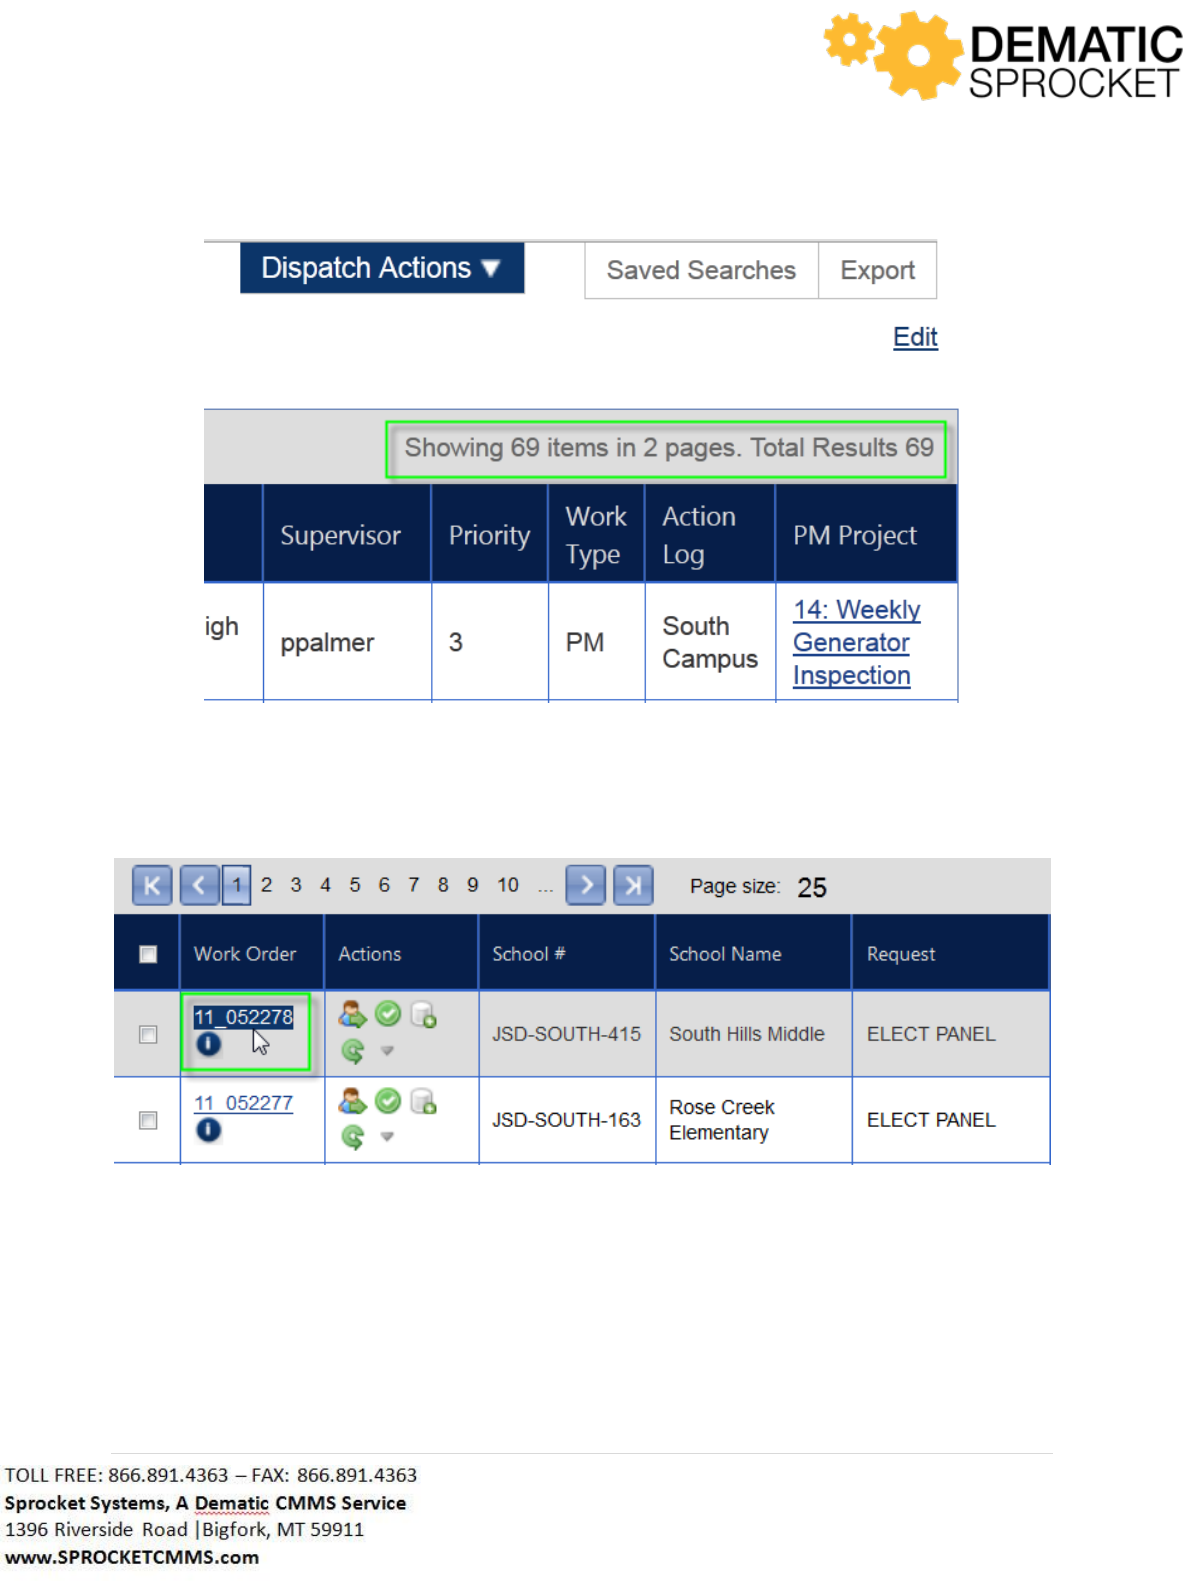
Notice at the top right of the grid, the total number of work orders is displayed.
42 | P a g e
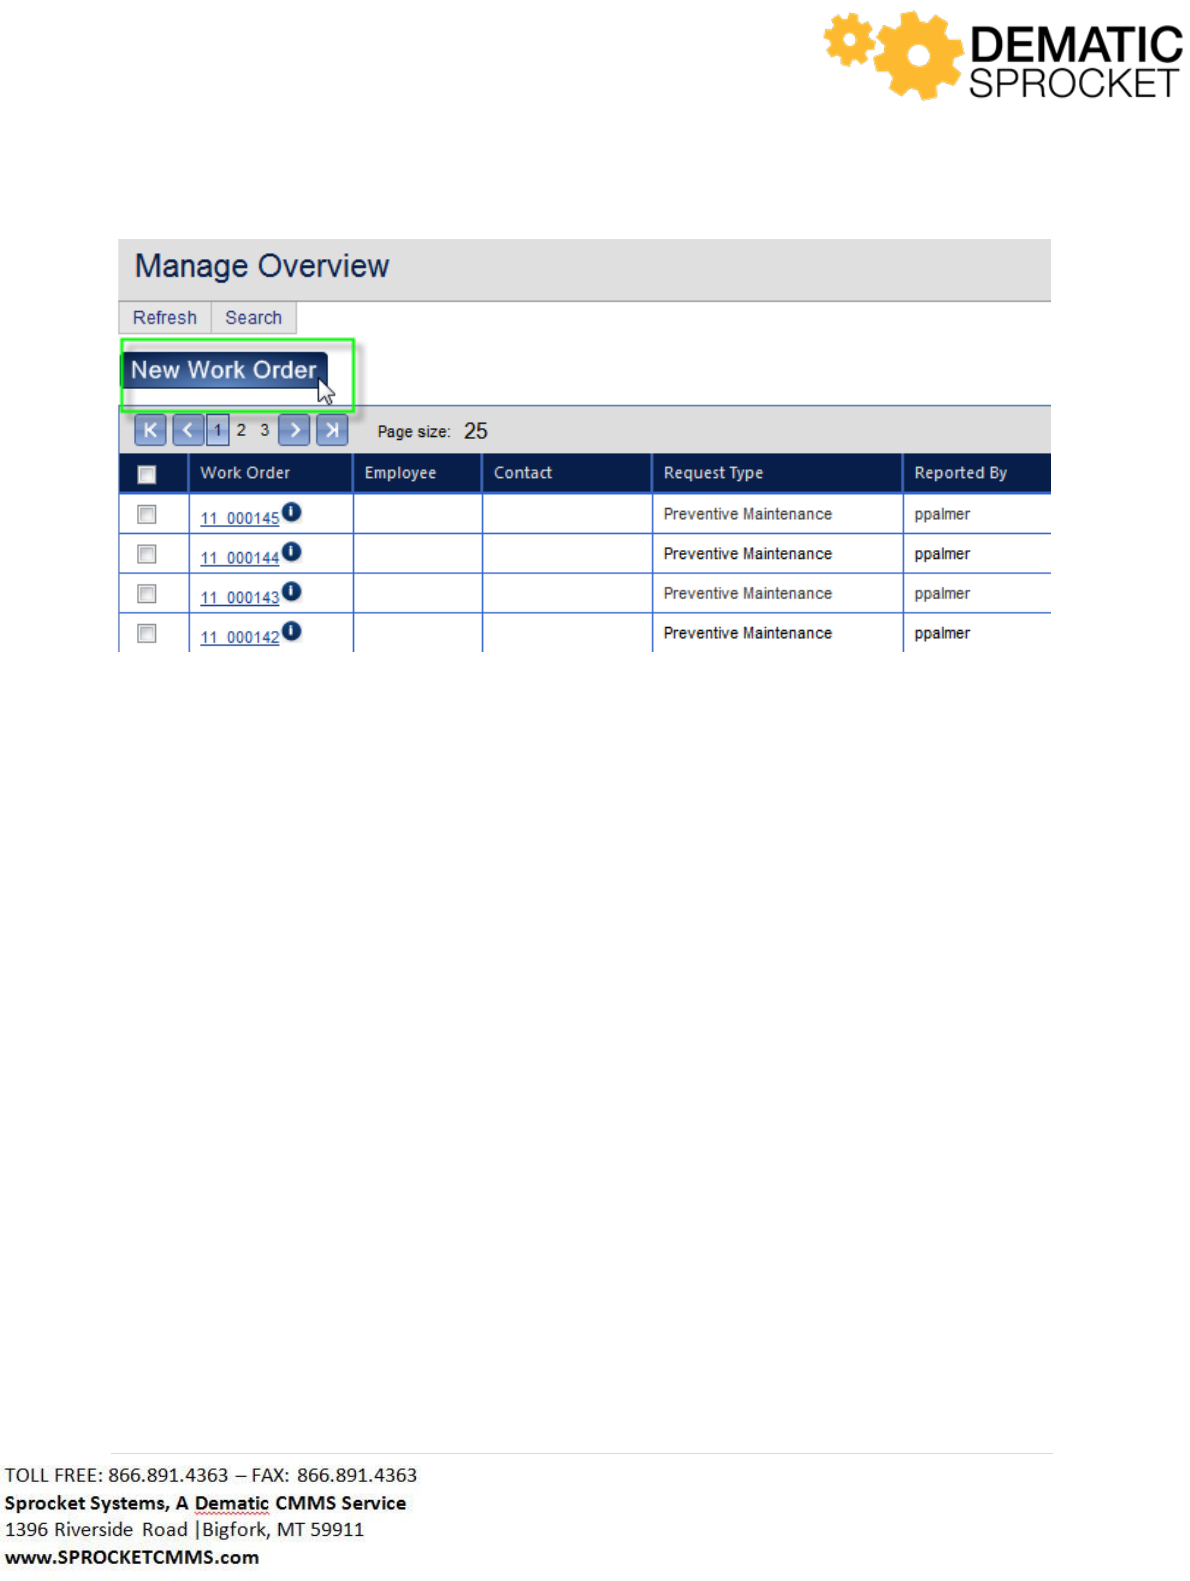
As you view your list of work orders, notice that the Work Order Identifier is a clickable link. Click on a
Work Order Identifier to view the details of this work order.
Note: Work Order Details will be explained in section 5.0.
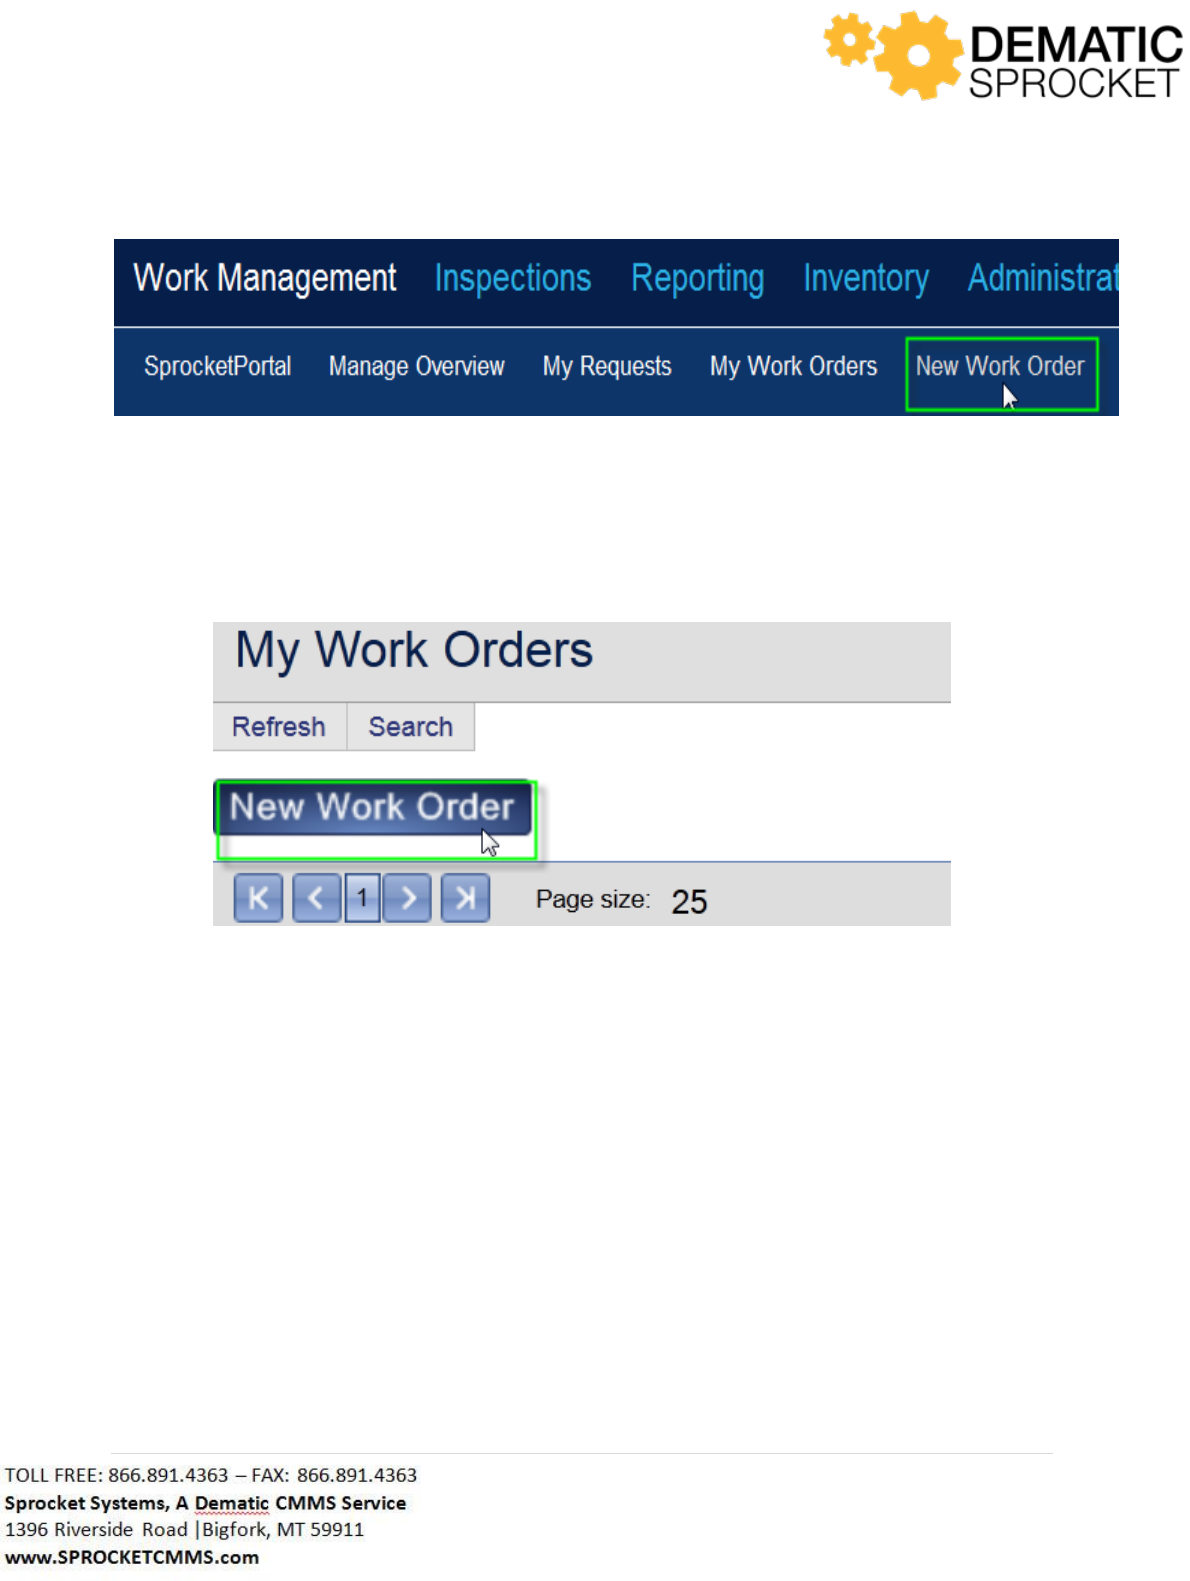
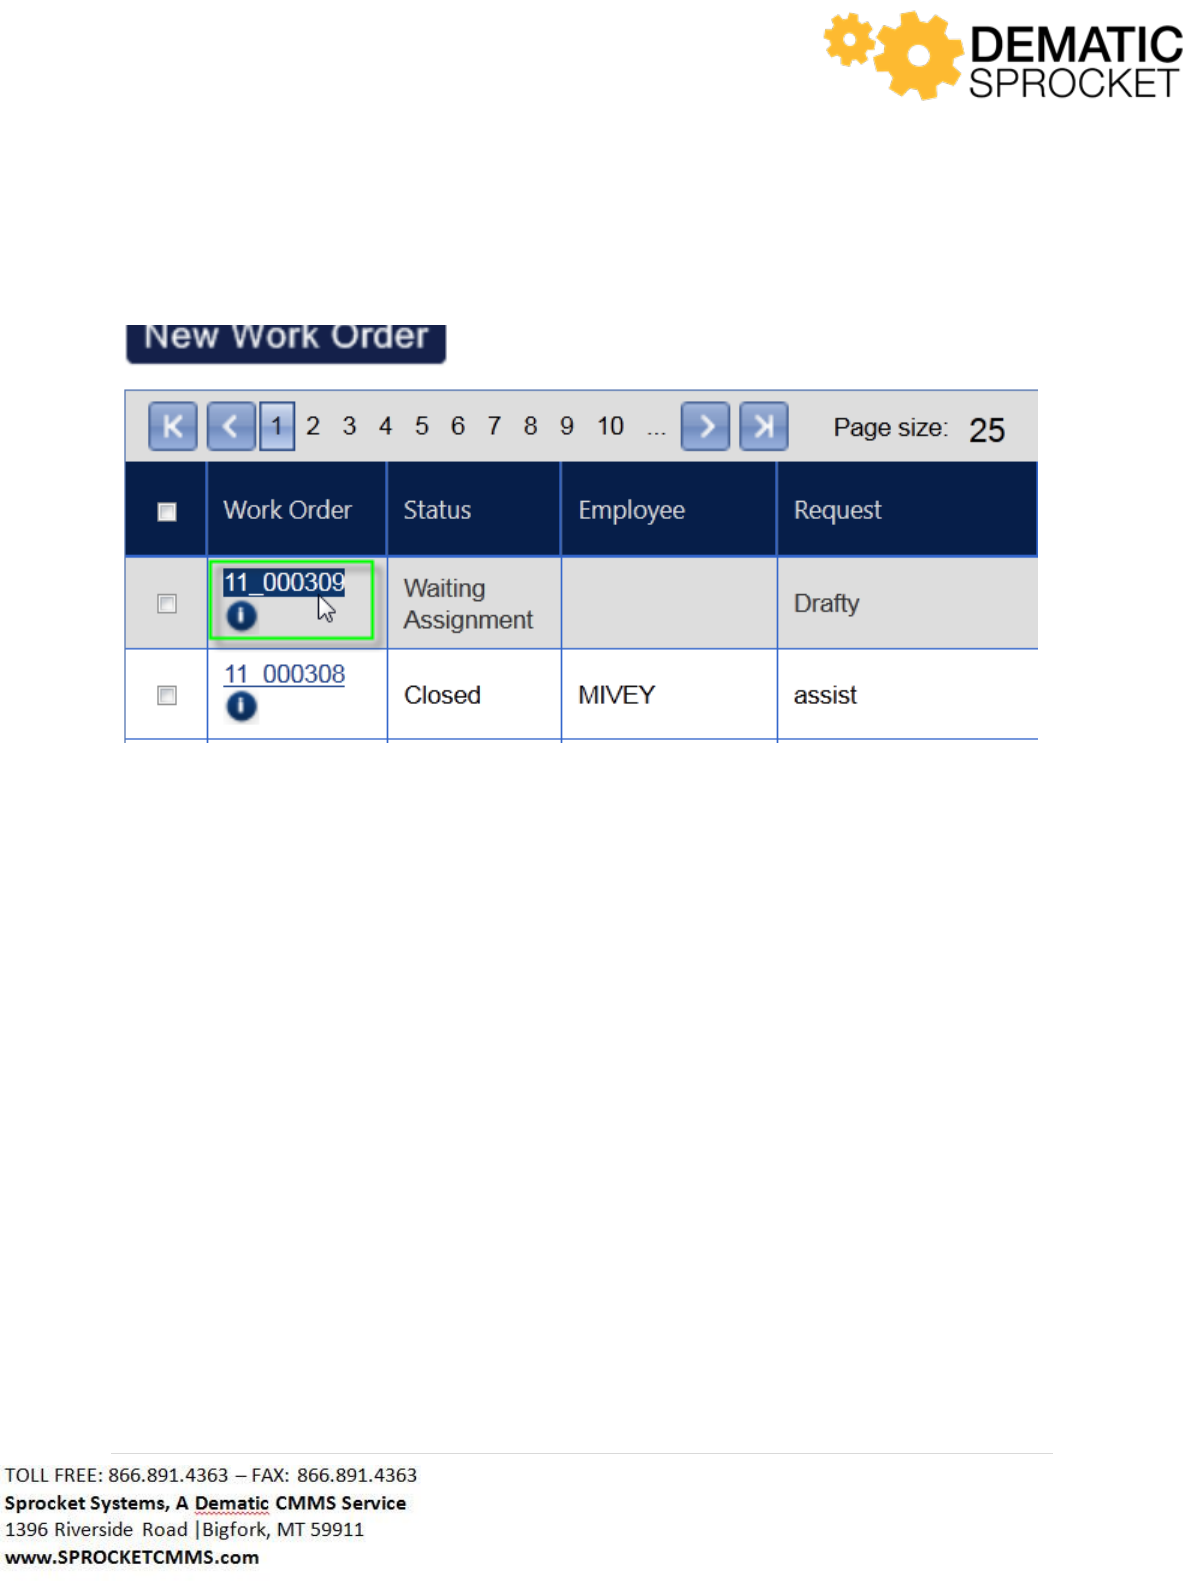
Notice the New Work Order button at the top of the screen. Click here to create a new work order on
the New Work Order Screen.
43 | P a g e
Note: The New Work Order Screen will be explained in section 4.5.
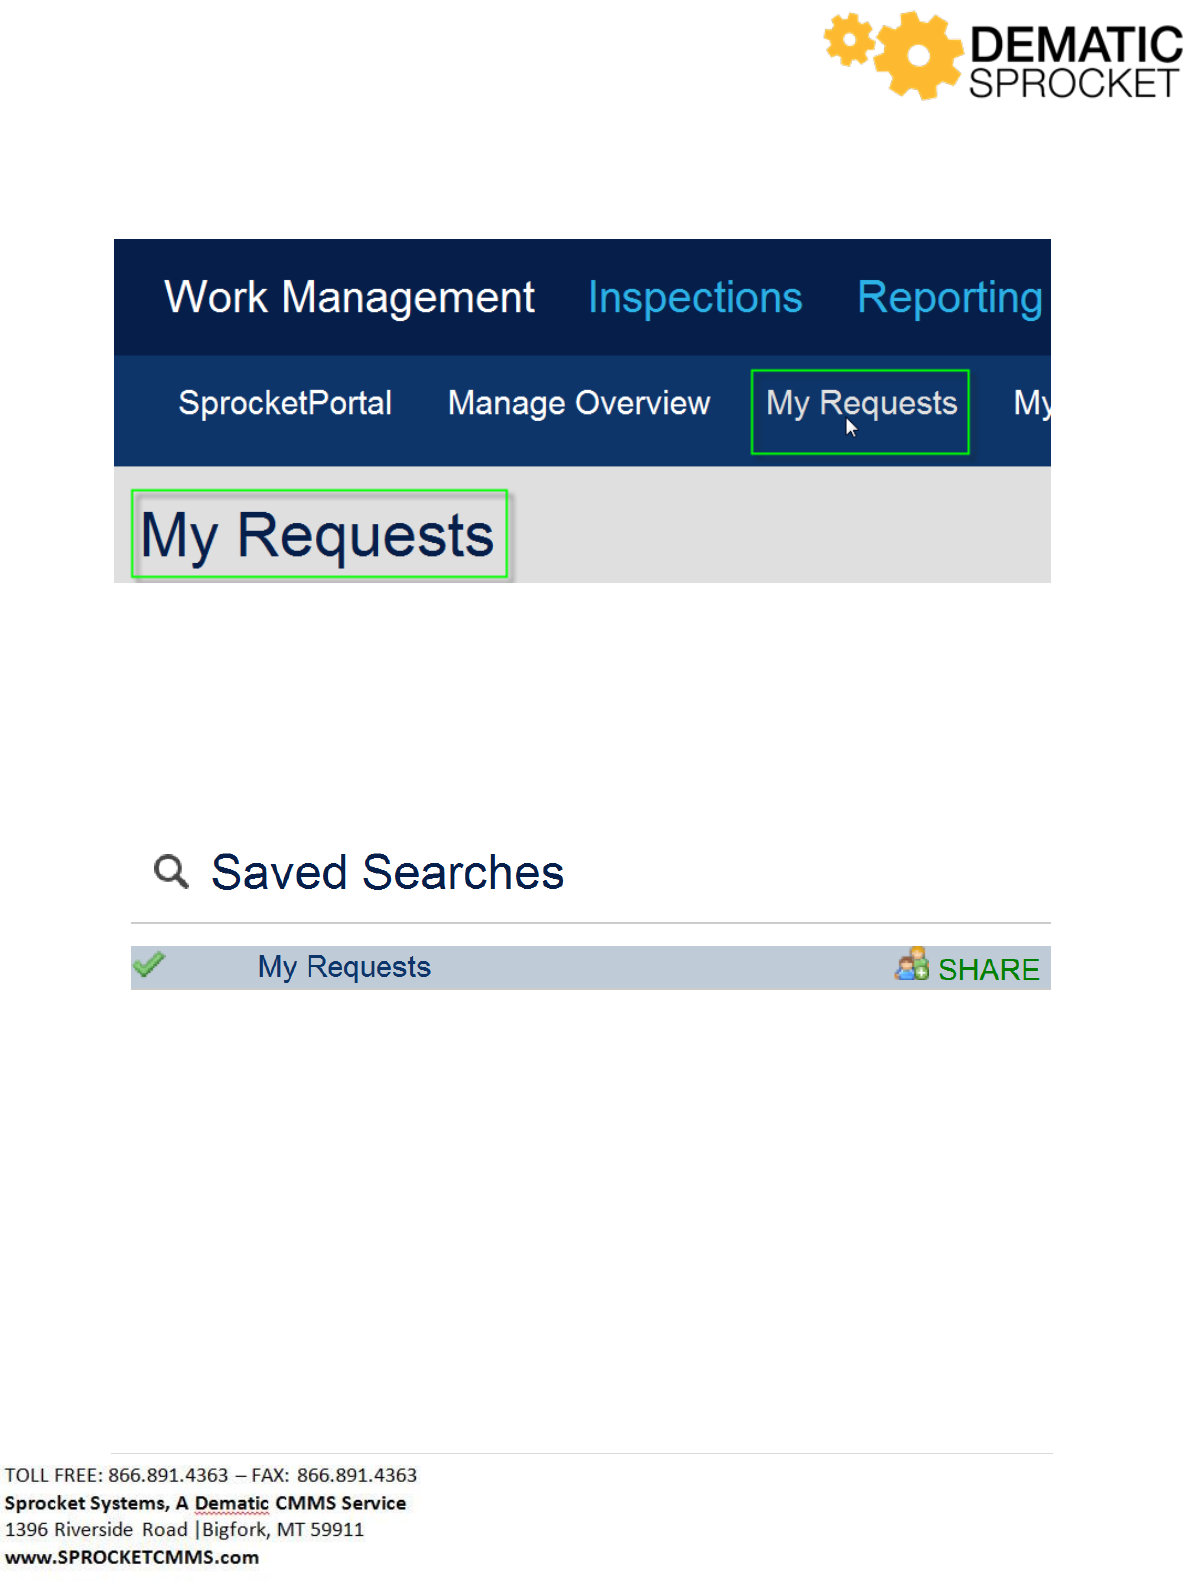
4.3 My Requests
Next to the Manage Overview tab is the My Requests tab. Click here to view and manage work orders
that you have requested.
44 | P a g e
Notice that the name of the Saved Search you are viewing is always displayed at the top left of the page.
This screen will automatically display the last Saved Search that was selected from the logged in user’s
last session. Because this screen is specific to requests that you have submitted, the only Saved Search
is typically My Requests.
Note: Sprocket is customized based on customer needs. My Requests is typically the only Saved Search
on the My Requests tab. Your screen may or may not display additional Saved Searches. Contact your
Sprocket Administrator with questions.
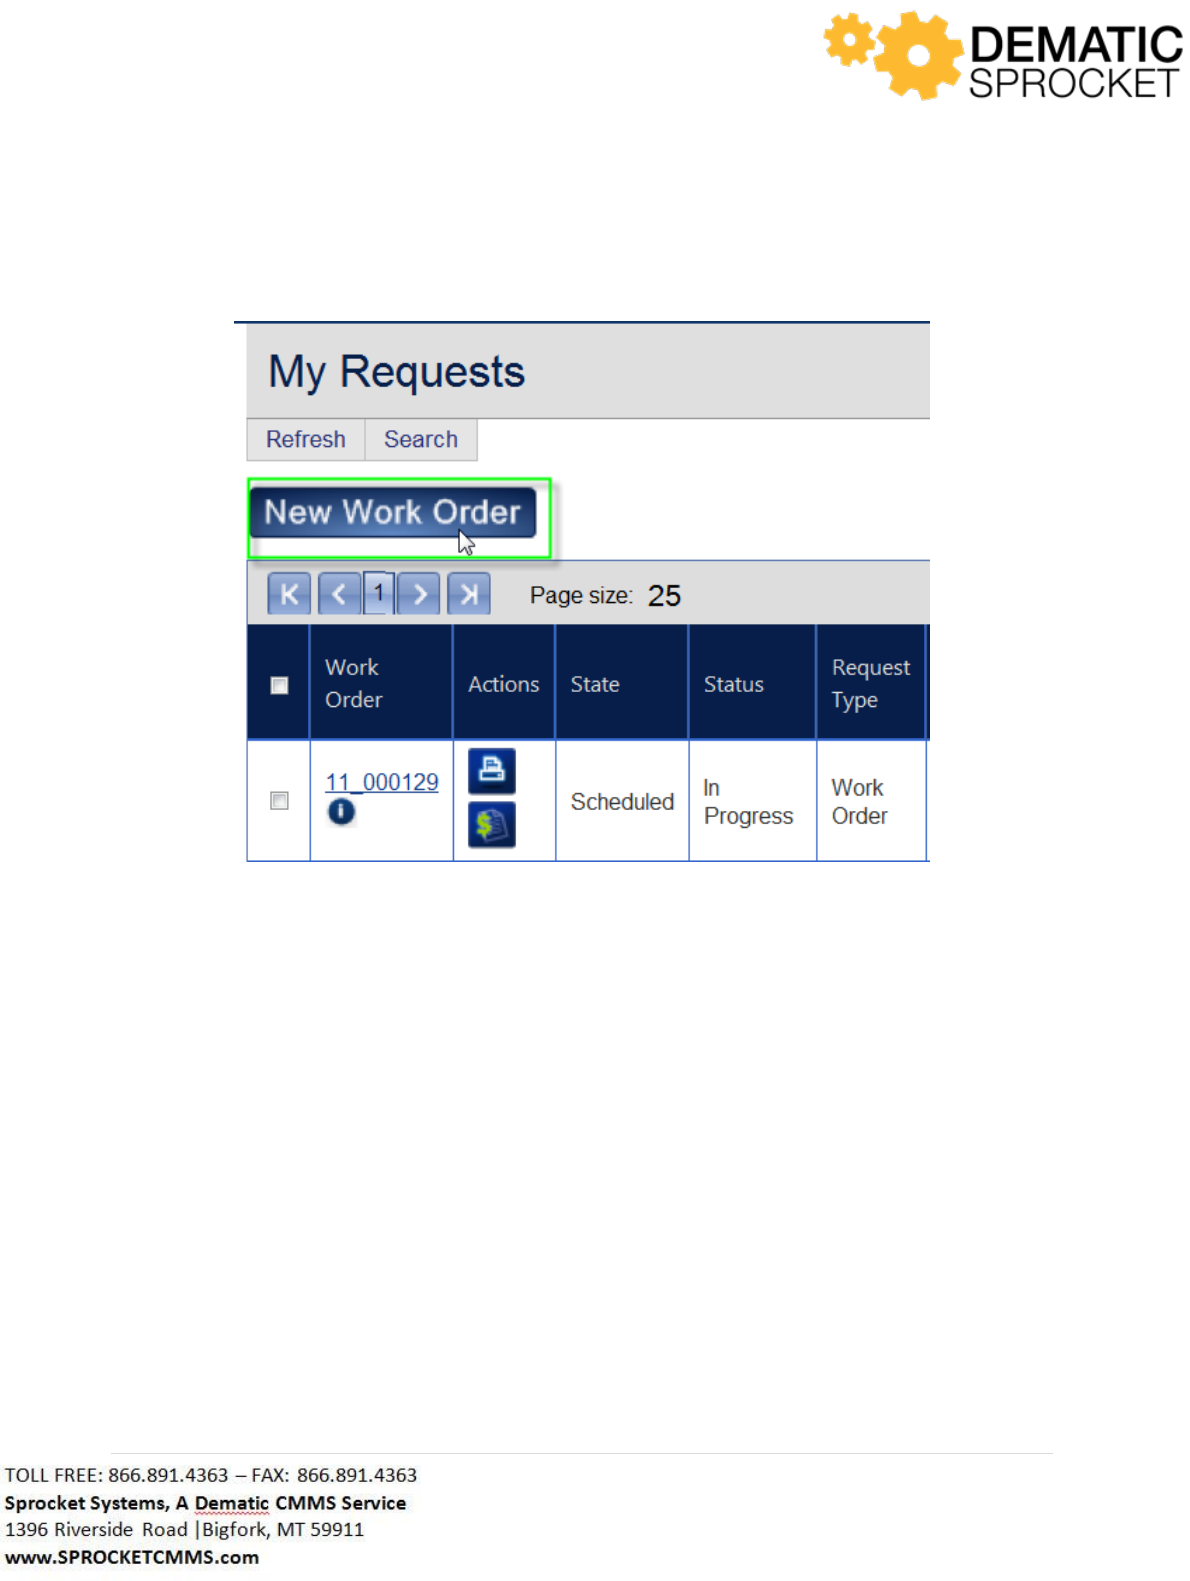
My Requests is based on Manage Overview configurations. Notice that this screen is nearly identical to
Manage Overview. It simply only filters work orders that you, the logged in user, has requested.
Use Search criteria to search for work orders using additional filters, use Dispatch Actions to easily
process work orders, and click the Work Order Identifier to view Work Order Details.
45 | P a g e
Notice at the top of the left of the screen, there is a button labeled New Work Order. Click here to
create a new work order on the New Work Order Screen.
Note: The New Work Order Screen will be explained in section 4.5.
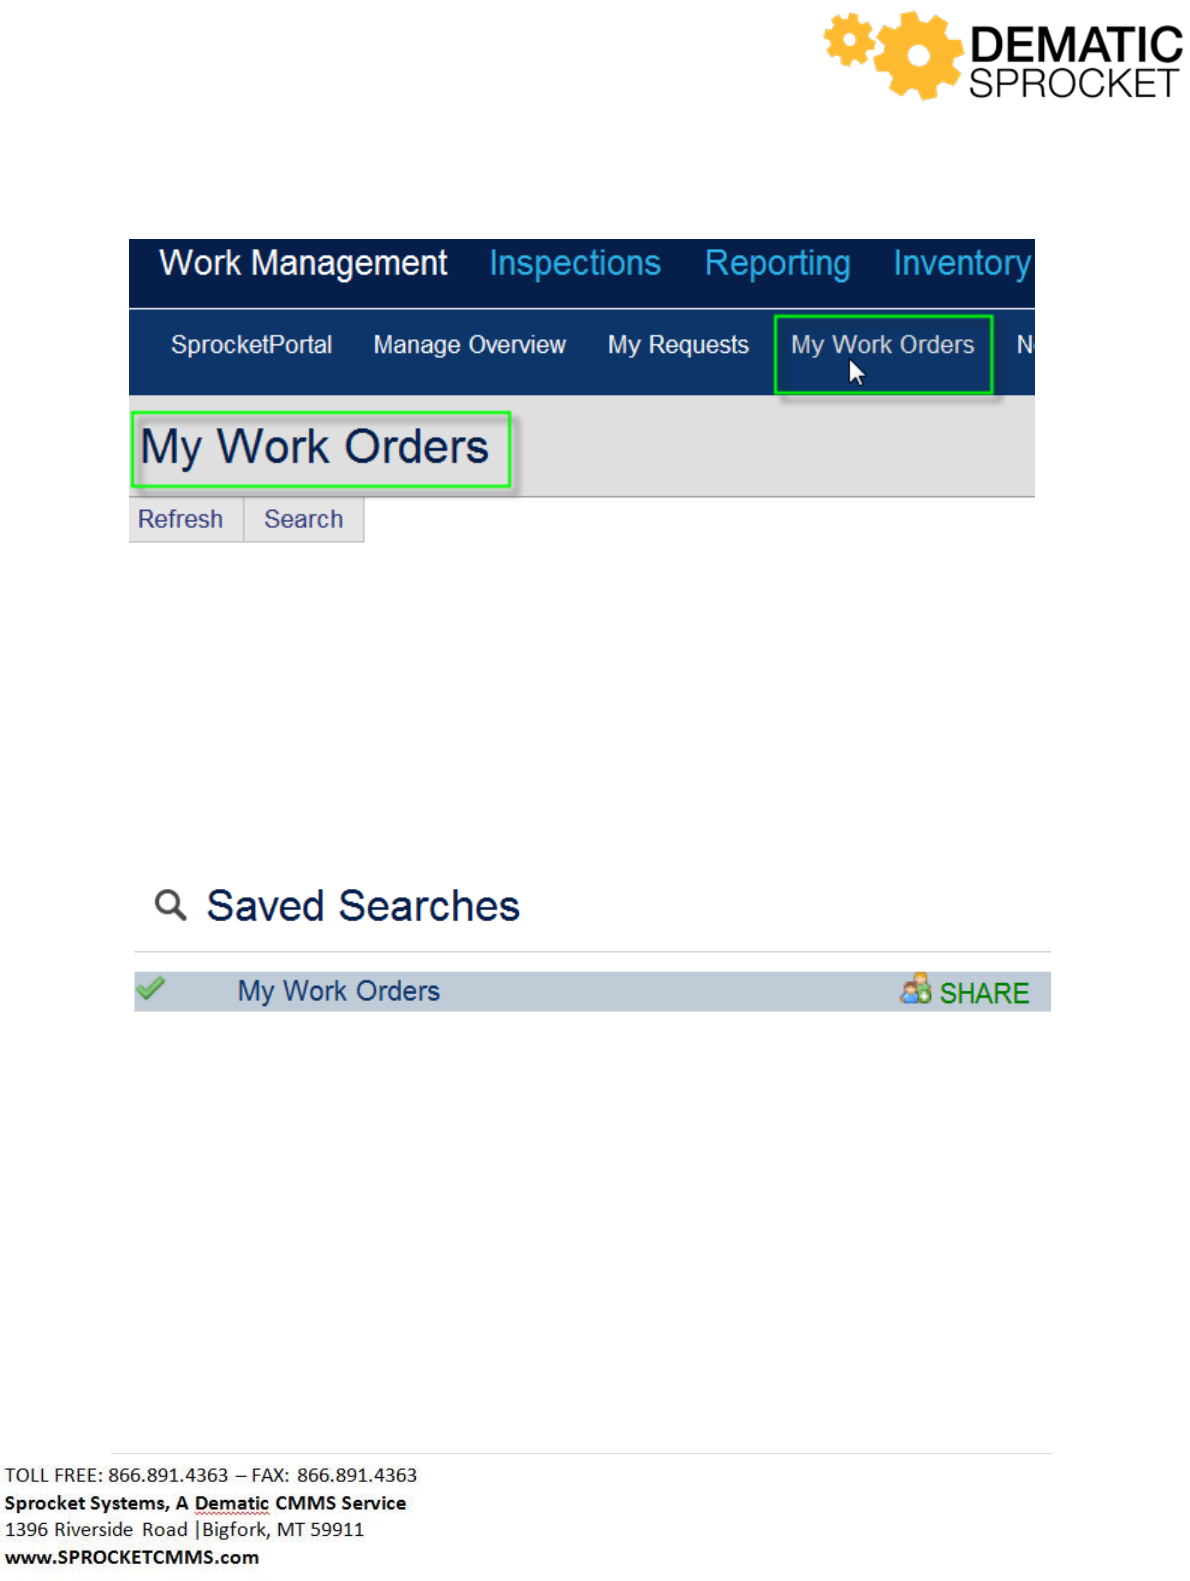
4.4 My Work Orders
Next to the My Requests tab is the My Work Orders tab. Click here to view and manage work orders
that are assigned to you, the logged in user.
46 | P a g e
Notice that the name of the Saved Search you are viewing is always displayed at the top left of the page.
This screen will automatically display the last Saved Search that was selected from the logged in user’s
last session. Because this screen is specific to work orders assigned to you, the only Saved Search is
typically My Work Orders.
Note: Sprocket is customized based on customer needs. My Work Orders is typically the only Saved
Search on the My Work Orders tab. Your screen may or may not display additional Saved Searches.
Contact your Sprocket Administrator with questions.
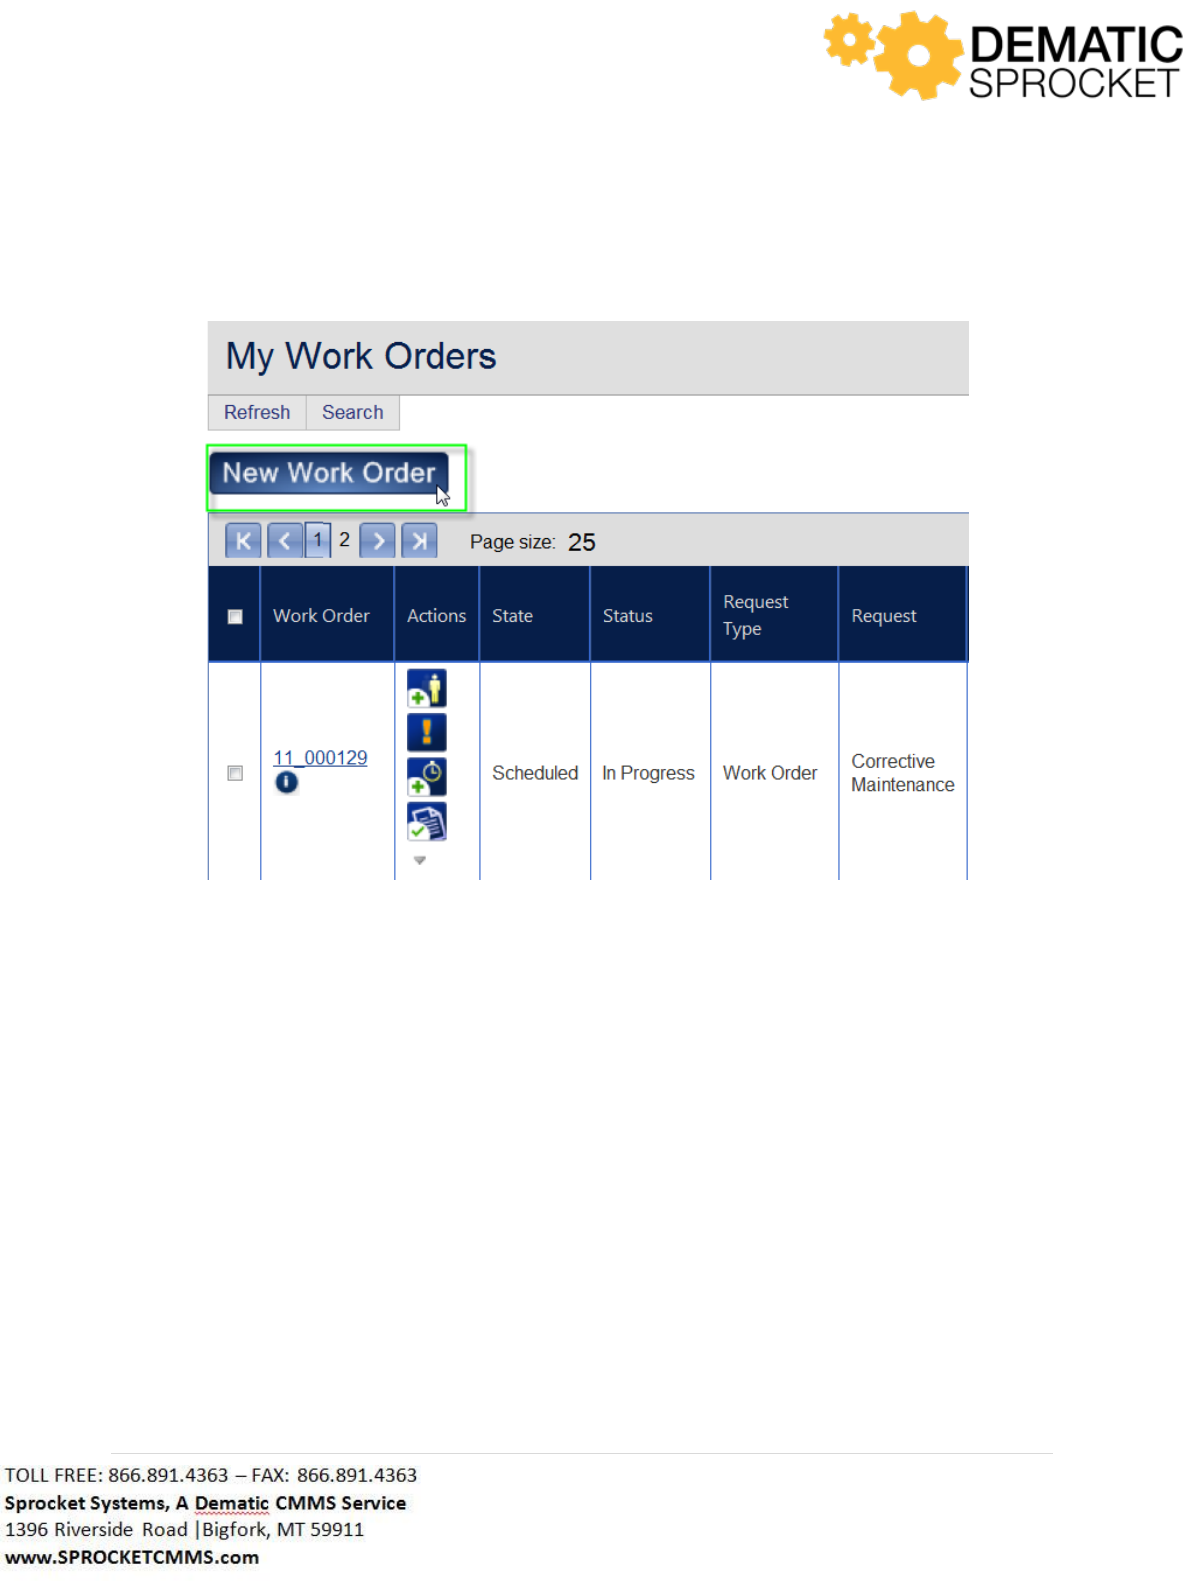
My Work Orders is based on Manage Overview configurations. Notice that this screen is nearly identical
to Manage Overview. It simply only filters work orders that you, the logged in user, are assigned to.
Use Search criteria to search for work orders using additional filters, use Dispatch Actions to easily
process work orders, and click the Work Order Identifier to view Work Order Details.
47 | P a g e
Notice at the top of the left of the screen, there is a button labeled New Work Order. Click here to
create a new work order on the New Work Order Screen.
Note: The New Work Order Screen will be explained in section 4.5.
4.5 New Work Order
Next to the My Work Orders tab is the New Work Order tab. Click here to create and submit a new
work order.
48 | P a g e
Remember that you can also use the New Work Order button at the top left of any Saved Search screen
to navigate to the New Work Order screen as well.
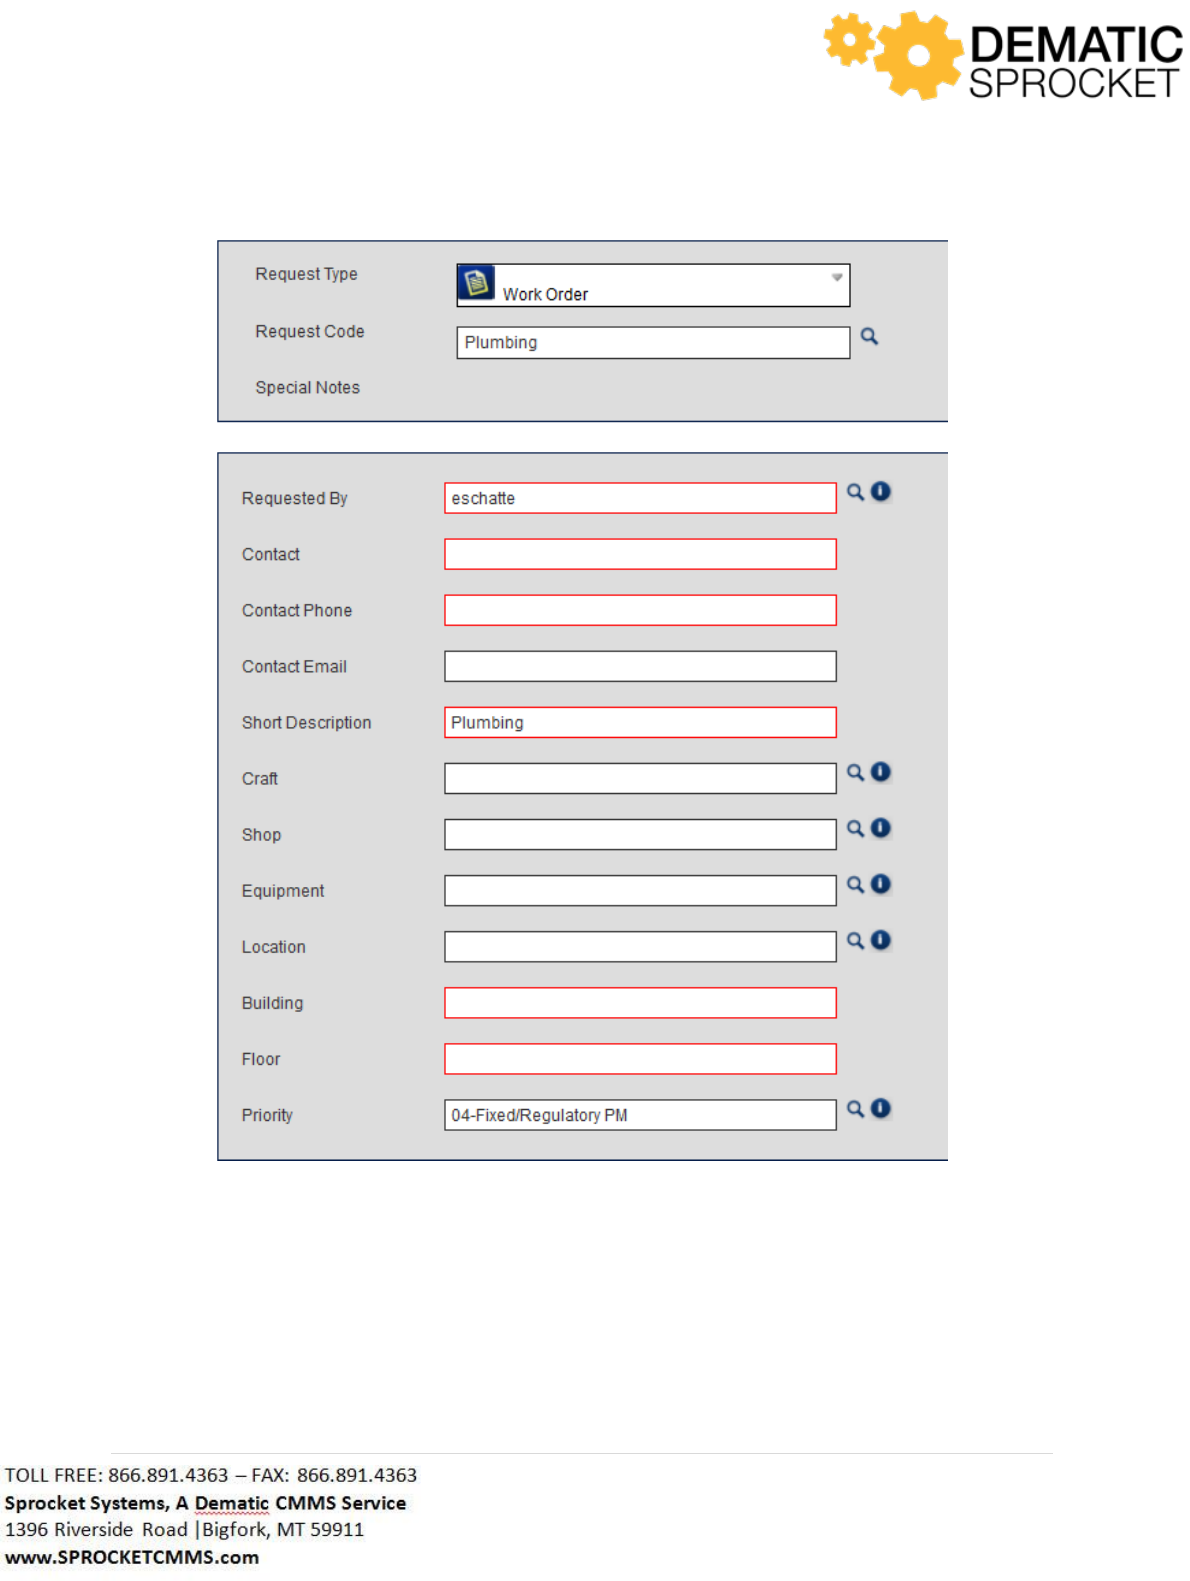
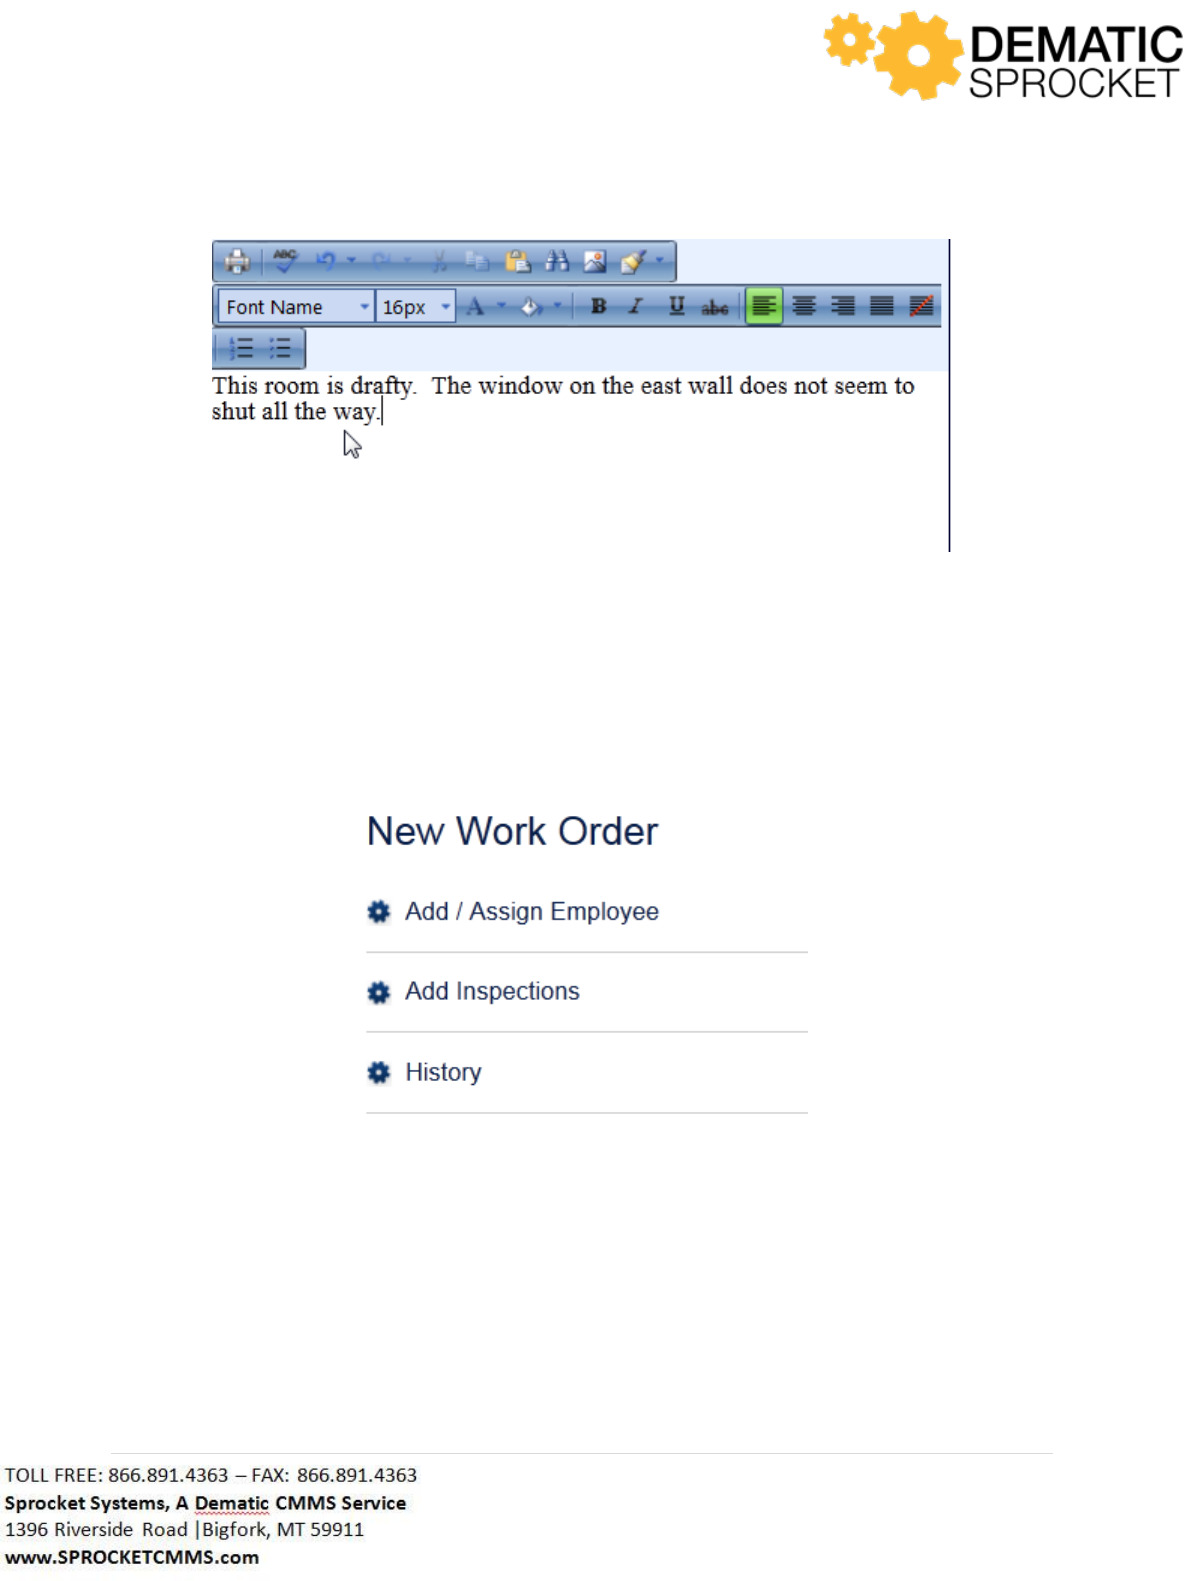
You will be directed to a form called the New Work Order Screen. This form is filled out with important
information about the work that needs to be done. All work order screens also have a Comments field
at the bottom of the page to enter in additional information or instructions about the work that needs
to be performed.
This screen will automatically default to the last Request Type and Request Code chosen by the logged in
user. These indicate the type of work you are requesting and the particular request category.
49 | P a g e
Note: Sprocket is customized based on customer needs. Your screen may or may not display the above
new work order fields. Contact your Sprocket Administrator with questions.
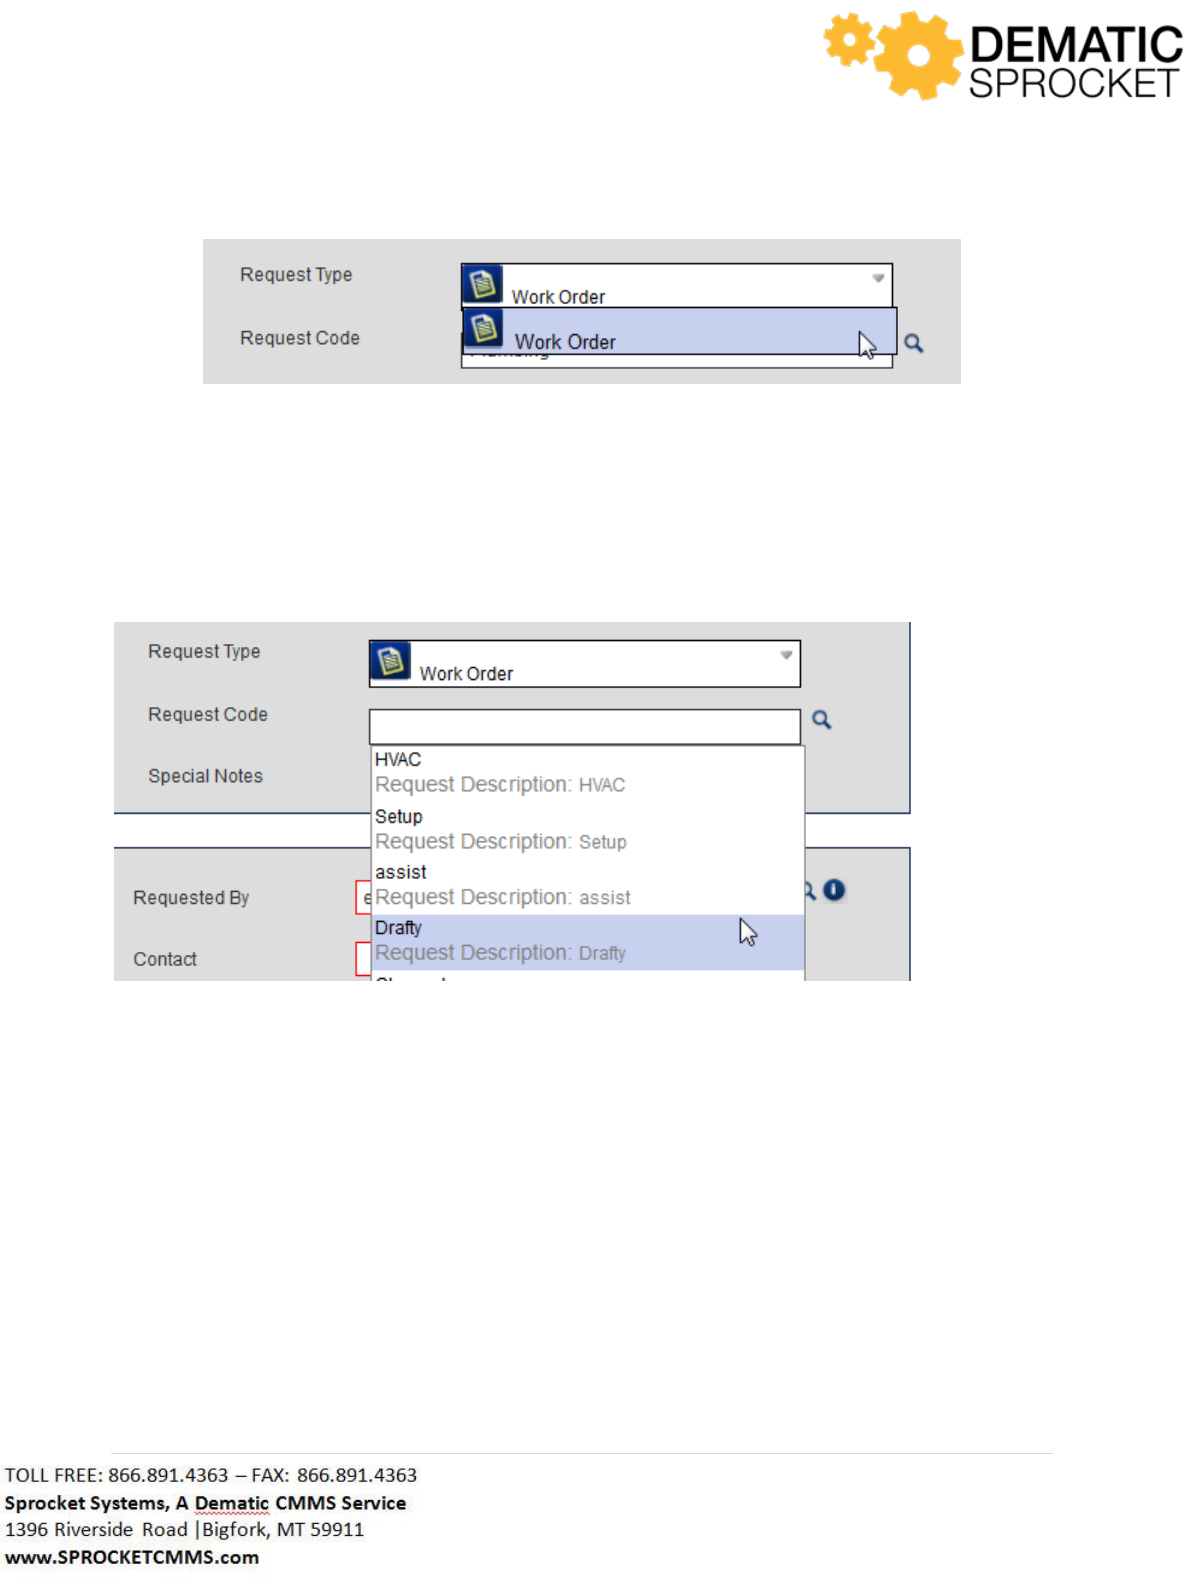
Notice that the Request Type and Request Code fields are located at the top of the New Work Order
Screen. Click the Request Type drop down menu to select the Request Type for this work order.
50 | P a g e
Note: Sprocket is customized based on customer needs. Your screen may or may not display the above
Request Types. Contact your Sprocket Administrator with questions.
It is common for Work Order to be the only Request Type.
Now, using the Auto Lookup Tool, select a Request Code from the list which helps further classify the
requested work.
Note: Sprocket is customized based on customer needs. Your screen may or may not display the above
Request Codes. Contact your Sprocket Administrator with questions.
Remember, if you do not see the correct Request Code in the list, you can always either click the Auto
Lookup Tool icon or begin typing all or part of the Request Code into the field to locate the correct
Request Code.
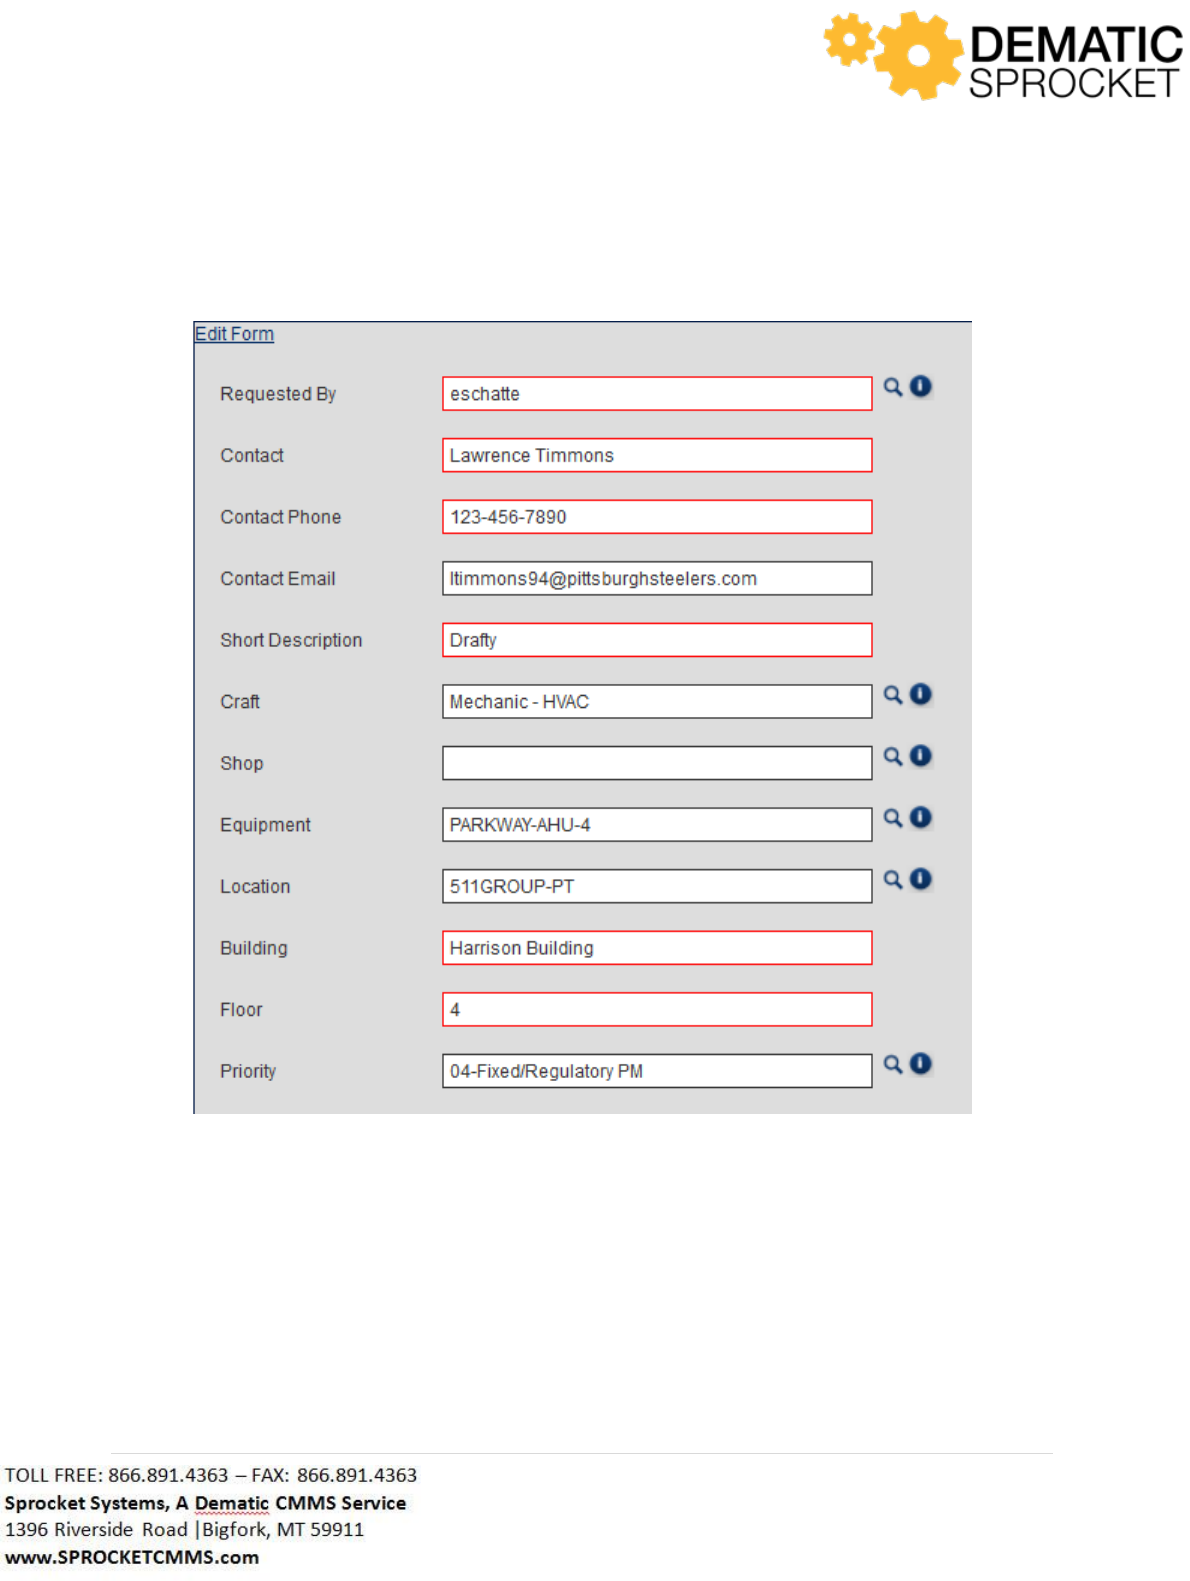
Once you have selected the correct Request Code and Request Type, the New Work Order form will
populate the fields you need to fill out. Go through this form and fill out the fields. Remember that
fields outlined in red are required fields. You cannot submit a work order without filling out required
fields. Fields that are not required are optional, so you may leave these fields unanswered if you wish.
51 | P a g e
Notice that some fields have the Auto Lookup Tool next to them. Use this to help locate and select
records in Sprocket such as location, craft, equipment, and shop.
Note: Sprocket is customized based on customer needs. Your screen may or may not display the above
fields, Auto Lookup Tools, and required fields. Contact your Sprocket Administrator with questions.
Once you have completed the form, notice the Comments field at the bottom of the page. Click here to
enter in addition comments, notes, or instructions for this work order.
52 | P a g e
4.5.1 New Work Order Menu Panel
Before you submit your work order, notice the New Work Order Menu Panel to the left of the screen.
Note: Sprocket is customized based on customer needs. Your screen may or may not display the above
New Work Order Menu Panel options. Contact your Sprocket Administrator with questions.
Use the menu to perform additional actions to a work order. Click the Add/Assign Employee button to
add or assign an employee.
When you click the Add/Assign Employee button, notice a few options are displayed.

53 | P a g e
At the top of this section, notice the checkbox labeled Manually Assign. When employees are assigned,
it is typically based on the craft or shop used for this work order. So, when the box is unchecked, the list
of assignable employees to choose from will only be people in the craft or shop categories indicated in
this work order. If you would like to choose from a list of employees regardless of shop or craft, check
the box to select from a list of all assignable employees.
Below this checkbox is the Employee drop down menu. This is the menu that displays possible
employees to assign to this work order. Notice that the Manually Assign box is unchecked, so this list
will only display employees that are in the shop or craft associated to the requested work in this work
order.

54 | P a g e
Now that an employee has been selected, notice the Why this list of Employees? link. Click here to view
a scorecard of suggested employees that can be assigned to this work order. Sprocket utilizes
dispatching heuristics to determine who the best candidate for this work is. So, the best employees for
this work are shown from top to bottom in this list.
55 | P a g e
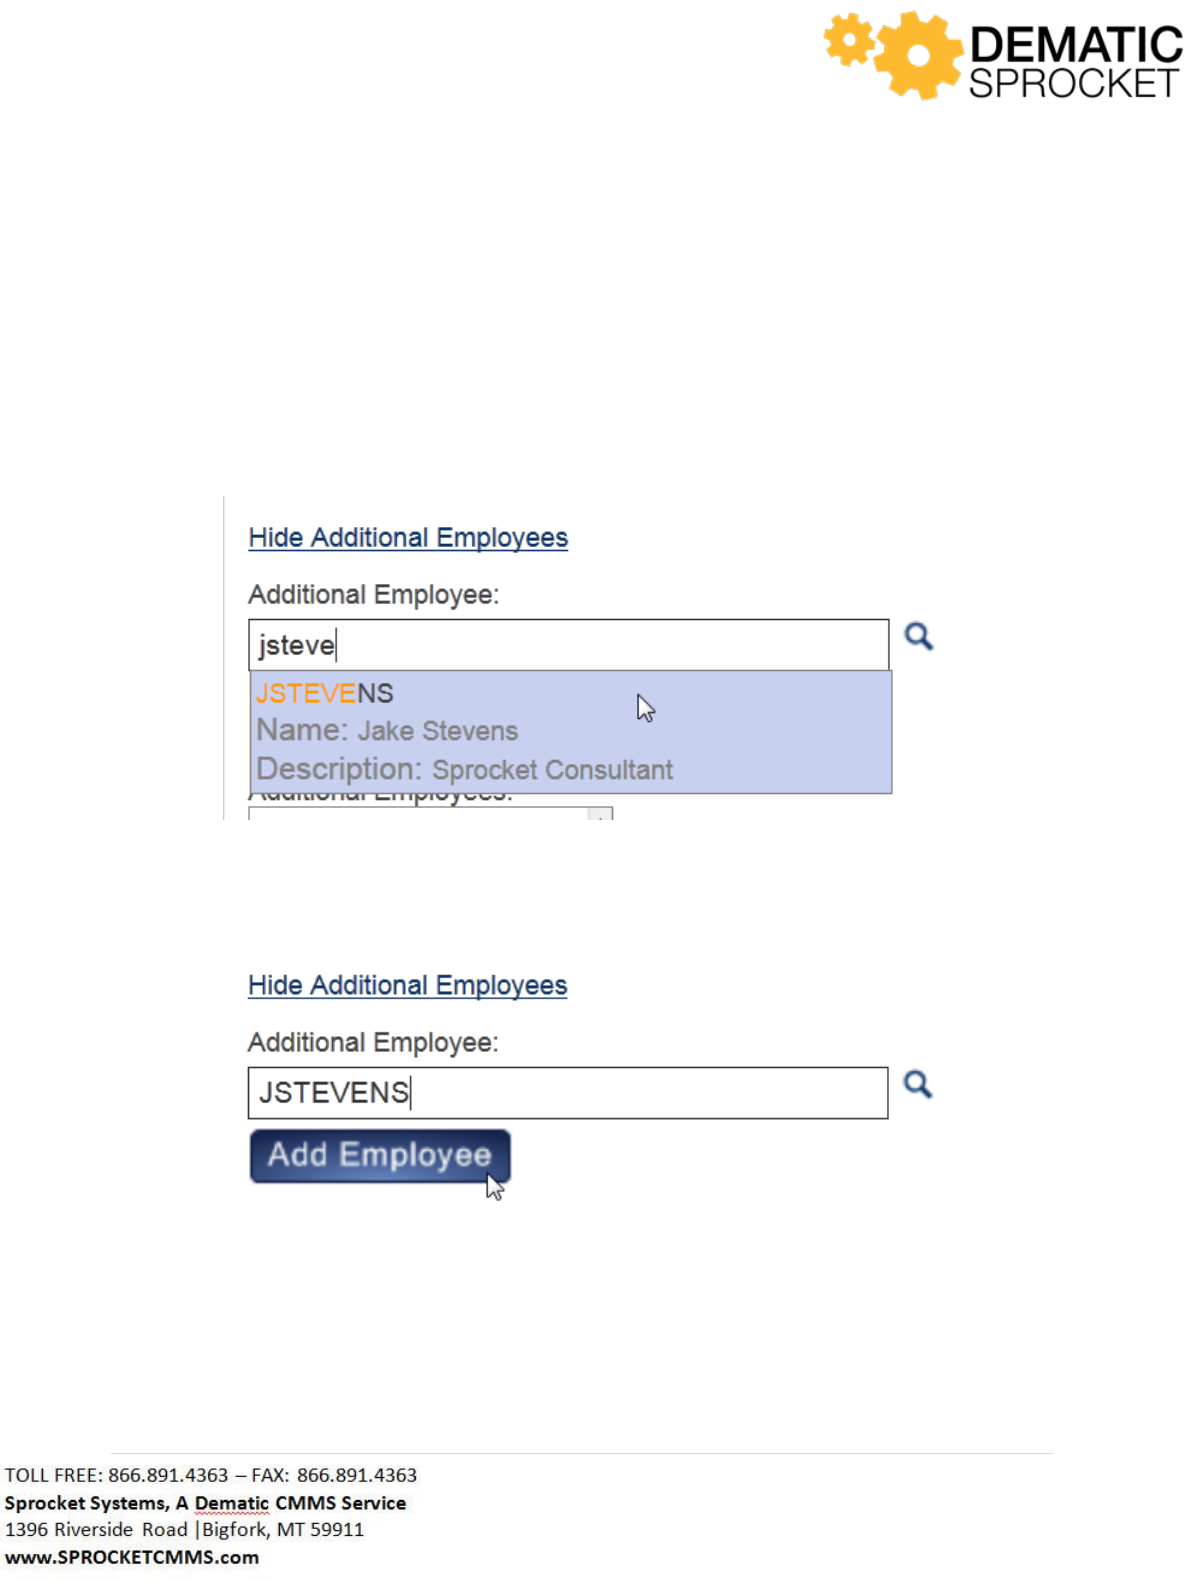
At the bottom of this section is another link labeled Show Additional Employees. Once an employee has
been assigned, you may assign another person to this work order and create a child work order for it.
Keep in mind it is possible to assign more than one additional employee.
To assign an additional employee, you may use the Auto Lookup Tool next to the Additional Employee
field to locate and select an additional employee. To do this, you may either click the Auto Lookup Tool
to view an entire list of possible employees, or begin typing all or part of the employee user name into
the Additional Employee field.
Once you have selected the desired employee, click the Add Employee at the bottom of the field.
56 | P a g e
Now, this employee’s user name appears in the Additional Employees column at the bottom of this
section. If you would like to add another employee, use the Additional Employee field again to locate
and select another employee to assign to this work order.
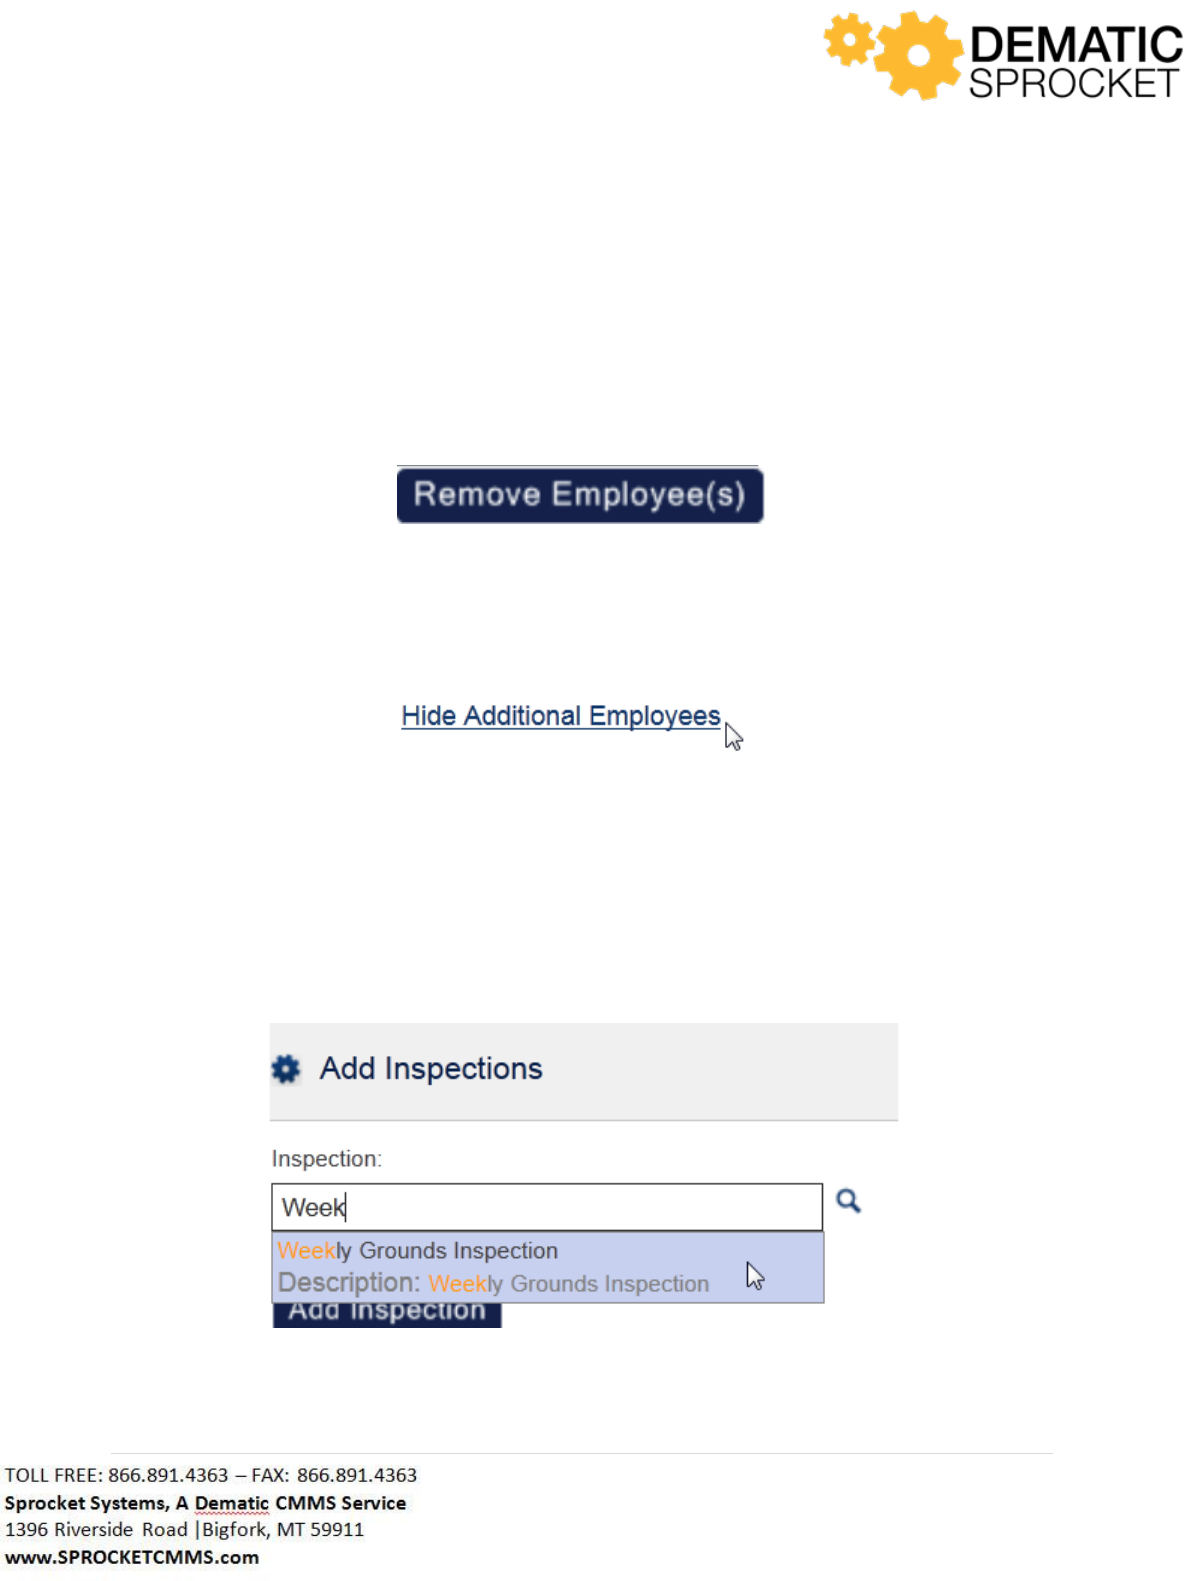
At the bottom of the Additional Employee column, use the Remove Employee(s) button to remove
employees from assignment to this work order. Simply select the desired employee and click this
button to remove an employee from this column.
Use the Hide Additional Employees link at the top of this section to hide this column and view the
previous fields. This will still keep any additional employees assigned to this work order.
The next item in the New Work Order Menu Panel is Add Inspections. Any work order can have an
inspection attached to it so when the work is completed, someone can also inspect everything before
closing the work order.
You can use the Auto Lookup Tool next to the Inspection field to view a list of all inspections and select
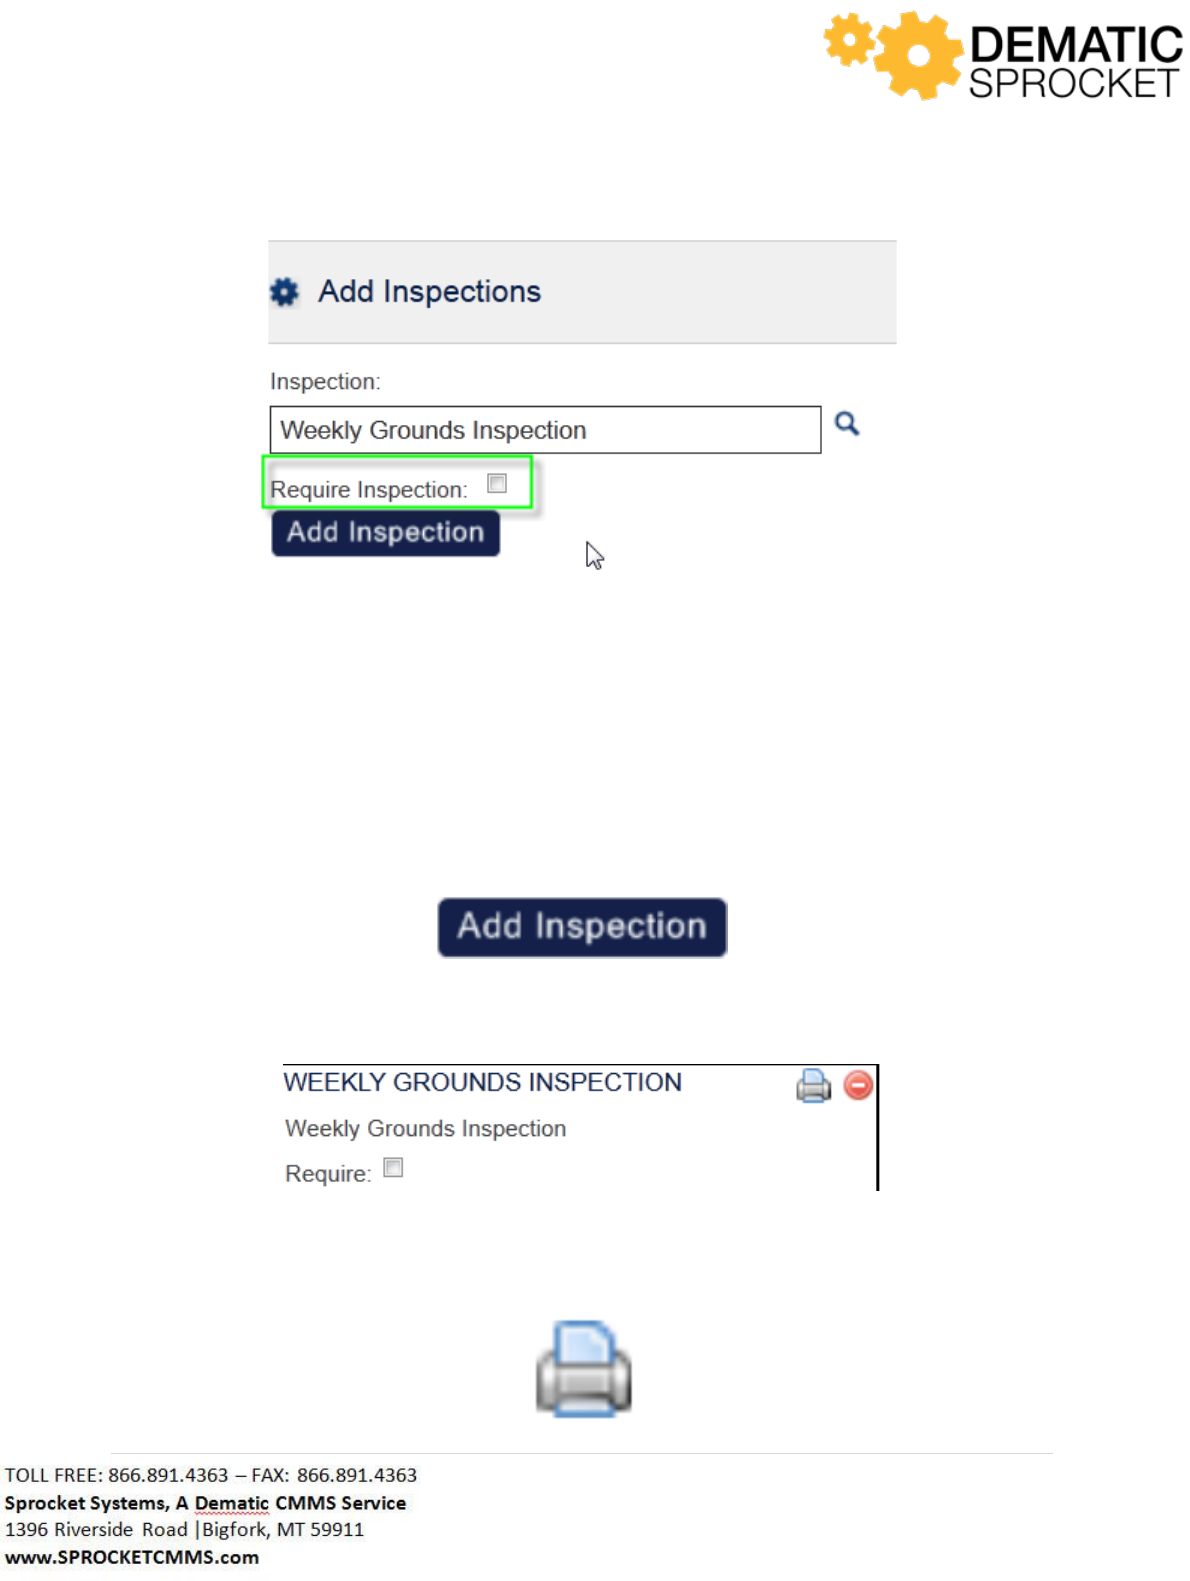
one, or begin typing all or part of the name of an inspection in to the Inspection field.
Once you have selected the desired inspection, notice the checkbox below labeled Require Inspection.
57 | P a g e
Click here to make this inspection required for the completion of this work order. If checked, this work
order will not be able to be closed until the inspection has been completed. Leave this unchecked to
make the inspection optional for this work order.
Once you have selected the desired inspection, click the Add Inspection button at the bottom of the
section.
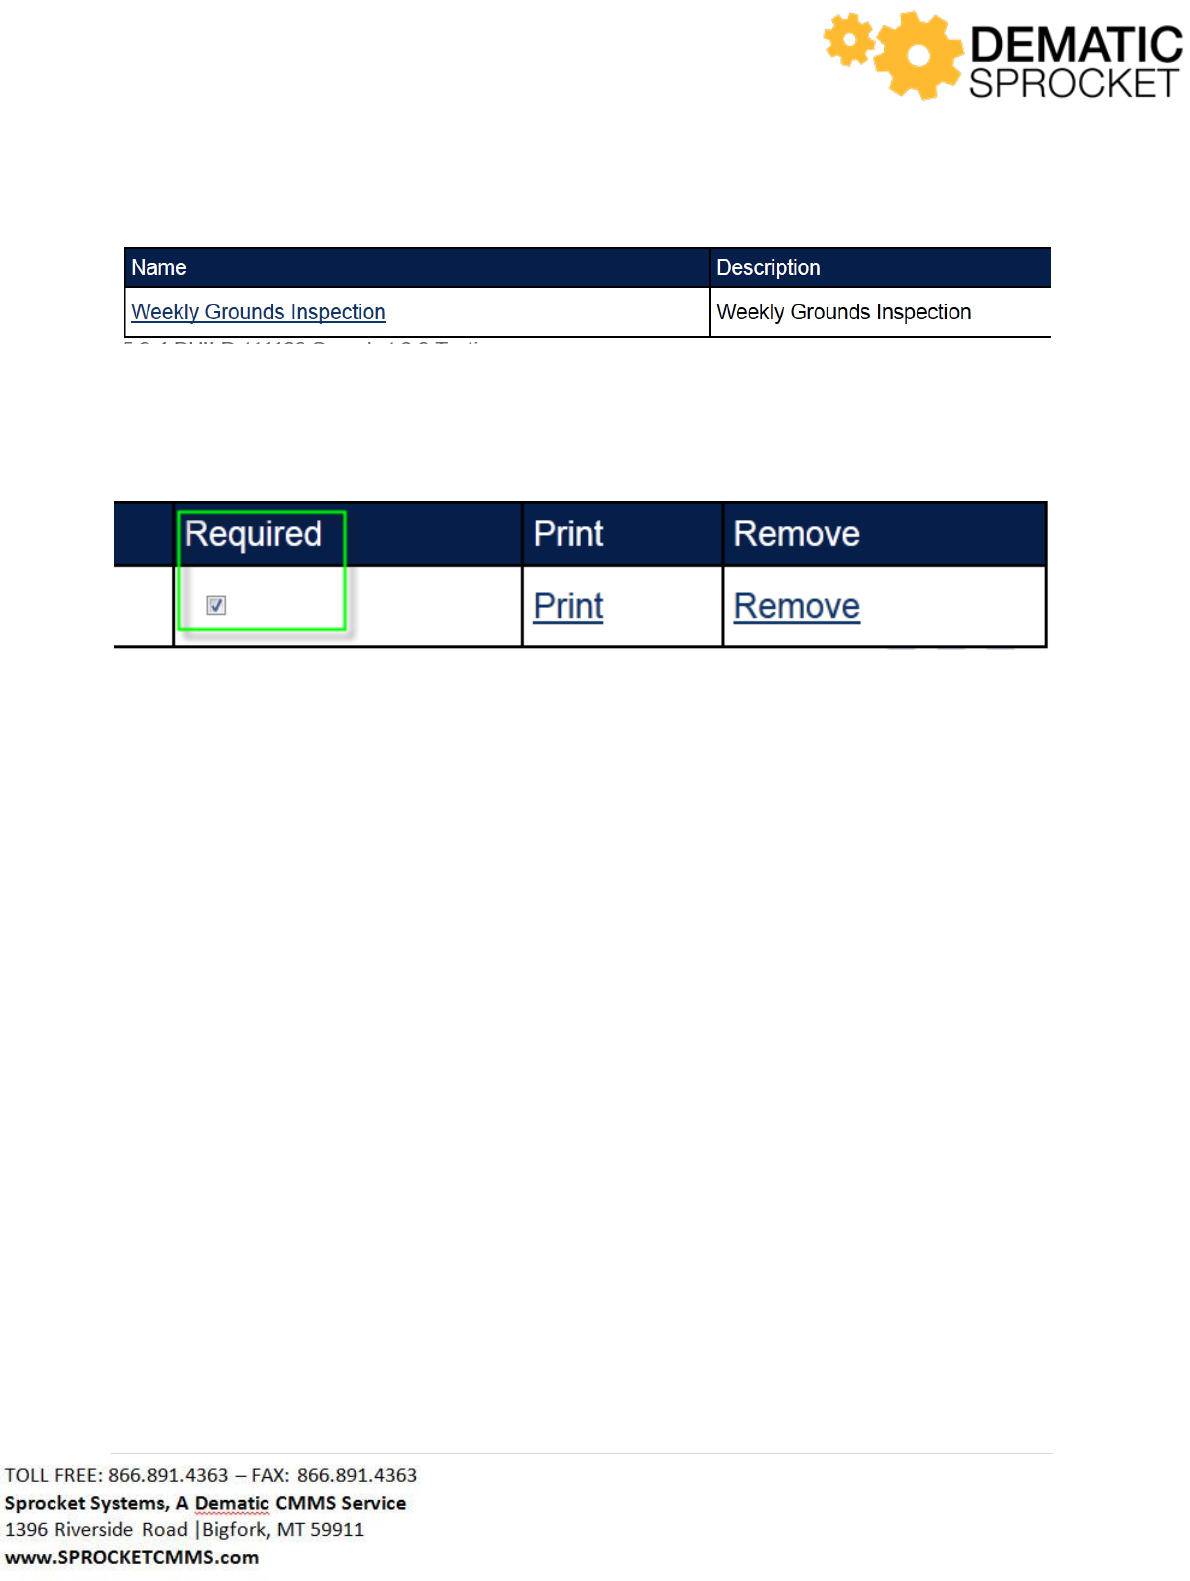
A window will appear at the bottom of this section displaying the inspection. Notice the checkbox
labeled Require. Click here to make this inspection required.
In the right hand corner of the window, click the printer icon to print this inspection.
58 | P a g e
Next to the printer, click the red circle to remove this inspection from the work order.
If you would like to add an additional inspection, follow the same process to do that.
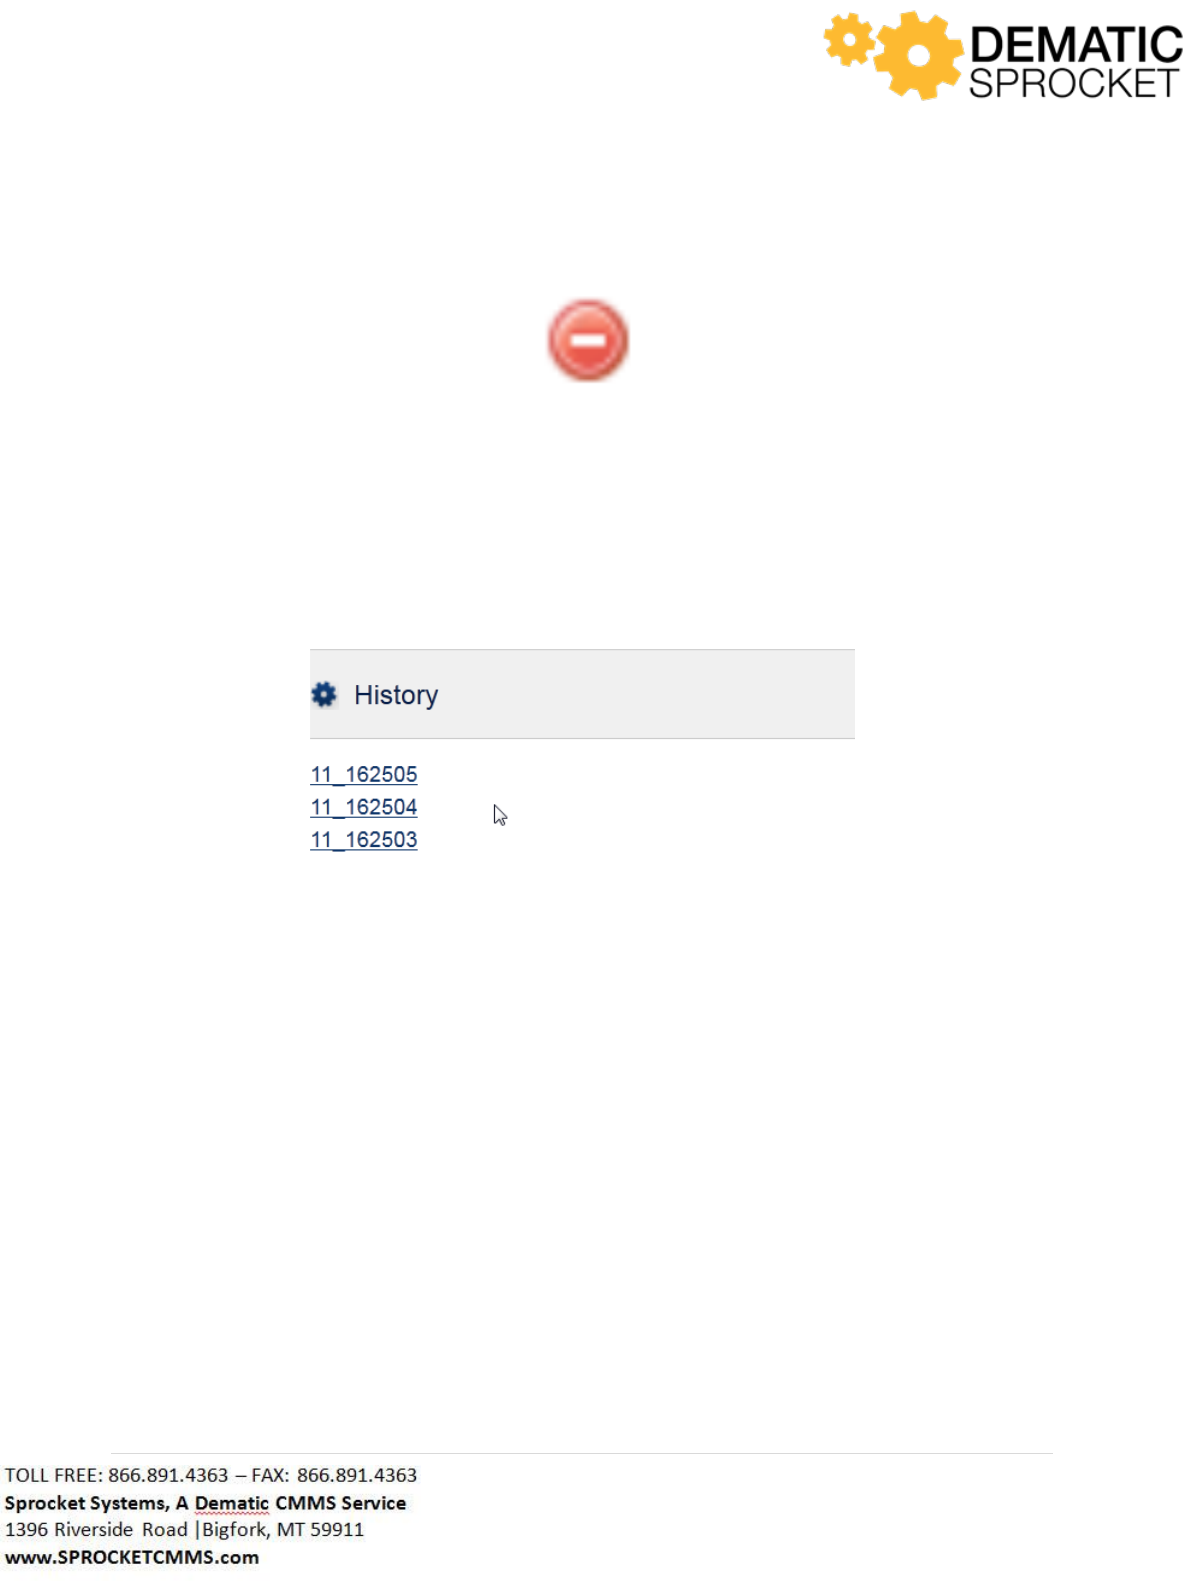
The last tab in the New Work Order Menu Panel is the History tab. Click here to view previously
submitted work orders.
This will show work orders submitted during a log in session. Click a Work Order Identifier to apply
changes to your current work order form. So, if your current form is showing certain information and
you click a Work Order Identifier from the History list, you can apply the information from the work
order in the History list to current work order form.
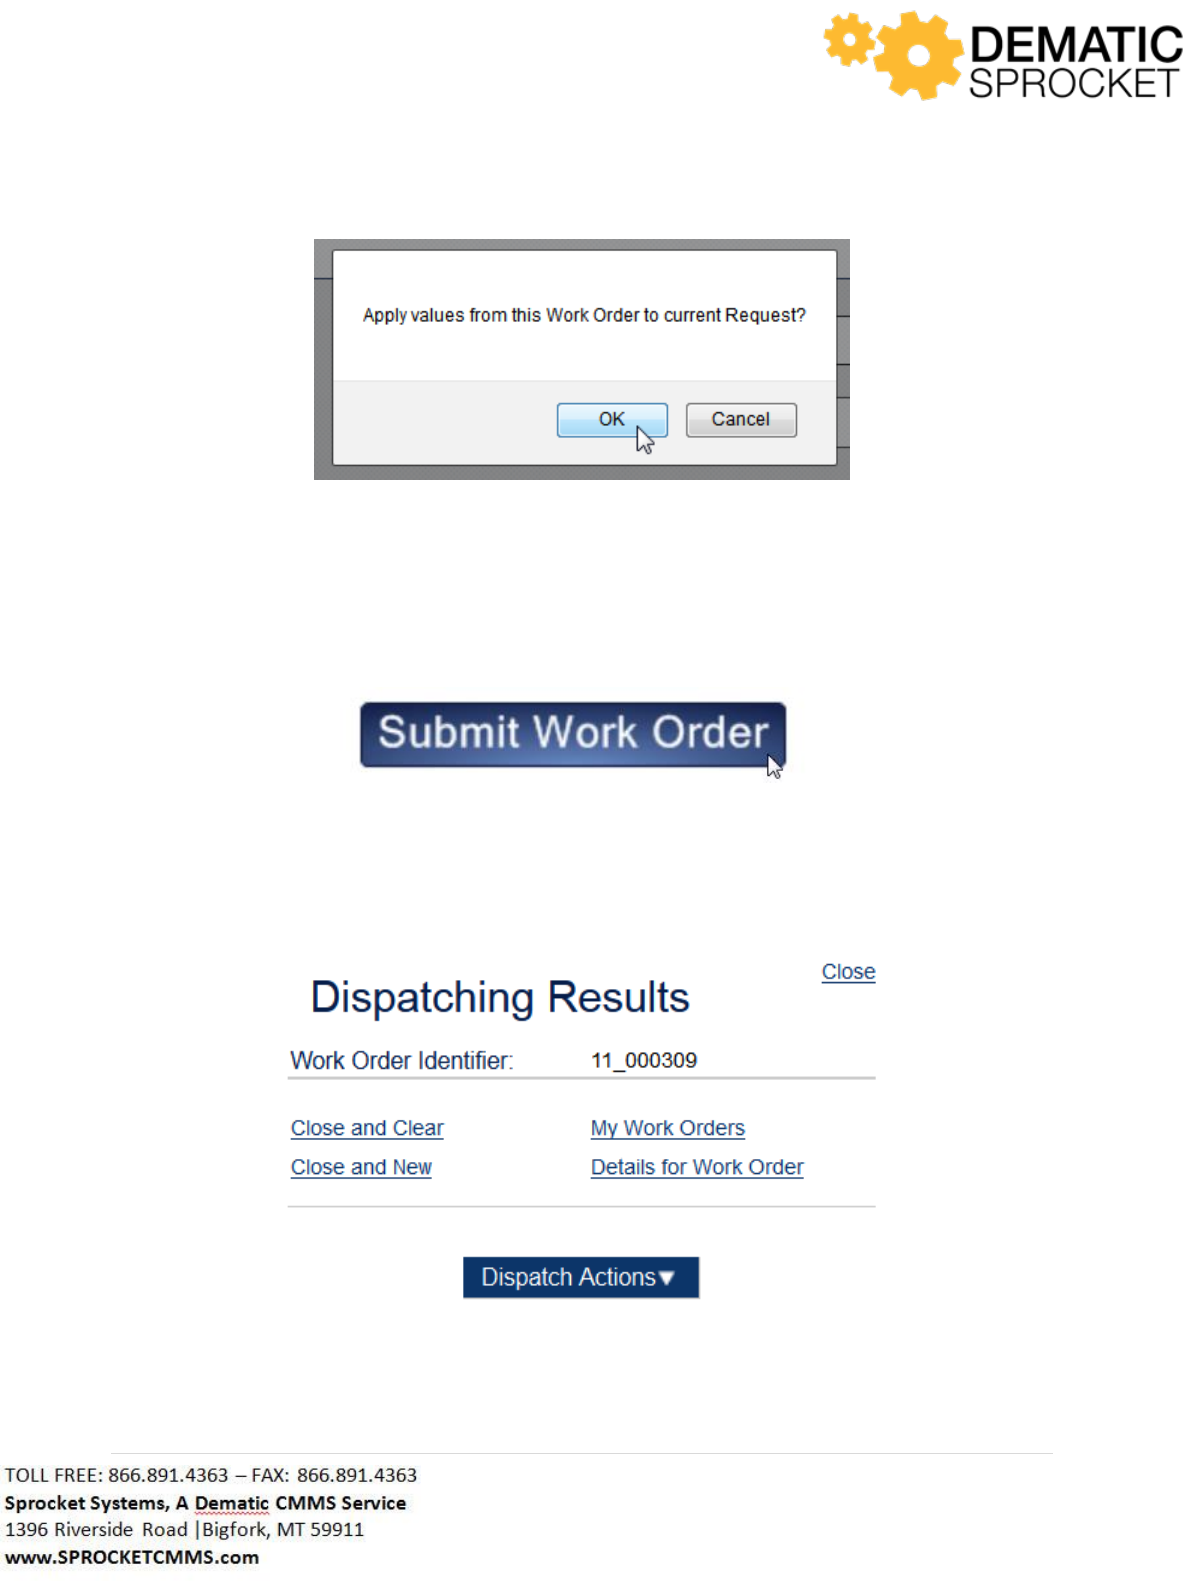
For example, let’s say your current work order form has a different request code, location, and
equipment than work order 11_162503. Select the work order 11_162503 to apply this request code,
location, and equipment to the current work order form. A window will appear asking if you wish to
apply these values to the current request.
59 | P a g e
Click OK to continue and apply these values or Cancel to return to the previous screen.
Once you have entered in any additional information on the New Work Order Menu Panel, you can click
the Submit Work Order button at the bottom of your screen to submit this work order.
4.5.2 Dispatching Results Window
Whenever a work order is submitted, the Dispatching Results window appears on the screen displaying
options to further process this work order.

60 | P a g e
Notice at the top of the screen, the Work Order Identifier is displayed. This will be the work order
number you use to reference this work order in the future.
Click the Close and Clear link to be directed to another work order form and submit a new request.
Click the Close and New link to be directed to another work order form with the same information as the
last submitted request. You might use this if the same work needs to be performed in two different
locations, for example.
Click the My Work Orders link to view a list of work orders assigned to you.
Click the Details for Work Order link to view the full details of this work order.
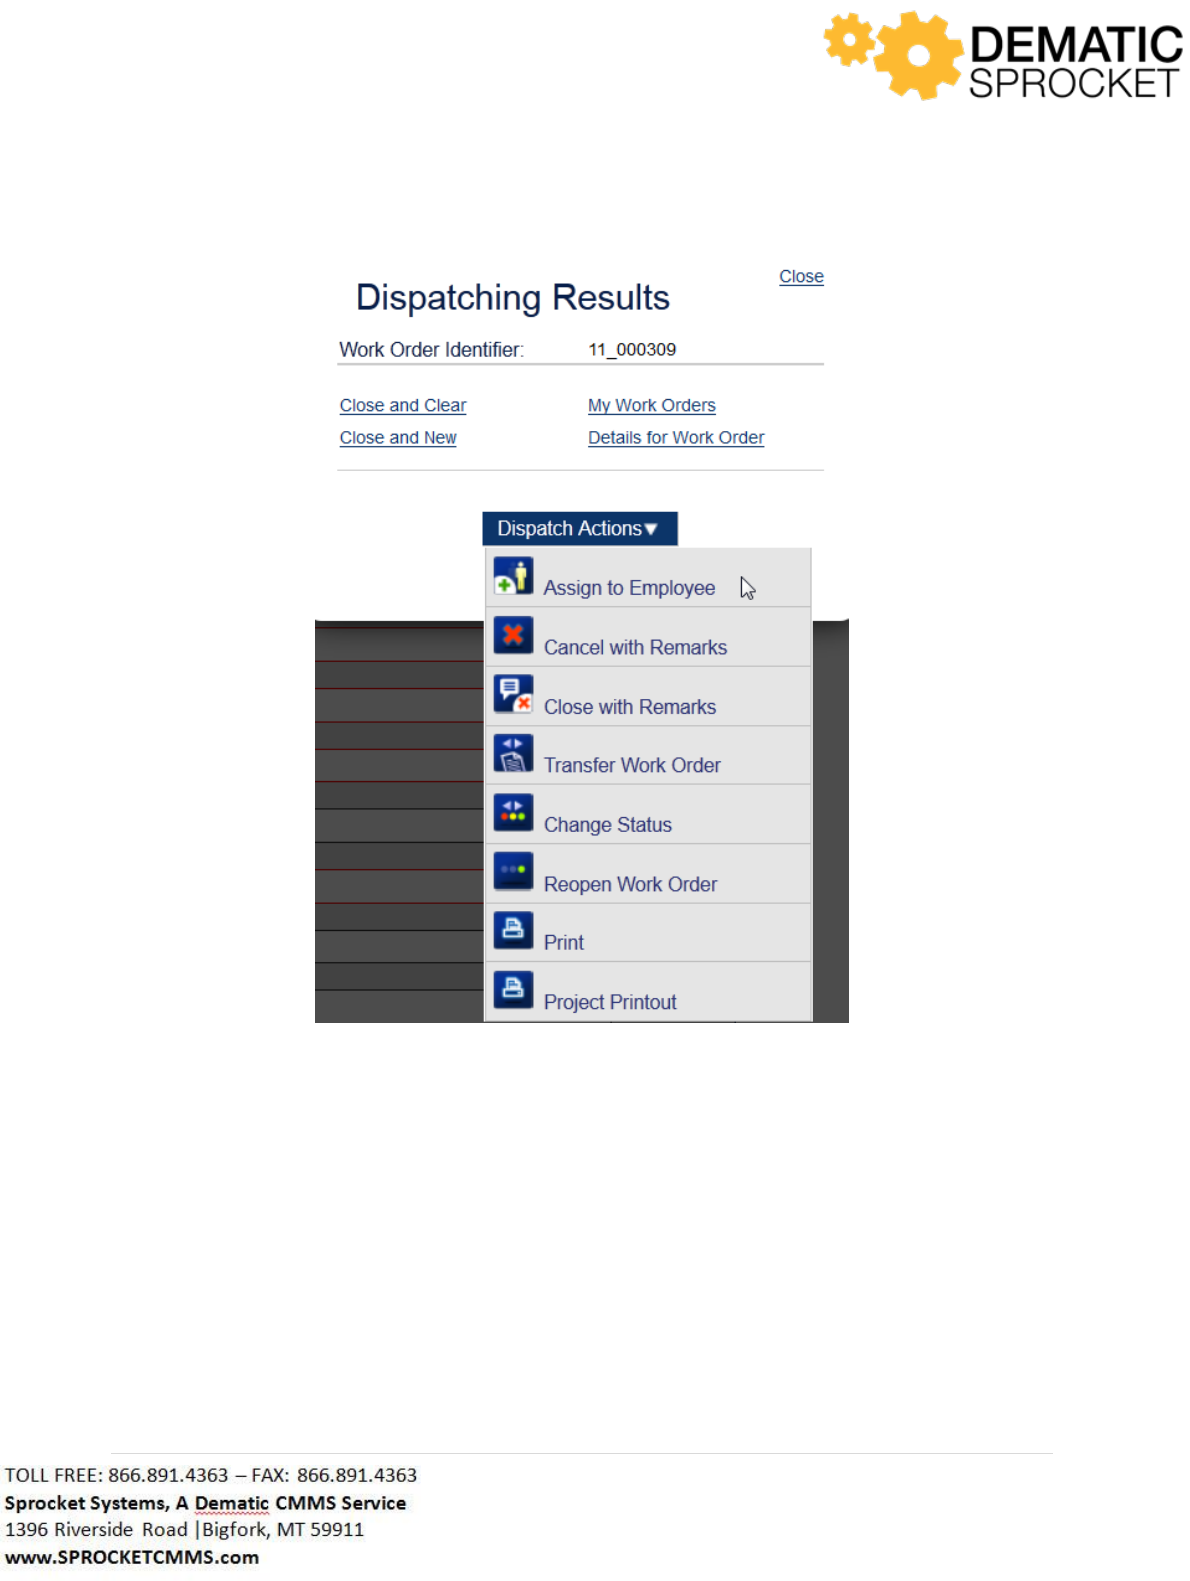
Notice the Dispatch Actions menu at the bottom of this screen. Use this menu to further process this
work order. Hover your mouse over the menu and select the Dispatch Action you would like to apply to
this work order.
So, let’s say you just entered in a work order. When the Dispatching Results Window appears, select
Assign Employee from the Dispatch Action menu.
61 | P a g e
Note: Sprocket is customized based on user needs. Your screen may or may not display the above
dispatch actions. Contact your Sprocket Administrator with questions.
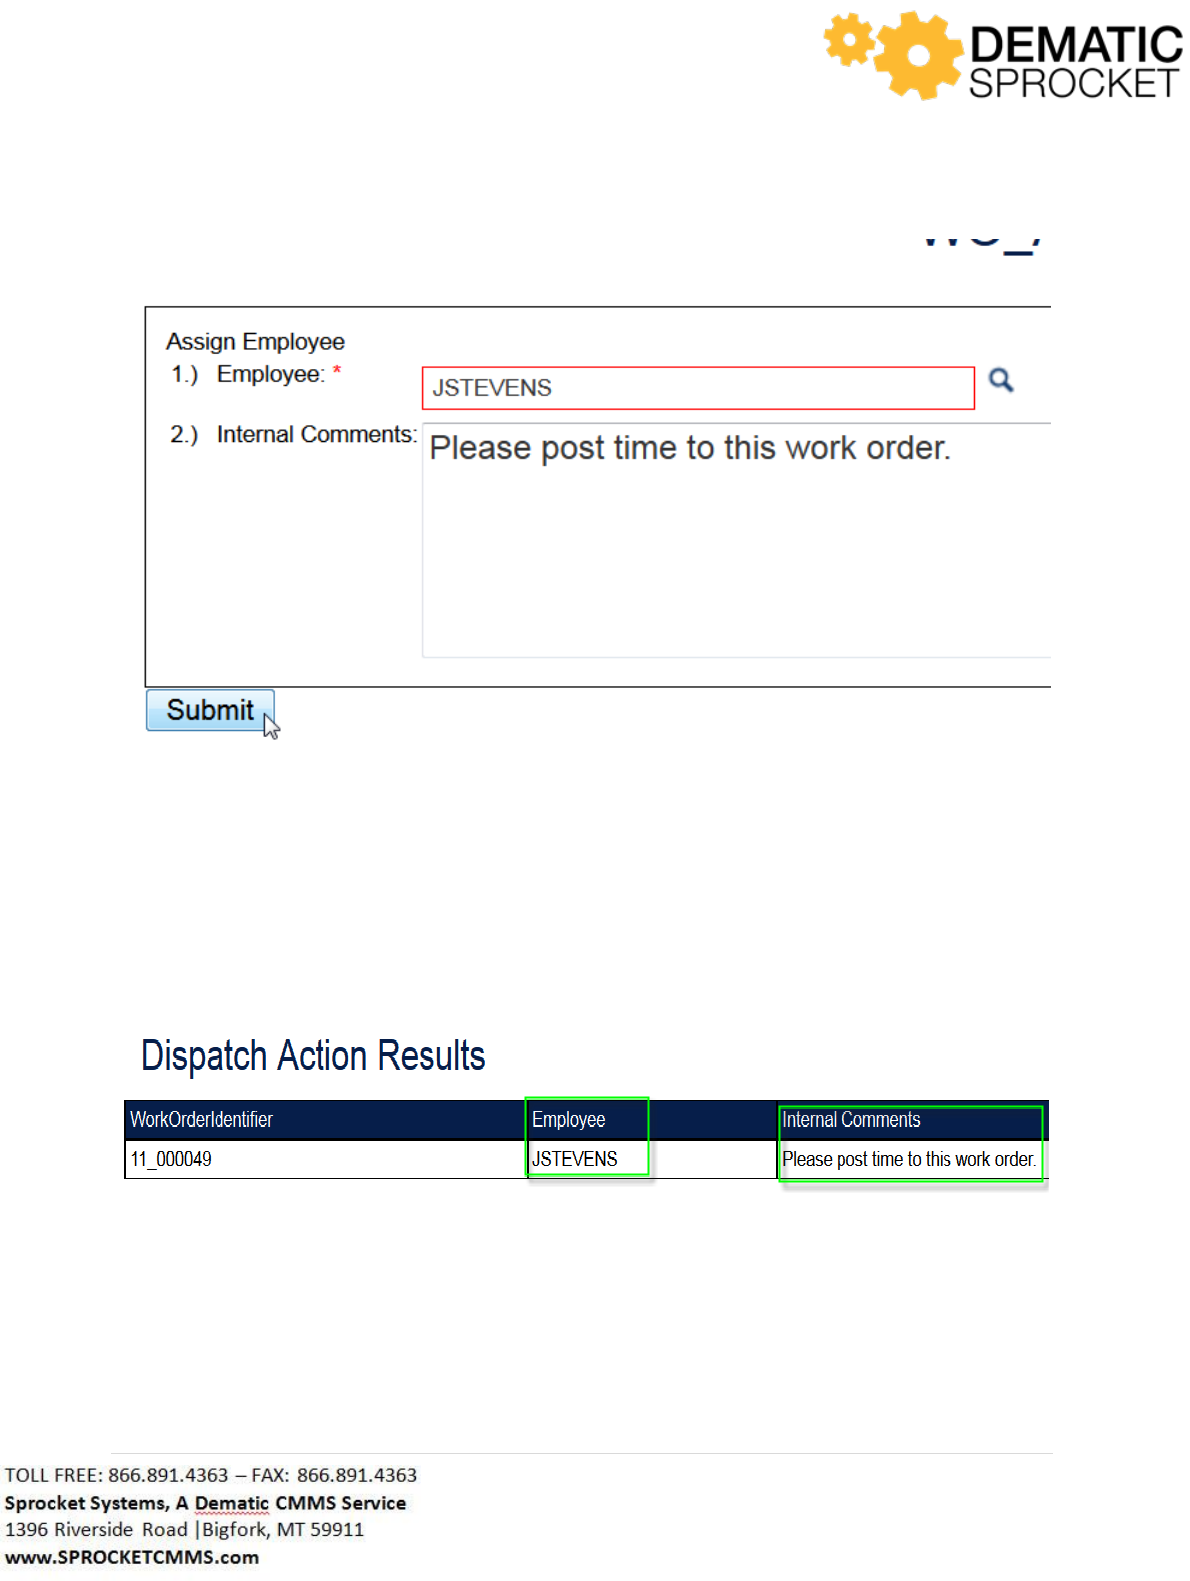
You will be directed to the Assign Employee form. Fill out the appropriate information and click the
Submit button at the bottom left of the screen to process this work order with this Dispatch Action.
62 | P a g e
Note: Sprocket is customized based on customer needs. Your screen may or may not display the above
fields. Contact your Sprocket Administrator with questions.
Once you have submitted the Dispatch Action, the Dispatch Action Results window will appear display
your results. Notice that the employee we just assigned is now listed for this work order and your
remarks have been added to the Internal Notes of this work order.
4.6 Time Materials Tab
The Time Materials tab allows you to track materials and time postings to either work orders or TM
Accounts(Time Material Accounts) . TM Accounts are used to track time and materials transactions to
events that aren’t documented with work orders. For example, supervisors may want to track vacation
time, so they may have their employees post time to a TM Account called Vacation Time. Along with
63 | P a g e
posting time, you can either issue materials to a work order/TM Account or return them from the work
order/TM Account back to inventory.
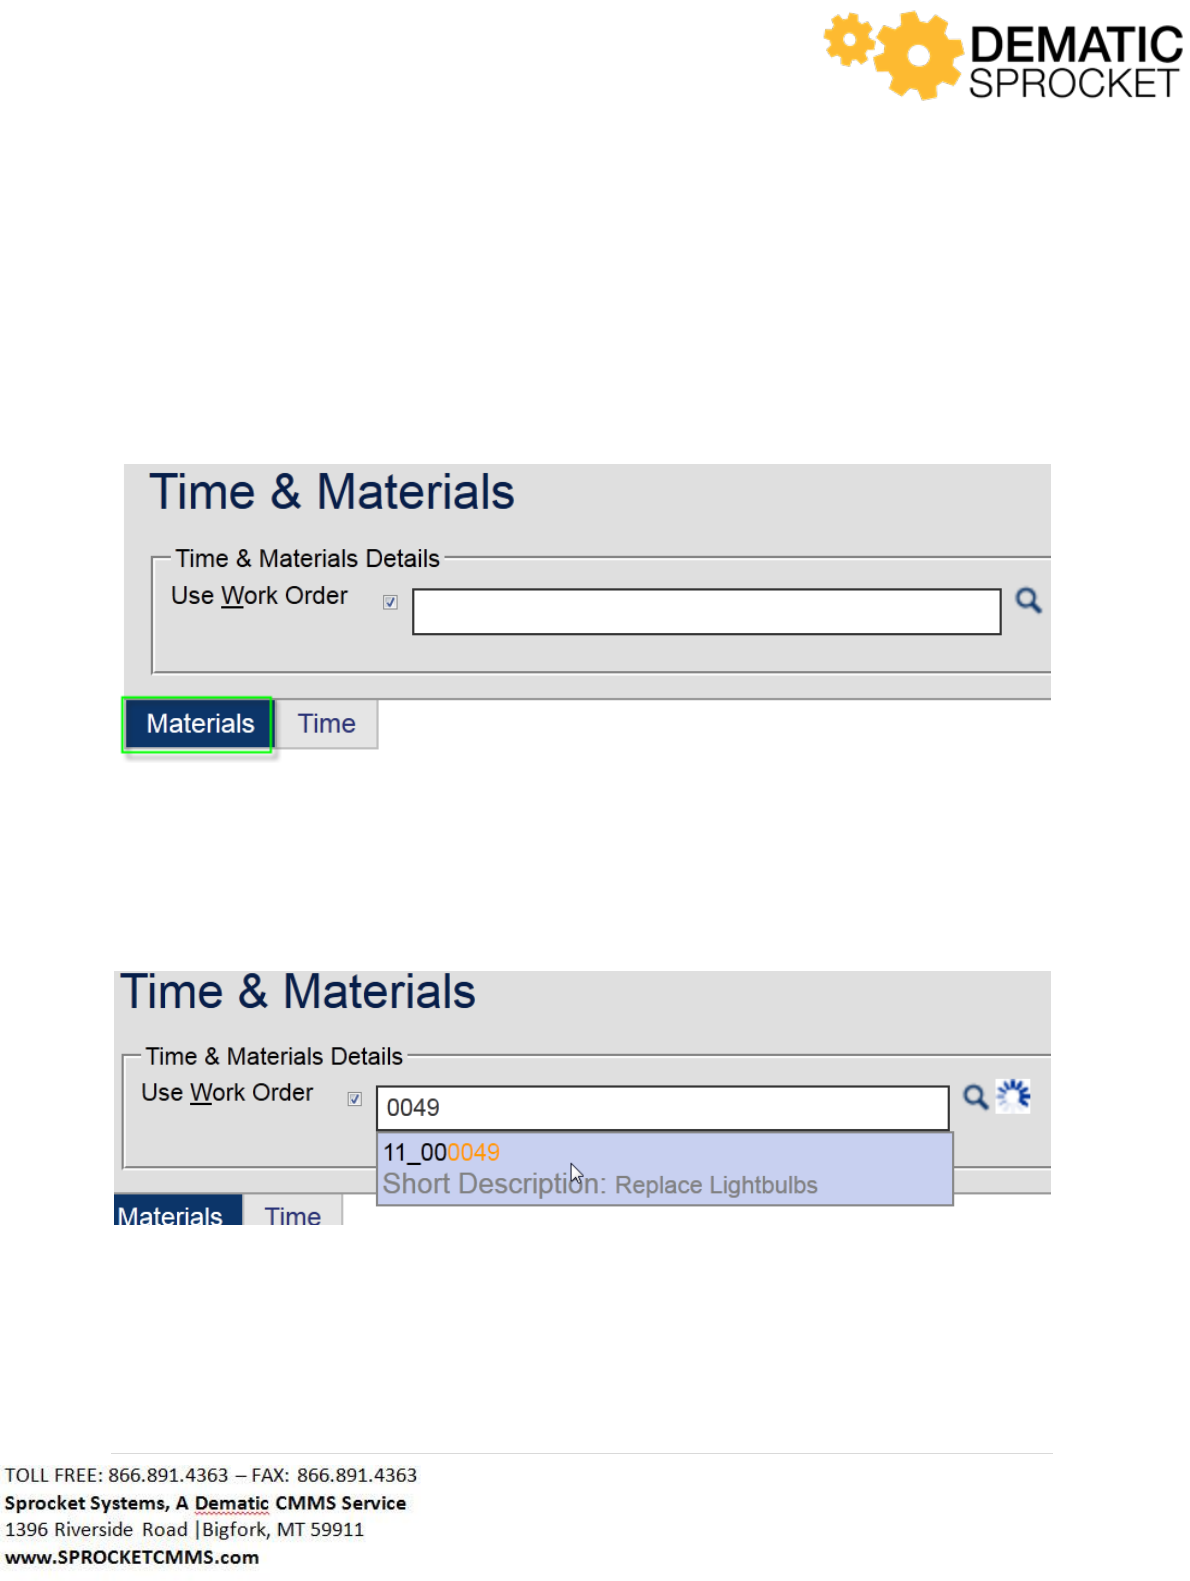
4.6.1 Materials
Once you select the Time Materials tab, a form will appear for you to begin assigning specified materials
to this work order or TM Account. Notice that the Materials tab his highlighted indicating that we are
on the Materials tab.
Notice at the top of the screen, there is a field labeled Use Work Order. Use the Auto Lookup Tool to
locate and select the desired work order for this Time Materials transaction. If you wish to post
materials to a TM Account, click the checkbox to the left of the field. For this example, let’s say we are
posting time to a work order. So, in the Use Work Order field, begin typing all or part of the work order
identifier to locate and select the appropriate work order.
Once you have selected the appropriate work order, begin with Material Assignment section at the top
of the form and begin filling in the fields with the correct information. Just like any other form in
Sprocket, a field that is outlined in red is required.
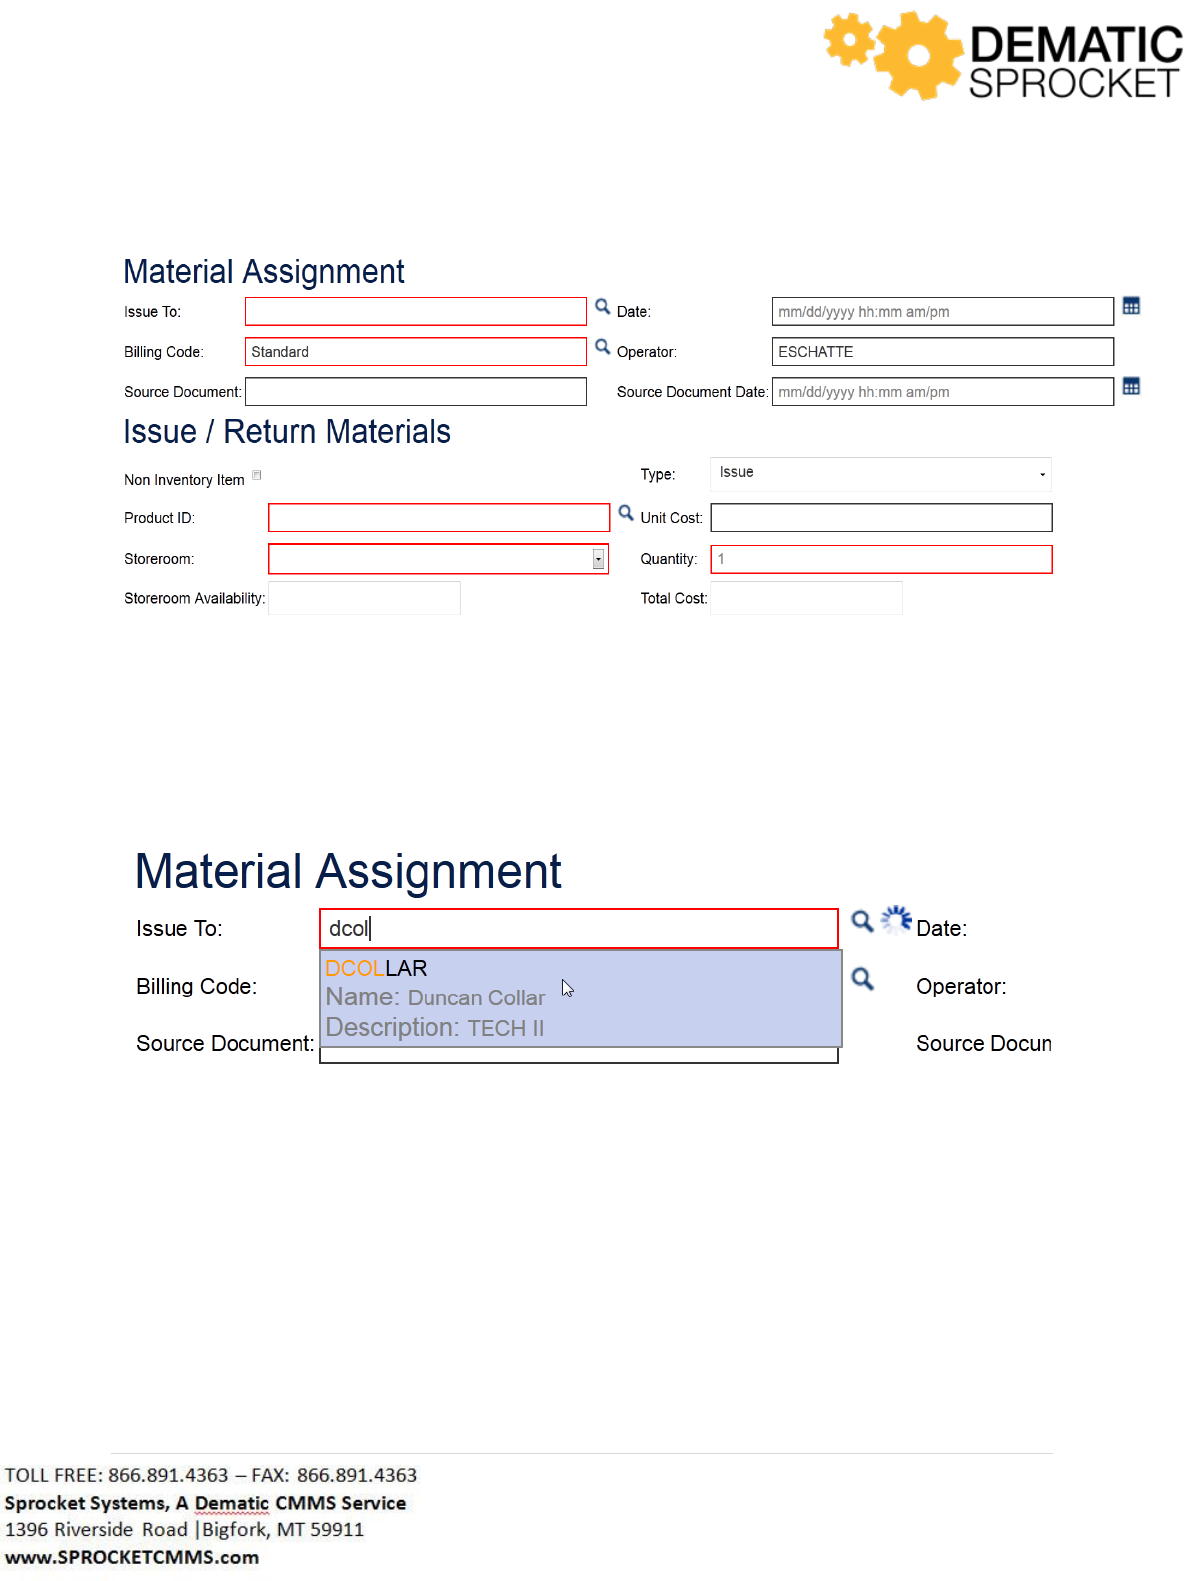
64 | P a g e
The first section of the form is labeled Material Assignment. Start here to document information such
as who is checking out the materials and the date they are issued on. Enter your information here.
Remember to use the Auto Lookup Tool to search for values or begin typing and it will auto complete
your entry.
Once you have filled out all of the information in the first section, you may move on to the Issue/Return
Materials section to specify which items you will be using.
To begin, we must first determine if this is an inventory or non-inventory item. If you must go to a store
to purchase the appropriate materials, check the Non Inventory Item box. The fields in the form will
change so that you may enter in the appropriate information.
If you are checking out items from your own inventory, leave the Non Inventory Item box unchecked.
Let’s say we are going to check out an inventory item so leave the box unchecked.
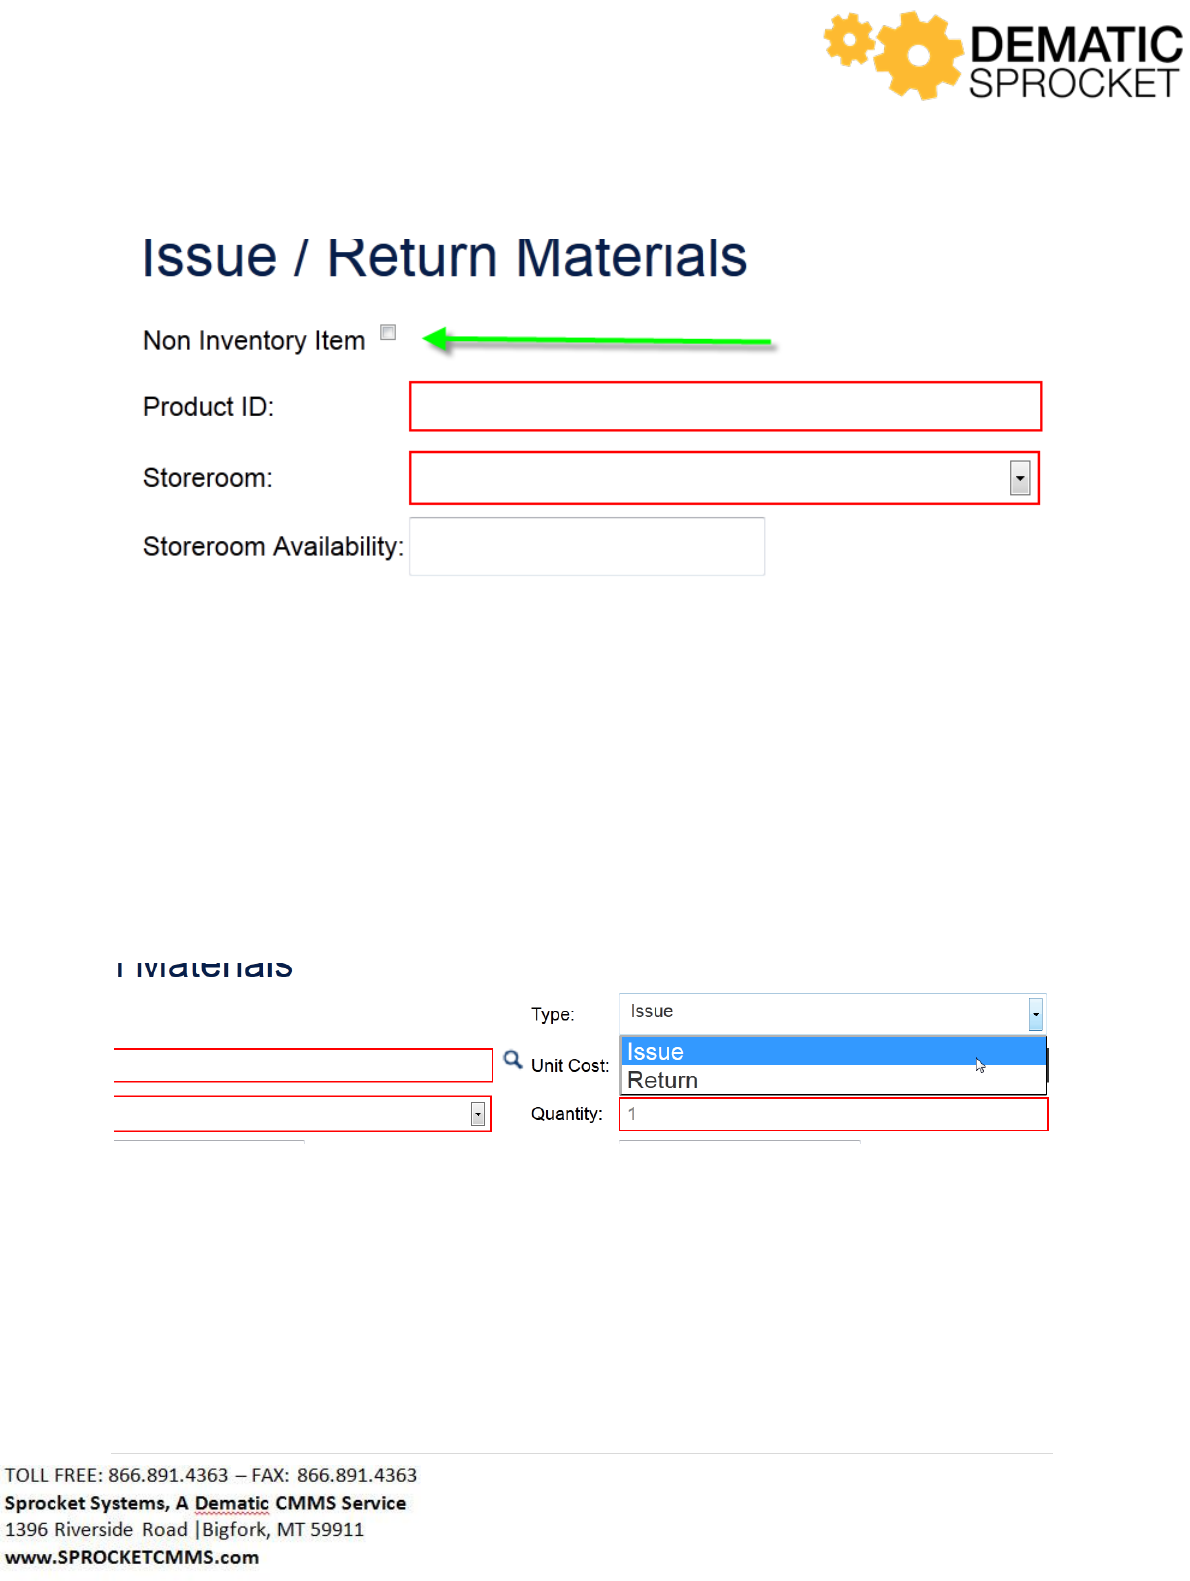
65 | P a g e
Next, we must determine if this is going to be an issue or return. This means that if we are going to
issue materials to use for this work order, we must select Issue from the drop down. If we want to
return unused items back to inventory, select Return from the drop down menu.
Let’s say we wish to issue an item from inventory, so in the drop down menu at the right of the form,
select Issue.
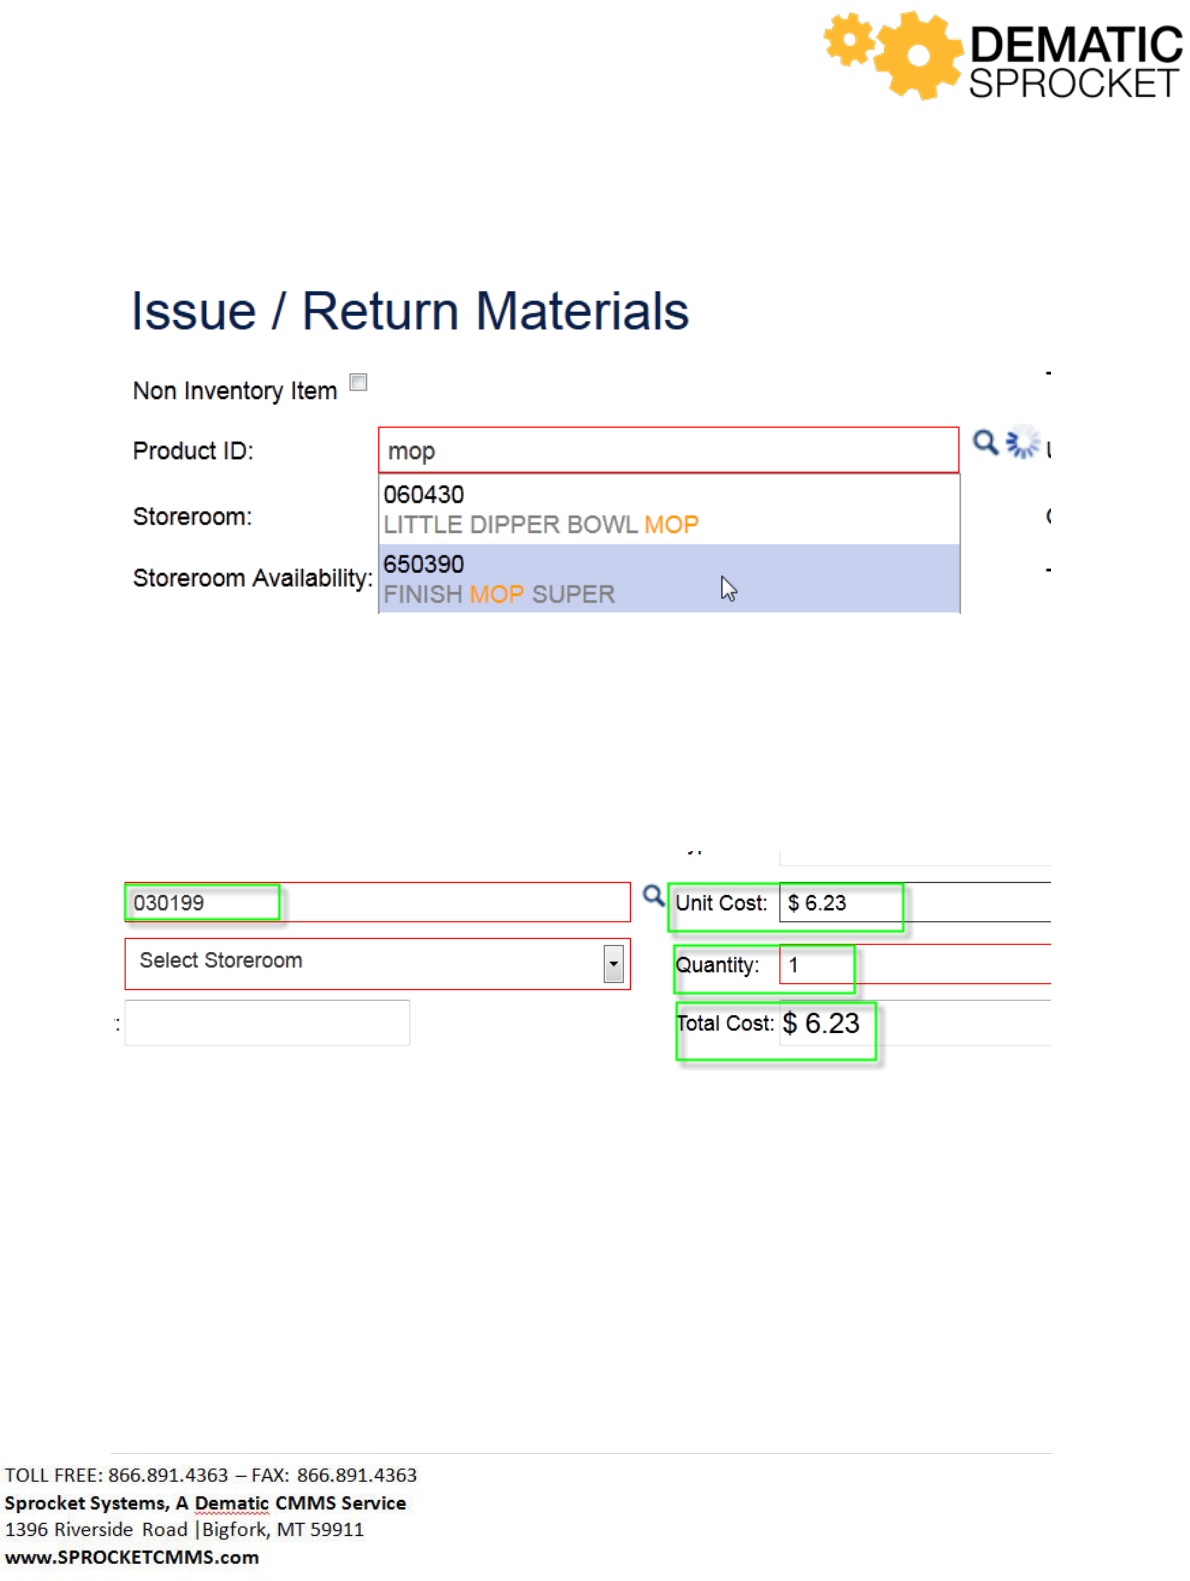
Now that we have determined the type of transaction this will be, we can now locate the correct item to
add to this work order. In the Product ID field, begin typing in all or part of the item you are searching
for. Remember, the Auto Lookup Tool has an auto complete function that will help locate the
appropriate record.
Once the correct record is returned, select it to continue filling out the form.
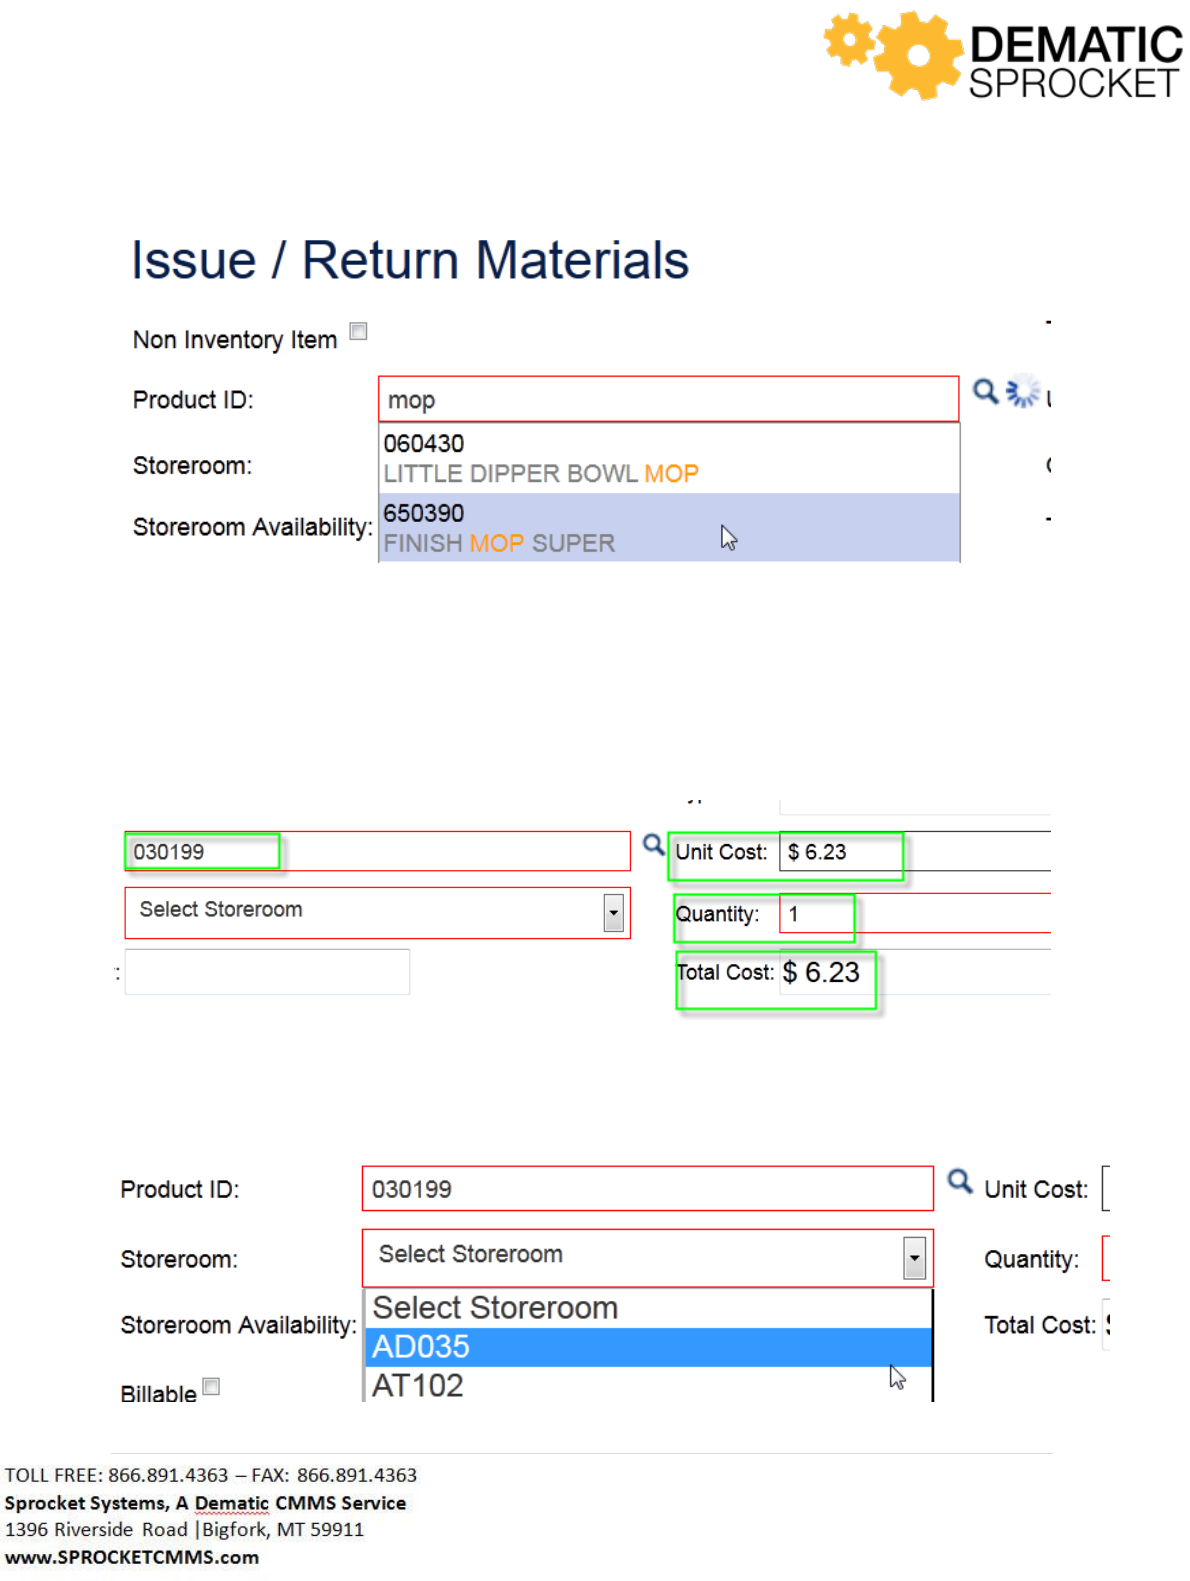
66 | P a g e
Notice that once a selection is made, the Unit Cost and Total Cost fields will automatically populate the
correct information for this inventory item. The Quantity field will default to 1, so if you need more than
one of what you are issuing, be sure to change this to the correct number.
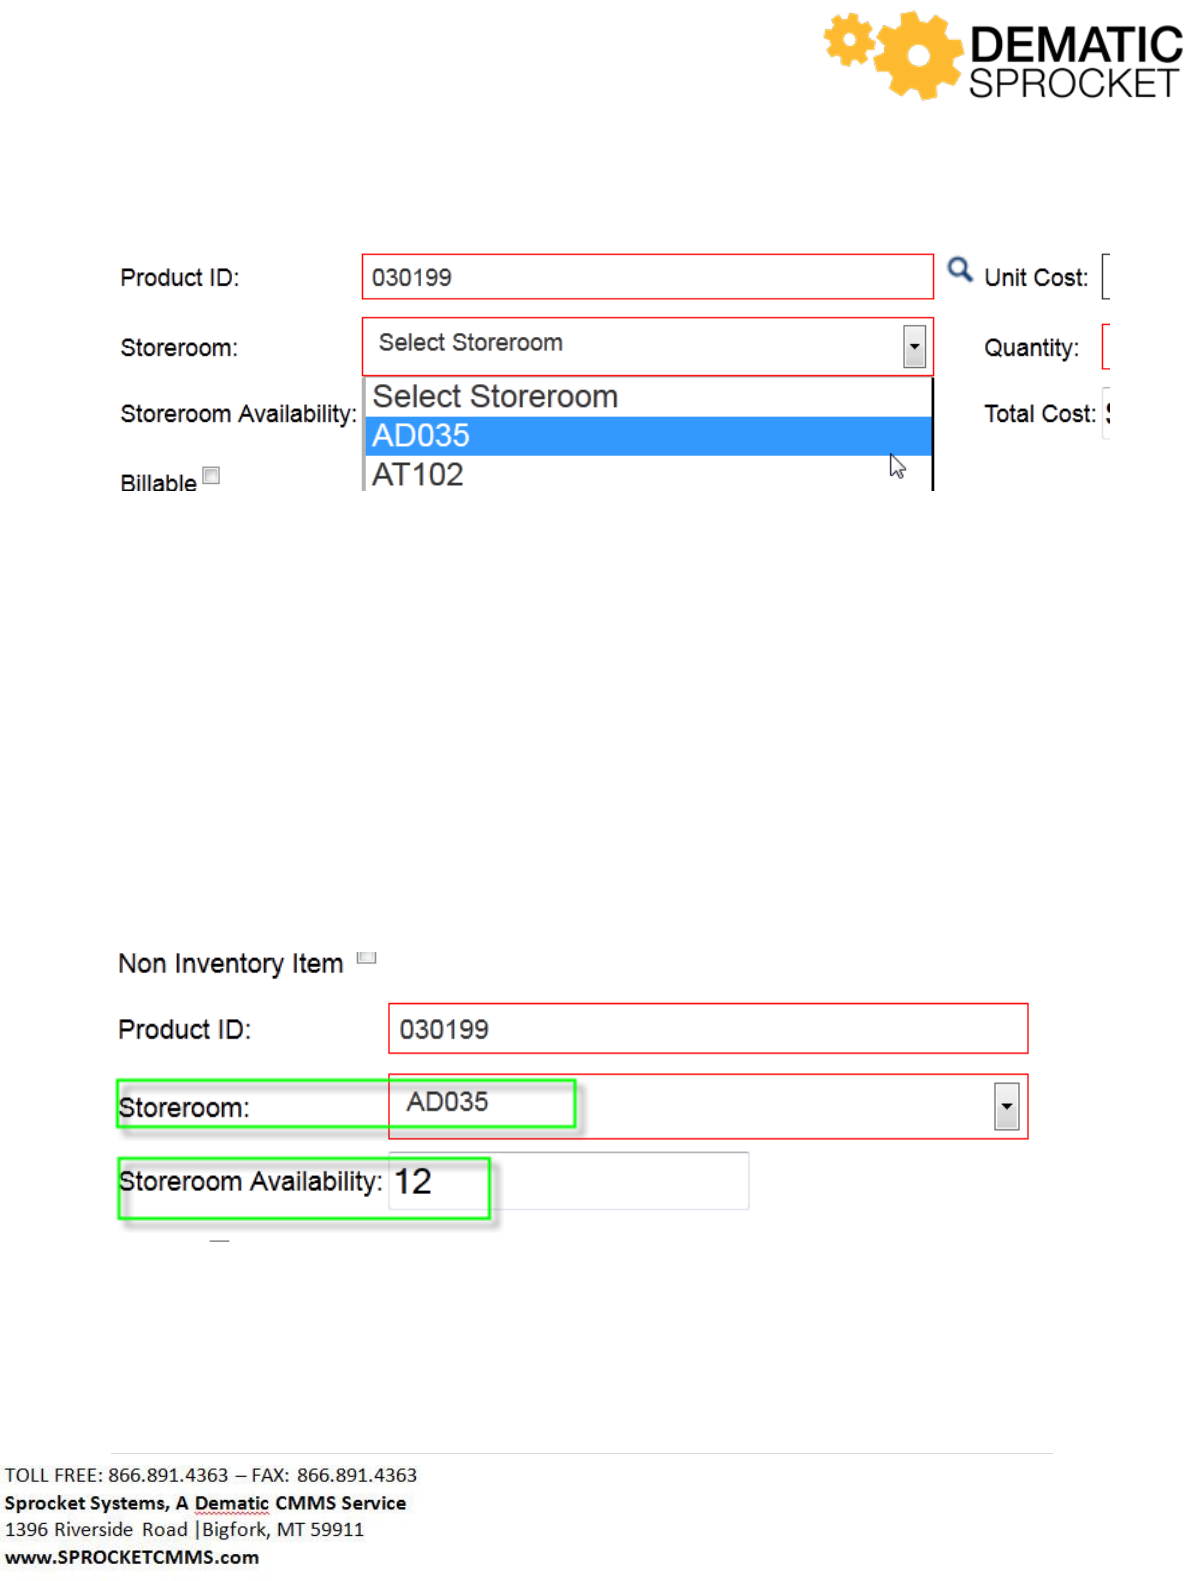
From here, select a storeroom from which you wish to check this item out from the drop down list.
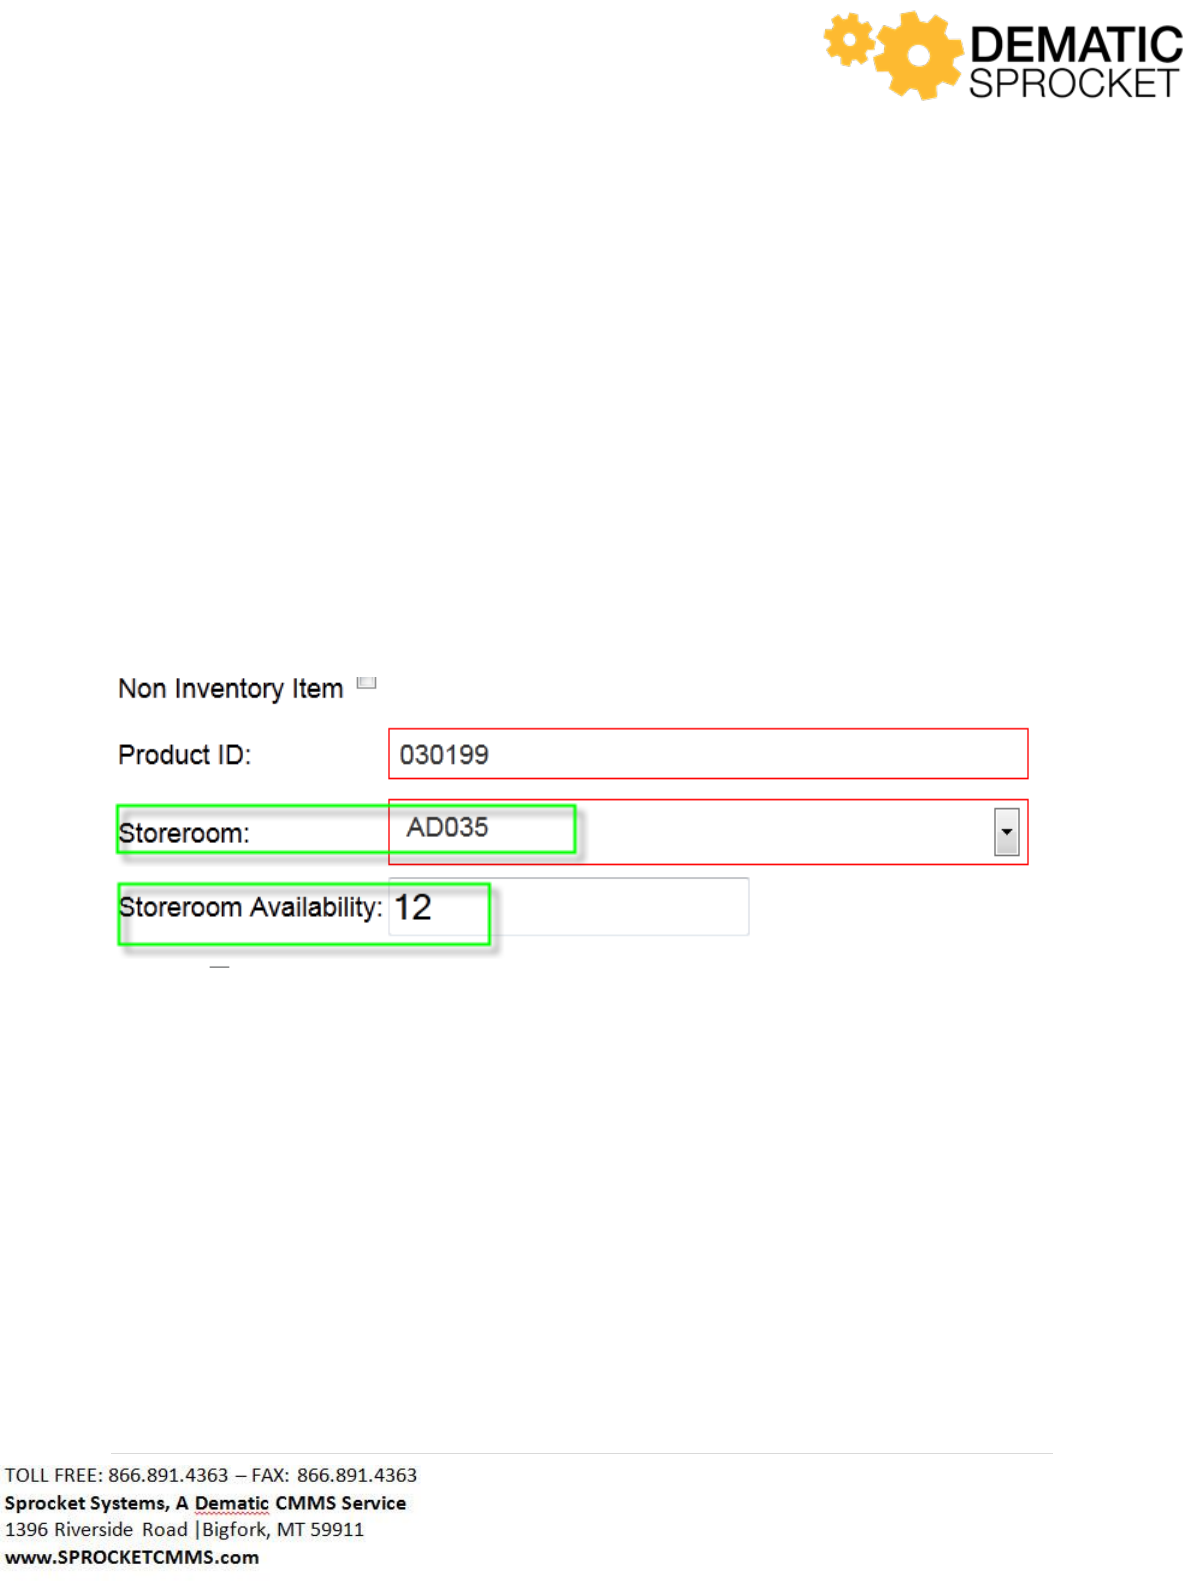
67 | P a g e
Notice that selecting a storeroom from the drop down list will automatically populate the amount of this
item available in the Storeroom Availability field.
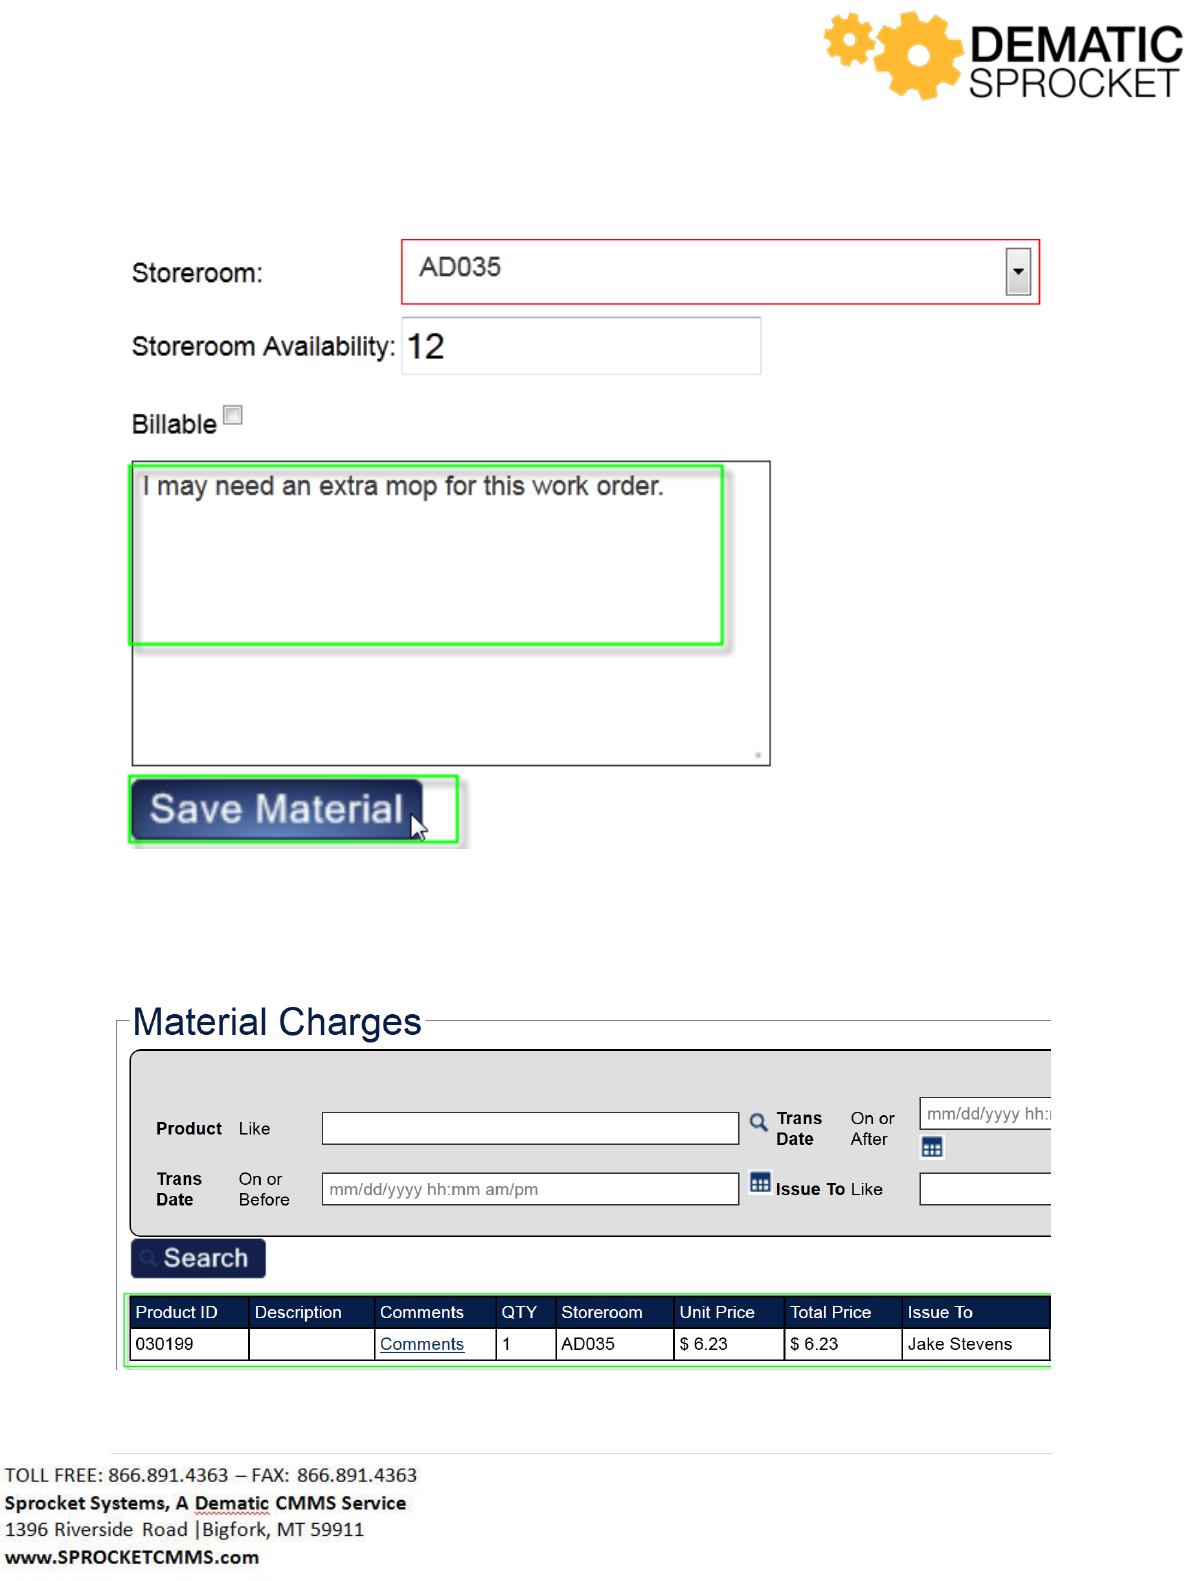
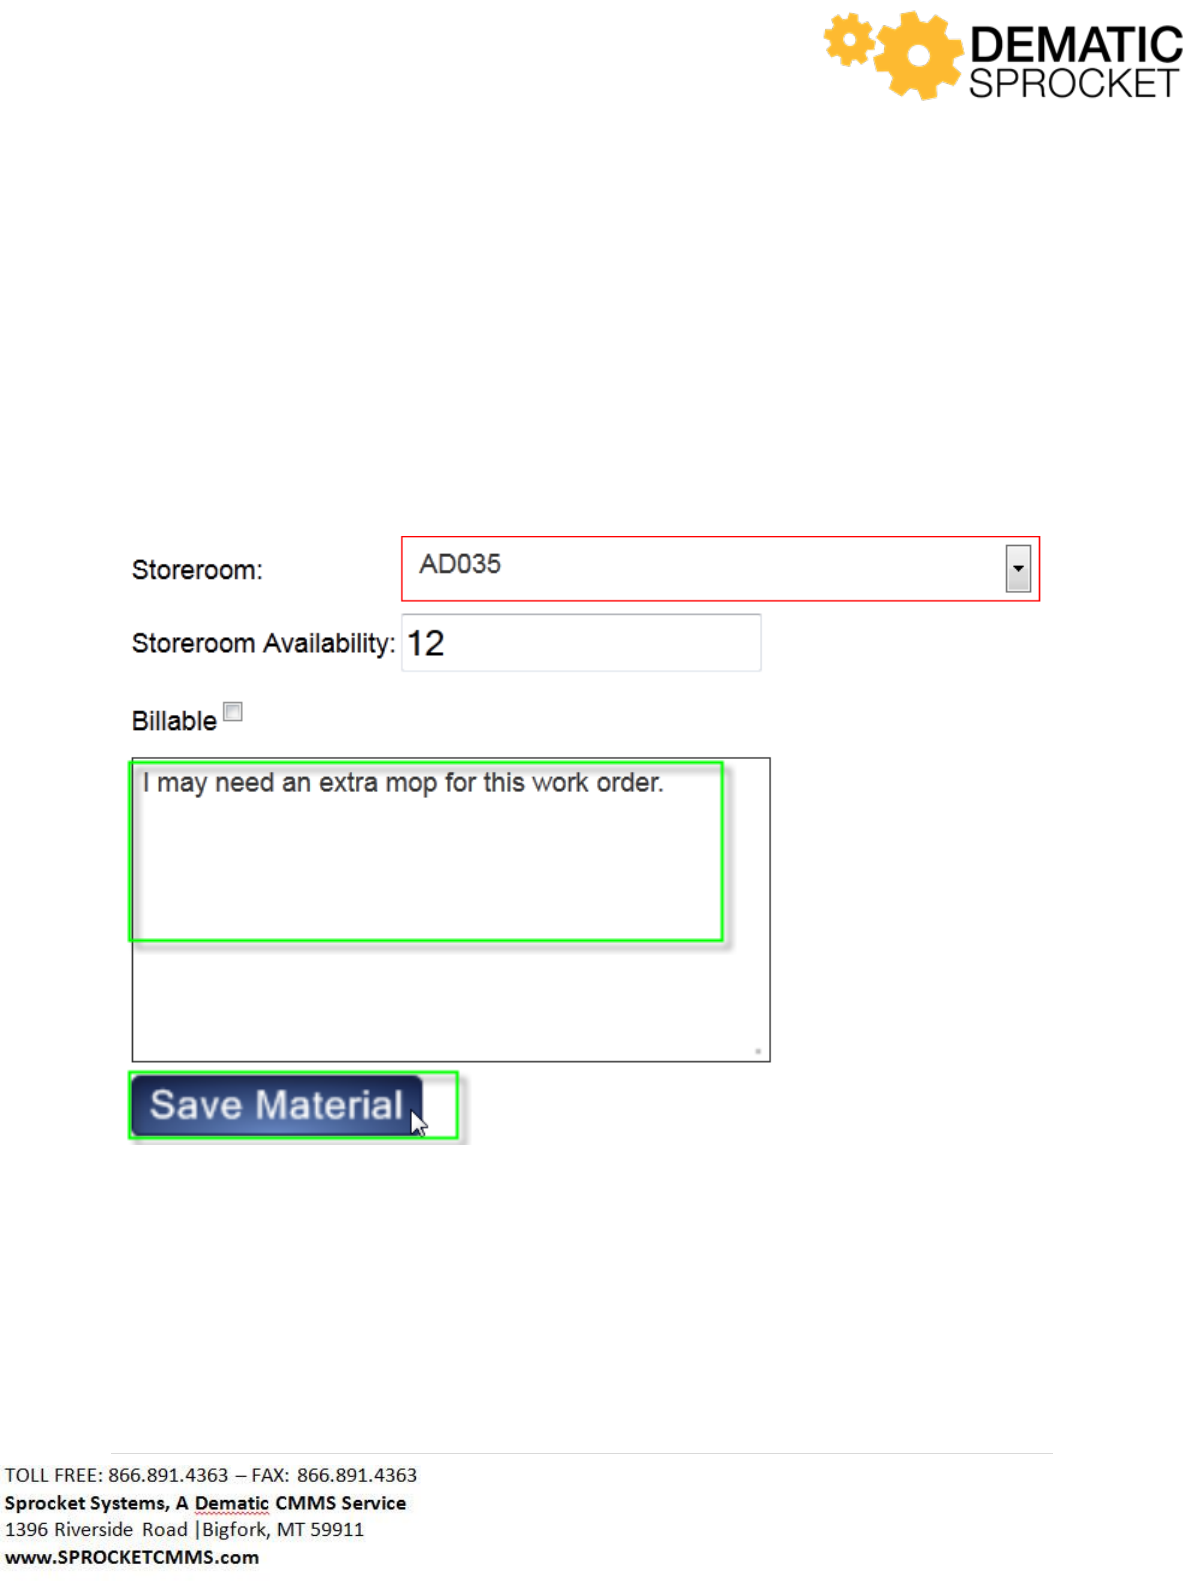
Before submitting this item to this work order, be sure to check the Billable checkbox below the
Storeroom availability field if this item will be billable.
Below this section there is a comments field where you can leave any remarks about issuing this item.
Click inside the Comments box to enter any remarks, the click the Save Material button at the bottom
left of the screen to issue this material to this work order.
68 | P a g e
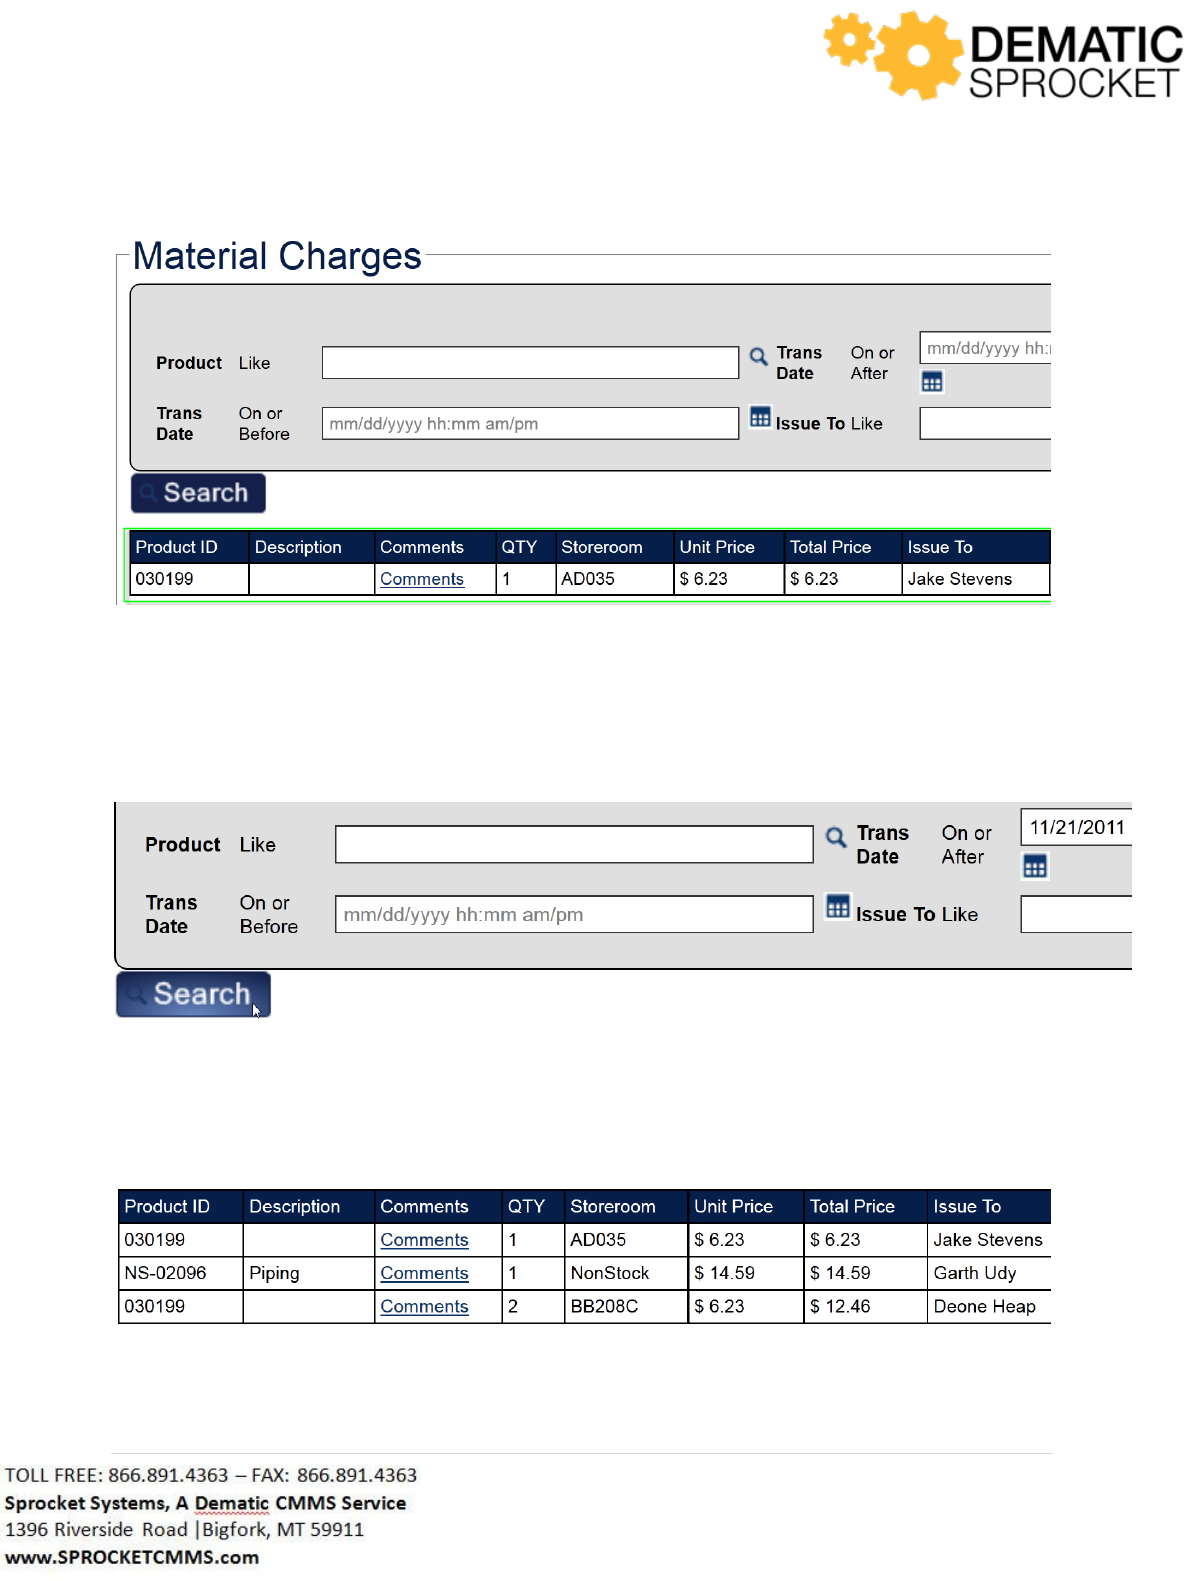
Notice in the Material Charges section at the bottom of the page, the grid has been updated to include
this transaction. This section will show all materials transactions throughout the life of this work order.
69 | P a g e
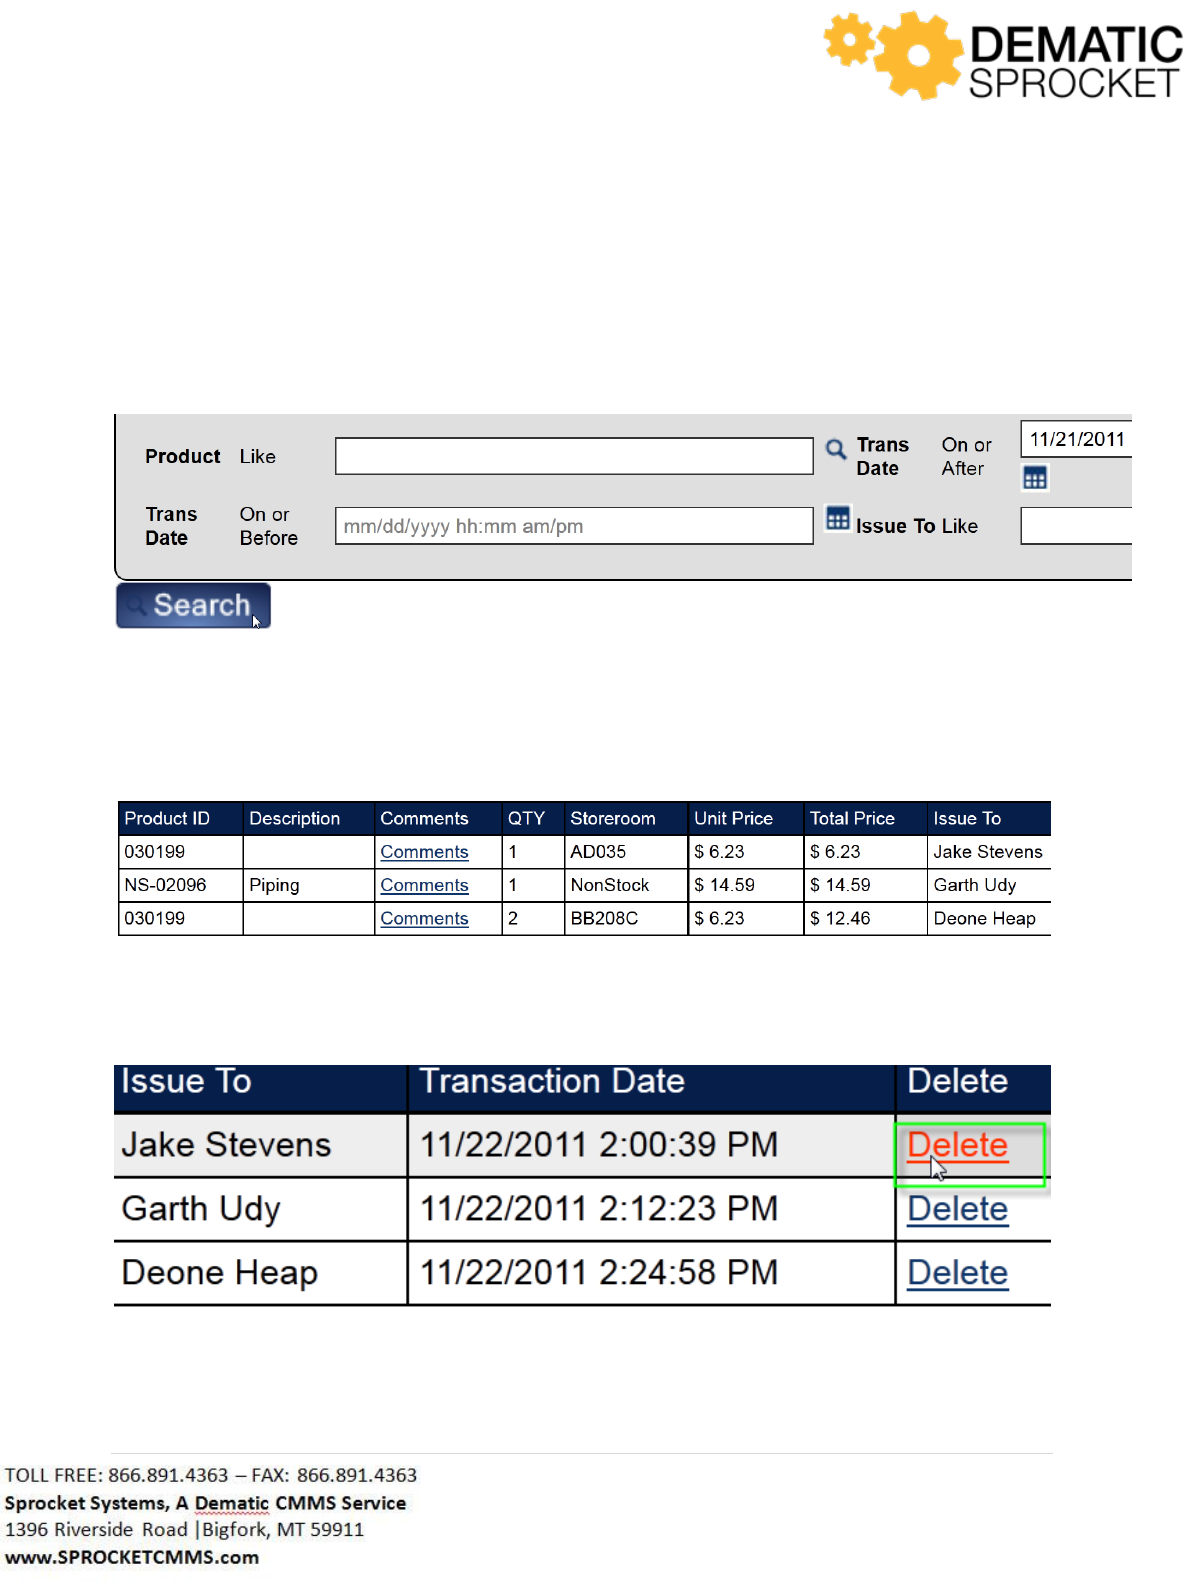
You can use the search fields above the grid in the Material Charges section to search for and locate
specific materials transactions. Simply use the desired field(s) to search for transaction. For example,
let’s say we want to search for all materials transactions to this work order made on or after November
21, 2011. Enter that date into the Trans Date On or After field and click the Search button at the
bottom left of the section.
Now this will show all the materials transactions made on or after our specified date in the grid below
the search criteria.
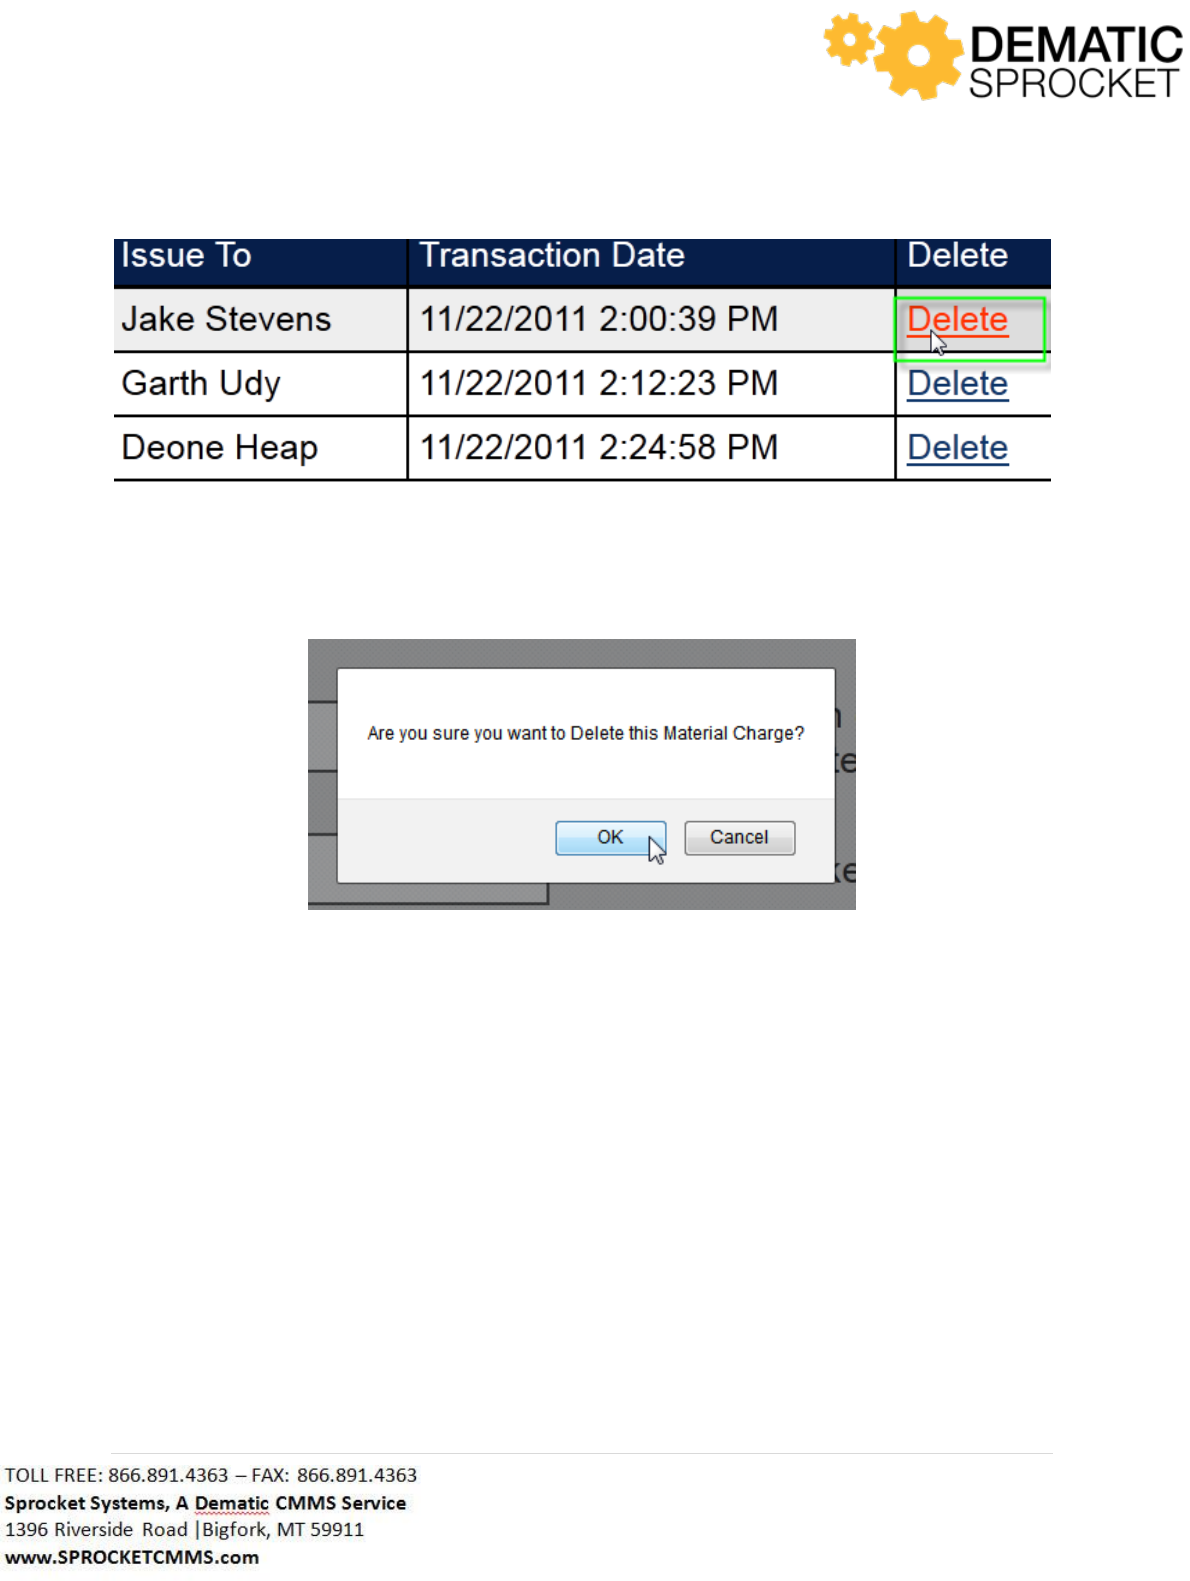
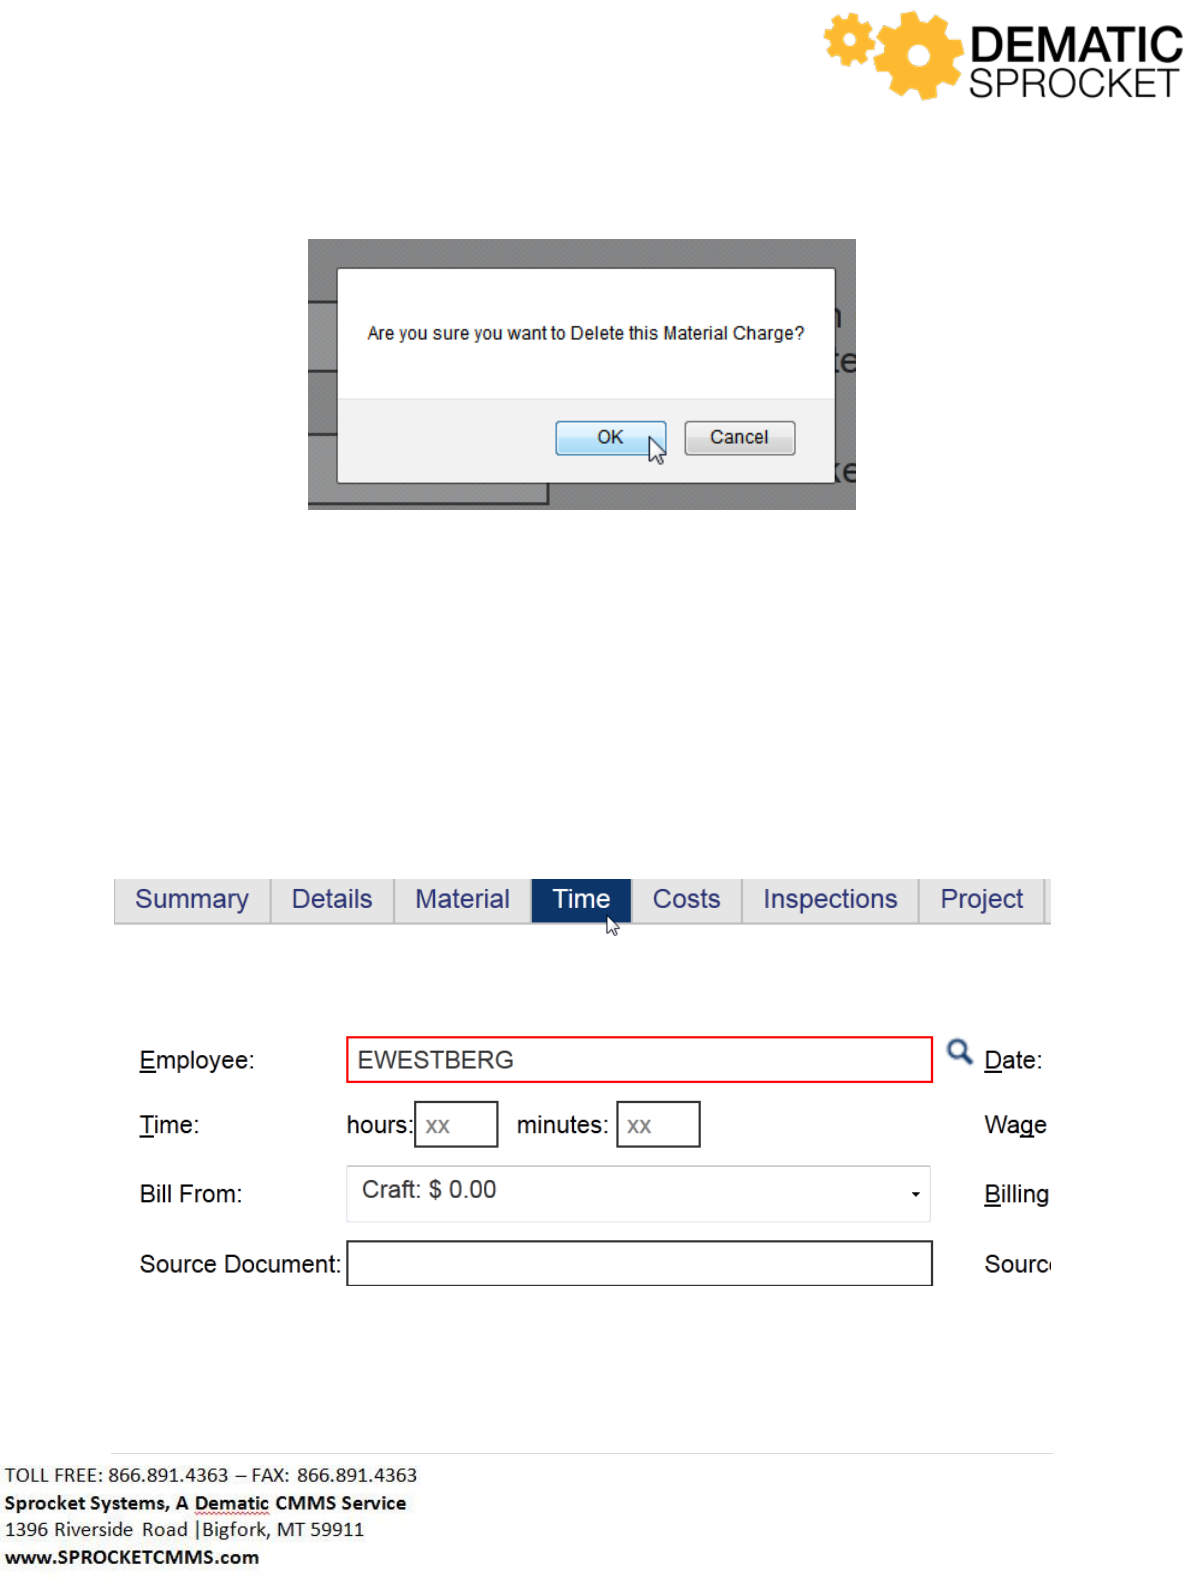
If you ever wish to delete a material posting, click the Delete link of the transaction you wish to remove.
70 | P a g e
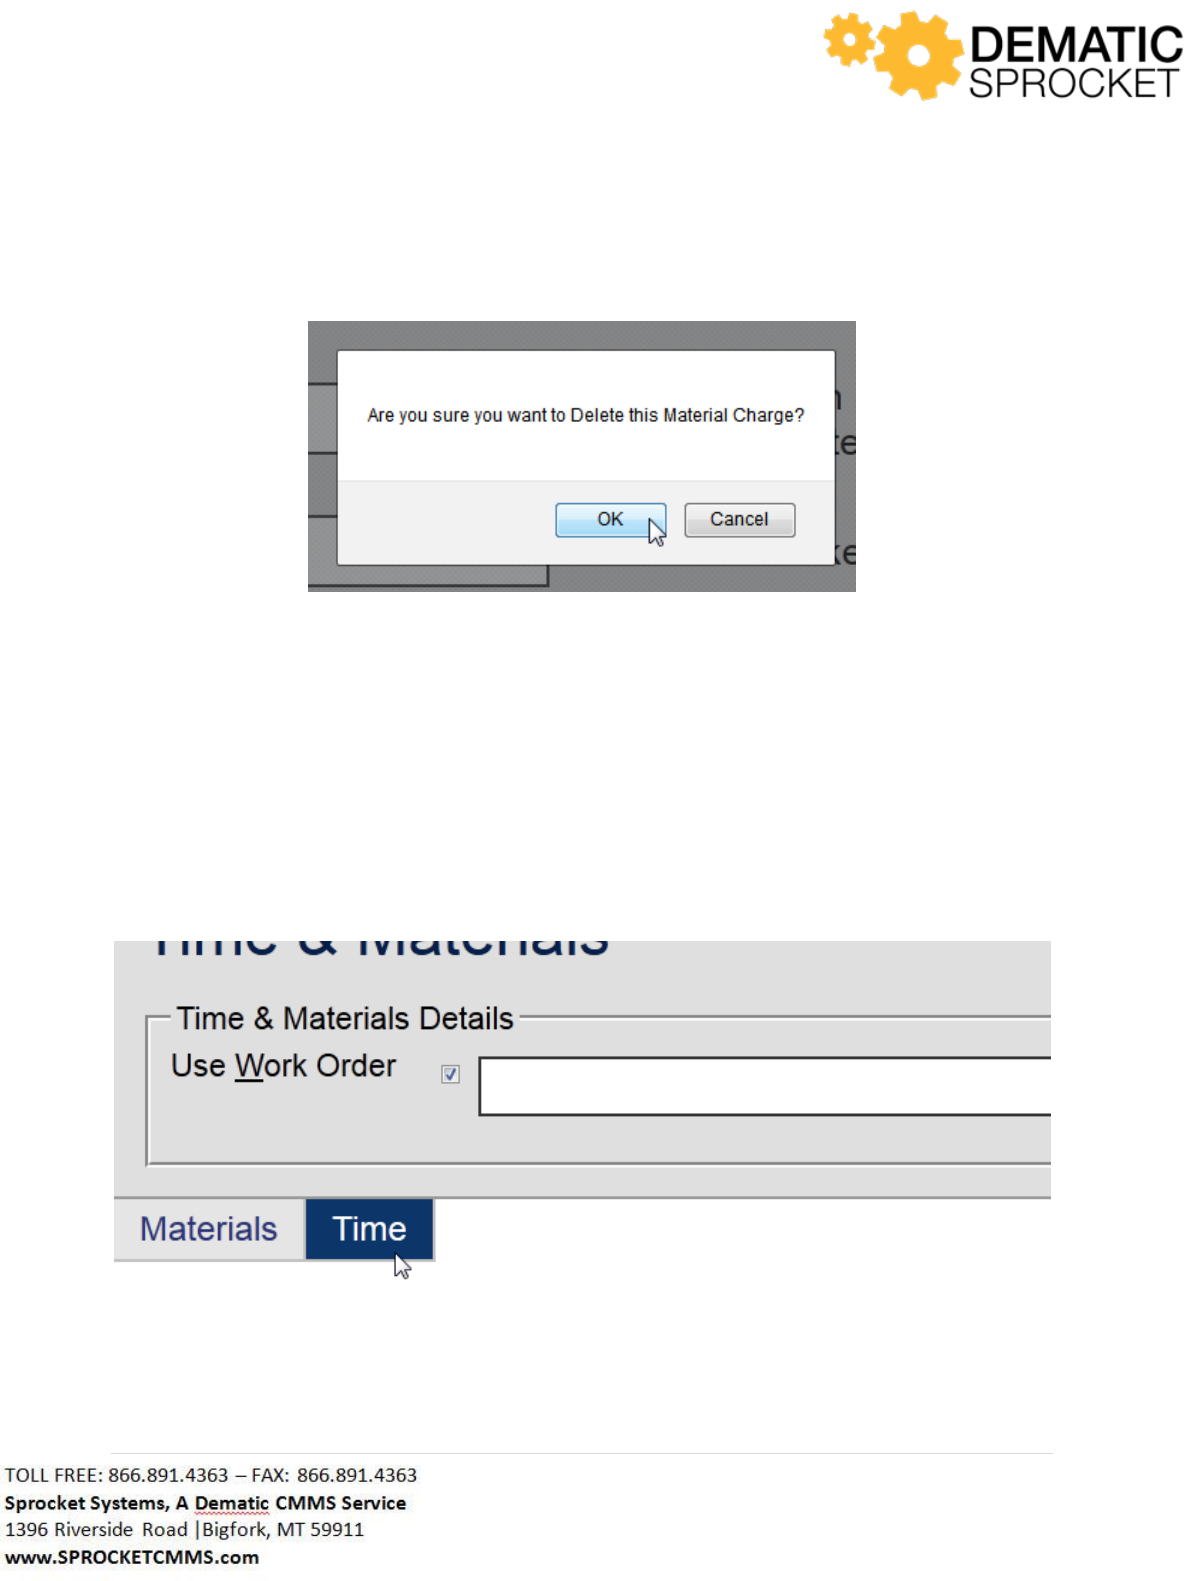
A window will appear saying “ Are you sure you wish to delete this Material Charge?” Click OK to
continue or Cancel to return to the previous screen.
The grid will refresh and your deleted material transaction will no longer be displayed in the material
charges.
4.6.2 Time
Much like the Materials tab, the Time tab is meant to be able to document time transactions throughout
the life of a work order. To post time to a work order or TM Account, click the Time tab at the top of
the page. Clicking the Time tab will display a form for employees to fill out to post time to a work order.

71 | P a g e
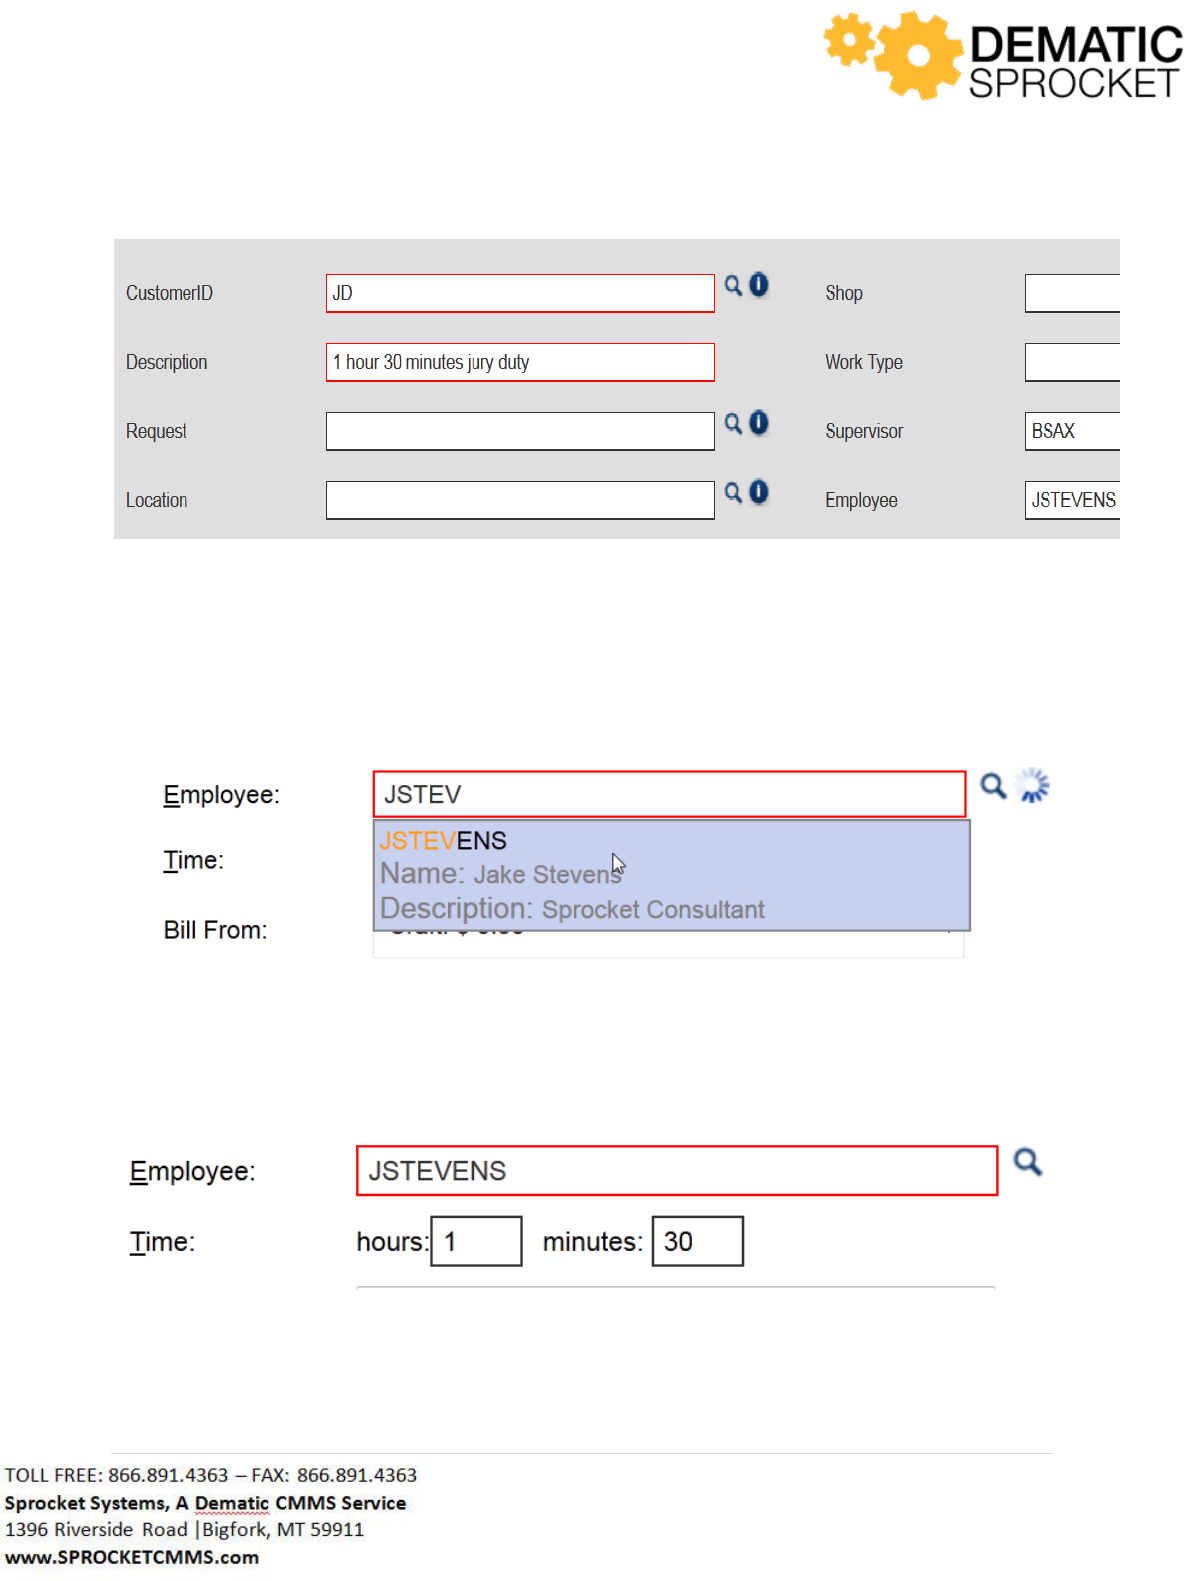
Let’s say for this example that we want to post time to a TM Account called Jury Duty. To do this,
instead of entering a work order identifier, uncheck the check box next to the Use Work Order field.
Notice that a new form appears below. Here, you can enter in the information to post time to your TM
Account. Remember that fields outlined in red are required fields.
Use the CustomerID field to locate and select the appropriate TM Account. Remember, the Auto Lookup
Tool can help you locate records in Sprocket. Begin typing all or part of the TM Account you wish to post
time to. When the correct record appears, select it and continue.
Continue filling out the rest of your TM Account form with the correct information. Remember that red
fields are required.
72 | P a g e
Once you have entered in the TM Account information at the top of the form, fill in the rest of the
information on this screen.
Once you have selected the desired employee, enter in the hours and minutes you wish to post in the
Time field below.
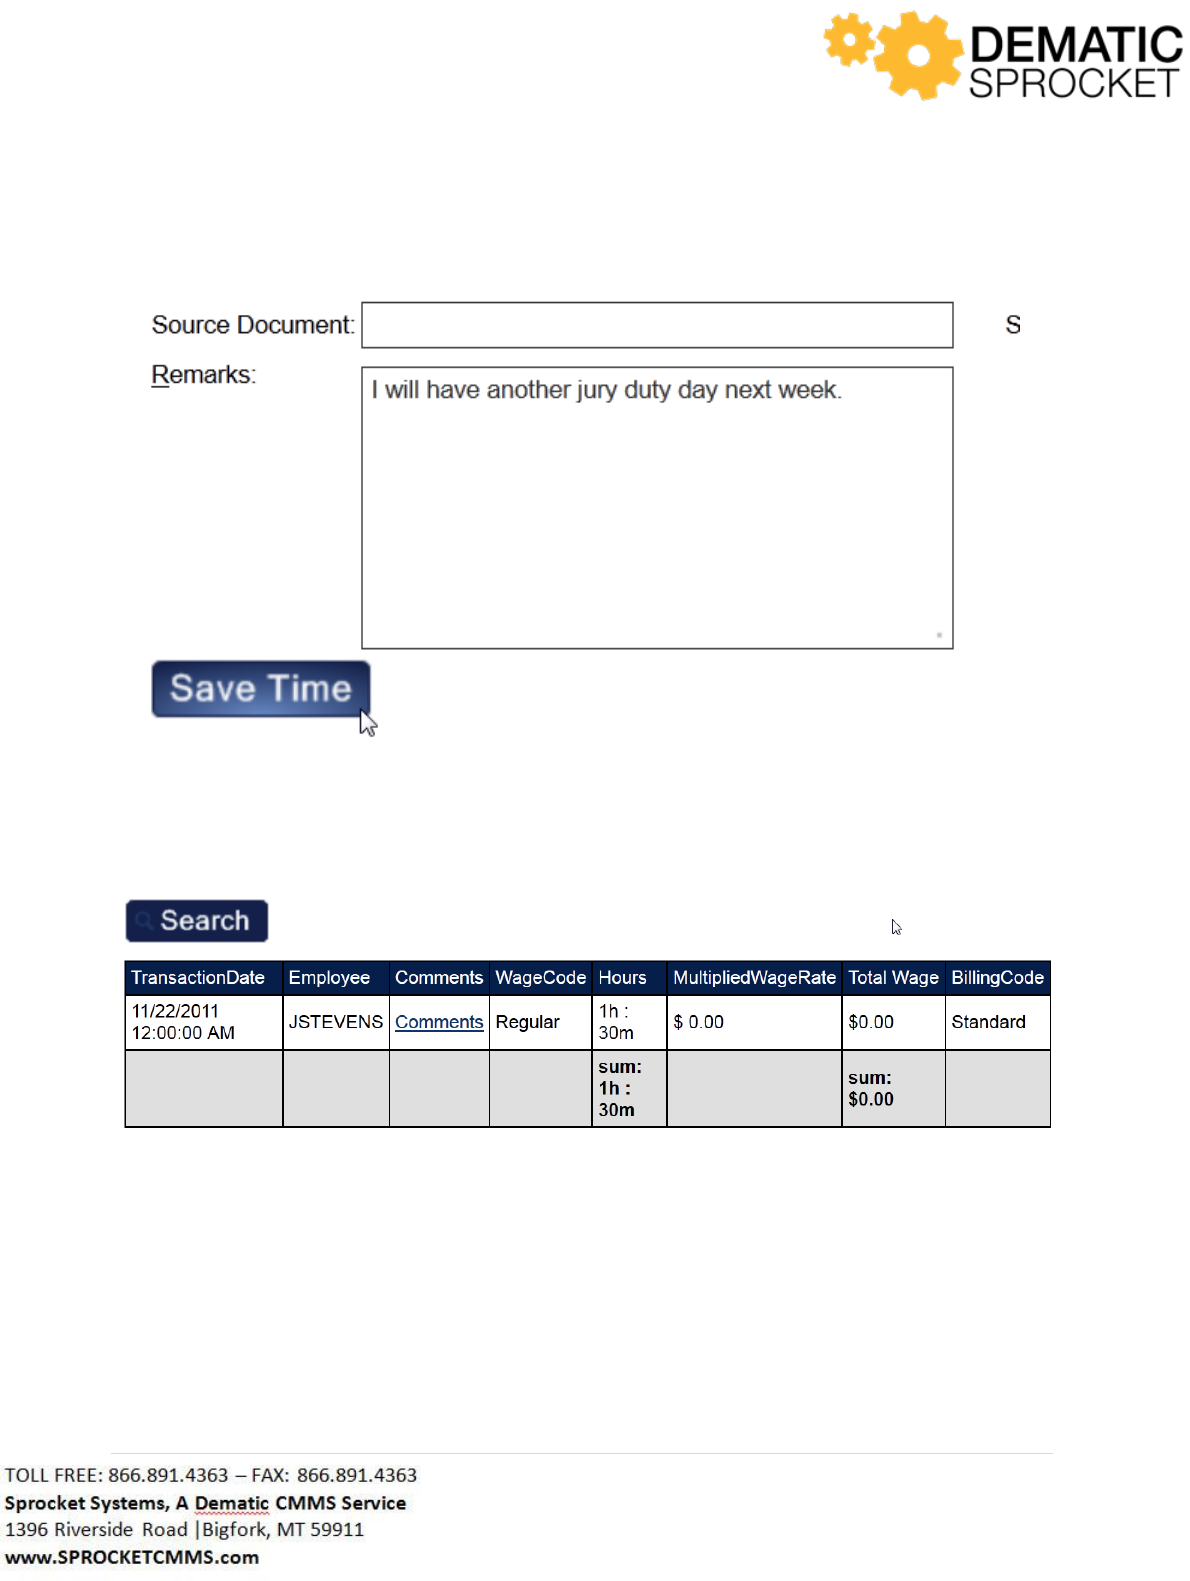
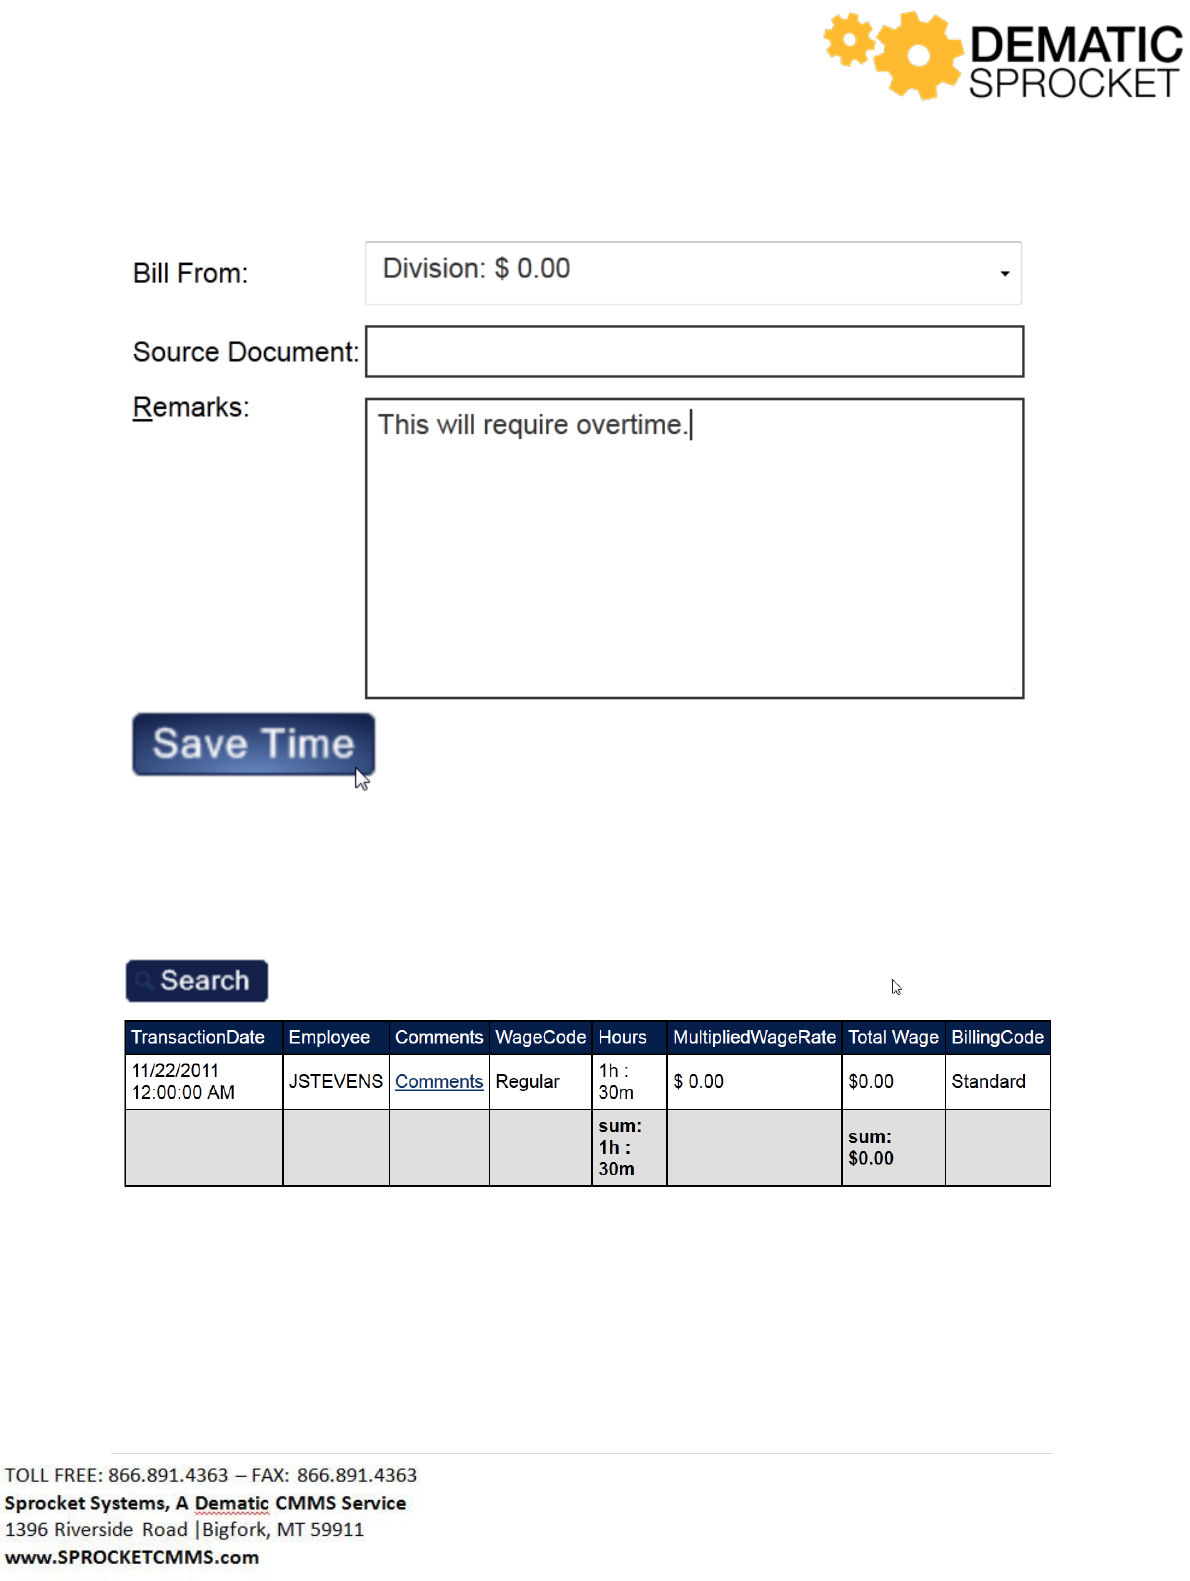
Fill in the other fields as necessary with the appropriate information. Once you have entered in all of
your information, you may leave comments about this time posting in the Remarks box below.
73 | P a g e
Click Save Time at the bottom of the form when you wish to submit your time posting.
Notice in the Time Charges section at the bottom of the page, the grid has been updated to include this
transaction. This section will show all time transactions throughout the life of this work order.
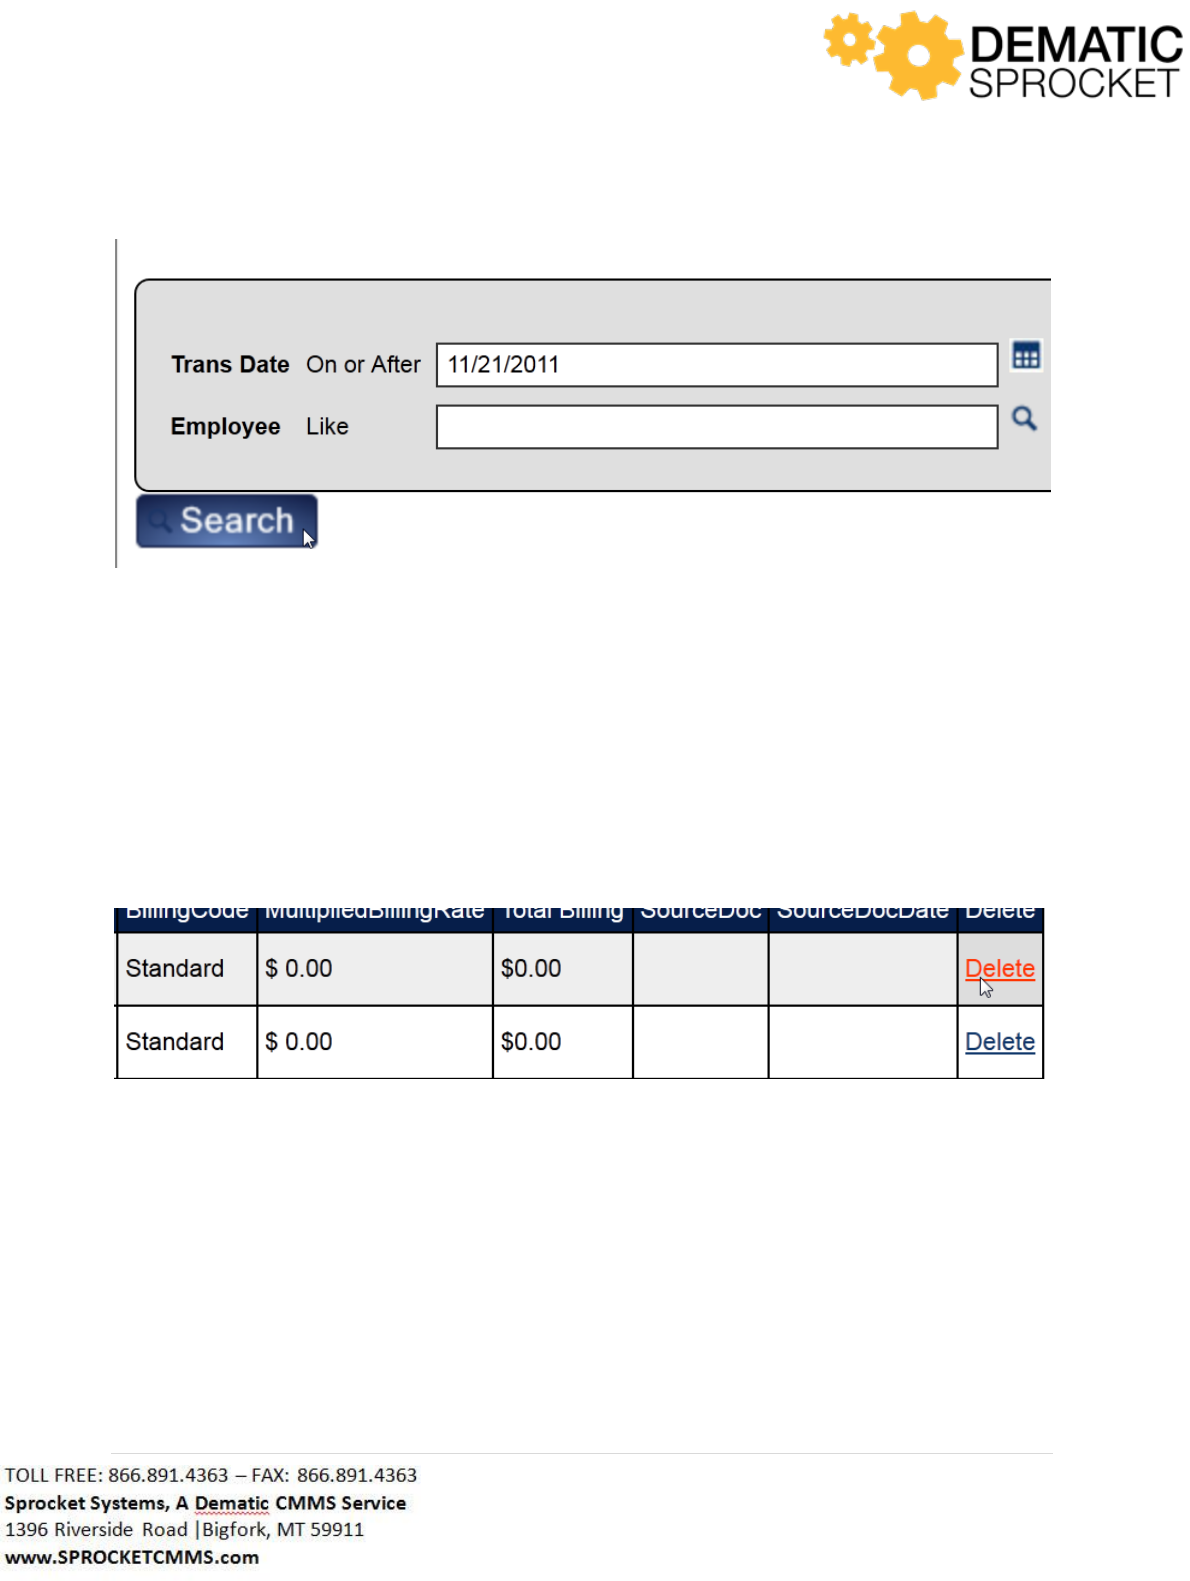
You can use the search fields above the grid in the Time Charges section to search for and locate specific
time transactions. Simply use the desired field(s) to search for a transaction. For example, let’s say we
want to search for all time transactions to this TM Account or work order made on or after November
21, 2011. Enter that date into the Trans Date On or After field and click the Search button at the
bottom left of the section.

74 | P a g e
Now this will show all the time transactions made on or after our specified date in the grid below the
search criteria.
If you ever wish to delete a time posting, simply scroll to the far right of the grid and click the Delete link
for the time transaction you wish to delete.
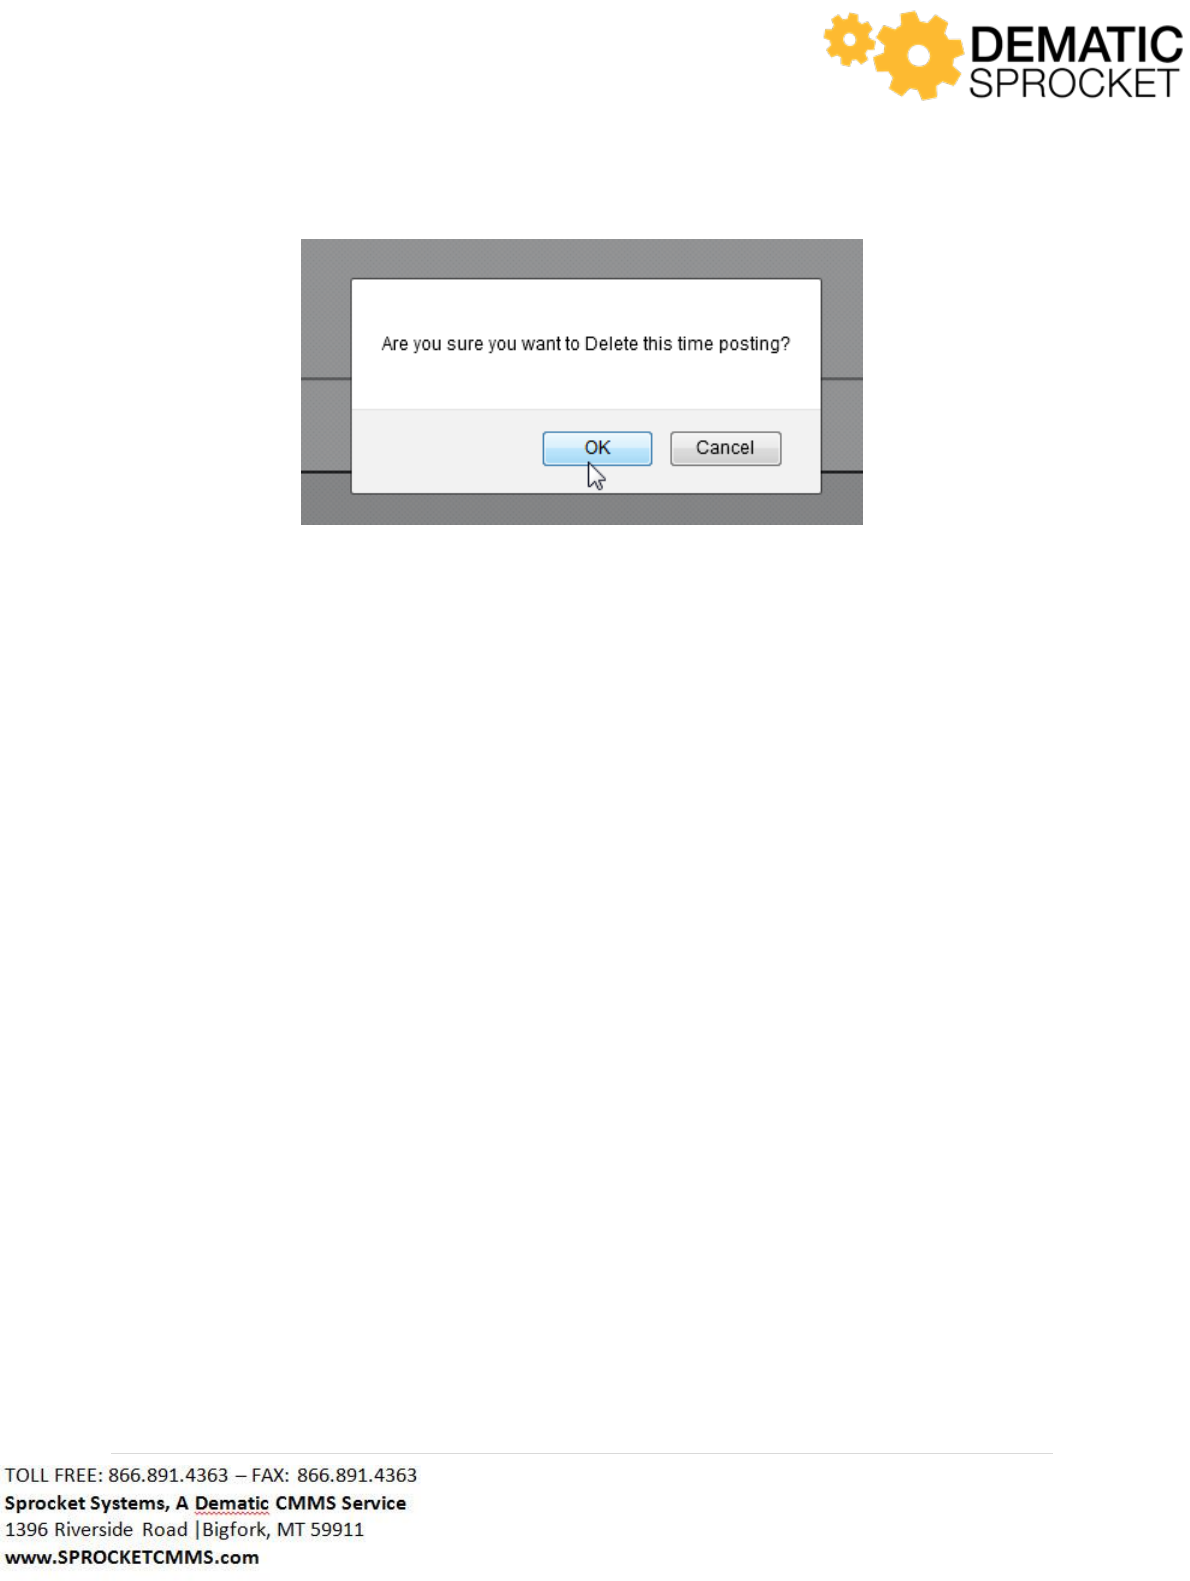
A window will appear saying “ Are you sure you wish to delete this Time posting?” Click OK to continue
or Cancel to return to the previous screen.

75 | P a g e
The grid will refresh and your deleted time transaction will no longer be displayed in the time charges.
5.0 Work Order Details
76 | P a g e
5.1 Navigating to Work Order Details
You can view Work Order Details by clicking the Work Order Identifier from a work order grid.
This will bring you to the Work Order Details screen. This screen displays all details for this particular
work order. Notice that there are additional fields here that were not on the New Work Order screen.
Here you can enter in additional information or update original information

77 | P a g e
Note: Sprocket is customized based on customer needs. Your screen may or may not display the above
fields. Contact your Sprocket Administrator with questions.
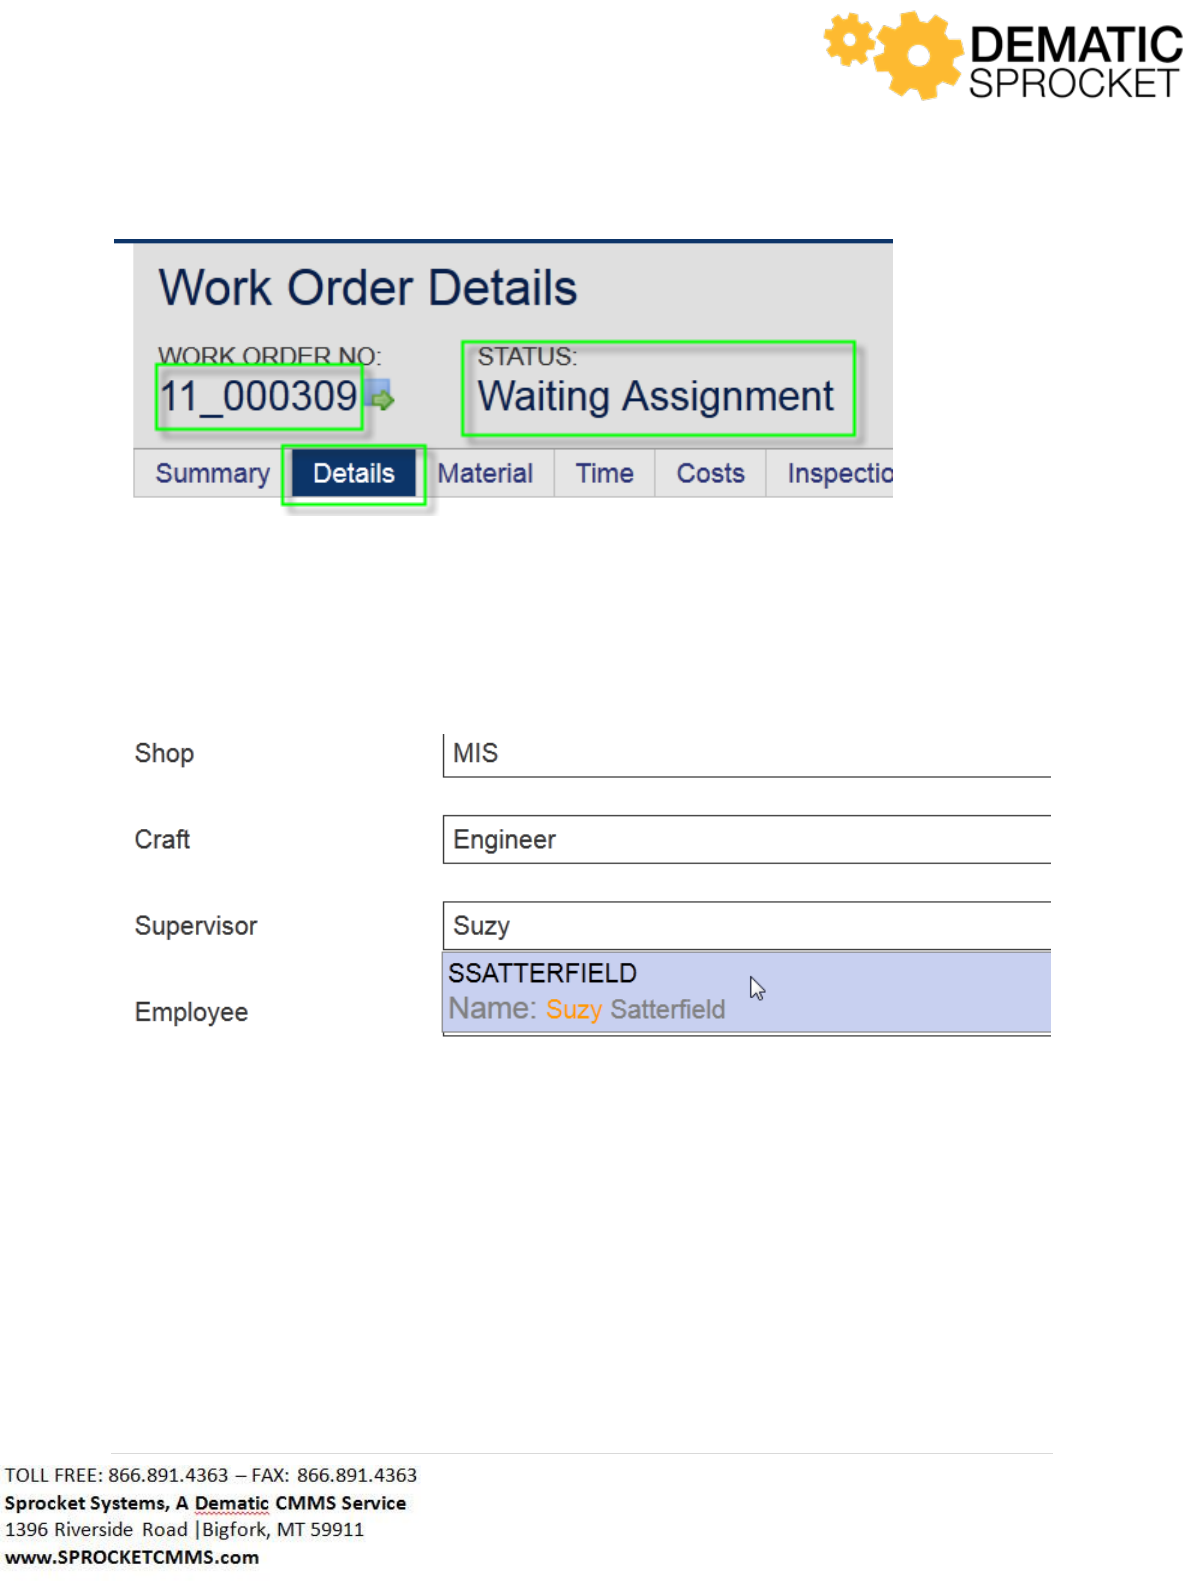
Notice that the top of the page displays the Work Order Identifier, the Status of this work order, and the
Details tab is highlighted indicating that we are viewing Work Order Details.
78 | P a g e
Notice that you are able to add additional information to this work order. Simply click the field you wish
to add contents to and enter in the information. For example, let’s say you would like to add a
Supervisor to a work order. Click inside the Supervisor field and enter in all or part of the name of the
supervisor. The Auto Lookup Tool will yield search results.
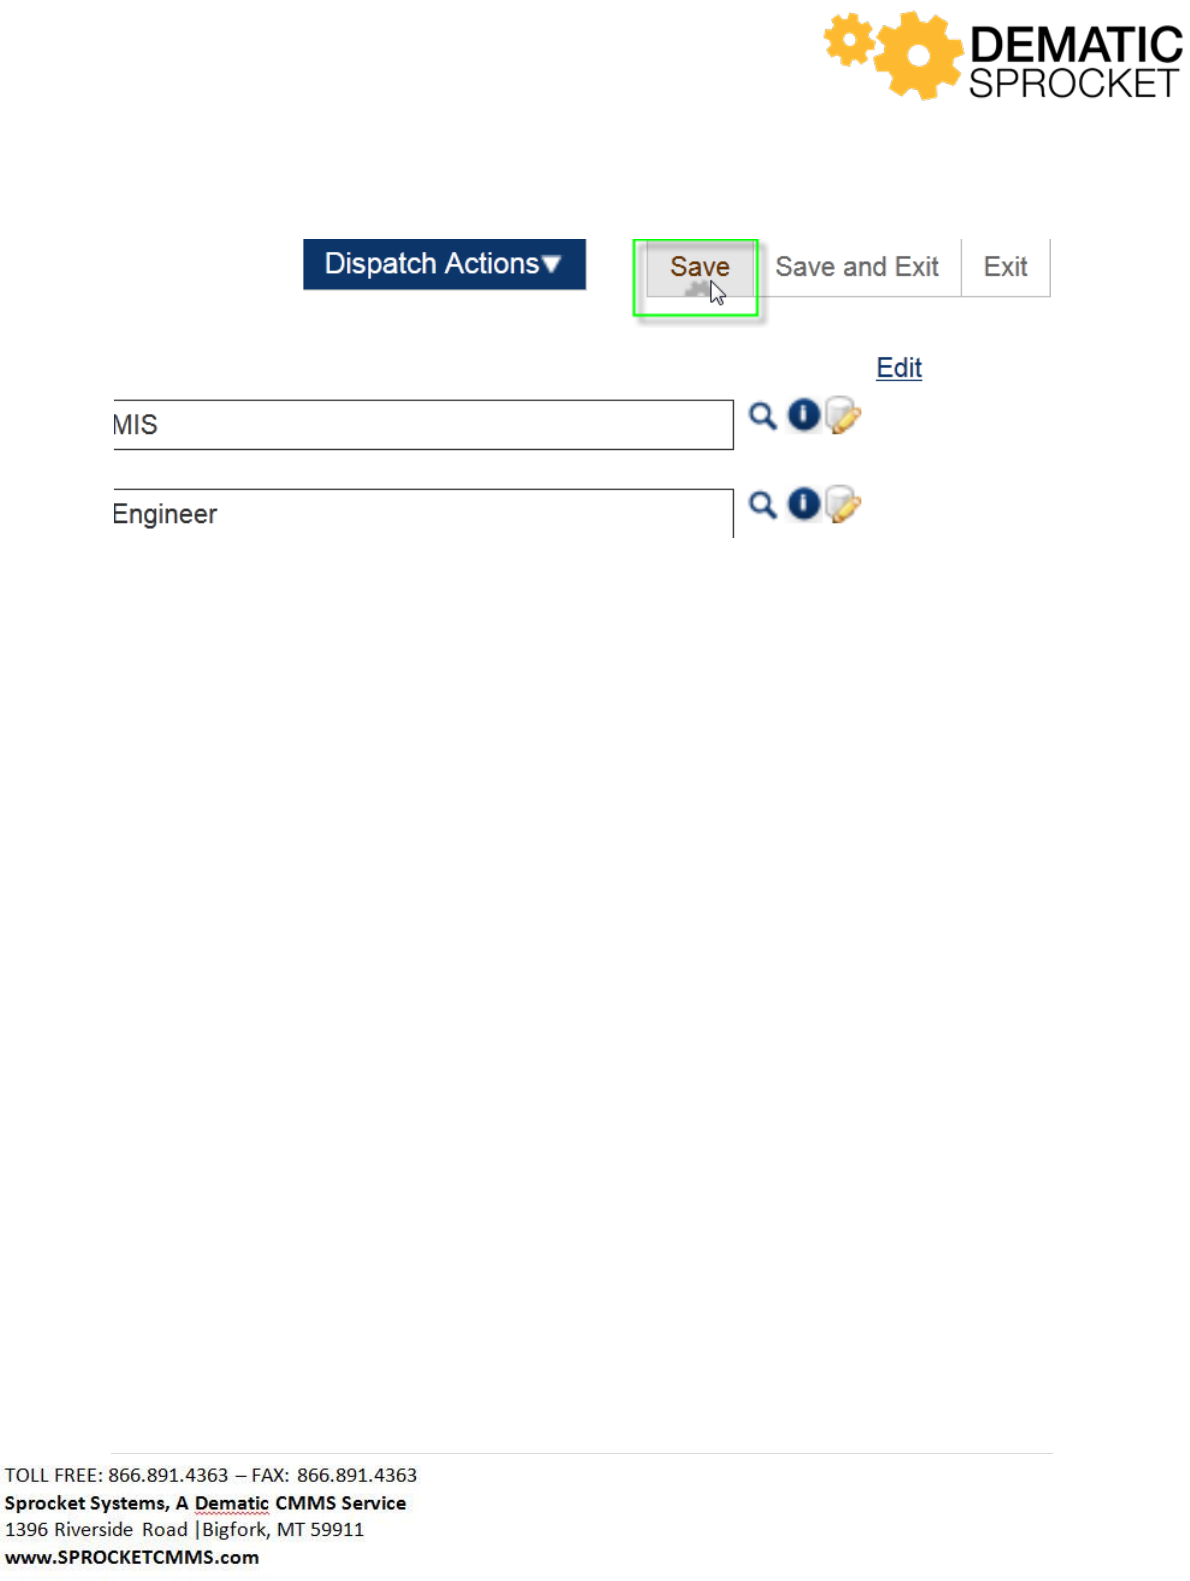
Once you have entered in any additional information to the Work Order Details, click the Save button in
the upper right hand corner to save your changes.
79 | P a g e
Notice the other two buttons: Save and Exit and Exit. You will see these buttons throughout Sprocket in
any form with fields that you are able to edit. Use Save to save work you have completed. Use Save and
Exit to save work you have completed and exit to the previous screen. Use Exit to exit the screen
without saving changes.
5.2 Work Order Notes
Remember that whenever you submit a new work order you can also submit comments with it as well.
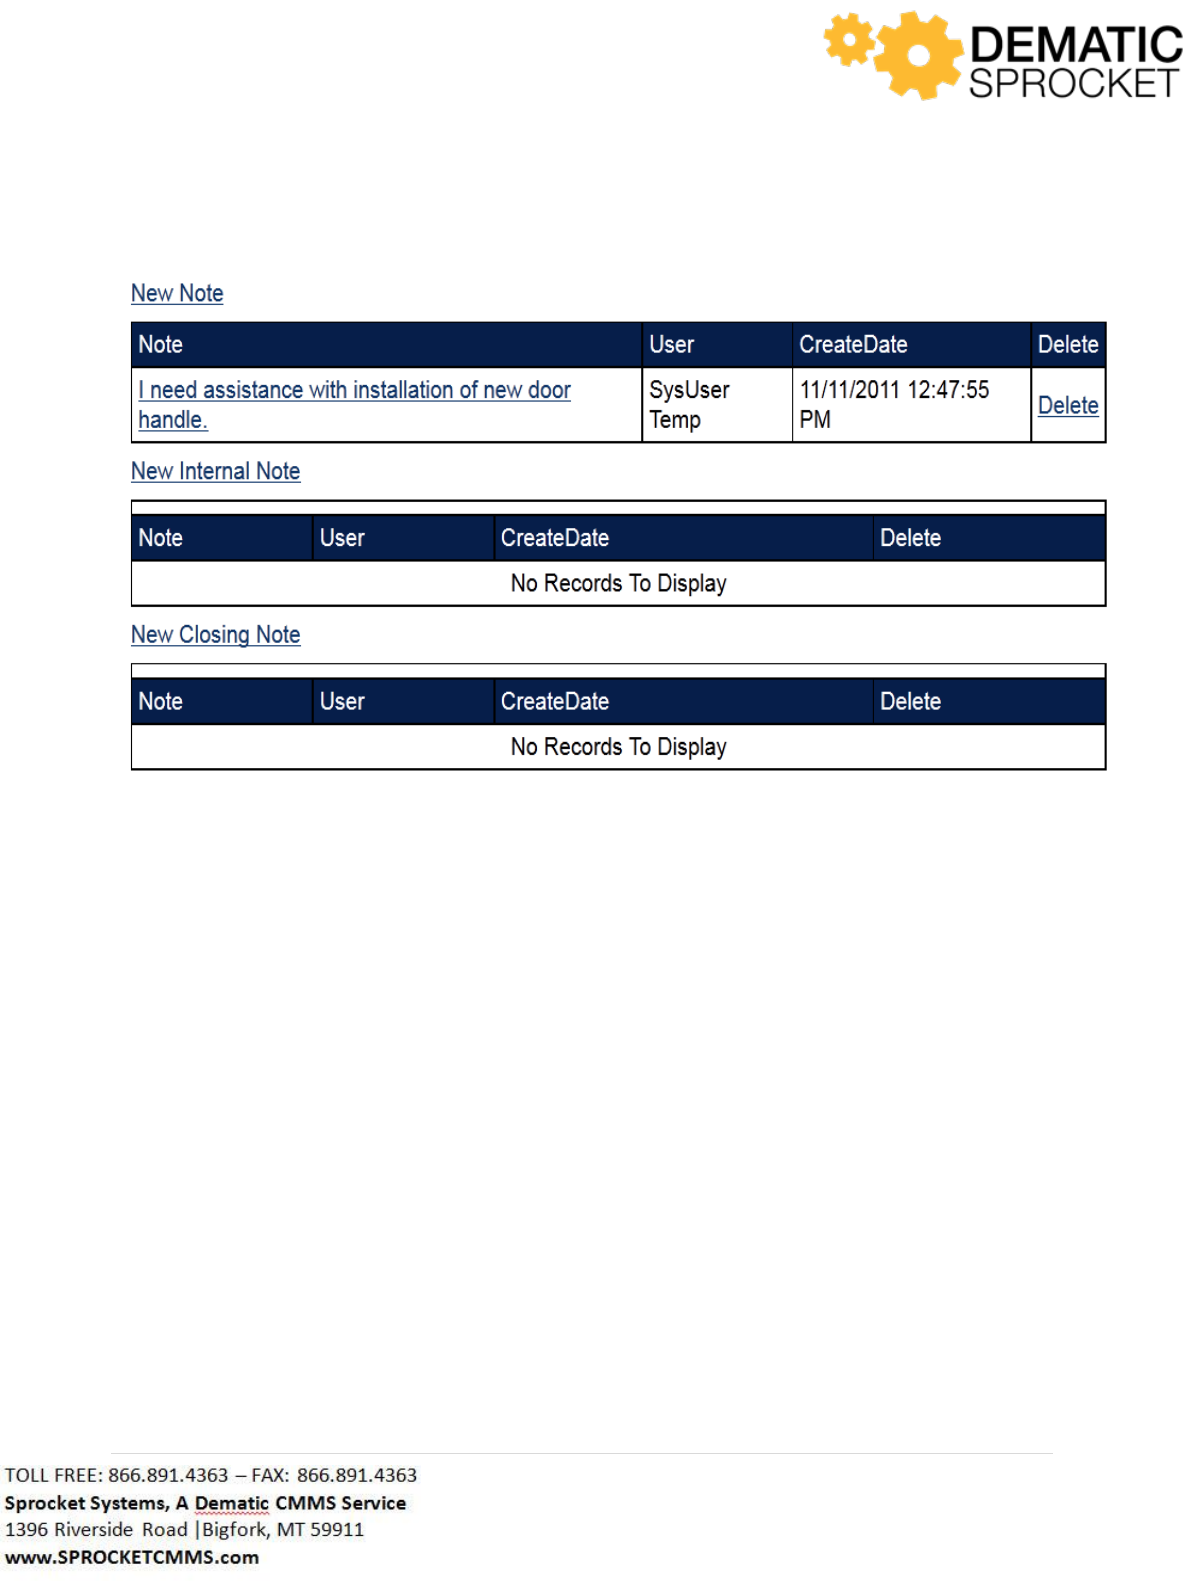
Notice at the bottom of the page, there is a note section.
80 | P a g e
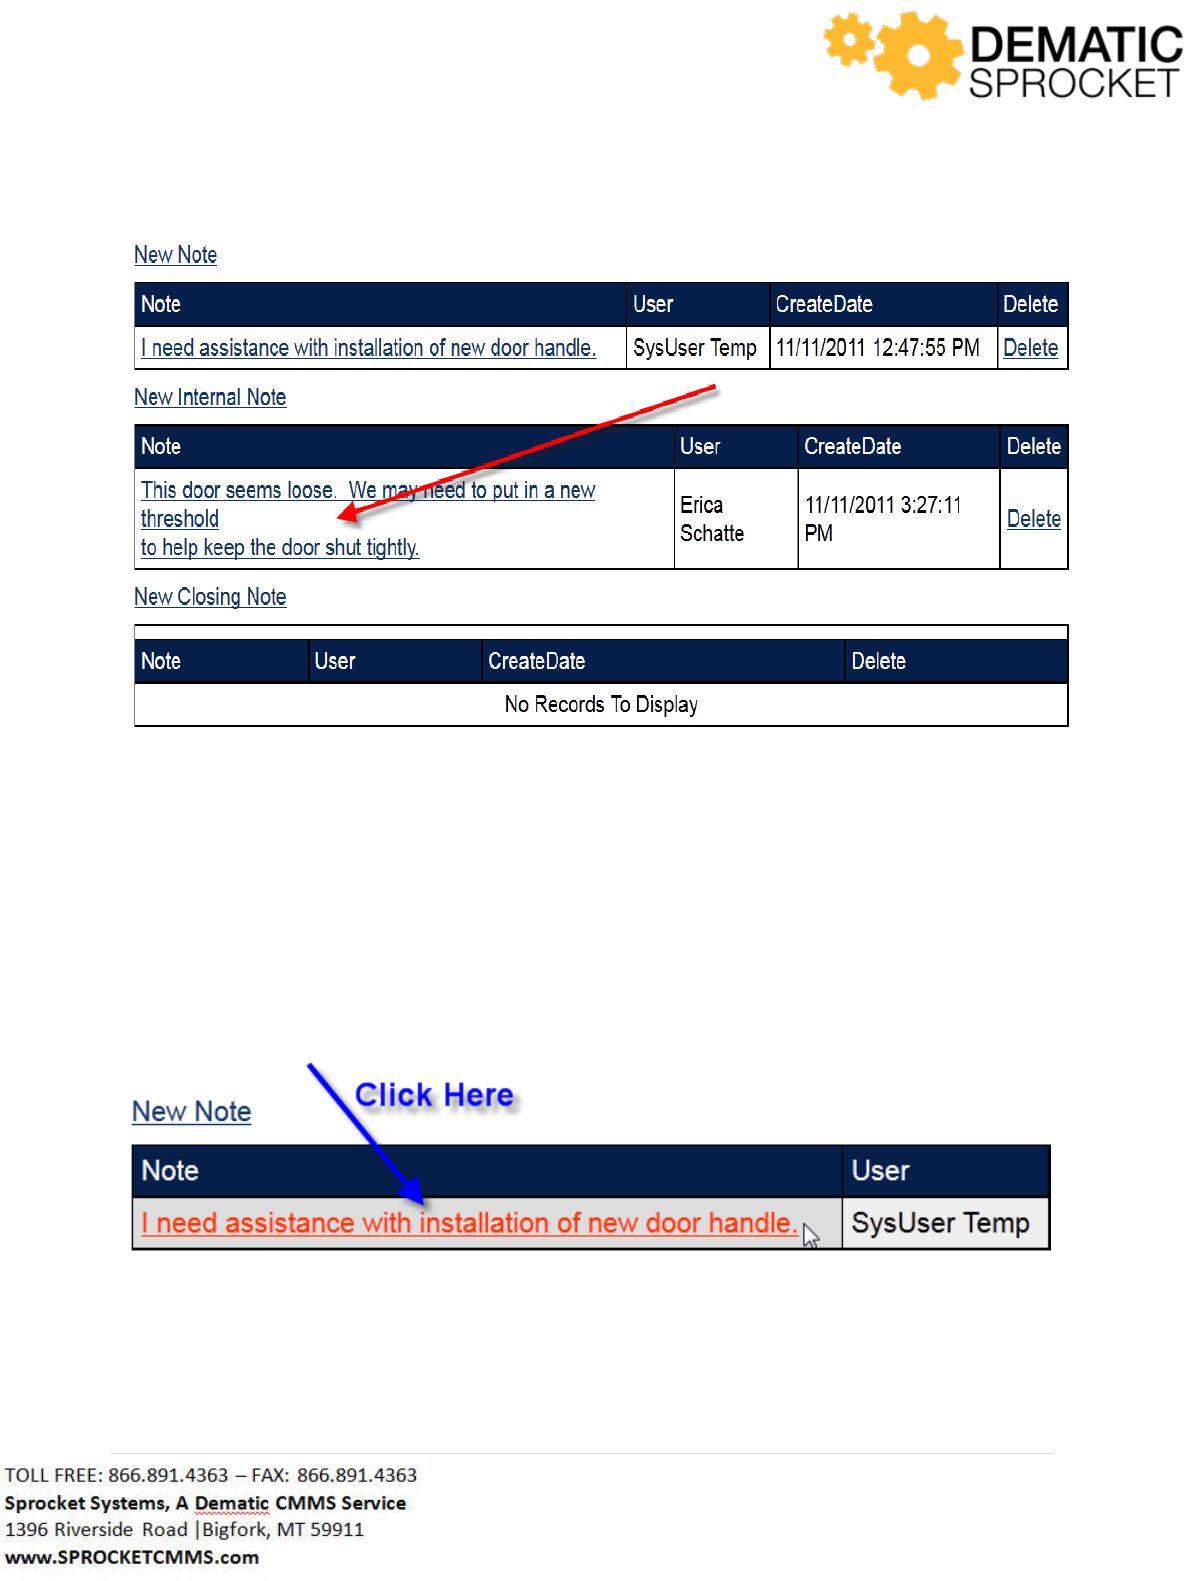
Sprocket has three types of notes that can be included with work orders:
o Notes-Comments included when work order is submitted
o Internal Notes-Comments added throughout work order life cycle
o Closing Notes-Comments added when a work order is closed
Notice that the top note field is labeled Note. The comments in this field were added by the person who
submitted this work order.
The next field below is labeled Internal Notes and the bottom field is labeled Closing Notes.
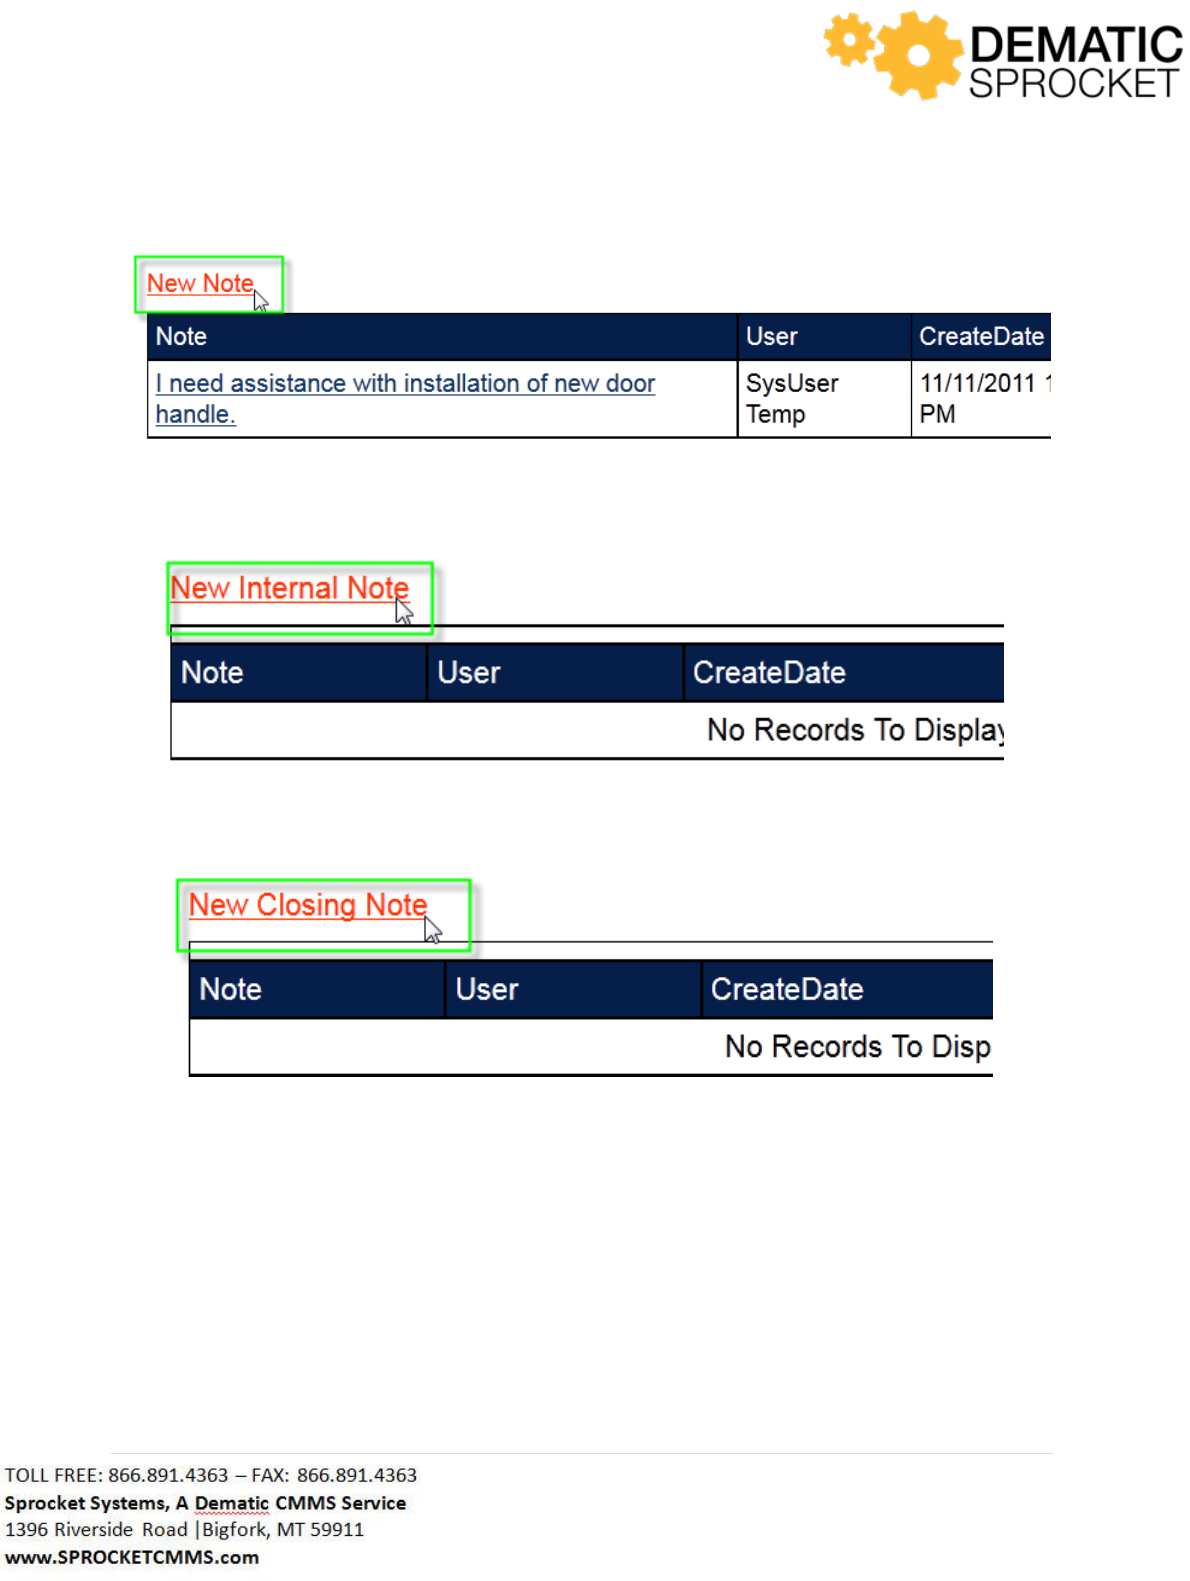
To add a new note to any of these fields, click the link above the upper left hand corner of any of these
fields.
So, to add a new note to the Notes field, click the New Note link at the upper left hand corner of the
field.
81 | P a g e
To add a new internal note to the Internal Note field, click the New Internal Note link at the upper left
hand corner of the field.
To add a new closing note to the Closing Notes field, click the New Closing Note at the upper left hand
corner of the field.
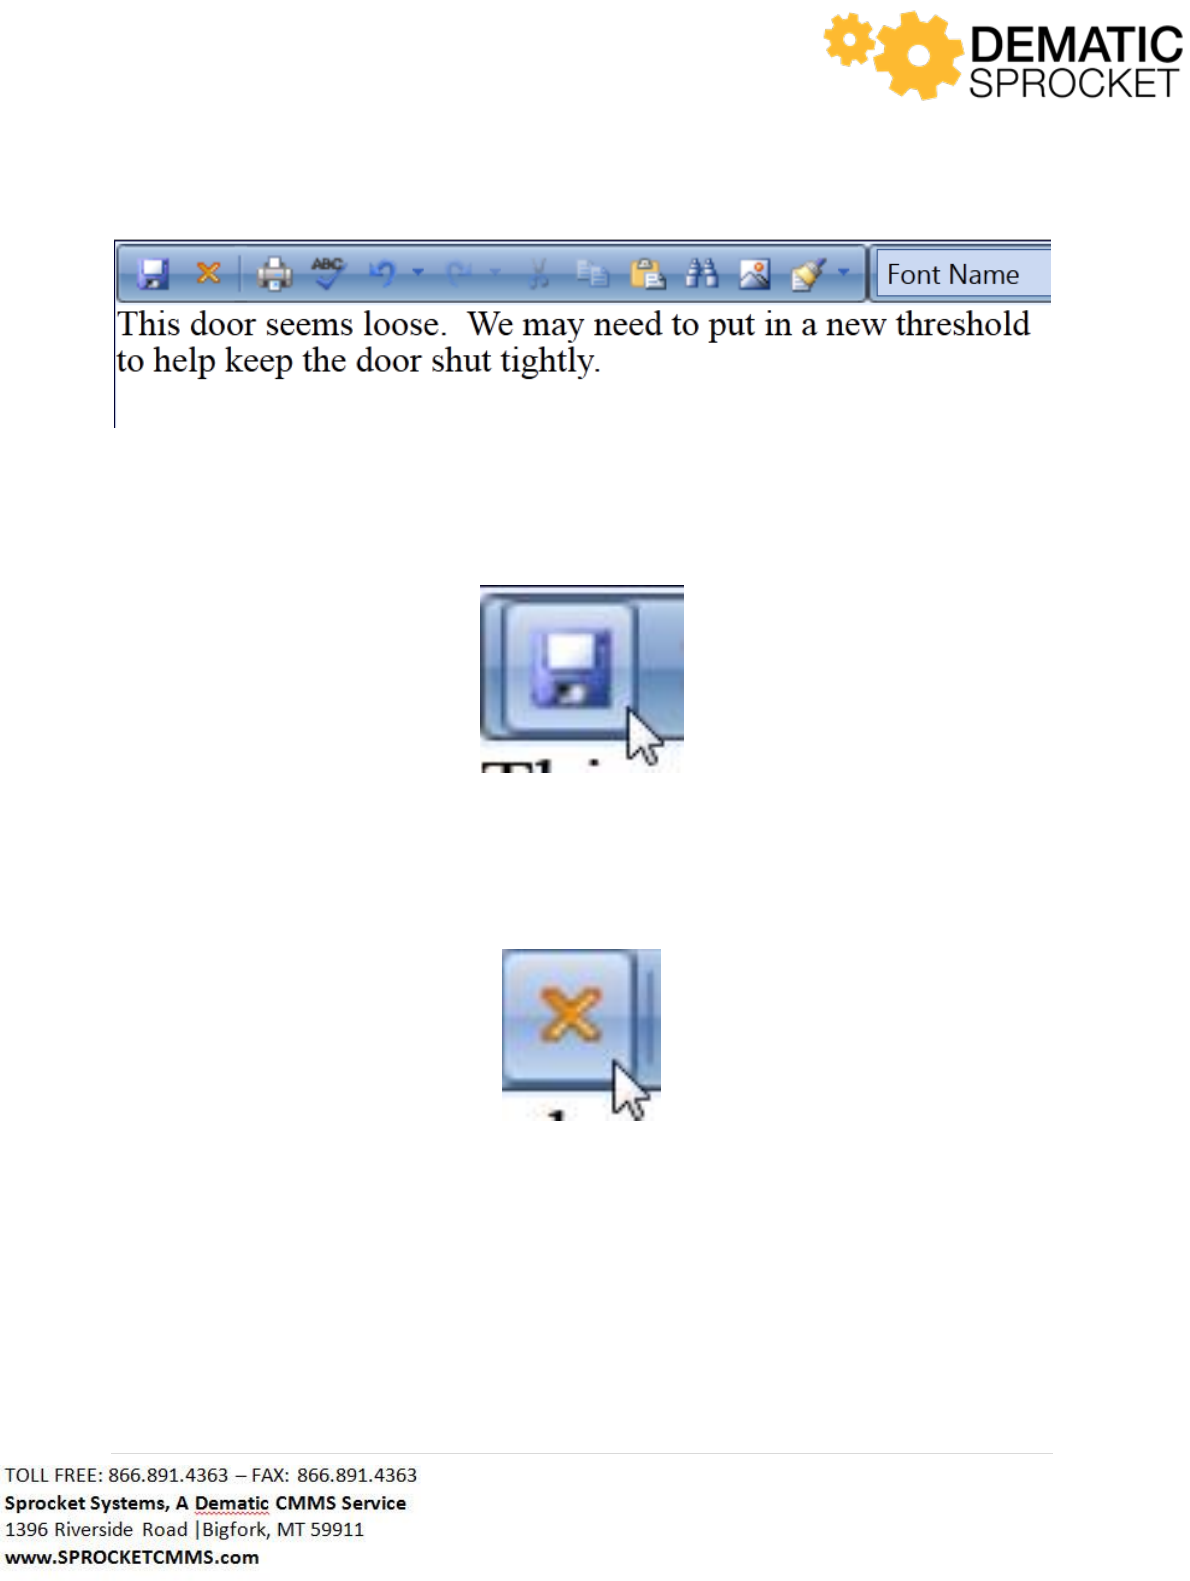
Once you have selected the New Note link for one of these fields, you will be redirected to a large free
text field.
Begin entering the comments, description, or instructions here.
82 | P a g e
You may enter as much information as you need to in the comments field. Once you have finished
entering your note, click the save disc icon in the upper left hand corner of the screen.
If you wish to cancel this note and return to the previous screen, click the red X icon to cancel.
Now the comments you entered will appear in the appropriate field.
83 | P a g e
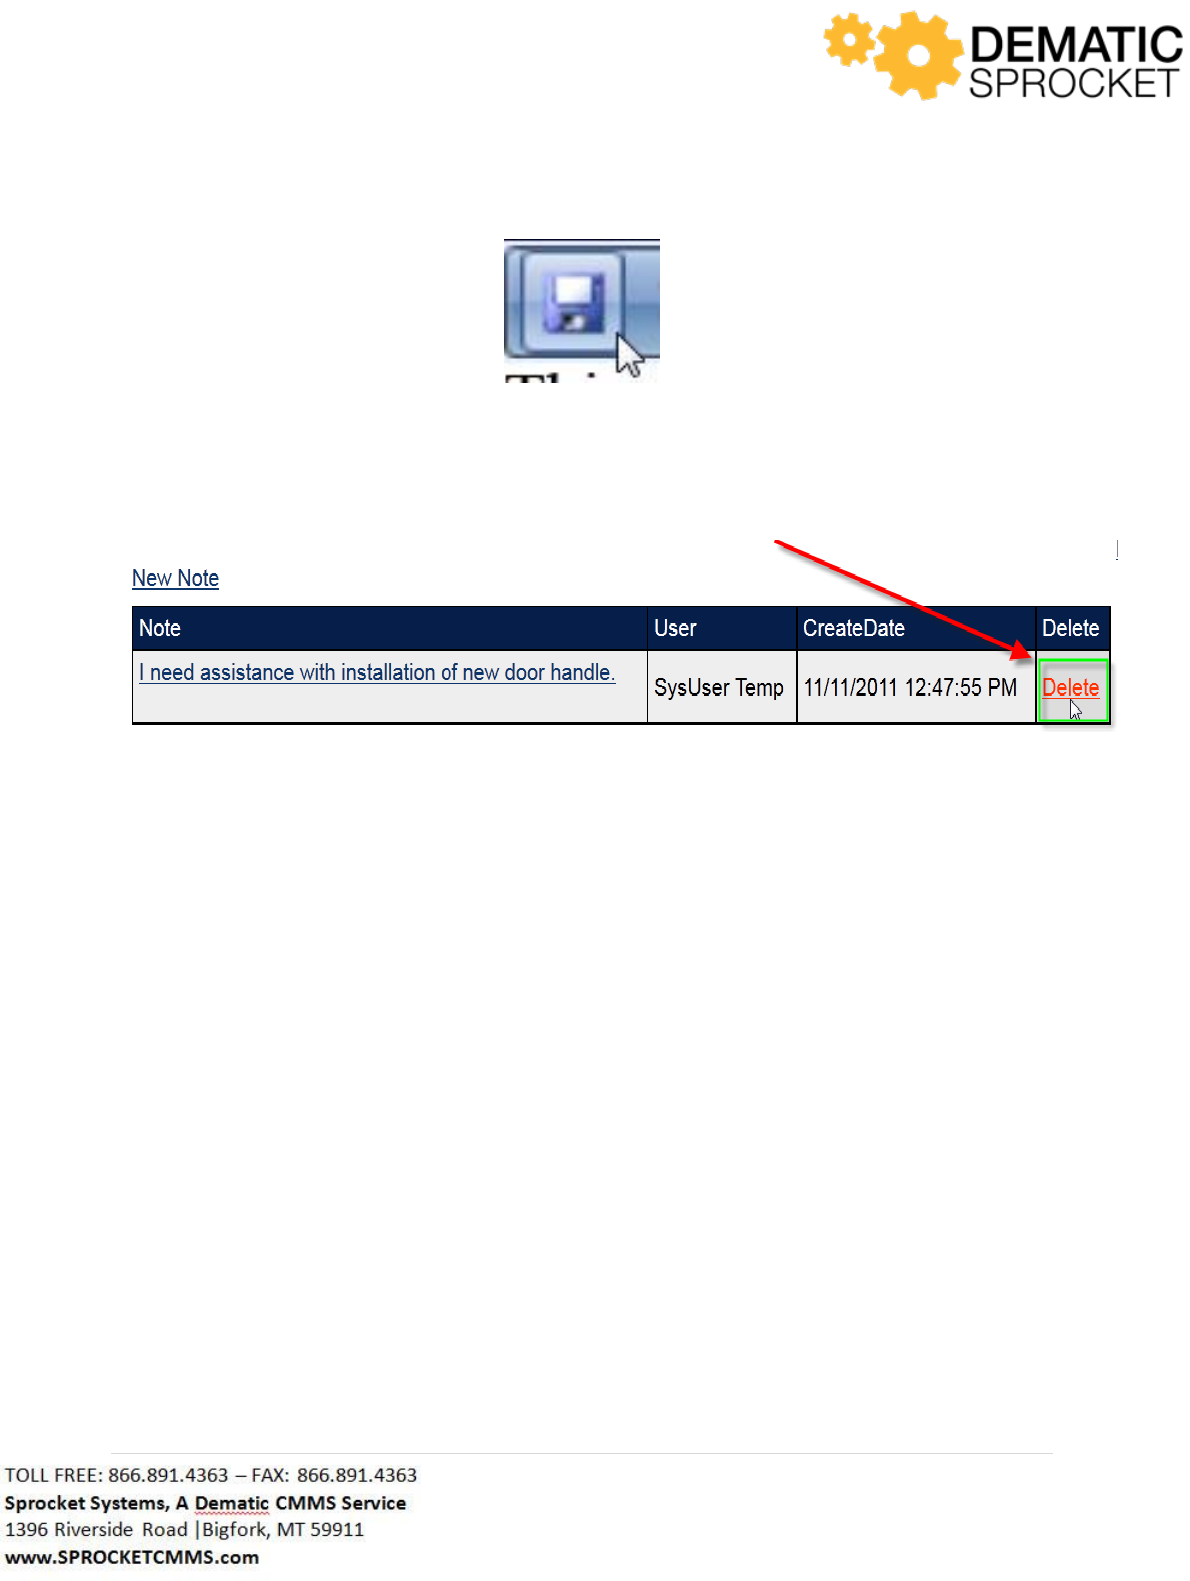
If you would like to edit a note, click on the note text and you will be directed back the text field.
Once back at the text field, you can edit the note or add additional text. When finished, click the Save
icon at the top left of the screen to save your comments.
84 | P a g e
You will be returned to the Work Order Details screen and your comments will be updated. If you wish
to delete a note, click the Delete link at the far right of the note grid.
Be sure to always click the Save button in the upper right hand corner of your screen before exiting this
screen to update all Work Order Details fields.
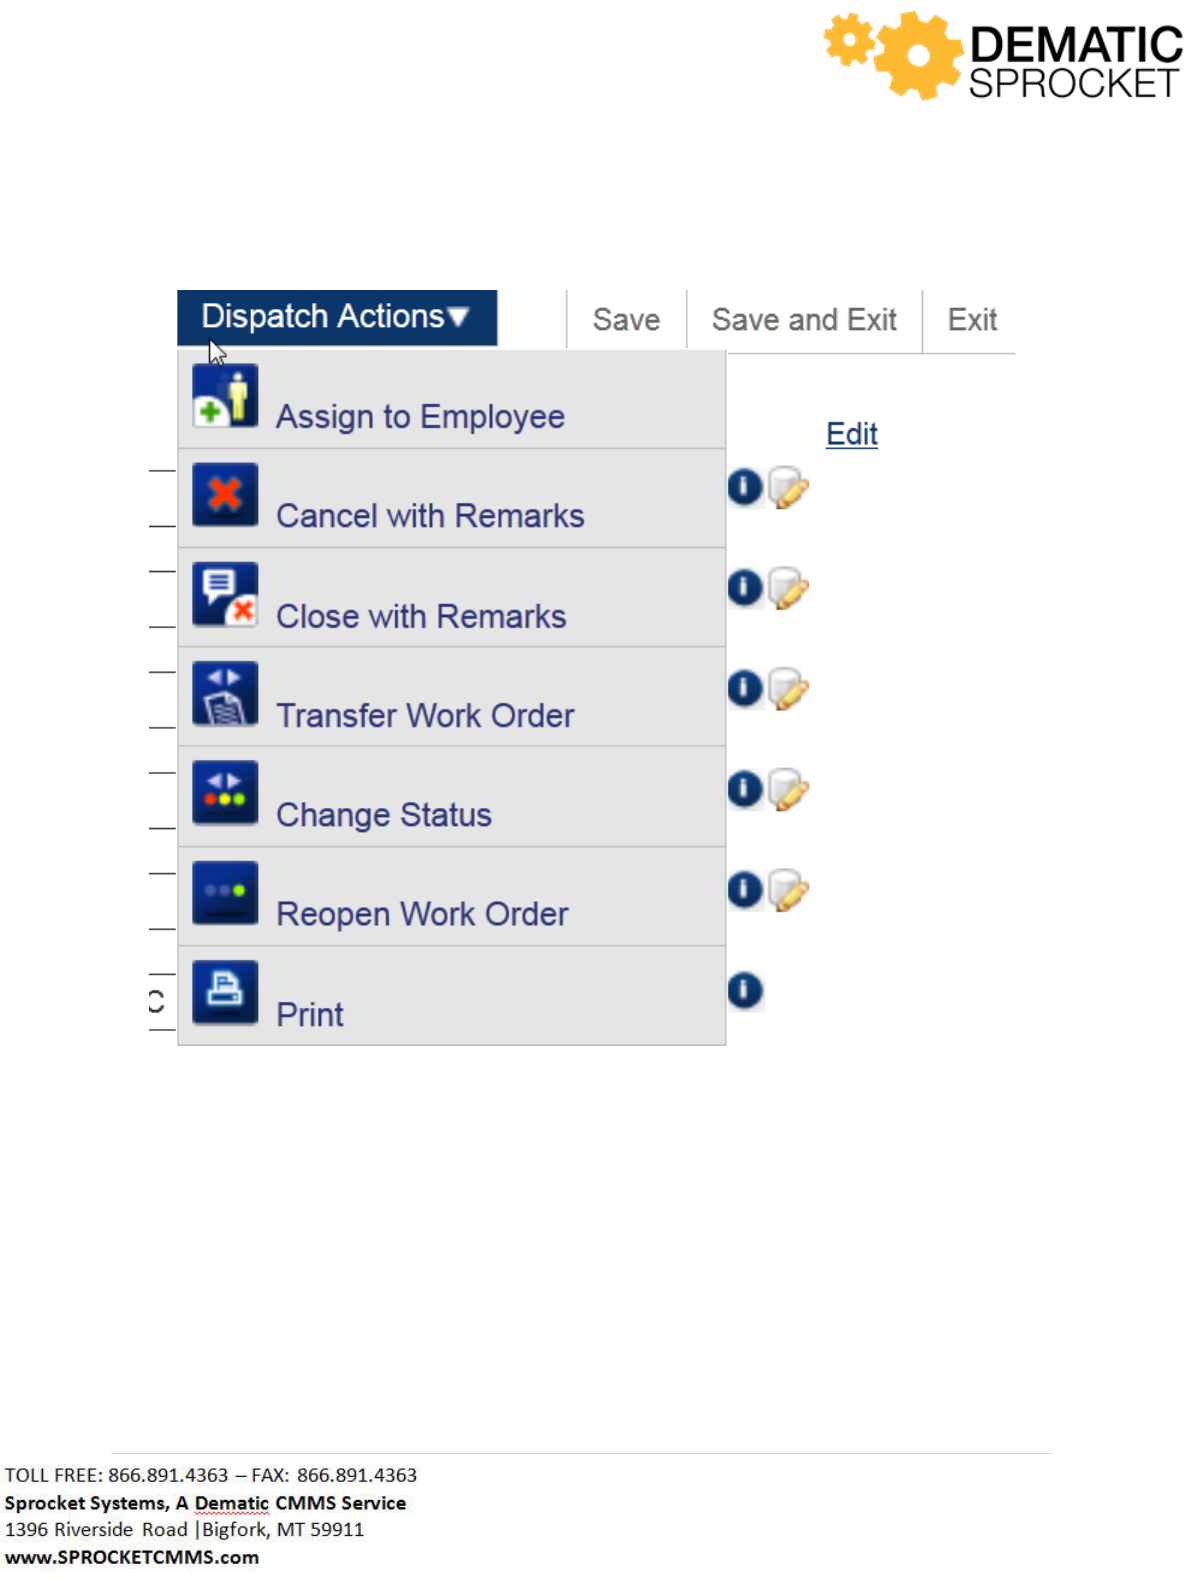
5.3 Work Order Details Dispatch Actions
Just like the Manage Overview screen and the Dispatching Results window, you can also use Dispatch
Actions from the Work Order Details screen. To do this, hover your mouse over the Dispatch Actions
button at the top right of the screen.
85 | P a g e
Note: Sprocket is customized based on customer needs. Your screen may or may not display the above
dispatch actions. Contact your Sprocket Administrator with questions.
From here select the dispatch action you would like to use and submit it to update this work order.
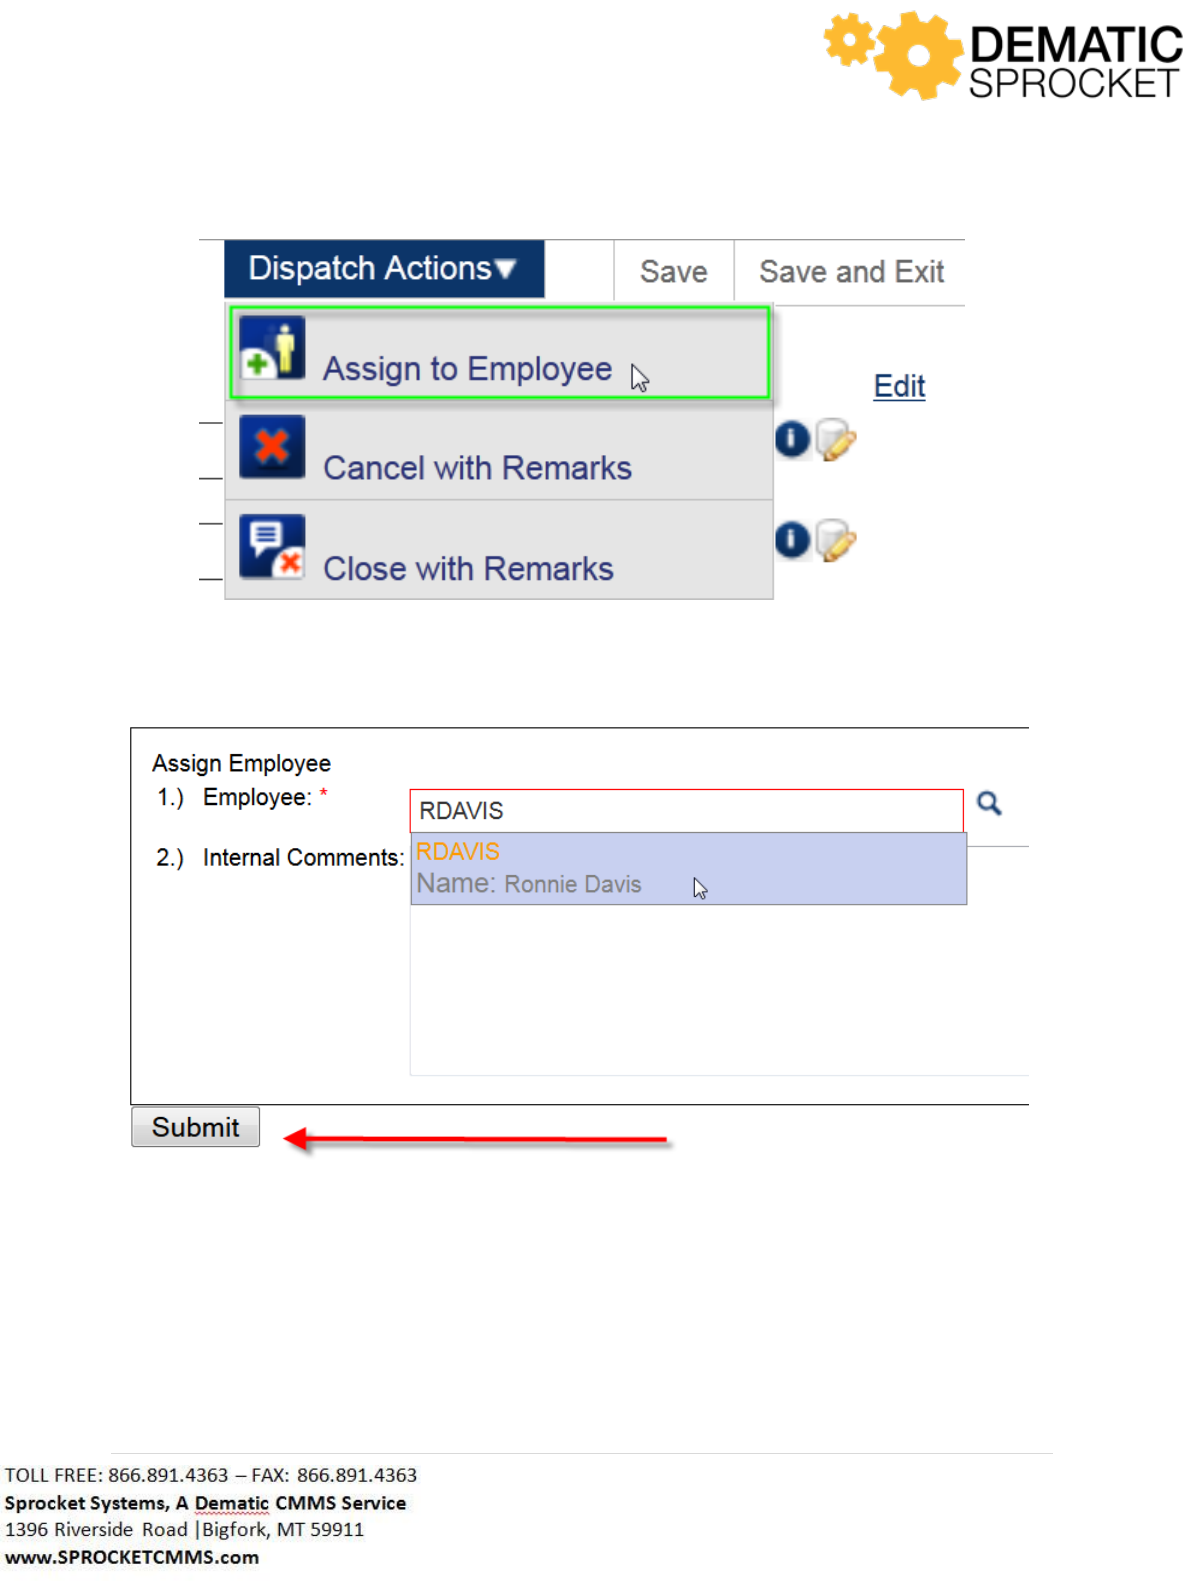
So, for example, if you wanted to assign an employee to this work order, you would select the Assign
Employee dispatch action.
86 | P a g e
From here, fill out the appropriate fields and submit the dispatch action.
5.4 Work Order Details Tabs
Now that you are familiar with the Work Order Details, notice that tabs across the top of the page.
Notice that the Details tab is highlighted. This indicates that the Work Order Details screen is being
displayed.
87 | P a g e
Note: Sprocket is customized based on customer needs. Your screen may or may not display the above
tabs. Contact your Sprocket Administrator with questions.
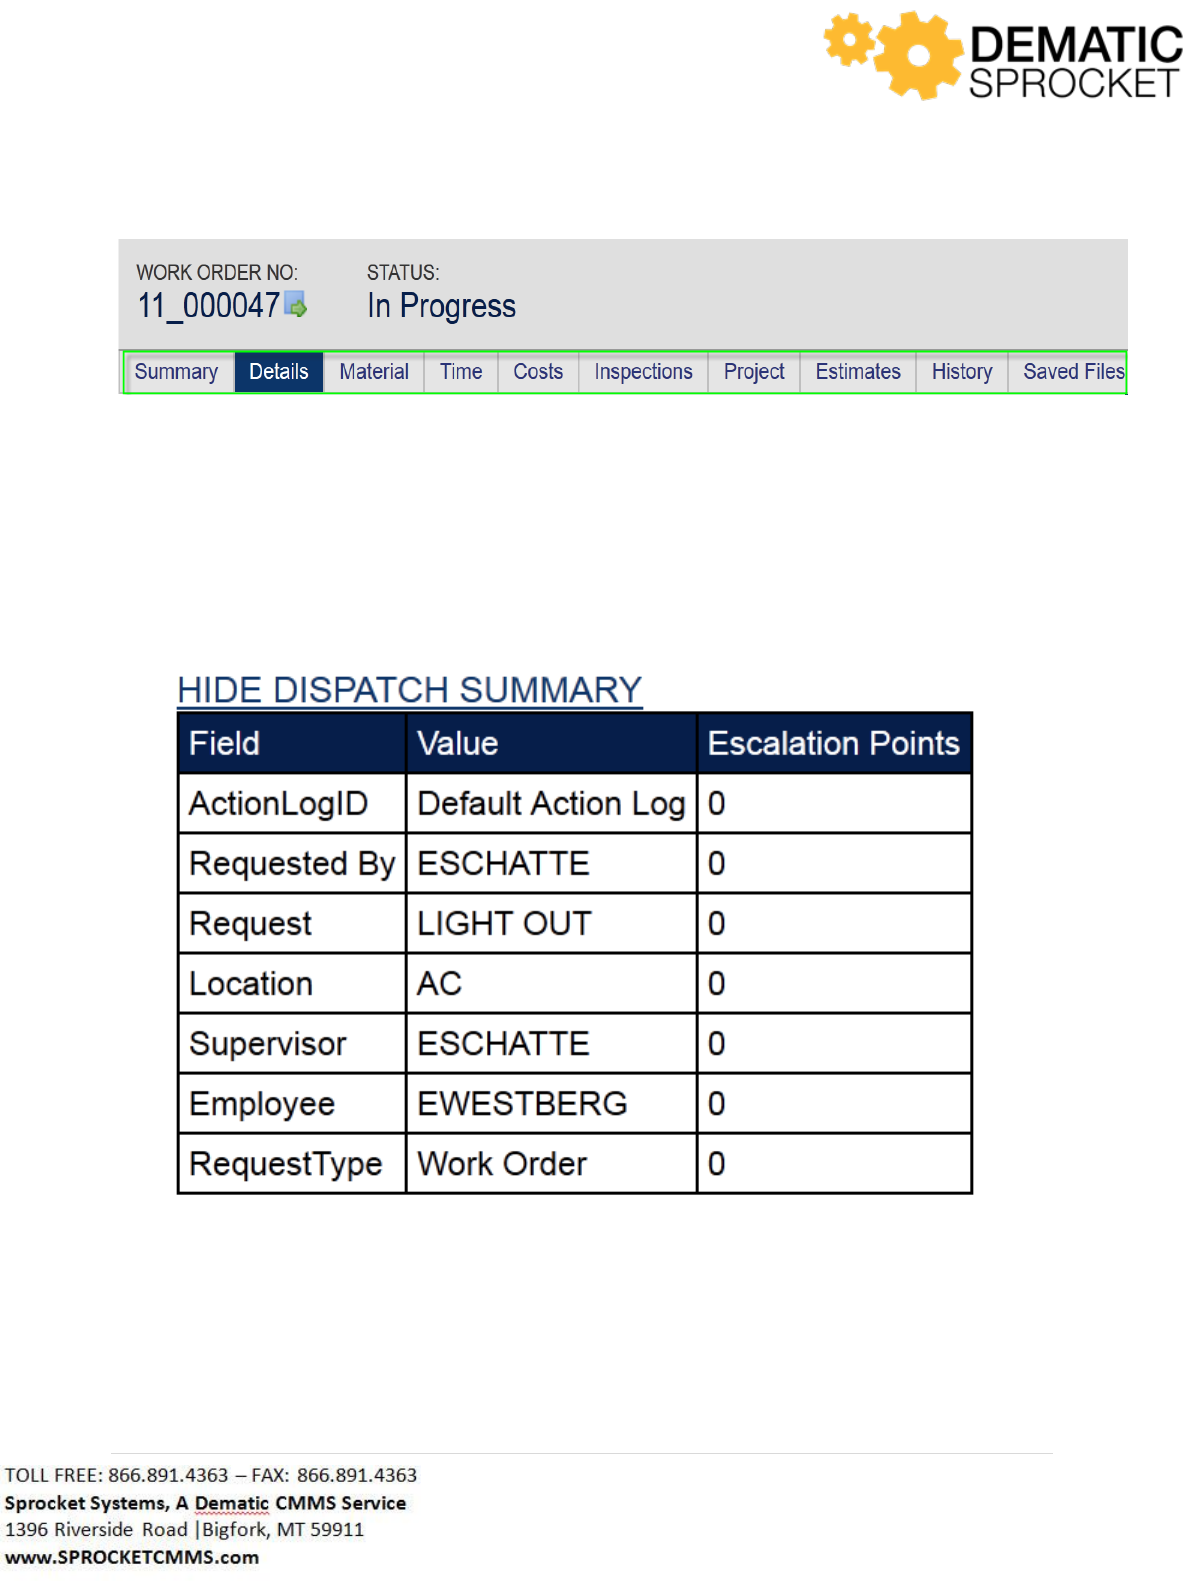
5.4.1 Summary Tab
Starting from left to right, click each tab and familiarize yourself with what each one does. First, select
the Summary tab.
This tab displays a chart with basic information about this work order such as Request, Employee, and
Supervisor.
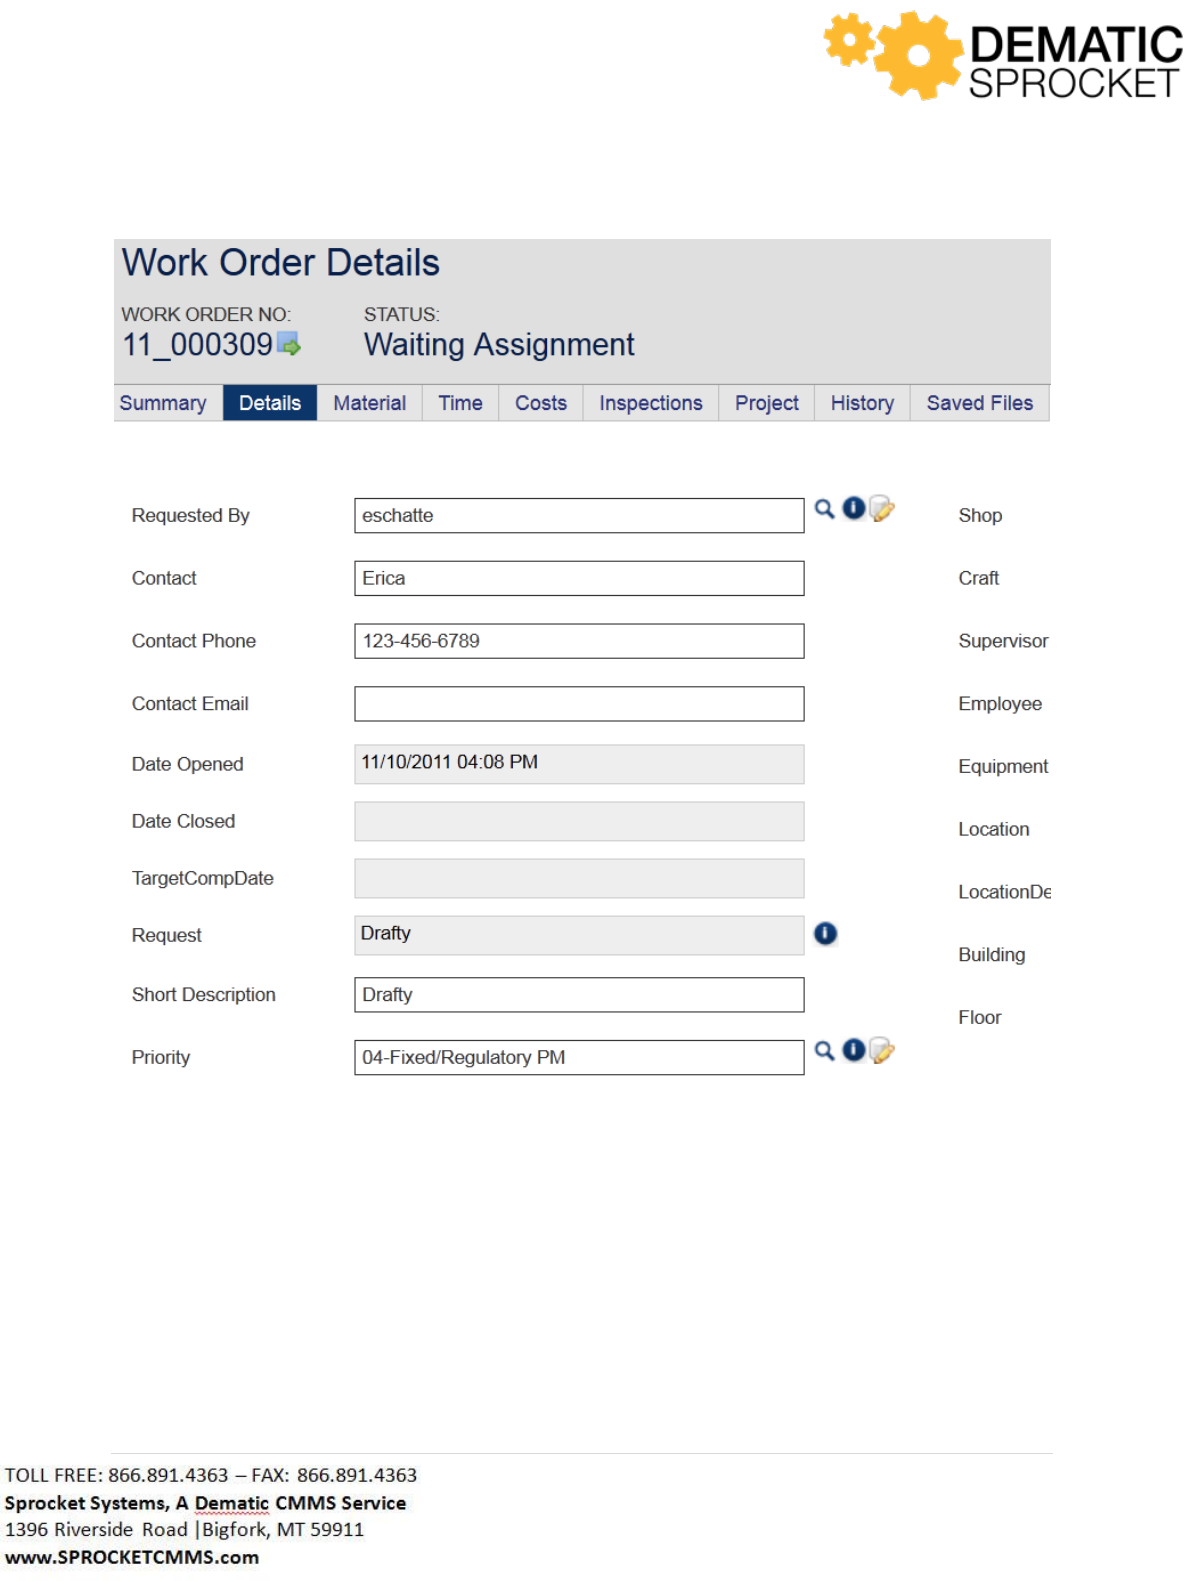
5.4.2 Details Tab
By now you should be familiar with the Details tab. This screen displays the full information for this
work order and allows you to add or update additional information, add comments or notes, and
process with Dispatch Actions.
88 | P a g e
Note: Sprocket is customized based on customer needs. Your screen may or may not display the above
fields. Contact your Sprocket Administrator with questions.
5.4.3 Materials Tab
The Materials tab allows you to document the inventory items used for this particular work order. You
can either issue materials to the work order or return them from the work order back to inventory.
89 | P a g e
Once you select the Materials tab, a form will appear for you to begin assigning specified materials to
this work order. Just like any other form in Sprocket, a field that is outlined in red is required.
The first section of the form is labeled Material Assignment. Start here to document information such as
who is checking out the materials and the date they are issued on. Enter your information here.
Remember to use the Auto Lookup Tool to search for values or begin typing and it will auto complete
your entry.
Once you have filled out all of the information in the first section, you may move on to the Issue/Return
Materials section to specify which items you will be using.
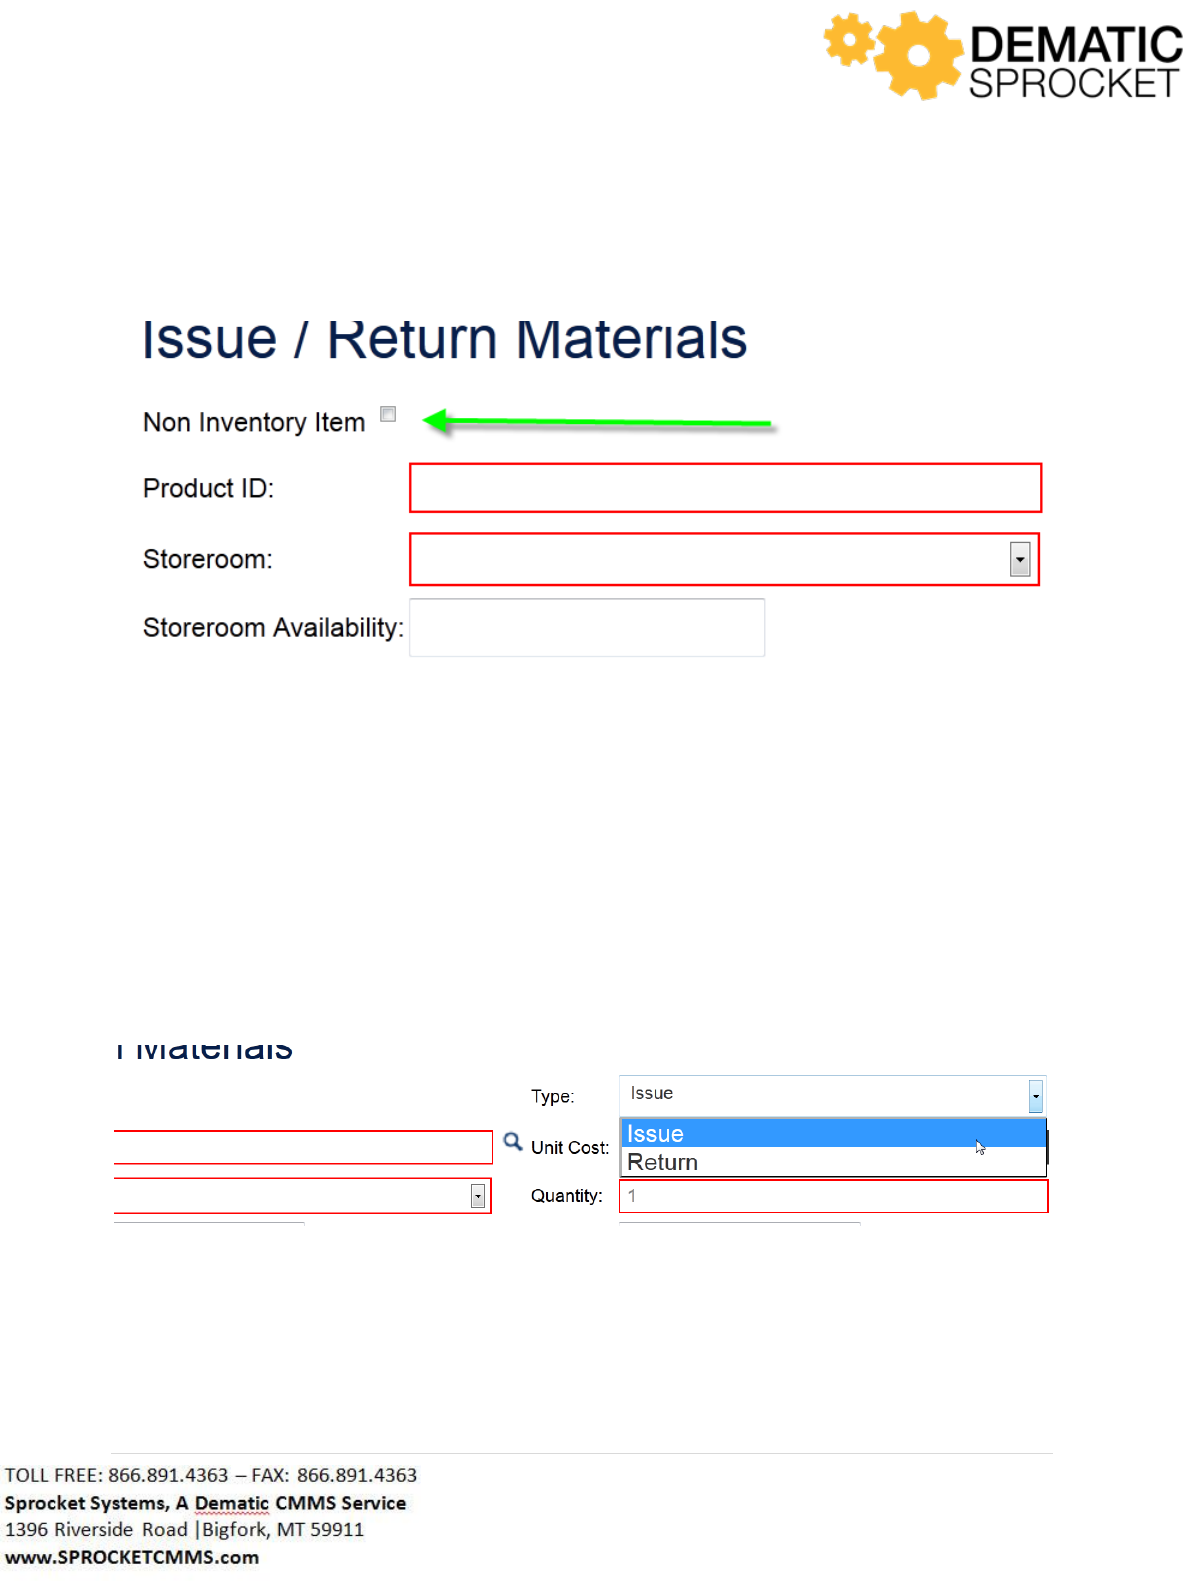
To begin, we must first determine if this is an inventory or non-inventory item. If you must go to a store
to purchase the appropriate materials, check the Non Inventory Item box. The fields in the form will
change so that you may enter in the appropriate information.
90 | P a g e
If you are checking out items from your own inventory, leave the Non Inventory Item box unchecked.
Let’s say we are going to check out an inventory item so leave the box unchecked.
Next, we must determine if this is going to be an issue or return. This means that if we are going to
issue materials to use for this work order, we must select Issue from the drop down. If we want to
return unused items back to inventory, select Return from the drop down menu.
Let’s say we wish to issue an item from inventory, so in the drop down menu at the right of the form,
select Issue.
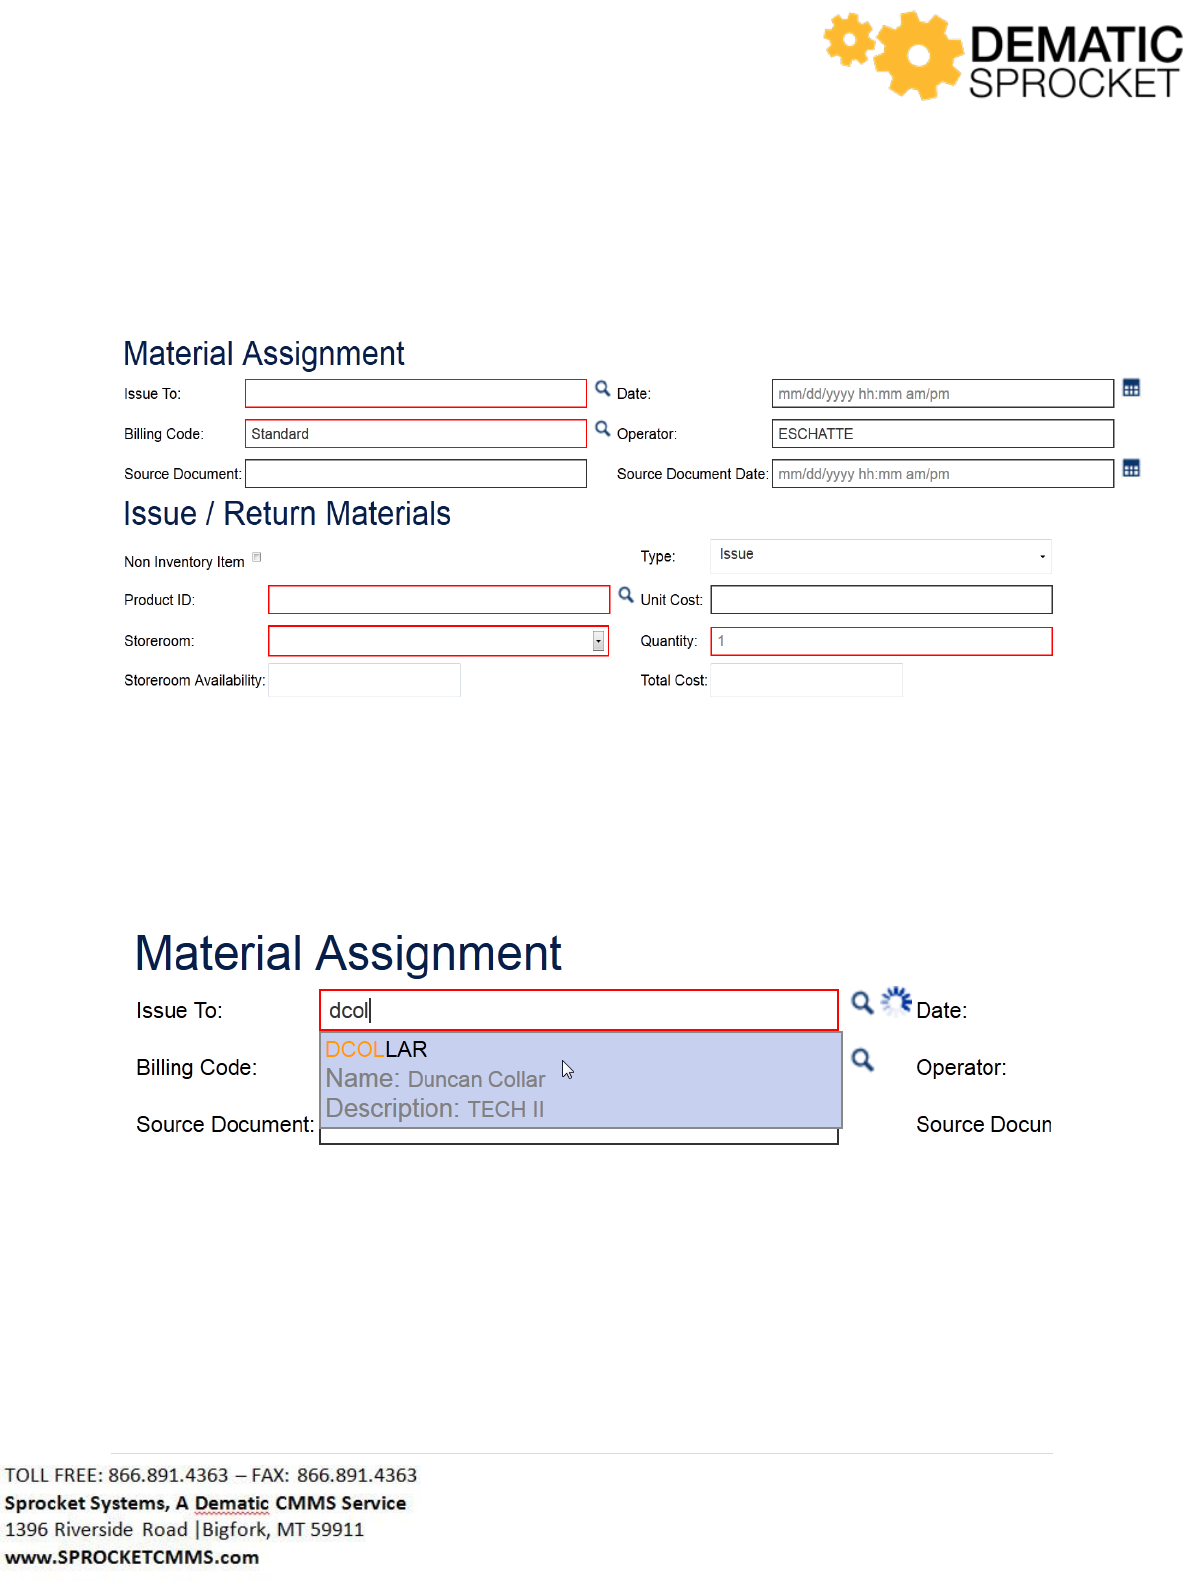
Now that we have determined the type of transaction this will be, we can now locate the correct item to
add to this work order. In the Product ID field, begin typing in all or part of the item you are searching
for. Remember, the Auto Lookup Tool has an auto complete function that will help locate the
appropriate record.
91 | P a g e
Once the correct record is returned, select it to continue filling out the form.
Notice that once a selection is made, the Unit Cost and Total Cost fields will automatically populate the
correct information for this inventory item. The Quantity field will default to 1, so if you need more than
one of what you are issuing, be sure to change this to the correct number.
From here, select a storeroom from which you wish to check this item out from the drop down list.
92 | P a g e
Notice that selecting a storeroom from the drop down list will automatically populate the amount of this
item available in the Storeroom Availability field.
93 | P a g e
Before submitting this item to this work order, be sure to check the Billable checkbox below the
Storeroom availability field if this item will be billable.
Below this section there is a comments field where you can leave any remarks about issuing this item.
Click inside the Comments box to enter any remarks, the click the Save Material button at the bottom
left of the screen to issue this material to this work order.
Notice in the Material Charges section at the bottom of the page, the grid has been updated to include
this transaction. This section will show all materials transactions throughout the life of this work order.
94 | P a g e
You can use the search fields above the grid in the Material Charges section to search for and locate
specific materials transactions. Simply use the desired field(s) to search for transaction. For example,
let’s say we want to search for all materials transactions to this work order made on or after November
21, 2011. Enter that date into the Trans Date On or After field and click the Search button at the
bottom left of the section.
Now this will show all the materials transactions made on or after our specified date in the grid below
the search criteria.
If you ever wish to delete a material posting, click the Delete link of the transaction you wish to remove.
95 | P a g e
A window will appear saying “ Are you sure you wish to delete this Material Charge?” Click OK to
continue or Cancel to return to the previous screen.
The grid will refresh and your deleted material transaction will no longer be displayed in the material
charges.
5.4.3.1 Reserved Materials
Before moving on, notice that when you hover your mouse over the Materials tab at the top of the
page, a sub-menu labeled Reserved Materials appears. Click here to checkout required or
recommended materials for this work order.
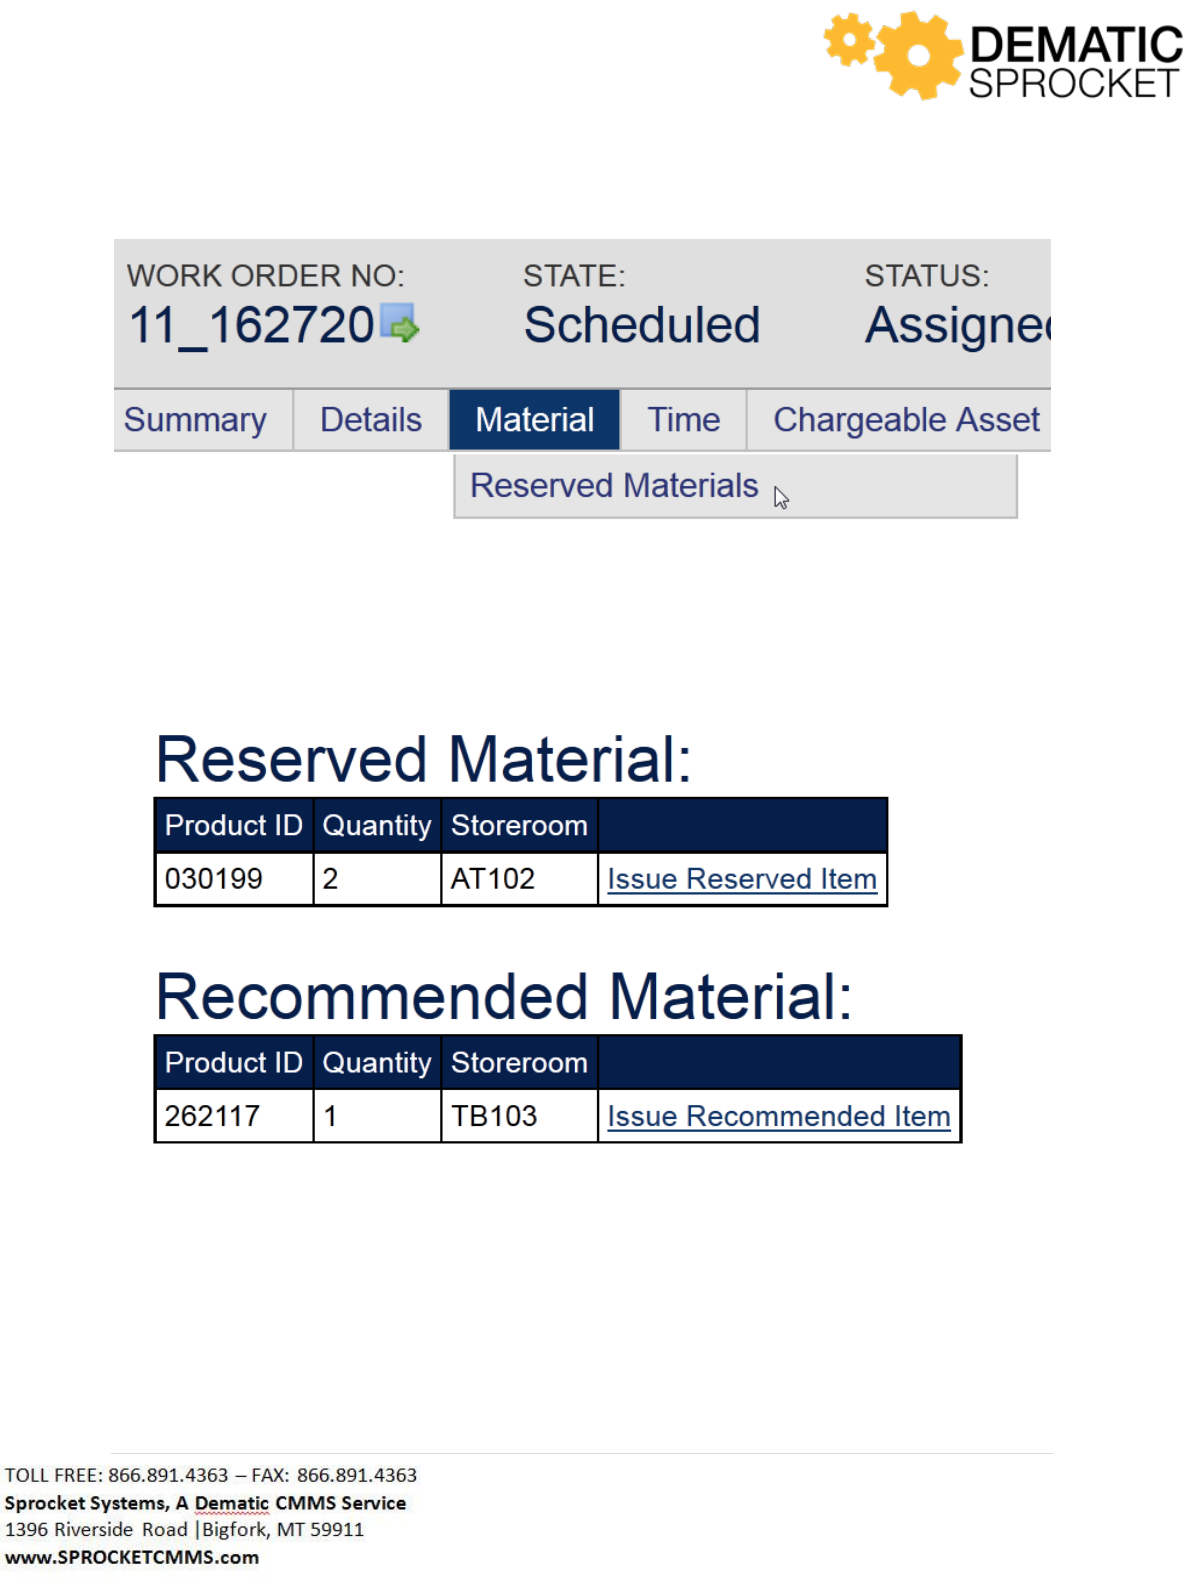
96 | P a g e
This will show any recommended or required items for this work.
To issue any of the recommended or required items, click the link at the right of the grid.
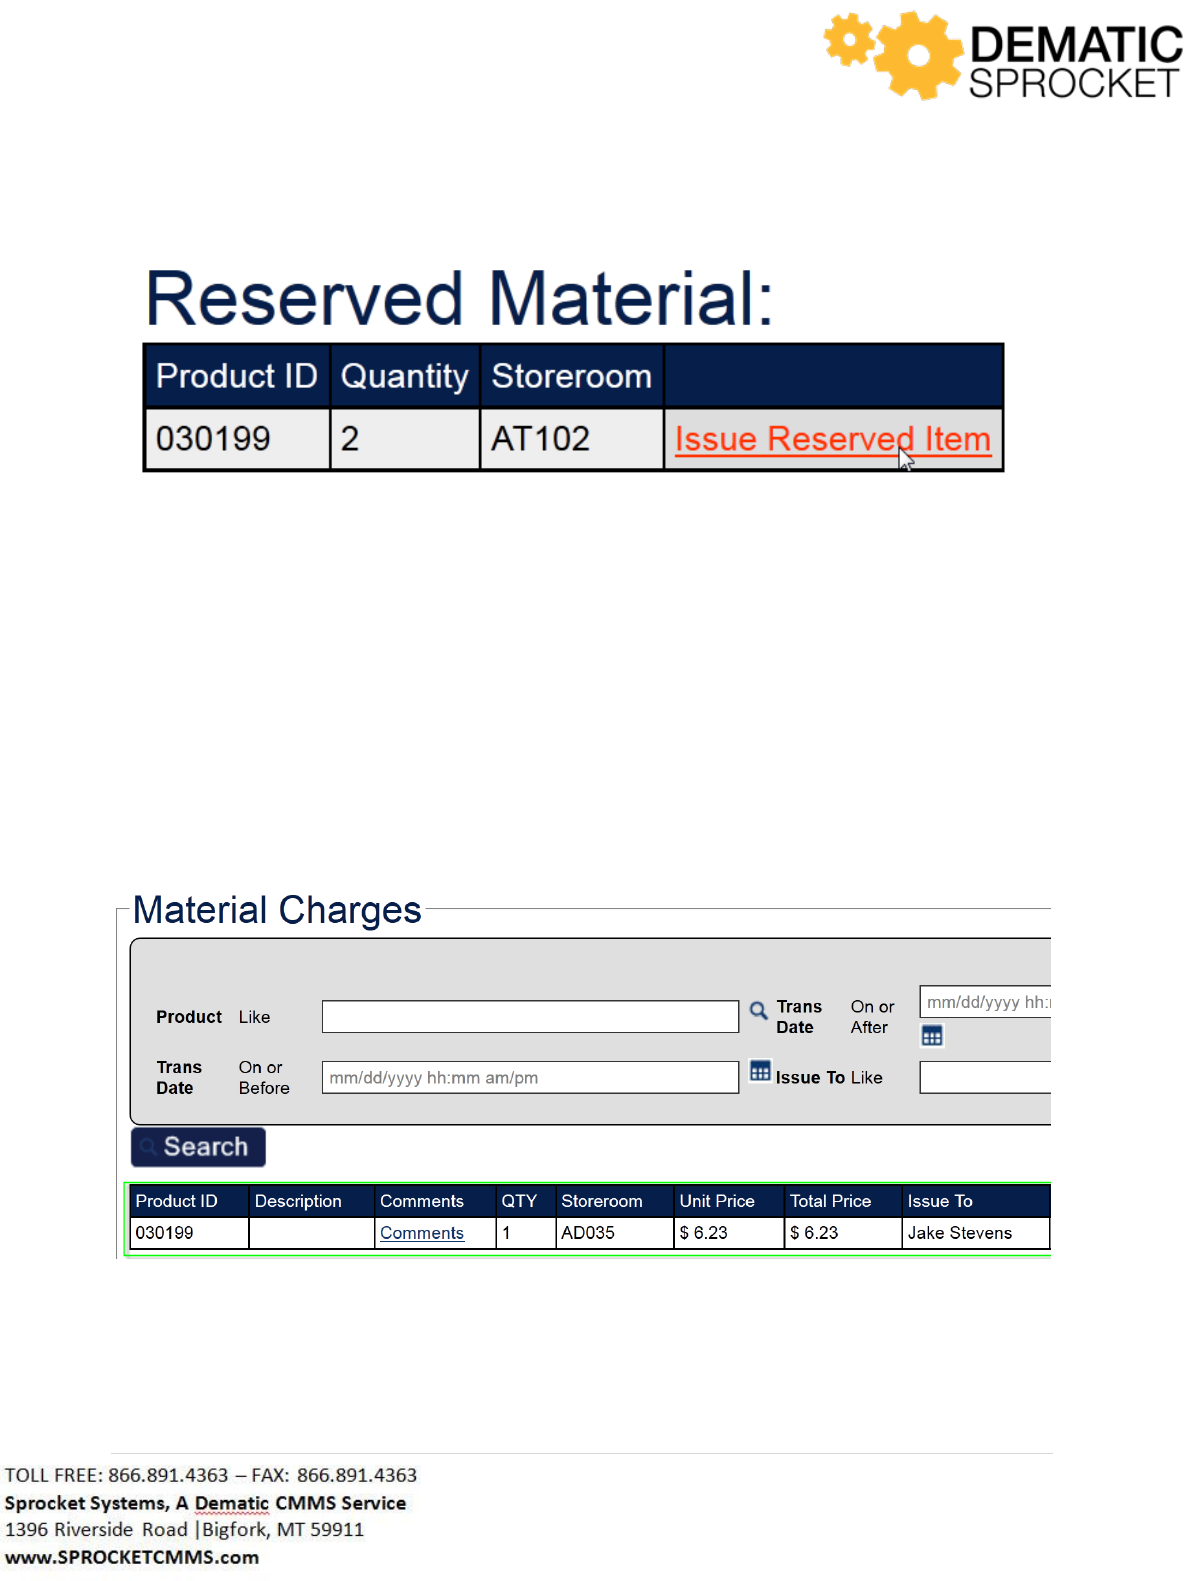
97 | P a g e
This will automatically populate the grid in the Material Charges section at the bottom of the page. This
makes it simple to check out items based on the work requested.
At the bottom of the page, you have the same search criteria in the Material Charges section as the
Materials tab. Here you can search for materials transactions specific to this work order.
Notice in the Material Charges section at the bottom of the page, the grid has been updated to include
this transaction. This section will show all materials transactions throughout the life of this work order.
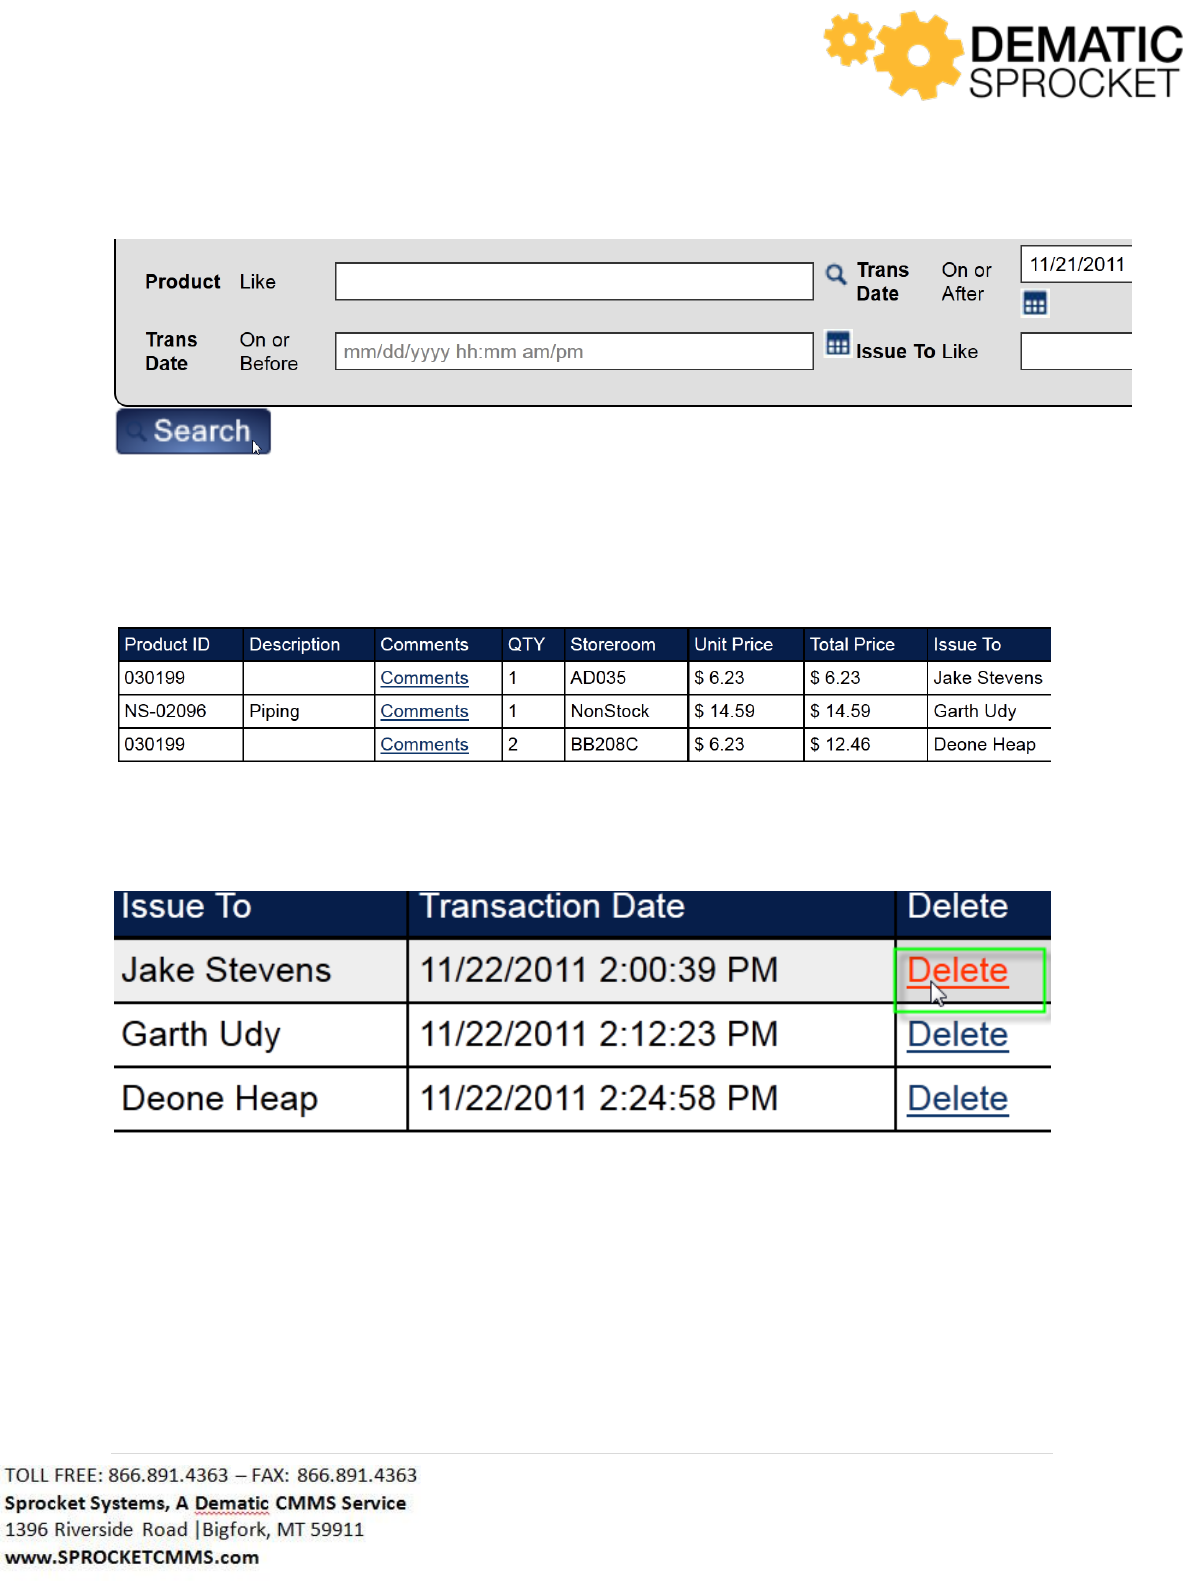
You can use the search fields above the grid in the Material Charges section to search for and locate
specific materials transactions. Simply use the desired field(s) to search for transaction. For example,
let’s say we want to search for all materials transactions to this work order made on or after November
21, 2011. Enter that date into the Trans Date On or After field and click the Search button at the
bottom left of the section.
98 | P a g e
Now this will show all the materials transactions made on or after our specified date in the grid below
the search criteria.
If you ever wish to delete a material posting, click the Delete link of the transaction you wish to remove.
A window will appear saying “ Are you sure you wish to delete this Material Charge?” Click OK to
continue or Cancel to return to the previous screen.
99 | P a g e
The grid will refresh and your deleted material transaction will no longer be displayed in the material
charges.
5.4.4 Time Tab
Much like the Materials tab, the Time tab is meant to be able to document time transactions throughout
the life of a work order.
Clicking the Time tab will display a form for employees to fill out to post time to a work order.
100 | P a g e
Notice that the value in the Employee field will automatically populate with the employee who is
assigned to this work order. If you wish to post time for a different employee, simply clear the name out
of the field and use the Auto Lookup Tool to locate and select the desired employee name.
Remember that fields outlined in red are required fields.
Once you have selected the desired employee, enter in the hours and minutes you wish to post in the
Time field below.
Fill in the other fields as necessary with the appropriate information. Once you have entered in all of
your information, you may leave comments about this time posting in the Remarks box below.
Click Save Time at the bottom of the form when you wish to submit your time posting.
101 | P a g e
Notice in the Time Charges section at the bottom of the page, the grid has been updated to include this
transaction. This section will show all time transactions throughout the life of this work order.
You can use the search fields above the grid in the Time Charges section to search for and locate specific
time transactions. Simply use the desired field(s) to search for a transaction. For example, let’s say we
want to search for all time transactions to this work order made on or after November 21, 2011. Enter
that date into the Trans Date On or After field and click the Search button at the bottom left of the
section.
102 | P a g e
Now this will show all the time transactions made on or after our specified date in the grid below the
search criteria.
If you ever wish to delete a time posting, simply scroll to the far right of the grid and click the Delete link
for the time transaction you wish to delete.
A window will appear saying “ Are you sure you wish to delete this Time posting?” Click OK to continue
or Cancel to return to the previous screen.
103 | P a g e
The grid will refresh and your deleted time transaction will no longer be displayed in the time charges.
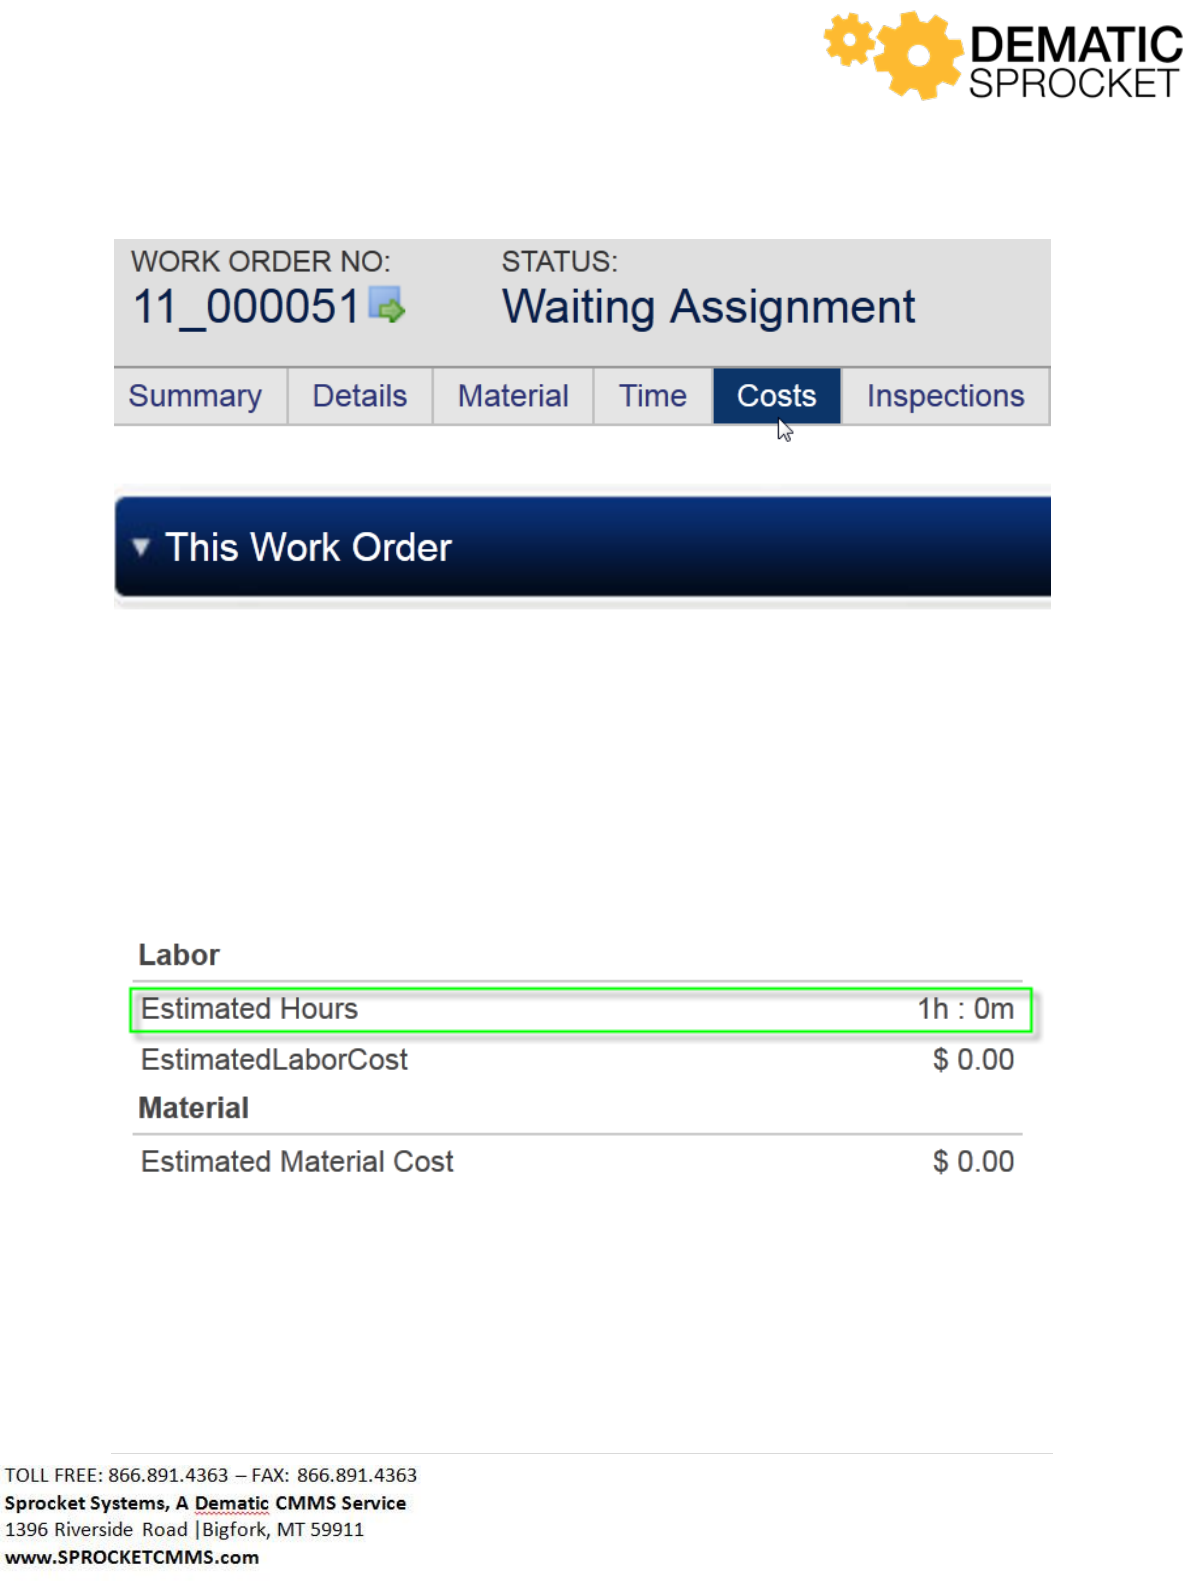
5.4.5 Costs Tab
The Costs tab is used by managers to estimate labor and materials charges and compare them to actual
costs.
104 | P a g e
Note: Sprocket is customized based on customer needs. Your screen may or may not display the above
information. This will be primarily used by managers. Contact your Sprocket Administrator with
questions.
This tab is separated into two sections: This Work Order and Additional Totals. Notice that you are first
directed to the This Work Order section of the tab. The left hand column displays estimated time and
materials for the type of work in this work order.
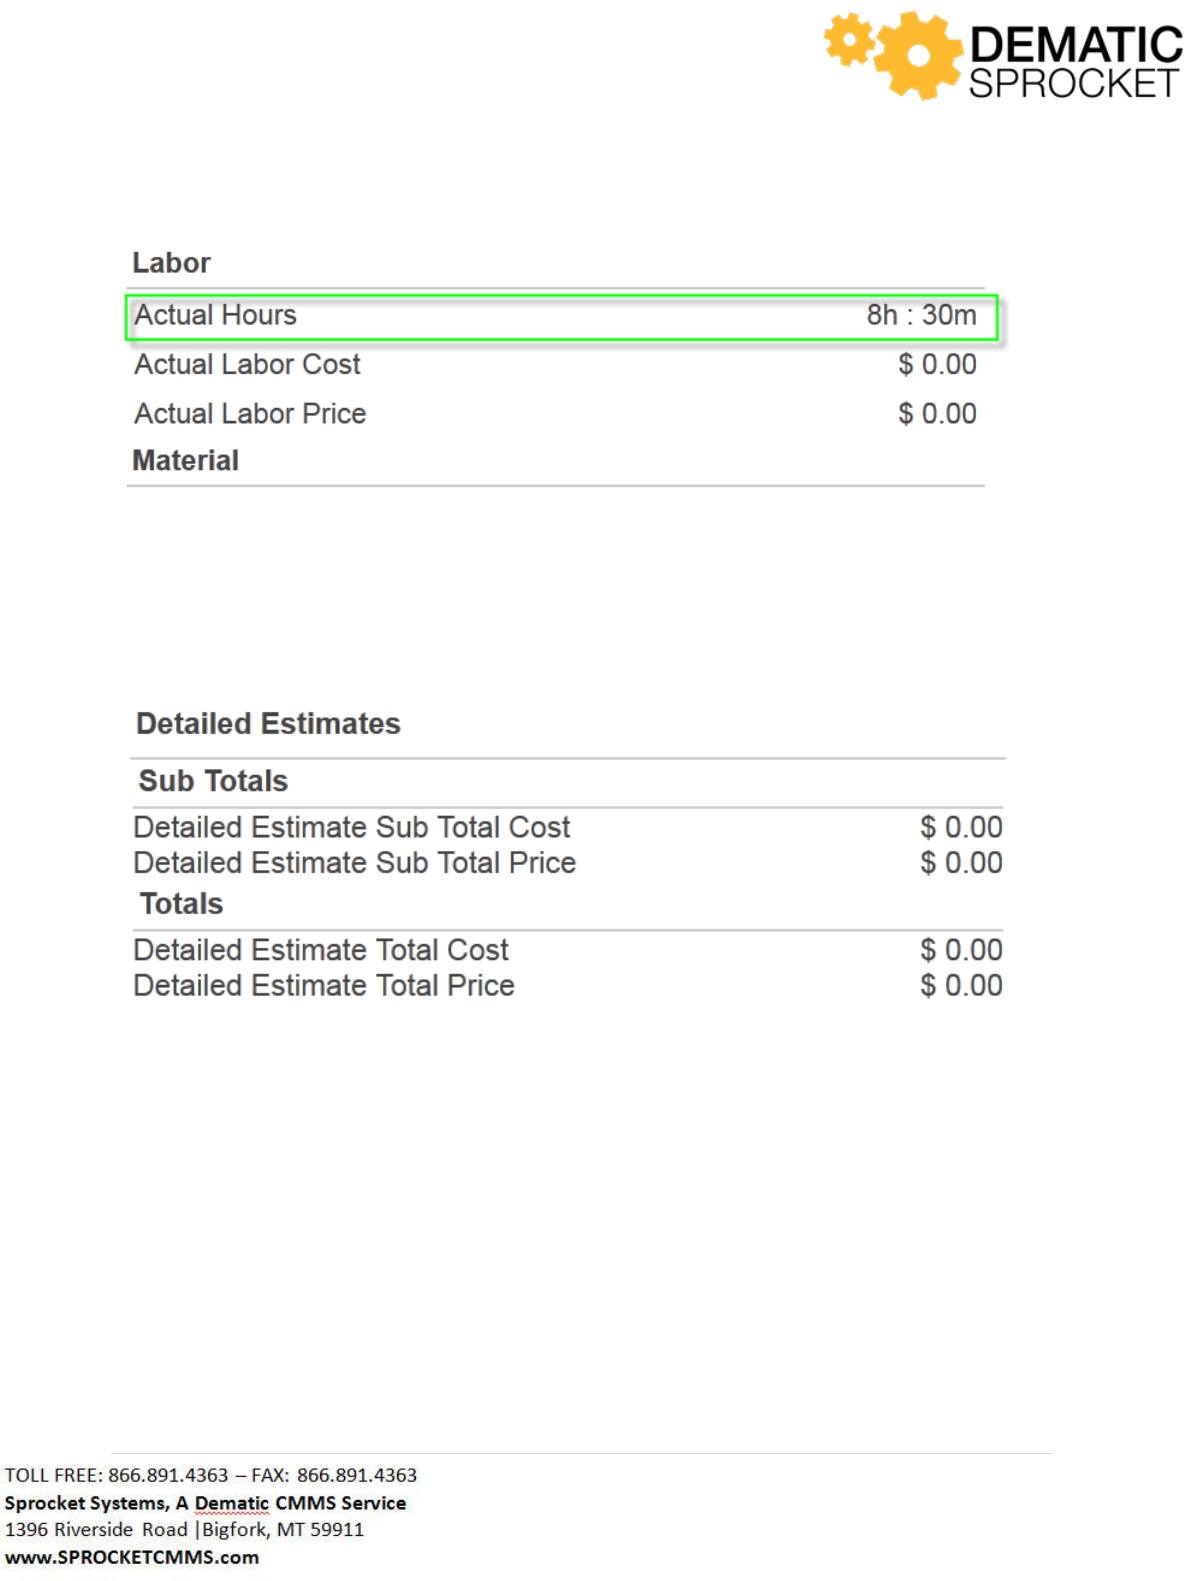
The right hand column will display actual labor and material costs of this work order. So, as technicians
enter time postings and issue materials, it will all be calculated and tracked in the Costs tab and
dynamically change according to changes in time and materials for this work order.
105 | P a g e
You can click the Additional Totals tab below the This Work Order tab to view additional costs and
details such as sub totals and estimate costs for this work order. The left hand column will include costs
for estimates for this work order.
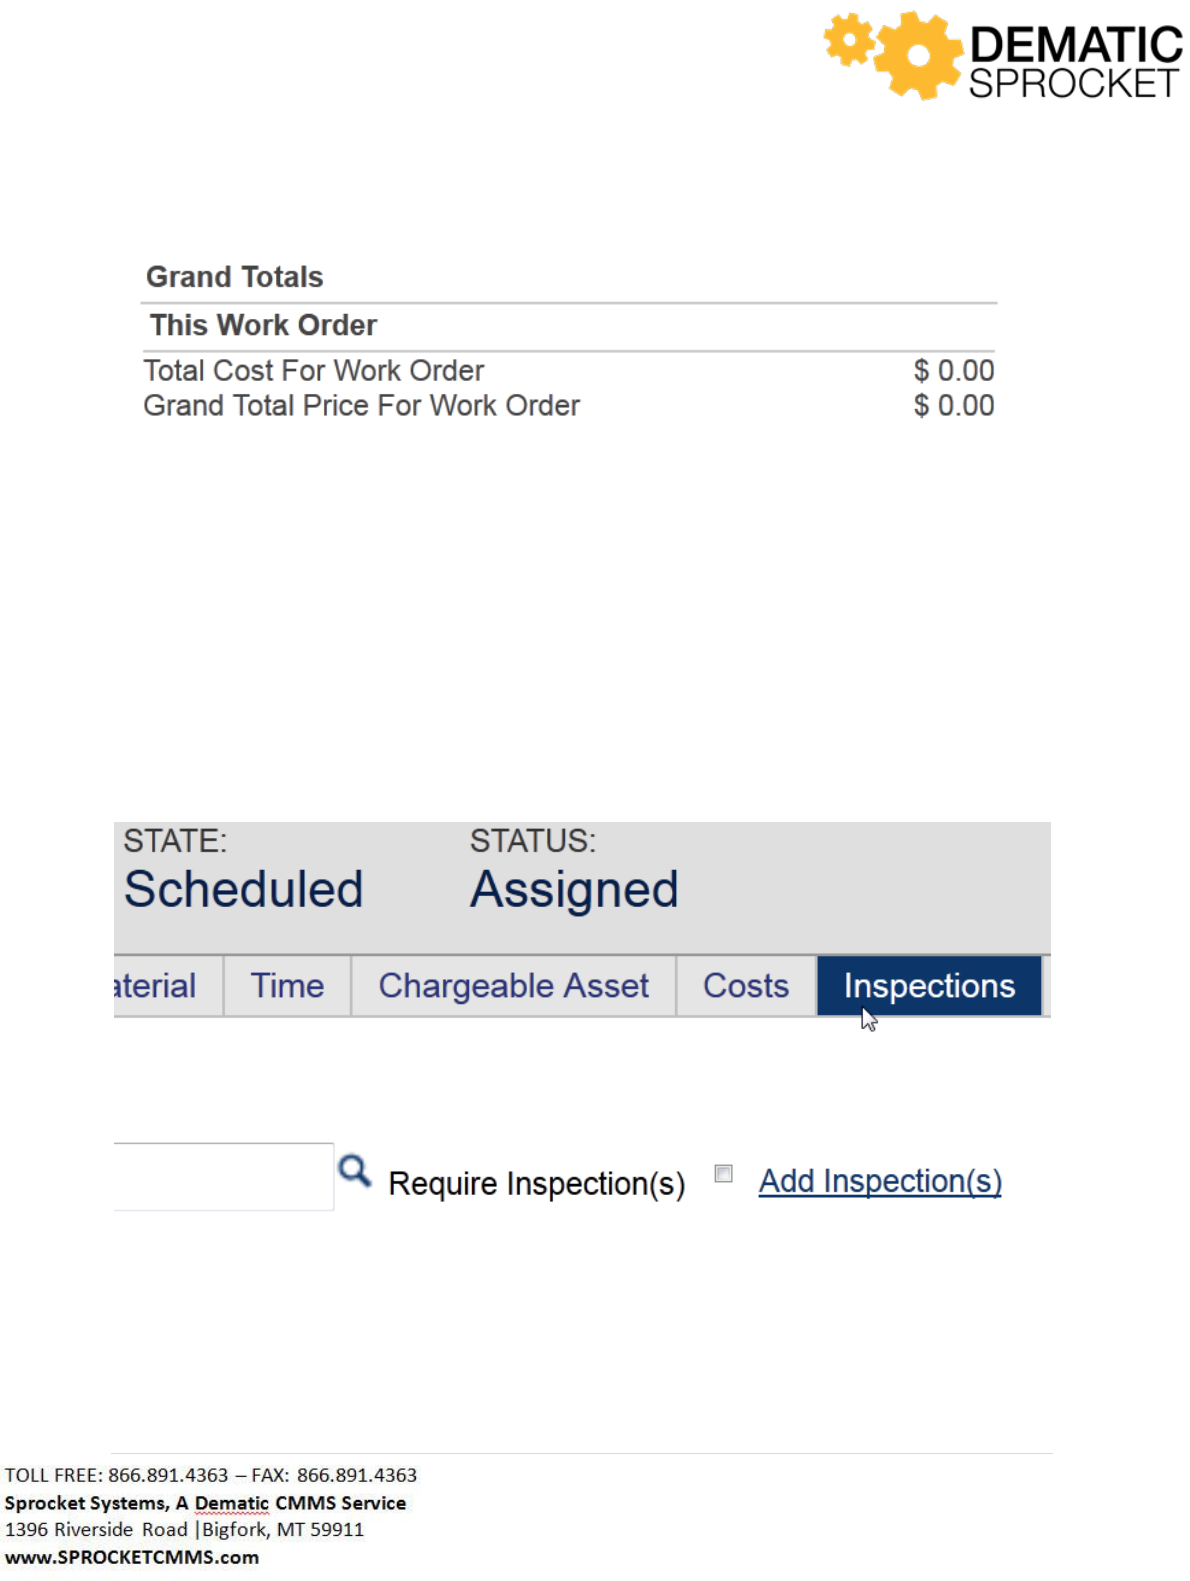
The right hand column in this section will display grand totals that incorporate all costs for labor,
materials, and estimates for this work order.
106 | P a g e
Note: Sprocket is customized based on customer needs. Your screen may or may not display the above
user information. Contact your Sprocket Administrator with questions.
5.4.6 Inspections Tab
The Inspections tab is used to display or add inspections for this particular work order.
5.4.6.1 Conducting an Inspection from Work Order Details
Notice that when you click the tab, any inspections that are attached to this work order will appear in a
grid at the bottom of the screen.
107 | P a g e
Notice that the box is checked in the Required column of the grid indicating that it is required that this
inspection be completed before the work order can be closed complete.
There are two ways you can run this inspection:
o You may click the Print link at the far right of the grid to use a hard copy
o You may click the Inspection Name to directed to the inspection to run it
Clicking the Inspection Name will automatically load the inspection form for you to complete.

108 | P a g e
Note: Sprocket is customized based on customer needs. Your inspection may or may not display the
above fields and/or answer options. Contact your Sprocket Administrator with questions.
You may begin filling in the appropriate information into the inspection form. To enter information,
click inside the text field to begin typing or select an option from a drop down menu. Please note that
any field with a red asterisk next to it is a required field so you must provide an answer.
So, in the Inspector field, enter in your name because you are the person performing this inspection.
Notice that the Location and Work Order Identifier fields are filled in with lettering. This string of data
indicates that the person who created this inspection has added some actions that automatically fill in
this information, so you can skip these questions as they will be automatically answered for you.

109 | P a g e
Next, notice that the four questions on this inspection have drop down menus for answer options. As
each item is inspected tap or select the Select an Option drop down menu to answer each question:
Yes
No
NA
Note: Sprocket is customized based on customer needs. Your inspection may or may not display the
above answer options. Contact your Sprocket Administrator with questions.
To answer a question, tap or select the Select an Option drop down menu next to each question. Locate
and select the appropriate answer and continue to the next question.
Continue through the inspection until you have answered all of the questions with the appropriate
answers.
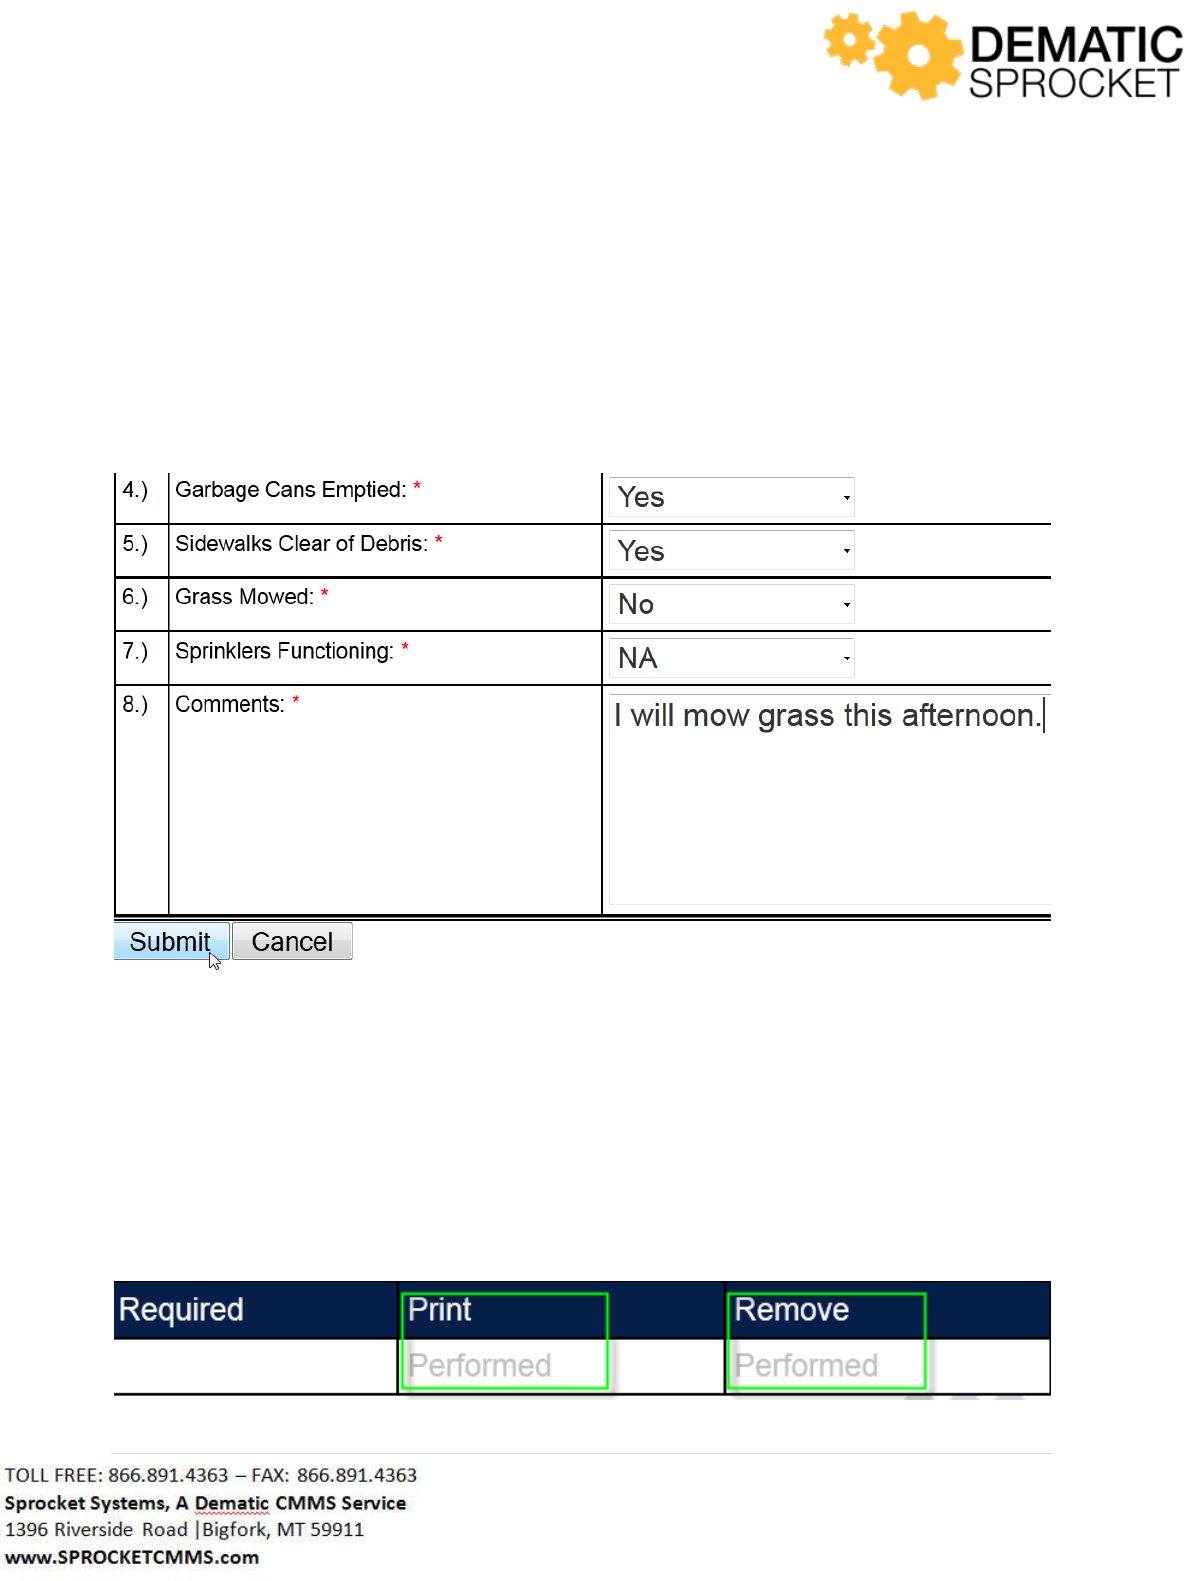
110 | P a g e
At the bottom of the inspection, notice that there is a text field labeled Comments. Here you can leave
any remarks about this inspection. Notice the red asterisk next to the field name indicating that this
field is also required.
Once you have answered all of the inspection questions and left comments, click the Submit button
submit your inspection results or click the Cancel button to return to the previous screen without
completing the inspection.
When you click the Submit button, you will be redirected to the Inspections tab in the Work Order
Details. Notice that the inspection grid has been updated and the links at the far right of the grid now
say Performed indicating that the inspection for this work order has been completed.
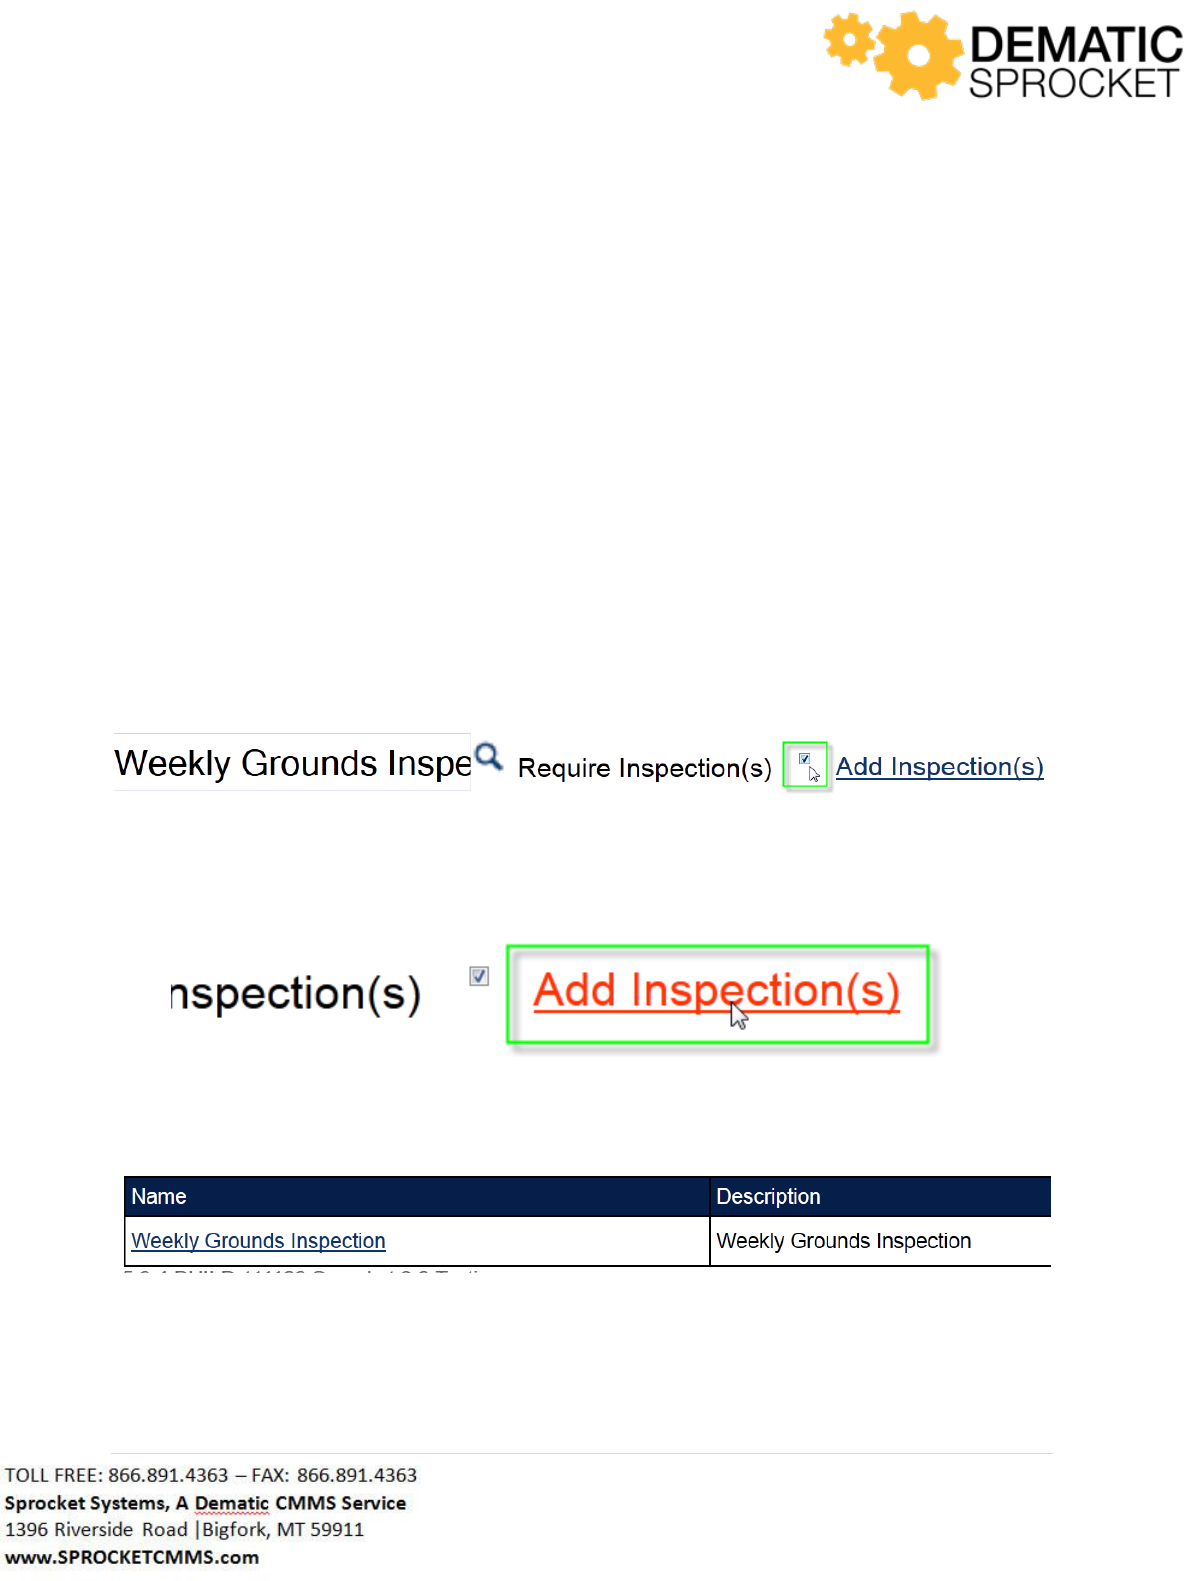
111 | P a g e
Now that the inspection has been completed, you are able to close out this work order with all the
required work being completed and the inspection results being updated in Sprocket.
5.4.6.2 Adding an Inspection to a Work Order
You can also use the Inspections tab in the Work Order Details to add an inspection to a work order and
make it required to complete the work. To do this, use the Auto Lookup Tool to locate and select the
desired inspection from the Add Inspection field.
Once the desired record is returned, select it to add it to the work order.
Next, determine if you would like this inspection to be required. If so, check the Required checkbox. If
you do not wish this inspection to be required, leave the Required checkbox unchecked. Let’s say we
would like to make this inspection required, so check the checkbox.
Once this is done, simply click the Add Inspection(s) link at the right of the screen.
Now notice that a grid appears at the bottom of the page displaying the inspection you just added to the
work order.
Now you can either add another inspection or exit the page.
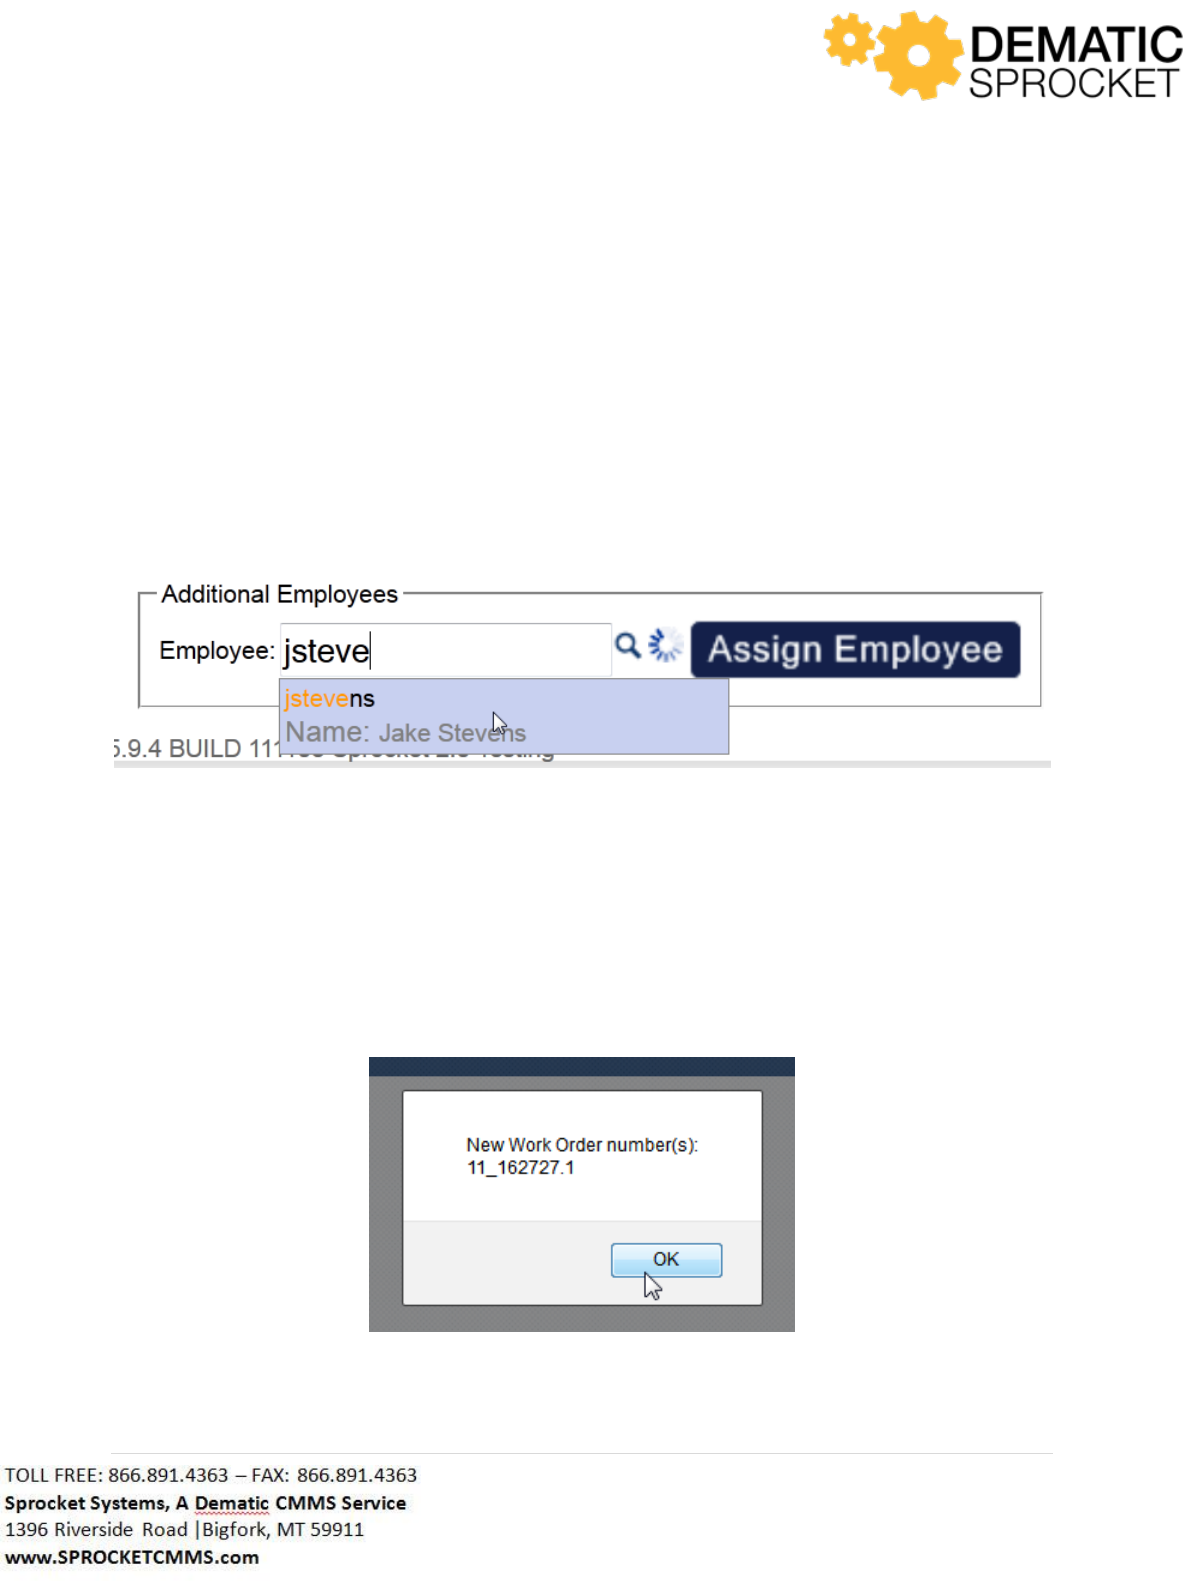
112 | P a g e
5.4.7 Project Tab
The next tab in the Work Order Details is the Project tab. The Project tab is used when a work order is
assigned to an employee and the employee needs additional employees to help complete the task. You
will use the Project tab to assign these employees to their own Child Work Order for them refer to for
this work.
To assign an additional employee, use the Auto Lookup Tool on the Employee field to help locate and
select the appropriate employee(s) to assign to this work order. Either click the Auto Lookup Tool icon
to view a list of all possible employees or begin typing all or part of the name of the employee you with
to assign in the Employee field.
Once the correct name is returned, select it and click the Assign Employee button to the right. A
window will pop up giving you a new work order number. This will be the Child Work Order Identifier.
Any work order that has a decimal in the Identifier is always a Child Work Order.
Click OK to continue.
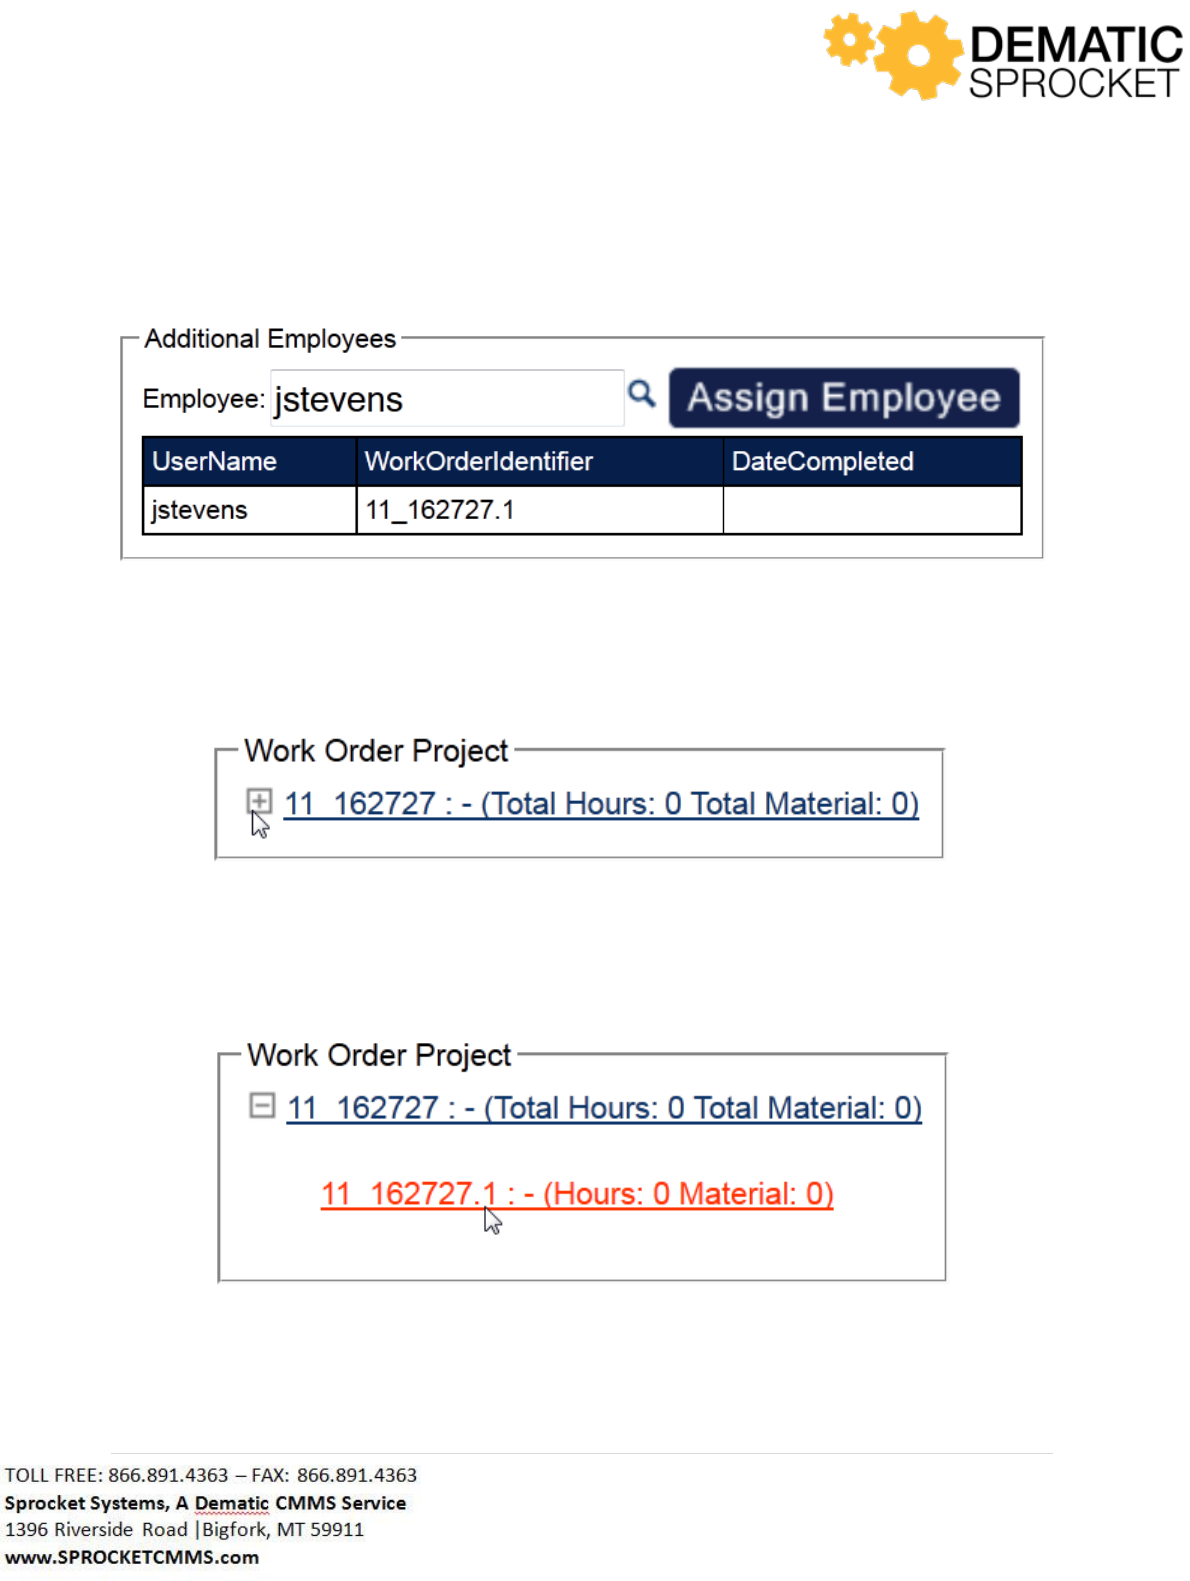
113 | P a g e
You will be returned to the Project tab screen. Notice that a grid is displayed with the name of the
employee you just added to the work order and the Child Work Order Identifier.
To the left of the grid, a Project Tree is displayed. You can expand each “branch” of the tree to view the
Work Order Details for each assigned employee by clicking the plus sign to the left of each branch.
Each branch will display the Work Order Identifier and the total time and materials posted to this work
order to date. You can click the branch to view the full details of that particular work order.
A window will appear asking if you wish to view the details for this work order. Click OK to continue or
click Cancel to stay on this page.
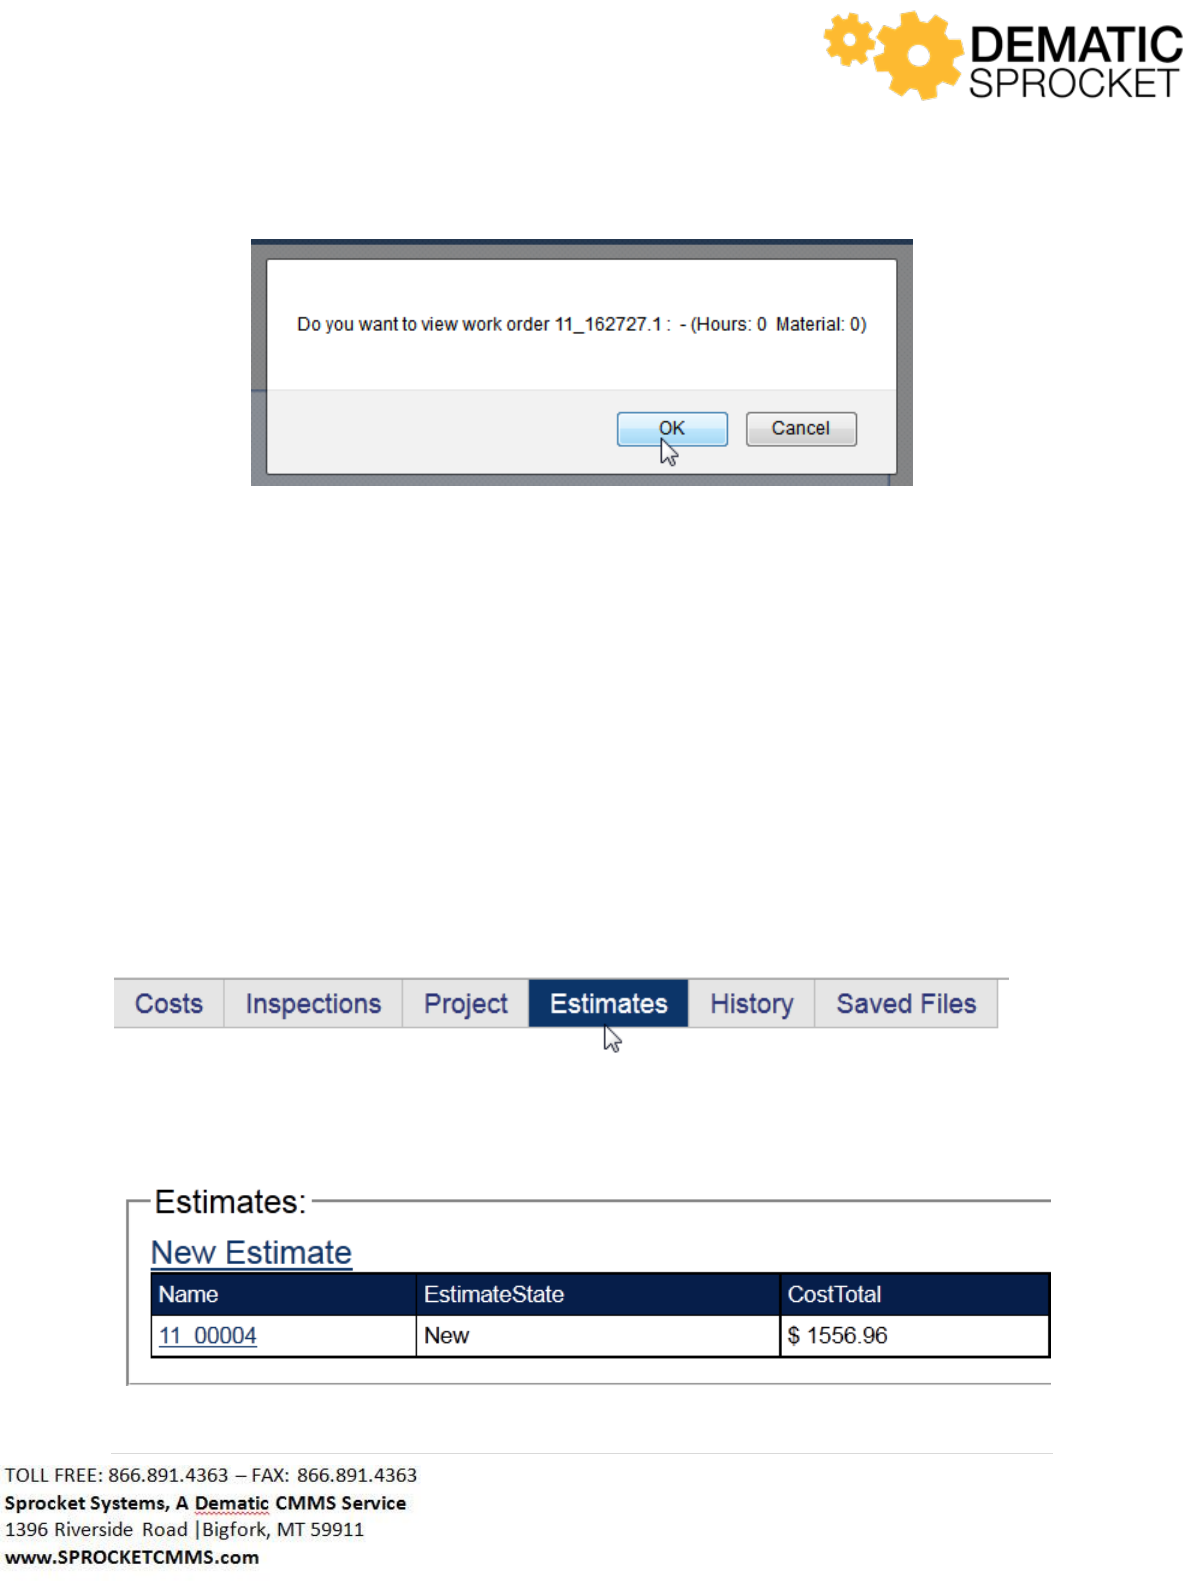
114 | P a g e
From here you may continue to assign employees to this work order or exit the page.
5.4.8 Estimates Tab
Use the Estimates tab to request approval of your estimate for this work order and view previous
estimate submissions for this work order.
Notice that when you navigate to this screen, any previous estimate submissions are displayed in a grid
on the screen.
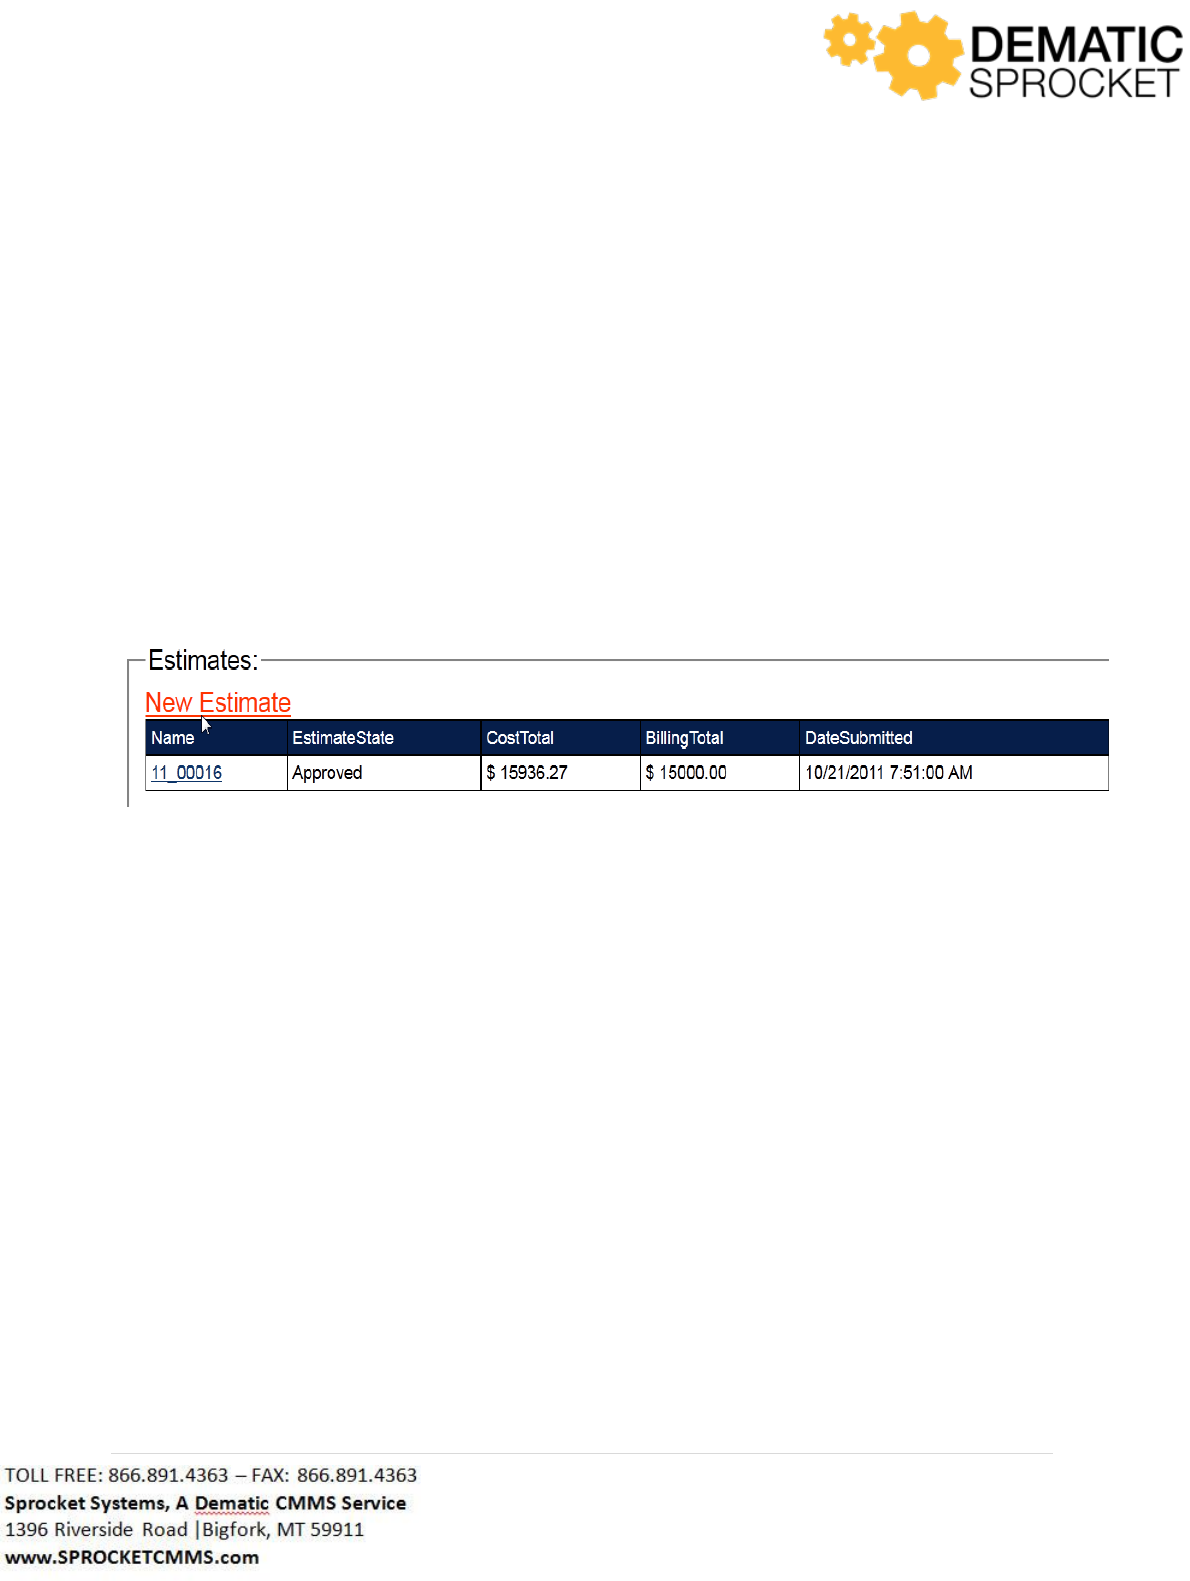
115 | P a g e
5.4.8.1 Creating New Estimate
Now that you have located the New Estimate screen and have identified the correct work order that
this estimate is for, you may begin entering the appropriate information to submit your estimate
request. Notice that fields that are outlined in red indicate that these are required fields. Notice that
fields filled out in gray are Read Only fields that need not be filled out right now.
If you wish to create a new estimate for this work order, click the New Estimate link at the top of the
grid.
You will be directed to the Main tab of the New Estimate form to fill out and submit for approval.
Remember that fields that are outlined in red indicate that these are required fields. Fields filled out in
gray are Read Only fields that need not be filled out right now.
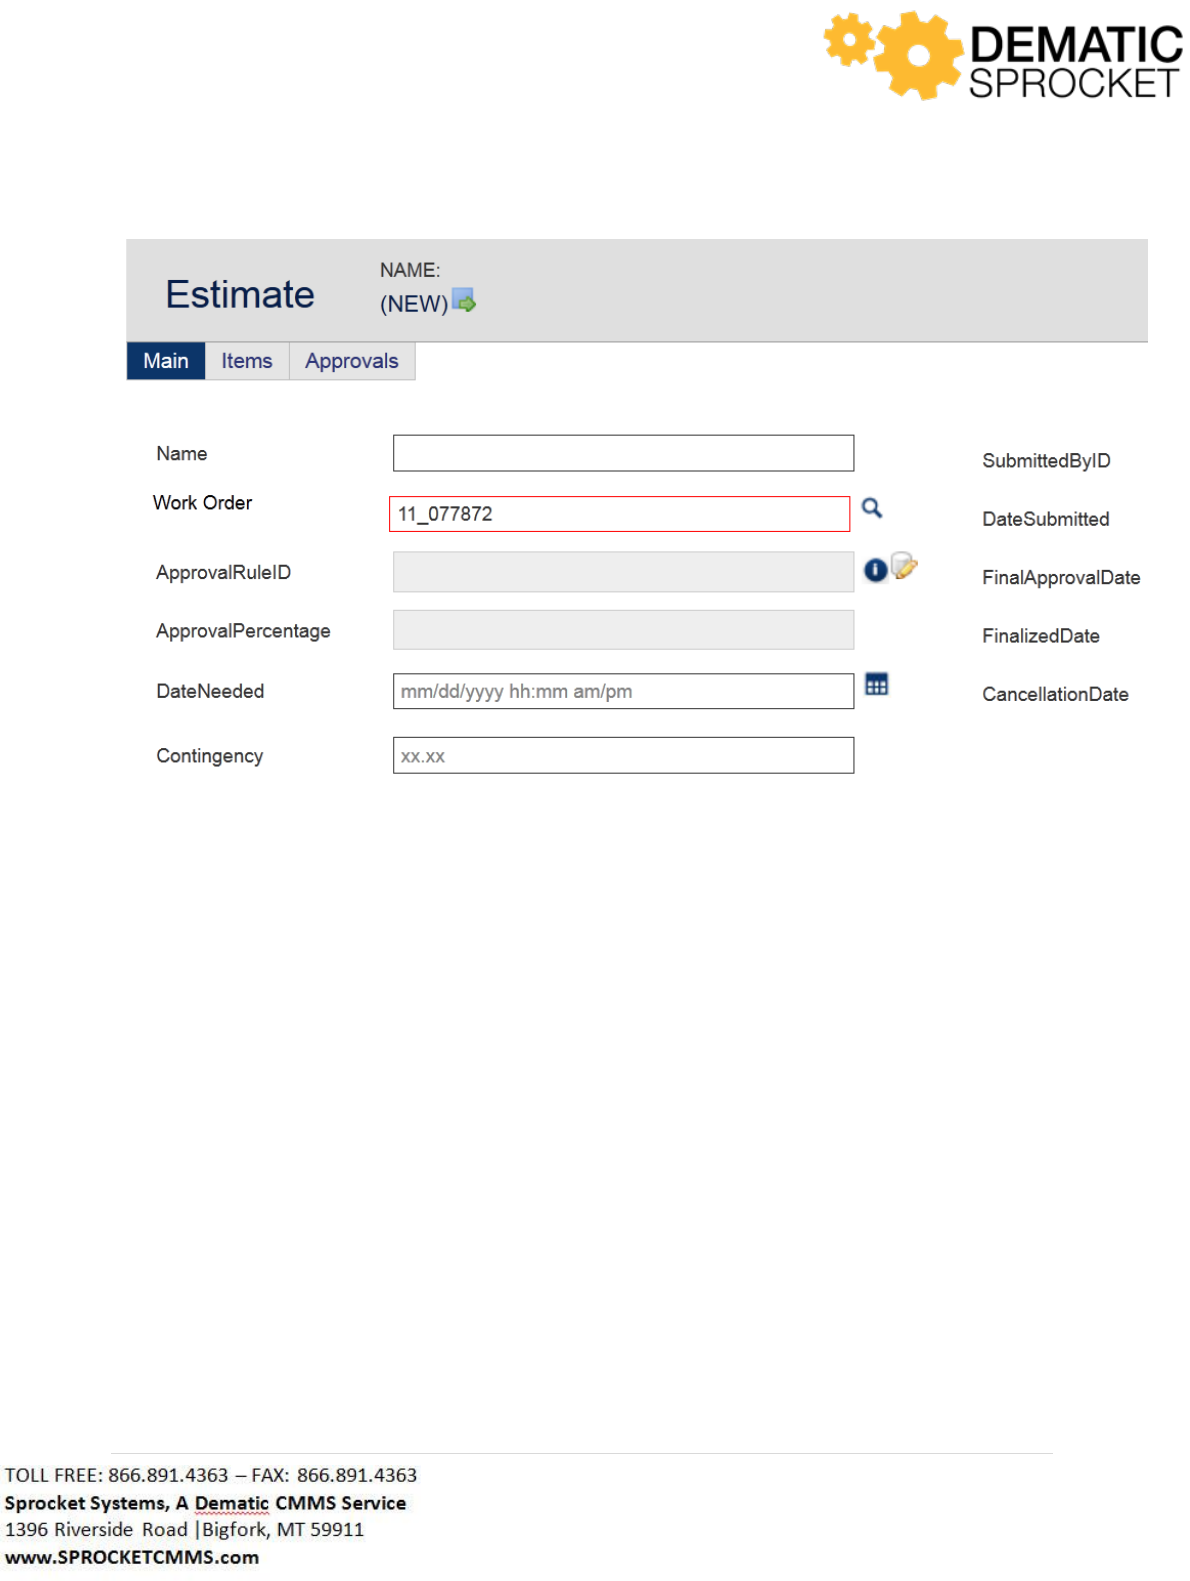
116 | P a g e
Note: Sprocket screens are customized based on customer needs. Your screen may or may not display
the above fields. Contact your Sprocket Administrator with questions.
Begin filling out the details of the estimate you wish to submit for approval. Let’s say we would like to
submit an estimate for approval for an office renovation for $3,543.89.
So, in the Name field, enter in Office Renovation. Let’s say we need this estimate to be approved by
October 21, 2011, so enter this into the Date field. Let’s assume that we plan for a 10% contingency
amount that is always rounded up to the next nearest hundred. In the Contingency field, enter in
$356.11 (3,543.89 + 10% = 3,898.279 rounded up to 3,900 – 3,543.89 = 356.11).
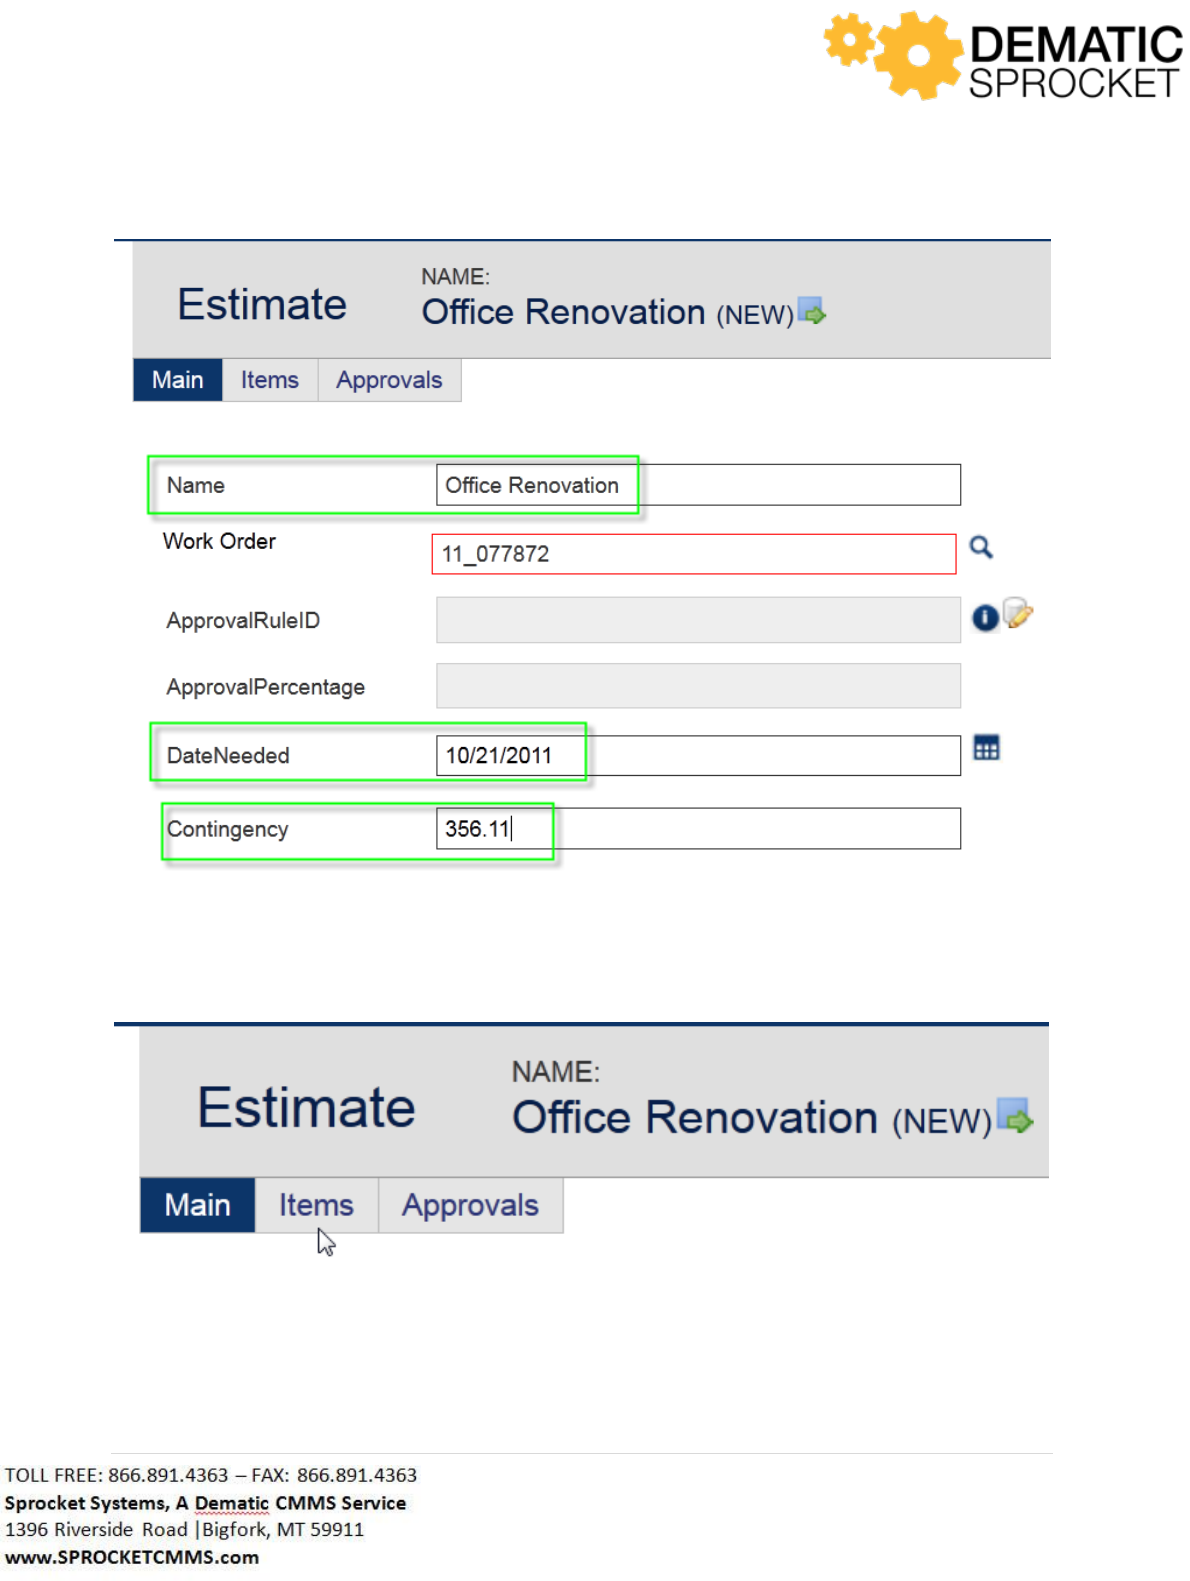
117 | P a g e
Now that you have added the preliminary information for this estimate, click the Items tab at the top of
the form to add in Materials and Labor costs.
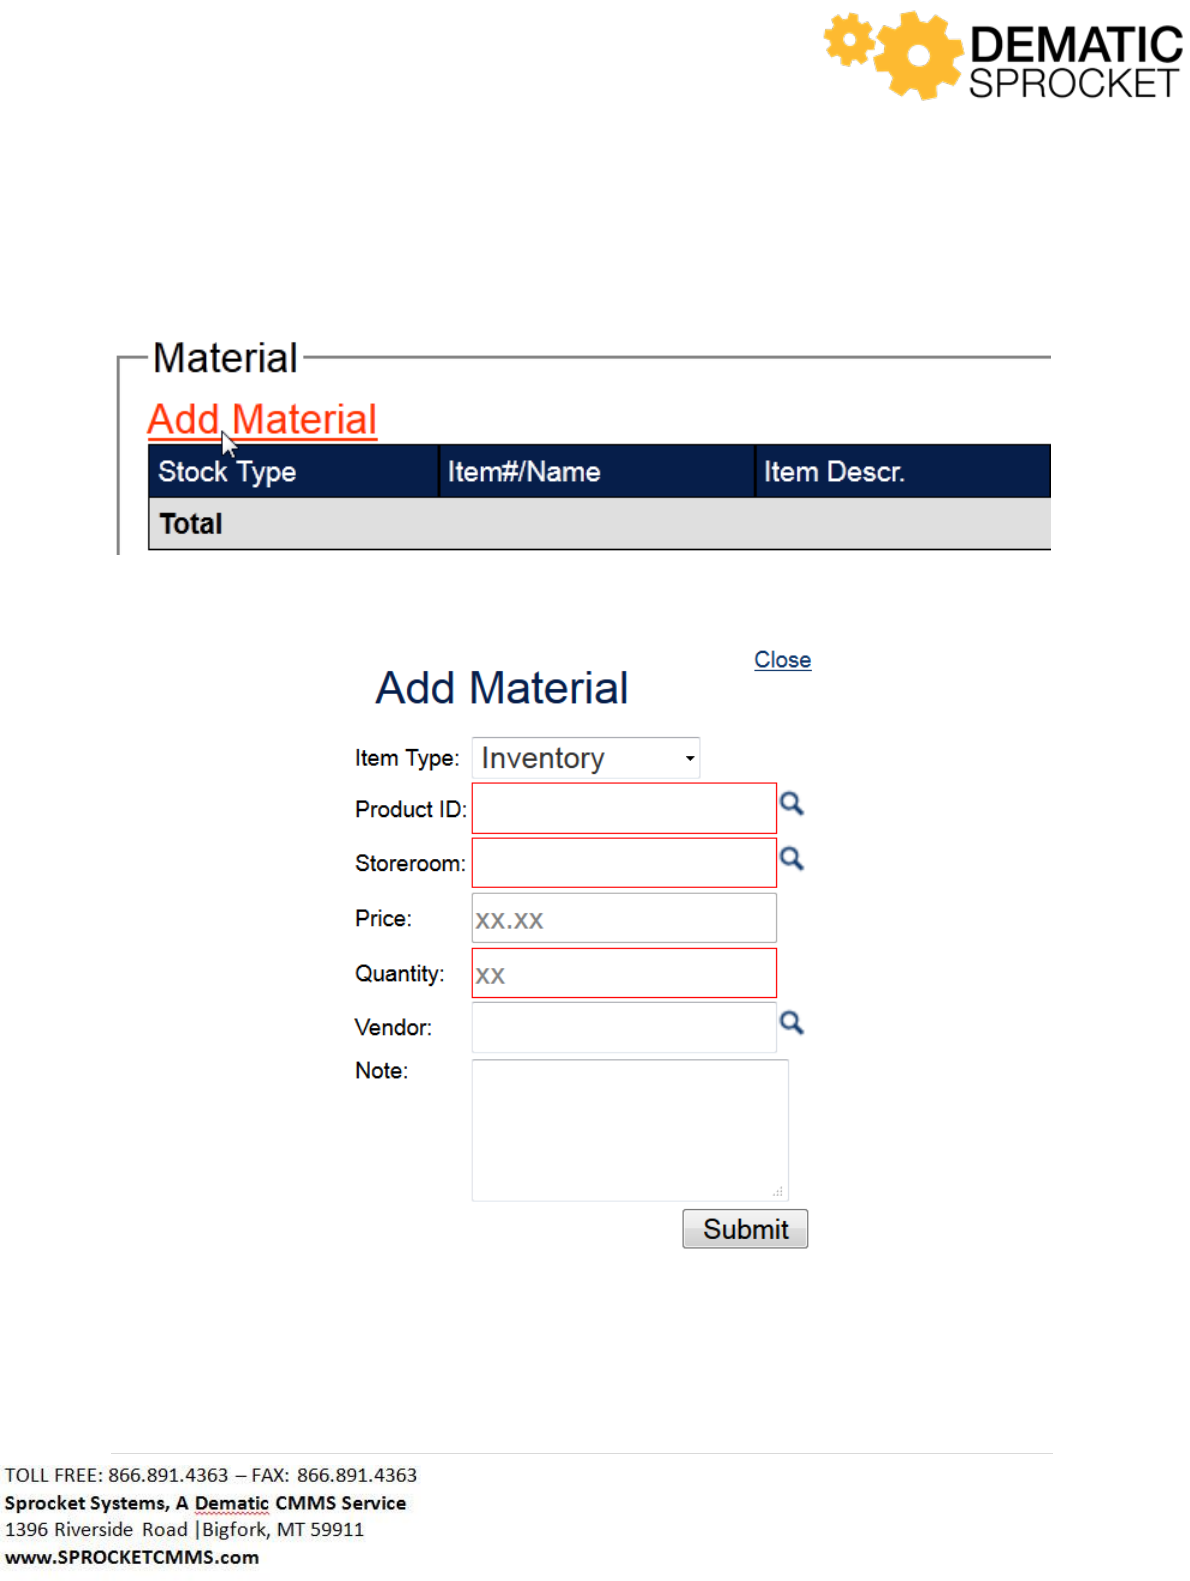
118 | P a g e
Notice at the top of the page that the current Estimate Totals for Material and Labor are all zero. Below
these totals are Material and Labor grids that also display zero. To add materials to this estimate, select
the Add Material link above the materials grid.
The Add Material window will pop up. Here you can fill out the specific information about the item you
will be adding to this estimate.
Note: Sprocket is customized based on customer needs. Your screen may or may not display the above
fields. Contact your Sprocket Administrator with question.
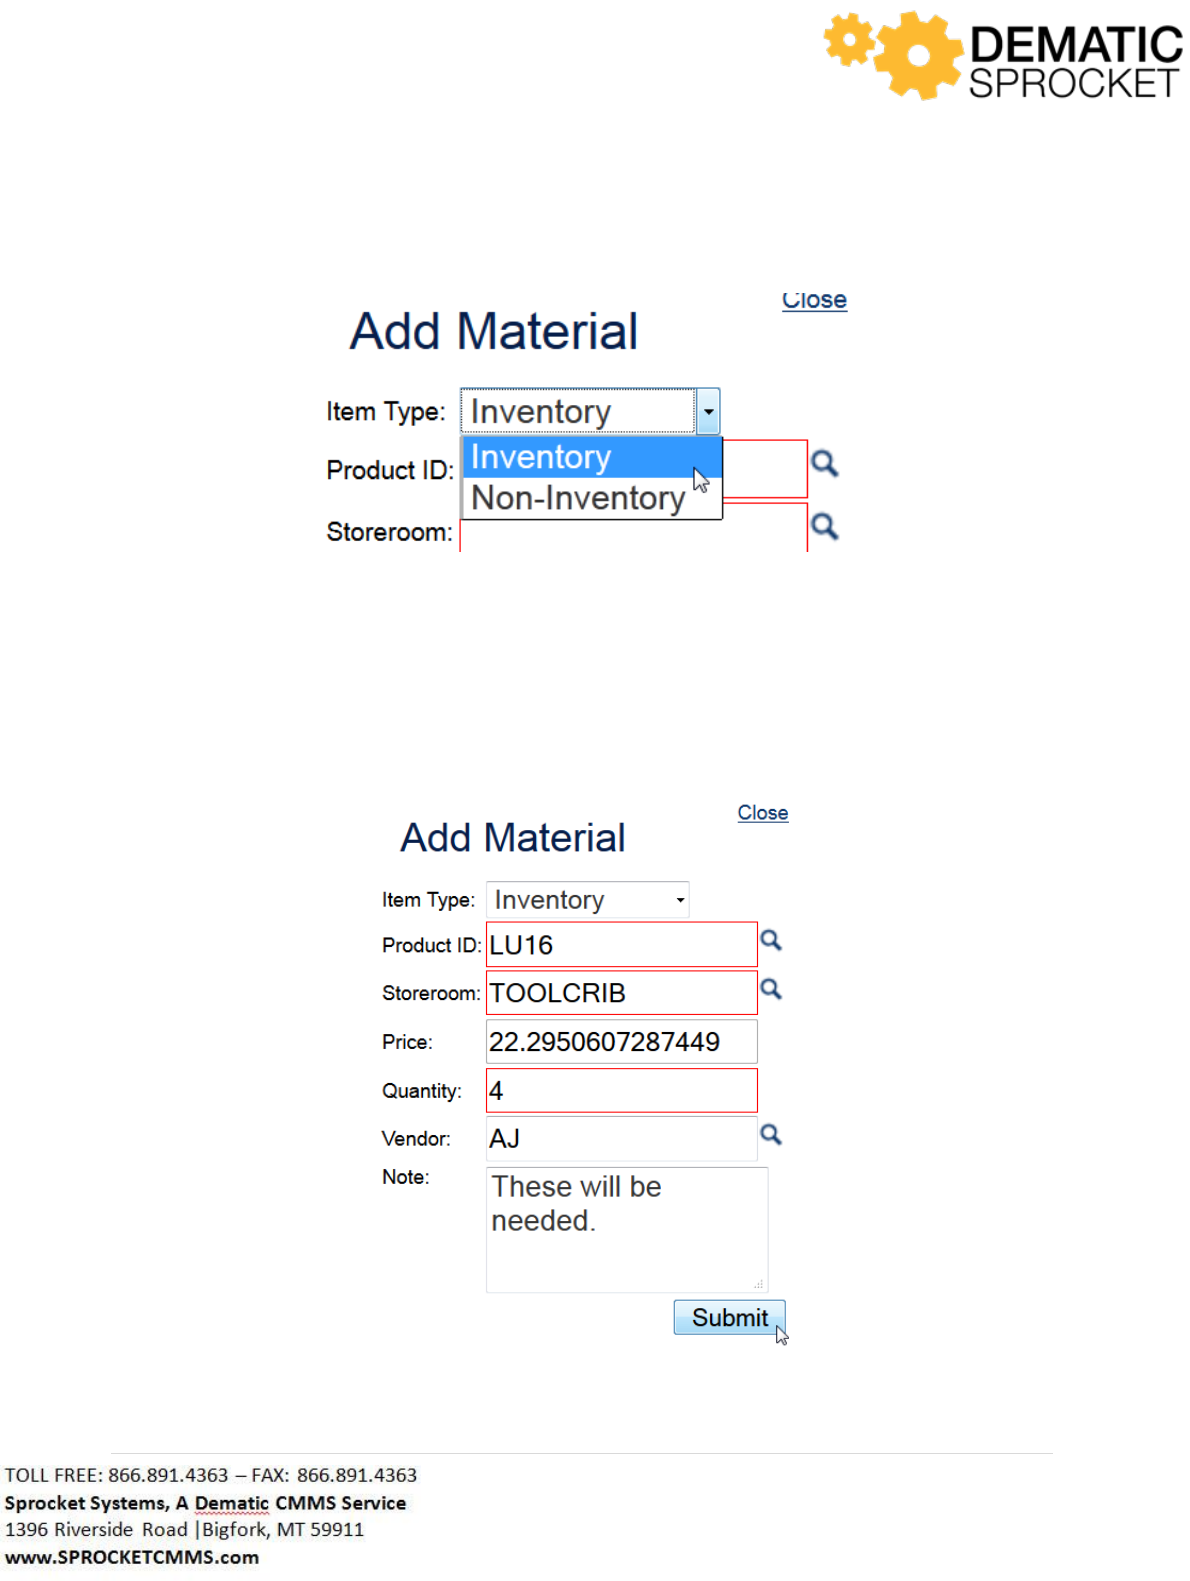
119 | P a g e
Notice that the Item Type field is a drop down menu where you can select an item from inventory or a
non-stock item for this project.
Let’s say we would like to add an item from inventory. Be sure that the word Inventory is displayed in
the Item Type field. From here, fill out the fields as necessary to add the desired material.
Notice that some fields have the Auto Lookup Tool icon to the right of them. Click this icon to conduct a
search for the desired material, or begin typing in all or part of the name and it will autocomplete your
entry for you.
Once you have completed the form, review that your information is correct and click the Submit button
at the bottom of the window.
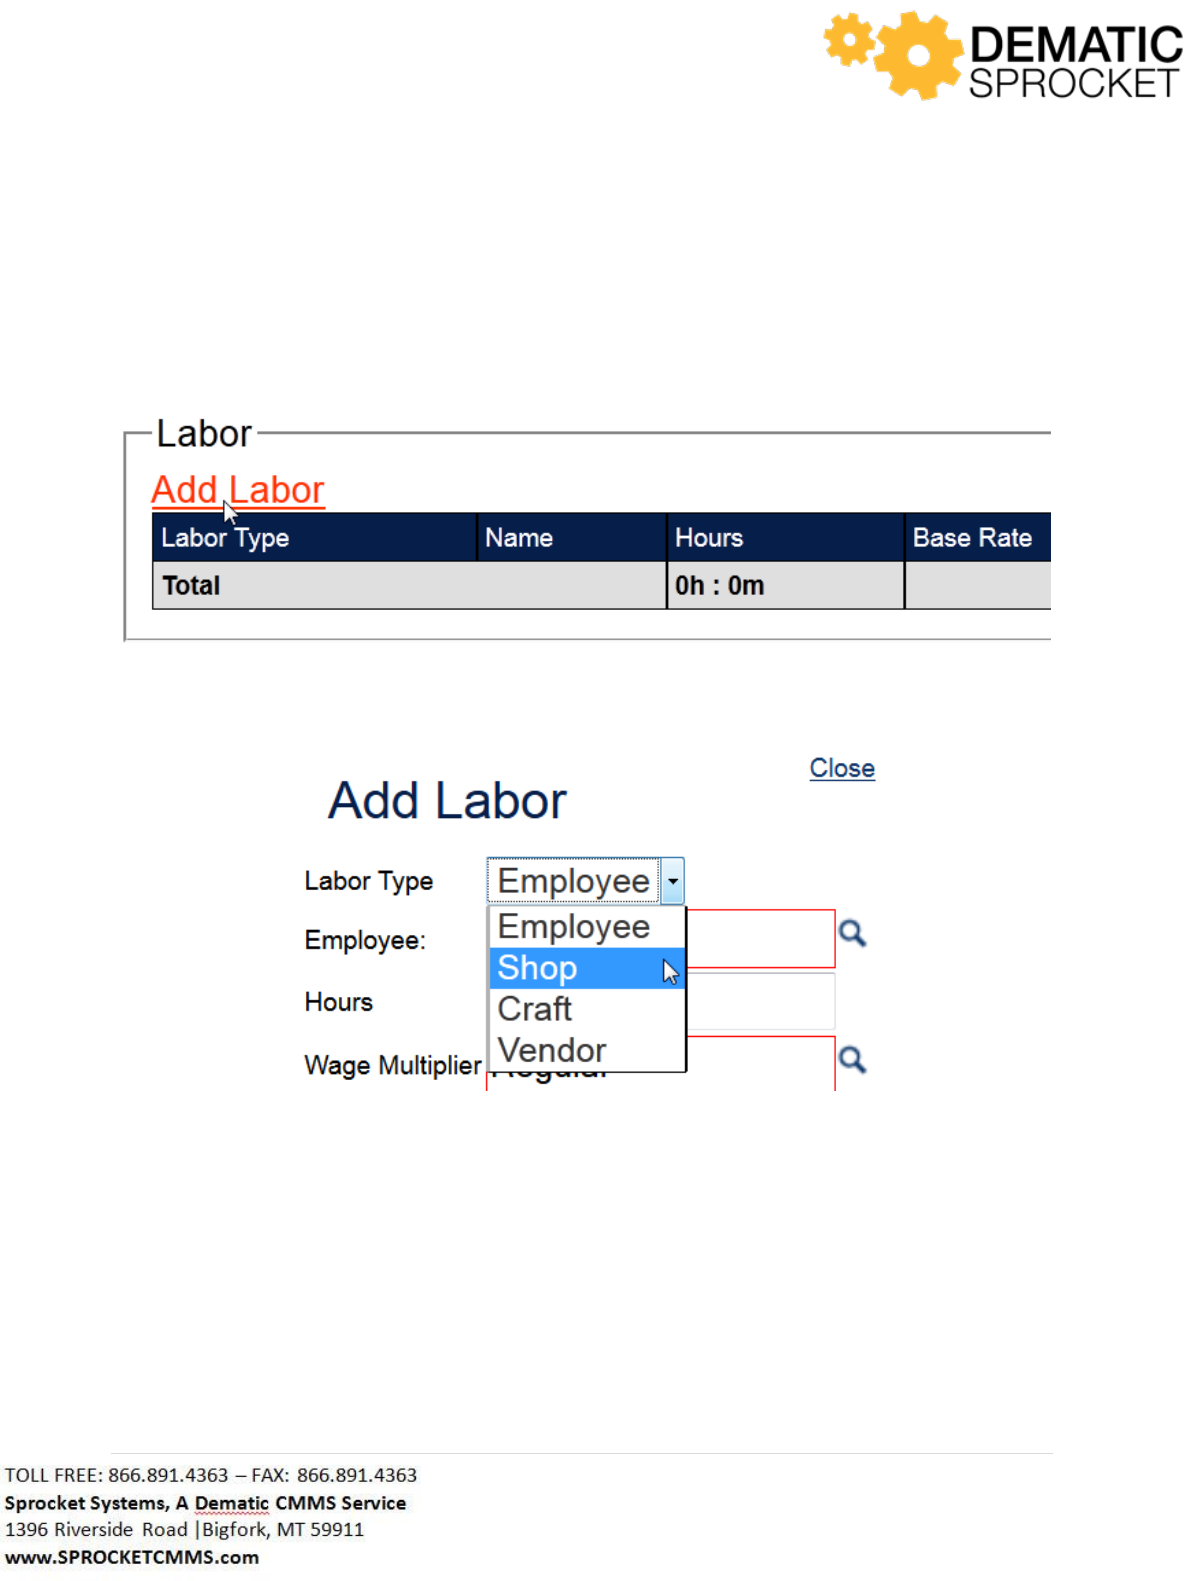
120 | P a g e
Notice that after selecting the Submit button at the bottom of the window, the Material grid is updated
with new Materials totals. If you wish to add additional items, you may do so by clicking the Add
Material link again.
Now we are going to add Labor hours to this estimate. To do this, click the Add Labor link above the
Labor grid.
Notice that the Labor Type field is a drop down menu where you can select which labor classification
you will be using for this project.
Let’s say we would like to add an Employee. Use the drop down menu to locate and select Employee for
the Labor Type. From here, fill out the fields as necessary to add the desired employee. Notice that
some fields have the Auto Lookup Tool icon to the right of them. Click this icon to conduct a search for
the desired employee, or begin typing in all or part of the name and it will autocomplete your entry for
you.
Next, enter the estimated amount of hours for this employee and select a Wage Multiplier.
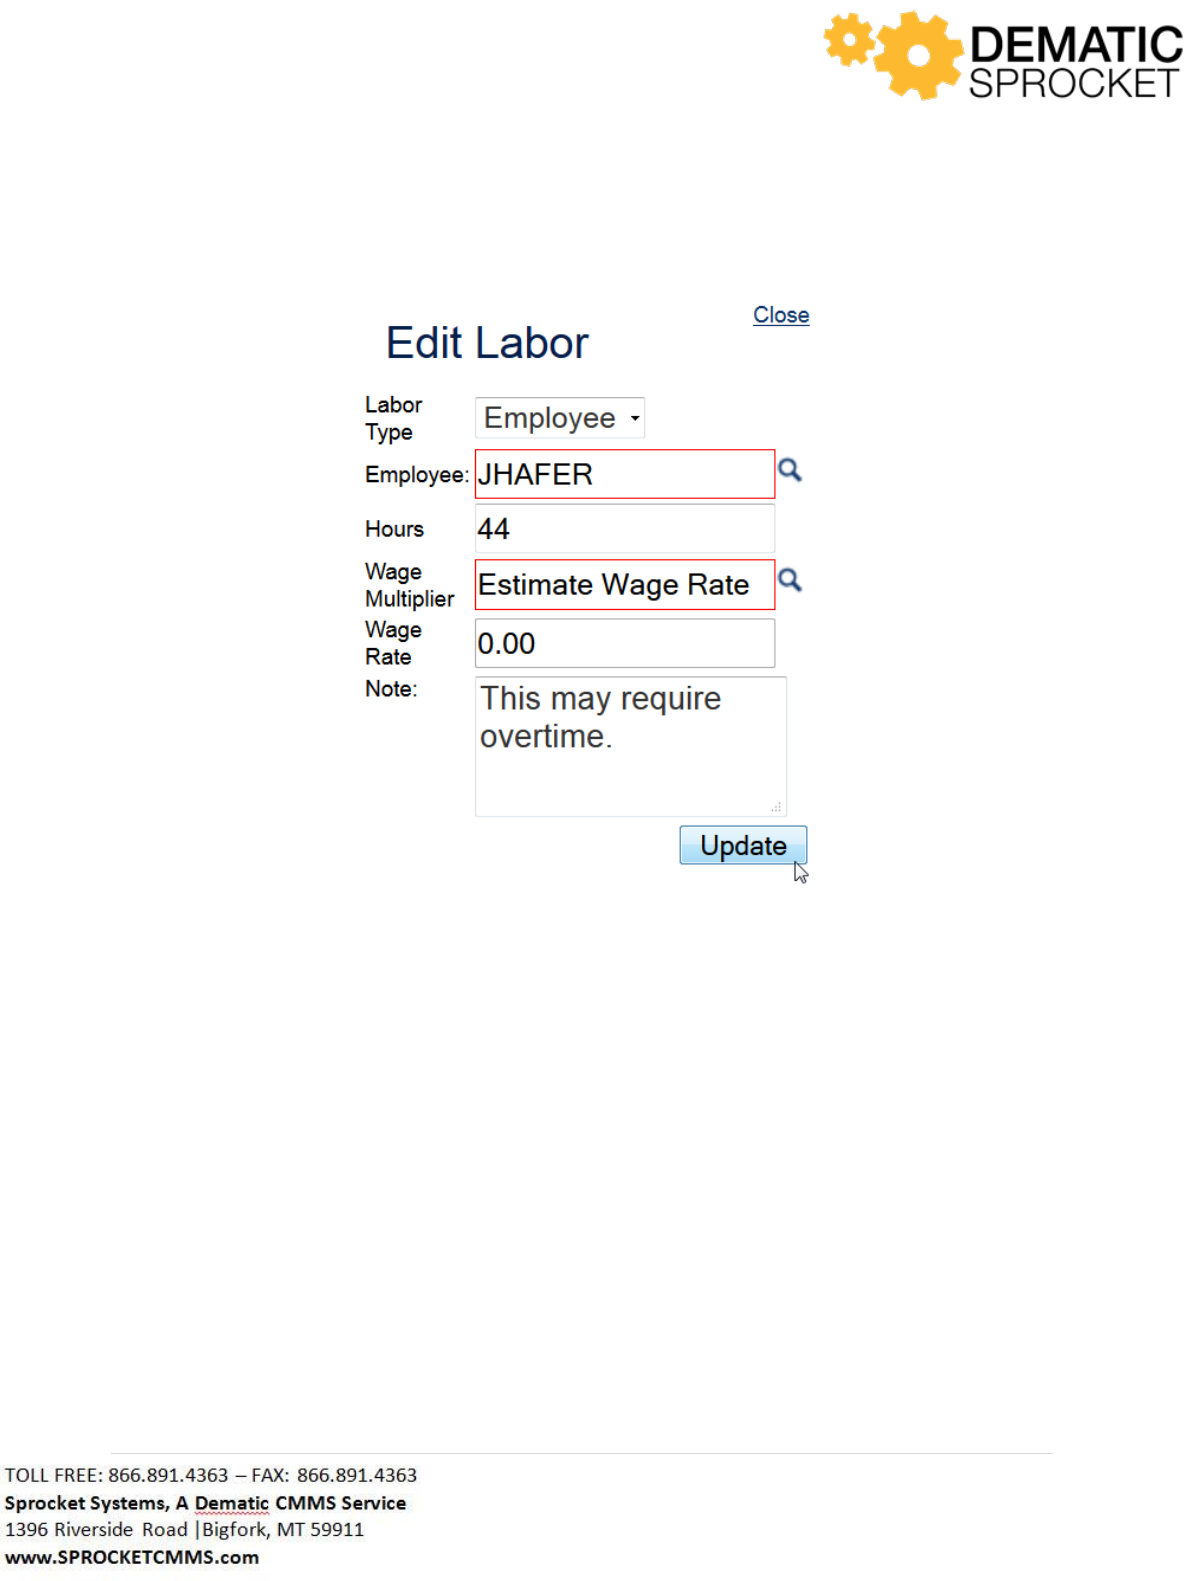
121 | P a g e
Once you have completed the form, review that your information is correct and click the Update button
at the bottom of the window.
Note: Sprocket is customized based on customer needs. Your screen may or may not display the above
fields. Contact your Sprocket Administrator with questions.
Notice that once the Update button is clicked, the Labor grid is updated with the new labor totals. You
may add additional labor to this estimate by clicking the Add Labor button again.
Also notice that the Estimate Totals grid is also updated with new labor and materials totals.
When the desired items are added to this project estimate, click the Save button at the top right of the
screen.
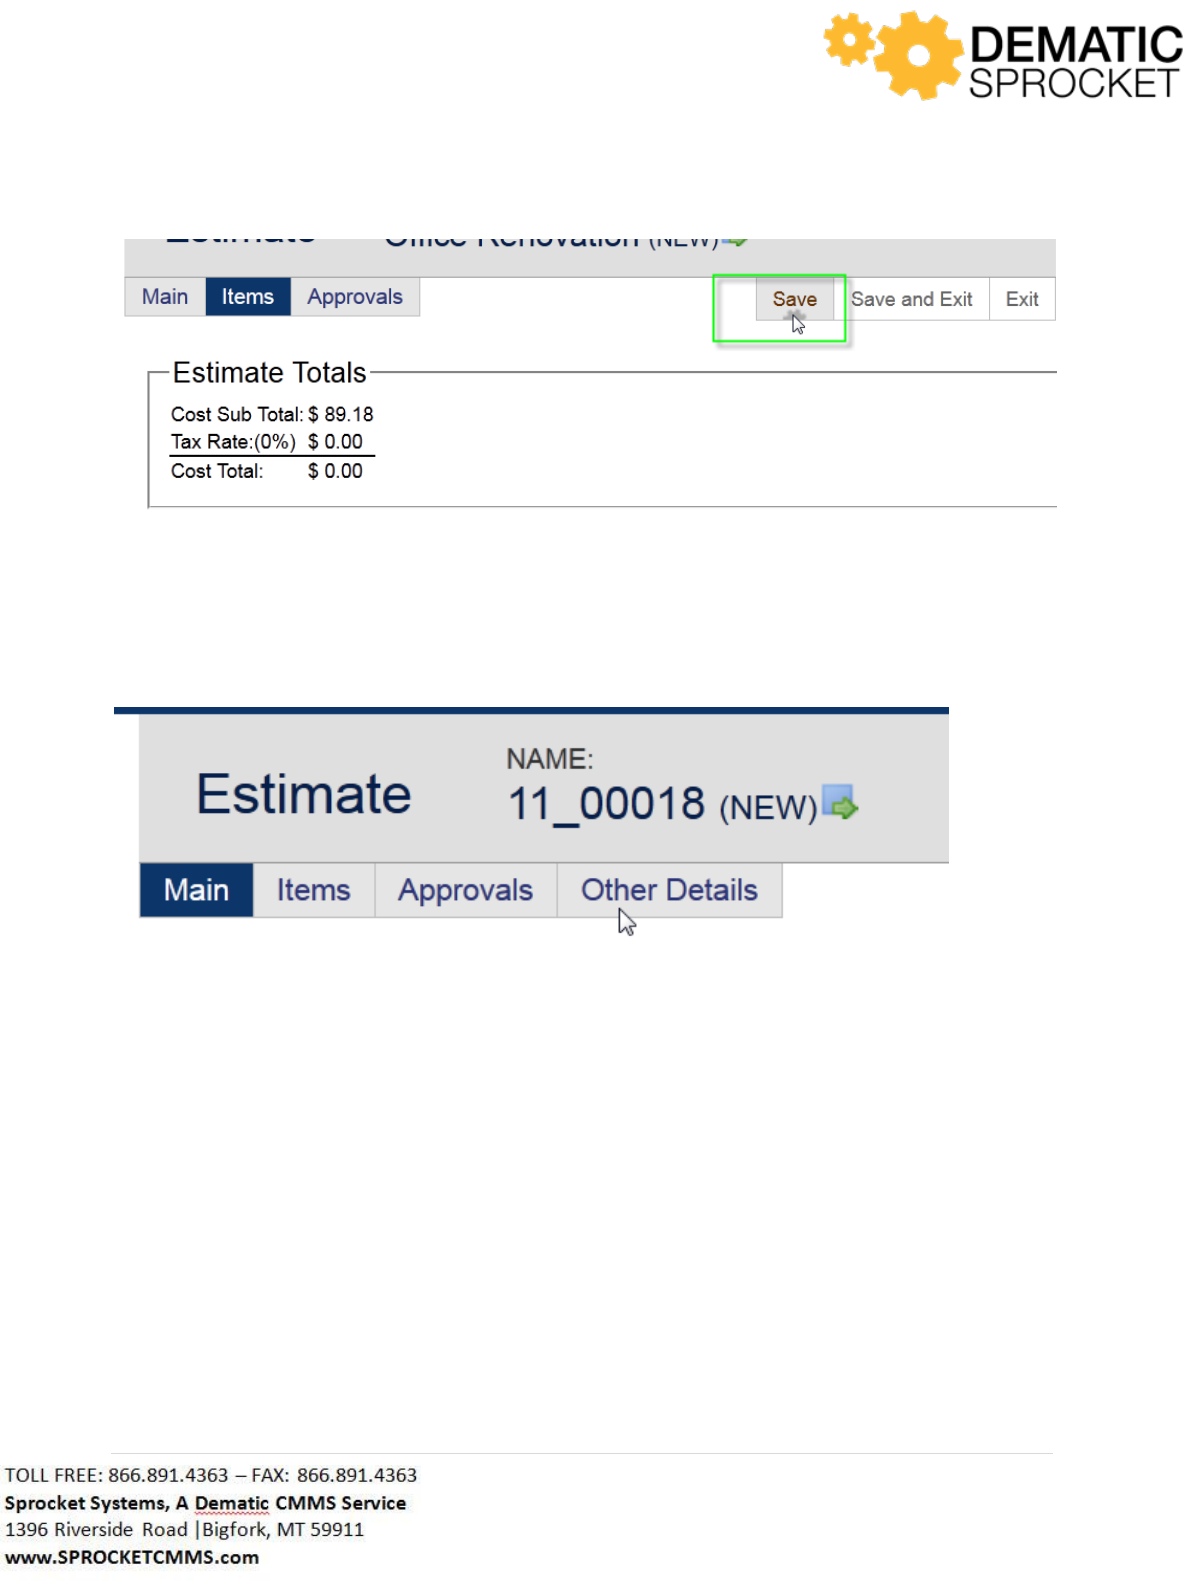
122 | P a g e
Once the record is saved, you will be directed back to the Main tab. Before submitting this estimate for
approval, if you wish to add any additional information such as Contact information or Attach Files, click
the Other Details tab at the top of the screen.
Here you can click the Add Contact, Add Note, and Attach File links to add addition details to this
estimate.
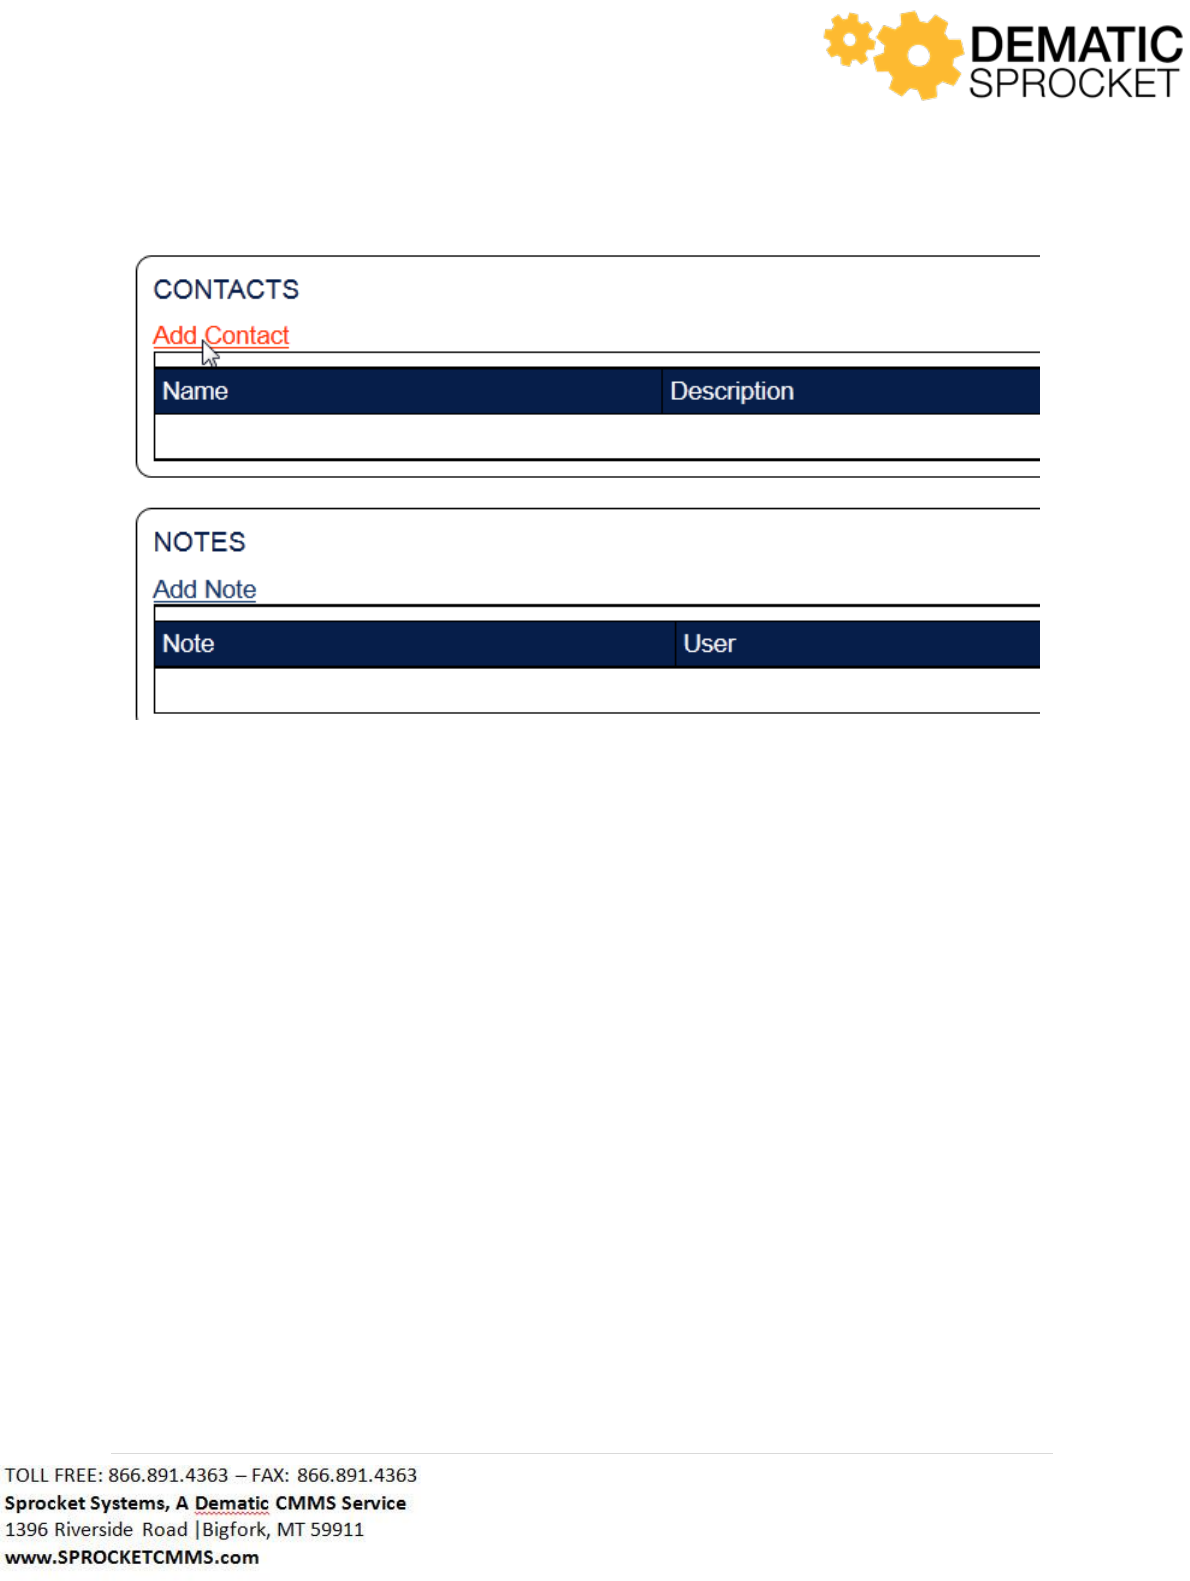
123 | P a g e
For example, if you wish to add contact information for the estimate requestor, click the Add Contact
link.
A form will appear for you to fill out the information. When you complete the form, click the Save
button at the bottom to update this tab with contact information.
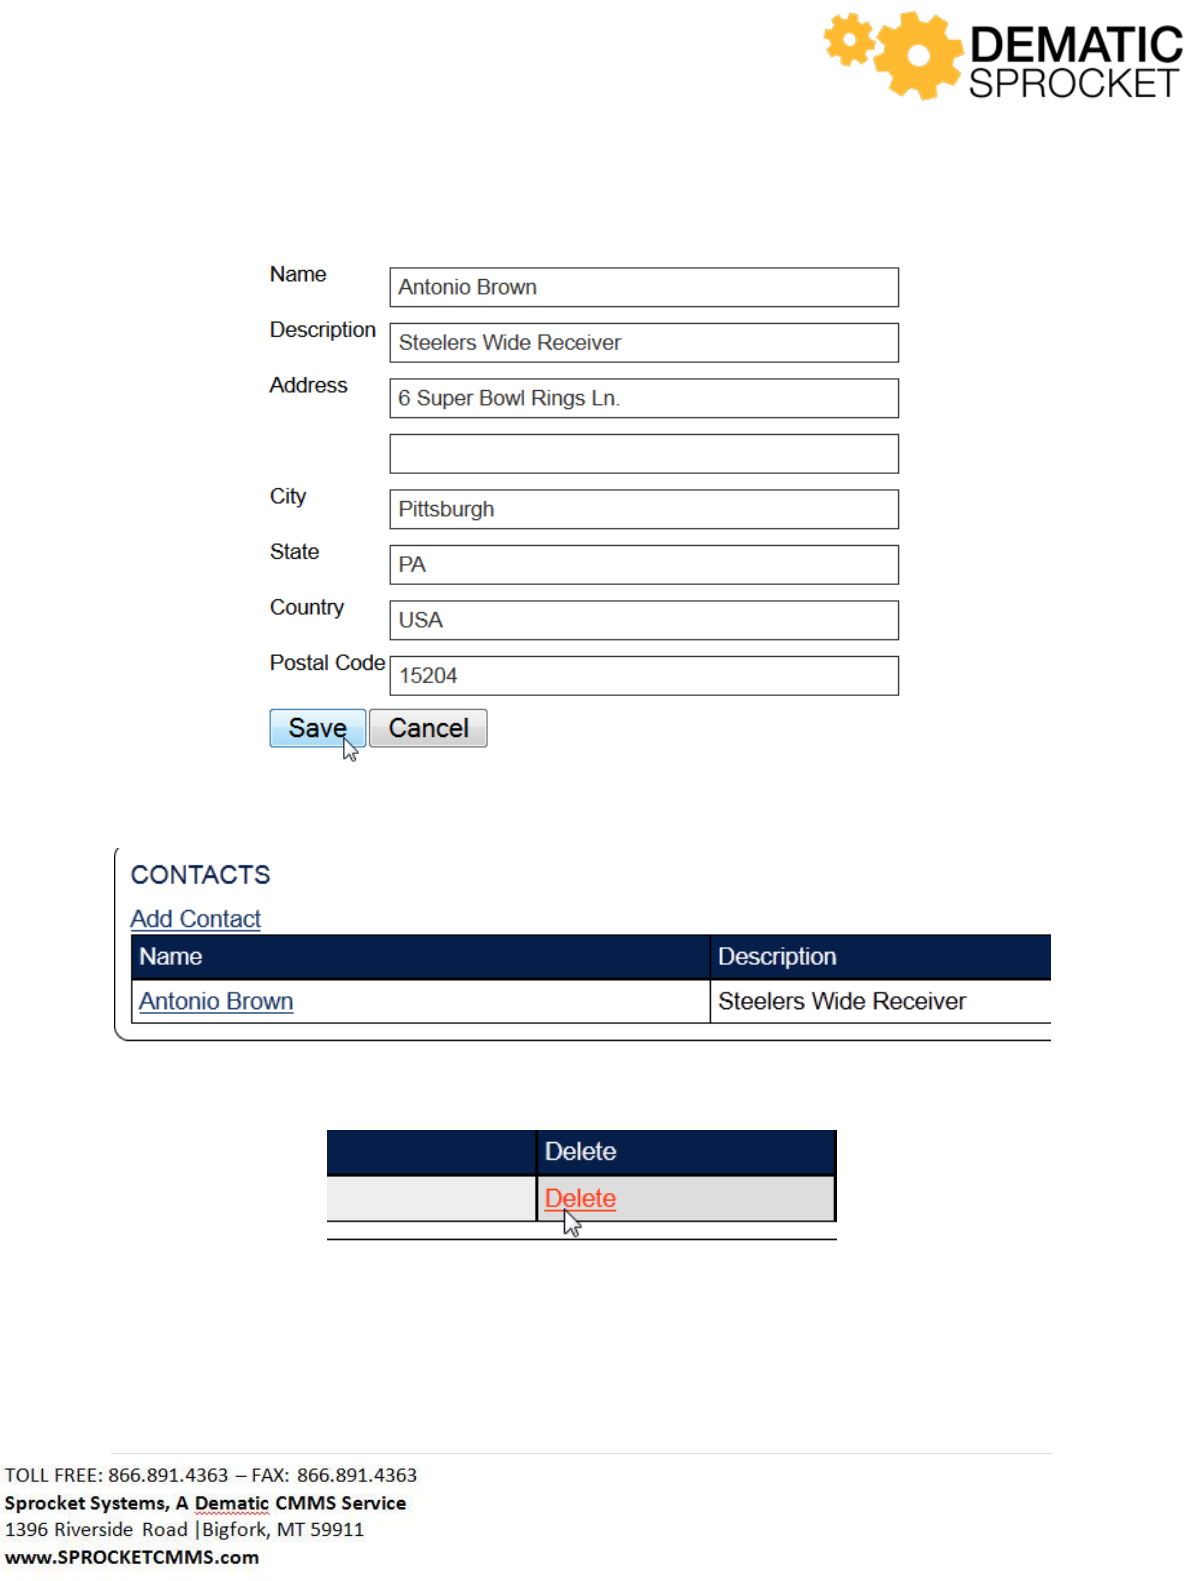
124 | P a g e
A window will appear saying Success. Click OK to continue. Now the Other Details tab will be updated
with your contact information.
You can always delete this information by clicking the Delete link at the far right of the grid.
On the Main tab, once you have entered and reviewed all of information for this project estimate, click
the Submit for Approval button to submit this for approval.
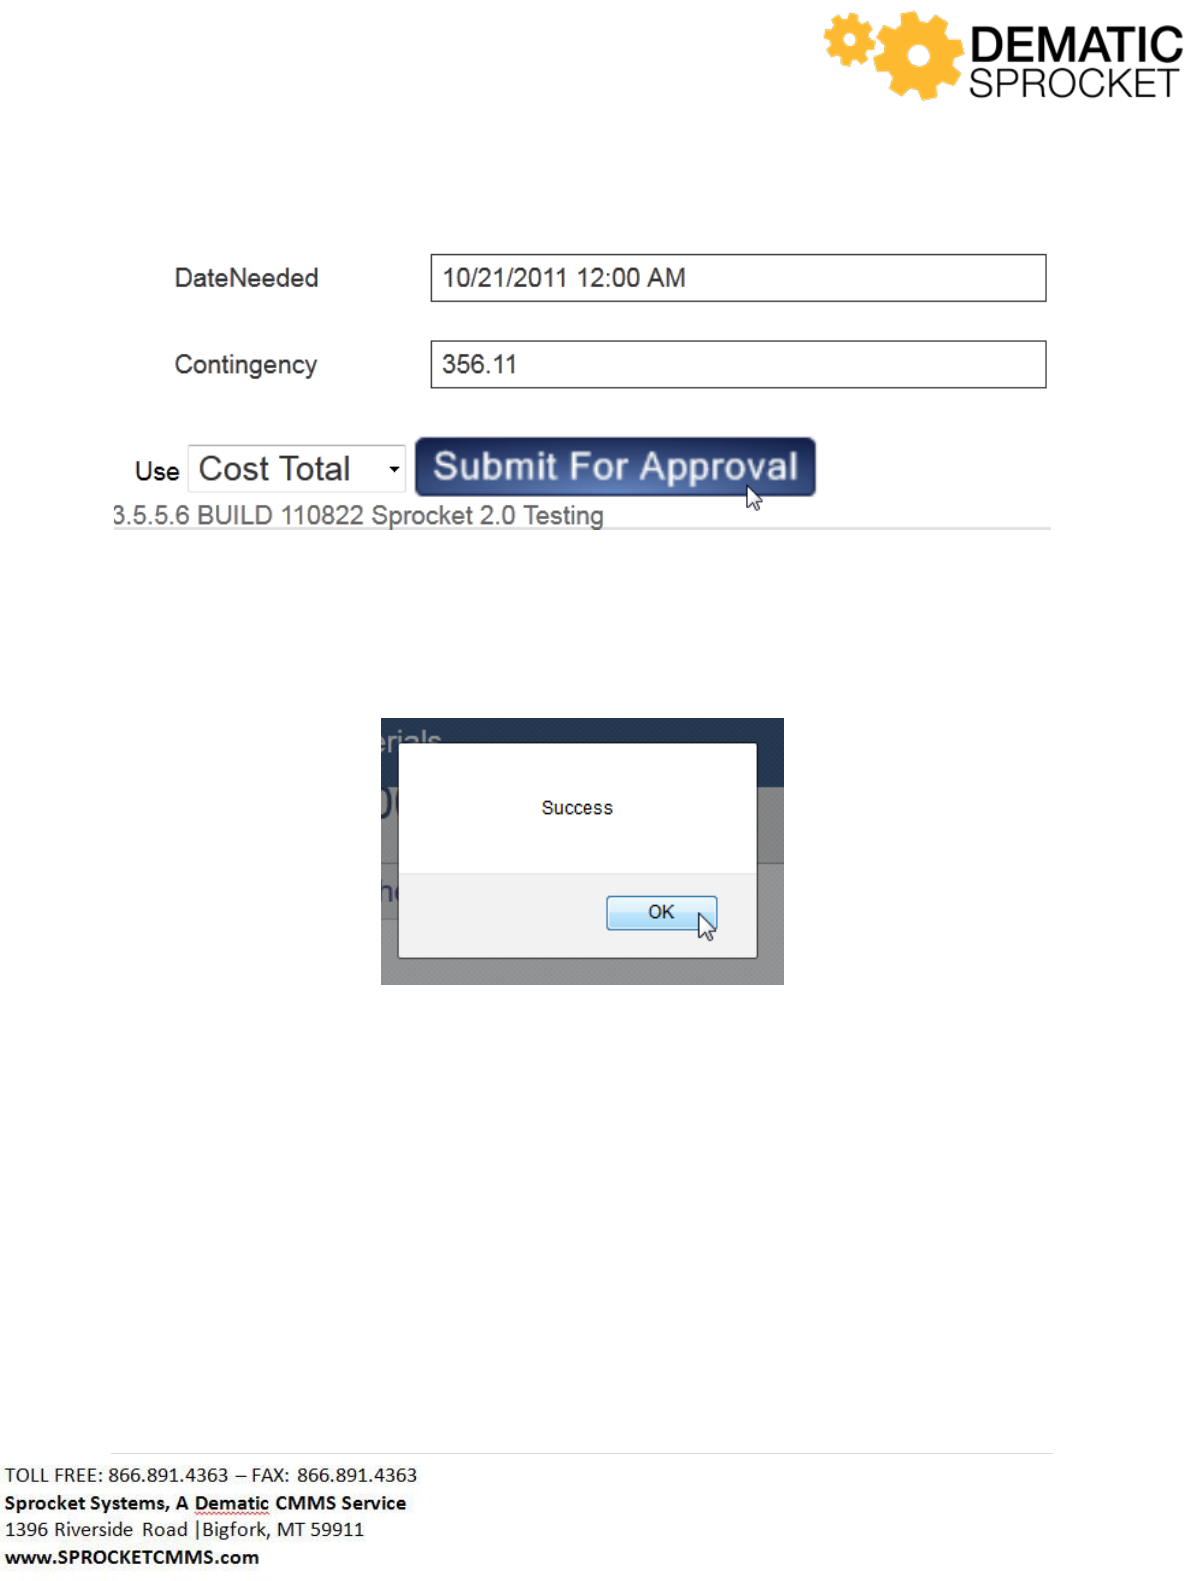
125 | P a g e
A window will appear saying Success. Click OK to continue.
This will direct you to the Estimates tab in work order details. Now the Estimates grid will be updated to
include the information you added.
5.4.8.2 Estimate Request Email Notifications
Now the Estimate is in a Waiting for Approval status. You will receive an initial email as confirmation of
that the estimate was submitted for approval. There will be a link at the top of the email document that
says Click here for work order details. Use this link to view details of this estimate.
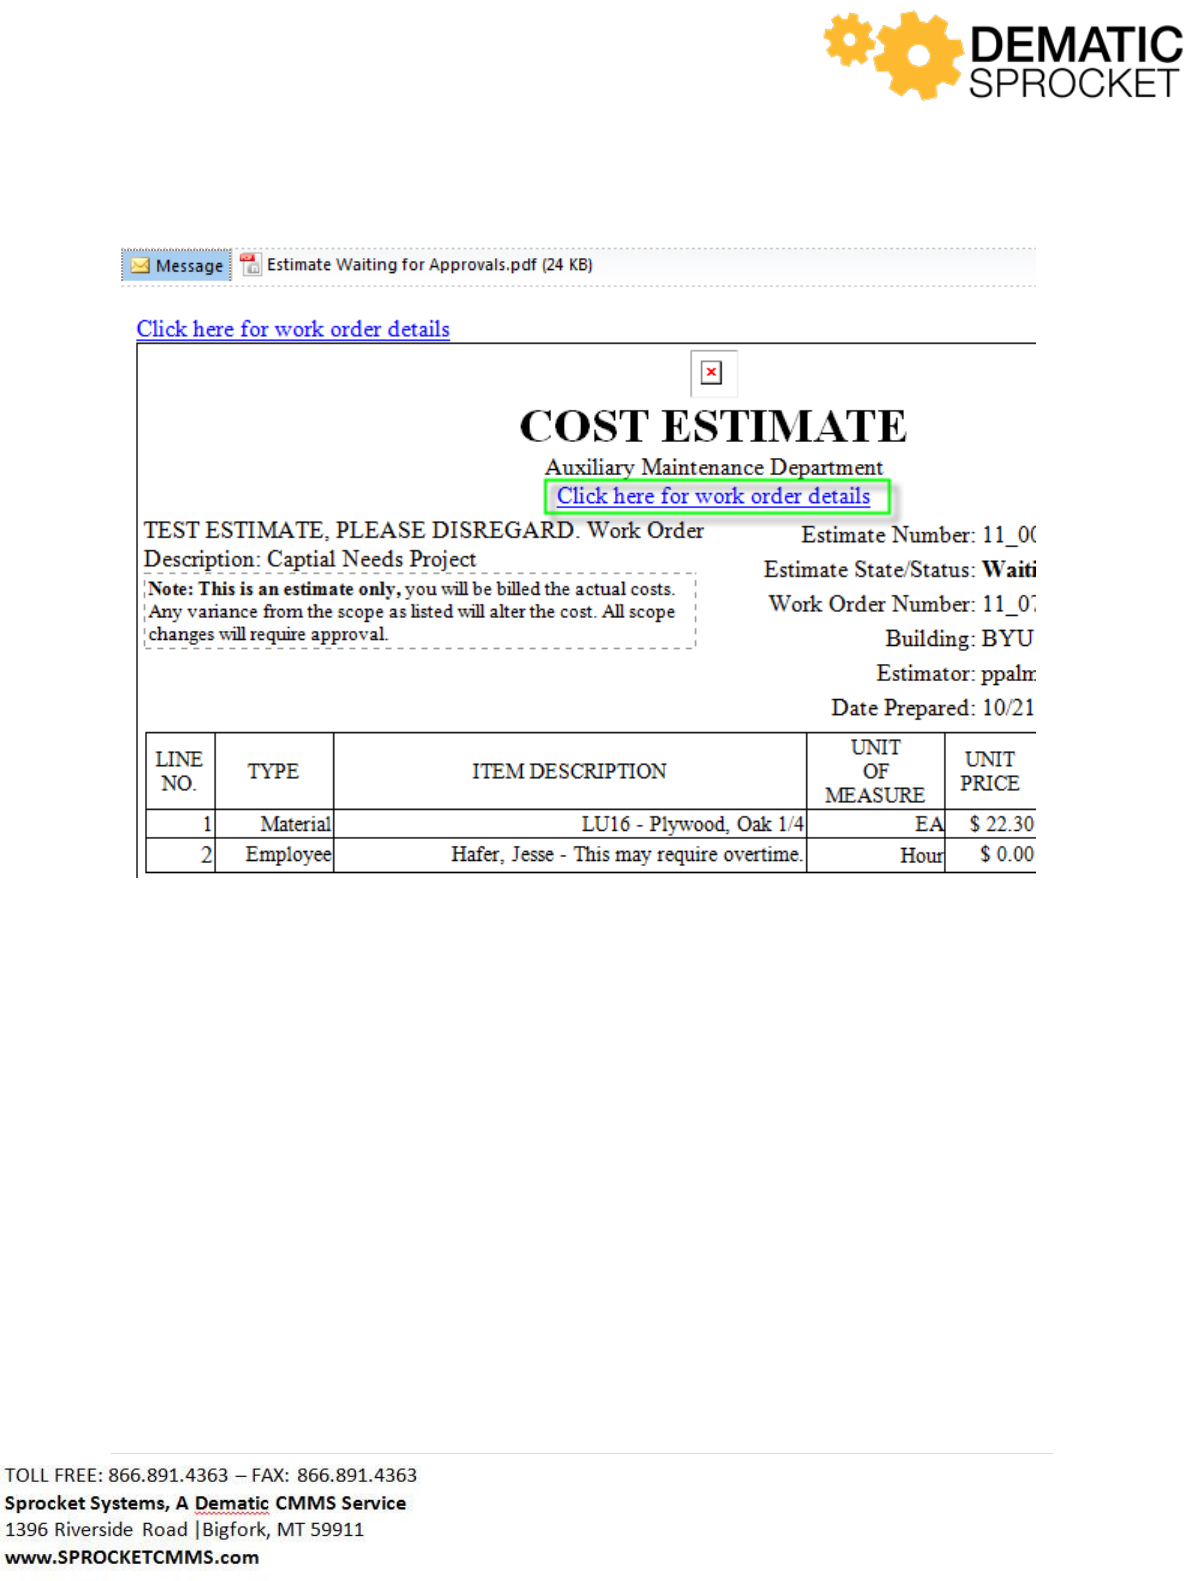
126 | P a g e
As your request goes through the approval process, you will be notified by email of the status
progression of this estimate.
5.4.8.3 Estimate Request for Modifications
While your Estimate Request is going through the approval process, an approver may request that
certain changes or modifications be made to the estimate before approval. If this happens, you will
receive another email with the subject line Estimate Modifications Requested. There will be a link at
the top of the screen saying Click here for work order details. Click this link to view the requested
modifications.
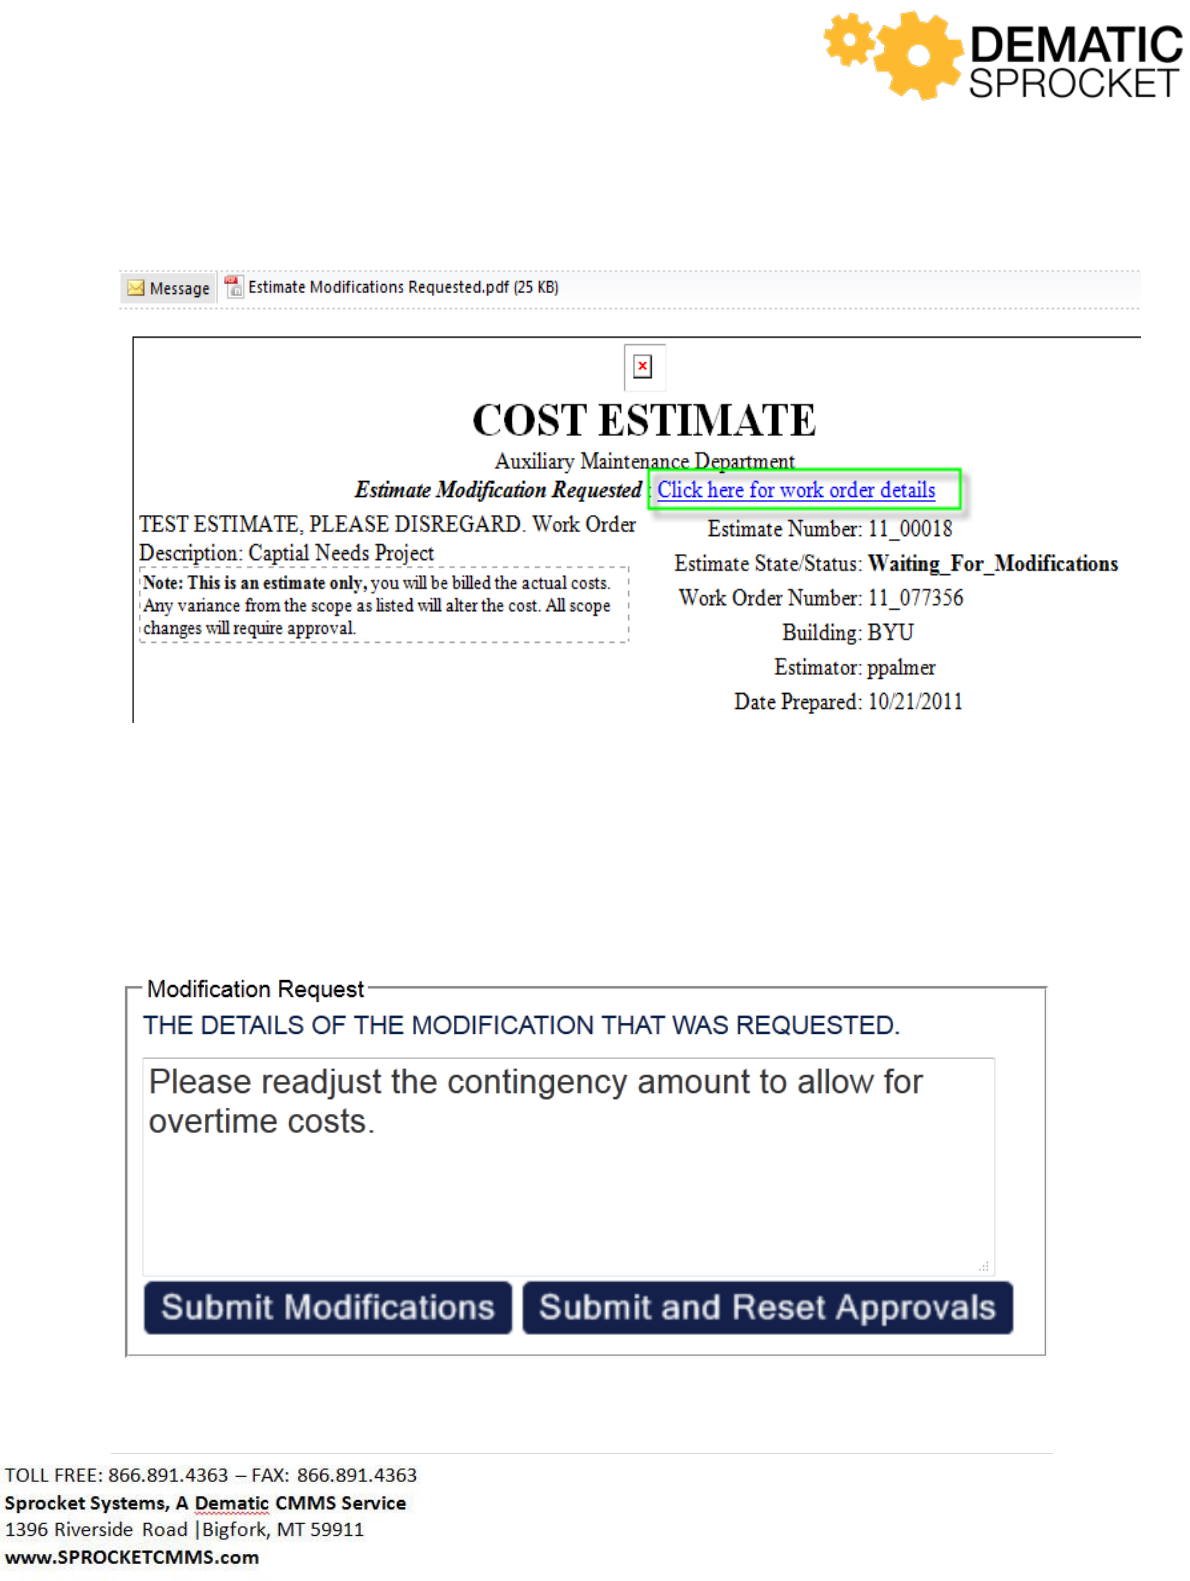
127 | P a g e
Once in the Work Order Details, you can edit, add, remove, or modify the desired aspects of this
estimate. Notice that at the bottom of the Estimate Details screen on the Main tab, a new grid has been
added that displays the Modification Request and two buttons that say Submit Modifications and
Submit and Reset Approvals.

128 | P a g e
Once the modifications have been made and this estimate is ready to be resubmitted again, you will
click one of these two buttons to resubmit.
Submit and Reset Approvals will submit the estimate again and the approval process will begin from the
beginning with the first approver.
Submit Modifications will submit the estimate again beginning with the approver who requested the
modifications. So, if an approval process requires 5 supervisors to approve this estimate and it was the
third supervisor who requested the modifications the last time, this estimate will immediately be sent to
that supervisor for review of modifications and approval.
Let’s continue where this left off and click the Submit Modifications button.
A window will pop up saying Are you sure you wish to submit your changes and notify the other users?
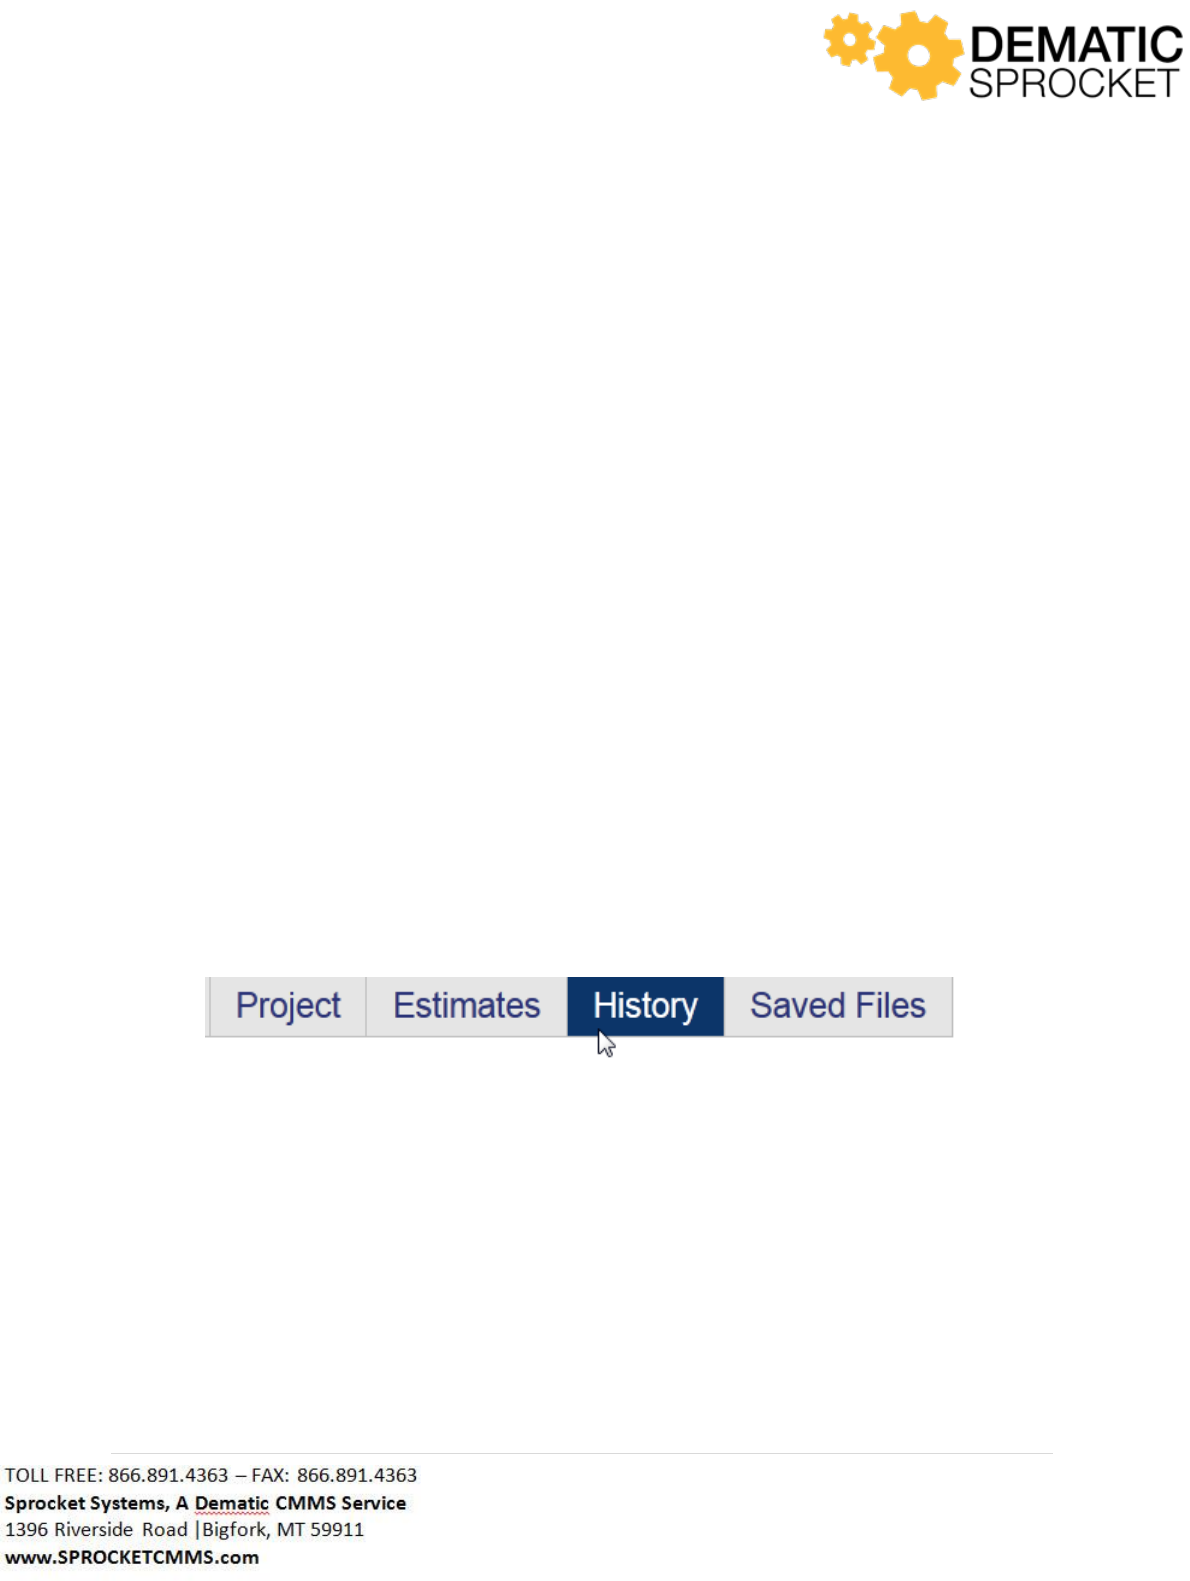
129 | P a g e
Click OK to continue or Cancel to return to the previous screen.
Now the email notifications will be issued to you and the approvers and the process will start from
where it left off in the Waiting for Approvals status.
Now that your estimate has been submitted, you will receive email notifications that allow you to know
if your estimate is approved or denied.
5.4.9 History Tab
The next tab in the Work Order Details is the History tab. Sprocket documents all actions performed to
a work order or record in the system. You can use the History tab to view actions and changes that have
occurred throughout the life of a work order.
This will display a tree that separates each action that has occurred in this work order. You can expand
each “branch” to view individual events of this work order by selecting the plus sign in each row.
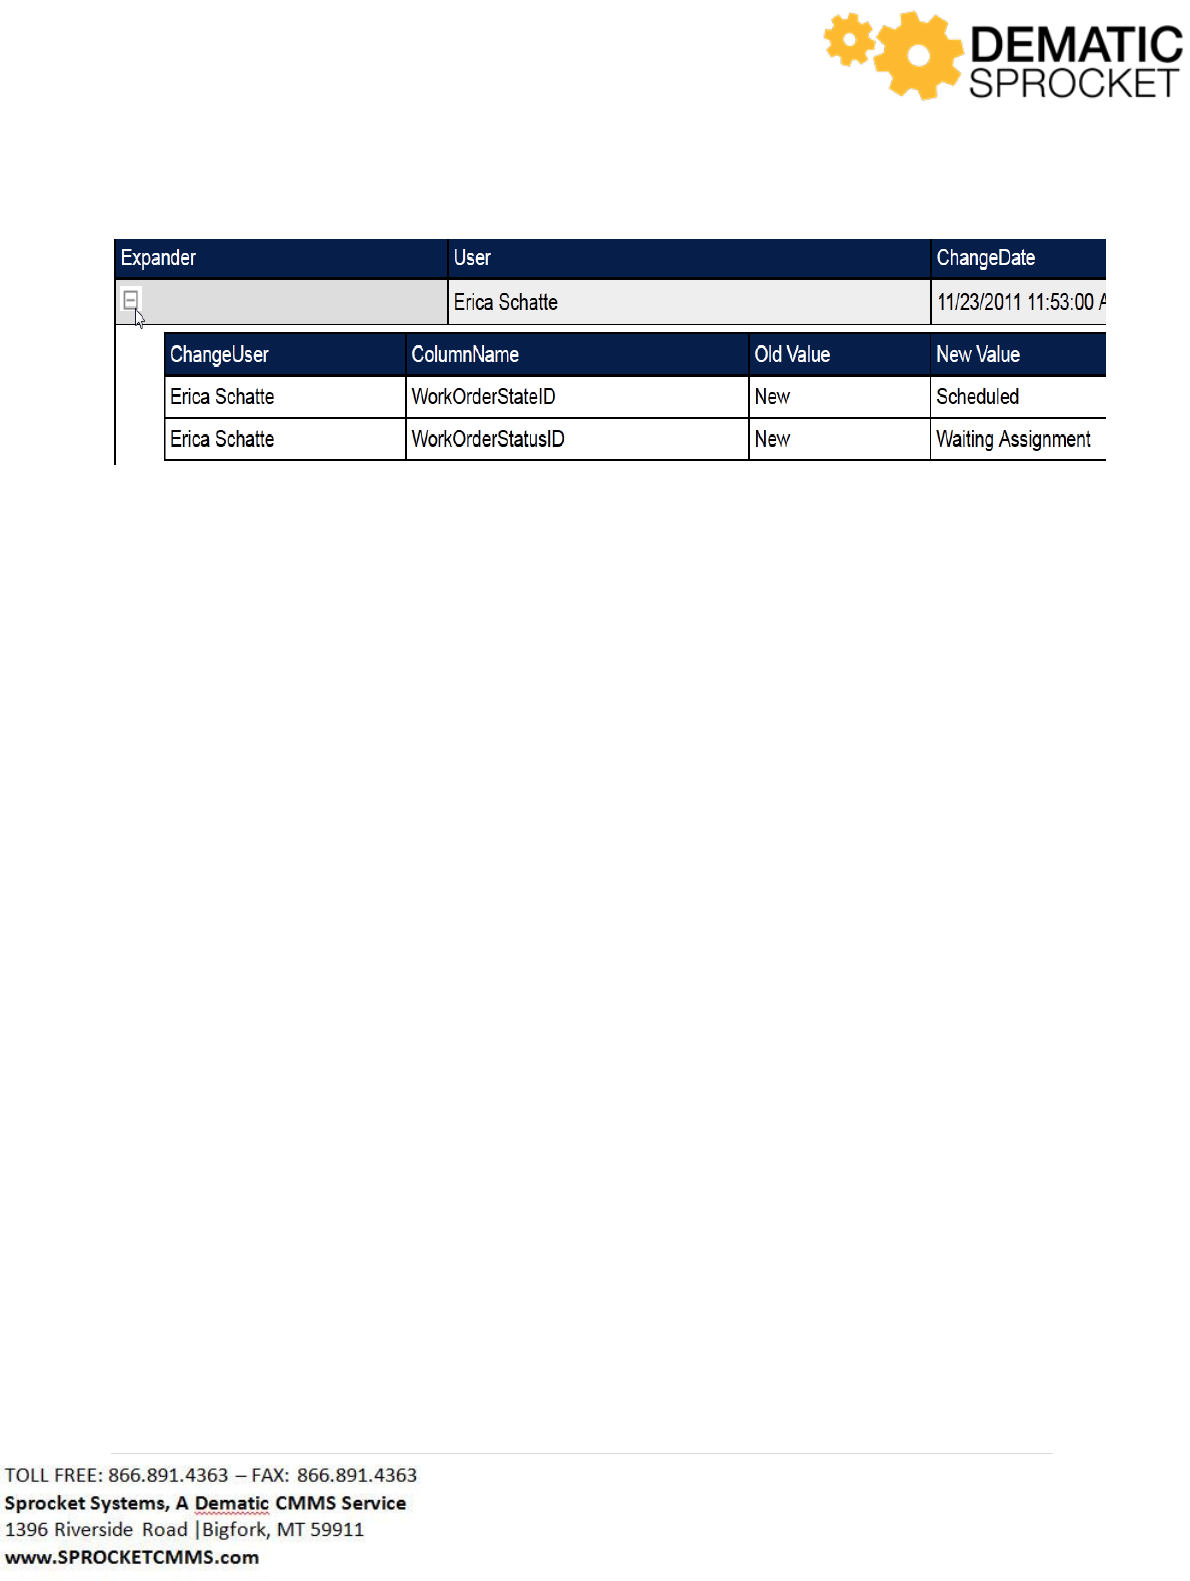
130 | P a g e
In the example above, you can see that the work order was changed to a Status of Scheduled. In the
Change User column, you can see that Erica Schatte is the user who changed the Status of the work
order.
The History tab keeps track of every action in a work order so that accountability for work order
dispatching is achieved.
5.4.10 Saved Files Tab
Sprocket allows you to attach files to any work order. A typical example of an attached file would be a
picture of the problem or a user manual for a certain piece of equipment.
Notice the row of tabs at the top of the Work Order Details screen. At the far right of these tabs, click
the Saved Files tab.
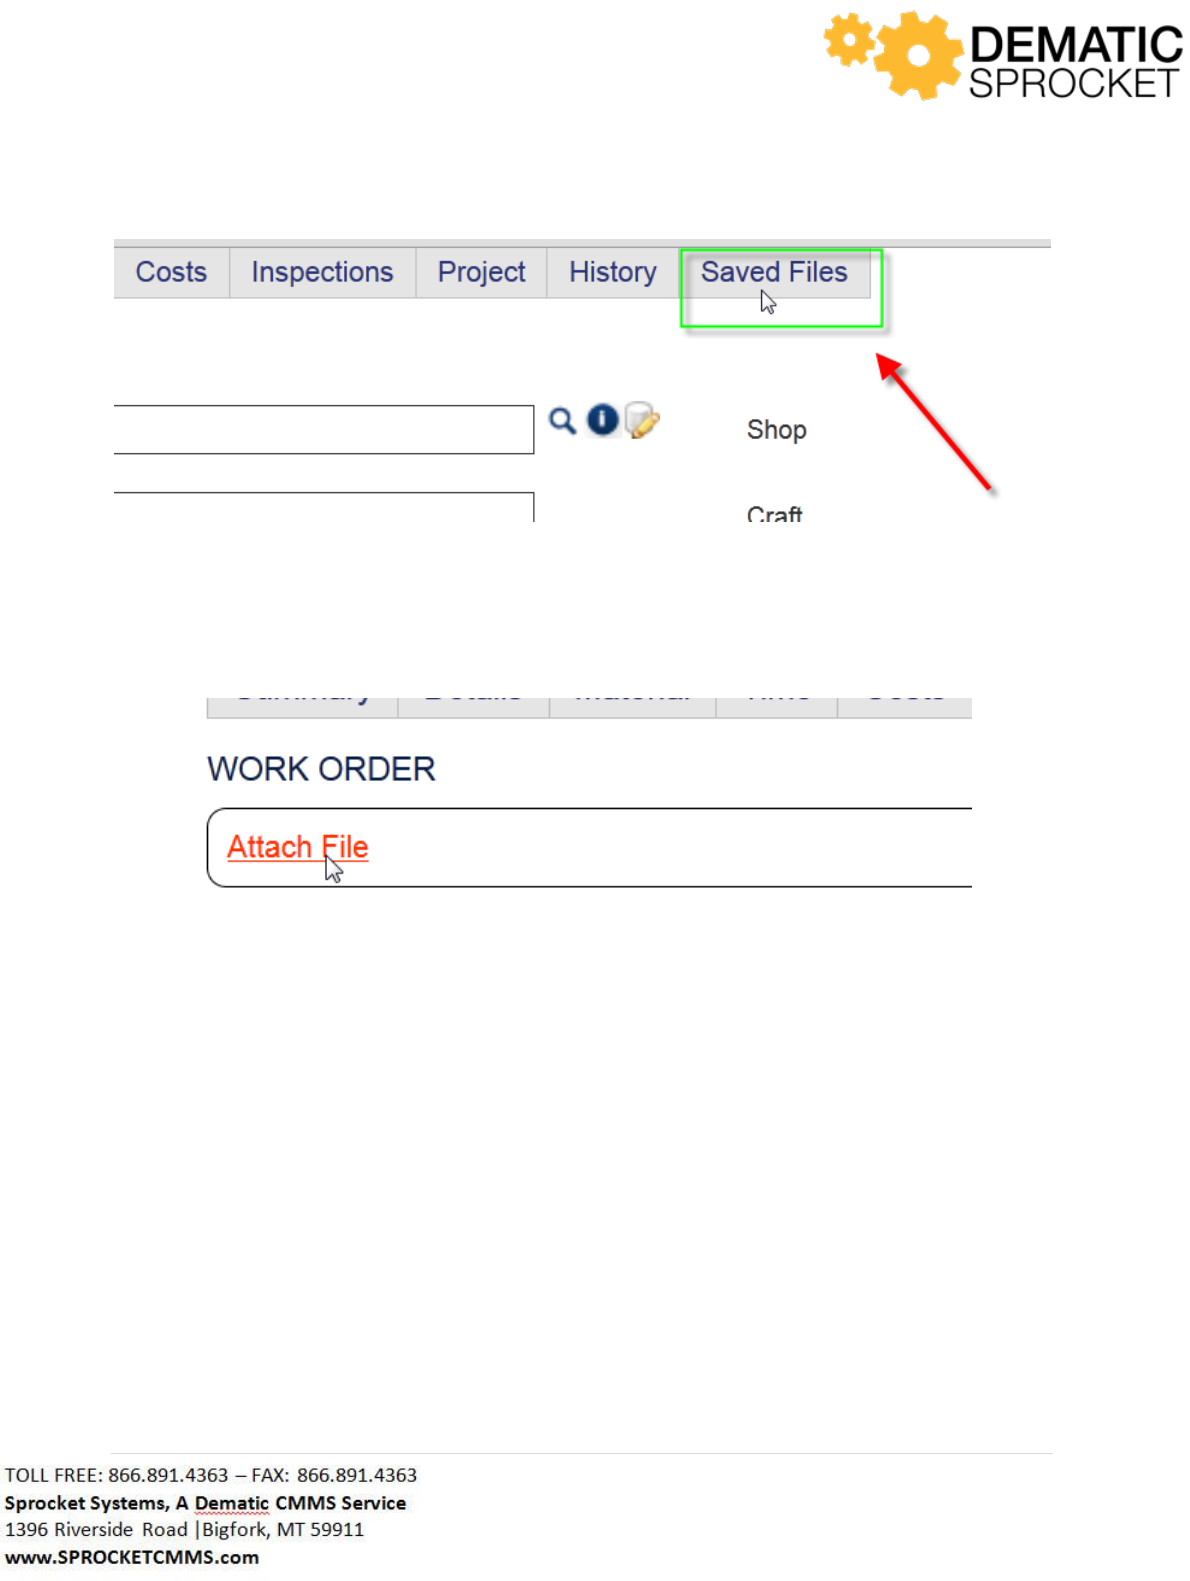
131 | P a g e
To attach a file to this work order, click the Attach File link.
A window will appear. Click the Browse button to search your computer for the file you would like to
attach to the work order.

132 | P a g e
Once you locate and select the file, click the Upload button to attach it to the work order.
Now the file name and a paperclip icon will be displayed under the Saved Files tab.
If you wish to view the Saved File attached to this work order, click the Saved Files tab from work order
details.
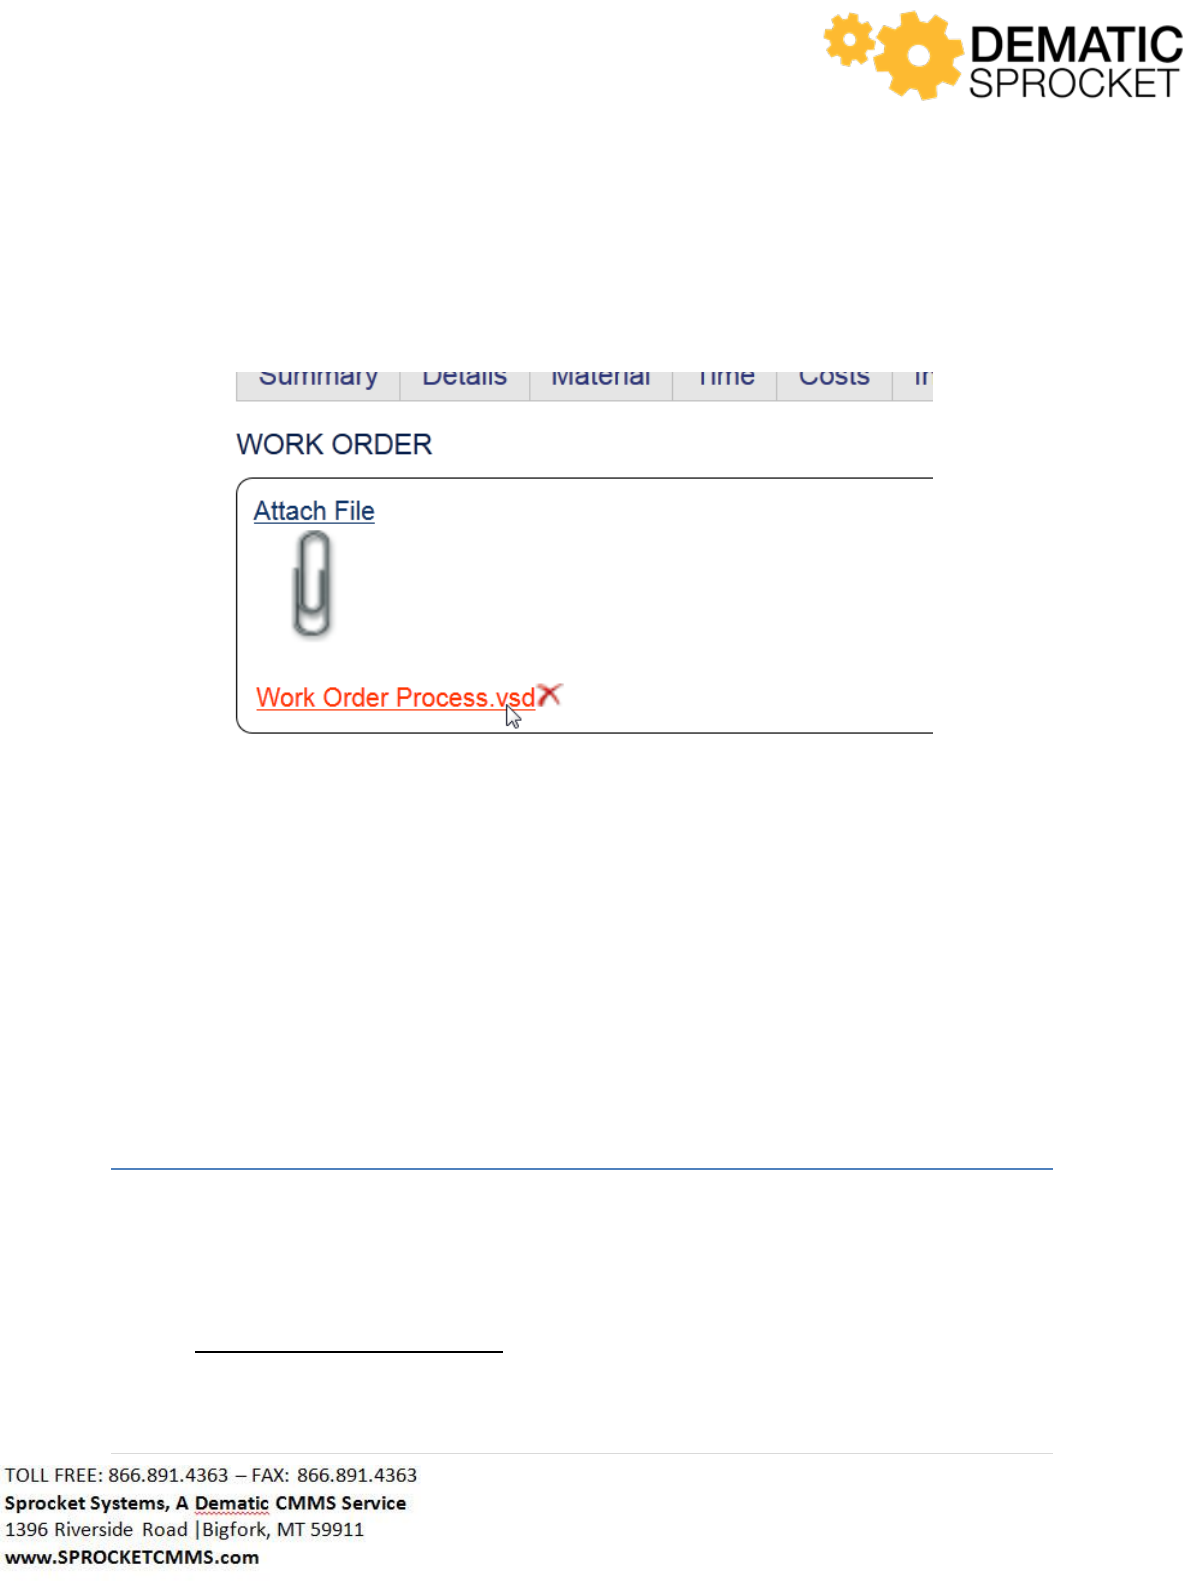
133 | P a g e
Once here, click the File Name link and the file will open in the appropriate program. If you wish to add
additional files, simply click the Attach File link again to add more files to this work order.
As always, when finished viewing, click the Save button at the upper right of the screen to ensure any
changes you have made will be applied to the work order.
6.0 Inspections Console
6.1 Inspection Manager
As you learned in the Work Order Details section, there will be times when it is necessary for you to
perform an inspection. If you need to run an inspection but it is not attached to a work order, you can
locate and conduct the inspection using the Inspection Manager within Inspections Console. To do this,
navigate Inspections
Inspection Manager.
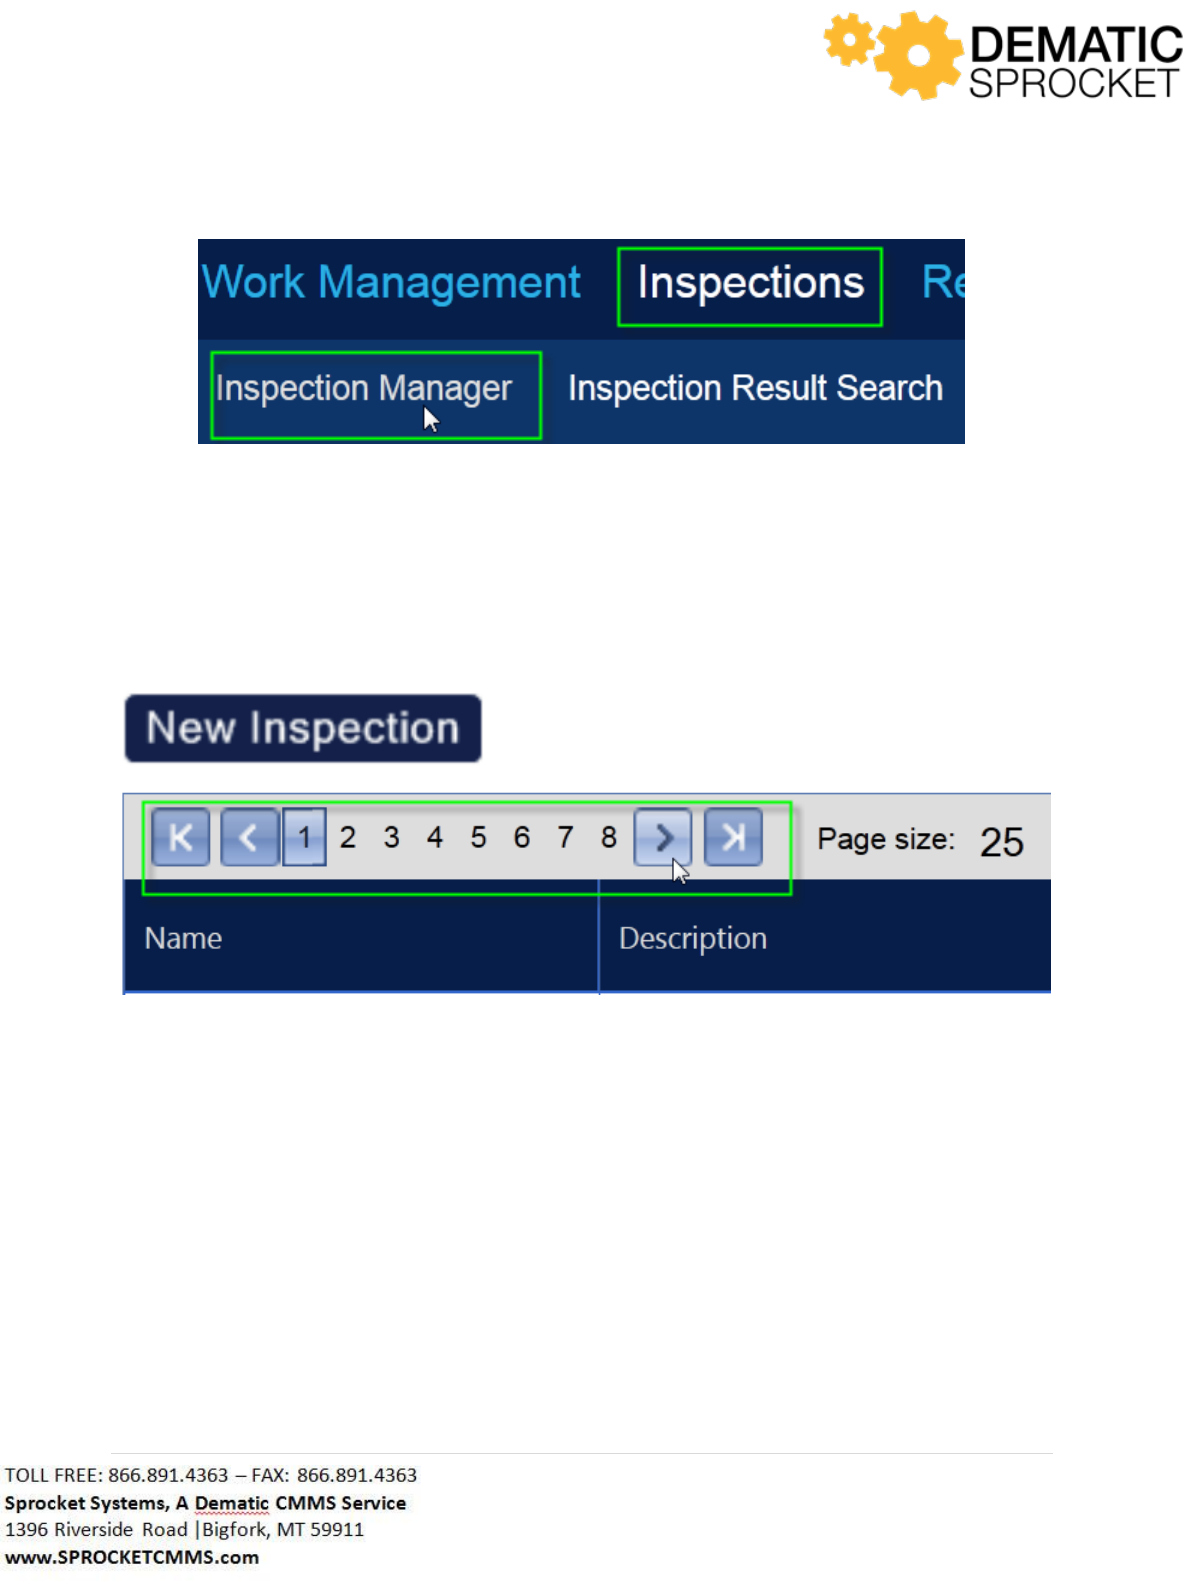
134 | P a g e
The Inspection Manager will display a list of all possible inspections in Sprocket. There are a couple of
different ways you can locate your inspection:
o You can use the page number arrows at the top of the grid to scroll through each
page of inspections and select the correct one
o You can use the Sprocket Search Criteria feature in the upper left hand corner of the
page.
To search for your inspection, click the Search button in the upper left hand corner of the page.
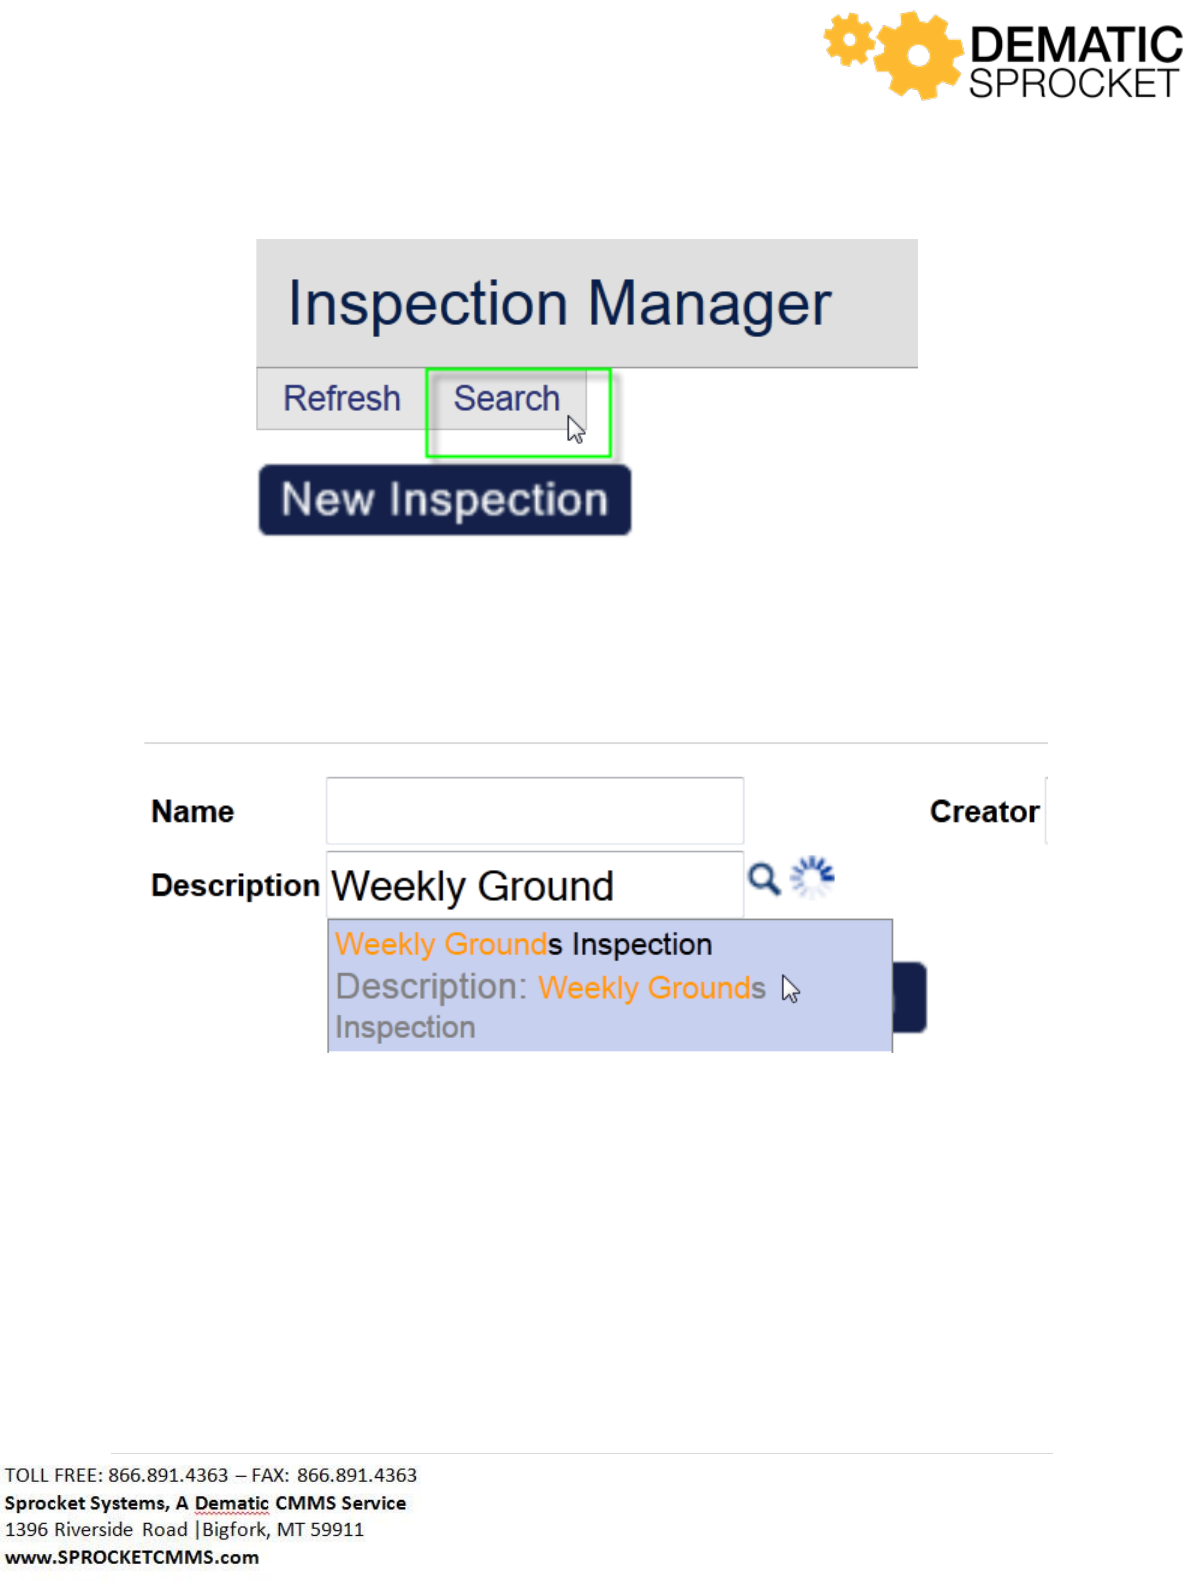
135 | P a g e
A window labeled Search Criteria will appear. Here you can enter in particular information you wish to
filter for you search. Let’s say we are searching for an inspection called Weekly Grounds Inspection. In
the Description field, enter in all or part of the name Weekly Grounds Inspection. Remember, the Auto
Lookup Tool will help locate the correct record.
Once the correct record is returned, select it and click Search.
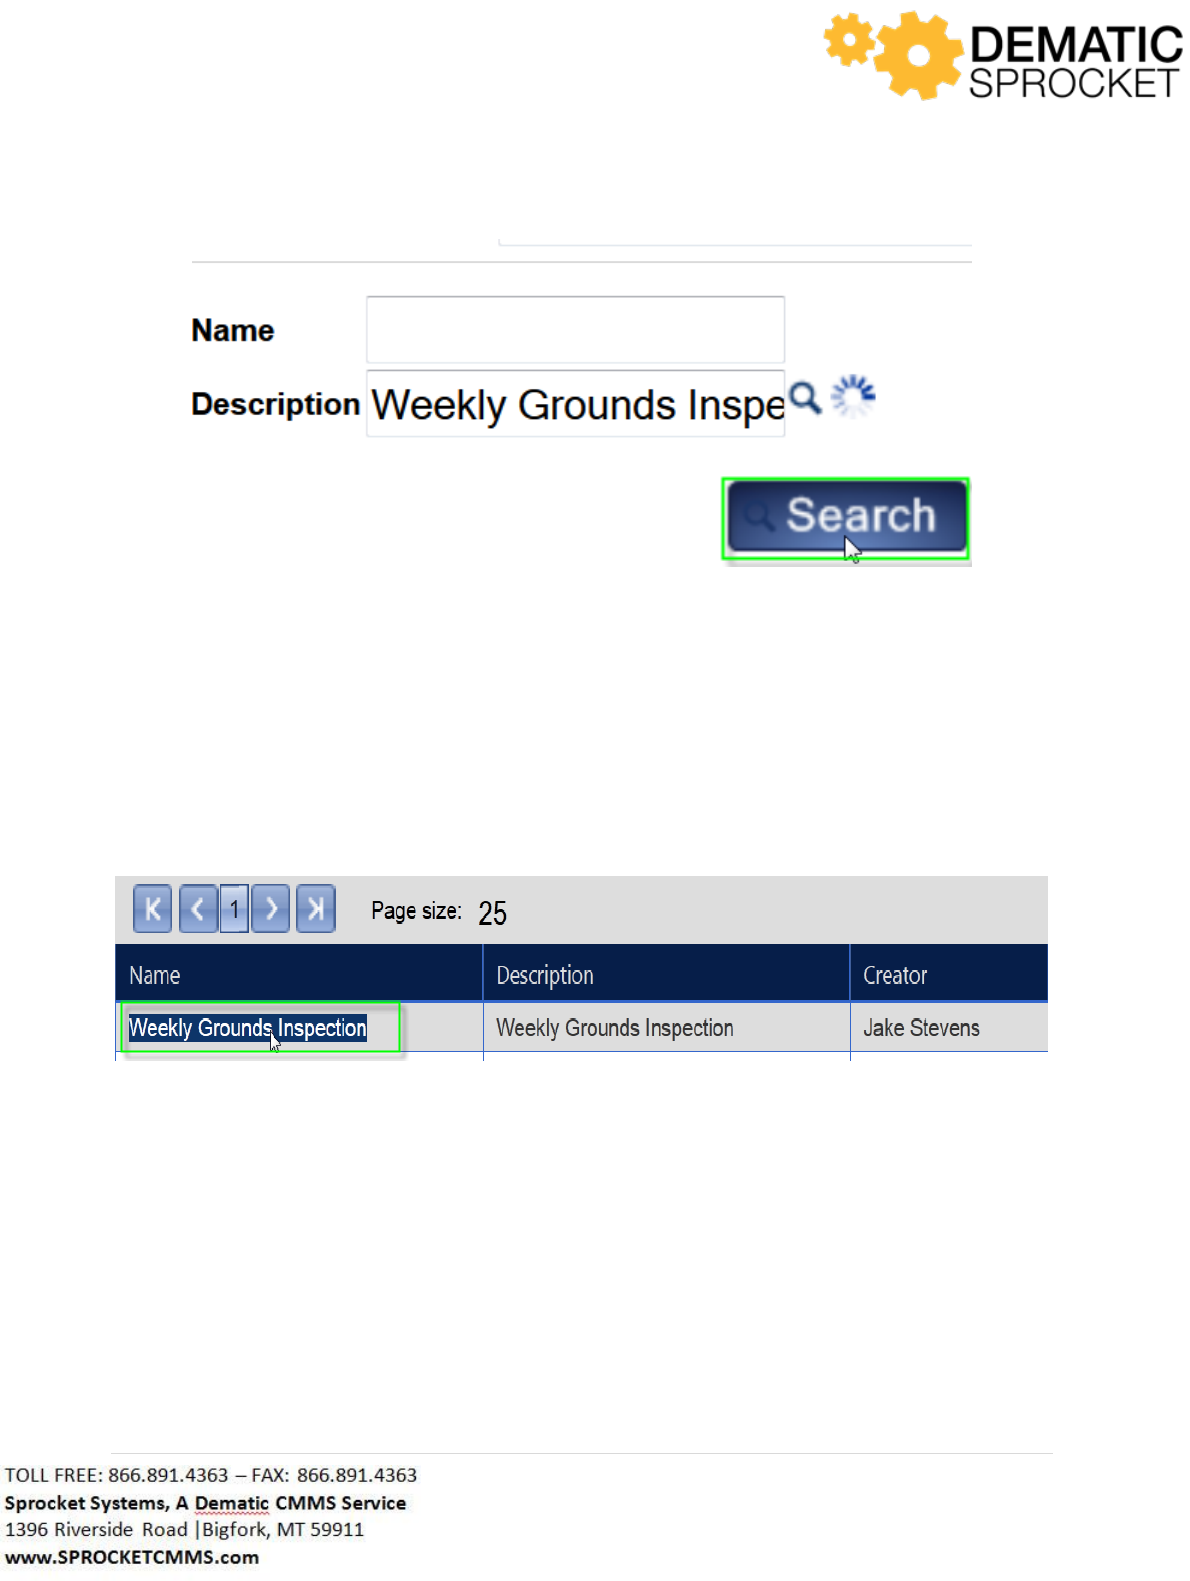
136 | P a g e
Note: Sprocket is customized based on customer needs. Your screen may or may not display the above
search fields. Contact your Sprocket Administrator with questions.
Now the correct results will be displayed. Select the name of your inspection to run and complete it.
Clicking the Inspection Name will automatically load the inspection form for you to complete.
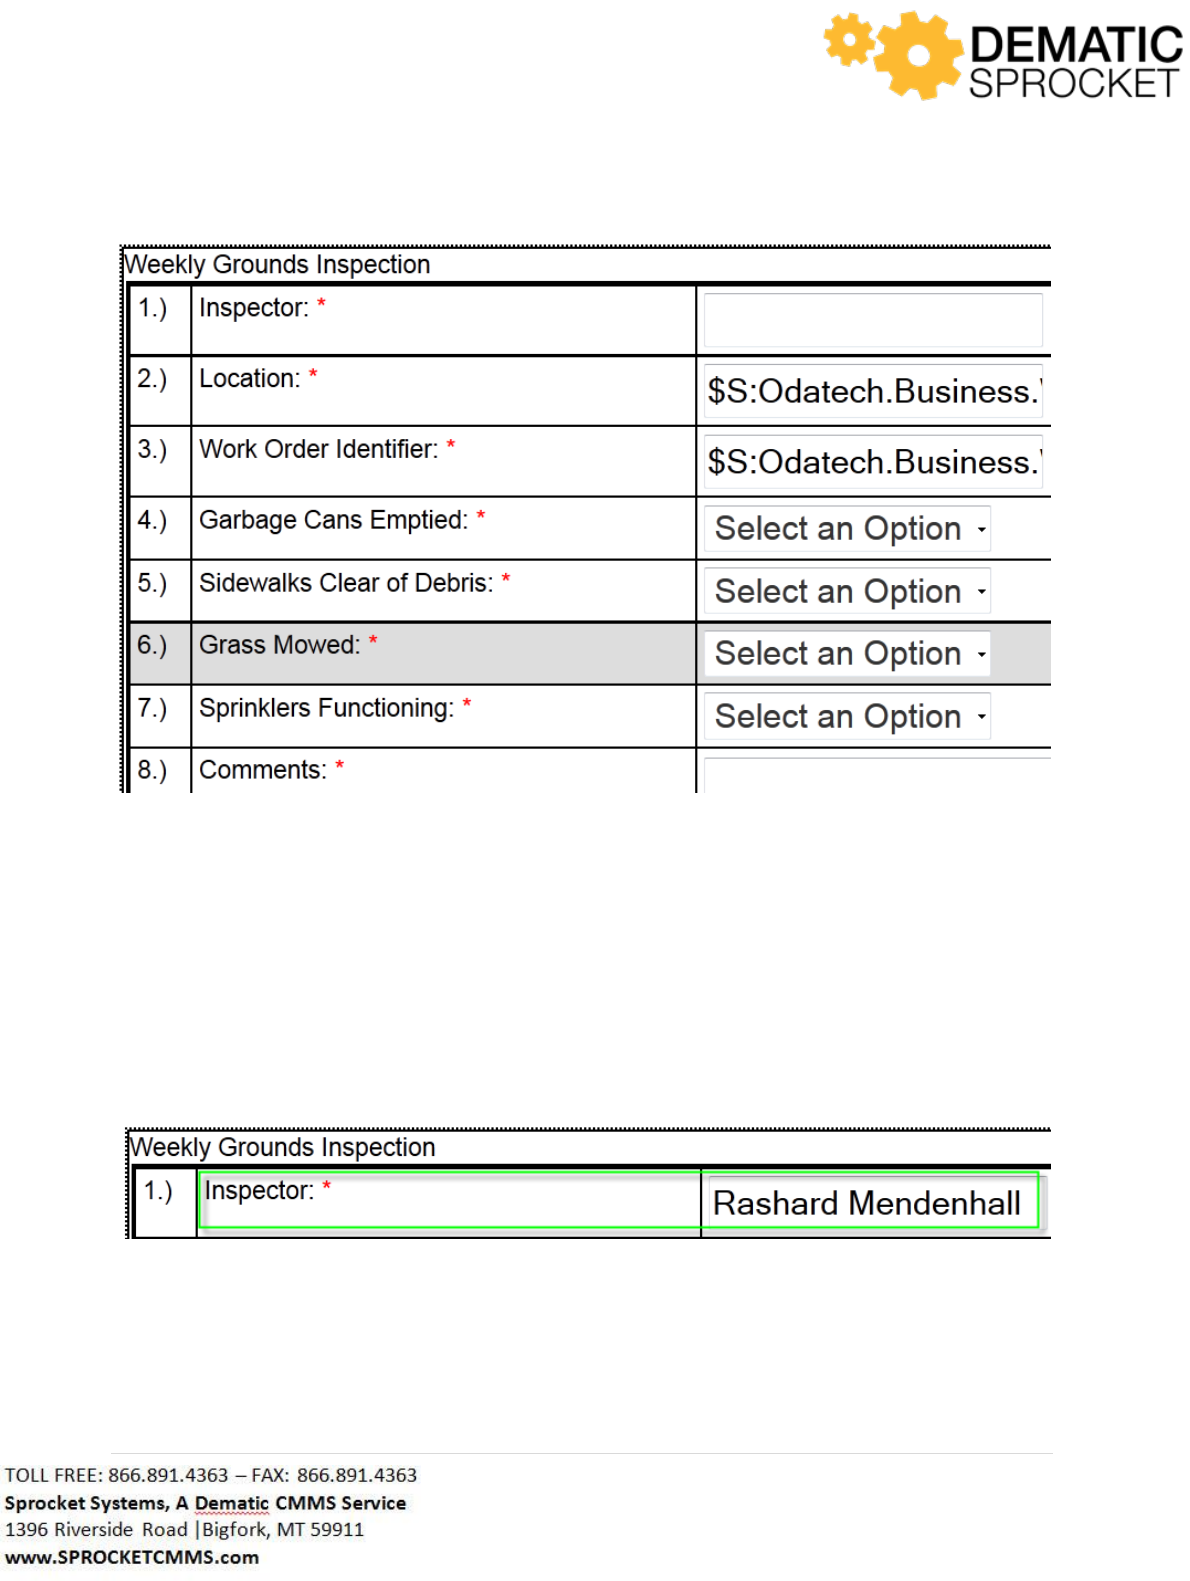
137 | P a g e
Note: Sprocket is customized based on customer needs. Your inspection may or may not display the
above fields and/or answer options. Contact your Sprocket Administrator with questions.
You may begin filling in the appropriate information into the inspection form. To enter information,
click inside the text field to begin typing or select an option from a drop down menu. Please note that
any field with a red asterisk next to it is a required field so you must provide an answer.
So, in the Inspector field, enter in your name because you are the person performing this inspection.
Notice that the Location and Work Order Identifier fields are filled in with lettering. This string of data
indicates that the person who created this inspection has added some actions that automatically fill in
this information, so you can skip these questions as they will be automatically answered for you.
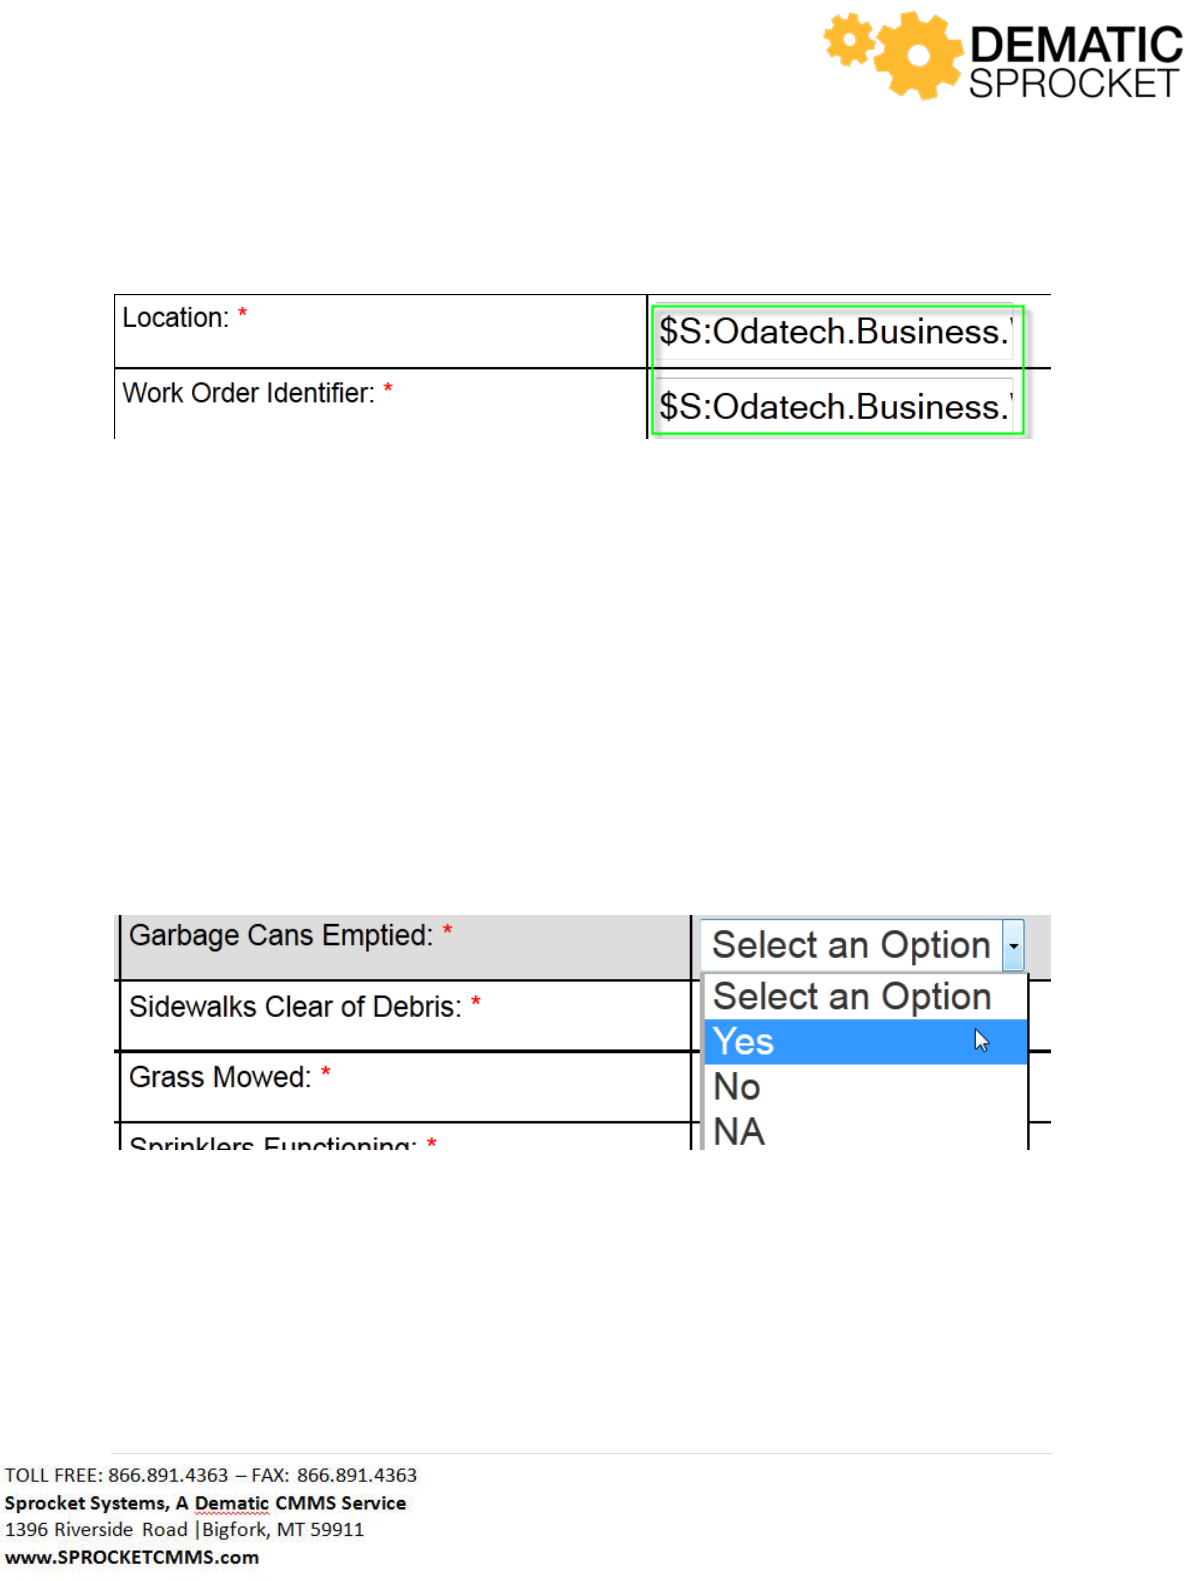
138 | P a g e
Next, notice that the four questions on this inspection have drop down menus for answer options. As
each item is inspected tap or select the Select an Option drop down menu to answer each question:
Yes
No
NA
Note: Sprocket is customized based on customer needs. Your inspection may or may not display the
above answer options. Contact your Sprocket Administrator with questions.
To answer a question, tap or select the Select an Option drop down menu next to each question. Locate
and select the appropriate answer and continue to the next question.
Continue through the inspection until you have answered all of the questions with the appropriate
answers.
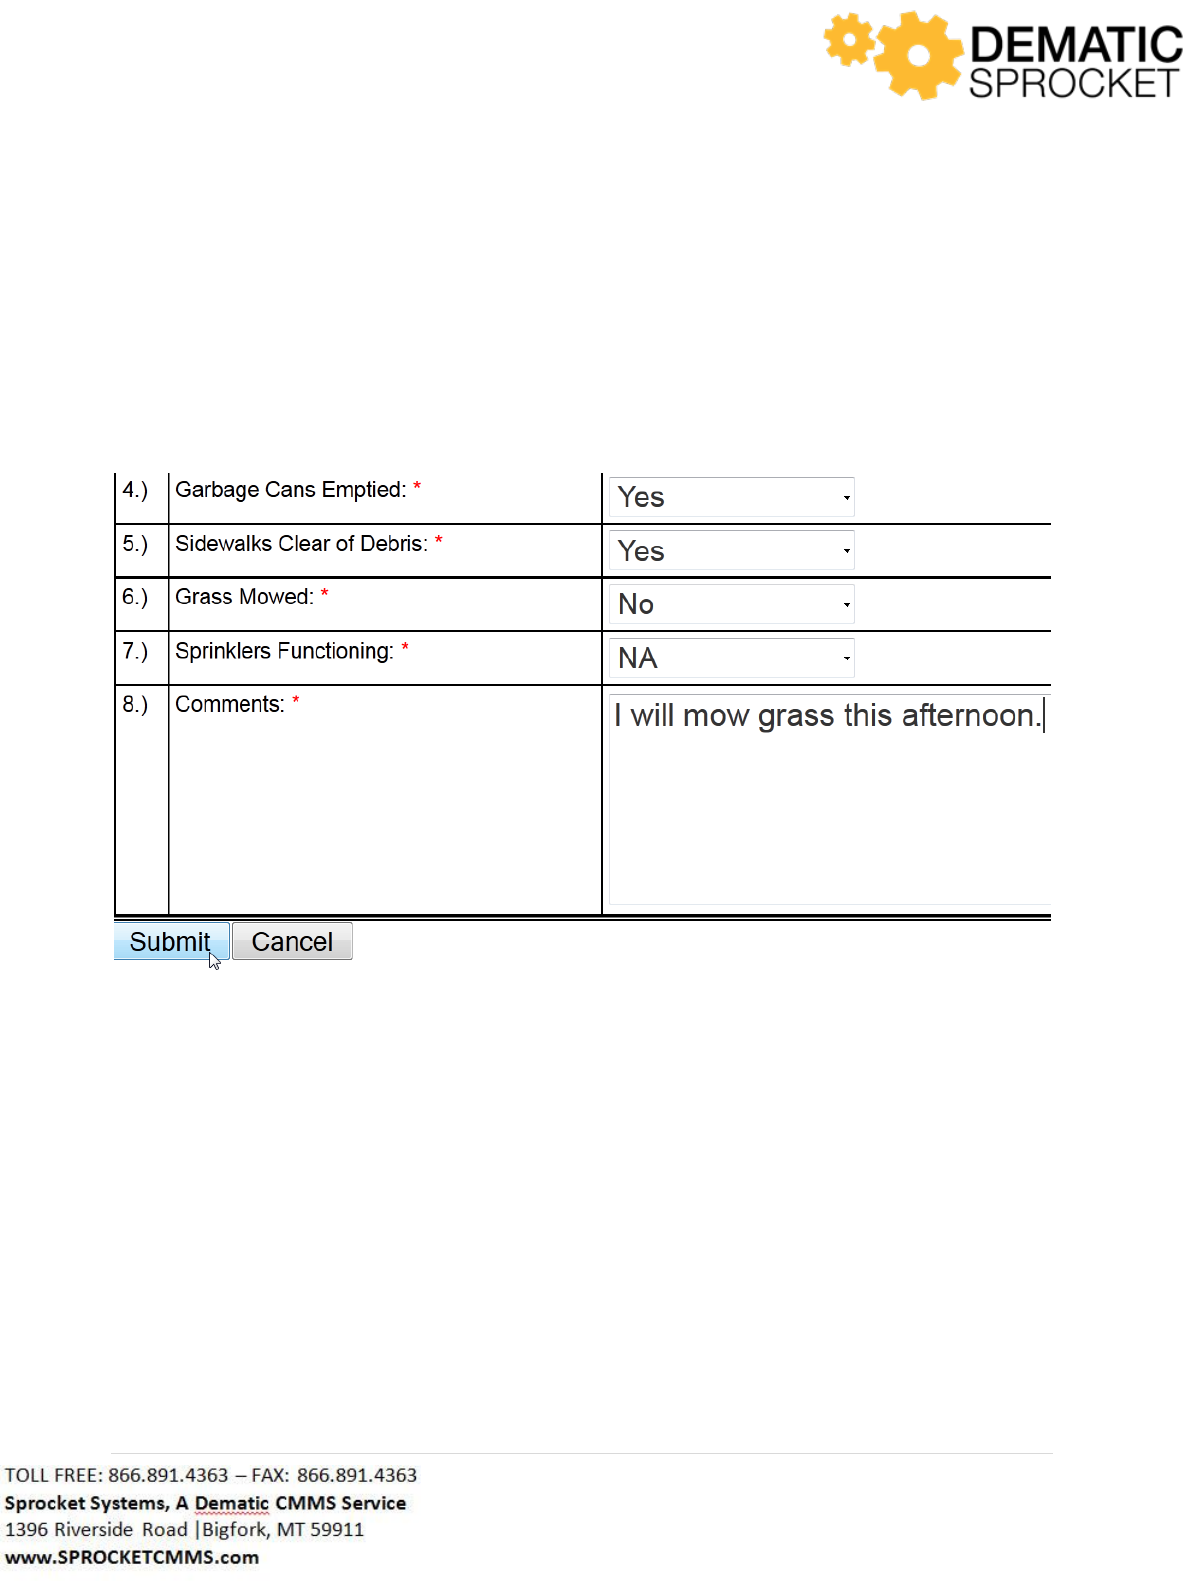
139 | P a g e
At the bottom of the inspection, notice that there is a text field labeled Comments. Here you can leave
any remarks about this inspection. Notice the red asterisk next to the field name indicating that this
field is also required.
Once you have answered all of the inspection questions and left comments, click the Submit button
submit your inspection results or click the Cancel button to return to the previous screen without
completing the inspection.
Now the results of this inspection will be automatically updated in Sprocket.
6.2 Inspection Results Search
If you submit an inspection and wish to view the results of the inspection, use the Inspection Results
Search tab.
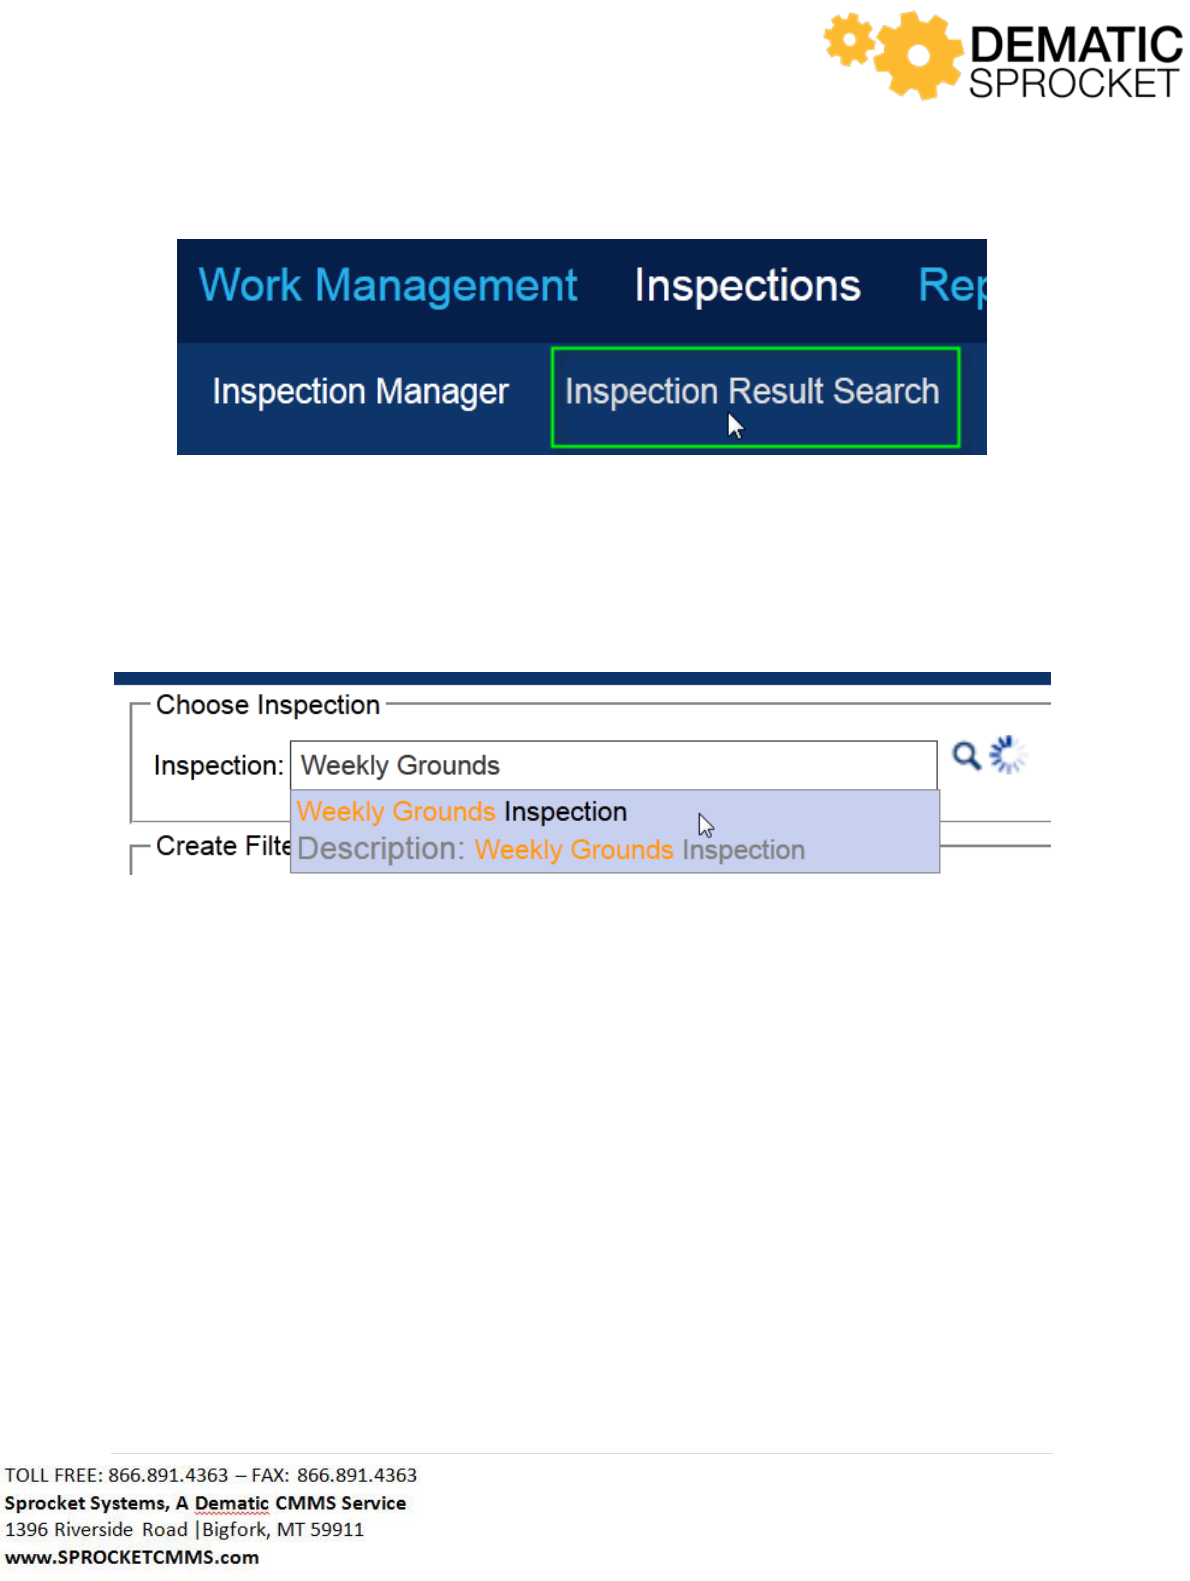
140 | P a g e
This will direct you to a form you can fill out and view the results. In the Choose Inspection, enter in the
name of the inspection you wish to see the results for. Remember the Auto Lookup Tool will help locate
the correct record in Sprocket if you either click the icon or enter into the text field all or part of the
name of the inspection.
Once the desired inspection is returned, select it and begin creating search filters in the Create Filters
section below. You must create filters because an inspection may be conducted on a monthly, weekly,
or even daily basis. So, you use filters to narrow down your search for a specific occurrence of an
inspection.
Use the Create Filters drop down menu to select which criteria you wish to search by. Let’s say we wish
to search for this inspection by the Inspector name. We want to see the inspection conducted by
employee JSTEVENS specifically.
So, using the drop down menu, select Inspector from the list.
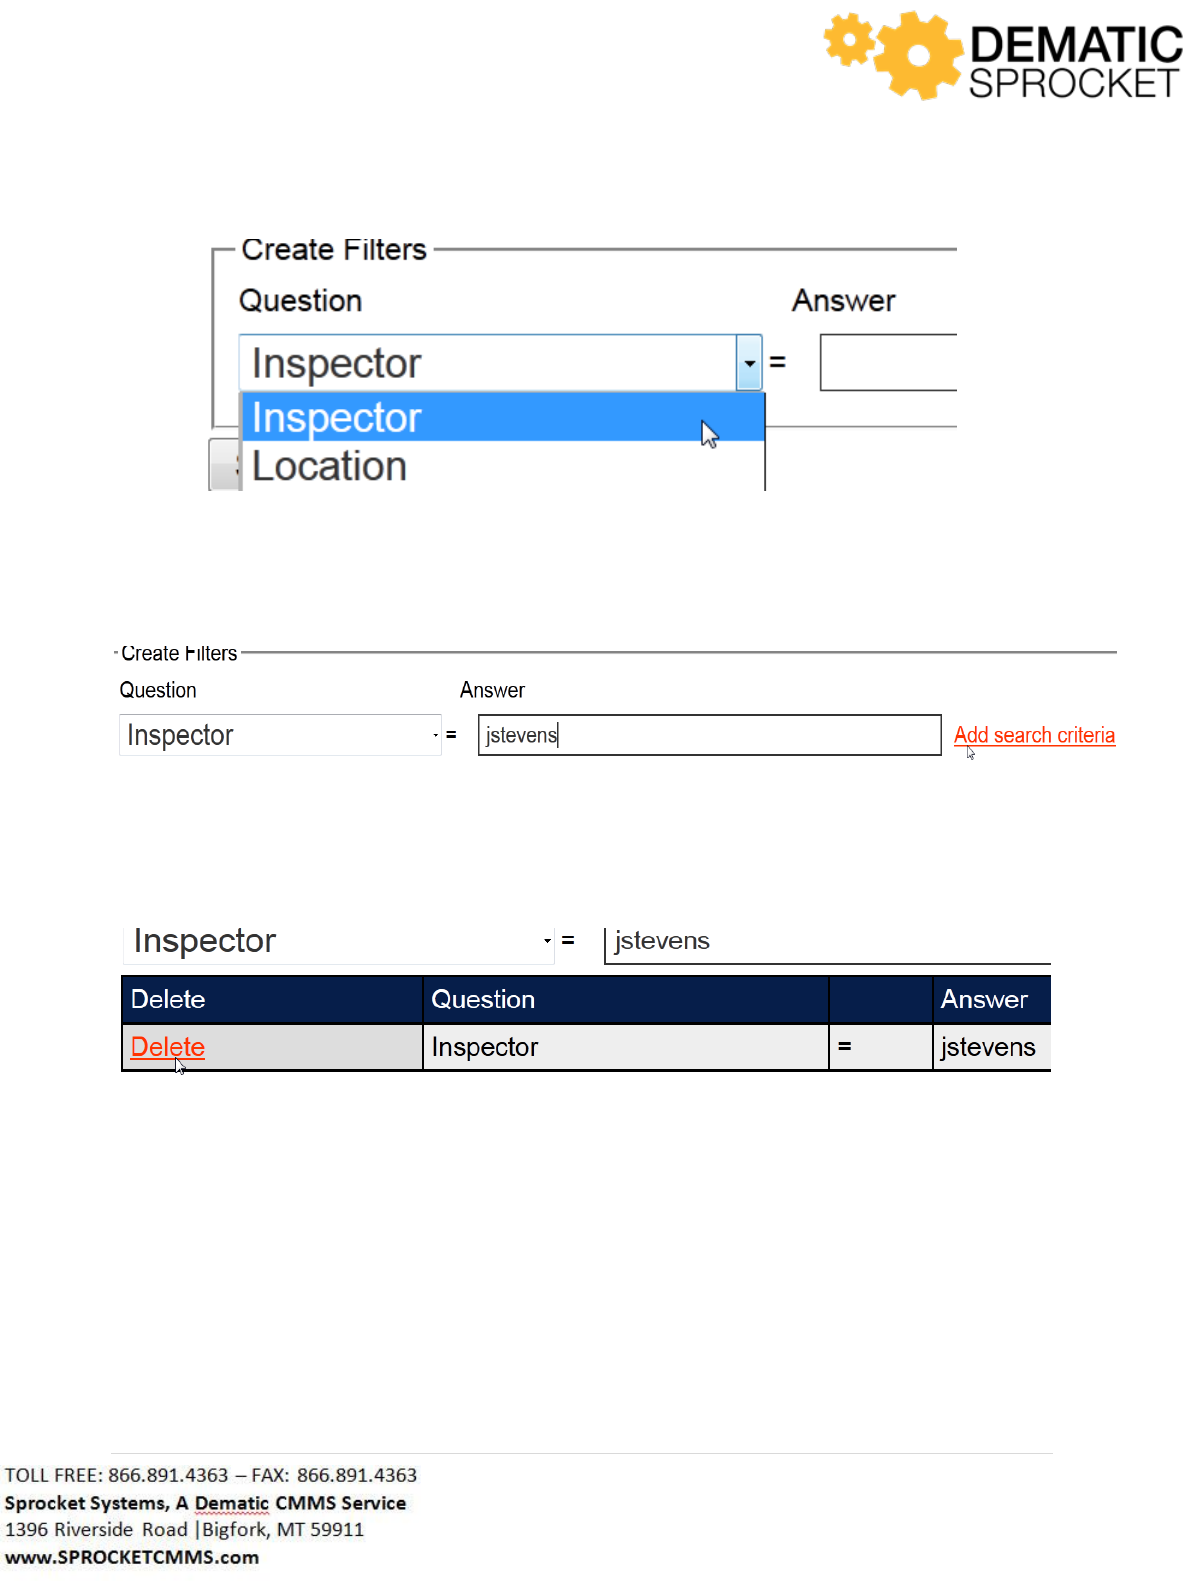
141 | P a g e
In the Answer field, type in JSTEVENS. Once you have entered the employee name into the text field,
click the Add Search Criteria link to the right of the text field.
Once you have added this Search Criteria, a grid will appear displaying your Search Criteria. If you wish
to remove this criteria, click the Delete link at the left of the grid.
If you wish to clear out this criteria and enter new search criteria, click the Clear Search Criteria link
below the grid.
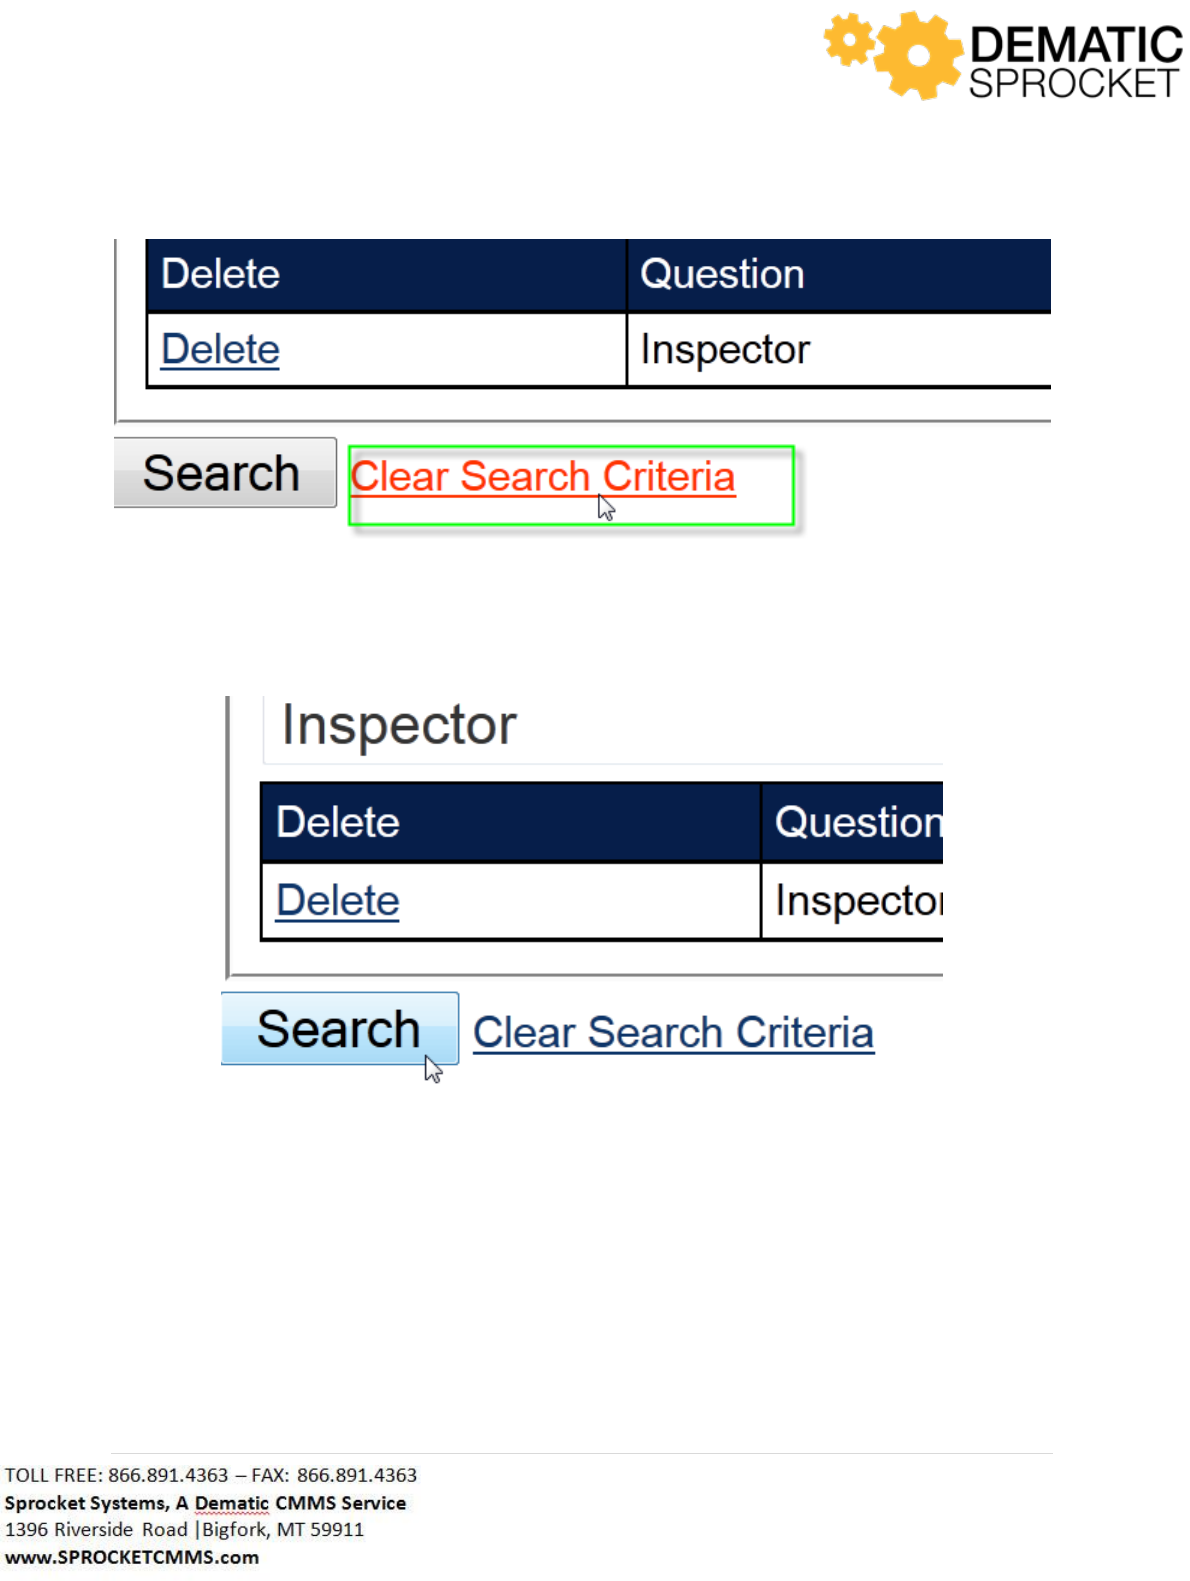
142 | P a g e
If you wish to use this criteria to search for the Inspection Results, click the Search button at the bottom
left of the page.
A grid will appear at the bottom of the page that displays all inspections by this inspector, per our Search
Criteria.
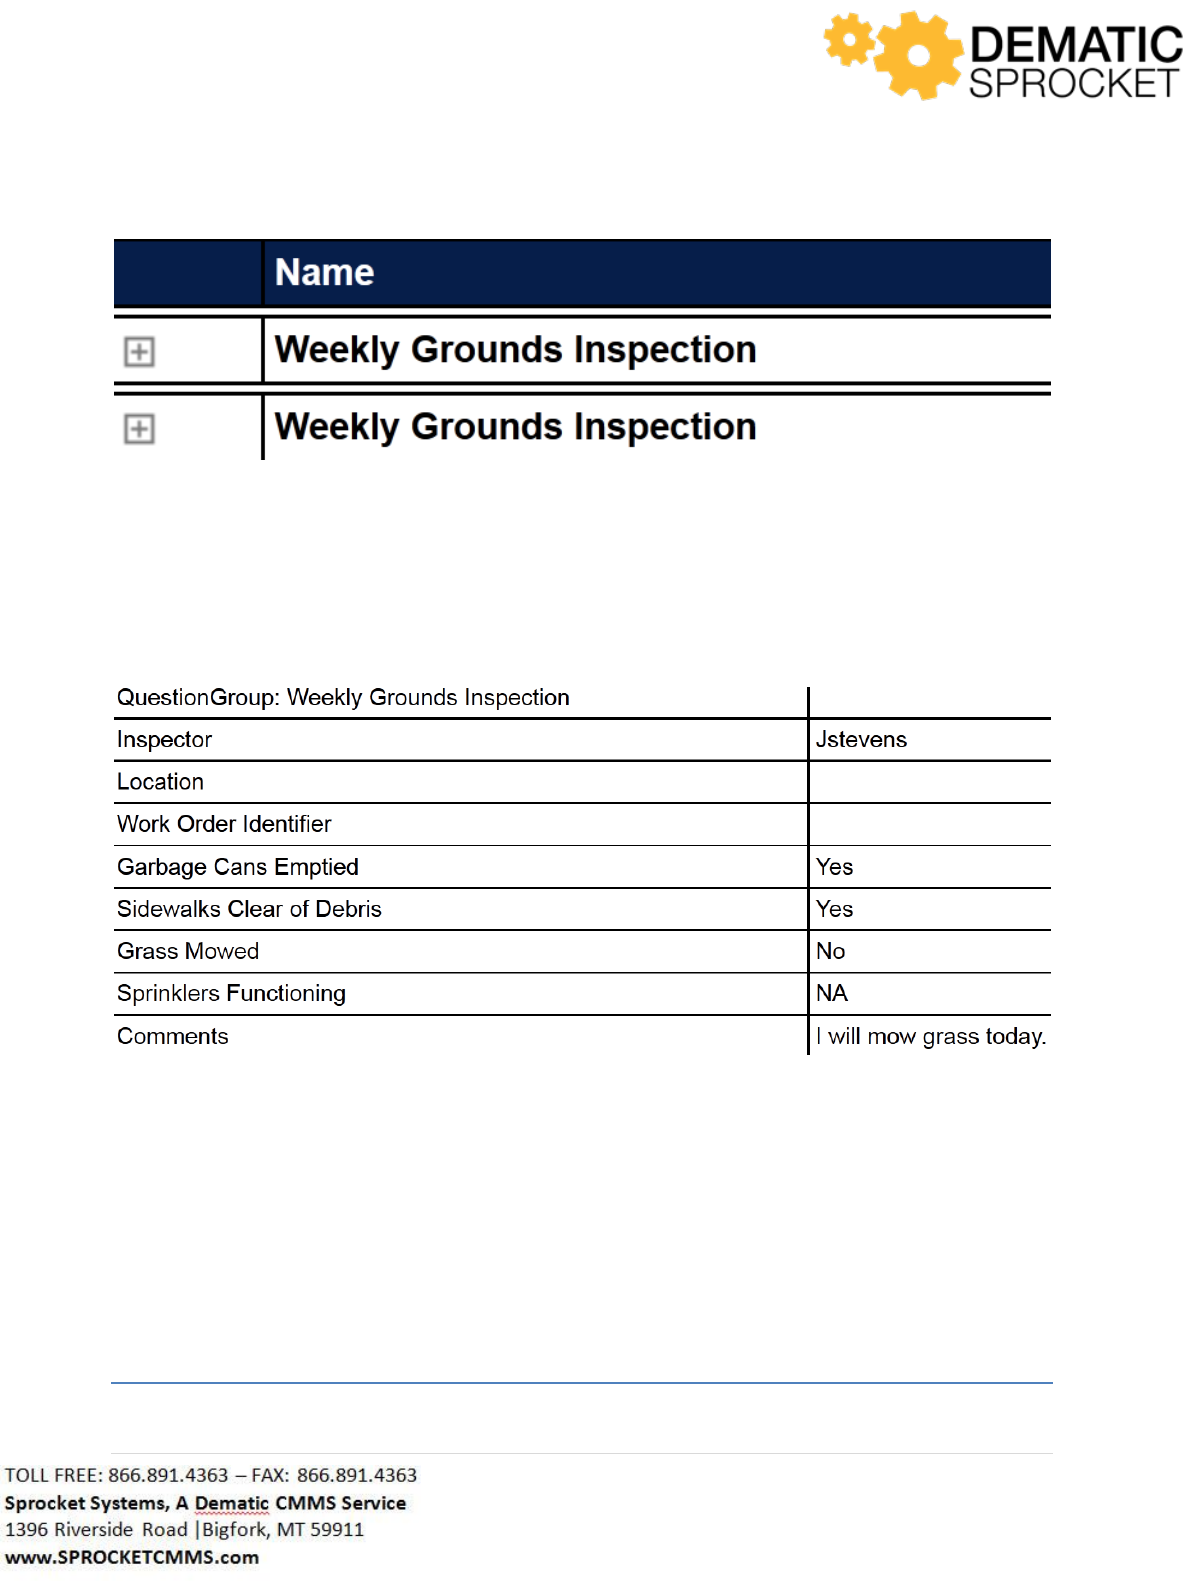
143 | P a g e
Use the plus signs at the left of each inspection row to view the results of each inspection.
Now you will be able to view your Inspection Results after submitting them as well as when they were
submitted.
7.0 Inventory Console
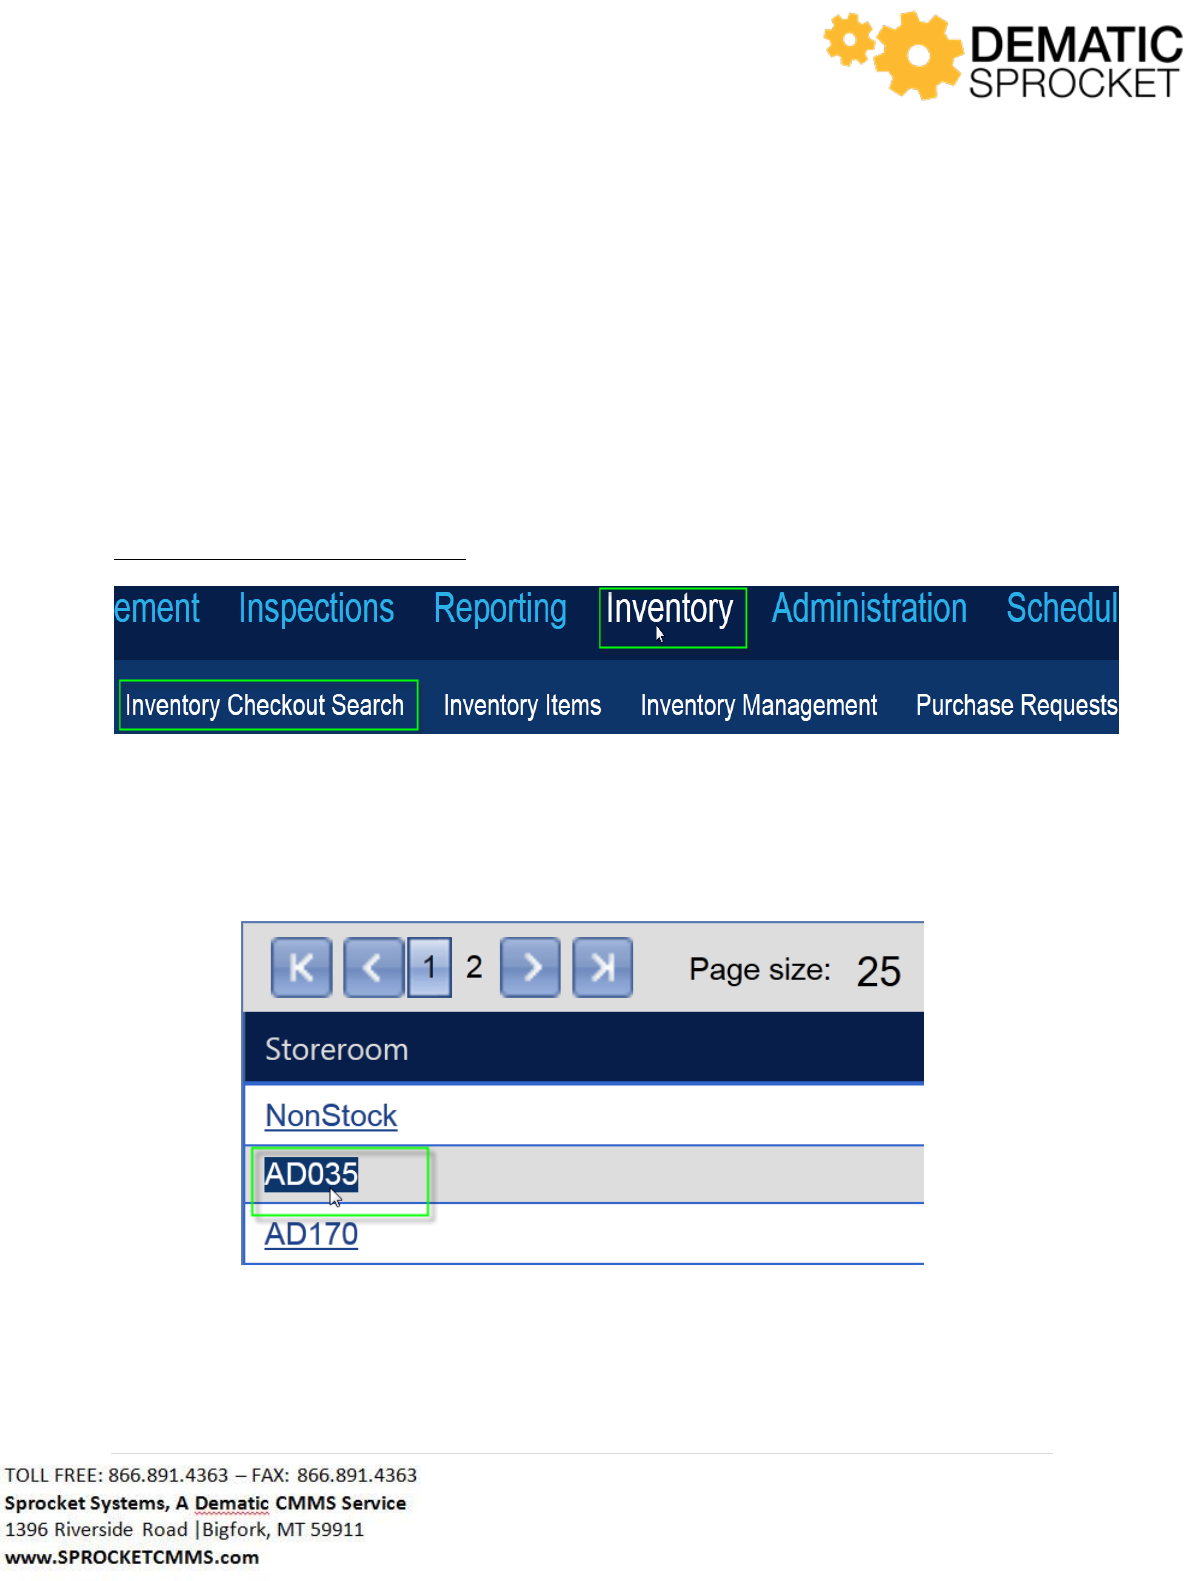
144 | P a g e
7.1 Inventory Overview
As a facility technician, you will use inventory items constantly in your day to day processes. This will
involve issuing items for work orders, checking storerooms for availability, and submitting purchase
requests to replenish inventory. The Inventory Module can help you do all of these things.
7.2 Inventory Checkout Search
Much like the Materials tab in Work Order Details, Inventory Checkout Search is used to check an item
out of inventory for use for a work order or return it to inventory. To checkout or return an inventory
item, navigate
Inventory
Inventory Checkout Search
Note: Sprocket is customized based on customer needs. Your screen may or may not display the above
tabs. Contact your Sprocket Administrator with questions.
You will be directed to a screen that displays all of the storerooms where inventory is kept for your
facility. To checkout an item from inventory, locate and select the desired storeroom.
Each storeroom name is a link. So let’s say you wish to check out an item from the AD036 Storeroom.
Simply click the name Master Storeroom and you will be directed to the checkout page.
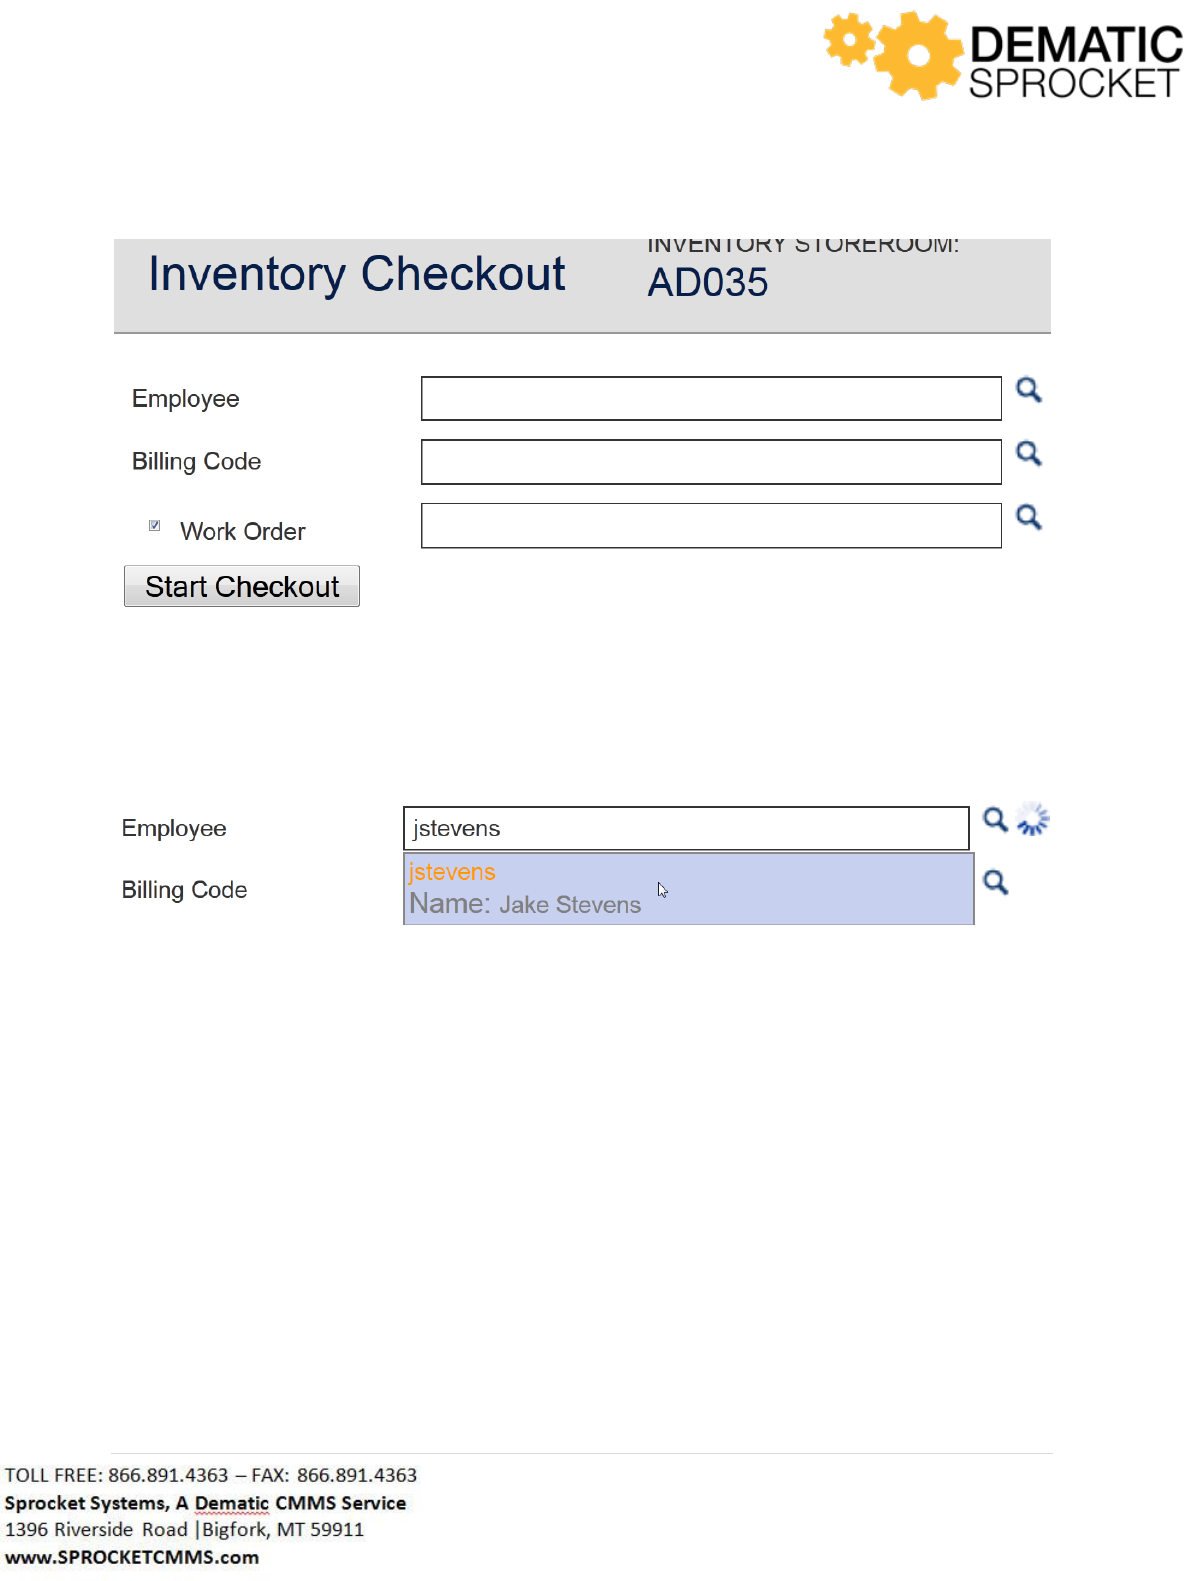
145 | P a g e
Here you can enter in the information for your inventory checkout. For the Employee field, enter in
your employee name, or use the Auto Lookup Tool to locate and tap or select the correct employee
name.
Next, enter in the correct billing code for this checkout. You can enter the Billing Code into the Billing
Code field, or use the Auto Lookup Tool to locate and tap or select the correct Billing Code.
To search for the correct billiing code using the Auto Lookup Tool, click the Auto Lookup Tool icon at the
right of the field.
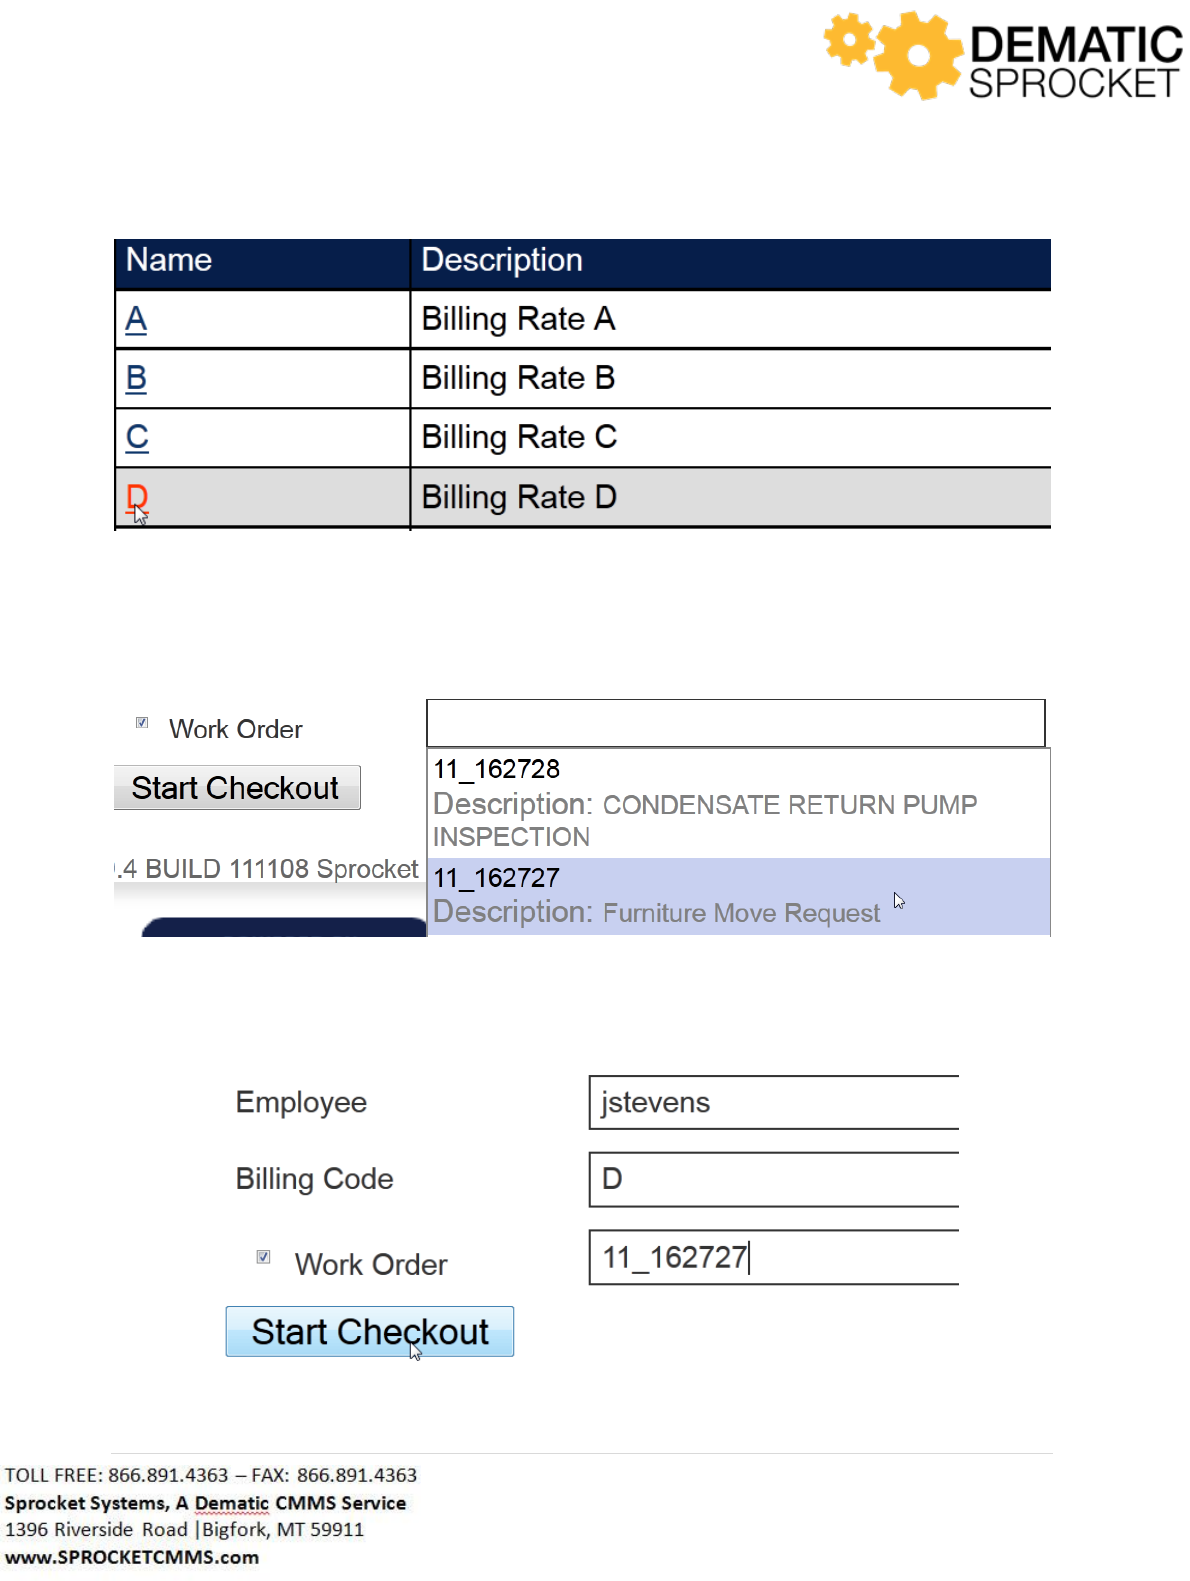
146 | P a g e
Note: Sprocket customizes screen settings as needed for customers. Your screen may or may not display
the billing codes. These settings are based on configurations and can be customized or modified.
Next, select the work order for which you will be checking out an item.
Once you have entered in this information, click the Start Checkout button.
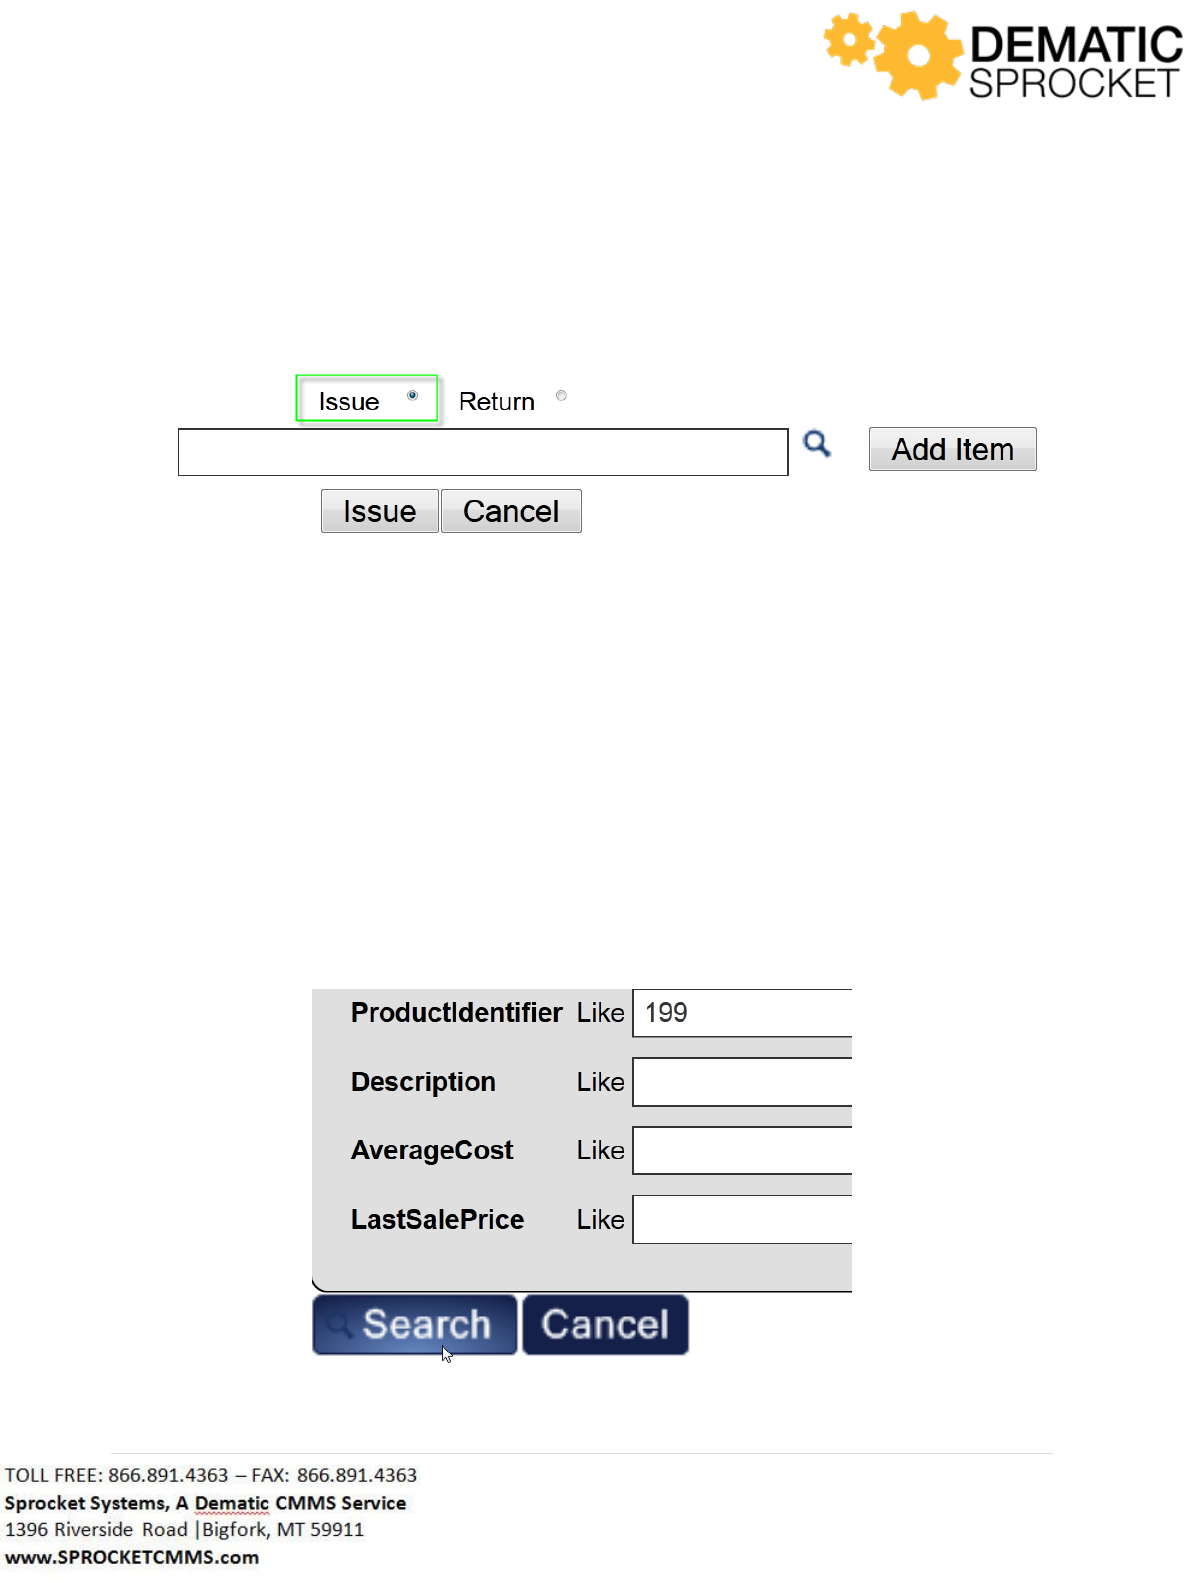
147 | P a g e
7.2.1 Issuing Items
Now, you are directed to the Inventory Checkout screen. Here you can issue or return an inventory
item. To check out an item, be sure that the Issue button is selected.
Next, in the Product Identifier field, click the Auto Lookup Tool to locate and select the correct inventory
item. Selecting the Auto Lookup Tool brings you to a search screen. Here you will locate and select the
item you wish to checkout from inventory.
Notice that there are search fileds located at the top of the screen to help you located and select
inventory items. In the Product Identifier Like field at the top left of the screen,enter in all or part of the
Product Identifier to search for your item.
In the Like field, type in part or all of the Product Identifier to search for an inventory item. Let’s say you
want to search for any item with the number 199 in the Product Identifier. Enter 199 into the Like field.
Once you have entered in your search criteria, click the Search button to view search results.
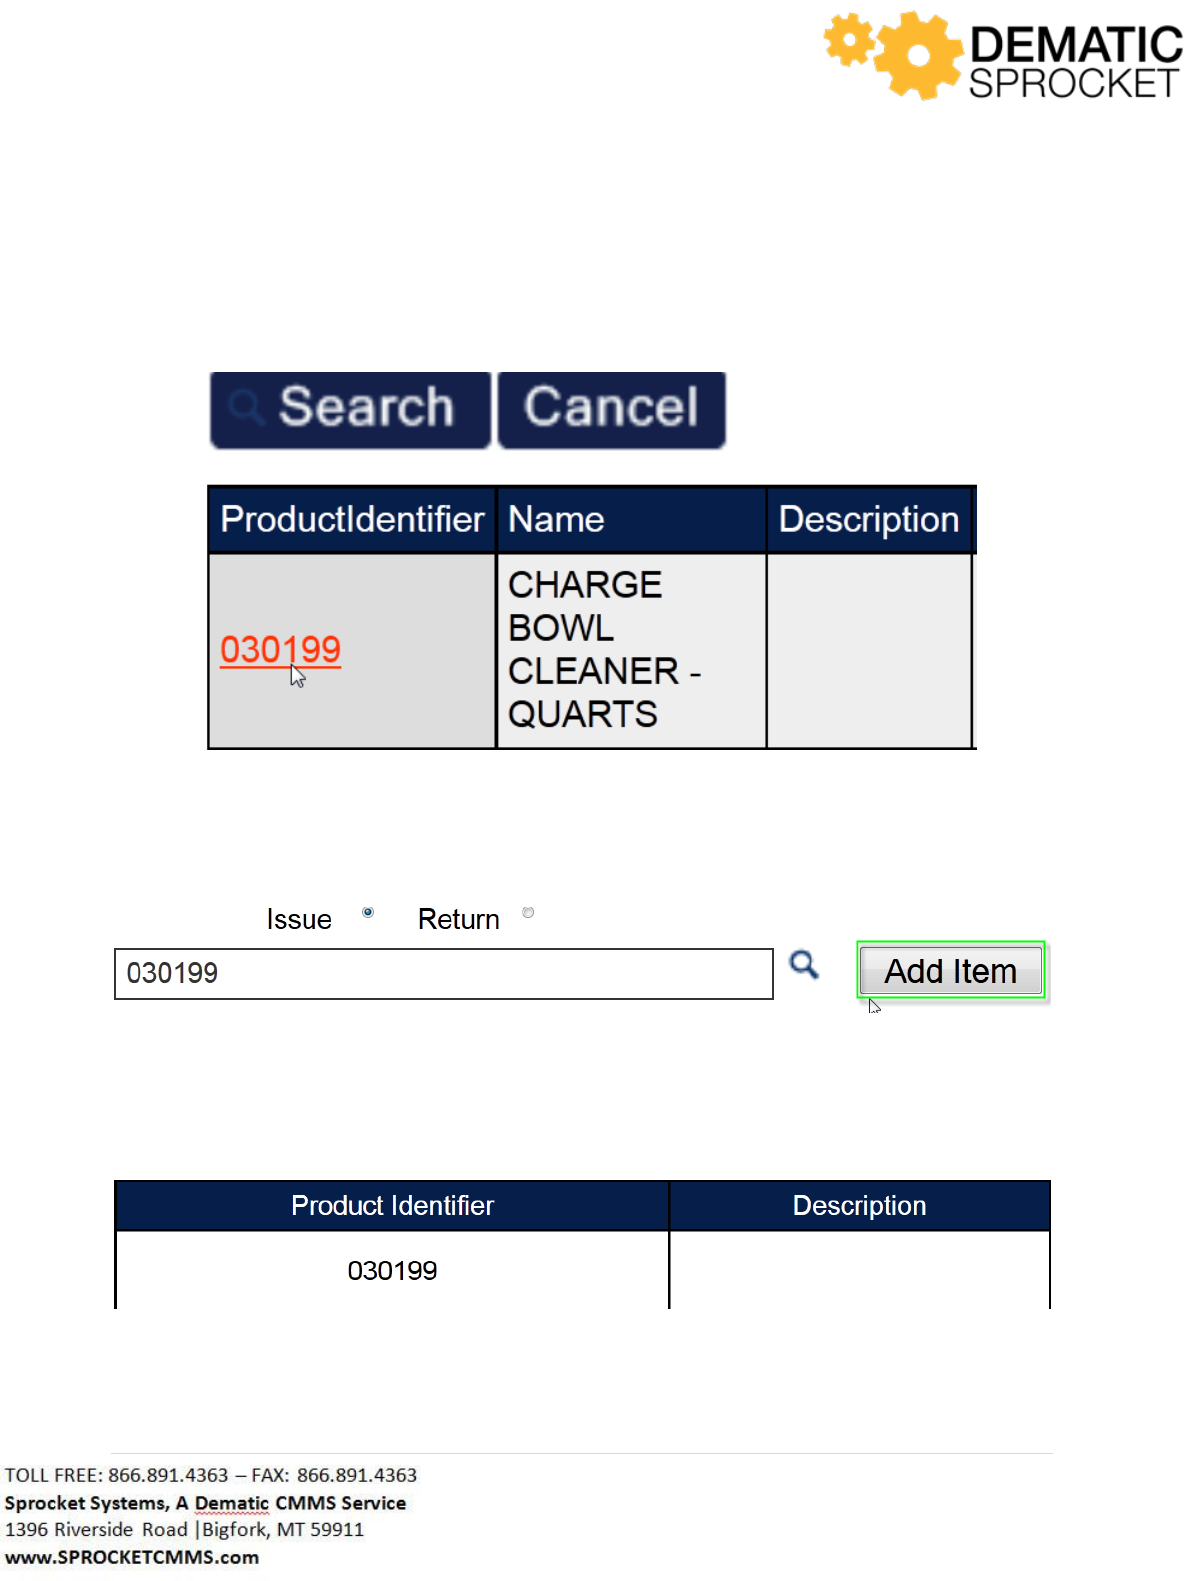
148 | P a g e
Once your search results are displayed, select the desired Product Identifier to return to the checkout
screen.
Now your selected product is added to the Product Identifier field on the checkout screen. Click the Add
Item at the right of the field to select it for a material issue.
Notice that this item is populated in a grid at the bottom of the screen. Now, you may select other
items to add to this checkout transaction, if you wish.
If this is an item you do not wish to checkout, click the Remove button at the right hand side of the grid.
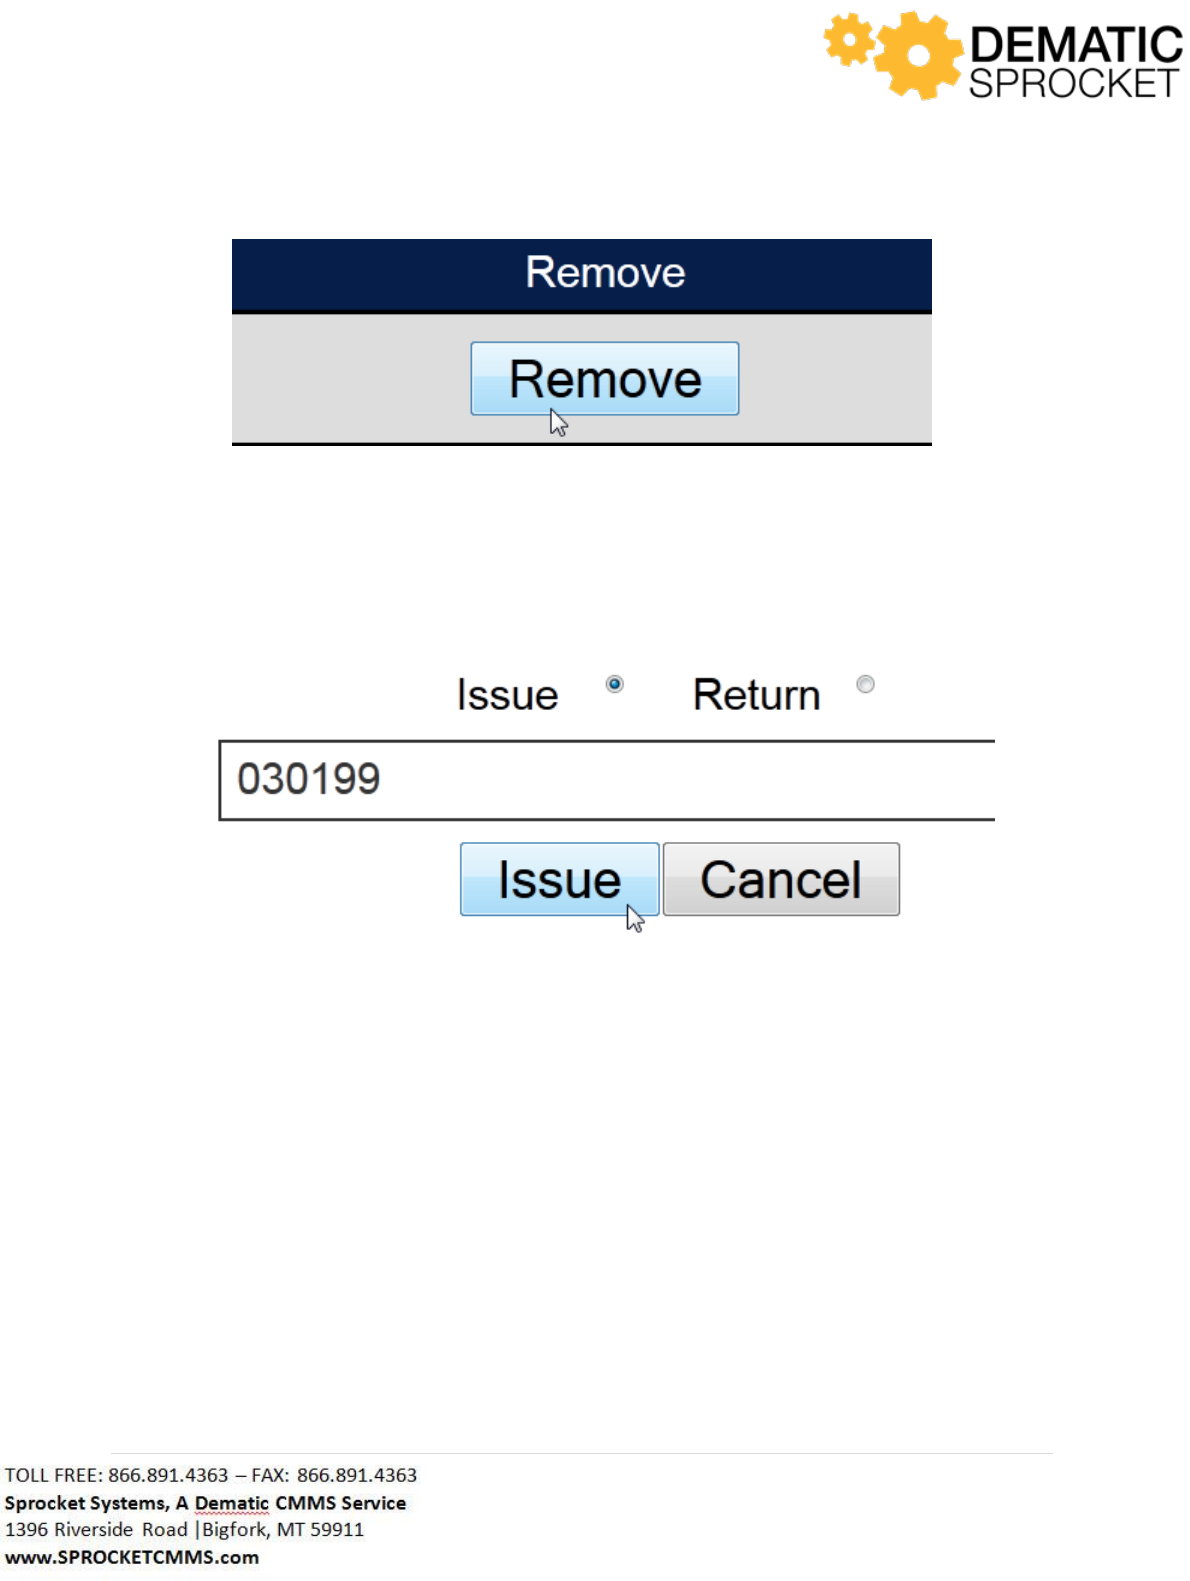
149 | P a g e
Once your search criteria is set, click the Issue button to yield search results.
A window will appear saying Issue Successful. Click OK to continue.
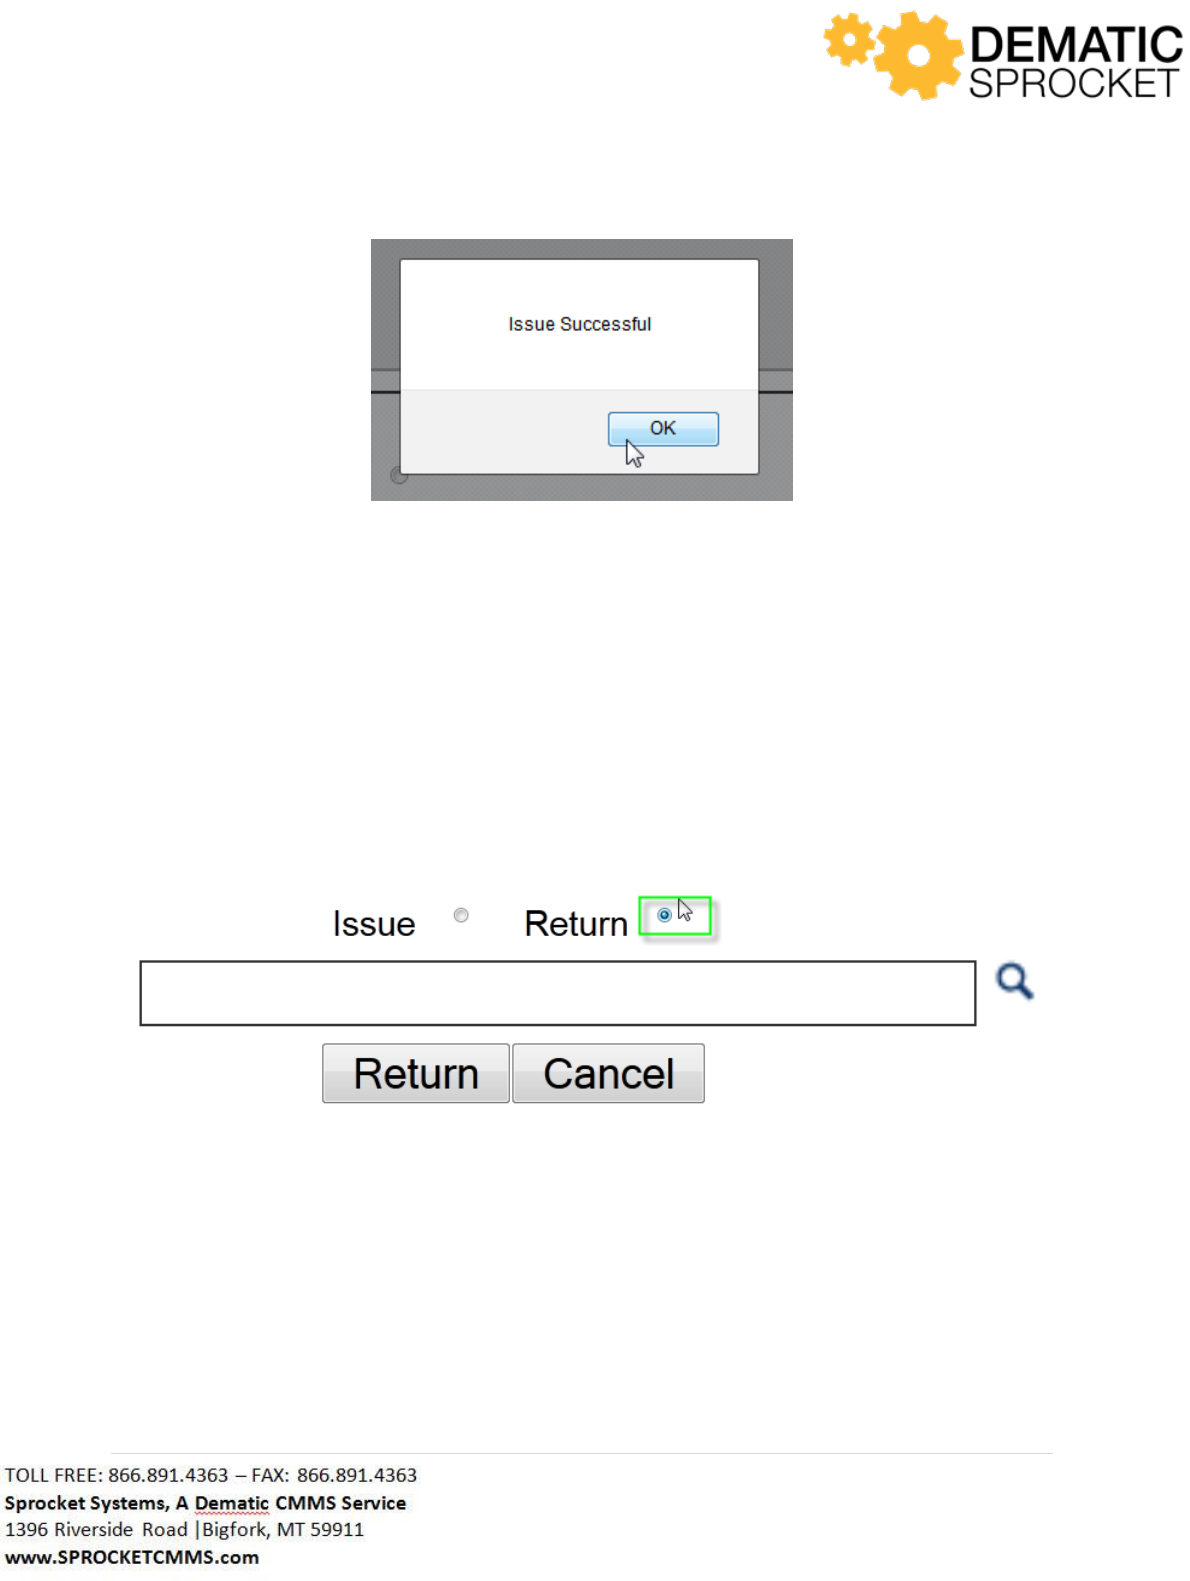
150 | P a g e
Now your checkout transaction has been completed. You will be returned to the Inventory Checkout
screen where you may checkout another item to another work order.
7.2.2 Returning Items
You may also return items to inventory using the Inventory Checkout screen. . To return an item, be
sure that the Return button is selected.
Next, in the Product Identifier field, click the Auto Lookup Tool to locate and select the correct inventory
item. Selecting the Auto Lookup Tool brings you to a search screen. Here you will locate and select the
item you wish to return to inventory.
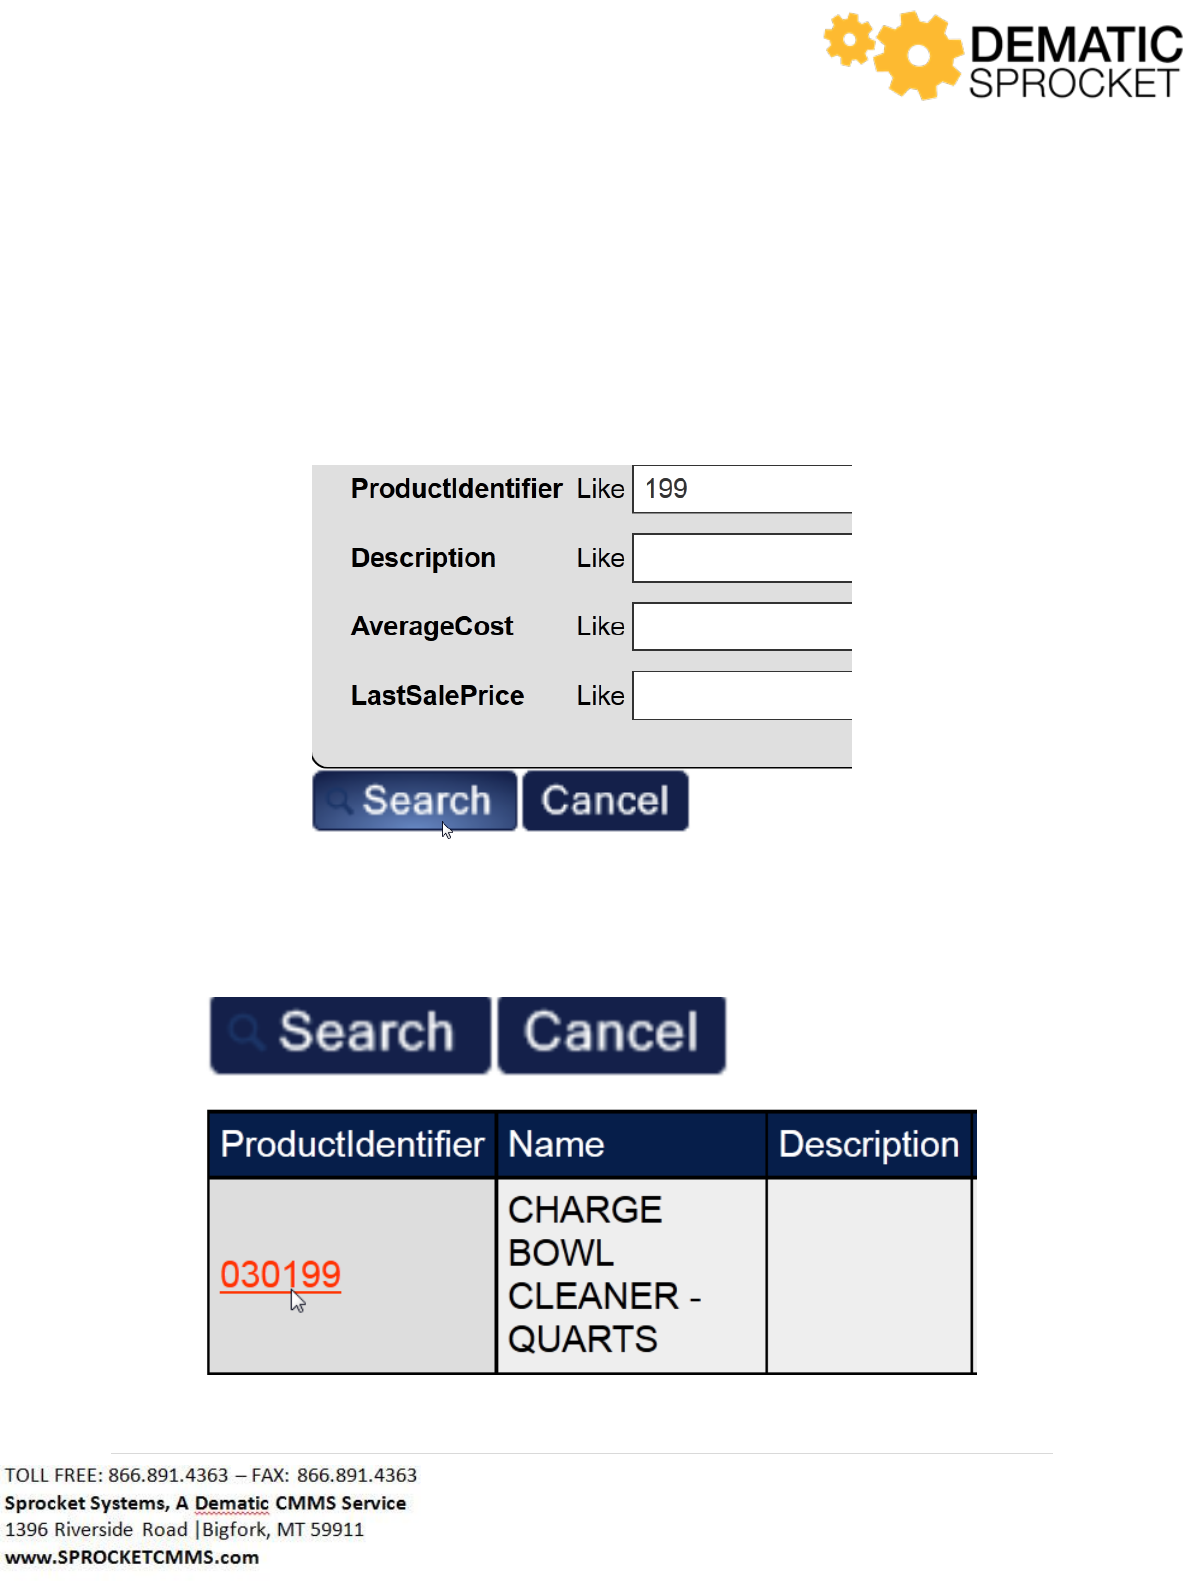
151 | P a g e
Notice that there are search fileds located at the top of the screen to help you located and select
inventory items. In the Product Identifier Like field at the top left of the screen,enter in all or part of the
Product Identifier to search for your item.
In the Like field, type in part or all of the Product Identifier to search for an inventory item. Let’s say you
want to search for any item with the number 199 in the Product Identifier. Enter 199 into the Like field.
Once you have entered in your search criteria, click the Search button to view search results.
Once your search results are displayed, select the desired Product Identifier to return to the checkout
screen.
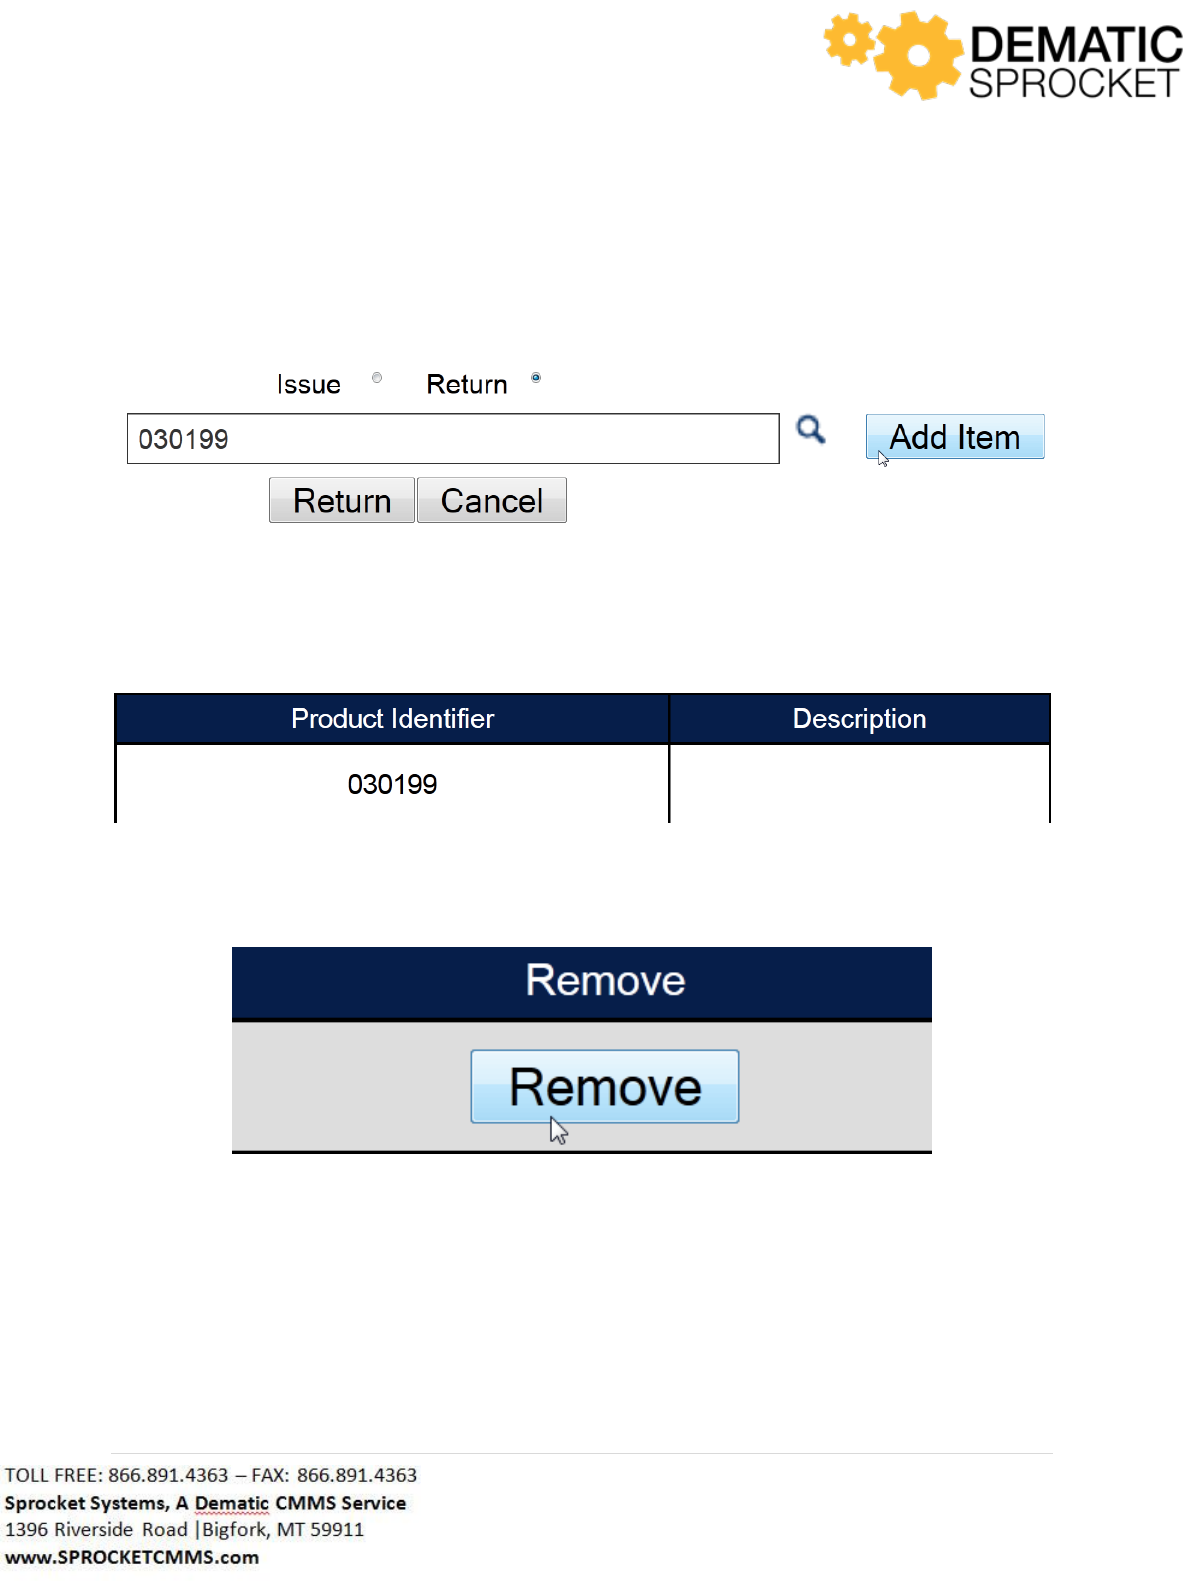
152 | P a g e
Now your selected product is added to the Product Identifier field on the checkout screen. Click the Add
Item at the right of the field to select it for a material issue.
Notice that this item is populated in a grid at the bottom of the screen. Now, you may select other
items to add to this return transaction, if you wish.
If this is an item you do not wish to return, click the Remove button at the right hand side of the grid.
Once your search criteria is set, click the Retrun button to yield search results.
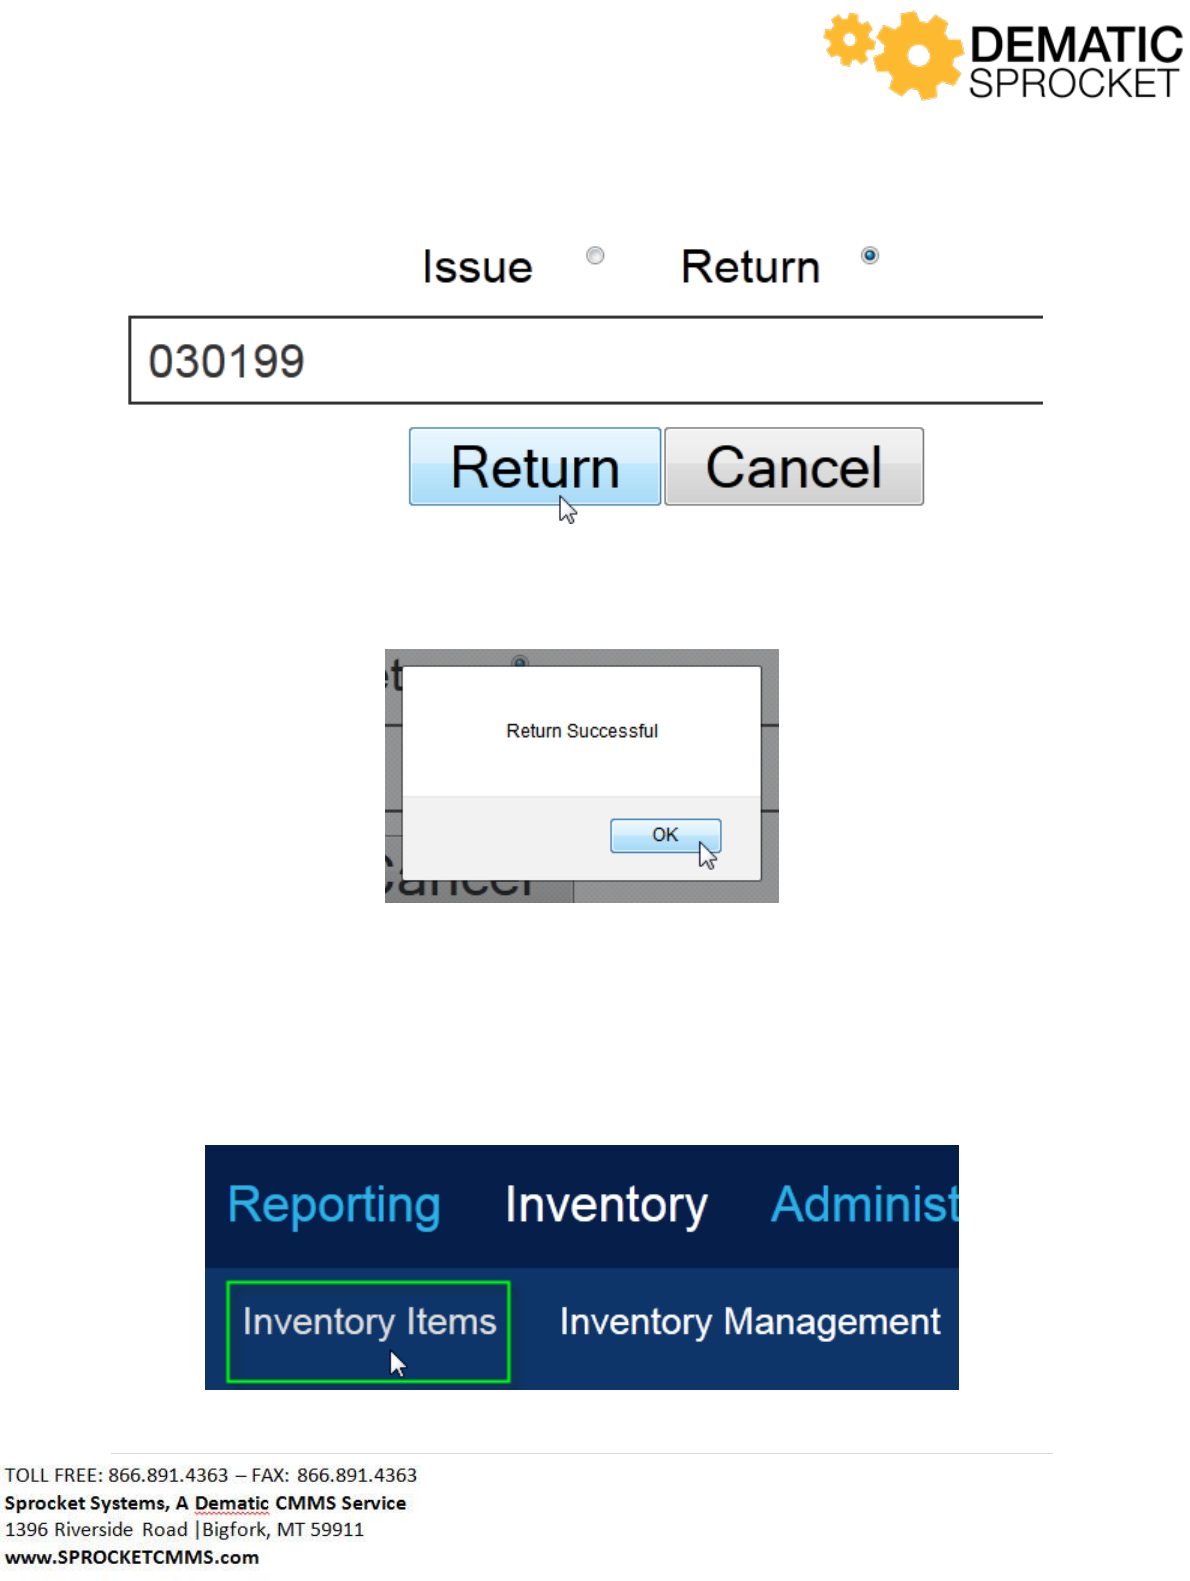
153 | P a g e
A window will appear saying Return Successful. Click OK to continue.
Now your return transaction has been completed. You will be returned to the Inventory Checkout
screen where you may checkout another item to another work order.
7.3 Inventory Items
The Inventory Items tab is used to view what items a facility has in inventory.
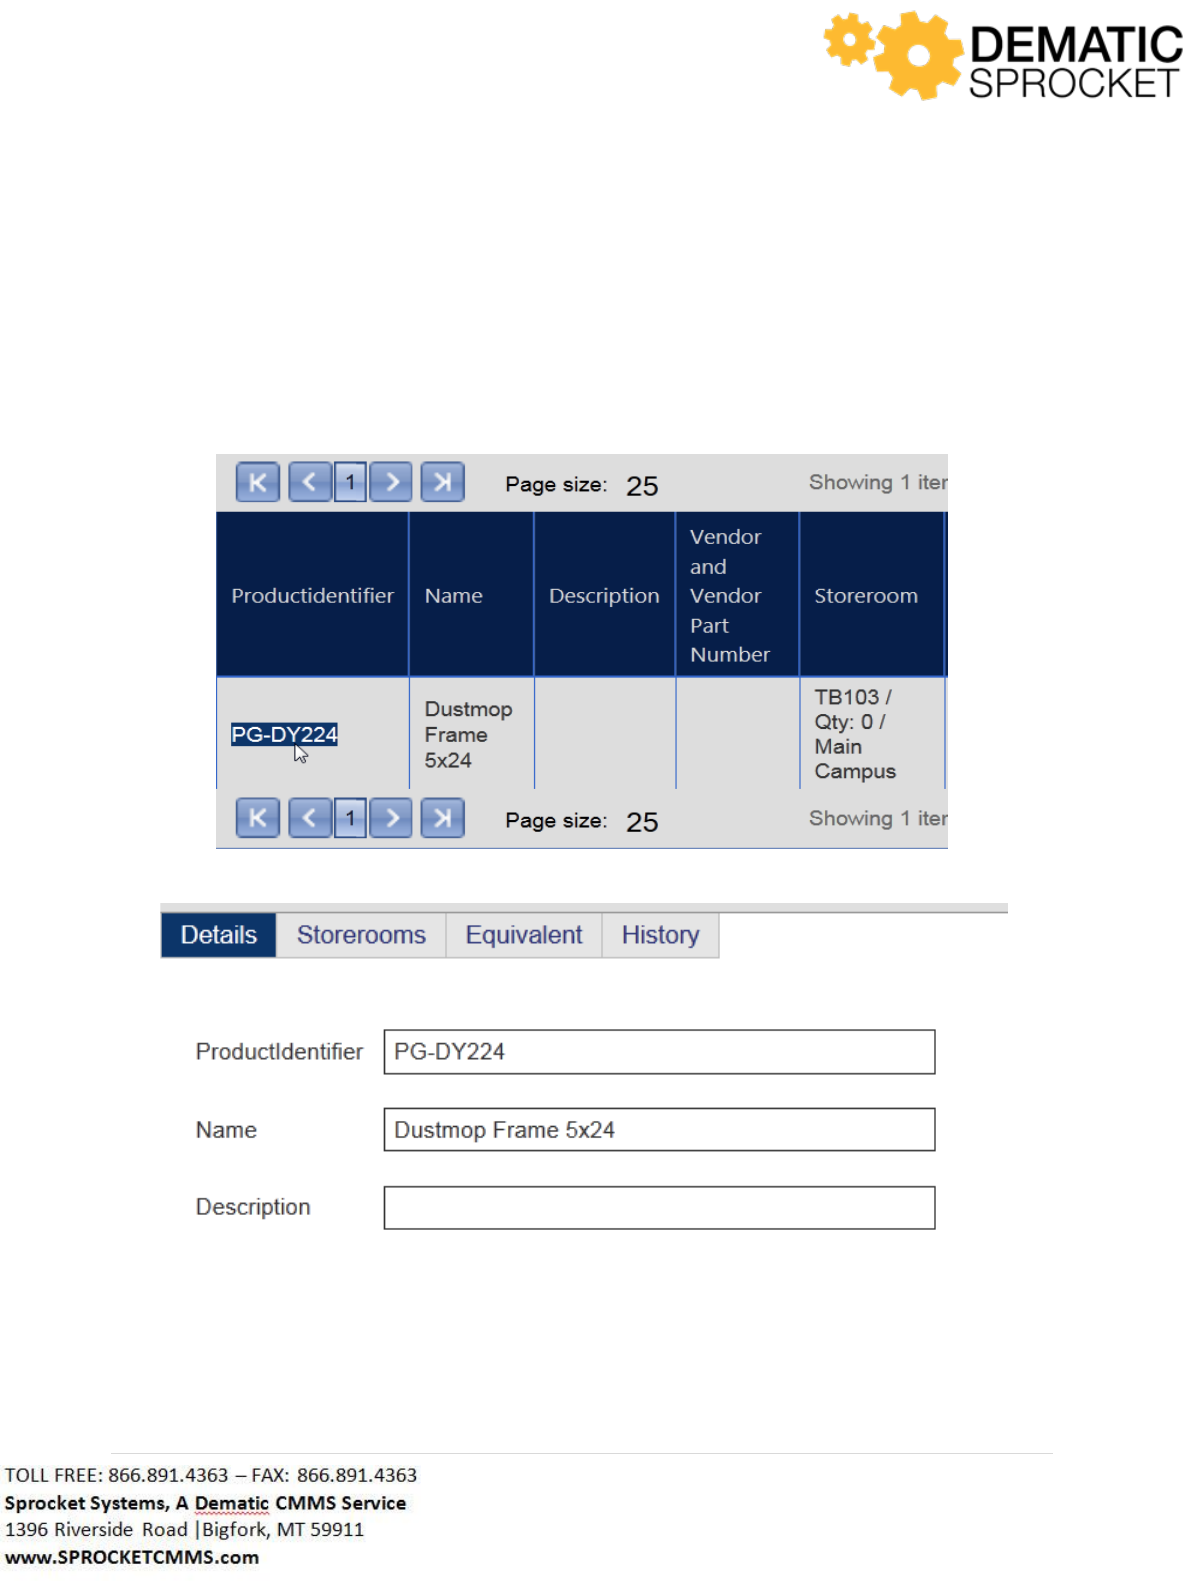
154 | P a g e
Once you select this tab, you will be directed to a list of all inventory items. Remember you can use the
Search button in the upper left hand corner to apply Search Criteria to locate a specific item.
To view the details of a particular item, click the Product Identifier on the left hand side of the grid. This
will take you to the Inventory Item Details form. Notice you are on the details tab.
7.3.1 Inventory Items Details Tab
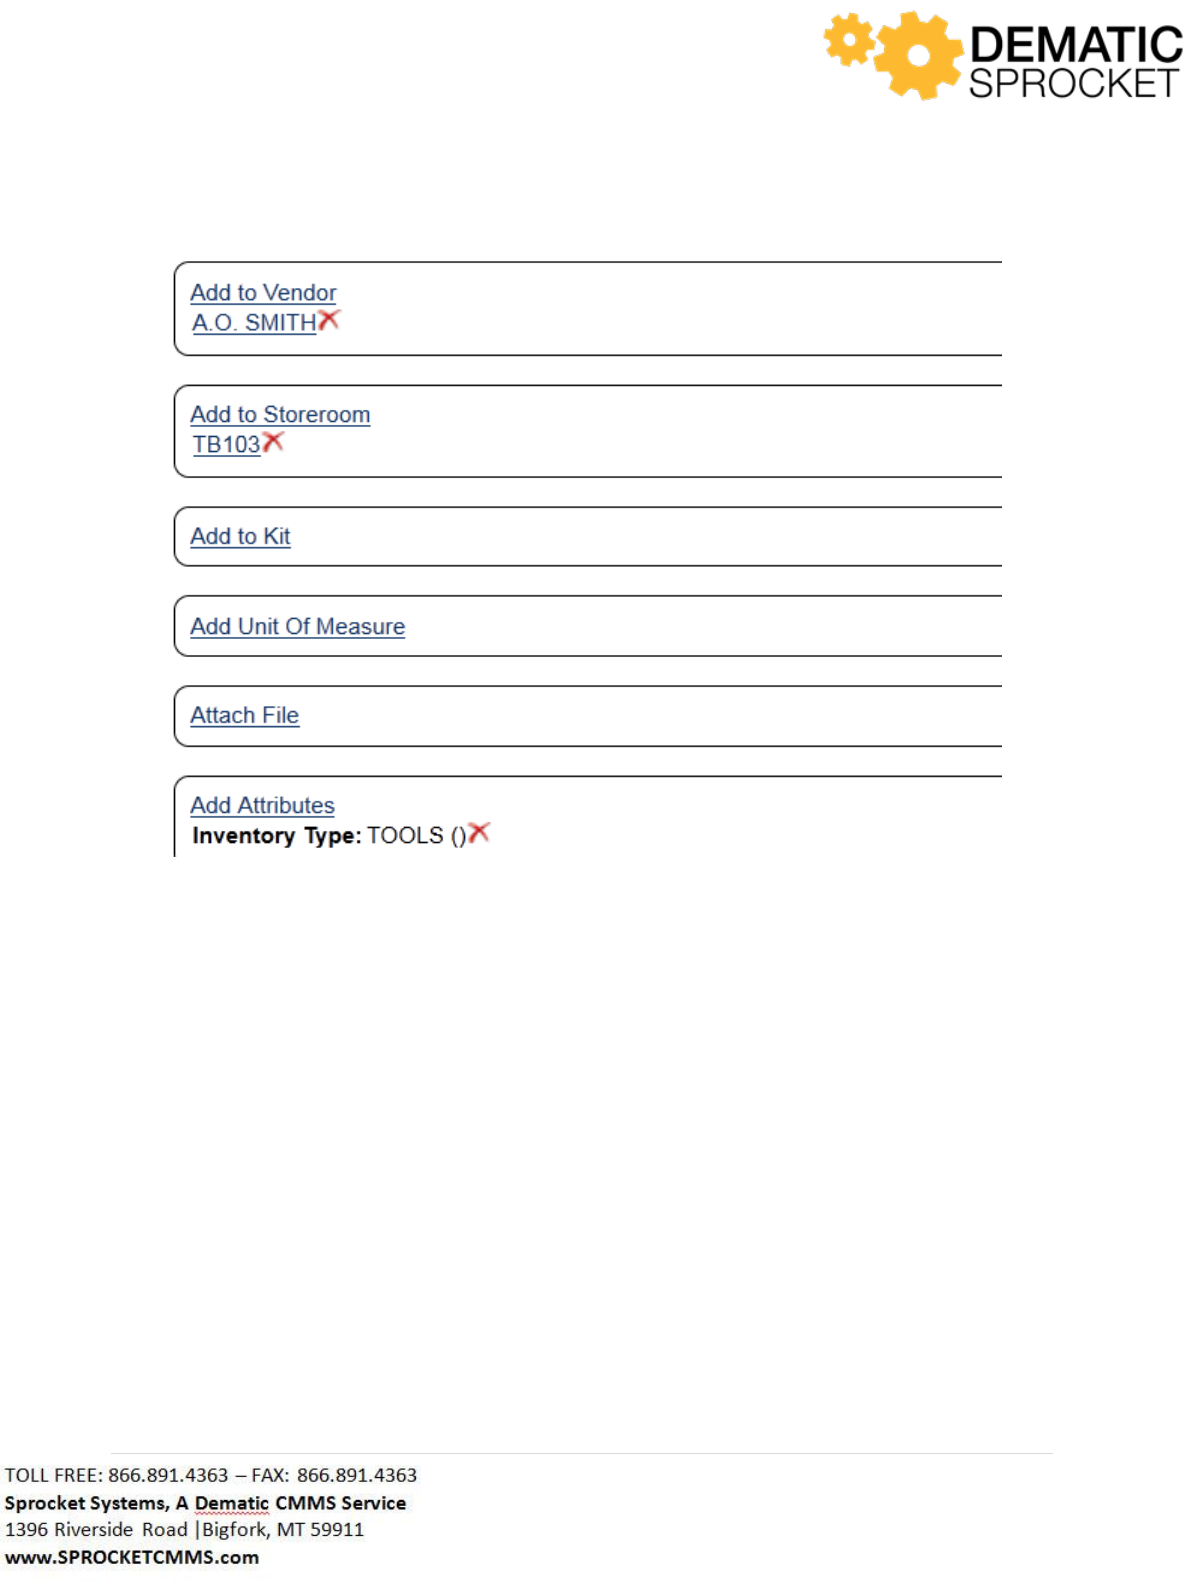
155 | P a g e
Note: Sprocket is customized based on customer needs. Your screen may or may not display the above
fields or information. It is common for inventory fields to be “read only.” Contact your Sprocket
Administrator with questions.
The Details tab displays basic and commonly needed information about this item. Notice the fields in the
Details tab. Some fields may be highlighted in gray indicating that they are “read only” fields. Fields
that are white are available for information to be added to them. To add or change information, simply
click inside the field and enter your information.
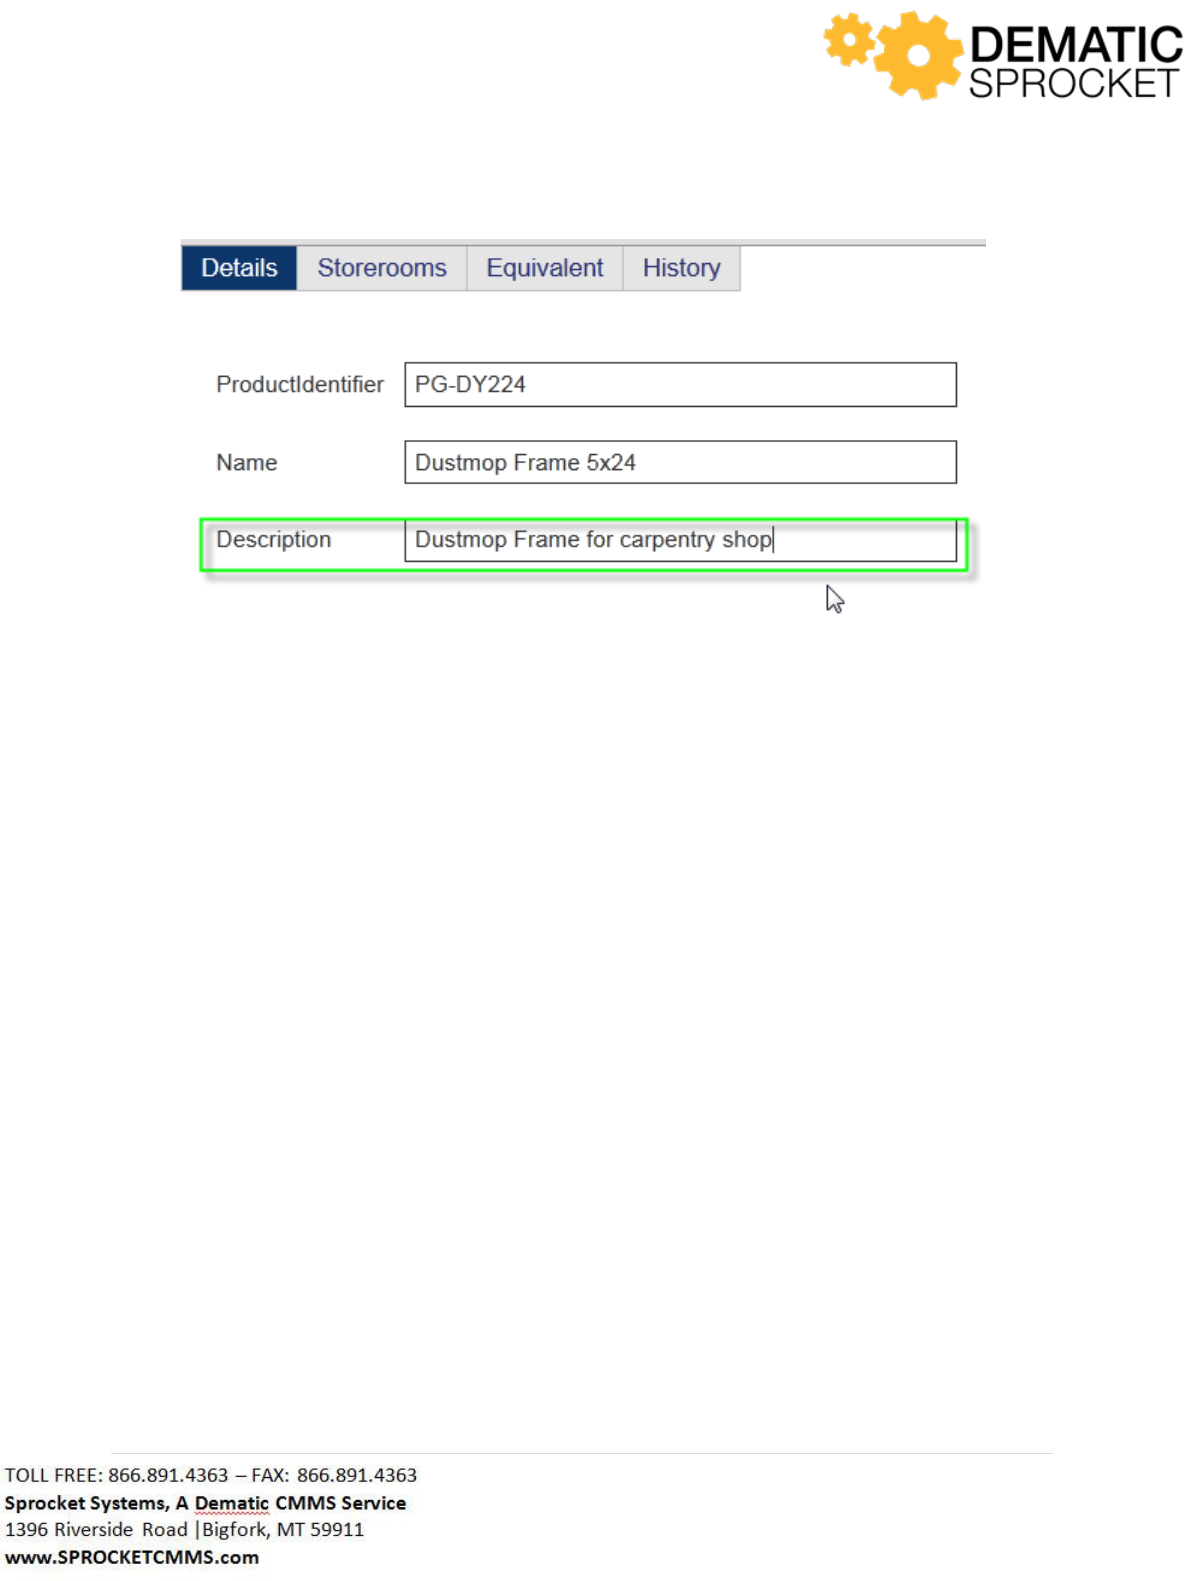
156 | P a g e
Note: Sprocket is customized based on customer needs. Your screen may or may not contain changeable
fields. Contact your Sprocket Administrator with questions.
Notice the fields at the bottom of the screen. Rather than text fields where information is entered,
these are meant to link inventory items other data tables in the Sprocket database such as vendors,
storerooms, kits etc. If you wish to associate additional information to an inventory item, click one of
these links and a form will appear. Here you can enter your additional information and cross reference
an item to another data table in Sprocket.
The links at the bottom of the Details tab can be used to associate an item to several different data
tables:
o Use the Add to Vendor link to display the vendor(s) that supplies this item to the
facility. If you receive this item from multiple vendors, you can rank each vendor
highest to lowest, indicate which vendor is preferred for supplying this item, and
specify the vendor ID for this item.
o Use the Add to Storeroom link to display the storeroom where this item resides.
You can add multiple storerooms as needed for items that are located in more than
one storeroom location.
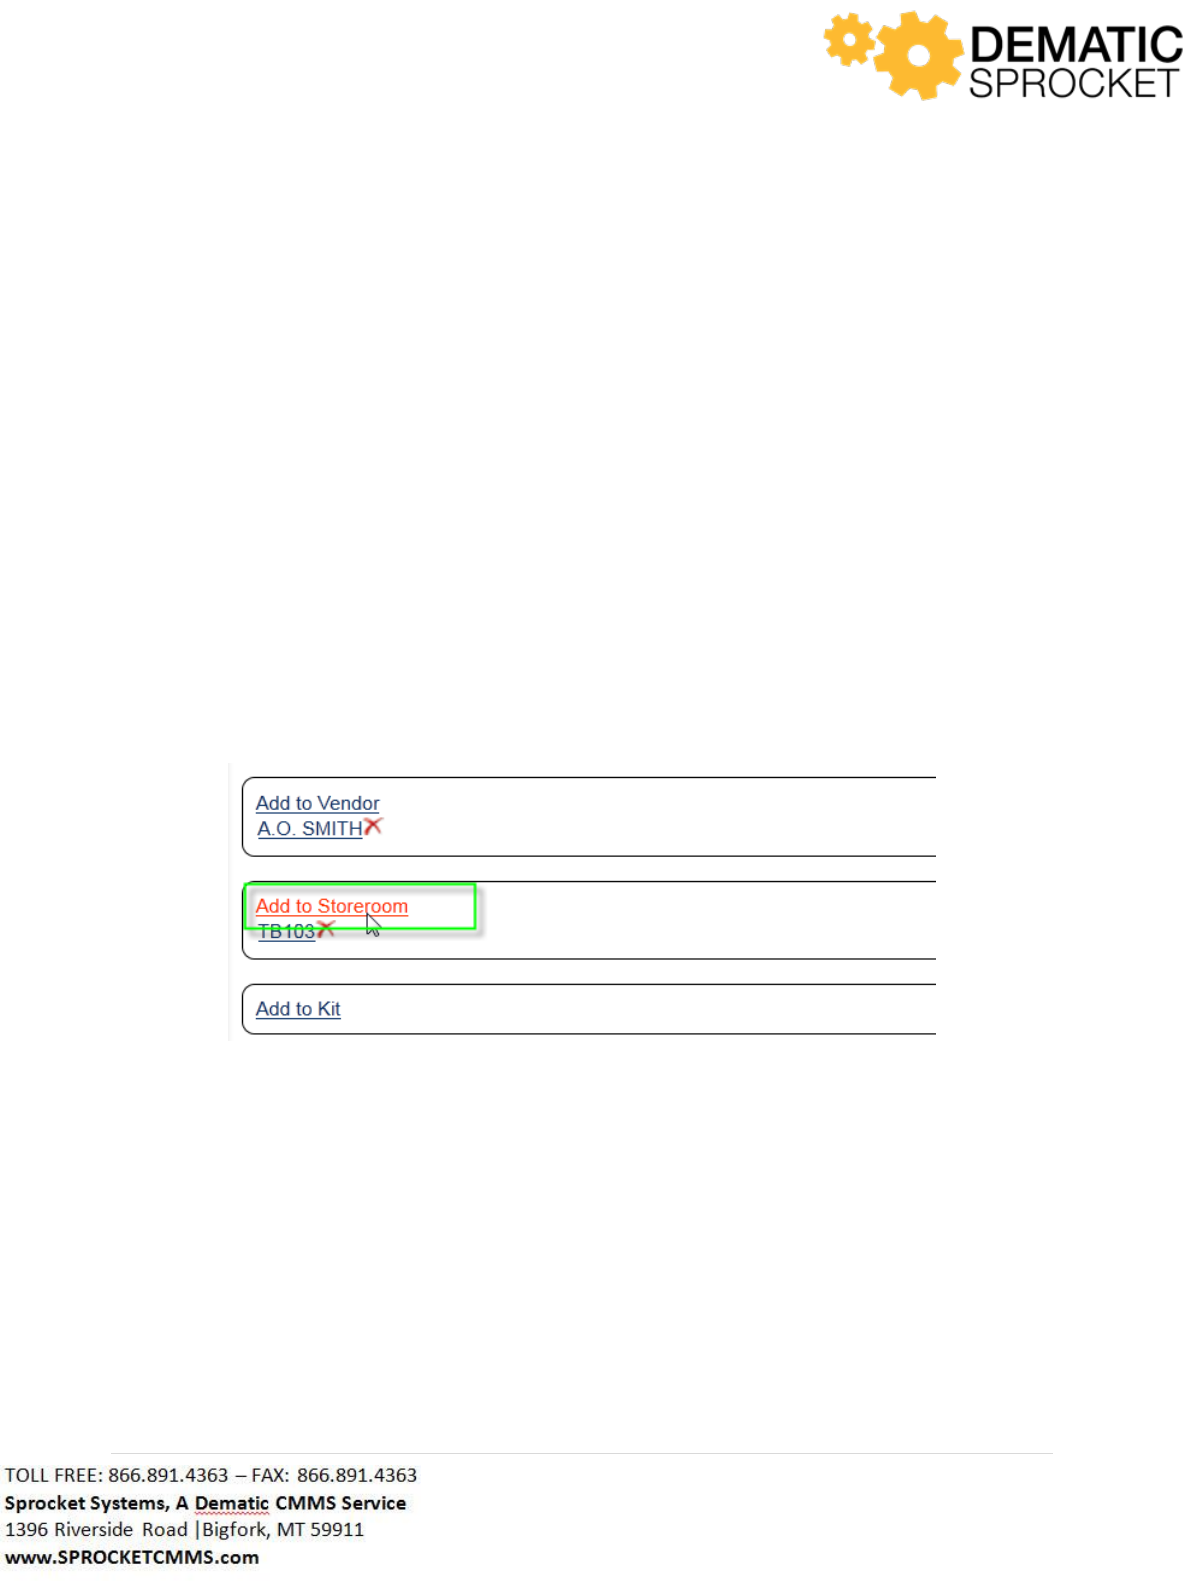
157 | P a g e
o Use the Add to Kit link to add this item to a Reserved Materials bundle or Kit. This
way, when work needs to be completed that inevitably requires this item, it will
automatically be added to a Reserved Materials list and checked out of inventory
through the Work Order Details.
o Use the Add Unit of Measure link to specify what quantity of this product equals a
unit. For example, one unit may be a case, a carton, a box etc. This way, when
items are issued, you have a specified amount that is being distributed per unit
issue.
o Use the Attach File link to attach files with additional information to this item.
Common attachments are pictures of the item or a manual for the item.
o Use the Add Attributes link to associate equipment and inventory classification and
sub types to this item. This helps further classify what this item is and what
category it falls under.
Let’s say you wish to link this item to an additional storeroom. Click the Add to Storeroom link.
A window will appear. Use the Auto Look Tool to help locate the appropriate record in Sprocket by
either clicking the icon or typing all or part of the Storeroom Name into the field. When the correct
record is returned, select it and continue filling out the form.

158 | P a g e
Once you have selected the desired storeroom, click the Save button in the window.
Now notice that the Storeroom field at the bottom of the page has been updated to include this
storeroom.
If you ever wish to remove any of this information, just click the red X next to the link.
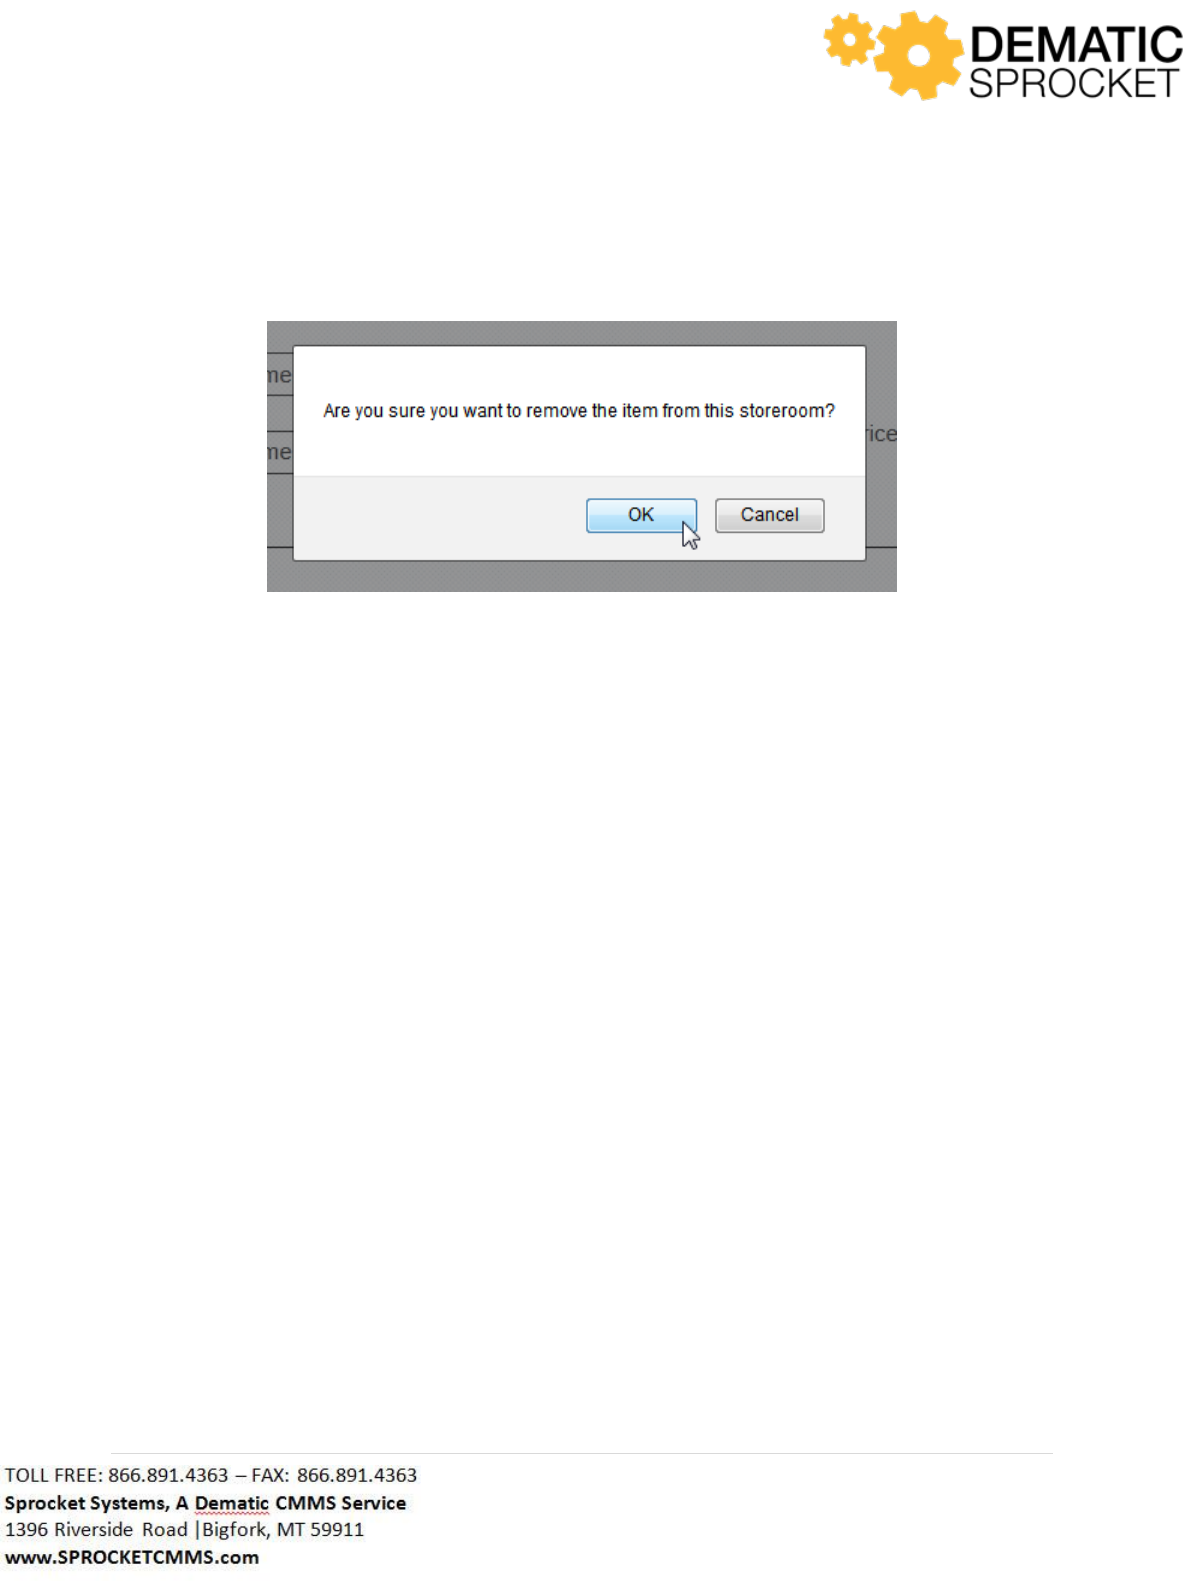
159 | P a g e
A window will appear asking if you are sure you want to remove this item. Click OK to continue or
Cancel to return to the previous page.
Now this Storeroom has been removed from this inventory item. When adding information or making
changes to an item, be sure to click the Save button in the upper right hand corner of the page to save
your changes.
7.3.2 Inventory Items Storerooms Tab
The Storerooms tab provides information about where this product is located and what the current
quantity is.

160 | P a g e
Note: Sprocket is customized based on customer needs. Your screen may or may not display the above
fields. Many fields may be read only. Contact your Sprocket Administrator with questions.
Here you can add additional information as needs as well as view the storeroom location(s) for this item
and view available quantity.
Notice the two links at the bottom of the page. Use these to count inventory and transfer item location
to a different storeroom.

161 | P a g e
7.3.2.1 Perform Physical Count
Click the Perform Physical Count link at the bottom of the Storerooms tab to update an actual inventory
count in Sprocket.
A form will appear. In the New Quantity field, enter in the amount of this item you counted. In the
Description field below, enter in any additional details about the product or about this particular
inventory count. Once you have entered in all the information about this Physical Count, click the
Submit Physical Count button to submit the new inventory quantity or click the Cancel button to exit
this window and return to the previous screen and old inventory quantity.
A window will appear saying Success. Click OK to continue.
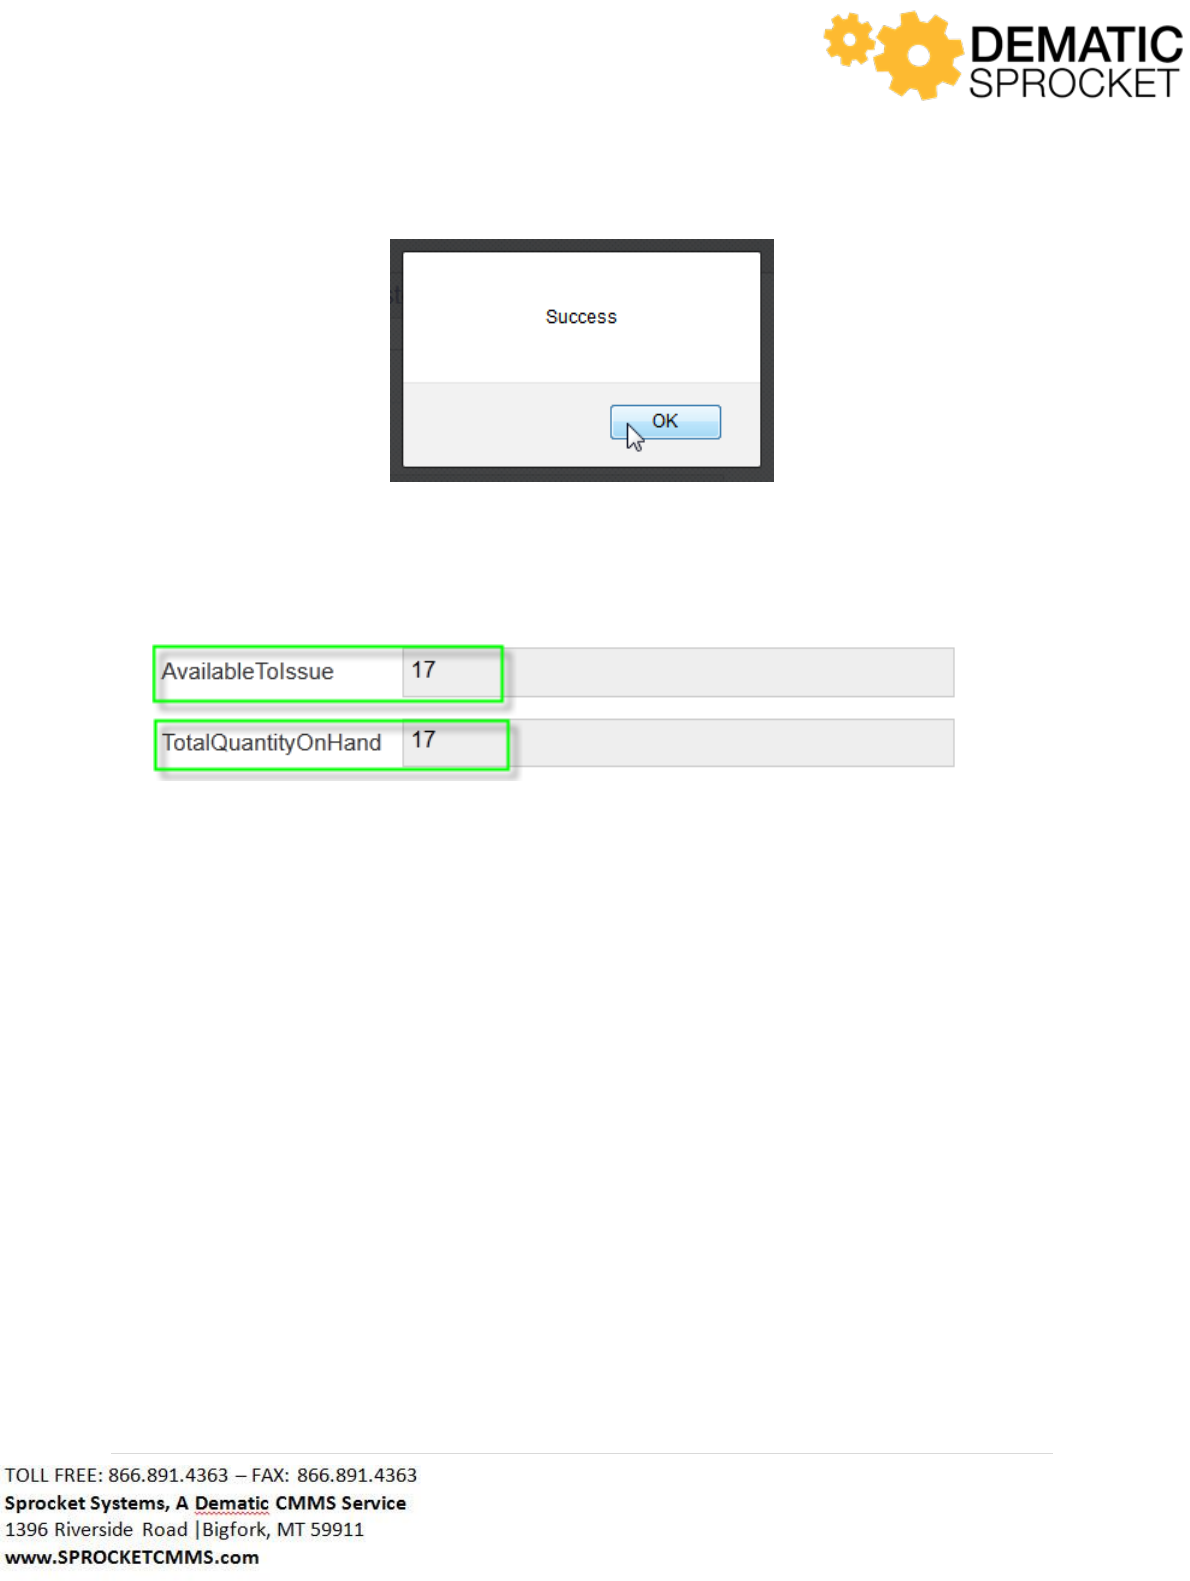
162 | P a g e
Now notice the Available to Issue and the Total Quantity on Hand fields have been updated with the
new inventory quantity.
As always, when changing information in Sprocket, click the Save button in the upper right hand corner
of the page to save your changes.
7.3.2.2 Perform Transfer
Use the Perform Transfer link at the bottom of the Storerooms tab to transfer all or part of the quantity
of an item to another storeroom and/or billing code.
In the Transfer window, enter the amount you wish to transfer in the Quantity field at the top of the
window. In the Storeroom drop down menu, select the storeroom you wish to transfer this item to.
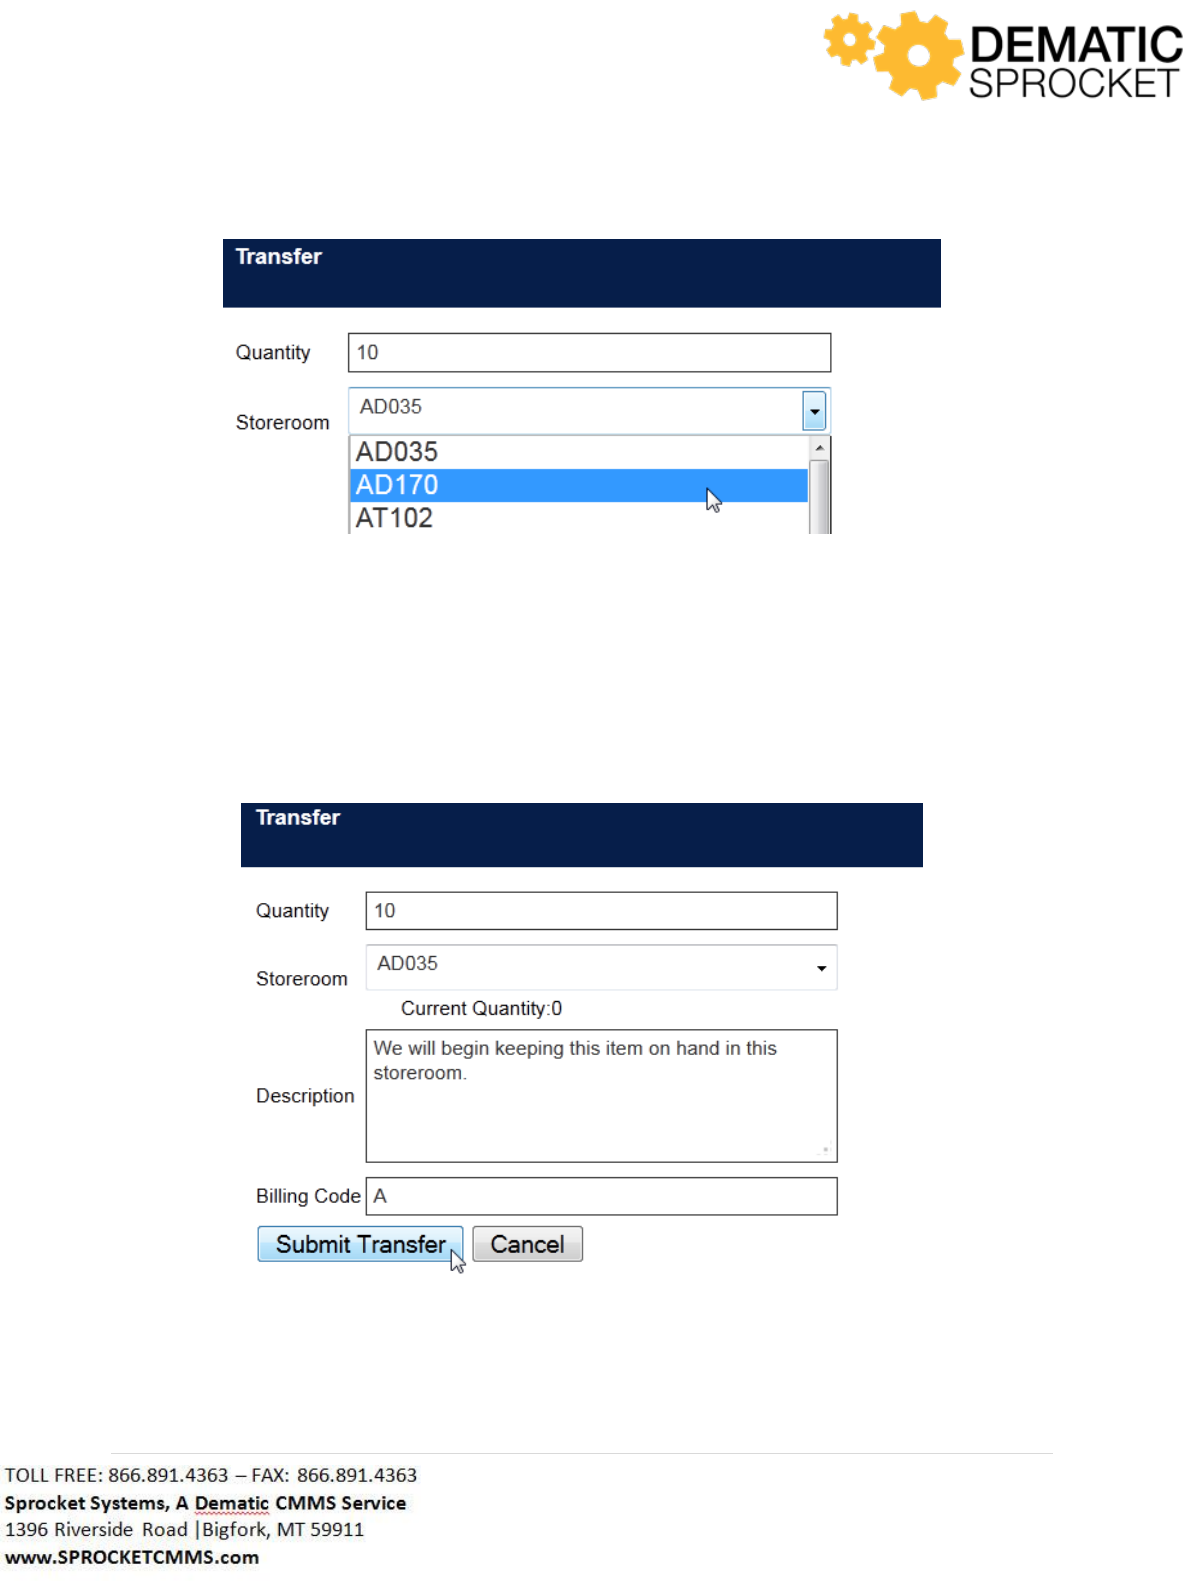
163 | P a g e
Next, in the Description field, you can enter in any comments or remarks about this transfer. At the
bottom of the window in the Billing Code field, you can enter a different billing code to be associated to
this item. Once all of the information is entered, click the Submit Transfer button to complete the
transaction or click the Cancel button to stop the transfer and return to the previous screen.
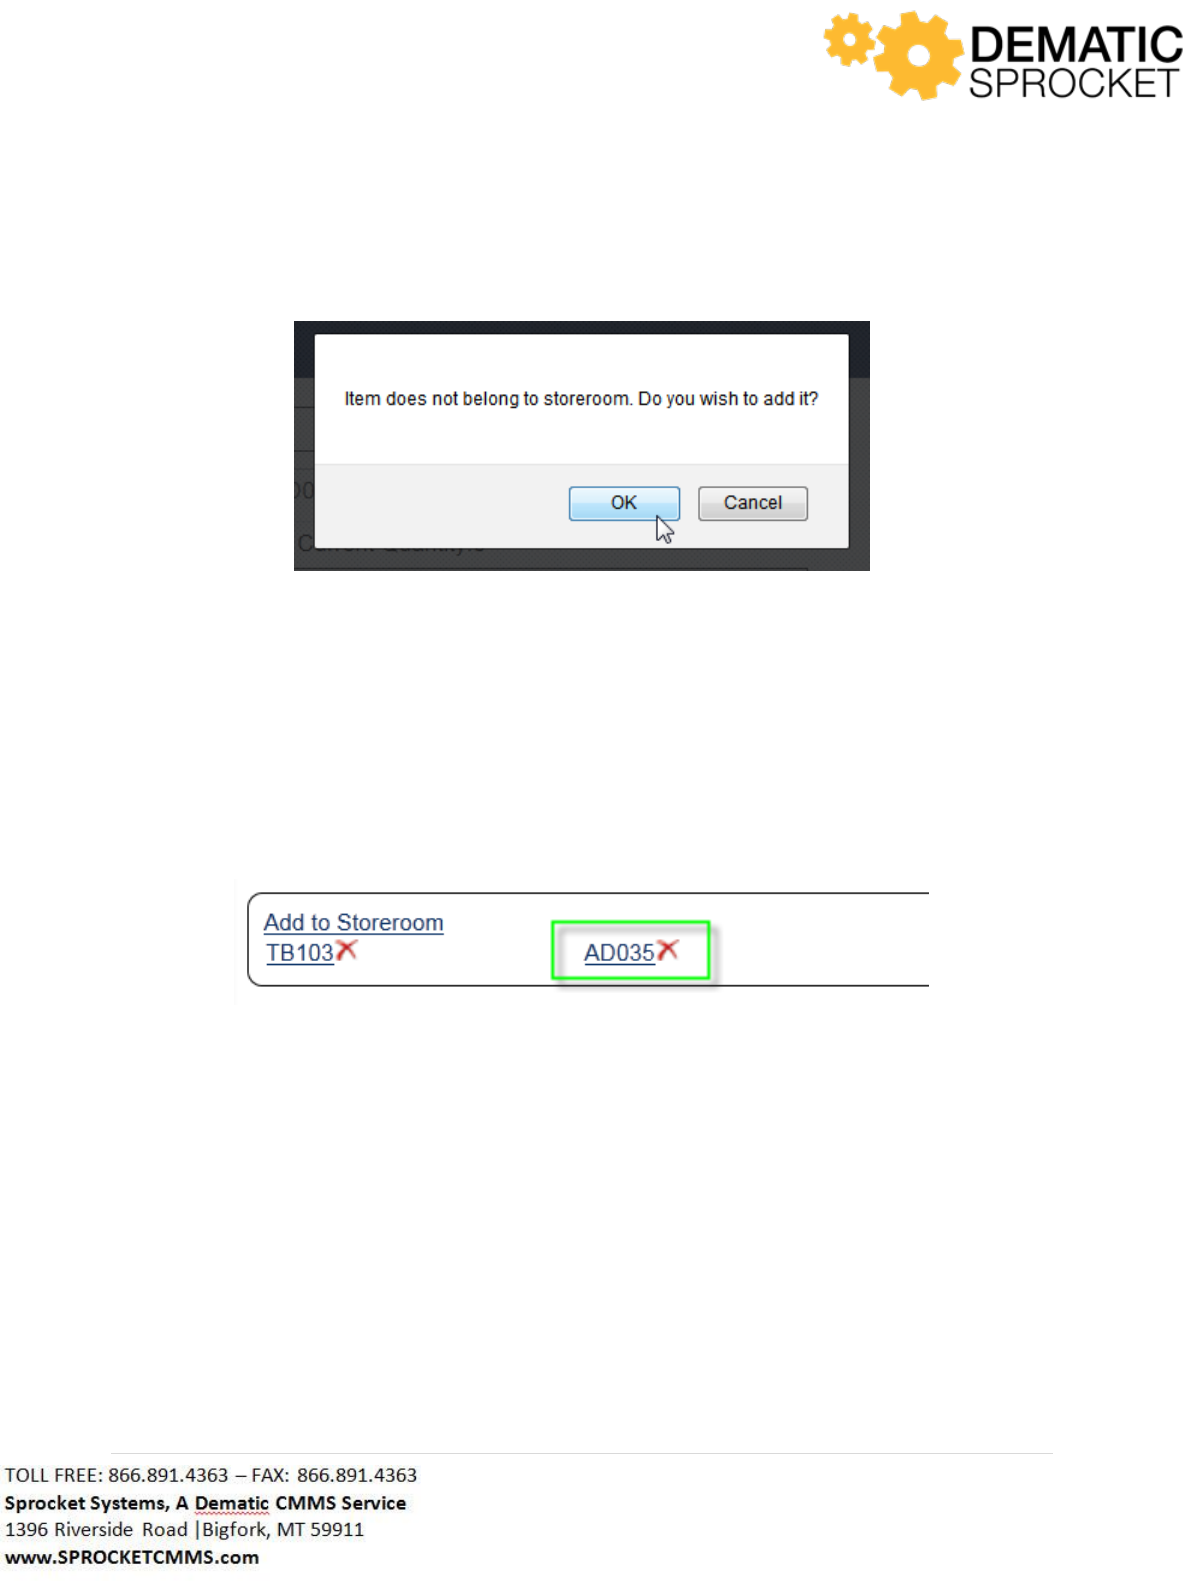
164 | P a g e
I window will appear saying this item does not belong to this storeroom, do you wish to add it? Click OK
to continue the transfer or Cancel to return to the previous screen.
You will be returned to the Details tab where the additional storeroom you added will be displayed in
the Add to Storeroom section at the bottom of the page.
As always, click the Save button in the upper right hand corner of the page to save your changes.
7.3.3 Inventory Items Equivalent
The Equivalent tab is used to display other inventory items that can be used as an equivalent substitute
for this inventory item. On this tab, a grid is displayed showing any equivalents to this inventory item.
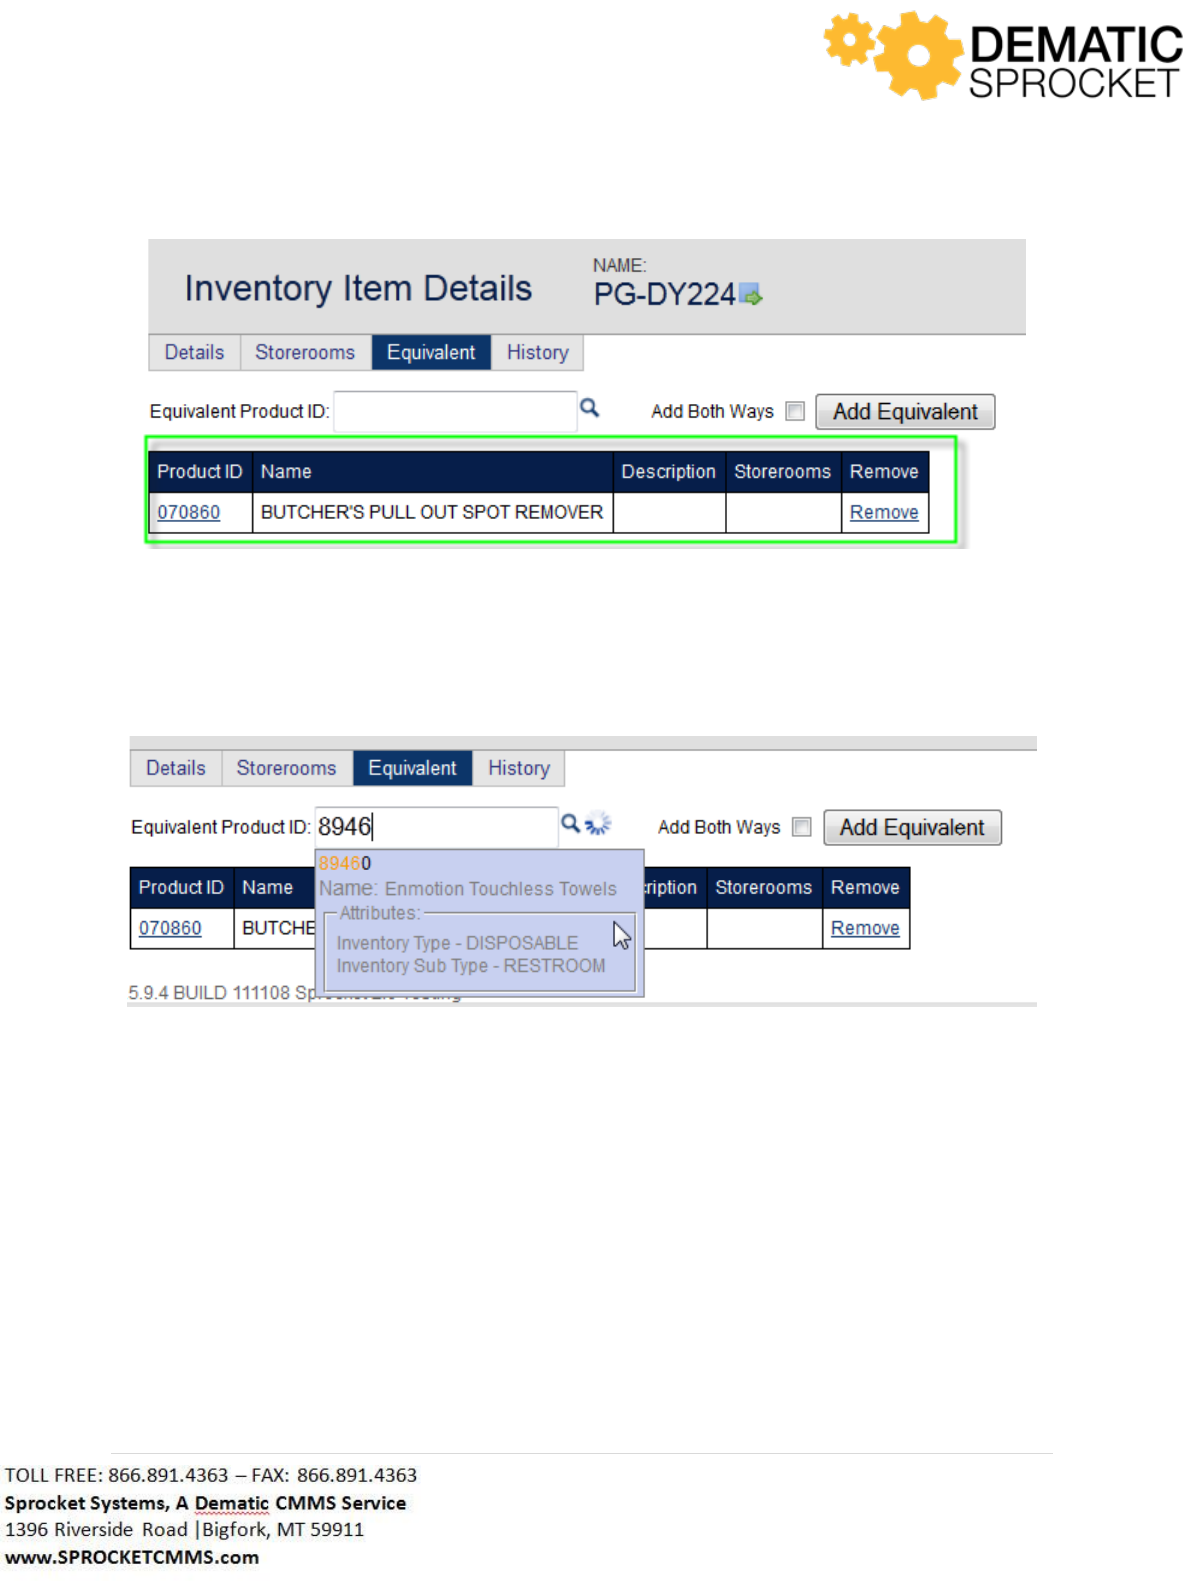
165 | P a g e
You may also use this tab to add or remove equivalents from an inventory item. To add an equivalent,
use the Auto Lookup Tool next to the Equivalent Product ID field at the top of the page to either auto
complete an entry to locate and select a product from a list of all possible products.
Once you have selected the Equivalent Product ID from the list, you must determine if you would like to
add this equivalent both ways. This means that you automatically make both of these products
substitutes for each other. If you would not like to substitute either of these products for the other,
leave the Add Both Ways box unchecked.
If you would like to be able substitute either product for the other one, check the Add Both Ways box.
Once this is done, click the Add Equivalent button to the right to update the grid below.

166 | P a g e
Now notice that the grid has been updated to include the new equivalent that you added.
If you ever wish to remove an equivalent from an inventory item, simply click the Remove link at the
right of the grid for the product you wish to remove.
Be sure to click the Save button in the upper right hand corner of the page to save your changes.
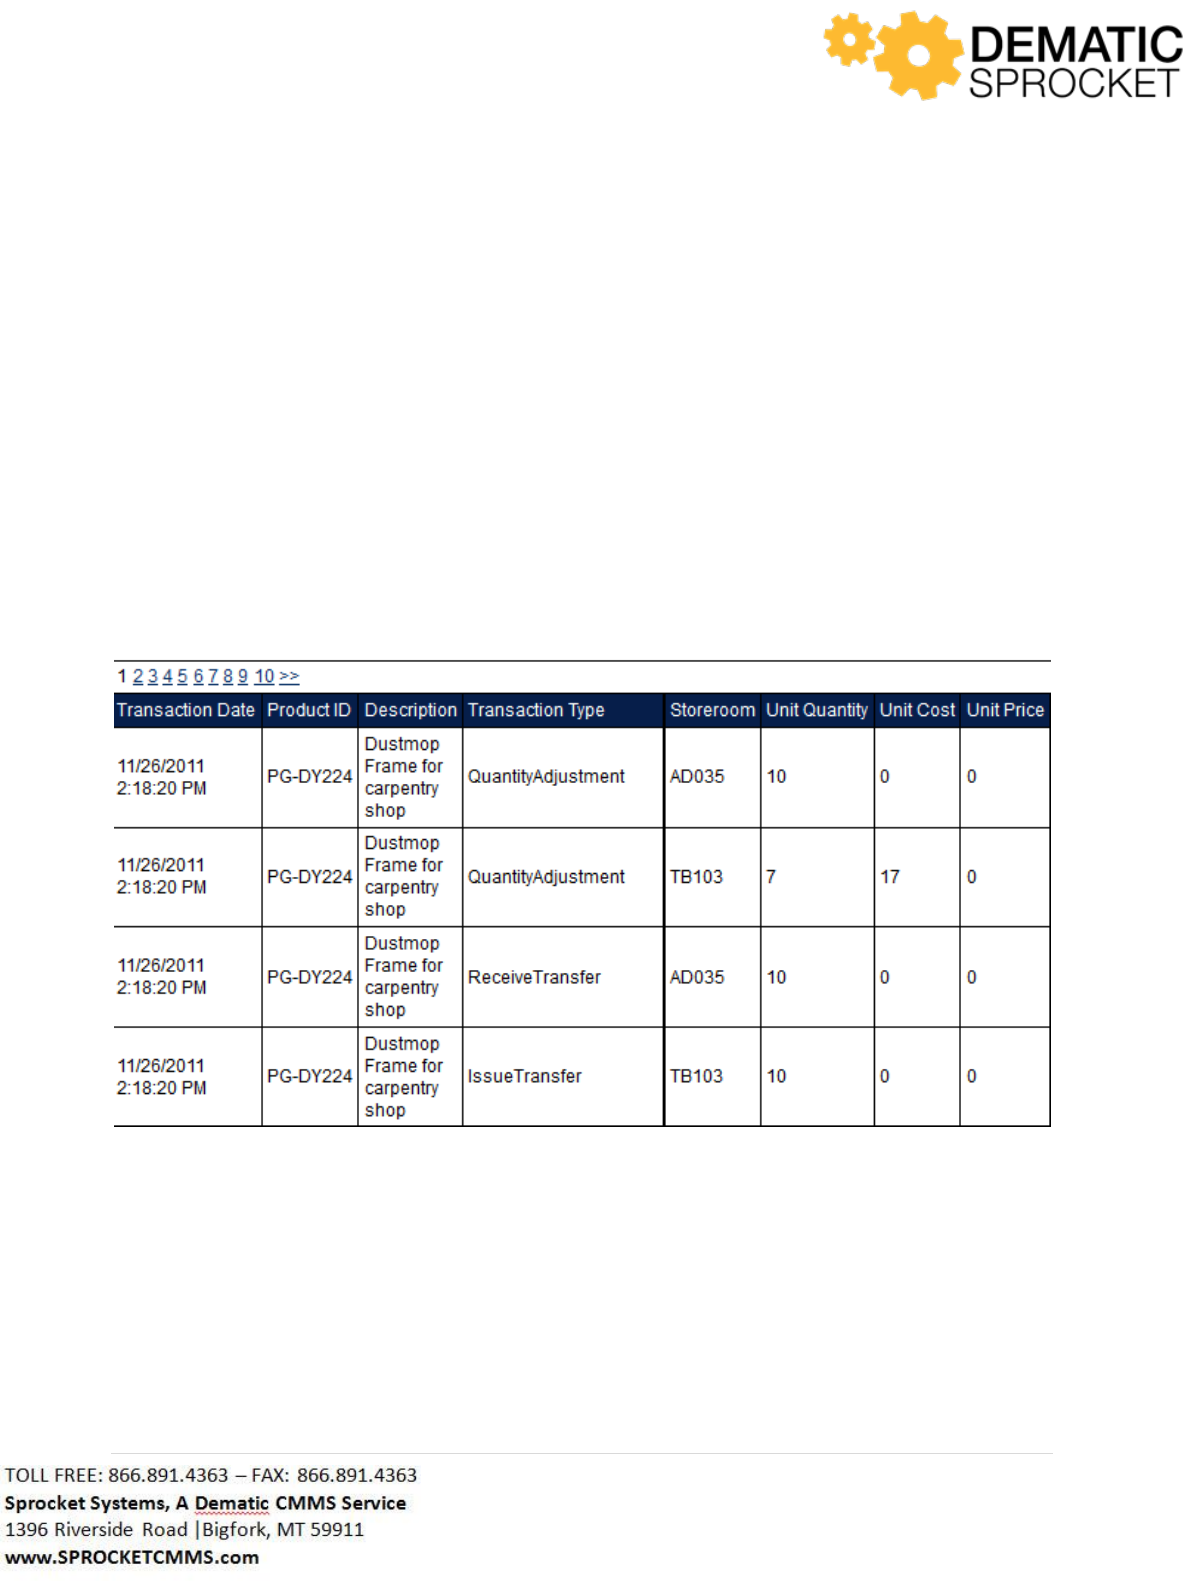
167 | P a g e
7.3.4 Inventory Items History Tab
The History tab allows you to see any transactions made with this product such as issues to work orders,
transfers, quantity changes etc. A grid is displayed showing adjustments made to the item.
Notice the search fields at the top of the page. Use these to add filters and narrow down search results.
So, let’s say you wish to see any inventory transactions for this item that were made after November 20,
2011. Enter November 20, 2011 in the On or After field at the top of the page and click the Search
button above the history grid.
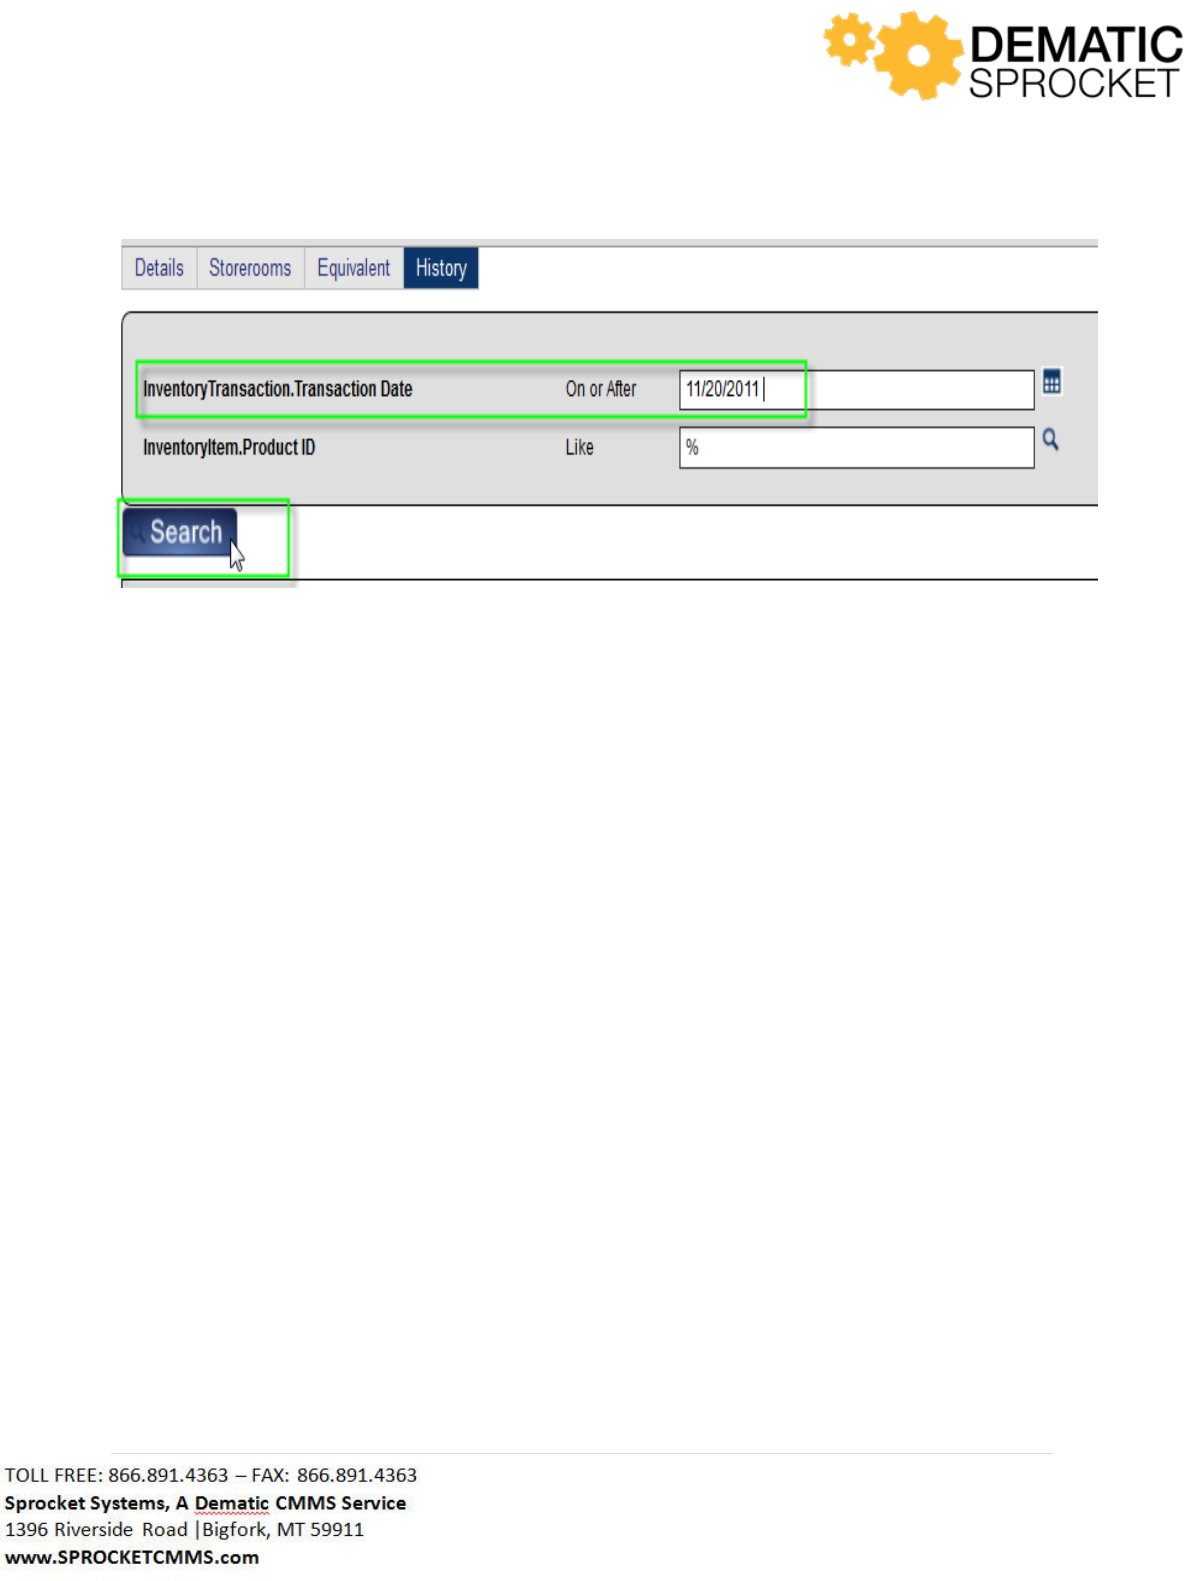
168 | P a g e
Now you are able to view transactions for this item using a date filter. Click the Exit button in the upper
right of the page to return to the Inventory Items page.
7.4 Inventory Management
Much like the Storerooms tab in Inventory Item Details, the Inventory Management tab is used to
perform Physical Counts for inventory items as well as transfer items among storerooms.
7.4.1 Inventory Management Transfer Tab
When you click Inventory Management, you are automatically directed to the Transfer tab. Use this
form to transfer inventory items to different storerooms and billing codes. A form will be displayed for
you to fill out the appropriate information about the transfer.
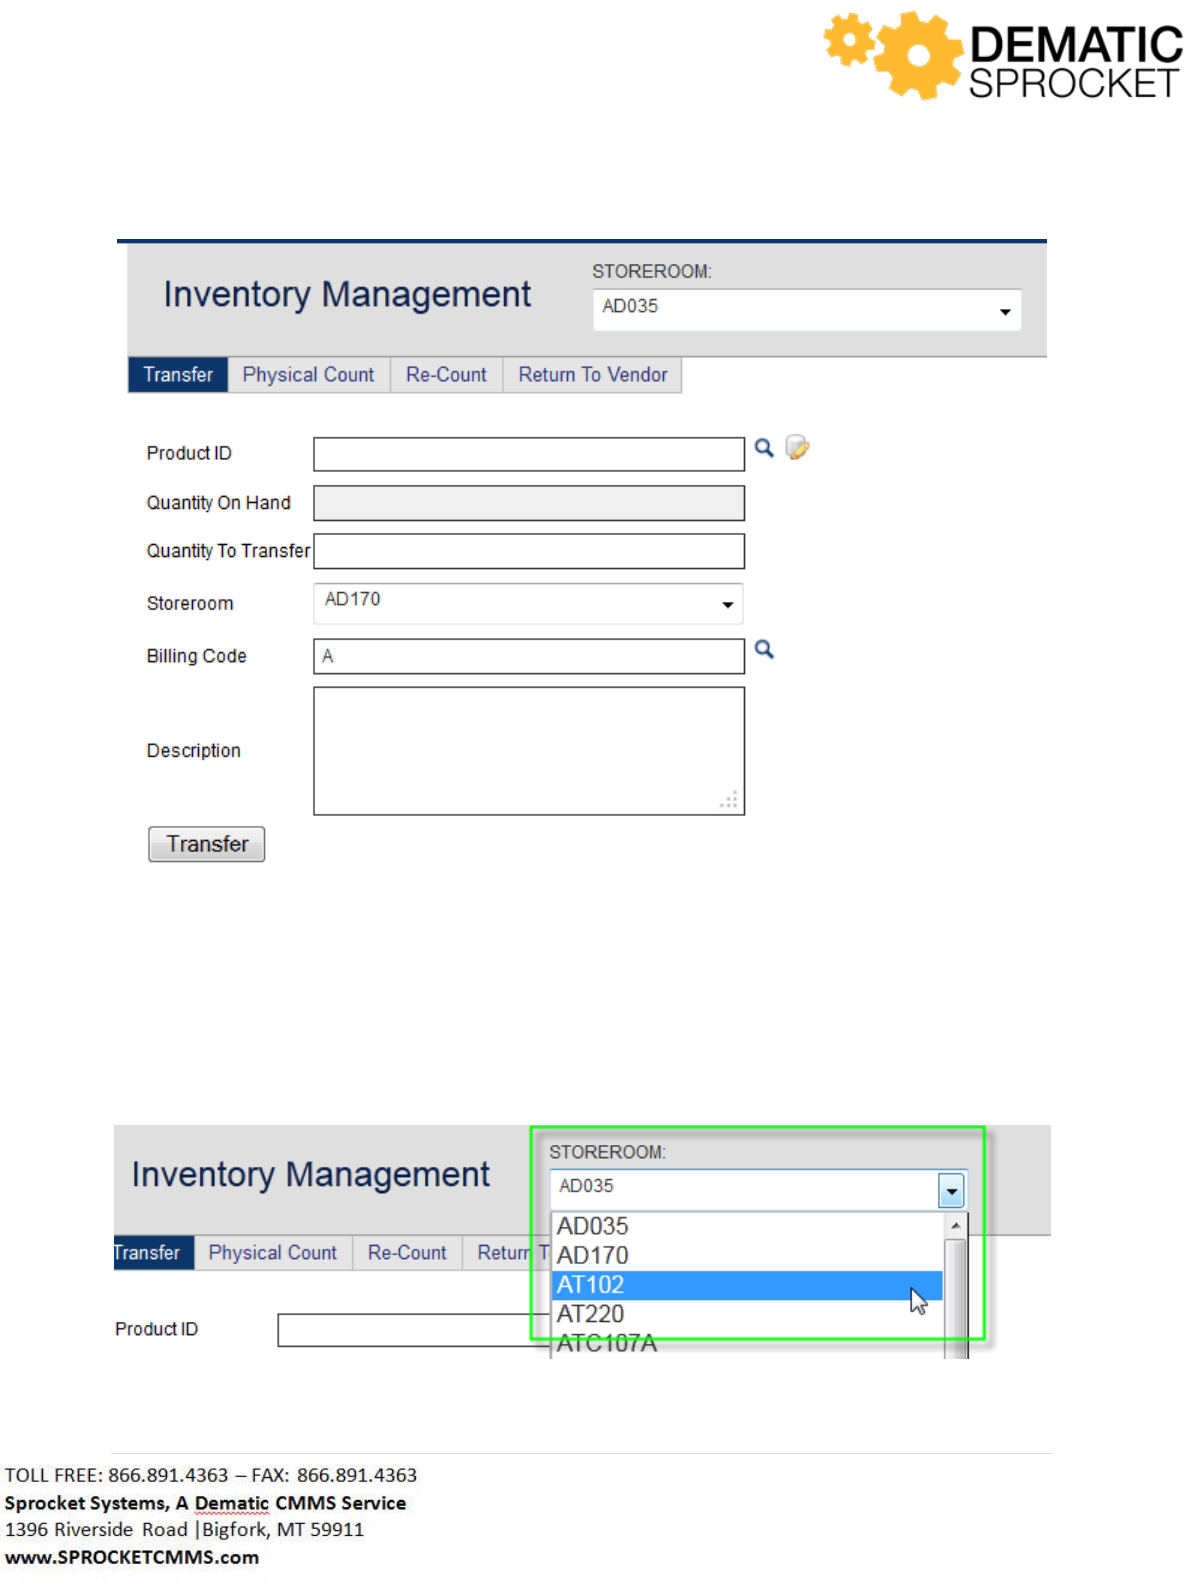
169 | P a g e
Notice the Storeroom drop down menu at the top of the page. Use this to locate and select the
storeroom you wish to transfer from.
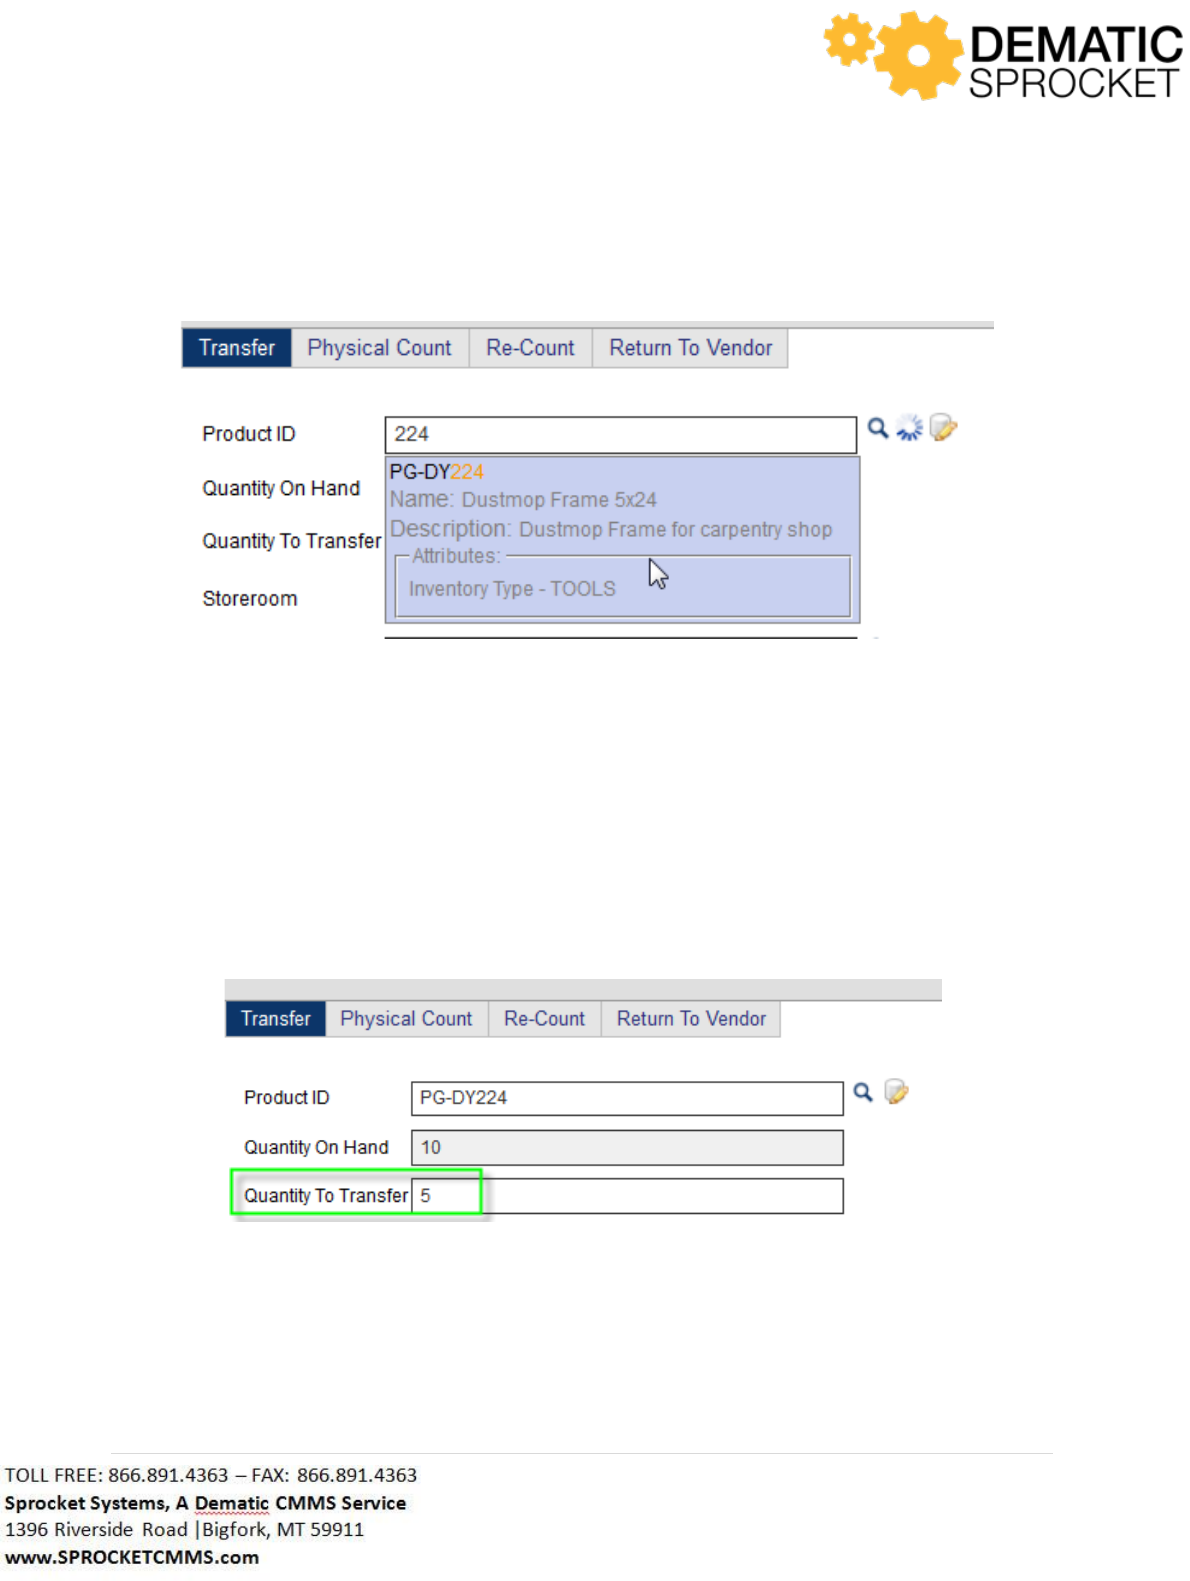
170 | P a g e
Once you have chosen a storeroom, use the Product ID Auto Lookup Tool to locate and select the item
you wish to transfer. Once the results are returned, select the item you wish to transfer.
Notice that the Quantity on Hand field automatically populates the quantity of that Product ID that
resides in the above selected storeroom. Below, in the Quantity To Transfer field, enter the quantity
you wish to transfer to a new storeroom.
In the Storeroom drop down menu below, select the storeroom you would like to transfer this item to.
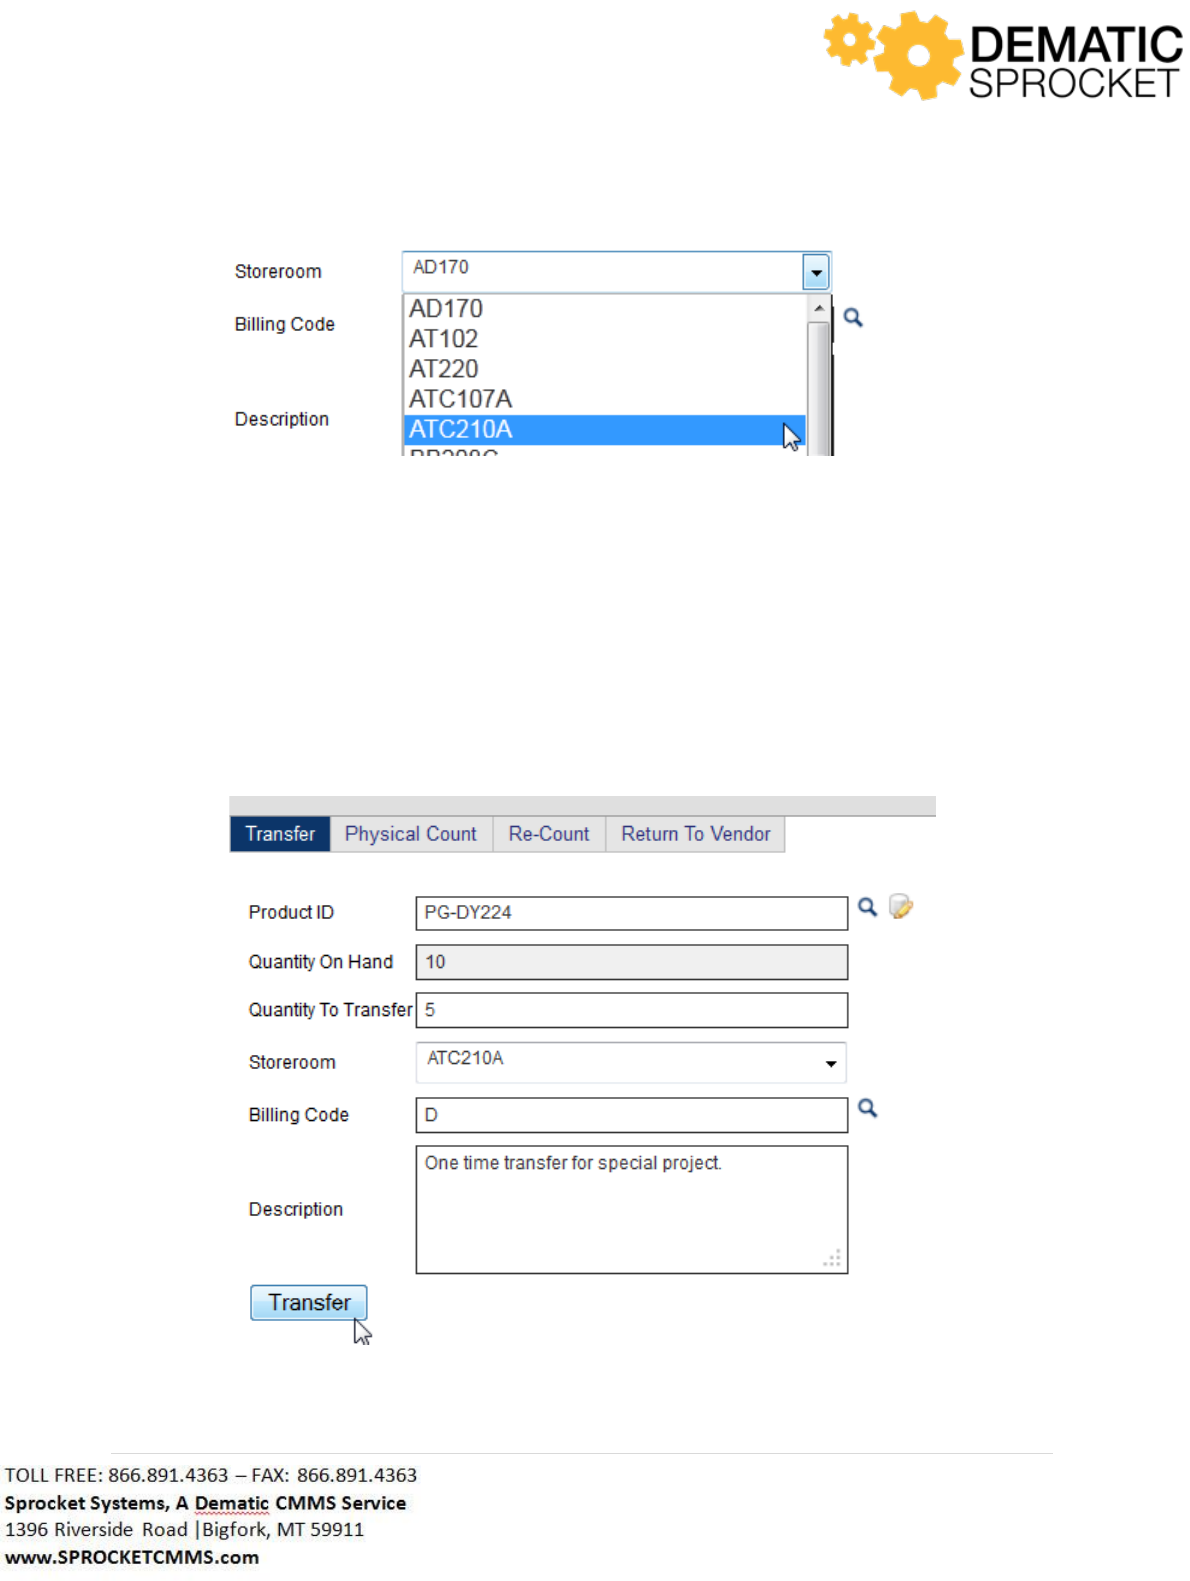
171 | P a g e
Below in the Billing Code field, select the billing code for this item using the Auto Lookup Tool and use
the Description field to enter any remarks about this transaction.
Once this has all been filled out, click the Transfer button at the bottom left of the page to finish the
transaction.
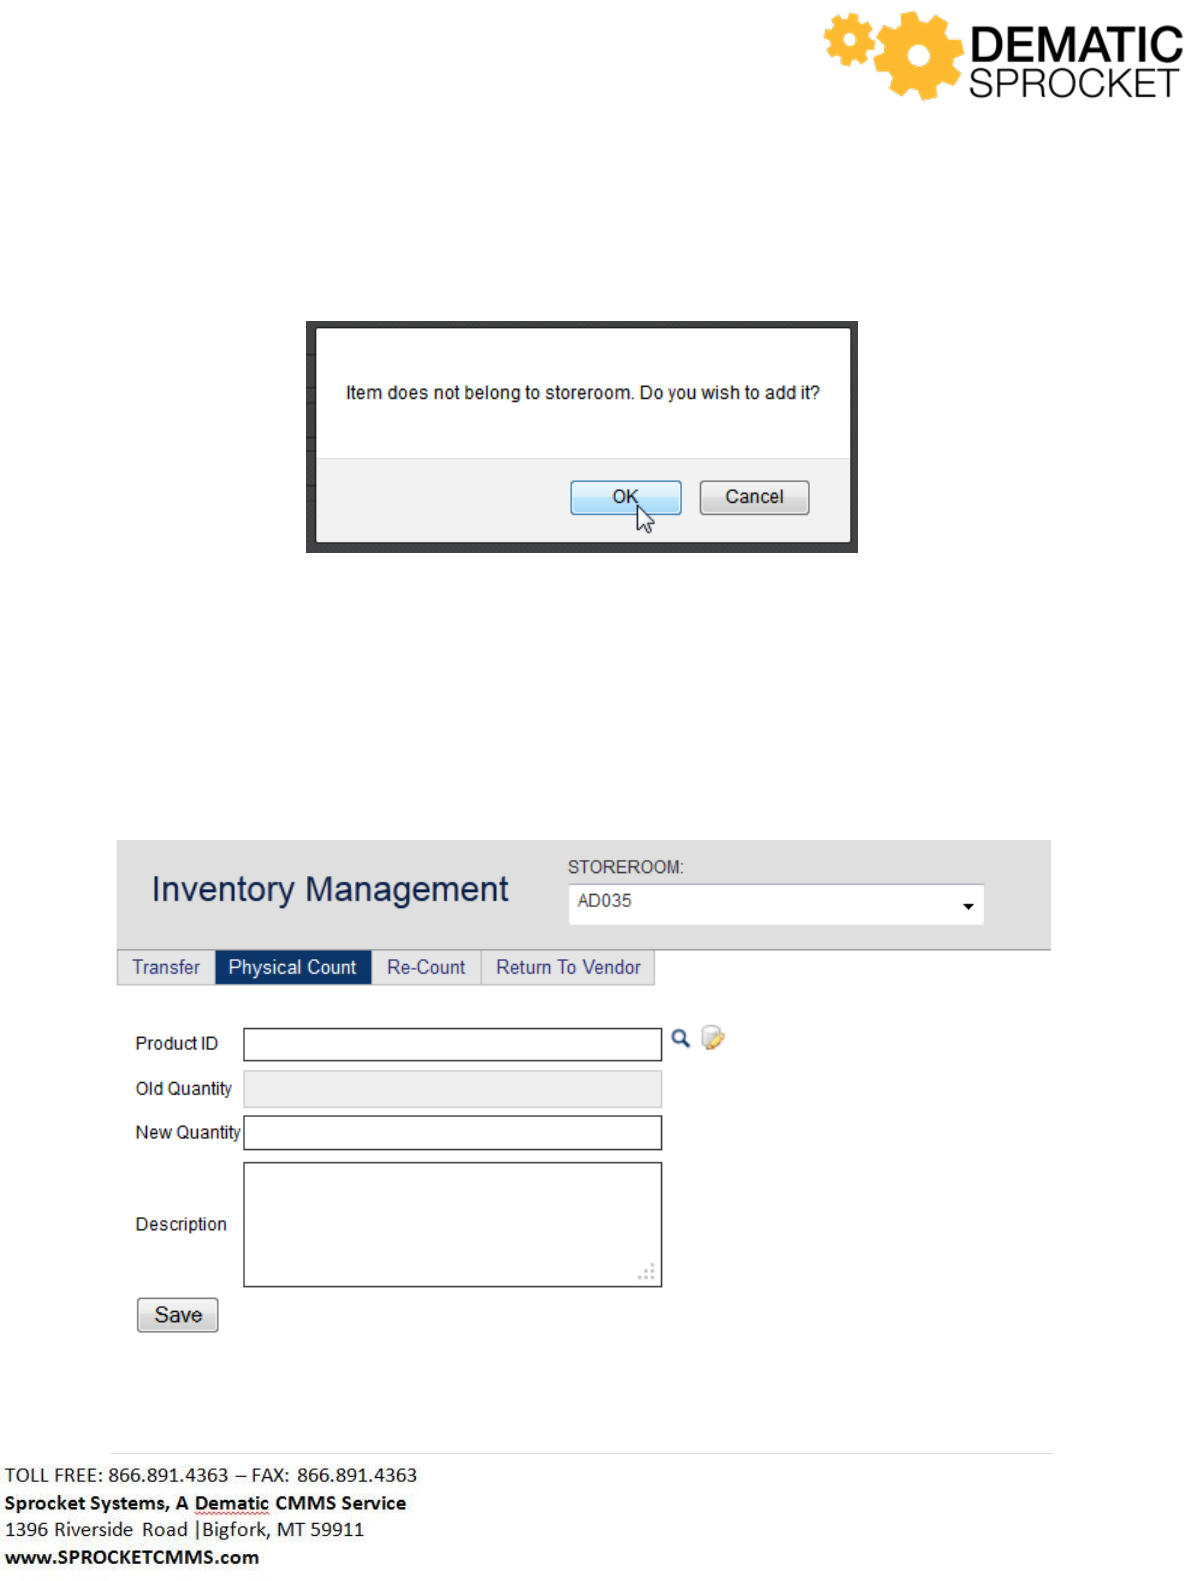
172 | P a g e
A window will appear saying this item does not belong to this storeroom, do you want to add it? Click
OK to continue or Cancel to return to the previous page.
This will complete your transaction and transfer this item to the new storeroom and/or billing code.
7.4.2 Inventory Management Physical Count
The Physical Count tab allows you to update inventory counts in Sprocket. Once you click the tab, you
will be directed to a form which can fill out with the accurate inventory quantity information.
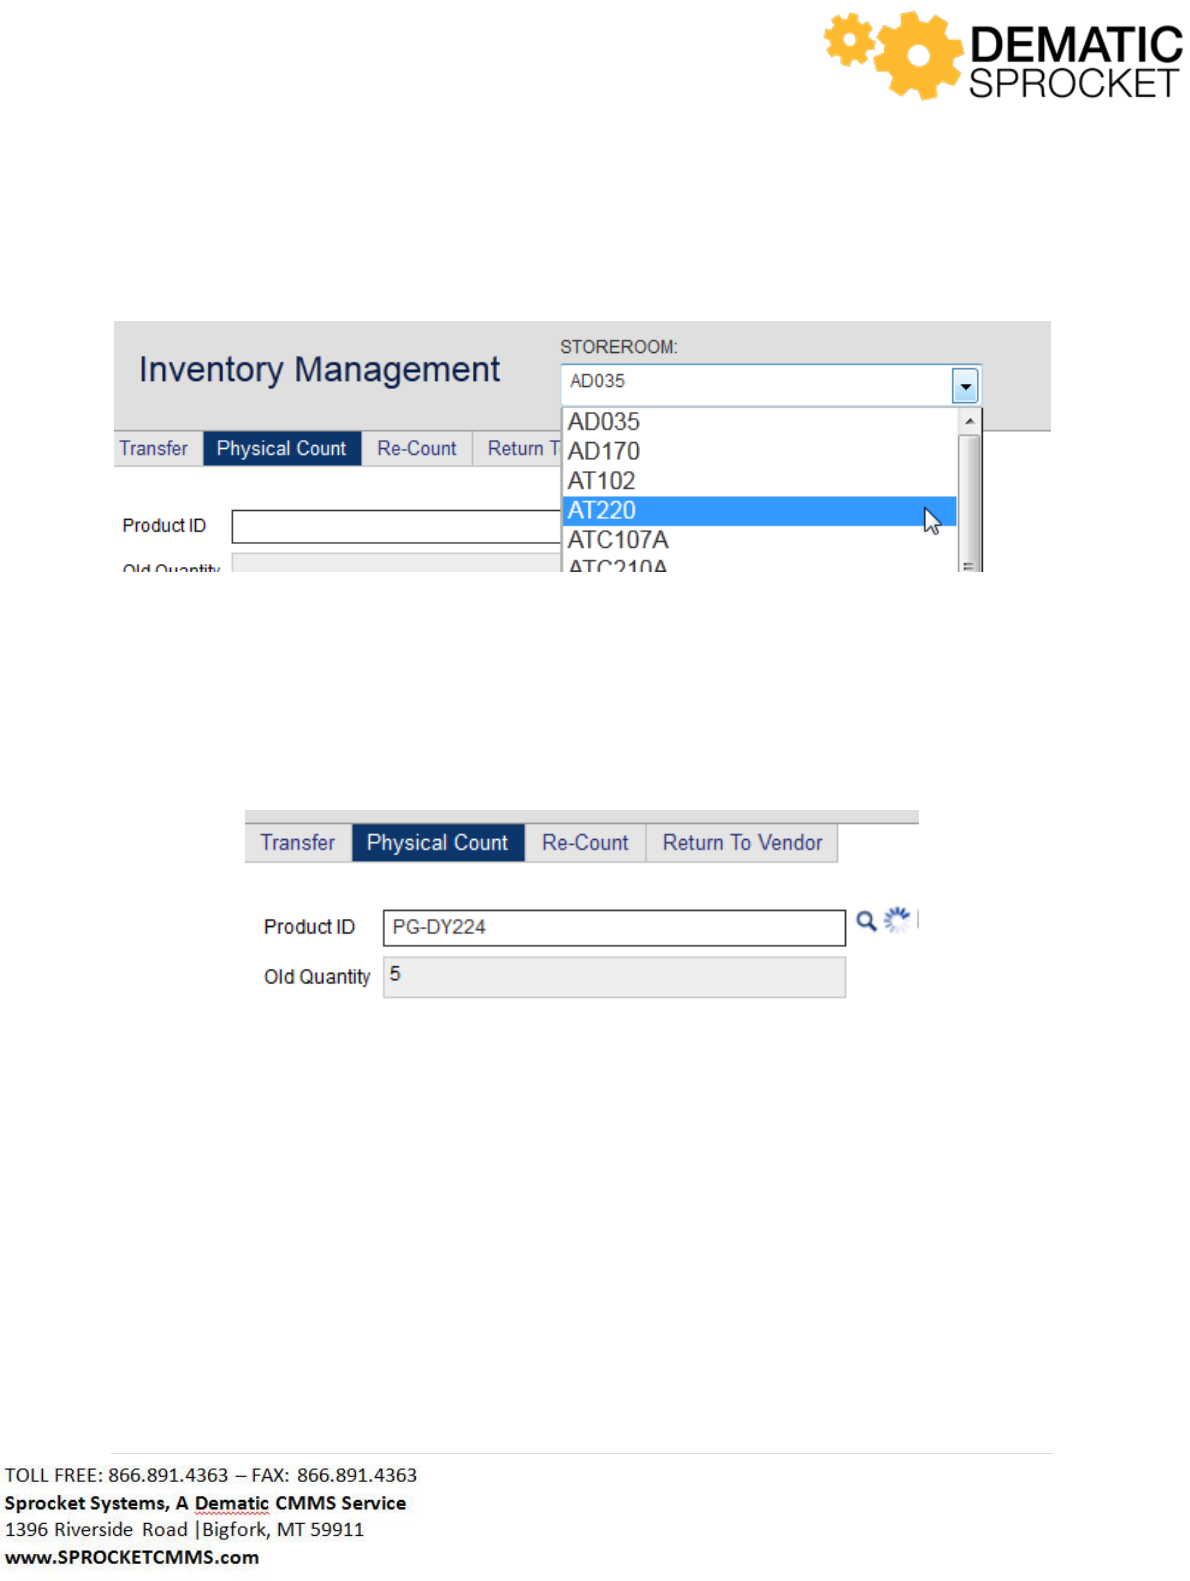
173 | P a g e
Notice the Storeroom drop down menu at the top of the page. Use this to select the storeroom you will
be counting in.
In the form below, use the Product ID Auto Lookup Tool to locate and select the item you are counting.
Once the results are returned, notice that the Old Quantity filled is automatically populated with the old
quantity on hand for this item.
Now, in the New Quantity field, enter the amount that you counted of this item. Use the Description
field at the bottom of the page to enter any comments or remarks about this item quantity. Once all of
your information has been entered, click the Save button at the bottom of the page to update the item
quantity.
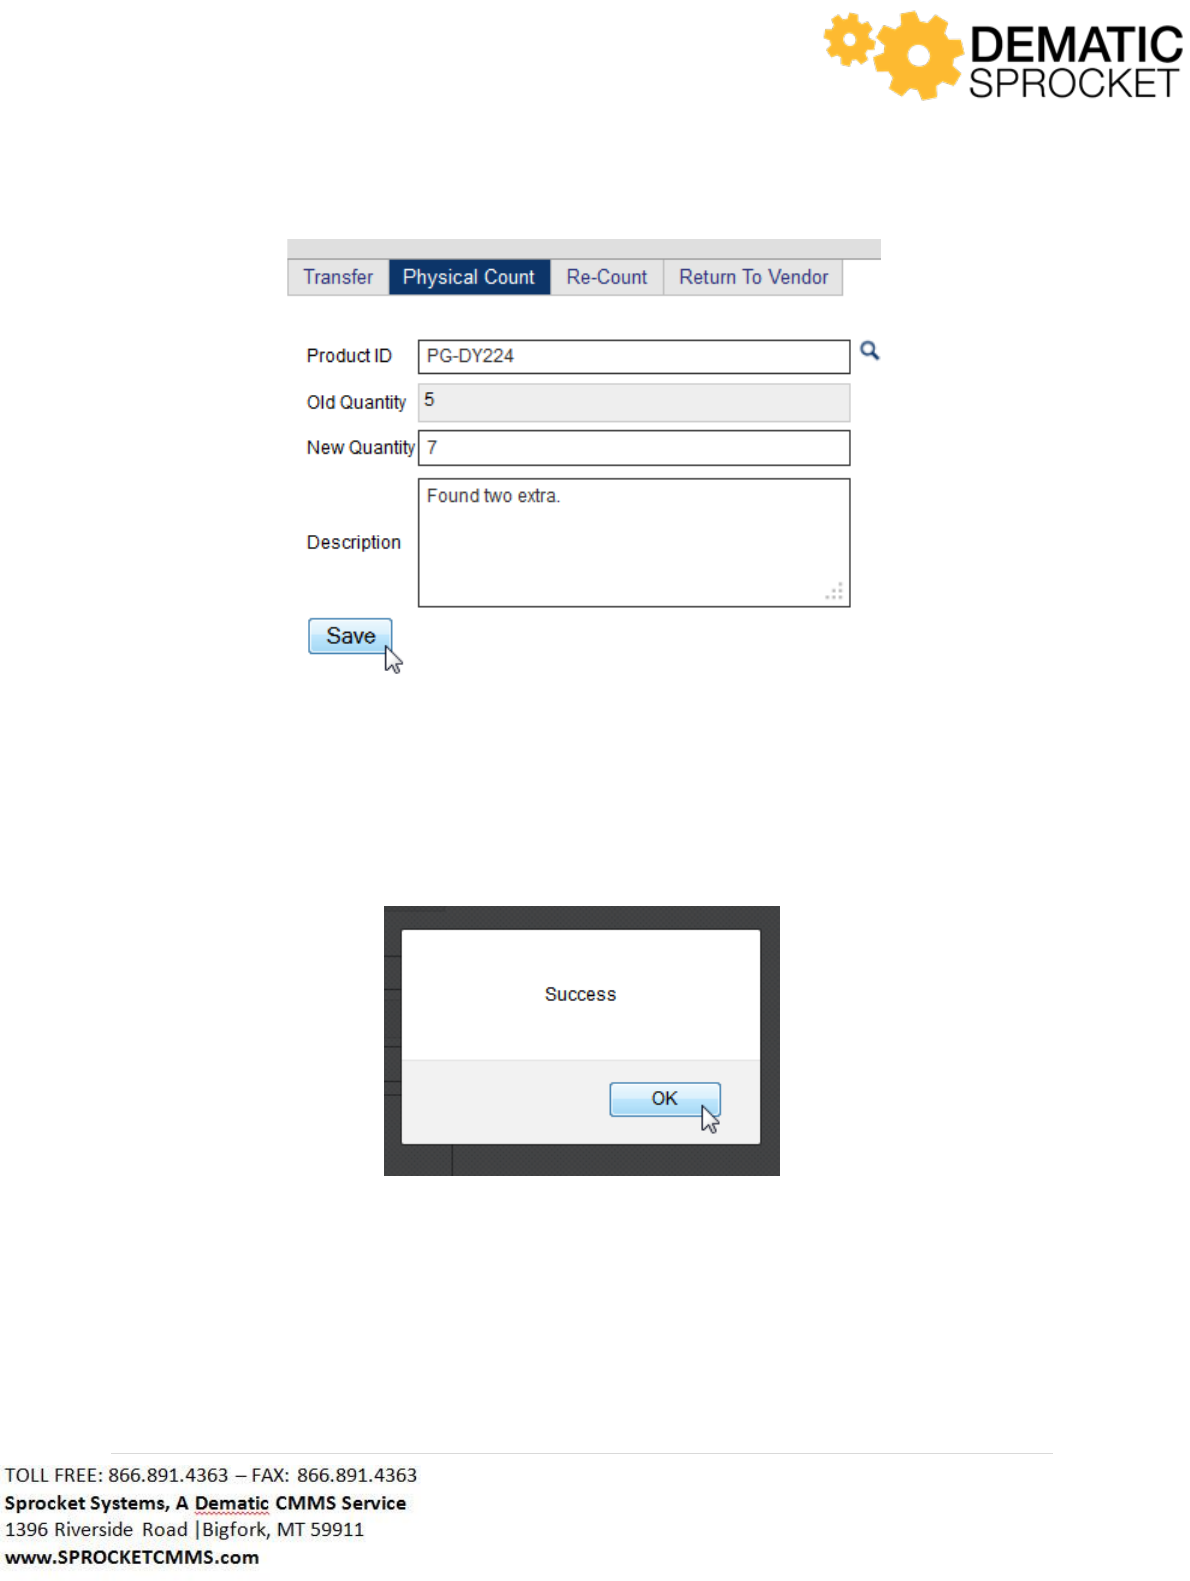
174 | P a g e
A window will appear saying Success. Click OK to continue.
Now you may enter an amount for another item to update the quantity.
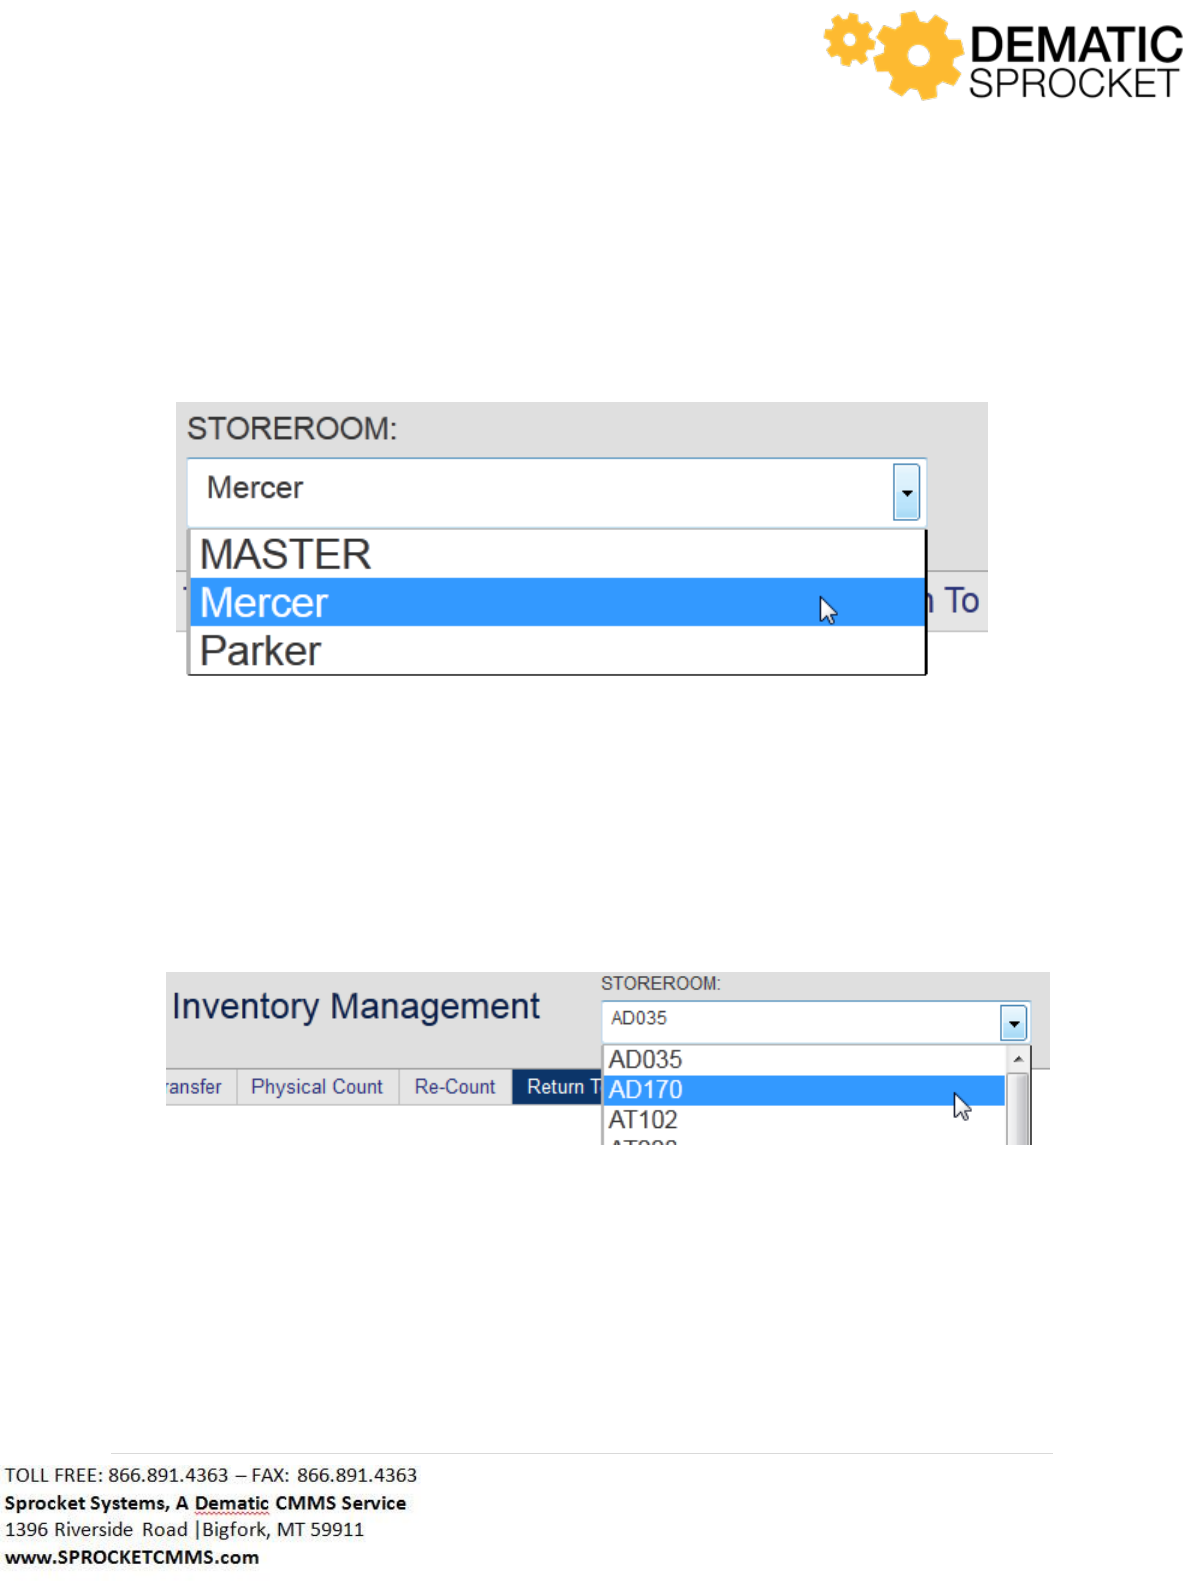
175 | P a g e
7.4.3 Inventory Management Re-Count
The Re-Count tab is used to submit any pending physical counts. Click the Submit All link to submit
pending physical counts for recounting.
Use the Storeroom dropdown menu at the top of the screen to select a storeroom for recounting.
Here you will see any pending physical counts. Click the Submit All link to submit for recounting.
7.4.4 Return to Vendor
Use the Return to Vendor tab to return items to vendors and properly update inventory. Use the
Storeroom drop down menu at the top of the page to select a storeroom.
In the form below, use the Product ID Auto Lookup Tool to locate and select the desired inventory item.
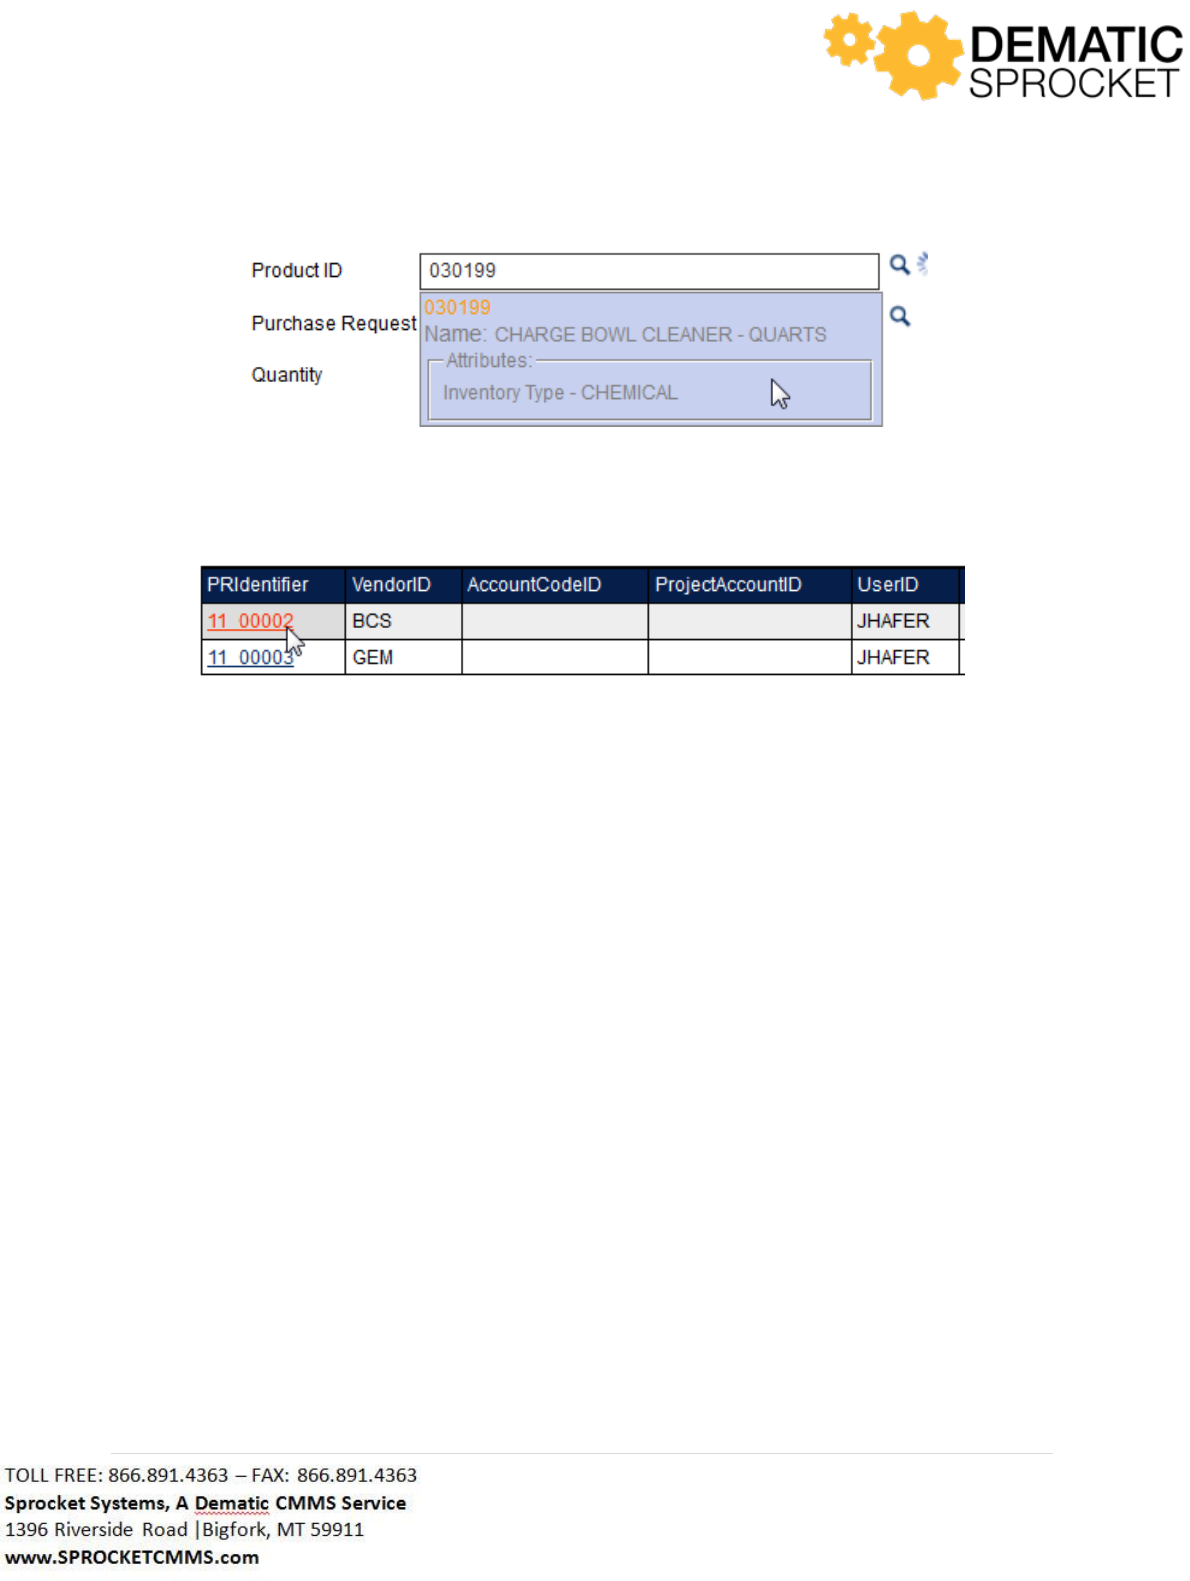
176 | P a g e
Use the Purchase Request Auto Lookup Tool to locate the correct purchase request for this item.
In the Quantity field enter in the quantity you wish to return to the vendor. Use the Description field to
enter in any remarks about this transaction.
Once you have entered in all of your information, click the Return button at the bottom left of the page.
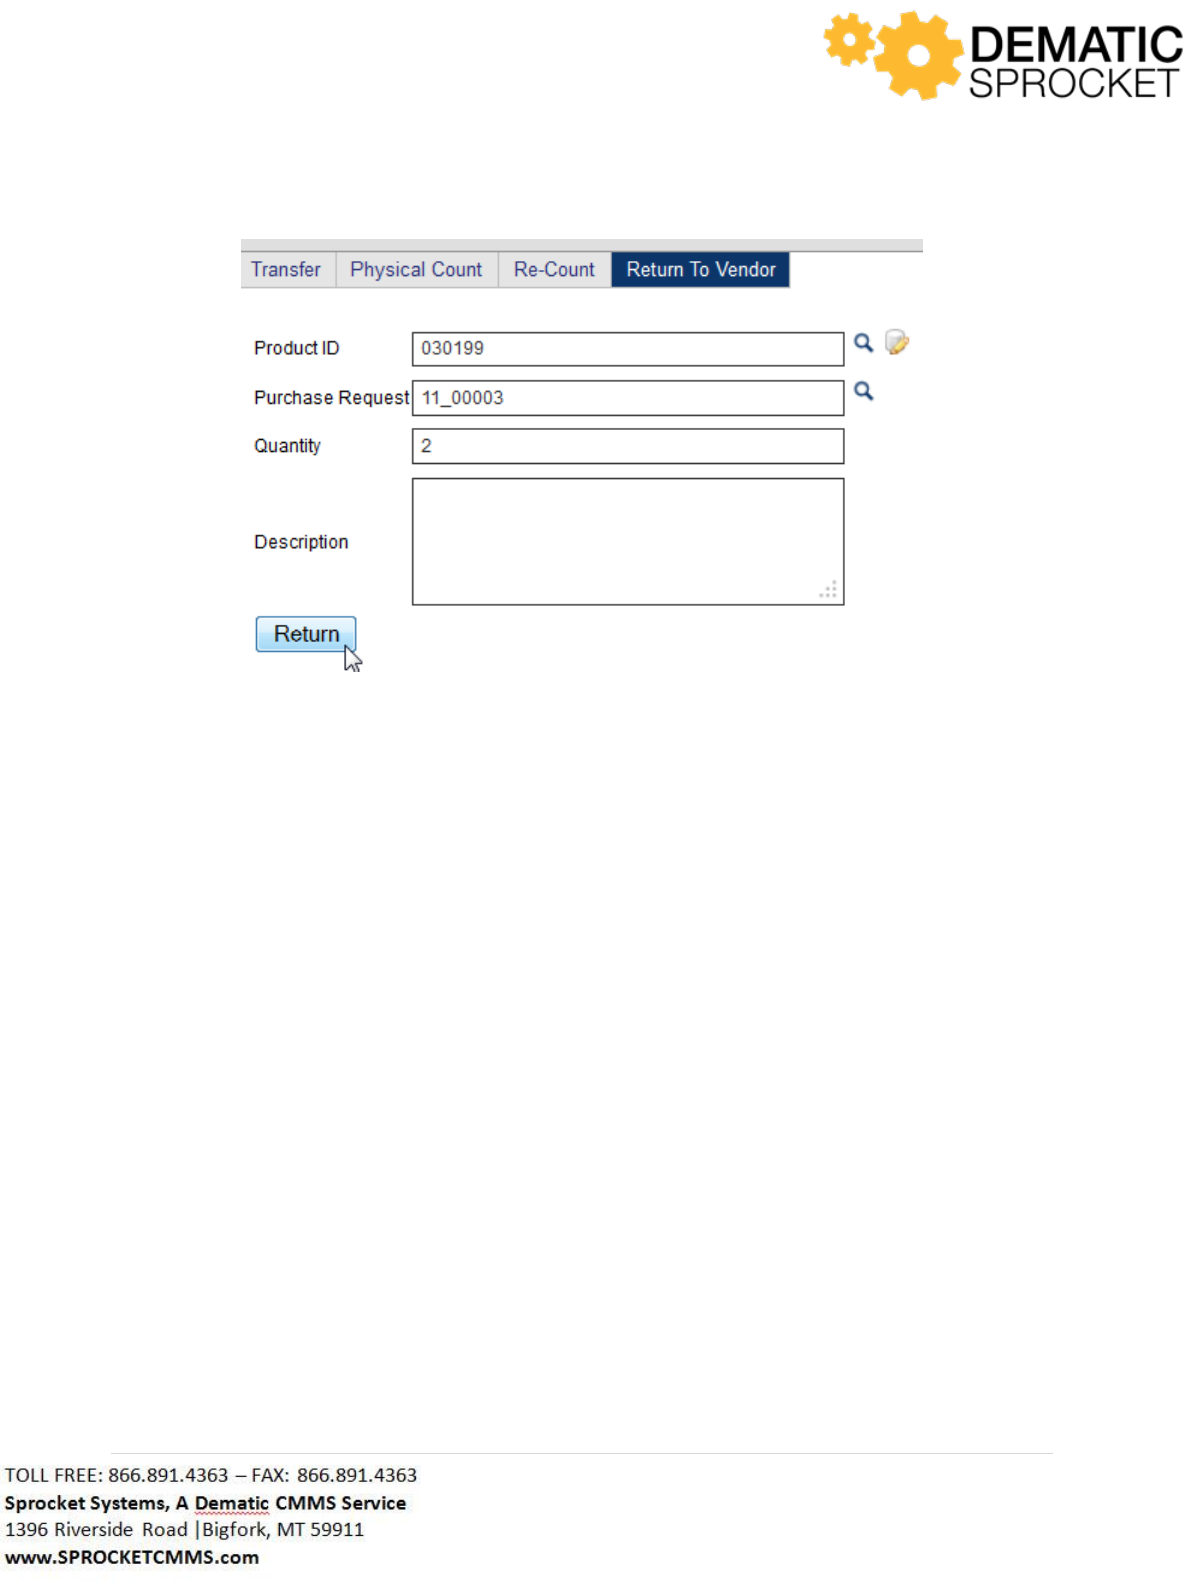
177 | P a g e
Now you may choose another item to return to a vendor or exit out of Inventory Management.
7.5 Purchase Requests
The Purchase Requests tab is used to view previous purchase request made by other employees as well
as submit purchase requests to replenish inventory. You will use this tab when you wish to have
management order more inventory items for employee use. When you click the Purchase Requests tab,
a grid will display previous purchase requests.
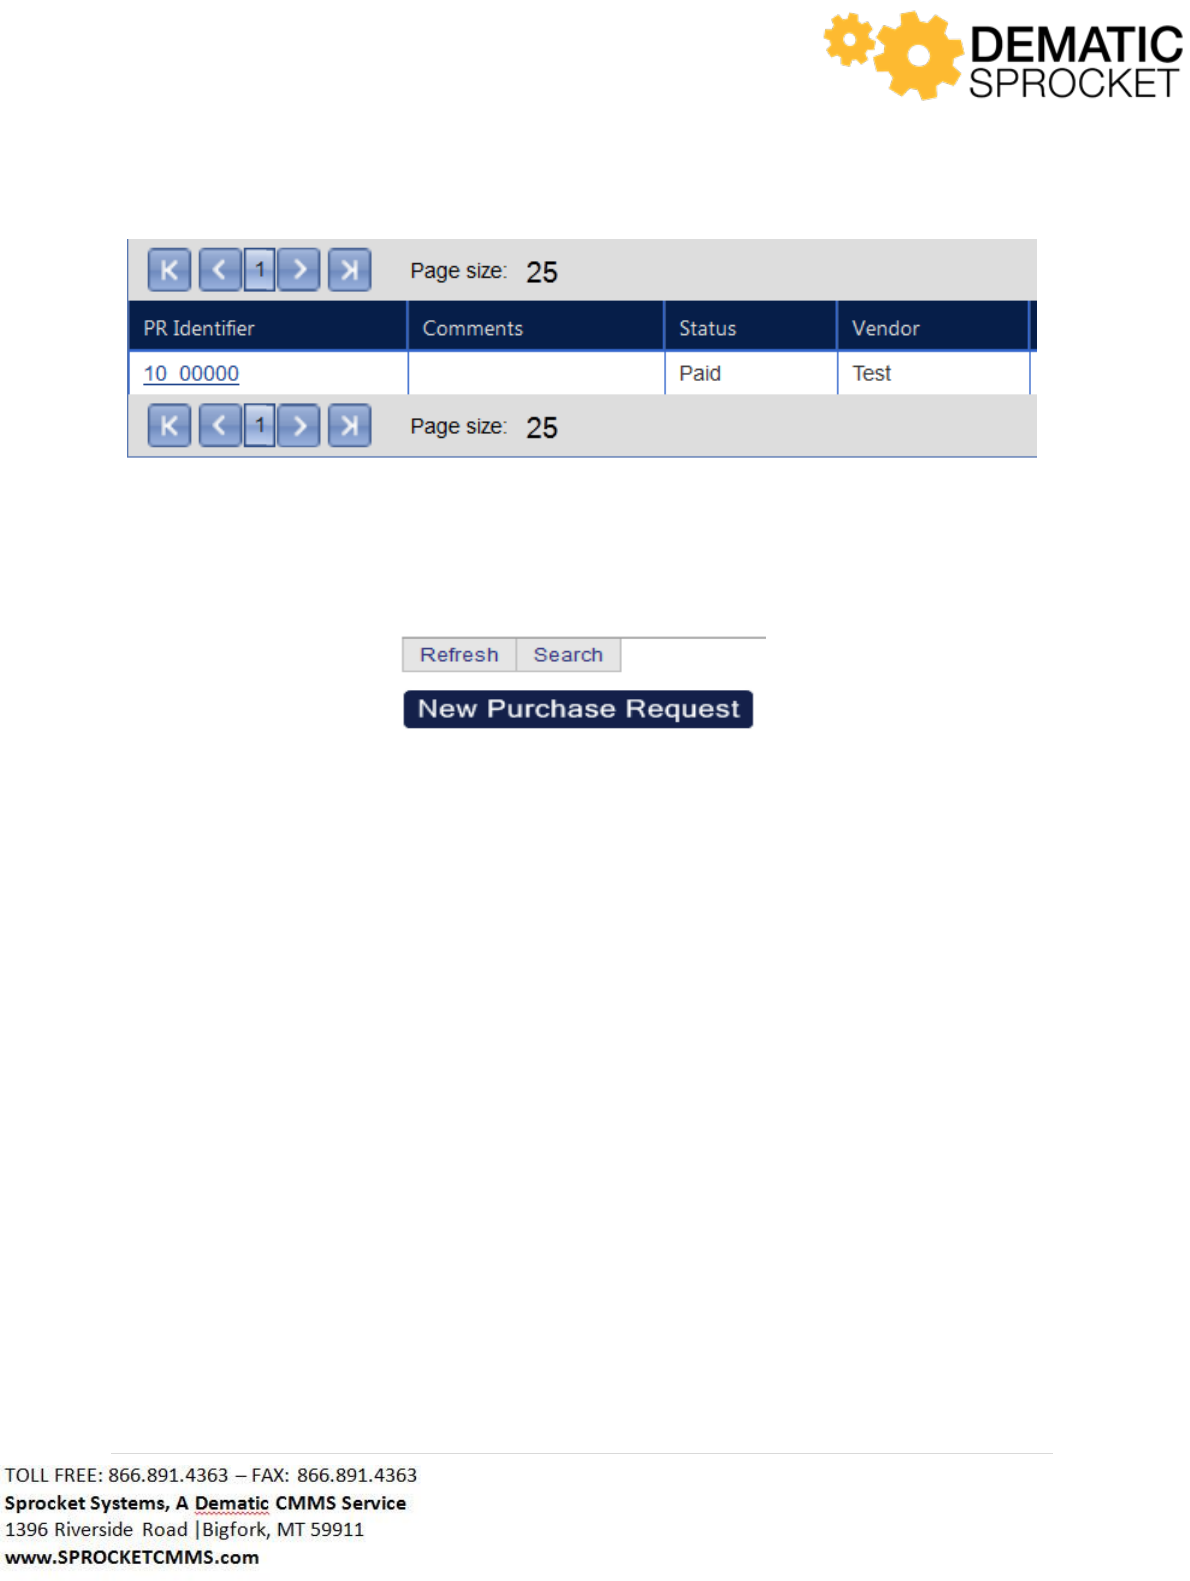
178 | P a g e
To submit a Purchase Request, click the New Purchase Request button at the top left of the grid.
7.5.1 New Purchase Request Vendor Tab
You will be directed to a form to fill out. Notice that you are on the Vendor tab.
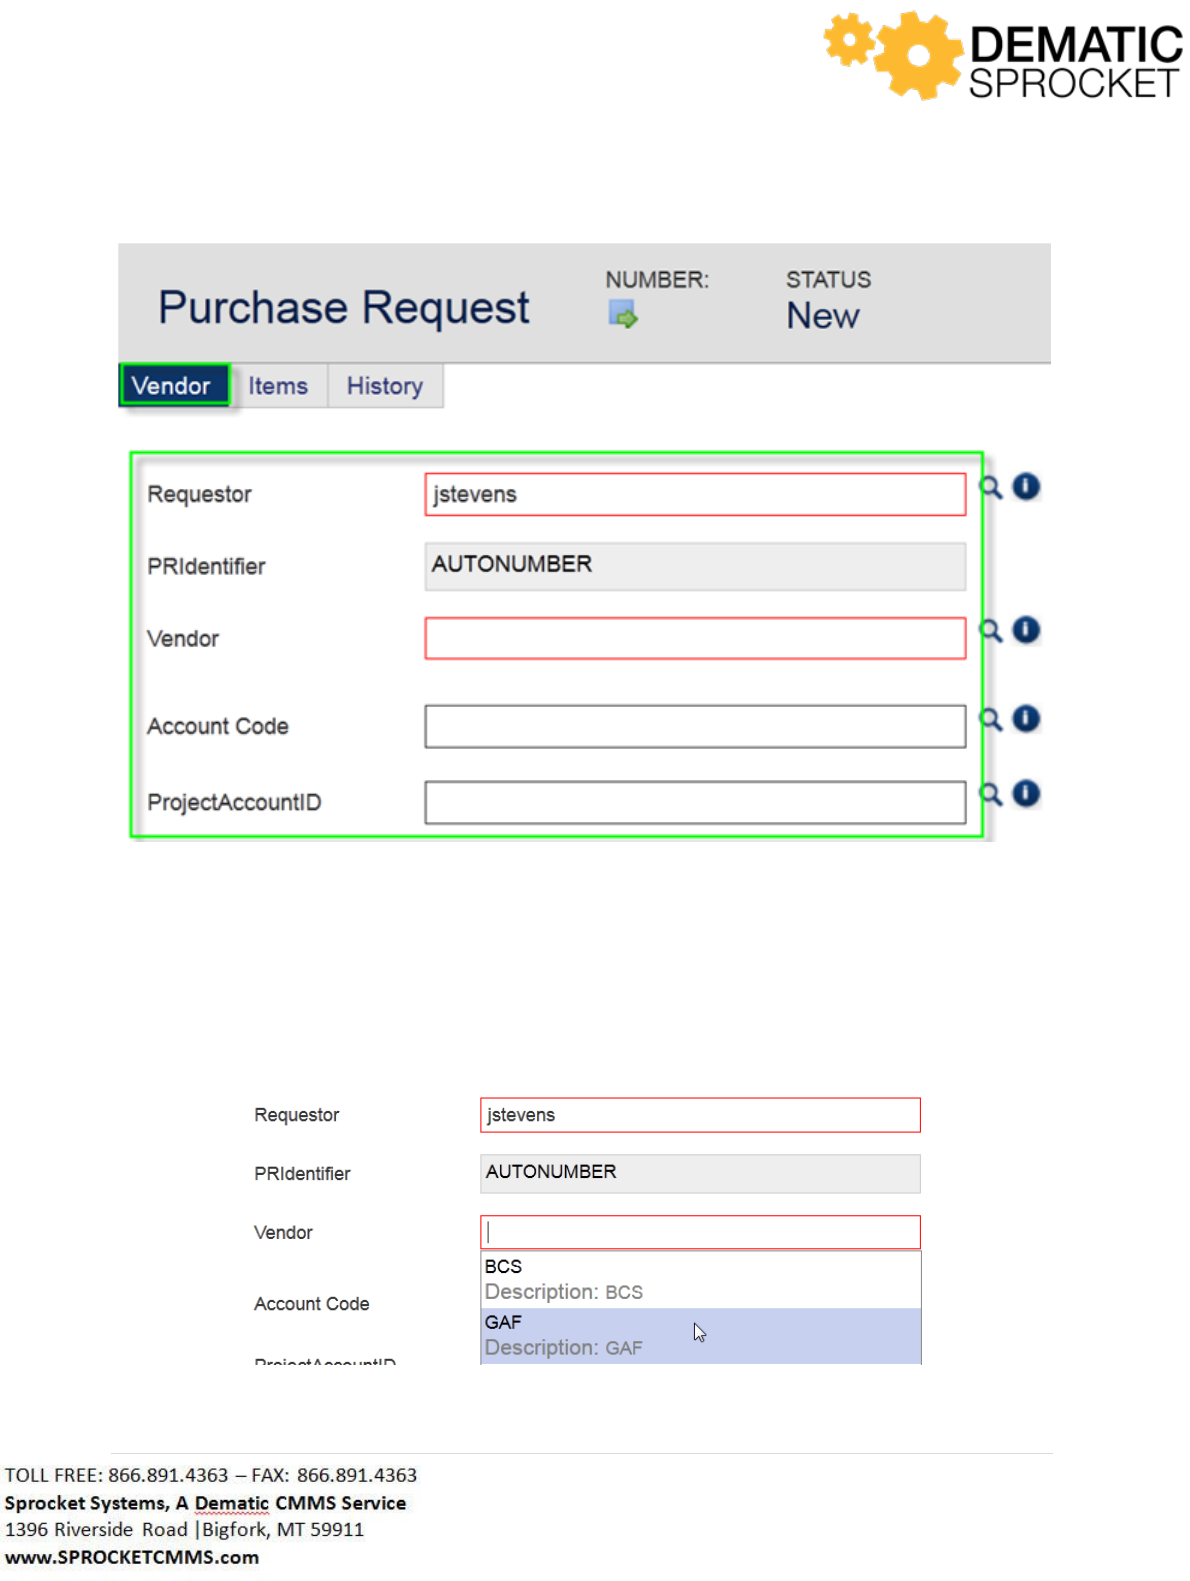
179 | P a g e
Note: Sprocket is customized based on customer needs. Your screen may or may not display the above
fields. Contact your Sprocket Administrator with questions.
Begin filling out the form on the Vendor tab. Note that fields outlined in red are required and fields that
are white are optional.
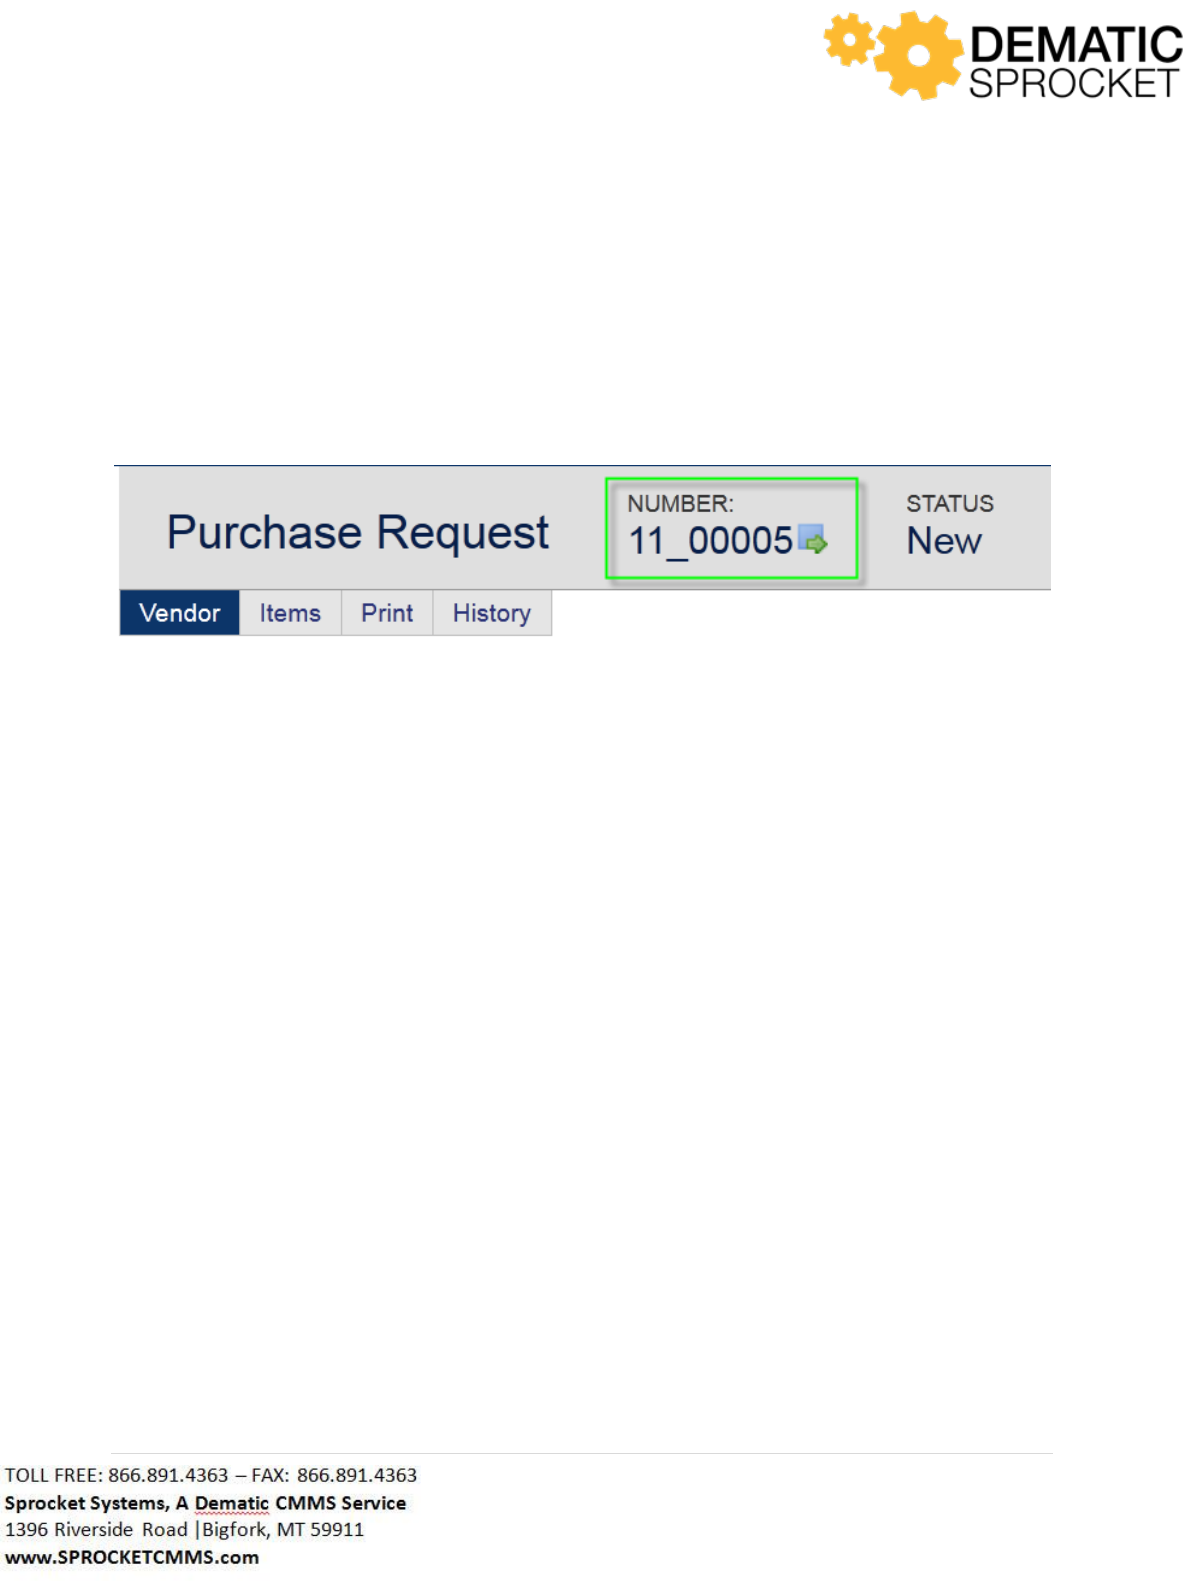
180 | P a g e
Remember that some fields, such as Account Code and Vendor, have the Auto Lookup Tool next to them.
Use the icon to help located records in Sprocket.
Once you have filled out all the required information on the Vendor tab, be sure to click the Save button
in the upper right hand corner of the page to ensure that your entries are saved. Notice that after
saving the information on the Vendor tab, a Purchase Request Identifier appears at the top of the page.
This will be the number used to reference this transaction.
7.5.2 New Purchase Request Items Tab
Now click the Items tab at the top of the page. Use this form to select the inventory items you wish to
request for purchasing.
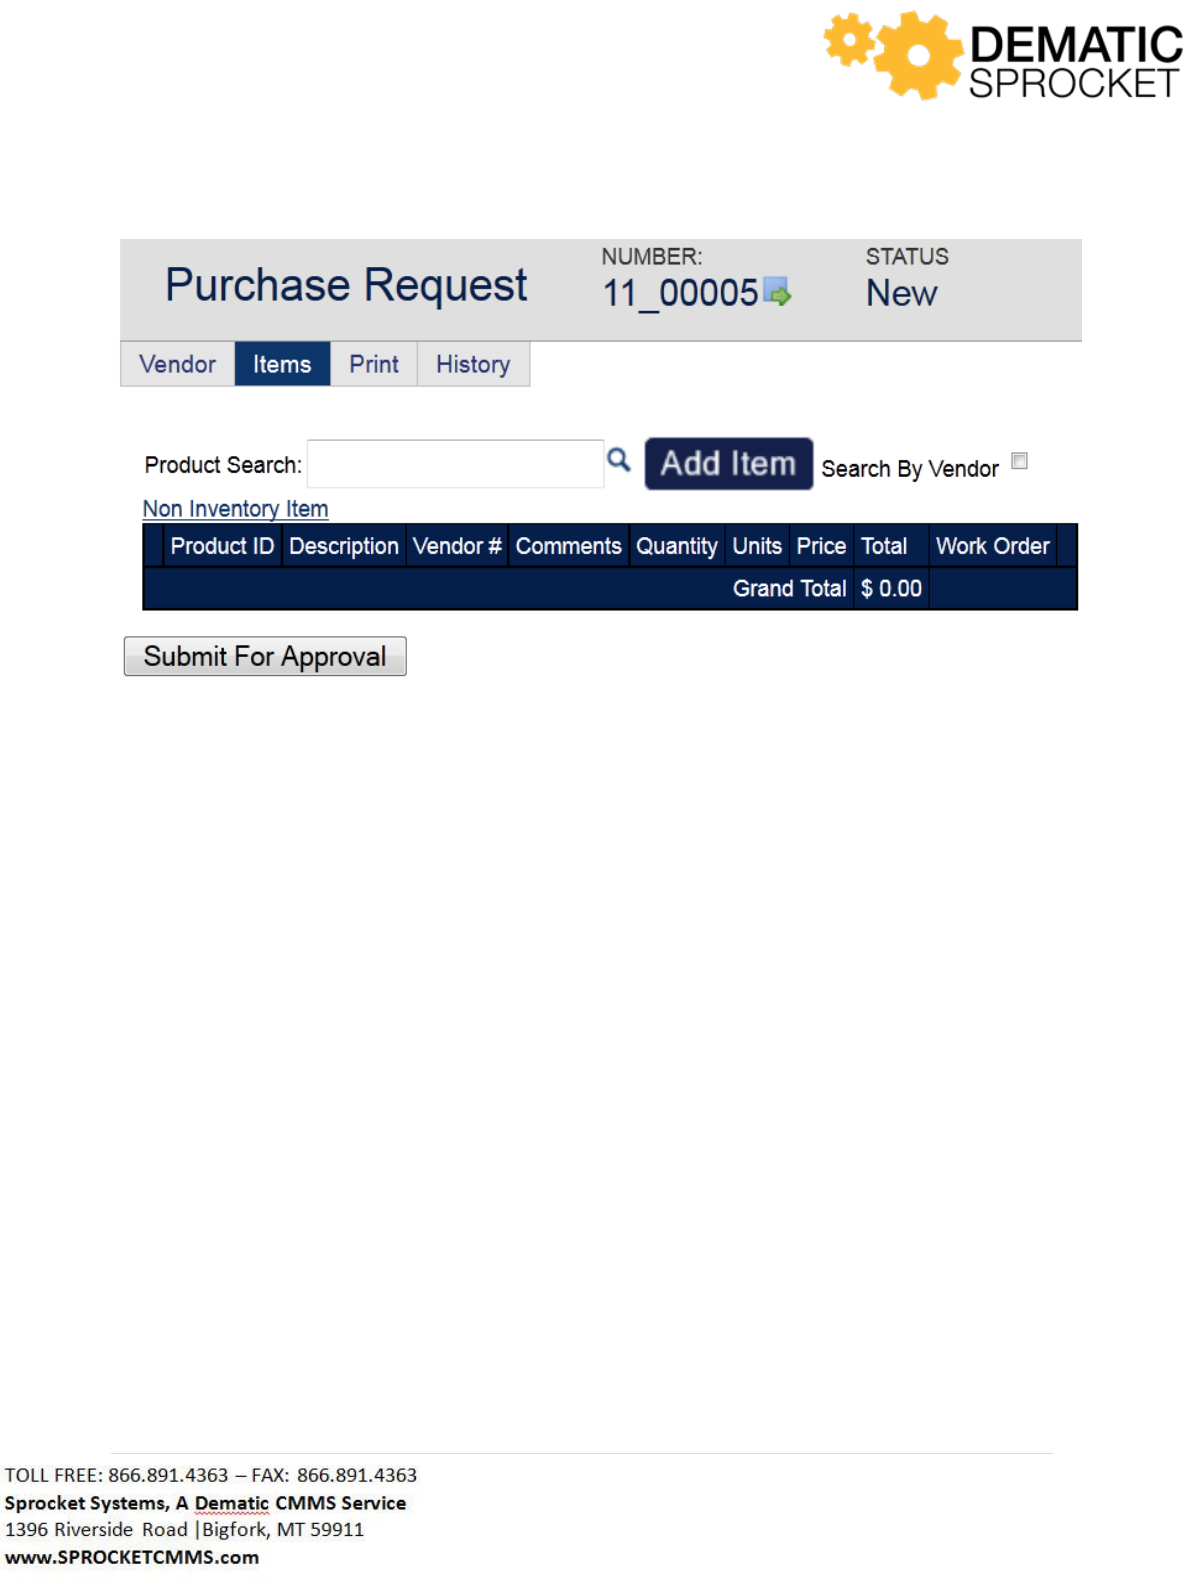
181 | P a g e
Here we will search for inventory items to add to this Purchase Request. You can search for products by
product name or by vendor. Notice the Product Search field is displayed indicating that searching by
product is the default search setting.
7.5.2.1 Selecting Products by Product Identifier
To begin selecting items for this Purchase Request, use the Product Search field at the top of the page to
search for and enter the products for this transaction. Notice that the Product Search field has the Auto
Lookup Tool next to it. Either begin typing all or part of the name of the product and the Auto Lookup
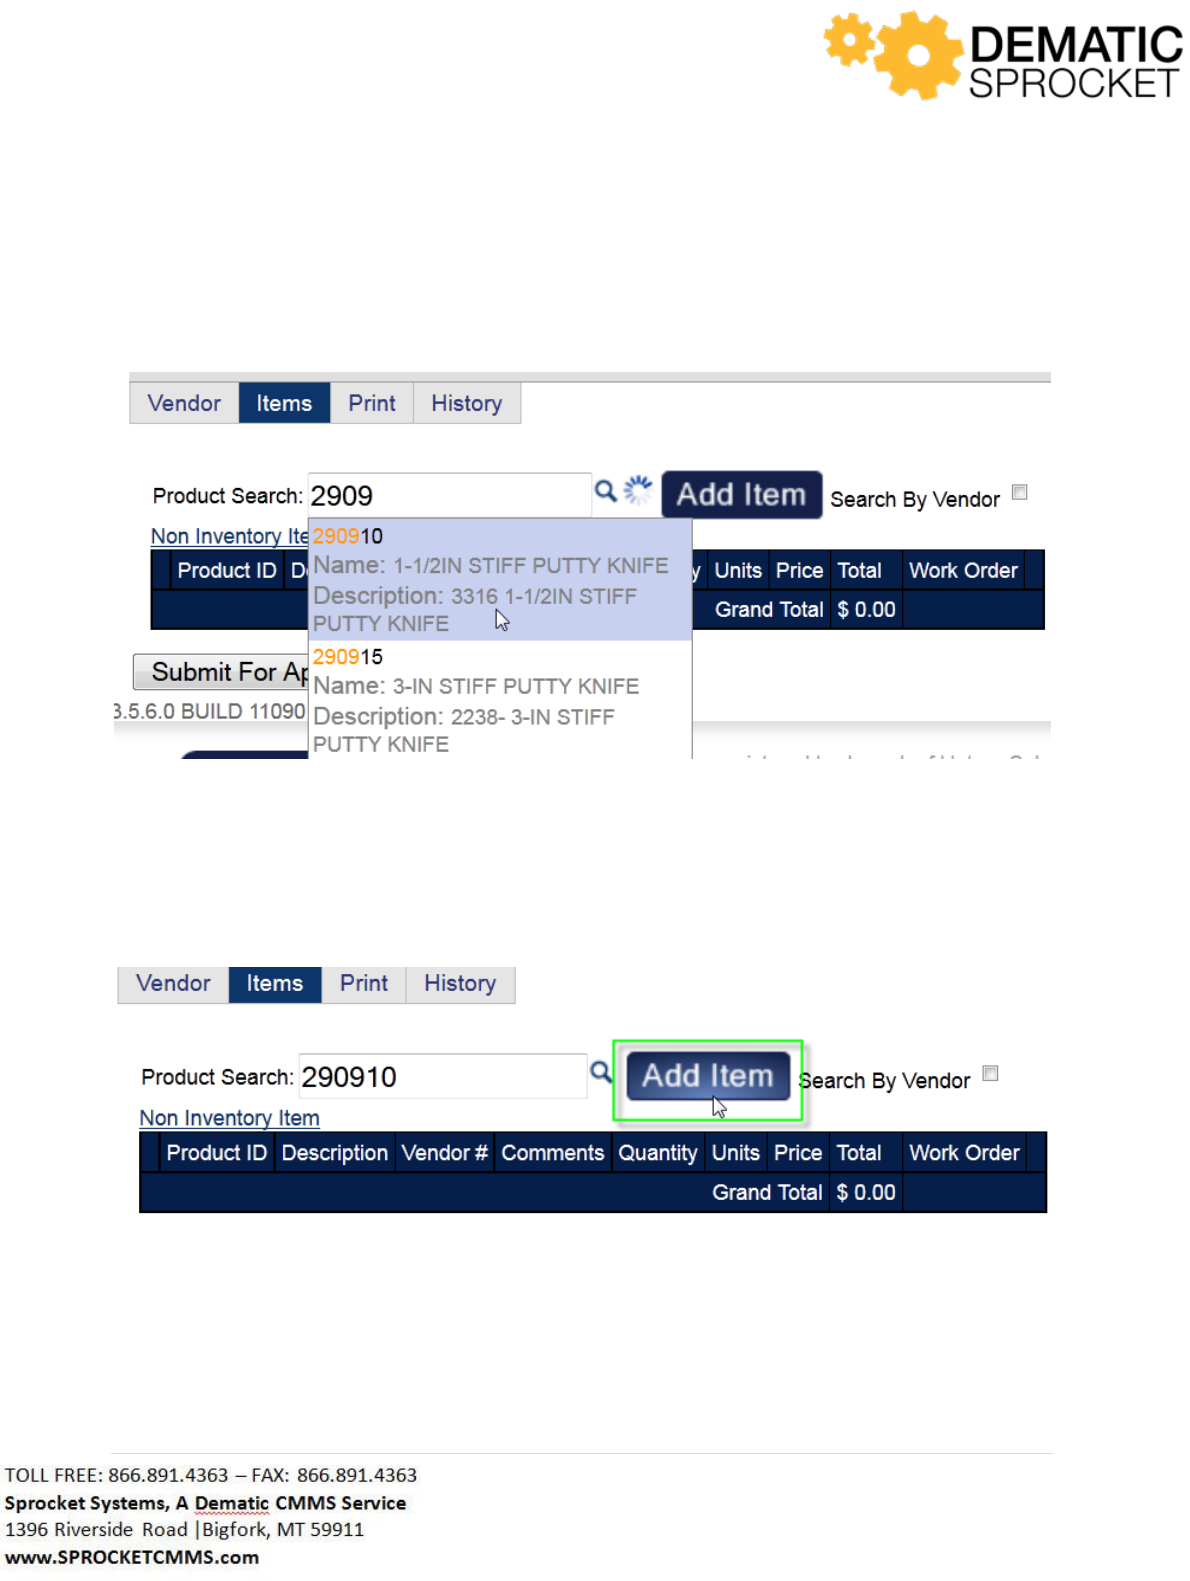
182 | P a g e
Tool will return results, or click the Auto Lookup Tool icon to view an entire list of inventory items to
select from.
Once you have selected the desired item, click the Add Item button to the right of the Product Search
field.
Notice that the grid at the bottom of the page is updated with the product you selected.
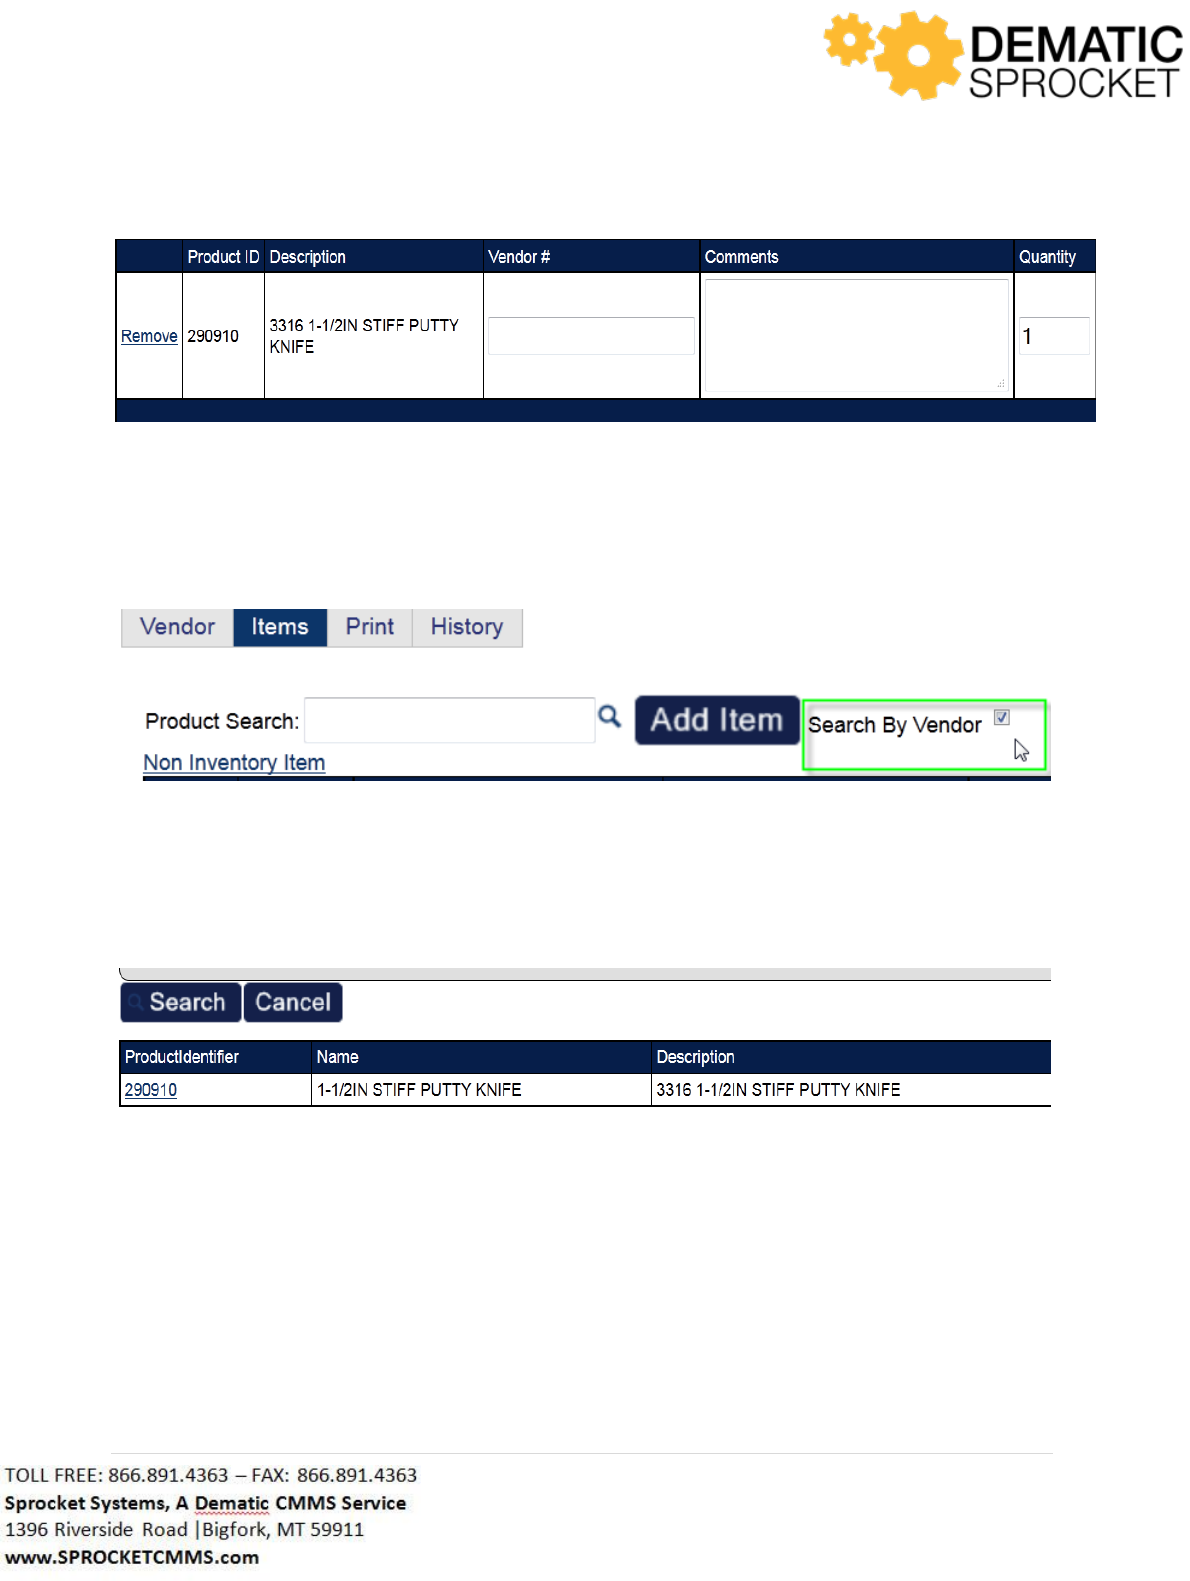
183 | P a g e
7.5.2.2 Selecting Products by Purchase Request Vendor
You may also search for products by Vendor. To do this, check the Search By Vendor checkbox at the
right of the screen.
Now, in the Product Search field, use the Auto Lookup Tool to locate and select the desired product.
Notice that the list may be very small. By checking this box, you are only able to select products that are
supplied by the Vendor you entered in on the Vendor Tab.
This list displays only one item. To select it, click the Product Identifier in the far right hand side of the
grid.
Now this Product Identifier will be populated in the Product Search field on the Items tab. Click the Add
Item button to add it to the grid.
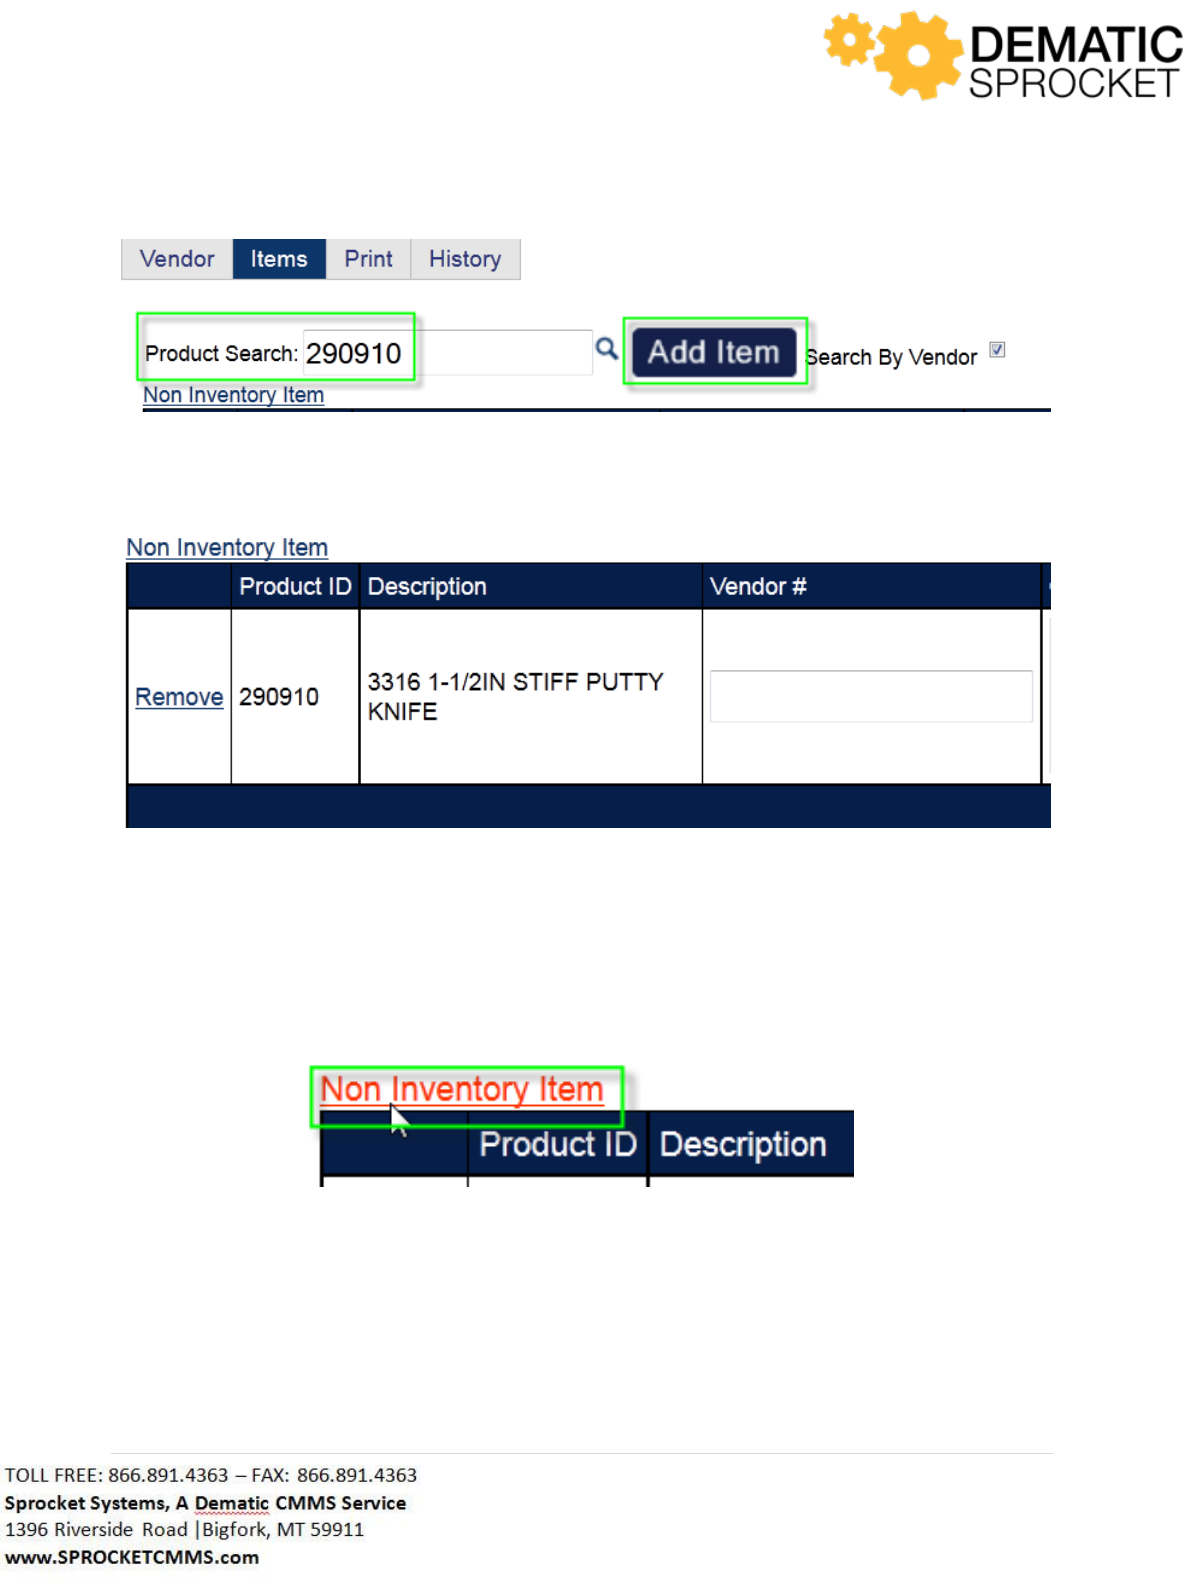
184 | P a g e
Now notice that the grid at the bottom of the page is updated to include this product.
7.5.2.3 Selecting Non-Inventory Items
You may also submit Purchase Requests for non-inventory items. To do this, click the Non Inventory
Item link above the items grid at the bottom of the page.
Notice that the form above changes with new fields to fill out.
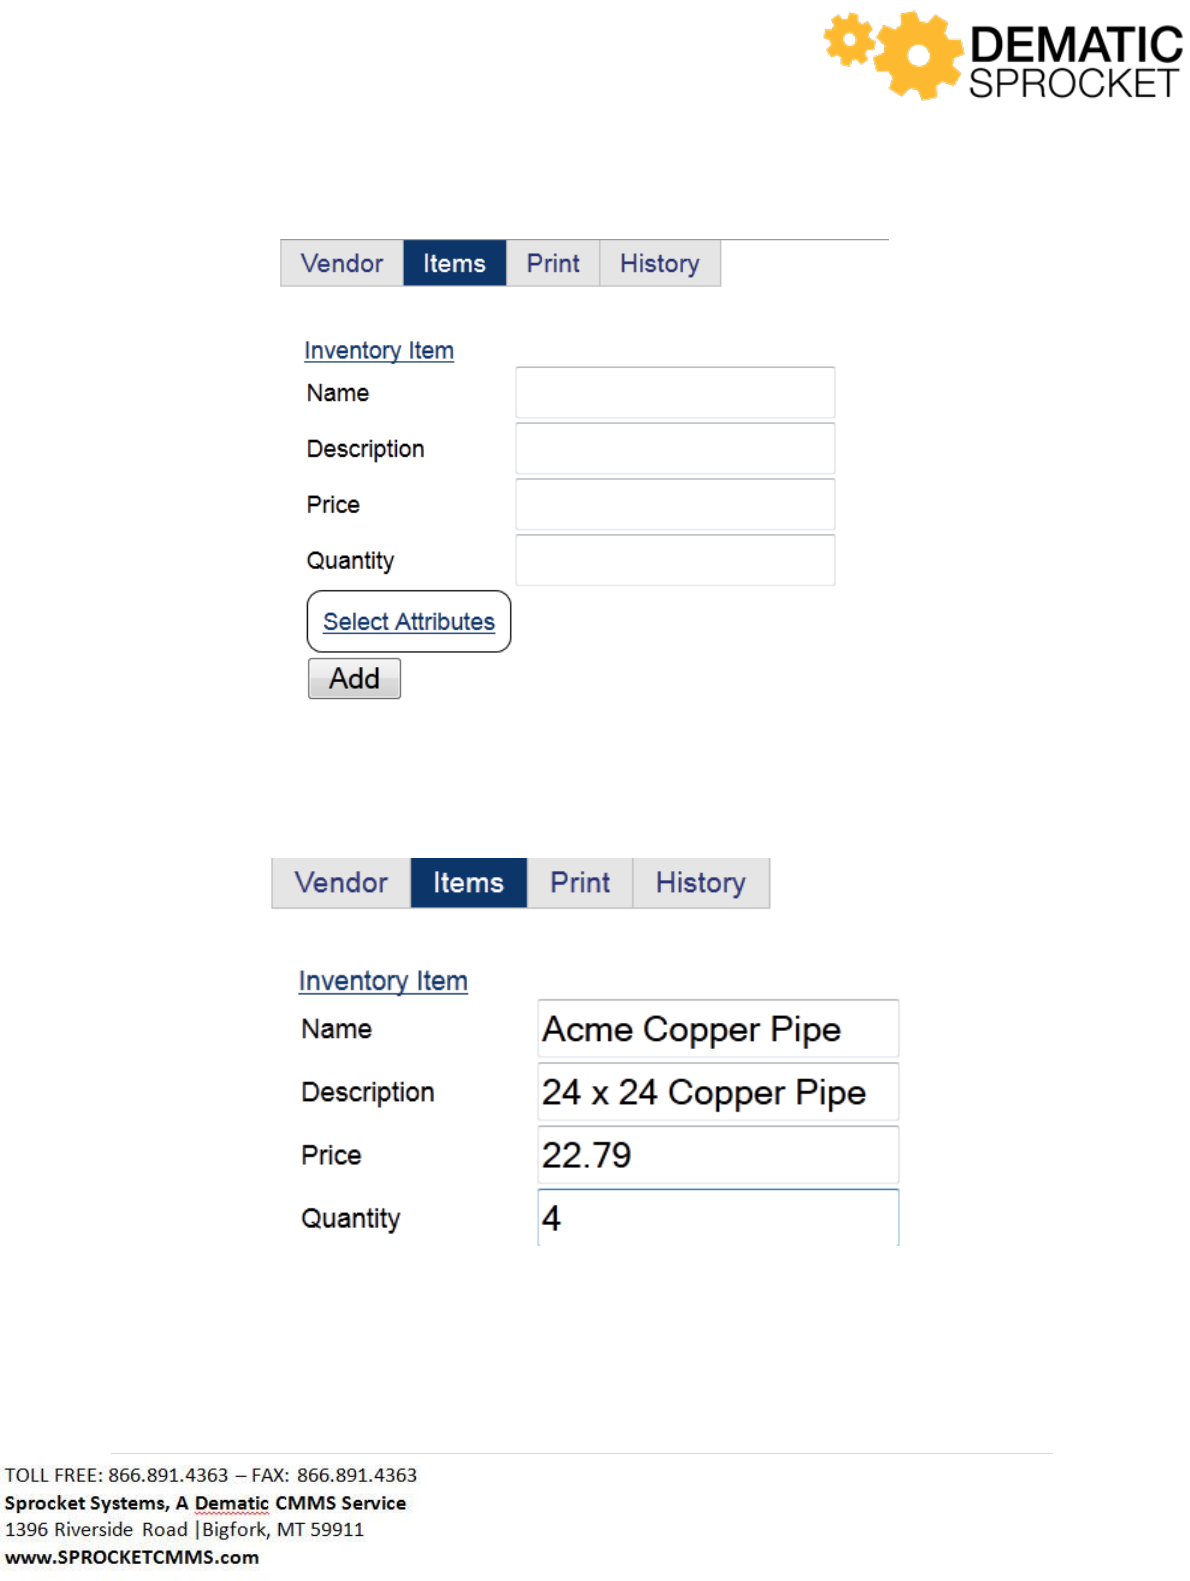
185 | P a g e
Note: Sprocket is customized based on customer needs. Your screen may or may not display the above
fields. Contact your Sprocket Administrator with questions.
Begin filling out the necessary information into the form.
Note: Adding this as a non-inventory item will automatically document this product as an item form the
vendor you listed on the vendor page. Be sure you have the correct vendor on the vendor tab before
adding additional non-inventory items.
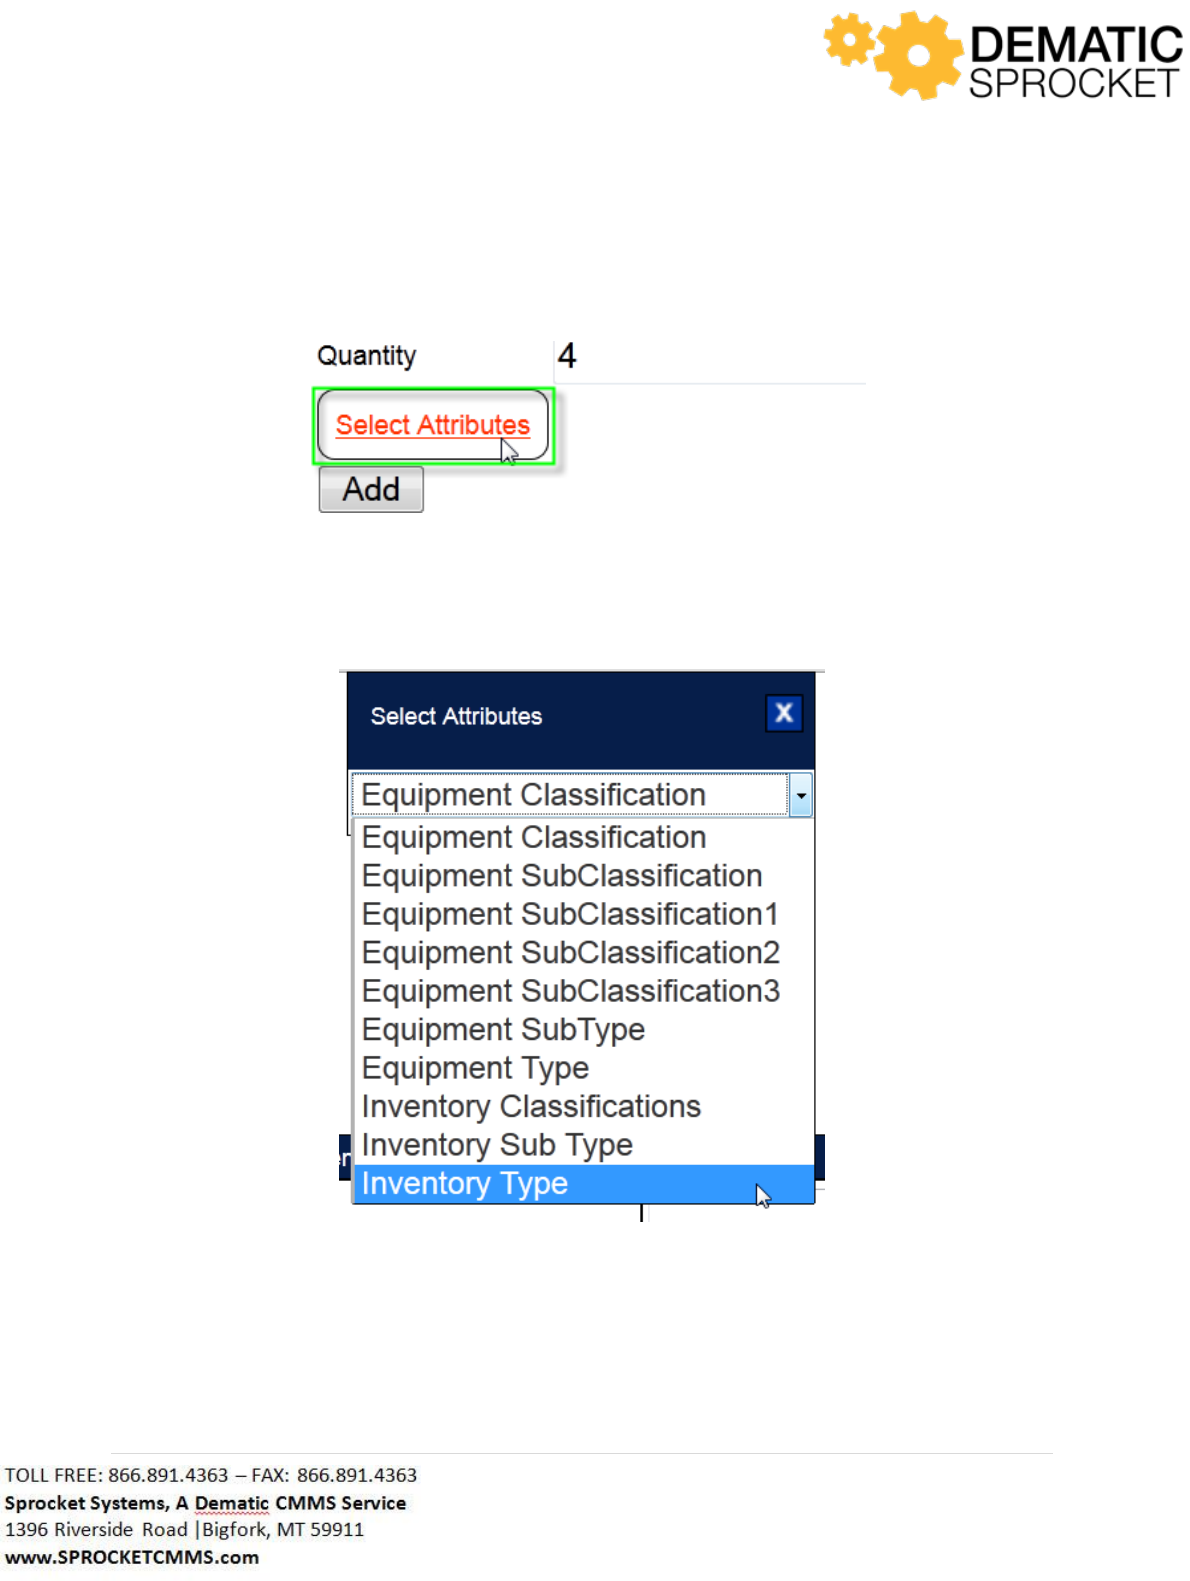
186 | P a g e
Use the Select Attributes below this form to add additional classifications to this item.
Use the drop down menu from the window that appears to further classify this item in the appropriate
category. Remember, Attributes are Optional.
A list of possible attributes will appear in the window. Select the appropriate attribute for this product.
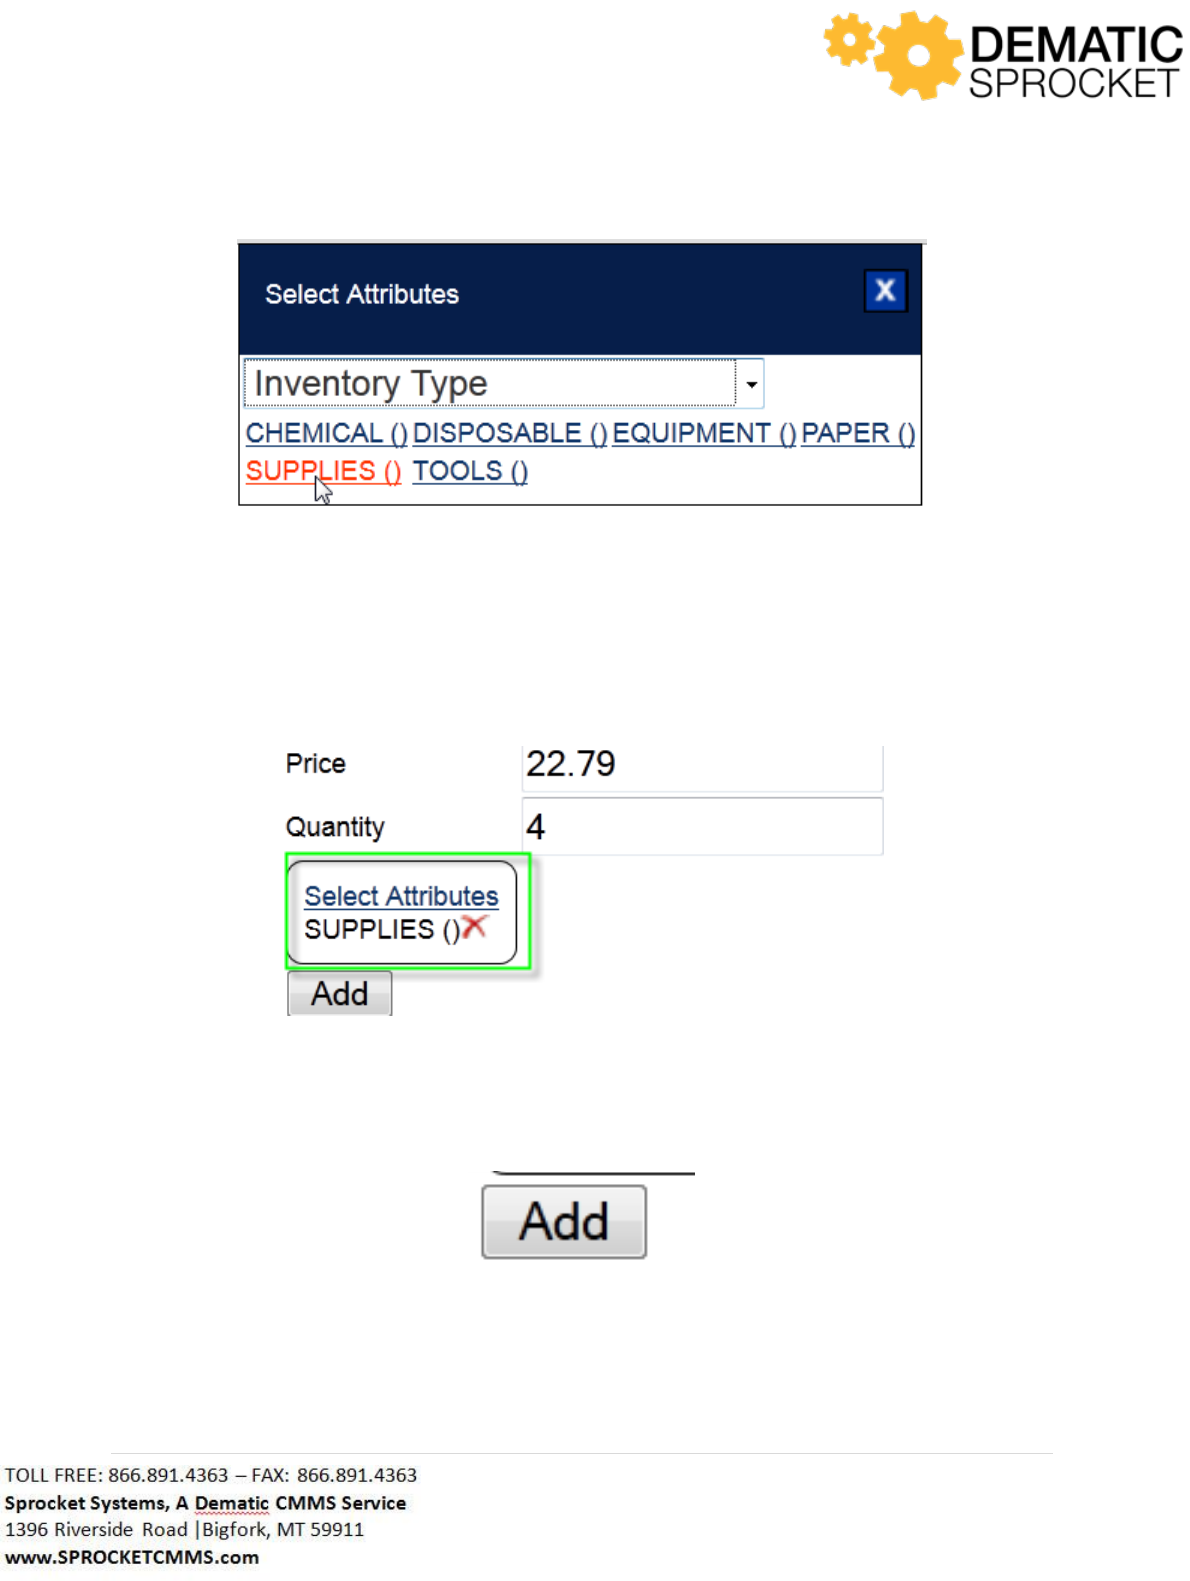
187 | P a g e
Note: Sprocket is customized based on customer needs. Your screen may or may not display the above
attributes. Contact your Sprocket Administrator with questions.
Once you select the appropriate attribute, either select another attribute or click the blue X in the upper
right hand corner of the Select Attributes window to close it.
Notice that the Attributes section of the form has been updated to include your selection.
Now that you have completed the form, click the Add button at the bottom to update the item grid with
this non-inventory product.
Now, notice that the grid has been updated to include the product you have added.
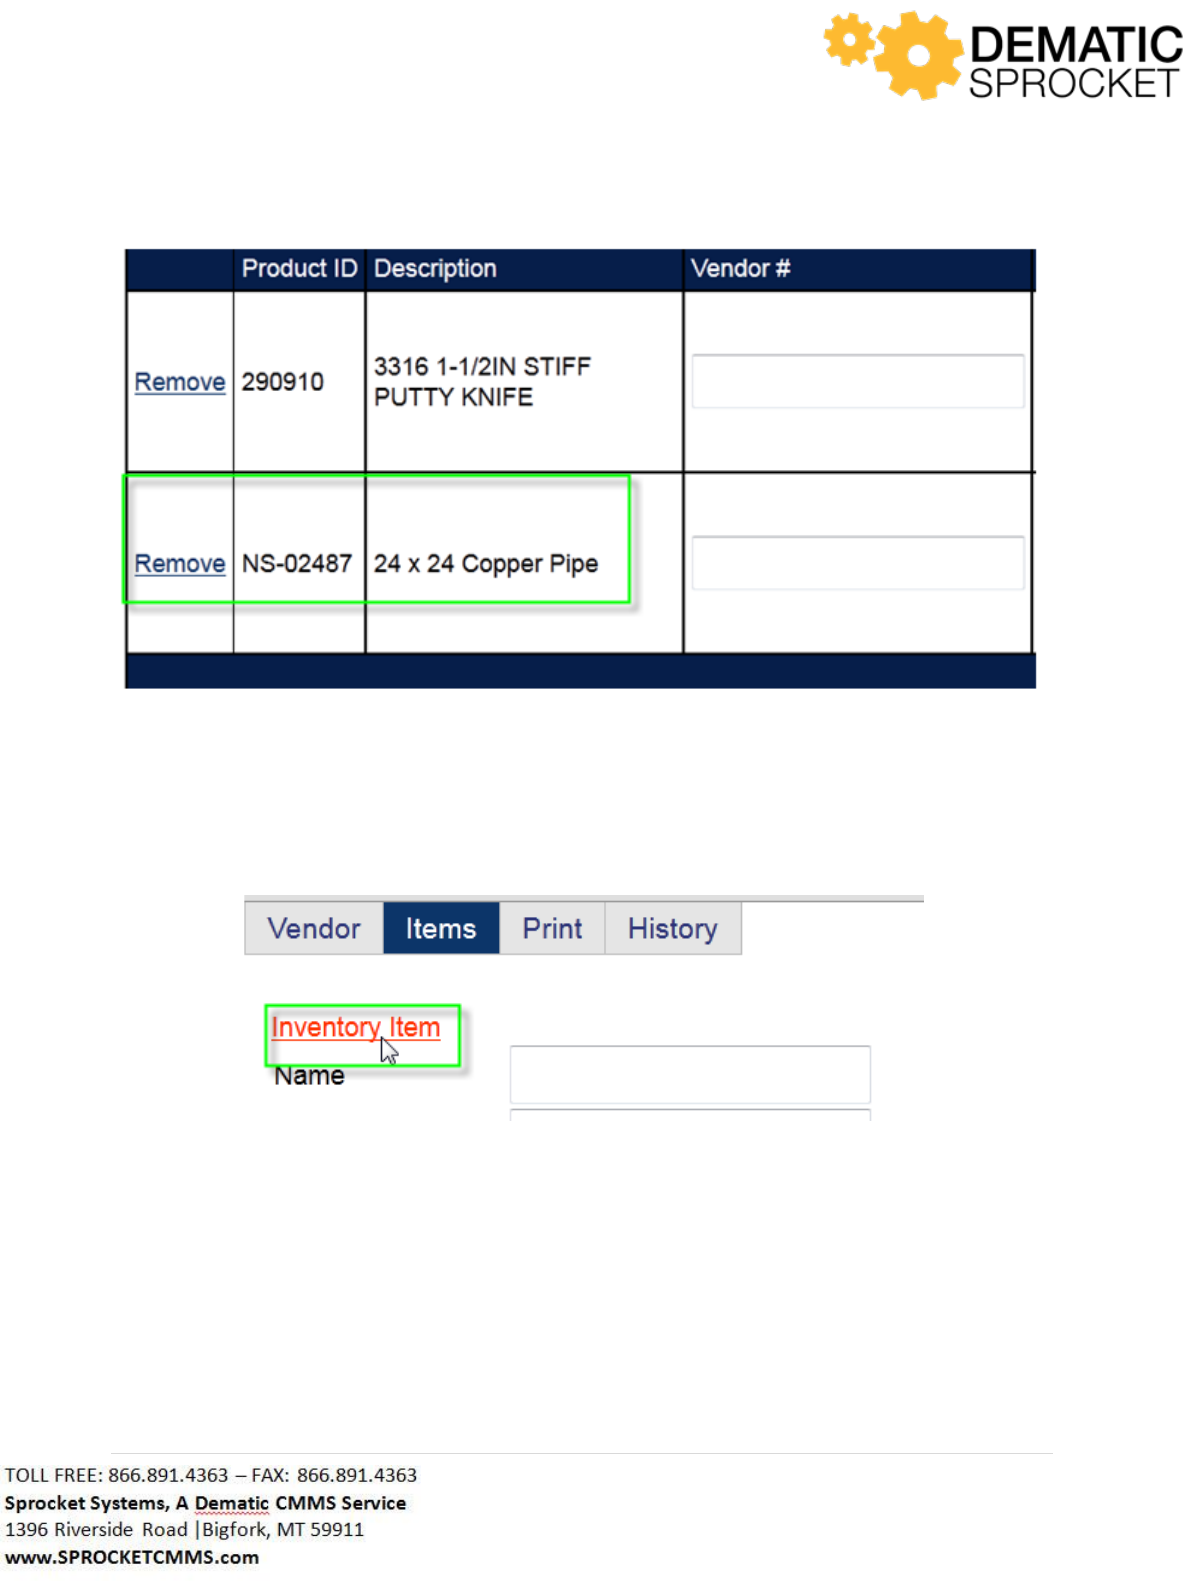
188 | P a g e
If you wish to add more non-inventory items, begin filling out the form again following the same steps as
before. If you wish to add additional inventory items, click the Inventory Item link at the top of the page
to revert back to the original screen format to add inventory items by Product Identifier or Vendor.
7.5.2.4 Inventory Items Grid
Once you have added all the items to wish to add to this Purchase Request, notice that several columns
in the Items grid have free text fields where you can enter information.

189 | P a g e
You can enter information simply by clicking inside a text field and entering the appropriate information.
If you wish to order more than one unit of a particular item, use the Quantity column to enter in the
product quantity you wish to request.
Notice the Units and Price column. Use these column fields to enter in what the units are you will be
requesting (i.e., boxes, crates, packages etc.) and the use the price column to enter in price per unit.
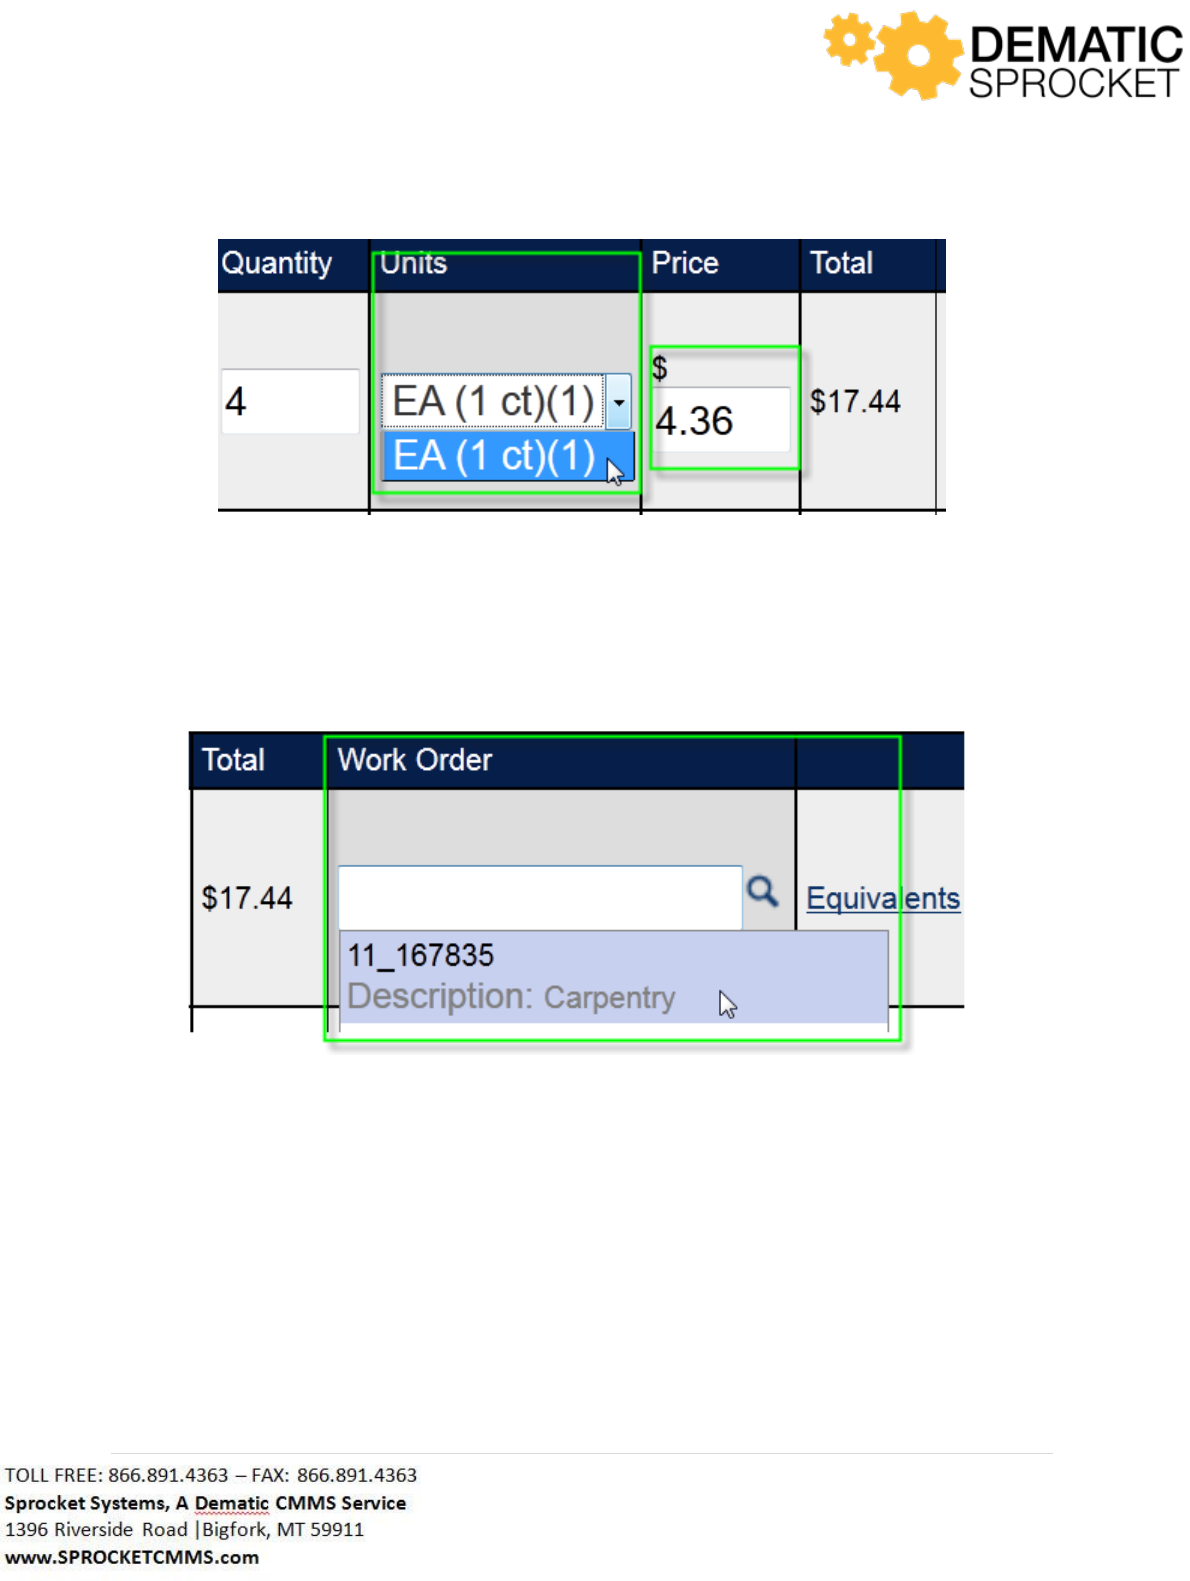
190 | P a g e
Notice that the Total column changes as price and quantity amounts are entered into the grid.
If this Purchase Request is for items to be applied toward a work order, use the Auto Lookup Tool in the
Work Order column to locate and select the appropriate work order.
At the far right of the grid, use the Equivalents link to view any equivalent substitute products for this
item.

191 | P a g e
A window will appear displaying all Equivalents, if any, for the product in this row.
Once you have finished adding all the information you can exit the screen as all the information has
automatically saved and added to the Purchase Request.
7.5.3 Purchase Request Print Tab
Use the Print tab to print out hard copies of your Purchase Request in three different types:
o File Copy: A hard copy kept on file within the company for reference
o Vendor Copy: A hard copy for vendors to use to supply inventory materials
o Receipt Copy: A hard copy of the receipt once materials are purchased
Simply select which copy you wish to print and follow the prompts on your computer to print the
document.
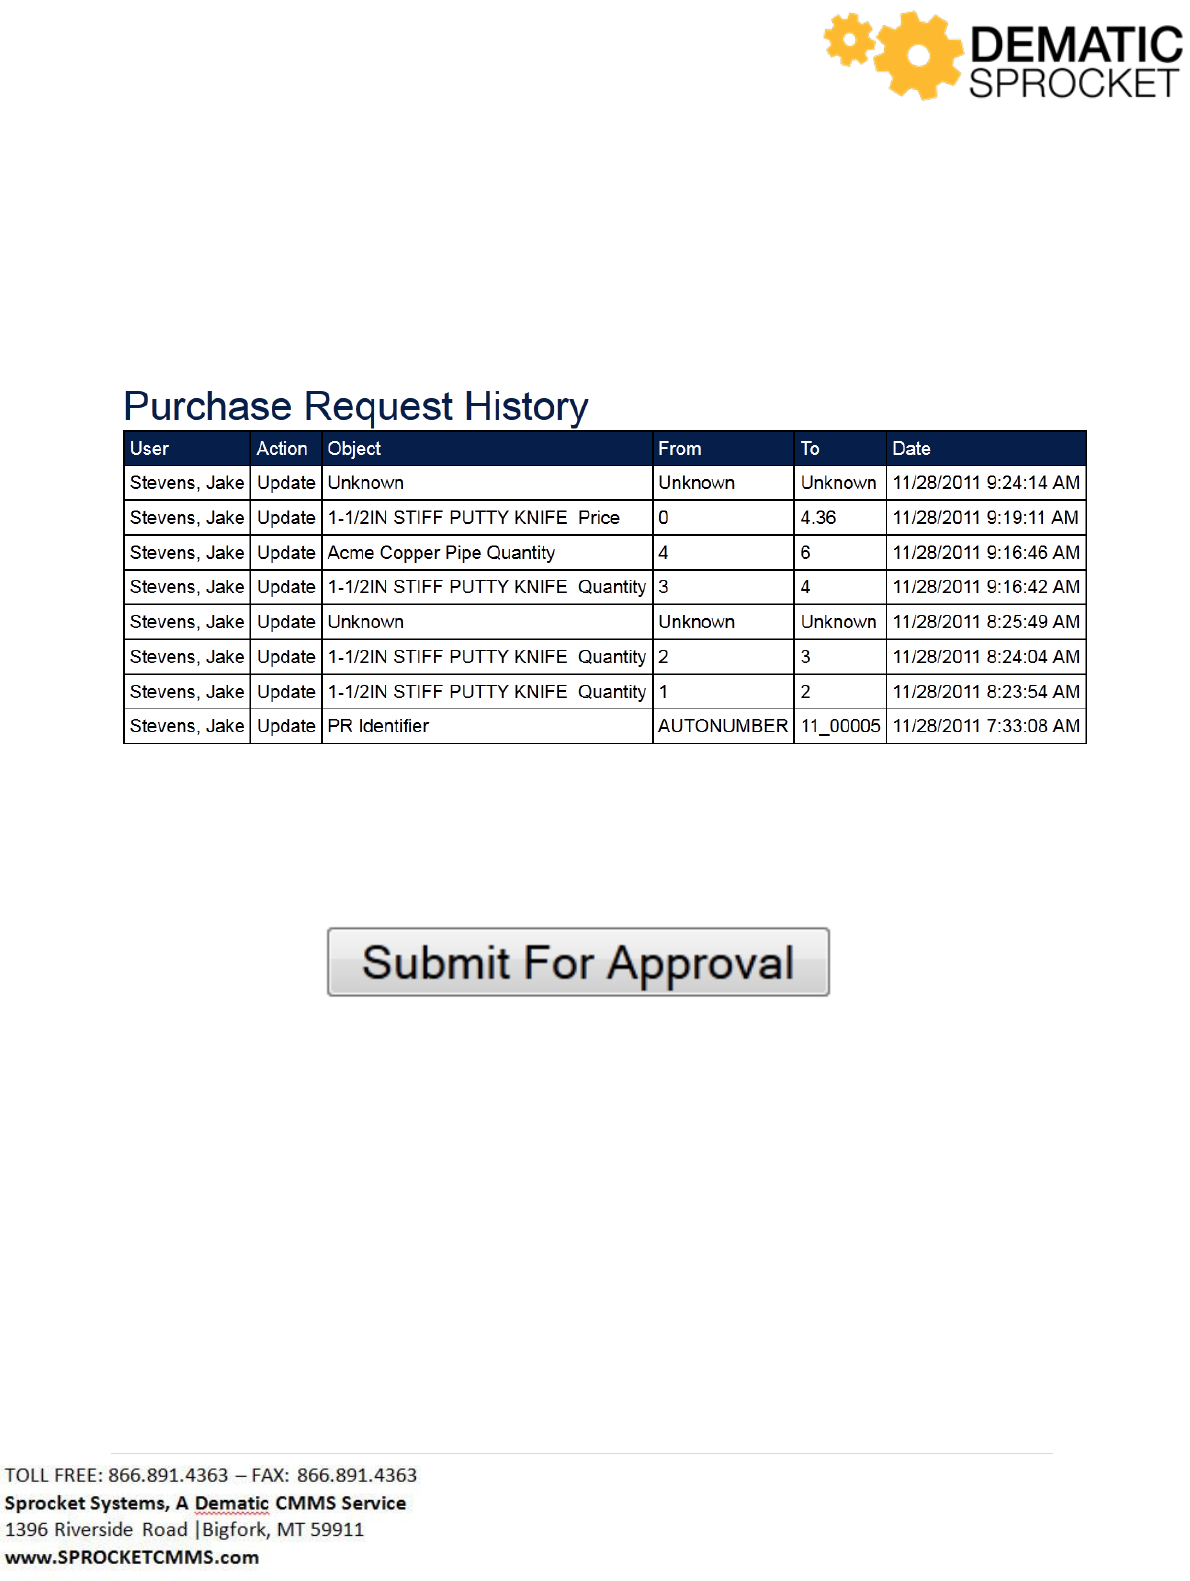
192 | P a g e
7.5.4 Purchase Request History Tab
Use the History tab to see an overview of all the additions or changes that have been applied to this
Purchase Request throughout its life cycle. Any actions will be displayed in a grid along with the
employee name who submitted the changes and the date these changes were made.
Once you have reviewed all of the tabs in the Purchase Request and you are ready to submit your
Purchase Request for approval, click the Submit For Approval button at the bottom left of your screen.
Now your Purchase Request has been submitted for approval and will go through the approval process
throughout your facility.
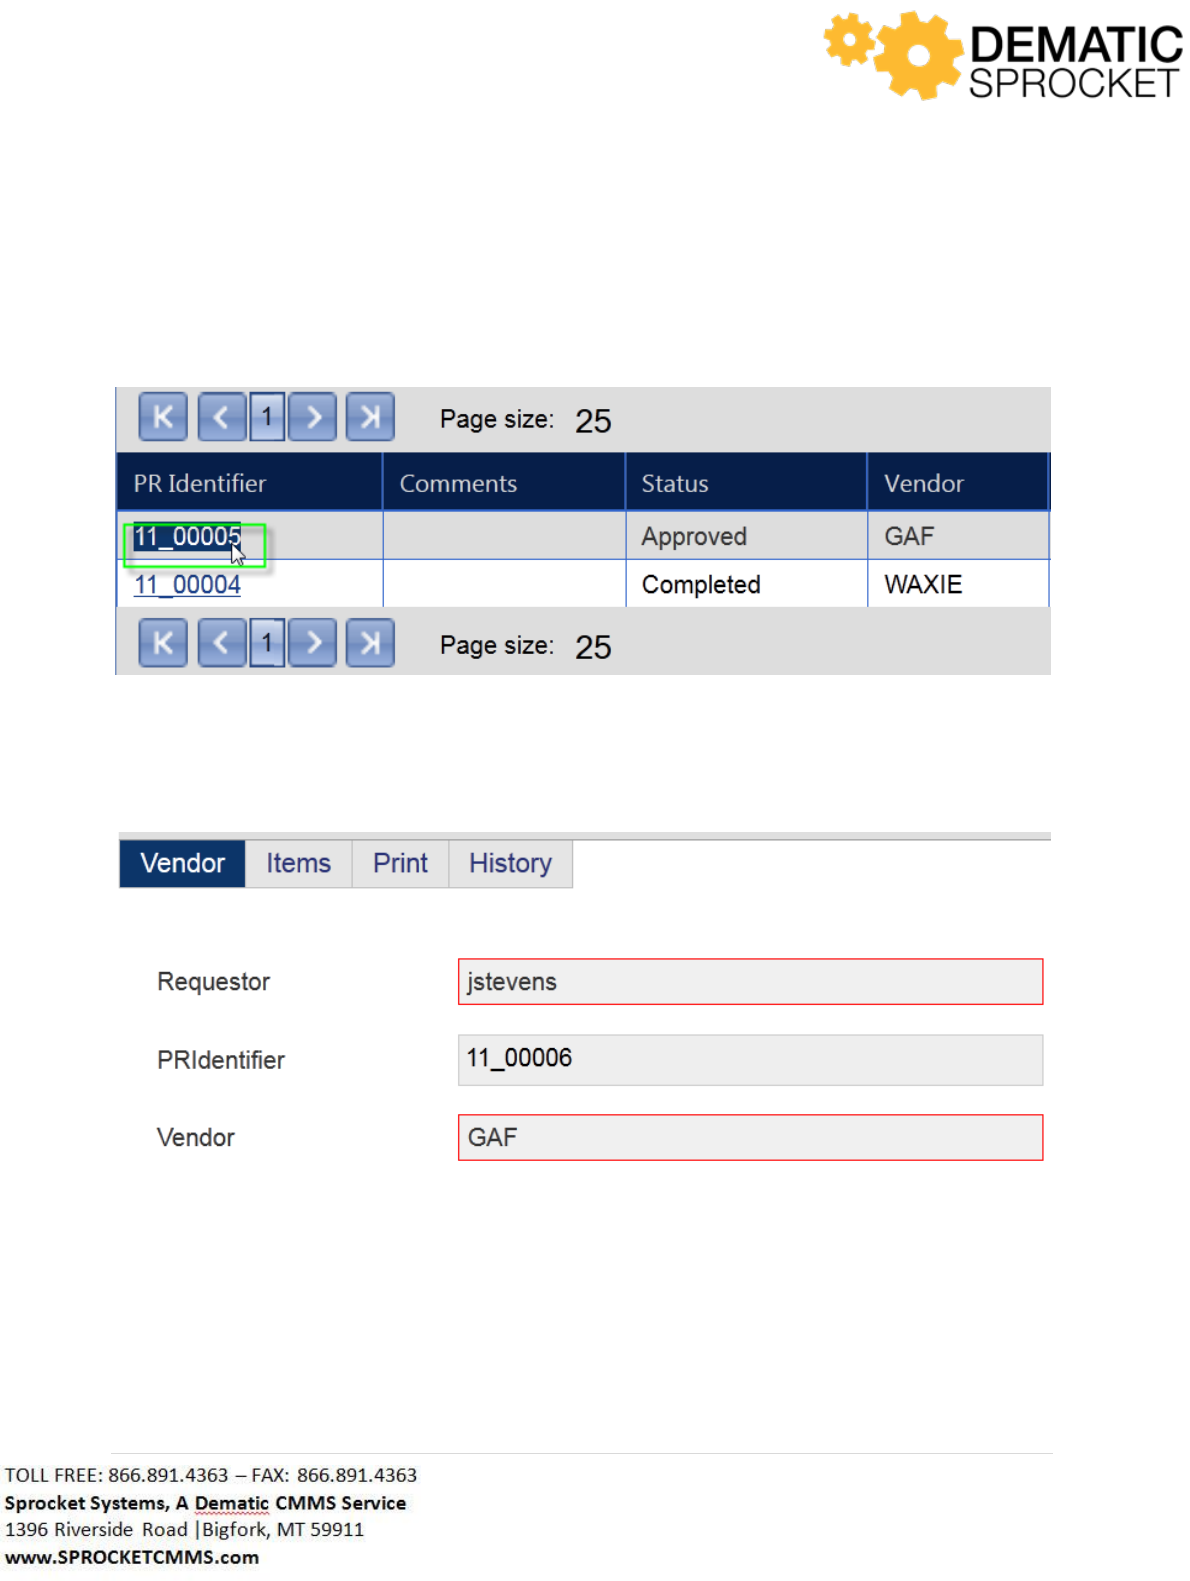
193 | P a g e
7.6 Purchase Request Details
Now that you have submitted your Purchase Request, note that you can always review the details of
your Purchase Request from the Purchase Request screen. To do this, navigate to Inventory
Purchase
Requests and select the Purchase Request Identifier you would like to view details for.
Once here, you can use the same tabs as before to navigate throughout the details of the Purchase
Request. You can also update, add, or change information in the Purchase Request.
If you wish to make any changes or additions to this Purchase Request, simply click in the field you wish
to change and type your changes.
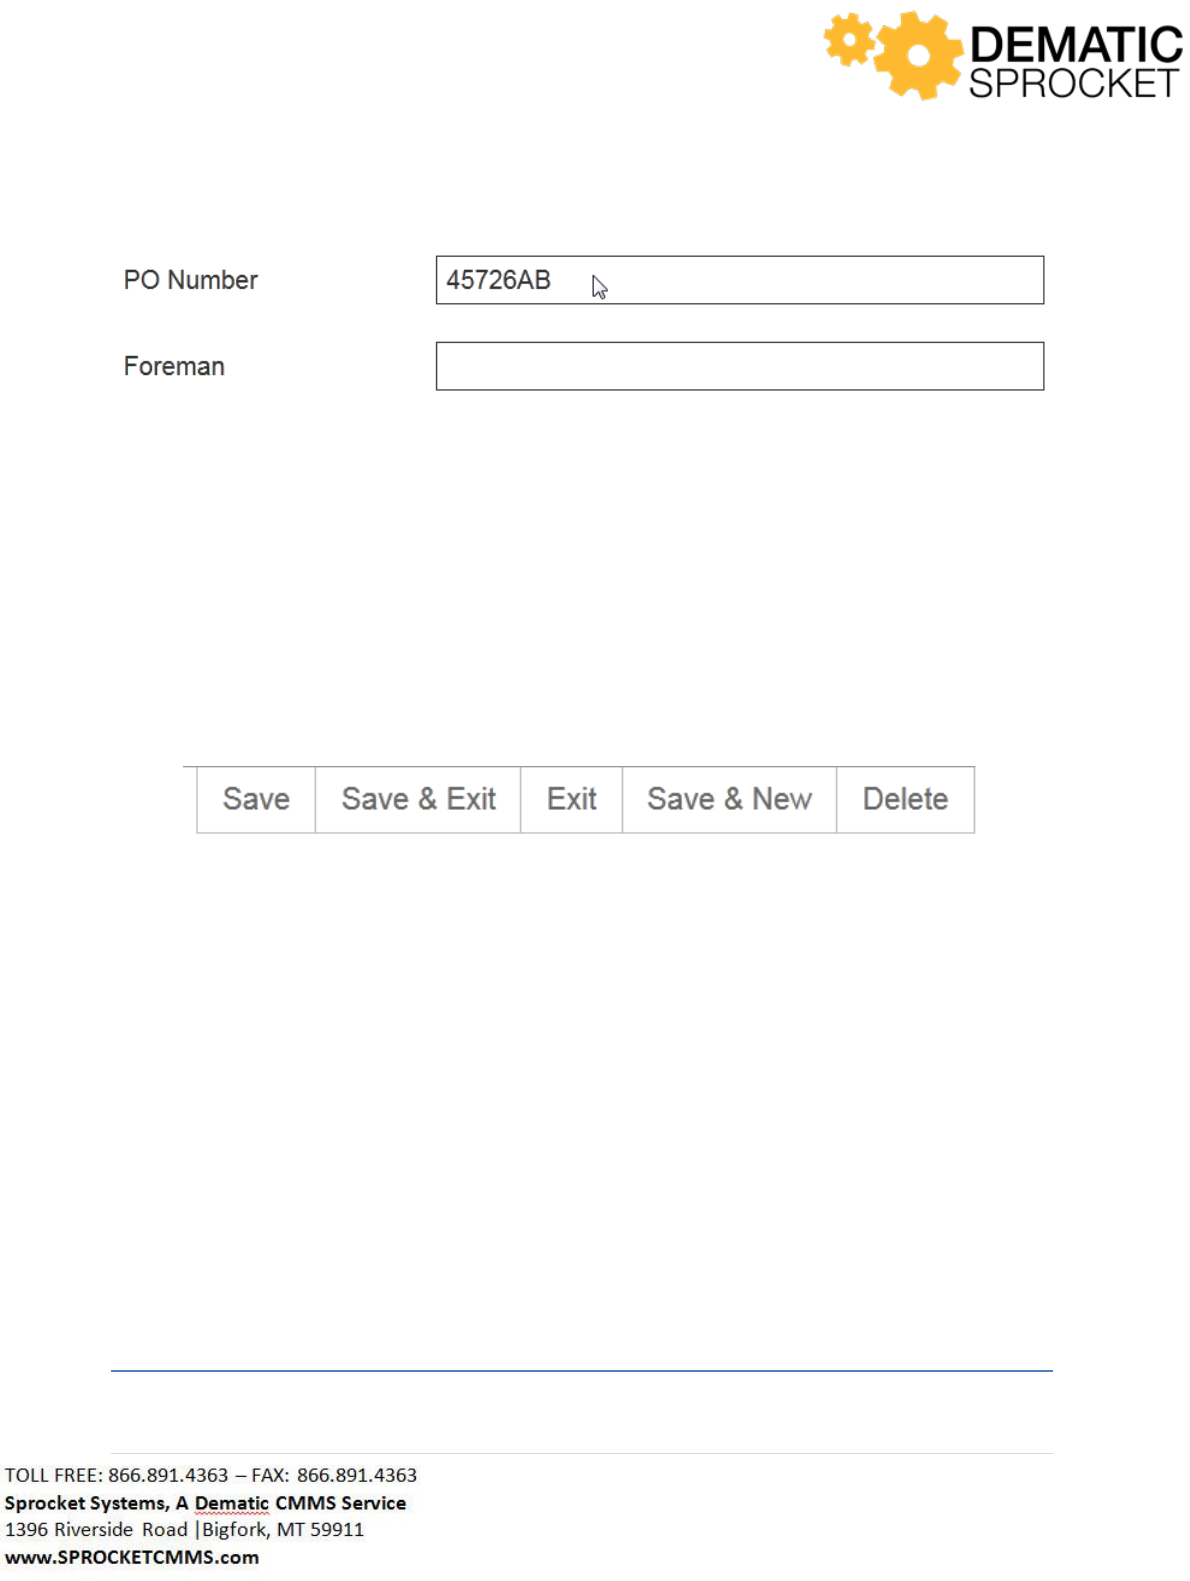
194 | P a g e
You may also add additional items using the same steps from section 7.4.2 as well as view history and
make additional hard copies from the Print tab.
Once you have made your changes, be sure to click the Save button in the upper right hand corner of
the screen to update the Purchase Request.
7.7 Purchase Request Save Buttons
When you save a purchase request, notice the other buttons next to the Save button.
These allow you to do several things within module:
o Save-Allows you to save the work you have completed so far
o Save & Exit-Allows you to save the work you have completed so far and exit the
screen with one click
o Exit-Allows you to exit the screen without saving any changes made
o Save & New-Allows you to save the work you have completed so far and clear the
contents to begin a new purchase request
o Delete-Allows you to delete the purchase request altogether.
Once you have saved your work, you can move on to the next Purchase Request.
8.0 Additional Details

195 | P a g e
8.1 Overview
Now that you have read this manual, you should have a better understanding of how Sprocket can be
used for many day to day processes in your facility. Remember that Sprocket is customized based on
facility needs so your screen may vary from the examples shown through out this guide. Your Sprocket
Administrator will be able to give you additional details about your Sprocket settings and configurations.
8.2 Contact Us
For further assistance, questions, or technical consulting, please contact Sprocket Customer Support at
866-891-4363. Office hours are Monday through Friday 8am-5pm MST (Office is closed for federal
holidays), or email Sprocket Customer Support at support@upturnsolutions.com.
