Discovery Cracker User Guide
2012-09-19
: Pdf Discovery Cracker User Guide Discovery Cracker User Guide
Open the PDF directly: View PDF ![]() .
.
Page Count: 280 [warning: Documents this large are best viewed by clicking the View PDF Link!]
- AccessData Legal and Contact Information
- Table of Contents
- 1. Introduction
- 2. Understanding Discovery Cracker
- Understanding the Discovery Cracker Components
- Understanding Discovery Cracker Concepts
- User Accounts and Roles
- The Discovery Cracker Hierarchy
- Task Settings
- Cracking Documents
- Rendering Documents
- Placeholder Pages
- Sessions
- Document Types and Document Type Groups
- File Extensions
- Full-Text Search
- Document Relationships
- Optical Character Recognition
- Endorsing Documents
- Discovery Cracker and EDRM
- Working with Languages
- 3. Getting Started
- 4. Administrative Tasks
- 5. Processing Setup
- 6. Processing
- 7. Previewing Documents
- 8. Quality Control
- 9. Postprocessing
- 10. Exporting
- 11. Paper Printing
- 12. Performing Optical Character Recognition
- 13. Endorsing Documents
- About Endorsing Documents
- Overview
- Assign Endorsement Permissions
- Create Endorsement Categories
- Create Endorsement Templates
- Set Endorsement Options
- Tag Documents in DC Detective
- Assign Endorsement Categories to Documents
- Create Views Based on Endorsement Category Assignments
- Deliver the Endorsed Rendered Documents
- 14. Creating Reports
- 15. Working With Languages
- 16. DC Engine Selection
- Appendix A. Task Settings
- Appendix B. Document Status
- Appendix C. QC Hotkeys
AD Summation
D
Di
is
sc
co
ov
ve
er
ry
y
C
Cr
ra
ac
ck
ke
er
r
User Guide
Version:
5.7
Published
2010

AD Summation Discovery Cracker User Guide AccessData Legal and Contact Information
i
AccessData Legal and Contact Information
Legal Information AccessData Group, LLC makes no representations or warranties
with respect to the contents or use of this documentation, and
specifically disclaims any express or implied warranties of mer-
chantability or fitness for any particular purpose. Further,
AccessData Group, LLC reserves the right to revise this publica-
tion and to make changes to its content, at any time, without
obligation to notify any person or entity of such revisions or
changes.
Further, AccessData Group, LLC makes no representations or
warranties with respect to any software, and specifically dis-
claims any express or implied warranties of merchantability or
fitness for any particular purpose. Further, AccessData Group,
LLC reserves the right to make changes to any and all parts of
AccessData software, at any time, without any obligation to
notify any person or entity of such changes.
You may not export or re-export this product in violation of any
applicable laws or regulations including, without limitation,
U.S. export regulations or the laws of the country in which you
reside.
©2010 AccessData Group, LLC All rights reserved. No part of
this publication may be reproduced, photocopied, stored on a
retrieval system, or transmitted without the express written con-
sent of the publisher.
AccessData Group, LLC.
384 South 400 West
Suite 200
Lindon, Utah 84042
U.S.A.
www.accessdata.com
AccessData Trademarks • AccessData® is a registered trademark of AccessData Group,
LLC.
• Distributed Network Attack® is a registered trademark of
AccessData Group, LLC.
AD Summation Discovery Cracker User Guide AccessData Legal and Contact Information
ii
• DNA® is a registered trademark of AccessData Group, LLC.
• Forensic Toolkit® is a registered trademark of AccessData
Group, LLC.
• FTK® is a registered trademark of AccessData Group, LLC.
• Password Recovery Toolkit® is a registered trademark of
AccessData Group, LLC.
• PRTK® is a registered trademark of AccessData Group, LLC.
• Registry Viewer® is a registered trademark of AccessData
Group, LLC.
• AD Summation iBlaze® is a registered trademark of Access-
Data Group, LLC.
• AD Summation WebBlaze is a registered trademark of Access-
Data Group, LLC.
• AD Summation Enterprise is a registered trademark of Access-
Data Group, LLC.
• AD Summation Discovery Cracker is a registered trademark
of AccessData Group, LLC.
• AD Summation CaseVantage is a registered trademark of
AccessData Group, LLC.
• AD Summation CaseVault is a registered trademark of Access-
Data Group, LLC.
Copyright Information A trademark symbol (®, ™, etc.) denotes an AccessData Group,
LLC. trademark. With few exceptions, unless otherwise
notated, all third-party product names are spelled and capital-
ized the same way the owner spells and capitalizes its product
name. Third-party trademarks and copyrights are the property
of the trademark and copyright holders. AccessData claims no
responsibility for the function or performance of third-party
products.
AFF® and AFFLIB® Copyright®2005, 2006, 2007, 2008 Simson L. Garfinkel and Basis
Technology Corp. All rights reserved.
This code is derived from software contributed by:
• Simson L. Garfinkel
• Olivier Castan
Redistribution and use in source and binary forms, with or
without modification, are permitted provided that the following
conditions are met:
AD Summation Discovery Cracker User Guide AccessData Legal and Contact Information
iii
1. Redistributions of source code must retain the above copy-
right notice, this list of conditions and the following dis-
claimer.
2. Redistributions in binary form must reproduce the above
copyright notice, this list of conditions and the following
disclaimer in the documentation and/or other materials
provided with the distribution.
3. All advertising materials mentioning features or use of this
software must display the following acknowledgement:
This product includes software developed by Simson
L. Garfinkel and Basis Technology Corp.
4. Neither the name of Simson L. Garfinkel, Basis Technol-
ogy, or other contributors to this program may be used to
endorse or promote products derived from this software
without specific prior written permission.
THIS SOFTWARE IS PROVIDED BY SIMSON L. GAR-
FINKEL, BASIS TECHNOLOGY, AND CONTRIBUTORS
“AS IS” AND ANY EXPRESS OR IMPLIED WARRANTIES,
INCLUDING, BUT NOT LIMITED TO, THE IMPLIED
WARRANTIES OF MERCHANTABILITY AND FITNESS
FOR A PARTICULAR PURPOSE ARE DISCLAIMED. IN
NO EVENT SHALL SIMSON L. GARFINKEL, BASIS
TECHNOLOGY, OR CONTRIBUTORS BE LIABLE FOR
ANY DIRECT, INDIRECT, INCIDENTAL, SPECIAL,
EXEMPLARY, OR CONSEQUENTIAL DAMAGES
(INCLUDING, BUT NOT LIMITED TO, PROCURE-
MENT OF SUBSTITUTE GOODS OR SERVICES; LOSS
OF USE, DATA, OR PROFITS; OR BUSINESS INTER-
RUPTION) HOWEVER CAUSED AND ON ANY THE-
ORY OF LIABILITY, WHETHER IN CONTRACT,
STRICT LIABILITY, OR TORT (INCLUDING NEGLI-
GENCE OR OTHERWISE) ARISING IN ANY WAY OUT
OF THE USE OF THIS SOFTWARE, EVEN IF ADVISED
OF THE POSSIBILITY OF SUCH DAMAGE.
AFF® and AFFLIB® are a registered US trademarks (US 3232830 &
US 3232831) of Simson Garfinkel and Basis Technology Corp.
The terms of this license can be modified by Simson L. Garfin-
kel or Basis Technology Corp.
AD Summation Discovery Cracker User Guide AccessData Legal and Contact Information
iv
Ayende Rahien Copyright © 2005 - 2009 Ayende Rahien
(ayende@ayende.com)
All rights reserved.
Redistribution and use in source and binary forms, with or
without modification, are permitted provided that the following
conditions are met:
• Redistributions of source code must retain the above copy-
right notice, this list of conditions and the following dis-
claimer.
• Redistributions in binary form must reproduce the above
copyright notice, this list of conditions and the following
disclaimer in the documentation and/or other materials
provided with the distribution.
• Neither the name of Ayende Rahien nor the names of its con-
tributors may be used to endorse or promote products
derived from this software without specific prior written
permission.
THIS SOFTWARE IS PROVIDED BY THE COPYRIGHT
HOLDERS AND CONTRIBUTORS “AS IS” AND ANY
EXPRESS OR IMPLIED WARRANTIES, INCLUDING,
BUT NOT LIMITED TO, THE IMPLIED WARRANTIES
OF MERCHANTABILITY AND FITNESS FOR A PARTIC-
ULAR PURPOSE ARE DISCLAIMED. IN NO EVENT
SHALL THE COPYRIGHT OWNER OR CONTRIBU-
TORS BE LIABLE FOR ANY DIRECT, INDIRECT, INCI-
DENTAL, SPECIAL, EXEMPLARY, OR
CONSEQUENTIAL DAMAGES (INCLUDING, BUT
NOT LIMITED TO, PROCUREMENT OF SUBSTITUTE
GOODS OR SERVICES; LOSS OF USE, DATA, OR PROF-
ITS; OR BUSINESS INTERRUPTION) HOWEVER
CAUSED AND ON ANY THEORY OF LIABILITY,
WHETHER IN CONTRACT, STRICT LIABILITY, OR
TORT (INCLUDING NEGLIGENCE OR OTHERWISE)
ARISING IN ANY WAY OUT OF THE USE OF THIS
SOFTWARE, EVEN IF ADVISED OF THE POSSIBILITY
OF SUCH DAMAGE.
Documentation Conventions In AccessData documentation, a number of text variations are
used to indicate meanings or actions. For example, a greater-
than symbol (>) is used to separate actions within a step. Where
AD Summation Discovery Cracker User Guide AccessData Legal and Contact Information
v
an entry must be typed in using the keyboard, the variable data
is set apart using [variable_data] format. Steps that required the
user to click on a button or icon are indicated by italics.
Registration The AccessData product registration is done at AccessData after
a purchase is made, and before the product is shipped. The
licenses are bound to either a USB security device, or a Virtual
CmStick, according to your purchase.
Documentation Please email us regarding any typos, inaccuracies, or other prob-
lems you find with the documentation to:
documentation@accessdata.com
Professional Services The AccessData Professional Services staff comes with a varied
and extensive background in digital investigations including law
enforcement, counter-intelligence, and corporate security. Their
collective experience in working with both government and
commercial entities, as well as in providing expert testimony,
enables them to provide a full range of computer forensic and
eDiscovery services.
At this time, Professional Services provides support for sales,
installation, training, and utilization of FTK, Enterprise, eDis-
covery, Lab, and Lab Lite. They can help you resolve any ques-
tions or problems you may have regarding these products.
Contact Information for Professional
Services
Contact AccessData Professional Services in the following ways:
Phone • Washington DC: 410.703.9237
• North America: 801.377.5410
• North America Toll Free: 800-489-5199, option 7
• International: +1.801.377.5410
Email adservices@accessdata.com

Table of Contents
AccessData Legal and Contact Information . . . . . . . . . . . . . . . . . . . . . . . . . . . . . . i
Legal Information . . . . . . . . . . . . . . . . . . . . . . . . . . . . . . . . . . . . . . . . . i
AccessData Trademarks . . . . . . . . . . . . . . . . . . . . . . . . . . . . . . . . . . . . i
Copyright Information . . . . . . . . . . . . . . . . . . . . . . . . . . . . . . . . . . . . . . ii
AFF® and AFFLIB® . . . . . . . . . . . . . . . . . . . . . . . . . . . . . . . . . ii
Ayende Rahien . . . . . . . . . . . . . . . . . . . . . . . . . . . . . . . . . . . .iv
Documentation Conventions. . . . . . . . . . . . . . . . . . . . . . . . . . . . . . . . . .iv
Registration . . . . . . . . . . . . . . . . . . . . . . . . . . . . . . . . . . . . . . . . . . . . v
Documentation . . . . . . . . . . . . . . . . . . . . . . . . . . . . . . . . . . . . v
Professional Services . . . . . . . . . . . . . . . . . . . . . . . . . . . . . . . . . . . . . . v
Contact Information for Professional Services . . . . . . . . . . . . . . . . . v
Introduction . . . . . . . . . . . . . . . . . . . . . . . . . . . . . . . . . . . . . . . . . . . . . . . . . . 9
About the Discovery Cracker Electronic Discovery Software . . . . . . . . . . . . . 9
How This Guide Is Organized . . . . . . . . . . . . . . . . . . . . . . . . . . . . . . . . 11
Who Should Use This Guide. . . . . . . . . . . . . . . . . . . . . . . . . . . . . . . . . 11
Training is Available . . . . . . . . . . . . . . . . . . . . . . . . . . . . . . . . . . . . . . 12
Contact Us . . . . . . . . . . . . . . . . . . . . . . . . . . . . . . . . . . . . . . . . . . . . 12
Obtaining Updates . . . . . . . . . . . . . . . . . . . . . . . . . . . . . . . . . . . . . . . 12
Understanding Discovery Cracker . . . . . . . . . . . . . . . . . . . . . . . . . . . . . . . . . . . 13
Understanding the Discovery Cracker Components . . . . . . . . . . . . . . . . . . 13
Understanding Discovery Cracker Concepts . . . . . . . . . . . . . . . . . . . . . . 15
User Accounts and Roles. . . . . . . . . . . . . . . . . . . . . . . . . . . . . 15
The Discovery Cracker Hierarchy. . . . . . . . . . . . . . . . . . . . . . . . 16
Task Settings . . . . . . . . . . . . . . . . . . . . . . . . . . . . . . . . . . . . 16
Cracking Documents. . . . . . . . . . . . . . . . . . . . . . . . . . . . . . . . 17
Rendering Documents. . . . . . . . . . . . . . . . . . . . . . . . . . . . . . . 17
Placeholder Pages . . . . . . . . . . . . . . . . . . . . . . . . . . . . . . . . . 18
Sessions . . . . . . . . . . . . . . . . . . . . . . . . . . . . . . . . . . . . . . . 18
Document Types and Document Type Groups . . . . . . . . . . . . . . . 19
File Extensions . . . . . . . . . . . . . . . . . . . . . . . . . . . . . . . . . . . 19
Full-Text Search. . . . . . . . . . . . . . . . . . . . . . . . . . . . . . . . . . . 20
Document Relationships . . . . . . . . . . . . . . . . . . . . . . . . . . . . . 21
Optical Character Recognition. . . . . . . . . . . . . . . . . . . . . . . . . . 23
Endorsing Documents . . . . . . . . . . . . . . . . . . . . . . . . . . . . . . . 23
Discovery Cracker and EDRM. . . . . . . . . . . . . . . . . . . . . . . . . . 23
Working with Languages . . . . . . . . . . . . . . . . . . . . . . . . . . . . . 24
Getting Started . . . . . . . . . . . . . . . . . . . . . . . . . . . . . . . . . . . . . . . . . . . . . . . 25
Log In . . . . . . . . . . . . . . . . . . . . . . . . . . . . . . . . . . . . . . . . . . . . . . . 25
Discovery Cracker Console . . . . . . . . . . . . . . . . . . . . . . . . . . . . . . . . . 26
Menu Bar . . . . . . . . . . . . . . . . . . . . . . . . . . . . . . . . . . . . . . . 26
Left Pane . . . . . . . . . . . . . . . . . . . . . . . . . . . . . . . . . . . . . . . 28
Right Pane . . . . . . . . . . . . . . . . . . . . . . . . . . . . . . . . . . . . . . 29
Status Bar . . . . . . . . . . . . . . . . . . . . . . . . . . . . . . . . . . . . . . 30
Initial Administrative Setup Tasks. . . . . . . . . . . . . . . . . . . . . . . . . . . . . . 30
The Discovery Cracker Workflow. . . . . . . . . . . . . . . . . . . . . . . . . . . . . . 33
Administrative Tasks. . . . . . . . . . . . . . . . . . . . . . . . . . . . . . . . . . . . . . . . . . . . 34
The Workflow Manager Settings Pane . . . . . . . . . . . . . . . . . . . . . . . . . . 34
Network . . . . . . . . . . . . . . . . . . . . . . . . . . . . . . . . . . . . . . . . 34
Default Directories . . . . . . . . . . . . . . . . . . . . . . . . . . . . . . . . . 34
System Timeout Settings . . . . . . . . . . . . . . . . . . . . . . . . . . . . . 35
The Tools Menu. . . . . . . . . . . . . . . . . . . . . . . . . . . . . . . . . . . . . . . . . 37
Changing Your Password. . . . . . . . . . . . . . . . . . . . . . . . . . . . . 38
Click Robot Settings . . . . . . . . . . . . . . . . . . . . . . . . . . . . . . . . 38
The Admin Menu . . . . . . . . . . . . . . . . . . . . . . . . . . . . . . . . . . . . . . . . 39
Managing Users and Security . . . . . . . . . . . . . . . . . . . . . . . . . . 39
Managing Document Type Groups . . . . . . . . . . . . . . . . . . . . . . . 44
Managing File Extensions . . . . . . . . . . . . . . . . . . . . . . . . . . . . 47
Managing Categories . . . . . . . . . . . . . . . . . . . . . . . . . . . . . . . 49
Managing Reference Files . . . . . . . . . . . . . . . . . . . . . . . . . . . . 51
Managing Your Discovery Cracker License. . . . . . . . . . . . . . . . . . 59
Processing Setup . . . . . . . . . . . . . . . . . . . . . . . . . . . . . . . . . . . . . . . . . . . . . 61
Setting Task Settings . . . . . . . . . . . . . . . . . . . . . . . . . . . . . . . . . . . . . 61
The [Level] Settings Dialog Box. . . . . . . . . . . . . . . . . . . . . . . . . 63
Creating Folders . . . . . . . . . . . . . . . . . . . . . . . . . . . . . . . . . . . . . . . . 67
Creating Projects . . . . . . . . . . . . . . . . . . . . . . . . . . . . . . . . . . . . . . . . 67
Editing an Active Project . . . . . . . . . . . . . . . . . . . . . . . . . . . . . 74
Opening Project Settings . . . . . . . . . . . . . . . . . . . . . . . . . . . . . 74
Creating Groups . . . . . . . . . . . . . . . . . . . . . . . . . . . . . . . . . . . . . . . . 74
Editing a Group . . . . . . . . . . . . . . . . . . . . . . . . . . . . . . . . . . . 75
Opening Group Settings . . . . . . . . . . . . . . . . . . . . . . . . . . . . . 75
Creating Views . . . . . . . . . . . . . . . . . . . . . . . . . . . . . . . . . . . . . . . . . 75
Editing a View . . . . . . . . . . . . . . . . . . . . . . . . . . . . . . . . . . . . 80
Opening View Settings . . . . . . . . . . . . . . . . . . . . . . . . . . . . . . 80
Processing. . . . . . . . . . . . . . . . . . . . . . . . . . . . . . . . . . . . . . . . . . . . . . . . . . 81
Creating a Job . . . . . . . . . . . . . . . . . . . . . . . . . . . . . . . . . . . . . . . . . 81
Selecting Actions . . . . . . . . . . . . . . . . . . . . . . . . . . . . . . . . . . . . . . . . 85
Editing a Job. . . . . . . . . . . . . . . . . . . . . . . . . . . . . . . . . . . . . . . . . . . 88
Pausing a Job. . . . . . . . . . . . . . . . . . . . . . . . . . . . . . . . . . . . . . . . . . 88
Job Status . . . . . . . . . . . . . . . . . . . . . . . . . . . . . . . . . . . . . . . . . . . . 89
Jobs Tab . . . . . . . . . . . . . . . . . . . . . . . . . . . . . . . . . . . . . . . . . . . . . 90
Monitoring Processing Activity . . . . . . . . . . . . . . . . . . . . . . . . . . . . . . . 91
The Workflow Manager User Interface . . . . . . . . . . . . . . . . . . . . 91
The Monitor Workflow Manager Activity Dialog Box . . . . . . . . . . . . 92
Previewing Documents . . . . . . . . . . . . . . . . . . . . . . . . . . . . . . . . . . . . . . . . . . 93
Preview Using the DC Detective Tool . . . . . . . . . . . . . . . . . . . . . . . . . . . 93
DC Detective Administration . . . . . . . . . . . . . . . . . . . . . . . . . . . 94
Setting up DC Detective Users . . . . . . . . . . . . . . . . . . . . . . . . . 94
Communicating with DC Detective Users. . . . . . . . . . . . . . . . . . . 95
Preview Using Data Delimited Text Files . . . . . . . . . . . . . . . . . . . . . . . . . 96
Quality Control . . . . . . . . . . . . . . . . . . . . . . . . . . . . . . . . . . . . . . . . . . . . . . 101
Opening a QC Session . . . . . . . . . . . . . . . . . . . . . . . . . . . . . . . . . . . 101
Opening a QC Session from a Project. . . . . . . . . . . . . . . . . . . . 101
Opening a QC Session from a Group, View, or Job . . . . . . . . . . . 102
QC Pre-Filter. . . . . . . . . . . . . . . . . . . . . . . . . . . . . . . . . . . . 102
Getting Acquainted with the QC Session User Interface . . . . . . . . . . . . . . 104
Customizing the QC Session User Interface . . . . . . . . . . . . . . . . 105
Ribbon Groups . . . . . . . . . . . . . . . . . . . . . . . . . . . . . . . . . . 105
Panels. . . . . . . . . . . . . . . . . . . . . . . . . . . . . . . . . . . . . . . . 109
Setting QC Session Options . . . . . . . . . . . . . . . . . . . . . . . . . . 112
Performing Quality Control Activities. . . . . . . . . . . . . . . . . . . . . . . . . . . 113
Checking the Quality of Rendered Documents . . . . . . . . . . . . . . 114
Approving Documents . . . . . . . . . . . . . . . . . . . . . . . . . . . . . . 114
Inserting Placeholder Pages . . . . . . . . . . . . . . . . . . . . . . . . . . 116
Recracking, Rerendering, or Redoing the
OCR Process on Documents . . . . . . . . . . . . . . . . . . . . . . . . . 120
Assigning Categories to Documents . . . . . . . . . . . . . . . . . . . . . 122
Adding Notes . . . . . . . . . . . . . . . . . . . . . . . . . . . . . . . . . . . 122
Replacing Pages . . . . . . . . . . . . . . . . . . . . . . . . . . . . . . . . . 122
Deactivating a Document or Pages. . . . . . . . . . . . . . . . . . . . . . 124
Closing a QC Session. . . . . . . . . . . . . . . . . . . . . . . . . . . . . . . . . . . . 125
Starting a QC Job . . . . . . . . . . . . . . . . . . . . . . . . . . . . . . . . . . . . . . 125
Handling Errors . . . . . . . . . . . . . . . . . . . . . . . . . . . . . . . . . . . . . . . . 126
Postprocessing . . . . . . . . . . . . . . . . . . . . . . . . . . . . . . . . . . . . . . . . . . . . . . 127
Understanding Document and Page Numbers . . . . . . . . . . . . . . . . . . . . 127
Understanding Packaging . . . . . . . . . . . . . . . . . . . . . . . . . . . . . . . . . 128
Volumes Folder . . . . . . . . . . . . . . . . . . . . . . . . . . . . . . . . . . 130
Understanding Sessions . . . . . . . . . . . . . . . . . . . . . . . . . . . . . . . . . . 132
Creating a U.S. Session. . . . . . . . . . . . . . . . . . . . . . . . . . . . . 133
Creating an International Session . . . . . . . . . . . . . . . . . . . . . . 143
Creating a Postprocessing Job . . . . . . . . . . . . . . . . . . . . . . . . . . . . . . 145
Pausing a Postprocessing Job . . . . . . . . . . . . . . . . . . . . . . . . . . . . . . 147
Exporting. . . . . . . . . . . . . . . . . . . . . . . . . . . . . . . . . . . . . . . . . . . . . . . . . . 149
Data Delimited Text File Export . . . . . . . . . . . . . . . . . . . . . . . . . . . . . . 150
Concordance Viewer Export . . . . . . . . . . . . . . . . . . . . . . . . . . . . . . . . 153
IPRO Export . . . . . . . . . . . . . . . . . . . . . . . . . . . . . . . . . . . . . . . . . . 154
Ringtail Export . . . . . . . . . . . . . . . . . . . . . . . . . . . . . . . . . . . . . . . . 155
AD Summation DII Export . . . . . . . . . . . . . . . . . . . . . . . . . . . . . . . . . 160
DocuLex 5 Export . . . . . . . . . . . . . . . . . . . . . . . . . . . . . . . . . . . . . . 167
EDRM XML Export. . . . . . . . . . . . . . . . . . . . . . . . . . . . . . . . . . . . . . 167
Paper Printing. . . . . . . . . . . . . . . . . . . . . . . . . . . . . . . . . . . . . . . . . . . . . . . 170
Performing Optical Character Recognition . . . . . . . . . . . . . . . . . . . . . . . . . . . . . 172
About OCR in Discovery Cracker. . . . . . . . . . . . . . . . . . . . . . . . . . . . . 172
Storage of OCR Text . . . . . . . . . . . . . . . . . . . . . . . . . . . . . . . . . . . . 173
All Text Field Considerations. . . . . . . . . . . . . . . . . . . . . . . . . . 173
Text File Considerations. . . . . . . . . . . . . . . . . . . . . . . . . . . . . 173
Setting OCR Options . . . . . . . . . . . . . . . . . . . . . . . . . . . . . . . . . . . . 174
Setting Options to Perform the
OCR Process on Native Image Documents . . . . . . . . . . . . . . . . 174
Setting Options to Perform the
OCR Process on Rendered TIFF Images. . . . . . . . . . . . . . . . . . 176
Setting Timeout Values for Performing OCR . . . . . . . . . . . . . . . . 178
Creating Views Using OCR Text . . . . . . . . . . . . . . . . . . . . . . . . . . . . . 179
Increasing the Accuracy of OCR Text . . . . . . . . . . . . . . . . . . . . . . . . . . 179
Checking OCR Text in a QC Session . . . . . . . . . . . . . . . . . . . . . . . . . . 180
View OCR text. . . . . . . . . . . . . . . . . . . . . . . . . . . . . . . . . . . 181
Replace OCR Text . . . . . . . . . . . . . . . . . . . . . . . . . . . . . . . . 181
Delete OCR Text . . . . . . . . . . . . . . . . . . . . . . . . . . . . . . . . . 182
Selecting Text to Export. . . . . . . . . . . . . . . . . . . . . . . . . . . . . . . . . . . 183
Endorsing Documents . . . . . . . . . . . . . . . . . . . . . . . . . . . . . . . . . . . . . . . . . 185
About Endorsing Documents . . . . . . . . . . . . . . . . . . . . . . . . . . . . . . . 185
Overview . . . . . . . . . . . . . . . . . . . . . . . . . . . . . . . . . . . . . . . . . . . . 186
Assign Endorsement Permissions . . . . . . . . . . . . . . . . . . . . . . . . . . . . 188
Create Endorsement Categories . . . . . . . . . . . . . . . . . . . . . . . . . . . . . 189
Create Endorsement Templates . . . . . . . . . . . . . . . . . . . . . . . . . . . . . 189
Set Endorsement Options . . . . . . . . . . . . . . . . . . . . . . . . . . . . . . . . . 193
When creating a postprocessing session . . . . . . . . . . . . . . . . . . 193
When creating a postprocessing job . . . . . . . . . . . . . . . . . . . . . 194
Tag Documents in DC Detective . . . . . . . . . . . . . . . . . . . . . . . . . . . . . 195
Assign Endorsement Categories to Documents. . . . . . . . . . . . . . . . . . . . 195
Assign categories to documents . . . . . . . . . . . . . . . . . . . . . . . 195
Remove categories from documents. . . . . . . . . . . . . . . . . . . . . 196
View category assignments . . . . . . . . . . . . . . . . . . . . . . . . . . 197
Create Views Based on Endorsement Category Assignments . . . . . . . . . . 197
Deliver the Endorsed Rendered Documents. . . . . . . . . . . . . . . . . . . . . . 199
Creating Reports . . . . . . . . . . . . . . . . . . . . . . . . . . . . . . . . . . . . . . . . . . . . . 200
Types of Reports Available. . . . . . . . . . . . . . . . . . . . . . . . . . . . . . . . . 200
Things to Consider. . . . . . . . . . . . . . . . . . . . . . . . . . . . . . . . . . . . . . 203
Creating a Report . . . . . . . . . . . . . . . . . . . . . . . . . . . . . . . . . . . . . . 204
Working With Languages. . . . . . . . . . . . . . . . . . . . . . . . . . . . . . . . . . . . . . . . 208
The World of Languages . . . . . . . . . . . . . . . . . . . . . . . . . . . . . . . . . . 209
Scripts. . . . . . . . . . . . . . . . . . . . . . . . . . . . . . . . . . . . . . . . 209
Languages . . . . . . . . . . . . . . . . . . . . . . . . . . . . . . . . . . . . . 210
Encodings . . . . . . . . . . . . . . . . . . . . . . . . . . . . . . . . . . . . . 211
Advanced Features Related to Languages. . . . . . . . . . . . . . . . . . . . . . . 211
Setting Task Settings . . . . . . . . . . . . . . . . . . . . . . . . . . . . . . 212
Full-Text Indexing and Searching . . . . . . . . . . . . . . . . . . . . . . . 217
Creating Project Filters and Views . . . . . . . . . . . . . . . . . . . . . . 218
Performing Quality Control . . . . . . . . . . . . . . . . . . . . . . . . . . . 220
Reports . . . . . . . . . . . . . . . . . . . . . . . . . . . . . . . . . . . . . . . 221
Exporting . . . . . . . . . . . . . . . . . . . . . . . . . . . . . . . . . . . . . . 222
Using DC Detective . . . . . . . . . . . . . . . . . . . . . . . . . . . . . . . 222
Limitations Processing Multilingual Documents . . . . . . . . . . . . . . . . . . . . 223
DC Engine Selection . . . . . . . . . . . . . . . . . . . . . . . . . . . . . . . . . . . . . . . . . . 225
Benefits of Manual DC Engine Selection . . . . . . . . . . . . . . . . . . . . . . . . 225
Selecting DC Engines Manually . . . . . . . . . . . . . . . . . . . . . . . . . . . . . 226
At job creation . . . . . . . . . . . . . . . . . . . . . . . . . . . . . . . . . . . 226
After job creation . . . . . . . . . . . . . . . . . . . . . . . . . . . . . . . . . 228
Changing the DC Engine Selection Mode . . . . . . . . . . . . . . . . . . . . . . . 229
Things to Know About DC Engine Selection . . . . . . . . . . . . . . . . . . . . . . 230
Glossary of Terms Related to DC Engine Selection . . . . . . . . . . . . . . . . . 232
Task Settings . . . . . . . . . . . . . . . . . . . . . . . . . . . . . . . . . . . . . . . . . . . . . . . 234
Document Status . . . . . . . . . . . . . . . . . . . . . . . . . . . . . . . . . . . . . . . . . . . . 273
List of Document Statuses . . . . . . . . . . . . . . . . . . . . . . . . . . . . . . . . . 273
Container Items and Document Statuses. . . . . . . . . . . . . . . . . . . . . . . . 274
QC Hotkeys . . . . . . . . . . . . . . . . . . . . . . . . . . . . . . . . . . . . . . . 276

AD Summation Discovery Cracker User Guide Introduction
9
1. Introduction
Discovery Cracker provides a full suite of options needed to
support electronic discovery projects of all sizes.
This chapter contains the following sections:
• About the Discovery Cracker Electronic Discovery Software
• How This Guide Is Organized
• Who Should Use This Guide
• Training is Available
• Contact Us
• Obtaining Updates
About the Discovery Cracker
Electronic Discovery Software
The Discovery Cracker electronic discovery software easily pro-
cesses terabytes of electronic files and e-mail messages in over
500 file formats and supports a wide range of automated elec-
tronic data processing needs. Due to its scalability and ease of
use, Discovery Cracker is well-suited for corporate legal depart-
ments, law firms, litigation support service bureaus, forensic
consulting firms, and government agencies. It is ideal for mat-
ter-based discovery or proactive systemic-based discovery related
to risk management and federal compliance.
Discovery Cracker supports high-volume extraction of elec-
tronic file metadata and conversion of data to Tagged Image File
Format (TIFF) images or Portable Document Format (PDF)
files and text files. It creates searchable databases of images, full-
text files, and metadata from e-mail messages and electronic files
(including Microsoft® Office, IBM® Lotus Notes®, and hun-
dreds of additional file formats). And because Discovery
Cracker supports the Unicode™ Standard, which is an interna-
tional standard that provides a single character set for all the
world’s languages, it can process and display data in any lan-
guage (see page 223 for limitations).
Discovery Cracker features the DC Detective preview tool. DC
Detective is a feature-rich tool that provides early visibility into
the electronic discovery process. This includes instant access to
the extracted metadata, allowing those with login permission to
filter files, view files natively, and select/tag individual files for
processing. Since the DC Detective tool is Internet browser-
based, it is well suited for in-house collaboration as well as for
AD Summation Discovery Cracker User Guide Introduction
10
providing a valuable service for vendors looking to increase their
electronic data discovery (EDD) offering.
A NOTE TO OUR USERS: Discovery Cracker is a sophisticated tool
for serious users. Our product offers a wide range of options
presented in a manner intended to support a wide range of user
needs and workflows. Allowing yourself the time to become
familiar with the product is essential and will leave you with a
high-powered solution capable of supporting your needs not
only today but also your growth needs tomorrow.
Here are some examples:
Focusing on a new streamlined workflow, Discovery Cracker
uses a unique concept of data: groups and views. A group is a
specified set of data files. A view is a subset of data that is pulled
from across all the groups in a project. The DC Detective tool
can also be used to create views by remote reviewers using a host
of thorough search and filtering options. Reviewers tag specific
records with particular processing instructions, and these in
turn become a view. Processing views versus traditional volumes
of data greatly increases the efficiency of any workflow by
greatly improving the culling process.
Improving on its unique distributed processing ability, the Dis-
covery Cracker software makes it easy to recruit multiple com-
puters to work together on one or more or projects. Innovative
features such as greater task automation and priority settings
allow you to devise the proper workflow for your projects and
adjust priorities to shift computer resources to add greater effi-
ciency to meet pressing deadlines. These features, all controlled
from a single command center, save time and resources and sig-
nificantly lower the overall costs associated with electronic dis-
covery.
Discovery Cracker processes files that are embedded in or
attached to other files while preserving their parent-child rela-
tionship. The benefit is thorough electronic capture of content
from files of differing native formats (i.e., a Microsoft Word
document containing a Microsoft Excel® spreadsheet).
Discovery Cracker exports to other AD Summation products
(with DII file and EDRM XML file support), the Concordance
AD Summation Discovery Cracker User Guide Introduction
11
viewer, Ringtail, and other prominent litigation information
management systems and imaging platforms.
How This Guide Is Organized This guide first presents information to help you understand
the components that make up the Discovery Cracker product
and important concepts in Discovery Cracker. You read this in
Chapter 2, “Understanding Discovery Cracker,” on page 13.
In Chapter 3, “Getting Started,” on page 25, you learn about
logging in to Discovery Cracker for the first time, you become
familiar with Discovery Cracker’s main user interface, and you
learn what initial administrative setup tasks you need to per-
form. Chapter 4, “Administrative Tasks,” on page 34, provides
instructions for performing those and other administrative
tasks.
The following chapters provide instructions for performing Dis-
covery Cracker activities in a typical workflow order:
• Chapter 5, “Processing Setup,” on page 61
• Chapter 6, “Processing,” on page 81
• Chapter 7, “Previewing Documents,” on page 93
• Chapter 8, “Quality Control,” on page 101
• Chapter 9, “Postprocessing,” on page 127
• Chapter 10, “Exporting,” on page 149
• Chapter 11, “Paper Printing,” on page 170
You will find more information about setting processing settings
to accomplish your goals in the following locations:
• Chapter 12, “Performing Optical Character Recognition,”
on page 172
• Chapter 13, “Endorsing Documents,” on page 185
• Chapter 15, “Working With Languages,” on page 208
• Chapter 16, “DC Engine Selection,” on page 225
• Appendix A, "Task Settings," on page 234
Who Should Use This Guide This guide is written for Discovery Cracker administrators and
operators. It is intended to be used as a reference by new users as
well as by users of previous versions of Discovery Cracker.
The following chapters provide information especially for Dis-
covery Cracker administrators.
• Chapter 2, “Understanding Discovery Cracker,” on page 13
AD Summation Discovery Cracker User Guide Introduction
12
• Chapter 3, “Getting Started,” on page 25
• Chapter 4, “Administrative Tasks,” on page 34
• Chapter 7, “Previewing Documents,” on page 93
Training is Available Our team is dedicated to helping you become familiar with the
product and understand the processing power that is available
so you can use it fully in the shortest time possible.
Please do not hesitate to ask us about the wide range of training
options available to you—at your site, at our site, or on the
Web.
Contact Us Please feel free to contact us with any comments or questions
you may have.
Our business office hours are 8 a.m. to 5 p.m. Eastern time,
Monday through Friday.
Hours for Discovery Cracker Product Support are 8 a.m. to
7 p.m. Eastern time, Monday through Friday.
Obtaining Updates To stay up to date with new product features, new
documentation, and new releases, check our Web site
periodically (http://www.ctsummation.com/SupportResources/
ProductUpdates.aspx).
Office
Mailing
Address
425 Market Street, 7th Floor
San Francisco, CA 94105
Phone 407-566-4300
Web Site http://www.discoverycracker.com
Product Support
Phone 866-833-5377
E-mail dc.support@accessdata.com
Updates and Information
Phone 407-566-4268
E-mail sales@summation.com

AD Summation Discovery Cracker User Guide Understanding Discovery Cracker
13
2. Understanding Discovery Cracker
Before you start using the AD Summation Discovery Cracker
electronic discovery software, we recommend that you take a
few minutes to read this chapter to help you better understand
the Discovery Cracker components and the basic Discovery
Cracker concepts.
This chapter contains the following sections:
• Understanding the Discovery Cracker Components
• Understanding Discovery Cracker Concepts
Understanding the Discovery
Cracker Components
Discovery Cracker is a data processing system that consists of
the components listed below. You can install all of the compo-
nents on one computer as a standalone, single-box solution for
your electronic discovery needs or you can install the compo-
nents on separate computers as a distributed, scalable solution.
Refer to the Discovery Cracker Environment Setup and Installa-
tion Guide for complete system and network requirements for
installing the Discovery Cracker components and the software
required for using Discovery Cracker.
A brief description of the Discovery Cracker components is pro-
vided here for your convenience.
• Discovery Cracker Console
Discovery Cracker Console is the main control console (the
user interface) for working with the Discovery Cracker soft-
ware. You can install the Discovery Cracker Console on any
number of computers.
• DC Engine
DC Engine is the workhorse of the Discovery Cracker sys-
tem. It processes the files—extracts metadata, renders (cre-
ates TIFF images or PDF files and text files)—and sends
the data to Workflow Manager, which then writes it to the
SQL Server database.
In a multiple-computer environment, this component is
distributed for improved performance. You can install DC
Engine on as many computers as your license allows.
AD Summation Discovery Cracker User Guide Understanding Discovery Cracker
14
Through the DC Engine user interface, you can monitor
the project, item, and task that the local computer is pro-
cessing.
• Workflow Manager
Workflow Manager is the task manager and communica-
tion center for the Discovery Cracker system. It manages
the workflow for the Discovery Cracker components, con-
trolling all events and balancing the load among the DC
Engine computers for faster processing.
You install the Workflow Manager component on only one
computer in a Discovery Cracker system. The Workflow
Manager computer requires a software license dongle.
The Workflow Manager user interface displays the follow-
ing panes:
• DC Engine Computers - displays a list of all the com-
puters that have DC Engine running and the date
Workflow Manager last saw the DC Engine. Workflow
Manager pings the DC Engines at regular intervals.
• Items Being Processed - displays the items that are being
processed by each DC Engine.
• QC Server
QC Server manages the DC Detective function of the Dis-
covery Cracker system. It is installed on the computer with
Workflow Manager and only needs to be running when
working with DC Detective.
• DC Detective Web Application
DC Detective is a secure browser-based data preview tool
that provides an early visibility window into the database
for both in-house and client use.
AD Summation Discovery Cracker User Guide Understanding Discovery Cracker
15
Understanding Discovery
Cracker Concepts
When using the Discovery Cracker electronic discovery soft-
ware, it is helpful if you understand some basic concepts and
terms.
This section discusses the following topics:
• User Accounts and Roles
• The Discovery Cracker Hierarchy
• Task Settings
• Cracking Documents
• Rendering Documents
• Placeholder Pages
• Sessions
• Document Types and Document Type Groups
• File Extensions
• Full-Text Search
• Document Relationships
• Optical Character Recognition
• Endorsing Documents
• Discovery Cracker and EDRM
• Working with Languages
User Accounts and Roles You manage security within Discovery Cracker by creating user
accounts. Before anyone can log in to Discovery Cracker, they
must have a user account with a user ID and password.
The program comes with only one user account: admin. This
account allows the administrator to log in, make appropriate
settings, and create other user accounts.
When creating user accounts, as the administrator you control
the activities each Discovery Cracker user is permitted to per-
form by assigning one or more roles to each account. A role is a
collection of permissions and can be assigned to multiple user
accounts.
There are two types of user roles:
• Security roles
• DC Detective access roles
Security roles allow users to perform specified activities in Dis-
covery Cracker and in the DC Detective tool. Discovery
Cracker comes with four security roles: Administrator, Man-
AD Summation Discovery Cracker User Guide Understanding Discovery Cracker
16
ager, Quality Controller, and Guest. As the administrator, you
create other roles that suit your business needs.
DC Detective access roles allow users to have access to selected
Discovery Cracker projects and views when using the DC
Detective tool.
See “Managing Users and Security” on page 39.
The Discovery Cracker Hierarchy Discovery Cracker provides a hierarchical system for organizing
your data. There are the following levels:
• Manager database
• Folders
• Projects
• Groups and Views
• Jobs
The manager database is the central repository for projects,
common settings, and user information. The manager database
is established during Discovery Cracker installation.
The folder level allows you to organize projects. For example,
you can organize projects by client, case, and custodian. This
level is optional.
The project level contains all the data for a particular project.
At the group level, you select the folders within your domain or
workgroup that contain the files you want to process.
At the view level, you create a subset of data by filtering the files
from the groups in a project. You can include files from all the
groups or specify a particular group.
At the job level, you tell Discovery Cracker what actions to per-
form on the files in a group or in a view, such as extract meta-
data, render, postprocess, and export to load files.
Task Settings When Discovery Cracker processes your files, it needs to know
what settings to use for the various tasks involved. Discovery
Cracker includes default task settings that apply on a system
level (at the manager database level). The pre-established set-
tings allow you to process files right “out-of-the-box,” or you
AD Summation Discovery Cracker User Guide Understanding Discovery Cracker
17
can customize the settings to fit your particular business needs.
(See “Setting Task Settings” on page 61.)
By default, each level inherits the settings from those set imme-
diately above it. Then, if it suits your needs, you can further
customize the settings at each level.
Cracking Documents When Discovery Cracker “cracks” a document, it extracts docu-
ment metadata. The actions Initial Spin Through, File Spin
Through, and Extract Metadata are all part of cracking. The
extracted metadata is stored in the Items table and the IntItems
table of the project database. You can consult the Discovery
Cracker Field List for a list of the metadata that is collected in
both tables. (For more information, see “Selecting Actions” on
page 85.)
Rendering Documents Rendering is the Discovery Cracker activity that produces TIFF
images or PDF files and, optionally, text files of documents. You
choose which file type to render to: TIFF or PDF.
If you choose the PDF file type, the Render action will produce
a searchable PDF file if the native document contains text. If
the native document is a nonsearchable document (such as an
image-only file), the Render action will produce an image-only
PDF file.
For both TIFF and PDF render file types, you can choose the
option of creating a text file during the Render action. If the
native document contains text, the text file will contain that
text.
If the native document does not contain text (is nonsearchable),
you have the option of performing optical character recognition
(OCR) to get searchable text. You have this option as part of the
Extract Metadata action for certain native document file types.
For file types that are not included in that list of native docu-
ment file types, you have to render the native documents to the
TIFF file type. Then as part of the same Render action, you can
choose to create OCR text from the rendered TIFF image.
The PDF file type is not one of the native document file types
for which you can perform OCR during the Extract Metadata
action. If you have a native document that is a nonsearchable
AD Summation Discovery Cracker User Guide Understanding Discovery Cracker
18
PDF file, to get searchable text you must render the document
to the TIFF file type and select the Render OCR option.
For more details about the OCR feature in Discovery Cracker
and the list of native file types on which you can perform OCR,
see “Performing Optical Character Recognition” on page 172.
For Render settings instructions, see page 240 of Appendix A,
“Task Settings.”
In this guide, we use the term “rendered document” to refer to a
TIFF image or a PDF file created by means of the Render
action. The term “rendered output” refers to the TIFF image or
PDF file and the text file produced by means of the Render
action.
Placeholder Pages Placeholder pages display messages. Placeholder pages fall into
two categories:
• Those that only display messages.
• Those that display messages and take the place of a rendered
document.
Discovery Cracker inserts the pages automatically in certain cir-
cumstances. Also, you can manually insert such pages. For an
explanation of placeholder pages and how they are used, see
“Inserting Placeholder Pages” on page 116.
Sessions To perform certain activities in the Discovery Cracker program,
you first have to create work sessions. These sessions and activi-
ties are:
1. QC Session - Perform quality control (QC) on processed
documents.
2. Export Session - Export data delimited text files.
3. Import Session - Import data delimited text files.
4. Postprocessing Session - Define a document numbering
scheme and a folder naming and creation scheme to pack-
age your document for delivery to your client.
All sessions apply at the project level. They are available to all
groups, views, and jobs in the project.
AD Summation Discovery Cracker User Guide Understanding Discovery Cracker
19
Quality Control Sessions When you access QC to perform quality control on processed
documents you are placed into a QC session which is created
for you. If you mark documents to be reworked, the program
automatically creates a QC job to store your chosen settings for
each document. As you exit QC the session is automatically
closed for you.
Other Sessions The sessions described in items 2 through 4 in the above list are
similar to templates. When you create a session, you set parame-
ters for available options, then save those settings. Sessions allow
the following flexibility:
• You can import, export, assign document numbers to, and
package the same data multiple times with different settings
and sequencing.
• A session maintains settings and sequencing. So you can
choose the same session but different groups and views (or
the same view if it is dynamic and there is new data) to con-
tinue the document number sequencing and volume num-
ber sequencing.
Document Types and Document Type
Groups
Discovery Cracker processes hundreds of different file types. We
use the term “document” and “document type” to refer to all
files and file types that Discovery Cracker processes.
A document type group is a collection of one or more docu-
ment types (file types) that use the same settings for processing.
By default, all the document types that Discovery Cracker pro-
cesses are assigned to predefined document type groups. When
the program processes your documents, it uses the task settings
that are set for document type groups.
If the predefined groups do not meet your needs, you can move
document types from one group to another or create new
groups to move selected document types into. You can then
adjust the settings to accomplish your specific processing needs.
See “Managing Document Type Groups” on page 44.
File Extensions Discovery Cracker normally uses information in the header of a
file, not the file extension, to determine the file’s document
type. It then processes the file according to the settings of the
document type group the document type is assigned to. If Dis-
covery Cracker can’t read the file header, the document type is

AD Summation Discovery Cracker User Guide Understanding Discovery Cracker
20
unknown, and the file will not be processed or will not be pro-
cessed correctly.
You can control how Discovery Cracker identifies documents,
and therefore how it processes them, by creating a relationship
between a file extension and a document type group. You can
do one of two things:
• Assign a file extension to a document type group.
This establishes default processing settings for files that are
typically unknown to Discovery Cracker.
• Override document types.
This tells Discovery Cracker to read the file extension and
not the file header to identify the document type.
For further information, see “Managing File Extensions” on
page 47.
Full-Text Search Full-text search capability is available if you use Microsoft® SQL
Server® 2005 Express Edition with Advanced Services, Standard
Edition, or Enterprise Edition.
NOTE: SQL Server 2005 Express Edition, which is installed by
the Discovery Cracker installer, does not provide the full-text
search capability.
Full-text search gives you the advantage of making advanced
SQL queries, such as proximity searches and generation
searches, when you create a view (see “Creating Views” on
page 75).
Since Discovery Cracker creates a full-text index when it cracks
documents, be aware that this additional activity increases pro-
cessing time.
Full-text search is also available in the DC Detective tool (see
“Preview Using the DC Detective Tool” on page 93).
For more information about full-text search, see Microsoft’s
SQL Server 2005 Books Online, “Introduction to Full-Text
Search,” at http://msdn.microsoft.com/en-us/library/
ms142545(SQL.90).aspx.
AD Summation Discovery Cracker User Guide Understanding Discovery Cracker
21
Document Relationships It is important to understand the relationship of documents in
Discovery Cracker. In the user interface you see references to
terms such as “Item,” “Item Number,” “Parent,” “Child,” “Main
Item,” “Main Item Number,” “Parent Item,” and “Parent Item
Number.” These terms have their origin in the Items table of
the project database. The following paragraphs explain these
terms and their relationships.
Item
In the Items table of the project database, every row is an
item. The rows contain references to different types of
items: virtual items, container items, and document items.
• Virtual items are groups and jobs.
Virtual items are used for organizational purposes.
They belong to the document type groups JOB and
GROUP. (See “Managing Document Type Groups” on
page 44.)
• Container items are folders, PST files, and NSF files.
Container items belong to one of the following docu-
ment type groups: FOLDER, OUTLOOKSTORE, or
LOTUSSTORE.
• Document items are the files contained within folders,
PST files, or NSF files.
Document items get processed. They include e-mail
messages, archive files, Microsoft Word files, Microsoft
Excel files, etc. They belong to all other document type
groups.
Parent
A parent is an item that contains another item.
Container items (folders, PST files, and NSF files) are par-
ent items.
Document items are parent items if they contain attached
or embedded files.
Child
A child is a item that has a parent, that is, it is inside of,
attached to, or embedded in another item.
Child items can be parents if they have attachments or
embedded files.
AD Summation Discovery Cracker User Guide Understanding Discovery Cracker
22
Main Item
A main item is a document item that is the child of a con-
tainer item (a folder, a PST file, or an NSF file).
A main item can have children (attachments or embedded
files) or be childless.
When this user guide or a dialog box in the user interface
uses the term "parent," it is referring to a “main item.”
Item Number
All items have an item number, which is the number of the
row in the Items table.
Parent Item Number
All items have a parent item number, either zero or greater
than zero.
• Zero
This means the item does not have a parent. This
applies to groups, folders, and jobs.
• Any number greater than zero
• For PST files and NSF files, their parent item num-
ber is the item number of the folder that contains
them.
• For main items, the parent item number is the item
number of its container, which is a folder, a PST
file, or NSF file.
• For child items, the parent item number is the item
number of the item it is attached to or embedded
in.
Main Item Number
The main item number is the item number of the main
item.
All items have a main item number except for container
items (folders, PST files, NSF files) and virtual items
(groups and jobs). Their main item number is <NULL>.
An item’s main item number indicates the family of docu-
ments it belongs to.

AD Summation Discovery Cracker User Guide Understanding Discovery Cracker
23
Table 2.1, “Document Relationships Illustrated,” illustrates the
previous explanation.
Optical Character Recognition Discovery Cracker can perform optical character recognition
(OCR) on image files. The OCR process translates images of
text on an image file into actual text characters. That makes it
possible to search and export the text displayed on image files.
See “Performing Optical Character Recognition” on page 172.
Endorsing Documents Discovery Cracker allows you to endorse documents. Endorsing
places text on the page. Documents have to be rendered before
they can be endorsed. Rendering creates a TIFF image or a PDF
file of the document. You can endorse the rendered document
during postprocessing or you can print the rendered and post-
processed document to paper and endorse the printed page.
See “Endorsing Documents” on page 185.
Discovery Cracker and EDRM The Federal Rules for Civil Procedure (FRCP) put organiza-
tions under a rigid and rapid schedule for producing electroni-
cally stored information (ESI). ESI is data that is subject to the
electronic discovery (e-discovery) process.
ESI must be collected, stored, reviewed, and produced. Doing
this across multiple systems in multiple formats is a very costly
and complex process.
Table 2.1: Document Relationships Illustrated
Item
Number
Parent Item
Number
Main Item
Number
10 0 <NULL> Folder
11 10 <NULL> PST
12 11 12 E-mail
13 12 12 Attachment
14 13 12 Embedded file
15 13 12 Embedded file
16 12 12 Attachment
17 16 12 Embedded file
18 16 12 Embedded file

AD Summation Discovery Cracker User Guide Understanding Discovery Cracker
24
The Electronic Discovery Reference Model (EDRM) was cre-
ated to provide a common, flexible, and extensible framework
for e-discovery products and services. Please refer to the EDRM
Web site at http://edrm.net for complete information about
EDRM.
A goal of the EDRM project was to produce a standard schema
for EDRM Extensible Markup Language (XML) files. The
EDRM XML Schema Definition (XSD) provides a standard
that facilitates the movement of ESI from one step of the e-dis-
covery process to the next, from one software program to the
next, and from one organization to the next. It allows all parties
to consistently describe scanned paper documents, e-mail mes-
sages, attachments, and standalone electronic files.
The December 18, 2007, version of the EDRM XML XSD
defines the most common elements found in ESI and its associ-
ated metadata.
Organizations can leverage this standard to increase efficiency,
improve accuracy, and minimize the time and cost involved in
transferring ESI throughout the discovery life cycle. They will
realize the benefits of EDRM XML only if their systems and
processes are compliant with the standard.
Discovery Cracker provides an EDRM XML export that can be
used with other vendors’ similarly compliant data formatted in
the same EDRM XML XSD schema, though field mapping
and/or data types may need some manual intervention.
AD Summation Enterprise Data Manager™ for AD Summation
Enterprise version 2.6 accepts the EDRM XML export.
For instructions for using the EDRM XML export, see “EDRM
XML Export” on page 167.
Working with Languages The Discovery Cracker program supports the Unicode™ Stan-
dard, which is an international standard that provides a single
character set for all the world’s languages. Therefore, it can pro-
cess and display data in any language (see page 223 for limita-
tions).
For a discussion of how Discover Cracker processes multilingual
documents with basic settings and advanced settings, see Chap-
ter 15, “Working With Languages,” on page 208.

AD Summation Discovery Cracker User Guide Getting Started
25
3. Getting Started
This chapter is designed to help you get started using the Dis-
covery Cracker program. It describes:
• Log In
• Discovery Cracker Console
• Initial Administrative Setup Tasks
• The Discovery Cracker Workflow
Log In To use the Discovery Cracker program, you must first log in.
To lo g in:
1. Start Workflow Manager. (Double-click the Workflow
Manager icon on the desktop.)
NOTE:
• For an advanced solution, you must go to the Workflow
Manager computer to start Workflow Manager.
• DC Engine must be started prior to running a job. How-
ever, you do not need to start it before logging in to
Discovery Cracker Console.
2. Start Discovery Cracker Console. (Double-click the Dis-
covery Cracker Console icon on the desktop.)
NOTE: For an advanced solution, you can do this from any
computer on which Discovery Cracker Console is installed.
The AD Summation Discovery Cracker login screen is dis-
played.
3. Type your user ID and password.
The first time you log in, the default user ID is “admin” and
the default password is “password”.
You can change the password and create additional user
accounts and set their passwords. See “Creating User
Accounts” on page 40.
4. If you want Discovery Cracker to remember the user ID
and password for the local computer, select the Remember
Log In check box.
5. Select Log In.
The main user interface for Discovery Cracker is displayed.
AD Summation Discovery Cracker User Guide Getting Started
26
Discovery Cracker Console The main user interface of the Discovery Cracker program is
called Discovery Cracker Console and is made up of the follow-
ing parts:
• Menu Bar
• Left Pane
• Right Pane
• Status Bar
Menu Bar The menu bar consists of the following menus:
• File
• Edit
• View
• Tools
• Admin
• Reports
• Help
The File menu displays the following commands:
• New
• Create Folder
• Create Project
• Create Group
• Create View
• Create Job
• Delete
• Delete Folder
• Delete Group
• Delete View
• Delete Job
• Print Project Volumes
• Exit
The Edit menu displays the following commands:
• Deactivate Project
• Reactivate Project
• Rename Folder
The View menu displays the following commands:
• All Projects
• Active Projects
• Favorite Projects
• Inactive Projects
• Show Project Names
AD Summation Discovery Cracker User Guide Getting Started
27
• Show Project ID Numbers
• Show Project Names and ID Numbers
• Settings
• Open System Settings
• Open Folder Settings
• Open Project Settings
• Open Group Settings
• Open View Settings
You can control which projects are displayed in the navigation
pane (the top part of the left pane) by selecting the command
that suits your needs. You can filter the view of projects in the
navigation pane according to favorites.
The Tools menu displays the following commands:
• Change Your Password
• Import Click Robot Settings
• Export Click Robot Settings
• Monitor Workflow Manager Activity
The Admin menu displays the following commands:
• Manage Users
• Manage Security
• Manage Security Roles and Permissions
• Manage DC Detective Access Roles
• Manage Document Type Groups
• Manage File Extensions
• Manage Categories
• Manage Reference Files
• Manage License
The Reports menu displays the following command:
• Create Reports
The Help menu displays the commands:
• Discovery Cracker User Guide
When you select this command, the Discovery Cracker
User Guide will open.
• About Discovery Cracker
AD Summation Discovery Cracker User Guide Getting Started
28
Left Pane The left pane of the Discovery Cracker Console main window is
where you navigate to projects, folders, groups, views, or jobs.
At the top of the left pane of the Discovery Cracker Console
main window you see the title All Projects. The title changes
depending on your selection from the View menu.
Just below that, you see a bar with the following tabs:
• Sort\Refresh - The buttons on this tab will allow you to sort
your projects, folders, groups, views, and jobs in Ascending
or Descending order. The Default Sort button will reload
the hierarchy to the original order, by ID number in
ascending order. You can also Refresh the hierarchy to show
the current status of jobs.
• Mark Favorites - Use the checkbox on this tab to mark
selected projects as your favorites. To do this:
1. Select a project
2. Select the checkbox on this tab to mark the project
as a favorite
3. Using the View menu show only your favorite
projects.
• Search - This tab provides you with the tools necessary to
search through your projects and folders for the specific one
you want. You can search by the ID or the name of a proj-
ect or by the name of a folder. When you are searching by
name type the full or partial name in the text field and
select the Search button. The search will begin at the top of
the hierarchy and highlight the first instance found. You
can then use the Find Next button to continue searching
for any additional projects or folders that match your crite-
ria. When you reach the end of the hierarchy and no more
items are found to match your criteria, a dialog box will
appear advising that the search has been completed. If you
want to change your search criteria, simply type your new
criteria in the text field and select the Search button
• License Info - The information displayed in this section
depends on the type of license you have.
If you have an enterprise license, you see:
• License Type
• Expiration Date
If you have a limited DC Engine license (shown onscreen as
a click license), you see:
AD Summation Discovery Cracker User Guide Getting Started
29
• License Type
• Expiration Date
• Processing PCs
• Documents Remaining
• Pages Remaining
When you approach a license limit, the information pre-
sented changes color.
For an explanation of the license status colors and further
information about Discovery Cracker licenses, see “Manag-
ing Your Discovery Cracker License” on page 59.
On the status bar, you see the name of the manager data-
base that you chose during Discovery Cracker installation.
Once you create folders, projects, groups, views, and jobs,
those are listed in the navigation pane in a hierarchical
structure similar to that of Microsoft Windows Explorer.
You can select projects to mark as your favorites.
When you create a group or a view, the Discovery Cracker
program automatically inserts a level labeled Groups or
Views for identification purposes. You see a level labeled
Groups and/or a level labeled Views under each project that
has groups and/or views.
Right Pane The right pane of the Discovery Cracker Console main window
displays various types of information, depending on what you
have selected in the navigation pane.
When you select the manager database or a folder, the right
pane is titled Workflow Manager Settings. You see the follow-
ing areas:
• Network
• Default Directories
• System Timeout Settings
When you select a project name or the group-level or view-level
identifier, the right pane displays the following tabs:
• Project Information. Displays information for the selected
project.
• Jobs. Displays a list of all the jobs in the project.
• Status Counts. Displays a list of all document statuses and
the total number of documents in the project that currently
AD Summation Discovery Cracker User Guide Getting Started
30
have each status. The count is presented per group and view
in the project.
When you select a group name, the right pane displays the fol-
lowing tabs:
• Group Information. Displays information for the selected
group.
• Jobs. Displays a list of all the jobs in the group.
• Status Counts. Displays a list of all document statuses and
the total number of documents in the group that currently
have each status.
When you select a view name, the right pane displays the fol-
lowing tabs:
• View Information. Displays information for the selected
view.
• Jobs. Displays a list of all the jobs in the view.
• Status Counts. Displays a list of all document statuses and
the total number of documents in the view that currently
have each status.
When you select a job ID, the right pane displays the following
tabs:
• General Job Information. Displays information for the
selected job.
• Job Settings. Displays the task settings for that particular
job.
Status Bar The status bar at the bottom of the Discovery Cracker Console
main window displays the name of the logged in user, the name
of the manager database you are using, and one or more of the
following, depending on what you have selected in the naviga-
tion pane:
• PROJECT
• GROUP
• VIEW
• JOB ID
Initial Administrative Setup
Tasks
Before you can start working with the Discovery Cracker pro-
gram, you must perform the following administrative setup
tasks:
1. Define Workflow Manager Settings
2. Set up reference files
AD Summation Discovery Cracker User Guide Getting Started
31
3. Create user accounts and roles
4. Analyze document types, document type groups, and file
extension relationships
5. Set task settings
Each task is described below and includes a reference to the
appropriate location in this user guide where you can find
instructions for performing the task.
• Define Workflow Manager Settings
When you log on to Discovery Cracker for the first time, in
the Workflow Manager Settings pane you need to make
the following settings:
• Network
• Default Directories
• Projects
• Reference files
• Work items
• System Timeout Settings
For an explanation of these settings, see “The Workflow
Manager Settings Pane” on page 34.
• Set up reference files
Reference files are files of various types that the Discovery
Cracker program needs to perform various tasks. Types of
reference files are:
• Archive Application
• Lotus Notes ID
• Lotus Notes Password
• Separator Template
• Endorsement Template
• Metadata Template
For a description of the reference files and an explanation of
how to set them up from the Admin menu, see “Managing
Reference Files” on page 51.
• Create user accounts and roles
The Discovery Cracker program comes with one user
account: admin. This account is assigned the Admin secu-
rity role and has permission to all the functions of the pro-
gram. In order for others to use the Discovery Cracker
AD Summation Discovery Cracker User Guide Getting Started
32
program, you must create accounts for those users and
assign appropriate roles to them.
The Discovery Cracker program comes with four security
roles: Admin, Guest, Manager, Quality Controller. Each
one has a different set of permissions. The permissions con-
trol which activities a user is permitted to perform. If the
predefined security roles do not fit your needs, you can cre-
ate your own custom security roles. Roles can be assigned to
multiple user accounts.
If your clients will use the DC Detective tool to preview
their processed documents before you postprocess them,
you need to create a security role with the proper DC
Detective permissions. You also need to create DC Detec-
tive access roles to give Discovery Cracker user accounts
access to the appropriate projects and views.
See “Managing Users and Security” on page 39.
• Analyze document types, document type groups, and file
extension relationships
Discovery Cracker has predefined document type groups. A
document type group is a collection of one or more docu-
ment types (file types) that use the same settings for pro-
cessing.
In most cases, the default processing settings are sufficient.
However, if you have special business needs, you may want
customized settings for particular document types or docu-
ments that have specific file extensions.
See “Managing Document Type Groups” on page 44 and
“Managing File Extensions” on page 47.
• Set task settings
When Discovery Cracker processes your files, it needs to
know what settings to use for the various tasks involved.
Discovery Cracker includes default task settings that apply
on a system level (at the manager database level). The
default settings allow you to process files right “out-of-the-
box.” However, you can customize the settings to fit your
particular business needs. See “Setting Task Settings” on
page 61.
AD Summation Discovery Cracker User Guide Getting Started
33
The Discovery Cracker
Workflow
Once you have made the initial settings as described in “Initial
Administrative Setup Tasks” on page 30, you are ready to start
using the Discovery Cracker electronic discovery software. The
basic workflow consists of the following steps:
1. Processing Setup (see page 61)
2. Processing (see page 81)
3. Previewing Documents (see page 93)
4. Quality Control (see page 101)
5. Postprocessing (see page 127)
6. Exporting (see page 149)
7. Paper Printing (see page 170)
If you need more information about setting up your processing
parameters to accomplish your goals, refer to the following:
• Chapter 12, “Performing Optical Character Recognition,”
on page 172
• Chapter 13, “Endorsing Documents,” on page 185
• Chapter 15, “Working With Languages,” on page 208
• Chapter 16, “DC Engine Selection,” on page 225
• Appendix A, "Task Settings," on page 234

AD Summation Discovery Cracker User Guide Administrative Tasks
34
4. Administrative Tasks
This chapter describes Discovery Cracker administrative tasks.
You perform administrative tasks from the following locations:
• The Workflow Manager Settings Pane
• The Tools Menu
• The Admin Menu
The following information describes the tasks you perform at
each location.
The Workflow Manager
Settings Pane
When you log on to Discovery Cracker for the first time, in the
Workflow Manager Settings pane of Discovery Cracker Con-
sole, you need to make settings in the following areas:
• Network
• Default Directories
• System Timeout Settings
The topics below explain these settings.
Network In the Network area, you need to select an operating domain or
workgroup. All Discovery Cracker computers, the SQL Server
computer, source files, output files, and reference files must be
on the same domain or workgroup.
The network operating domain or workgroup that you select
becomes the starting point for the share folder browsers and the
default directory paths when you set parameters in Discovery
Cracker Console.
Default Directories In the Default Directories area, you need to select default direc-
tories for projects, reference files, and work items.
Projects You need to select the root directory for the folders that Discov-
ery Cracker creates to receive the output files after processing. It
creates four output folders:
• The Items folder contains detached copies of attachments
and embedded files.
• The Images folder contains the rendered output (TIFF and/
or PDF and, optionally, text files).
AD Summation Discovery Cracker User Guide Administrative Tasks
35
• The Export folder contains export files, such as data delim-
ited text files and Concordance export files.
• The Vol umes folder contains the files that are ready for you
to deliver to your client. Such files can include some or all
of the following: document numbered rendered output
(TIFF and/or PDF and, optionally, text files), TIFF images
generated from rendered PDF files, native files, and attach-
ments.
Reference Files Reference files are files of various types that the separate process-
ing engines and other components of the Discovery Cracker
application need in order to perform various processing tasks.
Examples are the archive application, Lotus Notes user.id files,
Lotus Notes passwords, separator templates, endorsement tem-
plates, metadata templates, and other items such as images, job
settings exports, and placeholder pages. (See also “Managing
Reference Files” on page 51.)
Work Items Work items are your source files. In the Select a default root
directory for work item selection box you select the default
location of the files you want to process. When you create a
group to select the files to process, the folder selector brings you
to the location you select. (See “Creating Groups” on page 74.)
System Timeout Settings Timeout settings determine how long a process is allowed to
continue before the document is marked as Problem and the
program moves on to the next document. Timeout settings
apply to the following:
• Processing
With regard to timeout settings, the term “processing”
includes the actions of Initial Spin Through, File Spin
Through, and Extract Metadata. (For a discussion of
actions, see Chapter 5, “Processing Setup,” on page 61.)
You set the processing timeout value in minutes per docu-
ment.
• Rendering
Rendering is the Discovery Cracker activity that produces
TIFF images or PDF files, and, optionally, text files of doc-
uments.
AD Summation Discovery Cracker User Guide Administrative Tasks
36
The rendering timeout value is the maximum time Discov-
ery Cracker has to complete creating the TIFF image or
PDF file, and, optionally, the text file of a document.
You set the rendering timeout value in minutes per docu-
ment.
• OCR
Optical character recognition (OCR) is the activity Discov-
ery Cracker performs on image files that converts images of
text to actual text characters.
The OCR timeout value is the maximum time Discovery
Cracker has to perform OCR on a page of the document. If
one page times out, the document is marked as Problem,
but Discovery Cracker attempts to perform OCR on the
remaining pages.
You set the OCR timeout value in seconds per page.
The timeout values that you select on the Workflow Manager
Settings pane are system level settings. They are inherited by
each lower-level unit (folder, project, group, view, or job) until
you change the settings at a particular level.
To make settings on the Workflow Manager Settings pane:
Prerequisites:
• You may need to ask the network administrator for the name
of the network to select and the default directories to use
for output files, reference files, and source files.
• The network administrator needs to ensure that the folders
specified as the default directories are shared network fold-
ers, with permission Full Control assigned to the Everyone
user.
• You are logged in to Discovery Cracker Console.
Steps:
1. On the Workflow Manager Settings pane, in the Network
area, select an operating domain or workgroup.
NOTE: You will not be able to change the setting once you
select Save.
2. In the Default Directories area:
AD Summation Discovery Cracker User Guide Administrative Tasks
37
When selecting default directories, you must enter a shared
network folder. You can browse to the location or type the
path in the text box.
If you browse to the location, you must select My Network
Places\Entire Network\Microsoft Windows Net-
work\[domain] or [workgroup]\[computername]\[shared
folder].
If you type in the text box, you must use the UNC format,
i.e., \\[computername]\[shared folder].
In the Select a default directory for projects box, enter the
root path for your project output files.
NOTE: You will not be able to change this setting once
you select Save. However, you can make changes when
creating a project.
a. In the Select a default directory for reference files box,
enter the default path where the reference files will be
stored.
NOTE: You will not be able to change the setting once
you select Save.
b. In the Select a default root directory for work item
selection box, enter the root directory where your
source files are located.
NOTE: You can change the default directory setting for
work items as needed.
3. In the System Timeout Settings area, accept or change the
timeout values.
4. Select Save.
The Tools Menu On the Tools menu, you see the following commands:
• Change Your Password
• Import Click Robot Settings
• Export Click Robot Settings
• Monitor Workflow Manager Activity
The following topics explain how to use the commands on the
Tools menu:
• Changing Your Password
• Click Robot Settings

AD Summation Discovery Cracker User Guide Administrative Tasks
38
Changing Your Password Changing passwords does not have to be a task for administra-
tors only. When you set up user accounts, you can give users
permission to change their password. The following procedure
applies to administrators and other users.
To change your password:
1. From the Tools menu, select Change Your Password.
2. The Change Password dialog box is displayed.
3. Type the old password in the Old Password box.
4. Type a new password in the New Password box.
5. Type the new password again in the Confirm Password
box.
6. Select Save.
Click Robot Settings From time to time, while files are being processed, the native
applications generate dialog boxes (such as Printing dialog
boxes) with questions that require a response before processing
can continue. (These dialog boxes are also referred to as pop-up
messages.) The Click Robot in the Discovery Cracker program
responds to these messages, using instructions contained in the
wdwlist.xml file.
If a message occurs that the Discovery Cracker program cannot
handle, you can contact the Discovery Cracker Product Support
desk to obtain instructions to configure the wdwlist.xml file to
respond to the message. Call 1- 866-833-5377, or send an e-
mail message to dc.support@accessdata.com.
You can import and export Click Robot settings.
To import Click Robot settings:
1. From the To o l s menu, select Import Click Robot Settings.
The Import Click Robot File dialog box is displayed.
2. In the Select a properly formatted Click Robot XML file
to import box, browse to and select the file you want.
3. Select Import.
To export Click Robot settings:
1. From the Tools menu, select Export Click Robot Settings.
The Export Click Robot File dialog box is displayed.
AD Summation Discovery Cracker User Guide Administrative Tasks
39
2. In the Save exported file as box, open the Save As dialog
box.
3. Type a file name and browse to the location in which to
save the file, then select Save.
4. In the Export Click Robot File dialog box, select Export.
The Admin Menu On the Admin menu, you see the following commands:
• Manage Users
• Manage Security
• Manage Security Roles and Permissions
• Manage DC Detective Access Roles
• Manage Document Type Groups
• Manage File Extensions
• Manage Categories
• Manage Reference Files
• Manage License
The following topics explain how to use the commands on the
Admin menu.
• Managing Users and Security
• Managing Document Type Groups
• Managing File Extensions
• Managing Categories
• Managing Reference Files
• Managing Your Discovery Cracker License
Managing Users and Security You manage security within the Discovery Cracker program by
creating user accounts. Before anyone can log in to the Discov-
ery Cracker program, they must have a user account with a user
ID and password.
The program comes with only one user account: admin. This
account allows the administrator to log in, make appropriate
settings, and create other user accounts.
When creating user accounts, as the administrator you control
the activities each Discovery Cracker user is permitted to per-
form by assigning one or more roles to each account. A role is a
collection of permissions and can be assigned to multiple user
accounts.
There are two types of user roles:
AD Summation Discovery Cracker User Guide Administrative Tasks
40
• Security roles
• DC Detective access roles
Security roles allow users to perform specified activities in the
Discovery Cracker program and in the DC Detective tool. The
Discovery Cracker program comes with four security roles:
• Admin
• Guest
• Manager
• Quality Controller
As the administrator, you create other roles that suit your busi-
ness needs.
DC Detective access roles allow users to have access to selected
Discovery Cracker projects when using the DC Detective tool.
You manage users and security by:
• Creating User Accounts
• Creating Security Roles
• Creating DC Detective Access Roles
The following topics explain how to perform these activities.
Creating User Accounts Before others can log in to and use the Discovery Cracker pro-
gram, you must create Discovery Cracker user accounts for
them.
To create a user account:
1. From the Admin menu, select Manage Users.
The Manage Users dialog box is displayed.
You see two panes:
• System Users
On the System Users pane, you see the Security Roles
button (which displays the Manage Security Roles and
Permission dialog box) and the DC Detective Roles
button (which displays the Manage DC Detective
Access Roles dialog box).
You see a list of user IDs (out-of-the-box, you see one
user ID: admin).
You also see a Delete button and a New button.
• User Information
AD Summation Discovery Cracker User Guide Administrative Tasks
41
On the User Information pane, you see the user infor-
mation for the user ID that is highlighted in the list on
the System Users pane.
2. Select New at the bottom of the System Users pane.
3. On the User Information pane, complete the following
boxes:
• User ID
• First Name
• Last Name
• Password
• Reenter Password
• Department (optional)
• Start Date (optional; the user cannot log in until this
date)
• End Date (optional; the user cannot log in after this
date)
4. Select the check box Can Change Own Password if you
want to give the user permission to change his or her pass-
word.
5. Select Create.
The value in the User ID box is displayed in the list of user
IDs on the System Users pane.
6. Assign one or more roles to the user by selecting roles from
the Available Roles box and moving them to the Assigned
Roles box.
The roles you assign users control the activities within the
Discovery Cracker program and the DC Detective tool they
have access to.
All security roles and DC Detective access roles are listed in
the Available Roles box. If you need roles with different
permissions, select the Security Roles button or the DC
Detective Roles button and create the necessary roles. Refer
to the procedure “To create a security role:” on page 42 and
the procedure “To create a DC Detective access role:” on
page 43, if necessary.
7. Select Save to save the role assignments.
Creating Security Roles As administrator, you may decide that additional security roles
are necessary within your organization. For example, you may
want to create an Operator role or a DC Detective User role.
AD Summation Discovery Cracker User Guide Administrative Tasks
42
When you create a role, you need to decide which permissions
to assign the role.
To create a security role:
1. From the Admin menu, point to Manage Security, then
select Manage Security Roles and Permissions.
The Manage Security Roles and Permission dialog box is
displayed.
You see two panes:
• Roles
On the Roles pane, you see a Manage Users button,
which displays the Manage Users dialog box.
You see a list of roles.
You also see a Delete button and a New button.
• Permissions
On the Permissions For: [Role Name] pane, you see a
list of all the permissions that are available, along with a
check box for each permission. The check boxes indi-
cate which permissions have been assigned to the role
that is highlighted in the Roles pane.
You also see a button with a double arrow, an All Per-
missions check box, a Save button, a Cancel button,
and an Apply button.
You can expand and collapse the permissions list by
selecting the button with a double arrow.
2. On the Roles pane, select New.
The Security Role Creation dialog box is displayed.
3. Type a name in the Role Name box.
4. Select Create.
The new role name is displayed in the list on the Roles
pane.
The Permissions For: [Role Name] pane displays all the
permissions with no check boxes selected.
5. Select the check boxes of the permissions you want the role
to have. To select all the check boxes, select the All Permis-
sions check box.
NOTE: The system permissions Can Edit the Project Root
Path, Can Edit the Reference File Root Path, Can Change
AD Summation Discovery Cracker User Guide Administrative Tasks
43
the System Domain give you a one-time opportunity to set
the paths and the domain, not to change them.
6. Select Save to save the settings and close the dialog box.
Creating DC Detective Access Roles As administrator, you need to create DC Detective access roles
for your Discovery Cracker program users who are permitted to
use the DC Detective tool to preview processed documents.
Decide which projects each role will have access to.
To create a DC Detective access role:
Prerequisite:
• The projects that you want the role to have access to must be
created.
Steps:
1. From the Admin menu, point to Manage Security, then
select Manage DC Detective Access Roles.
The Manage DC Detective Access Roles dialog box is dis-
played.
You see two panes:
• DC Detective Access Roles
On the DC Detective Access Roles pane, you see a
button Manage Users, which displays the Manage
Users dialog box.
You see a list of roles (out-of-the-box, no roles are
listed).
You also see a New button and a Delete button.
• DC Detective Objects
On the DC Detective Objects pane, you see a list of all
the objects (projects and views) that are available, along
with a check box for each object. The check boxes indi-
cate which objects the role has permission to access in
the DC Detective tool.
You also see a button with a double arrow, an All
Objects check box, a Save button, a Cancel button,
and an Apply button.
You can expand and collapse the objects list by selecting
the button with a double arrow.
2. Select New at the bottom of the DC Detective Access
Roles pane.
AD Summation Discovery Cracker User Guide Administrative Tasks
44
3. The DC Detective Access Role Creation dialog box is dis-
played.
4. Type a name in the Role Name box.
5. Select Create.
The new role name is displayed in the list on the DC
Detective Access Roles pane.
The DC Detective Objects pane displays all the objects
with no check boxes selected.
6. Select the check boxes of the projects you want the role to
have access to in the DC Detective tool. To select all the
check boxes, select the All Objects check box.
NOTE: Discovery Cracker grants access at the project level.
You cannot grant access to individual views. When you
select a project, the role has access to all the views in the
project.
7. Select Save to save the settings and close the dialog box.
Managing Document Type Groups A document type group is a collection of one or more docu-
ment types (file types) that use the same settings for processing.
From the Admin menu, when you select Manage Document
Type Groups, the Manage Document Type Groups dialog box
is displayed. You see the list of document type groups. You can
click the plus sign (+) to the left of each document type group
to view the document types and file extensions assigned to each
group.
By default, all the document types that the Discovery Cracker
program processes are assigned to predefined document type
groups. However, if the predefined groups do not meet your
needs, you can move document types from one group to
another, create new groups, and delete groups.
The Discovery Cracker program processes a document type
according to the task parameters that are set for the document
type group it is assigned to. If multiple document types are
assigned to one document type group, all the document types
are processed with the same settings.
If you want to customize settings for a specific document type
or document type version, you have to create a new document
type group, move the document type into the new group, then
adjust the task settings.

AD Summation Discovery Cracker User Guide Administrative Tasks
45
There is no inherent relationship between document type
groups and task settings. However, default task parameters are
set to work appropriately with the document types included in
the document type groups.
NOTE: When moving document types into new or different doc-
ument type groups, you need to be aware that certain document
types influence the tasks that are associated with the File Spin
Through action.
For most document type groups, the File Spin Through action
has two task tabs: OLE Spin Through and Archive Application.
However, the document type groups LOTUSDOCUMENT,
LOTUSSTORE, OUTLOOKDOCUMENT, and OUT-
LOOKSTORE have a third task tab. The additional task tab is
not determined by the document type group, but by the docu-
ment types within the groups. So if you were to move any of the
document types that are assigned to those document type
groups to a different document type group, the additional task
tab would follow the document type. Table 4.1, “Document-
Type-Dependent Tasks,” identifies those tasks and the docu-
ment types that influence them.
Table 4.1: Document-Type-Dependent Tasks
Task Document Type
Spin Through Lotus Notes Documents Lotus Notes Document
Spin Through Lotus Notes Files Lotus Notes File
Spin Through Outlook PST Files Outlook File

AD Summation Discovery Cracker User Guide Administrative Tasks
46
Other than the exceptions above, there are no dependencies
between document types and tasks.
Document type groups can be edited, created, and deleted at
will, allowing you to customize how the Discovery Cracker pro-
gram processes your documents.
To create a new document type group:
1. From the Admin menu, select Manage Document Type
Groups.
2. In the Manage Document Type Groups dialog box, select
Create.
The Document Type Group Creation dialog box is dis-
played.
3. Type a name in the Document Type Group Name box.
4. Type a description in the Description box (optional).
5. Select Save.
The new document type group name is displayed in the list
of document type groups.
Spin Through Outlook PST Items Appointment
Contact
Distribution List
Journal
Mail
Meeting
MS Outlook
Note
Outlook Document
Post
Report
Tas k
Table 4.1: Document-Type-Dependent Tasks (Continued)
Task Document Type
AD Summation Discovery Cracker User Guide Administrative Tasks
47
To move a document type or file extension to a different docu-
ment type group:
1. From the Admin menu, select Manage Document Type
Groups.
2. In the Manage Document Type Groups dialog box, expand
the document type groups to display the document types
and file extensions assigned to the groups.
3. Select the document type or file extension you want.
4. Drag it to a different group.
5. Select Save.
To delete a document type group:
1. From the Admin menu, select Manage Document Type
Groups.
2. In the Manage Document Type Groups dialog box, select
the document type group you want to delete and expand it.
3. Move all the document types and file extensions to another
group.
4. When the document type group is empty, select Delete,
then select Save.
Managing File Extensions Discovery Cracker normally uses information in the header of a
file, not the file extension, to determine the file’s document
type. It then processes the file according to the settings of the
document type group the document type is assigned to. If Dis-
covery Cracker can’t read the file header, the document type is
unknown, and the file will not be processed or will not be pro-
cessed correctly.
NOTE: When Discovery Cracker detects an unknown document
type, it automatically assigns that document type to the Unas-
signed document type group.
You can control how the Discovery Cracker program identifies
documents, and therefore how it processes them, by creating a
relationship between a file extension and a document type
group. You can do the following:
• Assign a file extension to a document type group.
This establishes default processing settings for files that are
typically unknown to Discovery Cracker.
AD Summation Discovery Cracker User Guide Administrative Tasks
48
If the Discovery Cracker program cannot determine a file’s
document type by reading the file header, the program then
checks the file’s extension to determine if that file extension
is assigned to a document type group. If so, it processes the
file with that document type group’s settings.
• Override document types.
This tells Discovery Cracker to read the file extension and
not the file header to identify the document type.
You can assign a file extension to a document type group,
then override Discovery Cracker’s normal method of identi-
fying the document type.
For example: Suppose you process files with the extension
.log. Discovery Cracker may determine that some files with
this extension are the document type Rich Text Format,
some files are the document type Text Mail, and other files
are unknown. If you want to ensure that all of these differ-
ent document types are processed with the same settings,
assign the file extension .log to a specific document type
group and override the document type. Now, regardless of
the document type of a file with the .log extension, Discov-
ery Cracker processes it according to the settings of the doc-
ument type group that you assigned the .log file extension
to.
To create a relationship between a file extension and a docu-
ment type group:
Prerequisite:
• If necessary, create a new document type group to assign the
file extension to (see the procedure “To create a new docu-
ment type group:” on page 46).
Steps:
1. From the Admin menu, select Manage File Extensions.
The Manage File Extensions dialog box is displayed.
You see a File Extensions area that contains a table with the
following column headings:
• File Extension
• Document Type Group
• Override Document Type
2. Select Create.
3. The Create File Extension area is displayed.

AD Summation Discovery Cracker User Guide Administrative Tasks
49
4. Type a file extension in the File Extension box, using no
more than 15 alphanumeric characters.
5. Select a document type group in the Document Type
Group box.
6. Select the Override Document Types check box if you
want the Discovery Cracker program to read the file exten-
sion and not the file header to identify the document type.
7. Select Create.
The selections you made are displayed in the File Exten-
sions area. In the Manage Document Type Groups dialog
box, the file extension is listed under the document type
group you selected.
Managing Categories A category is an element that is assigned to a document that
identifies text for Discovery Cracker to endorse on the rendered
TIFF image or PDF file of the document. You create and view
the list of categories in the Manage Categories dialog box. The
quality controller assigns categories to documents in a QC Ses-
sion.
From the Admin menu, when you select Manage Categories,
the Manage Categories dialog box is displayed. In the Catego-
ries area, there are two columns, Category Name and Category
Display Text. The category name is a short version of the
endorsement text. It’s used like a label to identify the endorse-
ment text, which is displayed in the Category Display Text col-
umn.
Discovery Cracker does not include predefined categories.
However, examples of categories you may want to create are
shown in Table 4.2, “Endorsement Categories.”
Table 4.2: Endorsement Categories
Category Name Category Display Text
CONF Confidential
DUCR Document under confidential-
ity review
FAEO For attorney’s eyes only
MINOR Minor child
AD Summation Discovery Cracker User Guide Administrative Tasks
50
You can create categories as necessary to suit the needs of your
projects. All categories are available to be used with all of your
projects.
To create a category:
1. From the Admin menu, select Manage Categories.
The Manage Categories dialog box is displayed.
2. Select Add a Category.
The dialog box expands and the Create Category area is
displayed.
3. In the Category Name box, type a short name.
The category name is a descriptive label that identifies the
category display text. Whether you type uppercase or lower-
case letters, the name will be displayed in uppercase letters.
You can use up to 25 characters.
4. In the Category Display Text box, type the text you want
to have endorsed on documents.
The category display text is case sensitive; type uppercase or
lowercase letters. You will be able to customize the appear-
ance of the text (font, font style, size, etc.) when you create
an endorsement template.
The category display text can be up to 100 characters.
However, text that is wider than the page width is trun-
cated.
5. Select Save.
The new category name and category display text are dis-
played in the Manage Categories dialog box.
For more information about using categories with endorse-
ments, see Chapter 13, “Endorsing Documents,” on page 185.
PRIV Privileged
REVIEW Review for additional circum-
stances
Table 4.2: Endorsement Categories (Continued)
Category Name Category Display Text
AD Summation Discovery Cracker User Guide Administrative Tasks
51
Managing Reference Files Reference files are files of various types that the separate process-
ing engines and other components of the Discovery Cracker
system need to perform various tasks.
From the Admin menu, when you select Manage Reference
Files, the Manage Reference Files dialog box is displayed. You
see a list of reference file types:
• Archive Application
• Lotus Notes ID
• Lotus Notes Password
• Separator Template
• Endorsement Template
• Metadata Template
The following topics explain what each reference file is used for.
• Archive Application
If you want to process archived (compressed) files, Discov-
ery Cracker needs to use an archive application during the
File Spin Through action. WinZip32 and Discovery
Cracker Archiver (a Discovery Cracker internal solution)
are listed in the Manage Reference Files dialog box as
archive applications. Discovery Cracker Archiver is a Dis-
covery Cracker internal solution. You can use it with no
further action on your part. To use WinZip32, you must
first install it. However, you don’t need to add it to the ref-
erence files since it is already there. If you want to use one
of the other archive applications listed in the Discovery
Cracker system requirements, you must first install it and
then add it to the list of reference files.
• Lotus Notes ID
If you want to process Lotus Notes Store files (NSF files),
the Discovery Cracker program needs to reference the
Lotus Notes user.id file. Starting Lotus Notes Client for the
first time generates the default user.id file (located in
C:\Program Files\lotus\notes\data\user.id). However, some
NSF files need a specific user.id file.
You need to create a Lotus Notes ID reference file for each
user.id file that you want the Discovery Cracker program to
work with, including the default user.id file. The reference
files point to the locations of the user.id files.
• Lotus Notes Password
AD Summation Discovery Cracker User Guide Administrative Tasks
52
If you process NSF files, some of them may be password
protected, and they may use different passwords. You need
to create a Lotus Notes Password reference file for each
password you want the Discovery Cracker program to use.
If no passwords are needed to process NSF files, you need
to create a blank Lotus Notes password reference file.
NOTE: The Discovery Cracker program can only handle
passwords at the store file (NSF) level. If individual e-mail
messages are password protected, it cannot process them.
• Separator Template
The Discovery Cracker program allows you to print paper
copies of rendered TIFF images or PDF files after the docu-
ments are postprocessed. When you print paper copies, you
can include separator pages, which are inserted between
each document. The separator pages can be blank or display
information that you create or document metadata that you
select. During printing setup, you can choose to use a dif-
ferent color for the separator pages so the document breaks
are easier to see.
To use separator pages, you need to create at least one sepa-
rator template.
• Endorsement Template
The Discovery Cracker program allows you to print ren-
dered TIFF images or PDF files to paper after the docu-
ments are postprocessed. It can endorse the printed pages in
the top margin (header) and in the bottom margin (footer)
with custom wording, such as “Confidential,” or with
metadata, such as the document number.
The Discovery Cracker program also allows you to endorse
the rendered documents themselves as part of the packaging
process during postprocessing.
To endorse printed pages or rendered documents, you need
to create at least one endorsement template.
• Metadata Template
If you want don’t want to render certain document types
(such as system files or EXE files), but you do want to cap-
ture the metadata from those document types, you can cre-
ate a metadata template displaying the metadata fields that
you want. You can insert an image, such as a company logo,
in the template. When you select Metadata Viewer as the
AD Summation Discovery Cracker User Guide Administrative Tasks
53
user-selected render application for the Render action, you
can select the metadata template you want the Discovery
Cracker program to use. When it renders those document
types, it creates a TIFF image or a PDF file of the template.
To add a reference file:
1. From the Admin menu, select Manage Reference Files.
The Manage Reference Files dialog box is displayed.
2. Select Add.
The Add a Reference File dialog box is displayed.
3. In the Select a Reference File Type box, select the type of
reference file you want to add, then provide the other infor-
mation asked for on the dialog box. The information you
need to provide depends on the reference file type that you
select. Use the following instructions.
Archive Application When you select Archive Application, perform the following
steps:
1. In the Archive Executable File box, browse to and select the
correct executable file for the archive application you want
to use. Examples:
If you want to use WinRAR, the file is winrar.exe
If you want to use Power Archiver, the file is POWER-
ARC.EXE.
2. In the File Display Name box, type a display name.
3. In the Description box, type a description.
4. In the Extract Switch box, type an extract switch appropri-
ate for the archive application you want to use. Examples:
• For WinRAR:
Typ e e to extract from an archive ignoring paths.
Typ e x to extract from an archive with full paths.
• For Power Archiver, type -e.
NOTE: For more information about extract switches, contact
your archive application provider.
5. Select Add.
Lotus Notes ID When you select Lotus Notes ID, perform the following steps:
1. In the Lotus Notes ID File box, browse to and select a
Lotus notes user.id file.
AD Summation Discovery Cracker User Guide Administrative Tasks
54
NOTE: You must create Lotus Notes ID reference files for
each user.id file you want the Discovery Cracker program
to use during processing. At a minimum, you must create a
Lotus Notes ID reference file for the default user.id file.
The default user.id file is generated when you start Lotus
Notes Client for the first time after installing it. Its location
is, by default, C:\Program Files\lotus\ notes\data\user.id.
2. In the File Display Name box, type a display name.
3. In the Description box, type a description (optional).
4. Select the System check box if you want this file to be the
system default Lotus Notes ID file.
NOTE: If this is the only entry for Lotus Notes ID, the Dis-
covery Cracker program makes it the system default file
whether you select System or not.
5. Select Add.
Lotus Notes Password When you select Lotus Notes Password, perform the following
steps:
1. In the Password box, enter the password you want the Dis-
covery Cracker program to use when processing Lotus
Notes store files (NSF files).
NOTE: You must create Lotus Notes password reference files
for each password you want the Discovery Cracker program
to use during processing.
If no passwords are needed to process NSF files, you need
to create a blank Lotus Notes password reference file. Leave
the Password box blank.
2. In the Display Name box, type a display name.
3. In the Description box, type a description (optional).
4. Select the System check box if you want this password to be
the system default Lotus Notes password.
NOTE: If this is the only entry for Lotus Notes Password,
the Discovery Cracker program makes it the system default
password whether you select System or not.
5. Select Add.
AD Summation Discovery Cracker User Guide Administrative Tasks
55
Separator Template When you select Separator Template, perform the following
steps:
1. In the Template Name box, type a name.
2. In the Template Description box, type a description.
3. On the Fields tab, select Select Fields to display the Field
Selector dialog box.
4. In the Available Fields list, select one or more metadata
fields that contain the information you want to appear on
the page, and move them to the box on the right (select the
arrow pointing right or double-click the field).
Select USER CUSTOM TEXT in order to add custom
wording at top of the page.
5. In the Display Name column:
• If you selected a metadata field, by default the system
field name is displayed. The name appears on the page
to identify the metadata. You can modify the text or
delete it. If you delete it, the metadata is displayed
without an identifying label.
• If you selected USER CUSTOM TEXT, type your cus-
tom text.
6. In the Align column, select Left, Center, or Right.
7. In the Date Format column, choose a date format if appli-
cable.
8. Select Save to save your work and return to the Add a Ref-
erence File dialog box.
9. If you want to change the order of the metadata fields in the
list, select the field, then select either the up arrow or the
down arrow.
10. Select the Image tab if you want to add an image, such as a
company logo, to the template.
11. In the Select a new image box, browse to and select the
image you want to add.
12. Select Add Image to add the image to the Image List box.
13. Select the image that you want from the Image List box.
14. In the Image Alignment box, select where you want the
image to appear at the top of the page: left, center, or right.
15. When the template is finished, select Save.
AD Summation Discovery Cracker User Guide Administrative Tasks
56
Endorsement Template When you select Endorsement Template, perform the follow-
ing steps:
1. In the Template Name box, type a name.
2. In the Template Description box, type a description.
3. Select the Header Fields tab to set up information to dis-
play at the top of the endorsed page.
4. Select Select Fields and Categories to display the Field
Selector dialog box.
5. In the Available Fields list, select one or more metadata
fields that contain the information you want to appear on
the page, and move them to the box on the right (select the
arrow pointing right or double-click the field).
Select USER CUSTOM TEXT to endorse with custom
wording. All rendered TIFF images and PDF files in the
volume for which this template is used will be endorsed
with this text.
6. In the Available Categories list, select one or more category
names that represent the endorsement text and move them
to the box on the right (select the arrow pointing right or
double-click the field).
The only rendered documents that will be endorsed with
the selected text are those to which categories were assigned.
The categories will be ignored when endorsing rendered
documents that don’t have the category assignment. See
“Assign Endorsement Categories to Documents” on
page 195.
NOTE: If you use the template for paper printing, the cate-
gory selection does not apply.
7. In the Display Name column:
• If you selected a metadata field, you can enter the display
name. The display name provides an identifying label
for the metadata that will be endorsed on the page.
• If you selected USER CUSTOM TEXT, type the text
that you want endorsed on the rendered TIFF images
and PDF files.
• If you selected a category, you cannot edit the display
name.
8. In the Align column, select Left, Center, or Right.
AD Summation Discovery Cracker User Guide Administrative Tasks
57
9. In the Date Format column, choose a date format if appli-
cable.
10. In the Font column, make selections in the Font dialog
box.
• Select only Microsoft Windows-based fonts. If you select
an unsupported font, the Microsoft Sans Serif font will
be used.
• If you select a color for the font and endorse black-and-
white rendered TIFF images or PDF files, the color of
the endorsement is lost. The endorsed text will be
shades of black and white.
NOTE: If you use the template for paper printing, the font
selection does not apply.
11. Select Save to save your work and return to the Add a Ref-
erence File dialog box.
12. If you want to change the order of the fields in the list,
select the field, then select either the up arrow or the down
arrow.
13. Select the Footer Fields tab to set up information to display
at the bottom of the endorsed page.
14. Repeat steps 4 through 12.
15. When the template is finished, select Save.
AD Summation Discovery Cracker User Guide Administrative Tasks
58
Metadata Template When you select Metadata Template, perform the following
steps:
1. In the Template Name box, type a name.
2. In the Template Description box, type a description.
3. On the Fields tab, select Select Fields to display the Field
Selector dialog box.
4. In the Available Fields list, select one or more metadata
fields that contain the information you want to appear on
the template, and move them to the box on the right (select
the arrow pointing right or double-click the field).
5. The text in the Display Name column appears on the page
to identify the metadata. By default, the text is the system
field name. You can modify the text or delete it. If you
delete it, the metadata is displayed without an identifying
label.
6. In the Date Format column, choose a date format if appli-
cable.
7. Select Save to save your work and return to the Add a Ref-
erence File dialog box.
8. If you want to change the order of the metadata fields in the
list, select the field, then select either the up arrow or the
down arrow.
9. Select the Image tab to add an image, such as a company
logo, to the template.
10. In the Select a new image box, browse to and select the
image you want to add.
11. Select Add Image to add the image to the Image List box.
12. Select the image that you want from the Image List box.
13. In the Image Alignment box, select where you want the
image to appear at the top of the page: left, center, or right.
14. If you want to preview what the template looks like, select
Preview.
15. When the template is finished, select Save.

AD Summation Discovery Cracker User Guide Administrative Tasks
59
Managing Your Discovery Cracker
License
To use the Discovery Cracker program, you must have a USB
dongle. (A dongle is a security device that enables the use of
software. The Discovery Cracker program does not support par-
allel port dongles.) Information in the dongle represents your
license agreement. You install the dongle on the computer that
runs the Workflow Manager component.
The following topics explain:
• License Information
• Renewing Your Discovery Cracker License
• Replacing Your USB Dongle
License Information The Discovery Cracker Console displays the current status of
your license in the License Information area. The information
that is displayed depends on the type of license you have.
If you have an enterprise license, you see only License Type and
Expiration Date.
If you have a limited DC Engine license (shown onscreen as a
click license), you see:
• License Type
• Expiration Date
• Processing PCs (indicates the maximum number of com-
puters that can run the DC Engine component simultane-
ously)
• Documents Remaining
• Pages Remaining
When you approach a license limit, the data changes color to
indicate how much time remains on your license. Table 4.3,
“License Status Colors,” describes the meaning of the colors.
Table 4.3: License Status Colors
For If the color
is
Your license has the
following status
Expiration
Date
Green More than 90 days
remaining
Orange 31 to 90 days remaining
Red 30 or fewer days remain-
ing

AD Summation Discovery Cracker User Guide Administrative Tasks
60
Renewing Your Discovery Cracker License To prevent interruption in your processing workflow, you need
to renew your Discovery Cracker license before it expires.
To renew your Discovery Cracker license:
1. Contact your Discovery Cracker sales manager to discuss
renewal options and payment methods.
2. Provide payment information.
After payment information is received, you will receive a
text file from dckeys@discoverycracker.com with the new
license code.
3. Save the license file in a location on your network which is
accessible by the Discovery Cracker Console computer you
are working on.
4. Import the license file by doing the following:
a. In the Discovery Cracker Console, from the Admin
menu, select Manage License.
The Manage License dialog box is displayed.
b. In the Select License Import File box, browse to and
select the license file.
c. Select Import.
Your Discovery Cracker license is updated for the
extended time that you purchased.
Replacing Your USB Dongle If you lose your USB dongle or if your USB dongle is damaged
or nonfunctional, contact dckeys@discoverycracker.com.

AD Summation Discovery Cracker User Guide Processing Setup
61
5. Processing Setup
Discovery Cracker processing setup includes the following
activities:
• Setting Task Settings
• Creating Folders
• Creating Projects
• Creating Groups
• Creating Views
Detailed instructions for each of these activities are provided in
the sections that follow.
Once you have created projects and groups or views, you create
jobs to tell Discovery Cracker how to process your documents
(which actions to perform). Creating jobs is described in Chap-
ter 6, “Processing,” on page 81.
Setting Task Settings When Discovery Cracker processes your files, it needs to know
what settings to use for the various tasks involved. Discovery
Cracker includes default task settings that apply on a system
level (at the manager database level). These pre-established set-
tings allow you to process files right “out-of-the-box” since they
work well with the pre-established document type groups.
However, you may find it necessary to customize the settings to
fit your particular business needs.
You can adjust the settings on a system level, a folder level, a
project level, a group level, a view level, or a job level. Each sub-
level inherits the settings from the previous level and can be fur-
ther customized.
You adjust the settings in the [Level] Settings dialog box. The
name of the dialog box changes depending on the level you are
displaying: System Settings, Folder Settings, Project Settings,
Group Settings, View Settings or Job Settings.
To set task settings from the [System, Folder, Project, Group, or
View] Settings dialog box:
1. From the navigation pane in the Discovery Cracker Con-
sole, select the specific item you want (the manager data-
AD Summation Discovery Cracker User Guide Processing Setup
62
base for system settings or the specific folder, project,
group, or view), then right-click.
A submenu is displayed.
2. Select Open [System, Folder, Project, Group, or View] Set-
tings.
The [System, Folder, Project, Group, or View] Settings
dialog box is displayed. You see three panes: Actions, Doc-
Type Gro up s, and Tasks. For a description of the panes, see
“The [Level] Settings Dialog Box” on page 63.
3. Select an action.
4. Select a document type group (applicable only for the File
Spin Through, Extract Metadata, and Render actions).
5. In the Tas ks pane, select a tab and adjust the settings as
needed.
For instructions, refer to the locations listed in Table 5.2,
“Task Settings Instructions,” on page 66.
6. If you want to apply the settings of the tab you are currently
on to additional document type groups, do the following:
a. Select Select Additional Document Type Groups while
you are still on the tab.
NOTE:
• This button is available only when you change one
or more settings on the tab.
• This button is displayed only on the tabs for which
you can select additional document type groups.
• Be sure the settings on the current tab are appropri-
ate for the additional document type groups you
select.
The Select Additional Document Type Groups dialog
box is displayed with a list of all the document type
groups. The document type group you are currently
working in is selected, and you cannot change that
selection.
b. Select the document type groups for which you want to
apply the settings of the current tab, or select Select All.
c. Select OK.
The Apply Selection dialog box is displayed with the
message, “Depending on the number of document type
AD Summation Discovery Cracker User Guide Processing Setup
63
groups you selected, this could take a few seconds. Do
you want to proceed?”
d. Select Yes to proceed, or select No to return to the
Select Additional Document Type Groups dialog box
and change your selection.
Once you select Yes, Discovery Cracker records the
selected document type groups, then returns you to the
task tab.
7. Repeat steps 3 through 6 as needed.
8. When you have finished making all your settings, select
Save and Close.
To set task settings from the Job Settings dialog box, see “Creat-
ing a Job” on page 81.
The [Level] Settings Dialog Box In the [System, Folder, Project, Group, View, or Job] Settings
dialog box, you see three panes: Actions, DocType Groups, and
Tas ks . The panes are described below.
• The Actions Pane
The actions displayed on the Actions pane depend on
which level you are in.
The System Settings and the Folder Settings dialog boxes
display the following actions:
• File Spin Through
• Extract Metadata
• Render
The Project Settings, Group Settings, View Settings, and
Job Settings dialog boxes display the actions in the follow-
ing list, except that in Job Settings you see only the actions
you select for the job:
• File Spin Through
• Extract Metadata
• Render
• Postprocessing
• Data Delimited Text File Export
• Concordance Viewer Export
• IPRO Export
• Ringtail Export
• AD Summation DII Export
• Import Data
AD Summation Discovery Cracker User Guide Processing Setup
64
• DocuLex 5 Export
• EDRM XML Export
• The Document Type Groups Pane
For the File Spin Through, Extract Metadata, and Render
actions, the Document Type Groups pane displays the list
of document type groups.
The default document type groups are the following:
• ACCESS
• ACROBAT
• DATABASE FORMATS
• EMAIL FORMATS
• EXCEL
• GENERIC TEXT
• GRAPHIC FORMATS
• HTML
• LOTUSDOCUMENT
• LOTUSSTORE
• MEDIA
• OUTLOOKDOCUMENT
• OUTLOOKSTORE
• POWERPOINT
• PRESENTATION FORMATS
• SPREADSHEET FORMATS
• UNASSIGNED
• VISIO
• WINPROJ
• WINWORD
• WORD PROCESSING
• ZIP
You can customize the list of document type groups and the
document types that are assigned to each group. See “Man-
aging Document Type Groups” on page 44.
• The Tasks Pane
The Tasks pane of the [System, Folder, Project, Group,
View, or Job] Settings dialog box displays the tasks that are
associated with the action selected. Each task is displayed
on its own tab in the Tasks pane. The settings for the task
are displayed on the tab. The particular settings that you see
depend on the document type group you select and the
options you select on the task tab.

AD Summation Discovery Cracker User Guide Processing Setup
65
Table 5.1, “Action - Document Type Groups - Tasks,” pres-
ents a list of the task tabs that you see depending on the
action and document type group that you select.
Table 5.1: Action - Document Type Groups - Tasks
Action Document Type Groups Task Tabs
File Spin Through All document type groups listed
individually
• OLE Spin Through
• Archive Application
LOTUSDOCUMENT • Spin Through Lotus Notes Documents*
LOTUSSTORE • Spin Through Lotus Notes Files*
OUTLOOKDOCUMENT • Spin Through Outlook PST Items*
OUTLOOKSTORE • Spin Through Outlook PST Files*
Extract Metadata All document type groups listed
individually
• User-Selected Application
• OCR Options
• Missing Metadata Check
• Identify Scripts
• Get Body Comments
• Get Body Text
Render All document type groups listed
individually.
• Document Rendering
• User-Selected Application
• Blank Pages (this tab is not displayed when the None
render output file type is selected)
• OCR Options (this tab is not displayed when the
None or PDF render output file types are selected)
Postprocessing All document type groups. No
selection list.
• Numbering and Packaging
• Populate All Text
Data Delimited Text
File Export
All document type groups. No
selection list.
• Data Delimited Text File Export
Concordance Viewer
Export
All document type groups. No
selection list.
• Concordance Viewer Export
IPRO Export All document type groups. No
selection list.
• IPRO Export
Ringtail Export All document type groups. No
selection list.
• Ringtail Export
AD Summation DII
Export
All document type groups. No
selection list.
• AD Summation DII Export

AD Summation Discovery Cracker User Guide Processing Setup
66
Table 5.2, “Task Settings Instructions,” presents a list of the
actions you can select and where you can find instructions for
adjusting the task settings.
Import Data All document type groups. No
selection list.
• Import Data
DocuLex 5 Export All document type groups. No
selection list.
• DocuLex 5 Export
EDRM XML Export All document type groups. No
selection list.
• EDRM XML Export
*These tasks are document-type dependent. For an explanation, see the note on page 45 in the section “Managing Doc-
ument Type Groups.”
Table 5.1: Action - Document Type Groups - Tasks (Continued)
Action Document Type Groups Task Tabs
Table 5.2: Task Settings Instructions
For tasks associated with this action Look here for instructions
File Spin Through Appendix A, page 234
Extract Metadata • “Performing Optical Character Recognition,” page 174
• “Working With Languages,” page 212
• Appendix A, page 237
Render • “Performing Optical Character Recognition,” page 176
• “Working With Languages,” page 215
• Appendix A, page 240
Postprocessing “Postprocessing,” page 127
Data Delimited Text File Export • “Previewing Documents,” page 96, for exporting before postprocessing
• “Exporting,” page 153, for exporting after postprocessing
Concordance Viewer Export “Exporting,” page 153
IPRO Export “Exporting,” page 154
Ringtail Export “Exporting,” page 155
AD Summation DII Export “Exporting,” page 160
Import Data “Previewing Documents,” page 98
DocuLex 5 Export “Exporting,” page 167
EDRM XML Export “Exporting,” page 167
AD Summation Discovery Cracker User Guide Processing Setup
67
Creating Folders You can create folders to organize your projects for viewing pur-
poses in the navigation pane. For example, you can organize
projects by client, case, and custodian. This level is optional.
You can create folders before or after you create projects. Once
folders and projects are created, you can reorganize them by
using a drag-and-drop operation.
To create a folder:
1. In the navigation pane, select the manager database or
another folder and right-click.
2. Select Create Folder.
3. Type a folder name.
Creating Projects When you create a project, Discovery Cracker creates a project
database to keep track of all project data and it creates the fold-
ers that receive the output files after processing.
Project databases can reside on different instances of SQL Serv-
ers. During project creation, you can select the SQL Server
instance for the project database. You also select project-level
settings, such as a path different from the default directory for
project output files, the time zone, timeout settings, whether to
use full-text search, deduplication settings, and filtering criteria.
To cr eat e a pro ject:
1. In the navigation pane, select the manager database or a
folder and right-click.
2. Select Create Project.
The Project Information tab is displayed in the right pane
of the Discovery Cracker Console main window. You see a
Create Project panel with an Information area, a Project
Preferences tab, a Database Preferences tab, a Deduplica-
tion tab, and a Filtering tab.
3. In the Information area:
• Type a project name.
NOTE: Discovery Cracker does not allow you to use any
Windows illegal characters in the project name; how-
AD Summation Discovery Cracker User Guide Processing Setup
68
ever, it does not restrict you from using other characters
such as the ampersand (&). We recommend that you
do not use these types of characters as that will cause
problems with the export files and third-party software
such as Concordance or Summation. In addition, you
will experience problems with DC Detective connect-
ing to the project database.
• Accept or change the default project path.
• Accept or change the time zone.
• Type a project description (optional).
4. On the Project Preferences tab:
a. In the Project Timeout Settings area, accept or change
the processing timeout value, the rendering timeout
value, or the OCR timeout value. (For an explanation
of timeout settings, see “System Timeout Settings” on
page 35.)
b. In the Advanced Paths area, accept or change the paths
for project items, project images, project export files,
and project volumes.
• The Items folder will contain detached copies of
attachments and embedded files.
• The Images folder will contain the rendered output
(TIFF and/or PDF and, optionally, text files).
• The Export folder will contain export files, such as
data delimited text files and Concordance export
files.
• The Vol umes folder will contain the files for you to
deliver to your client. Such files can include some
or all of the following: document numbered ren-
dered output (TIFF and/or PDF and, optionally,
text files), TIFF images generated from rendered
PDF files, native files, and attachments.
5. On the Database Preferences tab:
In the Database Full-Text Search Settings area, you see one
of the following:
• The statement Full-text search functionality is not sup-
ported for the installed SQL Server version.
You see this statement if you use SQL Server 2005
Express Edition (without Advanced Services).
• Allow full-text indexing of the project database check
box
AD Summation Discovery Cracker User Guide Processing Setup
69
Full-text search capability is available if you use SQL
Server 2005 Express Edition with Advanced Services,
Standard Edition, or Enterprise Edition.
a. If you want to use full-text search, select the Allow full-
text indexing of the project database check box.
Full-text search gives you the advantage of making
advanced SQL queries, such as proximity searches and
generation searches, when you create a view (see “Cre-
ating Views” on page 75).
Discovery Cracker creates a full-text index when it
cracks documents. Be aware that the additional activity
of creating a full-text index increases processing time.
NOTE: This selection is a one-time option. If you do not
select it when you create the project, you cannot go
back and change it later.
b. If you select the Allow full-text indexing of the project
database check box, in the Full-text language box,
select the language to use for full-text indexing and
searching.
NOTE: With SQL Server 2005, you can index and
search based on only one language. If a document con-
tains different languages, the search based on the full-
text index may yield inaccurate results.
You can select only one full-text language per project.
You cannot change the language to be used for a full-
text index after a project is created. To specify a differ-
ent language, you would need to create a new project.
SQL Server 2005 stores some high-end Asian charac-
ters as two Unicode characters. Searching and filtering
based on these characters may yield inaccurate results.
The Project Database area displays the name of the local
computer and the name of the SQL Server instance that
was selected during installation (where the manager data-
base resides).
c. If you want the project database to reside on a different
SQL Server instance, do the following:
• In the Server Name box, select or type the name of
the SQL Server on which you want the project
database to reside.
• In the Login box, type the SQL Server login name.
AD Summation Discovery Cracker User Guide Processing Setup
70
• In the Password box, type the SQL Server password.
• Select Connect.
If the login and password are correct, the label
Connection Valid is displayed.
If the login and password are not correct, the label
Connection Invalid is displayed.
You must have a valid server connection to create a
project.
6. On the Deduplication tab:
a. Select the Enable Deduplication check box to enable
deduplication.
b. If you select the check box, select other settings to fit
your business needs. Use the following guidelines:
• Deactivate items identified as duplicates check box. You
can see deactivated documents in a QC Session and
you can export deactivated documents.
• Email Fields to Check area. These settings apply to Out-
look and Lotus Notes e-mail messages.
• Attachments are deduplicated using the following
default settings. You cannot change the settings.
Use MD5 Hash for attachments
Use file display name for attachments
• Examples of some of the fields you might choose are:
Author Email
BCC
Body
CC
Sent On
Subject
• E-files area. These settings apply to all other electronic
files.
• Use MD5 Hash for E-files. You cannot change this
default setting.
• Use file display name for e-files. Select this check
box if you want Discovery Cracker to check the file
display name in addition to the MD5 Hash value
of documents.
7. On the Filtering tab:

AD Summation Discovery Cracker User Guide Processing Setup
71
a. Select the Enable Filtering check box to enable filter-
ing.
This is an “excludes” filter. Documents that meet the
criteria are deactivated.
b. Select Create Expression to display the Filter Expres-
sion Builder dialog box and create a filter expression.
In the Filter Expression Builder dialog box:
• Create a working statement by doing the following
as many times as needed:
1. Select a field from the Select a Field to Search
list.
2. Select an operator from the Select an Operator
list.
The operators displayed in the list depend on
the type of field you select in the Select a Field
to Search list.
3. Enter the data you want to search for in the
Add a Text Value box.
The name of the box and the type of data you
can enter depends on the operator you select in
the Select an Operator list.
Some operators allow you to enter multiple
values so that you can search the same field for
multiple expressions.
4. Select Add to Working Statement.
• When the working statement is like you want it, add
it to the Final Statement.
• Select Save Final Statement to return to the Filter-
ing tab.
The filter expression is displayed in the Filter
Expression box.
NOTE:
• If you need help building a filter expression, see the
following resource:
For basic query creation—http://msdn.micro-
soft.com/en-us/library/bb264565.aspx
• The rules about filter creation do not apply to fold-
ers, PST files, or NSF files. They are not docu-
ments; they are container items (see “Document
AD Summation Discovery Cracker User Guide Processing Setup
72
Relationships” on page 21). These items will not
appear in a view regardless of the filter expression
you create.
• To create a project filter based on languages, see
“Creating Project Filters and Views” on page 218.
• To create a complex filter expression, you need to use
the Working Statement and the Final Statement
areas to switch between the AND and the OR join-
ing conditions in the query.
Each addition to the same working statement
needs to consist of the same joining condition
(AND or OR). To create complex statements such
as ((A=1 AND B=2) OR C=3), you would first cre-
ate the A, B working statement with AND, add the
statement to the final statement, create the C
working statement, and then add it to the final
statement using OR.
What you create in the working statement and
then add to the final statement controls the paren-
thesis groupings. You can create ((A=1 AND B=2)
OR C=3) or (A=1 AND (B=2 OR C=3)). Think of
the working statement as a place to create a sub-
statement that will be added to the final statement
as a parenthesis addition.
• When creating a project, the Does Not Contain and
the Is Not Like operators apply only to individual
documents or families of documents where all doc-
uments within the family meet the criteria.
For example, you create a project filter selecting the
option Consider family relationships. Examine all
documents and apply the Does not contain opera-
tor with the keyword “giraffe” and the field Body.
The desired result is to include documents in the
project that contain the word “giraffe” in the Body
field. There are three e-mail messages with attach-
ments. E-mail #1 does not contain the word
“giraffe” in the body, but the attachment to this e-
mail message does. E-mail #2 contains the word
“giraffe” in the body and so does its attachment. E-
mail #3 does not contain the word “giraffe” in
either the e-mail message or the attachment. The
AD Summation Discovery Cracker User Guide Processing Setup
73
end result is that E-mail #1 and E-mail #2 would
be included in the project.
• When you select an operator such as Contains, Does
Not Contain, Is In, or Is Not In, you can add mul-
tiple values for which to search in one field. In the
area where you add a value, you can manually cre-
ate an Expression List or you can import a list of
keywords. To use the Import List feature, you
must first create a .txt file containing a single list of
values, with each value on a separate line.
• When you add a date to the working statement, the
date format is converted to the international for-
mat (yyyy-MM-dd hh:mm:ss) for processing pur-
poses. The metadata remains unchanged.
c. In the Filter Instructions area, select an option.
When selecting an option, you choose how to apply the
filter: (1) Whether to disregard or consider family rela-
tionships. (2) Whether to examine all documents or
only main items. A main item is the child of a folder, a
PST file, or an NSF file. (For additional information,
see “Document Relationships” on page 21.)
Your options are:
• Disregard family relationships. Examine all docu-
ments.
Deactivate individual documents that match the
filter.
• Consider family relationships. Examine only docu-
ments that are main items.
If a main item matches the filter, deactivate the
main item and all of its children.
• Consider family relationships. Examine all docu-
ments.
If a document matches the filter, deactivate the
main item of the document and all of the main
item’s children.
NOTE: The results of the second and third option are
the same. The difference is what is being examined.
8. Select Create.
AD Summation Discovery Cracker User Guide Processing Setup
74
The right pane of the Discovery Cracker Console displays
the Project Information tab, the Jobs tab, and the Status
Counts tab.
You can add a view to the project, add a group to the proj-
ect, deactivate the project, edit the project, and view the
project settings.
Editing an Active Project To edit an active project:
1. Select an active project in the navigation pane.
2. On the Project Information tab, select Edit.
3. You can edit the following fields:
• In the Information area: Project Name and Description
• On the Project Preferences tab: Project Timeout Set-
tings
4. Select Save.
Opening Project Settings To access the settings for a project:
1. Select the project in the navigation pane and right-click.
2. Select Open Project Settings.
The Project Settings dialog box is displayed.
Creating Groups You create a group to select the folders that contain the files you
want to process.
To cr eat e a gro u p:
1. Select a project in the navigation pane and right-click.
2. Select Create Group.
The Group Information tab is displayed in the right pane
of the Discovery Cracker window. You see the Create
Group panel with an Information area, a Selected Folders
tab, and a Group Preferences tab.
3. In the Group area of the Information area, type a group
name and, optionally, a description.
4. On the Selected Folder tab, select the folders that contain
the files you want to process.
5. On the Group Preferences tab in the Group Timeout Set-
tings area, accept or change the processing timeout value,
the rendering timeout value, or the OCR timeout value.
AD Summation Discovery Cracker User Guide Processing Setup
75
(For an explanation of timeout settings, see “System Time-
out Settings” on page 35.)
6. Select Create.
The right pane of the Discovery Cracker Console displays
the Group Information tab, the Jobs tab, and Status
Counts tab.
You can add a job to the group, delete the group, edit the
group, and view the group settings.
Editing a Group To ed i t a gr oup:
1. Select a group in the navigation pane.
2. On the Group Information tab, select Edit.
3. You can edit the following fields:
• In the Information area: Name and Description
• On the Group Preferences tab: Group Timeout Settings
4. Select Save.
Opening Group Settings To access the settings for a group:
1. Select the group in the navigation pane and right-click.
2. Select Open Group Settings.
The Group Settings dialog box is displayed.
Creating Views Your project may include hundreds or thousands of documents.
You may want to find and process only documents that meet
specific search criteria. You can do that by creating views. You
create a view by creating a SQL query, or filter expression, that
searches the entire project data source (the documents from all
the groups in the project). The search creates a subset of data
that you can then process according to specified settings.
To cr eat e a view :
1. Select a project in the navigation pane and right-click.
2. Select Create View.
The View Information tab is displayed in the right pane of
the Discovery Cracker Console main window. You see the
Create View panel with an Information area, a View Con-
figuration tab, and a View Preferences tab.
3. In the View area of the Information area, type a view name
and, optionally, a description.
AD Summation Discovery Cracker User Guide Processing Setup
76
4. On the View Configuration tab:
a. In the View Type box, do one of the following:
• Select Static to search only documents that currently
exist in the project.
• Select Dynamic to search all documents that cur-
rently exist in the project and those that will be
added in the future.
NOTE: If you want to create views, especially dynamic
views, that are based on OCR text, see “Creating Views
Using OCR Text” on page 179 for an explanation of
when OCR text is available to be searched. Also, do not
attempt to create a dynamic view while processing as
this will cause errors.
b. In the Filter Instructions area, select an option.
When selecting an option, you choose how to apply the
filter: (1) Whether to disregard or consider family rela-
tionships. (2) Whether to examine all documents or
only main items. A main item is the child of a folder, a
PST file, or an NSF file. (For additional information,
see “Document Relationships” on page 21.)
Your options are:
• Disregard family relationships. Examine all docu-
ments.
Deactivate individual documents that match the
filter.
• Consider family relationships. Examine only docu-
ments that are main items.
If a main item matches the filter, deactivate the
main item and all of its children.
• Consider family relationships. Examine all docu-
ments.
If a document matches the filter, deactivate the
main item of the document and all of the main
item’s children.
NOTE: The results of the second and third option are
the same. The difference is what is being examined.
c. Select All Items if you want the view to contain all
items in the project.
Use this option to process jobs at a project level, such as
exporting metadata and postprocessing. When you

AD Summation Discovery Cracker User Guide Processing Setup
77
select the option, it is most useful if you also select
Dynamic in the View Type box.
When you select the All Items option, you don’t have
access to Filter Instructions.
d. Select New Filter to display the Filter Expression
Builder dialog box and create a filter expression. When
you create a filter expression, Discovery Cracker
searches for the documents that match the expression
and includes them in the view.
In the Filter Expression Builder dialog box:
• Create a working statement by doing the following
as many times as needed:
1. Select a field from the Select a Field to Search
list.
2. Select an operator from the Select an Operator
list.
The operators displayed in the list depend on
the type of field you select in the Select a Field
to Search list.
3. Enter the data you want to search for in the
Add a Text Value box.
The name of the box and the type of data you
can enter depends on the operator you select in
the Select an Operator list.
Some operators allow you to enter multiple
values so that you can search the same field for
multiple expressions.
4. Select Add to Working Statement.
• When the working statement is like you want it, add
it to the Final Statement.
• Select Save Final Statement to return to the View
Configuration tab.
The filter expression is displayed in the View Filter
Expression box.
NOTE:
• If you need help building a filter expression, see the
following resources:
For basic query creation—http://msdn.micro-
soft.com/en-us/library/bb264565.aspx

AD Summation Discovery Cracker User Guide Processing Setup
78
For advanced SQL queries using FreeText—http://
msdn.microsoft.com/en-us/library/
ms187787(SQL.90).aspx
For advanced SQL queries that can be written
against Full-Text indexes—http://msdn.micro-
soft.com/en-us/library/ms142559(SQL.90).aspx
• The rules about filter creation do not apply to fold-
ers, PST files, or NSF files. They are not docu-
ments; they are container items (see “Document
Relationships” on page 21). These items will not
appear in a view regardless of the filter expression
you create.
• To create a view based on groups, in the Filter
Expression Builder dialog box, select Group ID in
the Select a Field to Search list, and then select the
appropriate operator and enter the appropriate
group ID number.
• To create a view based on OCR text, see “Creating
Views Using OCR Text” on page 179.
• To create a view based on endorsement categories,
see “Create Views Based on Endorsement Category
Assignments” on page 197.
• To create a view based on languages, see “Creating
Project Filters and Views” on page 218.
• To create a complex filter expression, you need to use
the Working Statement and the Final Statement
areas to switch between the AND and the OR join-
ing conditions in the query.
Each addition to the same working statement
needs to consist of the same joining condition
(AND or OR). To create complex statements such
as ((A=1 AND B=2) OR C=3), you would first cre-
ate the A, B working statement with AND, add the
statement to the final statement, create the C
working statement, and then add it to the final
statement using OR.
What you create in the working statement and
then add to the final statement controls the paren-
thesis groupings. You can create ((A=1 AND B=2)
OR C=3) or (A=1 AND (B=2 OR C=3)). Think of
the working statement as a place to create a sub-
AD Summation Discovery Cracker User Guide Processing Setup
79
statement that will be added to the final statement
as a parenthesis addition.
• When creating a view, the Does Not Contain and
the Is Not Like operators apply only to individual
documents or families of documents where all doc-
uments within the family meet the criteria.
For example you create a view selecting the option
Consider family relationships. Examine all docu-
ments and apply the Does not contain operator
with the keyword “giraffe” and the field Body. The
desired result is to exclude documents with the
word “giraffe” in the Body field. There are three e-
mail messages with attachments. E-mail #1 does
not contain the word “giraffe” in the body, but the
attachment to this e-mail message does. E-mail #2
contains the word “giraffe” in the body and so does
its attachment. E-mail #3 does not contain the
word “giraffe” in either the e-mail message or the
attachment. The end result is that E-mail #1 and
E-mail #3 would be included in the view.
• When you select an operator such as Contains, Does
Not Contain, Is In, or Is Not In, you can add mul-
tiple values for which to search in one field. In the
area where you add a value, you can manually cre-
ate an Expression List or you can import a list of
keywords. To use the Import List feature, you
must first create a .txt file containing a single list of
values, with each value on a separate line.
• When you add a date to the working statement, the
date format is converted to the international for-
mat (yyyy-MM-dd hh:mm:ss) for processing pur-
poses. The metadata remains unchanged.
e. Select Manual Entry to enter your own SQL search
query instead of using the Filter Expression Builder
dialog box. You may type directly into the Manual
Entry box or use a copy-and-paste operation to enter
the search query. You must use a valid SQL WHERE
clause using valid SQL syntax. Because the metadata
you may be trying to query is stored in multiple tables,
you need to reference the table name as well as the field
you are looking in. For assistance in creating the
WHERE clause, please contact Discovery Cracker

AD Summation Discovery Cracker User Guide Processing Setup
80
Product Support. Call 1- 866-833-5377, or send an e-
mail message to dc.support@accessdata.com
5. On the View Preferences tab, accept or change the process-
ing timeout value, the rendering timeout value, or the OCR
timeout value. (For an explanation of timeout settings, see
“System Timeout Settings” on page 35.)
6. Select Create.
The right pane of the Discovery Cracker Console displays
the View Information tab, the Jobs tab, and the Status
Counts tab.
You can add a job to the view, delete the view, edit the view,
and view the settings for the view.
Editing a View To e dit a view:
1. Select a view in the navigation pane.
2. On the View Information tab, select Edit.
3. You can edit the following fields:
• In the Information area: Name and Description
• On the View Preferences tab: View Timeout Settings
4. Select Save.
Opening View Settings To access the settings for a view:
1. Select the view in the navigation pane and right-click.
2. Select Open View Settings.
The View Settings dialog box is displayed.

AD Summation Discovery Cracker User Guide Processing
81
6. Processing
Once you have created a group or a view, you must create a job
to process the documents. In this context, the term “process”
means that the Discovery Cracker program performs one or
more actions on the documents in a group or view. For a list of
actions, see Table 6.2, “Action Selection,” on page 87.
This chapter includes the following topics:
• Creating a Job
• Selecting Actions
• Editing a Job
• Job Status
• Jobs Tab
Creating a Job You create jobs from groups and from views.
NOTE: Before you run a job, make sure to start your DC
Engines. (Double-click the DC Engine icon on the desktop of
each DC Engine computer.)
To cr eat e a job:
1. In the navigation pane, select a group or a view and right-
click.
2. Select Create Job.
The General Job Information tab is displayed, with two
main areas: Information and Details.
3. In the Information area, under Job, in the Description box,
type a description of the job.
Discovery Cracker automatically assigns a job ID number
to every job. The description acts as the job name, helping
you identify what the job is when you view it on the Jobs
tab. (See “Jobs Tab” on page 90.)
In the Details area, do the following:
4. Select the DC Engine selection mode:
• Automatic: Discovery Cracker selects the DC Engines to
assign to a job.
• Manual: You select one or more DC Engines to assign to
a job.
AD Summation Discovery Cracker User Guide Processing
82
If you select Manual, select Select DC Engines to open
the DC Engine Selection dialog box and assign DC
Engines to the job. For complete instructions, see
Chapter 16, “DC Engine Selection,” on page 225.
5. Select When to run.
You can leave the setting as Immediately, select Scheduled
and enter a different date and time, or select Follow Job and
select a job from the list.
NOTE:
• If you create a job to run following the completion of
another job within the same project and group, but the
second job depends on the first job for count of items,
the second job may not perform the requested action
on all items.
For example, if you create a group to process data in a
folder and then create a job to perform the first three
actions (Initial Spin Through, File Spin Through, and
Extract Metadata) on that group, and immediately cre-
ate a job to perform the Render action and have the
second job follow the first, the job for Render will run
after the first job as requested, but because there were
no items for it to perform the action on at the time it
was created, no documents are rendered.
• After a job is created, you can change when it runs. See
“Pausing a Job” on page 88.
6. Select Job priority.
You can leave the job priority set to Normal, or you can
select High, Above Normal, Below Normal, or Low.
This setting controls the amount of system resources
assigned to a job. A job with a priority of High gets more
system resources. A job with a priority of Low gets fewer
system resources. Discovery Cracker considers job priority
only when multiple jobs are running at one time. The jobs
can be within one project or across multiple projects.
NOTE: After a job is created, you can change its priority. See
“Editing a Job” on page 88.
7. Select Job timeout settings.
Accept or adjust the Processing timeout, the Rendering
timeout, and the OCR timeout settings. For an explana-

AD Summation Discovery Cracker User Guide Processing
83
tion of timeout settings, see “System Timeout Settings” on
page 35.
8. Select Actions to be performed.
You must select at least one action. Refer to “Selecting
Actions” on page 85 to determine which actions to select.
NOTE: The first time you create a job for a particular selec-
tion of documents, you must select the Initial Spin
Through action.
9. You have the following options:
• Proceed to step 16.
• Select Import Settings to import the settings from a pre-
vious job. Then proceed to step 16.
• Select Edit Settings to display the Job Settings tab and
edit the task settings. Then proceed with step 10.
10. On the Job Settings tab, in the Actions pane, select an
action (only the actions that you selected are listed).
11. Select a document type group (applicable only for the File
Spin Through, Extract Metadata, and Render actions).
12. In the Task s pane, select a tab and adjust the settings as
needed.
For instructions, refer to the locations listed in Table 6.1, “Task
Settings Instructions.”
Table 6.1: Task Settings Instructions
For tasks associated with this action Look here for instructions
File Spin Through Appendix A, page 234
Extract Metadata • “Performing Optical Character Recognition,” page 174
• “Working With Languages,” page 212
• Appendix A, page 237
Render • “Performing Optical Character Recognition,” page 176
• “Working With Languages,” page 215
• Appendix A, page 240
Postprocessing “Postprocessing,” page 127
Data Delimited Text File Export • “Previewing Documents,” page 96, for exporting before postprocessing
• “Exporting,” page 153, for exporting after postprocessing
Concordance Viewer Export “Exporting,” page 153

AD Summation Discovery Cracker User Guide Processing
84
13. If you want to apply the settings of the tab you are currently
on to additional document type groups, do the following:
a. Select Select Additional Document Type Groups while
you are still on the tab.
NOTE:
• This button is available only when you change one
or more settings on the tab.
• This button is displayed only on the tabs for which
you can select additional document type groups.
• Be sure the settings on the current tab are appropri-
ate for the additional document type groups you
select.
The Select Additional Document Type Groups dialog
box is displayed with a list of all the document type
groups. The document type group you are currently
working in is selected, and you cannot change that
selection.
b. Select the document type groups for which you want to
apply the settings of the current tab, or select Select All.
c. Select OK.
The Apply Selection dialog box is displayed with the
message, “Depending on the number of document type
groups you selected, this could take a few seconds. Do
you want to proceed?”
d. Select Yes to proceed, or select No to return to the
Select Additional Document Type Groups dialog box
and change your selection.
IPRO Export “Exporting,” page 154
Ringtail Export “Exporting,” page 155
AD Summation DII Export “Exporting,” page 160
Import Data “Previewing Documents,” page 98
DocuLex 5 Export “Exporting,” page 167
EDRM XML Export “Exporting,” page 167
Table 6.1: Task Settings Instructions (Continued)
For tasks associated with this action Look here for instructions
AD Summation Discovery Cracker User Guide Processing
85
Once you select Yes, Discovery Cracker records the
selected document type groups, then returns you to the
task tab.
14. Repeat steps 10 through 13 as needed.
15. When you have finished making all your settings, select
Back To Job Creation.
16. On the General Job Information tab, select Create.
The Confirm dialog box is displayed with the question,
“Are you sure?”
17. Select Yes to create the job.
On the General Job Information tab, the Import Settings
button changes to Export Settings. You can export the set-
tings from this job so that you can import them into a job
you create in the future.
The job runs according to the settings you made.
Selecting Actions Discovery Cracker gives you great flexibility in processing your
documents.
You may only want a count of how much data you have to pro-
cess. Select Initial Spin Through and File Spin Through to get
that count. For certain document type groups, metadata is col-
lected as well.
You may want to just crack the documents and then let your cli-
ent preview them (see “Previewing Documents” on page 93.).
To crack documents, select Initial Spin Through, File Spin
Through, and Extract Metadata.
You may want to crack and render the documents all in one job.
In that case, select Initial Spin Through, File Spin Through,
Extract Metadata, and Render.
Typically, you would then check the quality of the processed
documents (see “Quality Control” on page 101) before pro-
ceeding to postprocess them (see “Postprocessing” on
page 127). In that case, select Postprocessing by itself after you
perform quality control.
If you don’t want to perform quality control before postprocess-
ing, you can set up a job to include Initial Spin Through, File
AD Summation Discovery Cracker User Guide Processing
86
Spin Through, Extract Metadata, Render, and Postprocessing
all at one time. However, to include Postprocessing without
performing quality control, you must change some of the post-
processing default settings. When creating a postprocessing ses-
sion, you must select Cracked OR Rendered as Documents to
include (see “Creating a U.S. Session” on page 133). If you use
those postprocessing settings, problem documents will not be
included in your final output.
However, that’s as far as you can go in selecting multiple actions
at one time. To import or export data, you have to create a sep-
arate job and select the appropriate import or export action.
Table 6.2, “Action Selection,” on page 87, lists the processing
actions you can choose from and explains the purpose of each
one.
NOTE:
• Having groups and views allows you to run different jobs
against the same documents. If Discovery Cracker has
already performed Initial Spin Through, File Spin
Through, Extract Metadata, or Render on a document, it
will not redo one of those actions. You can create a job to
redo those actions on a document level through a QC Ses-
sion. See “Recracking, Rerendering, or Redoing the OCR
Process on Documents” on page 120. However, once you
postprocess documents, you cannot recrack them.
• Export jobs. If you run more than one job of the same type
of export (for example, two AD Summation DII Export
jobs) at the same time within the same project, the jobs will
not run simultaneously; they will run consecutively. How-
ever, multiple exports of different types (for example, one
AD Summation DII Export job and one Concordance
Viewer Export job) will run simultaneously.
• With regard to the first 4 actions on the Actions to be per-
formed, you must complete these actions in the order in
which they appear on the list before preceding to the next
action. For example if you attempt to Render your docu-
ments before performing the Extract Metadata action, the
Render job will not complete successfully.
In the case where a job is run out of sequence, you must
pause the job with the missing prerequisite action (the Ren-
der job in this case), create a job to complete the prerequi-

AD Summation Discovery Cracker User Guide Processing
87
site action (create an Extract Metadata job) and once the
job is done, you can restart the original job (the Render
job).
Table 6.2: Action Selection
Select this action To do this
Initial Spin Through Receive a count of the number of files in the folders to be processed.
You must select this action the first time you create a job for a selection of folders.
File Spin Through Extract all the attachments and all the embedded files* from the selection of folders to
be processed. This gives you a total item count for the job.
*If you installed Microsoft Office 2007 on your DC Engine computers, you will not
be able to extract embedded files from PowerPoint documents created with versions
of PowerPoint earlier than Microsoft Office PowerPoint 2007. We recommend that,
if possible, you install Microsoft Office 2003 with Microsoft Office 2007 forward
compatibility on one of your DC Engine computers. Send PowerPoint documents to
that DC Engine for processing.
Extract Metadata • Collect the metadata from your documents. This is also referred to as “cracking.”
• Enable optical character recognition of native image files.
• Change the default encoding for extracting metadata when using the Discovery
Cracker Extractor.
• Identify scripts.
Render • Create TIFF images or PDF files and, optionally, text files of your documents.
• Change the default encoding for creating the text files.
• Enable optical character recognition of rendered TIFF images.
• Enable deactivation of blank pages.
Postprocessing • Assign numbers to documents or document pages.
• Package processed files to deliver to your client.
• Endorse documents.
• Populate the AllText field in the database. (This task copies the data from the text
files produced during rendering and stores it in the database so you can select the
AllText field when exporting.)
Data Delimited Text File
Export
Export a text file for loading into a third-party software, either before postprocessing
or after postprocessing.
Concordance Viewer Export Export your documents to a file that can be loaded into Concordance for use with the
Opticon viewer.
IPRO Export Export your documents to a file that can be loaded into an IPRO product.
Ringtail Export Export your documents to a file that can be loaded into Ringtail.
AD Summation DII Export Export your documents to a DII file that can be loaded into other AD Summation
products.
Import Data Import a text file containing documents that your client has previewed and returned
to you for further processing.

AD Summation Discovery Cracker User Guide Processing
88
Editing a Job If a job is waiting to run or if it is in a Paused state, you can edit
the description, when the job runs, and the job priority.
To ed i t a jo b :
1. In the navigation pane, select a job.
The General Job Information tab is displayed.
2. Select Edit.
3. In the Information area, under Job, in the Description box,
you can type a different description.
In the Details area, you can do the following:
4. Under When to run, you can make a different selection.
5. In the Job Priority box, you can select a different priority.
6. Select Save.
NOTE: To change the DC Engine selection, you don’t need to
select Edit. For information about changing the DC Engine
selection, see page 228.
Pausing a Job After you create a job, a Pause button appears at the bottom of
the General Job Information tab and remains there until the
job is finished. If you select Pause, the button changes to
Restart. The job will not run until you select Restart; then it
runs immediately.
You may want to pause a job for the following reasons:
• To change when the job runs if you selected Scheduled or
Follow Job in the When to Run area on the General Job
Information tab.
• To allow other jobs to finish first if you have multiple jobs
running and decide that one or more are not critical at that
time.
DocuLex 5 Export Export your documents to a file that can be loaded into DocuLex Professional Cap-
ture or DocuLex IP Studio.
EDRM XML Export Export your documents to an EDRM XML-compliant file that can be loaded into
applications that accept such files, such as AD Summation Enterprise Data Manager
for use with AD Summation Enterprise version 2.6.
Table 6.2: Action Selection (Continued)
Select this action To do this
AD Summation Discovery Cracker User Guide Processing
89
To pa u se a j o b:
1. In the navigation pane, select a job.
The General Job Information tab is displayed.
2. Select Pause.
The Pause button changes to Restart.
The job will run as soon as you select Restart. Do not select
Restart until you want to run the job.
3. Select Save.
The job runs according to the settings you made.
NOTE: Discovery Cracker does not allow you to pause a postpro-
cessing or an export job. Pausing a postprocessing job or an
export job could cause problems with document numbering or
with the export text file.
Job Status All jobs have a status. You see the status in the Status column of
the Jobs tab (when you select a project, group, or view).
NOTE: Do not confuse job status with document status. Please
see Appendix B, "Document Status," on page 273.
Table 6.3, “Job Status Descriptions,” explains what each status
means.
Table 6.3: Job Status Descriptions
Icon Job Status Description
Scheduled The job will run at the time you selected, or it will follow another job that you selected.
Active The job is currently running.
[blank] Indicates an open QC session.
Problem There was a problem during the creation of the job. You need to re-create the job.
Paused The job is not currently running. You paused the job or it is a QC job that you have not
started.
The job will run when you select Restart on the General Job Information tab.
Completed The job is finished.
Completed with
errors
The job completed with errors at the job level rather than at the individual document
level. Selecting the View hyperlink in the Errors column of the Jobs tab will display the
errors that occurred at the job level. The pane is displayed at the bottom of the tab.
AD Summation Discovery Cracker User Guide Processing
90
Jobs Tab After you create projects, groups, and views, the Jobs tab is dis-
played in the right pane of the Discovery Cracker Console main
window. After you create a job, the information about the job is
displayed in the Jobs tab.
You see the following information on the Jobs tab:
• Refresh Rate (seconds) - You can choose a time interval
(every 30, 60, 90, or 120 seconds) by which to automati-
cally refresh the information displayed on the Jobs tab.
• Refresh Now icon - Selecting the icon refreshes the informa-
tion displayed on the Jobs tab manually.
• The following columns:
• Parent (displayed only in the Jobs tab from a project
level) - Identifies the group or view the job belongs to.
• Job ID - Identifies the job by Job ID number. Selecting
the number takes you to the General Job Information
tab for the job.
• Description - Displays the description you entered for
the job.
• Priority - Displays the priority you set for the job.
• % Complete - Displays the percentage of the job that
has completed.
• Status - Displays one of the following statuses: Sched-
uled, Active, Problem, Paused, Completed, Com-
pleted with errors. (For descriptions of the statuses, see
Table 6.3, “Job Status Descriptions,” on page 89.
• Errors - Provides a View hyperlink when the job com-
pletes with errors. When you select View, error mes-
sages for the job are displayed at the bottom of the Jobs
tab.
• DC Engine Selection - Displays the DC Engine selec-
tion mode (automatic or manual) of the job if the job
has not finished running. Selecting Automatic or Man-
ual opens the DC Engine Selection dialog box. You
can change the mode or the DC Engines assigned to
the job. (See “DC Engine Selection” on page 225.)
• Job to Follow - The job will process after the job that is
listed.
• Scheduled Start - Displays the time the job is scheduled
to start.
• Created By - Displays the user who created the job.

AD Summation Discovery Cracker User Guide Processing
91
The jobs that are displayed on the Jobs tab depend on how you
access it. See Table 6.4, “Accessing the Jobs Tab.”
Monitoring Processing Activity Once jobs are processing, you can monitor the processing activ-
ity: which items are being processed and which DC Engine
computer is doing the processing.
You can do this from the Workflow Manager user interface or
from the Monitor Workflow Manager Activity dialog box in
Discovery Cracker Console. See the following topics for instruc-
tions.
The Workflow Manager User Interface Workflow Manager is the task manager and communication
center for the Discovery Cracker system. It manages the work-
flow for the Discovery Cracker components, controlling all
events and balancing the load among the DC Engine computers
for faster processing.
The Workflow Manager component is installed on only one
computer in a Discovery Cracker system.
To access the Workflow Manager user interface, you must go to
the computer that hosts the Workflow Manager component.
The Workflow Manager user interface displays the following
panes:
• DC Engine Computers - displays a list of all the computers
that have DC Engine running and the date Workflow Man-
ager last saw the DC Engine. Workflow Manager pings the
DC Engines at regular intervals.
• Items Being Processed - displays the items that are being
processed by each DC Engine.
Table 6.4: Accessing the Jobs Tab
If you select this from the
navigation pane The Jobs tab displays this
• Project name
• Group-level identifier
• View-level identifier
All the jobs in the project
Group name All the jobs in the group
View name All the jobs in the view
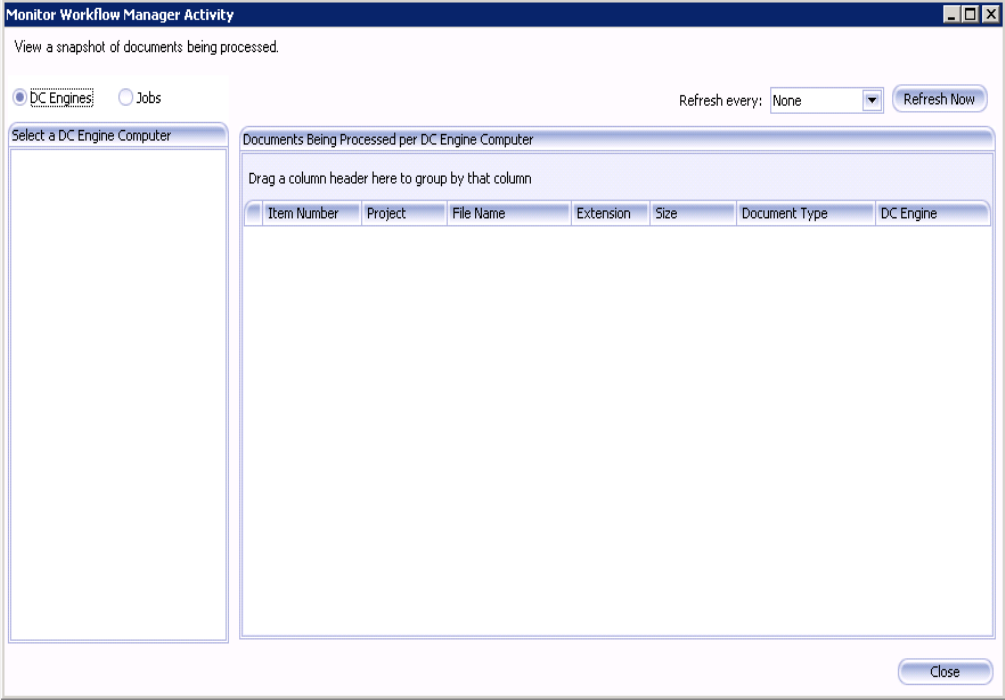
AD Summation Discovery Cracker User Guide Processing
92
The Monitor Workflow Manager Activity
Dialog Box
If you don’t have access to the Workflow Manager computer,
you can monitor the job processing activity by using the Moni-
tor Workflow Manager Activity dialog box in Discovery
Cracker Console. From the Tools menu, select Monitor Work-
flow Manager Activity.
When you open this dialog box, you see a detailed snapshot of
the items that are being processed at that moment in time. You
can choose to display the items according to DC Engine com-
puter or according to job.
You can manually refresh the snapshot or select to have the
snapshot refreshed automatically at regular intervals.
Figure 6.1.

AD Summation Discovery Cracker User Guide Previewing Documents
93
7. Previewing Documents
Your clients can preview their documents before they are post-
processed. This gives them a preview into their data so they can
cull down what you are to deliver back to them. This allows
them to reduce their cost for production since you will not have
to produce all of the documents they provided to you for pro-
cessing. It also reduces your cost because you do not have to
complete a full production of the data before your client pre-
views it.
Your clients can preview documents that have been processed
through a cracked stage (the Discovery Cracker program has
collected the metadata) in two different ways:
• They can preview the documents by using the DC Detective
tool.
• You can export a text file for loading into AD Summation
iBlaze, WebBlaze, or Enterprise; Concordance Viewer; or
any other software that accepts a delimited text file.
It is not necessary to render documents for this preview process
to take place. It is also not necessary to quality check the docu-
ments prior to a preview process. However, you may want to
look at any problem documents for possible missing metadata,
then recrack those documents if you feel that Discovery Cracker
may be able to collect more metadata.
The rest of this chapter explains what is necessary for you to do
as the Discovery Cracker administrator to make it possible for
your clients to:
• Preview Using the DC Detective Tool
• Preview Using Data Delimited Text Files
Preview Using the DC
Detective Tool
DC Detective is a secure browser-based data preview tool that
enables lawyers, paralegals, and others to preview any or all elec-
tronic documents that have been cracked by the Discovery
Cracker program.
In the DC Detective tool, previewers can view the documents,
decide what action is needed, and indicate what that action is.
They do that by creating tags that are meaningful for their
objective and assigning appropriate tags to the documents they
AD Summation Discovery Cracker User Guide Previewing Documents
94
choose. They can also include notes (comments) about the doc-
uments for other previewers to read. When finished, DC Detec-
tive then sends that information to the Discovery Cracker
database.
DC Detective Administration DC Detective is administered by the Discovery Cracker admin-
istrator.
You need to ensure that the DC Detective Web application is
installed on a Web server on your network. You or your network
administrator can perform the installation. (For installation
instructions, see the Discovery Cracker Environment Setup and
Installation Guide. In Chapter 1, “Installation Overview,” refer
to Table 1.1, “Checklist for Preinstallation, Installation, and
Postinstallation Tasks.” Note the column for DC Detective.)
If your network administrator installs DC Detective, he or she
needs to provide you with the Web address for accessing the DC
Detective Web site from computers other than the Web server
hosting DC Detective.
You perform the following DC Detective administration tasks:
• You set up DC Detective users.
• You ensure that DC Detective users receive the necessary
information to preview their data.
Setting up DC Detective Users The DC Detective Web site requires users to log in with a user
name and password. You assign login information to DC
Detective users.
You do this by setting up Discovery Cracker user accounts with
DC Detective permissions. Each Discovery Cracker user
account has a user name and password. DC Detective users log
in to DC Detective using their Discovery Cracker user name
and password.
You control who has access to the DC Detective tool, which
activities each DC Detective user is authorized to perform, and
which projects they have access to. (See “Managing Users and
Security” on page 39.)
For example: If you are a Discovery Cracker administrator who
works in a service bureau, you can have many different clients
AD Summation Discovery Cracker User Guide Previewing Documents
95
using the DC Detective tool to preview their data. You need to
make sure that previewers from Firm A can see only their case
information and not case information from other firms. You
also need to make sure that User 1 from Firm A can see only the
cases they are authorized to work on and not cases other users
from Firm A are working on.
To set up a DC Detective user:
Prerequisite:
• Projects, groups, and, optionally, views must be created.
Steps:
1. Create a Discovery Cracker user account (see “Creating
User Accounts” on page 40).
2. Assign the appropriate security role to the user.
The security role controls the activities the user is allowed
to perform in the DC Detective tool by means of the per-
missions you set for the role. If necessary, create a new secu-
rity role (see “Creating Security Roles” on page 41) with the
proper DC Detective permissions.
3. Assign the appropriate DC Detective access role to the user.
The DC Detective access role controls the projects the user
is allowed to access in DC Detective. If necessary, create a
new DC Detective access role (see “Creating DC Detective
Access Roles” on page 43) with access to the appropriate
projects.
Communicating with DC Detective Users You need to ensure that your client is informed when data is
ready for previewing and that DC Detective users have the fol-
lowing information:
• The DC Detective Web site address.
• Their Discovery Cracker user ID and password to use as
their DC Detective user name and password.
• A description of the DC Detective activities they are permit-
ted to perform.
• The list of projects they have access to.
• DC Detective user instructions. A copy of the DC Detective
User Guide in PDF format is located in the Documentation
folder of the Discovery Cracker program folder.
• Instructions to install applicable software on their local com-
puter in order to view native files.
AD Summation Discovery Cracker User Guide Previewing Documents
96
• Instructions to install supplemental language support on
their local computer in order to display the correct charac-
ters for all languages (Start>Control Panel>Regional and
Language Options>Languages>Supplemental language
support. Select Install files for complex script and right-to-
left languages (including Thai) and Install files for East
Asian languages).
Preview Using Data Delimited
Text Files
After cracking documents but before postprocessing them, you
can send delimited text files of the data to your clients to pre-
view and send back to you with instructions about how to fur-
ther process the documents. You then import the delimited text
files and continue processing them according to your client’s
instructions.
The following procedures describe exporting and importing
data delimited text files before postprocessing.
To create a data delimited text file export:
Prerequisite:
• You have processed the documents you want to export with
the Initial Spin Through, File Spin Through, and Extract
Metadata actions.
Steps:
1. Create a job from a group or a view.
On the General Job Information tab, complete the job
Description, DC Engine selection, When to run, Job pri-
ority, Job timeout settings.
(If necessary, refer to the instructions for “Creating a Job”
on page 81.)
2. Under Actions to be performed, select Data Delimited
Text Fi l e Exp o r t .
NOTE: If your client uses another AD Summation product
as a preview tool, see “AD Summation DII Export” on
page 160 or “EDRM XML Export” on page 167.
3. Select Edit Settings to display the Jobs Settings tab.
4. On the Data Delimited Text File Export task pane, do one
of the following:
AD Summation Discovery Cracker User Guide Previewing Documents
97
• Select a previously created session (see “To select a previ-
ously created session:” on page 97).
A document is only exported once per session. It is use-
ful to select an existing session to:
• Do incremental exports as you receive data from
your client.
• Ensure that documents are not exported twice if
you are exporting from a dynamic view.
• Create a new export session (see “To create a new export
session:” on page 97).
Create a new export session to export documents for
the first time or if you want to export the same docu-
ments again.
5. Select Back To Job Creation.
6. On the General Job Information tab, select Create.
The Confirm dialog box is displayed with the question,
“Are you sure?”
7. Select Yes to create the job.
To select a previously created session:
1. On the Data Delimited Text File Export task pane, from
the Select a session list, select the session you want.
The settings displayed are the ones you chose when you cre-
ated the export session.
2. Change or accept the settings.
3. Select Update Session to save your settings.
4. Continue with step 5 in the procedure “To create a data
delimited text file export:”.
To create a new export session:
1. On the Data Delimited Text File Export task pane, select
Create Session.
The Session Creation dialog box is displayed.
2. Type a name in the Session Name box and, optionally, a
description in the Session Description box, then select Cre-
ate.
3. From the Select a session list, select the session you just cre-
ated.
AD Summation Discovery Cracker User Guide Previewing Documents
98
4. In the Select name and location for the output file box,
accept the path and file name or browse to and select differ-
ent ones.
5. For Select an export type, select Before Postprocessing.
6. Make appropriate selections in the Export Configuration,
Documents to Process, and Replacement Characters areas.
NOTE:
• In the Export Configuration area, the Use Unicode
check box is selected by default. The export is created
using Unicode (UTF-16) encoding.
• If you clear the Use Unicode check box, the export is cre-
ated using ASCII encoding. In that case, in the
Replacement Characters area, you need to select values
less than 128 (0-127).
• In the Replacement Characters area, for Unicode or
ASCII encoding, be sure to select different values for
each delimiter.
7. On the Selected Fields tab, select the fields to be included
in the export file.
• Select Edit Fields to add fields.
• Select Save Fields to save the selected field set for future
data delimited text file exports.
• Select Use Saved Fields to used a previously saved data
delimited text file field set.
• If you plan to import the data back into the Discovery
Cracker program, at a minimum you must select the
fields Project_UID and ItemNumber (they are selected
by default). These fields are necessary so that Discovery
Cracker can recognize which project and which items
are being imported.
8. When you have finished setting all parameters, select
Update Session to save the settings.
9. Continue with step 5 in the procedure “To create a data
delimited text file export:”.
To import data delimited text files:
1. Create a job from a group or a view.
On the General Job Information tab, complete the job
Description, DC Engine selection, When to run, Job pri-
ority, Job timeout settings.
AD Summation Discovery Cracker User Guide Previewing Documents
99
(If necessary, refer to the instructions for “Creating a Job”
on page 81.)
2. Under Actions To Be Performed area, select Import Data.
3. Select Edit Settings to display the Job Settings tab.
4. On the Task s pane, do one of the following:
• In the Select an Import Session box, select a session you
previously created.
The Discovery Cracker program loads the settings from
the selected session. You can adjust the settings if neces-
sary, then proceed to step 8.
• If you want to create a new session, proceed with step 5.
5. Select Create Import Session.
The Session Creation dialog box is displayed.
6. In the Session Creation dialog box, do the following:
• Type a name in the Session Name box.
• Type a description in the Session Description box
(optional).
• In the Import Session area, decide if you want to select
the following check boxes:
• Maintain parent-child relationships
• Allow documents to be imported from different
sessions
• Select Create.
7. In the Select an Import Session box, select the session you
just created.
8. In the Select an Import File box, select the text file you
want to import.
You can browse to the location or type the path in the text
box.
If you browse to the location, you must select My Network
Places\Entire Network\Microsoft Windows Net-
work\[domain] or [workgroup]\[computername]\[shared
folder].
If you type in the text box, you must use the UNC format,
i.e., \\[computername]\[shared folder].
The import file must have the Project_UID and Item-
Number fields in order for the Discovery Cracker program
to know which documents are being imported.
AD Summation Discovery Cracker User Guide Previewing Documents
100
9. Make appropriate selections in the following boxes:
• Text Identifier
• Field Delimiter
• Start Import at Row
10. When you have finished setting all parameters, select Back
To Job Creation, then select Create.
A new view is created and is displayed in the navigation
pane under the appropriate project. The name of the view
is derived from the session name you provided:
“Import_[Session Name]”.

AD Summation Discovery Cracker User Guide Quality Control
101
8. Quality Control
Discovery Cracker provides the capability of performing quality
control on the documents you process to ensure the quality of
the end product that you deliver to your clients. Consistent
with the flexibility offered by Discovery Cracker, you can also
bypass this step at your discretion for faster delivery to your cli-
ent.
Should you decide to perform quality control, that is done in a
QC session window. This chapter explains how to use the QC
session and contains the following subjects:
• Opening a QC Session
• Getting Acquainted with the QC Session User Interface
• Performing Quality Control Activities
• Closing a QC Session
• Starting a QC Job
Opening a QC Session When you select a project, group, view, or job in the navigation
pane, the information panel about that selection is displayed in
the right pane. At the bottom this pane is a Start QC button.
You can also right mouse click on a project, group, view, or job
and select Start QC from the menu.
This section explains the following topics:
• Opening a QC Session from a Project
• Opening a QC Session from a Group, View, or Job
• QC Pre-Filter
Opening a QC Session from a Project From the project level, the QC session window opens in read-
only mode. When you open a QC session in read-only mode,
you can:
• navigate through the documents
• search and sort the documents
• view the documents and document information via the pan-
els
• customize the QC Session window
• set the QC session options
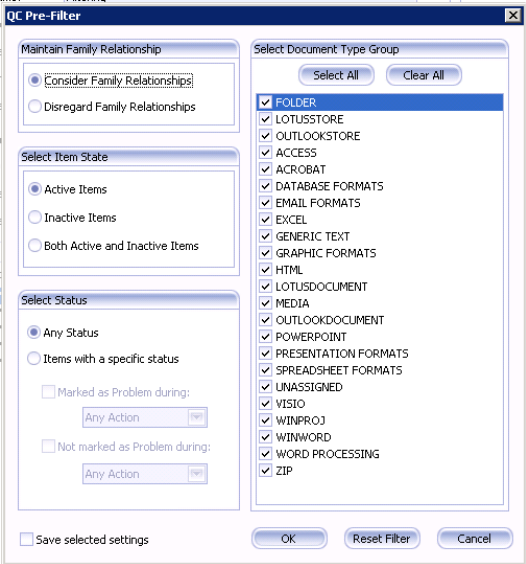
AD Summation Discovery Cracker User Guide Quality Control
102
Opening a QC Session from a Group,
View, or Job
You can open a QC session from a group, a view, or a job.
When you open a QC session, you can perform the quality con-
trol activities, such as:
• approving documents
• inserting placeholder pages
• replacing pages
• marking documents to be recracked, rerendered, or to redo
OCR
• assigning endorsement categories to documents
• deactivating documents and pages
When you perform a rework activity such as recrack, render, or
OCR, the program automatically creates a QC job for you.
After you close the QC session, you will be prompted to start
the QC job immediately or put the job in a paused state so you
can start it at a later time. See “Closing a QC Session” on
page 125 and “Starting a QC Job” on page 125
QC Pre-Filter After selecting Start QC from the navigation panel or from the
information panel, the QC Pre-Filter dialog will appear. This
allows you to choose what items you will see when the QC Ses-
sion window opens.
AD Summation Discovery Cracker User Guide Quality Control
103
The options available for filtering are:
• Maintain Family Relationships
• Consider Family Relationships - Selecting this option
considers the family relationship of items that meet the
filter criteria. Therefore, if at least one member of an
item family meets the filter criteria, all other members
of that item family will be displayed.
• Disregard Family Relationships - Selecting this option
ignores the family relationships when applying the fil-
ter criteria and displays only the item that meets the fil-
ter criteria.
• Select Item State
• Active Items - Display only active items.
• Inactive Items - Display only inactive items
• Both Active and Inactive Items - Display both active and
inactive items.
• Select Status
• Any Status - Display all items regardless of their current
status.
• Items with a specific status - Display items with specific
statuses. Additional options are:
• Marked as a problem during
• Any Action - Display items with any
problem status.
•Exporting - Display items that
encountered a problem during an
export.
• Importing - Display items that
encountered a problem during import.
• Postprocessing - Display items that
encountered a problem during
postprocessing.
•Processing - Display items that
encountered a problem during
processing. This includes problems
during: Initial Spin Through, File Spin
Through, Extract Metadata, and
Render.
• QC’ing - Display items that have been
QC’d and marked as a problem.
AD Summation Discovery Cracker User Guide Quality Control
104
• Not marked as a problem during:
• Any Action - Display items with any
action that did not encounter a problem
during processing, QC, postprocessing,
exporting, or importing.
•Exporting - Display items that
successfully completed exporting.
• Importing - Display items that
successfully completed importing.
• Postprocessing - Display items that
successfully completed postprocessing.
•Processing - Display items that
successfully completed processing. This
includes the actions of Initial Spin
Through, File Spin Through, Extract
Metadata, and Render.
• QC’ing - Display items with the status
of QC’d - Approved.
• Select Document Type Group - Display items within a spe-
cific Document Type Group.
• Save selected settings - Saves the selected filter settings for
the user that is logged into Discovery Cracker Console.
Each user can save their own filter settings.
Getting Acquainted with the QC
Session User Interface
The QC Session window is a modeless window. This means
that the window can be moved or minimized to allow you to do
other work within the DC Console while you are QC’ing.
The QC Session window is made up of a ribbon that contains
three tabs of groups with controls for activities within QC and
panels. By default, you see:
• The title bar of the QC Session window which displays the
current project and group or view that you have selected to
QC.
• The ribbon which contains three tabs of groups.
• The groups within the tabs.
• Controls for QC activities within the groups.
• Multiple panels in the middle of the screen.
This section explains the following topics:
• Customizing the QC Session User Interface
• The Ribbon Groups
• Panels
• Setting QC Session Options

AD Summation Discovery Cracker User Guide Quality Control
105
Customizing the QC Session User
Interface
You can customize the QC Session window to meet your needs.
For a description of the ribbon groups and their associated con-
trols see “Ribbon Groups” on page 105.
By default, the Data Panel is displayed in the left pane of the
QC Session window and other panels are displayed on the
right. You can display all panels or only the Data Panel. For a
description of the panels, see “Panels” on page 109.
You can control where the panels are located by using a drag-
and-drop operation. You can hide all the panels except the Data
Panel.
Ribbon Groups The following tables describe the groups within the ribbon tabs
and the controls that appear in each.
Table 8.1: Main tab
Group Control Actions
Action Approve All Approves all documents in the QC session without validation. This
applies to all documents that met the pre-filter criteria that you selected
prior to entering the QC session. This will not approve documents that
have a status of problem, inactive, or QC’d.
Note: This will approve documents that may not be currently visible in
the Data Panel due to any filtering that has taken place while in the QC
session.
Approve Approves the selected document(s) without validation. This allows you to
override a problem status.
Render Opens the Take Actio n dialog which allows you to send the selected doc-
ument(s) back through processing to redo rendering or to perform the
render action on documents that have not yet been rendered, but have
been processed through extraction of metadata.
Recrack Opens the Take Act io n dialog which allows you to send the selected doc-
ument(s) back through processing to reprocess the selected document(s).
You may choose to perform more or less actions on the selected docu-
ment(s) by selecting or deselecting the desired actions.
OCR Opens the Take Action dialog which allows you to OCR the image pages
of the selected document(s).
Mark as Problem Marks the selected document(s) as a problem.

AD Summation Discovery Cracker User Guide Quality Control
106
Assign Categories Opens the Select Categories dialog which displays a list of available cate-
gories which you can assign to the selected document(s).
Insert Placeholder Pages Opens the Take Action dialog which allows you to insert a placeholder
page to the selected document(s).
Activate Document Activates the selected document(s).
Deactivate Document Deactivates the selected document(s).
Activate/Deactivate
Pages
Allows you to select one or more pages from a document to activate or
deactivate. This action cannot be taken if you have selected multiple doc-
uments.
Open Original Opens the document in the native application. This option is only avail-
able for single documents.
(NOTE: The native application must be installed on the local computer.)
Replace Pages Replaces the existing TIFF image or PDF pages with others that you have
created. You can replace a single page within a document or all of the
pages of the document. This action cannot be taken if you have selected
multiple documents.
Add Note Opens the Add Note dialog which provides you with a text field area in
which to enter a note for the selected document(s).
Grid Data Reload Reloads the data from the project, group, view, or job that is currently
loaded in the QC session with the same filter or you may choose different
filter options. This is beneficial if you are processing while QC’ing on the
same project, group, view, or job as it will update the data grid with any
new items that have been processed while you were in the session.
Refresh Updates the status of the currently loaded documents in the current QC
session. This will not update the grid with new items if you are QC’ing
while processing.
Table 8.1: Main tab (Continued)
Group Control Actions

AD Summation Discovery Cracker User Guide Quality Control
107
Search/Filter Provides an expression builder to search for specific documents within
the QC session. When selected, a Filter Builder dialog will appear in
which to build your filter criteria. To use this builder:
1. Select the field you wish to use for searching
2. Select the correct operator such as equals, contains, begins with, etc.
3. Select the <enter a value> area and enter the criteria you are searching
for.
4. You can add additional fields using And, Or, Not And, and Not Or
operators.
5. Select the Apply button to view the results in the Data Panel and
then you can add more criteria or conditions to meet your needs.
6. Select the OK button to apply your criteria to the Data Panel and
close the Filter Builder dialog.
7. Select the Cancel button to cancel the expressions that have not yet
been applied and close the Filter Builder dialog.
Clear Filter Clears the previously applied filter.
Go To Opens a dialog box that you can type a specific item number and option-
ally a page number to navigate to a specific record within QC.
Exit Close QC Closes the QC session.
Table 8.1: Main tab (Continued)
Group Control Actions
Table 8.2: Auto QC tab
Group Control Actions
Auto QC/Auto
Paging Settings
Start Initiates the Auto QC function using the your selected settings for valida-
tion.
Stop Halts the Auto QC function.
View Image and Text When selected, during Auto QC the Image and Te x t panels are visible. If
not selected, the Image and Te x t panels will be closed during Auto QC.

AD Summation Discovery Cracker User Guide Quality Control
108
Approve and Validate When selected, the Auto QC function will validate that all images that
should be present are present in the appropriate Images folder and that
all attachments are present in the Items folder of the project directory. It
will also change the status of each item to QC’d - Approved if that item
has successfully completed processing and succeeds validation.
If not selected, the Auto QC function will scroll through the items but
will not validate that images exist or that attachments have been saved. In
addition the status of the items will not be changed to QC’d - Approved.
If you also have the View Images and Text option selected, the image and
text panels will display the appropriate images and text while Auto QC is
running. With this combination of selections you have an auto paging
capability without approving documents.
Stop on Error When selected along with the Approve and Validate option, the Auto
QC function will stop if the validation of the page or attachment loca-
tions have failed. If not selected, the Auto QC function will continue
through until completion or you select the stop button. In both cases, if
the Approve and Validate option is selected, the item’s status will be
changed to QC’d - Marked as problem.
Review Pages Determines how many pages will be cycled through during Auto QC
before moving to the next document. You can select from the pre-defined
options of All pages, or the first 1, 5, 10, 25, or 50 pages, or you can type
in your own value for the number of pages you would like to review.
Page Interval Determines the length of time in seconds that each page will be displayed
before moving to the next page during Auto QC. The smallest interval is
.01 and the largest interval is 999999.
Select Start Determines where Auto QC begins to function within the Data Panel. If
you select First, Auto QC will start from the first record in the Data
Panel. If you select Current, Auto QC will start from the record you are
on within the Data Panel and move down the data set.
Action This group is repeated from the Main tab for your convince so that while performing Auto QC you
can stop and take an action if you need to without switching back to the Main tab.
Exit Close QC Closes the QC session.
Table 8.2: Auto QC tab (Continued)
Group Control Actions
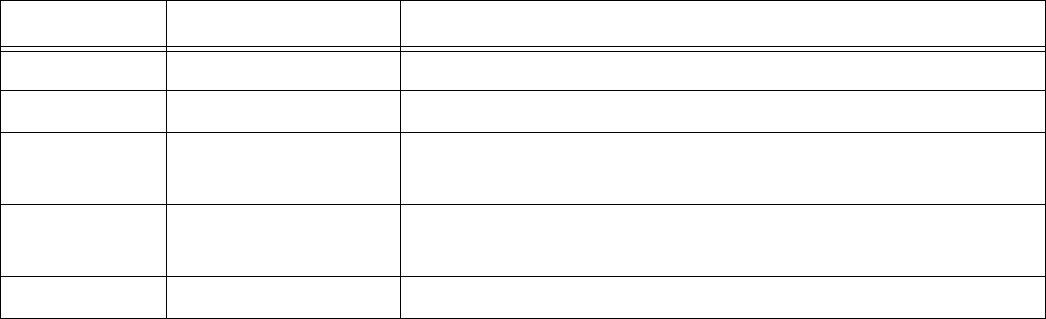
AD Summation Discovery Cracker User Guide Quality Control
109
Panels The Visibility control on the Tools tab allows you to control
which panels you see in while in a QC session. The following
panels are available:
Data Panel
Displays the metadata of the processed documents that are
in the project, group, or view that you select in the naviga-
tion pane.
You also see FOLDER, PST, and NSF items unless you
have excluded them in the QC Pre-Filter dialog. These
items are not documents that have been processed. They are
container items (see “Document Relationships” on
page 21). They are displayed for informational purposes
only, but can be selected for recracking if a problem
occurred during the Initial Spin Through action.
The Data Panel displays fields from the Items table and the
IntItems table. By default, you see at least the following
fields: Item Number, Parent Item Number, and Main Item
Number.
To understand the meaning of the numbers in these fields
you need to understand what an item is, what a parent item
is, and what a main item is. For an explanation, refer to
“Document Relationships” on page 21.
Another field that is displayed by default is the Status field.
The field displays the status of each document loaded into
Table 8.3: Tools tab
Group Control Actions
Panels Reset Layout Resets all of the default settings for the panel placement and visibility.
Visibility Displays a list of the available panels that can be displayed or hidden.
Tools Options Opens the Options dialog which provides the ability to change the View
Options and the Color Scheme.
Manage Placeholder
Pages
Opens the Manage Placeholder Pages dialog which allows you the ability
to import new placeholder pages or to create placeholder pages.
Exit Close QC Closes the QC session.
AD Summation Discovery Cracker User Guide Quality Control
110
the QC session. The status is the last action Discovery
Cracker performed on the document, the last action you
took on the document, or the current state of the docu-
ment. For more information, see Appendix B, "Document
Status," on page 273.
You can control which fields are displayed and how they are
displayed. When you right-click on the field name title bar,
you have a menu of formatting options to choose from.
The Data Panel contains navigation elements at the bottom
of the panel. The Record x of y box displays location within
the Data Panel that you currently have selected. You can
navigate up or down the data panel by using your up or
down arrow keys on the keyboard or you can navigate
through the records by using the navigation arrows sur-
rounding the Record x of y box.
Errors Panel
When Discovery Cracker encounters an error while pro-
cessing a document, it logs an entry in the Errors table of
the project database. If the document you select in the Data
Panel generated errors, the following information from the
Errors table is displayed: SystemMessage and CustomMes-
sage. By default the Error Panel is located directly below
the Data Panel so as you move through the records on the
data panel, errors for problem items will appear.
Image Panel
Displays the TIFF image or PDF file of each page of the
document that you select in the Data Panel. This panel will
also display any placeholder pages you have inserted. If no
TIFF, PDF, or placeholder page is associated with the
selected document, this panel will be blank. From this
panel you can:
• Navigate to the previous page
• Navigate to the next page
• Rotate the display window
• Rotate the physical image
• Rotate all of the pages in the document
• Deactivate\Activate the current page
• Zoom in on the page
• Zoom out on the page
• Change the size of the displayed page
AD Summation Discovery Cracker User Guide Quality Control
111
• Open the folder in which the page exists
Thumbnail Panel
Displays thumbnail images (if TIFF images or PDF files
exist) of each page of the document that you select in the
Data Panel. From this panel you can:
• Zoom in
• Zoom out
Text Pane l
Displays the text of the page displayed in the Image panel.
From this panel you can:
• Navigate to the previous page
• Navigate to the next page
Discovery Cracker Viewer Panel
Displays the document that you select in the Data Panel in
a print preview mode through the Discovery Cracker
Viewer.
The Discovery Cracker Viewer cannot view all document
types, for example, Access files. For such documents, noth-
ing is displayed in the Discovery Cracker Viewer panel.
Action Status Panel
Displays the status of each action performed on the docu-
ment that you select in the Data Panel.
Large Field Viewer Panel
Allows you to view the text of a large field for the document
that you select in the Data Panel. The panel contains a
Fields list. From the list you select the field you want to
view.
Categories Panel
Displays the categories that have been assigned to the docu-
ment you select in the Data Panel.
Scripts Panel
Displays the scripts that are used in the document you
select in the Data Panel.
AD Summation Discovery Cracker User Guide Quality Control
112
Setting QC Session Options To set QC session options, select the Options control on the
Tools tab. The Options dialog box is displayed with the follow-
ing tabs:
• View Options
• Color Scheme
On the View Options tab, you can select one or more of the fol-
lowing check boxes:
• Use QC mode - Selected by default, this provides the ability
to take actions on items. If this is not selected, QC will
operate in a read only mode which allows you navigation
and viewing capabilities, but you cannot take any actions
on items.
• Show active page - Displays the active rendered pages. By
default this option is selected.
• Show inactive page - Displays the inactive pages. By default
this option is not selected so you will only see active pages.
• Save session layout when closing - Saves the current layout
for each user that is logged in. Each user can set their layout
as they wish. With this option selected upon closing of a
QC session, each time you log into a QC session on any
computer that hosts DC Console, your last layout will be
presented to you.
• Missing Document Check - When selected, this option
invokes an additional check during QC to validate the exis-
tence of the native document in the expected location. This
check will take place during manual QC as well as Auto-
QC.
• Set Default for Cracking. Apply to Main Items. - When
selected, this option will apply any recrack action to the
main item regardless of whether or not you were on the
main item within a family of documents when you
requested the recrack action.
On the Color Scheme tab, you can select colors for the follow-
ing items:
• Approved
• Not QC’d
• Problem
• Inactive
AD Summation Discovery Cracker User Guide Quality Control
113
Performing Quality Control
Activities
Quality control activities include checking the quality of ren-
dered documents (TIFF images or PDF files); approving docu-
ments; inserting placeholder pages; recracking, rerendering, and
redoing the OCR process on documents; assigning categories to
documents; adding notes about the action you take on a docu-
ment; replacing pages in a document; and deactivating docu-
ments or pages.
You perform these activities from the following locations:
• The Main tab on the ribbon
• Auto QC tab on the ribbon
• The shortcut menu when you right-click a document in the
Data Panel
You can perform quality control activities on multiple docu-
ments at one time. In the Data Panel, select the first document
you want, then while holding down the Shift key, select the last
document you want. You can also select non-consecutive docu-
ments by holding the CTRL key as you select the documents
you want. Then follow the instructions later in this chapter for
the quality control activity you want to perform.
Many of the activities in a QC session can be performed by
selecting a menu option from a right click on the Data Panel or
by using a hotkey (for a list of the hotkeys available see Appen-
dix C, "QC Hotkeys," on page 276). For the purposes of this
document only the controls on the ribbon will be discussed, but
the activities function the same way regardless of how you
invoke them.
(Note: some actions cannot be performed on multiple docu-
ments)
Instructions for each of the QC activities are provided in the
following topics:
• Checking the Quality of Rendered Documents
• Approving Documents
• Inserting Placeholder Pages
• Recracking, Rerendering, or Redoing the OCR Process on
Documents
• Adding Notes
• Replacing Pages
• Deactivating a Document or Pages
AD Summation Discovery Cracker User Guide Quality Control
114
Checking the Quality of Rendered
Documents
You may want to check the quality of the rendered TIFF image
or PDF file of each document. By using Auto QC with the
View Image and Text option selected. You can automatically
cycle through each document.
Settings are available that allow you to customize how Discovery
Cracker automatically pages through your documents. You can
select the cycle speed, the number of pages of each document to
display, and the size of the view.
If you need to take action on a specific document, with that
document showing in the Image Panel, select the Stop button
in the Auto QC group and take the appropriate action from the
Action group.
NOTE: Using the Auto QC feature without selecting the
Approve and Validate option does not approve your docu-
ments.
Approving Documents In a QC session, you can approve documents manually or auto-
matically.
• Manually.
You can manually approve documents in two ways:
• Scroll through the documents one by one in the Data
Panel. As you step on and off a document, it is
approved.
• Select one or more documents in the Data Panel. Select
the Approve icon on the Action group.
• You can insert a placeholder page and approve docu-
ments. (For more information, see “Inserting Place-
holder Pages” on page 116.) You may want to use this
method to approve problem documents so they can be
postprocessed.
• Automatically.
To automatically approve documents without validation and
without viewing rendered pages:
1. On the Main tab of the ribbon select the Approve All icon.
2. A confirmation dialog will appear informing you of what
will be QC’d.
3. Select Yes to continue or select No to cancel this operation.
AD Summation Discovery Cracker User Guide Quality Control
115
This method will not perform any validation. When you
select this option, the approval occurs on all documents
that met the pre-filter conditions you set when entering
into the QC session. Some documents may not be visible in
the Data Panel if you have applied additional filtering since
entering the session, however, whether visible or not, all
documents will be approved. This will not approve any
documents that are inactive, problem, locked by another
process, or already QC’d. Also, because this is a bulk opera-
tion, the only notification you will have is a dialog that
advises that the activity is going on at the database level.
To automatically approve documents with validation and
optionally with viewing rendered pages:
1. Select the Auto QC tab on the ribbon.
2. Select the Approve and Validate checkbox.
3. Accept or change the settings for View Image and Text and
Stop on Error.
4. Select Start.
Auto QC approves each document loaded into the QC ses-
sion except those that are missing a rendered page or native
file. Inactive, problem, and currently locked documents are
disregarded. If you have applied any filtering after you have
entered a QC session, only those documents that are visible
after the filtering will be QC’d.
• With the Stop on Error check box cleared, when Auto
QC finds a document that is missing a rendered page
or native file the document is assigned the status QC’d
- Marked as Problem. Auto QC continues checking all
loaded documents. You can go back later and take
action on problem documents.
• With the Stop on Error check box selected, when Auto
QC finds a document that is missing a rendered page
or native document, Auto QC stops. A dialog box dis-
plays the item number of the problem document. You
can then go to the document in the Data Panel and
take the appropriate action. To continue Auto QC, you
must select the Start icon again.
When you select Start, an Auto QC Status dialog will
appear and display the following information:
AD Summation Discovery Cracker User Guide Quality Control
116
• Documents failed validation - Displays the number of
documents that had missing pages or native docu-
ments.
• Documents approved - Displays the number of docu-
ments that have been approved.
• Documents skipped - Displays the number of docu-
ments that were skipped. Documents that are inactive,
problem, or locked by another process will be skipped.
• Documents left to process - Displays the number of doc-
uments left to be QC’d.
You can manually stop Auto QC by selecting the Stop icon.
Inserting Placeholder Pages Placeholder pages are TIFF or PDF files that display messages
within the page that take the place of a rendered document.
Once a placeholder page is inserted, you see those messages in
the Image panel.
Discovery Cracker comes with the placeholder pages in the fol-
lowing list. They are located in the Discovery Cracker program
folder. (By default that location is C:\Program Files\Discovery
Cracker\DCPages.) The pages display the messages shown.
1. Document Not Rendered
“The Discovery Cracker program cannot render some types
of documents due to one of the following reasons:
• EXE - Executable file. There is nothing to render.
• DLL - Dynamic Linked Library. There is nothing to ren-
der.
• HTML - The page is not available offline and cannot be
rendered.
• URL - The page is not available offline and cannot be
rendered.
• LNK - The link or shortcut is not available and cannot
be rendered.
• There are also a number of proprietary file types that are
not accessible outside their native program and there-
fore cannot be rendered.”
2. Password Protected or Encrypted Document
In addition, you can manually insert a placeholder page, such as
when you need to explain why a rendered document (TIFF or
PDF) is not available. You can use Discovery Cracker-provided
AD Summation Discovery Cracker User Guide Quality Control
117
placeholder pages, or you can create placeholder pages with a
custom message.
To use Discovery Cracker-provided placeholder pages, you must
first import them (see instructions later in this topic). The
default location of those files is C:\Program Files\Discovery
Cracker\DCPages.
You have two options for creating custom placeholder pages:
• Create a TIFF image or a PDF file and, optionally, a corre-
sponding text file and import them into the Discovery
Cracker program.
NOTE: The text file must be a .txt file. The text file contains
the text that is represented in the TIFF image or the PDF
file.
• Create a placeholder page from within the Discovery
Cracker program. The program automatically creates the
proper TIFF or PDF file and, optionally, text file.
When you import or create placeholder pages, they are saved in
the default directory for reference files.
The instructions below describe how to do the following:
• Import a placeholder page
• Create a placeholder page
• Delete a placeholder page
• Insert a placeholder page
To import a placeholder page:
Prerequisite:
• You have created a TIFF image or PDF file with the message
you want and, optionally, a corresponding text (.txt) file
Steps:
1. Open a QC session.
2. Select the Tools tab on the ribbon.
3. In the Tools group, select Manage Placeholder Pages.
The Manage Placeholder Pages dialog box is displayed.
4. Select Import.
The Import Placeholder Page dialog box is displayed.
AD Summation Discovery Cracker User Guide Quality Control
118
5. In the Select TIFF or PDF file box, browse to and select
the file you want.
6. If you want to include a corresponding text file, select the
check box Include text file.
The path of the corresponding text file is displayed in the
box.
7. Type a name in the Name this placeholder page as box.
8. If you want the Discovery Cracker program to use this as
the default placeholder page, select the check box Set as
default placeholder page.
9. Select OK.
The new placeholder page appears in the list of placeholder
pages on the Manage Placeholder Pages dialog box.
To create a placeholder page:
1. Open a QC session
2. Select the Tools tab on the ribbon.
3. On the Tools group, select Manage Placeholder Pages.
The Manage Placeholder Page dialog box is displayed.
4. Select Create.
The Create Placeholder Page dialog box is displayed.
5. After Select format, select TIFF or PDF.
6. In the Enter content box, type or copy and paste the mes-
sage for your placeholder page.
7. By default, Discovery Cracker will create a corresponding
text file for the placeholder page. If you do not want a text
file, clear the check box Create text file with placeholder
page.
8. Type a name in the Name this placeholder page as box.
9. If you want the Discovery Cracker program to use this as
the default placeholder page, select the check box Set as
default placeholder page.
10. Select OK.
The new placeholder page appears in the list of placeholder
pages on the Manage Placeholder Pages dialog box.
To delete a placeholder page:
AD Summation Discovery Cracker User Guide Quality Control
119
Prerequisite:
• You must have imported or created at least one placeholder
page.
Steps:
1. Open a QC session.
2. Select the Tools tab on the ribbon.
3. On the Tools group, select Manage Placeholder Pages.
The Manage Placeholder Page dialog box is displayed.
4. Select a placeholder page from the list.
5. Select Delete.
Confirm that you want to delete the placeholder page.
6. Select OK.
To insert a placeholder page:
Prerequisite:
• You must first import or create a placeholder page.
Steps:
1. Open a QC session
2. Select one or more documents in the Data Panel for which
you want to insert a placeholder page.
Select the Insert Placeholder Pages icon in the Action
group of the Main or Auto QC tabs.
The Take Action dialog box is displayed.
3. The Take Action dialog box should already have the Insert
placeholder page check box selected for you.
4. Select TIFF or PDF, then select a placeholder page from the
box on the right.
5. Select OK.
NOTE: There are some documents for which you cannot insert a
placeholder page, such as the following:
• An item that is a FOLDER, a PST, or an NSF. These items
are not documents that have been processed. They are con-
tainer items (see “Document Relationships” on page 21).
• Items that are attachments that could not be saved into the
Items folder during processing due to one of the following
reasons:
AD Summation Discovery Cracker User Guide Quality Control
120
• The attachment was removed from an e-mail message,
but the attachment indicator still exists within the e-
mail message.
• The attachment is actually a shortcut link.
• The attachment is actually a link to another document.
When you select such documents in a QC session, you
receive a message that the file could not be found in the
Items folder of your project. You need to deactivate those
documents.
Recracking, Rerendering, or Redoing the
OCR Process on Documents
When documents have a problem status, you can recrack,
rerender, or redo the OCR process. Documents receive a
problem status in the following ways:
• Discovery Cracker assigns a problem status when it cannot
complete an action on a document.
• You can manually mark a document as problem so you can
recrack, rerender, or redo the OCR process.
To recrack, rerender, or redo the OCR process:
1. Open a QC session.
2. Select one or more documents in the Data Panel.
3. Select one of the following icons from the Action group on
either the Main or the Auto QC tabs:
• Render
• Recrack
• OCR
The Take Action dialog box will appear with the appropri-
ate selection already made for you.
4. Select Edit Settings to open the Rework Settings dialog
box.
5. Select an action.
6. Select a document type group.
7. Select the appropriate tab and make your desired changes to
the appropriate task settings. (If necessary, refer to “Setting
Task Settings” on page 61.)
8. If you want to apply the settings of the tab you are currently
on to additional document type groups, select Select Addi-
tional Document Type Groups while you are still on the
tab.
AD Summation Discovery Cracker User Guide Quality Control
121
NOTE: Be sure the settings on the current tab are appropri-
ate for the additional document type groups you select.
9. Repeat steps 5 through 8 as needed.
10. When you have finished making all your settings, select
Save and Close to return to the Tak e Action dialog box.
11. Select OK.
• You can recrack a document after it has been postprocessed,
however it will need to be postprocessed again to get a new
document or page number associated with it.
• When rerendering a document, you can select a different
render output file type.
• You can select a FOLDER, a PST, or an NSF for recracking
if a problem occurred during the Initial Spin Through
action. However, they cannot be rendered because these
items are not documents that have been processed. They are
container items (see “Document Relationships” on
page 21).
• When marking items to recrack, if you select a main item
document, you will receive a prompt that one of your items
is a main item or a parent item. If Discovery Cracker sees
that the child item has also been selected and is locked
because you are recracking the main item for this child
item, another prompt will appear after the recrack action
has been applied advising you that you cannot perform that
action on the child item. When you have marked the main
item to recrack, the child items will disappear from your
screen. (see “Document Relationships” on page 21).
• With regard to the Status field, if a main item document is
marked to recrack, the child items of this main item will
not be updated to a status of QC'd - Marked to Recrack.
Recracking a main item will automatically recrack the child
items as well so it is not necessary to update the status of a
child item if the main item is already in a QC'd - Marked
to Recrack status.
• For more information about document statuses, see Appen-
dix B, "Document Status," on page 273.
• For more information about OCR text options in a QC ses-
sion, see “Checking OCR Text in a QC Session” on
page 180.
AD Summation Discovery Cracker User Guide Quality Control
122
Assigning Categories to Documents In a QC session, you can assign categories to documents. When
you select one or more documents in the Data Panel, then
select the Assign Categories icon in the Action group, the
Select Categories dialog box is displayed with a list of category
names. Select the check box of one or more categories, and then
select Save to return to a QC session.
For more information about assigning categories in a QC ses-
sion, including removing and viewing category assignments, see
“Assign Endorsement Categories to Documents” on page 195.
Adding Notes When you select one or more documents in the Data Panel,
then select the Add Note icon in the Action group, the Add
Note dialog box is displayed. In addition, when you take actions
on the documents such as a rework actions, you can leave your-
self a note as to what you are doing and why in the Add the fol-
lowing notes box.
You may enter up to 44 characters for each note. Each note you
add will be preceded with the term NOTE:.
Replacing Pages If Discovery Cracker could not render a document or if you are
not happy with the way it was rendered, you can manually ren-
der the document and replace pages.
For TIFF images in the single-page format, you can replace one
page or the entire document. For multipage TIFF images and
PDF files, you must replace the entire document.
NOTE:
• TIFF images created outside of the Discovery Cracker pro-
gram must be one of the following formats: Group IV
TIFF, Color TIFF with JPEG, or Packbits. Otherwise, Dis-
covery Cracker cannot read the image format and you will
not be able to view the image in the QC session. You can
convert unsupported image files by using image conversion
software.
• If you create TIFF images outside of the Discovery Cracker
program with a corresponding text file and import them
into Discovery Cracker for processing, the text file, if multi-
page, will not be parsed correctly into individual pages.
AD Summation Discovery Cracker User Guide Quality Control
123
To manually render a document:
Prerequisite:
• If you are using a single-box solution, you must close the DC
Engine before you manually render a document.
Steps:
1. Open a QC Session
2. Select a document in the Data Panel.
3. Select the Open Original icon on the Actions group.
4. Print the document from within the open application.
• Select a DOXPrinter to print TIFF and text files.
• Select the DCPDFPrinter to print a PDF file in multi-
page format. No text files will be created for the PDF
file.
To replace pages:
1. Open a QC session
2. Select a document in the Data Panel.
Select the Replace Pages icon on the Actions group.
The Replace Pages dialog box is displayed.
3. In the Select TIFF or PDF file box, browse to and select
the appropriate TIFF or PDF file.
4. If you want to include a corresponding text file, select the
check box Include text file.
The path of the corresponding text file is displayed in the
box.
5. For PDF files, proceed to step 6. For TIFF files, make the
following selections.
a. If the Select compression format box is available,
accept the default compression format of CCITT
Group4 Fax, or select RGB No Compression or RGB
Packbits Compression.
b. If you want to replace all the pages of a multipage doc-
ument using the single-page TIFF file format, accept
the Single page option.
c. If you want to replace all the pages of a multipage doc-
ument using the multipage TIFF file format, select the
Multipage option.
AD Summation Discovery Cracker User Guide Quality Control
124
d. If you selected the Single page option and you want to
replace only one page of a multipage document, select
the Replace this page only check box, and then select
the page number.
6. Select OK.
You see the page or pages you replaced in the Image panel.
Deactivating a Document or Pages You can deactivate a document or pages in a document.
To deactivate a document:
1. Open a QC session.
2. Select a document in the Data Panel
3. Select the Deactivate Document icon from the Action
group.
The document is deactivated. The row in the Data Panel
changes to the color you selected for deactivated documents
(To o l s >Options>Color Scheme>Inactive).
To deactivate pages:
1. Open a QC session
2. Select a document in the Data Panel.
3. Select the Activate/Deactivate Pages icon from the Actions
group.
The Activate/Deactivate Pages dialog box is displayed.
4. Select the page or pages you want to deactivate.
5. Select OK.
The pages are deactivated. When the pages are displayed in
the Image panel, you see a red box in the top left corner of
the page with the word Inactive.
AD Summation Discovery Cracker User Guide Quality Control
125
Closing a QC Session You can close a QC session at any time.
To close a QC session:
Click on the Close QC button from any tab in the ribbon or
click on the upper right corner of the QC session window.
If you were in a QC session and performed any rework
actions such as recrack, render, or OCR, the Rework Job
Pending dialog box is displayed with the message, “There is
a rework job present (JobID: X). Would you like to start
the job immediately? If you choose no, the job will remain
in a paused state.”
6. Select one of the following:
• No if you do not want to run the job immediately or
have additional settings that you need to apply to the
job such as adjusting timeout values, selecting specific
engines to run the job, etc.
• Yes if you are ready to run the job.
The session closes and the QC job item is displayed in the
navigation pane. The job name will contain the user that
created it. On the Jobs tab, the description of the job is
Rework Auto-Create.
Starting a QC Job When you close a QC session with rework items and the QC
job is not run immediately, it will have the status of Paused. You
need to start the QC job in order for Discovery Cracker to pro-
cess it.
To start a QC job:
1. In the navigation pane, select the desired QC job.
The General Job Information tab is displayed in the right
pane.
2. Make any necessary adjustments to the settings on that tab.
If necessary, refer to “Creating a Job” on page 81.
To make changes other than selecting a DC Engine, you
must first select Edit. After making changes, select Save.
3. Select Restart.
The Confirm dialog box is displayed with the question,
“Are you sure?”
4. Select Yes.
Discovery Cracker runs the job according to its settings.

AD Summation Discovery Cracker User Guide Quality Control
126
Handling Errors You can get assistance with handling errors generated during
processing. You can export a project’s Errors table and send the
file to Discovery Cracker Product Support.
To export a project’s Errors table:
Prerequisites:
• You must have processed at least one job.
Steps:
1. Select a project from the navigation pane and right-click.
2. Select Save Errors.
3. The Save Errors File dialog box is displayed.
4. Select a location to save the file
5. Send the file to Discovery Cracker Product Support at
dc.support@accessdata.com

AD Summation Discovery Cracker User Guide Postprocessing
127
9. Postprocessing
After your documents are processed (cracked, rendered, or
both), you can:
1. Assign numbers to documents and pages.
2. Endorse rendered documents (TIFF and/or PDF).
3. Package files for delivery to your client.
4. Export metadata files in an appropriate format to use with
third-party software.
To accomplish item 4, you create a job using the appropriate
export action. See “Exporting” on page 149.
To accomplish items 1, 2, and 3, you create a job using the
Postprocessing action. To understand how to set up a postpro-
cessing job, you need to understand what numbering, packag-
ing, and sessions mean in the context of Discovery Cracker
postprocessing.
This chapter explains those subjects in the following topics:
• Understanding Document and Page Numbers
• Understanding Packaging
• Understanding Sessions
• Creating a Postprocessing Job
• Pausing a Postprocessing Job
Understanding Document and
Page Numbers
Discovery Cracker assigns numbers to documents during post-
processing.
• When you postprocess documents for which you rendered
single-page TIFF images, Discovery Cracker assigns num-
bers sequentially to each page of each document. The num-
ber is recorded in the database. During packaging, the
number becomes the file name of the TIFF and text files
and it is included in the file name of native files and attach-
ment files.
If you processed documents with the setting to produce
multipage TIFF images or PDF files (Discovery Cracker
renders only to multipage PDF files), the TIFF or PDF file
name is the number of the first page of the document,
which is known as the BegDoc (beginning document)
AD Summation Discovery Cracker User Guide Postprocessing
128
number. The BegDoc number is also the file name for mul-
tipage text files.
The file names of the native files and attachment files
include the number of the first page of the document (the
BegDoc number), a period, and the file extension. That
naming scheme keeps the native files and attachment files
associated with their TIFF or PDF and, optionally, text
files.
• When you postprocess documents for which you did not
render TIFF or PDF files (metadata-only documents),
numbers are assigned at the document level. Discovery
Cracker assigns numbers sequentially to each document.
The number is recorded in the database.
You need to create a postprocessing session to set a numbering
scheme and other numbering parameters (see “Creating a U.S.
Session” on page 133).
Understanding Packaging After documents are processed, you can package them for deliv-
ery to your client. Packaging copies files from the project’s
Images folder and Items folder to the project’s Volumes folder.
The endorsement of rendered documents (TIFF images and/or
PDF files) also takes place during packaging (see “Endorsing
Documents” on page 185).
You can package the following items:
• Rendered documents: Based on your Render options, the
Discovery Cracker program created one single-page TIFF
image for every page of every document, one multipage
TIFF image for every document, or one multipage PDF file
for every document.
If you chose PDF as your render output type, during pack-
aging you can choose to generate TIFF images from ren-
dered PDF files. They will be single page TIFF images.
• Text files: If you enabled text file output for document ren-
dering, for every TIFF image or PDF file, Discovery
Cracker created a corresponding text file.
If you chose the single-page TIFF render option, you can
choose to package text files in one of two ways:
• A separate text file for every page of every document.
AD Summation Discovery Cracker User Guide Postprocessing
129
• Text from all the pages of a document contained in one
text file.
• Text files without rendering: You can include text files with-
out having rendered your documents. The option to
include text files (from all text if it exists else body) gener-
ates a text file from the data contained within the All Text
field if it has any data. If it does not contain data, the text
file is generated from the Body field.
• Native files:
A native file is a document in its original form, copied from
the source data location.
• You can package originals of electronic files (e-files) and
their attachments.
• You can package an Outlook PST file as a PST file or as
separate MSG files.
• You can package attachments to Outlook documents.
• You can package attachments to Lotus Notes documents.
• You can include the original file name as part of the new
file name.
You can package the following combination of items:
• Rendered documents (TIFF and/or PDF) only.
• Rendered documents (TIFF and/or PDF) and text files.
• Rendered documents (TIFF and/or PDF) and native files.
• Rendered documents (TIFF and/or PDF), text, and native
files.
• Generated text files with native.
• Native only.
• Generated text only.
• Rendered documents with generated text.
NOTE: If you choose the option to generate TIFF images from
rendered PDF files, those files are automatically included in the
package.
For an explanation of the term “TIFF and/or PDF,” see page
130.
When the Discovery Cracker program produces TIFF or PDF
and, optionally, text files, by means of the Render action, it
places them in the project’s Images folder.
NOTE: If you run the OCR process when rendering to TIFF and
enable text file output, the OCR-created text files replace the

AD Summation Discovery Cracker User Guide Postprocessing
130
render-created text files in the Images folder. (See “Storage of
OCR Text” on page 173.)
During packaging, the Discovery Cracker program copies TIFF
and/or PDF and text files from the project’s Images folder to
subfolders in the project’s Volumes folder and includes the doc-
ument number in the file name.
Vo l u m e s F o l d e r The Volumes folder is used in U.S. packaging only. It contains
two levels of subfolders. Level 1 consists of the folders that con-
tain the folders containing the rendered output (TIFF and/or
PDF and text files) and generated TIFF images, folders that
contain the native files, folders that contain attachments, folders
that contain PST files, and folders that contain MSG files. Level
2 consists of the folders containing the rendered output (TIFF
and/or PDF and text files) and generated TIFF images. This is
illustrated in Table 9.1, “Volumes Folder for U.S. Packaging.”
AN EXPLANATION OF “TIFF AND/OR PDF”: The Images folder and
the Volumes folder can contain both TIFF and PDF files
because of the following circumstances:
• Even though you can choose only one render output type
per job, a project’s Images folder contains the output from
all of its jobs and you may have chosen different render out-
put types for different jobs within the project.
• Even if you chose only PDF as your render output type for
the entire project, if you choose to generate TIFF images
from rendered PDF files, the Level 2 subfolder in the Vol-
umes folder will contain the generated TIFF images.
Table 9.1: Volumes Folder for U.S. Packaging
Folders Description
Volumes This is the volume root folder
[Level 1] [Level 2]
Vol001
Level 1 rendered
output subfolder
This folder contains folders

AD Summation Discovery Cracker User Guide Postprocessing
131
001
Level 2 rendered
output subfolder
This folder contains rendered output (TIFF and/or PDF and,
optionally, text files) and, optionally, generated TIFF images.
The TIFF and PDF files may be endorsed.
002
Level 2 rendered
output subfolder
This folder contains rendered output (TIFF and/or PDF and,
optionally, text files) and, optionally, generated TIFF images.
The TIFF and PDF files may be endorsed.
Vol002
Level 1 rendered
output subfolder
This folder contains folders
001
Level 2 rendered
output subfolder
This folder contains rendered output (TIFF and/or PDF and,
optionally, text files) and, optionally, generated TIFF images.
The TIFF and PDF files may be endorsed.
002
Level 2 rendered
output subfolder
This folder contains rendered output (TIFF and/or PDF and,
optionally, text files) and, optionally, generated TIFF images.
The TIFF and PDF files may be endorsed.
Vol001_ATTACH
Level 1 attachment
file subfolder
This folder contains attachments to electronic files or e-mail
messages
Vol002_ATTACH
Level 1 attachment
file subfolder
This folder contains attachments to electronic files or e-mail
messages
Vol001_DOC
Level 1 native file
subfolder
This folder contains original electronic files
Vol002_DOC
Level 1 native file
subfolder
This folder contains original electronic files
Vol001_PST
Level 1 PST file
subfolder
This folder contains an Outlook PST file, which contains the
e-mail messages postprocessed from the original PST file.
Table 9.1: Volumes Folder for U.S. Packaging (Continued)
Folders Description

AD Summation Discovery Cracker User Guide Postprocessing
132
You copy the contents of the Level 1 subfolders to the medium
of your choice (CD, DVD, etc.) to deliver the files to your cli-
ent.
You control the name and the size of the Level 1 and Level 2
subfolders by creating a volume session (see “Creating a U.S.
Session” on page 133).
Understanding Sessions To define a numbering scheme for your documents and to
define a folder naming and creation scheme to package your
documents for delivery to your client, you first have to create a
session.
Note: Creating a session will differ when creating
a session for the U.S. and when creating an
International session.
Sessions are similar to templates. When you create a session, you
set parameters for available options, then save those settings.
Sessions apply at the project level. They are available to all
groups, views, and jobs in the project.
Sessions allow the following flexibility:
• You can assign numbers to and package the same data multi-
ple times with different settings and sequencing.
• A session maintains settings and sequencing. So you can
choose the same session but different groups and views (or
the same view if it is dynamic and there is new data) to con-
tinue the document number sequencing and volume num-
ber sequencing.
The following topics explain:
• Creating a U.S. Session
• Creating an International Session
Vol001_MSG
Level 1 MSG file
subfolder
This folder contains MSG files that were postprocessed from
an original PST file.
Table 9.1: Volumes Folder for U.S. Packaging (Continued)
Folders Description
AD Summation Discovery Cracker User Guide Postprocessing
133
Creating a U.S. Session When you create a U.S. session you do the following:
• Create the numbering scheme with which to identify the
documents in the project.
• Set other parameters that tell Discovery Cracker how to
assign numbers to the documents or document pages.
• Create the folder naming and creation scheme for packaging
files for delivery to your client: rendered output (optional)
(TIFF and/or PDF and, optionally, text files), TIFF images
generated from rendered PDF files, native files, and attach-
ment files.
• Set image and text file packaging options, which includes
endorsing rendered documents (TIFF and/or PDF) and
generating TIFF images from rendered PDF files.
• Set native file packaging options.
To create a U.S. session:
1. From the [Project, Group, View, or Job] Settings dialog
box, select Postprocessing on the Actions pane.
2. On the Postprocessing Session tab, select Create New Ses-
sion.
The New Postprocessing Session dialog box is displayed.
3. Type a name in the Session Name box.
4. Type a description in the Session Description box
(optional).
5. In the Criteria, Document Numbering, Packaging, and
Files to Include areas, make the appropriate selections to fit
your business needs. Use the guidelines in“U.S. Session
Guidelines” on page 134.
6. Click Create.

AD Summation Discovery Cracker User Guide Postprocessing
134
Table 9.2: U.S. Session Guidelines
Label Options Guidelines
Criteria
Documents to
include
• Approved Only
• Cracked AND Rendered
• Cracked OR Rendered
Choosing Approved Only allows only documents that you
have already approved to be in the directory.
Choosing Cracked or Rendered allows Discovery Cracker
to assign document numbers to documents with a prob-
lem status for which rendered documents (TIFF or PDF)
could not be created.
Consider the Documents to include option very carefully.
If you choose Cracked AND Rendered, documents will
only be included if they have successfully gone through all
of the first four job actions: Initial Spin Through, File
Spin Through, Extract Metadata, and Render. If a docu-
ment fails during any one of these actions, it will not be
postprocessed. However, in a QC Session you have the
option to approve a document that has failed, which over-
rides the document's problem status. If you choose to do
this, you also need to approve any other documents that
you want to be included during postprocessing, and be
sure that you have selected the Approve Only option.
Additionally, if you choose the Approved Only option, all
documents must have the current status of Approved. If
you are creating a new Postprocessing session for docu-
ments that may have been included in a previous Postpro-
cessing job, you must go back into QC and re-approve the
documents you want to be included.
When using the Cracked OR Rendered option, as long as
all of the actions related to cracking (Initial Spin
Through, File Spin Through, and Extract Metadata)
and/or the Render action have been successfully com-
pleted, the document will be included in the postprocess-
ing collection.

AD Summation Discovery Cracker User Guide Postprocessing
135
Process docu-
ments as
• Family (Maintain Parent-Child
Relationship)
• Separate Documents
• When you select Family (Maintain Parent-Child Rela-
tionship), Discovery Cracker considers the parent-
child relationship of documents when applying the
Approved Only option and Sort Fields parameters.
• If you select the Approved Only option, if one doc-
ument does not meet the criterion in the Docu-
ments to include box, document numbers are not
assigned to the entire document family of the
document’s main item.
• Discovery Cracker sorts based on the main item’s
metadata and keeps the children together with the
main item.
• When you select Separate documents, Discovery
Cracker considers each document separately when
applying the Approved Only option and Sort Fields
parameters.
• If you select the Approved Only option, only the
documents that do not meet the criterion in the
Documents to include box are not assigned docu-
ment numbers.
• The program sorts based on each document’s meta-
data.
NOTE: When making a selection for the Process
documents as parameter, choosing Family (Maintain
Parent-Child Relationship) will also have an effect on
what is included. All members of the document family
must be in the same status in order to be included. If any
one document of the document family does not meet the
criteria for inclusion in postprocessing, the whole family
of documents will be left out of the process.
Table 9.2: U.S. Session Guidelines (Continued)
Label Options Guidelines

AD Summation Discovery Cracker User Guide Postprocessing
136
Sort fields Any metadata field Documents are assigned document numbers based on the
selection and order of metadata fields. By default, Discov-
ery Cracker assigns document numbers based on the order
in which the documents were processed (using the Item-
Number field).
To choose a different order, select Get Sort Fields. In the
Sort Field Selector dialog box, select the fields you want to
sort by and whether you want to sort in Ascending or
Descending order.
Location of Vol-
ume
This is the root folder for the Level 1
subfolders. By default, this is the path
for the Volumes folder that you
selected when you created the proj-
ect.
Accept the default, or select a different path and/or change
the folder name.
Numbering and
Packaging Style
• U.S.
• International
Select U.S. if you are processing a document in the United
States and want to use United States numbering. Or, select
International if you are processing a document outside of
the United States and want to use international number-
ing.
Skip Deactivated
Pages
Check box Check to skip pages that have been deactivated.
Document Numbering
Prefix Check box
Any alphanumeric character except
the forward or backward slash
Limited to 25 characters.
Suffix Check box
Any alphanumeric character except
the forward or backward slash
Check to include a suffix.
Table 9.2: U.S. Session Guidelines (Continued)
Label Options Guidelines

AD Summation Discovery Cracker User Guide Postprocessing
137
Separator • None
• _ (underscore)
• . (period)
• - (hyphen)
• (space)
You can use a separator to create a visual break between
the different sections of the document number.
NOTE: There are five possible sections for a document
number scheme, which gives you the possibility of using
four separators. If you do not use all of the sections in your
document number scheme and you want to use separators
between the sections you do use, be sure to select the sepa-
rator to the left of the section.
Starting Number Numeric characters, limited to 12
digits
• Leave this set to one if you do not require a specific
starting number.
• The Starting Number value is used as a starting point
for the counter. This starting value will apply to either
the document number (if the Number by Document
option is selected) or to page number (if the Number
by Document option is not selected.
Number by Docu-
ment
Check box • Check to number by document rather than page.
• If this option is selected and you have rendered your
documents to single page images and you have
included the images as a part of your volume, the page
counter will be added automatically as a suffix to the
document counter. In this case, the page counter will
always start at one for each new document.
• Zero Fill: Check to include a zero fill.
• Separator: Select one of the following separators:
None, underscore, period, space, or hyphen.
• Padding: Sets the maximum number of characters
that will be used for the counter. Make sure to
select enough characters to accommodate the
number of documents that you will be including
in the session.
Table 9.2: U.S. Session Guidelines (Continued)
Label Options Guidelines

AD Summation Discovery Cracker User Guide Postprocessing
138
Child Document
Numbering
Check box • This option is available only when you check Number
by Document.
• If you do not check this, Discovery Cracker only uses
the main item document counter.
• Check if you want document number counting for
child documents in addition to main item documents.
• Zero Fill: Check to include zero fill.
• Separator: Select one of the following separators:
None, underscore, period, space, or hyphen.
• Padding: Sets the maximum number of characters
that will be used for the counter. Make sure to
select enough characters to accommodate the
number of documents that you will be including
in the session.
Number by Page Check box that adds a page counter.
Often used if you have rendered
items.
• Check to number by page rather than document.
• Zero Fill: Check to include a zero fill.
• Separator: Select one of the following separators:
None, underscore, period, space, or hyphen.
• Padding: Sets the maximum number of characters
that will be used for the counter. Make sure to
select enough characters to accommodate the
number of documents that you will be including
in the session.
Note: The option must be included if you selected to
include rendered pages. Otherwise, this is an optional
feature.
Packaging
Volume Check box Check to select options for the volume of the file. This is a
required check box.
Table 9.2: U.S. Session Guidelines (Continued)
Label Options Guidelines

AD Summation Discovery Cracker User Guide Postprocessing
139
(Volume)Prefix Naming of Level 1 rendered output
subfolders: The volume prefix and
volume number combined make up
the name of the Level 1 rendered out-
put subfolders. Example: Vol001
Naming of native file subfolders: The
volume prefix and volume number
combined, in addition to an under-
score and DOC, make up the name
of the Level 1 subfolders that contain
native files. Example: Vol001_DOC
Naming of attachment file subfold-
ers: The volume prefix and volume
number combined, in addition to an
underscore and ATTACH, make up
the name of the Level 1 subfolders
that contain attachment files. Exam-
ple: Vol001_ATTACH
See also Table 9.1, “Volumes Folder
for U.S. Packaging,” on page 130.
Enter your choice for the volume prefix.
NOTE: You can use any ASCII characters permitted by
Windows in a folder name. Windows does not permit the
following characters: \ / : * ? “ < > |
You can use no more than 26 characters in the Prefix box.
Windows limits the length of a path expression (e.g.,
C:\DC\Volumes\abc.tif ) to 255 characters. Consequently,
the limit on the total number of characters used in the
Prefix box is set by the length of the path in the Volume
Root Folder.
(Volume)Type Size (MB) Based on the size of the volume. Type cannot be altered
for United States numbering.
Table 9.2: U.S. Session Guidelines (Continued)
Label Options Guidelines

AD Summation Discovery Cracker User Guide Postprocessing
140
(Volume)Max
Value
By default this number is 500 mega-
bytes (MB), which allows you to copy
the contents onto one CD. You can
adjust this number up to 10,000 MB.
If you use CDs as your delivery
medium, it is recommend leaving
this number at 500. If the option to
maintain family relationships is used,
Discovery Cracker does not break
document families across multiple
volume folders. Therefore, a single
family of documents could cause the
folder size to exceed the parameter
you set. Setting the number at 500
allows for a buffer to make sure the
contents of one Level 1 rendered out-
put subfolder fits onto one CD.
Enter a number to limit the size of the Level 1 subfolders
that contain the Level 2 rendered output subfolders.
A NOTE ABOUT ENDORSED DOCUMENTS: The volume size is
determined at the time documents are assigned document
numbers. Endorsing a rendered document increases the
size of the file to allow space for the original image and the
new endorsing text. So your volumes may have a slightly
different size than originally selected. Take this into con-
sideration when you set the Max Value parameter.
When the contents of all the Level 2 subfolders reach the
size limit of the Level 1 subfolder, Discovery Cracker cre-
ates another folder and increments the volume number by
one.
If you are packaging native files and/or attachments, every
time Discovery Cracker creates a new Level 1 rendered
output subfolder, it also creates a new Level 1 native file
and/or attachment subfolder.
(Volume)Start The starting number is used for the
first Level 1 rendered output sub-
folder created using this session.
When subsequent jobs use this ses-
sion, Discovery Cracker numbers the
folders starting with the number after
the last one used.
Enter the starting number for the Level 1 subfolder.
(Volume)Zero Fill Check box Check to include zero fill.
(Volume)Padding Numeric Character Increase or decrease the padding on the number.
Folder Check box Check to set folder options. This is a required check box.
(Folder)Max
Value
Numeric Character Increase or decrease the file size for the folder based on the
type of folder that you selected.
(Folder)Zero Fill Check box Check to include zero fill.
(Folder)Padding Numeric Character Increase or decrease the padding on the number.
Files to Include and Other Options
Table 9.2: U.S. Session Guidelines (Continued)
Label Options Guidelines

AD Summation Discovery Cracker User Guide Postprocessing
141
Include Rendered
Images or PDFs
Check box Check to include rendered images or PDFs.
Endorse rendered
documents (TIFF
images and PDF
files)
You can endorse rendered documents
(TIFF images and PDF files). For full
instructions, see “Endorsing Docu-
ments” on page 185.
Select the check box Endorse rendered documents (TIFF
images and PDF files) to endorse rendered documents.
Select endorse-
ment template
To endorse rendered documents
(TIFF and PDF), you need to select
an endorsement template. Existing
endorsement templates are included
in the list.
Select an existing template from the list if one fits your
needs.
Create Template You can create an endorsement tem-
plate if necessary.
Select Create Template to create a new endorsement tem-
plate. (See “Create Endorsement Templates” on
page 189.)
Then select the template from the Select endorsement
template list.
Generate TIFF
images from ren-
dered and,
optionally,
endorsed PDF
files
You can generate TIFF images from
the rendered PDF files. If you
selected Endorse rendered docu-
ments (TIFF images and PDF files),
the TIFF images are created from the
endorsed PDF files.
Select the check box Generate TIFF images from ren-
dered and, optionally, endorsed PDF files.
DPI The DPI (dots per inch) determines
the output quality of the generated
TIFF images. If this option is set too
low, the image quality is poor, caus-
ing the text within the image to be
unreadable. If this option is set to the
highest level, 600, the image quality
is excellent, but the file size of each
TIFF image will be larger and addi-
tional processing time will be
required. The default setting of 300 is
most commonly used within Discov-
ery Cracker.
Select an appropriate DPI for your generated TIFF
images.
Table 9.2: U.S. Session Guidelines (Continued)
Label Options Guidelines

AD Summation Discovery Cracker User Guide Postprocessing
142
Include text files
(from Render)
Check box Select the check box Include text files (from Render).
Creates a text file that matches the images if the files have
been rendered.
For single-page
rendered TIFF
images, create a
single text file for
each document
(required by Ring-
tail)
By default, Discovery Cracker cre-
ates a separate text file for each page
of single-page TIFF documents. You
can choose to have the text from all
the pages of a single-page TIFF docu-
ment contained in just one text file.
This is required for the Ringtail
export, but is useful for other exports
as well.
All the text from a multipage TIFF or
PDF document is already in just one
text file.
Select the check box For single-page rendered TIFF
images, create a single text file for each document
(required by Ringtail) if you want all the text from all the
pages of a single-page TIFF document contained in just
one text file.
Include text files
(from All Text if
exists else Body)
Check box Check to generate a text file from a native document with-
out rendering.
Native Document Options
Include original
electronic file doc-
uments
You can package copies of electronic
file documents in their native file for-
mat.
Select the check box Include original electronic file docu-
ments.
Include Outlook
PST
You can package an Outlook PST file
as a single PST file or as separate
MSG files.
Select the check box Include Outlook PST if you are
packaging Outlook PST files.
as a PST file Select the option as a PST file to package the PST file as a
PST file.
NOTE: Do not choose this option for a view that was cre-
ated without regard to family relationships (first option
under Filter Instructions when creating a view). Discovery
Cracker cannot create a new PST from this type of view
since the family relationship has been broken.
as MSG files Select the option as MSG files to package the PST file as
separate MSG files.
Table 9.2: U.S. Session Guidelines (Continued)
Label Options Guidelines

AD Summation Discovery Cracker User Guide Postprocessing
143
Creating an International Session When you create an international session, you follow the same
steps as you would for creating a U.S. session with a few excep-
tions.
To create an international session:
1. Begin session creation. See the “Creating a U.S. Session” on
page 133 for information on how to begin creating your
session.
2. Enter basic information. See the “U.S. Session Guidelines”
on page 134 for information on how to enter basic infor-
mation into the New Post Processing Session dialog.
3. Enter information specific to international numbering. See
the “International Session Guidelines” on page 144 for
information that is specific to international numbering in
the New Post Processing Session dialog.
4. Click Create.
Include attach-
ments to e-file or
e-mail documents
You can package attachments, includ-
ing embedded files, to electronic files,
Outlook documents, or Lotus Notes
documents.
Select the option Include attachments to e-file or e-mail
documents.
Include original
file name as part
of the new file
name
You can include the original file
name along with the document num-
ber to create the new file name for
original e-files and attachments
(ABC00001_[filename].doc). Other-
wise the new file name becomes only
the document number
(ABC0001.doc).
Select the option Include original file name as part of the
new file name.
Table 9.2: U.S. Session Guidelines (Continued)
Label Options Guidelines

AD Summation Discovery Cracker User Guide Postprocessing
144
Table 9.3: International Session Guidelines
Label Explanation Instructions
Criteria
Numbering and Pack-
aging Style
• U.S.
• International
Select U.S. if you are processing a document
in the United States and want to use United
States numbering. Or, select International if
you are processing a document outside of the
United States and want to use international
numbering.
Document Numbering
Use Folder Structure
to Name Files
Check box and drop-down
• Native
• Rendered TIFFs or PDFs
• Text Fi l e
Check to name a specific component with
the folder structure as a prefix to the name of
that component. Then, select either Native,
Rendered TIFFs or PDFs, or Text File.
Start Document Num-
bering at 1 on Every
New Folder Created
Check box Check to start every document number at
one for each new folder. If not checked, then
each document will be numbered sequen-
tially, regardless of whether or not it goes
into a new folder.
Packaging
Party Code Check box Check to include a party code folder. The
folders corresponding to boxes are contained
within the party folder.
(Party Code)Prefix Alphanumeric characters Enter alphanumeric characters to name the
party code.
Box Check box Check to include a box folder level.
(Box)Static Check box Check to choose the box name to be static
rather than dynamic.
(Box)Prefix Numeric character Enter a value for the static. Typically
numeric and three character. The box name
serves two purposes: it is the name of a direc-
tory that contains folders, and it is a compo-
nent in the name of an individual file.
(Box)Type • Folders
• Documents
• Pages
Available if Static is not checked. Select the
type of box that you want to use.

AD Summation Discovery Cracker User Guide Postprocessing
145
Creating a Postprocessing Job After your documents are processed (cracked, rendered, or
both), you create a postprocessing job to:
• Assign numbers to the documents.
• Package files for delivery to your client.
• Endorse rendered documents (TIFF and/or PDF).
• Copy into the All Text field in the database all the data from
the text files that were produced during rendering. This
allows you to include the text file data in an export (see
“Exporting” on page 149).
Before postprocessing, you would typically check the quality of
the processed documents (see “Quality Control” on page 101).
If you don’t want to perform quality control before postprocess-
ing, you can set up a job to include Initial Spin Through, File
Spin Through, Extract Metadata, Render, and Postprocessing
all at one time. However, to include Postprocessing without
performing quality control, you must change some of the post-
processing default settings. When creating a postprocessing ses-
sion, you must select Cracked OR Rendered as Documents to
include (see “Creating a U.S. Session” on page 133). If you use
those postprocessing settings, problem documents will not be
included in your final output.
(Box)Max Value Numeric value Set a maximum number for the type of box
that you selected. After the max number has
been reached, the box number will incre-
ment.
(Box)Start Numeric value Enter the number where you want your box
numbering to begin. This will increment
when the max value has been reached.
(Box)Zero Fill Check box Check to include zero fill.
(Box)Seperator • None
• _ (underscore)
• . (period)
• - (hyphen)
• (space)
You can use a separator to create a visual
break between the different sections of the
Prefix number.
(Box)Padding Numeric value Increase or decrease the padding on the box
number.
Table 9.3: International Session Guidelines (Continued)
Label Explanation Instructions
AD Summation Discovery Cracker User Guide Postprocessing
146
The steps presented in the following procedure assume you are
creating a separate postprocessing job.
To postprocess documents:
Prerequisites:
• Your selection of documents has been cracked, rendered, or
both.
NOTE: Please be aware that FOLDER, PST, and NSF items
(as shown in the Data Panel in the QC Session window) are
not documents that can be postprocessed. These items are
not documents that have been processed. They are con-
tainer items (see “Document Relationships” on page 21 ).
• Your selection may include approved and unapproved docu-
ments.
• Your postprocessing job must include the selection of a post-
processing session. It may also include the selection of the
Populate All Text task.
• You must create a postprocessing session, either prior to cre-
ating the job or during job creation (see the procedure “To
create a U.S. session:” on page 133).
Steps:
1. Create a job from a group or a view.
On the General Job Information tab, complete the job
Description, DC Engine selection, When to run, Job pri-
ority, Job timeout settings.
(If necessary, refer to the instructions for “Creating a Job”
on page 81.)
2. In the Actions To Be Performed area, select Postprocess-
ing.
3. Select Edit Settings to display the Jobs Settings tab.
4. On the Task s pane, select the Document Numbering and
Packaging tab.
5. In the Select a postprocessing session box, select a postpro-
cessing session from the list.
6. If you want to view all the settings for the postprocessing
session, select View Session Details.
The View Session Details dialog box is displayed and pres-
ents read-only information.
AD Summation Discovery Cracker User Guide Postprocessing
147
7. If you want to include the text file data in an export, do the
following:
a. Select the Populate All Text tab.
b. Select the Populate All Text check box.
8. Select Back To Job Creation.
9. On the General Job Information tab, select Create.
The Confirm dialog box is displayed with the question,
“Are you sure?”
10. Select Yes to create the job.
Pausing a Postprocessing Job Discovery Cracker does not allow you to pause a postprocessing
job because doing so could cause problems with document
numbering.
Note: Though you can pause a postprocessing job, you cannot
run two jobs at once.
However, Discovery Cracker may put a postprocessing job into
a Paused state for one of the following reasons:
• When creating a postprocessing job, the job may go into a
Paused state even though you selected to start the job
immediately. This happens if an item in your postprocess-
ing job is currently being processed by another job.
• If you have not provided sufficient digits in the document
numbering scheme to allow for all of your items to be prop-
erly numbered, the postprocessing job will pause and you
will have to create another session.
When creating a postprocessing session, you need to plan
ahead. The Padding fields must be set to accommodate the
entire number of documents and pages in the entire post-
processing session. (See “Creating a U.S. Session” on
page 133.)
AD Summation Discovery Cracker User Guide Postprocessing
148
Note: It is not advisable to create multiple postprocessing jobs
in the same project at the same time if these jobs are created on
separate groups within the same project. You will see that the
second job will be run after the first job has completed the
numbering and sizing portion of the postprocessing action.
This is due to the need to lock the numbering so as not to create
duplicate document numbers or gaps within the numbers.
However, if you attempt to run multiple postprocessing jobs on
the same group at the same time, the second job will receive an
error message and will not be properly created.
The best practice is to not create multiple postprocessing jobs
within the same project at the same time. Allow each
postprocessing job within a project to run to completion before
beginning another.

AD Summation Discovery Cracker User Guide Exporting
149
10. Exporting
You can export metadata files in an appropriate format for your
clients to use with third-party software. Depending on the
export, you also have the option of exporting rendered docu-
ments and native files.
This chapter contains instructions for creating the following
exports:
• Data Delimited Text File Export
• Concordance Viewer Export
• IPRO Export
• Ringtail Export
• AD Summation DII Export
• DocuLex 5 Export
• EDRM XML Export (This export is compliant with the
December 18, 2007, version of the EDRM XML XSD)
NOTES ABOUT EXPORTS:
• Pausing. Discovery Cracker does not allow you to pause an
export job. Pausing an export job could cause problems
with the export text file.
• Saved field sets. The following exports allow you to select
the metadata fields to export: Data Delimited Text File
Export, Ringtail Export, AD Summation DII Export, and
DocuLex 5 Export. You can save the selected fields (also
known as field mappings or field sets). This allows you to
reuse the same set of fields as many times as you like. In
addition, you can create multiple field sets for specific cli-
ents or cases with slight variations.
Saved field sets are available across projects. However, saved
field sets can only be used by the export type for which it
was created.
For instructions, see the specific export in this chapter.
• Export jobs. If you run more than one job of the same type
of export (for example, two AD Summation DII Export
jobs) at the same time within the same project, the jobs will
not run simultaneously; they will run consecutively. How-
ever, multiple exports of different types (for example, one
AD Summation DII Export job and one Concordance
Viewer Export job) will run simultaneously.
AD Summation Discovery Cracker User Guide Exporting
150
Data Delimited Text File Export You can export selected metadata from your documents to a
data delimited text file. You can do this before or after the docu-
ments are postprocessed. For instructions for using Data
Delimited Text File Export before postprocessing, see “Preview
Using Data Delimited Text Files” on page 96.
The following instructions are for using Data Delimited Text
File Export after postprocessing.
To create a data delimited text file export:
Prerequisite:
• You have postprocessed the documents you want to export.
Steps:
1. Create a job from a group or a view.
On the General Job Information tab, complete the job
Description, DC Engine selection, When to run, Job pri-
ority, Job timeout settings.
(If necessary, refer to the instructions for “Creating a Job”
on page 81.)
2. Under Actions to be performed, select Data Delimited
Text Fi l e Exp o r t .
3. Select Edit Settings to display the Jobs Settings tab.
4. On the Data Delimited Text File Export task pane, do one
of the following:
• Select a previously created session (see the procedure “To
select a previously created session:” on page 151).
A document is only exported once per session. It is use-
ful to select an existing session to:
• Do incremental exports as you receive data from
your client.
• Ensure that documents are not exported twice if
you are exporting from a dynamic view.
• Create a new export session (see the procedure “To create
a new export session:” on page 151).
Create a new export session to export documents for
the first time or if you want to export the same docu-
ments again.
5. Select Back To Job Creation.
6. On the General Job Information tab, select Create.
AD Summation Discovery Cracker User Guide Exporting
151
The Confirm dialog box is displayed with the question,
“Are you sure?”
7. Select Yes to create the job.
To select a previously created session:
1. On the Data Delimited Text File Export task pane, from
the Select a session list, select the session you want.
The settings displayed are the ones you chose when you cre-
ated the export session.
2. Change or accept the settings.
3. Select Update Session to save your settings.
4. Continue with step 5 in the procedure “To create a data
delimited text file export:”.
To create a new export session:
1. On the Data Delimited Text File Export task pane, select
Create Session.
The Session Creation dialog box is displayed.
2. Type a name in the Session Name box and, optionally, a
description in the Session Description box, then select Cre-
ate.
3. From the Select a session list, select the session you just cre-
ated.
4. In the Select name and location for the output file box,
accept the path and file name or browse to and select differ-
ent ones.
5. For Select an export type, select After Postprocessing.
6. Make appropriate selections on the rest of the pane. The
minimum selections you need to make are:
• In the Export Configuration area and the Replacement
Characters area:
• The Use Unicode check box is selected by default.
The export is created using Unicode (UTF-16)
encoding.
• If you clear the Use Unicode check box, the export
is created using ASCII encoding. In that case, in
the Replacement Characters area, you need to
select values less than 128 (0-127).
AD Summation Discovery Cracker User Guide Exporting
152
• In the Replacement Characters area, for Unicode or
ASCII encoding, be sure to select different values
for each delimiter.
• In the Documents to Process area, select one of the fol-
lowing options:
• Select all Document in the Selected Session
• Select Specific Folders from this Session
• On the Selected Fields tab, select the fields to be
included in the export file.
• Select Edit Fields to add fields.
• Select Save Fields to save the selected field set for
future data delimited text file exports.
• Select Use Saved Fields to used a previously saved
data delimited text file field set.
• If you plan to import the data back into the Discov-
ery Cracker program, at a minimum you must
select the fields Project_UID and ItemNumber
(they are selected by default). These fields are nec-
essary so that Discovery Cracker can recognize
which project and which items are being
imported.
NOTE: There are three fields in the Available Fields list
in the Field Selector dialog box that allow you to
include the text of the documents you have processed.
These three fields are:
• Body. The Body field contains extracted body text
of the document as identified during extraction of
metadata.
• All Text. The All Text field can contain data from
one of two sources: (1) the OCR text that was cre-
ated during the OCR process, or (2) if you
selected Populate All Text when you postpro-
cessed, data from the text file that Discovery
Cracker created when it rendered the document.
• All Text if Exists Else Body. The All Text if Exists
Else Body field is a conditional field. If the All
Text field is empty, Discovery Cracker will use the
text in the Body field. You may want to select this
field because you may not render or perform
OCR on every document.
• On the Postprocessing tab:
• If you selected Select all Documents in the Selected
Session in the Documents to Process area:
AD Summation Discovery Cracker User Guide Exporting
153
From the Select a Postprocessing session list, select
the session that you want to export. By default, all
documents in the session will be exported.
• If you selected Select Specific Folders from this Ses-
sion in the Documents to Process area:
From the Select a Postprocessing session list, select
the session you want to export.
From the Select volumes to export list, select the
volumes/boxes/folders you want to export.
7. When you have finished making your settings, select
Update Session to save the settings.
8. Continue with step 5 in the procedure “To create a data
delimited text file export:”.
Concordance Viewer Export You can export images of your documents to a file that can be
loaded into Concordance for use with the Opticon viewer.
To create a Concordance Viewer export:
Prerequisite:
• You have postprocessed the documents you want to export.
Steps:
1. Create a job from a group or a view.
On the General Job Information tab, complete the job
Description, DC Engine selection, When to run, Job pri-
ority, Job timeout settings.
(If necessary, refer to the instructions for “Creating a Job”
on page 81.)
2. Under Actions to be performed, select Concordance
Viewer Export.
3. Select Edit Settings to display the Jobs Settings tab.
On the Concordance Viewer Export task pane, do the fol-
lowing:
4. From the Select a Postprocessing session list, select a post-
processing session to export.
5. From the Select volumes to export list, select the volumes
you want to export.
AD Summation Discovery Cracker User Guide Exporting
154
6. In the Select name and location for the output file box,
accept the path and file name or browse to and select differ-
ent ones.
The export file will contain the full path to the rendered
documents in the Volumes folder.
7. Select Back To Job Creation.
8. On the General Job Information tab, select Create.
The Confirm dialog box is displayed with the question,
“Are you sure?”
9. Select Yes to create the job.
IPRO Export You can export your documents to a file that can be loaded into
IPRO.
To create an IPRO export:
Prerequisite:
• You have postprocessed the documents you want to export.
Steps:
1. Create a job from a group or a view.
On the General Job Information tab, complete the job
Description, DC Engine selection, When to run, Job pri-
ority, Job timeout settings.
(If necessary, refer to the instructions for “Creating a Job”
on page 81.)
2. Under Actions To Be Performed, select IPRO Export.
3. Select Edit Settings to display the Jobs Settings tab.
On the IPRO Export task pane, do the following:
4. From the Select a Postprocessing session list, select a post-
processing session to export.
5. From the Select volumes to export list, select the volumes
you want to export.
6. In the Select name and location for the output file box,
accept the path and file name or browse to and select differ-
ent ones.
The IPRO export file will contain information such as the
volume name and location of rendered documents in the
Volumes folder.
AD Summation Discovery Cracker User Guide Exporting
155
7. Select Back To Job Creation.
8. On the General Job Information tab, select Create.
The Confirm dialog box is displayed with the question,
“Are you sure?”
9. Select Yes to create the job.
Ringtail Export You can export your documents to a file that can be loaded into
Ringtail.
To create a Ringtail export:
Prerequisites:
• You have postprocessed the documents you want to export.
• When creating a postprocessing session, you must select the
option Create a single text file for each document
(required by Ringtail).
Steps:
1. Create a job from a group or a view.
On the General Job Information tab, complete the job
Description, DC Engine selection, When to run, Job pri-
ority, Job timeout settings.
(If necessary, refer to the instructions for “Creating a Job”
on page 81.)
2. Under Actions To Be Performed, select Ringtail Export.
3. Select Edit Settings to display the Jobs Settings tab.
On the Ringtail Export task pane, you see the following
tabs:
• Document Number Selection
• Extra Table
• Party Table (not available unless you select Populate
Party Table on the Document Number Selection tab)
• Populate Levels (not available unless you select Populate
level structure on the Extra Table tab)
• Format Options
4. On the Document Number Selection tab, set the following
parameters:
a. In the Select Session and Volumes area:
AD Summation Discovery Cracker User Guide Exporting
156
• In the Select a Postprocessing session list box, select
the postprocessing session that you wish to per-
form the export for.
• In the Select a volume to export box, select the
appropriate volume to export.
b. In the Export Options area:
• The Output Location box displays by default the
previously selected output location for your proj-
ect. To change the location, select the down arrow
to browse to and select a new location.
• In the Compatibility list box, select the appropriate
Ringtail compatibility format.
• The Populate Export Extra table check box is
selected by default. Accept the setting if you wish
to have extra metadata populated in the Export
Extras table of the Ringtail database. With the
check box selected, the Extra Table tab and the
Format Options tab are available.
• Select the Populate Party Table check box if you
wish to populate the Parties table of the Ringtail
database. Selecting the check box makes the Party
Table tab available for you to select which fields to
use.
5. On the Extra Table tab, you can select the Discovery
Cracker fields to use to populate the Export table and the
Export Extras table of the Ringtail database. You can also
select settings to customize the data.
a. In the Customize Export Table area:
• Populate Document_Date - Accept or clear the
check box. Preset to use the CreationTime field. If
selected, you can choose another field to use for
this value.
• Populate Document_Type - Accept or clear the
check box. If selected, will populate the Ringtail
database Document_Type property with the value
stored in the RecordType field.
• Populate Title - Accept or clear the check box. Pre-
set to use the FileDisplayName field. If selected,
you can choose another field to use for this value.
• Populate Description - Accept or clear the check
box. Preset to use the RecordType field. If
AD Summation Discovery Cracker User Guide Exporting
157
selected, you can choose another field to use for
this value.
• Populate level structure - Select the check box to
create a folder structure specifically for use within
Ringtail. If selected, the Populate Levels tab
becomes available to allow you to choose the for-
mat of the folder structure.
• Create Host-Reference - Accept or clear the check
box. Allows you to keep the parent-child relation-
ship in tact during the creation of folder levels.
• Convert date fields to text - Select the check box to
change the format for dates, which is a date for-
mat by default, to a text format.
b. In the Export Extra Table area you can select addi-
tional fields to export. The fields will go into the Ring-
tail Export Extras table.
If you selected the Populate Export Extra table check
box on the Document Number Selection tab, you
must select at least one field. By default, the AuthorE-
mail field is selected.
• Select Select Fields to add or remove fields.
• Select Save Fields to save the selected field set for
future Ringtail exports.
• Select Use Saved Fields to use a previously saved
Ringtail field set.
NOTE: There are three fields in the Available Fields list
in the Field Selector dialog box that allow you to
include the text of the documents you have processed.
These three fields are:
• Body. The Body field contains extracted body text
of the document as identified during extraction of
metadata.
• All Text. The All Text field can contain data from
one of two sources: (1) the OCR text that was cre-
ated during the OCR process, or (2) if you
selected Populate All Text when you postpro-
cessed, data from the text file that Discovery
Cracker created when it rendered the document.
• All Text if Exists Else Body. The All Text if Exists
Else Body field is a conditional field. If the All
Text field is empty, Discovery Cracker will use the
text in the Body field. You may want to select this
AD Summation Discovery Cracker User Guide Exporting
158
field because you may not render or perform
OCR on every document.
6. On the Party Table tab, you can select the information to
include in the Parties table of the Ringtail database. Some
fields are preselected. They are SentTo, CC, BCC, Author-
Name and Recipients.
If you wish to add or remove fields, select Select Fields to
display the Field Selector dialog box. Make your desired
selections.
You can also select whether or not to split the values into
separate records if more than one party exists for any one
field. You can also determine the delimiter that Discovery
Cracker should look for to determine whether or not more
than one party exists. For example, if within the data being
processed you have an e-mail message that contains dc.sup-
port@accessdata.com; james.smith@anycompany.com;
henry.jones@anycompany.com as e-mail addresses in the
CC field, and you want to separate these individuals into
separate records within the Parties table, you would choose
the CC field. Select the check box in the Split Values col-
umn, and then select the semi-colon (;) character as the
delimiter.
7. On the Populate Levels tab, you can select the format of
the levels that are created when performing the Ringtail
export. You can also create your own custom level structure.
a. In the Level Options area, make the following settings:
• Name files according to level structure - Select the
check box to name the TIFF, PDF, text, and
native files using the level structure that you have
determined. This will override the previous docu-
ment number that you may have selected for these
files.
• Export rendered TIFF files - Select the check box to
include the rendered and/or generated TIFF
images in the Ringtail folder structure.
• Export rendered PDF files - Select the check box to
include the rendered PDF files in the Ringtail
folder structure.
• Export text files - Select the check box to include
the text files in the Ringtail folder structure
AD Summation Discovery Cracker User Guide Exporting
159
• Export native documents - Select the check box to
include the native files in the Ringtail folder
structure.
• Folder name length - Determines the maximum
number of characters that will be used for a folder
name. This will allow for any folder to be named
numerically, but also keep the numeric padding in
tact for proper sort order. This will also prevent
folders from being named with a folder name
length greater than the specified number of char-
acters. Therefore, if you happen to have a lot of
data to put into a folder structure, please choose
the number of characters wisely. If not enough
characters are chosen, you could have problems
exporting to the Ringtail folder structure.
• Page number length - Determines the maximum
number of characters that will be used for a TIFF
or PDF name page counter.
b. In the Custom Levels area, you can create your own
custom level structure which is used by Ringtail to
show a hierarchy within their program.
To create a custom level structure, you type entries or
make selections in the New level label box. When you
type folder names, you create your own structure.
When you make selections, you create a folder struc-
ture based on the current or past location of the files.
The predefined options are:
[VOLUMENAME] - Uses the Volumes folder struc-
ture after postprocessing is complete.
[SUBFOLDER] - Uses the husbanders within each
volume after postprocessing is complete.
[PATH] - Uses the original file path location of the
documents before processing was initiated. If the docu-
ments were inside a PST or an NSF store file, the
PATH will show the folder structure within the PST or
NSF.
• In the New level label box, type a folder name or
select a predefined option.
• Select Add New Level.
Your folder is added to the Custom Levels box.
AD Summation Discovery Cracker User Guide Exporting
160
• Continue typing folder names or selecting options
in the New level label box and selecting Add New
Level to build a folder structure.
The hierarchy is displayed in the Custom Levels
box.
• To remove a folder, you need to remove any sub-
folders below it. Select Remove Last Level to
remove, in order of hierarchy, each folder until
you remove the desired folder. You then need to
rebuild the folder structure from the last remain-
ing folder.
8. On the Format Options tab, the following settings are
selected by default:
• Replace null characters with blank - During the collec-
tion of metadata, some fields are not populated and
Discovery Cracker leaves the field with a null character.
This causes problems in the Ringtail database. Using
this option prevents the problems with null characters.
• Replace invalid date with - During the collection of
metadata, some date fields may be collected with
invalid dates. One such date is the Microsoft default
value of 1/1/4501. To replace this date, select the
option and type in the date of your choice. By default,
Discovery Cracker replaces invalid dates with 01-Jan-
1901; however, you can use a different date.
• Create a new database if total page count is more than -
Some of the older Ringtail database formats have prob-
lems when a database exceeds a certain size. Using this
option, you can create multiple databases based on
your choice of limit within a database. By default, Dis-
covery Cracker creates a new Ringtail database if your
data exceeds 20,000 pages (TIFF images or PDF files).
9. Select Back To Job Creation.
10. On the General Job Information tab, select Create.
The Confirm dialog box is displayed with the question,
“Are you sure?”
11. Select Yes to create the job.
AD Summation DII Export You can export your data to a DII file that can be loaded into
one of the other AD Summation products. You export before
postprocessing to use a AD Summation product as a preview

AD Summation Discovery Cracker User Guide Exporting
161
tool. You export after postprocessing to use a AD Summation
product as a review tool.
To create a AD Summation DII export:
Prerequisites:
• For Class 1 exports
• You have processed the documents through the Initial
Spin Through, File Spin Through, Extract Metadata,
and Render actions. The documents were rendered in
the TIFF image and text file format. AD Summation
iBlaze, WebBlaze, and Enterprise do not accept docu-
ments rendered in the PDF file format.
• You have postprocessed the documents.
• You selected the appropriate packaging options for
attachments and PST files during postprocessing in
order to put the files in the correct location. (See “Cre-
ating an International Session” on page 143.) Discovery
Cracker uses the relative path for attachments and elec-
tronic files for postprocessed data.
• For Class 2 exports
• You have processed the documents through the Initial
Spin Through, File Spin Through, and Extract Meta-
data actions. (They don’t have to be postprocessed.)
• For Class 3 exports
• You have processed the documents through the Initial
Spin Through, File Spin Through, Extract Metadata,
and, optionally, Render actions. If rendered, the docu-
ments were rendered in the TIFF image and text file
format. AD Summation iBlaze, WebBlaze, and Enter-
prise do not accept documents rendered in the PDF file
format.
• You have postprocessed the documents.
NOTE: For information about the AD Summation DII/eDII file,
please refer to the AD Summation DII/eDII Guide, A Guide for
Service Bureaus. You can download a copy from http://
www.summation.com/Support/download/
CTSum_DII_EDII_Guide.pdf
Steps:
1. Create a job from a group or a view.
AD Summation Discovery Cracker User Guide Exporting
162
On the General Job Information tab, complete the job
Description, DC Engine selection, When to run, Job pri-
ority, Job timeout settings.
(If necessary, refer to the instructions for “Creating a Job”
on page 81.)
2. Under Actions To Be Performed, select AD Summation
DII Export.
3. Select Edit Settings to display the Jobs Settings tab.
The AD Summation DII Export task pane is displayed.
4. On the DII Selection tab:
a. In the Select DII Class area, select one of the following
options:
• Class 1: Converted Images and Text
Use Class 1 for documents that have been rendered
to TIFF images and text files and then postpro-
cessed.
• Class 2: Native Files
Use Class 2 for nonpostprocessed documents that
have been processed through the Initial Spin
Through, File Spin Through, and Extract Meta-
data actions. This class export is commonly used to
deliver a metadata load file to a AD Summation
product end-user for the purposes of culling down
the number of documents that are needed for a
case. This export will allow you to create a AD
Summation DII file with the required metadata
fields and create a copy of the PST and/or attach-
ments that are a part of the exported data. This
export does not include NSF files or native elec-
tronic files.
• Class 3: Combined Native and Converted
Use Class 3 for native documents that have been
postprocessed and for documents that have been
rendered to TIFF images and text files and then
postprocessed.
b. Monitor record size to be less than (in KB)
Select the check box to limit the size of each record.
Your choices are 64 or 32.
c. Monitor DII file size to be less than (in KB
AD Summation Discovery Cracker User Guide Exporting
163
Select the check box to limit the DII file size to a speci-
fied number of kilobytes. If you select the check box,
be sure to select a file size; your choices are 100, 200,
500, 1000. If you leave the default of 0, you will get a
blank DII file.
d. Use document separator
This applies to Class 3 exports only. Select the check
box if you use a separator in the naming of native files.
For example, if you package your documents using the
original file name as part of the new packaged name,
you may want to select this option so that the name of
the file can be parsed at the underscore (_). (See“Creat-
ing an International Session” on page 143.)
e. Select name and location for the output file
Accept the path and file name for the output files or
browse to and select different ones.
5. On the Select Sessions tab:
For Class 1 or Class 3, you need to select the data to export.
You can select all the documents in a postprocessing session
or the documents in only specific volumes of the postpro-
cessing session.
For Class 2, this tab is not available. All the metadata from
the group or view from which you created the job will be
exported.
At the bottom of the Select Sessions tab, select one of the
following options:
• Select a Postprocessing session
If you select this option, from the Select a Postprocess-
ing session list at the top of the Select Sessions area,
select the Postprocessing session that you want to
export. By default, all documents in the session will be
exported.
• Select volumes to export
If you select this option, from the Select a Postprocess-
ing session list at the top of the Select Sessions area,
select the Postprocessing session that you want to
export. Then from the list in the Select volumes to
export box, select the volumes you want to export.
• Populate full text
AD Summation Discovery Cracker User Guide Exporting
164
Select the check box to add the token @FULLTEXT
Page or @FULLTEXT Doc to your DII file.
• Use relative file location options
Select the check box to replace the distinct file path
location with a relative file path location. Select @I to
use the @I token or @V to use the @V token.
• Use iterator to reduce size
Select the check box to list multiple TIFF pages in a
single line rather than list each TIFF page as a separate
entry.
6. On the Map Default Fields tab:
This tab is available for Class 2 and Class 3 exports only.
• Select the default field mappings or make adjustments.
• You can also select additional fields to include in your
export.
• Select Select Additional Fields to add fields.
• Select Save Fields to save the selected field set for
future AD Summation DII file exports.
• Select Use Saved Fields to used a previously saved
AD Summation DII file field set.
NOTE: For Class 2, do not select fields that are popu-
lated during postprocessing. BegDoc, EndDoc, and
PackagedFileName are examples of fields that are only
populated during postprocessing.
7. On the Mapped Field Settings tab:
This tab is available for Class 2 and Class 3 exports only.
• Remove invalid date (01/01/4501 or any irregular date)
Select the check box to replace the default Microsoft
date of 01/01/4501 with a blank entry.
• Find and Replace CR with CR and LF for Body and
Body Comment Fields
Select the check box to replace a single carriage return
that exists without a line feed character with a carriage
return and line feed character.
• Populate @O token for eDoc and Attachment
This check box is available for Class 3 exports only.
Select the check box to place the text files produced
during render into a folder called OCR Base.
• Use relative path for @O token
AD Summation Discovery Cracker User Guide Exporting
165
This check box is available for Class 3 exports only
when the Populate @O token for eDoc and Attach-
ment check box is selected.
Select the check box to populate the @O token with a
relative path rather than a distinct path to the OCR
Base folder.
• Populate @OCR token for eDoc and Attachment
Select the check box to place the searchable text into
the DII file rather than use the text files that were pro-
duced during render.
Select one of the following options:
• Body. The Body field contains extracted body text
of the document as identified during extraction of
metadata.
• All Text. The All Text field can contain data from
one of two sources: (1) the OCR text that was cre-
ated during the OCR process, or (2) if you
selected Populate All Text when you postpro-
cessed, data from the text file that Discovery
Cracker created when it rendered the document.
• All Text if Exists Else Body. The All Text if Exists
Else Body field is a conditional field. If the All
Text field is empty, Discovery Cracker will use the
text in the Body field. You may want to select this
field because you may not render or perform
OCR on every document.
• Replace original path with the following path for
@EDoc token
Select the check box to replace the existing path to the
packaged native files with a substitute path.
NOTE: We do not recommend selecting this check box
for Class 2 exports because Discovery Cracker does not
actually copy files to the Export folder for eDocs for
nonpostprocessed data.
• Select Time Zone
Select the check box to adjust the time stamps on the
metadata to another time zone. This is usually benefi-
cial if your project was processed in one time zone but
the data being exported should belong to another time
zone. This will not affect any TIFF images produced
with the original project time zone.
AD Summation Discovery Cracker User Guide Exporting
166
• Maintain Parent-Child Relationship
Select the check box to keep the parent and children
documents as one family of documents.
• Use Unicode
Select the check box if you want the export to be Uni-
code compliant. The export is created using Unicode
(UTF-16) encoding. If not selected, the export is cre-
ated using ASCII encoding. A Unicode file is larger
than an ASCII file.
• Volumize PSTs
This check box is available for Class 2 exports only.
Select the check box to package your PST files. Discov-
ery Cracker uses an absolute path to the Export folder.
Your DII file will have a path similar to this: \\Main
File Server\Projects\My Project\Export\Archive.pst.
• Use relative path for @PSTFile Token
This check box is available for Class 2 exports only
when the Volumize PSTs check box is selected.
Select the check box to use a relative path to the Export
folder for your packaged PST files.
• Use the following PST ID
This check box is available for Class 2 exports only
when the Volumize PSTs check box is selected.
Select the check box to replace the existing PST ID
with an alternative ID.
• Volumize Attachments
This check box is available for Class 2 exports only.
Select the check box to package your attachment files.
Discovery Cracker uses a relative path to the Export
folder.
• Sort By Parent
This check box is available for Class 2 exports only.
Select the check box to sort the records by a specific
field of the parent document before creating the export.
Select Select Parent Sort Fields to select the fields to
sort by and the direction by which to sort, ascending or
descending.
8. On the Select Documents tab:
This tab is available for Class 2 exports only.

AD Summation Discovery Cracker User Guide Exporting
167
• Select documents to include in the export. Your options
are:
• Active, Inactive, or Both Active and Inactive
• Problem, Non-problem, or Both Problem and
Non-problem
• Cracked, Uncracked, or Both Cracked and
Uncracked
9. When you have finished setting all parameters, select Back
to Job Creation.
10. On the General Job Information tab, select Create.
The Confirm dialog box is displayed with the question,
“Are you sure?”
11. Select Yes to create the job.
DocuLex 5 Export If you want to use a DocuLex 5 export, you need to render your
documents to TIFF images using the single-page output format
(see page 240 in Appendix A, “Task Settings”). Also, for docu-
ment numbering, you need to use only the page by number
option (see page 127 in Chapter 9, “Postprocessing”).
Complete instructions for this topic were not available prior to
the release of the Discovery Cracker program. If you need assis-
tance, please contact Product Support at 866-833-5377 or
dc.support@accessdata.com.
EDRM XML Export You can export your documents to an EDRM XML-compliant
file that can be loaded into applications that accept such files,
such as AD Summation Enterprise Data Manager for use with
AD Summation Enterprise version 2.6.
The Discovery Cracker EDRM XML file is compliant with the
December 18, 2007, version of the EDRM XML XSD (see
“Discovery Cracker and EDRM” on page 23).
To create an EDRM XML export:
Prerequisites:
• You have processed or postprocessed the documents you
want to export.
• To use the option Export metadata and rendered output,
you must postprocess the documents first.
AD Summation Discovery Cracker User Guide Exporting
168
Steps:
1. Create a job from a group or a view.
On the General Job Information tab, complete the job
Description, DC Engine selection, When to run, Job pri-
ority, Job timeout settings.
(If necessary, refer to the instructions for “Creating a Job”
on page 81.)
2. Under Actions To Be Performed, select EDRM XML
Export.
3. Select Edit Settings to display the Jobs Settings tab.
The EDRM XML Export task pane is displayed.
4. In the What to Export area, make the following settings:
a. Select one of the following options:
• Export metadata only - Select this option to export
metadata only.
• Export metadata and rendered output - Select this
option to export metadata, TIFF images, and
PDF files.
If you select Export metadata only, no other settings are
available in the What to Export area. All the metadata from
the group or view from which you created the job will be
exported. Native documents will not be exported.
If you select Export metadata and rendered documents:
b. From the Select a Postprocessing session list, select the
Postprocessing session that you want to export. By
default, all documents in the session will be exported.
c. If you want to export documents only in selected vol-
umes of the Postprocessing session, select the option
Export documents in the selected volumes only. Then
from the Select volumes to export list, select the vol-
umes you want to export.
d. Include the native documents - Select this check box
to include native documents in the export.
5. In the How to Export area, set the following parameters:
a. Use Unicode - Select this check box if you want the
XML file to be Unicode compliant. The export is cre-
ated using Unicode (UTF-16) encoding. If not
AD Summation Discovery Cracker User Guide Exporting
169
selected, the export is created using ASCII encoding. A
Unicode file is larger than an ASCII file.
b. Select time zone - Select a time zone from the list. The
date of the exported metadata will be converted to the
time zone you select.
c. Select a field containing searchable text - From the list,
select a field that contains the searchable text you want
to export. The choices are:
• Body. The Body field contains extracted body text
of the document as identified during extraction of
metadata.
• All Text. The All Text field can contain data from
one of two sources: (1) the OCR text that was cre-
ated during the OCR process, or (2) if you
selected Populate All Text when you postpro-
cessed, data from the text file that Discovery
Cracker created when it rendered the document.
• All Text if Exists Else Body. The All Text if Exists
Else Body field is a conditional field. If the All
Text field is empty, Discovery Cracker will use the
text in the Body field. You may want to select this
field because you may not render or perform
OCR on every document.
6. In the Where to Export area, in the Select a name and loca-
tion for the output file box, accept the path and file name
or browse to and select different ones.
7. Select Back To Job Creation.
8. On the General Job Information tab, select Create.
The Confirm dialog box is displayed with the question,
“Are you sure?”
9. Select Yes to create the job.

AD Summation Discovery Cracker User Guide Paper Printing
170
11. Paper Printing
The AD Summation Discovery Cracker program allows you to
print paper copies of TIFF images and PDF files after they are
postprocessed (assigned numbers and packaged). The TIFF
images can be produced from the Render action or generated
from rendered PDF files during postprocessing.
When you print paper copies, you can include separator pages,
which are inserted between each document. You can choose to
have the separator pages display information that is custom
wording or document metadata. You can choose to use a differ-
ent color for the separator pages so the document breaks are eas-
ier to see. To use separator pages, you need to create at least one
separator template.
The Discovery Cracker program can endorse the paper copies in
the top margin (header) and in the bottom margin (footer) of
the document pages with custom wording, such as “Confiden-
tial,” or with metadata, such as the document number. To
endorse printed pages, you need to create at least one endorse-
ment template.
NOTE: There are two ways to print a document with endorse-
ments.
• Endorse the rendered document during packaging, then
print the document. This method includes category
endorsements. See Chapter 13, “Endorsing Documents,”
on page 185.
• Print an unendorsed document using an endorsement tem-
plate. This method does not include category endorse-
ments.
If documents were endorsed during packaging, you proba-
bly don’t want to use an endorsement template when print-
ing. You can end up with double endorsements.
Separator and endorsement templates are considered reference
files. You can create them from the Admin menu, Manage Ref-
erence Files or from the Print Project Volumes dialog box. For
instructions, see the procedure “To add a reference file:” on
page 53.
Printing is done at the project level.
AD Summation Discovery Cracker User Guide Paper Printing
171
To print paper copies of documents:
Prerequisite:
• You must have documents that have been postprocessed
(assigned numbers and packaged). See Chapter 9, “Postpro-
cessing,” on page 127.
Steps:
1. Select a project in the navigation pane of Discovery Cracker
Console and right-click.
2. Select Print Project Volumes.
The Print Project Volumes dialog box is displayed.
3. Select a Postprocessing session from the list in the Select a
Postprocessing session box.
The session and the volume folders are displayed with
check boxes.
4. Select the items you want to print.
• To print all the volume folders in the session and their
contents, select the session.
• To print all the subfolders in the volume folder and their
contents, select a volume folder.
• To print all the TIFF images and/or PDF files in the sub-
folders, expand the volume folders and then select sub-
folders.
• To print individual TIFF images and/or PDF files,
expand the subfolders and then select the files you
want.
5. If you want each document to be separated by a separator
page, select a template from the list in the Select a separator
template box or select Create New to create a template.
6. If you want each page of the documents to be endorsed,
select a template from the list in the Select an endorsement
template box or select Create New to create a template.
7. Select Print.
The Print Settings dialog box is displayed.
8. Select a printer and make other selections as necessary.
If you want to use a different color of paper for separator
pages, be sure to select the appropriate paper tray in the
Separator Form area.
9. Select Print.
The Discovery Cracker program prints the documents.

AD Summation Discovery Cracker User Guide Performing Optical Character Recognition
172
12. Performing Optical Character Recognition
Discovery Cracker can perform optical character recognition
(OCR) on image files. The OCR process translates images of
text on an image file into actual text characters. That makes it
possible to search and export the text displayed on image files.
This chapter explains the following:
• About OCR in Discovery Cracker
• Storage of OCR Text
• Setting OCR Options
• Setting Options to Perform the OCR Process on Native
Image Documents
• Setting Options to Perform the OCR Process on Ren-
dered TIFF Images
• Setting Timeout Values for Performing OCR
• Creating Views Using OCR Text
• Increasing the Accuracy of OCR Text
• Checking OCR Text in a QC Session
• View OCR text
• Replace OCR Text
• Delete OCR Text
• Selecting Text to Export
About OCR in Discovery
Cracker
Discovery Cracker can perform OCR only on image files that
are one of the following file types. The following are supported
image file types for OCR:
• Windows Bitmap (BMP)
• Joint Photographic Experts Group (JPEG)
• Portable Network Graphics (PNG)
• Tagged Image File Format (TIFF)
• Windows Media Photo
• Graphics Interchange Format (GIF)
NOTE: Portable Document Format (PDF) is not a supported file
type for OCR. You cannot choose to perform the OCR process
on PDF files in Discovery Cracker, whether those files are
searchable or nonsearchable (image-only).
If a document is an OCR-supported image file type, Discovery
Cracker performs OCR on the native file. OCR takes place as
part of the Extract Metadata action.
AD Summation Discovery Cracker User Guide Performing Optical Character Recognition
173
If a document is an OCR-unsupported file type, OCR takes
place as part of the Render action. That is because you can ren-
der the document to a TIFF image, which is an OCR-sup-
ported image file type, and then Discovery Cracker can perform
OCR on the rendered TIFF image as part of the same Render
action. (You don’t need to run two separate jobs using the Ren-
der action.)
The OCR process produces plain ASCII text. It does not retain
text formatting, such as bold, italics, font selection, font size,
etc.
Please be aware that running the OCR process slows down the
overall processing speed.
Storage of OCR Text Discovery Cracker places the text produced during the OCR
process (OCR text) in the All Text field of the IntItems table of
the project database. This is true for the OCR text produced
during the Extract Metadata action and the Render action.
In addition, when OCR is performed during the Render action,
you can also choose to have the OCR text placed in a text file.
All Text Field Considerations The OCR text is stored in only one database field, the All Text
field. To delete OCR text for a document, you need to redo the
OCR process without the OCR option selected.
Because of this design, you need to exercise caution when select-
ing the OCR option. If you choose to perform OCR during the
Extract Metadata action on a selection of documents and you
render the same documents, you also need to perform OCR
during the Render action. Otherwise, the OCR text in the All
Text field produced during Extract Metadata will be lost.
Text File Considerations The OCR text file is located in the Images folder and will over-
write the text file created when the native document was ren-
dered to a TIFF image.
Text files will be empty when they are created from rendered
documents that were originally images or other nonsearchable
documents. So you want the OCR process to overwrite the
empty text file with a file containing text.
AD Summation Discovery Cracker User Guide Performing Optical Character Recognition
174
However, you may not want to overwrite the text files of ren-
dered documents that were not images or nonsearchable docu-
ments. To prevent the OCR process from overwriting those text
files, you must select the check box Create OCR text from
images that have a corresponding text file size of 0 KB on the
OCR Options task tab of the Render action. For more informa-
tion, see step 5.a on page 176.
To enable the creation of an OCR text file:
1. In the [System, Folder, Project, Group, View, or Job] Set-
ting dialog box, select the Render action.
2. Select the document type group.
3. In the Tas k pane, select the Document Rendering task tab.
4. Select the Enable text file output check box.
5. If you want to apply this setting to additional document
type groups, select Select Additional Document Type
Groups while you are still on the tab.
NOTE: Be sure the setting is appropriate for the additional
document type groups you select.
Setting OCR Options You set OCR options in the [System, Folder, Project, Group,
View, or Job] Settings dialog box, on the OCR Options task
tab of the Extract Metadata action and of the Render action.
You can also set OCR timeout values.
These settings are explained in the following topics:
• Setting Options to Perform the OCR Process on Native
Image Documents
• Setting Options to Perform the OCR Process on Rendered
TIFF Images
• Setting Timeout Values for Performing OCR
Setting Options to Perform the OCR
Process on Native Image Documents
You can choose to perform the OCR process on native docu-
ments (that are supported image file types) to produce search-
able text from nonsearchable documents. To do this, you set
OCR options in the Extract Metadata action.
To set OCR options for native image documents:
1. In the [System, Folder, Project, Group, View, or Job] Set-
tings dialog box, select the Extract Metadata action. (See
AD Summation Discovery Cracker User Guide Performing Optical Character Recognition
175
“Setting Task Settings” on page 61 or “Creating a Job” on
page 81.)
2. Select a document type group.
3. In the Tas ks pane, select the OCR Options tab.
4. Select the Create OCR text from native image documents
check box to turn on the OCR process.
5. Make selections for the following settings:
a. Straighten skewed image before creating OCR text
Select this check box to increase the accuracy of identi-
fying the text on a slightly skewed image of a document
(the text appears at an angle that is slightly off perpen-
dicular to the page).
b. Recognize language as
Select one of the following options: English, Spanish,
French, German, Italian, Portuguese, Danish, Dutch,
Norwegian, and Swedish.
English is the default setting. If you are processing doc-
uments written in one of the other languages in the list,
select the appropriate language.
NOTE: Discovery Cracker recognizes only one language
during one job. It will perform OCR on all the image
files in the same job using the language option you
select.
c. Recognize text type as
Select Tex t or Numeric.
Text is the default setting. This setting enables the rec-
ognition of characters as letters, numbers, or punctua-
tion marks. However, if you are processing documents
that are predominantly numbers, setting OCR to
Numeric increases the accuracy of recognizing charac-
ters as numbers.
d. Recognize page content as
Select Tex t o nly or Pictures and text.
Text o n ly is the default setting. With this setting, Dis-
covery Cracker attempts to recognize only the text on a
page outside of pictures (if there are any). With the Pic-
tures and text setting, the OCR process attempts to
recognize text (if there is any) in pictures that may be

AD Summation Discovery Cracker User Guide Performing Optical Character Recognition
176
on the page in addition to the text on the rest of the
page. The Pictures and text setting takes longer to pro-
cess that the Te xt on l y setting.
Setting Options to Perform the OCR
Process on Rendered TIFF Images
You can choose to perform the OCR process to produce search-
able text from nonsearchable documents that are OCR-unsup-
ported image file types. You do this during the Render action by
selecting the TIFF image output type and the OCR options for
rendered TIFF images. Discovery Cracker renders and performs
OCR during the same job. You don’t need to run two separate
jobs using the Render action.
To set OCR options for rendered TIFF images:
1. In the [System, Folder, Project, Group, View, or Job] Set-
tings dialog box, select the Render action. (See “Setting
Task Settings” on page 61 or “Creating a Job” on page 81.)
2. Select the document type group for which you want to run
OCR. (See “Managing Document Type Groups” on
page 44.)
3. In the Tas k pane, select the OCR Options tab.
4. Select the check box Create OCR text from rendered TIFF
images to turn on the OCR process.
5. Make selections for the following settings:
a. Create OCR text from images that have a correspond-
ing text file size of 0 KB
Select this check box to perform OCR only on TIFF
images that were originally image files.
NOTE:
• To use this setting, you must also select the check
box Enable text file output on the Document
Rendering task tab of the Render action. Selecting
that check box creates a text file when a document
is rendered to a TIFF image.
Caution! If you perform OCR during the Extract Metadata action, if you select the Render action
in the same job or a future job on the same documents, you must also perform OCR during Render,
or OCR data collected during metadata extraction will be lost.
AD Summation Discovery Cracker User Guide Performing Optical Character Recognition
177
• The 0 KB text file size indicates that the rendered
file was originally an image, having no text to
insert in the text file.
• Select this check box if you want to ensure that
OCR is not performed on documents needlessly,
since performing OCR slows down processing
speed.
• When this check box is cleared, the OCR process
runs on all rendered TIFF files. The resulting
OCR-created text file will replace the text file cre-
ated when the original native document was ren-
dered, if the Enable text file output check box is
selected.
You may want to perform OCR on all TIFF files of
rendered documents. For example, there may be an
image embedded in a Microsoft Word document.
Performing OCR on the TIFF image of the docu-
ment will capture the text in the image in addition
to the text of the document. The OCR-created text
file will replace the render-created text file.
NOTE: Since OCR accuracy is not 100%, the text
in an OCR-created text file may not be as accurate
as the text in the original render-created text file.
b. Straighten skewed image before creating OCR text
Select this check box to increase the accuracy of identi-
fying the text on a slightly skewed image of a document
(the text appears at an angle that is slightly off perpen-
dicular to the page).
c. Recognize language as
Select one of the following options: English, Spanish,
French, German, Italian, Portuguese, Danish, Dutch,
Norwegian, and Swedish.
English is the default setting. If you are processing doc-
uments written in one of the other languages in the list,
select the appropriate language.
NOTE: Discovery Cracker recognizes only one language
during one job. It will perform OCR on all the image
files in the same job using the language option you
select.
d. Recognize text type as

AD Summation Discovery Cracker User Guide Performing Optical Character Recognition
178
Select Tex t or Numeric.
Text is the default setting. This setting enables the rec-
ognition of characters as letters, numbers, or punctua-
tion marks. However, if you are processing documents
that are predominantly numbers, setting OCR to
Numeric increases the accuracy of recognizing charac-
ters as numbers.
e. Recognize page content as
Select Tex t o nly or Pictures and text.
Text o n ly is the default setting. With this setting, Dis-
covery Cracker attempts to recognize only the text on a
page outside of pictures (if there are any). With the Pic-
tures and text setting, the OCR process attempts to
recognize text (if there is any) in pictures that may be
on the page in addition to the text on the rest of the
page. The Pictures and text setting takes longer to pro-
cess that the Te xt on l y setting.
Setting Timeout Values for Performing
OCR
The OCR timeout value is the maximum time Discovery
Cracker has to perform OCR on one page of a document. If
one page times out, the document is marked as Problem, but
Discovery Cracker continues to attempt performing OCR on
the remaining pages.
You can change the OCR timeout value in the following loca-
tions, depending on the level at which you want to make the
setting. (See “Setting Task Settings” on page 61.)
• Workflow Manager Settings pane
• Project Information tab
• Group Information tab
• View Information tab
• General Job Information tab
Caution! If you choose to perform OCR during the Extract Metadata action in this job (or in a pre-
vious job on the same documents) and choose not to perform OCR during Render, the OCR data
collected during metadata extraction will be lost.
AD Summation Discovery Cracker User Guide Performing Optical Character Recognition
179
Creating Views Using OCR
Text
When you create a view (see “Creating Views” on page 75), you
can set up a filter to search for keywords according to criteria
that you specify in the Filter Expression Builder dialog box.
Only documents that meet the criteria are included in the view.
If you want to search OCR text, you must select All Text in the
Select a Field to Search list in the Filter Expression Builder dia-
log box.
Discovery Cracker assigns documents to views after metadata is
collected from the documents as part of the Extract Metadata
action, which occurs before the Render action. If you select to
perform OCR on native documents as part of the Extract Meta-
data action, OCR text from those documents is available in the
All Text field for searching. Documents that meet the search
criteria are included in the view.
If you select to perform OCR on rendered TIFF images as part
of the Render action, the OCR text from those documents is
not available when Discovery Cracker searches the All Text field
to identify documents to include in the view.
NOTE: It is important to keep this in mind when creating views,
especially dynamic views. If you want to create a view that
searches OCR text from native image documents and rendered
TIFF images, wait until you have completed all extract meta-
data (cracking) and render jobs for the project, including
recrack, rerender and redo OCR jobs created from a QC Ses-
sion, then create the view.
Increasing the Accuracy of OCR
Text
To increase the accuracy of recognizing characters displayed on
an image, the image must be oriented properly. If a document is
skewed (slightly crooked), upside down, or its orientation is
portrait when it should be landscape or landscape when it
should be portrait, the OCR engine will not recognize the char-
acters accurately. There are several things you can do to increase
the accuracy of optical character recognition.
• Straighten skewed images
An image is skewed if the text appears at an angle that is
slightly off perpendicular to the page. When you select the
option Straighten skewed image before creating OCR text,
the Discovery Cracker program will attempt to compensate
AD Summation Discovery Cracker User Guide Performing Optical Character Recognition
180
for the skew of the image before recognizing the characters.
The native document is not affected; therefore, metadata is
not changed.
You find the Straighten skewed image before creating
OCR text option in the [System, Folder, Project, Group,
View, or Job] Settings dialog box when you select the
Extract Metadata action and select the OCR Options task
tab, or when you select the Render action, select the TIFF
render output type, and select the OCR Options task tab.
• Rotate images
An image may need to be rotated to correct its orientation.
However, native documents cannot be rotated without
changing their metadata. So you must render the document
to create a TIFF image and then rotate the TIFF. In a QC
Session, you can rotate the image 90, 180, or 270 degrees
clockwise or counterclockwise. You have the option of
rotating a single page or rotating an entire document and
then redoing the OCR process.
For more information about rotating the TIFF image, see
Table 8.1, “Main tab,” on page 105.
For instructions on redoing the OCR process, see “Recrack-
ing, Rerendering, or Redoing the OCR Process on Docu-
ments” on page 120.
• Specify the text type
In the [System, Folder, Project, Group, View, or Job] Set-
tings dialog box, when you select the Extract Metadata
action or the Render action, on the OCR Options task tab
you have the Recognize text type as: option. You can select
Text or Numeric.
Text is the default setting. This setting enables the recogni-
tion of characters as letters, numbers, or punctuation
marks. However, if you are processing documents that are
predominantly numbers, setting OCR to Numeric
increases the accuracy of recognizing characters as numbers.
Checking OCR Text in a QC
Session
You can check the quality of OCR text and, if necessary, redo
the OCR process on documents when you perform quality con-
trol a QC Session. (For a detailed discussion of QC Sessions, see
Chapter 8, “Quality Control,” on page 101.)
AD Summation Discovery Cracker User Guide Performing Optical Character Recognition
181
In a QC Session, you can:
• View OCR text
• Replace OCR Text
• Delete OCR Text
View OCR text OCR text is stored in the All Text field in the IntItems table of
the project database. You can view the contents of that field to
check the quality of the text created by the OCR process. You
do that in the Large Field Viewer panel.
To view OCR text:
1. In the QC Session window, select a document in the Data
Panel.
2. Select the Large Field Viewer panel.
If the panel is not displayed, select the To o l s tab, then from
the Panels group, next select the Visibility drop down list,
then select Large Field Viewer.
3. In the Select field to view box at the top of the panel, select
All Text.
The OCR text of the document is displayed.
Replace OCR Text After viewing the contents of the All Text field, you may want
to redo the OCR process on documents. Redoing OCR replaces
the OCR text in the All Text field and the OCR-created text
file, if you select to create a text file during rerender.
To re pla c e OCR t e xt:
1. Open a QC session.
(See the procedure “Opening a QC Session” on page 101)
2. In the Data Panel, select one or more documents.
3. Select the OCR icon from the Action group on the Main or
Auto QC tabs.
4. In the Take Action dialog box select an option:
• For rendered documents, your options are Render,
Crack and render, or OCR rendered TIFF images.
• For metadata-only documents, your options are Render
or Crack.
5. Select Edit Settings to display the Rework Settings dialog
box.
6. Select an action.
AD Summation Discovery Cracker User Guide Performing Optical Character Recognition
182
7. Select a document type group.
8. Do one of the following:
• For the Redo Extract Metadata action:
On the OCR Options task tab, select the check box
Create OCR text from native image documents and
select the OCR options (see “Setting Options to Per-
form the OCR Process on Native Image Documents”
on page 174).
• For the Redo Render action:
On the OCR Options task tab, select the check box
Create OCR text from rendered TIFF images and
select the OCR options
To replace the OCR text in the OCR-created text file,
be sure the check box Enable text file output is
selected.
(See also “Setting Options to Perform the OCR Process
on Rendered TIFF Images” on page 176).
• For the Redo OCR action:
On the OCR Options task tab, select the check box
Create OCR text from rendered TIFF images and
select the OCR options.
(See also “Setting Options to Perform the OCR Process
on Rendered TIFF Images” on page 176).
9. If you want to apply the settings to additional document
type groups, select Select Additional Document Type
Groups while you are still on the tab.
NOTE: Be sure the settings are appropriate for the additional
document type groups you select.
10. Select Save and Close to return to the Take Action dialog
box.
11. Select OK.
Delete OCR Text You may want to delete the OCR text in the All Text field. To
delete OCR text, you have to redo the OCR process with the
OCR option turned off.
To de l ete O C R tex t :
1. Open a QC session.
(See the procedure “Opening a QC Session” on page 101)
AD Summation Discovery Cracker User Guide Performing Optical Character Recognition
183
2. In the Data Panel, select one or more documents.
3. Select an option:
• For rendered documents, your options are Render,
Recrack, or OCR.
• For metadata-only documents, your options are Render
or Recrack.
4. In the Take Action dialog box the option you selected will
be checked:
5. Select Edit Settings to display the Rework Settings dialog
box.
6. Select an action.
7. Select a document type group.
8. Do one of the following:
• For the Redo Extract Metadata action, on the OCR
Options task tab, clear the Create OCR text from
native image documents check box to turn off the
OCR process.
• For the Redo Render action, on the OCR Options task
tab, clear the Create OCR text from rendered TIFF
images check box to turn off the OCR process.
• For the Redo OCR action, on the OCR Options task
tab, clear the Create OCR text from rendered TIFF
images check box to turn off the OCR process.
9. If you want to apply the settings to additional document
type groups, select Select Additional Document Type
Groups while you are still on the tab.
NOTE: Be sure the settings are appropriate for the additional
document type groups you select.
10. Select Save and Close to return to the Take Action dialog
box.
11. Select OK.
Selecting Text to Export When creating a data delimited text file export, a Ringtail
export, a AD Summation DII export, or a Doculex 5 export,
there are three fields in the Available Fields list in the Field
Selector dialog box that allow you to include the text of the
documents you have processed.
AD Summation Discovery Cracker User Guide Performing Optical Character Recognition
184
When creating an EDRM XML export, the three fields are
listed in the Select a field containing searchable text box.
These three fields are:
• Body. The Body field contains extracted body text of the
document as identified during extraction of metadata.
• All Text. The All Text field can contain data from one of two
sources: (1) the OCR text that was created during the OCR
process, or (2) if you selected Populate All Text when you
postprocessed, data from the text file that Discovery
Cracker created when it rendered the document.
• All Text if Exists Else Body. The All Text if Exists Else Body
field is a conditional field. If the All Text field is empty, the
Discovery Cracker program will use the text in the Body
field. You may want to select this field because you may not
render or perform OCR on every document.
For exporting instructions, see Chapter 10, “Exporting,” on
page 149.

AD Summation Discovery Cracker User Guide Endorsing Documents
185
13. Endorsing Documents
Discovery Cracker allows you to endorse rendered documents
(TIFF images and PDF files). Endorsing places text on every
page of the document. Text can be placed at the left side, center,
or right side of the page in the header (top margin), footer (bot-
tom margin), or in both the header and footer.
This chapter includes the following sections:
• About Endorsing Documents
• Overview
• Assign Endorsement Permissions
• Create Endorsement Categories
• Create Endorsement Templates
• Set Endorsement Options
• Tag Documents in DC Detective
• Assign Endorsement Categories to Documents
• Create Views Based on Endorsement Category Assignments
• Deliver the Endorsed Rendered Documents
About Endorsing Documents Documents have to be rendered before they can be endorsed.
Rendering creates a TIFF image or a PDF file of the document.
You can endorse the rendered document during postprocessing
or you can print the rendered and postprocessed document to
paper and endorse the printed page.
You can endorse rendered documents with custom text that you
define (such as “Confidential”), a selection of the document’s
metadata (such as the document number), or a combination
thereof. To endorse rendered documents, you need to create at
least one endorsement template. Endorsement templates are
considered reference files. (See “Managing Reference Files” on
page 51.)
Discovery Cracker endorses all pages of all rendered documents
in the same postprocessing job with the same endorsement.
However, you can assign endorsement categories to documents,
which enables you to specify different endorsements for differ-
ent documents in the same job. This is called “category endorse-
ment.” Category endorsement applies only to endorsing
rendered documents, not to paper printing endorsement.
AD Summation Discovery Cracker User Guide Endorsing Documents
186
Endorsing rendered documents is part of postprocessing; it
takes place during packaging. You endorse paper copies if you
choose to print rendered documents after they have been pack-
aged.
There are two ways to print a document with endorsements.
• Endorse the rendered documents during packaging, then
print the rendered documents. This method includes cate-
gory endorsements.
Instructions for endorsing rendered documents during
packaging are in this chapter.
• Print an unendorsed rendered document using an endorse-
ment template. This method does not include category
endorsements.
Instructions for endorsing rendered documents during
paper printing are in Chapter 11, “Paper Printing,” on page
170.
If rendered documents were endorsed during packaging,
use caution if you use an endorsement template when
printing. You could end up with double endorsements.
During the endorsement process, Discovery Cracker attempts
to locate the specified reference file (endorsement template). If
it cannot find or read the file, the endorsement process will
mark the document as Problem and end processing of that doc-
ument. If it finds the reference file, it reads the file and stores it
locally until the job is finished.
Endorsing TIFF images and PDF files increases the size of the
file to allow space for the original image and the new endorse-
ment text.
Overview Many steps are involved in order to endorse rendered docu-
ments. The steps are performed by different Discovery Cracker
roles, such as the Discovery Cracker administrator, the Discov-
ery Cracker project manager, the Discovery Cracker quality
controller, and the Discovery Cracker operator. The actual roles
involved depend on the setup of your organization and the per-
missions assigned to the roles. The DC Detective user can also
perform endorsement activities.

AD Summation Discovery Cracker User Guide Endorsing Documents
187
Briefly, the endorsement steps are outlined in Table 13.1,
“Endorsement Steps.” Each step is explained in the sections that
follow. The roles are included for illustration purposes.
Table 13.1: Endorsement Steps
Action Performed by Role Description
1. Assign Endorsement Per-
missions
Discovery Cracker administra-
tor
• Assign proper endorsement-related permissions
to security roles
• Assign the proper security roles to the appropri-
ate user accounts
2. Create Endorsement Cat-
egories
Discovery Cracker project
manager
At the beginning of a project:
• Review the list of endorsement categories in the
Manage Categories dialog box
• Add categories that may be necessary for the
particular project
• Discuss with the DC Detective user what
endorsements are needed and what tags to use
in the DC Detective tool to represent the
endorsements
3. Create Endorsement
Temp l ates
Discovery Cracker project
manager
Create endorsement templates for the project
4. Set Endorsement Options
• When creating a post-
processing session
Discovery Cracker project
manager
• Set project-level task settings, which include cre-
ating Postprocessing session
• When creating a Postprocessing session, select to
endorse documents, then select or create an
endorsement template
5. Tag Documents in DC
Detective
DC Detective user Tag documents with a descriptive tag to indicate
which endorsement categories to assign to the doc-
uments
6. Assign Endorsement Cat-
egories to Documents
Discovery Cracker quality con-
troller
Assign categories to documents in a QC Session,
based on one of the following:
• Instructions from the Discovery Cracker project
manager
• Views created by the DC Detective user
7. Create Views Based on
Endorsement Category
Assignments
Discovery Cracker operator Create a view that contains only documents with
endorsement category assignments.

AD Summation Discovery Cracker User Guide Endorsing Documents
188
Assign Endorsement
Permissions
The Discovery Cracker administrator assigns proper permis-
sions to Discovery Cracker roles. When setting up a Discovery
Cracker user account, you assign one or more security roles to
the account. The security role controls which activities the user
is permitted to perform (see “Managing Users and Security” on
page 39).
The following permissions are necessary for endorsing images:
• Can Manage Categories (in System Permissions)—To add
new categories to the Manage Categories dialog box.
• Can Manage Reference Files (in Reference File Permis-
sions)—To create endorsement templates from the Manage
Reference Files dialog box.
• Can Create Postprocessing Sessions (in Session Permis-
sions)—To create endorsement templates when setting the
parameters for postprocessing.
To assign permissions to a security role:
1. From the Admin menu, select Manage Security, then select
Manage Security Roles and Permissions.
The Manage Security Roles and Permission dialog box is
displayed.
You see two panes:
• Roles
• Permissions For: [Role Name]
2. On the Roles pane, select a role.
3. On the Permissions For: [Role Name] pane, select the
check boxes of the permissions you want the role to have.
4. Select Apply.
8. Set endorsement options
• When creating a post-
processing job
Discovery Cracker operator • Set up a postprocessing job.
• Select an existing Postprocessing session and
accept or change the endorsement settings on
the Document Numbering and Packaging tab
9. Deliver the Endorsed
Rendered Documents
Discovery Cracker project
manager
The endorsed rendered documents (TIFF images
and PDF files) are in the project’s Volumes folder.
Table 13.1: Endorsement Steps (Continued)
Action Performed by Role Description
AD Summation Discovery Cracker User Guide Endorsing Documents
189
Create Endorsement Categories When endorsing rendered documents (TIFF images and PDF
files), you can specify different endorsements for different docu-
ments that are processed in the same postprocessing job. To do
this, you need to create categories and assign endorsement text
to each category. Then in a QC Session, appropriate categories
can be assigned to documents.
You can create categories as necessary to suit the needs of your
projects. All categories are available to be used with all of your
projects.
To create a category:
1. From the Admin menu, select Manage Categories.
The Manage Categories dialog box is displayed.
2. Select Add a Category.
The dialog box expands and the Create Category area is
displayed.
3. In the Category Name box, type a short name.
The category name is a descriptive label that identifies the
category display text. Whether you type uppercase or lower-
case letters, the name will be displayed in uppercase letters.
You can use up to 25 characters.
4. In the Category Display Text box, type the text you want
to have endorsed on documents.
The category display text is case sensitive; type uppercase or
lowercase letters. You will be able to customize the appear-
ance of the text (font, font style, size, etc.) when you create
an endorsement template.
The category display text can be up to 100 characters.
However, text that is wider than the page width is trun-
cated.
5. Select Save.
The new category name and category display text are dis-
played in the Manage Categories dialog box.
Create Endorsement Templates To endorse rendered documents (TIFF images and PDF files),
you need to create at least one endorsement template. You can
create an endorsement template from the Admin menu or when
creating a Postprocessing session.
AD Summation Discovery Cracker User Guide Endorsing Documents
190
The endorsement template allows you to specify:
• Where the text is to be endorsed on the page. Your options
are:
• Header (top margin)
Aligned left, right, or centered
• Footer (bottom margin)
Aligned left, right, or centered
• What text to endorse on the page. Your options are:
• Metadata, such as the document number.
Select a metadata field from the Available Fields list.
The value of the field is endorsed on all pages of all
documents of the same postprocessing job.
• Custom text.
Select USER CUSTOM TEXT in the Available Fields
list and supply your own wording in the Display Name
column. This text is endorsed on all pages of all docu-
ments of the same postprocessing job.
NOTE: Text wider than the page width is truncated.
• Predefined endorsement text.
Select a category name from the Available Categories
list. The endorsement text is shown in the Display
Name column. You cannot edit the text of the endorse-
ment. The text is endorsed only on documents that
have the category assigned to them.
• The appearance of the text. Your options are:
• The font, font style, size, strikeout, underline, color, and
script.
NOTE:
• Select only Microsoft Windows-based fonts. If you
select an unsupported font, the Microsoft Sans
Serif font is used.
• If you select a color for the font and endorse black-
and-white rendered documents, the color of the
endorsement is lost. The endorsed text will be
shades of black and white.
• The date format.
To create an endorsement template from the Admin menu:
1. From the Admin menu, select Manage Reference Files.
The Manage Reference Files dialog box is displayed.
2. Select Add.
AD Summation Discovery Cracker User Guide Endorsing Documents
191
The Add a Reference File dialog box is displayed.
3. In the Select a Reference File Type box, select Endorse-
ment Template.
4. In the Template Name box, type a name.
5. In the Template Description box, type a description.
6. Select the Header Fields tab to set up information to dis-
play at the top of the endorsed page.
7. Select Select Fields and Categories to display the Field
Selector dialog box.
8. In the Available Fields list, select one or more metadata
fields that contain the information you want to appear on
the page, and move them to the box on the right (select the
arrow pointing right or double-click the field).
Select USER CUSTOM TEXT to endorse with custom
wording. All rendered TIFF images and PDF files in the
volume for which this template is used will be endorsed
with this text.
9. In the Available Categories list, select one or more category
names that represent the endorsement text and move them
to the box on the right (select the arrow pointing right or
double-click the field).
The only rendered documents that will be endorsed with
the selected text are those to which categories were assigned.
The categories will be ignored when endorsing rendered
documents that don’t have the category assignment. See
“Assign Endorsement Categories to Documents” on
page 195.
NOTE: If you use the template for paper printing, the cate-
gory selection does not apply.
10. In the Display Name column:
• If you selected a metadata field, you can enter the display
name. The display name provides an identifying label
for the metadata that will be endorsed on the page.
• If you selected USER CUSTOM TEXT, type the text
that you want endorsed on the rendered TIFF images
and PDF files.
• If you selected a category, you cannot edit the display
name.
11. In the Align column, select Left, Center, or Right.
AD Summation Discovery Cracker User Guide Endorsing Documents
192
12. In the Date Format column, choose a date format if appli-
cable.
13. In the Font column, make selections in the Font dialog
box.
• Select only Microsoft Windows-based fonts. If you select
an unsupported font, the Microsoft Sans Serif font will
be used.
• If you select a color for the font and endorse black-and-
white rendered TIFF images or PDF files, the color of
the endorsement is lost. The endorsed text will be
shades of black and white.
NOTE: If you use the template for paper printing, the font
selection does not apply.
14. Select Save to save your work and return to the Add a Ref-
erence File dialog box.
15. If you want to change the order of the fields in the list,
select the field, then select either the up arrow or the down
arrow.
16. Select the Footer Fields tab to set up information to display
at the bottom of the endorsed page.
17. Repeat steps 7 through 15.
18. When the template is finished, select Save.
AD Summation Discovery Cracker User Guide Endorsing Documents
193
Set Endorsement Options Rendered documents (TIFF images and PDF files) are endorsed
during the packaging phase of postprocessing. To set your pack-
aging settings, you need to create a Postprocessing session. You
set endorsement options when you create a Postprocessing ses-
sion. You can also set endorsement options when you create a
postprocessing job.
This section includes instructions for setting endorsement
options when creating a Postprocessing session and when creat-
ing a postprocessing job.
When creating a postprocessing session To set endorsement options when creating a postprocessing ses-
sion:
1. From the [Project, Group, View, or Job] Settings dialog
box, on the Actions pane select Postprocessing.
The Tasks pane displays two tabs: Document Numbering
and Packaging and Populate All Text.
2. On the Document Numbering and Packaging tab, select
the Package Files check box.
3. Select Create Session.
The Session Creation dialog box is displayed.
4. Type a name in the Session Name box.
5. Type a description in the Session Description box
(optional).
6. In the Postprocessing Session area, make appropriate selec-
tions to fit your business needs. Use the guidelines in
Table 9.3, “International Session Guidelines,” on page 144.
NOTE: Remember that when you add endorsements to a
rendered document, the file size increases. So your volumes
may have a slightly different size than originally selected.
Take this into consideration when you set the Size of Vol-
ume parameter when creating a Postprocessing session.
7. In the Rendered Document and Text File Options area,
select the Endorse rendered documents (TIFF images and
PDF files) check box.
8. Select an endorsement template. Do one of the following:
• Select an existing template from the Select endorsement
template list.
AD Summation Discovery Cracker User Guide Endorsing Documents
194
• Select Create Template to create a new template (see
“Create Endorsement Templates” on page 189), then
select the template from the Select endorsement tem-
plate list.
9. Select Create.
When creating a postprocessing job To set endorsement options when creating a postprocessing job:
1. Create a postprocessing job, following the procedure “To
postprocess documents:” on page 146.
2. On the Document Numbering and Packaging tab, select
the Package Files check box.
3. In the Select a Postprocessing session box, select a Postpro-
cessing session from the list.
The Package Files area is populated with the settings for the
selected Postprocessing session. Endorsement settings are in
the Rendered Document and Text File Options area.
4. You can change the settings:
• Endorse rendered documents (TIFF images and PDF
files)
Select the check box to endorse documents.
Leave the check box cleared if you do not want to
endorse documents.
• Select endorsement template
If the Endorse documents check box is selected, you
can select a different template from the Select endorse-
ment template list.
You cannot create a new endorsement template from
this location. If you want to create a new template
before running the job, you can do so from the Admin
menu, Manage Reference Files, if you have the proper
permission. (See “Create Endorsement Templates” on
page 189.
5. Make other necessary settings for your postprocessing job.
6. Select Back to Job Creation, and then select Create to cre-
ate the job.
AD Summation Discovery Cracker User Guide Endorsing Documents
195
Tag Documents in DC Detective If your clients use the DC Detective tool to preview their docu-
ments, they can use descriptive tags to indicate which docu-
ments to endorse and what endorsement phrase to use.
At the beginning of a project, the Discovery Cracker project
manager and the DC Detective user need to discuss what
endorsements are needed and what tags to use in the DC Detec-
tive tool to represent the endorsements.
After the DC Detective user tags and commits documents, the
Discovery Cracker quality controller can then assign endorse-
ment categories to documents. The documents are endorsed
when the Discovery Cracker operator postprocesses the docu-
ments.
Assign Endorsement Categories
to Documents
In a QC session, the Discovery Cracker quality controller can:
• Assign categories to documents
• Remove categories from documents
• View category assignments
Prerequisites for performing these activities:
• A list of endorsement categories must exist. (See “Create
Endorsement Categories” on page 189.)
• Documents have been processed, at a minimum with the
actions Initial Spin Through and File Spin Through.
• The quality controller must know which category to assign
to which documents. This information is available from the
Discovery Cracker project manager or from views created
by DC Detective users.
• The quality controller knows how to perform activities in a
QC Session. (See Chapter 8, “Quality Control,” on page
101.)
Assign categories to documents The quality controller can assign one or more categories to one
document at a time or to multiple documents at the same time.
To assign categories to documents:
1. Open a QC session
2. Select one or more documents in the Data Panel.
3. Select the Assign Categories icon.
4. The Select Categories dialog box is displayed with a list of
the category names of the existing categories for the project.
AD Summation Discovery Cracker User Guide Endorsing Documents
196
If you selected only one document in the Data Panel, the
categories that have been previously assigned to the docu-
ment are checked.
If you selected multiple documents, no categories are
checked.
5. Select the check box of one or more categories that you
want to assign to the documents.
6. Select Save to save the category assignments and return to
the QC Session window.
Remove categories from documents The quality controller can remove categories from documents.
The procedure for removing categories when multiple docu-
ments are selected is different from the procedure for removing
categories from a single document.
To remove categories from a single document:
1. Open a QC session.
(See the procedure “Opening a QC Session” on page 101)
2. Select one document in the Data Panel.
3. Select the Assign Categories icon.
4. The Select Categories dialog box is displayed. The catego-
ries assigned to the document are selected.
5. Clear the check box of one or more categories you want to
remove, then, optionally, select the check box of one or
more categories you want to assign.
6. Select Save to save the removal and reassignment of catego-
ries and return to the QC Session window.
To remove categories from multiple documents:
1. Open a QC session.
(See the procedure “Opening a QC Session” on page 101)
2. Select more than one document in the Data Panel.
3. Select the Assign Categories icon.
4. The Select Categories dialog box is displayed. No check
boxes are selected.
5. Select the check box of one or more categories you want to
remove.
AD Summation Discovery Cracker User Guide Endorsing Documents
197
6. Select the Clear selected categories check box (this check
box appears only when you select multiple documents).
7. Select Save to save the removal of categories and return to
the QC Session window.
If any of the documents in the selection contain category
assignments for categories you have checked, those category
assignments are removed.
8. To reassign categories, follow the procedure “To assign cate-
gories to documents:” on page 195.
View category assignments The QC Session provides the Assigned Categories panel as a
convenient way to view which categories have been assigned to
individual documents. The Assigned Categories panel is for
viewing purposes only. You cannot make category assignments
in the panel.
To view a document’s category assignments:
1. Open a QC Session. (See “Opening a QC Session” on
page 101.)
2. Display the Assigned Categories panel:
a. On the Tools tab, select the Visibility dropdown
The list of panels is displayed.
b. Select Assigned Categories.
The Assigned Categories panel is displayed with the
other panels to the right of the Data Panel. The
Assigned Categories panel displays the Categories List
column and the Assigned column.
3. In the Data Panel, select a document.
4. Select the Assigned Categories tab in the panels area.
All the endorsement category names for the project are dis-
played in the Categories List column.
Create Views Based on
Endorsement Category
Assignments
After endorsement categories have been assigned to documents,
you may want to process only documents with endorsement
category assignments. To accomplish this, you create a view to
filter all the documents in a project according to the criteria you
desire.
AD Summation Discovery Cracker User Guide Endorsing Documents
198
You can create two different types of endorsement category
views:
• A view that contains all documents that have been assigned
any and all endorsement categories
• A view that contains only those documents that have been
assigned one or more specific endorsement categories
To create a view based on endorsement category assignments:
1. Create a view (see “Creating Views” on page 75).
When creating the filter expression, in the Filter Expression
Builder dialog box, do the following:
2. In the Select a Field to Search list:
a. For a view that contains all documents that have been
assigned any and all endorsement categories, select
PropertyGroup.
b. For a view that contains only those documents that
have been assigned a specific endorsement category,
select Property.
3. In the Select an Operator list, select IS LIKE.
4. In the Add a Text Value box:
a. If you selected the PropertyGroup field, type Endorse-
ment.
b. If you selected the Property field, type the category
name that you want to search for.
5. Select Add to Working Statement to add the expression to
the Working Statement area.
6. If you are creating a view of documents that have been
assigned more than one specific endorsement category,
repeat steps 2.b, 3, and 4.b for each endorsement category
you want to search for.
7. When the working statement is like you want it, select Add
to Final Statement to add it to the Final Statement area.
You can add one or more working statements to the final
statement.
8. Select Save Final Statement.
The filter expression is displayed in the View Filter Expres-
sion area of the View Configuration tab.
AD Summation Discovery Cracker User Guide Endorsing Documents
199
Deliver the Endorsed Rendered
Documents
Since the Discovery Cracker program endorses TIFF images
and PDF files during packaging, the endorsed documents are
placed in the subfolder of the project’s Volumes folder that con-
tains the TIFF, PDF, and text files. (See “Understanding Pack-
aging” on page 128.)
You determine the location and name of the Volumes folder
and subfolders when you create and select a Postprocessing ses-
sion to be used during packaging. (See “Creating an Interna-
tional Session” on page 143.)
You copy the contents of the subfolders to the medium of your
choice (CD, DVD, etc.) to deliver the files to your client.

AD Summation Discovery Cracker User Guide Creating Reports
200
14. Creating Reports
Discovery Cracker’s reporting feature gives you a way to view
data in the project databases and export it to a Microsoft Excel
(.xls) file, a Portable Document Format (.pdf) file, or a text for-
mat (.txt) file.
Types of Reports Available You can create reports based on a project, a group, a view, or a
Postprocessing session. When you select a Postprocessing ses-
sion, you can create reports based on all the volumes in the ses-
sion (the default setting) or on selected volumes only.
• Project-level reports contain data based on all the documents
in the project.
• Group-level reports contain data based on all the documents
in the group.
• View-level reports contain data based on all the documents
in the view.
• Postprocessing session-level reports contain data based on all
the documents in selected volumes of the document num-
ber session.
You have predefined reports to choose from. However, not all of
the reports are available for every reporting level. When you
select a reporting level, you are presented with a list of reports
appropriate for that level.
Table 14.1, “Discovery Cracker Reports,” lists the predefined
reports available within Discovery Cracker.
Table 14.1: Discovery Cracker Reports
Report Name Report Description Applicable
Reporting Levels
Documents Identified as
Duplicates
Lists all documents that were identified as duplicates. • Project
• Group
• View
Documents Not Packaged
During Postprocessing Ses-
sion
Lists all documents that could not be packaged during a Post-
processing session.
• Postprocessing
session
Documents Rendered with
Metadata Viewer
Lists all documents that were rendered using the Metadata
Viewer as the render application.
• Postprocessing
session

AD Summation Discovery Cracker User Guide Creating Reports
201
Documents That Match the
Project Filter
Lists all documents that match the project filter. These docu-
ments are culled out by filtering.
• Project
• Group
• View
Documents with a Place-
holder Page
Lists all documents that contain a placeholder page. • Postprocessing
session
Documents with OCR Text Lists all documents on which the optical character recognition
(OCR) process was performed.
NOTE: If you select the Populate All Text option in the Postpro-
cessing action, run this report before postprocessing. Otherwise,
the report will include all postprocessed documents.
• Postprocessing
session
Exception Report Lists all active error messages and their associated item identifi-
cation information.
NOTE: If you reprocessed items that received an error message
and the error message was resolved, those items will not be
included in this report. This report includes those items that
received an error message and you did not reprocess them or
you manually approved them in order to continue processing.
• Project
• Group
• View
• Postprocessing
session
File Counts by Document
Type Gro up
Displays a count of documents grouped by document type
group.
• Project
• Group
• View
File Counts by Document
Type
Displays a count of documents grouped by document type. • Project
• Group
• View
File Counts by Extension Displays a count of documents grouped by file extension and
the total file size of each group of documents.
• Project
• Group
• View
File Counts by Script Displays a count of documents grouped by script.
NOTE: Documents that use Greek characters in math equations
will be included in the count of Greek script documents.
• Project
• Group
• View
Table 14.1: Discovery Cracker Reports (Continued)
Report Name Report Description Applicable
Reporting Levels

AD Summation Discovery Cracker User Guide Creating Reports
202
Processing Summary Report Displays detailed information about your data set. This report
brings together the total counts from many of the individual
reports. It contains the following information:
Group or View Name. The name of the group or view.
Source Size (MB). The total size in megabytes of all main item
documents.
Processed Size (MB). The total size in megabytes of all main
item documents and their child documents before deduplica-
tion and filtering.
Tota l Doc u m ents . The total number of all main item docu-
ments and their child documents before deduplication and fil-
tering. This number equals E-Mail Messages plus E-Files.
E-Mail Messages. The total number of e-mail messages before
deduplication and filtering. Includes all documents in the
LOTUSDOCUMENT and the OUTLOOKDOCUMENT
document type groups.
E-Files. The total number of e-files and attachments before
deduplication and filtering.
Duplicates. The total number of documents that were identi-
fied as duplicates. Corresponds to the Documents Identified as
Duplicates report.
Filtered Documents. The total number of documents culled
out by filtering. Corresponds to the Documents That Match
the Project Filter report.
Documents with a Placeholder. The total number of docu-
ments that contain a placeholder page or that were rendered
using the Metadata Viewer as the render application. Corre-
sponds to the Documents Rendered with Metadata Viewer
report and the Documents with a Placeholder Page report.
• Project
Table 14.1: Discovery Cracker Reports (Continued)
Report Name Report Description Applicable
Reporting Levels

AD Summation Discovery Cracker User Guide Creating Reports
203
Things to Consider When creating reports, you need to consider the following:
• The length of time it takes to create a report depends on the
size of the data set you are reporting on and the specific
report you select to create. Some reports take longer than
others, such as Documents Identified as Duplicates, Pro-
cessing Summary Report, and Script Identification.
• The length of time increases if you attempt to create the
report while jobs are being processed. In addition, report
creation could slow down processing time.
• Reports are generated from the data in the database at the
time of report creation. If jobs are running on the same data
you are running a report on, the report results will not be
up to date once the job finishes. So, to get the most up-to-
date report results, be sure that all jobs for the reporting
level you have selected have the status Complete.
Documents with OCR Text. The total number of documents
on which the optical character recognition (OCR) process was
performed. Corresponds to the Documents with OCR Text
report.
Pages Rendered. The total number of pages rendered (includes
TIFF and PDF formats). This count does not include TIFF
pages produced during postprocessing. Corresponds to the
Number of Pages Rendered report.
Items with Active Errors. The total number of items with active
error messages. Corresponds to the Exception Report.
Number of Pages Rendered Displays a count of the total number of pages rendered to the
TIFF and/or PDF formats grouped by document type group.
This report does not include TIFF pages produced during post-
processing.
• Project
• Group
• View
• Postprocessing
session
Script Identification Lists all documents and the scripts identified in each document.
NOTE: Prerequisite for this report: You must turn on script iden-
tification in the Extract Metadata action (see page 214) before
processing your documents.
• Project
• Group
• View
Table 14.1: Discovery Cracker Reports (Continued)
Report Name Report Description Applicable
Reporting Levels
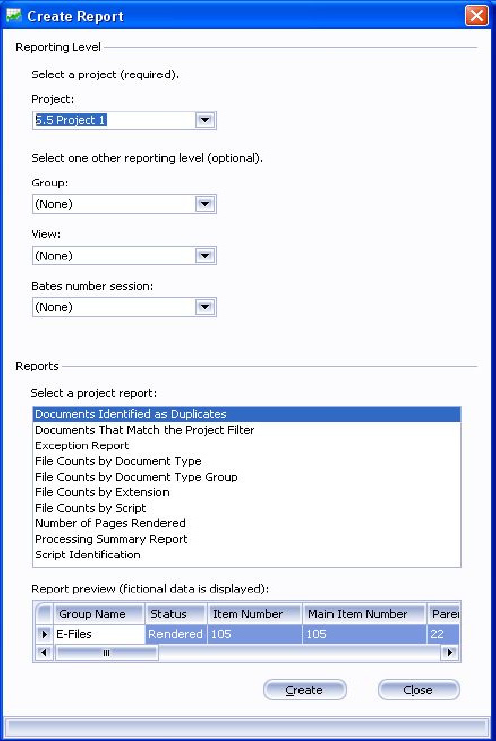
AD Summation Discovery Cracker User Guide Creating Reports
204
Creating a Report You can run reports anytime after you have processed a set of
documents. You create a report from the Create Report com-
mand on the Reports menu. Create Report is available when an
active project, a group-level identifier, a view-level identifier, a
group, a view, or a job is selected in the navigation pane of Dis-
covery Cracker Console.
Create Report is not available when the manager database, a
folder, or an inactive project is selected in the navigation pane.
When Create Report is available, you can select it from any-
where within Discovery Cracker Console.
To cr eat e a re p ort:
1. On the Reports menu, select Create Report.
The Create Report dialog box is displayed. (See
Figure 14.1.)
Figure 14.1.
AD Summation Discovery Cracker User Guide Creating Reports
205
2. Under Reporting Level, accept the currently displayed
selections or make different selections.
The project, group, and view boxes are populated according
to what is selected in the navigation pane.
• If a project is selected, the project name is displayed in
the Project list box.
• If a group is selected, the project name to which the
group belongs is displayed in the Project list box. The
group name is displayed in the Group list box.
• If a view is selected, the project name to which the view
belongs is displayed in the Project list box. The view
name is displayed in the View list box.
• If a job is selected, the project name to which the job
belongs is displayed in the Project list box. If the job
belongs to a group, the group name is displayed in the
Group list box. If the job belongs to a view, the view
name is displayed in the View list box.
You must always select a project. Once you select the proj-
ect you want, the groups, views, and Postprocessing sessions
that belong to that project will be available in the Group,
View, and Postprocessing session lists.
You can make a selection from the desired list (click the
arrow at the right end of the box to display the list), or you
can type the name of the project, group, view, or Postpro-
cessing session in the appropriate box.
To create a project-level report, select only a project; make
sure that (None) is selected in the group, view, and Postpro-
cessing session lists.
To create a group-level report, select a project and then
select a group from the Group list.
To create a view-level report, select a project and then select
a view from the View list.
To create a Postprocessing session-level report, select a proj-
ect and then select a Postprocessing session from the Post-
processing session list.
When you select a Postprocessing session, the Volumes to
include list is displayed. (See Figure 14.2.) You can create a
report that includes all the volumes in the session (that’s the
default setting), or you can select Clear All, and then select
specific volumes to include in the report.
AD Summation Discovery Cracker User Guide Creating Reports
206
Figure 14.2.
3. Under Reports, select a report from the list.
The list of available reports changes according to the report-
ing level you have selected. Only the reports appropriate for
the selected level are in the list.
When you move the mouse pointer over a report name in
the list, a description of the report is displayed in the status
bar of the dialog box. When you select a report name, you
see a preview of what the report will look like under Report
preview (fictional data is used). The database fields
AD Summation Discovery Cracker User Guide Creating Reports
207
included in the report are displayed along with sample data,
not your real data.
For a detailed description of the database fields, see the Dis-
covery Cracker Field List, which you can access from the
Start menu (Start>Program or All Programs>Discovery
Cracker>Documentation)
4. Select Create.
Discovery Cracker creates the report. This could take a sub-
stantial amount of time, depending on the data set involved
and the report you selected.
If you change your mind about running the report, you can
select Cancel.
When the report is ready, the Report Results dialog box
opens and displays the actual data from your project data-
base.
5. You can do one of the following:
• View the report.
• Select Print to print the report.
• Select Save As to save the report as a Microsoft Excel
(.xls) file, a Portable Document Format (.pdf ) file, or a
text (.txt) file.
The Save Document dialog box is displayed. A Reports
folder is created in the default directory for the project’s
output files. By default, the Save As dialog box opens
with that folder selected and with a default file name
that includes the report name, the project name, and, if
applicable, the group, view, or Postprocessing session
name. You can accept the defaults or select a different
location and type a different file name.

AD Summation Discovery Cracker User Guide Working With Languages
208
15. Working With Languages
Discovery Cracker allows you to process document sets that
include documents written in any language supported by the
Unicode™ Standard.
What is the Unicode Standard? It is a character coding system
that provides a set of characters that can support the written
texts of the diverse languages of the world. (For more informa-
tion, see Unicode Web site (http://www.unicode.org/standard/
standard.html).
The Unicode Standard does not specify how language charac-
ters are visually represented on screen or on paper. It only iden-
tifies how characters are interpreted. “The software or hardware-
rendering engine of a computer is responsible for the appear-
ance of the characters on the screen.”—
(http://www.unicode.org/standard/principles.html)
In order to take advantage of Discovery Cracker’s support of the
Unicode Standard, supplemental language support needs to be
installed on all DC Engine computers, Discovery Cracker Con-
sole computers, and computers that DC Detective previewers
use (as explained in the Discovery Cracker Environment Setup
and Installation Guide: Start>Control Panel>Regional and Lan-
guage Options>Languages>Supplemental language support.
Select Install files for complex script and right-to-left lan-
guages (including Thai) and Install files for East Asian lan-
guages.)
What does that mean for you? With supplemental language
support installed, you can use Discovery Cracker to process
documents written in any language and:
• The correct characters are extracted from the documents and
stored in the metadata fields of the database.
• The correct characters are displayed in the rendered TIFF
images, PDF files, and text files. (There are a few limita-
tions. See page 223.)
• The correct characters are displayed in the QC Session win-
dow as you view the documents and their metadata fields.
• The correct characters are displayed in DC Detective as you
view the native documents and their metadata fields.

AD Summation Discovery Cracker User Guide Working With Languages
209
• The correct characters are printed when you choose to print
paper copies of documents.
Sounds easy enough. And for basic, right out-of-the-box use, it
is. However, you also have the option to use advanced features
related to languages.
Before reading how to use the advanced features, it is advisable
to understand some fundamentals to ensure that you get the
results you want and expect from Discovery Cracker.
The rest of this chapter discusses the following topics:
• The World of Languages
• Scripts
• Languages
• Encodings
• Advanced Features Related to Languages
• Setting Task Settings
• Full-Text Indexing and Searching
• Creating Project Filters and Views
• Performing Quality Control
• Reports
• Exporting
• Using DC Detective
• Limitations Processing Multilingual Documents
The World of Languages Understanding the world of languages and multilingual data
can be tricky. That’s because we’re dealing with hundreds, if not
thousands, of human languages represented with different sym-
bols (such as alphabets, syllabaries, syllabic alphabets, and
abjads) and represented in different ways (such as left-to-right,
right-to-left, vertical, or horizontal). We’re also dealing with
computers, which understand only one thing: numbers--one’s
and zero’s.
Scripts The different symbols and different ways in which human lan-
guages are represented are known as writing systems, or scripts.
There are many different scripts in the world.
According to the topic “Supported Scripts” at http://www.uni-
code.org/standard/supported.html, “a single script may serve to
write tens or even hundreds of languages (e.g., the Latin script).
In other cases only one language employs a particular script

AD Summation Discovery Cracker User Guide Working With Languages
210
(e.g., Hangul, which is used only for the Korean language). The
writing systems for some languages may also make use of more
than one script; for example, Japanese traditionally makes use of
the Han (Kanji), Hiragana, and Katakana scripts, and modern
Japanese usage commonly mixes in the Latin script as well.”
Discovery Cracker identifies scripts. You can create a project or
view filter based on scripts. The Scripts panel in the QC Session
window displays the scripts contained in a document. You can
generate reports based on scripts. In DC Detective, you can fil-
ter a view of documents by script and display a list of scripts per
document.
Languages What's the difference between a language and a script? English,
Hindi, Portuguese, Russian, Spanish, and Vietnamese are lan-
guages.
English, Portuguese, Spanish, and Vietnamese are written with
the Latin script. Vietnamese can also be written with the Chi-
nese script. Hindi is written with the Devanagari script. Russian
is written with the Cyrillic script.
In the list of scripts to filter by or in the Scripts panel in the QC
Session window, when you generate a scripts report, or in the
property window in DC Detective, you will see a list of scripts
(such as Latin, Chinese, Devanagari, and Cyrillic). You will not
see a list of languages (such as English, Hindi, Portuguese, Rus-
sian, Spanish, and Vietnamese).
The Unicode Web site provides a reference for mapping scripts
to languages and languages to scripts on the following pages:
• http://www.unicode.org/cldr/data/charts/supplemental/
scripts_and_languages.html
• http://www.unicode.org/cldr/data/charts/supplemental/
languages_and_scripts.html
When setting parameters for performing OCR and for selecting
full-text search, you will see a limited list of languages to choose
from. (See “Optical Character Recognition” on page 216 and
“Full-Text Indexing and Searching” on page 217).

AD Summation Discovery Cracker User Guide Working With Languages
211
Encodings Computers store data as numbers, even textual data. So they
need an encoding scheme that assigns a number to each letter,
number, or character.
Encoding is the assignment of numbers (that computers can
understand) to letters, digits, punctuation marks and other sym-
bols (that computers do not understand). Many different
encodings exist that define the many different scripts used
throughout the world. ASCII, ANSI, Chinese Big 5, Chinese
GB, Unicode (UTF-8), and Unicode (UTF-16) are examples of
encodings.
The Unicode Standard provides the capacity to encode all of the
characters used for the written languages of the world. By con-
trast, ASCII is limited to characters used in the English alpha-
bet, which is written with the Latin script. The ANSI encoding
includes characters for languages other than English, but is still
limited to the Latin script. Other encodings are limited to other
scripts.
For more information about the encoding forms that are sup-
ported by the Unicode Standard, see “The Unicode® Standard:
A Technical Introduction” at http://www.unicode.org/standard/
principles.html.
Advanced Features Related to
Languages
In the Discovery Cracker program, you will see settings options
that pertain to encodings, scripts, and languages. These settings
allow you to:
• Help Discovery Cracker read your documents correctly
• Identify the scripts that are used within each document
• Choose the encoding to use for your rendered text files
• Select the language to recognize when performing optical
character recognition.
• Create a full-text index and search based on a specific lan-
guage
• Create a project filter based on one or more scripts
• Create a view filter based on one or more scripts
• Display the list of scripts contained in each document
• Generate reports related to the script information in your
documents
• Include in export files the list of identified scripts for each
document
AD Summation Discovery Cracker User Guide Working With Languages
212
The following topics explain how to accomplish the above list
of tasks. The topics are provided in a general workflow order:
• Setting Task Settings
• Full-Text Indexing and Searching
• Creating Project Filters and Views
• Performing Quality Control
• Reports
• Exporting
• Using DC Detective
Setting Task Settings The Extract Metadata action and the Render action include
task settings that are related to the processing of languages. You
can select encodings and you can select metadata fields that you
want Discovery Cracker to examine in order to identify the
scripts used.
The Extract Metadata Action The Extract Metadata action offers encoding options and script
identification options.
Select the Encoding for Extracting Metadata
When you run a job to extract the metadata from your docu-
ments, Discovery Cracker needs to read the encoding for each
document so it can interpret the characters correctly.
On the User-Selected Application task tab you can choose one
of three applications to extract the metadata: Discovery Cracker
Extractor, Lotus Notes, or Outlook. Your choice depends on
the document type group you select.
When you select Lotus Notes or Outlook, you do not need to
indicate the encoding.
When you select Discovery Cracker Extractor, in most cases
Discovery Cracker can read the document's encoding and inter-
pret the text correctly. In certain cases, however, it is impossible
for Discovery Cracker to determine the encoding from the
available data.
If Discovery Cracker cannot determine a document’s encoding,
it will use the default encoding to interpret the document’s
character set. By default, this is set to ASCII. You will know if
that encoding choice is right or wrong for a certain document
by viewing the text in the QC Session window. If the text is

AD Summation Discovery Cracker User Guide Working With Languages
213
unintelligible, or if you see questions marks (????), you can
recrack the document and choose a different encoding (see page
220).
If you know from the start that certain documents require a spe-
cific encoding, you can make that selection before you run the
job. By using the correct default encoding, you can assist Dis-
covery Cracker in the correct conversion of your data. For more
information on encoding, see “Encodings” on page 211.
To change the default encoding:
1. Open the [System, Folder, Project, Group, View, or Job]
Settings dialog box. (See “Setting Task Settings” on page 61
or “Creating a Job” on page 81.)
2. In the Actions pane, select Extract Metadata.
3. In the Tas ks pane, select the User-Selected Application tab.
4. Confirm that Discovery Cracker Extractor is the user-
selected application.
5. In the Default Encoding box, select a different encoding.
6. Select Save and Close or Back to Job Creation.
Identify Scripts
One document set may contain documents written in different
languages. In addition, one document may contain multiple
languages. Therefore, you may want to identify the languages
you are working with.
As explained in the topic “Scripts” on page 209, Discovery
Cracker identifies scripts that are used to write languages. In
some cases, the script identifies the language—if only one lan-
guage uses the script, such as with the Armenian script. In other
cases, the script does not identify the language—if more than
one language uses the script, such as with the Latin script. (For a
chart that maps scripts to languages, see the following Web site:
http://www.unicode.org/cldr/data/charts/supplemental/
scripts_and_languages.html)
Discovery Cracker identifies scripts by examining the characters
of the data extracted from the document and placed into the
metadata fields in the project database.
AD Summation Discovery Cracker User Guide Working With Languages
214
If you want Discovery Cracker to identify the scripts that docu-
ments are written in, you must select one or more metadata
fields for Discovery Cracker to examine.
When you turn on script identification, you can:
• Create project filters based on scripts
• Create view filters based on scripts (for static views, you
would first have to run a job on the document set to extract
metadata)
• See a list of scripts contained in each document in the QC
Session window in the Scripts panel.
• Generate reports based on script information.
• Export the script information for each document in a data
delimited text file export.
• In DC Detective, filter the view of documents by one or
more scripts
• In DC Detective, display a list of scripts per document in the
property window.
To turn on script identification:
1. Open the [System, Folder, Project, Group, View, or Job]
Settings dialog box. (See “Setting Task Settings” on page 61
or “Creating a Job” on page 81.)
2. In the Actions pane, select Extract Metadata.
3. In the Tas ks pane, select the Identify Scripts tab.
4. From the Available fields list, select the fields you want Dis-
covery Cracker to examine and add them to the Selected
fields list.
NOTE: The more fields you select, the longer the processing
time.
You may want to start with the following fields: Author-
Name, Body, FileDisplayName.
5. Select Save and Close or Back to Job Creation.
Results of script identification:
The names of the scripts identified in each document become
part of the document’s metadata and are saved in the ItemProp-
erties table of the project database.
The script metadata is an individual, document-level property.
Child documents do not inherit the parent document’s script
AD Summation Discovery Cracker User Guide Working With Languages
215
metadata. A parent document does not receive script metadata
that may be identified in any of its children. For example, if a
parent document is identified as being written with the Devana-
gari script and its child document is identified as being written
with the Latin script, the parent document’s script metadata will
include only Devanagari, while the child document’s script
metadata will contain only Latin.
If you recrack a document, its script metadata is deleted and
replaced.
The Render Action The Render action offers the option to choose the encoding to
use for your rendered text files.
Rendering is the Discovery Cracker activity that produces TIFF
images or PDF files and, optionally, text files of documents.
The text file contains the text of the document that is repre-
sented in the TIFF image or a PDF file if the native document
contains text.
If you want Discovery Cracker to produce text files of rendered
documents (TIFF or PDF), you must enable text file output
and select the appropriate encoding for the text files. The
encoding tells the printer driver which character set to use when
creating the text files. This is especially important when you are
processing documents containing languages written in scripts
other than Latin.
When you select the TIFF render file type, your text file encod-
ing options are ANSI, UTF-16, and UTF-8.
When you select the PDF render file type, your text file encod-
ing options are ACSII, Unicode, UTF-16, UTF-32, UTF-7,
and UTF-8.
The ANSI and ASCII encodings have the advantage of produc-
ing a smaller text file than a Unicode text file. ANSI-encoded
and ASCII encoded text files process faster and save space.
ASCII is limited to characters used in the English alphabet,
which is written with the Latin script. The ANSI encoding
includes characters for languages other than English, but is still
limited to the Latin script.

AD Summation Discovery Cracker User Guide Working With Languages
216
The Unicode Standard provides the capacity to encode all of the
characters used for the written languages of the world.
If you are processing documents that contain languages written
in scripts other than Latin, you need to choose a Unicode
encoding form (Unicode, UTF-7, UTF-8, UTF-16, and UTF-
32). Unicode encoding forms contain the character sets for all
known languages.
For an explanation of the different Unicode encoding forms, see
“The Unicode® Standard: A Technical Introduction” at http://
www.unicode.org/standard/principles.html.
The default encoding for text files is UTF-8.
To change the text file encoding:
1. Open the [System, Folder, Project, Group, View, or Job]
Settings dialog box. (See “Setting Task Settings” on page 61
or “Creating a Job” on page 81.)
2. In the Actions pane, select Render.
3. In the Tas ks pane, select the Document Rendering tab.
4. Select the Enable text file output check box.
5. In the Text E n cod i n g box, select the encoding you want to
use.
6. If necessary, make other selections appropriate to your busi-
ness needs (refer to page 240 in Appendix A, “Task Set-
tings”).
7. Select Save and Close.
Optical Character Recognition The optical character recognition function (OCR) in the Dis-
covery Cracker program does not support the Unicode Stan-
dard. It supports only a small number of languages that use the
Latin script.
If you select to perform OCR on an image document that con-
tains unsupported languages or scripts, the resulting text file
will contain only the supported language letters (words). If the
entire document is an unsupported language or script, the text
file will be blank.
For more information about performing OCR, see Chapter 12,
“Performing Optical Character Recognition,” on page 172.

AD Summation Discovery Cracker User Guide Working With Languages
217
Full-Text Indexing and Searching When you create a project, if you connect to SQL Server 2005
Express Edition with Advanced Services, Standard Edition, or
Enterprise Edition, you have the option to allow full-text index-
ing of the project database. (SQL Server 2005 Express Edition,
which is installed by the Discovery Cracker installer, does not
provide the full-text search capability.)
If you select that option, you need to specify the language for
indexing and searching. English is the language selected by
default. Since SQL Server 2005 creates the index and performs
the search, the languages you have to choose from are the lan-
guages that SQL Server 2005 supports. The language you
choose determines the rules that SQL Server 2005 uses to find
word boundaries (word breaking) and to conjugate verbs (stem-
ming). The rules differ for different languages. The word
boundaries in the English language are typically white space or
some form of punctuation. In other languages, such as German,
words or characters may be combined together.
If you need a language that is not in the list and the language is
a sublanguage (such as French Canadian) of a major language
(such as French), select the major language. If you are unsure, or
if a particular language is not listed, select Neutral. With the
neutral word breaker, words are broken at neutral characters
such as spaces and punctuation marks. However, language-
based stemming does not come into play when you specify
Neutral.
For more information about selecting a language when creating
a full-text index, see Microsoft's SQL Server 2005 Books
Online (September 2007), “International Considerations for
Full-Text Search,” at http://msdn.microsoft.com/en-us/library/
ms142507(SQL.90).aspx.
To select a full-text language:
1. Create a project. (See "Creating Projects" on page 53.)
2. On the Database Preferences tab, in the Database Full-
Text Search Settings area, select the Allow full-text index-
ing of the project database check box.
Note:
This selection is a one-time option. If you do not select it
when you create the project, you cannot go back and
change it later.
AD Summation Discovery Cracker User Guide Working With Languages
218
Full-text search gives you the advantage of making
advanced SQL queries, such as proximity searches and gen-
eration searches, when you create a view (see “Creating
Views” on page 75).
Discovery Cracker creates a full-text index when it cracks
documents. Be aware that the additional activity of creating
a full-text index increases processing time.
3. In the Full-text language box, select the language to use for
full-text indexing and searching.
NOTE:
With SQL Server 2005, you can index and search based on
only one language. If a document contains different lan-
guages, the search based on the full-text index may yield
inaccurate results.
You can select only one full-text language per project. You
cannot change the language to be used for a full-text index
after a project is created. To specify a different language,
you would need to create a new project.
SQL Server 2005 stores some high-end Asian characters as
two Unicode characters. Searching and filtering based on
these characters may yield inaccurate results.
Creating Project Filters and Views In Discovery Cracker, you can create project filters and view fil-
ters based on languages. There are two ways to do that:
• Filter documents according to the scripts they are written in.
• Filter documents by words or phrases written in any lan-
guage.
To filter documents according to scripts:
Prerequisite:
• You must turn on the Identify Scripts setting by selecting
the metadata fields you want Discovery Cracker to examine
for script identification. (See “To turn on script identifica-
tion:” on page 214.)
NOTE: If you don't know what scripts are contained in your
documents, you may need to crack the documents first with
the appropriate Identify Scripts settings, then go back and
create a project or view with the appropriate filter selec-
tions.
Steps:
AD Summation Discovery Cracker User Guide Working With Languages
219
1. Do one of the following:
• Create a project. (See “Creating Projects” on page 67.)
• Create a view. (See “Creating Views” on page 75.)
2. Display the Filter Expression Builder dialog box by doing
one of the following:
• For projects, select the Enable Filtering check box, then
select Create Expression.
• For views, select New Filter.
3. In the Filter Expression Builder dialog box, from the Select
a Field to Search list, select Script.
4. From the Select an Operator list, select either Is Equal To
or Is Not Equal To.
5. From the Select Scripts list, select the scripts you want to
filter by.
6. Select Add to Working Statement.
7. When the working statement is like you want it, select Add
to Final Statement to add it to the Final Statement area.
You can add one or more working statements to the final
statement.
8. Select Save Final Statement.
To filter documents by words or phrases written in any lan-
guage:
1. Do one of the following:
• Create a project. (See “Creating Projects” on page 67.)
• Create a view. (See “Creating Views” on page 75.)
2. Display the Filter Expression Builder dialog box by doing
one of the following:
• For projects, select the Enable Filtering check box, then
select Create Expression.
• For views, select New Filter.
3. In the Filter Expression Builder dialog box, create a work-
ing statement by doing the following as many times as
needed:
a. From the Select a Field to Search list, select a field.
b. From the Select an Operator list, select an operator.
c. In the Add a Text Value box, enter the text you want to
search for.
AD Summation Discovery Cracker User Guide Working With Languages
220
You can type the text or use a copy-and-paste opera-
tion.
d. Select Add to Working Statement.
4. When the working statement is like you want it, select Add
to Final Statement to add it to the Final Statement area.
You can add one or more working statements to the final
statement.
5. Select Save Final Statement.
Performing Quality Control QC Sessions offer several features to help you perform quality
control on documents that are written in any language.
• Display correct language characters. Characters of all lan-
guages supported by the Unicode character set are displayed
when you view the metadata fields of documents in the
Data Panel, when you view the contents of the other pan-
els, and when you view the native documents.
• Display a list of scripts contained in a document. When you
highlight a document in the Data Panel, the Script panel
displays the list of scripts contained in the document.
• Change encoding settings and script identification settings at
the document level. For individual documents you can
change the default encoding, the metadata fields used to
identify scripts, and the encoding used to generate text files.
To change the settings for a document:
Prerequisite:
• You have cracked and, optionally, rendered documents (see
“Selecting Actions” on page 85).
Steps:
1. “Opening a QC Session” on page 101
2. In the Data Panel, select one or more documents.
3. From the action group, do one of the following:
• Select Render if you only want to change the encoding
used to generate text files.
• Select Recrack, if you want to change the default encod-
ing used for extracting metadata, if you want to change
the metadata fields used to identify scripts during the
Extract Metadata action, and/or you want to change
the encoding used to generate text files during the Ren-
der action.
AD Summation Discovery Cracker User Guide Working With Languages
221
4. Select Edit Settings to open the Rework Settings dialog
box.
5. Select an action.
6. Select a document type group.
7. Select the appropriate tab and make your desired changes to
the appropriate task settings. (See page 213, page 214, and
page 216.)
8. If you want to apply the settings of the tab you are currently
on to additional document type groups, select Select Addi-
tional Document Type Groups while you are still on the
tab.
NOTE: Be sure the settings on the current tab are appropri-
ate for the additional document type groups you select.
9. Repeat steps 5 through 8 as needed.
10. When you have finished making all your settings, select
Save and Close to return to the Tak e Action dialog box.
11. Select OK.
Reports You can request the following reports related to the script infor-
mation in your documents:
• File Counts by Script: This is a project-level report. It dis-
plays a list of scripts identified in the project and the num-
ber of documents the scripts were identified in. The list of
scripts and the number of documents are also presented per
group and per view.
NOTE: Documents that use Greek characters in math equa-
tions will be included in the count of Greek script docu-
ments.
• Script Identification: This is a project-level report. For each
script that is identified, the report displays the following
information: Item Number, File Name, Subject, File Path,
Script, Document Type.
NOTE: It could take a substantial amount of time to run the
Script Identification report if you attempt to run it during
processing. In addition, it could slow down your process-
ing.
AD Summation Discovery Cracker User Guide Working With Languages
222
Exporting You can include the identified script information as metadata to
be included in a data delimited text file export, a Ringtail
export, or a AD Summation DII export.
To be able to export script metadata, you must process docu-
ments with the Identify Scripts task turned on (see “To turn on
script identification:” on page 214).
To include the script metadata in an export, from the Field
Selector dialog box, in the Available Fields list, select the
Scripts field.
You can access the Field Selector dialog box in the following
locations:
• Data Delimited Text File Export: On the Selected Fields
tab, select Edit Fields. (For instructions for Before Postpro-
cessing jobs, see page 96. For instructions for After Postpro-
cessing jobs, see page 150.)
• Ringtail Export: On the Extra Table tab, in the Export
Extra Table area, select Select Fields. (For the Extra Table
tab to be available, the Populate Export Extra Table check
box needs to be selected. The check box is on the Docu-
ment Number Selection tab in the Export Options area
and is selected by default. For more instructions, see page
155.)
• AD Summation DII Export: For Class 2 and Class 3, on the
Map Default Fields tab, in the Additional Fields area,
select Select Additional Fields. (For more instructions, see
page 160.)
In addition, by default, data delimited text file exports are cre-
ated using the Unicode (UTF-16) encoding. In the Export
Configuration area, the Use Unicode check box is selected.
Using DC Detective When previewing documents using the DC Detective tool, you
can see a list of scripts that are contained in each document and
you can filter documents by one or more scripts.
NOTE: Viewing script information and filtering by script is only
possible if the documents are processed in Discovery Cracker
with the Identify Scripts task turned on (see “To turn on script
identification:” on page 214).

AD Summation Discovery Cracker User Guide Working With Languages
223
Display script information You can see a list of the scripts that are used in each document.
To see the list of scripts for each document, ensure that the
Show Property Window check box is selected in the Change
Layout box in the setup pane (the area on the left side of the
Web page).
When you select a document on the Home tab, the list of
scripts for that document is displayed in the property window,
which is below the native viewer on the right side of the Web
page.
Filter by script You can filter the documents that are loaded into DC Detective
so that only documents containing certain scripts are displayed.
By default, DC Detective loads all scripts.
To fi l ter b y scr i pts
1. In the Filter by Scripts box of the setup pane, expand All
Scripts.
2. Select Clear All.
3. Select only the scripts you want to load.
4. Select Submit.
Limitations Processing
Multilingual Documents
Because of the nearly infinite variations in file types and charac-
ter representations possible with the Unicode character set and
which can be processed by Discovery Cracker, it is virtually
impossible to state with certainty that all characters in all lan-
guages for all file types will be rendered faithfully to the native.
We have made every possible effort to validate the rendering
results; however, errors are possible. We will make every effort
to identify and resolve any inaccuracies. If you should notice
such inaccuracies in rendered documents, please notify our
Product Support team immediately and send a copy of the
native file and a copy of the rendered file to us (call 866-833-
5377; send an e-mail message to dc.support@accessdata.com).
Known limitations are:
• Microsoft Outlook 97-2002 does not support the Unicode
Standard. If Outlook PST data files created in Outlook 97-
2002 contain languages written with scripts other than the
Latin script, they need to be converted in Outlook 2003 to

AD Summation Discovery Cracker User Guide Working With Languages
224
the new PST format, which supports the Unicode Stan-
dard. For more information, refer to the following article:
http://office.microsoft.com/en-us/outlook/
HP010383511033.aspx?pid=CH010404871033
• When rendering, for languages that use combined charac-
ters, such as Hindi and other Indian languages, we cannot
guarantee that the text files will be usable. In the text file,
the combined characters are usually dropped, even though
the TIFF image or the PDF file is accurate. However, the
data in the Body field is correct because it is created during
metadata extraction, which uses a different process.
• When rendering, for right-to-left languages, such as Arabic:
• For all document type groups, in the text files, the letters
in each word are displayed in reverse order, like a mir-
ror image.
• For Word documents, in TIFF, PDF, and text files, if the
document contains a mixture of Latin script words and
right-to-left script words, the Latin script words at the
beginning or end of a sentence are dropped. If Latin
script words are in the middle of the sentence, they are
retained.

AD Summation Discovery Cracker User Guide DC Engine Selection
225
16. DC Engine Selection
You can choose how to send jobs to your DC Engines for pro-
cessing: automatically or manually.
• Automatic DC Engine selection—Discovery Cracker selects
the DC Engines to assign to a job.
• Manual DC Engine selection—You select one or more DC
Engines to assign to a job.
This chapter explains the following subjects:
• Benefits of Manual DC Engine Selection
• Selecting DC Engines Manually
• Changing the DC Engine Selection Mode
• Things to Know About DC Engine Selection
• Glossary of Terms Related to DC Engine Selection
The explanations herein assume that you know:
• How to create projects, groups, and views (Chapter 5, “Pro-
cessing Setup”)
• How to create jobs and how to access the Jobs tab (Chapter
6, “Processing”)
• How to start a QC job (Chapter 8, “Quality Control”)
Benefits of Manual DC Engine
Selection
The following scenarios provide a few examples of the benefits
of using manual DC Engine selection.
1. You get a hard drive and crack it letting Discovery Cracker
automatically select the DC Engines. After the job is fin-
ished, the quality controller finds documents that should
have been rendered but they weren't because your DC
Engine computers did not have the necessary application
installed, such as AutoCAD. The quality controller marks
those documents to rerender.
You can install AutoCAD on one of your DC Engine com-
puters. When the quality controller starts the QC job, he or
she can select the specific DC Engine that has AutoCAD.
2. You want to take control of the prioritization of the work-
load. You have some DC Engine computers that are more
powerful than others, so you select those computers for
faster processing of the job.
3. Export jobs are performed on only one DC Engine at a
time; those jobs are not distributed among multiple DC
AD Summation Discovery Cracker User Guide DC Engine Selection
226
Engines. For that reason, when you are ready to export your
data, you may want to choose your most powerful DC
Engine computer to run export jobs.
NOTE: Manual DC Engine selection does not provide any bene-
fit if you are using the single-box solution, which has only one
DC Engine.
Selecting DC Engines Manually You can select DC Engines to assign to a job. You can do that at
job creation (when you initially create a job or when starting a
QC job) and after job creation (before the job runs or while a
job is running).
At job creation At job creation, or when starting a QC job, you make selections
in the Details area of the General Job Information tab. (See
Figure 16.1.)
The DC Engine selection area provides the options Automatic
or Manual for choosing which way DC Engines will be selected
for the job.
By default, DC Engine selection is set to Automatic, which
means the Workflow Manager component of Discovery Cracker
selects DC Engines to process the job. You take control of
selecting DC Engines by choosing the Manual option.
AD Summation Discovery Cracker User Guide DC Engine Selection
227
Figure 16.1.
To manually select DC Engines for a job at job creation or
when starting a QC job:
1. On the General Job Information tab, in the Details area,
under DC Engine selection, select Manual.
2. Select Select DC Engines.
The DC Engine Selection dialog box is displayed. (See
Figure 16.2.)
Figure 16.2.

AD Summation Discovery Cracker User Guide DC Engine Selection
228
3. Select one or more computers in the Available DC Engine
Computers list and move them to the Current Job Assign-
ment list.
The Available DC Engine Computers list displays all the
computers that are available for processing. That includes
all computers in the general DC Engine pool, those that
have been assigned to other jobs, and offline computers.
(Offline computers are indicated by a red X ). A com-
puter becomes unavailable (and therefore is not listed) only
if it has been offline for 300 minutes.
For important details, see “Things to Know About DC
Engine Selection” and “Glossary of Terms Related to DC
Engine Selection,” later in this chapter.
Move one computer at a time by selecting it and clicking
the single right arrow . Move all computers at one time
by clicking the double right arrow .
You can remove computers from the Current Job Assign-
ment list one at a time by selecting a computer and clicking
the single left arrow . You can remove all computers
from the Current Job Assignment list by clicking the dou-
ble left arrow .
4. Select Save to return to the General Job Information tab
and continue creating the job.
NOTE: If you select Cancel, the mode remains Manual but
no DC Engines will be selected.
If you don't select any DC Engine computers to assign to
the job and select Save, the mode returns to Automatic.
When you select Create on the General Job Information
tab, the job will be created in automatic mode.
After job creation After you create a job, the job is listed on the Jobs tab, which
includes the DC Engine Selection column. (See Figure 16.3.) If
the job has not completed, you see the DC Engine selection
mode of the job, either automatic or manual.
The manual mode icon displays double checks if all the
DC Engine computers assigned to the job are online. If one or
AD Summation Discovery Cracker User Guide DC Engine Selection
229
more of the assigned computers goes offline, the icon displays a
red X and the label Manual with errors.
Figure 16.3.
If you want to change the selected DC Engines before a job
runs or while it is running (on the fly), you can do so from the
General Job Information tab or the Jobs tab:
• The General Job Information tab
a. Select a job in the navigation pane to display the Gen-
eral Job Information tab for the job.
You don't need to select Edit, if it is waiting to run, or
Pause, if it is running.
b. Select Select DC Engines to display the DC Engine
Selection dialog box.
c. Add or remove DC Engine computers.
d. Select Save.
• The Jobs tab
a. For the job you want to change, click the icon in the
DC Engine Selection column. The DC Engine Selec-
tion dialog box is displayed.
b. Add or remove DC Engine computers.
c. Select Save.
Changing the DC Engine
Selection Mode
You can change the DC Engine selection mode (from automatic
to manual or from manual to automatic). You can do that at
any time, while a job is running (on the fly) or waiting to run.
AD Summation Discovery Cracker User Guide DC Engine Selection
230
To change the DC Engine selection mode of the job:
1. Open the DC Engine Selection dialog box in one of the
following ways.
• From the General Job Information tab:
a. Select a job in the navigation pane to display the
General Job Information tab.
You don't need to select Edit, if it is waiting to run,
or Pause, if it is running.
b. If the job is in automatic mode, select Manual.
c. Select Select DC Engines.
• From the Jobs tab, click the icon in the DC Engine
Selection column for the job you want.
2. Change the DC Engine selection mode:
• To change from manual to automatic, move all the com-
puters in the Current Job Assignment list to the Avail-
able DC Engine Computers list.
• To change from automatic to manual, move one or more
computers from the Available DC Engine Computers
list to the Current Job Assignment list.
3. Select Save.
• On the General Job Information tab, the DC Engine
Selection option changes from Manual to Automatic
or from Automatic to Manual.
• On the Jobs tab, the DC Engine Selection mode changes
from Manual to Automatic or from Automatic to
Manual.
Things to Know About DC
Engine Selection
When using manual DC Engine selection, it is important that
you know and take into consideration the following informa-
tion:
lWorkflow Manager assigns DC Engines to jobs based on
the user-selected priority levels and load balancing. Load
balancing is an algorithm that Workflow Manager uses to
assign tasks to multiple DC Engines to process jobs. Load
balancing is performed among the DC Engines that are in
the general DC Engine pool. The general DC Engine pool
is made up of all of your DC Engines except those that you
have manually assigned to jobs.
When you assign a DC Engine to a job, it is taken out of
the general DC Engine pool.
AD Summation Discovery Cracker User Guide DC Engine Selection
231
lAt times, you may require applications other than those
listed in the Discovery Cracker system requirements to ren-
der some of your documents. The advantage of using man-
ual DC Engine selection is that you don't have to install the
special applications on all of your DC Engine computers.
You can install them on only one DC Engine computer or
on as many as your business needs require.
NOTE: If you set up DC Engine computers with special
applications, you have to install only the required software
applications listed in the Discovery Cracker system require-
ments. Adobe Acrobat, Lotus Notes Client, and an archive
application are optional. They are required only if you need
to process PDF files, NSF files, or compressed documents.
However, all DC Engine computers require Microsoft
Office (whether or not you are going to process Microsoft
Office documents) because the Discovery Cracker program
looks for Microsoft Office Outlook during processing.
lYou can assign many DC Engines to process one job. For
those jobs, Discovery Cracker uses load balancing to pro-
cess the job among the assigned DC Engines.
lYou can assign one DC Engine to process more than one
job. For two or more jobs, Discovery Cracker processes the
jobs according to load balancing based on job priorities.
lIf you assign more than one DC Engine to process a job,
the job will be processed only by the assigned DC Engines
as long as at least one of those DC Engines is online. If the
last of the assigned DC Engines is offline for at least one
minute, then the job will be processed by the general DC
Engine pool. When at least one assigned DC Engine comes
back online, that DC Engine will take precedence and the
general DC Engine pool computers will eventually stop
processing. They will finish the tasks they are performing
on the documents they have been assigned, and then drop
out of the process.
For example, if you assign three DC Engines to a job and all
three are taken offline by IT for maintenance, the job goes
to the general DC Engine pool. When the first assigned
engine becomes available, the job goes to it. Then as other
DC Engines become available, the job goes to them with
load balancing.
AD Summation Discovery Cracker User Guide DC Engine Selection
232
CAUTION: If you send documents to a specific DC Engine
for rendering because that is where a specific application
resides and that computer goes offline, your documents will
be sent to other computers in the general DC Engine pool
for processing.
lWhen you select the manual DC Engine selection mode for
a job, if the job is sent to the general DC Engine pool
because all assigned DC Engines went offline, the job stays
in the manual mode as indicated on the Jobs tab and on the
General Job Information tab. That's because the job is still
officially in the manual mode and the job will be sent to the
assigned DC Engines when at least one becomes available.
The mode indicator will change only when you change the
manual mode to the automatic mode. You do that in the
DC Engine Selection dialog box by removing all the
assigned DC Engines.
lWhen you make any changes in the DC Engine Selection
dialog box and select Save, the DC Engine assignment is
committed immediately, whether the job is running or not.
Glossary of Terms Related to
DC Engine Selection
Automatic mode. Discovery Cracker selects DC Engines to
assign to a job according to user-selected priority levels and load
balancing. Load balancing is performed among the DC Engines
that are in the general DC Engine pool.
Available. A DC Engine computer that appears in the list of
Available DC Engine Computers in the DC Engine Selection
dialog box. To appear in the list, the computer must be recog-
nized by Workflow Manager. DC Engine computers ping
Workflow Manager at regular intervals. If a DC Engine com-
puter has not pinged Workflow Manager in 300 minutes, it is
dropped from the list. An offline computer can appear in the
list and therefore be available for selection if it has been offline
for less than 300 minutes.
DC Engine. The data processing component of the Discovery
Cracker program. It processes the files—extracts metadata and
renders—and sends the data to Workflow Manager, which then
writes it to the database.
DC Engine computer. The computer that hosts the DC Engine
component.
AD Summation Discovery Cracker User Guide DC Engine Selection
233
General DC Engine pool. The DC Engine computers that are
available to process jobs in the automatic mode. DC Engine
computers that you assign to jobs are taken out of the general
DC Engine pool. Discovery Cracker processes jobs among all
the DC Engine computers in the pool based on job priority and
load balancing.
Job priority. The setting on the General Job Information tab
that controls the number of system resources assigned to a job.
You can set the job priority to High, Above Normal, Normal,
Below Normal, or Low. A job with a priority of Low gets fewer
system resources. A job with a priority of High gets more system
resources. Discovery Cracker considers job priority only when
multiple jobs are running at one time. The jobs can be within
one project or across multiple projects.
Load balancing. An algorithm that Workflow Manager uses to
assign tasks to multiple DC Engines to process a job. Load bal-
ancing is used when you have installed the DC Engine compo-
nent on more than one computer. Load balancing takes into
consideration the job priority.
Manual mode. You are responsible for selecting one or more
DC Engines to assign to a job.
Offline computer. Workflow Manager has not received a ping
from the DC Engine computer for five minutes. This could
happen if the computer is turned off or disconnected from the
network or if the DC Engine component is not running.
Workflow Manager. The task manager and communication
center for the Discovery Cracker program. It manages the work-
flow for the Discovery Cracker components, controlling all
events and balancing the load among the DC Engines for faster
processing.
The Workflow Manager user interface displays a list of all the
computers on which the DC Engine component is running and
the time that the DC Engine computers last pinged Workflow
Manager.

AD Summation Discovery Cracker User Guide
234
Appendix A. Task Settings
When Discovery Cracker processes your files, it needs to know
what settings to use for the various tasks involved. Discovery
Cracker includes pre-established task settings that work well
with the pre-established document type groups. However, you
may find it necessary to customize the settings to fit your partic-
ular business needs. Use the information in the table below to
help you customize task settings for the File Spin Through,
Extract Metadata, and Render actions.
You can adjust these settings at the system, folder, project,
group, view, or job level. Each sublevel inherits the settings from
the previous level and can be further customized.
Table A.1: Task Setting Descriptions
Action Task Settings Instructions
File Spin
Through
Purpose:
To ext r act
attachments
and embedded
files from the
selection of
folders to be
processed.
To ide n tify t h e
contents within
a PST or NSF
file.
OLE Spin
Through
The following check boxes:
• Extract embedded object files
• Extract fully embedded files
from Word, Word Perfect and
RTF files
• Extract linked embedded files
from Word, Word Perfect and
RTF files
• Extract embedded files from
PDFs
Select Extract embedded object files to
enable this task.
Select the other two check boxes accord-
ing to your needs.
NOTE: If you installed Microsoft Office
2007 on your DC Engine computers, you
will not be able to extract embedded files
from PowerPoint documents created with
versions of PowerPoint earlier than
Microsoft Office Powerpoint 2007. We
recommend that, if possible, you install
Microsoft Office 2003 with Microsoft
Office 2007 forward compatibility on
one of your DC Engine computers. Send
PowerPoint documents to that DC
Engine for processing.
Archive Applica-
tion
The following check box:
• Spin through archive
The following parameter:
• Archive application
Select Spin through archive to enable the
ability to spin through archive files. This
selection will also enable the parameter.
From the Archive application menu,
select the archive application you want
the Discovery Cracker program to use to
extract the contents of the archive for the
selected document type group.

AD Summation Discovery Cracker User Guide
235
File Spin
Through
(continued)
Spin Through
Lotus Notes Doc-
uments
The following check box:
• Process attachments
The following parameters:
• ID file option
• Password option
Select Process attachments to enable the
processing of attachments to Lotus Notes
e-mail messages and to enable the param-
eters.
If selected, e-mail messages and attach-
ments are processed. If not selected, only
e-mail messages are processed.
ID file option allows you to override the
system default Lotus Notes ID file.
Password option allows you to override
the system default password used to open
Lotus Notes Store files.
Spin Through
Lotus Notes Files
The following check boxes:
• Enable spin through Lotus
Notes NSFs
• Bypass any corrupted files
The following parameters:
• ID file option
• Password option
Select the Enable spin through Lotus
Notes NSFs check box to process the
contents of Lotus Notes Store files. When
this check box is selected, the other check
boxes and parameters are enabled.
Select Mark encrypted files as problems
to allow the Discovery Cracker program
to identify encrypted files even though it
cannot process them.
Select Bypass any corrupted files to allow
the Discovery Cracker program to ignore
corrupted files.
ID file option allows you to override the
system default Lotus Notes ID file.
Password option allows you to override
the system default password used to open
Lotus Notes Store files.
Spin Through
Outlook PST
Items
The following check box:
Process attachments
Select Process attachments to enable the
processing of attachments to Outlook e-
mail messages. If selected, e-mail mes-
sages and attachments are processed. If
not selected, only e-mail messages are
processed.
Table A.1: Task Setting Descriptions (Continued)
Action Task Settings Instructions

AD Summation Discovery Cracker User Guide
236
File Spin
Through
(continued)
Spin Through
Outlook PST Files
The following check boxes:
• Enable spin through of Out-
look PSTs
• Bypass corrupt documents
• Process mail
• Process appointments
• Process contacts
• Process distribution lists
• Process journals
• Process notes
• Process tasks
• Process reports
Select the Enable spin through of Out-
look PSTs check box to process the con-
tents of Outlook PST files. When this
check box is selected, the other check
boxes are enabled.
Select Bypass corrupt documents to
allow the Discovery Cracker program to
bypass corrupt documents and continue
on.
Select Process mail to process e-mail doc-
uments from a PST file.
Select Process appointments to process
calendar documents from a PST file.
Select Process contacts to process contact
documents from a PST file.
Select Process distribution lists to process
distribution list documents from a PST
file.
Select Process journals to process journal
documents from a PST file.
Select Process notes option to process
notes documents from a PST file.
Select Process tasks to process task docu-
ments from a PST file.
Select Process reports to process report
documents from a PST file.
NOTE: If you clear a check box, you can-
not go back after processing and select it.
Table A.1: Task Setting Descriptions (Continued)
Action Task Settings Instructions

AD Summation Discovery Cracker User Guide
237
Extract Meta-
data
Purpose:
To collect the
metadata from
your docu-
ments.
User-Selected
Application
The following parameter:
• User-Selected Application with
one of the following applica-
tions displayed (depending on
the document type group
selected):
• Discovery Cracker Extrac-
tor
• Lotus Notes
• Outlook
If the displayed application is Dis-
covery Cracker Extractor, the
Default Encoding parameter is
displayed.
If the displayed application is
Lotus Notes, Get Lotus Notes
metadata is displayed with the fol-
lowing:
• Populate Extra Properties field
check box
• Replace CR + LF in Body field
check box
• ID file option parameter
• Password file option parameter
If the displayed application is Out-
look, Get Outlook metadata is
displayed with the following:
• Populate Extra Properties field
check box
• Replace CR + LF in Body field
check box
Depending on the document type group
you have selected, select the appropriate
application for the Discovery Cracker
program to use to extract metadata.
Default Encoding allows you to select the
encoding to use when Discovery Cracker
cannot determine a document’s encoding.
(See page 212 in Chapter 15, “Working
With Languages.”)
Select Populate Extra Properties field to
extract additional metadata from Lotus
Notes e-mail message or Outlook e-mail
message files (e.g., start time and end
time of a meeting).
Select Replace CR + LF in Body field to
enable the Replace CR + LF with param-
eter.
CR = Carriage Return
LF = Line Feed
Enter a number between 1 and 255
in the Replace CR + LF with box.
The ANSI character corresponding
to the number will be entered in
place of the CR and LF.
NOTE: If you choose a value greater than
127 and export that field without using
the Unicode option, any characters
greater than 127 will be changed to a
question mark (“?”). (See “Preview Using
Data Delimited Text Files” on page 96
and “Data Delimited Text File Export”
on page 150.)
ID file option allows you to override the
system default Lotus Notes ID file.
Password file option allows you to over-
ride the system default password used to
open Lotus Notes Store files.
Table A.1: Task Setting Descriptions (Continued)
Action Task Settings Instructions

AD Summation Discovery Cracker User Guide
238
Extract Meta-
data
(continued)
Get Body Com-
ments
The following check boxes:
• Extract body comments
The following parameters:
• Replace CR + LF with
Select the check box to collect the body
comment metadata fields from Excel,
Word, and PowerPoint files and to enable
the Replace CR + LF with parameter.
CR = Carriage Return
LF = Line Feed
Enter a number between 1 and 255
in the Replace CR + LF with box.
The ANSI character corresponding
to the number will be entered in
place of the CR and LF.
NOTE: If you choose a value greater than
127 and export that field without using
the Unicode option, any characters
greater than 127 will be changed to a
question mark (“?”). (See “Preview Using
Data Delimited Text Files” on page 96
and “Data Delimited Text File Export”
on page 150.)
Get Body Text The following check boxes:
• Extract body text
Select Extract body text to extract data
from the body of any document.
NOTE: The Get Body Text option does
not apply to Outlook or Lotus Notes e-
mail messages.
Table A.1: Task Setting Descriptions (Continued)
Action Task Settings Instructions

AD Summation Discovery Cracker User Guide
239
Extract Meta-
data
(continued)
Missing Metadata
Check
The following check box:
• Check metadata
The following parameters:
• Minimum fields populated
• Metadata fields to check
Select check metadata to enable this task
and to enable the parameters.
Enter a number for Minimum fields pop-
ulated.
In Metadata fields to check, select the
specific metadata fields you want to
check.
With these parameters set, Discovery
Cracker ensures that cracked documents
have values for the specific number of
metadata fields that you select. You may
select fewer fields in the Minimum fields
populated than you have selected in the
Metadata fields to check. Discovery
Cracker will use the selected number of
fields to check and if at least that number
of fields are populated, no errors will be
given to the document.
Documents that do not meet the parame-
ters are marked as Problem.
OCR Options For an explanation of the OCR option settings, see page 174 in Chapter 12,
“Performing Optical Character Recognition.”
Identify Scripts To enable script identification, select fields from the Available fields list and add
them to the Selected fields list. Select the fields you want Discovery Cracker to
examine in order to identify the scripts used in documents. (See page 213 in
Chapter 15, “Working With Languages.”)
Table A.1: Task Setting Descriptions (Continued)
Action Task Settings Instructions

AD Summation Discovery Cracker User Guide
240
Render
Purpose:
To create T I FF
files (images) or
PDF files and,
optionally, text
files of your
documents.
Document Ren-
dering
The following check boxes:
• Enable text file output
• Compare the estimated page
count to the actual rendered
output page count
• Render output in color
The following parameters:
• Render output type
• Output format (not shown for
PDF)
• Te xt En c odi n g
• DPI
• Maximum time (in minutes)
to change render settings
between documents
• Rotate landscape (not shown
for PDF)
• Rotate portrait (not shown for
PDF)
The Render output type allows you select
None, PDF, or TIFF.
The settings options are slightly different
for TIFF and PDF. When you select
None, no settings are displayed.
NOTE: If you select Metadata Viewer on
the User-Selected Application tab, set-
tings on the Document Rendering tab
are ignored.
The Output format allows you to pro-
duce Single page or Multipage TIFF
images. PDF files are produced in multi-
page format only.
Single page creates a separate TIFF image
for each page of the documents being ren-
dered. Multipage creates a single TIFF
image for each document rendered.
NOTE: The DocuLex 5 export requires
that you create single-page TIFF images.
Selecting Enable text file output pro-
duces a text file for each document that is
rendered. If you select the Single page
format, a separate .txt file is produced for
each page of the document being ren-
dered. If you select the Multipage format,
a single .txt file will be created for each
document rendered. That is the text file
output you get when you render to PDF.
Table A.1: Task Setting Descriptions (Continued)
Action Task Settings Instructions

AD Summation Discovery Cracker User Guide
241
Render
(continued)
Document Ren-
dering
(continued)
The Te x t En c odin g selection tells the
printer driver which character set to use
when creating the text files. This is espe-
cially important when you are processing
documents containing international lan-
guages. For more information, see page
215 in Chapter 15, “Working With Lan-
guages.”
The DPI (dots per inch) determines the
output quality of the rendered TIFF
images or PDF files. If this option is set
too low, the image quality is poor, causing
the text within the image to be unread-
able. If this option is set to the highest
level, 600, the image quality is excellent,
but the file size will be larger and addi-
tional processing time will be required.
The default setting of 300 is most com-
monly used within Discovery Cracker.
The Maximum time (in minutes) to
change render settings between docu-
ments is the maximum time per docu-
ment that Discovery Cracker has to
process the commands to change settings
from one document to the next. Once
this maximum time has been reached,
Discovery Cracker will discontinue per-
forming the rendering action and move
on to another document. Setting this
option too low will cause more docu-
ments to time out.
Setting this option too high will cause
delays in processing if a problem docu-
ment is encountered.
Table A.1: Task Setting Descriptions (Continued)
Action Task Settings Instructions

AD Summation Discovery Cracker User Guide
242
Render
(continued)
Document Ren-
dering
(continued)
Select Compare the estimated page
count to the actual rendered output page
count to use the metadata property Esti-
mated Pages to verify that the correct
number of TIFF images or PDF files have
been produced. This option only works
with documents that contain an Esti-
mated Pages metadata property.
Render output in color will render any
color document as a color TIFF image or
PDF file. However, if the document pages
are black and white, the TIFF image or
PDF file will be produced as black and
white.
Rotate landscape will rotate any land-
scape-oriented document to the right the
number of degrees selected. This option is
not available for PDF output.
Rotate portrait will rotate any portrait-
oriented document to the right the num-
ber of degrees selected.This option is not
available for PDF output.
Table A.1: Task Setting Descriptions (Continued)
Action Task Settings Instructions

AD Summation Discovery Cracker User Guide
243
Render
(continued)
User-Selected
Application
The following parameter:
• User-Selected Render Applica-
tion with one of the following
applications displayed
(depending on the document
type group selected):
• Adobe Acrobat
• Discovery Cracker Viewer
• Internet Explorer
• Kodak
• Lotus Notes
• Metadata Viewer
• MS Access
• MS Excel
• MS PowerPoint
• MS Project
• MS Visio
• MS Word
• None
• OS-Associated
• Outlook
Select the user-selected render application
that you want to use for the selected doc-
ument type group.
Caution: Be sure to choose an application
that can render all the document types in
the selected document type group. Using
an application that cannot render all of
the document types could cause undesir-
able results.
You see check boxes and parameters that
vary depending on the application you
select.
See Table A.2 on page 245 for detailed
instructions on how to set each parameter
within the user-selected render applica-
tions.
Blank Pages When you select the TIFF render
output file type on the Document
Rendering tab, you see:
The following check boxes:
• Check for and deactivate blank
pages
• Check only pages that are
smaller than
The following parameter:
• Size in KB
Select Check for and deactivate blank
pages to allow Discovery Cracker to
check the rendered TIFF images for blank
pages. Every TIFF image regardless of size
is reviewed to determine if it is blank.
Select Check only pages that are smaller
than to limit the TIFF images that are
checked for blank pages and to enable the
Size in KB parameter.
Entering a number from 1 to 100 for the
Size in KB tells Discovery Cracker to
review only pages that are smaller than
the number of kilobytes in that parame-
ter.
NOTE: In Discovery Cracker, a blank
TIFF page is a TIFF image that has no
pixels on the page.
Table A.1: Task Setting Descriptions (Continued)
Action Task Settings Instructions

AD Summation Discovery Cracker User Guide
244
Render
(continued)
Blank Pages
(continued)
When you select the PDF render
output file type on the Document
Rendering tab, you see:
The following check box:
• Check for and deactivate blank
pages
When you select the None render
output file type on the Document
Rendering tab, the Blank Pages
tab is not displayed.
Select Check for and deactivate blank
pages to allow Discovery Cracker to
check the rendered PDF file for blank
pages. Every PDF file regardless of size is
reviewed to determine if it is blank.
NOTE: In Discovery Cracker, a blank PDF
page is a page with no text or images.
OCR Options The OCR Options tab is not displayed when the None or PDF render output
file types are selected.
For an explanation of the OCR option settings when you select the TIFF render
output file type, see page 176 in Chapter 12, “Performing Optical Character
Recognition.”
Table A.1: Task Setting Descriptions (Continued)
Action Task Settings Instructions

AD Summation Discovery Cracker User Guide
245
Table A.2: User-Selected Render Application Settings
Application Setting
Category Option Settings Description
Adobe Acro-
bat
Adobe render
options
Send each
document
page as a sepa-
rate render-
ing job
None available Select Send each document page as a
separate rendering job to send each
page of the document to render as a
separate document. This will not
affect the final output of the rendered
document. Therefore if you have
selected the multipage TIFF or the
PDF output option, you will still have
a multipage document when the ren-
dering is complete.
Discovery
Cracker
Viewer
Discovery
Cracker Viewer
render options
Default Font The following check
boxes:
• Print bold
• Print italic
• Use original docu-
ment formatting if
available
The following parame-
ters:
• Print font:
• Font size:
Select the appropriate Print font to
use when the font contained within
the document is not on the machine
processing the file or when rendering
spreadsheets, databases or documents
in draft form.
Select the appropriate Font size to use
when the font contained within the
document is not on the machine pro-
cessing the file or when rendering
spreadsheets, databases or documents
in draft form.
Select Print bold or Print italic in
addition to the Print font and Font
size options that you have previously
selected to render the documents with
a bold or italic font if a replacement
font is used.
Select Use original document format-
ting if available to maintain the origi-
nal print settings stored in the
document.

AD Summation Discovery Cracker User Guide
246
Discovery
Cracker
Viewer (con-
tinued)
Discovery
Cracker Viewer
render options
(continued)
Spreadsheet The following check
boxes:
• Print gridlines
• Print row and col-
umn headings
The following parame-
ters:
• Print direction:
• Scaling options:
• Scale percentage:
• Width in pages:
• Height in pages:
Select Print gridlines to print the
gridlines of each cell within rendered
spreadsheets.
Select Print row and column head-
ings to print the row and column
headings of spreadsheets.
Select Print direction to control the
order in which pages are rendered.
Print across renders the pages in the
first set of rows first, then moves
down and renders the next set of
rows.
Print down renders the pages in the
first set of columns first, then moves
over and renders the next set of col-
umns.
Select Scaling options to control the
amount of data that can fit onto one
page when rendered.
Select Scale to selected percentage to
adjust the amount of data that can fit
onto one page when rendered, but not
to control the number of pages ren-
dered. This option has a parameter
Scale percentage which allows from
10 to 200% scale adjustment.
Select Fit to selected width and
height to adjust how many pages will
be rendered and how large the ren-
dered cells will be on the page.
This option has two parameters
Width in pages and Height in pages
which can each be set from 1 page to
10 pages.
Table A.2: User-Selected Render Application Settings (Continued)
Application Setting
Category Option Settings Description

AD Summation Discovery Cracker User Guide
247
Discovery
Cracker
Viewer (con-
tinued)
Discovery
Cracker Viewer
render options
(continued)
Database The following check
boxes:
• Print gridlines
• Print row and col-
umn headings
The following parame-
ter:
• Scaling options:
which contains the
following options:
• Fit to page
• Fit to page
height
• Fit to page width
• No scaling
Select Print gridlines to print the
gridlines of each cell within rendered
database tables.
Select Print row and column head-
ings to print the row and column
headings of database tables.
Select Scaling options to control the
amount of data that can fit onto one
page when rendered.
NOTE: The Discovery Cracker Viewer
can only process Microsoft Access
databases that are version 2.0 or
below. We recommend selecting MS-
Access as the application to render
Microsoft Access databases.
Bitmap The following check
box:
• Print Bitmap image
border
The following parame-
ter:
• Bitmap image aspect
ratio: which con-
tains the following
options:
• Original aspect
ratio
• Stretch to mar-
gin
Select Print Bitmap image border to
render Bitmap images with a border.
Select the appropriate Bitmap image
aspect ratio: to render Bitmap images.
Select Original aspect ratio to render
the image without altering the aspect
ratio. Note that the image will be
stretched to the page margins, but
that aspect ratio will remain
unchanged.
Select Stretch to margin to stretch the
image to the margin of the page, but
not maintain the original aspect ratio.
Table A.2: User-Selected Render Application Settings (Continued)
Application Setting
Category Option Settings Description

AD Summation Discovery Cracker User Guide
248
Discovery
Cracker
Viewer (con-
tinued)
Discovery
Cracker Viewer
render options
(continued)
Drawing The following check
box:
• Print vector drawing
border
The following parame-
ter:
• Vector drawing
aspect ratio: which
has the following
options:
• Original aspect
ratio
• Stretch to mar-
gin
Select Print vector drawing border to
render vector drawings with a border.
Select the appropriate Vector drawing
aspect ratio: to render vector drawing
images.
Select Original aspect ratio to render
the drawing without altering the
aspect ratio. Note that the drawing
will be stretched to the page margins,
but that aspect ratio will remain
unchanged.
Select Stretch to margin to stretch the
drawing to the margin of the page,
but not maintain the original aspect
ratio of the drawing.
Internet
Explorer
Internet
Explorer render
options
Download
Pictures /
Videos
None available Select Download Pictures / Videos to
render embedded pictures that are
linked within an HTML formatted
document.
NOTE: Discovery Cracker cannot
update pictures if the link to the pic-
ture is broken. Discovery Cracker
cannot render videos.
Wait time for
Internet
Explorer to
load the page
(in seconds)
The following parame-
ter:
• 1 to 60
Select Wait time for Internet
Explorer to load the page time option
to control how long Discovery
Cracker will wait while Internet
Explorer attempts to load the page.
This wait time can be set from 1 to 60
seconds.
Tr y d o w n -
load again if
timed out
None available Select Try download again if timed
out to control whether or not multi-
ple tries should be attempted to load a
page into Internet Explorer.
Table A.2: User-Selected Render Application Settings (Continued)
Application Setting
Category Option Settings Description

AD Summation Discovery Cracker User Guide
249
Internet
Explorer (con-
tinued)
Internet
Explorer render
options (contin-
ued)
Shutdown
Internet
Explorer
between each
attempt
None available Select Shut down Internet Explorer
between each attempt to close the
Internet Explorer application between
attempts to load the page into Inter-
net Explorer.
Shut down
Internet
Explorer after
rendering (in
seconds):
The following parame-
ter:
• 1 to 60
Select length of time in Shut down
Internet Explorer after rendering to
determine how long after the render-
ing task has been completed before
shutting down Internet Explorer.
Kodak There are no options for this selection because it is not an application required for processing. By
default, Discovery Cracker Viewer renders documents of this file type.
If you want better images than what Discovery Cracker Viewer can produce for this file type, you need
to install the native application. Please contact Discovery Cracker Product Support at 866-833-5377
or dc.support@accessdata.com for guidance.
Lotus Notes Lotus Notes
Render Options
Expand
Names field
content when
printing
None available Select Expand Names field content
when printing to control the size of
the CC and BCC fields on the ren-
dered document (TIFF or PDF).
When selected, if the CC or BCC
fields contain more than 3 rows of
recipients, the field will be expanded
to accommodate the full recipient list.
If not selected, only 3 rows of recipi-
ents in either field will be rendered.
Render Pri-
vate Docu-
ments
None available Select Render Private Documents to
allow Discovery Cracker to render
Lotus Notes e-mail messages that have
been sent as private.
If this option is not selected, e-mail
messages marked private cannot be
rendered.
Table A.2: User-Selected Render Application Settings (Continued)
Application Setting
Category Option Settings Description

AD Summation Discovery Cracker User Guide
250
Lotus Notes
(continued)
Lotus Notes
Render Options
(continued)
Render docu-
ment in edit
mode
None available Select Render document in edit
mode to change the mode with which
Lotus Notes e-mail documents are
rendered.
In some instances this option removes
double CC and Subject lines in the
rendered document (TIFF or PDF).
In other cases this option causes dou-
ble CC and Subject lines to appear in
the rendered document.
ID File
Options:
The following parame-
ters:
• Select the file to use,
which has the fol-
lowing option ID
File to Use:
• Use system default
ID file
Select ID File Options to control
whether Discovery Cracker will use
the system default ID file or a differ-
ent ID file. There are two parameters
for this setting:
• Select the file to use
• Use system default ID file
If a new ID file is needed, choose
Select the file to use which then
enables the parameter field ID File To
Use: for selecting a different ID file.
Once a new ID file is selected, a new
Reference File entry will be added.
If the system default is needed select
Use system default ID file.
Password
options:
The following parame-
ters:
• Select the password
to use, which has
the following
option Password to
use:
• Use all existing pass-
words
Use system default
password
Select Password options to control
whether Discovery Cracker will use
the system default password or a dif-
ferent password. There are three
options for this setting:
• Select the password to use
• Use all existing passwords
• Use system default password
Table A.2: User-Selected Render Application Settings (Continued)
Application Setting
Category Option Settings Description

AD Summation Discovery Cracker User Guide
251
Lotus Notes
(continued)
Lotus Notes
Render Options
(continued)
Password
options
(continued)
If a different password is needed,
select the option Select the password
to use, which then enables the param-
eter field Password to use: for select-
ing a different password. Once a new
password is selected, a new reference
file entry will be added.
If there are multiple passwords
needed, select the option Use all
existing passwords. This enables Dis-
covery Cracker to cycle through all of
the passwords within the reference
files.
If you would like to use the system
default password, select Use system
default password. This will enable
Discovery Cracker to use the pass-
word that has been set in the Refer-
ence Files previously as the system
default.
Metadata
Viewer
Metadata
Viewer render
options
Metadata
template to
use:
None available Select the Metadata template to use.
Metadata templates are created and
stored in the reference files. If chosen
as a rendering application, only the
metadata will be rendered in an
HTML format.
NOTE: If you select Metadata Viewer,
settings on the Document Rendering
tab will be ignored.
Table A.2: User-Selected Render Application Settings (Continued)
Application Setting
Category Option Settings Description

AD Summation Discovery Cracker User Guide
252
MS Access MS Access ren-
der options
Page setup
options
The following check
boxes:
• AutoFit column
• AutoFit row
• Wrap text
• Print gridlines
Select AutoFit column to adjust the
column width of each column within
the Access database tables to fit the
contents within the column.
Select AutoFit row to adjust the row
height of each row within the Access
database tables to fit the contents
within each row.
Select Wrap text to adjust the con-
tents within each cell within the
Access database tables to render mul-
tiple lines of text rather than a single
row of text.
Select Print gridlines to enable the
gridline borders to print on the ren-
dered document (TIFF or PDF) for
each cell within the Access database
tables.
Margin set-
ting options
The following parame-
ters:
• Top margin which
has the following
options: 0.25 inches
to 11 inches
• Bottom margin
which has the fol-
lowing options:
0.25 inches to 11
inches
• Right margin which
has the following
options: 0.25 inches
to 8 inches
• Left margin which
has the following
options: 0.25 inches
to 8 inches
Select a Top margin value to adjust
the distance from the top edge of the
page to the first line of data within the
rendered document (TIFF or PDF).
Select a Bottom margin value to
adjust the distance from the bottom
edge of the page to the last line of data
within the rendered document.
Select a Right margin value to adjust
the distance from the right edge of the
page to the data within the rendered
document.
Select a Left margin value to adjust
the distance from the left edge of the
page to the data within the rendered
document.
Table A.2: User-Selected Render Application Settings (Continued)
Application Setting
Category Option Settings Description

AD Summation Discovery Cracker User Guide
253
MS Access
(continued)
MS Access ren-
der options
(continued)
Page order
options
The following parame-
ter:
• Page order: which
has the following
options:
• Down then Over
• Over then Down
Select Page order to control the order
in which pages are rendered.
Down then over renders the pages in
the first set of columns first, then
moves over and renders the next set of
columns.
Over then down renders the pages in
the first set of rows first, then moves
down and renders the next set of
rows.
Scale size
options
The following parame-
ter:
• Scale size: which has
the following
options: 10 to 200
Select a Scale size value to adjust the
amount of data that can fit onto one
page when rendered.
Orientation
options
The following parame-
ter:
• Page orientation:
which has the fol-
lowing options:
• Portrait
• Landscape
Select Page orientation to control the
orientation with which the page will
be rendered.
Portrait renders the page in an 8 1/2
by 11 format
Landscape renders the page in an 11
by 8 1/2 format.
Table A.2: User-Selected Render Application Settings (Continued)
Application Setting
Category Option Settings Description

AD Summation Discovery Cracker User Guide
254
MS Excel MS Excel ren-
der options
Enable cus-
tom settings
None available Select Enable custom settings to
adjust various rendering options for
Excel spreadsheets.
If this option is not selected, the doc-
ument will be rendered with Excel,
but the pages will use the original
saved document formatting.
Chart settings The following check
box:
• Enable chart size set-
tings
The following parame-
ter:
• Chart size: which
has the following
options:
• Custom
• Scale to fit page
• Use full page
Select Enable chart size settings to
adjust how charts appear on the ren-
dered document (TIFF or PDF).
Select the appropriate Chart size
option.
Custom maintains the size as origi-
nally saved in the document.
Scale to fit page sizes the chart to fit
the size of the rendered page.
Use full page sizes the chart to fill up
the rendered page.
Object set-
tings
The following check
boxes:
• Enable objects view
• Enable chart setting
• Enable graphic
objects setting
• Print chart object
• Print graphic objects
The following parame-
ters:
• Hide all shapes
• Show all shapes
• Show only place-
holders
Select Enable objects view to control
how the graphic objects of an Excel
spreadsheet are rendered.
Hide all shapes will hide all graphic
objects such as buttons, text boxes,
drawn objects and pictures.
Show all shapes will render all graphic
objects such as buttons, text boxes,
drawn objects and pictures.
Show only placeholders will render
gray rectangles in place of graphic
objects such as buttons, text boxes,
drawn objects and pictures.
Table A.2: User-Selected Render Application Settings (Continued)
Application Setting
Category Option Settings Description

AD Summation Discovery Cracker User Guide
255
MS Excel
(continued)
MS Excel ren-
der options
(continued)
Object set-
tings (contin-
ued)
Select Enable chart setting to control
whether or not the chart object is ren-
dered.
Select Print chart object to render the
chart object. If this option is not
selected, but the Enable chart setting
has been selected, no chart objects
will be rendered.
Select Enable graphic objects setting
to control whether or not the graphic
objects are rendered.
Select Print graphic objects to render
the graphic objects such as buttons,
text boxes, drawn objects and pic-
tures. If not selected, but the Enable
graphic objects setting has been
selected, no graphic objects will be
rendered.
Worksheet
function
options
The following check
boxes:
• Enable date function
replacement
options (body only)
• Enable header/
footer date func-
tion replacement
options
• Enable header/
footer time func-
tion replacement
options
• Enable path func-
tion replacement
options (body only)
• Enable time func-
tion replacement
options
Select Enable date function replace-
ment options (body only) to control
how date functions are handled
within the body of Excel worksheets.
Select Enable header/footer date
function replacement options to con-
trol how date functions are handled
within the header and footer of Excel
worksheets.
Select Enable header/footer time
function replacement options to con-
trol how time stamp functions are
handled within the header or footer of
Excel worksheets.
Select Enable path function replace-
ment options (body only) to control
how path functions are handled
within the body of Excel worksheets.
Table A.2: User-Selected Render Application Settings (Continued)
Application Setting
Category Option Settings Description

AD Summation Discovery Cracker User Guide
256
MS Excel
(continued)
MS Excel ren-
der options
(continued)
Worksheet
function
options (con-
tinued)
• Enable header/
footer filename
function replace-
ment options
• Enable header/
footer path func-
tion replacement
options
• Enable filename
function replace-
ment options
• Display formulas
Select Enable time function replace-
ment options to control how time
functions are handled Excel work-
sheets.
Select Enable header/footer filename
function replacement options to con-
trol how file name functions are han-
dled within the header and footer of
Excel worksheets.
Select Enable header/footer path
function replacement options to con-
trol how path functions are handled
within the header and footer of Excel
worksheets.
Select Enable filename function
replacement options to control how
file name functions are handled
within Excel worksheets.
Select Display Formulas to render all
of the formulas within the body of
Excel worksheets rather than the val-
ues of the formulas. This includes for-
mulas for mathematical formulas.
The following parame-
ters:
• Replace with: which
includes the follow-
ing parameters:
• Custom text:
• Original date
• Original time
• Remove com-
pletely
• Original formula
The Replace with parameter allows
you to select which method will be
used to handle an automatic date
functions.
The Custom text: option is used with
an input field. These options allow
you to type replacement text to be
used instead of an automatic date.
The Original date option will render
using the last printed date of the doc-
ument. If the document had never
been printed, the last modified date
will be used.
Table A.2: User-Selected Render Application Settings (Continued)
Application Setting
Category Option Settings Description

AD Summation Discovery Cracker User Guide
257
MS Excel
(continued)
MS Excel ren-
der options
(continued)
Worksheet
function
options (con-
tinued)
The Original time option will render
using the last printed time of the doc-
ument. If the document had never
been printed, the last modified time
will be used.
The Remove Completely option will
remove the function from the header
or footer of the worksheet.
The Original Formula option which
will display the formula rather than
the value of the function. (i.e., you
will see "Today()" rather than "1/14/
2008" in the location of the function)
Print area
options
The following check
boxes:
• Remove rows to
repeat at top
• Remove columns to
repeat at left
• Remove print range
Select Remove Rows to Repeat at
To p to disable the repeating rows at
the top of Excel worksheets.
Select Remove Columns to Repeat at
Left to disable the repeating columns
on the left of the Excel worksheets.
The Set Print Range option
Page setup
options
The following check
boxes:
• Enable custom page
setup
• Enable headings
options
• Enable gridline
options
• Enable orientation
options
• Enable page order
options
• Enable page size
options
• Enable comment
options
Select Customize Page Setup in order
to control page setup options within
Excel worksheets.
Select Enable Headings Options in
order to control the rendering of row
and column headings.
Select Print Row and Column Head-
ings to render the row and column
headings. If not selected, row and col-
umn headings will not be rendered.
Select Enable Gridline Options in
order to control the rendering of cell
gridlines.
Table A.2: User-Selected Render Application Settings (Continued)
Application Setting
Category Option Settings Description

AD Summation Discovery Cracker User Guide
258
MS Excel
(continued)
MS Excel ren-
der options
(continued)
Page setup
options (con-
tinued)
• Enable scaling
options
• Remove blank rows
and columns
• Enable print quality
options
• Draft quality
• Black and white
• Print row and col-
umn headings
• Print gridlines
The following parame-
ters:
• Page layout: which
has the following
options:
• Portrait
• Landscape
• Page order: which
has the following
options:
• Down then over
• Over then down
• Page size: which has
the standard page
size options
• Print comments:
which has the fol-
lowing options:
• As displayed on
sheet
• At the end of the
sheet
• None
• Scale percentage:
which has the fol-
lowing option: 10 -
400
Select Print Gridlines to render cell
gridlines. If not selected, no cell grid-
lines will be rendered.
Select Enable Orientation Options to
control the page orientation for ren-
dering.
Select Portrait to render the work-
sheets with an 8 1/2 by 11 format.
Select Landscape to render the work-
sheets with an 11 by 8 1/2 format.
Select Enable Page Order Options to
control the order in which pages are
rendered.
Down then over renders the pages in
the first set of columns first, then
moves over and renders the next set of
columns.
Over then down renders the pages in
the first set of rows first, then moves
down and renders the next set of
rows.
Select Enable Page Size Options to
control the rendered page size.
The Page Size options allow you to
select a standard page size for the ren-
dered document (TIFF or PDF).
Select Enable Comment Options to
control how cell comments are ren-
dered.
Select the Render Comments option
that suits your business needs.
Table A.2: User-Selected Render Application Settings (Continued)
Application Setting
Category Option Settings Description

AD Summation Discovery Cracker User Guide
259
MS Excel
(continued)
MS Excel ren-
der options
(continued)
Page setup
options (con-
tinued)
The None option renders no com-
ments.
The As displayed on the sheet option
renders comments in a comment bub-
ble near the location of the comment
entry.
The At the end of the sheet option
renders the comments at the bottom
of each worksheet with a reference to
the cell that the comment was origi-
nally placed.
Select Scale Size to adjust the amount
of data that can fit onto one page
when rendered.
Select Remove Blank Columns and
Rows (Selecting this option may sub-
stantially change the formatting) to
remove blank rows and columns
within each worksheet of Excel work-
books.
Select Enable print quality options to
enable the options to render in Draft
quality and to render in Black and
white.
Select Draft quality to increase ren-
dering speed by ignoring most for-
matting and graphics. This option
will also remove gridlines even if the
Print gridlines option has been
selected.
Select Black and white to render fonts
and borders in black and white
instead of shades of gray. This option
will also render cell and AutoShape
backgrounds as white and renders
other graphics and charts in shades of
gray.
Table A.2: User-Selected Render Application Settings (Continued)
Application Setting
Category Option Settings Description

AD Summation Discovery Cracker User Guide
260
MS Excel
(continued)
MS Excel ren-
der options
(continued)
Worksheet
options
The following check
boxes:
• Remove Worksheet
Level Protection
• AutoFit Row
• AutoFit Column
• Unhide Columns
• Unhide Rows
• Unhide Worksheet
• Color No Fill
(Change Font
Color to Black is
recommended with
this option)
• Change Font Color
to Black
• Wrap Text
• Show all data
(Remove Filtering)
• Show Detail (Group
and Outline)
• Shrink to Fit
Select Remove Worksheet Level Pro-
tection to allow access to the work-
sheet for the other formatting
adjustments that are selected. If this
option is not selected and the work-
sheet is protected, none of the other
options selected for formatting will be
applied.
NOTE: If the worksheet is protected
with a password and you select this
option, Discovery Cracker will use a
brute force functionality that will iter-
ate through up to 196,000 times to
attempt to crack the password on the
worksheet.
Please note that this can make pro-
cessing of Microsoft Excel spread-
sheets take longer than expected if
you have quite a few that are work-
sheet password protected. However,
on those Excel documents that do not
have password protection at the work-
sheet level, the processing will not be
impeded.
Select AutoFit Row to adjust the row
height of each row within each work-
sheet to fit the contents within the
row.
Select AutoFit Column to adjust the
column width of each column within
each worksheet to fit the contents
within the column.
Select Unhide Columns to render
hidden columns.
Select Unhide Rows to render hidden
rows.
Table A.2: User-Selected Render Application Settings (Continued)
Application Setting
Category Option Settings Description

AD Summation Discovery Cracker User Guide
261
MS Excel
(continued)
MS Excel ren-
der options
(continued)
Worksheet
options (con-
tinued)
Select Unhide Worksheet to render
hidden worksheets within workbooks.
Select Color No Fill to remove the
background color of cells within
worksheets.
When selecting this option it is rec-
ommended to also select the Change
Font Color to Black option to enable
white or light colored text to be ren-
dered black for visibility on the ren-
dered document (TIFF or PDF).
NOTE: This option will not change a
negative number from red to black,
because it is red due to a format, not a
font.
Select Wrap Text to adjust the con-
tents within each cell within work-
sheets to render multiple lines of text
rather than a single row of text.
This option cannot be used if the
Shrink to Fit option has been
selected.
Select Show all data to remove filter-
ing.
Select Show Detail to remove group-
ing and outlines.
Select Shrink to Fit to reduce the size
of the text font within cells of work-
sheets to show all of the text within
the cells.
This option cannot be used if the
Wrap Text option has been selected.
Table A.2: User-Selected Render Application Settings (Continued)
Application Setting
Category Option Settings Description

AD Summation Discovery Cracker User Guide
262
MS Power-
Point
MS Power-
Point render-
ing options
Enable cus-
tom settings
None available Select Enable custom settings to
adjust various rendering options for
PowerPoint documents.
If this option is not selected, the doc-
ument will be rendered through Pow-
erPoint, but the pages will be
rendered using the original saved doc-
ument formatting.
Enable cus-
tom page
setup
The following check
boxes:
• Enable page orienta-
tion options
• Enable slide size
options
The following parame-
ters:
• Slide orientation:
which has the fol-
lowing options:
• Portrait
• Landscape
• Notes, handouts and
outline orienta-
tion: which has the
following options:
• Portrait
• Landscape
• Slides sized for:
which has the fol-
lowing options:
• 35 mm Slides
• A4 Paper
• Banner
• Letter Paper
• On-Screen Show
• Overhead
Select Enable custom page setup to
control the format of the pages.
Select Enable orientation options to
control the orientation with which
the page will be rendered.
There are two separate orientation
options:
Slide orientation which adjusts the
orientation of pages that are rendered
as slides
Notes, handouts and outline orienta-
tion: which adjusts the orientation of
pages that are rendered as notes.
Each of these two options have two
additional options for the direction of
the format:
Portrait renders the page in an 8 1/2
by 11 format
Landscape renders the page in an 11
by 8 1/2 format.
Select Enable slide size options con-
trol the size of the slides.
When this option is selected, the
parameter Slides sized for should be
set to the appropriate size of the slides
when rendered.
Table A.2: User-Selected Render Application Settings (Continued)
Application Setting
Category Option Settings Description

AD Summation Discovery Cracker User Guide
263
MS Power-
Point (contin-
ued)
MS PowerPoint
rendering
options (contin-
ued)
Enable cus-
tom print set-
tings
The following check
boxes:
• Enable print options
• Enable comment
options
• Enable scaling
options
• Enable frame
options
• Enable hidden slide
options
• Enable color options
• Print comments
• Scale to fit page
• Frame slides
• Print hidden slides
The following parame-
ters:
• Print what: which
has the following
options:
• Handout
• Notes Pages
• Outline
• Slides
• Handouts orienta-
tion: which has the
following options:
• Portrait
• Landscape
• Handouts slides per
page: which has the
following options:
• 2, 3, 4, 6 and 9
Select Enable custom print settings
to control what is rendered.
Select Enable custom print settings
to control what is rendered. When
selected an additional parameter is set
to the desired output format.
Select the appropriate format for the
Print what selection from these
options:
• Handout
• Notes Pages
• Outline
• Slides
If the Handout selection is chosen,
additional formatting options are
required such as the Handouts orien-
tation: which requires either of these
two options:
Portrait renders the page in an 8 1/2
by 11 format
Landscape renders the page in an 11
by 8 1/2 format.
Additionally a selection is needed for
the parameter Handouts slides per
page which determines how many
slides per page will be rendered on
each handout page. The options avail-
able are: 2,3,4,6,9
Select Print comments to render any
comments from the body of the Pow-
erPoint presentations
Table A.2: User-Selected Render Application Settings (Continued)
Application Setting
Category Option Settings Description

AD Summation Discovery Cracker User Guide
264
MS Power-
Point (contin-
ued)
MS PowerPoint
rendering
options (contin-
ued)
Enable cus-
tom print set-
tings
(continued)
Parameters (continued)
• Color / grayscale:
which has the fol-
lowing options:
• Color
• Grayscale
• Pure Black and
White
Select Enable scaling Options to con-
trol the size of the slide within the
page.
Select Scale to fit page to increase the
size of the slide to fit the page size
selected previously when setting the
Slides sized for: option. If this option
is not selected, the slides will not be
sized according to the page size.
Select Enable frame options to con-
trol whether or not a frame is placed
around the slides on each page.
Select Frame slides to place a frame
around the slides on each page. If this
option is not selected, but the Enable
frame options is selected, no frame
will be rendered around the slides.
Select Print hidden slides to render
hidden slides within presentations.
Select Enable Color Options to con-
trol what color method is used to ren-
der the slides.
Select the appropriate Color/Gray-
scale: option from the following avail-
able options:
• Color
• Grayscale
• Pure Black and White
Table A.2: User-Selected Render Application Settings (Continued)
Application Setting
Category Option Settings Description

AD Summation Discovery Cracker User Guide
265
MS Power-
Point (contin-
ued)
MS PowerPoint
rendering
options (contin-
ued)
Enable cus-
tom print set-
tings
(continued)
If the rendering option of Render
output in color has not been chosen,
these options will determine what
level of gradient will be used, but will
not render the document in color. A
common setting that allows for clear
black and white TIFF images or PDF
files is Grayscale. A common setting
that removes the background image is
Pure Black and White.
Replace
header /
footer date
with original
date
None available Select Replace header / footer date
with original date to replace an auto-
matic date format within the headers
and footers of PowerPoint presenta-
tions.
If this option is selected, the auto-
matic date will be replaced with the
last printed date if the document had
been printed, or the last modified date
if the document had never been
printed.
MS Project There are no options for this selection because it is not an application required for processing. By
default, Discovery Cracker Viewer renders documents of this file type.
If you want better images than what Discovery Cracker Viewer can produce for this file type, you need
to install the native application. Please contact Discovery Cracker Product Support at 866-833-5377
or dc.support@accessdata.com for guidance.
MS Visio There are no options for this selection because it is not an application required for processing. By
default, Discovery Cracker Viewer renders documents of this file type.
If you want better images than what Discovery Cracker Viewer can produce for this file type, you need
to install the native application. Please contact Discovery Cracker Product Support at 866-833-5377
or dc.support@accessdata.com for guidance.
Table A.2: User-Selected Render Application Settings (Continued)
Application Setting
Category Option Settings Description

AD Summation Discovery Cracker User Guide
266
MS Word MS Word ren-
der options
Enable cus-
tom settings
None available Select Enable custom settings to
adjust various rendering options for
Word documents.
If this option is not selected, the doc-
ument will be rendered through
Word, but the pages will be rendered
using the original saved document
formatting.
Page setup
options
The following check
boxes:
• Enable custom page
setup
• Enable page orienta-
tion options
• Enable comment
options
• Enable page size
options
• Print comments
The following parame-
ters:
• Page layout: which
has the following
options:
• Portrait
• Landscape
• Page size: which has
the standard page
size options.
Select Enable custom page setup in
order to control page layout options
within Word documents.
Select Enable page orientation
options to control the page orienta-
tion for rendering.
Select Portrait to render the pages
with an 8 1/2 by 11 format.
Select Landscape to render the pages
with an 11 by 8 1/2 format.
Select Enable comment options to
control how comments within a
Word document are rendered.
Select Print comments to render the
comments within the document. If
this option is not selected, but the
option to Enable comment rendering
options has been selected, no com-
ments will be rendered.
Select Enable page size options to
control the rendered page size.
The Page size options allow you to
select a standard page size for the ren-
dered document (TIFF or PDF).
Table A.2: User-Selected Render Application Settings (Continued)
Application Setting
Category Option Settings Description

AD Summation Discovery Cracker User Guide
267
MS Word
(continued)
MS Word ren-
der options
(continued)
Print setting
options
The following check
boxes:
• Enable custom print
options
• Enable markup
options
• Enable letter resiz-
ing
• Enable field code
options
• Enable hidden text
options
• Enable document
property page
options
• Print markups (track
changes)
• Allow A4/letter
resizing
• Print field codes
• Print hidden text
• Print document
property pages
Select Enable custom print options to
control the objects that will be ren-
dered.
Select Enable markup options to con-
trol whether or not the markups are
rendered.
Select Print markups (track changes)
to render the markups within Word
documents. If this option is not
selected, but Enable markup options
has been selected, no markups will be
rendered.
Select Enable letter resizing to con-
trol whether or not the document
pages will be enabled to be rendered
with A4 format.
Select Allow A4/letter resizing to ren-
der the document pages with A4 for-
matting. If this option is not selected,
but the Enable letter resizing has
been selected, document pages will
not allow the page resizing.
Select Enable field code options to
control whether or not field codes will
be rendered.
Select Print field codes to render field
codes from Word documents. If this
option is not selected, but the Enable
field code options has been selected,
no field codes will be rendered.
Table A.2: User-Selected Render Application Settings (Continued)
Application Setting
Category Option Settings Description

AD Summation Discovery Cracker User Guide
268
MS Word
(continued)
MS Word ren-
der options
(continued)
Print setting
options (con-
tinued)
Select Enable hidden text options to
control whether or not the hidden
text will be rendered.
Select Print hidden text to render the
hidden text from Word documents. If
this option is not selected, but the
Enable hidden text options has been
selected, no hidden text will be ren-
dered.
Select Enable document properties
options to control whether or not the
properties page of each document is
rendered.
Select Print document properties to
render the document properties page
for each Word document. If this
option is not selected, but the Enable
document properties options has
been selected, no document proper-
ties will be rendered.
Table A.2: User-Selected Render Application Settings (Continued)
Application Setting
Category Option Settings Description

AD Summation Discovery Cracker User Guide
269
MS Word
(continued)
MS Word ren-
der options
(continued)
Field options The following check
boxes:
• Enable Date field
code replacement
options (body only)
• Enable header/
footer Date field
code replacement
options
• Enable header/
footer Time field
code replacement
options
• Enable Path field
code replacement
options (body only)
• Enable UserName
field code replace-
ment options (body
only)
• Enable header/
footer UserName
field code replace-
ment options
• Enable header/
footer Path field
code replacement
options
• Enable time func-
tion replacement
options
Select Enable Date field replacement
options (body only) to control how
date fields are handled within the
body of Word documents.
Select Enable header/footer Date
field code replacement options to
control how date fields are handled
within the header and footer of Word
documents.
Select Enable header/footer Time
field code replacement options to
control how time stamp fields are
handled within the header and footer
of Word documents.
Select Enable Path field code replace-
ment options (body only) to control
how path fields are handled within
the body of Word documents.
Select Enable UserName field code
replacement options (body only) to
control how user name fields are han-
dled within the body of Word docu-
ments.
Select Enable header/footer User-
Name field code replacement options
to control how user name fields are
handled within the headers and foot-
ers of Word documents.
Select Enable header/footer Path
field code replacement options to
control how path fields are handled
within the headers and footers of
Word documents.
Select Enable time function replace-
ment options to control how time
functions are handled within Word
documents.
Table A.2: User-Selected Render Application Settings (Continued)
Application Setting
Category Option Settings Description

AD Summation Discovery Cracker User Guide
270
MS Word
(continued)
MS Word ren-
der options
(continued)
Field options
(continued)
The following parame-
ters:
• Replace with: which
has the following
options:
• Original date
• Original time
• Original path
• Original user
name
• Original formula
• Custom text
• Custom text:
The Replace with parameter allows
you to select which method will be
used to handle an automatic field
codes.
The Original date option will render
using the last printed date of the doc-
ument. If the document had never
been printed, the last modified date
will be used.
The Original time option will render
using the last printed time stamp of
the document. If the document had
never been printed, the last modified
time stamp will be used.
The Original path option will render
using the original path were the docu-
ment was created and saved.
The Original user name option will
render using the name of the original
user listed when the document was
created.
The Original formula option will
render the field code used in the date
function rather than an actual date
value.
The Custom text option is used with
the Custom text input field. These
options allow you to type replacement
text to be used instead of an auto-
matic field code.
Table A.2: User-Selected Render Application Settings (Continued)
Application Setting
Category Option Settings Description

AD Summation Discovery Cracker User Guide
271
None There are no options for this selection.
This is the default selection for the Unassigned document type group.
If you process a file which is in the Unassigned document type group and leave the User-Selected Ren-
dering Application option set to None, the rendering action is marked as finished, which does not
allow you to identify the item as having a missing rendered document (TIFF image or PDF file). This
is by design as it is expected that you did not want any rendered documents.
If this is a concern, you can do one of the following:
• In a QC Session perform a search for documents with a page count of zero.
• Select OS-Associated as the rendering application. However, selecting OS-Associated as the render-
ing application can result in rendered documents with no useful data on them if DC Engine does
not associate the file with the correct application within Microsoft Windows.
OS-
Associated
There are no options for this selection.
If you select OS-Associated, DC Engine will attempt to render the document using the application
that is associated with that document in Microsoft Windows. It will not work in every case.
Outlook Outlook render
options
Render
HTML body,
if present
With Outlook selected, Discovery
Cracker uses Outlook to render e-
mail messages. When Outlook ren-
ders HTML-formatted e-mail mes-
sages, the current date will be
included at the bottom of the page.
Select Render HTML body, if pres-
ent to use Internet Explorer to render
an HTML-formatted e-mail message.
The current date will not be included
on the page.
Download Pictures /
Videos
Select Download Pictures / Videos to
render embedded pictures that are
linked within an HTML-formatted
document.
NOTE: Discovery Cracker cannot
update pictures if the link to the pic-
ture is broken. Discovery Cracker
cannot render videos.
Table A.2: User-Selected Render Application Settings (Continued)
Application Setting
Category Option Settings Description

AD Summation Discovery Cracker User Guide
272
Outlook (con-
tinued)
Outlook render
options (contin-
ued)
Render
HTML body,
if present
(continued)
Wait time for Internet
Explorer to load the
page (in seconds)
Select Wait time for Internet
Explorer to load the page time option
to control how long Discovery
Cracker will wait while Internet
Explorer attempts to load the page.
This wait time can be set from 1 to 60
seconds.
Try download again if
timed out
Select Try download again if timed
out to control whether or not multi-
ple tries should be attempted to load a
page into Internet Explorer.
Shut down Internet
Explorer
Select Shut down Internet Explorer
to close the Internet Explorer applica-
tion between attempts to load the
page into Internet Explorer.
Close Internet Explorer
after rendering (in sec-
onds)
Select length of time in Close Inter-
net Explorer after rendering to deter-
mine how long after the rendering
task has been completed before clos-
ing Internet Explorer. This time can
be set from 1 to 60 seconds.
Table A.2: User-Selected Render Application Settings (Continued)
Application Setting
Category Option Settings Description

AD Summation Discovery Cracker User Guide
273
Appendix B. Document Status
The document status reflects the last action Discovery Cracker
performed on the document, the last action you took on the
document, or the current state of the document.
You see document statuses in the following places:
• The Status Counts tab in the right pane of the Discovery
Cracker Console main window. It displays the total number
of documents in the project, group, or view (depending on
what you select in the navigation pane) that currently have
each status.
Status counts change when actions are taken on documents,
such as running a new job, approving them in a QC Ses-
sion, marking them to recrack or rerender in a QC Session,
etc.
For the status counts to reflect changes, you need to select
Refresh or step off of the Status Counts tab and back on.
Note: The total count does not include container items (see
“Container Items and Document Statuses” on page 274.)
• The Status field of the Data Panel in the QC Session win-
dow. It displays the status of each document that you load
into a QC Session.
List of Document Statuses The statuses are:
• The last action Discovery Cracker performed on the docu-
ment
• Initial Spin Through
• File Spin Through
• Extract Metadata
• Render
• Postprocessing
• Data Delimited Text File Export
• Concordance Viewer Export
• IPRO Export
• Ringtail Export
• AD Summation DII Export
• Import Data
• DocuLex 5 Export
• EDRM XML Export

AD Summation Discovery Cracker User Guide
274
• The last action you took on the document
• QC’d - Marked to Recrack
• QC’d - Marked to Render
• QC’d - Marked to Rerender
• QC’d - Marked to Re-OCR
• QC’d - Approved
• QC’d - Marked as Problem
• The current state of the document
• Pending (The document has not been touched by any
processing action)
• Inactive - Duplicate
• Inactive - Filtered
• Inactive - QC’d
• Problem - Initial Spin Through
• Problem - File Spin Through
• Problem - Extract Metadata
• Problem - Render
• Problem - Postprocessing
• Problem - Data Delimited Text File Export
• Problem - Concordance Viewer Export
• Problem - IPRO Export
• Problem - Ringtail Export
• Problem - AD Summation DII Export
• Problem - Import Data
• Problem - DocuLex 5 Export
• Problem - EDRM XML Export
• Unknown (An unidentifiable status. This should be a
rare occurrence. If seen, please notify Discovery
Cracker Product Support (call 866-833-5377 or send
an e-mail message to dc.support@accessdata.com).
Container Items and Document
Statuses
In the QC Session window, in the Data Panel, you see
FOLDER, PST, and NSF items. These items are not docu-
ments that have been processed. They are container items (see
“Document Relationships” on page 21). They are displayed for
informational purposes only, but can be selected for recracking
if a problem occurred during the Initial Spin Through action.
The status in the Status field for container items may or may
not apply to the item.
A status may not apply to a container item for the following rea-
son. To ensure complete processing, all actions for a specific job
AD Summation Discovery Cracker User Guide
275
will be executed on all items in that job. For example, an action
of File Spin Through is necessary on a folder or a PST in order
to get the contents of that folder or PST. However, Render is
not an action that would apply to a folder or PST. But because
the job that contains the folder item included a Render action,
the Render action must be displayed as being completed or not
completed for that folder.
Statuses that apply to container items are:
• Initial Spin Through
• File Spin Through
• QC’d - Marked to Recrack
• QC’d - Approved
• Problem - Initial Spin Through
• Problem - File Spin Through
When container items (FOLDER, PST, or NSF) are marked to
recrack, the documents in the container are either deleted from
the database or marked as deleted (folder documents are
deleted; PST and NSF documents are marked as deleted). The
documents in such a container are deleted from the QC Session
window. When the QC job is run and the container item is
recracked, the documents in the container are assigned new
item numbers.
When looking at the Status Counts tab, you may find that all of
the items you marked to recrack are not being displayed in the
appropriate status. There are family relationships that can cause
this to happen. If you mark a container item (such as a PST) to
recrack, the items within the container will not be included in
the count for the status QC’d - Marked to Recrack because the
process of recracking the container item will automatically
recrack the items within the container. This also occurs when
you mark a main item to recrack. The child items will not be
included in the count for the status QC’d - Marked to Recrack
on the Status Counts tab, but the main item will.
AD Summation Discovery Cracker User Guide
276
Appendix C. QC Hotkeys
Table C.1: QC Hotkeys
Main
Tab
Auto
QC
Tab
Tools
Tab
Button
Name
Hotkey
Combination Description
XApprove All CTRL + L Automatically approve the Currently loaded
documents with no validation.
X X Approve CRTL + Z Approve the currently selected document(s).
X X Render CTRL + E Mark the currently selected document(s) to
be rendered or rerendered.
X X Recrack CTRL + R Mark the currently selected document(s) to
be recracked.
X X OCR CTRL + O Mark the currently selected document(s) to
be OCR’d
X X Mark as Problem CTRL + P Mark the currently selected document(s) as
a problem.
X X Assign Categories CTRL + T Assign categories to the currently selected
document(s).
X X Insert Placeholder Pages CTRL + I Insert placeholder pages for the currently
selected document(s)
X X Activate Document CTRL + X Activate the currently selected document(s)
X X Deactivate Document CTRL + D Deactivate the currently selected docu-
ment(s)
X X Activate/Deactivate
Pages
CTRL + B Activate or deactivate the pages of the
selected document.
X X Open Original CTRL + N Opens the original document with the native
application.
X X Replace Pages CTRL + K Replace image or PDF pages for the
selected document.
X X Add Note CTRL + M Add a note to the selected document(s).
XReload F1 Displays the Pre-Filter window allowing you
to change the filter and repopulate the docu-
ments in this session.
X Refresh F5 Refreshes the currently loaded document
information.
XSearch/Filter F2 Displays the search/filter options
AD Summation Discovery Cracker User Guide
277
X Clear Filter F6 Clears all filters, grouping, and sorting from
the loaded documents.
XGo To F3 Navigate to a specific document and (option-
ally) page within a document.
X Start CTRL + G Start Auto QC.
XStop CTRL + S Stop Auto QC.
X Reset Layout F12 Reset QC panels to their default location.
XVisiblity F11 Select/Deselect visible panels.
X Options F10 Additional QC options.
XManage Placeholder
Pages
F9 Create/Manage placeholder pages
Table C.1: QC Hotkeys
Main
Tab
Auto
QC
Tab
Tools
Tab
Button
Name
Hotkey
Combination Description
