CSVToolbox Reference Guide Doc Toolbox Manual 1033
User Manual: Pdf
Open the PDF directly: View PDF ![]() .
.
Page Count: 31
Create documents efficiently
DocToolbox
User Guide
DocToolbox UserGuide
Page 2 of 31
DocToolbox
User Guide
DocToolbox v1.0.3
Responsible: Dr. Michael Eisele
Document version: Edition 1.1

User Guide DocToolbox
Page 3 of 31
Contents
1 About This Guide................................................................................................ 5
2 DocToolbox Overview ........................................................................................ 6
2.1 DocToolbox support for eReports ............................................................................................ 6
2.2 Language of the User Interface ................................................................................................ 7
2.3 Language of Documents ......................................................................................................... 7
3 DocToolbox Functions ....................................................................................... 8
3.1 DocToolbox: Ribbon Elements ................................................................................................ 8
3.2 DocToolbox Dialog: Info ........................................................................................................ 10
3.2.1 Enter the document information manually ............................................................ 10
3.3 DocToobox Dialog: Doc Config ............................................................................................. 11
3.4 DocToolbox Dialog: Insert ..................................................................................................... 13
3.4.1 Insert a Document Information Field ...................................................................... 13
3.4.2 Insert Special Text Items ......................................................................................... 13
3.5 DocToolbox Dialog: Remove ................................................................................................. 15
3.6 DocToolbox Dialog: Finalize .................................................................................................. 16
3.7 DocToolbox Dialog: Configuration ........................................................................................ 18
3.8 DocToolbox Ribbon: eReports ............................................................................................... 18
3.9 Support for CSVToolbox Documents .................................................................................... 20
3.9.1 Conversion of existing documents and templates ................................................. 20
3.9.2 CSVToolbox: Insert Test Case .................................................................................. 20
3.9.3 CSVToolbox: Risk Assessment ................................................................................ 20
3.9.4 CSVToolbox: GAMP Category 4 and 5 Text ............................................................. 21
3.9.5 CSVToolbox: Limitations in DocToolbox ................................................................ 21
4 Translation Tool ............................................................................................... 22
4.1 Access to the Translation Tool ............................................................................................... 22
4.2 Translation for Document Language ..................................................................................... 22
4.3 Translation of User Interface ................................................................................................. 25
4.4 Handover of Translated Files to the Developer ...................................................................... 26
5 Troubleshooting .............................................................................................. 28
5.1 Online Help ........................................................................................................................... 28
5.2 Check DocToolbox Add-in Status .......................................................................................... 28
6 Glossary ........................................................................................................... 31

DocToolbox UserGuide
Page 4 of 31
Copyright © [2016] Boehringer Ingelheim International GmbH
All rights reserved. No part of the contents of this reference guide may be reproduced or
transmitted in any form or by any means without the written permission of Boehringer
Ingelheim.

User Guide DocToolbox
Page 5 of 31
1 About This Guide
DocToolbox provides a set of automation functions to facilitate the creation and use of the Word
templates and documents.
The indented target audience for this document is
Authors of documents
Authors of templates
Some functions in DocToolbox are intended for authors of templates only. However, there will
be no harm or damage to the document if those functions are being used by authors of a
document.
The use of DocToolbox is optional for authors of documents. You may also use normal MS
Word functionality to perform all actions supported by DocToolbox. However, please be aware
that functions of DocToolbox may no longer work if you have deleted or modified items like
bookmarks or fields in a document which are needed by DocToolbox.
The use of DocToolbox is mandatory for authors of templates. Only the use of DocToolbox
will ensure that all elements like bookmarks and fields are inserted compatible with DocToolbox.
Not using DocToolbox may cause trouble for the authors of documents using the templates
together with DocToolbox.

DocToolbox UserGuide
Page 6 of 31
2 DocToolbox Overview
DocToolbox is an add-in for MS-Word which provides a set of functions for the creation of standardized
documents based on standardized templates. It can be used both to edit documents based on the
templates, and for the creation and maintenance of the templates themselves.
Each template and the documents created from these templates are associated with a specific
configuration and a master template in DocToolbox. The master template contains all text elements like
cover pages, page headers & footers, and special text items.
DocToolbox provides the following functions:
Insert fields to display document information attributes like title, document number, version etc.
Inserted fields are compatible with e.g. IDEAforCON or ITEMS auto-population feature, if
applicable.
Manually edit the document information attributes, if those are not auto-populated.
Remove the instructional and optional text from the templates
Remove text which is marked as applicable for specific cases only (‘removable items’)
Restore correct page headers and footers. This is useful after inserting section breaks into the
document.
Insert the default cover page and other elements like ‘Tables of...’
Insert special text items which can be automatically customized according to parameters
entered into the document.
Create and prepare a document as an eReport, i.e. add editable controls that still can be edited
after the document has been made read-only.
Finalize a document for approval: Remove all comments, accept all changes, and remove
'highlight' markings, update all fields, check fields for errors, and switch off track-changes mode.
Important to know: DocToolbox applies all changes via the regular MS Word functions.
Consequently you can always use the MS Word 'Undo' function to roll-back any changes made. Also
DocToolbox respects the 'track changes' mode. If 'track changes' is turned on all changes made will be
visible as unaccepted changes.
2.1 DocToolbox support for eReports
DocToolbox supports the creation of documents that can be ‘executed’ as eReports. eReports are read-
only documents (with Word document protection activated) where only specific parts of the documents
still can be edited. Doctoolbox provides the following functions for this purpose:
Mark templates and documents by a custom document property as an eReport. This
custom document property can be used by an external system (e.g. ITEMS) to recognize
eReports.
Define special text items which contain the editable parts (content controls) for the
eReport.
Provide a function to prepare the document for document protection by marking all
content controls in the document as exceptions from the read-only protection
Apply read-only protection to the document
Provide a navigation function to jump to the next or previous editable content control.
Navigation can be done by buttons on the ribbon, or by keyboard shortcuts (Ctrl-Left and
Ctrl-right)
For details on the use of eReports refer to section 3.8.

User Guide DocToolbox
Page 7 of 31
2.2 Language of the User Interface
DocToolbox has a multilingual user interface which automatically adapts to the language setting of MS
Word. Currently the following languages are supported:
English (default)
German
All other languages will be automatically mapped to the default language English. More languages may
be added in the future. There is an integrated translation tool available (see section 4.3) which allows
any user to create and submit a translation for the user interface.
2.3 Language of Documents
DocToolbox supports multiple languages for documents and templates. The supported languages are
defined in the respective configuration for the templates and documents.
The language setting (see 3.3 ) of the document or template determines the language specific version
of items used by DocToolbox, e.g. cover page, page headers and footers, names of the special styles etc.
It is essential that the language setting of the document matches the actual language used in the
document.
The language setting should only be changed for templates, but never for documents. If the
language setting is changed for a template, other adaptations need to be made as well, i.e. replace all
language specific items in the template.
DocToolbox UserGuide
Page 8 of 31
3 DocToolbox Functions
This section provides a detailed description of the functions of DocToolbox. Step-by-Step
instructions for specific actions are included in the detailed sections.
DocToolbox provides two user interfaces within MS Word
A ribbon which makes many of the DocToolbox functions accessible for instant use
A dialog box which allows access to all functions
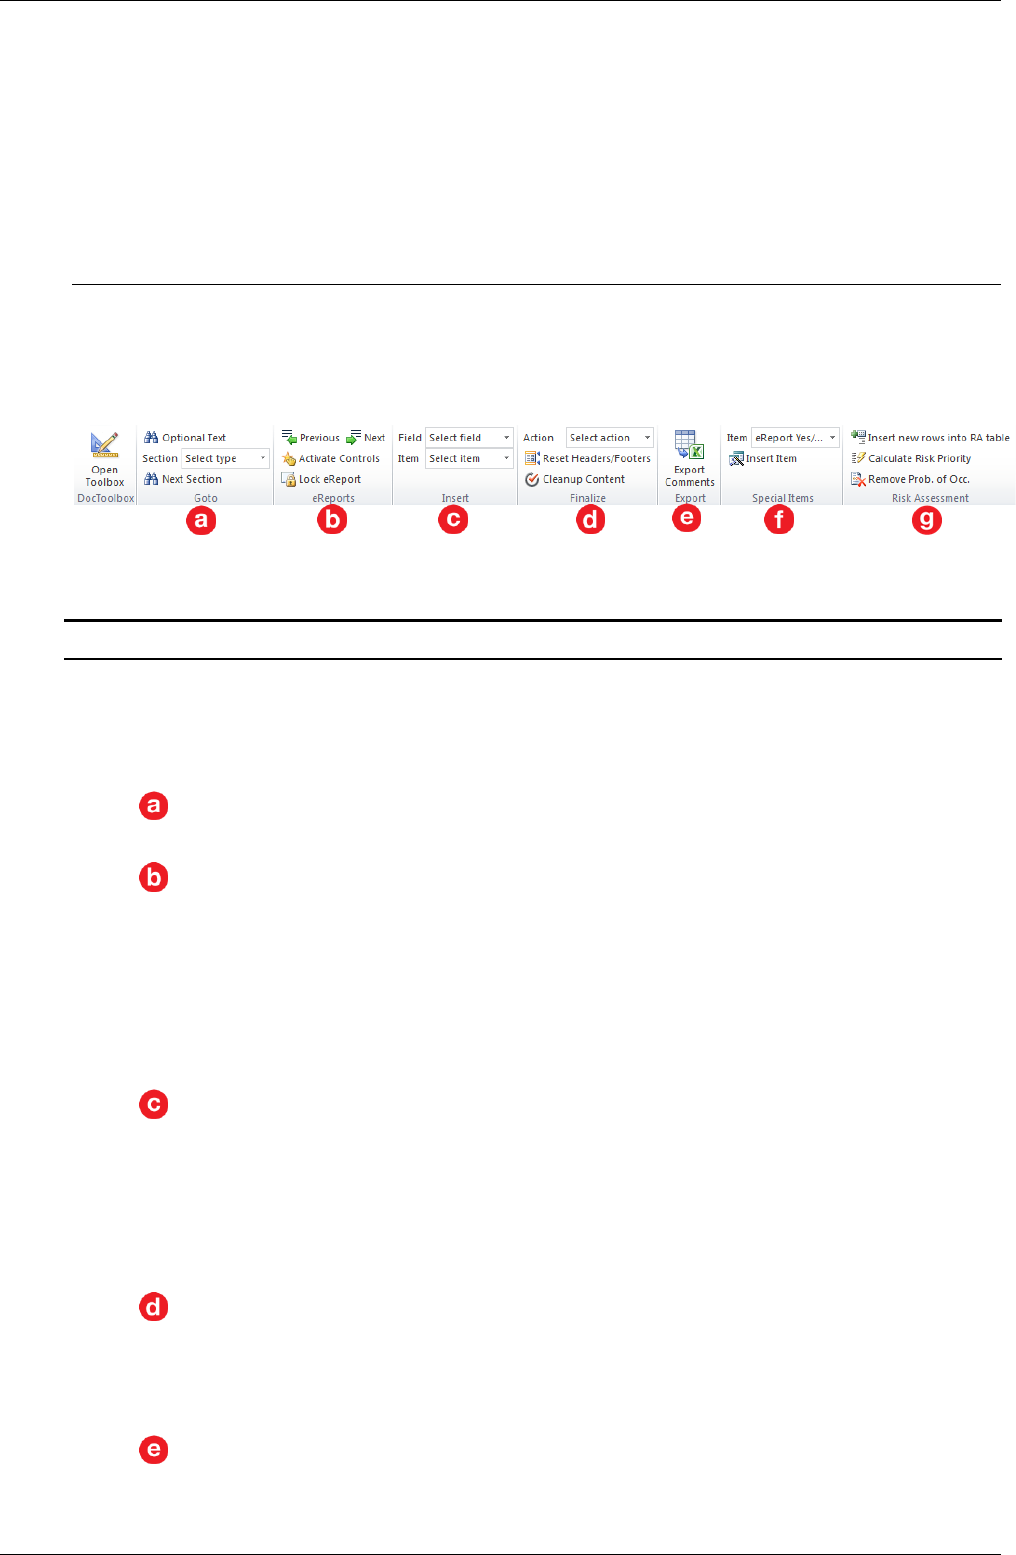
3.1 DocToolbox: Ribbon Elements
The DocToolbox ribbon contains the following elements:
Please note: The visibility of these elements depends on the actual state and configuration of the
active document
Callout
Description
To open the DocToolbox dialog click on Open Toolbox. This opens the toolbox
dialog. You can leave it open as long as you need it. The toolbox is bound to your
document. Each document has its own dialog. If you click on any open DocToolbox
dialog the related document window will be activated automatically.
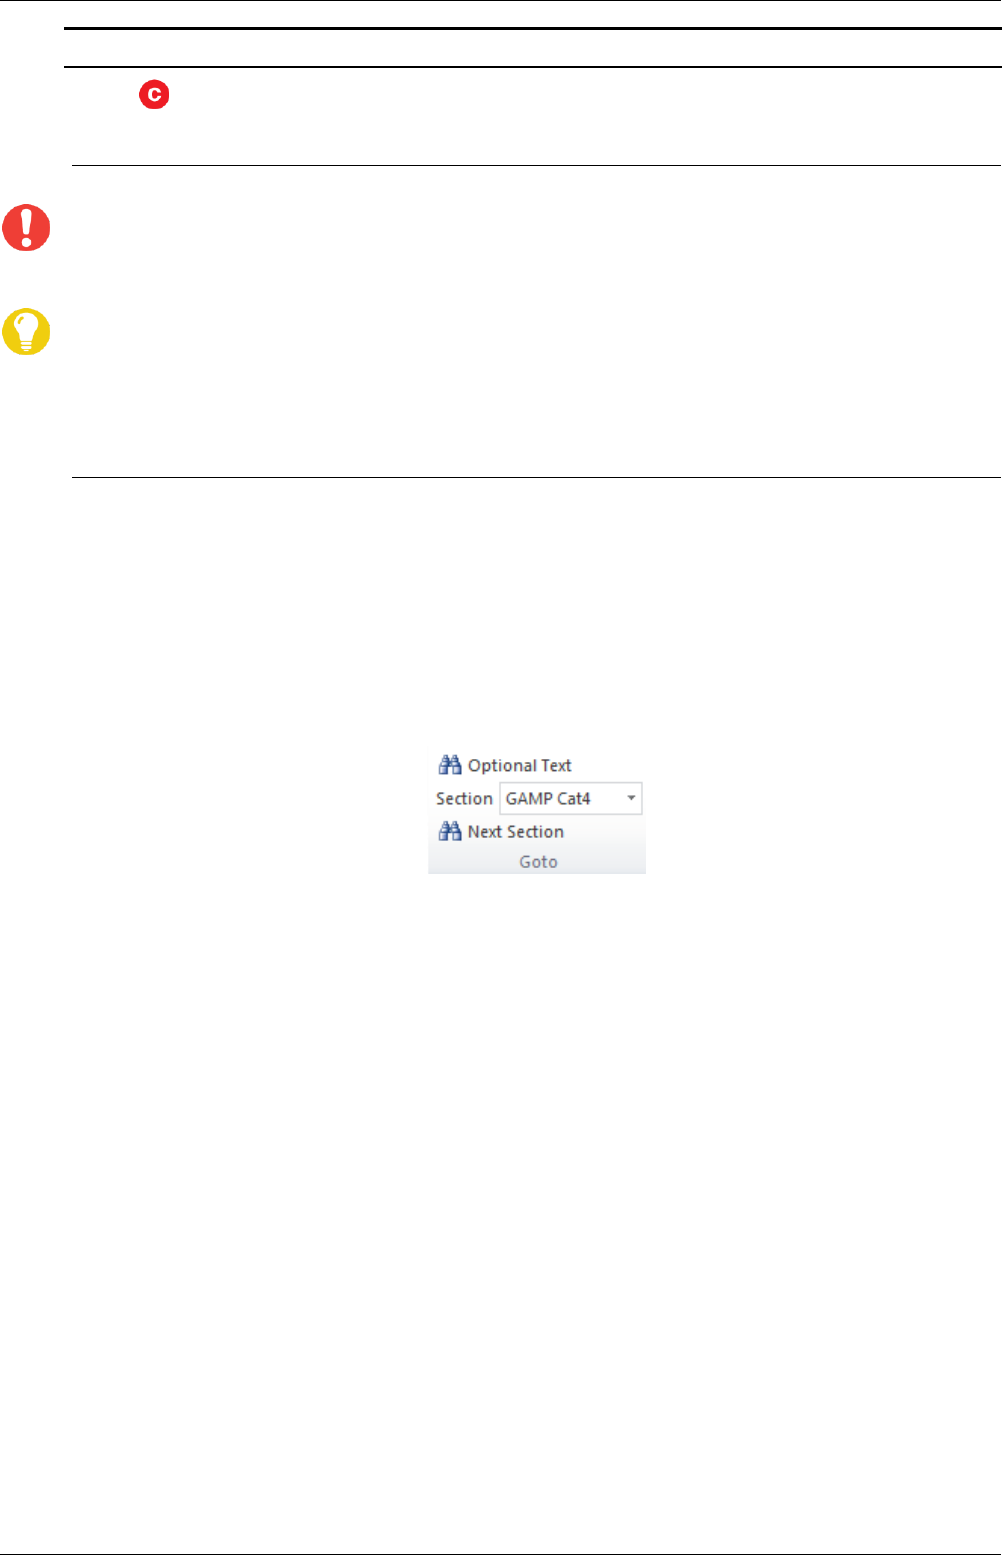
Search and select the next Optional Text item, or the next section marked as
removable. Select the type of the removable section in the drop-down box.
Functions for eReports. Click Previous or Next to navigate to the previous or next
editable content control.
Activate Controls applies an exception to all content controls so these are still
editable after the document protection ‘read-only’ has been applied.
Lock eReport actually applies a read-only protection to the document which cannot
be reverted.
For details refer to section 3.8.
Insert fields for document information like e.g. document title, document number,
version etc. Select one of the available fields from the drop-down list. The field will
be inserted at the cursor position.
Insert standard items like cover page, table of contents, and table of figures. Select
one of the available items from the drop-down list. The item will be inserted
according to the configuration, i.e. at document start, at cursor position, or at
document end.
Remove instructions and optional text (select from the drop-down list)
Reset all page headers and footers to the default again
Cleanup the content: Remove all comments, accept all changes, remove highlight
markings etc.
Export all comments into an Excel spreadsheet
User Guide DocToolbox
Page 9 of 31
Callout
Description
Insert a conditional special text item. Select the available items from the drop-down
box and click on Insert Item. The item will be inserted according to the configuration
(start of document, at cursor position, or at end of document). The available items
will depend on the configuration and the specific document.
Einfügen von 5 zusätzlichen Zeilen in einer Risikobewertungstabelle.
Berechnen der Risikobewertung (RPZ und Risikopriorität) für die aktuelle
Risikobewertungstabelle.
Entfernen des optionalen Faktors "Auftrittswahrscheinlichkeit" aus dem
Risikobewertungsdokument.
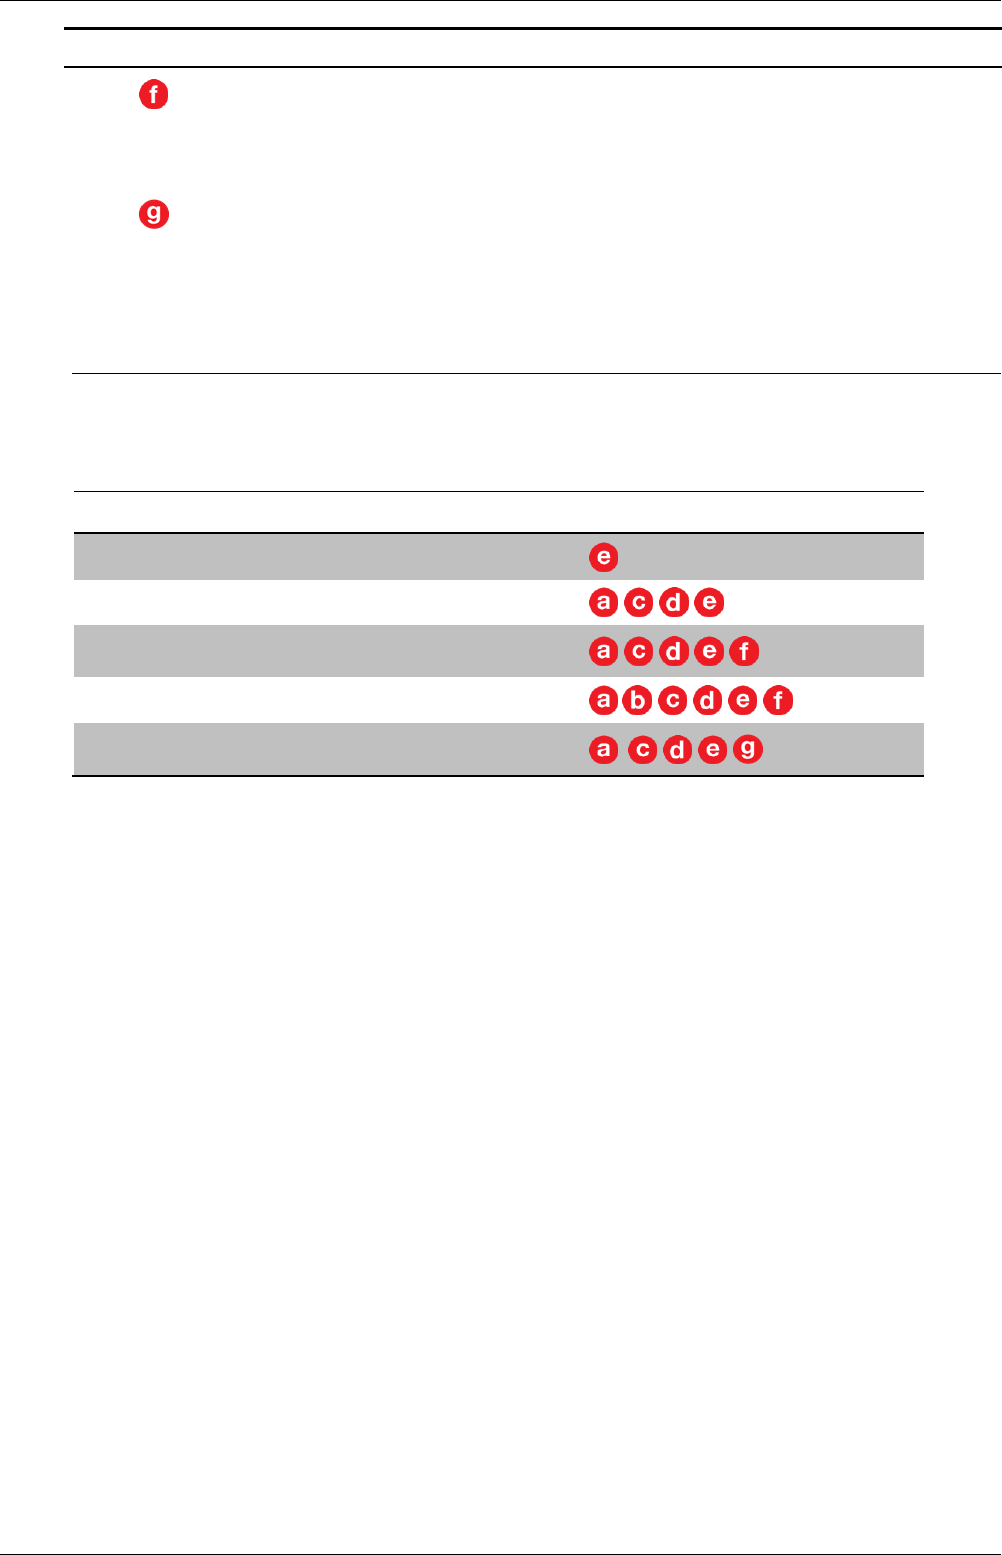
Only elements which are applicable for the currently open document are displayed on the DocToolbox
ribbon:
Type of document
Elements displayed
Non-DocToolbox document or template
DocToolbox document or template
DocToolbox document or template with
conditional special text items
Doctoolbox document is an eReport
DocToolbox document based on a LeVA Risk
assessment template (C-RA)

DocToolbox UserGuide
Page 10 of 31
3.2 DocToolbox Dialog: Info
3.2.1 Enter the document information manually
The Tab Info allows you to enter the document attributes. Most of the document attributes are used to
be displayed in fields in the document. .
Callout
Description
Enter the document information manually into the fields
Update will save the values into the document and update all fields in the document
Undo changes will reload the field information from the document. Any changes you
have already made in the dialogue will be discarded. The fields will display their
original values again.
All fields which display 'auto' will be automatically filled when the document is
checked in into the target system. You cannot manually enter this information.
Depending on the target system (e.g. IDEAforCON, ITEMS) where the document will be finalized /
approved some fields can be manually edited, or will be automatically filled by the target system. This
feature is often called ‘auto-population’. In the example above document number will be auto-
populated after check-in of the document. You cannot enter these values manually.

User Guide DocToolbox
Page 11 of 31
3.3 DocToobox Dialog: Doc Config
The tab Doc Config allows to edit the configuration of the template or document. The configuration can
be changed only within the limits defined in the underlying DocType. The DocType (see 3.3) determines
e.g. which document attributes are available, which sub types, doc levels and languages are supported.
The DocType is assigned when a template or document is initialized for DocToolbox. After a document
has been initialized the DocType can no longer be changed.
Callout
Description
Select the SubType of the document. The subtype determines the target
environment of the document to support the auto-population of attributes
accordingly. There will be always an entry ‘None’ in the list which means no specific
target environment and no auto-population is used.
Select the document level for the template. The available values will depend on the
DocType of the document. The document level determines which fields are available
for the document. Fields which are not supported for the selected doc level will be
automatically removed from standard elements like cover page, page headers &
footers when these are inserted.
This setting should normally only changed for a template. It should not be
changed for a document.
Select the language of the template.
This setting should normally only changed for a template. It should not be
changed for a document.
DocToolbox UserGuide
Page 12 of 31
Callout
Description
These first two checkboxes determine if DocToolbox automatically inserts or
updates page headers & footers.
If Document has a cover page is checked DocToolbox will remove the page header &
footer from the first page
If Document has custom header and footer is checked DocToolbox will completely
turn of the insert or update of page headers and footers.
The checkbox Document is an eReport determines if the document is an eReport. If
activated the eReport functions will be available. See section 3.8 for details.
The following checkboxes determine the behavior of the document cleanup function
(see 3.6).
If Headings are auto-numbered is checked cleanup will detect and comment all
headings which are not auto-numbered. If Headings are auto-numbered is not
checked cleanup will detect and comment all headings which are auto-numbered.
If Delete empty table rows is checked cleanup will delete all empty rows from all
tables in the document. To prevent deletion in this case a single character (e.g. a
blank space) in any cell will prevent deletion.
If Remove external hyperlinks is checked cleanup will remove all external hyperlinks,
but will keep the text. If there is e.g. ‘www.google.com’ in the text with the
corresponding hyperlink, the text ‘www.google.com’ will still exist, but there will be
no active hyperlink.
Click Special Styles to check if all special styles (for instructions, optional text etc.)
exist in the document or template. Missing styles will be copied from the master
template into the document. The function should be used when creating a new
template.
Click on Undo Changes to discard any changes you have made.
Click on Update to save the changes in the document. DocToolbox will then also
update the document according to the new settings.
User Guide DocToolbox
Page 13 of 31
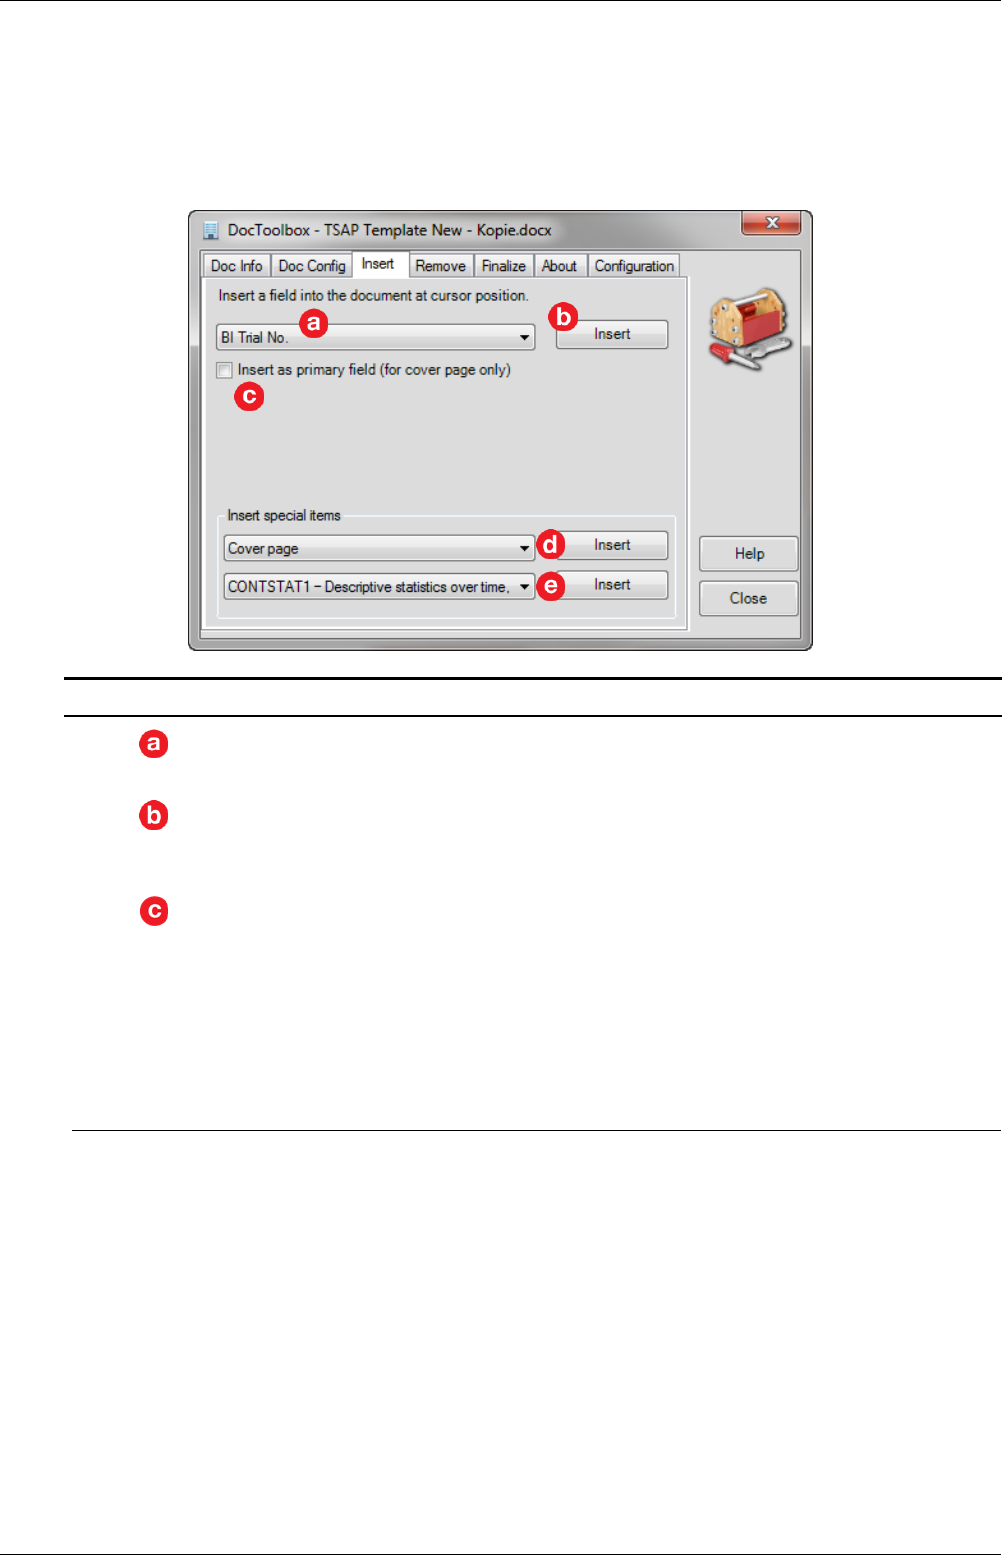
3.4 DocToolbox Dialog: Insert
3.4.1 Insert a Document Information Field
The tab Insert allows you to insert fields displaying the standard document attributes into the
document. To insert a field perform the following steps:
Callout
Description
Select a field from the drop-down list. The available fields will depend on the
DocType and DocLevel setting of the document.
Click the button Insert to insert the field for the corresponding document attribute at
the cursor position in the document. If text is selected, the selected text will be
replaced by the field.
By default DocToolbox determines automatically how to insert fields. Each field has
one ‘primary’ field instance (typically on the cover page) and any number of
secondary instances. To force DocToolbox to insert the primary instance check this
checkbox. If a primary instance for the field already exists it will be replaced by a
secondary instance. After inserting a primary field the checkbox will be automatically
unchecked.
This function is relevant for template authors; normally there is no need for
document authors to use it.
3.4.2 Insert Special Text Items
DocToolbox supports two types of text items to be inserted into document. The items are defined as
part of the DocType configuration and are stored in the master template for the DocType.
Unconditional Items: These items are available for all templates and documents of the
DocType
Conditional items: These items are only available if a template or document has been
specifically marked to allow insertion of these items.
For each item the location is defined in the DocType configuration where to insert in the document. This
can be start of document, cursor location, or end of document. Most items will be configured to ber
inserted at the cursor position. However, a cover page will be configured to be inserted always at the
start of the document.
All items can be modified according to the current document configuration by DocToolbox when they
are inserted, e.g. insert or delete specific fields, delete text related to these fields etc. This is defined as

DocToolbox UserGuide
Page 14 of 31
part of the DocType configuration. For details please refer to the DocToolbox Configuration Editor
Manual.
Callout
Description
Select and insert an unconditional item: Place the cursor in the document where the
item shall be inserted (not applicable for items inserted at document start or end)
Click the button Insert to insert the item
Select and insert a conditional item: Place the cursor in the document where the
item shall be inserted (not applicable for items inserted at document start or end)
Click the button Insert to insert the item
If the document is not already marked for the selected conditional item
DocToolbox will request a confirmation to mark the document accordingly and then
insert the item.
The handling of conditional special text items on the DocToolbox ribbon is as follows:
By default conditional items are not available for any document.
The template author must use the function above to mark the template accordingly.
A template can be marked for more than one type of special text items.
All available conditional items will show up on the corresponding drop-down list of the
ribbon (see 3.1)
User Guide DocToolbox
Page 15 of 31
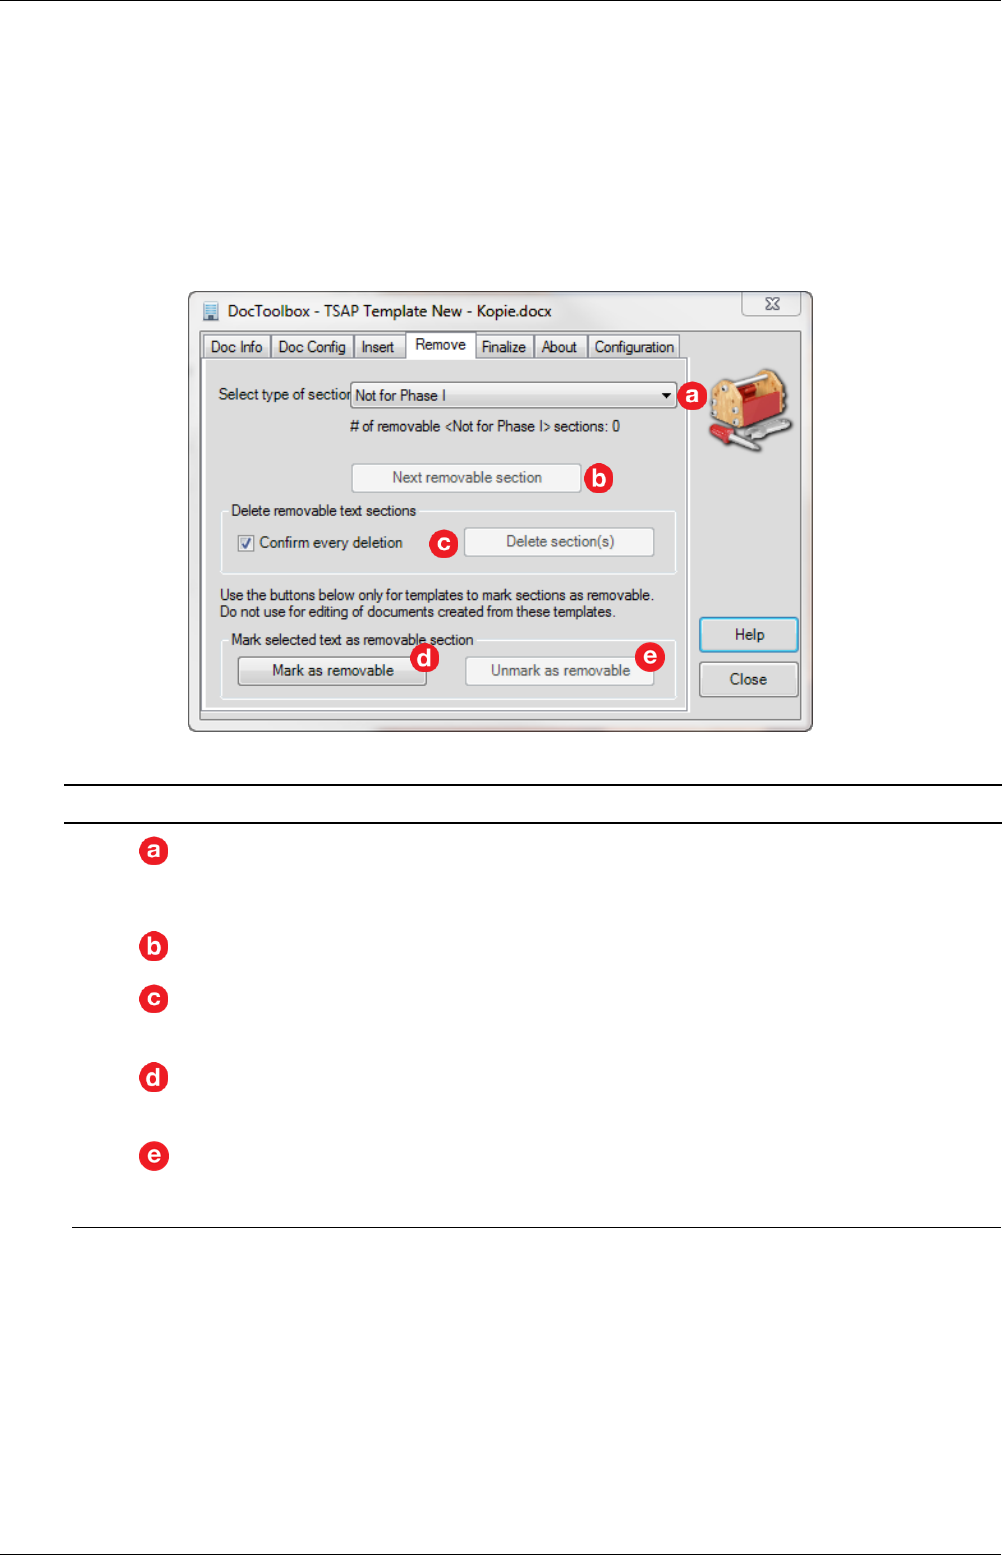
3.5 DocToolbox Dialog: Remove
The tab Remove provides functions to mark (for template authors) and remove (for document authors)
text sections in a document. The removable sections have to be defined in the DocType configuration.
The actual text sections then can be marked in the templates, and document authors using the
templates can search and delete these sections.
For each available type of removable section an arbitrary number of actual text sections can be marked.
A text section can be anything from a single word or even character, a paragraph or set of paragraphs,
parts of table like rows or columns, or entire tables.
Callout
Description
Select the type of the removable section. After selecting a type the text below the
drop-down box will display the number of actual sections which (still) exist in the
document.
Click on Next removable section to navigate to the next removable section of
this type. Search starts at the cursor location.
Click on Delete section(s) to delete the text sections of the selected type. If
Confirm every deletion is checked (default) DocToolbox will navigate to all
sections and ask for confirmation for every section.
Select a text section in the document and click on Mark as removable to
mark the section as removable for the selected type. This function should be
used by template authors only.
Select a text section which is already marked as removable and click on
Unmark as removable to remove the marking (bookmarks). This function
should be used by template authors only.
DocToolbox UserGuide
Page 16 of 31
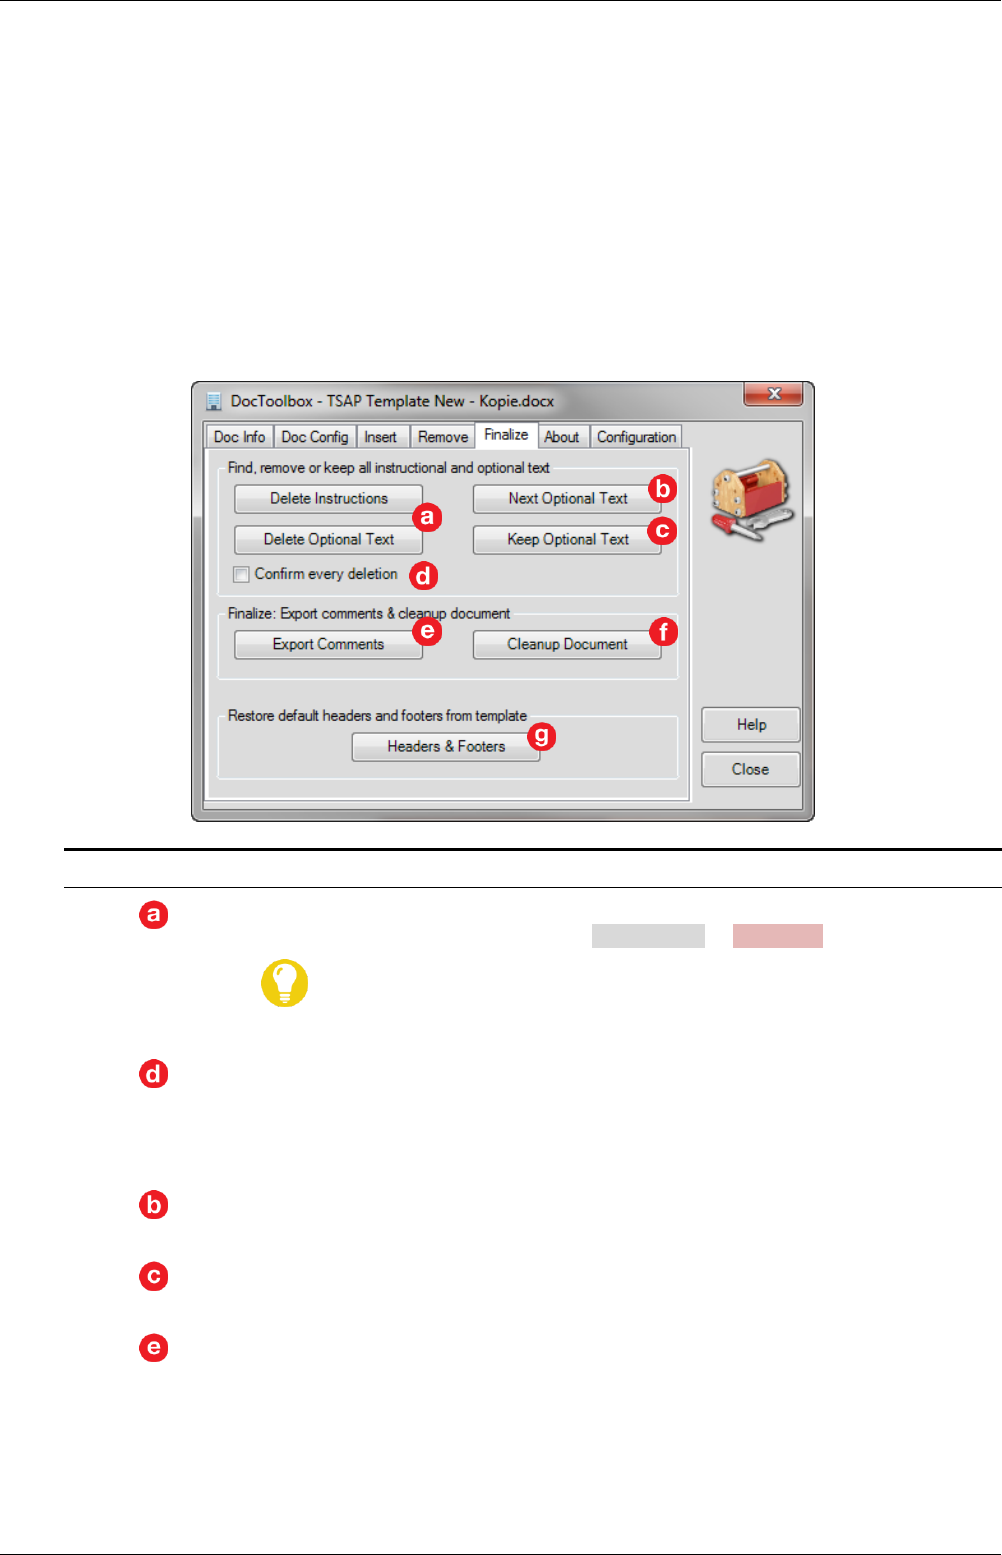
3.6 DocToolbox Dialog: Finalize
The tab Finalize provides functions to create a clean Word document ‘ready for approval’. The functions
allow to:
Remove text which is formatted as instruction or optional text
Export comments into an Excel file (to save them before they are deleted)
Restore the correct page headers and footers in all sections of the document
General cleanup the document: Accept all changes, switch off track-changes mode,
update all fields/cross-references and check for any errors, delete all comments, remove
all text-highlighting, check if there is any remaining instructional or optional text.
Callout
Description
Delete Instructions and Delete Optional Text will delete all text which is formatted
using one of the designated styles like 'Instructions' or 'Optional'.
If you confirm every deletion, you can also keep optional text: In the
confirmation dialog click Keep. This will format the optional text as normal text.
If Confirm every deletion is ticked, you will be asked for every text section if you
want to delete it
If Confirm every deletion is not ticked all text will be deleted at once, without
confirmation
Next Optional Text will navigate to the next optional text item, starting from the
cursor location.
Select a range of text in the document and click on Keep Optional Text to convert all
text formatted as optional text into normal text within the current selection.
Export Comments button allows you to export all comments in the current
document into a new Excel Spreadsheet. Besides the comment itself the author of
the comment, and section # and page # of the comment is exported into the
spreadsheet.
User Guide DocToolbox
Page 17 of 31
Callout
Description
The Finalize Document button provides a function to finalize a document 'ready for
signature':
1. Delete all comments
2. Accept all changes
3. Switch off 'track changes' mode
4. Remove all 'highlight' markings
5. Update all fields / cross-references and check if fields contain any errors
6. Issue warnings if there is still text formatted as instructions or optional text
7. Remove empty rows from tables (if enabled, see 3.3)
8. Remove all external hyperlinks (if enabled, see 3.3)
9. Mark headings not following the auto-numbering setting (see 3.3)
10. Check for empty pages and mark them
Use this function with care! Due to the nature of changes made by this
function it is not possible to undo all the changes done by this function using the
Word Undo functionality!
Click on Header&Footer to restore all page headers and footers in all sections to the
default headers and footers from the master template. Use this function to ensure
that the page headers and footers are correct in all sections of the document, e.g. if
you have mixed portrait and landscape pages in the document
DocToolbox UserGuide
Page 18 of 31
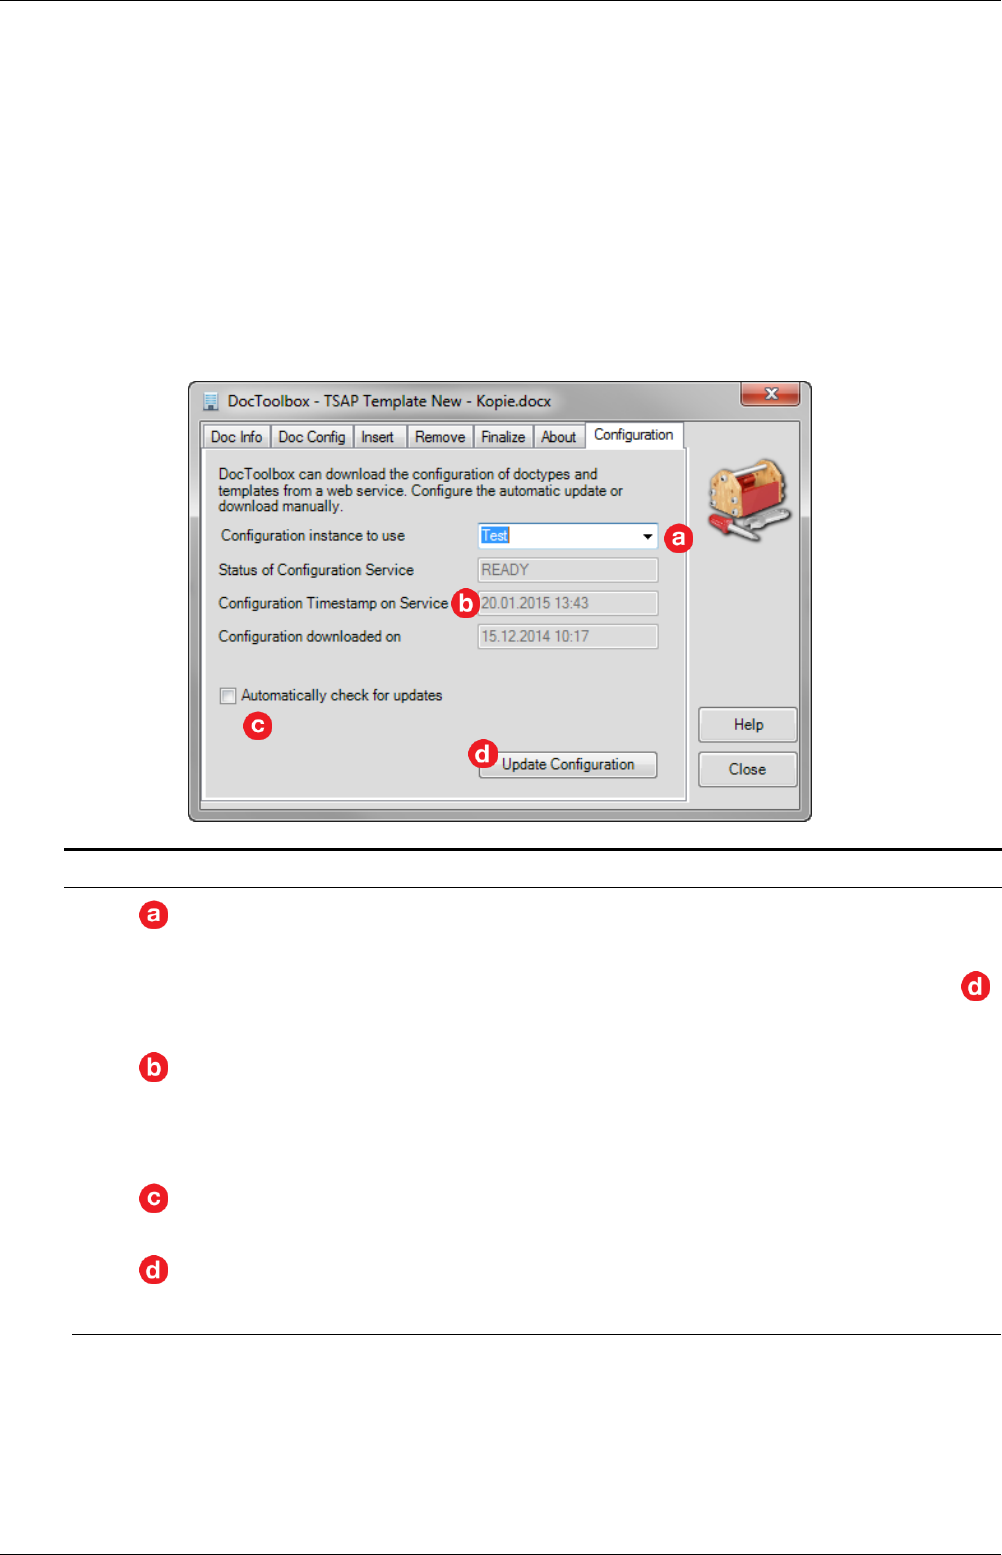
3.7 DocToolbox Dialog: Configuration
The tab Configuration provides functions to manage the DocToolbox configuration. DocToolbox
configuration (including all DocTypes and associated master templates) is managed centrally by a web
service. The DocToolbox client can download the current configuration from the service. Download can
be automatic or manual.
If automatic check for updates is enabled, DocToolbox will start at first start on every day
if a newer configuration is available on the configuration service. If yes, the new
configuration will be downloaded automatically.
If the configuration is updated manually, the current configuration is downloaded from
the server, independent if it is newer or older than the local configuration.
Callout
Description
Select configuration instance from which the configuration will be downloaded.
Normally this should be set to the ‘Prod’ instance. For development or testing of new
DocToolbox configurations and DocTypes change this to the respective instance.
After selecting a new instance the configuration must be downloaded manually
to make the new configuration available to DocToolbox.
These fields display the status of the configuration service for the currently
selected instance. The normal status should be ‘READY’ which means the
service is up-and-running, and a valid configuration is available. The fields
below show the timestamp of the current configuration on the service, and
the most recent download of the configuration.
If Automatically check for updates is checked, DocToolbox will check once daily if a
newer configuration is available, and if yes download it automatically.
Click on Update Configuration to force a download of the current configuration
from the service.
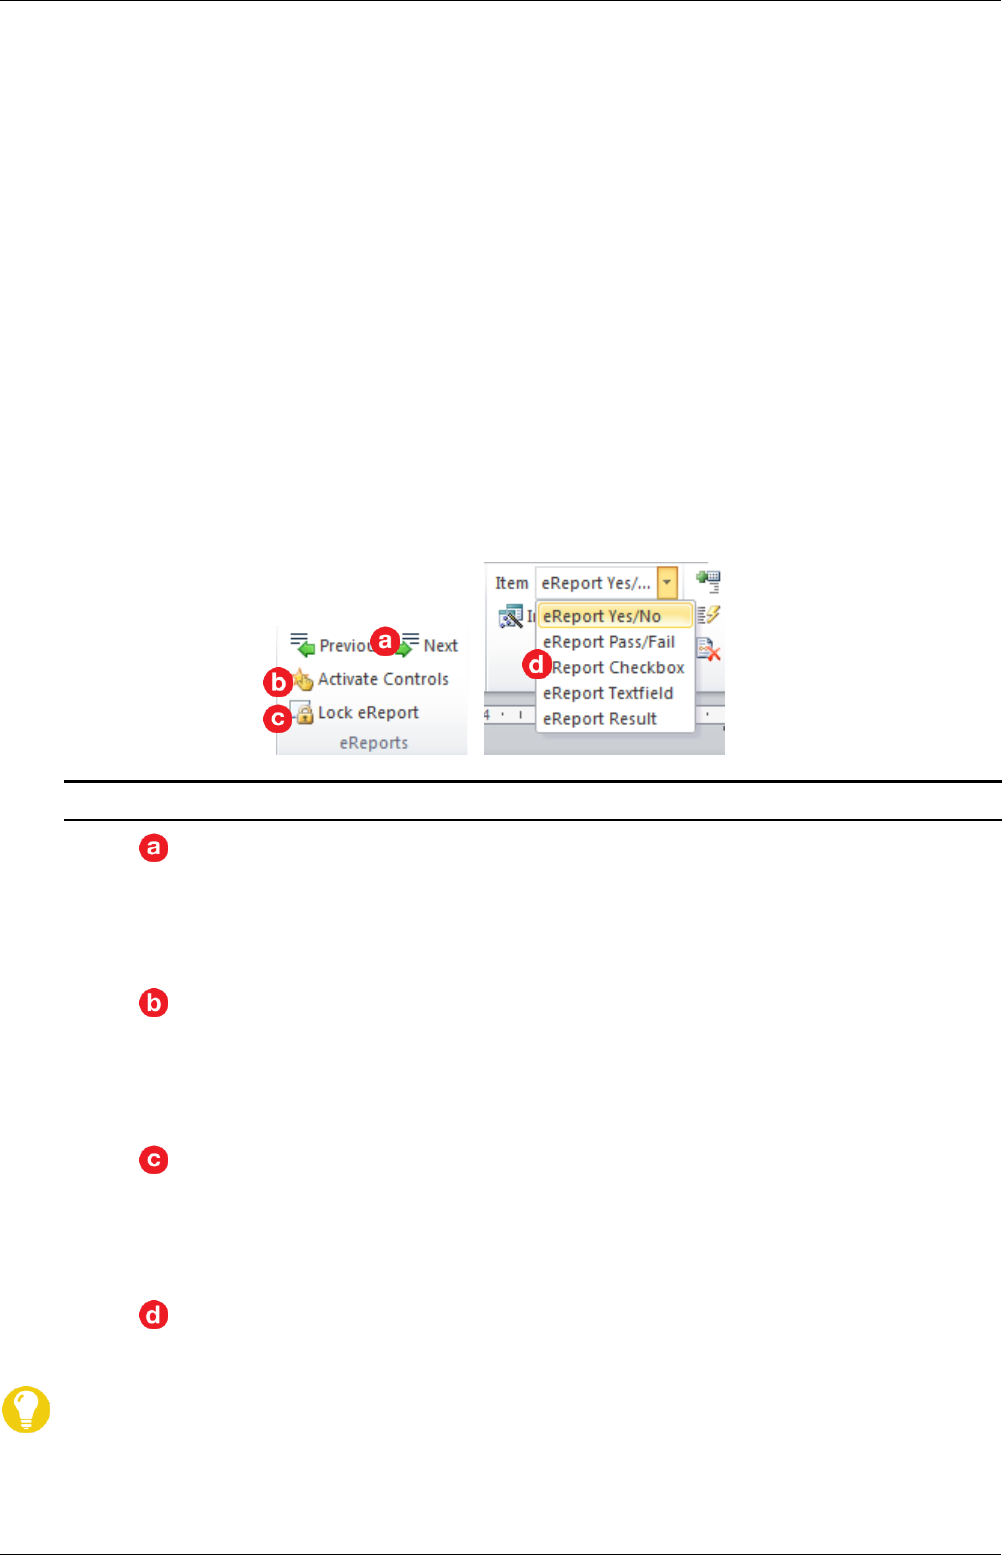
3.8 DocToolbox Ribbon: eReports
To support the requirements of a ‘plan / report’ document following Good Documentation Practice
DocToolbox provides some functions to prepare a ‘plan’ document so it can later be filled out without
changing the content of the plan itself:
User Guide DocToolbox
Page 19 of 31
In the ‘plan’ document specific controls (‘content controls’) have to be inserted. These
controls will be the only parts in the ‘report’ document that still can be edited.
DocToolbox supports the insert of these controls via the Special Items.
Activating and locking the document will make only the content controls editable, but
the rest of the document read-only
The following scenarios can be followed for the eReport concept:
Create a plan document (version 1.0), activate and lock it as an eReport, and approve the
plan. Then copies or new versions of the plan document can be filled out and approved
as the report. However, it is not possible in this scenario to update (new version) the plan
itself because the plan document is already locked.
Create a plan document (version 1.0), activate as an eReport, but do not lock. Approve
the plan. Now a copy of the plan document can be made, locked, and filled out as an
eReport. In this scenario still new versions of the plan can be created because the plan is
not locked yet. The creation of the report document must fulfill the criteria for a ‘true
copy’ of the plan, i.e. it must either be created by a validated automated process (e.g. in
ITEMS), or if created manually an electronic signature for verification of the true copy
must be applied before the plan is executed.
Callout
Description
Navigation buttons to jump to the previous or next content control. The buttons
work both in the plan document (i.e. before the document is made read-only) and in
the report document (i.e. after the document has been made read-only)
For navigation also key shortcuts are available: Ctrl-Left to jump to the previous
control, Ctrl-Right to jump to the next control.
This function ‘activates’ the controls for the report, i.e. marks them as an
exemption from read-only mode. This function needs to be executed before
the document is made-read-only (locked), otherwise controls which have not
been marked would not be editable.
Please note: The Finalize and the Lock eReport function include the ‘active’
function as well.
Locks the eReport, i.e. makes the document read-only after confirmation. The
locking will only be effective after the document has been saved. The locking cannot
be undone. A secure random password is used to protect the document.
Please note: This function should not be used if the locking of the eReport is done
by an external system, e.g. ITEMS.
Use the Special Items functions to insert the controls into the eReport. The available
items will depend on the Doc Type of the document.
Please note the following on activation of eReports:
The Activate Controls function is also automatically executed when the document is
saved.
DocToolbox UserGuide
Page 20 of 31
The Activate Controls function replaces any legacy form fields and ActiveX controls in
the document by the corresponding content controls. The content of the controls is
preserved. If such legacy fields have been replaced a corresponding message is
displayed. Check the document again for correctness and completeness.
Some legacy form fields and ActiveX controls are not replaced because no corresponding
content controls exist, or they are not relevant for an eReport. If such controls exist in
the document a warning is displayed. Check the document again and replace or delete
these controls manually, if needed. These controls will not be editable in the locked
eReport.
3.9 Support for CSVToolbox Documents
DocToolbox supports most of the function of CSVToolbox and can be used as a full replacement for
CSVToolbox. The following section provide an overview of the use of DocToolbox for CSVToolbox
documents and templates, i.e. documents based on the LeVA templates
3.9.1 Conversion of existing documents and templates
CSVToolbox documents can be opened and used with DocToolbox as well. The document properties are
adjusted automatically so both CSVToolbox and DocToolbox can be used for the document. There is no
manual adaption required.
3.9.2 CSVToolbox: Insert Test Case
This function of CSVToolbox has been replaced in DocToolbox by a generic function Special Items to
insert any kind of items. If a test cases document based on template C-TC is open the DocToolbox
ribbon will show the Special Items group. To insert a test case select ‘Test case’ from the drop-down
and click on Insert Item.
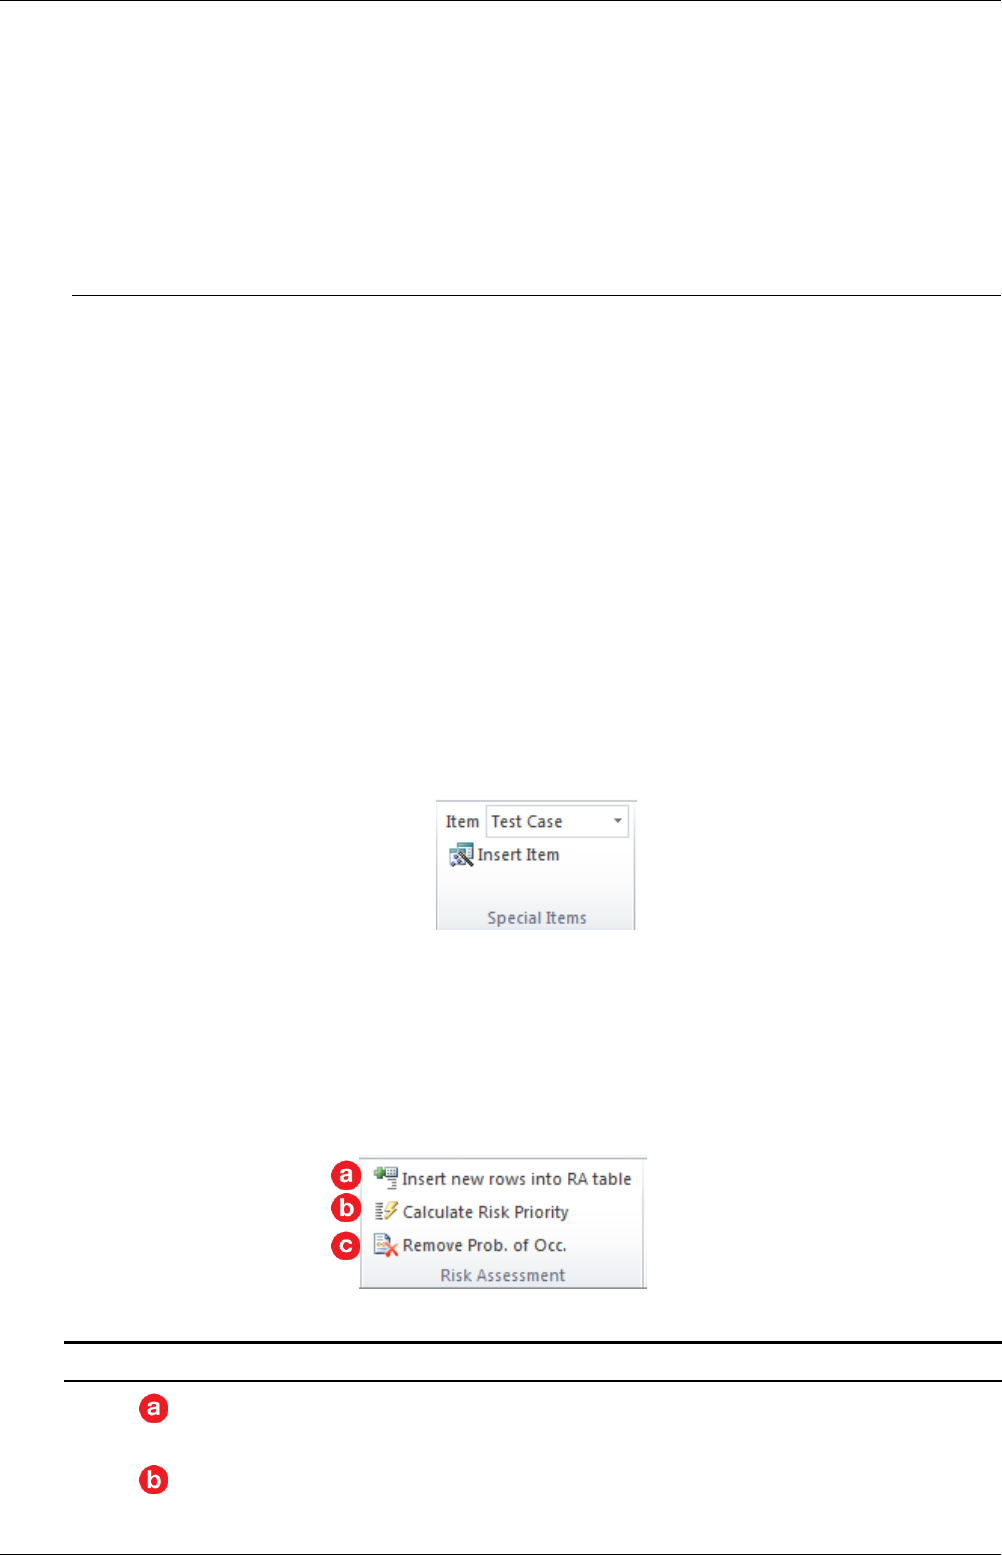
3.9.3 CSVToolbox: Risk Assessment
The group Risk Assessment on the ribbon provides functions for performing a risk assessment. This
button group will only be visible if the current document is based on the template C-RA. Just like in
CSVToolbox the functions will work only if the cursor is within a risk assessment table which has the
correct format and column headings.
Callout
Description
Insert new rows into RA table will insert 5 empty rows in the risk assessment table
just below the current cursor position
Calculate Risk Priority will calculate the risk priority number (RPN) and the
risk priority according to the algorithm described in the template
User Guide DocToolbox
Page 21 of 31
Callout
Description
Remove 'Prob. of Occurrence' will remove all items related to the probability
of occurrence from the document. This includes some text sections and the
related column in the risk analysis table
The RA functions will work correctly only if the original template has been used and has not been
modified. Namely the column headers in the risk assessment table must not be modified!
The calculation respects the 'track changes' mode. If 'tack changes' is turned on the newly
calculated risk priority will be shown as a change. If there is no change of the calculated risk priority (i.e.
it is the same as the current value) the value in the table is not changed. Acceptance of all changes
before updating the risk factors can help to more easily detect which risk priorities have actually been
changed.
3.9.4 CSVToolbox: GAMP Category 4 and 5 Text
These CSVToolbox functions have been replaced in DocToolbox by a generic function for
removable sections.
On the ribbon, instead to the specific buttons to search for GAMP Category 4 or 5 section
there is a dropdown for removable section. Select the section type from the dropdown (a
message will display the number of sections in the document) and click on Next Section
to navigate to the next section of this type.
All other functions related to these sections can be found on the DocToolbox dialog on
tab Remove. In CSVToolbox this has been on the tab GAMP.
3.9.5 CSVToolbox: Limitations in DocToolbox
DocToolbox does not support separate headers and footers for ITEMS documents as
CSVToolbox did.
The functions for risk assessments based on template C-RA are available only via the
ribbon, as explained above, but not on the DocToolbox dialog
DocToolbox UserGuide
Page 22 of 31
4 Translation Tool
DocToolbox provides a built-in tool for editing and translation of all text items for
Document language
DocToolbox User Interface
The tool is not intended for regular end users. However, it does allow any user of DocToolbox to do
translations, and subsequently submit the language specfic files for inclusion in the DocToolbox
product.
The dialogues of the translation tool are avaiable in English only.
Any translations or changes to the text strings made are stored in the local configuration files only.
To make them available to other users you need to submit the files to the developer for inclusion in the
next DocToolbox version.
4.1 Access to the Translation Tool
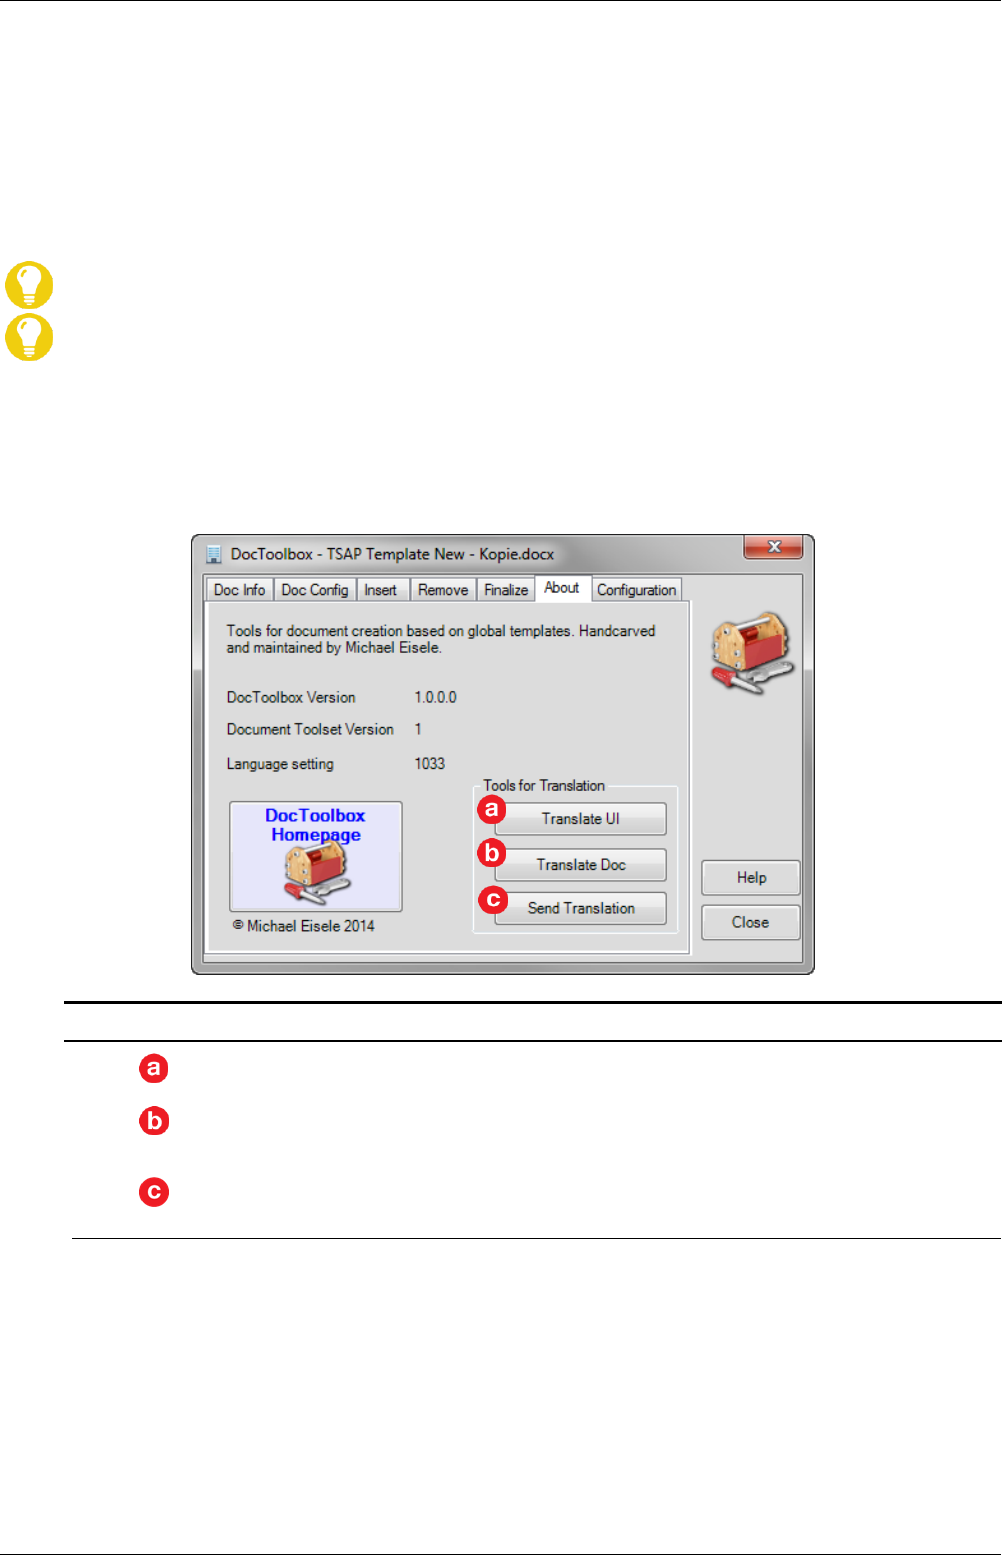
The translation tool can be accessed from the DocToolbox dialog, on the tab About.
Callout
Description
Translate UI opens the dialog for the translation of all strings used by the
user interface
Translate Doc opens the dialog for the translation of document specific strings and
text items
Send Translation will create an Outlook mail and attach all language files to
this mail. The mail is not automatically sent.
4.2 Translation for Document Language
Most language specific text items which are used by DocToolbox are stored in a separate .dotx template
file. Changes and translation of these text items can be done directly in these files. Some text items are
stored in a language specific configuration file. This file contains:
The name of the above mentionned .dotx template file
The names of the styles for instructions and optional text
Text patterns to identify specific text elements in the risk assessment (template C-RA)
User Guide DocToolbox
Page 23 of 31
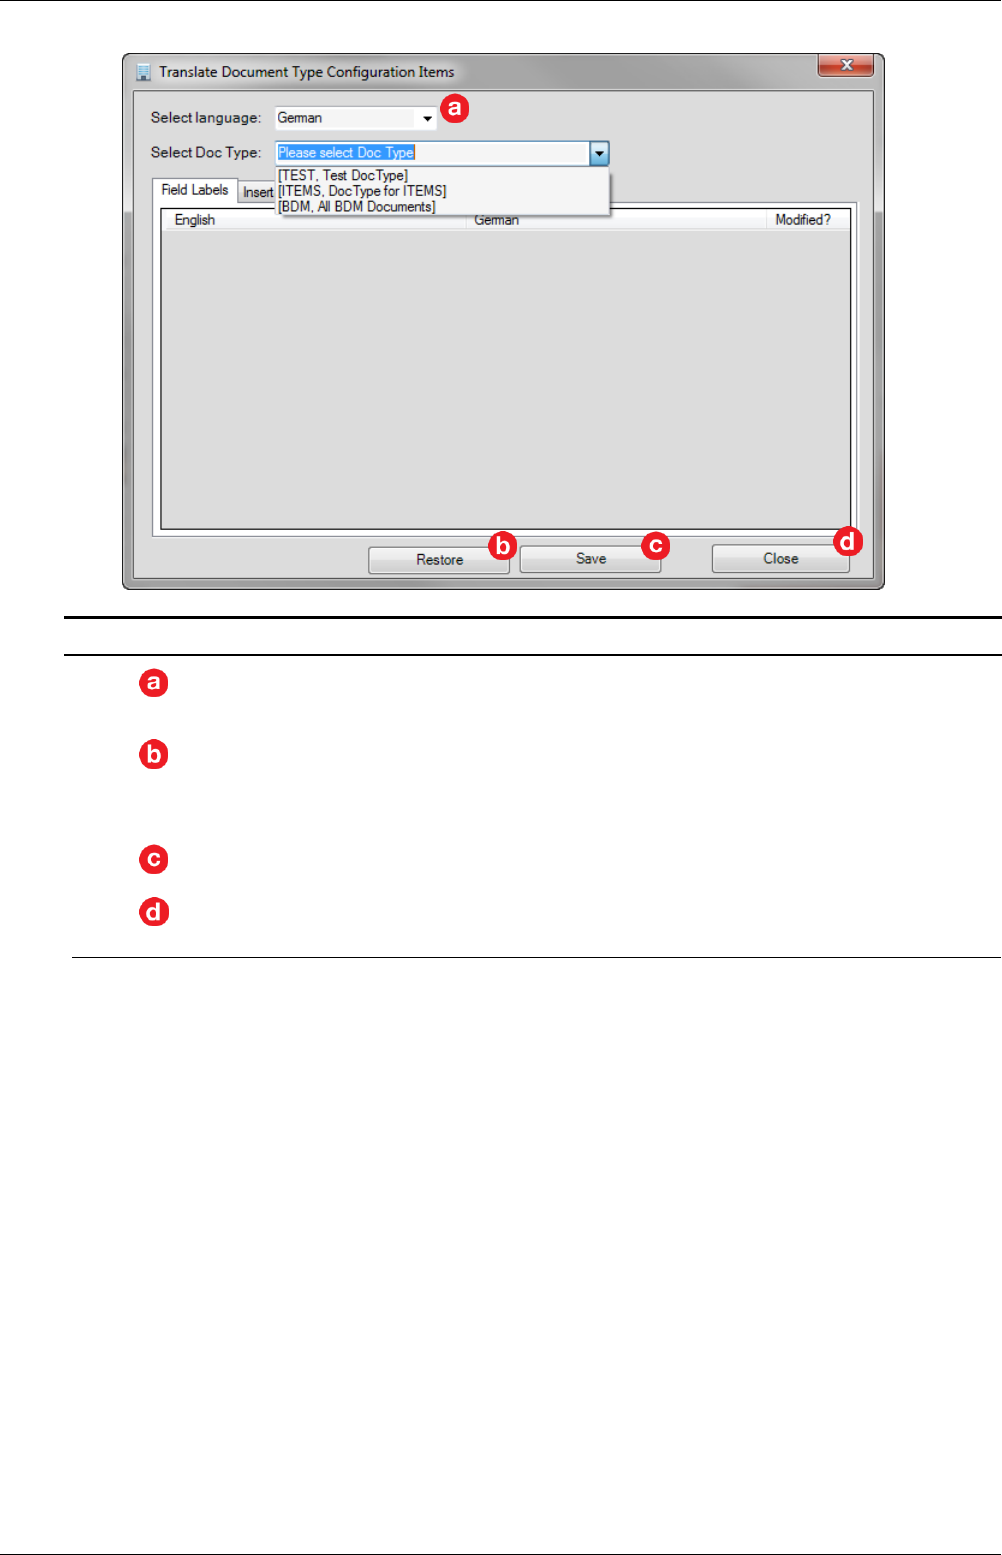
Callout
Description
Select the language you want to translate. The dialog will be automatically populated
with the language specific strings
Restore will restore the original language file and overwrite any
modifications you may have made and saved already. Use this function only
if you want to start translation from scratch again (as currently contained in
the DocToolbox package).
Save will save the current translation
Close will close the dialog. If there are unsaved changes you will be
prompted if you want to save the changes.
DocToolbox UserGuide
Page 24 of 31
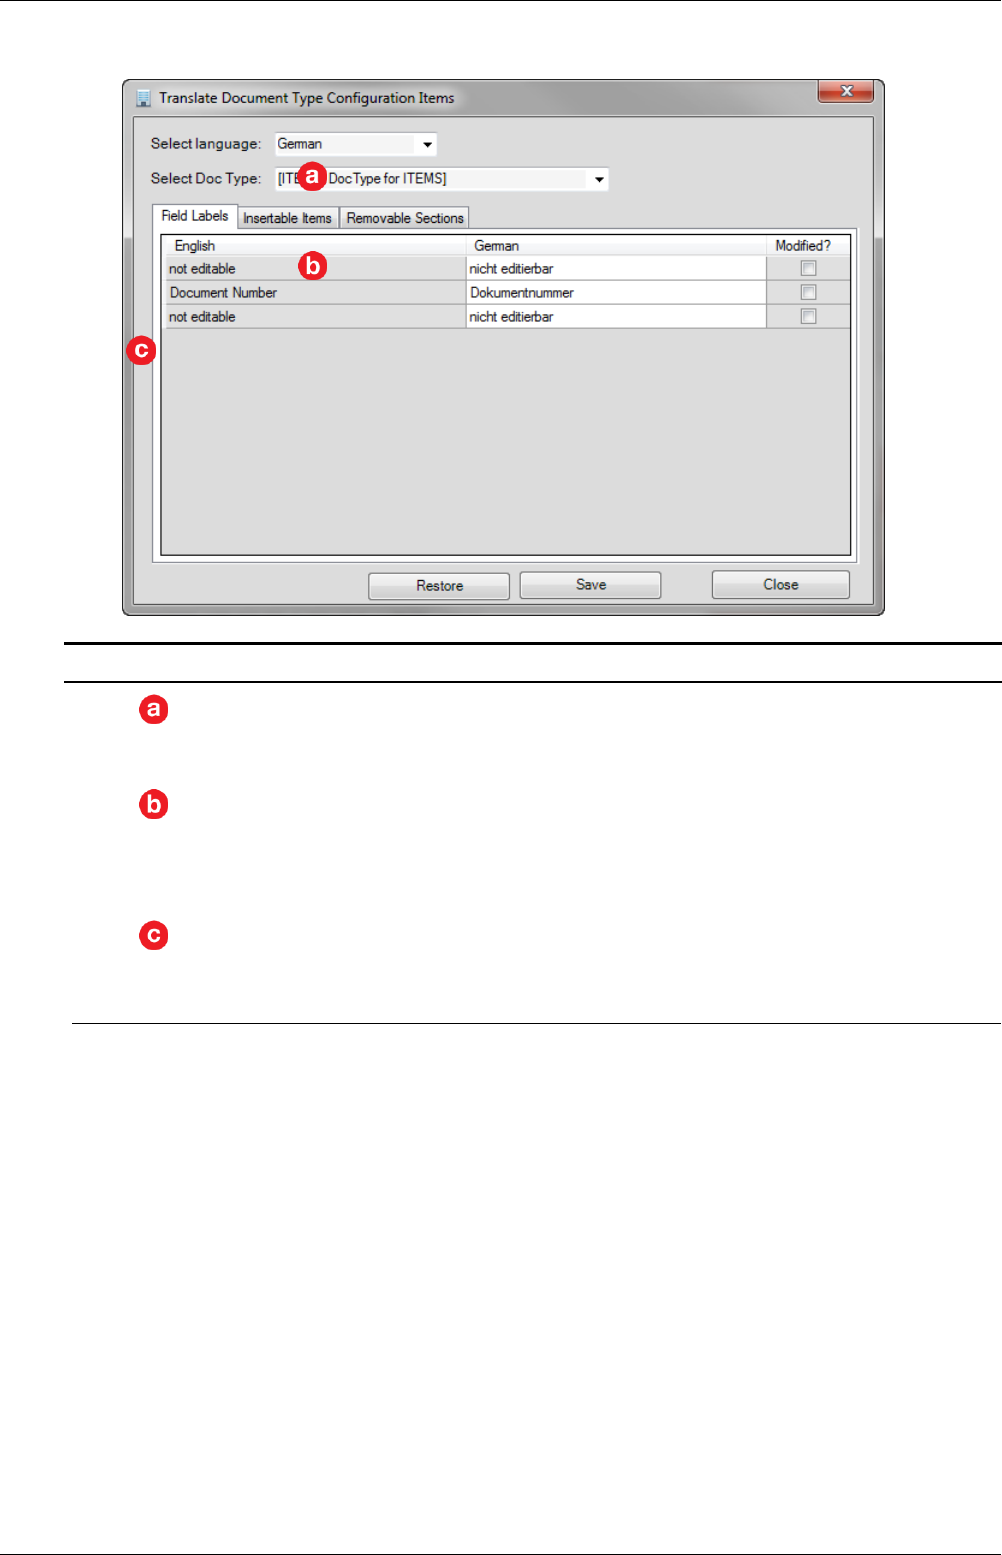
After selection of a language, all the input fields get filled with the language specific text:
Callout
Description
Name of the language specific .dotx file which contains the autotext elements used
by DocToolbox (e.g. cover page, page headers and footers etc.). Normally it should
not be required to change this name.
Translation of the style names used for the formatting of instructions and
optional text. The names must match the actual style names in the templates
and documents. Normally it should not be required to change these names.
If changed, the names of the styles in all existing templates would need to be
adapted.
Language specific strings used in the template C-RA (risk assessment). The labels of
the input fields show the corresponding English texts. Every pattern must end with a
‘*’ (meaning any text can follow). The ‘*’ is appended automatically, if missing.
User Guide DocToolbox
Page 25 of 31
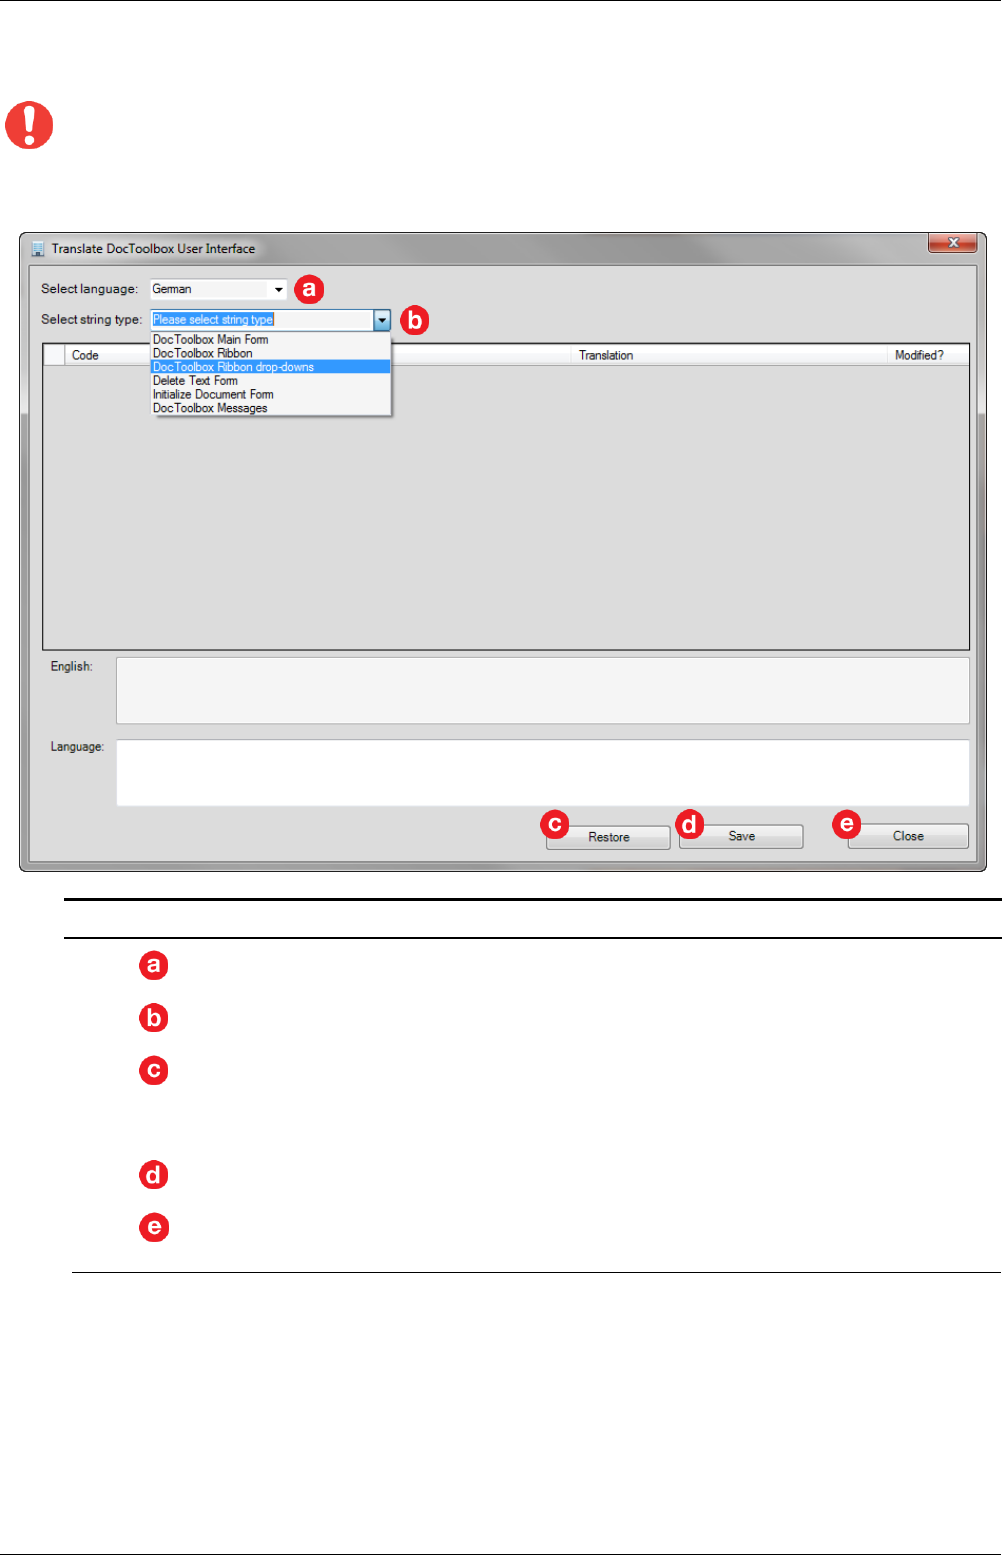
4.3 Translation of User Interface
Use this to edit or translate all text items that are used in the DocToolbox user interface.
For all text items except the Message Box strings it is important that the length of the translated
text is not significantly longer than the English text. Too long text may not be displayed correctly (i.e.
truncated) in the user interface.
Callout
Description
Select a language for translation
Select a string type. For a better overview different types of strings can be
edited separately.
Restore will restore the original language file and overwrite any
modifications you may have made and saved already. Use this function only
if you want to start translation from scratch again (as currently contained in
the DocToolbox package).
Save will save the current translation
Close will close the dialog. If there are unsaved changes you will be
prompted if you want to save the changes.
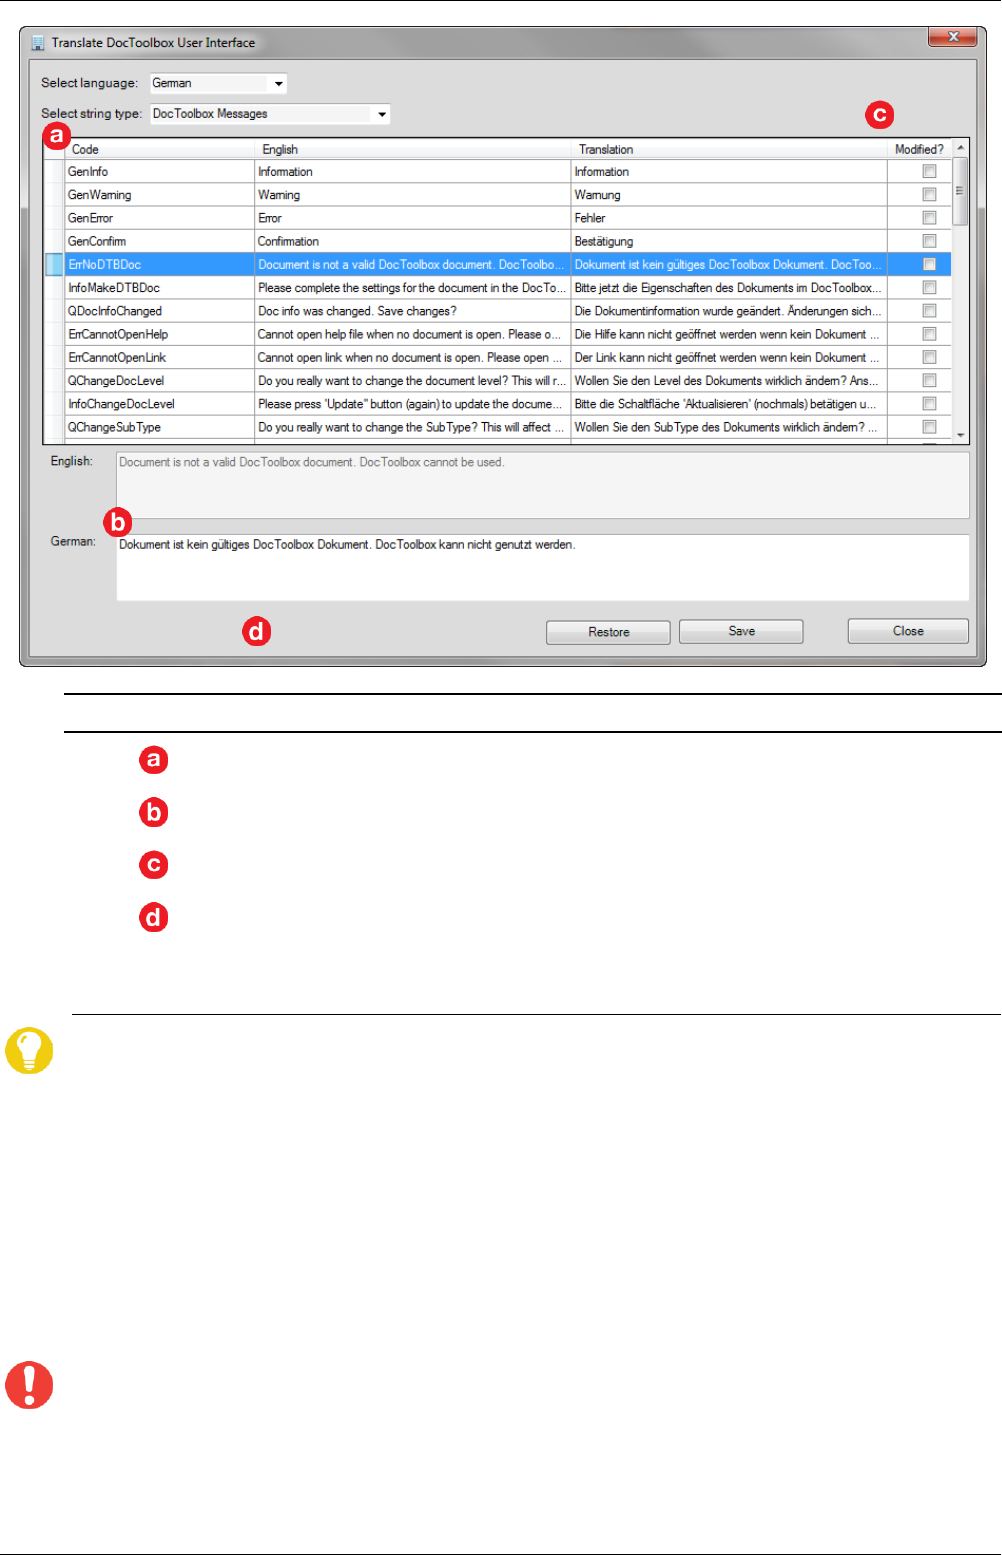
After selection of a language and a string type, the list of available strings gets populated with the
english and translated text. If there is not yet a translation for the selected language available the
translation will contain the English text.
DocToolbox UserGuide
Page 26 of 31
Callout
Description
Select the text item you want to translate or edit in the list
The upper text field shows the full (current) English text. The lower text field
allows you to edit / translate the text for the selected language.
The checkboxes indicate if a text item has been modified or deleted.
The New item and Delete item buttons should normally not been used. They
are intended for developers only, when references to text items are added or
removed in the source code. The buttons are only enabled when language
English is selected.
After making changes to a language set you should verify that everything looks fine in the
DocToolbox user interface. To do this you need to have the Office UI set to the respective language.
Changes to the translation become visible in DocToolbox only after a restart of MS Word.
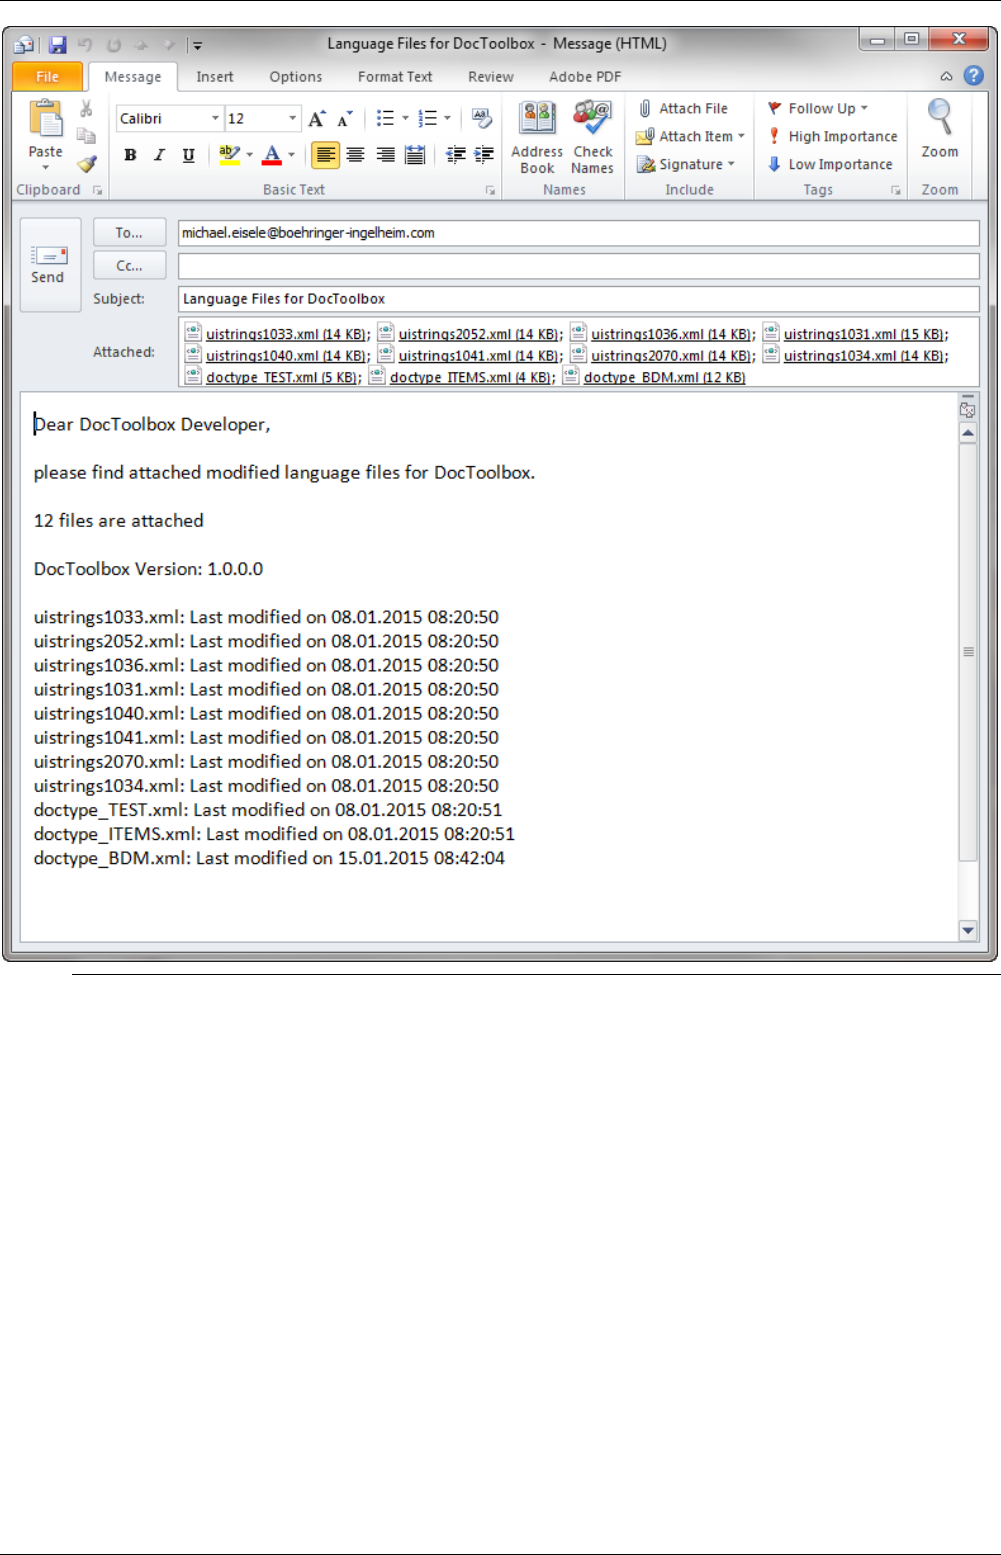
4.4 Handover of Translated Files to the Developer
After you have made any changes to the translated text the language specific files need to be integrated
into the installation package for DocToolbox. Use the button Send Translation (see 4.1) to automatically
create an email with all language specific files attached. The mail body will also show the last modified
dates of the files. You may modify the message text before sending the mail.
Outlook 2007 or higher must be installed on your PC for this function to work properly.
User Guide DocToolbox
Page 27 of 31
DocToolbox UserGuide
Page 28 of 31
5 Troubleshooting
5.1 Online Help
You can open this reference guide from the DocToolbox by clicking the Help button on the DocToolbox
dialog.
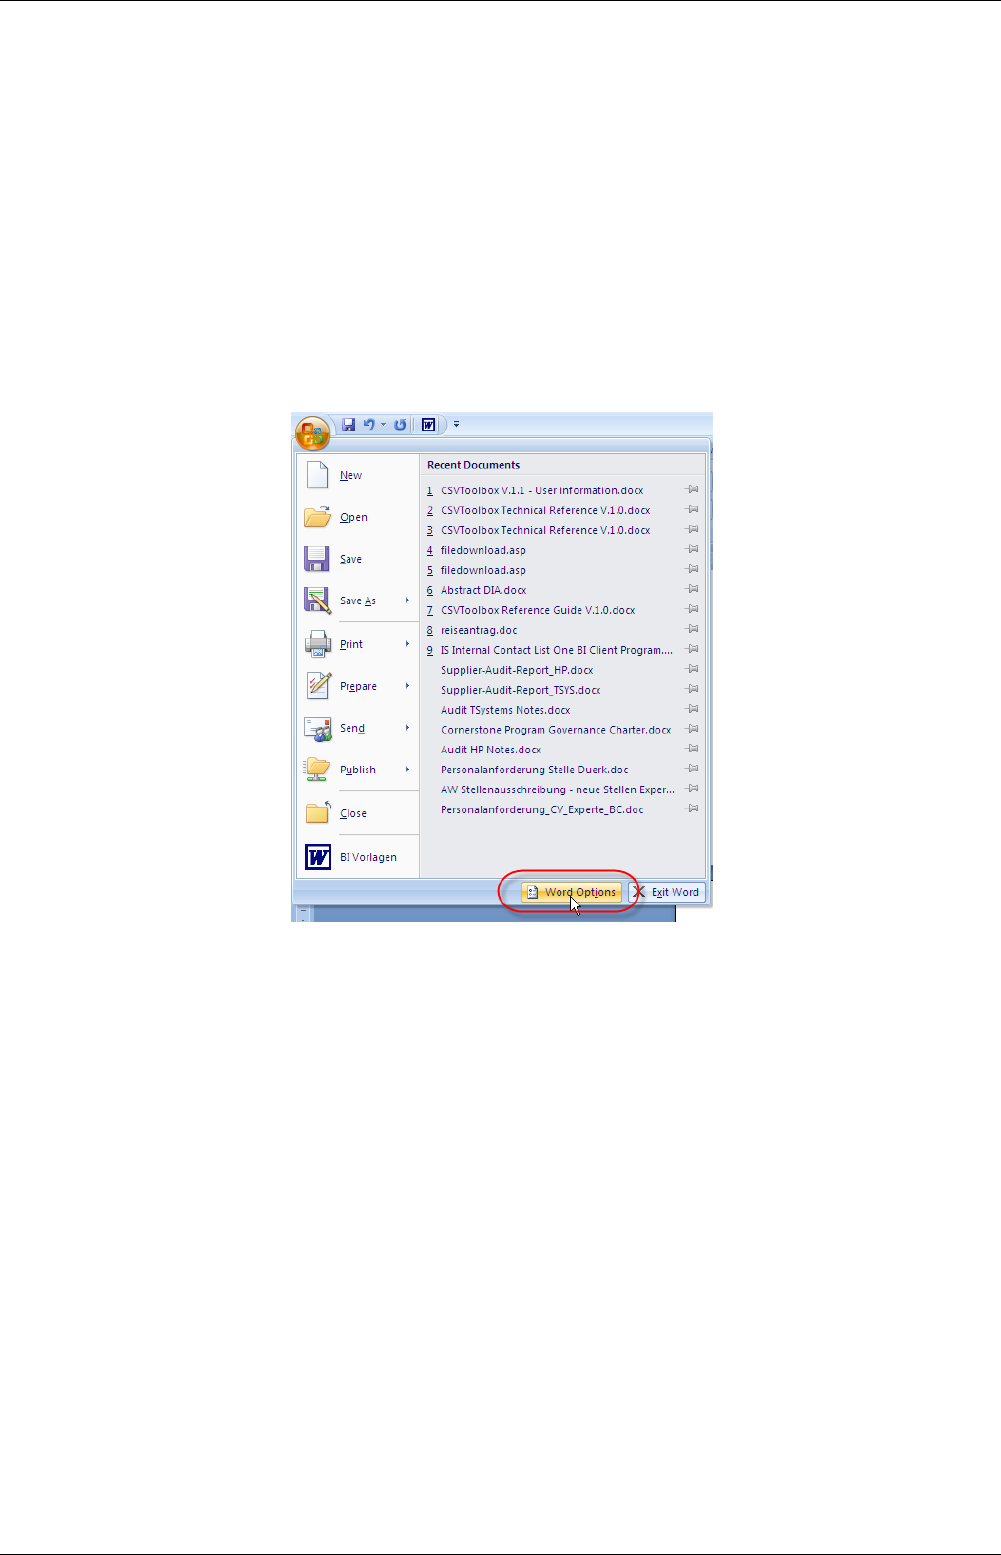
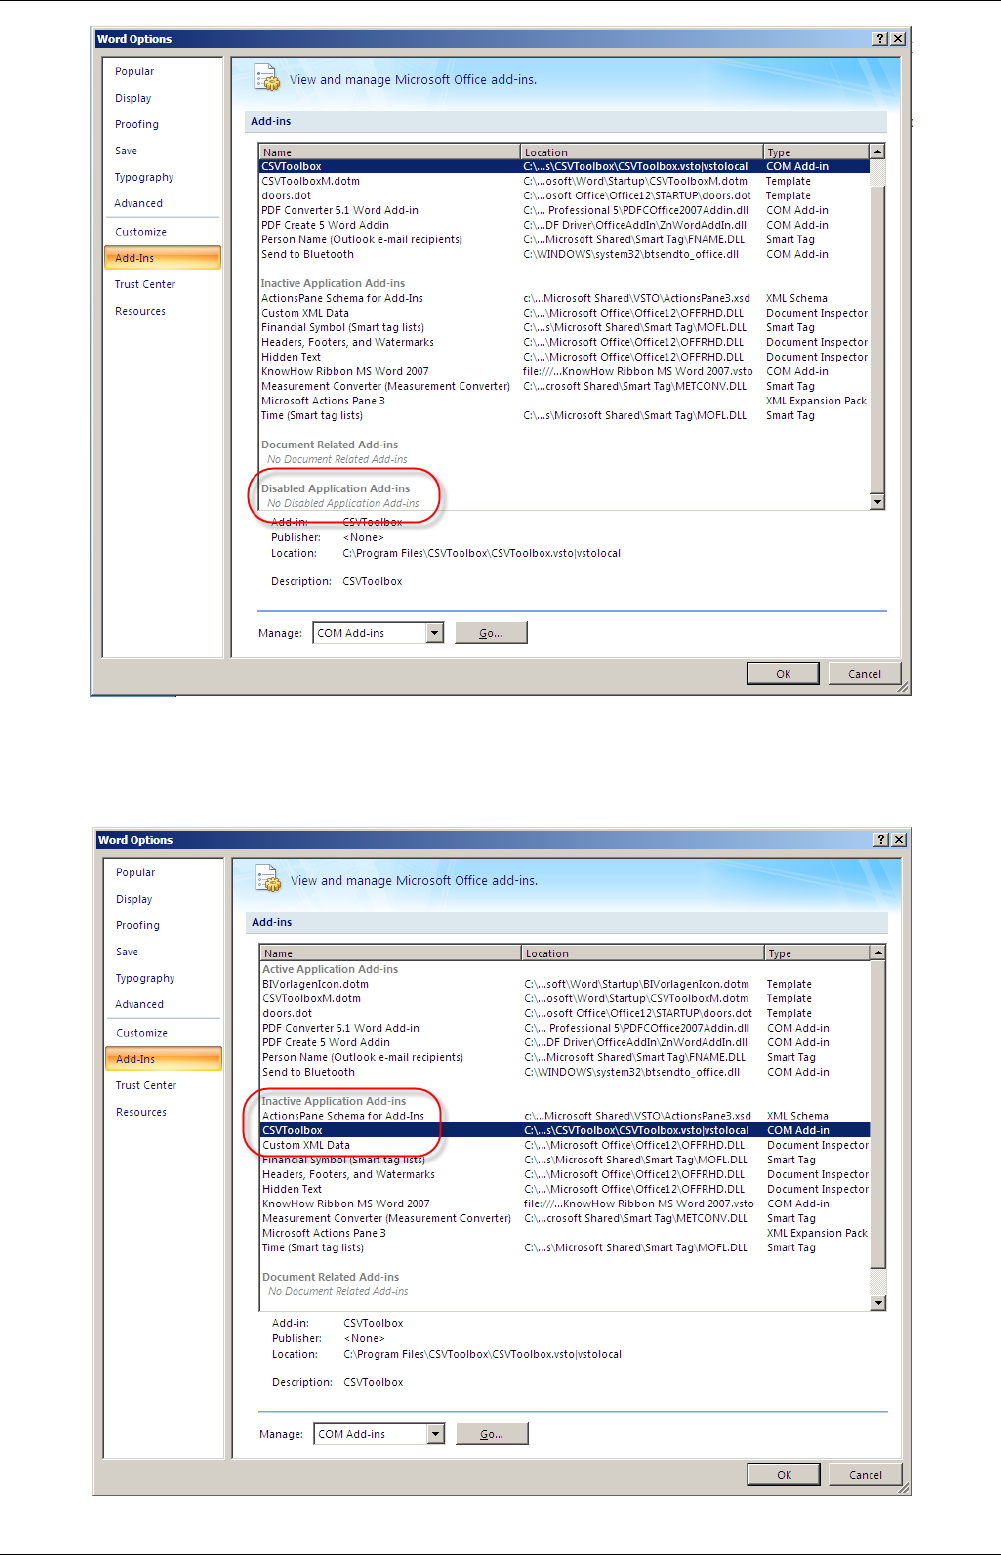
5.2 Check DocToolbox Add-in Status
It may happen that add-ins like DocToolbox are getting inactivated by the user or disabled by MSWord.
If you have installed DocToolbox, but do not see the tab ‘DocTools’ on the ribbon, the add-in may have
been deactivated or disabled. In this case proceed as follows:
Goto the Word options:
Check if DocToolbox is listed under ‘Disabled Application Add-ins. If Yes, select ‘Disabled Add-ins’ from
the ‘Manage’ drop-down list, and click the ‘Go’ button. Then re-enable DocToolbox in the dialog box.
User Guide DocToolbox
Page 29 of 31
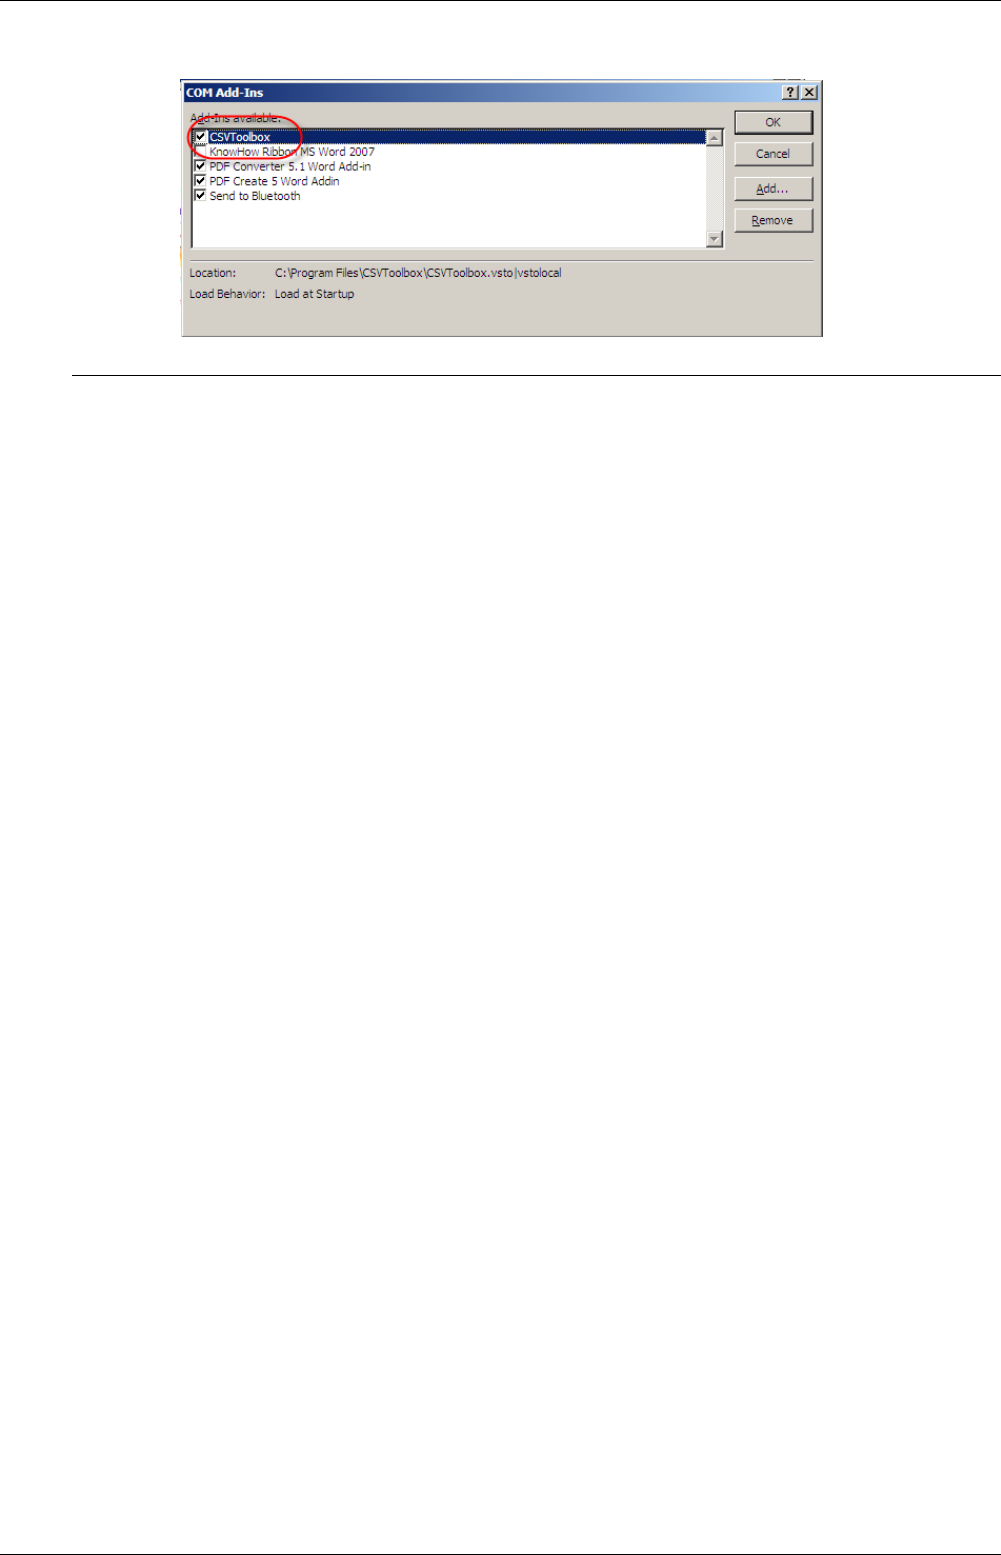
Check if DocToolbox is listed under ‘Inactive Application Add-ins’. If Yes, select ‘COM Add-ins’ from the
‘Manage’ drop-down list, and click the ‘Go’ button.
DocToolbox UserGuide
Page 30 of 31
In the dialog, make sure the checkbox for DocToolbox is checked, then click OK.

User Guide DocToolbox
Page 31 of 31
6 Glossary
Term
Description
DocToolbox
A MS word add-in which provides automation functions for editing
documents based on templates and the related configuration in
DocToolbox.
DocToolbox Configuration
Editor
An application to create, maintain, and manage the configuration of
DocToolbox. The application is required for developers and editors of
DocTypes. Normal users like authors of documents and templates do
not need this tool.
DocToolbox Configuration
Service
A web-based service which distributes the DocToolbox configuration
to all client PCs.
DocType
A DocType is a configuration in DocToolbox for a specific set of
templates and documents. Every template and document must be
initialized for one DocType before DocToolbox can be used.
Ribbon
Ribbon is the new toolbar-like user interface of Microsoft Office 2007
and later. Ribbons have replaced the traditional text-based menus
which still existed in Office 2003 and earlier.
SCCM
System Center Configuration Manager. A software product from
Microsoft used at BI for central distribution and installation of
software packages on client PCs.
