Edu BOSS 4.1 Installation Guide
User Manual: Pdf
Open the PDF directly: View PDF ![]() .
.
Page Count: 34

EduBOSS GNU/Linux 4.1
Installation Guide

Installation Steps
This guide helps you to install EduBOSS GNU/Linux on desktops and laptops. The
installation system is flexible enough to use even if you have no previous knowledge of
Linux or computer networks. If you select default options, EduBOSS GNU/Linux provides a
complete desktop operating system, including productivity applications, Internet utilities,
and desktop tools.
1.1 Before You Begin
1.1.1 System Requirements
EduBOSS GNU/Linux does not impose hardware requirements beyond the requirements of
the Linux kernel and the GNU tool-sets. Therefore, any architecture or platform to which
the Linux kernel, libc, gcc, etc. have been ported, can run EduBOSS GNU/Linux. To install
EduBOSS GNU/Linux you need very minimum system configurations. The hardware
requirement details are as follows:
Hard Disk – 8.0 GB (unpartitioned space)
RAM – 512 MB
DVD-ROM drive
To install EduBOSS GNU/Linux from disc, you need the installation DVD. Currently,
EduBOSS GNU/Linux supports the i386 and x86_64 architectures. These architectures are
described below:
i386
Intel x86-compatible processors, including Intel Pentium and Pentium-MMX, Pentium Pro,
Pentium-II, Pentium-III, Celeron, Pentium 4, and Xeon; VIAC3/C3-m and Eden/Eden-N;
and AMD Athlon, AthlonXP, Duron, AthlonMP, and Sempron.
x86_64
64-bit AMD processors such as Athlon64, Turion64, Opteron; and Intel 64-bit processors
such as EM64T.

1.1.2 Overview of the Installation Process
First, just a note about re-installations. With EduBOSS GNU/Linux, a circumstance that will
require a complete re-installation of your system is very rare; perhaps mechanical failure of
the hard disk would be the most common case. Many common operating systems may
require a complete installation to be performed when critical failures take place or for
upgrades to new OS versions. Even if a completely new installation isn't required, often the
programs you use must be re-installed to operate properly in the new OS. Under EduBOSS
GNU/Linux, it is much more likely that your OS can be repaired rather than replaced if
things go wrong. Upgrades never require a wholesale installation; you can always upgrade
in-place. And the programs are almost always compatible with successive OS releases. If a
new program version requires newer supporting software, the EduBOSS packaging system
ensures that all the necessary software is automatically identified and installed. The point
is, much effort has been put into avoiding the need for re-installation, so think of it as your
very last option. The installer is not designed to re-install over an existing system. Here's a
road map for the steps you will take during the installation process.
1. Back up any existing data or documents on the hard disk where you plan to install.
2. Gather information about your computer and any needed documentation, before
starting the installation.
3. Create partition-table space for EduBOSS on your hard disk.
4. Set up the first boot drive to DVD drive (through CMOS setup) and restart your
system.
5. Insert the EduBOSS GNU/Linux DVD into the drive.
6. Boot the installation system.
7. Select installation language.
8. Activate the ethernet network connection, if available.
9. Create and mount the partitions on which EduBOSS GNU/Linux will be installed.
10.Watch the automatic install/setup of the base system.
11.Install additional software (tasks and/or packages), at your discretion.
12.Install a boot loader which can start up EduBOSS GNU/Linux on your existing
system.
13.Load the newly installed system for the first time, and make some initial system
settings.

14.If you have problems during the installation, it helps to know which packages are
involved in which steps.
15.Introducing the leading software actors in this installation drama: The installer
software, debian-installer, is the primary concern of this manual. It detects hardware
and loads appropriate drivers and runs debootstrap to install the base system
packages. Many more actors play smaller parts in this process, but debian-installer
has completed its task when you load the new system for the first time. Upon
loading the new base system, base-config supervises adding users and setting up the
package installation system (using apt-setup). It then launches tasksel which can be
used to select large groups of related programs, and in turn can run aptitude which
allows you to choose individual software packages.
1.1.3 Back Up Your Existing Data!
Before you start, make sure to back up every file that is now on your system. If this is the
first time a non-native operating system has been installed on your computer, it's quite
likely you will need to re-partition your disk to make room for EduBOSS GNU/Linux.
Anytime you partition your disk, you should count on losing everything on the disk, no
matter what program you use to do it. The programs used in installation are quite reliable
and most have seen years of use; but they are also quite powerful and a false move can cost
you.
Even after backing up be careful and think about your answers and actions. Two minutes of
thinking can save hours of unnecessary work. If you are creating a multi-boot system, make
sure that you have the distribution media of any other present operating systems on hand.
Especially if you repartition your boot drive, you might find that you have to reinstall your
operating system's boot loader, or in many cases the whole operating system itself and all
files on the affected partitions.
1.2 Begin the Installation
To begin installation of EduBOSS GNU/Linux, boot the computer from the boot media i.e
from DVD or any other storage bootable media like USB .
The BIOS (Basic Input/Output System) on your computer must support the type of boot
media you select. The BIOS controls access to some hardware devices during boot time.
Any computer that meets the minimum recommended specification for EduBOSS
GNU/Linux can boot from a CD or DVD drive with the first disc.
If you are not sure what capabilities your computer has, or how to configure the BIOS,
consult the documentation provided by the manufacturer. Detailed information on
hardware specifications and configuration is beyond the scope of this document.

Aborting the Installation
To abort the installation process at any time before the Installing Packages screen, either
press Ctrl+Alt+Del or power off the computer with the power switch. EduBOSS GNU/Linux
makes no changes to your computer until package installation begins.
Booting from Disc
To boot your computer from disc:
1. Switch on the computer.
2. Insert the disc into the DVD drive.
3. A screen appears to ask for a booting option.,
a) Start EduBOSS Live
b) Install EduBOSS - Graphical Mode
c) Install EduBOSS - Text Mode
d) Advance options
e) Help
f) Install with speech synthesis
Booting through “Start EduBOSS Live” will take you a tour around EduBOSS virtually.
Using this Live Boot you can check out the EduBOSS desktop and its applications and once
you are satisfied with EduBOSS., you can come back and choose “Install EduBOSS -
Graphical Mode” or “Install EduBOSS - Text Mode”.
Figure 1. Boot Screen

1.3 Language Selection
The installation program displays a list of languages which are supported by EduBOSS
GNU/Linux. Select the Language as “English” / “Tamil” / “Hindi” (or any other). Click
“Continue” to proceed.
Figure 2. Language Selection Screen
1.4 Country Selection
Next the country selection screen appears. Select the appropriate country from the list.
Click “Continue” and proceed further.
Figure 3. Country Selection Screen

1.5 Keyboard Configuration
The installation program displays a list of the keyboard layouts supported by EduBOSS
GNU/Linux. Highlight the correct layout on the list, and select “Next”.
Figure 4. Keyboard Configuration Screen
1.6 Hostname
The screen will ask you to enter the host name for the system.
Figure 5 Set hostname

1.7 Create User Account
Next step is to create a user account and setting password for the user. You can use this
user account for logging into EduBOSS GNU/Linux.
The screen shots are as follows:
Figure 6.1 Set up user account
Figure 6.2 Set up user account's username

Figure 6.3 Set up user account's password
1.8 Disk Partitioning Setup
If you are new to Linux, you may want to use the automatic partitioning method. If you are
a more experienced Linux user, use the manual partitioning method for more control over
your system configuration, or select and modify the automatically defined partitions.
The screen below shows the way you would like to partition. These are the following ways
in which you can partition the hard disk
a) Automatic partitioning
b) LVM partitioning
c) Manual partitioning
a) Automatic Partitioning
By selecting automatic partitioning, you will not have to use partitioning tools to assign
mount points, create partitions or allocate space for your installation.
You will be provided with two options in automatic partition -
Format entire Hard Disk
Use Existing Hard disk Space
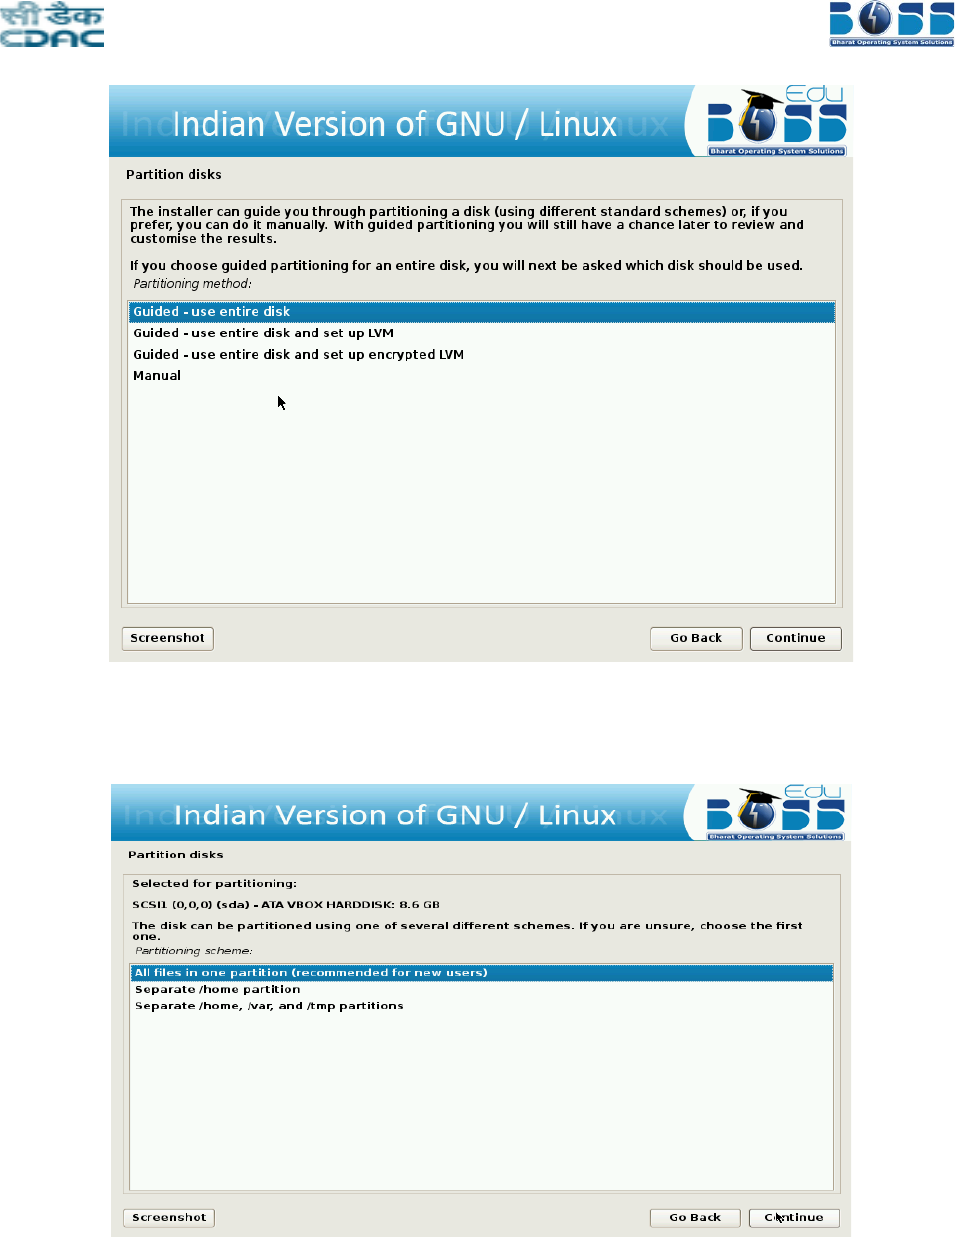
Figure 7.1 Format Entire Hard Disk
Figure 7.2 Allot the space for different directories

b) LVM partitioning
LVM is a tool for logical volume management which includes allocating disks, resizing
logical volumes. The Logical Volume Manager (LVM) enables flexible distribution of hard
disk space over several file systems. As it is difficult to modify partitions on a running
system, LVM was developed. It provides a virtual pool (Volume Group — VG for short) of
memory space from which logical volumes (LV) can be generated if needed. The operating
system accesses these instead of the physical partitions.
The screen shots are as follows:
Figure 7.3 LVM Partitioning
Figure 7.4 Select the disk to partition
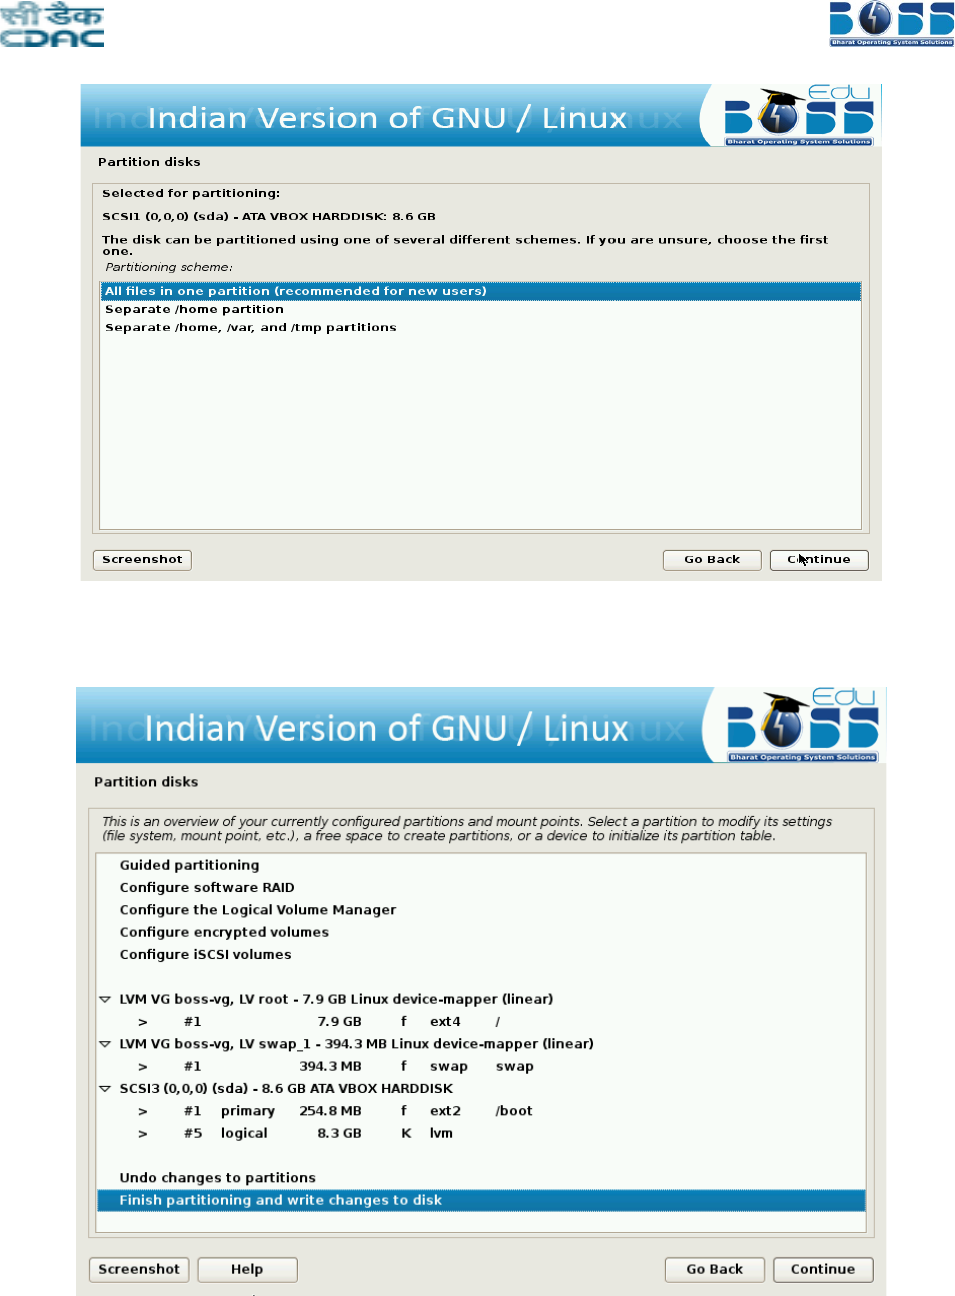
Figure 7.5 LVM Partitioning
Figure 7.6 Finish Partitioning
Use Existing Hard disk Space
This means that you need to have an empty unpartitioned free space which is not used for
any other OS like Windows or Linux. Once you select this option it will ask you for the
partition space details and then format it, later the installation proceeds.
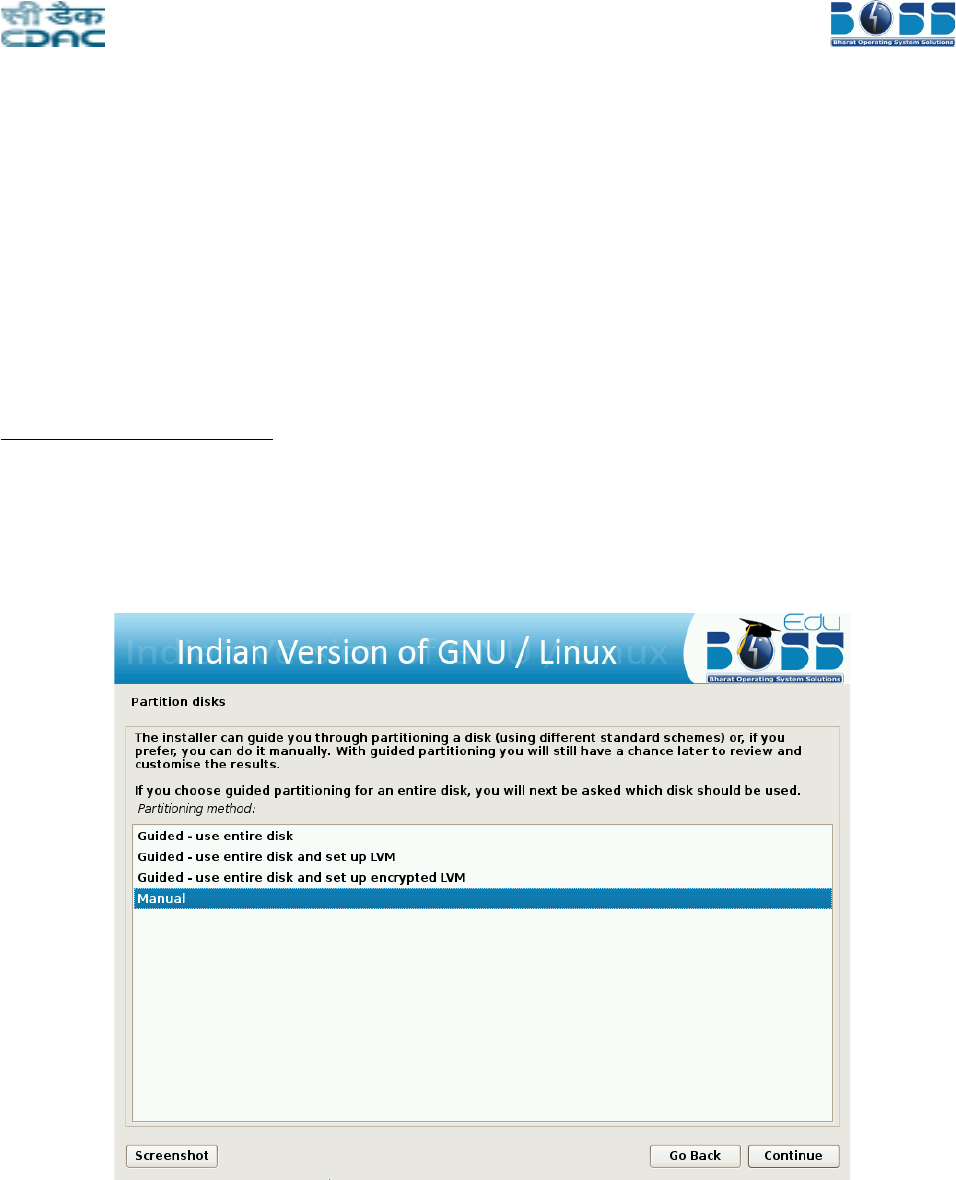
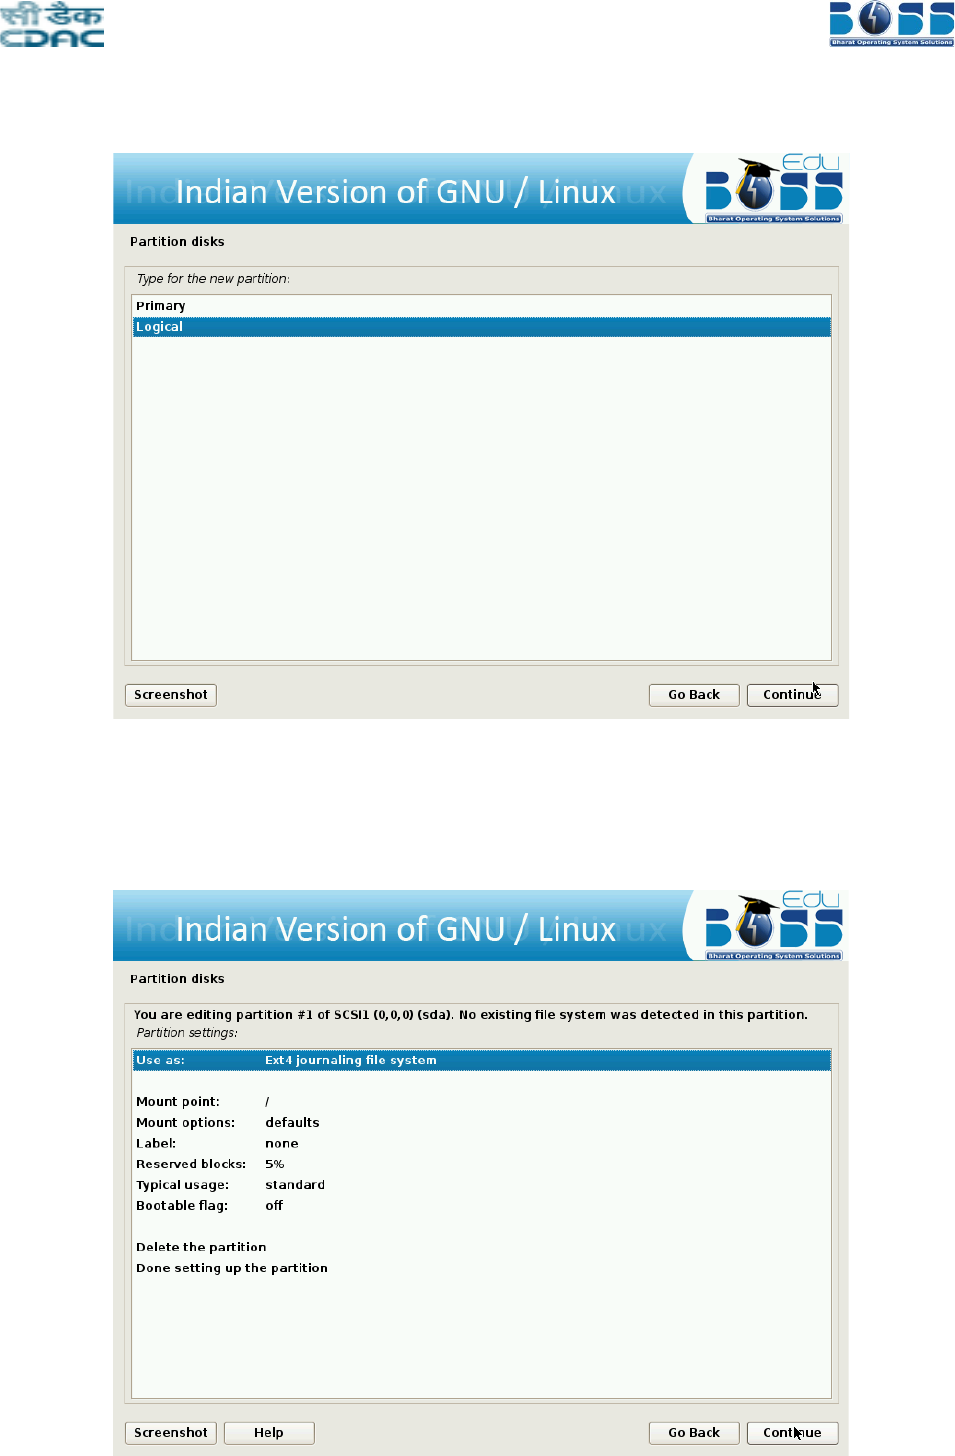
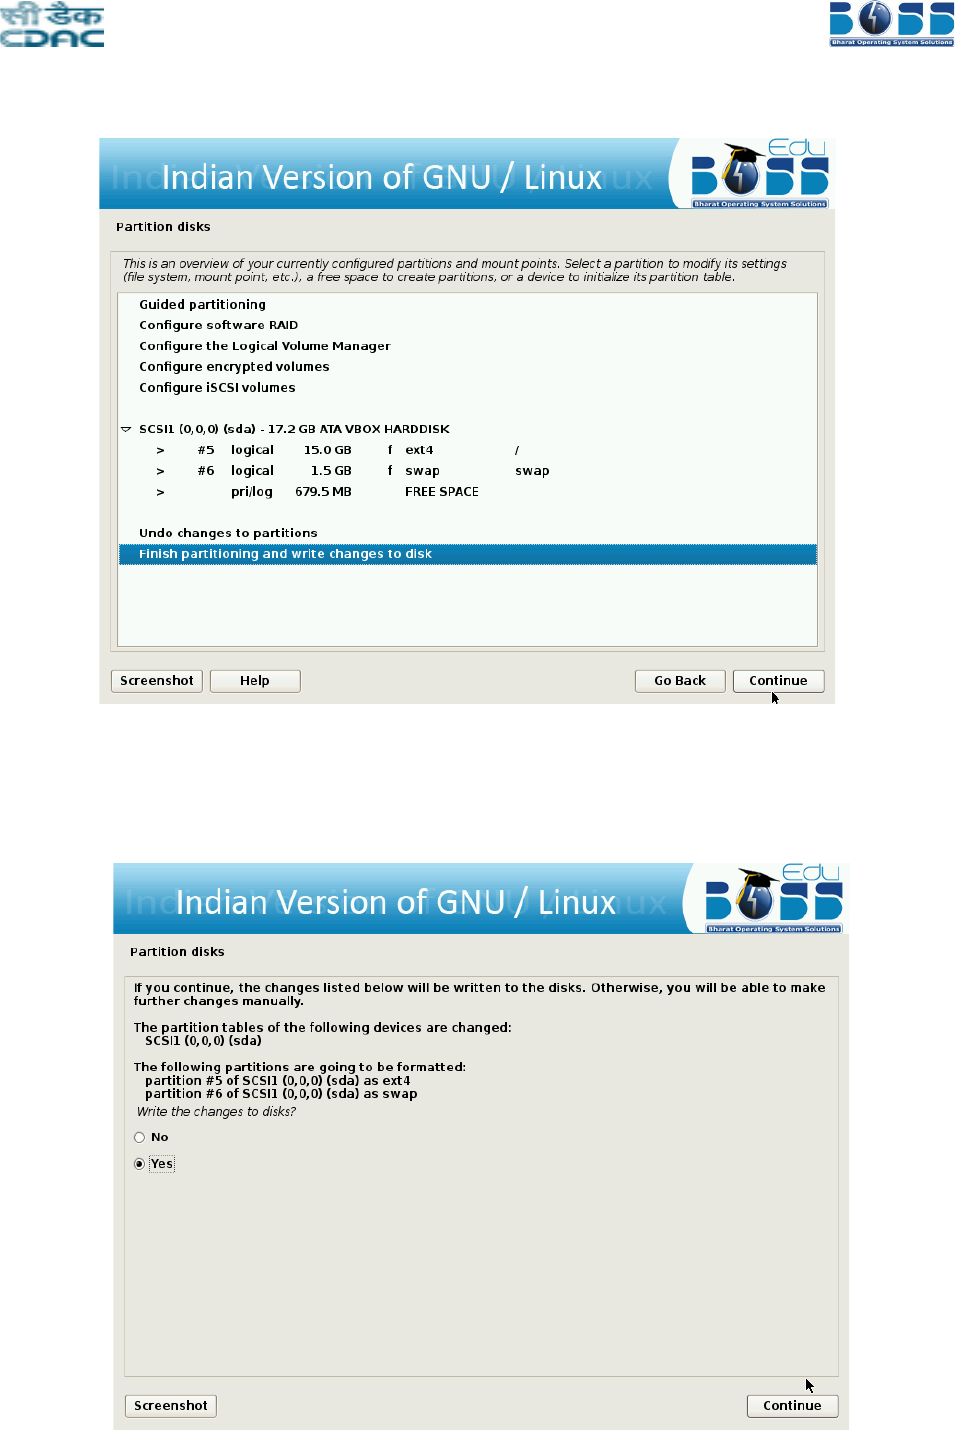
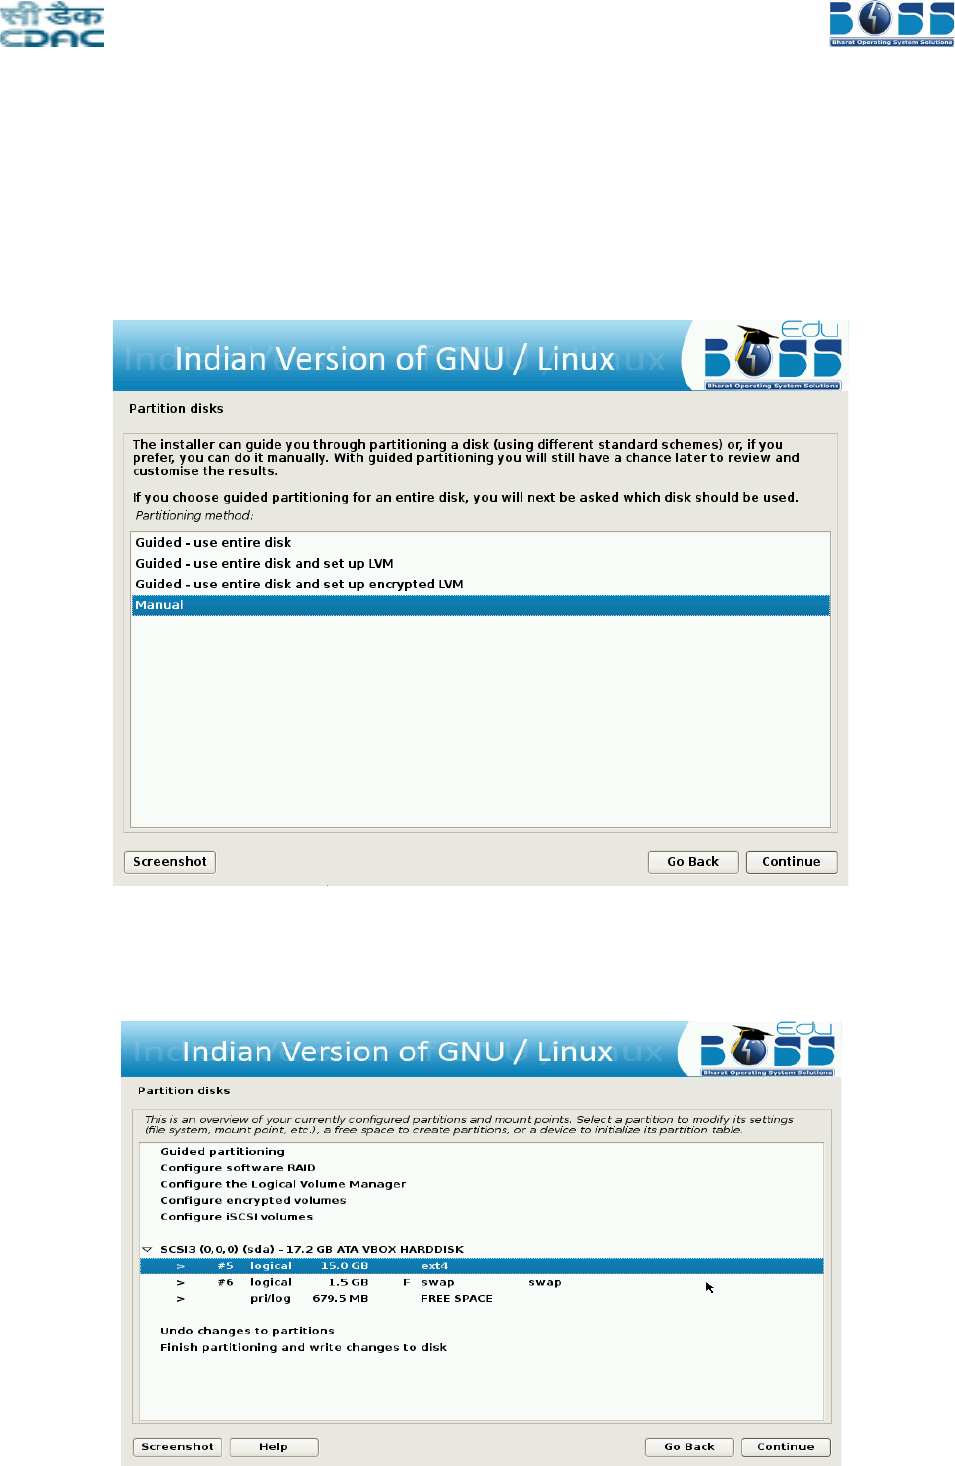
c) Manual Partitioning
Creating a new partition
To partition manually , the following screen shots will help you setting up the partition.
1. A screen with name “Partition disks” will be displayed. In that click “Manual” and then
click “Continue.”
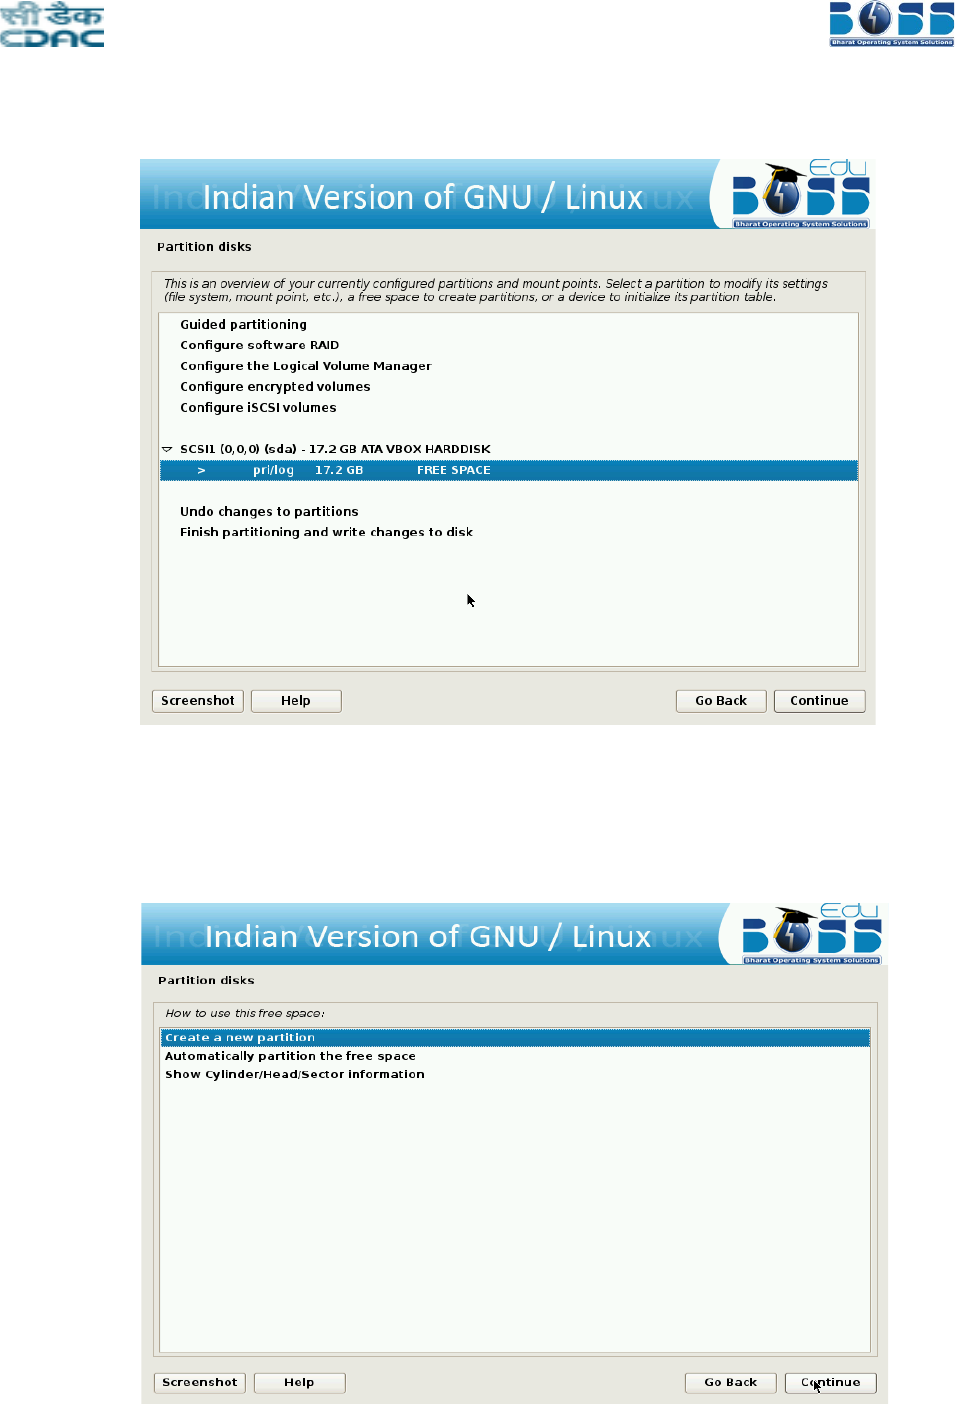
2. After clicking “Manual” a screen will be displayed which contains overview of your
currently configured partitions. Click on free space and then click “Continue”.
3. Create new partition for EduBOSS GNU/Linux by double clicking “Create a new
partition”.

4. A screen appears showing the maximum size that can be assigned for this partition. In
this screen change the size to your required size. The minimum should be 8.0 GB. Then
click “Continue”.
5. Select the type for the new partition.

6. Specify whether the partition should be at the beginning or at the End.
7. Click “Done setting up the partition” and then click “Continue”.

After selecting the partition for the “/”, you need to select a partition for the “swap” space.
If you are already having Linux installed on your system then you will be having a swap
space in your system. If so no need of another swap space. The swap should be double the
RAM size. If there is no swap space then create a new swap space. The screen shots are as
follows:
8. Create swap area from free space.

9. Click “Create a new partition” and then click “Continue”.
10. Specify the partition size for swap area.

11. Select the type for the new partition.
12. Specify whether the partition should be at the beginning or at the End.
13. Change default file system ext4 to swap by double clicking “Ext4 journaling file system”
in the screen shown below.

14. Double click “swap area”.
15. Creation of swap area is completed. Click “Done setting up the partition” and then click
“Continue”.
16. Finish the partitioning process.

17. Write the changes to disk by clicking “Yes”.
Deleting the hard disk partition

To partition manually , the following screen shots will help you setting up the partitioning
separately for “/” and “swap”. A screen with name “Partition disks” will be displayed. In
that click on “Manual” and then click on “Continue.”
1. After clicking “Manual” a screen will be displayed which contains overview of your
currently configured partitions and mount points.
Then click on partition which you want to delete and then click “Continue”.
2. Click on “Delete the partition” and then click “Continue”.

3. Once that partition is deleted you will get some free space.
4. To create a new partition using that free space double-click on “Create a new partition”.
5. In the next screen specify the new partition size. The minimum size should be 8.0GB.

6. Select the type for the new partition.
7. Specify whether the partition should be at the beginning or at the End.
8. Click “Done setting up the partition” and then click “Continue”.
After selecting the partition for the “/”, you need to select a partition for the “swap” space.
If you are already having Linux installed on your system then you will be having a swap
space in your system. If so no need of another swap space. The swap should be double the

RAM size. If there is no swap then create a new swap space. The screen shots are as
follows:
9. Create swap area from free space.
10. Create new swap area by double clicking “Create a new partition”.
11. Specify the partition size for swap area.
12. Select the type for the new partition.
13. Specify whether the partition should be at the beginning or at the End.
14. Change default file system ext4 to swap by double clicking “Ext4 journaling file system”
in the screen shown below.
15. Double click on “swap area”.
16. Creation of swap area is completed. Click on “Done setting up the partition” and then
click “Continue”.
17. Finish the partitioning process.
18. After all the partitions are allocated, you need to write the changes to disk. For this
select “Yes” in in the following screen and then click “Continue”.
Resizing the Hard disk Partition
To resize hard disk partition at the time of installing EduBOSS GNU/Linux, follow these
steps:
1. A screen with name “Partition disks” will be displayed. In that click “Manual” and then
click “Continue.”
2. After clicking “Manual” a screen will be displayed which contains overview of your
currently configured partitions and mount points. Then click on the partition which you
want to resize and then click “Continue”.
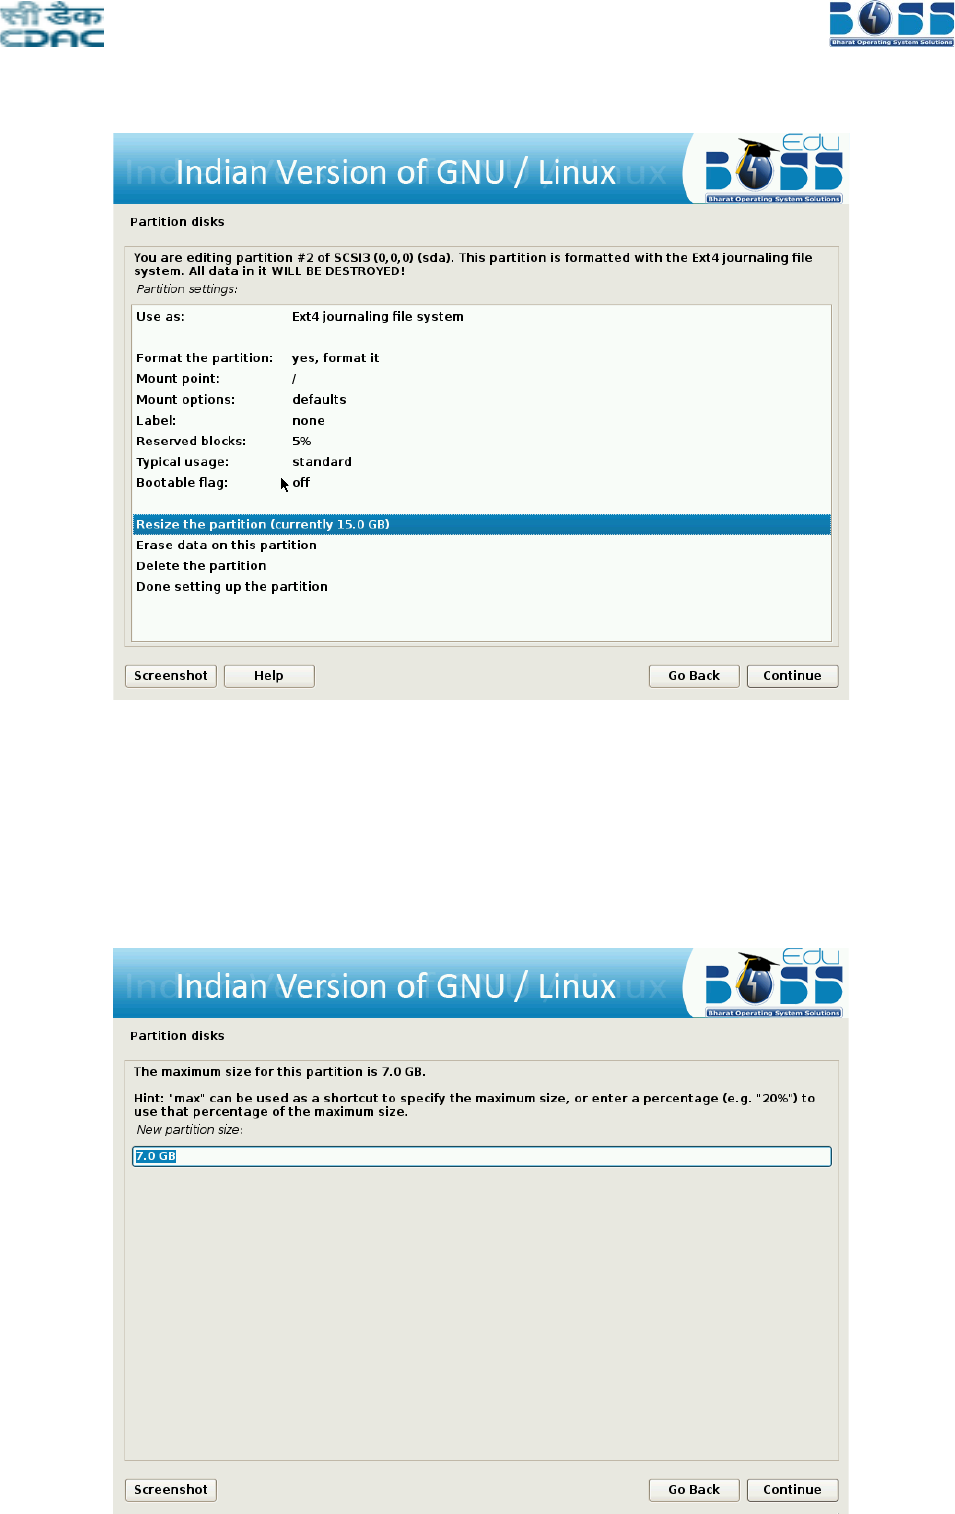
3. Double click on “Resize the partition”.
4. It will ask the confirmation before writing the changes to disk. Click “Yes” and then click
“Continue”.
5. The next screen will show by default maximum size as a new partition size which you
can change as per requirement. You can give new partition size more than whatever
required to that particular file system and click “Continue”.
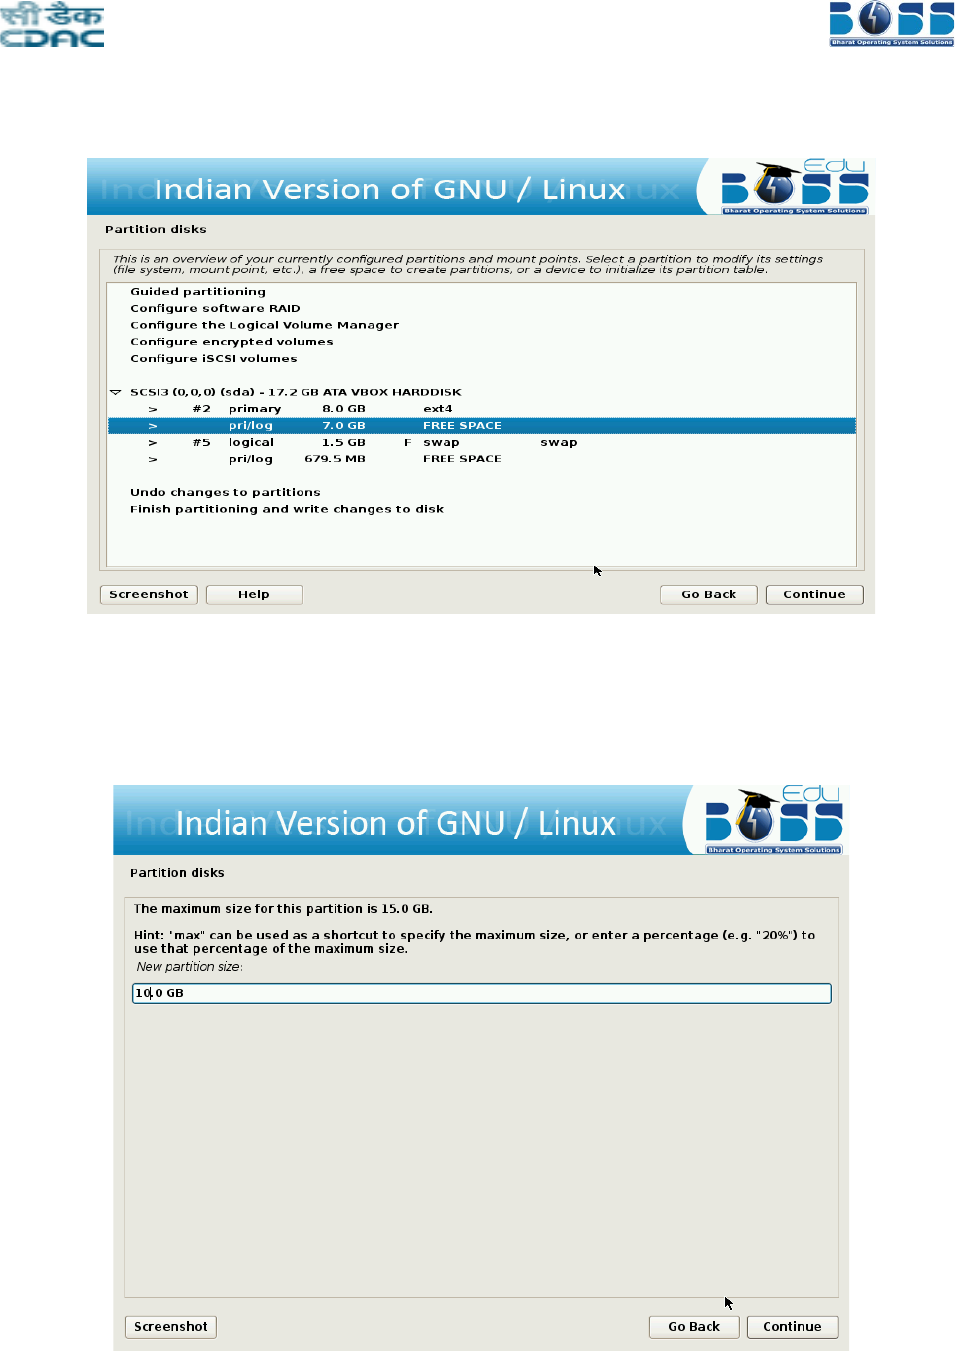
6. Now you have done resizing. You will get some free space to install EduBOSS
GNU/Linux. Click on free space.
7. Create new partition for EduBOSS GNU/Linux by clicking “Create a new partition”.
8. Give partition size for installing EduBOSS GNU/Linux. It should be minimum 8.0 GB.

9. Select the type of partition.
10. Specify whether the partition should be at the beginning or end.

11. Partition setting is covered. Click “Done setting up the partition” and click “Continue”.
12. After selecting the partition for the “/”, you need to select a partition for the “swap”
space. If you are already having Linux installed on your system then you will be having a
swap space in your system. If so no need of another swap space. The swap should be
double the RAM size. If there is no swap then create a new swap space by following the
steps 8 to 15 in “Creating a new partition” section.

13. Finish the partitioning process.
14. After all the partitions are allocated, you need to write the changes to disk. For this
select “Yes” in in the following screen and then click “Continue”.
EduBOSS GNU/Linux is ready to install the packages into your system now.
