Exactive 062 Quadrupole Cleaning Procedure Rev0
2019-02-04
: Pdf Exactive-062 Quadrupole Cleaning Procedure - Rev0 Exactive-062 Quadrupole Cleaning Procedure - Rev0 QEGC TN
Open the PDF directly: View PDF ![]() .
.
Page Count: 14
Factory Communication
Action Required
Logistics: ____________________________________
Institute:_____________________________________
Order Entry: __________________________________
Technical Support: _____________________________
Other: _______________________________________
Confidentiality Notice:
This document contains confidential or legally privileged information that is intended for the exclusive use of
Thermo Fisher Scientific employees. If you are not a Thermo Fisher Scientific employee, then you are hereby notified that any
disclosure, copying, distribution, or reliance upon the contents of this document is strictly prohibited. If you have received this
document in error, then please destroy it immediately.
Factory: BREMEN Date: 23-Jul-12 #: Exactive- 062
Model: Q Exactive Product Line: Hybrid-LSMS
Instrument: Exactive Series Revision Level: 0
Author: Andreas Boegehold
Quadrupole Cleaning Procedure
In some special cases the quadrupole on the Q Exactive can become
contaminated over time.
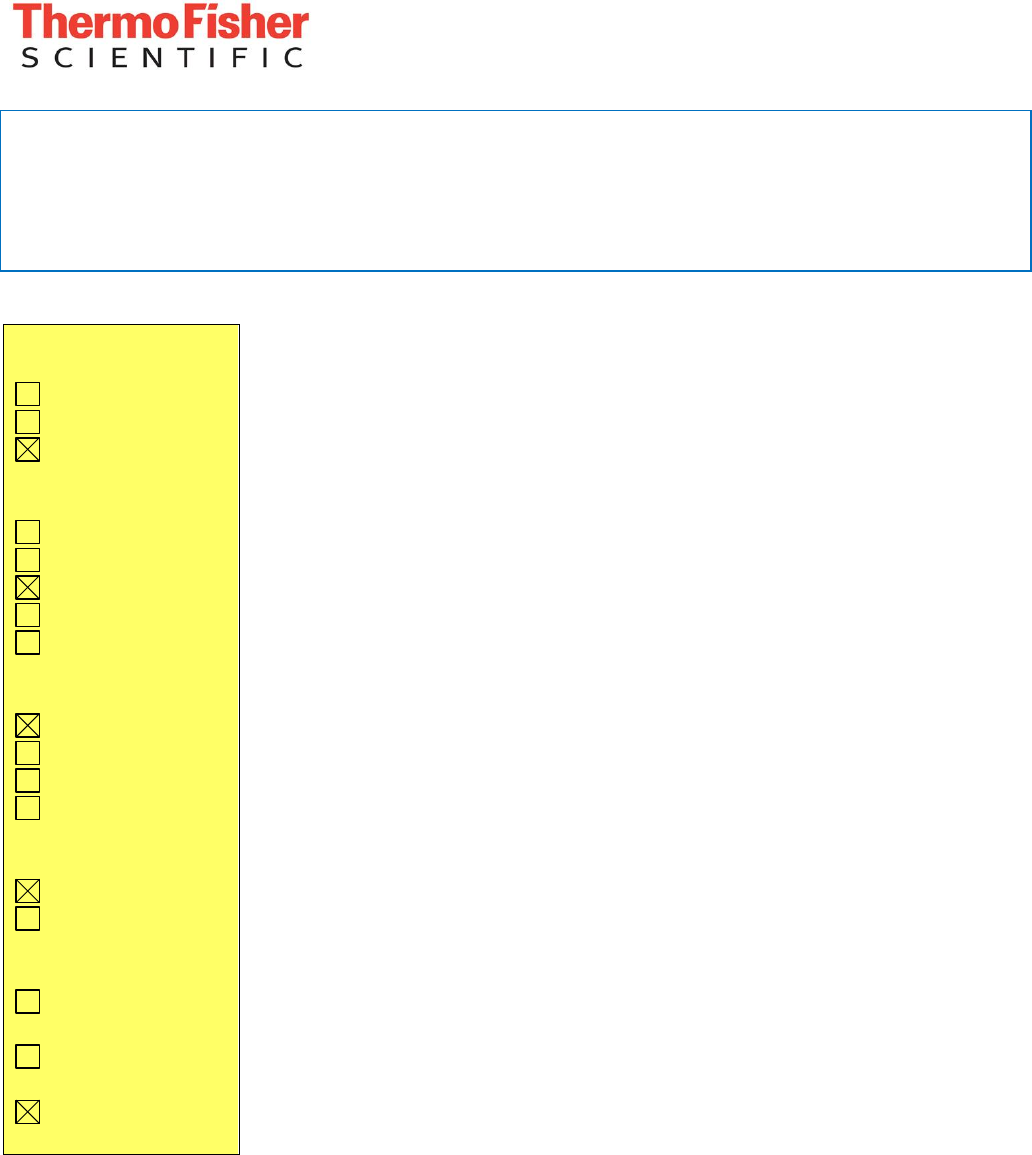
The contamination will appear on the TK lens and the front of the
Quadrupole rods. Typically only two opposing rods should show the
contamination.
Under good lighting conditions the contamination can be found by
visual inspection, but it is hard to spot. Thorough cleaning as described
in the following procedure is recommended for all 4 rods. The cleaning
should only be performed by authorized FSEs.
The picture below shows the contamination and where it will be
located.
Priority
Urgent
Next visit
Not required
Category
Safety
Upgrade
Fix
Info
New Feature
Issue
Hardware
Software
Application
Documentation
Implementation
Field
Depot
Sensitivity
General
Distribution
Preferred
Customer
Internal
Factory Communication
- 2 -
Confidentiality Notice:
This document contains confidential or legally privileged information that is intended for the exclusive use of
Thermo Fisher Scientific employees. If you are not a Thermo Fisher Scientific employee, then you are hereby notified that any disclosure,
copying, distribution, or reliance upon the contents of this document is strictly prohibited. If you have received this document in error, then
please destroy it immediately.
Contamination on one of the quadrupole rods shown on a disassembled quadrupole assembly (disassembled for illustration
purposes only!). It is on the half of the quadrupole facing the TK lens.
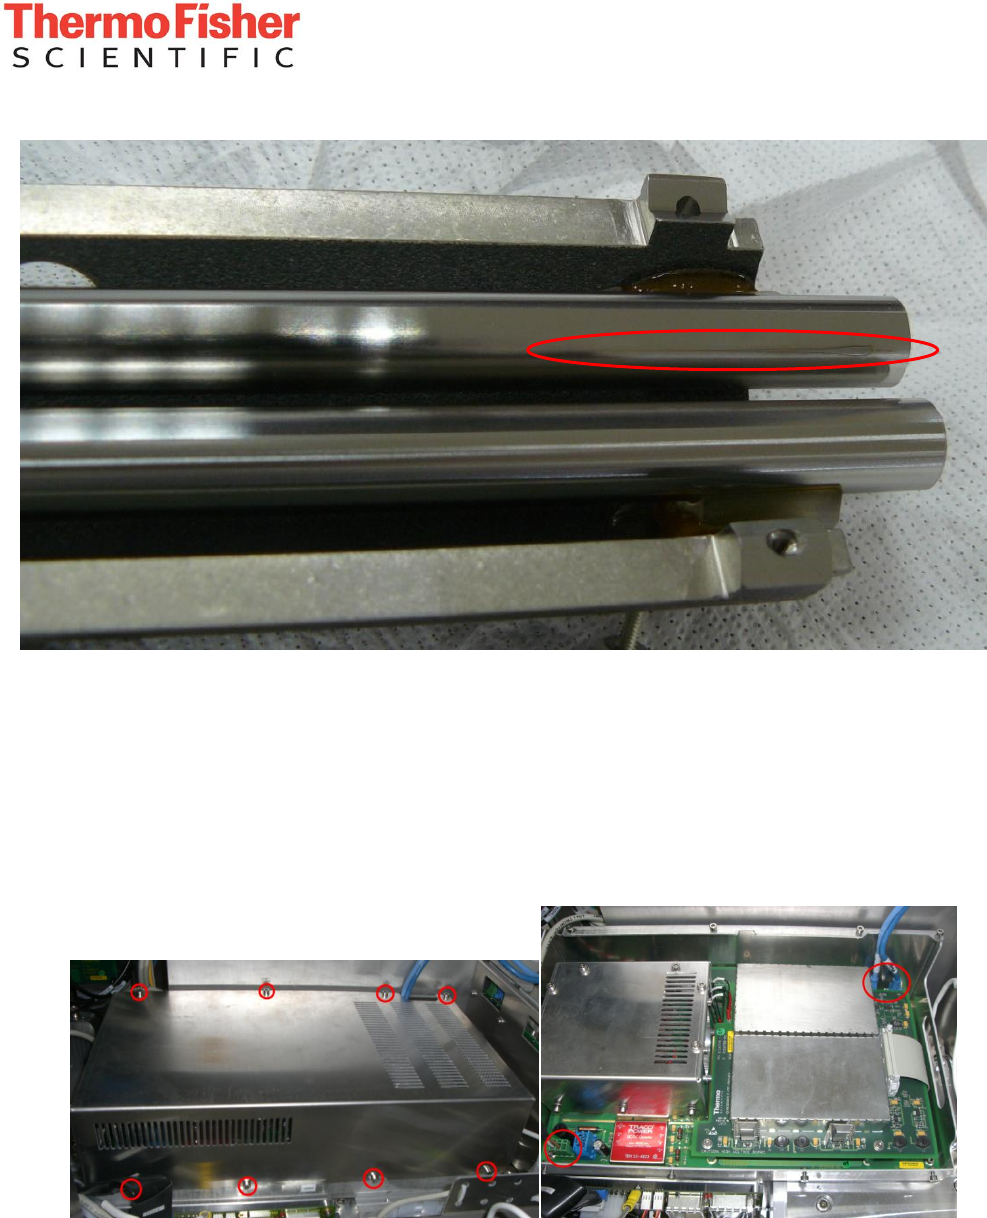
1. Taking out the quadrupole
- Switch off the instrument and remove the covers
- Remove the quad electronics by loosening the 8 screws, pulling off the lid and removing the
power and SPI bus cables. Then loosen the 4 screws that secure the unit in place.
Factory Communication
- 3 -
Confidentiality Notice:
This document contains confidential or legally privileged information that is intended for the exclusive use of
Thermo Fisher Scientific employees. If you are not a Thermo Fisher Scientific employee, then you are hereby notified that any disclosure,
copying, distribution, or reliance upon the contents of this document is strictly prohibited. If you have received this document in error, then
please destroy it immediately.
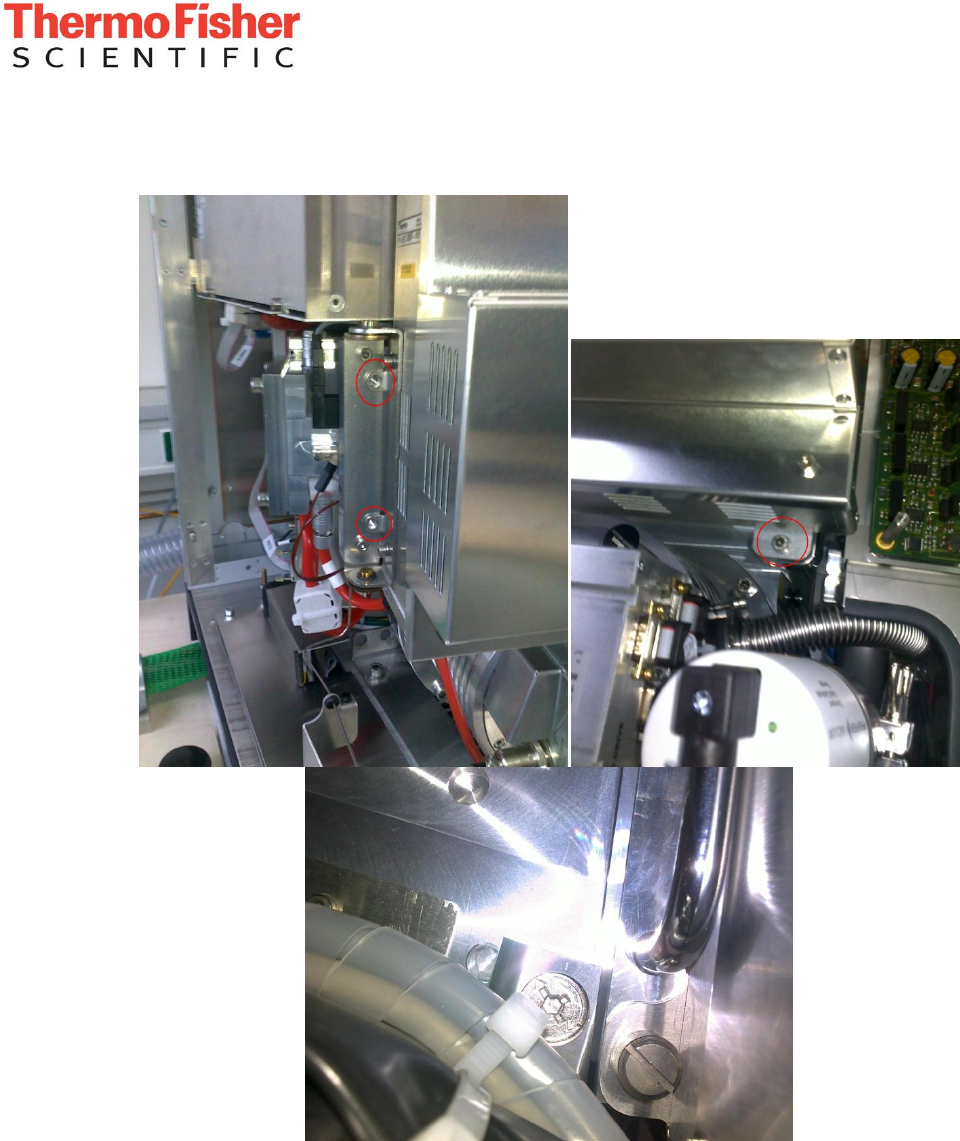
- Loosen the screws on the CLT-RF board and swing it out of the way.
Factory Communication
- 4 -
Confidentiality Notice:
This document contains confidential or legally privileged information that is intended for the exclusive use of
Thermo Fisher Scientific employees. If you are not a Thermo Fisher Scientific employee, then you are hereby notified that any disclosure,
copying, distribution, or reliance upon the contents of this document is strictly prohibited. If you have received this document in error, then
please destroy it immediately.
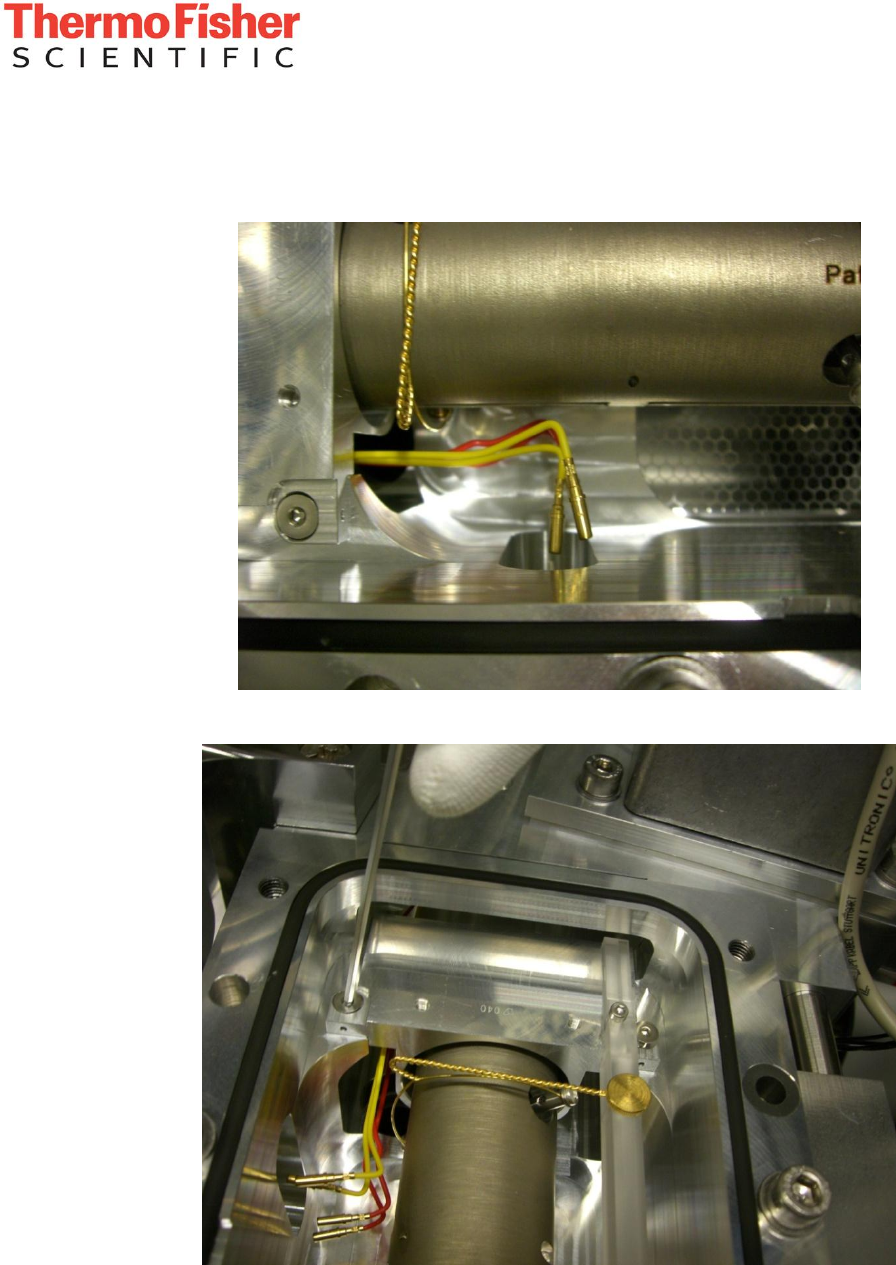
- Loosen the 4 screws on the CLT flange and pull out the flange with the CLT.
- Loosen the 2 screws on the transfer octapole and disconnect the wires. Remove the octapole
from its holder.
Factory Communication
- 5 -
Confidentiality Notice:
This document contains confidential or legally privileged information that is intended for the exclusive use of
Thermo Fisher Scientific employees. If you are not a Thermo Fisher Scientific employee, then you are hereby notified that any disclosure,
copying, distribution, or reliance upon the contents of this document is strictly prohibited. If you have received this document in error, then
please destroy it immediately.
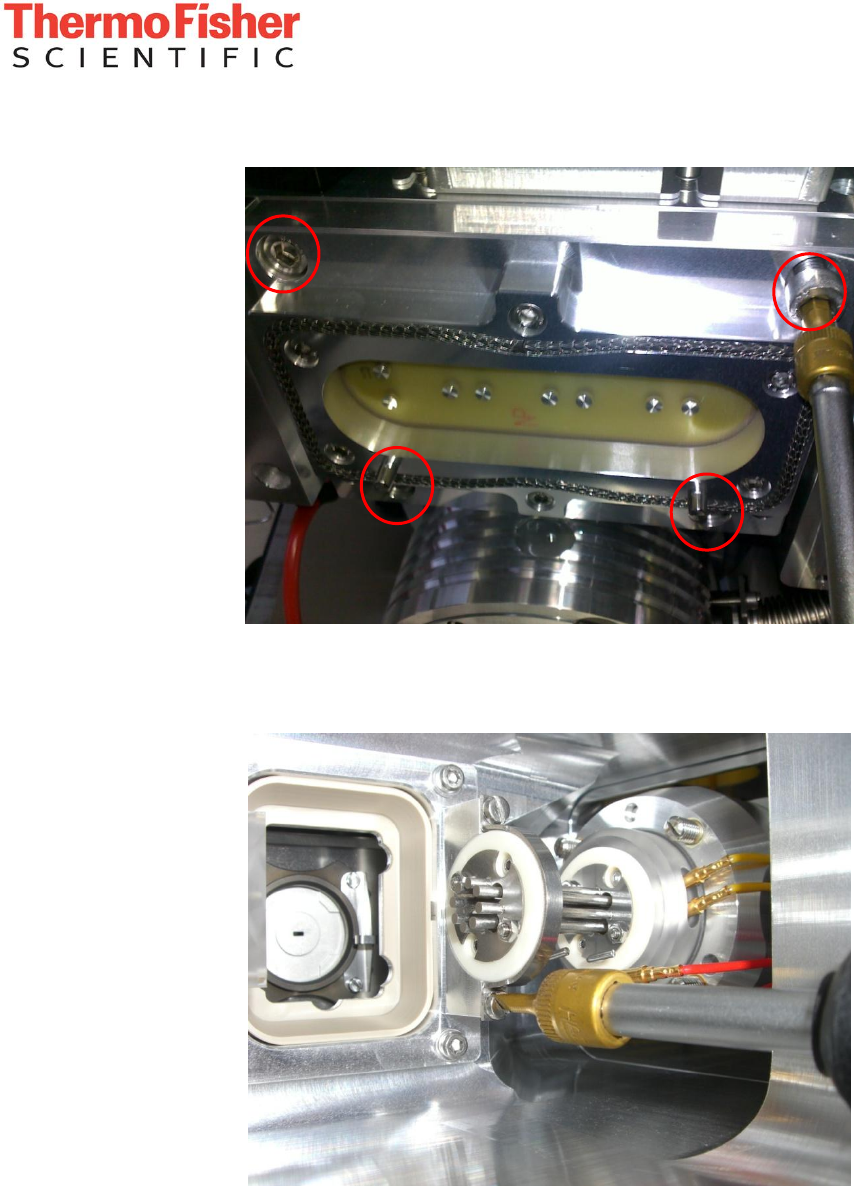
- Loosen the screws on top of the vacuum chamber and remove the lid.
- Disconnect the wires to the IOS RF feedthrough (split lens, quad exit lens and RF2) on the
vacuum chamber (the other side is attached to the assembly)
- Loosen the 2 screws on the quadrupole retainer assembly.
Factory Communication
- 6 -
Confidentiality Notice:
This document contains confidential or legally privileged information that is intended for the exclusive use of
Thermo Fisher Scientific employees. If you are not a Thermo Fisher Scientific employee, then you are hereby notified that any disclosure,
copying, distribution, or reliance upon the contents of this document is strictly prohibited. If you have received this document in error, then
please destroy it immediately.
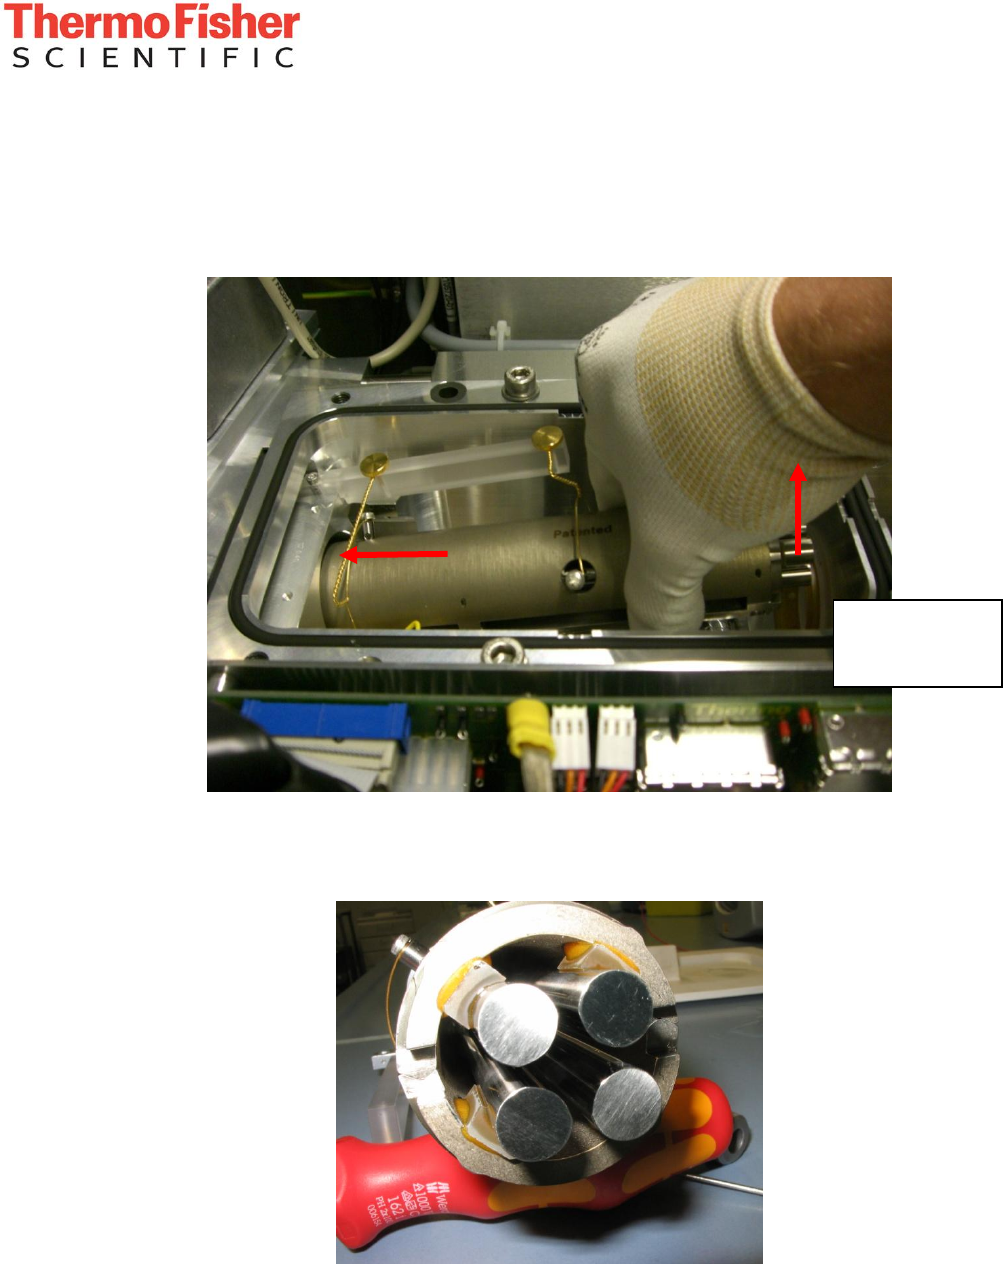
- Firmly grip the quadrupole assembly and slide it to the left (the retainer should move, if it is
stuck, gently lift it upwards until free and proceed.). Gently tilt the quadrupole until the rods
are clear of the vacuum chamber wall and pull the quadrupole out of the chamber.
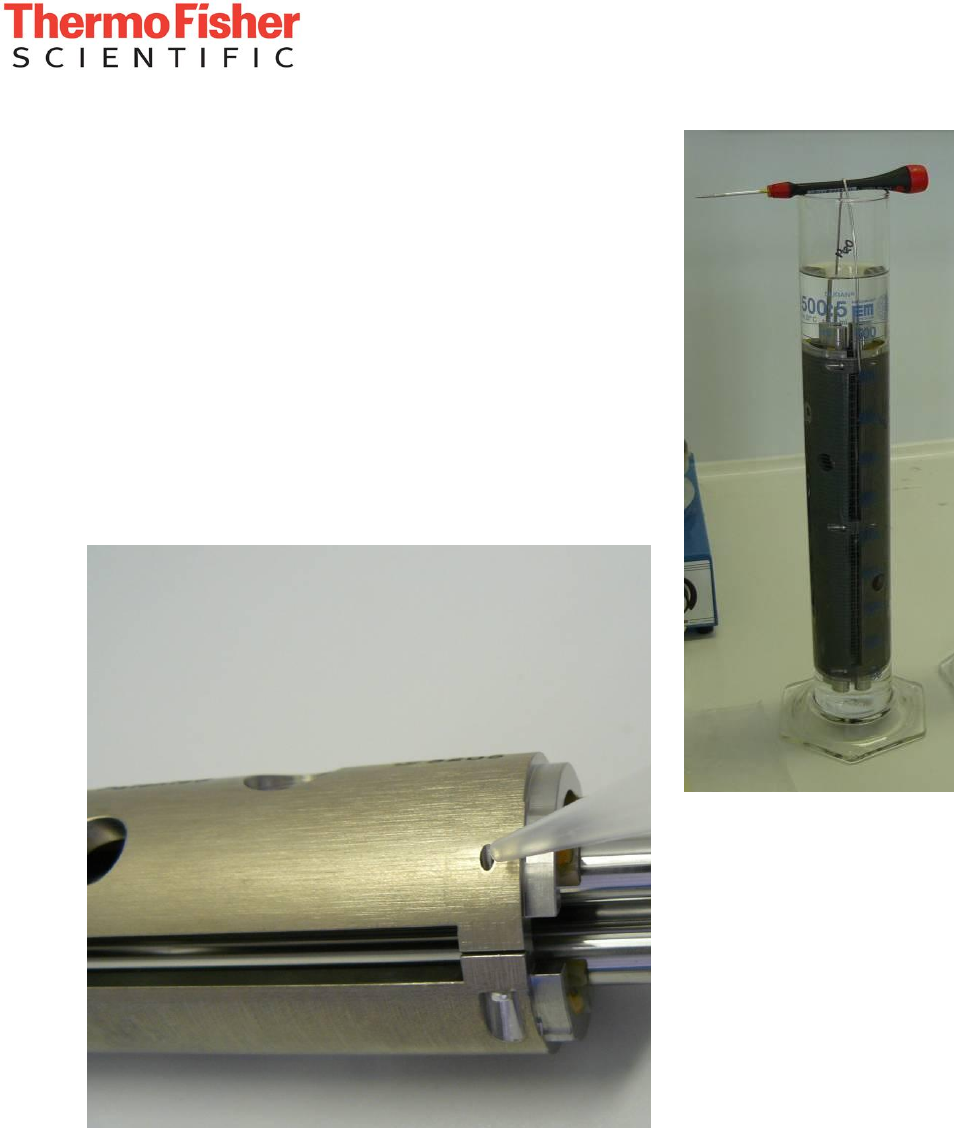
- When putting the quadrupole assembly down, take care to not place it on one of the
connector bolts for the RF, as these are directly connected to the rods. Support the end that is
not inside the retainer with something, e.g. a screwdriver handle (place it under the shell, not
under the rods, as seen in the picture below).
1. Slide
2. Lift
Be careful not to
damage the rods
while lifting.

Factory Communication
- 7 -
Confidentiality Notice:
This document contains confidential or legally privileged information that is intended for the exclusive use of
Thermo Fisher Scientific employees. If you are not a Thermo Fisher Scientific employee, then you are hereby notified that any disclosure,
copying, distribution, or reliance upon the contents of this document is strictly prohibited. If you have received this document in error, then
please destroy it immediately.
2. Removal of the retainer parts and connectors
- Each quad carries two serial numbers. Use one serial number of the two quad shells „V0000“
as reference for the orientation: Write down one serial number and its position (entrance/exit
and upper/lower). To not mix up the plastic rings, put the one that is already loose into the
TK lens assembly.
- Remove the Retainer from the Quad by loosening the two screws at the side, and the 4 screws
holding the wires. Put the other plastic ring into the retainer, if it came out.
Serial
Number

Factory Communication
- 8 -
Confidentiality Notice:
This document contains confidential or legally privileged information that is intended for the exclusive use of
Thermo Fisher Scientific employees. If you are not a Thermo Fisher Scientific employee, then you are hereby notified that any disclosure,
copying, distribution, or reliance upon the contents of this document is strictly prohibited. If you have received this document in error, then
please destroy it immediately.
- Remove the rods for the supply wires carefully (turn anti-clockwise):
Factory Communication
- 9 -
Confidentiality Notice:
This document contains confidential or legally privileged information that is intended for the exclusive use of
Thermo Fisher Scientific employees. If you are not a Thermo Fisher Scientific employee, then you are hereby notified that any disclosure,
copying, distribution, or reliance upon the contents of this document is strictly prohibited. If you have received this document in error, then
please destroy it immediately.
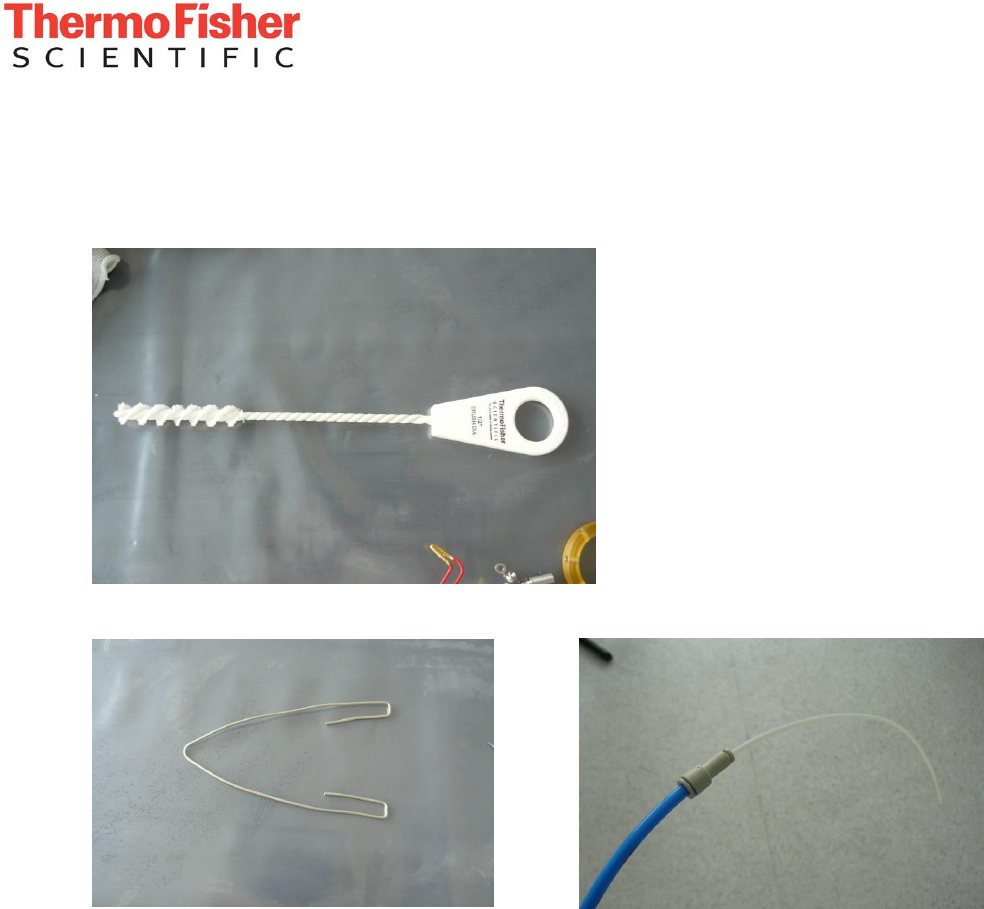
3. Cleaning the quadrupole rods
Required accessories:
Nylon-covered brush (e.g. from TSQ cleaning kit, PN 70111-62112)
Self made holder (e.g. from 2mm wire): Nitrogen blow-out tool (see below):
The nitrogen blow-out tool is a 6mm to 3.2mm (1/8 inch) OD adapter fitting (e.g.
SMC KJH23-06) and a short piece of 3.2mm tubing. These can be attached to the 6 mm tubing
that supplies the instrument to create a higher pressure.
Factory Communication
- 10 -
Confidentiality Notice:
This document contains confidential or legally privileged information that is intended for the exclusive use of
Thermo Fisher Scientific employees. If you are not a Thermo Fisher Scientific employee, then you are hereby notified that any disclosure,
copying, distribution, or reliance upon the contents of this document is strictly prohibited. If you have received this document in error, then
please destroy it immediately.
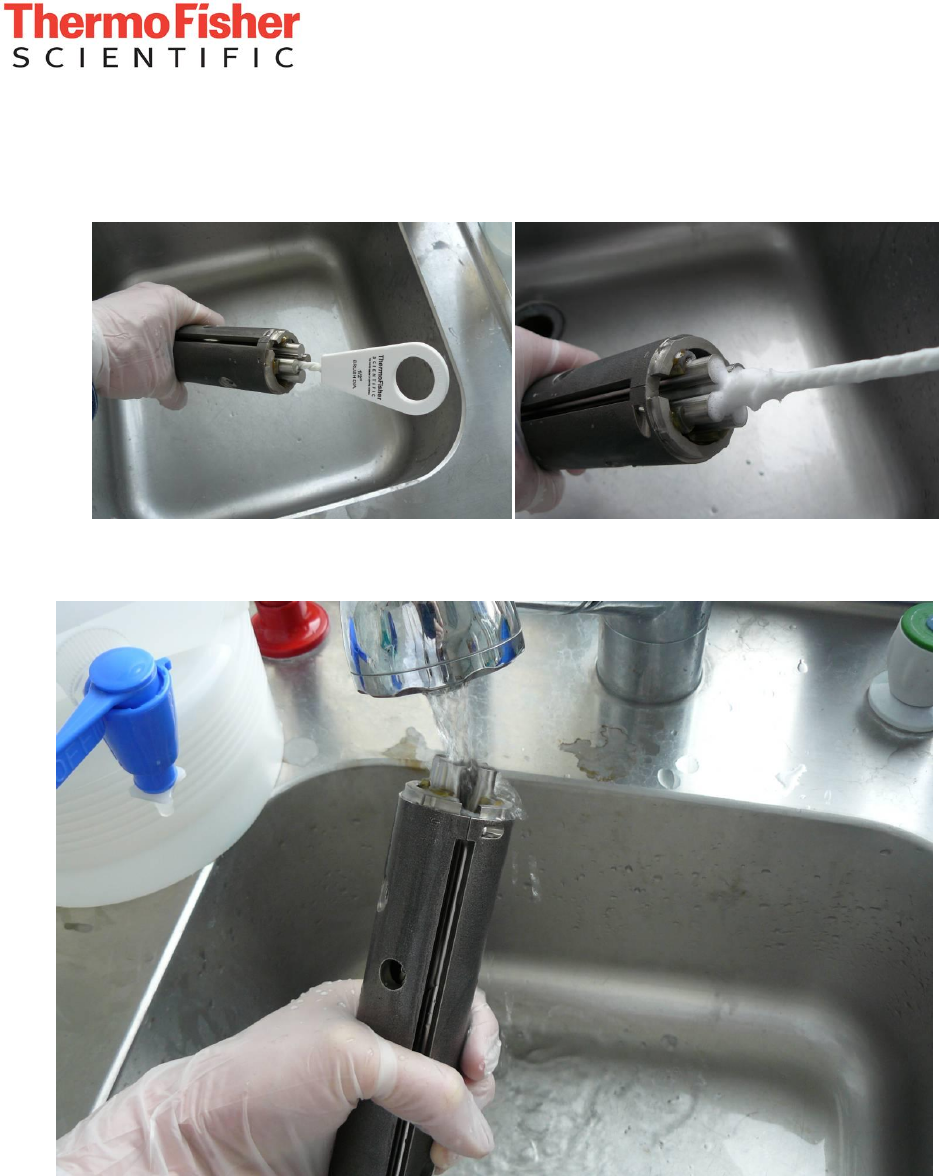
Procedure
- Prepare a solution of 1% Liquinox (or comparable detergent) in water.
- Scrub the quad from both sides for 2 minutes each.
- Use toothbrush to clean the ends of the quad rods.
- Thoroughly flush with tap water (ideally demineralized, otherwise rinse with some deionized
water afterwards.
Factory Communication
- 11 -
Confidentiality Notice:
This document contains confidential or legally privileged information that is intended for the exclusive use of
Thermo Fisher Scientific employees. If you are not a Thermo Fisher Scientific employee, then you are hereby notified that any disclosure,
copying, distribution, or reliance upon the contents of this document is strictly prohibited. If you have received this document in error, then
please destroy it immediately.
- Wash off the water with pure (LC grade or better) methanol
(LC grade Ethanol or Isopropanol are also acceptable). Use
the holder to fully submerge in Methanol. A 500 mL
graduated cylinder with 350 mL of methanol works fine.
- Blow off the methanol with nitrogen using the reducing
adapter. Do this immediately after removing from methanol
to prevent any drying marks.
Pay special attention to vent holes, as residual solvents will
considerably extend the pumping time afterwards.
Factory Communication
- 12 -
Confidentiality Notice:
This document contains confidential or legally privileged information that is intended for the exclusive use of
Thermo Fisher Scientific employees. If you are not a Thermo Fisher Scientific employee, then you are hereby notified that any disclosure,
copying, distribution, or reliance upon the contents of this document is strictly prohibited. If you have received this document in error, then
please destroy it immediately.
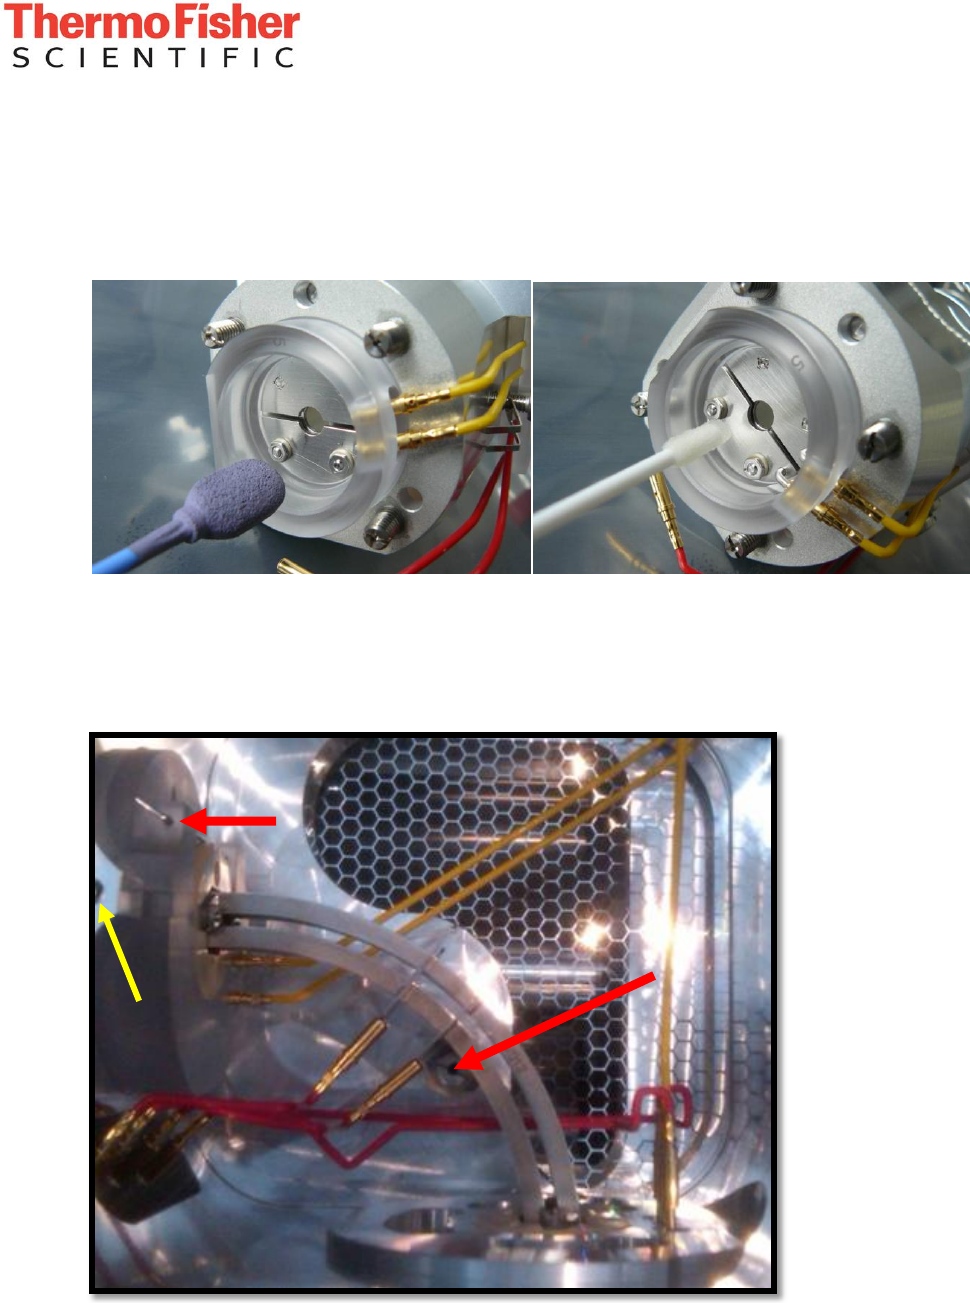
4. Cleaning the split lens
- Use a Micromesh 6000 swab to rub off the spot on the split lens.
- Use a lint-free swab with 50:50 methanol:water to wipe off the lens.
- Dry with nitrogen.
- Check carefully for residual lint.
5. Cleaning the TK lens
- Disconnect the wires going to the bent flatapole.
- Remove the screw and Pin holding the bent flatapole:
Factory Communication
- 13 -
Confidentiality Notice:
This document contains confidential or legally privileged information that is intended for the exclusive use of
Thermo Fisher Scientific employees. If you are not a Thermo Fisher Scientific employee, then you are hereby notified that any disclosure,
copying, distribution, or reliance upon the contents of this document is strictly prohibited. If you have received this document in error, then
please destroy it immediately.
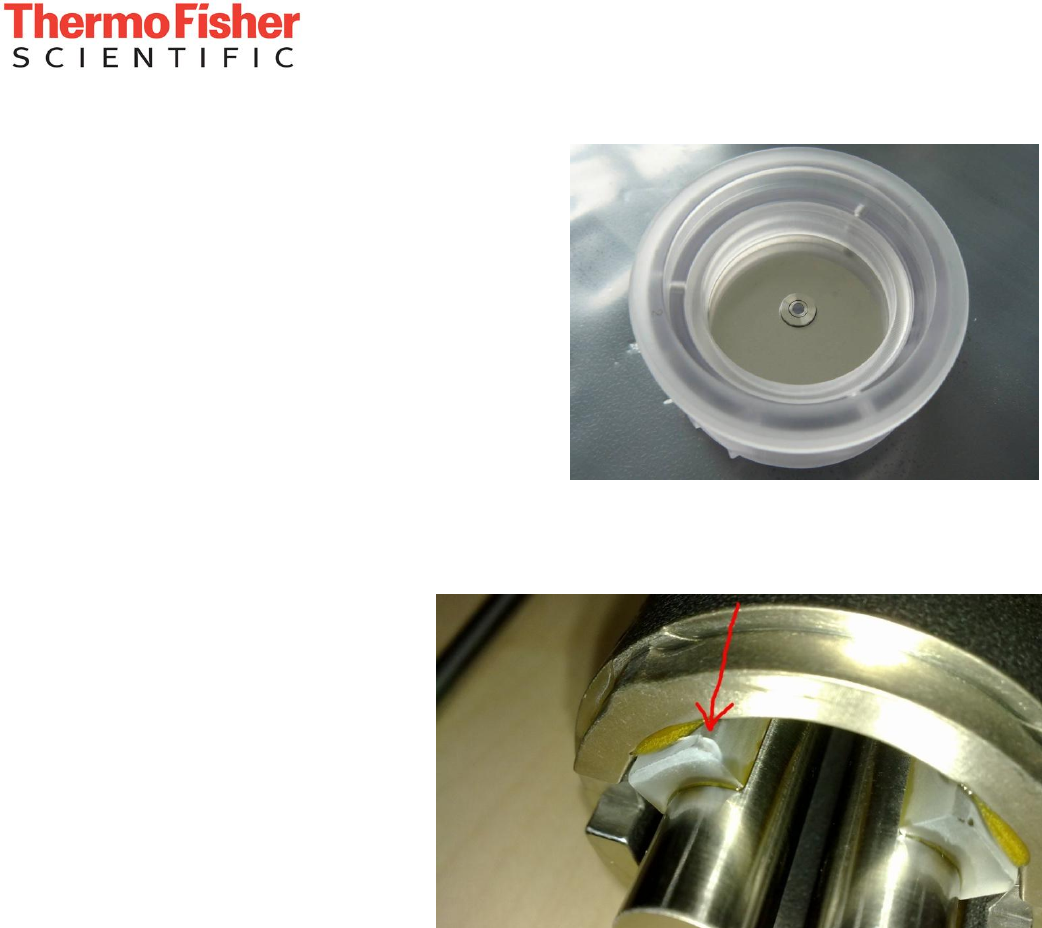
- Take out the bent flatapole.
- Take note of the wiring for the inner and outer
TK lens and unplug the two yellow wires.
- Loosen the holding screw on the TK lens
assembly (yellow arrow) and pull the assembly
out to the left. If it cannot be moved without
force, wait some more time to let the
instrument cool down further.
- Remove any contaminations like done before
on the split lens.
- Blow dry with nitrogen
- Carefully check for remaining lint on the
lenses.
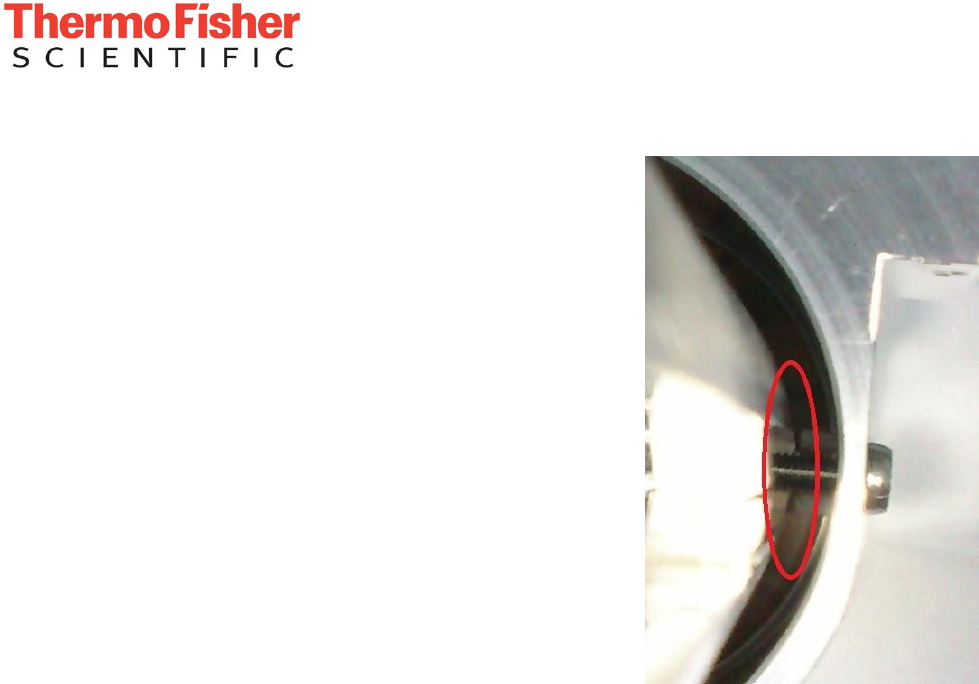
6. Inspection
- Inspect the quadrupole for
leftover dirt or any damage taken
during the procedure. Repeat
after reassembly.
- Especially check for cracks on
the spacers holding the rods.
Cracks like those shown in the
picture on the right mean that the
quadrupole assembly is broken
and needs to be replaced
7. Reassembly
- Reinstall the TK lens assembly and tighten the holder screw.
- Connect the two yellow wires for the inner and outer TK lens.
- Install the bent flatapole (hint: take out the screw and washer and put them on the holder pin.
Now hold the pin and screw, insert it into the thread and let the screw drop into place and turn
it until it catches onto the thread before removing the pin). Now fix the bent flatapole in place
with the pin and tighten the screw (do not use too much force as this will push the bent
flatapole out of alignment).
- Go through the steps under 2 in reverse order to reassemble the quad.
- Do not overtighten the bolts on the quad rods. This might bend the quadrupole rods or
crack the isolators which hold them in the shell.
Factory Communication
- 14 -
Confidentiality Notice:
This document contains confidential or legally privileged information that is intended for the exclusive use of
Thermo Fisher Scientific employees. If you are not a Thermo Fisher Scientific employee, then you are hereby notified that any disclosure,
copying, distribution, or reliance upon the contents of this document is strictly prohibited. If you have received this document in error, then
please destroy it immediately.
- Take care to insert the quad in the same orientation
it had before. Refer to the notes on serial numbers
from the beginning of the procedure.
- Check that the split lens assembly is aligned correctly
(guidance pin) in the quadrupole retainer piece.
- To mount the retainer piece, the screws go into the slit
between the two shells as shown in the picture on the
right. Hold the retainer in your hands with the Quad
installed then insert the screws and metal springs. If
you put it down on a table, it will not be possible to get
the screws installed properly.
- Go through the steps in 1 in reverse order to
reassemble the remaining parts.
8. Calibration
- After performing the vacuum bakeout, the system will need to be fully calibrated in “Advanced
Mode” to properly adjust the ion transfer settings to the clean quadrupole. Any Manual
Settings in the quad tweak parameters need to be removed.
