Exporting
2012-09-27
: Pdf Exporting Exporting 4.0.1 summation
Open the PDF directly: View PDF ![]() .
.
Page Count: 28

| 1
:\TTH[PVU,_WVY[PUN

| 2

AccessData Legal and Contact Information | 3
AccessData Legal and Contact Information
Document date: May 7, 2012
Legal Information
©2012 AccessData Group, LLC All rights reserved. No part of this publication may be reproduced, photocopied,
stored on a retrieval system, or transmitted without the express written consent of the publisher.
AccessData Group, LLC makes no representations or warranties with respect to the contents or use of this
documentation, and specifically disclaims any express or implied warranties of merchantability or fitness for any
particular purpose. Further, AccessData Group, LLC reserves the right to revise this publication and to make
changes to its content, at any time, without obligation to notify any person or entity of such revisions or changes.
Further, AccessData Group, LLC makes no representations or warranties with respect to any software, and
specifically disclaims any express or implied warranties of merchantability or fitness for any particular purpose.
Further, AccessData Group, LLC reserves the right to make changes to any and all parts of AccessData
software, at any time, without any obligation to notify any person or entity of such changes.
You may not export or re-export this product in violation of any applicable laws or regulations including, without
limitation, U.S. export regulations or the laws of the country in which you reside.
AccessData Group, LLC.
384 South 400 West
Suite 200
Lindon, Utah 84042
U.S.A.
www.accessdata.com
AccessData Trademarks and Copyright Information
-AccessData® is a registered trademark of AccessData Group, LLC.
-AD Summation is a registered trademark of AccessData Group, LLC
A trademark symbol (®, ™, etc.) denotes an AccessData Group, LLC. trademark. With few exceptions, and
unless otherwise notated, all third-party product names are spelled and capitalized the same way the owner
spells and capitalizes its product name. Third-party trademarks and copyrights are the property of the trademark
and copyright holders. AccessData claims no responsibility for the function or performance of third-party
products.
Documentation Conventions
In AccessData documentation, a number of text variations are used to indicate meanings or actions. For
example, a greater-than symbol (>) is used to separate actions within a step. Where an entry must be typed in

AccessData Legal and Contact Information | 4
using the keyboard, the variable data is set apart using [variable_data] format. Steps that require the user to
click on a button or icon are indicated by Bolded text. This Italic font indicates a label or non-interactive item in
the user interface.
A trademark symbol (®, ™, etc.) denotes an AccessData Group, LLC. trademark. Unless otherwise notated, all
third-party product names are spelled and capitalized the same way the owner spells and capitalizes its product
name. Third-party trademarks and copyrights are the property of the trademark and copyright holders.
AccessData claims no responsibility for the function or performance of third-party products.
Registration
The AccessData product registration is done at AccessData after a purchase is made, and before the product is
shipped. The licenses are bound to either a USB security device, or a Virtual CmStick, according to your
purchase.
Subscriptions
AccessData provides a one-year licensing subscription with all new product purchases. The subscription allows
you to access technical support, and to download and install the latest releases for your licensed products during
the active license period.
Following the initial licensing period, a subscription renewal is required annually for continued support and for
updating your products. You can renew your subscriptions through your AccessData Sales Representative.
Use License Manager to view your current registration information, to check for product updates and to
download the latest product versions, where they are available for download. You can also visit our web site,
www.accessdata.com anytime to find the latest releases of our products.
For more information, see Managing Licenses in your product manual or on the AccessData website.
AccessData Contact Information
Your AccessData Sales Representative is your main contact with AccessData Group, LLC. Also, listed below are
the general AccessData telephone number and mailing address, and telephone numbers for contacting
individual departments.
Mailing Address and General Phone Numbers
You can contact AccessData in the following ways:
AD Mailing Address, Hours, and Department Phone Numbers
Corporate Headquarters: AccessData Group, LLC.
384 South 400 West
Suite 200
Lindon, UT 84042 USA
Voice: 801.377.5410
Fax: 801.377.5426
General Corporate Hours: Monday through Friday, 8:00 AM – 5:00 PM (MST)
AccessData is closed on US Federal Holidays

AccessData Legal and Contact Information | 5
Technical Support
Free technical support is available on all currently licensed AccessData products.
You can contact AccessData Customer and Technical Support in the following ways:
State and Local
Law Enforcement Sales:
Voice: 800.574.5199, option 1
Fax: 801.765.4370
Email: Sales@AccessData.com
Federal Sales: Voice: 800.574.5199, option 2
Fax: 801.765.4370
Email: Sales@AccessData.com
Corporate Sales: Voice: 801.377.5410, option 3
Fax: 801.765.4370
Email: Sales@AccessData.com
Training: Voice: 801.377.5410, option 6
Fax: 801.765.4370
Email: Training@AccessData.com
Accounting: Voice: 801.377.5410, option 4
AD Customer & Technical Support Contact Information
Domestic Support Americas/Asia-Pacific
AD SUMMATION Americas/Asia-Pacific:
800.786.2778 (North America).
415.659.0105.
Email: support@summation.com
Web Site: http://www.AccessData.com/Support
The Support website allows access to Discussion
Forums, Downloads, Previous Releases, our
Knowledgebase, a way to submit and track your
“trouble tickets”, and in-depth contact information.
Standard Support: Monday through Friday, 6:00 AM– 6:00 PM (PST),
except corporate holidays.
After Hours Support: Monday through Friday by calling 415.659.0105.
After Hours Email-only Support: Between 12am and 4am (PST) Product Support is
available only by email at
afterhours@accessdata.com.
AD Mailing Address, Hours, and Department Phone Numbers (Continued)

AccessData Legal and Contact Information | 6

Table of Contents | 7
Table of Contents
AccessData Legal and Contact Information . . . . . . . . . . . . . . . . . . . . 3
Table of Contents . . . . . . . . . . . . . . . . . . . . . . . . . . . . . . . . . . . . . . . . . 7
1 Introduction . . . . . . . . . . . . . . . . . . . . . . . . . . . . . . . . . . . . . . . . . . . . . 8
1.1 About Production Sets and Exports . . . . . . . . . . . . . . 8
1.2 Export Tab . . . . . . . . . . . . . . . . . . . . . . . . . . . . . . . . . . . . . .10
2 Creating Production Sets . . . . . . . . . . . . . . . . . . . . . . . . . . . . . . . . . 11
2.1 Production Set General Options . . . . . . . . . . . . . . . . 11
2.2 Production Set Files to Include Options . . . . . . . . . . . . . . . . .13
2.2.1 U.S. Volume Document Options. . . . . . . . . . . . . . . . . . .15
2.3 Production Set Image Branding Options . . . . . . . . . . . . . . . . .22
2.4 Additional Production Set Options . . . . . . . . . . . . . . . . . . . . .25
2.4.1 Saving Production Set Options as a Template . . . . . . . . .25
2.4.2 Deleting a Production Set . . . . . . . . . . . . . . . . . . . . . . .25
2.4.3 Sharing a Production Set . . . . . . . . . . . . . . . . . . . . . . .25
3 Exporting Production Sets . . . . . . . . . . . . . . . . . . . . . . . . . . . . . . . . 26
3.1 Exporting Production a Set . . . . . . . . . . . . . . . . . . 26

Introduction | 8
1 Introduction
This document is about creating and exporting production sets for a case. Exporting, in most cases, is performed
by the case manager. You need the correct permissions to create and export production sets.
1.1 About Production Sets and Exports
When you sort through data, organization remains key to preparing a streamlined set of data to include in a
report that is delivered to the attorney for the criminal case, civil case, or corporate authorities for a corporate
security case. To prepare data for the final report, you can create production sets of filtered data that you can
export to various formats.
After applying labels to the evidence set, you can create a production set. A production set is the final output.
When you create production sets, you can only use one label per set.
Note: Production set records cannot be labeled. Creating a production set results in new items being created,
these resulting items, cannot be labeled.
See Export Tab on page 10.
See Exporting Production Sets on page 26.
The following table describes the export formats that you can use for your production sets.
Export Formats
Format Description
AD1 Creates an AD1 forensic image of the documents included in the Export Set.
AD1 is a forensic file format that integrates with FTK.
An AD1 contains the logical structure of the original files and the original files
themselves. The AD1 file is hashed and verifiable to ensure that no changes
have occurred to it.
Image Load File Export Converts the native documents to a graphic format such as TIFF, JPG, or PDF.
It creates a load file in the IPRO LFP or the Opticon OPT formats.
This is similar to Load File Export except that it does not contain any metadata.
Native Export Exports the native documents in their original format and optionally rendered
images into a directory of your choosing. This export does not provide a load file.

Introduction | 9
Load File Export Exports your choice of Native, Filtered text (includes the OCR text that was
created during processing), rendered images of the native document, and
optionally OCR text of the rendered images.
If the recipient intends to use third-party software to review the export set, select
Load File Export.
You have the option of exporting rendered documents in the following formats:
-Concordance
-EDRM (Electronic Discovery Reference Model) XML
-Generic
-iCONECT
-Introspect
-Relativity
-Ringtail (flat file)
-Summation eDII
-CaseVantage
Some programs have load file size limits. If needed, you can split load files into
multiple files.
If you use the Concordance, Generic or Relativity exports, and include rendered
images, you will also get an LFP and OPT file.
Export Formats (Continued)
Format Description
Introduction Export Tab | 10
1.2 Export Tab
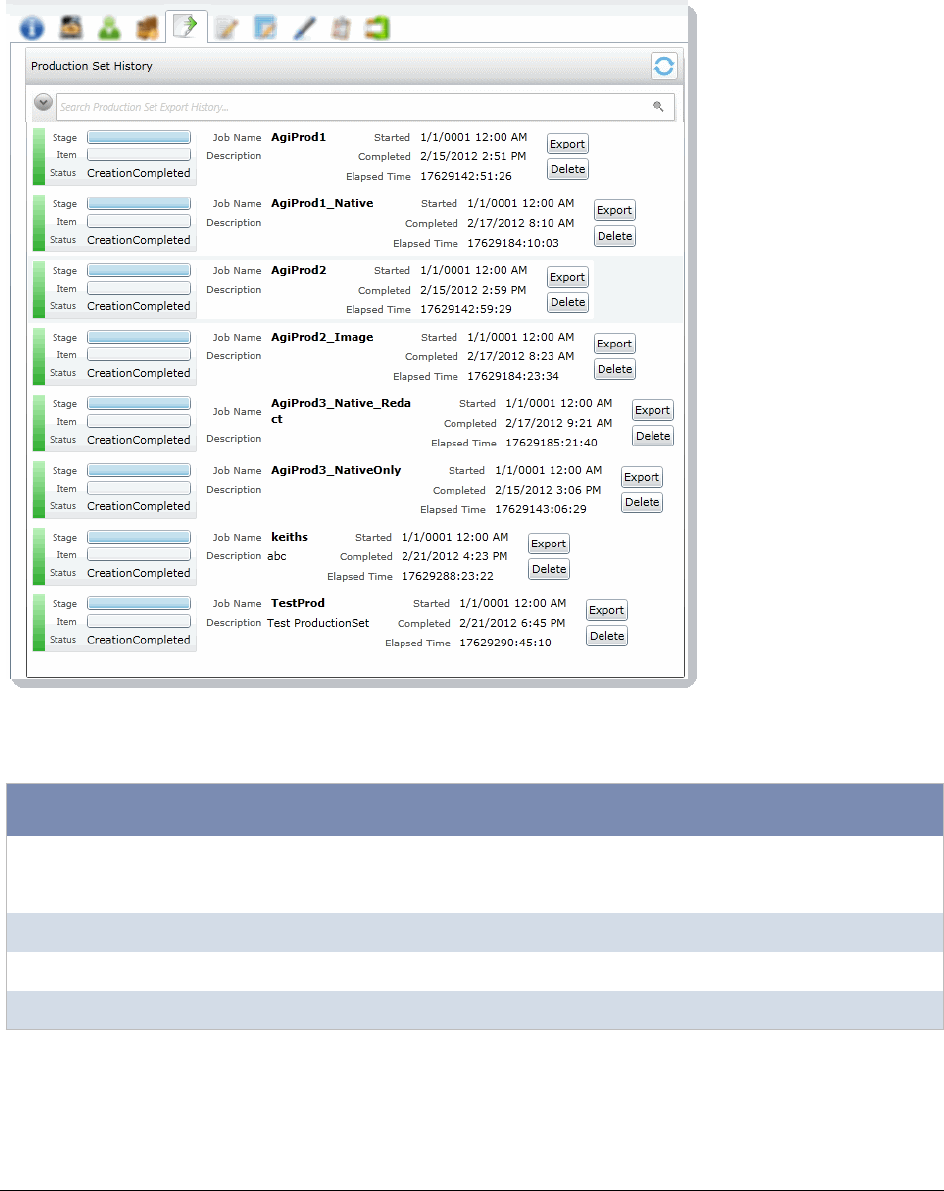
The Export tab on the Home page can be used to export or delete production sets and view the history.
Export Tab
Export Tab Elements
Element Description
Production Set
History Search
Field
Enter text to search by production set name.
Production Set List Lists the production sets and the status of the production sets.
Export Button Click to export the production set to a load file.
Delete Button Click to delete the production set.

Creating Production Sets | 11
2 Creating Production Sets
When you create a production set, you include all of the evidence to which you have applied a given label. After
you create the production set, you export the set to an AD1 image file, an image load file, a native export, or a
load file.
Note: Once you've created a production set you cannot add documents to that set even if you use the same
labels. You will need to label the additional documents and then create a new set using the same label.
Case managers with the Create Production Sets permission can create production sets.
To create a production set
1. Before you create a production set, be sure you have applied at least one label to evidence files that
you want to filter into the export set.
2. Log in as a user with Create Production Set rights.
3. Click the Case Review button next to the case in the Case List.
4. In the Case Explorer, select the Explore tab, right-click the Production Sets folder, and select Create
Production Set.
5. See Production Set General Options (page 11) for information on how to fill out the options in the
General Options screen.
6. Click Next.
7. See Production Set Files to Include Options (page 13) for information on the option in the Files to
Include screen.
8. Click Next.
9. In the Columns to Include, click the right arrow to add a column to the production set and the left arrow
to remove a column from the production set. You can rearrange the order of the columns by clicking the
up and down arrows.
10. Click Next.
11. See U.S. Volume Document Options (page 15) for information on the options in the Volume Document
Options screen.
12. See Production Set Image Branding Options (page 22) for information on the options in the Image
Branding Options screen.
13. In the Summary screen, review the options that you have selected for the production set and click the
Edit (pencil) button if you want to make any changes.
14. Click Save.
After your production set is created, it will appear in the Export tab of the Home page and under the
Production Sets folder in the Case Explorer of the Case Review.
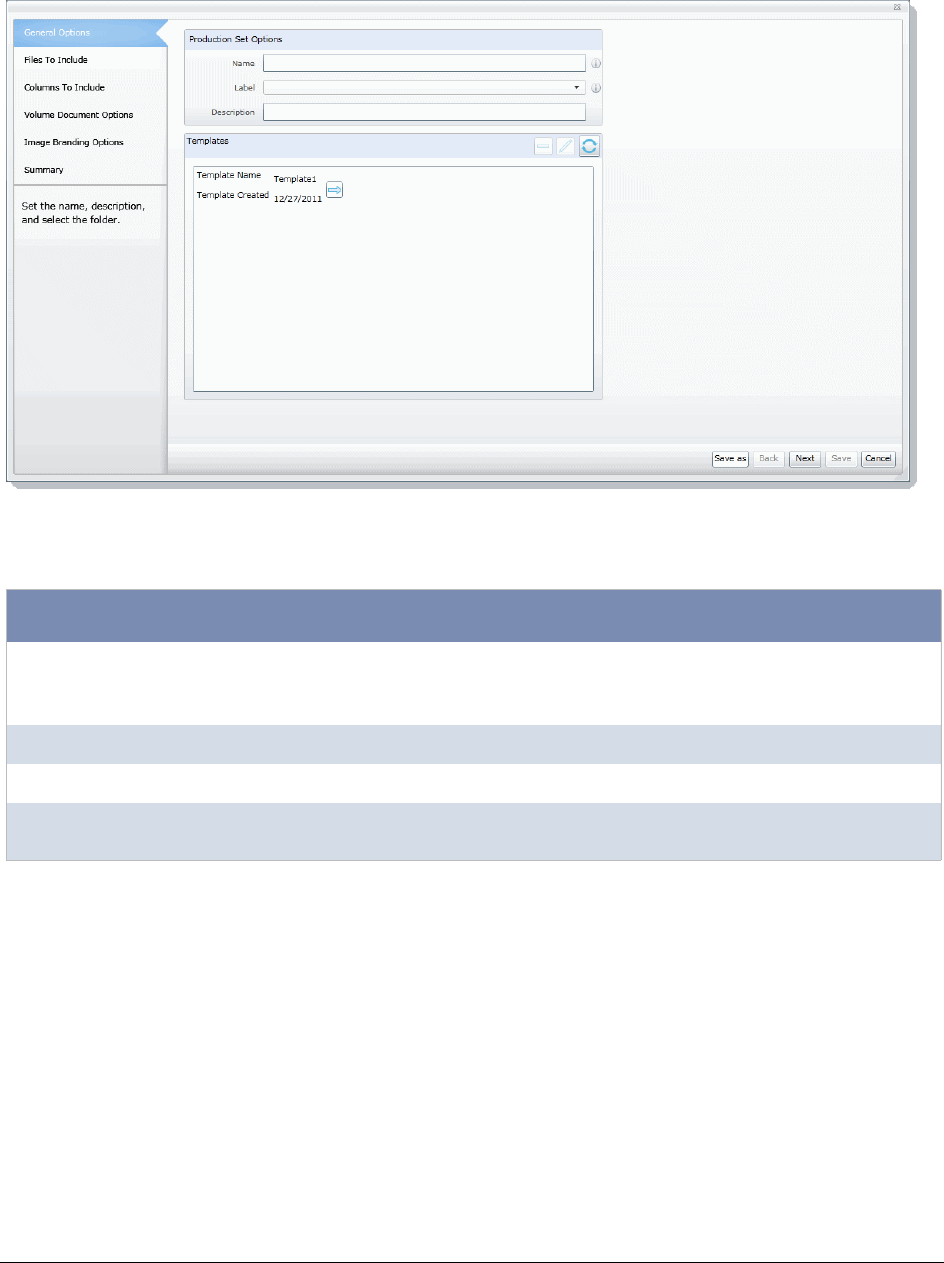
2.1 Production Set General Options
The following table describes the options that are available on the General Options screen of the production set
wizard.
Creating Production Sets | 12
See Export Tab on page 10.
Production Set General Options Screen
General Export Options
Option Description
Name Enter the name of the production set job you are creating.
This does not need to be a unique name, but it is recommended that you make all names
unique to avoid confusion.
Label Select the label that has the documents you want to include in the production set.
Description Enter a description for the production set if desired.
Templates Select a template to populate all the fields of the production set wizard using the options
selected in a previous production set.
Creating Production Sets Production Set Files to Include Options | 13
2.2 Production Set Files to Include Options
The following table describes the options that are available on the Files to Include screen of the production set
wizard.
See Export Tab on page 10.
Production Set Files to Include Screen
Files to Include Options
Option Description
Include Text Files Select this to include all filtered text files in the production set. This does not
include redacted text. This will not re-extract text from native files.
Include Native Files Select this option if you want to include the native documents with the production
set. This will only include native files that have not been redacted. If the native file
has been redacted, a pdf of the file will be included.
Output Email in
Archives
Select this option if there are emails that were originally in a PST or an NSF
format and you want to put them into a PST or NSF container.
Output Email as HTML Select this option if there are emails that were originally in a PST or NSF and you
want to make them HTML files.
Output email as MSG Select this option if there are emails that you want to make into MSG files.
Include Rendered and
Redacted Images
Select this option to include images that have been created in the Case Review.
Additionally, if an image has not yet been created, this option will convert the
native document to an image format.

Creating Production Sets Production Set Files to Include Options | 14
Excluded Extensions Enter the file extensions of documents that you do not want to be converted. File
extensions must be typed in exactly as they appear and separated by commas
between multiple entries. This field does not allow the use of wild card characters.
The default values are:
EXE, DLL, and COM
File Format Select which format you want the native file converted to:
-Multi-page - one TIFF image with multiple pages for each document.
-PDF - one PDF file with multiple pages for each document.
-Single Page - a single TIFF image for each page of each document. For exam-
ple, a 25 page document would output 25 single-page TIFF images.
Compression -CCITT3 (Bitonal) - Produces a lower quality black and white image.
-CCITT4 (Bitonal) - Produces a higher quality black and white image.
-LZW (Color) - Produces a color image with LZW compression.
-None (Color) - Produces a color image with no compression (This is a very
large image).
-RLE (Color) - Produces a color image with RLE compression.
DPI Set the resolution of the image.
The range is from 96 - 1200 dots per inch (DPI).
Produce color JPGs for
provided extensions
This and the following two options are available if you are rendering to CCITT3 or
CCITT4 format and allows you to specify certain file extensions to render in color
JPGs.
For example, if you wanted everything in black and white format, but wanted all
PowerPoint documents in color, you would choose this option and then type PPT
or PPTX in the To JPG Extensions text box. Additionally, you can choose the
quality of the resulting JPG from 1 - 100 percent (100 percent being the most
clear, but the largest resulting image).
To JPG Extensions Lets you specify file extensions that you want exported to JPG images.
JPG Quality Sets the value of JPG quality (1-100). A high value (100) creates high quality
images. However, it also reduces the compression ratio, resulting in large file
sizes. A value of 50 is average quality.
OCR TIFF Images Creates a page by page OCR text file from the rendered images.
By default, the text file uses a TXT extension.
As a best practice, you would not create both Filtered Text files and OCR text files.
However, if you do both, the Filtered Text files use a TXT extension and the OCR
text files use an OCR.TXT extension.
If you create only OCR text files and not Filtered Text files, the OCR text files use
a TXT extension.
Files to Include Options (Continued)
Option Description

Creating Production Sets Production Set Files to Include Options | 15
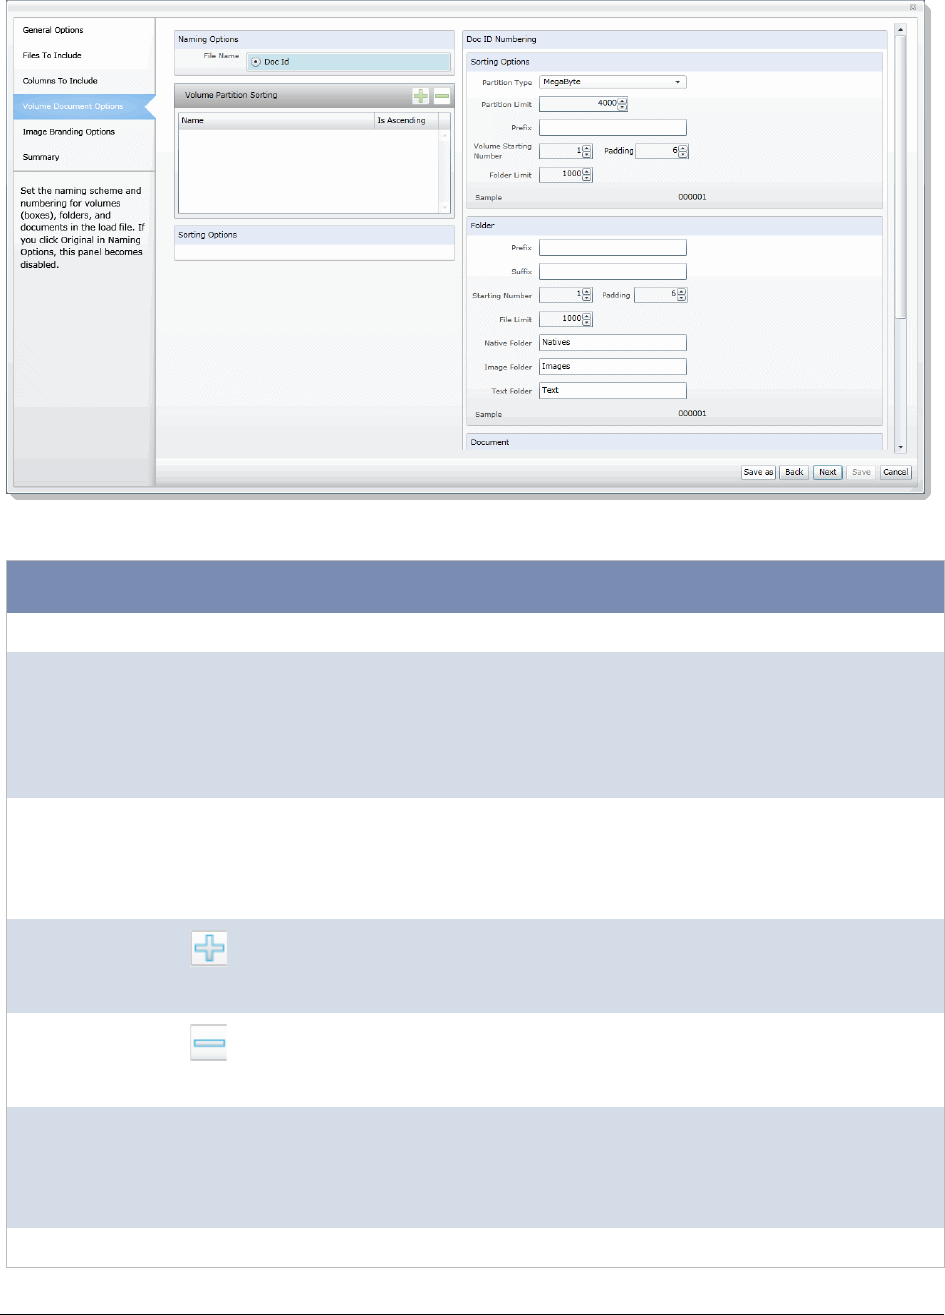
2.2.1 U.S. Volume Document Options
This section describes the options available in the Volume Document Options screen of the production set
wizard if you have US numbering enabled. US numbering is default. The following table describes the options
available in the following screen.
OCR Text Encoding -ANSI - Encodes text files using ANSI.
ANSI encoding has the advantage of producing a smaller text file than a Uni-
code file (UTF). ANSI-encoded text files process faster and save space. The
ANSI encoding includes characters for languages other than English, but it is
still limited to the Latin script.
If you are exporting documents that contain languages written in scripts other
than Latin, you need to choose a Unicode encoding form. Unicode encoding
forms contain the character sets for all known languages.
-UTF- 16 Encodes load files using UTF-16.
-UTF - 8 (Default) Encodes load files using UTF-8.
For more information on the Unicode standard, see the following website
http://www.unicode.org/standard/principles.html
Redactions Markups Check the Markup Sets that you want included in the production set. Markups will
be burned into the images that are created.
Files to Include Options (Continued)
Option Description
Creating Production Sets Production Set Files to Include Options | 16
Production Set Volume Document Options Screen US Numbering
Volume Document Options Screen
Option Type Option Description
Naming Options Choose a naming option:
DOCID (Default) This file naming allows you to determine what the name of
the files will be, based on the document ID numbering scheme. This
option is used with the Document Numbering Options on this tab.
In Case Review, you can view the DocID that is created for exported
files. This is useful in associating an exported file with the original file.
Volume Partition Sorting You can sort the documents before they are converted and named.
This allows you to choose one or more metadata field values to sort
the documents in ascending or descending order.
You can choose any combination of fields by which to sort, however, it
is not recommended to choose more than 3 fields to sort by.
(Volume
Partition
Sorting)
Add volume partition sorting filters based on specified ascending or
descending fields.
(Volume
Partition
Sorting)
Delete the selected sorting option.
Sorting Specify the order that the files are listed in each volume. Sorting
occurs on the parent document.
For example, you might sort by Ascending on the field FILESIZE. In
such case, the first volume contains the largest file sizes, and the last
volume contains the smallest file sizes.
Field Set the column heading by which you want to sort.
Creating Production Sets Production Set Files to Include Options | 17
Add Add the sorting options that you have selected. You can add one or
more sorting filters.
Volume Sample Provide a sample of the volumes.
Volume Options Select a volume folder structure for the output files. The selections will
determine how much data is put into each folder before a new folder is
created and the folder structure in which the output is placed.
See About the U.S. Volume Structure Options on page 19.
Partition Limit Set the size of the partition based on the partition type that you have
selected.
Prefix Specify the prefix-naming convention you want to use for the root
volume of the production set.
Starting
Number
Set the starting number of the first partition in the production set.
Padding Specify the number of document counter digits that you want. The
range is 1 to 21. 0 padding is not available.
Folder Limit Create a new numbered volume when the specified folder limit is
reached inside the volume.
Folder Lets you name and limit the size or the number of items that are
contained in a folder. An export can have one or more folders.
Prefix Specifies the prefix-naming convention that you want to use for the
folders within the volume of the export.
Suffix Specifies the suffix-naming convention that you want to use for the
folders within the volume of the export.
Starting
Number
Sets the starting number of the first folder within the volume of the
export.
Padding Specify the number of document counter digits that you want. The limit
is 21.
File Limit Creates a new numbered folder when the specified file limit is reached
inside the folder.
Native Folder Lets you set the name of the Natives folder.
Image Folder Lets you set the name of the Image folder.
See Files to Include Options on page 13.
Text Folder Lets you set the name of the Text folder where text files go that are
generated by the OCR engine.
See Files to Include Options on page 13.
Document
Numbering
Options
See About U.S. Document Numbering Options on page 20.
Prefix Specifies the prefix-naming convention that you want to use for the
document and page numbering within the folders of the export.
Volume Document Options Screen (Continued)
Option Type Option Description

Creating Production Sets Production Set Files to Include Options | 18
Suffix Specifies the suffix-naming convention that you want to use for the
document and page numbering within the folders of the export.
Starting
Number
Sets the starting number of the first folder within the volume of the
export.
Padding Specify the number of document counter digits that you want. The limit
is 21.
Continue from
last used
number
Lets you have sequential numbering across all exports per legal
matter.
Sets Starting Number to the last document number plus 1 from the last
export.
In order to enable this, you must also enable the Use Last Document
Number option in the export default settings.
Volume Document Options Screen (Continued)
Option Type Option Description

Creating Production Sets Production Set Files to Include Options | 19
2.2.1.1 About the U.S. Volume Structure Options
You can specify the volume folder structure for the output files. The selections will determine how much data is
put into each folder before a new folder is created and the folder structure in which the output is placed.
See U.S. Volume Document Options on page 15.
The output files will be contained within the following hierarchy:
-Volume folder - Contains two levels of subfolders for organizing the files. A new volume will be created
when a specified limit is reached.
You can choose from the following limits.
You can also specify a volume folder limit. In order to prevent issues with Microsoft Windows Explorer,
you can specify an additional limit of the number of folders in a volume. This works in addition to the
selected limit type. If the specified volume limit is not reached, but the folder limit is, a new volume will be
created.
-File type folder - The first level subfolders within each volume are separated by the file types of the
exported files. By default, the folders are named by file type, for example, native documents, images, or
text files.
-Level 2 folder - The second level folders contain the actual files being exported. You can specify a limit of
the total number of files per folder. This limit, once reached, will create a new folder within the same file
type folder until the volume maximum or number of folders has been reached.
Using the Partition Type, Partition Limit, and Folder limit values together, you can create the volume structure
that meets your needs. The following graphic is an example of a volume structure.
Limits
Limit Description
Documents Output will be placed into a volume until the specified number of documents has
been reached, then a new volume will be created.
For example, if you export 2000 files and you set the partition limit to 1000, you
will have two document volumes.
Images Output will be placed into a volume until the specified number of images has
been reached, then a new volume will be created.
This option is useful because a single, large document may create one image
per page.
Megabyte Output will be placed into a volume until the specified megabyte size of all of the
files has been reached, then a new volume will be created.
For example, you can set a partition limit of 4000 MB if you intend to burn the
files to DVD media.
Single All output will be placed into one volume.
Creating Production Sets Production Set Files to Include Options | 20
Note: No document that has been rendered will have its rendered pages divided into more than one folder.
2.2.1.2 About U.S. Document Numbering Options
If you have chosen to use a DocID naming scheme for the output files, you can specify the method for creating
Doc IDs. This section describes the Numbering options found in the Volume Document Options screen of the
Production Set wizard.
See U.S. Volume Document Options on page 15.
Production Set Numbering Options
You will choose from the document numbering options:

Creating Production Sets Production Set Files to Include Options | 21
-Document and Page Numbering Uniquely Sequenced
This option generates a sequential number that is applied to the document without regard to the rendered
pages that may or may not be produced. The images will also be numbered sequentially without regard
to the document number.
For example, if you have two documents each that produce two images during conversion, the output
would be:
You can optionally specify a prefix- and a suffix-naming convention.
- Document Numbering Tied to Page Numbering
This option generates a sequential number for every page created. The corresponding document name
will be the same as its first page generated for each document.
For example, if you have two documents each that produce two images during conversion, the output
would be::
You can optionally specify a prefix- and a suffix-naming convention.
-Document Numbering with Page Counter Suffix
This option generates a sequential number for every document and the pages produced for that
document will carry the document's name with a counter as a suffix that represents which page is
represented by the image.
For example, if you have two documents each that produce two images during conversion, the output
would be:
Example Output
Native Documents Image Output
ABC00001.doc ABC00001.tif
ABC00002.tif
ABC00002.doc ABC00003.tif
ABC00004.tif
Example Output
Native Documents Image Output
ABC00001.doc ABC00001.tif
ABC00002.tif
ABC00003.doc ABC00003.tif
ABC00004.tif
Example Output
Native Document Image Output
ABC00001.doc ABC00001.001.tif
ABC00001.002.tif
ABC00002.doc ABC00002.001.tif
ABC00002.002.tif

Creating Production Sets Production Set Image Branding Options | 22
2.3 Production Set Image Branding Options
You can brand the rendered pages of TIFF and PDF images with a header, footer, watermark, or Bates
numbering from the Production Set wizard.
See Export Tab on page 10.
Image Branding Screen
Image Branding Options
Option Group Options Options Description
Sample Displays a sample of the image branding options
selected.
Watermark Set options to brand a watermark to the middle of the
document.
Opacity Sets the visibility of the watermark text.
Watermark/
Header/Footer
Type
There are multiple types of image branding available.
The options in the Watermark, Header and Footer
groups will differ depending on the Type that you
select.
None No branding on the image.
Creating Production Sets Production Set Image Branding Options | 23
Bates Turns Bates numbering of rendered image pages on or
off.
Bates numbering is a term used for placing an
identifying number on every page of evidence files that
are presented in court.
If you create a production set of evidence files with the
setting to produce multi-page TIFF images or PDF files,
the TIFF or PDF file name is the Bates number of the
first page of the document, which is known as the
BegDoc (beginning document) number.
Bates numbering is not driven by the document or page
numbering that was assigned in the Volume/Document
Options panel.
Prefix Specify up to any 25 alphanumeric characters except
the forward slash or backward slash.
You can use a separator to create a visual break
between the different sections of the Bates number.
Starting
Number
Sets the starting number to a value from 1-100.
Padding Specify the number of document counter digits that you
want. The limit is 42.
Font Sets the font style for the text.
Font Size Sets the font size for the text.
Doc ID Displays the Doc ID in the designated location.
Font Sets the font style for the text.
Font Size Sets the font size for the text.
Field Displays the selected field value in the designated
location.
Field Select one of the available fields to display in the
designated location.
Font Sets the font style for the text.
Font Size Sets the font size for the text.
Global
Endorsement
Displays the entered text in the designated location.
Text Enter the text that you want to appear in the designated
location.
Font Sets the font style for the text.
Font Size Sets the font size for the text.
Page ID Displays the page ID number in the designated
location.
Font Sets the font style for the text.
Image Branding Options (Continued)
Option Group Options Options Description

Creating Production Sets Production Set Image Branding Options | 24
Font Size Sets the font size for the text.
Image Branding Options (Continued)
Option Group Options Options Description

Creating Production Sets Additional Production Set Options | 25
2.4 Additional Production Set Options
2.4.1 Saving Production Set Options as a Template
After configuring the production set options, you can save the settings as a template. The template can be
reused for future production sets with the current case or other cases.
To save options as a template
1. Access the production set wizard and set the options for the production set.
See Export Tab on page 10.
2. In the production set wizard, click Save As.
3. Enter a name for the template.
4. Click Save.
2.4.2 Deleting a Production Set
Users with production set rights can delete production sets from Case Review.
To delete a production set
1. Log in as a user with Production Set rights.
2. Click the Case Review button next to the case in the Case List.
3. In the Case Explorer, select the Explore tab, expand the Production Sets folder, right-click the
production set that you want to delete and select Delete.
4. Click OK.
2.4.3 Sharing a Production Set
Users with production set rights can share production sets that they have created with other groups of users.
To share a production set
1. Log in as a user with Production Set rights.
2. Click the Case Review button next to the case in the Case List.
3. In the Case Explorer, select the Explore tab, expand the Production Sets folder, right-click the
production set that you want to delete and select Manage Permissions.
4. Check the groups that you want to have access to the production set that you created and click Save.

Exporting Production Sets | 26
3 Exporting Production Sets
3.1 Exporting Production a Set
After you create a production set, you can export it containing only the files needed for presentation to a law firm
or corporate security professional.
To export a production set
1. On the Home Page, select a case and click the Export tab.
2. Next to the production set that you want to export, click Export.
Production Set Export Dialog
3. Enter or browse to the path where you want to save the export.
4. Enter a name for the Load File.

Exporting Production Sets | 27
5. Select a format that you want to use for the export. The following formats are available:
-CaseVantage - Generates a DII file specifically formatted for use with the AD Summation
CaseVantage program.
-Concordance - Generates a DAT file that can be used in Concordance.
-EDRM - Generates an XML file that meets the EDRM v1.2 standard.
-Generic - Generates a standard delimited text file.
-iCONECT - Generates an XML file formatted for use with the iConect program.
-Introspect (IDX file) - Generates an IDX file specifically formatted for use with the Introspect
program.
-Relativity - Generates a DAT file that can be used in Relativity.
-Ringtail (flat file) - Generates a delimited text file that can be converted to be used in Ringtail.
-Summation eDII - Generates a DII file specifically formatted for use with the AD Summation iBlaze or
Enterprise programs.
Note: If you are outputting a Concordance, Relativity, or Generic load file, and include rendered
images, you will also get an OPT and LFP file in the export directory.
6. Depending on the load file format you choose, you may need to check whether or not to show the row
header for the columns of data. The Show Row Header option is only available for the following load file
formats:
-Concordance
-Generic
-Introspect
-Relativity
-Ringtail (Flat File)
7. Select an option for Load File Encoding. The following options are available:
-ANSI - Encodes load files using ANSI (for text written in the Latin script).
ANSI encoding has the advantage of producing a smaller load file than a Unicode file (UTF). ANSI-
encoded load files process faster and save space. The ANSI encoding includes characters for
languages other than English, but it is still limited to the Latin script.
If you are exporting documents that contain languages written in scripts other than Latin, you need to
choose a Unicode encoding form. Unicode encoding forms contain the character sets for all known
languages.
-UTF-8 - (Default) Encodes load files using UTF-8.
For more information on the Unicode standard, see the following website:
http://www.unicode.org/standard/principles.html
Most commonly used for text written in Chinese, Japanese, and Korean.
-UTF-16 - Encodes load files using UTF-16.
Similar to UTF-8 this option is used for text written in Chinese, Japanese, and Korean.
8. Select a Field Mapping character. This delimiter is the character that is placed between the columns of
data. The default delimiters are recommended by the program to which the load file was intended.
However, you can change these defaults by selecting the drop-down and choosing an alternative.
Field Mapping is available for the following load file formats:
-Concordance
-Generic
-Introspect
-Relativity
-Ringtail (Flat File)

Exporting Production Sets | 28
9. Select a Text Identifier character. This delimiter is the character that is placed on either side of the
value within each of the columns. All of the text that follows the character and precedes the next
occurrence of the same character is imported as one value.
The default delimiters are recommended by the program to which the load file was intended. However,
you can change these defaults by selecting the drop-down and choosing an alternative. If you do not
wish to use a delimiter, you can choose the (none) option.
Text Identifier is available for the following load file formats:
-Concordance
-Generic
-Introspect
-Relativity
-Ringtail (Flat File)
10. Select a Newline character. This is a replacement character for any newline (carriage return/line feed)
character. The default delimiters are recommended by the program to which the load file was intended.
However, you can change these defaults by selecting the drop-down and choosing an alternative. If you
do not wish to use a delimiter, you can choose the (none) option.
Newline is available for the following load file formats:
-Concordance
-Generic
-Introspect
-Relativity
-Ringtail (Flat File)
11. Select the Available Fields of metadata to be included in the load file and click the right arrow to add
the field.
12. Some load file applications require that certain fields be in the load file. In such cases, you can click the
Custom plus button to add a custom field entry that is not already listed in the Available Fields list.
13. Click Export.
