FBX Exporter User Guide
FBX_Exporter_User_Guide
FBX_Exporter_User_Guide
FBX_Exporter_User_Guide
FBX_Exporter_User_Guide
FBX_Exporter_User_Guide
User Manual: Pdf
Open the PDF directly: View PDF ![]() .
.
Page Count: 33
About the FBX Exporter package
Version: 1.3.0f1
The FBX Exporter package provides round-trip workflows between Unity and 3D modeling
software. Use this workflow to send geometry, Lights, Cameras, and animation from Unity to
Maya, Maya LT, or 3ds Max, and back again, with minimal effort.
The FBX Exporter package includes the following features:
●FBX Exporter: Export geometry, animation, Lights, and Cameras as FBX files so you
can transfer game data to any 3D modeling software. Record gameplay and export it to
make cinematics. Start grey-boxing with ProBuilder, then export to FBX to replace with
final assets..
●Linked Prefab: Link a Prefab to a new or existing FBX file. When you later change the
FBX file, Unity automatically updates the Prefab to integrate changes to the transforms
and hierarchy (in addition to Meshes and Materials). This helps you avoid rebuilding your
Prefabs from scratch.
●Unity Integration for 3D modeling software: Effortlessly import and export Assets
between Unity and Maya, Maya LT, or 3ds Max. The 3D modeling software remembers
where the files go, and what objects to export back to Unity.
Requirements
The FBX Exporter package is compatible with the following versions of the Unity Editor:
● 2017.3 and later
The Unity Integration for Maya feature supports the following versions of Maya:
● Maya 2017
● Maya 2018
● Maya LT 2017
● Maya LT 2018
The Unity Integration for 3ds Max feature supports the following versions of 3ds Max:
● 3ds Max 2017
● 3ds Max 2018
Contents
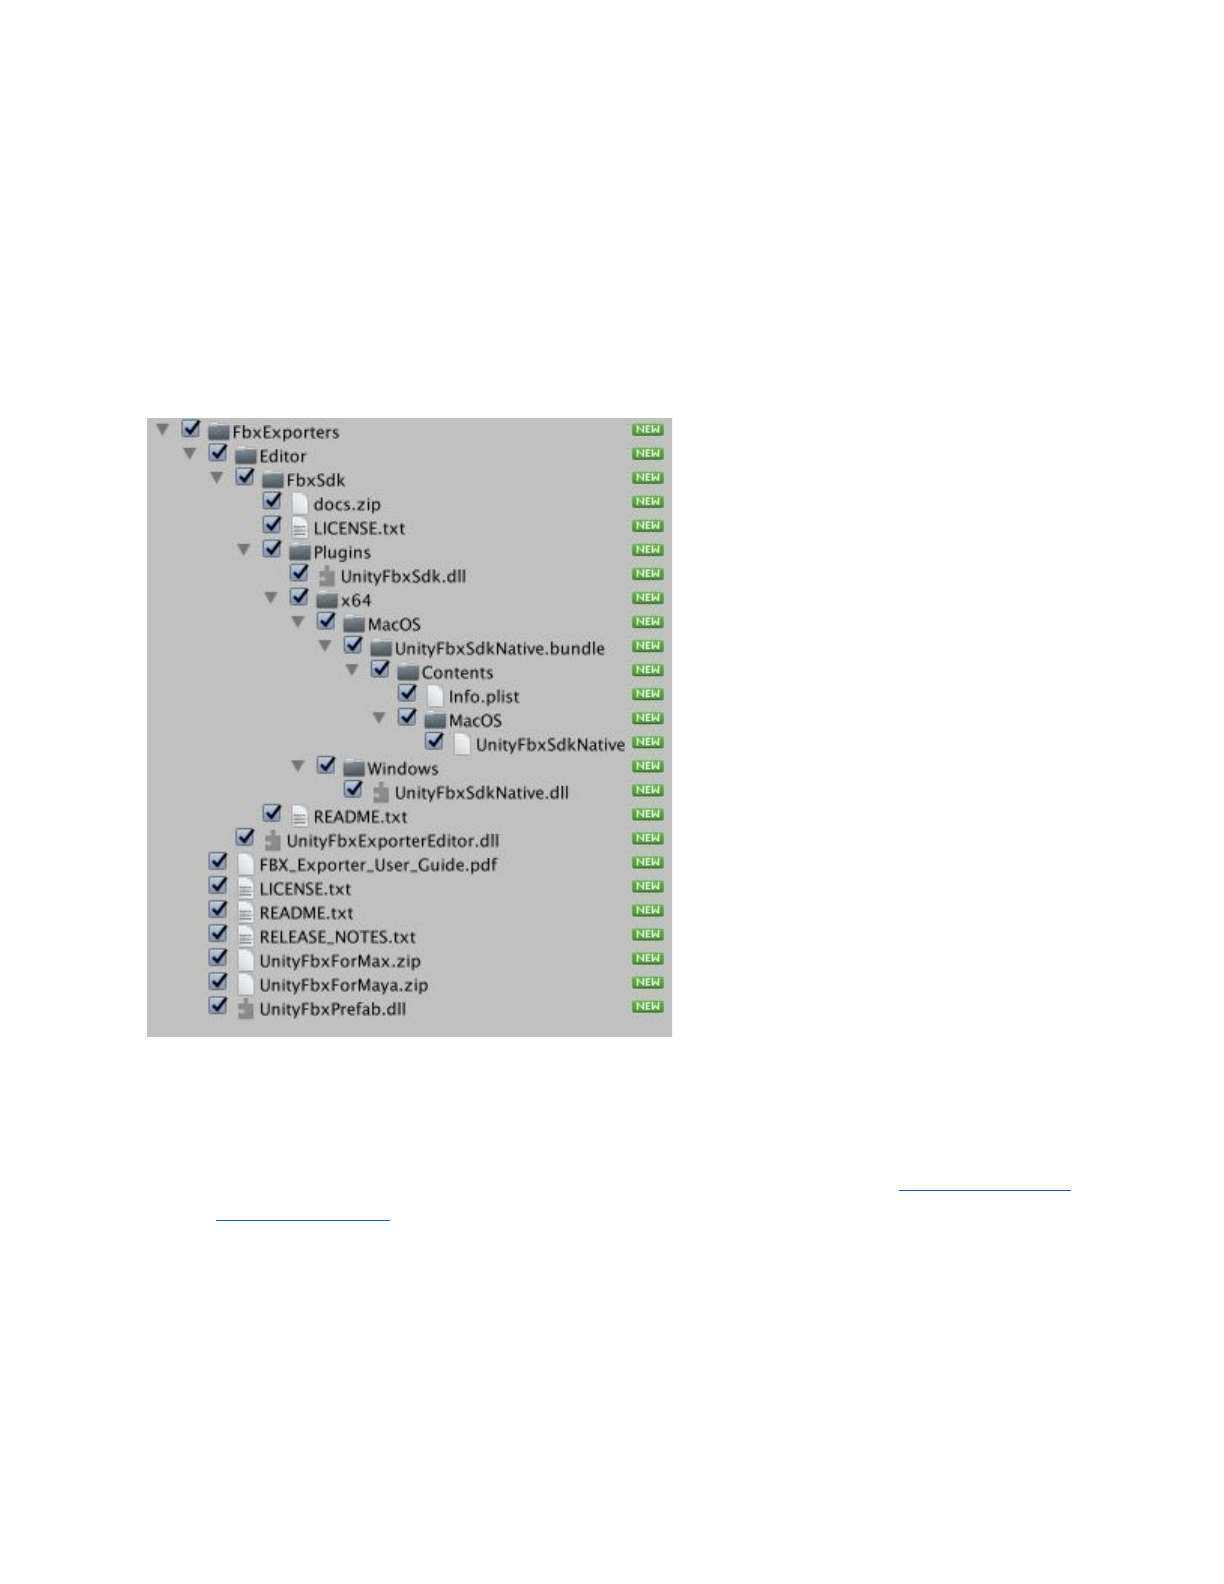
The FBX Exporter package contains:
● FBX Exporter
● FBX Prefab Component
● Integration with 3D modeling software (3ds Max and Maya)
Known Issues
● When installing a new version of the FBX Exporter Package after using version 1.1.0.b1,
the link between Assets and FbxPrefab components may be lost. See Installing the FBX
Exporter Package for repairing instructions.
Installing the FBX Exporter package in Unity
Before you install the FBX Exporter Package, follow these steps (recommended):
1. Back up your Project.
2. Restart Unity.
3. Delete the FbxExporters
folder.
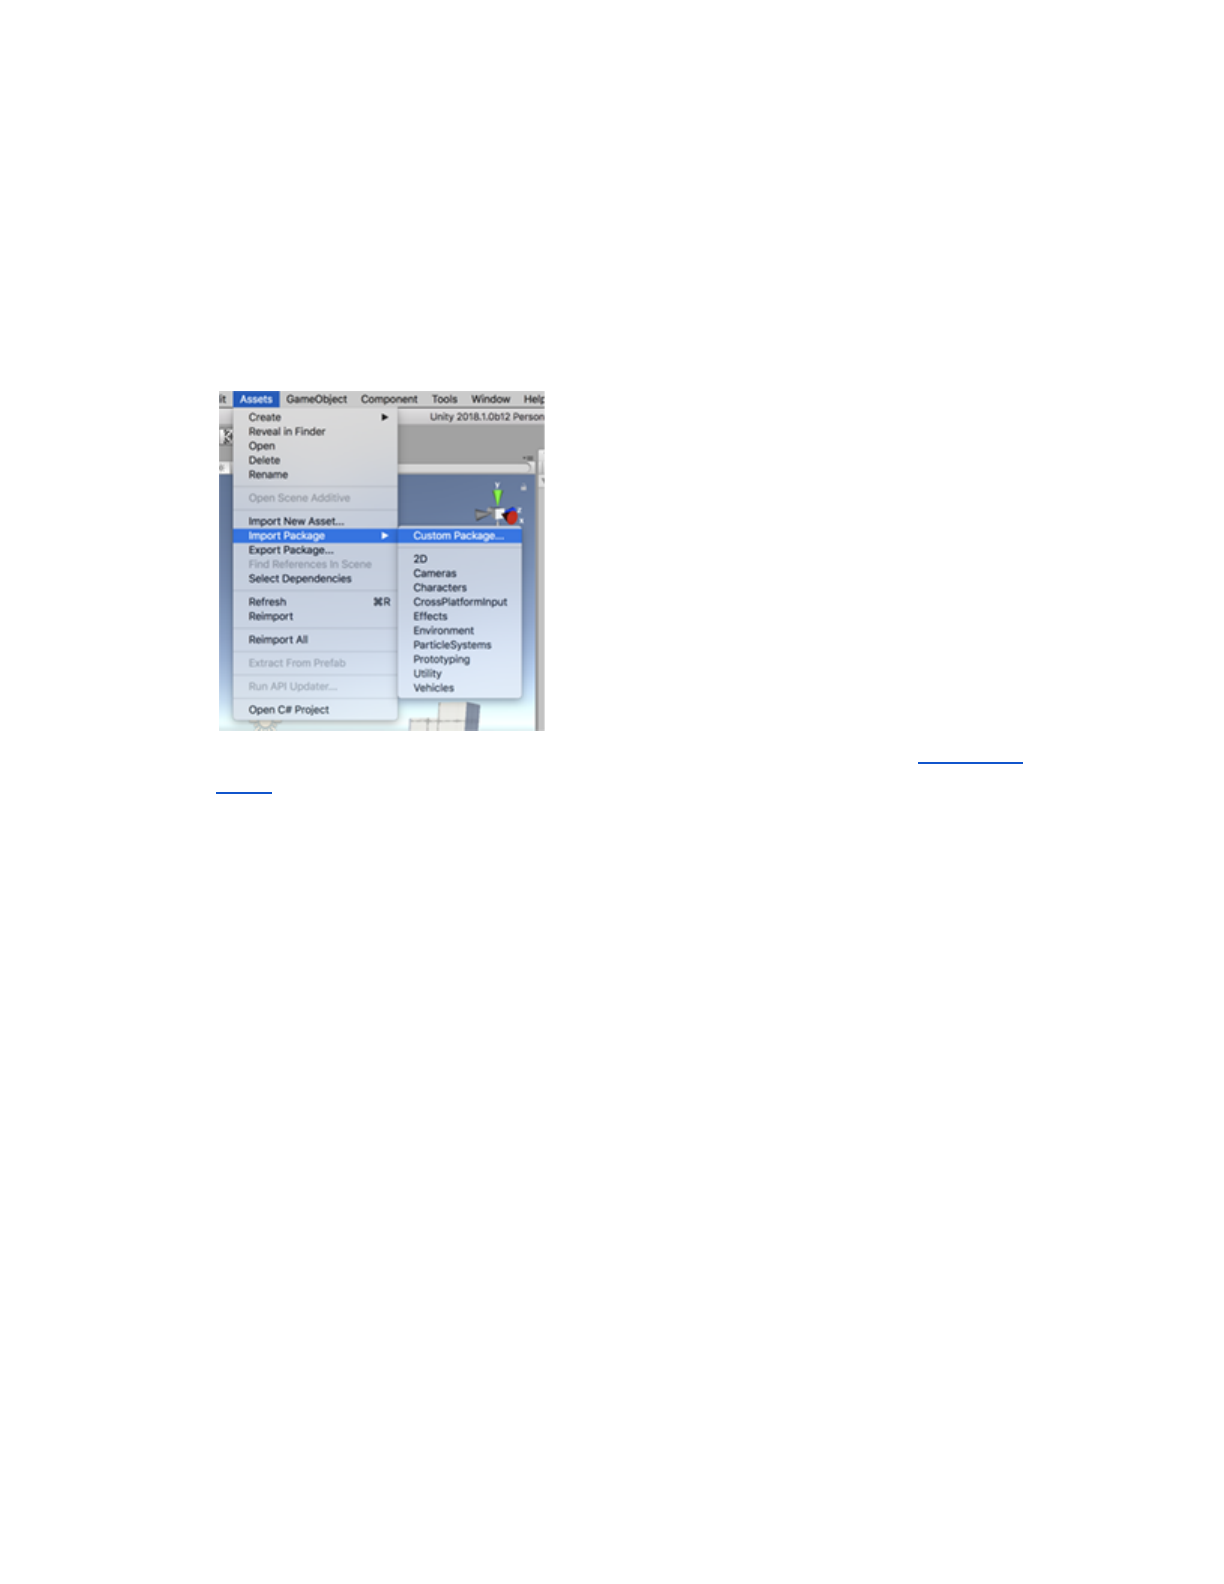
4. Select Assets > Import Package > Custom Package in Unity.
5. Select the FbxExporter package from the file browser and click Open to import and
install the new version of the FBX Exporter package.
Updating from 1.1.0b1
If your previous version of the FBX Exporter Package was 1.1.0b1, some Assets in your Project
may lose their FbxPrefab components. To repair this issue, follow these steps:
1. If your Project Assets are serialized as Binary, select Edit > Project Settings > Editor
to view the Editor Settings.
2. Change the Asset Serialization mode to Force Text. The Force Text option converts
all Project Assets to text.
3. Before continuing, back up your Project.
4. Select Edit > Project Settings > Fbx Export to view the Fbx Export Settings.
5. Click the Run Component Updater button to repair all text serialized Prefab and Scene
Assets in the Project containing the FbxPrefab component.

Exporting FBX files from Unity
Use Export To FBX (menu: GameObject > Export To FBX) to manually export GameObject
hierarchies to an FBX file. The FBX Exporter exports selected objects and their descendants to
a single FBX file. However, if you select both a parent and a descendant, only the parent’s
hierarchy is exported.
The FBX Exporter exports the following objects:
● GameObject hierarchies and their transforms
● Meshes. The FBX Exporter exports multiple copies of the same mesh as instances. The
FBX Exporter also exports the following mesh attributes:
○ Normals
○ Binormals
○ Tangents
○ Vertex Colors
○ All 4 Mesh UVs, if present
○ Quads or Triangles
● SkinnedMeshRenderers with the following exceptions:
○ Humanoid rigs are not supported
○ Animated meshes in bone hierarchy are not supported
● Materials as Phong if the material has specular; Lambert in all other cases
● Textures
● Cameras as film cameras with 35mm TV Projection; also the following camera attributes:
○ Projection type (perspective/orthographic)
○ Aperture Width and Height (Height set to 0.612 inches, and width calculated
based on aspect ratio)
○ Aspect ratio
○ Focal length
○ Field of view
○ Near and far clipping plane
● Lights of type Directional
, Spot
, Point
, and Area
; also the following light attributes:
○ Spot Angle (for Spot lights)
○ Color
○ Intensity
○ Range
○ Shadows (either On or Off)
● Legacy and Generic Animation from Animation and Animator components, or from a
Timeline clip; also the following animated attributes:
○ Transforms
○ Lights:
■ Intensity
■ Spot Angle (for Spot lights)
■ Color
○ Cameras:
■ Field of View
● Blendshapes
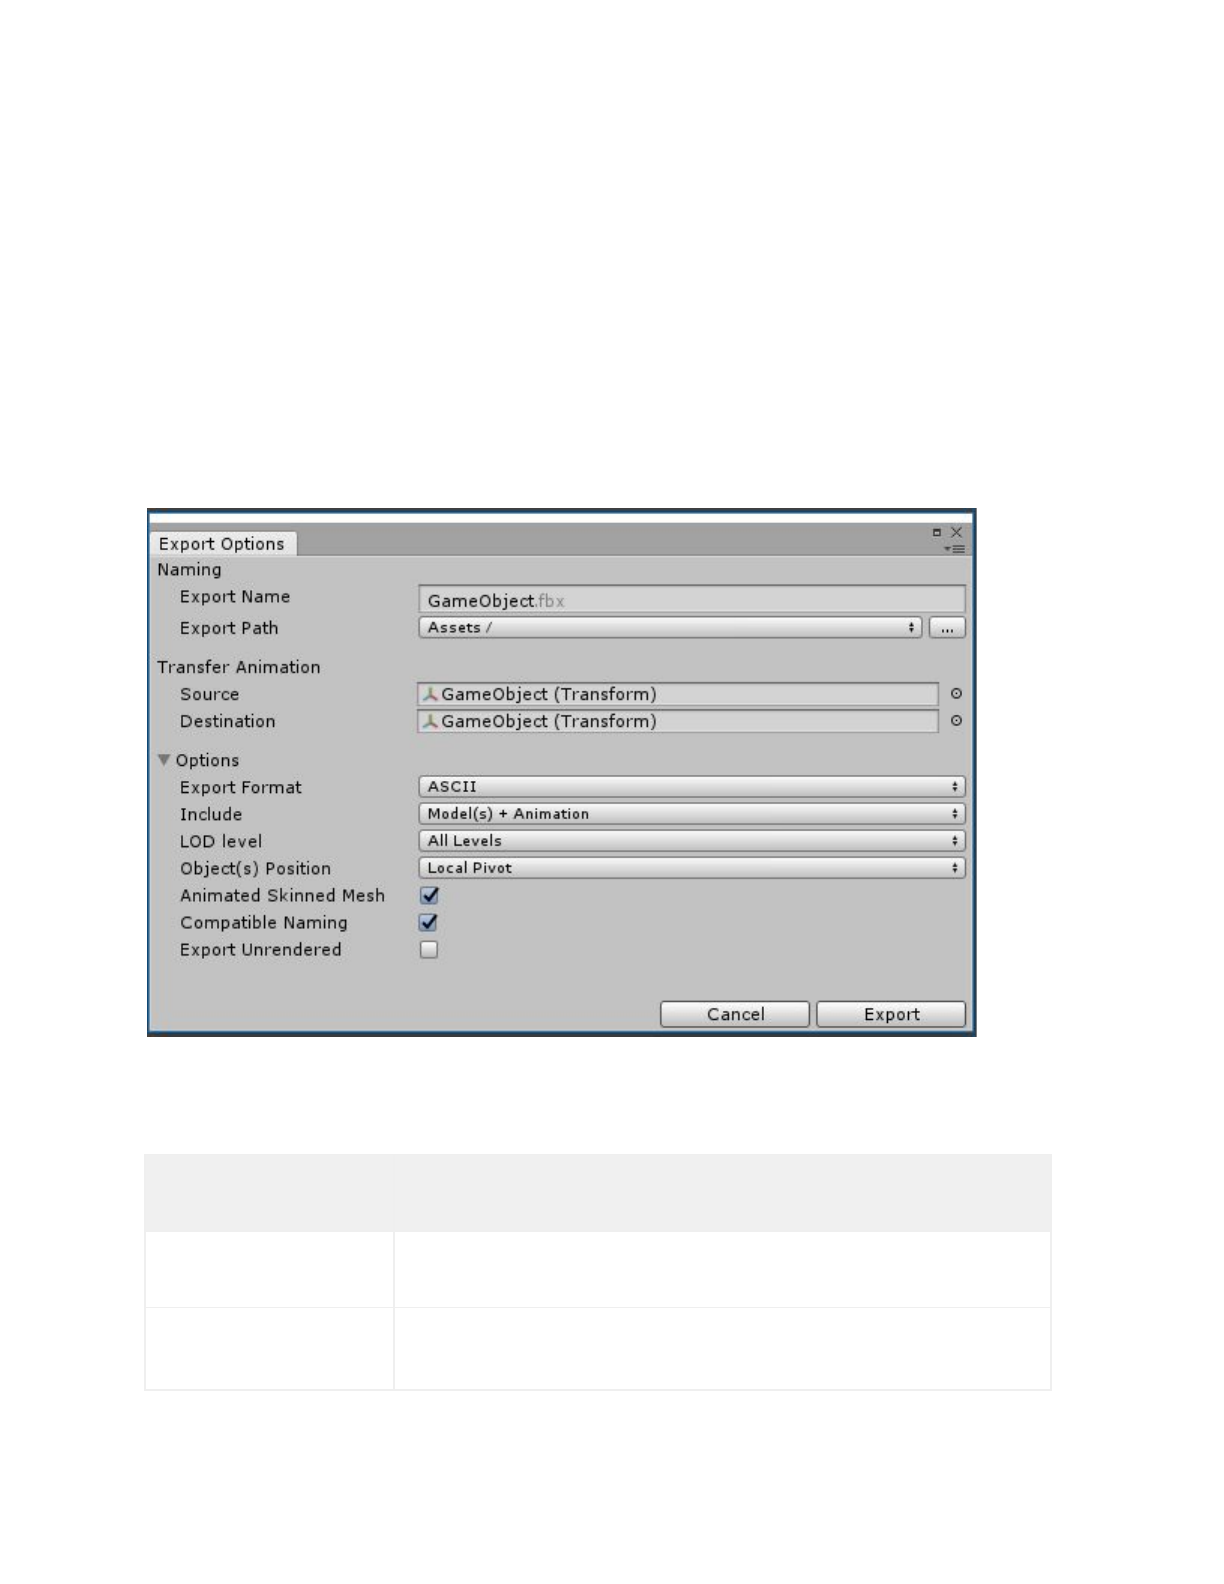
Export Options window
When exporting an FBX file, the following Export Options window opens, displaying options for
specifying what gets exported.
Export Options Properties
Property:
Function:
Export Name
Specify the filename to export to.
Export Path
Specify the location where the FBX Exporter will save the FBX file.
Source
Transfer the transform animation from this transform to the
Destination.
Notes:
●Source must be an ancestor of Destination.
●Source may be an ancestor of the selected object.
Destination
Where to transfer the transform animation to (which Transform
object).
This object receives the transform animation on objects between
Source and Destination as well as the animation on the Source
itself.
Export Format
Select the format for the FBX Exporter to use when exporting the
FBX file (ASCII or binary).
Include
Choose whether to export both Models and Animation, only Models,
or only Animations.
LOD level
For level of detail (LOD) groups, choose the desired level of detail to
export (all, highest, or lowest).
Notes:
● The FBX Exporter ignores LODs outside of selected
hierarchy.
● The FBX Exporter does not filter out objects that are used as
LODs and doesn't export them if they aren’t direct
descendants of their respective LOD Group
Object(s) Position
Choose whether to reset the exported objects to world center, or
keep world transforms during export.
If you select multiple objects for export, and you choose Local
Centered from this drop-down menu, the FBX Exporter centers
objects around a shared root while keeping their relative placement
unchanged.
Animated Skinned
Mesh
Check this option to export animation on objects with skinned
meshes.
If unchecked, the FBX Exporter does not export animation on
skinned meshes.

Compatible Naming
Check this option to control renaming the GameObject and
Materials during export.
The FBX Exporter ensures compatible naming with Maya to avoid
unexpected name changes between Unity and Maya. During export
the FBX Exporter replaces characters in Unity names as follows:
● Replaces invalid characters with underscores ("_"). Invalid
characters are all non-alphanumeric characters, except for
the colon (":").
● Adds an underscore ("_") to names that begin with a
number.
● Replaces diacritics. For example, replaces “é” with “e”.
For FBX Model filenames, the FBX Exporter ensures that names do
not contain invalid characters for the file system. The set of invalid
characters may differ between file systems.
Note: If you have a Material with a space in its name, the space is
replaced with an underscore ("_"). This results in a new Material
being created when it is imported. For example, the Material named
"Default Material" is exported as "Default_Material" and is created
as a new Material when it is imported. If you want the exported
Material to match an existing Material in the scene, you must
manually rename the Material before exporting.
Export Unrendered
Check this option to export meshes that either don't have a renderer
component, or that have a disabled renderer component. For
example, a simplified mesh used as a mesh collider.
Exporting Animation from the Timeline
In order to export an animation clip from the timeline, in the Timeline editor select the desired
clip, then from the top menu select GameObject > Export Selected Timeline Clip.
Exporting with relevant system units
The FBX Exporter exports in centimeter units (cm) with the Mesh set to real world meter (m)
scale. For example, if vertex[0] is at [1, 1, 1] m., it is converted to [100, 100, 100] cm.
In 3ds Max, it is recommended to set the system units to centimeters to avoid any scaling on
Model import and export.

There are no specific import options to adjust between Unity and Maya. When working in Maya,
you can set the working units to meters if you prefer.
For example, when working with large models in Maya, to ensure that the models clip to meters,
adjust the scale of the near and far clipping planes for all cameras by 100x. In addition, you
should scale lights by 100x so that objects display in the viewport.
Known Issues
- Bind pose of animated skinned mesh is lost on export. For example, if you export an
animated skinned mesh from Unity and import it into Maya you will not be able to set the
character into the bind pose using the Rigging > Skin > Go to Bind Pose command.
- Animated skinned meshes may not export with the correct skinning if they are not in the
bind pose on export (that is, not being previewed in the Animation or Timeline windows,
and the original Rig's FBX must not contain animation)
- For skinned meshes all bones must be descendants of the root bone. For example, if the
root bone is “hips” and the right leg for the same skinned mesh is not a descendant of
hips, export will fail.

Converting GameObjects to Linked Prefabs
A Linked Prefab is a Prefab which maintains a link to an FBX file and is responsible for updating
the Prefab so that it remains in sync with its source. What it adds to the default Unity behaviour
is that the Linked Prefab integrates changes in the hierarchy and transforms (in addition to
Meshes and Materials).
During an update, the Linked Prefab preserves components and object references to the
greatest extent possible. If you delete a node in the FBX, the Linked Prefab deletes the
corresponding object in Unity along with its components.
The Linked Prefab contains a FbxPrefab script component that is responsible for recording
changes and merging FBX Model changes into the Linked Prefab. The automatic update
happens whenever the Asset database reimports the corresponding FBX Model, after all Assets
have been imported.
Use Convert To Linked Prefab Instance (right-click on an object in the hierarchy view, or
menu: GameObject > Convert To Linked Prefab Instance) to replace the GameObject
hierarchy with an instance of a Prefab that is linked to an FBX Model.
Convert To Linked Prefab Instance exports each selected GameObject hierarchy and writes
both a .prefab and a .fbx file. Linked Prefabs use the same rules as for exporting: all selected
objects and their descendants are exported to a single FBX file. If you select both a parent and
a descendant, the Linked Prefab only exports the parent’s hierarchy.
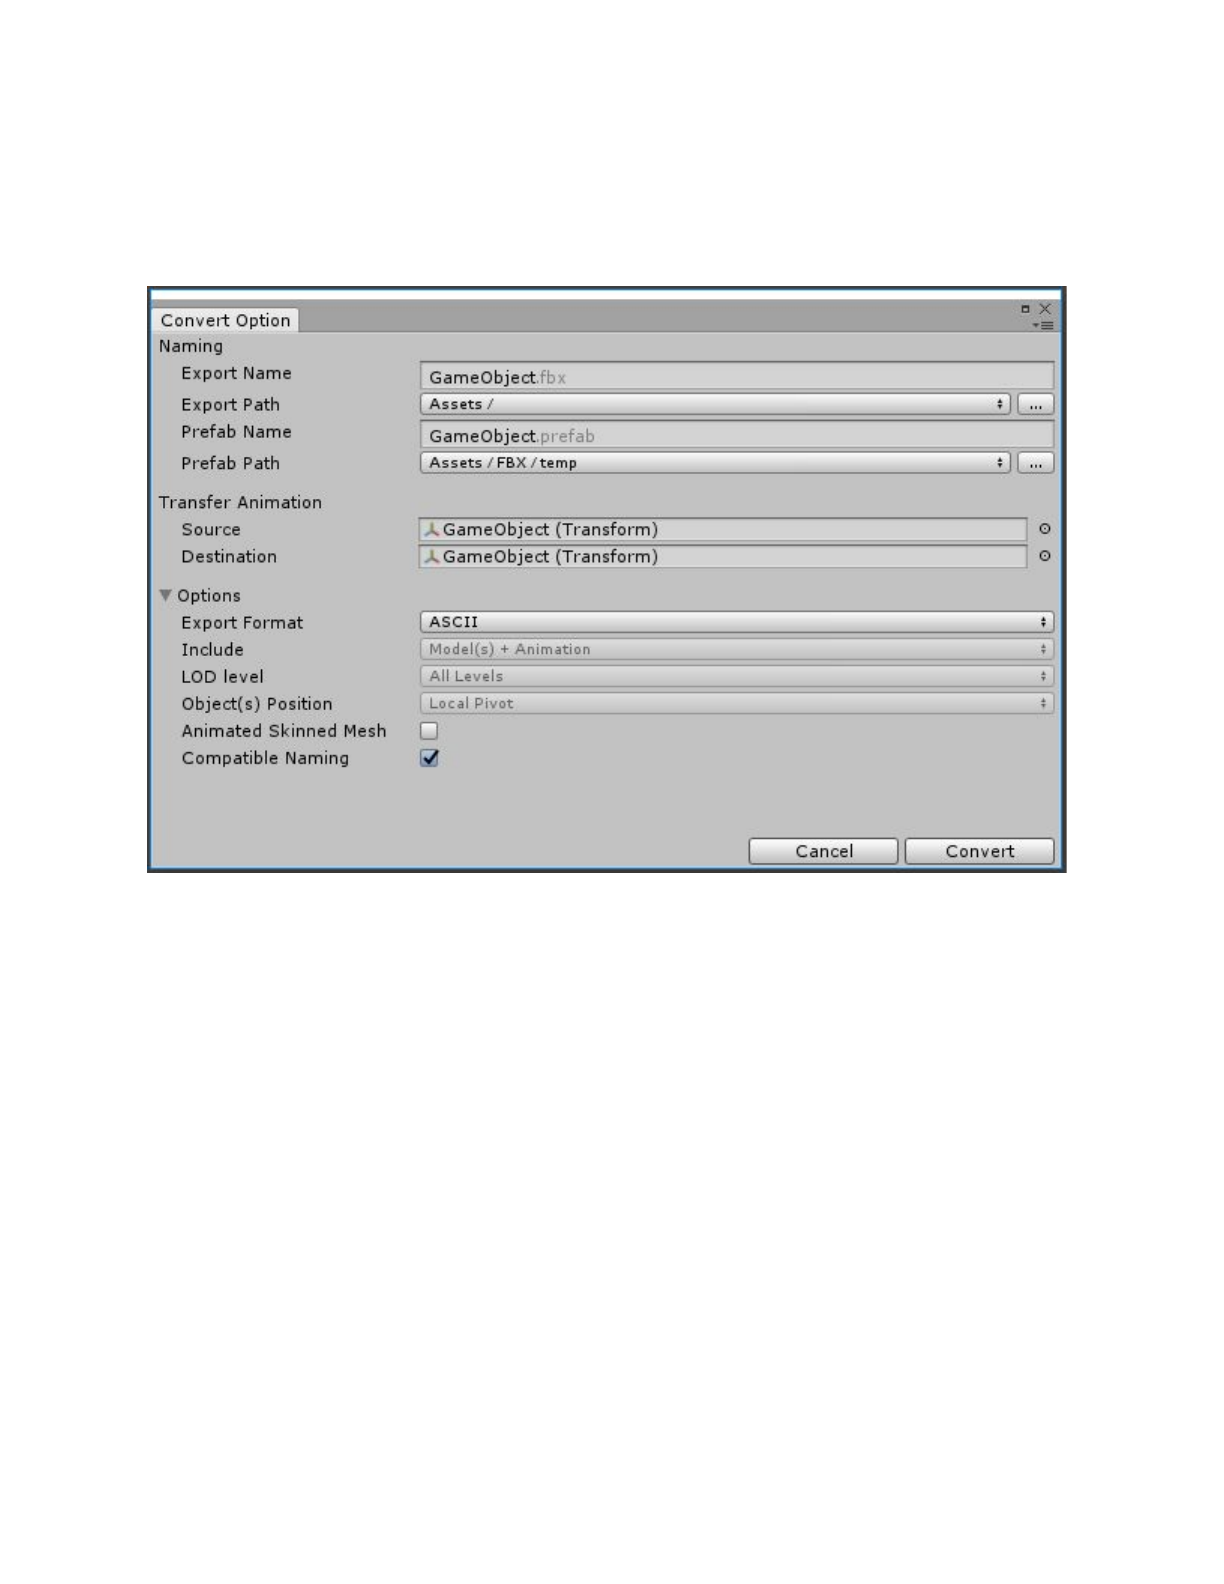
Convert Options window
When converting to a Linked Prefab, the following window opens, displaying options to specify
what gets exported:
Convert Option Properties
Property:
Function:
Export Name
Specify the filename to export to
Export Path
Specify the location where the FBX Exporter will save the FBX file.
Prefab Name
Specify the filename to save the Linked Prefab to
Prefab Path
Specify the location where the FBX Exporter will save the linked
prefab file.
Source
Transfer the transform animation from this transform to Destination.
Notes:
●Source must be an ancestor of Destination.
●Source may be an ancestor of the selected object.
Destination
Where to copy the transform animation to (which Transform object).
This object receives the transform animation on objects between
Source and Destination as well as the animation on the Source
itself.
Export Format
Select the format for the FBX Exporter to use when exporting the
FBX file (ASCII or binary).
Include
Convert to Linked Prefab Instance always exports both Models
and Animation in the hierarchy.
LOD level
Convert to Linked Prefab Instance always exports All levels of
detail (LOD) available in the hierarchy for LOD groups.
Object(s) Position
Convert to Linked Prefab Instance always resets the root object's
transform during export. However, the Prefab maintains the global
transform for the root object.

Animated Skinned
Mesh
Check this option to export animation on objects with skinned
meshes.
If unchecked, the FBX Exporter does not export animation on
skinned meshes.
Compatible Naming
Check this option to control renaming the GameObject and
Materials during export.
The FBX Exporter ensures compatible naming with Maya to avoid
unexpected name changes between Unity and Maya. During export
the FBX Exporter replaces characters in Unity names as follows:
● Replaces invalid characters with underscores ("_"). Invalid
characters are all non-alphanumeric characters, except for
colon (":").
● Adds an underscore ("_") to names that begin with a
number.
● Replaces diacritics. For example, replaces “é” with “e”.
For FBX Model filenames, the FBX Exporter ensures that names do
not contain invalid characters for the file system. The set of invalid
characters may differ between file systems.
Note: If you have a Material with a space in its name, the space is
replaced with an underscore ("_"). This results in a new Material
being created when it is imported. For example, the Material named
"Default Material" is exported as "Default_Material" and is created
as a new Material when it is imported. If you want the exported
Material to match an existing Material in the scene, you must
manually rename the Material before exporting.
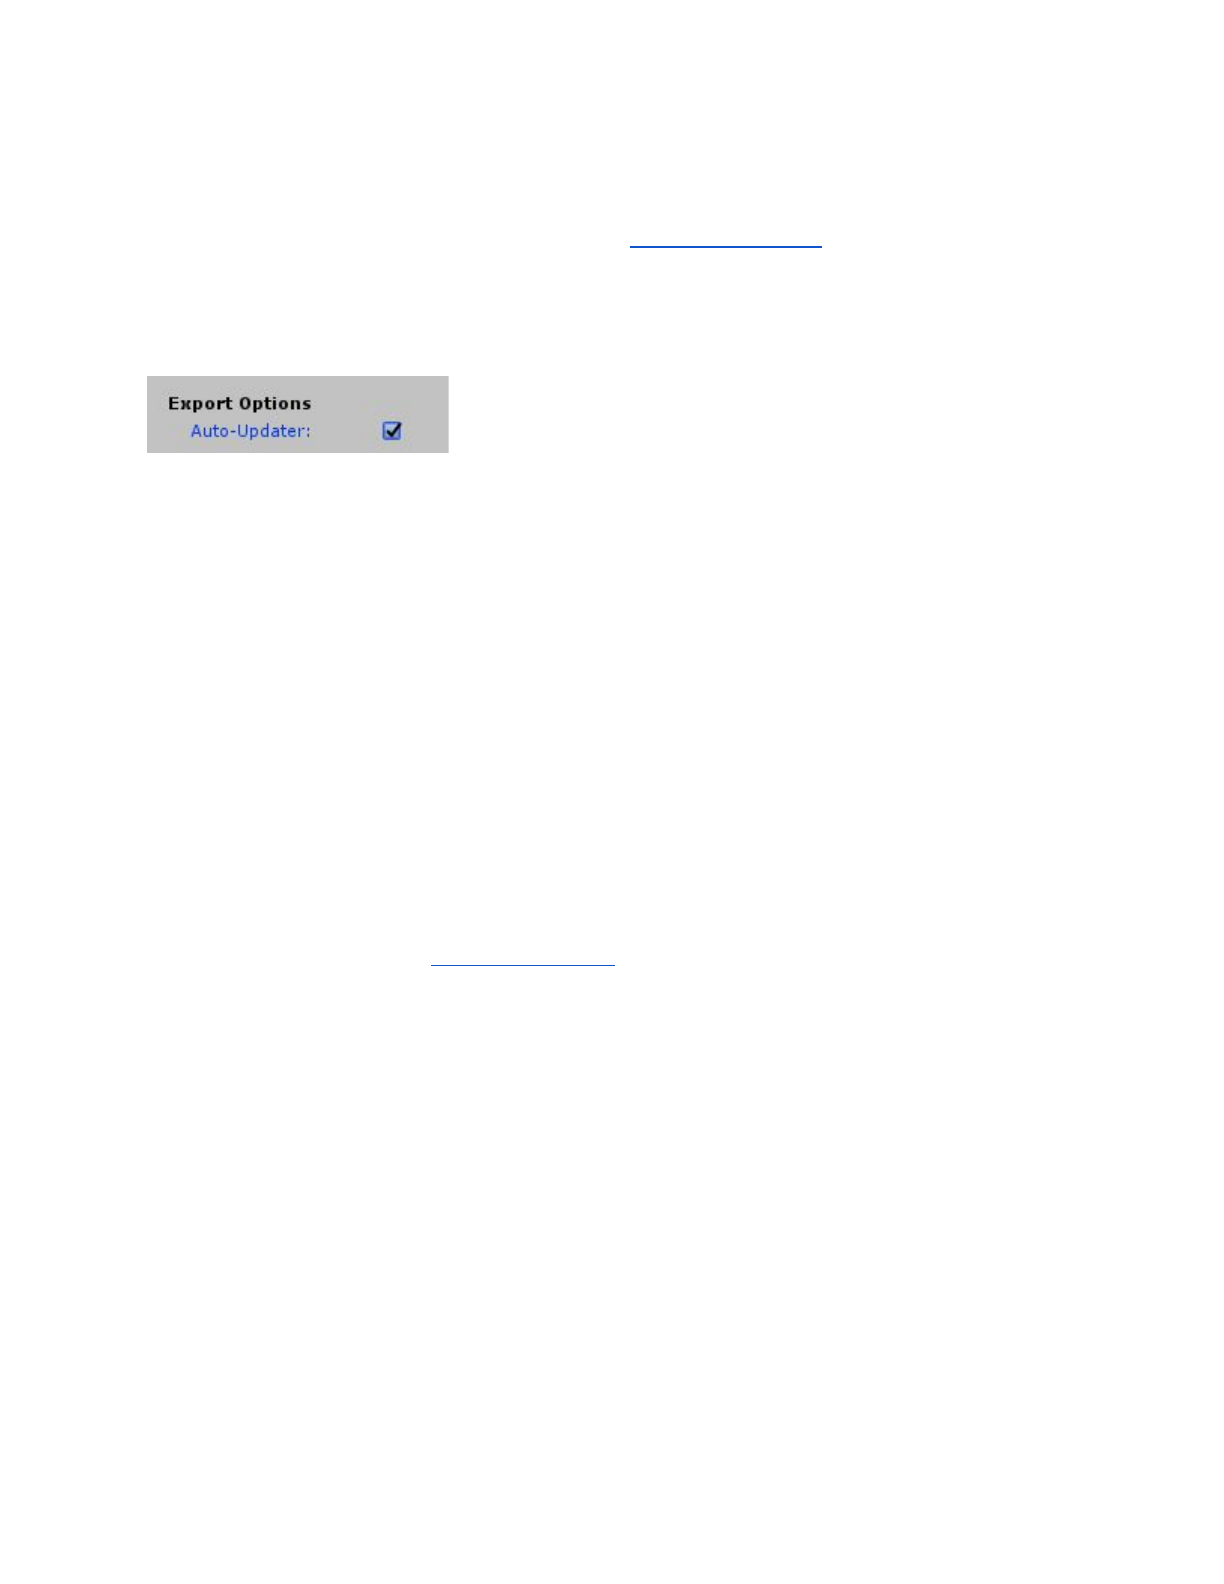
Automatic updates
When you enable the Auto-Updater option in the Fbx Export Settings, the Linked Prefab
automatically updates whenever the linked FBX file is reimported. If you disable this option, the
Linked Prefab reverts back to the default behavior of only reflecting Material attribute and Mesh
changes.
Whenever an FBX file changes on disk and the FBX file resides within the Asset folder of the
Unity Project, the built-in FBX Importer runs and updates the geometry. A Linked Prefab merges
the following additional changes:
● Adding or removing objects in the hierarchy
● Changing the parent of objects in the hierarchy
● Adding or removing the Mesh component for an object
● Changing the transform of the children in the hierarchy
● Adding or removing a Camera component for an object
● Changing the Camera component’s properties
Notes:
● If a merge conflict occurs between a changed FBX file and a Linked Prefab, the FBX file
takes precedence.
● If the updater detects that an FBX node has been deleted or renamed since the last
update, by default it deletes the corresponding object in the Prefab as well, along with its
components. See the Name Remapping feature for strategies for how to manage this
more carefully.
Name Remapping between FBX and Prefabs
You can use the Name Remapping feature in the FBX Exporter tool to apply name changes to
nodes in Unity's Linked Prefab by remapping them to use the names from your 3D modeling
software. For example, during level design you might use names that are less formal in Unity.
When you are in production mode, you might have to change the names to match the more
formal names coming from Maya or 3ds Max.
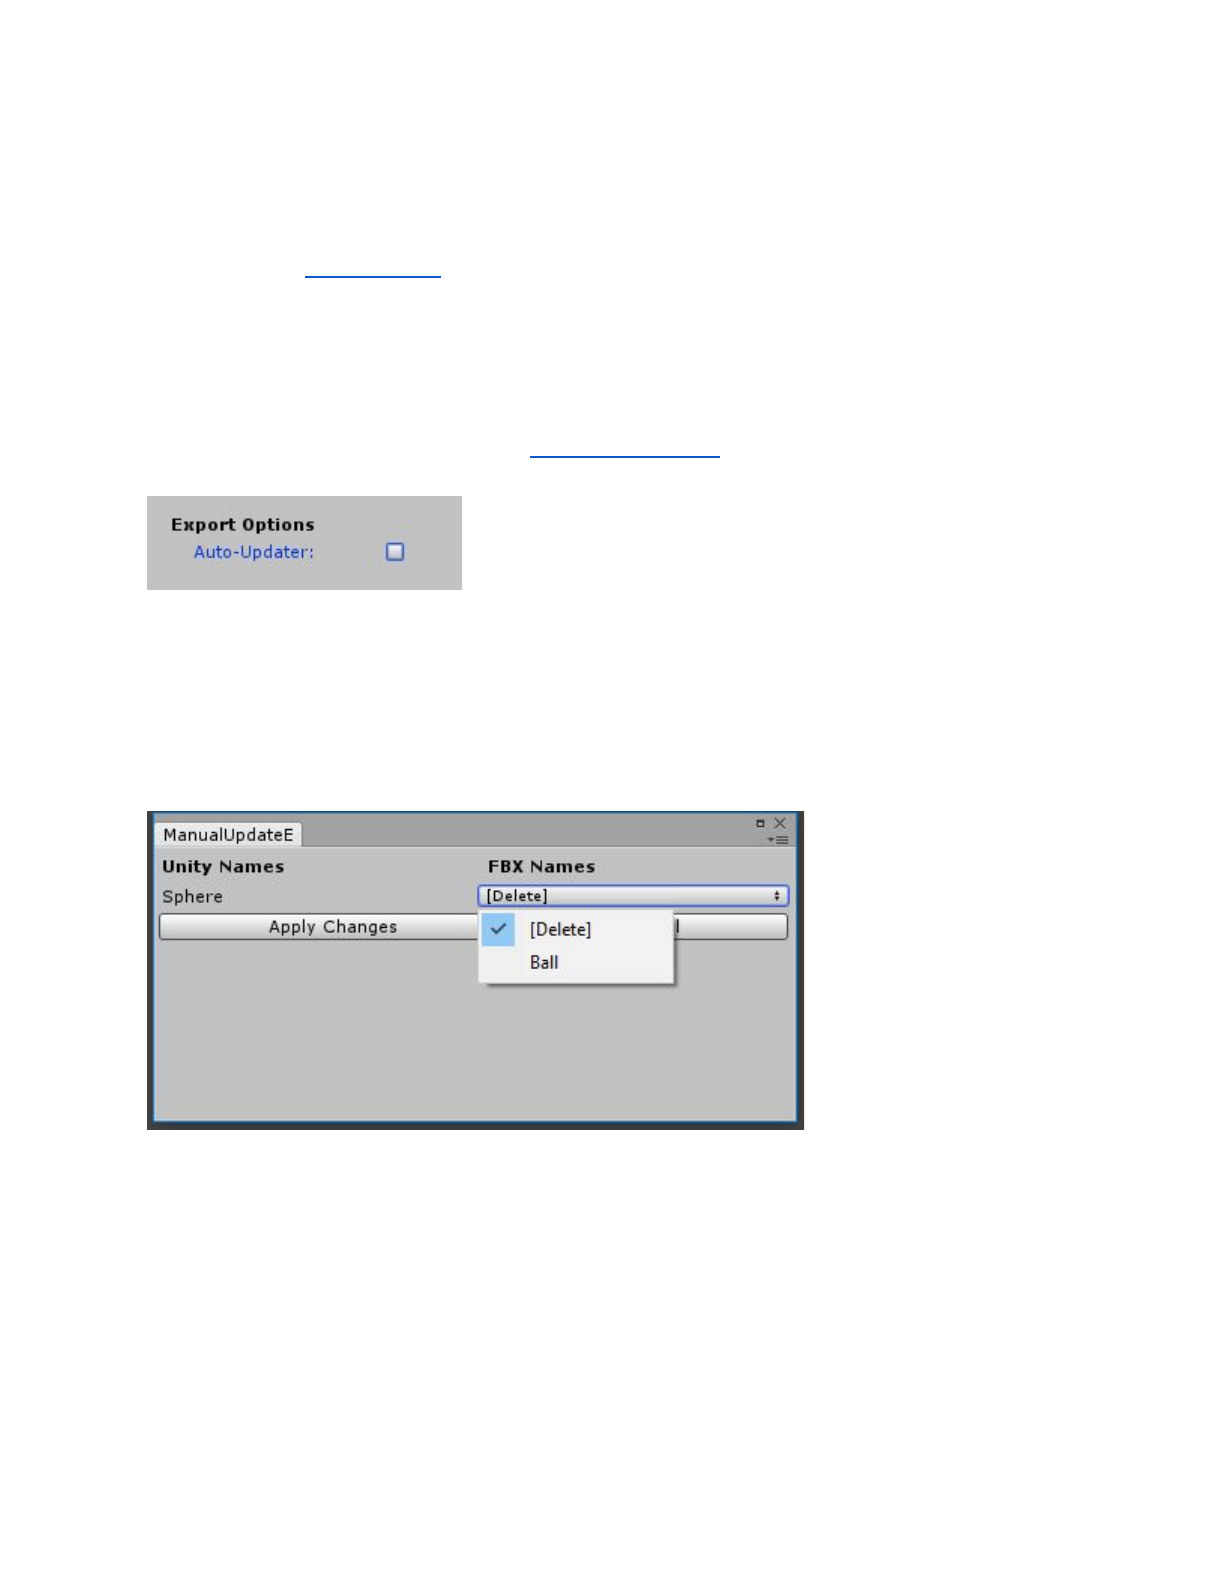
In order to access the Name Remapping feature, first disable the Auto-Updater. When you
disable the Auto-Updater option in the Fbx Export Settings, no automatic updates to the Prefab
occur when you re-import the Linked FBX.
In order to update the Prefab, select the Prefab instance in the Scene and select GameObject >
Update from FBX.
In the case of a name change, the following window opens, allowing you to determine the
outcome of the update.
Click Apply Changes to make the changes, or Cancel to cancel the update.
If you re-enable the Auto-Updater option after having disabled manual updates, you need to
manually run Update from FBX on each Prefab to ensure that all pending updates have been
processed. If the FBX changes, the automatic update is applied with the last name remapping
settings.

Notes:
● It is very important to disable the Auto-Updater option in the FBX Settings window before
starting this process.
● The Name Remapping ignores the root object, since the name comes from the name of
the FBX file, rather than what's in the file.
Known Issues
● Name or path changes are ignored when converting a Model instance.
Integrating Unity with 3D modeling software
The Unity Integration tool allows you to effortlessly exchange Assets between Unity and either
Maya, Maya LT or 3ds Max.
Use the Unity Integration tool to import and export FBX files directly to and from Unity without
having to specify filenames, select objects, or set FBX importer or exporter settings.
To customize the FBX Importer or Exporter settings in Maya or Maya LT, use the
unityFbxImportSettings.mel
and unityFbxExportSettings.mel
files. Both files are located in the
Integrations/Autodesk/maya/scripts
folder.
For 3ds Max, use the unityFbxImportSettings.ms
and unityFbxExportSettings.ms
files located in
the Integrations/Autodesk/max/scripts
folder.
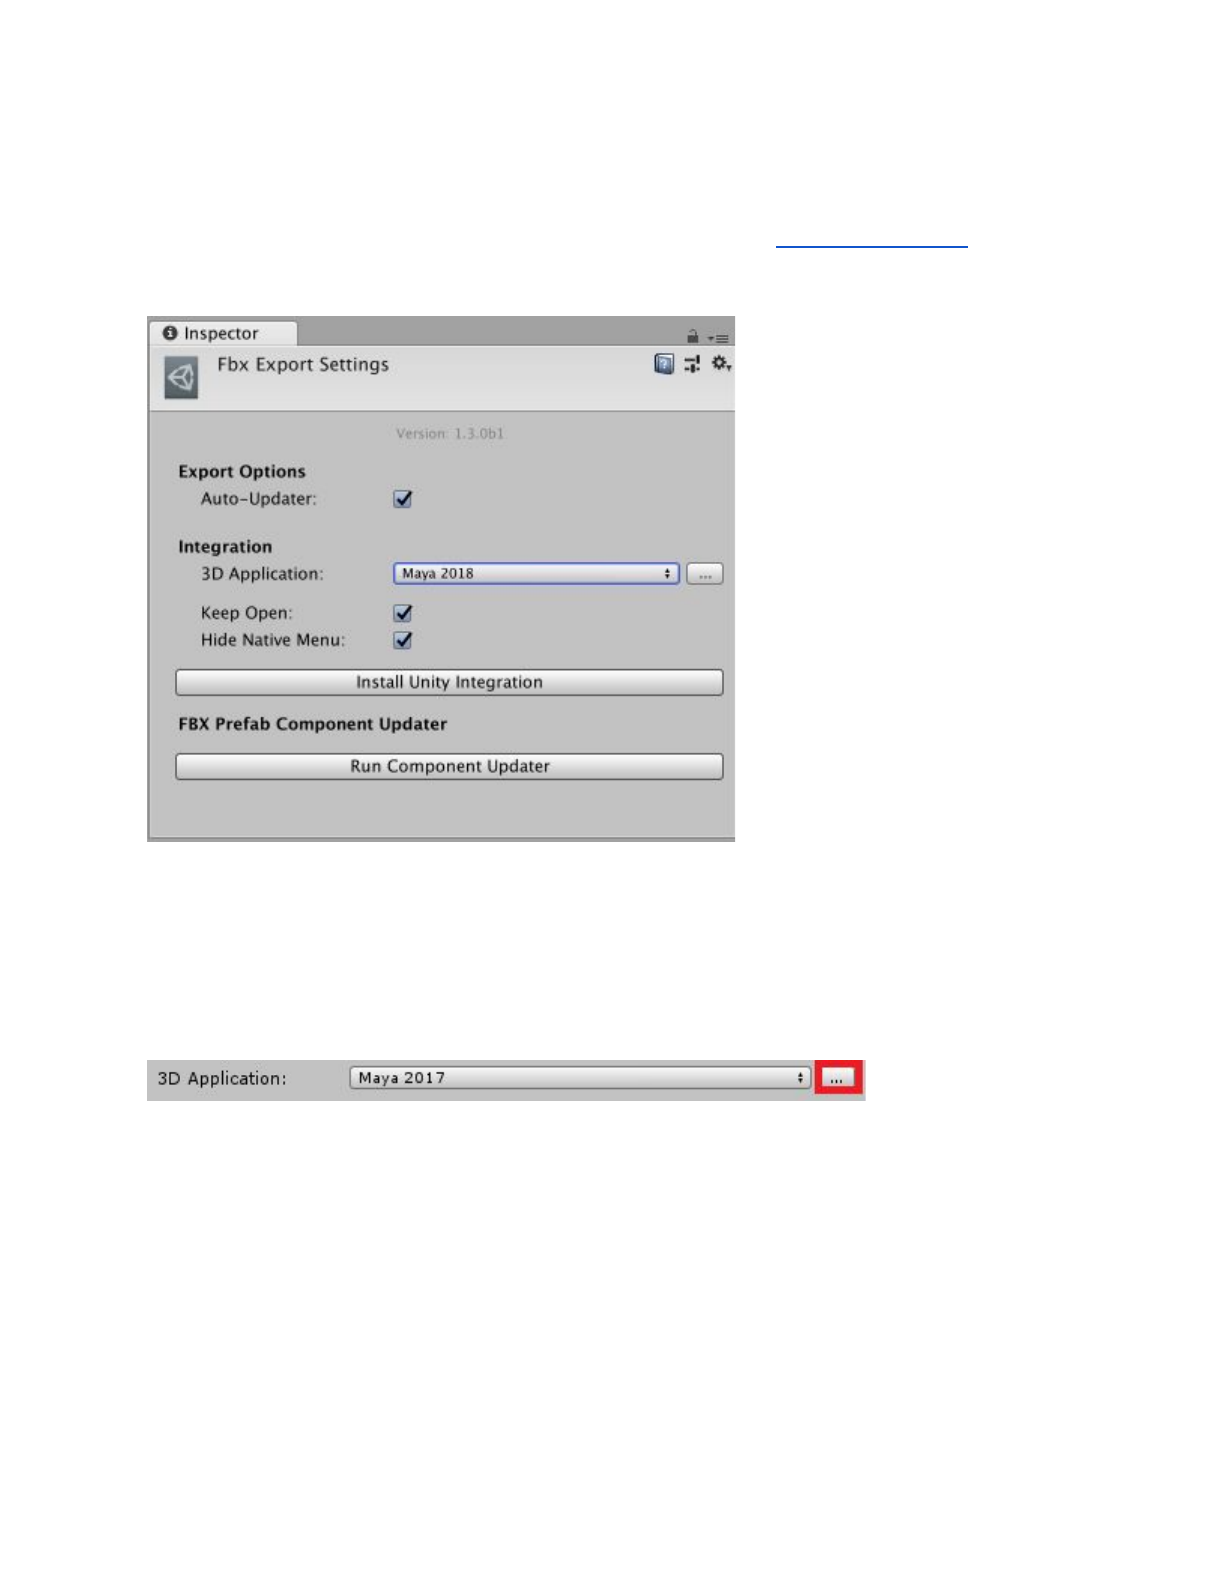
Installing an Integration
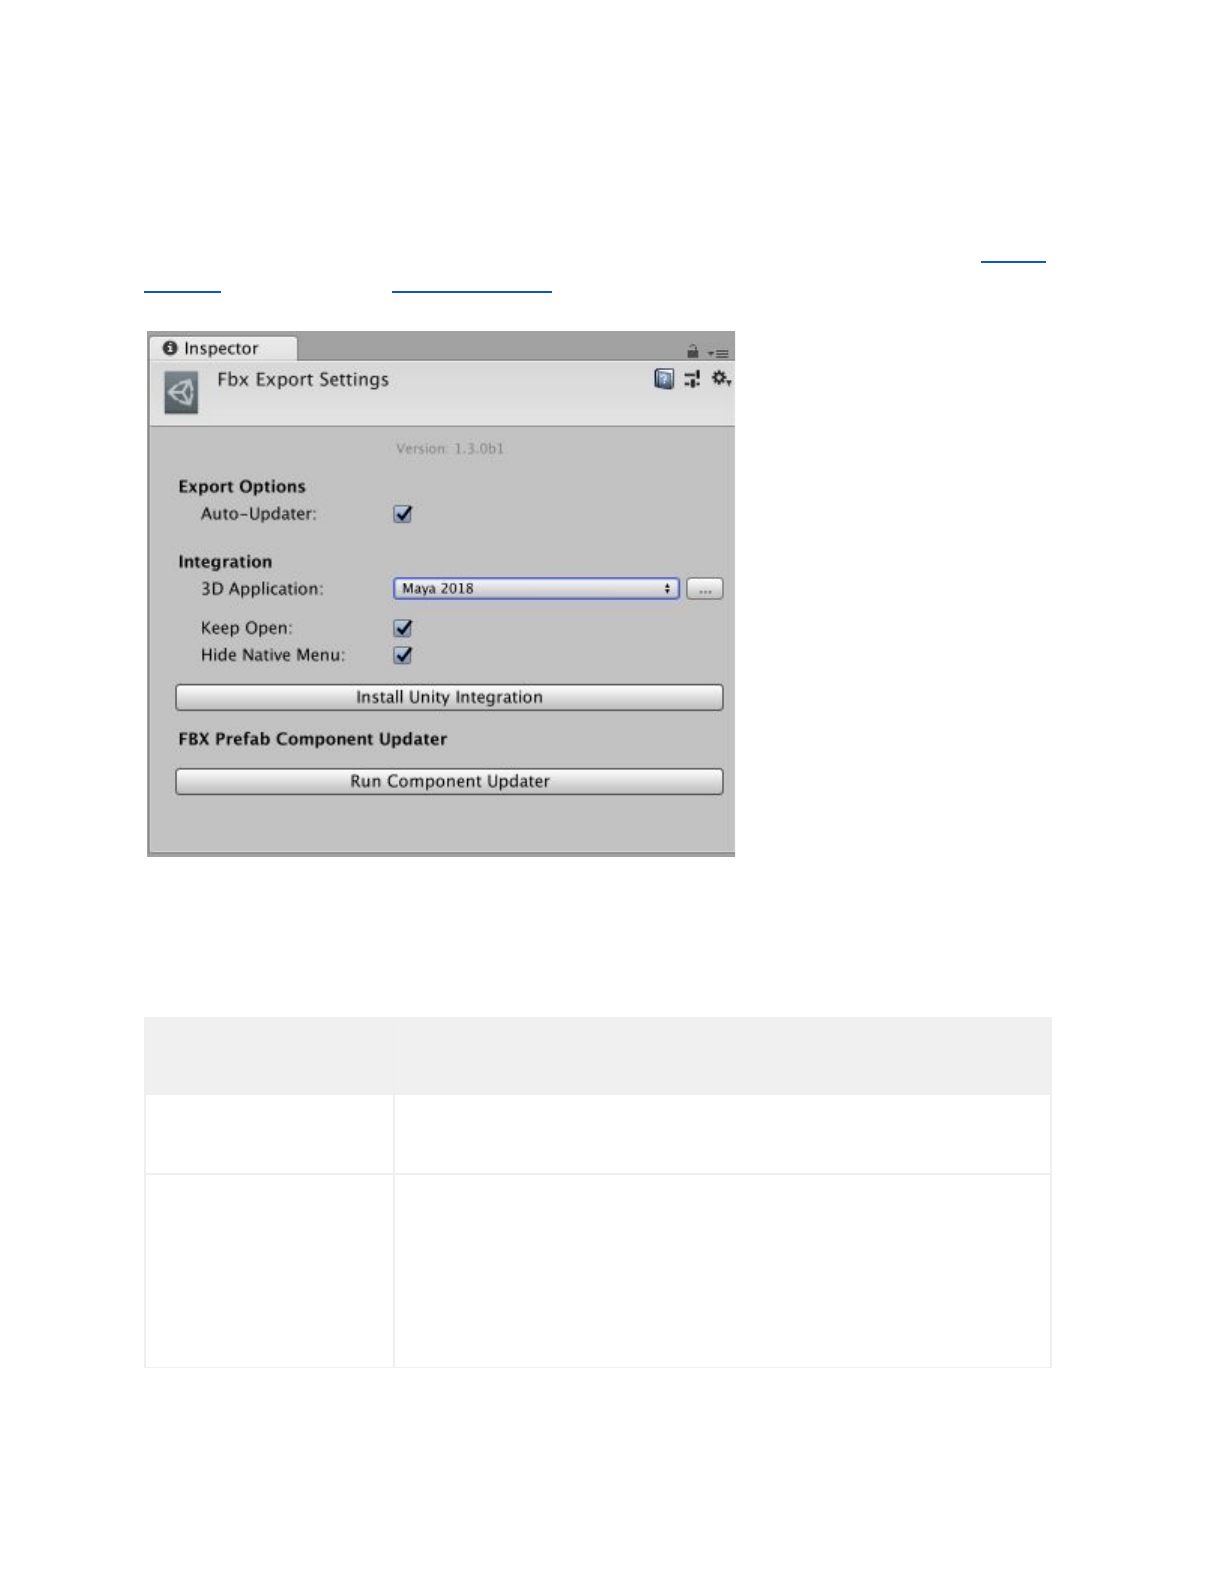
To install Unity Integration for Maya, Maya LT, or 3ds Max, open Fbx Export Settings (menu:
Edit > Project Settings > Fbx Export) in Unity:
Use the 3D Application property to choose the 3D modeling software and version where you
want to install the Unity Integration.
To select a version of Maya, Maya LT, or 3ds Max installed outside the default location, click the
Browse button.
3D Application property with Browse button (red outline)
Before installing Unity Integration, close all instances of the selected 3D modeling software that
matches the specified version.
Click Install Unity Integration to install the Unity Integration for the selected 3D modeling
software. Unity Integration comes packaged in several zip files (one zip file per supported
application). Then select a target folder to extract the Unity Integration to when prompted. The
target folder can be outside of your current Project. Maya and Maya LT both use the same zip
folder.

The application starts, configures the plug-in, and automatically exits. Unity reports whether the
installation was a success.
If an error occurs during startup, Maya may not close. If this happens, check the Maya console
to see if you can resolve the issue, and then manually close Maya.
If you enabled the Keep Open option in the Fbx Export Settings window, then Maya stays open
after installation completes.
Manually Installing a Maya Integration
Sometimes you need to install a Maya integration manually. For example, if you are using an
unsupported version of Maya.
To manually install a Maya Integration, follow these steps:
1. Extract the UnityFbxForMaya.zip
file in the FbxExporters/
folder from the Unity package to a
writable location. This can be in or outside of your Unity Project.
2. Copy the contents of Integrations/Autodesk/maya/UnityFbxForMaya.txt
from the unzipped
folder to the following file:
● On Windows:
C:\Users\{username}\Documents\maya\modules\UnityFbxForMaya.mod
● On Mac:
$HOME/Library/Preferences/Autodesk/Maya/modules/UnityFbxForMaya.mod
3. In UnityFbxForMaya.mod
, modify the following line (mel code):
+ UnityFbxForMaya {Version} {UnityIntegrationsPath}/Integrations/Autodesk/maya
Where this:
Corresponds to:

{Version}
1.3.0b1
(or your version number of the FBX Exporter package)
{UnityIntegratio
nsPath}
the location where you unzipped UnityFbxForMaya.zip
in step 1
4. Locate the following file (if it doesn't exist, create the file):
● On Windows:
C:\Users\{username}\Documents\maya\scripts\userSetup.mel
● On Mac:
$HOME/Library/Preferences/Autodesk/Maya/scripts/userSetup.mel
5. Add this line (mel code):
if(`exists unitySetupUI`){ unitySetupUI; }
6. Open Maya, and then open the Script Editor:
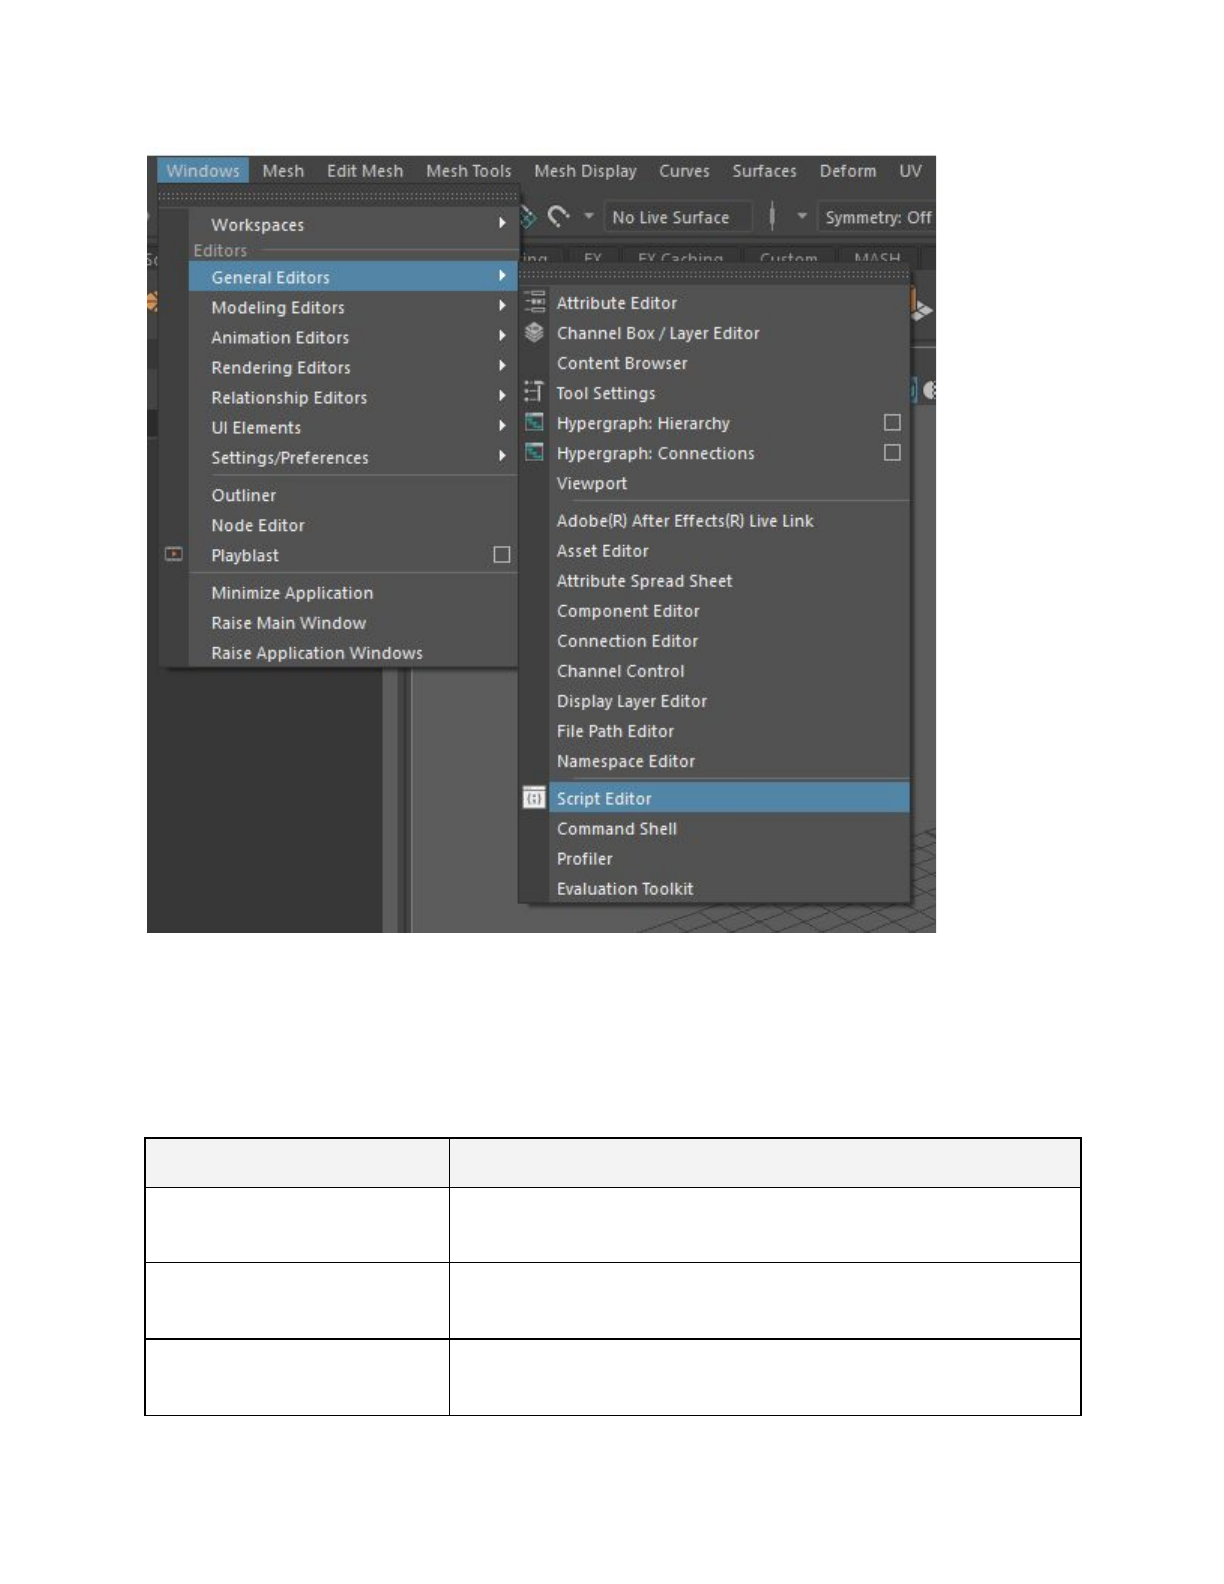
7. Run the following (mel code):
unityConfigure "{UnityProjectPath}" "{ExportSettingsPath}"
"{ImportSettingsPath}" 0 0;
Where this:
Corresponds to:
{UnityProjectPath}
path/to/UnityProject
{ExportSettingsPath}
path/to/Integrations/Autodesk/maya/scripts/unityFbxExportSett
ings.mel
{ImportSettingsPath}
path/to/Integrations/Autodesk/maya/scripts/unityFbxImportSett
ings.mel
Working with Maya 2017+ and Maya LT 2017+
Importing from Unity
Importing an FBX Model automatically configures the plug-in for export. The plug-in remembers
your Unity Project, the export filenames, and which objects to export per file.
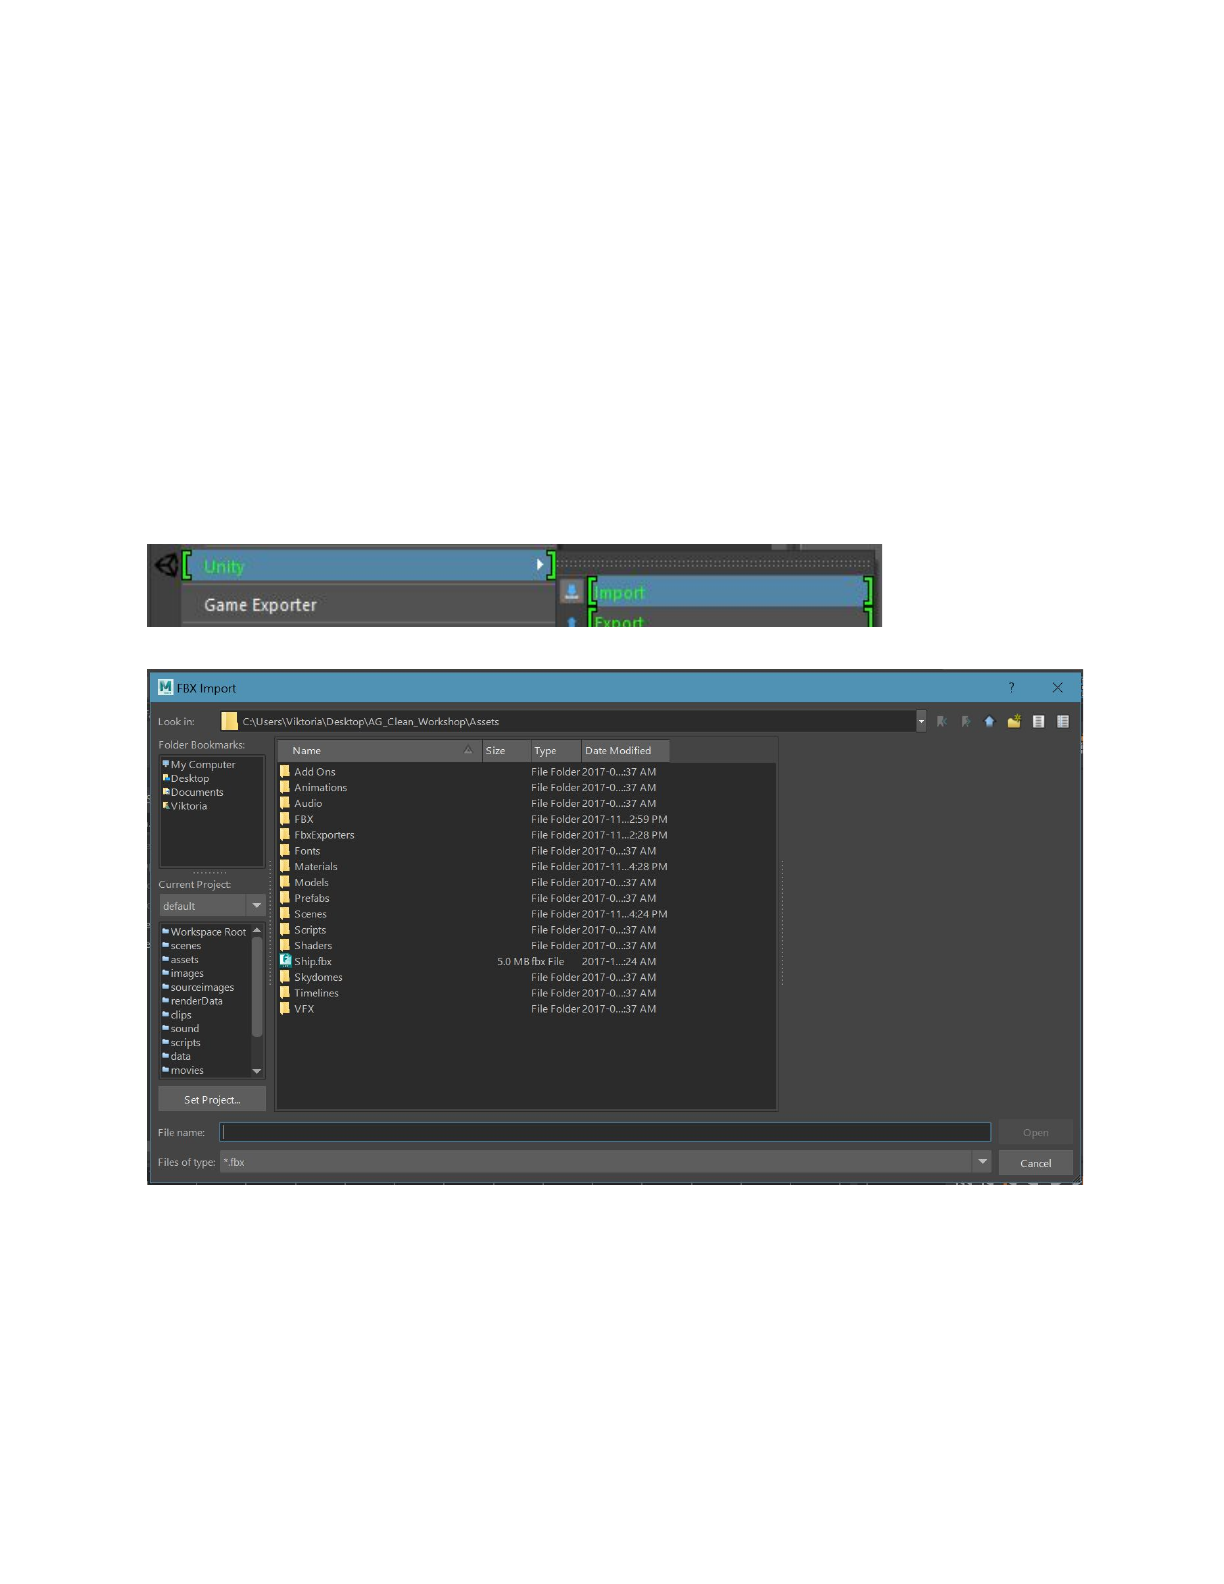
Select File > Unity > Import to open a file browser directly in your current Unity Project. Use the
file browser to select the FBX files to import. One or more files can be selected at once. Hold
Shift or Ctrl to select multiple files.
Maya and Maya LT FBX import menu
The FBX Exporter adds the contents of each imported file to an export set named after the
imported FBX file. For example, if you import model.fbx
, you can find its contents in an export
set called model_UnityExportSet
.
In addition, the contents of the file are placed into a namespace based on the filename. For
model.fbx
, the contents are placed into the model: namespace.
Animation files using the @ notation (<modelname>@<animation>.fbx
), are recognized as
animation files belonging to the Model contained in model.fbx
.
For instance, if you import a file called model@anim.fbx
, the export set and namespace name
are based on the name before the @ symbol. Therefore, it uses the same set and namespace
as model.fbx
.
This allows animation files to be easily imported and applied to the appropriate objects in the
Scene. Maya stores the animation filename and path for easy export. A single animation file is
supported per model file. Importing a new animation overwrites the existing animation in the
Scene.
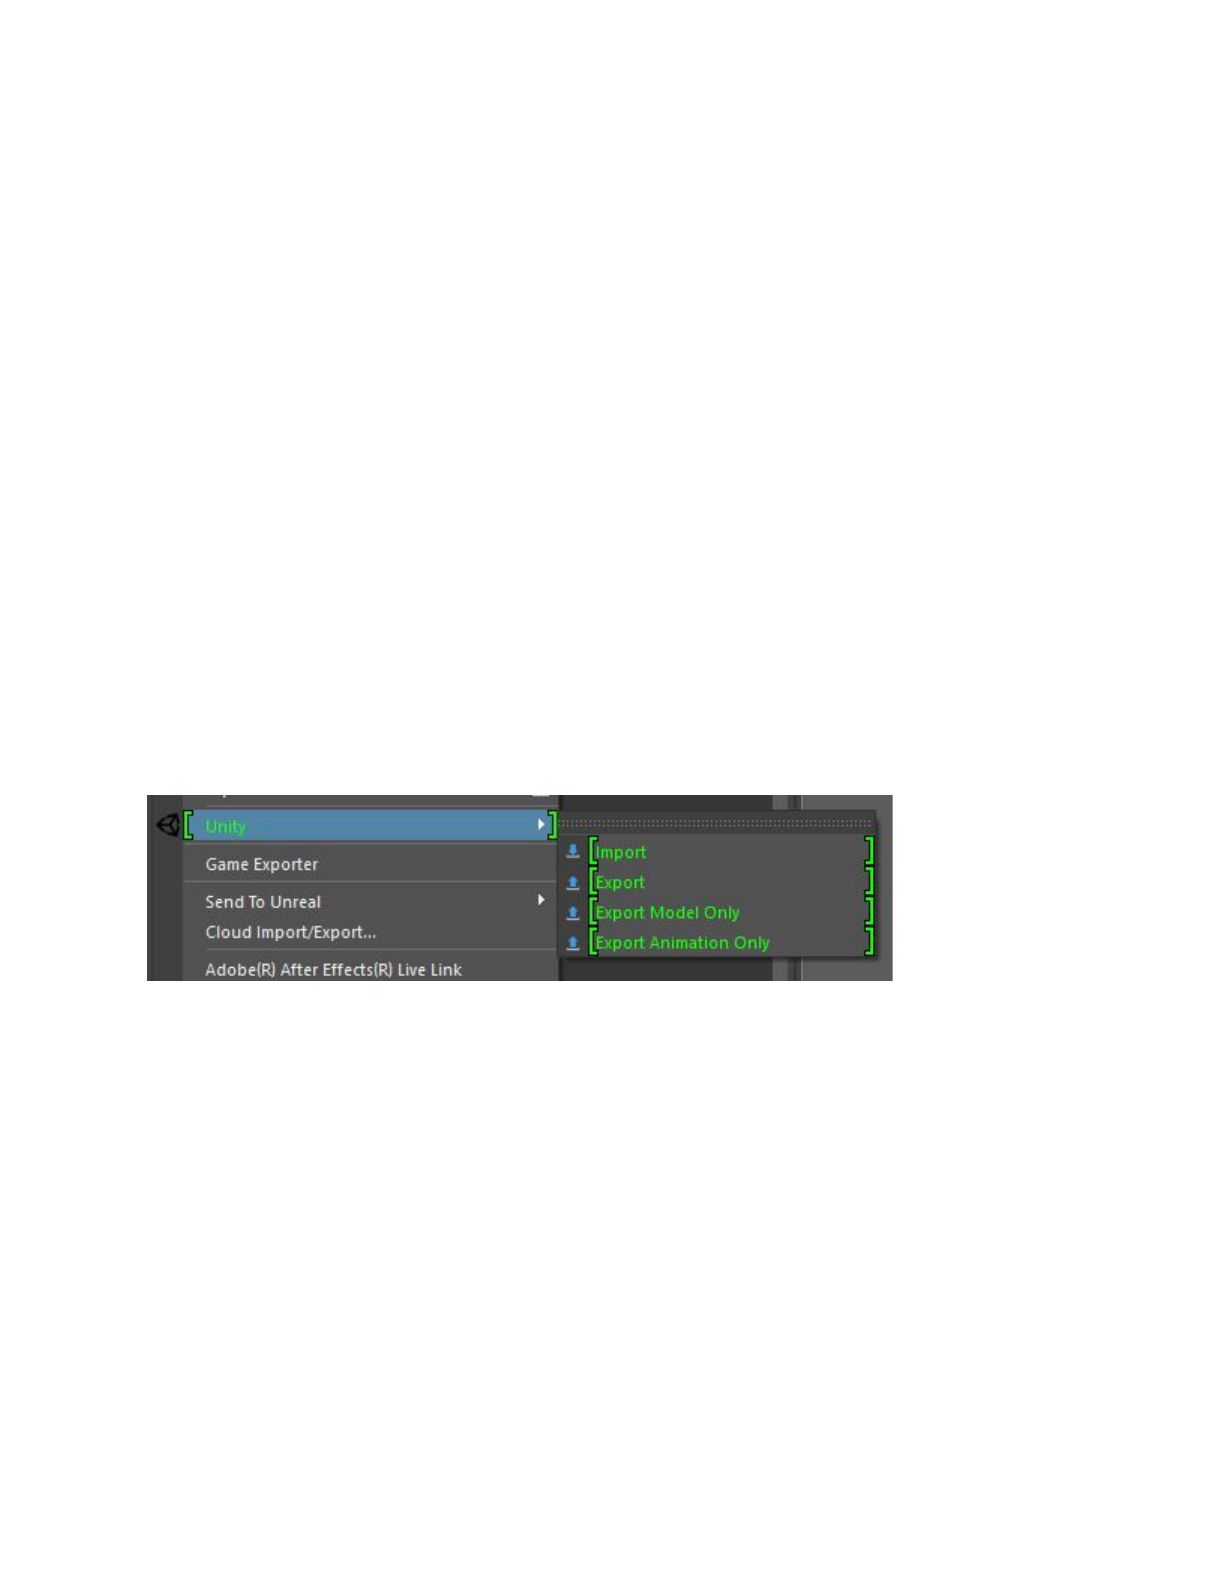
Exporting to Unity
There are three options available for export in Maya and Maya LT:
● Export
● Export Model Only
● Export Animation Only
File > Unity > Export exports both Models and animation contained in the export sets selected
for export.
File > Unity > Export Model Only exports all Models in the selected export sets, but does not
export any animation.
File > Unity > Export Animation Only exports only the animation applied to the objects in the
export set as well as the minimum components required for the animation (such as transforms,
animated lights and cameras).
Note: If no animation file with the @ notation has been imported, then this option has no effect.
The workaround for exporting a new animation is to first import an empty FBX file with the @
notation ({model}@anim.fbx
), so that the export set is configured correctly.
In order to export objects from the desired export set, you can select one or more objects in the
set or the set itself. In either case, the FBX Exporter exports the entire contents of the set.
If you select multiple sets or objects from multiple sets, then the FBX Exporter exports each set
to its respective file defined in the attributes of the set.
Working with 3ds Max 2017+
Importing from Unity
Importing an FBX Model automatically configures the plug-in for export. The plug-in remembers
your Unity Project, the export filename, and which objects to export.
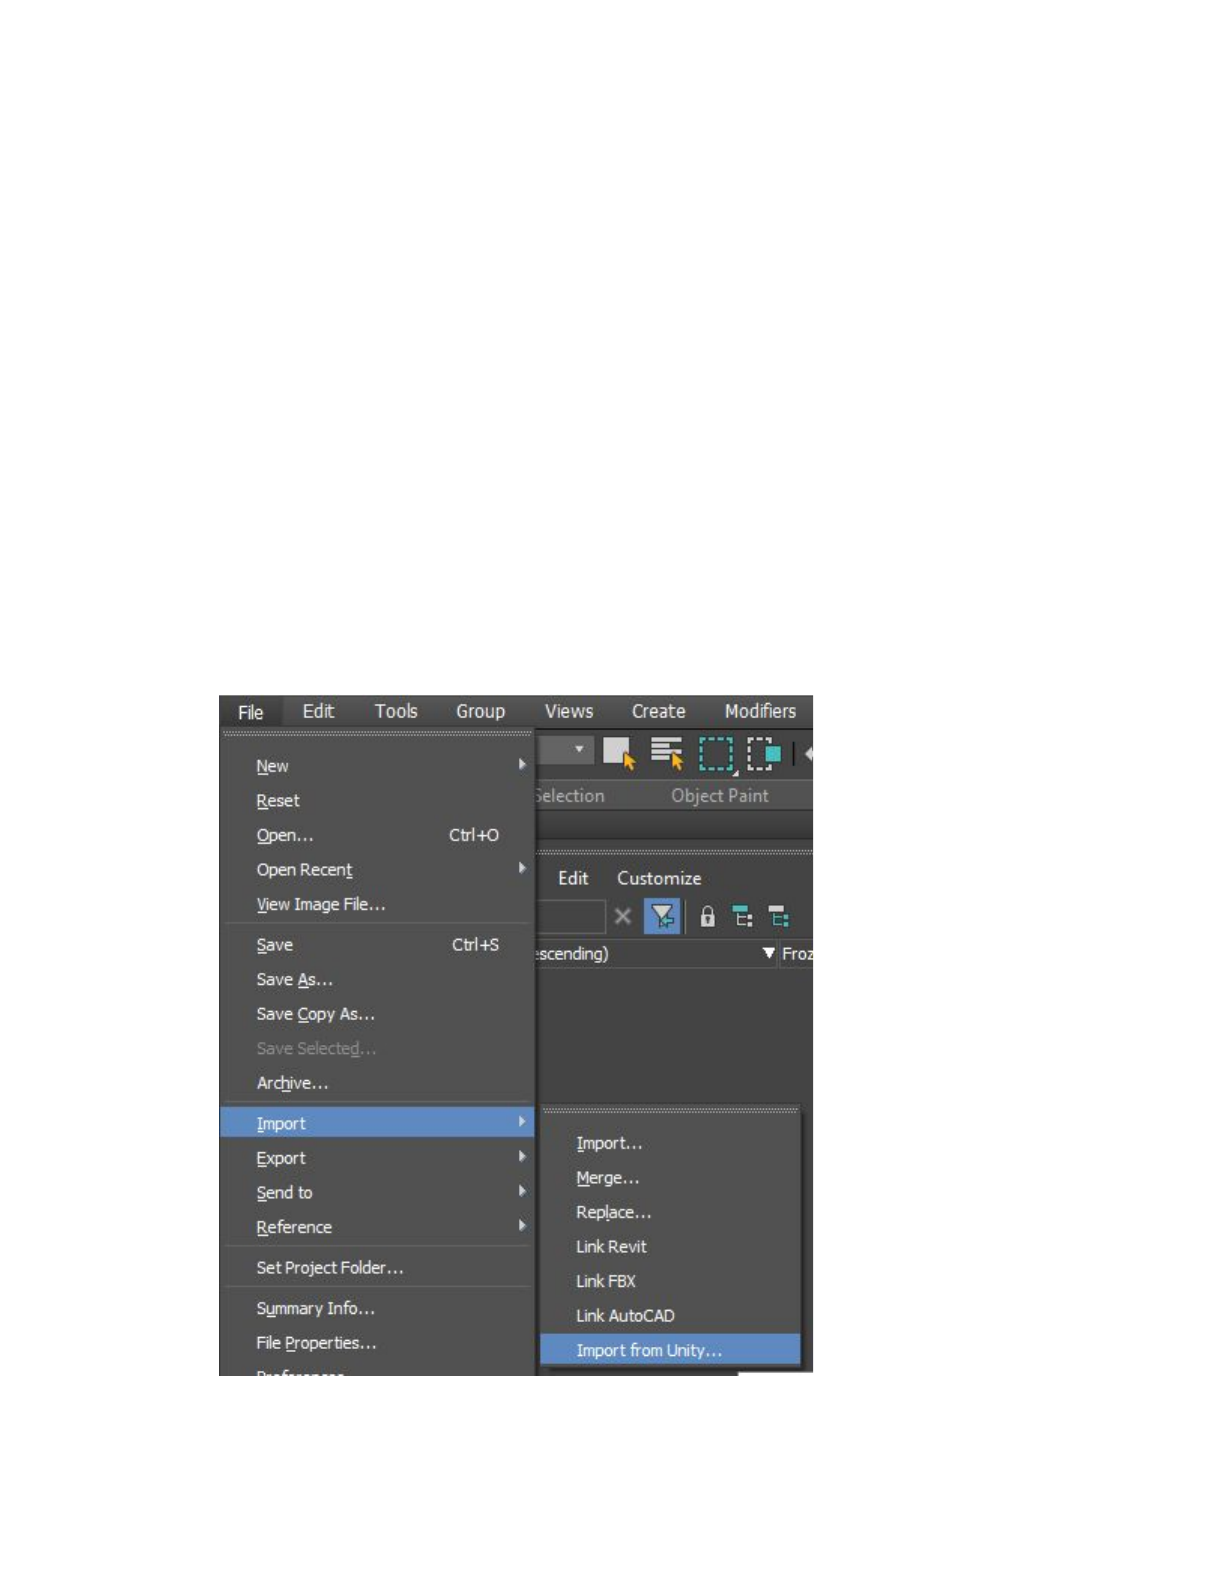
Select Import to open a file browser directly in your current Unity Project:
● In 3ds Max 2018, select File > Import > Import from Unity....
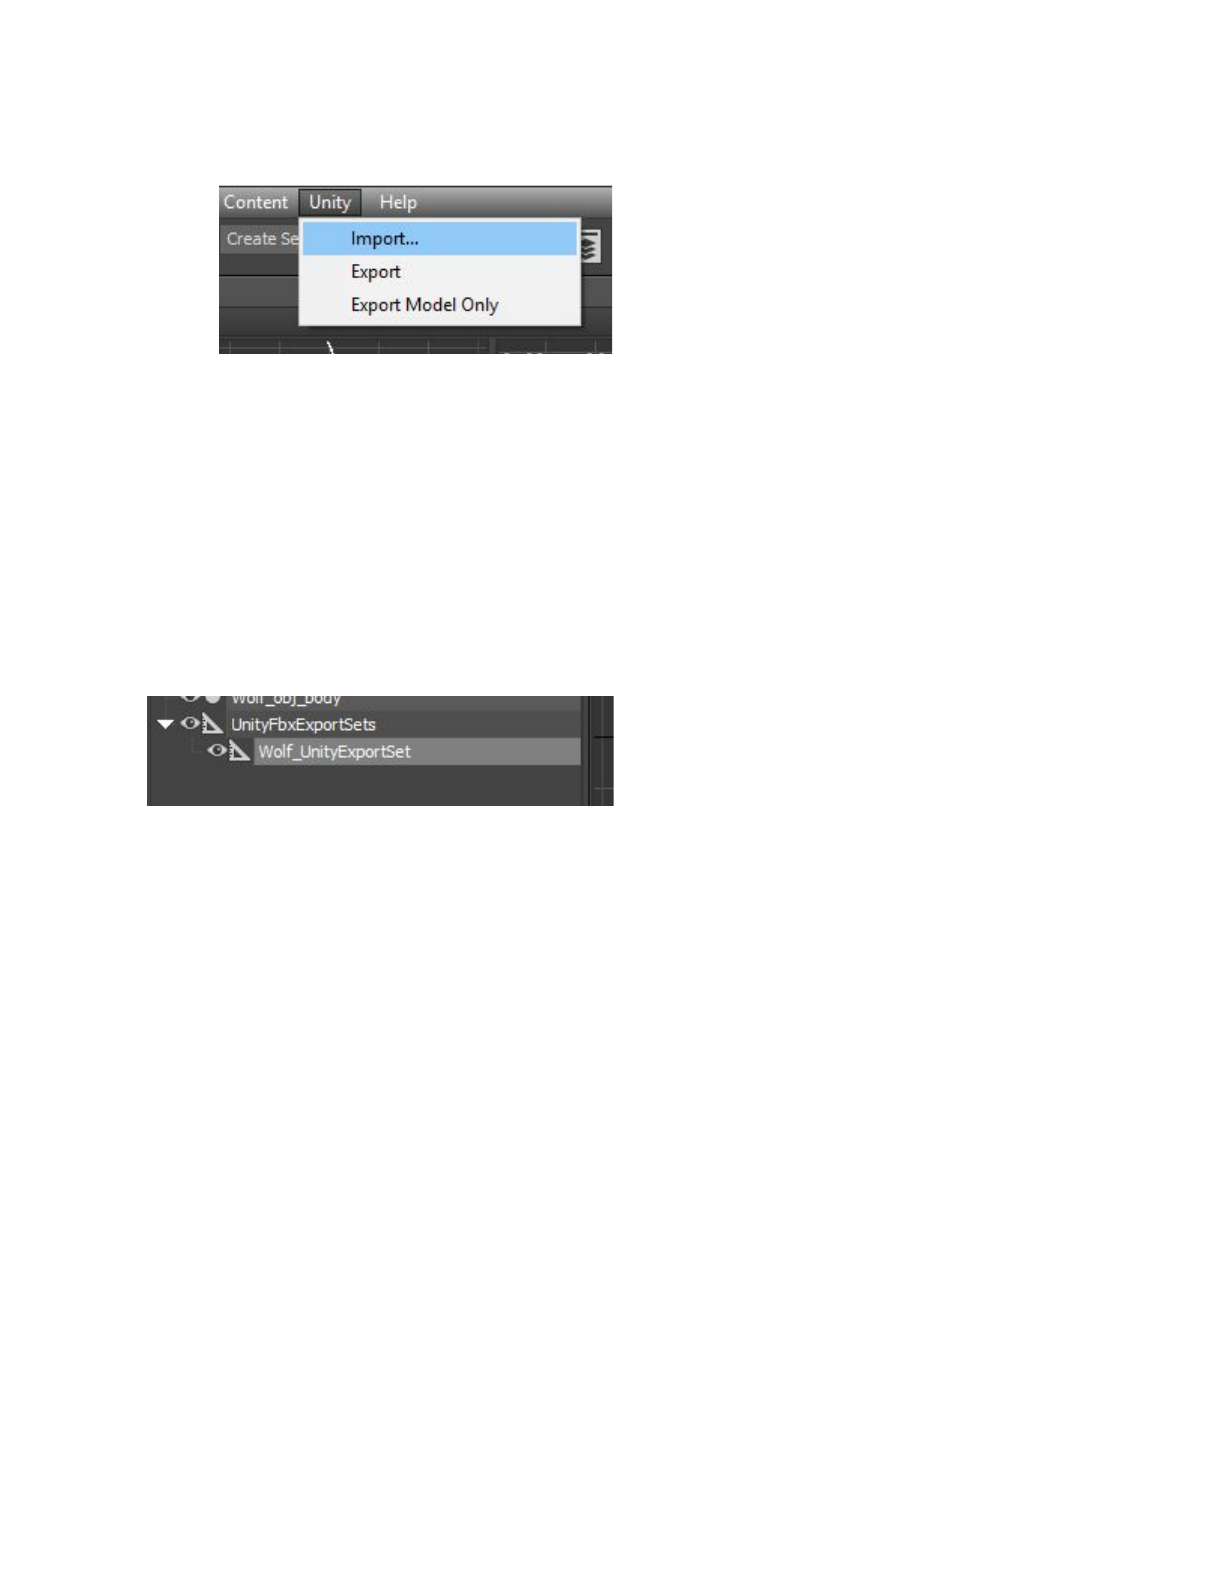
● In 3ds Max 2017, select Unity > Import....
Use the file browser to select one or more Model(s) to import. You can hold the Shift or Ctrl keys
to select multiple files.
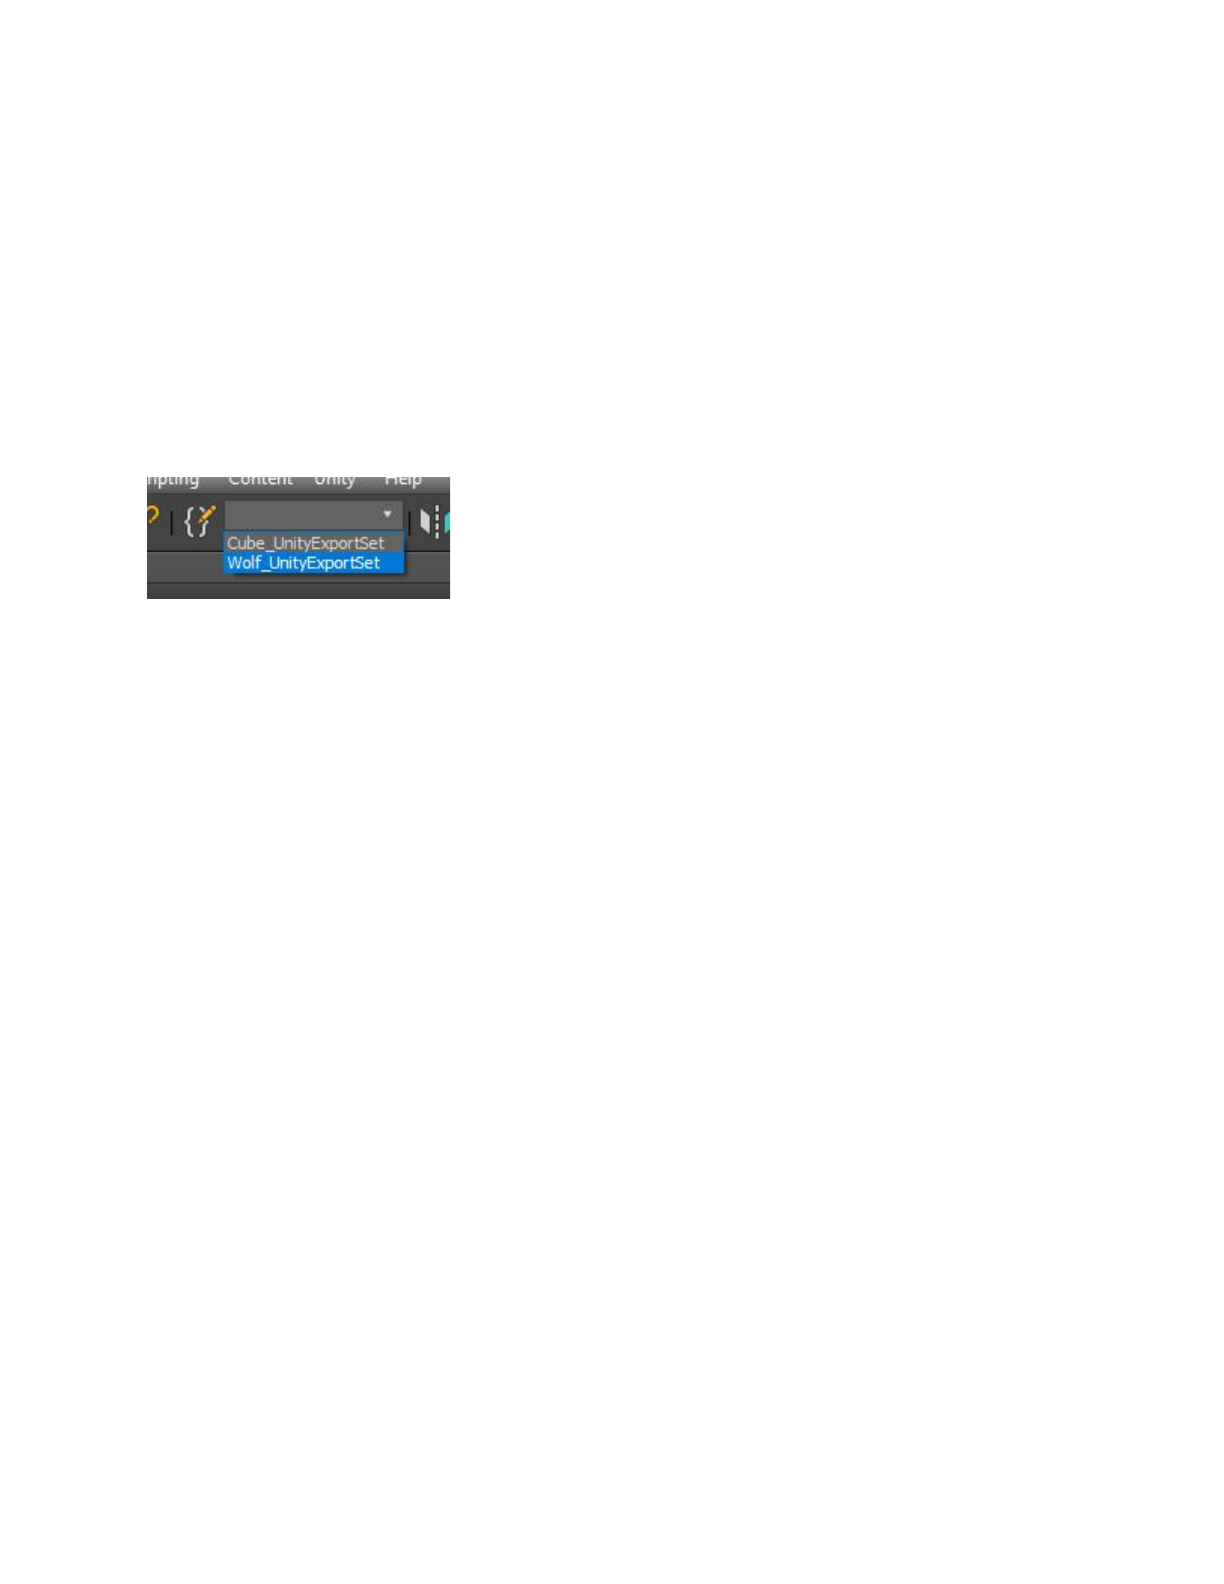
The FBX Exporter automatically adds the contents of each imported file to a selection set
named after the imported FBX file. For example, if you import model.fbx
, you can find its
contents in a selection set called model_UnityExportSet
.
A dummy with the same name (model_UnityExportSet
) is also created for each imported file
and parented under another dummy object called UnityFbxExportSets
.
Dummy created in 3ds Max after importing Wolf.fbx
This dummy contains the imported file’s path and filename as custom attributes, which the FBX
Exporter also uses on export.
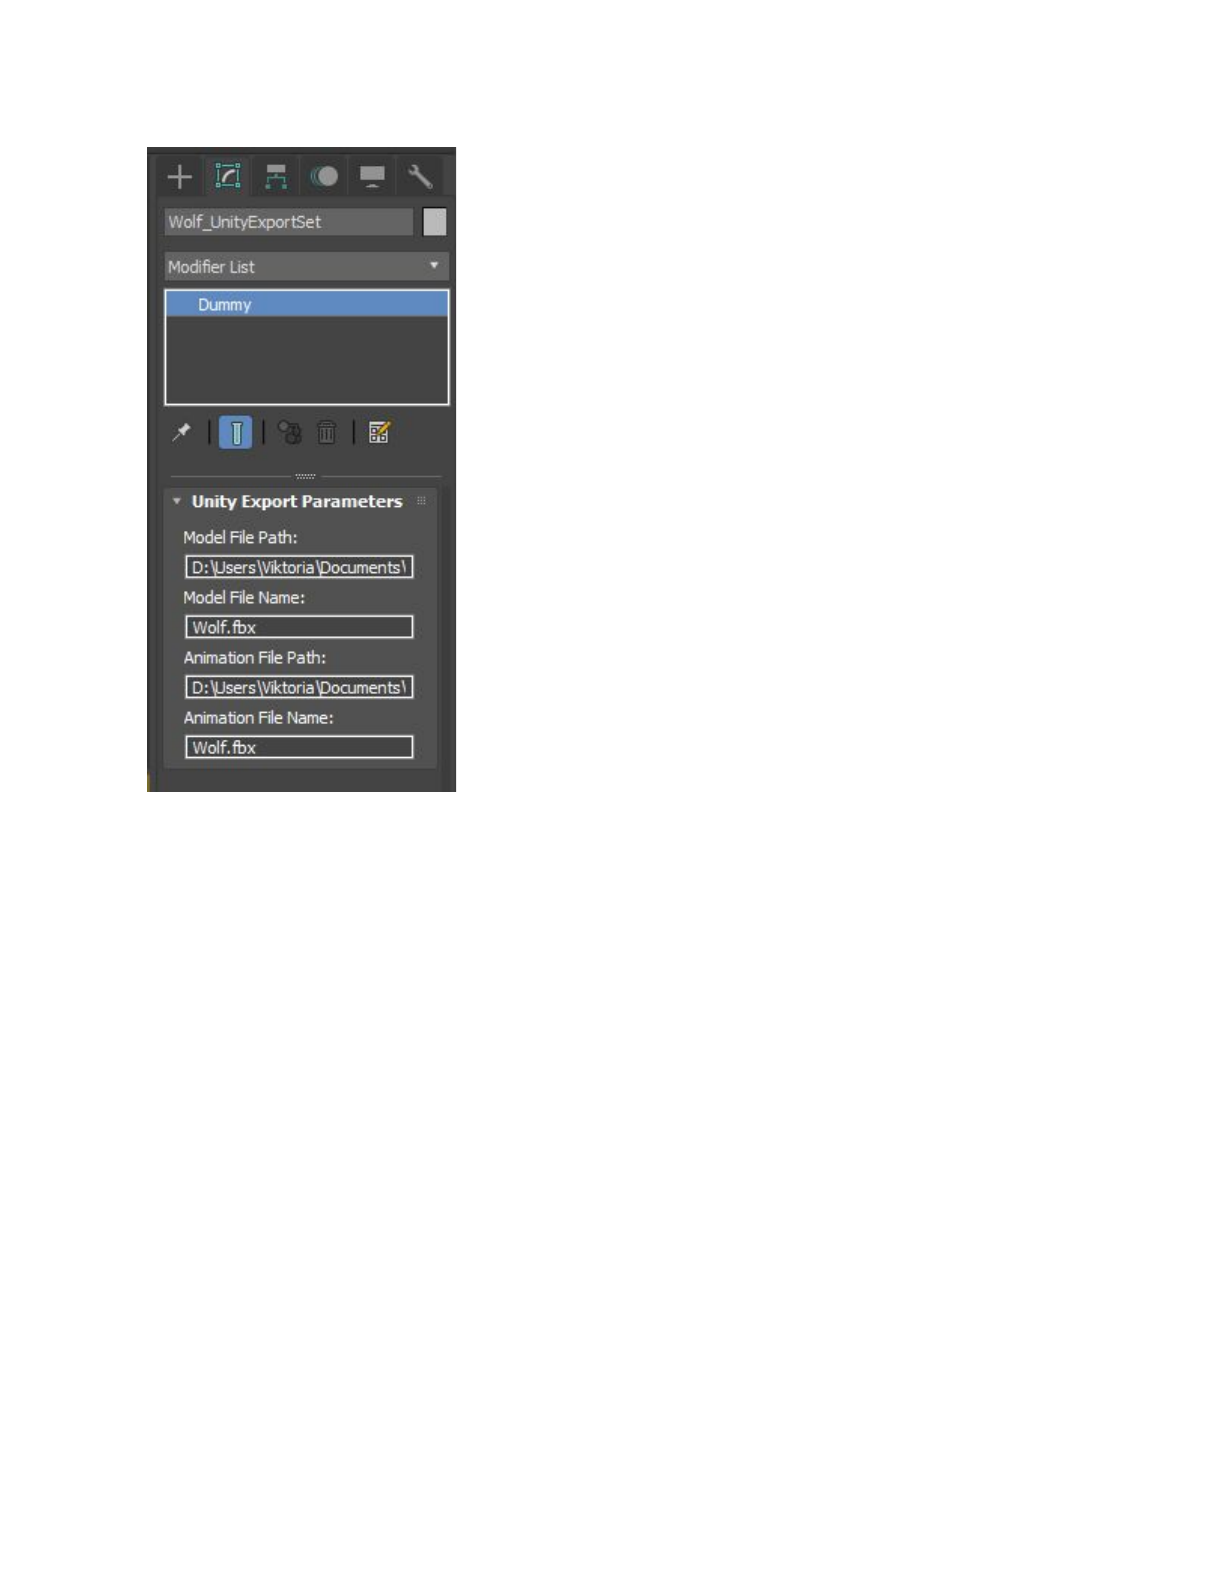
Custom attributes on a UnityExportSet dummy
The @ notation (<modelname>@<animation>.fbx
), indicates that this is an animation file
belonging to the Model contained in model.fbx
.
For instance, if you import a file called model@anim.fbx
, the export set is based on the name
before the @ symbol. Therefore, it uses the same set as model.fbx
.
This allows you to easily import animation files and apply them to the appropriate objects in the
Scene. A single animation file is supported per Model file. Importing a new animation overwrites
the existing animation in the Scene.
Note: Exporting animation only from 3ds Max is not supported.
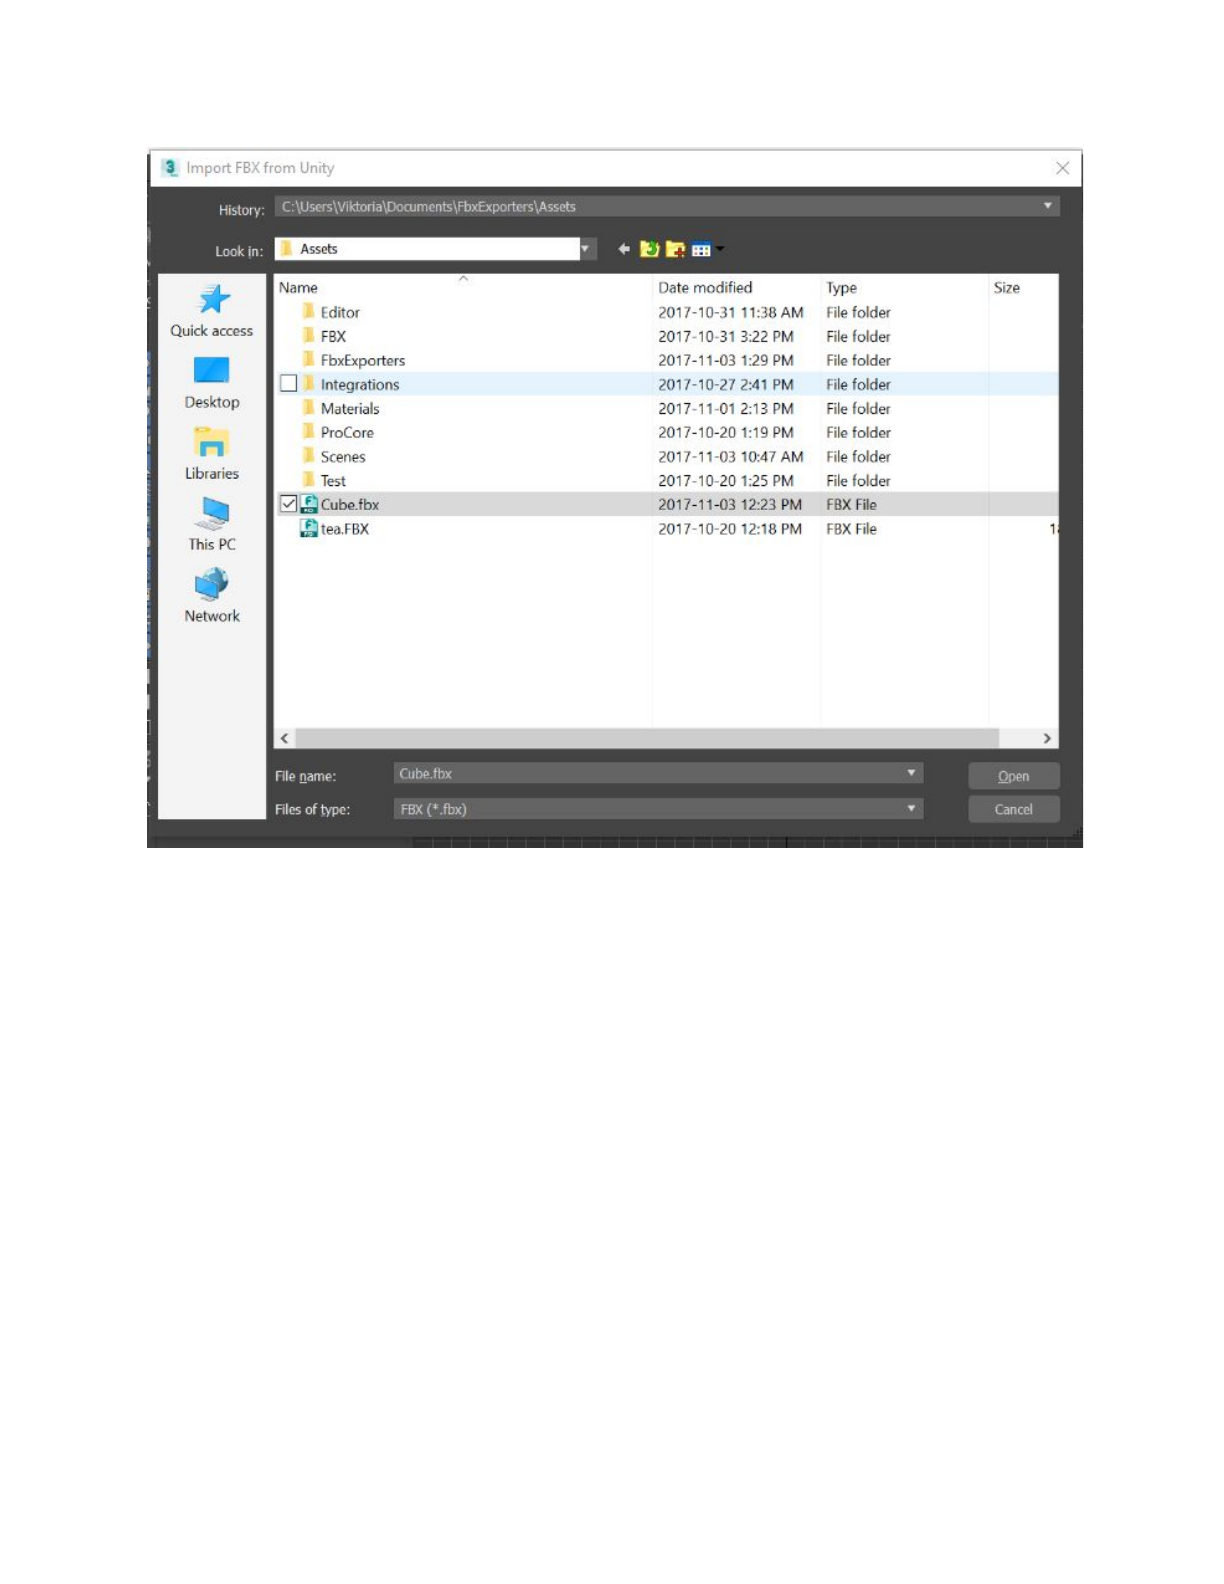
3ds Max FBX import file browser
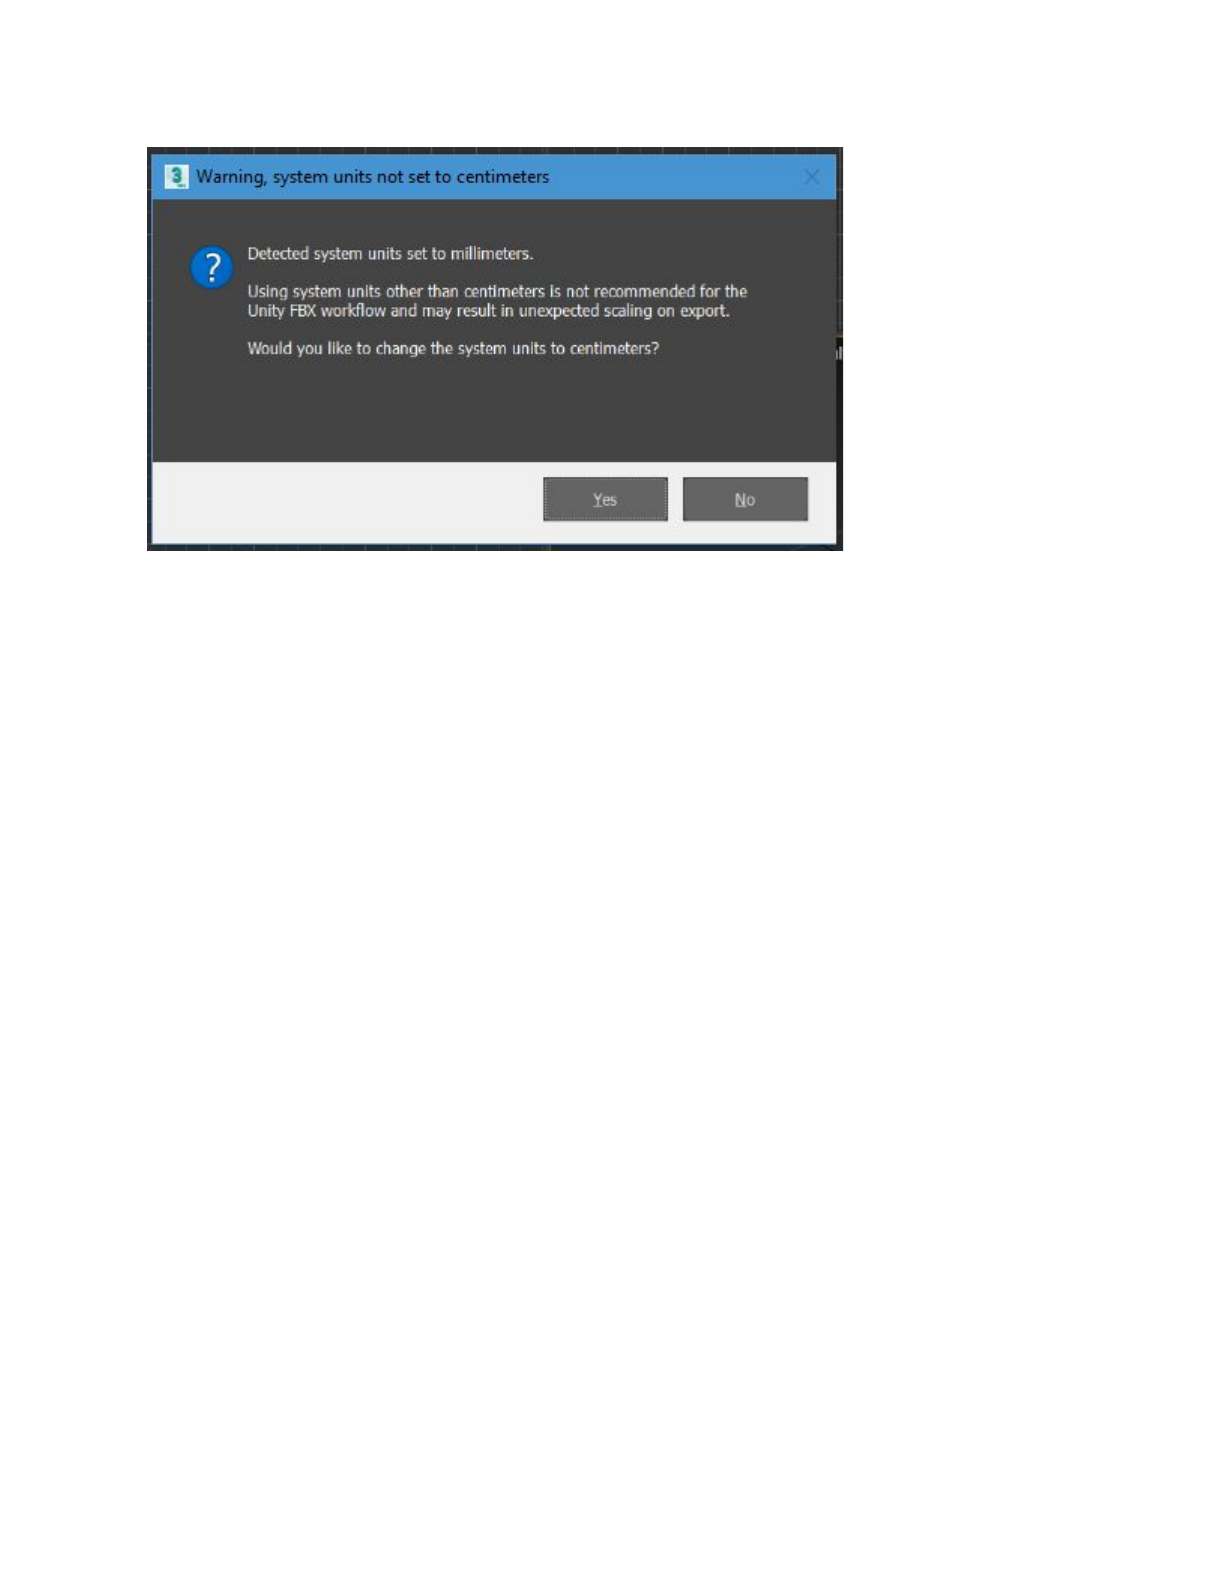
If the system units are not set to centimeters, 3ds Max prompts you to change the system units
to centimeters. Select one of the following options:
● Click Yes to change the system units (recommended) to centimeters, ensuring that the
scaling is maintained on export.
● Click No to use the current system units (not recommended). The prompt does not
appear again for the remainder of the 3ds Max session or, in the case of a .max file,
does not appear again for this file.
Export to Unity
There are two options available for export in 3ds Max:
● Export
● Export Model Only
Export exports both Models and animation contained in the export sets selected for export.
Export Model Only exports all Models in the selected export sets, but does not export any
animation.
Select either to automatically export with the settings and Models configured during import. No
additional steps are required.
In 3ds Max 2018, select File > Export > Export to Unity or File > Export > Export to Unity
(Model Only).
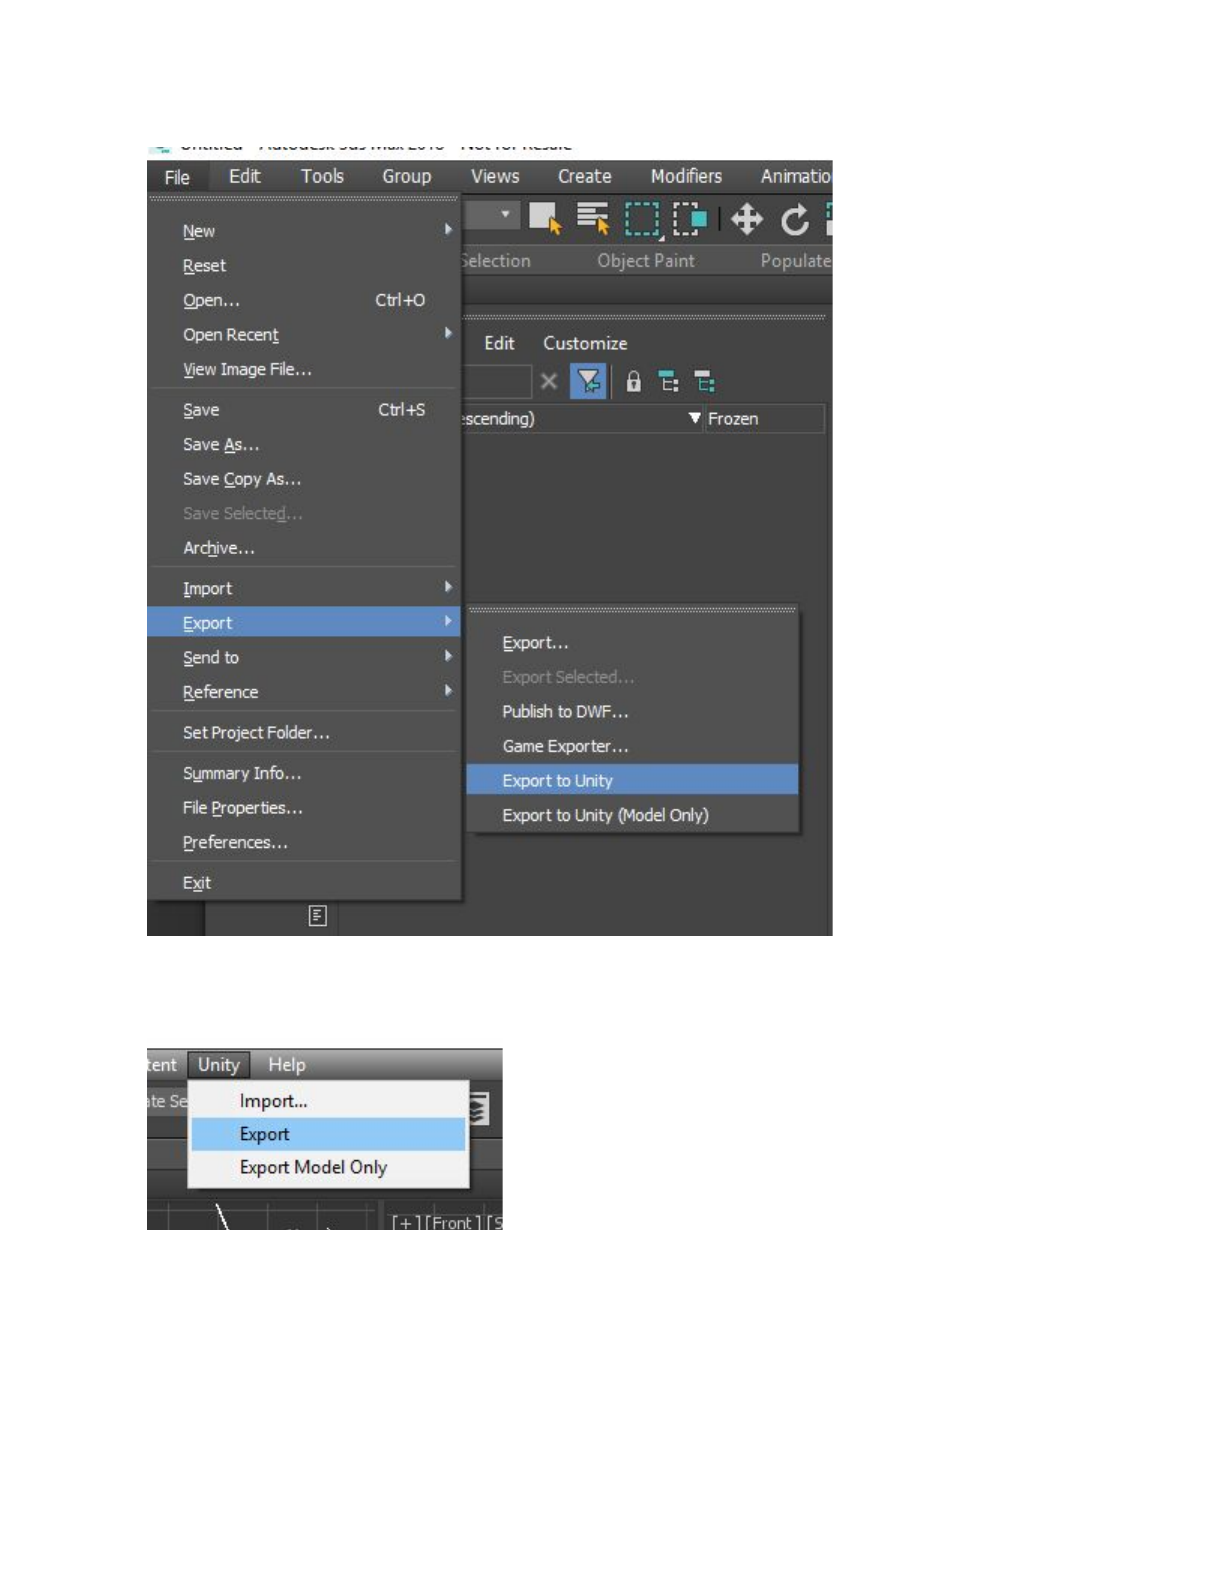
In 3ds Max 2017, select Unity > Export or Unity > Export Model Only.
In order to export objects from the desired export set, you can select one or more objects in the
set, the set itself, or the corresponding dummy object. In either case, the FBX Exporter exports
the entire contents of the set.
If you select multiple dummy objects corresponding to sets or objects from multiple sets, then
the FBX Exporter exports each set to its respective file defined in the custom attributes of the
set’s dummy object.
In each case, selecting Export automatically exports the current Model back to Unity. When you
switch back into Unity, your Scene has already been updated.
Unity export uses the selection sets created on import to determine which objects to export. If
you add a new object to the Model, you must also add this new object to the model’s
UnityExportSet set.
UnityExportSets in 3ds Max
Click the Edit Named Selection Sets button to edit a UnityExportSet.
To add an object to a set, select the set, select an object and click the Add Selected Objects
button.
To remove an object from a set, select the object in the set and click the Subtract Selected
Objects button.
Tip: You can also right-click the UnityExportSets and add or remove objects using the context
menu.
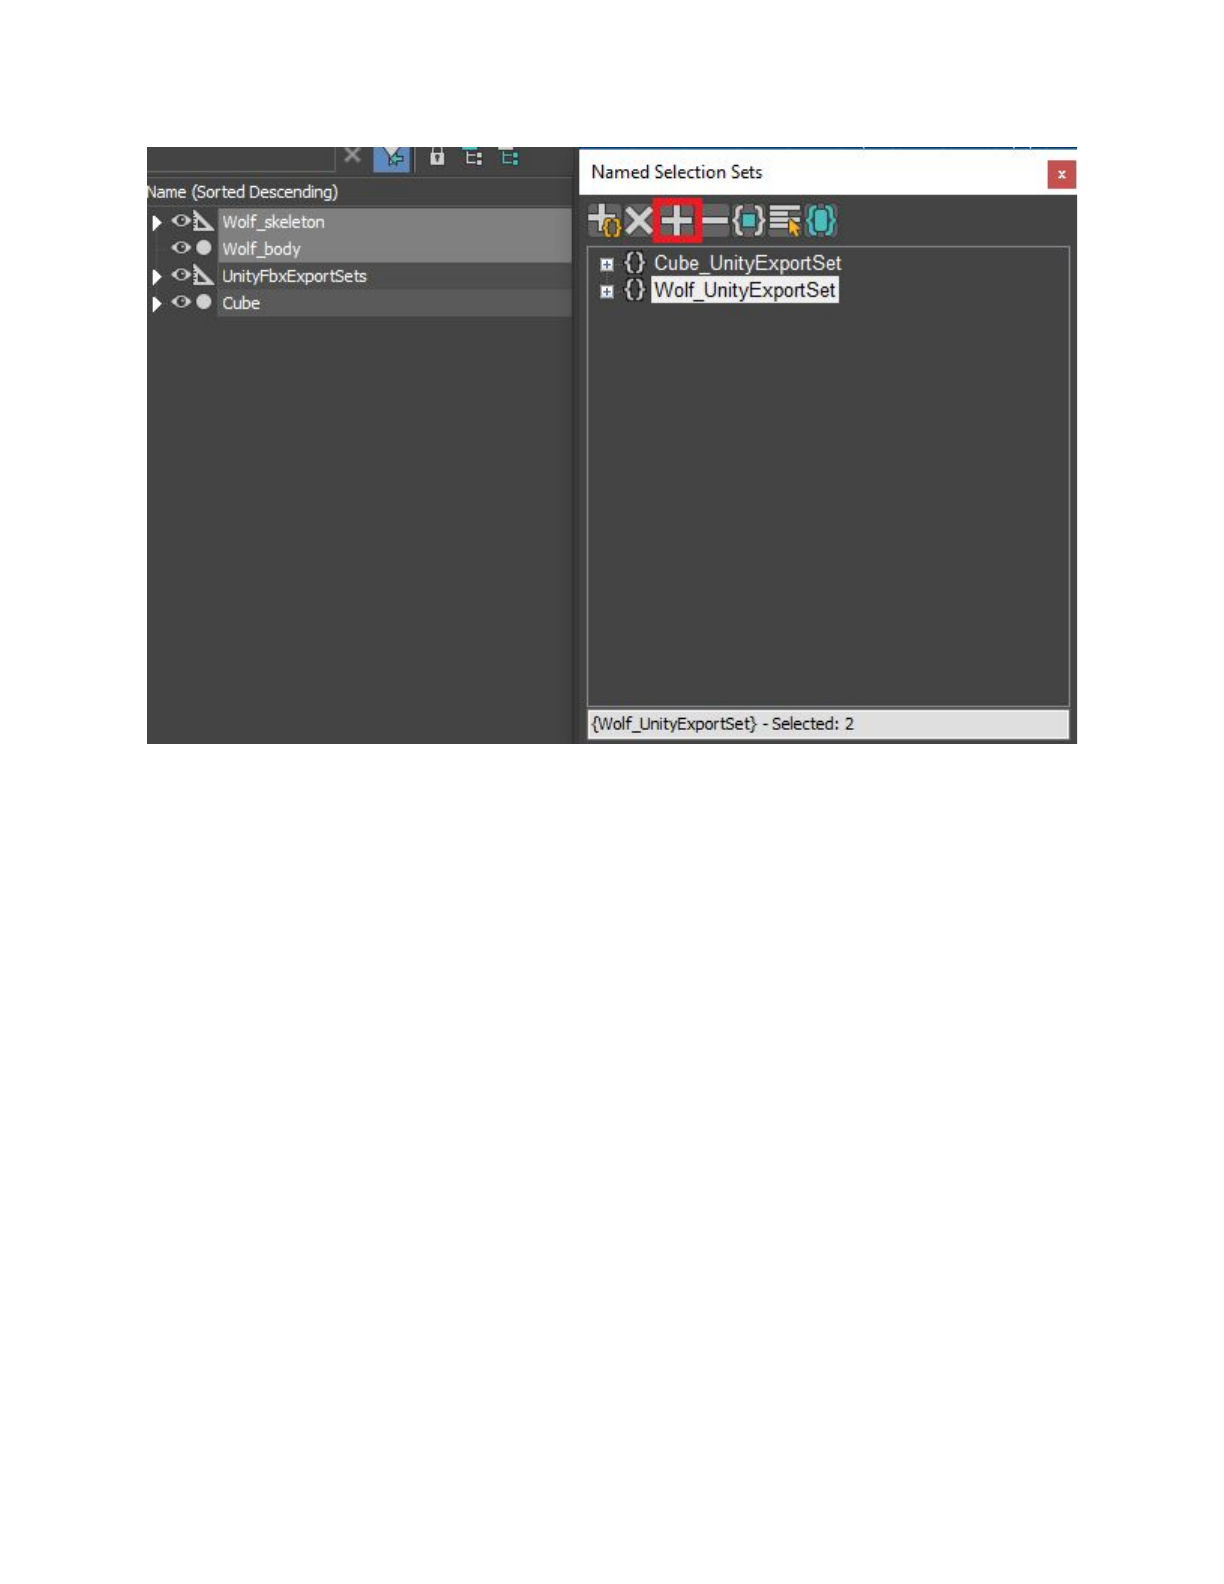
In 3ds max, use the
Add Selected Objects
button (red outline) to add objects to
Wolf_UnityExportSet.
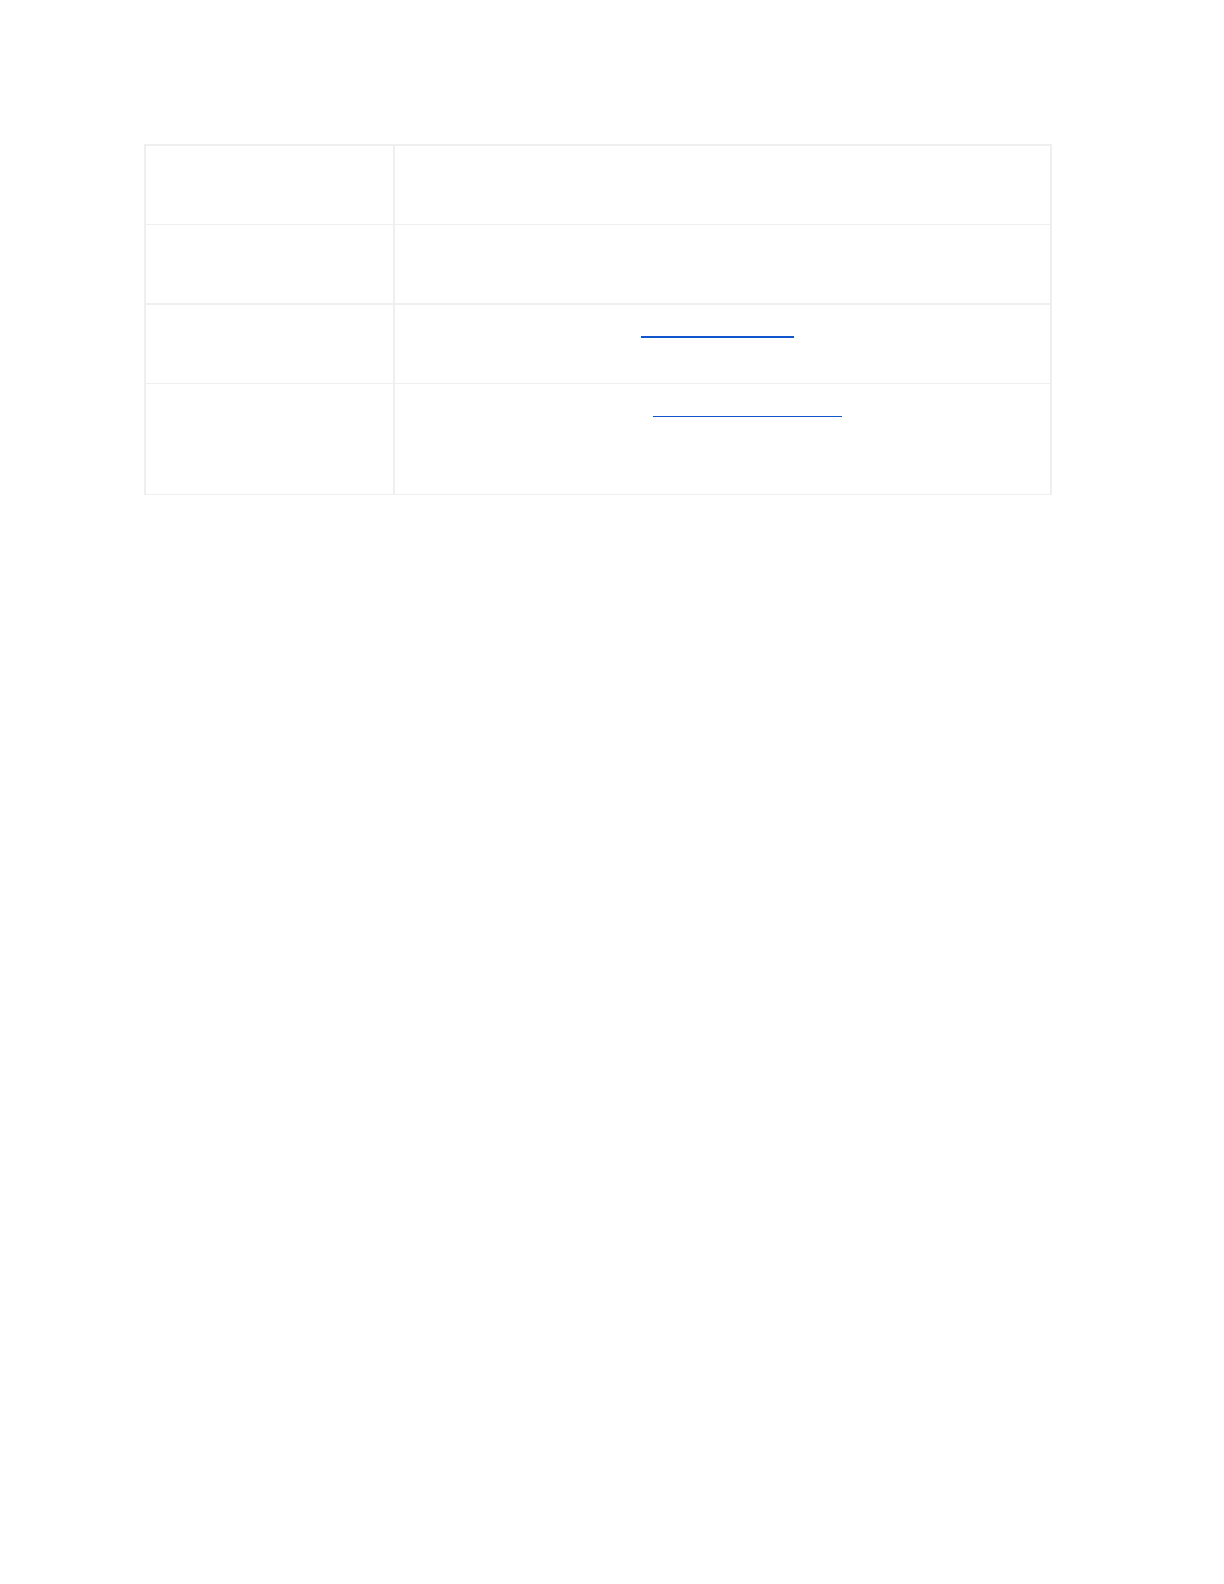
Setting FBX Export options
Use the Fbx Export Settings window to specify whether or not to automatically update Linked
Prefabs and to install the Unity Integration for Maya, Maya LT, or 3ds Max.
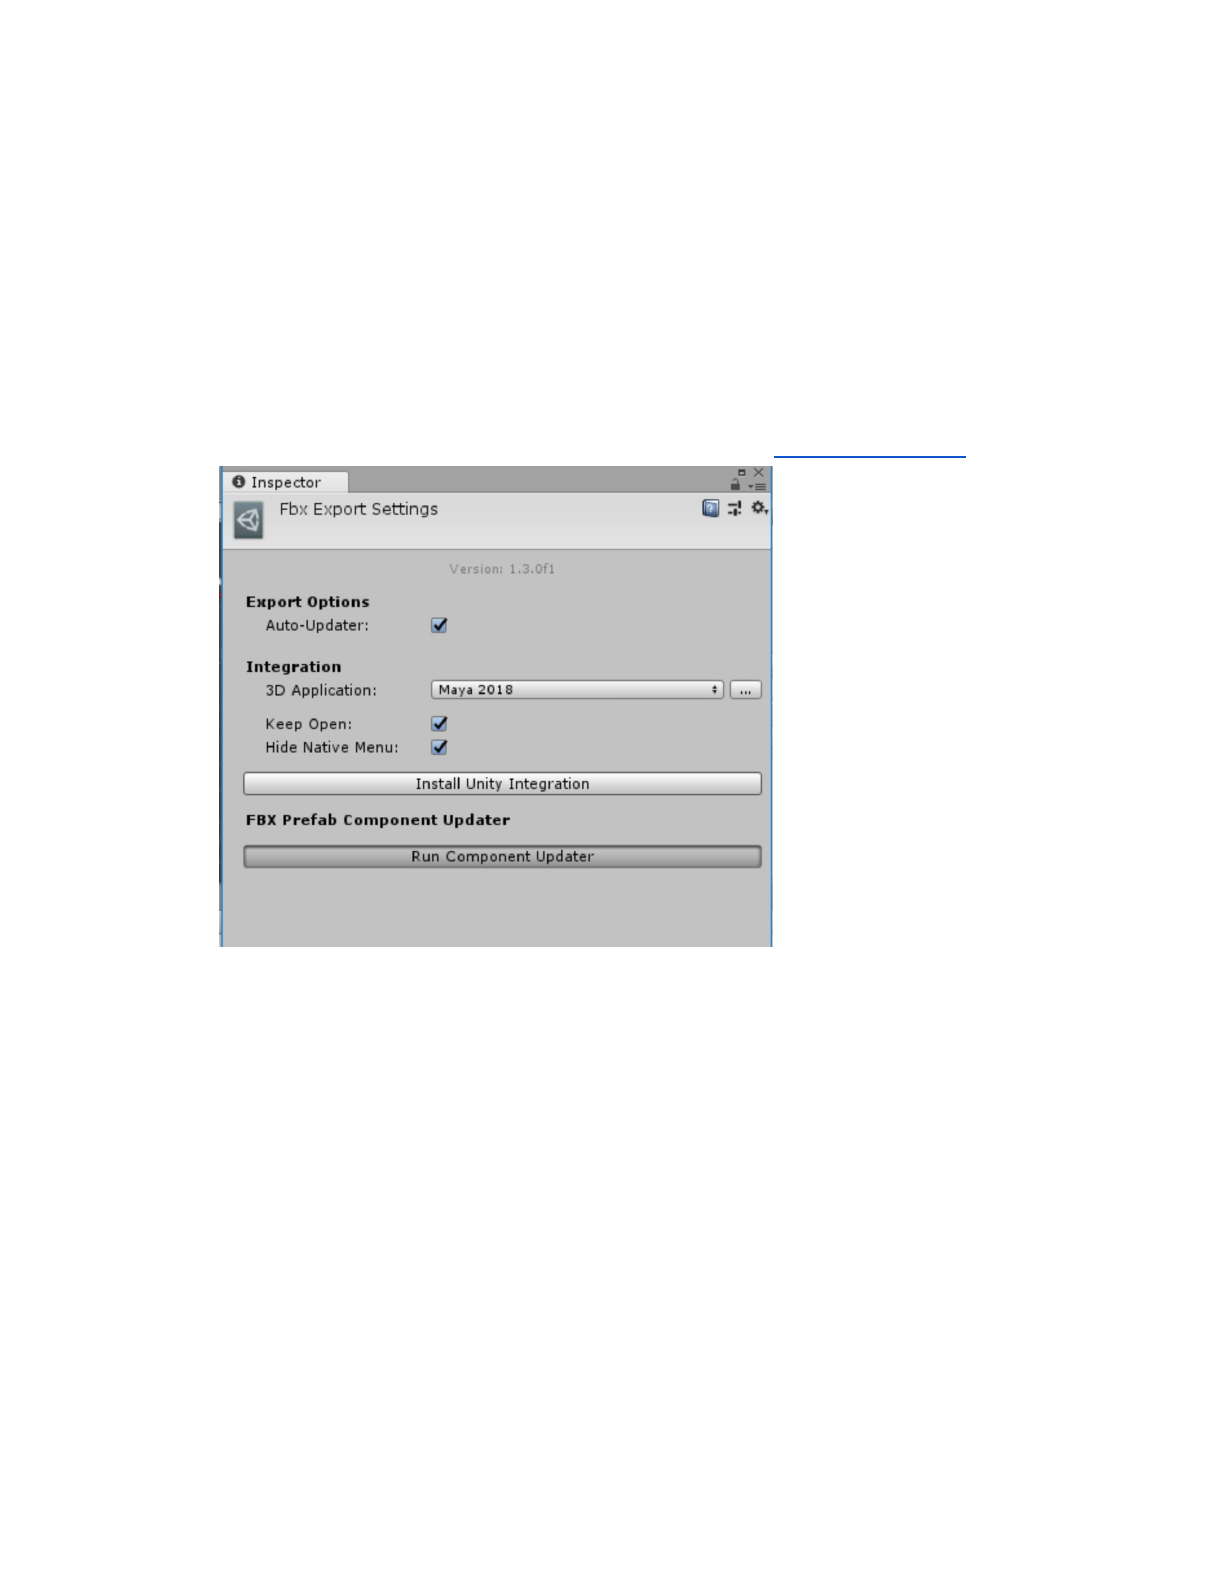
Fbx Export Settings window
Property:
Function:
Auto-Updater
Check this option to enable automatic updating for Linked Prefabs
whenever their linked FBX files is updated.
3D Application
Select the 3D modeling software you want to integrate with Unity.
Maya 2017+, Maya LT 2017+, and 3ds Max 2017+ are the three
applications currently supported.
Click the Browse button to choose a 3D modeling software installed
in a non-standard location.
Keep Open
Check this option to keep the selected 3D modeling software open
after installing it.
Hide Native Menu
Check this option to hide the native Send to Unity menu in Maya
and Maya LT.
Install Unity
Integration
Click this button to install Unity Integration for the selected 3D
Application.
Run Component
Updater
Click this button to run the Component Updater to repair any broken
FbxPrefab components if your previous version of the FBX
Exporter Package was 1.1.0b1.
Developer’s Guide
As a developer you have access to the FBX Exporter from C# scripting. You can use the basic
API for exporting Models with animation, Models only, or Animation only by providing a list of
GameObjects.
You can call the FBX Exporter from C# using methods found in the FbxExporters.Editor and
FbxExporters.EditorTools namespaces, for example:
using System.IO;
using UnityEditor;
using UnityEngine;
using FbxExporters.Editor;
using FbxExporters.EditorTools;
public static void ExportModelAndAnimation(Objects[] objects)
{
string filePath = Path.Combine(Application.dataPath, "MyGame.fbx");
var options = new ExportModelSettingsSerialize ();
options.SetModelAnimIncludeOption(ExportSettings.Include.ModelAndAnim);
ModelExporter.ExportObjects(filePath, objects, options);
}
