Full Instructions
User Manual: Pdf
Open the PDF directly: View PDF ![]() .
.
Page Count: 29
- Guide Contents
- Overview
- Simulated Glowy Physics!
- Prerequisite Guides
- Adafruit Feather M0 Basic Proto - ATSAMD21 Cortex M0
- Adafruit 15x7 CharliePlex LED Matrix Display FeatherWings
- Lithium Ion Polymer Battery - 3.7v 350mAh
- Adafruit LIS3DH Triple-Axis Accelerometer (+-2g/4g/8g/16g)
- Breadboard-friendly SPDT Slide Switch
- Ultimaker 2+ 3D Printer
- PLA Filament for 3D Printers - 1.75mm Diameter - Teal - 1KG
- Circuit Diagram
- Code
- 3D Printing
- Assembly
- Measure Wires
- Assemble Slide Switch
- Wire Boards
- Solder Slide Switch
- Solder Accelerometer
- Accelerometer Mount
- Spacer
- Attach boards
- Bundle wires
- Mount Battery
- Attach Spacer
- Plug in battery
- Mount inside enclosure
- Tuck wires
- Align mounting holes
- Face cover
- Slide Switch Tolerances
- Slide Switch Mount
- Attach Lid
- Gimbal Assemble
- Teeter totter
Animated LED Sand
Created by Ruiz Brothers
Last updated on 2018-02-06 04:55:15 PM UTC

2
3
3
3
4
4
5
5
5
5
6
7
8
13
14
14
15
15
15
17
17
18
19
20
20
21
22
23
24
24
24
24
25
27
27
27
27
28
Guide Contents
Guide Contents
Overview
Simulated Glowy Physics!
Prerequisite Guides
Adafruit Feather M0 Basic Proto - ATSAMD21 Cortex M0
Adafruit 15x7 CharliePlex LED Matrix Display FeatherWings
Lithium Ion Polymer Battery - 3.7v 350mAh
Adafruit LIS3DH Triple-Axis Accelerometer (+-2g/4g/8g/16g)
Breadboard-friendly SPDT Slide Switch
Ultimaker 2+ 3D Printer
PLA Filament for 3D Printers - 1.75mm Diameter - Teal - 1KG
Circuit Diagram
Code
3D Printing
Slice Settings
Clean up
Assembly
Measure Wires
Assemble Slide Switch
Wire Boards
Solder Slide Switch
Solder Accelerometer
Accelerometer Mount
Spacer
Attach boards
Bundle wires
Mount Battery
Attach Spacer
Plug in battery
Mount inside enclosure
Tuck wires
Align mounting holes
Face cover
Slide Switch Tolerances
Slide Switch Mount
Attach Lid
Gimbal Assemble
Teeter totter
© Adafruit Industries https://learn.adafruit.com/animated-led-sand Page 2 of 29

Overview
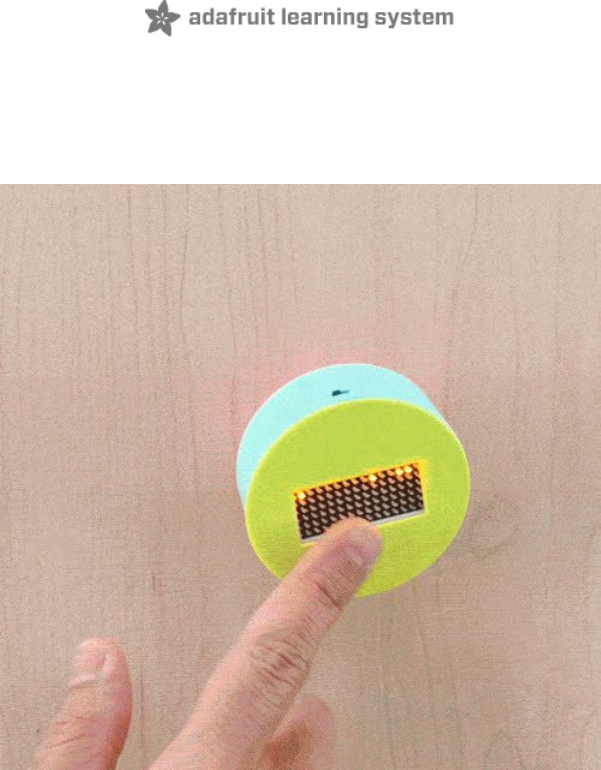
Simulated Glowy Physics!
These LEDs interact with motion and looks like they’re affect by gravity. An Adafruit LED matrix displays the LEDs as
little grains of sand which are driven by sampling an accelerometer with an Adafruit Feather.
The code, written by Phillip Burgess, simulates physics by calculating collisions and terminal velocity.
We designed 3d printed enclosures to take advantage of sensor readings by allowing it teeter totter as well as a
gimbal to create interesting simulations.
Prerequisite Guides
I suggest walking through the following guides to get a better understanding of the electronics.
Adafruit LIS3DH Triple-Axis Accelerometer
Adafruit 15x7 CharliePlex LED Matrix
Adafruit Feather M0 Basic
© Adafruit Industries https://learn.adafruit.com/animated-led-sand Page 3 of 29
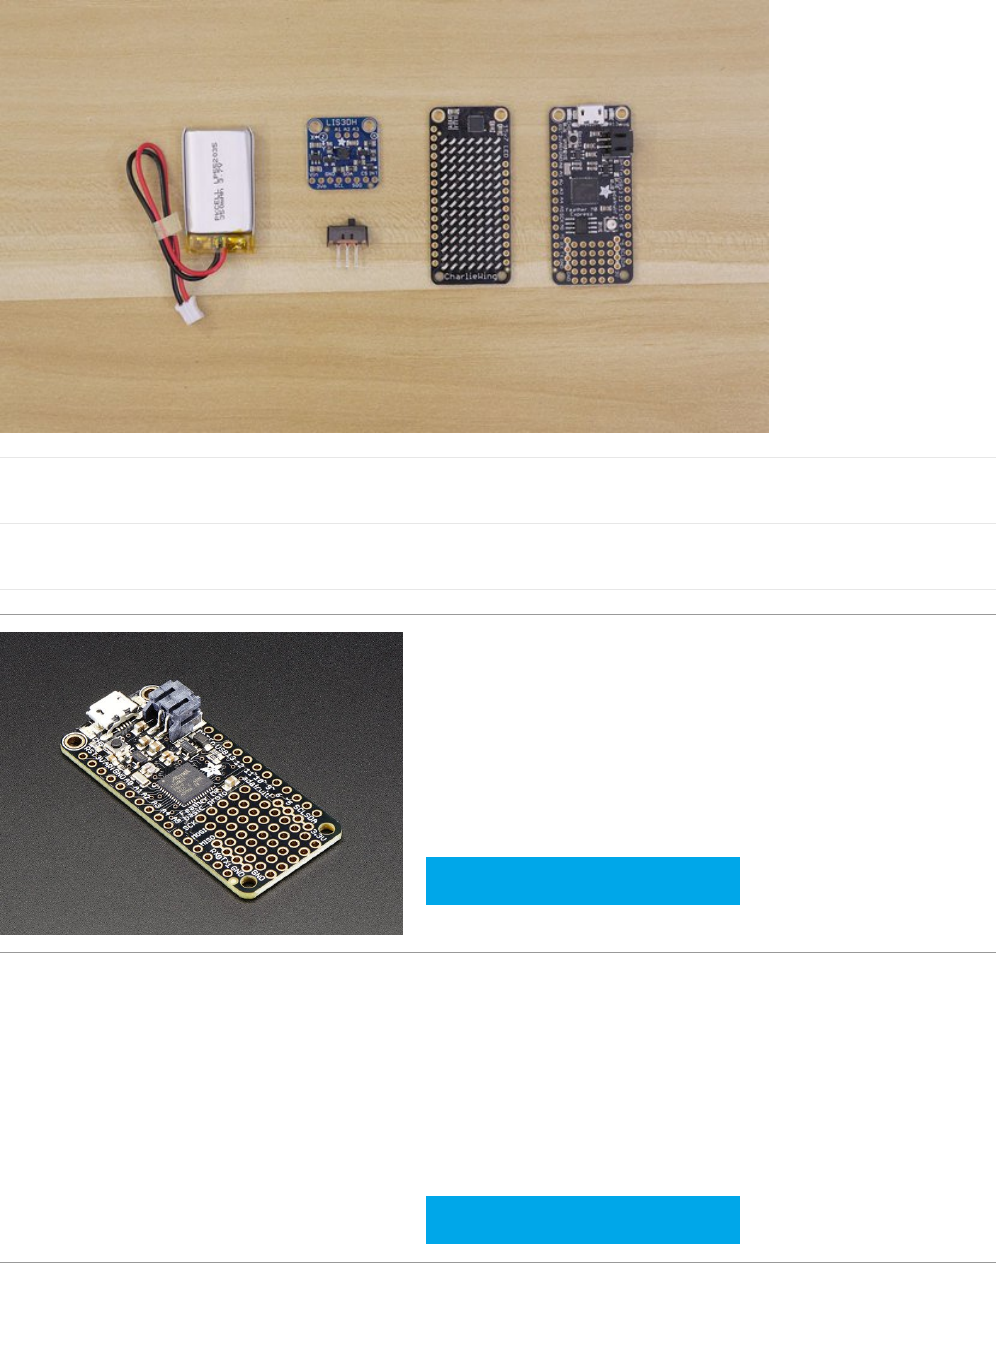
6 x M2X8mm Screws
M2x8mm screws
2 x M2X4mm screws
M2X4mm screws
Adafruit Feather M0 Basic Proto - ATSAMD21 Cortex M0
PRODUCT ID: 2772
https://adafru.it/s1d $19.95
IN STOCK
Your browser does not support the video tag. Adafruit 15x7 CharliePlex LED Matrix Display FeatherWings
PRODUCT ID: 2965
https://adafru.it/wft $0.00
OUT OF STOCK
© Adafruit Industries https://learn.adafruit.com/animated-led-sand Page 4 of 29
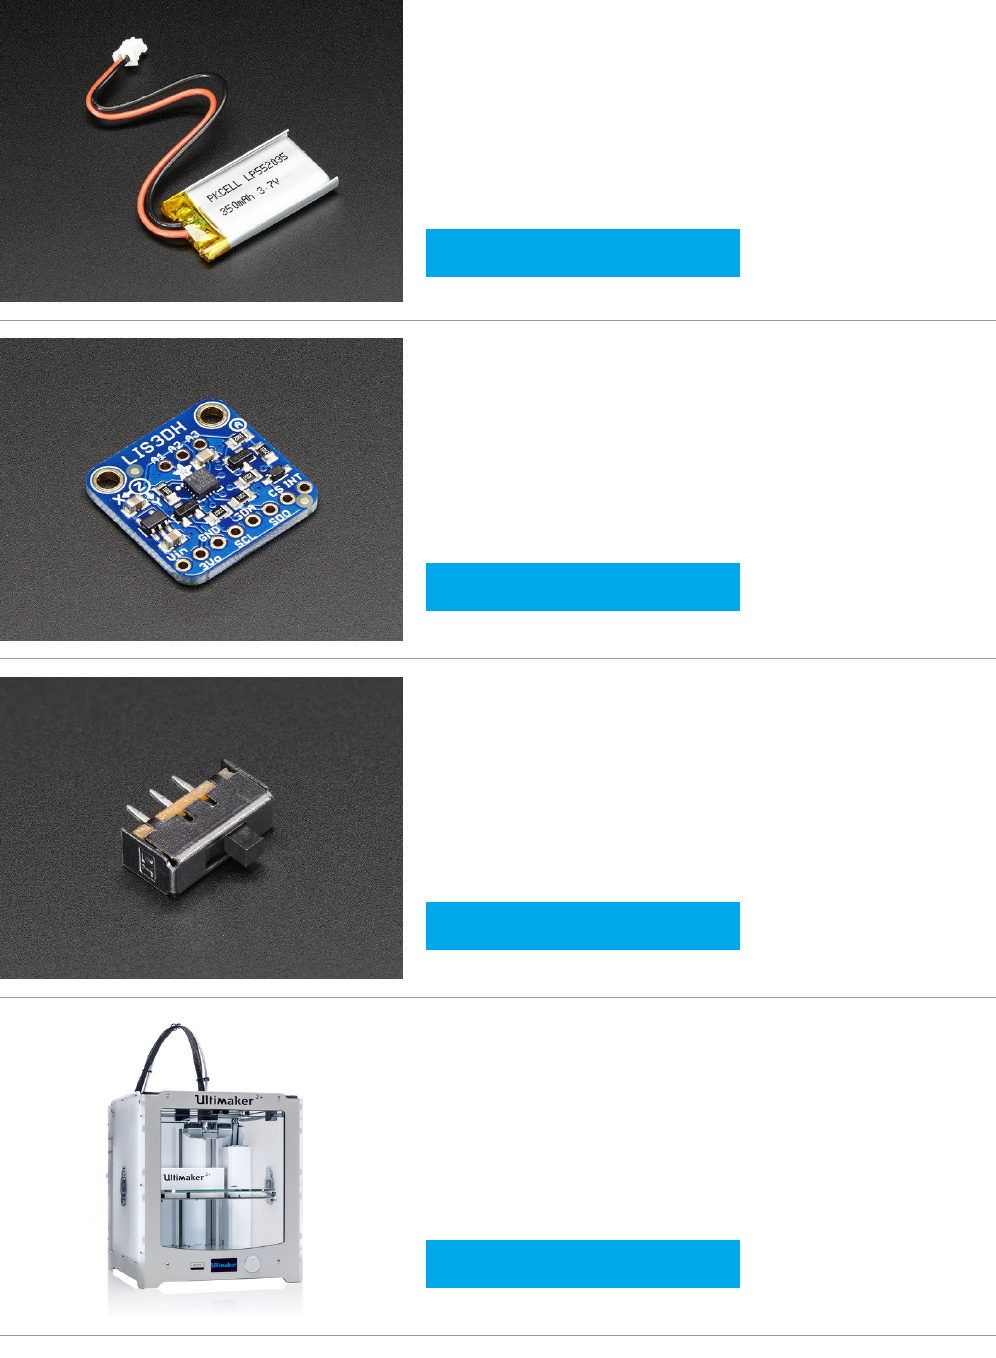
Lithium Ion Polymer Battery - 3.7v 350mAh
PRODUCT ID: 2750
https://adafru.it/kBj $6.95
IN STOCK
Adafruit LIS3DH Triple-Axis Accelerometer (+-
2g/4g/8g/16g)
PRODUCT ID: 2809
https://adafru.it/uBq $4.95
IN STOCK
Breadboard-friendly SPDT Slide Switch
PRODUCT ID: 805
https://adafru.it/drN $0.95
IN STOCK
Ultimaker 2+ 3D Printer
PRODUCT ID: 2673
https://adafru.it/zef $2,499.00
IN STOCK
© Adafruit Industries https://learn.adafruit.com/animated-led-sand Page 5 of 29


Circuit Diagram
Take a moment to review the components in the circuit diagram. This illustration is meant for referencing wired
connections - The length of wire, position and size of components are not exact.
The Slide switch will connect to the Feather board and will need to be 70mm for the GND and 50mm for the EN pin
CharliePlex Featherwing connects the Feather.
The connections for SDA and SCL wires will need to be 70mm long.
3V and GND connections can both be 80mm long
LIS3DH connects to the top of the Feather via the 3d printed mount and will needto be 40mm long for 3V, GND, SDA
and SCL connections.
© Adafruit Industries https://learn.adafruit.com/animated-led-sand Page 7 of 29

Code
To use the LED Sand sketch you'll want to make sure you're using the latest version of the Arduino IDE (1.6.5 at the
time of this writing).
If you're totally new to Arduino take a little time to go through some introductory tutorials like how to make a LED blink.
This will help you understand how to use the IDE, load a sketch, and upload code.
Next you'll need to make sure the libraries used by the sketch are installed. With the latest Arduino IDE you can use its
library manager to easily install libraries, or check out this guide on how to manually install a library. You'll want to
install the following libraries:
Adafruit LIS3DH
Adafruit Unified Sensor
Adafruit IS31FL3731 Charlieplex LED
Search for the libraries in the library manager and they should be easy to find and install.
If you already have one or more of these libraries installed then make sure to update it to the latest version.
//--------------------------------------------------------------------------
// Animated 'sand' for Adafruit Feather. Uses the following parts:
// - Feather 32u4 Basic Proto (adafruit.com/product/2771)
// - Charlieplex FeatherWing (adafruit.com/product/2965 - any color!)
// - LIS3DH accelerometer (2809)
// - 350 mAh LiPoly battery (2750)
// - SPDT Slide Switch (805)
//
// This is NOT good "learn from" code for the IS31FL3731; it is "squeeze
// every last byte from the microcontroller" code. If you're starting out,
// download the Adafruit_IS31FL3731 and Adafruit_GFX libraries, which
// provide functions for drawing pixels, lines, etc.
//--------------------------------------------------------------------------
#include <Wire.h> // For I2C communication
#include <Adafruit_LIS3DH.h> // For accelerometer
#define DISP_ADDR 0x74 // Charlieplex FeatherWing I2C address
#define ACCEL_ADDR 0x18 // Accelerometer I2C address
#define N_GRAINS 20 // Number of grains of sand
#define WIDTH 15 // Display width in pixels
#define HEIGHT 7 // Display height in pixels
#define MAX_FPS 45 // Maximum redraw rate, frames/second
// The 'sand' grains exist in an integer coordinate space that's 256X
// the scale of the pixel grid, allowing them to move and interact at
// less than whole-pixel increments.
#define MAX_X (WIDTH * 256 - 1) // Maximum X coordinate in grain space
#define MAX_Y (HEIGHT * 256 - 1) // Maximum Y coordinate
struct Grain {
int16_t x, y; // Position
int16_t vx, vy; // Velocity
} grain[N_GRAINS];
Adafruit_LIS3DH accel = Adafruit_LIS3DH();
uint32_t prevTime = 0; // Used for frames-per-second throttle
uint8_t backbuffer = 0, // Index for double-buffered animation
img[WIDTH * HEIGHT]; // Internal 'map' of pixels
© Adafruit Industries https://learn.adafruit.com/animated-led-sand Page 8 of 29

img[WIDTH * HEIGHT]; // Internal 'map' of pixels
const uint8_t PROGMEM remap[] = { // In order to redraw the screen super
0, 90, 75, 60, 45, 30, 15, 0, // fast, this sketch bypasses the
0, 0, 0, 0, 0, 0, 0, 0, // Adafruit_IS31FL3731 library and
0, 91, 76, 61, 46, 31, 16, 1, // writes to the LED driver directly.
14, 29, 44, 59, 74, 89,104, 0, // But this means we need to do our
0, 92, 77, 62, 47, 32, 17, 2, // own coordinate management, and the
13, 28, 43, 58, 73, 88,103, 0, // layout of pixels on the Charlieplex
0, 93, 78, 63, 48, 33, 18, 3, // Featherwing is strange! This table
12, 27, 42, 57, 72, 87,102, 0, // remaps LED register indices in
0, 94, 79, 64, 49, 34, 19, 4, // sequence to the corresponding pixel
11, 26, 41, 56, 71, 86,101, 0, // indices in the img[] array.
0, 95, 80, 65, 50, 35, 20, 5,
10, 25, 40, 55, 70, 85,100, 0,
0, 96, 81, 66, 51, 36, 21, 6,
9, 24, 39, 54, 69, 84, 99, 0,
0, 97, 82, 67, 52, 37, 22, 7,
8, 23, 38, 53, 68, 83, 98
};
// IS31FL3731-RELATED FUNCTIONS --------------------------------------------
// Begin I2C transmission and write register address (data then follows)
uint8_t writeRegister(uint8_t n) {
Wire.beginTransmission(DISP_ADDR);
Wire.write(n); // No endTransmission() - left open for add'l writes
return 2; // Always returns 2; count of I2C address + register byte n
}
// Select one of eight IS31FL3731 pages, or the Function Registers
void pageSelect(uint8_t n) {
writeRegister(0xFD); // Command Register
Wire.write(n); // Page number (or 0xB = Function Registers)
Wire.endTransmission();
}
// SETUP - RUNS ONCE AT PROGRAM START --------------------------------------
void setup(void) {
uint8_t i, j, bytes;
if(!accel.begin(ACCEL_ADDR)) { // Init accelerometer. If it fails...
pinMode(LED_BUILTIN, OUTPUT); // Using onboard LED
for(i=1;;i++) { // Loop forever...
digitalWrite(LED_BUILTIN, i & 1); // LED on/off blink to alert user
delay(250); // 1/4 second
}
}
accel.setRange(LIS3DH_RANGE_4_G); // Select accelerometer +/- 4G range
Wire.setClock(400000); // Run I2C at 400 KHz for faster screen updates
// Initialize IS31FL3731 Charlieplex LED driver "manually"...
pageSelect(0x0B); // Access the Function Registers
writeRegister(0); // Starting from first...
for(i=0; i<13; i++) Wire.write(10 == i); // Clear all except Shutdown
Wire.endTransmission();
for(j=0; j<2; j++) { // For each page used (0 & 1)...
pageSelect(j); // Access the Frame Registers
for(bytes=i=0; i<180; i++) { // For each register...
© Adafruit Industries https://learn.adafruit.com/animated-led-sand Page 9 of 29

for(bytes=i=0; i<180; i++) { // For each register...
if(!bytes) bytes = writeRegister(i); // Buf empty? Start xfer @ reg i
Wire.write(0xFF * (i < 18)); // 0-17 = enable, 18+ = blink+PWM
if(++bytes >= 32) bytes = Wire.endTransmission();
}
if(bytes) Wire.endTransmission(); // Write any data left in buffer
}
memset(img, 0, sizeof(img)); // Clear the img[] array
for(i=0; i<N_GRAINS; i++) { // For each sand grain...
do {
grain[i].x = random(WIDTH * 256); // Assign random position within
grain[i].y = random(HEIGHT * 256); // the 'grain' coordinate space
// Check if corresponding pixel position is already occupied...
for(j=0; (j<i) && (((grain[i].x / 256) != (grain[j].x / 256)) ||
((grain[i].y / 256) != (grain[j].y / 256))); j++);
} while(j < i); // Keep retrying until a clear spot is found
img[(grain[i].y / 256) * WIDTH + (grain[i].x / 256)] = 255; // Mark it
grain[i].vx = grain[i].vy = 0; // Initial velocity is zero
}
}
// MAIN LOOP - RUNS ONCE PER FRAME OF ANIMATION ----------------------------
void loop() {
// Limit the animation frame rate to MAX_FPS. Because the subsequent sand
// calculations are non-deterministic (don't always take the same amount
// of time, depending on their current states), this helps ensure that
// things like gravity appear constant in the simulation.
uint32_t t;
while(((t = micros()) - prevTime) < (1000000L / MAX_FPS));
prevTime = t;
// Display frame rendered on prior pass. It's done immediately after the
// FPS sync (rather than after rendering) for consistent animation timing.
pageSelect(0x0B); // Function registers
writeRegister(0x01); // Picture Display reg
Wire.write(backbuffer); // Page # to display
Wire.endTransmission();
backbuffer = 1 - backbuffer; // Swap front/back buffer index
// Read accelerometer...
accel.read();
int16_t ax = -accel.y / 256, // Transform accelerometer axes
ay = accel.x / 256, // to grain coordinate space
az = abs(accel.z) / 2048; // Random motion factor
az = (az >= 3) ? 1 : 4 - az; // Clip & invert
ax -= az; // Subtract motion factor from X, Y
ay -= az;
int16_t az2 = az * 2 + 1; // Range of random motion to add back in
// ...and apply 2D accel vector to grain velocities...
int32_t v2; // Velocity squared
float v; // Absolute velocity
for(int i=0; i<N_GRAINS; i++) {
grain[i].vx += ax + random(az2); // A little randomness makes
grain[i].vy += ay + random(az2); // tall stacks topple better!
// Terminal velocity (in any direction) is 256 units -- equal to
// 1 pixel -- which keeps moving grains from passing through each other
// and other such mayhem. Though it takes some extra math, velocity is
© Adafruit Industries https://learn.adafruit.com/animated-led-sand Page 10 of 29

// and other such mayhem. Though it takes some extra math, velocity is
// clipped as a 2D vector (not separately-limited X & Y) so that
// diagonal movement isn't faster
v2 = (int32_t)grain[i].vx*grain[i].vx+(int32_t)grain[i].vy*grain[i].vy;
if(v2 > 65536) { // If v^2 > 65536, then v > 256
v = sqrt((float)v2); // Velocity vector magnitude
grain[i].vx = (int)(256.0*(float)grain[i].vx/v); // Maintain heading
grain[i].vy = (int)(256.0*(float)grain[i].vy/v); // Limit magnitude
}
}
// ...then update position of each grain, one at a time, checking for
// collisions and having them react. This really seems like it shouldn't
// work, as only one grain is considered at a time while the rest are
// regarded as stationary. Yet this naive algorithm, taking many not-
// technically-quite-correct steps, and repeated quickly enough,
// visually integrates into something that somewhat resembles physics.
// (I'd initially tried implementing this as a bunch of concurrent and
// "realistic" elastic collisions among circular grains, but the
// calculations and volument of code quickly got out of hand for both
// the tiny 8-bit AVR microcontroller and my tiny dinosaur brain.)
uint8_t i, bytes, oldidx, newidx, delta;
int16_t newx, newy;
const uint8_t *ptr = remap;
for(i=0; i<N_GRAINS; i++) {
newx = grain[i].x + grain[i].vx; // New position in grain space
newy = grain[i].y + grain[i].vy;
if(newx > MAX_X) { // If grain would go out of bounds
newx = MAX_X; // keep it inside, and
grain[i].vx /= -2; // give a slight bounce off the wall
} else if(newx < 0) {
newx = 0;
grain[i].vx /= -2;
}
if(newy > MAX_Y) {
newy = MAX_Y;
grain[i].vy /= -2;
} else if(newy < 0) {
newy = 0;
grain[i].vy /= -2;
}
oldidx = (grain[i].y/256) * WIDTH + (grain[i].x/256); // Prior pixel #
newidx = (newy /256) * WIDTH + (newx /256); // New pixel #
if((oldidx != newidx) && // If grain is moving to a new pixel...
img[newidx]) { // but if that pixel is already occupied...
delta = abs(newidx - oldidx); // What direction when blocked?
if(delta == 1) { // 1 pixel left or right)
newx = grain[i].x; // Cancel X motion
grain[i].vx /= -2; // and bounce X velocity (Y is OK)
newidx = oldidx; // No pixel change
} else if(delta == WIDTH) { // 1 pixel up or down
newy = grain[i].y; // Cancel Y motion
grain[i].vy /= -2; // and bounce Y velocity (X is OK)
newidx = oldidx; // No pixel change
} else { // Diagonal intersection is more tricky...
// Try skidding along just one axis of motion if possible (start w/
// faster axis). Because we've already established that diagonal
// (both-axis) motion is occurring, moving on either axis alone WILL
© Adafruit Industries https://learn.adafruit.com/animated-led-sand Page 11 of 29

// (both-axis) motion is occurring, moving on either axis alone WILL
// change the pixel index, no need to check that again.
if((abs(grain[i].vx) - abs(grain[i].vy)) >= 0) { // X axis is faster
newidx = (grain[i].y / 256) * WIDTH + (newx / 256);
if(!img[newidx]) { // That pixel's free! Take it! But...
newy = grain[i].y; // Cancel Y motion
grain[i].vy /= -2; // and bounce Y velocity
} else { // X pixel is taken, so try Y...
newidx = (newy / 256) * WIDTH + (grain[i].x / 256);
if(!img[newidx]) { // Pixel is free, take it, but first...
newx = grain[i].x; // Cancel X motion
grain[i].vx /= -2; // and bounce X velocity
} else { // Both spots are occupied
newx = grain[i].x; // Cancel X & Y motion
newy = grain[i].y;
grain[i].vx /= -2; // Bounce X & Y velocity
grain[i].vy /= -2;
newidx = oldidx; // Not moving
}
}
} else { // Y axis is faster, start there
newidx = (newy / 256) * WIDTH + (grain[i].x / 256);
if(!img[newidx]) { // Pixel's free! Take it! But...
newx = grain[i].x; // Cancel X motion
grain[i].vy /= -2; // and bounce X velocity
} else { // Y pixel is taken, so try X...
newidx = (grain[i].y / 256) * WIDTH + (newx / 256);
if(!img[newidx]) { // Pixel is free, take it, but first...
newy = grain[i].y; // Cancel Y motion
grain[i].vy /= -2; // and bounce Y velocity
} else { // Both spots are occupied
newx = grain[i].x; // Cancel X & Y motion
newy = grain[i].y;
grain[i].vx /= -2; // Bounce X & Y velocity
grain[i].vy /= -2;
newidx = oldidx; // Not moving
}
}
}
}
}
grain[i].x = newx; // Update grain position
grain[i].y = newy;
img[oldidx] = 0; // Clear old spot (might be same as new, that's OK)
img[newidx] = 255; // Set new spot
}
// Update pixel data in LED driver
pageSelect(backbuffer); // Select background buffer
for(i=bytes=0; i<sizeof(remap); i++) {
if(!bytes) bytes = writeRegister(0x24 + i);
Wire.write(img[pgm_read_byte(ptr++)] / 3); // Write each byte to matrix
if(++bytes >= 32) bytes = Wire.endTransmission();
}
if(bytes) Wire.endTransmission();
}
© Adafruit Industries https://learn.adafruit.com/animated-led-sand Page 12 of 29

3D Printing
The 3D printed parts are fairly easy to make with most common home desktop 3D printers that are on the market.
And if you don’t have access a 3D printer, you can order our parts by visiting our Thingiverse page and have someone
local 3D print the parts and ship them to you.
Download the Fusion360 files (dome version)
https://adafru.it/ArR
Download the Fusion 360 files (gimbal version)
https://adafru.it/ArS
Download from Thingiverse
https://adafru.it/ArT
Download from Youmagine
https://adafru.it/svF
Download from Pinshape
https://adafru.it/ArU
© Adafruit Industries https://learn.adafruit.com/animated-led-sand Page 13 of 29

Slice Settings
Download the STL file and import it into your 3D printing
slicing software. You'll need to adjust your settings
accordingly if you're using material different than PLA.
230C Extruder Temp
No heated bed (65C for heated)
1.0 Extrusion Multiplier
.4mm Nozzle
0.38 Extrusion Width
.2mm Layer Height
30% infill
No Supports
skirt
60mm/s | 120mm travel speed
Clean up
We used a flush diagonal cutter to clean up any stringing and overhangs around the port openings and around the
standoffs inside the enclosure.
Make sure the openings for the USB ports are cleaned before mounting components. Use a hobby knife to help cut
away stringing that could block components from mounting.
© Adafruit Industries https://learn.adafruit.com/animated-led-sand Page 14 of 29
Assembly
Measure Wires
First we'll need to measure wires for each component so
its long enough to reach each mount inside the
enclosure.
The Slide Switch will connect to the Feather board and
will need to be 70mm for the GND and 50mm for the
EN pin.
CharliePlex Featherwing connects the Feather.
Connections for SDA and SCL wires will need to be
70mm long. Measure the 3v and GND connections to
both be 80mm long.
LIS3DH connects to the Feather and will need all four
connections to be 40mm long.
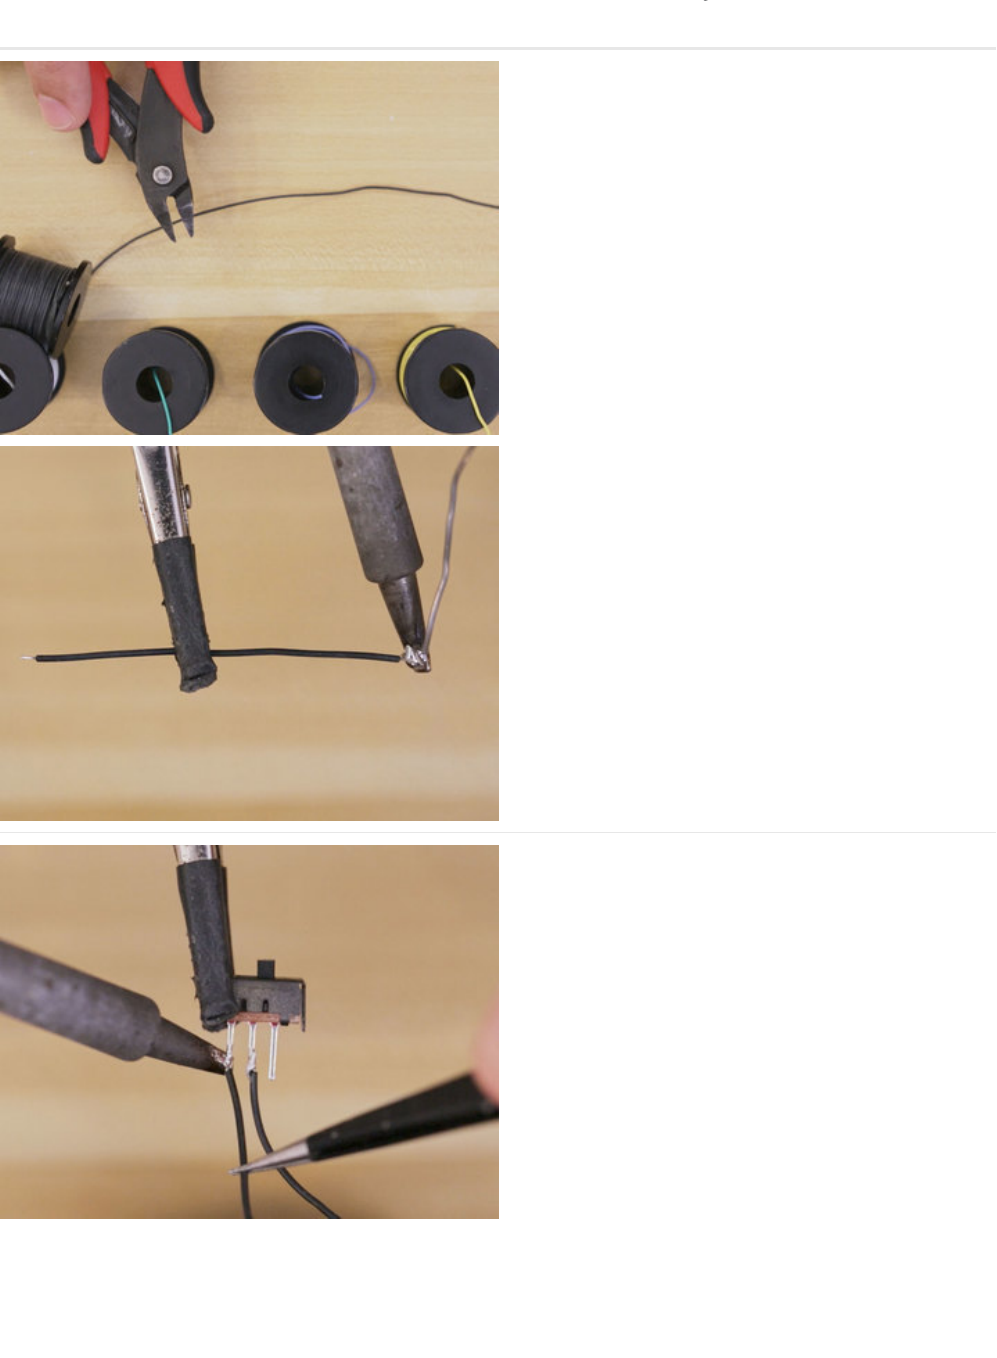
Assemble Slide Switch
A slide switch is used to tie the enable and ground pins
so we can turn off the 3 volt regulator, while still
enabling you to charge the lipo battery through a USB
cable.
Use heat shrink to prevent the pins from touching other
components when inserted into the enclosure.
We used 1x45mm sized heat shrink tubes. You can use
the side of the soldering iron to heat up and shrink the
tubes around the solder connections.
Use a flush diagonal cutter to remove the unused third
© Adafruit Industries https://learn.adafruit.com/animated-led-sand Page 15 of 29

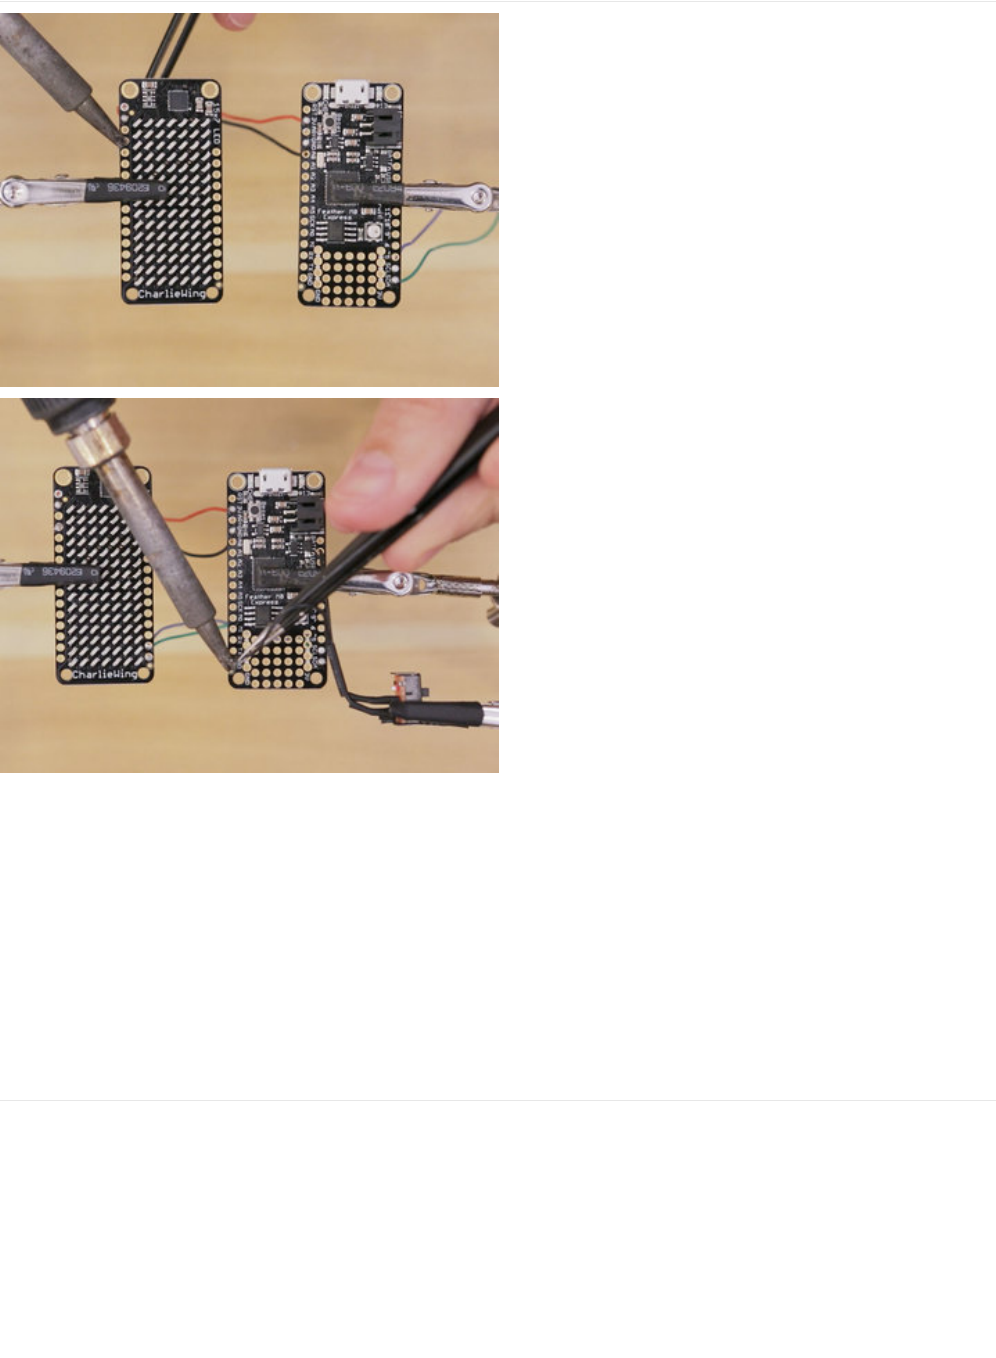
Wire Boards
The LED matrix is free-wired to the Adafruit Feather to
make the assembly as slim as possible.
We can solder the wires from the bottom side of the
boards to make them easy to attach to each other. This
also gives room for the battery to fit between the two
boards.
We used 30AWG silicone coated wires to provide
flexibility and durable handling.
Solder Slide Switch
Next, we'll solder the slide switch to the EN and GND
pin on the top of the Feather board.
© Adafruit Industries https://learn.adafruit.com/animated-led-sand Page 17 of 29
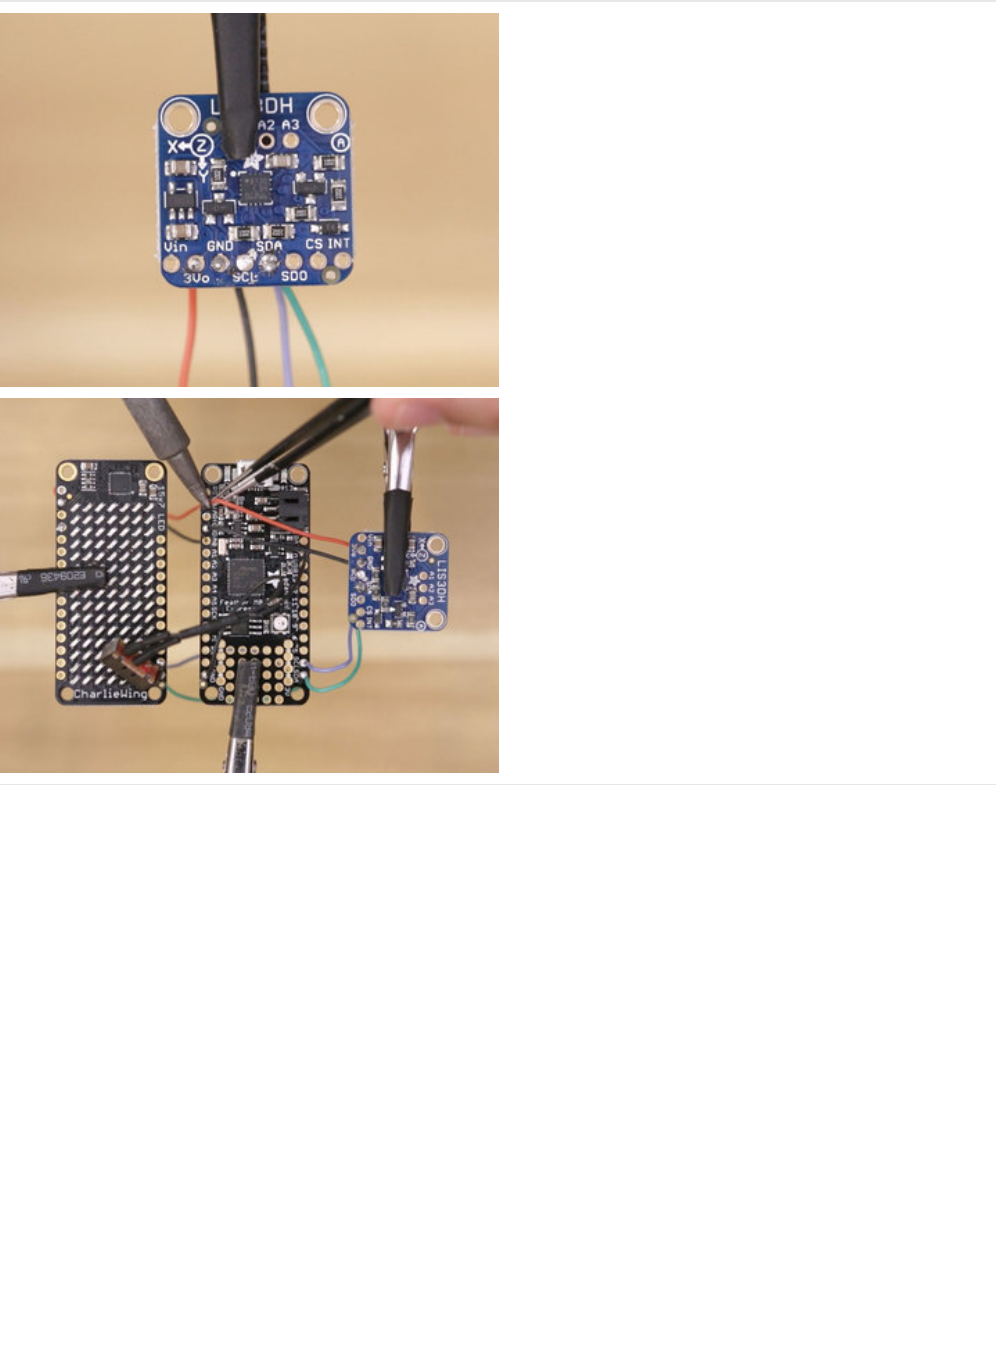
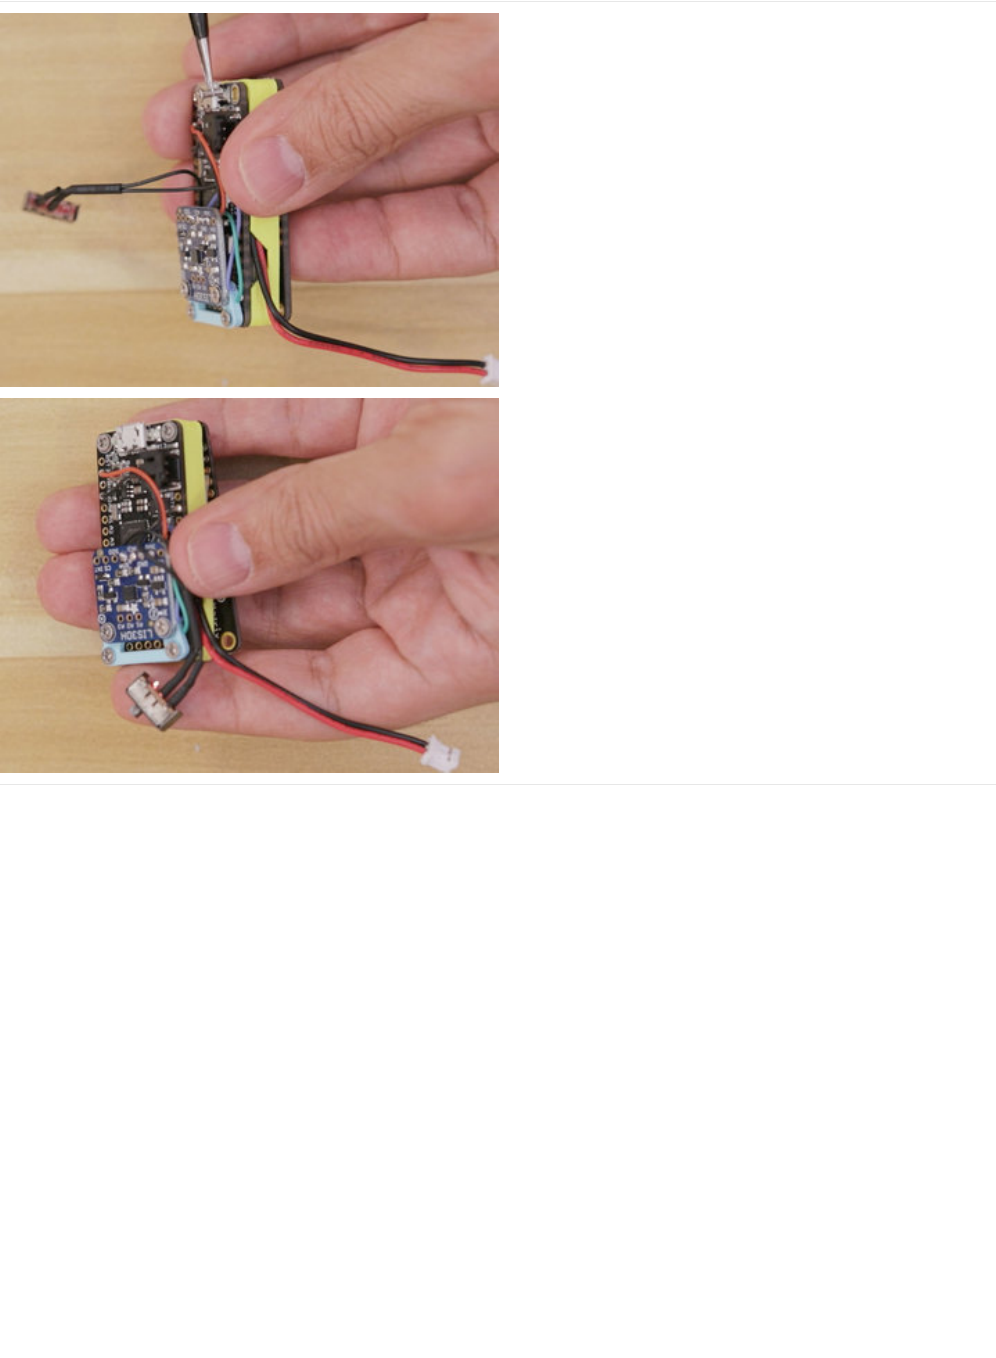
Solder Accelerometer
The LIS3DH is soldered in the same way, with the wires
underneath the board.
We can then solder connections for SDA, SCL, GND and
3V to the top side of the Feather board.
Later, will mount it to the top of the Feather board with
the help of a 3d printed mount.
© Adafruit Industries https://learn.adafruit.com/animated-led-sand Page 18 of 29
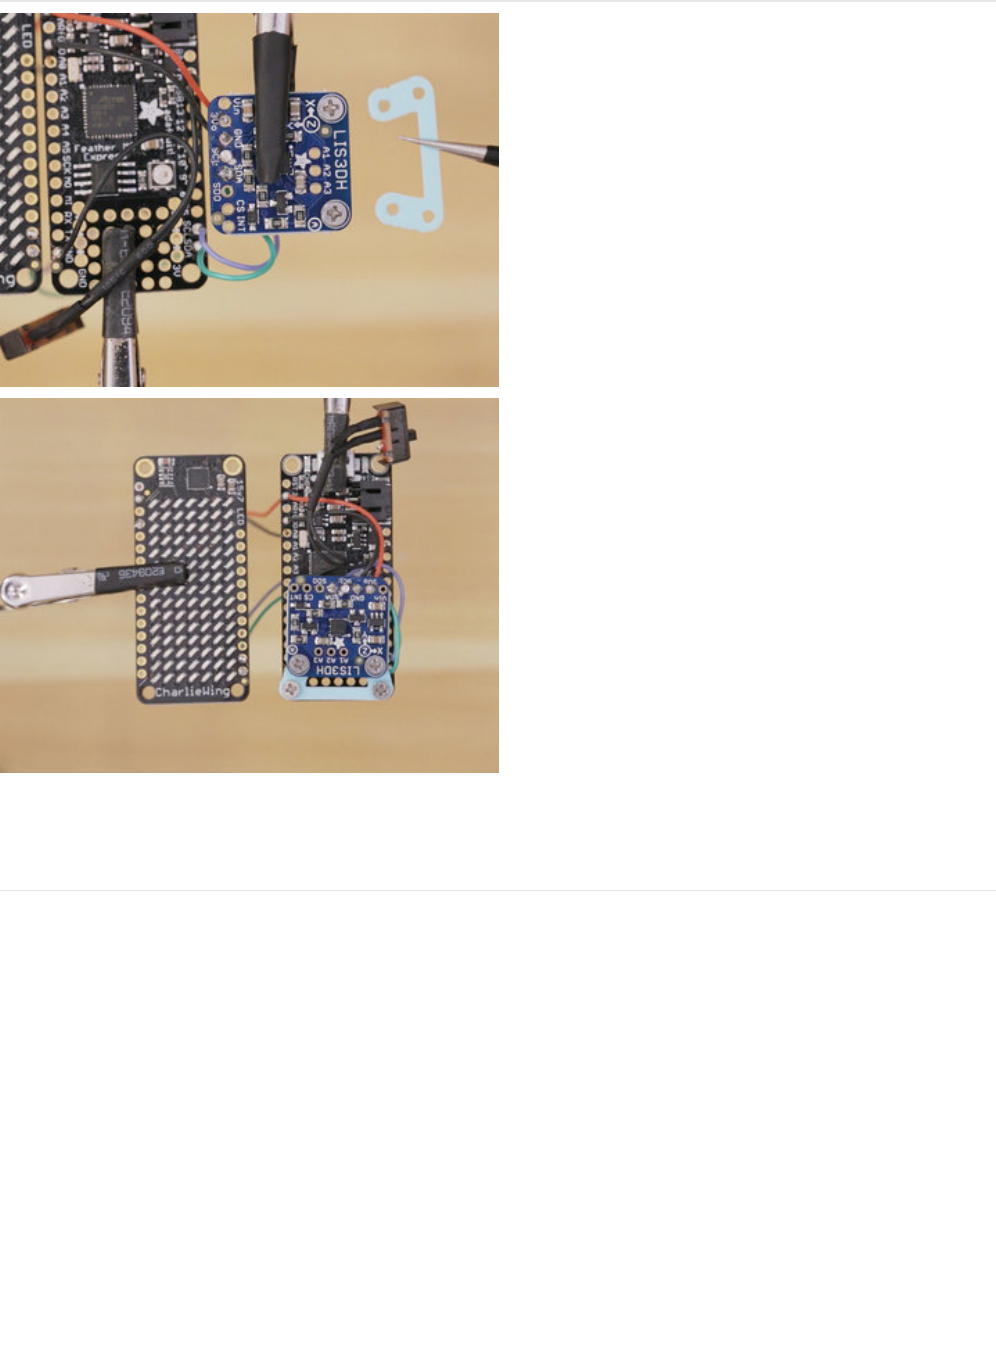
Accelerometer Mount
This 3d printed mount will secure the LIS3DH to the top
of the Feather board.
We'll use M2x4mm screws to connect the LIS3DH to the
3d printed mount.
Next we'll fasten the the 3d printed mount on top of the
feather board. We'll use the two mounts close to the
prototyping area.
Use two M2x8mm screws so they can reach through
the Feather and in the 3d printed spacer.
© Adafruit Industries https://learn.adafruit.com/animated-led-sand Page 19 of 29
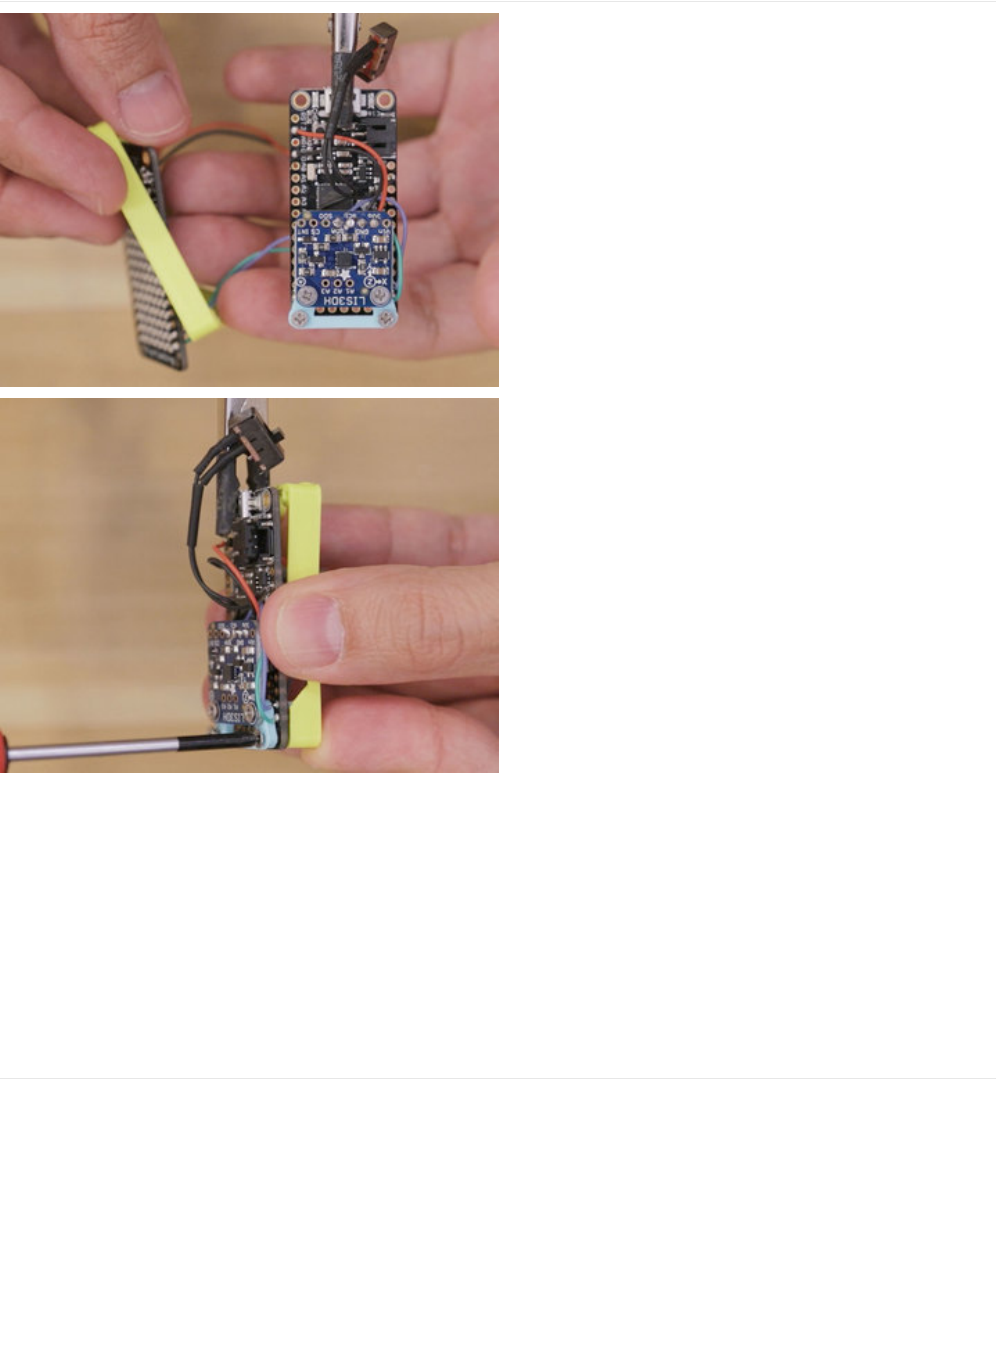
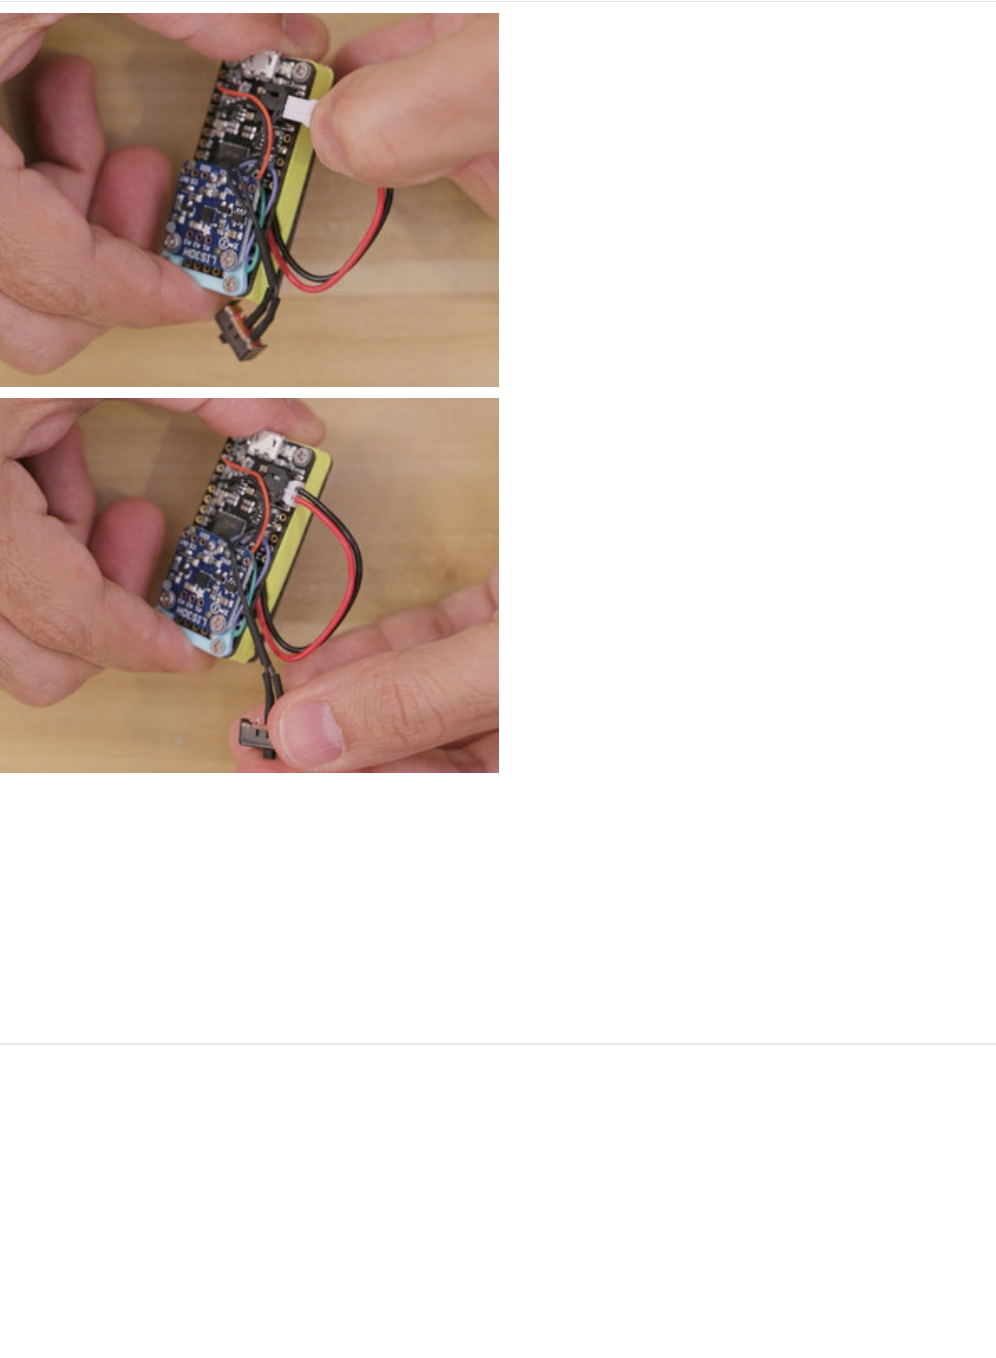
Spacer
This 3d printed spacer will join the Feather and
CharliePlex board together.
This will allow a 350mAh lipo battery to safely sit
between the two boards, with just enough space to fit
the wires from both boards.
Attach boards
First fasten the two screws on the accelerometer mount.
Leave the other two screws unfastened until we fit the
battery cable through the opening on the spacer.
© Adafruit Industries https://learn.adafruit.com/animated-led-sand Page 20 of 29


Attach Spacer
Now we can fasten the other two M2x8mm screws
through the Feather board. Tighten them in from the top
of the Feather, into the spacer.
The Feather board should now be firmly attached to the
3d printed spacer. The CharliePlex board will attach
after we mount it into the enclosure.
© Adafruit Industries https://learn.adafruit.com/animated-led-sand Page 23 of 29
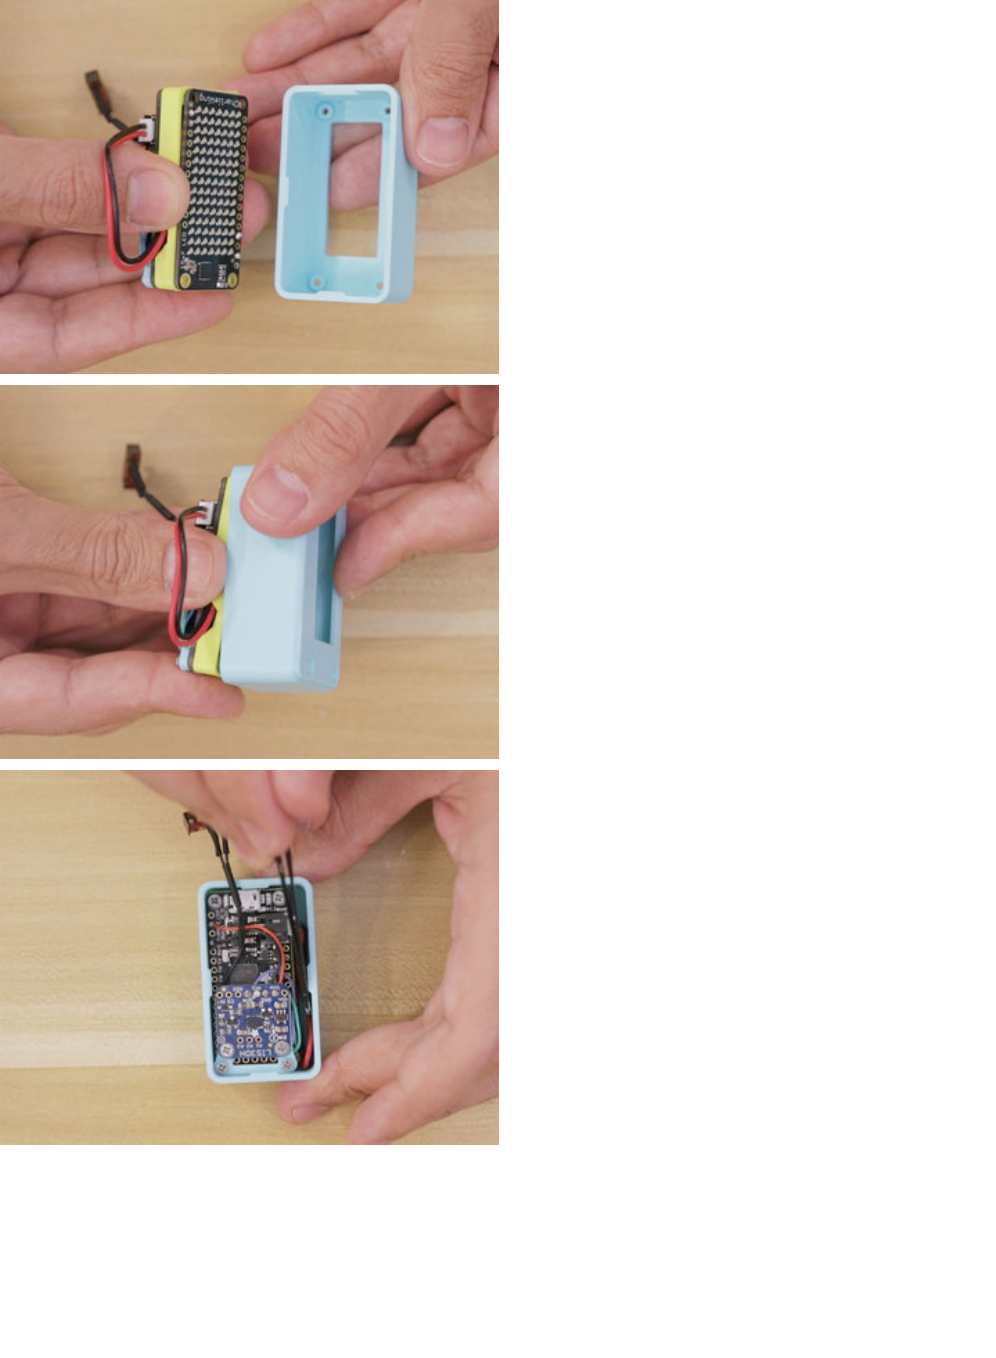
Plug in battery
First we'll need to plug in the battery before we insert it
into the enclosure.
Reference the picture to route the wire along the side of
the spacer, to the JST PH-2 connector on the Feather
board.
If the LEDs light up, use the slide switch to turn the
circuit off.
Mount inside enclosure
Align the CharliePlex to the enclosure, making sure the
display cutout matches the LED matrix. (We're showing
the box enclosure, but all of the design variants mount
the same).
Tuck wires
© Adafruit Industries https://learn.adafruit.com/animated-led-sand Page 24 of 29
One side of the enclosure is wider to accommodate the
JST connection on the side of the Feather board.
Carefully fit the wires inside the enclosure. You can use
tweezers to arrange them next to the spacer.
Align mounting holes
Flip the enclosure to the display cutout. Move the
CharliePlex board so it aligns with the mounting holes
on the front face of the enclosure.
Use four M2x8mm screws on the front face of the
enclosure to attach the CharliePlex to the spacer.
Face cover
To hide the screws on the front of the enclosure, we
used a small amount of tac to adhere one of the printed
face cover.
© Adafruit Industries https://learn.adafruit.com/animated-led-sand Page 25 of 29

Slide Switch Tolerances
To adjust for different printer tolerances and to ensure
the slide switch tightly press fits into the enclosure, we
might need to gently spread the two metal sides. This
will help the slide switch snap fit into place on the
printed part.
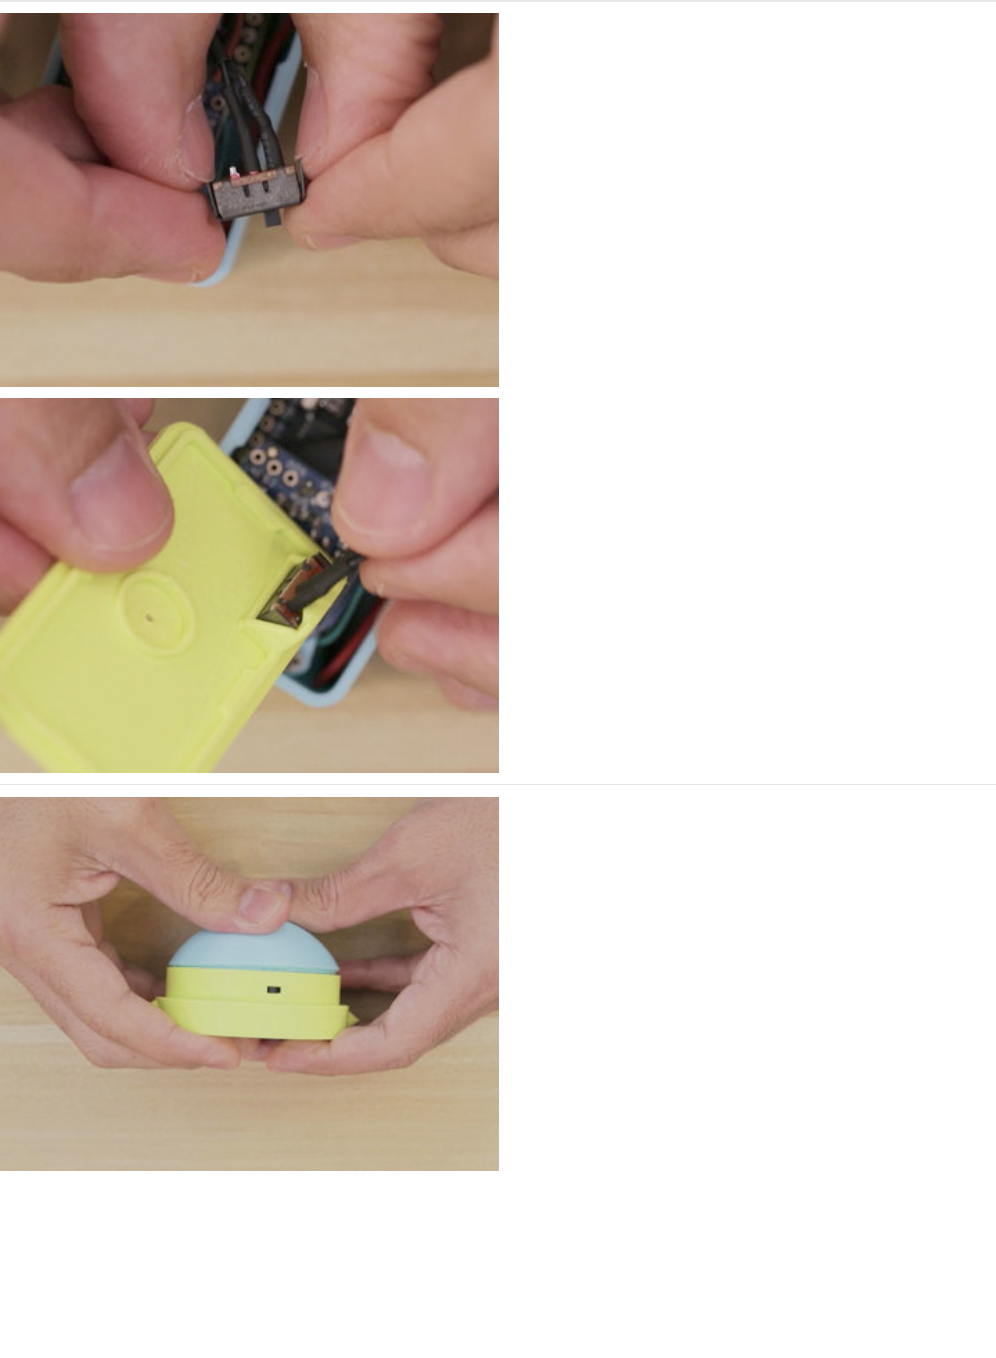
Slide Switch Mount
First, carefully flip the slide the switch into the middle
position. This will make it easier to pass through the
opening in the enclosure.
Now we can insert the slide switch into the mount. Tilt
the slide switch at an angle and then press fit into place.
Attach Lid
The lid press fits onto the enclosure by aligning the nubs
on both parts. Insert the protruding nubs on the lid into
its matching cavity on the enclosure.
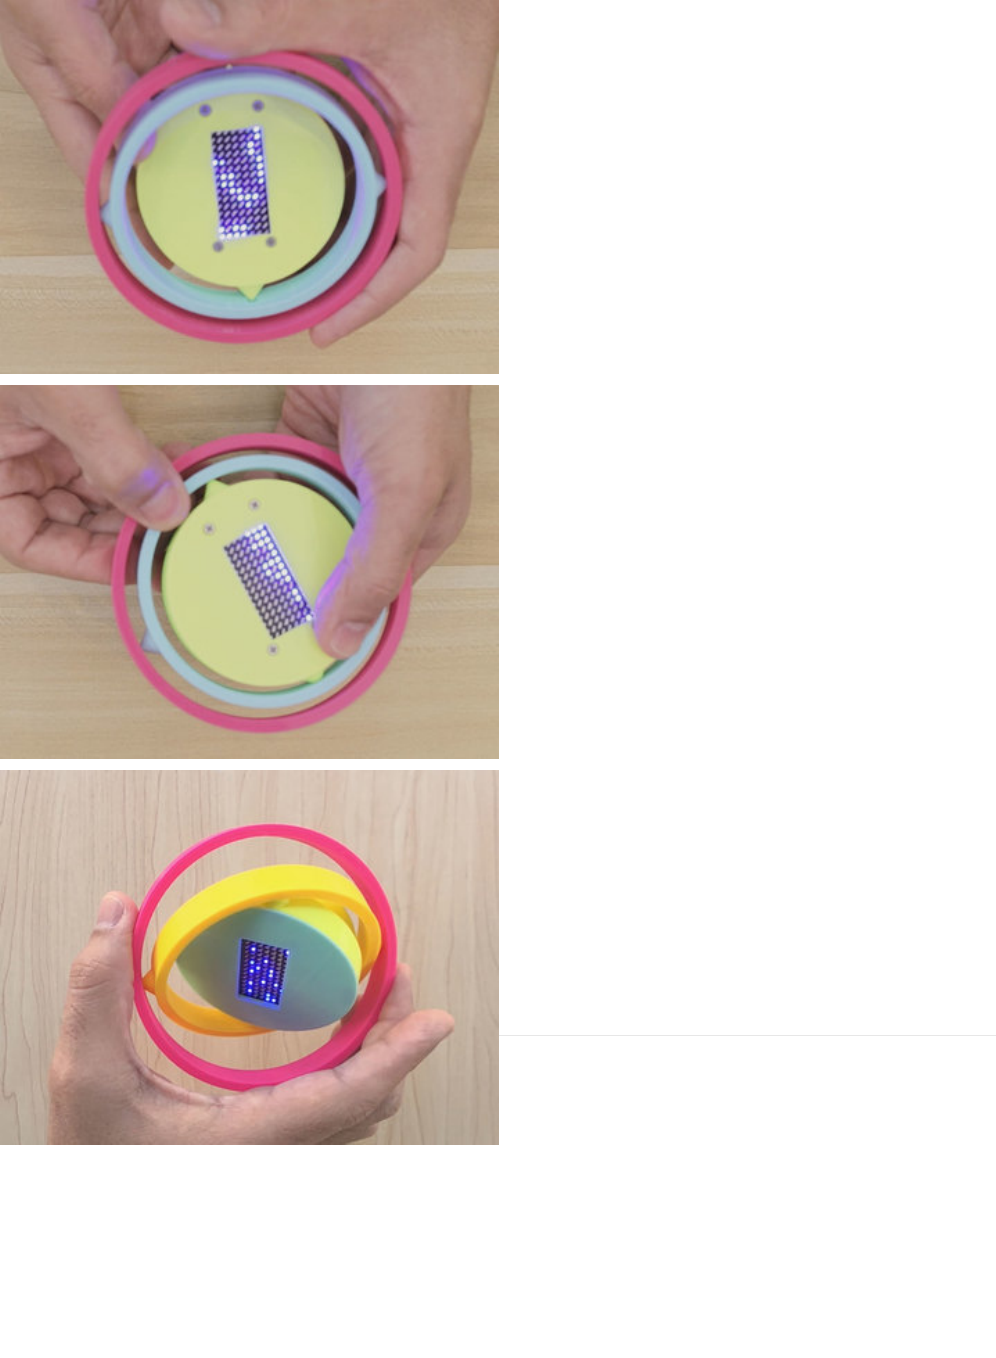
Gimbal Assemble
To assemble the gimbal version of the enclosure, simply
insert the points on the sides, one by one, at an angle.
Use by holding the outer ring close, but not over the
points that attach them to each other ring. Gently move
in an up and down motion to spin the center of the
gimbal!
© Adafruit Industries https://learn.adafruit.com/animated-led-sand Page 27 of 29
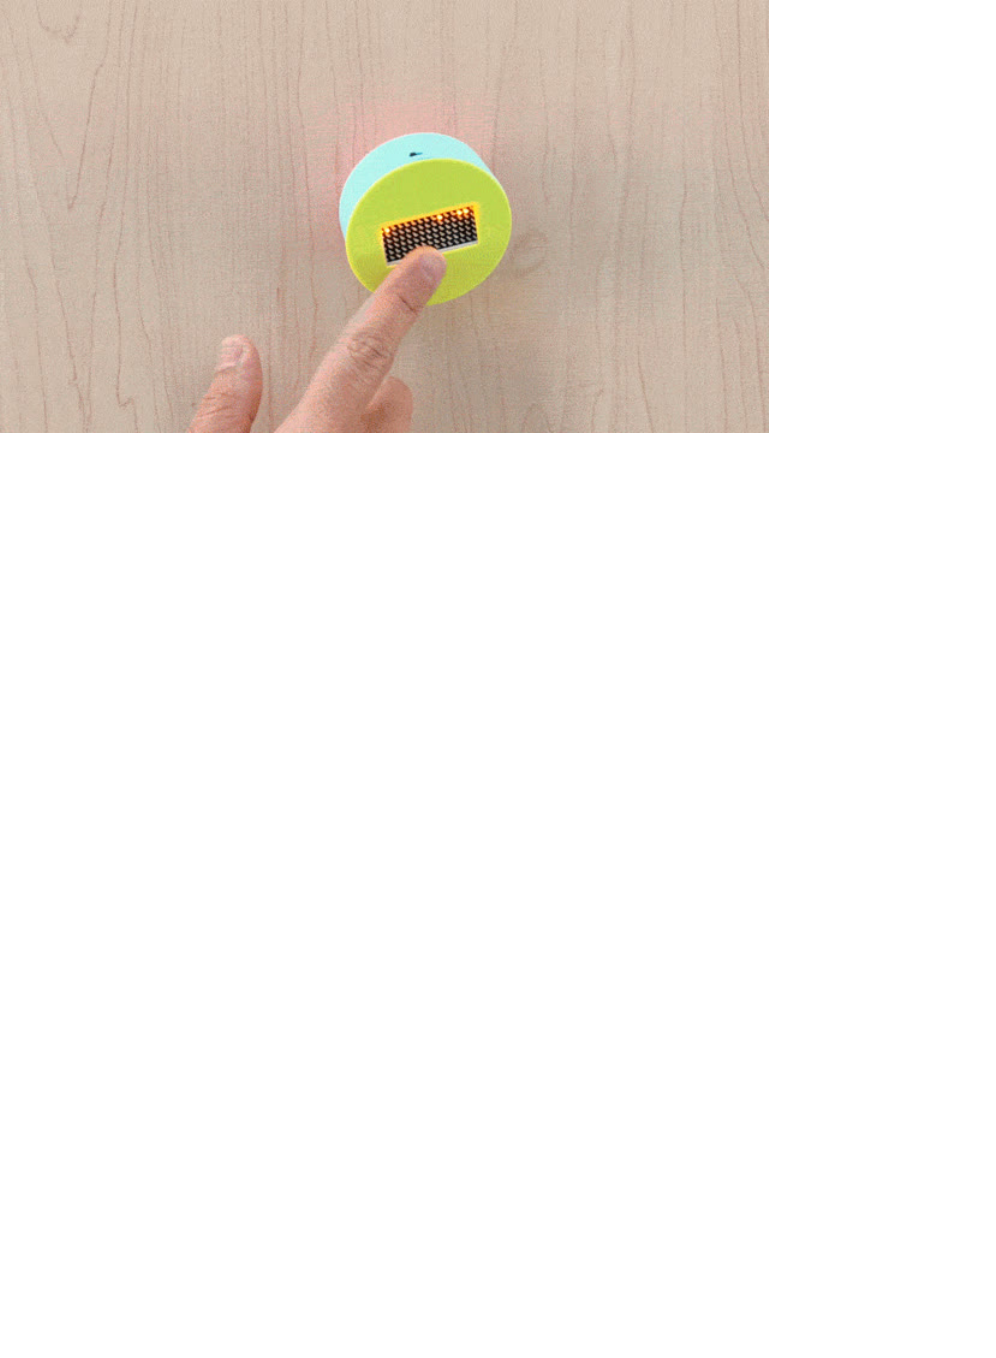
Teeter totter
The boards are offset so the display can mount to the
center of the enclosure. This make it unstable on a
dome, making the "grains of sand" bounce in
unexpected fun ways.
Simply push on the side close to the USB port to
randomly spin the enclosure on a flat table.
© Adafruit Industries https://learn.adafruit.com/animated-led-sand Page 28 of 29
© Adafruit Industries Last Updated: 2018-02-06 04:55:12 PM UTC Page 29 of 29
