Geant4 Installation Guide Building And Installing For Users Developers CERNInstal
User Manual: Pdf
Open the PDF directly: View PDF ![]() .
.
Page Count: 61
- Geant4 Installation Guide
- Table of Contents
- Chapter 1. Getting Started
- Chapter 2. Building and Installing Geant4
- Chapter 3. Setting Up and Using an Install of Geant4
- Chapter 4. CMake and Build Tools For Geant4 Developers
- Chapter 5. Help And Support
Geant4 Installation Guide
Building and Installing Geant4
for Users and Developers
Version: geant4 10.1
Publication date 5 December 2014
Geant4 Collaboration

Geant4 Installation Guide : Building and Installing Geant4 for Users
and Developers
by Geant4 Collaboration
Version: geant4 10.1
Publication date 5 December 2014

iii
Table of Contents
1. Getting Started .......................................................................................................................... 1
1.1. Supported and Tested Platforms ......................................................................................... 1
1.2. Software Required to Build Geant4 .................................................................................... 1
1.2.1. CLHEP Library .................................................................................................... 2
1.3. Software Required to Build Optional Components of Geant4 ................................................... 2
1.4. Software Suggested for Use With Geant4 ............................................................................ 3
2. Building and Installing Geant4 ..................................................................................................... 4
2.1. Building and Installing on Unix Platforms ........................................................................... 4
2.2. Building and Installing on Windows Platforms ..................................................................... 6
2.3. Geant4 Build Options ..................................................................................................... 13
2.3.1. Standard Options ................................................................................................. 14
2.3.2. Advanced Options ............................................................................................... 16
2.3.3. Selecting a Different Compiler and Changing Flags ................................................... 20
2.3.4. Using an Initial Cache File for Build Options ........................................................... 21
3. Setting Up and Using an Install of Geant4 .................................................................................... 23
3.1. Geant4 Installation Locations ........................................................................................... 23
3.2. Building Applications with Geant4 ................................................................................... 27
3.2.1. Using CMake to build Applications: Geant4Config.cmake .......................................... 27
3.2.2. Using Geant4Make to build Applications: binmake.gmk ............................................. 47
3.2.3. Other Unix Build Systems: geant4-config ......................................................... 49
3.3. Note on Geant4 Datasets ................................................................................................. 50
4. CMake and Build Tools For Geant4 Developers ............................................................................ 55
4.1. Developing Geant4 using Make, Xcode, Visual Studio and Eclipse ......................................... 55
4.1.1. Using the Eclipse IDE .......................................................................................... 55
4.2. Command Line Help with Make ...................................................................................... 56
4.3. Building Quickly and Efficiently with Multiple Build Directories ........................................... 56
4.4. Building Test Applications Against Your Development Build ................................................ 57
5. Help And Support .................................................................................................................... 58
5.1. Getting Help ................................................................................................................. 58
5.2. Further Information ........................................................................................................ 58

1
Chapter 1. Getting Started
Geant4 uses CMake to configure a build system for compiling and installing the toolkit headers, libraries and
support tools. This document covers the basics of using CMake to build and install Geant4 together with an
overview of the most commonly used advanced features. We also provide a basic overview of how to build an
application that uses Geant4. For more information on CMake itself, the CMake Help and Documentation should
be consulted.
1.1. Supported and Tested Platforms
Geant4 is officially supported on the following operating system and compiler combinations:
• Scientific Linux CERN 6 with gcc 4.8.X, 4.9.X, 64bit
GCC 4.8.X may be installed on SLC6 systems via the free Developer Toolset .
Geant4 has also been successfully compiled on other Linux distributions, including Debian, Ubuntu and
openSUSE. Please note that distributions other than SLC are not officially supported. However, we welcome
feedback and patches for non-SLC platforms!
• Mac OS X 10.9 (Mavericks) with Clang 3.5 (Apple-LLVM 6.0), 64bit.
Geant4 has also been successfully compiled on Mac OS X 10.7 (Lion) with Clang 3.2 (Apple), and 10.8
(Mountain Lion) with Clang 3.4 (Apple) but these versions of Mac OS X are not officially supported. Please
note that Mac OS X 10.10 (Yosemite) is not officially supported or tested in the initial release. Geant4 has been
successfully installed and applications built and run against it on Yosemite, and official testing and support is
expected in subsequent patches.
• Windows 7 with Visual Studio 12 (VS2013).
Multithreading of Geant4 is currently not supported on the Windows platform.
The Geant4 toolkit and applications can also be compiled for Intel Xeon Phi systems. Though we cannot offer full
support for this architecture, a guide discussing our current experience with the platform is available separately.
The following platforms and compilers are also tested, but not officially supported:
• Scientific Linux CERN 6 with gcc 4.4.X, 4.7.X.
Scientific Linux CERN 6 with Intel 14.X.
• Ubuntu Linux 14 with gcc 4.8.
• Mac OS X 10.8 (Mountain Lion) Clang 3.4.
• Windows 7 with Visual Studio 9 (VS2008) (single threaded only).
We welcome user feedback and/or bug reports via our HyperNews Forum and Bugzilla.
1.2. Software Required to Build Geant4
The following minimal set of software must be present to build Geant4:
• Geant4 Toolkit Source Code.
• CMake 2.8.4 or higher.
Geant4 has also been successfully configured and built with CMake 3.
• C++ Compiler:

Getting Started
2
• Linux: GNU Compiler Collection.
• Mac OS X: Clang (Xcode 5 or 6).
You will also need to install the command line tools (via Xcode->Preferences->Downloads ).
In Xcode 5 and 6, you may need to run xcode-select --install from the command line if the above
method does not work.
• Windows: Visual Studio 2012, either Express or Higher Editions.
• Linux/Mac only: Make
On Linux, we recommend that you use CMake as provided through the package management system of your
distribution, unless this does not meet the minimum version requirement of CMake 2.8.4. In that case, we
recommend you install it using the Linux binary installer for the latest version of CMake, available with
instructions from the Kitware download site. This installer is highly portable and should work on the vast majority
of distributions.
On Mac and Windows, CMake is not installed by default, so we recommend that you install it using the most
recent Darwin64 dmg (Mac) or Win32 exe (Windows) installers supplied by the Kitware download site.
On Linux, it is strongly recommended to use the g++ compiler supplied by the package management system of
your distribution (Linux). On OS X, you must use the clang compiler as supplied with Xcode (Mac).
1.2.1. CLHEP Library
Geant4 distributes a minimal version of the CLHEP library sources with the toolkit to help cross-platform usage.
This internal version of the CLHEP library is built and used by default, so having an external install of CLHEP
is no longer a prerequisite for Geant4.
However, Geant4 can still be configured to use an existing install of CLHEP if required by your use case. This
configuration is done by passing extra options to CMake, and if your require this feature you should consult
Section 2.3.
1.3. Software Required to Build Optional
Components of Geant4
Geant4 has several optional components which if enabled require further software to be preinstalled on your
system. These components and their requirements are listed below.
• GDML Support (All Platforms)
Requires: Xerces-C++ headers and library.
• Qt User Interface and Visualization (All Platforms)
Requires: Qt4 or Qt5 headers and libraries, OpenGL or MesaGL headers and libraries.
Either Qt4 or Qt5 can be used provide that the version of Qt is 4.6 or higher on Linux and Windows.
On Mac OS X, you should use Qt 4.8 or better.
• Motif User Interface and Visualization (Linux and Mac OS X)
Requires: Motif and X11 headers and libraries, OpenGL or MesaGL headers and libraries.
• X11 OpenGL Visualization (Linux and Mac OS X)

Getting Started
3
Requires: X11 headers and libraries,OpenGL or MesaGL headers and libraries.
On Mac OS X 10.8 and higher, X11 can be obtained through the XQuartz project.
• WIN32 OpenGL Visualization (Windows)
Requires: OpenGL or MesaGL headers and libraries.
• Open Inventor Visualization (All Platforms)
Requires: Coin3D with SoXt(SoWin) graphics binding on Linux/Mac(Windows). Coin3D is a free
implementation of Open Inventor.
• X11 RayTracer Visualization (Linux and Mac OS X)
Requires: X11 headers and libraries.
On Mac OS X 10.8 and higher, X11 can be obtained through the XQuartz project.
On Linux, it is strongly recommend that you use the binary packages as supplied through the package management
system of your distribution. If you require a component that uses OpenGL, we also recommend that you install
the OpenGL package supplied for your video card (e.g. NVIDIA). You should consult the documentation of your
distribution for information on the packages that provide the needed software libraries and headers.
On Mac and Windows, we strongly recommend installing any required packages through binary dmg/exe installers
supplied through the vendor links above. Note that Visual Studio supplies an install of OpenGL on Windows. Mac
OS X supplies OpenGL, but if you need X11 you will need to install the XQuartz app. Installation and use of
packages on Mac through homebrew, MacPorts or fink is not tested or supported, but you may build Geant4 using
packages supplied by these package management systems with that caveat.
1.4. Software Suggested for Use With Geant4
Geant4 includes many cross-platform file-based visualization drivers, together with the lightweight inexlib for
basic analysis. Geant4 does not require any additional software over and above that listed in Section 1.2 to build
and install these components.
However, you may wish to install the software suggested below to make use of these components when running
your Geant4 application. We again emphasize that you do not need these packages to build and install Geant4.
• DAWN postscript renderer (for use with DAWN visualization driver).
• HepRApp Browser (for use with HepRep visualization driver).
• WIRED4 JAS Plug-In (for use with HepRep visualization driver).
• VRML Browser (for use with VRML visualization driver).
• OpenScientist interactive environment for analysis.
• AIDA implementation such as OpenScientist, iAIDA, JAS3 or rAIDA.
• gMocren volume visualizer for Geant4 medical simulations.
For more details on Geant4's visualization and analysis components, you should consult the relevant sections in
the Geant4 User's Guide for Application Developers.

4
Chapter 2. Building and Installing Geant4
2.1. Building and Installing on Unix Platforms
Unpack the Geant4 source package geant4.10.01.tar.gz to a location of your choice. For illustration only,
this guide will assume it's been unpacked in a directory named /path/to, so that the Geant4 source package
sits in a subdirectory
/path/to/geant4.10.01
We refer to this directory as the source directory. The next step is to create a directory in which to configure and
run the build and store the build products. This directory should not be the same as, or inside, the source directory.
In this guide, we create this build directory alongside our source directory:
$ cd /path/to
$ mkdir geant4.10.1-build
$ ls
geant4.10.01 geant4.10.1-build
To configure the build, change into the build directory and run CMake:
$ cd /path/to/geant4.10.1-build
$ cmake -DCMAKE_INSTALL_PREFIX=/path/to/geant4.10.1-install /path/to/geant4.10.01
Here, the CMake Variable CMAKE_INSTALL_PREFIX is used to set the install directory, the directory under
which the Geant4 libraries, headers and support files will be installed. It must be supplied as an absolute path. The
second argument to CMake is the path to the source directory. In this example, we have used the absolute path to
the source directory, but you can also use the relative path from your build directory to your source directory.
Additional arguments may be passed to CMake to activate optional components of Geant4, such as visualization
drivers, or tune the build and install parameters. See Section 2.3 for details of these options. If you run CMake and
decide afterwards you want to activate additional options, simply rerun CMake in the build directory, passing it
the extra options plus the build directory. For example, after running CMake as above, you may wish to activate
the installation of Geant4's datasets, so you would run
$ cd /path/to/geant4.10.1-build
$ cmake -DGEANT4_INSTALL_DATA=ON .
On executing the CMake command, it will run to configure the build and generate Unix Makefiles to perform
the actual build. CMake has the capability to generate buildscripts for other tools, such as Eclipse and Xcode, but
please note that we do not support user installs of Geant4 with these tools. On Linux, you will see output similar to:
$ cmake -DCMAKE_INSTALL_PREFIX=/path/to/geant4.10.1-install /path/to/geant4.10.01
-- The C compiler identification is GNU
-- The CXX compiler identification is GNU
-- Check for working C compiler: /usr/bin/gcc
-- Check for working C compiler: /usr/bin/gcc -- works
-- Detecting C compiler ABI info
-- Detecting C compiler ABI info - done
-- setting default compiler flags for CXX
-- Check for working CXX compiler: /usr/bin/c++
-- Check for working CXX compiler: /usr/bin/c++ -- works
-- Detecting CXX compiler ABI info
-- Detecting CXX compiler ABI info - done
-- Found EXPAT: /usr/lib64/libexpat.so
-- Looking for sys/types.h
-- Looking for sys/types.h - found
-- Looking for stdint.h
-- Looking for stdint.h - found
-- Looking for stddef.h
-- Looking for stddef.h - found

Building and Installing Geant4
5
-- Check size of off64_t
-- Check size of off64_t - done
-- Looking for fseeko
-- Looking for fseeko - found
-- Looking for unistd.h
-- Looking for unistd.h - found
-- Pre-configuring dataset G4NDL (4.5)
-- Pre-configuring dataset G4EMLOW (6.40)
-- Pre-configuring dataset PhotonEvaporation (3.1)
-- Pre-configuring dataset RadioactiveDecay (4.1)
-- Pre-configuring dataset G4NEUTRONXS (1.4)
-- Pre-configuring dataset G4PII (1.3)
-- Pre-configuring dataset RealSurface (1.0)
-- Pre-configuring dataset G4SAIDDATA (1.1)
-- Pre-configuring dataset G4ABLA (3.0)
-- Pre-configuring dataset G4ENSDFSTATE (1.0)
*WARNING*
Geant4 has been pre-configured to look for datasets
in the directory:
/path/to/geant4-10.1-install/share/Geant4-10.0.0/data
but the following datasets are NOT present on disk at
that location:
G4NDL (4.5)
G4EMLOW (6.40)
PhotonEvaporation (3.1)
RadioactiveDecay (4.1)
G4NEUTRONXS (1.4)
G4PII (1.3)
RealSurface (1.0)
G4SAIDDATA (1.1)
G4ABLA (3.0)
G4ENSDFSTATE (1.0)
If you want to have these datasets installed automatically
simply re-run cmake and set the GEANT4_INSTALL_DATA
variable to ON. This will configure the build to download
and install these datasets for you. For example, on the
command line, do:
cmake -DGEANT4_INSTALL_DATA=ON <otherargs>
The variable can also be toggled in ccmake or cmake-gui.
If you're running on a Windows system, this is the best
solution as CMake will unpack the datasets for you
without any further software being required
Alternatively, you can install these datasets manually
now or after you have installed Geant4. To do this,
download the following files:
http://geant4.cern.ch/support/source/G4NDL.4.5.tar.gz
http://geant4.cern.ch/support/source/G4EMLOW.6.40.tar.gz
http://geant4.cern.ch/support/source/G4PhotonEvaporation.3.1.tar.gz
http://geant4.cern.ch/support/source/G4RadioactiveDecay.4.1.tar.gz
http://geant4.cern.ch/support/source/G4NEUTRONXS.1.4.tar.gz
http://geant4.cern.ch/support/source/G4PII.1.3.tar.gz
http://geant4.cern.ch/support/source/RealSurface.1.0.tar.gz
http://geant4.cern.ch/support/source/G4SAIDDATA.1.1.tar.gz
http://geant4.cern.ch/support/source/G4ABLA.3.0.tar.gz
http://geant4.cern.ch/support/source/G4ENSDFSTATE.1.0.tar.gz
and unpack them under the directory:
/path/to/geant4-10.1-install/share/Geant4-10.1.0/data
As we supply the datasets packed in gzipped tar files,
you will need the 'tar' utility to unpack them.
Nota bene: Missing datasets will not affect or break
compilation and installation of the Geant4
libraries.
-- The following Geant4 features are enabled:
GEANT4_BUILD_CXXSTD: Compiling against C++ Standard 'c++98'

Building and Installing Geant4
6
GEANT4_USE_SYSTEM_EXPAT: Using system install of EXPAT
-- Configuring done
-- Generating done
-- Build files have been written to: /path/to/geant4.10.1-build
On Mac OS X, the output will have slight differences, but the last three lines at least should be the same. These
indicate a successful configuration.
The warning message about datasets is simply an advisory. Due to the size of the datasets, Geant4 will try and
reuse any datasets it can find under the data installation prefix, in our example case /path/to/geant4.10.1-
install/share/Geant4-10.1.0/data. If any datasets are not found here, it will pre-configure the setup
scripts for using Geant4 (described in Section 3.1 and Section 3.2) to point to this location and emit the message
to advise you on the steps you need to take to manually install the datasets at a time of your convenience.
Datasets are not required to be present to build Geant4, but may be required to run your application, depending on
the physics models you use. If you wish to download and install the datasets automatically as part of your build
of Geant4, simply add the option -DGEANT4_INSTALL_DATA=ON to the arguments passed to CMake. Note
that this requires a working network connection and will download around 0.5GB of data. If you already have the
datasets present on your system, you can point Geant4 to their location. See the GEANT4_INSTALL_DATADIR
option described Section 2.3.1 for more details.
If you see any errors at this point, carefully check the error messages output by CMake, and check your install of
CMake and C++ compiler first. The default configuration of Geant4 is very simple, and provided CMake and the
compiler are installed correctly, you should not see errors.
After the configuration has run, CMake will have generated Unix Makefiles for building Geant4. To run the build,
simply execute make in the build directory:
$ make -jN
where N is the number of parallel jobs you require (e.g. if your machine has a dual core processor, you could
set N to 2).
The build will now run, and will output information on the progress of the build and current operations. If you
need more output to help resolve issues or simply for information, run make as
$ make -jN VERBOSE=1
Once the build has completed, you can install Geant4 to the directory you specified earlier in
CMAKE_INSTALL_PREFIX by running
$ make install
in the build directory. The libraries, headers and resource files are installed under your chosen install prefix in a
standard Unix-style hierarchy of directories, described below in Section 3.1. If you are performing a staged install
for packaging or deployment, the CMake generated Makefiles support the DESTDIR variable for copying to a
temporary location. To uninstall Geant4 you can run
$ make uninstall
which will remove all installed files but not any installed directories.
2.2. Building and Installing on Windows Platforms
Unpack the Geant4 source package, geant4_10_01.zip to a location of your choice. For illustration only,
this guide will assume it's been unpacked in a directory C:\Users\Ben\Documents\geant4\, so that the
Geant4 source package resides in the subdirectory
Building and Installing Geant4
7
C:\Users\Ben\Documents\geant4\geant4_10_01
We refer to this directory as the source directory.
Whilst CMake can be used from the Windows cmd program, we recommend using the CMake GUI for configuring
the build. The steps required to use the CMake GUI and Visual Studio to build and install Geant4 are described
below.
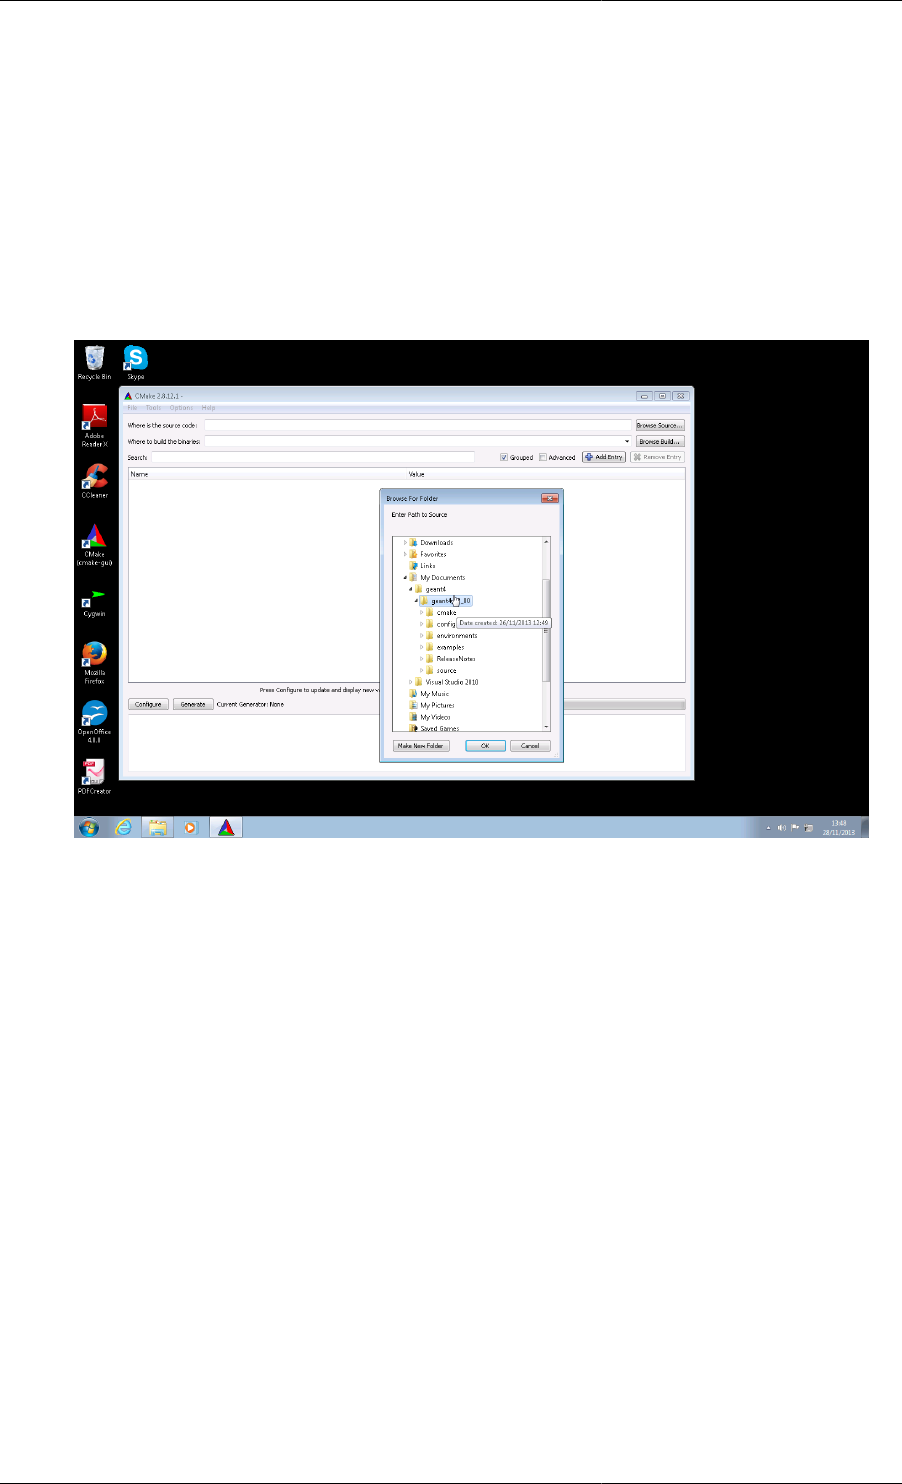
1. Open the CMake (cmake-gui) executable, and click on the Browse Source... button in the top right hand
corner of the window. Use the file browser popup to locate the Geant4 source directory, and click OK.
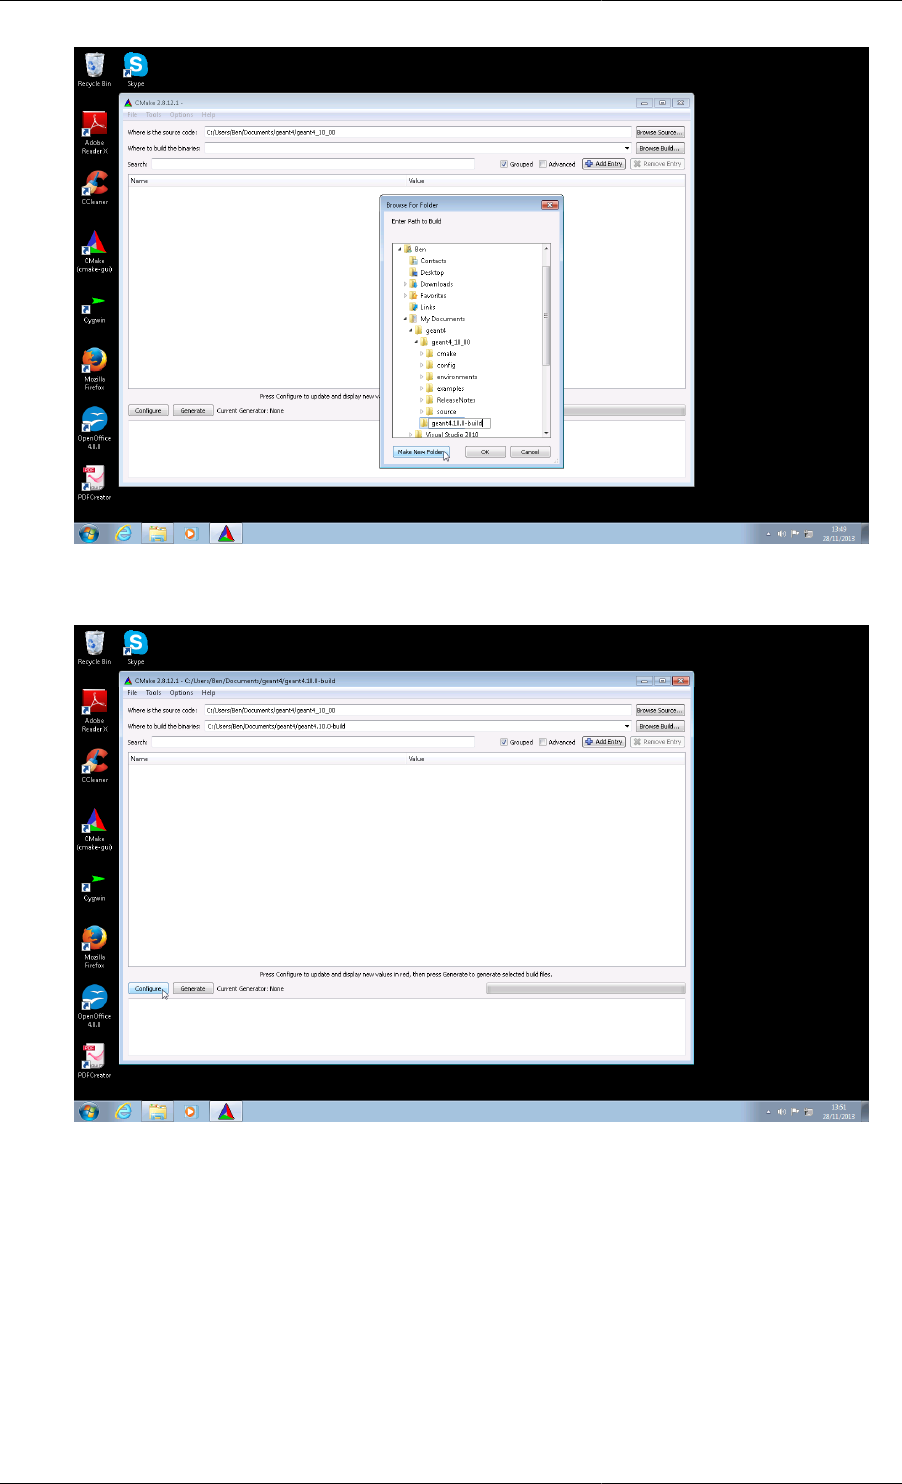
2. Now we create a directory in which to create the Visual Studio project files and hold the build products.
This directory should not be the same as, or inside, the the source directory. Here we will create this build
directory alongside our source directory.
Click on the Browse Build... button in the top right hand side of the CMake GUI window. Use the file browser
popup to browse back to C:\Users\Ben\Documents\geant4\, and click on the Make New Folder
button. Rename the created folder to geant4.10.1-build, and click on the OK button. The two text entries at
the top of the GUI should now contain C:/Users/Ben/Documents/geant4/geant4_10_01 and
C:/Users/Ben/Documents/geant4/geant4.10.1-build respectively (Note: CMake always
represents Windows paths with forward slashes).
Building and Installing Geant4
8
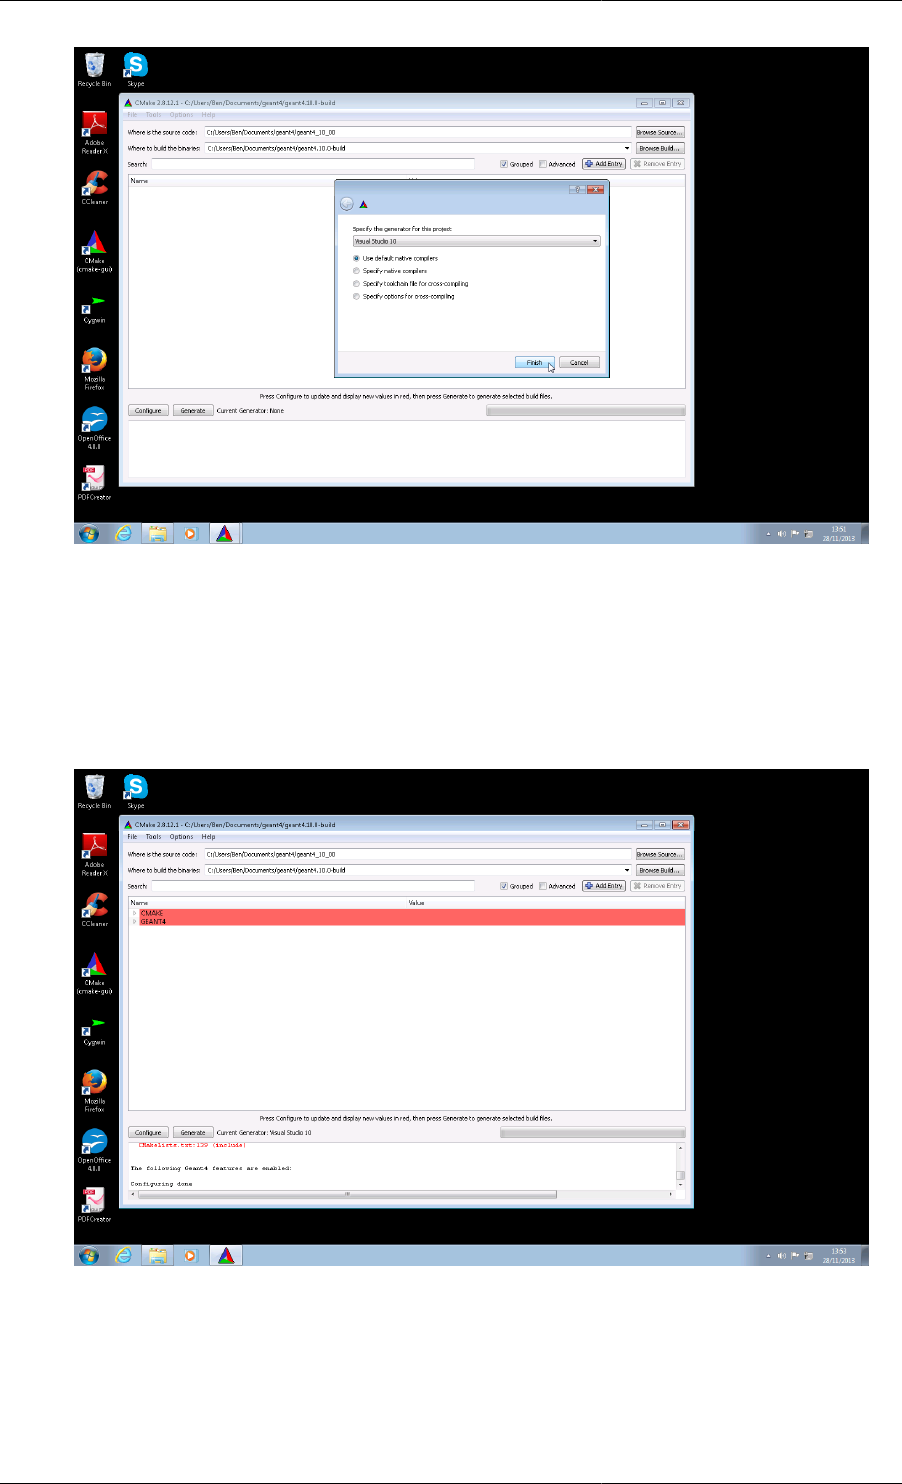
3. Click on the Configure button on the bottom left hand side of the GUI.
4. In the popup window, select Visual Studio 2010. Ensure only the Use default native compilers radio box is
checked. Then click on the Finish button.
Building and Installing Geant4
9
5. CMake will then run to check features and provide an initial configuration. All being well, you will see
red highlighted entries in the main options window including CMAKE and GEANT4 entries. Note that the
red highlighting means CMake has not fully resolved all configuration variables yet, not that has been an
error. On Express editions of Visual Studio, you may see a warning about missing system runtime libraries
in the logging window at the bottom of the GUI, but this can be ignored for a standard install. On the latest
versions of CMake, you may also see warnings relating to LINK_INTERFACE_LIBRARIES and these can
be ignored. Any other errors will be reported in this logging window.
6. By default, CMake will configure the build to install Geant4 under C:/Program Files/Geant4. If you
do not wish to use this directory, or do not have permission to install there, you can change the installation
location. Click on the arrow next to the the CMAKE entry in the central options display to expand all CMake
specific configuration options. Scroll down to locate the CMAKE_INSTALL_PREFIX entry. Click on the

Building and Installing Geant4
10
entry and edit the path directly or via the file browser popup. In this example we will modify this install
directory to C:/Users/Ben/Documents/geant4/geant4.10.1-install.
If you need to activate extra components of Geant4, click on the expansion arrow next to the GEANT4
entry in the central options display to expand all Geant4 specific configuration options. Simply click
on the tick box next to an option to select it if you require. For illustration only, we will enable two
options, GEANT4_INSTALL_DATA and GEANT4_OPENGL_WIN32 which will download and install
physics datasets for you and enable OpenGL support respectively. Note that GEANT4_INSTALL_DATA
requires a working network connection so that datasets can be downloaded, so if you are working offline you
should disable it. These, and other options, are documented in Section 2.3.
7. Once you have adjusted any options, click on the Configure button again. After this has finished, all the
options listed in the central option display should be white. If you still have entries in red, click Configure
to reconfigure until all entries are white.
Building and Installing Geant4
11
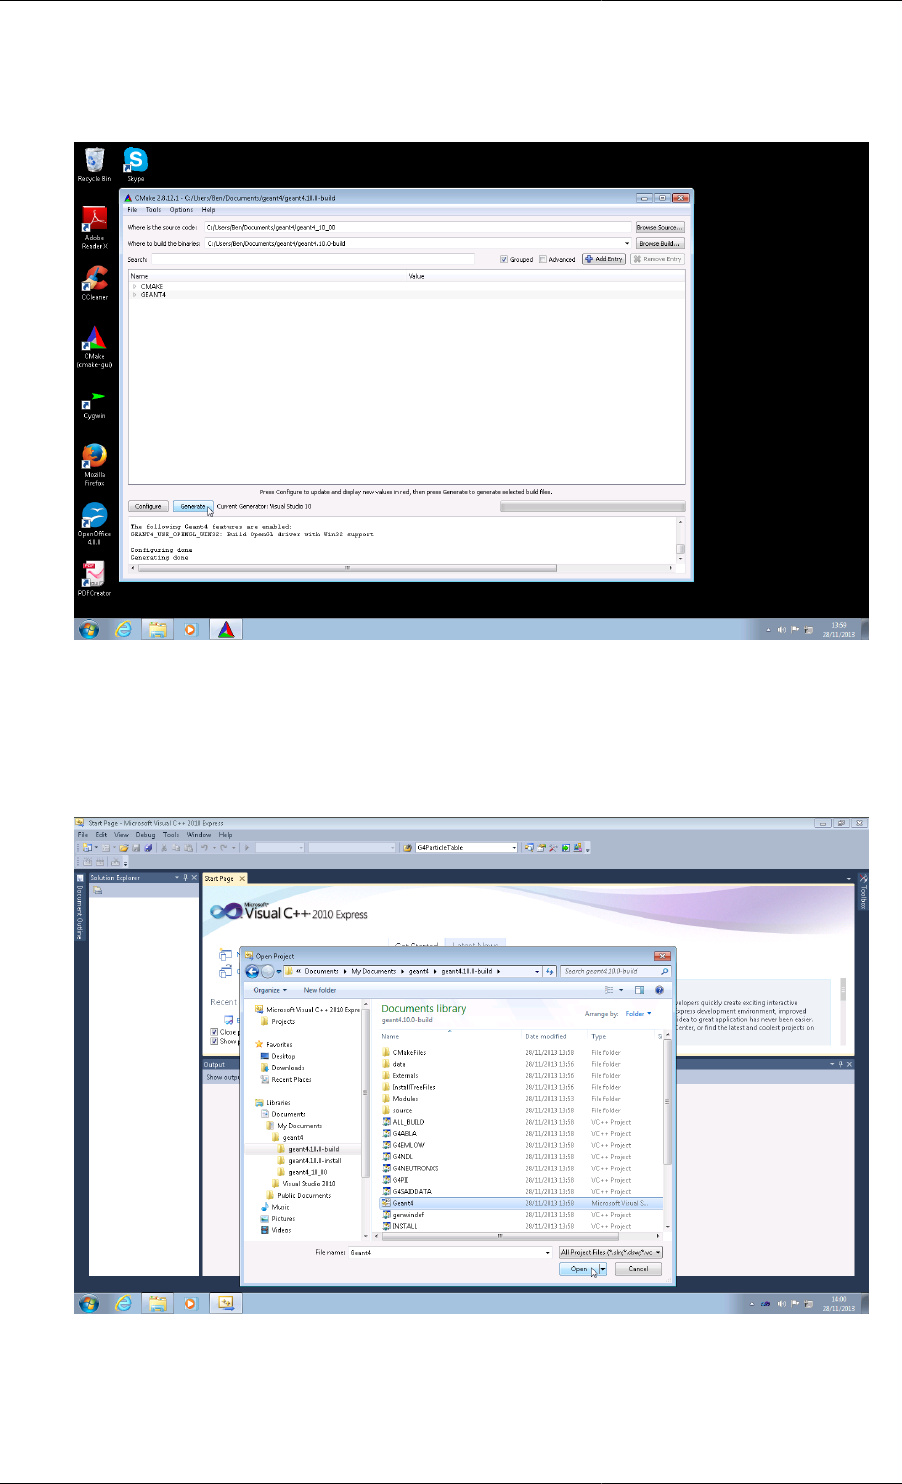
8. Now click on the Generate button to generate the Visual Studio project. All being well, CMake will generate
the solution files and finally report Configuring done, Generating done in the logging window at the bottom
of the GUI. You can now close the CMake GUI.
9. Now start up Visual Studio, and choose Open Project. This guide is somewhat specific to Visual Studio
2010 Express, but the solutions should appear with the same names in other versions. Browse to your build
directory, and open the Geant4.sln Microsoft Visual Studio Solution file. Note that it may take some time to
fully configure, open and parse all files in the solution. You may also use the MSBuild command line utility
to build the solution directly if you are familiar with that tool, but we do not as yet document or support this.
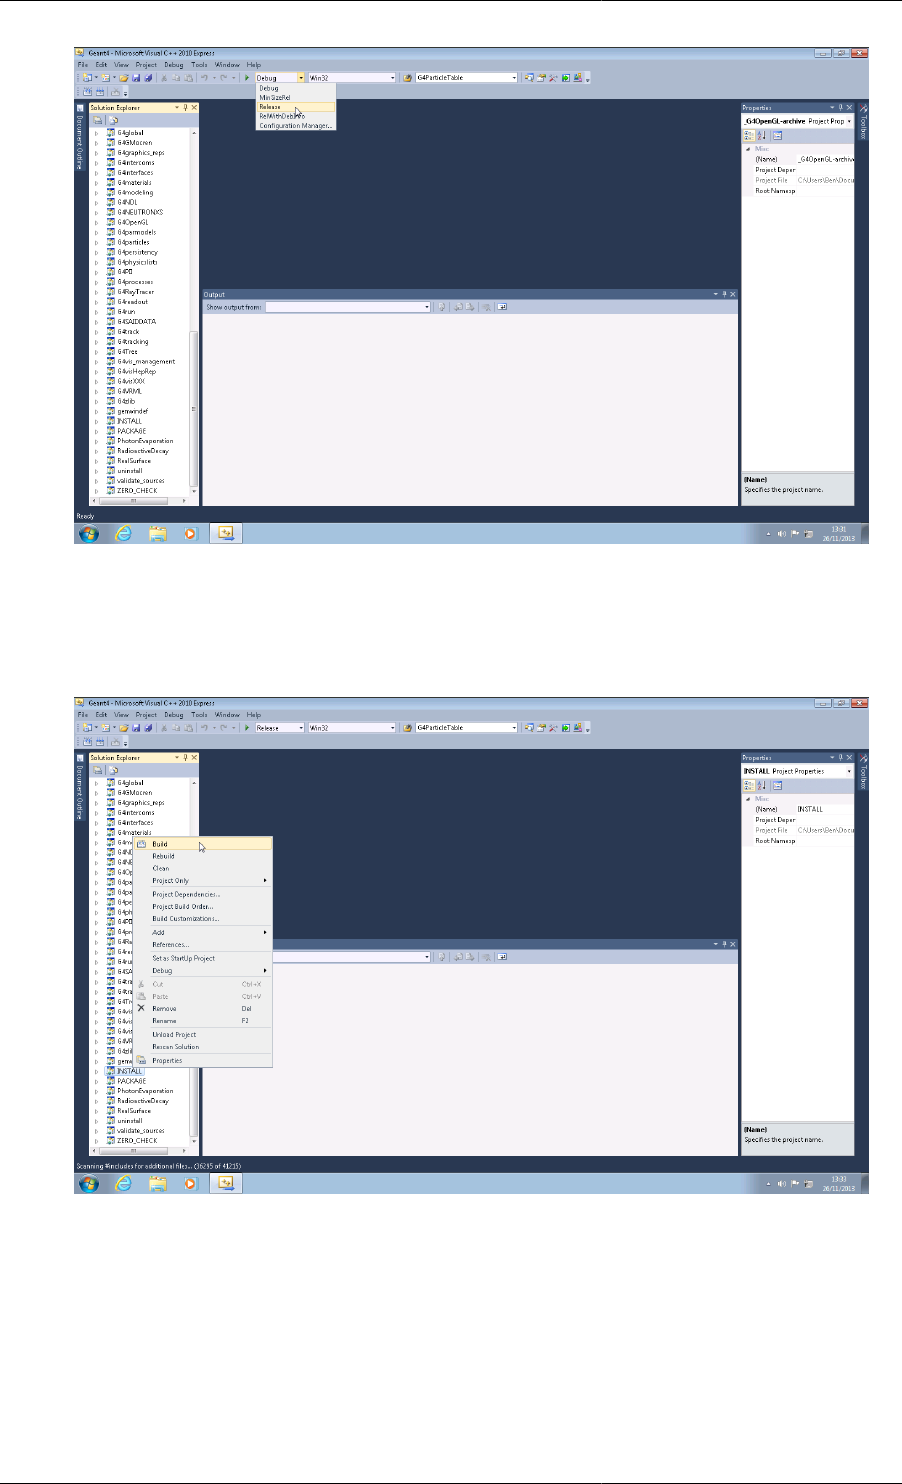
10. By default, the Visual Studio solution builds the Debug Configuration, so if you want an optimized build, you
should select the Release option from the drop down Solutions Configurations menu in the toolbar (Visual
Studio 2010).
Building and Installing Geant4
12
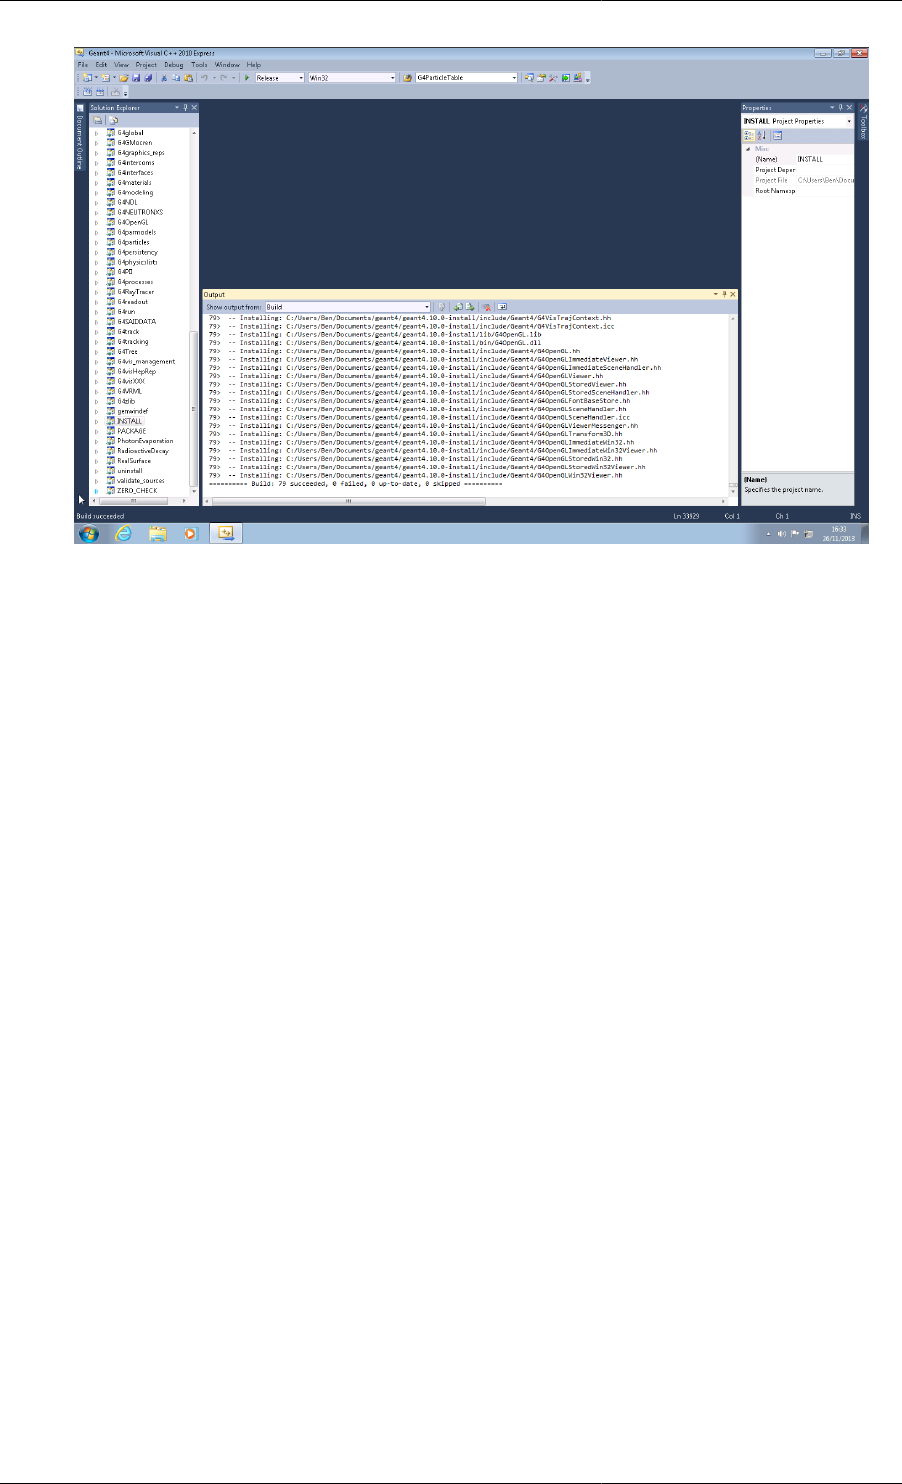
11. In the Solution Explorer, right click on the INSTALL solution, and select Build from the popup menu. The
solution will now build and install to the directory you chose for CMAKE_INSTALL_PREFIX earlier. If you
wish to build a different configuration (Release if you built Debug first, for example), then simply change
the solution configuration as described in the previous paragraph, and build the INSTALL solution again.
12. If you see a successful build, you can exit Visual Studio.
Building and Installing Geant4
13
The file and directory structure of the installation follows that of the Unix build, and is described in Section 3.1.
2.3. Geant4 Build Options
Both Section 2.1 and Section 2.2 give the minimal proceedure to build and install Geant4. Many additional options
can be passed to CMake to adjust the way Geant4 is built and installed and to enable optional components.
On the command line, these options may be set by passing their name and value to the cmake command via -
D flags, for example
$ cmake -DCMAKE_INSTALL_PREFIX=/opt/geant4 -DGEANT4_USE_GDML=ON /path/to/geant4.10.01
would configure the build of Geant4 for installation under /opt/geant4 and compilation of support for GDML.
In the CMake GUI, the options are listed as textbox entries, and values may be set directly by clicking on the
entry for the option and entering the requested information (for example, if a path is required, the GUI will pop
up a file browser).
On Unix, CMake also provides a curses based interface, ccmake, which can be used to browse and set options
in the terminal. Please see the CMake documentation for more information on this command.
If you have already created a build directory and used CMake to configure the build, you can always rerun CMake
in that directory with new options to regenerate the buildscripts (Makefiles or IDE solutions). The curses based
ccmake command is very useful in this case for browsing the current configuration and for updating it if required.
In the CMake GUI, you should set the Where is the source code: path to that of your source directory, and the
Where to build the binaries: path to that of the build directory you wish to reconfigure. You will then need to
rebuild and reinstall to pick up the changes. You can also deactivate a previously selected option to remove a
component from the build. For example, we could do
$ cmake -DCMAKE_INSTALL_PREFIX=/opt/geant4 -DGEANT4_USE_GDML=OFF /path/to/geant4.10.01
to explicitly remove support for GDML from a build (In the CMake GUI, we would simply uncheck the tick box
for GEANT4_USE_GDML). Note however that if you reconfigure to unset an option and rebuild and reinstall, your

Building and Installing Geant4
14
install may contain files installed by the previously set option (for example headers). In this case, you may wish
to build the uninstall target before reconfiguring.
Options are divided into Standard options, which any user or developer can set directly, and Advanced options,
which in general are only needed by advanced users, developers or to give very fine control over the build and
and install. Some options enable components of Geant4 which require external software (as listed in Section 1.2).
If these options are enabled, the required software will be searched for, and hence there are also options which
control where CMake should look for these packages. If a required software package is not found, then CMake
will exit with an error message detailing what was not found.
2.3.1. Standard Options
We list standard options here in logical order. If you use CMake's curses or GUI interfaces, they will be listed
alphabetically.
•CMAKE_INSTALL_PREFIX
• Sets the installation prefix for Geant4. Equivalent to --prefix in Autotools. Its default is platform
dependent:
Unix: /usr/local
Windows: C:\Program Files\Geant4
It should be supplied as an absolute path, otherwise CMake will interpret its value relative to your build
directory.
See also the CMAKE_INSTALL_XXXDIR Advanced Options for fine control of installation locations.
•CMAKE_BUILD_TYPE : (DEFAULT : Release)
• Controls the type of build, at present only the additional flags passed to the compiler. It defaults to Release
which gives an optimized build with no debugging symbols. The most useful values are:
Release : Optimized build, no debugging symbols
Debug : Debugging symbols, no optimization
RelWithDebInfo : Optimized build with debugging symbols
Note that if you use a build system which supports multiconfiguration builds (e.g. Xcode, Visual Studio),
this variable has no effect as all build types are available inside the CMake generated project.
•GEANT4_BUILD_MULTITHREADED : (DEFAULT : OFF, Unix Only)
• If set to ON, build Geant4 libraries with support for multithreading. At present, this is only supported on
Unix systems.
REQUIRES: Compiler with support for Thread Local Storage, pthread libraries and headers.
•GEANT4_INSTALL_DATADIR : (DEFAULT : CMAKE_INSTALL_DATAROOTDIR)
• Installation directory for Geant4 datasets. It can be supplied as a path relative to CMAKE_INSTALL_PREFIX
or as an absolute path. It is always searched for existing datasets, which if present will be reused.
•GEANT4_INSTALL_DATA : (DEFAULT : OFF)
• If set to ON, download and install any Geant4 datasets missing from GEANT4_INSTALL_DATADIR. Each
dataset will be unpacked and installed in the directory pointed to by GEANT4_INSTALL_DATADIR.
REQUIRES : A working network connection. It is highly recommended to switch this option on if you
have a network connection to give the best integration with application development.

Building and Installing Geant4
15
•GEANT4_USE_GDML : (DEFAULT : OFF | ON if XERCESC_ROOT_DIR is set)
• If set to ON, build the G4persistency library with support for GDML.
REQUIRES : Xerces-C++ libraries and headers, see the XERCESC_ROOT_DIR option.
•XERCESC_ROOT_DIR
• If your Xerces-C++ installation is in a non-standard location, set this variable to the root directory of the
installation (i.e. the directory containing the include and lib subdirectories for Xerces-C++). If this is not
sufficient to locate Xerces-C++, see the Advanced XERCESC_INCLUDE_DIR and XERCESC_LIBRARY
options.
•GEANT4_USE_G3TOG4 : (DEFAULT : OFF)
• If set to ON, build the G3ToG4 library for reading ASCII call list files generated from Geant3 geometries.
•GEANT4_USE_QT (DEFAULT : OFF)
• If set to ON, build Qt4/5 User Interface and Visualization drivers.
REQUIRES : Qt4 or Qt5 and OpenGL libraries and headers. See also the QT_QMAKE_EXECUTABLE and
CMAKE_PREFIX_PATH options if CMake has trouble locating your Qt installation. Qt5 will be searched
for first, and if not found Qt4 will be searched for.
•QT_QMAKE_EXECUTABLE
• If your Qt4 installation is in a non-standard location, set this variable to point to the qmake executable of
the Qt4 installation you wish to use. If you have a system install on Linux or the binary SDK install on other
platforms, Qt4 will in general be found automatically (CMake should also honor the QTDIR environment
variable).
•CMAKE_PREFIX_PATH
• If your Qt5 installation is in a non-standard location, this variable can be set to point to the root directory
where Qt5 is installed. If you have a system install on Linux or binary SDK install on other platforms, Qt5
will in general be found automatically. Note that CMAKE_PREFIX_PATH is not specifically for Qt5 and
simply provides CMake with additional locations to search for packages.
•GEANT4_USE_XM (DEFAULT : OFF, Unix Only)
• If set to ON, build Motif User Interface and Visualization drivers.
REQUIRES : Motif and OpenGL libraries and headers. In most cases, these should be found automatically,
but if not, see the Advanced MOTIF_INCLUDE_DIR and MOTIF_LIBRARIES options.
•GEANT4_USE_OPENGL_X11 (DEFAULT : OFF, Unix Only)
• If set to ON, build the X11 OpenGL visualization driver.
REQUIRES : X11 and OpenGL libraries and headers.
•GEANT4_USE_OPENGL_WIN32 (DEFAULT : OFF, Windows Only)
• If set to ON, build the Win32 OpenGL visualization driver.
REQUIRES : OpenGL libraries and headers. If you are using Visual Studio, then this should supply the
needed headers and libraries.
•GEANT4_USE_INVENTOR (DEFAULT : OFF)
• If set to ON, build the OpenInventor visualization driver.

Building and Installing Geant4
16
REQUIRES : Coin3D Open Inventor implementation, SoXt (Unix) or SoWin (Windows)
binding, and OpenGL libraries and headers. CMake will use coin-config and soxt-config
if present to locate the Coin3D and SoXt implementation respectively, and will honor the
COINDIR environment variable. In case of issues with locating the Inventor implementation, see the
Advanced INVENTOR_INCLUDE_DIR, INVENTOR_LIBRARY, INVENTOR_SOXT_INCLUDE_DIR,
INVENTOR_SOXT_LIBRARY and INVENTOR_SOWIN_LIBRARY options.
KNOWN ISSUE : Use of clang compiler and Debug build mode will cause the Inventor driver build to fail
with errors relating to Inventor specific debugging functions.
•GEANT4_USE_RAYTRACER_X11 (DEFAULT : OFF, Unix only)
• If set to ON, build RayTracer visualization driver with X11 support.
REQUIRES : X11 Headers and Libraries.
•GEANT4_USE_SYSTEM_CLHEP (DEFAULT : OFF | ON if CLHEP_ROOT_DIR set)
• If set to ON, build Geant4 with an external install of CLHEP. You should not set this unless your usage of
Geant4 mandates a specific external CLHEP installation (e.g. if your experiment's software uses CLHEP in
other tools and requires consistent use of the same CLHEP across the software). If the CLHEP_ROOT_DIR
option is not set, CLHEP will be searched for under standard system paths.
REQUIRES : CLHEP libraries and headers.
•CLHEP_ROOT_DIR
• If you wish GEANT4 to use a specific installation of CLHEP, set this variable to point to the root install
directory of the CLHEP installation you wish to use. This directory should contain the include and lib
subdirectories containing the CLHEP headers and library respectively. If this is not sufficient to locate
CLHEP, see the Advanced CLHEP_INCLUDE_DIR and CLHEP_LIBRARY options.
•GEANT4_USE_SYSTEM_EXPAT (DEFAULT : ON)
• If set to ON, build Geant4 with an external install of Expat. In this case, the Expat headers and library will
be searched for under the standard system paths. If these are not sufficient to locate the required Expat
installation, see the Advanced EXPAT_INCLUDE_DIR and EXPAT_LIBRARY options.
Whilst Expat is installed on the vast majority of systems, it may be missing in certain instances. In these
cases, simply switch this option to OFF and Geant4 will build and use its internal version of Expat.
REQUIRES : Expat library and headers.
•GEANT4_USE_SYSTEM_ZLIB (DEFAULT : OFF)
• If set to ON, build Geant4 with an external install of zlib. In this case, the zlib headers and library will be
searched for under the standard system paths. If these are not sufficient to locate the required zlib installation,
see the Advanced ZLIB_INCLUDE_DIR and ZLIB_LIBRARY options.
REQUIRES : Zlib library and headers.
2.3.2. Advanced Options
Most builds should never need to touch the advanced options, but should you need more control or CMake has
problems locating needed software packages, they can be very helpful. We only list the options and variables
most relevent for Geant4. For help on core CMake variables and options, you should consult the Reference
Documentation section of the main CMake documentation , and specifically the sections on Variables.
Advanced options are not displayed by default in CMake's curses and GUI interfaces, but can be displayed by
pressing t in ccmake, or clicking the 'advanced' check box in the CMake GUI. Note that displaying advanced

Building and Installing Geant4
17
options will also display a large number of options and variables used by CMake for build configuration and to
cache the locations of Third Party packages. On the command line, advanced options and variables can be set like
the standard ones listed earlier using -D arguments.
•GEANT4_USE_NETWORKDAWN : (DEFAULT : OFF, Unix Only)
• If set to ON, build network server/client support for DAWN visualization driver. You do not need this to
view DAWN files.
•GEANT4_USE_NETWORKVRML : (DEFAULT : OFF, Unix Only)
• If set to ON, build network server/client support for VRML visualization driver. You do not need this to view
VRML files.
•GEANT4_INSTALL_DATA_TIMEOUT : (DEFAULT : 1500)
• Sets the time in seconds allowed for download of each Geant4 dataset. The value can be increased if you are
on a slow network connection and require more time to download.
REQUIRES : a working network connection.
•BUILD_SHARED_LIBS : (DEFAULT : ON)
• If set to ON build Geant4 shared libraries.
•BUILD_STATIC_LIBS : (DEFAULT : OFF)
• If set to ON, build Geant4 static libraries.
•CMAKE_INSTALL_BINDIR : (DEFAULT : bin)
• Installation directory for Geant4 executables. It can be supplied as a path relative to
CMAKE_INSTALL_PREFIX or as an absolute path.
•CMAKE_INSTALL_INCLUDEDIR : (DEFAULT : include)
• Installation directory for Geant4 C/C++ headers. It can be supplied as a path relative to
CMAKE_INSTALL_PREFIX or as an absolute path. The headers will always be installed in a subdirectory
of CMAKE_INSTALL_INCLUDEDIR named Geant4.
•CMAKE_INSTALL_LIBDIR : (DEFAULT : lib(+?SUFFIX))
• Installation directory for object code libraries. It can be supplied as a path relative to
CMAKE_INSTALL_PREFIX, or an absolute path. When the default is used, SUFFIX will be set to 64 on
64bit Linux platforms apart from Debian systems.
•CMAKE_INSTALL_DATAROOTDIR : (DEFAULT : share)
• Installation directory for read-only architecture-independent data files. It can be supplied as a path relative
to CMAKE_INSTALL_PREFIX, or an absolute path.
•XERCESC_INCLUDE_DIR
• If CMake cannot locate your Xerces-C++ installation, set this to the directory containing the Xerces-C
++ headers (e.g. if you have /foobar/xercesc/util/XercesVersion.hpp, then set this to /
foobar).
•XERCESC_LIBRARY
• If CMake cannot locate your Xerces-C++ installation, set this to the full path to the Xerces-C++ library, e.g.
/usr/lib/libxerces-c.so
•MOTIF_INCLUDE_DIR

Building and Installing Geant4
18
• If CMake cannot locate your Motif installation, set this to the directory containing the Motif headers (e.g. if
you have /foobar/Xm/Xm.h, then set this to /foobar).
•MOTIF_LIBRARIES
• If CMake cannot locate your Motif installation, set this to the full path to the Motif library, e.g. /usr/lib/
libXm.so
•INVENTOR_INCLUDE_DIR
• If CMake cannot locate your OpenInventor installation, set this to the directory containing the Inventor
headers (e.g. if you have /foobar/Inventor/So.h, then set this to /foobar).
•INVENTOR_LIBRARY
• If CMake cannot locate your Inventor installation, set this to the full path to the Inventor library, e.g. /usr/
lib/libCoin.so
•INVENTOR_SOWIN_LIBRARY (Windows only)
• If CMake cannot locate your Inventor installation, set this to the full path to the Inventor SoWin binding
library, e.g. C:\Program Files\Coin\sowin.dll.
•INVENTOR_SOXT_INCLUDE_DIR (Unix only)
• If CMake cannot locate your Inventor installation, set this to the directory containing the Inventor SoXt
binding headers (e.g. if you have /foobar/Inventor/SoXt/SoXt.h, then set this to /foobar).
•INVENTOR_SOXT_LIBRARY (Unix only)
• If CMake cannot locate your Inventor installation, set this to the full path to the Inventor SoXt binding library,
e.g. /usr/lib/libSoXt.so.
•CLHEP_INCLUDE_DIR (If GEANT4_USE_SYSTEM_CLHEP selected)
• If CMake cannot locate your external CLHEP installation, set this to the directory containing the CLHEP
headers (e.g. if you have /foobar/CLHEP/Vector/defs.h, then set this to /foobar).
•CLHEP_LIBRARY (If GEANT4_USE_SYSTEM_CLHEP selected)
• If CMake cannot locate your CLHEP installation, set this to the full path to the CLHEP library, e.g. /usr/
lib/libCLHEP.so
•EXPAT_INCLUDE_DIR (If GEANT4_USE_SYSTEM_EXPAT selected)
• If CMake cannot locate your external EXPAT installation, set this to the directory containing the EXPAT
headers (e.g. if you have /foobar/expat.h, then set this to /foobar).
•EXPAT_LIBRARY (If GEANT4_USE_SYSTEM_EXPAT selected)
• If CMake cannot locate your EXPAT installation, set this to the full path to the EXPAT library, e.g. /usr/
lib/libexpat.so
•ZLIB_INCLUDE_DIR (If GEANT4_USE_SYSTEM_ZLIB selected)
• If CMake cannot locate your external zlib installation, set this to the directory containing the zlib headers
(e.g. if you have /foobar/zlib.h, then set this to /foobar).
•ZLIB_LIBRARY (If GEANT4_USE_SYSTEM_ZLIB selected)
• If CMake cannot locate your zlib installation, set this to the full path to the zlib library, e.g. /usr/lib/
libz.so

Building and Installing Geant4
19
•GEANT4_BUILD_CXXSTD : (DEFAULT : c++98, Unix Only)
• Compile Geant4 against given C++ standard ( c++98, including addenda, c++0x, or c++11. Geant4 is
written in c++98, and you should use this option if your application requires support for the newer standards.
If you set the variable to a standard the compiler does not support, an error will be emitted.
REQUIRES : GNU, Clang or Intel C++ compiler.
•GEANT4_BUILD_TLS_MODEL : (DEFAULT : initial-exec, Unix Only)
• If building Geant4 with multithreading support, use a specific model for Thread Local Storage ( initial-
exec, local-exec, global-dynamic or local-dynamic). If you set the variable to a model
unknown to the compiler, an error will be emitted.
Geant4's default model of initial-exec is chosen to give the best performance under a wide variety of
use cases.
REQUIRES : GEANT4_BUILD_MULTITHREADED set to ON, GNU, Clang or Intel C++ compiler.
•GEANT4_BUILD_STORE_TRAJECTORY : (DEFAULT : ON)
• If set to ON, store trajectories in event processing. It can be switched to OFF to give a degree of performance
improvement, but you will not be able to visualize events.
•GEANT4_BUILD_VERBOSE_CODE : (DEFAULT : ON)
• If set to ON, build Geant4 libraries with extra verbosity. It can be switched to OFF to give a degree of
performance improvement, but you will not have as much information output should you run into problems
or need to debug.
•GEANT4_BUILD_EXAMPLES : (DEFAULT : OFF)
• If set to ON, build all Geant4 example applications using current Geant4 build. WARNING: this option is for
Geant4 system testing only and is not intended for use by users studying and working on the examples. No
support is, or will be, provided for user builds of the examples using this option.
•GEANT4_ENABLE_TESTING : (DEFAULT : OFF)
• If set to ON, build and run Geant4 testing suites. WARNING: this option is for Geant4 system testing only
and is not intended for use by users. No support is, or will be, provided for user builds with this option.
•GEANT4_USE_USOLIDS : (DEFAULT : OFF)
• If set to ON, replace Geant4 solids with USolids equivalents. WARNING: the use of USolids is experimental
and should be used with caution.
•GEANT4_USE_SYSTEM_USOLIDS : (DEFAULT : OFF)
• If set to ON, build Geant4 with an external install of USolids. In this case, the USolids headers and library
will be searched for under the standard system paths. If these are not sufficient to locate the required USolids
installation, see the CMAKE_PREFIX_PATH variable, which may be used to point CMake to the root
directory of the USolids installation.
REQUIRES : USolids library and headers.
•GEANT4_USE_WT : (DEFAULT : OFF)
• If set to ON, build Geant4 Wt web based visualization driver. WARNING: this driver is experimental and
should be used with caution.
REQUIRES : Wt libraries and headers, OpenGL libraries and headers, Boost headers and Boost signals
library.

Building and Installing Geant4
20
2.3.3. Selecting a Different Compiler and Changing Flags
CMake will, by default, select the first C and C++ compilers it finds in your path. Geant4's CMake scripts configure
a default set of flags based on the compiler identity, as follows
• GNU Compiler Collection
•CMAKE_CXX_FLAGS : -W -Wall -pedantic -Wno-non-virtual-dtor -Wno-long-long
-Wwrite-strings -Wpointer-arith -Woverloaded-virtual -pipe
•CMAKE_CXX_FLAGS_RELEASE : -O2 -DNDEBUG
•CMAKE_CXX_FLAGS_DEBUG : -g
•CMAKE_CXX_FLAGS_RELWITHDEBINFO : -O2 -g
• Clang
•CMAKE_CXX_FLAGS : -W -Wall -pedantic -Wno-non-virtual-dtor -Wno-long-
long -Wwrite-strings -Wpointer-arith -Woverloaded-virtual -pipe -Qunused-
arguments
•CMAKE_CXX_FLAGS_RELEASE : -O2 -DNDEBUG
•CMAKE_CXX_FLAGS_DEBUG : -g
•CMAKE_CXX_FLAGS_RELWITHDEBINFO : -O2 -g
• Microsoft Visual C++
•CMAKE_CXX_FLAGS : -GR -EHsc -Zm200 -nologo -D_CONSOLE -D_WIN32 -DWIN32 -
DOS -DXPNET -D_CRT_SECURE_NO_DEPRECATE
•CMAKE_CXX_FLAGS_RELEASE : -MD -O2 -DNDEBUG
•CMAKE_CXX_FLAGS_DEBUG : -MDd -Od -Zi
•CMAKE_CXX_FLAGS_RELWITHDEBINFO : -MD -O2 -Zi
• Intel C and C++ Compilers
•CMAKE_CXX_FLAGS : -w1 -Wno-non-virtual-dtor -Wpointer-arith -Wwrite-
strings -fp-model precise
•CMAKE_CXX_FLAGS_RELEASE : -O2 -DNDEBUG
•CMAKE_CXX_FLAGS_DEBUG : -g
•CMAKE_CXX_FLAGS_RELWITHDEBINFO : -O2 -g
For the GNU, Clang and Intel compilers, an additional flag selecting the C++ standard to compile against will
be set. By default, this will use the c++98 standard. This can be changed if the compiler version supports it by
setting the GEANT4_BUILD_CXXSTD to the required standard, as described in Section 2.3.2.
When Geant4 is built with support for multithreading (GEANT4_BUILD_MULTITHREADED set to ON), the
following additional flags are added to all build types for the GNU, Clang and Intel compilers:
•-DG4MULTITHREADED -ftls-model=initial-exec -pthread
Note that the model passed to the -ftls-model argument can be changed using the
GEANT4_BUILD_TLS_MODEL option described in Section 2.3.2.

Building and Installing Geant4
21
Please note that at the current time, multithreading support is not available on Windows platforms.
If you are using an unsupported or unrecognized (by Geant4) compiler, CMake will default to a standard and very
simple set of flags for that compiler. We strongly recommend that you use the default compiler and flags, but
both can be modified if your use case requires it. To specify the C and C++ compilers to be used, you can set
the CC and CXX variables
... assuming clang/clang++ are in the PATH ...
$ CC=clang CXX=clang++ cmake <otherargs>
... or ...
$ export CC=clang
$ export CXX=clang++
$ cmake <otherargs>
You can also specify a full path should the compilers not be in the PATH. You can also specify the C and C++
compilers via the CMAKE_<LANG>_COMPILER options:
$ cmake -DCMAKE_C_COMPILER=clang -DCMAKE_CXX_COMPILER=clang++ <otherargs>
Use of CMAKE_<LANG>_COMPILER will take precedence over any setting of CC or CXX in the environment
or on the command line.
Whilst you can change the compiler after an initial configuration with CMake, it is not recommended as you
may need to reset some variables by hand. If you do perform this step, it can only be done by rerunning CMake
and passing the new compiler via the CMAKE_<LANG>_COMPILER argument(s), as the CC and CXX variables
have no effect on subsequent runs of CMake in a given build directory. You may also need to remove the
CMakeCache.txt file from the build directory before running CMake again. If you are building Geant4 using
several compilers and/or versions, we strongly recommend creating one build directory per compiler system.
Whilst this takes extra disk space, it provides a clean separation between different builds and also allows fast
incremental builds against a single source directory.
Compiler flags can be interactively modified through the ccmake and CMake GUI interfaces. As compiler flags
are an advanced option, you will need to activate viewing of advanced options. You may then edit the flags as
you wish.
CMake is also aware of the CFLAGS and CXXFLAGS variables, so you may set these on the command
line or as environment variables. However, note that this will only prepend extra flags to the default
CMAKE_<LANG>_FLAGS.
If you need to completely change the compiler flags, then you can set CMAKE_<LANG>_FLAGS directly as a -D
option to CMake. This will override all defaults set by Geant4's CMake scripts.
2.3.4. Using an Initial Cache File for Build Options
As Geant4, and CMake in general, has many configurable options, remembering and typing out the CMake
command line can be tedious and potentially error prone once you start to use a significant number of options.
To ease this task and provide reproducible builds, you can write options as CMake set() commands into a so-
called initial cache script. For example, to select Clang as the compiler and enable Qt support, we could write
the following
set(CMAKE_C_COMPILER clang CACHE STRING "")
set(CMAKE_CXX_COMPILER clang++ CACHE STRING "")
set(GEANT4_USE_QT ON CACHE BOOL "")
into a file, say, mysettings.cmake. We could then pass this file to CMake to configure the Geant4 build with
these settings:

Building and Installing Geant4
22
$ cmake -C /home/me/mysettings.cmake /path/to/geant4.10.01
Any settings in the supplied script will take priority over the defaults, so this can be a useful way to manage
different builds in a reproducible way. Note that the set() commands must use the CACHE argument to ensure
they are loaded into the CMake cache.

23
Chapter 3. Setting Up and Using an Install of
Geant4
3.1. Geant4 Installation Locations
If you choose the default installation paths, then your install of Geant4 is completely contained under the directory
you chose for CMAKE_INSTALL_PREFIX, with the structure
+- CMAKE_INSTALL_PREFIX
+- bin/
| +- geant4-config (UNIX ONLY)
| +- geant4.csh (UNIX ONLY)
| +- geant4.sh (UNIX ONLY)
| +- G4global.dll (WINDOWS ONLY)
| +- ...
+- include/
| +- Geant4/
| +- G4global.hh
| +- ...
| +- CLHEP/ (WITH INTERNAL CLHEP ONLY)
| +- tools/
+- lib/ (MAY BE lib64 on LINUX)
| +- libG4global.so (AND/OR .a, OR G4Global.lib ON WINDOWS)
| +- ...
| +- Geant4-10.1.0/
| +- Geant4Config.cmake
| +- Geant4ConfigVersion.cmake
| +- Geant4LibraryDepends.cmake
| +- Geant4LibraryDepends-Release.cmake
| +- UseGeant4.cmake
| +- Linux-g++ (OR Darwin-g++ UNIX ONLY SOFTLINK -> ..)
| +- Modules/
+- share
+- Geant4-10.1.0
+- geant4-10.1.0
+- data/ (IF GEANT4_INSTALL_DATA WAS SET)
+- examples/
+- geant4make/
+- geant4make.csh
+- geant4make.sh
+- config/
If you wish to make the Geant4 binaries and libraries available via your PATH and library path
(LD_LIBRARY_PATH on Linux, DYLD_LIBRARY_PATH on Mac OS X), together with default environment
variables for locating datasets, you should source the relevant script in CMAKE_INSTALL_PREFIX/bin
On interactive bourne shells (e.g. bash), do (assuming you are in CMAKE_INSTALL_PREFIX/bin):
$ . geant4.sh
This command can also be used to setup the Geant4 environment in other Bourne shell scripts. You can also supply
the full path to the script rather than changing to the directory containing it.
On interactive C shells, do (assuming you are in CMAKE_INSTALL_PREFIX/bin):
$ source geant4.csh
In an interactive session you can also supply the full path to the script rather than changing to the directory
containing it. The C shell script cannot be sourced directly inside other shell scripts due to a limitation of the C
shell which prevents the script being able to locate itself. If you need to source the C shell script inside another,
then you can use the command
Setting Up and Using
an Install of Geant4
24
cd CMAKE_INSTALL_PREFIX/bin ; source geant4.csh
where you should replace CMAKE_INSTALL_PREFIX/bin with the directory you installed geant4.csh in.
You can also use the command
source CMAKE_INSTALL_PREFIX/bin/geant4.csh CMAKE_INSTALL_PREFIX/bin
where as above you should replace CMAKE_INSTALL_PREFIX/bin with the directory where geant4.csh
is located.
In addition to shell scripts, a modulefile for the Environment Modules system is provided at
CMAKE_INSTALL_PREFIX/share/Geant4-10.1.0/geant4-10.1.0. Use of this modulefile will
depend on how you use Environment Modules on your system. If you have a private install of Geant4, you
can simply copy CMAKE_INSTALL_PREFIX/share/Geant4-10.1.0/geant4-10.1.0 to $HOME/
privatemodules/geant4-10.1.0. Here, $HOME/privatemodules is the standard location supported
by Environment Modules for personal modulefiles. Geant4 may then be configured using the standard module
commands:
$ module load use.own
$ module load geant4-10.1.0
If you are integrating Geant4 as a system wide tool using Environment Modules as the configuration system, the
modulefile may be copied directly to your custom location for modulefiles. You may rename the file if you need
to support multiple versions. Paths in the modulefile are absolute to permit such copying, but can be patched if
you require relative (to the modulefile or other location) paths. We do not provide tools to perform such operations
due to the variety of filesystem hierarchies used to manage tools under Environment Modules.
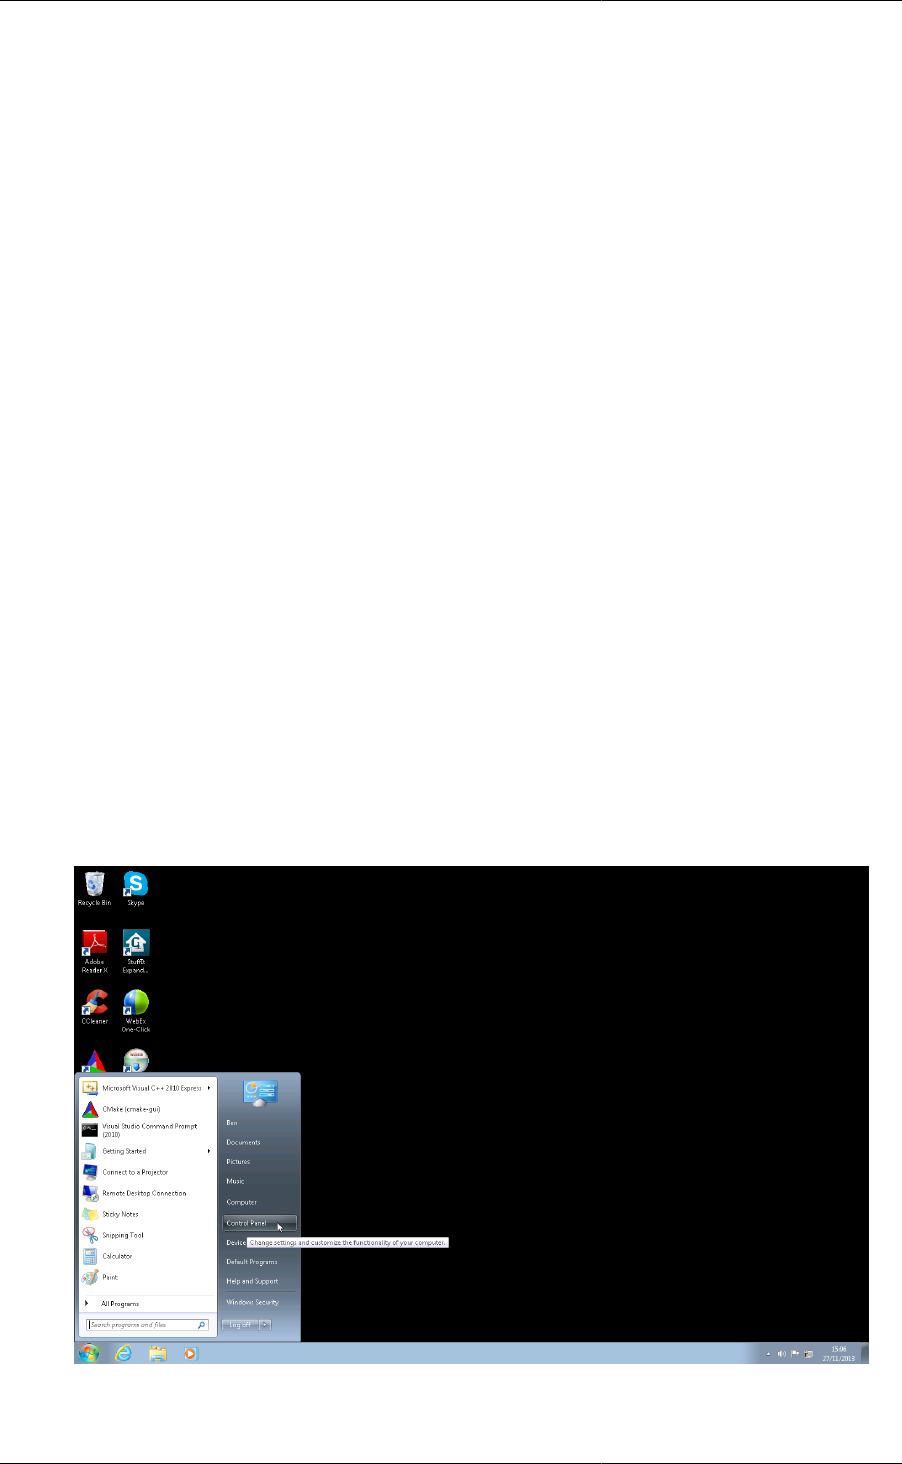
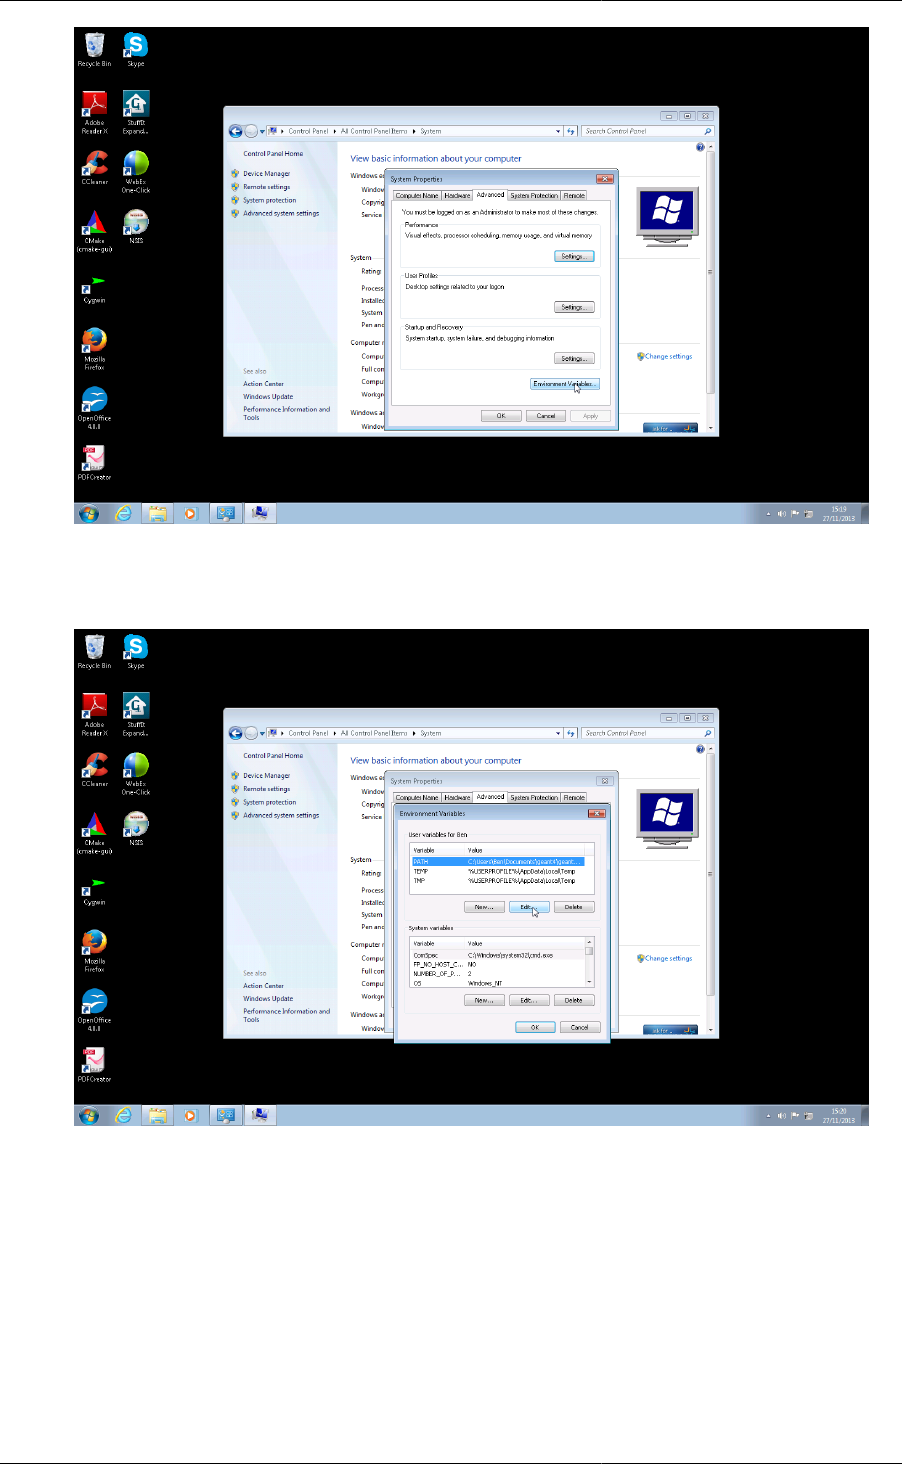
On Windows, you should add the directory containing the Geant4 dll files to your PATH environment variable.
On Windows 7/XP, this can be done via the Control Panel as follows
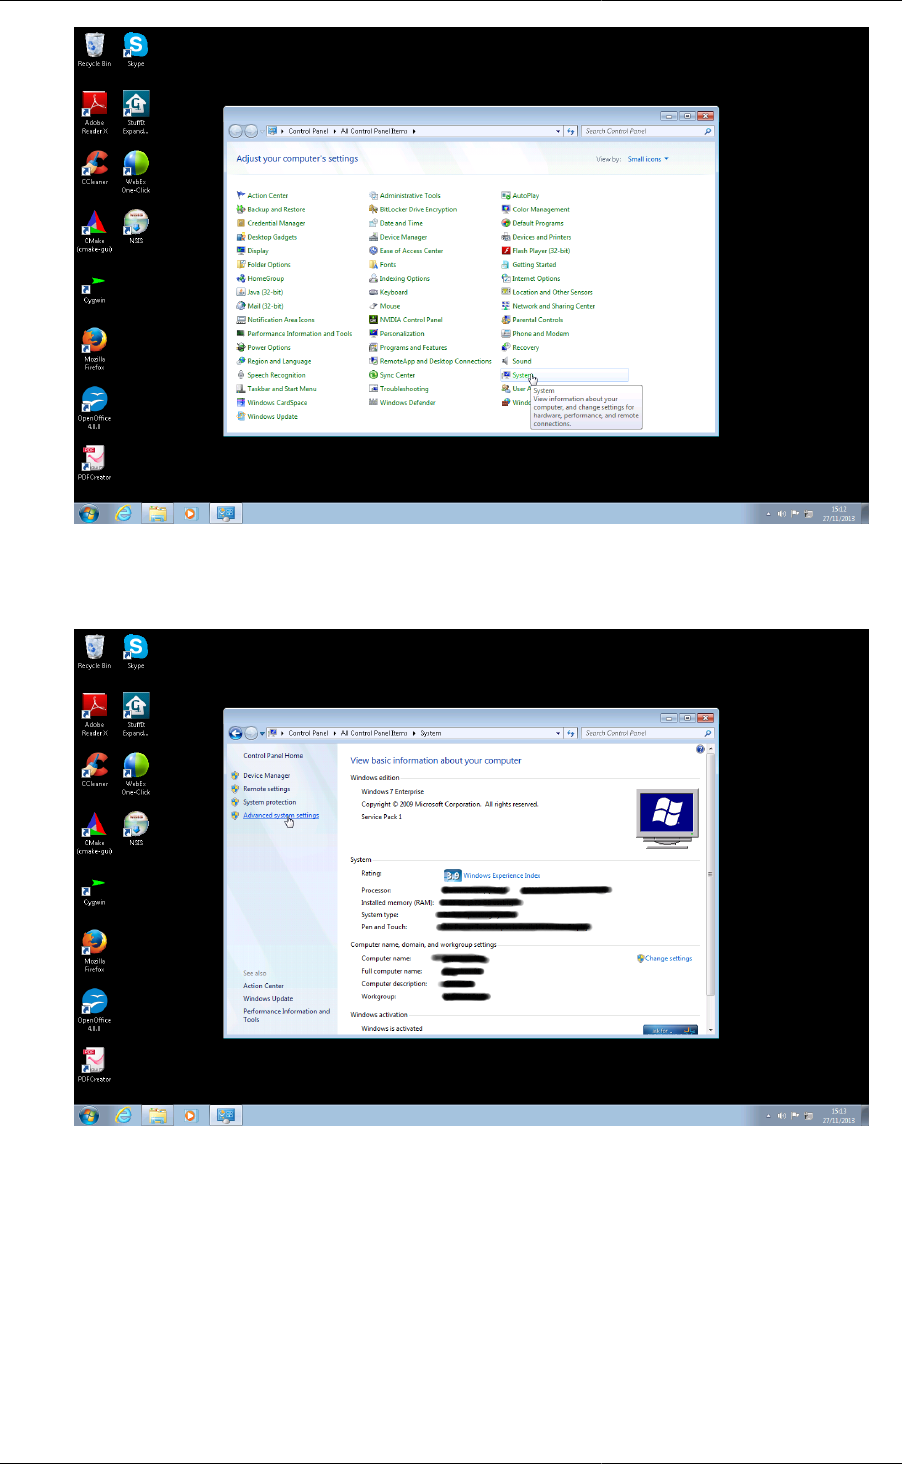
1. Open the Windows Control Panel.
2. Open the System item in the Control Panel.
Setting Up and Using
an Install of Geant4
25
3. Click on the Advanced system settings link on the System window (on Windows XP, click on the Advanced
tab).
4. Click on the Environment Variables button in the System Properties window.
Setting Up and Using
an Install of Geant4
26
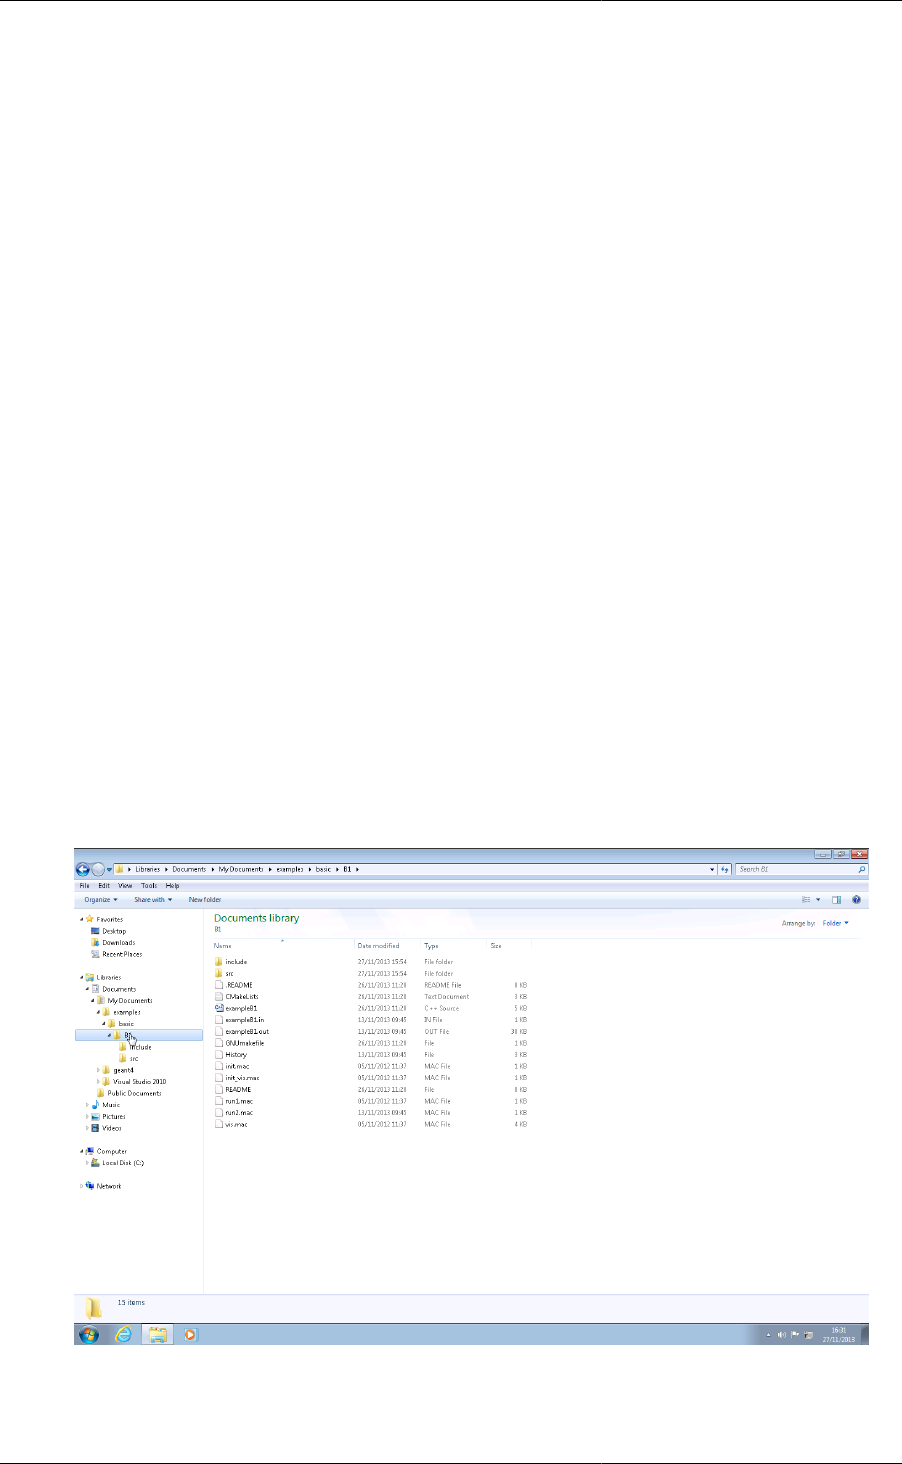
5. Select the PATH entry in the User variables list, and click the Edit button. If PATH is not present, click on
the New and create it.
6. In the popup Edit User Variable window, append the directory in which the Geant4 dlls are installed to the
Variable value entry of the PATH variable (Note that on Windows, path entries are separated by semicolons).
It's very important to append the Geant4 dll path if you have an existing PATH, otherwise other programs
may stop working correctly! If the Variable value entry of the PATH variable is empty, or you've just created
it, you can simply set the value to the directory in which the Geant4 dlls are installed. Once you have edited,
click OK.

Setting Up and Using
an Install of Geant4
27
3.2. Building Applications with Geant4
To build an application that uses the Geant4 toolkit, it is necessary to include Geant4 headers in the application
sources and link the application to the Geant4 libraries. The details of how to implement source code for an
application are described in detail in the Geant4 User's Guide for Application Developers. Here, we describe how
you can build your sources into an application and compile and link it against Geant4.
We provide three main tools to help with building applications: a CMake "Geant4Config.cmake" config
file, a GNUMake module "binmake.gmk" and a UNIX-only command line program "geant4-config". The
following sections give an overview of each tool and how to use them to build a simple application.
3.2.1. Using CMake to build Applications:
Geant4Config.cmake
Geant4 installs a file named Geant4Config.cmake located in:
+- CMAKE_INSTALL_PREFIX
+- lib/
+- Geant4-10.1.0/
+- Geant4Config.cmake
which is designed for use with the CMake scripting language find_package command. Building a Geant4
application using CMake therefore involves writing a CMake script CMakeLists.txt using this and other
CMake commands to locate Geant4 and describe the build of your application against it. Whilst it requires a bit
of effort to write the script, CMake provides a very powerful and flexible tool, especially if you are working on
multiple platforms. It is therefore the method we recommend for building Geant4 applications.
We'll use Basic Example B1, which you may find in the Geant4 source directory under examples/basic/B1,
to demonstrate the use of CMake to build a Geant4 application. You'll find links to the latest CMake documentation
for the commands used throughout, so please follow these for further information. The application sources and
scripts are arranged in the following directory structure:
+- B1/
+- CMakeLists.txt
+- exampleB1.cc
+- include/

Setting Up and Using
an Install of Geant4
28
| ... headers.hh ...
+- src/
... sources.cc ...
Here, exampleB1.cc contains main() for the application, with include/ and src/ containing the
implementation class headers and sources respectively. This arrangement of source files is not mandatory when
building with CMake, apart from the location of the CMakeLists.txt file in the root directory of the
application.
The text file CMakeLists.txt is the CMake script containing commands which describe how to build the
exampleB1 application:
# (1)
cmake_minimum_required(VERSION 2.6 FATAL_ERROR)
project(B1)
# (2)
option(WITH_GEANT4_UIVIS "Build example with Geant4 UI and Vis drivers" ON)
if(WITH_GEANT4_UIVIS)
find_package(Geant4 REQUIRED ui_all vis_all)
else()
find_package(Geant4 REQUIRED)
endif()
# (3)
include(${Geant4_USE_FILE})
include_directories(${PROJECT_SOURCE_DIR}/include)
# (4)
file(GLOB sources ${PROJECT_SOURCE_DIR}/src/*.cc)
file(GLOB headers ${PROJECT_SOURCE_DIR}/include/*.hh)
# (5)
add_executable(exampleB1 exampleB1.cc ${sources} ${headers})
target_link_libraries(exampleB1 ${Geant4_LIBRARIES})
# (6)
set(EXAMPLEB1_SCRIPTS
exampleB1.in
exampleB1.out
init.mac
init_vis.mac
run1.mac
run2.mac
vis.mac
)
foreach(_script ${EXAMPLEB1_SCRIPTS})
configure_file(
${PROJECT_SOURCE_DIR}/${_script}
${PROJECT_BINARY_DIR}/${_script}
COPYONLY
)
endforeach()
# (7)
install(TARGETS exampleB1 DESTINATION bin)
For clarity, the above listing has stripped out the main comments (CMake comments begin with a "#") you'll find
in the actual file to highlight each distinct task:
1. Basic Configuration
The cmake_minimum_required command simply ensures we're using a suitable version of CMake.
The project command sets the name of the project and enables and configures C and C++ compilers.
2. Find and Configure Geant4
The aforementioned find_package command is used to locate and configure Geant4 (we'll see how
to specify the location later when we run CMake), the REQUIRED argument being supplied so that CMake

Setting Up and Using
an Install of Geant4
29
will fail with an error if it cannot find Geant4. The option command specifies a boolean variable
which defaults to ON , and which can be set when running CMake via a -D command line argument, or
toggled in the CMake GUI interfaces. We wrap the calls to find_package in a conditional block on
the option value. This allows us to configure the use of Geant4 UI and Visualization drivers by exampleB1
via the ui_all vis_all "component" arguments to find_package . These components and their
usage is described later.
3. Configure the Project to Use Geant4 and B1 Headers
To automatically configure the header path, compiler flags and compiler definitions needed for linking to
Geant4, we use the include command to load a CMake script supplied by Geant4. The CMake variable
named Geant4_USE_FILE is set to the path to this module when Geant4 is located by find_package
. We use the include_directories command to add the B1 header directory to the compiler's
header search path. The CMake variable PROJECT_SOURCE_DIR points to the top level directory of
the project and is set by the earlier call to the project command.
4. List the Sources to Build the Application
Use the globbing functionality of the file command to prepare lists of the B1 source and header files.
Note however that CMake globbing is only used here as a convenience. The expansion of the glob only
happens when CMake is run, so if you later add or remove files, the generated build scripts will not know
a change has taken place. Kitware strongly recommend listing sources explicitly as CMake automatically
makes the build depend on the CMakeLists.txt file. This means that if you explicitly list the sources in
CMakeLists.txt, any changes you make will be automatically picked when you rebuild. This is most
useful when you are working on a project with sources under version control and multiple contributors.
5. Define and Link the Executable
The add_executable command defines the build of an application, outputting an executable named
by its first argument, with the sources following. Note that we add the headers to the list of sources so that
they will appear in IDEs like Xcode.
After adding the executable, we use the target_link_libraries command to link it with the
Geant4 libraries. The Geant4_LIBRARIES variable is set by find_package when Geant4 is located,
and is a list of all the libraries needed to link against to use Geant4.
6. Copy any Runtime Scripts to the Build Directory
Because we want to support out of source builds so that we won't mix CMake generated files with our actual
sources, we copy any scripts used by the B1 application to the build directory. We use foreach to loop
over the list of scripts we constructed, and configure_file to perform the actual copy.
Here, the CMake variable PROJECT_BINARY_DIR is set by the earlier call to the project
command and points to the directory where we run CMake to configure the build.
7. If Required, Install the Executable
Use the install command to create an install target that will install the executable to a bin directory
under CMAKE_INSTALL_PREFIX.
If you don't intend your application to be installable, i.e. you only want to use it locally when built, you can
leave this out.
This sequence of commands is the most basic needed to compile and link an application with Geant4, and is easily
extendable to more involved use cases such as using other third party packages (via find_package ) or
platform specific configuration.
With the CMake script in place, using it to build an application is a two step process. First CMake is run to
generate buildscripts to describe the build. By default, these will be Makefiles on Unix platforms, and Visual

Setting Up and Using
an Install of Geant4
30
Studio solutions on Windows, but you can generate scripts for other tools like Xcode and Eclipse if you wish.
Second, the buildscripts are run by the chosen build tool to compile and link the application.
A key concept with CMake is that we generate the buildscripts and run the build in a separate directory, the so-
called build directory, from the directory in which the sources reside, the so-called source directory. This is the
exact same technique we used when building Geant4 itself. Whilst this may seem awkward to begin with, it is a
very useful technique to employ. It prevents mixing of CMake generated files with those of your application, and
allows you to have multiple builds against a single source without having to clean up, reconfigure and rebuild.
We'll illustrate this configure and build process on Linux/Mac using Makefiles, and on Windows using Visual
Studio. The example script and Geant4's Geant4Config.cmake script are vanilla CMake, so you should be
able to use other Generators (such as Xcode and Eclipse) without issue.
3.2.1.1. Building ExampleB1 with CMake on Unix with Makefiles
We'll assume, for illustration only, that you've copied the exampleB1 sources into a directory under your home
area so that we have
+- /home/you/B1/
+- CMakeLists.txt
+- exampleB1.cc
+- include/
+- src/
+- ...
Here, our source directory is /home/you/B1, in other words the directory holding the CMakeLists.txt file.
Let's also assume that you have already installed Geant4 in your home area under, for illustration only, /home/
you/geant4-install.
Our first step is to create a build directory in which build the example. We will create this alongside our B1 source
directory as follows:
$ cd $HOME
$ mkdir B1-build
We now change to this build directory and run CMake to generate the Makefiles needed to build the B1 application.
We pass CMake two arguments:
$ cd $HOME/B1-build
$ cmake -DGeant4_DIR=/home/you/geant4-install/lib64/Geant4-10.1.0 $HOME/B1
Here, the first argument points CMake to our install of Geant4. Specifically, it is the directory holding the
Geant4Config.cmake file that Geant4 installs to help CMake find and use Geant4. You should of course
adapt the value of this variable to the location of your actual Geant4 install.
The second argument is the path to the source directory of the application we want to build. Here it's just the B1
directory as discussed earlier. You should of course adapt the value of that variable to where you copied the B1
source directory.
CMake will now run to configure the build and generate Makefiles. On Linux, you will see the output
$ cmake -DGeant4_DIR=/home/you/geant4-install/lib64/Geant4-10.1.0 $HOME/B1
-- The C compiler identification is GNU
-- The CXX compiler identification is GNU
-- Check for working C compiler: /usr/bin/gcc
-- Check for working C compiler: /usr/bin/gcc -- works
-- Detecting C compiler ABI info
-- Detecting C compiler ABI info - done
-- Check for working CXX compiler: /usr/bin/c++
-- Check for working CXX compiler: /usr/bin/c++ -- works
-- Detecting CXX compiler ABI info

Setting Up and Using
an Install of Geant4
31
-- Detecting CXX compiler ABI info - done
-- Configuring done
-- Generating done
-- Build files have been written to: /home/you/B1-build
On Mac OS X, you will see slightly different output, but the last three lines should be identical.
If you now list the contents of you build directory, you can see the files generated:
$ ls
CMakeCache.txt exampleB1.in init_vis.mac run2.mac
CMakeFiles exampleB1.out Makefile vis.mac
cmake_install.cmake init.mac run1.mac
Note the Makefile and that all the scripts for running the exampleB1 application we're about to build have been
copied across. With the Makefile available, we can now build by simply running make:
$ make -jN
CMake generated Makefiles support parallel builds, so can set N suitable for the number of cores on your machine
(e.g. on a dual core processor, you could set N to 2). When make runs, you should see the output
$ make
Scanning dependencies of target exampleB1
[ 16%] Building CXX object CMakeFiles/exampleB1.dir/exampleB1.cc.o
[ 33%] Building CXX object CMakeFiles/exampleB1.dir/src/B1PrimaryGeneratorAction.cc.o
[ 50%] Building CXX object CMakeFiles/exampleB1.dir/src/B1EventAction.cc.o
[ 66%] Building CXX object CMakeFiles/exampleB1.dir/src/B1RunAction.cc.o
[ 83%] Building CXX object CMakeFiles/exampleB1.dir/src/B1DetectorConstruction.cc.o
[100%] Building CXX object CMakeFiles/exampleB1.dir/src/B1SteppingAction.cc.o
Linking CXX executable exampleB1
[100%] Built target exampleB1
CMake Unix Makefiles are quite terse, but you can make them more verbose by adding the VERBOSE argument
to make:
$ make VERBOSE=1
If you now list the contents of your build directory you will see the exampleB1 application executable has been
created:
$ ls
CMakeCache.txt exampleB1 init.mac run1.mac
CMakeFiles exampleB1.in init_vis.mac run2.mac
cmake_install.cmake exampleB1.out Makefile vis.mac
You can now run the application in place:
$ ./exampleB1
Available UI session types: [ GAG, tcsh, csh ]
*************************************************************
Geant4 version Name: geant4-10-01-ref-00 [MT] (5-December-2014)
<< in Multi-threaded mode >>
Copyright : Geant4 Collaboration
Reference : NIM A 506 (2003), 250-303
WWW : http://cern.ch/geant4
*************************************************************
<<< Reference Physics List QBBC
Visualization Manager instantiating with verbosity "warnings (3)"...
Visualization Manager initialising...
Registering graphics systems...
Setting Up and Using
an Install of Geant4
32
Note that the exact output shown will depend on how both Geant4 and your application were configured. Further
output and behaviour beyond the Registering graphics systems... line will depend on what UI
and Visualization drivers your Geant4 install supports. If you recall the use of the ui_all vis_all in the
find_package command, this results in all available UI and Visualization drivers being activated in your
application. If you didn't want any UI or Visualization, you could rerun CMake as:
$ cmake -DWITH_GEANT4_UIVIS=OFF -DGeant4_DIR=/home/you/geant4-install/lib64/Geant4-10.1.0 $HOME/B1
This would switch the option we set up to false, and result in find_package not activating any UI or
Visualization for the application. You can easily adapt this pattern to provide options for your application such
as additional components or features.
Once the build is configured, you can edit code for the application in its source directory. You only need to rerun
make in the corresponding build directory to pick up and compile the changes. However, note that due to the use
of CMake globbing to create the source file list, if you add or remove files, you need to rerun CMake to pick up
the changes! This is another reason why Kitware recommend listing the sources explicitly.
3.2.1.2. Building ExampleB1 with CMake on Windows with Visual
Studio
We'll assume, for illustration only, that you've copied the exampleB1 sources into a directory
C:\Users\Ben\Documents\examples\basic\B1
Let's now use the CMake GUI to configure the build and generate a Visual Studio solution for it, and then use
Visual Studio to build the application from this solution. This process involves several steps, which we break
down as follows.
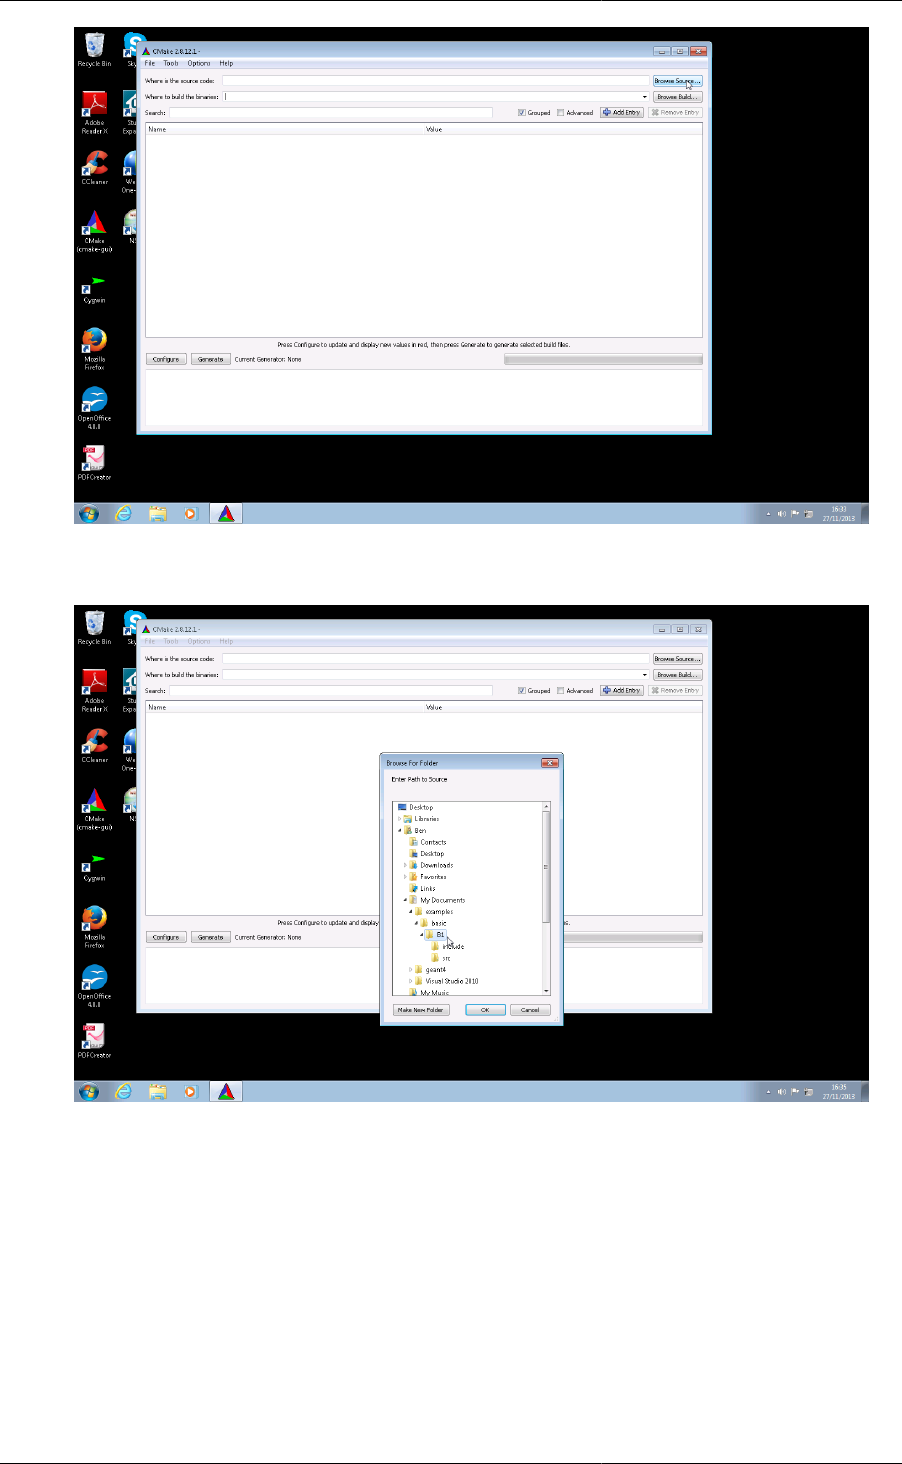
1. If you browse the contents of the source directory, you can see that it contains the CMakeLists.txt file.
So our source directory is C:\Users\Ben\Documents\examples\basic\B1, in other words the
directory holding the CMakeLists.txt file.
2. Open the CMake (cmake-gui) executable, and click on the Browse Source... button in the top right hand
corner of the window.
Setting Up and Using
an Install of Geant4
33
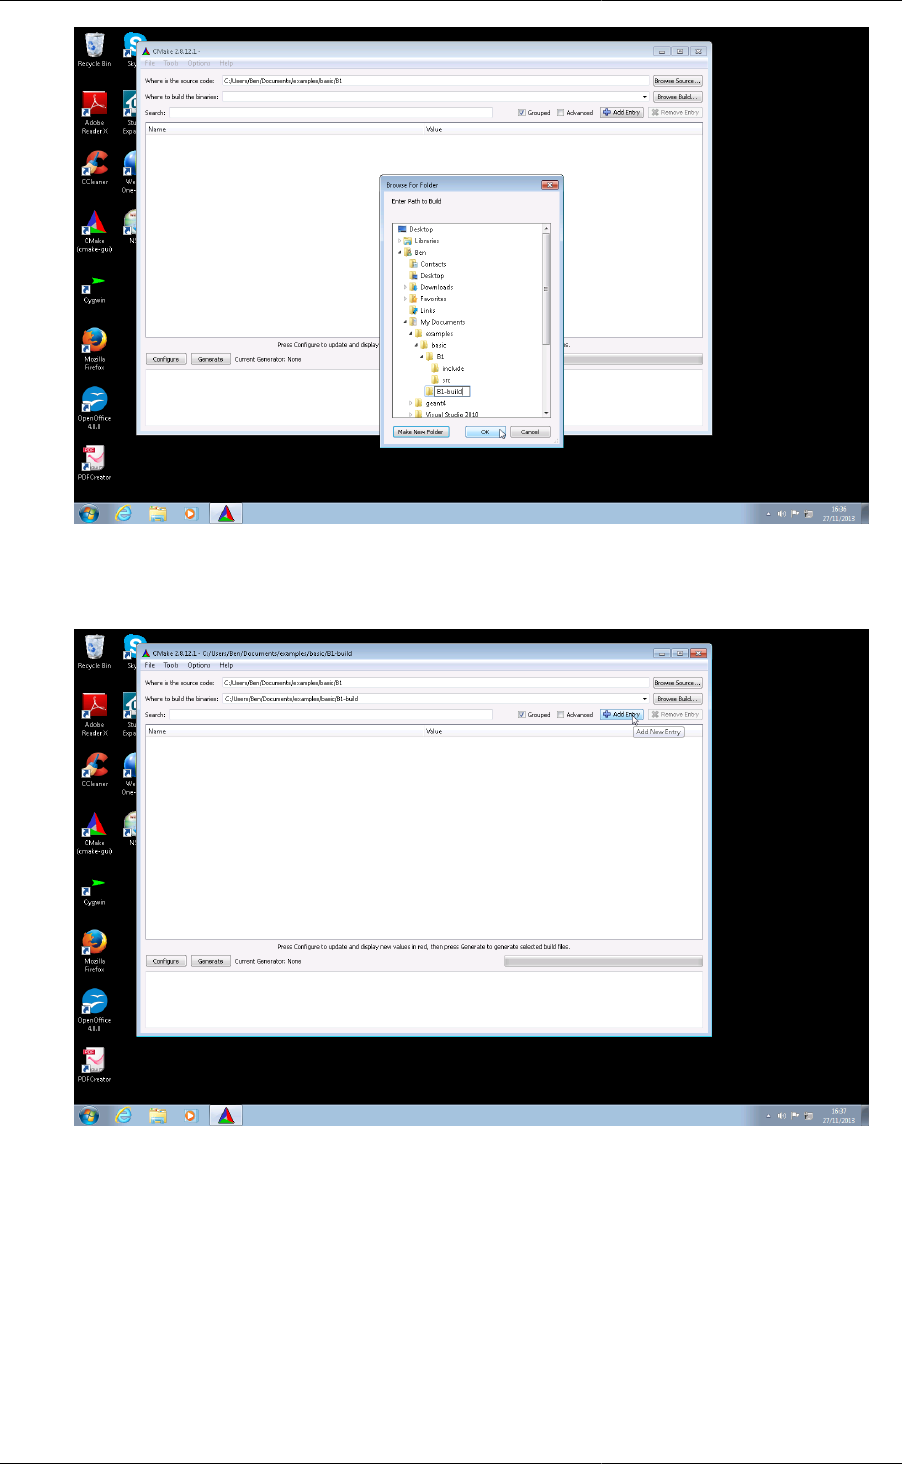
3. Use the file browser popup to locate the B1 source directory, and click OK.
4. Now we create the build directory in which to create the Visual Studio project files and hold the build
products. This directory should not be the same as, or inside, the source directory. Therefore, let's create this
build directory alongside our source directory.
Click on the Browse Build... button in the top right hand side of the CMake GUI window. Use the file
browser popup to browse back to C:\Users\Ben\Documents\examples\basic, and click on the
Make New Folder button. Rename the created folder to B1-build, and click on the OK button. The two text
entries at the top of the GUI should now contain C:/Users/Ben/Documents/examples/basic/B1
and C:/Users/Ben/Documents/examples/basic/B1-build respectively (Note: CMake always
represents Windows paths with forward slashes).
Setting Up and Using
an Install of Geant4
34
5. Before we can configure the project, we need to tell CMake where to find Geant4. To do this, click on the
Add Entry button in the top right corner of the CMake GUI.
6. In the Add Cache Entry window that pops up, set the Name of the entry to Geant4_DIR. Set the Type to PATH.
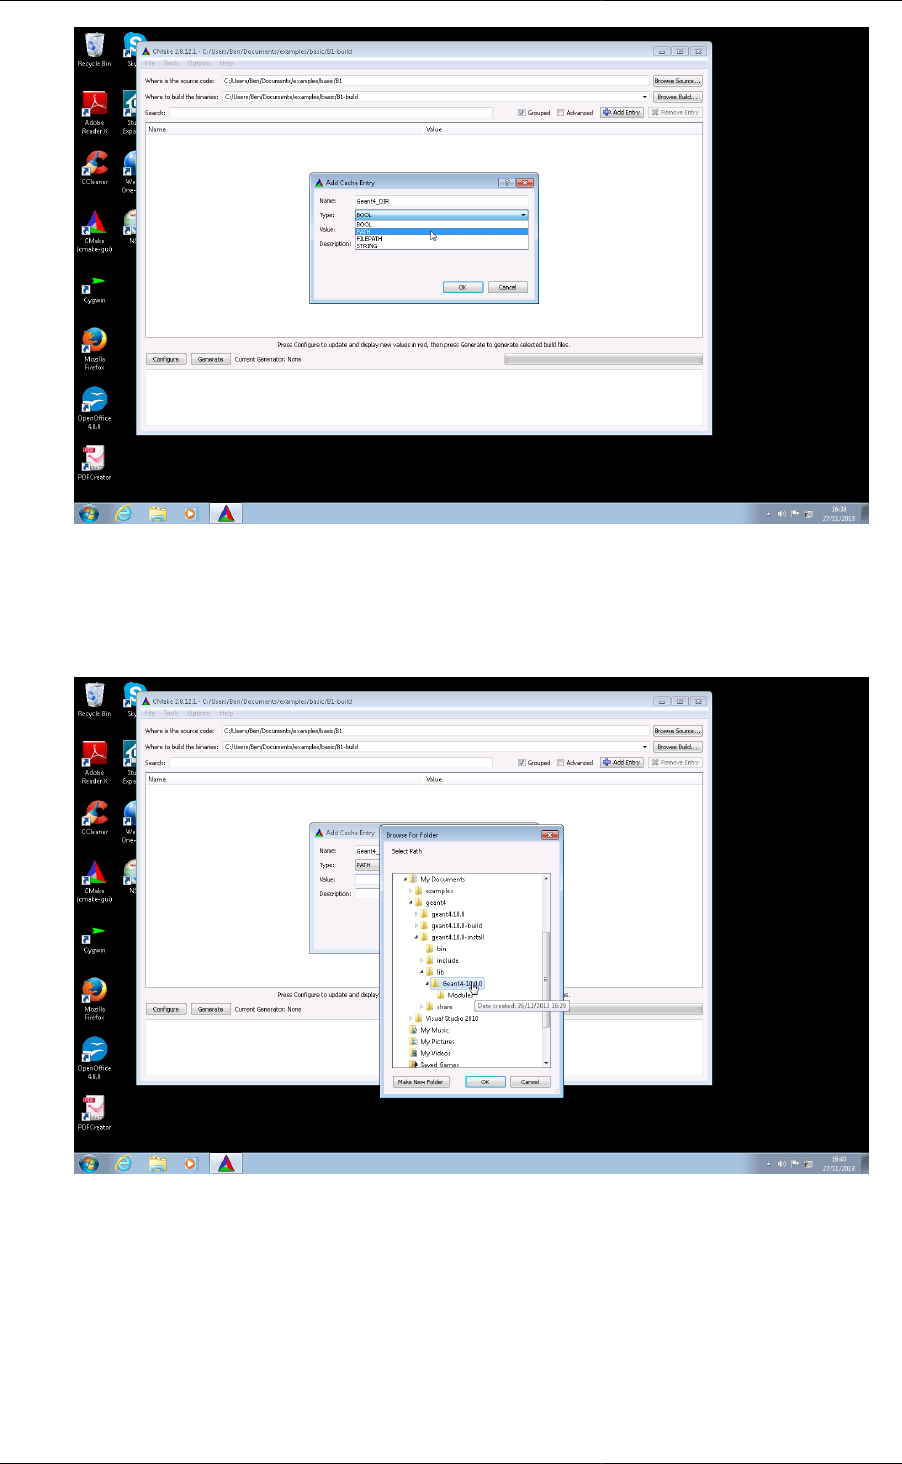
Setting Up and Using
an Install of Geant4
35
7. In the Add Cache Entry window, click the browse button on the right hand side of the Value to pop up the
Browse For Folder window. Browse to find your install of Geant4, and select the folder which contains the
Geant4Config.cmake file. This is generally located in the lib/Geant4-X.Y.Z (where X.Y.Z is the
Geant4 version number) folder inside the directory in which you installed Geant4.
8. With Geant4_DIR set, click on the Configure button in the bottom left hand corner of the GUI.
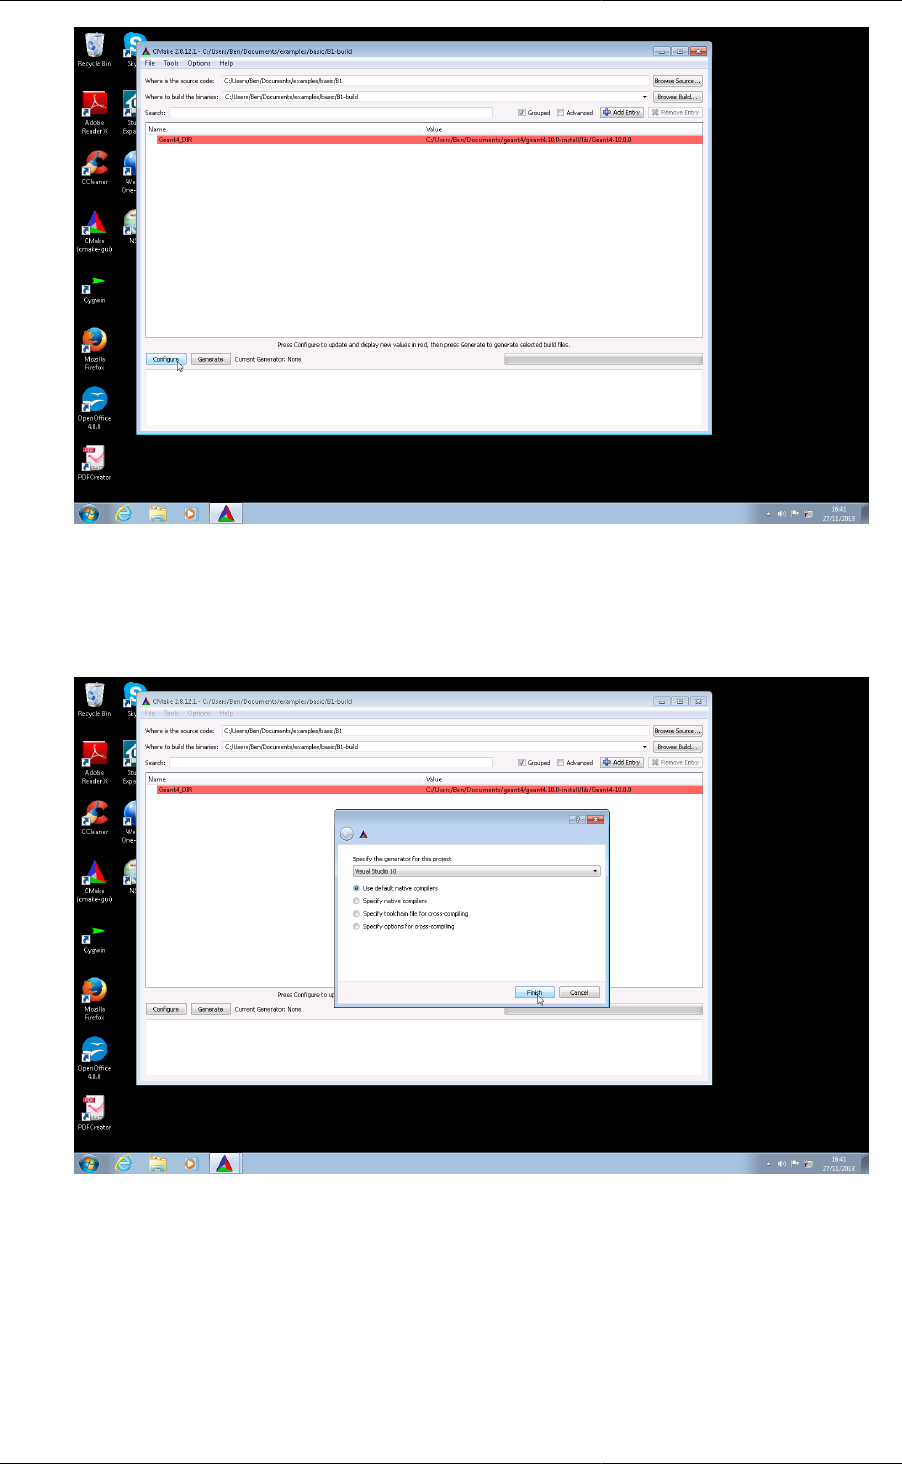
Setting Up and Using
an Install of Geant4
36
9. In the pop up window, select Visual Studio 10 (or 9 if you have that version installed) and ensure the Use
default native compilers radio button is ticked. Click on the Finish button. CMake will run to check that your
system can perform the build and that Geant4 can be found. It will output information on its status and any
errors in the logging window at the bottom of the GUI.
10. After a successful configuration, you will see Configuring done in the logging window at the bottom, and
some red highlighted entries in the main window, including one for CMake. The red color does not always
mean there has been an error, but denotes that CMake needs to rerun to resolve options it has found in the
build. Simply reclick the Configure button to rerun CMake.
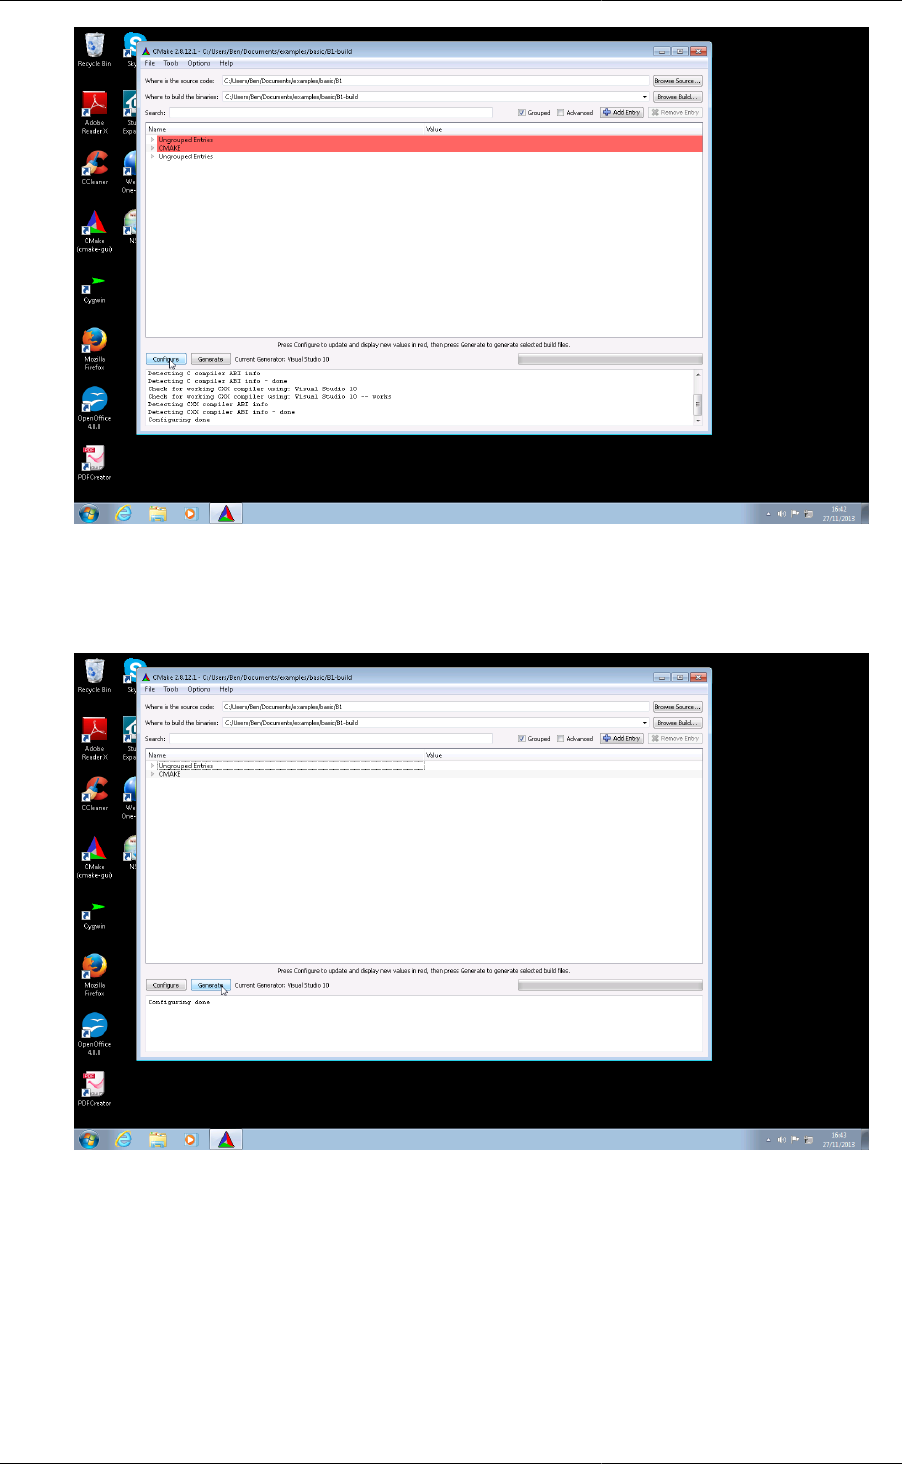
Setting Up and Using
an Install of Geant4
37
11. After a further successful configuration, you will see Configuring done in the logging window at the bottom,
and there should be no red colored entries in the main window. Now click on the Generate button to create
the Visual Studio solution.
12. After generation, you should see Configuring done, Generating done in the logging window at the bottom
of the GUI. CMake has run successfully, and a Visual Studio solution has been created. You can now exit
the CMake GUI.
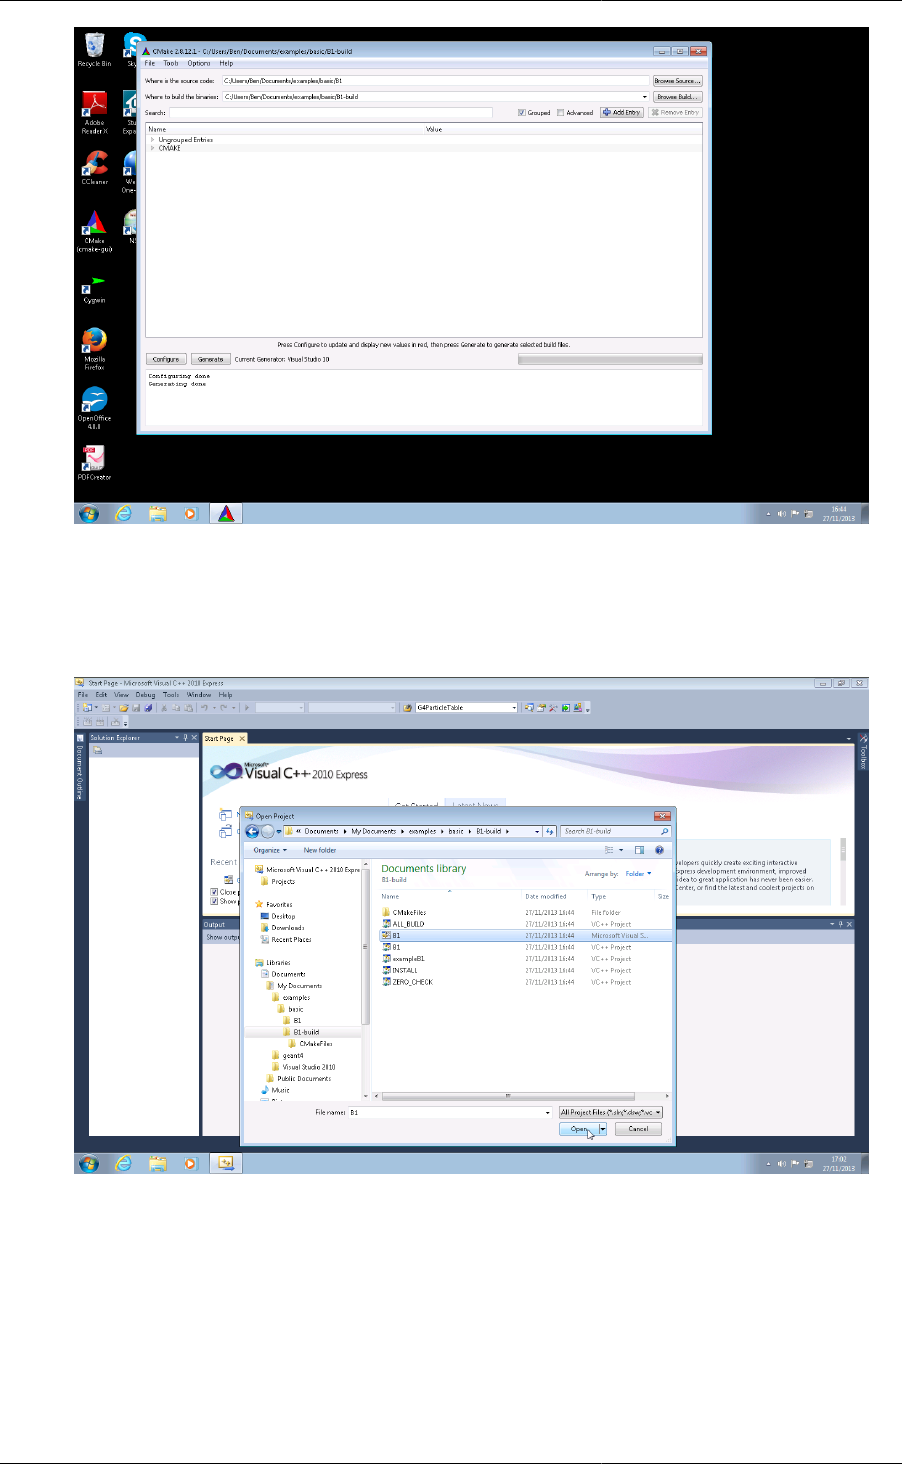
Setting Up and Using
an Install of Geant4
38
13. Now start up Visual Studio and choose Open Project. This guide is somewhat specific to Visual Studio 2010
Express, but the solution files should appear with the same names in both 2008 and 2010. Browse to your
build directory and open the B1.sln Microsoft Visual Studio Solution file. It may take some time for Visual
Studio to fully open the project and parse all the sources.
14. In the Solution Explorer, you can click on the exampleB1 to view the sources for the project.
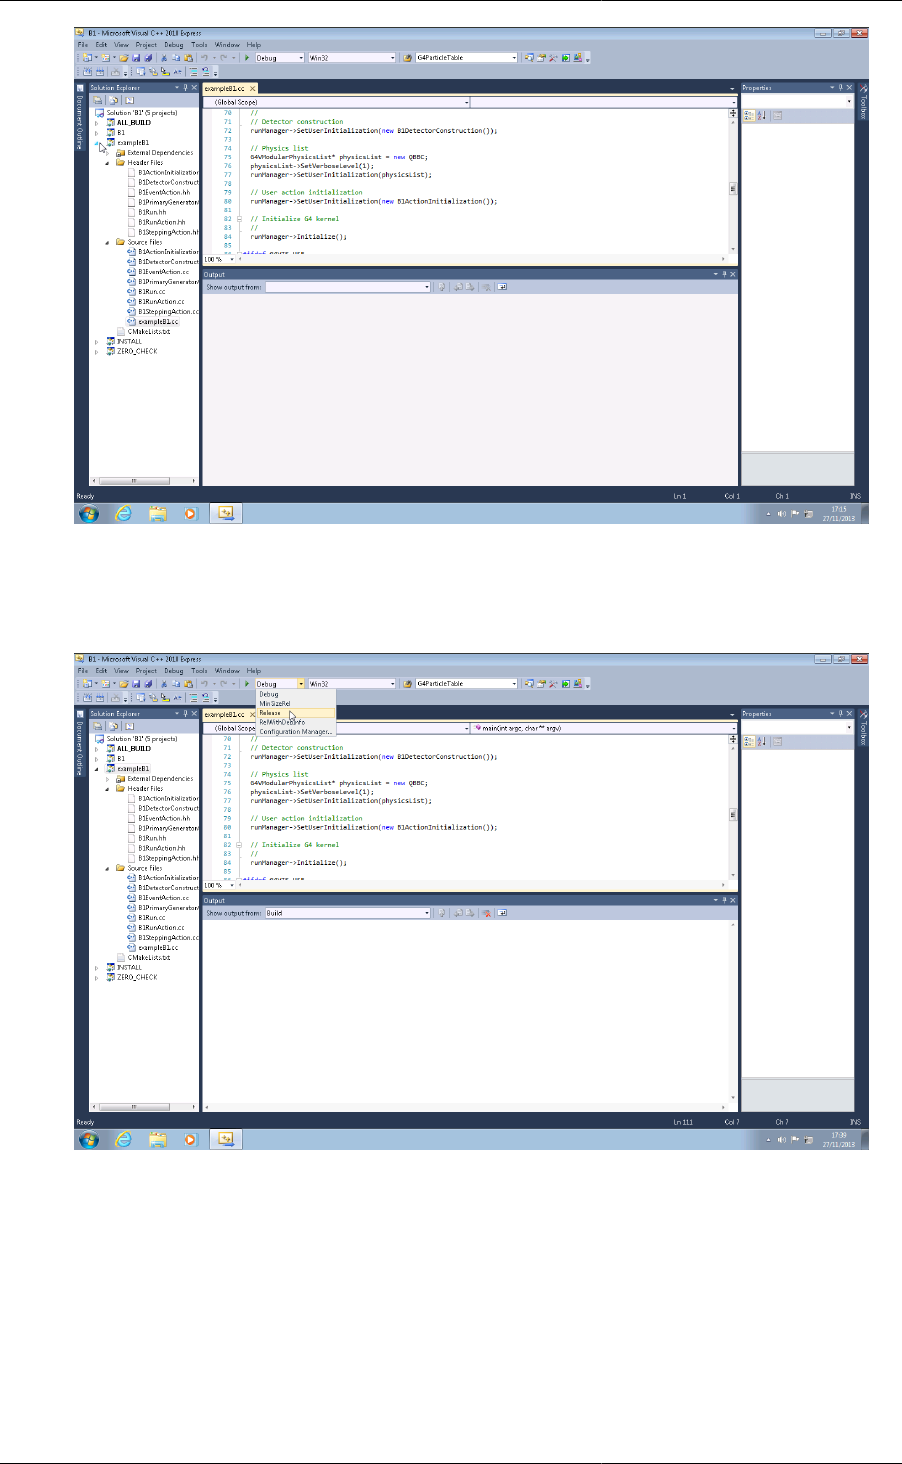
Setting Up and Using
an Install of Geant4
39
15. Click on the Solution Configuration drop down, and change the configuration to Release. In general, it's best
to build your application with the same configuration as your Geant4 installation. In this example, we built
Geant4 in Release mode, so we build the B1 example in the same mode.
16. To build the project, right click on ALL_BUILD in the Solution Explorer and click Build in the dialog box.
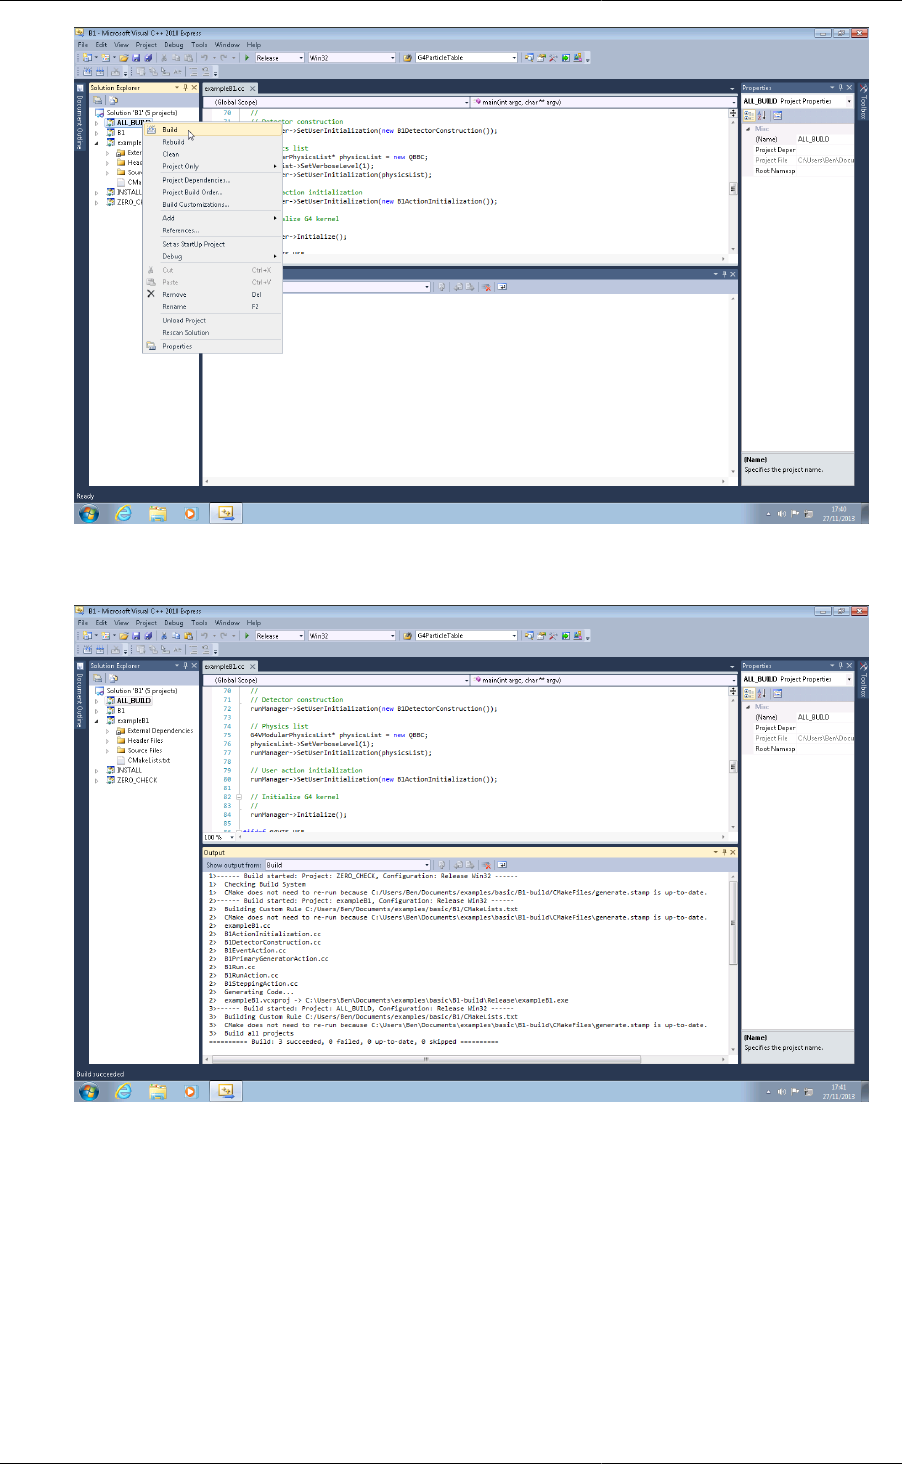
Setting Up and Using
an Install of Geant4
40
17. Visual Studio will perform the build, and report on progress in Output.
18. Whilst you can run the built application in Visual Studio, it can be tricky to set up all the paths correctly (see
below). It's therefore easiest to open a cmd.exe window and cd to the build directory (the directory where
the Visual Studio solution was generated). You can then run the built application directly from the command
line. Note that because Visual Studio supports multiple configurations and we've built in Release mode, the
application is located at Release\exampleB1.exe.
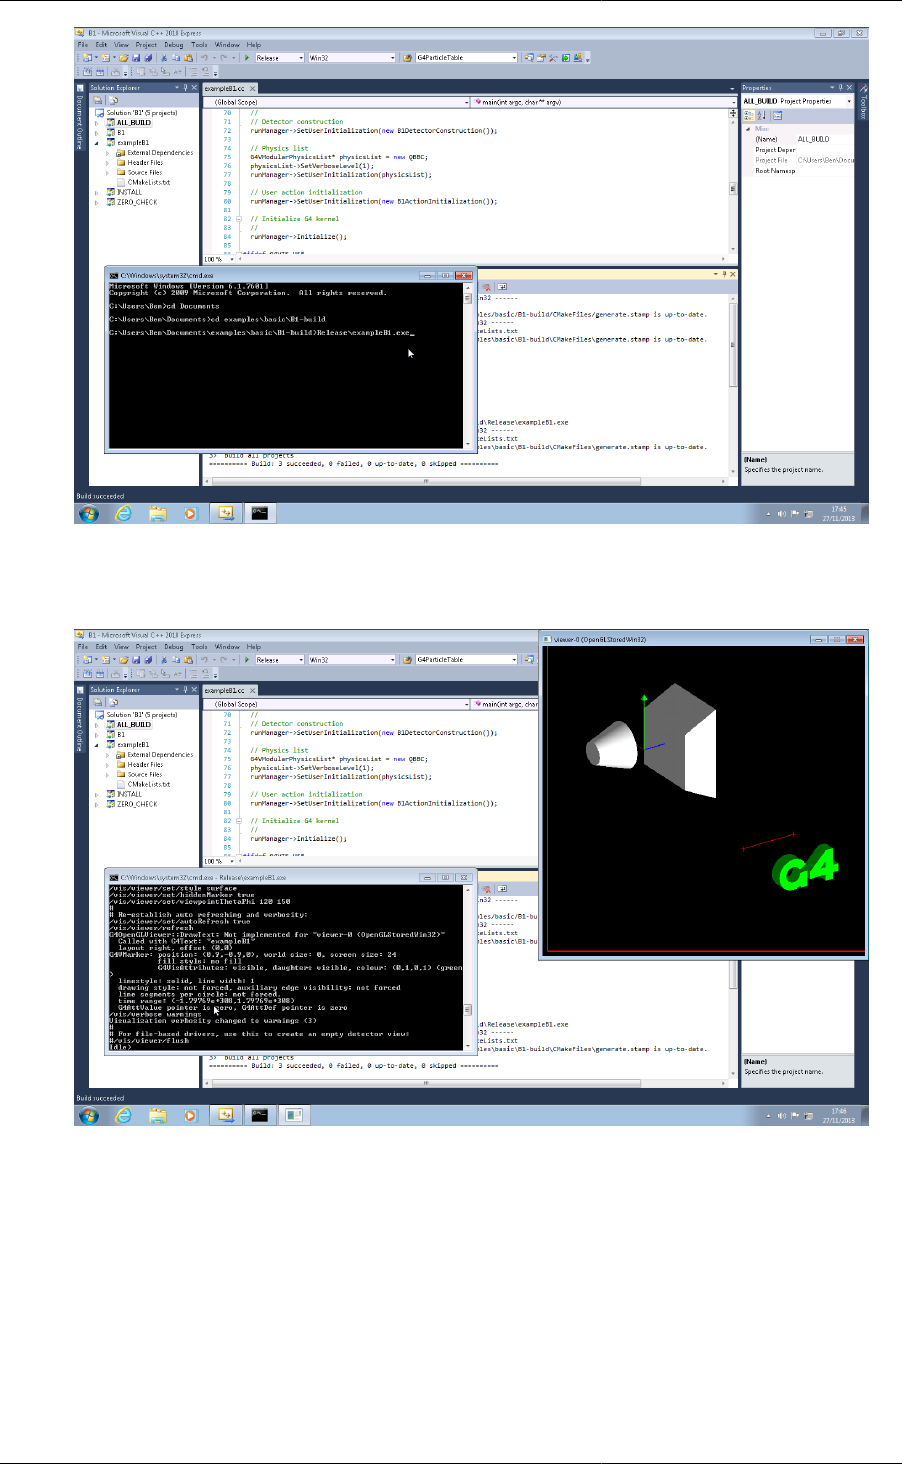
Setting Up and Using
an Install of Geant4
41
19. On execution, the exampleB1 application should pop up a UI window, and a visualization window if your
install of Geant4 was installed with OpenGL visualization.
20. The exampleB1 can be controlled from the Geant4 CLI as normal, here we have run 10 events.
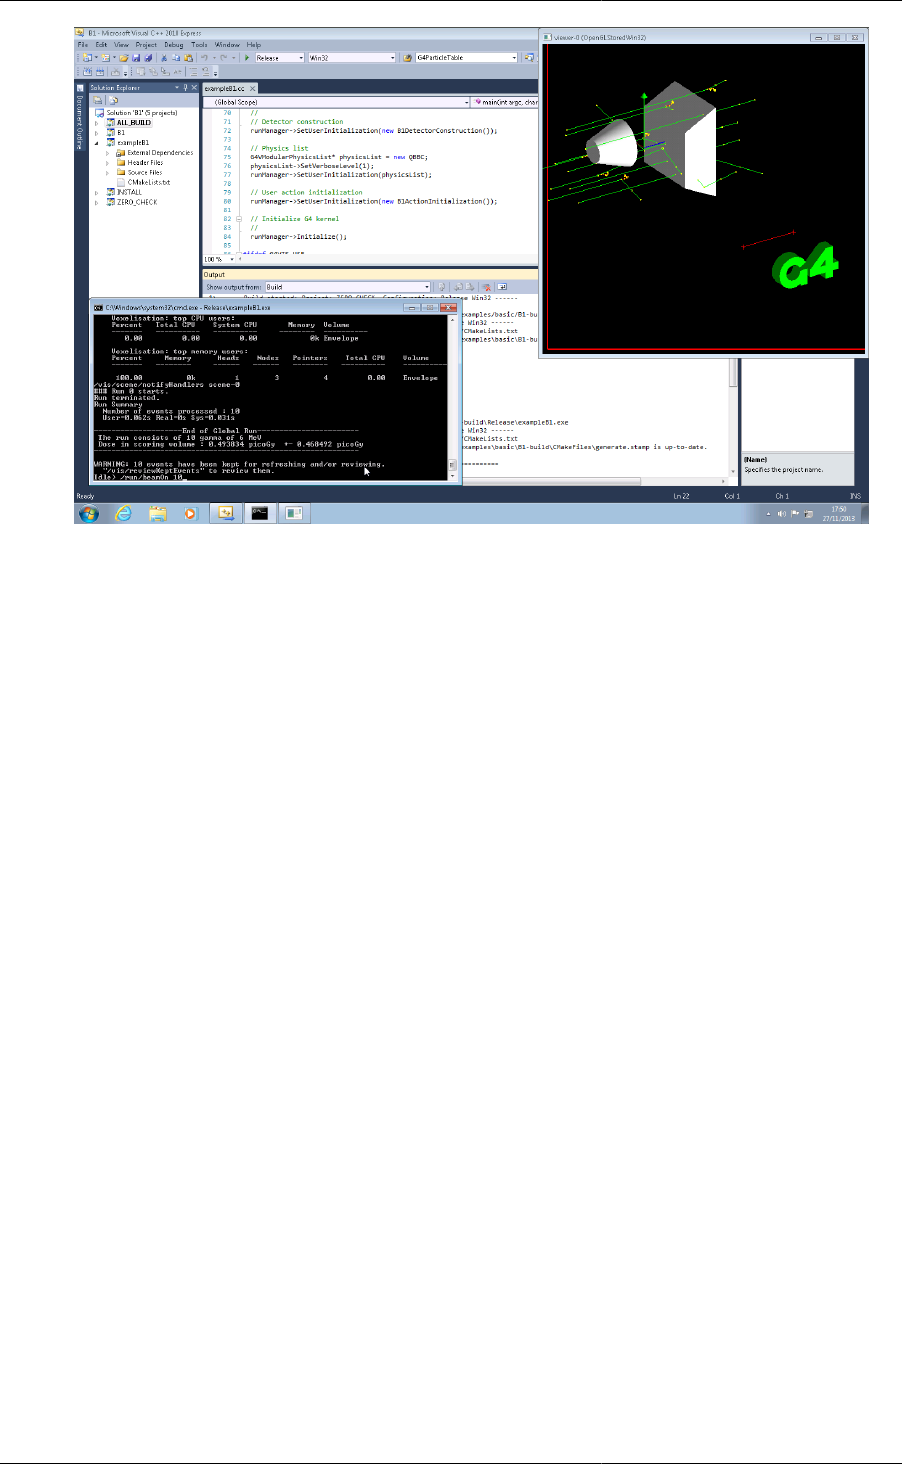
Setting Up and Using
an Install of Geant4
42
As noted above, you can also run the application through the Visual Studio debugger, although we have seen
issues with setting the directory to run incorrectly. The executable locates the macro files by assuming they are in
the current working directory, so the executable must be run from a directory containing the macros.
One key CMake related item to note goes back to our listing of the headers for the application in the call to
add_executable. Whilst CMake will naturally ignore these for configuring compilation of the application, it
will add them to the Visual Studio Solution. If you do not list them, they will not be editable in the Solution.
3.2.1.3. Usage of Geant4Config.cmake
Geant4Config.cmake is designed to be used with CMake's find_package command. When found, it
sets several CMake variables and provides a mechanism for checking and activating optional features of Geant4.
This allows you to use it in many ways in your CMake project to configure Geant4 for use by your application.
The most basic usage of Geant4Config.cmake in a CMakeLists.txt file is just to locate Geant4 with no
requirements on its existence, version number or components:
find_package(Geant4)
If you must find Geant4, then you can use
find_package(Geant4 REQUIRED)
This will cause CMake to fail should an install of Geant4 not be located.
When an install of Geant4 is found, the module sets a sequence of CMake variables that can be used elsewhere
in the project:
•Geant4_FOUND
Set to CMake boolean true if an install of Geant4 was found.
•Geant4_INCLUDE_DIRS
Set to a list of directories containing headers needed by Geant4. May contain paths to third party headers if
these appear in the public interface of Geant4.

Setting Up and Using
an Install of Geant4
43
•Geant4_LIBRARIES
Set to the list of libraries that need to be linked to an application using Geant4.
•Geant4_DEFINITIONS
The list of compile definitions needed to compile an application using Geant4. This is most typically used to
correctly activate UI and Visualization drivers.
•Geant4_CXX_FLAGS
The compiler flags used to build this install of Geant4. Usually most important on Windows platforms.
•Geant4_CXX_FLAGS_<CONFIG>
The compiler flags recommended for compiling Geant4 and applications in mode CONFIG (e.g. Release, Debug,
etc). Usually most important on Windows platforms.
•Geant4_CXXSTD
The C++ standard, e.g. "c++98" against which this install of Geant4 was compiled.
•Geant4_TLS_MODEL
The thread-local storage model, e.g. "initial-exec" against which this install of Geant4 was compiled.
Only set if the install was compiled with multithreading support.
•Geant4_USE_FILE
A CMake script which can be included to handle certain CMake steps automatically. Most useful for very basic
applications.
•Geant4_builtin_clhep_FOUND
A CMake boolean which is set to true if this install of Geant4 was built using the internal CLHEP.
•Geant4_builtin_expat_FOUND
A CMake boolean which is set to true if this install of Geant4 was built using the internal Expat.
•Geant4_builtin_usolids_FOUND
A CMake boolean which is set to true if this install of Geant4 was built using the internal USolids.
•Geant4_builtin_zlib_FOUND
A CMake boolean which is set to true if this install of Geant4 was built using the internal zlib.
•Geant4_DATASETS
A CMake list of the names of the physics datasets used by physics models in Geant4. It is provided to help
iterate over the Geant4_DATASET_XXX_YYY variables documented below.
•Geant4_DATASET_<NAME>_ENVVAR
The name of the environment variable used by Geant4 to locate the dataset with name <NAME>.
•Geant4_DATASET_<NAME>_PATH
The absolute path to the dataset with name <NAME>. Note that the setting of this variable does not guarantee
the existence of the dataset, and no checking of the path is performed. This checking is not provided because
the action you take on non-existing data will be application dependent.

Setting Up and Using
an Install of Geant4
44
You can access the Geant4_DATASET_XXX_YYY variables in a CMake script in the following way:
find_package(Geant4_REQUIRED) # Find Geant4
foreach(dsname ${Geant4_DATASETS}) # Iterate over dataset names
if(NOT EXISTS ${Geant4_DATASET_${dsname}_PATH}) # Check existence
message(WARNING "${dsname} not located at ${Geant4_DATASET_${dsname}_PATH}")
endif()
endforeach()
A typical use case for these variables is to automatically set the dataset environment variables for your
application without the use of the shell scripts described in Section 3.1. This could typically be via a shell script
wrapper around your application, or runtime configuration of the application environment via the relevant C/
C++ API for your system.
The typical usage of find_package and these variables to configure a build requiring Geant4 is thus:
find_package(Geant4 REQUIRED) # Find Geant4
include_directories(${Geant4_INCLUDE_DIRS}) # Add -I type paths
add_definitions(${Geant4_DEFINITIONS}) # Add -D type defs
set(CMAKE_CXX_FLAGS ${Geant4_CXX_FLAGS}) # Optional
add_executable(myg4app myg4app.cc) # Compile application
target_link_libraries(myg4app ${Geant4_LIBRARIES}) # Link it to Geant4
Alternatively, the CMake script pointed to by Geant4_USE_FILE may be included:
find_package(Geant4 REQUIRED) # Find Geant4
include(${Geant4_USE_FILE}) # Auto configure includes/flags
add_executable(myg4app myg4app.cc) # Compile application
target_link_libraries(myg4app ${Geant4_LIBRARIES}) # Link it to Geant4
When included, the Geant4_USE_FILE script performs the following actions:
1. Adds the definitions in Geant4_DEFINITIONS to the global compile definitions.
2. Appends the directories listed in Geant4_INCLUDE_DIRS to those the compiler uses for search for include
paths, marking them as system include directories.
3. Prepends Geant4_CXX_FLAGS to CMAKE_CXX_FLAGS, and similarly for the extra compiler flags for
each build mode (Release, Debug etc).
This use file is very useful for basic applications, but if your use case requires finer control over compiler
definitions, include paths and flags you should use the relevant Geant4_NAME variables directly.
By default, CMake will look in several platform dependent locations for the Geant4Config.cmake file
(see find_package for listings). You can also specify the location directly when running CMake by setting
the Geant4_DIR variable to the path of the directory holding Geant4Config.cmake. It may be set on the
command line via a -D option, or by adding an entry to the CMake GUI. For example, if we have an install of
Geant4 located in
+- opt/
+- Geant4/
+- lib/
+- libG4global.so
+- ...
+- Geant4-10.1.0/
+- Geant4Config.cmake
then we would pass the argument -DGeant4_DIR=/opt/Geant4/lib/Geant4-10.1.0 to CMake. The
CMAKE_PREFIX_PATH variable may also be used to point CMake to Geant4 by adding, to take the example

Setting Up and Using
an Install of Geant4
45
above, /opt/Geant4 to the list of paths it holds. This may be set either on the command line or as a path-style
UNIX environment variable.
You can also, if you wish, build an application against a build of Geant4 without installing it. If you look
in the directory where you built Geant4 itself (e.g. on UNIX, where you ran make), you see there is a
Geant4Config.cmake file. This is a perfectly valid file, so you can also point CMake to this file when building
your application. Simply set Geant4_DIR to the directory where you built Geant4. This feature is most useful
for Geant4 developers, but it can be useful if you cannot, or do not want to, install Geant4.
A version number may also be supplied to search for a Geant4 install greater than or equal to the supplied version,
e.g.
find_package(Geant4 9.6.0 REQUIRED)
would make CMake search for a Geant4 install whose version number is greater than or equal to 9.6.0. An exact
version number may also be specified:
find_package(Geant4 10.1.0 EXACT REQUIRED)
In both cases, CMake will fail with an error if a Geant4 install meeting these version requirements is not located.
Geant4 can be built with many optional components, and the presence of these can also be required by passing extra
"component" arguments. For example, to require that Geant4 is found and that it support Qt UI and visualization,
we can do
find_package(Geant4 REQUIRED qt)
In this case, if CMake finds a Geant4 install that does not support Qt, it will fail with an error. Multiple component
arguments can be supplied, for example
find_package(Geant4 REQUIRED qt gdml)
requires that we find a Geant4 install that supports both Qt and GDML. If the component(s) is(are) found,
any needed header paths, libraries and compile definitions required to use the component are appended to
the variables Geant_INCLUDE_DIRS, Geant4_LIBRARIES and Geant4_DEFINITIONS respectively.
Variables Geant4_<COMPONENTNAME>_FOUND are set to TRUE if component COMPONENTNAME is
supported by the installation.
If you want to activate options only if they exist, you can use the pattern
find_package(Geant4 REQUIRED)
find_package(Geant4 QUIET COMPONENTS qt)
which will require CMake to locate a core install of Geant4, and then check for and activate Qt support if the install
provides it, continuing without error otherwise. A key thing to note here is that you can call find_package
multiple times to append configuration of components. If you use this pattern and need to check if a component was
found, you can use the Geant4_<COMPONENTNAME>_FOUND variables described earlier to check the support.
The components which can be supplied to find_package for Geant4 are as follows:
•static
Geant4_static_FOUND is TRUE if the install of Geant4 provides static libraries.
Use of this component forces the variable Geant4_LIBRARIES to contain static libraries, if they are available.
It can therefore be used to force static linking if your application requires this, but note that this does not
guarantee that static version of third party libraries will be used.

Setting Up and Using
an Install of Geant4
46
•multithreaded
Geant4_multithreaded_FOUND is TRUE if the install of Geant4 was built with multithreading support.
Note that this only indicates availability of multithreading support and activates the required compiler definition
to build a multithreaded Geant4 application. Multithreading in your application requires creation and usage of
the appropriate C++ objects and interfaces as described in the Application Developers Guide.
•usolids
Geant4_usolids_FOUND is TRUE if the install of Geant4 was built with USolids replacing the Geant4
solids.
Note that this only indicates that the replacement of Geant4 solids with USolids has taken place. Further
information on the use of USolids applications is provided in the Application Developers Guide.
•gdml
Geant4_gdml_FOUND is TRUE if the install of Geant4 was built with GDML support.
•g3tog4
Geant4_g3tog4_FOUND is TRUE if the install of Geant4 provides the G3ToG4 library. If so, the G3ToG4
library is added to Geant4_LIBRARIES.
•ui_tcsh
Geant4_ui_tcsh_FOUND is TRUE if the install of Geant4 provides the TCsh command line User Interface.
Using this component allows use of the TCsh command line interface in the linked application.
•ui_win32
Geant4_ui_win32_FOUND is TRUE if the install of Geant4 provides the Win32 command line User
Interface. Using this component allows use of the Win32 command line interface in the linked application.
•motif
Geant4_motif_FOUND is TRUE if the install of Geant4 provides the Motif(Xm) User Interface and
Visualization driver. Using this component allows use of the Motif User Interface and Visualization Driver in
the linked application.
•qt
Geant4_qt_FOUND is TRUE if the install of Geant4 provides the Qt4 User Interface and Visualization driver.
Using this component allows use of the Qt User Interface and Visualization Driver in the linked application.
•wt
Geant4_wt_FOUND is TRUE if the install of Geant4 provides the Wt Web User Interface and Visualization
driver. Using this component allows use of the Wt User Interface and Visualization Driver in the linked
application.
•vis_network_dawn
Geant4_vis_network_dawn_FOUND is TRUE if the install of Geant4 provides the Client/Server network
interface to DAWN visualization. Using this component allows use of the Client/Server DAWN Visualization
Driver in the linked application.
•vis_network_vrml
Geant4_vis_network_vrml_FOUND is TRUE if the install of Geant4 provides the Client/Server network
interface to VRML visualization. Using this component allows use of the Client/Server VRML Visualization
Driver in the linked application.

Setting Up and Using
an Install of Geant4
47
•vis_opengl_x11
Geant4_vis_opengl_x11_FOUND is TRUE if the install of Geant4 provides the X11 interface to the
OpenGL Visualization driver. Using this component allows use of the X11 OpenGL Visualization Driver in
the linked application.
•vis_opengl_win32
Geant4_vis_opengl_win32_FOUND is TRUE if the install of Geant4 provides the Win32 interface to the
OpenGL Visualization driver. Using this component allows use of the Win32 OpenGL Visualization Driver in
the linked application.
•vis_openinventor
Geant4_vis_openinventor_FOUND is TRUE if the install of Geant4 provides the OpenInventor
Visualization driver. Using this component allows use of the OpenInventor Visualization Driver in the linked
application.
•ui_all
Activates all available UI drivers. Does not set any variables, and never causes CMake to fail.
•vis_all
Activates all available Visualization drivers. Does not set any variables, and never causes CMake to fail.
Please note that whilst the above aims to give a complete summary of the functionality of
Geant4Config.cmake, it only gives a sampling of the ways in which you may use it, and other CMake
functionality, to configure your application. We also welcome feedback, suggestions for improvement and bug
reports on Geant4Config.cmake.
3.2.2. Using Geant4Make to build Applications:
binmake.gmk
Geant4Make is the Geant4 GNU Make toolchain formerly used to build the toolkit and applications. It is installed
on UNIX systems (except for Cygwin) for backwards compatibility with the Geant4 Examples and your existing
applications which use a GNUmakefile and the Geant4Make binmake.gmk file. However, please note that the
system is now deprecated, meaning that it is no longer supported and may be removed in future releases without
warning. You should migrate your application to be built using CMake via the Geant4Config.cmake script,
or any other build tool of your choice, using the geant4-config program to query the relevant compiler/
linker flags.
The files for Geant4Make are installed under:
+- CMAKE_INSTALL_PREFIX/
+- share/
+- geant4make/
+- geant4make.sh
+- geant4make.csh
+- config/
+- binmake.gmk
+- ...
The system is designed to form a self-contained GNUMake system which is configured primarily by
environment variables (though you may manually replace these with Make variables if you prefer). Building a
Geant4 application using Geant4Make therefore involves configuring your environment followed by writing a
GNUmakefile using the Geant4Make variables and GNUMake modules.
To configure your environment, simply source the relevant configuration script CMAKE_INSTALL_PREFIX/
share/Geant4-10.1.0/geant4make/geant4make.(c)sh for your shell. Whilst both scripts can be

Setting Up and Using
an Install of Geant4
48
sourced interactively, if you are using the C shell and need to source the script inside another script, you must
use the commands:
cd CMAKE_INSTALL_PREFIX/share/Geant4-10.1.0/geant4make
source geant4make.csh
or alternatively
source CMAKE_INSTALL_PREFIX/share/Geant4-10.1.0/geant4make/geant4make.csh \\
CMAKE_INSTALL_PREFIX/share/Geant4-10.1.0/geant4make
In both cases, you should replace CMAKE_INSTALL_PREFIX with the actual prefix you installed Geant4 under.
Both of these commands work around a limitation in the C shell which prevents the script locating itself.
Please also note that due to limitations of Geant4Make, you should not rely on the environment variables
it sets for paths into Geant4 itself. In particular, note that the G4INSTALL variable is not equivalent to
CMAKE_INSTALL_PREFIX.
Once you have configured your environment, you can start building your application. Geant4Make enforces a
specific organization and naming of your sources in order to simplify the build. We'll use Basic Example B1,
which you may find in the Geant4 source directory under examples/basic/B1, as the canonical example
again. Here, the sources are arranged as follows
+- B1/
+- GNUmakefile
+- exampleB1.cc
+- include/
| ... headers.hh ...
+- src/
... sources.cc ...
As before, exampleB1.cc contains main() for the application, with include/ and src/ containing the
implementation class headers and sources respectively. You must organise your sources in this structure with
these filename extensions to use Geant4Make as it will expect this structure when it tries to build the application.
With this structure in place, the GNUmakefile for exampleB1 is very simple:
name := exampleB1
G4TARGET := $(name)
G4EXLIB := true
.PHONY: all
all: lib bin
include $(G4INSTALL)/config/binmake.gmk
Here, name is set to the application to be built, and it must match the name of the file containing the main()
program without the .cc extension. The rest of the variables are structural to prepare the build, and finally the
core Geant4Make module is included. The G4INSTALL variable is set in the environment by the geant4make
script to point to the root of the Geant4Make directory structure.
With this structure in place, simply run make to build your application:
$ make
If you need extra detail on the build, you append CPPVERBOSE=1 to the make command to see a detailed log
of the command executed.

Setting Up and Using
an Install of Geant4
49
The application executable will be output to $(G4WORKDIR)/bin/$(G4SYSTEM)/exampleB1, where
$(G4SYSTEM) is the system and compiler combination you are running on, e.g. Linux-g++. By default,
$(G4WORKDIR) is set by the geant4make scripts to $(HOME)/geant4_workdir, and also prepends this
directory to your PATH. You can therefore run the application directly once it's built:
$ exampleB1
If you prefer to keep your application builds separate, then you can set G4WORKDIR in the GNUmakefile before
including binmake.gmk. In this case you would have to run the executable by supplying the full path.
Further documentation of the usage of Geant4Make and syntax and extensions for the GNUMakefile is described
in the FAQ and Appendices of the Geant4 User's Guide for Application Developers.
Please note that the Geant4Make toolchain is provided purely for conveniance and backwards compatibility. We
encourage you to use and migrate your applications to the new CMake and geant4-config tools. Geant4Make
is deprecated in Geant4 10.0 and later.
3.2.3. Other Unix Build Systems: geant4-config
If you wish to write your own Makefiles or use a completely different buildsystem for your application, a simple
command line program named geant4-config is installed on Unix systems to help you query a Geant4
installation for locations and features. It is installed at
+- CMAKE_INSTALL_PREFIX
+- bin/
+- geant4-config
It may be run using either a full or relative path, or directly if CMAKE_INSTALL_PREFIX/bin is in your PATH.
This program provides the following command line interface for querying various parameters of the Geant4
installation:
$ geant4-config --help
Usage: geant4-config [OPTION...]
--prefix output installation prefix of Geant4
--version output version for Geant4
--cxxstd C++ Standard compiled against
--tls-model Thread Local Storage model used
--libs output all linker flags
--cflags output all preprocessor
and compiler flags
--libs-without-gui output linker flags without
GUI components
--cflags-without-gui output preprocessor and compiler
flags without GUI components
--has-feature FEATURE output yes if FEATURE is supported,
or no if not supported
--datasets output dataset name, environment variable
and path, with one line per dataset
--check-datasets output dataset name, installation status and
expected installation location, with one line
per dataset
--install-datasets download and install any missing datasets,
requires a network connection and for the dataset
path to be user writable
Known Features:
staticlibs[no]
multithreading[yes]
clhep[yes]

Setting Up and Using
an Install of Geant4
50
expat[no]
zlib[yes]
gdml[no]
usolids[no]
g3tog4[no]
qt[no]
motif[no]
raytracer-x11[no]
opengl-x11[no]
openinventor[no]
Help options:
-?, --help show this help message
--usage display brief usage message
You are completely free to organise your application sources as you wish and to use any buildsystem that can
interface with the output of geant4-config.
The --cflags argument will print the required compile definitions and include paths (in -I<path> format)
to use Geant4 to stdout. Note that default header search paths for the compiler Geant4 was built with are filtered
out of the output of --cflags. The --libs argument will print the libraries (in -L<path> -lname1 ...
-lnameN format) required to link with Geant4 to stdout. Note that this may include libraries for third party
packages and may not be reliable for static builds. By default, all the flags and Geant4 libraries needed to activate
all installed UI and Visualization drivers are provided in these outputs, but you may use the -without-gui
variants of these arguments to suppress this.
You may also check the availability of features supported by the install of Geant4 with the --has-feature
argument. If the argument to --has-feature is known to Geant4 and enabled in the installation, yes will be
printed to stdout, otherwise no will be printed.
The --datasets argument may be used to print out a table of dataset names, environment variables and paths.
No checking of the existence of the paths is performed, as the action to take on a non-existing dataset will depend
on your use case. The table is printed with one row per dataset, with space separated columns for the dataset
name, environment variable name and path. As with Geant4Config.cmake, this information is provided to
help you configure your application environment to locate the Geant4 datasets without a preexisting setup, if your
use case demands this.
The --check-datasets argument may be used to check whether the datasets are installed in the location
expected (as set by the configuration of Geant4). A table is printed with one row per dataset, with space separated
columns for the dataset name, installation status and expected path. If the expected path is found, the status column
will contain INSTALLED, otherwise it will contain NOTFOUND. Note that this check only verifies the existence of
the dataset path. It does not validate that the dataset files are all present nor that the relevant environment variables
are set.
If you did not use the GEANT4_INSTALL_DATA option to install data when Geant4 itself was installed, you can
use the --install-datasets argument to perform this task at a later time. Running geant4-config with
this argument will download, unpack and install each dataset to the location expected by the Geant4 installation.
These steps require a working network connection, the local dataset installation path to be writable by the user
running geant4-config and the presence of the curl, openssl and tar programs. Note that no changes
to the environment are made by the data installation, so you may need to update this using the relevant scripts
documented in Section 3.1.
Due to the wide range of possible use cases, we do not provide an example of using geant4-config to build
an application. However, it should not require more than appending the output of --cflags to your compiler
flags and that of --libs to the list of libraries to link to. We welcome feedback, suggestions for improvement
and bug reports on geant4-config.
3.3. Note on Geant4 Datasets
If you built and installed Geant4 configured with the option GEANT4_INSTALL_DATA set, then the Geant4
datasets will have been downloaded and installed automatically.
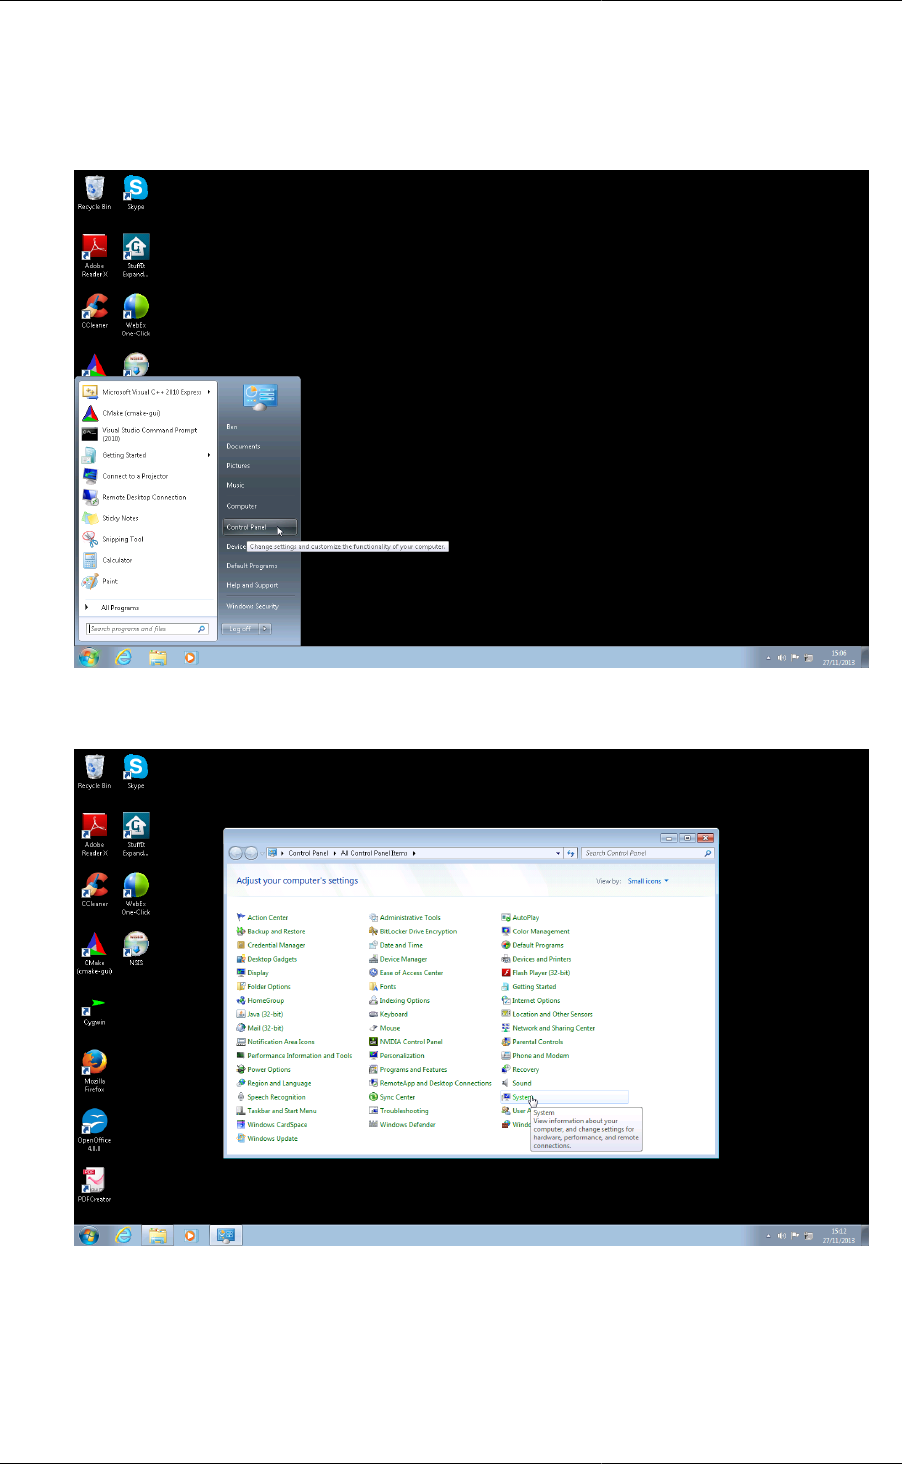
Setting Up and Using
an Install of Geant4
51
In this case, the geant4.(c)sh and geant4make.(c)sh scripts will set up the needed environment variables
required by Geant4 to locate these datasets. On Windows, you will need to set the needed environment variables
listed below by hand. This can be done as follows
1. Open the Windows Control Panel.
2. Open the System item in the Control Panel.
3. Click on the Advanced system settings link on the System window (on Windows XP, click on the Advanced
tab).
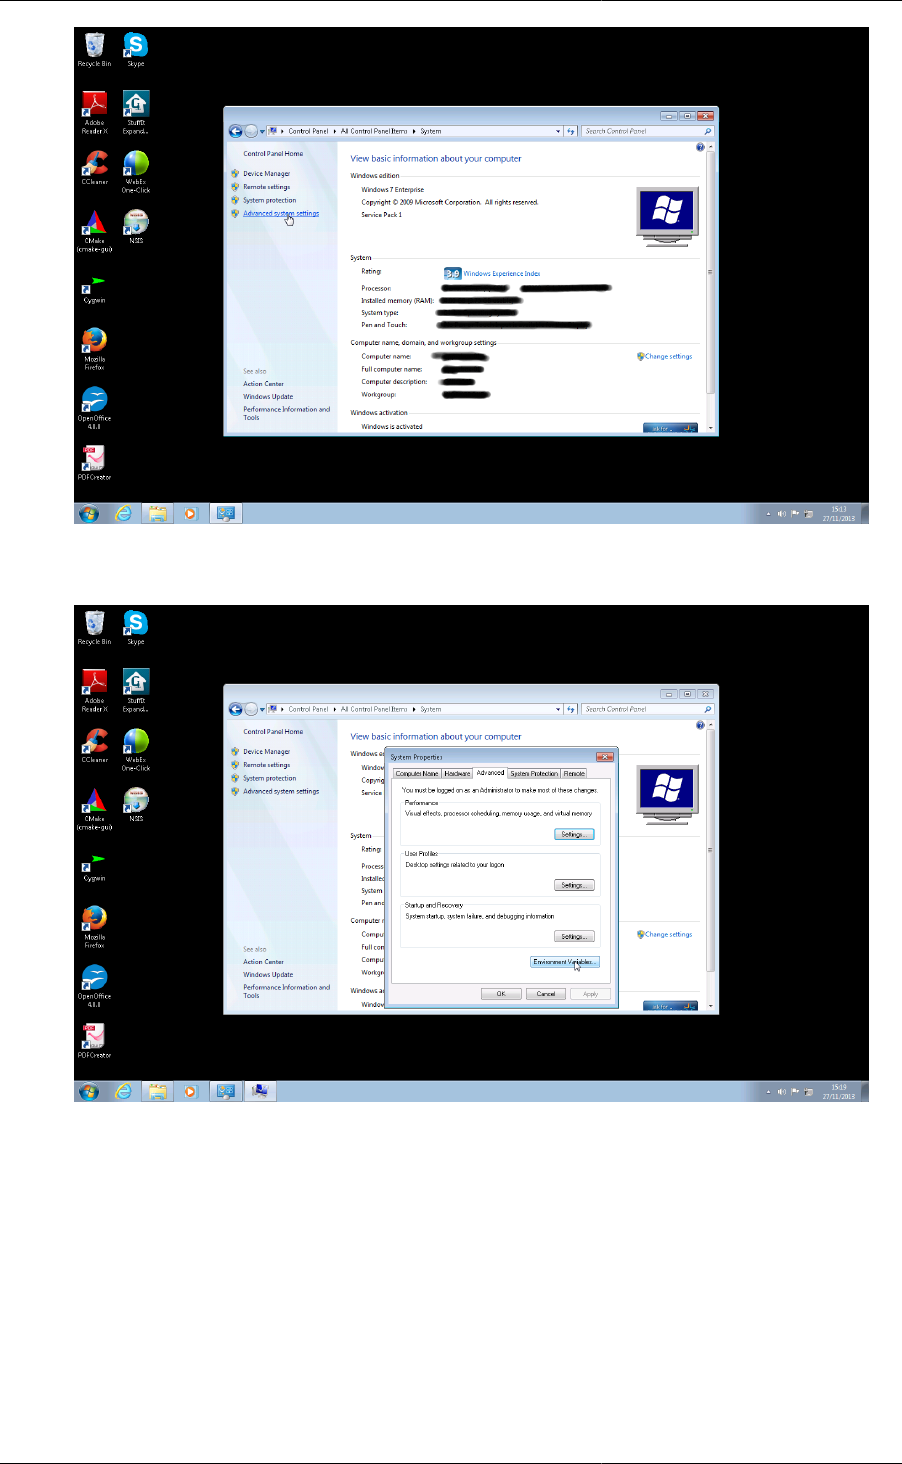
Setting Up and Using
an Install of Geant4
52
4. Click on the Environment Variables button in the System Properties window.
5. For each dataset, click on the New button to create a new entry
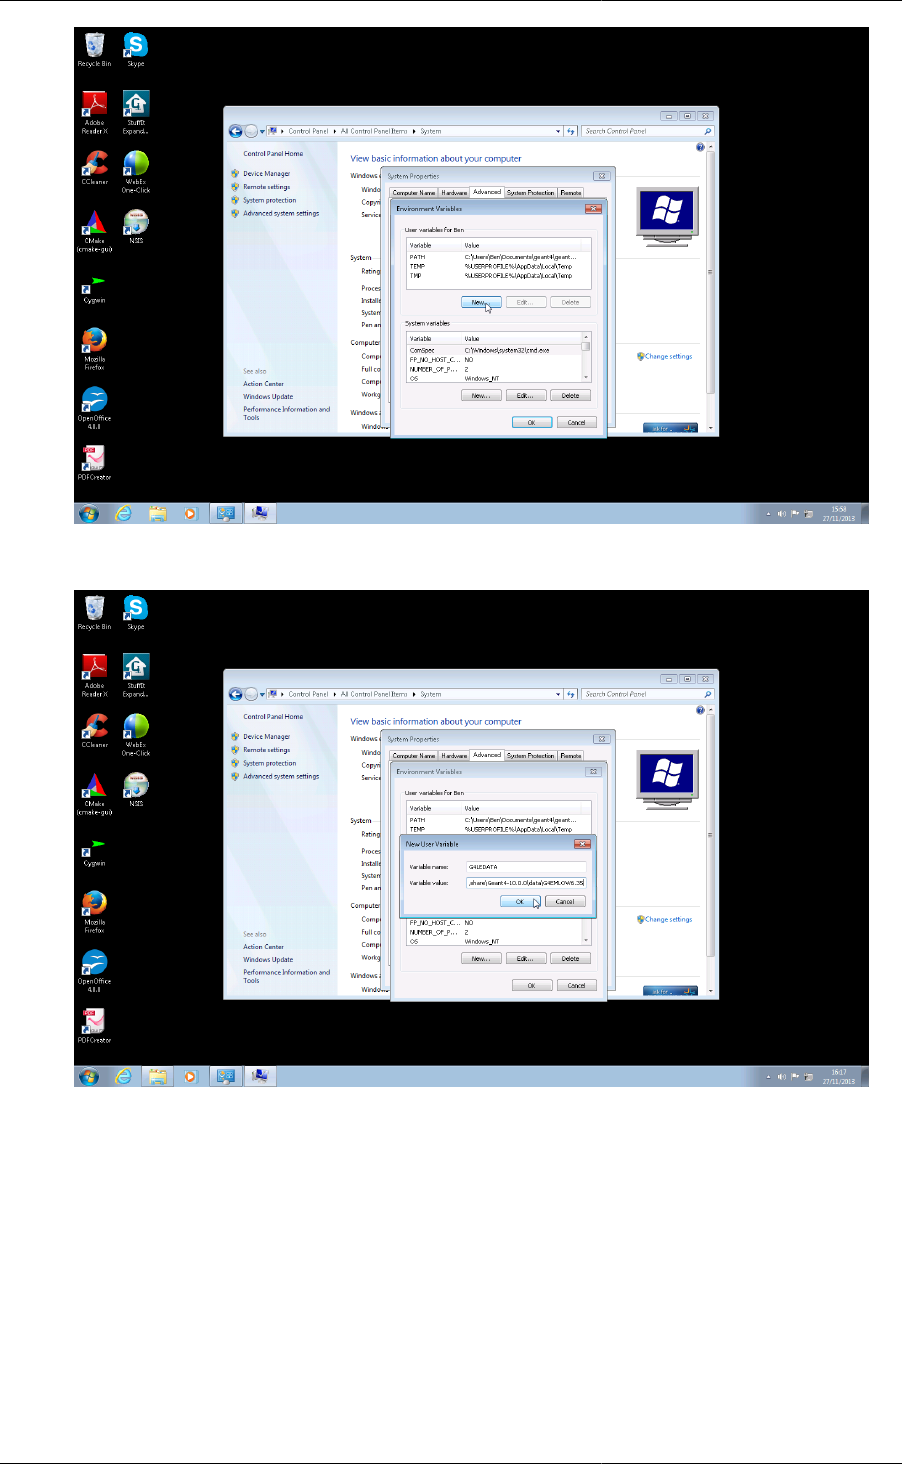
Setting Up and Using
an Install of Geant4
53
6. Enter the Variable name and Variable value using the names and paths described below.
If you chose not to install the datasets, but require them later, the geant4-config program may be used to
install them on Unix platforms via its --install-datasets argument. This is documented in Section 3.2.3.
On Windows platforms, you will need to download and unpack them by hand to the location you specified for
GEANT4_INSTALL_DATADIR. If you did not set this, it defaults to CMAKE_INSTALL_PREFIX/share/
Geant4-10.1.0/data. Unpacking the datasets in this location will result in Geant4 automatically locating
them once geant4.(c)sh or geant4make.(c)sh have been sourced.
If you have datasets in a different location, then you will need to manually set the following environment variables:
•G4LEDATA
Set to the path to the G4EMLOW6.40 dataset.

Setting Up and Using
an Install of Geant4
54
•G4LEVELGAMMADATA
Set to the path to the PhotonEvaporation3.1 dataset.
•G4NEUTRONHPDATA
Set to the path to the G4NDL4.5 dataset.
•G4NEUTRONXSDATA
Set to the path to the G4NEUTRONXS1.4 dataset.
•G4PIIDATA
Set to the path to the G4PII1.3 dataset.
•G4RADIOACTIVEDATA
Set to the path to the RadioactiveDecay4.1 dataset.
•G4REALSURFACEDATA
Set to the path to the RealSurface1.0 dataset.
•G4SAIDXSDATA
Set to the path to the G4SAIDDATA1.1 dataset.
•G4ABLADATA
Set to the path to the G4ABLA3.0 dataset.
In Geant4 10.1, a new dataset G4ENSDFSTATE1.0 has been introduced. Whilst this dataset is downloaded and
installed for convenience, it is only required in a few special use cases described in the Geant4 Guide for Toolkit
Developers. It is therefore not configured by default (meaning that the environment variable pointing to the data
is not set) and you should not do so unless your application has the specific use cases discussed in that guide.
Please see the Application Developer's Guide for information about these use cases and how to configure the use
of G4ENSDFSTATE1.0.

55
Chapter 4. CMake and Build Tools For Geant4
Developers
Geant4 developers can make use of several powerful features of CMake to help with their work. The key concept
and working practice is the separation of the source directory, which is where the sources you edit reside, and
the build directory, where the buildscripts and compiled products reside. The reason for enforcing this separation
is twofold:
• It provides separation of CMake generated files (e.g. Makefiles) from the Geant4 sources under revision control.
• It allows multiple builds against a single source directory, giving fast incremental builds without having to
reconfigure.
4.1. Developing Geant4 using Make, Xcode, Visual
Studio and Eclipse
CMake is a buildsystem generator that can create scripts for many buildsystems including Make, Xcode, Visual
Studio and Eclipse, among others. To find out which systems your install of CMake can generate scripts for, consult
the "GENERATORS" section of the CMake man page, or click on the "Generate" button in the CMake GUI. The
resulting scripts can be used within the buildsystem of choice to perform the actual build, install and packaging.
Whilst we only support Make and Visual Studio for Unix and Windows user builds respectively, Geant4 developers
are welcome, and encouraged, to use their buildsystem of choice. Scripts for developing Geant4 using these
systems can be generated by choosing the CMake generator when running CMake for the first time.
On the command line, one can select the tool using the -G argument of CMake. For example, to generate an Xcode
project for Geant4 using the example from Section 2.1:
$ mkdir -p /path/to/geant4.10.1-build-xcode
$ cd /path/to/geant4.10.1-build-xcode
$ cmake -G Xcode -DCMAKE_INSTALL_PREFIX=/path/to/geant4.10.1-install /path/to/geant4.10.1
The resulting /path/to/geant4.10.1-build-xcode/Geant4.xcodeproj project may be opened
with Xcode.
In the CMake GUI, the generator will be asked for the first time you click on Configure button (see Section 2.2),
where it can be selected from a drop down list.
Note that in all cases, you can only have one buildtool configuration in a given build directory (e.g. you cannot
have Unix Makefiles alongside an Xcode project).
Support for these buildtools is still preliminary, so feedback is welcome, whether bug reports, guides or general
comments.
4.1.1. Using the Eclipse IDE
Eclipse projects using Makefiles can be generated via the command:
$ cmake -G"Eclipse CDT4 - <TYPE> Makefiles" <otherargs>
where <TYPE> is platform dependent and one of Unix, MinGW or NMake. Note that only a single build mode is
supported here because the projects are Makefile based. This means that you will need to supply CMake with the
command line argument -DCMAKE_BUILD_TYPE=<MODE>, where <MODE>, is the required mode if you want
to change the default mode. By default, Geant4 is built in "Release" mode.

CMake and Build Tools
For Geant4 Developers
56
With out-of-source builds enforced in Geant4, there are two issues that need to be worked around due to the
way Eclipse expects project directories to be organised. These are to do with the integration of version control
support and code editing/navigation/autocompletion. Both issues, together with their resolution are described in
the CMake Wiki entry on Eclipse CDT4 under the "Out-ofSource Builds" section.
4.2. Command Line Help with Make
If you develop using the command line and Make, you can get information on the targets available by "building"
the help target in your build directory:
$ make help
The following are some of the valid targets for this Makefile:
... all (the default if no target is provided)
... clean
... depend
.furthertargets.
You may build any target individually, and it will be built together with all of its dependencies. CMake's generated
makefiles only output minimal information by default, so if you need to see the full commands used, you can run
make with the extra VERBOSE argument:
$ make VERBOSE=1
to output every command in full.
If you want to quickly check that your target compiles, without checking and rebuilding any of its dependencies,
you can append /fast to the target name, e.g.
$ make G4run/fast
This will finish with an error if any dependents of the target do not exist, but can be useful for rapidly checking
that your sources simply compile.
4.3. Building Quickly and Efficiently with Multiple
Build Directories
The many ways in which Geant4 can be configured with optional components can make compilation and testing
under different configurations time consuming.
As the CMake generated scripts live in a build directory isolated from the source directory, one can create several
build directories configured against the same source directory. Each directory can have a different configuration,
for example
$ cd /path/to
$ ls
geant4.10.1
$ mkdir geant4.10.1-build-release geant4.10.1-build-debug
$ cd geant4.10.1-build-release
$ cmake -DCMAKE_BUILD_TYPE=Release ../geant4.10.1
...output...
$ make -j8
...output...
$ cd ../geant4-build-debug
$ cmake -DCMAKE_BUILD_TYPE=Debug ../geant4.10.1
...output...

CMake and Build Tools
For Geant4 Developers
57
$ make -j8
...output...
The above example uses Unix Makefiles, but the same technique works on all platforms. It may not seem to have
gained you much, but when you edit and develop code that is living under /path/to/geant4.10.1, you only
need to rebuild in each directory:
... work on code ...
$ cd /path/to/geant4.10.1-build-release
$ make -j8
... incremental build ...
$ cd /path/geant4.10.1-build-debug
$ make -j8
... incremental build ...
The builds pick up the changes you make to the source and build separately without needing reconfiguration.
This is particularly powerful if the different configurations you need to test (for example, different versions of
an external package) would require significant recompilation if the configuration were changed. Naturally, this
power comes at the cost of some disk space, so may not be ideal in all cases.
Note that whilst this technique works on all platforms and buildtools, some IDEs (Xcode or Visual Studio for
example) automatically support multiple build modes such as Release and Debug. In this case, you do not need
separate build directories as the IDE handles this for you. However, you would still need two separate build
directories if you, for example, wanted to develop and test against two versions of an external package such as
Xerces-C.
4.4. Building Test Applications Against Your
Development Build
A key feature of Geant4's CMake scripts is that you do not need to install your current build to be able to use it.
A typical use case here is that you have a simple testing application which you want to build against your latest
development build of Geant4.
Versions of the geant4cmake.(c)sh (described in Section 3.2.2), Geant4Config.cmake (described in
Section 3.2.1) and geant4-config (described in Section 3.2.3) scripts are created in the build directory. These
versions are all configured to use the libraries as they exist in the build directory, and headers from the source
directory, without installation.
You can therefore use these scripts as described earlier in Chapter 3 to build your test applications against a
specific build tree. You therefore don't need to install Geant4 everytime you make a small update.

58
Chapter 5. Help And Support
5.1. Getting Help
Whilst every effort has been made to make the build of Geant4 robust and reliable, the multitude of platforms
and system configurations mean we cannot guarantee that problems will not be encountered on platforms other
than those listed in Section 1.1.
In case of issues with building and installing Geant4, we welcome questions as well as feedback via our HyperNews
Forum. To help us deal with your problem as quickly as possible, please include as much detail as possible on the
problem you have encountered. At minimum, you should let us know the platform and operating system version,
your C++ compiler type and version, CMake version and any error messages. It also helps to have the sequence
of commands you used so we can try and reproduce the issue.
Please note that as discussed earlier we can only support user installs on Unix via CMake and Unix Makefiles, and
on Windows via CMake and Visual Studio. Developers however are welcome to try CMake and other buildtools
like Xcode and Eclipse, and we welcome your feedback here.
If you feel you have found a genuine bug in the Geant4 CMake build, please report in to the CMake category on
our Bugzilla. As with reports to HyperNews, please include as much information as possible so that we can triage
the bug and track it down quickly. We also welcome general feature requests and feedback on the system.
5.2. Further Information
• CMake Documentation
• CMake Wiki
• CMake Tutorial
