General Instructionsx Instructions
User Manual: Pdf
Open the PDF directly: View PDF ![]() .
.
Page Count: 6
Real‐TimeProgramming,GeneralLabInstructions March2017,ÖrebroUniversity
pg.1
General Information of Lab Instrument and Platform
FarhangNemati,March2017
Real‐TimeProgramming,GeneralLabInstructions March2017,ÖrebroUniversity
pg.2
Introduction
InthelabweuseRaspberryPiB+platformforlabassignments.RaspberryPiisacheap,smallandgeneral
purposecomputermainlyusedforprogrammingembeddedapplications.Itwasoriginallymadeforeducation
purposes,however,itsoonbecameapopularplatformamonghobbyistsandthosewhowishedtolearn
developingembeddedapplications.ThereisabigcommunityforprogrammingonRaspberryPiandthereare
interestingprojectsandworksavailableonline.Usually,adistributionofLinux(Raspbian)isusedasoperating
systemforRaspberryPi.Thismakesitquiteusefulsinceprogramscanbewritteninawiderangeoflanguages,
e.g.,C,C++,Java,andPython.
TheoperatingsystemwehaveinstalledontheseplatformsinthelabisReal‐TimeLinux(Raspbian
compiledwithReal‐Timesettings).TheprogramminglanguagetobeusedisC.WewilluseVisualStudiofor
programminganddebuggingenvironment.Tobeabletoeasilywriteprograms,compile,run,anddebugthem
usingVisualStudio,wehaveinstalledVisualGDBwhichisaconvenientadd‐onforVisualStudio.Oneofthe
usagesofVisualGDBisprogramminganddebuggingC/C++LinuxapplicationsforRaspberryPiandotherLinux
platforms,Androidappsetc.
Raspberry Pi B+
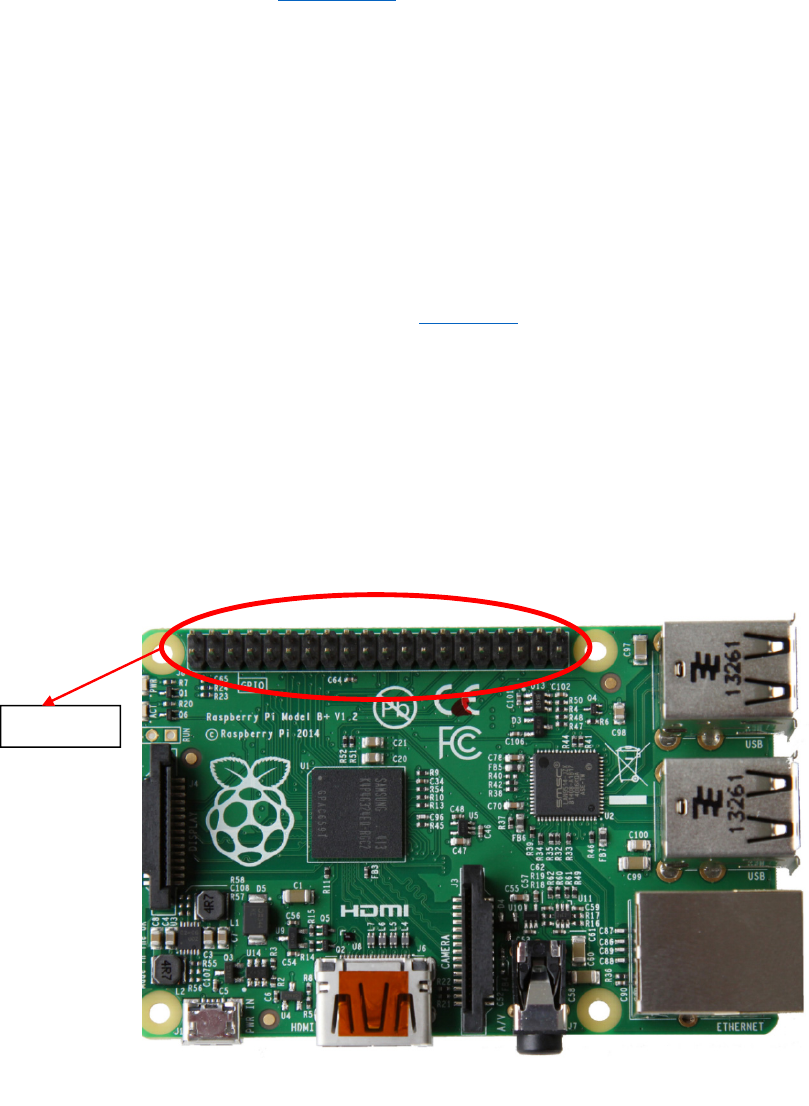
ThemodelB+ofRaspberryPi(Figure1)has40GeneralPurposeInput/Output(GPIO)pins.GPIOpinsare
usedforinput/outputpurposes.However,notallofthe40pinscanbeusedforinput/output;someofthemare
forsupplyingpowerfordevicesconnectingtoRaspberryPi;8pinsforGND(ground),2pinstosupply3.3Volt,
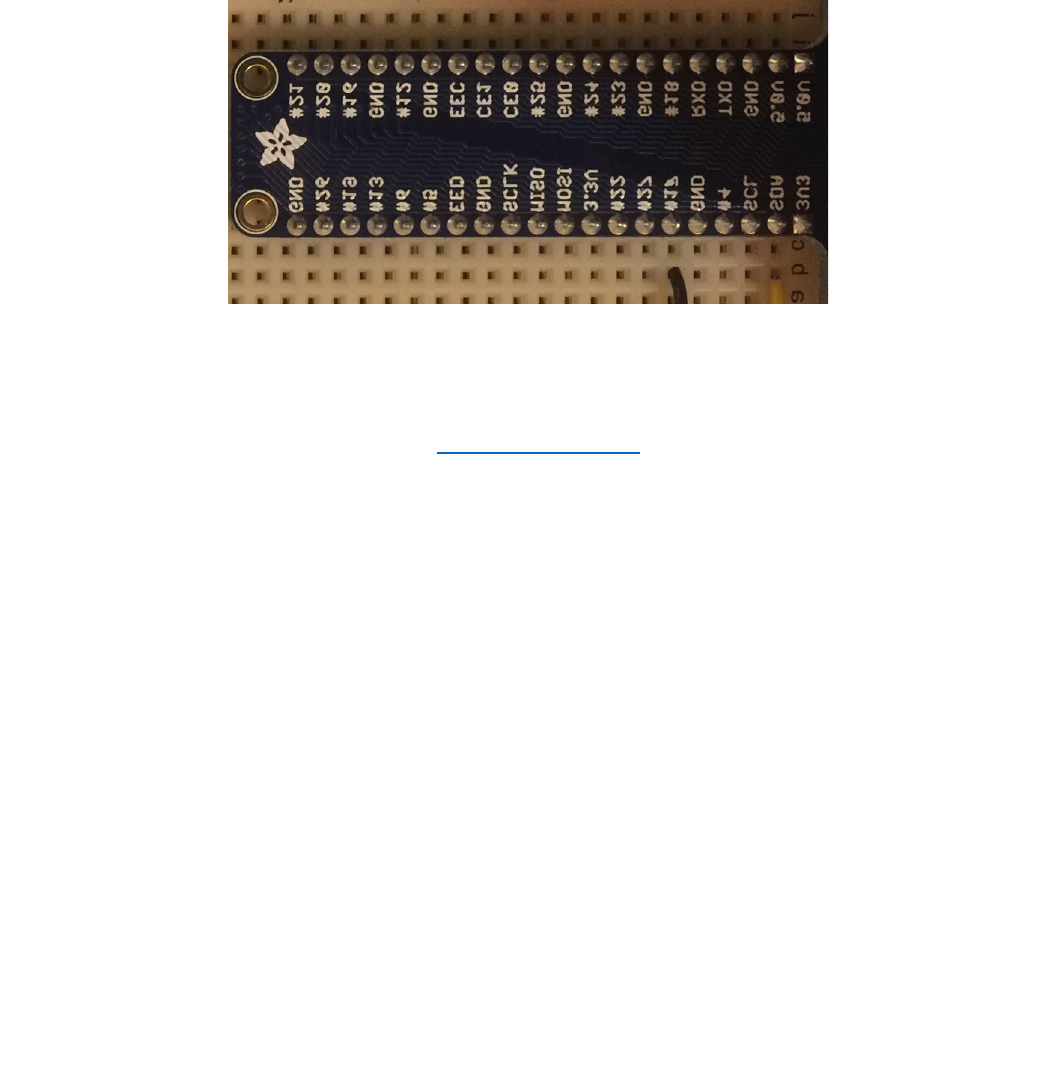
and2pinstosupply5Volt.AsshowninFigure1itisdifficulttorecognizethepins,thereforewehaveconnected
thepinstoaboardwhereeachpinisshownbyalabelnexttoit(Figure2).Exceptthepowersupplypinsthe
restofGPIOpinscanbeusedforeitheroutputorinputpurposes.Thismeansthateachofthesepinscan
GPIOpins
Fi
g
ure1:Ras
p
berr
y
PiB+
Real‐TimeProgramming,GeneralLabInstructions March2017,ÖrebroUniversity
pg.3
programmaticallybesettoeitherinputoroutput.Toeaseworkingwithinput/outputinthelabwehave
providednecessaryfunctionswritteninCwhichcanbedownloadedfromBlackboard.Youhavetobevery
carefulwhenusingGPIO;failureinconnectingandusingthepinsmightdestroythepins.Alwaysaskthelab
assistantforhelptoassistyouconnectingGPIOstootherdevices.Inthefollowingsectionitisexplainedhowto
usetheprovidedCcodetoworkwithGPIO.
ThereisalotofonlineinformationandinterestingprojectsdonebyRaspberryPi.Formoredetails
aboutRaspberryPivisititsofficialwebsiteatwww.raspberrypi.org.
Specifications
• 700MHzBCM2835CPU
• 512MBSDRAM
• 10/100Ethernetport
• Full‐sizeHDMIport
• 4USBports
• MicroSDslot
• Combined3.5mmaudiojackandcompositevideooutput
• Camerainterface(CSI)
• Displayinterface(DSI)
• 40pinsGPIOheader
Starting up Shutting down Raspberry Pi in the Lab
Starting up
ConnecttheelectronicdevicesthatyouaresupposedtoworkwithbeforeturningthePion
(connectingittoelectricity).MakesurethatyouhaveconnectedthePitonetworkusingthenetworkcable.
WhenreadyconnectthePitoelectricitytoturniton.RTLinuxwillbootandafterseveralsecondsthePiwillbe
readytouse.
Fi
g
ure2:GPIOswithlabelsinthe

Real‐TimeProgramming,GeneralLabInstructions March2017,ÖrebroUniversity
pg.4
Shutting down
WhenyouarefinishedwiththePishutdownitproperly.Neverturnitoffbyunpluggingitfromthe
electricitybeforeshuttingitdown.Toshutdownsendthefollowingterminalcommand(forexampleusing
PuTTY)tothePi:
Using GPIO
TouseGPIOsalwaysusetheCfunctionsintheprovidedCfiles(piodirect.handpiodirect.c).Foreachlab
whenyoucreateaprojectinVisualStudiofirstdownloadpiodirect.handpiodirect.cfromBlackboard
(“Kursmaterial/Labs/HelperCode”)andaddthemtotheproject.Thedetailsonhowtocreateaprojectfor
RaspberryPiinVisualStudiowillbeexplainedintheinstructionsforthefirstlab.
Setting up GPIO
AlwayscallgpioSetup()atthebeginningoffunctionmain()inanyproject:
intmain(intargc,char*argv[])
{
gpioSetup();
...
}
Setting a GPIO pin as input or output
Forsettingapinasaninputoroutputcallthefollowingfunction:
GPIOcreate(enumPinpin,intdirection)
PutthereturnedGPIOtypeinavariableoftypeGPIO.Fromthatpointyouwillusethisvariabletowork
withthepin.
Parameterpinisthenameofpin(writtenonthelabelnexttothepin)followedby“_”.ForexampleGPIO
pin#17isenteredas_17
Thedirectionsetsthepintoeitherinputoroutput;enterIN_PINifthepinistobeaninput,andenter
OUT_PINifthepinisgoingtobeanoutputpin.
Examples:
GPIOgpio4=create(_4,OUT_PIN);/*setspin#4(seeFigure2)asoutputpin*/
GPIOgpioScl=create(_SCL,OUT_IN);/*setspinSCL(seeFigure2)asinputpin*/
Writing a value to an output GPIO pin
Thevalueofanoutputpincanbesettohigh(1)orlow(0).Whenitishighthevoltageofthepinis
around3.3Voltandwhenitislowitsvoltageisaround0Volts(GND).Toputanoutputpintohighcallthe
followingfunction:
Real‐TimeProgramming,GeneralLabInstructions March2017,ÖrebroUniversity
pg.5
intonOff(GPIOgpio_,intonOff);
ParameteronOffhastobeONtoputthepinonhighandOFFtoputthepinonlow.
Example:
GPIOgpio17=create(_17,OUT_PIN);
onOff(gpio17,ON);/*setspin#17tohigh*/
onOff(gpio17,OFF);/*setspin#17tolow*/
Reading the value of an input GPIO pin
ToreadavaluefromaGPIOpinthatissetasinput,callthefollowingfunction:
intreadIn(GPIOgpio_);
Ifthereturnvalueis1itmeanstheinputishigh,ifthereturnvalueis0thevalueofinputpinislow.
Example:
intvalue;
GPIOgpio4=create(_4,IN_PIN);
value=readIn(gpio4);
Using a GPIO pin for buttons and switches
WhenusingabuttonwithRaspberryPi,onepinofthebuttonhastobeconnectedtoaGNDandits
otherpinhastobeconnectedtoaninputGPIOpin.FirstofalltheGPIOpinhastobecreatedasinputpinand
thenfunctionpullUpDown(GPIOgpio_,intpud)hastobecalledonthatpin.Thevalueofparameterpudcan
beeitherPUD_UPorPUD_DOWN.IfPUD_UP(pullup)isgivenasthevalueofpudtheGPIOpinbydefaultis
high(1)andwhenthebuttonispushedtheinputvaluebecomeslow(0).OntheothersideifPUD_DOWN(pull
down)isgiven,thedefaultvalueoftheGPIOpinbydefaultislowandwhenthebuttonispushedtheinput
valueoftheGPIOpinbecomeshigh.
Example1:
GPIOgpio17=create(_17,IN_PIN);
pullUpDown(gpio17,PUD_UP);
while(1)
{
if(readIn(gpio17)==0)
{
printf("Buttonpushed!\n");
break;
}
else
{
printf("Buttonreleased!\n");
}
usleep(20000);
}
destroy(gpio17);
Real‐TimeProgramming,GeneralLabInstructions March2017,ÖrebroUniversity
pg.6
Thereisafunctionthatdoestheworkofbothcreate()andpullUpDown()together.Itispreferredto
usethisfunctionforbuttons:
GPIOcreateWithPullUpDown(enumPinpin,intup);
Example2:
GPIOgpio17=createWithPullUpDown(_17,PUD_UP);
while(1)
{
if(!readIn(gpio17))
{
printf("Buttonpushed!\n");
break;
}
else
{
printf("Buttonreleased!\n");
}
usleep(20000);
}
destroy(gpio17);
Example3:
GPIOgpio17=createWithPullUpDown(_17,PUD_DOWN);/*NoticethatitisPullDown!*/
while(1)
{
if(readIn(gpio17))
{
printf("Buttonpushed!\n");
break;
}
else
{
printf("Buttonreleased!\n");
}
usleep(20000);
}
destroy(gpio17);
Unset a GPIO pin
Whenyouarefinishedworkingwithapinandyoudon’tneeditanymorecallthefollowingfunction
(alwaysdoit!):
voiddestroy(GPIOgpio_);
Example:
destroy(gpio17);
