Geotech Portable Turbidity Meter Installation And Operation Manual
User Manual: Pdf Geotech Portable Turbidity Meter
Open the PDF directly: View PDF ![]() .
.
Page Count: 32
Rev 3/12/2018 Part # 22100045
Portable Turbidity
Meter
Installation and Operation Manual
1
1
Table of Contents
DOCUMENTATION CONVENTIONS ................................................................... 2
Section 1: System Description ........................................................................... 4
Function and Theory ......................................................................................... 4
Instrument Features .......................................................................................... 4
System Components ......................................................................................... 4
Section 2: System Installation & Navigation ................................................... 4
Install the battery ............................................................................................... 5
Sample Vial Handling ........................................................................................ 5
User Interface .................................................................................................... 6
Section 3: System Operation .............................................................................. 7
3.1 Quick Start Guide ........................................................................................ 7
3.2 Menu Navigation ......................................................................................... 8
3.3 USB Connection ........................................................................................ 18
3.4 Menu Structure .......................................................................................... 19
Section 4: System Maintenance ....................................................................... 20
Section 5: System Troubleshooting ................................................................ 21
Section 6: System Specifications .................................................................... 22
Section 7: Parts and Accessories .................................................................... 23
The Warranty ...................................................................................................... 29

2
NOTE
DOCUMENTATION CONVENTIONS
This uses the following conventions to present information:
General Information
In no event will the manufacturer be liable for direct, indirect, special, incidental or
consequential damages resulting from any defect or omission in this manual. The
manufacturer reserves the right to make changes in this manual and the products it
describes at any time, without notice or obligation. Revised editions are found on the
manufacturer’s website.
An exclamation point icon indicates a WARNING of a situation
or condition that could lead to personal injury or death. You
should not proceed until you read and thoroughly understand the
WARNING message.
WARNING
CAUTION
A raised hand icon indicates CAUTION information that relates to
a situation or condition that could lead to equipment malfunction
or damage. You should not proceed until you read and thoroughly
understand the CAUTION message.
A note icon indicates NOTE information. Notes provide additional
or supplementary information about an activity or concept.
3
In order to ensure your Turbidity Meter has a long service life and operates
properly, adhere to the following cautions and read this manual before use.
Disconnect from power source when not in use.
Power input source must not exceed maximum ratings.
Equipment must be wired to a negative ground system.
Equipment may not operate properly with excess wiring not supplied by
manufacturer.
Avoid spraying fluid directly at equipment.
Never submerge equipment.
Avoid pulling on wires to unplug equipment wiring.
Avoid using equipment with obvious physical damage.
To prevent equipment damage, avoid dropping it.
WARNING
The following applies only to users in European countries:
This product is designated for separate collection at an appropriate collection
point. Do not dispose of as household waste.
For more information, contact the seller or the local authorities in charge of waste
management.
Do not operate this equipment if it has visible signs of significant
physical damage other than normal wear and tear.
Notice for consumers in Europe:
This symbol indicates that this product is to be collected
separately.
4
Section 1: System Description
Function and Theory
Geotech's Portable Turbidity Meter offers great precision, repeatability and ease of use in
a low cost extremely robust portable/laboratory instrument. Data points from field sample
events can be stored to memory and transferred to computer or other storage device.
Turbidity Meters provide fluid clarity insight by shining light onto a sample and measuring
the amount of light scattered by suspended particles in the fluid.
The Geotech Portable Turbidity Meter has two light source models to fulfill specific
customer and site requirements:
Model GTW: White Light source, compliant to US EPA method 180.1
Model GTI: Infrared light source, compliant to ISO 7027 standards
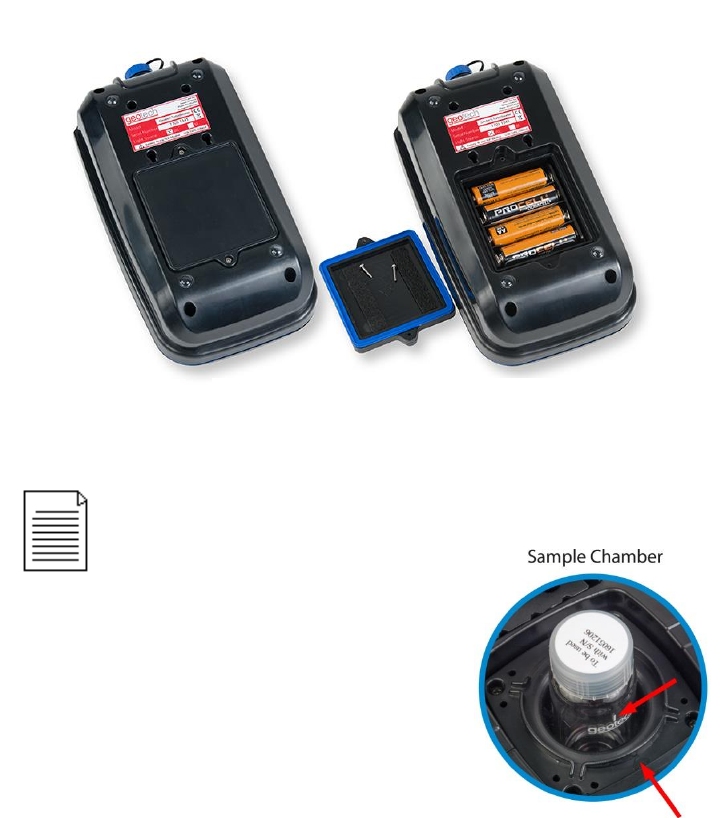
Instrument Features
Sample chamber with lid
Data port/ power supply (serial
output, USB to Mini-B cable not
included)
Sealed battery compartment (4x AA
batteries)
IP67 Seal for extension into
hazardous environments
Digital display and navigation keypad
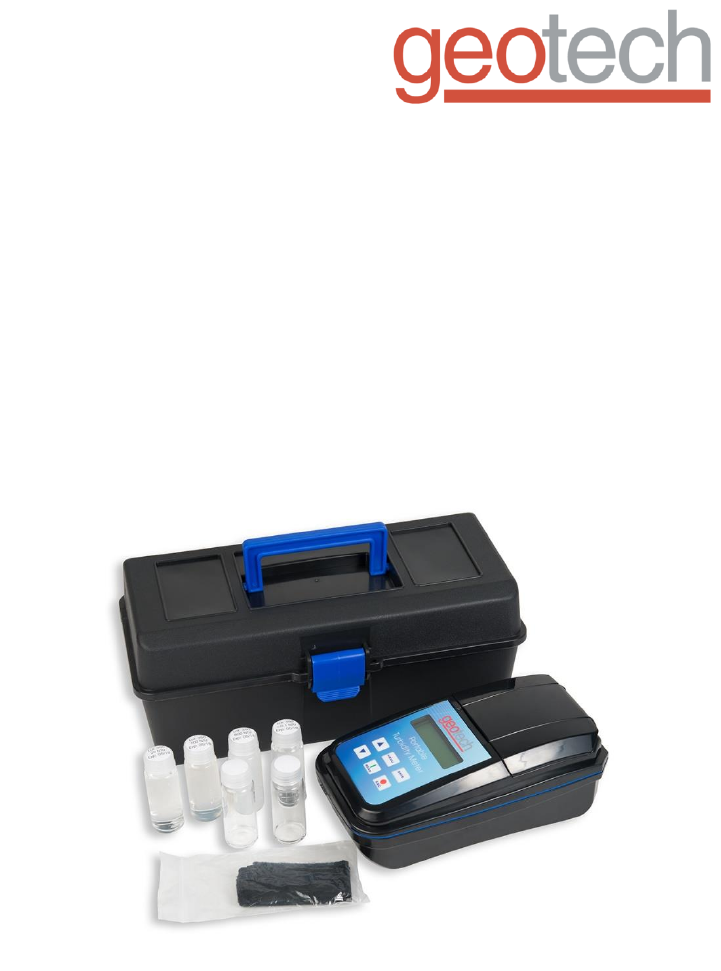
System Components
Economy carry case included,
optional custom foam cut case
available
Lint-free cleaning cloth
2 sample vials
Primary Calibration Standards: 0.10,
20, 100, 800 NTU
Figure 1-1: Instrument Features
5
Section 2: System Installation & Navigation
Install the battery
1. With a small Phillips screwdriver, remove the battery cover (located on the backside
of the instrument).
Take care to keep the small screws and washers safe when removing the
battery cover.
2. Install four (4) AA alkaline or nickel metal hydride (NiMH) batteries.
Make sure that batteries are installed in the correct orientation.
3. Replace the battery cover.
For optimal seal, we recommend using a torque screwdriver set to 4N-m.
Sample Vial Handling
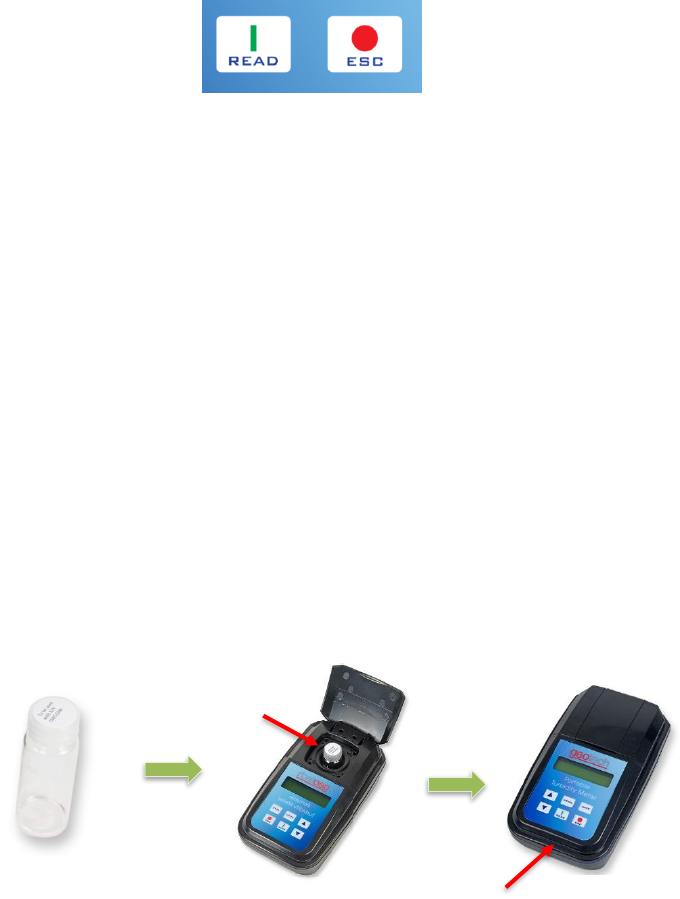
When placing the vials into the instrument, ensure that
the white line on the sample vial is aligned with the black
arrow on the bottom edge of the instrument’s sample
chamber.
The sample vials must be very clean while calibrating or
doing field readings; no debris or fingerprints should be
visible on the glass. Use a soft cleaning cloth to ensure
clarity before each measurement. Do no store samples
and vial in extreme temperatures or direct sunlight.
Figure 2-1: Replacing the batteries
Handle calibration and sample vials by caps only. Any scratches on the
vials will compromise accurate turbidity readings.

6
User Interface
1. DISPLAY
Displays readings, diagnostics, and operational data.
2. UP ARROW (▲)
Scroll through menus, enter numbers and letters
3. DOWN ARROW (▼)
Scroll through menus, enter numbers and letters
4. MENU
Enters into main menu function, selects options to configure the instrument, select
analysis, and moves cursor to the right.
5. SAVE
Store Selections and data, saves the result to be USB transferred and selects the
parameters.
6. ESC/OFF
Powers off the instrument (hold for 3 seconds), aborts operations, return to the
previous screen.
7. READ/ON
Powers on the instrument (hold for 3 seconds), confirms options, initiates sample
reading, moves cursor to the left.
Figure 2-3: Instrument Keypad
Figure 2-2: Sample chamber
alignment
7
Section 3: System Operation
3.1 Quick Start Guide
To turn ON unit: press and hold the READ button for 3 seconds.
To turn OFF unit: press and hold the ESC button for 3 seconds.
Basic Operation
1. Turn instrument on by pressing READ for 3 seconds.
a. Once through the welcome screens, the unit will automatically
begin reading a sample.
b. See Section 3.2.2: Calibrate if Calibration is required.
2. Rinse the inside of each sample vial three times with the sample to be
tested.
3. Completely fill sample vial with sample, then dry and clean the outside of
vial.
Handle vial by the cap.
4. Align white mark on vial with arrow on bottom of sample chamber.
See “Sample Vial Handling” in Section 2: System Installation &
Navigation for details.
5. Close the sample chamber cap.
6. Press READ button again to take sample, NTU reading will appear after
status bar is complete.
7. Press SAVE button to mark reading, “M” will flash for 3 seconds in upper
left corner of display.
Figure 3-1: Basic Operation
Figure 3-1: Read (ON/Enter) ESC (OFF/Back)
8
3.2 Menu Navigation
The Geotech Portable Turbidity Meter has several configuration capabilities. The menu
structure is easy and simple to operate, please follow the steps below to configure the unit
according to your needs.
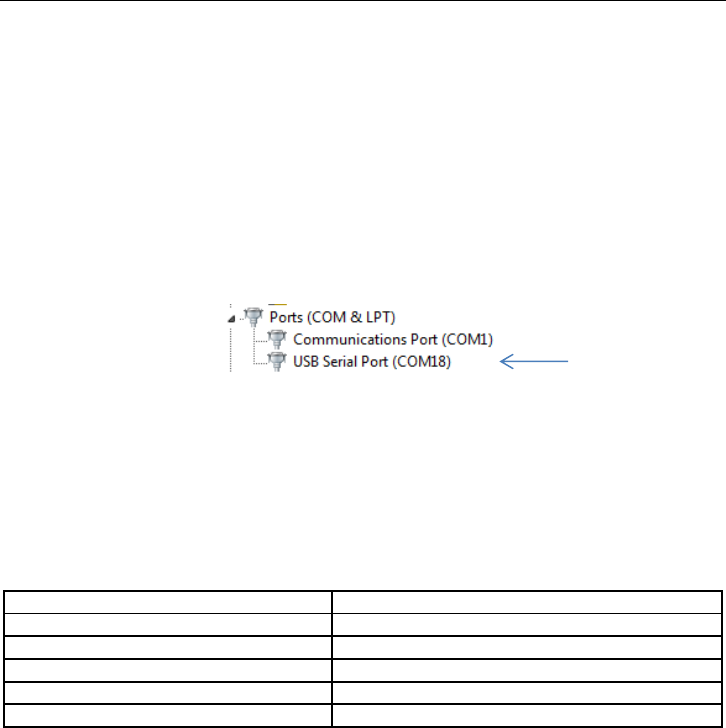
To Enter Main Menu: With instrument turned on, press MENU key for 3 seconds to enter
the Menu Function. You will see the following screen:
Using ▲ or ▼ the user can navigate between the main menu functions. When you reach
the desired menu or function press READ to enter, or ESC to go back to the previous
screen.
The four main sub menus are listed below:
ID - Access the user identification function
Calibrate - Access the calibration functions
Config - Access the configuration functions
Service - Access the service functions (only for certified technicians)
The fifth menu item is “Back” – when selected will navigate to the ready-to-sample screen.
Please reference the following pages for an explanation of instrument configuration and
menu navigation. See section 3.4: Menu Structure for an overview of the complete menu
structure.
3.2.1 ID (Identification)
From the main menu, use the ▲ or ▼ keys select the ID function, then press READ to
enter that submenu.
Sample
Use the ▲ or ▼ keys to set sample number from 0-99. Use the READ or
SAVE button to set the sample number and exit to the ID menu.
Main Menu
ID
Calibrate
Config
Service

9
User
Use the ▲ or ▼ keys to set user number from 0-99. Use the READ or SAVE
button to set the user number and exit to the ID menu.
3.2.2 Calibrate
From the main menu, use the ▲ or ▼ keys select the Calibrate function, then press
READ to enter that submenu.
Guided Cal.
The complete calibration procedure, as outlined below, should be performed by the user
according to required quality and maintenance programs.
1. Gather the four (4) calibration sample vials with formula standards of <0.10 (i.e. 0.02),
20.0, 100, 800 NTU (or stabilized primary standards in the same concentrations).
Ensure each vial is cleaned with a soft cloth.
2. Hold MENU button for 3 seconds until the main menu is displayed.
3. Scroll through the menu using the ▲ or ▼ keys until “Calibrate” is displayed.
4. Press the READ button to enter into the calibration menu.
5. Select “Guided Cal” and follow the scrolling prompts on the screen.
Before placing each vial into the sample chamber, gently invert the vial to
ensure a homogeneous mix.
6. Once done calibrating to the four standards, the instrument will return to the
calibration menu.
7. Press the ESC key twice to navigate to the ready-to-sample screen.
Free Cal.
Free Calibration allows for a single calibration point. For many users, this single point
calibration will be sufficient for routine work.
1. Follow steps 1-3 from “Guided Cal” above.
2. Select “Free Cal”
The Standard vials must be thoroughly cleaned before each
measurement, using a lint-free cloth.

10
3. On the “Cal. Auto” screen, there will be a value displayed from the previous
calibration. Place one of the calibration standards into the sample chamber.
4. Press READ button and wait for result.
5. If necessary use ▲ or ▼ keys to change the displayed value for this standard to
match its label, press and hold SAVE for 3 seconds.
"Saving" will be displayed.
6. After the value is saved, the display returns to the "Calibrate" menu.
7. Recalibrate against the same standard for better accuracy, or perform the
“Guided Cal” routine.
NOTE 1: If an error message displays, check the standards and repeat the previous steps.
NOTE 2: After the calibration, perform standard readings for verification, and if needed
repeat the calibration procedure.

11
3.2.3 Config (Configuration)
From the main menu, use the ▲ or ▼ keys select the Config function, then press READ
to enter that submenu.
Time/Date
When inside this configuration you can change Time and Date.
Use MENU/READ to move the cursor right/left and ▲ or ▼ keys to adjust the numbers as
desired. Press and hold SAVE for 3 seconds to store the data, or ESC to return to the
previous menu without saving any changes.
Display
When inside this configuration you can set and change Contrast, Backlight Time and
Backlight Brightness (Time and Contrast only on instruments with Backlight optional
installed), use ▲ or ▼ to select between the options and READ to enter it or ESC to go
back to the previous menu.
Contrast
Using ▲ or ▼, you can change the contrast to the desired level: 00-30. When done,
press and hold SAVE for 3 seconds to store the data and ESC to return to the
previous menu.
Backlight Time
From 0 up to 60 minutes of backlight on.
Using ▲ or ▼ change the time to the desired backlight time, when done, press and
hold SAVE for 3 seconds to store the data and ESC to return to the previous menu.
Backlight Level
From 0 up to 100 (intensity level).
Using ▲ or ▼ change the level to the desired, when done, press and hold SAVE for
3 seconds to store the data and ESC to return to the previous menu.
Partial Res.
Using ▲ or ▼ to choose Yes or No.
Big Number
Using ▲ or ▼ to choose Yes or No to show the large number displayed on the Auto
screen.
Instrument
When inside this configuration you can set Auto off, Readings, Color compensation,
curves, fast settling, Sampling, ID, Calibration interval, personalization, patrimony, use ▲

12
or ▼ to select between the options and READ to enter it or ESC to go back to the
previous menu.
Auto off
The Auto off function shall be activated to save the batteries; it can be configured
to turn the unit off after 0 to 60 minutes of inactivity.
Using ▲ or ▼ change the time to the desired level, when done, press and hold
SAVE for 3 seconds to store the data and ESC to return to the previous menu.
NOTE: When the time is in 0 minutes the auto off will not be operational.
Auto Reading
The Auto reading function can be activated from 1 to 250 seconds; this will set
the time between readings.
NOTE: If you configure the Auto reading for 5 seconds the unit will make
readings every 5 seconds until it is turned off.
Using ▲ or ▼ change the desired time between readings, press and hold SAVE
for 3 seconds to store the data and ESC to return to the previous menu.
Color Compensation
The instrument can compensate for the color of the sample for a more accurate
reading.
Using ▲ or ▼ select Yes or No, when done, press and hold SAVE for 3 seconds
to store the data and ESC to return to the previous menu.
NOTE: When activated (Yes selected) “C” will appear in the upper right corner of
the display in the reading mode screen.
Test Curves
You can define which curves will appear in the curve selection menu (when you
press and release the Menu key).
Press ESC to remove the * icon from the curves you don´t want and READ to put
the * icon in the ones you want.
Press and hold SAVE for 3 seconds to store the data and ESC to return to the
previous menu.
A password is required to access this feature. Default password is
9999. Input password and hold SAVE for 3 seconds to proceed.
13
Measure Mode/ Fast Settling
When selected, instrument will take a snapshot of the sample and display the
immediate reading before particles settle in the vial (for high solids samples).
Using ▲ or ▼ select yes or no, when done, press and hold SAVE for 3 seconds
to store the data and ESC to return to the previous menu.
Sample
This function can be used to set the number of readings the unit will take to
calculate the average and present it as a measurement in the display. Number of
samples ranges from 8-100.
1. User ID
Here you can set up user names/passwords and when they shall be requested
by the unit.
Edit
To create users and its passwords:
Choose the user number between 00 and 50 , press READ
Choose a name for this user using ▲ to scroll faster to letters , ▼ to scroll
faster to numbers (both can be used to go up or down) and MENU/READ
(send the cursor to the right/left), press and hold SAVE for 3 seconds to
store the data. Name can be a maximum of thirteen (13) characters.
You will see “PIN:” on the Display, use ▲ to scroll faster to letters , ▼ to
scroll faster to numbers (both can be used to go up or down) and
MENU/READ (send the cursor to the right/left), press and hold SAVE for 3
seconds to store the data. Pin must be four (4) characters.
Press and Hold ESC for 3 seconds to return to the previous menu.
Request
To define when the user ID and password will be required:
Choose between the following options using ▲ or ▼, when done, press
and hold SAVE for 3 seconds to store the data and ESC to return to the
previous menu.
Always – ID and password will be request at every measurement.
On Start – ID and password will be request at Instrument Start Up.
MEMO – ID and password will be request when SAVE is pressed.
Previous – ID and password will not be requested, the previous user
informed will be assigned for all operations.
No – ID and password will not be requested.
2. Sample ID
Here you can set up sample names /passwords and when they shall be
requested by the unit.

14
Edit
To create sample names and their passwords:
Choose the user number between 00 and 50, press READ
Choose a name for this sample using ▲ to scroll faster to letters , ▼ to
scroll faster to numbers (both can be used to go up or down) and
MENU/READ (send the cursor to the right/left), press and hold SAVE for 3
seconds to store the data.
Press and Hold ESC for 3 seconds to return to the previous menu.
Request
To define when the sample name will be required:
Choose between the following options using ▲ or ▼, when done, press
and hold SAVE for 3 seconds to store the data and ESC to return to the
previous menu.
Always –Sample name will be request at every measurement.
On Start –Sample name will be request at Instrument Start Up.
MEMO –Sample name will be request when SAVE is pressed.
Previous –Sample name will not be requested, the previous user
informed will be assigned for all operations.
No –Sample name will not be request.
Schedule Cal.
Access this function to set up the time (Days/hours) before calibration is
requested.
F.Scale
Choose the number of days and hours before the calibration
warning graph will appear on the display using ▲ or ▼ and
MENU/READ (send the cursor to the right/left), press and hold
SAVE for 3 seconds to store the data.
NOTE: When the calibration schedule is programmed, a graph will be
displayed in the upper right corner during measurements, when the
calibration date arrives, a bar will appear in the graph and a Calibration
warning will be displayed.
Customize
Use ▲ or ▼ and MENU/READ (send the cursor to the right/left) to set an ID for
the unit, press and hold SAVE for 3 seconds to store the data. ID must be four
(4) characters.
A password is required to access this feature. Default password is
9999. Input password and hold SAVE for 3 seconds to proceed.
15
Tag Number
Use ▲ or ▼ and MENU/READ (send the cursor to the right/left) to set an ID
number for the unit, press and hold SAVE for 3 seconds to store the data. ID
must be four (4) characters.
Language
Use ▲ or ▼ to select the desired language from the list below, press and hold
SAVE for 3 seconds to store the data.
US – English
ES – Spanish
BR – Portuguese
Communication
Use ▲ or ▼ to select between Eco Result or Log Transmit and READ to enter it or ESC
to go back to the previous menu.
Eco Result
In this mode, the measurement displayed is sent to the USB port. You can select
to send all measurements only part of them.
Using ▲ or ▼ select Auto, Manual and Off, when done, press and hold SAVE for
3 seconds to store the data and ESC to return to the previous menu.
Auto – Sends all measurements to the USB (when they are performed)
Manual – Sends measurements that are selected (SAVE pressed during on
measurement mode)
Off – No measurement will be sent to the USB
Log Transmit
Here you can select 4 ways to send the instrument measurement log
Using ▲ or ▼ select between, New Mark, All Mark, New, All, Press and hold
SAVE for 3 seconds to store the data and ESC to return to the previous menu.
Auto - Sends all measurements to the USB (when they are performed)
Manual - Sends measurements that are selected (SAVE pressed during on
measurement mode)
Off - No measurement will be sent to the USB
NOTE: When the time is in 0 minutes the instrument will not be shut off.
16
Serial Baud
Sets the data rate in bits for data transmission.
Options include: 57600, 38400, 19200, and 9600. Default/suggested
configuration is 19200bits/sec. Press and hold SAVE for 3 seconds to store the
data and ESC to return to the previous menu.
Header
Select Yes or No to display header. Press and hold SAVE for 3 seconds to store
the data and ESC to return to the previous menu.
CSV Separator
Determines character to be placed in between spaces. Select a symbol then
press and hold SAVE for 3 seconds to store the data and ESC to return to the
previous menu.
User Test
The instrument allows users to calibrate a user curve.
NOTE: When user curve is calibrated, the instrument performance might change due to
standard and procedures adopted, factory calibrated curve is made with 100% traceable
standards and reference materials in controlled environment, use it in order to have full
confidence in instrument performance.
Security/Password
Here you can set up the security level and password for the Calibration, configuration and
service functions.
The Factory pre-saved password is 9999, if this is required during configuration or
operation use ▲ to scroll faster to letters , ▼ to scroll faster to numbers (both can be used
to go up or down) and MENU/READ (send the cursor to the right/left), press and hold
SAVE for 3 seconds to store the data.
ID
Here you will assign a security level and password to access all the ID functions.
Using ▲ or ▼ select the desired security level, when done, press and hold SAVE for 3
seconds to store the data.
Sec. Level
Choose the user number between 0 and 5, press and hold SAVE for 3 seconds
to store the data.
Password
Using ▲ to scroll faster to letters, ▼ to scroll faster to numbers (both can be
used to go up or down) and MENU/READ (send the cursor to the right/left), press
17
and hold SAVE for 3 seconds to store the data. Password must be four (4)
characters.
Calibration
Here you will assign a security level and password to access all the calibration functions.
Using ▲ or ▼ select the desired security level, when done, press and hold SAVE for 3
seconds to store the data.
Sec. Level
Choose the user number between 0 and 5, press and hold SAVE for 3 seconds
to store the data.
Password
Using ▲ to scroll faster to letters, ▼ to scroll faster to numbers (both can be
used to go up or down) and MENU/READ (send the cursor to the right/left), press
and hold SAVE for 3 seconds to store the data.
Config.
Here you will assign a security level and password to access all the Configurable
functions.
Using ▲ or ▼ select the desired security level, when done, press and hold SAVE for 3
seconds to store the data.
Sec. Level
Choose the user number between 0 and 5, press and hold SAVE for 3 seconds
to store the data.
Password
Using ▲ to scroll faster to letters, ▼ to scroll faster to numbers (both can be
used to go up or down) and MENU/READ (send the cursor to the right/left), press
and hold SAVE for 3 seconds to store the data.
Service
Here you will assign a security level and password to access all the service functions.
Using ▲ or ▼ select the desired security level, when done, press and hold SAVE for 3
seconds to store the data.
Sec. Level
Choose the user number between 0 and 5, press and hold SAVE for 3 seconds
to store the data.
Password
Using ▲ to scroll faster to letters, ▼ to scroll faster to numbers (both can be
used to go up or down) and MENU/READ (send the cursor to the right/left), press
and hold SAVE for 3 seconds to store the data.
18
3.3 USB Connection
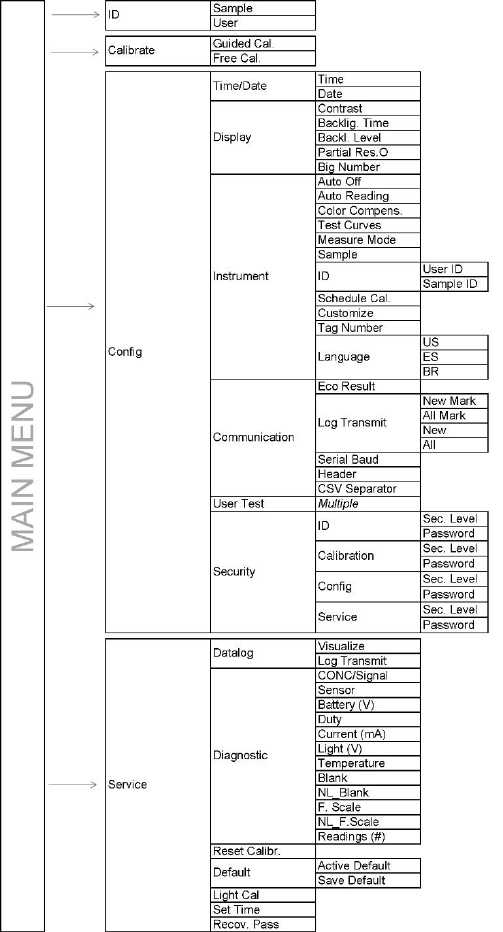
1. Plug the unit into the computer; wait for device driver to download. Device connection is
successful if an additional COM port is recognized in the Device Manager.
2. Identify a communication port for the connection, look in the computer’s Device
Manager (example: COM2, COM18).
If unsure of which communication port, disconnect and then reconnect the Turbidity Meter
while Device Manager is open and notice which new communication/USB serial port
opens, look under “Ports (COM & LPT)”.
3. Open a serial terminal connection to access the saved data.
Serial terminal programs are available to download from the internet.
For example, “PuTTY” or “TeraTerm” are two serial terminal programs which are
quick and free to download, and simple to use.
4. Configure the serial terminal interface as follows:
Parameter
Value
Speed
19200 bits/sec (baud rate)
Data bits
8
Parity
None
Stop Bits
1
Flow Control
None
5. To transmit the Data use the menu structure diagram (see Section 3.4) to navigate to
Service > Datalog > Log Transmit.
The display will read, “Wait…” and the serial terminal on the computer will begin the data
log transfer. The data output could be copied and pasted into a data processing program,
such as MS Excel or Word (comma delineated import).
Note: Some variables will appear in the data collected,
"M": Marked
"D": Point where the data has already being transmitted
"E": Clock not adjusted in last transmission
19
3.4 Menu Structure
Use the “READ” button to enter into a sub menu, use the “ESC” button to exit a sub menu.
20
Section 4: System Maintenance
The Geotech Portable Turbidity Meter is designed to be a low-maintenance lab instrument
that can be used in the field.
General cleaning guidelines:
Use a soft cloth with mild soap and warm water to clean the unit.
Clean and dry the sample chamber to ensure no water droplets accumulate on the
lens, as this can affect the accuracy of turbidity readings.
Per each use:
Keep unit clean and free of debris when traveling - build up on sample chamber
lenses could permanently damage the instrument
Calibrate before each use to ensure good data
Seasonal use:
Keep unit clean and free of debris when storing - build up on lenses could
permanently damage the instrument
Remove batteries when storing long term
Ensure a complete calibration is conducted when bringing unit out of storage
Calibration Solutions:
Avoid exposing calibration standards to extreme temperatures. Do not store below
the freezing point, or above 122 °F (55°C)
21
Section 5: System Troubleshooting
Problem: Unit will not turn on.
Solution:
No power to unit:
o Check that batteries are installed and in the correct orientation (+/- polarity)
Problem: Cannot get accurate readings on control samples.
Solution:
Recalibrate unit
Clean lenses inside sample chamber to ensure a clear read
Clean outside of bottles
Check the expiration date on the calibration standards. Expired standards will result in
an inaccurate reading.
If these troubleshooting guidelines have not resolved the problem, contact Geotech
Environmental Equipment at 1-800-833-7958.

22
Section 6: System Specifications
Measurement Method
Nephelometric
Regulatory
EPA method 180.1 (GTW)
ISO method 7027 (GTI)
Light Source
EPA - White light Tungsten (GTW)
ISO - 860nm LED (GTI)
Range
0 to 1000 NTU (FNU)
Accuracy
±2% of reading plus stray light
Repeatability
±1% of reading, or 0.01 NTU (FNU),
whichever is greater
Resolution
0.01 NTU on lowest range
Stray Light
<0.02 NTU (FNU)
Signal Averaging
Selectable On/Off (programmable from 8 to 100
readings/ 4 to 27 seconds)
Detector
Silicon photocell
Reading Modes
Fast Settling, automatic, manual reading, EBC
Data Logger
1000 Data Sets
Download
Standard USB, no special software required
Languages
English, Spanish, Portuguese
Power
4 AA Alkaline batteries
USB 5VDC/500mA
Operating Temperature
32 to 122°F (0 to 50°C)
Storage Conditions
-40 to 140°F (-40 to 60°C), instrument only
Instrument Enclosure Rating
IP67 with lid open or closed
Sample Required
0.473 oz. (14 ml)
Sample Vials
2.55 x 0.94 in. (65 x 24 mm)
Dimensions
4.48 x 7.79 x 3.26 in. (114 x 198 x 83 mm)
Weight
1.09 lb. (496 g) without batteries
1.28 lb. (585 g) with 4 AA alkaline batteries
Warranty
2 year

23
Section 7: Parts and Accessories
Part Number
Qty
Part Description
82100003
1
TURBIDITY METER,WL, 0-1000NTU,GEOTECH,CALKIT,FIELD
CASE
82100005
1
TURBIDITY METER,WL, 0-1000NTU,GEOTECH,CALKIT,ECO
CASE
82100004
1
TURBIDITY METER,IR, 0-1000NTU,GEOTECH,CALKIT,FIELD
CASE
82100006
1
TURBIDITY METER,IR, 0-1000NTU,GEOTECH, CALKIT,
ECONOMY CASE
52100003
1
CASE,FIELD,TURBIDITY
52100000
1
CAL KIT, PRIMARY, WL, TURBIDITY,GEOTECH,
.1,20,100,800NTU
*52100002
1
CAL KIT, SECONDARY, TURBIDITY GEOTECH,GEL,0-10,0-
100,0-1000
52100007
1
CAL KIT,PRIMARY,IR,TURBIDITY,GEOTECH,.1,20,100,800NTU
22100046
.5
VIAL,TURBIDITY,4PK
22100048
1
CLOTH,LINT FREE,TURBIDITY
PPE041006
4
BATTERY, 1.5V, SIZE AA, EACH
22100045
1
MANUAL, PORTABLE TURBIDITY METER,GEOTECH
*22100049
1
CASE,ECONOMY,TURBIDITY
*52100004
1
COMM CABLE,USB,TURBIDITY
*Indicates optional accessories.
For additional information, please call Geotech Environmental Equipment at:
1-800-833-7958

24
Document Revisions
EDCF #
Description
Rev/Date
-
Release, SP
07/07/2016
Project
#1496
Updated graphics, additional user instructions, StellaR, SP
06/08/2017
Project
#1569
Added calibration kit part numbers, StellaR
9/28/2017
Project
#1608
Added part number 82100004, 82100006, 52100007, and
changed description for part number 82100003, 82100005,
52100000 –StellaR
3/12/2018
25
NOTES
26
NOTES

5/24/2017 27
EC Declaration of Conformity
Manufacturer: Geotech Environmental Equipment, Inc.
2650 E 40th Avenue
Denver, CO 80205
Declares that the following products,
Product Name: Geotech Portable Turbidity Meter
Model(s): Portable Turbidity Meter, White Light (GTW)
Portable Turbidity Meter, Infrared Light (GTI)
Year of manufacture: 2017
Conform to the principle safety objectives of 2006/95/EC Low Voltage Directive by application of the
following standards:
EN 61010-1: 2010
Year of affixation of the CE Marking: 2017
Conform to the protection requirements of 2004/108/EC Electromagnetic Compatibility (EMC) by
application of the following standards:
EN 61000-6-1: 2007
EN 61000-6-3: 2012
EN 61326-1: 2013
EMC conformity established 5/24/2017
Production control follows the ISO 9001:2008 regulations and includes required safety routine tests.
This declaration issued under the sole responsibility of Geotech Environmental Equipment, Inc.
Joe Leonard
Product Development
Serial number ________________

28
DOCUMENT REVISIONS
EDCF#
DESCRIPTION
REV/DATE
-
Release, SP
07/07/2016
Project
#1496
Added Declaration of Conformity, general updates
to images and menu descriptions, SB
05/26/2017
Project#1496
Updated parts list, updated menu navigation,
StellaR
6/15/2017
29
The Warranty
For a period of two (2) years from date of first sale, product is warranted to be free from
defects in materials and workmanship. Geotech agrees to repair or replace, at Geotech’s
option, the portion proving defective, or at our option to refund the purchase price thereof.
Geotech will have no warranty obligation if the product is subjected to abnormal operating
conditions, accident, abuse, misuse, unauthorized modification, alteration, repair, or
replacement of wear parts. User assumes all other risk, if any, including the risk of injury,
loss, or damage, direct or consequential, arising out of the use, misuse, or inability to use
this product. User agrees to use, maintain and install product in accordance with
recommendations and instructions. User is responsible for transportation charges
connected to the repair or replacement of product under this warranty.
Equipment Return Policy
A Return Material Authorization number (RMA #) is required prior to return of any
equipment to our facilities, please call our 800 number for appropriate location. An RMA #
will be issued upon receipt of your request to return equipment, which should include
reasons for the return. Your return shipment to us must have this RMA # clearly marked
on the outside of the package. Proof of date of purchase is required for processing of all
warranty requests.
This policy applies to both equipment sales and repair orders.
FOR A RETURN MATERIAL AUTHORIZATION, PLEASE CALL OUR
SERVICE DEPARTMENT AT 1-800-833-7958.
Model Number: ________________
Serial Number: ________________
Date of Purchase: ________________
Equipment Decontamination
Prior to return, all equipment must be thoroughly cleaned and decontaminated. Please
make note on RMA form, the use of equipment, contaminants equipment was exposed to,
and decontamination solutions/methods used. Geotech reserves the right to refuse any
equipment not properly decontaminated. Geotech may also choose to decontaminate the
equipment for a fee, which will be applied to the repair order invoice.
