Getting Started Guide 2.2a
Getting%20Started%20Guide%202.2a
User Manual: Pdf
Open the PDF directly: View PDF ![]() .
.
Page Count: 32

A FREE Invector addon brought to you by
Shades of Insomnia
the undisputed kings of feature creep…
Contents
Usage Guidelines ..................................................................................................................................... 3
V2.1 Features .......................................................................................................................................... 4
Installation Requirements / Order .......................................................................................................... 5
Step by Step New Project Tutorial .......................................................................................................... 5
Build a Simple Test Scene ................................................................................................................... 5
Setup the Player for Magic.................................................................................................................. 6
Setup Invector AI for Magic ................................................................................................................ 7
Manual Player Component Setup ....................................................................................................... 8
Manual Invector AI Component Setup ............................................................................................... 9
Manual Setup Notes ........................................................................................................................... 9
How to Create a Spell ............................................................................................................................ 10
Step 1 Creating the Prefab ................................................................................................................ 10
Step 2 Configuring the spell .............................................................................................................. 10
Potential Spell Types ......................................................................................................................... 11
How to use the Spell Book to apply animator changes .................................................................... 12
Setting Up the Animator (Manual) ................................................................................................... 13
Add a new Spell to the Animator (Manual) ...................................................................................... 14
A Quick Look at the Magic Projectile ................................................................................................ 15
Adding spells to the Inventory .......................................................................................................... 16
Demo Scenes ......................................................................................................................................... 17
Features_SpellShowcase ................................................................................................................... 17
Original Levelling System .................................................................................................................. 17
MenuTest_Lobby .............................................................................................................................. 17
Features_WaypointActionSets.unity ................................................................................................ 18
Features_GenericAI.unity (Experimental) ........................................................................................ 19
Features_ReOrganiseCharacter.unity (simplyGon handling) ........................................................... 21
Hobgoblin_Original ....................................................................................................................... 21
Hobgoblin_CleanedChildNames ................................................................................................... 21
Hobgoblin_ReadyForMerge .......................................................................................................... 22
Hobgoblin_LODsMerged ............................................................................................................... 23
Hobgoblin_GenericRagdollAdded ................................................................................................. 24
Equip Character ............................................................................................................................. 25
Attribution-ShareAlike 4.0 International (CC BY-SA 4.0) Licence ......................................................... 27
Using Creative Commons Public Licenses ......................................................................................... 27
Creative Commons Attribution-ShareAlike 4.0 International Public License ................................... 27
Section 1 – Definitions. ................................................................................................................. 28
Section 2 – Scope. ......................................................................................................................... 29
Section 3 – License Conditions. ..................................................................................................... 30
Section 4 – Sui Generis Database Rights. ...................................................................................... 30
Section 5 – Disclaimer of Warranties and Limitation of Liability. ................................................. 31
Section 6 – Term and Termination. ............................................................................................... 31
Section 7 – Other Terms and Conditions. ..................................................................................... 32
Section 8 – Interpretation. ............................................................................................................ 32
Usage Guidelines
You are free to:
• Share - copy and redistribute the material in any medium or format.
• Adapt - remix, transform, and build upon the material for any purpose, even commercially.
The licensor cannot revoke these freedoms as long as you follow the license terms.
Under the following terms:
• Attribution - You must give appropriate credit, provide a link to the license, and indicate if
changes were made. You may do so in any reasonable manner, but not in any way that
suggests the licensor endorses you or your use.
• ShareAlike - If you remix, transform, or build upon the material, you must distribute your
contributions under the same license as the original.
You may not apply legal terms or technological measures that legally restrict others from doing
anything the license permits.
V2.1 Features
• Full pooling system, automatic or pre-warmed
• Centralized spawn class linked to the pooler, including spawns on birth, death, body
removal, spell hits & explosions, trapped objects, proximity triggers, and more
• Player and AI magic enabled character creation wizards for easy setup
• vInventory integration for spells, including custom AI item manager
• Leveling system with data abstraction layer, modifiable attributes, resistances & formula’s
• Main menu system linked to the data abstraction layer
• SQLLite/EasySave2 abstract data layer implementation (easy to clone for other data formats)
• Character information screen
• Attribute System with Point Spending
• Magic weapons and armour with damage and resist types linked to the levelling system
• New Damage System with Damage Over Time, and various Damage Types
• Damage Mitigation System including resist types
• Weapon trails effects
• Custom animation on AI instantiation
• Status effects aka burning, poisoned, frozen etc
• Generic AI without modifying the Invector core (Experimental)
• Ranged AI for Invector Core AI capable of spell casting or arrow shooting.
• Feed vWaypoints into the animator and trigger actions
• 600 free gems unique to this asset (uses the Unity Gem Shader)
• Merge LOD levels from simplygon output onto singular bone structure
• Character equipment material changer (across multiple LOD levels
• Generic ragdoll builder which works from bone chains
• Archery and Thrown weapon System
• Complete custom-made spells and Skills Examples, free for commercial use
• Custom Emissions Shader
• Shield Bash System
• Custom inputs for spells
• Magic Projectile Script with homing and advanced targeting systems
• Custom hand effect’s
• Animator based multi-layered spell casting system
• Custom Spell Sounds
• Physics Based Spells
• Gold and Object Collection System that shows in the Character Screen
• Custom Scripts to do everything from Raise the Dead to Heal.
• Basic Character Creation System (Name, Axis, Class, Race and Alignment)
• Damage Mitigation System
• Centralised spell book wizard outputs/validates multiple animators at once

Installation Requirements / Order
• Ensure using Unity 5.6+ (ideally 2017.1+)
• Install Invector Melee (or Shooter) Controller 2.x
• Check Edit->Project Settings->Player->Other Settings
o To view the demos as intended set colour space to linear
• Install easysave2 if owned (if not don’t import CharacterDataEasySave2.cs), SQLLite is
included in the package as a free alternative
• Install the ShadesSpellSystem2.0aMelee.unitypackage or
ShadesSpellSystem2.0aShooter.unitypackage as appropriate
• To run the mainmenu_lobby scene, add the level1 and level2 scenes to the build settings.
• If you’re running a non-windows OS then you will need to download the appropriate SQLLite
dll, see https://www.sqlite.org/download.html
Step by Step New Project Tutorial
How to get your Invector player/AI’s setup in a fresh scene, this chapter covers the required
components, settings that are mandatory when setting up the spell system. Note that currently the
spell system is targeting the melee rather than shooter controller, though there is no reason why
similar setup cannot be applied to shooter, though the relevance would be a good question.
It is assumed that the package installation steps have already been performed, including the Invector
Melee Package, the Shades Spell System Package and the compiler pre-processor directive INVECTOR
confirmed present.
See the scenes directory for each step completed to fast forward into the tutorial, see the last scene
to just play with the end-result “Tutorial_3_SetupAI”.
Build a Simple Test Scene
1. Create a new scene
2. Add a plane
a. name it “Ground”
b. Tick “Static”
c. zero its position
d. set its scale to 10
e. drag material “carbon2.mat” onto the plane
\Invector-3rdPersonController\Basic Locomotion\3D
Models\Textures\prototype_textures\Materials
3. Add the offensive / defensive chests at positions (-2.5, 0, 2.5) and (2.5, 0, 2.5)
\Invector-3rdPersonController\Add-ons\ShadesSpellSystem\Inventory
4. Open the NavMesh builder (window->Navigation) with the plane selected
a. Select tab “Bake”
b. Press “Bake”

Setup the Player for Magic
1. Open the Melee Controller wizard (Invector->Melee Combat->Create Melee Controller)
a. Set the FBX Model to one of the VBOT prefabs
\Invector-3rdPersonController\Basic Locomotion\3D Models\Characters\Invector@V-Bot
2.0\Prefab
b. Set the animator controller to “MagicMeleeCombatv3”
\Invector-3rdPersonController\Add-ons\ShadesSpellSystem\Mecanim
c. Set the Camera List Data to “vMeleeCombat@CameraState” as per normal
d. Set the HUD to the magic UI prefab “MagicHUD.prefab”
\Invector-3rdPersonController\Add-ons\ShadesSpellSystem\UI
e. Press “Create”
2. Open the Ragdoll wizard (Invector->Basic Locomotion->Components->Ragdoll) with
vThirdPersonMelee still selected in the scene hierarchy
a. Leave the defaults for humanoid selected
b. Press “Create”
c. Find the Ragdoll System component in the inspector
i. Press Open Properties
ii. Check Disable Colliders
iii. Set Collision Clip to “RagdollCollision.wav”
\Invector-3rdPersonController\Basic Locomotion\Audio\RagdollCollision
3. Open the Magic Controller wizard (Invector->Shades Spell System->Create Magic Controller) with
the vThirdPersonMelee still selected in the scene hierarchy
a. Select the LOD1 Body mesh from the dropdown
b. Press “Create”
4. Find the ”CharacterInstance” script on vThirdPersonMelee (titled character attributes)
a. Set the character name
b. Choose the character type (Lawful, Good, Human, Mage, Supreme Commander)
c. Add 5 Mana Regen
d. Set the Level to 20
e. Press “Rnd” on Unspent Skill Points

Setup Invector AI for Magic
1. Launch the Invector AI wizard (Invector->Melee Combat->Create NPC)
a. Leave the Character Type as AI
b. Set the FBX model to one of the VBOT’s
\Invector-3rdPersonController\Basic Locomotion\3D Models\Characters\Invector@V-Bot
2.0\Prefab
c. Set the animator controller to “MagicMeleeCombatv3”
\Invector-3rdPersonController\Add-ons\ShadesSpellSystem\Mecanim
d. Press “Create”
e. Select vEnemyAI in the hierarchy and set PositionZ to 10 and RotationY to 180, ie facing
the player
2. Open the Ragdoll wizard (Invector->Basic Locomotion->Components->Ragdoll) with vEnemyAI
still selected in the scene hierarchy
a. Leave the defaults for humanoid selected
b. Press “Create”
c. Find the Ragdoll System component in the inspector
i. Press Open Properties
ii. Check Disable Colliders
iii. Set Collision Clip to “RagdollCollision.wav”
\Invector-3rdPersonController\Basic Locomotion\Audio\RagdollCollision
3. Open the Magic Controller wizard (Invector->Shades Spell System->Create Magic NPC Controller)
with the vEnemyAI still selected in the scene hierarchy
a. Select the LOD1 Body mesh from the dropdown
b. Press “Create”
4. Find the “CharacterInstance” script on vEnemyAI
a. Set the character name
b. Choose the character type (Chaotic, Evil, Human, Mage)
c. Add 5 Mana Regen
d. Set the Level to 20
e. Press “Rnd” on Unspent Skill Points
5. Find the “MagicAIItemManager” script on vEnemyAI
a. Press “Add Item”
b. Choose a spell (or two) and press “Add”

Manual Player Component Setup
1. Follow steps 1 & 2 of the “Setup the Player for Magic” section
2. Add the script “vHit Damage Particle” to vThirdPersonMelee
a. Set the “Default Hit Effect” to “bloodSplash.prefab”
\Invector-3rdPersonController\Basic Locomotion\3D
Models\Particles\DamageEffect\prefabs
3. Open the Inventory wizard (Invector->Inventory->Item Manager) with the vThirdPersonMelee
still selected in the scene hierarchy
a. Set the Inventory Prefab to “Inventory_MeleeMagic_Auto.prefab”
\Invector-3rdPersonController\Add-ons\ShadesSpellSystem\Inventory
b. Set the Item List Data to “vMeleeMagic_ItemListDataV2.asset”
\Invector-3rdPersonController\Add-ons\ShadesSpellSystem\Inventory
c. Press “Create”
4. Drag the “ItemCollectionDisplay.prefab” onto the vUI gameobject in the hierarchy
\Invector-3rdPersonController\ItemManager\Prefabs
5. Drag the “Inventory_MeleeMagic.prefab” into the hierarchy root
6. Add the CharacterInstance script to vThirdPersonMelee
a. Choose the character type (Lawful, Good, Human, Mage)
b. Add 5 Mana Regen and set the Level to 20
c. Press Rnd on Unspent Skill Points
7. Expand the “vThirdPersonController” script and set the event “OnReceiveDamage” to
“CharacterInstance->OnReceiveDamage”
8. Create an empty child gameobject under the vThirdPersonController root, move to chest height
(Y 1.5), forward approx. 0.9 on the Z axis and name MagicSpawn
9. Add script “MagicInput” to vThirdPersonMelee
a. Enable “Pooled Magic”
b. Expand “Spells Triggers”, set size to 5 and expand it
c. Press “Use” on the input and set to keyboard to F1, F2, F3 etc
d. In the hierarchy drag the UI display slots to each “Equip Display”
Inventory_MeleeMagic->EquipmentDisplayWindow->EquipDisplay_Spell (1-5)
e. Expand each of the inputs “Equip Slots”, set size to 1
f. Then drag from the hierarchy to the 5 “EquipSlot” elements and link the
OnAddItem/OnRemoveItem to MagicInput->SpellEquiped/SpellUnEquiped
Inventory_MeleeMagic_Auto->InventoryWindow->EquipmentInventory
->EquipAreaWindow->EquipMentArea_Spells->EquipSlots->EquipSlot (1-5)
g. Drag the newly created MagicSpawn gameobject (step 8) to the MagicSpawnPoint
h. In the hierarchy
i. drag “vUI->HUD->XP” to “XP Text”
ii. drag “vUI->HUD->Level” to “Level Text”
iii. drag “vUI->HUD->Level up” to “Level Up Text”
iv. drag “vUI->HUD->mana” to “Mana Slider”
i. Press “Open Events” and link OnUseMana event to CharacterInstance->UseMana
10. Expand the “ItemManager” events and set
a. “OnUseItem” event to “MagicInput->UsePotion”
b. “OnOpenCloseInventory” event to “vMeleeCombatInput->LockInput”
11. Expand the “Melee Manager” events and set
a. “OnDamageHit” event to “CharacterInstance->OnSendHit”

Manual Invector AI Component Setup
1. Follow steps 1 & 2 of the “Setup Invector AI for Magic” section
2. Add the script “vHit Damage Particle” to vEnemyAI
a. Set the “Default Hit Effect” to “bloodSplash.prefab”
\Invector-3rdPersonController\Basic Locomotion\3D
Models\Particles\DamageEffect\prefabs
3. Add the script “vMelee Manager” to vEnemyAI
a. Set the Hit Properties->”Hit Damage Tags” to “Player”
4. Add the script “Character Instance” to vEnemyAI
a. Set the name
b. Add 1 life and mana regen
c. Set the level
d. Press “Rnd” on distribute points
5. Create an empty gameobject at the root of vEnemyAI in the hierarchy
a. Name it “MagicSpawn”
b. Set position to Y 1.5 and Z 0.9
6. Add script “Magic AI Item Manager” to vEnemyAI
a. Set “Item List Data” to “vMeleeMagic_ItemListDataV2”
\Invector-3rdPersonController\Add-ons\ShadesSpellSystem\Inventory
b. Change the Item Filter to “Spells”
c. Press “Add Item”
d. Choose one of the spells, (eg Fireball) from the list and press “Add”
7. Add script “Magic AI” to vEnemyAI
a. Drag the MagicSpawn gameobject from the hierarchy to the “Magic Spawn Point”
property
8. Add the Enemy Health/Mana display
a. Find the VBOT head bone “VBOT_:Head”
b. Drag “enemyHealthUI.prefab” onto the head bone
\Invector-3rdPersonController\Add-ons\ShadesSpellSystem\UI
9. Open the “v_AIController” component on vEnemyAI
a. Set “Death By” to “Ragdoll”
b. Set “Current State” to “Idle”
c. Link the “OnReceiveDamage” event to “CharacterInstance->OnReceiveDamage”
10. Expand the “Melee Manager” events and set
a. “OnDamageHit” event to “CharacterInstance->OnSendHit”
Manual Setup Notes
For both the player and the invector AI, please note that for the conditions prefabs created by the
wizard, these are found in the Prefabs/Conditions directory and must be placed under the character
root in the hierarchy in a empty game object called “Conditions”.
When adding the conditions you will need to set the mesh of the shape element of the particle
effect(s) to the LOD1 body mesh and press Reset to Defaults on the levelling system aka
CharacterInstance.cs.
How to Create a Spell
Spells are controlled in two separate places. The magic attack behaviour animator state, which
controls spawning options and the friend or foe targeting, and the spell prefab, which contains the
projectile, damage, collision, physics, sub spawns and particle effects.
Step 1 Creating the Prefab
1. Create an empty gameObject
2. Attach the following Components in order. Sphere Collider, RigidBody, vObjectDamage,
MagicProjectile, Magic Object Damage
3. Attach the particle effect you want as a child of the gameObject.
4. Configure Components (Examples Below)
Alternatively
1. Duplicate and Existing Spell Prefab
2. Rename it
3. Swap the Particle Effect for your Particle Effect
Step 2 Configuring the spell
There are many different types of spells out there. We wanted to create a system that was flexible
and had options to do just about anything you can think of. In doing so, we realize that the sheer
number of options can be overwhelming. We have created examples for many of the common spells
found in games. By playing with both Magic Attack Behaviour’s Settings and the Prefab Spells
components settings, you can create just about any spell behaviour.
The easiest way to get started would be to duplicate a spell, and then replace the particle effect.
[Example Using Fireball Custom]
1. Find Fireball Custom in the project folder and Duplicate it
2. Rename Fireball Custom (1) to whatever your spell will be named
3. Drag the Spell into the Scene
4. Delete All Particle effects and Audio (On Fireball Custom delete all children)
5. Replace them with your particle effect’s
6. Replace Fireball Custom Collision with your own Collision effect’s
Completed Spells, Condition Effects, Collision Effects, Hand Effects and other prefabs can be found at
Assets\Invector-3rdPersonController\Add-ons\ShadesSpellSystem\Spells.

Potential Spell Types
Below is a list of Spells we have already provided, to act as a template for how to create a specific
spell type, and what each of the Magic Projectile values do.
Spell Type
Example Spell
Projectile AoE
Fireball OnFire / Fireball Custom
Distance Based AoE
Lightning Strike (check both animator and prefab values)
Point Blank Area of Effect
Frost Nova
Charged PBAoE
Charged Frost Nova
Chain Spell
Chained Lightning
Damage Over Time
Poison Bolt
Projectile PBAoE
Cyclone / Large Cylone Projectile
Multiple Direct Damage
Magic Missile (Spawner contains the projectile Magic Missile v3)
Melee Skill
SpinSlash
Multiple AoE
Meteor (Spawner contains Fireball Custom Gravity)
Grenade
Fireball Custom Gravity Prefab
Homing
Poison Bolt, Water, Magic Missile v3 prefabs
Light Spell
Light
Heal
Heal
Summon
Summon Minions (Spawner holds the AI it spawns and any FX’s)
Resurrect
Raise the Fallen
Damage by Proximity
Cyclone Armor
Charged Spells
UpperBody Layer → Magic → Charged Fireball For how to setup
Animation States
Random Spawn within a Sphere
Meteor, Magic Missile
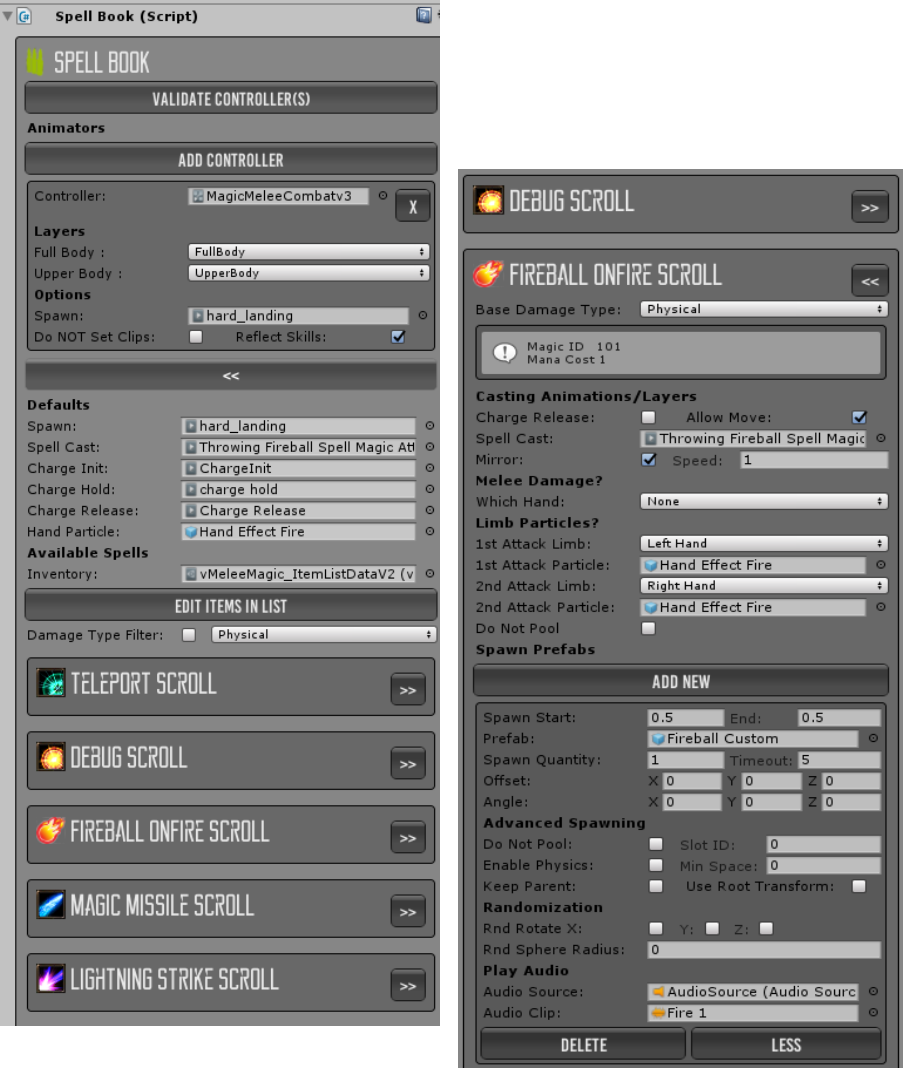
How to use the Spell Book to apply animator changes
Version 2.1 brings in a new component which automates setting up the relevant animator states on a
new controller and validates an existing controller for missing states, spells.
Load the spell system showcase scene and inspect the spell book, add your controllers and your
inventory and you will see all the spells extracted.
Expand a spell with the >> arrows and change the
settings, these are now using a custom editor that
is also shown on the animator states (rather than
the previous raw array).
Update the animation, spawned prefabs, hand
effects, same as before.
Then press “Validate Controller(s)” and the updated settings are applied to all the linked animators in
one step, this is centralised control. Note that on the controller behaviours a new script will be applied
“SpellBookAttack” rather than “MagicAttackBehavior” so no existing spells will be affected.
Whilst we were very happy with the way spells could be easily setup on a controller, in our shared
game prototype project we found that multiple enemies would often end up needing separate
controllers and we needed a way to sync the spell settings between them, which once you get close
to 100 spells and 30 different creatures became a problem.
The spell settings are unchanged though are arranged in a slightly different order and the notes
regarding setup in the below sections still apply.
To try it out, add some spells into your invector inventory, click the spell book prefab in project view,
add a duplicated invector melee or shooter animator controller, add the inventory, set the spell
settings and press validate. This will also add the animator parameters and spawn animation state.
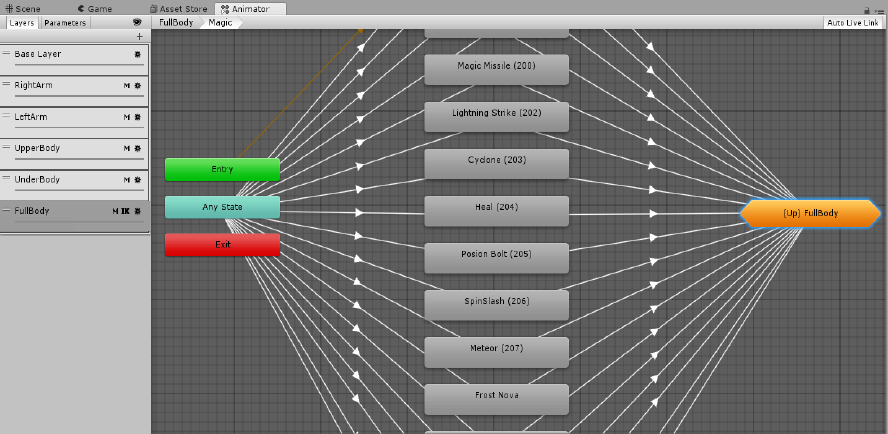
Setting Up the Animator (Manual)
Illustration 1: Magic Spells In Full Body Layer
There are 2 layers to use depending on how you want the spell to act.
If you want to just use the upper body for the animations then use upper body. This will allow being
able to walk around while you cast spells.
Full Body will use the entire body to animate during a spell cast. If you want spells that can be
interrupted, then use Full Body.
Please check out MagicMeleeCombatv2 Animator for a reference of both Upper Body and Full Body
Setup. To the right is a image of the Magic SubState in the Full Body layer of the MagicMeleeCombatv2
animator.
It’s important to note that each state needs to have a transition from any state and a transition
leading to Null.
When adding spells to the animator, each spell uses a SpellID and MagicAttack trigger.
The animator assigns targets to the spells depending upon the source, so if a player fires a spell then
the AI’s are automatically targeted and vice versa, the Magic Settings class on the player controls the
layers and tags used by the animator.
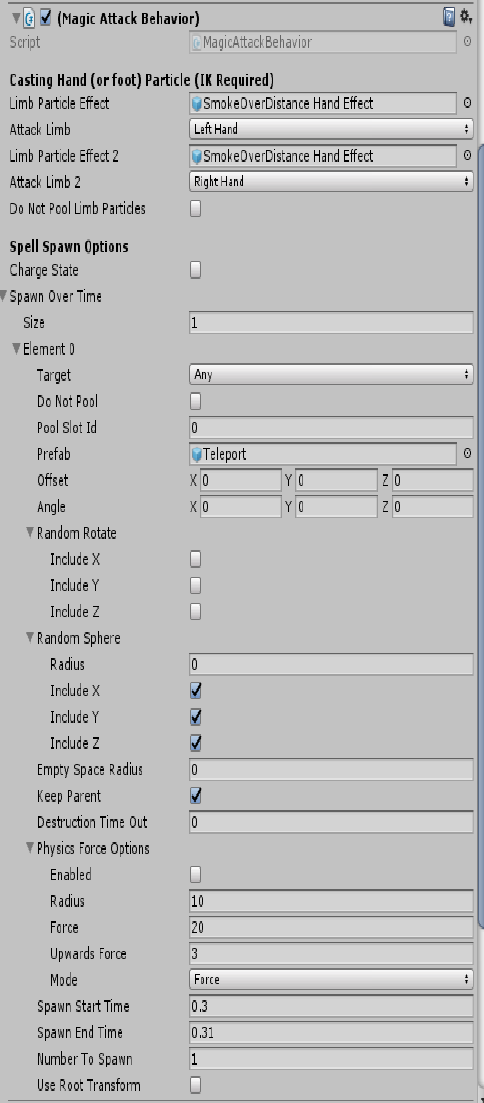
Add a new Spell to the Animator (Manual)
1. Right click, Create State → Empty
2. Right Click on [Any State] → Make Transition, Drag
it to the Empty State
3. Right Click on the Empty State → Make Transition,
Drag it to (Up)Full Body → StateMachine → Null
4. Select Empty State Machine and click Add
Behaviour. Select Magic Attack Behaviour
5. Under Motion on the Empty State Machine add an
animation to use.
On Transition Entry (the line from Any State to your
new Empty State Machine) There is an option in
settings “Can transition to self”. Remove the Check if
you want the animation to complete before you cast
another spell.
See the API (or tooltips) for full notes on each field, the
key ones include:
• Limb Particle Effect, this will spawn a particle effect
attached to the casters limbs. Import to note that
this uses IK and to make work IK must be enabled
on the layer.
• Charge state is for a holding spell whilst the button
is down, the keep parent option is needed when
this is enabled.
• Spawn over time, you will notice a common array in
use here and in many of the other scripts. Define
as many spawns as is needed here.
• Spawn start time and end time within the
animation, note if number to spawn is greater than
1 the spawns are averaged between the two times.
• Prefab is the spell prefab to be spawned, likely
from the pooling system
• Pool Slot ID is for when pre warming the pool, set
to match the magical pool element id for the spell,
this is also used dynamically at runtime when the
pool is being filled on the fly.
• Keep parent is needed for charging states and the teleport spell.
• Lastly, use root transform spawns the spell from the root of the character (ie the feet) rather
than the magic spawn point which is at hand height.
• Destruction timeout when set to greater than zero will destroy the spell after that time (or
return it to the pool), this is for when the spell is fired but doesn’t hit anything.
• Random sphere allows the spawning of multiple projectiles within a random radius with axis
restrictions.
• Random rotate adds spin to the projectile, to spin child elements see the MagicProjectile class.
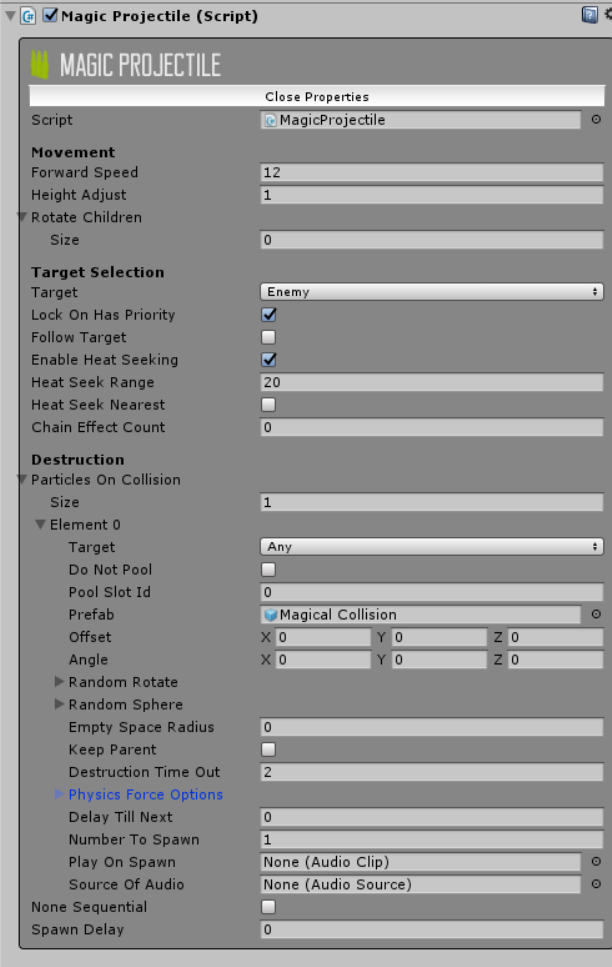
A Quick Look at the Magic Projectile
How has the projectile changed, well, key additions include child rotation, friend/foe targeting
(assigned by the animator on launch), curved path heat seeking (should be called tag seeking),
multiple spawns and chaining.
You will notice an array that will become
very familiar, the spawner options titled
here as Particles on Collision.
Same as on the animator magic attack
behaviour (though note the missing
times as this is the standard variant).
The same set of options will be
presented on all scripts that spawn any
prefab, this is mainly to allow the pooling
behaviour but also has centralised the
code.
For any destruction explosion note the
destruction timeout allows return of the
explosion to the pool. This can also be
achieved via the destroy and spawn or
magic return scripts.
The heat (tag) seeking provides a curve
towards the target, for true homing
behaviour enable follow target.
The chain effect, it is listed as a count
(which counts down each time this
projectile reaches a target). On reaching
a target the destruction timeout is reset
allowing the particle to keep going until it
either doesn’t find another target or
chain effect count = 0
The height adjust is an original property
that allows the spell to target the torso
of the character, if left at 0 the feet will
be hit.
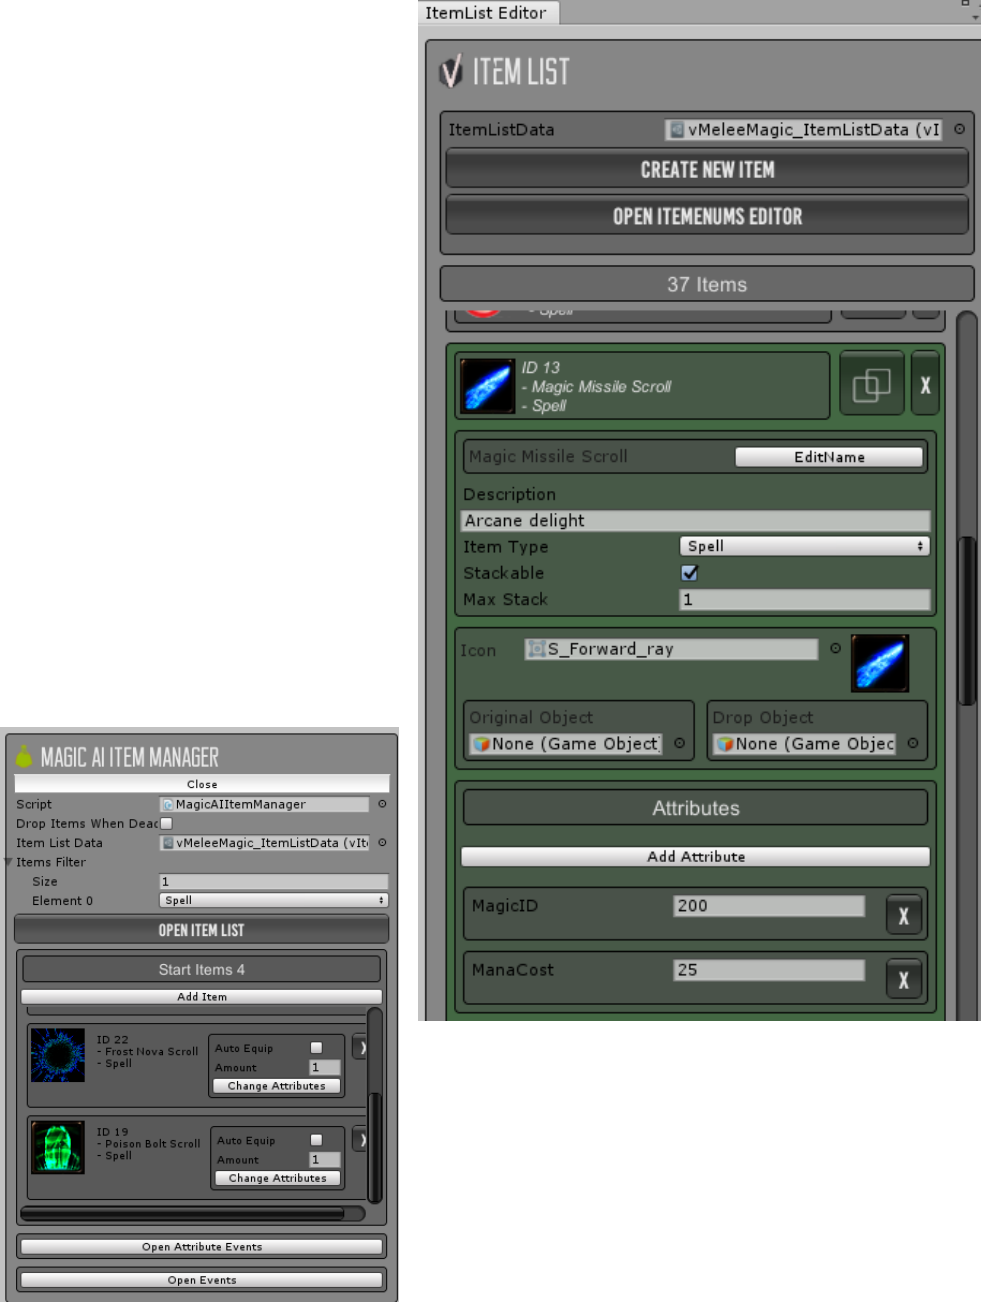
Adding spells to the Inventory
1. On the Player, go to vItem Manager and
click Open Item List
2. Click Create New Item or use the Clone
button on an existing spell
3. Name the spell and add an Icon
4. On the drop-down list select Spell (For
Scrolls check stackable)
5. Click Add Attribute, Select MagicID and
fill in the MagicID you have on the
animator
6. Click Add Attribute, Select ManaCost,
and fill in the cost for each spell cast
7. Hit Create and you’re done!
Nice and easy, certainly, now whilst you are
all fully used to invectors inventory, you will
note that we have a custom item type that is
required of spell.
Another important innovation provided is
that as the player and the AI are sharing
spell (via the dynamic targeting) we have
also provided an item manager (with most
of the guts ripped out) for the AI. The
purpose is to allow easy assignment of the
spells onto the AI’s and it looks like this.
Demo Scenes
To make things easier, we have setup a selection of demo scenes that show the core features of the
system, accelerating your learning curve climb.
Features_SpellShowcase
Use this scene for playing around, we do. Inside you will find a VBOT all setup and ready to rock,
through the door you will find a variant of Sauron, use your wits accordingly.
Spells are found within the two chests, when testing your own spells add them either directly onto
the characters start items or into the chests (our choice).
You will also find Shade’s complete tease of a bow and throwing stars, these really demonstrate the
numerous applications of the magic projectile, want to impress us, video some fire arrows, can you
do it?
When developing spell note that the fastest way is to use the testing animator state.
Original Levelling System
This was out starting point before feature creep took over and turned the levelling system into
something akin to DnD (almost, maybe later). Useful if you’re after a clean starting point for your
own levelling system, this is not in active development.
MenuTest_Lobby
Now this comes in two variants, this is because an abstract data layer is in place. Why is it abstract,
this is so that the levelling system can talk to different datasources without knowing whether it is
saving to SQL or xml.
Two data connectors have been provided, SQLLite (included for free in the project) and EasySave2,
due to the abstraction there is little advantage between the two and either may be used.
Now the lobby scene is an example of an actual game, on run pick new game, name and choose your
base character axis, alignment, race and class and the lobby scene will load level1.
You will notice the structure persists all needed components (including the camera, inventory, player
and the main menu) from the lobby scene to the level 1 scene.
Go open the chests to get your spells and provided magic weapons, now press Esc and Save, then
stop the scene from running.
Hit play again and you will see you can now choose a game to load or continue, hit continue and
level 1 is loaded with all equipment and spells as you left them.
Now run into the room, kill the enemies, you will notice many of them drop gold and shrooms,
collect as you will. Notice the Magical Pool in the hierarchy being filled as spells are needed.
Now go through the portal at the end of the room, this causes level2 to be loaded, keeping all of
your equipment, this also causes an autosave.
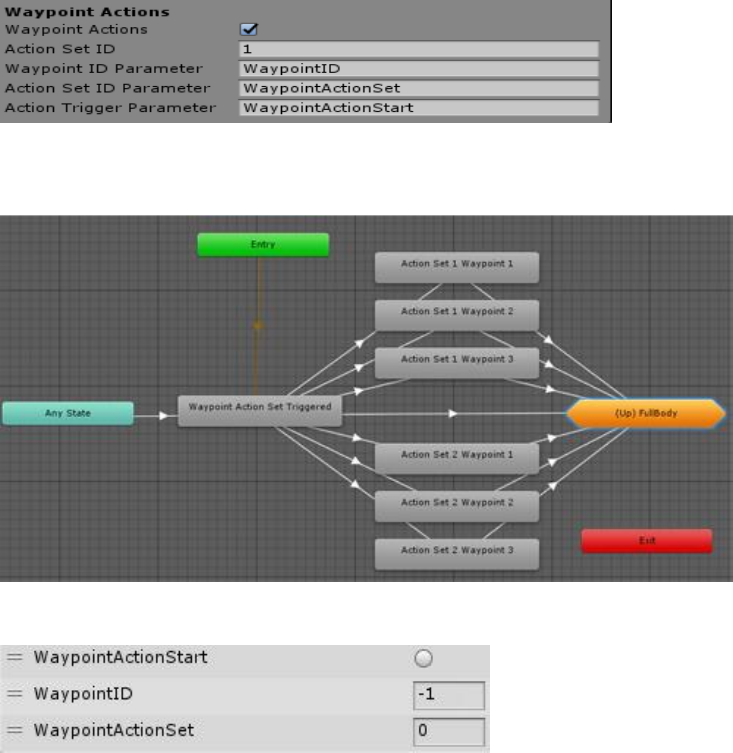
Features_WaypointActionSets.unity
This demo shows a feature test that works by sending the current invector waypoint ID to the
animator and triggering the animator when a waypoint is reached.
The net effect is that at each waypoint a different animation is played by the animator, think
chopping wood, or fetching water from a well.
In the provided scene, you will find 5 VBOT’s doing a different dance at each vWaypoint, the dances
have been split into two sets, WaypointActionSet1&2 with the bots performing the relevant dances
from the two sets at each of the three invector waypoints.
The settings to enable this are in the MagicAI component, under waypoint actions on the VBOT.
In the full body layer of the animator you will find the listed triggers in use in the waypoints state
machine.
Which is fed by the following triggers and ID’s
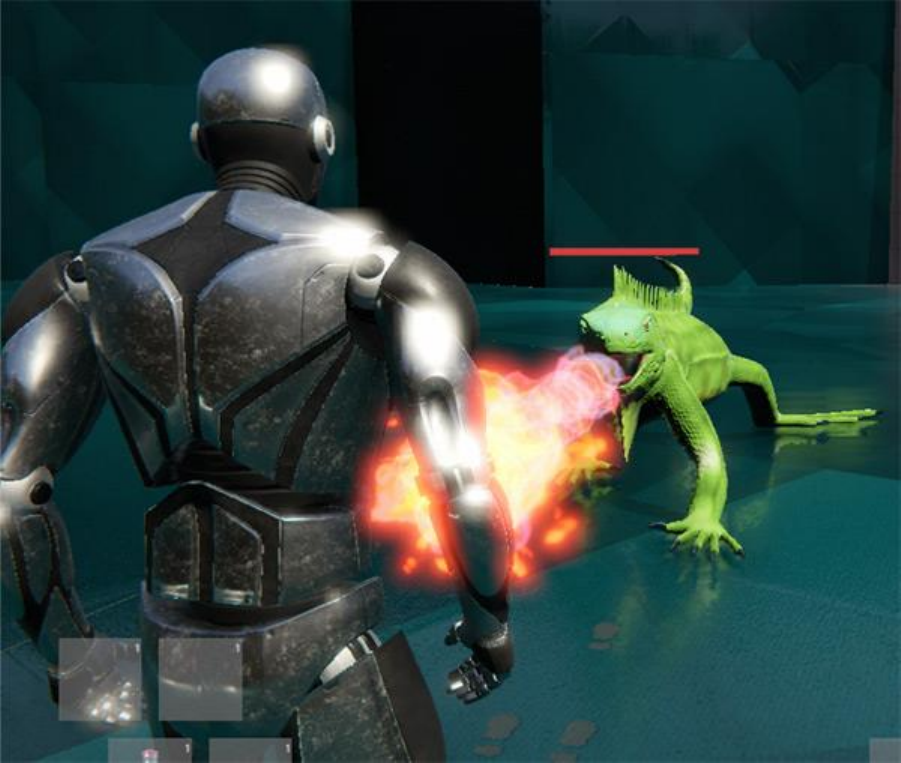
Features_GenericAI.unity (Experimental)
This scene shows the results of an experiment to use the invector AI on a generic rigged iguana, note
that the animator is only partially complete and at the time of writing requires root motion
animations (invector’s later releases will include support for AI with non-root motion).
Lets take a look, running the scene you will find that the iguana is rather larger than you would want
to meet and also breathing fire, nasty, well we don’t provide magic for no reason hero, sort it out.
Now if you look at the iguana gameobject you will notice two things, the Generic Ragdoll System and
Generic RIG Controller scripts.
The Generic Ragdoll is a clone of the invector one with most of the humanoid bone grabs swapped
for the properties on the main script.
The controller is literally an inherited vAIController with one extra property and an update to the
constructor to fix and error.
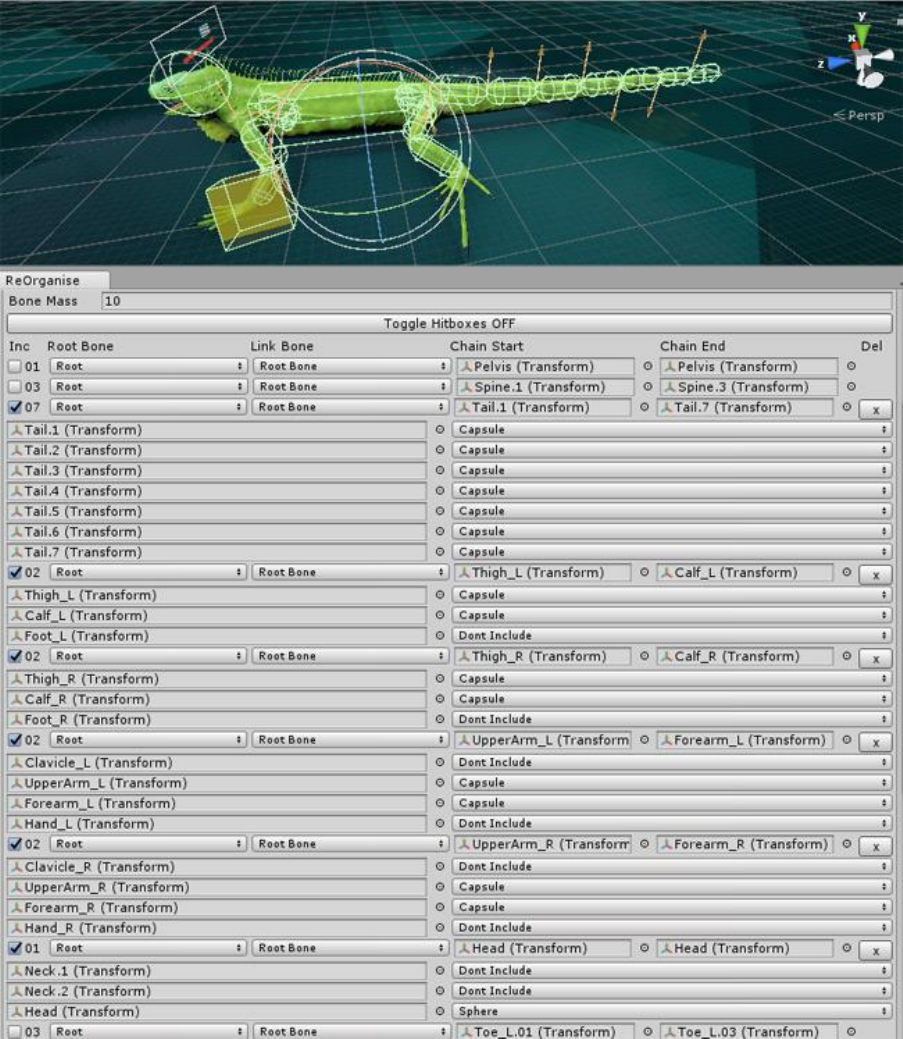
Now how did we get the ragdoll you might ask, well this was before invector released the generic
template to their ragdoll builder, so at the time a script was built that created linked bone chains,
allowing ragdoll activation.
See the reorganise helper documentation, but here is a teaser.
Features_ReOrganiseCharacter.unity (simplyGon handling)
This scene demo’s the workflow possibilities of the ReOrganiseCharacter editor window, originally
written to handle SFBay characters being sold with multiple LOD levels, each with their own set of
bones/animator (simplyGon output) and multiple materials/equipments across those LOD levels.
This script allows child name cleanup, LOD level merging (producing a LOD group and multi LOD
levels working from one set of bones), generic bone ragdoll creation and multi LOD level character
equipment handling.
So, when the scene is loaded you will find two rows of hobgoblins, lets work from left to right:
Hobgoblin_Original
This is, well the unmodified original model found for free on the asset store.
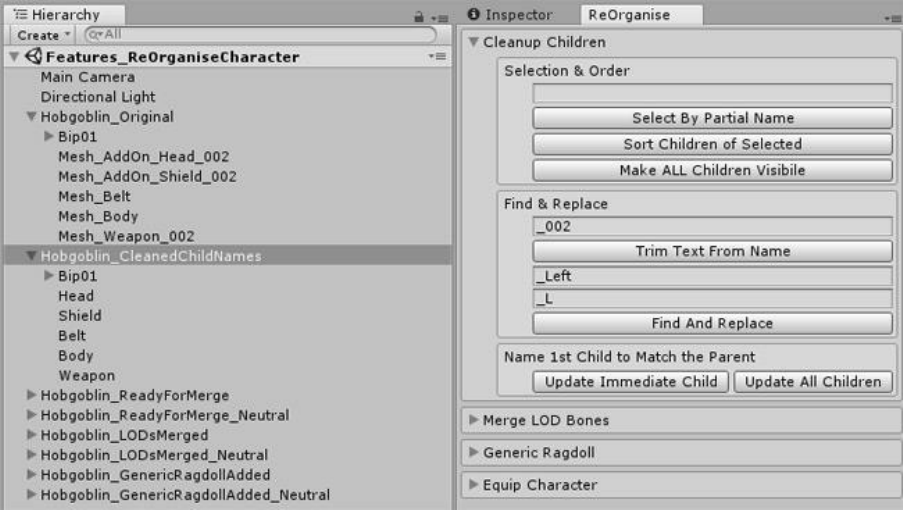
Hobgoblin_CleanedChildNames
As the name suggests, first (optional) step is to sort out the child names on a new model, on the
Invector menu load the ReOrganise Character editor window, if you select the cleanup children tab
you will see you have options to select by name, sort children of, make all children visible, find and
replace and update child name to match the parent.
In the case of the hobgoblin, it would have been fairly quick so rename these by hand, however if
you own a complex model, eg SFBay Human Barbarian, suddenly renaming a large volume of
equipment from two genders becomes a pain.

Hobgoblin_ReadyForMerge
Now this is where things get more interesting. What we have here is the result of running our
hobgoblin through simplygon, outputting three LOD levels.
You will notice that the hobgoblin on the row behind is gender neutral (can be male or female), in
both cases the LOD1 hobgoblin has been dragged into the scene, then the LOD2&3 have been
attached as children of the LOD1.
Note to create the gender neutral hobgoblin, the male LOD1 was dragged into the scene, two empty
child objects of Male & Female were added, then all the male LOD1 equipment was placed into
Male/Hobgoblin_LOD1 empty gameobject. Then the male LOD2&3 prefabs and the Female
LOD1,2&3 prefabs resulting in the structure above.
Note simplygon has been bought by Microsoft and is free for indie developers to use, to see what
simplygon has output, see the folder LODs\Characters\TSWHobgoblin\Hobgoblin_20170927_004943
Now, in the reorganise window, change the tab to Merge LOD bones, select the character and press
analyse and you will get the above display, showing the number of LOD levels found and the root
bone.
The option Set LOD to half the width of LOD2 affects the output LOD group, on a high poly character,
I have LOD1-5 set to 100,75,50,25 & 12.5 in the LOD group. The LOD group is auto calculated and
this option creates the last group at 12.5, if disabled you would get an even split 100,80,60,40,20.
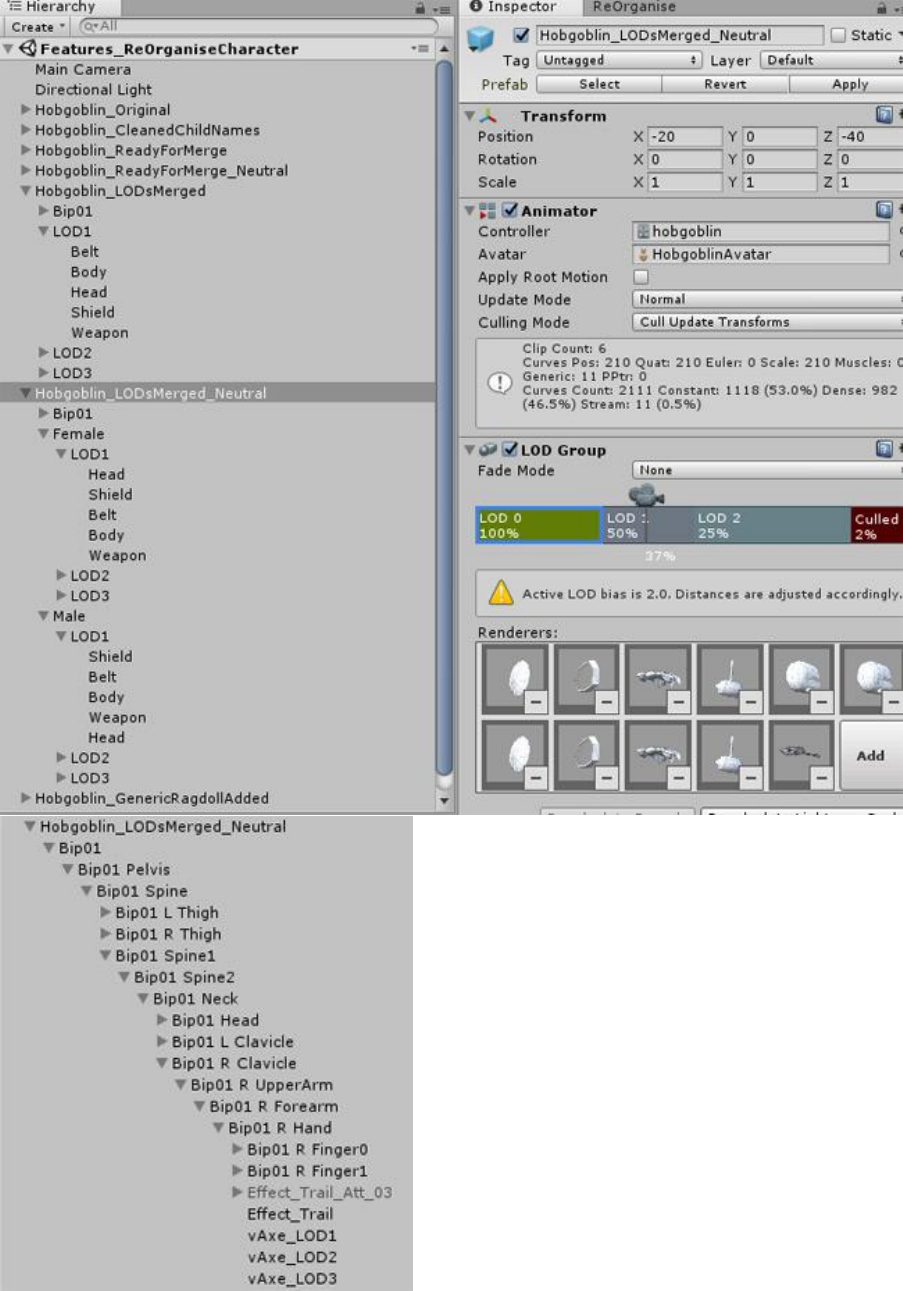
Hobgoblin_LODsMerged
This hobgoblin shows the result of pressing the Attempt Merge button on both single gender/gender
neutral versions, lets take a look
As you can see the resulting output is clean, with
one skeleton (rather than 3 or 6), one animator and
all equipment/bodes for all LOD levels neatly
structured and attached to the single skeleton.
Looking at the LOD group you will see all meshes are
added and the scaling is set already.
Last thing to note, is the vAxe, expand the bone
structure and you can see that the mesh on the
bone structure that had been run through
simplygon has also been merged onto the single
skeleton and added into the LOD group.

Hobgoblin_GenericRagdollAdded
This shows the ragdoll creation abilities that were coded before invector added generic ragdoll
ability, however it still has some use for custom bones (eg hair) or where the invector ragdoll is not
producing desired results.
How does it work, well, it scans the skeleton and produces bone chains, you simply tick which bone
chains to include, and which bones/collider type to use from that chain. These chains are all linked
back to the root bone, or to another bone chain.
The invector ragdoll, collider and joint components are added on all included bones within a ticked
bone chain.
Note what this script does not handle (and why for the most part use invectors auto ragdoll wizard)
is the joint constraints, if anyone can see a way to calculate these, that would be impressive.
Equip Character
To demo the last function of the reorganise character script, create a new scene, load the editor
(Invector->ShadesSpellSystem->ReOrganise Character).
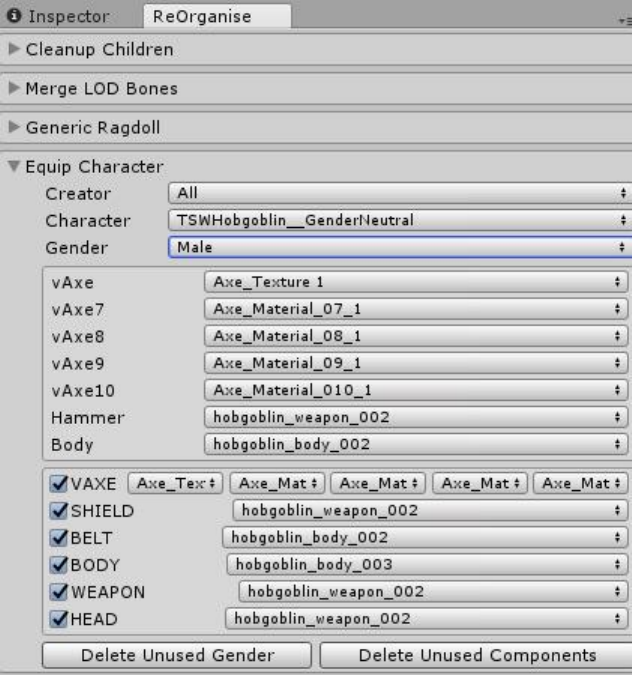
Now change the tab to Equip Character and select TSWHobgoblin_GenderNuetral from the
character dropdown list.
So what do we have here? The hobgoblin got loaded into the scene (from Prefabs/Character folder)
and you can see a list of all body parts with the respective materials but also a distinct list of
materials, this is so that when multiple body parts share a material, the material can be swapped (via
the dropdowns) in one go.
Now hang on your thinking, I can easily just go and swap the materials by hand, well yes this is true,
however imagine you had 5 LOD levels and 20 body parts, that is going to take awhile right, that is
where this script comes in.
Apart from material swapping, it also allows the enabling/disabling of equipment across the LOD
levels via the checkboxes and the swapping between the two genders.
The buttons on the bottom do as they are labelled and are optional, basically they remove the
unwanted gender or equipment’s from all LOD levels and the LOD group.
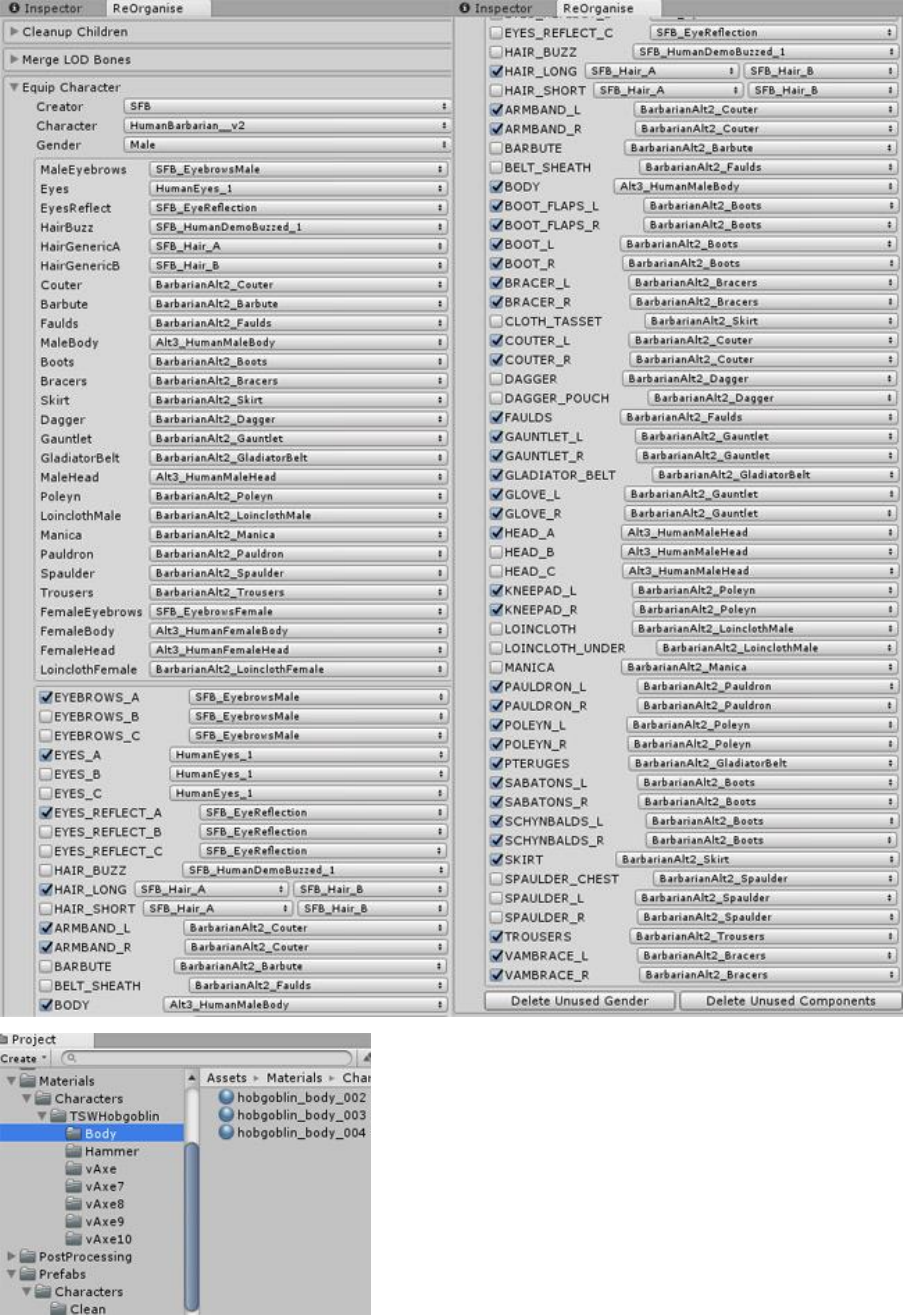
Now for a more complex example, here is SFBay’s Human Barbarian, with 2 genders and an
excessive amount of equipment.
So much equipment I had to take two screenshots, this is
the character, that this entire script (apart from the
ragdoll tab) was built for, it was just taking hours to
adjust materials on equipment and enable the armour I
wanted.
Important, note the folder structure is important, prefabs
need to be in the prefabs/character/clean or
prefabs/creatures/clean folder and the materials need to
be in a separate folder per body part to enable swapping.
Attribution-ShareAlike 4.0 International (CC BY-SA 4.0) Licence
Creator Credits due to Shade (Charles Page) and Insomnia (Rob Alexander)
https://creativecommons.org/licenses/by-sa/4.0/
Creative Commons Corporation (“Creative Commons”) is not a law firm and does not provide legal
services or legal advice. Distribution of Creative Commons public licenses does not create a lawyer-
client or other relationship. Creative Commons makes its licenses and related information available
on an “as-is” basis. Creative Commons gives no warranties regarding its licenses, any material licensed
under their terms and conditions, or any related information. Creative Commons disclaims all liability
for damages resulting from their use to the fullest extent possible.
Using Creative Commons Public Licenses
Creative Commons public licenses provide a standard set of terms and conditions that creators and
other rights holders may use to share original works of authorship and other material subject to
copyright and certain other rights specified in the public license below. The following considerations
are for informational purposes only, are not exhaustive, and do not form part of our licenses.
Considerations for licensors: Our public licenses are intended for use by those authorized to give the
public permission to use material in ways otherwise restricted by copyright and certain other rights.
Our licenses are irrevocable. Licensors should read and understand the terms and conditions of the
license they choose before applying it. Licensors should also secure all rights necessary before applying
our licenses so that the public can reuse the material as expected. Licensors should clearly mark any
material not subject to the license. This includes other CC-licensed material, or material used under
an exception or limitation to copyright. More considerations for licensors.
Considerations for the public: By using one of our public licenses, a licensor grants the public
permission to use the licensed material under specified terms and conditions. If the licensor’s
permission is not necessary for any reason–for example, because of any applicable exception or
limitation to copyright–then that use is not regulated by the license. Our licenses grant only
permissions under copyright and certain other rights that a licensor has authority to grant. Use of the
licensed material may still be restricted for other reasons, including because others have copyright or
other rights in the material. A licensor may make special requests, such as asking that all changes be
marked or described. Although not required by our licenses, you are encouraged to respect those
requests where reasonable. More considerations for the public.
Creative Commons Attribution-ShareAlike 4.0 International Public License
By exercising the Licensed Rights (defined below), You accept and agree to be bound by the terms and
conditions of this Creative Commons Attribution-ShareAlike 4.0 International Public License ("Public
License"). To the extent this Public License may be interpreted as a contract, You are granted the
Licensed Rights in consideration of Your acceptance of these terms and conditions, and the Licensor
grants You such rights in consideration of benefits the Licensor receives from making the Licensed
Material available under these terms and conditions.

Section 1 – Definitions.
a. Adapted Material means material subject to Copyright and Similar Rights that is derived from
or based upon the Licensed Material and in which the Licensed Material is translated, altered,
arranged, transformed, or otherwise modified in a manner requiring permission under the
Copyright and Similar Rights held by the Licensor. For purposes of this Public License, where
the Licensed Material is a musical work, performance, or sound recording, Adapted Material
is always produced where the Licensed Material is synched in timed relation with a moving
image.
b. Adapter's License means the license You apply to Your Copyright and Similar Rights in Your
contributions to Adapted Material in accordance with the terms and conditions of this Public
License.
c. BY-SA Compatible License means a license listed at
creativecommons.org/compatiblelicenses, approved by Creative Commons as essentially the
equivalent of this Public License.
d. Copyright and Similar Rights means copyright and/or similar rights closely related to
copyright including, without limitation, performance, broadcast, sound recording, and Sui
Generis Database Rights, without regard to how the rights are labeled or categorized. For
purposes of this Public License, the rights specified in Section 2(b)(1)-(2) are not Copyright and
Similar Rights.
e. Effective Technological Measures means those measures that, in the absence of proper
authority, may not be circumvented under laws fulfilling obligations under Article 11 of the
WIPO Copyright Treaty adopted on December 20, 1996, and/or similar international
agreements.
f. Exceptions and Limitations means fair use, fair dealing, and/or any other exception or
limitation to Copyright and Similar Rights that applies to Your use of the Licensed Material.
g. License Elements means the license attributes listed in the name of a Creative Commons
Public License. The License Elements of this Public License are Attribution and ShareAlike.
h. Licensed Material means the artistic or literary work, database, or other material to which the
Licensor applied this Public License.
i. Licensed Rights means the rights granted to You subject to the terms and conditions of this
Public License, which are limited to all Copyright and Similar Rights that apply to Your use of
the Licensed Material and that the Licensor has authority to license.
j. Licensor means the individual(s) or entity(ies) granting rights under this Public License.
k. Share means to provide material to the public by any means or process that requires
permission under the Licensed Rights, such as reproduction, public display, public
performance, distribution, dissemination, communication, or importation, and to make
material available to the public including in ways that members of the public may access the
material from a place and at a time individually chosen by them.
l. Sui Generis Database Rights means rights other than copyright resulting from Directive
96/9/EC of the European Parliament and of the Council of 11 March 1996 on the legal
protection of databases, as amended and/or succeeded, as well as other essentially
equivalent rights anywhere in the world.
m. You means the individual or entity exercising the Licensed Rights under this Public License.
Your has a corresponding meaning.

Section 2 – Scope.
a. License grant.
1. Subject to the terms and conditions of this Public License, the Licensor hereby grants
You a worldwide, royalty-free, non-sublicensable, non-exclusive, irrevocable license
to exercise the Licensed Rights in the Licensed Material to:
A. reproduce and Share the Licensed Material, in whole or in part; and
B. produce, reproduce, and Share Adapted Material.
2. Exceptions and Limitations. For the avoidance of doubt, where Exceptions and
Limitations apply to Your use, this Public License does not apply, and You do not need
to comply with its terms and conditions.
3. Term. The term of this Public License is specified in Section 6(a).
4. Media and formats; technical modifications allowed. The Licensor authorizes You to
exercise the Licensed Rights in all media and formats whether now known or
hereafter created, and to make technical modifications necessary to do so. The
Licensor waives and/or agrees not to assert any right or authority to forbid You from
making technical modifications necessary to exercise the Licensed Rights, including
technical modifications necessary to circumvent Effective Technological Measures.
For purposes of this Public License, simply making modifications authorized by this
Section 2(a)(4) never produces Adapted Material.
5. Downstream recipients.
A. Offer from the Licensor – Licensed Material. Every recipient of the Licensed
Material automatically receives an offer from the Licensor to exercise the
Licensed Rights under the terms and conditions of this Public License.
B. Additional offer from the Licensor – Adapted Material. Every recipient of
Adapted Material from You automatically receives an offer from the Licensor
to exercise the Licensed Rights in the Adapted Material under the conditions
of the Adapter’s License You apply.
C. No downstream restrictions. You may not offer or impose any additional or
different terms or conditions on, or apply any Effective Technological
Measures to, the Licensed Material if doing so restricts exercise of the
Licensed Rights by any recipient of the Licensed Material.
6. No endorsement. Nothing in this Public License constitutes or may be construed as
permission to assert or imply that You are, or that Your use of the Licensed Material
is, connected with, or sponsored, endorsed, or granted official status by, the Licensor
or others designated to receive attribution as provided in Section 3(a)(1)(A)(i).
b. Other rights.
1. Moral rights, such as the right of integrity, are not licensed under this Public License,
nor are publicity, privacy, and/or other similar personality rights; however, to the
extent possible, the Licensor waives and/or agrees not to assert any such rights held
by the Licensor to the limited extent necessary to allow You to exercise the Licensed
Rights, but not otherwise.
2. Patent and trademark rights are not licensed under this Public License.
3. To the extent possible, the Licensor waives any right to collect royalties from You for
the exercise of the Licensed Rights, whether directly or through a collecting society
under any voluntary or waivable statutory or compulsory licensing scheme. In all other
cases the Licensor expressly reserves any right to collect such royalties.

Section 3 – License Conditions.
Your exercise of the Licensed Rights is expressly made subject to the following conditions.
a. Attribution.
1. If You Share the Licensed Material (including in modified form), You must:
A. retain the following if it is supplied by the Licensor with the Licensed Material:
i. identification of the creator(s) of the Licensed Material and any
others designated to receive attribution, in any reasonable manner
requested by the Licensor (including by pseudonym if designated);
ii. a copyright notice;
iii. a notice that refers to this Public License;
iv. a notice that refers to the disclaimer of warranties;
v. a URI or hyperlink to the Licensed Material to the extent reasonably
practicable;
B. indicate if You modified the Licensed Material and retain an indication of any
previous modifications; and
C. indicate the Licensed Material is licensed under this Public License, and
include the text of, or the URI or hyperlink to, this Public License.
2. You may satisfy the conditions in Section 3(a)(1) in any reasonable manner based on
the medium, means, and context in which You Share the Licensed Material. For
example, it may be reasonable to satisfy the conditions by providing a URI or hyperlink
to a resource that includes the required information.
3. If requested by the Licensor, You must remove any of the information required by
Section 3(a)(1)(A) to the extent reasonably practicable.
b. ShareAlike.
In addition to the conditions in Section 3(a), if You Share Adapted Material You produce, the
following conditions also apply.
1. The Adapter’s License You apply must be a Creative Commons license with the same
License Elements, this version or later, or a BY-SA Compatible License.
2. You must include the text of, or the URI or hyperlink to, the Adapter's License You
apply. You may satisfy this condition in any reasonable manner based on the medium,
means, and context in which You Share Adapted Material.
3. You may not offer or impose any additional or different terms or conditions on, or
apply any Effective Technological Measures to, Adapted Material that restrict exercise
of the rights granted under the Adapter's License You apply.
Section 4 – Sui Generis Database Rights.
Where the Licensed Rights include Sui Generis Database Rights that apply to Your use of the Licensed
Material:
a. for the avoidance of doubt, Section 2(a)(1) grants You the right to extract, reuse, reproduce,
and Share all or a substantial portion of the contents of the database;
b. if You include all or a substantial portion of the database contents in a database in which You
have Sui Generis Database Rights, then the database in which You have Sui Generis Database

Rights (but not its individual contents) is Adapted Material, including for purposes of Section
3(b); and
c. You must comply with the conditions in Section 3(a) if You Share all or a substantial portion of
the contents of the database.
For the avoidance of doubt, this Section 4 supplements and does not replace Your obligations under
this Public License where the Licensed Rights include other Copyright and Similar Rights.
Section 5 – Disclaimer of Warranties and Limitation of Liability.
a. Unless otherwise separately undertaken by the Licensor, to the extent possible, the Licensor
offers the Licensed Material as-is and as-available, and makes no representations or
warranties of any kind concerning the Licensed Material, whether express, implied, statutory,
or other. This includes, without limitation, warranties of title, merchantability, fitness for a
particular purpose, non-infringement, absence of latent or other defects, accuracy, or the
presence or absence of errors, whether or not known or discoverable. Where disclaimers of
warranties are not allowed in full or in part, this disclaimer may not apply to You.
b. To the extent possible, in no event will the Licensor be liable to You on any legal theory
(including, without limitation, negligence) or otherwise for any direct, special, indirect,
incidental, consequential, punitive, exemplary, or other losses, costs, expenses, or damages
arising out of this Public License or use of the Licensed Material, even if the Licensor has been
advised of the possibility of such losses, costs, expenses, or damages. Where a limitation of
liability is not allowed in full or in part, this limitation may not apply to You.
c. The disclaimer of warranties and limitation of liability provided above shall be interpreted in
a manner that, to the extent possible, most closely approximates an absolute disclaimer and
waiver of all liability.
Section 6 – Term and Termination.
a. This Public License applies for the term of the Copyright and Similar Rights licensed here.
However, if You fail to comply with this Public License, then Your rights under this Public
License terminate automatically.
b. Where Your right to use the Licensed Material has terminated under Section 6(a), it reinstates:
1. automatically as of the date the violation is cured, provided it is cured within 30 days
of Your discovery of the violation; or
2. upon express reinstatement by the Licensor.
For the avoidance of doubt, this Section 6(b) does not affect any right the Licensor may have
to seek remedies for Your violations of this Public License.
c. For the avoidance of doubt, the Licensor may also offer the Licensed Material under separate
terms or conditions or stop distributing the Licensed Material at any time; however, doing so
will not terminate this Public License.
d. Sections 1, 5, 6, 7, and 8 survive termination of this Public License.

Section 7 – Other Terms and Conditions.
a. The Licensor shall not be bound by any additional or different terms or conditions
communicated by You unless expressly agreed.
b. Any arrangements, understandings, or agreements regarding the Licensed Material not stated
herein are separate from and independent of the terms and conditions of this Public License.
Section 8 – Interpretation.
a. For the avoidance of doubt, this Public License does not, and shall not be interpreted to,
reduce, limit, restrict, or impose conditions on any use of the Licensed Material that could
lawfully be made without permission under this Public License.
b. To the extent possible, if any provision of this Public License is deemed unenforceable, it shall
be automatically reformed to the minimum extent necessary to make it enforceable. If the
provision cannot be reformed, it shall be severed from this Public License without affecting
the enforceability of the remaining terms and conditions.
c. No term or condition of this Public License will be waived and no failure to comply consented
to unless expressly agreed to by the Licensor.
d. Nothing in this Public License constitutes or may be interpreted as a limitation upon, or waiver
of, any privileges and immunities that apply to the Licensor or You, including from the legal
processes of any jurisdiction or authority.
Creative Commons is not a party to its public licenses. Notwithstanding, Creative Commons may elect
to apply one of its public licenses to material it publishes and in those instances will be considered the
“Licensor.” The text of the Creative Commons public licenses is dedicated to the public domain under
the CC0 Public Domain Dedication. Except for the limited purpose of indicating that material is shared
under a Creative Commons public license or as otherwise permitted by the Creative Commons policies
published at creativecommons.org/policies, Creative Commons does not authorize the use of the
trademark “Creative Commons” or any other trademark or logo of Creative Commons without its prior
written consent including, without limitation, in connection with any unauthorized modifications to
any of its public licenses or any other arrangements, understandings, or agreements concerning use
of licensed material. For the avoidance of doubt, this paragraph does not form part of the public
licenses.
Creative Commons may be contacted at creativecommons.org.
