HP OneView 2.0 Installation Guide One View
User Manual: Pdf
Open the PDF directly: View PDF ![]() .
.
Page Count: 25
- HP OneView 2.0 Installation Guide
- Contents
- 1 Preparing for installation
- 2 Installing HP OneView on a VM host
- 2.1 Validating the authenticity and integrity of the .ova download
- 2.2 Installing the HP OneView virtual appliance on a VMware vSphere hypervisor host
- 2.3 Installing the HP OneView virtual appliance on a Hyper-V host
- 2.4 Connecting to the appliance in DHCP and non-DHCP environments
- 2.5 Completing appliance startup tasks
- 2.6 Enable or disable authorized services access
- 2.7 Logging in to the appliance for the first time
- 2.8 Configuring the appliance network
- 2.9 Next steps
- 3 Appliance update
- 4 Support and other resources
- 4.1 Gather information before contacting an authorized support representative
- 4.2 How to contact HP
- 4.3 Get connected to the HP OneView online user forum
- 4.4 Software technical support and software updates
- 4.5 Related information
- 4.5.1 Product bulletins and Quick Specs for all HP products
- 4.5.2 HP OneView documentation and websites
- 4.5.3 Enclosure, iLO, and server hardware documentation and websites
- 4.5.4 HP 3PAR StoreServ Storage documentation and websites
- 4.5.5 HP Virtual Connect documentation and websites
- 4.5.6 Finding documents on the HP Support Center website
- 4.6 Submit documentation feedback
- A About using your appliance
- B Troubleshooting installation issues

HP OneView 2.0 Installation Guide
Abstract
This document provides instructions for installing new HP OneView appliances and for updating HP OneView appliances.
HP Part Number: 5900-4322
Published: October 2015
Edition: 1
© Copyright 2015 Hewlett-Packard Development Company, L.P.
Confidential computer software. Valid license from HP required for possession, use or copying. Consistent with FAR 12.211 and 12.212, Commercial
Computer Software, Computer Software Documentation, and Technical Data for Commercial Items are licensed to the U.S. Government under
vendor's standard commercial license. The information contained herein is subject to change without notice. The only warranties for HP products
and services are set forth in the express warranty statements accompanying such products and services. Nothing herein should be construed as
constituting an additional warranty. HP shall not be liable for technical or editorial errors or omissions contained herein.
Acknowledgments
Microsoft®, and Windows® are trademarks of the Microsoft Group of companies. Google® is a registered trademark of Google Inc. VMware®
is a registered trademark of VMware Inc.
Warranty
HP will replace defective delivery media for a period of 90 days from the date of purchase.

Contents
1 Preparing for installation.............................................................................5
1.1 Appliance VM and host requirements.....................................................................................5
1.2 Where to deploy the virtual machine.....................................................................................6
1.2.1 Deploying in a DL-based hypervisor environment..............................................................6
1.2.2 Deploying in a BladeSystem hypervisor environment.........................................................7
1.3 Planning for high availability................................................................................................7
2 Installing HP OneView on a VM host.............................................................8
2.1 Validating the authenticity and integrity of the .ova download...................................................8
2.2 Installing the HP OneView virtual appliance on a VMware vSphere hypervisor host.....................8
2.2.1 Downloading the OVA file............................................................................................8
2.2.2 Deploying the OVA file................................................................................................9
2.3 Installing the HP OneView virtual appliance on a Hyper-V host..................................................9
2.3.1 Downloading the zip file...............................................................................................9
2.3.2 Deploying the Hyper-V zip file.....................................................................................10
2.4 Connecting to the appliance in DHCP and non-DHCP environments........................................11
2.5 Completing appliance startup tasks.....................................................................................11
2.6 Enable or disable authorized services access........................................................................12
2.7 Logging in to the appliance for the first time.........................................................................13
2.8 Configuring the appliance network.....................................................................................13
2.8.1 Using the HP OneView UI to configure the appliance network.........................................13
2.8.2 Using REST APIs to configure appliance networking.......................................................14
2.9 Next steps.......................................................................................................................14
3 Appliance update....................................................................................15
3.1 Appliance update instructions.............................................................................................15
3.1.1 Upgrade paths...........................................................................................................15
3.1.2 Update time..............................................................................................................15
3.1.3 Update prerequisites...................................................................................................15
3.1.4 Update instructions.....................................................................................................15
3.1.5 Back up the appliance after the update.........................................................................16
4 Support and other resources......................................................................17
4.1 Gather information before contacting an authorized support representative...............................17
4.2 How to contact HP............................................................................................................17
4.3 Get connected to the HP OneView online user forum.............................................................17
4.4 Software technical support and software updates..................................................................17
4.4.1 Registering for software technical support.....................................................................17
4.4.2 Using your software technical support and update service..............................................18
4.4.3 Obtaining HP OneView software and firmware updates.................................................18
4.4.4 Obtaining software and drivers for HP ProLiant products................................................18
4.4.5 Warranty.................................................................................................................18
4.5 Related information...........................................................................................................18
4.5.1 Product bulletins and Quick Specs for all HP products.....................................................18
4.5.2 HP OneView documentation and websites....................................................................18
4.5.3 Enclosure, iLO, and server hardware documentation and websites...................................19
4.5.4 HP 3PAR StoreServ Storage documentation and websites...............................................19
4.5.5 HP Virtual Connect documentation and websites...........................................................19
4.5.6 Finding documents on the HP Support Center website....................................................19
4.6 Submit documentation feedback.........................................................................................20
A About using your appliance.......................................................................21
A.1 Using the virtual appliance console.....................................................................................21
Contents 3
A.2 Controlling access to the appliance console.........................................................................21
A.2.1 Restricting console access...........................................................................................22
A.3 Best practices for managing a VM appliance.......................................................................22
A.4 Enable off-appliance browsing of UI help and REST API help..................................................22
B Troubleshooting installation issues...............................................................24
B.1 You cannot deploy the OVA file..........................................................................................24
B.2 You cannot log in.............................................................................................................24
B.3 Appliance cannot access the network..................................................................................24
B.4 Reduced performance on the VM host.................................................................................24
B.5 VM does not restart when the vSphere VM host time is manually set........................................25
4 Contents

1 Preparing for installation
This chapter describes the VM host requirements for installing HP OneView on a new appliance.
For other HP OneView 2.0 documentation, including release notes and the user guide, see http://
www.hp.com/go/oneview/docs.
1.1 Appliance VM and host requirements
HP OneView is a virtual appliance running on the following supported hypervisor hosts.
Table 1 Supported hypervisors and versions
VersionHypervisor
VMware vSphere ESXi •5.0
•5.0 update 1
•5.0 update 2
•5.0 update 3
•5.1
•5.1 update 1
•5.1 update 2
•5.1 update 3
•5.5
•5.5 update 1
•5.5 update 2
•5.5 update 3
•6.0
•6.0 update 1
Hyper-V is supported on the following Microsoft Windows platforms with the
Hyper-V role installed:
Microsoft Hyper-V
•Windows Server 2012
•Windows Server 2012 R2
•Windows Hyper-V Server 2012
•Windows Hyper-V Server 2012 R2
The appliance virtual machine (VM) must run on a VM host with ProLiant G7–class CPUs or later.
The appliance VM requires the following:
•Two 2 GHz or greater virtual CPUs.
•10 GB of memory dedicated to the appliance.
•170 GB of thick-provisioned disk space.
•A connection to the management LAN. HP recommends that you have separate networks for
management and data.
In addition, the clock on the VM host must be set to the correct time. If NTP (Network Time Protocol)
is not used to synchronize the time on the VM host, HP recommends configuring the appliance to
use NTP directly.
1.1 Appliance VM and host requirements 5

An HP OneView VM host must have the following requirements:
•At least two ProLiant Gen 7-class CPUs of at least 2.0 GHz.
•Ensure the hypervisor host meets the minimum system requirements:
Minimum system requirements for installing ESXi/ESX (1003661), VMware Knowledge Base
Review Prerequisites for Installation (Hyper-V Server 2012, Hyper-V Server 2012 R2), Microsoft
TechNet
Install Hyper-V and Configure a Virtual Machine (Windows Server 2012), Microsoft Windows
Server
•For power management options under BIOS settings:
Set HP Power Regulator to HP Static High Performance Mode.
Set Power Profile to Maximum Performance.
1.2 Where to deploy the virtual machine
You can deploy HP OneView on any Proliant hardware that meets the requirements in “Appliance
VM and host requirements” (page 5). Specific restrictions apply to hardware that is managed or
monitored by HP OneView.
You can deploy HP OneView to a hypervisor in the following hardware environments:
•Rack-mount ProLiant DL
•BladeSystem
Restrictions apply to both environments if you want to use HP OneView to manage the hypervisor
host on which it is executing.
IMPORTANT: HP recommends that you deploy the HP OneView virtual appliance on a hypervisor
environment that is dedicated to management functions and separate from the production hypervisor
environment.
1.2.1 Deploying in a DL-based hypervisor environment
Deploying HP OneView using a DL-based hypervisor configuration environment is typically the
simplest choice. Deploying to a hypervisor cluster configuration for high availability (HA) is the
best practice.
In a non-high availability (HA) configuration with a single DL server hypervisor host, adding the
DL server hypervisor host into HP OneView as managed server hardware is not supported. Add
the host in monitored mode. In monitored mode, do not power off the hypervisor host from HP
OneView, because doing so would inadvertently power off the virtual appliance.
In an HA configuration, where the HP OneView virtual appliance can be migrated between hosts,
the above restriction still applies but can be worked around using VM migration. Note that this
approach is error prone. The virtual appliance cannot detect the hypervisor host on which it is
running and therefore cannot warn the user regarding an unsupported operation.
The best practice is to use HP OneView to monitor, not manage, the DL hypervisor hosts in the
cluster. In monitored mode, before powering off a host using HP OneView, make sure that the
appliance is not running on that host. If it is, the HP OneView appliance needs to be migrated to
a different cluster member.
6 Preparing for installation

If the DL hypervisor hosts are added into HP OneView in managed mode, the following additional
restrictions apply:
•You cannot apply or edit the server profile for the hypervisor host on which the HP OneView
virtual appliance is currently executing.
•You must migrate the appliance to a different host in the cluster before applying the server
profile.
1.2.2 Deploying in a BladeSystem hypervisor environment
A BladeSystem configuration has the same restrictions as DL servers above and adds the additional
considerations of server profile connection management for managed enclosures.
For BladeSystems, the server profile encapsulates all the network connectivity for the blade server
and works in conjunction with the interconnect modules in the enclosure.
For a single enclosure, non-HA hypervisor BladeSystem environment, when deploying HP OneView
on ESXi hosts in the enclosure, the best practice is to monitor but not manage the enclosure. The
same restrictions above still apply. Do not power off the VM host where the HP OneView appliance
is currently executing.
For a single enclosure or multi-enclosure environment where the enclosures are added to HP
OneView in managed mode, the enclosure must include non-VC interconnect modules. The storage
and network connectivity for the hypervisor hosts supporting the HP OneView virtual appliance
must be restricted to using these non-VC interconnect modules. When performing server profile
operations and power operations, refrains from having HP OneView execute on the specific host
where those operations are being performed.
1.3 Planning for high availability
To use HP OneView in an HA (high availability) configuration, see the hypervisor documentation
for specific requirements.
VMware vSphere ESXi http://www.vmware.com/products/datacenter-virtualization/
vsphere/high-availability.html
Microsoft Hyper-V http://technet.microsoft.com/en-us/library/cc753787.aspx
1.3 Planning for high availability 7

2 Installing HP OneView on a VM host
HP OneView is delivered in the following formats:
File formatHypervisor host
Open Virtual Appliance (OVA) file containing an Open Virtual Format (OVF)
package.
VMware vSphere Hypervisor
To install the OVA file, you need:
1. The VMware vSphere Client (a Microsoft Windows application) or the
vSphere Web Client installed on the host system.
2. Access to a VMware vCenter server to install HP OneView.
The vSphere Web Client requires vCenter 5.1 Update 2 or higher to
download the OVA file.
Image zip file.Microsoft Hyper-V hypervisor
To install HP OneView with this .zip file, the Hyper-V role must be installed
on the Windows Server.
2.1 Validating the authenticity and integrity of the .ova download
When you download the HP OneView appliance file from the HP Software Depot website at
https://www.software.hp.com, you can trust that the virtual appliance image is from HP because
HTTPS connection uses trusted security certificates.
You can additionally use the freely available GPG tools to validate the authenticity and integrity
of the file. For example:
gpg --verify HP_OneView_<version>.ova.sig HP_OneView_<version>.ova
NOTE: This digital signature verification step is not required for upgrade installations. The upgrade
file (the *.bin file) is already digitally signed, and the digital signature is automatically validated
during the upgrade procedure.
See the following web page for detailed verification instructions: http://www.hp.com/go/codeverify
2.2 Installing the HP OneView virtual appliance on a VMware vSphere
hypervisor host
Follow these instructions to install HP OneView on a VMware vSphere hypervisor host.
2.2.1 Downloading the OVA file
If you do not have the OVA file on physical media, download the OVA file from the HP Software
Depot.
The OVA file size is approximately 3.5 GB. Download time varies depending on your network
connection. HP recommends using a download manager that supports resuming downloads, such
as the one provided by the HP Software Depot.
1. Open a browser on a system running the hypervisor client.
2. Go to the HP Software Depot at http://software.hp.com and select HP OneView.
NOTE: If you have an account with HP Software Depot, you must log in before downloading
files. If you have not registered, you will be prompted to do so.
3. Download the OVA file to a local directory.
The local directory must be located on the system running the vSphere client or must be
accessible through a web address.
8 Installing HP OneView on a VM host

NOTE: The OVA file is digitally signed. You have the option to validate the authenticity and
integrity of the download by following the instructions at http://www.hp.com/go/codeverify. See
“Validating the authenticity and integrity of the .ova download” (page 8) for more information.
2.2.2 Deploying the OVA file
1. Start the vSphere client and log into vCenter.
2. From the menu, select File→Deploy OVF Template to launch the Deploy OVF Template wizard.
a. On the Source screen, specify one of the following:
•The path to the OVA file
•Web address (URL) of the OVA file, if you made it accessible via a web server
b. Verify the information on the OVF Template Details screen.
c. On the Name and Location screen, enter a name and location for the deployed template
that is unique within the inventory folder, and then select the inventory location.
d. On the Host / Cluster screen, select the host or cluster on which to run the deployed
template.
e. On the Storage screen, select a storage destination for the VM files.
f. On the Disk Format screen, select the format for storing the virtual disks.
IMPORTANT: HP highly recommends that you select Thick Provisioning because if you
select thin provisioning, the appliance VM is suspended if the VM host runs out of disk
space. If this occurs during actions such as upgrading firmware, applying a profile, or
performing a backup of appliance updates, it can result in failures that are difficult to
diagnose and might require a service call to resolve..
HP also ecommends that you select Eager Zeroed.
g. On the Network Mapping screen, select a network that has connectivity to your
management LAN.
h. On the Ready to Complete screen, verify your selections. Use the Back button to make
changes, if necessary. Click Finish to complete the template and start deployment.
When the deployment is complete, the VM is available for use.
NOTE: If you are planning on using the hypervisor host to set the time, you should configure
the host with NTP. Or you can configure the appliance to reference NTP servers.
3. On the Summary tab, click Power on the virtual machine. Click the Console tab to watch the
appliance start.
It takes approximately 10 minutes, depending on your hardware, from the time the appliance
is powered on until it is ready to accept browser connections. During this time, the vSphere
virtual console displays the message Please wait while the appliance starts.
When startup is complete, the virtual console displays the HP OneView EULA screen.
4. See “Connecting to the appliance in DHCP and non-DHCP environments” (page 11) to connect
to the appliance.
2.3 Installing the HP OneView virtual appliance on a Hyper-V host
Follow these instructions to install the HP OneView virtual appliance on a Microsoft Hyper-V host.
2.3.1 Downloading the zip file
If you do not have the Hyper-V zip file on physical media, download the zip file from the HP
Software Depot.
2.3 Installing the HP OneView virtual appliance on a Hyper-V host 9

The zip file is approximately 3.5 GB. Download time varies depending on your network connection.
HP recommends using a download manager that supports resuming downloads, such as the one
provided by the HP Software Depot.
1. Open a browser on a system running the hypervisor client.
2. Go to the HP Software Depot at http://software.hp.com and select HP OneView.
NOTE: If you have an account with HP Software Depot, you must log in before downloading
files. If you have not registered, you will be prompted to do so.
3. Download the zip file to a local directory.
NOTE: The zip file is digitally signed. You have the option to validate the authenticity and integrity
by following the instructions at http://www.hp.com/go/codeverify.
2.3.2 Deploying the Hyper-V zip file
1. Extract the Hyper-V image zip file (HPOneView_<version number>.zip) to a location
accessible from the Hyper-V host.
2. Open the Hyper-V Manager. Right-click on the Hyper-V host and select Import Virtual Machines.
3. In the Import Virtual Machine wizard, browse to where you unpacked the Hyper-V image zip
file and click through until you see the directories called Snapshots, Virtual Hard Disks and
Virtual Machines. Select the parent directory of those three directories.
4. Continue through the steps in the wizard to import the appliance virtual machine.
IMPORTANT: Be sure to select Copy the virtual machine (create a new unique ID) option.
5. Verify that the VM is configured to meet the host requirements (see “Appliance VM and host
requirements” (page 5)), set up thick provisioning, and set up network adapters on your VM
host.
To edit settings on the VM, right-click on the appliance VM and select Settings.
•For appliance VM and host requirements: See “Appliance VM and host
requirements” (page 5).
•For thick provisioning: To use a fixed size disk in Hyper-V after the VM is imported, select
Settings and select the virtual hard disk. Edit the current disk, select Convert, and then
select Fixed size. Change the size of the VM hard disk to the new fixed size disk you just
created.
IMPORTANT: HP recommends using a fixed size disk, otherwise, if your VM host disk
runs out of space, the appliance will likely encounter errors and terminate unexpectedly
and might not recover. If this happens, you will need to install a new appliance and
restore it from a backup file.
•For network adapters: Use the hypervisor UI to set the VM network adapters. The appliance
supports one NIC on the management LAN.
You will normally connect the network adapter to one or more virtual switches, depending
on your networking configuration.
IMPORTANT: Be sure to uncheck the VLAN ID box if you are not using VLANs and
VLAN identifiers.
6. Before powering on your virtual appliance, verify the date and time are set properly on your
VM host system. Maintain an accurate time on the VM host system, using tools such as NTP,
10 Installing HP OneView on a VM host

because the VM guest will synchronize with that time. If your VM host does not have the time
set properly, the following message can be displayed when you boot the appliance:
The time and date on your hypervisor appears to be incorrect. Please
power off your appliance, correct the time and date on your
hypervisor, and power on your appliance.
If you encounter this problem, follow the instructions in the message.
7. Power on the virtual machine for the first time.
In the Hyper-V Manager, right-click on the appliance VM and power it on.
8. On the console you will see the appliance license and support screens. You are now ready
to log into your appliance for the first time.
2.4 Connecting to the appliance in DHCP and non-DHCP environments
Connect to the appliance for the first time using one of the following methods, depending on how
your host environment is configured:
DescriptionEnvironment
With DHCP VMware
vSphere
Use the Summary tab on the vSphere virtual console to determine the initial
IP address for the appliance. Then, connect to the appliance using the
appliance IP address in a browser running on your local computer.
Microsoft
Hyper-V
If you have DHCP and Dynamic DNS available on the management LAN,
the appliance registers a DNS name at startup with the format: ci-<MAC
address>. You can determine the Ethernet MAC address of the appliance
using the Network tab of Hyper-V Manager. Use the name in the browser's
address bar. For example:
https://ci-<MAC address>.example.com
If you do not have dynamic DNS, use the virtual console to connect to the
appliance. Select Connect in Hyper-V Manager to connect to the appliance
console to perform the first time setup steps.
Without DHCP VMware
vSphere
Use the vSphere virtual console to connect to the appliance using the browser
running on the virtual console. Press Ctrl+Alt to exit from the virtual console.
Microsoft
Hyper-V
Select Connect in Hyper-V Manager to connect to the appliance console to
perform the first time setup steps.
Connect to the appliance using the assigned host name or IP address.
NOTE: If there are networking issues and you cannot connect to the appliance, use the hypervisor
virtual console to log on to the appliance to verify or change network settings.
2.5 Completing appliance startup tasks
Complete these steps to start the appliance for the first time.
1. If you have not already done so, connect to the appliance using one of the methods described
in “Connecting to the appliance in DHCP and non-DHCP environments” (page 11).
NOTE: You can also use REST APIs to complete the remaining installation steps. For more
information, see the Quick Start for initial configuration in the REST API scripting help.
2. On the HP OneView EULA screen, review the end user license agreement, and click Agree to
continue.
NOTE: If you click Disagree, the installation process is cancelled.
2.4 Connecting to the appliance in DHCP and non-DHCP environments 11
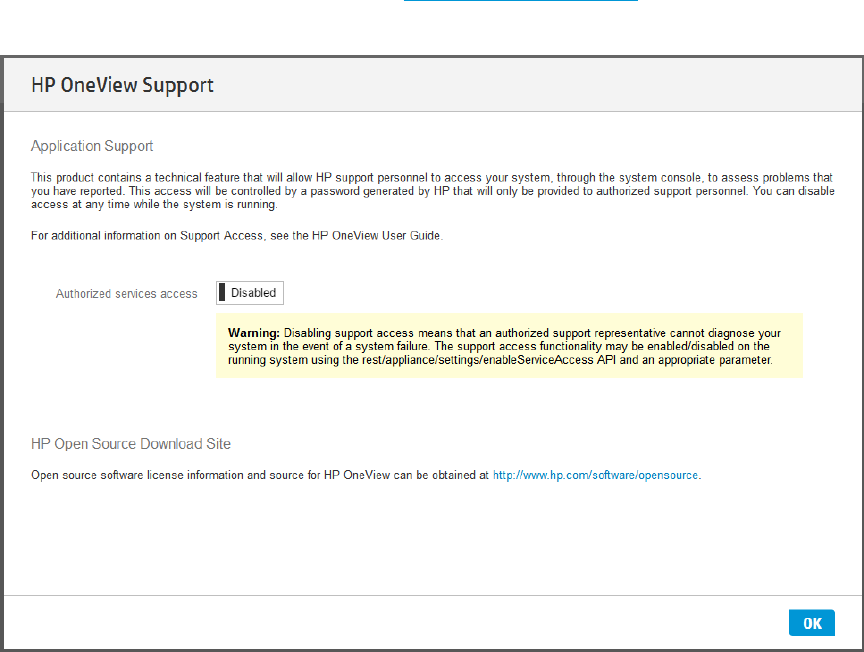
3. On the HP OneView Support screen, decide if you want to Enable or Disable authorized
services access to your appliance. See the HP OneView User Guide for information about the
implications of disabling services access to your appliance.
4. Click OK to continue.
2.6 Enable or disable authorized services access
When you first start up the appliance, you can choose to enable or disable access by on-site
authorized support representatives. By default, on-site authorized support representatives are
allowed to access your system through the appliance console and diagnose issues that you have
reported.
Support access is a root-level shell, which enables the on-site authorized support representative to
debug any problems on the appliance and obtain a one-time password using a challenge/response
mechanism similar to the one for a password reset.
Any time after the initial configuration of the appliance, an Infrastructure administrator can enable
or disable services access through the UI with the following procedure:
Prerequisites
•Minimum required privileges: Infrastructure administrator
Enabling or disabling authorized services access
1. From the main menu, select Settings.
2. Click the Edit icon in the Security panel.
The Edit Security window opens.
3. Select the appropriate setting for Service console access:
•Disabled to prevent access to the console.
•Enabled to allow access to the console.
4. Click OK.
12 Installing HP OneView on a VM host
You can also use an appliance/settings REST API to enable or disable services access.
NOTE: HP recommends that you enable access. Otherwise, the authorized support representative
will not be able to access the appliance to correct troubleshoot issues.
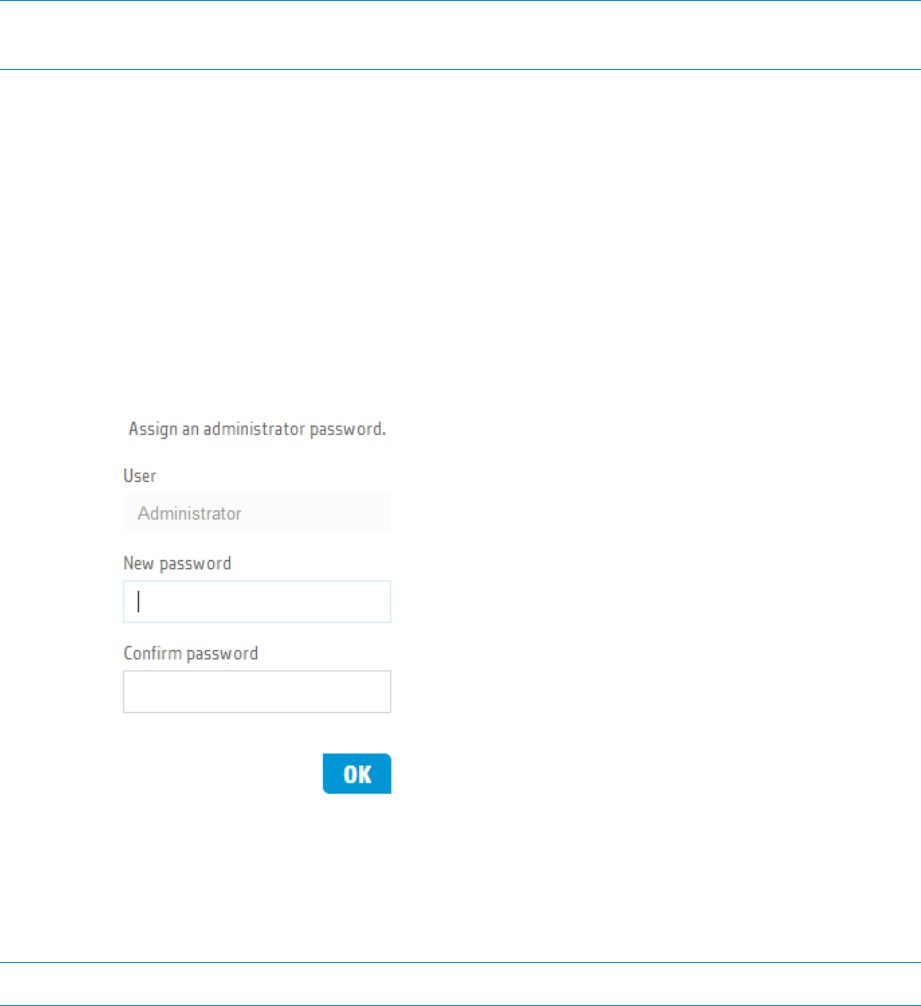
2.7 Logging in to the appliance for the first time
When the appliance starts up, use the default credentials to log in to the appliance. This is typically
done using the special restricted browser running in your VM Console window.
1. Use the following default credentials the first time you log in to the appliance:
User name: Administrator
Password: admin
If you cannot log in using the default credentials, see “You cannot log in” (page 24).
2. Change the default password to a password of your choice that contains at least 8 characters.
2.8 Configuring the appliance network
The next step in the process is to use the UI to configure the appliance network.
NOTE: For Hyper-V VMs, you must configure the appliance network from the virtual console.
2.8.1 Using the HP OneView UI to configure the appliance network
After you log in as the Administrator for the first time, the Appliance Networking screen
appears.
2.7 Logging in to the appliance for the first time 13

Most of the information on this screen is provided for you. However, you must enter the following
information:
•Appliance host name - A default name appears in the appliance host name field, but you can
change the default name to a host name of your choice.
NOTE: If you specify DNS (Domain Name Service) either directly or indirectly, you must
specify the fully qualified host name.
•The IPv4 address - HP OneView requires an IPv4 address. You can configure an IPv6 address
on the appliance and use it to connect to the appliance from your browser; however, HP
OneView requires IPv4 to communicate with managed resources.
•DNS server addresses - If you are using DNS, enter the DNS server addresses here.
•IPv6 address information - If you are using IPv6 for address assignment, select Manual or
DHCPv6.
For more information about the options available for configuring the appliance networking settings,
click to access help.
2.8.2 Using REST APIs to configure appliance networking
You can use a REST API POST operation with the /rest/appliance/network-interfaces
API that includes all of the networking settings to configure appliance networking for the first time.
For more information, click to view the REST API scripting help and the HP OneView REST API
Reference. These documents are also available from the http://www.hp.com/go/oneview/docs.
2.9 Next steps
After the installation is complete and you have configured the appliance network, the next step is
to bring your data center resources under appliance management. First time configuration tasks
are documented in the online help and the HP OneView User Guide, which also contains illustrated
step-by-step instructions for configuring an example data center.
14 Installing HP OneView on a VM host

3 Appliance update
3.1 Appliance update instructions
3.1.1 Upgrade paths
You can upgrade directly to version 2.0 from any 1.10 or later version of HP OneView.
3.1.2 Update time
The update requires an appliance reboot and the time to complete an update, including the reboot,
takes approximately 60 minutes.
3.1.3 Update prerequisites
NOTE: Microsoft Internet Explorer (IE) cannot transfer files larger than 4 GB. For those files, use
Mozilla Firefox or Google Chrome browsers to upload updates or patches to HP OneView, or use
the REST APIs. The REST APIs are easily accessible using HP OneView's community-supported
Powershell or Python integrations.
NOTE: When updating from releases earlier than V1.20, note that this update contains a custom
Software Pack for Proliant containing critical firmware updates. Ensure there is at least 3.4 GB of
free space in the appliance firmware bundle repository before installing this update. When deleting
existing SPPs, first make sure they are not currently in use by any server profiles.
•You must be logged in to the appliance as a user with Infrastructure administrator privileges.
•No other users are logged in to the appliance and no one logs in during the update.
•Before you begin the update process, use the appliance UI or REST APIs to back up the
appliance:
◦Appliance UI: Settings→Actions→Create backup and Settings→Actions →Download
backup
◦REST APIs: /rest/backups and /rest/backups/archive
NOTE: See the HP OneView online help topic “Back up an appliance” if you need assistance.
•Before you begin, create a VM snapshot of your appliance.
3.1.4 Update instructions
To update an appliance to version :
1. Download the HP OneView Update (Z7550-96195.bin) image file from HP Software Depot
(https://www.software.hp.com) to your local computer.
2. Log in to your appliance and select Settings→Actions→Update appliance.
3. Move the Z7550-96195.bin file to the appliance UI screen either by dragging and dropping
or browsing to it.
NOTE: See the HP OneView online help topic “Update the appliance” if you need assistance.
4. Click Upload and Install to start the update process.
3.1 Appliance update instructions 15
3.1.5 Back up the appliance after the update
After upgrading your appliance to HP OneView version 2.0, remember to create a new backup
file. If you need to restore a 2.0 appliance, you can only do so from a backup file that was created
on a 2.0 appliance.
16 Appliance update

4 Support and other resources
The following topics provide information about authorized technical support as well as the other
resources and documentation that are available to assist you in the use of HP OneView.
4.1 Gather information before contacting an authorized support
representative
If you need to contact authorized technical support , be sure to have the following information
available:
•Your Service Agreement Identifier (SAID)
•Software product name — HP OneView
•Hypervisor virtualization platform and version
•Messages generated by the appliance
•Other HP or third-party software in use
•A support dump if a message recommended that you create a support dump for analysis
purposes
4.2 How to contact HP
•See the Contact HP Worldwide website to obtain contact information for any country:
http://www.hp.com/go/assistance
•See the contact information provided on the HP Support Center website:
http://www.hp.com/go/hpsc
•In the United States, call +1 800 334 5144 to contact HP by telephone. This service is available
24 hours a day, 7 days a week. For continuous quality improvement, conversations might be
recorded or monitored. Say OneView when prompted for the product name.
4.3 Get connected to the HP OneView online user forum
The HP OneView interactive online forum enables you to share your experiences and pose and
answer questions related to using HP OneView.
See http://www.hp.com/go/oneviewcommunity to join the discussion.
4.4 Software technical support and software updates
HP OneView software products with an Advanced license include three years of 24 x 7 software
technical support and update services, which provides access to technical assistance to resolve
software implementation or operations problems. A Standard license includes three years of 9 x
5 software technical support and update services.
With this service, you benefit from expedited problem resolution as well as proactive notification
and delivery of software updates.
See http://www.hp.com/go/hpsc for more information.
4.4.1 Registering for software technical support
When you order HP OneView, you receive a license entitlement certificate by physical shipment
or email, which you must redeem online in order to obtain the license activation key.
4.1 Gather information before contacting an authorized support representative 17

After redeeming your license certificate activation key, you are prompted to register for software
technical support and update services. Licenses that are embedded in the hardware are automatically
registered.
See https://myhplicensing.hp.com for more information.
4.4.2 Using your software technical support and update service
Once registered, you receive a service contract in the mail containing the customer service phone
number and your Service Agreement Identifier (SAID). You need the SAID when you phone for
technical support.
4.4.3 Obtaining HP OneView software and firmware updates
See http://www.hp.com/go/oneviewupdates to obtain HP OneView software updates and
product-specific firmware bundles.
4.4.4 Obtaining software and drivers for HP ProLiant products
See http://www.hp.com/go/support for the latest software and drivers for your HP ProLiant
products.
4.4.5 Warranty
HP will replace defective delivery media for a period of 90 days from the date of purchase. This
warranty applies to all products found on the delivery media.
4.5 Related information
To learn about the technical documentation, websites, and other resources that are available for
HP OneView and related products, see the following topics:
•“HP 3PAR StoreServ Storage documentation and
websites” (page 19)
•“Product bulletins and Quick Specs for all HP
products” (page 18)
•“HP OneView documentation and websites” (page 18) •“HP Virtual Connect documentation and websites” (page
19)
•“Enclosure, iLO, and server hardware documentation
and websites” (page 19) •“Finding documents on the HP Support Center
website” (page 19)
4.5.1 Product bulletins and Quick Specs for all HP products
The HP product bulletin website http://www.hp.com/go/productbulletin, accessible from your
desktop or mobile device, is a convenient central resource providing technical overviews and
specifications for HP hardware and software products.
4.5.2 HP OneView documentation and websites
See the HP Enterprise Information Library at http://www.hp.com/go/oneview/docs to download
the latest versions of the following HP OneView documentation:
•HP OneView REST API Reference•HP OneView Release Notes
•HP OneView Support Matrix •zip file of HP OneView user interface HTML help files
18 Support and other resources

•zip file of HP OneView REST API HTML help files•HP OneView Installation Guide
• •HP OneView User Guide Technical white papers
HP OneView websitesHP OneView help
To view help on the appliance, click to open the Help
sidebar. Links in the sidebar open help in a new browser
window or tab:
•Primary website: http://www.hp.com/go/oneview
•Software updates: http://www.hp.com/go/
oneviewupdates
•User community forum: http://www.hp.com/go/
oneviewcommunity
•Help on this page opens help for the current screen
•Browse help opens the top of the help system where
you decide which help topics you want to read about •Videos: http://www.hp.com/go/oneviewdemos
•Browse REST API help opens help for API scripting and
reference information
•Clicking on a screen or dialog box opens
context-sensitive help for that dialog box
NOTE: See the online help for instructions to enable users and developers to browse the HP
OneView help and HP OneView REST API Reference on their local computers or a web server.
4.5.3 Enclosure, iLO, and server hardware documentation and websites
You can download the latest versions of hardware manuals from the HP Servers Information Library
http://www.hp.com/go/enterprise/docs.
For more information about hardware products, see the following websites:
HP ProLiant server hardware websitesEnclosure and iLO websites
•General information: http://www.hp.com/go/proliant•HP BladeSystem enclosures: http://www.hp.com/go/
bladesystem •BL series server blades: http://www.hp.com/go/blades
•HP Integrated Lights-Out : http://www.hp.com/go/ilo •DL series rack mount servers: http://www8.hp.com/
us/en/products/proliant-servers/index.html?
facet=ProLiant-DL-Rack
4.5.4 HP 3PAR StoreServ Storage documentation and websites
You can download the latest versions of HP 3PAR StoreServ Storage manuals from the HP Storage
Information Library http://www.hp.com/go/storage/docs.
For more information about HP 3PAR StoreServ Storage products, see http://www.hp.com/go/
storage.
4.5.5 HP Virtual Connect documentation and websites
You can download the latest versions of HP Virtual Connect manuals from the HP Support Center.
HP Virtual Connect websiteDocument type
http://www.hp.com/go/virtualconnect
•HP Virtual Connect user guides
•HP Virtual Connect command line references
See “Finding documents on the HP Support Center
website” (page 19)
4.5.6 Finding documents on the HP Support Center website
Follow these instructions to access technical manuals hosted on the HP Support Center.
4.5 Related information 19

1. Go to the HP Support Center website at http://www.hp.com/go/hpsc.
2. Under Knowledge Base in the left navigation pane, select Manuals.
3. Type a product name in the Find an HP product by search box (for example, Storage 3PAR
or HP Virtual Connect) and click Go.
4. If more than one product name is returned in the results, select the product you want.
5. On the Manuals page for that product, select your Language.
6. Next, select the type of document you are looking for to narrow down the list of documents
that are offered to you. For example, select getting started information, user guides, setup and
installation guides, general reference information, or white papers.
If the list of documents is long, it might take a few seconds to load the page. You can use the
sorting options in the table headings to sort the list of documents alphabetically by title or by
publication date.
7. Select a document title to download to your local computer or to view online.
4.6 Submit documentation feedback
HP is committed to providing documentation that meets your needs. To help us improve our
documentation, send your suggestions and comments to this email address:
docsfeedback@hp.com
For UI and REST API help
In your email message, include the section title where the content is located. Also include the
product name, product version, help edition, and publication date located on the legal notices
page.
For user guides and other manuals
In your email message, include the document title, edition, publication date, and document part
number located on the front cover of the document as well as the section title and page number.
20 Support and other resources

A About using your appliance
A.1 Using the virtual appliance console
The virtual appliance console has a restricted browser interface that supports the following:
•Appliance networking configuration in non-DHCP environments
•Password reset requests for the Administrator account
•Advanced diagnostics for authorized support representatives
Use the virtual appliance console to access the appliance and configure the appliance network
for the first time. The virtual appliance console enables you to bootstrap an appliance onto the
network in non-DHCP environments. The virtual appliance console is not intended to be a full-featured
replacement for your browser.
The virtual appliance console starts a browser session; The browser takes up the full screen; you
cannot add tabs. You cannot perform any operation that requires you to select a file from a dialog
box, including uploading software updates and firmware bundles (SPPs). Only basic browsing,
including forward and backward navigation, are enabled.
Table 2 Key combinations for the virtual appliance console
FunctionKey combination
Browse backward(Alt and left arrow)Alt-←
Browse forward(Alt and right arrow)Alt-→
Zoom in(Ctrl and plus sign)Ctrl-+
Zoom out(Ctrl and hyphen)Ctrl--
Reset zoom(Ctrl and zero)Ctrl-0
SearchCtrl-F
Reload/RefreshCtrl-R or F5
Restart the browser interfaceCtrl-Alt-Backspace
A.2 Controlling access to the appliance console
Use the hypervisor management software to restrict access to the appliance, which prevents
unauthorized users from accessing the password reset and service access features. See “Restricting
console access” (page 22).
Typical legitimate uses for access to the console are:
•Troubleshooting network configuration issues
•Resetting an appliance administrator password
•Enabling service access by an on-site authorized support representative
The virtual appliance console is displayed in a graphical console; password reset and HP Services
access use a non-graphical console.
Switching from one console to another (VMware vSphere)
1. Open the virtual appliance console.
2. Press and hold Ctrl+Alt.
3. Press and release the space bar.
4. Press and release F1 to select the non-graphical console or F2 to select the graphical console.
A.1 Using the virtual appliance console 21

A.2.1 Restricting console access
You can restrict console access to the virtual appliance through secure management practices of
the hypervisor itself.
For VMware vSphere, this information is available from the VMware website:
http://www.vmware.com
In particular, search for topics related to vSphere's Console Interaction privilege and best practices
for managing VMware's roles and permissions.
A.3 Best practices for managing a VM appliance
HP recommends the following guidelines for managing your VM appliance from the virtual console:
Table 3 Best practices for managing a VMware vSphere virtual machine
Do notDo
•Use thin provisioning.•Use thick provisioning.
• •Use shares and reservations to ensure adequate CPU
performance.
Update the VMware tools. If VMware Tools show Out
of Date or Unmanaged, they are running correctly.
These status messages are not a problem, because the
tools are available and running. VMware tools are
updated with each HP OneView software update.
•Revert to a VM snapshot (unless under specific
circumstances, as instructed by your authorized support
representative).
•Set the Synchronize guest time with host option in the
vSphere client when the HP OneView appliance is
configured to use NTP. HP OneView automatically sets
the appropriate Synchronize guest time with host setting
during network configuration. When HP OneView is
configured to use NTP servers, the Synchronize guest
time with host option is disabled. If HP OneView is not
configured to use NTP servers, it synchronizes to the
host VM clock and the Synchronize guest time with host
option is enabled. In this case, configure the VM host
to use NTP.
•Reduce the amount of memory assigned to the VM.
Table 4 Best practices for managing a Hyper-V virtual machine
Do notDo
•Use fixed size. •Update integration services.
•Revert to a VM checkpoint (unless under specific
circumstances, as instructed by your authorized support
representative).
•Reduce the amount of memory assigned to the VM.
A.4 Enable off-appliance browsing of UI help and REST API help
The off-appliance versions of the HP OneView help systems are useful for developers who are
writing REST API scripts or other users who prefer the convenience of accessing help locally without
logging in to the appliance.
NOTE: You can also browse the API Reference at http://www.hp.com/go/oneview/docs.
Downloading HTML UI help and HTML REST help
1. Go to the Enterprise Information Library:
http://www.hp.com/go/oneview/docs
22 About using your appliance
2. Select the HP OneView UI online help zip file or the HP OneView REST API online help zip
and save it to your computer or a local directory on a web server.
3. Use the utility of your choice to extract the contents of the .zip file.
4. Navigate to the content directory.
5. Double-click the index.html file to open the HP OneView help system.
A.4 Enable off-appliance browsing of UI help and REST API help 23

B Troubleshooting installation issues
This chapter describes issues that you might experience when you install HP OneView and provides
possible solutions.
B.1 You cannot deploy the OVA file
Possible cause and recommendationSymptom
The OVA file name was not included in the selected path.
•You must specify the complete address of the OVA file that resides in the OVA file directory.
The complete address includes the directory, the file name, and the file extension. If you
specify only the directory address, the message appears.
The FTP file transfer mode is not set to binary
•Retry the transfer with the transfer mode set to binary and then verify the checksum.
The file may have been corrupted or partially downloaded
•Retry the download and the verify the checksum.
The following message
appears: The OVF
package is
invalid and
cannot be
deployed.
B.2 You cannot log in
Possible cause and recommendationSymptom
The appliance has already been configured and the default password was
changed.
Default credentials fail
when you log in to the
appliance for the first
time. •Contact the administrator who performed the initial setup to get the new password.
•Start the installation process again.
B.3 Appliance cannot access the network
Possible cause and recommendationSymptom
Appliance network not properly configured
Appliance cannot
access the network. 1. Ping the appliance.
2. From the VM console, verify that the network configuration is correct.
3. From the VM console, verify that the DNS IP address is correct.
4. From the VM console, verify that the DNS server is running.
B.4 Reduced performance on the VM host
Possible cause and recommendationSymptom
The host machine has power management enabled.
Poor appliance
performance. 1. Ensure that power savings is disabled on the host machine.
2. Consider using a host machine with a more powerful chipset.
Poor I/O performance on hypervisor host
•Check the RAID configuration which can contribute to slower I/O.
•Verify bandwidth to an SAN storage that may be hosting the VM.
24 Troubleshooting installation issues

B.5 VM does not restart when the vSphere VM host time is manually set
Possible cause and recommendationSymptom
The appliance is not using NTP and the VM host time was incorrectly set to a
time in the past.
The appliance VM
does not restart and
the following error
•Reset the time settings on the VM host to the correct time, and then restart the VM appliance.
For more information, see your vSphere documentation.
appears in the
vSphere virtual
console: The •If the appliance or VM host is configured as an NTP client, ensure that the NTP server is
working correctly.
superblock last
mount time is in
NOTE: For recommended best practices for managing the appliance VM, see “Best practices
for managing a VM appliance” (page 22).
the future
UNEXPECTED
INCONSISTENCY;
RUN fsck
MANUALLY.
B.5 VM does not restart when the vSphere VM host time is manually set 25
