HPC Guide
User Manual: Pdf
Open the PDF directly: View PDF ![]() .
.
Page Count: 16

1
Road to Building a Linux Cluster
A How-To-Guide Manual written by Carlos Hernandez, Harsh Gadani,
Christopher Ricks, and Eric Brauner
Introduction:
Computer clusters consist of connected computers that work together so that it can be
viewed as one system. Each node (CPU) is set to perform the same task for speed and efficiency.
The components of a computer cluster are usually connected to each other through fast local area
networks, which each node running its own instance of an operating system. In most cases, the
nodes use the same hardware with the same operating systems but you can also install different
operating systems on each compute node. In this manual we will be guiding you on how to build a
Linux cluster from scratch using multiple compute nodes (CPU) and each of them will be using
Debian 7.11 as the operating system.
Getting Started:
Before starting to build your Linux Cluster, you should know some basic information on
Linux so here are some Linux commands you should be familiar with:
Commands
●cd - used to change the current working directory in the operating system
●ls - used for listing files in the current working directory and subdirectories
●mkdir - used to create new directories
●apt-get - tool used for working with APT (the Advanced Packaging Tool) software
packages. A rapid, practical, and efficient way to install packages on your system
●chmod - used to change the permissions of files or directories
●su - makes it possible to change a login session’s owner without the owner having to first
log out of that session. This command is short for “substitute user”
●wget - stands for “web get.” Used for downloading files over a network
●ssh - used to start a SSH client program that enables secure connection to a SSH server on
a remote machine
●vi - a screen-oriented text editor originally created for the Unix operating system
●nano - a text editor for Unix-like computing systems or operating environments using a
command line interface
●cp - used to make copies of files and directories

2
●chroot - runs a command or an interactive shell from another directory, and treats that
directory as root
●tar - used to create, maintain, modify, and extract files that are archived in the tar format
●dd - enables you to create a bootable USB drive
Also some hardware components you will be using for your build. Creating ethernet cables,
installing the hard drive and network drive into your compute nodes. Here are some definitions of
hardware and software components:
Definitions
●RAM (Random Access Memory) - alternatively referred to as main memory, primary
memory, or system memory, RAM is a hardware device that allows info to be stored and
retrieved on a computer.
●USB Drive - alternatively referred to as a flash drive, data stick, pen drive, memory unit,
or key chain drive. This is simply a portable storage device.
●Debian - a free, open-source operating system developed with tools from the GNU project
●Ethernet - a widely used local-area network (LAN) protocol originally created by Xerox
PARC in 1973 by Robert Metcalfe and others
●CPU (Central Processing Unit) - alternatively referred to as a processor, central processor,
or microprocessor. The CPU handles all instructions it receives from hardware and
software running on the computer.
●TCP (Transmission Control Protocol) - a standard that dictates how to establish and
maintain a connection through which two programs may exchange data.
●Network File System- allows network users to access shared files over TCP/IP.
●NTP (Network Time Protocol) - a protocol introduced in 1988 that is used on computer
networks to synchronize the time of computers and network devices.
●Warewulf - a computer cluster implementation toolkit that facilitates the process of
installing a cluster and long term administration
●MariaDB - one of the most popular database servers in the world. It’s made by the original
developers of MySQL.
3
Beginning your Build
Hardware
In order to begin working on your linux cluster, you will first need a master node. This
node will need a CPU, hard drive, cpu cooler, network card, motherboard, RAM and the
peripherals needed will consist of a monitor, mouse, keyboard, ethernet cables, and power cables.
Once the master node’s hardware has been set up, you will need a bootable USB drive to install an
OS (in this case Debain 7.11). Using Debian 7 is more stable than using Debian 9!
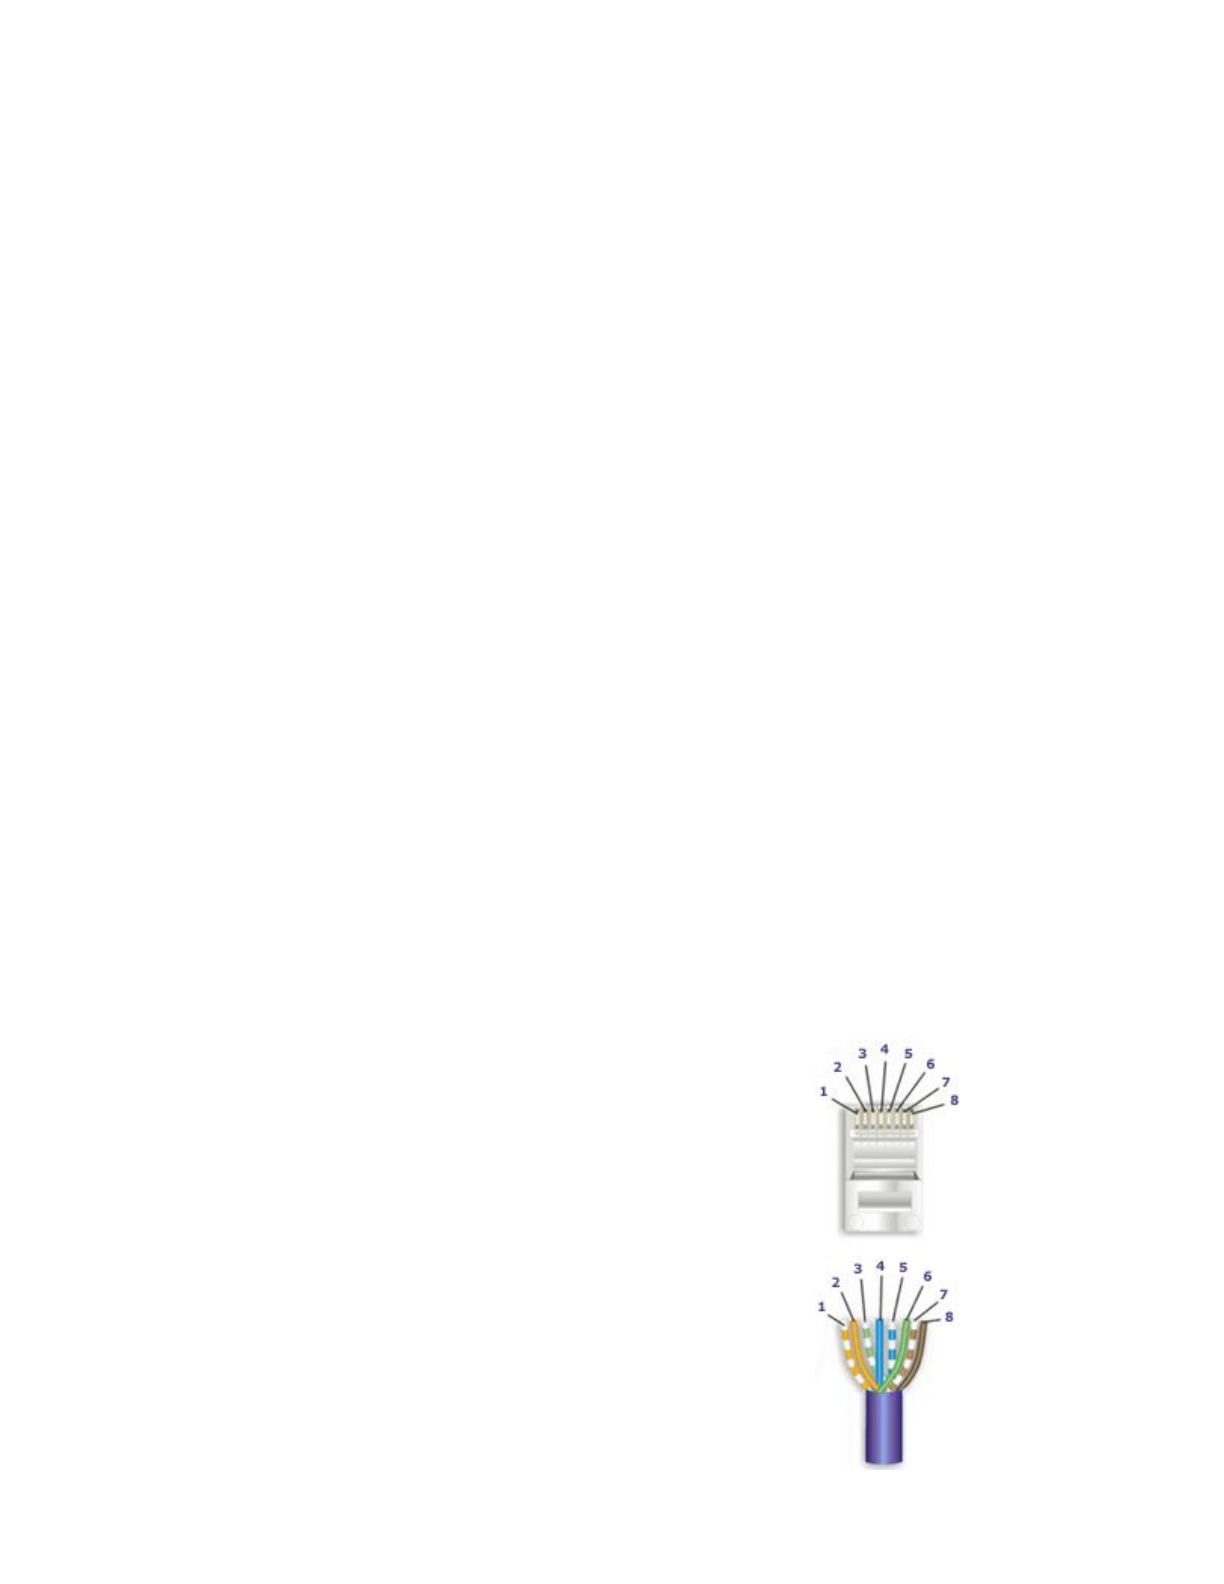
How to make a network cable:
Supplies
1. Cable
2. Crimp tool
3. Box of cat 5 plugs.
Three steps: Strip, Arrange, Crimp
Step 1: Strip
Using the razor on the crimp tool, strip off the amount you want off the sheath at the end
of the cable. If you somehow cut the internal wires, just cut the wire an inch down and strip again.
After the strip you will find 8 color-codes internal wires.
Step 2: Arrange
For making a standard network cable, you’ll want to arrange the colors in the same order
on both ends:
1. White/Orange striped
2. Orange solid
3. White/Green striped
4. Blue solid
5. White/Blue striped
6. Green solid
7. White/Brown striped
8. Brown solid
Step 3: Crimp
Insert the colored wires in that order into the cat 5 plug.

4
After you have done that, double check to see if they stayed in the correct order. It may take a
couple tries to get it right. Once it’s correctly placed into the plug, insert it into the crimp tool and
squeeze. But do not squeeze too hard because you might end up cutting one of the internal wires.
Repeat these 3 steps for the other end, and then you are done!!
Software
To create a bootable USB you will need to download Debian Wheezy from a separate
computer, and use a program which will create a bootable USB drive such as the dd command in
linux or LinuxLive USB creator in windows. With a bootable USB drive in hand, plug it into the
master node and power on the node. If necessary, enter the BIOS and change the boot sequence to
start with the USB drive and if the USB drive is not detected reset the BIOS to its defaults and
try again. Once you are able to boot off the USB, complete OS installation and remove USB. Be
sure to install the desktop environment, the ssh server, and the needed system software. When
partitioning, allocate 10 GB of memory to /boot, 2x Physical Memory to swap and the rest to /
(root). With multiple drives we will partition differently. Our build had three drives which were
partitioned:
Drive one: 50-100GB for /Boot, 10GB /swap, 50GB /usr/local and rest to / (root)
Drive two: 50GB /var, /home
Drive three: /scratch
Configuring the Master Node
This section will set up your master node in order to communicate with the other compute
nodes. We will setup the network so that the compute node has access to the outside world or the
internet through the PCI network card, and will communicate with the compute nodes through the
motherboards network card. We will also create a chrooted environment for the nodes and a
network file system to be shared to the compute nodes. As well as installing any necessary
software.
With a working computer, first thing we will need to do is set up the network. To set up
networking connections, edit the /etc/network/interfaces file, this file describes the network
interfaces available on your system.
# The loopback network interface
auto lo
iface lo inet loopback

5
#Use DHCP for public interface
auto eth0
iface eth0 inet dhcp
#setup static for mobo
auto eth1
iface eth1 inet static
address 10.253.1.254
netmask 255.255.255.0
gateway 10.253.1.254
Afterwards reboot the node and check your network using:
ip route
The output should look something along the lines of:
default via 136.160.116.1 dev eth0 proto static
10.253.1.0/24 dev eth1 proto kernel scope link src 10.253.1.254
136.160.116.0/22 dev eth0 proto kernel scope link src 136.160.119.40
Once everything checks out, you will need to install the essential build tools:
apt-get install build-essential
Then install the new updated mysql (mariaDB), and other important packages:
apt-get install mysql-server mysql-client
apt-get install ssh ntp qt-sdk pkg-config ncurses-dev nfs-server
libselinux1-dev pdsh tftp gfortran libxml2-dev tk-dev apache2
libapache2-mod-perl2 tftp-hpa debootstrap tcpdump isc-dhcp-server curl
libterm-readline-gnu-perl
Then reboot master node either using the reboot command or the GUI shutdown and reboot. If
problems occur you may need to turn off selinux by editing the /etc/selinux/config file and setting
the flag:
vi /etc/selinux/config
SELINUX=permissive
Note: when you exit vi editor (saving upon exit): Hit the (esc) key followed by :exit

6
If everything is fine up to this point then you will work on installing warewulf:
mkdir ~/src
cd ~/src
wget --no-check-certificate
https://warewulf.lbl.gov/svn/trunk/platform/deb/install-wwdebsystem
chmod +x install-wwdebsystem3.6
./install-wwdebsystem3.6
It should be noted that this will and should only fail on the VNFS with an invalid chroot path.
Therefore, you will need to eliminate the SSHD root login for security purposes:
nano /etc/ssh/sshd_config
change the line ‘#PermitRootLogin yes’ to ‘PermitRootLogin no’
/etc/init.d/ssh restart
Then edit /etc/exports to contain the following. Be careful to note the rw flag in /opt and the
‘no_subtree_check’. This is changing the default settings from warewulf.
vi /etc/exports
/home 10.253.1.0/255.255.255.0(rw,no_root_squash,no_subtree_check)
/srv/chroots 10.253.1.0/255.255.255.0(ro,no_root_squash,no_subtree_check)
/srv/chroots/debian7/vnfs
10.253.1.0/255.255.255.0(ro,no_root_squash,no_subtree_check)
/usr/local 10.253.1.0/255.255.255.0(rw,no_root_squash,no_subtree_check)
/opt 1 0.253.1 .0/255.255.255.0(rw,no_root_squash,no_subtree_check)
Afterwards edit /usr/local/libexec/warewulf/wwmkchroot/include-deb to replace/root:
vi /usr/local/libexec/warewulf/wwmkchroot/include-deb
DEB_CONF="/etc/apt-ww.conf"
DEB_CONF_FULL="$CHROOTDIR/etc/apt-ww.conf"
DEB_SRC="/etc/apt/sources.list"
DEB_SRC_FULL="$CHROOTDIR/etc/apt/sources.list"
Then edit /usr/local/etc/warewulf/vnfs.conf to include or read:

7
vi /usr/local/etc/warewulf/vnfs.conf
hybridpath = /srv/chroots/%{name}
Once finished, create a file in /usr/local/libexec/warewulf/wwmkchroot/ named debian7.tmpl
containing:
vi /usr/local/libexec/warewulf/wwmkchroot/debian7.tmpl
# Start debian7.tmpl
# DESC: A base 64 bit Debian wheezy chroot
# The general Deb include has all of the necessary functions, but #requires
# some basic variables specific to each chroot type to be defined.
. include-deb
ARCH="amd64"
SUITE="wheezy"
DEB_MIRROR="http://http.us.debian.org/debian/"
# Install additional packages with debootstrap.
PKGLIST="openssh-server,openssh-client,isc-dhcp-client,pciutils,strace,nfs-com
mon,ethtool,iproute,iputils-ping,iputils-arping,net-tools,linux-image-amd64,km
od,ntp,python-dev,libxml2,gfortran"
# End debian7.tmpl file
Once done create directories using mkdir command:
mkdir /srv/chroots
mkdir /srv/chroots/debian7
mkdir /srv/chroots/debian7/vnfs
mkdir /srv/chroots/debian7/srv
mkdir /srv/chroots/debian7/srv/chroots
Then create the warewulf chroot:
wwmkchroot debian7 /srv/chroots/debian7
Then edit the files (on the master node) /etc/idmapd.conf &
/srv/chroots/debian7/etc/idmapd.conf to read:
[General]
Verbosity = 0
Pipefs-Directory = /var/lib/nfs/rpc_pipefs
#set your own domain here. If ID differs from FQDN minus hostname
Domain = tier1.cluster
[Mapping]

8
Nobody-User = nobody
Nobody-Group = nogroup
Nobody and nogroup may need to be changed to the non-root username.
Next edit the /usr/local/etc/warewulf/defaults/node.conf to read:
#groups = maingroup
cluster = teir1
domain = cluster
unique hwaddrs = yes
Also edit the /usr/local/etc/warewulf/defaults/provision.conf to read:
vnfs = debian7
files = dynamic_hosts, passwd, group, shadow
Next you should comment out the infiniband drivers in /usr/local/etc/warewulf/bootstrap.conf.
Simply add a ‘#’ in front of the lines with drivers. The next step is to edit the
/srv/chroots/debian7/etc/fstab file to read under the infiniband section:
tmpfs /dev/shm tmpfs defaults 0 0
devpts /dev/pts devpts gid=5,mode=620 0 0
sysfs /sys sysfs defaults 0 0
proc /proc proc defaults 0 0
10.253.1.254 /home /home nfs defaults 0 0
10.253.1.254 /srv/chroots /srv/chroots nfs defaults 0 0
10.253.1.254 /srv/chroots/debian7/vnfs /vnfs nfs defaults 0 0
10.253.1.254 /usr/local /usr/local/ nfs defaults 0 0
10.253.1.254 /opt/opt nfs defaults 0 0
After editing these files, restart the nfs on the master node:
/etc/init.d/nfs-kernel-server restart
/etc/init.d/nfs-common restart
In the chroot directory you will need to edit the /srv/chroots/debian7/etc/rc.local file to look like:
#mount all nfs shares
/bin/mount -a
exit 0
Then we will need to verify that the network file system is being exported by the master node,
using the command:

9
showmount -e 10.253.1.254
With the nfs being correctly exported, next we will check to see if the tftp config file is using the
correct address /etc/default/tftpd-hpa:
TFTP_ADDRESS=“10.253.1.254:69”
Restart the tftp server:
/etc/init.d/tftpd-hpa restart
With all of the above completed we will now build our chroot environment and install it using the
warewulf commands which all start with “ww” then add our first compute node. As a side note the
compute node will not need a hard drive because it will be using the master node for any
information:
wwvnfs --chroot /srv/chroots/debian7 --hybridpath=/vnfs
wwsh dhcp update
wwsh node new n0001 --hwaddr=YourComputeNodesADDR --ipaddr=10.253.1.1
If you’re having trouble finding your compute nodes hardware address just enter the BIOS and
look in the settings, it is also known as the MAC address. At this point you should have another
computer ready to go, this pc should have everything your master node has hardware wise except
for the PCI network card and the hard drive. Connect the two nodes (computers) together with a
network cable which you have created. The nodes should be connected through the motherboards
network, not the master nodes PCI network card. Turn on the second computer which we will now
reference as n0001 or compute node1. Once n0001 has been turned on you may attach the display
cord (VGA, HDMI, etc) to it in order to see what it is doing and to verify that it is performing as a
compute node and not failing. Once you are sure that it is working continue to the next section.
Any issue will need to be fixed, some helpful commands are wwsh, wwinit ALL, and you should
go through each of the files which were edited and examine any spelling or syntax mistakes which
could be causing an issue.
Working with the Compute Nodes
With n0001 running and acting like a compute node, we will need to check that the nfs
mounts are working on it and are keeping the correct permissions. To do this we will do:
ssh n0001
df -k

10
ls -ltra /home
Examine the output and of the ownership and permissions of the mount. Next we will work of the
non-root user setup of ssh and passwordless login.
su (non-root user)
ssh (name of node)
cd
ssh-keygen -t rsa #(do not enter a passphrase)
Cd ~/.ssh
cp id_rsa pub authorized_keys
cd
ssh n0001 (answer yes)
exit
ssh n0001
If you run into any issues, BE VERY CAREFUL WITH THIS STEP, but you can remove the
files created by:
cd ~
rm -rf .ssh/
The second ssh into n0001 should not prompt for a password. If any issue occurs with ssh (non
root user) then you may have an issue with exporting the shadow file from the master node. If this
is the case:
sudo wwsh file import /etc/shadow
sudo wwsh provision set n0001 --fileadd shadow
After that works, we will then make sure the vnfs system stays up to date, patched and secure. On
the master node, as root, edit /srv/chroots/debian7/etc/apt/sources.list to include the following
lines to the beginning:
deb http://security.debian.org/ wheezy/updates main
deb-src http://security.debian.org/ wheezy/updates main
Optionaly, you can copy the sources.list file from the master to the chroot if any problems occur:
cp /etc/apt/sources.list /srv/chroots/debian7/etc/apt/sources.list
Then update, install, rebuild chroot and reboot compute nodes:
chroot /srv/chroots/debian7
mount -t proc proc proc/

11
apt-get update && apt-get upgrade
exit
wwvnfs --chroot /srv/chroots/debian7 --hybridpath=/vnfs
(while in the compute node ssh)
reboot
After restarting your compute nodes, you may need to update the bootstrap image (only if you
have a kernel upgrade in this) by executing the following commands:
wwbootstrap 3.21.6
wwsh provision set n0001 --vnfs=debian7 --bootstrap=3.21.6-4-amd64
After that works, we want the clocks to be the same on all nodes (synchronized with each other).
Edit the /srv/chroots/debian7/etc/ntp.conf file for compute nodes to read as follows:
#driftfile /var/lib/ntp/drift
#Permit all access over the loopback interface. This could be tightened as
#well, but to do so would #effect some of the administrative functions.
#restrict 127.0.0.1
#restrict default ignore
server 10.253.1.254
#restrict 10.253.1.254 nomodify
Rebuild vnfs to incorporate the changes:
wwvnfs --chroot /srv/chroots/debian7 --hybridpath=/vnfs
Reboot your compute node n0001, ssh into n0001 and check that ntp info is being picked up by
the compute nodes.Type “ntpq” in the command prompt then “peers”:
ntpq
ntpq> peers
SAMPLE OUTPUT FOR PEERS COMMAND
remote refid st t when poll reach delay offset jitter
============================================
debian 12.167.151.1 3 u 58 64 1 0.207 -4972.7 0.000
Now you can manually add new nodes by individually executing each of the following commands:

12
wwsh node new n0002 --hwaddr=”MAC ADDRESS OF NODE” --ipaddr=10.253.1.2
wwsh node new n0003 --hwaddr=”MAC ADDRESS OF NODE” --ipaddr=10.253.1.3
Make sure each ip address is unique for each node.
After adding another compute node, go back to Page 9 and follow through the steps of Working
with Compute Nodes again up till synchronizing their clocks.
Then after that update the files.
wwsh file sync
wwsh dhcp update
wwsh pxe update
Make sure that all of your nodes have their hostnames added to the ssh config files by logging into
them manually over ssh, which should prompt for their addition to the files.
Then confirm that pdsh will execute a command in parallel across as a root user and a normal
user.
pdsh -R ssh -w (masternodename), n0001 hostname
pdsh -R ssh -w (masternodename), n0001 uname -a
Optionally, if rsyslog needs to be installed on compute nodes:
chroot /srv/chroots/debian7
mount -t proc proc proc/
apt-get install rsyslog
wwvnfs --chroot /srv/chroots/debian7 --hybridpath=/vnfs
wsh dhcp update
(restart compute nodes)
Next, you have to build and install MPICH as root from this source (https://www.mpich.org/):
Click on the Green button (Download MPICH).
cd ~/src
cp (Path)/Downloads/mpich-3.2.tar.gz ~/src
tar zxvf mpich-3.2.tar.gz
cd mpich-3.2
./configure --enable-fc --enable-f77 --enable-romio --enable-mpe
--with-pm=hydra
make
make install
If problems occur during configuration you may need to also add --disable-fortran to the
./configure… line. Also don’t forget to make sure that /usr/local/lib is in library path on all
nodes. Addition of /usr/local/lib to the file /srv/chroots/debian7/etc/ld.so.conf.d/libc.conf file.

13
Reboot each node:
pdsh -R ssh -w n0001,n0002,n0003 reboot
Installing Ganglia
Ganglia is a scalable monitoring tool for high-performance computing systems, cluster and
networks. The software is used to record live statistics covering metrics such as CPU loads. You
can monitor your master node and also the nodes you add to your cluster. You will have to edit the
ganglia monitoring daemon (gmond) file which basically runs on each compute node you want to
monitor (including the master node). The ganglia meta daemon (gmetad) file you will also edit,
will collect information from each node periodically. Using data sources such as IP addresses for
access control over the compute nodes. And the ganglia web interface, which of course will let you
interact with ganglia and allow you to easily monitor and control your cluster.
On the master node, install Ganglia monitor, RDDtool, Gmetad, and the Ganglia web front end.
sudo apt-get install -y ganglia-monitor rrdtool gmetad ganglia-webfrontend
During the installation, you will be asked to restart Apache. Select yes. Then set up the online
dashboard by copying the Ganglia web front end configuration file to the Apache sites-enabled
folder.
sudo cp /etc/ganglia-webfrontend/apache.conf (continued on next line)
/etc/apache2/sites-enabled/ganglia.conf
Then edit the Gmetad configuration file to set up your cluster. This file configures where and how
the Getad daemon will collect data.
sudo vi /etc/ganglia/gmetad.conf
Find the line in the file that begins with “data_source”:
data_source “my cluster” localhost
And edit the line to:
data_source “my cluster” 60 localhost
Save file.

14
Next, edit the Gmond configuration file. We are setting it up for monitoring as the first node in the
“my cluster” cluster. The gmond.conf file configures where the node sends its information.
sudo vi /etc/ganglia/gmond.conf
In the cluster section in this file, make sure you set the name to the same one you set in the
gmetad.conf file
cluster {
name = “my cluster” #use the name from gmetad.conf file
owner = “unspecified”
latlong = “unspecified”
url = “unspecified”
}
In the udp_send_channel section, insert a new host line with the value localhost, which is the
server where you’re sending the information. Comment out the mcast_join line.
For reference, the mcast_join value provides a multicast address, but we need to send the data to
only one host, so this is unnecessary.
udp_send_channel {
#mcast_join = 239.2.11.71 #comment out
host = localhost
port = 8649
ttl = 1
}
In the upd_recv_channel section, comment out the mcast_join and bind lines.
The bind value provides a local address to bind to, but since the cluster will only be sending
information, this is unnecessary.
udp_recv_channel {
#mcast_join = 239.2.11.71 #comment out
port = 8649
#bind = 239.2.11.71 #comment out
}
tcp_accept_channel {
port = 8649
}
Restart Ganglia-monitor, Gmetad and Apache.

15
sudo service ganglia-monitor restart && sudo service gmetad restart && sudo
service apache2 restart
Web Interface
Ganglia should now be set up on your master node and accessed by typing localhost/ganglia in
your address bar.
Client Installation
For installing ganglia on your compute nodes you will need to go in your chroot environment.
sudo chroot /srv/chroots/debian7/
On the second node you want to monitor, install the ganglia monitor.
sudo apt-get install -y ganglia-monitor
Edit the gmond configuration file for monitoring the node.
sudo nano /etc/ganglia/gmond.conf
In the file you want to edit it so your node can match up with the master node files.
Cluster {
Name = “my cluster” #cluster name
Owner = “unspecified”
Laglong = “unspecified”
Url = “unspecified”
}
Udp_send_channel {
#mcast_join = 239.2.11.71
Host = localhost #IP address of master node
Port = 8649
Ttl = 1
}
/* udp_recv_channel {
Mcast_join = 239.2.11.71
Port = 8649
Bind = 239.2.11.71
} */

16
If you run into an issue where the compute nodes are not being picked up by ganglia monitor then:
globals {
daemonize = yes
setuid = no
user = ganglia
debug_level = 1
max_udp_msg_len = 1472
mute = no
deaf = no
host_dmax = 0 /*secs */
cleanup_threshold = 300 /*secs */
gexec = no
send_metadata_interval = 0
}
Pay special attention to debug_level = 1 as well as setuid = no. These configurations should
resolve or help resolve any issues.
After making these changes in the /etc/ganglia/gmond.conf file you would want to restart the
monitor service.
sudo service ganglia-monitor restart
After restarting the service, wait between 2-3 minutes and then reload the web interface. The new
node you just added should appear in the cluster. Repeat these steps if you want to add more
compute nodes.
Link to our blog: http://carloshernandezsalisburycompsci420.blogspot.com/2017/
BRAINBLAST
