HTML 5 Games Development By Example Beginner's Guide Makzan (Packt, 2011) BBS
HTML%205%20Games%20Development%20by%20Example%20-%20Beginner's%20Guide%20-%20Makzan%20(Packt%2C%202011)%20BBS
User Manual: Pdf
Open the PDF directly: View PDF ![]() .
.
Page Count: 352 [warning: Documents this large are best viewed by clicking the View PDF Link!]
- Cover
- Copyright
- Credits
- About the Author
- About the Reviewers
- www.PacktPub.com
- Table of Contents
- Preface
- Chapter 1: Introducing HTML5 Games
- Chapter 2: Getting Started with DOM-based Game Development
- Preparing the development environment
- Preparing the HTML documents for a DOM-based game
- Time for action – Installing the jQuery library
- Setting up the Ping Pong game elements
- Time for action – Placing Ping Pong game elements in DOM
- Time for action – Changing position of elements with jQuery
- Getting keyboard input from players
- Time for action – Moving DOM objects by keyboard input
- Supporting multiple keyboard input from players
- Time for action – Listening to keyboard input with
- another approach
- Moving a DOM object with JavaScript Interval
- Time for action – Moving the ball with JavaScript Interval
- Beginning collision detection
- Time for action – Hitting the ball with the paddles
- Showing text dynamically in HTML
- Time for action – Showing the score of both players
- Summary
- Chapter 3: Building a Memory Matching Game in CSS3
- Moving game objects with CSS3 transition
- Time for action – Moving a playing card around
- Creating a card-flipping effect
- Time for action – Flipping a card with CSS3
- Creating a card matching memory game
- Time for action – Preparing the card matching game
- Adding game logic to the matching game
- Time for action – Adding game logic to the matching game
- Embedding web fonts into our game
- Time for action – Embedding a font from Google Font Directory
- Summary
- Chapter 4: Building the Untangle Game with Canvas and Drawing API
- Introducing the HTML5 Canvas Element
- Drawing a circle in canvas
- Time for action – Drawing color circles on canvas
- Time for action – Drawing different arcs with arc function
- Time for action – Putting the circle drawing code into a function
- Time for action – Saving the circle position
- Drawing lines in canvas
- Time for action – Drawing straight lines between each circle
- Interacting with drawn objects in canvas with mouse events
- Time for action – Dragging the circles in canvas
- Detecting line intersection in canvas
- Time for action – Distinguishing the intersected lines
- Making the untangle puzzle game
- Time for action – Making the untangle puzzle game in canvas
- Summary
- Chapter 5: Building a Canvas Games Masterclass
- Filling shapes with gradient color
- Time for action – Drawing a gradient color background
- to the Untangle game
- Time for action – Filling the circles with radial gradient color
- Drawing text in canvas
- Time for action – Displaying the progress level text
- inside the canvas element
- Time for action – Embedding Google Web Font into the
- canvas element
- Drawing images in canvas
- Time for action – Adding graphics to the game
- Time for action – Adding CSS styles and images
- decoration to the game
- Animating a sprite sheet in canvas
- Time for action – Making a game guide animation
- Creating a multi-layers canvas game
- Time for action – Dividing the game into four layers
- Summary
- Chapter 6: Adding Sound Effects to your Games
- Adding a sound effect to the play button
- Time for action – Adding sound effects to the play button
- Time for action – Converting an MP3 sound to Ogg
- format with Audacity
- Building a mini piano musical game
- Time for action – Creating a basic background to the
- music game
- Time for action – Creating the playback visualization
- in the music game
- Linking the play button to the music game scene
- Time for action – Animating the scene transition
- Creating a keyboard-driven mini piano musical game
- Time for action – Creating a mini piano musical game
- Time for action – Removing music dots with the splice function
- Adding additional features to the mini piano game
- Time for action – Removing missed melody notes
- Time for action – Adding functionality to record the
- music level data
- Handling the audio event on playback completes
- Time for action – Indicating a game over event in the console
- Summary
- Chapter 7: Using Local Storage to Store Game Data
- Storing data by using HTML5 local storage
- Time for action – Creating a game over dialog with the
- elapsed played time
- Time for action – Saving the game score
- Saving objects in the local storage
- Time for action – Saving the time alongside the score
- Notifying players of breaking a new record with a nice ribbon effect
- Time for action – Creating a ribbon in CSS3
- Saving the entire game progress
- Time for action – Saving all essential game data in the
- local storage
- Time for action – Resuming a game from the local storage
- Summary
- Chapter 8: Building a Multiplayer Draw-and-Guess Game with WebSockets
- Trying an existing WebSockets web application
- Time for action – Trying the multiuser sketchpad
- Installing a WebSocket server
- Time for action – Installing Node.JS
- Time for action – Creating a WebSocket server that sends
- the total count of connections
- Time for action – Showing the connection count in a
- WebSocket application
- Building a chatting application with WebSockets
- Time for action – Sending a message to the server
- through WebSockets
- Broadcasting every received message on the server side to create a chat room
- Time for action – Broadcasting the messages to all connected
- browsers
- Making a shared drawing whiteboard with Canvas and WebSockets
- Time for action – Making a local drawing whiteboard with
- the Canvas
- Time for action – Sending the drawing through WebSockets
- Building a multiplayer draw-and-guess game
- Time for action – Building the draw-and-guess game
- Decorating the draw-and-guess game with CSS
- Time for action – Decorating the game
- Summary
- Chapter 9: Building a Physics Car Game with Box2D and Canvas
- Installing the Box2D JavaScript library
- Time for action – Installing the Box2D physics library
- Creating a static ground body in the physics world
- Time for action – Creating a ground in the world
- Drawing the physics world in the canvas
- Time for action – Drawing the physics world into the canvas
- Creating a dynamic box in the physics world
- Time for action – Putting a dynamic box in the world
- Advancing the world time
- Time for action – Setting up the world step loop
- Adding wheels to the game
- Time for action – Putting two circles in the world
- Creating a physical car
- Time for action – Connecting the box and two circles
- with revolute joint
- Adding force to the car with a keyboard input
- Time for action – Adding force to the car
- Time for action – Creating the world with ramps
- Checking collisions in the Box2D world
- Time for action – Checking a collision between the car and the
- destination body
- Restarting the game
- Time for action – Restarting the game while pressing the R key
- Adding a level support to our car game
- Time for action – Loading game with levels data
- Replacing the Box2D outline drawing with graphics
- Time for action – Adding a flag graphic and a car graphic
- to the game
- Adding a final touch to make the game fun to play
- Time for action – Decorating the game and adding a fuel
- limitation
- Summary
- Appendix: Pop Quiz Answers
- Chapter 2: Getting Started with DOM-based Game Development
- Chapter 3: Building Memory Match Game in CSS3
- Chapter 4: Building Untangle Game with Canvas and Drawing API
- Chapter 5: Building Canvas Games Masterclass
- Chapter 6: Adding Sound Effects to your Games
- Chapter 7: Using Local Storage to Store Game Data
- Chapter 8: Building Multiplayer Draw-and-Guess Game with WebSockets
- Index

HTML5 Games Development by
Example
Beginner's Guide
Create six fun games using the latest HTML5, Canvas, CSS,
and JavaScript techniques
Makzan
BIRMINGHAM - MUMBAI
HTML5 Games Development by Example
Beginner's Guide
Copyright © 2011 Packt Publishing
All rights reserved. No part of this book may be reproduced, stored in a retrieval system,
or transmied in any form or by any means, without the prior wrien permission of the
publisher, except in the case of brief quotaons embedded in crical arcles or reviews.
Every eort has been made in the preparaon of this book to ensure the accuracy of the
informaon presented. However, the informaon contained in this book is sold without
warranty, either express or implied. Neither the author, nor Packt Publishing, and its dealers
and distributors will be held liable for any damages caused or alleged to be caused directly
or indirectly by this book.
Packt Publishing has endeavored to provide trademark informaon about all of the
companies and products menoned in this book by the appropriate use of capitals.
However, Packt Publishing cannot guarantee the accuracy of this informaon.
First published: August 2011
Producon Reference: 1180811
Published by Packt Publishing Ltd.
Livery Place
35 Livery Street
Birmingham B3 2PB, UK.
ISBN 978-1-849691-26-0
www.packtpub.com
Cover Image by Girish Suryawanshi (girish.suryawanshi@gmail.com)

Credits
Author
Makzan
Reviewers
Maeo Ferre
Henk Jurriens
William Malone
Acquision Editor
David Barnes
Development Editor
Neha Mallik
Technical Editors
Pallavi Kachare
Azharuddin Sheikh
Copy Editor
Neha Shey
Project Coordinator
Zainab Bagasrawala
Proofreader
Joanna McMahon
Indexer
Rekha Nair
Graphics
Geetanjali Sawant
Producon Coordinators
Melwyn D'sa
Adline Swetha Jesuthas
Cover Work
Melwyn D'sa

About the Author
Makzan is the founder of 42games Limited. He has been designing games since he was
a child. He likes to see how the well-designed interacons in his games can trigger the
emoons and inuence the player. He believes that games should let a player share joyful
mes with friends. Therefore, his favorite game type is mulplayer casual games.
Makzan also wrote a book named Flash Mulplayer Virtual World. It is about developing
a virtual world to play with friends in real me with Adobe Flash and socket server.
I would like to thank the enre team from Packt Publishing. The book
would not have been possible without the help from all the editors and
proofreaders. I thank all the reviewers for providing useful comments
from which I have learned a lot. I thank my family for giving me support
during the book wring process.

About the Reviewers
Maeo Ferre is a soware engineer, an amateur comic-book arst, and an
occasional graphic designer, who was drawn into soware development since he
played his rst video game.
He fell in love with JavaScript at the end of the 20th century, and he sll loves it with the
same passion.
Currently he is working for Mozilla, aer more than two years in TomTom as a Senior
Soware Engineer and Tech Leader.
I wish to thank my love, Elisa, for her paence and understanding. I also
want to thank my parents, for their connuous support throughout my
whole life.
Henk Jurriens is a soware developer and developer evangelist, experienced with Java,
Groovy and Grails, and HTML5. Henk is passionate about new technologies and loves to
talk about it, and so gives dierent presentaons about HTML5, Linked Data, and Groovy
and Grails.
In addion, Henk founded an HTML5 User Group to promote and share knowledge about
HTML5. During the year, dierent meetups are organized. Together with the Google
Technology User Group, he organized for example, a HTML5 Hackathon.
Last year, Henk also helped with a HTML5 Game Jam and there he saw the potenal of
HTML5 Games and this was the reason for him to review this book. With the help of this
book, great HTML5 games can be built!
William Malone is a soware developer specializing in dialects of ECMAScript
(AconScript and JavaScript). He has wrien many arcles about Flash and HTML5
which are available at http://www.williammalone.com.

www.PacktPub.com
Support files, eBooks, discount offers and more
You might want to visit www.PacktPub.com for support les and downloads related to your book.
Did you know that Packt oers eBook versions of every book published, with PDF and ePub les
available? You can upgrade to the eBook version at www.PacktPub.com and as a print book
customer, you are entled to a discount on the eBook copy. Get in touch with us at service@
packtpub.com for more details.
At www.PacktPub.com, you can also read a collecon of free technical arcles, sign up for a range
of free newsleers and receive exclusive discounts and oers on Packt books and eBooks.
hp://PacktLib.PacktPub.com
Do you need instant soluons to your IT quesons? PacktLib is Packt's online digital book library. Here,
you can access, read and search across Packt's enre library of books.
Why Subscribe?
Fully searchable across every book published by Packt
Copy and paste, print and bookmark content
On demand and accessible via web browser
Free Access for Packt account holders
If you have an account with Packt at www.PacktPub.com, you can use this to access PacktLib today
and view nine enrely free books. Simply use your login credenals for immediate access.

Table of Contents
Preface 1
Chapter 1: Introducing HTML5 Games 7
Discovering new features in HTML5 8
Canvas 8
Audio 8
GeoLocaon 8
WebGL 9
WebSocket 10
Local Storage 10
Oine applicaon 11
Discovering new features in CSS3 11
CSS3 transion 12
CSS3 transform 13
CSS3 animaon 14
Learning more detail of new HTML5 and CSS3 features 15
The benet of creang HTML5 games 15
No third-party plugin required 16
Supporng iOS devices without plugin 16
Breaking the boundary of usual browser games 16
Building HTML5 games 18
What others are playing with HTML5 18
Matching game 18
Sinuous 19
Asteroid-styled bookmarklet 19
Quake 2 20
RumpeTroll 21
Scrabb.ly 21
Aves Engine 22
Table of Contents
[ ii ]
Browsing more HTML5 games 22
What we are going to create in this book 23
Summary 24
Chapter 2: Geng Started with DOM-based Game Development 25
Preparing the development environment 26
Preparing the HTML documents for a DOM-based game 26
Time for acon – Installing the jQuery library 27
New HTML5 doctype 28
Header and footer 29
Best pracce to place the JavaScript code 29
Running our code aer the page is ready 29
Seng up the Ping Pong game elements 30
Time for acon – Placing Ping Pong game elements in DOM 30
Introducing jQuery 32
Understanding basic jQuery selectors 33
Understanding the jQuery CSS funcon 34
Benets of using jQuery 35
Manipulang game elements in DOM with jQuery 35
Time for acon – Changing posion of elements with jQuery 35
Understanding the behavior of absolute posion 36
Geng a keyboard input from players 37
Time for acon – Moving DOM objects by a keyboard input 38
Understanding a key code 39
Making constants more readable 40
Converng strings to numbers with parseInt funcon 40
Execung JavaScript expressions directly in the Console panel 42
Checking the console window 42
Supporng mulple keyboard input from players 43
Time for acon – Listening to keyboard input with another approach 43
Declaring global variables in a beer way 45
Creang a JavaScript mer with setInterval funcon 46
Understanding Game Loop 46
Moving a DOM object with JavaScript Interval 47
Time for acon – Moving the ball with JavaScript Interval 47
Beginning collision detecon 49
Time for acon – Hing the ball with the paddles 50
Showing text dynamically in HTML 53
Time for acon – Showing the score of both players 53
Summary 56
Table of Contents
[ iii ]
Chapter 3: Building a Memory Matching Game in CSS3 57
Moving game objects with CSS3 transion 57
Time for acon – Moving a playing card around 58
2D transforms funcons 61
3D transforms funcons 61
Tweening the styles by using CSS3 transion 62
Creang a card-ipping eect 64
Time for acon – Flipping a card with CSS3 64
Toggling class with jQuery toggleClass funcon 66
Controlling the visibility of overlapped elements by z-index 67
Introducing CSS perspecve property 68
Introducing backface-visibility 69
Creang a card matching memory game 70
Downloading the sprites sheet of playing cards 70
Seng up the game environment 71
Time for acon – Preparing the card matching game 71
Cloning DOM elements with jQuery 77
Selecng the rst child of an element in jQuery by using child lters 77
Vercally aligning a DOM element 77
Using CSS sprite with a background posion 78
Adding game logic to the matching game 79
Time for acon – Adding game logic to the matching game 80
Execung code aer CSS transion ended 83
Delaying code execuon on ipping cards 83
Randomizing an array in JavaScript 83
Storing internal custom data with an HTML5 custom data aribute 84
Accessing custom data aribute with jQuery 85
Making other playing card games 87
Embedding web fonts into our game 87
Time for acon – Embedding a font from Google Font Directory 88
Choosing dierent font delivery services 90
Summary 91
Chapter 4: Building the Untangle Game with Canvas and Drawing API 93
Introducing the HTML5 Canvas Element 94
Drawing a circle in canvas 95
Time for acon – Drawing color circles on canvas 95
Pung fallback content when the web browser does not support canvas 97
Drawing circles and shapes with canvas arc funcon 98
Converng degree to radians 98
Time for acon – Drawing dierent arcs with arc funcon 99
Execung the path drawing in canvas 102

Table of Contents
[ iv ]
Beginning a path for each style 102
Closing a path 103
Wrapping the circle drawing in funcon 104
Time for acon – Pung the circle drawing code into a funcon 104
Generang random numbers in JavaScript 105
Saving the circle posion 106
Time for acon – Saving the circle posion 107
Dening a basic class denion in JavaScript 108
Drawing lines in canvas 108
Time for acon – Drawing straight lines between each circle 109
Introducing the line drawing API 111
Interacng with drawn objects in canvas with mouse events 112
Time for acon – Dragging the circles in canvas 112
Geng the mouse posion in the canvas element 116
Detecng mouse events on circles in canvas 116
Game loop 117
Clearing the canvas 118
Detecng line intersecon in canvas 119
Time for acon – Disnguishing the intersected lines 119
Determining whether two line segments intersect 123
Making the untangle puzzle game 124
Time for acon – Making the untangle puzzle game in canvas 125
Dening the leveling data 129
Determining level-up 130
Displaying current level and completeness progress 131
Summary 131
Chapter 5: Building a Canvas Games Masterclass 133
Filling shapes with gradient color 134
Time for acon – Drawing a gradient color background to the Untangle game 134
Adding color stops in the gradient color 135
Filling radial gradient color 136
Time for acon – Filling the circles with radial gradient color 136
Drawing text in canvas 139
Time for acon – Displaying the progress level text inside the canvas element 139
Using embedded web font inside canvas 142
Time for acon – Embedding Google Web Font into the 143
canvas element 143
Drawing images in canvas 144
Time for acon – Adding graphics to the game 144
Using the drawImage funcon 147

Table of Contents
[ v ]
Decorang the canvas-based game 149
Time for acon – Adding CSS styles and images decoraon to the game 149
Animang a sprite sheet in canvas 152
Time for acon – Making a game guide animaon 152
Creang a mul-layers canvas game 156
Time for acon – Dividing the game into four layers 156
Mixing CSS technique with Canvas drawing 162
Summary 163
Chapter 6: Adding Sound Eects to your Games 165
Adding a sound eect to the play buon 166
Time for acon – Adding sound eects to the play buon 166
Dening an audio element 169
Playing a sound 171
Pausing a sound 171
Adjusng the sound volume 172
Using the jQuery hover event 172
Creang the Ogg format audio to support Mozilla Firefox 172
Time for acon – Converng an MP3 sound to Ogg format with Audacity 173
Supporng dierent web browsers with dierent audio formats 174
Building a mini piano musical game 174
Time for acon – Creang a basic background to the 174
music game 174
Creang scenes in HTML5 games 177
Visualizing the music play back 178
Time for acon – Creang the playback visualizaon in the music game 179
Choosing the right song for the music game 183
Storing and extracng the song level data 183
Geng the elapsed me of the game 184
Creang music dots 185
Moving the music dots 186
Linking the play buon to the music game scene 187
Time for acon – Animang the scene transion 187
Creang a slide-in eect in CSS3 189
Creang a keyboard-driven mini piano musical game 190
Time for acon – Creang a mini piano musical game 190
Hing the three music lines by key down 192
Determining music dot hits on key down 193
Removing an element in an array with the given index 194
Time for acon – Removing music dots with the splice funcon 194
Table of Contents
[ vi ]
Adding addional features to the mini piano game 195
Adjusng the music volume according to the player 196
Time for acon – Removing missed melody notes 196
Removing dots from the game 198
Storing the success count in the last ve results 198
Recording music notes as level data 199
Time for acon – Adding funconality to record the music level data 199
Handling the audio event on playback completes 202
Time for acon – Indicang a game over event in the console 202
Handling audio events 203
Summary 204
Chapter 7: Using Local Storage to Store Game Data 205
Storing data by using HTML5 local storage 206
Creang a game over dialog 206
Time for acon – Creang a game over dialog with the elapsed played me 207
Saving scores in the browser 210
Time for acon – Saving the game score 210
Storing and loading data with local storage 211
The local storage saves the string value 212
Treang the local storage object as an associated array 213
Saving objects in the local storage 213
Time for acon – Saving the me alongside the score 214
Geng the current date and me in JavaScript 217
Using the nave JSON to encode an object into a string 218
Loading a stored object from a JSON string 218
Inspecng the local storage in a console window 219
Nofying players of breaking a new record with a nice ribbon eect 220
Time for acon – Creang a ribbon in CSS3 221
Saving the enre game progress 224
Saving the game progress 224
Time for acon – Saving all essenal game data in the local storage 224
Removing a record from the local storage 227
Cloning an array in JavaScript 227
Resuming the game progress 228
Time for acon – Resuming a game from the local storage 228
Summary 231
Chapter 8: Building a Mulplayer Draw-and-Guess Game with WebSockets 233
Trying an exisng WebSockets web applicaon 234
Time for acon – Trying the muluser sketchpad 235

Table of Contents
[ vii ]
Installing a WebSocket server 236
Installing the Node.JS WebSocket server 236
Time for acon – Installing Node.JS 236
Creang a WebSockets server to broadcast the connecon count 238
Time for acon – Creang a WebSocket server that sends the total
count of connecons 238
Inializing the WebSockets server 239
Listening to the connecon event on the server side 240
Geng a count of connected clients on the server side 240
Broadcasng a message to all connected browsers 240
Creang a client that connects to a WebSocket server and geng the total
connecons count 241
Time for acon – Showing the connecon count in a WebSocket applicaon 241
Establishing a WebSocket connecon 243
WebSockets client events 243
Building a chang applicaon with WebSockets 243
Sending a message to the server 243
Time for acon – Sending a message to the server through WebSockets 244
Sending a message from the client to the server 246
Receiving a message on the server side 246
Broadcasng every received message on the server side to create a chat room 247
Time for acon – Broadcasng the messages to all connected browsers 247
Comparing between WebSockets and polling approaches 248
Making a shared drawing whiteboard with Canvas and WebSockets 250
Building a local drawing sketchpad 250
Time for acon – Making a local drawing whiteboard with the Canvas 251
Drawing on the canvas 254
Broadcasng the drawing to all connected browsers 254
Time for acon – Sending the drawing through WebSockets 254
Dening a data object to communicate between the client and the server 258
Packing the drawing lines data into JSON for broadcasng 259
Recreang the drawing lines aer receiving them from other clients 259
Building a mulplayer draw-and-guess game 259
Time for acon – Building the draw-and-guess game 260
Controlling the game ow of a mulplayer game 265
Enumerang connected clients on the serverside 266
Sending a message to a specic connecon on the server side 267
Improving the game 267
Storing drawn lines on each game 268
Improving the answer checking mechanism 268
Decorang the draw-and-guess game with CSS 268

Time for acon – Decorang the game 268
Summary 271
Chapter 9: Building a Physics Car Game with Box2D and Canvas 273
Installing the Box2D JavaScript library 274
Time for acon – Installing the Box2D physics library 275
Using b2World to create a new world 277
Using b2AABB to dene a bounding area 278
Seng the gravity of the world 278
Seng the Box2D to ignore the slept object 278
Creang a stac ground body in the physics world 279
Time for acon – Creang a ground in the world 279
Creang a shape 280
Creang a body 280
Drawing the physics world in the canvas 281
Time for acon – Drawing the physics world into the canvas 281
Creang a dynamic box in the physics world 284
Time for acon – Pung a dynamic box in the world 284
Seng the bouncing eect with the restuon property 285
Advancing the world me 286
Time for acon – Seng up the world step loop 286
Adding wheels to the game 287
Time for acon – Pung two circles in the world 287
Creang a physical car 288
Time for acon – Connecng the box and two circles with revolute joint 289
Using a revolute joint to create an anchor point between two bodies 290
Adding force to the car with a keyboard input 291
Time for acon – Adding force to the car 291
Applying force to a body 292
Understanding the dierence between ApplyForce and ApplyImpulse 293
Adding ramps to our game environment 293
Time for acon – Creang the world with ramps 293
Checking collisions in the Box2D world 295
Time for acon – Checking a collision between the car and the desnaon body 295
Geng the collision contact list 296
Restarng the game 297
Time for acon – Restarng the game while pressing the R key 297
Adding a level support to our car game 299
Time for acon – Loading game with levels data 299
Replacing the Box2D outline drawing with graphics 303
Time for acon – Adding a ag graphic and a car graphic to the game 303

Table of Contents
[ ix ]
Using userData in shape and body 306
Drawing graphics every frame according to the state of its physics body 307
Rotang and translang an image in the canvas 308
Adding a nal touch to make the game fun to play 308
Time for acon – Decorang the game and adding a fuel 309
limitaon 309
Adding fuel to add a constraint when applying force 314
Presenng the remaining fuel in a CSS3 progress bar 315
Summary 316
HTML5 game engines 316
Game sprites, and textures 317
Sound eects 317
Appendix: Pop Quiz Answers 319
Chapter 2: Geng Started with DOM-based Game Development 319
Running our code aer the page is ready 319
Understanding the behavior of absoluon posion 319
Chapter 3: Building Memory Match Game in CSS3 319
Storing internal custom data with HTML5 custom data aribute 319
Accessing custom data aribute with jQuery 319
Chapter 4: Building Untangle Game with Canvas and Drawing API 320
Using startAngle and endAngle 320
Using closePath with ll command only 320
Accessing shapes in canvas 320
Clearing drawn shapes in canvas 320
Chapter 5: Building Canvas Games Masterclass 320
Drawing text in canvas 320
Styling canvas background 320
Chapter 6: Adding Sound Eects to your Games 321
Using the audio tag 321
Chapter 7: Using Local Storage to Store Game Data 321
Using local storage 321
Chapter 8: Building Mulplayer Draw-and-Guess Game with WebSockets 321
Index 237
Preface
HTML5 promises to be the hot new plaorm for online games. HTML5 games work on
computers, smartphones, and tablets, including iPhones and iPads. Be one of the rst
developers to build HTML5 games today and be ready for tomorrow!
This book will show you how to use the latest HTML5 and CSS3 web standards to build card
games, drawing games, physics games, and even mulplayer games over the network. With
this book, you will build six example games with clear systemac tutorials.
HTML5, CSS3, and the related JavaScript API are the latest hot topics in web. These standards
bring us the new game market, HTML5 Games. With the new power from them, we can
design games with HTML5 elements, CSS3 properes, and JavaScript to play in browsers.
This book is divided into nine chapters with each one focusing on one topic. We will create
six games and specically learn how we draw game objects, animate them, add audio,
connect players, and build a physics game with a Box2D physics engine.
What this book covers
Chapter 1, Introducing HTML5 Games, introduces the new features from HTML5, CSS3, and
related JavaScript API. It also demonstrates what games we can make with these features
and its benets.
Chapter 2, Geng Started with DOM-based Game Development, kick-starts the game
development journey by creang a tradional Ping Pong game in DOM and jQuery.
Chapter 3, Building Memory Matching Game in CSS3, walks through the new features from
CSS3 and discusses how we can create a memory card matching game in DOM and CSS3.
Chapter 4, Building Untangle Game with Canvas and Drawing API, introduces a new way
to draw games and interact with them in a web page with the new Canvas element. It also
demonstrates how to build a puzzle solving game with Canvas.

Preface
[ 2 ]
Chapter 5, Building a Canvas Game Masterclass, extends the untangle game to show how we
can draw gradients and images using Canvas. It also discusses sprite sheet animaons and
mul-layer management.
Chapter 6, Adding Sounds Eects to Your Games, adds sound eects and background music
to the game by using the Audio element. It discusses the audio format capability among
web browsers and creates a keyboard-driven music game by the end of the chapter.
Chapter 7, Using Local Storage to Store Game Data, extends the CSS3 memory matching
game to demonstrate how we can use the new Local Storage API to store and resume game
progress and best records.
Chapter 8, Building a Mulplayer Draw-and-Guess Game with WebSockets, discusses the
new WebSockets API which allows browsers to establish a persistent connecon with the
socket server. This allows mulple players to play the game together in real me. A draw-
and-guess game is created at the end of chapter.
Chapter 9, Building a Physics Car Game with Box2D and Canvas, teaches how to integrate
a famous physics engine, Box2D, into our Canvas games. It discusses how to create physics
bodies, apply force, connect them together, associate graphics with the physics, and nally
create a plaorm card game.
What you need for this book
You need the latest modern web browsers, a good text editor, and a basic HTML, CSS, and
JavaScript knowledge.
Who this book is for
This book is for game designers who have a basic understanding of HTML, CSS, and JavaScript
and want to create Canvas or DOM-based games that run on browsers.
Conventions
In this book, you will nd several headings appearing frequently.
To give clear instrucons of how to complete a procedure or task, we use:
Preface
[ 3 ]
Time for action – heading
1. Acon 1
2. Acon 2
3. Acon 3
Instrucons oen need some extra explanaon so that they make sense, so they are
followed with:
What just happened?
This heading explains the working of tasks or instrucons that you have just completed.
You will also nd some other learning aids in the book, including:
Pop quiz – heading
These are short mulple choice quesons intended to help you test your own understanding.
Have a go hero – heading
These set praccal challenges and give you ideas for experimenng with what you
have learned.
You will also nd a number of styles of text that disnguish between dierent kinds of
informaon. Here are some examples of these styles, and an explanaon of their meaning.
Code words in text are shown as follows: "We will start our HTML5 game developmentpment
journey from index.html."
A block of code is set as follows:
// starting game
var date = new Date();
audiogame.startingTime = date.getTime();
// some time later
var date = new Date();
var elapsedTime = (date.getTime() - audiogame.startingTime)/1000;
Preface
[ 4 ]
When we wish to draw your aenon to a parcular part of a code block, the relevant lines
or items are set in bold:
function setupLevelData()
{
var notes = audiogame.leveldata.split(";");
// store the total number of dots
audiogame.totalDotsCount = notes.length;
for(var i in notes)
{
var note = notes[i].split(",");
var time = parseFloat(note[0]);
var line = parseInt(note[1]);
var musicNote = new MusicNote(time,line);
audiogame.musicNotes.push(musicNote);
}
}
Any command-line input or output is wrien as follows:
$ ./configure
$ sudo make install
New terms and important words are shown in bold. Words that you see on the screen, in
menus or dialog boxes for example, appear in the text like this: "You will get an introducon
page of the muluser sketchpad. Right click on the Launch Experiment opon and choose
Open link in new window".
Warnings or important notes appear in a box like this.
Tips and tricks appear like this.

Preface
[ 5 ]
Reader feedback
Feedback from our readers is always welcome. Let us know what you think about this
book—what you liked or may have disliked. Reader feedback is important for us to develop
tles that you really get the most out of.
To send us general feedback, simply send an e-mail to feedback@packtpub.com, and
menon the book tle via the subject of your message.
If there is a book that you need and would like to see us publish, please send us a note in the
SUGGEST A TITLE form on www.packtpub.com or e-mail suggest@packtpub.com.
If there is a topic that you have experse in and you are interested in either wring or
contribung to a book, see our author guide on www.packtpub.com/authors.
Customer support
Now that you are the proud owner of a Packt book, we have a number of things to help you
to get the most from your purchase.
Downloading the example code for this book
You can download the example code les for all Packt books you have purchased from your
account at http://www.PacktPub.com. If you purchased this book elsewhere, you can
visit http://www.PacktPub.com/support and register to have the les e-mailed directly
to you.
Errata
Although we have taken every care to ensure the accuracy of our content, mistakes do
happen. If you nd a mistake in one of our books—maybe a mistake in the text or the
code—we would be grateful if you would report this to us. By doing so, you can save other
readers from frustraon and help us improve subsequent versions of this book. If you
nd any errata, please report them by vising http://www.packtpub.com/support,
selecng your book, clicking on the errata submission form link, and entering the details
of your errata. Once your errata are veried, your submission will be accepted and the errata
will be uploaded on our website, or added to any list of exisng errata, under the Errata
secon of that tle. Any exisng errata can be viewed by selecng your tle from
http://www.packtpub.com/support.

Preface
[ 6 ]
Piracy
Piracy of copyright material on the Internet is an ongoing problem across all media. At Packt,
we take the protecon of our copyright and licenses very seriously. If you come across any
illegal copies of our works, in any form, on the Internet, please provide us with the locaon
address or website name immediately so that we can pursue a remedy.
Please contact us at copyright@packtpub.com with a link to the suspected
pirated material.
We appreciate your help in protecng our authors, and our ability to bring you
valuable content.
Questions
You can contact us at questions@packtpub.com if you are having a problem with any
aspect of the book, and we will do our best to address it.
1
Introducing HTML5 Games
Hyper-Text Markup Language, HTML, has been shaping the Internet in the
last few decades. It denes how content is structured in web and the linkage
between related pages. HTML keeps evolving from version 2 to HTML 4.1,
and later XHTML 1.1. Thanks to those web applicaons and social network
applicaons, HTML is now on the way to HTML5.
Cascading Style Sheet (CSS) denes how web pages are presented visually. It
styles all HTML elements and the styles of their states, such as hover and acve.
JavaScript is the logic controller of the web page. It makes the web page
dynamic and provides client-side interacon between the page and users. It
accesses the HTML through Document Object Model (DOM). It re-styles the
HTML elements by applying dierent CSS styles.
These three receipts bring us the new game market, HTML5 Games. With the new power
from them, we can design games with HTML5 elements, CSS3 properes, and JavaScript to
play in the browsers.
In this chapter, we shall:
Discover new features in HTML5
Discuss what makes us so excited around HTML5 and CSS3
Take a look at what others are playing with HTML5 on game designing
Preview what games we are going to build in later chapters
So let's get started.

Introducing HTML5 Games
[ 8 ][ 8 ]
Discovering new features in HTML5
There are many new things introduced in HTML5 and CSS3. Before geng our hands dirty in
creang the games, let's take an overview of the new features and see how we can use them
to create games.
Canvas
Canvas is an HTML5 element that provides drawing shapes and bitmap manipulaon
funcons in low level. We can imagine the Canvas element as a dynamic image tag. The
tradional <img> tag shows a stac image. Whether the image is dynamically generated or
stacally loaded from the server, the image is stac and will not be changed. We can change
the <img> tag to another image source or apply styles to the image, but we cannot modify
the image bitmap context itself.
On the other hand, Canvas is like a client-side dynamic <img> tag. We can load images inside
it, draw shapes there, and interact with it by JavaScript.
Canvas plays an important role in HTML5 game development. It is one of our main focuses in
this book.
Audio
Background music and sound eects are oen an essenal element in game design. HTML5
comes with nave audio support by the audio tag. Thanks to this feature, we do not require
the proprietary Flash Player to play sound eects in our HTML5 games. We will discuss the
usage of the audio tag in Chapter 6, Building Music Games with HTML5 Audio Elements.
GeoLocation
GeoLocaon lets the web page retrieve the latude and longitude of the user's computer.
This feature may not have been so useful years ago when everyone was using the Internet
with their desktop PC. There are not many things that we need the road level locaon
accuracy of the user. We can get the rough locaon by analyzing the IP address.
These days, more and more users are going on the Internet with their powerful
smartphones. Webkit and other modern mobile browsers are in everyone's pocket.
GeoLocaon lets us design mobile applicaons and games to play with the locaon.
Locaon-based services have been used in several social networking applicaons such
as foursquare (http://foursquare.com) and Gowalla (http://gowalla.com). The
success of this type of locaon-based social community creates a trend of using locaon
services with our smartphone.
Chapter 1
[ 9 ][ 9 ]
WebGL
WebGL extends the Canvas element by providing a set of 3D graphics API in the web
browser. The API follows the standard of OpenGL ES 2.0. The WebGL provides a real 3D
rendering place for 3D HTML5 games. However, not all browsers navely support the WebGL
yet at the me of wring this book. Currently only Mozilla Firefox 4, Google Chrome, and a
nightly build of WebKit browser support it navely.
The technique of creang games for WebGL is quite dierent from usual HTML5 game
developments. Creang games in WebGL requires handing the 3D models and use of API
similar to the OpenGL. Therefore, we will not discuss the WebGL game development in
this book.
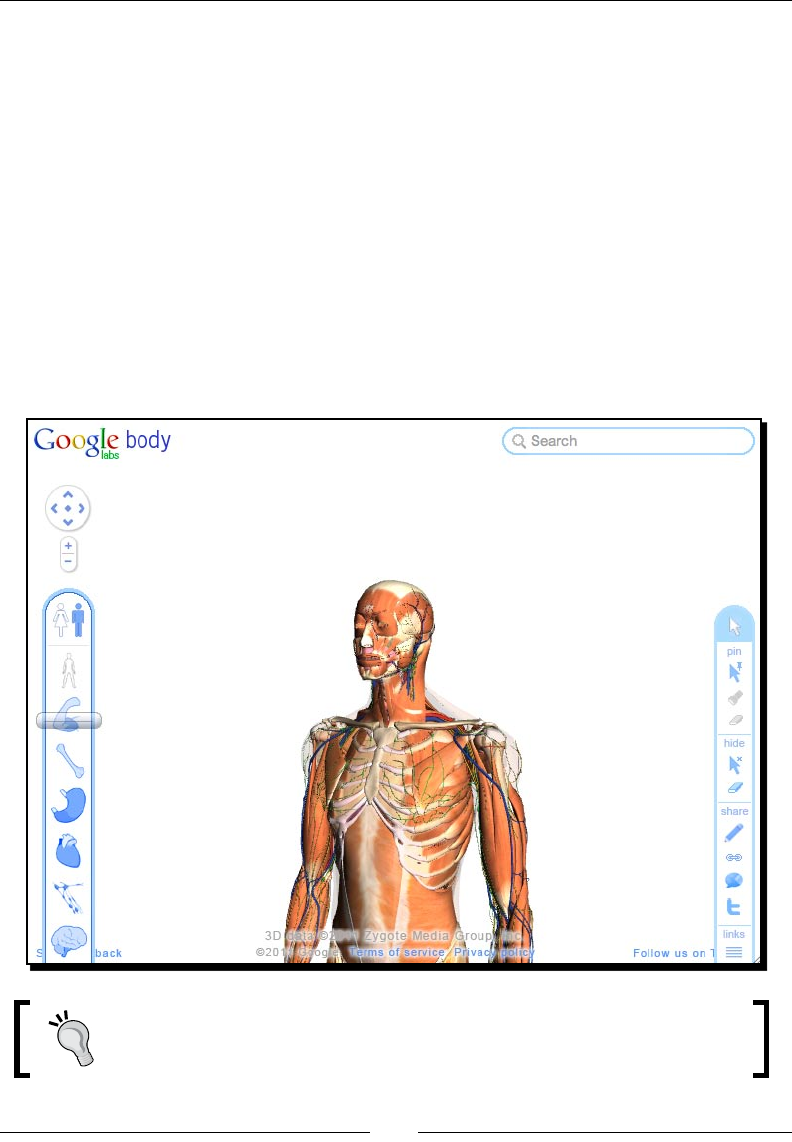
The following screenshot from Google Body (http://bodybrowser.googlelabs.com)
demonstrates how they use WebGL to show a 3D human body that responds to the
user's input:
The LearningWebGL (http://learnwebgl.com) provides a collecon of
tutorials on geng started with WebGL. It is a good starng point if you want
to learn more on using it.
Introducing HTML5 Games
[ 10 ][ 10 ]
WebSocket
WebSocket is part of the HTML5 spec for connecng the web page to a socket server. It
provides us with an event-driven connecon between the browser and server. That means
the client does not need to poll the server for new data every short period. The server will
push updates to the browsers whenever there is any data to update. One benet of this
feature is that the game players can interact with each other almost in real me. When one
player does something and sends data to the server, the server will broadcast an event to
every other connected browser to acknowledge what the player just did. This creates the
possibility of creang mulplayer HTML5 games.
Due to a security issue, WebSocket is now temporary disabled by Mozilla
Firefox and Opera. Safari and Chrome may also drop the support on
WebSocket unl the issue is xed. You can learn more on this issue by
vising the following link: http://hacks.mozilla.org/2010/12/
websockets-disabled-in-firefox-4/.
Local Storage
HTML5 provides a persistent data storage soluon to web browsers.
Local Storage stores key-value paired data persistently. The data is sll there aer the
browser terminates. Moreover, the data is not limited to be accessible only to the browsers
that created it. It is available to all browser instances with the same domain. Thanks to Local
Storage, we can easily save game status, such as progress and earn achievements, locally in
web browsers.
HTML5 also provides Web SQL Database. It is a client-side relaonal database and is
currently supported by Safari, Chrome, and Opera. With the database storage, we can
not only store key-value paired data but also complicated relaonal structures that support
SQL queries.
Local Storage and Web SQL Database are useful for us to save game state locally when
creang games.
Besides Local Storage, some other storage approaches are now being supported by web
browsers. These include Web SQL Database and IndexedDB. These approaches support
querying the stored data with condion and thus are more powerful for supporng a
complicated data structure.
You can nd more informaon on using the Web SQL Database and IndexedDB in the
following link from Mozilla: http://hacks.mozilla.org/2010/06/comparing-
indexeddb-and-webdatabase/.
Chapter 1
[ 11 ][ 11 ]
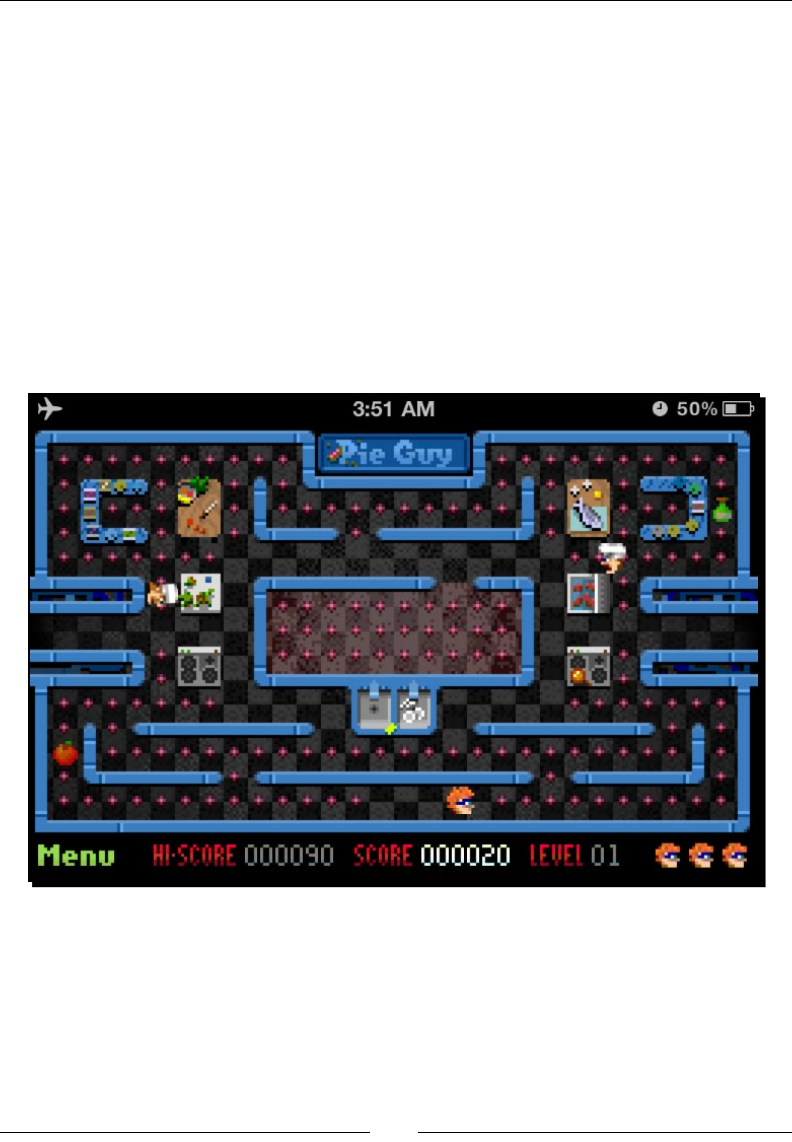
Ofine application
Normally we need an Internet connecon to browse web pages. Somemes we can browse
cached oine web pages. These cached oine web pages usually expire quickly. With the
next oine applicaon introduced by HTML5, we can declare our cache manifest. It is a list
of les that will be stored for later access without an Internet connecon.
With the cache manifest, we can store all the game graphics, game control JavaScript
les, CSS stylesheets, and the HTML les locally. We can pack our HTML5 games as an
oine game on the desktop or the mobile device. Players can play the games even in
airplane mode.
The following screenshot from the Pie Guy game (http://mrgan.com/pieguy) shows
an HTML5 game in iPhone without an Internet connecon. Note the lile airplane symbol
indicang the oine status:
Discovering new features in CSS3
CSS is the presentaon layer as HTML is the content layer. It denes how the HTML looks. We
cannot miss the CSS when creang games with HTML5, especially for DOM-based games. We
may purely use JavaScript to create and style the games with a Canvas element. But we need
CSS when creang DOM-based HTML5 games. Therefore, let's take a look at what is new in
CSS3 and how we can use the new properes to create games.
Introducing HTML5 Games
[ 12 ][ 12 ]
Instead of directly drawing and interacng on the Canvas drawing board, new CSS3
properes let us animate the DOM in dierent ways. This makes it possible to make
more complicated DOM-based browser games.
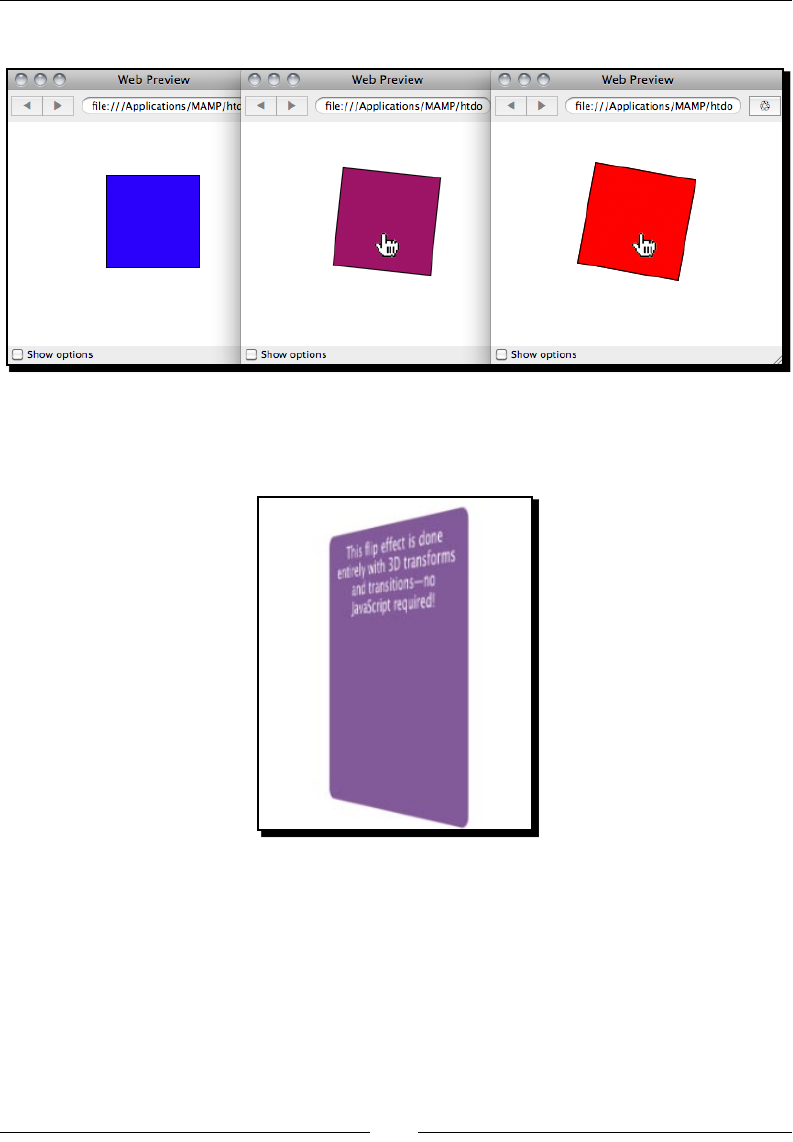
CSS3 transition
Tradionally, the style changes immediately when we apply a new style to an element.
CSS3 transion applies tweening during the style changes of the target elements.
For example, we have a blue box here and want to change it to red when we do a
mouseover. We will use the following code snippets:
HTML:
<a href="#" class="box"></a>
CSS:
a.box {
display:block;
width: 100px;
height: 100px;
background: #00f; /* blue */
border: 1px solid #000;
}
a.box:hover {
background: #f00;
}
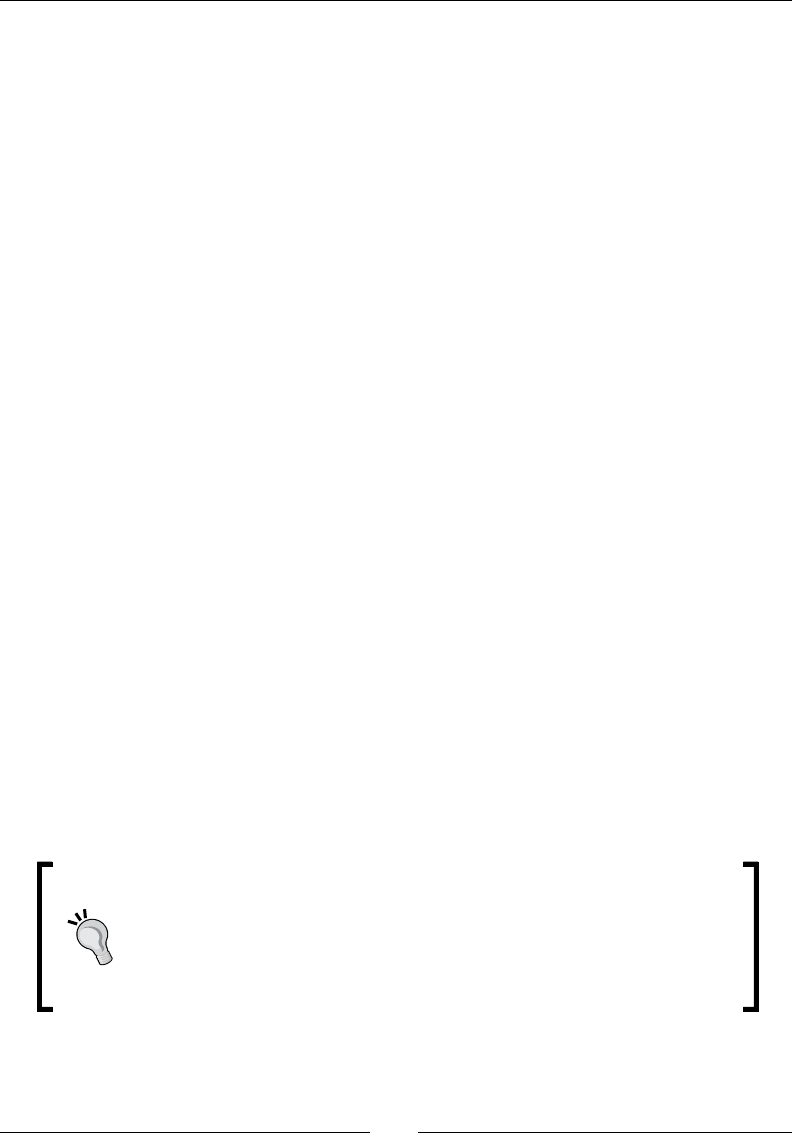
The box changes to red immediately when we do a mouseover. With CSS3 transion applied,
we can tween the styles with a specic duraon and the easing value:
a.box {
-webkit-transition: all 5s linear;
}
Downloading the example code for this book
You can download the example code les for all Packt books you have
purchased from your account at http://www.PacktPub.com. If you
purchased this book elsewhere, you can visit http://www.PacktPub.
com/support and register to have the les e-mailed directly to you.
Chapter 1
[ 13 ][ 13 ]
The following screenshot shows the box hover eect with the transion applied:
Since the CSS3 spec is sll in dra and not yet xed, the implementaon from
dierent browser vendors may have some minor dierences to the W3C spec.
Therefore, browser vendors tend to implement their CSS3 properes with a
vendor prex to prevent conict.
Safari and Chrome use the -webkit- prex. Opera uses the -o- prex.
Firefox uses the -moz- prex and IE uses the -ms- prex. It is a lile
complex now to declare a CSS3 property, such as box-shadow, with several
lines of the same rule for several browsers. We can expect the prex to be
eliminated aer that property spec is xed.
I will just use the -webkit- prex in most examples to prevent pung so
many similar lines in the book. It is more important to get the concept instead
of reading the same rules with dierent vendors prexed here.
CSS3 transform
CSS3 transform lets us scale the elements, rotate the elements, and translate their posion.
CSS3 transform is divided into 2D and 3D.
We can reposion an element with translate:
-webkit-transform: translate(x,y);
or scale the element with scale transformaon:
-webkit-transform: scale(1.1);
We can also scale and rotate the elements with CSS3 transform and combine other
transformaons:
a.box {
-webkit-transition: all 0.5s linear;
-webkit-transform: translate(100px,50px);
}
a.box:hover {
-webkit-transform: translate(100px,50px) scale(1.1) rotate(30deg);
}
Introducing HTML5 Games
[ 14 ][ 14 ]
The following screenshots show the CSS3 transform eect when we do a mouseover:
CSS3 transform 3D further extends the spaces into three axes and it currently works only
on Safari and Mobile Safari. The following screenshot from WebKit.org shows a 3D card
ipping eect when we do a mouseover:
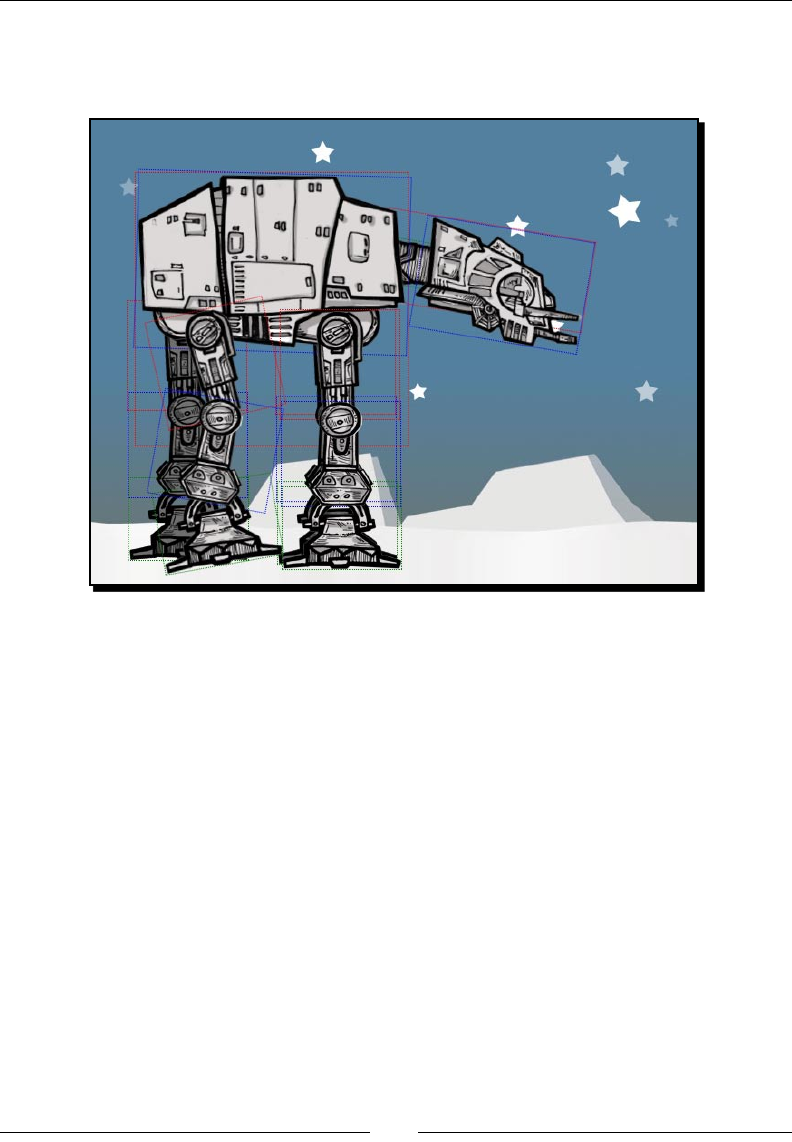
CSS3 animation
CSS3 transion is one type of animaon. It declares the tweening animaon between two
styles of the elements.
CSS3 animaon is one step further. We can dene key frames of an animaon. Each key
frame contains a set of properes that should change at that moment. It is like a set of CSS3
transions applied in sequence to the target element.
Chapter 1
[ 15 ][ 15 ]
The AT-AT Walker (http://anthonycalzadilla.com/css3-ATAT/index-bones.html)
shows a nice demo on creang a skeleton bone animaon with CSS3 animaon key frames,
transform, and transion:
Learning more detail of new HTML5 and CSS3 features
HTML5Rocks (http://html5rocks.com) from Google provides a solid quick start guide on
new HTML5 elements and CSS3 properes.
Apple also showcases how appealing it can be by using HTML5 in the WebKit-based browser
in their homepage (http://apple.com/html5).
CSS3 Info (http://www.css3.info) is a blog with the latest CSS3 news. It is a good place
to get the latest CSS3 spec status, compable list, and basic CSS3 codes.
The benet of creating HTML5 games
We explored several key new features from HTML5 and CSS3. With these features, we can
create HTML5 games on browsers. But why do we need to do that? What is the benet of
creang HTML5 games?

Introducing HTML5 Games
[ 16 ][ 16 ]
No third-party plugin required
With the nave support of all those features in modern browsers, we do not require the
users to pre-install any third-party plugin in order to play. These plugins are not standard.
They are proprietary and usually require an extra plugin installaon that we may not be able
to install.
Supporting iOS devices without plugin
Millions of Apple iOS devices around the world do not support third-party plugins such as
Flash Player. Despite whatever reason Apple does not allow Flash Player running on their
Mobile Safaris, HTML5 and related web standard is what they get in their browsers. We can
reach this user base by creang HTML5 games that opmize for mobiles.
Breaking the boundary of usual browser games
In tradional game designing, we build games within a boundary box. We play video games
on a television. We play Flash games in web browsers with a rectangle boundary.
With creavity, we are not bound in a rectangle game stage any more. We can have fun
with all the page elements and we can even use many browser windows to compose
a game. Furthermore, we can even just use the URL bar to create a game (http://
probablyinteractive.com/url-hunter). It may sound confusing, but it is because not
many web pages have done this yet.
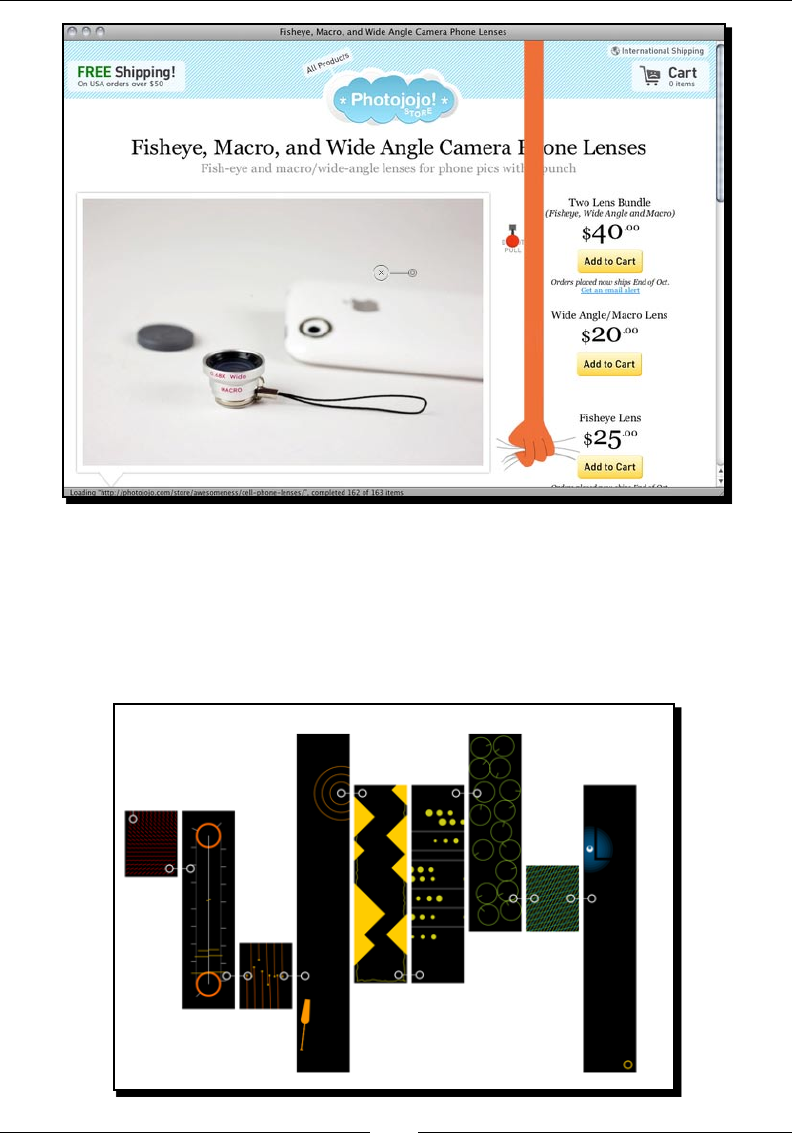
Photojojo (http://photojojo.com/store/awesomeness/cell-phone-lenses), an
online photography store, provides a fun Easter egg feature on their store page. There is a
switch buon on the page with a capon Do not pull. When the user clicks on it, an orange
arm appears from the top with frame-by-frame animaon. It holds the web page like a
holding cloth and pulls the whole page up to create a funny scroll-down eect. This is not a
game, but it is fun enough to demonstrate how we can break the boundary.
Chapter 1
[ 17 ][ 17 ]
Here is another example named Twitch (http://reas.com/twitch/) from Chrome
Experiments. It is a collecon of mini games where the player has to carry the ball from
the starng point to the end point. The fun part is that each mini game is a small browser
window. When the ball reaches the desnaon point of that mini game, it is transferred into
the newly created mini game browser to connue the journey. The following screenshot
shows the whole map of Twitch with the individual web browser:
Introducing HTML5 Games
[ 18 ][ 18 ]
Building HTML5 games
Thanks to the new features from HTML5 and CSS3, we can now create an enre game
in the browser. We can control every element in the DOM. We can animate each
document object with CSS3. We have Canvas to dynamically draw things and interact
with them. We have an audio element to handle the background music and sound eects.
We also have Local Storage to save game data and WebSocket to create a real me
mulplayers game. Most modern browsers are already supporng these features. It is
now me to build HTML5 games.
What others are playing with HTML5
It is a good chance to study how dierent HTML5 games perform by watching other HTML5
games made with dierent techniques.
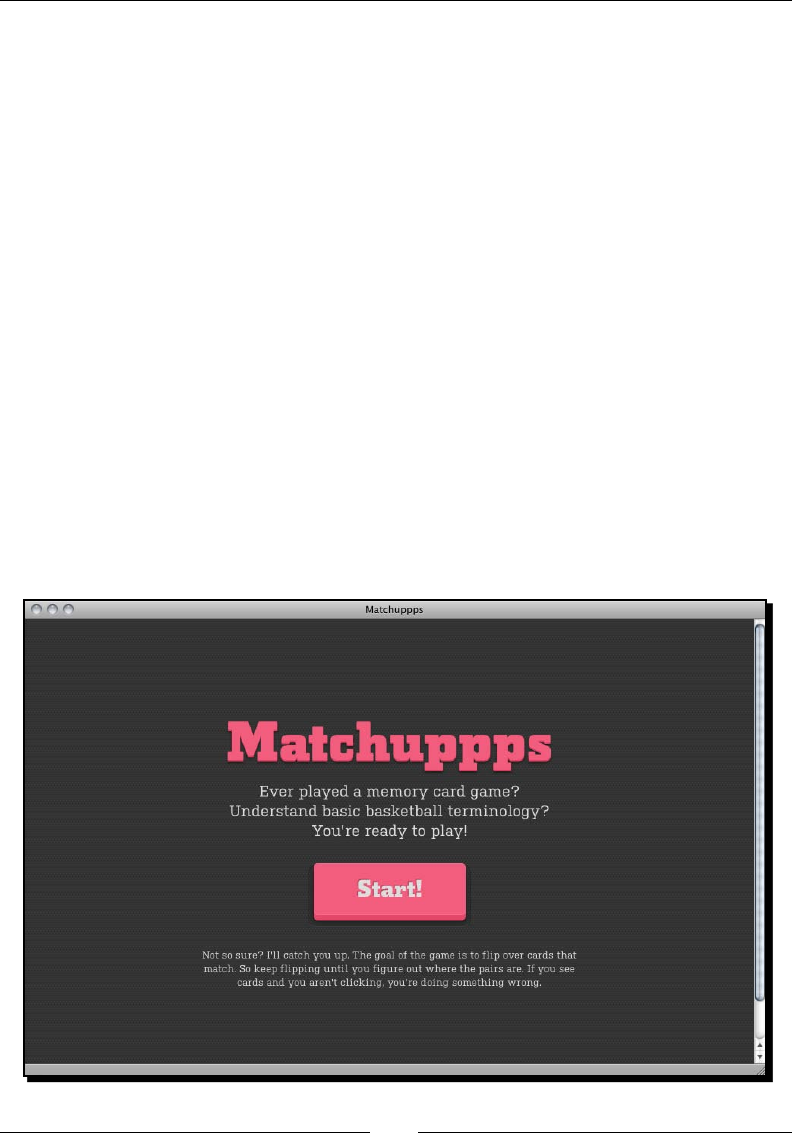
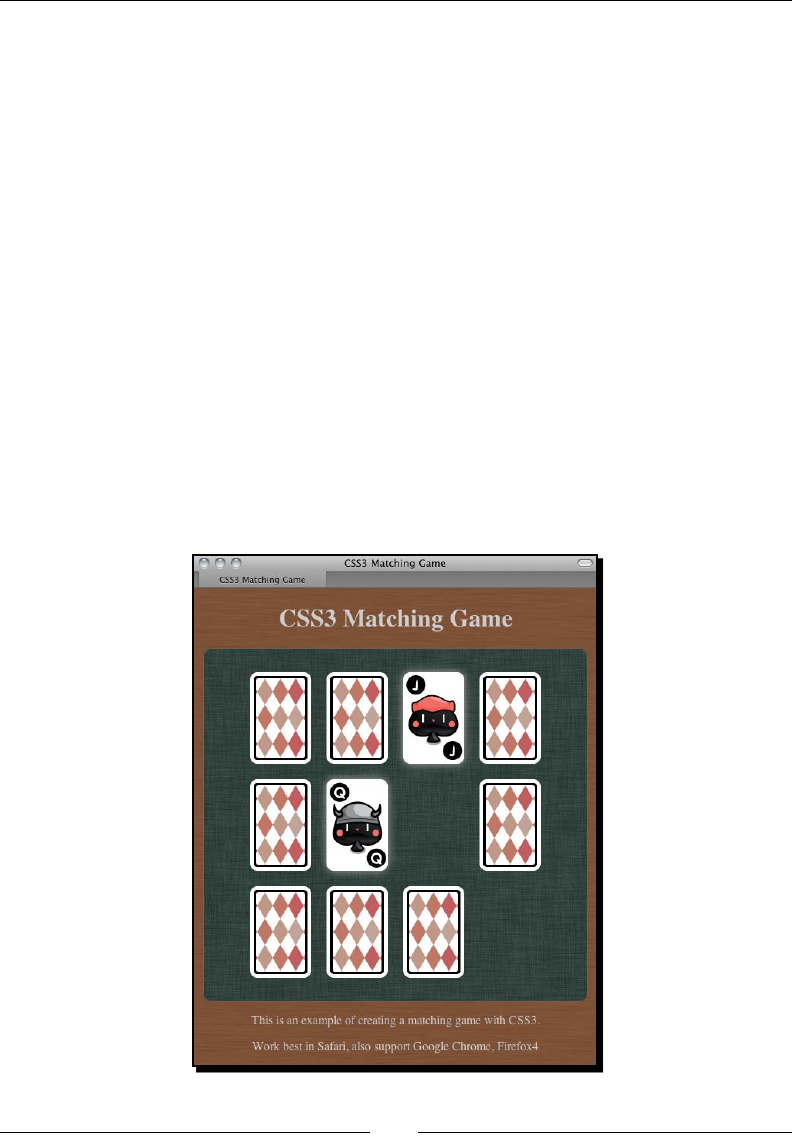
Matching game
The Match game (http://10k.aneventapart.com/Uploads/300/) demonstrates a
beauful matching game with CSS3 animaon and other visual enhancements. The game
starts when you press the 3D-like CSS buon. The cards present at the back and the front
side are ipped using 3D rotaon. The front side paerns are fetched dynamically from an
online gallery.
Chapter 1
[ 19 ][ 19 ]
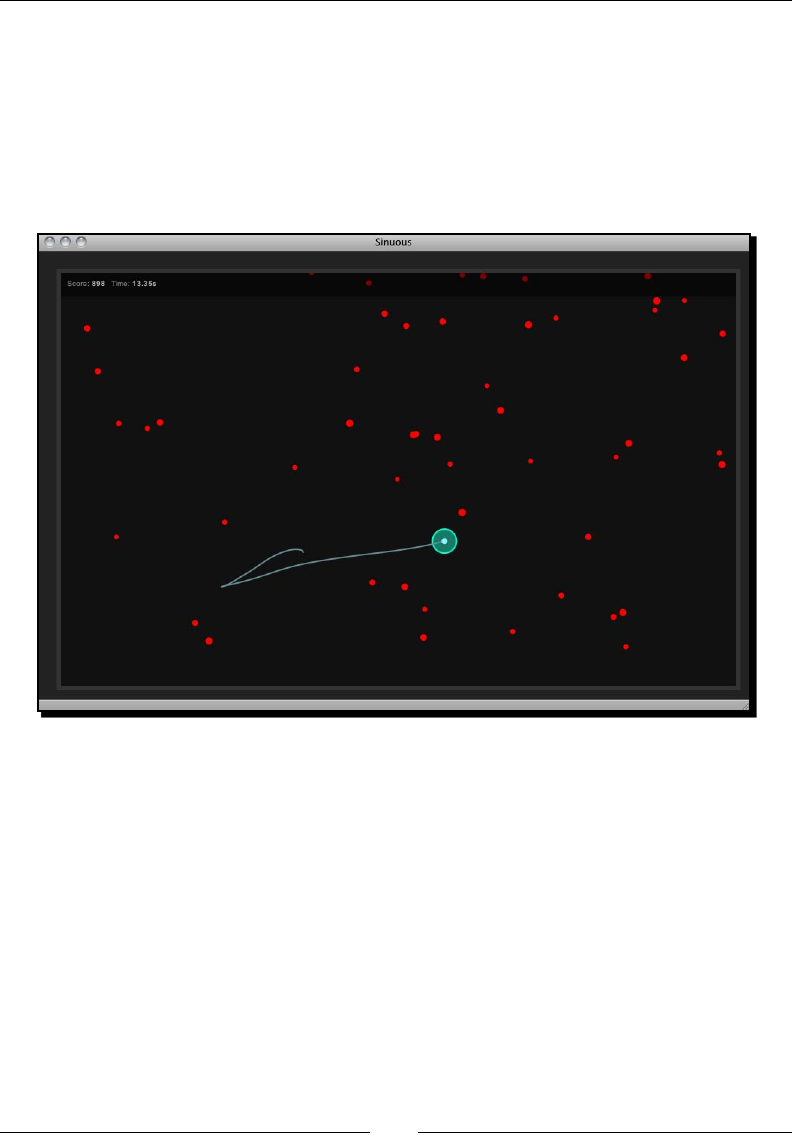
Sinuous
Sinuous (http://10k.aneventapart.com/Uploads/83/), winner of the 10K Apart,
shows us how a simple game idea with proper implementaon can get people addicted to
it. The player controls the big dots in the space with the mouse. The aim is to move the dots
to avoid the ying comets. It sounds easy and simple, but it is denitely addicve and a just-
one-more-try game. The game is created with a Canvas tag. Players can also play this game
with their webkit-enabled mobile devices, such as iPhone, iPad, and Android.
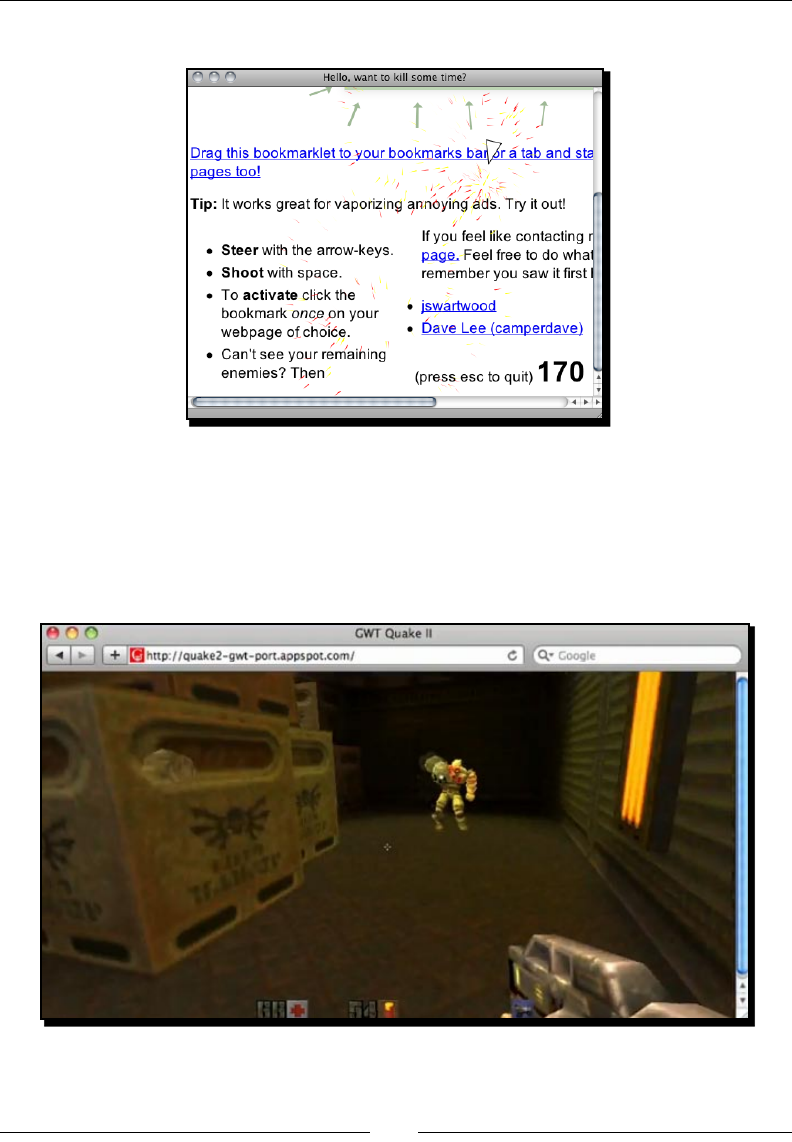
Asteroid-styled bookmarklet
Erik, a web designer from Sweden, created an interesng bookmarklet. It is an
asteroid-styled game for any web page. Yes, any web page. It shows an abnormal way
to interact with any web page. It creates a plane on the website you are reading from.
You can then y the plane using arrow keys and re bullets using the space bar. The fun
part is that the bullets will destroy the HTML elements on the page. Your goal is to destroy
all the things on the web page you choose. This bookmarklet is another example of breaking
the boundary of usual browser games. It tells us that we can think outside the box while
designing HTML5 games.
The bookmarklet is available for installaon at http://erkie.github.com/.
Introducing HTML5 Games
[ 20 ][ 20 ]
The following screenshot shows the plane destroying the content on the web page:
Quake 2
Google demonstrates a WebGL HTML5 port of the rst person shooter game, Quake 2.
Players move around using the WSAD key and shoot enemies with their mouse. Players
can even play with each other in real me by using WebSocket. According to Google, the
frame-per-seconds of the HTML5 Quake 2 can be up to 60 fps.
The Quake 2 port is available on Google Code at http://code.google.com/p/quake2-
gwt-port/.
Chapter 1
[ 21 ][ 21 ]
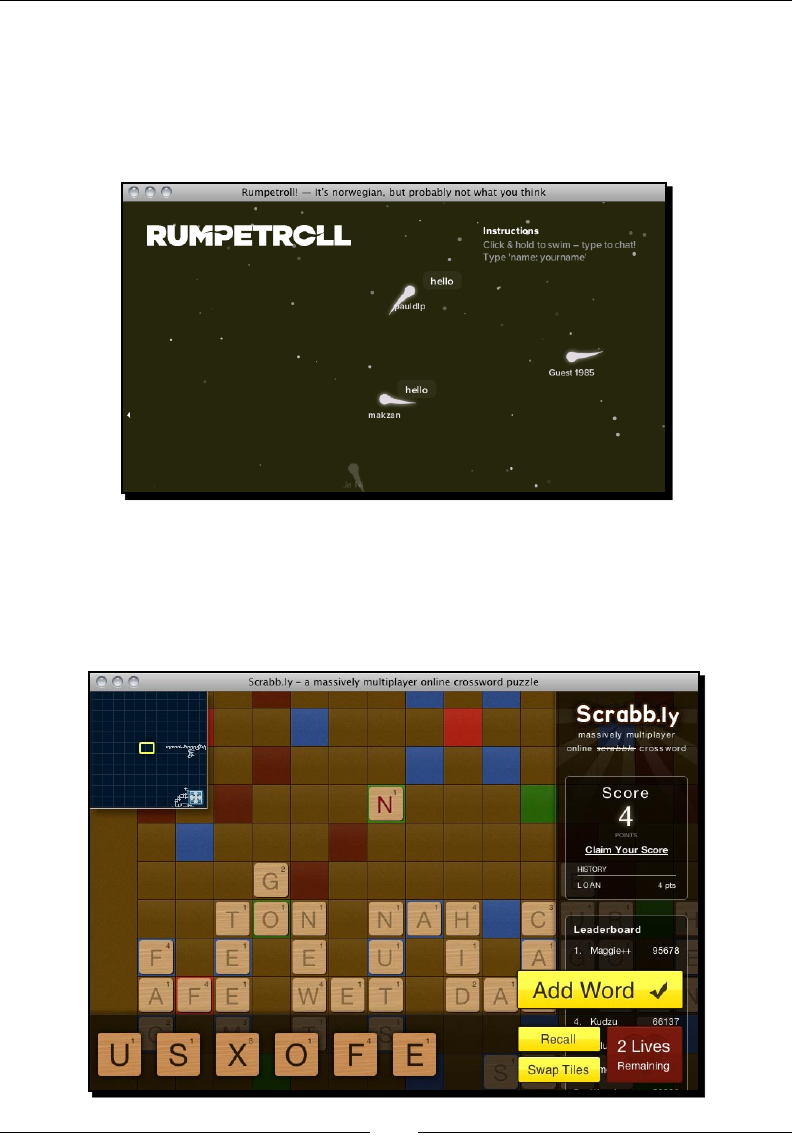
RumpeTroll
RumpeTroll (http://rumpetroll.com/) is an experiment of the HTML5 community
where everyone gets connected via WebSocket. We can give our creatures names and move
around through mouse clicks. We can also type anything to start a chat. Moreover, we can
see what others are doing in real me, thanks to the WebSocketInsert.
Scrabb.ly
Scrabb.ly (http://scrabb.ly) is a mulplayer crossword board game which won the
popularity prize in the Node.js Knockout contest. It connects users together with HTML5
WebSocket. This online board game is DOM-based and driven by JavaScript.
Introducing HTML5 Games
[ 22 ][ 22 ]
Node.js (http://nodejs.orgp://nodejs.org) is an event-driven server-side JavaScript.
It can be used as a server connecng concurrent WebSocket clients.
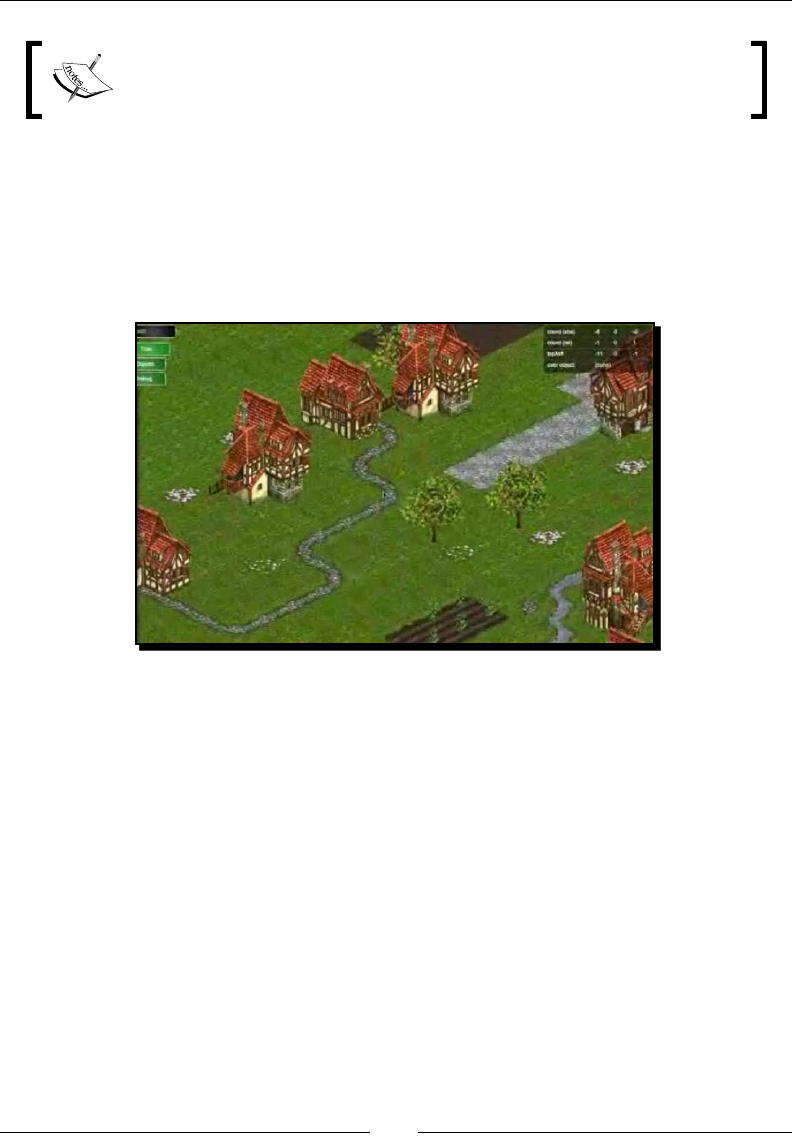
Aves Engine
Aves Engine is an HTML5 game development framework developed by dextrose. It provides
tools and API for game developers building their own isometric browser game world with the
map editor. The following screenshot captured from the ocial demonstraon video shows
how it creates an isometric world:
The engine also takes care of the 2.5 dimension isometric coordinate system, collision
detecon, and other basic virtual world features. This game engine even works well on
mobile devices such as iPad and iPhone. The Aves Engine has gained a lot of aenon since
its debut and is now acquired by Zynga Game Network Inc, a big social game company.
The video demonstraon of the Aves Engine is available on YouTube at the following link:
http://tinyurl.com/dextrose-aves-engine-sneak
Browsing more HTML5 games
These examples are just a selected few. The following sites provide updates on HTML5 games
created by others:
Canvas Demo (http://canvasdemo.com) collects a set of applicaons and games
using the HTML5 Canvas tag. It also provides a bunch of Canvas tutorial resources. It
is a good place to start learning Canvas.
Chapter 1
[ 23 ][ 23 ]
HTML5 games (http://html5games.com) collect many HTML5 games and
organizes them into categories.
Mozilla Labs hosted a HTML5 game design contest in early 2011 and many great
games were submied to the contest. The contest is now over and the list of all the
entries is at the following link: https://gaming.mozillalabs.com/games/.
The HTML5 Game Jam (http://www.html5gamejam.com/games) is an
HTML5 event and the website lists a collecon of fun HTML5 games and also
some useful resources.
What we are going to create in this book
In the following chapters, we are going to build six games. We are going to rst create a
DOM-based Ping Pong game that can be played by two players in the same machine. Then
we will create a memory matching game with CSS3 animaon. Later, we will use Canvas to
create an untangle puzzle game. Next, we will build a music game with audio elements. Then
we will create a mulplayer draw and guess game with WebSocket. Lastly, we will use the
Box2D JavaScript port to create a prototype of a physics car game. The following screenshot
is of the memory matching game that we will build in Chapter 3, Building a Memory
Matching Game in CSS3

Introducing HTML5 Games
[ 24 ][ 24 ]
Summary
We learned a lot in this chapter about basic informaon of HTML5 games.
Specically, we covered:
New features from HTML5 and CSS3. We had a glimpse of what techniques we will
use to create our games in later chapters. Canvas, audio, CSS animaon, and more
new features were introduced. We will have many new features to play with.
The benet of creang HTML5 games. We discussed why we want to create HTML5
games. We want to meet the web standard, meet the mobile devices, and break the
boundary of a game.
HTML5 games that others are playing. We listed several exisng HTML5 games that
were created with dierent techniques that we will use. We can test those games
before creang our own.
We also previewed the games that we are going to build throughout the book.
Now that we've learned about some background informaon of HTML5 games, we're ready
to create our rst DOM-based JavaScript-driven game in the next chapter.
2
Getting Started with DOM-based
Game Development
We have had an idea about what we are going to learn in the whole book in
Chapter 1, Introducing HTML5 Games. From this chapter, we will go through a
lot of learning-by-doing secons and we will focus on one topic in each secon.
Before digging deeply into the cung edge CSS3 animaons and HTML5
Canvas game, let's start with tradional DOM-based game development.
We will warm up with some basic techniques in this chapter.
In this chapter, we will be:
Preparing the development tools
Seng up our rst game—Ping Pong
Learning basic posioning with the jQuery JavaScript library
Geng keyboard inputs
Creang the Ping Pong game with scoring
Geng Started with DOM-based Game Development
[ 26 ][ 26 ]
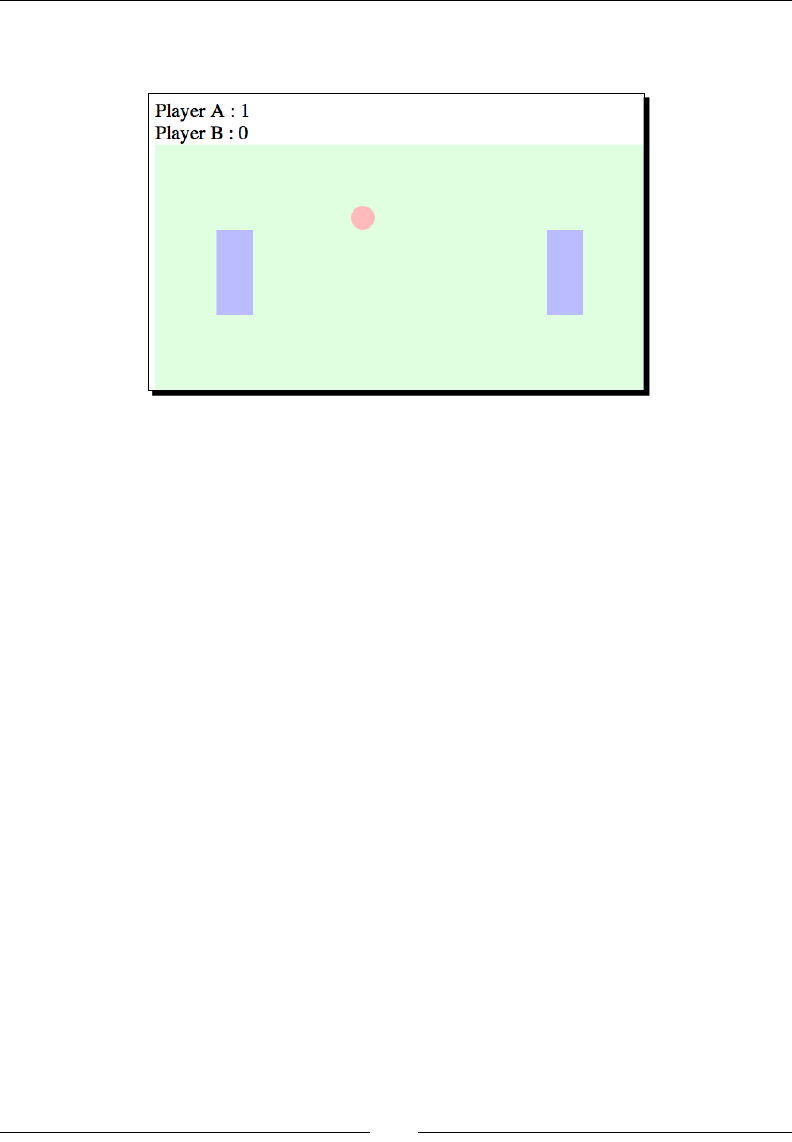
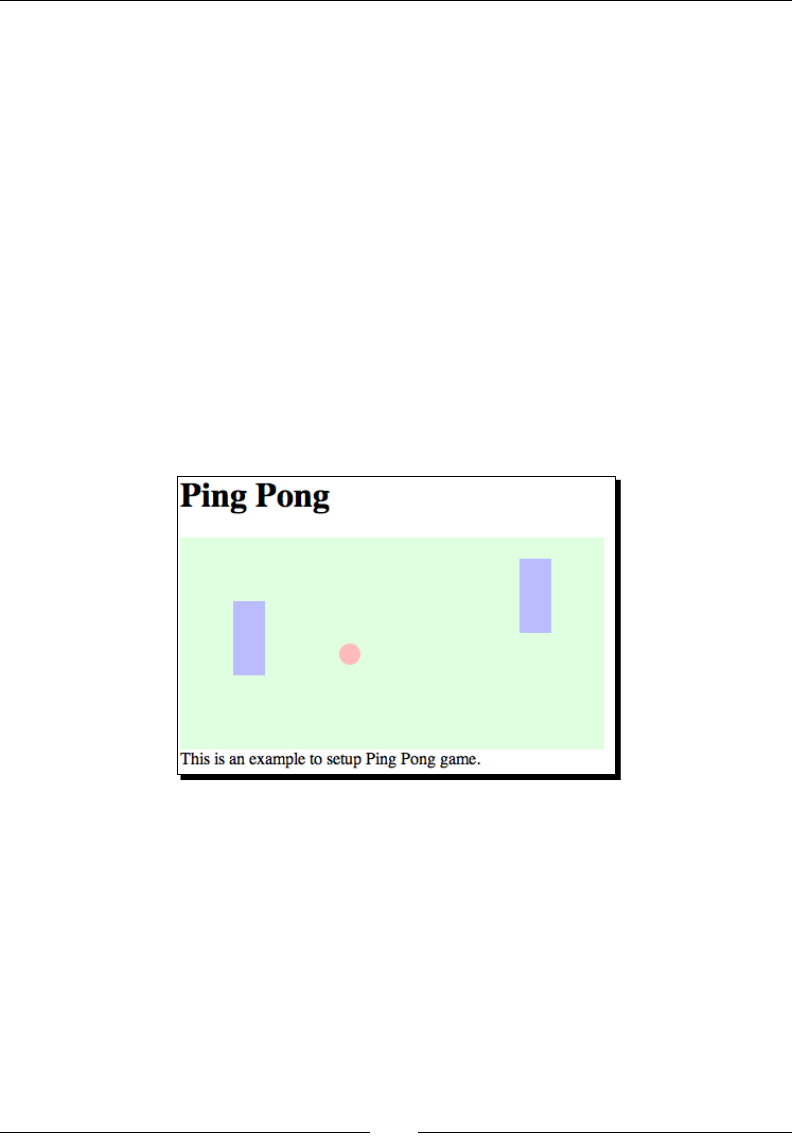
The following screenshot shows the game we will get aer this chapter. It is a Ping Pong
game played by two players with one keyboard simultaneously:
So, let's get on with making our Ping Pong.
Preparing the development environment
The environment for developing HTML5 games is similar to designing websites. We need
web browsers with the required plugin and a good text editor. Which text editor is good is a
never-ending debate. Each text editor comes with its own strength, so just pick your favorite
one. For the browser, we will need a modern browser that supports the latest HTML5, CSS3
spec, and provides us with handy tools for debugging.
There are several modern browser choices on the Internet now. They are Apple Safari
(http://apple.com/safari/), Google Chrome (http://www.google.com/chrome/),
Mozilla Firefox (http://mozilla.com/firefox/), and Opera (http://opera.com).
These browsers support most features we discuss in the examples in the whole book. We
will use Google Chrome to demonstrate most examples in the book because it runs fast and
smooth with CSS3 transion and Canvas.
Preparing the HTML documents for a DOM-based game
Every website, web page, and HTML5 game starts with a default HTML document. Moreover,
the document starts with a basic HTML code. We will start our HTML5 game development
journey from index.html.

Chapter 2
[ 27 ][ 27 ]
Time for action – Installing the jQuery library
We will create our HTML5 Ping Pong game from scratch. It may sound as if we are going
to be preparing all the things ourselves. Luckily, at least we can use a JavaScript library to
help us. jQuery is the JavaScript library we will be using in the whole book. It will help us in
simplifying our JavaScript logic:
1. Create a new folder named pingpong.
2. Create a new folder named js inside the pingpong directory.
3. Now it's me to download the jQuery library. Go to http://jquery.com/.
4. Select Producon and click on Download jQuery.
5. Save jquery-1.4.4.min.js in the js folder we created in step 2.
6. Create a new document named index.html and save it in the rst game folder.
7. Open index.html in text editor and insert an empty HTML template:
<!DOCTYPE html>
<html lang="en">
<head>
<meta charset="utf-8">
<title>Ping Pong</title>
</head>
<body>
<header>
<h1>Ping Pong</h1>
</header>
<footer>
This is an example of creating a Ping Pong Game.
</footer>
</body>
</html>
8. Include the jQuery JavaScript le by adding the following line before the closing of
the body tag:
<script src="js/jquery-1.4.4.min.js"></script>

Geng Started with DOM-based Game Development
[ 28 ][ 28 ]
9. Finally, we have to ensure that jQuery is loaded successfully. We place the following
code before the close of the body tag and aer the jQuery:
<script>
$(function(){
alert("Welcome to the Ping Pong battle.");
});
</script>
10. Save the index.html and open it in the browser. We should see the following alert
window showing our text. This means our jQuery is correctly set up:
What just happened?
We just created a basic HTML5 page with jQuery and ensured that the jQuery is
loaded correctly.
New HTML5 doctype
The DOCTYPE and meta tags are simplied in HTML5.
In HTML4.01, we declare doctype as the following code:
<!DOCTYPE HTML PUBLIC "-//W3C//DTD HTML 4.01//EN" "http://www.w3.org/
TR/html4/strict.dtd">
It is a long line of code, right? While in HTML5, the doctype declaraon cannot be simpler:
<!DOCTYPE html>
We even do not have the HTML version in the declaraon. This implies that HTML5 will
support all exisng content of previous HTML versions. Future HTML versions will also
support the exisng content of HTML5.
The simplicaon also comes to meta tag. We dene the charset of the HTML by using
the following short line now:
<meta charset=utf-8>
Chapter 2
[ 29 ][ 29 ]
Header and footer
HTML5 comes with many new features and improvements, one of them is semancs. HTML5
adds new elements to improve the semancs. We just used two, header and footer.
Header gives a heading introducon to the secon or the enre page. Therefore, we put
the h1 tle inside header. Footer, same as its name, contains the footer informaon of the
secon or the page.
A semanc HTML means that the markup itself provides meaningful
informaon to the content instead of only dening the visual
outlook.
Best practice to place the JavaScript code
We put the JavaScript code right before the closing </body> tag and aer all the content
in the page. There is a reason for pung the code there instead of pung it inside the
<head></head> secon.
Normally, browsers load content and render them from top to boom. If the JavaScript
code is put in the head secon, then the content of document will not be loaded unl all
JavaScript code is loaded. Actually, all rendering and loading will be blocked if the browsers
load a JavaScript code in the middle of the page. This is the reason why we want to put the
JavaScript code at the boom when possible. In this way, we can deliver the content with
higher performance.
At the me of wring this book, the latest jQuery version is 1.4.4. That is why the jQuery
le in our code examples is named jquery-1.4.4.min.js. This version number will be
dierent, but the usage should be the same unless there is a big change in jQuery without
backward compability.
Running our code after the page is ready
We need to ensure that the page is ready before our JavaScript code is executed. Otherwise,
we may get an error when we try to access an element that is not yet loaded. jQuery
provides us with a way to execute the code aer the page is ready. It is the following code:
jQuery(document).ready(function(){
// code here.
});
Actually, what we just used is the following codes:
$(function(){
// code here.
});
Geng Started with DOM-based Game Development
[ 30 ][ 30 ]
The $ sign is a shortcut for jQuery. When we are calling $(something), we are actually
calling jQuery(something).
$(function_callback) is another shortcut for the ready event.
It is idencal to the following:
$(document).ready(function_callback);
Also, idencal to:
jQuery(document).ready(function_callback);
Pop quiz
1. Which is the best place to put JavaScript code?
a. Before the <head> tag
b. Inside the <head></head> elements
c. Right aer the <body> tag
d. Right before the </body> tag
Setting up the Ping Pong game elements
We have the preparaon ready and it is me to set up the Ping Pong game.
Time for action – Placing Ping Pong game elements in DOM
1. We will connue from our jQuery installaon example. Open the index.html in a
text editor.
2. Then, create the following playground and game objects with DIV nodes in the
body. There are two paddles and one ball inside the playground. Moreover, the
playground is inside the game:
<div id="game">
<div id="playground">
<div id="paddleA" class="paddle"></div>
<div id="paddleB" class="paddle"></div>
<div id="ball"></div>
</div>
</div>

Chapter 2
[ 31 ][ 31 ]
3. We now have the game objects' structure ready and it is me to apply styles to
them. Put the following styles inside the head element:
<style>
#playground{
background: #e0ffe0;
width: 400px;
height: 200px;
position: relative;
overflow: hidden;
}
#ball {
background: #fbb;
position: absolute;
width: 20px;
height: 20px;
left: 150px;
top: 100px;
border-radius: 10px;
}
.paddle {
background: #bbf;
left: 50px;
top: 70px;
position: absolute;
width: 30px;
height: 70px;
}
#paddleB {
left: 320px;
}
</style>
4. In the last secon, we put our JavaScript logic right aer the jQuery inclusion. We
will put it in a separate le as our code is geng large. Therefore, create a le
named html5games.pingpong.js inside the js folder.
Geng Started with DOM-based Game Development
[ 32 ][ 32 ]
5. We prepared the JavaScript le. Now it is me to link them to our HTML le. Put the
following code in index.html before the </body> tag:
<script src="js/jquery-1.4.4.js"></script>
<script src="js/html5games.pingpong.js"></script>
6. We will place the game logic inside the html5games.pingpong.js. Our only logic
now is the following paddle's inializaon code:
// code inside $(function(){} will run after the DOM is loaded and
ready
$(function(){
$("#paddleB").css("top", "20px");
$("#paddleA").css("top", "60px");
});
7. We will test the setup in a browser. Open the index.html le in a browser and we
should see a screen similar to the one shown in the following screenshot:
What just happened?
We have put two paddles and a ball in the Ping Pong game. We also used jQuery to inialize
the posion of the two paddles.
Introducing jQuery
jQuery is a JavaScript library that is designed for easily navigang the DOM elements,
manipulang them, handling events, and creang an asynchronies remote call.
It contains two major parts: selecon and modicaon. Selecon uses CSS selector syntax
to select all matched elements in the web page. Modicaon acons modify the selected

Chapter 2
[ 33 ][ 33 ]
elements, such as add, remove children, or style. Using jQuery oen means chaining
selecon and modicaons acons together.
For example, the following code selects all elements with box class and sets the
CSS properes:
$(".box").css({"top":"100px","left":"200px"});
Understanding basic jQuery selectors
jQuery is about selecng elements and performing acons on them. We need a method to
select our required elements in the enre DOM tree. jQuery borrows the selectors from CSS.
The selector provides a set of paerns to match elements. The following table lists the most
common and useful selectors that we will use in this book:
Selector paern Meaning Examples
$("Element") Selects all elements with
the given tag name
$("p") selects all the p tags.
$("body") selects the body tag.
$("#id") Selects the element with
the given ID of the aribute
Provides the following code:
<div id="box1"></div>
<div id="box2"></div>
$("#box1") selects the highlighted
element.
$(".className") Selects all elements with
the given class aribute
Provides the following code:
<div class="apple"></div>
<div class="apple"></div>
<div class="orange"></div>
<div class="banana"></div>
$(".apple") selects the highlighted
elements with class set to apple.
$("selector1,
selector2,
selectorN")
Selects all elements that
match the given selector
Provides the following code:
<div class="apple"></div>
<div class="apple"></div>
<div class="orange"></div>
<div class="banana"></div>
$(".apple, .orange") selects the
highlighted elements that class is set to,
either apple or orange.
Geng Started with DOM-based Game Development
[ 34 ][ 34 ]
Understanding the jQuery CSS function
The jQuery css is a funcon to get and set the CSS properes of the selected elements.
Here is a general denion of how to use the css funcon:
.css(propertyName)
.css(propertyName, value)
.css(map)
The css funcon accepts several types of arguments as listed in the following table:
Funcon type Arguments denions Discussion
.css(propertyName) propertyName is a
CSS property
The funcon returns the value of the given
CSS property of the selected element.
For example, the following code returns
the value of the background-color
property of the body element:
$("body").css("background-
color")
It will only read the value and not modify
the property value.
.css(propertyName,
value)
propertyName is a
CSS property,
value is a value to
set for the property
The funcon modies the given CSS
property to the given value.
For example, the following code sets the
background color to red of all elements
with box class:
$(".box").css("background-
color","#ff0000")
.css(map) map is a set of
property-value pairs to
update
This funcon is useful for seng mulple
CSS properes to the same selected
elements at the same me.
For example, the following code sets both
le and top CSS properes to the selected
element with ID box1:
$("#box1").css({
"left" : "40px",
"top" : "100px"
})
Chapter 2
[ 35 ][ 35 ]
Benets of using jQuery
There are several advantages of using jQuery over pure JavaScript, which are as follows:
Using jQuery requires shorter code to select DOM nodes and modify them
Shorter code results in more clear code for reading, it is important in game
development that usually contains a lot of code
Wring shorter code increases the development speed
Using the jQuery library enables the code to support all major browsers without
extra tweaks; jQuery wraps the pure JavaScript code and deals with cross browser
capability by itself
Manipulating game elements in DOM with jQuery
We inialized the paddles game elements with jQuery. We will do an experiment on how we
use jQuery to place the game elements.
Time for action – Changing position of elements with jQuery
Let's inspect our Ping Pong game element with a grid background:
1. We will connue with our Ping Pong example.
2. I have prepared a grid image. Download the pixel_grid.jpg image from the
following URL:
http://gamedesign.cc/html5games/pixel_grid.jpg
3. Create a folder named images in the example directory.
4. Place the pixel_grid.jpg into the images folder. This image helps us inspect the
pixel displacement later.
5. Next, open the index.html le in a text editor.
6. Modify the background property of the playground DIV to include the pixel grid
image like the following:
#playground{
background: #e0ffe0 url(images/pixel_grid.jpg);
width: 400px;
height: 200px;
position: relative;
overflow: hidden;
}
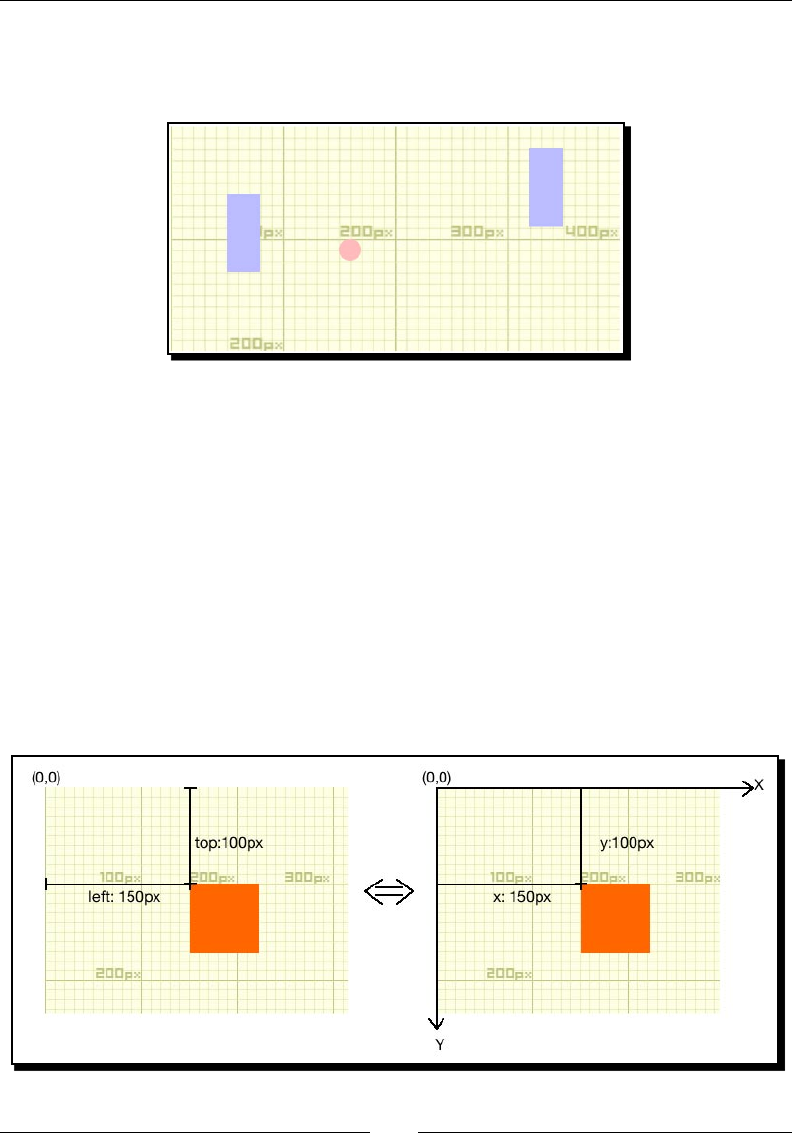
Geng Started with DOM-based Game Development
[ 36 ][ 36 ]
7. Now on opening the index.html in web browser we should have the following
screenshot. The game elements are overlaid on top of a grid image so we can see
where the elements are placed:
What just happened?
We began the example by placing an image called pixel_grid.jpg. This is an image I
created for easy debugging purposes. The image is divided into small grids. Every 10 x 10 grid
forms a big block with 100 x 100 pixels. By placing this image as background of the DIV, we
put a ruler that enables us to measure the posion of its children DIVs on the screen.
Understanding the behavior of absolute position
When a DOM node is set to be the absolute posion, the le and top properes can be
treated as a coordinate. We can treat the le/top properes into X/Y coordinates with Y
posive poinng down. The following graphs show the relaonship. The le side is the
actual CSS value and the right side is the coordinate system in our mind when programming
the game:

Chapter 2
[ 37 ][ 37 ]
By default, the le and top properes refer to the top le edge of the web page. This
reference point is dierent when any parent of this DOM node has a position style set
explicitly. The reference point of the le and top properes becomes the top le edge of
that parent.
This is why we need to set the playground with relave posion and all game elements
inside with absolute posion. The following code snippet from our example shows their
posion values:
#playground{
position: relative;
}
#ball {
position: absolute;
}
.paddle {
position: absolute;
}
Pop quiz
1. Which jQuery selector is to be used if you want to select all header elements?
a. $("#header")
b. $(".header")
c. $("header")
d. $(header)
Getting a keyboard input from players
This book is about game development. We can think about game development as the
following loop:
1. A game state is visually displayed.
2. Players input their commands.
3. The game runs according to the players' input under the designed game mechanics.
4. Loop the process again from step 1.
We learned how to display game objects with CSS and jQuery in previous secons. The next
thing we need to create in the game is geng input from the players. We will discuss the
keyboard input in this chapter.

Geng Started with DOM-based Game Development
[ 38 ][ 38 ]
Time for action – Moving DOM objects by a keyboard input
We are going to create a tradional ping pong game. There are two paddles on the le and
right side. A ball is placed in the middle of the playground. Players can control the le paddle
and move it up and down by using w and s keys, and use arrow-up and down keys for the
right paddle. We will focus on the keyboard input and leave the ball movement for the
later secon:
1. Let's connue with our pingpong directory.
2. Open the html5games.pingpong.js le which will contain our game logic.
Our only logic now is to listen to the key down event and move the corresponding
paddles up or down. Replace the content in the le with the following code:
var KEY = {
UP: 38,
DOWN: 40,
W: 87,
S: 83
}
$(function(){
// listen to the key down event
$(document).keydown(function(e){
switch(e.which){
case KEY.UP: // arrow-up
// get the current paddle B's top value in Int type
var top = parseInt($("#paddleB").css("top"));
// move the paddle B up 5 pixels
$("#paddleB").css("top",top-5);
break;
case KEY.DOWN: // arrow-down
var top = parseInt($("#paddleB").css("top"));
// move the paddle B down 5 pixels
$("#paddleB").css("top",top+5);
break;
case KEY.W: // w
var top = parseInt($("#paddleA").css("top"));
// move the paddle A up 5 pixels
$("#paddleA").css("top",top-5);
break;
case KEY.S: // s
var top = parseInt($("#paddleA").css("top"));
// move the paddle A drown 5 pixels
$("#paddleA").css("top",top+5);

Chapter 2
[ 39 ][ 39 ]
break;
}
});
});
3. Let's test the paddle control of the game. Open the index.html in Google Chrome.
Try pressing the w key, the s key, and arrow-up and down. The two paddles should
be able to move up or down according to the input, but they cannot move at the
same me now.
What just happened?
Let's take a look at the HTML code we just used. The HTML page contains header, footer
informaon, and a DIV with ID game. The game node contains a child named playground.
The playground contains three children, two paddles, and the ball.
We oen start the HTML5 game development by preparing a well-structured HTML
hierarchy. The HTML hierarchy helps us group similar game objects (which are some DIVs)
together. It is a lile like grouping assets into a movie clip in Adobe Flash if you have ever
made animaons with it. We may also consider it as layers of game objects for us to select
and style them easily.
Understanding a key code
Every key on the keyboard is assigned a number. By geng that number, we can nd out
which key is pressed. We listen to the jQuery keydown event listener. The event res with
the event object containing the key code. We can obtain the key code by calling the which
funcon to the key down event object.

Geng Started with DOM-based Game Development
[ 40 ][ 40 ]
You can try adding a console log funcon inside the keydown event listener and observe the
represenng integer of each key:
$(document).keydown(function(e){
console.log(e.which);
});
Making constants more readable
In our example, we use the key code to check whether the player hits the keys we are
interested in. Take the arrow-up key as an example. Its key code is 38. We can simply
compare the key code with the number directly, as follows:
$(document).keydown(function(e){
switch(e.which){
case 38:
// do something when pressed arrow-up
}
}
However, this is not a recommended pracce because it makes the game code more dicult
to maintain. Imagine later if we want to map the acon from the arrow-up key to another
key. We may not be sure whether 38 means the arrow-up. Instead, we can give the constant
a meaningful name with the following code:
var KEY = {
UP: 38,
DOWN: 40,
W: 87,
S: 83
}
// listen to the key down event
$(document).keydown(function(e){
switch(e.which){
case KEY.UP:
// do something when pressed arrow-up
}
}
By giving 38 a name KEY.UP, we can be sure that the block of code is mapped to the
arrow-up key and so we can modify it without doubt when maintaining the game.
Converting strings to numbers with parseInt function
In most cases, we apply the le and top CSS styles to DOM elements by using the format
such as 100px. We specify the unit when seng the property. It is the same when we get
the value of the property. When we call $("#paddleA").css("top"), we get the value

Chapter 2
[ 41 ][ 41 ]
of 100px instead of 100. This gives us a problem when we want to perform an arithmec
operaon on the value.
In the example, we want to move up the paddle by seng the paddle top property to its
current posion minus ve pixels. Let us assume paddle A has the top property set to 100px
now. If we use the following expression to add ve pixels, it fails and returns 100px5:
$("#paddleA").css("top") + 5
It is because JavaScript executes the css funcon and gets "100px". Then it appends "5" to
the "100px" string.
We need a method to convert the "100px" string before doing any mathemacal operaon.
JavaScript provides us with the parseInt funcon.
Here is a general denion of how to use the parseInt funcon:
parseInt(string, radix)
The parseInt funcon takes one required argument and one opon:
Argument Denion Discussion
String The string to be parsed The funcon parses the rst number of the
string. It will return NaN, Not a Number, if
the given string cannot be converted into a
number.
It will parse the string starng with "0x" in
hexadecimal by default.
Take the following code as examples:
parseInt("100px") returns 100.
parseInt("5cm") returns 5.
parseInt("0xF") returns 15.
Radix Oponal. A number to
indicate which number system
to be used
The second argument forces the parseInt
funcon to parse the string in a given
number system.
For example:
parseInt("0x10") returns 16
parseInt("0x10",10) returns 0
parseInt("FF",16) returns 255
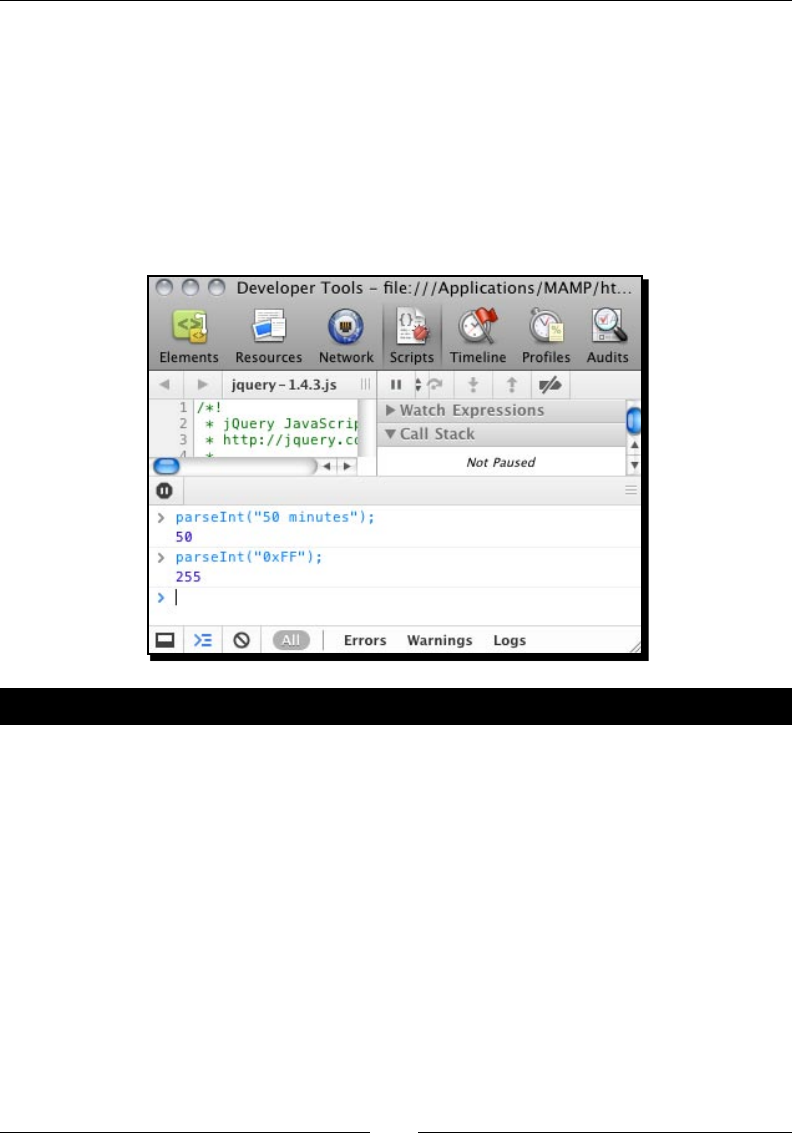
Geng Started with DOM-based Game Development
[ 42 ][ 42 ]
Executing JavaScript expressions directly in the Console panel
You should also know that you can execute JavaScript expressions by directly typing it
into the console window. The console window is a tool from the Developer Tool in Google
Chrome. (There are also other similar tools in other web browsers). We can open the console
by clicking on Wrench Icon | Tools | Developer tools | Console.
It is a handy way to quickly test a simple expression when you are not sure whether
it works during development. The following screenshot tests the return value of the
two parseInt expressions:
Have a go hero
Converng strings to integers can be tricky somemes. Do you know what is the parseInt
result of 10 seconds 20? How about 10x10 and $20.5?
It is me to open the console panel and try converng some strings into numbers.
Checking the console window
We are wring more complicated logic code now. It is good pracce to keep an eye on the
console of the Developers Tools. If the code contains any error or warning, the error message
will appear there. It reports any error found and the line of code that contains the error.
It is very useful and important to have the console window open when tesng the HTML5
games. I have seen many mes that people get stuck and have no idea as to why the code is
not working. The reason is that they have a typo or syntax error and they did not check the
console window unl ghng with the code for hours.
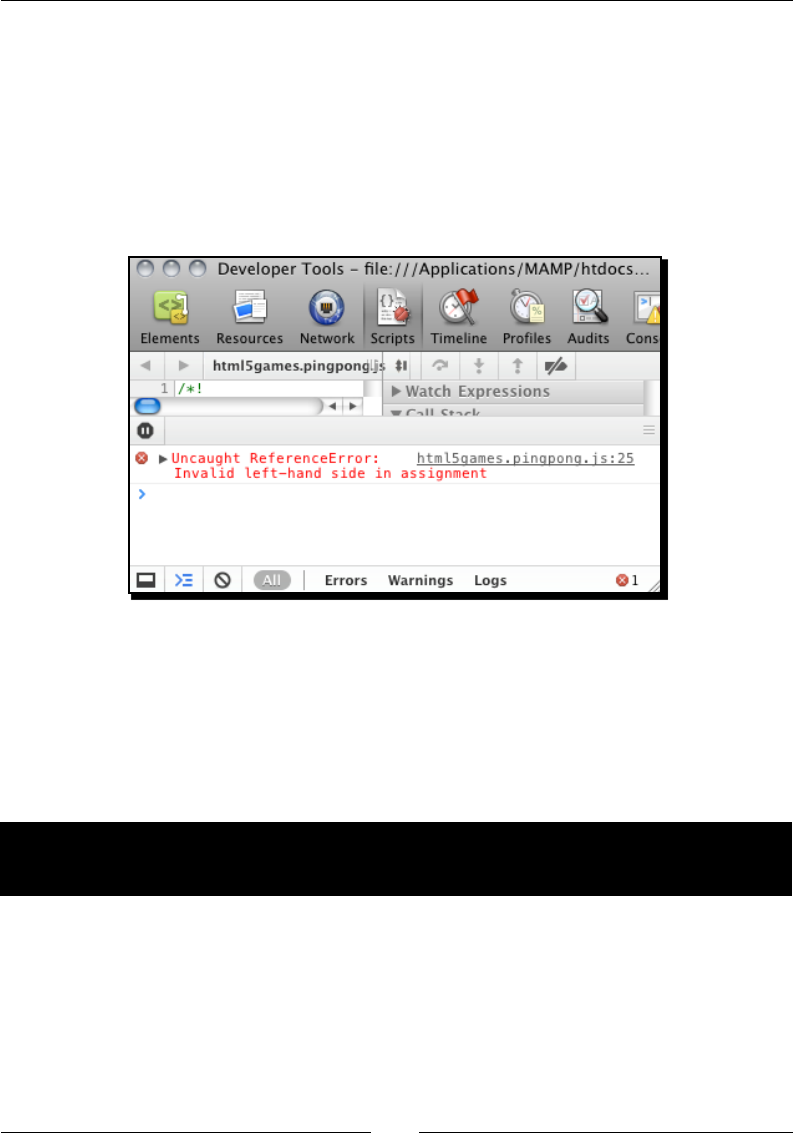
Chapter 2
[ 43 ][ 43 ]
The following screenshot shows that there is an error in line 25 of the html5games.
pingpong.js le. The error message is Invalid le-hand side in assignment. Aer
inspecng the code, I found that I wrongly used an equal sign (=) when seng the
CSS top property in jQuery:
$("#paddleA").css("top"=top+5);
// instead of the correct code:
// $("#paddleA").css("top", top+5);
Supporting multiple keyboard input from players
The previous input method only allows one input at a me. The keyboard input is also not so
smooth. Imagine now that two players are playing the Ping Pong game together. They cannot
control the paddle well because their inputs interrupt the others. In this secon, we are
going to modify our code to make it support mulple keyboard inputs.
Time for action – Listening to keyboard input with
another approach
We will use another approach to handle the key down event. This approach will be a lot
smoother and supports mulple inputs at the same me:
1. Open the html5games.pingpong.js we used in the last secon.
2. Delete all the code we coded there. It is simpler to start from scratch.

Geng Started with DOM-based Game Development
[ 44 ][ 44 ]
3. We will need a global variable of array to store the key pressed status. Enter the
following code in the opened JavaScript le:
var pingpong = {}
pingpong.pressedKeys = [];
4. The next thing is the code is executed once the page is loaded and ready. It will
listen and mark the pressed key. Put the following code in the JavaScript le aer
the two lines we just coded there:
$(function(){
// set interval to call gameloop every 30 milliseconds
pingpong.timer = setInterval(gameloop,30);
// mark down what key is down and up into an array called
"pressedKeys"
$(document).keydown(function(e){
pingpong.pressedKeys[e.which] = true;
});
$(document).keyup(function(e){
pingpong.pressedKeys[e.which] = false;
});
});
5. We have stored the key which is pressed. What we are missing is actually moving
the paddles. We set a mer to connuously call a funcon to move the paddles.
Paste the following code in the html5games.pingpong.js le:
function gameloop() {
movePaddles();
}
function movePaddles() {
// use our custom timer to continuously check if a key is
pressed.
if (pingpong.pressedKeys[KEY.UP]) { // arrow-up
// move the paddle B up 5 pixels
var top = parseInt($("#paddleB").css("top"));
$("#paddleB").css("top",top-5);
}
if (pingpong.pressedKeys[KEY.DOWN]) { // arrow-down
// move the paddle B down 5 pixels
var top = parseInt($("#paddleB").css("top"));
$("#paddleB").css("top",top+5);
}

Chapter 2
[ 45 ][ 45 ]
if (pingpong.pressedKeys[KEY.W]) { // w
// move the paddle A up 5 pixels
var top = parseInt($("#paddleA").css("top"));
$("#paddleA").css("top",top-5);
}
if (pingpong.pressedKeys[KEY.S]) { // s
// move the paddle A down 5 pixels
var top = parseInt($("#paddleA").css("top"));
$("#paddleA").css("top",top+5);
}
}
6. Let's test what we just coded. Save all the les and open index.html in the
web browser.
7. Try pressing the keys to control both paddles. The two paddles should move
smoothly and respond at the same me without interrupon.
What just happened?
We have used another approach to capture the keyboard input. Instead of doing the acon
once aer the key press is detected, we store which keys are pressed and which are not.
Aerwards, we use a JavaScript interval to check the pressed keys every 30 milliseconds.
This approach enables us to know all the keys pressed at the me and so we can move both
paddles at the same me.
Declaring global variables in a better way
Global variables are variables that can be accessed globally in the enre document.
Any variable that is declared outside any funcon is a global variable. For instance, in
the following example code snippets, a and b are global variables while c is a local variable
that only exists inside the funcon:
var a = 0;
var b = "xyz";
function something(){
var c = 1;
}
Since global variables are available in the enre document, it may increase the change of
variable name conicts if we integrate dierent JavaScript libraries into the web page. As
good pracce, we should put all global variables we use into an object.

Geng Started with DOM-based Game Development
[ 46 ][ 46 ]
In the Time for acon secon, we have a global array to store all pressed keys. Instead of just
pung this array in global scope, we created a global object named pingpong and put the
array inside it:
var pingpong = {}
pingpong.pressedKeys = [];
In the future, we may need more global variables and we will put them all inside the
pingpong object. This reduces the chance of name conicon to only one name,
pingpong.
Creating a JavaScript timer with setInterval function
The pressed keys are stored in the array and we have a mer to loop and check the array
periodically. This can be done by the setInterval funcon in JavaScript.
Here is the general denion of the setInterval funcon:
setInterval(expression, milliseconds)
The setInterval takes two required arguments:
Argument Denion Discussion
expression The funcon call back
or code expression to
be executed
The expression can be a reference of funcon call back
or an inline code expression. The inline code expression
is quoted and reference of funcon call back is not.
For example, the following code calls the hello
funcon 100 milliseconds:
setInterval(hello,100);
The following code calls the hi funcon with
parameters every 100 milliseconds:
setInterval("hi('Makzan')",100);
milliseconds The duraon between
every execuon of
the expression, in
milliseconds
The unit of the interval is in milliseconds. Therefore,
seng it to 1000 means running the expression every
second.
Understanding Game Loop
We have a mer to execute some game-related code every 30 milliseconds, so this code is
executed 33.3 mes per second. In game development, this is called Game Loop.
Chapter 2
[ 47 ][ 47 ]
There are several common things we will execute inside a game loop:
Processing user input, which we just did
Updang game objects' status, including posion and appearance
Checking game over
What is actually execung in the game loop diers in dierent types of games but the
purpose is the same. The game loop is executed periodically to help run the game smoothly.
Moving a DOM object with JavaScript Interval
Imagine now we can make the lile red ball move around in the playground. The ball will
bounce away when it hits the paddles. The player will lose a score when the ball passes the
paddle and hits the playground edge behind the paddle. All these acons are manipulang
the posion of the DIVs inside the HTML page by jQuery. To complete this Ping Pong game,
our next step is to move the ball.
Time for action – Moving the ball with JavaScript Interval
We just learnt and used the setInterval funcon to create a mer. We will use the mer
to move the ball a lile bit every 30 milliseconds. We are going to also change the direcon
of the ball movement once it hits the playground edge. Let's make the ball move now:
1. We will use our last example, listening to mulple keyboard inputs, as the
starng point.
2. Open the html5games.pingpong.js le in the text editor.
3. We are now moving the ball and we need to store the ball status globally. We will
put the ball-related variable inside the pingpong object:
pingpong.ball = {
speed: 5,
x: 150,
y: 100,
directionX: 1,
directionY: 1
}

Geng Started with DOM-based Game Development
[ 48 ][ 48 ]
4. In every game loop, we used to move the paddles. Now we will move the ball as
well. Add a moveBall funcon call to the gameloop funcon:
function gameloop() {
moveBall();
movePaddles();
}
5. It is me to dene the moveBall funcon. The funcon is divided into four parts, it
gets the current ball posion, checks the boundaries of the playground, changes the
direcon of the ball when hing the boundaries and actually moves the ball aer
all these calculaons. Let's put the following moveBall funcon denion in the
JavaScript le:
function moveBall() {
// reference useful variables
var playgroundHeight = parseInt($("#playground").height());
var playgroundWidth = parseInt($("#playground").width());
var ball = pingpong.ball;
// check playground boundary
// check bottom edge
if (ball.y + ball.speed*ball.directionY > playgroundHeight)
{
ball.directionY = -1;
}
// check top edge
if (ball.y + ball.speed*ball.directionY < 0)
{
ball.directionY = 1;
}
// check right edge
if (ball.x + ball.speed*ball.directionX > playgroundWidth)
{
ball.directionX = -1;
}
// check left edge
if (ball.x + ball.speed*ball.directionX < 0)
{
ball.directionX = 1;
}
ball.x += ball.speed * ball.directionX;
ball.y += ball.speed * ball.directionY;
// check moving paddle here, later.

Chapter 2
[ 49 ][ 49 ]
// actually move the ball with speed and direction
$("#ball").css({
"left" : ball.x,
"top" : ball.y
});
}
6. We have prepared the code to move the ball every 30 milliseconds. Save all les and
open index.html in Google Chrome to test it.
7. The paddles work just as in the last example and the ball should be moving around
the playground.
What just happened?
We just successfully made the ball move around the playground. We have a loop to run
roune game logic every 30 milliseconds. Inside that game loop, we move the ball ve
pixels at a me.
There are three properes of the ball, speed, and direcon X/Y. The speed denes how many
pixels the ball moves in each step. The direcon X/Y is either 1 or -1. We move the ball with
the following equaon:
new_ball_x = ball_x_position + speed * direction_x
new_ball_y = ball_y_position + speed * direction_y
The direcon value is mulplied by the movement. When the direcon is 1, the ball moves
to the posive direcon of the axis. When the direcon is -1, the ball moves to the negave
direcon. By toggling the X and Y direcons, we can move the ball in four direcons.
We compare the ball's X and Y with the four edges of the playground DIV element. This
checks whether the ball's next posion is beyond the boundary and then we toggle the
direcon between 1 and -1 to create the bouncing eect.
Beginning collision detection
We have checked the boundary of the playground when moving the ball in the previous
secon. Now we can control the paddles with the keyboard and watch the ball moving
around the playground. What is missing now? We cannot interact with the ball. We control
the paddles but the ball just passes through them as if they are not there. It is because we
missed the collision detecon between the paddles and the moving ball.

Geng Started with DOM-based Game Development
[ 50 ][ 50 ]
Time for action – Hitting the ball with the paddles
We will use a similar approach of checking the boundary to check the collision:
1. Open the html5games.pingpong.js le we used in the previous secon.
2. In the moveball funcon, we have already reserved the place to put the collision
detecon code there. Find the line with // check moving paddle here.
3. Let's put the following code there. The code checks whether the ball is overlapping
with either paddle and bounces the ball away when they overlap:
// check left paddle
var paddleAX = parseInt($("#paddleA").css("left"))+parseInt($("#pa
ddleA").css("width"));
var paddleAYBottom = parseInt($("#paddleA").css("top"))+parseInt($
("#paddleA").css("height"));
var paddleAYTop = parseInt($("#paddleA").css("top"));
if (ball.x + ball.speed*ball.directionX < paddleAX)
{
if (ball.y + ball.speed*ball.directionY <= paddleAYBottom &&
ball.y + ball.speed*ball.directionY >= paddleAYTop)
{
ball.directionX = 1;
}
}
// check right paddle
var paddleBX = parseInt($("#paddleB").css("left"));
var paddleBYBottom = parseInt($("#paddleB").css("top"))+parseInt($
("#paddleB").css("height"));
var paddleBYTop = parseInt($("#paddleB").css("top"));
if (ball.x + ball.speed*ball.directionX >= paddleBX)
{
if (ball.y + ball.speed*ball.directionY <= paddleBYBottom &&
ball.y + ball.speed*ball.directionY >= paddleBYTop)
{
ball.directionX = -1;
}
}
4. We will also need to reset the ball in the middle area aer the ball hits the le or
right edge of the playground. Remove the bouncing ball code in the check right
and check left code secon and paste the following code there:
// check right edge
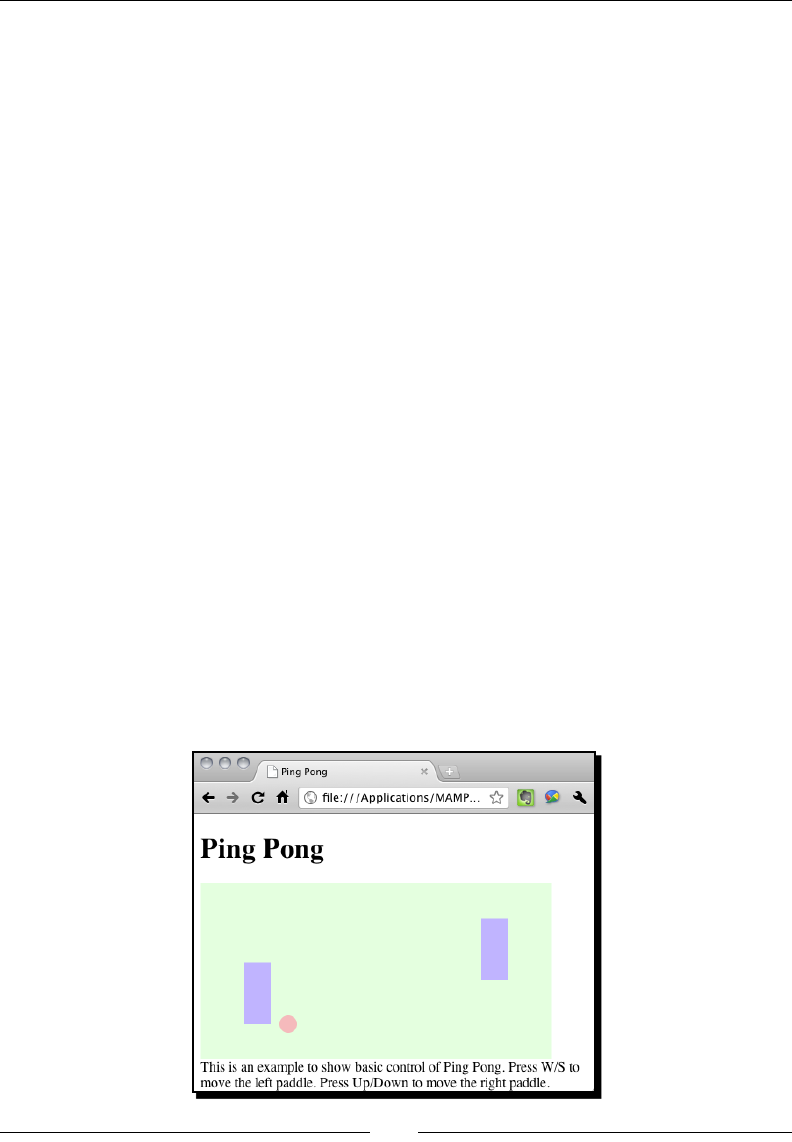
Chapter 2
[ 51 ][ 51 ]
if (ball.x +ball.speed*ball.directionX > playgroundWidth)
{
// player B lost.
// reset the ball;
ball.x = 250;
ball.y = 100;
$("#ball").css({
"left": ball.x,
"top" : ball.y
});
ball.directionX = -1;
}
// check left edge
if (ball.x + ball.speed*ball.directionX < 0)
{
// player A lost.
// reset the ball;
ball.x = 150;
ball.y = 100;
$("#ball").css({
"left": ball.x,
"top" : ball.y
});
ball.directionX = 1;
}
5. Test the game in a browser and the ball will now bounce away aer hing the le
or right paddle. It will also reset to the center of the playground when hing the le
or right edge.
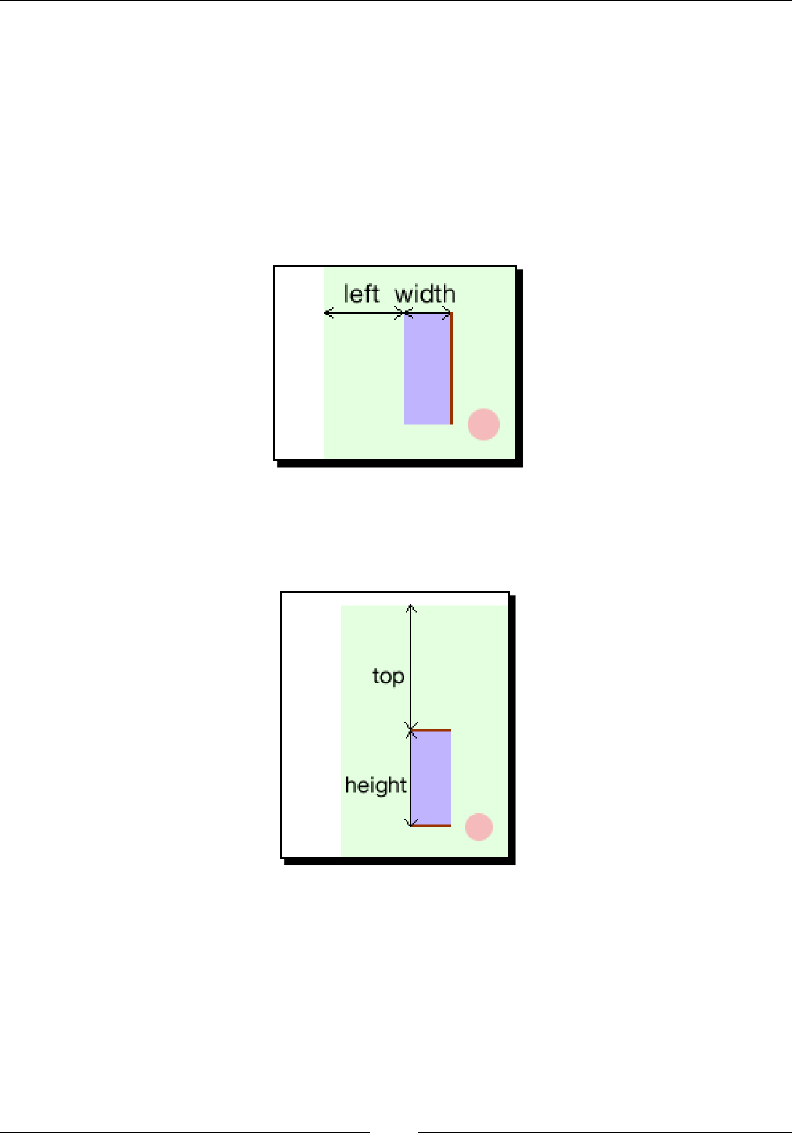
Geng Started with DOM-based Game Development
[ 52 ][ 52 ]
What just happened?
We have modied the ball checking to make it bounce away when overlapping with the
paddles. Moreover, we reposion the ball in the center of the playground when hing the
le and right edge.
Let's see how we check the collision between the ball and the le paddle.
At rst, we check whether the ball's X posion is less than the le paddle's right edge.
The right edge is the left value plus the width of the paddle.
Then we check whether the ball's Y posion is between the top edge and boom edge of the
paddle. The top edge is the top value and the boom edge is the top value plus the height
of the paddle.
We bounce the ball away if the ball's posion passes both checks. This is how we check it
and it is just a basic collision detecon.
We determine that the two objects are overlapped by checking their posion and width/
height. This type of collision detecon works well in rectangle objects but is not good for
circles and other shapes. The following screenshot illustrates the issue. The collision areas
shown in the following graph are false posive. Their bounding box collides but the actual
shapes do not overlap each other.
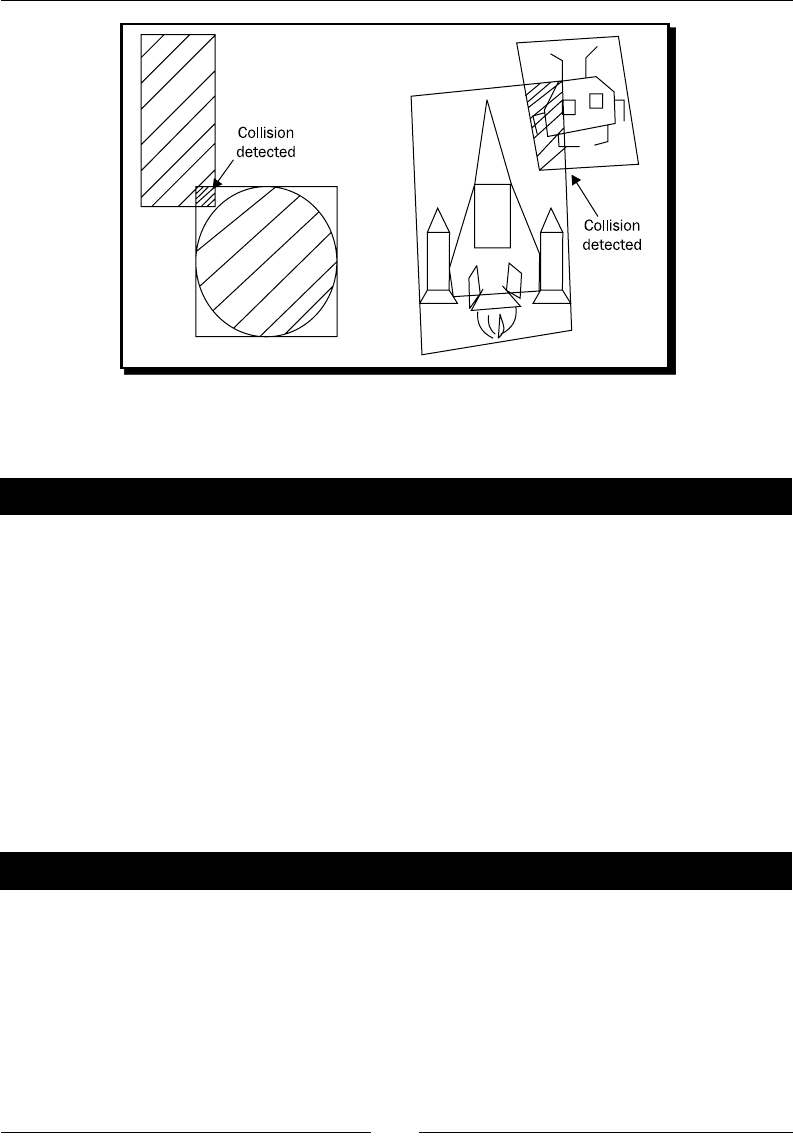
Chapter 2
[ 53 ][ 53 ]
For special shapes, we will need more advanced collision detecon techniques that we will
discuss later.
Have a go hero
We check three edges of the paddles to determine whether the ball overlaps with them. If
you play the game and observe the ball bouncing carefully, you will nd that it is not perfect
now. The ball may bounce while behind the paddles. Think about the reason and modify the
code to make a beer collision detecon with the ball and the paddles.
Showing text dynamically in HTML
We have the basic game mechanics implemented in the previous secons. Our Ping Pong
game is missing a scoring board now showing both players' scores. We discussed how to use
jQuery to modify the CSS styles of the selected elements. Can we also alter the content of
the selected elements with jQuery? Yes, we can.
Time for action – Showing the score of both players
We are going to create a text-based scoreboard and update the scores when either player
scores a goal:
1. We are making improvements on our exisng game so we use the last example as
the starng point.
2. Open the index.html in the text editor. We are going to add the scoreboard
DOM elements.
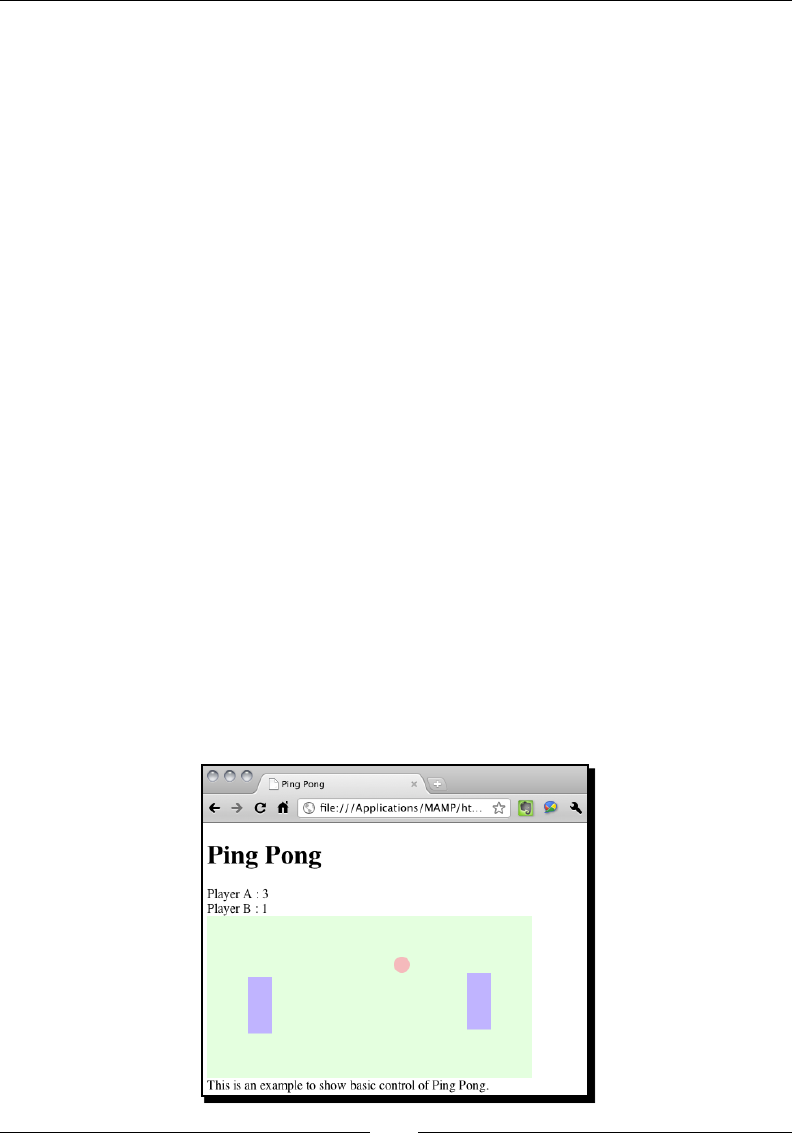
Geng Started with DOM-based Game Development
[ 54 ][ 54 ]
3. Add the following HTML code before the game DIV inside index.html:
<div id="scoreboard">
<div class="score">Player A : <span id="scoreA">0</span></div>
<div class="score">Player B : <span id="scoreB">0</span></div>
</div>
4. Let's move onto the JavaScript part. Open the html5games.pingpong.js le.
5. We need two more global variables to store the players' scores. Add their score
variables inside the pingpong global object:
var pingpong = {
scoreA : 0, // score for player A
scoreB : 0 // score for player B
}
6. We had a place to check if player B lost. We incremented the player A's score there
and updated the scoreboard with the following code:
// player B lost.
pingpong.scoreA++;
$("#scoreA").html(pingpong.scoreA);
7. We have similar code as in step 6 to update player B's score when player A lost:
// player A lost.
pingpong.scoreB++;
$("#scoreB").html(pingpong.scoreB);
8. It is me to test our latest code. Open the index.html in a web browser. Try
playing by controlling both paddles and lose some points. The scoreboard should be
counng the scores correctly:

Chapter 2
[ 55 ][ 55 ]
What just happened?
We just used another common jQuery funcon: html() to alter the content of the game on
the y.
The html() funcon gets or updates the HTML content of the selected element. Here is a
general denion of the html() funcon:
.html()
.html(htmlString)
When we use the html ( ) funcon without an argument, it returns the HTML content of
the rst match element. When we use it with an argument, it sets the HTML content to all
matched elements with the given HTML string.
For example, provide the following HTML structure:
<p>My name is <span id="myname" class="name">Makzan</span>.</p>
<p>My pet's name is <span id="pet" class="name">
Both the following jQuery calls return Makzan:
$("#myname").html(); // returns Makzan
$(".name").html(); // returns Makzan
However, in the following jQuery call, it sets all matched elements to the given HTML
content:
$(".name").html("<small>Mr. Mystery</small>")
Execung the jQuery command makes the following HTML result:
<p>My name is <span id="myname" class="name"><small>Mr. Mystery</
small></span></p>
<p>My pet's name is <span id="pet" class="name"><small>Mr. Mystery</
small></span></p>
Have a go hero – Winning the game
We have the scoring now. See whether you can modify the game to make it stop aer any
player gets 10 points. Then show a win message.
You might also want to try styling the game to make it more appealing. How about giving
the scoreboard and playground some image backgrounds? Replacing the paddles with two
goalkeeper characters?

Geng Started with DOM-based Game Development
[ 56 ][ 56 ]
Summary
We learned a lot in this chapter about basic techniques of creang a simple Ping Pong game
with HTML5 and JavaScript.
Specically, we covered:
Creang our rst HTML5 game—Ping Pong
Using jQuery to manipulate DOM objects
Geng keyboard inputs with mulple keys down support
Detecng collisions with the bounding box
We also discussed how to create a game loop and move the ball and paddles.
Now that we've warmed up by creang a simple DOM-based game, we are ready to create
more advanced DOM-based games with new features from CSS3. In the next chapter, we will
create games with CSS3 animaon, transion, and transformaon.
3
Building a Memory Matching Game
in CSS3
CSS3 introduces many excing features. In this chapter, we will explore and
use some of them to create a matching memory game. The CSS3 styles how
the game objects look and animate while the jQuery library helps us dene the
game logic.
In this chapter, we will:
Transform a playing card with animaon
Flip a playing card with new CSS3 properes
Create the whole memory matching game
And embed a custom web font to our game
So let's get on with it.
Moving game objects with CSS3 transition
We had a glimpse of the CSS3 transion module and transformaon module in Chapter 1,
Introducing HTML5 Games, when we were overviewing the new CSS3 features. We oen
want to animate the game objects by easing the properes. Transion is the CSS property
designed for this purpose. Imagine we have a playing card on the web page and want to
move it to another posion in ve seconds. We had to use JavaScript and setup mer and
write our own funcon to change the posion every several milliseconds. By using the
transition property, we just need to specify the start and end styles and the duraon.
The browser does all the easing and in-between animaons, magically.
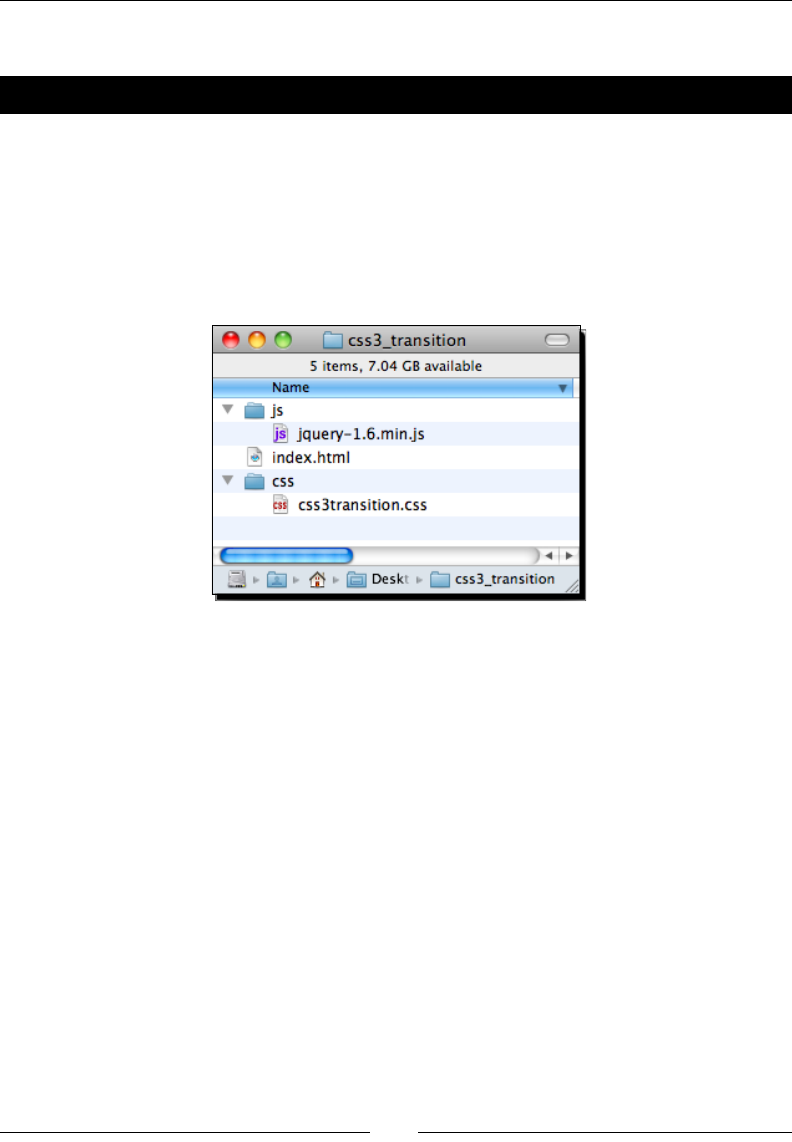
Building a Memory Matching Game in CSS3
[ 58 ][ 58 ]
Let's take a look at some examples to understand it.
Time for action – Moving a playing card around
In this example, we will place two playing cards on the web page and transform them
to a dierent posion, scale, and rotaon. We will tween the transformaon by seng
the transion:
1. Create a new folder with three les in the following hierarchy. The css3transition.
css and index.html is empty now and we will add the code later. The jquery-
1.6.min.js is the jQuery library that we have used in the previous chapter.
2. We are using two playing card graphic images in this example. The images
are available in the code bundle or you can download them from http://
gamedesign.cc/html5games/css3-basic-transition/images/AK.png
and http://gamedesign.cc/html5games/css3-basic-transition/
images/AQ.png.
3. Create a new folder named images and place the two card images inside.
4. The next thing is to code the HTML with two card DIV elements. We will apply
CSS transion style to these two cards elements when the page is loaded:
<!DOCTYPE html>
<html lang="en">
<head>
<meta charset="utf-8">
<title>Getting Familiar with CSS3 Transition</title>
<link rel="stylesheet" href="css/css3transition.css" />
</head>
<body>
<header>

Chapter 3
[ 59 ][ 59 ]
<h1>Getting Familiar with CSS3 Transition</h1>
</header>
<section id="game">
<div id="cards">
<div id="card1" class="card cardAK"></div>
<div id="card2" class="card cardAQ"></div>
</div> <!-- #cards -->
</section> <!-- #game -->
<footer>
<p>This is an example of transitioning cards.</p>
</footer>
<script src="js/jquery-1.6.min.js"></script>
<script>
$(function(){
$("#card1").addClass("moveAndScale");
$("#card2").addClass("rotateRight");
});
</script>
</body>
</html>
5. It is me to dene the visual styles of the playing cards via CSS. It contains basic CSS
2.1 properes and CSS3 new properes. The new CSS3 properes are highlighted:
body {
background: #aaa;
}
/* defines styles for each card */
.card {
width: 80px;
height: 120px;
margin: 20px;
background: #efefef;
position: absolute;
-webkit-transition: all 1s linear;
}
/* set the card to corresponding playing card graphics */
.cardAK {
background: url(../images/AK.png);
}
.cardAQ {
background: url(../images/AQ.png);
}
Building a Memory Matching Game in CSS3
[ 60 ][ 60 ]
/* rotate the applied DOM element 90 degree */
.rotateRight {
-webkit-transform: rotate3d(0,0,1,90deg);
}
/* move and scale up the applied DOM element */
.moveAndScale {
-webkit-transform: translate3d(150px,150px,0) scale3d(1.5, 1.5,
1);
}
6. Let's save all the les and open the index.html in the browser. The two cards
should animate as shown in the following screenshot:
What just happened?
We just created two animaon eects by using the CSS3 transion to tween the
transform property.
Please note that the new CSS3 transion and transform properes are not
yet nalized. Web browsers support these draed but stable properes
with a vendor prex. In our example to support Chrome and Safari, we
used the -webkit- prex. We can use other prexes in the code to
support other browsers, such as -moz- for Mozilla and -o- for Opera.

Chapter 3
[ 61 ][ 61 ]
Here is the usage of CSS transform:
transform: transform-function1 transform-function2;
The arguments of the transform property are funcons. There are two sets of funcons,
2D transform funcon and 3D. CSS transform funcons are designed to move, scale,
rotate, and skew the target DOM elements. The following shows the usage of the
transforms funcons.
2D transforms functions
The 2D rotate funcon rotates the element clockwise on a given posive argument and
counter-clockwise on the given negave argument:
rotate(angle)
The translate funcon moves the element by the given X and Y displacement:
translate (tx, ty)
We can translate the X or Y-axis independently by calling the translateX and translateY
funcon as follows:
translateX(number)
translateY(number)
The scale funcon scales the element by the given sx, sy vector. If we only pass the rst
argument, then sy will be of the same value as sx:
scale(sx, sy)
In addion, we can independently scale the X and Y-axis as follows:
scaleX(number)
scaleY(number)
3D transforms functions
The 3D rotaon funcon rotates the element in 3D space by the given [x, y, z] unit vector.
For example, we can rotate the Y-axis 60 degrees by using rotate3d(0, 1, 0, 60deg):
rotate3d(x, y, z, angle)
We can also rotate one axis only by calling the following handy funcons:
rotateX(angle)
rotateY(angle)
rotateZ(angle)

Building a Memory Matching Game in CSS3
[ 62 ][ 62 ]
Similar to the 2D translate funcon, translate3d allows us to move the element in all
three axes:
translate3d(tx, ty, tz)
translateX(tx)
translateY(ty)
translateZ(tz)
Also, the scale3d scales the element in the 3D spaces:
scale3d(sx, sy, sz)
scaleX(sx)
scaleY(sy)
scaleZ(sz)
The transform funcons we just discussed are those that are common and we will use
them many mes. There are several other transform funcons not discussed. They are
matrix, skew, and perspective.
If you want to nd the latest CSS transforms working spec, you can visit the W3C website
with the following addresses. CSS 2D Transforms Modules (http://dev.w3.org/csswg/
css3-3d-transforms/) and the 3D Transforms Modules (http://www.w3.org/TR/
css3-2d-transforms/).
Tweening the styles by using CSS3 transition
There are tons of new features in CSS3. Transion module is one among them that aects us
most in game designing.
What is CSS3 transion? W3C explains it in one sentence.:
CSS transions allows property changes in CSS values to occur smoothly over a
specied duraon.
Normally, when we change any properes of the element, the properes are updated to
the new value immediately. Transion slows down the changing process. It creates smooth
in-between easing from the old value towards the new value in the given duraon.
Here is the usage of the transition property:
transition: property_name duration timing_function delay.
Chapter 3
[ 63 ][ 63 ]
Argument Denion
property_name The name of the property where the transion applies. It can be
set to all.
Duration The duraon the transion takes.
Timing_function The timing funcon denes the interpolaon between the
start and end value. The default value is ease. Normally we will
use ease, ease-in, ease-out, and linear.
Delay The delay argument delays the start of the transion by the
given seconds.
We can put several transition properes in one line. For example, the following code
transits the opacity in 0.3 seconds and background color in 0.5 seconds:
transition: opacity 0.3s, background-color 0.5s
We can also dene each transion property individually by using the following properes:
transition-property, transition-duration, transition-timing-function and
transition-delay.
Modules of CSS3
According to W3C, CSS3 is unlike CSS 2.1 in that there is only one CSS 2.1 spec.
CSS3 is divided into dierent modules. Each module is reviewed individually. For
example, there is transion module, 2D/3D transforms module, and exible box
layout module.
The reason of dividing the spec into modules is because the working progress
pace of each part of the CSS3 is not the same. Some CSS3 features are rather
stable, such as border radius, while some have not yet seled down. By dividing
the whole spec into dierent parts, it allows the browser vendor to support
modules that are stable. In this scenario, slow pace features will not slow down
the whole spec. The aim of the CSS3 spec is to standardize the most common
visual usage in web designing and this module ts this aim.
Have a go hero
We have translated, scaled, and rotated the playing cards. How about we try changing
dierent values in the example? There are three axes in the rotate3d funcon. What will
happen if we rotate the other axis? Experiment with the code yourselves to get familiar with
the transform and transion modules.

Building a Memory Matching Game in CSS3
[ 64 ][ 64 ]
Creating a card-ipping effect
Imagine now we are not just moving the playing card around, but we also want to ip the
card element, just like we ip a real playing card. By using the rotation transform
funcon, it is now possible to create the card-ipping eect.
Time for action – Flipping a card with CSS3
We are going to start a new project and create a card-ipping eect when we click on the
playing card.:
1. Let's connue on our previous code example.
2. The card now contains two faces, a front face and a back face. Replace the following
code into the body tag in the HTML:
<section id="game">
<div id="cards">
<div class="card">
<div class="face front"></div>
<div class="face back cardAK"></div>
</div> <!-- .card -->
<div class="card">
<div class="face front"></div>
<div class="face back cardAQ"></div>
</div> <!-- .card -->
</div> <!-- #cards -->
</section> <!-- #game -->
<script src="js/jquery-1.6.min.js"></script>
3. Then change the CSS external link to the css3flip.css le:
<link rel="stylesheet" href="css/css3flip.css" />
4. Now let's add the styles to the css3flip.css:
#game {
background: #9c9;
padding: 5px;
}
/* Define the 3D perspective view and dimension of each card. */
.card {
-webkit-perspective: 600;
width: 80px;
height: 120px;
}

Chapter 3
[ 65 ][ 65 ]
5. There are two faces on each card. We are going to rotate the face late. Therefore,
we dene how the face transits by CSS3 transition property. We also hide the
back face visibility. We will look at the detail of this property later:
.face {
border-radius: 10px;
width: 100%;
height: 100%;
position: absolute;
-webkit-transition: all .3s;
-webkit-backface-visibility: hidden;
}
6. Now it is me to style each individual face. The front face has a higher z-index than
the back face:
.front {
background: #966;
z-index: 10;
}
.back {
background: #eaa;
-webkit-transform: rotate3d(0,1,0,-180deg);
z-index: 8;
}
7. When we ip the card, we rotate the front face to back and back face to front.
We also swap the z-index of the front and back face:
.card-flipped .front {
-webkit-transform: rotate3d(0,1,0,180deg);
z-index: 8;
}
.card-flipped .back {
-webkit-transform: rotate3d(0,1,0,0deg);
z-index: 10;
}
.cardAK {
background: url(../images/AK.png);
}
.cardAQ {
background: url(../images/AQ.png);
}
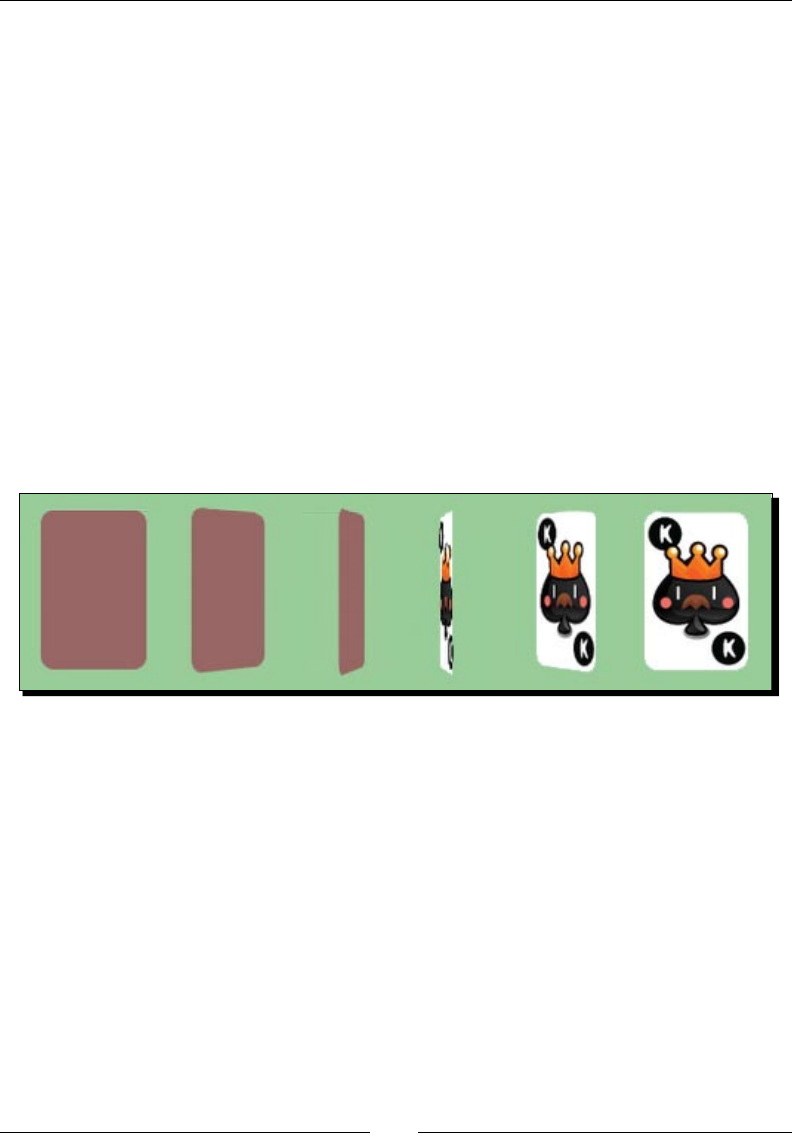
Building a Memory Matching Game in CSS3
[ 66 ][ 66 ]
8. Next, we will add logic aer loading the jQuery library to toggle the card-ipped
status when clicking on the card:
<script>
$(function(){
$("#cards").children().each(function(index) {
// listen the click event on each card DIV element.
$(this).click(function() {
// add the class "card-flipped".
// the browser will animate the styles between current state
and card-flipped state.
$(this).toggleClass("card-flipped");
});
});
});
</script>
9. The styles and the scripts are now ready. Let's save all the les and preview it in our
web browser. Click the playing card to ip it over and click again to ip back.
What just happened?
We have created a card-ipping eect toggled by a mouse click. The example made use of
several CSS transforms properes and JavaScript for handling the mouse click event.
Toggling class with jQuery toggleClass function
We apply the class card-flipped to the card element when the mouse is clicked on the
card. On the second click, we want to remove the applied card-ipped style so the card ips
back again. This is called toggling a class style.
jQuery provides us with a handy funcon named toggleClass to add or remove classes
automacally, depending on whether the class is applied or not.
To use the funcon, we simply pass the classes that we want to toggle as an argument.
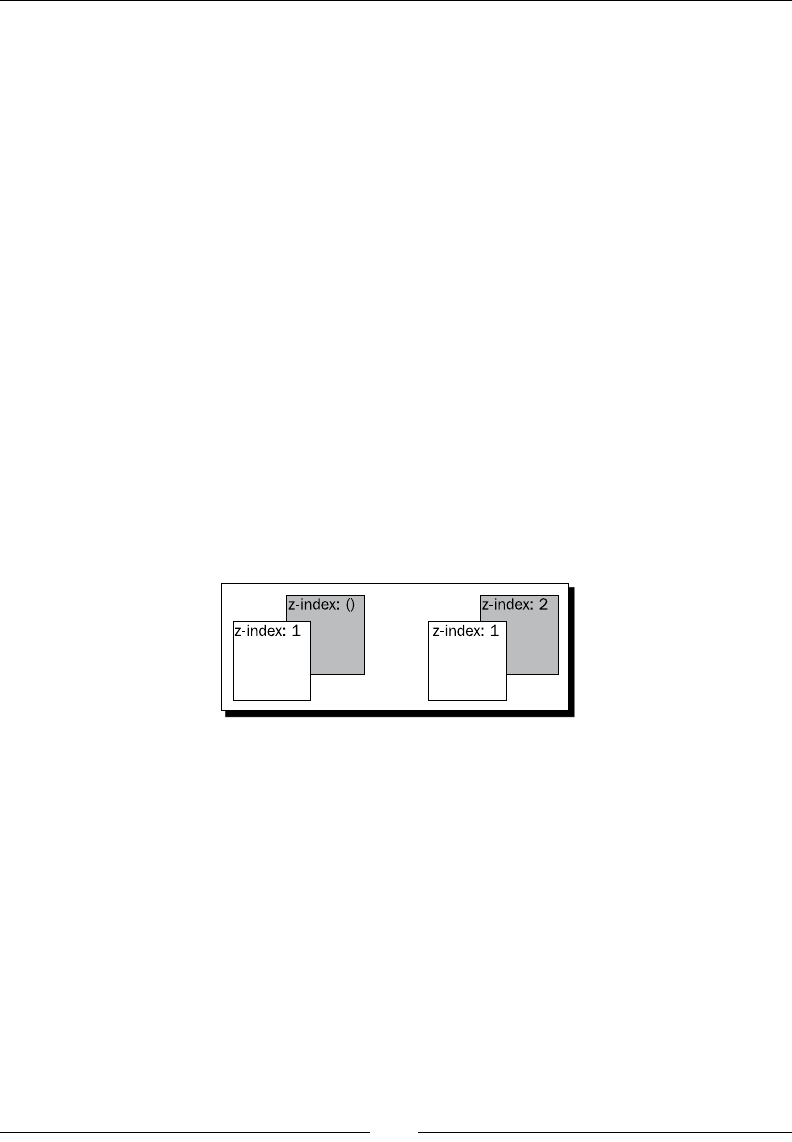
Chapter 3
[ 67 ][ 67 ]
For example, the following code adds or removes the card-flipped class to an element
with ID card1:
$("#card1").toggleClass("card-flipped");
The toggleClass funcon accepts toggle from more than one class at the sample me.
We can pass in several class names and separate them by using space. Here is an example
of toggling two classes at the same me:
$("#card1").toggleClass("card-flipped scale-up");
Controlling the visibility of overlapped elements by z-index
Normally, all elements in a web page are distributed and presented without overlapping.
Designing a game is a dierent story. We always need to deal with overlapped elements and
hide them (or part of them) on purpose. Z-index, a CSS 2.1 property, helps us to control the
visibility behaviors when more than one element is overlapped.
In this example, we have two faces for each card, the front and the back face. The two faces
are placed in the exact posion. They overlap each other. The Z-index property denes which
element is on top and which is behind. The elements with a higher z-index go in front of
elements with a lower z-index. When they overlap, the one with the higher z-index will cover
the one with the lower z-index. The following screenshot demonstrates the z-index behavior:
In the card-ipping example, we swapped the z-index of both faces to ensure the
corresponding face is on top of the other in both the normal state and the ipped
state. The following code shows the swapping.
When in a normal state, the front face has a higher z-index:
.front {
z-index: 10;
}
.back {
z-index: 8;
}
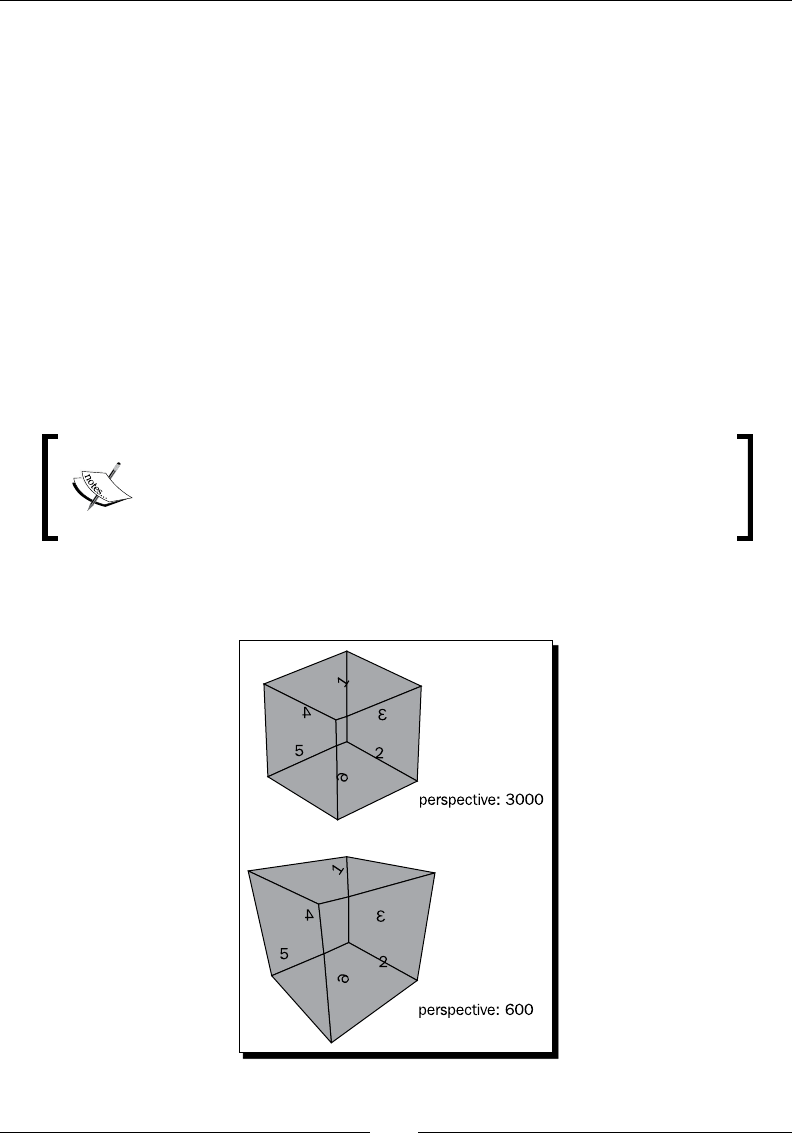
Building a Memory Matching Game in CSS3
[ 68 ][ 68 ]
While in a ipped state, the front face changes to a lower z-index than the back face.
The back face now covers the front face:
.card-flipped .front {
z-index: 8;
}
.card-flipped .back {
z-index: 10;
}
Introducing CSS perspective property
CSS3 lets us present elements in 3D. We have been able to transform the elements in 3D
space. The perspective property denes how the 3D perspecve view looks. You can treat
the value as far as you are looking at the object. The closer you are, the more perspecve
distoron there is on the viewing object.
While wring this book, only Safari supported the 3D perspecve
feature. Chrome supports 3D transform while not supporng the
perspective property. Therefore, we will have the best eect in
Safari and an acceptable eect in Chrome.
The following two 3D cubes demonstrate how dierent perspecve values change the
perspecve view of the element:

Chapter 3
[ 69 ][ 69 ]
You can view this experiment by going to the following address in Safari:
http://gamedesign.cc/html5games/perspective-cube/
Have a go hero
The cube is created by pung six faces together with 3D transforms applied to each face.
It used the techniques we've discussed. Try to create a cube and experiment with the
perspective property.
The following web page gives a comprehensive explanaon on creang the CSS3 cube, and
also discusses controlling the rotaon of the cube through the keyboard:
http://www.paulrhayes.com/2009-07/animated-css3-cube-interface-using-
3d-transforms/
Introducing backface-visibility
Before the backface-visibility is introduced, all elements on the page present their front face
to the visitor. Actually, there was no concept of the front face or back face of the element
because it was the only choice. While CSS3 introduces the rotaon in three axes, we can
rotate an element so that its face is on the back. Try looking at your palm and rotang your
wrist, your palm turns and you see the back of your palm. This happens to the rotated
elements too.
CSS3 introduces a property named backface-visibility to dene whether we can
see the back face of the element or not. By default, it is visible. The following screenshots
demonstrate the two dierent behaviors of the backface-visibility property.
At the me of wring this book, only Apple Safari supported the
backface-visibility property.
Building a Memory Matching Game in CSS3
[ 70 ][ 70 ]
You can read more detailed informaon about dierent properes and
funcons in CSS 3D transforms on the ocial Webkit blog: http://webkit.
org/blog/386/3d-transforms/.
Creating a card matching memory game
We have gong through some CSS basic techniques. Let's make a game with the techniques.
We are going to make a card game. The card game makes use of transform to ip the card,
transion to move the card, JavaScript to hold the logic, and a new HTML5 feature called
custom data aribute. Don't worry, we will discuss each component step by step.
Downloading the sprites sheet of playing cards
In the card-ipping example, we were using two dierent playing card graphics. Now we
prepare the whole deck of playing card graphics. Although we only use six playing cards in
the matching game, we prepare the whole deck so we can reuse these graphics in other
playing card games that we may create.
There are 52 playing cards in a deck and we have one more graphic for the backside. Instead
of using 53 separated les, it is good pracce to put separated graphics into one big sprite
sheet le. The term sprite sheet was from an old computer graphics technique that loaded
one graphics texture into memory and displayed part of the graphics.
One benet of using a big sprite sheet instead of separated image les is that we can
reduce the amount of HTTP requests. When the browser loads the web page, it creates a
new HTTP request to load each external resource, including JavaScript les, CSS les, and
images. It takes quite a lot of me to establish a new HTTP request for each separated small
le. Combining the graphics into one le, largely reduces the amount of requests and thus
improves the responsiveness of the game when loading in the browser.
Another benet for placing graphics into one le is to avoid the overhead of the le format
header. The size of a 53 images sprite sheet is less than the sum of 53 dierent images with
the le header in each le.
The following deck of playing cards graphics is drawn and aligned in Adobe Illustrator. You
can download it from http://gamedesign.cc/html5games/css3-matching-game/
images/deck.png.
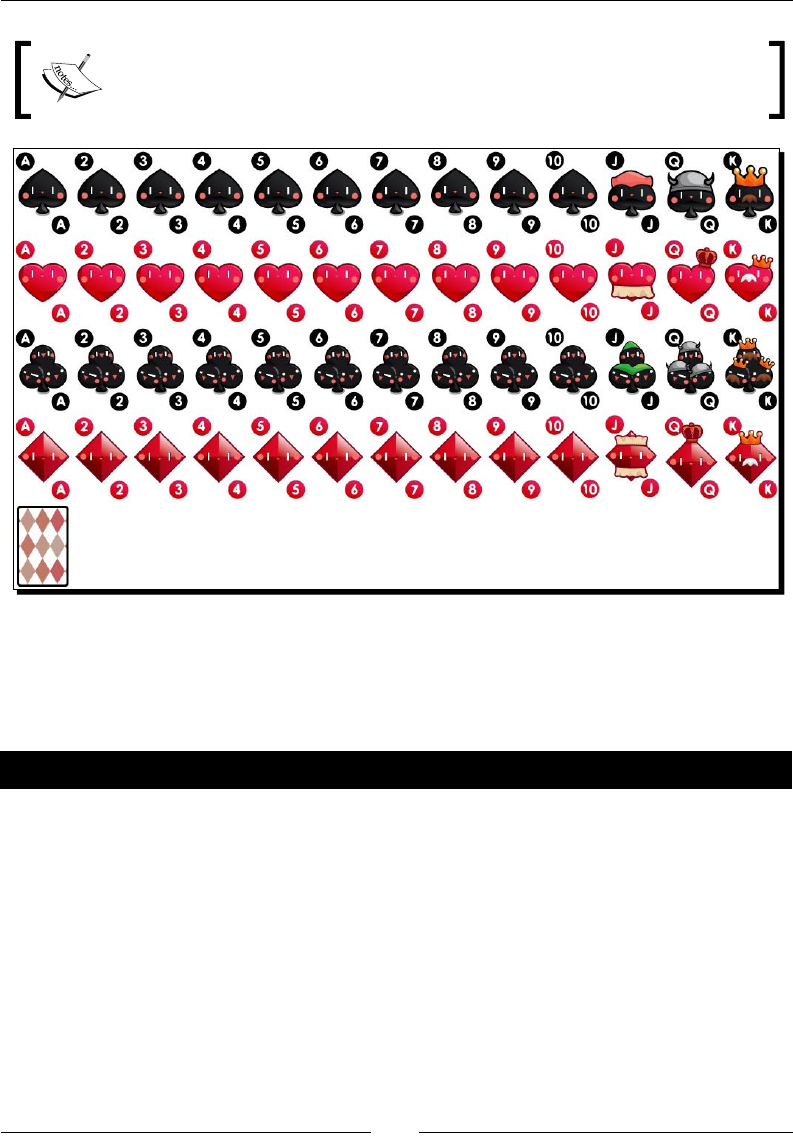
Chapter 3
[ 71 ][ 71 ]
The following arcle explains in detail why and how we can create and use the
CSS sprite sheet:
http://css-tricks.com/css-sprites/
Setting up the game environment
The graphics are ready, we will then need to set up a stac page with the game objects
prepared and placed on the game area. It is easier for adding game logic and interacon later:
Time for action – Preparing the card matching game
Before adding the complicated game logic to our matching game, let's prepare the HTML
game structure and prepare all the CSS styles:
1. Let's connue on our code. Replace the index.html le with the following HTML:
<!DOCTYPE html>
<html lang=en>
<head>
<meta charset=utf-8>
<title>CSS3 Matching Game</title>
<link rel="stylesheet" href="css/matchgame.css" />
</head>
<body>

Building a Memory Matching Game in CSS3
[ 72 ][ 72 ]
<header>
<h1>CSS3 Matching Game</h1>
</header>
<section id="game">
<div id="cards">
<div class="card">
<div class="face front"></div>
<div class="face back"></div>
</div> <!-- .card -->
</div> <!-- #cards -->
</section> <!-- #game -->
<footer>
<p>This is an example of creating a matching game with CSS3.</
p>
</footer>
<script src="js/jquery-1.6.min.js"></script>
<script src="js/html5games.matchgame.js"></script>
</body>
</html>
2. In order to make the game more appealing, I prepared background images for the
game table and the page. These graphic assets can be found in the code example
bundle. The background images are oponal and they will not aect the gameplay
and the logic of the matching game.
3. We will also place the deck sprite sheet graphics into the images folder. Download
the deck.png le from http://gamedesign.cc/html5games/css3-
matching-game/images/deck.png and save it into the images folder.
4. Let's add style to the matching game before wring any logic. Open matchgame.
css and add the following body styles:
body {
text-align: center;
background: #a46740 url(../images/bg.jpg);
}
5. Connue to add the styles to the game element. It will be the main area
of the game:
#game {
border-radius: 10px;
border: 1px solid #666;
background: #232 url(../images/table.jpg);
width: 500px;

Chapter 3
[ 73 ][ 73 ]
height: 460px;
margin: 0 auto;
display: box;
box-pack: center;
box-align: center;
}
6. We will put all card elements into a parent DOM named cards. By doing this, we
can easily center all cards to the game area:
#cards {
position: relative;
width: 380px;
height: 400px;
}
7. For each card, we dene a perspective property to give it a visual depth eect:
.card {
-webkit-perspective: 600;
width: 80px;
height: 120px;
position: absolute;
-moz-transition: all .3s;
-webkit-transition: all .3s;
transition: all .3s;
}
8. There are two faces on each card. The face will be rotated later and we will dene
the transion properes to animate the style changes. We also want to make sure
the back face is hidden:
.face {
border-radius: 10px;
width: 100%;
height: 100%;
position: absolute;
-webkit-transition-property: opacity, transform, box-shadow;
-webkit-transition-duration: .3s;
-webkit-backface-visibility: hidden;
}

Building a Memory Matching Game in CSS3
[ 74 ][ 74 ]
9. Then we set the front and back face styles. They are almost the same as the
ipping card example, except that we are now giving them background images
and box shadows:
.front {
background: #999 url(../images/deck.png) 0 -480px;
z-index: 10;
}
.back {
background: #efefef url(../images/deck.png);
-webkit-transform: rotate3d(0,1,0,-180deg);
z-index: 8;
}
.card:hover .face, .card-flipped .face {
-webkit-box-shadow: 0 0 10px #aaa;
}
.card-flipped .front {
-webkit-transform: rotate3d(0,1,0,180deg);
z-index: 8;
}
.card-flipped .back {
-webkit-transform: rotate3d(0,1,0,0deg);
z-index: 10;
}
10. When any card is removed, we want to fade it out. Therefore, we declare a
card-removed class with 0 opacity:
.card-removed {
opacity: 0;
}
11. In order to show dierent playing card graphics from the sprite sheet of the card
deck, we clip the background of the card into dierent background posions:
.cardAQ {background-position: -880px 0;}
.cardAK {background-position: -960px 0;}
.cardBQ {background-position: -880px -120px;}
.cardBK {background-position: -960px -120px;}
.cardCQ {background-position: -880px -240px;}
.cardCK {background-position: -960px -240px;}
.cardDQ {background-position: -880px -360px;}
.cardDK {background-position: -960px -360px;}
12. We have dened a lot of CSS styles. It is now me for the JavaScript logic.
Open the html5games.matchgame.js le and put the following code inside:
$(function(){
// clone 12 copies of the card
for(var i=0;i<11;i++){
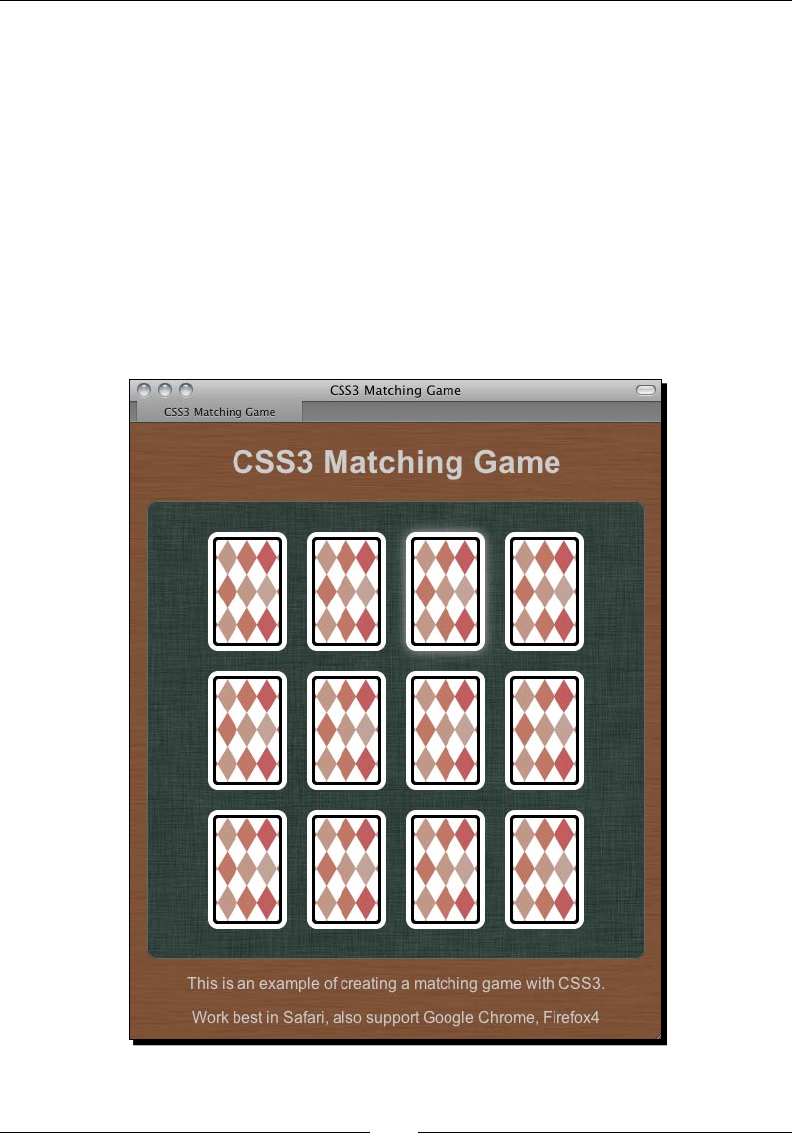
Chapter 3
[ 75 ][ 75 ]
$(".card:first-child").clone().appendTo("#cards");
}
// initialize each card's position
$("#cards").children().each(function(index) {
// align the cards to be 4x3 ourselves.
$(this).css({
"left" : ($(this).width() + 20) * (index % 4),
"top" : ($(this).height() + 20) * Math.floor(index / 4)
});
});
});
13. Now save all les and preview the game in the browser. The game should be well
styled and 12 cards should appear in the center. However, we cannot click on the
cards yet because we have not set any interacon logic to the cards.
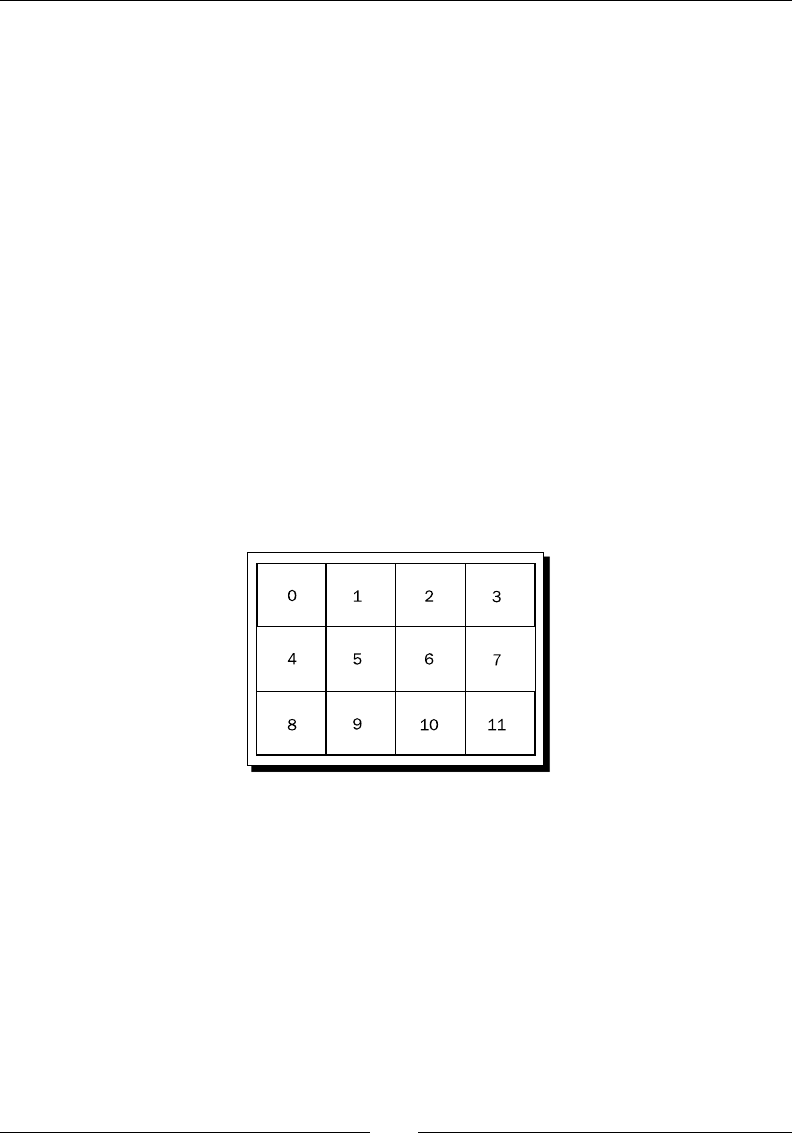
Building a Memory Matching Game in CSS3
[ 76 ][ 76 ]
What just happened?
We created the game structure in HTML and applied styles to the HTML elements. We also
used jQuery to create 12 cards on the game area once the web was loaded and ready. The
styles of ipping and removing of the cards are also prepared and can be applied to the card
by using the game logic later.
Since we are using absolute posioning for each card, we need to align the cards into 4x3
les ourselves. In the JavaScript logic, we loop through each card and align it by calculang
the posion with the looping index:
$("#cards").children().each(function(index) {
// align the cards to be 4x3 ourselves.
$(this).css({
"left" : ($(this).width() + 20) * (index % 4),
"top" : ($(this).height() + 20) * Math.floor(index / 4)
});
});
The "%" in JavaScript is the modulus operator that returns the remainder le aer division.
The remainder is used to get the column count when looping the cards. The following
diagram shows the row/column relaonship with the index number:
The division, on the other hand, is used to get the row count so we can posion the card
on that corresponding row.
Take index 3 as an example, 3 % 4 is 3. So the card at index 3 is on the third column.
And 3 / 4 is 0, so it is on the rst row.
Let's pick another number to see how the formula works. Let's see index 8. 8 % 4 is 0
and it is on the rst column. 8 / 4 is 2 so it is on the third row.
Chapter 3
[ 77 ][ 77 ]
Cloning DOM elements with jQuery
In our HTML structure, we only have one card and in the result, we have 12 cards there. It is
because we used the clone funcon in jQuery to clone the card element. Aer cloning the
target element, we called the appendTo funcon to append the cloned card element as a
child in the cards element:
$(".card:first-child").clone().appendTo("#cards");
Selecting the rst child of an element in jQuery by using
child lters
When we selected the card element and cloned it, we used the following selector:
$(".card:first-child")
The :first-child is a child lter that selects the rst child of the given parent element.
Besides :first-child, we can also select the last child by using :last-child.
You can also check other child-related selectors on the jQuery document:
http://api.jquery.com/category/selectors/child-filter-
selectors/
Vertically aligning a DOM element
We put the cards DIV in the center of the game element. CSS3 exible box layout module
introduces an easy method to achieve the vercal center alignment. As this module is sll in
progress, we need to apply a browser vendor prex. We will use Webkit as an example here:
display: -webkit-box;
-webkit-box-pack: center;
-webkit-box-align: center;
The exible box module denes the alignment of the element when there are extra spaces in
their container. We can set the element to behaviors as a exible box container by using the
display, a CSS2 property, with the value box, a new CSS3 property value.
box-pack and box-align are two properes for dening how it aligns and uses the extra
free space horizontally and vercally. We can center the element by seng both properes
to center.
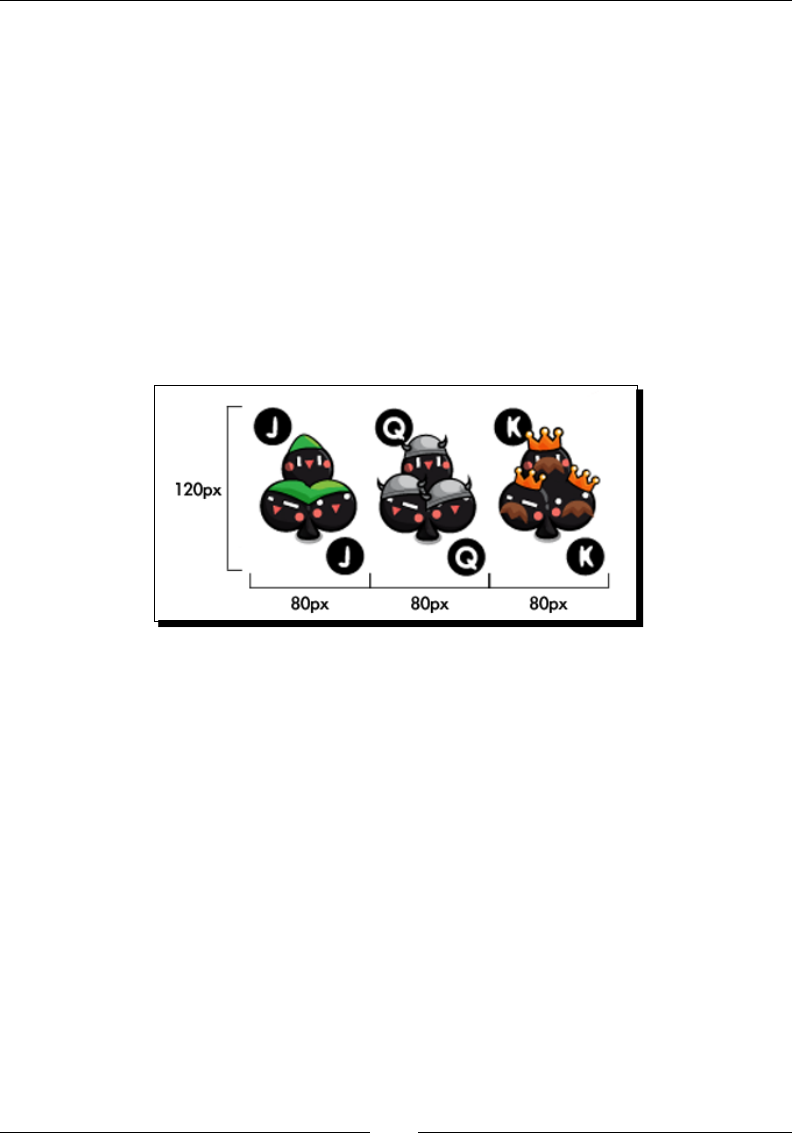
Building a Memory Matching Game in CSS3
[ 78 ][ 78 ]
Vercal alignment is just a small part of the exible box layout module. It is very powerful
when making layout in web design. You may nd further informaon on the W3C page of
the module (http://www.w3.org/TR/css3-flexbox/) or the CSS3 Info website
(http://www.css3.info/introducing-the-flexible-box-layout-module/).
Using CSS sprite with a background position
The CSS sprite sheet is a big image that contains many individual graphics. The big sprite
sheet image is applied as background image for the elements. We can clip each graphic out
by moving the background posion on a xed width and height element.
Our deck image contains a total of 53 graphics. In order to demonstrate the background
posion easily, let's assume we have an image that contains three card images, such as the
following screenshot:
In the CSS style, we set the card element to 80px width and 120px height, with the
background image set to the big deck image. If we want the top le graphic, we apply both
the X and Y of the background posion to 0. If we want the second graphic, we move the
background image to le 80px. That means seng the X posion to -80px and Y to 0. Since
we have a xed width and height, only the clipped 80x120 area shows the background
image. The rectangle in the following screenshot shows the viewable area:
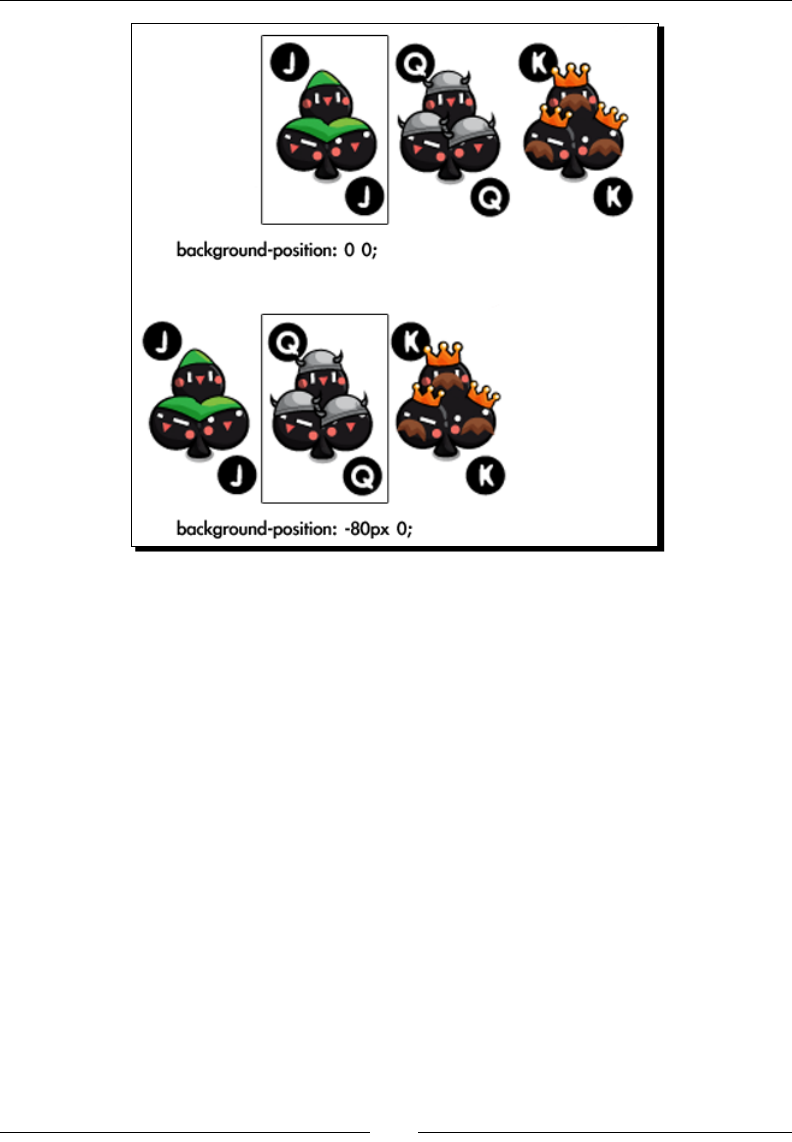
Chapter 3
[ 79 ][ 79 ]
Adding game logic to the matching game
Let's now imagine holding a real deck in our hand and seng up the matching game.
We rst shue the cards in our hand and then we put each card on the table with the back
facing up. For easier game play, we align the cards into a 4x3 array. Now the game is set up.
Now we are going to play the game. We pick up one card and ip it to make it face up. We
pick another one and face it upwards. Aerwards, we have two possible acons. We take
away those two cards if they are in the same paern. Otherwise, we put it back facing down
again, as if we have not touched them. The game connues unl we pair all cards and take
them all.
The code ow will be much more clear aer we have the step-by-step scenario in our mind.
Actually, the code in this example is exactly the same as the procedure we play with a real
deck. We just need to replace the human language into the JavaScript code.

Building a Memory Matching Game in CSS3
[ 80 ][ 80 ]
Time for action – Adding game logic to the matching game
We have prepared the game environment in the last example and decided the game logic to
be the same as playing a real deck. It is me to code the JavaScript logic now:
1. Let's begin from our last matching game example. We have styled the CSS and now
it is me to add the game logic in the html5games.matchgame.js le.
2. The game is to match pairs of playing cards. We have 12 cards now so we need six
pairs of playing cards. The following global array declares six pairs of card paerns:
var matchingGame = {};
matchingGame.deck = [
'cardAK', 'cardAK',
'cardAQ', 'cardAQ',
'cardAJ', 'cardAJ',
'cardBK', 'cardBK',
'cardBQ', 'cardBQ',
'cardBJ', 'cardBJ',
];
3. We aligned the cards in the jQuery ready funcon in the previous chapter. Now we
need to prepare and inialize more codes in the ready funcon. Change the ready
funcon to the following code. The changed code is highlighted:
$(function(){
matchingGame.deck.sort(shuffle);
for(var i=0;i<11;i++){
$(".card:first-child").clone().appendTo("#cards");
}
$("#cards").children().each(function(index) {
$(this).css({
"left" : ($(this).width() + 20) * (index % 4),
"top" : ($(this).height() + 20) * Math.floor(index / 4)
});
// get a pattern from the shuffled deck
var pattern = matchingGame.deck.pop();
// visually apply the pattern on the card's back side.
$(this).find(".back").addClass(pattern);
// embed the pattern data into the DOM element.
$(this).attr("data-pattern",pattern);
// listen the click event on each card DIV element.

Chapter 3
[ 81 ][ 81 ]
$(this).click(selectCard);
});
});
4. Similar to playing a real deck, the rst thing we want to do is shue the deck. Add
the following shuffle funcon to the JavaScript le:
function shuffle() {
return 0.5 - Math.random();
}
5. When we click on the card, we ip it and schedule the checking funcon.
Append the following codes to the JavaScript le:
function selectCard() {
// we do nothing if there are already two card flipped.
if ($(".card-flipped").size() > 1) {
return;
}
$(this).addClass("card-flipped");
// check the pattern of both flipped card 0.7s later.
if ($(".card-flipped").size() == 2) {
setTimeout(checkPattern,700);
}
}
6. When two cards are opened, the following funcon executes. It controls whether
we remove the card or ip the card back:
function checkPattern() {
if (isMatchPattern()) {
$(".card-flipped").removeClass("card-flipped").addClass
("card-removed");
$(".card-removed").bind("webkitTransitionEnd",
removeTookCards);
} else {
$(".card-flipped").removeClass("card-flipped");
}
}
7. It is me for the paern checking funcon. The following funcon accesses the
custom paern aribute of the opened cards and compares whether they are in the
same paern:
function isMatchPattern() {
var cards = $(".card-flipped");
var pattern = $(cards[0]).data("pattern");
var anotherPattern = $(cards[1]).data("pattern");
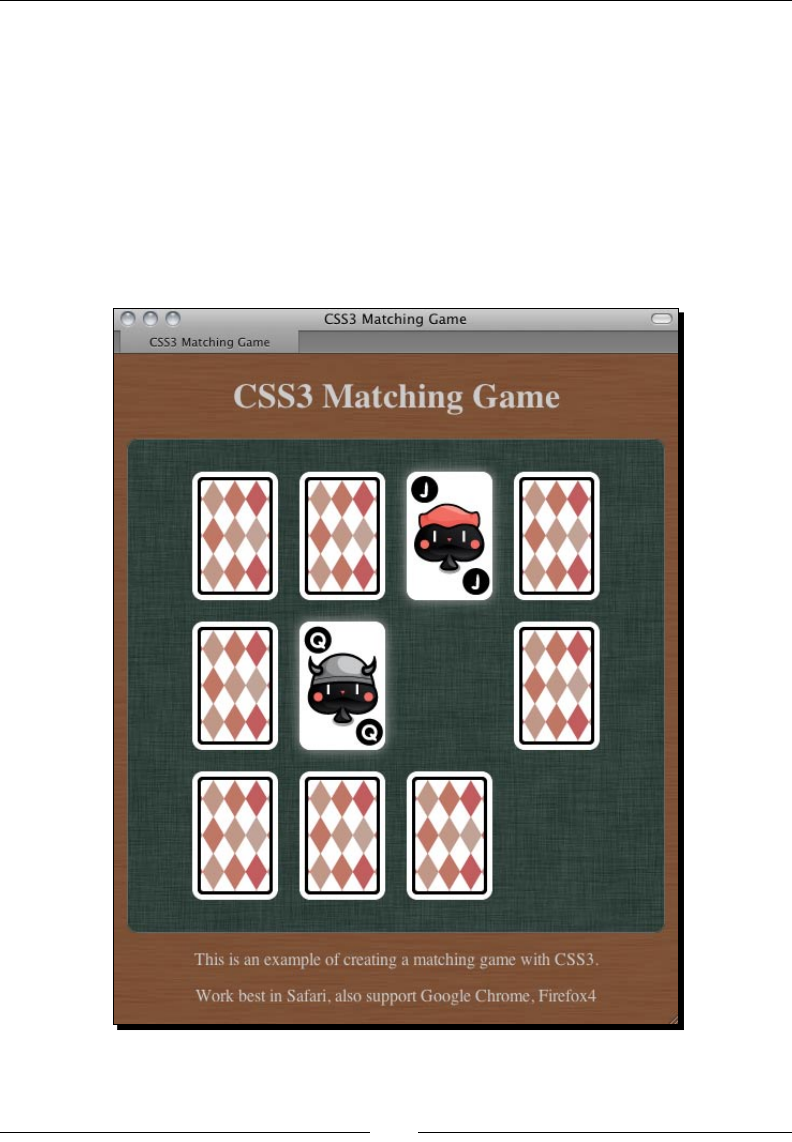
Building a Memory Matching Game in CSS3
[ 82 ][ 82 ]
return (pattern == anotherPattern);
}
8. Aer the matched cards fade out, we execute the following funcon to remove the
cards:
function removeTookCards() {
$(".card-removed").remove();
}
9. The game logic is ready now. Let's open the game HTML in a browser and play.
Remember to check the console window in Developer Tools if there is any error.

Chapter 3
[ 83 ][ 83 ]
What just happened?
We coded the game logic of the CSS3 matching game. The logic adds the mouse click
interacon to the playing cards and it controls the ow of the paern checking.
Executing code after CSS transition ended
We remove the pair cards aer playing the fade out transion. We can schedule a funcon to
be executed aer the transion is ended by using the TransitionEnd event. The following
code snippet from our code example adds a card-removed class to the pair card to start
the transion. Then, it binds the TransitionEnd event to remove the card complete in
DOM aerwards. Also, please note the webkit vendor prex for the event because it is not
yet nalized:
$(".card-flipped").removeClass("card-flipped").addClass("card-
removed");
$(".card-removed").bind("webkitTransitionEnd", removeTookCards);
Delaying code execution on ipping cards
The game logic ow is designed in the same way as playing a real deck. One big dierence is
that we used several setTimeout funcons to delay the execuon of the code. When the
second card is clicked, we schedule the checkPattern funcon to be executed 0.7 seconds
later in the following code example snippet:
if ($(".card-flipped").size() == 2) {
setTimeout(checkPattern,700);
}
The reason we delay the funcon call is to give me to the player to memorize the card
paern. That's why we delayed it by 0.7 seconds before checking the card paerns.
Randomizing an array in JavaScript
There is no built-in array randomize funcon in JavaScript. We have to write our own. Luckily,
we can get help from the built-in array sorng funcon.
Here is the usage of the sort funcon:
sort(compare_function);
The sort funcon takes one oponal argument.
Building a Memory Matching Game in CSS3
[ 84 ][ 84 ]
Argument Denion Discussion
compare_function A funcon that denes the
sort order of the array. The
compare_function
requires two arguments
The sort funcon compares two
elements in the array by using the
compare funcon. Therefore, the
compare funcon requires two
arguments.
When the compare funcon
returns any value that is bigger
than 0, it puts the rst argument
at the lower index than the second
argument.
When the return value is smaller
than 0, it puts the second argument
at a lower index than the rst
argument.
The trick here is that we used the compare funcon that returns a random number between
-0.5 and 0.5:
anArray.sort(shuffle);
function shuffle(a, b) {
return 0.5 - Math.random();
}
By returning a random number in the compare funcon, the sort funcon sorts the same
array in an inconsistent way. In another words, we are shuing the array.
The following link from the Mozilla Developer Network provides a detailed
explanaon on using the sort funcon with example:
https://developer.mozilla.org/en/JavaScript/Reference/
Global_Objects/Array/sort
Storing internal custom data with an HTML5 custom data attribute
We can store custom data inside the DOM element by using the custom data aribute.
We can create a custom aribute name with data- prex and assign a value to it.
For instance, we can embed custom data to the list elements in the following code:
<ul id="games">
<li data-chapter="2" data-difficulty="easy">Ping-Pong</li>
<li data-chapter="3" data-difficulty="medium">Matching Game</li>
</ul>
Chapter 3
[ 85 ][ 85 ]
This is a new feature proposed in the HTML5 spec. According to the W3C, the custom data
aributes are intended to store custom data private to the page or applicaon, for which
there are no more appropriate aributes or elements.
W3C also stated that this custom data aribute is "intended for use by the site's own
script and not a generic extension mechanism for publicly-usable metadata."
We are coding our matching game and embedding our own data to the card elements,
therefore, custom data aribute ts our usage.
We used the custom aribute to store the card paern inside each card so we can check
whether the two ipped cards match in JavaScript by comparing the paern value. Also,
the paern is used to style the playing cards into corresponding graphics as well:
$(this).find(".back").addClass(pattern);
$(this).attr("data-pattern",pattern);
Pop quiz
1. According to W3C's guideline about the custom data aribute, which of the
following statements is true?
a. We may create a data-href aribute to store the link of the a tag.
b. We may want to access the custom data aribute in a third party game
portal website.
c. We may want to store a data-score aribute in each player's DOM element
to sort the ranking in our web page.
d. We may create a ranking aribute in each player's DOM element to
store the ranking data.
Accessing custom data attribute with jQuery
In the matching game example, we used the attr funcon from the jQuery library to
access our custom data:
pattern = $(this).attr("data-pattern");
The attr funcon returns the value of the given aribute name. For example, we can get
the links in all a tags by calling the following code:
$("a").attr("href");
For the HTML5 custom data aribute, jQuery provides us with another funcon to access the
HTML5 custom data aribute. It is the data funcon.

Building a Memory Matching Game in CSS3
[ 86 ][ 86 ]
Data funcon was designed to embed custom data into the jQuery object of the HTML
elements. It was designed before the HTML5 custom data aribute.
Here is the usage of the data funcon:
.data(key)
.data(key,value)
The data funcon accepts two types of funcons:
Funcon type Arguments denion Discussion
.data(key) key is a string naming the entry
of the data
When there is only the key
given, the data funcon reads
the data associated with the
jQuery object and returns the
corresponding value.
In the recent jQuery update,
this funcon is extended to
support the HTML5 custom data
aribute.
.data(key, value) key is a a string naming the
entry of the data
value is the data to be
associated to the jQuery object
When both key and value
arguments are given, the data
funcon sets a new data entry
to the jQuery object.
The value can be any JavaScript
type, including array and object.
In order to support the HTML5 custom data aribute, jQuery extends the data funcon to
let it access the custom data dened in the HTML code.
The following code explains how we use the data funcon.
Given the following HTML code:
<div id="target" data-custom-name="HTML5 Games"></div>
We can access the data-custom-name aribute by calling the data funcon in jQuery:
$("#target").data("customName")
It will return "HTML5 Games".
Chapter 3
[ 87 ][ 87 ]
Pop quiz
1. Given the following HTML code:
<div id="game" data-score="100"></div>
which two of these jQuery statements reads the custom score data and returns 100?
a. $("#game").ar("data-score");
b. $("#game").ar("score");
c. $("#game").data("data-score");
d. $("#game").data("score");
Have a go hero
We have created the CSS3 matching game. What is missing here? The game logic does not
check whether the game is over. Try adding a You won text when the game is over. You can
also animate the text by using the techniques we discussed in this chapter.
Making other playing card games
This CSS3 playing card approach is suitable for creang card games. There are two sides in a
card that t the ipping. The transion is suitable for moving the cards. With both moving
and ipping, we can just dene the playing rule and make the most of the card games.
Have a go hero
Can you use the playing card graphics and ipping techniques to create another game?
How about poker?
Embedding web fonts into our game
Over the years, we have been using limited fonts to design web pages. We could not use
whatever fonts we wanted because the browser loaded the font from the visitor's local
machine. We cannot control and ensure that visitors have our desired fonts.
Although we can embed web fonts back to Internet Explorer 5 with limited type format,
we have to wait unl browser vendors support embedding the most common TrueType
font format.
Imagine that we can control the mood of the game by embedding dierent styles of web
fonts. We can design the games with our desired fonts and have more control over the
appeal of game. Let's try embedding a web font to our matching memory game.
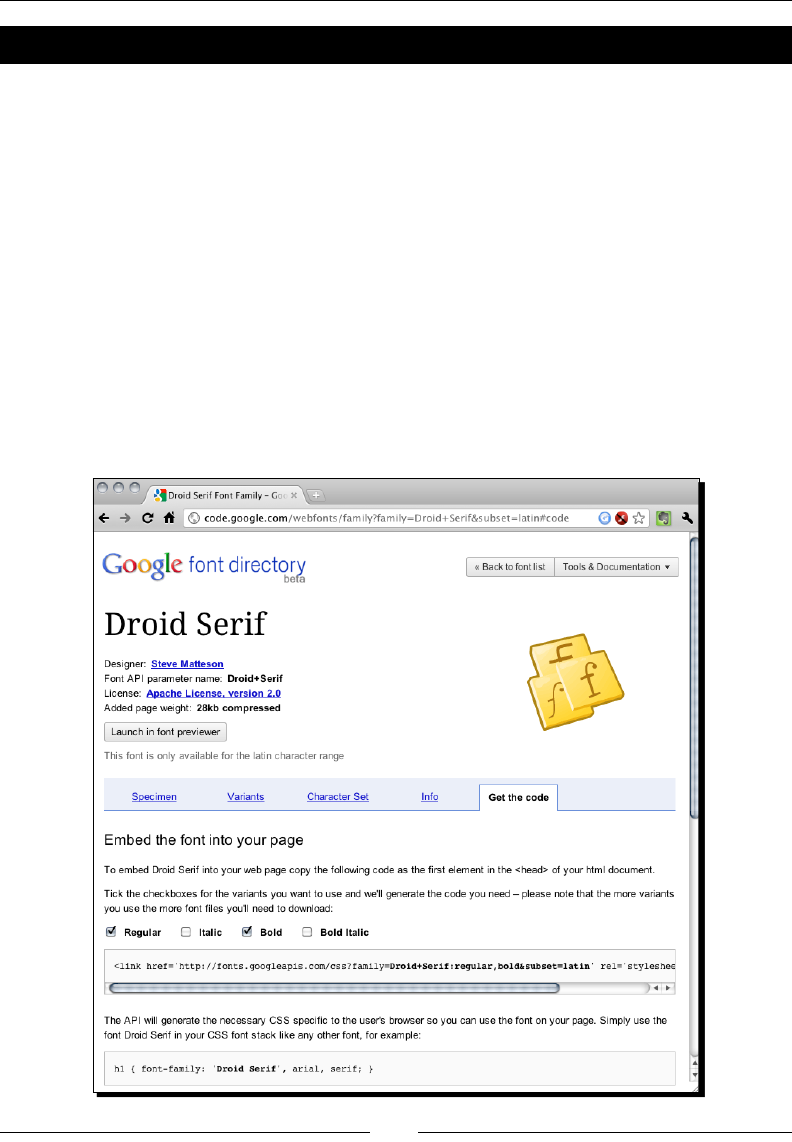
Building a Memory Matching Game in CSS3
[ 88 ][ 88 ]
Time for action – Embedding a font from Google Font Directory
Google Font Directory is a web font service that lists free-to-use web fonts. We will embed a
web font chosen from the Google Font Directory:
1. Go to the Google Font Directory site: http://code.google.com/webfonts.
2. In the font directory, there is a list of web fonts that is under an open source license
and can be used freely.
3. Choose one of them and click on the font name to proceed to the next step. In this
example, I used Droid Serif.
4. Aer clicking on a font, the font directory displays detailed informaon about that
font. There are several acons we can carry out there, such as preview the fonts,
choose from variants, and most importantly get the font embedding code.
5. Click on the Get the code tab and you will see the following screenshot. It shows a
guide on how to embed this font to our web page:

Chapter 3
[ 89 ][ 89 ]
6. Copy the link tag provided by Google and paste it into the HTML code. It should be
placed before any other style denion:
<link href='http://fonts.googleapis.com/css?family=Droid+Serif:
regular,bold&subset=latin' rel='stylesheet' type='text/css'>
7. Now we can use the font to style our text. Set the body's font family property to the
following code:
body {
font-family: 'Droid Serif', arial, serif;
}
8. Save all the les and open the index.html le. The browser will download the font
from the Google server and embed it into the web page. Keep an eye on the fonts,
they should be loaded and rendered as our selected Google font.
What just happened?
We have just styled our game with a non-common web font. The font is hosted and delivered
through the Google Font Directory.
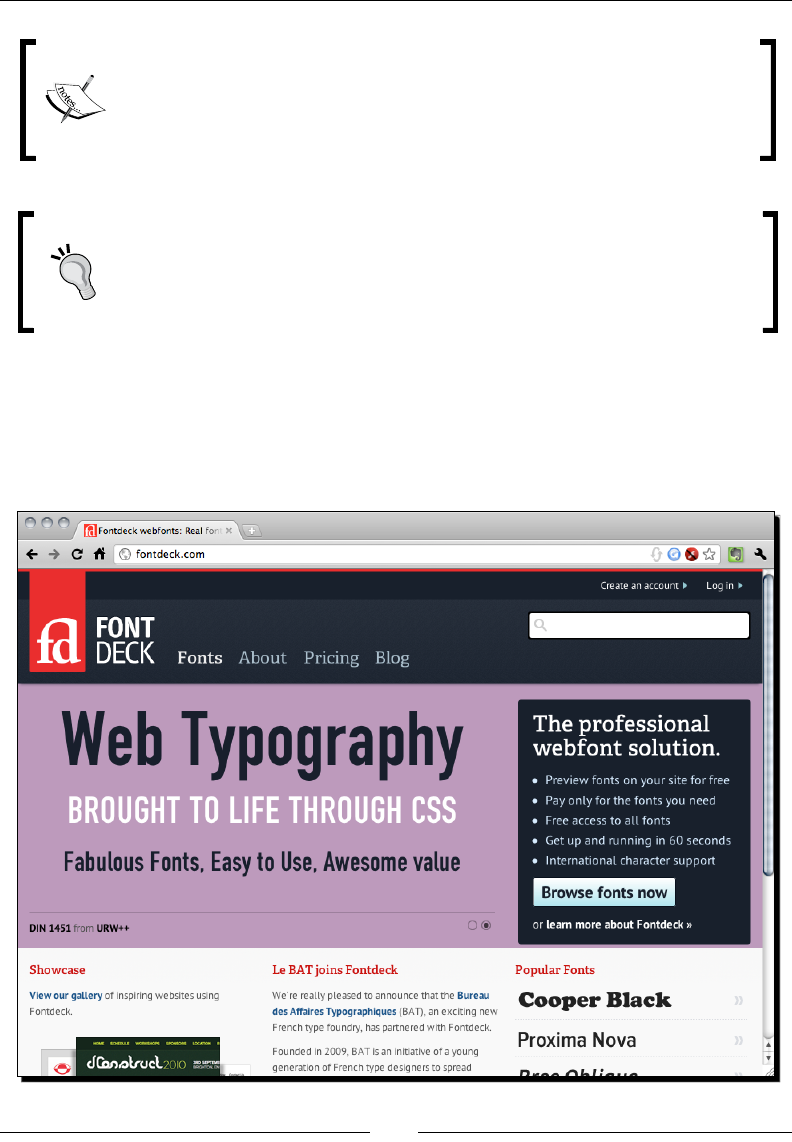
Building a Memory Matching Game in CSS3
[ 90 ][ 90 ]
Besides using the font directory, we can embed our font le by using the @
font face. The following link provides a bulletproof approach to embed a font
ourselves:
http://www.fontspring.com/blog/the-new-bulletproof-
font-face-syntax
Check the font license before embedding
Normally the font licenses do not cover the usage on web pages. Be sure to
check the license before embedding the font. All the fonts listed in the Google
Font Directory are licensed under open source license and can be used on any
website.
Choosing different font delivery services
Google Font Directory is just one of those font delivery services. Typekit (http://typekit.
com) and Fontdeck (http://fontdeck.com) are two other font services providing
hundreds of high quality fonts via yearly subscripon plans.

Chapter 3
[ 91 ][ 91 ]
Summary
In this chapter we learned about using dierent CSS3 new properes to create games.
Specically, we covered:
Transforming and animang the game object by transion module
Flipping a card back and forth with perspecve depth illusion
Creang a matching memory game based on CSS3 styles and animaon and game
logic by jQuery
Choosing and embedding web fonts from an online font delivery service
Now that we've learned about creang DOM-based HTML5 games with the help of CSS3
features, we are going to explore another approach of creang HTML5 games in the next
chapter, which is using the new Canvas tag and the drawing API.
4
Building the Untangle Game with
Canvas and Drawing API
One new highlighted feature in HTML5 is the Canvas element. We can treat the
canvas element as a dynamic area that we can draw graphics and shapes on
with scripts.
Images in websites have been stac for years. There is animaon gif but it
cannot interact with its visitors. Canvas is dynamic. We draw and modify the
context in canvas dynamically through JavaScript drawing API. We can also add
interacon to the canvas and thus make games.
In the past two chapters, we have discussed DOM-based game development with CSS3 and
few HTML5 features. In the coming two chapters, we will focus on using new HTML5 features
to create games. In this chapter, we will take a look at a core feature, canvas, and some basic
drawing techniques.
In this chapter, we shall cover the following topics:
Introducing the HTML5 canvas element
Drawing a circle in canvas
Drawing lines in the canvas element
Interacng with drawn objects in canvas with mouse events
Detecng line intersecon
Building the Untangle puzzle game with canvas

Building the Untangle Game with Canvas and Drawing API
[ 94 ]
The Untangle puzzle game is a game where players are given circles with some lines
connecng them. The lines may intersect the others and the players need to drag the
circles so that no line intersects anymore.
The following screenshot previews the game that we are going to achieve through
this chapter:
So let's start making our canvas game from scratch.
Introducing the HTML5 Canvas Element
W3C community states that the canvas element and the drawing funcons are:
A resoluon-dependent bitmap canvas, which can be used for rendering graphs,
game graphics, or other visual images on the y.
The canvas element contains context for drawing and the actual graphics and shapes are
drawn by the JavaScript drawing API.
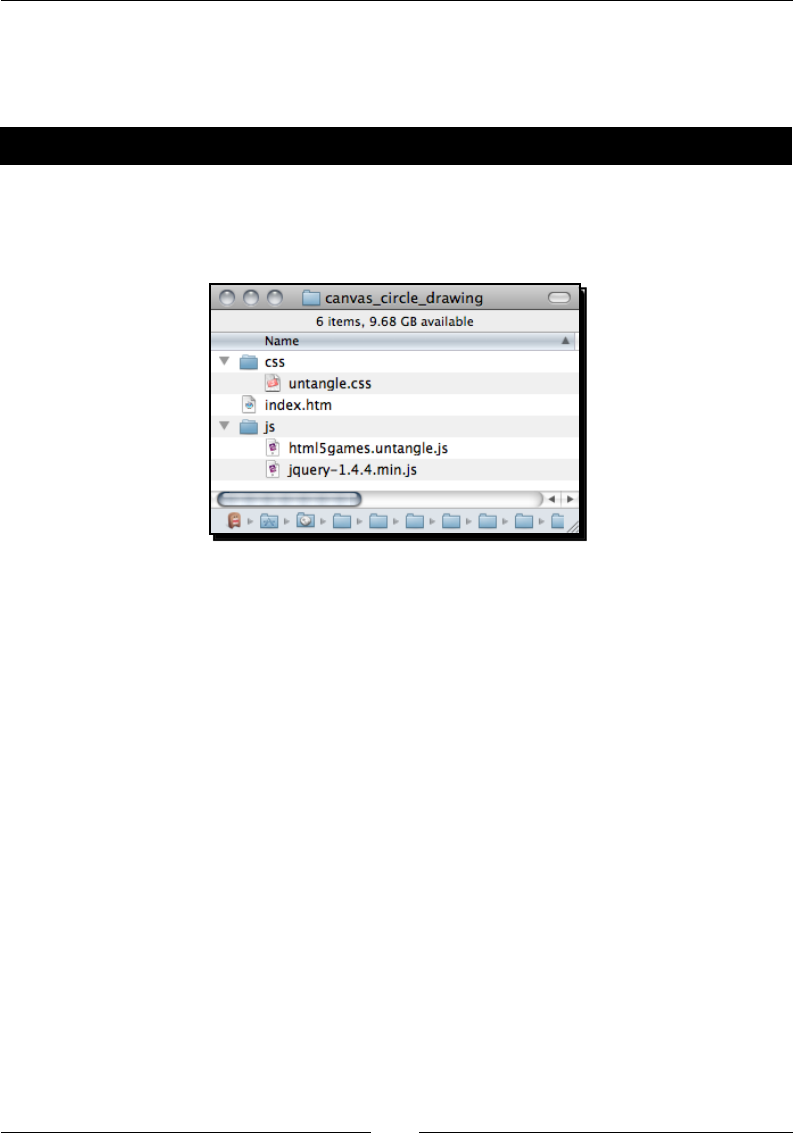
Chapter 4
[ 95 ]
Drawing a circle in canvas
Let's start our drawing on canvas from the basic shape—circle.
Time for action – Drawing color circles on canvas
1. First, let's set up the new environment for the example. That is an HTML le that will
contain the canvas element, a jQuery library to help us on JavaScript, a JavaScript le
containing the actually drawing logic, and a style sheet.
2. Put the following HTML code into the index.html. It is a basic HTML document
containing the canvas element:
<!DOCTYPE html>
<html lang="en">
<head>
<meta charset="utf-8">
<title>Drawing Circles in Canvas</title>
<link rel="stylesheet" href="css/untangle.css" />
</head>
<body>
<header>
<h1>Drawing in Canvas</h1>
</header>
<canvas id="game" width="768" height="400">
Sorry, your web browser does not support Canvas content.
</canvas>
<script src="js/jquery-1.6.min.js"></script>
<script src="js/html5games.untangle.js"></script>
</body>
</html>
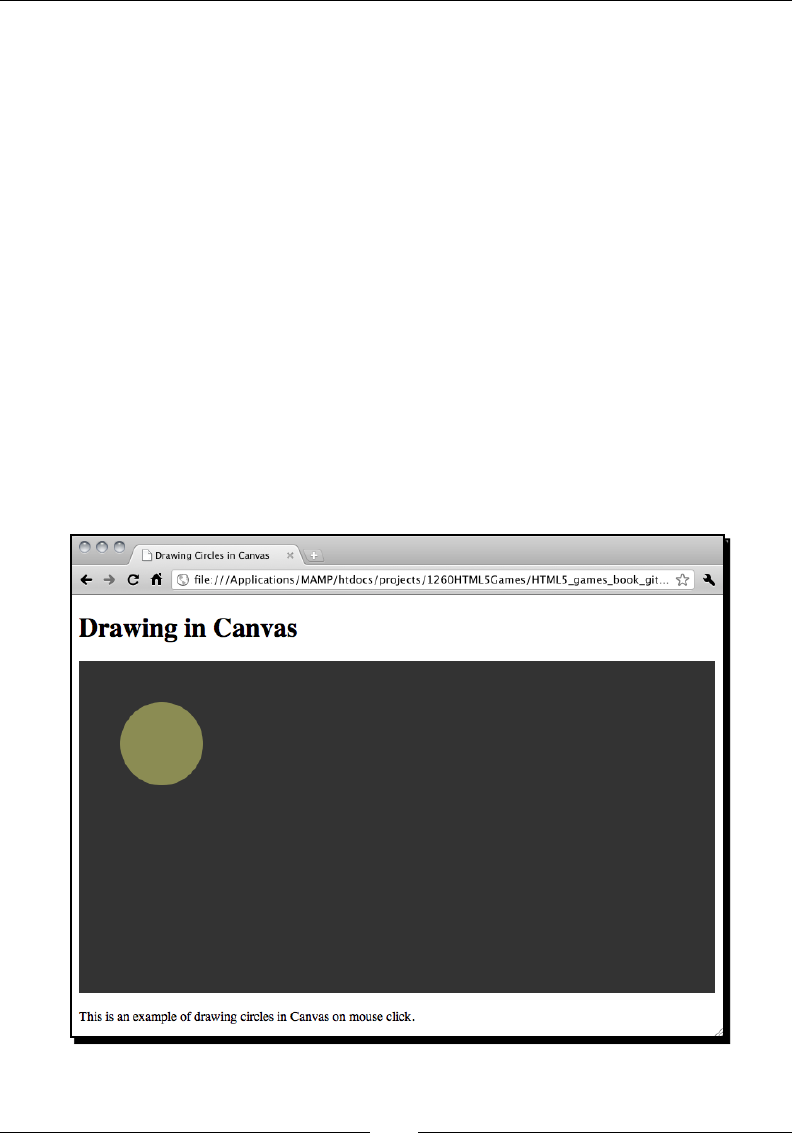
Building the Untangle Game with Canvas and Drawing API
[ 96 ]
3. Use CSS to set the background color of the canvas inside untangle.css:
canvas {
background: #333;
}
4. In the html5games.untangle.js JavaScript le, we put a jQuery ready funcon
and draw a color circle inside it:
$(function(){
var canvas = document.getElementById("game");
var ctx = canvas.getContext("2d");
ctx.fillStyle = "rgba(200, 200, 100, .6)";
ctx.beginPath();
ctx.arc(100, 100, 50 , 0, Math.PI*2, true);
ctx.closePath();
ctx.fill();
});
5. Open the index.html le in a web browser and we will get the
following screenshot:
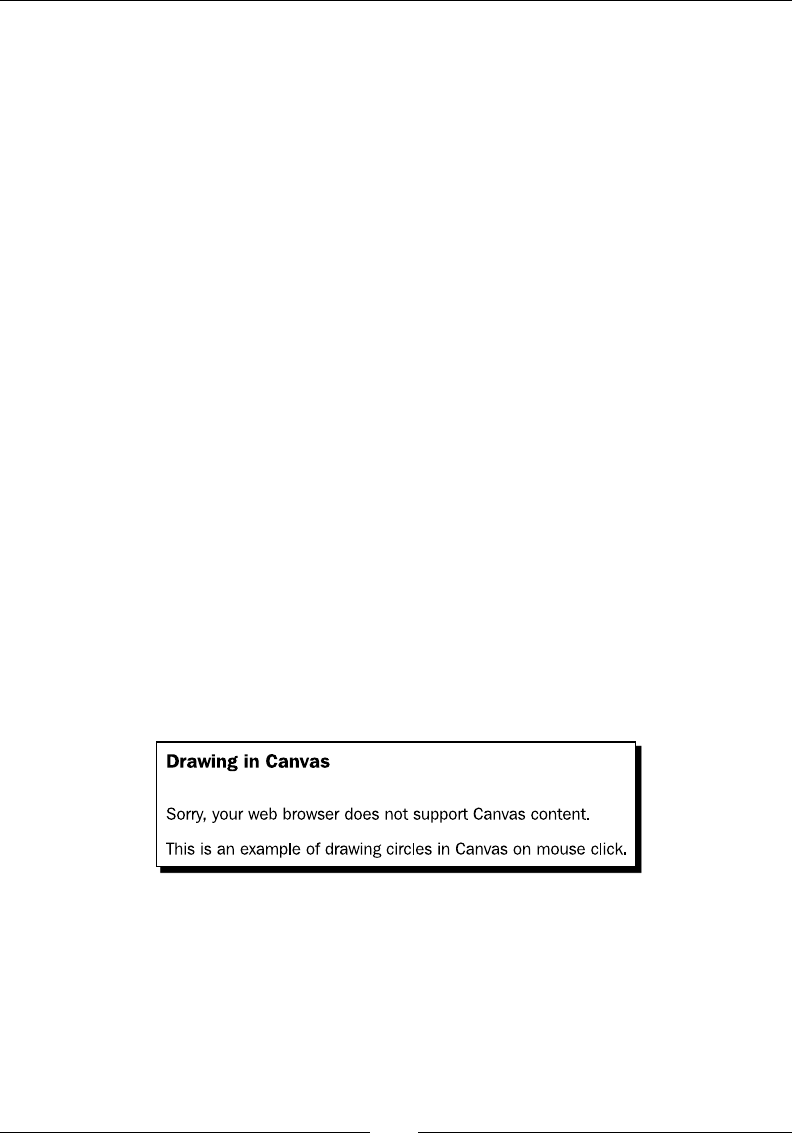
Chapter 4
[ 97 ]
What just happened?
We have just created a simple canvas context with circles on it.
There are not many sengs for the canvas element itself. We set the width and height of the
canvas, same as we have a xed the dimensions of a real drawing paper. Also, we assign an
ID aribute to the canvas for easier reference again in JavaScript:
<canvas id="game" width="768" height="400">
Sorry, your web browser does not support Canvas content.
</canvas>
Putting fallback content when the web browser does not
support canvas
Not every web browser supports the canvas element. Especially, those aged old version
ones. The Canvas element provides an easy way to provide fallback content if the canvas
element is not supported. Anything inside the canvas open and close tag is the fallback
content. This content is hidden if the web browser supports the element. Browsers that
don't support canvas will instead display that fallback content. It is good pracce to provide
useful informaon in the fallback content. For instance, if the canvas purpose is a dynamic
picture, we may consider placing a <img> alternave there. Or we may also provide some
links to modern web browsers for the visitor to upgrade their browser easily.
In this example, we provided a sentence inside the canvas element. This sentence is hidden
from any browsers that support the canvas element. It will show to the visitor if their
browsers do not support the new HTML5 canvas feature. The following screenshot shows
the old version of Internet Explorer displaying the fallback content instead of drawing the
canvas element:

Building the Untangle Game with Canvas and Drawing API
[ 98 ]
Drawing circles and shapes with canvas arc function
There is no circle funcon to draw a circle. Canvas drawing API provides a funcon to draw
dierent arcs, including the circle. The Arc funcon accepts following arguments
Arguments Discussion
XThe center point of the arc in x axis.
Y The center point of the arc in y axis.
radius The radius is the distance between the center point and the arc perimeter.
When drawing a circle, a larger radius means a larger circle.
startAngle The starng point is an angle in radian. It denes where to start drawing the
arc on the perimeter.
endAngle The ending point is an angle in radian. The arc is drawn from the posion of
the starng angle to this end angle.
counter-
clockwise
This is a Boolean indicang the arc from startingAngle to
endingAngle drawn in a clockwise or counter-clockwise direcon.
This is an oponal argument with the default value false.
Converting degree to radians
The angle arguments used in the arc funcon are in radian instead of degree. If you
are familiar with the degrees angle, you may need to convert the degree into radians
before pung the value into the arc funcon. We can convert the angle unit by using
the following formula:
radians = π/180 x degrees
The following graph contains some common angle values in both degree and radian units.
The graph also indicates the posion of the angle value for us to easily pick the starng angle
and ending angle argument when drawing arc in canvas.
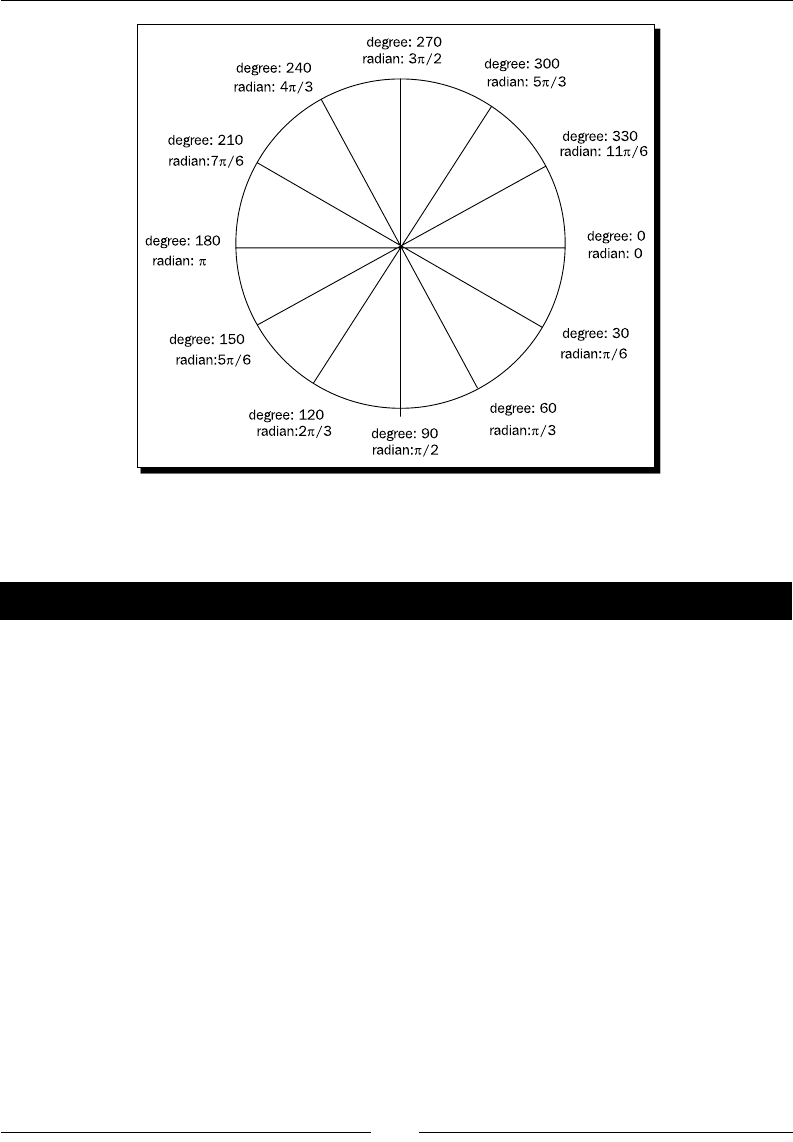
Chapter 4
[ 99 ]
In order to be clearer on drawing dierent arcs with the starng angle and ending angle,
let's draw some arcs.
Time for action – Drawing different arcs with arc function
Let's do some experiments on using the arc funcon by giving dierent starng and
ending angles:
1. Open the html5games.untangle.js le we just used to draw the circle.
2. Replace the circle drawing code by using the following arcs drawing codes:
$(function(){
var canvas = document.getElementById('game');
var ctx = canvas.getContext('2d');
ctx.fillStyle = "rgba(200, 200, 100, .6)";
// draw bottom half circle
ctx.beginPath();
ctx.arc(100, 110, 50 , 0, Math.PI);
ctx.closePath();
ctx.fill();
// draw top half circle
ctx.beginPath();
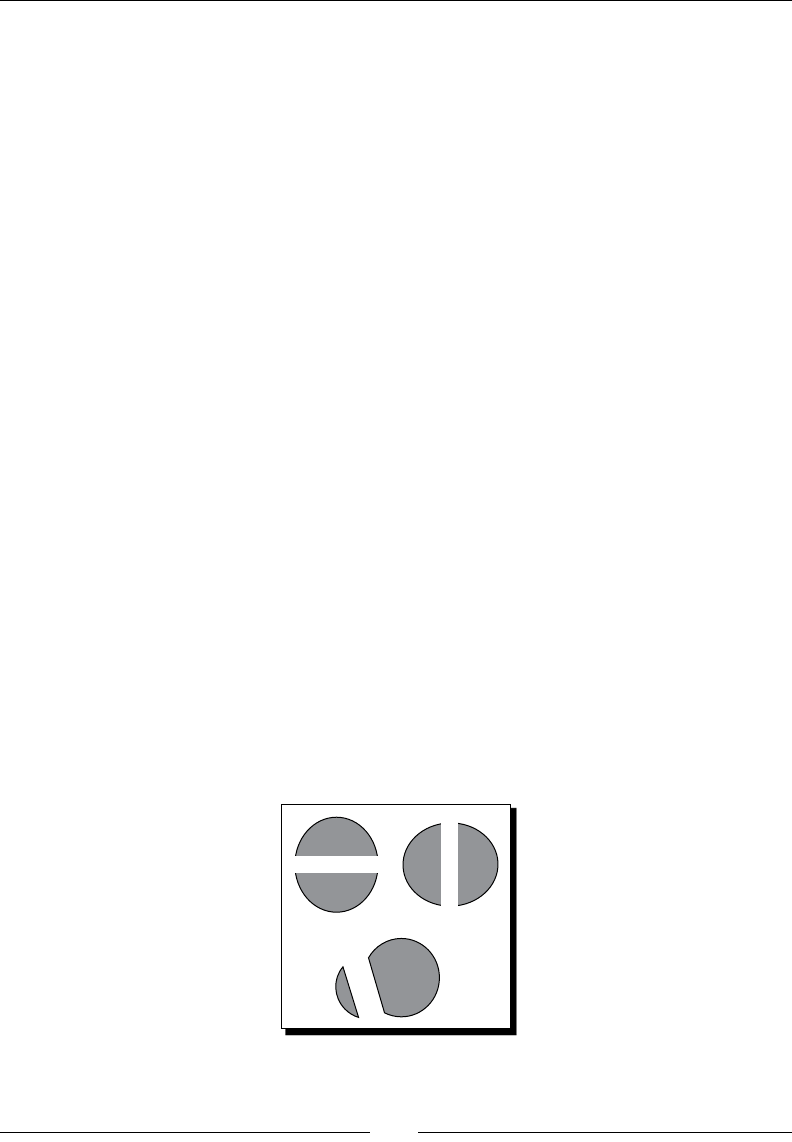
Building the Untangle Game with Canvas and Drawing API
[ 100 ]
ctx.arc(100, 90, 50 , 0, Math.PI, true);
ctx.closePath();
ctx.fill();
// draw left half circle
ctx.beginPath();
ctx.arc(230, 100, 50 , Math.PI/2, Math.PI*3/2);
ctx.closePath();
ctx.fill();
// draw right half circle
ctx.beginPath();
ctx.arc(250, 100, 50 , Math.PI*3/2, Math.PI/2);
ctx.closePath();
ctx.fill();
// draw a shape that is almost a circle
ctx.beginPath();
ctx.arc(180, 240, 50 , Math.PI*7/6, Math.PI*2/3);
ctx.closePath();
ctx.fill();
// draw a small arc
ctx.beginPath();
ctx.arc(150, 250, 50 , Math.PI*7/6, Math.PI*2/3, true);
ctx.closePath();
ctx.fill();
});
3. It is me to test it in a web browser. There should be six dierent half circles and
arcs on the canvas as shown in the following screenshot:
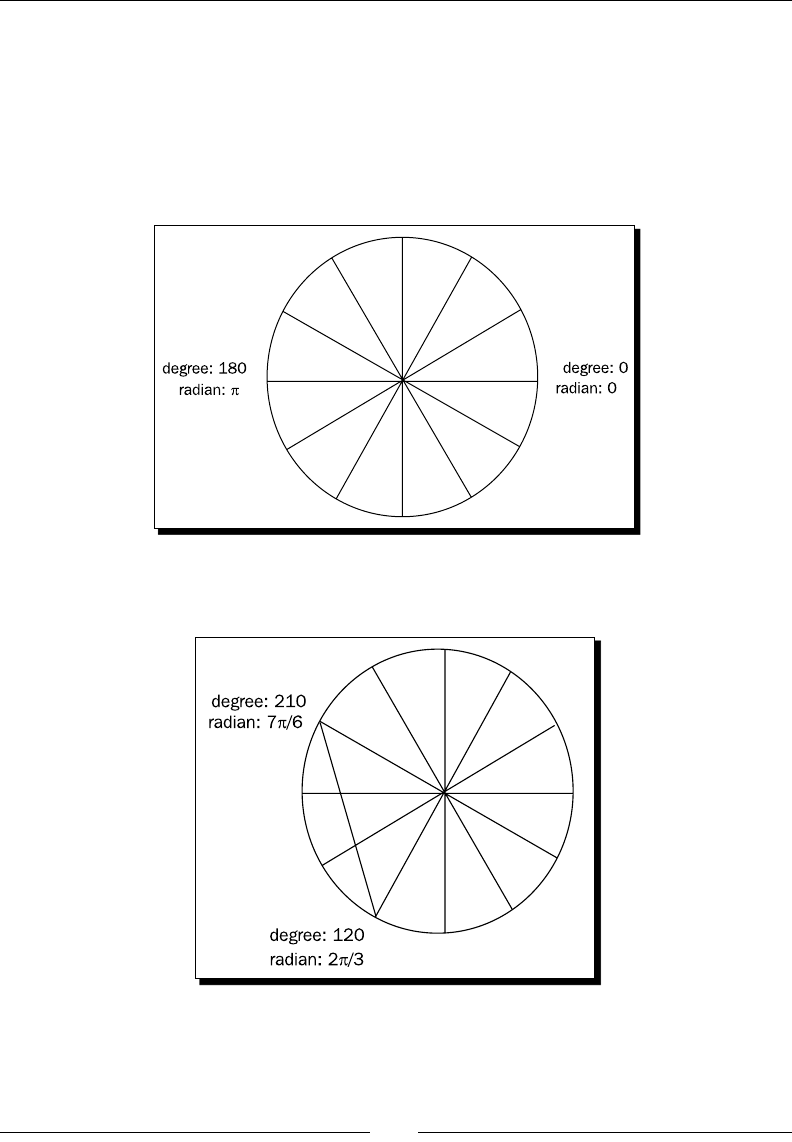
Chapter 4
[ 101 ]
What just happened?
We have used dierent startAngle and endAngle arguments in the arc funcon to draw
six dierent arc shapes. These arc shapes demonstrate how the arc funcon works.
Let's recall the degrees and radians relaonship circle and take a look at the top half
circle. The top half circle begins at angle 0 and ends at angle π, and the arc is drawn in an
counter-clockwise direcon. If we take a look at the circle, it looks like the following graph:
And if we start at angle 210 degrees and end at angle 120 degrees, in a clockwise direcon,
we will get the following arc:

Building the Untangle Game with Canvas and Drawing API
[ 102 ]
Pop quiz
1. Which arc command we can use to draw the following arc?
a. ctx.arc(300, 250, 50 , Math.PI*3/2, Math.PI/2, true);
b. ctx.arc(300, 250, 50 , Math.PI*3/2, Math.PI/2);
c. ctx.arc(300, 250, 50 , Math.PI*3/2, 0, true);
d. ctx.arc(300, 250, 50 , Math.PI*3/2, 0);
Executing the path drawing in canvas
When we are calling the arc funcon or other path drawing funcons, we are not drawing
the path immediately on the canvas. Instead, we are adding it into a list of the paths. These
paths will not be drawn unl we execute the drawing command.
There are two drawing execung commands. One command for lling the paths and the
other for drawing the stroke.
We ll the paths by calling the fill funcon and draw the stroke of the paths by calling the
stroke funcon, which we will use later when drawing lines:
ctx.fill();
Beginning a path for each style
The fill and stroke funcon lls and draws the paths on canvas but it does not clear the
list of paths. Take the following code snippet as an example. Aer lling our circle with red
color, we add other circles and ll it with green. What happens to the code is both the circles
are lled with green color, instead of only the new circle being lled by green color:
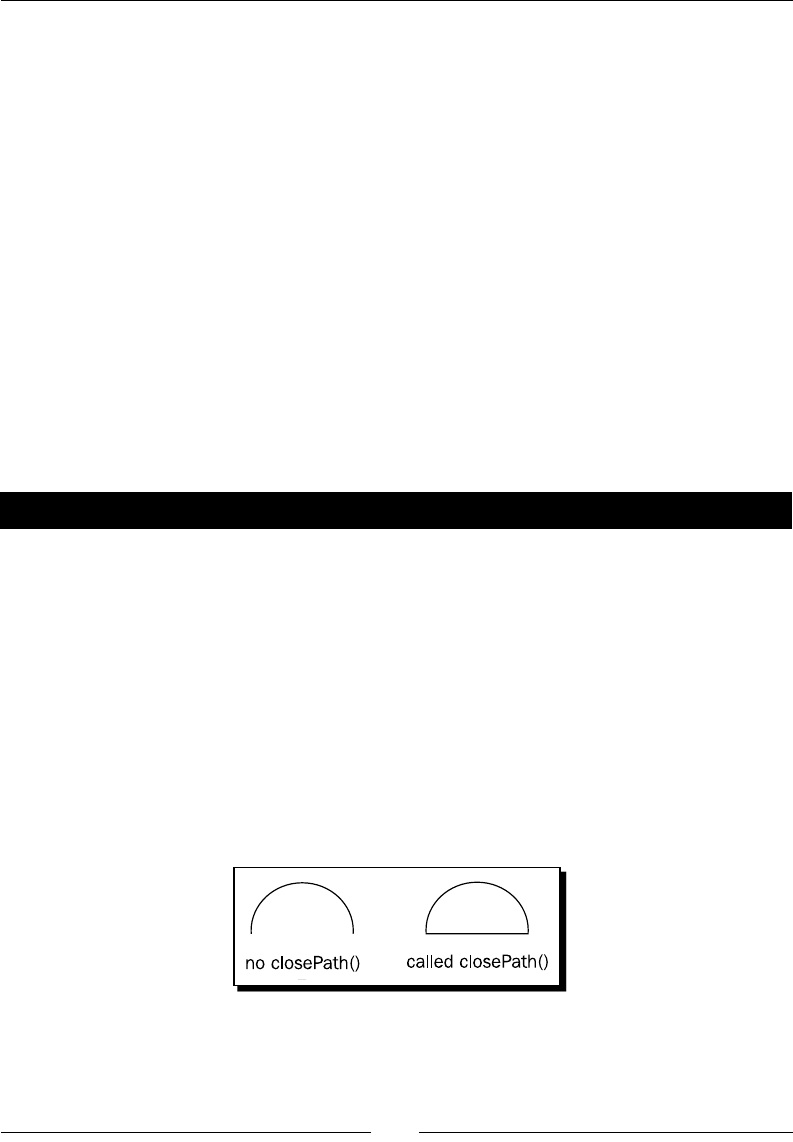
Chapter 4
[ 103 ]
var canvas = document.getElementById('game');
var ctx = canvas.getContext('2d');
ctx.fillStyle = "red";
ctx.arc(100, 100, 50 , 0, Math.PI*2, true);
ctx.fill();
ctx.arc(210, 100, 50, 0, Math.PI*2, true);
ctx.fillStyle = "green";
ctx.fill();
It is because when calling the second fill command, the list of paths in the canvas contain
both circles. Therefore, the fill command lls both circles with green and overrides the red
color circle.
In order to x this issue, we want to ensure we call beginPath before drawing a new shape
every me.
beginPath empes the list of paths so next me we call the fill and stroke command,
it will only apply to all paths aer the last beginPath.
Have a go hero
We have just discussed a code snippet where we intend to draw two circles with one in red
color and the other in green. The code turns out drawing both circles in green color. How can
we add a beginPath command to the code so that it draws one red circle and one green
circle correctly?
Closing a path
The closePath funcon will draw a straight line from the last point of the latest path to the
rst point of the path. That is closing the path. If we are only going to ll the path and not
going to draw the stroke outline, the closePath funcon does not aect the result. The
following screenshot compares the result on a half circle with one calling closePath and
the other not calling closePath:
Building the Untangle Game with Canvas and Drawing API
[ 104 ]
Pop quiz
1. Do we need to use the closePath funcon on the shape we are drawing if we just
want to ll the color and not draw the outline stroke?
a. Yes, we need the closePath funcon.
b. No, it does not care if we have the closePath funcon.
Wrapping the circle drawing in function
Drawing a circle is a common funcon that we will use a lot. It is beer to create a funcon
for drawing a circle instead of entering several code lines now.
Time for action – Putting the circle drawing code into a function
Let's make a funcon for the circle drawing and draw some circles on the canvas:
1. Open the html5games.untangle.js le.
2. Replace the original code in the JavaScript le with the following code. It basically
puts the circle drawing code we just used into a funcon and uses a for-loop to
randomly place ve circles on the canvas:
var untangleGame = {};
function drawCircle(ctx, x, y, radius) {
ctx.fillStyle = "rgba(200, 200, 100, .9)";
ctx.beginPath();
ctx.arc(x, y, radius, 0, Math.PI*2, true);
ctx.closePath();
ctx.fill();
}
$(function(){
var canvas = document.getElementById('game');
var ctx = canvas.getContext('2d');
var circleRadius = 10;
var width = canvas.width;
var height = canvas.height;
// random 5 circles
var circlesCount = 5;
for (var i=0;i<circlesCount;i++) {
var x = Math.random()*width;

Chapter 4
[ 105 ]
var y = Math.random()*height;
drawCircle(ctx, x, y, circleRadius);
}
});
3. Open the HTML le in the web browser to see the result.
What just happened?
The code of drawing circles is executed aer the page is loaded and ready. We used a loop
to draw several circles in random places on the canvas.
Generating random numbers in JavaScript
In game development, we oen use random funcons. We may want to randomly summon
a monster for the player to ght, we may want to randomly drop a reward price when the
player makes progress, and we may want a random number to be the result of rolling a dice.
In this code, we place the circles randomly in the canvas.
To generate a random number in JavaScript, we use the Math.random() funcon.

Building the Untangle Game with Canvas and Drawing API
[ 106 ]
There is no argument in the random funcon. It always returns a oang number between 0
and 1. The number is equal or bigger than 0 and smaller than 1.
There are two common ways to use the random funcon. One way is to generate random
numbers within a given range. The other way is generang a true or false value
Usage Code Discussion
Geng a random
integer between A
and B
Math.oor(Math.random()*B)+A Math.floor() funcon cuts the
decimal point of the given number.
Take Math.floor(Math.
random()*10)+5 as an example.
Math.random() returns a decimal
number between 0 to 0.9999….
Math.random()*10 is a decimal
number between 0 to 9.9999….
Math.floor(Math.
random()*10) is an integer
between 0 to 9.
Finally, Math.floor(Math.
random()*10) + 5 is an integer
between 5 to 14.
Geng a random
Boolean
(Math.random() > 0.495) (Math.random() > 0.495)
means there is 50 percent false and 50
percent true.
We can further adjust the true/false
rao.
(Math.random() > 0.7) means
there is almost 70 percent false and 30
percent true.
Saving the circle position
When we are developing a DOM-based game, such as the games we built in previous
chapters, we oen put the game objects into DIV elements and access them later in
code logic. It is a dierent story in canvas-based game development.
In order to access our game objects aer they are drawn on the canvas, we need to
remember their states ourselves. Lets say now we want to know how many circles are
drawn and where they are, and we will need an array to store their posion.

Chapter 4
[ 107 ]
Time for action – Saving the circle position
1. Open the html5games.untangle.js le in the text editor.
2. Add the following circle object denion code at the top of the JavaScript le:
function Circle(x,y,radius){
this.x = x;
this.y = y;
this.radius = radius;
}
3. Now we need an array to store the circles posion. Add a new array to the
untangleGame object:
var untangleGame = {
circles: []
};
4. Aer drawing every circle on the canvas, we save the posion of the circle into the
circles array. Add the highlighted line aer calling the drawCircle funcon:
$(function(){
var canvas = document.getElementById('game');
var ctx = canvas.getContext('2d');
var circleRadius = 10;
var width = canvas.width;
var height = canvas.height;
// random 5 circles
var circlesCount = 5;
for (var i=0;i<circlesCount;i++) {
var x = Math.random()*width;
var y = Math.random()*height;
drawCircle(ctx, x, y, circleRadius);
untangleGame.circles.push(new Circle(x,y,circleRadius));
}
});
Building the Untangle Game with Canvas and Drawing API
[ 108 ]
5. Now we can test the code in the web browser. There is no visual dierence
between this code and the last example when drawing random circles on canvas.
It is because we are saving the circles but have not changed any code that aects
the appearance.
What just happened?
We saved the posion and color of each circle. This is because we cannot directly access the
drawn object in canvas. All lines and shapes are drawn on the canvas and we cannot access
the lines or shapes as individual objects. The drawn items are drawn on a canvas. We cannot
just move a house in an oil painng, the same way we cannot directly manipulate any drawn
items in the canvas element.
Dening a basic class denition in JavaScript
JavaScript is object-oriented programming language. We can dene some object structure
for our use. The Circle object provides a data structure for us to easily store a collecon of
x and y posions and the radii.
Aer dening the Circle object, we can create a new Circle instance with an x, y, and
radius value by the following code:
var circle1 = new Circle(100, 200, 10);
For more detail usage on object-oriented programming JavaScript, please
read the Mozilla Developer Center in the following link:
https://developer.mozilla.org/en/Introduction_to_
Object-Oriented_JavaScript
Have a go hero
We have drawn several circles randomly on the canvas. They are in the same style and same
size. How about we randomly draw the size of the circles? And ll the circles with dierent
colors? Try modifying the code and play with the drawing API.
Drawing lines in canvas
Now we have several circles here, how about connecng them with lines? Let's draw a
straight line between each circle.

Chapter 4
[ 109 ]
Time for action – Drawing straight lines between each circle
1. Open the index.html we have just used in the circle drawing example.
2. Change the wordings drawing circles in Canvas to drawing lines in Canvas.
3. Open the html5games.untangle.js JavaScript le.
4. We are going to add the line drawing code on top of our exisng circles drawing
code. Replace the original code with the following. The modied code is highlighted:
function Circle(x,y,radius){
this.x = x;
this.y = y;
this.radius = radius;
}
function Line(startPoint,endpoint, thickness) {
this.startPoint = startPoint;
this.endPoint = endPoint;
this.thickness = thickness;
}
var untangleGame = {
circles: [],
thinLineThickness: 1,
lines: []
};
function drawLine(ctx, x1, y1, x2, y2, thickness) {
ctx.beginPath();
ctx.moveTo(x1,y1);
ctx.lineTo(x2,y2);
ctx.lineWidth = thickness;
ctx.strokeStyle = "#cfc";
ctx.stroke();
}
function drawCircle(ctx, x, y, radius) {
ctx.fillStyle = "rgba(200, 200, 100, .9)";
ctx.beginPath();
ctx.arc(x, y, radius, 0, Math.PI*2, true);
ctx.closePath();

Building the Untangle Game with Canvas and Drawing API
[ 110 ]
ctx.fill();
}
$(function(){
var canvas = document.getElementById('game');
var ctx = canvas.getContext('2d');
var circleRadius = 10;
var width = canvas.width;
var height = canvas.height;
// random 5 circles
var circlesCount = 5;
for (var i=0;i<circlesCount;i++) {
var x = Math.random()*width;
var y = Math.random()*height;
drawCircle(ctx, x, y, circleRadius);
untangleGame.circles.push(new Circle(x,y,radius));
}
for (var i=0;i< untangleGame.circles.length;i++) {
var startPoint = untangleGame.circles[i];
for(var j=0;j<i;j++) {
var endPoint = untangleGame.circles[j];
drawLine(ctx, startPoint.x, startPoint.y, endPoint.x,
endPoint.y, 1);
untangleGame.lines.push(new Line(startPoint, endpoint,
untangleGame.thinLineThickness));
}
}
});
5. Test the code in the web browser. We should see there are lines connected with
each randomly placed circle.
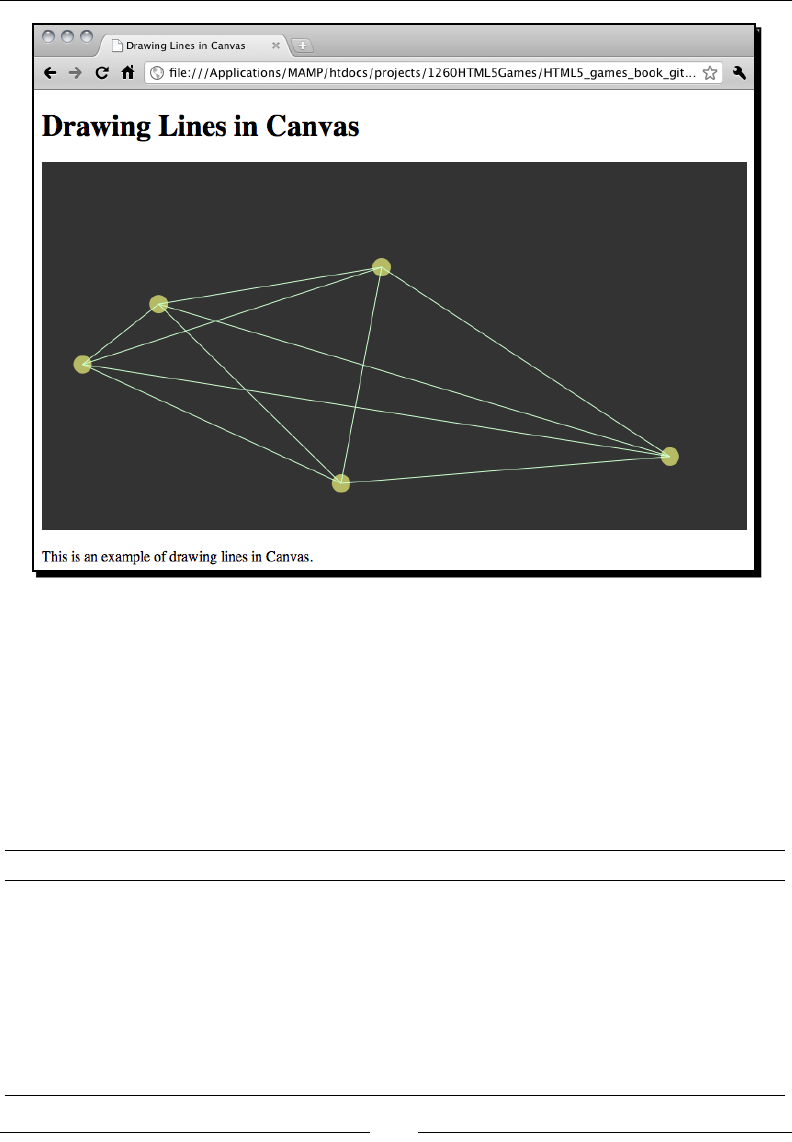
Chapter 4
[ 111 ]
What just happened?
Similar to the way we saved the circles posion, we have an array to save every line segment
we draw. We declare a line class denion to store some essenal informaon of a line
segment. That is, we save the start and end point and the thickness of the line.
Introducing the line drawing API
There are some drawing APIs for us to draw and style the line stroke
Line drawing funcons Discussion
MoveTo The Moveto funcon is like holding the pen in our hand and moving
it on top of the paper without touching it with the pen.
LineTo This funcon is like pung the pen down on the paper and drawing a
straight line to the desnaon point.
lineWidth LineWidth sets the thickness of the strokes we draw aerwards.
Stroke stroke is the funcon to execute the drawing. We set up a collecon
of moveTo, lineTo, or styling funcons and nally call the stroke
funcon to execute it on canvas.

Building the Untangle Game with Canvas and Drawing API
[ 112 ]
We usually draw lines by using the moveTo and lineTo pairs. Just like in the real world,
we move our pen on top of the paper to the starng point of a line and put down the pen
to draw a line. Then, keep on drawing another line or move to the other posion before
drawing. This is exactly the ow in which we draw lines on canvas.
We just demonstrated drawing a simple line. We can set dierent line styles
to lines in canvas. For more line styling detail, please read the styling guide in
W3C (http://dev.w3.org/html5/2dcontext/#line-styles)
and Mozilla Developer Center (https://developer.mozilla.org/
En/Canvas_tutorial/Applying_styles_and_colors).
Interacting with drawn objects in canvas with
mouse events
So far, we have shown that we can draw shapes in canvas dynamically based on our logic.
There is one part missing in the game development that is, input.
Imagine now we can drag the circles around on the canvas, the connected lines will follow the
circles. In this secon, we will add mouse events to the canvas to make our circles draggable.
Time for action – Dragging the circles in canvas
1. Let's connue with our previous code. Open the html5games.untangle.js le.
2. We will need a funcon to clear all the drawing in the canvas. Add the following
funcon to the end of the JavaScript le:
function clear(ctx) {
ctx.clearRect(0,0,ctx.canvas.width,ctx.canvas.height);
}
3. Remove the line drawing code in the jQuery ready funcon. We are going to
separate it into two parts, the line data and the drawing.
4. Add the following funcon that assigns lines to connect each circle. These lines will
be drawn later:
function connectCircles()
{
// connect the circles to each other with lines
untangleGame.lines.length = 0;
for (var i=0;i< untangleGame.circles.length;i++) {
var startPoint = untangleGame.circles[i];

Chapter 4
[ 113 ]
for(var j=0;j<i;j++) {
var endPoint = untangleGame.circles[j];
untangleGame.lines.push(new Line(startPoint, endPoint,
untangleGame.thinLineThickness));
}
}
}
5. Add the mouse event listener code to the jQuery ready funcon. The following code
is how the funcon looks now. The highlighted code is the mouse event handlers:
$(function(){
// get the reference of canvas element.
var canvas = document.getElementById("game");
var ctx = canvas.getContext("2d");
var circleRadius = 10;
var width = canvas.width;
var height = canvas.height;
// random 5 circles
var circlesCount = 5;
for (var i=0;i<circlesCount;i++) {
var x = Math.random()*width;
var y = Math.random()*height;
drawCircle(ctx, x, y, circleRadius);
untangleGame.circles.push(new Circle(x,y,circleRadius));
}
connectCircles();
// Add Mouse Event Listener to canvas
// we find if the mouse down position is on any circle
// and set that circle as target dragging circle.
$("#game").mousedown(function(e) {
var canvasPosition = $(this).offset();
var mouseX = e.layerX || 0;
var mouseY = e.layerY || 0;
for(var i=0;i<untangleGame.circles.length;i++)
{
var circleX = untangleGame.circles[i].x;
var circleY = untangleGame.circles[i].y;
var radius = untangleGame.circles[i].radius;

Building the Untangle Game with Canvas and Drawing API
[ 114 ]
if (Math.pow(mouseX-circleX,2) + Math.pow(mouseY-circleY,2) <
Math.pow(radius,2))
{
untangleGame.targetCircle = i;
break;
}
}
});
// we move the target dragging circle when the mouse is moving
$("#game").mousemove(function(e) {
if (untangleGame.targetCircle != undefined)
{
var canvasPosition = $(this).offset();
var mouseX = e.layerX || 0;
var mouseY = e.layerY || 0;
var radius = untangleGame.circles[untangleGame.targetCircle].
radius;
untangleGame.circles[untangleGame.targetCircle] = new
Circle(mouseX, mouseY,radius);
}
connectCircles();
});
// We clear the dragging circle data when mouse is up
$("#game").mouseup(function(e) {
untangleGame.targetCircle = undefined;
});
// setup an interval to loop the game loop
setInterval(gameloop, 30);
});
6. Then we add the gameloop funcon that is responded to draw the updated circles
and lines:
function gameloop() {
// get the reference of the canvas element and the drawing
context.
var canvas = document.getElementById('game');
var ctx = canvas.getContext('2d');
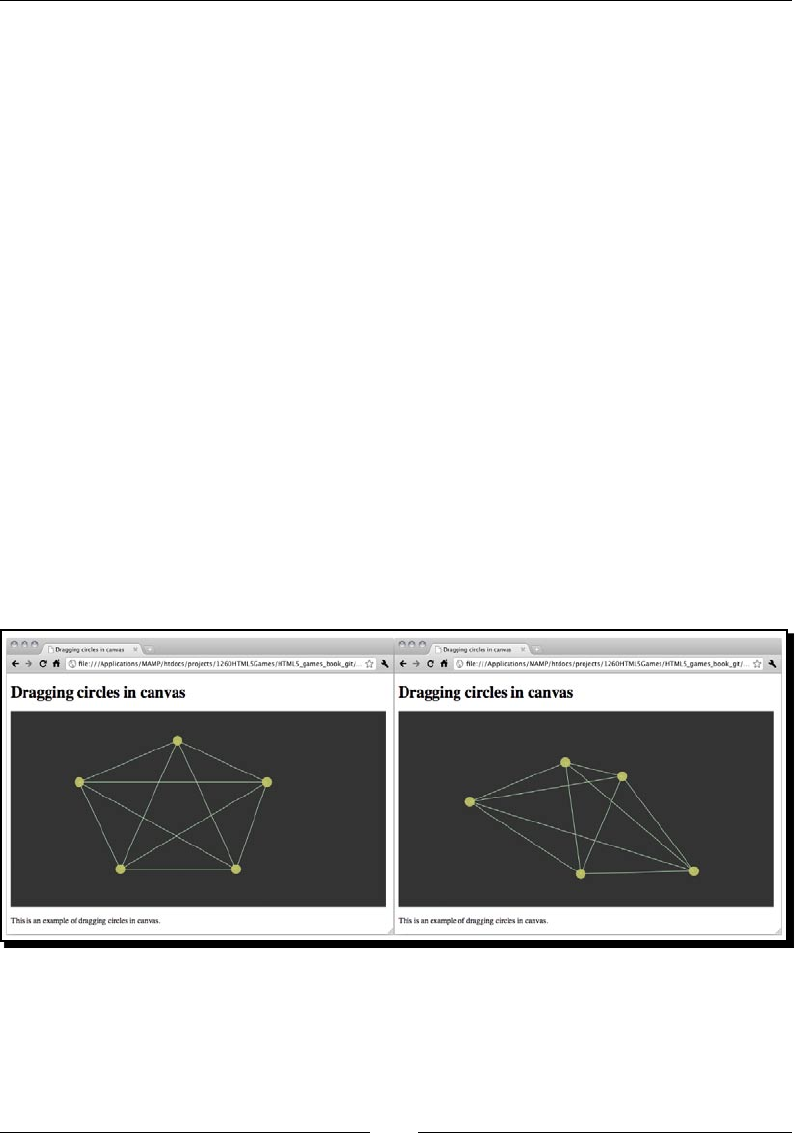
Chapter 4
[ 115 ]
// clear the canvas before re-drawing.
clear(ctx);
// draw all remembered line
for(var i=0;i<untangleGame.lines.length;i++) {
var line = untangleGame.lines[i];
var startPoint = line.startPoint;
var endPoint = line.endPoint;
var thickness = line.thickness;
drawLine(ctx, startPoint.x, startPoint.y, endPoint.x,
endPoint.y, thickness);
}
// draw all remembered circles
for(var i=0;i<untangleGame.circles.length;i++) {
var circle = untangleGame.circles[i];
drawCircle(ctx, point.x, point.y, circle.radius);
}
}
7. Open index.html in a web browser. There should be ve circles with lines
connecng them. Try dragging the circles. The dragged circle will follow the
mouse cursor and the connected lines will follow too.
What just happened?
We have set up three mouse event listeners in the jQuery ready funcon. They are the
mouse down, move, and up events.
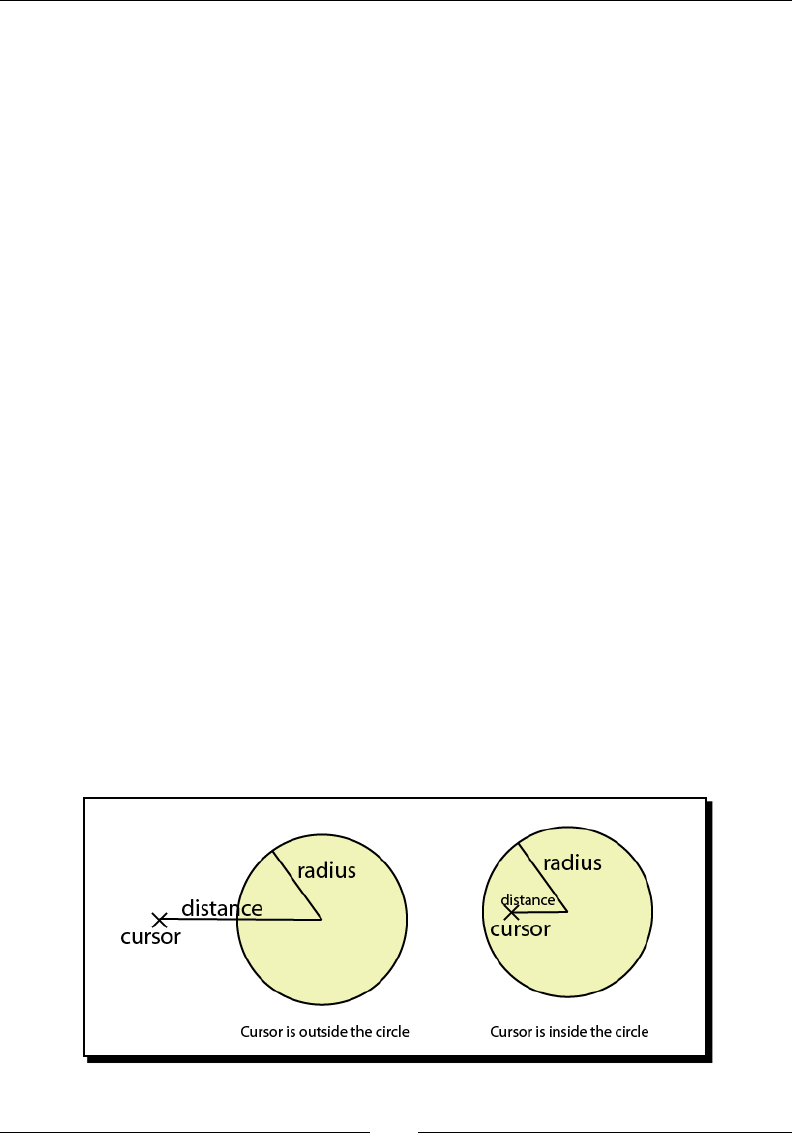
Building the Untangle Game with Canvas and Drawing API
[ 116 ]
Getting the mouse position in the canvas element
We can get the mouse cursor posion relave to the element in the mouse event from the
layerX and layerY property. The following shows the code snippet we used in our code
example. The || 0 is to make the result 0 when the layerX or layerY is undened:
var mouseX = e.layerX || 0;
var mouseY = e.layerY || 0;
Please note that we need to explicitly set the posion property of the element in order to
get the correct layerX and layerY property.
Detecting mouse events on circles in canvas
Aer discussing the dierence between DOM-based development and Canvas-based
development, we cannot directly listen to the mouse events of any drawn shapes in the
canvas. There is no such thing. We cannot monitor the event on any drawn shapes in the
canvas. We can only get the mouse event of the canvas element and calculate the relave
posion of the canvas. Then we change the states of the game objects according to the
mouse posion and nally redraw it on canvas.
How do we know we are clicking on a circle?
We can use the point-in-circle formula. That is to check the distance between the center
point of the circle and the mouse posion. The mouse clicks on the circle when the distance
is less than the circle radius.
We use the following formula to get the distance between two points:
Distance = (x2-x1)2 + (y2-y1)2
The following graph shows that when the distance between the center point and the mouse
cursor is smaller than the radius, the cursor is in the circle:
Chapter 4
[ 117 ]
The following code we used explains how we can apply the distance checking to know
whether the mouse cursor is inside the circle in the mouse down event handler:
if (Math.pow(mouseX-circleX,2) + Math.pow(mouseY-circleY,2) < Math.
pow(untangleGame.circleRadius,2))
{
untangleGame.targetCircle = i;
break;
}
When we know that the mouse cursor is pressing the circle in canvas, we mark it as the
targeted circle to be dragged on the mouse move event. During the mouse move event
handler, we update the target dragged circle's posion to the latest cursor posion. When
the mouse is up, we clear the target circle's reference.
Pop quiz
1. Can we directly access an already drawn shape in the canvas?
a. Yes
b. No
2. Which method can we use to check whether a point is inside a circle?
a. The coordinate of the point is smaller than the coordinate of the center
of the circle.
b. The distance between the point and the center of the circle is smaller than the
circle radius.
c. The x coordinate of the point is smaller than the circle radius.
d. The distance between the point and the center of the circle is bigger than the
circle radius.
Game loop
In Chapter 2, Geng Started with DOM-based Game Development, we discussed the game
loop approach. In the Ping Pong game in Chapter 2, the game loop manipulates the keyboard
input and updates the posion of the DOM-based game objects.
Here, the game loop is used to redraw the canvas to present the later game states. If we
do not redraw the canvas aer changing the states, say the posion of the circles, we will
not see it.
It is like refreshing the image on television. The TV refreshes the screen 12 mes per second.
We also redraw the canvas scene several mes a second. In each redraw, we draw the game
state on canvas based on the current circle posion.
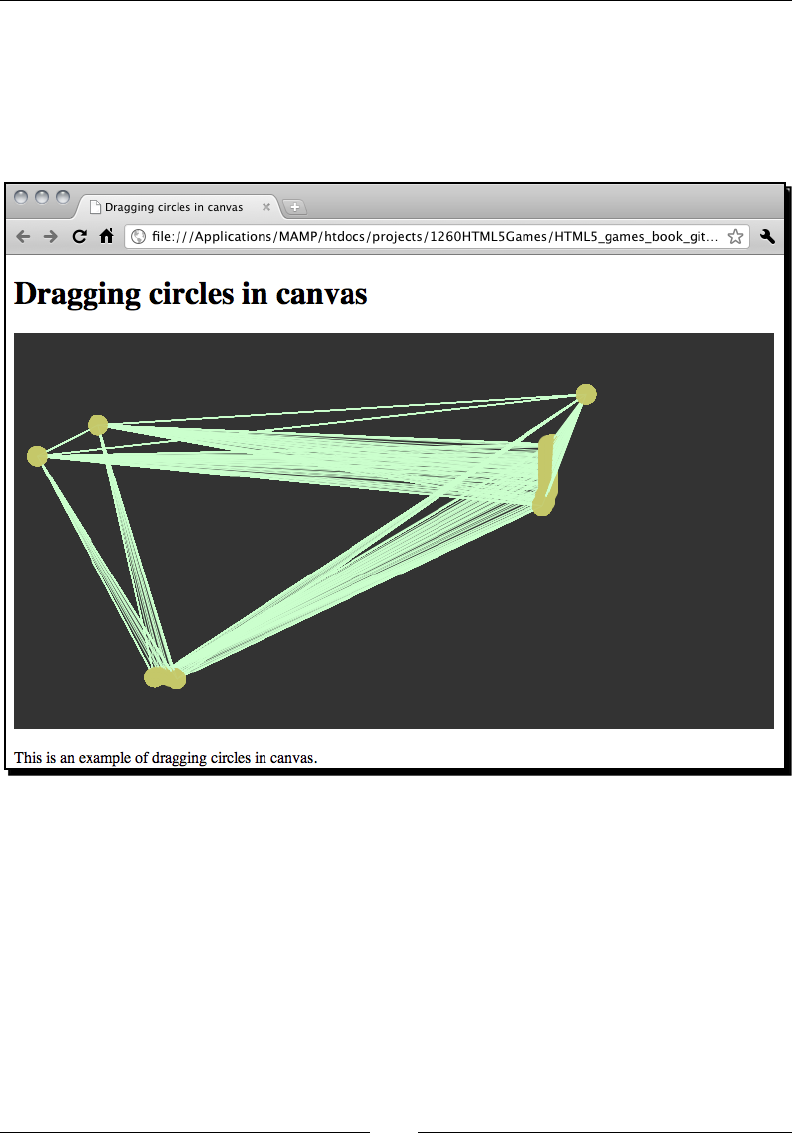
Building the Untangle Game with Canvas and Drawing API
[ 118 ]
Clearing the canvas
When we drag the circle, we redraw the canvas. The problem is the already drawn shapes
on canvas won't disappear automacally. We will keep adding new paths to the canvas and
nally mess up everything on the canvas. The following screenshot is what will happen if we
keep dragging the circles without clearing the canvas on every redraw:
Since we have saved all game statuses in the JavaScript, we can safely clear the enre canvas
and draw the updated lines and circles with the latest game status. To clear the canvas, we
use the clearRect funcon provided by canvas drawing API. The clearRect funcon
clears a rectangle area by providing a rectangle clipping region. It accepts the following
arguments as the clipping region:
Chapter 4
[ 119 ]
ctx.clearRect(x,context.clearRect(x, y, width, height)
Argument Denion
xThe top le point of the rectangle clipping region, in x-axis.
yThe top le point of the rectangle clipping region, in y-axis.
width The width of the rectangle region.
height The height of the rectangle region.
The x and y set the top le posion of the region to be cleared. The width and height
denes how much area is to be cleared. To clear the enre canvas, we can provide (0,0)
as the top le posion and the width and height of the canvas to the clearRect funcon.
The following code clears all drawn things on the enre canvas:
ctx.clearRect(0, 0, ctx.canvas.width, ctx.canvas.height);
Pop quiz
1. Can we clear a poron of the canvas by using the clearRect funcon?
a. Yes
b. No
2. Does the following code clear things on the drawn canvas?
ctx.clearRect(0, 0, ctx.canvas.width, 0);
a. Yes
b. No
Detecting line intersection in canvas
We have draggable circles and connected lines on the canvas. Some lines intersect others
and some do not. Imagine now we want to disnguish the intersected lines. We need some
mathemacs formula to check them and bold those intersected lines.
Time for action – Distinguishing the intersected lines
Let's increase the thickness of those intersected lines so we can disnguish them
in the canvas:
1. Open the html5games.untangle.js le in the text editor.

Building the Untangle Game with Canvas and Drawing API
[ 120 ]
2. We have the thinLineThickness seng as the default line thickness. We add the
following code to dene a thickness for bold lines:
var untangleGame = {
circles: [],
thinLineThickness: 1,
boldLineThickness: 5,
lines: []
};
3. In order to make the code more reusable and readable, we want to isolate the
line intersecon logic from the game logic. We create a funcon to check whether
the given two lines intersect. Add the following funcons to the end of the
JavaScript le:
function isIntersect(line1, line2)
{
// convert line1 to general form of line: Ax+By = C
var a1 = line1.endPoint.y - line1.point1.y;
var b1 = line1.point1.x - line1.endPoint.x;
var c1 = a1 * line1.point1.x + b1 * line1.point1.y;
// convert line2 to general form of line: Ax+By = C
var a2 = line2.endPoint.y - line2.point1.y;
var b2 = line2.point1.x - line2.endPoint.x;
var c2 = a2 * line2.startPoint.x + b2 * line2.startPoint.y;
// calculate the intersection point
var d = a1*b2 - a2*b1;
// parallel when d is 0
if (d == 0) {
return false;
}else {
var x = (b2*c1 - b1*c2) / d;
var y = (a1*c2 - a2*c1) / d;
// check if the interception point is on both line segments
if ((isInBetween(line1.startPoint.x, x, line1.endPoint.x) ||
isInBetween(line1.startPoint.y, y, line1.endPoint.y)) &&
(isInBetween(line2.startPoint.x, x, line2.endPoint.x) ||
isInBetween(line2.startPoint.y, y, line2.endPoint.y)))
{
return true;
}

Chapter 4
[ 121 ]
}
return false;
}
// return true if b is between a and c,
// we exclude the result when a==b or b==c
function isInBetween(a, b, c) {
// return false if b is almost equal to a or c.
// this is to eliminate some floating point when
// two value is equal to each other but different with
0.00000...0001
if (Math.abs(a-b) < 0.000001 || Math.abs(b-c) < 0.000001) {
return false;
}
// true when b is in between a and c
return (a < b && b < c) || (c < b && b < a);
}
4. Next, we have a funcon to check whether our lines intersect and mark that line in
bold. Add the following new funcon to the code:
function updateLineIntersection()
{
// checking lines intersection and bold those lines.
for (var i=0;i<untangleGame.lines.length;i++) {
for(var j=0;j<i;j++) {
var line1 = untangleGame.lines[i];
var line2 = untangleGame.lines[j];
// we check if two lines are intersected,
// and bold the line if they are.
if (isIntersect(line1, line2)) {
line1.thickness = untangleGame.boldLineThickness;
line2.thickness = untangleGame.boldLineThickness;
}
}
}
}
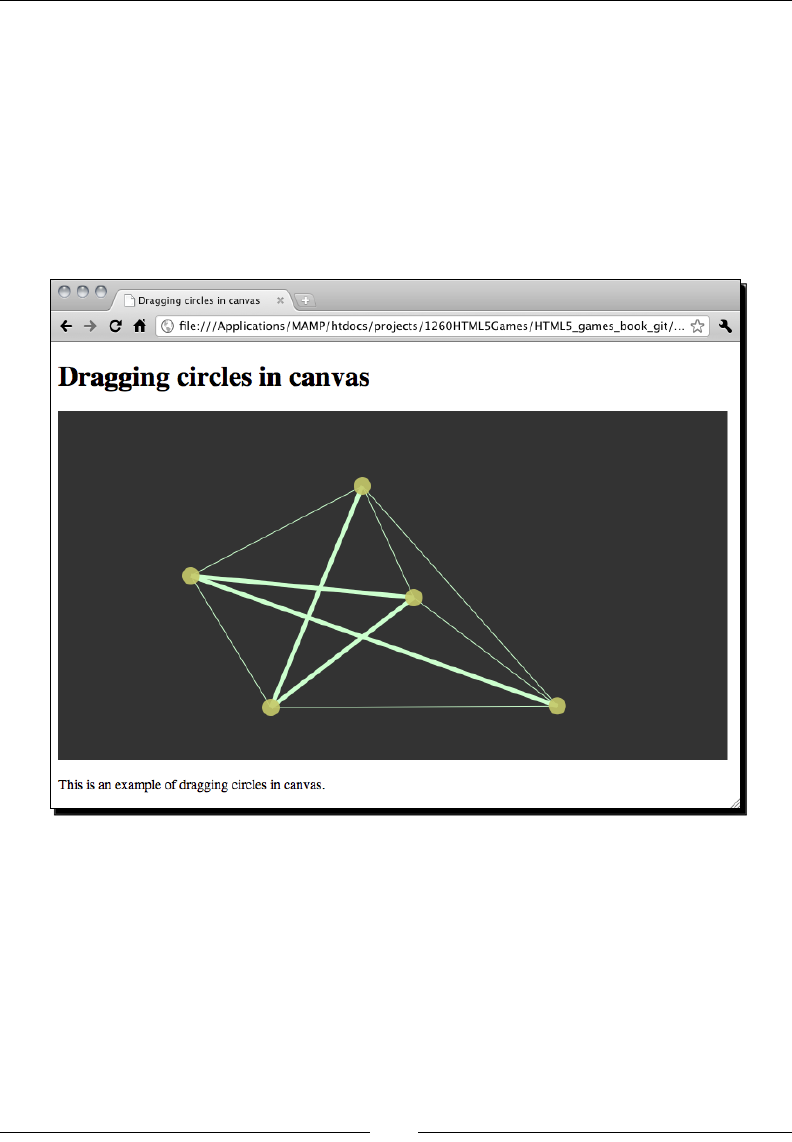
Building the Untangle Game with Canvas and Drawing API
[ 122 ]
5. Finally we update the line intersecon by adding the following funcon call in
two places. One aer connecng our circles and the other in the mouse move
event handler:
updateLineIntersection();
6. It is me to test the intersecon in the web browser. When viewing the circles and
lines in canvas the lines with intersecon should be thicker than those without
intersecon. Try dragging the circles to change the intersecon relaonship and the
lines will become thin or thick.
What just happened?
We have just added line intersecon checking code to our exisng circle dragging example.
The line intersecon code involves some mathemacal formula to get the intersecon point
of two lines and checks whether the point is inside the line segment we provide. Let's look at
the mathemacs part and see how it works.
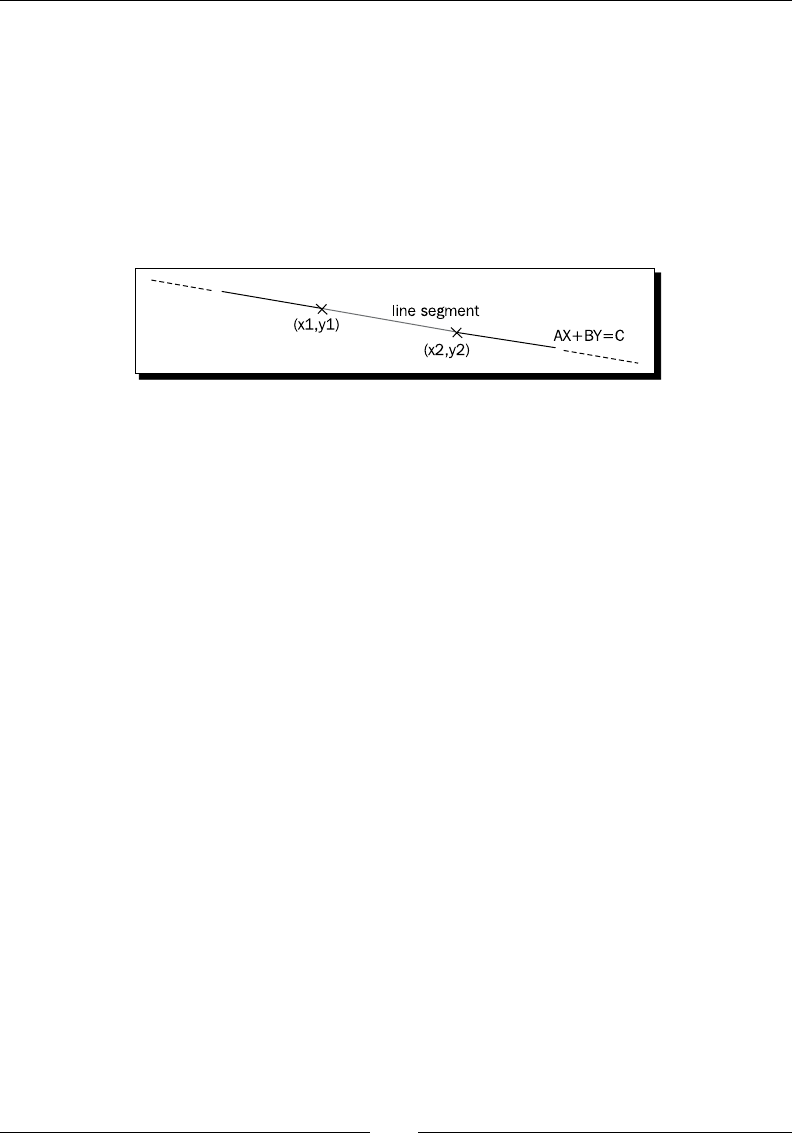
Chapter 4
[ 123 ]
Determining whether two line segments intersect
According to the intersecon equaon we learnt from geometry, with two given lines in
general form, we can get the intersecon point.
What is general form? In our code, we have the starng point and ending point of a line in
x and y coordinates. This is a line segment because it is just a segment part of the line in
mathemacs. A general form of a line is represented by Ax + By = C.
The following graph explains the line segment on a line in general form:
We can transform the line segment with point 1 in x1, y1 and point 2 in x2, y2 into general
form by the following equaon:
A = y2-y1
B = x1-x2
C = A * x1 + B * y2
Now we have a line equaon AX+BY = C where A, B, C are known and X and Y are
unknown.
We are checking two lines intersecng. We can transform both lines into general form and
get two line equaons:
Line 1: A1X+B1Y = C1
Line 2: A2X+B2Y = C2
By pung the two general form equaons together, X and Y are two variables that are
unknown. We can then solve these two equaons and get the intersecon point of X and Y.
If A1 * B2 - A2 * B1 is zero, then two lines are parallel and there is no intersecon
point. Otherwise we get the intercepon point by using the following equaon:
X = (B2 * C1 – B1 * C2) / (A1 * B2 – A2 * B1)
Y = (A1 * C2 – A2 * C1) / (A1 * B2 – A2 * B1)
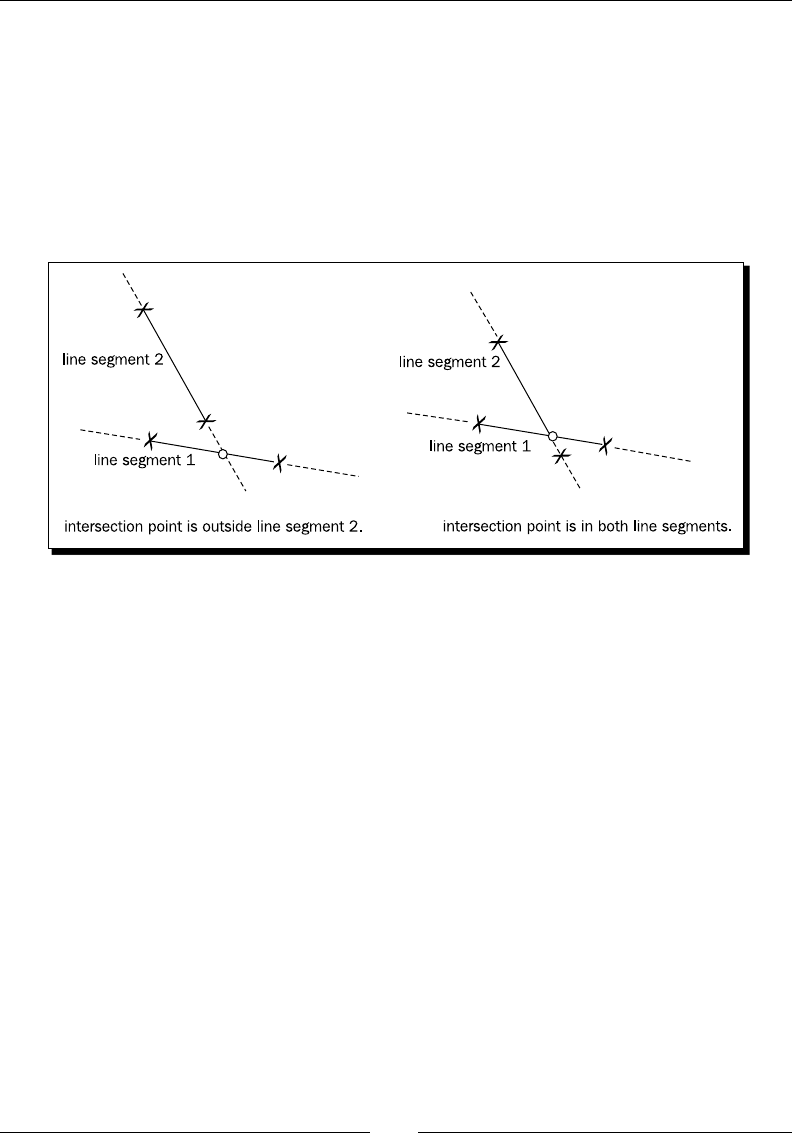
Building the Untangle Game with Canvas and Drawing API
[ 124 ]
The intersecon point of the general forms only provides that the two lines are not parallel
to each other and will intersect each other at some point. It does not guarantee the
intersecon point is on both line segments.
The following graphs show two possible results of the intersecon point and the given line
segments. The intersecon point is not in between both line segments in the le graph, in
this case, the two line segments are not intersected to each other. In the right-hand side
graph, the point is in between both line segments so these two line segments intersect to
each other:
Therefore, we need another funcon named isInBetween to determine if a provided
value is in between the beginning and ending value. Then we use this funcon to check
whether the intersecon point from the equaon is in between both line segments that
we are checking.
Aer geng the result of the lines intersecon, we draw the thick line to indicate those
intersected lines.
Making the untangle puzzle game
Now that we have created an interacon canvas we can drag the circles and the lines
connecng the circles intersecng with other lines. How about we make it a game? There are
some pre-dened circles and lines and our aim is to drag the circles so that there are no lines
intersecng with others. This is called an untangle puzzle game.

Chapter 4
[ 125 ]
Time for action – Making the untangle puzzle game in canvas
Let's add the game logic to our line intersecon code:
1. Open the index.html le in text editor.
2. First, let's set the tle as the following:
<header>
<h1>Untangle Puzzle Game in Canvas</h1>
</header>
3. We also need to display the current level and the progress to the player. Add the
following code aer the canvas element:
<p>Puzzle <span id="level">0</span>, Completeness:
<span id="progress">0</span>%</p>
4. Open the html5games.untangle.js JavaScript le to add the game logic.
5. Add the variable info, the untangleGame. It stores the current level of the game:
var untangleGame = {
circles: [],
thinLineThickness: 1,
boldLineThickness: 5,
lines: [],
currentLevel: 0
};
6. We need some pre-dened level data for the players to play. It is a collecon of data
dening where the circles are placed and how they connect to each other inially.
Add the following level data code to the untangleGame object:
untangleGame.levels =
[
{
"level" : 0,
"circles" : [{"x" : 400, "y" : 156},
{"x" : 381, "y" : 241},
{"x" : 84, "y" : 233},
{"x" : 88, "y" : 73}],
"relationship" : {
"0" : {"connectedPoints" : [1,2]},
"1" : {"connectedPoints" : [0,3]},
"2" : {"connectedPoints" : [0,3]},
"3" : {"connectedPoints" : [1,2]}

Building the Untangle Game with Canvas and Drawing API
[ 126 ]
}
},
{
"level" : 1,
"circles" : [{"x" : 401, "y" : 73},
{"x" : 400, "y" : 240},
{"x" : 88, "y" : 241},
{"x" : 84, "y" : 72}],
"relationship" : {
"0" : {"connectedPoints" : [1,2,3]},
"1" : {"connectedPoints" : [0,2,3]},
"2" : {"connectedPoints" : [0,1,3]},
"3" : {"connectedPoints" : [0,1,2]}
}
},
{
"level" : 2,
"circles" : [{"x" : 92, "y" : 85},
{"x" : 253, "y" : 13},
{"x" : 393, "y" : 86},
{"x" : 390, "y" : 214},
{"x" : 248, "y" : 275},
{"x" : 95, "y" : 216}],
"relationship" : {
"0" : {"connectedPoints" : [2,3,4]},
"1" : {"connectedPoints" : [3,5]},
"2" : {"connectedPoints" : [0,4,5]},
"3" : {"connectedPoints" : [0,1,5]},
"4" : {"connectedPoints" : [0,2]},
"5" : {"connectedPoints" : [1,2,3]}
}
}
];
7. When starng on each level, we need to set up the inial level data. To help make
the code more readable, we create a funcon. Add the following code to the end of
the JavaScript le:
function setupCurrentLevel() {
untangleGame.circles = [];
var level = untangleGame.levels[untangleGame.currentLevel];
for (var i=0; i<level.circles.length; i++) {
untangleGame.circles.push(new Point(level.circles[i].x, level.
circles[i].y, 10));
}

Chapter 4
[ 127 ]
// setup line data after setup the circles.
connectCircles();
updateLineIntersection();
}
8. This is a game with several levels. We need to check whether the player solves the
puzzle in the current level and jumps to the next puzzle. Add the following funcon
to the end of the le:
function checkLevelCompleteness() {
if ($("#progress").html() == "100") {
if (untangleGame.currentLevel+1 < untangleGame.levels.length)
untangleGame.currentLevel++;
setupCurrentLevel();
}
}
9. We update the original mouse up event handler to check whether the player
completes the level:
$("#game").mouseup(function(e) {
untangleGame.targetCircle = undefined;
// on every mouse up, check if the untangle puzzle is solved.
checkLevelCompleteness();
});
10. We are going to draw the circles based on the level data instead of drawing them
randomly. Therefore, we delete the circle drawing code in the jQuery ready funcon.
11. On the place we deleted the circle drawing code in the jQuery ready funcon, we
add the following code to set up the circles level data for game loop to use:
setupCurrentLevel();
12. Next, we update the connectCircles funcon to connect circles based on the
level data:
function connectCircles()
{
// setup all lines based on the circles relationship
var level = untangleGame.levels[untangleGame.currentLevel];
untangleGame.lines.length = 0;
for (var i in level.relationship) {
var connectedPoints = level.relationship[i].connectedPoints;

Building the Untangle Game with Canvas and Drawing API
[ 128 ]
var startPoint = untangleGame.circles[i];
for (var j in connectedPoints) {
var endPoint = untangleGame.circles[connectedPoints[j]];
untangleGame.lines.push(new Line(startPoint, endPoint));
}
}
}
13. We need another funcon to update the game progress. Add the following funcon
to the code:
function updateLevelProgress()
{
// check the untangle progress of the level
var progress = 0;
for (var i=0;i<untangleGame.lines.length;i++) {
if (untangleGame.lines[i].thickness == untangleGame.
thinLineThickness) {
progress++;
}
}
var progressPercentage = Math.floor(progress/untangleGame.lines.
length*100);
$("#progress").html(progressPercentage);
// display the current level
$("#level").html(untangleGame.currentLevel);
}
14. Finally, we need to update the level progress in the following mouse move
event handler.
$("#game").mousemove(function(e) {
…
connectCircles();
updateLineIntersection();
updateLevelProgress();
…
});
15. Save all les and test the game in the browser. We can drag the circles and the
line thickness will indicate if it is intersected with other lines. During the mouse
dragging, the level completeness percentage should change when more or less
line intersecons are detected. If we solve the puzzle, that is no lines are
intersected, the game will jump to the next level. When the game reaches the last
level, it will keep showing the last level again. It is because we have not yet added
the game over screen.
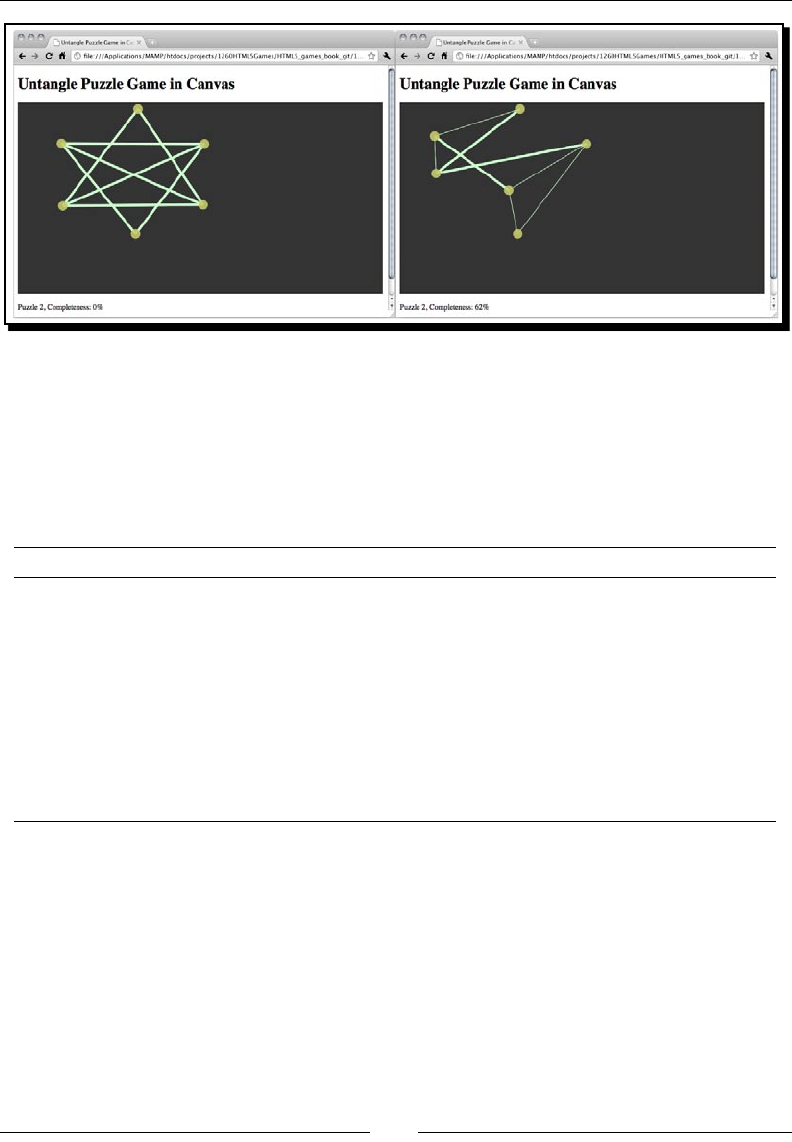
Chapter 4
[ 129 ]
What just happened?
We have added the game logic to our canvas so that we can play our circle dragging code
that was created throughout the chapter.
Let's recall the variables we added to the untangleGame object. The following table lists the
descripon and usage of these:
Variable Descripon
circleRadius The radius seng of all drawing circles.
thinLineThickness The line thickness when drawing thin lines.
boldLineThickness The line thickness when drawing bold lines.
circles An array to store all drawn circles in the canvas.
lines An array to store all drawn lines in the canvas.
targetCircle Keeping track of the circle that we are dragging.
levels Stores all inial data of each level in the JSON format.
currentLevel A number to remember the current level.
Dening the leveling data
In each level, we have an inial posion of the circles for the untangle puzzle. The level data
is designed as an array of objects. Each object contains every level data. Inside every level
data, there are three properes: level number, circles, and lines connecng the circles. The
following table shows the properes in each level data:

Building the Untangle Game with Canvas and Drawing API
[ 130 ]
Level property Denion Discussion
level The level number of the object. This is a number in each level object to
let us easily know which level we are in.
circles An array of circles' posion in
the level.
This denes how the circles are placed
inially when the level is set up.
relaonships An array of relaonships
dening which circles connect
to each other.
There are some lines connecng the
circles in each level. We design the line
connecons so that there is a soluon in
each level. The line relaonship denes
which circle connects to which circle.
For example, the following code means
circle 1 is connected to circle 2:
{"connectedPoints" :
[1,2]}
Aer every level data is dened well with our custom structure
Determining level-up
The level is complete when there are no lines intersecng with each other. We loop
through each line and see how many lines are thin. Thin lines mean they are not
intersected with others. We can use the thin lines to all line raos to get the percentage
of the level of completeness:
var progress = 0;
for (var i in untangleGame.lines) {
if (untangleGame.lines[i].thickness == untangleGame.
thinLineThickness) {
progress++;
}
}
var progressPercentage = Math.floor(progress/untangleGame.lines.
length * 100);
We can then simply determine the level has been completed when the progress
is 100 percent:
if ($("#progress").html() == "100") {
// level complete, level up code
}

Chapter 4
[ 131 ]
Displaying current level and completeness progress
We have a sentence below the canvas game describing the current level status and progress.
It is used for displaying the game status to the players so they know that they are making
progress in the game:
<p>Puzzle <span id="level">0</span>, Completeness:
<span id="progress">0</span>%</p>
We use the jQuery HTML funcon that we discussed in Chapter 2, Geng Started with DOM-
based Game development, to update the completeness progress:
$("#progress").html(progressPercentage);
Have a go hero
We have only dened three levels in the example untangle puzzle game. It is not fun
enough to play with three levels. How about adding more levels to the game? If you
cannot come up a level, try searching similar untangle games on the Internet and get
some inspiraon on the leveling.
Summary
We learned a lot in this chapter about drawing shapes and creang interacon with the new
HTML5 canvas element and the drawing API.
Specically, we covered:
Drawing dierent paths and shapes in canvas, including circles, arcs, and lines.
Adding mouse events and interacon with the drawn paths in the canvas.
Dragging drawn paths in the canvas.
Checking line intersecon with the help of mathemacs formulas.
Creang an untangle puzzle game in which players need to drag the circles so the
connecng lines are not intersected by each other.
Now that we've learned about basic drawing funcons in the canvas and drawing API,
use them to create a puzzle solving game in canvas. We're ready to learn some advanced
drawing techniques in canvas. In the next chapter, we will enhance our untangle puzzle
game with more canvas drawing APIs, such as drawing text, drawing images, and
drawing gradients.
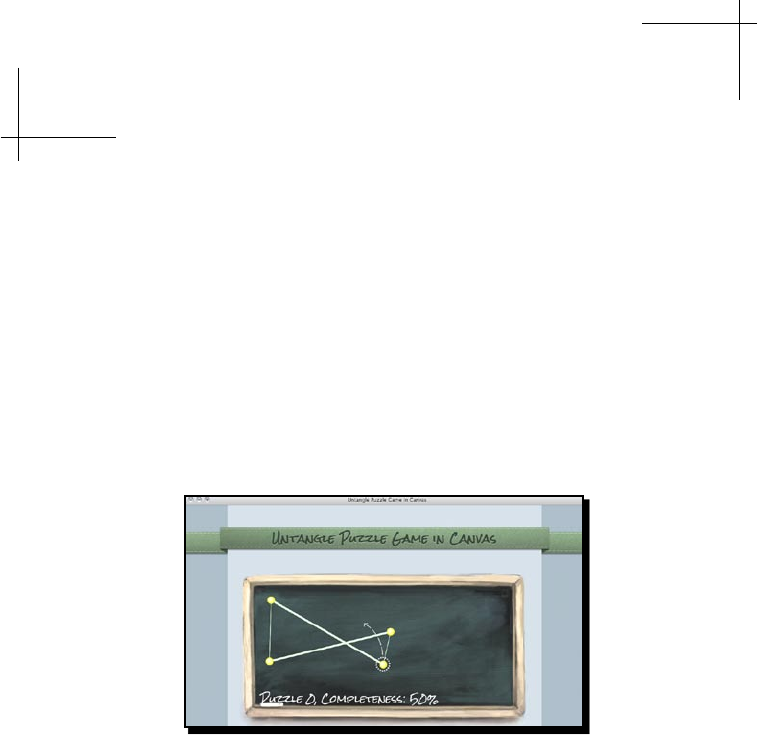
5
Building a Canvas Games
Masterclass
In the previous chapter, we explored some basic canvas context drawing APIs
and created a game named Untangle. In this chapter, we are going to enhance
the game by using some other context drawing APIs.
In this chapter we shall:
Fill our game objects with gradient color
Fill text in the canvas with custom webfont
Draw images in Canvas
Animate a sprite sheet image
And build mulple canvas layers
The following screenshot is a preview to the nal result that we are going to build through
this chapter. It is a canvas-based Untangle game with an animated game guideline and
several subtle details:
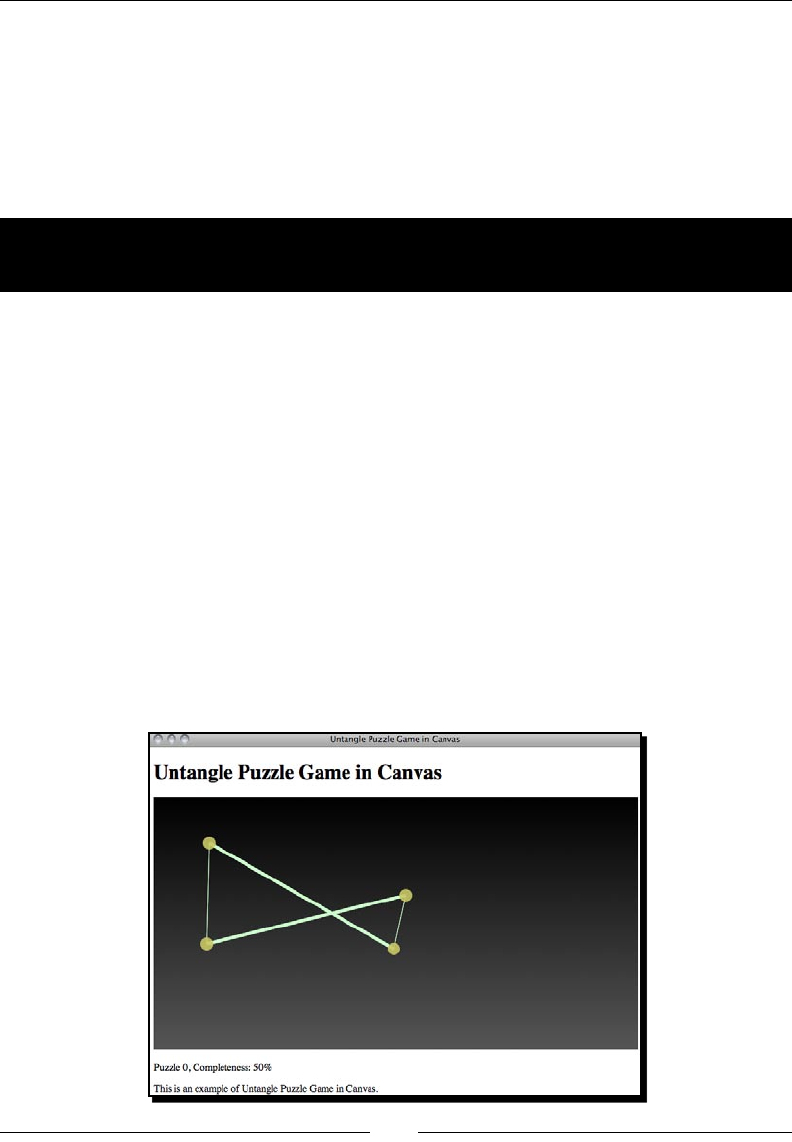
Building a Canvas Games Masterclass
[ 134 ][ 134 ]
So let's get on with it...
Filling shapes with gradient color
We covered lling solid color in the last chapter. Canvas can do far more when lling shapes.
We can ll the shape with both linear and radial gradient.
Time for action – Drawing a gradient color background
to the Untangle game
Let's improve the black solid background we have now. How about drawing a gradient from
top to boom?
1. We will use the Untangle game we created in the last chapter as a starng point.
Open the html5games.untangle.js JavaScript le in the text editor.
2. Add the following code in the gameloop funcon aer clearing the canvas to draw
the gradient background:
var bg_gradient = ctx.createLinearGradient(0,0,0,ctx.canvas.
height);
bg_gradient.addColorStop(0, "#000000");
bg_gradient.addColorStop(1, "#555555");
ctx.fillStyle = bg_gradient;
ctx.fillRect(0,0,ctx.canvas.width,ctx.canvas.height);
3. Save the les and preview the index.html in the browser. The background should
be a linear gradient with black on top which gradually becomes grey at the boom.

Chapter 5
[ 135 ][ 135 ]
What just happened?
We just lled a rectangle with a linear gradient color. To ll linear gradient color, all we need
to do is set the starng point and ending point of the gradient. Then we add several color
stops between them.
Here is how we use the linear gradient funcon:
createLinearGradient(x1, y1, x2, y2);
Argument Denion
x1 The starng point of the gradient.
y1
x2 The ending point of the gradient.
y2
Adding color stops in the gradient color
It is not enough to just have the starng and ending point. We also need to dene what color
we use and how it is applied to the gradient. It is called a color stop in gradient. We can add
a color stop to the gradient by using the following gradient funcon:
addColorStop(position, color);
Argument Denion Discussion
posion A oang number between 0
and 1.
Posion 0 means the color
stops at the starng point and
1 means it stops at the ending
point. Any number between
0 and 1 means it stops in
between the starng and
ending point.
For example, 0.5 means a half
and 0.33 means 30 percent
away from the starng point.
color The color style of that color
stop.
The color style shares the
same syntax from the CSS
color styling. We may use
the HEX expression, such
as #FFDDAA. Or other color
styles such as RGBA color
name.
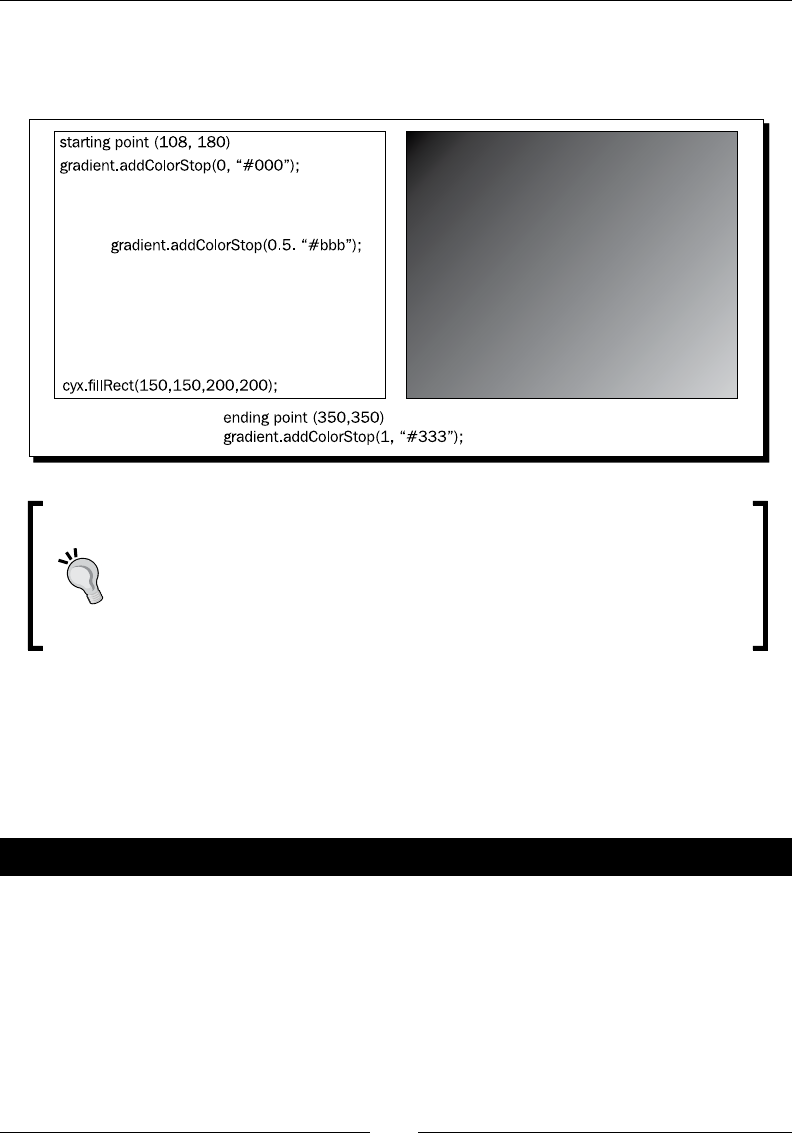
Building a Canvas Games Masterclass
[ 136 ][ 136 ]
The follow screenshot shows a side-by-side comparison between a linear gradient seng
and the result drawing. The starng point and ending point denes the scope and the angle
of the gradient. The color stops dene how the color mixes between the gradient scopes:
Adding color stop with opacity
We can set an opacity value to the color stop by using the RGBA funcon.
The following code tells the gradient to start by using red color with half
opacity:
gradient.addColorStop(0, "rgba(255, 0, 0, 0.5)");
Filling radial gradient color
There are two types of gradients in the Canvas drawing API. The one we just used is called
linear gradient. The other one is radial gradient. The radial gradient lls the gradient from
one circle to another circle.
Time for action – Filling the circles with radial gradient color
Imagine that we now ll our dragging circles to radial gradient. We will change the solid
yellow circles to white-yellow gradient:
1. Open the html5game.untangle.js JavaScript le. We are going to modify the
code we used to draw the circle in the game.
2. Aer we draw the circle path with the arc funcon and before we ll it we replace
the original solid color style seng to the following radial gradient color:

Chapter 5
[ 137 ][ 137 ]
function drawCircle(ctx, x, y) {
// prepare the radial gradients fill style
var circle_gradient = ctx.createRadialGradient(x-3,y-
3,1,x,y,untangleGame.circleRadius);
circle_gradient.addColorStop(0, "#fff");
circle_gradient.addColorStop(1, "#cc0");
ctx.fillStyle = circle_gradient;
// draw the path
ctx.beginPath();
ctx.arc(x, y, untangleGame.circleRadius, 0, Math.PI*2, true);
ctx.closePath();
// actually fill the circle path
ctx.fill();
}
3. Save the modied le and preview the index.html in a web browser. The circles
are now lled with radial gradient color.
In the following screenshot I've scaled up the drawing to 200 percent to beer demonstrate
the radial gradient in the circle:
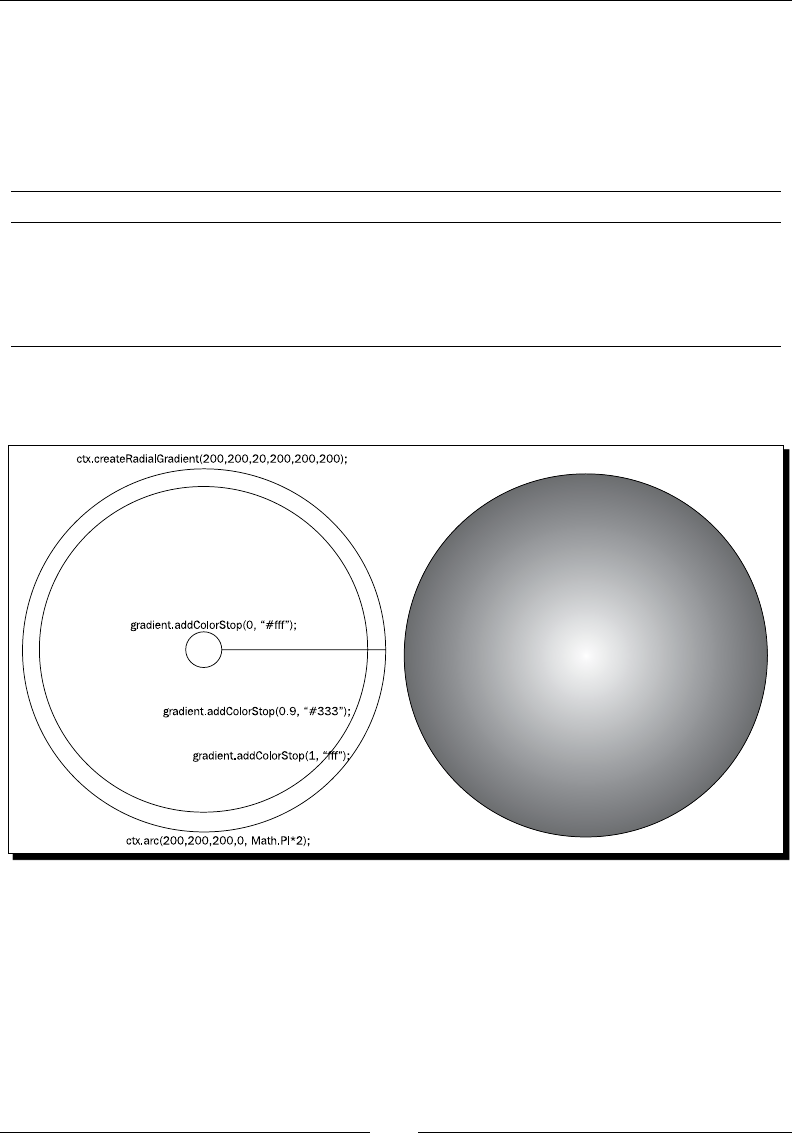
Building a Canvas Games Masterclass
[ 138 ][ 138 ]
What just happened?
We just made the dragging circles look more realisc by lling a radial gradient.
Here is how we create a radial gradient:
createRadialGradient(x1, y1, r1, x2, y2, r2);
Argument Denion
x1, y1 The center of the starng circle in x and y in the canvas coordinate.
r1 The radius of the starng circle.
x2, y2 The center of the ending circle in x and y in the canvas coordinate.
r2 The radius of the ending circle.
The following screenshot shows a side-by-side comparison between a radial gradient seng
and the nal result drawing in canvas:
The radial gradient blends the color from the starng circle to the ending circle. In this
gradient circle, the starng circle is a small circle in the center and the ending circle is the
outermost circle. There are three color stops. A white color stops at both the starng and
ending circle; another dark color stops 90 percent away from the starng circle.
Chapter 5
[ 139 ][ 139 ]
Have a go hero – Filling gradients
We add color stops to the gradients to dene how the colors blend. What happens if we
forget to add any color stops to the gradient and ll a rectangle? What if we only dene one
color stop? Try experimenng with the color stop sengs.
In the radial gradient example, the small starng circle is inside the bigger ending circle.
What happens if the starng circle is bigger than the ending one? How about if the starng
circle is not inside the ending circle? That is, what happens if the two circles do not overlap?
Drawing text in canvas
Imagine now we want to show the progress level directly inside the canvas. Canvas provides
us with methods to draw text inside canvas.
Time for action – Displaying the progress level text
inside the canvas element
1. We will connue using our Untangle game. Open the html5games.untangle.js
JavaScript le in text editor.
2. First, let's make the level progress percentage a global variable so we can use it in
dierent places:
var untangleGame = {
circles: [],
thinLineThickness: 1,
boldLineThickness: 5,
lines: [],
currentLevel: 0,
progressPercentage: 0
};
3. Add the following code aer the canvas drawing code in the gameloop funcon:
// draw the title text
ctx.font = "26px Arial";
ctx.textAlign = "center";
ctx.fillStyle = "#ffffff";
ctx.fillText("Untangle Game",ctx.canvas.width/2,50);
// draw the level progress text
ctx.textAlign = "left";
ctx.textBaseline = "bottom";
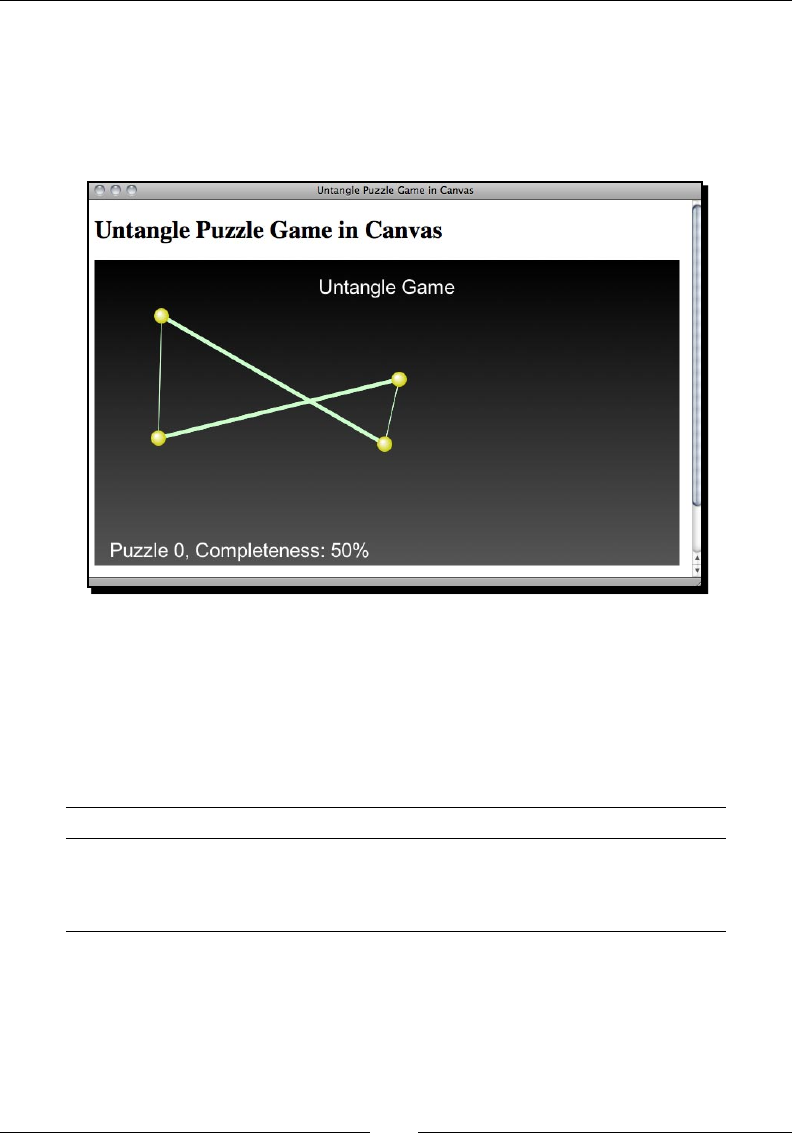
Building a Canvas Games Masterclass
[ 140 ][ 140 ]
ctx.fillText("Puzzle "+untangleGame.currentLevel+", Completeness:
" + untangleGame.progressPercentage + "%", 20,ctx.canvas.height-
5);
4. Save the le and preview the index.html in a web browser. We will see that the
text is now drawn inside the canvas.
What just happened?
We have just drawn the tle and the level progress text in our canvas-based game.
We draw text in canvas by using the llText funcon. The following table shows how
we use the funcon:
fillText(string, x, y);
Argument Denion
string The text that we are going to draw.
xThe x coordinate that the text draws.
yThe y coordinate that the text draws.
This is the basic seng to draw a text. There are several more drawing context properes to
set up the text drawing.
Chapter 5
[ 141 ][ 141 ]
Context properes Denion Discussion
context.font The font style of the
text.
It shares the same syntax we used to
declare font style in CSS. For example, the
following code sets the font style to 20
pixels bold with Arial typeface:
ctx.font = "bold 20px
Arial";
context.textAlign The text alignment. The alignment denes how the text aligns.
It can be one of the following values:
start
end
le
right
center
For instance, if we are going to place
a text on the right edge of the canvas.
Using left alignment means we need to
calculate text width in order to know the x
coordinate of the text.
When using right alignment in this case, all
we need to do is set the x posion directly
to the canvas width. The text will then
automacally be placed on the right edge
of the canvas.
context.textBaseline The text baseline. The following lists the common value of a
textBaseline:
top
middle
boom
alphabet
Similar to the text alignment, the bottom
baseline is useful when we want to place
our text at the boom of the canvas. The
y posion of the fillText funcon is
based on the boom baseline of the text
instead of the top.
The alphabet baseline aligns the y
posion based on the lower case alphabet.
The following screenshot shows our text
drawing with alphabet baseline.
Building a Canvas Games Masterclass
[ 142 ][ 142 ]
Please beware that the text drawing in canvas is treated as bitmap image
data. That means visitors cannot select the text; search engines cannot index
the text; we cannot search them. For this reason, we should think carefully
whether we want to draw the text inside a canvas or just place them directly in
the DOM.
Pop quiz – Drawing text in canvas
1. If we are going to draw a text close to the boom rightcorner of the canvas which
alignment and baseline seng is beer?
a. Le alignment, boom baseline.
b. Center alignment, alphabet baseline.
c. Right alignment, boom baseline.
d. Center alignment, middle baseline.
2. We are going to make a realisc book with a ipping eect with the latest open web
standard. Which of the following sengs is beer?
a. Draw the realisc book in canvas, including all the text and the ipping eect.
b. Put all text and content in DOM and draw the realisc page-ipping eect
in canvas.
Using embedded web font inside canvas
We used custom font in our memory matching game in the previous chapter. The custom
font embedding also worked in the canvas. Let's conduct an experiment on drawing a custom
font in our Untangle game in canvas.
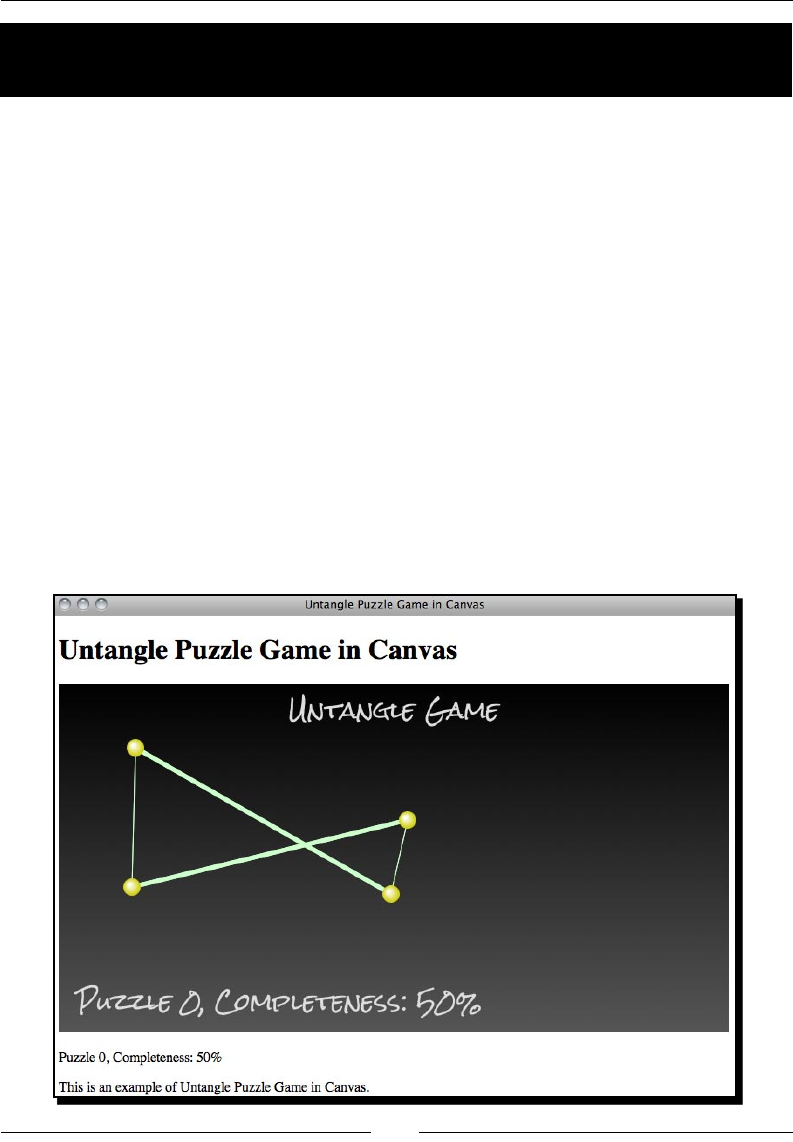
Chapter 5
[ 143 ][ 143 ]
Time for action – Embedding Google Web Font into the
canvas element
Let's draw the canvas texts with a handwring style font:
1. First, go to the Google Font Directory and choose a handwring style font. I used the
font Rock Salt and you can get it from the following URL:
http://code.google.com/webfonts/family?family=Rock+Salt&subset=
latin#code.
2. The Google font directory provides a CSS link code that we can add to our game in
order to embed the font. Add the following CSS link to the head of index.html:
<link href='http://fonts.googleapis.com/css?family=Rock+Salt'
rel='stylesheet' type='text/css'>
3. The next thing is to use the font. We open the html5games.untangle.js
JavaScript le and modify the context font property to the following:
ctx.font = "26px 'Rock Salt'";
4. It is me to open our game in the web browser to test the result. The text drawn in
the canvas now is using the font we choose in the Google font directory.
Building a Canvas Games Masterclass
[ 144 ][ 144 ]
What just happened?
We just chose a web font and embedded it into the canvas when drawing text. It shows that
we can style the font family of the lled text in canvas just like other DOM elements.
Somemes the width of the text varies in dierent font families although
they have the same word count. In this case, we can use the measureText
funcon to get the width of the text we draw. The following link to the Mozilla
Developer Network explains how we can use the funcon:
https://developer.mozilla.org/en/Drawing_text_using_
a_canvas#measureText()
Drawing images in canvas
We have drawn some text inside canvas. What about drawing an image? Yes. Drawing
images and image manipulaon is one big feature that canvas has.
Time for action – Adding graphics to the game
We are going to draw a blackboard background to the game:
1. Download the graphic les from the code example bundle or the following URL.
The graphics les include all graphics that we need in this chapter:
http://gamedesign.cc/html5games/1260_05_example_graphics.zip
2. Put the newly downloaded graphics les into a folder named images.
3. We will load an image and loading means it may take a while unl the image is
loaded. Ideally, we should not start the game unl all game assets are loaded. In this
case, we can prepare a splash screen with loading words to let the player know the
game is going to start later. Add the following code in the jQuery ready funcon
aer clearing the canvas context:
// draw a splash screen when loading the game background
// draw gradients background
var bg_gradient = ctx.createLinearGradient(0,0,0,ctx.canvas.
height);
bg_gradient.addColorStop(0, "#cccccc");
bg_gradient.addColorStop(1, "#efefef");
ctx.fillStyle = bg_gradient;
ctx.fillRect(0, 0, ctx.canvas.width, ctx.canvas.height);

Chapter 5
[ 145 ][ 145 ]
// draw the loading text
ctx.font = "34px 'Rock Salt'";
ctx.textAlign = "center";
ctx.fillStyle = "#333333";
ctx.fillText("loading...",ctx.canvas.width/2,canvas.height/2);
4. Then it is me to really load the image. There is a board.png in the graphics
le we just downloaded. It is a blackboard graphics we will draw to the canvas
as background. Add the following code aer the code we just added in the
previous step:
// load the background image
untangleGame.background = new Image();
untangleGame.background.onload = function() {
// setup an interval to loop the game loop
setInterval(gameloop, 30);
}
untangleGame.background.onerror = function() {
console.log("Error loading the image.");
}
untangleGame.background.src = "images/board.png";
5. In the gameloop funcon, we draw the image into the canvas aer clearing the
context and before drawing anything else. Since the image loading takes me, we
also need to ensure it is loaded before drawing it:
// draw the image background
ctx.drawImage(untangleGame.background, 0, 0);
6. We had set up a levels array to store the level data including the inial circles
posion. Some circles are now overlapped with the border of the background image
so we may want to alter the circles posion. Update the circles array of level 2 with
the following new values:
"circles" : [{"x" : 192, "y" : 155},
{"x" : 353, "y" : 109},
{"x" : 493, "y" : 156},
{"x" : 490, "y" : 236},
{"x" : 348, "y" : 276},
{"x" : 195, "y" : 228}],
7. Also we need to adjust the posion of the level progress text. Modify the fill
text funcon calling as the following code with a dierent posion value:
ctx.fillText("Puzzle "+untangleGame.currentLevel+", Completeness:
" + untangleGame.progressPercentage + "%", 60, ctx.canvas.height-
80);
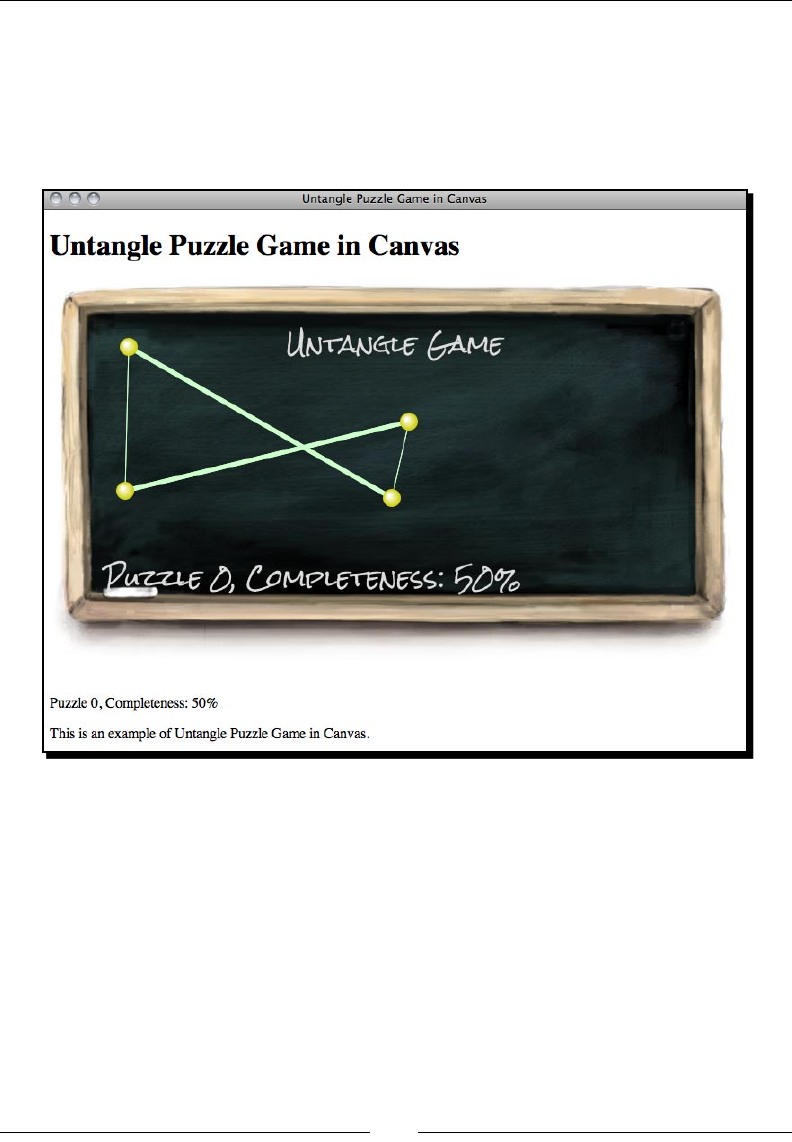
Building a Canvas Games Masterclass
[ 146 ][ 146 ]
8. Next, we do not want a background color set to the canvas now because we have
a PNG background with a transparent border. Open the untangle.css le and
remove the background property in canvas.
9. Now save all les and open the index.html in the web browser. The background
should be there and the handwrien fonts should match our blackboard theme.
What just happened?
We just drew an image inside the canvas element.
There are two common ways to draw an image on canvas. We can either reference an
exisng img tag or load the image on the y in JavaScript.
Here is how we reference the exisng image tag in canvas.
Assuming that we have the following img tag in HTML:
<img id="board" src="img/board.png">
Chapter 5
[ 147 ][ 147 ]
We can draw the image in canvas by using the following JavaScript code:
var img = document.getElementById('board');
context.drawImage(img, x, y);
Here is another code snippet to load the image without aaching the img tag into DOM.
If we load the image inside JavaScript, we need to make sure the image is loaded before
drawing it on canvas. Therefore, we draw the image aer the onload event of the image:
var board = new Image();
board.onload = function() {
context.drawImage(board, x, y);
}
board.src = "images/board.png";
The order meters when seng the onload event handler and assigning
the image src
When we assign the src property to the image and if the image is cached
by the browser, some browsers re the onload event immediately. If we
place the onload event handler aer assigning the src property, we may
miss it because it is red before we set the event handler.
In our example, we used the laer approach. We create an Image object and load the
background. When the image is loaded, we start the game loop and thus start the game.
Another event that we should handle when loading the image is the onerror event. It is
especially useful when we are accessing extra network data. We have the following code
snippet to check the error in our example:
untangleGame.background.onerror = function() {
console.log("Error loading the image.");
}
Have a go hero
The error loading now only displays a message in the console. The console is normally not
viewed by players. How about designing an alert dialog or some other approaches to tell
players that the game failed to load the game assets?
Using the drawImage function
There are three behaviors to draw an image in the canvas. We can draw the image without
any modicaon on a given coordinate, we can also draw the image with a scaling factor on
a given coordinate, or we can even crop the image and draw only the clipping region.

Building a Canvas Games Masterclass
[ 148 ][ 148 ]
The drawImage funcon accepts several arguments:
drawImage(image, x, y);
Argument Denion Discussion
image The image reference that we
are going to draw.
We either get the image reference by geng
an exisng img element or creang a
JavaScript Image object.
xThe x posion to place the
image in canvas coordinate.
The x and y coordinate is where we place the
image with respect to its top-le corner.
yThe y posion to place the
image in canvas coordinate.
drawImage(image, x, y, width, height);
Argument Denion Discussion
image The image reference that we
are going to draw.
We either get the image reference by
geng an exisng img element or creang
a JavaScript Image object.
xThe x posion to place the
image in canvas coordinate.
The x and y coordinate is where we place
the image with respect to its top-le corner.
yThe y posion to place the
image in canvas coordinate.
width The width of the nal drawn
image.
We are applying scale to the image if the
width and height is not the same as the
original image.
height The height of the nal drawn
image.
drawImage(image, sx, sy, sWidth, sHeight, dx, dy, width, height);
Argument Denion Discussion
image The image reference that we
are going to draw.
We either get the image reference by geng
an exisng img element or creang a
JavaScript Image object.
sx The x coordinate of the top-le
corner of the clipping region.
The clipping x, y, width, height together
denes a rectangular clipping area. The
given image is clipped by this rectangle.
sy The y coordinate of the top-le
corner of the clipping region.
sWidth The width of the clipping region.
sHeight The height of the clipping
region.
Chapter 5
[ 149 ][ 149 ]
Argument Denion Discussion
dx The x posion to place the
image in canvas coordinate.
The x and y coordinate is where we place
the image with respect to its top-le corner.
dy The y posion to place the
image in canvas coordinate.
width The width of the nal drawn
image.
We are applying scale to the clipped image if
the width and height is not the same as the
clipping dimension.
height The height of the nal drawn
image.
Have a go hero – Optimizing the background image
In the example, we draw the blackboard image as background in every call of the gameloop
funcon. Since our background is stac and does not change along the me, clearing it
and redrawing it again and again is wasng CPU resources. How can we opmize this
performance issue?
Decorating the canvas-based game
We have enhanced the canvas game with gradients and images. Before moving forward, let's
decorate the web page of our canvas game.
Time for action – Adding CSS styles and images
decoration to the game
We are going to build a center-aligned layout with a game tle:
1. We embed another font from the Google font directory to style the normal body
text. Add the following CSS link within the head in index.html:
<link href='http://fonts.googleapis.com/css?family=Josefin+Sans:60
0' rel='stylesheet' type='text/css'>
2. It is easier for us to style the layout with one grouping DOM element. We put all the
elements inside the body into a secon with id page:
<section id="page">
...
</section>
3. Let's apply CSS to the page layout. Replace exisng content in the untangle.css
le with the following code:
html, body {

Building a Canvas Games Masterclass
[ 150 ][ 150 ]
background: url(../images/title_bg.png) 50% 0 no-repeat, url(../
images/bg_repeat.png) 50% 0 repeat-y #889ba7;
margin: 0;
font-family: 'Josefin Sans', arial, serif;
color: #111;
}
#game{
position:relative;
}
#page {
width: 821px;
min-height: 800px;
margin: 0 auto;
padding: 0;
text-align: center;
text-shadow: 0 1px 5px rgba(60,60,60,.6);
}
header {
height: 88px;
padding-top: 36px;
margin-bottom: 50px;
font-family: "Rock Salt", Arial, sans-serif;
font-size: 14px;
text-shadow: 0 1px 0 rgba(200,200,200,.5);
color: #121;
}
4. Now we have the header text in the ribbon. Showing the tle again in canvas seems
redundant. Let's remove the following line of code which draws the tle:
ctx.fillText("Untangle Game",ctx.canvas.width/2,50);
5. It is me to save all the les and preview it in the web browser. We should see a
tle ribbon and a well-styled layout that is center-aligned. The following screenshot
shows the result:
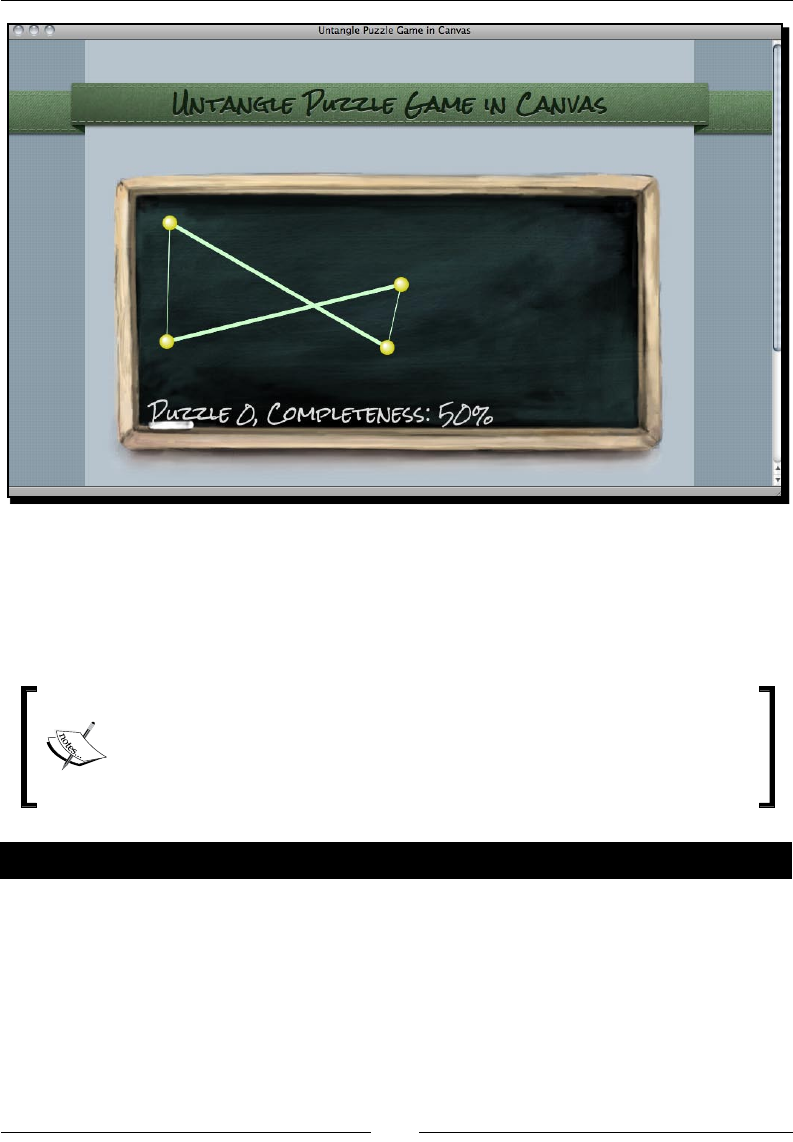
Chapter 5
[ 151 ][ 151 ]
What just happened?
We just decorated the web page that contains our canvas-based game. Although our game
is based on canvas drawing, it does not restrict us from decorang the whole web page with
graphics and CSS styles.
Default background of the canvas element
The default background of the canvas element is transparent. If we do not set
any background CSS style of the canvas, it will be transparent. It is useful when
our drawing is not a rectangle. In this example, the textured layout background
shows within the canvas region.
Pop quiz – Styling a canvas background
1. How can we set the canvas background to be transparent?
a. Set the background color to #.
b. Do nothing. It is transparent by default.
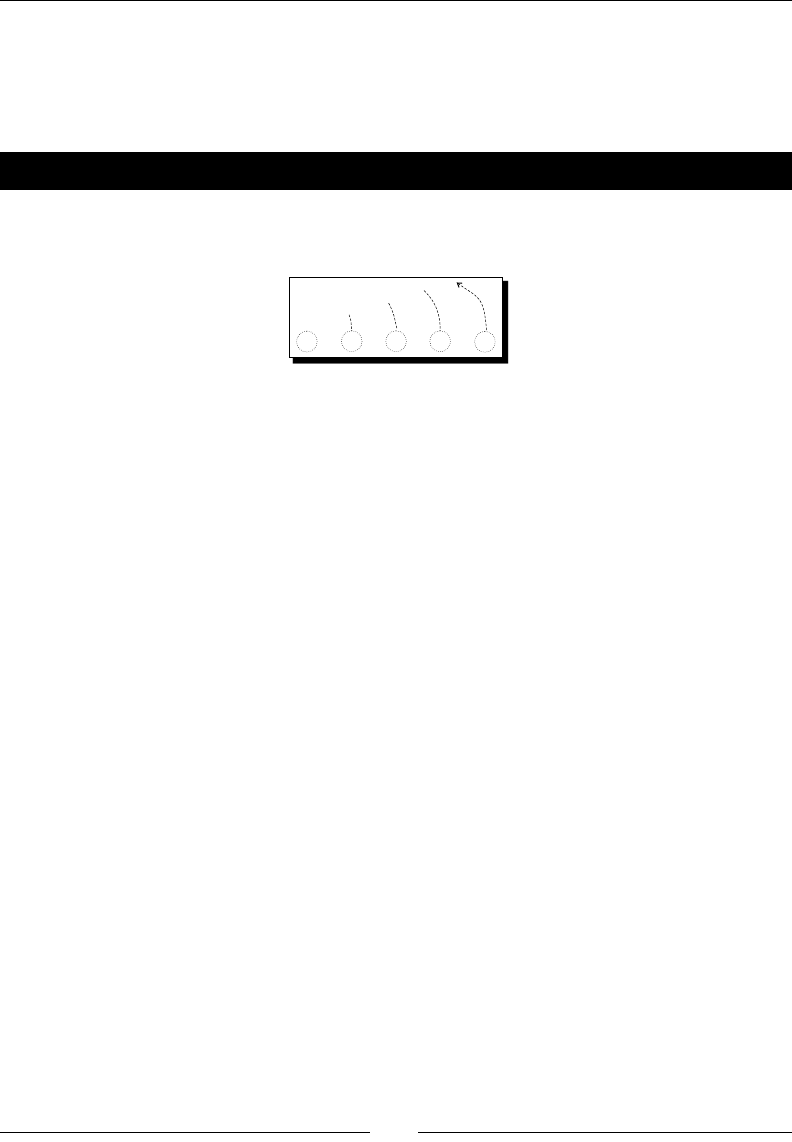
Building a Canvas Games Masterclass
[ 152 ][ 152 ]
Animating a sprite sheet in canvas
We rst used sprite sheet images in Chapter 3, Building a Memory Matching Game in CSS3,
when displaying a deck of playing cards.
Time for action – Making a game guide animation
There is a graphics le named guide_sprite.png in the images folder. It is a game
guideline graphic that contains each step of the animaon.
Let's draw this guide into our game with animaons:
1. Open the html5games.untangle.js JavaScript le in the text editor.
2. In the jQuery ready funcon add the following code:
// load the guide sprite image
untangleGame.guide = new Image();
untangleGame.guide.onload = function() {
untangleGame.guideReady = true;
// setup timer to switch the display frame of the guide sprite
untangleGame.guideFrame = 0;
setInterval(guideNextFrame, 500);
}
untangleGame.guide.src = "images/guide_sprite.png";
3. We add the following funcon to move the current frame to the next frame every
500 meters:
function guideNextFrame()
{
untangleGame.guideFrame++;
// there are only 6 frames (0-5) in the guide animation.
// we loop back the frame number to frame 0 after frame 5.
if (untangleGame.guideFrame > 5)
{
untangleGame.guideFrame = 0;
}
}
4. In the gameloop funcon, we draw the guide animaon according to the
current frame.
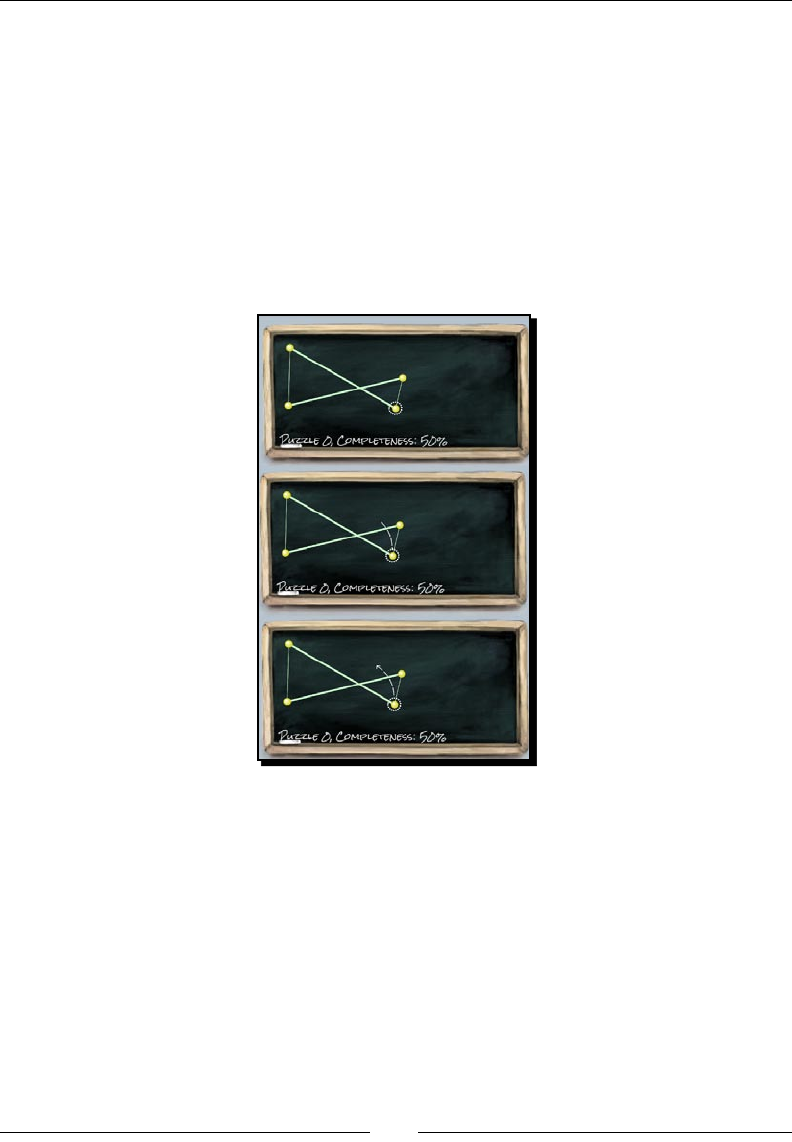
Chapter 5
[ 153 ][ 153 ]
// draw the guide animation
if (untangleGame.currentLevel == 0 && untangleGame.guideReady)
{
// the dimension of each frame is 80x130.
var nextFrameX = untangleGame.guideFrame * 80;
ctx.drawImage(untangleGame.guide, nextFrameX, 0, 80, 130, 325,
130, 80, 130);
}
5. Let's watch the animaon in the web browser by opening the index.html. The
following screenshot demonstrates the animaon of the game guideline. The
guideline animaon will play and loop unl the player levels up:
What just happened?
We can draw only a region of an image when using the drawImage context funcon.
The following screenshot demonstrates the process of the animaon step by step. The
rectangle is the clipping region. We used a variable named guideFrame to control which
frame to show. The width of each frame is 80. Therefore, we get the x posion of the clipping
region by mulplying the width and the current frame number:
var nextFrameX = untangleGame.guideFrame * 80;
ctx.drawImage(untangleGame.guide, nextFrameX, 0, 80, 130, 325, 130,
80, 130);
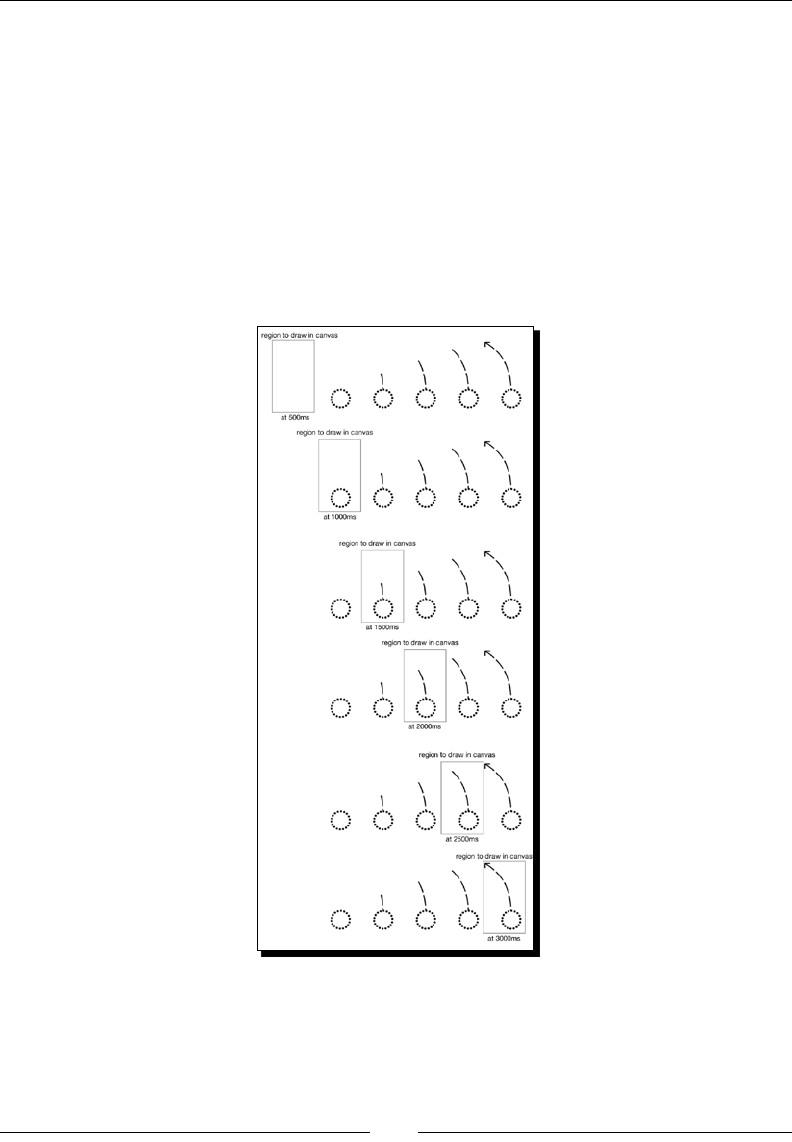
Building a Canvas Games Masterclass
[ 154 ][ 154 ]
The guideFrame variable is updated every 500 meters by the following guideNextFrame
funcon:
function guideNextFrame()
{
untangleGame.guideFrame++;
// there are only 6 frames (0-5) in the guide animation.
// we loop back the frame number to frame 0 after frame 5.
if (untangleGame.guideFrame > 5)
{
untangleGame.guideFrame = 0;
}
}
Animang a sprite is a commonly used technique when developing games. There are some
benets of using sprite animaon when developing games in tradional video games. The
reasons may not apply to the web game development but we have other benets of using
sprite sheet animaon:
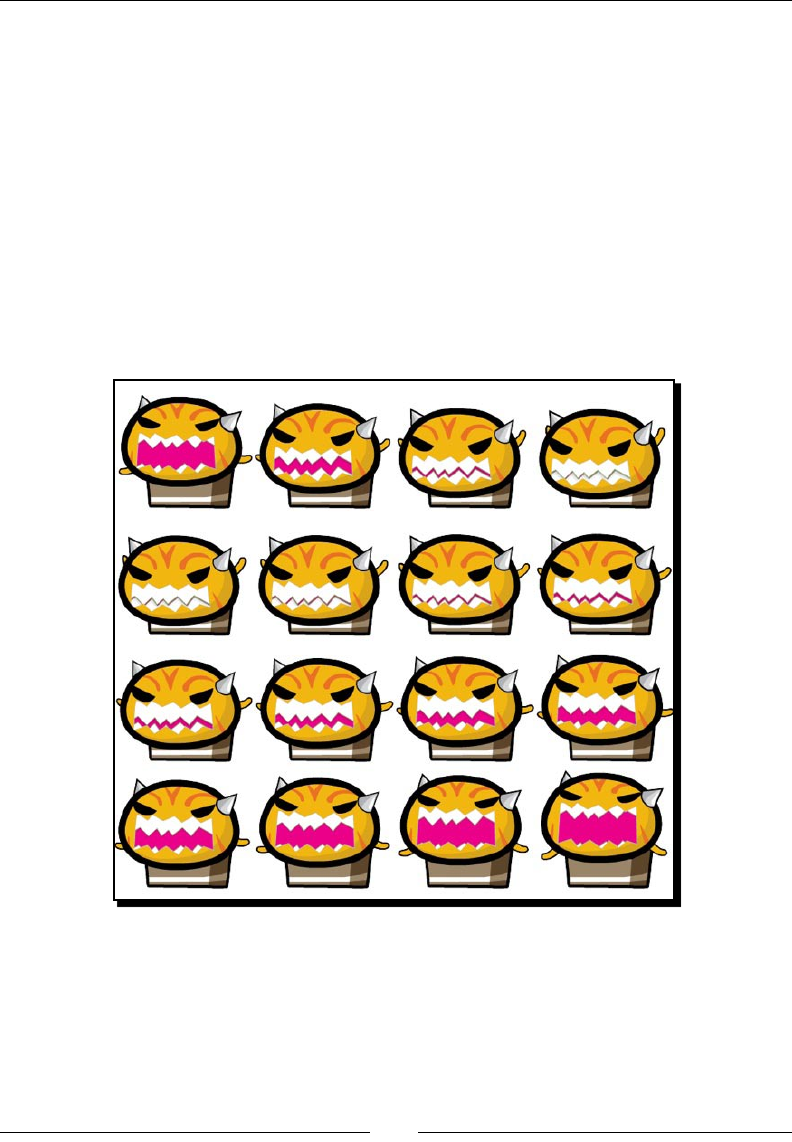
Chapter 5
[ 155 ][ 155 ]
All frames are loaded as one le so the whole animaon is ready once the sprite le
is loaded.
Pung all frames into one le means we can reduce the HTTP request from the
web browser to the server. If each frame is a le, the browser requests the le many
mes while now it just requests one le and uses one HTTP request.
Pung dierent images into one le also helps reduce the duplicate le's header,
footer, and meta data.
Pung all frames into one image means we can easily clip the image to display any
frame without the complex code to change the image source.
It is usually used in character animaon. The following screenshot is a sprite animaon of
an angry cat that I used in an HTML5 game named Neighbours (http://gamedesign.cc/
html5games/neighbours/):
We built the sprite sheet animaon by clipping the frame and seng up the mer ourselves
in this example. When working with a lot of animaons, we may want to use some third
party sprite animaon plugin or create our own canvas sprite animaon to beer reuse and
manage the logic code.
Building a Canvas Games Masterclass
[ 156 ][ 156 ]
Sprite animaon is an important topic in HTML5 games development and
there are many online resources discussing this topic. The following links are
some of them:
The sprite animaon tutorial (http://codeutopia.net/
blog/2009/08/21/using-canvas-to-do-bitmap-sprite-
animation-in-javascript/) from CodeUtopia discusses how we can
make a sprite object from scratch and use it to animate a sprite.
The sprite animaon demo (http://www.johnegraham2.com/web-
technology/html-5-canvas-tag-sprite-animation-demo/)
by John Graham provides another sprite object to animate a sprite in canvas.
The Spritely (http://www.spritely.net/), on the other hand, provides
sprite animaon over the DOM element with CSS. It is useful when we want to
animate a sprite without using canvas.
Creating a multi-layers canvas game
Now all things are drawn into the context and it has no other state to disnguish the drawn
items. We may split the canvas game into dierent layers and code the logic to control and
draw each layer at a me.
Time for action – Dividing the game into four layers
We are going to separate our Untangle game into four layers:
1. In index.htm, we changed the canvas HTML to the following code. It contains
several canvases within a secon:
<section id="layers">
<canvas id="bg" width="768" height="440">
Sorry, your web browser does not support canvas content.
</canvas>
<canvas id="guide" width="768" height="440"></canvas>
<canvas id="game" width="768" height="440"></canvas>
<canvas id="ui" width="768" height="440"></canvas>
</section>
2. We also need to apply some styles to the canvas so they overlap with each other to
create the mulple layers eect. Also we have to prepare a fadeout class and dim
class to make the target transparent. Add the following code into the untangle.
css le:
#layers {

Chapter 5
[ 157 ][ 157 ]
height: 440px;
position: relative;
margin: 0 auto;
width:768px;
height: 440px;
}
#layers canvas{
left: 50%;
margin-left: -384px;
position: absolute;
}
#guide {
opacity: .7;
}
#guide.fadeout {
opacity: 0;
-webkit-transition: opacity .5s linear;
transition: opacity .5s linear;
}
#ui {
-webkit-transition: opacity .3s linear;
transition: opacity .3s linear;
}
#ui.dim {
opacity: .3;
}
3. In the html5games.untangle.js JavaScript le, we modify the code to
support the layers feature. First, we add an array to store the context reference
of each canvas:
untangleGame.layers = new Array();
4. Then, we get the context reference and store them in the array:
// prepare layer 0 (bg)
var canvas_bg = document.getElementById("bg");
untangleGame.layers[0] = canvas_bg.getContext("2d");
// prepare layer 1 (guide)
var canvas_guide = document.getElementById("guide");
untangleGame.layers[1] = canvas_guide.getContext("2d");
// prepare layer 2 (game)
var canvas = document.getElementById("game");
var ctx = canvas.getContext("2d");

Building a Canvas Games Masterclass
[ 158 ][ 158 ]
untangleGame.layers[2] = ctx;
// prepare layer 3 (ui)
var canvas_ui = document.getElementById("ui");
untangleGame.layers[3] = canvas_ui.getContext("2d");
5. Since now the game canvas are overlapped together, the mouse event listener we
had in the game canvas does not re anymore. We can listen to the event from the
parent layers DIV which has the same posion and dimension of the canvas:
$("#layers").mousedown(function(e)
$("#layers").mousemove(function(e)
$("#layers").mouseup(function(e)
6. We are going to separate the drawing part into dierent funcons for dierent
layers. In the following drawLayerBG funcon, it is only in charge of drawing
the background:
function drawLayerBG()
{
var ctx = untangleGame.layers[0];
clear(ctx);
// draw the image background
ctx.drawImage(untangleGame.background, 0, 0);
}
7. We draw the background layer when the background image is loaded. Add the
following highlighted code into the onload event of the background:
untangleGame.background.onload = function() {
drawLayerBG();
// setup an interval to loop the game loop
setInterval(gameloop, 30);
}
8. We divide the game loop into three dierent funcons for the specied layer:
function gameloop() {
drawLayerGuide();
drawLayerGame();
drawLayerUI();
}

Chapter 5
[ 159 ][ 159 ]
9. We put the guideline animaon into a dedicated canvas now so we can easily apply
CSS style to fade out the guideline later:
function drawLayerGuide()
{
var ctx = untangleGame.layers[1];
clear(ctx);
// draw the guide animation
if (untangleGame.guideReady)
{
// the dimension of each frame is 80x130.
var nextFrameX = untangleGame.guideFrame * 80;
ctx.drawImage(untangleGame.guide, nextFrameX, 0, 80, 130, 325,
130, 80, 130);
}
// fade out the guideline after level 0
if (untangleGame.currentLevel == 1)
{
$("#guide").addClass('fadeout');
}
}
10. The following drawLayerGame keeps all the drawing code we used in the gameplay.
Most of the code is from the original gameloop funcon:
function drawLayerGame()
{
// get the reference of the canvas element and the drawing
context.
var ctx = untangleGame.layers[2];
// draw the game state visually
// clear the canvas before drawing.
clear(ctx);
// draw all remembered line
for(var i=0;i<untangleGame.lines.length;i++) {
var line = untangleGame.lines[i];
var startPoint = line.startPoint;
var endPoint = line.endPoint;
var thickness = line.thickness;
drawLine(ctx, startPoint.x, startPoint.y, endPoint.x,
endPoint.y, thickness);

Building a Canvas Games Masterclass
[ 160 ][ 160 ]
}
// draw all remembered circles
for(var i=0;i<untangleGame.circles.length;i++) {
var circle = untangleGame.circles[i];
drawCircle(ctx, circle.x, circle.y, circle.radius);
}
}
11. The level progress text is now placed in the UI layer and drawn by the drawLayerUI
funcon. It uses a dedicated layer so we can easily dim the opacity when the text is
overlapped with the game objects, such as circles:
function drawLayerUI()
{
var ctx = untangleGame.layers[3];
clear(ctx);
// draw the level progress text
ctx.font = "26px 'Rock Salt'";
ctx.fillStyle = "#dddddd";
ctx.textAlign = "left";
ctx.textBaseline = "bottom";
ctx.fillText("Puzzle "+untangleGame.currentLevel+",
Completeness: ", 60,ctx.canvas.height-80);
ctx.fillText(untangleGame.progressPercentage+"%",450,
ctx.canvas.height-80);
// get all circles, check if the ui overlap with the game
objects
var isOverlappedWithCircle = false;
for(var i in untangleGame.circles) {
var point = untangleGame.circles[i];
if (point.y > 310)
{
isOverlappedWithCircle = true;
}
}
if (isOverlappedWithCircle)
{
$("#ui").addClass('dim');
}
else
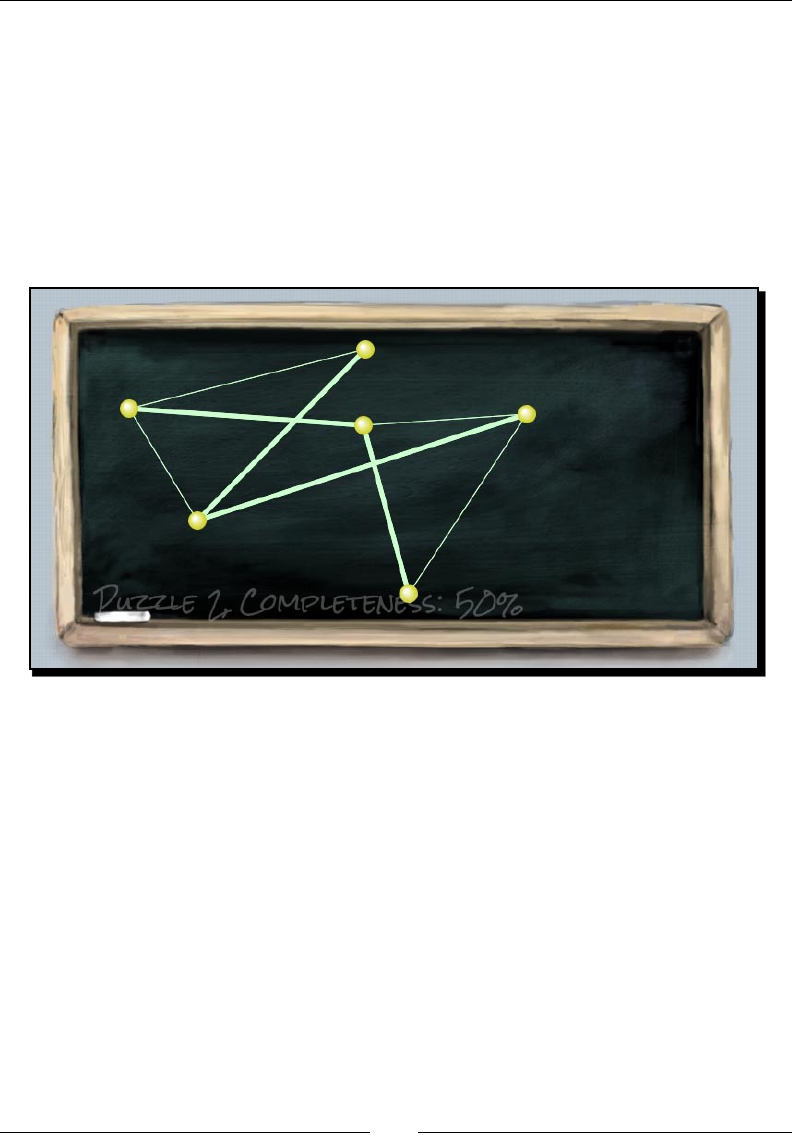
Chapter 5
[ 161 ][ 161 ]
{
$("#ui").removeClass('dim');
}
}
12. Save all the les and check our big code changes in the web browser. The game
should be displayed as if we haven't changed anything. Try dragging the circle down
close to the boom edge of the blackboard. The level progress text should dim to
a low opacity. When you nish the rst level, the guideline animaon will fade out
gracefully. The following screenshot shows the level progress in half opacity:
What just happened?
There are four canvases in total now. Each canvas is in charge of one layer. The layers are
divided into background, game guideline, game itself, and the user interface showing the
level progress.
By default, the canvases, like other elements, are placed one aer the other. In order
to overlap all canvases to construct the layer eect, we applied the absolute posion
to them.
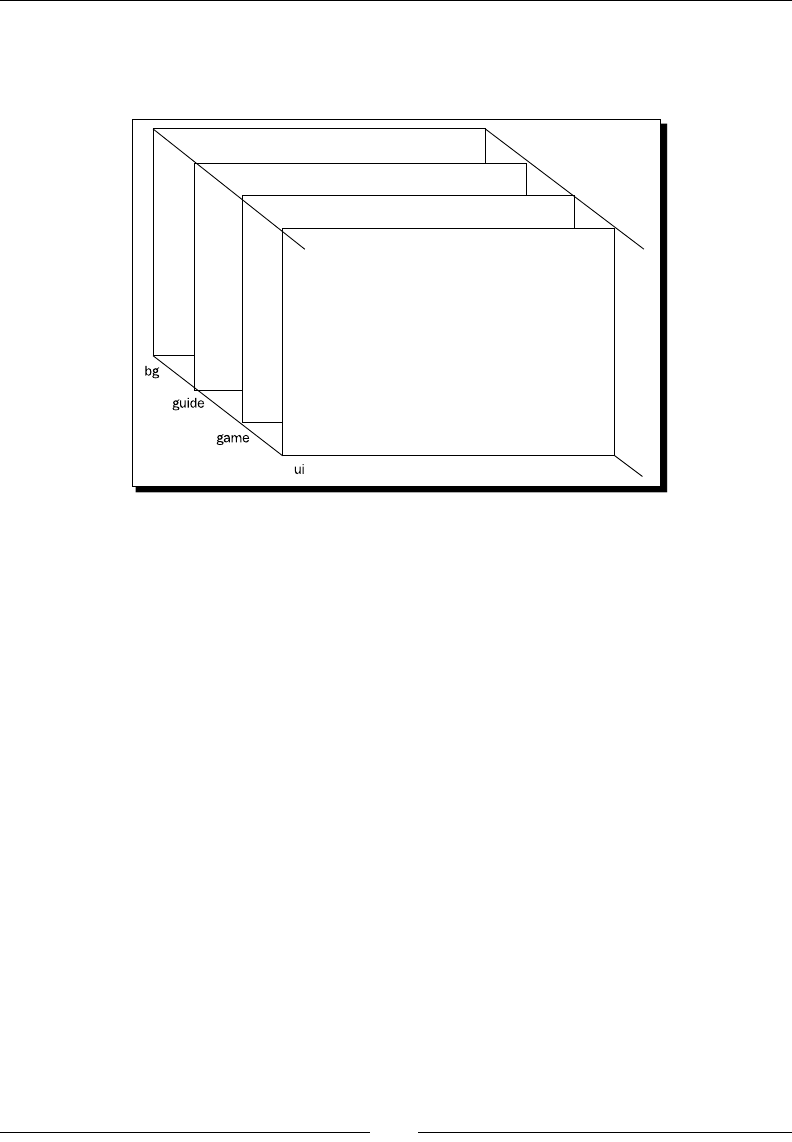
Building a Canvas Games Masterclass
[ 162 ][ 162 ]
The following screenshots show the four layers seng now in our game. By default, the
later added DOM is on top of the one added before. Therefore, bg canvas is at the boom
and ui is on the top:
Mixing CSS technique with Canvas drawing
We are creang a canvas-based game but we are not restricted to use only a canvas drawing
API. The level progress informaon is now in another canvas with ID ui. In this example,
we mixed the CSS technique we discussed in Chapter 3, Building a Memory Matching Game
in CSS3.
When we drag the circles around the canvas, they may overlap the level informaon. When
drawing the UI canvas layer, we check whether any circle's coordinate is too low and is
overlapping the text. We then fade the UI canvas CSS opacity so it does not distract the
player from the circles.
We also fade out the guideline animaon aer the player levels up. This is done by fading
out the whole guide canvas with CSS transion easing to 0 opacity. Since the guide canvas
is only in charge of that animaon, hiding that canvas does not aect other elements:
if (untangleGame.currentLevel == 1)
{
$("#guide").addClass('fadeout');
}
Chapter 5
[ 163 ][ 163 ]
Clearing only the changed region to boost canvas performance
We can use the clear funcon to only clear part of the canvas context. This
will give the performance some boost because it avoids redrawing the enre
canvas context every me. This is achieved by marking the 'dirty' region of the
context which has changed state since last drawn.
In the guide canvas layer in our example, we may consider clearing only the
region of the sprite sheet image drawing instead of the whole canvas.
We may not see signicant dierences in simple canvas examples but it helps
boost the performance when we have a complex canvas game that includes
many sprite images animaons and complex shape drawings.
Have a go hero
We fade out the guide when the players advance to level 2. How about we fade out the
guide animaon once the player drags any circles? How can we do that?
Summary
We learned a lot in this chapter about drawing gradients, text, and images in canvas.
Specically, we covered:
Filling shapes with either linear or radial gradient
Filling text in canvas with font-face embedding and other text styles
Drawing images into canvas
Animang a sprite sheet by the clipping funcon when drawing images
Dividing the game into several layers by stacking several canvas elements
Mixing the CSS transion animaon in a canvas-based game
One thing we haven't menoned in this book is the bitmap manipulaon in canvas. Canvas
context is a bitmap data where we can apply an operaon on each pixel. For instance, we
may draw an image in the canvas and apply Photoshop-like lters to the image. We will not
cover that in the book because image manipulaon is an advanced topic and the applicaon
may not relate to game development.

Building a Canvas Games Masterclass
[ 164 ][ 164 ]
There are some good canvas games examples on the Internet. The Canvas Demo
(http://www.canvasdemos.com/type/games/) links the latest canvas games from other
websites. The Game On 2010 gallery (https://gaming.mozillalabs.com/games/)
from Mozilla lists a bundle of game entries for their gaming development compeon. Some
of them are made in canvas.
Now that we've learned about building games in canvas and making animaon for game
objects, such as game character, we are ready to add audio components and sound eects
to our games in the next chapter.
We will get back to canvas-based games in Chapter 9, Building a Physics Car Game with
Box2D and Canvas.
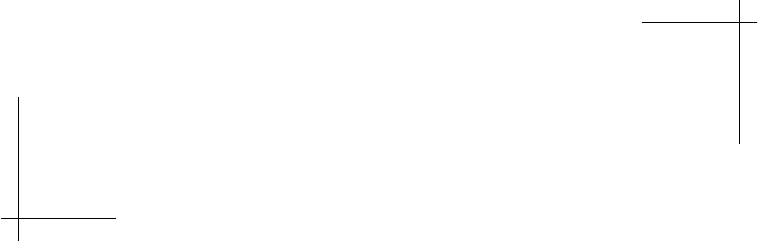
6
Adding Sound Effects to your Games
We have discussed several techniques of drawing game objects visually. In this
chapter, we will focus on using the audio tag that is introduced in the HTML5
specicaon. We can add sound eects, background music, and control the
audio through the JavaScript API. In addion, we will build a music game in this
chapter. It is a game that requires players to hit the correct string at the right
me to produce the music.
In this chapter, we will learn the following topics:
Adding a sound eect to the play buon
Building a mini piano musical game
Linking the music game and the play buon
Adding keyboard-driven to the game
Creang a keyboard-driven music game
Compleng the musical game with level data recording and the game over event
Adding Sound Eects to your Games
[ 166 ][ 166 ]
The following screenshot shows the nal result we will create through this chapter:
So, let's get on with it.
Adding a sound effect to the play button
We had several mouse interacons in the Untangle game examples in previous chapters.
Now imagine that we want to have sound eects with the mouse interacon. This requires
us to instruct the game about the audio le to be used. We will use the audio tag to create
a sound eect on a buon.
Time for action – Adding sound effects to the play button
We will start with the code example available in the code bundle. We will have the folder
structure similar to the one shown in the following screenshot:
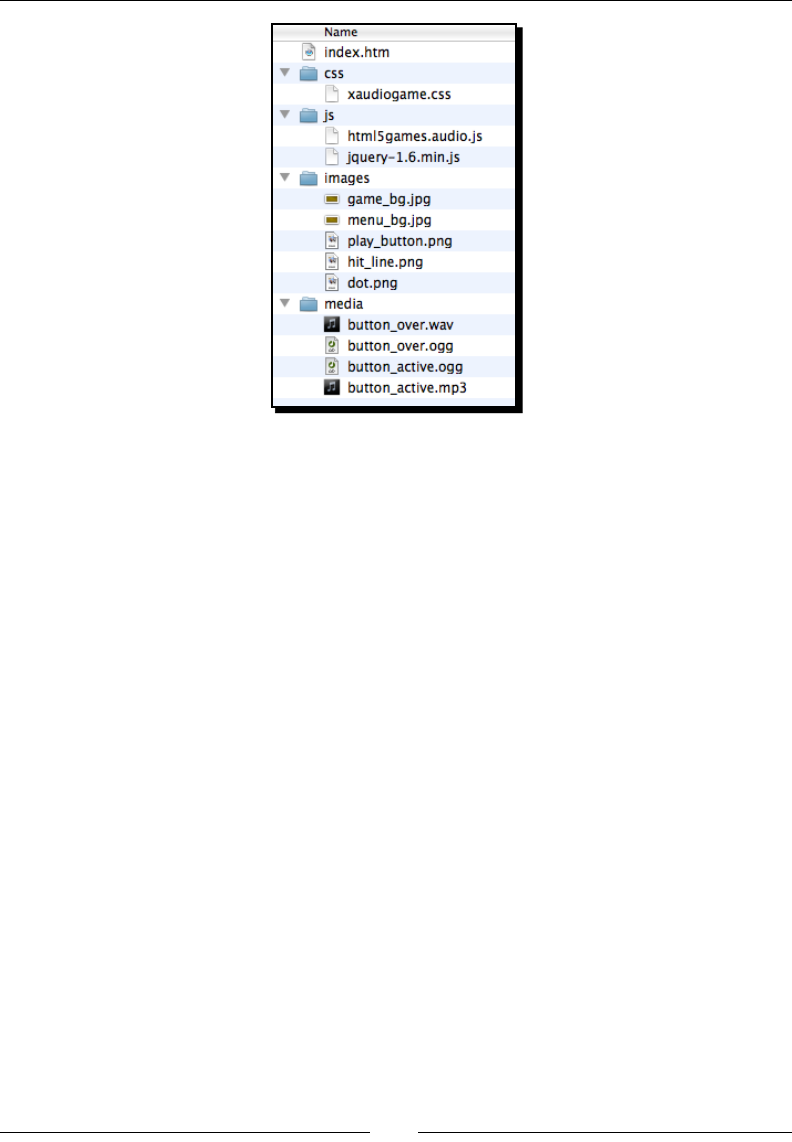
Chapter 6
[ 167 ][ 167 ]
1. The index.htm le contains the basic structure of the HTML. Now let's add the
following code to the body secon of the index.htm le:
<div id="game">
<section id="menu-scene" class="scene">
<a href="#game"><span>Play</span></a>
</section>
</div>
<audio id="buttonover">
<source src="media/button_over.wav" />
<source src="media/button_over.ogg" />
</audio>
<audio id="buttonactive">
<source src="media/button_active.mp3" />
<source src="media/button_active.ogg" />
</audio>
2. The HTML le accomplishes with a stylesheet. The le can be found in the code
bundle named audiogame.css.
3. Next, we will add a sound eect to the buon in the JavaScript le. Add the
following JavaScript in the html5games.audio.js le:
//a global object variable to store all game scope variable.
var audiogame = {};
// init function when the DOM is ready
$(function(){
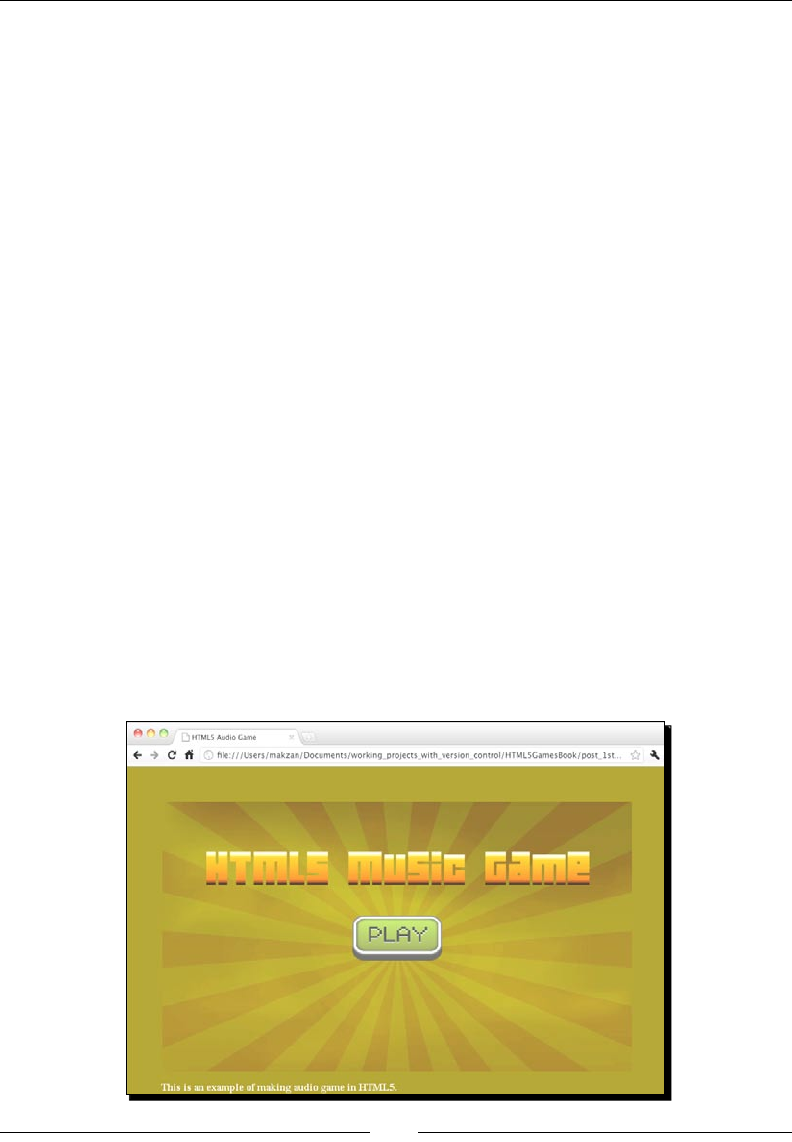
Adding Sound Eects to your Games
[ 168 ][ 168 ]
// get the references of the audio element.
audiogame.buttonOverSound =
document.getElementById("buttonover");
audiogame.buttonOverSound.volume = 0.3;
audiogame.buttonActiveSound =
document.getElementById("buttonactive");
audiogame.buttonActiveSound.volume = 0.3;
// listen the button event that links to #game
$("a[href='#game']")
.hover(function(){
audiogame.buttonOverSound.currentTime = 0;
audiogame.buttonOverSound.play();
},function(){
audiogame.buttonOverSound.pause();
});
.click(function(){
audiogame.buttonActiveSound.currentTime = 0;
audiogame.buttonActiveSound.play();
return false;
});
});
4. Open the index.htm le in a browser. There, you should see a PLAY buon on a
yellow background, as shown in the following screenshot. Try to move the mouse on
the buon and click on it. You should be able to hear a sound when you hover over
the buon and another sound when you click on it:
Chapter 6
[ 169 ][ 169 ]
What just happened?
We just created a basic HTML5 game layout with a play buon placed in the middle of
the page. The JavaScript le handles the mouse hover and clicks of the buon and plays
corresponding sound eects.
Dening an audio element
The easiest way to use the audio tag is by providing a source le. The following code snippet
shows how we can dene an audio element:
<audio>
<source src="media/button_active.mp3" />
<source src="media/button_active.ogg" />
<!-- Any code for browser that does not support audio tag -->
</audio>
Showing the fallback content in the audio tag
The audio tag is newly introduced in the HTML5 specicaon. We can put
the fallback content inside the audio tag, such as Flash movie to play the
audio. The following link from HTML5 Rocks shows a quick guide on using the
audio tag with Flash fallback:
http://www.html5rocks.com/tutorials/audio/quick/
Besides seng the source le of the audio tag, we can have addional controls by using
several aributes. The following table shows the aributes we can set to the audio element:
Arguments Denion Explanaon
src Denes the source le of
the audio element
When we use the src aribute in the
audio tag, it species one source le of
the audio le. For example, we load a sound
eect Ogg le in the following code:
<audio src='sound.ogg'>
If we want to specify mulple les with
dierent formats, then we use the source
tag inside the audio element. The following
code species the audio tag with dierent
formats to support dierent web browsers:
<audio>
<source src='sound.ogg'>
<source src='sound.mp3'>
<source src='sound.wav'>
</audio>
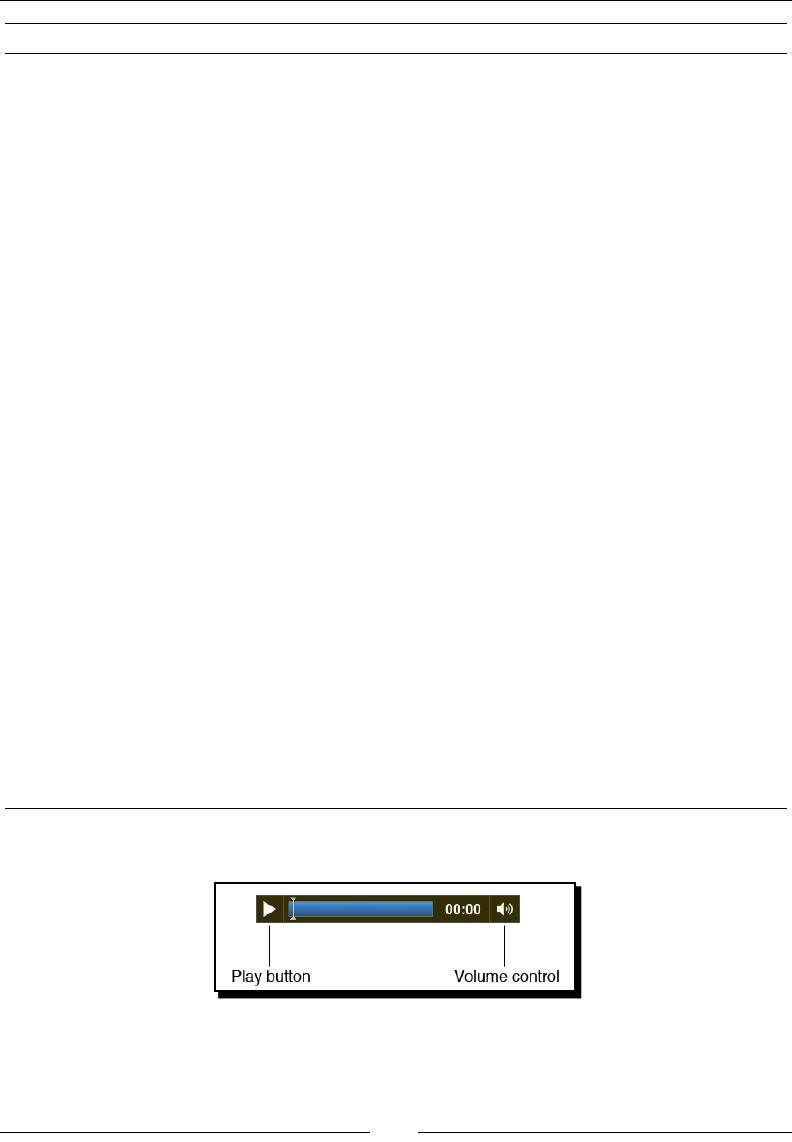
Adding Sound Eects to your Games
[ 170 ][ 170 ]
Arguments Denion Explanaon
autoplay Species that the audio
plays automacally once it
is loaded
Autoplay is used as a standalone aribute.
This means that there is no dierence in the
following two lines of code:
<audio src='file.ogg'
autoplay>
<audio src='file.ogg
autoplay="autoplay">
loop Species that the audio
plays from beginning again
aer playback nishes
This is also used as a standalone aribute.
preload Species that the audio
source is loaded once the
page is loaded
The preload aribute takes either of the
following values:
preload="auto"
preload="metadata"
preload="none"
When the preload is used as a standalone
aribute, it acts as seng it to auto and the
browser will preload the audio.
When it is set as metadata, the browser
will not preload the content of the audio.
However, it will load the meta data of the
audio such as the duraon and size.
When it is set to none, the browser will not
preload the audio at all. The content and
metadata is loaded once it is played.
controls Shows the playback
control of the audio
The controls aribute is a standalone
aribute. It instructs the browser to show a
playback control in the audio posion.
The following screenshot shows the Chrome displaying controls:
Chapter 6
[ 171 ][ 171 ]
Playing a sound
We can get the reference of the audio element by calling the getElementById
funcon. Then, we play it by calling the play funcon. The following code plays
the buttonactive audio:
<audio id="buttonactive">
<source src="media/button_active.mp3" />
<source src="media/button_active.ogg" />
</audio>
<script>
document.getElementById("buttonactive").play();
</script>
The play funcon plays the audio from the elapsed me, which is stored in the
currentTime property. The default value of currentTime is zero. The following
code plays the audio from 3.5 seconds:
<script>
document.getElementById("buttonactive").currentTime = 3.5;
document.getElementById("buttonactive").play();
</script>
Pausing a sound
Similar to the play buon, we can also pause the playback of an audio element by using
the pause funcon. The following code pauses the buttonactive audio element:
<script>
document.getElementById("buttonactive").pause();
</script>
There is no stop funcon to stop the audio element. Instead, we can pause
the audio and reset the currentTime property of the element to zero. The
following code shows how we can stop an audio element:
<script>
document.getElementById("buttonactive").pause();
document.getElementById("buttonactive").currentTime =
0;
</script>
Adding Sound Eects to your Games
[ 172 ][ 172 ]
Adjusting the sound volume
We can also set the volume of the audio element. The volume must range between 0 and
1. We can set the volume to 0 to mute it, and set it to 1 for the maximum volume. The
following code snippet sets the volume of the buttonactive audio to 30%:
<script>
document.getElementById("buttonactive").volume = 0.3;
</script>
Using the jQuery hover event
jQuery provides a hover funcon to dene the behavior when we mouse over and mouse
out a DOM element. Here is how we use the hover funcon:
.hover(function1, function2);
Arguments Discussion
function1 The funcon is executed when the mouse moves in.
function2 This is oponal. The funcon is executed when the mouse moves
out. When this funcon is not provided, the move out behavior is
the same as funcon1.
In the following code, we play the mouse over sound eect when moving the mouse in and
pause the sound during mouse out:
$("a[href='#game']").hover(function(){
audiogame.buttonOverSound.currentTime = 0;
audiogame.buttonOverSound.play();
},function(){
audiogame.buttonOverSound.pause();
});
Creating the Ogg format audio to support Mozilla Firefox
We use an MP3 format and the Ogg format le when we dene the source of the audio
element. The Ogg is a free and open source media container format which is supported in
Mozilla Firefox. We will use a free audio convertor to convert our MP3 les into an Ogg le.
Wikipedia contains a detailed explanaon on the Ogg format at the following URL:
http://en.wikipedia.org/wiki/Ogg
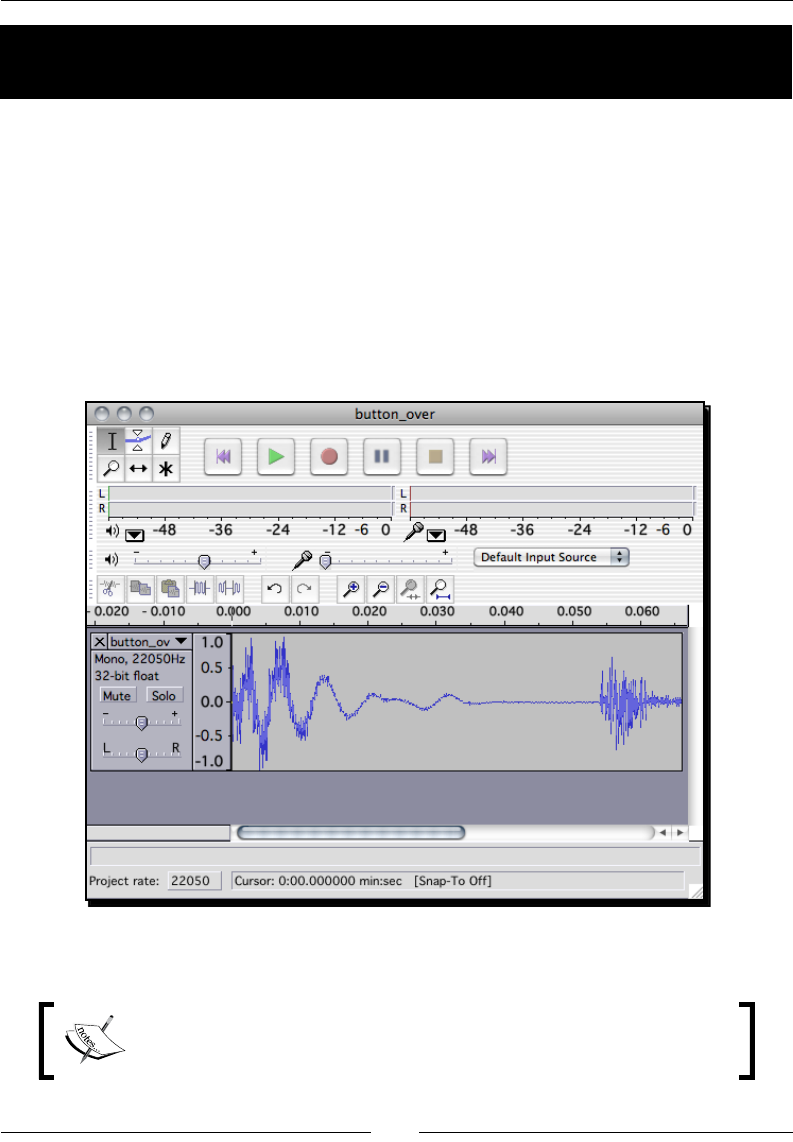
Chapter 6
[ 173 ][ 173 ]
Time for action – Converting an MP3 sound to Ogg
format with Audacity
Ogg is an open source standard that is free to use. There are many music players and
convertors supporng it. We will use free soware named Audacity to convert our MP3 les
to the Ogg format:
1. Go to the following URL to download Audacity:
http://audacity.sourceforge.net/download/
2. Install Audacity by following the instrucons of the installer.
3. Open button_over.mp3 in Audacity. The following screenshot shows Audacity
with the MP3 le opened, waing for us to start the conversion:
4. Click on File | Export As Ogg Vorbis to open the export dialog.
At the me of wring this book, Audacity 1.3 beta was released and
the export layout changed. Click on File | Export … and choose the Ogg
format in the export dialog.

Adding Sound Eects to your Games
[ 174 ][ 174 ]
5. Save the Ogg format le in the working directory.
What just happened?
We just converted an MP3 format sound eect into the Ogg format in order to make the
audio work in browsers that do not support an MP3 format.
Supporting different web browsers with different audio formats
The following table shows the audio formats supported by the latest popular web browsers
at the me of wring this book:
Browser Ogg MP3 WAV
Firefox 3.6+ Yes - Yes
Safari 5+ - Yes Yes
Chrome Yes Yes -
Opera 10.5+ Yes - Yes
Internet Explorer 9 - Yes Yes
Pop quiz – Using the audio tag
1. How can we stop an audio element playing?
a. Use the stop funcon
b. Use the pause funcon and reset the currentTime to 0
c. Reset the currentTime to 0
2. How can we put fallback content to display in browsers that do not support
audio tags?
Building a mini piano musical game
Imagine now we are not only playing a sound eect, but also playing a full song with the
audio tag. Along with the song playing, there are some music dots moving downwards
as a visualizaon of the music.
Time for action – Creating a basic background to the
music game
First, we will draw a few paths in canvas as the background of the music playback.

Chapter 6
[ 175 ][ 175 ]
1. We will connue working with our example and draw the background. Open the
index.htm le in a text editor and add the following highlighted code that denes
the game scene with two canvases set up:
<div id="game">
<section id="menu-scene" class="scene">
<a href="#game"><span>Play</span></a>
</section>
<section id="game-scene" class="scene">
<canvas id="game-background-canvas" width="768" height="440">
Sorry, your web browser does not support canvas content.
</canvas>
<canvas id="game-canvas" width="768" height="440"></canvas>
</section>
</div>
2. We added a game scene in the HTML le. We want to make it on top of the menu
scene, so we style the game scene to have absolute posion by adding the
following to audiogame.css:
#game-scene {
background: #efefef url(../images/game_bg.jpg);
}
#game-canvas, #game-background-canvas {
position: absolute;
}
3. It is me for the background drawing code. Open the html5games.audio.js
JavaScript le.
4. In the jQuery ready funcon, we call a drawBackground funcon to draw the
background as follows:
drawBackground();
5. Add the following drawBackground funcon to the end of the JavaScript le. The
code draws three black lines and one grey line in the game-background-canvas
canvas:
function drawBackground()
{
// get the reference of the canvas and the context.
var game = document.getElementById("game-background-canvas");
var ctx = game.getContext('2d');
// set the line style of the three vertical lines.

Adding Sound Eects to your Games
[ 176 ][ 176 ]
ctx.lineWidth = 10;
ctx.strokeStyle = "#000";
var center = game.width/2;
// draw the three lines
// the left line is placed 100 pixels on the left of center.
ctx.beginPath();
ctx.moveTo(center-100, 50);
ctx.lineTo(center-100, ctx.canvas.height - 50);
ctx.stroke();
// the middle line is placed at the center
ctx.beginPath();
ctx.moveTo(center, 50);
ctx.lineTo(center, ctx.canvas.height - 50);
ctx.stroke();
// the right line is placed 100 pixels on the right of center.
ctx.beginPath();
ctx.moveTo(center+100, 50);
ctx.lineTo(center+100, ctx.canvas.height - 50);
ctx.stroke();
// draw the horizontal line
ctx.beginPath();
ctx.moveTo(center-150, ctx.canvas.height - 80);
ctx.lineTo(center+150, ctx.canvas.height - 80);
// reset the line style to 1px width and grey before actually
drawing the horizontal line.
ctx.lineWidth = 1;
ctx.strokeStyle = "rgba(50,50,50,.8)";
ctx.stroke();
}
6. When we open the index.htm le in a browser, we will see four lines with a
background, as shown in the following screenshot. Do not worry that the play
buon is hidden for now, we will show it again later:
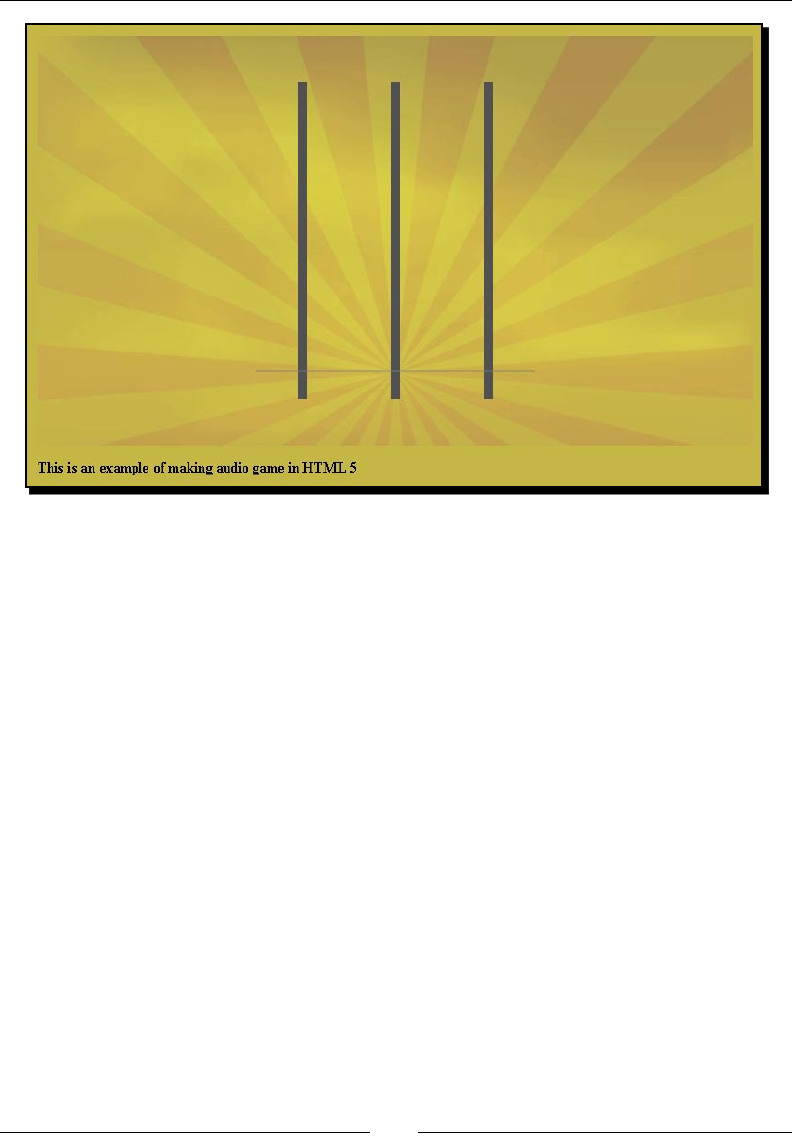
Chapter 6
[ 177 ][ 177 ]
What just happened?
We have created a canvas where we draw the music game background. In this music game
example, we introduced the basic scene management in HTML5 games.
Creating scenes in HTML5 games
Creang scenes in HTML5 is similar to creang layers like we did in the last chapter. It is
a DOM element that contains several children. All the children elements are posioned
in absolute. We have two scenes in our example now. The following code snippet shows
a possible scene structure in an enre game with a game over scene, credit scene, and
leaderboard scene included:
<div id="game">
<section id="menu-scene" class="scene"></section>
<section id="game-scene" class="scene"></section>
<section id="gameover-scene" class="scene"></section>
<section id="credit-scene" class="scene"></section>
<section id="leaderboard-scene" class="scene"></section>
</div>
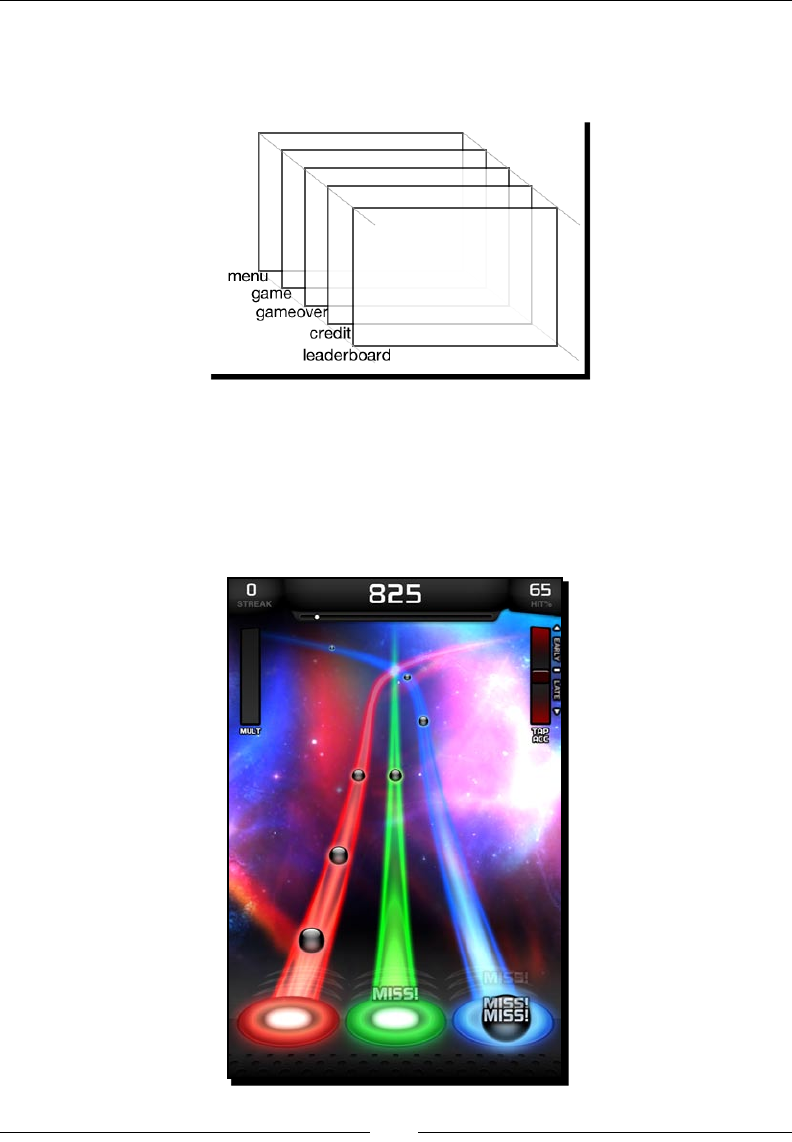
Adding Sound Eects to your Games
[ 178 ][ 178 ]
The following screenshot shows that the scenes are placed at the same place in a web page.
It is very similar to the layers structure. The dierence is that we will control the scene by
showing and hiding each scene:
Visualizing the music play back
If you have ever played the Dance Dance Revoluon, Guitar Hero, or the Tap Tap Revenge
game, then you may be familiar with the music dots moving downwards or upwards and
the player hing the music dots when it moves to the right place. The following screenshot
demonstrates the Tap Tap Revenge game:

Chapter 6
[ 179 ][ 179 ]
We will play a song in the audio tag with similar music visualizaon in the canvas.
Time for action – Creating the playback visualization
in the music game
Carry out the following steps:
1. We need a song with both a melody part and a base part. Copy the minuet_in_
g.ogg, minuet_in_g.mp3, minuet_in_g_melody.ogg, and minuet_in_g_
melody.mp3 les from the downloaded les or from the code bundle in the
media folder.
2. Then, add the audio tag with the song as a source le. Open the index.htm le
and add the following code:
<audio id="melody">
<source src="media/minuet_in_g_melody.mp3" />
<source src="media/minuet_in_g_melody.ogg" />
</audio>
<audio id="base">
<source src="media/minuet_in_g.mp3" />
<source src="media/minuet_in_g.ogg" />
</audio>
3. The music visualizaon is mainly done in JavaScript. Open the html5games.
audio.js JavaScript le in a text editor.
4. Add a MusicNote object type to represent the music data and a Dot object type to
represent the visual dot of the music note in the canvas as follows:
function MusicNote(time,line){
this.time = time;
this.line = line;
}
function Dot(distance, line) {
this.distance = distance;
this.line = line;
this.missed = false;
}
5. Then, we need several game variables to store the MusicNote instances, the
Dot instance, and other informaon. The level data is a sequence of me and the
appearing line that is separated by a semi-colon. The level data represents the me
and line at which the music note should appear:
// an array to store all music notes data.

Adding Sound Eects to your Games
[ 180 ][ 180 ]
audiogame.musicNotes = [];
audiogame.leveldata = "1.592,3;1.984,2;2.466,1;2.949,2;4.022,3;";
// the visual dots drawn on the canvas.
audiogame.dots = [];
// for storing the starting time
audiogame.startingTime = 0;
// reference of the dot image
audiogame.dotImage = new Image();
6. The level data is stored in a string format. We have the following funcon to extract
the string in the MusicNote object instances and store in an array:
function setupLevelData()
{
var notes = audiogame.leveldata.split(";");
for(var i in notes)
{
var note = notes[i].split(",");
var time = parseFloat(note[0]);
var line = parseInt(note[1]);
var musicNote = new MusicNote(time,line);
audiogame.musicNotes.push(musicNote);
}
}
7. Add the following code in the starng of the jQuery ready funcon. It references
the melody and base audio tags and loads the dot image for later use:
audiogame.melody = document.getElementById("melody");
audiogame.base = document.getElementById("base");
// load the dot image
audiogame.dotImage.src = "images/dot.png";
8. Then, add the following code in the end of the jQuery ready funcon:
setupLevelData();
setInterval(gameloop, 30);
startGame();
9. Add the following two funcons in the JavaScript le. The startGame funcon sets
the starng me and executes the playMusic funcon with a delay. The laer
funcon plays both the melody and base audios:
function startGame()
{
// starting game
var date = new Date();

Chapter 6
[ 181 ][ 181 ]
audiogame.startingTime = date.getTime();
setTimeout(playMusic, 3550);
}
function playMusic()
{
// play both the melody and base
audiogame.melody.play();
audiogame.base.play();
}
10. Add the following gameloop funcon to JavaScript. The gameloop funcon creates
new dots at the top of the game and moves the exisng notes down:
// logic that run every 30ms.
function gameloop()
{
var game = document.getElementById("game-canvas");
var ctx = game.getContext('2d');
// show new dots
// if the game is started
if (audiogame.startingTime != 0)
{
for(var i in audiogame.musicNotes)
{
// get the elapsed time from beginning of the melody
var date = new Date();
var elapsedTime = (date.getTime() -
audiogame.startingTime)/1000;
var note = audiogame.musicNotes[i];
// check if the dot appear time is as same as
the elapsed time
var timeDiff = note.time - elapsedTime;
if (timeDiff >= 0 && timeDiff <= .03)
{
// create the dot when the appear time is within
one frame of the elapsed time
var dot = new Dot(ctx.canvas.height-150, note.line);
audiogame.dots.push(dot);
}
}
}
// move the dots

Adding Sound Eects to your Games
[ 182 ][ 182 ]
for(var i in audiogame.dots)
{
audiogame.dots[i].distance -= 2.5;
}
// only clear the dirty area, that is the middle area
ctx.clearRect(ctx.canvas.width/2-200, 0, 400,
ctx.canvas.height);
// draw the music note dots
for(var i in audiogame.dots)
{
// prepare the radial gradients fill style
var circle_gradient = ctx.createRadialGradient
(-3,-3,1,0,0,20);
circle_gradient.addColorStop(0, "#fff");
circle_gradient.addColorStop(1, "#cc0");
ctx.fillStyle = circle_gradient;
// prepare the dot position to draw
ctx.save();
var center = game.width/2;
var dot = audiogame.dots[i];
var x = center-100
if (dot.line == 2)
{
x = center;
}
else if (dot.line == 3)
{
x = center+100;
}
// draw the dot at position according to the line and distance
ctx.translate(x, ctx.canvas.height-80-
audiogame.dots[i].distance);
ctx.drawImage(audiogame.dotImage, -audiogame.dotImage.width/2,
-audiogame.dotImage.height/2);
ctx.restore();
}
}
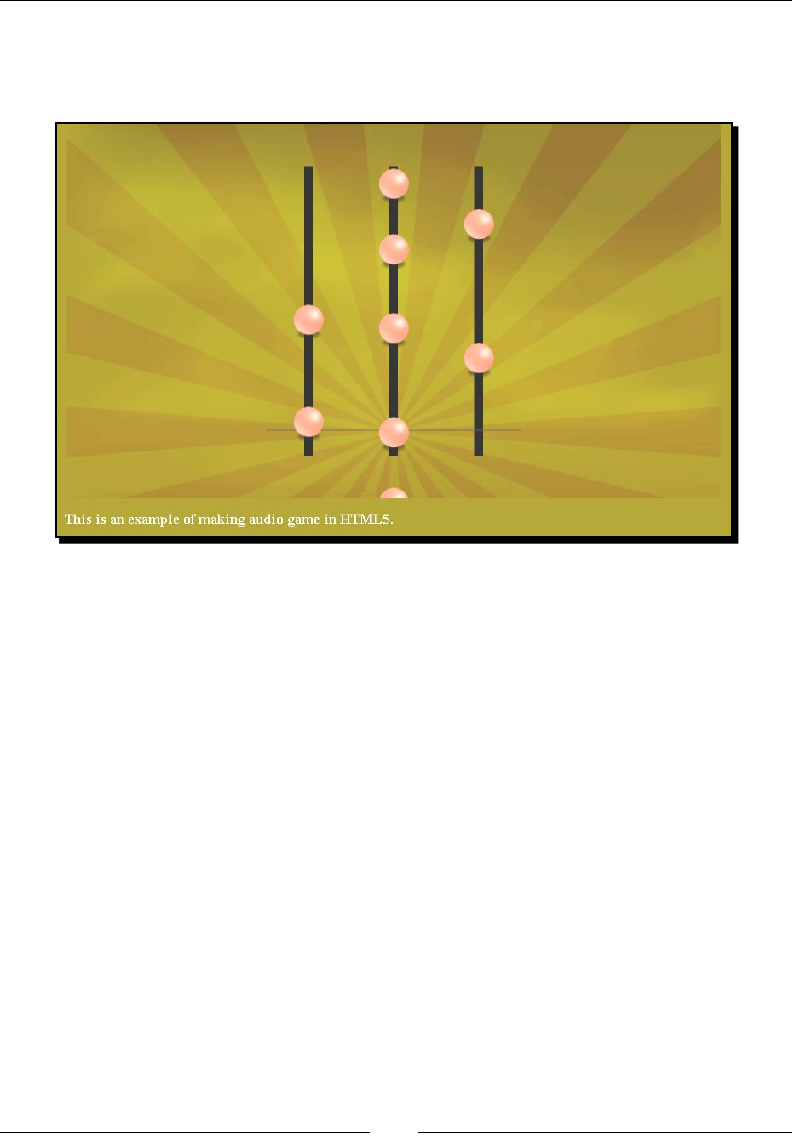
Chapter 6
[ 183 ][ 183 ]
11. Save all les and open the index.htm le in web a browser. The following
screenshot shows the music playing with the music dots appearing on the top
and moving downwards:
What just happened?
We just built a fully funconal music game and this is the basic playback funcon. It plays the
song with both the melody and the base part with some music dots moving downwards.
Choosing the right song for the music game
We have to be careful of the copyright issue when choosing a song for the music game.
It usually requires paying a usage fee or making an agreement with the song copyright
owner to use a song with copyright. It is ne if you are building a commercial music game
that is going to be a hit in the game industry and the earnings can overcome the copyright
usage expense. However, as a book example here, we are going to use a copyright-free song.
That is why we use the classical song Minute in G which is free public domain.
Storing and extracting the song level data
The level data shown in the Time for acon secon is just a poron of the enre level data.
It is a very long string storing music note informaon, including the me and the line. It is
stored in the following format:
music_current_time, line; music_current_time, line; …
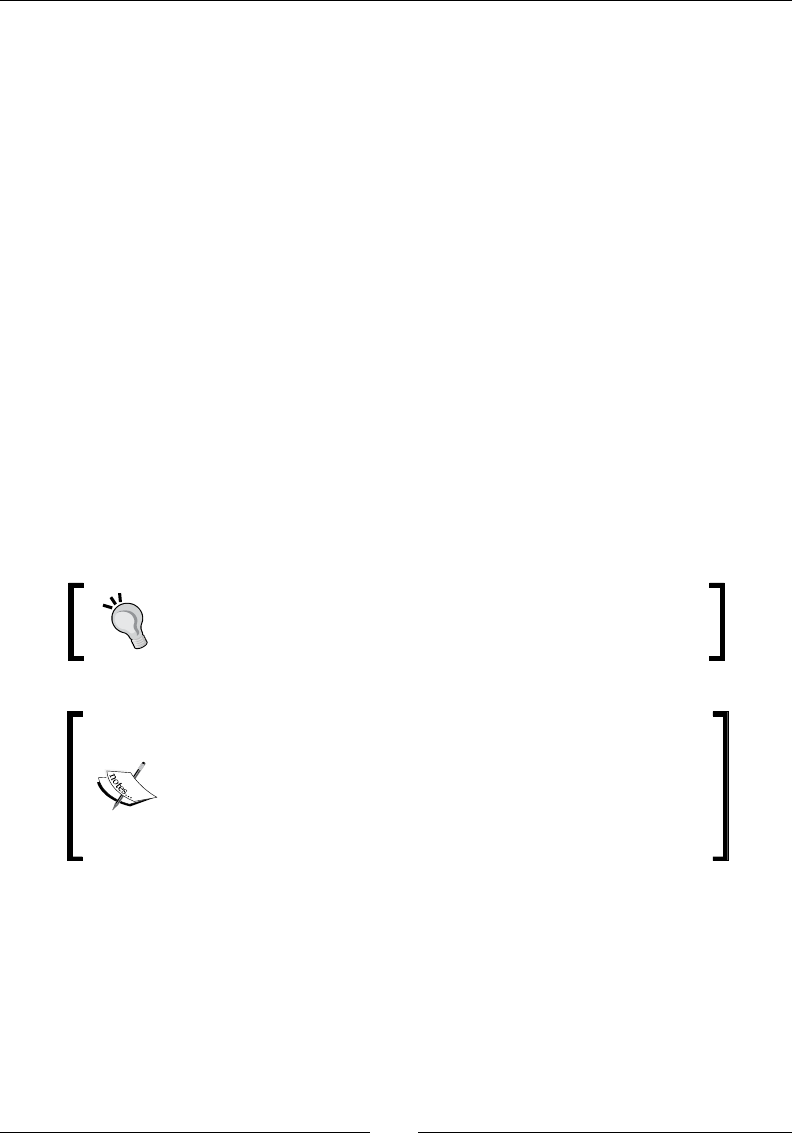
Adding Sound Eects to your Games
[ 184 ][ 184 ]
Each music dot data contains the me to show up and which line it shows. This data is
separated by a comma. Every piece of music dot data is separated by a semi-colon. The
following code extracts the level string into a MusicNote object by spling the semi-colon
and the comma:
audiogame.musicNotes = [];
audiogame.leveldata = "1.592,3;1.984,2;2.466,1;2.949,2;4.022,3;";
function setupLevelData()
{
var notes = audiogame.leveldata.split(";");
for(var i in notes)
{
var note = notes[i].split(",");
var time = parseFloat(note[0]);
var line = parseInt(note[1]);
var musicNote = new MusicNote(time,line);
audiogame.musicNotes.push(musicNote);
}
}
The level data string is recorded by the keyboard and we are going to discuss the recording
later in this chapter.
The level data contains only several music notes here. In the code
bundle, there is the whole level data of the complete song.
There is an oponal second parameter for the JavaScript
parseInt funcon. It denes the radix of the number to
parse. By default, it uses decimal but parseInt will parse the
string as octal when the string begins with zero. For example,
parseInt("010") return result 8 instead of 10. If we want the
decimal number, then we can use parseInt("010",10) to
specify the radix.
Getting the elapsed time of the game
Although we know the elapsed me of an audio element by accessing the currentTime
property, we want to get the me from the starng of the game.
We can get the elapsed me by storing the current computer me when starng the
game and subtracng the current me value to get the elapsed me.
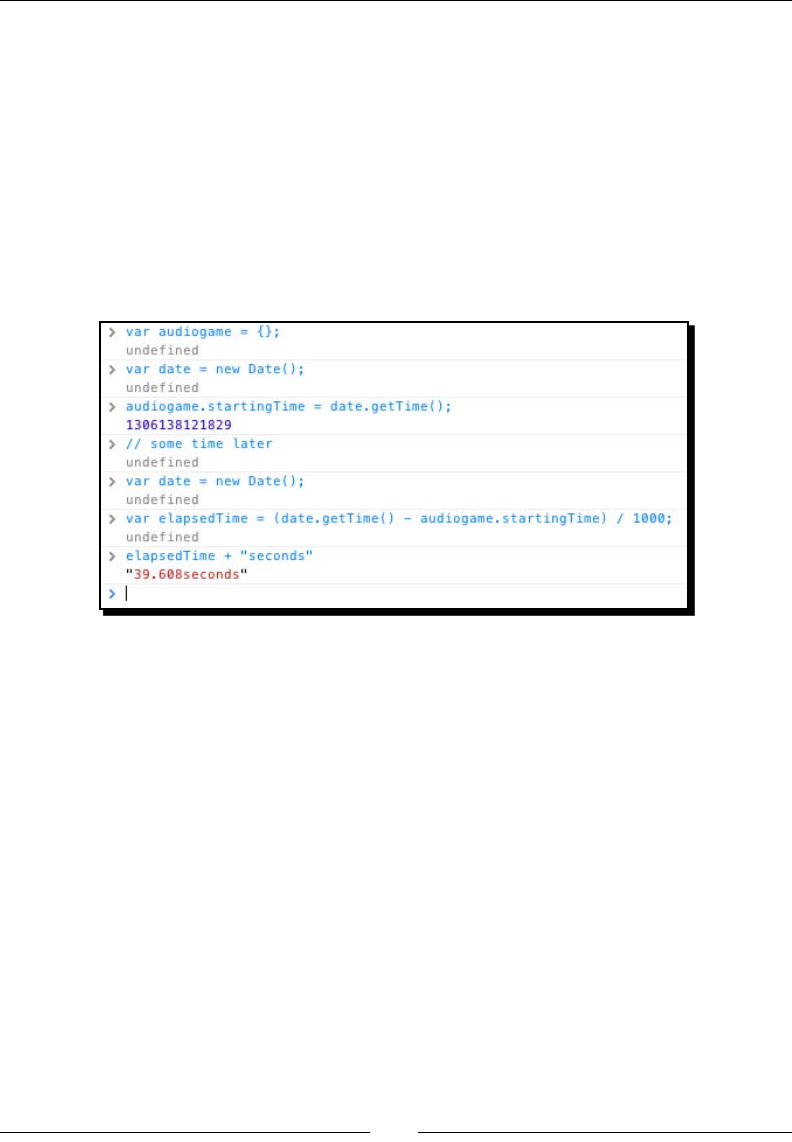
Chapter 6
[ 185 ][ 185 ]
We get the current computer me by using the Date object. The following code snippet
shows how we use startingTime to get the elapsed me:
// starting game
var date = new Date();
audiogame.startingTime = date.getTime();
// some time later
var date = new Date();
var elapsedTime = (date.getTime() - audiogame.startingTime)/1000;
The following screenshot shows the preceding code snippet running in console:
Creating music dots
In the gameloop funcon, we check all the MusicNote instances and see whether it is me
to create the visual dot of that music note. The following code shows the logic we used to
create the visual music dot. Basically, we get the elapsed me of the game and compare it
with the current me of each music note. If the me dierence between the note's current
me and elapsed me is within 30 ms, then we create the visual dot instance and let the
gameloop funcon draw it:
if (audiogame.startingTime != 0)
{
for(var i in audiogame.musicNotes)
{
// get the elapsed time from beginning of the melody
var date = new Date();
var elapsedTime = (date.getTime() -
audiogame.startingTime)/1000;
var note = audiogame.musicNotes[i];

Adding Sound Eects to your Games
[ 186 ][ 186 ]
// check if the dot appear time is as same as the elapsed time
var timeDiff = note.time - elapsedTime;
if (timeDiff >= 0 && timeDiff <= .03)
{
// create the dot when the appear time is within one frame
of the elapsed time
var dot = new Dot(ctx.canvas.height-150, note.line);
audiogame.dots.push(dot);
}
}
}
Moving the music dots
There is a me dierence between the game start and music start. The game starts several
seconds before the song starts playing. It is because we need to show the music dots and
move it down before the music starts.
The music dots should match the song when the dots are in the grey line. The music dots
appear from the top of the game and move down towards the grey line. We delay the music
play to wait as the dots move from top to boom. It is around 3.55 seconds in this example,
so we delay the music playing by 3.55 seconds.
When the dot is created, it is placed at a given distance. We decrease all dots' distance by
2.5 every me the gameloop funcon executes. The distance is stored in each dot object
represenng how far away it is from the grey line:
for(var i in audiogame.dots)
{
audiogame.dots[i].distance -= 2.5;
}
The y posion of the dot is calculated by the grey line subtracng the distance as follows:
// draw the dot
ctx.save();
var x = ctx.canvas.width/2-100
if (audiogame.dots[i].line == 2)
{
x = ctx.canvas.width/2;
}
else if (audiogame.dots[i].line == 3)
{
x = ctx.canvas.width/2+100;
}
ctx.translate(x, ctx.canvas.height-80-audiogame.dots[i].distance);
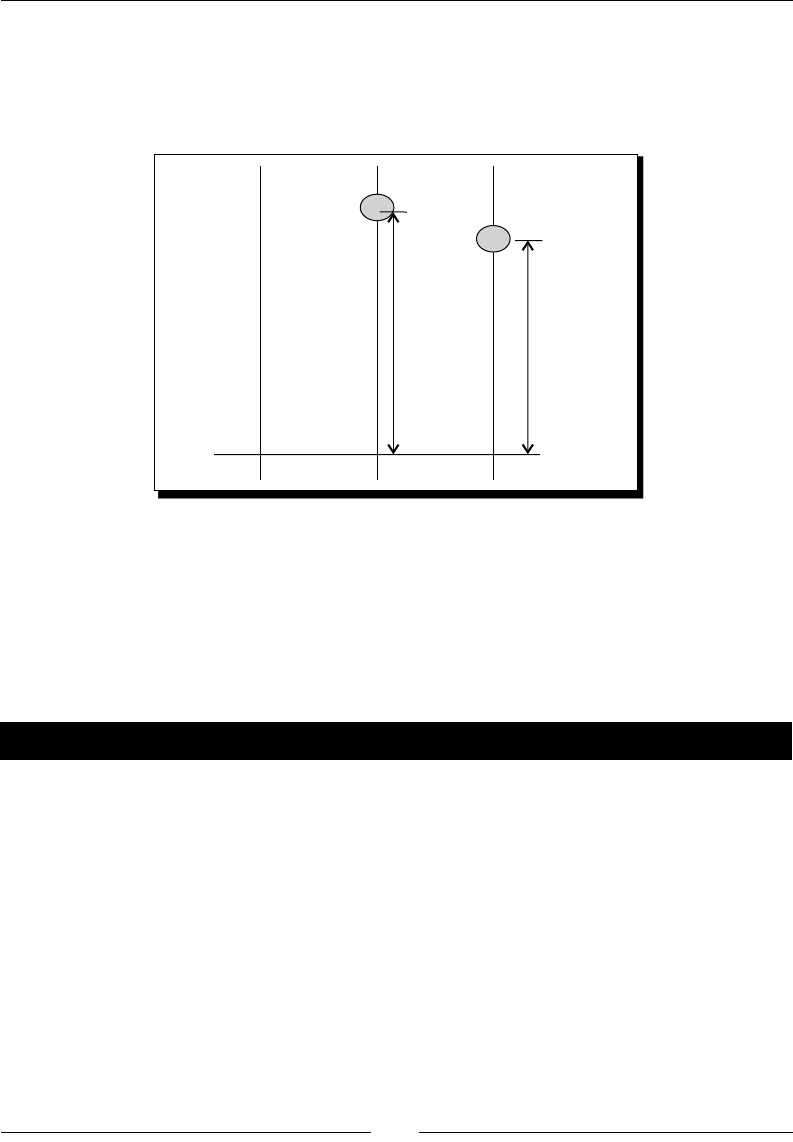
Chapter 6
[ 187 ][ 187 ]
ctx.drawImage(audiogame.dotImage, -audiogame.dotImage.width/2, -
audiogame.dotImage.height/2);
The following screenshot shows the distance between the grey line and each dot. When the
distance is zero, it is exactly on the grey line:
dot2
dot2.distance
dot1
dot1.distance
the grey line
Linking the play button to the music game scene
We have a game scene now playing our song. However, it covers the menu scene we
made with a play buon inside. Imagine now we open the game with the play buon
being displayed, then we click on the buon and the game scene slides in and starts
playing the music.
Time for action – Animating the scene transition
We will hide the game scene by default and show it aer the play buon is clicked:
1. First, we have to modify the stylesheet. Open the audiogame.css le.
2. Add the following highlighted overow property to #game. It helps to clip the game
into a 768x440px mask:
#game {
position: relative;
width: 768px;
height: 440px;
overflow: hidden;
}

Adding Sound Eects to your Games
[ 188 ][ 188 ]
3. Next, we add the following highlighted code to style the game scene:
#game-scene {
background: #efefef url(../images/game_bg.jpg);
top: -440px;
}
#game-scene.show-scene {
top: 0;
-webkit-transition: top .3s linear;
-moz-transition: top .3s linear;
transition: top .3s linear;
}
4. Then, we will move on to the JavaScript part. Open the html5games.audio.js
JavaScript le.
5. Delete the startGame funcon calling in the jQuery ready funcon. We will call it
when the play buon is clicked.
6. In the play buon click handler, we add the following highlighted code:
$("a[href='#game']").click(function(){
audiogame.buttonActiveSound.currentTime = 0;
audiogame.buttonActiveSound.play();
$("#game-scene").addClass('show-scene');
startGame();
return false;
});
Save all les and open the index.htm in a browser. There should be a slide-in animaon to
show the music playback scene when we click on the play buon. The following screenshot
sequence shows the slide-in animaon:
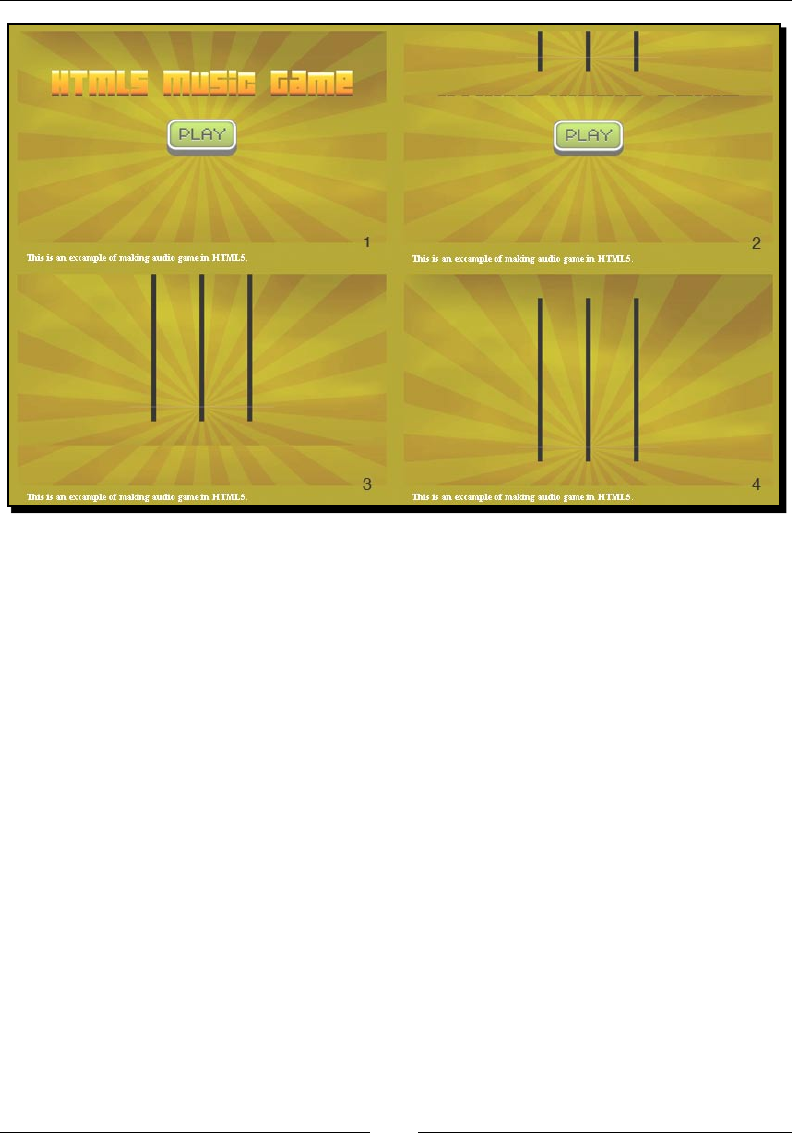
Chapter 6
[ 189 ][ 189 ]
What just happened?
We just created a transion between the menu scene and the game scene.
Creating a slide-in effect in CSS3
The game scene slides in from the top when the play buon is clicked. This scene transion
eect is done by moving the game scene by CSS3 transion. The game scene posion is
inially placed with a negave top value. We then change the top posion from negave
value to zero with a transion, so it animates from the top to the correct posion.
Another important thing to make the sliding eect work is to set the overow of the parent
DIV of the scenes to hidden. Without the hidden overow, the game scene is visible even
with a negave top posion. Therefore, it is important to set the parent DIV of the scenes to
the hidden overow.

Adding Sound Eects to your Games
[ 190 ][ 190 ]
The following screenshot illustrates the slide-in transion of the game scene. The #game
DIV is the parent of both menu scene and game scene. The game scene moves from the top
when we add the .show-scene class which sets the top value to 0 with transion:
#game-scene.show-scene
#menu-scene
#game
#menu-scene
#game-scene
#game #game
#game-scene.show-scene
Have a go hero – Creating different scene transition effects
We made a slide-in eect to the scene transion when showing the game. By using
JavaScript and CSS3, we can make many dierent scene transion eects creavely.
Try making your own transion eect to the game, such as fading in, pushing in from
the right, or even ipping with a 3D rotaon.
Creating a keyboard-driven mini piano musical game
Now we can click on the play buon. The music game slides in and plays the song with music
notes dropping down. Our next step is adding interacon to the music notes. Therefore, we
will add keyboard events to control the three lines to hit the music notes.
Time for action – Creating a mini piano musical game
Carry out the following steps:
1. We want to show an indicaon when pressing the keyboard. Open the index.htm
le and add the following highlighted HTML:
<section id="game-scene" class="scene">
<canvas id="game-background-canvas" width="768" height="440">
Sorry, your web browser does not support canvas content.

Chapter 6
[ 191 ][ 191 ]
</canvas>
<canvas id="game-canvas" width="768" height="440">
Sorry, your web browser does not support canvas content.
</canvas>
<div id="hit-line-1" class="hit-line hide"></div>
<div id="hit-line-2" class="hit-line hide"></div>
<div id="hit-line-3" class="hit-line hide"></div>
</section>
2. Then, we may want to inform visitors that they can play the game by pressing the J,
K, and L keys. Modify the footer content as follows:
<footer>
<p>This is an example of making audio game in HTML5.
Press J, K, L to play.
</p>
</footer>
3. Now, we will move on to the stylesheet. The stylesheet is included in the code
bundle with a folder named audio_game_scene_transition.
4. Next, we will add the keyboard event in the JavaScript part. Open the html5games.
audio.js JavaScript le and add the following code inside the jQuery ready
funcon:
// keydown
$(document).keydown(function(e){
var line = e.which-73;
$('#hit-line-'+line).removeClass('hide');
$('#hit-line-'+line).addClass('show');
// our target is J(74), K(75), L(76)
var hitLine = e.which-73;
// check if hit a music note dot
for(var i in audiogame.dots)
{
if (hitLine == audiogame.dots[i].line &&
Math.abs(audiogame.dots[i].distance) < 20)
{
// remove the hit dot from the dots array
audiogame.dots.splice(i, 1);
}
}
});
$(document).keyup(function(e){
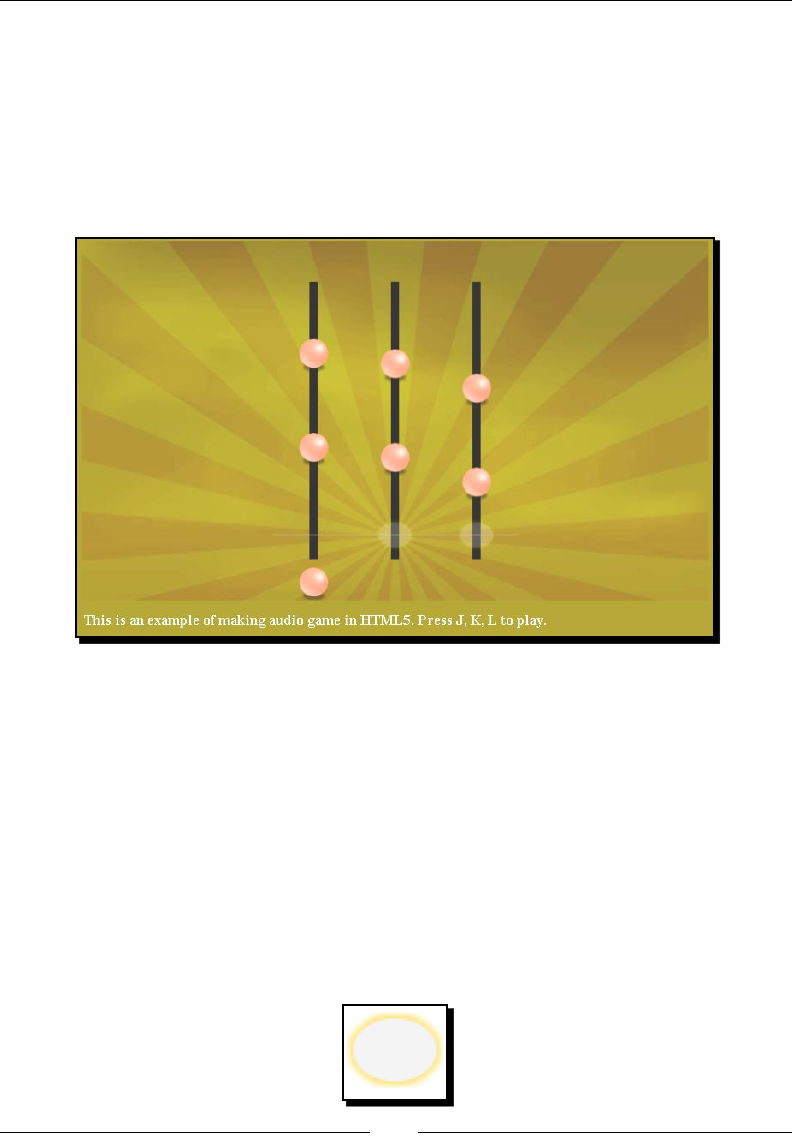
Adding Sound Eects to your Games
[ 192 ][ 192 ]
var line = e.which-73;
$('#hit-line-'+line).removeClass('show');
$('#hit-line-'+line).addClass('hide');
});
5. Now save all les and open the game in a browser. Try pressing the J, K, and L keys.
The three hit line indicator should appear and fade out when the key is pressed. If
the music dot passes by the grey line when hing the right key, then it disappears:
What just happened?
We just added keyboard interacon to our music game. There is a glow animaon
when hing the keys. The music dot will disappear when the right key is pressed
at the right moment.
Hitting the three music lines by key down
We use the J, K, and L keys to hit the three music lines in the game. The J key controls the le
line, the K key controls the middle line, and the L key controls the right one.
There is also an indicaon showing that we just hit the music line. This is done by placing the
following image at the intersecon of the grey line and music lines:

Chapter 6
[ 193 ][ 193 ]
Then, we can control the showing and hiding of the hit indicaon graphics with the following
jQuery code:
$(document).keydown(function(e){
var line = e.which-73;
$('#hit-line-'+line).removeClass('hide');
$('#hit-line-'+line).addClass('show');
});
$(document).keyup(function(e){
var line = e.which-73;
$('#hit-line-'+line).removeClass('show');
$('#hit-line-'+line).addClass('hide');
});
J, K, and L keys control the music line 1 to 3. As J, K, and L have the key code 74, 75, and 76
respecvely, we know which line number it is by subtracng the key code by 73.
Determining music dot hits on key down
The distance is close to zero if the dot is almost on the grey horizontal line. This helps us in
determining if the dots hit the grey line. By checking both the key down event and the dot
distance, we can determine if we successfully hit a music dot. The following code snippet
shows that we consider the dot is hit when the distance is within 20 pixels:
$(document).keydown(function(e){
var line = e.which-73;
$('#hit-line-'+line).removeClass('hide');
$('#hit-line-'+line).addClass('show');
// our target is J(74), K(75), L(76)
var hitLine = e.which-73;
// check if hit a music note dot
for(var i in audiogame.dots)
{
if (hitLine == audiogame.dots[i].line &&
Math.abs(audiogame.dots[i].distance) < 20)
{
// remove the hit dot from the dots array
audiogame.dots.splice(i, 1);
}
}
});
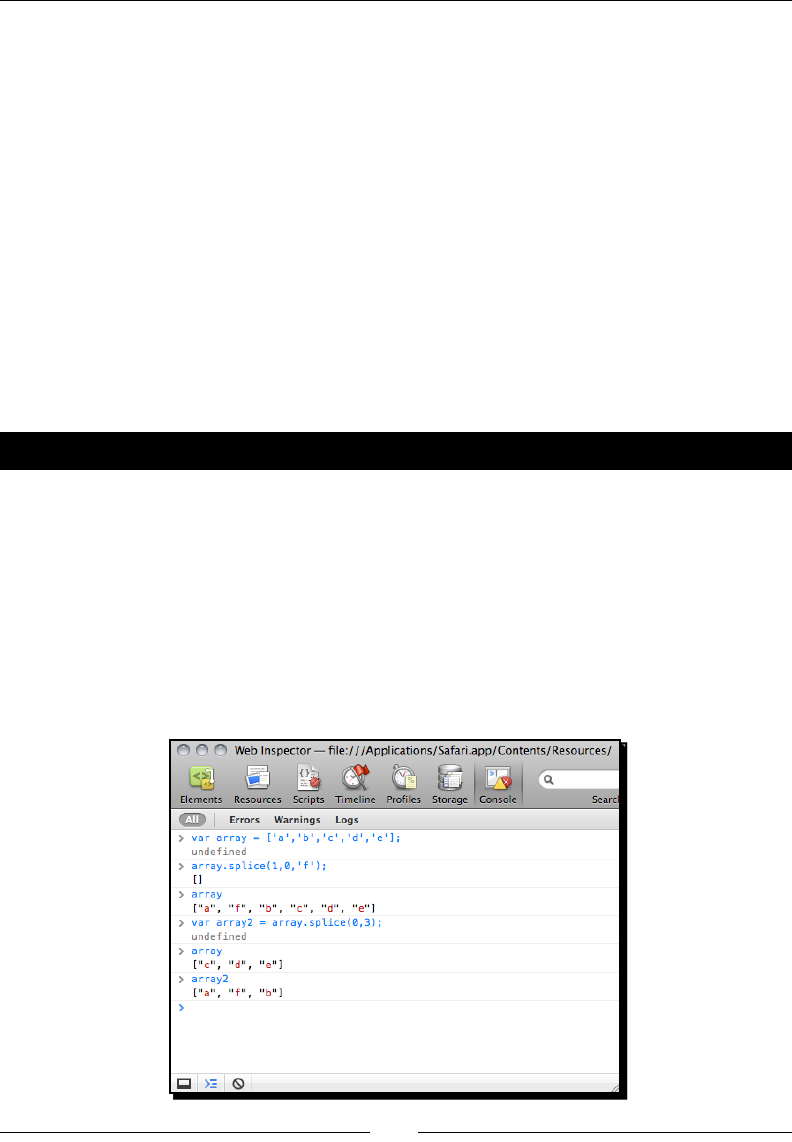
Adding Sound Eects to your Games
[ 194 ][ 194 ]
With determinaon, we remove the music dots when we hit them. The missed dots will sll
pass through the grey line and move towards the boom. This creates a basic game play
where the player has to eliminate all the music dots by hing them correctly at the right
moment when the song is playing.
Removing an element in an array with the given index
We remove the music dot data from an array when it is hit (and thus it will not be drawn
anymore). To remove an element in an array, we use the splice funcon. The following
line of code removes one element from an array at the given index:
array.splice(index, 1);
The splice funcon is a lile tricky to use. This is because it allows us to add or remove
elements in an array. Then, it returns removed elements as another array. It sounds
complicated. Therefore, we will perform some experiments.
Time for action – Removing music dots with the splice function
We will open the JavaScript console in a web browser to perform a few tests on the
splice funcon:
1. Open the JavaScript console.
2. Input the following commands to the console line by line. That is, pressing Enter on
each command line. These commands create an array and manipulate it with the
splice funcon.
3. We should get a result similar to the one shown in the following screenshot:
Chapter 6
[ 195 ][ 195 ]
What just happened?
We just created an array and tried adding and removing elements by using the splice
funcon. Please note that the splice array returns another array with the removed elements.
Here is how we use the splice funcon:
array.splice(index, length, element1, element2, …, elementN);
The following table shows how we use the arguments:
Argument Denion Discussion
index Species the index of an
element to be added or
removed in the array
The index starts from 0. 0 means
the rst element, 1 means the
second one, and so on. We
can also use negave indexes,
such as -1 which means the last
element, -2 which means the
second last element, and so on.
length Species how many elements
we want to remove
Pung 0 means we do not
remove any element.
element1, element2 …
elementN
The new elements to be added
into the array; this is oponal
This is oponal. Pung a list of
elements here means we add
the elements at the given index.
The following Mozilla Developer Network link discusses dierent usages of the
splice funcon:
https://developer.mozilla.org/en/JavaScript/Reference/
Global_Objects/Array/splice
Have a go hero
In similar commercial music games, there are some words showing when the player hits or
misses a music dot. How can we add this feature to our game?
Adding additional features to the mini piano game
We have created basic interacon to the game. We can go further to make the game beer,
by adding melody volume feedback to make the performance playing realisc, and counng
the success rate of the performance.

Adding Sound Eects to your Games
[ 196 ][ 196 ]
Adjusting the music volume according to the player
Imagine now we are in a performance playing the music. We hit the music dots to play the
melody. If we miss any of them, then we fail to perform it well and the melody disappears.
Time for action – Removing missed melody notes
We will store some gameplay stascs and use it to adjust the melody volume. We will
connue with our JavaScript le:
1. First, add the following variables in the variable declaraon region:
audiogame.totalDotsCount = 0;
audiogame.totalSuccessCount = 0;
// storing the success count of last 5 results.
audiogame.successCount = 5;
2. In the setupLevelData funcon, we get the total amount of dots with the
highlighted code:
function setupLevelData()
{
var notes = audiogame.leveldata.split(";");
// store the total number of dots
audiogame.totalDotsCount = notes.length;
for(var i in notes)
{
var note = notes[i].split(",");
var time = parseFloat(note[0]);
var line = parseInt(note[1]);
var musicNote = new MusicNote(time,line);
audiogame.musicNotes.push(musicNote);
}
}
3. We want to not only remove a dot but also keep track of the result when we hit it by
using a keyboard. Add the following code inside the keyboard handler in the jQuery
ready funcon:
// check if hit a music note dot
for(var i in audiogame.dots)
{
if (hitLine == audiogame.dots[i].line &&

Chapter 6
[ 197 ][ 197 ]
Math.abs(audiogame.dots[i].distance) < 20)
{
// remove the hit dot from the dots array
audiogame.dots.splice(i, 1);
// increase the success count
audiogame.successCount++;
// keep only 5 success count max.
audiogame.successCount = Math.min
(5, audiogame.successCount);
// increase the total success count
audiogame.totalSuccessCount ++;
}
}
4. In the gameloop funcon, we calculate all missed dots and store the result. Then,
we can use these stascs to get the successful rate of the game. Add the following
code to the gameloop funcon:
// check missed dots
for(var i in audiogame.dots)
{
if (!audiogame.dots[i].missed &&
audiogame.dots[i].distance < -10)
{
// mark the dot as missed if it is not mark before
audiogame.dots[i].missed = true;
// reduce the success count
audiogame.successCount--;
// reset the success count to 0 if it is lower than 0.
audiogame.successCount = Math.max
(0, audiogame.successCount);
}
// remove missed dots after moved to the bottom
if (audiogame.dots[i].distance < -100)
{
audiogame.dots.splice(i, 1);
}
}

Adding Sound Eects to your Games
[ 198 ][ 198 ]
// calculate the percentage of the success in last 5 music dots
var successPercent = audiogame.successCount / 5;
// prevent the successPercent to exceed range(fail safe)
successPercent = Math.max(0, Math.min(1, successPercent));
5. At last, we adjust the melody volume by using the successful rate. Put the following
code aer the code we just added in the gameloop funcon:
audiogame.melody.volume = successPercent;
6. Save all les and test our game in a browser. When the player connues to play the
game well, the melody keeps playing. When the player misses several music dots,
the melody disappears and only the base plays.
What just happened?
We just used the player performance as a feedback on the melody volume. It gives a feeling
that we are really performing the music. When we perform poorly, the melody volume is low
and the song sounds poor too.
Removing dots from the game
We want to remove the dots either aer it drops under the boom bound or when they are
being hit by the player. The game loop displays all the dots in the dot list on the game canvas.
We can remove the dot graphic by removing its data from the array of dots.
We use the following splice funcon to remove an entry in the array at the target index:
audiogame.dots.splice(index, 1);
Storing the success count in the last ve results
In our game, we need to store the success count in the last ve results to calculate the
success rate. We can do this by using a counter represenng this. When a dot is successfully
hit, the counter increases by one, but when the player fails on hing a dot, the counter
decreases by 1.
The counter is then represenng the successful counts within the last several results if we
limit the counter to have a range, such as 0 to 5 in our example.
Chapter 6
[ 199 ][ 199 ]
Have a go hero
We discussed how to display the game progress in the Untangle game in the last chapter. Can
we apply a similar technique in the music game? We have the player's success percentage
during game play. How about displaying it as a percentage bar on the top of the game?
Recording music notes as level data
The game relies on the level data to play. The playback visualizaon will not work if there is
no level data. We also cannot play it if the playback visualizaon is not working. So how can
we record that level data?
Imagine now the music is playing without any music dots appearing in the game. We listen to
the music carefully and press the J, K, L keys when the music plays. Aer the music ends, we
print out all the keys and me we pressed. This data will then be used back in the playback
visualizaon of the music.
Time for action – Adding functionality to record the
music level data
Carry out the following steps:
1. First, we create a variable to toggle between the recording mode and normal playing
mode. Open the html5games.audio.js le and add the code as follows:
audiogame.isRecordMode = true;
2. Next, we add the following highlighted code in the keydown event handler. This
code stores all our pressed keys in an array and prints them out to the console when
the semi-colon key is pressed:
$(document).keydown(function(e){
var line = e.which-73;
$('#hit-line-'+line).removeClass('hide');
$('#hit-line-'+line).addClass('show');
if (audiogame.isRecordMode)
{
// print the stored music notes data when press ";" (186)
if (e.which == 186)
{
var musicNotesString = "";
for(var i in audiogame.musicNotes)
{
musicNotesString += audiogame.musicNotes[i].time+",

Adding Sound Eects to your Games
[ 200 ][ 200 ]
"+audiogame.musicNotes[i].line+";";
}
console.log(musicNotesString);
}
var currentTime = parseInt
(audiogame.melody.currentTime * 1000)/1000;
var note = new MusicNote(currentTime, e.which-73);
audiogame.musicNotes.push(note);
}
else
{
// our target is J(74), K(75), L(76)
var hitLine = e.which-73;
// check if hit a music note dot
…
}
});
3. Finally, we want to make sure that the setupLevelData and the gameloop
funcons are not executed during the recording mode. These funcons are for
playing mode only:
if (!audiogame.isRecordMode) {
setupLevelData();
setInterval(gameloop, 30);
}
4. Now open the index.htm in a browser. Aer clicking on the play buon, the game
starts and the music plays without the music notes. Try pressing the J, K, and L keys
following the music beat. Aer nishing the music, press the semi-colon to print the
level data in the console. The following screenshot shows the console displaying the
level data string:
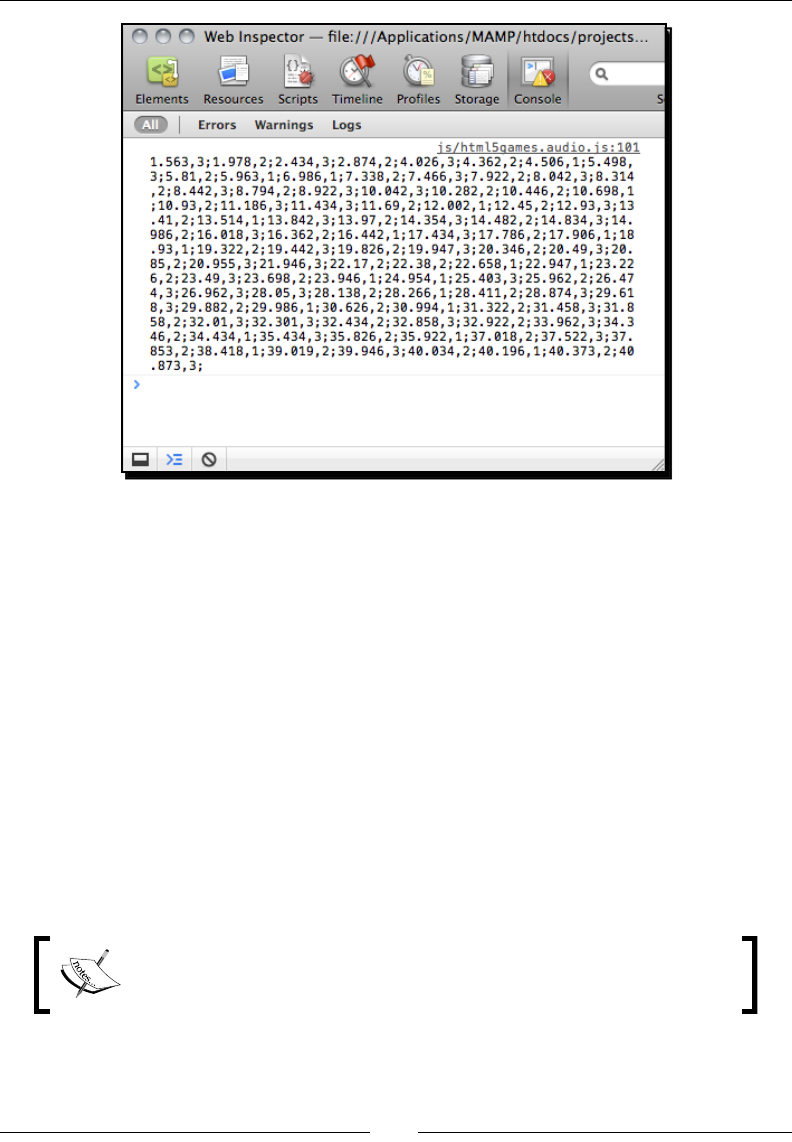
Chapter 6
[ 201 ][ 201 ]
What just happened?
We just added a recording feature to our game. We can now record our music notes. We
can toggle the record mode and playing mode by seng the audiogame.isRecordMode
variable to true and false.
On every key press, we get the elapsed me of the melody and create a MusicNote instance
with the me and line number. The following code shows how we record the pressed keys.
The currentTime is cut to two decimal digits before saving:
var currentTime = audiogame.melody.currentTime.toFixed(3);
var note = new MusicNote(currentTime, e.which-73);
audiogame.musicNotes.push(note);
We also capture the semi-colon key to print out all the recorded MusicNote data into a
string. The string follows the time,line;time,line; format, so we can directly copy the
printed string and paste it as level data to play.
The toFixed funcon formats the number with the given number of
trailing decimals. In our example, we used it to get the current me with 3
trailing decimals.
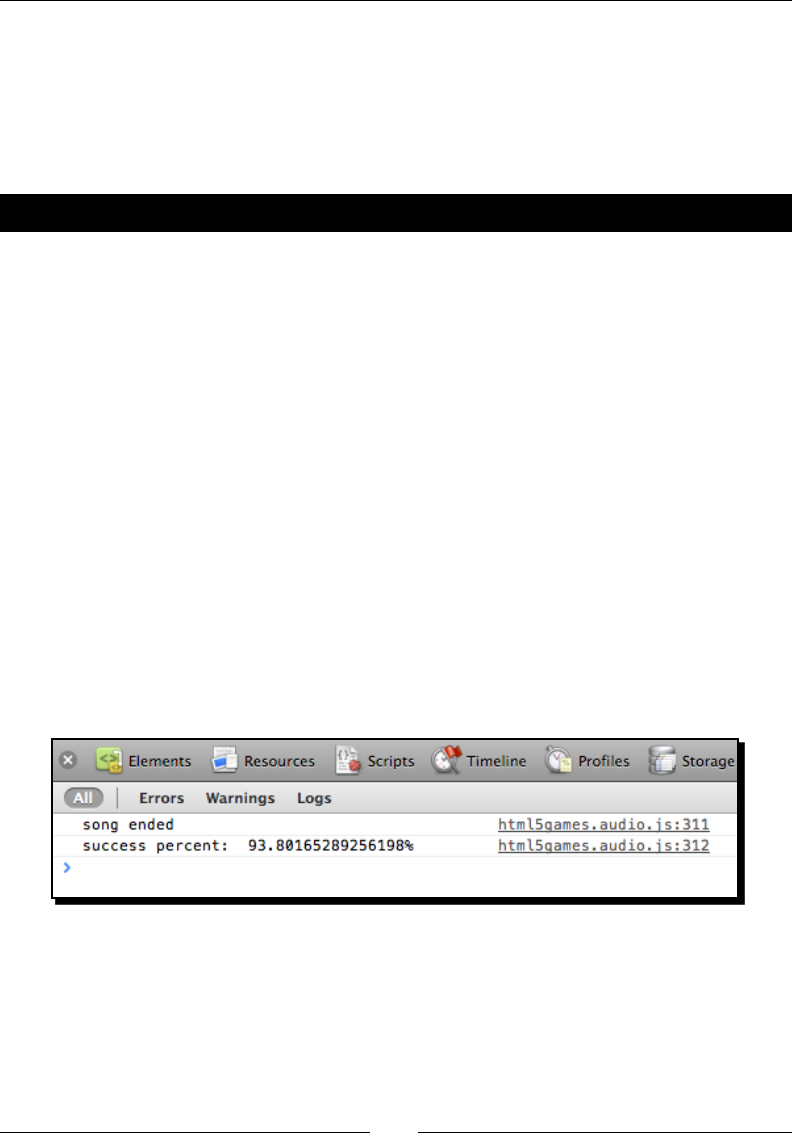
Adding Sound Eects to your Games
[ 202 ][ 202 ]
Handling the audio event on playback completes
We can play the game now, but there is no indicaon on game over. Imagine now, we want
to know how well we played when the game completes. We will capture the melody-ending
signal and display the successful rate of the game.
Time for action – Indicating a game over event in the console
Carry out the following steps:
1. Open the html5games.audio.js JavaScript le.
2. Add the following code in the jQuery ready funcon:
$(audiogame.melody).bind('ended', onMelodyEnded);
3. Add the following event handler funcon to the end of the le:
// show game over scene on melody ended.
function onMelodyEnded()
{
console.log('song ended');
console.log('success percent: ',audiogame.totalSuccessCount /
audiogame.totalDotsCount * 100 + '%');
}
4. It is me to save all les and play the game in a web browser. When the game is
over, we should see that the successful rate is printed in the console as shown in the
following screenshot:
Chapter 6
[ 203 ][ 203 ]
What just happened?
We just listened to the ended event of the audio element and handled it with
a handler funcon.
Handling audio events
There are many other events in the audio element. The following table lists a few commonly
used audio events:
Event Discussion
ended Sent when the audio element nishes a playback
play Sent when the audio element plays or resumes
pause Sent when the audio element pauses
progress Sent periodically when the audio element is downloading
timeupdate Sent when the currentTime property changes
Here we just listed a few commonly used events; you can reference the complete audio
event list in the Mozilla Developer Center at the following URL:
https://developer.mozilla.org/En/Using_audio_and_video_in_
Firefox#Media_events
Have a go hero
In our music game, we print out the successful rate in the console when the game is over.
How about adding a game over scene to our game and showing it at the end of the game?
It would be good to use animaon transion when showing a game over scene too.

Adding Sound Eects to your Games
[ 204 ][ 204 ]
Summary
We learned a lot in this chapter about using the HTML5 audio element and built
a music game.
Specically, we covered the following topics:
Adding the audio tag to the HTML. There are dierent aributes we can set to
dene how the audio tag behaves and loads dierent format sources.
Controlling the audio playback and volume by using the JavaScript API.
Adding sound eects on mouse hover and acve with the help of jQuery.
Creang a music game in canvas with keyboard inputs.
Handling audio events; the audio element sends several events when
its state changes.
We also discussed managing scenes and animang the transion.
We have learned about adding music and sound eects in our HTML5 games. Now we are
ready to build a more complete game by adding a leaderboard to store game scores in the
next chapter.
7
Using Local Storage to Store
Game Data
Local storage is a new specicaon from HTML5. It allows a website to store
informaon in the browser locally and access the stored data later. This is a
useful feature in game development because we can use it as a memory slot to
save any game data locally in a web browser.
We are going to add game data storing in the CSS3 memory matching game we built in
Chapter 3, Building a Memory Matching Game in CSS3. Besides storing and loading the
game data, we will also nofy the player for breaking a record with a nice 3D ribbon with
pure CSS3 styling.
In this chapter, we will cover the following topics:
Storing data by using HTML5 local storage
Saving the object in the local storage
Nofying players for breaking a new record with a nice ribbon eect
Saving the enre game progress
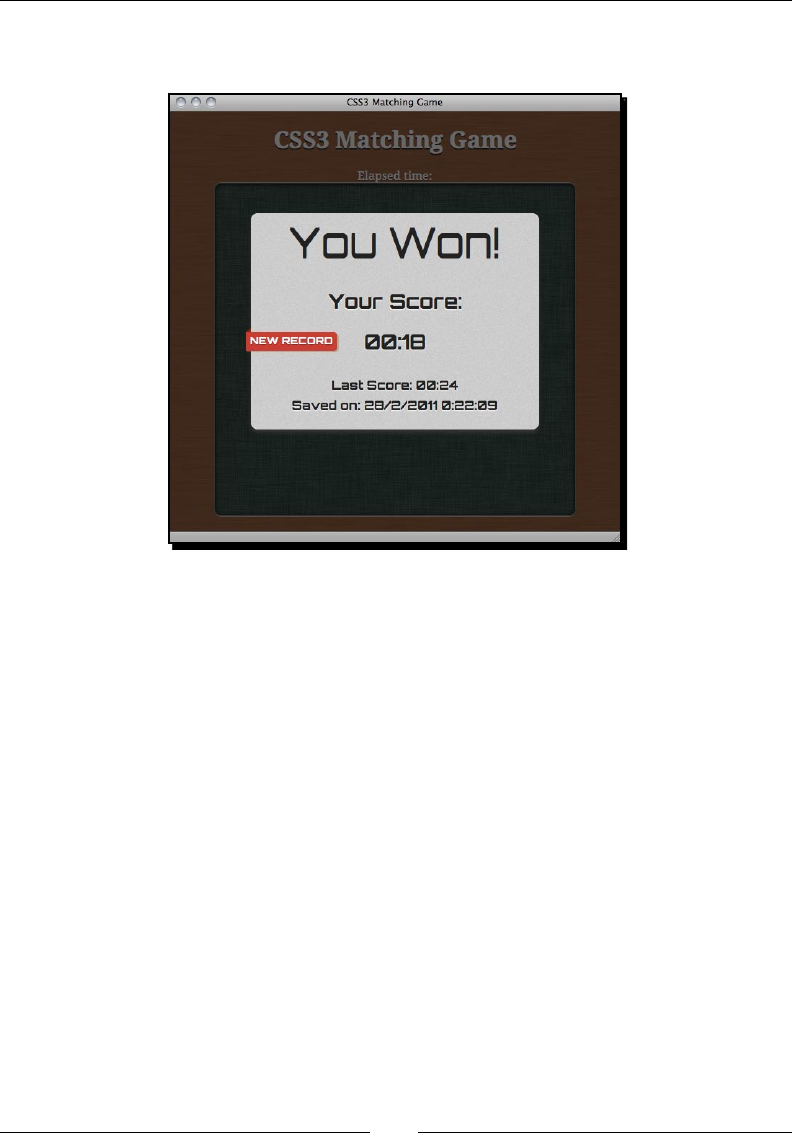
Using Local Storage to Store Game Data
[ 206 ][ 206 ][ 206 ]
The following screenshot shows the nal result we will create through this chapter. So, let's
get on with it:
Storing data by using HTML5 local storage
Remember the CSS3 memory matching game we made in Chapter 3? Imagine now we have
published our game and players are trying their best to perform well in the game.
We want to show the players whether they played beer or worse than the last me. We
will save the latest score and inform players whether they are beer or not this me by
comparing the scores.
They may feel proud when performing beer. This may make them addicted and they may
keep trying to get higher scores.
Creating a game over dialog
Before actually saving anything in the local storage, we need a game over screen. We have
made a few games in previous chapters. We made a Ping Pong game, memory matching
game, Untangle puzzle game, and a music game. In these games, we did not create any game
over screen. Imagine now we are playing the CSS3 memory matching game that we built in
Chapter 3. We successfully match and remove all cards. Once we nish, a game over screen
pops up and shows the me we ulized to complete the game.

Chapter 7
[ 207 ][ 207 ][ 207 ]
Time for action – Creating a game over dialog with the
elapsed played time
We will connue with the code from the memory matching game we made in Chapter 3.
Carry out the following steps:
1. Open the CSS3 matching game folder as our working directory.
2. Download a background image from the following URL (we will use it as the
background of the pop up):
http://gamedesign.cc/html5games/popup_bg.jpg
3. Place the image in the images folder.
4. Open index.html into any text editor.
5. We will need a font for the game over pop up. Add the following font embedding
CSS into the head secon:
<link href="http://fonts.googleapis.com/css?family=Orbitron:400,70
0" rel="stylesheet" type="text/css" >
6. Before the game secon, we add a div named timer to show the elapsed playing
me. In addion, we add a new popup secon containing the HTML markup of the
pop-up dialog:
<div id="timer">
Elapsed time: <span id="elapsed-time">00:00</span>
</div>
<section id="game">
<div id="cards">
<div class="card">
<div class="face front"></div>
<div class="face back"></div>
</div> <!-- .card -->
</div> <!-- #cards -->
</section> <!-- #game -->
<section id="popup" class="hide">
<div id="popup-bg">
</div>
<div id="popup-box">
<div id="popup-box-content">
<h1>You Won!</h1>
<p>Your Score:</p>
<p><span class='score'>13</span></p>

Using Local Storage to Store Game Data
[ 208 ][ 208 ][ 208 ]
</div>
</div>
</section>
7. We will now move on to the style sheet. As it is just for styling and not related to
our logic yet, we can simply copy the matchgame.css le from matching_game_
with_game_over in the code example bundle.
8. It is me to edit the game logic part. Open the html5games.matchgame.js le in
an editor.
9. In the jQuery ready funcon, we need a variable to store the elapsed me of the
game. Then, we create a mer to count the game every second as follows:
$(function(){
...
// reset the elapsed time to 0.
matchingGame.elapsedTime = 0;
// start the timer
matchingGame.timer = setInterval(countTimer, 1000);
}
10. Next, add a countTimer funcon which will be executed every second. It displays
the elapsed seconds in the minute and second format:
function countTimer()
{
matchingGame.elapsedTime++;
// calculate the minutes and seconds from elapsed time
var minute = Math.floor(matchingGame.elapsedTime / 60);
var second = matchingGame.elapsedTime % 60;
// add padding 0 if minute and second is less then 10
if (minute < 10) minute = "0" + minute;
if (second < 10) second = "0" + second;
// display the elapsed time
$("#elapsed-time").html(minute+":"+second);
}
11. In the removeTookCards funcon which we wrote earlier, add the following
highlighted code that executes the game over logic aer removing all cards:
function removeTookCards()
{
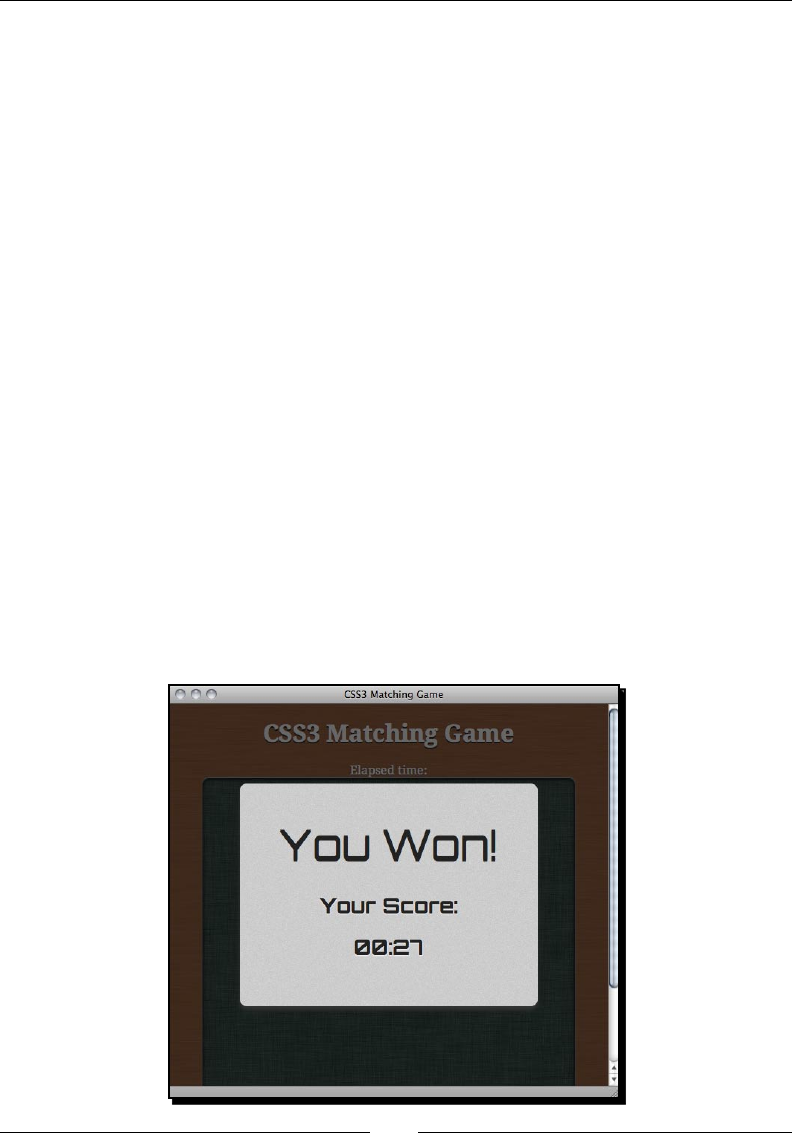
Chapter 7
[ 209 ][ 209 ][ 209 ]
$(".card-removed").remove();
// check if all cards are removed and show game over
if ($(".card").length == 0)
{
gameover();
}
}
12. At last, we create the following gameover funcon. It stops the counng mer,
displays the elapsed me in the game over pop up, and nally shows the pop up:
function gameover()
{
// stop the timer
clearInterval(matchingGame.timer);
// set the score in the game over popup
$(".score").html($("#elapsed-time").html());
// show the game over popup
$("#popup").removeClass("hide");
}
13. Now, save all les and open the game in a browser. Try nishing the
memory matching game and the game over screen will pop up, as shown
in the following screenshot:

Using Local Storage to Store Game Data
[ 210 ][ 210 ][ 210 ]
What just happened?
We have used the CSS3 transion animaon to show the game over pop up. We benchmark
the score by using the me a player ulized to nish the game.
Saving scores in the browser
Imagine now we are going to display how well the player played the last me. The game over
screen includes the elapsed me as the last score alongside the current game score. Players
can then see how well they do this me compared to last me.
Time for action – Saving the game score
1. First, we need to add a few markups in the popup secon to display the last score.
Add the following HTML in the popup secon in index.html:
<p>
<small>Last Score: <span class='last-score'>20</span>
</small>
</p>
2. Then, we open the html5games.matchgame.js to modify some game logic in the
gameover funcon.
3. Add the following highlighted code in the gameover funcon. It loads the saved
score from local storage and displays it as the score last me. Then, save the current
score in the local storage:
function gameover()
{
// stop the timer
clearInterval(matchingGame.timer);
// display the elapsed time in the game over popup
$(".score").html($("#elapsed-time"));
// load the saved last score from local storage
var lastElapsedTime = localStorage.getItem
("last-elapsed-time");
// convert the elapsed seconds into minute:second format
// calculate the minutes and seconds from elapsed time
var minute = Math.floor(lastElapsedTime / 60);
var second = lastElapsedTime % 60;
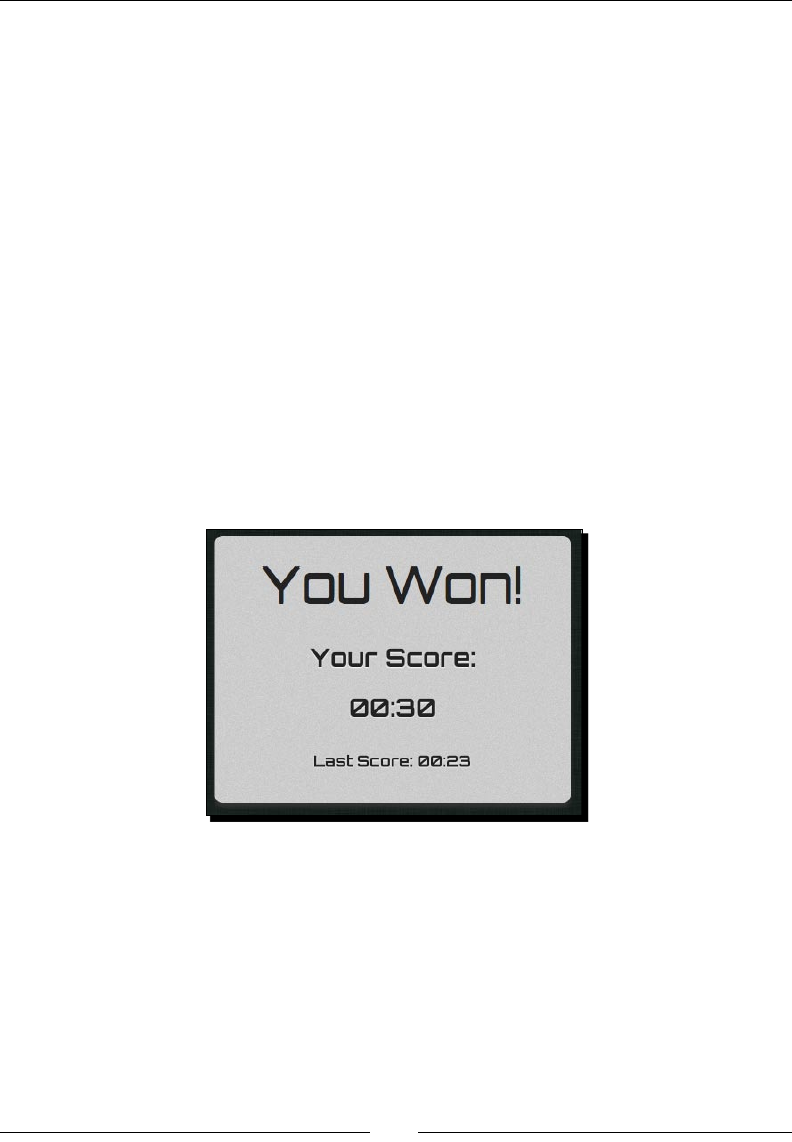
Chapter 7
[ 211 ][ 211 ][ 211 ]
// add padding 0 if minute and second is less then 10
if (minute < 10) minute = "0" + minute;
if (second < 10) second = "0" + second;
// display the last elapsed time in game over popup
$(".last-score").html(minute+":"+second);
// save the score into local storage
localStorage.setItem
("last-elapsed-time", matchingGame.elapsedTime);
// show the game over popup
$("#popup").removeClass("hide");
}
4. It is now me to save all les and test the game in the browser. When you nish the
game for the rst me, the last score should be 00:00. Then, try to nish the game
for the second me. The game over pop up will show the elapsed me you played
the last me. The following screenshot shows the game over screen with the current
and last score:
What just happened?
We just built a basic scoring system that compares a player's score with his/her last score.
Storing and loading data with local storage
We can store data by using the setItem funcon from the localStorage object. The
following table shows the usage of the funcon:
localStorage.setItem(key, value);

Using Local Storage to Store Game Data
[ 212 ][ 212 ][ 212 ]
Argument Denion Descripon
key The key is the name of the
record that we used to idenfy
an entry.
The key is a string and each
record has a unique key. Wring
a new value to an exisng key
overwrites the old value.
value The value is any data which will
be stored.
It can be any data, but the nal
storage is in a string. We will
discuss this shortly.
In our example, we save the game elapsed me as the score with the following code by using
the key last-elapsed-item:
localStorage.setItem("last-elapsed-time", matchingGame.elapsedTime);
Complementary to setItem, we get the stored data by using the getItem funcon in the
following way:
localStorage.getItem(key);
The funcon returns the stored value of the given key. It returns null when trying to get a
non-existent key. This can be used to check whether we have stored any data for a specic key.
The local storage saves the string value
The local storage stores data in a key-value pair. The key and value are both strings. If we
save numbers, Boolean, or any type other than string, then it will convert the value into a
string while saving.
Usually, problems occur when we load a saved value from the local storage. The loaded value
is a string regardless of the type we are saving. We need to explicitly parse the value into the
correct type before using it.
For example, if we save a oang number into the local storage, we need to use the
parseFloat funcon when loading it. The following code snippet shows how we can use
parseFloat to retrieve a stored oang number:
var score = 13.234;
localStorage.setItem("game-score",score);
// result: stored "13.234".
var gameScore = localStorage.getItem("game-score");
// result: get "13.234" into gameScore;
gameScore = parseFloat(gameScore);
// result: 13.234 floating value

Chapter 7
[ 213 ][ 213 ][ 213 ]
In the preceding code snippet, the manipulaon may be incorrect if we forget to convert the
gameScore from string to oat. For instance, if we add the gameScore by 1 without the
parseFloat funcon, the result will be 13.2341 instead of 14.234. So, be sure to convert
the value from local storage to its correct type.
Size limitaon of local storage
There is a size limitaon on the data stored through localStorage
for each domain. This size limitaon may be slightly dierent in dierent
browsers. Normally, the size limitaon is 5 MB. If the limit is exceeded, then
the browser throws a QUOTA_EXCEEDED_ERR excepon when seng a
key-value into localStorage.
Treating the local storage object as an associated array
Besides using the setItem and getItem funcons, we can treat the localStorage object
as an associated array and access the stored entries by using square brackets.
For instance, we can replace the following code with the laer version:
Using the setItem and getItem:
localStorage.setItem("last-elapsed-time", elapsedTime);
var lastElapsedTime = localStorage.getItem("last-elapsed-time");
Access localStorage as an array as follows:
localStorage["last-elapsed-time"] = elapsedTime;
var lastElapsedTime = localStorage["last-elapsed-time"];
Saving objects in the local storage
Now, imagine that we are saving not only the score, but also the date and me when the
ranking is created. We can either save two separate keys for the score and date me of
playing, or pack the two values into one object and store it in the local storage.
We will pack all the game data into one object and store it.

Using Local Storage to Store Game Data
[ 214 ][ 214 ][ 214 ]
Time for action – Saving the time alongside the score
Carry out the following steps:
1. First, open the index.html le from our CSS3 memory matching game.
2. Replace the HTML markup with the last score by the following HTML (it shows both
scores and the date me in the game over pop up):
<p>
<small>Last Score: <span class='last-score'>20</span><br>
Saved on: <span class='saved-time'>13/4/2011 3:14pm</span>
</small>
</p>
3. The HTML markup is now ready. We will move on to the game logic. Open the
html5games.matchgame.js le in a text editor.
4. We will modify the gameover funcon. Add the following highlighted code to the
gameover funcon. It gets the current date me when the game ends and packs a
formaed date me with elapsed me together into local storage:
function gameover()
{
// stop the timer
clearInterval(matchingGame.timer);
// display the elapsed time in the game over popup
$(".score").html($("#elapsed-time"));
// load the saved last score and save time from local storage
var lastScore = localStorage.getItem("last-score");
// check if there is no any saved record
lastScoreObj = JSON.parse(lastScore);
if (lastScoreObj == null)
{
// create an empty record if there is no any saved record
lastScoreObj = {"savedTime": "no record", "score": 0};
}
var lastElapsedTime = lastScoreObj.score;
// convert the elapsed seconds into minute:second format
// calculate the minutes and seconds from elapsed time
var minute = Math.floor(lastElapsedTime / 60);
var second = lastElapsedTime % 60;

Chapter 7
[ 215 ][ 215 ][ 215 ]
// add padding 0 if minute and second is less then 10
if (minute < 10) minute = "0" + minute;
if (second < 10) second = "0" + second;
// display the last elapsed time in game over popup
$(".last-score").html(minute+":"+second);
// display the saved time of last score
var savedTime = lastScoreObj.savedTime;
$(".saved-time").html(savedTime);
// get the current datetime
var currentTime = new Date();
var month = currentTime.getMonth() + 1;
var day = currentTime.getDate();
var year = currentTime.getFullYear();
var hours = currentTime.getHours();
var minutes = currentTime.getMinutes();
// add padding 0 to minutes
if (minutes < 10) minutes = "0" + minutes;
var seconds = currentTime.getSeconds();
// add padding 0 to seconds
if (seconds < 10) seconds = "0" + seconds;
var now = day+"/"+month+"/"+year+"
"+hours+":"+minutes+":"+seconds;
//construct the object of datetime and game score
var obj = { "savedTime": now, "score":
matchingGame.elapsedTime};
// save the score into local storage
localStorage.setItem("last-score", JSON.stringify(obj));
// show the game over popup
$("#popup").removeClass("hide");
}
5. We will save the les and open the game in a web browser.
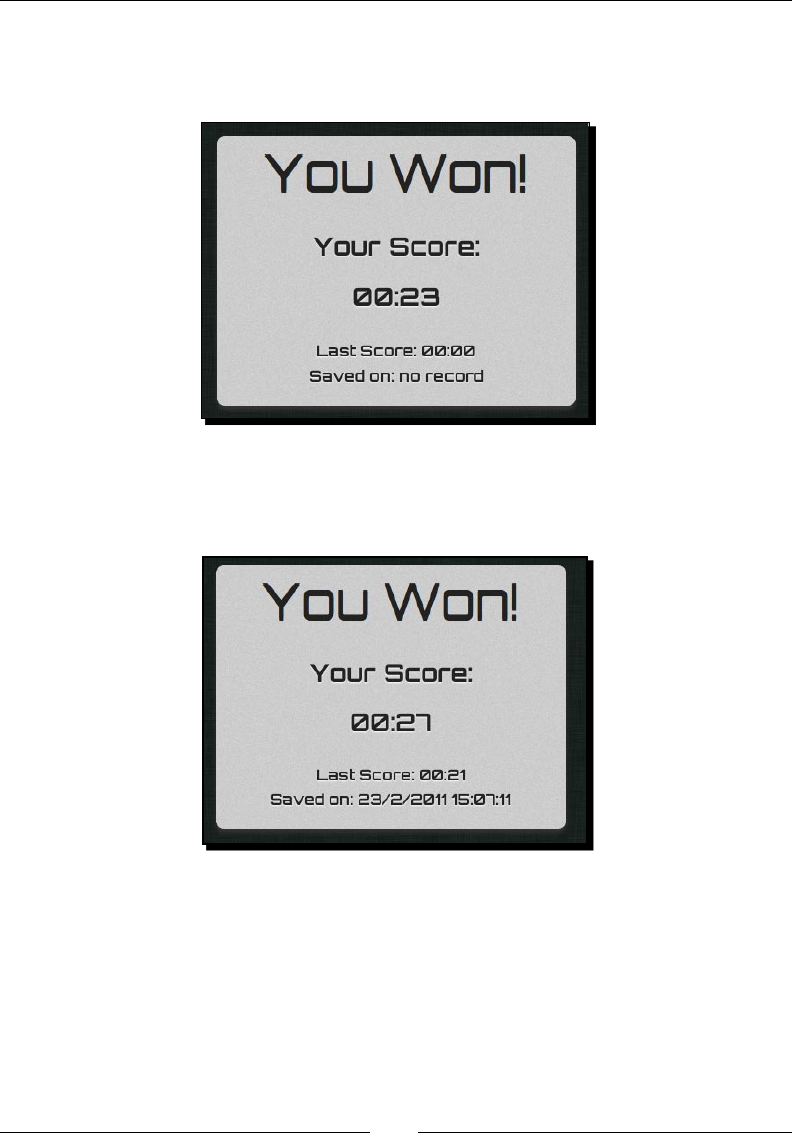
Using Local Storage to Store Game Data
[ 216 ][ 216 ][ 216 ]
6. When we nish the game for the rst me, we will get a screen similar to the
following screenshot which will show our game score and state that there are no
previous records:
7. Now try reloading the page and play the game again. When we nish the game for
the second me, the game over dialog will show our saved record. The following
screenshot shows how it should look:
What just happened?
We have just used a Date object in JavaScript to get the current date and me when the
game is over. In addion, we packed the game over date and me and the game elapsed
me in one object and saved it into the local storage. The saved object is encoded in a JSON
string. It will also load the last saved date and me and the game elapsed me from the
storage and parse it back to the JavaScript object from a string.

Chapter 7
[ 217 ][ 217 ][ 217 ]
Getting the current date and time in JavaScript
The Date object in JavaScript is used to working with date and me. When we create an
instance from the Date object, by default it stores the current date and me. Therefore, we
can easily get the current date and me informaon by using the following code snippet:
var currentTime = new Date();
var month = currentTime.getMonth() + 1;
var day = currentTime.getDate();
var year = currentTime.getFullYear();
var hours = currentTime.getHours();
var minutes = currentTime.getMinutes();
var seconds = currentTime.getSeconds();
As we display the date and me in a human-friendly format, we also need to add zero
padding to minutes and seconds when they are less than 10. We do this as follows:
if (minutes < 10) minutes = "0" + minutes;
if (seconds < 10) seconds = "0" + seconds;
var now = day+"/"+month+"/"+year+" "+hours+":"+minutes+":"+seconds;
The following table lists some useful funcons in the Date object to get the date and me:
Funcon Descripon
getFullYear Returns the year in four digits
getMonth Returns the month in integer, starng from 0 (Jan is 0 and Dec
is 11)
getDate Returns the day of the month, starng from 1
getDay Returns the day of the week, starng from 0 (Sunday is 0 and
Saturday is 6)
getHours Returns the hour, starng from 0 to 23
getMinutes Returns the minutes
getSeconds Returns the seconds
getMilliseconds Returns the milliseconds in 3 digits
getTime Returns the number of milliseconds since 1 Jan, 1970 00:00
Using Local Storage to Store Game Data
[ 218 ][ 218 ][ 218 ]
The Mozilla Developer Network provides a detailed reference for using the Date
object at the following URL:
https://developer.mozilla.org/en/JavaScript/Reference/
Global_Objects/Date
Using the native JSON to encode an object into a string
We used JSON to represent the game level data in Chapter 4, Building an Untangle Game
with Canvas and Drawing API.
JSON is an object notaon format that is friendly for machines to parse and generate.
In this example, we packed the nal elapsed me and the date and me into an object.
Then, we encoded the object into JSON. Modern web browsers come with a nave JSON
support. We can easily encode any JavaScript object into JSON by using the stringify
funcon as follows:
JSON.stringify(anyObject);
Normally, we only use the rst parameter for the stringify funcon. It is the object that
we are going to encode as a string. The following code snippet demonstrates the result of an
encoded JavaScript object:
var jsObj = {};
jsObj.testArray = [1,2,3,4,5];
jsObj.name = 'CSS3 Matching Game';
jsObj.date = '8 May, 2011';
JSON.stringify(jsObj);
// result: {"testArray":[1,2,3,4,5],"name":"CSS3 Matching
Game","date":"8 May, 2011"}
The stringify method can parse objects with data structure into a string
well. However, it cannot convert anything from an object into a string. For
instance, it will return an error if we try to pass a DOM element into it. It will
return the string represenng the date if we pass a Date object. Alternavely,
it will drop all methods denion of the parsing object.
Loading a stored object from a JSON string
The complete form of JSON is JavaScript Object Notaon. From the name, we know that it
uses the syntax from JavaScript to represent an object. Therefore, it is very easy to parse a
JSON formaed string back to a JavaScript object.
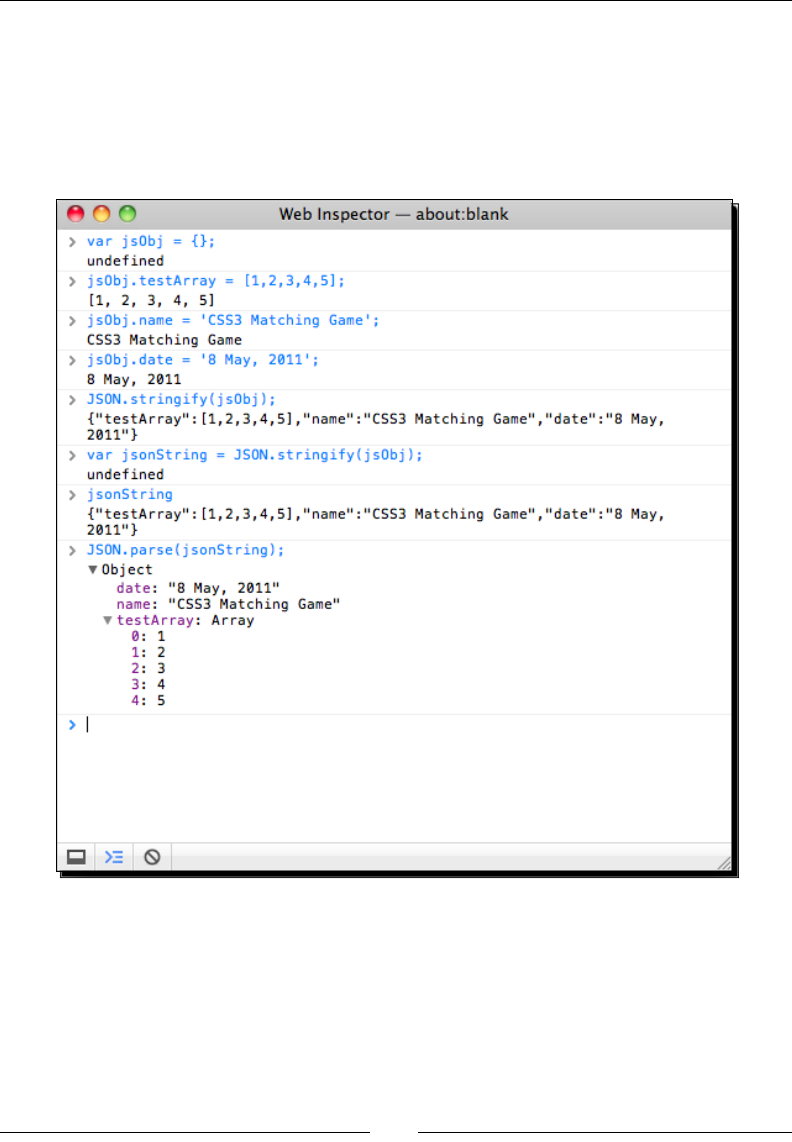
Chapter 7
[ 219 ][ 219 ][ 219 ]
The following code snippet shows how we can use the parse funcon in the JSON object:
JSON.parse(jsonFormattedString);
We can open the console in the Web Inspector to test the JSON JavaScript funcons. The
following screenshot shows the running result of the code snippets we just discussed when
encoding an object and parsing them:
Inspecting the local storage in a console window
Aer we have saved something in the local storage, we may want to know what is exactly
saved before we write the loading part. We can inspect what we have saved by using the
storage panel in the Web Inspector. It lists all the saved key-value pairs under the same
domain. The following screenshot shows that we have the last-score saved with value
{"savedTime":"23/2/2011 19:27:02","score":23}.
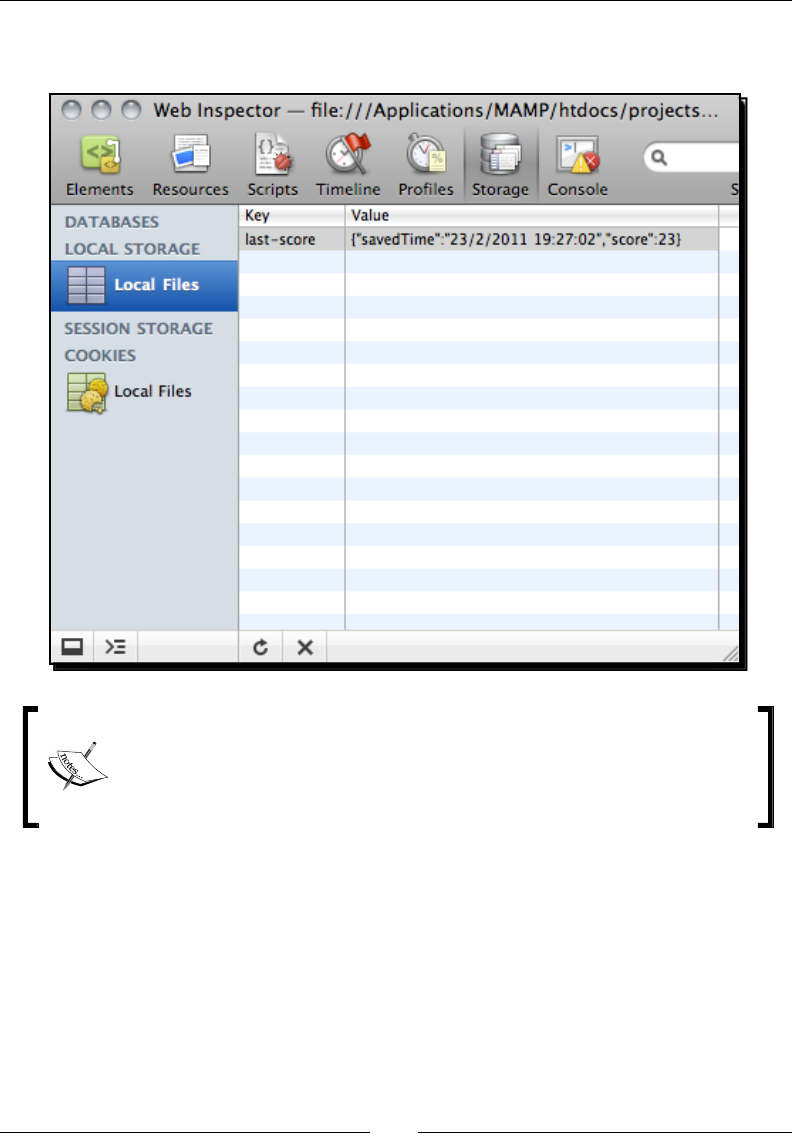
Using Local Storage to Store Game Data
[ 220 ][ 220 ][ 220 ]
The value is the result of the JSON.stringify funcon we used to encode the object into
JSON. You may also try saving an object directly into local storage:
Besides localStorage, there are other storage approaches that were
not discussed. These approaches include the Web SQL Database (http://
www.w3.org/TR/webdatabase/), which uses SQLite to store data, and
IndexedDB (https://developer.mozilla.org/en/IndexedDB).
Notifying players of breaking a new record with a nice
ribbon effect
Imagine that we want to encourage players by informing them that they broke a new record
compared to the last score. We want to show a ribbon with New Record text on it. Thanks to
the new CSS3 properes, we can create a ribbon eect completely in CSS.

Chapter 7
[ 221 ][ 221 ][ 221 ]
Time for action – Creating a ribbon in CSS3
We will create a new record ribbon and display it when a player breaks his/her last score. So,
carry out the following steps:
1. First, open index.html where we will add the ribbon HTML markup.
2. Add the following highlighted HTML right aer popup-box and before popup-box-
content:
<div id="popup-box">
<div class="ribbon hide">
<div class="ribbon-body">
<span>New Record</span>
</div>
<div class="triangle"></div>
</div>
<div id="popup-box-content">
…
3. Next, we need to focus on the style sheet. The enre ribbon eect is done in CSS.
Open the matchgame.css le in a text editor.
4. In the popup-box styling, we need to add a relave posion to it. We do this
as follows:
#popup-box {
position: relative;
...
}
5. Then, we need to add the following styles that create the ribbon eect to the
CSS le:
.ribbon.hide {
display: none;
}
.ribbon {
float: left;
position: absolute;
left: -7px;
top: 165px;
z-index: 0;
font-size: .5em;
text-transform: uppercase;
text-align: right;

Using Local Storage to Store Game Data
[ 222 ][ 222 ][ 222 ]
}
.ribbon-body {
height: 14px;
background: #ca3d33;
padding: 6px;
z-index: 100;
-webkit-box-shadow: 2px 2px 0 rgba(150,120,70,.4);
border-radius: 0 5px 5px 0;
color: #fff;
text-shadow: 0px 1px 1px rgba(0,0,0,.3);
}
.triangle{
position: relative;
height: 0px;
width: 0;
left: -5px;
top: -32px;
border-style: solid;
border-width: 6px;
border-color: transparent #882011 transparent transparent;
z-index: -1;
}
6. Lastly, we need to modify the game over logic a lile bit. Open the html5games.
matchgame.js le and locate the gameover funcon.
7. Add the following code to the gameover funcon which compares the current score
with the last score to determine the new record:
if (lastElapsedTime == 0 || matchingGame.elapsedTime <
lastElapsedTime)
{
$(".ribbon").removeClass("hide");
}
8. We will test the game in a web browser. Try nishing a game slowly and then nish
another game fast. When you break the last score, the game over pop up shows a
nice NEW RECORD ribbon, as shown in the following screenshot:
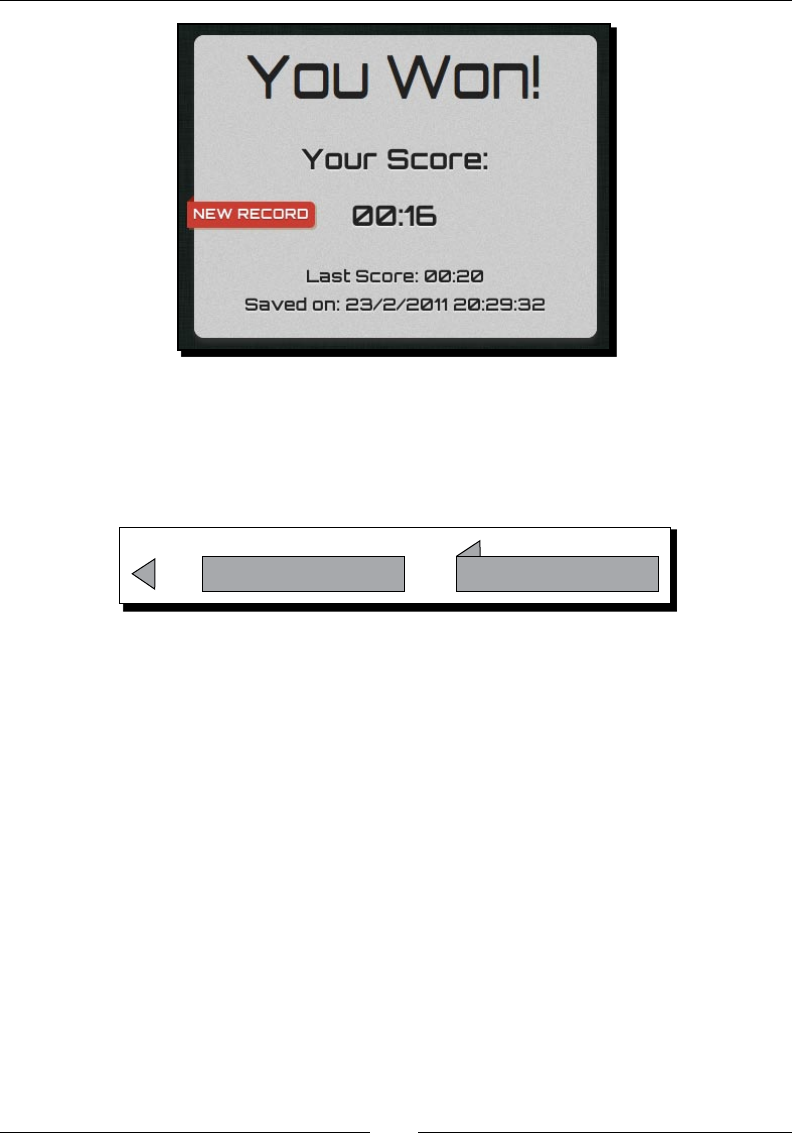
Chapter 7
[ 223 ][ 223 ][ 223 ]
What just happened?
We have just created a ribbon eect in a pure CSS3 style with some help from JavaScript
to show and hide it. The ribbon is composited by a lile triangle overlaid by a rectangle, as
shown in the following screenshot:
=
+
Now, how can we create a triangle in CSS? We can create a triangle by seng both width
and height to 0 and drawing only one border. The size of the triangle is then decided by the
border width. The following code is for the triangle CSS we used in our new record ribbon:
.triangle{
position: relative;
height: 0px;
width: 0;
left: -5px;
top: -32px;
border-style: solid;
border-width: 6px;
border-color: transparent #882011 transparent transparent;
z-index: -1;
}

Using Local Storage to Store Game Data
[ 224 ][ 224 ][ 224 ]
The following PVM Garage website provides a detailed explanaon on pure
CSS3 ribbon usage:
http://www.pvmgarage.com/2010/01/how-to-create-depth-
and-nice-3d-ribbons-only-using-css3/
Have a go hero – Saving and comparing only to the fastest time
Each me the game nishes, it compares the last score with the current score. Then, it saves
the current score.
How about changing the code to save the highest score and show the new record ribbon
when breaking the highest score?
Saving the entire game progress
We have enhanced our CSS3 memory matching game by adding a game over screen and
storing the game record. Imagine now that a player is in the mid game and accidentally
closes the web browser. Once the player opens the game again, the game starts from the
beginning and the game that the player was playing is lost. With the local storage, we can
encode the enre game data into JSON and store them. In this way, players can resume
their game later.
Saving the game progress
We are going to pack the game data into one object and save it into the local storage
every second.
Time for action – Saving all essential game data in the
local storage
We will connue work with our CSS3 memory matching game:
1. Open the html5games.matchgame.js JavaScript le.
2. Add the following code at the top of the JavaScript le aer declaring the
matchingGame variable. This code creates an object named savingObject
to save the array of deck and removed cards and the current elapsed me:
matchingGame.savingObject = {};
matchingGame.savingObject.deck = [];

Chapter 7
[ 225 ][ 225 ][ 225 ]
// an array to store which card is removed by storing their index.
matchingGame.savingObject.removedCards = [];
// store the counting elapsed time.
matchingGame.savingObject.currentElapsedTime = 0;
3. In the jQuery funcon, add the following highlighted code. It clones the order of the
deck to the savingObject. In addion, it assigns an index to each card in the DOM
data aribute:
$(function(){
// shuffling the deck
matchingGame.deck.sort(shuffle);
// copying the deck into saving object.
matchingGame.savingObject.deck = matchingGame.deck.slice();
// clone 12 copies of the card DOM
for(var i=0;i<11;i++){
$(".card:first-child").clone().appendTo("#cards");
}
...
// embed the pattern data into the DOM element.
$(this).attr("data-pattern",pattern);
// save the index into the DOM element, so we know which is the
next card.
$(this).attr("data-card-index",index);
...
4. We have a countTimer funcon that executes every second. We add the following
highlighted code in the countTimer funcon. It saves the current elapsed me in
the savingObject and also saves the object in the local storage:
function countTimer()
{
matchingGame.elapsedTime++;
// save the current elapsed time into savingObject.
matchingGame.savingObject.currentElapsedTime =
matchingGame.elapsedTime;
...
// save the game progress

Using Local Storage to Store Game Data
[ 226 ][ 226 ][ 226 ]
saveSavingObject();
}
5. The game removes cards when the player nds a matching pair. We replace the
original $(".card-removed").remove(); code with the following highlighted
code in the removeTookCards funcon. It remembers which cards are removed in
the savingObject:
function removeTookCards()
{
// add each removed card into the array which store which cards
are removed
$(".card-removed").each(function(){
matchingGame.savingObject.removedCards.push
($(this).data("card-index"));
$(this).remove();
});
// check if all cards are removed and show game over
if ($(".card").length == 0)
{
gameover();
}
}
6. We have to remove the saved game data in the local storage when the game is over.
Add the following code in the gameover funcon:
function gameover()
{
//at last, we clear the saved savingObject
localStorage.removeItem("savingObject");
}
7. At last, we have a funcon to save the savingObject in the local storage:
function saveSavingObject()
{
// save the encoded saving object into local storage
localStorage["savingObject"] =
JSON.stringify(matchingGame.savingObject);
}
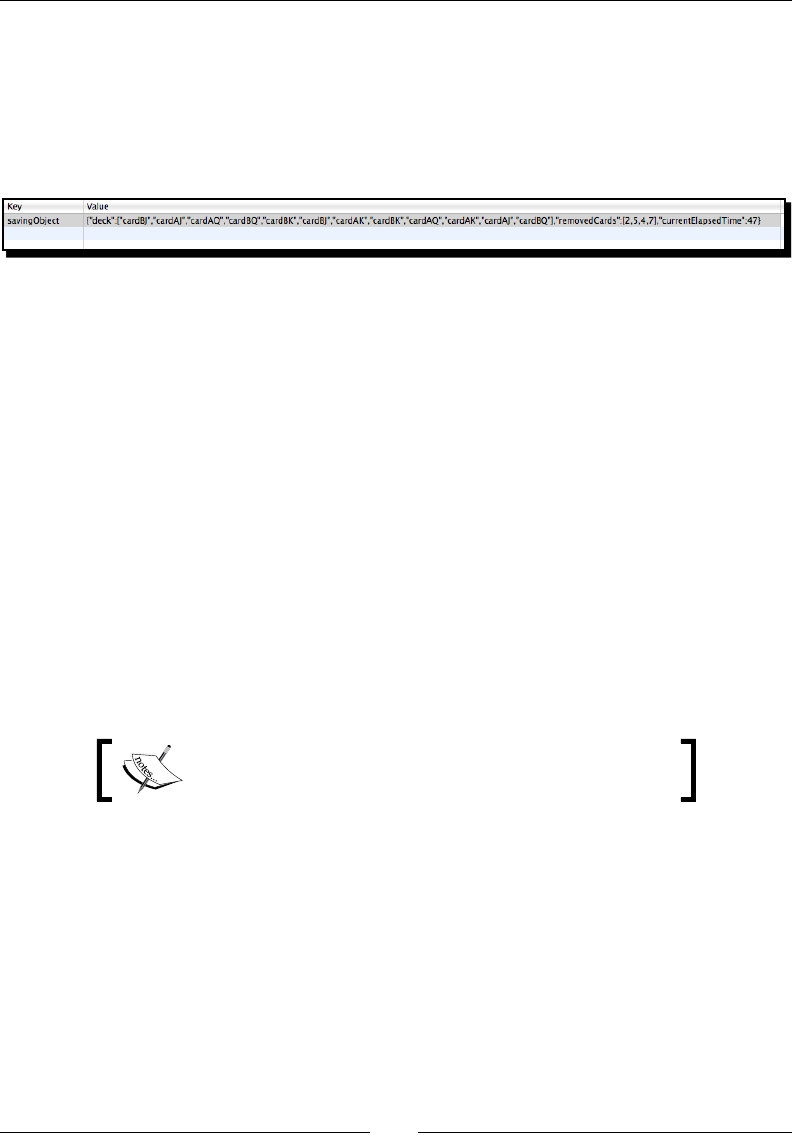
Chapter 7
[ 227 ][ 227 ][ 227 ]
8. We have modied the code a lot and it is now me to test the game in a web
browser. Aer the game runs, try clearing several matching cards. Then, open
the storage panel in the Web Inspector. The local storage should contain an entry
similar to the one shown in the following screenshot. It is a record with a key
savingObject and a value with a long string in a JSON format. The JSON string
contains the shued deck, removed cards, and the current elapsed me:
What just happened?
We have just entered all essenal game data into an object named savingObject. This
savingObject contains all informaon that we need to recreate the game later. It includes
the order of cards, removed cards, and the current elapsed me.
Lastly, we saved savingObject in localStorage on each second. The object is encoded
into JSON using the stringify funcon we used earlier in this chapter. Then, we recreated
the game by parsing the JSON string from the local storage.
Removing a record from the local storage
We need to remove the saved record when the game is over. Otherwise, the new game will
not start. Local storage provides a remoteItem funcon to remove a specic record.
Here is how we use the funcon to remove the record with the given key:
localStorage.removeItem(key);
If you want to remove all stored records, then you can use
the localStorage.clear() funcon.
Cloning an array in JavaScript
We cloned the shued deck in savingObject, so that we could use the order of the deck
to recreate the cards when we resumed the game. However, we cannot copy an array by
assigning the array to another variable. The following code fails to copy an array A to array B:
var a = [1,2,3,4,5];
var b = a;
a.pop();
// result:
// a: [1,2,3,4]
// b: [1,2,3,4]
Using Local Storage to Store Game Data
[ 228 ][ 228 ][ 228 ]
The slice funcon provides an easy way to clone an array with only primive types of
elements. We can clone an array with the slice funcon as long as it does not contain
another array or object as an element. The following code successfully clones an array A to B:
var a = [1,2,3,4,5];
var b = a.slice();
a.pop();
// result:
// a: [1,2,3,4]
// b: [1,2,3,4,5]
The slice funcon is normally used to create a new array by selecng a range of elements
from an exisng array. When using the slice funcon without any arguments, it clones
the enre array. The Mozilla Developer Network provides a detailed usage on the slice
funcon at the following URL:
https://developer.mozilla.org/en/JavaScript/Reference/Global_Objects/
Array/slice
Resuming the game progress
We have saved the game progress, but have not yet wrien the logic for resuming the game.
So, let's move on to the resuming part.
Time for action – Resuming a game from the local storage
Carry out the following steps:
1. Open the html5games.matchgame.js JavaScript le.
2. In the jQuery ready funcon, we used the saved order of deck in the previous game
instead of shuing a new deck. Add the following highlighted code into the ready
funcon:
$(function(){
// shuffling the deck
matchingGame.deck.sort(shuffle);
// re-create the saved deck
var savedObject = savedSavingObject();
if (savedObject != undefined)
{
matchingGame.deck = savedObject.deck;
}
...

Chapter 7
[ 229 ][ 229 ][ 229 ]
3. Aer inializing the cards in the ready funcon, we remove cards which were
removed in the previous game. We also restore the saved elapsed me from the
saved value. Add the following highlighted code in the jQuery ready funcon:
// removed cards that were removed in savedObject.
if (savedObject != undefined)
{
matchingGame.savingObject.removedCards =
savedObject.removedCards;
// find those cards and remove them.
for(var i in matchingGame.savingObject.removedCards)
{
$(".card[data-card-index="+matchingGame.savingObject.
removedCards[i]+"]").remove();
}
}
// reset the elapsed time to 0.
matchingGame.elapsedTime = 0;
// restore the saved elapsed time
if (savedObject != undefined)
{
matchingGame.elapsedTime = savedObject.currentElapsedTime;
matchingGame.savingObject.currentElapsedTime = savedObject.
currentElapsedTime;
}
4. Finally, we create the following funcon to retrieve savingObject from the
local storage:
// Returns the saved savingObject from the local storage.
function savedSavingObject()
{
// returns the saved saving object from local storage
var savingObject = localStorage["savingObject"];
if (savingObject != undefined)
{
savingObject = JSON.parse(savingObject);
}
return savingObject;
}
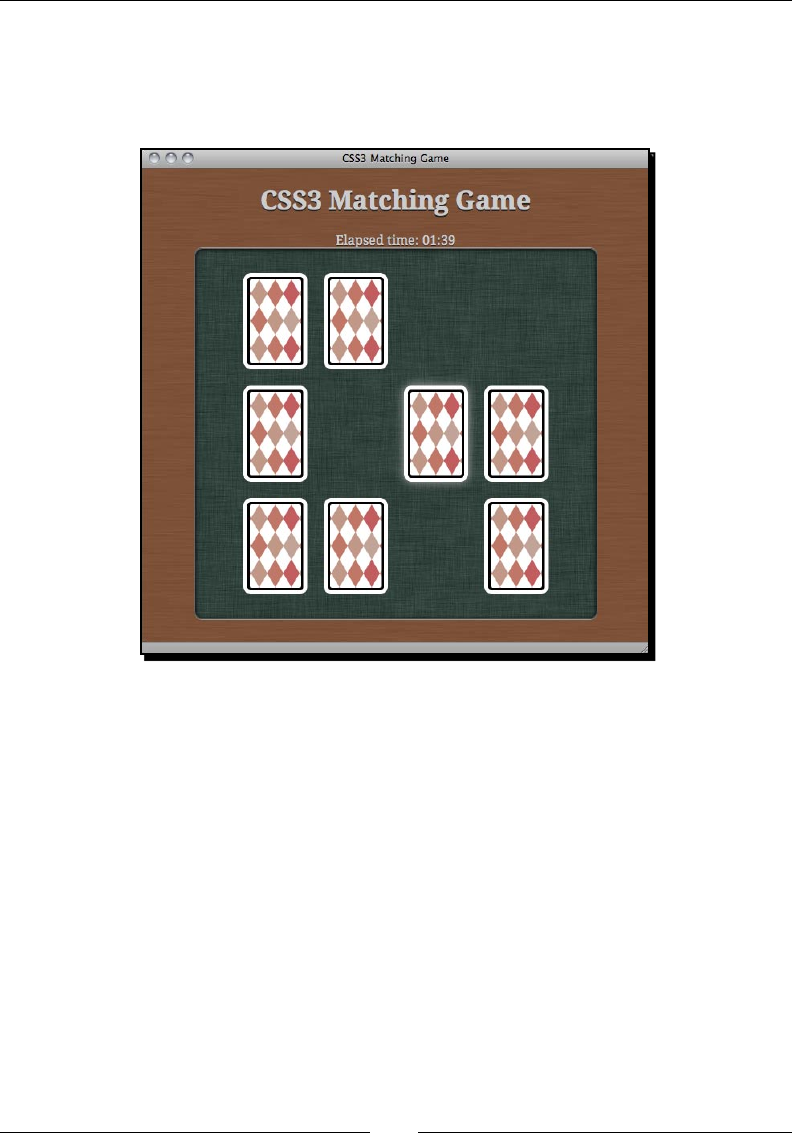
Using Local Storage to Store Game Data
[ 230 ][ 230 ][ 230 ]
5. Save all les and open the game in web a browser. Try playing the game by removing
several matching cards. Then, close the browser window and open the game again.
The game should resume from the state where we closed the window, as shown in
the following screenshot:
What just happened?
We just nished the game loading part by parsing the saved JSON string of the enre
game status.
Then, we restored the elapsed me and order of deck from the loaded savingObject.
Restoring these two properes is simply variable assigning. The tricky part is recreang
the card removing. In the game saving secon, we assigned an index to each card DOM by
custom data aribute data-card-index. We stored the index of each removed card when
saving the game, so we can know which cards are removed when loading the game. Then,
we can remove those cards when the game sets up. The following code removes the cards
in a jQuery game ready funcon:
if (savedObject != undefined)
{
matchingGame.savingObject.removedCards = savedObject.removedCards;
// find those cards and remove them.
Chapter 7
[ 231 ][ 231 ][ 231 ]
for(var i in matchingGame.savingObject.removedCards)
{
$(".card[data-card-index="+matchingGame.savingObject.
removedCards[i]+"]").remove();
}
}
Tracking the storage changes with the storage event
Somemes, we may want to listen to the changes of the localStorage.
We can do that by listening to the storage event. It is red when anything
is changed in the localStorage. The following link from Dive into HTML5
provides a detailed discussion on how we can use the event:
http://diveintohtml5.org/storage.html#storage-event
Pop quiz – Using local storage
Consider whether each of the following statements is true or not:
1. We can save an integer or object directly in the local storage.
2. We can save the data of an object into the local storage by encoding them
into a string.
3. We can use localStorage["hello"] = "world" to save the value "world" with
key "hello" in the local storage.
Summary
We learned a lot in this chapter about using the local storage to save the game data
in a web browser.
Specically, we covered:
Saving and retrieving basic data into the key-value pair local storage
Encoding an object into the JSON formaed string and parsing the string back to a
JavaScript object
Saving the enre game progress, so the game can resume even if le mid way
We also created a nice 3D ribbon as a new record badge in pure CSS3 styling.
Now that we have learned about improving our previous games by using the local storage,
we are ready to move on to an advanced feature named WebSocket which connects players
together in a real me interacon.
8
Building a Multiplayer
Draw-and-Guess Game
with WebSockets
We built several local single player games in previous chapters. In this chapter,
we will build a mulplayer game with the help of WebSockets. WebSockets
enable us to create event-based server-client architecture. The messages
passed between all connected browsers become instant. We will combine the
canvas drawing, JSON data packing, and several techniques learned in previous
chapters to build the draw-and-guess game.
In this chapter, we will learn the following topics:
Trying an exisng muluser sketchpad which shows drawings from dierent
connected users through WebSockets
Installing a WebSockets server which is implemented by node.js
Connecng the server from a browser
Creang an instant chat room with WebSocket API
Creang a muluser drawing pad in Canvas
Building a draw-and-guess game by integrang the chat room and drawing with
game logic
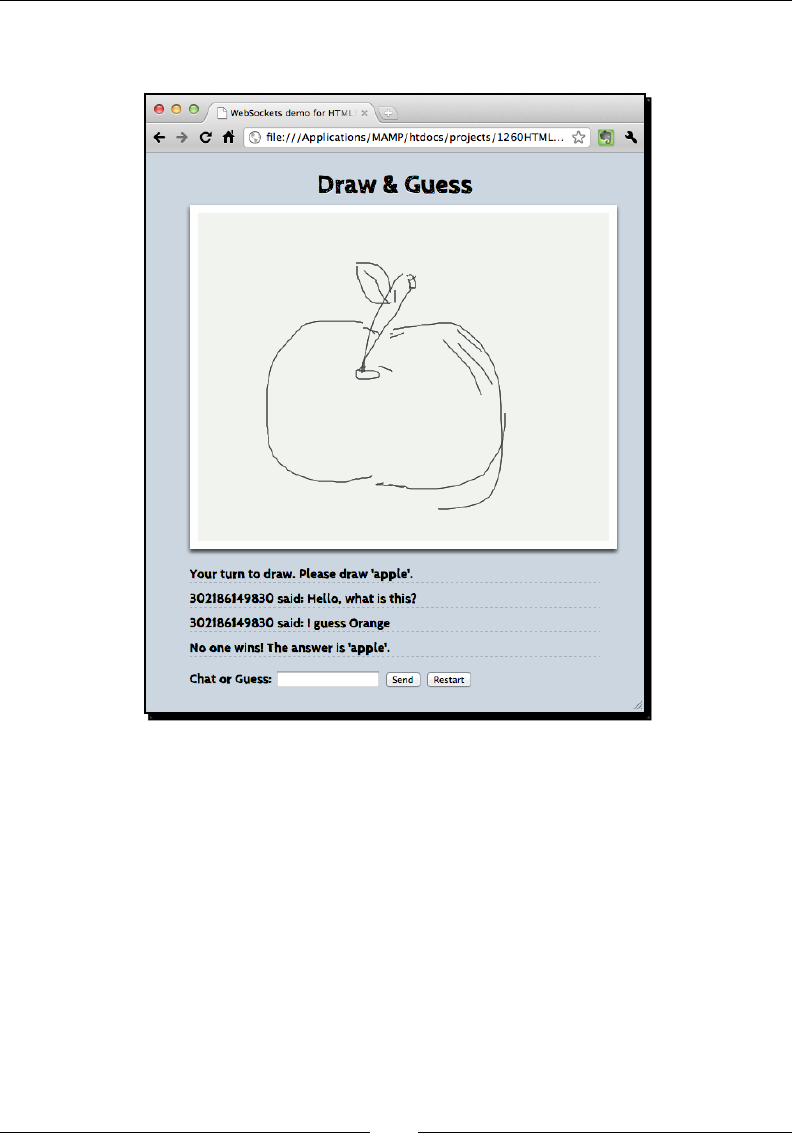
Building a Mulplayer Draw-and-Guess Game with WebSockets
[ 234 ][ 234 ]
The following screenshot shows the draw-and-guess game that we will create in
this chapter:
So, let's get on with it.
Trying an existing WebSockets web application
Before we start to build our WebSockets example, we will take a look at an exisng muluser
sketchpad example. This example lets us know how the data is sent between browsers by
using the WebSockets server instantly.
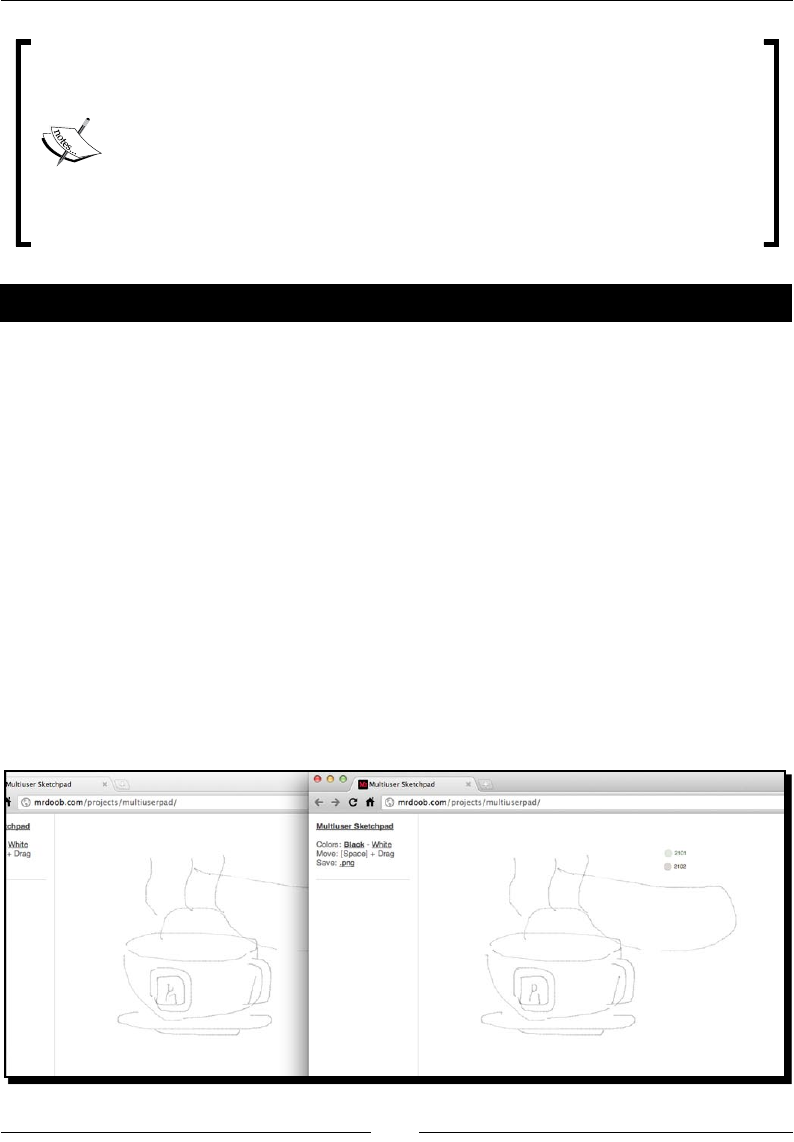
Chapter 8
[ 235 ][ 235 ]
A browser's capability of using WebSockets
At the me of wring this book, only Apple Safari and Google Chrome
supported the WebSockets API. Mozilla Firefox and Opera dropped support
on WebSockets because of a potenal security issue on the protocol. Google
Chrome is also planning to drop WebSockets unl the security hole is xed.
The following link from Mozilla explains why they disabled WebSockets:
http://hacks.mozilla.org/2010/12/websockets-disabled-
in-firefox-4/
Time for action – Trying the multiuser sketchpad
Carry out the following steps:
1. Open the following link in a web browser:
http://www.chromeexperiments.com/detail/multiuser-sketchpad/
2. You will get an introducon page of the muluser sketchpad. Right click on the
Launch Experiment opon and choose Open link in new window.
3. The browser prompts a new window with the sketchpad applicaon. Then, we
repeat the preceding step again to open another instance of the sketchpad.
4. Put the two browsers side by side on the desktop.
5. Try to draw something on either sketchpad. The drawing should appear on both
sketchpads. In addion, the sketchpad is shared with everyone who is connecng.
You may also see drawings from other users.
6. The following screenshot shows a cup drawn on the sketchpad by two users:

Building a Mulplayer Draw-and-Guess Game with WebSockets
[ 236 ][ 236 ]
What just happened?
We have just seen how browsers can be connected together in real me. We draw
something on the sketchpad and all other connected users can view the drawings. In
addion, we can see what others are drawing too.
The example is made by using the HTML5 WebSockets feature with a backend server to
broadcast drawing data to all connected browsers.
The drawing part is built on a canvas which we already covered in Chapter 4, Building the
Untangle Game with Canvas and Drawing API. The WebSocket API enables browsers to
establish a persistent connecon with the server. The backend is an event-based server
named node.js which we will install and use in this chapter.
Installing a WebSocket server
The HTML5, WebSockets provides a client-side API to connect a browser to a backend server.
This server has to support WebSockets protocol in order to keep the connecon persistent.
Installing the Node.JS WebSocket server
In this secon, we will download and install a server named Node.JS on which we can
install a WebSockets module.
Time for action – Installing Node.JS
Carry out the following steps:
1. Go to the following URL which contains the source code of the Node.JS server:
hps://github.com/joyent/node
2. Click on the Downloads buon on the page. It prompts a dialog asking which format
to download. Just select the ZIP format.
3. Unzip the ZIP le in a working directory.
4. In Linux or Mac OSX, use Terminal and change the directory to where the node.js
le is located.
Chapter 8
[ 237 ][ 237 ]
Node.JS works out of the box in Linux and Mac. The following link provides
an installer for installing it on Windows:
http://node-js.prcn.co.cc/
5. Run the following command:
$ ./configure
$ sudo make install
The sudo make install command installs Node.JS with root ownership
and also installs the required third party libraries with root access. The
following link discusses how we can install the Node.JS without using sudo:
http://increaseyourgeek.wordpress.com/2010/08/18/
install-node-js-without-using-sudo/
6. The sudo make install command requires typing the password of the user in a
system who has admin privileges. Type the password to connue the installaon.
7. Aer the installaon, we can check whether the node.js is installed by checking its
version with the following command:
$ node --version
8. The preceding command should print a version number of the node.js. In my case,
it is version 0.5 pre:
v0.5.0-pre
9. Next, we will install the WebSockets library for the Node.JS server. Go to the
following URL in a browser:
https://github.com/miksago/node-websocket-server
10. Click on the Downloads buon on the page and download the ZIP le.
11. Unzip the ZIP le in a directory. We will need the lib directory in this package later.
Building a Mulplayer Draw-and-Guess Game with WebSockets
[ 238 ][ 238 ]
What just happened?
We just downloaded and installed the Node.JS server. We also downloaded the WebSockets
library for the node.js server. We will build server logic on top of this server and the
WebSockets library through the examples in this chapter.
Node.js server installaon runs well on Unix or Linux operang systems.
However, it requires a few more steps to install and run the node.js server
on Windows. The following link shows how we can install the node.js
server on Windows:
https://github.com/joyent/node/wiki/Building-node.
js-on-Cygwin-(Windows)
Creating a WebSockets server to broadcast the connection
count
We just installed the node.js server with the WebSockets library. Now, we will build
something to test the WebSockets. Imagine now we want a server that accepts connecons
from browsers and then broadcasts the connecon count to all users.
Time for action – Creating a WebSocket server that sends
the total count of connections
Carry out the following steps:
1. Create a new directory named server.
2. Copy the enre lib folder in the node-websocket-server package in the
server directory.
3. Create a new le named server.js under the server directory with the following
content:
var ws = require(__dirname + '/lib/ws/server');
var server = ws.createServer();
server.addListener("connection", function(conn){
// init stuff on connection
console.log("A connection established with id",conn.id);
var message = "Welcome "+conn.id+" joining the party.
Total connection:"+server.manager.length;
server.broadcast(message);

Chapter 8
[ 239 ][ 239 ]
});
server.listen(8000);
console.log("WebSocket server is running.");
console.log("Listening to port 8000.");
4. Open the terminal and change to the server directory.
5. Type the following command to execute the server:
node server.js
6. We should get the following result if it works:
$ node server.js
WebSocket server is running.
Listening to port 8000.
What just happened?
We just created a simple server logic that inialized the WebSockets library and listened to
the connecon event.
Initializing the WebSockets server
In Node.JS, dierent funcons are packed into modules. When we need a funconality in
a specic module, we use require to load it. We load the WebSockets module and then
inialize the server using the following code in the server logic:
var ws = require(__dirname + '/lib/ws/server');
var server = ws.createServer();
__dirname represents the current directory of the server JavaScript le that is being
executed. We placed the lib folder under the same folder of our server logic le. Therefore,
the WebSockets server is in current directory | lib | ws | server.
At last, we need to assign a port for the server to listen to by the following code:
server.listen(8000);
In the preceding code snippet, 8000 is the port number with which a client connects to this
server. We may choose a dierent port number, but we have to ensure that the chosen port
number is not overlapped by other common server services.
Building a Mulplayer Draw-and-Guess Game with WebSockets
[ 240 ][ 240 ]
In order to get more informaon about the global scope objects and variables
from the node.js server, please visit their ocial document at the following link:
http://nodejs.org/docs/v0.4.3/api/globals.html
Listening to the connection event on the server side
The node.js server is event-based. This means that most logic is executed when a certain
event is red. The following code we used in the example listens to the connection event
and handles it:
server.addListener("connection", function(conn){
console.log("A connection established with id",conn.id);
…
});
The connection event comes with a connecon argument. We have an id property in the
connecon instance that we can use to disnguish each connected client.
The following table lists two commonly used server events:
Server-side event for WebSockets
node.js
Descripon
connection Event res when there is a new connecon established by
the client
close Event res when a connecon closes
Getting a count of connected clients on the server side
We can get the count of connected clients in the WebSockets node.js server by accessing
the server manager. We can get the count by using the following code:
var totalConnectedClients = server.manager.length;
Broadcasting a message to all connected browsers
Once the server gets a new connection event, we broadcast the updated count of the
connecon to all clients. Broadcasng a message to clients is easy. We just need to call the
broadcast funcon in the server instance with a string argument as the message.
The following code snippet broadcasts a server message to all connected browsers:
var message = "a message from server";
server.broadcast(message);

Chapter 8
[ 241 ][ 241 ]
Creating a client that connects to a WebSocket server and
getting the total connections count
We built the server in the last example and now we will build a client that connects to our
WebSocket server and receives messages from the server. The message will contain the total
connecon count from the server.
Time for action – Showing the connection count in a
WebSocket application
Carry out the following steps:
1. Create a new directory named client.
2. Create an HTML le named index.htm in the client folder.
3. We will add a few markups in our HTML le. Put the following code in the index.
htm le:
<!DOCTYPE html>
<html lang="en">
<head>
<meta charset="utf-8">
<title>WebSockets demo for HTML5 Games Development: A
Beginner's Guide</title>
<meta name="description" content="This is a WebSockets demo
for the book HTML5 Games Development: A Beginner's Guide
by Makzan">
<meta name="author" content="Makzan">
</head>
<body>
<script src="js/jquery-1.6.min.js"></script>
<script src="js/html5games.websocket.js"></script>
</body>
</html>
4. Create a directory named js and put the jQuery JavaScript le inside.
5. Create a new le named html5games.websockets.js as follows:
var websocketGame = {
}
// init script when the DOM is ready.
$(function(){
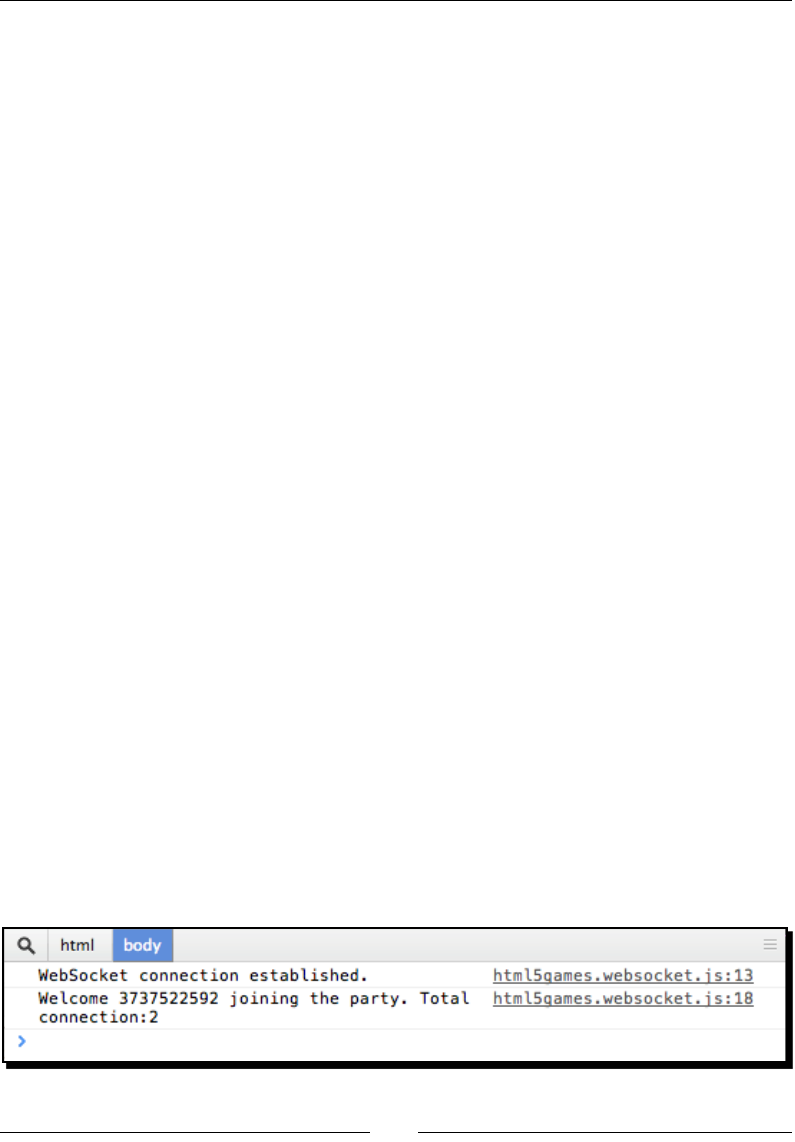
Building a Mulplayer Draw-and-Guess Game with WebSockets
[ 242 ][ 242 ]
// check if existence of WebSockets in browser
if (window["WebSocket"]) {
// create connection
websocketGame.socket = new WebSocket("ws://127.0.0.1:8000");
// on open event
websocketGame.socket.onopen = function(e) {
console.log('WebSocket connection established.');
};
// on message event
websocketGame.socket.onmessage = function(e) {
console.log(e.data);
};
// on close event
websocketGame.socket.onclose = function(e) {
console.log('WebSocket connection closed.');
};
}
});
6. We will test the code. First, we need to run the node server with our server.js
code by node server.js.
7. Next, open the index.htm le in a client directory in a web browser twice.
8. Inspect the server terminal. There should be log messages similar to the following
indicang the connecon informaon and total connecon count:
$ node server.js
WebSocket server is running.
Listening to port 8000.
A connection established with id 3863522640
A connection established with id 3863522651
9. Then, we inspect the console panel in a browser. We get the total connecon count
once we have loaded the page. The following screenshot shows the result on the
client side:

Chapter 8
[ 243 ][ 243 ]
What just happened?
We just built a client that established a WebSockets connecon to the server we built in
the last secon. The client then prints any message received from the server to the console
panel in the Inspector.
Establishing a WebSocket connection
In any browser that supports WebSockets, we can establish a connecon by creang a new
WebSocket instance with the following code:
var socket = new WebSocket(url);
The url argument is a string with the WebSockets URL. In our example, we are running our
server locally. Therefore, the URL we have used is ws://127.0.0.1:8000, where 8000
represents the port number of the server to which we are connecng. It is 8000 because the
server is listening to the port 8000 when we built the server-side logic.
WebSockets client events
Similar to the server, we have several WebSockets events on the client side. The following
table lists the events we will use to deal with WebSockets:
Event name Descripon
onopen Fired when a connecon to the server is established
onmessage Fired when any message from the server is received
onclose Fired when the server closes the connecon
onerror Fired when there is any error in the connecon
Building a chatting application with WebSockets
We now know how many browsers are connected. Suppose we want to build a chat room
where users can type a message in their respecve browsers and broadcast the message to
all the connected users instantly.
Sending a message to the server
We will let the user input a message and then send the message to the node.js server. The
server will then forward the message to all connected browsers. Once the browser receives
the messages, it displays it in the chat area. In this case, the users are connected to the
instant chat room once they load the web page.

Building a Mulplayer Draw-and-Guess Game with WebSockets
[ 244 ][ 244 ]
Time for action – Sending a message to the server
through WebSockets
Carry out the following steps:
1. First, code the server logic.
2. Open server.js and add the following highlighted code:
server.addListener("connection", function(conn){
// init stuff on connection
console.log("A connection established with id",conn.id);
var message = "Welcome "+conn.id+" joining the party.
Total connection:"+server.manager.length;
server.broadcast(message);
// listen to the message
conn.addListener("message", function(message){
console.log("Got data '"+message+"' from
connection "+conn.id);
});
});
3. Now move on to the client folder.
4. Open the index.htm le and add the following markup in the body secon. It
provides inputs for the user to type and send messages to the server:
<input type='text' id="chat-input">
<input type='button' value="Send" id="send">
5. Then, add the following code to the html5games.websocket.js JavaScript le. It
sends the message to the server when the user clicks on the send buon or presses
the Enter key:
$("#send").click(sendMessage);
$("#chat-input").keypress(function(event) {
if (event.keyCode == '13') {
sendMessage();
}
});
function sendMessage()
{
var message = $("#chat-input").val();
websocketGame.socket.send(message);
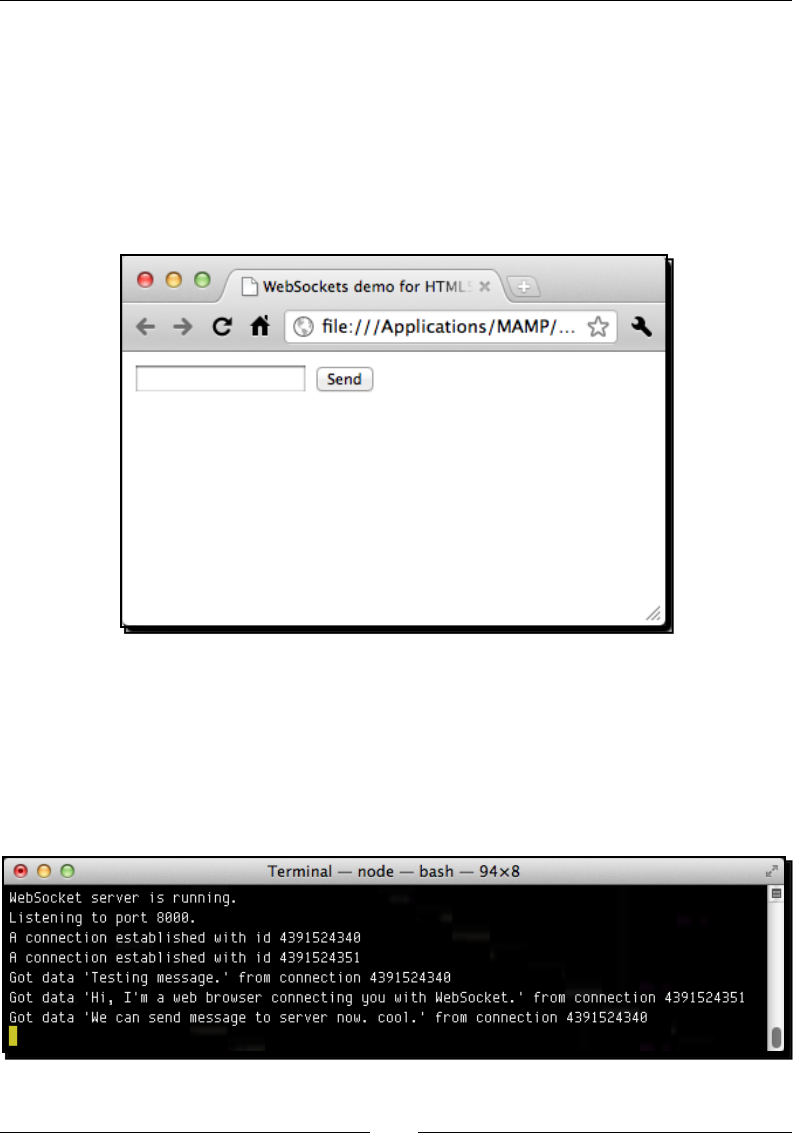
Chapter 8
[ 245 ][ 245 ]
$("#chat-input").val("");
}
6. Before tesng our code, check the server terminal and see whether the node
server is sll running. Press Ctrl+C to terminate it and run it again by using the node
server.js command.
7. Open index.htm in a web browser. You should see an input text eld with a Send
buon as shown in the following screenshot:
8. Try to type something in the input text eld and then click on the Send buon or
press Enter. The input text is cleared.
9. Now, switch to the server terminal and we will see the server prinng the text we
just sent. You can also put the browser and server terminal side by side to see how
instantly the message is sent from the client to the server. The following screenshot
shows the server terminal with messages from two connected browsers:

Building a Mulplayer Draw-and-Guess Game with WebSockets
[ 246 ][ 246 ]
What just happened?
We just extended our connecon example by adding an input text eld for the users to type
some text there and send it out. The text is sent as a message to the WebSockets server. The
server will then print the received message in the terminal.
Sending a message from the client to the server
In order to send a message from the client to the server, we call the following send method
in the WebSocket instance:
websocketGame.socket.send(message);
In the following code snippet from our example, we get the message from the input text eld
and send it to the server:
var message = $("#chat-input").val();
websocketGame.socket.send(message);
Receiving a message on the server side
On the server side, we need to handle the message we just sent from the client. We have
an event named message in the connecon instance in the WebSocket node.js library.
We can listen to the connecon message event to receive a message from each client
connecon.
The following code snippet shows how we use the message event listener to print the
message and the unique connecon ID on the server terminal:
conn.addListener("message", function(message){
console.log("Got data '"+message+"' from connection "+conn.id);
});
Only string is accepted when sending and receiving messages between the
server and the client. We cannot directly send objects. However, we can
convert the data into a JSON-formaed string before transming. We will
show an example of sending data objects later in this chapter.

Chapter 8
[ 247 ][ 247 ]
Broadcasting every received message on the server side
to create a chat room
In the last example, the server could receive messages sent from browsers. However, the
server does nothing except print the received messages in the terminal. Therefore, we will
add some logic to the server to broadcast the messages out.
Time for action – Broadcasting the messages to all connected
browsers
Carry out the following steps:
1. Open the server.js le for the server-side logic.
2. Add the following highlighted code to the message event listener handler:
conn.addListener("message", function(message){
console.log("Got data '"+message+"' from connection "+conn.id);
var displayMessage = conn.id + " says: "+message;
server.broadcast(displayMessage);
});
3. That is it for the server side. Move on to the client folder and open the index.
htm le.
4. We want to display the chat messages in the chat history area. Add the following
code to the HTML le:
<ul id="chat-history"></ul>
5. Next, we need the client-side JavaScript to handle the received message from the
server. We used it to print it out into the console panel, replace the console.log
code by the following highlighted code in the onmessage event handler:
socket.onmessage = function(e) {
$("#chat-history").append("<li>"+e.data+"</li>");
};
6. Let's test our code. Terminate any running node server by Ctrl + C. Then run the
server again.
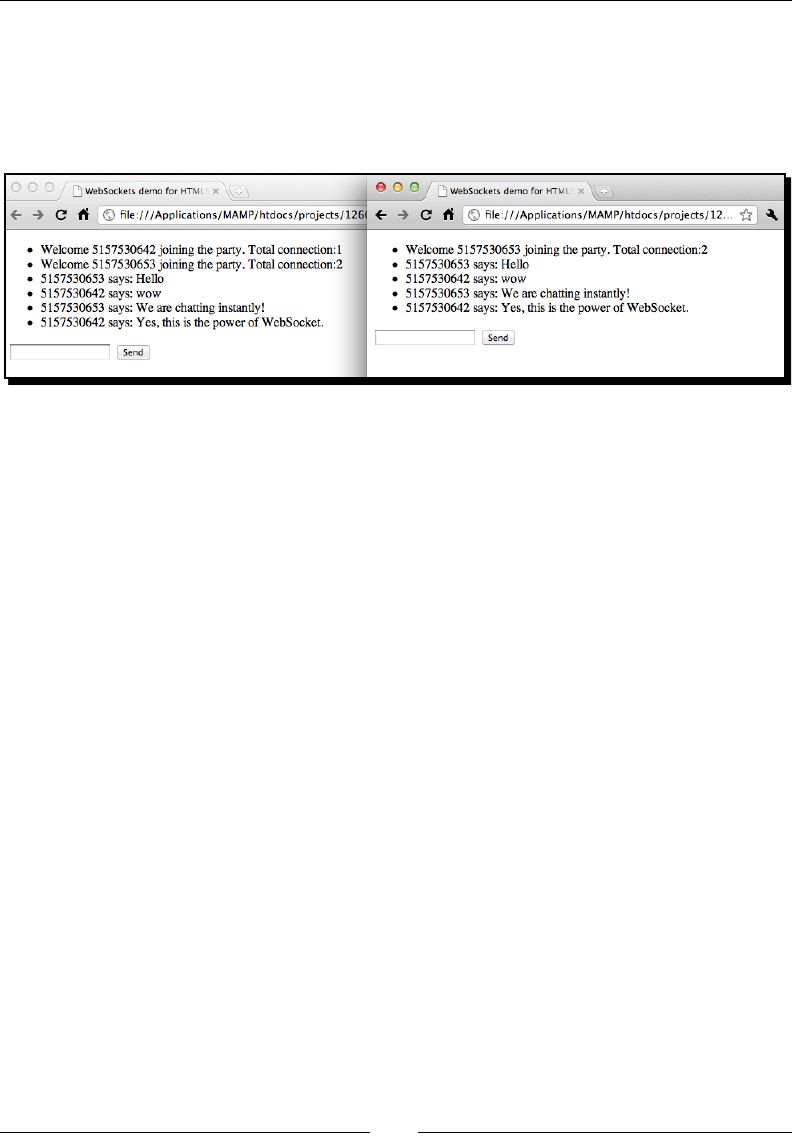
Building a Mulplayer Draw-and-Guess Game with WebSockets
[ 248 ][ 248 ]
7. Open the index.htm le twice and put them side by side. Type something in
the text eld and press Enter. The message will appear on both opened browsers.
If you open many instances of the HTML le, the message should appear on all
browsers. The following screenshot shows two browsers displaying the chat history
side by side:
What just happened?
This is an extension of our previous examples. We discussed how a server broadcasts the
connecon count to all connected clients. We also discussed how the client sends a message
to the server. In this example, we combine these two techniques to let the server broadcast
the received messages to all connected users.
Comparing between WebSockets and polling approaches
If you have ever built a web page chat room by using a server-side language and a database,
then you may wonder what is the dierence between the WebSocket implementaon and
the tradional one.
The tradional chat room method is oen implemented by using a polling approach. The
client asks the server for an update periodically. The server responds to the client with either
no update or updated data. However, the tradional approach has several problems. The
client does not get new data updated from the server unl the next me it asks the server.
This means that the data update is delayed with the periodic me and the response is not
instant enough. If we want to improve this issue by shortening the polling duraon, then
more bandwidth is ulized because clients need to keep sending requests to the server.
The following graph shows requests between the client and the server. It shows that many
useless requests are sent, but the server responds to the client without any new data:
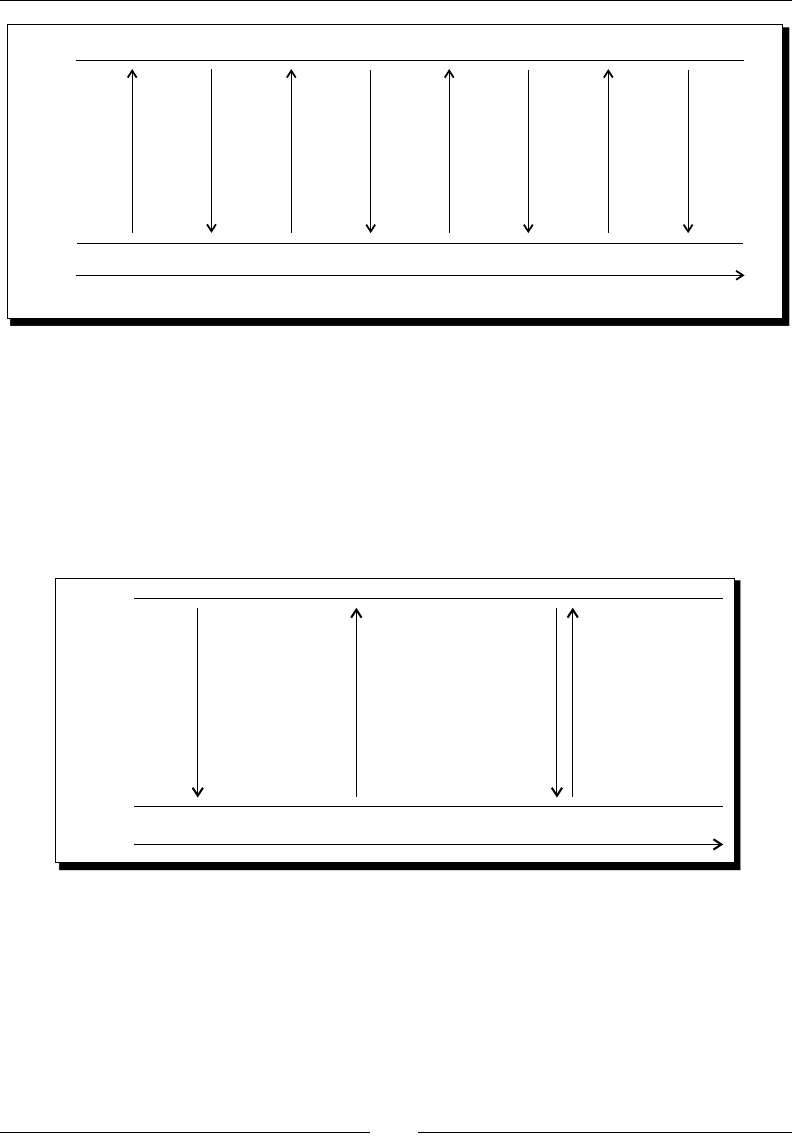
Chapter 8
[ 249 ][ 249 ]
any updates? any updates?
no update. Send
message
hi” and
any update?
“
no update. any
updates?
Yes,
message
hello”
any
updates?
no update.
“
server
requests
client
time
There is a beer polling approach named long polling. The client sends a request to the
server and waits for the response. Instead of the tradional polling approach where the
server responds with "no update", the server does not respond at all unl there is something
that needs to be pushed to the server. In this approach, the server can push something to
clients whenever there is an update. Once the client receives a response from the server, it
creates another request and waits for the next server nocaon. The following graph shows
the long polling approach where clients ask for updates and the server responds only when
there is an update:
received
message hello”
“
server
requests
client
time
any updates?
Send
message
hi” and
any update?
“any updates?
Building a Mulplayer Draw-and-Guess Game with WebSockets
[ 250 ][ 250 ]
In the WebSockets approach, the number of requests are way less than the polling approach.
It is because the connecon between the client and server is persistent. Once the connecon
is established, a request from either the client side or the server side is sent only when there
is any update. For instance, a client sends a message to the server when it wants to update
something to the server. The server also sends messages to clients only when it needs to
nofy the clients of a data update. No other useless requests are sent during the connecon.
Therefore, less bandwidth is ulized. The following graph shows the WebSockets approach:
Send
message hi”
“
Received
message hello”
“
server
requests
client
time
connection
established
Pop quiz – The benet of WebSockets verses the polling approach
What are the benets of using an event-based WebSockets approach to implement the
muluser chat room? How do these benets make the message-passing so instant?
Making a shared drawing whiteboard with Canvas and
WebSockets
Suppose we want a shared sketchpad. Anyone can draw something on the sketchpad and
all others can view it, just like the sketchpad example we played at the beginning of this
chapter. We learned how messages are communicated between clients and servers. We will
go further and send drawing data.
Building a local drawing sketchpad
Before we deal with the data sending and the server handling, let's focus on making a
drawing whiteboard. We will use the canvas to build a local drawing sketchpad.

Chapter 8
[ 251 ][ 251 ]
Time for action – Making a local drawing whiteboard with
the Canvas
Carry out the following steps:
1. We will focus only on the client side in this secon. Open the index.htm le and
add the following canvas markup:
<canvas id='drawing-pad' width='500' height='400'>
</canvas>
2. We will draw something on the canvas and we will need the mouse posion relave
to the canvas. We did this in Chapter 4, Building an Untangle Game with Canvas and
Drawing API. Add the following style to the canvas:
<style>
canvas{position:relative;}
</style>
3. Then, we open the html5games.websocket.js JavaScript le to add the
drawing logic.
4. Replace the websocketGame global object with the following variable at the top of
the JavaScript le:
var websocketGame = {
// indicates if it is drawing now.
isDrawing : false,
// the starting point of next line drawing.
startX : 0,
startY : 0,
}
// canvas context
var canvas = document.getElementById('drawing-pad');
var ctx = canvas.getContext('2d');
5. In the jQuery ready funcon, we add the following mouse event handler code. The
code handles the mouse down, move, and up events:
// the logic of drawing on canvas
$("#drawing-pad").mousedown(function(e) {
// get the mouse x and y relative to the canvas top-left point.
var mouseX = e.layerX || 0;
var mouseY = e.layerY || 0;

Building a Mulplayer Draw-and-Guess Game with WebSockets
[ 252 ][ 252 ]
startX = mouseX;
startY = mouseY;
isDrawing = true;
});
$("#drawing-pad").mousemove(function(e) {
// draw lines when is drawing
if (websocketGame.isDrawing) {
// get the mouse x and y relative to the canvas
top-left point.
var mouseX = e.layerX || 0;
var mouseY = e.layerY || 0;
if (!(mouseX == websocketGame.startX &&
mouseY == websocketGame.startY)) {
drawLine(ctx, websocketGame.startX,
websocketGame.startY,mouseX,mouseY,1);
websocketGame.startX = mouseX;
websocketGame.startY = mouseY;
}
}
});
$("#drawing-pad").mouseup(function(e) {
websocketGame.isDrawing = false;
});
6. At last, we have the following funcon to draw a line on the canvas with the given
starng and ending point:
function drawLine(ctx, x1, y1, x2, y2, thickness) {
ctx.beginPath();
ctx.moveTo(x1,y1);
ctx.lineTo(x2,y2);
ctx.lineWidth = thickness;
ctx.strokeStyle = "#444";
ctx.stroke();
}
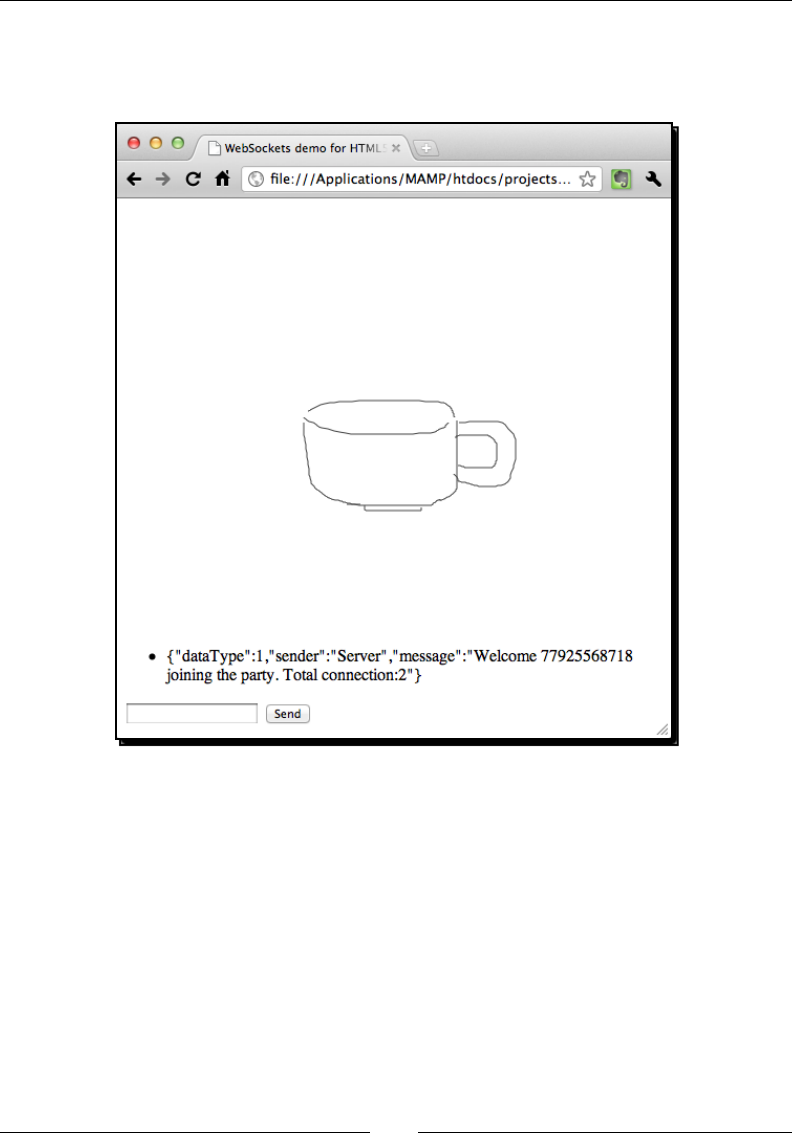
Chapter 8
[ 253 ][ 253 ]
7. Save all les and open the index.htm le. We should see an empty space where
we can draw something by using the mouse. The drawings are not sent to the server
yet, so others cannot view our drawings:
What just happened?
We just created a local drawing pad. This is like a whiteboard where the player can draw on
the canvas by dragging the mouse. However, the drawing data is not sent to the server yet;
all drawings are only displayed locally.
The drawing line funcon is the same that we used in Chapter 4. We also used the same
code to get the mouse posion relave to the canvas element. However, the logic of the
mouse events is dierent from Chapter 4.
Building a Mulplayer Draw-and-Guess Game with WebSockets
[ 254 ][ 254 ]
Drawing on the canvas
When we draw something on the computer, it oen means that we click on the canvas and
drag the mouse (or pen). The line is drawn unl the mouse buon is up. Then, the user clicks
on another place and drags again to draw lines.
In our example, we have a Boolean ag named isDrawing to indicate if the user is drawing.
The isDrawing ag is false by default. When the mouse buon is down, we turn the ag to
true. When the mouse is moving, we draw a line between the moved point and the last point
when the mouse buon is down. Then, we set the isDrawing ag to false again when the
mouse buon is up.
This is how the drawing logic works.
Have a go hero – Drawing with colors
Can we modify the drawing sketchpad by adding color support? How about adding ve
buons with red, blue, green, black, and white color? The player can choose the color
when drawing.
Broadcasting the drawing to all connected browsers
We will go further by sending our drawing data to the server and let the server broadcast the
drawing to all connected browsers.
Time for action – Sending the drawing through WebSockets
Carry out the following steps:
1. First, we need to modify the server logic. Open the server.js le and replace the
following code. It uses a JSON-formaed string for broadcasng, so we can send and
receive data object:
// Constants
var LINE_SEGMENT = 0;
var CHAT_MESSAGE = 1;
var ws = require(__dirname + '/lib/ws/server');
var server = ws.createServer();
server.addListener("connection", function(conn){
// init stuff on connection
console.log("A connection established with id",conn.id);
var message = "Welcome "+conn.id+" joining the party.
Total connection:"+server.manager.length;

Chapter 8
[ 255 ][ 255 ]
var data = {};
data.dataType = CHAT_MESSAGE;
data.sender = "Server";
data.message = message;
server.broadcast(JSON.stringify(data));
// listen to the message
conn.addListener("message", function(message){
console.log("Got data '"+message+"' from connection
"+conn.id);
var data = JSON.parse(message);
if (data.dataType == CHAT_MESSAGE) {
// add the sender information into the message
data object
data.sender = conn.id;
}
server.broadcast(JSON.stringify(data));
});
});
server.listen(8000);
console.log("WebSocket server is running.");
console.log("Listening to port 8000.");
2. On the client side, we need the logic to respond to the server with the same data
object denion. Open the html5games.websocket.js JavaScript le in the
client | js directory.
3. Add the following constants to the websocketGame global variable. The same
constants with the same values are also dened in the server side logic.
// Contants
LINE_SEGMENT : 0,
CHAT_MESSAGE : 1,
4. When handling the message event on the client-side, we convert the JSON
formaed string back to the data object. If the data is a chat message, then we
display it as chat history, otherwise we draw it on the canvas as a line segment.
Replace the onmessage event handler with the following code:
socket.onmessage = function(e) {
// check if the received data is chat message or line segment
console.log("onmessage event:",e.data);
var data = JSON.parse(e.data);

Building a Mulplayer Draw-and-Guess Game with WebSockets
[ 256 ][ 256 ]
if (data.dataType == websocketGame.CHAT_MESSAGE) {
$("#chat-history").append("<li>"+data.sender+"
said: "+data.message+"</li>");
}
else if (data.dataType == websocketGame.LINE_SEGMENT) {
drawLine(ctx, data.startX, data.startY,
data.endX, data.endY, 1);
}
};
5. When the mouse is moving, we not only draw the line on the canvas but also send
the line data to the server. Add the following highlighted code to the mouse move
event handler:
$("#drawing-pad").mousemove(function(e) {
// draw lines when is drawing
if (websocketGame.isDrawing) {
// get the mouse x and y relative to the canvas
top-left point.
var mouseX = e.layerX || 0;
var mouseY = e.layerY || 0;
if (!(mouseX == websocketGame.startX &&
mouseY == websocketGame.startY)) {
drawLine(ctx,startX,startY,mouseX,mouseY,1);
// send the line segment to server
var data = {};
data.dataType = websocketGame.LINE_SEGMENT;
data.startX = startX;
data.startY = startY;
data.endX = mouseX;
data.endY = mouseY;
websocketGame.socket.send(JSON.stringify(data));
websocketGame.startX = mouseX;
websocketGame.startY = mouseY;
}
}
});
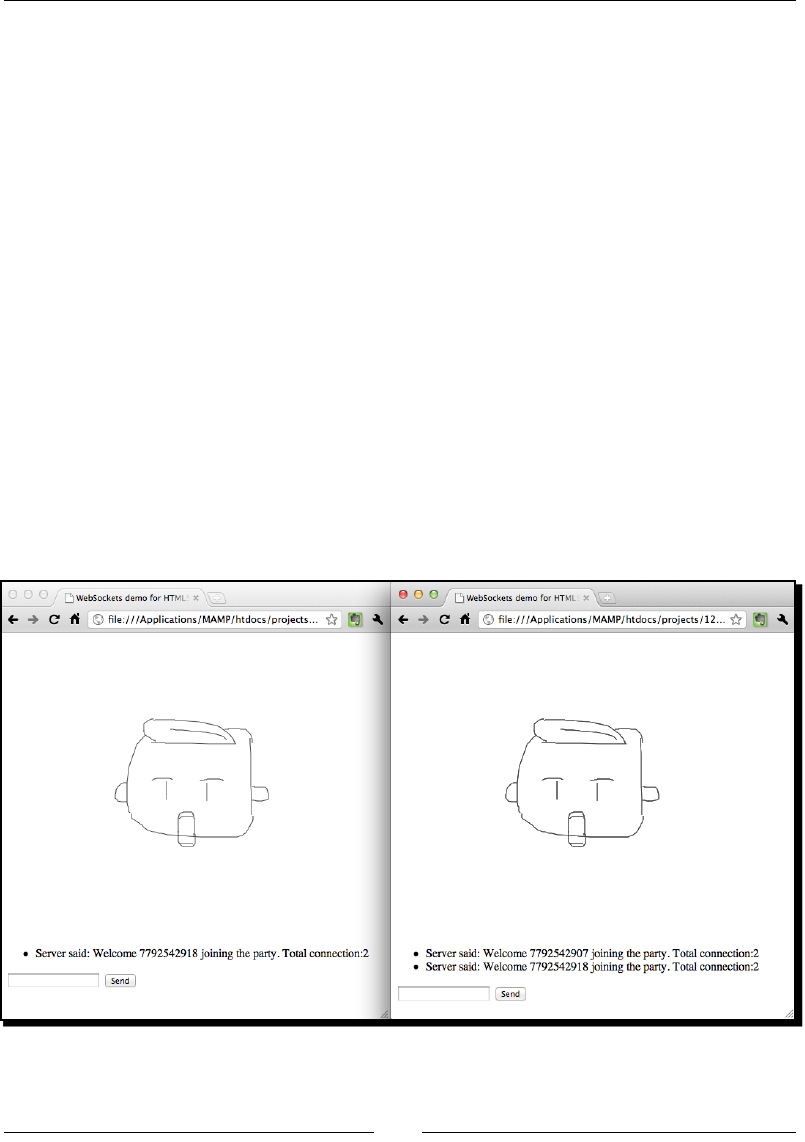
Chapter 8
[ 257 ][ 257 ]
6. Lastly, we need to modify the send message logic. We now pack the message
in an object and format it as JSON when sending it to the server. Change the
sendMessage funcon to the following code:
function sendMessage() {
var message = $("#chat-input").val();
// pack the message into an object.
var data = {};
data.dataType = websocketGame.CHAT_MESSAGE;
data.message = message;
websocketGame.socket.send(JSON.stringify(data));
$("#chat-input").val("");
}
7. Save all les and re-launch the server.
8. Open the index.htm le in two browser instances.
9. First, try the chat room feature by typing some messages and sending them.
Then, try drawing something on the canvas. Both browsers should display the
same drawing as shown in the following screenshot:

Building a Mulplayer Draw-and-Guess Game with WebSockets
[ 258 ][ 258 ]
What just happened?
We have just built a muluser sketchpad. This is similar to the sketchpad we tried at the
beginning of this chapter. We extended what we learned when building a chat room by
sending a complex data object as a message.
Dening a data object to communicate between the client and
the server
In order to communicate correctly between the server and clients with several data packed
into one message, we have to dene a data object that both client and server understand.
There are several properes in the data object. The following table lists the properes with
why we need them:
Property name Why we need this property
dataType This is an important property that helps us to understand about
the enre data. The data is either a chat message or a drawing line
segment data.
sender If the data is a chat message, the client needs to know who sent the
message.
message When the data type is a chat message, we surely need to include the
message content itself into the data object.
startX When the data type is a drawing line segment, we include the x/y
coordinate of the starng point of the line.
startY
endX When the data type is a drawing line segment, we include the x/y
coordinate of the ending point of the line.
endY
In addion, we have the following constants dened on both the client side and the server
side. These constants are for the dataType property:
// Contants
LINE_SEGMENT : 0,
CHAT_MESSAGE : 1,
With these constants, we can compare the dataType by the following readable code
instead of using the meaningless integer:
if (data.dataType == websocketGame.CHAT_MESSAGE) {…}

Chapter 8
[ 259 ][ 259 ]
Packing the drawing lines data into JSON for broadcasting
We used the JSON.stringify funcon in the last chapter when storing a JavaScript object
into a JSON-formaed string in the local storage. Now, we need to send the data in a string
format between the server and the client. We used the same method to pack the drawing
lines data into an object and send it as a JSON string.
The following code snippet shows how we pack the line segment data on the client side and
send it to the server with a JSON-formaed string:
// send the line segment to server
var data = {};
data.dataType = websocketGame.LINE_SEGMENT;
data.startX = startX;
data.startY = startY;
data.endX = mouseX;
data.endY = mouseY;
websocketGame.socket.send(JSON.stringify(data));
Recreating the drawing lines after receiving them from
other clients
The JSON parsing oen comes as a pair of stringify. When we receive a message from
the server, we have to parse it to the JavaScript object. The following code on the client side
parses the data and either updates the chat history or draws a line based on the data:
var data = JSON.parse(e.data);
if (data.dataType == websocketGame.CHAT_MESSAGE) {
$("#chat-history").append("<li>"+data.sender+" said:
"+data.message+"</li>");
}
else if (data.dataType == websocketGame.LINE_SEGMENT) {
drawLine(ctx, data.startX, data.startY, data.endX, data.endY, 1);
}
Building a multiplayer draw-and-guess game
We built an instant chat room earlier in this chapter. Moreover, we just built a muluser
sketchpad. How about combining these two techniques and building a draw-and-guess
game? A draw-and-guess game is a game in which one player is given a word to draw. All
other players do not know the word and guess the word according to the drawing. The one
who draws and who correctly guesses the word earn points.

Building a Mulplayer Draw-and-Guess Game with WebSockets
[ 260 ][ 260 ]
Time for action – Building the draw-and-guess game
We will implement the game ow of the draw-and-guess game as follows:
1. First, we will add the game logic on the client side.
2. Open the index.htm le in the client directory. Add the following restart buon
right aer the send buon:
<input type='button' value="Restart" id="restart">
3. Open the html5games.websocket.js JavaScript.
4. We need a few more constants to determine dierent states during the game play.
Add the following highlighted code to the top of the le:
// Constants
LINE_SEGMENT : 0,
CHAT_MESSAGE : 1,
GAME_LOGIC : 2,
// Constant for game logic state
WAITING_TO_START : 0,
GAME_START : 1,
GAME_OVER : 2,
GAME_RESTART : 3,
5. In addion, we want a ag to indicate this player to in charge of drawing. Add the
following Boolean global variable to the code:
isTurnToDraw : false,
6. When the client receives a message from the server, it parses it and checks whether
it is a chat message of line drawing. We have another type of message now for
handling the game logic named GAME_LOGIC. The game logic message contains
dierent data for dierent game states. Add the following code to the onmessage
event handler:
else if (data.dataType == websocketGame.GAME_LOGIC) {
if (data.gameState == websocketGame.GAME_OVER) {
websocketGame.isTurnToDraw = false;
$("#chat-history").append("<li>"+data.winner+" wins!
The answer is '"+data.answer+"'.</li>");
$("#restart").show();
}
if (data.gameState == websocketGame.GAME_START) {
// clear the canvas.

Chapter 8
[ 261 ][ 261 ]
canvas.width = canvas.width;
// hide the restart button.
$("#restart").hide();
// clear the chat history
$("#chat-history").html("");
if (data.isPlayerTurn) {
isTurnToDraw = true;
$("#chat-history").append("<li>Your turn to draw.
Please draw '"+data.answer+"'.</li>");
}
else {
$("#chat-history").append("<li>Game Started. Get Ready.
You have one minute to guess.</li>");
}
}
}
7. We have added the game logic to the client side. There is some minor code on the
client side containing the restart logic and prevenng the non-drawing player to
draw on the canvas. These codes can be found in the code bundle.
8. It is me to move on to the server side.
9. In the previous example, the server side is just in charge of broadcasng any
incoming message to all connected browsers. This is not enough for a mulplayer
game. The server will act as the game master that controls the game ow and
winning determinaon. Therefore, delete the exisng code in server.js and use
the following code. The changes are highlighted:
// Constants
var LINE_SEGMENT = 0;
var CHAT_MESSAGE = 1;
var GAME_LOGIC = 2;
// Constant for game logic state
var WAITING_TO_START = 0;
var GAME_START = 1;
var GAME_OVER = 2;
var GAME_RESTART = 3;
var ws = require(__dirname + '/lib/ws/server');
var server = ws.createServer();

Building a Mulplayer Draw-and-Guess Game with WebSockets
[ 262 ][ 262 ]
// the current turn of player index.
var playerTurn = 0;
var wordsList = ['apple','idea','wisdom','angry'];
var currentAnswer = undefined;
var currentGameState = WAITING_TO_START;
var gameOverTimeout;
server.addListener("connection", function(conn){
// init stuff on connection
console.log("A connection established with id",conn.id);
var message = "Welcome "+conn.id+" joining the party.
Total connection:"+server.manager.length;
var data = {};
data.dataType = CHAT_MESSAGE;
data.sender = "Server";
data.message = message;
server.broadcast(JSON.stringify(data));
// send the game state to all players.
var gameLogicData = {};
gameLogicData.dataType = GAME_LOGIC;
gameLogicData.gameState = WAITING_TO_START;
server.broadcast(JSON.stringify(gameLogicData));
// start the game if there are 2 or more connections
if (currentGameState == WAITING_TO_START &&
server.manager.length >= 2)
{
startGame();
}
// listen to the message
conn.addListener("message", function(message){
console.log("Got data '"+message+"' from connection
"+conn.id);
var data = JSON.parse(message);
if (data.dataType == CHAT_MESSAGE)
{
// add the sender information into the message data object.
data.sender = conn.id;
}

Chapter 8
[ 263 ][ 263 ]
server.broadcast(JSON.stringify(data));
// check if the message is guessing right or wrong
if (data.dataType == CHAT_MESSAGE)
{
if (currentGameState == GAME_START && data.message ==
currentAnswer)
{
var gameLogicData = {};
gameLogicData.dataType = GAME_LOGIC;
gameLogicData.gameState = GAME_OVER;
gameLogicData.winner = conn.id;
gameLogicData.answer = currentAnswer;
server.broadcast(JSON.stringify(gameLogicData));
currentGameState = WAITING_TO_START;
// clear the game over timeout
clearTimeout(gameOverTimeout);
}
}
if (data.dataType == GAME_LOGIC && data.gameState ==
GAME_RESTART)
{
startGame();
}
});
});
function startGame()
{
// pick a player to draw
playerTurn = (playerTurn+1) % server.manager.length;
// pick an answer
var answerIndex = Math.floor(Math.random() * wordsList.length);
currentAnswer = wordsList[answerIndex];
// game start for all players
var gameLogicData1 = {};
gameLogicData1.dataType = GAME_LOGIC;
gameLogicData1.gameState = GAME_START;

Building a Mulplayer Draw-and-Guess Game with WebSockets
[ 264 ][ 264 ]
gameLogicData1.isPlayerTurn = false;
server.broadcast(JSON.stringify(gameLogicData1));
// game start with answer to the player in turn
var index = 0;
server.manager.forEach(function(connection){
if (index == playerTurn)
{
var gameLogicData2 = {};
gameLogicData2.dataType = GAME_LOGIC;
gameLogicData2.gameState = GAME_START;
gameLogicData2.answer = currentAnswer;
gameLogicData2.isPlayerTurn = true;
server.send(connection.id, JSON.stringify(gameLogicData2));
}
index++;
});
// game over the game after 1 minute.
gameOverTimeout = setTimeout(function(){
var gameLogicData = {};
gameLogicData.dataType = GAME_LOGIC;
gameLogicData.gameState = GAME_OVER;
gameLogicData.winner = "No one";
gameLogicData.answer = currentAnswer;
server.broadcast(JSON.stringify(gameLogicData));
currentGameState = WAITING_TO_START;
},60*1000);
currentGameState = GAME_START;
}
server.listen(8000);
console.log("WebSocket server is running.");
console.log("Listening to port 8000.");
10. We will save all les and re-launch the server. Then, launch the index.htm le in
two browser instances. One browser gets a message from the server informing the
player to draw something. The other browser, on the other hand, informs the player
to guess what the other is drawing within one minute.
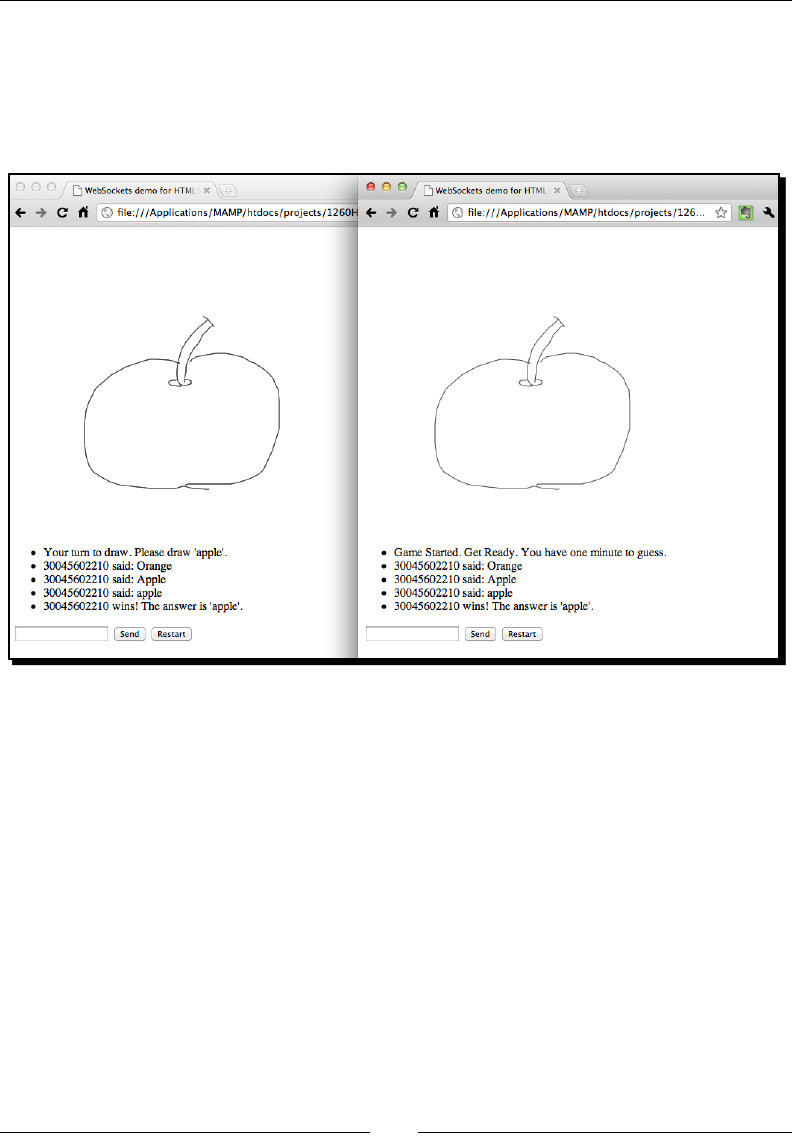
Chapter 8
[ 265 ][ 265 ]
11. The player who is told to draw something can draw on the canvas. The drawings are
broadcasted to other connected players. The players who are told to guess cannot
draw anything on the canvas. Instead, players type what they guess in the text eld
and send to the server. If the guessing is correct, then the game ends. Otherwise,
the game connues unl the one-minute countdown nishes.
What just happened?
We just created a mulplayer draw-and-guess game in WebSockets and Canvas. The main
dierence between the game and the muluser sketchpad is that the server now controls
the game ow instead of leng all users draw.
Controlling the game ow of a multiplayer game
Controlling the game ow of a mulplayer game is much more dicult than a single game.
We can simply use a few variables to control the game ow of a single game, but we have to
use message passing to inform each player of specic updated game ow.
First, we require the following highlighted constant GAME_LOGIC for dataType. We use this
dataType to send and receive a message which is related to the game logic control:
// Constants
var LINE_SEGMENT = 0;

Building a Mulplayer Draw-and-Guess Game with WebSockets
[ 266 ][ 266 ]
var CHAT_MESSAGE = 1;
var GAME_LOGIC = 2;
There are several states in the game ow. Before the game starts, the connected players are
waing for the game to start. Once there are enough connecons for the mulplayer game,
the server sends a game logic message to all players to inform them to start the game.
When the game is over, the server sends a game over state to all players. Then, the game
nishes and the game logic halts unl any player clicks on the restart buon. Once the
restart buon is clicked, the client sends a game restart state to the server instrucng the
server to prepare a new game. Then, the game starts again.
We declare the four game states as the following constants in both client and server, so they
understand them:
// Constant for game logic state
var WAITING_TO_START = 0;
var GAME_START = 1;
var GAME_OVER = 2;
var GAME_RESTART = 3;
The following code on the server side holds an index to indicate which player is in turn now:
var playerTurn = 0;
The data which is sent to the player (whose turn it is) is dierent from the data that is sent to
other players. The other players receive the following data with only a game start signal:
var gameLogicData1 = {};
gameLogicData1.dataType = GAME_LOGIC;
gameLogicData1.gameState = GAME_START;
gameLogicData1.isPlayerTurn = false;
On the other hand, the player (who is in turn to draw) receives the following data with the
word informaon:
var gameLogicData2 = {};
gameLogicData2.dataType = GAME_LOGIC;
gameLogicData2.gameState = GAME_START;
gameLogicData2.answer = currentAnswer;
gameLogicData2.isPlayerTurn = true;
Enumerating connected clients on the serverside
We can enumerate all connected clients by using the forEach method in the server
manager class. The following code shows the usage. It loops through each connecon and
calls the given callback funcon as follows:

Chapter 8
[ 267 ][ 267 ]
server.manager.forEach(function);
For example, the following code snippet prints all connecons ID on the server terminal:
server.manager.forEach(function(connection){
console.log("This is connection",connection.id);
}
}
Sending a message to a specic connection on the server side
We used broadcast in our previous examples to send a message to all connected clients.
Besides sending the message to everyone, we can send it to a specic connecon by using
the send method as follows:
server.send(connectionID, message);
The send method requires two arguments. The connectionID is the unique ID of the
target connecon and message is the string that we want to send.
In the following code extracted from our draw-and-guess game, we send special data to the
player's browser who now has to draw something. We use the forEach funcon to loop
through the connecons and check whether the connecon is in turn to draw. Then, we pack
the answer and send this data to this target connecon as follows:
server.manager.forEach(function(connection){
if (index == playerTurn)
{
var gameLogicData2 = {};
gameLogicData2.dataType = GAME_LOGIC;
gameLogicData2.gameState = GAME_START;
gameLogicData2.answer = currentAnswer;
gameLogicData2.isPlayerTurn = true;
server.send(connection.id, JSON.stringify(gameLogicData2));
}
index++;
});
Improving the game
We just created a mulplayer game which is playable. However, there is sll lots to improve.
In the following secons, we list two possible improvements in the game.
Building a Mulplayer Draw-and-Guess Game with WebSockets
[ 268 ][ 268 ]
Storing drawn lines on each game
In the game, the drawer draws lines and other players guess the drawing. Now, imagine that
two players are playing and the third player joins. As there is no storage for the drawn lines
anywhere, the third player cannot see what the drawer has drawn. This means that the third
player has to wait unl the game ends to play.
Have a go hero
How can we let a player who has joined late connue the game without losing those drawn
lines? How can we reconstruct the drawing for a newly connected player? How about storing
all drawing data of the current game on the server?
Improving the answer checking mechanism
The answer checking on the server side compares the message with the currentAnswer
variable to determine whether a player guessed correctly. The answer is treated as incorrect
if the case does not match. It looks strange when the answer is "apples" and the player is
told wrong when guessing "apple".
Have a go hero
How can we improve the answer checking mechanism? How about improving the
answer checking logic to treat the answer as correct when using a dierent case or even
similar words?
Decorating the draw-and-guess game with CSS
The game logic is basically nished and the game is playable already. However, we forgot to
decorate the game to make it look appealing. We will use CSS styles to decorate our draw-
and-guess game.
Time for action – Decorating the game
Carry out the following steps:
1. The decoraon only applies to the client side. Open the index.htm le.
2. Add the following CSS style link in the head:
<link href='http://fonts.googleapis.com/css?family=Cabin+Sketch:
bold' rel='stylesheet' type='text/css'>
<link rel="stylesheet" type="text/css" media="all"
href="css/drawguess.css">

Chapter 8
[ 269 ][ 269 ]
3. We put all markups in the body inside section with id=game. Also, we add an h1
tle for the game as follows:
<section id="game">
<h1>Draw & Guess</h1>
...
</section>
4. Add a wording Chat or Guess: in front of the text eld input, so the player knows
where to type their guessing words.
5. Next, create a directory named css inside the client folder.
6. Create a new le named drawguess.css and save it in the css directory.
7. Put the following styles in the CSS le:
body {
background: #ccd6e1;
font-family: 'Cabin Sketch', arial, serif;
}
#game {
width: 500px;
margin: 0 auto;
}
#game h1 {
text-align: center;
margin-bottom: 5px;
text-shadow: 0px 1px 0px #fff;
}
#drawing-pad {
border: 10px solid #fffeff;
background: #f1f3ef;
box-shadow:0px 3px 5px #333;
}
#chat-history {
list-style: none;
padding: 0;
}
#chat-history li {
border-bottom: 1px dashed rgba(20,20,20,.2);
margin: 10px 0;
}
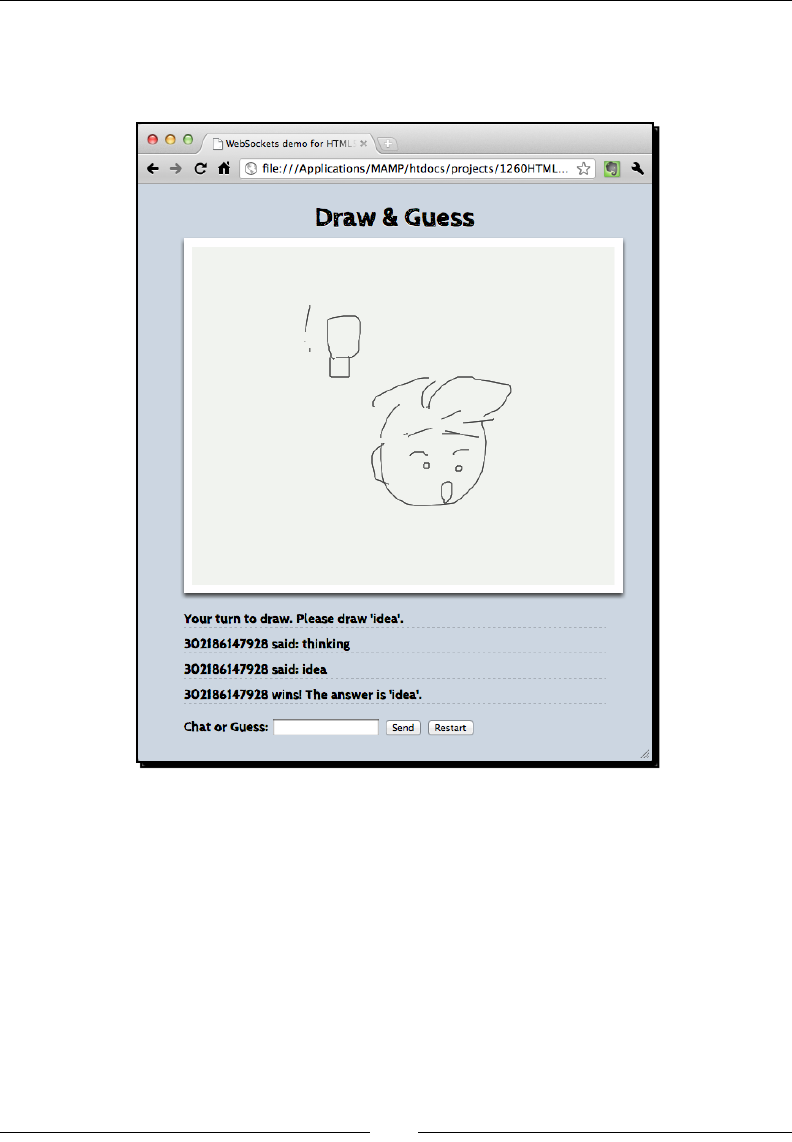
Building a Mulplayer Draw-and-Guess Game with WebSockets
[ 270 ][ 270 ]
8. Save all les and open the index.htm le again in two browsers to play the game.
As we only changed the decoraon code, the game should look beer now as shown
in the following screenshot:
What just happened?
We just applied styles to our game and embedded a font from the Google Font Directory
that looks like sketching text. The canvas is now styled to look more like a canvas with a thick
border and subtle shadow.

Chapter 8
[ 271 ][ 271 ]
Summary
We learned a lot in this chapter about connecng browsers to WebSockets. The messages
and events from one browser are broadcasted to another browser in almost real me.
Specically, we:
Learned how WebSockets provide real-me events by drawing on an exisng
mulplayer sketchpad. It shows drawings from other users who are connected.
Installed a Node.js server with the WebSocket library. By using this server, we can
easily build an event-based server to handle WebSocket requests from browsers.
Discussed the relaonship between the server and a client.
Built an instant chat room applicaon. We learned how to implement a server script
to broadcast incoming messages to other connected browsers. We also learned how
to display a received message from the server on the client side.
Built a muluser drawing board. We learned how to pack data in the JSON format to
pass a message between the server and browsers.
Built a draw-and-guess game by integrang the chang and drawing pad. We also
learned how to create the game logic in a mulplayer game.
Now that we have learned to build a mulplayer game, we are ready to build physics games
with the help of the physics engine in the next chapter.
9
Building a Physics Car Game with
Box2D and Canvas
2D Physics Engine is a hot topic in game development. With the help of a
physics engine, we can easily create a playable game by just dening an
environment and a simple rule. Taking exisng games as examples, players in
the Angry Birds game y birds to destruct the enemy's castle. In Cut the Rope,
candy drops into the monster's mouth to progress to the next level.
In this chapter, we will learn the following topics:
Installing the Box2D JavaScript library
Creang a stac ground body in the physics world
Drawing the physics world on the Canvas
Creang a dynamic box in the physics world
Advancing the world me
Adding wheels to the game
Creang the physics car
Adding force to the car with a keyboard input
Checking a collision in the Box2D world
Restarng the game
Adding a level support to our car game
Replacing the Box2D outline drawing with graphics
Adding a nal touch to make the game fun to play
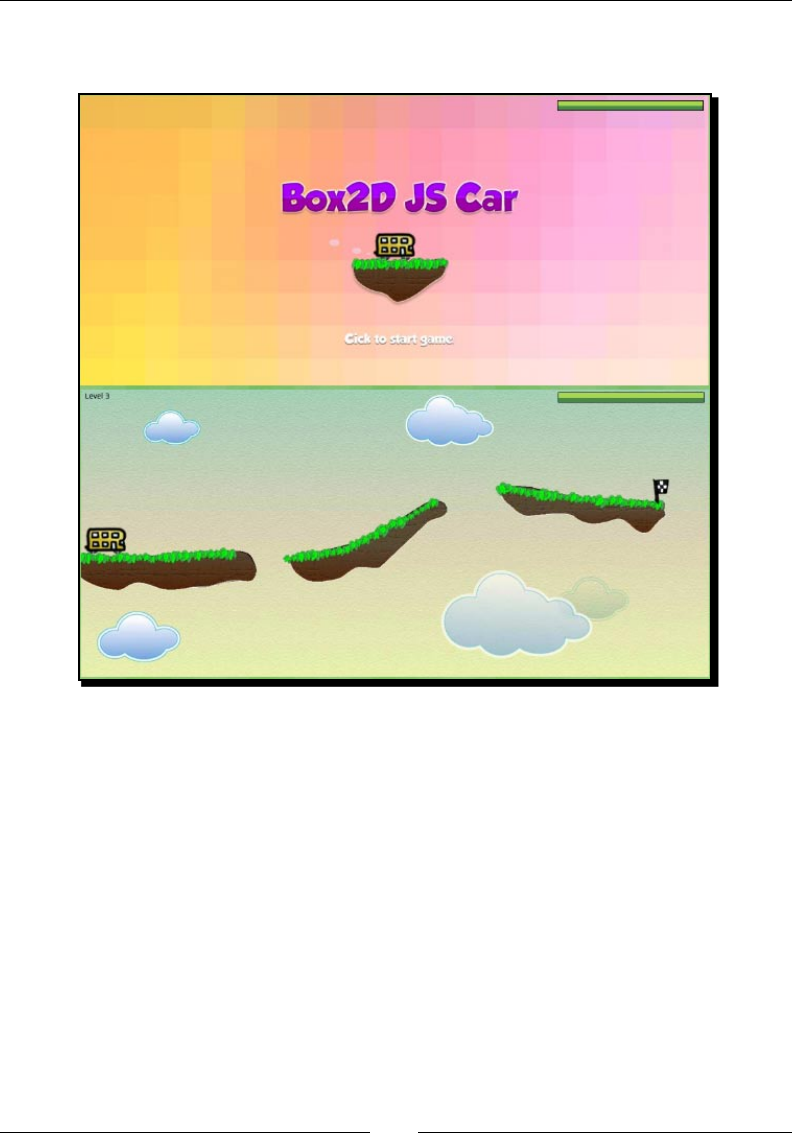
Building a Physics Car Game with Box2D and Canvas
[ 274 ][ 274 ]
The following screenshot shows what we will get by the end of this chapter. It is a car game
in which a player moves the car towards the desnaon point:
So, let's get on with it.
Installing the Box2D JavaScript library
Now, suppose that we want to create a car game. We apply force to the car to make it move
forward. The car moves on a ramp and then ies through the air. Aerwards, the car falls
on the desnaon ramp and the game nishes. Every collision in every part of the physics
world counts on this movement. If we have to make this game from scratch, then we have
to calculate at least the velocity and angle of each part. Luckily, the physics library helps us
to handle all these physical problems. All we have to do is to create the physics model and
present it in the canvas.
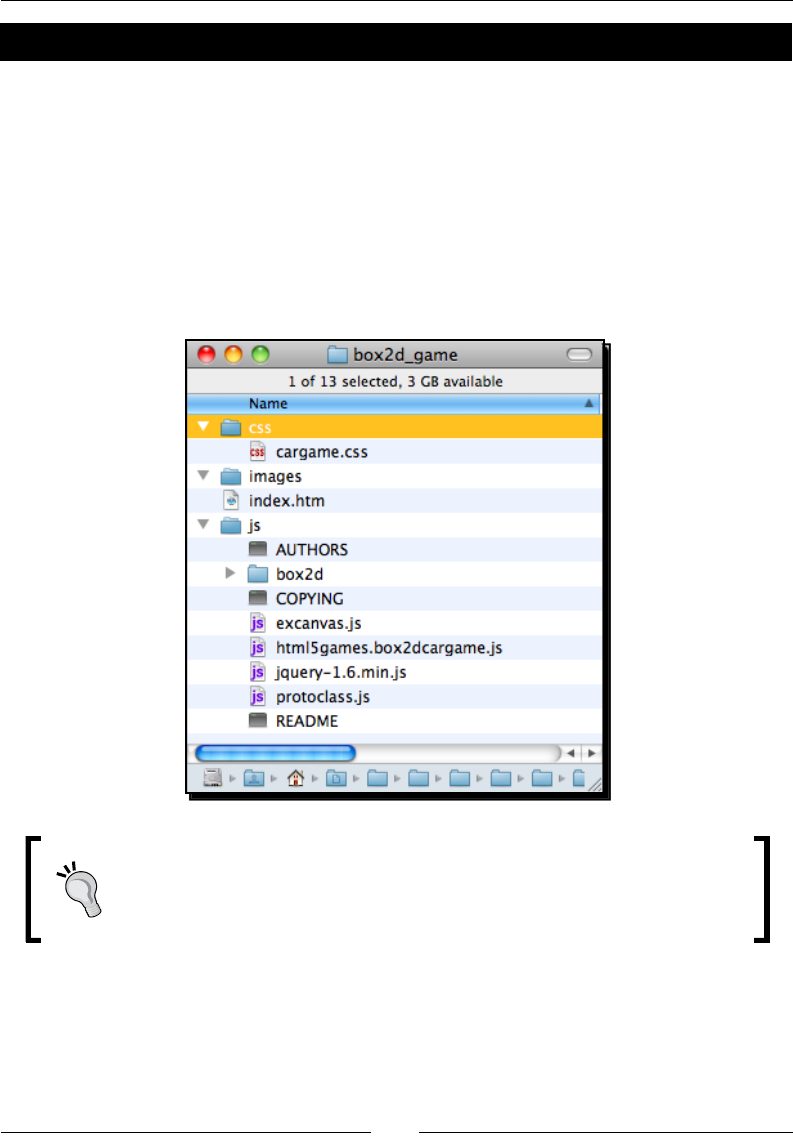
Chapter 9
[ 275 ][ 275 ]
Time for action – Installing the Box2D physics library
Carry out the following steps:
1. We will get the Box2D JavaScript library. The original Box2D JavaScript library is
based on the prototype JavaScript library. The prototype library provides similar
funcons from jQuery but with a lile dierent API. Thanks to KJ (http://kjam.
org/post/105) who ported it into the jQuery capable version, we can use the
jQuery library on which we have based our whole book. The Box2D library with the
starng code can be found from the code bundle named box2d_game.
2. Now, we should have the following setup:
We have already imported the essenal JavaScript les. It is worth
remembering that if you want to later use this base to create another physics
game, Box2D JS recommends copying the JavaScript import codes in exactly
the same order because there are dependencies between les.
3. Now, we will create an empty world to test our Box2D library installaon. Open the
html5games.box2dcargame.js JavaScript le and put the following code in the
le to create the world:
// the global object that contains the variable needed for the car
game.

Building a Physics Car Game with Box2D and Canvas
[ 276 ][ 276 ]
var carGame = {
}
var canvas;
var ctx;
var canvasWidth;
var canvasHeight;
$(function() {
carGame.world = createWorld();
console.log("The world is created. ",carGame.world);
// get the reference of the context
canvas = document.getElementById('game');
ctx = canvas.getContext('2d');
canvasWidth = parseInt(canvas.width);
canvasHeight = parseInt(canvas.height);
});
function createWorld() {
// set the size of the world
var worldAABB = new b2AABB();
worldAABB.minVertex.Set(-4000, -4000);
worldAABB.maxVertex.Set(4000, 4000);
// Define the gravity
var gravity = new b2Vec2(0, 300);
// set to ignore sleeping object
var doSleep = false;
// finally create the world with the size, gravity,
and sleep object parameter.
var world = new b2World(worldAABB, gravity, doSleep);
return world;
}
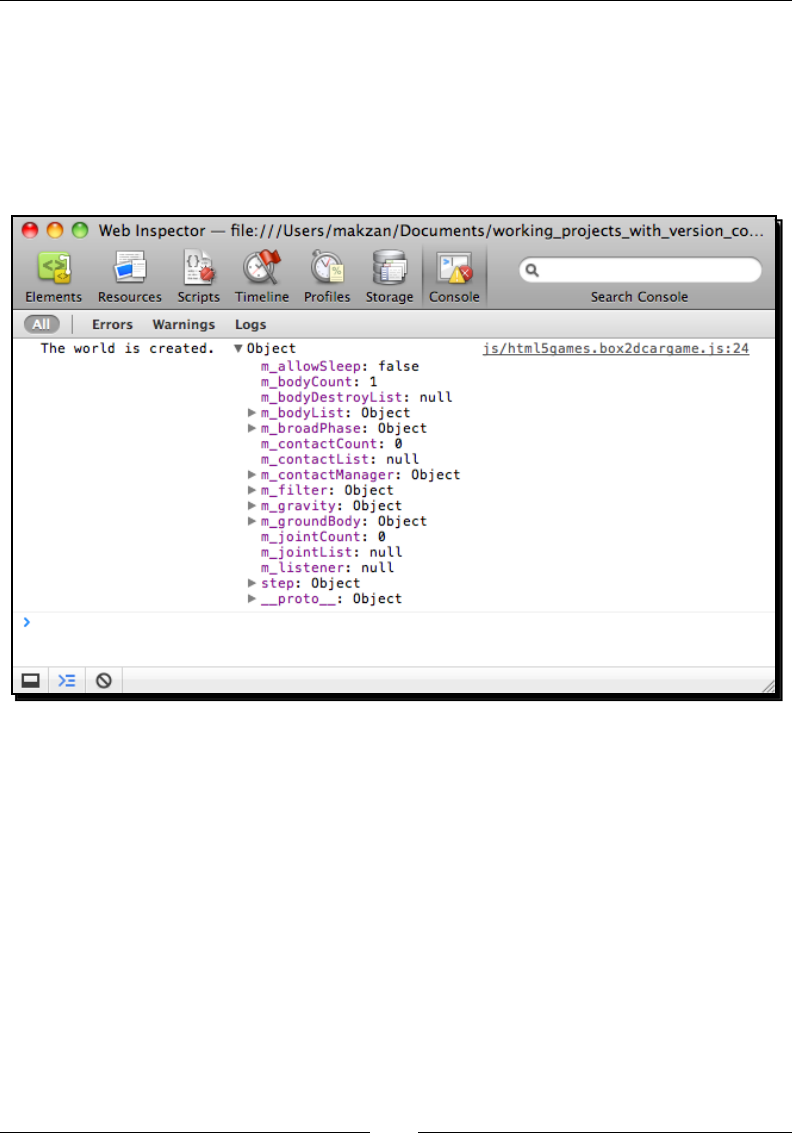
Chapter 9
[ 277 ][ 277 ]
4. Open the index.html le in a web browser. We should see a grey canvas with
nothing there.
We have not presented the physics world in the canvas yet. That is why we only see a blank
canvas on the page. However, we have printed the newly created world in the console log.
The following screenshot shows the console tracing the world object with many properes
beginning with m_. These are the physical states of the world:
What just happened?
We have just installed the Box2D JavaScript library and created an empty world to
test the installaon.
Using b2World to create a new world
The b2World is a core class in the Box2D environment. All our physics bodies, including the
ground and car, are created in this world. The following code shows how to create a world:
var world = new b2World(worldAABB, gravity, doSleep);
Building a Physics Car Game with Box2D and Canvas
[ 278 ][ 278 ]
The b2World class takes three arguments to inialize, which are listed in the following table
with their descripon:
Arguments Type Discussion
worldAABB b2AABB Represents the bounding area of the world
gravity b2Vec2 Represents the gravity of the world
doSleep Bool Denes whether the world ignores slept objects or not
Using b2AABB to dene a bounding area
In the physics world, we need a lot of bounding area. The rst bounding we need is for
the world. All things within the world bounding will be calculated and things outside the
bounding area will be destroyed.
We can treat b2AABB as a rectangle with the lowest bounding point and highest bounding
point. The following code snippet shows how to use the b2AABB class. The minVertex is
the top le-most point of the bound while maxVertex is the boom right-most point. The
following world denes a world with 8000x8000:
var worldAABB = new b2AABB();
worldAABB.minVertex.Set(-4000, -4000);
worldAABB.maxVertex.Set(4000, 4000);
The unit in the Box2D mathemacs model is dierent from what we commonly
use in the computer world. The length unit is in meters instead of pixels.
Moreover, the rotaon unit is in radians.
Setting the gravity of the world
We have to dene the gravity of the world. The gravity is dened by b2Vec2. The b2Vec2
is a vector with a 1x2 matrix. We can treat it as a vector of X and Y-axis. Therefore, the
following code denes the gravity with 300 units downwards:
var gravity = new b2Vec2(0, 300);
Setting the Box2D to ignore the slept object
A slept body is a dynamic body that does not move or change states anymore.
The physics library calculates the mathemacal data and collision of all bodies in the world.
The performance will slow down when there are more bodies in the world to get calculated
in every frame. When creang the physics world, we need to set the library to either ignore
slept bodies or calculate all of them.
Chapter 9
[ 279 ][ 279 ]
In our game, there are only a few bodies, so the performance is not yet a problem.
Moreover, if later our created bodies get into an idle or sleep state, we cannot interact
with them anymore. Therefore, we set this ag to false in this example.
At the me of wring this book, only Google Chrome runs the Box2D
JavaScript library in canvas smoothly. Therefore, it is suggested to test the
game in Google Chrome unl other web browsers can run it smoothly.
Creating a static ground body in the physics world
The world is empty now. If we are going to place objects there, those objects will fall and
nally leave our sight. Now suppose that we want to create a stac ground body in the
world, so that objects can stand there. We can do this in Box2D.
Time for action – Creating a ground in the world
Carry out the following steps:
1. Open the html5games.box2dcargame.js JavaScript le.
2. Add the following funcon to the end of the JavaScript le. It creates a xed body
as the playground:
function createGround() {
// box shape definition
var groundSd = new b2BoxDef();
groundSd.extents.Set(250, 25);
groundSd.restitution = 0.4;
// body definition with the given shape we just created.
var groundBd = new b2BodyDef();
groundBd.AddShape(groundSd);
groundBd.position.Set(250, 370);
var body = carGame.world.CreateBody(groundBd);
return body;
}
3. Call the createGround funcon aer creang the world as follows:
createGround();

Building a Physics Car Game with Box2D and Canvas
[ 280 ][ 280 ]
4. As we are sll dening the logic and have not yet presented the physics world
visually, we will see nothing if we open the browser. However, it is a good habit to
try it and inspect the console window for an error message if there is any.
What just happened?
We have created a ground body with the shape and body denions. This is a common
process we will use a lot to create dierent kinds of physical bodies in the world. So, let's get
into details on how we made it.
Creating a shape
A shape denes the geometrical data. In the JavaScript port of Box2D, a shape also denes
material properes such as density, fricon, and restuon. The shape can be a circle,
rectangle, or a polygon. The following code that we used in the preceding example denes
a box shape denion. In the box shape, we have to dene the size of the box by seng the
extents property. The extents property takes two arguments: half width and half height.
It is a half value, so the nal area of the shape is four mes the value:
// box shape definition
var groundSd = new b2BoxDef();
groundSd.extents.Set(250, 25);
groundSd.restitution = 0.4;
Creating a body
Aer dening the shape, we can then create a body denion with the given shape
denion. Then, we set the inial posion of the body and nally ask the world instance to
create a body from our body denion. The following code shows how we create a body in
the world with the given shape denion:
var groundBd = new b2BodyDef();
groundBd.AddShape(groundSd);
groundBd.position.Set(250, 370);
var body = carGame.world.CreateBody(groundBd);
A body set without a mass is considered as a stac body, or xed body. These bodies are
immovable and will not have collisions with other stac bodies. Therefore, these bodies
can be used as a ground or walls to become the level environment. On the other hand, a
dynamic body will move following the gravity and collision with other bodies. We will create
a dynamic box body later.

Chapter 9
[ 281 ][ 281 ]
Drawing the physics world in the canvas
We have created a ground but it is only in the mathemacs model. We do not see anything
in the canvas because we have not drawn anything on it yet. In order to show what the
physics looks like, we have to draw something according to the physics world.
Time for action – Drawing the physics world into the canvas
Carry out the following steps:
1. First, open the html5games.box2dcargame.js JavaScript le.
2. Add a drawWorld funcon call to the page loaded event handler as the following
code:
$(function() {
// create the world
carGame.world = createWorld();
// create the ground
createGround();
// get the reference of the context
canvas = document.getElementById('game');
ctx = canvas.getContext('2d');
canvasWidth = parseInt(canvas.width);
canvasHeight = parseInt(canvas.height);
// draw the world
drawWorld(carGame.world, ctx);
});
3. Next, open the draw_world.js JavaScript le from the Box2D JavaScript example
code. There are two funcons named drawWorld and drawShapes. Copy the
enre le, which is shown in the following code, to the end of our JavaScript le:
// drawing functions
function drawWorld(world, context) {
for (var b = world.m_bodyList; b != null; b = b.m_next) {
for (var s = b.GetShapeList(); s != null; s = s.GetNext()) {
drawShape(s, context);
}
}
}

Building a Physics Car Game with Box2D and Canvas
[ 282 ][ 282 ]
// drawShape function directly copy from draw_world.js in Box2dJS
library
function drawShape(shape, context) {
context.strokeStyle = '#003300';
context.beginPath();
switch (shape.m_type) {
case b2Shape.e_circleShape:
var circle = shape;
var pos = circle.m_position;
var r = circle.m_radius;
var segments = 16.0;
var theta = 0.0;
var dtheta = 2.0 * Math.PI / segments;
// draw circle
context.moveTo(pos.x + r, pos.y);
for (var i = 0; i < segments; i++) {
var d = new b2Vec2(r * Math.cos(theta),
r * Math.sin(theta));
var v = b2Math.AddVV(pos, d);
context.lineTo(v.x, v.y);
theta += dtheta;
}
context.lineTo(pos.x + r, pos.y);
// draw radius
context.moveTo(pos.x, pos.y);
var ax = circle.m_R.col1;
var pos2 = new b2Vec2(pos.x + r * ax.x, pos.y + r * ax.y);
context.lineTo(pos2.x, pos2.y);
break;
case b2Shape.e_polyShape:
var poly = shape;
var tV = b2Math.AddVV(poly.m_position,
b2Math.b2MulMV(poly.m_R, poly.m_vertices[0]));
context.moveTo(tV.x, tV.y);
for (var i = 0; i < poly.m_vertexCount; i++) {
var v = b2Math.AddVV(poly.m_position,
b2Math.b2MulMV(poly.m_R, poly.m_vertices[i]));
context.lineTo(v.x, v.y);
}
context.lineTo(tV.x, tV.y);
break;
}
context.stroke();
}
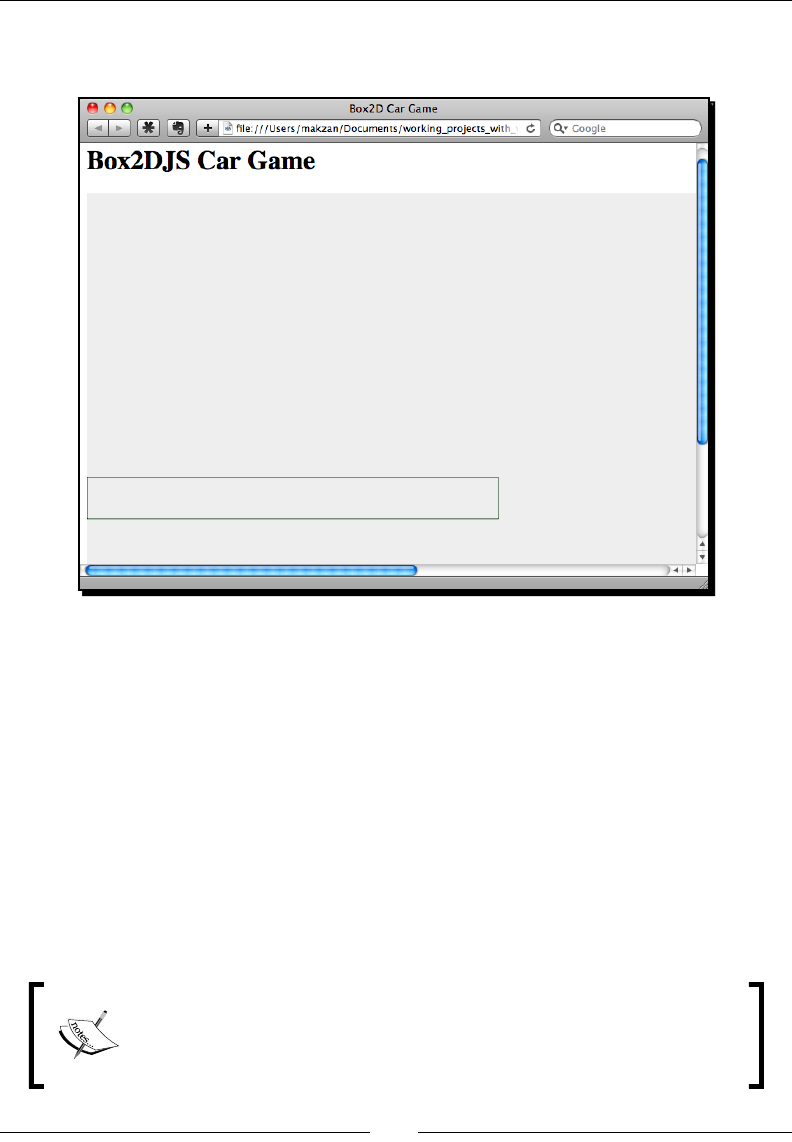
Chapter 9
[ 283 ][ 283 ]
4. Now re-open the game in a browser and we should see the outline of the ground
body in the canvas, as shown in the following screenshot:
What just happened?
We have just created a funcon to draw every shape in the world as a box with a dark
green outline.
The following code shows how we loop through each shape in the world to draw it:
function drawWorld(world, context) {
for (var b = world.m_bodyList; b != null; b = b.m_next) {
for (var s = b.GetShapeList(); s != null; s = s.GetNext()) {
drawShape(s, context);
}
}
}
There is the drawJoint funcon and related code from the Box2D JS
library too. This joint drawing funcon is oponal for our example. Adding
the joint drawing funcon can let us see the invisible joint connected
between two bodies.

Building a Physics Car Game with Box2D and Canvas
[ 284 ][ 284 ]
Now we will take a look at the drawShape funcon.
On every shape, we want to draw the outline of the object in the canvas to present it. We set
the line style to dark green before drawing anything. Then, we check whether the shape is
a circle, rectangle box, or a polygon. If it is a circle, then we use the pole coordinate to draw
the circle with the given radius of the shape. If it is a polygon, then we draw each side of the
polygon as follows:
function drawShape(shape, context) {
context.strokeStyle = '#003300';
context.beginPath();
switch (shape.m_type) {
case b2Shape.e_circleShape:
// Draw the circle in canvas bases on the physics object shape
break;
case b2Shape.e_polyShape:
// Draw the polygon in canvas bases on the physics object shape
break;
}
context.stroke();
}
Creating a dynamic box in the physics world
Imagine now we drop a box into the world. The box falls from the air and nally hits the
ground. The box bounces up a lile and nally stops on the ground. This is dierent from
what we created in the last secon. In the last secon, we created a stac ground which is
immovable and will not be aected by gravity. Now we will create a dynamic box.
Time for action – Putting a dynamic box in the world
Carry out the following steps:
1. Open our JavaScript logic le and add the following box creaon code to the page
loaded event handler. Place the code aer the createGround funcon:
// create a box
var boxSd = new b2BoxDef();
boxSd.density = 1.0;
boxSd.friction = 1.5;
boxSd.restitution = .4;
boxSd.extents.Set(40, 20);
var boxBd = new b2BodyDef();
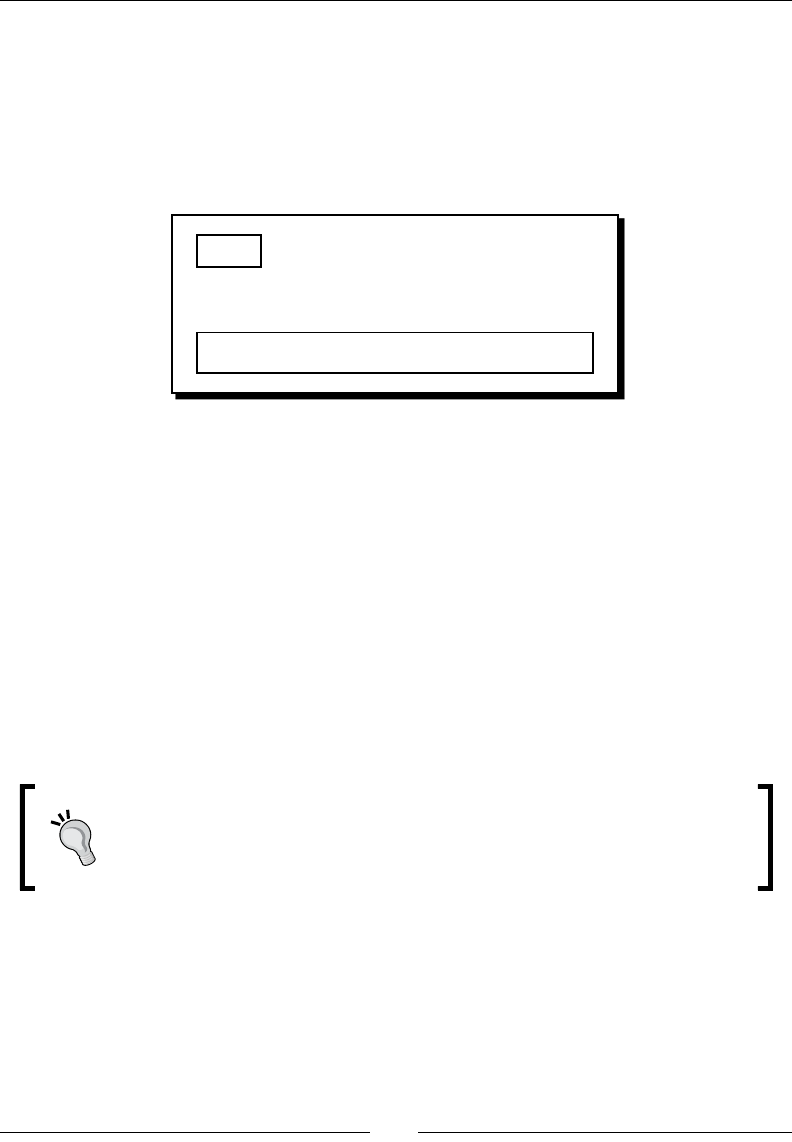
Chapter 9
[ 285 ][ 285 ]
boxBd.AddShape(boxSd);
boxBd.position.Set(50,210);
carGame.world.CreateBody(boxBd);
2. Now we will test the physics world in a browser. We should see that a box is created
at the given inial posion. However, the box is not falling down; it is because we
sll have something to do to make it fall:
What just happened?
We have just created a dynamic body in the world. In contrast to the ground body that is
immovable, this box is aected by the gravity and the velocity changes during a collision.
When a body contains a shape with any mass or density, it is a dynamic body. Otherwise, it
is stac. Therefore, we dene a density to our box. Box2D will make it dynamic and calculate
the mass according to the density and the size of the body automacally.
Setting the bouncing effect with the restitution property
The restuon value is between 0 and 1. In our case, the box is falling down on the ground.
When the restuon value is 0 on both the ground and the box, the box does not bounce at
all. When either the box or ground has restuon value 1, the collision is perfectly elasc.
When two bodies collide, the restuon value of that collision is the maximum
value between both restuon values of the bodies. Therefore, if a box with
a restuon of 0.4 drops on the ground with restuon 0.6, this collision uses
0.6 to calculate the bouncing velocity.

Building a Physics Car Game with Box2D and Canvas
[ 286 ][ 286 ]
Advancing the world time
The box is dynamic but it does not fall down. Are we doing anything wrong here? The
answer is no. We have setup the box correctly, but we forget to advance the me in the
physics world.
In the Box2D physics world, all calculaons are done in a systemac iteraon. The world
calculates the physical transformaon of all things according to the current step. When we
move the step to the next level, the world calculates again as the new state.
Time for action – Setting up the world step loop
We will make the world me advance by carrying out the following steps:
1. In order to advance the world step, we have to call the step funcon in the world
instance periodically. We used setTimeout to keep calling the step funcon. Put
the following funcon in our JavaScript logic le:
function step() {
world.Step(1.0/60, 1);
ctx.clearRect(0, 0, canvasWidth, canvasHeight);
drawWorld(carGame.world, ctx);
setTimeout(step, 10);
}
2. Next, we will kick-start the world by calling the rst step funcon in the
document ready event handler. Add the following highlighted code to the
loaded handler funcon:
$(function() {
…
// start advancing the step
step();
});
3. We will again simulate the world in a browser. The box is created at the inialized
posion and falls on the ground correctly. The following screenshot shows the
sequence of a box dropping on the ground:
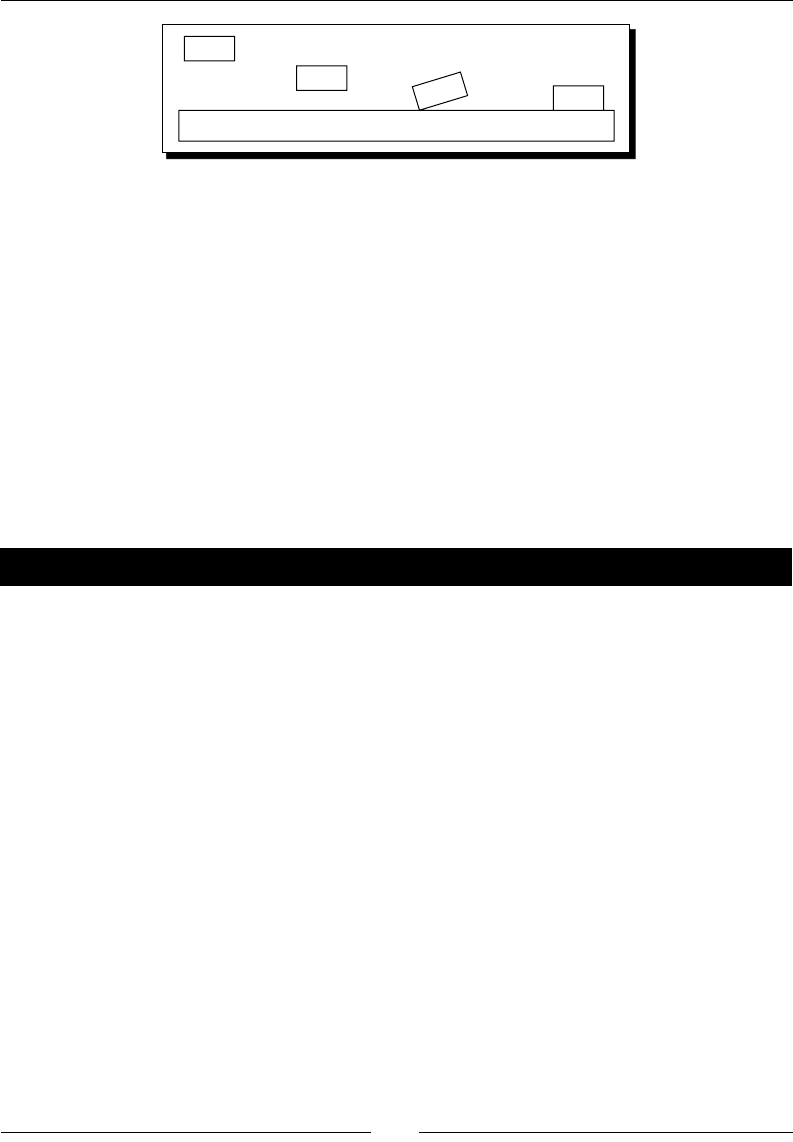
Chapter 9
[ 287 ][ 287 ]
What just happened?
We have advanced the me of the world. Now the physics library simulates the world every
10 milliseconds.
The step funcon is similar to our gameloop funcon in Chapter 2, Geng Started
with DOM-based Game Development. It executes periodically to calculate the new state
of the game.
Adding wheels to the game
Now we have a box in the game. Imagine now we create two circular shaped bodies as the
wheels. Then, we will have the basic component of a car, the body, and the wheels.
Time for action – Putting two circles in the world
We will add two circles to the world by carrying out the following steps:
1. Open the html5games.box2dcargame.js JavaScript le to add the wheel bodies.
2. Add the following code aer the box creaon code. It calls the createWheel
funcon which we will write to create a circular shaped body:
// create two wheels in the world
createWheel(carGame.world, 25, 230);
createWheel(carGame.world, 75, 230);
3. Now let's work on the createWheel funcon. We design this funcon to create a
circle shaped body in the given world at the given x and y coordinates in the world.
Put the following funcon in our JavaScript logic le:
function createWheel(world, x, y) {
// wheel circle definition
var ballSd = new b2CircleDef();
ballSd.density = 1.0;
ballSd.radius = 10;
ballSd.restitution = 0.1;
ballSd.friction = 4.3;
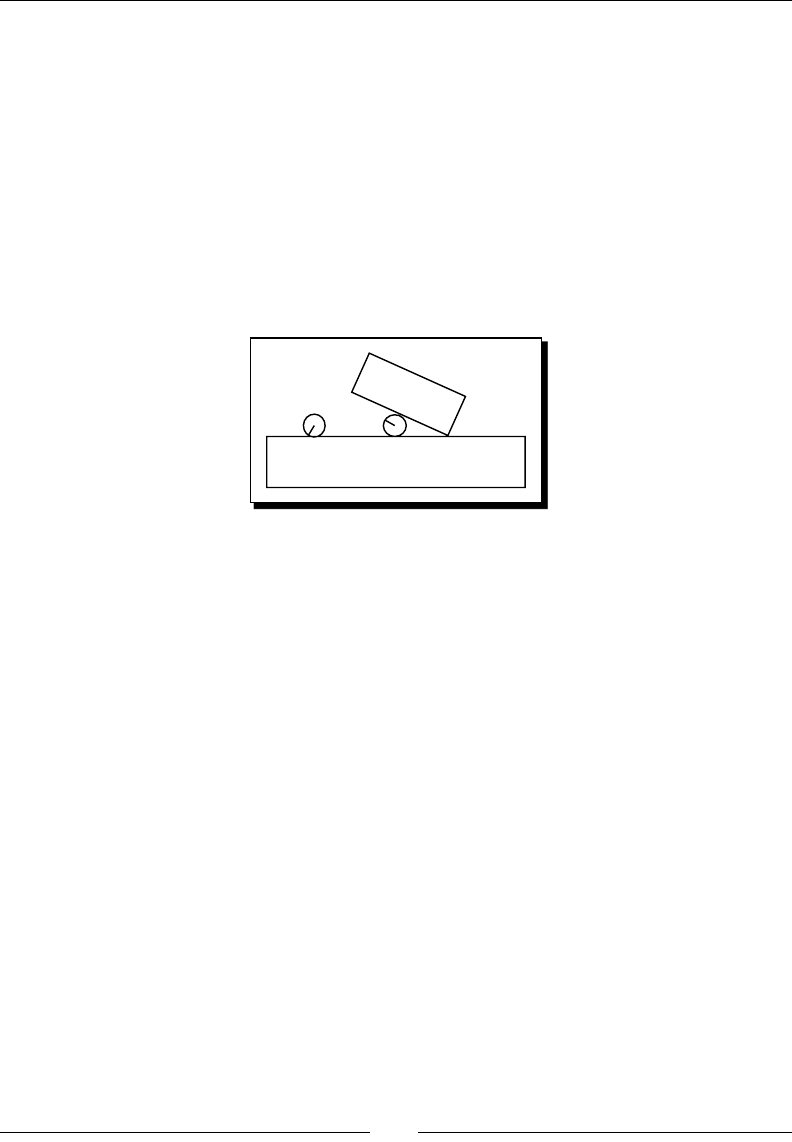
Building a Physics Car Game with Box2D and Canvas
[ 288 ][ 288 ]
// body definition
var ballBd = new b2BodyDef();
ballBd.AddShape(ballSd);
ballBd.position.Set(x,y);
return world.CreateBody(ballBd);
}
4. We will now reload the physics world in a web browser. This me, we should see
the result similar to the one shown in the following screenshot with a box and two
wheels falling down from the air. These bodies collide with others and bounce away
when they hit the wall:
What just happened?
When simulang the physics world, both the box and wheels drop and collide with each
other and the ground.
Creang a circular body is similar to creang a box body. The only dierence is that we use a
CircleDef class instead of the box shape denion. In the circle denion, we dene the
circle size by using the radius property instead of the extents property.
Creating a physical car
We have prepared the car box body and two wheel bodies. We are just one step away from
making a car. Imagine now we have a glue to glue the wheels to the car body. Then, the car
and wheels will not separate anymore and we will have a car. We can use joint to achieve
that. In this secon, we will use joint to sck the wheels and the car body together.

Chapter 9
[ 289 ][ 289 ]
Time for action – Connecting the box and two circles
with revolute joint
Carry out the following steps:
1. We are sll working only on the logic part. Open our JavaScript logic le in
a text editor.
2. Add the following global variable at the top of the document to reference the
car body:
var car;
3. Create a funcon named createCarAt which takes the coordinate as arguments.
Then, we move the body and the wheel creaon code in this funcon. Aerwards,
add the following highlighted Joint creaon code. At last, return the car body:
function createCarAt(x, y) {
// the car box definition
var boxSd = new b2BoxDef();
boxSd.density = 1.0;
boxSd.friction = 1.5;
boxSd.restitution = .4;
boxSd.extents.Set(40, 20);
// the car body definition
var boxBd = new b2BodyDef();
boxBd.AddShape(boxSd);
boxBd.position.Set(x,y);
var carBody = carGame.world.CreateBody(boxBd);
// creating the wheels
var wheelBody1 = createWheel(carGame.world, x-25, y+20);
var wheelBody2 = createWheel(carGame.world, x+25, y+20);
// create a joint to connect left wheel with the car body
var jointDef = new b2RevoluteJointDef();
jointDef.anchorPoint.Set(x-25, y+20);
jointDef.body1 = carBody;
jointDef.body2 = wheelBody1;
carGame.world.CreateJoint(jointDef);
// create a joint to connect right wheel with the car body
var jointDef = new b2RevoluteJointDef();
jointDef.anchorPoint.Set(x+25, y+20);

Building a Physics Car Game with Box2D and Canvas
[ 290 ][ 290 ]
jointDef.body1 = carBody;
jointDef.body2 = wheelBody2;
carGame.world.CreateJoint(jointDef);
return carBody;
}
4. Then, all we need to do is to create a car with the inial posion. Add the following
code to the page loaded event handler aer the world creaon:
// create a car
car = createCarAt(50, 210);
5. It is me to save the le and run the physics world in a browser. At this me, the
wheels and the car body are not separate pieces. They glue together as a car and
drop on the ground correctly, as shown in the following screenshot:
What just happened?
Joint is useful to add constraint between two bodies (or between a body and the world).
There are many kinds of joints and what we used in this example is called revolute joint.
Using a revolute joint to create an anchor point between
two bodies
The revolute joint scks two bodies together with a common anchor point. The two
bodies are then glued together and are only allowed to rotate based on the common
anchor point. The le hand side of the following screenshot shows that two bodies are
connected with an anchor. In our code example, we set the anchor point to be exactly the
center point of the wheel. The right hand side of the following screenshot shows how we set
the joint. The wheel rotates as a wheel because the rotaon origin is at the center. This setup
makes the car and wheels look real:
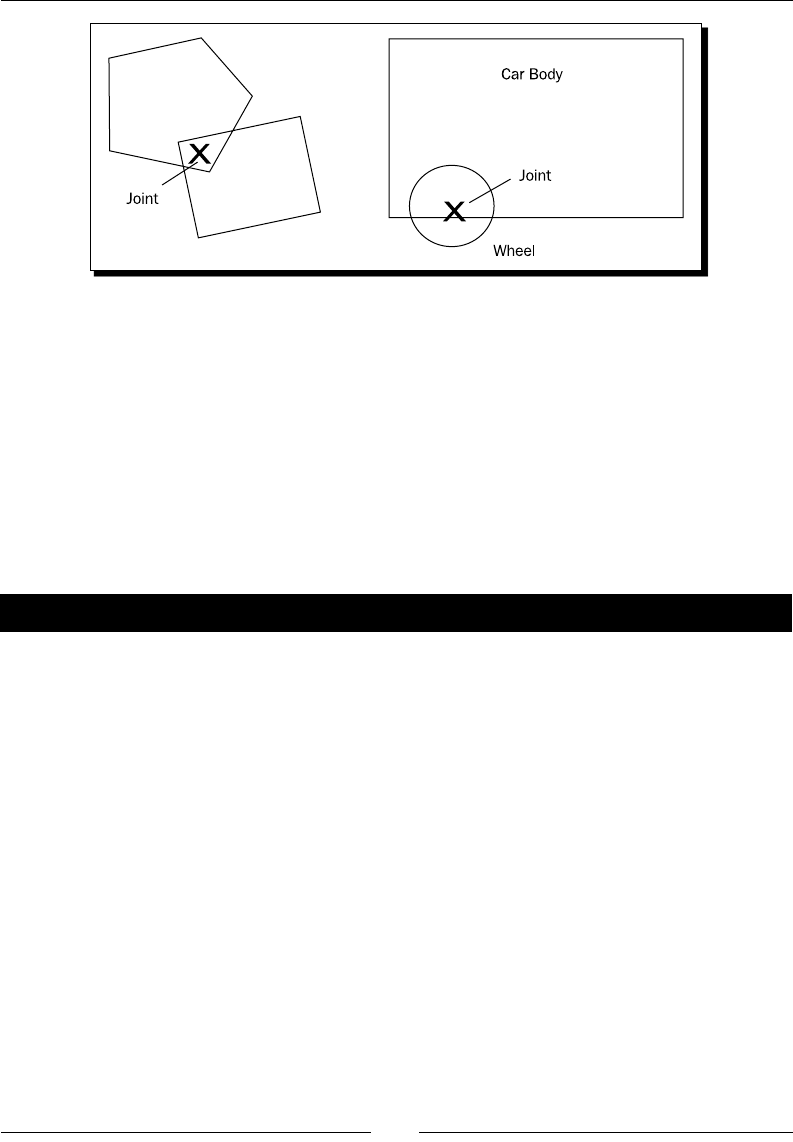
Chapter 9
[ 291 ][ 291 ]
There are other types of joints which are useful in dierent ways. Joints are useful in creang
a game environment and as there are several types of joints, each joint type is worth a
try and you should think how to use them. The following link is the Box2D manual which
explains each type of joint and how we can use them on dierent environment setups:
http://www.box2d.org/manual.html#_Toc258082974
Adding force to the car with a keyboard input
We have the car ready now. Let's move it with our keyboard.
Time for action – Adding force to the car
Carry out the following steps:
1. Open the html5games.box2dcargame.js JavaScript le in a text editor.
2. In the page loaded event handler, we add the following keydown event handler to
the beginning. It listens to the X key and Z key to apply force in dierent direcons:
// Keyboard event
$(document).keydown(function(e) {
switch(e.keyCode) {
case 88: // x key to apply force towards right
var force = new b2Vec2(10000000, 0);
carGame.car.ApplyForce
(force, carGame.car.GetCenterPosition());
break;
case 90: // z key to apply force towards left
var force = new b2Vec2(-10000000, 0);
carGame.car.ApplyForce
(force, carGame.car.GetCenterPosition());
break;
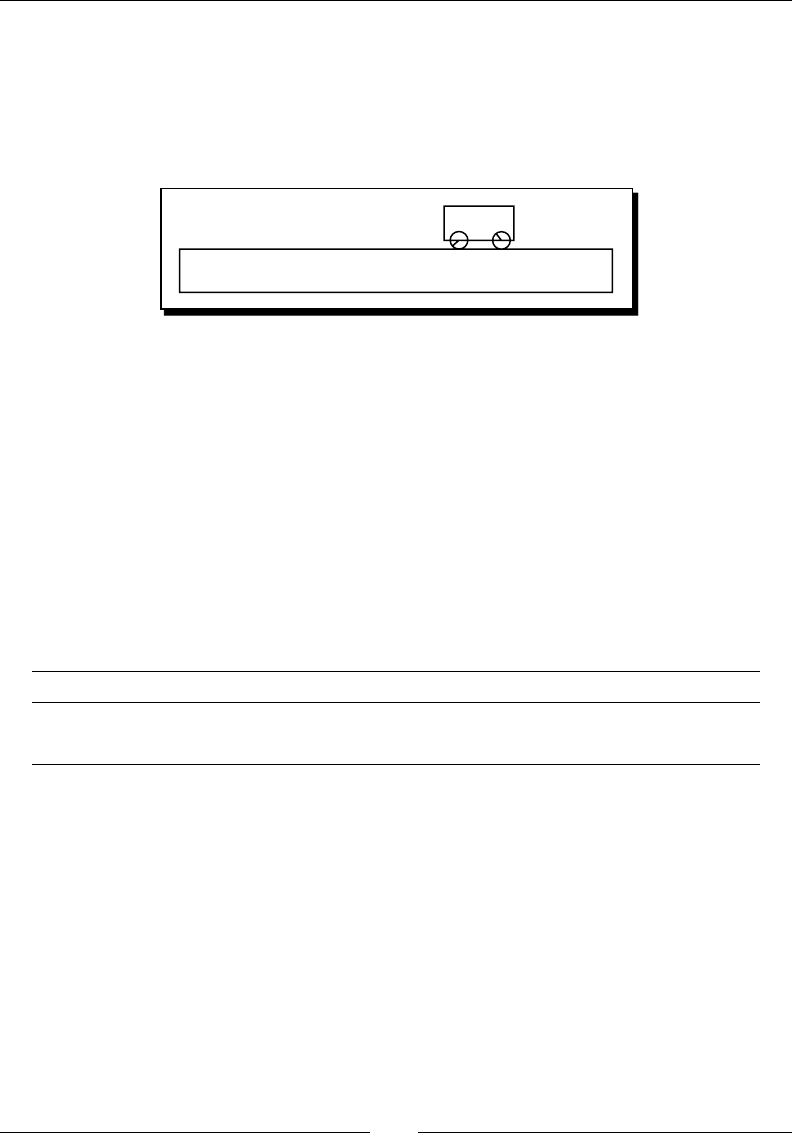
Building a Physics Car Game with Box2D and Canvas
[ 292 ][ 292 ]
}
});
3. That is all. Save the les and run our game in the browser. When you press the X or
Z key, the car starts moving. If you keep pressing the key, the world will keep adding
force to the car and make it y away:
What just happened?
We just created an interacon with our car body. We can move the car le and right by
pressing the Z and X keys. It seems like the game is geng interesng now.
Applying force to a body
We can apply force to any body by calling the ApplyForce funcon in that body.
The following code shows the usage of the funcon:
body.ApplyForce(force, point);
This funcon takes two arguments, which are listed in the following table:
Arguments Type Discussion
force b2Vec2 The force vector to apply to the body
point b2Vec2 The point where the force applies
Chapter 9
[ 293 ][ 293 ]
Understanding the difference between ApplyForce and
ApplyImpulse
Besides the ApplyForce funcon, we can also move any body by using the ApplyImpulse
funcon. Both funcons move the body, but they move them in a dierent approach. If we
want to change the instance velocity of a body, then we use ApplyImpulse once on the
body to change velocity to our target value. On the other hand, we need to constuently
apply force to a body to increase the speed.
For example, we want to increase the velocity of the car like stepping on the pedal. In this
case, we apply force to the car. If we are creang a ball game that needs to kick-start the ball,
we may use the ApplyImpulse funcon to add an instance impulse to the ball body.
Have a go hero
Can you think about a dierent situaon where we will need to apply force or impulse
to the body?
Adding ramps to our game environment
Now we can move the car. However, the environment is not interesng enough to play.
Imagine now there are some ramps for the car to jump, and there is a gap between two
plaorms that a player has to y the car over. It will become more interesng to play with
dierent ramp setups.
Time for action – Creating the world with ramps
Carry out the following steps:
1. We will open the game logic JavaScript le.
2. Move the current ground creaon code into a new funcon named createGround.
Then, change the code to use the four given arguments as follows:
function createGround(x, y, width, height, rotation) {
// box shape definition
var groundSd = new b2BoxDef();
groundSd.extents.Set(width, height);
groundSd.restitution = 0.4;
// body definition with the given shape we just created.
var groundBd = new b2BodyDef();
groundBd.AddShape(groundSd);
groundBd.position.Set(x, y);
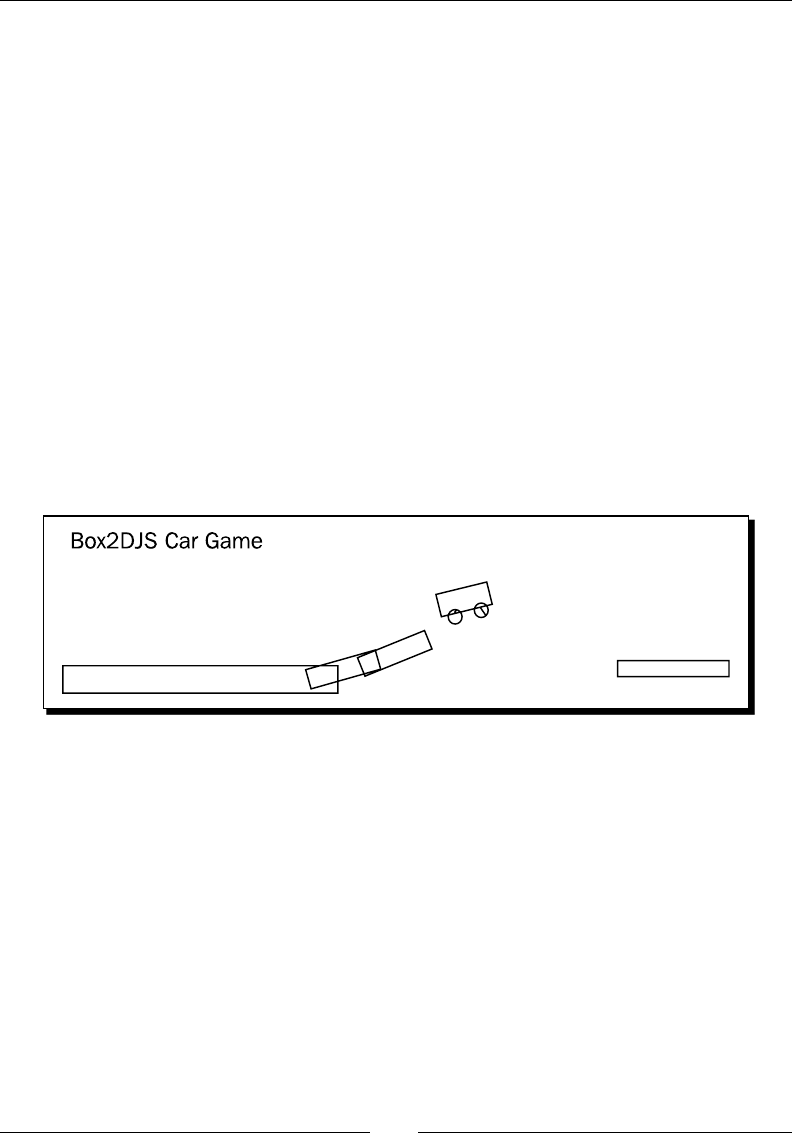
Building a Physics Car Game with Box2D and Canvas
[ 294 ][ 294 ]
groundBd.rotation = rotation * Math.PI / 180;
var body = carGame.world.CreateBody(groundBd);
return body;
}
3. Now we have a funcon to create the ground body. We will now replace the ground
creaon code in the page loaded handler funcon with the following code:
// create the ground
createGround(250, 270, 250, 25, 0);
// create a ramp
createGround(500, 250, 65, 15, -10);
createGround(600, 225, 80, 15, -20);
createGround(1100, 250, 100, 15, 0);
4. Save the le and preview the game in a browser. We should see a ramp now and a
desnaon plaorm as shown in the following screenshot. Try to control the car,
jump over the ramp, and reach the desnaon without falling down. Refresh the
page to restart the game if you fail:
What just happened?
We just wrapped the ground box creang code into a funcon, so that we can easily
create a combinaon of ground bodies. These ground bodies composite the level
environment of the game.
In addion, this is the rst me we are rotang a body. We set the rotaon of the body by
using the rotation property which takes a value in radian. Most people may get used to
the degree unit; we can get the radian value from degree by using the following formula:
groundBd.rotation = degree * Math.PI / 180;
By seng the rotaon of a box, we can have a ramp of varying slope setup in our game.
Chapter 9
[ 295 ][ 295 ]
Have a go hero – Creating different environments with different joints
We have a ramp setup now and we can play with the car within the environment. How
about using dierent kinds of joints to setup the playground? For example, how about a
pulley joint to act as a li? On the other hand, how about including a dynamic board with
a joint at the center?
Checking collisions in the Box2D world
The Box2D physics library calculates all collisions automacally. Imagine now we setup a
ground body as the desnaon. Players win when they successfully move the car to hit the
desnaon. As Box2D already calculates all collisions, all we have to do is get the detected
collision list and determine whether our car has hit the desnaon ground.
Time for action – Checking a collision between the car and the
destination body
Carry out the following steps:
1. Again, we start from our game logic. Open the html5games.box2dcargame.js
JavaScript le in a text editor.
2. We setup a desnaon ground in the ground creaon code and assign it to our
gamewinWall reference inside the carGame global object instance as follows:
carGame.gamewinWall = createGround(1200, 215, 15, 25, 0);
3. Next, we move on to the step funcon. In each step, we get the complete contact
list from the world and check whether any two colliding objects are car and the
desnaon ground:
function step() {
carGame.world.Step(1.0/60, 1);
ctx.clearRect(0, 0, canvasWidth, canvasHeight);
drawWorld(carGame.world, ctx);
setTimeout(step, 10);
//loop all contact list to check if the car hits the
winning wall
for (var cn = carGame.world.GetContactList(); cn != null;
cn = cn.GetNext()) {
var body1 = cn.GetShape1().GetBody();
var body2 = cn.GetShape2().GetBody();
if ((body1 == carGame.car && body2 == carGame.gamewinWall) ||
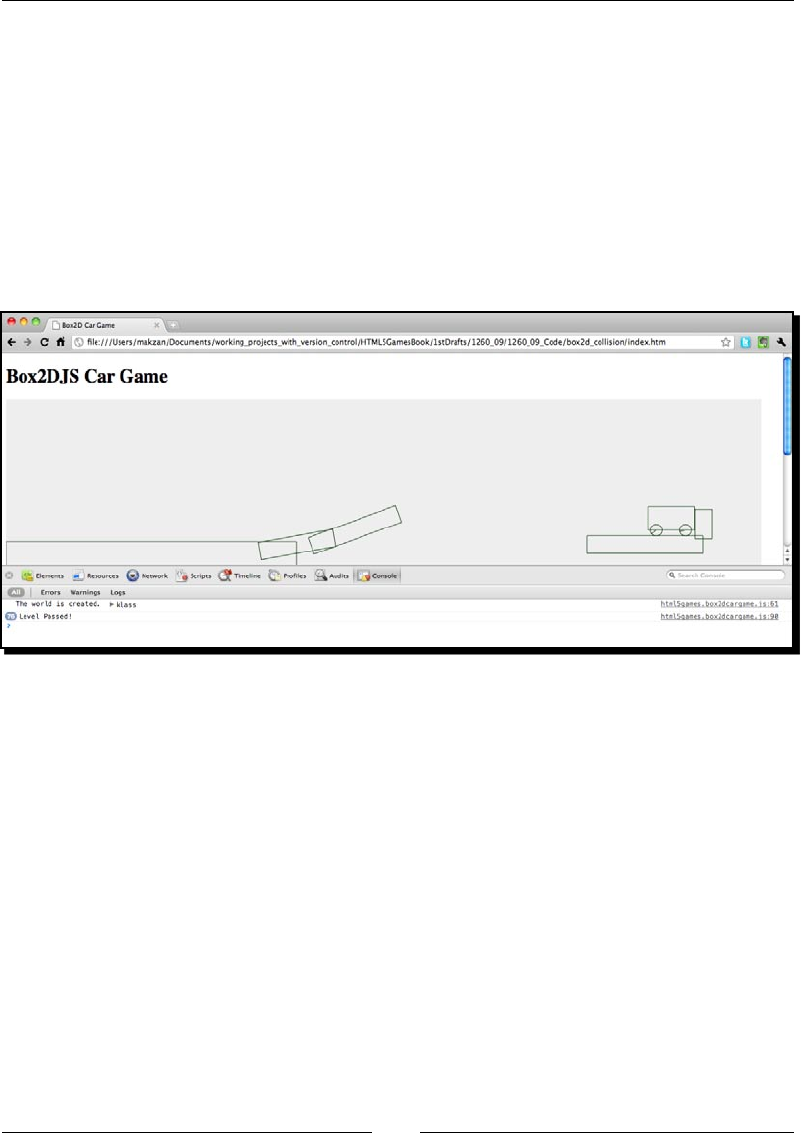
Building a Physics Car Game with Box2D and Canvas
[ 296 ][ 296 ]
(body2 == carGame.car && body1 == carGame.gamewinWall))
{
console.log("Level Passed!");
}
}
}
4. We will now save the code and open the game in a browser again. This me, we
have to open the console window to track if we get the Level Passed! output when
the car hits that wall. Try to nish the game and we should see the output in the
console once the car hits the desnaon:
What just happened?
We just created the game winning logic by checking the collision contacts. The player wins
when the car successfully reaches the desnaon ground object.
Getting the collision contact list
In each step, Box2D calculates all collisions and puts them into a contact list in the world
instance. We can get the contact list by using the carGame.world.GetContactList()
funcon. The returned contact list is a link list. We can travel through the enre link list by
using the following for-loop:
for (var cn = carGame.world.GetContactList(); cn != null; cn =
cn.GetNext()) {
// We have shape 1 and shape 2 of each contact node.
// cn.GetShape1();
// cn.GetShape2();
}
Chapter 9
[ 297 ][ 297 ]
When we get the collided shapes, we check whether the body of that shape is a car or the
desnaon body. As the car shape may be in shape 1 or shape 2, and the same applies to the
gamewinWall, we use the following code to check both combinaons:
var body1 = cn.GetShape1().GetBody();
var body2 = cn.GetShape2().GetBody();
if ((body1 == carGame.car && body2 == carGame.gamewinWall) ||
(body2 == carGame.car && body1 == carGame.gamewinWall))
{
console.log("Level Passed!");
}
Have a go hero
We created a game over dialog in Chapter 7, Using Local Storage to Store Game Data. How
about using that technique here to create a dialog showing the player passed the level when
hing the winning wall? It will also be useful as level transion later when we add dierent
level setups to the game.
Restarting the game
You may have already tried refreshing the page several mes in the last example to make the
car successfully jump to the desnaon. Imagine now we can press a key to re-inialize the
world. Then, we can follow the trial-and-error method unl success.
Time for action – Restarting the game while pressing the R key
We will assign the R key as the restart key for our game:
1. Again, we only need to change the JavaScript le. Open the html5games.
box2dcargame.js JavaScript le in a text editor.
2. We move the create world, ramp, and the car code into a funcon named
restartGame. They were originally in the page loaded handler funcon:
function restartGame() {
// create the world
carGame.world = createWorld();
// create the ground
createGround(250, 270, 250, 25, 0);
// create a ramp
createGround(500, 250, 65, 15, -10);

Building a Physics Car Game with Box2D and Canvas
[ 298 ][ 298 ]
createGround(600, 225, 80, 15, -20);
createGround(1100, 250, 100, 15, 0);
// create a destination ground
carGame.gamewinWall = createGround(1200, 215, 15, 25, 0);
// create a car
carGame.car = createCarAt(50, 210);
}
3. Then, in the page loaded event handler, we call the restartGame funcon to
inialize the game as follows:
restartGame();
4. Finally, we add the following highlighted code to the keydown handler to restart the
game when the R key is pressed:
$(document).keydown(function(e) {
switch(e.keyCode) {
case 88: // x key to apply force towards right
var force = new b2Vec2(10000000, 0);
carGame.car.ApplyForce
(force, carGame.car.GetCenterPosition());
break;
case 90: // z key to apply force towards left
var force = new b2Vec2(-10000000, 0);
carGame.car.ApplyForce
(force, carGame.car.GetCenterPosition());
break;
case 82: // r key to restart the game
restartGame();
break;
}
});
5. How about restarng the game when the player passes the level? Add the following
highlighted code to the game win logic:
if ((cn.GetShape1().GetBody() == carGame.car &&
cn.GetShape2().GetBody() == carGame.gamewinWall) ||
(cn.GetShape2().GetBody() == carGame.car &&
cn.GetShape1().GetBody() == carGame.gamewinWall))
{
console.log("Level Passed!");
restartGame();
}
Chapter 9
[ 299 ][ 299 ]
6. It is me to test the game in a browser. Try playing the game and press the R key to
restart the game.
What just happened?
We refractor our code to create a restartGame funcon. The world is destroyed and
inialized again each me we call this funcon. We can destroy the exisng world and
create a new empty one by creang a new world instance of our world variable as follows:
carGame.world = createWorld();
Have a go hero – Creating the game over wall
Now the only way to restart the game is by pressing the restart key. How about creang a
ground at the boom of the world that checks any falling car? When the car drops and hits
the boom ground, we know that the player has failed and then restart the game.
Adding a level support to our car game
Imagine now we can level up to the next environment setup when nishing each game.
We will need several environment setups for each level.
Time for action – Loading game with levels data
We will refractor our code to support loading the stac ground bodies from a levels data
structure. Let's work on it by carrying out the following steps:
1. Open the html5games.box2dcargame.js JavaScript le in a text editor.
2. We will need each ground setup on each level. Put the following code at the top of
the JavaScript le. It is an array of levels. Each level is another array of objects with
the posion, dimension, and rotaon of the stac ground body:
carGame.levels = new Array();
carGame.levels[0] = [{"type":"car","x":50,"y":210,"fuel":20},
{"type":"box","x":250, "y":270, "width":250,
"height":25, "rotation":0},
{"type":"box","x":500,"y":250,"width":65,"height":15,
"rotation":-10},
{"type":"box","x":600,"y":225,"width":80,"height":15,
"rotation":-20},
{"type":"box","x":950,"y":225,"width":80,"height":15,
"rotation":20},
{"type":"box","x":1100,"y":250,"width":100,"height":15,

Building a Physics Car Game with Box2D and Canvas
[ 300 ][ 300 ]
"rotation":0},
{"type":"win","x":1200,"y":215,"width":15,"height":25,
"rotation":0}];
carGame.levels[1] = [{"type":"car","x":50,"y":210,"fuel":20},
{"type":"box","x":100, "y":270, "width":190,
"height":15, "rotation":20},
{"type":"box","x":380, "y":320, "width":100, "height":15,
"rotation":-10},
{"type":"box","x":666,"y":285,"width":80,"height":15,
"rotation":-32},
{"type":"box","x":950,"y":295,"width":80,"height":15,
"rotation":20},
{"type":"box","x":1100,"y":310,"width":100,"height":15,
"rotation":0},
{"type":"win","x":1200,"y":275,"width":15,"height":25,
"rotation":0}];
carGame.levels[2] = [{"type":"car","x":50,"y":210,"fuel":20},
{"type":"box","x":100, "y":270, "width":190,
"height":15, "rotation":20},
{"type":"box","x":380, "y":320, "width":100,
"height":15, "rotation":-10},
{"type":"box","x":686,"y":285,"width":80,"height":15,
"rotation":-32},
{"type":"box","x":250,"y":495,"width":80,"height":15,
"rotation":40},
{"type":"box","x":500,"y":540,"width":200,"height":15,
"rotation":0},
{"type":"win","x":220,"y":425,"width":15,"height":25,
"rotation":23}];
3. Then, we use the following variable in the carGame object instance to store the
current level:
var carGame = {
currentLevel: 0
}

Chapter 9
[ 301 ][ 301 ]
4. Replace the restartGame funcon with the following code. It changes the funcon
to accept a level argument. Then, create the ground or car by the level data:
function restartGame(level) {
carGame.currentLevel = level;
// create the world
carGame.world = createWorld();
// create a ground in our newly created world
// load the ground info from level data
for(var i=0;i<carGame.levels[level].length;i++) {
var obj = carGame.levels[level][i];
// create car
if (obj.type == "car") {
carGame.car = createCarAt(obj.x,obj.y);
continue;
}
var groundBody = createGround(obj.x, obj.y,
obj.width, obj.height, obj.rotation);
if (obj.type == "win") {
carGame.gamewinWall = groundBody;
}
}
}
5. In the page loaded handler funcon, we change the restartGame funcon calling
by providing currentLevel as follows:
restartGame(carGame.currentLevel);
6. We also need to provide the currentLevel value in the restart key handler:
case 82: // r key to restart the game
restartGame(carGame.currentLevel);
break;
7. Lastly, we change the following highlighted code in the game win logic. We level up
the game when the car hits the desnaon:
if ((body1 == carGame.car && body2 == carGame.gamewinWall) ||
(body2 == carGame.car && body1 == carGame.gamewinWall))
{
console.log("Level Passed!");
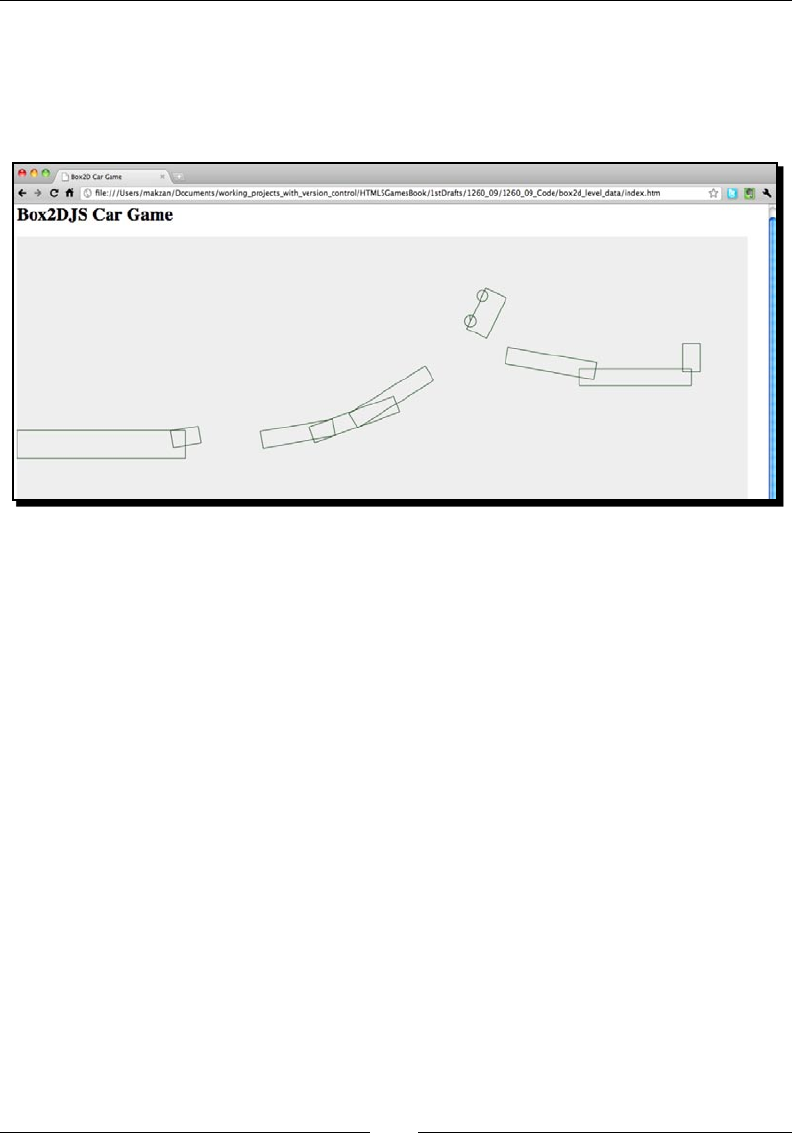
Building a Physics Car Game with Box2D and Canvas
[ 302 ][ 302 ]
restartGame(carGame.currentLevel+1);
}
8. We will now run the game in the web browser. Finish the level and the game should
restart at the next level:
What just happened?
We just created a data structure to store the levels. Then, we created the game with the
given level number and constructed the world with the level data.
Each level data is an array of objects. Each object contains properes of each ground body
in the world. This includes basic properes such as posion, size, and rotaon. There is also
a property named type. It denes whether the body is a normal box body, car data, or the
desnaon winning ground:
carGame.levels[0] = [{"type":"car","x":50,"y":210,"fuel":20},
{"type":"box","x":250, "y":270, "width":250, "height":25,
"rotation":0},
{"type":"box","x":500,"y":250,"width":65,"height":15,"rotation":-10},
{"type":"box","x":600,"y":225,"width":80,"height":15,"rotation":-20},
{"type":"box","x":950,"y":225,"width":80,"height":15,"rotation":20},
{"type":"box","x":1100,"y":250,"width":100,"height":15,"rotation":0},
{"type":"win","x":1200,"y":215,"width":15,"height":25,"rotation":0}];
When creang the world, we use the following code to loop through all objects in the level
array. We then create the car and ground bodies and reference the game winning ground
according to the type:
for(var i=0;i<carGame.levels[level].length;i++) {
Chapter 9
[ 303 ][ 303 ]
var obj = carGame.levels[level][i];
// create car
if (obj.type == "car") {
carGame.car = createCarAt(obj.x,obj.y);
continue;
}
var groundBody = createGround(obj.x, obj.y, obj.width,
obj.height, obj.rotation);
if (obj.type == "win") {
carGame.gamewinWall = groundBody;
}
}
Have a go hero – Creating more levels
Now we have several levels setup for our game. How about duplicang the level data to
create more interesng levels to play? Create your own levels and play with them. It is just as
if a kid builds blocks and plays with them.
Replacing the Box2D outline drawing with graphics
We have created the game that is at least playable with several levels. However, they are just
some outline boxes. We cannot even disnguish between the desnaon body and other
ground bodies in the game. Imagine now the desnaon is a racing ag and there is a car
graphic to represent it. It will make the game purpose clearer.
Time for action – Adding a ag graphic and a car graphic
to the game
Carry out the following steps:
1. We will rst download the graphics we need for this example. Go to the following
link to download the graphics:
http://gamedesign.cc/html5games/1260_09_example_graphics.zip
2. Extract the ZIP le in the images folder.

Building a Physics Car Game with Box2D and Canvas
[ 304 ][ 304 ]
3. Now it is me to edit the index.htm le. Add the following HTML markup
to the body:
<div id="asset">
<img id="flag" src='images/flag.png'>
<img id="bus" src="images/bus.png">
<img id="wheel" src="images/wheel.png">
</div>
4. We want to hide the asset DIV that contains our img tags. Open the cargame.css
le and add the following CSS rule to keep the asset DIV out of our sight:
#asset {
position: absolute;
top: -99999px;
}
5. We will now move on to the logic part. Open the html5games.box2dcargame.js
JavaScript le.
6. In the createGround funcon, we add a new argument named type to pass in the
type. Then, we add the highlighted code to assign the reference of the flag image
to the ground shape user data if it is a winning desnaon ground:
function createGround(x, y, width, height, rotation, type) {
// box shape definition
var groundSd = new b2BoxDef();
groundSd.extents.Set(width, height);
groundSd.restitution = 0.4;
if (type == "win") {
groundSd.userData = document.getElementById('flag');
}
…
}
7. When creang the ground, we need to pass the type property now. Replace the
ground creaon code with the following one:
var groundBody = createGround(obj.x, obj.y, obj.width,
obj.height, obj.rotation, obj.type);
8. Next, we assign the reference of the bus image tag to the user data in the car shape.
Add the following highlighted code to the car box denion creaon:
// the car box definition
var boxSd = new b2BoxDef();
Chapter 9
[ 305 ][ 305 ]
boxSd.density = 1.0;
boxSd.friction = 1.5;
boxSd.restitution = .4;
boxSd.extents.Set(40, 20);
boxSd.userData = document.getElementById('bus');
We used to get the reference of an element by the jQuery $(selector)
method. The jQuery selector returns an array of the element objects
with addional jQuery data wrapped. If we want to get the original
document element reference, then we can either use the document.
getElementById method or $(selector).get(0). As
$(selector) returns an array, get(0) gives the rst original document
element in the list
9. Then, we need to handle the wheels. We assign the wheel image tag to the
wheel body's userData property. Add the following highlighted code to the
createWheel funcon:
function createWheel(world, x, y) {
// wheel circle definition
var ballSd = new b2CircleDef();
ballSd.density = 1.0;
ballSd.radius = 10;
ballSd.restitution = 0.1;
ballSd.friction = 4.3;
ballSd.userData = document.getElementById('wheel');
…
}
10. Finally, we have to draw the images in the canvas. Replace the drawWorld funcon
with the following code. The highlighted code is the changed part:
function drawWorld(world, context) {
for (var b = world.m_bodyList; b != null; b = b.m_next) {
for (var s = b.GetShapeList(); s != null; s = s.GetNext()) {
if (s.GetUserData() != undefined) {
// the user data contains the reference to the image
var img = s.GetUserData();
// the x and y of the image.
// We have to substract the half width/height
var x = s.GetPosition().x;
var y = s.GetPosition().y;
var topleftX = - $(img).width()/2;
var topleftY = - $(img).height()/2;
context.save();
context.translate(x,y);
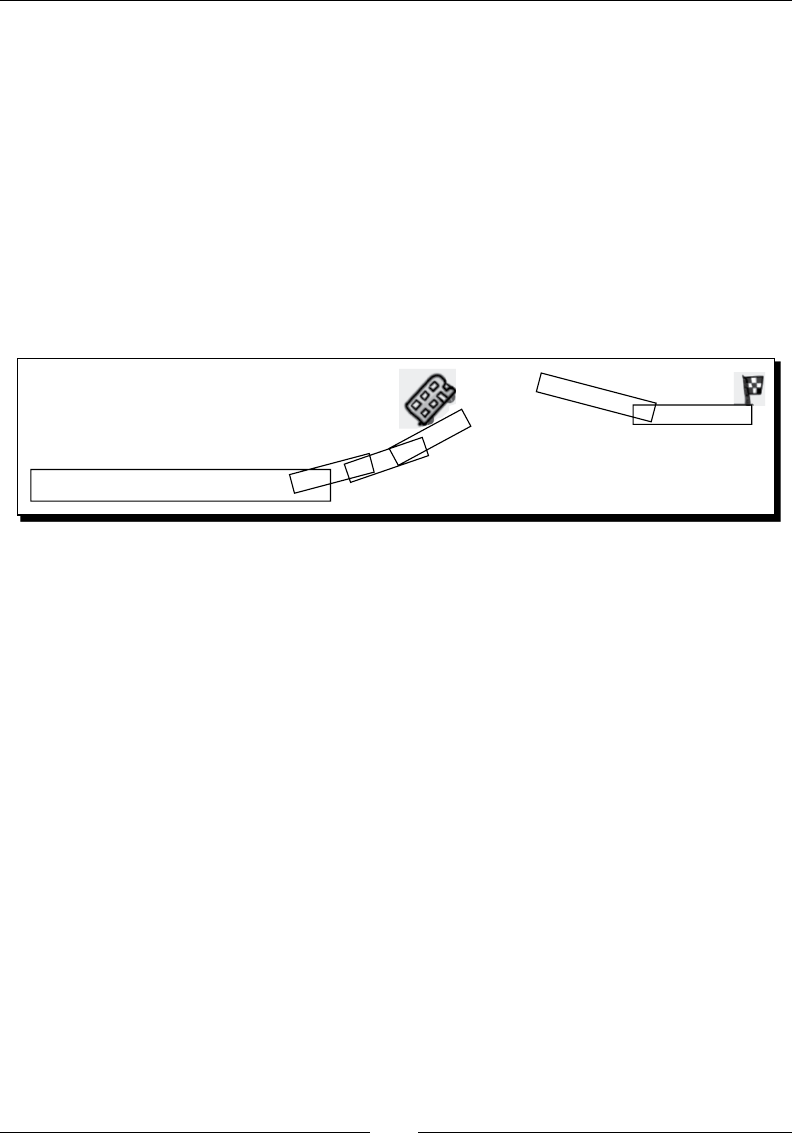
Building a Physics Car Game with Box2D and Canvas
[ 306 ][ 306 ]
context.rotate(s.GetBody().GetRotation());
context.drawImage(img, topleftX, topleftY);
context.restore();
} else {
drawShape(s, context);
}
}
}
}
11. Finally, save all les and run the game in a web browser. We should see a yellow bus
graphic, two wheels, and a ag as the desnaon. Play the game now and the game
should move on to the next level when the bus hits the ag:
What just happened?
We are now presenng our game with minimal graphics. At least, players can easily know
what they are controlling and where they should go.
The Box2D library uses a canvas to render the physics world. Therefore, all techniques that
we learned about a canvas can be applied here. In Chapter 5, Building a Canvas Games
Masterclass, we learned the use of the drawImage funcon to display an image in the
canvas. We used this technique to draw the ag graphic in the canvas of the physics world.
Using userData in shape and body
How do we know which physics body needs to be displayed as the ag image? There is a
property named userData in every Box2D shape and body. This property is used to store
any custom data related to that shape or body. For example, we may store the lename of
the graphic le or we just directly store the reference to the image tag.

Chapter 9
[ 307 ][ 307 ]
We have a list of image tags referencing the graphic assets that we need in the game.
However, we do not want to display the image tags, they are just for the purpose of loading
and referencing. We hide those asset image tags by seng their posion out of the HTML
bound with the following CSS style. We do not use display:none because we cannot get
the width and height of the element that is not displayed at all. We need the width and
height to posion graphics correctly in the physics world:
#asset {
position: absolute;
top: -99999px;
}
Drawing graphics every frame according to the state of its
physics body
The drawing from Box2D is just for development use before we replace it with our graphics.
The following code checks whether the shape has a user data assigned. In our example, the
user data is used for referencing the image tag of that graphics asset. We get the image tag
and pass it to the canvas context drawImage funcon to draw.
All box and circle shapes in Box2D have the origin point at the center. However, the image
drawing in the canvas needs the top-le point. Therefore, we have both x/y coordinates and
oset of top-le x/y points which is a negave half width and height of the image:
if (s.GetUserData() != undefined) {
// the user data contains the reference to the image
var img = s.GetUserData();
// the x and y of the image.
// We have to substract the half width/height
var x = s.GetPosition().x;
var y = s.GetPosition().y;
var topleftX = - $(img).width()/2;
var topleftY = - $(img).height()/2;
context.save();
context.translate(x,y);
context.rotate(s.GetBody().GetRotation());
context.drawImage(img, topleftX, topleftY);
context.restore();
}
Building a Physics Car Game with Box2D and Canvas
[ 308 ][ 308 ]
Rotating and translating an image in the canvas
We used the drawImage funcon to draw an image directly with the coordinate. However,
the situaon is dierent here. We need to rotate the drawn image. This is done by rotang
the context before drawing and then restoring the rotaon aerwards. We can do this by
saving the context state, translang it, rotang it, and then calling the restore funcon.
The following code shows how we draw an image at a given posion and rotaon. The
topleftX and topleftY are the oset distances from the image center origin to the top
le point:
context.save();
context.translate(x,y);
context.rotate(s.GetBody().GetRotation());
context.drawImage(img, topleftX, topleftY);
context.restore();
We do not need to make the physics body area exactly the same as its
graphics. For example, if we have a round circle chicken, we can represent
it in the physics world by just a ball body. Using a simple physics body can
improve the performance a lot.
Have a go hero – Applying the previously learned technique
to the car game
We have learned using CSS3 transion to animate a scoreboard. How about applying
it to this car game? Moreover, how about adding some engine sounds to the car?
Just try applying what we have learned through this book to give players a complete
game experience.
Adding a nal touch to make the game fun to play
Imagine now we want to publish the game. The game logic is basically here, but it looks quite
ugly with the black and white environment. In this secon, we will add some nal touches to
the game so it is much more aracve. We will also apply some constraints to limit the me
of ApplyForce. This constraint makes the game more fun because it requires a player to think
before he applies too much force to the car.
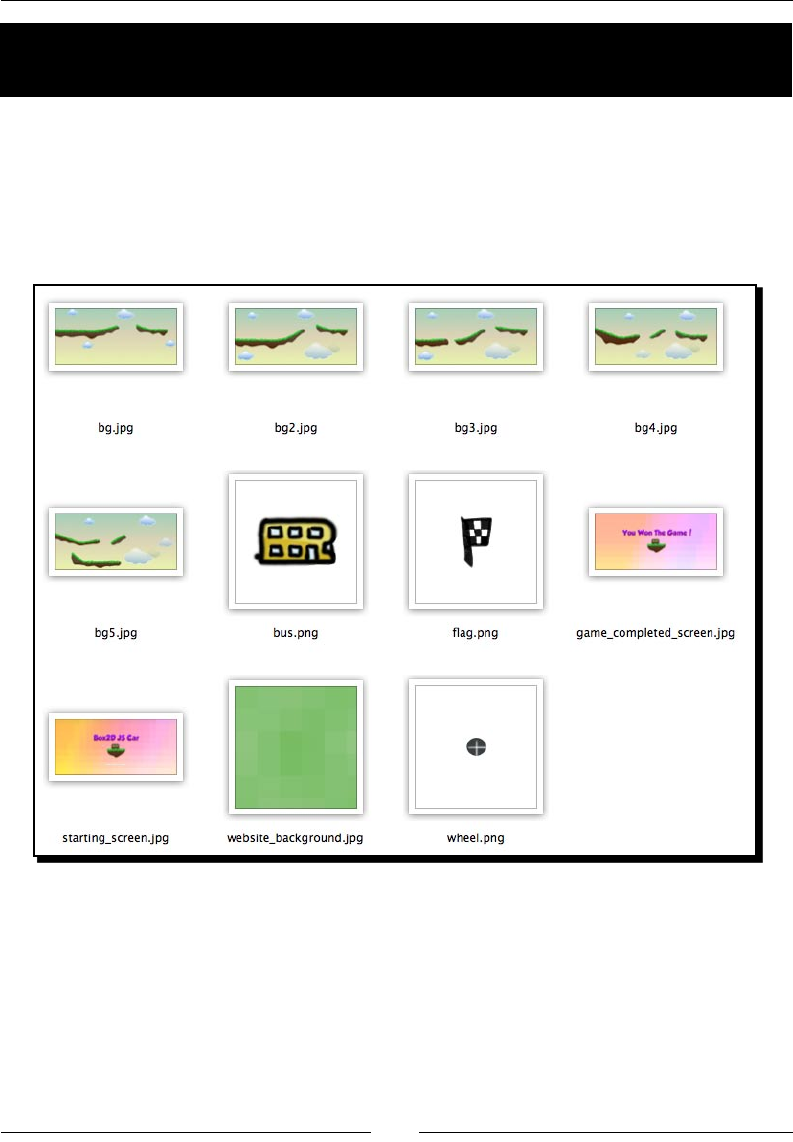
Chapter 9
[ 309 ][ 309 ]
Time for action – Decorating the game and adding a fuel
limitation
Carry out the following steps:
1. First, we need some background images for the starng screen, game winning
screen, and environment backgrounds for each level. These graphics can be found
from the code bundle named box2d_final_game. The following screenshot shows
the graphics we need in this secon:
2. Open the index.htm le and replace the canvas element with the following
markup. It creates two more game components named current level and fuel
remaining, and groups the game components into a game-container DIV:
<section id="game-container">
<canvas id="game" width='1300' height='600'
class="startscreen"></canvas>
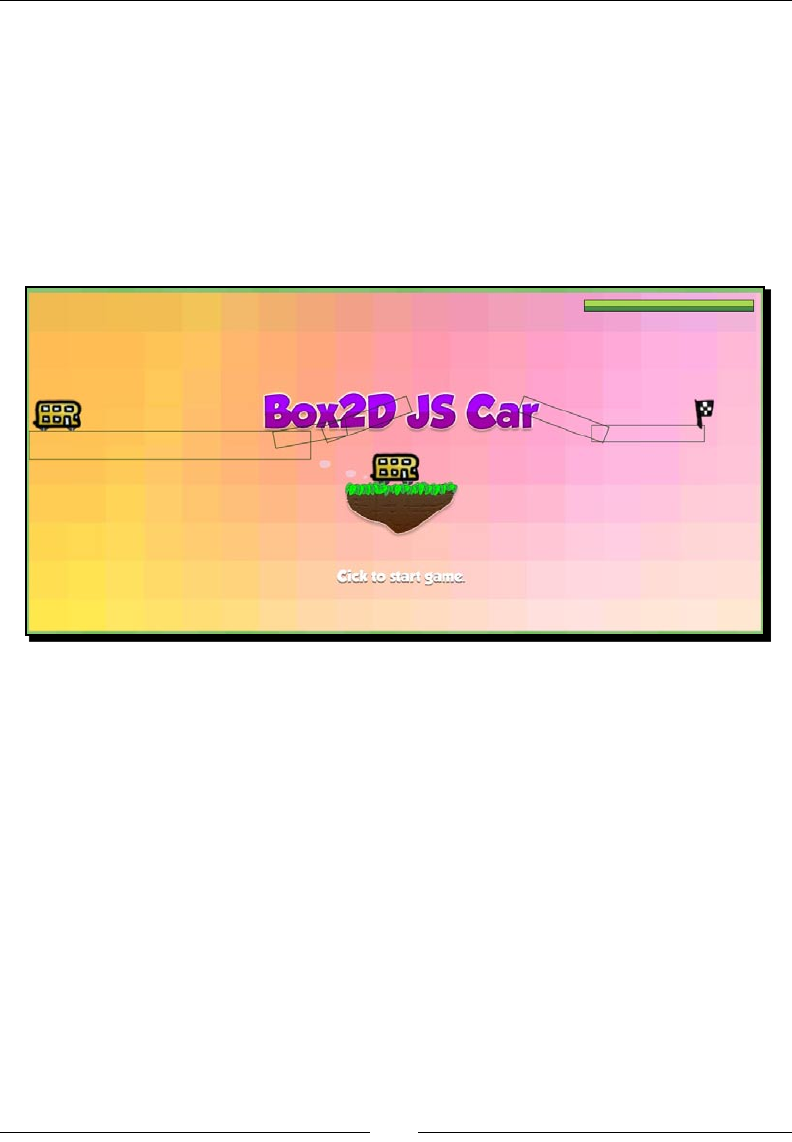
Building a Physics Car Game with Box2D and Canvas
[ 310 ][ 310 ]
<div id="fuel" class="progressbar">
<div class="fuel-value" style="width: 100%;"></div>
</div>
<div id="level"></div>
</section>
3. Next, we will copy the cargame.css le from the code bundle. It contains several
class style denions for the game. The game should look similar to the one shown
in the following screenshot when we have applied the new stylesheet:
4. Now we will move on to the JavaScript part. Open the html5games.
box2dcargame.js le.
5. Update the carGame object declaraon with the following addional variable:
var carGame = {
// game state constant
STATE_STARTING_SCREEN : 1,
STATE_PLAYING : 2,
STATE_GAMEOVER_SCREEN : 3,
state : 0,
fuel: 0,
fuelMax: 0,
currentLevel: 0
}

Chapter 9
[ 311 ][ 311 ]
6. Now we have the starng screen. Instead of starng the game once, the page is
loaded. We show the starng screen and wait for the player to click on the game
canvas. Add the following logic to the page ready funcon:
// set the game state as "starting screen"
carGame.state = carGame.STATE_STARTING_SCREEN;
// start the game when clicking anywhere in starting screen
$('#game').click(function(){
if (carGame.state == carGame.STATE_STARTING_SCREEN)
{
// change the state to playing.
carGame.state = carGame.STATE_PLAYING;
// start new game
restartGame(carGame.currentLevel);
// start advancing the step
step();
}
});
7. We need to remove the original step() funcon calling at the end of the page
ready funcon because we are calling it on a mouse click.
8. Next, we need to handle the game winning screen when the player passes all levels.
In the winning ag collision checking logic, we replace the original restartGame
funcon calling with the following logic which checks whether we show the next
level or the ending screen:
if (currentLevel < 4)
{
restartGame(currentLevel+1);
}
else
{
// show game over screen
$('#game').removeClass().addClass('gamebg_won');
// clear the physics world
world = createWorld();
}

Building a Physics Car Game with Box2D and Canvas
[ 312 ][ 312 ]
9. Then, we will handle the game playing background. We prepared each game
background for each level seng. We will switch the background in the
restartGame funcon which responds to reconstruct the world:
$("#level").html("Level " + (level+1));
// change the background image to fit the level
$('#game').removeClass().addClass('gamebg_level'+level);
10. With the game graphics now, we do not need the physics object outline
drawing any more. We can remove the drawShape(s, context); code
in the drawWorld funcon.
11. Finally, let's add some constraints. Remember that in our level data, we include
a mystery fuel data to the car. It is an indicator indicang how much fuel the car
contains. We will use this fuel to limit the player's input. The fuel reduces each me
a force is applied to the car. The player cannot apply any addional force once the
fuel runs out. This limitaon makes the game more fun to play:
12. Update the x and z keydown funcon with the following logic:
case 88: // x key to apply force towards right
if (carGame.fuel > 0)
{
var force = new b2Vec2(10000000, 0);
carGame.car.ApplyForce
(force, carGame.car.GetCenterPosition());
carGame.fuel--;
$(".fuel-value").width(carGame.fuel/carGame.fuelMax *
100 +'%');
}
break;
case 90: // z key to apply force towards left
if (carGame.fuel > 0)
{
var force = new b2Vec2(-10000000, 0);
carGame.car.ApplyForce
(force, carGame.car.GetCenterPosition());
carGame.fuel--;
$(".fuel-value").width(carGame.fuel/carGame.fuelMax *
100 +'%');
}
break;
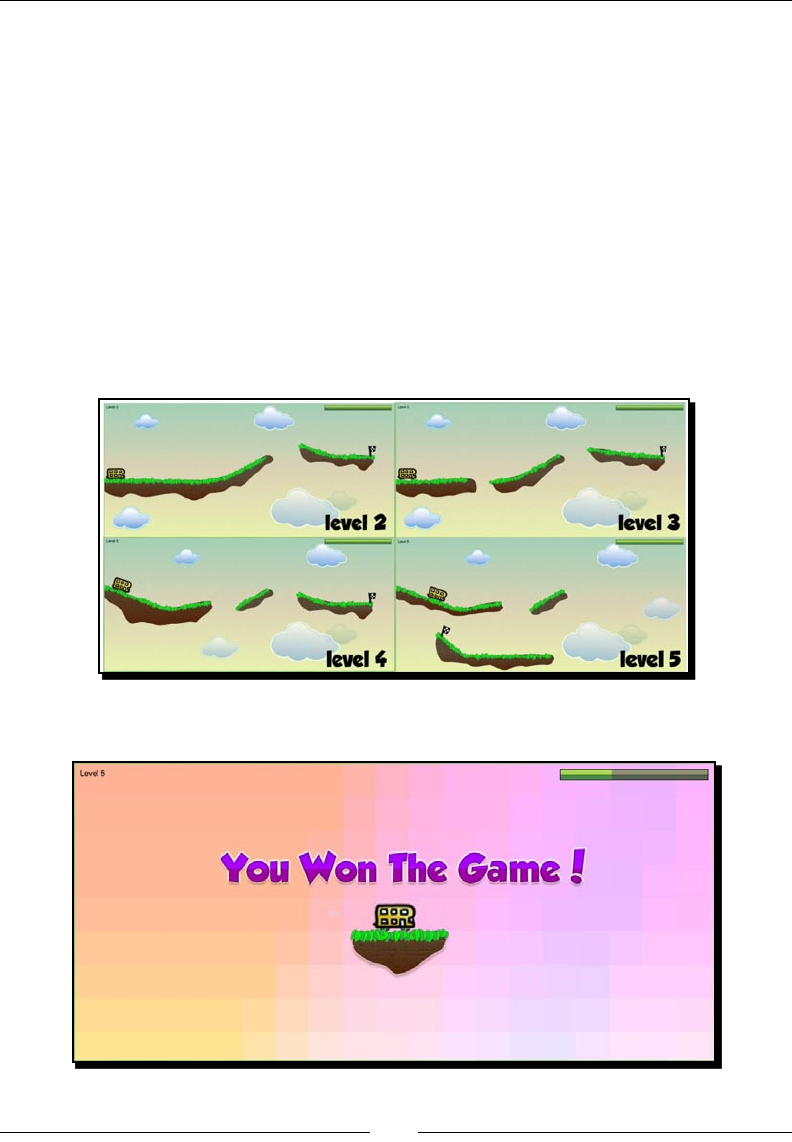
Chapter 9
[ 313 ][ 313 ]
13. In addion, in the car creang logic in the restart game funcon, we inialize the
fuel as follows:
// create car
if (obj.type == "car")
{
carGame.car = createCarAt(obj.x,obj.y);
carGame.fuel = obj.fuel;
carGame.fuelMax = obj.fuel;
$(".fuel-value").width('100%');
continue;
}
14. Now, run the game in a browser. We should get ve graphic levels. The following
screenshot shows how the last four levels look:
15. Aer passing all levels, we get the following winning screen:
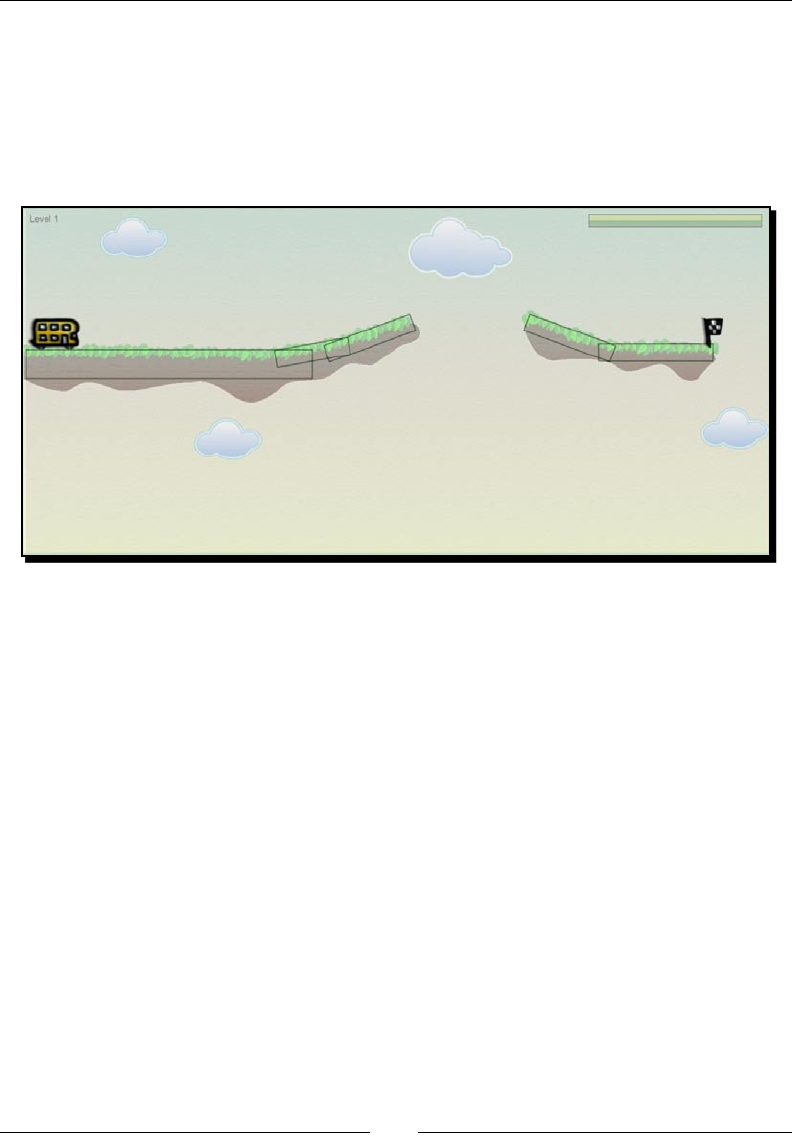
Building a Physics Car Game with Box2D and Canvas
[ 314 ][ 314 ]
What just happened?
We just decorated our game with more graphics. We also draw each level environment a
background image. The following screenshot illustrates how the visual ground represents
the logical physics boxes. Unlike the car and the winning ag, the ground graphics are not
associated with the physics ground. It is just a background image with the graphics in their
respecve posions. We can use this approach because those boxes will never move:
We can then prepare several CSS styles for each level with the level number in the class
name, such as .gamebg_level_1 and .gamebg_level_2. With each class linked with
each level background, we can change the background when switching a level in the
following code:
$('#game').removeClass().addClass('gamebg_level'+level);
Adding fuel to add a constraint when applying force
Now we limit the player's input by providing limited fuel to use. The fuel decreases when
players apply force to the car. We used the following keydown logic to decrease the fuel
and prevent addional force when running out of fuel:
case 88: // x key to apply force towards right
if (carGame.fuel > 0)
{
var force = new b2Vec2(10000000, 0);
carGame.car.ApplyForce(force, carGame.car.GetCenterPosition());
carGame.fuel--;
$(".fuel-value").width(carGame.fuel/carGame.fuelMax * 100 +'%');
}
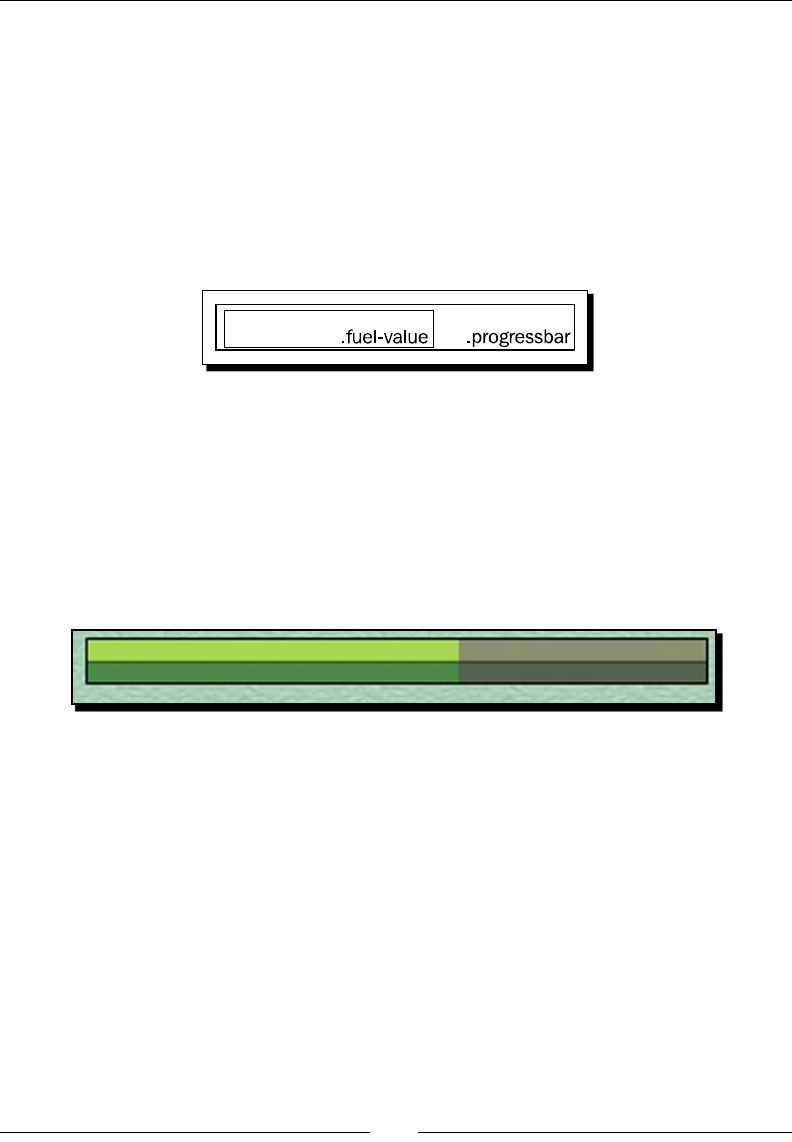
Chapter 9
[ 315 ][ 315 ]
Presenting the remaining fuel in a CSS3 progress bar
In our game, we present the remaining fuel as a progress bar. The progress bar is actually a
DIV inside another DIV. The following markup shows the structure of the progress bar. The
outer DIV denes the maximum value and the inner DIV shows the actual value:
<div id="fuel" class="progressbar">
<div class="fuel-value" style="width: 100%;"></div>
</div>
The following screenshot illustrates the structure of the progress bar:
With this structure, we can show a specic progress by seng the width as a percentage
value. We use the following code to update the progress bar according to the percentage
of the fuel:
$(".fuel-value").width(carGame.fuel/carGame.fuelMax * 100 +'%');
This is the basic logic to setup a progress bar and control it with the width style.
Furthermore, we give the progress bar's background a nice gradient as shown in the
following screenshot:
It is done in the stylesheet with the following CSS3 gradient background denion:
.progressbar {
background: -webkit-gradient(linear, left top, left bottom,
color-stop(0%,#8C906F), color-stop(48%,#8C906F),
color-stop(51%,#323721), color-stop(54%,#55624F),
color-stop(100%,#55624F));
}
.progressbar .fuel-value {
background: -webkit-gradient(linear, left top, left bottom,
color-stop(0%,#A8D751), color-stop(48%,#A8D751),
color-stop(51%,#275606), color-stop(54%,#4A8A49),
color-stop(100%,#4A8A49));
}

Building a Physics Car Game with Box2D and Canvas
[ 316 ][ 316 ]
Summary
We learned a lot in this chapter about using the Box2D physics engine to create a car
adventure game in canvas.
Specically, we covered the following topics:
Installing the JavaScript ported physics engine
Creang stac and dynamic bodies in the physics world
Seng up the car by using joints to constrain bodies and wheels
Geng a keyboard input with the prototype library
Interacng with the car by adding force to it
Checking collisions in the physics world as the level desnaon
Drawing an image to replace the outline of our physical game objects
We also discussed adding a fuel bar to limit the player's input to give some constraint
and add more fun to the game play.
We have now learned about using the Box2D physics library to create a canvas-based
physics game.
We discussed dierent aspects of making HTML5 games with CSS3 and JavaScript through
all nine chapters. We learned building a tradional Ping Pong game in DOM, we built a card
matching game in CSS3, and an Untangle puzzle game with the canvas. Then, we explored
adding sounds to the game and created a mini piano musical game around it. Next, we
discussed saving and loading game statuses by using the local storage. Moreover, we tried
building a draw-and-guess real-me mulplayer game with WebSockets. Finally, we created
a car game with a physics engine in this chapter.
Throughout the book, we built dierent types of games and learned some essenal
techniques that we need to make HTML5 games. The next step is to go on and deploy
your own games. To help develop your own games, there are some resources that can
help. The following list gives some useful links for HTML5 games development:
HTML5 game engines
Impact (http://impactjs.com/)
Rocket Engine (http://rocketpack.fi/engine/)
LimeJS (http://www.limejs.com/)

Chapter 9
[ 317 ][ 317 ]
Game sprites, and textures
Lost Garden (http://lunar.lostgarden.com/labels/
free%20game%20graphics.html)
Some free sprites from The_Protagonist's Domain (http://www.freewebs.com/
teh_pro/sprites.htm)
HasGraphics sprites, textures, and lesets (http://hasgraphics.com/
category/sprites/)
CG Textures (http://cgtextures.com/)
Sound effects
PacDV (http://www.pacdv.com/sounds/)
FlashKit Sound Eects (http://www.flashkit.com/soundfx/)
FlashKit Sound Loops (http://www.flashkit.com/loops/)

Pop Quiz Answers
Chapter 2: Getting Started with DOM-based Game
Development
Running our code after the page is ready
1 d
Understanding the behavior of absolution position
1 c
Chapter 3: Building Memory Match Game in CSS3
Storing internal custom data with HTML5 custom data attribute
1 c or d
Accessing custom data attribute with jQuery
1 a and d
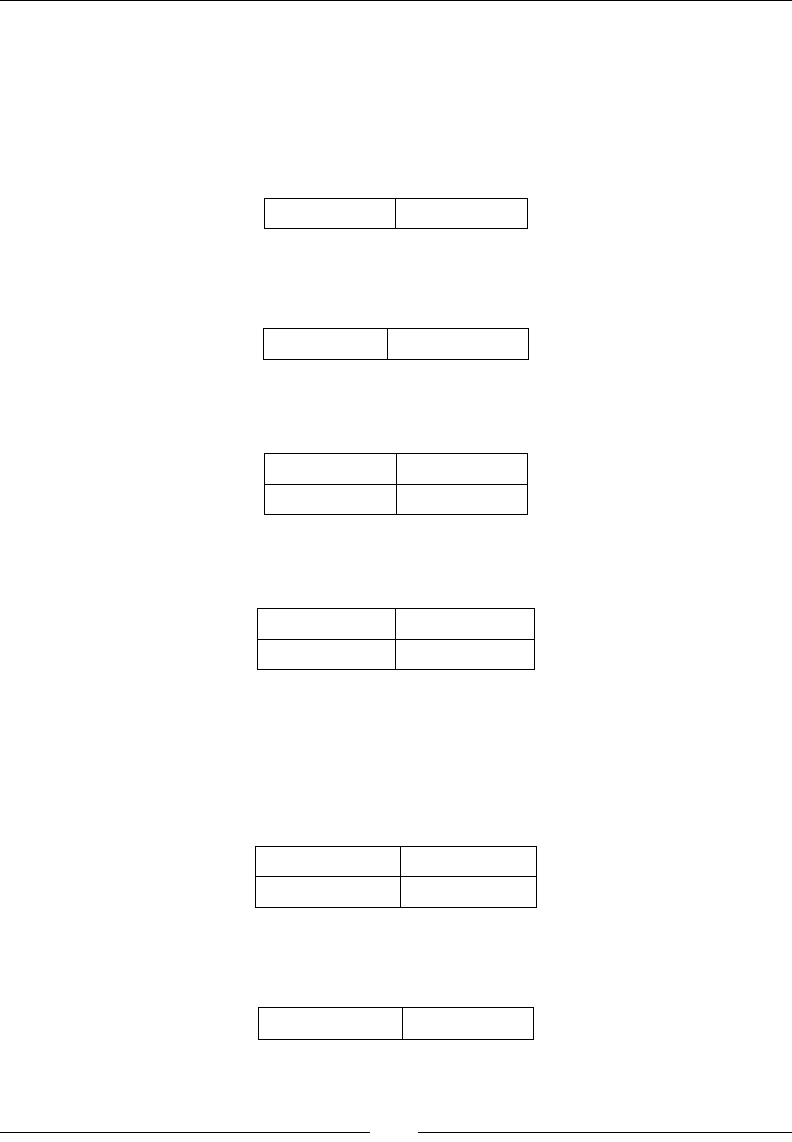
Appendix
[ 320 ]
Chapter 4: Building Untangle Game with Canvas and
Drawing API
Using startAngle and endAngle
1 c
Using closePath with ll command only
1 b
Accessing shapes in canvas
1 b
2 d
Clearing drawn shapes in canvas
1 a
2 b
Chapter 5: Building Canvas Games Masterclass
Drawing text in canvas
1 c
2 b
Styling canvas background
1 b
Pop Quiz Answers
[ 321 ]
Chapter 6: Adding Sound Effects to your Games
Using the audio tag
1 b
2 Please the fallback content
between <canvas> and </
canvas>
Chapter 7: Using Local Storage to Store Game Data
Using local storage
1 False
2 True
3 True
Chapter 8: Building Multiplayer Draw-and-Guess Game
with WebSockets
1 Referring to the content related to Web
Sockets secon
In the WebSockets approach, the amount
of requests is much less than the polling
approach. It is because the connecon
between the client and server is persistence.
Once the connecon is established, a request
from either client-side or server-side is only
sent when there is any update. For instance,
a client sends a message to server when it
wants to update something to server. The
server also sends messages to clients only
when it needs to nofy the clients for data
update. No other useless requests are sent
during the connecon. Therefore much
less bandwidth is used. The following graph
shows the WebSockets approach.
Index
Symbols
-ms- prex 13
-o- prex 13
-webkit- prex 13
.css(map) funcon type 34
.css(propertyName, value) funcon type 34
.css(propertyName) funcon type 34
.data(key), data funcon 86
.data(key, value), data funcon 86
.show-scene class 190
<img> tag 8
2D Physics Engine 273
A
alignment 141
appendTo funcon 77
Apple
homepage 15
Apple Safari
URL 26
ApplyImpulse funcon 293
Arc funcon
Arc funcon Arcs, drawing 99
AT-AT Walker 15
ar funcon 85
audio event
about 202
game over event, indicang 202, 203
handling 203
audio tag
using 174
autoplay aribute 170
Aves Engine, HTML5 games 22
B
b2World class 278
backface-visibility property 69
background property 35
beginPath command 103
benets, HTML5 games
browser game boundary, breaking 16
iOS devices without plugin, supporng 16
third-party plug-in, avoiding 16
boldLineThickness variable 129
Box2D JavaScript library
installing 274
Box2D world
collision contact list, obtaining 296, 297
collisions, checking 295, 296
nal touches, adding 308-314
fuel, adding 314
outline drawings, replacing with graphics 303
progress bar structure, presenng 315
broadcast funcon 240
C
canvas
basic class denion, in JavaScript 108
circle, drawing 104, 105
circle drawing, Arc funcon used 98
circle posion, saving 106, 107
circles, dragging 112-115

[ 324 ]
circles, drawing in 95-97
clearing 118, 119
degree conversion, to radians 98
fall back content, providing 97
lines, drawing 108
mouse events, adding 112
mouse posion, obtaining 116
path, closing 103, 104
path, iniang for each style 102
path drawing, execung 102
random number, generang 105, 106
canvas-based game
CSS styles, adding 149-151
image decoraon, adding 149-151
Canvas Demo, HTML5 games 22
canvas games masterclass, building
images in canvas, drawing 144
mul-layers canvas game, creang 156
shape lling, gradient color used 134
sprite sheet, animang 152
text in canvas, drawing 139
card-ipped class 67
card ipping eect
backface-visibility 69
creang, CSS used 64, 66
CSS perspecve property 68, 69
overlapped element visibility control, z-index
used 67
toggling a class style 66
card matching memory game
about 70
CSS sprite, using with background posion 78
DOM element, aligning vercally 77
DOM elements cloning, jQuery used 77
rst-child selecng, child lter used 77
game environment, seng up 71-76
paying card sprites sheet, downloading 70, 71
car game
levels data, loading 299-303
more levels, creang 303
carGame.world.GetContactList() funcon 296
Cascading Style Sheet. See CSS
CG Textures
URL 317
chang applicaon building, WebSockets used
message, receiving on server side 246
message from client to server, sending 246
message to server, sending 243-246
checkPaern funcon 83
child lter 77
CircleDef class 288
circleRadius variable 129
circles property 130
circles variable 129
clearRect funcon 119
close event 240
closePath funcon 103, 104
collision detecon
about 49
boundary, checking 50-53
player score, displaying 53, 55
color stop
with opacity, adding 136
compare_funcon 84
connectCircles funcon 127
connecon event 240
contact list 296
context.font property 141
context.textAlign property 141
context.textBaseline property 141
controls aribute 170
createGround funcon 279, 284, 304
createWheel funcon 305
CSS 7
CSS3
animaon 14, 15
card ipping eect, creang 64
card matching memory game, creang 70
features 11
game logic, adding to matching game 79
modules 63
playing card, moving 58-60
transform 13
transion 12
transion module, using 57
web fonts, embedding into game 87
CSS3 exible box layout module 77
CSS3 Info 15
CSS3 transion module
2D transforms funcons 61
3D transforms funcons 61
playing card, moving 58-60
styles, tweening 62

[ 325 ]
CSS sprite sheet 78
CSS transform funcons 61
currentLevel variable 129
currentTime property 171
custom data aribute 84
D
data-custom-name aribute 86
data-href aribute 85
data-score aribute 85
data storage
HTML5 local storage, using 206
data storage, HTML5 local storage used
game over dialog, creang 206-209
game scores, saving 210, 211
local storage, benets 212
local storage, limitaons 213
local storage, treang as associated array 213
setItem funcon, using 211
dataType property 258
development environment
preparing 26
dim class 156
document.getElementById method 305
Document Object Model. See DOM
DOM 7
DOM-based game development
collision detecon, beginning 49
DOM object moving, JavaScript Interval used
47
HTML documents, preparing 26
keyboard input, geng from player 37
manipulang, jQuery used 35
mulple keyboard input, supporng 43
Ping Pong game elements, seng 30
text in HTML, displaying 53
DOM object moving, JavaScript Interval used
dball, moving 47- 49
collision detecon, starng 49
draw-and-guess game
about 234
chang applicaon building, WebSockets used
243
decorang, CSS used 268-270
message broadcasng 247
mulplayer game building 259
shared drawing whiteboard, making 250
WebSocket server, installing 236
WebSockets web applicaon, trying 234
drawBackground funcon 175
drawCricle funcon 107
drawImage funcon 148, 149, 308
drawJoint funcon 283
drawLayerBG funcon 158
drawLayerUI funcon 160
drawWorld funcon 281, 312
E
endX property 258
endY property 258
event
audio 203
ended 203
pause 203
play 203
progress 203
meupdate 203
TransionEnd 83
exisng WebSockets web applicaon
about 234
muluser sketchpad, trying 235, 236
F
fadeout class 156
features, CSS3
about 11
animaon 14, 15
transform 13, 14
transion 12, 13
features, HTML5
audio 8
canvas 8
GeoLocaon 8
local storage 10
oine applicaon 11
WebGL 9
WebSocket 10
ll command 103
ll funcon 102
llText funcon 141

[ 326 ]
FlashKit Sound Eects
URL 317
FlashKit Sound Loops
URL 317
Fontdeck 90
forEach funcon 267
G
game logic, adding to matching game
code, execung 83
code execuon, delaying on ip cards 83
custom data aribute access, jQuery used 85,
86
internal custom data storage, HTML5 custom
data aribute used 84
JavaScript array, randomizing 83, 84
playing card games, creang 87
steps 79-83
game loop
using 117
gameloop funcon 48, 134, 200
gameover funcon 209
getDate funcon, date object 217
getDay funcon, date object 217
getElementById funcon 171
getFullYear funcon, date object 217
getHours funcon, date object 217
getMilliseconds funcon, date object 217
getMinutes funcon, date object 217
getMonth funcon, date object 217
getSeconds funcon, date object 217
getTime funcon, date object 217
Google Body
screenshot for WebGL 9
Google Chrome
URL 26
Google Font Directory
site 88
guideFrame variable 154
H
HTML 7
html() funcon 55
HTML5
Asteroid-styled bookmarklet 19
Aves Engine 22
features 8
HTML5Rocks 15
Match game 18
other technique games 18-22
Quake 2 20
RumpeTroll 21
Scrabb.ly 21, 22
Sinuous 19
WebSocket 10
HTML5 Canvas Element 94
HTML5 game engines
LimeJS 316
HTML5 Game Jam, HTML5 games 23
HTML5 games
benets 15
building 18
Canvas Demo 22
HTML5 Game Jam 23
HTML5 local storage
data, storing 206
HTML5Rocks 15
HTML documents, preparing for DOM-based
game
about 26
code, running 29
DOCTYPE 28
footer 29
header 29
JavaScript code placing, best pracces 29
jQuery library, installing 27, 28
HTTP requests 70
Hyper-Text Markup Language. See HTML
I
images, inside canvas
background image, opmizing 149
canvas-based game, decorang 149
drawImage funcon, using 147-149
drawing 146, 147
graphics, adding to game 144-146
index.html le 89
IndexedDB
URL 220
installaon, Box2D JavaScript library
about 274

[ 327 ]
b2AABB, using 278
b2World, using 277
Box2d, seng 278, 279
gravity of the world, seng 278
steps 275, 277
installaon, WebSocket server. See WebSockets
server installaon
intersecon point 122
J
JavaScript Object Notaon. See JSON
J key 192
jQuery
about 32
benets 35
modicaon 32
selecon 32
selector paerns 33
using, for game element manipulaon 35
jQuery CSS funcon
.css(map) 34
.css(propertyName) 34
.css(propertyName, value) 34
JSON 219
JSON.stringify funcon 220, 259
K
keyboard driven mini piano musical game
creang 190, 192
element in array, removing 194
J key 192
K key 193
L key 193
music dot hits, determining 193, 194
music dot removal, splice funcon used 194,
195
keyboard input
console window, checking 42
constants 40
DOM objects, moving 38, 39
JavaScript expression, execung in Console
panel 42
key code 39, 40
strings to numbers conversion, parseInt
funcon used 41
keydown event handler 199
keydown event listener 40
K key 193
L
layerX property 116
layerY property 116
LearningWebGL
URL 9
level property 130
levels variable 129
linear gradient color
using 135
line intersecon
determining, in canvas 119-122
of two line segments 123, 124
lines, in canvas
drawing 108
drawing APIs 111
straight lines, drawing 109-111
lines, variable 129
line segment 123
LineTo funcon 111
lineWidth funcon 111
link list 296
link tag 89
L key 193
local drawing sketchpad
building, canvas used 251-253
canvas, drawing on 254
local storage
current date in JavaScript, obtaining 217, 218
current me in JavaScript, obtaining 217, 218
inspecng, in console window 219, 220
object, saving 213-216
object encoding, nave JSON used 218
stored object, loading from JSON string 218,
219
local variable 45
locaon-based service
foursquare 8
Gowalla 8
long polling 249
loop aribute 170
Lost Garden
URL 317

[ 328 ]
M
Match game, HTML5 games 18
Math.oor() funcon 106
Math.random() funcon 105
measureText funcon 144
message broadcasng
to all connected browsers 247, 248
WebSockets and polling approaches, comparing
248, 250
message property 258
method
document.getElementById 305
mini piano game
about 174
addional features, adding 195-199
basic background, creang 174-177
game dots, removing 198
music level data recording, funconality adding
199-201
music notes, recording as level data 199
music play back, visualizing 178
music volume, adding accordingly 196
scenes creaon, in HTML5 177, 178
success count, storing 198
modulus operator 76
mouse events
adding 112
detecng, on circles 116, 117
moveBall funcon 48
Moveto funcon 111
Mozilla Firefox
Opera 26
URL 26
mul-layers canvas game
creang 156
CSS technique- canvas drawing integraon 162,
163
four layers, dividing into 156-162
mulplayer draw-and-guess game
building 260-265
connected clients, enumerang, on server-side
266, 267
game, improving 267
game ow, controlling 265
message, sending to specic server 267
mulplayer draw-and-guess game, improving
answer checking mechanism, improving 268
drew lines, storing 268
mulple keyboard input support
another approach, using 43-45
Game Loop 46
global variables, declaring 45, 46
JavaScript mer creang, setInterval funcon
used 46
music game scene
play buon, linking to 187
music play back visualizaon
creang, steps 179-183
game elapsed me, obtaining 184
music dots, creang 185, 186
music dots, moving 186, 187
proper song, selecng 183
song level data, extracng 183
song level data, storing 183
music volume, adding accordingly
missed melody notes, removing 196-198
N
Node.js 22
node server.js command 245
O
object-oriented programming language 108
Ogg format audio
for Mozilla Firefox, creang 172
MP3 sound, converng to 173
onerror event 147
onload event 158
onmessage event handler 247
outline drawings, Box2D world
canvas image, rotang 308
canvas image, translang 308
car graphic, adding 303-306
ag graphic, adding 303-306
graphics, drawing 307
replacing with graphics 303
userData in body, using 306
userData in shape, using 306

[ 329 ]
P
PacDV
URL 317
parseFloat funcon 212
parseInt funcon 41
pause funcon 171
Photojojo
URL 16
physical car
about 288
anchor point creang, revolute joint used 290,
291
ApplyForce funcon 293
ApplyImpulse funcon 293
box and two circles, connecng with revolute
joint 289, 290
creang 289, 290
force, applying to 292
moving, keyboard used 291, 292
ramps, adding to environment 293, 294
physics world
bouncing eect seng, restuon property
used 285
drawing, in canvas 281-284
dynamic box, creang 284, 285
game over wall, creang 299
restarng 297
R key, for restarng 297, 299
stac ground body, creang 279
wheels, adding 287, 288
Pie Guy game
about 11
Ping Pong game elements
absoluon posion behavior 36, 37
placing, in DOM 30, 32
posion, changing 35, 36
play buon, linking to music game scene
scene transion, animang 187, 188
scene transion eects, creang 190
sound eect, adding 166
slide-in eect in CSS3, creang 189, 190
play funcon 171
point-in-circle formula 116
polling approach 248
preload aribute 170
Q
Quake 2 port , HTML5 games 20
R
radial gradient color
circles, lling with 136, 138
creang 138
lling 135, 136
radius property 288
random funcon 106
ranking aribute 85
ready event 30
ready funcon 311
relaonships property 130
removeTookCards funcon 208
restartGame funcon 301, 312
restore funcon 308
rotate3d funcon 63
rotate funcon 61
rotaon property 294
RumpeTroll, HTML5 games 21
S
scale funcon 61
Scrabb.ly, HTML5 games 21, 22
selector paern, jQuery
$( “. className”) 133
$(“#id”) 133
$(“Element”) 133
$(“selector1, selector2, selectorN”) 133
sender property 258
send method 267
server manager class 266
setInterval funcon 47
setItem funcon 211
setTimeout funcons 83
setupLevelData funcon 196
shape lling
color stops, adding in gradient color 135, 136
gradient color, using 134-136
radial gradient color, lling 136
shared drawing whiteboard
connected browsers drawings, broadcasng
254- 258

[ 330 ]
data object, dening 258
drawing lines, recreang 259
drawing lines data into JSON, broadcasng 259
local drawing sketchpad, building 250
sound eect
adding, to Play buon 166
audio event, adding 202
mini piano game, building 174
sound eect, adding to Play buon
audio element, dening 169
dierent web browser support 174
fallback content, displaying in audio tag 169,
170
jQuery hover event, using 172
Ogg format audio, creang 172
sound, pausing 171
sound, playing 171
steps 166-169
volume, adjusng 172
sound eects
FlashKit Sound Eects 317
FlashKit Sound Loops 317
PacDV 317
splice funcon 198
sprite animaon 156
sprite sheet, in canvas
game guide animaon, creang 152-155
src aribute 169
src property 147
startGame funcon 180, 188
startX property 258
startY property 258
stac ground body creang, physics world
body, creang 280
shape, creang 280
steps 279, 280
step() funcon 311
stringify funcon 218
stringify method 218
stroke command 103
Stroke funcon 111
sudo make install command 237
T
targetCircle variable 129
text, inside canvas
drawing 139-142
embedded web font, using 142-144
textBaseline 141
thinLineThickness variable 129
toFixed funcon 201
toggleClass funcon 67
toggling a class style 66
top property 41
TransionEnd event 83
translateX funcon 61
translateY funcon 61
Twitch
URL 17
Typekit 90
U
untangle puzzle game
about 94
building, with canvas 95, 108
completeness progress, displaying 131
creang 124-129
current level, displaying 131
drawn objects in canvas, interacng with 112
HTML5 Canvas Element 94
level-up, determining 130
levelling data, dening 129
line intersecon in canvas 119
userData property 305
V
vercal center alignment 77
W
web fonts
about 87
embedding, from Google Font Directory 88, 89
font delivery services, choosing 90
WebGL 9
Webkit
blog 70
WebSockets approach
graph 250
WebSockets server
installing 236

[ 331 ]
WebSockets server installaon
client events 243
connected clients count, determining 240
connecon, establishing 243
connecon client, creang 241, 242
connecon event listening, on server side 240
inializing 239
message, broadcasng 240
Node.JS WebSocket server, installing 236
WebSockets server, creang for connecon
count broadcast 238
Web SQL Database
URL 220
which funcon 39
world me
about 286
world step loop, seng 286
X
x keydown funcon 312
Z
Z-index property 67
z keydown funcon 312

Thank you for buying
HTML5 Games Development by Example
Beginner's Guide
About Packt Publishing
Packt, pronounced 'packed', published its rst book "Mastering phpMyAdmin for Eecve MySQL
Management" in April 2004 and subsequently connued to specialize in publishing highly focused
books on specic technologies and soluons.
Our books and publicaons share the experiences of your fellow IT professionals in adapng and
customizing today's systems, applicaons, and frameworks. Our soluon-based books give you the
knowledge and power to customize the soware and technologies you're using to get the job done.
Packt books are more specic and less general than the IT books you have seen in the past. Our unique
business model allows us to bring you more focused informaon, giving you more of what you need to
know, and less of what you don't.
Packt is a modern, yet unique publishing company, which focuses on producing quality, cung-edge
books for communies of developers, administrators, and newbies alike. For more informaon, please
visit our website: www.PacktPub.com.
Wring for Packt
We welcome all inquiries from people who are interested in authoring. Book proposals should be sent
to author@packtpub.com. If your book idea is sll at an early stage and you would like to discuss
it rst before wring a formal book proposal, contact us; one of our commissioning editors will get in
touch with you.
We're not just looking for published authors; if you have strong technical skills but no wring
experience, our experienced editors can help you develop a wring career, or simply get some
addional reward for your experse.
Flash Game Development by Example
ISBN: 978-1-84969-090-4 Paperback:328 pages
Build 10 classic Flash games and learn game development
along the way
1. Build 10 classic games in Flash. Learn the
essenal skills for Flash game development.
2. Start developing games straight away. Build your
rst game in the rst chapter.
3. Fun and fast paced. Ideal for readers with no
Flash or game programming experience.Topic
4. The most popular games in the world are built in
Flash.
Flash Development for Android
Cookbook
ISBN: 978-1-84969-142-0 Paperback: 372 pages
Over 90 recipes to build excing Android applicaons with
Flash, Flex, and AIR
1. The quickest way to solve your problems with
building Flash applicaons for Android
2. Contains a variety of recipes to demonstrate mobile
Android concepts and provide a solid foundaon for
your ideas to grow
3. Learn from a praccal set of examples how to
take advantage of multouch, geolocaon, the
accelerometer, and more
Please check www.PacktPub.com for information on our titles

HTML5 Mulmedia Development
Cookbook
ISBN: 978-1-84969-104-8 Paperback:288 pages
Recipes for praccal, real-world HTML5 mulmedia driven
development.
1. Use HTML5 to enhance JavaScript funconality.
Display videos dynamically and create movable
ads using JQuery.
2. Set up the canvas environment, process shapes
dynamically and create interacve visualizaons.
3. Enhance accessibility by tesng browser support,
providing alternave site views and displaying
alternate content for non supported browsers
XNA 4.0 Game Development by
Example: Beginner's Guide
ISBN: 978-1-84969-066-9 Paperback: 428 pages
Create your own excing games with Microso XNA 4.0
1. Dive headrst into game creaon with XNA
2. Four dierent styles of games comprising a puzzler,
a space shooter, a mul-axis shoot 'em up, and a
jump-and-run plaormer
3. Games that gradually increase in complexity
to cover a wide variety of game development
techniques
4. Focuses enrely on developing games with the free
version of XNA
Please check www.PacktPub.com for information on our titles
