Health Cloud Implementation Guide
User Manual: Pdf
Open the PDF directly: View PDF ![]() .
.
Page Count: 124 [warning: Documents this large are best viewed by clicking the View PDF Link!]
- Salesforce Health Cloud Implementation Guide
- How Health Cloud Works
- Set Up Health Cloud
- Install the Health Cloud Package
- Define Your My Domain Subdomain Name
- Configure Health Cloud Profiles
- Assign the Health Cloud Permission Set License
- Set Field Access
- Add Health Cloud Users
- Control Access to Patient Lists
- Create Roles for Care Team Members
- Enable Task Assignment for Community Users Created from Contacts
- Enable Care Gaps
- Customize Health Cloud
- Give Your Users the Health Cloud Lightning Experience Console
- Customize Health Cloud
- Health Cloud Custom Tabs
- Customizing the Patient Details Tab
- Refine the Householding Map for Care Coordinators
- Customize the Patient Card
- Override Custom Labels
- Configure the Timeline View
- Customize the Delivered Care Team Roles
- Use Custom Metadata Settings to Configure Health Cloud
- Customize Problems and Goals
- Customize Tasks
- Customize the Create External Member Fields
- Customize the Candidate Patient List View
- Add Cross-Object Relationships to Customize Patient List Filter Options
- Dashboards Give Your Users Access to the Big Picture
- Let Care Coordinators Create Concurrent Care Plans for a Patient
- Use Assessments to Gather Patient Information
- The Assessments Tab
- Create a Care Plan Template
- Use Data Loader to Import Care Plan Templates
- Customize the Health Cloud Apps
- Show Detailed Error Messages
- Enable Users to Import Leads as Patients
- Migrate More Data with the Patient Creation Job Flow
- Provide Easy Access to Protocols and Articles
- Use Person Accounts in Health Cloud (Optional)
- Build Patient Communities
- Use Assessments to Gather Patient Information
- The Assessments Tab
- Manage Patient Risk with Einstein Analytics for Health Cloud
- Set Up Einstein Analytics for Health Cloud
- Enable Analytics
- Enable a Permission Set License for the Admin
- Create a Permission Set for the Health Cloud Analytics Admin
- Assign the Health Cloud Analytics Admin Permission Set
- Install the Einstein Analytics for Health Cloud: Risk Stratification Package
- Assign the Health Cloud Analytics Integration Permission Set
- Add Remote Site Settings for Analytics Patient Lists
- Confirm Field-Level Security
- Create a Permission Set for Analytics Users
- Enable View Access for Health Cloud Analytics Users
- Set Up and Start Risk Scoring Dataflow
- Set Up Dashboards
- Upgrade Picklist Values and Page Layouts for Analytics
- Add Risk Scoring Record Types to the Admin Profile
- Health Cloud Risk Scoring Data Tables
- Recalculate Patient Risk Scores
- Set Up Einstein Analytics for Health Cloud
- Protect Your Health Data with Salesforce Shield
© Copyright 2000–2018 salesforce.com, inc. All rights reserved. Salesforce is a registered trademark of salesforce.com, inc.,
as are other names and marks. Other marks appearing herein may be trademarks of their respective owners.

CONTENTS
Salesforce Health Cloud Implementation Guide ..............................1
How Health Cloud Works ................................................2
The Health Cloud Data Model ..........................................2
Patient Records in Health Cloud ........................................4
Health Cloud Limitations .............................................5
Set Up Health Cloud ....................................................6
Install the Health Cloud Package ........................................7
Define Your My Domain Subdomain Name .................................8
Configure Health Cloud Profiles .........................................9
Assign the Health Cloud Permission Set License ..............................9
Set Field Access ...................................................10
Add Health Cloud Users .............................................12
Control Access to Patient Lists .........................................12
Create Roles for Care Team Members ...................................14
Enable Task Assignment for Community Users Created from Contacts ..............15
Enable Care Gaps .................................................15
Customize Health Cloud ................................................16
Give Your Users the Health Cloud Lightning Experience Console ..................17
Customize Health Cloud .............................................18
Customize the Health Cloud Apps ......................................56
Show Detailed Error Messages ........................................57
Enable Users to Import Leads as Patients .................................58
Migrate More Data with the Patient Creation Job Flow ........................63
Provide Easy Access to Protocols and Articles ..............................73
Use Person Accounts in Health Cloud (Optional) .............................79
Build Patient Communities ...............................................81
How Patient Communities Work ........................................81
Switch On Salesforce Communities .....................................83
Community Setup Checklist ..........................................84
Use Health Cloud Empower Lightning Components ..........................86
Reference Information About Health Cloud Empower Components ................91
Use Assessments to Gather Patient Information ................................98
Enable Surveys ...................................................98
Add Survey Objects to Health Cloud Permission Sets ..........................99
Configure Email Invitations for Surveys and Assessments (Optional) ...............99
Update Sharing Settings for Surveys ....................................100
The Assessments Tab .................................................100
Manage Patient Risk with Einstein Analytics for Health Cloud .......................103
Set Up Einstein Analytics for Health Cloud ................................105
Upgrade Picklist Values and Page Layouts for Analytics .......................110
Add Risk Scoring Record Types to the Admin Profile ..........................111
Health Cloud Risk Scoring Data Tables ...................................111
Recalculate Patient Risk Scores ........................................119
Protect Your Health Data with Salesforce Shield ................................120
Contents

SALESFORCE HEALTH CLOUD IMPLEMENTATION GUIDE
EDITIONS
Health Cloud is available in
Salesforce Classic and
Lightning Experience
Available in: Enterprise,
Performance, and
Unlimited Editions
Delivering outstanding patient care means more than just managing your patients’ information
and healthcare events. It’s about creating a strong, collaborative relationship with patients and
caregivers to help your patients along on their journey to better health. Health Cloud reinvents the
way that care coordinators engage with patients by giving you a consolidated view of critical patient
records, access to a patient’s care team, and the tools to bring it all together to improve healthcare
outcomes.
How Health Cloud Works
Health Cloud is a managed package, installed on top of Salesforce. Its data model is based on
the standard Salesforce object model. You can use it to support your users in delivering quality
care.
Set Up Health Cloud
When you complete these steps, you’ll have a basic working Health Cloud console that care coordinators can use to manage their
patients and provide excellent care. When you're done, consider customizing your Health Cloud app to make your users even more
efficient.
Customize Health Cloud
You can adapt the Health Cloud user interface to fit your organization’s unique needs. Give your users exactly the information they
need when they need it so they can do their best work.
Build Patient Communities
The private patient community is the heart of collaborative patient care. Communities provide care coordinators, physicians, patients,
and caregivers an easy way to interact with each other whenever and wherever they are. You can set up private patient community
using Salesforce Community Builder with the Customer Service (Napili) template.
Use Assessments to Gather Patient Information
Improve the quality of patient care by gathering information that helps to manage your patients more efficiently. Whether it’s a
pre-surgery assessment or a patient feedback survey, you have the information you need within the patient’s care plan.
The Assessments Tab
The Assessments tab lets you send surveys to your patients, check on a survey’s status, and view completed surveys.
Manage Patient Risk with Einstein Analytics for Health Cloud
Einstein Analytics for Health Cloud: Risk Stratification lets your company identify high-risk patients. You can use this information to
proactively manage those patients and provide preventive care to reduce over-consumption of expensive healthcare resources.
Protect Your Health Data with Salesforce Shield
Salesforce Shield is a set of security tools you can use to comply with regulations on storing sensitive protected health information.
With Platform Encryption, Event Monitoring, and and Field Audit Trail, you can monitor usage, prevent malicious activity, and protect
data at rest while allowing full functionality.
1
How Health Cloud Works
EDITIONS
Health Cloud is available in
Salesforce Classic and
Lightning Experience
Available in: Enterprise,
Performance, and
Unlimited Editions
USER PERMISSIONS
To set up case teams for
care teams:
•Customize Application
AND
Manage Users
To add team members:
•Edit on cases
Health Cloud is a managed package, installed on top of Salesforce. Its data model is based on the
standard Salesforce object model. You can use it to support your users in delivering quality care.
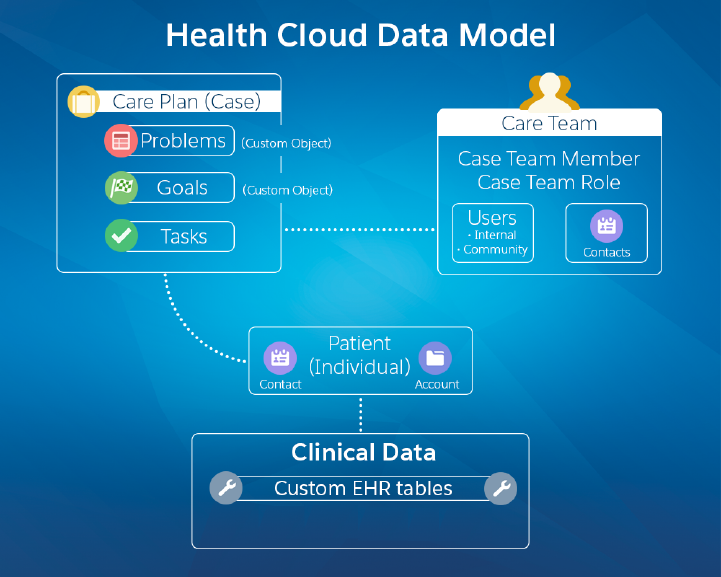
The Health Cloud Data Model
Health Cloud supports the standard Salesforce data model. You can map clinical data from a
source EHR system to Health Cloud objects and fields that hold patient and engagement data.
Patient Records in Health Cloud
A Health Cloud patient is associated with a patient record, an individual record, and a candidate
patient record.
Health Cloud Limitations
Health Cloud has some specific behaviors and limitations that may be different from your users’
standard Salesforce experience.
The Health Cloud Data Model
EDITIONS
Health Cloud is available in
Salesforce Classic and
Lightning Experience
Available in: Enterprise,
Performance, and
Unlimited Editions
Health Cloud supports the standard Salesforce data model. You can map clinical data from a source
EHR system to Health Cloud objects and fields that hold patient and engagement data.
Patient and Individual Data Model
Health Cloud uses the individual model to address the different roles a person can have in relation
to an organization. In one context, an individual is a patient; in another, a caregiver; and in another,
an employee. The Health Cloud patient and individual data model is based on a unified object view
consisting of fields and attributes from two standard Salesforce business objects: Account and
Contact. Both objects are a part of the standard Salesforce data model, and within Health Cloud
they are connected through a common field: Individual ID. When a patient is created in
the system, both an account and a contact record are created and linked through the Individual ID field.
The Account object supports the transactions through the Case object to manage the care plan, its tasks, and the care team that supports
the patient. The Contact object supports the communication between the patient, the coordinator, and the care team when Communities
is enabled.
2
How Health Cloud WorksSalesforce Health Cloud Implementation Guide
All patient-specific information, including patient medical records, is tied to the account record. Because the contact record doesn’t
contain clinical information, a patient can collaborate with the external care team without them seeing the patient’s medical records.
Together, the account and contact records comprise the information that supports the patient, and are connected to the care plan, EHR
data, and the members of the entire care team.
Health Cloud uses the following standard and custom objects to manage patient data.
•Account—In Health Cloud, the account record represents people instead of a business or an organization. Through the individual
record type, it is also linked to the contact records. Accounts supports the transactions that occur related to the patient. So not only
is the patient contact record connected through the Individual ID, but the contacts and users that represent caregivers or external
healthcare providers are associated with the account through the patient care plan (case record).
•Contact—In the Salesforce data model, contacts are the people associated with the patient, such as family members and specialists
who are outside of your organization. A contact must be related to an account. When you set up and use Salesforce Communities,
the Contact object supports communication within the private patient community. Care team members are added as either external
contacts without community access or as community users and contacts, which gives them community access.
•User—Health Cloud includes internal Salesforce users and community users. Each user type has different access to records and
functions. Internal users have access to patient data, when granted. Community users don’t have access to patient data.
•Case Team Member—The Case Team Membership object represents a patient care team member who is part of the team that
works on tasks in the patient’s care plan. In Health Cloud, care team members can be family members and healthcare providers from
outside of your organization. They can also be internal Salesforce users, like the primary care physician. When Salesforce Communities
is enabled, care team members with access to the community use Case Feed to collaborate around the patient and the care plan.
Care team members who are only contacts can’t log in to Salesforce, so they don’t have access to Chatter in the case feed or to the
patient care plan.
•Case Team Role—The Case Team Role object represents a role for a member of the patient care team, such as Caregiver or
Physiotherapist. Care coordinators assign roles when they add a member to the private patient community. The case team role also
controls access to the case and the care plan, and controls visibility of the user in the community.
3
The Health Cloud Data ModelSalesforce Health Cloud Implementation Guide

•Case— In Health Cloud, the care plan is associated with the case record. The case permission controls access to the elements of the
care plan, to the care team (Case Team), and to the communication within the patient’s community. All care team members are
associated with the patient’s contact record through the Case object.
•Problems—Each care plan has a list of clinical or non-clinical health issues that must be addressed. The conditions, problems,
concerns, and diagnoses that are managed and mitigated by this plan are represented in the Care Plan Problem custom object.
•Goals—Represents the intended objectives of carrying out a care plan.
•Task—Represents an activity, such as making a phone call, completing a survey, attending a medical appointment, or other to-do
items. Tasks can be directly related to a goal on the care plan, or they can be unrelated to a specific problem or goal.
•EHR Clinical Data Objects—The custom objects that hold patient data that comes from the EHR system of record. For example,
EhrCondition__c represents detailed information about conditions, problems, and diagnoses recognized by a clinician.
Clinical Data Model
Clinical data that comes from EHR or other clinical systems is critical to the planning, execution, and management of coordinated care
plans for patients. Clinical data can be integrated with Salesforce using several standard APIs, to map messages from EHR systems into
Health Cloud objects and fields. These objects and fields closely resemble the HL7® FHIR® standard.
Because the Health Cloud clinical data model is similar to FHIR® standard, it enables easier and more straightforward clinical data
integration from other source systems. When devising an implementation strategy, you or your integration partner map messages from
the EHR system to the correct Health Cloud object. Data is replicated into the clinical data model with read-only access. Data that
originates in the EHR or other clinical systems, Health Cloud is view-only, so the source system remains the system of record.
You can take a deep dive into the Health Cloud data model by using Schema Builder. Schema Builder provides details, such as the field
values, required fields, and how objects are related, by displaying lookup and master-detail relationships. You can view the fields and
relationships for both standard and custom objects. Schema Builder is enabled by default and lets you add the following to your schema:
•Custom objects
•Lookup relationships
•Master-detail relationships
•All custom fields, except geolocation
To access Schema Builder, from Setup, enter schema in the Quick Find box.
Patient Records in Health Cloud
EDITIONS
Health Cloud is available in
Salesforce Classic and
Lightning Experience
Available in: Enterprise,
Performance, and
Unlimited Editions
A Health Cloud patient is associated with a patient record, an individual record, and a candidate
patient record.
Individual
An individual is composed of both an account and a contact record that each use the individual
record type. These records point to each other (the account has a primary contact lookup field).
Using an individual record type with only a contact or only an account record is invalid.
Patient
A patient is an individual (account and contact) that also has a care plan (case) ID in the Care Plan lookup field on the account record.
Also, the patient must be part of a care team (case team) in the role of patient. This relationship can be made to the contact record of
the patient or the community user record, if the patient is enabled for communities. Usually, a Patient also has an EHR Patient record
that points to the account record of the patient.
4
Patient Records in Health CloudSalesforce Health Cloud Implementation Guide

Lead
You can turn existing Salesforce leads into patients using Health Cloud’s custom fields on the Lead object. These additional fields capture
important patient information, like a person’s medical record number and the name of the patient’s care coordinator.
Candidate Patient
A candidate patient is simply a row of data on the Candidate Patient object. Candidate patients can be converted into patients using
the conversion process in the Health Cloud console. The process creates the records and relationships for the individual and patient
records, so that the patient is available in the console.
Health Cloud Limitations
EDITIONS
Health Cloud is available in
Salesforce Classic and
Lightning Experience
Available in: Enterprise,
Performance, and
Unlimited Editions
Health Cloud has some specific behaviors and limitations that may be different from your users’
standard Salesforce experience.
Display
Health Cloud is available only in Microsoft Internet Explorer 10 or 11; Microsoft Edge; the most
recent stable version of Mozilla Firefox; the most recent stable version of Apple Safari; and the most
recent stable version of Google Chrome.
Tip: For best performance, we recommend that console users adopt the Google Chrome
browser and machines with 8 GB of RAM.
Security
Fields protected by Platform Encryption can’t be used as filter or sort criteria.
Encryption is not the same as masking. Fields protected by Platform Encryption are unmasked and visible to Health Cloud users. Use
object-level security and field-level security to restrict the visibility of sensitive data.
Event monitoring doesn’t log which patients appear on the Today page, the Patient List pages, or the Candidate Patients page. Event
monitoring does log that a user went to those pages, but doesn’t log the details on what is displayed on those pages. However, when
you select a patient to view in the Health Cloud console, it logs the ID of that patient.
Behavior and Access
Health Cloud doesn’t meet accessibility requirements.
When you add a task to the care plan, it doesn’t appear on the Timeline until you refresh the Timeline. Refresh the Timeline by selecting
the Timeline from the Patient Card tab switcher.
When you add a task to the care plan, it doesn’t appear on the Today page until you refresh the Today page. You can refresh the Today
page by refreshing your browser.
You can’t sort a column in a list that is based on an encrypted field.
List view pages display up to 500 patients per page. Sorting and searching applies to the data within a single page in the patient list.
Long text fields (such as description fields) and the Address field aren’t supported as filter criteria when creating a patient list. To filter
on an address, use subfields such as the Street field.
5
Health Cloud LimitationsSalesforce Health Cloud Implementation Guide
Localization
Health Cloud supports the following languages: Chinese (Traditional), Dutch, English (United Kingdom), French, German, Japanese,
Korean, Portuguese (Brazil), Spanish, and Spanish (Mexico) (es_MX).
Important: Legal Disclaimer for Language Support and Regulatory Requirements
Although Health Cloud supports a language, it doesn’t indicate that Salesforce has done a legal compliance evaluation for all
countries in which that language is spoken. You are responsible for determining whether there are any legal or regulatory
requirements that apply to using Health Cloud for every country in which you intend to use it.
The column names in the Patient List aren’t localized and in the language used to create them. So if the labels for column names were
created in an English org, they only display in that language.
Users can edit the Patient List only when they have the same language and locale as the org in which the list was created. When someone
edits a list created in a language different from their own, they receive an error.
The delivered All Patients list appears in English only.
The Category and Sub-Category fields in the Patient Card Menu can’t be localized using the Translation Workbench. To display the labels
in another language, deactivate or delete the delivered field configuration record. Then, create a different field record in the language
for that org.
The Friendly Name field used as a display label in the Timeline and Patient Card can’t be localized using the Translation Workbench. To
display the labels in another language, create a different field record in the language for that org and set the language field to the new
label’s language.
Set Up Health Cloud
EDITIONS
Health Cloud is available in
Salesforce Classic and
Lightning Experience
Available in: Enterprise,
Performance, and
Unlimited Editions
When you complete these steps, you’ll have a basic working Health Cloud console that care
coordinators can use to manage their patients and provide excellent care. When you're done,
consider customizing your Health Cloud app to make your users even more efficient.
Note: Salesforce Communities provides the collaboration support for Health Cloud. Some
of the collaborative features aren’t available until you enable Salesforce Communities and
create a private patient community.
1. Install the Health Cloud Package
Install the Health Cloud managed package in your org so that you can begin implementing
Health Cloud for your care coordinators.
2. Define Your My Domain Subdomain Name
To set up a My Domain subdomain, you choose a name for your subdomain and register it with Salesforce domain registries worldwide.
You can try out names and check availability before registering it.
3. Configure Health Cloud Profiles
Adjust users’ profiles to give them access to the Health Cloud fields and records.
4. Assign the Health Cloud Permission Set License
To apply the Health Cloud permission set license, assign a permission set labeled Health Cloud Permission Set License to each user.
5. Set Field Access
Field permissions specify the access level for each field in an object. Whether you’re using profiles or permission sets to control access
to data in Health Cloud, make sure that users have access to these standard fields.
6
Set Up Health CloudSalesforce Health Cloud Implementation Guide
6. Add Health Cloud Users
You can add internal Salesforce users one at a time or in batches of up to 10 users.
7. Control Access to Patient Lists
Use sharing settings to control access to patient lists.
8. Create Roles for Care Team Members
Care team member roles define the access that members have to information in the care plan.
9. Enable Task Assignment for Community Users Created from Contacts
Make sure that care team members created outside of the Health Cloud console can be selected for task assignment.
10. Enable Care Gaps
Health Cloud helps you prioritize efficiently by surfacing gaps in a patient’s care where your team can make a difference. To close a
care gap, you tie it to a support process.
Install the Health Cloud Package
EDITIONS
Health Cloud is available in
Salesforce Classic and
Lightning Experience
Available in: Enterprise,
Performance, and
Unlimited Editions
USER PERMISSIONS
To install packages:
•Download AppExchange
Packages
Install the Health Cloud managed package in your org so that you can begin implementing Health
Cloud for your care coordinators.
Health Cloud functionality is available through several packages. The managed package delivers
most of the features, while the unmanaged extension package delivers functionality to convert
Lead records to Patient records. You can also download and install the Einstein Analytics for Health
Cloud: Risk Stratification package to let administrators view dashboards of at-risk patients.
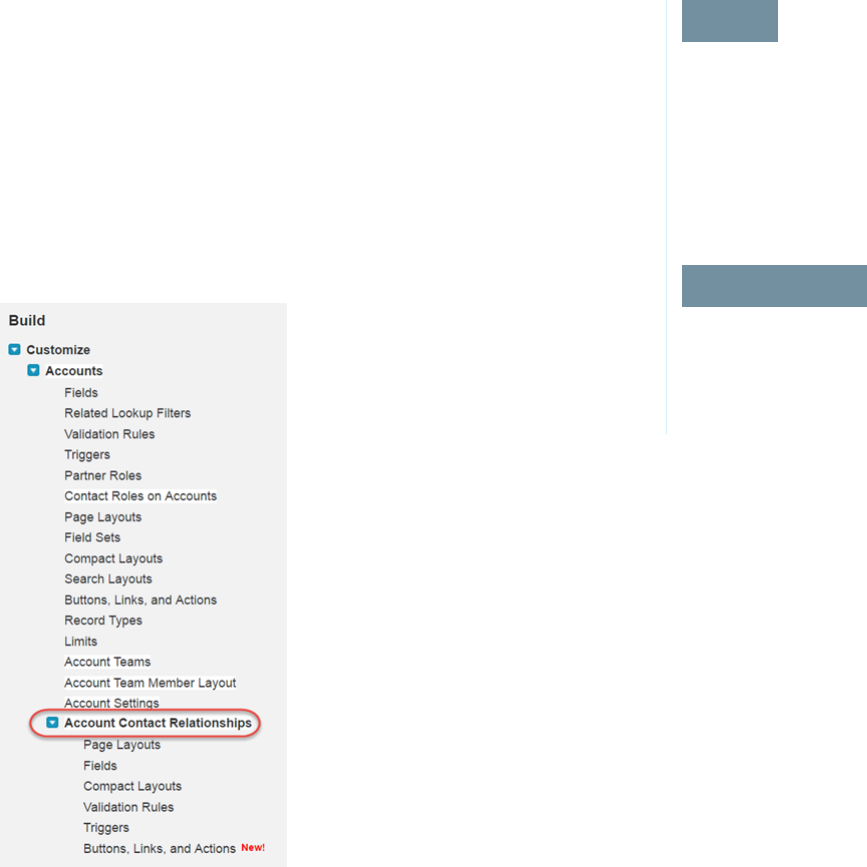
1. Verify that contacts can relate to multiple accounts.
This is required to support the Health Cloud data model.
a. In Setup, find Accounts and verify that the Setup menu under Accounts includes Account
Contact Relationships.
7
Install the Health Cloud PackageSalesforce Health Cloud Implementation Guide

If you see these options, then Contacts to Multiple Accounts is enabled in your org.
b. If you don’t see these options, go to Account Settings and find the Contacts to Multiple Accounts Setting section of the page.
If Allow users to relate a contact to multiple accounts is not selected, select it.
2. Verify that Chatter is enabled.
Health Cloud uses Chatter to support easy communication among users.
a. In Setup, find Chatter Settings.
b. If Enable is not selected under Chatter Settings, select it.
3. Paste the URL for the Health Cloud package into the browser navigation bar and press Enter.
You can find the package download URL in the Terms and Conditions section of your contract.
4. Log in as a system administrator.
5. Click Install. You’ll see a message that describes the progress and a confirmation message after the installation is complete.
See Install the Einstein Analytics for Health Cloud: Risk Stratification Package for instructions on downloading and installing the package.
Note: The API version for objects included in the Health Cloud packages is one version behind core Salesforce. For example, if
your org’s API version is 40, the packaged Health Cloud elements including custom objects, components, classes, and triggers are
API version 39.
Define Your My Domain Subdomain Name
EDITIONS
Available in: both Salesforce
Classic and Lightning
Experience
Available in: Essentials,
Performance, Unlimited,
Enterprise, Developer,
Professional, and Group
Editions.
USER PERMISSIONS
To define a domain name:
•Customize Application
To set up a My Domain subdomain, you choose a name for your subdomain and register it with
Salesforce domain registries worldwide. You can try out names and check availability before
registering it.
Start setting up your My Domain subdomain by finding a unique subdomain name and registering
it. Choose your name carefully. When you register, Salesforce updates its domain registries worldwide
with your subdomain. After the name is registered, only Salesforce Customer Support can disable
or change your domain name.
1. From Setup, enter My Domain in the Quick Find box, then select My Domain.
2. Enter the name that you want to use for your My Domain subdomain. Your name can include
up to 40 letters, numbers, and hyphens.
You can’t use these reserved words in your subdomain name:
•www
•salesforce
•heroku
You can’t start the subdomain name with:
•root
•status
•a hyphen (-)
3. Click Check Availability. If your name is already taken, choose a different one.
4. Click Register Domain.
5. You receive an email when your subdomain name is ready for testing. It can take a few minutes.
8
Define Your My Domain Subdomain NameSalesforce Health Cloud Implementation Guide

Before making your new My Domain subdomain available to your users, test that your org’s URLs work with your new subdomain name.
Then you can roll it out to your users.
Configure Health Cloud Profiles
Adjust users’ profiles to give them access to the Health Cloud fields and records.
Note: To be able to set up the Health Cloud console, you must make these additions to the System Administrator profile, as well.
1. From Setup, enter Profiles in the Quick Find box, then select Profiles.
2. Select a profile to configure.
Assign your users standard Salesforce profiles. If you need custom profiles to extend visibility and access to certain objects, use a
standard profile, clone it, and edit it to meet your organization’s needs.
3. Add or enable the following items for the profile.
a. Page Layouts
•Account (Individual record type): Patient layout
•Case (Care Plan record type): Care Plan layout
•Contact (Individual record type): Patient layout
•Lead (Patient record type): Patient layout
•Task (Care Plan Task record type): Health Task layout
b. Record Types
•Account: Business, Household, Individual (Default)
•Cases: CarePlan
•Contacts: Business, Individual (Default)
•Lead: Patient
•Tasks: Care Plan Task
4. Click Save.
SEE ALSO:
Salesforce Help: Assign Record Types to Profiles in the Original Profile User Interface
Salesforce Help: Enable and Disable the Translation Workbench
Assign the Health Cloud Permission Set License
USER PERMISSIONS
To assign a permission set
license:
•Manage Users
To apply the Health Cloud permission set license, assign a permission set labeled Health Cloud
Permission Set License to each user.
Note: Health Cloud Empower users don’t require the Health Cloud permission set license.
The Health Cloud permission set license provides access to the standard version of Health Cloud.
Users with this license have access to the standard Salesforce objects and Health Cloud custom
objects.
9
Configure Health Cloud ProfilesSalesforce Health Cloud Implementation Guide
Note: If you installed the Health Cloud managed package before the Summer ’17 release, this step is optional.
1. From Setup, enter Permission Sets in the Quick Find box, then select Permission Sets.
2. Click Health Cloud Permission Set License.
3. Click Manage Assignments.
4. Select the users to whom you want to assign the permission set.
5. Click Add Assignments.
6. Save your changes. The Health Cloud permission set license is assigned to the users you selected.
Note: To view assigned permission set licenses, from Setup click Company Profile and then click Company Information.
Set Field Access
Field permissions specify the access level for each field in an object. Whether you’re using profiles or permission sets to control access
to data in Health Cloud, make sure that users have access to these standard fields.
1. Make sure that the following fields have Edit permission:
Field LabelObject
Accounts •Account Name
•Account Owner
•Care Plan
•Individual ID
•Primary Contact
•Source System
•Source System ID
AccountContactRelation •End Date
•Is Active
•Roles
•Start Date
Cases •Account Name
•Case Origin
•Contact Name
•Description
•Priority
•Status
•Subject
•Type
Contacts •Birthdate
10
Set Field AccessSalesforce Health Cloud Implementation Guide
Field LabelObject
•Mailing Address
•Name
•Phone
•Source System ID
Note: The Birth Date field is a custom formula field
that reformats the date retrieved from Birthdate.
Access is defined in the Health Cloud permission sets.
Tasks •Comments
•Due Date
•Goal
•Name
•Priority
•Problem
•Public
•Recurrence Interval
•Related To
•Repeat This Task
•Status
•Task Type
•Task Record Type
•Task Subtype
Anyone who adds external users who are contacts to a care team needs Edit access to the following fields on the User object.
Field LabelObject
User •Alias
•Email
•Last Name
•Nickname
•Profile
•Username
•User License
2. Click Save.
11
Set Field AccessSalesforce Health Cloud Implementation Guide
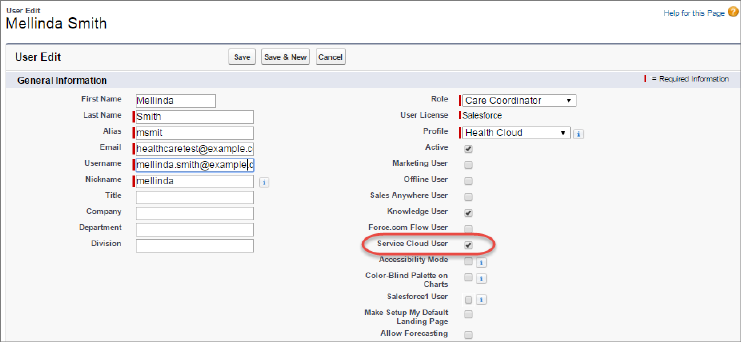
Add Health Cloud Users
You can add internal Salesforce users one at a time or in batches of up to 10 users.
1. From Setup, enter Users in the Quick Find box, then select Users.
2. Click New User to add a single user or click Multiple Users to add up to 10 users at a time.
3. If multiple user license types are available in your organization, select the user license to associate with the users you plan to create.
The user license determines the available profiles.
4. Specify the information for each user, including Role and Profile.
Users who need access to the Health Cloud console must have Service Cloud User enabled. If you’re using Salesforce
Knowledge articles to manage protocols, enable Knowledge User for every user needing access to articles.
5. To email a login name and temporary password to each new user, select Generate new password and notify user immediately.
6. To specify more details for the users that you’ve created, edit individual users as needed.
Control Access to Patient Lists
Use sharing settings to control access to patient lists.
By default, any patient list created in your org is available to all users with access to the Health Cloud console.
Field-level and object-level security can also restrict access to an entire patient list or to columns in the patient list.
•Users with profile or permission sets that restrict access to an object can’t create a list using that object. The object doesn’t appear
in the list of records, as a results column, or as a category when creating the list.
•If a user’s field-level security restricts access to a field that's selected on the Add Filters tab, that patient list isn’t available for that
user.
•When a user’s field-level security restricts access to a field used as a display column, the column doesn’t appear in the patient list.
To restrict access to patient lists, you can use standard Salesforce sharing settings on the list. For example, you can grant access to all
care coordinators in a certain department or who share a specific role.
1. To apply sharing settings to a patient list, select the Filter Criteria tab from the Health Cloud - Admin app.
2. On the Filter Criteria Home page, select All in the View field and then select the name of the filter criterion for the patient list you’re
working with.
3. In the Filter Criterion Detail area of the page, select Sharing.
12
Add Health Cloud UsersSalesforce Health Cloud Implementation Guide
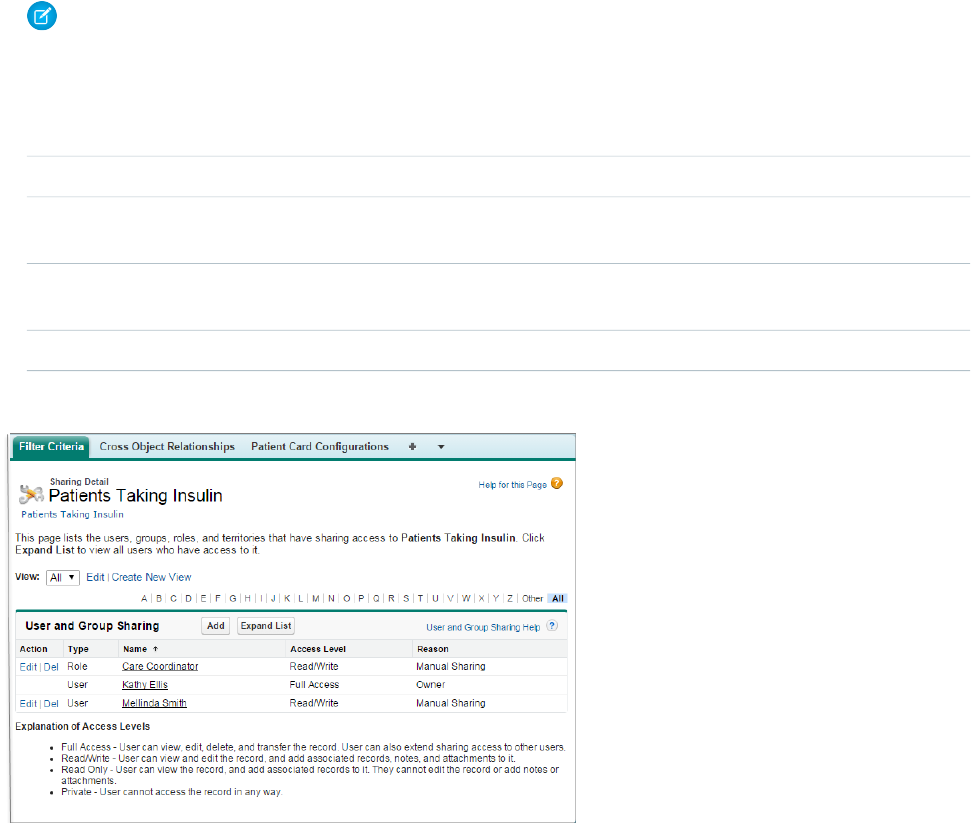
Note: The Sharing button is available when your sharing model is either Private or Public Read Only for a type of record or
related record.
4. Grant access to other users, groups, or roles.
Org-Wide ResultAccess Level
The user can view, edit, and delete the patient list.Full Access
Anyone with access to the Health Cloud console can use and
edit the list.
Read/Write
Only the user who created the list view can view, edit, or delete
the patient list.
Private
Anyone with access to the Health Cloud console can use the list.Public Read Only
SEE ALSO:
Salesforce Help: Sharing Settings
13
Control Access to Patient ListsSalesforce Health Cloud Implementation Guide
Create Roles for Care Team Members
EDITIONS
Health Cloud is available in
Salesforce Classic and
Lightning Experience
Available in: Enterprise,
Performance, and
Unlimited Editions
USER PERMISSIONS
To set up case teams for
care teams:
•Customize Application
AND
Manage Users
To add team members:
•Edit on cases
Care team member roles define the access that members have to information in the care plan.
Note: Salesforce Communities provides the collaboration support for Health Cloud. Some
of the collaborative features aren’t available until you enable Salesforce Communities and
create a private patient community.
Every member has a unique role to play in caring for the patient, such as primary care physician,
caregiver, or case manager. Roles determine access to patient information, like read only or read/write
access. You create a list of roles that care coordinators select from when assigning roles to new care
team members. The patient role is automatically assigned during the patient conversion process
in Health Cloud and the care coordinator can be assigned during that process, as well.
Note: Salesforce offers a user role hierarchy that you can use together with sharing settings
to determine the levels of access users have to your organization’s data. Roles within the
hierarchy affect access on key components like records and reports. Unlike standard Salesforce
roles, the access you provide with care team roles applies only to Case records. When an
internal user who is a member of the care team already has a standard Salesforce role, they
retain access that comes with their standard role.
When you set up roles for care team membership, you can include internal users who are already
in your organization, and external contacts. (Contacts are the people associated with the patient
such as family members or specialists outside of your organization.) For each contact, you can store
various kinds of information, such as phone numbers, addresses, titles, and roles. In addition, if
you’ve set up Communities, you can make the contact a community user and add them to the
patient community. That way, they can see the care plan and collaborate in the feed, if given access.
At a minimum, create a role entitled Care Coordinator and a role entitled Patient. These roles are used by Health Cloud
during patient conversion, and appear as labels throughout the app. To customize the role labels, clone the Careplan Role Care
Coordinator or Careplan Role Patient metadata types in Health Cloud Settings, and rename them. For example, you
can change Care Coordinator to Care Manager, if your organization uses that name for the role.
1. From Setup, enter Case Team Roles in the Quick Find box, then select Case Team Roles.
2. Click New.
3. Enter a name for the role.
Remember that you must create a role entitled Care Coordinator and a role entitled Patient. These roles are used by
Health Cloud during patient conversion, and appear as labels throughout the app.
4. From the Case Access picklist, select the role's level of access to cases. Access levels are:
DescriptionAccess Level
User can view and edit the record and add associated records,
notes, and attachments to it.
Read/Write
User can view the record and add associated records to it. The
user can’t edit the record or add notes or attachments.
Read Only
User can’t access the record.Private
5. Click Save. Alternatively, click Save & New to save the role and begin creating another role.
14
Create Roles for Care Team MembersSalesforce Health Cloud Implementation Guide
6. Select Visible in Customer Portal so that care team members with this role are visible to community members.
The care team member roles are now available to assign to different care team members.
SEE ALSO:
Salesforce Help: Create Case Team Roles
Customize the Delivered Care Team Roles
Enable Task Assignment for Community Users Created from Contacts
Make sure that care team members created outside of the Health Cloud console can be selected for task assignment.
When you create care team members from within the Health Cloud console, they are created as users with community access. When
you create a user in the Salesforce Classic Contact page, you can also grant that person community access by enabling them as a customer
user. While you can add customer users to the care team and they have access to the patient’s community, they can’t be assigned tasks
using care plan templates until you manually update their user type.
1. Open the patient’s Detail page, select the case that’s associated with the care plan.
2. In the Case Team related list, find users who have Contact: as a prefix to their name.
These contacts have a user record, but you must update their user type to assign them tasks from the care plan template.
3. Click Update Case Team Members.
4. Next to the user’s name, use the picklist to change their assignment from Contact to Customer Portal User.
Enable Care Gaps
Health Cloud helps you prioritize efficiently by surfacing gaps in a patient’s care where your team can make a difference. To close a care
gap, you tie it to a support process.
The Care Gaps feature was added to Salesforce Health Cloud in the Spring ‘18 release.
Care coordinators can use this capacity to improve patient outcomes. Population health analysts may find it helpful in learning which
patients have the highest likelihood of improvement after a particular intervention. To start using Care Gaps, add it to the Patient Card
dropdown in Custom Settings. Multiple source systems can create Care Gap records in Health Cloud.
1. From Setup enter custom settings in the Quick Find box and select Custom Settings.
2. To add Care Gaps to the Card View drop-down menu, select Card View Dropdown and click on Manage, then New.
3. Create a Care Gaps item in the drop down menu by entering the following into the fields shown:
Care GapsName
EngagementCategory Name
SubtabTab Type
Care GapsSubcategory Name
VFpagePage Type
/apex/HealthCloudGA__HcCareGapsPageURL
EngagementCategory Label
15
Enable Task Assignment for Community Users Created from
Contacts
Salesforce Health Cloud Implementation Guide
checkedDefault Subtab
Tab_Care_GapsSubcategory Label
enter a unique ordinal, e.g. 4.0Subtab Sort Order
4. Save your settings.
5. Add Care Gaps record type to the user profile. From the Users > Profiles menu item, select the appropriate user profile (for example,
Health Cloud).
6. Under Record Type Settings, click Edit under the Cases record type and add the Care Gaps record type.
7. Save your settings.
Return to the Health Cloud console. The Care Gaps menu item should now appear in the Card View dropdown menu.
Customize Health Cloud
You can adapt the Health Cloud user interface to fit your organization’s unique needs. Give your users exactly the information they need
when they need it so they can do their best work.
Give Your Users the Health Cloud Lightning Experience Console
When you enable the Health Cloud Lightning Experience Console, your users can access the console using the App switcher. To
turn on the Console, just add the app to your org and assign users.
Customize Health Cloud
Health Cloud is a managed package, installed on top of Salesforce Enterprise Edition, Performance, or Unlimited editions. While not
every component or attribute in a managed package is customizable, we’ve given you the ability to edit the key components and
attributes that you’ll need to make your instance of Health Cloud fit your company’s needs.
Customize the Health Cloud Apps
You can change some of the properties of the Health Cloud Apps in your organization. For example, you can add the Knowledge
widget so that care coordinators can see articles and protocols from the console footer. You can also do things like add your company’s
logo, change the color of page elements, and enable keyboard shortcuts in the Health Cloud console.
Show Detailed Error Messages
Configure the Industries Application Config custom setting to display detailed error messages so you can debug access errors quickly
when setting up user profiles.
Enable Users to Import Leads as Patients
Your company can use existing Salesforce Lead records to create the Patient records that are used in Health Cloud.
Migrate More Data with the Patient Creation Job Flow
When patients are first imported into Health Cloud, the information required to identify and represent those patients is created.
Historical medical information associated with patients is not imported into Health Cloud by default; however, you can choose to
map more historical information, as needed. You can implement a custom integration to import historical medical records from the
EHR system and append it to the default patient creation job flow.
Provide Easy Access to Protocols and Articles
Salesforce Knowledge lets you easily create and manage content and make it available to other healthcare professionals and to the
patient and care team members.
16
Customize Health CloudSalesforce Health Cloud Implementation Guide

Use Person Accounts in Health Cloud (Optional)
If your org uses person accounts to manage people, you can now use Health Cloud without migrating your patient data to the
individual data model. Person accounts store information about individual people by combining certain account and contact fields
into a single record.
Give Your Users the Health Cloud Lightning Experience Console
When you enable the Health Cloud Lightning Experience Console, your users can access the console using the App switcher. To turn
on the Console, just add the app to your org and assign users.
Use the Lightning Experience Migration Assistant as your control center for tackling these steps. From Setup in Salesforce Classic, click
Get Started in the Migration Assistant tile at the top of the menu.
Users with Health Cloud Standard or Health Cloud Admin permission sets can access Health Cloud - Lightning Console app. You need
the Health Cloud Admin permission set to access the Health Cloud - Lightning Admin app.
The Health Cloud console in Salesforce Classic is still here, and it’s easy for Lightning Experience users to move between the old and the
new. So even if Lightning Experience isn’t a perfect fit yet, you and your users can try it on for size without losing out.
Here’s a checklist of tasks to complete before rolling out the Health Cloud Lightning Console to your users.
Enable Lightning Experience
Enable Lightning Experience using the Lightning Experience Migration Assistant.
Define Your My Domain Subdomain Name on page 8.
Switch to Lightning Experience.
Create the Health Cloud Lightning Console App
Use the App Manager to create a new Lightning console app and name it Health Cloud Lightning Console.
Set the app’s primary color, give it a logo, and add a description.
Add items to your app’s utility bar, select the items you want to appear in the app, and assign it to user profiles.
Create the Patient Console Record Flexipage (Required)
In the Lightning App Builder, create a new Lightning record page named Patient Console and select the Account object.
Select the three-column page template.
Drag the Patient Detail for Health Cloud component into the left column.
Customize the other two columns by dragging other components onto the page.
Save your work and select the Activate button.
Select the following org and app defaults.
•Org and App Defaults: Don’t set this flexipage as the org or app default page.
•Select Apps: Health Cloud Lightning Console.
•Selected Record Types: All individual record types that you’ve configured using the Individual Record Type Mapper.
•Selected Profiles: Any profiles that need access to the page.
17
Give Your Users the Health Cloud Lightning Experience
Console
Salesforce Health Cloud Implementation Guide
Create Optional Flexipages
The Patient Console record flexipage is a required component for the Health Cloud console, but other flexipages are optional and can
be created and added as needed. Follow the steps to create the Patient Console flexipage and use the information listed in this table
for each flexipage you want to add.
Component NamePage LayoutLabelFlexipage
Patient List View for Health
Cloud
One ColumnPatientsPatients
Candidate Patient List View for
Health Cloud
One ColumnCandidate PatientsCandidate Patients
Today View for Health CloudMain Column and Right Sidebar
(for Chatter)
TodayToday
Create Health Cloud Lightning Admin App
Create the Lightning app that lets you and your admins set up and customize the console.
Use the App Manager to create a Lightning app and name it Health Cloud Lightning Admin.
Set the app’s primary color, give it a logo, and add a description.
Select the Standard Navigation option.
Add items to your app’s utility bar and select the items you want to appear in the app. This should include all EHR objects and other
items, as required. Assign it to user profiles and save your work.
Customize Health Cloud
Health Cloud is a managed package, installed on top of Salesforce Enterprise Edition, Performance, or Unlimited editions. While not every
component or attribute in a managed package is customizable, we’ve given you the ability to edit the key components and attributes
that you’ll need to make your instance of Health Cloud fit your company’s needs.
Health Cloud Custom Tabs
We’ve delivered a set of custom tabs to help you customize the Health Cloud Console to align with how your company works with
patients.
Customizing the Patient Details Tab
The Patient Details tab shows patient records that are associated with the Account record. If you prefer to have the Contact record
appear on the tab, you can change the settings for HcFeatureDriver in Health Cloud Settings that are part of Custom Metadata Types.
Refine the Householding Map for Care Coordinators
The householding map brings together patients, care plans, caregivers, households, businesses, and other individuals in one view.
You can change the roles and relationships that appear in the map.
Customize the Patient Card
You can add fields to the patient card and provide care coordinators with the information they need about a patient’s contact
information, conditions, prescriptions, appointments, and other information from their medical records.
18
Customize Health CloudSalesforce Health Cloud Implementation Guide
Override Custom Labels
The custom labels that are delivered with Health Cloud package can’t be edited, but you can override them by creating a translated
version of the label.
Configure the Timeline View
Add or remove healthcare events from the timeline view to provide care coordinators and patients with a chronological view of
healthcare events.
Customize the Delivered Care Team Roles
The roles that people have in the healthcare world are incredibly varied. So we’ve given you the flexibility to change the standard
Health Cloud roles to ones that reflect how your organization works.
Use Custom Metadata Settings to Configure Health Cloud
You can add or replace fields in many of the components of Health Cloud using custom metadata.
Customize Problems and Goals
You can customize problems and goals in Lightning Experience by editing the corresponding page layouts. In Salesforce Classic,
use field sets to change the delivered pages. With fields sets, you can add custom fields or change the order of existing fields on the
pages used to create problems and goals.
Customize Tasks
Customize the fields on the New Task page so that the field values reflect the kinds of tasks care coordinators most often assign, and
use rating terminology specific to your organization.
Customize the Create External Member Fields
You can customize the fields that appear on the modal that care coordinators use to create an external care team member.
Customize the Candidate Patient List View
You can customize the fields that appear on the list view that care coordinators use to convert candidate patients to patients in
Health Cloud.
Add Cross-Object Relationships to Customize Patient List Filter Options
Cross-object relationships control which objects and fields appear in the filter selection options when creating patient lists.
Dashboards Give Your Users Access to the Big Picture
Set up your reporting environment, use the report builder to create a basic report, and organize your reports to make it easy to find
information. You can also find great dashboard apps on the Salesforce AppExchange and add them to the console.
Let Care Coordinators Create Concurrent Care Plans for a Patient
When multiple care plans are enabled in your org, care coordinators can create one or more care plans per patient allowing more
focused, manageable care components.
Use Assessments to Gather Patient Information
Improve the quality of patient care by gathering information that helps to manage your patients more efficiently. Whether it’s a
pre-surgery assessment or a patient feedback survey, you have the information you need within the patient’s care plan.
The Assessments Tab
The Assessments tab lets you send surveys to your patients, check on a survey’s status, and view completed surveys.
Create a Care Plan Template
You can create a care plan template within Salesforce by adding problems, goals, and tasks to a care plan template.
Use Data Loader to Import Care Plan Templates
Use Data Loader to make import existing care plan templates into Salesforce and make them available to care coordinators.
19
Customize Health CloudSalesforce Health Cloud Implementation Guide

Health Cloud Custom Tabs
We’ve delivered a set of custom tabs to help you customize the Health Cloud Console to align with how your company works with
patients.
DescriptionTab Name
Cross-object relationships control which objects and fields appear
in the filter selection options when creating patient lists.
Cross Object Relationships
These tables contain data from the source record system related
to things like prescriptions, conditions, patients, and immunizations.
EHR Custom Objects
(EHR Patients, EHR Encounters, and so on)
Edit the patient card view to add or remove information from EHR
or other records.
Patient Card Configurations
Add or remove healthcare events from the timeline to provide care
coordinators with the information they need to be more effective
in managing patients.
Timeline View Configurations
Customizing the Patient Details Tab
The Patient Details tab shows patient records that are associated with the Account record. If you prefer to have the Contact record appear
on the tab, you can change the settings for HcFeatureDriver in Health Cloud Settings that are part of Custom Metadata Types.
When you change the default settings or if you use a custom page layout, you must also modify the associated page layout. For example,
to modify the Account layout, follow these steps.
1. From Setup, enter Account in the Quick Find box, then select Accounts.
2. Select Edit next to Patient Layout.
3. Select the Custom Console Components link at the top of the page.
4. In the Primary Tab Components section, add the following information to the Left Sidebar section.
ValueField
StackStyle
350Width px
SelectedAutosize Components
Visualforce pageType
PatientProfile_PageComponent
100Height %
20
Customize Health CloudSalesforce Health Cloud Implementation Guide

Refine the Householding Map for Care Coordinators
The householding map brings together patients, care plans, caregivers, households, businesses, and other individuals in one view. You
can change the roles and relationships that appear in the map.
Note: If you don’t see the Household option in the patient card navigation menu, add it using the CardView Dropdown custom
setting. Use permission sets or profiles to grant users access to the contact role and account role record types for the Reciprocal
Role object.
How Are Patient Relationships Modeled?
Health Cloud uses a household model to represent patients and their relationships with the people who participate in their care. A
household is an account with the Household record type. The household is related to the contact part of the individual using the
Account Contact Relationship standard object.
Configure Reciprocal Roles
Within a relationship, a reciprocal role is the role of one entity relative to another entity. For example, husband and wife, or caregiver
and patient. We’ve provided commonly used reciprocal role records. You can edit them to specify more granular roles for extended
families, specific types of caregivers, or various professional affiliations.
Update Roles for Account Contact Relationships
You can create more roles to represent the types of people or companies that care coordinators can add to the Household tab.
How Are Patient Relationships Modeled?
EDITIONS
Health Cloud is available in
Salesforce Classic and
Lightning Experience
Available in: Enterprise,
Performance, and
Unlimited Editions
Health Cloud uses a household model to represent patients and their relationships with the people
who participate in their care. A household is an account with the Household record type. The
household is related to the contact part of the individual using the Account Contact Relationship
standard object.
You can relate the patient to relationship groups that include care plans and external contacts and
accounts. Custom objects represent relationships with other caregivers and healthcare business
entities.
Record TypesRepresentsStandard or
Custom
Object
StandardAccount •Business
•Business
•Individual •Individual
•Institution
•Institution
• •
Group Household
N/AThe membership in a
relationship group and
StandardAccount Contact
Relationship
the relationship
between the patient
and an account.
•The membership
in a relationship
group lets you roll
up a member’s
21
Customize Health CloudSalesforce Health Cloud Implementation Guide
Record TypesRepresentsStandard or CustomObject
information to the group.
•For a business account to be
a member of a relationship
group, the business must
first be related to a person
in the group.
N/AThe relationship between two
contacts.
CustomContact-Contact Relationship
N/AThe complementary role implied
by the relationship of an
CustomReciprocal Role
individual to another individual
or entity. For example, Parent is
the reciprocal role for Child.
Configure Reciprocal Roles
Within a relationship, a reciprocal role is the role of one entity relative to another entity. For example, husband and wife, or caregiver
and patient. We’ve provided commonly used reciprocal role records. You can edit them to specify more granular roles for extended
families, specific types of caregivers, or various professional affiliations.
Note: A user must have access to the Contact Role record type to add or edit reciprocal roles. You can grant access in the Record
Type Settings section of the Reciprocal Role object. When you grant console users access to the record type, they can create
reciprocal roles when they’re adding a related contact.
1. In Salesforce Classic, go to the Reciprocal Roles tab. In Lightning Experience, select Reciprocal Roles in the App Launcher.
You can also add reciprocal roles in the Create Contact-Contact Relationship modal on the Household tab. In the Related Role, select
New Reciprocal Role.
2. Click New.
3. Select the Contact Role record type, and click Continue.
4. Enter the name of the role. For example, Parent.
5. Enter the name of the reciprocal role. For example, Child.
6. Save your work.
Update Roles for Account Contact Relationships
EDITIONS
Health Cloud is available in
Salesforce Classic and
Lightning Experience
Available in: Enterprise,
Performance, and
Unlimited Editions
You can create more roles to represent the types of people or companies that care coordinators
can add to the Household tab.
1. From Setup, go to the Object Manager.
2. Enter Account Contact Relationship in the Quick Find box. Select Fields &
Relationships under Account Contact Relationships.
3. Select Roles.
4. Add or remove roles as needed.
22
Customize Health CloudSalesforce Health Cloud Implementation Guide
5. Save your changes.
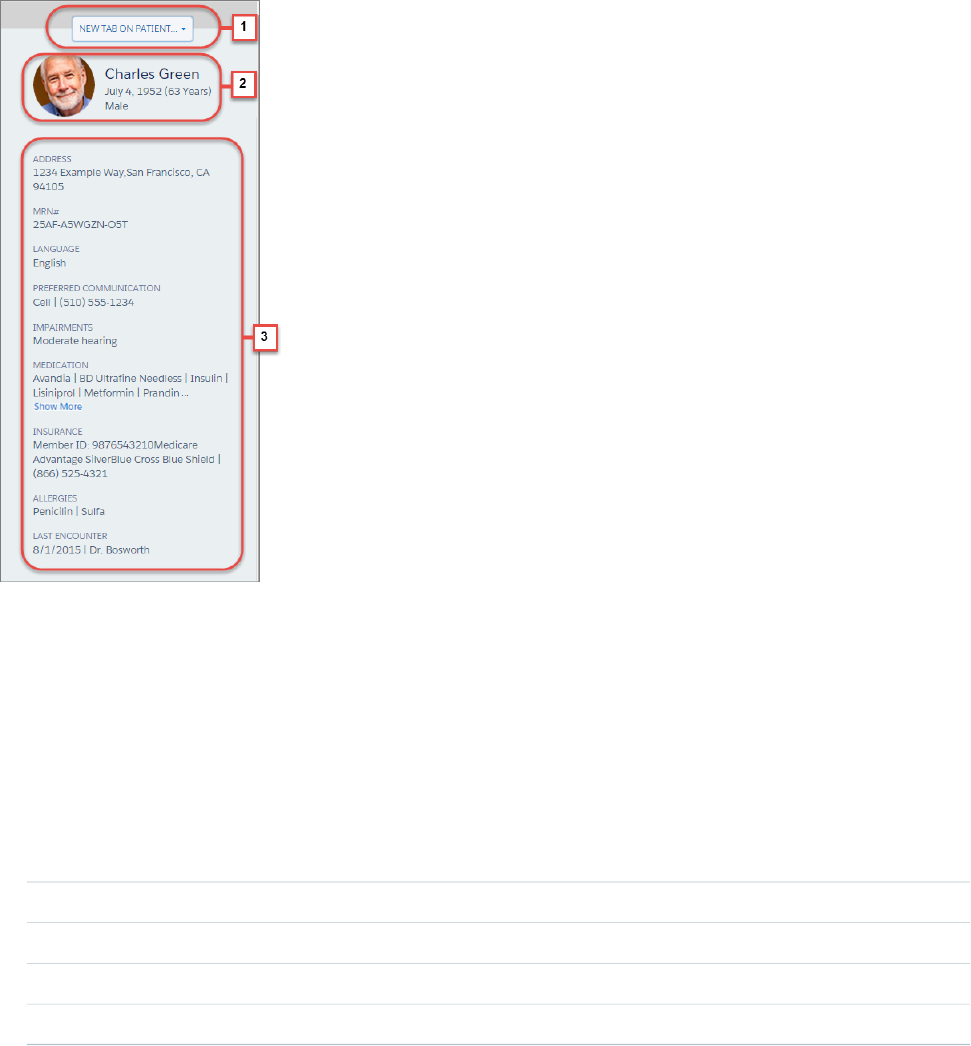
Customize the Patient Card
You can add fields to the patient card and provide care coordinators with the information they need about a patient’s contact information,
conditions, prescriptions, appointments, and other information from their medical records.
The patient card is made up of three different components:
•The patient card navigation menu (1) that lets care coordinators navigate to the pages they need without leaving the patient card.
You can customize the items that appear in the tab navigation list on the patient card using custom settings. So you can add a new
navigation item to one of the default menu categories, or you can add a category with new child navigation options to what you
already have.
•The patient card header (2) that provides basic information on the patient as well as a thumbnail photo, if available.
The patient card header shows identification information for the patient. The following table shows the source of the information
that is displayed for each patient. Fields from the patient card header aren’t available for editing or other customizations.
SourceField
Chatter profile photoThumbnail photo
Contact recordPatient name
Formula field based on fields from the contact recordDate of birth and age
Gender custom field on Contact recordGender
23
Customize Health CloudSalesforce Health Cloud Implementation Guide
•Patient contact and medical record fields (3) that you can add to the patient card. You can customize the patient card and add fields
from the source record system so that care coordinators have the information they need to manage patients. Each field displays up
to 200 characters, after which users can click Show More to expand the section and view the remaining text. There is no upper
limit to the number of fields you can add to the patient card, but we recommend no more than 15-20 fields to ensure optimal
performance.
Customize the Patient Card Navigation Menu and Patient Subtabs
Make it quick and easy for care coordinators to navigate to the pages they need without leaving the patient card. You can also specify
which subtabs open and in what order when a patient record opens in the console.
Add Fields to the Patient Card
You can edit the patient card view to add or remove information from EHR or other records.
Customize the Patient Card Navigation Menu and Patient Subtabs
EDITIONS
Health Cloud is available in
Salesforce Classic and
Lightning Experience
Available in: Enterprise,
Performance, and
Unlimited Editions
USER PERMISSIONS
To customize the patient
card navigation menu:
•Manage Profiles and
Permission Sets AND
Customize Application
Make it quick and easy for care coordinators to navigate to the pages they need without leaving
the patient card. You can also specify which subtabs open and in what order when a patient record
opens in the console.
You can also configure the tab navigation menu on the patient card to open standard and custom
pages or URLs as either primary or secondary tabs. Clicking an item in the menu opens a new tab
or subtab related to that patient’s records.
Customize the items that appear in the tab navigation list on the patient card using custom settings.
You can add a navigation item to a default menu category, or a category with new child navigation
options to what you already have. For example, create your own Visualforce page and add it to the
navigation list or you can add a URL to another frequently used page.
The Subtab Sort Order field sets the order that the related subtabs appear in the console. You can
also specify which tabs appear when the patient record opens in the console.
Note: All navigation menu elements appear in alphabetical order. Categories are listed in
alphabetical order, as are the subcategories beneath them.
1. From Setup, enter Custom Settings in the Quick Find box, then select Custom
Settings.
2. In the list of custom settings, click Manage next to the CardView Dropdown custom
settings.
3. Click New and complete the following fields:
DetailsField
Enter the name of the custom label for the parent category that contains
child menu navigation items, for example Tab_Timeline. The category
Category Label
name is just a heading and isn’t a clickable navigation link. You can use
a localized category name in this field. When a value exists for this field,
the Category Name field isn’t used.
Name of the parent category that contains child menu navigation items.
The category name is just a heading and isn’t a clickable navigation link.
Category Name
When selected, the related subtab appears by default in the Health Cloud
console.
Default Subtab
24
Customize Health CloudSalesforce Health Cloud Implementation Guide
DetailsField
Name of the parent category that contains child menu navigation items.
The category name is just a heading and isn’t a clickable navigation link.
Name
Content type of the new page. Specify VFpage or URL.Page Type
Note: Make sure to add external URLs to the console’s whitelist
so that console users can access that domain.
Name of the child category in the menu list. This text is the clickable link
that opens the page or tab.
Subcategory Name
Customized label for the name of the child category in the menu list. This
text is the clickable link that opens the page or tab. Use a custom label
Subcategory Label
to create a localized category name in this field. When a value exists for
this field, the Subcategory Name field isn’t used.
Indicates the order in which this tab appears in the console when it’s been
selected as a default tab.
Subtab Sort Order
Note: If you add a configuration record to the menu, then modify
the sort order. Since you can’t have two records with the same
assigned sort order, create a different version number for the new
record.
Specify the type of tab to use for this page: Primary or Subtab. A
primary tab is the main item to work on. A subtab is related to an item
on a primary tab.
Tab Type
URL to access the page.URL
(Optional) Add more URL parameters to the existing Visualforce page or
URL to open the new tab.
URL Parameter
4. Click Save.
Example: The following example shows how to add a subtab entitled All Medical Records to a category named
Medical Records:
DetailsField
All Medical Data.Name
Medical RecordCategory Name
Not necessaryURL Parameter
SubtabTab Type
All Medical RecordsSubcategory Name
25
Customize Health CloudSalesforce Health Cloud Implementation Guide
DetailsField
VFpagePage Type
Note: Make sure to add external URLs to the console’s whitelist
so that console users can access that domain.
/apex/<VF page name>URL
To use a localized or customized version of the Category Name field,
enter it here. When there is a value in this field, it’s used instead of the
value in Category Name.
Category Label
Enabled so that the subtab shows by default when the page loads.Default Subtab
3.0
This category displays in the third position on the menu.
Sort Order
To use a localized or customized version of the Subcategory Name field,
enter it here. When there is a value in this field, it’s used instead of the
value in Subcategory Name.
Subcategory Label
Whitelist Domains for Health Cloud Console
Administrators can let console users access domains outside of Salesforce. For example, you can add www.example.com to a
console’s whitelist so that console users can access that domain.
Whitelist Domains for Health Cloud Console
Administrators can let console users access domains outside of Salesforce. For example, you can add www.example.com to a
console’s whitelist so that console users can access that domain.
1. From Setup, enter Apps in the Quick Find box, then select Apps.
2. Select a console app.
3. Click Edit.
4. In Whitelist Domains, type the domains you want users to access, and separate multiple domains by commas. You don’t
need to add http:// or https:// because those are part of a URL, not a domain.
5. Click Save.
Add Fields to the Patient Card
You can edit the patient card view to add or remove information from EHR or other records.
Watch a Demo: Add Essential Information to the Patient Card
Health Cloud delivers the patient card with the basic fields that care coordinators commonly use. You can customize the patient card
and add fields from the source record system so that care coordinators have the information necessary to make informed decisions and
provide excellent patient care.
26
Customize Health CloudSalesforce Health Cloud Implementation Guide

Each field displays up to 200 characters, after which users can click More to expand the section and view the remaining text. There’s
no limit to the number of fields you can add to the patient card, but we recommend no more than 15-20 fields for optimal performance.
You can add fields from objects that come from the custom EHR tables and other objects, as well. Be sure that the objects that you’re
adding to the patient card are related to the Account object.
Tip: Check the Schema Builder in your org if you’re unsure if an object is related to the Account object.
1. From the Health Cloud - Admin Home page, select the Patient Card Configuration tab, and click New.
2. Enter the following:
DescriptionField
Name of the patient card item you’re creating. This name appears
only on setup pages.
Patient Card Configuration Name
Name of the object that contains the field to show on the patient
card. Use the exact spelling of the object name to ensure correct
results.
Object Name
Name of the field that contains the information to display on the
patient card.
Field Name
Text that appears as a field label on the patient card.
Friendly Name
Note: The text in this field isn’t available for localization
using the Translation Workbench. To have this text appear
in another language, clone the configuration record and
enter the text using the language you want to display.
Then, set the Language field of the new record to that
language. The system displays the label text that matches
the user’s language setting.
27
Customize Health CloudSalesforce Health Cloud Implementation Guide
DescriptionField
Indicates the vertical order in which this field appears on the
patient card.
Sort Order
Note: If you clone a configuration record so that you can
localize the label, then also modify the sort order. Since
you can’t have two records with the same assigned sort
order, create a different version number for the new
record. For example, if the English record has 3 in the
Sort Order field, then assign the Spanish version
3.1.
Enter the name of the field used to define the order in which the
results appear. For example, if you have several medication names
Sort By
returned, you can sort them by the date prescribed. That way,
the most recent prescriptions appear first in the field.
If you’re creating your own filter field or adding a field to the
patient card, enter the name of your filter field.
Override Filter Field
When creating your own filter field to use instead of
IsVisibleOnPatientCard__c, enter the name of your filter field.
Make sure that the new filter field is either a Boolean or a formula
field that returns a checkbox-type value.
Note: If you’re adding a standard Salesforce field (like
Case), this field is required.
Select to display results in ascending order. This field works with
the Sort By field.
Ascending
Select to activate this field and have it appear on the patient card.Active
Enter the maximum number of results that can appear in the
field.
Limit
The setting that specifies the language of the text in the
Friendly Name field.
Language
The code that specifies the language of the text in the
Friendly Name field.
Language Code
Name of the lookup to display on the patient card when multiple
lookups to Account exist. The default for this field is Account__c.
Patient Account Lookup
Note: To use delivered Account lookups for standard
objects like Contact or Task, you must append Id to the
lookup field name. For example, to configure a lookup
from Contact to Account, use AccountId in this field.
Similarly, for a lookup from Task to What, use WhatId.
28
Customize Health CloudSalesforce Health Cloud Implementation Guide
Note: If you don’t see the Language and Language Code fields on the list view, add the fields to the page layout and
to the patient account lookup. Then, refresh the page by selecting All and clicking Go!.
Create a Custom Formula Field for the Patient Card
You can customize the information that appears on the patient card by adding a custom filter field to a specified object.
Create a Custom Formula Field for the Patient Card
You can customize the information that appears on the patient card by adding a custom filter field to a specified object.
By default, the patient card shows fields that provide basic medical and contact information for the patient. To add other items to the
patient card or to change the information that displays from the delivered fields, create a custom formula field on the object you want
to display. For example, to display medical device information, create a custom field on the EHR_Devices object with a formula that
returns the information you want to display on the patient card.
1. From Setup, enter Object in the Quick Find box, then select Objects.
2. Select the name of the custom object that holds the information you want to display on the patient card.
3. In the Custom Fields & Relationships section of the page, click New.
4. Select Formula as the data type and click Next.
5. Enter a field label that identifies the custom field.
6. Select Checkbox for the return type and click Next.
7. Create a formula that returns the results that you want to display on the patient card.
For instructions on using the Advanced Formula tab, search for Build a Formula Field in the Salesforce Help & Training.
Example: The following table shows the objects and fields you can use to add information on the patient card. When there are
multiple entries returned for an item, each value is separated by a vertical bar.
FieldObjectDescriptionDisplay Name
IsVisibleOnPatientCard
EHR Related PersonName of person responsible for
the patient.
Agent/Guardian/Guarantor
IsVisibleOnPatientCard
EHR PatientPreferred languageLanguage
IsVisibleOnPatientCard
EHR Medication PrescriptionName of current medications.Medications
IsVisibleOnPatientCard
EHR ImmunizationCurrent or valid immunizations.Immunization
IsVisibleOnPatientCard
EHR ConditionCurrently diagnosed conditionsMedical Conditions
IsVisibleOnPatientCard
EHR AllergyIntoleranceKnown allergies or
intolerances.
Allergies
29
Customize Health CloudSalesforce Health Cloud Implementation Guide
FieldObjectDescriptionDisplay Name
IsVisibleOnPatientCard
EHR EncounterDescription and date of last
medical interaction.
Last Encounter
SEE ALSO:
Salesforce Help: Building Formulas />
Override Custom Labels
The custom labels that are delivered with Health Cloud package can’t be edited, but you can override them by creating a translated
version of the label.
To override custom labels, you must enable the Translation Workbench and add English as a supported language.
1. From Setup, enter Custom Labels in the Quick Find box, then select Custom Labels.
2. Select the name of the custom label to open.
3. In the Translations related list, click New to override the existing label by creating a new translation.
4. Select the language you are translating into. Since Health Cloud is currently not localized, select English.
5. Enter the Translation Text. This text overrides the value specified in the label’s Value field.
Localize Labels in Multilingual Orgs
If you have a multilingual org, use the Translation Workbench to localize the labels in the Health Cloud console. Specify languages
you want to translate, create translations for customizations you’ve made, and override the labels in Health Cloud.
SEE ALSO:
Salesforce Help: Enable and Disable the Translation Workbench
Localize Labels in Multilingual Orgs
USER PERMISSIONS
Create, edit, or delete
custom labels:
•Customize Application
Create or override a
translation:
•Manage Translation
OR
View Setup and
Configuration and be
designated as a
translator
If you have a multilingual org, use the Translation Workbench to localize the labels in the Health
Cloud console. Specify languages you want to translate, create translations for customizations
you’ve made, and override the labels in Health Cloud.
Note: Labels that appear in the timeline, patient card, or card view menu can’t be translated
using the Translation Workbench. Instead, you add new custom labels for the values in the
language that replace the delivered English values.
Custom labels are custom text values that can be accessed from Apex classes, Visualforce pages,
or Lightning components. The values can be translated into any language Salesforce supports.
Custom labels enable developers to create multilingual applications by automatically presenting
information (for example, help text or error messages) in a user's native language.
1. To access custom labels, from Setup, enter Custom Labels in the Quick Find box,
then select Custom Labels.
2. Create a view that shows the labels that you want to localize.
30
Customize Health CloudSalesforce Health Cloud Implementation Guide
This example shows a view with custom labels that include the word Patient.
3. Select the name of the custom label you want to translate.
4. In the Translations related list, click New to enter a new translation or Edit next to the language to change a translation. If you click
Delete, Salesforce confirms that you want to delete, then removes the translation from the custom label.
5. Select the Language you are translating into.
6. Enter the Translation Text. This text overrides the value specified in the label's Value field when a user's default language
is the translation language.
7. Click Save.
SEE ALSO:
Salesforce Help: Create and Edit Custom Label Translations
Add Fields to the Patient Card
Configure the Timeline View
Customize the Patient Card Navigation Menu and Patient Subtabs
Configure the Timeline View
Add or remove healthcare events from the timeline view to provide care coordinators and patients with a chronological view of healthcare
events.
On the Timeline View Configurations tab, add different events to the timeline by exposing fields on custom or standard objects. Then,
select icons to represent the data on timeline. Use filters to narrow down which events appear on the timeline and then specify which
timeline the configuration applies to. So you can show only tasks with medium to high priority instead of including tasks that are assigned
lower priorities. Or include medications on the timeline in the Health Cloud console and exclude them from the timeline that the patient
sees in the community. You can target a timeline configuration record to appear only in the Health Cloud console, only the Timeline for
Health Cloud Empower, or in both. We’ve already added a filter on tasks that appears in both the console and the community. Users can
decide to show or hide tasks based on whether they are open or closed.
In your organization-wide sharing defaults, set the Timeline View Configuration and Filter Criterion objects to Public Read/Write
in the Default External Access column. Use permission sets and profiles to give access to the fields you want to expose in the timeline.
31
Customize Health CloudSalesforce Health Cloud Implementation Guide
Note: Be sure that the objects that you’re adding to the timeline are related to the Account object. Tasks can be related to the
patient account or to a case related to the patient account. Events must be related to the patient account.
1. From the Health Cloud - Admin Home page, select the Timeline View Configurations tab, and click New.
2. Enter the following:
DescriptionField
Name of the timeline event. This name appears only on setup
pages.
Timeline View Configuration Name
Name of the category of objects that this event is related to. Use
this field to create a group of events. This name appears in the
Object Category
Select All Events menu in the console timeline and the filter
dropdown in the community timeline. By default, all
pre-configured objects are either Engagement Data or
Medical Data.
Label that appears in the timeline for the event.
Friendly Name
Note: The text in this field isn’t available for localization
using the Translation Workbench. To have this text appear
in another language, clone the configuration record and
enter the text using the language you want to display.
Then, set the Language field of the new record to that
language. The system displays the label text that matches
the user’s language setting.
Name of the object that contains the field that is shown in the
timeline. To ensure correct results, use the exact spelling of the
object—for example, EhrMedicationPrescription__c.
Object Name
Name of the field that holds the text you want to display as an
event on the timeline.
Detail Field
For example, to display the name of a task, use the Subject field
on the Task object. The text from the Subject field shows on the
timeline along with the icon that you select for that type of
timeline event. To display other fields from the object as hover
text, add them to the Hover Field Name field.
Note: This field isn’t used in the Timeline for Health Cloud
Empower component.
Date field that the system uses to position the event
chronologically on the correct date on the timeline.
Position Field
32
Customize Health CloudSalesforce Health Cloud Implementation Guide
DescriptionField
Name of the image file that represents the event on the timeline.
Upload the image file to the Health Cloud Assets folder in the
Documents tab.
Graphical Icon
Note: For images to display with the best results in the
timeline, they must be within the recommended file and
frame size. The recommended file size is up to 1 MB.
Salesforce scales the image to roughly 48 x 48 pixels, so
smaller images, and images with an aspect ratio of 1:1
(square) provide the best results.
Indicates the vertical order that the events appear when the
timeline has more than one event on the same date. If you clone
Sort Order
a configuration record so that you can localize the label, then
also modify the sort order. Since you can’t have two records with
the same assigned sort order, create a different version number
for the new record. For example, if the English record has 3 in
the Sort Order field, then assign the Spanish version 3.1.
Note: This field isn’t used in the Timeline for Health Cloud
Empower component.
Select to activate this field and have it appear on the timeline.Active
Name of the lookup to display on the timeline when multiple
lookups to Account exist. The default for this field is Account__c.
Patient Account Lookup
Note: To use delivered Account lookups for standard
objects like Contact or Task, you must append Id to the
lookup field name. For example, to configure a lookup
from Contact to Account, use AccountId in this field.
Similarly, for a lookup from Task to What, use WhatId.
The setting that specifies the language of the text in the
Friendly Name field.
Language
The code that specifies the language of the text in the
Friendly Name field.
Language Code
Enter up to seven comma-separated field names from the object
you want to display. The values from this field appear as hover
Hover Field Name
text for an event on the timeline. For example, you can display
fields like the due date, performer name, status, and the related
problem for tasks. Make sure to use the API field name and not
the field label. Valid field types are:
•Date
•Combobox
•Number
•Picklist
33
Customize Health CloudSalesforce Health Cloud Implementation Guide
DescriptionField
•Text
Note: This field isn’t used in the Timeline for Health Cloud
Empower component.
Select to have this event appear by default on the timeline when
the page first loads.
Show on Load
All timeline configurations that have the Active checkbox
selected are available to appear on the timeline when they’re
selected using the events filter. But only those configuration
records with the Show on Load setting selected appear on
the timeline by default.
The name of the collection of filters that apply to this
configuration. To create the filter logic for this specific
Filter Criterion
configuration setting, use the Timeline Filter component at the
bottom of the tab.
Select the timelines in which to display these fields. You can
create one configuration record for patient communities and
Configuration Target
one for the Health Cloud console. To show the same fields in
both the Health Cloud console and the Timeline for Health Cloud
Empower component, select them both.
Note: If you don’t see a field on the tab, add it to the Timeline View Configuration object’s page layout. You may also have
to add it to the patient account lookup. Also be sure to configure visibility for each field according to your organization’s needs.
3. Click Save.
When you create a configuration record, the Timeline Filter doesn’t appear until you’ve saved the configuration.
4. To add filters, click Add Row in the Timeline Filter component.
5. In the first row, click inside the first lookup and type the name of the record to use as a filter. The field displays a dynamic list of
matching records when you start typing in the lookup field.
6. In the second lookup field, type the name of the field in that record to display.
For example, select a priority level for tasks that you want to appear in the timeline.
7. Choose a filter operator.
The operator in a filter is like the verb in a sentence. Use an operator to specify the action you want the filter to take.
8. Enter a value to either match or exclude.
The values that appear in this field are dependent of the type of field you select. For example, if you select High Priority for
tasks, a checkbox field with the value True appears.
Note: There are some filter criteria limitations to consider.
•None is not a value available in picklists.
34
Customize Health CloudSalesforce Health Cloud Implementation Guide
•If you select an ID field as a criterion, make sure that you enter a valid ID. ID values are not validated.
•If you select a Date field as a criterion, make sure that you don't leave its value blank or null.
9. Add more rows, if necessary.
10. If you have multiple filter rows, you can fine-tune your criteria further. Enter a logical expression in the Filter Logic text box that
applies filter logic operators to your filters.
•You can apply the filter logic operators AND and OR. For example, the expression (1 AND 2) OR 3 finds records that match both
Filter 1 and Filter 2, or Filter 3. Filter rows that you don't specify in the expression are ignored.
•If you leave the Filter logic text box empty, the default operator AND is applied to all your filter rows.
11. Click Next.
12. Enter the name for the list.
13. Click Save.
Example: For example, to display tasks in both the console and the community, use the Task object.
DescriptionField
TasksTimeline View Configuration Name
SelectedActive
Engagement DataObject Category
TasksFriendly Name
TaskObject Name
Filter Criterion
SubjectDetail Field
ActivityDatePosition Field
timeline_icon_check_pngGraphical Icon
3Sort Order
SelectedShow On Load
WhatIdPatient Account Lookup
Subject, ActivityDateHover Field Name
Health Cloud Console App; Timeline For Health Cloud EmpowerConfiguration Target
Upload Timeline View Icons
When you add information from custom objects or fields to the timeline view, make sure to include an icon for the timeline that lets
care coordinators understand the type of event that’s represented.
35
Customize Health CloudSalesforce Health Cloud Implementation Guide

Upload Timeline View Icons
EDITIONS
Health Cloud is available in
Salesforce Classic and
Lightning Experience
Available in: Enterprise,
Performance, and
Unlimited Editions
USER PERMISSIONS
To upload new documents:
•Create on documents
When you add information from custom objects or fields to the timeline view, make sure to include
an icon for the timeline that lets care coordinators understand the type of event that’s represented.
Note: For images to display with the best results in the timeline, they must be within the
recommended file and frame size. The recommended file size is up to 1 MB. Salesforce scales
the image to roughly 48 x 48 pixels, so smaller images, and images with an aspect ratio of
1:1 (square) provide the best results.
1. From the Health Cloud - Admin Home page, select the Documents tab, and click New.
2. On the Upload New Document page, specify a descriptive document name for the image file.
To use the file name, leave this field blank. The file name appears automatically when you
upload the file.
3. Enter a unique name to be used by the API.
4. To have the image appear in the timeline, select Externally Available Image.
5. Select the Health Cloud Assets folder for the file.
6. Enter a description and keywords to use later as search criteria.
7. Select the option to upload the image file. Click Choose File, choose the file, and click Open.
8. Click Save.
Customize the Delivered Care Team Roles
The roles that people have in the healthcare world are incredibly varied. So we’ve given you the flexibility to change the standard Health
Cloud roles to ones that reflect how your organization works.
What if your organization is an extended care facility and call the people you manage residents rather than patients? Or instead of care
coordinators, you have case managers who interact with patients. It’s easy to change the text that appears throughout the app.
From Setup, enter Custom metadata in the Quick Find box, then select Custom Metadata Types, then select Health
Cloud Settings. Clone the Careplan Role Care Coordinator setting or the Careplan Role Patient setting.
Modify the Setting Value field to reflect your customized role name. Then, deactivate the original setting and make the new
record active.
Note: When you change the role settings, make sure to also update the corresponding roles in the Assigned To picklist for the
Care Plan Template Task object. When you change role names, existing tasks retain the original role names in the Assigned to field.
You can edit these tasks to change to the new name.
Use Custom Metadata Settings to Configure Health Cloud
You can add or replace fields in many of the components of Health Cloud using custom metadata.
ControlsSetting
Used to create and manage different types
of care plans.
Care Plan Record Type
36
Customize Health CloudSalesforce Health Cloud Implementation Guide

ControlsSetting
Used to configure a custom household or
group record type.
See GroupRecordTypeMapper in the Health
Cloud Object Reference Guide for more
information.
Group Record Type Mapper
Reserved for internal use.HcHelpTray
A generic dictionary for Health Cloud
specific app configuration key value pairs.
See Manage Health Cloud Settings for more
information.
Health Cloud Settings
Used to configure a custom individual
record type.
See IndividualRecordTypeMapper
Individual Record Type
Mapper
Lookup table of age groups for patients who
have been enrolled in Medicare for more
Risk Score Age Band
Continued Enrollee
than a year. For example, patients who are
between 35–44 years old and patients who
are 60–64 are in two different age bands.
This information is used in risk calculation
scoring.
Lookup table of age groups for patients who
are newly enrolled in Medicare. For example,
Risk Score Age Band New
Enrollee
patients who are between 35–44 years old
and patients who are 60–64 are in two
different age bands. This information is used
in risk calculation scoring groups.
Lookup table for Hierarchical Condition
Category (HCC) codes and risk scores.
Risk Score HCCCode
Lookup table with disease interaction scores.
This information is used in risk calculation
scoring.
Risk Score Disease
Interaction
Lookup table with disease interaction scores
for patients who are enrolled in both
Risk Score Medicaid
Interactions
Medicare and Medicaid. This information is
used in risk calculation scoring.
To change the settings, deactivate the setting in Health Cloud Settings. Then, clone the setting record keeping the Setting Name, make
your changes, and then make that record active.
1. From Setup, enter Custom metadata in the Quick Find box, then select Custom Metadata Types.
37
Customize Health CloudSalesforce Health Cloud Implementation Guide
2. Click Manage Records next to Health Cloud Settings.
3. Click Edit in the row for the setting you want to override or change.
4. Deselect the Active checkbox, and then click Save.
5. Click the name of the setting you want to override.
6. Click Clone, create a settings record using the exact text found in the Setting Name field of the cloned record, and make the record
active.
Manage Health Cloud Settings
Health Cloud Settings contains a variety of key/value pairs of configuration settings for the Health Cloud application. You can
de-activate the delivered settings and create new settings to fit your business needs.
Configure Custom Record Types for Individuals or Groups
Health Cloud gives you the flexibility to configure custom individual and household (group) record types. For example, custom
record types let you add doctors as a type of individual or hospitals as a group record type. You can easily configure a custom record
type based on the default individual or group record type provided by Health Cloud.
SEE ALSO:
Customize the Delivered Care Team Roles
Manage Health Cloud Settings
Health Cloud Settings contains a variety of key/value pairs of configuration settings for the Health Cloud application. You can de-activate
the delivered settings and create new settings to fit your business needs.
ControlsSetting
Label Care Coordinator that appears throughout the appCareplan_Role_Care_Coordinator
Label for Patient that appears throughout the app.Careplan_Role_Patient
Defines whether a contact or account record appears for a patient
in the Details tab of the console.
HcFeatureDriver
Reserved for internal use.HcHelpTray
Adds an external care team member.HcFieldSet_AddMember
Fields that appear on the list view for candidate patients.HcFieldSet_CandidatePatientListView
Fields that appear as part of care plan goals.HcFieldSet_GoalDefaultFieldSet
Fields that appear as part of care plan problems.HcFieldSet_ProblemDefaultFieldSet
Columns that appear in the patient task list.HcFieldSet_TaskListDefaultFieldSet
Patient creation job flow.PatientCreateFlow_default
Patient creation data mappings.PatientCreateMappingGroup_default
1. From Setup, enter Custom Metadata in the Quick Find box, then select Custom Metadata Types.
2. Click Health Cloud Setting, then click Manage Health Cloud Settings.
38
Customize Health CloudSalesforce Health Cloud Implementation Guide

3. Click name of the setting you want to change and click Edit.
4. Clear the Active checkbox and then click Save.
5. Navigate back to the Health Cloud Settings page, and click New, and fill out the information for your custom setting.
Make sure to use the same Setting Name as the default setting that you are overriding. For example,
Careplan_Role_Patient, if you are creating your own label for patients.
6. Select the Active checkbox to make the setting available.
Configure Custom Record Types for Individuals or Groups
EDITIONS
Health Cloud is available in
Salesforce Classic and
Lightning Experience
Available in: Enterprise,
Performance, and
Unlimited Editions
Health Cloud gives you the flexibility to configure custom individual and household (group) record
types. For example, custom record types let you add doctors as a type of individual or hospitals as
a group record type. You can easily configure a custom record type based on the default individual
or group record type provided by Health Cloud.
To configure a custom individual record type, create a custom account record type using the Account
(Patient) Layout and then create a custom contact record type using the Contact (Patient) Layout.
To configure a custom household or group record type, you must first create a custom account
record type using the Account (Household) Layout.
1. From Setup, enter custom in the Quick Find box, then select Custom Metadata Types.
2. To configure an individual record type, click Individual Record Type Mapper. To configure
a household or group record type, click Group Record Type Mapper.
3. Depending on your record type, click either Manage Individual Record Type Mappers or Manage Group Record Type Mappers.
4. Click New.
5. Complete the following information for the record type mapper.
a. Enter the Label for your custom record type mapper.
The Individual Record Type Mapper Name is filled automatically based on this label. Keep it the same as the
label.
b. For Account Record Type, enter your custom account record type name.
This name is the same as your custom record type.
c. Enter the account namespace for your custom record type’s org.
d. For Contact Record Type, enter your custom contact record type name.
e. Enter the contact namespace for your custom record type’s org.
f. Enter the Lead Record Type to be used when converting Lead records.
Leave this field blank to use the Master record type. If a master record type isn’t found, all available record types are converted
to an Individual record type.
g. Enter the lead namespace for your custom record type’s org.
6. Save your changes.
39
Customize Health CloudSalesforce Health Cloud Implementation Guide

Customize Problems and Goals
EDITIONS
Health Cloud is available in
Salesforce Classic and
Lightning Experience
Available in: Enterprise,
Performance, and
Unlimited Editions
You can customize problems and goals in Lightning Experience by editing the corresponding page
layouts. In Salesforce Classic, use field sets to change the delivered pages. With fields sets, you can
add custom fields or change the order of existing fields on the pages used to create problems and
goals.
Note: The delivered problem and goal pages use a packaged field set, which lets you choose
the fields and the order of appearance on these pages. The delivered pages aren’t available
for edit through the page layout editor.
Customize the fields that show up on the pages care coordinators use to create problems and goals
for the care plan. Problems and Goals are both custom objects, and you can add custom groupings
of fields by using Salesforce field sets. A field set is a grouping of fields you create and then add to
an object.
After you create the field sets, you add them to the default field set for that object in the Custom Labels page. For example, to add fields
to the Problems page, you modify the defaultFieldSet for Problems.
1. From Setup, enter Object in the Quick Find box, then select Objects, and select either the Problem custom object or the
Goal custom object.
2. From the management settings for the appropriate object, go to Field Sets, and then click New.
3. Enter a Field Set Label.
4. Optionally, enter a name for your field set.
5. In the Where is this used? area, provide a brief description of which pages use the field set, and for what purpose. This information
helps a subscriber understand where and how an installed field set is being used, so that they can populate it with their own fields
6. Save your changes.
7. To add fields to the field set, drag the fields from the object palette and drop them into the Available for the Field
Set or the In the Field Set container. The fields in the In the Field Set container are visible by default.
Note: In the field set, you can span to fields that reference multiple objects. When you span a field into a field set that references
multiple objects, the only field you can span into is the Name object.
You can drag and drop a field from one container to the other. The vertical order of the In the Field Set list indicates the
order of how the fields render on pages.
8. To remove a field from the field set, drag the element back to the object palette, or click the icon next to the element.
9. To make a field required, double-click the element or click the wrench icon ( ) next to it and select the Required checkbox.
Note: Indicates that the field is required and must have a value to save the record.
Customize Tasks
Customize the fields on the New Task page so that the field values reflect the kinds of tasks care coordinators most often assign, and use
rating terminology specific to your organization.
You can add to or change the values for the following picklists on the New Task page:
•Status
•Priority
•Task Type
40
Customize Health CloudSalesforce Health Cloud Implementation Guide
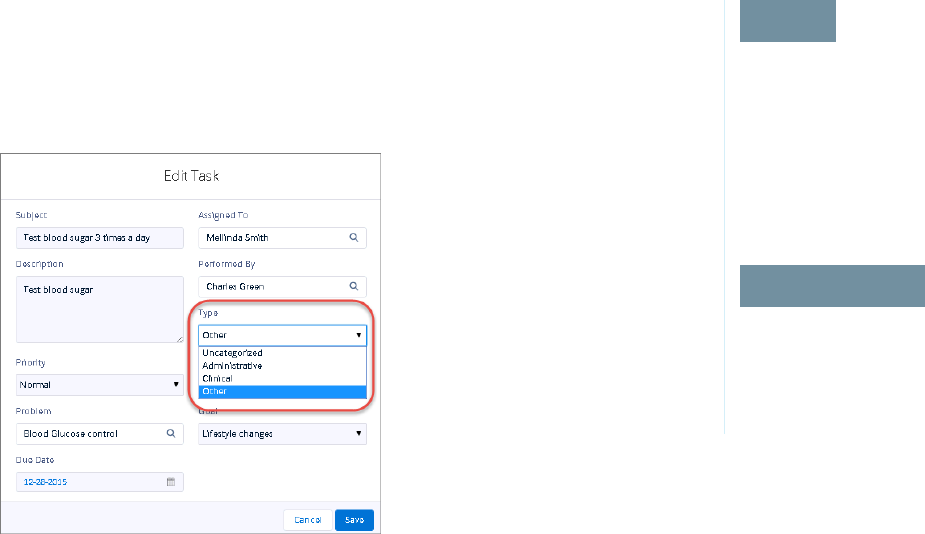
Add Custom Task Types
Custom task types help your care coordinators create tasks that are specific to the type of patient care that they deliver. For example,
for an outpatient orthopedic surgery center, task types could include Pre-Op Lab Work or Weekly PT.
Add or Edit Task Priority Values
You can change the values that appear in the Priority field that shows the importance of a task.
Add or Edit Task Status Values
You can change the values that appear in the Status field that shows the progress or measures the completion of a task.
Customize the Task List View in the Console and Community
Use field sets to customize the task columns that appear in the Health Cloud console list view and for the fields that display in patient
communities.
Add Custom Task Types
EDITIONS
Health Cloud is available in
Salesforce Classic and
Lightning Experience
Available in: Enterprise,
Performance, and
Unlimited Editions
USER PERMISSIONS
To create or change custom
fields:
•Customize Application
Custom task types help your care coordinators create tasks that are specific to the type of patient
care that they deliver. For example, for an outpatient orthopedic surgery center, task types could
include Pre-Op Lab Work or Weekly PT.
Plan carefully when you create task types so that there aren’t a large number of choices in the
picklist.
1. From Setup, enter Activity Custom Fields in the Quick Find box.
2. Click Task Type.
3. In the Picklist Values section, click New.
4. Add one or more picklist values in the text box. Put each value on its own line
5. Select Care Plan Task so that the new values are associated with the Task Type picklist.
6. Click Save.
7. To change the order in which the values display in the picklist, click Reorder.
8. To specify a default value for the picklist, select the Default checkbox for that task type.
41
Customize Health CloudSalesforce Health Cloud Implementation Guide
Add or Edit Task Priority Values
You can change the values that appear in the Priority field that shows the importance of a task.
1. From Setup, enter Task in the Quick Find box and select Task Fields.
2. In the Task Standard Fields list, click Priority.
3. To add a value to the list, click New.
4. Add one or more picklist values in the text box. Put each value on its own line
5. Select Care Plan Task so that the new values are associated with the care plan.
6. Click Save.
7. To change the order in which the values display in the picklist, click Reorder.
8. To specify a default value for the picklist, select the Default checkbox for that priority.
9. Select the value that represents the highest priority for the task.
Add or Edit Task Status Values
You can change the values that appear in the Status field that shows the progress or measures the completion of a task.
1. From Setup, enter Task in the Quick Find box and select Task Fields.
2. In the Task Standard Fields list, click Status.
3. To add a value to the list, click New.
4. Add one or more picklist values in the text box. Put each value on its own line
5. Select Care Plan Task so that the new values are associated with the care plan.
6. Click Save.
7. To change the order in which the values display in the picklist, click Reorder.
8. To specify a default value for the picklist, select the Default checkbox for that status.
9. To select a value that closes the task, select the Closed checkbox for that status.
Customize the Task List View in the Console and Community
Use field sets to customize the task columns that appear in the Health Cloud console list view and for the fields that display in patient
communities.
A field set is a grouping of fields you create and then add to an object. Health Cloud delivers two field sets that control what information
appears in the task lists. The HcCarePlanTaskFields field set controls which fields appear on tasks listed in the patient community. The
HC Task List field set controls the columns in the list view in the Care Plan tab of the console. Since these field sets are part of the Health
Cloud managed package, you have limited editing options. You can change the order of fields in the field set or remove fields. To add
fields, you must create a different field set and use it in place of the delivered field set.
1. From Setup, enter Task in the Quick Find box, then select Task Field Sets.
2. Select New.
3. Enter a Field Set Label. This label is the name presented to subscribers who install the field through a managed package.
4. Enter a name for your field set.
5. In the Where is this used? area, provide a brief description of which pages use the field set, and for what purpose. This information
helps a subscriber understand where and how an installed field set is being used, so that they can populate it with their own fields
42
Customize Health CloudSalesforce Health Cloud Implementation Guide

6. Click Save.
7. To add fields to the field set, drag the fields from the object palette and drop them into the Available for the Field
Set or the In the Field Set container. The fields in the In the Field Set container are visible by default.
Note: In the field set, you can span to fields that reference multiple objects. When you span a field into a field set that references
multiple objects, you can only span to the Name object.
You can drag and drop a field from one container to the other. The vertical order of the In the Field Set list indicates the
order of how the fields render on pages.
8. To remove a field from the field set, drag the element back to the object palette, or click the icon next to the element.
9. To make a field required, double-click the element or click the wrench icon ( ) next to it and select the Required checkbox.
Note: Indicates that the field is required and must have a value to save the record.
10. Save your work.
SEE ALSO:
Manage Health Cloud Settings
Customize the Create External Member Fields
You can customize the fields that appear on the modal that care coordinators use to create an external care team member.
Use field sets to add new fields or change the order of existing fields used to create external care team members.
1. From Setup, enter Accounts in the Quick Find box, then select Field Sets.
2. Select Edit next to the New External Member field set.
3. Drag and drop the fields you want to display on the New External member modal.
Note: You can only add fields from Account and the related primary contact. Fields from other related objects will be ignored.
4. Click Save.
Customize the Candidate Patient List View
You can customize the fields that appear on the list view that care coordinators use to convert candidate patients to patients in Health
Cloud.
Use field sets to add new fields or change the order of existing fields used in the candidate patient list view.
1. From Setup, enter Objects in the Quick Find box, then select Objects.
2. On the Custom Object page, select the Candidate Patient custom object.
3. Scroll to the Field Sets section and click Edit next to the Candidate Patient List View.
4. Drag and drop the fields you want to display on the Candidate Patients list view.
Note: The following fields must be included in the field set and should not be deleted:
•Record ID (Id)
•Name (Name__c)
•Patient Account (AccountId__c)
43
Customize Health CloudSalesforce Health Cloud Implementation Guide
•Patient Account Name (AccountId__r.Name)
•Patient Account Primary Contact (AccountId__r.PrimaryContact__c)
5. Click Save.
Add Cross-Object Relationships to Customize Patient List Filter Options
Cross-object relationships control which objects and fields appear in the filter selection options when creating patient lists.
Health Cloud delivers a basic set of filters that you can use when you define a patient list. To add other custom records to the patient
list filter options, create relationships that link records with each other. When your users view records, they can also see related data.
You can define different types of relationships by creating custom relationship fields between objects. For example, to add fields related
to patient immunizations to the patient list filters, you create a relationship between Account and EhrImmunization__c.
Before creating relationships, determine which fields you want to expose in the filter and which object exposes those fields. Relationships
between objects in Health Cloud determine sharing, required fields in page layouts, and which fields are available when you create a
patient list.
Note: The Account object must be one of the two objects in your cross-object relationship.
To see a list of Health Cloud objects and fields, see the Health Cloud Object Reference Guide.
1. To create the relationship that adds a custom object to the patient list filter criteria, select the Cross Object Relationships tab.
2. Specify the details of the relationship:
DescriptionField
Name that describes the relationship.Cross Object Relationship Name
Name of the parent object. This field is a required field, and in
Health Cloud the object must be Accounts.
From Object
Name of the child object to include as an option in patient list
filter criteria.
To Object
Optionally, the name of the custom relationship.Relationship
Optionally, the name of the object that is the originating or “from”
object.
Reverse Relationship
The following table shows some of the cross object relationships that are pre-configured with Health Cloud. You can use this table as a
reference to create other cross-object relationships and make more records and fields available when creating patient lists.
To ObjectFrom ObjectCross Object Relationship Name
EhrCondition__cAccountAccountToCondition
ContactAccountAccountToContact
EhrMedicationPrescription__cAccountAccountToEhrMedicationPrescriptions
EhrEncounter__cAccountAcountToEncounter
EhrObservation__cAccountAccountToObservation
44
Customize Health CloudSalesforce Health Cloud Implementation Guide
Dashboards Give Your Users Access to the Big Picture
Set up your reporting environment, use the report builder to create a basic report, and organize your reports to make it easy to find
information. You can also find great dashboard apps on the Salesforce AppExchange and add them to the console.
People love the summarized views they get with dashboards, and you can help care coordinators optimize their workload with dashboards.
A dashboard shows data from source reports as visual components, which can be charts, gauges, tables, metrics, or Visualforce pages.
The components provide a snapshot of key metrics and performance indicators for your organization. Each dashboard can have up to
20 components.
You can start with a standard report and customize it to your needs. Users can report on any data they have read or read/write access
to.
For a fun and engaging learning experience, check out the Reports & Dashboards module in the Trailhead Admin Beginner trail.
To save you time, there are many apps available on the AppExchange that you can download and customize. The following sample
dashboard was created using the Salesforce Labs Service & Support Dashboards. Search the AppExchange to find the best app for your
needs.
Once you create your dashboard, remember to add it to the console so that care coordinators can use the tab switcher to access the
dashboard. From Setup, enter Apps in the Quick Find box, then select Apps. Select the Health Cloud app you want to customize
and then add it as a navigation tab item.
Let Care Coordinators Create Concurrent Care Plans for a Patient
When multiple care plans are enabled in your org, care coordinators can create one or more care plans per patient allowing more focused,
manageable care components.
45
Customize Health CloudSalesforce Health Cloud Implementation Guide
When enabled, all care plans for a patient appear in a condensed view within the console, allowing easy access to the underlying
problems, goals, and tasks. The patient card menu (1) provides easy access to manage any open care plan associated with the patient.
In the All Care Plans view, care coordinators can see and manage every detail of an individual care plan (2). It’s easy to expand an individual
care plan and see its details or open a care plan and work on it in its own tab (3).
Initially, only the patient’s primary care plan appears in the All Care Plans view. (You can determine the primary care plan by viewing the
value in the Care Plan field on the patient’s Account record.) As care plans are added for the patient, they appear in the order in which
they were created with the newest care plan appearing first. You can create custom care plan record types to give care coordinators
flexibility in tracking and managing their patients by using different types of care plans.
A primary care plan is created for every patient during the conversion process and added to the patient account. The Care Plan field on
Account is automatically populated at the time of initial conversion, but you can add a different care plan in the future. You can set up
a different process for updating that field, and create workflows for managing multiple open and closed care plans.
Enable the Ability to Create Concurrent Care Plans
Give care coordinators the ability to create one or more care plans per patient and organize a patient’s care into focused, manageable
components. Before care coordinators can create multiple care plans, you must enable the option in your org.
Create Multiple Care Plan Record Types
Create custom care plan record types to give care coordinators flexibility in tracking and managing their patients by using different
types of care plans.
Enable the Ability to Create Concurrent Care Plans
Give care coordinators the ability to create one or more care plans per patient and organize a patient’s care into focused, manageable
components. Before care coordinators can create multiple care plans, you must enable the option in your org.
Note: This option is enabled by default in new orgs. You can disable the setting to allow only a single care plan per patient.
1. From Setup, enter Custom Settings in the Quick Find box, then select Custom Settings.
2. In the list of custom settings, click Manage next to the Health Cloud Feature Toggles custom settings.
46
Customize Health CloudSalesforce Health Cloud Implementation Guide
3. Click Edit next to Multiple Care Plans.
4. Select the Enabled checkbox.
5. Click Save.
Create Multiple Care Plan Record Types
Create custom care plan record types to give care coordinators flexibility in tracking and managing their patients by using different types
of care plans.
Health Cloud comes with a default care plan that’s ready to use. But care coordinators can manage patients that have vastly different
needs and concerns. Using custom metadata, you can create many types of care plans that care coordinators can apply to their patients
and provide customized care.
Note: Make sure to use record types that are associated with a care plan record when creating custom care plans. Record types
based on standard case records aren't supported for care plans.
To use multiple care plan record types, existing orgs with cloned permission sets must add Read and Edit permissions to the
Care_Plan_Record_Type_Name and Care_Plan_Record_Type_Namespace fields on the Lead object. Users without
permissions on these fields can access the default care plan record type only.
1. From Setup, enter custom in the Quick Find box, then select Custom Metadata Types.
2. Click Manage Records next to Care Plan Record Type.
3. Click New.
4. Complete the following fields.
DescriptionField
The name of care plan record type.Label
The unique name used by the API and managed packages.Care Plan Record Type
Name
(Optional). If your org has a namespace, enter it here.Record Type Namespace
The name of the type of case associated with the care plan record type.Case Record Type Name
Select this field so that the care plan record type is available in Health Cloud.Active
Select to make this record a default record type. You can have more than one active default
care plan record type. When there are multiple care plan record types, their first letters are
Default
compared. If they differ, then the label whose first letter comes earlier in the alphabet appears
as the default in the picklist.
Note: If a default hasn’t been specified or the user can’t access the record type, then
the patient is converted using the delivered default record type.
You can use the Lead to Patient API to convert leads to patients. Specify a care plan record type name and namespace in the Lead
custom fields that matches an active record type name and namespace. If there the fields don’t match or the current user doesn’t
have access to that record type, the default record type is used. If a default hasn’t been specified or the user can’t access the record
type, then the lead is converted using the delivered default record type.
47
Customize Health CloudSalesforce Health Cloud Implementation Guide

Use Assessments to Gather Patient Information
Improve the quality of patient care by gathering information that helps to manage your patients more efficiently. Whether it’s a pre-surgery
assessment or a patient feedback survey, you have the information you need within the patient’s care plan.
Note: We provide Surveys to selected customers through a pilot program that requires agreement to specific terms and conditions.
The Surveys feature is subject to change and isn’t generally available unless or until Salesforce announces its general availability
in documentation or in press releases or public statements. We can’t guarantee general availability within any particular time frame
or at all. Make your purchase decisions only on the basis of generally available products and features.
With Surveys, you can create beautiful, easy-to-use forms for collecting feedback and data from your users or customers. You can
customize survey questions and answers in a simple editor. You can add various types of questions to gather the exact data you need.
View the surveys that are available to send to patients on the Assessments tab of the Health Cloud console. You can also find completed
surveys for patients and drill into to see their answers.
From within each patient’s care plan, see the list of surveys that are available to send to that patient. With a simple click, the email
invitation is on its way to the patient. When the patient clicks the survey link within the email, they can log in to the community and
complete the survey.
To see the survey responses, open the survey from Sent to Patient tab. The Sent to Patient tab lists all the surveys that have been sent
to that patient. Easily view the date the survey was sent, whether it’s been completed, its status, and the version of the survey you’re
viewing.
Enable Surveys
Enable Surveys so your care coordinators can create surveys and send them to patients and other members of the care team.
Add Survey Objects to Health Cloud Permission Sets
Make sure to add access to the survey-related objects for every permission set that interacts with Health Cloud assessments.
Configure Email Invitations for Surveys and Assessments (Optional)
Create a Survey Email Branding configuration to customize the email that patients receive when care coordinators invite them to
take a survey or assessment.
Update Sharing Settings for Surveys
Enable Surveys so your care coordinators can create surveys and send them to patients and other members of the care team.
Enable Surveys
Enable Surveys so your care coordinators can create surveys and send them to patients and other members of the care team.
1. From Setup, enter Surveys in the Quick Find box.
2. Click Survey, then Survey Settings.
48
Customize Health CloudSalesforce Health Cloud Implementation Guide

3. Enable Surveys.
Add Survey Objects to Health Cloud Permission Sets
EDITIONS
Health Cloud is available in
Salesforce Classic and
Lightning Experience
Available in: Enterprise,
Performance, and
Unlimited Editions
Make sure to add access to the survey-related objects for every permission set that interacts with
Health Cloud assessments.
To find the list of delivered permission sets, enter Permission Sets in the Quick Find
box, then select Permission Sets.
In Object Settings, ensure that the following permissions apply to any permission set that requires
access to the Assessments tab.
PermissionObject
ReadSurveys
Read, Create, Edit, DeleteSurvey Invitations
No AccessSurvey Responses
Configure Email Invitations for Surveys and Assessments (Optional)
Create a Survey Email Branding configuration to customize the email that patients receive when care coordinators invite them to take
a survey or assessment.
1. From Setup, enter Survey Email Branding in the Quick Find box.
2. Click Survey Email Branding, then New.
3. Define the branding settings.
DescriptionSetting
A unique name for the Survey Email Branding object.Name
Label for the branding setting.Label
The subject line of the email.Email Subject
The body text of the email.Email Body
The email address that appears in the From field of the email.Email From Address
The image that appears in the email’s header.Header Image for Email
Note: To add a header or footer image, either select an existing asset file or add an
asset to Salesforce.
The image that appears in the email’s footer.Footer Image for Email
Note: To add a header or footer image, either select an existing asset file or add an
asset to Salesforce.
4. Save your work.
49
Customize Health CloudSalesforce Health Cloud Implementation Guide
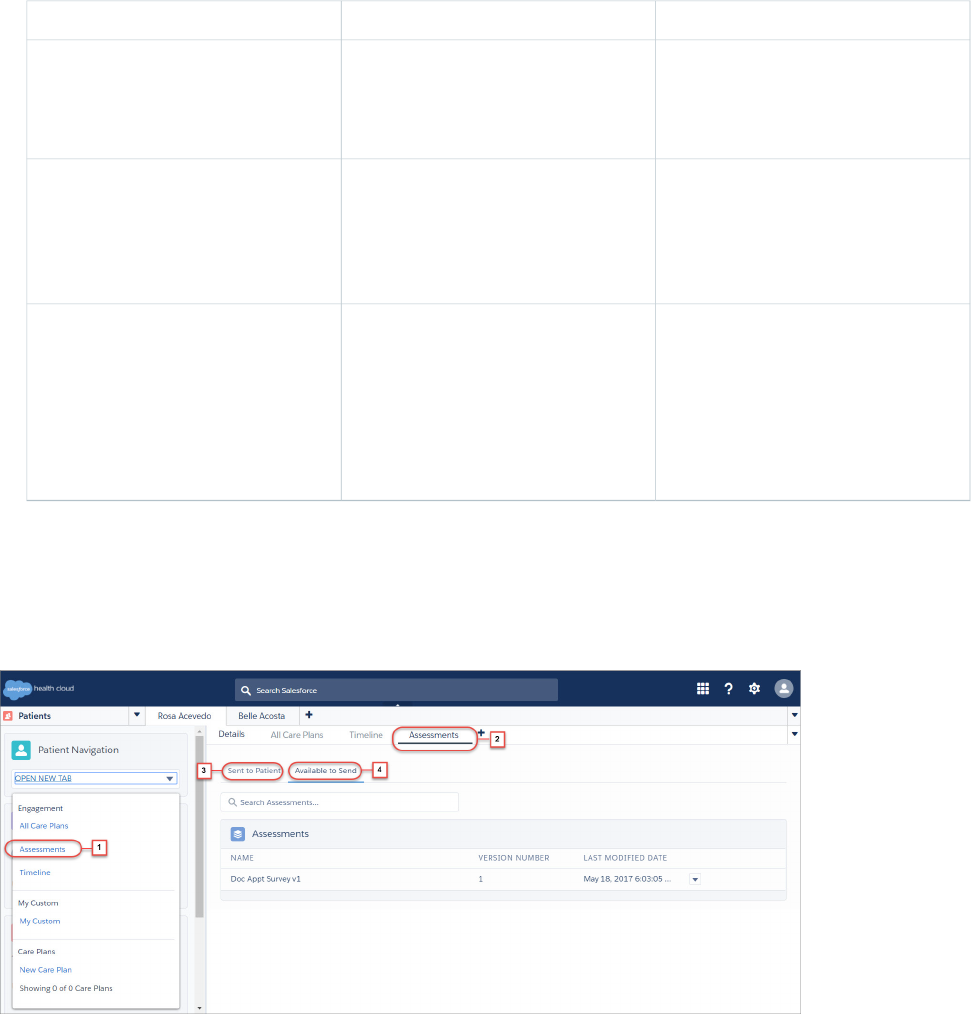
Update Sharing Settings for Surveys
Enable Surveys so your care coordinators can create surveys and send them to patients and other members of the care team.
1. From Setup, enter Sharing Settings in the Quick Find box.
2. Click Sharing Settings, then Edit.
3. Update the following sharing settings.
Why?Default Internal AccessObject
This lets any participant view your survey.
That way, anyone who has a link to the
Public Read OnlySurvey
survey can access it without having to ask
for permission from a Salesforce admin.
This lets any participant view a survey
invitation. That way, anyone who receives
Public Read OnlySurvey Invitation
a survey invitation can access it without
having to ask for permission from a
Salesforce admin.
This makes all survey responses private;
only the participant and the person who
PrivateSurvey Response
created the survey invitation can see
participants’ responses. That way, only the
person in charge of sending the survey and
reviewing responses has access to sensitive
data from participants.
The Assessments Tab
The Assessments tab lets you send surveys to your patients, check on a survey’s status, and view completed surveys.
You can find patient assessments by selecting Assessments from the patient card menu (1) or by selecting the Assessments tab for a
patient (2).
50
Customize Health CloudSalesforce Health Cloud Implementation Guide

The Assessments tab shows the surveys that you’ve sent to a patient (3) in addition to surveys that are available to send to the patient
(4).
The Available to Send tab shows the list of surveys that you can send to a patient. With a click, the email invitation is on its way to the
patient. Click Send to Patient in <Community Name> to have the assessment sent to the patient as an email message in one of the
communities to which the patient belongs. When the patient clicks the assessment link within the email, they can log in to the community
and complete the assessment.
The Sent to Patient tab lists all the assessments that have been sent to that patient. Easily view the date the survey was sent, whether
it’s been completed, its status, and the version of the survey you’re viewing. To see the patient’s responses, open the assessment from
Sent to Patient tab.
51
Customize Health CloudSalesforce Health Cloud Implementation Guide

The Survey Response page shows a list of questions and their responses. You can drill into the question to see the question name, and
details like which version of the survey the questions is associated with.
The Related subtab of the Survey Response tab shows the questions associated with the assessment and the selected answers or choices
the patient made.
The Details tab shows other important details such as the submitter’s name, the survey invitation link, and the status, completion date,
and version of the survey.
52
Customize Health CloudSalesforce Health Cloud Implementation Guide
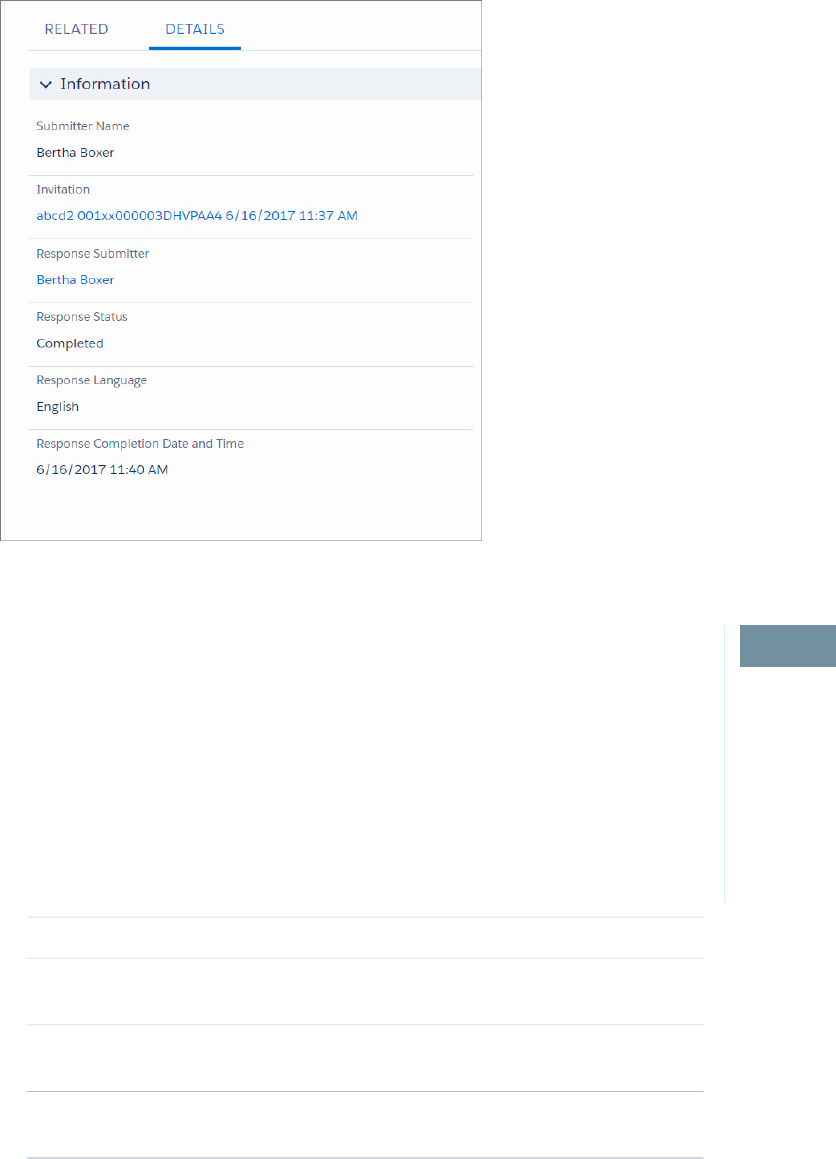
Create a Care Plan Template
EDITIONS
Health Cloud is available in
Salesforce Classic and
Lightning Experience
Available in: Enterprise,
Performance, and
Unlimited Editions
You can create a care plan template within Salesforce by adding problems, goals, and tasks to a
care plan template.
To create a care plan template along with its associated problems, goals, and tasks, use the Care
Plan Templates tab. Make sure to add the profiles of any users who create templates and add the
tab to the Health Cloud custom apps. You can include any additional fields you need to the Care
Plan Template object’s page layout.
1. From the Health Cloud - Admin Home page, select the Care Plan Templates tab, and click New.
2. Enter the following:
DescriptionField
Name of the care plan template.Care Plan Template Name
Provide a brief description of the template
and its intended use.
Description
Select to activate this care plan template and
make it available to apply to a patient.
Active
Name of the original template that this
template was cloned or copied from.
Cloned From
3. Click Save. The Care Plan Template Problems tab opens.
4. In the Care Plan Template Problems tab, click New Care Plan Template Problem.
53
Customize Health CloudSalesforce Health Cloud Implementation Guide

5. Enter the following:
DescriptionField
Name of the problem for the care plan template.Care Plan Problem Name
Name of the care plan template this problem is related to.Care Plan Template
Provide a brief description of the problem that is being addressed.Description
Select to activate this care plan problem and make it available
to apply to a patient.
Active
Indicates the vertical order in which this problem appears on the
care plan template.
Sort Order
The priority of the care plan problem such as low, normal, or
high.
Priority
6. Click Save to open the Care Plan Template Goal tab and create a goal. Click Save & New to create more problems.
7. In the Care Plan Template Goals tab, click New Care Plan Template Goal.
8. Enter the following:
DescriptionField
Name of the goal associated with the care plan template.Care Plan Template Goal Name
Provide a brief description of the template and its intended use.Description
Select to activate this care plan goal and make it available to
apply to a patient.
Active
Indicates the vertical order in which this goal appears within the
list of goals.
Sort Order
The priority of the care plan goal such as low, normal, or high.Priority
Name of the template problem that this goal is related to.Template Problem
9. Click Save to open the Care Plan Template Task tab and create a task. Click Save & New to create more goals.
10. In the Care Plan Template Tasks tab, click New Care Plan Template Task.
11. Enter the following:
DescriptionField
Name of the task associated with care plan template.Care Plan Template Task Name
The subject or name of the task.Subject
Select to activate this care plan task and make it available to apply
to a patient.
Active
54
Customize Health CloudSalesforce Health Cloud Implementation Guide
DescriptionField
Name of the person who’s assigned to the task.Assigned To
Name of the template goal that this task is related to.Care Plan Template Goal
The priority of the care plan task such as low, normal, or high.Priority
A description of the task.Description
Indicates the order in which tasks are sorted in the list of tasks.Sort Order
The status of the care plan task such as in progress, complete, or
new.
Status
The number of days to add as an offset date. Tasks that have an
offset date add the assigned number of days to the task start
Offset
date. For example, if the care plan start date is December 9 and
a task offset is +7 days, the task’s due date is December 16.
Use Data Loader to Import Care Plan Templates
EDITIONS
Available in: Enterprise,
Performance, Unlimited,
and Developer Editions
USER PERMISSIONS
To access the page to
download Data Loader:
•Modify All Data
To use Data Loader:
•API Enabled
AND
The appropriate user
permission for the
operation you are doing,
for example, Create on
accounts to insert new
accounts
Use Data Loader to make import existing care plan templates into Salesforce and make them
available to care coordinators.
Data Loader is a client application for the bulk import or export of data. Use it to insert, update,
delete, or export Salesforce records.
When importing data, Data Loader reads, extracts, and loads data from comma-separated values
(CSV) files or from a database connection. When exporting data, it outputs CSV files.
To import existing care plan templates, create a CSV file for each of the target objects in a care plan
template: care plan template, care plan problems, care plan goals, and care plan tasks. Each of the
child CSV files must include the record type ID of the parent object. Make sure to include all required
fields in the CSV file for each object. For a list of the fields you must include, see Create a Care Plan
Template.
Import the CSV files in the following sequence.
1. Care plan template
2. Care plan problems
3. Care plan goals
4. Care plan tasks
Check Considerations for Installing Data Loader for system requirements and other prerequisites
to using Data Loader.
1. From Setup, enter Data Loader in the Quick Find box, then select Data Loader.
2. Download and configure Data Loader for the correct version of your operating system.
For more information, see Configure Data Loader.
3. Open the Data Loader and click Insert.
55
Customize Health CloudSalesforce Health Cloud Implementation Guide
4. Enter your Salesforce username and password. Click Log in. After your login completes successfully, click Next. (Until you log out
or close the program, you are not asked to log in again.)
5. Select name of the object to receive the imported data. If the object name does not display in the default list, check Show all
objects to see a complete list of the objects that you can access.
6. Click Browse... and select the CSV file that contains the template information that you’re importing.
7. Click Next.
After the object and CSV file are initialized, click OK.
8. Define how the columns in your CSV file map to Salesforce fields. Click Choose an Existing Map to select an existing field mapping,
or click Create or Edit a Map to create a map or modify an existing map. For more details and an example of usage, see Define Data
Loader Field Mappings.
9. Click Next.
10. For every operation, the Data Loader generates two unique CSV log files; one file name starts with “success,” while the other starts
with “error.” Click Browse... and specify a directory for these files.
11. To perform the operation, click Finish, and then click Yes to confirm.
12. As the operation proceeds, a progress information window reports the status of the data movement.
13. After the operation completes, a confirmation window summarizes your results. To view the success file, click View Successes, and
click View Errors to open your errors file, or click OK to close.
Customize the Health Cloud Apps
EDITIONS
Health Cloud is available in
Salesforce Classic and
Lightning Experience
Available in: Enterprise,
Performance, and
Unlimited Editions
USER PERMISSIONS
To view apps:
•View Setup and
Configuration
To manage apps:
•Customize Application
You can change some of the properties of the Health Cloud Apps in your organization. For example,
you can add the Knowledge widget so that care coordinators can see articles and protocols from
the console footer. You can also do things like add your company’s logo, change the color of page
elements, and enable keyboard shortcuts in the Health Cloud console.
Note: Make sure to assign the Health Cloud - Admin app to the user profile of the Health
Cloud admin.
1. From Setup, enter Apps in the Quick Find box, then select Apps.
2. Click Edit next to the app you want to modify.
Select Health Cloud - Admin, Health Cloud - Worklist, or Health
Cloud - Console.
Note: The only modification that the Health Cloud - Admin app requires is to select the
tabs you want to display as an admin.
The Today page is to be used in the Health Cloud - Console app only. Adding it to the
Health Cloud - Worklist app causes the Today page to display incorrectly.
3. Specify a label for the app. The label can have a maximum of 40 characters, including spaces.
This label is the app’s name in the app menu.
4. Optionally, specify a custom logo for the app. Click Insert an image and choose an image file from the document library.
Consider these requirements when choosing a custom app logo for a Classic app from the document library:
•The image must be in GIF or JPEG format and less than 20 KB.
•If the image is larger than 300 pixels wide by 55 pixels high, then it is scaled to fit.
56
Customize the Health Cloud AppsSalesforce Health Cloud Implementation Guide
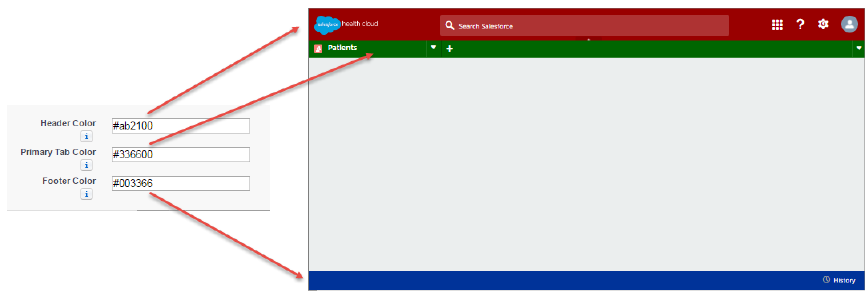
•For the best on-screen display, we recommend that you use an image with a transparent background.
•The Externally Available checkbox must be selected on the document’s properties so that users can view the image.
5. Optionally, to change the color of the app’s page elements, enter the hex code beginning with #.
6. Ensure that Patients, Candidate Patients, and Today are selected as navigation tabs and that they’re configured to
display as primary tabs in the Choose How Records Display selection.
If you create your own custom apps, like a Dashboards tab, select it to display in the Health Cloud app and configure how it displays
in the console. Also, if you’re using the Einstein Analytics for Health Cloud: Risk Scoring App, add the related tabs to the Health Cloud
app. That way, each user profile can see the tabs by default.
7. Optionally, select how the list is placed in the console.
8. In Choose Console Components, add Knowledge One to Selected Items.
When the Knowledge One widget is enabled, care coordinators can access articles and protocols from the console footer.
9. In Align Custom Console Component, choose whether the component appears in the footer’s right or left side.
10. To let care coordinators perform actions using key combinations instead of the mouse, click the Customize Keyboard
Shortcuts.
11. Make sure that Save User Sessions, Enable Multi-Monitor Components, Pin Tabs, and Responsive
Lists are all selected.
12. Select the Visible option for every profile that needs access to the app.
13. Select the Default box to set the app as that profile’s default app.
14. Click Save.
Show Detailed Error Messages
Configure the Industries Application Config custom setting to display detailed error messages so you can debug access errors quickly
when setting up user profiles.
1. From Setup, enter Custom Settings in the Quick Find box, then select Custom Settings.
2. Click Industries Application Config.
3. Click Manage and then click Edit.
4. Select Show Detailed Error Messages.
5. Save your changes.
57
Show Detailed Error MessagesSalesforce Health Cloud Implementation Guide

A detailed error message includes information about the access type, fields, and object.
Enable Users to Import Leads as Patients
Your company can use existing Salesforce Lead records to create the Patient records that are used in Health Cloud.
Note: As a best practice, we recommended that customers use the Leads object and its associated patient conversion in place
of the Candidate Patients object. If you’re using Candidate Patients, we recommend changing your processes to use Leads. That
way, you can benefit from ongoing enhancements to Leads that aren’t planned to be extended to Candidate Patients.
You can either install the HealthCloudExtensions unmanaged package to install the conversion process or you can create your own
conversion process. Either way, make sure to add the Convert to Patient button to the Leads list view so that care coordinators
can convert lead records to patient records. We also recommend removing the Convert button from the standard Lead Detail section
of the Lead page layout.
Install the Health Cloud Unmanaged Package Extension (Optional)
The unmanaged extension package delivers the process that lets care coordinators convert Lead records into Patient records.
Map Your Custom Lead Fields
Get the most out of records created from leads when you map your custom lead fields to the fields of the patient record.
Manage the Conversion of Lead Record Types
When you convert lead records, use the Individual Record Type Mapper to specify which record types are converted to patients and
which are converted to other record types.
Customize the Leads List View for Patient Conversion
Add the Convert to Patient button to the Leads list view so that care coordinators can convert lead records to patients in
Health Cloud.
Use Process Builder to Convert Leads to Patients
Enable care coordinators to convert leads to patient records within Health Cloud by setting up a simple conversion process in Process
Builder.
SEE ALSO:
Install the Health Cloud Unmanaged Package Extension (Optional)
Install the Health Cloud Unmanaged Package Extension (Optional)
The unmanaged extension package delivers the process that lets care coordinators convert Lead records into Patient records.
After you’ve installed the managed package, install the unmanaged package to enable the process that care coordinators use to convert
Lead records to Patient records. If you don’t want to install the package, you can always create a conversion process in Process Builder.
1. Paste the following URL for the package into your browser navigation bar: http://industries.force.com/healthcloudextension.
2. Press Enter.
3. Enter your Salesforce password.
4. Select Install.
If it takes a while, you can select Done and move on to do something else while installation finishes. Check your email for confirmation
that installation was successful.
5. Verify installation of the unmanaged package.
58
Enable Users to Import Leads as PatientsSalesforce Health Cloud Implementation Guide

a. From Setup, enter Installed Packages in the Quick Find box, then select Installed Packages.
b. Look for HealthCloudExtensions.
Map Your Custom Lead Fields
Get the most out of records created from leads when you map your custom lead fields to the fields of the patient record.
Important: Health Cloud automatically handles the default mappings for delivered custom fields on Lead records. Those field
mappings support duplicate record checking during conversion. Altering the settings for the following delivered fields can cause
unexpected results during the conversion process.
•Birth Date
•Care Coordinator Contact
•Care Coordinator User
•Created from Lead
•Current Generator(s)
•IsMarkedForPatientConversion
•MedicalRecordNumber
•Number of Locations
•Primary
•Product Interest
•SIC Code
•Source System
•Source System ID
If you have your own custom fields on leads, you can map them to fields in the other records and make them available in Health Cloud.
1. From the object management settings for leads, go to the fields section, then click Map Lead Fields.
2. For each custom lead field, choose the field into which you want the information inserted when you convert a lead.
3. Save your work.
Manage the Conversion of Lead Record Types
When you convert lead records, use the Individual Record Type Mapper to specify which record types are converted to patients and
which are converted to other record types.
During lead conversion, Health Cloud automatically maps all lead record types to the Individual account record type and the Individual
contact record type. But if your company has lead record types that are used for other purposes, you can ensure that those leads convert
to your specified record types.
For example, a company uses two Lead record types: Patient, and Unaffiliated Provider. They want to convert Patient Lead record types
to Individual (Patients) account type records, and Unaffiliated Provider record types to another record type. Using the Individual Record
Type Mapper, they create two mapping records. The Patient mapping record specifies IndustriesIndividual as the Account
and Contact record types and the Lead1 mapping specifies IndustriesUnaffiliatedProvider for Account and Contact
record types.
The default Individual Record Type Mapper record only allows editing of the Lead Record Type and Record Type
Namespace (Lead) fields. To create a mapping record for additional record type, clone an existing record and make your changes.
59
Enable Users to Import Leads as PatientsSalesforce Health Cloud Implementation Guide

Note: If you don’t see the Lead Record Type and Record Type Namespace (Lead) fields on the page, add
them to the Individual Record Type Mapper page layout.
1. From Setup, enter custom in the Quick Find box, then select Custom Metadata Types.
2. Click Manage Records next to Individual Record Type Mapper.
3. Click Edit next to Individual.
4. Complete the Lead Record Type and Record Type Namespace (Lead) fields with the record type you’re mapping
to.
Note: Leave this field blank to use any record type. All available record types are converted to an Individual record type unless
there is another mapping specified.
SEE ALSO:
Configure Custom Record Types for Individuals or Groups
Customize the Leads List View for Patient Conversion
Add the Convert to Patient button to the Leads list view so that care coordinators can convert lead records to patients in
Health Cloud.
1. From Setup, enter Leads in the Quick Find box, then select Search Layouts.
2. Select Edit next to Leads List View.
3. Accept the default settings in the Standard Buttons section.
4. In the Custom Buttons section, select and click the right arrow to add the Convert to Patient button.
5. Click Save.
Use Process Builder to Convert Leads to Patients
USER PERMISSIONS
To create, edit, or view
processes:
•Manage Flow
AND
View All Data
Enable care coordinators to convert leads to patient records within Health Cloud by setting up a
simple conversion process in Process Builder.
1. From Setup, enter Process Builder in the Quick Find box, select Process Builder,
and then click New.
You can also modify an existing active process by cloning a new inactive copy of it. The copy
can be a new process or a new version of the current process.
2. Fill out these fields that define your process.
DescriptionField
The name for your process, such as Lead to Patient.
This name appears in the process management page, so consider naming
your process so that you can differentiate it from other processes.
Process
Name
The name that’s used by the API and managed packages.
This name must be unique across all processes and flows. (In flows, this field
is Unique Name.) The name must begin with a letter and use only
API Name
60
Enable Users to Import Leads as PatientsSalesforce Health Cloud Implementation Guide

DescriptionField
alphanumeric characters and underscores. It can’t include spaces, end with an underscore, or have two
consecutive underscores.
After it’s saved, API Name can’t be changed for the process.
Optional. A description for your process.
The description also appears in the process management page. It’s intended to help you differentiate
between processes, such as to understand what a process does.
Description
Select the option to start this process when A record changes.The process
starts when
3. Click Save.
4. In the new process, associate the process with an object, and specify when to start the process.
a. Click Add Object and type Lead, then select the Lead object.
b. In the Start the process field, select when a record is created or edited.
5. Click Save.
6. Next, define the criteria that must be true before the process can execute the associated actions.
a. Click Add Criteria.
b. Type Not Converted in the Criteria Name field.
c. Select Conditions are met as the criteria to for executing the action.
d. Set the following conditions:
ValueTypeOperatorField
FalseBooleanEqualsIsConverted
TrueBooleanEqualsIsMarkedForPatientConversion
e. For Conditions, select All of the conditions are met (AND).
f. Click Save.
61
Enable Users to Import Leads as PatientsSalesforce Health Cloud Implementation Guide
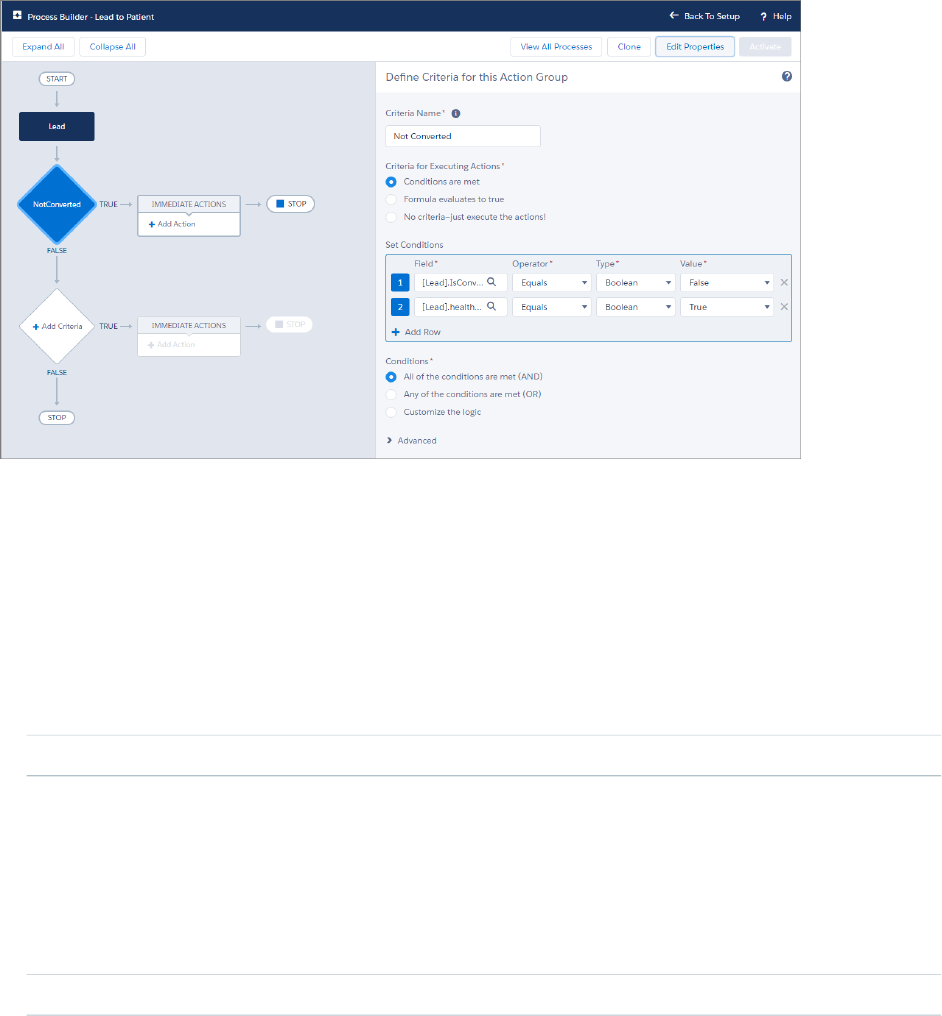
7. Next, define the actions that are executed when the criteria are met.
a. Click Add Action.
b. Select Apex in the Action Type field.
c. In the Action Name field, type Lead to Individual.
d. Select the Lead to Individual Apex class.
e. In the Set Apex Variables field, select the following options.
ValueTypeField
Lead IDReferenceleadIds
f. Repeat the previous steps and create another Apex action type named Create Care Plan and associate it with the Create
Care Plan and Care Team Apex class.
In the Set Apex Variables field, select the following.
ValueTypeField
Lead IDReferenceleadIds
g. Click Save.
62
Enable Users to Import Leads as PatientsSalesforce Health Cloud Implementation Guide
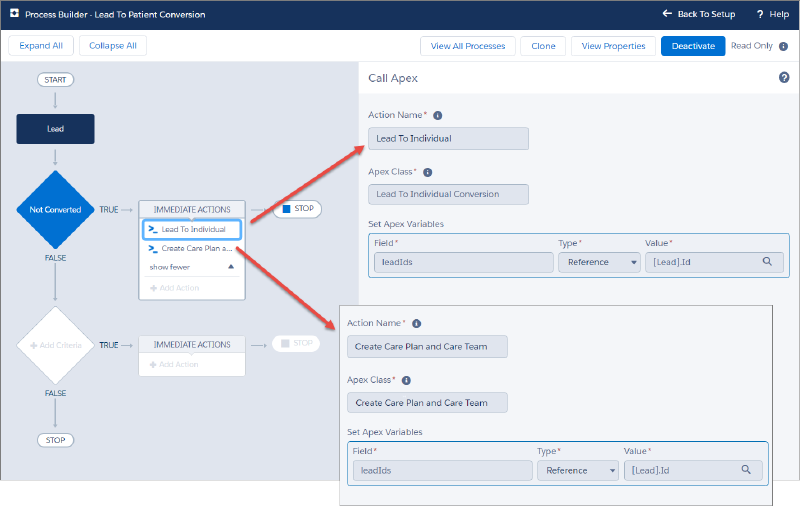
8. Click Activate to begin using the process. Salesforce doesn’t start using a process to evaluate records as they’re created or edited
until you activate it.
Migrate More Data with the Patient Creation Job Flow
When patients are first imported into Health Cloud, the information required to identify and represent those patients is created. Historical
medical information associated with patients is not imported into Health Cloud by default; however, you can choose to map more
historical information, as needed. You can implement a custom integration to import historical medical records from the EHR system
and append it to the default patient creation job flow.
Patient Creation Job Flow in Health Cloud
Each patient is initially represented in Health Cloud as a candidate for services that are managed in Health Cloud. As a result, each patient
starts with a CandidatePatient__c record. When the candidate patient is converted, the patient creation process creates corresponding
objects in Salesforce:
•An account and contact representing a patient
•A case representing a care plan
•A care team (case team) linked to the care plan coordinator user and the patient contact
The data copied to the Salesforce objects is based on mapping of fields between CandidatePatient__c and the appropriate Salesforce
objects.
The candidate patient record (CandidatePatient__c) is a cross-reference between the representation of a patient in the EHR system and
in Health Cloud. The records are linked through the medical record number, which is represented in Salesforce by the Medical
Record Number field. Salesforce uses the MedicalRecordNumber__c and SourceSystem__c fields to check for duplicate
patient records during the patient creation process. You can create a validation rule to verify that all candidate patient records have
values in these fields before converting patient records.
63
Migrate More Data with the Patient Creation Job FlowSalesforce Health Cloud Implementation Guide
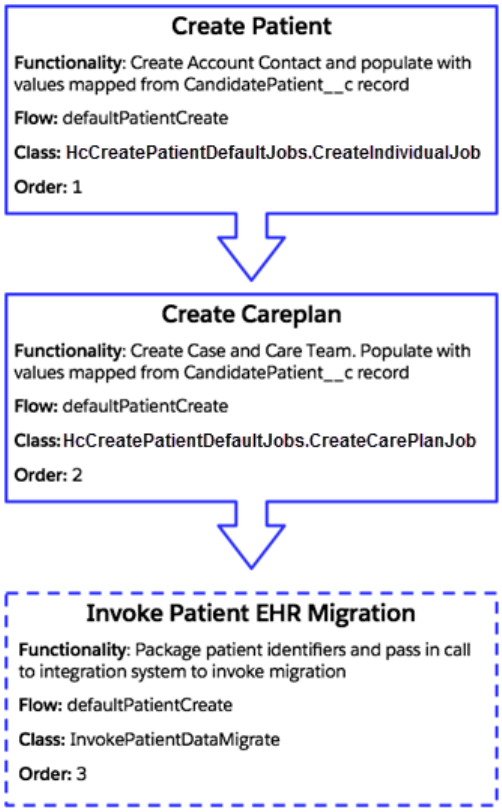
The following diagram shows the patient creation job flow. This flow consists of two jobs that perform the steps that occur when a
candidate patient record is converted. The third job (Invoke Patient EHR Migration) is a custom integration that you can implement to
migrate more data for that patient into Health Cloud.
Extend or Override the Default Patient Creation Job Flow
Because Health Cloud populates objects with minimal information when a patient is converted, you can add a custom integration to
import more medical records. To migrate more data, append your custom integration as the last job in the patient creation job flow.
You can also deactivate either of the delivered jobs and add your own customized job instead. Or, you can override the entire delivered
job flow and instead use a custom job flow that you create.
Your custom integration consists of an Apex class that extends a base class and implements an interface from the Health Cloud package.
The previous job passes your job relevant patient record information through a context parameter. By providing your own implementation
for this custom job, you can choose which patient records you want to migrate to Health Cloud. The following list shows examples of
useful data migrations after a candidate patient has been converted in Health Cloud.
•Import medical records for a patient from the EHR system, such as:
–The full patient record
64
Migrate More Data with the Patient Creation Job FlowSalesforce Health Cloud Implementation Guide

–Encounters
–Conditions
–Observations
–Diagnosis
–Treatments
•Flag EHR patient data to be published to Health Cloud if it is changed or created.
•Establish cross-references of patient records between Health Cloud and the EHR system. This cross-reference linkage enables posting
data back to the EHR system through another integration. For example, when one of the following records is created in Health Cloud,
it can be updated in the EHR system later.
–Encounters: phone calls to the patient, emails, or Chatter messages
–Observations: Performed remotely by patient or caregivers, or performed by devices
Note: EHR systems can update only the records they create. If records were created in an external system and were migrated,
they are viewable, but not editable in the current system.
Create a Custom Apex Class for the Patient Creation Job Flow
Create a custom Apex class that extends a base class and implements an interface from the Health Cloud package. The custom class
overrides the methods in the base class and the interface.
Customize the Patient Conversion Process
Patient creation includes two processes: a job flow that creates the patients and then a mapping group that maps data from the
Candidate Patient object to other patient objects.
Create a Custom Apex Class for the Patient Creation Job Flow
Create a custom Apex class that extends a base class and implements an interface from the Health Cloud package. The custom class
overrides the methods in the base class and the interface.
Your Apex class extends the HealthCloudGA.MoiJobFlowFactory.MoiJobBase base class and implements the
HealthCloudGA.MoiJobFlowFactory.MoiIJob interface from the Health Cloud package. Your class signature looks as
follows:
public with sharing class InvokePatientDataMigrate
extends HealthCloudGA.MoiJobFlowFactory.MoiJobBase
implements HealthCloudGA.MoiJobFlowFactory.MoiIJob { }
Your class overrides the following methods, which are in the base class.
boolean processJob(HealthCloudGA.MoiJobFlowFactory.MoiIJobContext flowCtxts)
Override this method to implement the logic of your data migration job that is part of the patient creation flow. In this method, you
call another method to make a callout to the external EHR system to get more medical records for the patient.
The patient creation job flow runs all the jobs as a single Apex transaction. Partial data changes aren’t saved if an error occurs because
all changes are rolled back in that transaction. Any callouts must be invoked from a future method so that the data from the first
two jobs is saved even if the callout fails. Future methods are executed asynchronously, in the background. For example, this method
signature represents the callout utility method in our sample.
@Future(callout=true)
private static void invokeIntegration(String jsonPatientIds)
65
Migrate More Data with the Patient Creation Job FlowSalesforce Health Cloud Implementation Guide

The type of the parameter passed to the processJob() method is the
HealthCloudGA.MoiJobFlowFactory.MoiIJobContext class, installed from the Health Cloud package. The patient
creation job flow uses this context object to pass information about the created objects to the next job. The jobs for creating a patient
populate this context object with the account and contact. Next, the job for creating the care plan accesses the objects in the context
to link the case (care plan record type) to CaseTeam members. You can use the objects in the context parameter to find out which
objects have been created in Health Cloud and link them to the EHR system. The objects you can access from the flowCtxts
parameter are:
•Account
•Contact
•CandidatePatient__c
•Case (CarePlan record type)
You can obtain these objects by calling getContextData() on the flowCtxts parameter. The getContextData()
method returns a list of maps. Each map corresponds to the context of one patient and contains the objects related to that patient.
The map is keyed by the name of the object. For example, this snippet shows how to get the CandidatePatient__c object from a
returned map object:
for (Map<String, Object> flowCtxt : flowCtxts.getContextData()) {
HealthCloudGA__CandidatePatient__c candidatePatient =
(HealthCloudGA__CandidatePatient__c)flowCtxt.get('CandidatePatient__c'); }
HealthCloudGA.MoiJobFlowFactory.MoiIErrorHandler getErrorHandler()
Override this method to add error handling logic when an exception is thrown from processJob(). This method returns an
instance of a class that performs error handling. The class performing the error handling must implement the
HealthCloudGA.MoiJobFlowFactory.MoiIErrorHandler interface and override its method:
public void handleError(HealthCloudGA.MoiJobFlowFactory.MoiIJobContext context, Exception
e)
We’ve provided a sample Apex class that you can copy and modify to suit your needs. The implementation of the callout in the
invokeIntegration helper method is not provided and is left for you to provide. Details of how to communicate with the service
endpoint and fetch data differs based on what you want to accomplish. For information about how to make callouts from Apex, see
Invoking Callouts Using Apex in the Lightning Platform Apex Code Developer's Guide.
You can create an Apex class by using various tools. This walkthrough uses the Developer Console.
1. From Setup, click Your Name and then click Developer Console to open the Developer Console.
2. Click File > New > Apex Class.
3. Enter InvokePatientDataMigrate for the class name, and then press OK.
4. Delete the auto-generated content and paste the following sample.
public with sharing class InvokePatientDataMigrate extends
HealthCloudGA.MoiJobFlowFactory.MoiJobBase
implements HealthCloudGA.MoiJobFlowFactory.MoiIJob {
private static final String CTXTVAR_ACCOUNT = 'Account';
private static final String CTXTVAR_CONTACT = 'Contact';
private static final String CTXTVAR_CAREPLAN = 'CarePlan';
private static final String CTXTVAR_CANDIDIATEPATIENT = 'CandidatePatient__c';
public with sharing class IntegrationErrorHandler implements
HealthCloudGA.MoiJobFlowFactory.MoiIErrorHandler {
66
Migrate More Data with the Patient Creation Job FlowSalesforce Health Cloud Implementation Guide

public void handleError(HealthCloudGA.MoiJobFlowFactory.MoiIJobContext context,
Exception e) {
// Code can be placed here to address the failure
System.debug('Exception: '+e+' thrown on Job with context '+context);
//No Exception
}
}
public override HealthCloudGA.MoiJobFlowFactory.MoiIErrorHandler getErrorHandler()
{
return (HealthCloudGA.MoiJobFlowFactory.MoiIErrorHandler)
new IntegrationErrorHandler();
}
// Invokes asynchronous migration of patient data for list of patient identifiers
@Future(callout=true)
private static void invokeIntegration(String jsonPatientIds){
String SalesforceOrgId = System.UserInfo.getOrganizationId();
////////////////////////////////////////////////////////////////////
// Make call to integration system passing patient Identifiers
// and organization Id.
// Integration System should respond asynchronously by push Patient
// EHR records to the org.
////////////////////////////////////////////////////////////////////
}
private class PatientId{
public PatientId(String MedicalRecordNumber, Id accountId, Id contactId,
Id carePlanId){
this.SFDCMedicalRecordNumber = MedicalRecordNumber;
this.SFDCAccountId = accountId;
this.SFDCContactId = contactId;
this.carePlanId = carePlanId;
}
// Id of account created in CreateIndividual Job
public Id SFDCAccountId;
// Id of contact created in CreateIndividual Job
public Id SFDCContactId;
// Id of Careplan created in CreateCarePlan job
public Id carePlanId;
// Medical Record Number of patient in external Electronic
// Health Record System
public String SFDCMedicalRecordNumber;
}
// Override processJob method to be called when this job is invoked
// by MoiJobFlowManager.
public override boolean processJob(HealthCloudGA.MoiJobFlowFactory.MoiIJobContext
67
Migrate More Data with the Patient Creation Job FlowSalesforce Health Cloud Implementation Guide

flowCtxts) {
System.debug('Entered InvokeIntegration.processJob');
// Compile List of strings with Patient Ids
// {CandidatePatient__c.MedicalRecordNumber_c, Account.Id and Contact.Id}
// to pass to integration system to invoke asynchronous publish
// of patient EHR records.
List<PatientId> patientIds = new List<PatientId>();
for (Map<String, Object> flowCtxt : flowCtxts.getContextData()) {
HealthCloudGA__CandidatePatient__c candidatePatient =
(HealthCloudGA__CandidatePatient__c)flowCtxt.get(
CTXTVAR_CANDIDIATEPATIENT);
if (candidatePatient == null ||
candidatePatient.HealthCloudGA__MedicalRecordNumber__c == '')
throw new IntegrationException(
'Failure: No CandidatePatient record set. ' + candidatePatient);
patientIds.add(
new PatientId(candidatePatient.HealthCloudGA__MedicalRecordNumber__c,
((Account)flowCtxt.get(CTXTVAR_ACCOUNT)).Id,
((Contact)flowCtxt.get(CTXTVAR_CONTACT)).Id,
((Case)flowCtxt.get(CTXTVAR_CAREPLAN)).Id)
);
}/* for Flow Ctxts (on for each patient in creation flow */
System.debug('Calling future method InvokeIntegration('+patientIds+')');
invokeIntegration(JSON.serializePretty(patientIds));
return true;
} // processJob()
class IntegrationException extends Exception{}
} //class InvokePatientDataMigrate
5. Click File > Save.
Register a Remote Site — Before the callout in this integration can be made, the service endpoint must be registered as a remote site
in Salesforce. To register the remote site:
1. From Setup, enter Remote Site Settings in the Quick Find box, then select Remote Site Settings.
2. Click New Remote Site.
3. Enter a descriptive term for the Remote Site Name. For example, ClinicalIntegrationEndPoint.
4. Enter the URL for the remote site.
5. Optionally, enter a description of the site.
6. Click Save.
Customize the Patient Conversion Process
Patient creation includes two processes: a job flow that creates the patients and then a mapping group that maps data from the Candidate
Patient object to other patient objects.
68
Migrate More Data with the Patient Creation Job FlowSalesforce Health Cloud Implementation Guide
The settings that control these processes are available for customization so that you can control how patient creation and data mapping
occur in your org. From Setup, enter Custom metadata in the Quick Find box, then select Custom Metadata Types.
•Health Cloud Setting (1) contains the configuration values for processes like the job flow that creates patients.
•Job Flow Data Mapping (2) holds the rules that determine which fields from the Candidate Patient object get mapped to patient
objects like Account, Contact, and Case.
•Job Flow Setting (3) contains the actual job flows that execute in the patient creation process.
You can customize the delivered patient creation job flow by creating your own custom Apex class and adding your own job, changing
the order in which the jobs run, or overriding the job entirely and using your own job flow. You can also change which fields are mapped
during patient creation.
Health Cloud Settings
Health Cloud Settings contains a variety of key/value pairs of configuration settings for the Health Cloud application. This includes the
two default settings that control which flow to use when creating patients. PatientCreateFlow_default controls which job
flow to use when creating patients and PatientCreateMappingGroup__default controls which group of mappings is used.
You can deactivate either of these records and create your own patient creation flow or mapping group.
When creating your own job flows, you must rename the Setting Name and Setting Value fields. For readability, it’s helpful
to make the object name and label of Health Cloud Setting record be a combination of the setting name and something about the new
value. For example, you can rename PatientCreateFlow_default to PatientCreateFlow_mynewflow.
To learn more about overriding one of the Health Cloud job settings, see Use Custom Metadata Settings to Configure Health Cloud.
Patient Creation and Data Mapping Job Flows
You can also add new steps to the patient creation job flow or add new mappings to the data mapping process. To deactivate a step in
the job flow, deselect the Active field for the record.
Override the Health Cloud Job Flows
You can override either of the delivered jobs in the default patient creation job flow and use your own custom job to create patients
or to map patient data from the source record system.
Add Your Job to the Patient Creation Job Flow
Whether you have chosen to add a job to the existing patient creation job flow, or have defined an entirely new patient creation
job flow, you must create a JobFlowSetting custom metadata record for every job that you want executed.
69
Migrate More Data with the Patient Creation Job FlowSalesforce Health Cloud Implementation Guide

Data Mapping to Health Cloud Objects
When a patient is converted, Health Cloud copies patient data from CandidatePatient__c to the corresponding Account, Contact,
and Case (CarePlan record type) objects. A mapping defines how patient data maps to the fields in the destination Salesforce objects.
This mapping is specified in the JobFlowDataMapping__mdt custom metadata object.
Override the Health Cloud Job Flows
You can override either of the delivered jobs in the default patient creation job flow and use your own custom job to create patients or
to map patient data from the source record system.
You can deactivate the delivered jobs and use your own custom job when you create and activate a new record with the same job flow
name. Since you’re not deleting the delivered setting, you can reactivate it and use it in the future.
1. From Setup, enter Custom Metadata in the Quick Find box, then select Custom Metadata Types.
2. Click Health Cloud Setting, then click Manage Health Cloud Settings.
3. Click name of the setting you want to change and click Edit.
•To override the delivered patient creation job, click PatientCreateFlow_default.
•To override the delivered patient data mapping job, click PatientCreateMappingGroup_default
4. Clear the Active checkbox and then click Save.
5. Navigate back to the Health Cloud Settings page, and click New, and fill out the information for your custom job and Apex class.
Make sure to use the same Setting Name as the default job flow that you are overriding. For example, PatientCreateFlow,
if you are overriding the default patient creation job flow with your own entirely new job flow.
6. Select the Active checkbox to make the setting available.
Add Your Job to the Patient Creation Job Flow
Whether you have chosen to add a job to the existing patient creation job flow, or have defined an entirely new patient creation job
flow, you must create a JobFlowSetting custom metadata record for every job that you want executed.
JobFlowSetting Custom Metadata
Job flows for Health Cloud consist of one or more jobs, each represented by a JobFlowSetting__mdt custom metadata record. Each
record points to an Apex class that implements that job.
The settings for each job are defined as one row. You can insert custom metadata records the same way you'd create an instance of
another sObject. You can also override any of the jobs within the Patient Create job flow by deselecting the Active field on the job.
The jobs that make up the default patient creation job flow are represented by these custom metadata records.
Table 1: Default Patient Create Job Flow
CustomActiveJob OrderJob NameJob Flow NameLabel
falsetrue1HcCreatePatientDefaultJobs.CreateIndividualJobdefaultPatientCreatePatient
Create
falsetrue2HcCreatePatientDefaultJobs.CreateCarePlanJobdefaultPatientCreateCare Plan
Create
70
Migrate More Data with the Patient Creation Job FlowSalesforce Health Cloud Implementation Guide
The default Patient Create flow defines the steps for creating a patient record. The jobs in this flow create one Account record and one
Contact record, and a Case record for the patient’s care plan. This flow uses the JobFlowDataMapping__mdt custom metadata object
to define the field mapping from the source CandidatePatient__c to the Account, Contact, and Case records.
The following are descriptions of the fields in the JobFlowSetting__mdt custom metadata type.
Master Label
The friendly name for the job flow entry.
Object Name
The API name of the job flow entry.
Job Flow Name
The name of the job flow. All jobs in the same flow share the job flow name.
Job Name
The name of the Apex class that implements the job. This class extends the
HealthCloudGA.MoiJobFlowFactory.MoiJobBase class and overrides its processJob() method.
Job Order
An integer number that specifies the order of the job in the job flow. Jobs in a job flow must have unique job order numbers, and
their order must be linear.
Active
Indicates whether the job is used (true) or not (false).
Custom
False if provided by default in the Health Cloud package; otherwise true.
Protected Component
Specifies whether this Job Flow Setting component is hidden outside a managed package. This field is unchecked (false) in the
Health Cloud package as the component is accessible outside the package.
To register your custom integration job, insert a record to the JobFlowSetting__mdt custom metadata. To do so in the user interface:
1. From Setup, enter Custom Metadata Types in the Quick Find box, then select Custom Metadata Types.
2. Click Job Flow Setting, then click Manage Job Flows Settings.
3. Click New, and fill out the information for your custom job and Apex class, including the job flow name, job name, and order in
which it runs.
4. Ensure that the Active and Custom checkboxes are checked.
5. Click Save.
For example, to register the sample class that’s provided, enter the following information.
1. For Master Label, enter Create Patient: Invoke Integration.
2. For Object Name, enter CreatePatientInvokeIntegration.
3. For Job Flow Name, enter defaultPatientCreate to append your job to the existing job flow.
4. For Job Name, enter the class name InvokePatientDataMigrate.
5. For Job Order, enter 3 to ensure that Health Cloud invokes this job after the second default job for patient creation.
6. Ensure that the Active and Custom checkboxes are checked.
7. Click Save.
71
Migrate More Data with the Patient Creation Job FlowSalesforce Health Cloud Implementation Guide
Data Mapping to Health Cloud Objects
When a patient is converted, Health Cloud copies patient data from CandidatePatient__c to the corresponding Account, Contact, and
Case (CarePlan record type) objects. A mapping defines how patient data maps to the fields in the destination Salesforce objects. This
mapping is specified in the JobFlowDataMapping__mdt custom metadata object.
These mappings can’t be changed or deleted. To change the mappings in your org, create another mapping group and specify in the
Health Cloud Settings to use that mapping group instead of the default mappings.
Note: Salesforce uses the MedicalRecordNumber__c and SourceSystem__c fields to check for duplicate patient
records during the patient creation process. You can create a validation rule to verify that all candidate patient records have values
in these fields before converting patient records.
Table 2: JobFlowDataMapping__mdt
TargetFieldTargetObjectSourceFieldSourceObjectMappingGroupName
NameAccountName__cCandidatePatient__cdefaultPatientCreate
MedicalRecordNumber__cAccountMedicalRecordNumber__cCandidatePatient__cdefaultPatientCreate
SubjectCare Plan2
Health Cloud Care Plan1
nulldefaultPatientCreate
MedicalRecordNumber__cContactMedicalRecordNumber__cCandidatePatient__cdefaultPatientCreate
MailingStreetContactAddress1Line1__cCandidatePatient__cdefaultPatientCreate
FirstNameContactGivenName1__cCandidatePatient__cdefaultPatientCreate
LastNameContactFamilyName1__cCandidatePatient__cdefaultPatientCreate
BirthdateContactBirthDate__cCandidatePatient__cdefaultPatientCreate
MailingCityContactAddress1City__cCandidatePatient__cdefaultPatientCreate
MailingCountryContactAddress1Country__cCandidatePatient__cdefaultPatientCreate
PhoneContactTelecom1Value__cCandidatePatient__cdefaultPatientCreate
MailingPostalCodeContactAddress1PostalCode__cCandidatePatient__cdefaultPatientCreate
1 Because the source object for this record is null, Health Cloud Care Plan is a string literal and not a field name. This string
value is applied to the target field, Subject.
2Care Plan is a string literal that corresponds to the object that represents a care plan, namely a Case whose record type is CarePlan.
The following is a description of the fields in the JobFlowDataMapping__mdt custom metadata type that’s used for mapping.
Mapping Group Name
The name of a mapping group, which represents a set of field mappings. The patient creation job flow uses only one mapping group
named defaultPatientCreate.
Source Object
The API name of the sObject from which data is copied to the target object.
Source Field
The API name of the field that is copied to the target object.
Target Object
The API name of the sObject to copy the data to.
72
Migrate More Data with the Patient Creation Job FlowSalesforce Health Cloud Implementation Guide
Target Field
The API name of the field to copy the data to.
Active
Indicates whether the job is used (true) or not (false).
Mapping Extra Fields
You can add new field mappings by inserting a record in the JobFlowDataMapping__mdt custom metadata object for each new
mapping. Custom mappings can be changed and removed.
To add a mapping in the user interface:
1. From Setup, enter Custom Metadata Types in the Quick Find box, then select Custom Metadata Types.
2. Click Job Flow Data Mapping, then click Manage Job Flow Data Mappings.
3. Click New, and fill out the information for the new mapping.
4. Click Save.
Note: You can also deactivate the delivered JobFlowDataMapping__mdt and use your own custom set of mappings when you
create and activate a new record with the same setting name and setting value.
Provide Easy Access to Protocols and Articles
Salesforce Knowledge lets you easily create and manage content and make it available to other healthcare professionals and to the
patient and care team members.
An article can contain the protocols you use to manage conditions or can hold educational materials you send to patients. When you
set up Salesforce Knowledge, you give your care coordinators access to your organization’s library of articles and protocols. After you
set up Salesforce Knowledge in your organization, users with Knowledge licenses can write, edit, publish, and archive articles using the
Articles Management tab or find and view published articles using the Articles tab.
By setting up the Knowledge One widget, you give care coordinators the ability to search, send, and create articles, all without leaving
the Health Cloud console. Make sure that you’ve added Knowledge One to all the profiles that have access to the console.
Using the Knowledge One widget, articles can be accessed from the console footer, care coordinators can:
•Search for and find relevant articles or protocols
•Attach a published article to a care plan in one click
•Email an article as a PDF, if shared on a public channel
73
Provide Easy Access to Protocols and ArticlesSalesforce Health Cloud Implementation Guide

•Create and manage articles, when the user has permission and the correct license.
Enable Knowledge Users
Before you can set up all the great features of Salesforce Knowledge, make sure that you’re a Salesforce Knowledge user.
Create Article Types
Articles types are the first step in creating the articles used to display protocols. An article type defines the structure and the types
of content an author can add to an article or a protocol.
Enable Salesforce Knowledge
Before you can set up Knowledge, you must enable it in the organization.
Drive Learning with Protocols and Articles
Salesforce Knowledge lets you easily create and manage content and make it available to other healthcare professionals and to the
patient and care team members. An article can contain the protocols you use to manage conditions or can hold educational materials
you send to patients. You can write, edit, publish, and archive articles using the Articles Management tab or find and view published
articles using the Articles tab.
Enable Knowledge Users
EDITIONS
Health Cloud is available in
Salesforce Classic and
Lightning Experience
Available in: Enterprise,
Performance, and
Unlimited Editions
USER PERMISSIONS
To set up Salesforce
Knowledge, and create
article types:
•Customize Application
AND Manage Salesforce
Knowledge
Before you can set up all the great features of Salesforce Knowledge, make sure that you’re a
Salesforce Knowledge user.
1. At the top of any Salesforce page, click the down arrow next to your name.
2. From My Settings, select Personal Settings, enter Advanced User Details in the
Quick Find box, then select Advanced User Details.
3. Click Edit.
4. Select Knowledge User.
5. Click Save.
74
Provide Easy Access to Protocols and ArticlesSalesforce Health Cloud Implementation Guide

Create Article Types
EDITIONS
Health Cloud is available in
Salesforce Classic and
Lightning Experience
Available in: Enterprise,
Performance, and
Unlimited Editions
USER PERMISSIONS
To create, edit, or delete
article types:
•Customize Application
AND Manage Salesforce
Knowledge
Articles types are the first step in creating the articles used to display protocols. An article type
defines the structure and the types of content an author can add to an article or a protocol.
Health Cloud uses the power of Salesforce Knowledge to let you author and manage the article
types that you use for protocols or educational articles.
Note: You can’t enable Salesforce Knowledge until at least one article type is created.
When creating the article that contains a protocol, the author begins by selecting an article type.
Article types, such as protocols, FAQs, and tutorials, provide the format and structure to control
how an article displays for each audience, known as a channel. For each article type you can create
custom fields, customize the layout by adding or removing sections and fields, and choose a template
for each channel. You can also create workflow rules and approval processes to help your
organization track and manage article creation and publication.
1. From Setup, enter Article Types in the Quick Find box, then select Knowledge
Article Types.
2. Click New Article Type or edit an existing article type.
3. Enter the information for the following fields:
DescriptionField
A name used to refer to the article type in any
user interface pages.
Label
The plural name of the object. If you create a
tab for this object, this name is used for the
tab.
Plural Label
If it is appropriate for your organization’s
default language, specify the gender of the
Gender
label. This field appears if the
organization-wide default language expects
gender. Your personal language preference
setting does not affect whether the field
appears. For example, if the organization’s
default language is English and your personal
language is French, you are not prompted for
gender when creating an article type.
If it is appropriate for your organization’s
default language, check if your label must be
preceded by "an" instead of "a".
Starts with a vowel sound
(Read only) A unique name used to refer to
the article type when using the API. The
Object Name
Object Name field can contain only
underscores and alphanumeric characters. It
must be unique, begin with a letter, not
include spaces, not end with an underscore,
and not contain two consecutive underscores.
75
Provide Easy Access to Protocols and ArticlesSalesforce Health Cloud Implementation Guide
DescriptionField
An optional description of the article type. A meaningful
description helps you remember the differences between your
article types when you are viewing them in a list.
Description
(Optional) Select this option to track the full history of an article
and its versions. The system records and displays field updates,
Track Field History
publishing workflow events, and language versions for the master
article and any translations.
Indicates whether the article type is visible outside Setup. In
Development means that article managers can’t choose this
Deployment Status
article type when creating articles. Only select Deployed after
you are done creating the article type.
4. Click Save.
5. In the Fields section of the Article Type definition, click New.
6. On the New Custom Field page, select Text Area (Rich).
The Rich Text Area field lets authors enter formatted text, add images, videos, and links. The fields hold up to 131,072 characters on
separate lines.
7. Click Next.
8. Enter a field label. The field name is populated based on the field label you enter. Ensure that the custom field name is not identical
to any standard field name for that object.
9. Enter any field attributes, such as Description, and click Next to continue.
10. Set the field-level security to determine whether the field is visible and editable or read only for specific profiles, and click Next.
Field-level security allows you to control which fields are visible in different channels.
11. Ensure that the field Yes, add this custom field to the layout is selected so that the rich text field is included
in the page layout.
12. Click Save to finish or Save & New to create more custom fields.
13. Optionally, rearrange your custom fields on the article-type layout.
Note: Don’t forget to grant article type permissions for each user profile needing access to protocols and articles.
76
Provide Easy Access to Protocols and ArticlesSalesforce Health Cloud Implementation Guide

Enable Salesforce Knowledge
EDITIONS
Health Cloud is available in
Salesforce Classic and
Lightning Experience
Available in: Enterprise,
Performance, and
Unlimited Editions
USER PERMISSIONS
To enable Salesforce
Knowledge:
•Customize Application
Before you can set up Knowledge, you must enable it in the organization.
1. From Setup, enter Knowledge in the Quick Find box, then select Knowledge Settings.
2. Confirm that you understand the impact of enabling Salesforce Knowledge and click Enable
Salesforce Knowledge and click OK in the dialog box.
3. Click Edit to select your general settings.
a. Select Allow users to create and edit articles from the
Articles tab to enable care coordinators and internal users to edit articles without
going to the Article Management tab.
b. Select Activate Validation Status field to add a Validation Status field
to all articles.
This way, users can attach approved articles to questions instead of ones that haven’t gone
through an approval process.
c. Select Allow users to add external multimedia content to HTML
in the standard editor to allow <iframe> elements in the standard editor to
embed multimedia content from Dailymotion, Vimeo, and YouTube.
4. Select Internal App and Customer to show article summaries to customers and internal community members in the article
list view.
5. Accept the default settings for Knowledge One options.
6. Choose the Default Knowledge Base Language. This is the language your authors will use to write most of the articles. We
recommend that your default knowledge base language and your organization's language be the same.
Note: Current multi-language users can still use Communities. The Salesforce Help provides more details on multi-language
organizations.
7. Select Single Language.
8. Optionally, select Allow users to create an article from a case to let users create a draft article that is
attached to the case.
9. Select the option to let users with correct privileges use the standard editor when they create articles. This lets them add links,
formatting, and videos to articles.
10. Select a default article type.
11. Optionally, select the options to use profiles to create PDF files on cases and for users to share articles with public URLs.
12. Optinally, select the option to Allow agents to create an article from a reply.
This lets users turn a particularly helpful answer into an article.
a. Select the default article type.
b. Select an internal user to assign the article to so that it can be evaluated for accuracy.
13. Skip the steps to set up Chatter Questions and Knowledge Statistics.
14. Click Save.
For more information on setting up Salesforce Knowledge, see the Salesforce Knowledge Implementation Guide or search the Salesforce
Help.
77
Provide Easy Access to Protocols and ArticlesSalesforce Health Cloud Implementation Guide

Drive Learning with Protocols and Articles
EDITIONS
Health Cloud is available in
Salesforce Classic and
Lightning Experience
Available in: Enterprise,
Performance, and
Unlimited Editions
USER PERMISSIONS
To create articles:
•Manage Articles
AND
Create and Read on the
article type
To edit draft articles:
•Manage Articles
AND
Read and Edit on the
article type
To edit published or
archived articles:
•Manage Articles
AND
Create, Read, and Edit
on the article type
Salesforce Knowledge lets you easily create and manage content and make it available to other
healthcare professionals and to the patient and care team members. An article can contain the
protocols you use to manage conditions or can hold educational materials you send to patients.
You can write, edit, publish, and archive articles using the Articles Management tab or find and
view published articles using the Articles tab.
Authors create articles by selecting an article type, writing content, and selecting where it should
be published. You create both articles and protocols from the Article Management tab, but you
select a different article type depending on the content you want to create.
Note: It’s possible that not everyone in your organization will have the license type or
permissions to create articles and protocols for your patients and care coordinators. Contact
your Salesforce administrator for access to the Article Management tab. You can also make
the Article Management tab visible to a user’s profile.
1. On the Article Management tab, click New.
2. If your organization supports multiple languages, choose the language for the article.
3. Choose an article type, enter the article title, and click OK.
4. Edit the article's fields, and select a validation status. If your article contains a rich text area field,
you can add some formatting such as bulleted lists, links, and images.
5. Optionally, if your organization uses data categories, select the categories to associate with
your article:
•Click Edit next to a category group to open the category selection dialog box.
•In the Available Categories list, expand the category hierarchy to select a
category.
•Click Add to move a selected category to the Selected Categories list.
Note: You can’t add both a category and its child categories to the Selected
Categories list. When you add a category to an article:
–Child categories in the Available Categories list are unavailable unless
you remove the parent from the Selected Categories list.
–Child categories in the Selected Categories list disappear from that list.
Users searching for articles can find them by selecting an exact category or by selecting
a parent or child category.
•Click OK.
6. Select the audience you want to publish the article to:
•Internal App: Salesforce Communities users can access articles in the Articles tab depending on their role visibility.
•Customer: Customers can access articles if the Articles tab is available in a community. Customer users inherit the role visibility
of the manager on the account. In a community, the article is available only to users with Customer Community licenses or
Customer Community Plus licenses.
•Partner: Partners can access articles if the Articles tab is available in a community. Partner users inherit the role visibility of the
manager on the account. In a community, the article is available only to users with Partner Community licenses.
•Public Knowledge Base: Articles can be made available to anonymous users by creating a public knowledge base using the
Sample Public Knowledge Base for Salesforce Knowledge app from the AppExchange.
78
Provide Easy Access to Protocols and ArticlesSalesforce Health Cloud Implementation Guide

•Your own website. Articles can be made available to users through your company website.
7. Click Quick Save to save your changes and remain on this page. Alternatively, click Save to save your changes, close the article, and
go to the Article Management tab.
8. Click Publish... when the content is ready to be published.
9. Select Publish article(s) now or Schedule publication on to choose the date to publish the article.
10. If the article has previously been published, select the Flag as new version checkbox to make the new article icon ( )
display next to your article in the selected channels. Users from these channels can see that this article has been modified since the
last time they’ve read it. This checkbox is not available when you publish an article for the first time, as the icon displays by default
for new articles.
11. Click OK.
Articles you scheduled for publication at a later date continue to appear in the Draft Articles filter, now with the pending icon ( )
next to the article title. Hover over the icon to see the publication date.
SEE ALSO:
Salesforce Help: Publish Articles and Translations
Use Person Accounts in Health Cloud (Optional)
If your org uses person accounts to manage people, you can now use Health Cloud without migrating your patient data to the individual
data model. Person accounts store information about individual people by combining certain account and contact fields into a single
record.
Note: To use person accounts in your organization, contact Salesforce.
Person accounts are accounts that can also be used as contacts in many situations. However, there are key areas in which person accounts
differ from business accounts and contacts, or have unique considerations. In Health Cloud, once you enable person accounts, you can
no longer use the individual data model to manage the patients. Patient records that you bring into Health Cloud are converted to the
person account record type. Person account record types can’t be changed back to an individual record type.
Enable Person Accounts
Once you have person accounts enabled in your org, you can begin using them in Health Cloud.
Create a Page Layout for Person Accounts
Create a page layout to hold the fields your org uses for patients. Person accounts have their own page layouts that can include
account and contact fields, account custom links, and account and contact related lists.
Customize the Health Cloud App for Person Accounts (Salesforce Classic Only)
If you’re using Salesforce Classic, make a small change to page layout you’ve created for person accounts and you’re ready to go.
Map Person Accounts in Health Cloud
Configure a default mapping record using the label Person Accounts to create patients in Health Cloud.
SEE ALSO:
Salesforce Help: Enable Person Accounts
79
Use Person Accounts in Health Cloud (Optional)Salesforce Health Cloud Implementation Guide
Enable Person Accounts
Once you have person accounts enabled in your org, you can begin using them in Health Cloud.
1. From Setup, enter Custom Settings in the Quick Find box, then select Custom Settings.
2. In the list of custom settings, click Manage next to the Use Person Accounts custom settings.
3. Click Edit next to Use Person Account.
4. Select Enable.
After person accounts are enabled, assign them to profiles.
Create a Page Layout for Person Accounts
Create a page layout to hold the fields your org uses for patients. Person accounts have their own page layouts that can include account
and contact fields, account custom links, and account and contact related lists.
1. From Setup, enter Account in the Quick Find box, then select Page Layouts.
2. Click New.
3. Optionally, choose an existing page layout to clone.
4. Type a name for the new layout.
5. Click Save.
6. Modify the layout.
Make sure to add the following fields to the layout.
•Primary Contact
•Individual Type
•Source System
•Source System ID
•Medical Record Number
7. Assign the new layout to user profiles.
Customize the Health Cloud App for Person Accounts (Salesforce Classic Only)
If you’re using Salesforce Classic, make a small change to page layout you’ve created for person accounts and you’re ready to go.
1. From Setup, enter Account in the Quick Find box, then select Page Layouts.
2. Click Edit next to page layout you created for person accounts in your org.
3. Click Custom Console Components and select the PatientProfile_Page component Visualforce page for the left sidebar.
4. Save your work.
Map Person Accounts in Health Cloud
Configure a default mapping record using the label Person Accounts to create patients in Health Cloud.
1. From Setup, enter Custom Metadata in the Quick Find box, then select Custom Metadata Types.
2. In the list of custom metadata types, click Manage Records next to the Individual Record Type Mapper custom
settings.
80
Use Person Accounts in Health Cloud (Optional)Salesforce Health Cloud Implementation Guide

3. Click New to create the mapping record.
4. Enter Person Account as the label for the mapping record.
You must have at least one mapping record using this label. This mapping is used by Health Cloud to create patients records.
5. For Individual Record Type Name, enter a name for the record type. This field is for internal use only. The name can be the same as
the label.
6. In the Account Record Type field, enter the name of a valid person account record type that you want to use in this mapping.
7. In the Record Type Namespace (Account) field, enter the namespace for your org.
8. Leave the Contact Record Type field blank.
Person accounts don’t use the contact record type.
9. Leave the Record Type Namespace (Contact) field blank.
10. Save your work.
Build Patient Communities
The private patient community is the heart of collaborative patient care. Communities provide care coordinators, physicians, patients,
and caregivers an easy way to interact with each other whenever and wherever they are. You can set up private patient community
using Salesforce Community Builder with the Customer Service (Napili) template.
How Patient Communities Work
Use the Health Cloud Empower Lightning components and the Customer Service (Napili) template for a quick roll-out of a patient
community, with easy customization using Community Builder. Lightning Components help you build a patient community in no
time at all.
Switch On Salesforce Communities
If you’re extending the Health Cloud console with Communities, the first step in setting up a private community is to flip the switch
to enable Salesforce Communities.
Community Setup Checklist
Building a community is the result of research, mapping of goals, and defining your audience. At the same time, you must have all
your ducks in a row so the actual implementation process is seamless. You know your org best, but use this general checklist to help
you organize what you need for a community using the Customer Service (Napili) template.
Use Health Cloud Empower Lightning Components
Health Cloud Empower Lightning components make it quick and easy to set up private patient communites.
Reference Information About Health Cloud Empower Components
Developers can use the Health Cloud Empower Components in other applications to create a patient community.
How Patient Communities Work
Use the Health Cloud Empower Lightning components and the Customer Service (Napili) template for a quick roll-out of a patient
community, with easy customization using Community Builder. Lightning Components help you build a patient community in no time
at all.
Community templates let you build self-service communities that give customers the same visual and functional experience on tablets,
mobile devices, or desktops. Community Builder makes it super easy to customize your community. Simply edit a few components, add
images to extend your branding, and you’re ready to go—without any coding!
81
Build Patient CommunitiesSalesforce Health Cloud Implementation Guide
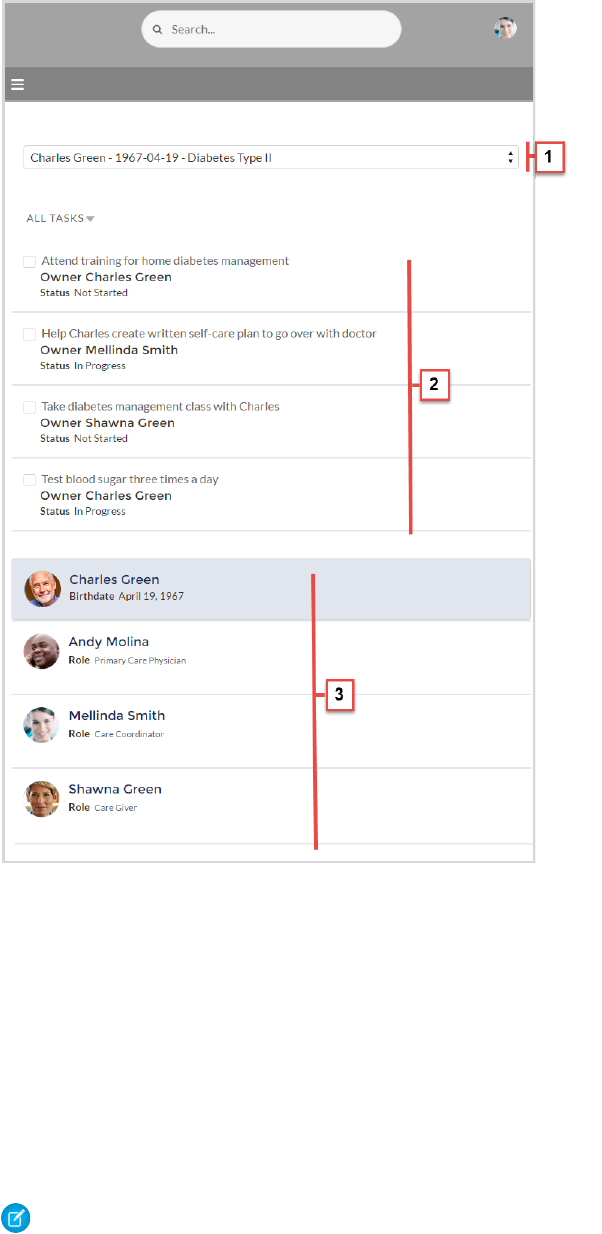
These components let you create a patient community:
•The Care Plan Selector for Health Cloud Empower component (1) lets community users select a patient’s care plan. Only users who
are members of the care team with access to the care plan can see it in the picklist.
•The Care Plan Tasks for Health Cloud Empower component (2) lets Health Cloud community users see and filter their tasks associated
with a care plan.
•Care Team for Health Cloud Empower component (3) lets you add fields from the User and Contact objects to display basic information
about the patient and the care team members, and you can change the order in which the fields appear. Access to the Care Team
for Health Cloud Empower component is available only to members of a patient’s care team.
And if you want a more custom experience, you can create custom pages, add components to pages, use other custom Lightning
components, and expose more Salesforce objects. Refer to the Salesforce Help and the Using Templates to Build Communities guide to
get your community launched in no time at all.
Note: The Health Cloud Empower Lightning components are only available after you’ve installed the Health Cloud managed
package.
82
How Patient Communities WorkSalesforce Health Cloud Implementation Guide
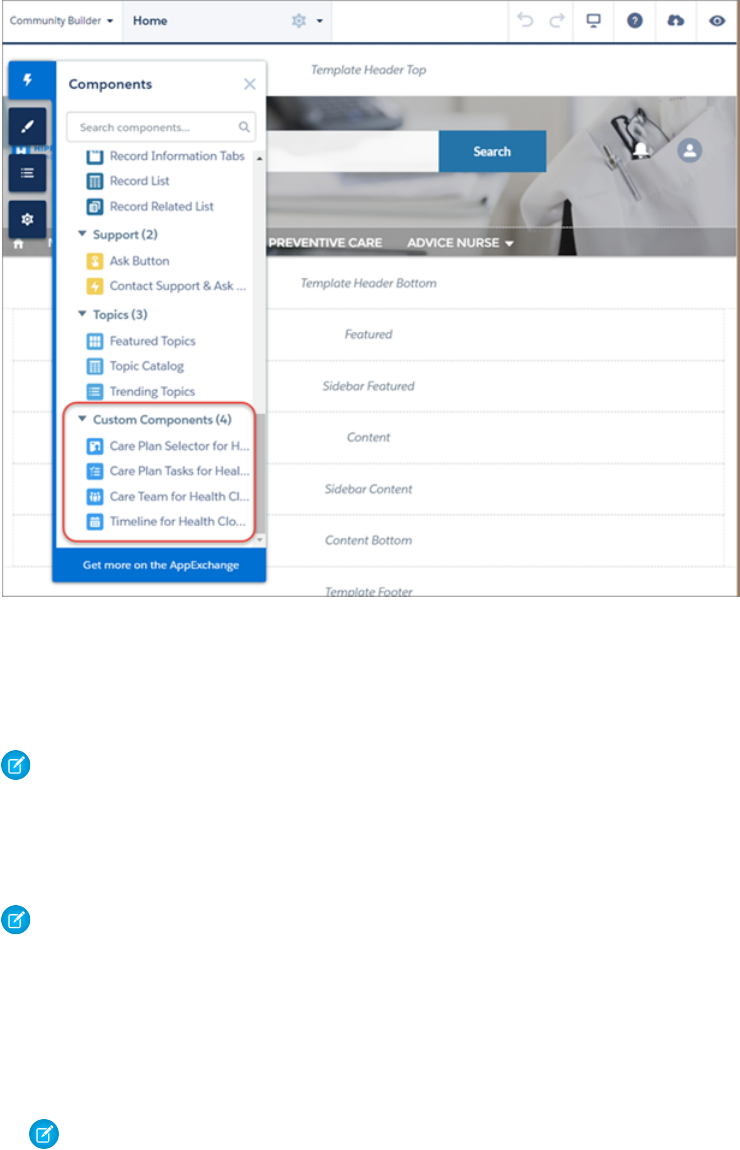
Switch On Salesforce Communities
If you’re extending the Health Cloud console with Communities, the first step in setting up a private community is to flip the switch to
enable Salesforce Communities.
Note: Salesforce Communities provides the collaboration support for Health Cloud. Some of the collaborative features aren’t
available until you enable Salesforce Communities and create a private patient community.
Salesforce Communities lets care coordinators, patients, and care team members collaborate in the private community. Although all
Health Cloud users share the same Community, access to information is restricted through the security that surrounds each individual
care plan. So a patient can only see information or communication related to his or her specific care plan.
Note: Once you enable Communities, you can’t turn it off.
1. From Setup, enter Communities Settings in the Quick Find box, then select Communities Settings.
2. Select Enable Communities.
3. Enter a unique value to use as your domain name. Click Check Availability to make sure it’s not being used by someone else.
It’s a good idea to use something recognizable to your users, such as your company name. Although the domain name is the same
for all communities, you create a unique URL for each community during the creation process.
Note: Keep in mind that you can’t change the domain name after you save it. You’ll have to call Salesforce to change it.
4. Click Save, and make sure you click OK on the confirmation message page to enable the community.
83
Switch On Salesforce CommunitiesSalesforce Health Cloud Implementation Guide

Community Setup Checklist
Building a community is the result of research, mapping of goals, and defining your audience. At the same time, you must have all your
ducks in a row so the actual implementation process is seamless. You know your org best, but use this general checklist to help you
organize what you need for a community using the Customer Service (Napili) template.
Note: External care team members require at least a Customer Community Plus license to become community members and
collaborate around the patient care plan.
Before you begin:
Gather your branding assets:
High-resolution image of your company logo
Color scheme (or an image to upload to automatically generate one)
Image to use as a header
Thumbnail images (385x385 pixels), if you’re using Featured Topics
In your internal Salesforce org:
Switch On Salesforce Communities . Choose a unique URL that works for your business, because you can’t change it after it’s been
set.
Set up email templates for any communication between the community and its members (welcome email, resetting password
email, etc.).
Enable the global header for the system administrator profile, and any other profiles accessing your community from the internal
org.
Enable any other features you plan to use in the community, such as Salesforce Knowledge.
Review profiles and add permission sets as needed.
Health Cloud Setup
Perform the following steps when setting up Health Cloud in the Salesforce Setup menu:
• Create Health Cloud community user profiles.
To update the profile from Setup, enter Profile in the Quick Find box, then select Profiles. Clone the existing Customer
Community Plus user profile and modify it, as needed. Add Read access to Accounts, Contacts, Solutions, Cases, Documents, Problems,
and Goals. Update field level security to make all fields visible for Problems and Goals. Verify that the Chatter tab is enabled.
• Create a Health Cloud Admin profile.
Add the Patient Card Configuration tab to the profile.
• Create users.
When you create community users manually, assign a community user profile to them and clear the Salesforce 1 checkbox.
• Configure sharing settings for cases.
To update the setting from Setup, enter Sharing in the Quick Find box, then select Sharing Settings. Make sure that you
select Enable External Sharing Model and set external case sharing to Private. That way, users can collaborate only with the care
teams they are members of. Care plan access is restricted by membership in the community, as well.
• Update the CommunityProfileName custom setting with the value Health Cloud - Community. This value is the name
of your community profile.
84
Community Setup ChecklistSalesforce Health Cloud Implementation Guide

From Setup, enter Custom in the Quick Find box, then select Custom Settings. Click Manage next to CommunityProfileName,
and then click New to add the name and the value for the community.
Community Setup
Perform the following setup tasks from the Community node in Setup:
• Select the Customer Service (Napili) template.
In the Community Creation wizard, select the Customer Service (Napili) template to start building your community. Customer Service
(Napili) is a powerful, responsive template that gives users the same visual and functional experience whether they use a tablet, a
mobile device, or their desktop.
• Enable the global header.
The global header lets users switch between their communities and the internal organization. Users must be assigned the “View
Global Header” permission either by selecting it on standard profiles, creating custom profiles, or by creating a permission set.
• Customize community properties.
From the Community Management page, select Administration > Members to customize the properties of the community.
• Enable private messages.
From the Community Management page, select Administration > Preferences, select Users can send and receive private
messages. Remember that both the sender and receiver of private messages must have a profile that is associated with the
community.
Community Builder
Perform the following setup tasks using Community Builder. From Setup, enter All Communities in the Quick Find box,
then select All Communities. Then click Manage next to the community name.
• Brand your community.
Add your logo and use Community Builder’s enhanced Branding Editor to efficiently apply color and style to your community.
• Edit community pages and components.
Remove unwanted default pages from the Customer Service (Napili) template and create more pages, as needed. To allow access
the new pages you create, be sure to update the navigation menu.
• Update component properties.
Review and update the properties for the User Profile Header, the Search Publisher, and any other components that you use.
• Configure page layouts.
Configure page layouts in the Page Editor for objects using the Record Information component.
• Preview, test, and publish your community.
Look at your community in a desktop browser window and on mobile devices. When you’re happy with your changes, click Publish
in the toolbar to publish your changes.
SEE ALSO:
Using Templates to Build Communities
85
Community Setup ChecklistSalesforce Health Cloud Implementation Guide

Use Health Cloud Empower Lightning Components
Health Cloud Empower Lightning components make it quick and easy to set up private patient communites.
Care Plan Selector for Health Cloud Empower
The Care Plan Selector for Health Cloud Empower component is a picklist that lets a community user select a patient’s care plan.
Care Team for Health Cloud Empower
The Care Team for Health Cloud Empower component lets your users access a patient’s care team in a private patient community.
Care Plan Tasks for Health Cloud Empower
The Care Plan Tasks for Health Cloud Empower component lets community users see tasks associated with a care plan. Members
can choose to see either their incomplete or complete tasks.
Timeline for Health Cloud Empower
The Timeline for Health Cloud Empower component lets patients who are logged in to the community to see their past, current,
and future healthcare events.
Customize Fields in the Health Cloud Empower Lightning Components
Use field sets to customize the fields that appear for patients and care team members in the Health Cloud Empower Lightning
components.
Care Plan Selector for Health Cloud Empower
The Care Plan Selector for Health Cloud Empower component is a picklist that lets a community user select a patient’s care plan.
A user must be a member of the care team to view its associated care plan in the picklist. If the user doesn’t belong to any care teams,
then the picklist doesn’t appear at all. If the logged in user belongs to only one care team, the associated care plan is selected automatically.
When a user is a member of multiple care teams, every care plan they belong to appears in the picklist.
Note: If the person is assigned to the care team using their contact record instead of their user record, that care plan doesn’t
appear in the picklist.
The label for the Phone field of the patient’s contact record doesn’t appear in the community for the care team list or the care plan
selector. Instead, the label appears as Business Phone. However, the value for the field comes from the Phone field and not
the Business Phone field.
1. Select the Care Plan Selector for Health Cloud Empower component in the page you’re configuring.
2. In the property editor, configure properties for the component:
Placeholder Text for Picklist
Enter the text that displays in the picklist before anything is selected. The default text is Select a name and care
plan.... Placeholder text can’t be translated using the Translation Workbench.
Show birthdate
Select to add the patient’s birthdate to the picklist in addition to the patient’s name and the care plan name.
Show all care plans
Lets a user see all the care plans that they belong to. This option is only available if you’ve enabled multiple care plans in your
org. If a patient only has one care plan, this option doesn’t appear in the picklist.
Include birth year
Shows the patient’s year of birth in the picklist.
Show birth month as text
Shows the patient’s birth month as Jan or Feb instead of 01 or 02.
86
Use Health Cloud Empower Lightning ComponentsSalesforce Health Cloud Implementation Guide
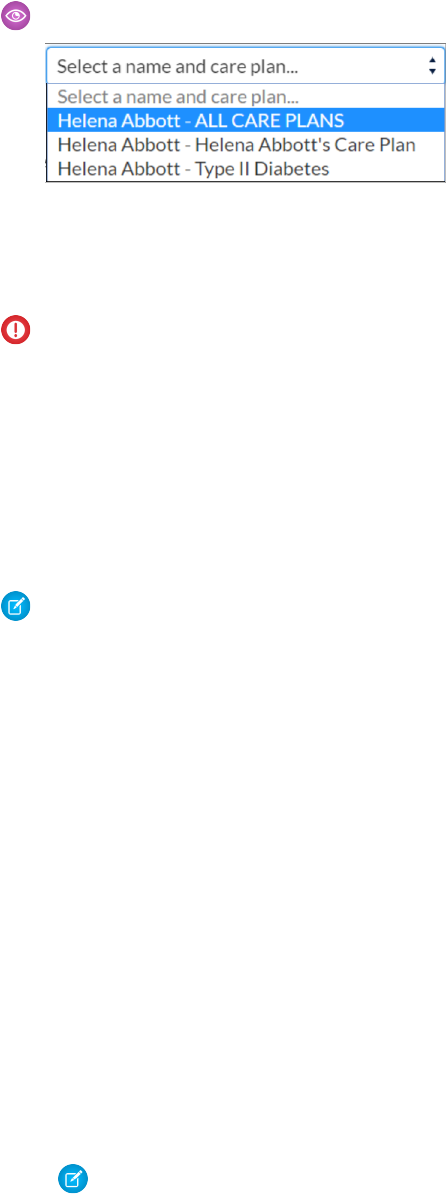
Example: Sample Care Plan Selector for Health Cloud Empower component:
Care Team for Health Cloud Empower
The Care Team for Health Cloud Empower component lets your users access a patient’s care team in a private patient community.
Important: Legal Disclaimer for Care Team for Health Cloud Component
Admins can configure the Care Team for Health Cloud Empower component to display patient contact information to users of
Health Cloud and Salesforce Communities. Ensure that only authorized users have access to this contact information and that all
communications with patients are conducted in compliance with HIPAA regulations.
Access to the Care Team for Health Cloud Empower component is available only to members of a patient’s care team. The component
lists all members of the care team that the user is also a member of. When you enable multiple care plans and show all care plans in the
Care Plan Selector component, then members from all care teams appear in the component. Members’ name, role, and photo are shown
by default. Use field sets from the User and Contact objects to add other information to the list or to change the order in which the fields
appear. You can also include the care plan owner as a member of the care team and customize the label that describes their role.
Note: The label for the Phone field of the patient’s contact record doesn’t appear in the community for the care team list or the
care plan selector. Instead, the label appears as Business Phone. However, the value for the field comes from the Phone
field and not the Business Phone field.
Use the Care Plan Selector for Health Cloud Empower or another component with similar functionality to access the Care Team for Health
Cloud Empower component.
1. On the page that you’re configuring, select the Care Team for Health Cloud Empower component.
2. In the property editor, configure the component’s properties.
Patient Field Set Name
Enter the name of the field set that contains the fields that you want to display for the patient. The default is HcPatientInfoFields.
Since this field set is part of the Health Cloud managed package, you can’t edit it. If you want to display different information,
add a different field set and enter its name in this field instead.
Team Member Field Set Name
Enter the name of the field set that contains the fields that you want to display for the team members. The default is
HcTeamMemberInfoFields. Since this field set is part of the Health Cloud managed package, you can’t edit it. If you want to
display different information, add a different field set and enter its name in this field instead.
Show Labels
Select to show the field’s label.
Include care plan owner in list
Shows the care plan owner in the list of care team members when that person is an internal user.
Note: Queues aren’t supported as care plan owners in Health Cloud.
Care Plan Owner Role Name
Enter the label text for the name of the care plan owner role. For example, if a nurse practitioner creates and owns the care plan,
you can show Nurse Practitioner as the role instead of the default.
87
Use Health Cloud Empower Lightning ComponentsSalesforce Health Cloud Implementation Guide
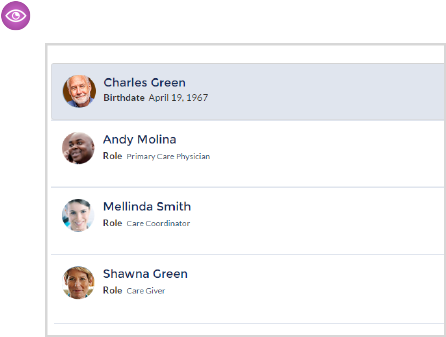
Example: Sample Care Team List component:
SEE ALSO:
Customize Fields in the Health Cloud Empower Lightning Components
Care Plan Tasks for Health Cloud Empower
The Care Plan Tasks for Health Cloud Empower component lets community users see tasks associated with a care plan. Members can
choose to see either their incomplete or complete tasks.
1. Select the Care Plan Tasks for Health Cloud Empower component in the page you’re configuring.
2. In the property editor, configure properties for the component:
Field Set Name
Enter the name of the field set that contains the fields you want to display for tasks. The default is HcCarePlanTaskFields. Since
this field set is part of the Health Cloud managed package, you have limited editing options. You can change the order of fields
in the field set or remove fields. To add fields, you must create a different field set and use it in place of the delivered field set.
Show labels
Select to show labels for the fields that appear in the task list.
Show all tasks
This setting is currently unavailable. Enabling it doesn't do anything.
88
Use Health Cloud Empower Lightning ComponentsSalesforce Health Cloud Implementation Guide
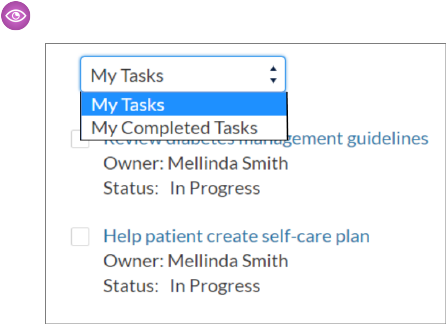
Example: Sample Care Plan Tasks for Health Cloud Empower component:
SEE ALSO:
Customize Fields in the Health Cloud Empower Lightning Components
Timeline for Health Cloud Empower
The Timeline for Health Cloud Empower component lets patients who are logged in to the community to see their past, current, and
future healthcare events.
Use the Timeline View Configurations tab to create filters that specify the precise fields that appear in the timeline from a particular
record. Make sure to select Timeline for Health Cloud Empower in the Configuration Target field.
Health Cloud respects your org's sharing and field-level security settings for data that is displayed in the timeline component. Ensure
that security settings for the Timeline View Configuration, Filter Column, Filter Condition, and Filter Criteria objects are configured
appropriately for your users.
1. Select the Timeline for Health Cloud Empower component in the page you’re configuring.
2. In the property editor, configure properties for the component:
Empty State Text
Text instructing users to select a care plan to view timeline events. Default text is Select a care plan to view
timeline events.
Show Past Activity
Select to show past activity in the timeline.
Show Future Activity
Select to show future activity in the timeline.
Page Reload Size
The number of events loaded initially for each category of tasks and when a user selects Show More. The default is 50 events.
The filter element on the page is controlled by the types of events you define in the Timeline View Configurations tab.
The Past, Today, and Future tabs of the Timeline can each show up to 500 events.
89
Use Health Cloud Empower Lightning ComponentsSalesforce Health Cloud Implementation Guide
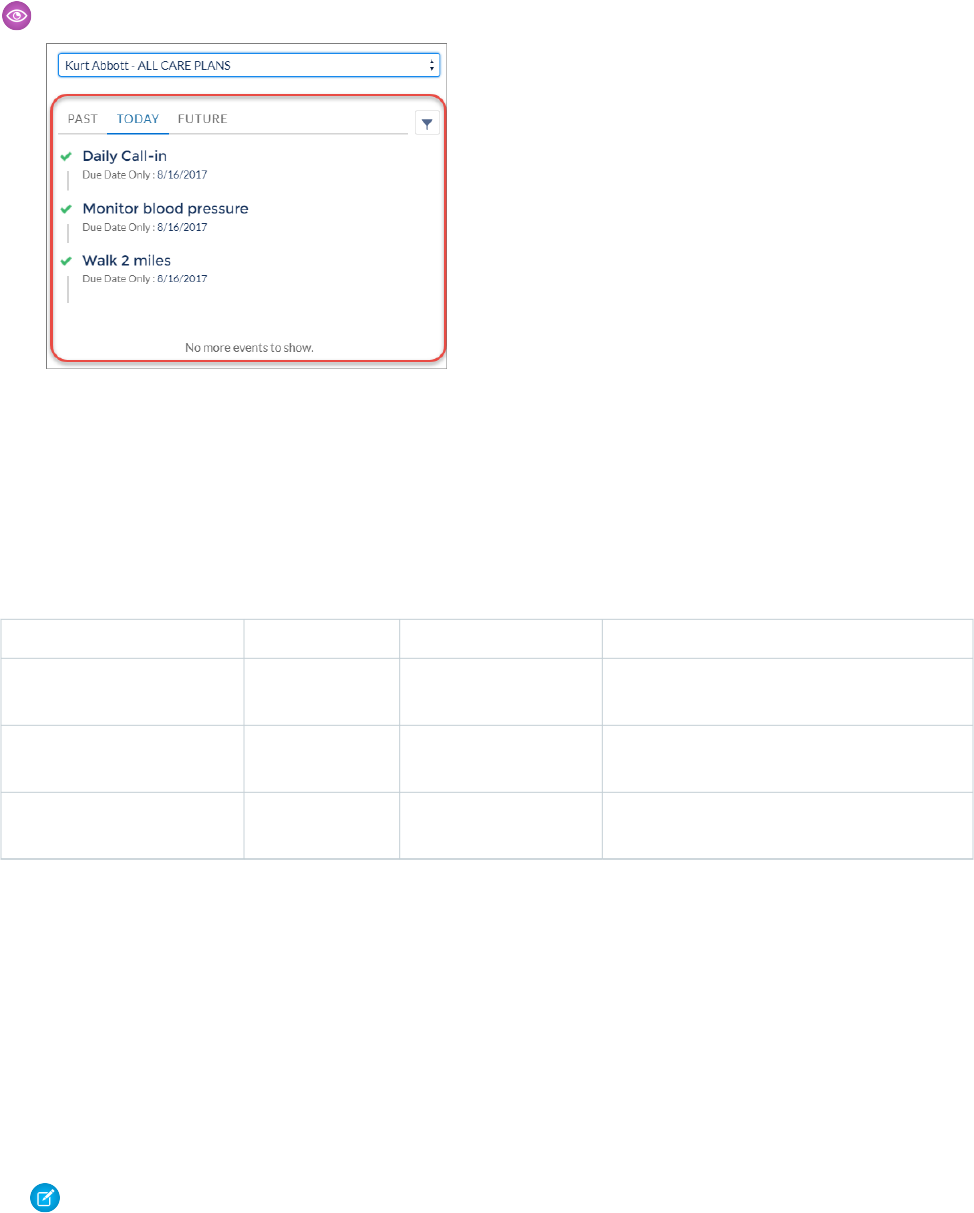
Example: Sample Timeline for Health Cloud Empower component:
Customize Fields in the Health Cloud Empower Lightning Components
Use field sets to customize the fields that appear for patients and care team members in the Health Cloud Empower Lightning components.
A field set is a grouping of fields you create and then add to an object. Since these field sets are part of the Health Cloud managed
package, you have limited editing options. You can change the order of fields in the field set or remove fields. To add fields, you must
create a different field set and use it in place of the delivered field set. The following table shows field sets and their related components
that are delivered with Health Cloud.
DescriptionComponentRelated ObjectField Set
Controls which fields appear for the patient in the
community.
Care Team for Health
Cloud Empower
UserHcPatientInfoFields
Controls which fields appear in the community for
team members who are not the patient.
Care Team for Health
Cloud Empower
UserHcTeamMemberInfoFields
Controls which fields appear for tasks in the
community.
Care Plan Tasks for Health
Cloud Empower
ActivitiesHcCarePlanTaskFields
1. From the management settings for the related object, go to Field Sets.
2. Select the field set that you want to change and select New. You can also clone the field set and edit the cloned field set.
3. Enter a Field Set Label. This label is the name presented to subscribers who install the field through a managed package.
4. Optionally, enter a name for your field set.
5. In the Where is this used? area, provide a brief description of which pages use the field set, and for what purpose.
6. Click Save.
7. To add fields to the field set, drag the fields from the object palette and drop them into the Available for the Field
Set or the In the Field Set container. The fields in the In the Field Set container are visible by default.
Note: In the field set, you can span to fields that reference multiple objects. When you span a field into a field set that references
multiple objects, you can only span to the Name object.
90
Use Health Cloud Empower Lightning ComponentsSalesforce Health Cloud Implementation Guide
You can drag and drop a field from one container to the other. The vertical order of the In the Field Set list indicates the
order of how the fields render on pages.
8. To remove a field from the field set, drag the element back to the object palette, or click the icon next to the element.
9. To make a field required, double-click the element or click the wrench icon ( ) next to it and select the Required checkbox.
Note: Indicates that the field is required and must have a value to save the record.
10. Save your work.
Reference Information About Health Cloud Empower Components
EDITIONS
Available in: Enterprise,
Performance, and
Developer Editions
Developers can use the Health Cloud Empower Components in other applications to create a patient
community.
For example, to create a Lightning app showing these components:
<aura:application extends="force:slds">
<HealthCloudGA:HcCommunityCarePlanPicker />
<HealthCloudGA:HcCommunityCareTeamList />
<HealthCloudGA:HcCommunityTaskList />
<HealthCloudGA:HcCommunityTimeline />
</aura:application>
Developing with the Care Plan Selector for Health Cloud Empower Component
The Care Plan Selector for Health Cloud Empower component (HcCommunityCarePlanPicker) lets users select a patient’s care plan.
Developing with the Care Team for Health Cloud Empower Component
The Care Team for Health Cloud Empower component (HcCommunityCareTeamList) displays details for members of the care team.
Developing with the Care Plan Tasks for Health Cloud Empower Component
The Care Plan Tasks for Health Cloud Empower component (HcCommunityTaskList) lets users see tasks associated with a care plan.
Members can view only their own tasks, and they can filter the task list to keep track of which tasks are completed.
Developing with the Timeline for Health Cloud Empower Component
The Timeline for Health Cloud Empower component lets patients see their past, current, and future healthcare events.
Examples
Use these examples to help you create custom Health Care Empower components.
Developing with the Care Plan Selector for Health Cloud Empower Component
The Care Plan Selector for Health Cloud Empower component (HcCommunityCarePlanPicker) lets users select a patient’s care plan.
If the user has access to only one care plan, the plan is selected automatically. When a user is a member of multiple care teams, the
picklist shows all the user’s plans. If the user doesn’t belong to any care team, the picklist doesn’t appear. Only users who are members
of the care team or the owner of the care plan can see the plan.
Includes only case record types that are in the Care Plan Record Type custom metadata records.
91
Reference Information About Health Cloud Empower
Components
Salesforce Health Cloud Implementation Guide

Note: In the tables, the labels listed reflect the field in the Community Builder and the Lightning App Builder. Attributes that do
not have a label use a default, unless set by a custom use of the component.
Table 3: Care Plan Selector Component Attributes
DescriptionTypeField LabelAttribute
List of care plan IDs and descriptions. If no value is
set, the attribute is populated with values based on
map[]carePlans
other selections and the list obtained from a SOQL
query.
Enter the text to display in the picklist before
anything is selected. The default is Select a
stringPlaceholder text for picklistpicklistDefaultOptionText
name and care plan... Placeholder text
can’t be translated using the Translation Workbench.
Add the patient’s birthdate to the picklist in addition
to the patient’s name and the care plan name.
Default is false.
booleanShow birthdateshowBirthDate
Include year of birth. Default is true.booleanInclude birth yearincludeYearOfBirth
Show the patient’s birth month as text, such as Jan
or Feb. Default is true.
booleanShow birth month as textuseMonthText
Add an item to a patient picklist to show details for
all care plans at once when the user has multiple
booleanShow all care plansincludeAllCarePlanOption
care plans. ALL CARE PLANS is shown as the
name of the care plan. Default is true.
Table 4: Care Plan Selector Component Events Handled
DescriptionName (Type)
When a user navigates within the community, the navigation
change is captured. The care plan selector fires the
forceCommunity:routeChange (Application)
eventCarePlanSelected event to keep all components in sync with
the currently selected option.
Table 5: Care Plan Selector Component Events Fired
DescriptionAttributes (Type)Name (Type)
Fire this event when an option is selected or changed so
that dependent components are kept in sync.
HcCommunity:EventCarePlanSelected
(Application) •carePlanId (string)
•patientId (string)
Usage
This component registers and fires on an event called HcCommunityEventCarePlanSelected.
92
Reference Information About Health Cloud Empower
Components
Salesforce Health Cloud Implementation Guide

If you build a component that responds to the user selection at runtime, include an event handler for the
HcCommunityEventCarePlanSelected event.
The Health Cloud package provides two Lightning components, Care Team List and Care Plan Picker, that handle this event.
Developing with the Care Team for Health Cloud Empower Component
The Care Team for Health Cloud Empower component (HcCommunityCareTeamList) displays details for members of the care team.
HcCommunityPatientCard controls the fields and the order in which they appear for the patient in the community.
HcCommunityTeamMembers controls which fields appear for the rest of the team members in the community and their order.
Table 6: Care Team Component Attributes
DescriptionTypeField LabelAttribute
ID of the care plan or case for a given care team.stringcarePlanId
Account ID of the patient for whom to show care
plan members Setting patientId shows all care plans
stringpatientId
for the patient. Setting carePlanId shows only the
details for the referenced care plan. If both are set,
carePlanId is used.
Name of the field set on the User object. Retrieves
the fields to display for the patient. Default is
stringPatient Field Set NamepatientFieldSet
HcPatientInfoFields (which is part of the
Health Cloud managed package).
Name of the field set that contains the fields to display
for the team members. Default is
stringTeam Member Field Set NameteamMemberFieldSet
HcTeamMemberInfoFields (which is part of
the Health Cloud managed package).
Boolean attribute to toggle label visibility. Default is
true.
booleanShow labelsshowLabels
Toggle to show the care plan owner in the list of care
team members. Default is false.
booleanInclude owner in listincludeOwner
Label text for the name of the care plan owner's role.
For example, if a nurse practitioner creates and owns
stringCare Plan Owner Role NamecarePlanOwnerRoleLabel
the care plan, you can show Nurse Practitioner as the
role instead of the default.
Table 7: Care Team Component Events Handled
DescriptionAttributes (Type)Name (Type)
Event that is fired when a care plan option is selected
in the Health Cloud Care Plan Picker component.
HcCommunityEventCarePlanSelected
(Application) •carePlanId (string)
•patientId (string)
93
Reference Information About Health Cloud Empower
Components
Salesforce Health Cloud Implementation Guide

Use Alongside Another Component
This component has an event handler for HcCommunityEventCarePlanSelected event.
Your custom component needs to fire the HcCommunityEventCarePlanSelected event that this component handles. The value
passed in the event is CaseId (type string). The Health Cloud package provides the Care Plan Selector component, which registers
and fires the HcCommunityEventCarePlanSelected event with CaseId.
Use as a Child or Nested Component
This component requires carePlanId (type string) (or accountId or patientId) as input from its parent component. The value of
carePlanId must be a valid CaseId value.
Use in a Case Record or Account Page
You can use this component in a Lightning record page for the Case and Account object. The Case or Account record page fires the
Aura attribute force:hasRecordId that this component handle.
Developing with the Care Plan Tasks for Health Cloud Empower Component
The Care Plan Tasks for Health Cloud Empower component (HcCommunityTaskList) lets users see tasks associated with a care plan.
Members can view only their own tasks, and they can filter the task list to keep track of which tasks are completed.
Table 8: Care Plan Tasks Component Attributes
DescriptionTypeField LabelAttribute
ID of the care plan or case for a given care team.stringcarePlanId
The account ID of the patient for whom list of care
plan tasks need to be shown. Setting the patientId
stringpatientId
shows all tasks for the patient (when they have
multiple). Setting the carePlanId only shows the
details for the referenced care plan. If both are set
we prioritize carePlanId and show only one list of
care plan tasks.
Name of the field set that contains the fields you
want to display for tasks. The default is
stringField Set NametaskFieldSet
HcCarePlanTaskFields (which is part of the Health
Cloud managed package).
Boolean attribute to toggle visibility of the labels
that appear in the task list. Default: true
booleanShow labelsshowLabels
Toggle visibility of all tasks. (Currently unavailable
and has no effect.) Default:true
booleanShow all tasksshowAll
Table 9: Care Plan Tasks Component Events Handled
DescriptionAttributes (Type)Name (Type)
Event that is fired when a care plan option is selected
in the Health Cloud Care Plan Picker component.
HcCommunityEventCarePlanSelected
(Application) •carePlanId (string)
•patientId (string)
94
Reference Information About Health Cloud Empower
Components
Salesforce Health Cloud Implementation Guide

DescriptionAttributes (Type)Name (Type)
Event used to update the status of a task when it is
checked.
HcCommunityGlobalEvent •taskId (string)
•selected (boolean)
Use Alongside Another Component
This component has an event handler for HcCommunityEventCarePlanSelected event.
Your custom component needs to fire the HcCommunityEventCarePlanSelected event that this component handles. The value
passed in the event is CaseId (type string). The Health Cloud package provides the Care Plan Selector component, which registers
and fires the HcCommunityEventCarePlanSelected event with CaseId.
Use as a Child or Nested Component
This component requires carePlanId (type string) (or accountId or patientId) as input from its parent component. The value of
carePlanId must be a valid CaseId value.
Use in a Case Record or Account Page
You can use this component in a Lightning record page for the Case and Account object. The Case or Account record page fires the
Aura attribute force:hasRecordId that this component handle.
Developing with the Timeline for Health Cloud Empower Component
The Timeline for Health Cloud Empower component lets patients see their past, current, and future healthcare events.
The HcCommunityTimeline component displays lists of events for a care plan as configured in the Timeline configuration records. The
events are shown on three tabs: Today (always shown); Past (can be excluded); and Future (can be excluded). This component is similar
to the care team and tasks list in that it handles the plan selected event.
Note: In the tables below, Label refers to the label for the field in the Community Builder and the Lightning App Builder. Attributes
that do not have a label use a default unless set by a custom use of the component.
Table 10: HcCommunityTimeline Component Attributes
DescriptionTypeLabelName
ID of the care plan or case for a given care team.stringcarePlanId
Account ID of the patient for whom to show
care plan members Setting patientId shows all
stringpatientId
care plans for the patient. Setting carePlanId
shows only the details for the referenced care
plan. If both are set, carePlanId is used.
Flag indicates if the Past tab should be included
to display past timeline activity. Default is
true.
booleanShow past eventsshowPastActivity
Flag indicates if the Future tab should be
included to display future timeline activity.
Default is true.
booleanShow future eventsshowFutureActivity
95
Reference Information About Health Cloud Empower
Components
Salesforce Health Cloud Implementation Guide

DescriptionTypeLabelName
Number of activities to be loaded when a care
plan is selected, Show More button is clicked,
or when filters are changed.
doublePage Reload SizepageReloadSize
Default: Select a care plan to view timeline events.stringText instructing users
to select a care plan to
view timeline events.
picklistDefaultOptionTextForTimeline
Table 11: HcCommunityTImeline Component Events Handled
DescriptionAttributes (Type)Name (Type)
Event that is fired when a care plan option is selected
in the Health Cloud Care Plan Picker component.
HcCommunityEventCarePlanSelected
(Application) •carePlanId (string)
•patientId (string)
Use Alongside Another Component
This component has an event handler for HcCommunityEventCarePlanSelected event.
Your custom component would need to fire HcCommunityEventCarePlanSelected event that this component will handle. The value
passed in the event is CaseId (type String). Health Cloud package provides a component, Care Plan Selector, that registers and fires
HcCommunityEventCarePlanSelected event with CaseId.
Use as a Child/Nested Component
This component would require carePlanId (type String) as input from its parent component. The value of the carePlanId should be
a valid CaseId value.
Use in a Case Record Page
This component can be used in Lightning Record Page for Case object. The Case Record Page will set the recordId attribute to the
case Id since it implements the force:hasRecordId interface.
Examples
Use these examples to help you create custom Health Care Empower components.
Create a component that works with the care plan selector
You can create a component to display custom objects or information for a care plan or patient. For example:
•Customer has a custom object - display the related list of records for the care plan
•Display a list of the EHR records for the patient, like medications or visits
•Display the list of care plan problems or goals
•Display a graph of medical device measurements or lab results
•Display details of the care plan
The custom components are used with the Empower care plan selector, so you need to handle the
HcCommunityEventCarePlanSelected event.
For example:
96
Reference Information About Health Cloud Empower
Components
Salesforce Health Cloud Implementation Guide

.cmp file
<aura:component implements="forceCommunity:availableForAllPageTypes" access="global"
>
<!-- attributes here -->
<aura:handler event="HcCommunityEventCarePlanSelected" action="{!c.onCarePlanChange}"/>
<!-- display data here -->
</aura:component>
controller.js file
({
onCarePlanChange : function(component, event, helper) {
var carePlanId = event.getParam("carePlanId");
var patientId = event.getParam("patientId");
// do some action here to update the data/layout of the component
}
})
Create custom component that replaces the care plan selector
You can create a substitute component for the care plan selector. For example, the custom component could have a select list that
displays different information or behaves differently than the one included in the package. Or you could add a text search box to
find a patient name or medical record number.
The component must fire the HcCommunityEventCarePlanSelected event trigger.
.cmp file
<aura:component implements="forceCommunity:availableForAllPageTypes" access="global" >
<!-- attributes here -->
<aura:registerEvent name="carePlanChange" type="c:HcCommunityEventCarePlanSelected"/>
<!-- display data here -->
</aura:component>
controller.js file
({
onSomeActionInTheComponent : function(component, event, helper) {
var carePlanId = [get from component];
// OR
var patientid = [get from component];
var carePlanEvent =
$A.get("e.HcCommunityEventCarePlanSelected");
carePlanEvent.setParams({
'carePlanId': carePlanId,
'patientId': patientId
}).fire();
}
})
97
Reference Information About Health Cloud Empower
Components
Salesforce Health Cloud Implementation Guide

Use Assessments to Gather Patient Information
Improve the quality of patient care by gathering information that helps to manage your patients more efficiently. Whether it’s a pre-surgery
assessment or a patient feedback survey, you have the information you need within the patient’s care plan.
Note: We provide Surveys to selected customers through a pilot program that requires agreement to specific terms and conditions.
The Surveys feature is subject to change and isn’t generally available unless or until Salesforce announces its general availability
in documentation or in press releases or public statements. We can’t guarantee general availability within any particular time frame
or at all. Make your purchase decisions only on the basis of generally available products and features.
With Surveys, you can create beautiful, easy-to-use forms for collecting feedback and data from your users or customers. You can
customize survey questions and answers in a simple editor. You can add various types of questions to gather the exact data you need.
View the surveys that are available to send to patients on the Assessments tab of the Health Cloud console. You can also find completed
surveys for patients and drill into to see their answers.
From within each patient’s care plan, see the list of surveys that are available to send to that patient. With a simple click, the email
invitation is on its way to the patient. When the patient clicks the survey link within the email, they can log in to the community and
complete the survey.
To see the survey responses, open the survey from Sent to Patient tab. The Sent to Patient tab lists all the surveys that have been sent
to that patient. Easily view the date the survey was sent, whether it’s been completed, its status, and the version of the survey you’re
viewing.
Enable Surveys
Enable Surveys so your care coordinators can create surveys and send them to patients and other members of the care team.
Add Survey Objects to Health Cloud Permission Sets
Make sure to add access to the survey-related objects for every permission set that interacts with Health Cloud assessments.
Configure Email Invitations for Surveys and Assessments (Optional)
Create a Survey Email Branding configuration to customize the email that patients receive when care coordinators invite them to
take a survey or assessment.
Update Sharing Settings for Surveys
Enable Surveys so your care coordinators can create surveys and send them to patients and other members of the care team.
Enable Surveys
Enable Surveys so your care coordinators can create surveys and send them to patients and other members of the care team.
Add Survey Objects to Health Cloud Permission Sets
Make sure to add access to the survey-related objects for every permission set that interacts with Health Cloud assessments.
Configure Email Invitations for Surveys and Assessments (Optional)
Create a Survey Email Branding configuration to customize the email that patients receive when care coordinators invite them to
take a survey or assessment.
Update Sharing Settings for Surveys
Enable Surveys so your care coordinators can create surveys and send them to patients and other members of the care team.
Enable Surveys
Enable Surveys so your care coordinators can create surveys and send them to patients and other members of the care team.
1. From Setup, enter Surveys in the Quick Find box.
98
Use Assessments to Gather Patient InformationSalesforce Health Cloud Implementation Guide
2. Click Survey, then Survey Settings.
3. Enable Surveys.
Add Survey Objects to Health Cloud Permission Sets
EDITIONS
Health Cloud is available in
Salesforce Classic and
Lightning Experience
Available in: Enterprise,
Performance, and
Unlimited Editions
Make sure to add access to the survey-related objects for every permission set that interacts with
Health Cloud assessments.
To find the list of delivered permission sets, enter Permission Sets in the Quick Find
box, then select Permission Sets.
In Object Settings, ensure that the following permissions apply to any permission set that requires
access to the Assessments tab.
PermissionObject
ReadSurveys
Read, Create, Edit, DeleteSurvey Invitations
No AccessSurvey Responses
Configure Email Invitations for Surveys and Assessments (Optional)
Create a Survey Email Branding configuration to customize the email that patients receive when care coordinators invite them to take
a survey or assessment.
1. From Setup, enter Survey Email Branding in the Quick Find box.
2. Click Survey Email Branding, then New.
3. Define the branding settings.
DescriptionSetting
A unique name for the Survey Email Branding object.Name
Label for the branding setting.Label
The subject line of the email.Email Subject
The body text of the email.Email Body
The email address that appears in the From field of the email.Email From Address
The image that appears in the email’s header.Header Image for Email
Note: To add a header or footer image, either select an existing asset file or add an
asset to Salesforce.
The image that appears in the email’s footer.Footer Image for Email
Note: To add a header or footer image, either select an existing asset file or add an
asset to Salesforce.
99
Add Survey Objects to Health Cloud Permission SetsSalesforce Health Cloud Implementation Guide

4. Save your work.
Update Sharing Settings for Surveys
Enable Surveys so your care coordinators can create surveys and send them to patients and other members of the care team.
1. From Setup, enter Sharing Settings in the Quick Find box.
2. Click Sharing Settings, then Edit.
3. Update the following sharing settings.
Why?Default Internal AccessObject
This lets any participant view your survey.
That way, anyone who has a link to the
Public Read OnlySurvey
survey can access it without having to ask
for permission from a Salesforce admin.
This lets any participant view a survey
invitation. That way, anyone who receives
Public Read OnlySurvey Invitation
a survey invitation can access it without
having to ask for permission from a
Salesforce admin.
This makes all survey responses private;
only the participant and the person who
PrivateSurvey Response
created the survey invitation can see
participants’ responses. That way, only the
person in charge of sending the survey and
reviewing responses has access to sensitive
data from participants.
The Assessments Tab
The Assessments tab lets you send surveys to your patients, check on a survey’s status, and view completed surveys.
100
Update Sharing Settings for SurveysSalesforce Health Cloud Implementation Guide
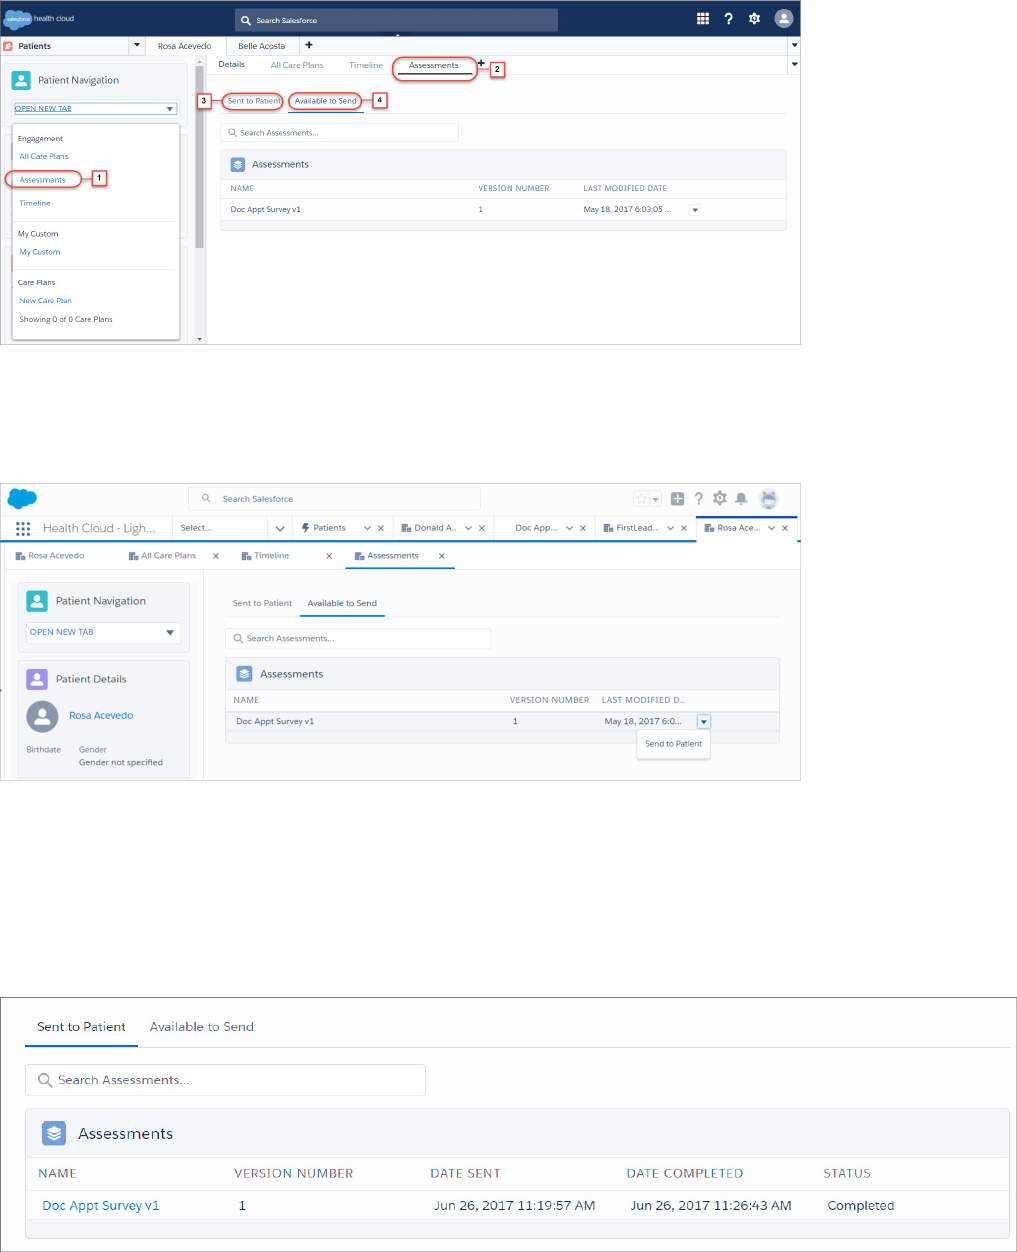
You can find patient assessments by selecting Assessments from the patient card menu (1) or by selecting the Assessments tab for a
patient (2).
The Assessments tab shows the surveys that you’ve sent to a patient (3) in addition to surveys that are available to send to the patient
(4).
The Available to Send tab shows the list of surveys that you can send to a patient. With a click, the email invitation is on its way to the
patient. Click Send to Patient in <Community Name> to have the assessment sent to the patient as an email message in one of the
communities to which the patient belongs. When the patient clicks the assessment link within the email, they can log in to the community
and complete the assessment.
The Sent to Patient tab lists all the assessments that have been sent to that patient. Easily view the date the survey was sent, whether
it’s been completed, its status, and the version of the survey you’re viewing. To see the patient’s responses, open the assessment from
Sent to Patient tab.
101
The Assessments TabSalesforce Health Cloud Implementation Guide
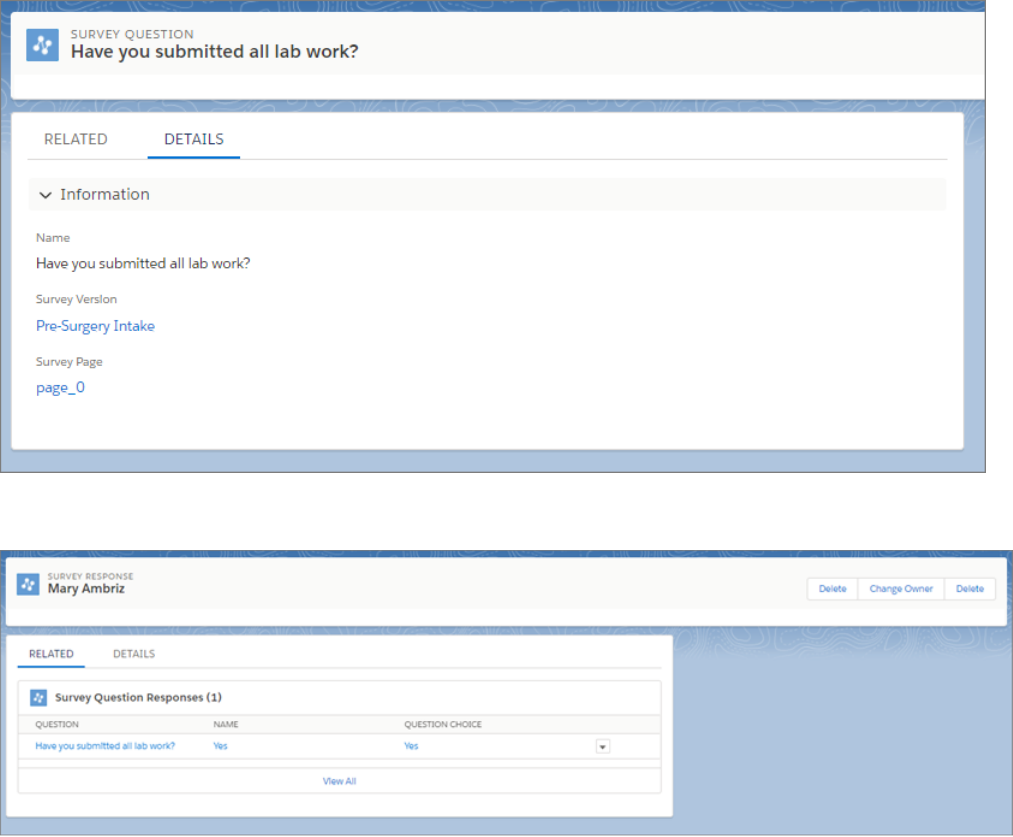
The Survey Response page shows a list of questions and their responses. You can drill into the question to see the question name, and
details like which version of the survey the questions is associated with.
The Related subtab of the Survey Response tab shows the questions associated with the assessment and the selected answers or choices
the patient made.
The Details tab shows other important details such as the submitter’s name, the survey invitation link, and the status, completion date,
and version of the survey.
102
The Assessments TabSalesforce Health Cloud Implementation Guide
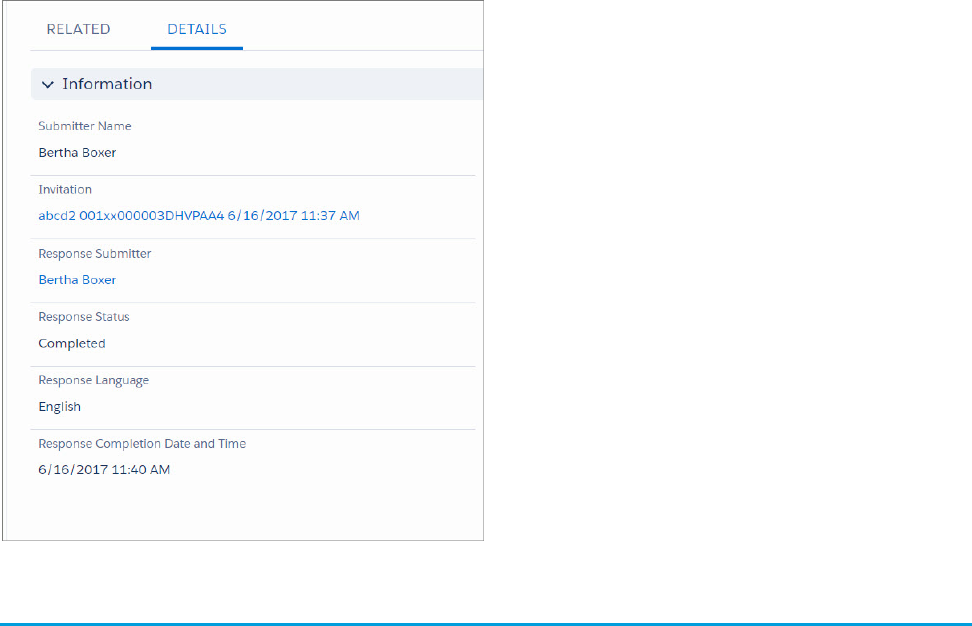
Manage Patient Risk with Einstein Analytics for Health Cloud
Einstein Analytics for Health Cloud: Risk Stratification lets your company identify high-risk patients. You can use this information to
proactively manage those patients and provide preventive care to reduce over-consumption of expensive healthcare resources.
The Einstein Analytics for Health Cloud: Risk Stratification app includes embedded dashboards that connect with the Heath Cloud risk
scoring tables. The dashboards display the calculated risk scores based on the CMS-Hierarchical Condition Category (HCC) risk adjustment
model.
You can install the package that contains the app after you install and implement the core Health Cloud package. To use the Einstein
Analytics for Health Cloud: Risk Stratification App, add the related tabs to the Health Cloud app. Make sure that each user profile can see
the tabs by default.
103
Manage Patient Risk with Einstein Analytics for Health CloudSalesforce Health Cloud Implementation Guide
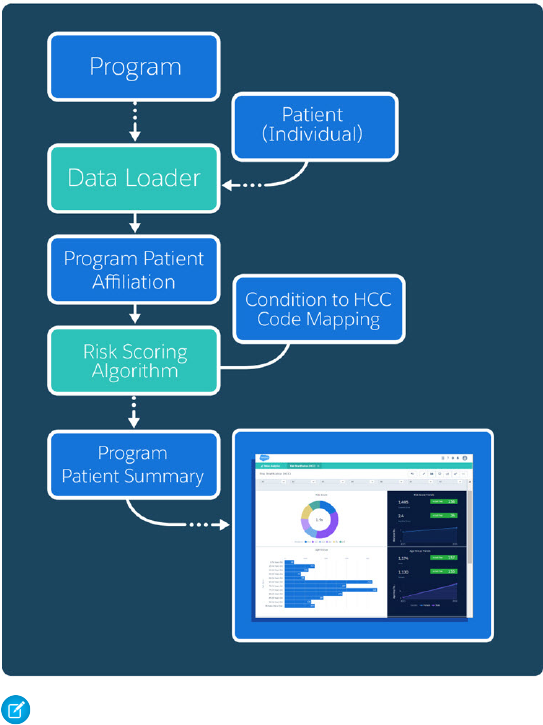
Note: Each Health Cloud org comes with five Analytics app permission set licenses. Available in English only. Localization isn’t
supported, so all users see the same date, time, and number formats, regardless of their own locale and language settings.
Set Up Einstein Analytics for Health Cloud
Once you’ve set up the core features of Health Cloud, perform these steps to install and configure Einstein Analytics for Health Cloud:
Risk Stratification.
Upgrade Picklist Values and Page Layouts for Analytics
When you upgrade an existing Health Cloud org to use Einstein Analytics for Health Cloud: Risk Stratification, you must add extra
picklist values to the Account record type. Also, make sure to add extra fields to the page layouts for objects that are used to calculate
patient risk scores.
Add Risk Scoring Record Types to the Admin Profile
To expose CMS Risk Scoring data in an Analytics dashboard, you must add the associated record types to the Health Cloud admin
profile.
Health Cloud Risk Scoring Data Tables
There are several Health Cloud tables that hold the information that is used to aggregate and calculate patient data. Once calculated,
this information appears in Analytics dashboards so that your company can make informed decisions about patients who fall into
categories that are at risk.
Recalculate Patient Risk Scores
You can recalculate patient Centers for Medicare and Medicaid Services (CMS) risk scores in Health Cloud with a batch Apex job
using the HcCMSRiskScoringScheduledJob class. You can either run the job manually as needed or schedule it.
104
Manage Patient Risk with Einstein Analytics for Health CloudSalesforce Health Cloud Implementation Guide
Set Up Einstein Analytics for Health Cloud
Once you’ve set up the core features of Health Cloud, perform these steps to install and configure Einstein Analytics for Health Cloud:
Risk Stratification.
Enable Analytics
To get started configuring Einstein Analytics for Health Cloud, first enable Analytics.
Enable a Permission Set License for the Admin
Enable the Analytics Platform permission set license to create a permission set for Health Cloud admins.
Create a Permission Set for the Health Cloud Analytics Admin
After you’ve enabled the Analytics permission set license, create a permission set to assign to the Health Cloud Analytics admin user.
This permission set enables full access to manage Einstein Analytics for Health Cloud.
Assign the Health Cloud Analytics Admin Permission Set
Assign the Health Cloud Analytics Admin permission set to give your Health Cloud admin access to all Einstein Analytics for Health
Cloud functionality.
Install the Einstein Analytics for Health Cloud: Risk Stratification Package
The Einstein Analytics for Health Cloud: Risk Stratification package contains functionality for the Einstein Analytics for Health Cloud:
Risk Stratification dashboard.
Assign the Health Cloud Analytics Integration Permission Set
To give Einstein Analytics for Health Cloud access to all your Salesforce org data, assign the Health Cloud Analytics Integration
permission set to the integration user.
Add Remote Site Settings for Analytics Patient Lists
Enable remote site settings so that care coordinators can send patient lists from the Einstein Analytics for Health Cloud dashboard
to the Health Cloud console.
Confirm Field-Level Security
The Analytics Cloud Integration User profile requires read permission on specific object fields so that Einstein Analytics for Health
Cloud: Risk Stratification can access data from your org.
Create a Permission Set for Analytics Users
Create a permission set that enables view access to the dashboard. You can also grant permission for users to download a .CSV file
of the patient lists that are generated in the dashboard.
Enable View Access for Health Cloud Analytics Users
Enable access for users to view the Einstein Analytics for Health Cloud: Risk Stratification. Users who are assigned a Health Cloud
Analytics permission set can then access Analytics from the App picker.
Set Up and Start Risk Scoring Dataflow
Schedule and start the dataflow so that your risk scoring data can be refreshed daily.
Set Up Dashboards
Upload extended metadata (XMD) files to make sure that all custom colors, labels, and quick actions are available for dashboards in
Einstein Analytics for Health Cloud.
Enable Analytics
To get started configuring Einstein Analytics for Health Cloud, first enable Analytics.
1. From Setup, enter Analytics in the Quick Find box, then select Analytics > Getting Started.
105
Set Up Einstein Analytics for Health CloudSalesforce Health Cloud Implementation Guide
2. Click Enable Analytics.
Enable a Permission Set License for the Admin
Enable the Analytics Platform permission set license to create a permission set for Health Cloud admins.
1. From Setup, enter Users in the Quick Find box, then select Users.
2. Click the user name with the System Administrator profile.
3. Click Permission Set License Assignments and then click Edit Assignments.
4. Enable the Analytics Platform permission set license.
5. Save your changes.
Create a Permission Set for the Health Cloud Analytics Admin
After you’ve enabled the Analytics permission set license, create a permission set to assign to the Health Cloud Analytics admin user.
This permission set enables full access to manage Einstein Analytics for Health Cloud.
1. From Setup, enter Permission in the Quick Find box, then select Permission Sets.
2. Click New.
3. Enter a name for the role, such as Health Cloud Analytics Admin.
4. For License, select None.
5. Save your changes.
6. On the Permission Set Overview page, click System Permissions.
7. Select Manage Analytics.
8. Save your changes.
Assign the Health Cloud Analytics Admin Permission Set
Assign the Health Cloud Analytics Admin permission set to give your Health Cloud admin access to all Einstein Analytics for Health Cloud
functionality.
1. From Setup, enter Permission in the Quick Find box, then select Permission Sets.
2. Click the Health Cloud Analytics admin permission set and then click Manage Assignments.
3. Click Add Assignments.
4. Select the admin users who manage Einstein Analytics for Health Cloud.
5. Click Assign and then click Done.
Install the Einstein Analytics for Health Cloud: Risk Stratification Package
The Einstein Analytics for Health Cloud: Risk Stratification package contains functionality for the Einstein Analytics for Health Cloud: Risk
Stratification dashboard.
Make sure that you’ve installed and configured Health Cloud before installing the Einstein Analytics for Health Cloud: Risk Stratification
package.
1. Paste the following URL for the package into your browser navigation bar: http://industries.force.com/healthcloudwave.
2. Press Enter.
106
Set Up Einstein Analytics for Health CloudSalesforce Health Cloud Implementation Guide
3. Enter your Salesforce password.
4. Select Install for Admins only and then click Install.
If it takes a while, you can select Done and move on to do something else while installation finishes. Check your email for confirmation
that installation was successful.
5. Verify installation of the package.
a. From Setup, enter Installed Packages in the Quick Find box, then select Installed Packages.
b. Look for Einstein Analytics for Health Cloud: Risk Stratification.
Assign the Health Cloud Analytics Integration Permission Set
To give Einstein Analytics for Health Cloud access to all your Salesforce org data, assign the Health Cloud Analytics Integration permission
set to the integration user.
1. From Setup, enter Permission in the Quick Find box, then select Permission Sets.
2. Click Health Coud Analytics Integration and then click Manage Assignments.
3. Click Add Assignments.
4. Select the checkbox next to User, Integration.
5. Click Assign and then click Done.
Add Remote Site Settings for Analytics Patient Lists
Enable remote site settings so that care coordinators can send patient lists from the Einstein Analytics for Health Cloud dashboard to
the Health Cloud console.
Before any Apex callout can call an external site, that site must be registered in the Remote Site Settings page, or the callout fails. Salesforce
prevents calls to unauthorized network addresses.
When the list generated in the dashboard contains more than 500 entries, it’s processed by a queueable job. As a best practice, set up
two remote site settings entries for your org—one for the Visualforce page and one for the queueable job.
1. From Setup, enter Remote Site Settings in the Quick Find box, then select Remote Site Settings.
2. Click New Remote Site.
3. Enter a descriptive term for the Remote Site Name.
4. Enter the URL for the remote site. The URL’s format differs depending on whether you use a Visualforce page for the list or send the
records to a queueable job.
You can find the remote URL for the Visualforce page by viewing its preview in your org and copying the domain name from that
URL.
a. From Setup, enter Visualforce Pages in the Quick Find box and select Visualforce Pages.
b. Navigate to the HcWaveListIntegrationPage, click the name of the page, and select Preview.
c. Copy the page URL from your browser and use it as the value for this field.
For example, the URL is: https://healthcloudga.cs5.visual.force.com/apex/HcWaveListIntegrationPage. Enter
https://healthcloudga.cs5.visual.force.com as the value for Remote Site URL.
To use a queueable job to process lists with over 500 entries, copy the URL from the Setup page.
a. Go to Setup in your org.
107
Set Up Einstein Analytics for Health CloudSalesforce Health Cloud Implementation Guide

b. Copy the page URL from your browser and use it as the value for this field.
For example, the URL is: https://cs5.salesforce.com/setup/. Enter https://cs5.salesforce.com as the value for
Remote Site URL.
5. To allow access to the remote site regardless of whether the user’s connection is over HTTP or HTTPS, select the Disable Protocol
Security checkbox. When selected, Salesforce can pass data from an HTTPS session to an HTTP session, and from HTTP to HTTPS.
Only select this checkbox if you understand the security implications.
6. Optionally, enter a description of the site.
7. Make the setting active.
8. Click Save.
Confirm Field-Level Security
The Analytics Cloud Integration User profile requires read permission on specific object fields so that Einstein Analytics for Health Cloud:
Risk Stratification can access data from your org.
1. From Setup, enter Profiles in the Quick Find box, then select Profiles.
2. Click Analytics Cloud Integration User.
3. In the Field-Level Security section, next to Account, click View.
4. Confirm that Read Access is selected for all fields. If any fields aren’t selected, click Edit and select Read Access for those fields.
5. Save your changes, and then click Back to Profile.
6. Confirm that the following objects also have read access.
•Account
•Contact
Create a Permission Set for Analytics Users
Create a permission set that enables view access to the dashboard. You can also grant permission for users to download a .CSV file of
the patient lists that are generated in the dashboard.
1. From Setup, enter Permission in the Quick Find box, then select Permission Sets.
2. Click New.
3. Enter a label and a description for the permission set.
For example, View Analytics Dashboard.
4. For License, select None.
5. Save your changes.
6. On the Permission Set Overview page for the new permission set, click System Permissions.
7. Select Use Analytics. Optionally, select Download Analytics Data to let users download a .CSV file of the patient list generated in
the dashboard.
Important: Only grant feature access to individuals who have a valid need to know the protected health information of all
individuals your company treats.
8. Save your changes.
108
Set Up Einstein Analytics for Health CloudSalesforce Health Cloud Implementation Guide

Enable View Access for Health Cloud Analytics Users
Enable access for users to view the Einstein Analytics for Health Cloud: Risk Stratification. Users who are assigned a Health Cloud Analytics
permission set can then access Analytics from the App picker.
Note: Always allow popups in your browser for your org domain so that the Analytics app can open.
1. From the App Launcher menu, click Analytics.
2. From Apps, hover over Analytics for Health Cloud and click Share from the list.
3. Select the users with the Risk Stratification (HCC) permission and can see all patient data.
Important: Only grant feature access to individuals who have a valid need to know the protected health information of all
individuals your company treats.
4. Save your changes.
Set Up and Start Risk Scoring Dataflow
Schedule and start the dataflow so that your risk scoring data can be refreshed daily.
If an Analytics user has access to a dataset, they have access to all records in the dataset, by default. Only grant access to individuals who
have a valid need to know the PHI of all individuals your company treats. However, you can implement row-level security on a dataset
to restrict access to records. To implement row-level security in this dashboard, update the default dataflow to add a row-level security
filter to the datasets associated with Account and Contact. These filters can be used to restrict access so that users see only the patients
that they can access based on their role. Row-Level Security for Datasets provides more information on implementing row-level security
for Analytics datasets.
1. In Analytics, click the gear icon and then click Data Manager to open the data monitor.
2. In the Monitor Data Tasks picklist, select Dataflow View.
3. Next to the dataflow with your namespace and __SalesEdgeEltWorkflow, select Schedule from the list.
4. Schedule the dataflow for every 1 day at 4 AM, or as needed (hourly or daily).
5. Save your changes and click Done.
6. Next to the dataflow with your namespace and __SalesEdgeEltWorkflow, select Start from the list.
Dataflow is now running and could take time to finish depending on the size of the Analytics datasets. Data must be present in the
org for dataflow to work. For the initial data flow, the org must contain at least one Provider record with a valid Related Contact
record.
Set Up Dashboards
Upload extended metadata (XMD) files to make sure that all custom colors, labels, and quick actions are available for dashboards in
Einstein Analytics for Health Cloud.
Important: Before starting this task, the dataflow must have finished running at least once.
1. Download the XMD files.
a. From Setup, enter Static in the Quick Find box, then select Static Resources.
b. Click healthcloudwaveresources.
c. To download the resources .zip file, click View File.
d. Extract the .zip file of XMD files.
109
Set Up Einstein Analytics for Health CloudSalesforce Health Cloud Implementation Guide

Note: Record the location of the extracted files.
2. Update the datasets.
a. From the App Launcher menu, select Analytics.
b. Click the Datasets tab.
c. Next to FinalDashboardDataset, hover, and select Edit from the list.
d. Under Add Extended Metadata File (JSON), click Select file or drag here.
e. From the downloaded and extracted zip folder, upload the FinalDashboardDataset file.
Note: The XMD file name corresponds with the dataset name.
f. Click Update Dataset.
Upgrade Picklist Values and Page Layouts for Analytics
When you upgrade an existing Health Cloud org to use Einstein Analytics for Health Cloud: Risk Stratification, you must add extra picklist
values to the Account record type. Also, make sure to add extra fields to the page layouts for objects that are used to calculate patient
risk scores.
1. Add the custom picklist fields to the Account record type.
a. From Setup, enter Account in the Quick Find box, then select Record Types.
b. Select the Individual record type.
c. Click Edit for the following picklists and select all available values.
ValuesField
Dual, NonDual, FBDual, ESRDEnrollment Type
New Enrollee, ContinuedMedicare Enrollee
Age, DisabledOREC
d. Save your work.
2. Add extra fields to the page layouts for the following objects. You can access the page layout from the object management settings
for the object.
Fields to AddObjects
Disabled, Enrollment Type, Institution, Low Income, Medicaid
Eligibility Status, Medicare Enrollee, OREC
Account (Patient Layout)
Hospitalize Period End, Hospitalize Period Start, Period EndEHR Encounter
Code Label, Encounter, Source System Modified, Year
Documented
EHR Conditions
GenderContact (Patient Layout)
110
Upgrade Picklist Values and Page Layouts for AnalyticsSalesforce Health Cloud Implementation Guide

Add Risk Scoring Record Types to the Admin Profile
To expose CMS Risk Scoring data in an Analytics dashboard, you must add the associated record types to the Health Cloud admin profile.
1. From Setup, enter Profiles in the Quick Find box, then select Profiles.
2. Select the Health Cloud Admin profile, click Clone, and name the new profile.
Note: If you’ve already created a custom admin profile, click Edit to add the record types.
3. In the Custom Record Type Settings, click Edit next to the Program object.
4. Add the CMS Risk Scoring record type to the Selected Record Types picklist.
5. Select the CMS Risk Scoring as the default record type.
6. Click Save.
Health Cloud Risk Scoring Data Tables
There are several Health Cloud tables that hold the information that is used to aggregate and calculate patient data. Once calculated,
this information appears in Analytics dashboards so that your company can make informed decisions about patients who fall into
categories that are at risk.
Health Cloud delivers tables that store the data used to calculate patient risk scores.
Risk Score Medicaid Interactions
Disease interaction scores and originally disabled interactions for patients who are enrolled in both Medicare and Medicaid.
Risk Score Disease Interaction
Disease interactions used to calculate risk scores.
Risk Score HCC Code
Mappings between HCC codes and risk scores.
111
Add Risk Scoring Record Types to the Admin ProfileSalesforce Health Cloud Implementation Guide
Risk Score Age Band New Enrollee
Mapping used to calculate risk score for age groups of patients who are newly enrolled in Medicare. For example, patients who are
between 35–44 years old and patients who are 60–64 are in two different age bands.
Risk Score Age Band Continued Enrollee
Mappings used to calculate risk score for age groups for patients who have been enrolled in Medicare for more than a year. For
example, patients who are between 35–44 years old and patients who are 60–64 are in two different age bands.
Manage Mappings Between Conditions and HCC Codes
Salesforce provides the most current mappings between ICD condition and HCC codes. These codes are used to calculated patient
risk for the Einstein Analytics for Health Cloud: Risk Scoring app. You can add or edit these mappings, but doing so can affect the
accuracy of your results.
Manage Programs
Use the Programs tab to manage the relevant data about the programs a patient participates in that are tracked or monitored in
Health Cloud.
Manage Program-Patient Affiliations
Manage the associations between patients and the programs they’re enrolled in. This record can also link a patient with the providers
who care for them within their enrolled programs. You can implement a custom integration or use Data Loader to import historical
medical records from the EHR system and map it to the fields that appear in this tab.
View Program Patient Summary Information
View the patient’s risk score and other summary information about the patient and affiliated programs using Analytics dashboards.
The patient’s risk score, along with demographic information such age, gender, disability status, conditions, Medicaid eligibility, HCC
codes, and other items appear in the dashboard.
Manage Provider Information
Manage the current healthcare provider names based on information from the EHR Practitioner object, or related contact and user
records.
Manage Procedures
Use the EHR Procedures tab to manage the relevant data about the medical procedures a patient undergoes that are tracked or
monitored in Health Cloud.
Manage Procedure Performer Records
Use the Procedure Performer tab to manage the relevant data about the practitioners who perform a procedure on a patient.
Manage Procedure Requests
Use the EHR Procedure Requests tab to manage the relevant data about requests for a patient to undergo a medical procedure.
Manage Mappings Between Conditions and HCC Codes
Salesforce provides the most current mappings between ICD condition and HCC codes. These codes are used to calculated patient risk
for the Einstein Analytics for Health Cloud: Risk Scoring app. You can add or edit these mappings, but doing so can affect the accuracy
of your results.
You can also download the most current information from the Centers for Medicare & Medicaid Services website. To replace or edit a
delivered mapping, you must deselect the Active field and create another record.
1. From the Health Cloud - Admin Home page, select the Condition to HCC Code Mapping tab, and click New.
2. Enter the following:
112
Health Cloud Risk Scoring Data TablesSalesforce Health Cloud Implementation Guide
DescriptionField
Identifier for a specific mapping relationship.Mapping ID
The ICD code for a specific condition.Condition Code
The CMS HCC code.HCC Code
Unique key for the record that links the Valid From field,
the ICD condition code, and the HCC code.
Year + Condition + HCC Code
Number field that holds the year in which the HCC code became
valid. For example, 2016.
Valid From
The last year in which the HCC code was valid. For example, if a
code was replaced in 2016, that’s the year that appears in the
Valid Through
field. Codes that are being used and that are still valid don’t have
a value in this field.
Indicates whether this condition to HCC mapping is active and
available for use.
Active
3. Click Save.
Manage Programs
Use the Programs tab to manage the relevant data about the programs a patient participates in that are tracked or monitored in Health
Cloud.
The Programs tab contains information such as start and end dates, reimbursement rates, target interaction times, and the role of the
professional who ics interacting with the patient.
Note: If you don’t see the User Role, Rate, Target, Unit of Measure, and Time Span fields, then you must add them to the
1. From the Health Cloud - Admin Home page, select the Programs tab, and click New.
2. Select a record type for the new program and click Continue.
3. Enter the following:
DescriptionField
Name of the program.Program Name
Types of providers who qualify for reimbursement during a time
period, if applicable.
User Role
Reimbursement rate for the measurement period of a patient’s
program.
Rate
Target time to spend with the patient for the measurement
period.
Target
Date when the program begins.Start Date
Date when the program ends.End Date
113
Health Cloud Risk Scoring Data TablesSalesforce Health Cloud Implementation Guide

DescriptionField
Select to activate the program.Is Active
Unit of measurement for the time spent with the patient during
the measurement period defined in the Target field. Valid values
are Minutes and Seconds.
Unit of Measure
Measurement period for the program. Valid values are
Annually, Monthly, Quarterly, and Weekly.
Time Span
Name of the Analytics dashboard that uses this information. For
example, CCM Dashboard.
Report Name
4. Save your work.
Manage Program-Patient Affiliations
Manage the associations between patients and the programs they’re enrolled in. This record can also link a patient with the providers
who care for them within their enrolled programs. You can implement a custom integration or use Data Loader to import historical
medical records from the EHR system and map it to the fields that appear in this tab.
At a minimum, you must populate the Program ID, Account ID, and Is Active field for each record.
1. From the Health Cloud - Admin Home page, select the Program Patient Affiliation tab, and click New.
2. Enter the following:
DescriptionField
Lookup field to Account.Patient
Program in which the patient is enrolled.Program
Name of the physician or other health care provider.Provider
Status of the patient’s Medicare Chronic Care Management (CCM)
program.
Status
Date when the patient’s enrollment in the program starts.Start Date
Date when the patient’s enrollment in the program ends.End Date
Indicates whether the enrollment of the person in the associated
program is active.
Is Active
Indicates whether new and relevant information about the
patient has been received that triggers a recalculation of the
appropriate program metrics.
Recalculate?
Changes to the following fields trigger a recalculation of a
patient’s risk score.
•Account: Disability, Enrollment Type, Institution, Medicaid,
and OREC.
114
Health Cloud Risk Scoring Data TablesSalesforce Health Cloud Implementation Guide
DescriptionField
•Contact: Birthdate, and Gender.
•EHR Condition: Date Asserted, Encounter, and Source System
Modified. Adding or deleting an EHR Condition record also
triggers a recalculation.
•EHR Encounter: Hospitalize Period End, Hospitalize Period
Start, Period End, and Period Start.
3. Click Save.
View Program Patient Summary Information
View the patient’s risk score and other summary information about the patient and affiliated programs using Analytics dashboards. The
patient’s risk score, along with demographic information such age, gender, disability status, conditions, Medicaid eligibility, HCC codes,
and other items appear in the dashboard.
Each time the scoring algorithm job runs and there has been a change in underlying records, the system generates a new Program
Patient Summary record. You can identify the most current information by viewing the record that has the Most Recent checkbox
selected. There is only one active record per patient for a given year. Historical data is stored in the table and isn’t overwritten.
Note: If you edit the calculated data, it can affect the accuracy of your results.
1. From the Health Cloud - Admin Home page, select the Program Patient Summary tab, and click New.
2. Enter the following:
DescriptionField
System-generated identifier.Name
Patient’s gender.Gender
Patient’s age in years as of December 31 for the year being
calculated.
Age
Indicates whether the patient is flagged as disabled in the Patient
record.
Disability Status
Indicates whether the patient is in an institution. A blank field
indicates that the patient resides in a community.
Institution
Indicates whether the person is a new Medicare patient or a
continued enrollee.
New Patient
Indicates whether the patient falls within low-income guidelines.Low Income
Patient’s calculated HCC risk score.Risk Score
Note: If a patient has a risk score of 0, check to see that
the enrollment type is set correctly for that patient.
Year that the risk score applies to.Year
115
Health Cloud Risk Scoring Data TablesSalesforce Health Cloud Implementation Guide

DescriptionField
HCC codes that apply to the patient for the year.HCC Codes
Patient’s age group in years as of December 31 for the year being
calculated.
Age Band
Date when the risk score was calculated.Effective Date
Identifies that this summary information is the most current for
the patient for that year.
Most Recent
Number of medical conditions associated with the patient.Number of Conditions
Lookup field to the Program Patient Affiliation object.Patient Program Affiliation
List of Hierarchical Condition Category (HCC) codes associated
with the patient.
Conditions
3. Click Save.
Manage Provider Information
Manage the current healthcare provider names based on information from the EHR Practitioner object, or related contact and user
records.
1. From the Health Cloud - Admin Home page, select the Providers tab, and click New.
2. Enter the following:
DescriptionField
Name of the physician or other healthcare provider.Provider Name
Name of the provider as it exists in the EHR Practitioner object.EHR Practitioner
Contact record for the provider.Related Contact
User record for the provider, followed by user’s name.Related User
Indicates whether this provider is actively practicing.Active
3. Click Save.
Manage Procedures
Use the EHR Procedures tab to manage the relevant data about the medical procedures a patient undergoes that are tracked or monitored
in Health Cloud.
The EHR Procedures tab contains information about a procedure such as date it was performed, the name of practitioners involved,
reason for the procedure.
1. From the Health Cloud - Admin Home page, select the EHR Procedures tab, and click New.
116
Health Cloud Risk Scoring Data TablesSalesforce Health Cloud Implementation Guide

2. Enter the following:
DescriptionField
Reference to the request for the procedure.Request
The individual account that represents the patient.Account
Status of the procedure.Status
High-level categorization of the procedure.Category
Industry-standard code for the procedure.Code
Industry-standard name for the procedure.Code Label
Anatomical location for the procedure.Body Site
Reason that the procedure was requested.Reason 1
Reason that the procedure was requested.Reason 2
Reason that the procedure was requested.Reason 3
Reason that the procedure was requested.Reason 4
Date and time that the procedure was performed.Performed Date Time
Indicates that the procedure was not performed as scheduled.Not Performed
Reason that the procedure wasn’t performed.Reason Not Performed
Encounter associated with the procedure.Encounter
Physical location where the procedure was performed, such as
a clinic or a medical office.
Location
Result of the procedure.Outcome
Name of the report related to the procedure.Report
Code that identifies any resulting complications.Complication
Items used during the procedure.Items Used
Instructions for care after the procedure.Follow Up Instructions
Additional information about the procedure.Notes
Record ID from a system outside of Salesforce.Source System ID
3. Save your work.
Manage Procedure Performer Records
Use the Procedure Performer tab to manage the relevant data about the practitioners who perform a procedure on a patient.
117
Health Cloud Risk Scoring Data TablesSalesforce Health Cloud Implementation Guide

The EHR Procedure Performer tab contains information about a procedure such as which practitioner performed it and what their role
was.
1. From the Health Cloud - Admin Home page, select the EHR Procedure Performer tab, and click New.
2. Enter the following:
DescriptionField
Name of the procedure.Procedure
Name of the practitioner performing the procedure.Performer
Practitioner’s role during the procedure.Performer Role
3. Save your work.
Manage Procedure Requests
Use the EHR Procedure Requests tab to manage the relevant data about requests for a patient to undergo a medical procedure.
The EHR Procedure Request tab contains information about a procedure such as who ordered it, the reason it was requested, and its
priority.
1. From the Health Cloud - Admin Home page, select the EHR Procedure Requests tab, and click New.
2. Enter the following:
DescriptionField
The individual account that represents the patient.Account
Name of the practitioner making the request.Ordered By
High-level categorization of the procedure.Category
Industry-standard code for the procedure.Code
Industry-standard name for the procedure.Code Label
Anatomical location for the procedure.Body Site
Reason that the procedure was requested.Reason 1
Reason that the procedure was requested.Reason 2
Reason that the procedure was requested.Reason 3
Reason that the procedure was requested.Reason 4
Priority of the procedure.Priority
Date and time the request was created.Ordered On
Scheduled date and time to perform the procedure.Scheduled Date Time
Encounter associated with the procedure.Encounter
Status of the procedure.Status
118
Health Cloud Risk Scoring Data TablesSalesforce Health Cloud Implementation Guide
DescriptionField
Additional information about the procedure.Notes
Record ID from a system outside of Salesforce.Source System ID
3. Save your work.
Recalculate Patient Risk Scores
EDITIONS
Available in: Salesforce
Classic
Available in: Enterprise,
Performance, Unlimited,
and Developer Editions
You can recalculate patient Centers for Medicare and Medicaid Services (CMS) risk scores in Health
Cloud with a batch Apex job using the HcCMSRiskScoringScheduledJob class. You can
either run the job manually as needed or schedule it.
Risk scores are recalculated for patient records that are affiliated with a care program and have the
Recalculate flag set to true. The flag resets to true whenever a patient’s information changes.
Recalculate Patient Risk Scores as Needed
Recalculate Medicare and Medicaid patient risk scores in Health Cloud as needed with a batch
Apex job.
Recalculate Patient Risk Scores at a Scheduled Time
Recalculate Medicare and Medicaid patient risk scores in Health Cloud at a specific time with a batch Apex job.
Recalculate Patient Risk Scores as Needed
EDITIONS
Available in: Salesforce
Classic
Available in: Enterprise,
Performance, Unlimited,
and Developer Editions
USER PERMISSIONS
To execute Apex classes:
•Author Apex
To invoke the class:
•Health Cloud Admin and
Health Cloud Analytics
Admin
Recalculate Medicare and Medicaid patient risk scores in Health Cloud as needed with a batch Apex
job.
Invoke the HcCMSRiskScoringScheduledJob class in your Apex job.
1. Open the Developer Console.
2. Select Debug | Open Execute Anonymous Window.
3. In the Enter Apex Code window, enter this text.
HealthcloudGA.HcCMSRiskScoringScheduledJob s = new
HealthcloudGA.HcCMSRiskScoringScheduledJob (year);
s.execute(null);
•Enter the year as a four-digit number, for example, 2017.
•The batch size is optional. If you don’t specify a batch size, the job processes up to 200
records.
•Optionally, set a value to ignore the recalculate flag and run the algorithm for all active
patients.
4. Click Execute.
Recalculate Patient Risk Scores at a Scheduled Time
Recalculate Medicare and Medicaid patient risk scores in Health Cloud at a specific time with a batch Apex job.
119
Recalculate Patient Risk ScoresSalesforce Health Cloud Implementation Guide
Use the HcCMSRiskScoringScheduledJob class and the Schedule.system method to schedule the job and a CronTrigger
expression to initiate the schedule.
Example: To run the HcCMSRiskScoringScheduledJob class each day at midnight, select Debug | Open Execute
Anonymous Window. Enter the following text in the Enter Apex Code window in Developer Console.
HealthcloudGA.HcCMSRiskScoringScheduledJob riskJob =
new HealthcloudGA.HcCMSRiskScoringScheduledJob (2017);
String sch = '0 00 00 * * ?';
String jobName = 'Risk Scoring Job';
System.schedule('Risk Scoring Job', sch , riskJob);
Protect Your Health Data with Salesforce Shield
Salesforce Shield is a set of security tools you can use to comply with regulations on storing sensitive protected health information. With
Platform Encryption, Event Monitoring, and and Field Audit Trail, you can monitor usage, prevent malicious activity, and protect data at
rest while allowing full functionality.
Platform Encryption
Platform Encryption allows you to natively encrypt your most sensitive data at rest, allowing you to address HIPAA requirements for
storing sensitive protected health information. Encryption helps you protect PII, PHI, sensitive, confidential, or proprietary data. It enables
you to meet both external and internal data compliance policies while keeping critical app functionality—like search, workflow, and
validation rules. You keep full control over encryption keys and can set encrypted data permissions to protect sensitive data from
unauthorized users.
Event Monitoring
Event Monitoring gives you access to detailed performance, security, and usage data on all your Salesforce apps. Every interaction is
tracked and accessible via API, so you can view it in the data visualization app of your choice. See who is accessing critical business data
when, and from where they’re getting access. Understand user adoption across your apps. Troubleshoot and optimize performance to
improve end-user experience. Event Monitoring data can be easily imported into any data visualization or application monitoring tool
like Analytics, Splunk, or New Relic. To get started, check out our Event Monitoring Trailhead module.
Field Audit Trail
Field Audit Trail lets you know the state and value of your data for any date, at any time. You define a policy to retain archived field history
data up to 10 years, independent of field history tracking. This feature helps you comply with industry regulations related to audit
capability and data retention. You can use it for regulatory compliance, internal governance, audit, or customer service. Field Audit Trail
helps you create a forensic data-level audit trail with up to 10 years of history, and set triggers for when data is deleted.
SEE ALSO:
Salesforce Help: Platform Encryption
120
Protect Your Health Data with Salesforce ShieldSalesforce Health Cloud Implementation Guide
