INSTALL GUIDE
INSTALL_GUIDE
INSTALL_GUIDE
User Manual: Pdf
Open the PDF directly: View PDF ![]() .
.
Page Count: 16

Installation Guide for sundials v2.7.0
Eddy Banks, Aaron M. Collier, Alan C. Hindmarsh, Radu Serban, and Carol S. Woodward
Center for Applied Scientific Computing
Lawrence Livermore National Laboratory
September 26, 2016
UCRL-SM-208116
DISCLAIMER
This document was prepared as an account of work sponsored by an agency of the United States
government. Neither the United States government nor Lawrence Livermore National Security, LLC,
nor any of their employees makes any warranty, expressed or implied, or assumes any legal liability or
responsibility for the accuracy, completeness, or usefulness of any information, apparatus, product, or
process disclosed, or represents that its use would not infringe privately owned rights. Reference herein
to any specific commercial product, process, or service by trade name, trademark, manufacturer, or
otherwise does not necessarily constitute or imply its endorsement, recommendation, or favoring by
the United States government or Lawrence Livermore National Security, LLC. The views and opinions
of authors expressed herein do not necessarily state or reflect those of the United States government
or Lawrence Livermore National Security, LLC, and shall not be used for advertising or product
endorsement purposes.
This work was performed under the auspices of the U.S. Department of Energy by Lawrence Livermore
National Laboratory under Contract DE-AC52-07NA27344.
Approved for public release; further dissemination unlimited
Contents
1 SUNDIALS Package Installation Procedure 1
1.1 CMake-basedinstallation .................................. 2
1.1.1 Configuring, building, and installing on Unix-like systems . . . . . . . . . . . . 2
1.1.2 Configuration options (Unix/Linux) . . . . . . . . . . . . . . . . . . . . . . . . 4
1.1.3 Configurationexamples ............................... 7
1.1.4 Working with external Libraries . . . . . . . . . . . . . . . . . . . . . . . . . . 8
1.2 Building and Running Examples . . . . . . . . . . . . . . . . . . . . . . . . . . . . . . 9
1.3 Configuring, building, and installing on Windows . . . . . . . . . . . . . . . . . . . . . 9
1.4 Installed libraries and exported header files . . . . . . . . . . . . . . . . . . . . . . . . 10
3

Chapter 1
SUNDIALS Package Installation
Procedure
The installation of any sundials package is accomplished by installing the sundials suite as a whole,
according to the instructions that follow. The same procedure applies whether or not the downloaded
file contains one or all solvers in sundials.
The sundials suite (or individual solvers) are distributed as compressed archives (.tar.gz).
The name of the distribution archive is of the form solver-x.y.z.tar.gz, where solver is one of:
sundials,cvode,cvodes,arkode,ida,idas, or kinsol, and x.y.z represents the version number
(of the sundials suite or of the individual solver) . To begin the installation, first uncompress and
expand the sources, by issuing
% tar xzf solver-x.y.z.tar.gz
This will extract source files under a directory solver-x.y.z.
Starting with version 2.6.0 of sundials, CMake is the only supported method of installation.
The explanations on the installation procedure begins with a few common observations:
•The remainder of this chapter will follow these conventions:
srcdir is the directory solver-x.y.z created above; i.e., the directory containing the sundials
sources.
builddir is the (temporary) directory under which sundials is built.
instdir is the directory under which the sundials exported header files and libraries will be
installed. Typically, header files are exported under a directory instdir/include while
libraries are installed under instdir/lib, with instdir specified at configuration time.
•For sundials CMake-based installation, in-source builds are prohibited; in other words, the
build directory builddir can not be the same as srcdir and such an attempt will lead to an error.
This prevents “polluting” the source tree and allows efficient builds for different configurations
and/or options.
•The installation directory instdir can not be the same as the source directory srcdir.
!
•By default, only the libraries and header files are exported to the installation directory instdir.
If enabled by the user (with the appropriate toggle for CMake), the examples distributed with
sundials will be built together with the solver libraries but the installation step will result
in exporting (by default in a subdirectory of the installation directory) the example sources
and sample outputs together with automatically generated configuration files that reference the
installed sundials headers and libraries. As such, these configuration files for the sundials ex-
amples can be used as ”templates” for your own problems. CMake installs CMakeLists.txt files
and also (as an option available only under Unix/Linux) Makefile files. Note this installation
1

approach also allows the option of building the sundials examples without having to install
them. (This can be used as a sanity check for the freshly built libraries.)
•Even if generation of shared libraries is enabled, only static libraries are created for the FCMIX
modules. (Because of the use of fixed names for the Fortran user-provided subroutines, FCMIX
shared libraries would result in ”undefined symbol” errors at link time.)
1.1 CMake-based installation
CMake-based installation provides a platform-independent build system. CMake can generate Unix
and Linux Makefiles, as well as KDevelop, Visual Studio, and (Apple) XCode project files from the
same configuration file. In addition, CMake also provides a GUI front end and which allows an
interactive build and installation process.
The sundials build process requires CMake version 2.8.1 or higher and a working compiler. On
Unix-like operating systems, it also requires Make (and curses, including its development libraries, for
the GUI front end to CMake, ccmake), while on Windows it requires Visual Studio. While many Linux
distributions offer CMake, the version included is probably out of date. Many new CMake features
have been added recently, and you should download the latest version from http://www.cmake.org.
Build instructions for CMake (only necessary for Unix-like systems) can be found on the CMake
website. Once CMake is installed, Linux/Unix users will be able to use ccmake, while Windows users
will be able to use CMakeSetup.
As previously noted, when using CMake to configure, build and install sundials, it is always
required to use a separate build directory. While in-source builds are possible, they are explicitly
prohibited by the sundials CMake scripts (one of the reasons being that, unlike autotools, CMake
does not provide a make distclean procedure and it is therefore difficult to clean-up the source tree
after an in-source build). By ensuring a separate build directory, it is an easy task for the user to
clean-up all traces of the build by simply removing the build directory. CMake does generate a make
clean which will remove files generated by the compiler and linker.
1.1.1 Configuring, building, and installing on Unix-like systems
The default CMake configuration will build all included solvers and associated examples and will build
static and shared libraries. The installdir defaults to /usr/local and can be changed by setting the
CMAKE INSTALL PREFIX variable. Support for FORTRAN and all other options are disabled.
CMake can be used from the command line with the cmake command, or from a curses-based
GUI by using the ccmake command. Examples for using both methods will be presented. For the
examples shown it is assumed that there is a top level sundials directory with appropriate source,
build and install directories:
% mkdir (...)sundials/instdir
% mkdir (...)sundials/builddir
% cd (...)sundials/builddir
Building with the GUI
Using CMake with the GUI follows this general process:
•Select and modify values, run configure (ckey)
•New values are denoted with an asterisk
•To set a variable, move the cursor to the variable and press enter
–If it is a boolean (ON/OFF) it will toggle the value
–If it is string or file, it will allow editing of the string
2
–For file and directories, the <tab> key can be used to complete
•Repeat until all values are set as desired and the generate option is available (gkey)
•Some variables (advanced variables) are not visible right away
•To see advanced variables, toggle to advanced mode (tkey)
•To search for a variable press /key, and to repeat the search, press the nkey
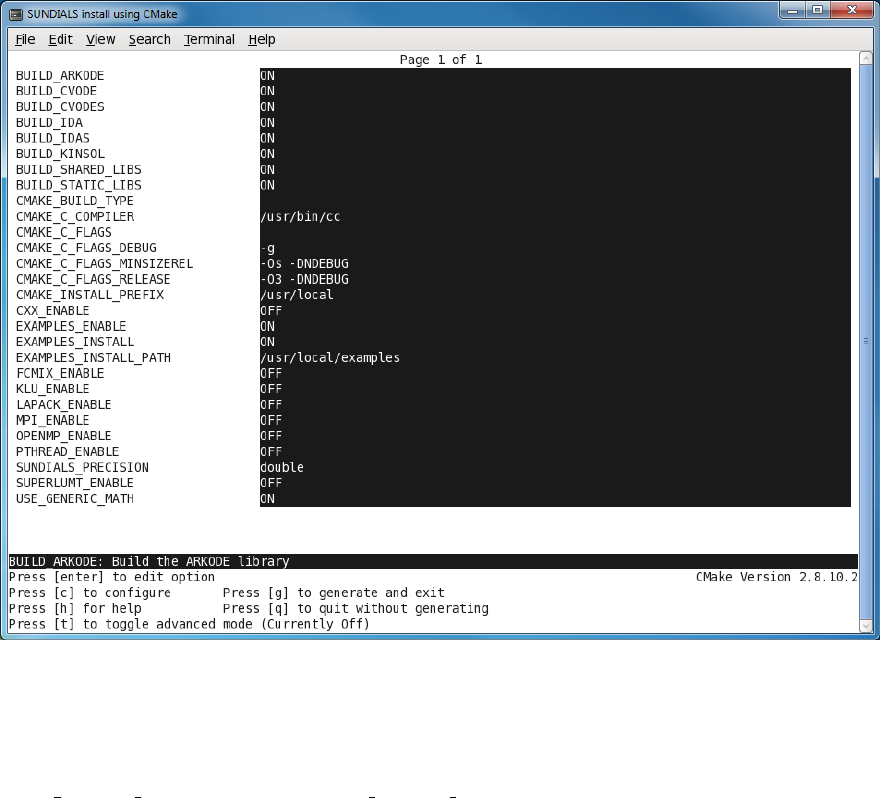
To build the default configuration using the GUI, from the builddir enter the ccmake command
and point to the srcdir:
% ccmake ../srcdir
The default configuration screen is shown in Figure 1.1.
Figure 1.1: Default configuration screen. Note: Initial screen is empty. To get this default config-
uration, press ’c’ repeatedly (accepting default values denoted with asterisk) until the ’g’ option is
available.
The default instdir for both sundials and corresponding examples can be changed by setting the
CMAKE INSTALL PREFIX and the EXAMPLES INSTALL PATH as shown in figure 1.2.
Pressing the (gkey) will generate makefiles including all dependencies and all rules to build sun-
dials on this system. Back at the command prompt, you can now run:
% make
To install sundials in the installation directory specified in the configuration, simply run:
% make install
3
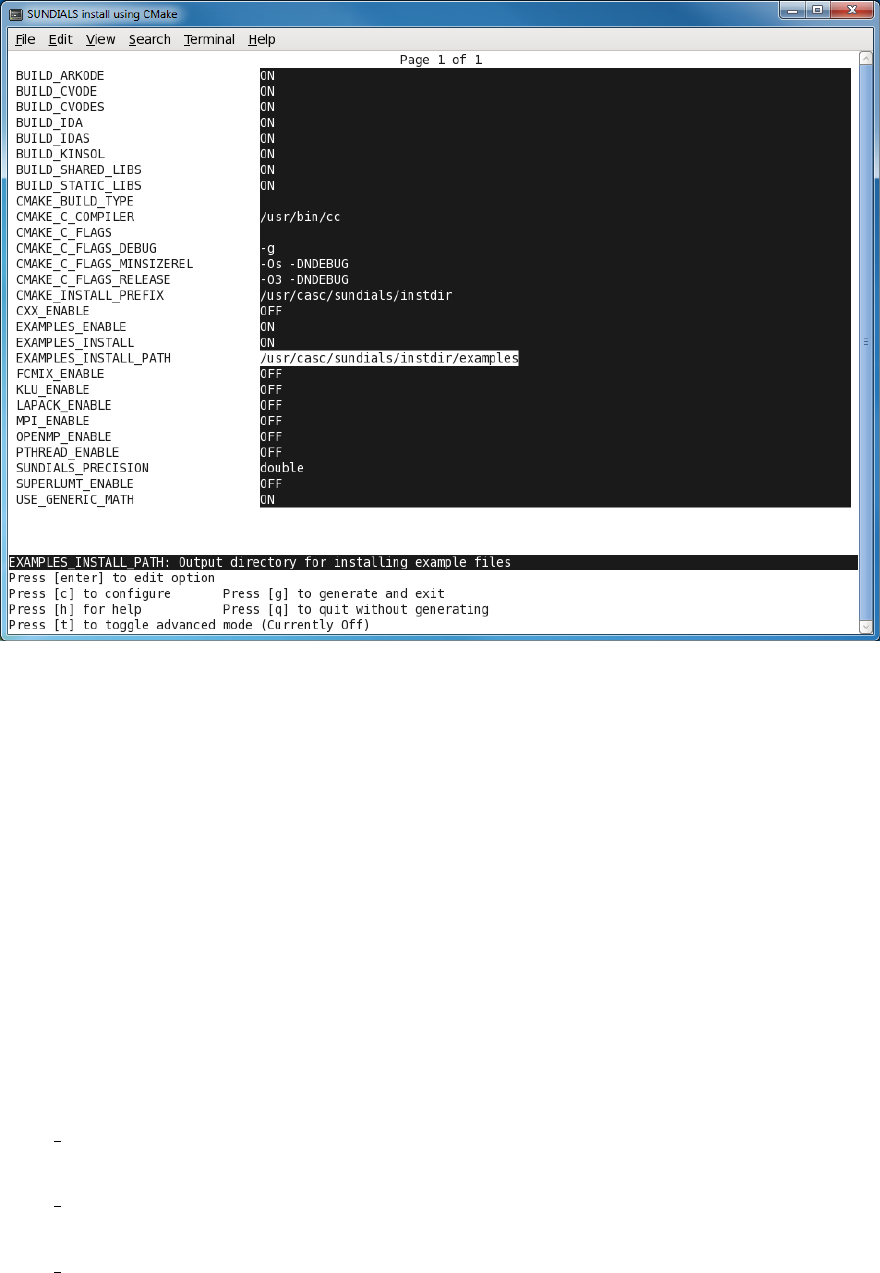
Figure 1.2: Changing the instdir for sundials and corresponding examples
Building from the command line
Using CMake from the command line is simply a matter of specifying CMake variable settings with
the cmake command. The following will build the default configuration:
% cmake -DCMAKE_INSTALL_PREFIX=/home/myname/sundials/instdir \
> -DEXAMPLES_INSTALL_PATH=/home/myname/sundials/instdir/examples \
> ../srcdir
% make
% make install
1.1.2 Configuration options (Unix/Linux)
A complete list of all available options for a CMake-based sundials configuration is provide below.
Note that the default values shown are for a typical configuration on a Linux system and are provided
as illustration only.
BUILD ARKODE - Build the ARKODE library
Default: ON
BUILD CVODE - Build the CVODE library
Default: ON
BUILD CVODES - Build the CVODES library
Default: ON
4
BUILD IDA - Build the IDA library
Default: ON
BUILD IDAS - Build the IDAS library
Default: ON
BUILD KINSOL - Build the KINSOL library
Default: ON
BUILD SHARED LIBS - Build shared libraries
Default: OFF
BUILD STATIC LIBS - Build static libraries
Default: ON
CMAKE BUILD TYPE - Choose the type of build, options are: None (CMAKE C FLAGS used) Debug
Release RelWithDebInfo MinSizeRel
Default:
CMAKE C COMPILER - C compiler
Default: /usr/bin/cc
CMAKE C FLAGS - Flags for C compiler
Default:
CMAKE C FLAGS DEBUG - Flags used by the compiler during debug builds
Default: -g
CMAKE C FLAGS MINSIZEREL - Flags used by the compiler during release minsize builds
Default: -Os -DNDEBUG
CMAKE C FLAGS RELEASE - Flags used by the compiler during release builds
Default: -O3 -DNDEBUG
CMAKE Fortran COMPILER - Fortran compiler
Default: /usr/bin/gfortran
Note: Fortran support (and all related options) are triggered only if either Fortran-C support is
enabled (FCMIX ENABLE is ON) or Blas/Lapack support is enabled (LAPACK ENABLE is ON).
CMAKE Fortran FLAGS - Flags for Fortran compiler
Default:
CMAKE Fortran FLAGS DEBUG - Flags used by the compiler during debug builds
Default:
CMAKE Fortran FLAGS MINSIZEREL - Flags used by the compiler during release minsize builds
Default:
CMAKE Fortran FLAGS RELEASE - Flags used by the compiler during release builds
Default:
CMAKE INSTALL PREFIX - Install path prefix, prepended onto install directories
Default: /usr/local
Note: The user must have write access to the location specified through this option. Exported
sundials header files and libraries will be installed under subdirectories include and lib of
CMAKE INSTALL PREFIX, respectively.
EXAMPLES ENABLE - Build the sundials examples
Default: ON
5

EXAMPLES INSTALL - Install example files
Default: ON
Note: This option is triggered only if building example programs is enabled (EXAMPLES ENABLE
ON). If the user requires installation of example programs then the sources and sample output
files for all sundials modules that are currently enabled will be exported to the directory
specified by EXAMPLES INSTALL PATH. A CMake configuration script will also be automatically
generated and exported to the same directory. Additionally, if the configuration is done under
a Unix-like system, makefiles for the compilation of the example programs (using the installed
sundials libraries) will be automatically generated and exported to the directory specified by
EXAMPLES INSTALL PATH.
EXAMPLES INSTALL PATH - Output directory for installing example files
Default: /usr/local/examples
Note: The actual default value for this option will an examples subdirectory created under
CMAKE INSTALL PREFIX.
FCMIX ENABLE - Enable Fortran-C support
Default: OFF
HYPRE ENABLE - Enable hypre support
Default: OFF
HYPRE INCLUDE DIR - Path to hypre header files
HYPRE LIBRARY - Path to hypre installed library
KLU ENABLE - Enable KLU support
Default: OFF
KLU INCLUDE DIR - Path to SuiteSparse header files
KLU LIBRARY DIR - Path to SuiteSparse installed library files
LAPACK ENABLE - Enable Lapack support
Default: OFF
Note: Setting this option to ON will trigger the two additional options see below.
LAPACK LIBRARIES - Lapack (and Blas) libraries
Default: /usr/lib/liblapack.so;/usr/lib/libblas.so
Note: CMake will search for these libraries in your LD LIBRARY PATH prior to searching default
system paths.
MPI ENABLE - Enable MPI support
Default: OFF
Note: Setting this option to ON will trigger several additional options related to MPI.
MPI MPICC -mpicc program
Default:
MPI RUN COMMAND - Specify run command for MPI
Default: mpirun
Note: This can either be set to mpirun for OpenMPI or srun if jobs are managed by SLURM -
Simple Linux Utility for Resource Management as exists on LLNL’s high performance computing
clusters.
MPI MPIF77 -mpif77 program
Default:
Note: This option is triggered only if using MPI compiler scripts (MPI USE MPISCRIPTS is ON)
and Fortran-C support is enabled (FCMIx ENABLE is ON).
6

OPENMP ENABLE - Enable OpenMP support
Default: OFF
Turn on support for the OpenMP based nvector.
PETSC ENABLE - Enable PETSc support
Default: OFF
PETSC INCLUDE DIR - Path to PETSc header files
PETSC LIBRARY DIR - Path to PETSc installed library files
PTHREAD ENABLE - Enable Pthreads support
Default: OFF
Turn on support for the Pthreads based nvector.
SUNDIALS PRECISION - Precision used in sundials, options are: double, single or extended
Default: double
SUPERLUMT ENABLE - Enable SUPERLU MT support
Default: OFF
SUPERLUMT INCLUDE DIR - Path to SuperLU MT header files (typically SRC directory)
SUPERLUMT LIBRARY DIR - Path to SuperLU MT installed library files
SUPERLUMT THREAD TYPE - Must be set to Pthread or OpenMP
USE GENERIC MATH - Use generic (stdc) math libraries
Default: ON
1.1.3 Configuration examples
The following examples will help demonstrate usage of the CMake configure options.
To configure sundials using the default C and Fortran compilers, and default mpicc and mpif77
parallel compilers, enable compilation of examples, and install libraries, headers, and example sources
under subdirectories of /home/myname/sundials/, use:
% cmake \
> -DCMAKE_INSTALL_PREFIX=/home/myname/sundials/instdir \
> -DEXAMPLES_INSTALL_PATH=/home/myname/sundials/instdir/examples \
> -DMPI_ENABLE=ON \
> -DFCMIX_ENABLE=ON \
> /home/myname/sundials/srcdir
%
% make install
%
To disable installation of the examples, use:
% cmake \
> -DCMAKE_INSTALL_PREFIX=/home/myname/sundials/instdir \
> -DEXAMPLES_INSTALL_PATH=/home/myname/sundials/instdir/examples \
> -DMPI_ENABLE=ON \
> -DFCMIX_ENABLE=ON \
> -DEXAMPLES_INSTALL=OFF \
> /home/myname/sundials/srcdir
%
% make install
%
7
1.1.4 Working with external Libraries
The sundials Suite contains many options to enable implementation flexibility when developing
solutions. The following are some notes addressing specific configurations when using the supported
third party libraries.
Building with LAPACK and BLAS
To enable LAPACK and BLAS libraries, set the LAPACK ENABLE option to ON. If the directory contain-
ing the LAPACK and BLAS libraries is in the LD LIBRARY PATH environment variable, CMake will
set the LAPACK LIBRARIES variable accordingly, otherwise CMake will attemp to find the LAPACK
and BLAS libraries in standard system locations. To explicitly tell CMake what libraries to use, the
LAPACK LIBRARIES varible can be set to the desired libraries. Example:
% cmake \
> -DCMAKE_INSTALL_PREFIX=/home/myname/sundials/instdir \
> -DEXAMPLES_INSTALL_PATH=/home/myname/sundials/instdir/examples \
> -DLAPACK_LIBRARIES=/mypath/lib/liblapack.so;/mypath/lib/libblas.so \
> /home/myname/sundials/srcdir
%
% make install
%
Building with KLU
The KLU libraries are part of SuiteSparse, a suite of sparse matrix software, available from the Texas
A&M University website: http://faculty.cse.tamu.edu/davis/suitesparse.html.sundials has
been tested with SuiteSparse version 4.5.3. To enable KLU, set KLU ENABLE to ON, set KLU INCLUDE DIR
to the include path of the KLU installation and set KLU LIBRARY DIR to the lib path of the KLU
installation. The CMake configure will result in populating the following variables: AMD LIBRARY,
AMD LIBRARY DIR,BTF LIBRARY,BTF LIBRARY DIR,COLAMD LIBRARY,COLAMD LIBRARY DIR, and
KLU LIBRARY
Building with SuperLU MT
The SuperLU MT libraries are available for download from the Lawrence Berkeley National Labo-
ratory website: http://crd-legacy.lbl.gov/∼xiaoye/SuperLU/#superlu mt.sundials has been
tested with SuperLU MT version 3.1. To enable SuperLU MT, set SUPERLUMT ENABLE to ON, set
SUPERLUMT INCLUDE DIR to the SRC path of the SuperLU MT installation, and set the variable
SUPERLUMT LIBRARY DIR to the lib path of the SuperLU MT installation. At the same time, the
variable SUPERLUMT THREAD TYPE must be set to either Pthread or OpenMP.
Do not mix thread types when building sundials solvers. If threading is enabled for sundials by
having either OPENMP ENABLE or PTHREAD ENABLE set to ON then SuperLU MT should be set to use
the same threading type.
!
Building with PETSc
The PETSc libraries are available for download from the Argonne National Laboratory website:
http://www.mcs.anl.gov/petsc.sundials has been tested with PETSc version 3.7.2. To en-
able PETSc, set PETSC ENABLE to ON, set PETSC INCLUDE DIR to the include path of the PETSc
installation, and set the variable PETSC LIBRARY DIR to the lib path of the PETSc installation.
Building with hypre
The hypre libraries are available for download from the Lawrence Livermore National Laboratory web-
site: http://computation.llnl.gov/projects/hypre-scalable-linear-solvers-multigrid-methods.
8
sundials has been tested with hypre version 2.11.1. To enable hypre, set HYPRE ENABLE to ON, set
HYPRE INCLUDE DIR to the include path of the hypre installation, and set the variable HYPRE LIBRARY DIR
to the lib path of the hypre installation.
1.2 Building and Running Examples
Each of the sundials solvers is distributed with a set of examples demonstrating basic usage. To
build and install the examples, set both EXAMPLES ENABLE and EXAMPLES INSTALL to ON. Specify the
installation path for the examples with the variable EXAMPLES INSTALL PATH. CMake will generate
CMakeLists.txt configuration files (and Makefile files if on Linux/Unix) that reference the installed
sundials headers and libraries.
Either the CMakeLists.txt file or the traditional Makefile may be used to build the examples as
well as serve as a template for creating user developed solutions. To use the supplied Makefile simply
run make to compile and generate the executables. To use CMake from within the installed example
directory, run cmake (or ccmake to use the GUI) followed by make to compile the example code.
Note that if CMake is used, it will overwrite the traditional Makefile with a new CMake-generated
Makefile. The resulting output from running the examples can be compared with example output
bundled in the sundials distribution.
NOTE: There will potentially be differences in the output due to machine architecture, compiler
versions, use of third party libraries etc.
!
1.3 Configuring, building, and installing on Windows
CMake can also be used to build sundials on Windows. To build sundials for use with Visual
Studio the following steps should be performed:
1. Unzip the downloaded tar file(s) into a directory. This will be the srcdir
2. Create a separate builddir
3. Open a Visual Studio Command Prompt and cd to builddir
4. Run cmake-gui ../srcdir
(a) Hit Configure
(b) Check/Uncheck solvers to be built
(c) Change CMAKE INSTALL PREFIX to instdir
(d) Set other options as desired
(e) Hit Generate
5. Back in the VS Command Window:
(a) Run msbuild ALL BUILD.vcxproj
(b) Run msbuild INSTALL.vcxproj
The resulting libraries will be in the instdir. The sundials project can also now be opened in Visual
Studio. Double click on the ALL BUILD.vcxproj file to open the project. Build the whole solution to
create the sundials libraries. To use the sundials libraries in your own projects, you must set the
include directories for your project, add the sundials libraries to your project solution, and set the
sundials libraries as dependencies for your project.
9

1.4 Installed libraries and exported header files
Using the CMake sundials build system, the command
% make install
will install the libraries under libdir and the public header files under includedir. The values for these
directories are instdir/lib and instdir/include, respectively. The location can be changed by setting
the CMake variable CMAKE INSTALL PREFIX. Although all installed libraries reside under libdir/lib,
the public header files are further organized into subdirectories under includedir/include.
The installed libraries and exported header files are listed for reference in Tables 1.1 and 1.2. The
file extension .lib is typically .so for shared libraries and .a for static libraries. Note that, in the
Tables, names are relative to libdir for libraries and to includedir for header files.
A typical user program need not explicitly include any of the shared sundials header files from
under the includedir/include/sundials directory since they are explicitly included by the appropriate
solver header files (e.g.,cvode dense.h includes sundials dense.h). However, it is both legal and
safe to do so, and would be useful, for example, if the functions declared in sundials dense.h are to
be used in building a preconditioner.
10
Table 1.1: sundials libraries and header files
shared Libraries n/a
Header files sundials/sundials config.h sundials/sundials types.h
sundials/sundials math.h
sundials/sundials nvector.h sundials/sundials fnvector.h
sundials/sundials direct.h sundials/sundials lapack.h
sundials/sundials dense.h sundials/sundials band.h
sundials/sundials sparse.h
sundials/sundials iterative.h sundials/sundials spgmr.h
sundials/sundials spbcgs.h sundials/sundials sptfqmr.h
sundials/sundials pcg.h sundials/sundials spfgmr.h
nvector serial Libraries libsundials nvecserial.lib libsundials fnvecserial.a
Header files nvector/nvector serial.h
nvector parallel Libraries libsundials nvecparallel.lib libsundials fnvecparallel.a
Header files nvector/nvector parallel.h
nvector openmp Libraries libsundials nvecopenmp.lib libsundials fnvecopenmp.a
Header files nvector/nvector openmp.h
nvector pthreads Libraries libsundials nvecpthreads.lib libsundials fnvecpthreads.a
Header files nvector/nvector pthreads.h
cvode Libraries libsundials cvode.lib libsundials fcvode.a
Header files cvode/cvode.h cvode/cvode impl.h
cvode/cvode direct.h cvode/cvode lapack.h
cvode/cvode dense.h cvode/cvode band.h
cvode/cvode diag.h
cvode/cvode sparse.h cvode/cvode klu.h
cvode/cvode superlumt.h
cvode/cvode spils.h cvode/cvode spgmr.h
cvode/cvode sptfqmr.h cvode/cvode spbcgs.h
cvode/cvode bandpre.h cvode/cvode bbdpre.h
cvodes Libraries libsundials cvodes.lib
Header files cvodes/cvodes.h cvodes/cvodes impl.h
cvodes/cvodes direct.h cvodes/cvodes lapack.h
cvodes/cvodes dense.h cvodes/cvodes band.h
cvodes/cvodes diag.h
cvodes/cvodes sparse.h cvodes/cvodes klu.h
cvodes/cvodes superlumt.h
cvodes/cvodes spils.h cvodes/cvodes spgmr.h
cvodes/cvodes sptfqmr.h cvodes/cvodes spbcgs.h
cvodes/cvodes bandpre.h cvodes/cvodes bbdpre.h
arkode Libraries libsundials arkode.lib libsundials farkode.a
Header files arkode/arkode.h arkode/arkode impl.h
arkode/arkode direct.h arkode/arkode lapack.h
arkode/arkode dense.h arkode/arkode band.h
arkode/arkode sparse.h arkode/arkode klu.h
arkode/arkode superlumt.h
arkode/arkode spils.h arkode/arkode spgmr.h
arkode/arkode sptfqmr.h arkode/arkode spbcgs.h
arkode/arkode pcg.h arkode/arkode spfgmr.h
arkode/arkode bandpre.h arkode/arkode bbdpre.h
11
Table 1.2: sundials libraries and header files (cont.)
ida Libraries libsundials ida.lib libsundials fida.a
Header files ida/ida.h ida/ida impl.h
ida/ida direct.h ida/ida lapack.h
ida/ida dense.h ida/ida band.h
ida/ida sparse.h ida/ida klu.h
ida/ida superlumt.h
ida/ida spils.h ida/ida spgmr.h
ida/ida spbcgs.h ida/ida sptfqmr.h
ida/ida bbdpre.h
idas Libraries libsundials idas.lib
Header files idas/idas.h idas/idas impl.h
idas/idas direct.h idas/idas lapack.h
idas/idas dense.h idas/idas band.h
idas/idas sparse.h idas/idas klu.h
idas/idas superlumt.h
idas/idas spils.h idas/idas spgmr.h
idas/idas spbcgs.h idas/idas sptfqmr.h
idas/idas bbdpre.h
kinsol Libraries libsundials kinsol.lib libsundials fkinsol.a
Header files kinsol/kinsol.h kinsol/kinsol impl.h
kinsol/kinsol direct.h kinsol/kinsol lapack.h
kinsol/kinsol dense.h kinsol/kinsol band.h
kinsol/kinsol sparse.h kinsol/kinsol klu.h
kinsol/kinsol superlumt.h
kinsol/kinsol spils.h kinsol/kinsol spgmr.h
kinsol/kinsol spbcgs.h kinsol/kinsol sptfqmr.h
kinsol/kinsol bbdpre.h kinsol/kinsol spfgmr.h
12
