Online Commerce Suite™ WebPay Integration Guide I Web Pay
User Manual: Pdf
Open the PDF directly: View PDF ![]() .
.
Page Count: 14

Online Commerce Suite™
WebPay Integration Guide
Release 1.3
March 2013
Merchant Partners
11121 Willows Rd NE
Suite 120
Redmond, WA 98052
© 2013 Merchant Partners. All Rights Reserved.

Table of Contents
Overview......................................................................................................................................................................Page 1
What's In This Guide........................................................................................................................................Page 1
How to Comment on This Guide......................................................................................................................Page 1
Contact Information....................................................................................................................................Page 1
Customer Service......................................................................................................................................Page 1
Documentation...........................................................................................................................................Page 1
Certified Networks......................................................................................................................................Page 1
Hardware Compatible List..........................................................................................................................Page 1
WebPay Forms & Descriptions..................................................................................................................................Page 2
WebPay Configuration................................................................................................................................................Page 3
FRISK Management Configure Option.............................................................................................................Page 3
Creating / Editing WebPay Forms....................................................................................................................Page 4
WebPay Forms.................................................................................................................................................Page 5
WebPay Form Field Descriptions.....................................................................................................................Page 6
WebPay Work Flow.....................................................................................................................................................Page 7
API Overview....................................................................................................................................................Page 8
WebPay URL....................................................................................................................................................Page 8
Custom Data....................................................................................................................................................Page 9
URL generation Sample Code...................................................................................................................Page 9
Post-Back URL...............................................................................................................................................Page 10
Post-back URL Processing......................................................................................................................Page 11
Online Commerce Suite™ WebPay Integration Guide

Overview
This document provides technical information to aid in the integration and customization of the WebPay Gateway module.
It provides instructions for configuring the Online Commerce Suite Gateway to accept payments through WebPay and
describes the WebPay Web Service API with example code.
What's In This Guide
The remainder of this guide is organized into the following sections:
WebPay Configuration1. WebPay Form Field Descriptions2. WebPay Flow3. API Overview4. Sample Code5.
How to Comment on This Guide
Every effort has been made to produce an accurate and easy to understand WebPay Integration Guide.
Contact Information
For more information about Online Commerce Suite, refer to the following:
Customer Service
If you have problems with this document, or find that the instructions are incorrect, incomplete, or inadequate, please let
us know.
Send your comments to support@merchantpartners.com
Phone: (866) 242-9933
Documentation
Web Site URL: https://www.onlinemerchantcenter.com/mpartners/html/user_manuals.html
Certified Networks
Web Site URL: https://www.onlinemerchantcenter.com/mpartners/html/networks.html
Hardware Compatible List
Web Site URL: https://www.onlinemerchantcenter.com/mpartners/html/equipment.html
Page 1

WebPay Forms & Descriptions
Note: The Header, Form, and Footer fields will accept HTML.
WebPay Forms Description
Form Name Your choice for the name of the form you will be using for the checkout process. Make
sure that your form is named descriptively, so it is easy to identify later.
Form
The automatically generated form for your checkout process. Check or uncheck fields
in order for them to be made editable by the customer. You may also change the
descriptions for the fields here, i.e. Name On Card could be changed to Cardholder
Name, etc...
Form Style A selection of default layouts available to you for the checkout process.
Host Domain The domain (http or https) that your images will be hosted on.
Logo Path The path, on the Host Domain, where your logo image is hosted. If using additional
images (stylesheets, etc..), you'll need to ensure that the image tag is formated as:
<img src=>
Header Message Any text you want to have displayed below your logo. This text will appear on all pages
of the checkout process.
Footer Message Any text you want to be displayed at the bottom of the page. This text will be displayed
on all pages of the checkout process.
Accept Message This text will be displayed to the customer once their transaction has been approved.
You can also include links to return the customer back to your website, etc...
Decline Message This text will be displayed to the customer if their transaction is declined, along with the
details of why the transaction was declined.
Post Back URL The full URL (http or https) of the page on your web server which will receive and
process all transaction decline and accept messages. The request method will be in a
form of a POST.
WebPay URL This is the link that you will use to direct your customer from the site hosted on your
web server to the WebPay gateway to complete the checkout process.
Advanced Mode In the advanced tab, web developers have the ability to edit the HTML for the form
fields.
Page 2
WebPay Configuration
To get started with setting up WebPay to accept payments, first log into the Online Merchant Center using the login info
sent when your Online Commerce Suite Gateway account was set up.
To configure WebPay, you'll first need to generate a 3DES key for your Online Commerce Suite Gateway account. If
you've already got an account 3DES key, you can skip this section and continue to the Creating / Editing WebPay
Forms section
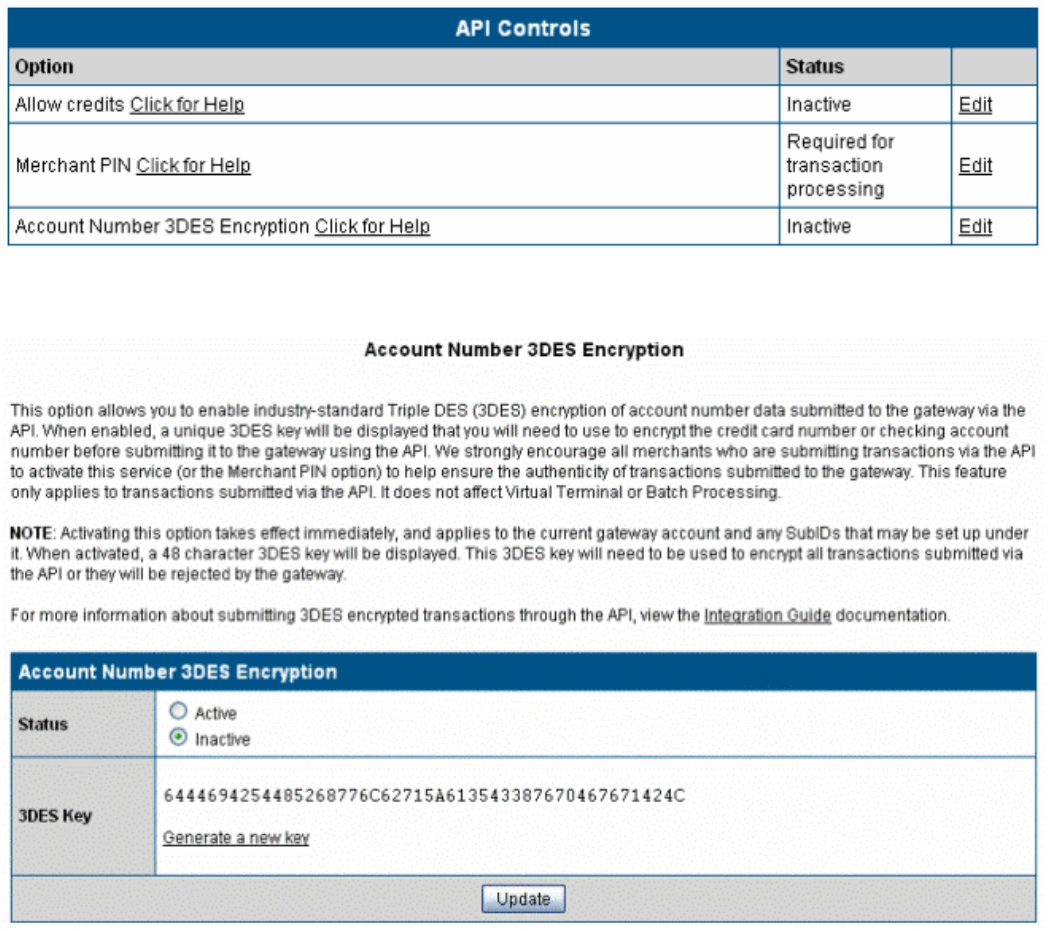
FRISK Management Configure Option
Once logged in, click on Configure Options under FRISK(TM) Management in the left navigation panel.
Find Account Number 3DES Encryption and click Edit to the right.
Click Generate a new key then Update on the next page.
Take note of this key, and keep it in a safe place. This key is used to generate secure WebPay URLs.
Note: Setting the Account Number 3DES Encryption Status to Active is not necessary for WebPay.
Page 3
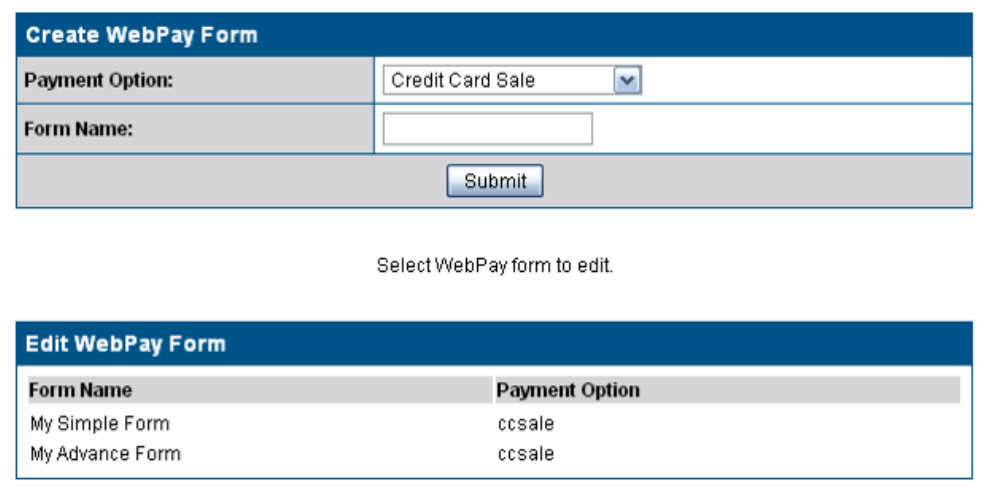
Creating / Editing WebPay Forms
Choose Credit Card Sale from the Payment Option drop-down, and enter a descriptive name for your form then click
Submit to create a form. The new form will appear below in the Edit WebPay Form box. To edit an existing form, click
the name of the form you'd like to edit.
Online Commerce Suite™ WebPay Integration Guide
Page 4
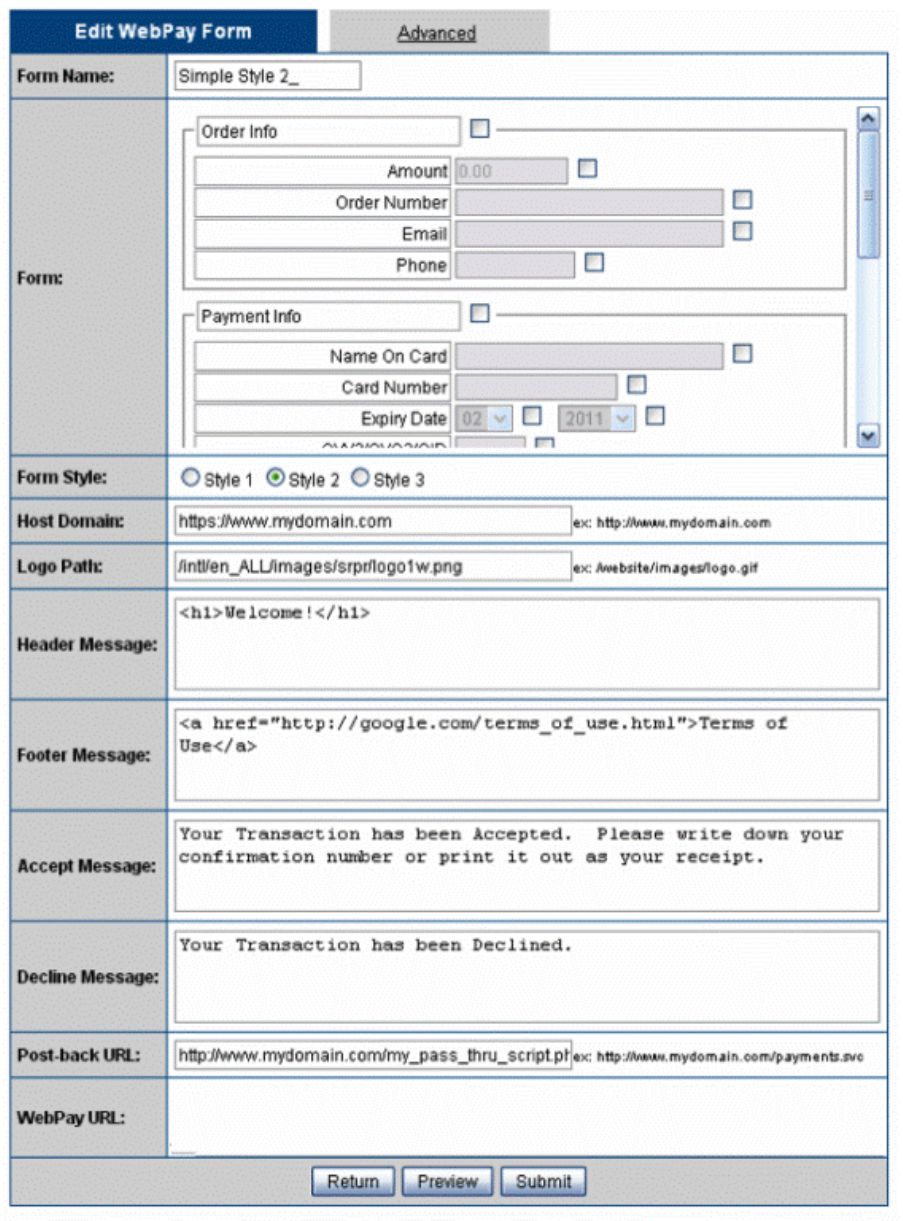
WebPay Forms
Form Name: Your choice for the name of the form you will be using for the checkout process. Make sure that your form is
named descriptively, so it is easy to identify later.
Form: The automatically generated form for your checkout process. Check or uncheck fields in order for them to be made
editable by the customer. You may also change the descriptions for the fields here, i.e. Name On Card could be changed
to Cardholder Name, etc...
Form Style: A selection of default layouts available to you for the checkout process.
Host Domain: The domain (http or https) that your images will be hosted on.
Logo Path: The path, on the Host Domain, where your logo image is hosted. If using additional images (stylesheets,
etc..), you'll need to ensure that the image tag is formated as: <img src=»»>
Header Message: Any text you want to have displayed below your logo. This text will appear on all pages of the checkout
process.
Footer Message: Any text you want to be displayed at the bottom of the page. This text will be displayed on all pages of
the checkout process.
Accept message: This text will be displayed to the customer once their transaction has been approved. You can also
include links to return the customer back to your website, etc...
Decline Message: This text will be displayed to the customer if their transaction is declined, along with the details of why
the transaction was declined.
Post-back URL: The full URL (http or https) of the page on your web server which will receive and process all transaction
decline and accept messages. The request method will be in a form of a POST.
WebPay URL: This is the link that you will use to direct your customer from the site hosted on your web server to the
WebPay gateway to complete the checkout process.
Advanced Mode: In the advanced tab, web developers have the ability to edit the HTML for the form fields.
Note: The Header, Form, and Footer fields will accept HTML.
Online Commerce Suite™ WebPay Integration Guide
Page 5
WebPay Form Field Descriptions
Online Commerce Suite™ WebPay Integration Guide
Page 6
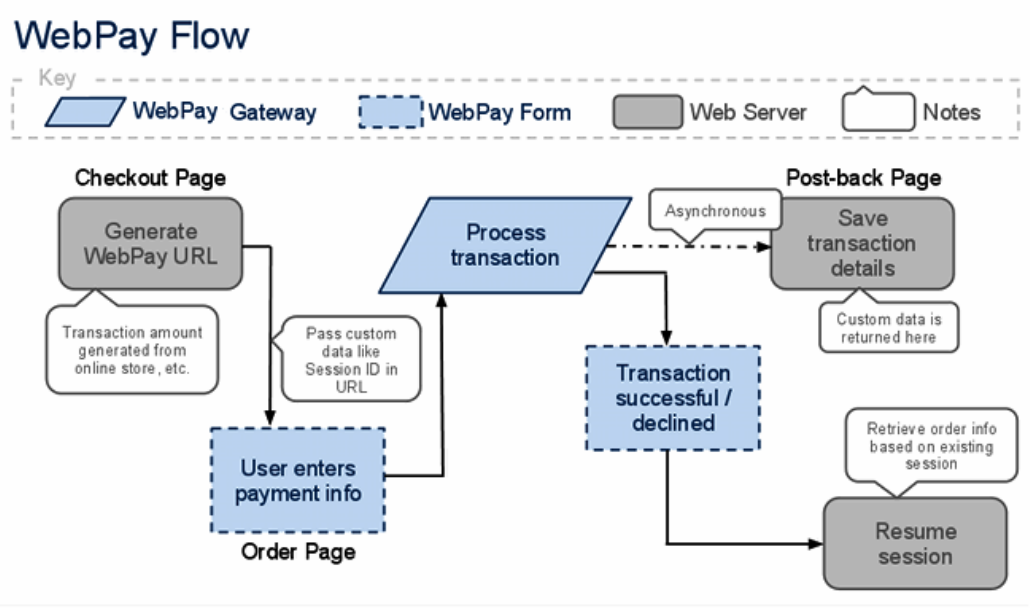
WebPay Work Flow
In the diagram below, the WebPay flow is outlined:
The Merchant/Client must generate/display the WebPay URL. Default URL is provided in the Online Merchant
Center. The WebPay URL can also be customized to include a transaction Amount and Custom Data:
•
WebPay Form ID (formid – required)♦ WebPay Session ID (sessionid – required)♦ Custom Data (customdata - optional)♦
A user clicks the link and is taken to the WebPay Order Page where the user enters their payment information
(credit card or ach info, email address, etc.)
•
The user submits the WebPay form and the transaction is processed by the Online Commerce Suite Gateway.• The Gateway makes a call to the Post-back URL (if enabled) providing transaction details (accepted/declined,
name, email address, any custom data) and asynchronously displays the WebPay transaction confirmation page
to the user.
•
The user can then be directed back to a page on the original site to continue the existing session.•
Page 7

API Overview
Since WebPay is a hosted PA-DSS compliant solution, it requires the end user to go to a secondary secure URL for
transmission of personal and financial data. It differs from the traditional Online Commerce Suite Gateway by having the
user communicate with the Gateway via their browser and a customizable WebPay form instead of your server
communicating directly with the Gateway. For your server to communicate with WebPay you form a URL with variables,
that the end user goes to in their browser.
First you'll need to generate a 3DES key from the Online Merchant Center for your Gateway AcctID. If you've already got
a 3DES key you can skip this step and continue to the WebPay URL section. Log onto the Online Merchant Center.
Once logged in, click on Configure Options under FRISK(TM) Management in the left navigation panel.• Scroll down to Account Number 3DES Encryption and click Edit to the right.• Click Generate a new key then Update.• Take note of this key, and keep it in a safe place. This key is in effect, used as your WebPay API key. • Note: Setting the Account Number 3DES Encryption Status to Active is not necessary for WebPay.•
WebPay URL
To create a WebPay form, click WebPay under Shopping Cart in the left navigation panel. Edit the fields as you wish. A
URL is generated at the bottom of the page in this form:
https://trans.merchantpartners.com/cgi-bin/WebPay.cgi?formid=SomeString&sessionid=SomeString
It contains two important GET vars:
Sessionid is used by WebPay for 3DES key look up.• Formid is an 3DES encypted string. The below customization to the formid string is not required unless you want
to specify an amount. The formid string contains Account ID, WebPay form ID, and transaction amount in the
following format: ACCOUNT_ID:SUB_ACCOUNT_ID:WEBPAY_FORM_ID:AMOUNT: Note: sub account id and
amount are optional. For instance, if you have the customer specify the amount in the WebPay form, you
wouldn't specify the amount. Specifying the Amount in the formid will override any amount specified in the
WebPay form.
•
If customizing the formid string (transaction Amount or Custom Data), the WebPay URL must be generated and displayed
on your server at the time of checkout.
You'll need to write code (or use the sample php code below) to generate the encrypted formid string from your Gateway
3DES key.
To encrypt the plain-text formid string, use your programming language's Triple DES encryption method(s) along with your
Gateway Account 3DES key. WebPay uses the ECB block cipher operation mode. For more info on Triple DES and ECB
visit http://en.wikipedia.org/wiki/Block_cipher_modes_of_operation
Online Commerce Suite™ WebPay Integration Guide
Page 8

Custom Data
The WebPay URL can also include a custom data GET var to pass-thru additional information about your order back to
your server (via the Post-back URL described below) once the transaction is complete. This information should be
encrypted similarly to the formid variable for security purposes, but can be used for any data you'd like to be relayed back
to your server. This GET var is called: customdata
Typically, you'd write an incomplete order record into a database and pass the order ID through WebPay, then get it from
WebPay's response, update the order record's details and mark its transaction status as complete.
In addition to passing information back to the Post-back URL, customdata can also be used to display custom
information within the WebPay Form. By formating the unencrypted customdata string like a URL (valid querystring –
name/value pairs with the values being URLEncoded), certain variables can be outputted directly on the WebPay form. An
example unencrypted customdata string would look like:
my_variable=Test&cdata1=0000234&another_variable=Is%20this%20a%20test%20phrase%3F
This example string, after encrypted and included in the WebPay URL, will be passed back to the Post-back URL (still
encrypted) and the cdata1 variable will be accessible in the WebPay from by typing ::CDATA1:: into the WebPay
Configuration form fields (Header Text, Footer Text, etc.) In total, five variables are available for use in a form: cdata1,
cdata2, cdata3, cdata4, and cdata5 => ::CDATA1::, ::CDATA2::, etc.
For more info, see the code sample below.
URL generation Sample Code
PHP code: http://mydomain.com/checkout.php
<?php
//utility function to convert key for use by PHP's mycrypt library
function hexToStr($hex){
$string = '';
for ($i = 0; $i < strlen($hex) - 1; $i += 2) {
$string .= chr(hexdec($hex[$i] . $hex[$i + 1]));
}
return $string;
}
//Set these values to the values for your account
$ip_account_id = 'TEST0'; // Your Gateway account ID
$ip_sub_account_id = ''; // Your Gateway account ID. If you are not using a sub account leave this blank
$ip_form_id = ''; // WebPay Encrypted Form ID string
$ip_session_id = ''; // WebPay Session ID
$ip_key = ''; // Account 3DES key from FRISK
$amount = '13.37'; // Transaction amount in US dollars, calculated by your cart, etc.
/* decrypt formid to get plain-text string */
// create initialization vector
$iv = mcrypt_create_iv(mcrypt_get_iv_size(MCRYPT_3DES, MCRYPT_MODE_ECB), MCRYPT_RAND);
$decoded = trim(mcrypt_decrypt(MCRYPT_3DES, hexToStr($ip_key), hexToStr($ip_form_id), MCRYPT_MODE_ECB, $iv));
$decoded_parts = explode(':', $decoded);
$ip_template_id = $decoded_parts[2]; // WebPay Form ID, i.e. '1000-123456789'
/* now rebuild URL */
// create initialization vector
$iv = mcrypt_create_iv(mcrypt_get_iv_size(MCRYPT_3DES, MCRYPT_MODE_ECB), MCRYPT_RAND);
// string to encrpyt, colon (:) deliminated
$string = $ip_account_id.':'.$ip_sub_account_id.':'.$ip_template_id.':'.$amount.':';
// encrypt string
$encoded = mcrypt_encrypt(MCRYPT_3DES, hexToStr($ip_key), $string, MCRYPT_MODE_ECB, $iv);
Online Commerce Suite™ WebPay Integration Guide
Page 9

$webpay_url = 'https://trans.merchantpartners.com/cgi-bin/WebPay.cgi?formid=';
$webpay_url .= bin2Hex($encoded);
$webpay_url .= '&sessionid=';
$webpay_url .= $ip_session_id;
/**
* Example of custom data pass-thru:
* Sometimes it's useful to pass an order id or server session id to WebPay in
* order to track the transaction.
* For example, to save a transaction for a user on your server, so when the
* user returns, the order can be presented to them again.
* The post-back URL entered on the WebPay form page will receive this custom
* data.
*/
$webpay_url .= '&customdata=';
// For this example we'd create an order record with a status set to incomplete in a database
// we'll assume we've gotten our insert_id for the order and assigned it.
// $mysql_order_id = mysql_insert_id(); // e.g., '00134'
// $custom = 'cdata1='.urlencode($mysql_order_id).','; // e.g., 'cdata1=000134,'
// now encrypt
// $encoded_custom = mcrypt_encrypt(MCRYPT_3DES, hexToStr($ip_key), $custom, MCRYPT_MODE_ECB, $iv);
// then append it to the URL
// $webpay_url .= bin2Hex($encoded_custom);
echo '<a href="'.$webpay_url.'">Checkout</a>';
?>
Displaying Amount and Custom Data in WebPay Form
HTML code using the Advanced Option:
"WebPay Form Header Text" section
When encrypting an amount, you will need to remove the amount <input> tag from your source as the encrypted amount
will always be used. You can display the encrypted amount to the customer by adding the ::AMOUNT:: in the source of
the html template.
Example: (Note: variable tokens are always uppercase)
<h1>You will be billed: <span>::AMOUNT::</span></h1>
To display the encrypted CDATA values
Example: (Note: variable tokens are always uppercase)
<h1>Order number: <span>::CDATA1::</span></h1>
Post-Back URL
If you'd like a script on your server to be notified when a transaction is completed (accept and decline), you can enter a
Post-back URL within them WebPay templates once you're logged into the Online Merchant Center. When the end user
submits the WebPay form, WebPay will make a request to that URL sending all of the fields in your WebPay form (minus
financial information like credit card number, expiration date, etc.) as POST variables, just like a normal form would. For
more information about response variables, please read the Response Format portion of the Online Commerce Suite
Gateway Integration Guide found at https://www.onlinemerchantcenter.com/mpartners/html/user_manuals.html or view
the Post-back URL Processing code sample below.
Online Commerce Suite™ WebPay Integration Guide
Page 10

Post-back URL Processing
PHP code: http://mydomain.com/webpay_postback.php
<?php
// utility function to convert key for use by PHP's mycrypt library
function hexToStr($hex){
$string = '';
for ($i = 0; $i < strlen($hex) - 1; $i += 2) {
$string .= chr(hexdec($hex[$i] . $hex[$i + 1]));
}
return $string;
}
/* Depending on your WebPay form's fields, the post-back URL will contain some of the following */
// typically required in a WebPay form:
$_POST['ccname']; // Name on card
$_POST['billaddr1']; // Billing street
$_POST['billaddr2']; // Billing address 2
$_POST['billcity']; // Billing city
$_POST['billstate']; // Billing state
$_POST['billzip']; // Billing postal code
// Always returned to post-back URL:
$_POST['action']; // Online Commerce Suite Gateway action, ex: ns_quicksale_cc
$_POST['acctid']; // Online Commerce Suite Gateway Account ID, ex: TEST0
$_POST['ci_ipaddress']; // Client IP address
$_POST['orderid']; // Online Commerce Suite Gateway Order ID
$_POST['ACCOUNTNUMBER']; // Last four of card number/check number prepended by asterisks, ex: ************4444
$_POST['Status']; // Status string, ex: Declined or Accepted
$_POST['transid']; // Online Commerce Suite transaction ID
// Always returned for declined transaction:
$_POST['Declined']; // Declined string, ex: DECLINED:0710940009:INVALID CARD NO 204:
$_POST['Reason']; // Declined reason string, ex: DECLINED:0710940009:INVALID CARD NO 204:
$_POST['rcode']; // Response code, ex: 0710940009
// Always returned for accepted transactions:
$_POST['Accepted']; // Accept string, ex: SALE:TEST:::46031495:::
$_POST['authcode]'; // Authcode, ex: TEST
// Any other fields you've created in a WebPay form
$_POST['my_field'];
/* retrieve custom data (as implemented in URL generation code above) */
if (isset($_POST['customdata'])) {
$ip_key = '6B44694254285268776C82715A613543E87670467671424C'; // Account 3DES key from FRISK
//create initialization vector
$iv = mcrypt_create_iv(mcrypt_get_iv_size(MCRYPT_3DES, MCRYPT_MODE_ECB), MCRYPT_RAND);
$decoded = trim(mcrypt_decrypt(MCRYPT_3DES, hexToStr($ip_key), $_POST['custom_data'], MCRYPT_MODE_ECB, $iv));
$custom = explode('&', $decoded);
$custom_data = array();
if (is_array($custom)) {
foreach ($custom as $pair) {
$kv = explode('=', $pair);
$custom_data[urldecode($kv[0])] = urldecode($kv[1]);
}
if (array_key_exists('cdata1', $custom_data)) {
echo $custom_data['cdata1']; //outputs '000134' from above example - our order id
/**
* in our example from above, we could now update our order record with the transaction
Online Commerce Suite™ WebPay Integration Guide
Page 11
* details and set the order status to complete here.
*/
}
}
?>
Online Commerce Suite™ WebPay Integration Guide
Page 12
