In Situ Multi Parameter TROLL 9500 Operator's Manual
User Manual: Pdf In-Situ TROLL 9500 Manual
Open the PDF directly: View PDF ![]() .
.
Page Count: 164 [warning: Documents this large are best viewed by clicking the View PDF Link!]
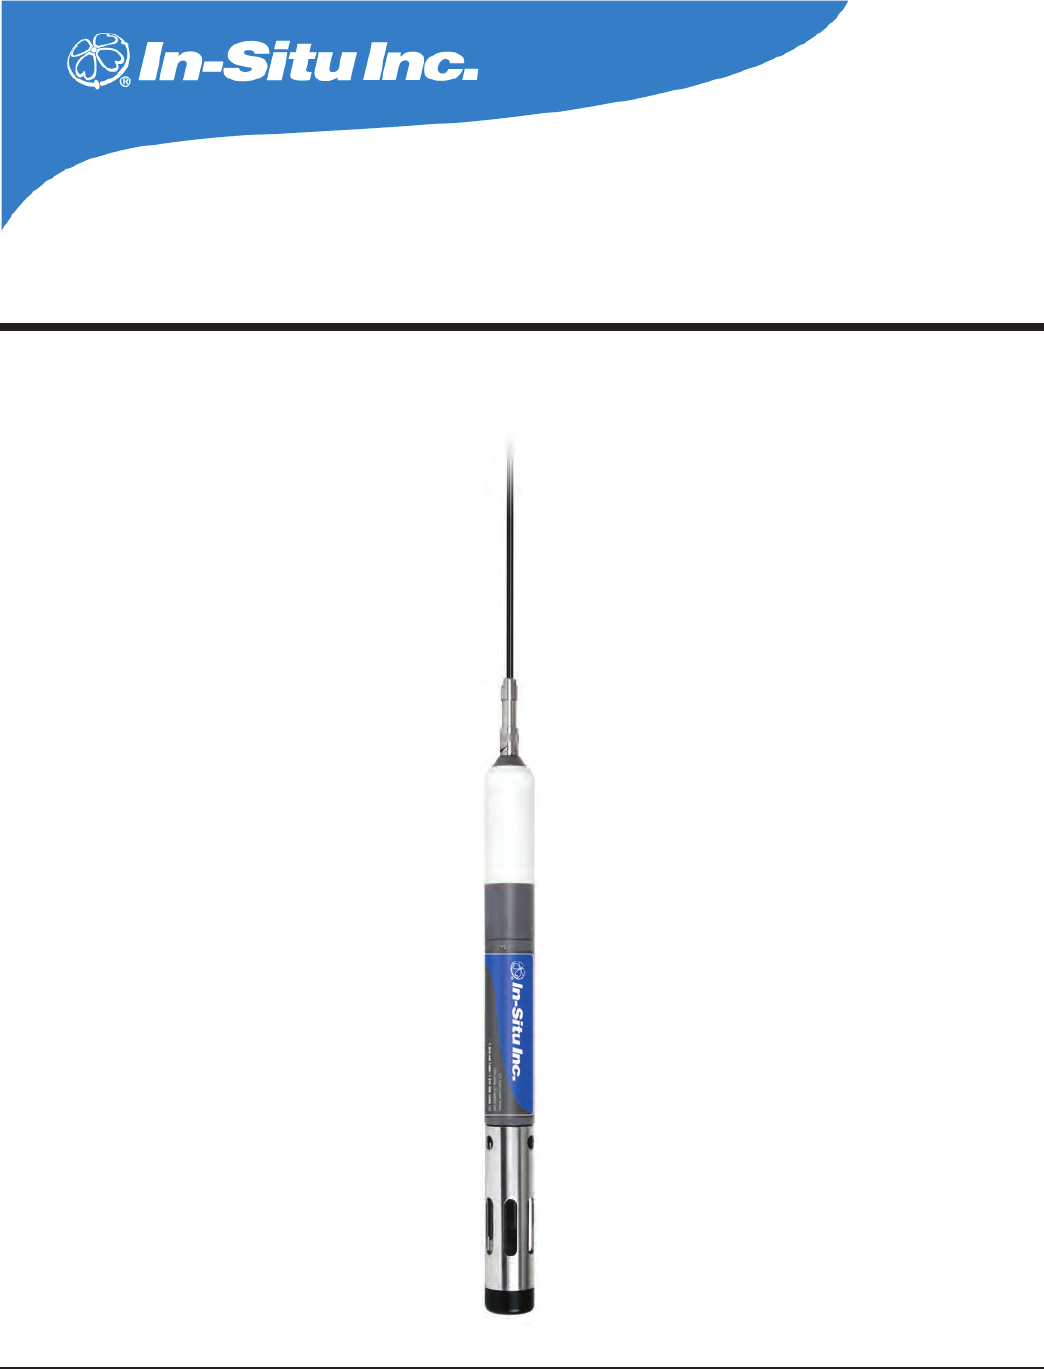
Multi-Parameter TROLL 9500
OPERATOR’S MANUAL
January 2009
Multi-Parameter
Water Quality TROLL®
For Sales & Service Contact
2650 E. 40th Ave. • Denver, CO 80205
Phone 303-320-4764 • Fax 303-322-7242
1-800-833-7958
www.geotechenv.com

Copyright © 2001 – 2009 by In-Situ Inc. All rights reserved.
Revision history Beta draft September 23, 2005
Initial release, October 28, 2005
Rev. 001, April 6, 2006
Rev. 002, November 2006
Rev. 003, April 2007
Rev. 004a, September 2007
Rev. 005, April 2008
Rev. 006, September 2008
Rev. 007, January 2009
This document contains proprietary information which is protected by copyright. No part of this document may be photocopied, reproduced, or translated to
another language without the prior written consent of In-Situ Inc.
Mailing & Shipping Address: Phone: 970 498 1500
In-Situ Inc. Fax: 970 498 1598
221 E. Lincoln Ave. Internet: www.in-situ.com
Fort Collins, CO 80524 Support Line: 800 446 7488
USA (US & Canada)
The information in this document is subject to change without notice. In-Situ Inc. has made a reasonable effort to be sure that the information contained herein is
current and accurate as of the date of publication.
In-Situ Inc. makes no warranty of any kind with regard to this material, including, but not limited to, its fitness for a particular application. In-Situ will not be liable
for errors contained herein or for incidental or consequential damages in connection with the furnishing, performance, or use of this material.
In no event shall In-Situ Inc. be liable for any claim for direct, incidental, or consequential damages arising out of, or in connection with, the sale, manufacture,
delivery, or use of any product.
Images in this manual have been selected for illustration; actual images may vary from those shown.
In-Situ and the In-Situ logo, Win-Situ, TROLL, BaroTROLL, HERMIT, RuggedReader, RuggedCable, and RDO are trademarks or registered trademarks of
In-Situ Inc. Microsoft, Windows, Windows Vista, Internet Explorer, Excel, and ActiveSync are trademarks or registered trademarks of Microsoft Corporation.
Teflon and Delrin are registered trademarks of E. I. DuPont de Nemours and Company. Viton is a registered trademark of DuPont Dow Elastomers. Kellems is
a registered trademark of Hubbell Inc. NIST is a registered trademark of the National Institute of Standards and Technology. Alconox is a registered trademark of
Alconox Inc. Other brand names and trademarks are the property of their respective owners.

0095110 rev. 007 01/09
Multi-Parameter
Water Quality TROLL®
TROLL 9500 Operator’s Manual III
Contents
1 INTRODUCTION ................................................ 1
General Description of the MP TROLL 9500 ......................................1
How to Use This Manual ..................................................................... 1
Conventions ............................................................................... 2
Unpacking and Inspection .................................................................. 2
Serial Number ............................................................................ 2
To Our Customers . . . ......................................................................... 2
What We Provide ................................................................................ 3
Warranty Provisions ................................................................... 3
Firmware & Software Upgrades ................................................. 3
How to Contact Us .............................................................................. 3
To Obtain Repair Service (U.S.) ........................................ 3
Outside the U.S. ................................................................ 3
Certification ......................................................................................... 3
Cleaning Guidelines ............................................................................ 4
2 COMPONENTS & FEATURES ................................ 5
System Description ............................................................................ 5
Standard Features .............................................................................. 5
Optional Features ............................................................................... 5
Cables ................................................................................................ 6
RuggedCable™ ......................................................................... 6
Cable Desiccants ....................................................................... 7
Communication Cables .............................................................. 7
Power Components ............................................................................ 7
Internal Power ............................................................................ 7
External Power .......................................................................... 7
Water Quality Accessories ................................................................. 8
Installation Accessories ...................................................................... 9
Control Software ................................................................................. 9
Product Specifications ...................................................................... 10
3 GETTING STARTED ...........................................12
Provide Power .................................................................................. 12
Install Sensors .................................................................................. 13
Install the Software .......................................................................... 14
Win-Situ 4 ............................................................................... 14
USB TROLL Com Drivers ........................................................ 14
Pocket-Situ 4 ........................................................................... 14
Win-Situ Sync .......................................................................... 14
Connect the Hardware ...................................................................... 14
TROLL 9500 to TROLL Com .................................................... 14
TROLL Com to Computer ........................................................ 14
Twist-Lock Cable Connections ................................................. 15
Establish Communication with the MP TROLL 9500 ........................ 16
Set the Real-Time Clock ................................................................... 16
Quick-Cal the Basic Water-Quality Sensors ..................................... 17
Calibrate the Extended Sensors ....................................................... 20
Set Up Custom Pressure/Level Measurements ................................ 20
Set Up to Log Data (Set Up a Test) .................................................. 21
Complete the Setup .......................................................................... 21
4 CONTROL SOFTWARE ...................................... 22
Launching the Software .................................................................... 22
Win-Situ 4 ................................................................................ 22
Pocket-Situ 4 ............................................................................ 22
The User Interface ............................................................................ 23
The Navigation Tree ................................................................. 23
Software Functions ........................................................................... 24
Configuring the Port ................................................................. 24
Establishing Communication with the MP TROLL 9500 ........... 24
New Connection .............................................................. 24
Existing Connection ........................................................24
Displaying Device Information ................................................. 24
Upgrading Firmware and Features .......................................... 25
Editing the Device Properties ................................................... 26
Setting a Device Name ...................................................26
Setting the Real-Time Clock ............................................ 26
Setting Battery Information .............................................. 26
SDI-12 and ASCII Mode Preferences ............................. 26
Choosing Measurement Units and Other Preferences ............ 27
Choosing Pressure Display & Conversion Options .................. 28
Logging Data (Adding a Test) ................................................... 29
Taking “Manual” Readings ....................................................... 29
Extracting and Viewing Data .................................................... 30
Deleting Data from Instrument Memory ................................... 30
Exiting the Software .......................................................................... 30
Win-Situ 4 ................................................................................ 30
Pocket-Situ 4 ............................................................................ 30
5 PROFILING .....................................................31
Profiler Features ............................................................................... 31
Starting the Profiler ........................................................................... 31
Graphing Profiler Data ...................................................................... 32
Profiling Dissolved Oxygen ............................................................... 32
Profiling Pressure or Depth ............................................................... 32
Profiling Turbidity .............................................................................. 32

0095110 rev. 007 01/09
TROLL 9500 Operator’s Manual
CONTENTS
IV
Customizing the Profiler .................................................................... 34
Changing the Channels Displayed .................................. 34
Changing Measurement Units ........................................ 34
Changing the Sample Rate ............................................. 34
Starting in Profiler Mode .................................................. 34
Logging Profiler Data ........................................................................ 34
To Stop Logging ...................................................................... 34
Retrieving Logged Profiler Data ............................................... 34
Exiting the Profiler ............................................................................. 34
6 LOGGING DATA .............................................. 35
Adding a Test to a Device: The Test Wizard ..................................... 35
Test Setup Parameters............................................................. 36
1. Test Name (Optional) ..................................................36
2. Parameters to Include ................................................. 36
3. Measurement Schedule ............................................. 36
4. Measurement Interval .................................................37
5. Start Mode ................................................................... 37
Ending Setup ........................................................................... 37
More on Measurement Schedules .................................................... 37
Linear ...................................................................................... 37
Event ....................................................................................... 37
Linear Average ......................................................................... 38
Other Test Operations ....................................................................... 39
Starting a Manual Start Test ..................................................... 40
Stopping a Test ........................................................................ 40
Retrieving Logged Data ........................................................... 40
Deleting Tests ........................................................................... 41
Cloning a Test .......................................................................... 41
Transferring Files from a PDA to a Desktop PC ............................... 42
Viewing Logged Data ........................................................................ 43
Selecting Data in the Data Folder ............................................ 43
Graphing Data .................................................................................. 44
Changing the Data Display ............................................................... 45
Transferring Data to Excel from Win-Situ 4 ...................................... 45
Printing Data in Win-Situ 4 ................................................................ 45
Saving Text Files from Win-Situ 4 ..................................................... 45
7 MONITORING PRESSURE (WATER LEVEL) .......... 46
Why Monitor Pressure? .................................................................... 46
The Pressure Sensor ........................................................................ 46
Factory Calibration ................................................................... 46
Operating Principle .................................................................. 47
Non-Vented (Absolute) vs. Vented (Gauged) Sensors............. 47
Pressure vs. Depth vs. Level ................................................... 47
Zeroing the Pressure Sensor ............................................................ 47
Setting up Pressure Measurements: The Parameter Wizard ........... 48
Pressure Setup Choices .......................................................... 48
1. Name (Optional) ................................................................... 48
2. Display Mode ....................................................................... 48
3. Converting Pressure to Depth or Level ................................ 49
Conversion Using Specific Gravity .................................. 49
Conversion Using Density, Latitude, and Elevation ......... 49
4. Level Reference ................................................................... 49
Reference Time ............................................................... 49
Quick Summary of Pressure Setup .................................................. 50
Installation for Pressure/Level Measurement ................................... 51
Securing the Cable .................................................................. 51
Stabilization Time ..................................................................... 51
Twist-Lock Hanger Installations ............................................... 51
Installation Tips for Level/Depth/Pressure Monitoring ..... 51
Correcting Absolute Pressure Readings for Barometric Pressure .... 52
Manual Barometric Pressure Compensation ........................... 52
Using the MP TROLL’s Barometric Pressure Sensor ...... 52
Using a Second Unit and a Spreadsheet ........................ 52
Automatic Barometric Pressure Compensation ...................... 52
Collecting Barometric Pressure Data for Reference ....... 52
Collecting PSIA Data ....................................................... 52
Using the Baro Wizard .................................................... 52
Recalibration Recommendations ...................................................... 53
8 MONITORING TEMPERATURE ........................... 54
Why Monitor Temperature? ............................................................... 54
The Temperature Sensor .................................................................. 54
Role of the Sensor in Calibration ............................................ 55
Software Functions ........................................................................... 55
References ....................................................................................... 55
9 MONITORING BAROMETRIC PRESSURE ............. 56
What is Barometric Pressure? .......................................................... 56
Why Monitor Barometric Pressure? .................................................. 56
The Barometric Pressure Sensor ..................................................... 56
Collecting Accurate Measurements without Vented Cable ............... 56
Pressure vs. Elevation ............................................................. 57
10 MONITORING WATER QUALITY: OVERVIEW ..... 58
Why Monitor Water Quality? ............................................................. 58
The Sensors ..................................................................................... 58
Basic Sensor Set ..................................................................... 58
Installing Sensors ..................................................................... 59
Removing Sensors ................................................................... 60
Calibration Overview ......................................................................... 60
Traditional Calibration .............................................................. 60
Quick Calibration ...................................................................... 61
Out of the Box .......................................................................... 61
Default Coefficients .................................................................. 61
Preparing to Calibrate ....................................................................... 61
Calibration Kits ........................................................................ 61
The Calibration Cup ................................................................. 61
Effect of Temperature on Calibration ........................................ 62
Rinsing ..................................................................................... 62
Stirring ...................................................................................... 62
Calibration Procedures ..................................................................... 62
After Calibration ................................................................................ 62
Calibration History .................................................................... 63
How Often to Calibrate ............................................................ 64
How to Check if a Sensor is Still in Calibration ........................ 64
When to Replace a Sensor ...................................................... 65
References ....................................................................................... 65
11 PH ............................................................... 66
What Is pH? ..................................................................................... 66
Why Measure pH? .................................................................. 66
The pH Sensor ................................................................................. 66
Sensor Installation ............................................................................ 67

0095110 rev. 007 01/09
TROLL 9500 Operator’s Manual
CONTENTS
V
Calibration ........................................................................................ 67
Overview .................................................................................. 67
Nominal vs. Stable .......................................................... 68
Calibration Solutions ................................................................ 68
Recommended Calibration Frequency .................................... 68
pH Quick Cal ............................................................................ 68
Traditional pH Calibration Procedure ....................................... 68
Recommended Calibration Order for pH and ORP .................. 68
Resetting Default Coefficients .................................................. 70
Sensor Slope and Offset .......................................................... 70
Units and Calculated Measurements ................................................ 70
Usage Recommendations and Cautions .......................................... 70
Sensor Care and Handling .............................................................. 71
Sensor Removal ...................................................................... 71
Maintenance/Inspection/Cleaning ............................................ 71
Replacing the Filling Solution .................................................. 71
Replacing the Junction ............................................................. 71
Storage ................................................................................... 71
References ....................................................................................... 71
12 CONDUCTIVITY ..............................................72
What Is Conductivity? ....................................................................... 72
Why Measure Conductivity? .................................................... 72
How is Conductivity Measured? ............................................... 72
The Conductivity Sensors ................................................................ 72
Sensor Installation ............................................................................ 73
Calibration ......................................................................................... 73
Overview .................................................................................. 73
Nominal vs. Stable .......................................................... 73
Calibration Solutions (Primary Standards) ............................... 73
Calibrating with Other Solutions ...................................... 73
Recommended Calibration Frequency .................................... 73
Conductivity Quick Cal ............................................................. 74
Traditional Conductivity Calibration Procedure ........................ 74
Using a Conductivity Meter as a Secondary Standard ............76
Entering a Cell Constant Manually ........................................... 76
Units and Calculated Measurements ................................................ 76
Basic Unit: AC ................................................................. 76
Specific Conductance (SC) ............................................. 76
Total Dissolved Solids (TDS) ........................................... 77
Resistivity ....................................................................... 77
Salinity ............................................................................. 77
Usage Recommendations and Cautions .......................................... 77
Conductivity and Temperature ................................................. 77
Sensor Care and Handling ............................................................... 77
Sensor Removal ...................................................................... 77
Maintenance/Inspection/Cleaning ............................................ 77
Storage .................................................................................... 77
References ....................................................................................... 77
13 DISSOLVED OXYGEN ..................................... 78
What is Dissolved Oxygen? .............................................................. 78
Why Measure Dissolved Oxygen? .......................................... 78
Polarographic Measurement of Dissolved Oxygen ........................... 79
The Polarographic Dissolved Oxygen Sensor .................................. 79
Theory of Operation ................................................................. 79
Sensor Conditioning ................................................................. 79
Sensor Installation ............................................................................ 79
Fill the Membrane Module ...................................................... 79
Install the Sensor in the MP TROLL 9500 ................................ 80
Condition a Newly Installed Sensor ........................................ 80
Calibration ........................................................................................ 80
Overview .................................................................................. 80
Nominal vs. Stable .......................................................... 81
Calibration Solutions & Equipment .......................................... 81
Recommended Calibration Frequency .................................... 81
Dissolved Oxygen Calibration Tips .......................................... 81
Dissolved Oxygen Quick Cal ................................................... 81
Traditional Dissolved Oxygen Calibration Procedure ............... 81
Usage Recommendations and Cautions .......................................... 86
Attaching the Stirrer ........................................................86
Starting the Stirrer ........................................................... 86
Sensor Care and Handling ............................................................... 87
Sensor Removal ...................................................................... 87
Maintenance/Inspection ........................................................... 87
Replacing the Membrane Module ............................................ 87
Sensor Life ............................................................................... 87
References ....................................................................................... 88
Optical Measurement of Dissolved Oxygen ...................................... 89
The RDO Optical Dissolved Oxygen Sensor .................................... 89
The RDO Sensor and Salinity ......................................... 89
Unpack the RDO Cable connect Sensor ................................. 89
Unpack the RDO Direct connect Sensor ................................. 90
Installing the RDO Sensor CAP ............................................... 90
INstalling the RDO Sensor ....................................................... 90
Calibration ......................................................................................... 91
Overview .................................................................................. 91
Nominal vs. Stable .......................................................... 91
Calibration Solutions ................................................................ 92
Recommended Calibration Frequency .................................... 92
Traditional 2-Point Calibration .................................................. 92
Oxygen Saturation Point .......................................................... 92
Zero Oxygen Point ................................................................... 93
Barometric Pressure Options .......................................... 93
Finalize the Calibration ............................................................ 94
Status indicators: ............................................................ 94
Clean-up .......................................................................... 95
Units and Calculated Measurements ................................................ 95
Usage Recommendations and Cautions .......................................... 95
Salinity ............................................................................. 95
Sensor Care and Handling ............................................................... 95
Biofouling ................................................................................. 95
Cleaning the Sensor Cap ................................................ 96
Cleaning the Optical Window (Perform only if changing the
cap) ........................................................................ 96
Cleaning the Sensor Body ..............................................96
Storage ............................................................................ 96
Replacing the Sensor Cap .............................................. 96

0095110 rev. 007 01/09
TROLL 9500 Operator’s Manual
CONTENTS
VI
14 OXIDATION-REDUCTION POTENTIAL ................ 97
What is ORP? .................................................................................. 97
Why Measure ORP? ................................................................ 97
The pH/ORP Sensor ......................................................................... 97
Sensor Installation ............................................................................ 98
Calibration ......................................................................................... 98
Overview .................................................................................. 98
Calibration Solutions ................................................................ 98
Recommended Calibration Order for pH and ORP .................. 99
Traditional ORP Calibration Procedure .................................... 99
Resetting Default Coefficients ................................................ 100
Sensor Offset ......................................................................... 100
Units and Calculated Measurements .............................................. 100
Recommended Calibration Frequency ........................................... 100
Normalization to Standard Hydrogen Electrode Values .................. 100
Usage Recommendations and Cautions ........................................ 101
Sensor Care and Handling ............................................................. 101
Sensor Removal .................................................................... 101
Maintenance/Inspection/Cleaning .......................................... 101
Replacing the Filling Solution ................................................ 101
Replacing the Junction ........................................................... 101
Storage .................................................................................. 101
References ..................................................................................... 101
15 AMMONIUM .............................................. 104
What is Ammonium ? ..................................................................... 104
Why Measure Ammonium? ................................................... 104
The Ammonium Sensor .................................................................. 104
Sensor Preparation ................................................................ 104
The Nitrogen Cycle ................................................................ 104
Sensor Installation ................................................................. 105
Calibration ....................................................................................... 105
Overview ................................................................................ 105
Calibration Solutions .............................................................. 105
Recommended Calibration Frequency .................................. 106
Preparing to Calibrate ............................................................ 106
Ammonium Calibration Procedure ......................................... 106
Sensor Slope and Offset ........................................................ 108
Units and Calculated Measurements .............................................. 108
Usage Recommendations and Cautions ........................................ 108
pH ...................................................................................... 108
Temperature ........................................................................... 108
Conductivity ........................................................................... 108
Potential Interferences ........................................................... 108
Sensor Care and Handling ............................................................. 109
Sensor Removal .................................................................... 109
Maintenance/Inspection/Cleaning .......................................... 109
Storage .................................................................................. 109
References ..................................................................................... 109
16 CHLORIDE ................................................... 110
What Is Chloride? ........................................................................... 110
Why Measure Chloride? ........................................................ 110
The Chloride Sensor ....................................................................... 110
Sensor Preparation ................................................................ 110
Sensor Installation ................................................................. 110
Calibration ........................................................................................111
Overview .................................................................................111
Calibration Solutions ...............................................................111
Recommended Calibration Frequency ...................................111
Preparing to Calibrate .............................................................111
Chloride Calibration Procedure .............................................. 112
Sensor Slope and Offset ........................................................ 114
Units and Calculated Measurements .............................................. 114
Usage Recommendations and Cautions ........................................ 114
pH Effects .............................................................................. 114
Potential Interferences ........................................................... 114
Sensor Care and Handling ............................................................. 114
Sensor Removal .................................................................... 114
Maintenance/Inspection/Cleaning .......................................... 114
Storage .................................................................................. 114
17 NITRATE ..................................................... 115
What Is Nitrate ? ............................................................................. 115
Why Measure Nitrate? ........................................................... 115
The Nitrate Sensor .......................................................................... 115
Sensor Preparation ................................................................ 116
Sensor Installation ................................................................. 116
Calibration ....................................................................................... 116
Overview ................................................................................ 116
Calibration Solutions .............................................................. 117
Recommended Calibration Frequency .................................. 117
Preparing to Calibrate ............................................................ 117
Nitrate Calibration Procedure ................................................. 117
Sensor Slope and Offset ........................................................ 119
Units and Calculated Measurements .............................................. 119
Usage Recommendations and Cautions ........................................ 119
Temperature ........................................................................... 119
Potential Interferences ........................................................... 120
Sensor Care and Handling ............................................................. 120
Sensor Removal .................................................................... 120
Maintenance/Inspection/Cleaning .......................................... 120
Storage .................................................................................. 120
References ..................................................................................... 120
18 TURBIDITY .................................................. 121
What Is Turbidity? ........................................................................... 121
Why Measure Turbidity? ........................................................ 121
How Is Turbidity Measured? .................................................. 121
The Turbidity Sensor ....................................................................... 122
The Turbidity Wiper ......................................................................... 122
Wiper Installation ................................................................... 123
Wiper Movement .................................................................... 123
Manual Wipe .......................................................................... 124
Wiper Guidelines and Precautions ......................................... 124
Calibration ....................................................................................... 124
Factory Calibration ................................................................. 124
Field Calibration ..................................................................... 124
Calibration Solutions .............................................................. 124
Recommended Calibration Frequency .................................. 125
Turbidity Calibration Procedure .............................................. 125
Resetting Default Coefficients ................................................ 128
Sensor Slope and Offset ........................................................ 128
Units and Calculated Measurements .............................................. 128
Usage Recommendations and Cautions ........................................ 128
Common Interferences .......................................................... 128
Profiling Turbidity ............................................................................ 128
Logging Turbidity Data .................................................................... 128

0095110 rev. 007 01/09
TROLL 9500 Operator’s Manual
CONTENTS
VII
Sensor Care .................................................................................... 128
Inspection/Maintenance/Cleaning .......................................... 128
Wiper Maintenance ......................................................................... 129
References ..................................................................................... 129
19 SDI-12 OPERATION ......................................130
SDI-12 Requirements ..................................................................... 130
Wiring .............................................................................................. 130
Connections .................................................................................... 130
SDI-12 Support ............................................................................... 130
Sensor Identification .............................................................. 131
Sensor Verification ................................................................. 131
Making SDI-12 Measurements ....................................................... 131
Redundant Logging (Win-Situ 4 and SDI-12) ................................. 132
Extended (ISCO) Commands ......................................................... 132
Reference ....................................................................................... 132
SDI-12 V 1.3 Command Set .................................................. 133
20 LOW-FLOW MONITORING ............................135
Preparation ..................................................................................... 135
RDO Sensor Preparation ....................................................... 135
Prepare the Flow Cell ............................................................ 135
Start the Software ........................................................................... 136
Launch the Flow-Sense Wizard ...................................................... 136
Verify Unit Preferences .......................................................... 136
Flow-Sense Wizard Input ....................................................... 137
Saving the Low-Flow Data or Template .......................................... 138
Output ............................................................................................. 139
Export to Excel Option .................................................................... 139
Using a Custom Excel Template ............................................ 139
21 CARE & MAINTENANCE ................................ 141
Replacing Batteries ........................................................................ 141
O-Ring Seals .................................................................................. 141
Lubrication ............................................................................. 141
Replacement .......................................................................... 142
General Cleaning ............................................................................ 142
Storage ........................................................................................... 142
Sensor Storage ..................................................................... 142
Twist-Lock Connectors ........................................................... 142
22 TROUBLESHOOTING .....................................143
Troubleshooting Connections ......................................................... 143
Troubleshooting Data Collection (Tests) ......................................... 143
Troubleshooting Sensors ................................................................ 144
Troubleshooting Calibration ........................................................... 144
APPENDIX ........................................................145
Electronic Drift and Device Recalibration ....................................... 145
Determining Density ....................................................................... 145
GLOSSARY .......................................................147
1
Multi-Parameter
Water Quality TROLL®
TROLL 9500 Operator’s Manual 0095110 rev. 007 01/09
General Description of the Mp troll
9500
Your new Multi-Parameter TROLL 9500 water quality probe uses
the latest sensor and electronics technology to provide a robust,
durable, and user-friendly instrument.
The MP TROLL 9500 logs data from up to 7 water-level and
water-quality sensors, as well as built-in temperature and baro-
metric pressure sensors. Many custom options and versions are
available, so your instrument may not look exactly like those we
have chosen to illustrate in this manual.
The MP TROLL 9500 provides the convenience of a labora-
tory-quality measurement instrument for field use, providing true
in-situ monitoring of water level and water quality.
how to Use this ManUal
This operator’s manual is designed as both a start-up guide and
a permanent reference for the features, uses, and applications of
the Multi-Parameter TROLL 9500.
Section 1: Introduction to this Operator’s Manual and to In-Situ
Inc.; contacting us for warranty and repair issues
Section 2: Description of components and features of the Multi-
Parameter TROLL 9500
Section 3: Getting Started: setting up the software, connecting
for the first time, Quick-Calibrating the sensors, and a summary
overview of the setup to start collecting data
Section 4: Control Software: Win-Situ® 4 and Pocket-Situ 4
Section 5: Profiling
Section 6: How to set up tests and start logging data; extracting
data to your PC; viewing and graphing data
1 introDUction
Section 7: Monitoring Pressure (Water Level): Info on the two basic
types of pressure sensors; setting up the pressure channel to obtain
the most accurate readings for your altitude and latitude; how to
display data as you wish to see it
Section 8: Temperature
Section 9: Barometric Pressure
Section 10: An overview of monitoring water quality with the MP
TROLL 9500: Sensor installation and calibration, software options,
calibration reports
Section 11: pH
Section 12: Conductivity
Section 13: Dissolved Oxygen: Polarographic (Clark cell)
RDO® Optical Dissolved Oxygen
Section 14: Oxidation-Reduction Potential (ORP)
Section 15: Ammonium
Section 16: Chloride
Section 17: Nitrate
Section 18: Turbidity
Section 19: SDI-12 Operation
Section 20: Low-Flow Monitoring
Section 21: Care and Maintenance advice
Section 22: Troubleshooting: Look here first if you have problems
making connections or calibrating . . .
The manual includes a Glossary and a comprehensive Index
20095110 rev. 007 01/09
TROLL 9500 Operator’s Manual
CONVENTIONS
Throughout this operator’s manual you will see the following symbols.
The check mark highlights a tip about a convenient feature
of the MP TROLL 9500
The exclamation point calls your attention to a requirement
or important action that should not be overlooked
Typical usage questions and answers that we hope will help you gain
a better understanding of your new Multi-Parameter TROLL 9500
and simplify its setup and operation
UnpackinG anD inspection
Your MP TROLL 9500 was carefully inspected before shipping. Check
the instrument for any physical damage sustained during shipment.
Notify In-Situ and file a claim with the carrier if there is any such dam-
age; do not attempt to operate the instrument.
Please save packing materials for future storage and shipping of your
MP TROLL 9500. The shipping boxes have been performance-tested
and provide protection for the instrument and its accessories.
Accessories may be shipped separately and should also be inspected
for physical damage and the fulfillment of your order.
SERIAL NUMBER
The serial number is located on the large label on the Multi-Param-
eter TROLL 9500 body, and also on a small label inside the battery
compartment. The serial number is programmed into the instrument
and displayed when the instrument is connected to a PC running Win-
Situ 4 or Pocket-Situ 4. We recommend that owners keep a separate
record of this number. Should your Multi-Parameter TROLL 9500 be
lost or stolen, the serial number is often necessary for tracing and
recovery, as well as any insurance claims. If necessary, In-Situ main-
tains complete records of original owner’s names and serial numbers.
Serial numbers of the water-quality sensors are stored in sensor
memory and displayed in the software when sensors are installed.
to oUr cUstoMers . . .
Thank you for your purchase of an In-Situ product. We are glad
you chose us and our products to help you with your environmental
monitoring needs. In-Situ Inc. has been designing and manufactur-
ing world-class environmental monitoring instrumentation for over 25
years in the Rocky Mountains of the United States. As it was in the
beginning, our expectation is that this product will provide you with
many trouble-free years of use. To that end, we pride ourselves on
delivering the best customer service and support possible—24 hours
a day, 7 days a week. We believe that this level of commitment to
you, our customer, is imperative in helping you ensure clean, safe
groundwater and surface water resources across the globe. We
also understand the need for accurate, reliable assessments and we
continue to make significant investments in Research and Develop-
ment to ensure that we deliver the latest product and technological
innovations to support your needs.
Whether you are gathering information about your body of water for
a few moments, or over a period of years, you can rely upon us to
provide you with a quality product and outstanding customer support
at a fair price and have that product delivered to you when and where
you need it.
We want your experience with In-Situ Inc. to be pleasant and profes-
sional, whether you are renting from us, or purchasing from us. We
would be pleased to hear from you and learn more about your needs,
and your experiences with our products. Again, we thank you for
choosing In-Situ Inc. and we look forward to serving your needs now,
and in the future.
Bob Blythe, President and CEO
In-Situ Inc.
bblythe@in-situ.com
Section 1: introduction

30095110 rev. 007 01/09
TROLL 9500 Operator’s Manual
what we proviDe
WARRANTY PROVISIONS
In-Situ Inc. warrants the Multi-Parameter TROLL 9500 for one year,
RDO sensors for three years, and other sensors for 90 days from date
of purchase by the end user against defects in materials and work-
manship under normal operating conditions. To exercise this warranty
contact Technical Support at the phone or e-mail address listed below
for a return material authorization (RMA) and instructions. Complete
warranty provisions are posted on our website at www.In-Situ.com.
Maintenance & calibration plans as well as extended warranties are
available. Contact your In-Situ representative for complete informa-
tion.
FIRMWARE & SOFTWARE UPGRADES
From time to time In-Situ may make available enhanced versions of
firmware and software to its customers over the Internet.
Visit our website at www.in-situ.com to download the latest firmware
and software.
how to contact Us
Technical Support: 800 446 7488
Toll-free 24 hours a day in the U.S. and Canada
Address: In-Situ Inc.
221 East Lincoln Ave.
Fort Collins, CO 80524
USA
Phone: 970 498 1500
Fax: 970 498 1598
Internet: www.in-situ.com
e-mail: support@in-situ.com
To Obtain Repair Service (U.S.)
If you suspect that your Multi-Parameter TROLL 9500 is malfunction-
ing and repair is required, you can help assure efficient servicing by
following these guidelines:
1. Call or e-mail In-Situ Technical Support (support@in-situ.com).
Have the product model and serial number handy.
2. Be prepared to describe the problem, including how the instru-
ment was being used and the conditions noted at the time of the
malfunction.
3. If Tech Support determines that service is needed, they will ask
that your company pre-approve a specified dollar amount for repair
charges. When the pre-approval is received, Tech Support will as-
sign an RMA (Return Material Authorization) number.
TIP: Please keep your RMA number for future
reference.
4. Clean the Multi-Parameter TROLL 9500 and cable. Decontaminate
thoroughly if it has been used in a toxic or hazardous environment.
See the cleaning guidelines and form on the following page.
If an instrument returned for servicing shows evidence of
having been used in a toxic or hazardous environment,
Customer Service personnel will require written proof of
decontamination before they can service the unit.
5. Carefully pack your Multi-Parameter TROLL 9500 in its original
shipping box, if possible. Include a statement certifying that the
instrument and cable have been decontaminated, and any support-
ing information.
6. Mark the RMA number clearly on the outside of the box with a
marker or label.
7. Send the package, shipping prepaid, to
In-Situ Inc.
ATTN: Repairs
221 East Lincoln Ave.
Fort Collins, CO 80524
USA
The warranty does not cover damage during transit. We recom mend
the customer insure all shipments. Warranty repairs will be shipped
back prepaid.
Outside the U.S.
Contact your international In-Situ distributor for repair and service
information.
certification
The MP TROLL 9500 complies with all applicable directives per the
CE and FCC and was tested to the EN 61326 / FCC specifications
Section 1: introduction
4
TROLL 9500 Operator’s Manual 0095110 rev. 007 01/09
cleaninG GUiDelines
Please help us protect the health and safety of our employees by
cleaning and decontaminating equipment that has been subjected to
any potential biological or health hazards, and labeling such equip-
ment. Unfortunately, we cannot service your equipment without such
notification. Please complete and sign the form below (or a similar
statement certifying that the equipment has been cleaned and decon-
taminated) and send it along to us with each downhole instrument.
• Werecommendagoodcleaningsolution,suchasAlconox®, a
glassware cleaning product available from In-Situ (Catalog No.
0029810) and laboratory supply houses.
• Cleanallcabling.Removeallforeignmatter.
• Cleancableconnector(s)withaclean,drycloth.Donotsubmerge.
If an instrument is returned to our Service Center
for repair or recalibration without a statement
that it has been cleaned and decontaminated,
or in the opinion of our Service Representatives
presents a potential health or biological hazard,
we reserve the right to withhold service until
proper certification has been obtained.
Alconox is a registered trademark of Alconox Inc.
Company Name ____________________________________________Phone ________________________
Address ________________________________________________________________________________
City __________________________________ State ________________ Zip _______________________
Instrument Type ___________________________________ Serial Number ___________________________
Contaminant(s) (if known) __________________________________________________________________
_______________________________________________________________________________________
Decontamination procedure(s) used __________________________________________________________
_______________________________________________________________________________________
Cleaning verified by ________________________________________ Title ___________________________
Date _______________________________
Decontamination & Cleaning Statement
Section 1: introduction
• Cleantheprobebody—includingthenosecone,restrictor,cable
head, and protective caps. Remove all foreign matter.
• Removeandcleanallremovablesensors.Rinsewithdeionizedor
distilled water after cleaning.

5
Multi-Parameter
Water Quality TROLL®
TROLL 9500 Operator’s Manual 0095110 rev. 007 01/09
systeM Description
The Multi-Parameter TROLL 9500 is a compact, modular system with
a range of components to customize the instrument to various ap-
plications and operational modes. Components include the instrument
body with a host of options, sensors, cables, external power acces-
sories, and consumable items.
stanDarD featUres
• 47mm(1.85in)diameter
• corrosion-resistantPVChousingwithtitaniumsetscrews
• 316Lstainlesssteelowrestrictor/sensorbuard
• Viton®seals
• Fastdatasampling
• Continuousreal-timereadings(proling)
• User-replaceableoff-the-shelfD-cellalkalinebatteries,orIn-
Situ–supplied 3.6V lithium D-cell batteries
• Fullysubmersible
• RS485communications
• Low-powermicroprocessor
• Permanentlyinstalled,factory-calibratedtemperaturesensor
• Permanentlyinstalled,factory-calibratedbarometricpressure
sensor, for use on vented cable
• Temperature-compensatedreal-timeclock
• Easy-to-useWin-Situ® 4 control software for setup, download-
ing, text and graphical data display
• Opticallyisolatedcommunicationsignals
• Cableavailableinstandardandcustomlengthsofventedor
non-vented polyurethane, Halogen-free polyurethane, or Tefzel®
• Externalpowercapable
optional featUres
• ProlerandProfessionalfeaturesets,bothavailableinXP with
extended parameter capability
• SmartSensorsforwaterqualitymeasurements—removable,
replaceable, field-calibrated
• BasicSensorsincludeDissolvedOxygen(polarographic),
pH, combination pH/ORP, Low Conductivity, High Conductiv-
ity
• TheExtendedSensorsetincludesAmmonium,Chloride,
Nitrate, Turbidity, RDO® Optical Dissolved Oxygen
• Pocket-Situfull-featuredcontrolsoftwareforelduseona
PDA—take continuous real-time readings, calibrate, program,
and download logged data from multiple MP TROLLs
• RuggedReader® handheld PDA
• Temperature-compensatedventedornon-ventedpressure
sensor, available in several ranges, permanently installed and
factory-calibrated
• Permanentlyinstalled,factory-calibratedturbiditysensor
• Integraldataloggingcapability—upto4megabytesashdata-
storage memory (about a million individual readings)
• Fastdatadownloads
• Upto16-testcapacity;linear,event,andlinearaveragemea-
surement schedules
• SDI-12orRS485interface—orboth
• Flow-Senselow-owsamplingsoftwareforautomatedsampling
and report creation
• Optionalaccessoriesincludelow-owowcell,user-service-
able turbidity wiper, battery-powered magnetic stirrer for use in
stagnant water
• Instrumentnetworkingandtelemetry
2 coMponents & featUres
60095110 rev. 007 01/09
TROLL 9500 Operator’s Manual
cables
Several basic cable types are used in the MP TROLL 9500 system:
• RuggedCable™,TPU-jacketed(ThermoplasticPolyUrethane)
• ventedornon-vented
• Halogen-Freeventedornon-vented(LSZH-rated,low
smoke zero halide)
Vented cable is recommended for applications where
accurate barometric pressure measurement is required—for
example when calibrating dissolved oxygen, or for
measuring DO in percent saturation.
• VentedTefzel®*cable
• Stainless steel suspension wire for use when cable venting is not
required (e.g., with an absolute pressure sensor)
• Communicationcablesforprogrammingthedevice/downloading
the logged data
RuggedCable™
Cable includes conductors for power and communication signals, a
strength member, and a Kellems® grip to anchor the MP TROLL 9500
securely. Available in standard and custom lengths.
Uphole and downhole ends are identical bayonet-type
Twist-Lock connectors that mate with the TROLL 9500
body, TROLL Com communication cable, desiccants, and
other accessories.
Vented cable is designed for use with vented pressure/
level sensors (gauged measure ments). The cable vent
tube insures that atmospheric pressure is the reference
pressure applied to the pressure sensor diaphragm.
Vented cable also enables proper functioning of the inter-
nal barometric pressure sensor, and improves dissolved
oxygen readings.
Non-vented cable may be used with non-vented pressure/
level sensors (absolute measurements), or instruments
without a pressure sensor.
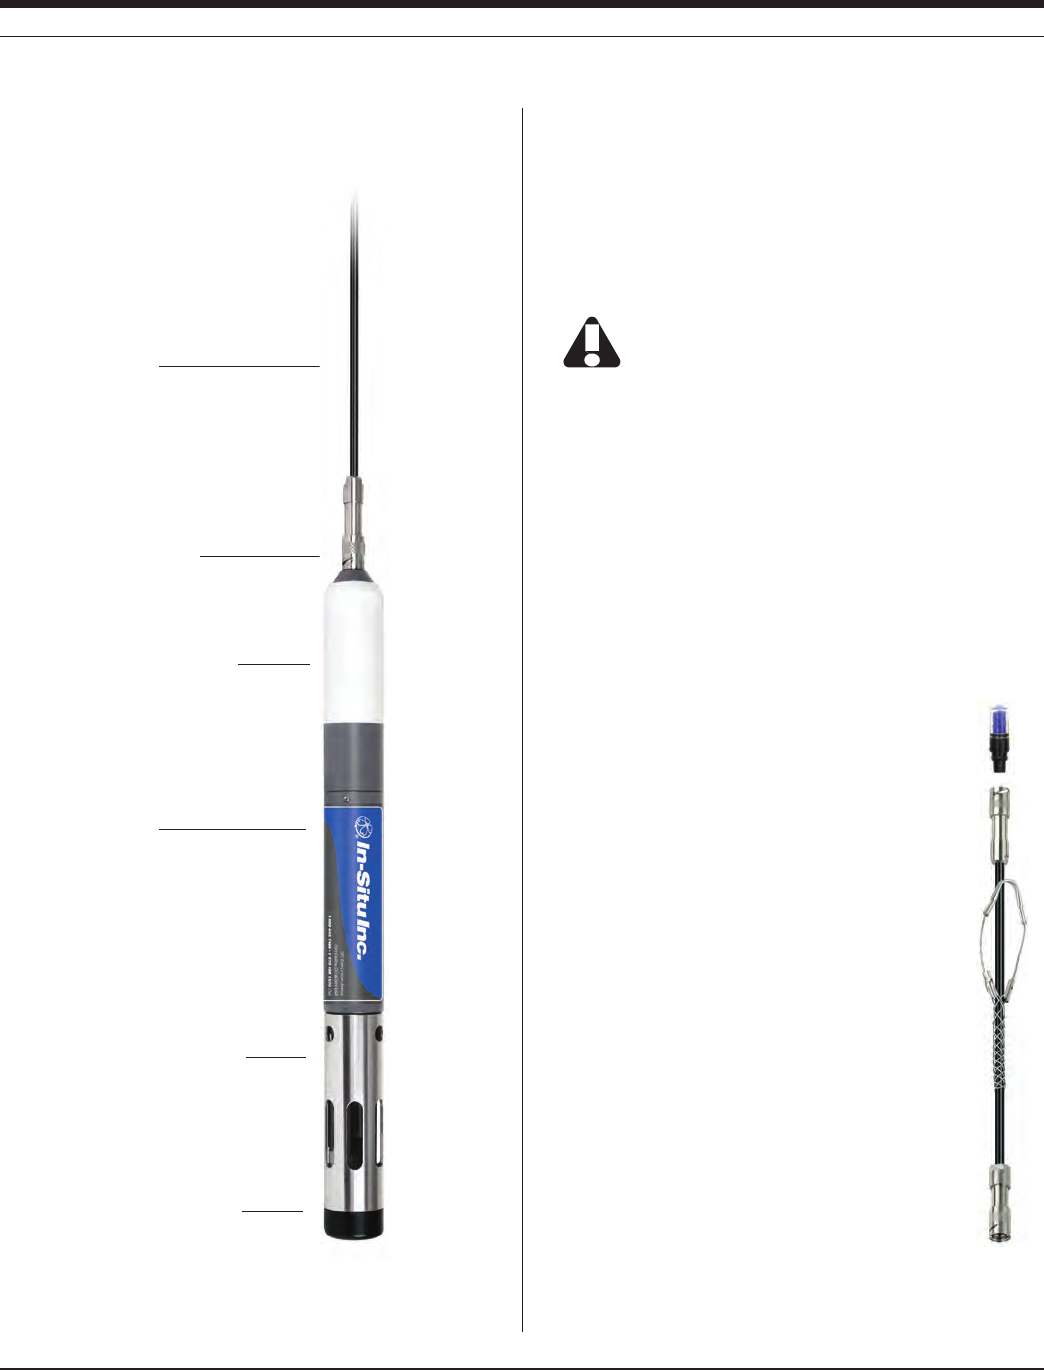
Section 2: componentS & FeatureS
MP TROLL 9500
Sealed Body
Sealed Battery Compartment
Twist-Lock Connector
Stainless steel Restrictor —
provides generous openings for
circulation of environmental water,
unscrews for installation/removal of
sensors
Acetal Nose Cone minimizes sedi-
ment buildup and protects the front
end from bottoming out on a hard
surface; removable for installation of
optional accessories
RuggedCable
* FEP = fluorinated ethylene propylene, the generic equivalent of DuPont Teflon®.
70095110 rev. 007 01/09
TROLL 9500 Operator’s Manual
CABLE DESICCANTS
Small Desiccant
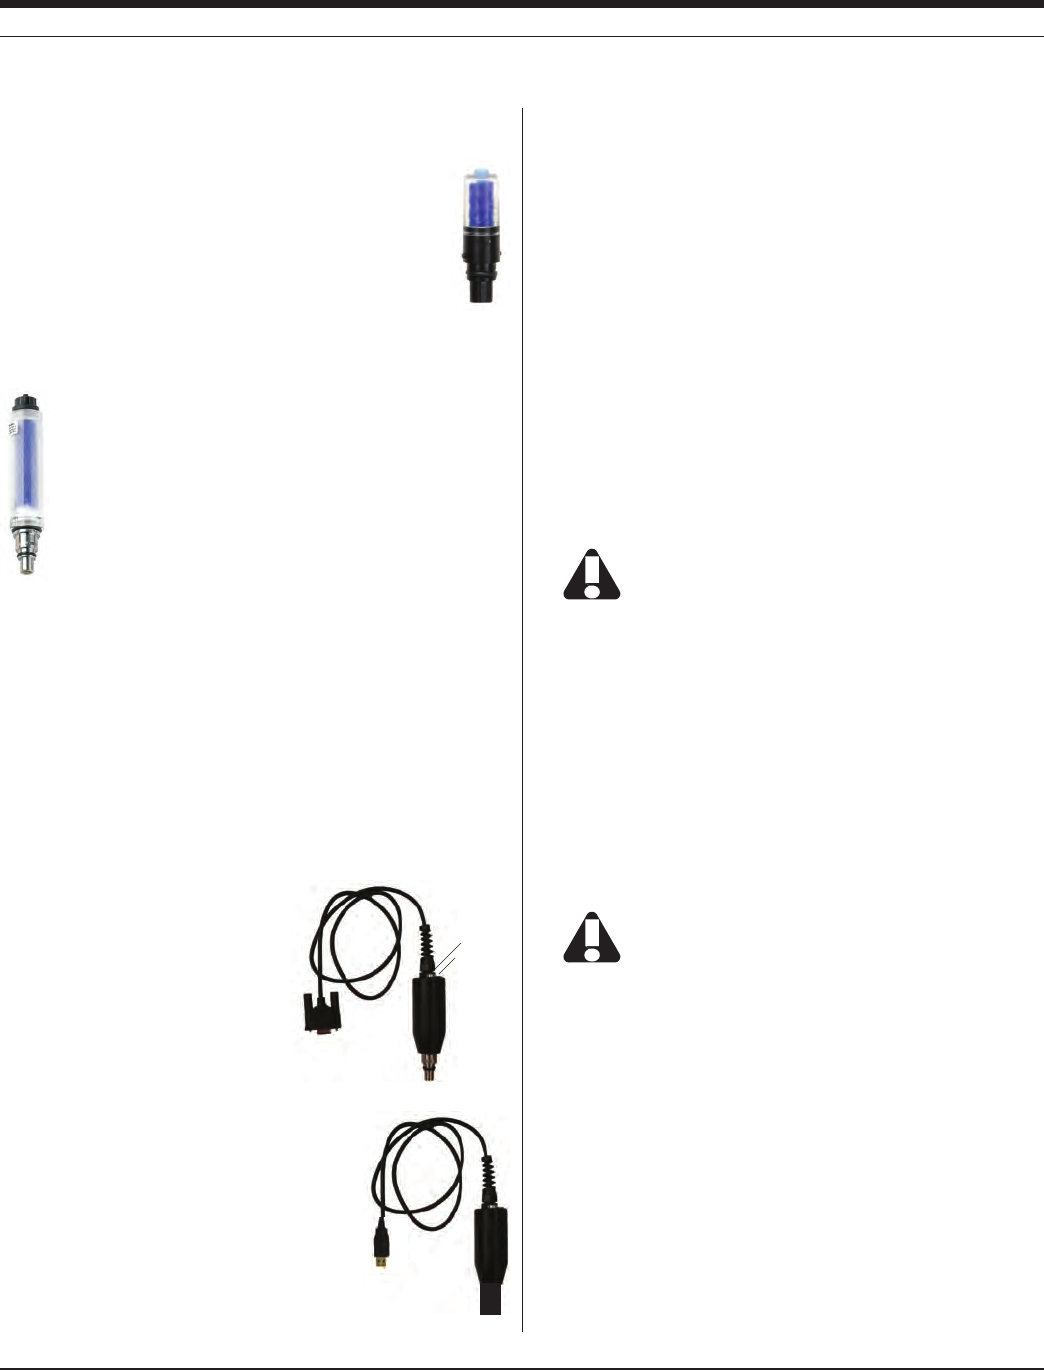
Clear cap of indicating silica gel desiccant seals the uphole
end of the RuggedCable during use; protects the cable vent
tube and device electronics from condensation. The desic-
cant is blue when active. It will absorb moisture from the
top down and for best results should be replaced before the
entire volume has turned pink. Replacements are available
from In-Situ Inc. or your distributor.
Large Desiccant
The high-volume desiccant pack may last up to 20 times
longer than the small desiccant in humid environments. It
attaches to the RuggedCable in the same way. Refill kits are
available from In-Situ Inc. or your distributor.
Accessory Catalog No.
Small desiccant (3) ................................................................. 0052230
Large desiccant, plastic connector ......................................... 0053550
Large desiccant, titanium connector ....................................... 0051810
Large desiccant refill kit .......................................................... 0029140
COMMUNICATION CABLES
Comm cables interface between the TROLL 9500 and a desktop/lap-
top PC or handheld PDA for profiling, calibrating, programming, and
downloading. Both types include 0.9 m (3 ft) polyurethane cable,
external power input jack, and vent
with replaceable membrane.
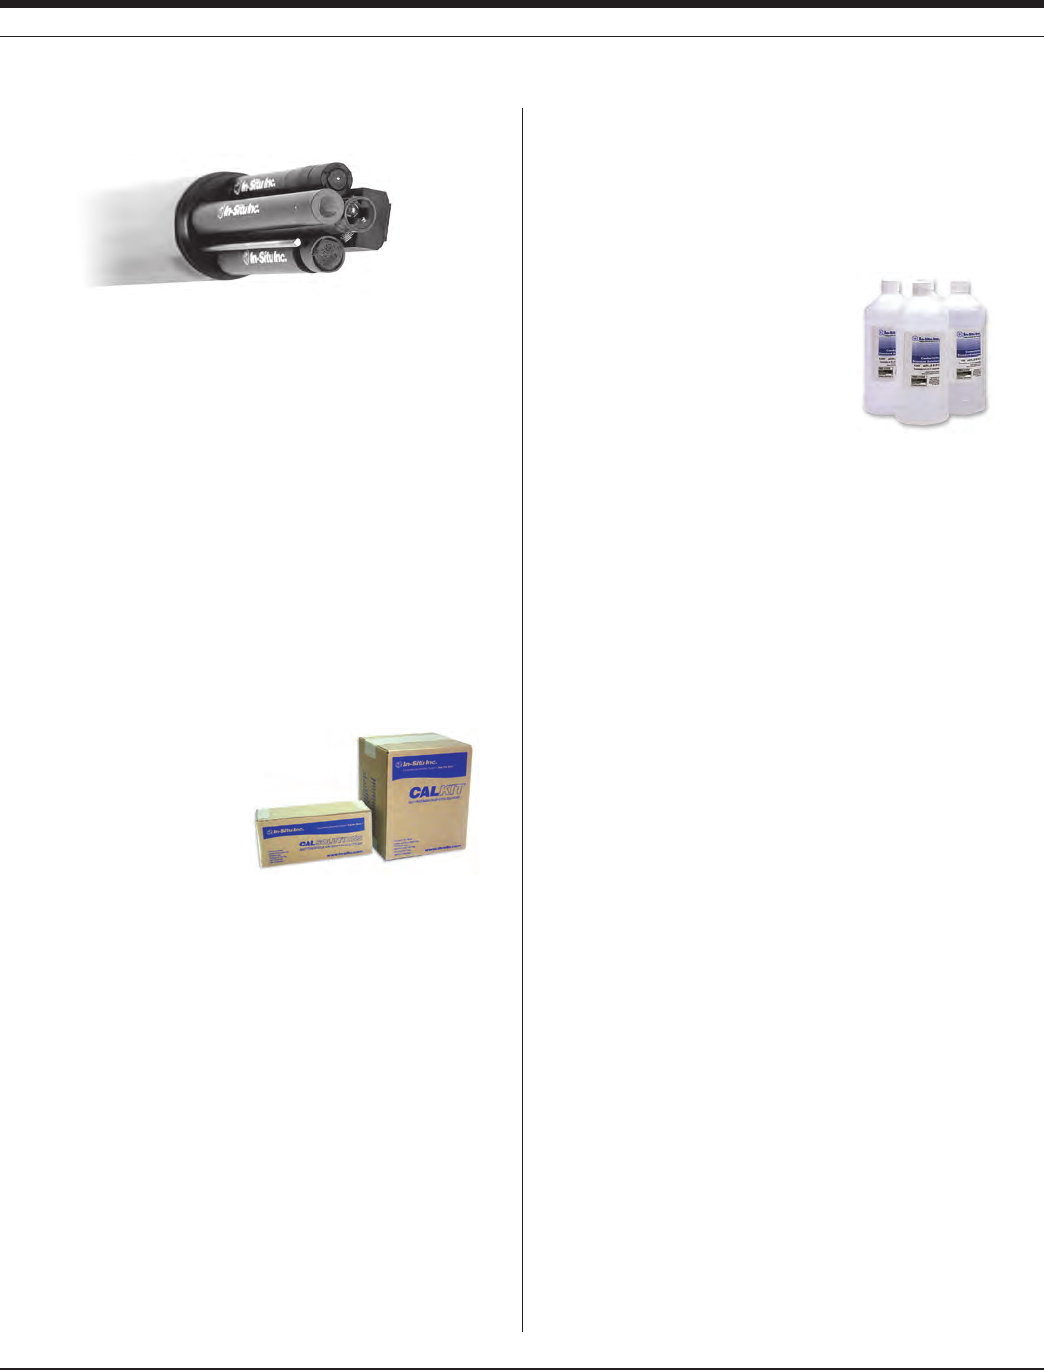
TROLL Com (Cable Connect)
Connects a TROLL 9500’s Rug-
gedCable to a serial or USB port;
Weatherproof, withstands a temporary
immersion (IP67).
TROLL Com (Direct Connect)
Connects a TROLL 9500 directly to a serial or
USB port. A good choice for permanent connec-
tion to a PC, or for programming a non-vented
TROLL 9500 that will be deployed without Rug-
gedCable. Not designed for field use.
Accessory Catalog No.
RS232 TROLL Com, Cable Connect ...................................... 0056140
RS232 TROLL Com, Direct Connect ...................................... 0056150
USB TROLL Com, Cable Connect ......................................... 0052500
USB TROLL Com, Direct Connect ......................................... 0052510
power coMponents
The MP TROLL 9500 operates in 2 power modes
• internalpower
• externalAClinepower
INTERNAL POWER
The MP TROLL 9500 uses:
• twostandard1.5ValkalineDcells,OR
• two3.6VlithiumDcells—recommendedforusewithanRDO
optical dissolved oxygen sensor, and with a turbidity wiper
Use only Saft LSH-20 3.6V lithium D cells. Use of any other
lithium battery will void the product warranty.
EXTERNAL POWER
A single MP TROLL 9500 can run exclusively on power supplied from
a 9 -12 VDC line power supply connected to a 90-264 VAC input.
When line power is enabled, the TROLL shuts down the battery regu-
lator, thus preserving the internal batteries. All TROLL Com models
include an external power input jack.
Accessory Catalog No.
AC Adapter 9V ........................................................................ 0031880
Replacement batteries, alkaline (1) ........................................ 0042020
Lithium battery (2) kit ............................................................. 0048230
TIP: Battery life is dependent upon temperature, cable
length, and how often the device is recording measure-
ments.
Section 2: componentS & FeatureS
RS232
or USB
connector
Vent
External
power input
Twist-Lock
connector
80095110 rev. 007 01/09
TROLL 9500 Operator’s Manual
water QUality accessories
Basic Sensors Catalog No.
pH .......................................................................................... 0059510
pH/ORP ................................................................................. 0059520
Low Conductivity ................................................................... 0033210
High Conductivity ................................................................... 0033220
Polarographic Dissolved Oxygen .......................................... 0032870
Extended Sensors Catalog No.
Nitrate .................................................................................... 0032050
Ammonium ............................................................................ 0032060
Chloride ................................................................................. 0032070
RDO Optical Dissolved Oxygen sensor
for use with pressure and/or turbidity sensor, sub-4” .............. 0085070
RDO Optical Dissolved Oxygen sensor
without pressure and/or turbidity sensor, sub-2” ..................... 0084310
Turbidity Wiper........................................................................ 0044510
Battery-Powered Magnetic Stirrer .......................................... 0042210
Calibration Kit Catalog No.
Quick-Cal: 4 x 250 mL (for calibrating Basic Sensors) .......... 0033250
Dissolved Oxygen: 1 liter DI water, 500 mL Na2SO3 .............. 0032110
RDO bubbler cal kit for 0085070 sensor ................................ 0048580
RDO bubbler cal kit for 0084310 sensor ................................ 0080830
Polarographic DO bubbler cal kit ............................................ 0095150
Conductivity: 147 µS, 1413 µS, 12890 µS, DI water .............. 0032090
Low Conductivity: 2 each 147 µS, 1413 µS .......................... 0032630
High Conductivity: 2 each 12890 µS, 58670 µS ..................... 0032640
pH: 1 each pH 4, pH 7, pH 10, DI water ................................. 0032080
ORP: 1 liter Zobell’s Solution ................................................. 0032100
pH/ORP: 1 each pH 4, pH 7, pH 10, Zobell’s Solution ........... 0032120
Nitrate: 1 each 14, 140, 1400 ppm, DI water .......................... 0032130
Low Nitrate: 2 each 14, 140 ppm ............................................ 0032650
High Nitrate: 2 each 140, 1400 ppm ....................................... 0032660
Ammonium: 1 each 14 ppm, 140 ppm, 1400 ppm, DI water .. 0032140
Low Ammonium: 2 each 14, 140 ppm ................................... 0032670
High Ammonium: 2 each 140, 1400 ppm ............................... 0032680
Chloride: 1 each 35.5, 355, 3545 ppm, DI water .................... 0032150
Low Chloride: 2 each 35.5, 355 ppm ...................................... 0032690
High Chloride: 2 each 355, 3545 ppm .................................... 0032700
Calibration Solution Catalog No.
Na2SO3 (Sodium Sulfite) for DO Cal, 500 mL ......................... 0017670
Conductivity, 147 µS ............................................................... 0032560
Conductivity, 1413 µS ............................................................. 0020680
Conductivity, 12890 µS ........................................................... 0020690
Conductivity, 58670 µS ........................................................... 0032580
pH 4 ........................................................................................ 0006370
pH 7 ........................................................................................ 0006380
pH 10 ...................................................................................... 0006390
ZoBell’s Solution (ORP) .......................................................... 0032210
Nitrate, 14 ppm as N ............................................................... 0032520
Nitrate, 140 ppm as N ............................................................. 0032230
Nitrate, 1400 ppm as N ........................................................... 0032240
Ammonium, 14 ppm as N ....................................................... 0032510
Ammonium, 140 ppm as N ..................................................... 0032260
Ammonium, 1400 ppm as N ................................................... 0032270
Chloride, 35.5 ppm ................................................................. 0032500
Chloride, 355 ppm .................................................................. 0032290
Chloride, 3545 ppm ................................................................ 0032300
Turbidity, 10 NTU polymer suspension, 500 mL ..................... 0033070
Turbidity, 100 NTU polymer suspension, 500 mL ................... 0033100
Turbidity, 1000 NTU polymer suspension, 500 mL ................. 0033120
Turbidity, 1800 NTU polymer suspension, 500 mL ................. 0033140
Maintenance/Service/Replacement Parts Catalog No.
Sensor insertion tool ............................................................... 0042310
Sensor removal tool ................................................................ 0042110
Cal cup, PVC .......................................................................... 0041440
Replacement wiper head ....................................................... 0044520
Wiper pad replacement kit ...................................................... 0044530
Lithium battery kit (2 “D” cells, 3.6V ea.) ................................ 0048230
Calibration Kits (four liters
unless otherwise noted)
Individual Calibration Solutions
(one liter unless otherwise noted)
Section 2: componentS & FeatureS

90095110 rev. 007 01/09
TROLL 9500 Operator’s Manual
Section 2: componentS & FeatureS
MP TROLL 9500 Maintenance kit (o-rings, lubricant, dust caps,
sensor port plugs) .............................................................. 0095100
MP TROLL 9500 Maintenance kit (o-rings, lubricant, dust caps,
sensor port plugs) for use with 0085070 RDO sensors ..... 0095100
DO sensor service kit, 1-mil membranes ................................ 0033200
DO sensor service kit, 2-mil membranes ................................ 0033440
RDO Sensor Cap replacement kit .......................................... 0084230
RDO Maintenance kit (sensors purchased before 09/08) ...... 0048250
RDO Foil replacement kit (sensors purch. before 09/08) ....... 0048500
pH & pH/ORP Reference Filling Solution (60 mL) .................. 0056900
pH & pH/ORP Reference Junction kit ..................................... 0059620
pH & pH/ORP Sensor Storage Solution (500 mL) .................. 0065370
installation accessories
• Twist-LockHanger:stainlesssteelhangertosuspendanon-
vented TROLL 9500, Level TROLL, or Baro TROLL while taking
data; no venting, no communication capabilities
• CableExtender:connectstwolengthsofRuggedCable
• Wellcaps,lockingandvented
• WellDocks:top-of-wellsupportfor2”,4”,or6”well
• SDI-12adapter:powerandsignalmanagementforSDI-12com-
munication
Accessory Catalog No.
Twist-Lock Hanger .................................................................. 0051480
Cable Extender ....................................................................... 0051490
Locking Wellcap, 2” ............................................................... 0020360
Locking Wellcap, 2” vented ................................................... 0020370
Locking Wellcap, 4” ............................................................... 0020380
Locking Wellcap, 4” vented ................................................... 0020390
Top-of-well installation ring ................................. WELLDOCK2”, 4”, 6”
SDI-12 adapter ...................................................... 0095200, 0095210
Flow Cell (sub-2 in) ................................................................. 0044710
Flow Cell (sub-4 in) ................................................................. 0057600
Twist-Lock Hanger Cable Extender Locking Wellcap
Well Dock
SDI-12 Adapter
control software
Win-Situ® 4 enables communication between the MP TROLL 9500
and a desktop or laptop PC.
Win-Situ provides instrument control for calibration, profiling, direct
readings, data logging, data extraction, data viewing (text and graphi-
cal interface), choice of units and other custom display options, bat-
tery/memory usage tracking, interface to networks and telemetry.
System requirements: Microsoft® Windows® 2000, Windows XP, or
WindowsVista™;InternetExplorer(IE)5.0orlater,andaCD-ROM
drive.
Pocket-Situ 4 provides Win-Situ’s features and functions on a field-
portable platform. Requirements: In-Situ RuggedReader® or other
supported PDA running Microsoft Pocket PC (Windows Mobile®)
2003 or later, with a serial communications port for connection to the
TROLL 9500, and at least 16 megabyte capacity for data storage (SD
card, CF card, or the device’s built-in non-volatile memory).
For installation and file exchange, Pocket-Situ requires the following
installed on an office desktop or laptop computer:
• Microsoft® ActiveSync®
• Win-Situ4
• Optional:Win-SituSync(orPocket-Sync4,earlierversionof
Win-Situ Sync)

10
TROLL 9500 Operator’s Manual 0095110 rev. 007 01/09
proDUct specifications
WettedMaterials* PVC,titanium,Viton®, acetal, 316L SS
OperatingTemperature* -5°Cto50°C(23°Fto122°F)
StorageTemperature* -40°Cto80°C(-40°Fto176°F)
PressureRating* 350psi(246m,807ft)
Dimensions 47 mm (1.85 in) dia, x 57.7 cm (22.7 in)
long
with RDO adapter 88.4 mm (3.48 in) dia, 57.7 cm (22.7 in)
long
Weight (without cable) 1.4 Kg (3.1 lbs)
Power
Battery type 2 standard alkaline D-cells (1.5 V), or
2 lithium D cells (approx. 3.6 V)
External power input 9-12 VDC (optional)
Data Sampling
Memorytype/size(memory 4megabytesashdatastorage,about
-equipped models) 1,000,000 individual readings
Fastest linear logging rate 5 seconds (10 seconds with RDO)
Profiling speed 2 seconds
Communications RS485
Computer interface RS232
Software
Win-Situ® 4 Desktop/laptop PC with Micro soft® Win-
dows® 2000 SP2 or later (Windows XP,
WindowsVista™),InternetExplorer5.0
or later, serial com port, CD-ROM drive,
16-64 Mb RAM
Pocket-Situ 4 In-Situ RuggedReader® or other sup-
ported handheld PDA running Microsoft
Pocket PC (Windows Mobile®) 2003 or
later
Cable
Jacket options Polyurethane, halogen-free (HF) polyure-
thane, Tefzel®
Conductors 6 conductors, 24 AWG, polypropylene
insulation
Diameter 6.7 mm (0.265 in)
Connector Titanium, 18.5 mm (0.73 in) O.D.
Break strength 127 kg (280 lb)
Minimum bend radius 2X cable diameter (13.5 mm, 0.54 in)
Weight Vented, regular & HF: 14 kg/300 m (32.3
lb/1000 ft)
Non-vented, regular & HF: 16 kg/300 m
(35.6 lb/1000 ft)
Vented Tefzel®: 23kg / 300m (52 lb /1000 ft)
Factory-Installed Sensors
Pressure/level
Type Media-isolated piezoresistive silicon
strain gauge
Range 15 psig (0-11 m, 0-35 ft)
30 psia/psig (0-21 m, 0-69 ft)
100 psia/psig (0-70 m, 0-231 ft)
300 psia/psig (0-210 m, 0-692 ft)
Accuracy better than ± 0.1% FS
Resolution 1 mm
Temperature
Type Platinum resistance thermometer
Range -5°Cto50°C(23°Fto122°F)
Accuracy ±0.1°C
Resolution 0.01°C
Barometric pressure
Type Piezoresistive silicon pressure sensor
Range 0-16.5 psia (854 mm Hg, 33.6 in Hg)
Accuracy ± 0.3% FS (2.54 mm Hg, 0.1 in Hg)
Resolution 0.1 mm Hg, 0.01 in Hg
Turbidity
Type Nephelometer,90°lightscattering,870
nm LED, solid-state
Range 0-2000 NTU
Accuracy ± 5% or 2 NTU (whichever is greater)
Resolution 0.1 NTU
Turbidity Wiper
Pressure Rating 350 psi (246 m, 807 ft)
OperatingTemp. 0°Cto50°C
Basic Sensors
Conductivity
Type 4-cell conductivity, AC drive
Operating Range
Low Range sensor 5 µS/cm to 20,000 µS/cm
High Range sensor 150 µS/cm to 112,000 µS/cm
Accuracy
Low Range sensor ± 0.5% or 2 µS/cm (whichever is greater)
when calibrated in region of interest.
High Range sensor ± 0.5% + 2 µS/cm between 150 µS/cm
and 112,000 µS/cm when calibrated in
region of interest. From 70 to 150 µS/cm
& 112,000 to 200,000 µS/cm ± 2% + 4
µS/cm typical
Resolution Range-dependent
Pressure Rating 350 psi (246 m, 807 ft)
OperatingTemp. -5°Cto50°C(23°Fto122°F)
Section 2: componentS & FeatureS
* Base unit = MP TROLL 9500 & factory-installed sensors
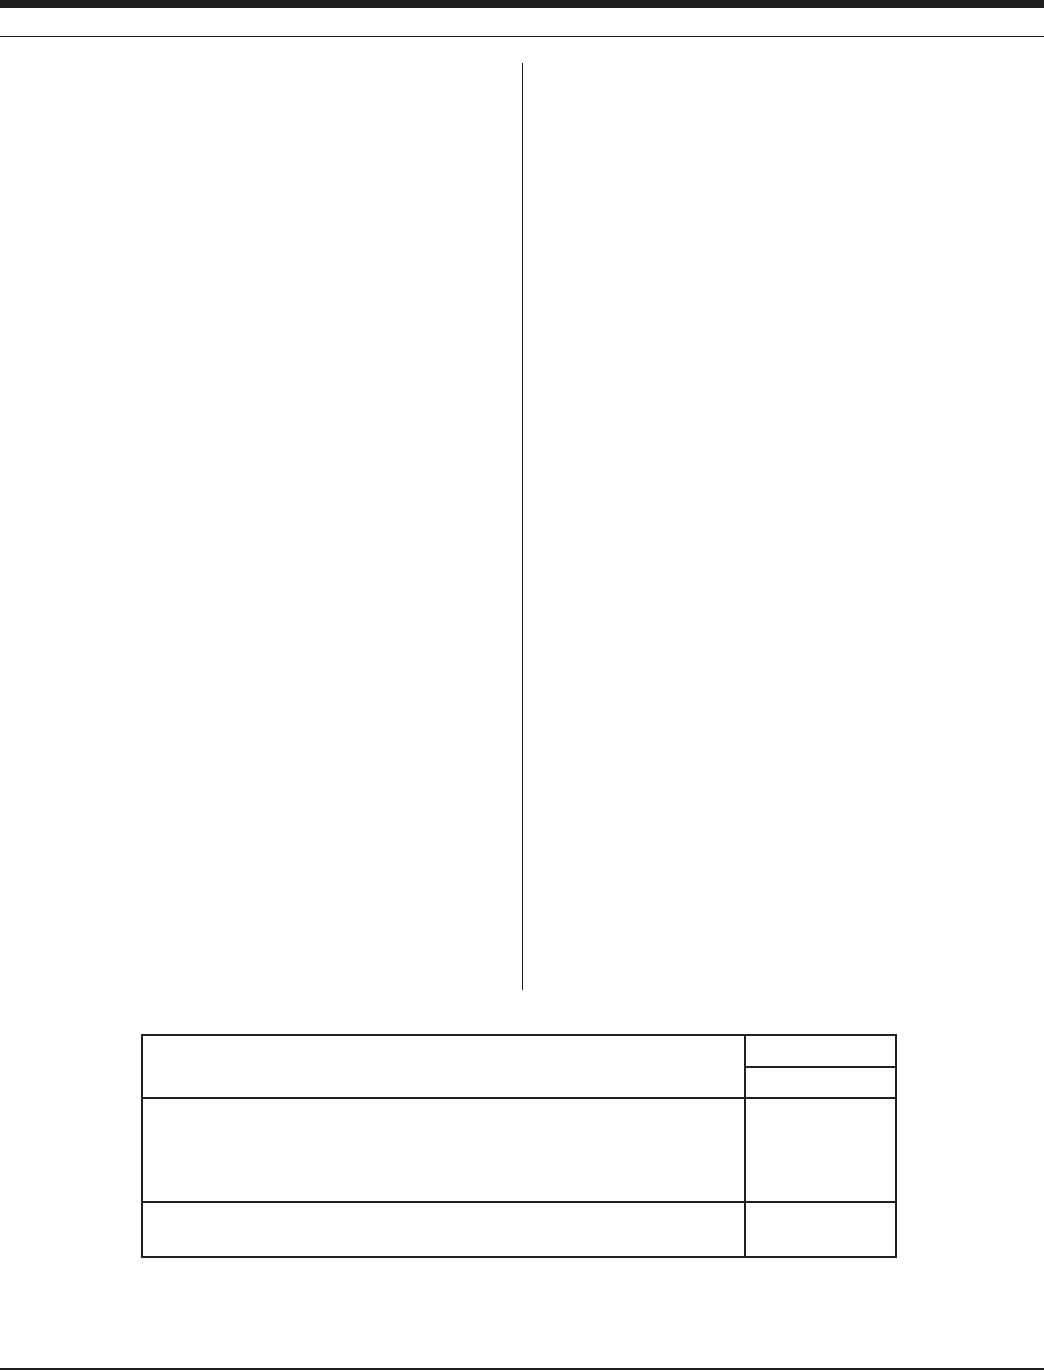
11
TROLL 9500 Operator’s Manual 0095110 rev. 007 01/09
pH
Type Glass sensing bulb, single-junction
electrode, replaceable ceramic junction,
refillable reference electrolyte
Range 0 to 12 pH units
Pressure Rating 350 psi 246 m, 807 ft
Operating Temp. 0°C to 50°C (32°F to 122°F)
Accuracy ± 0.1 pH unit
Resolution 0.01 pH unit
pH/ORP
Type Glass sensing bulb, platinum wire, single-
junction electrode, replaceable ceramic
junction, refillable reference electrolyte
Range ± 1400 mV, 0 to 12 pH
Pressure Rating 350 psi 246 m, 807 ft
Operating Temp. 0°C to 50°C (32°F to 122°F)
Accuracy ± 4 mV, ± 0.1 pH unit
Resolution 1 mV, 0.01 pH unit
Dissolved Oxygen (polarographic)
Type Clark polarographic
Range 0 to 20 mg/L, 0 to 200% saturation
Pressure Rating 350 psi (246 m, 807 ft); submersion &
retrieval at up to 4 ft per second
Operating Temp. -5°C to 50°C (23°F to 122°F)
Accuracy ± 0.2 mg/L
Resolution 0.01 mg/L
Extended Sensors
Dissolved Oxygen (optical, RDO)
Type Optical, fluorescence quenching
Range 0 to 20 mg/L, 0 to 450% saturation
Pressure Rating 300 psi
Operating Temp. 0°C to 40°C (32°F to 104°F)
Accuracy ± 0.1 mg/L @ 0-8 mg/L
± 0.2 mg/L @ 8-20 mg/L
Resolution 0.01 mg/L
Section 2: componentS & FeatureS
Ammonium (NH4
+)
Type PVC membrane sensing element, double
junction Ag/AgCl reference half-cell,
reference electrolyte gel
Range 0.14 to 14,000 ppm N (0.1 to 18,000 ppm
NH4
+)
Pressure Rating 20 psi (14 m, 46 ft)
Operating Temp. -5°C to 40°C (23°F to 104°F)
Accuracy ± 10%
Resolution 0.01 ppm
Chloride (Cl–)
Type Solid-state sensing electrode, double
junction Ag/AgCl reference half-cell,
reference electrolyte gel
Range 0.35 to 35,500 ppm Cl (2 to 35,000 ppm
Cl–)
Pressure Rating 100 psi (70 m, 231 ft)
Operating Temp. -5°C to 50°C (23°F to 122°F)
Accuracy ± 15%
Resolution 0.01 ppm
Nitrate (NO3
–)
Type PVC membrane sensing element, double
junction Ag/AgCl reference half-cell,
reference electrolyte gel
Range 0.14 to 14,000 ppm N (0.4 to 62,000 ppm
NO3
–)
Pressure Rating 20 psi (14 m, 46 ft)
Operating Temp. -5°C to 40°C (23°F to 104°F)
Accuracy ± 10%
Resolution 0.01 ppm
Typical Battery Life @ 20°C
Battery type
Installed sensors
Sample Interval
15 min.
2 alkaline D-cells
Pressure, temperature, baro, turbidity
Pressure, temperature, baro, turbidity, pH/ORP, conductivity, RDO, DO
Pressure, temperature, baro, turbidity, pH/ORP, conductivity, RDO
127 days
85 days
90 days
2 lithium D-cells
Pressure, temperature, baro, pH/ORP, conductivity, RDO, turbidity, no wiper
270 days
12
Multi-Parameter
Water Quality TROLL®
TROLL 9500 Operator’s Manual 0095110 rev. 007 01/09
This section provides a quick overview of the initial steps necessary to
get the Multi-Parameter TROLL 9500 ready to take measurements.
You will need—
• Power
• Sensors
• Software
• Cable
TROLL Com communication cable for deployment
• CalibrationKit—oneforeachsensortobecalibrated,orthe
QuickCal Kit for the Basic Sensor set (pH, ORP, polarographic
D.O., Conductivity)
proviDe power
TIP: When the unit ships with a Polarographic Dissolved
Oxygen sensor installed, alkaline batteries are pre-installed
in the device to power the D.O. sensor and keep it
conditioned.
Install batteries in the Multi-Parameter TROLL 9500 as
follows:
1. Unscrew and remove the battery compartment
cover. Slide it up over the cable (if attached).
3 GettinG starteD
2. Insert two D-size batteries negative side first, positive side up.
3. Replace the battery compartment cover and tighten to compress
the o-ring seals.
Screw the cover down firmly to compress the o-rings and
create a waterproof seal. When properly assembled, the o-
rings will not be vsible.
TIP: The MP TROLL 9500 uses standard off-the-shelf 1.5V
alkaline D-cells.
Alternatively, you may use Saft LSH-20 3.6V lithium D cells.
Use of any other lithium battery will void the product
warranty.
13 0095110 rev. 007 01/09
TROLL 9500 Operator’s Manual
install sensors
Basic water-quality sensors—pH or pH/ORP, polarographic D.O.,
Conductivity—may arrive installed in the instrument’s sensor ports.
Proceed to Install Software if there are no additional sensors to be
installed.
Install sensors in the Extended Sensor Set and any sensors shipped
separately as follows:
TIP: The RDO® Optical Dissolved Oxygen sensor has
special installation requirements. Please refer to the RDO
Quick Start guide, or see Section 13 of this operator’s
manual for complete information.
1. Remove the restrictor or Cal Cup from the front end of the MP
TROLL 9500.
This allows access to the sensor block depicted in the drawing
below.
There are four sensor ports, 1 – 4, plus a permanently installed
pressure and/or turbidity sensor or plug.
sensor
removal
tool
2. Remove the sensor’s protective cap or storage bottle and set aside
for future storage of the sensor. If the connector end is covered
with a cap, remove it also.
3. Remove any moisture or dirt from the area around
the port where you will install the sensor, then use
the sensor removal tool to remove the plug from the
port. Retain the plug for use when with fewer than 4
removable sensors installed.
4. Remove any moisture or dirt from the port connector with a clean
swab or tissue.
5. Check lubrication of the sensor o-rings.
The sensor o-rings require generous lubrication before
installation. New sensors will be lubricated at the factory. If
the o-rings appear dry, apply a silicone lubricant before
installation.
6. Align the mark on the side of the sensor with the mark on the cor-
rect port (see diagram), or visually align the sensor connector pins
with the port connector pins.
If the sensing element is at the end of the sensor, be careful
to handle the sensor by the sides. Use the insertion tool to
press the sensor into the port at step 7.
7. Press the sensor firmly into the port until you feel it
dock with the connector at the bottom.
When the sensor is properly inserted, a small gap (the
width of the sensor removal tool) remains between the
instrument body and the widest part of the sensor, for
ease of removal.
After installing a polarographic D.O. sensor, we recommend
conditioning it for 2-4 hours, preferably overnight, before
calibrating. For more on D.O. sensor conditioning, see
Section 13.
sensor
insertion
tool
Section 3: GettinG Started
Cable
connector Body Restrictor
Battery com-
partment
Conductivity
Pressure/Turbid-
ity (or plug)
Temperature
D.O. (polarographic)
or ammonium
or chloride
or nitrate
pH/ORP
or RDO
or pH
or ammonium
or chloride
or nitrate
RDO
or pH
or ammonium
or chloride
or nitrate
or turbidity wiper
End view of sensor block
Alignment mark
End view with the RDO cable
connect sensor plugged into ports
1 or 3
End view with the RDO direct con-
nect sensor plugged into ports 3 and
covering ports 2 and 5.
14 0095110 rev. 007 01/09
TROLL 9500 Operator’s Manual
install the software
WIN-SITU 4
Install Win-Situ 4 from the In-Situ software CD or the In-Situ website:
• ClickonWin-Situ4andfollowtheinstructionstoinstallWin-Situ4
to your local hard drive.
USB TROLL COM DRIVERS
• SelecttheoptiontoinstallUSBTROLLComdriversduringthe
Win-Situ installation. Two drivers will be loaded to your hard drive,
(USB TROLL Com, USB TROLL Com serial port).
POCKET-SITU 4
For communication using a RuggedReader® handheld in the field,
install the desktop component of Pocket-Situ 4 from the CD or web-
site. The desktop component is the “Win-Situ Software Manager,” and
helps you install Pocket-Situ on the RuggedReader at any time.
• ClickonPocket-Situ4andfollowtheinstructionstoinstalltheWin-
Situ Software Manager to your local hard drive.
To install Pocket-Situ on the RuggedReader: When convenient, con-
nect the RuggedReader to the PC, establish a connection in Microsoft
ActiveSync®, launch the Win-Situ Software Manager, and follow the
instructions.
WIN-SITU SYNC
If you plan to synchronize data files from the RuggedReader back to a
desktop PC after collecting data in the field, also install Win-Situ Sync
from the CD or website.
Section 3: GettinG Started
connect the harDware
TROLL 9500 TO TROLL COM
Connect the TROLL 9500 to the appropriate TROLL Com as shown.
• ConnectaDirect Connect model simply by pressing onto the con-
nector at the back end of the TROLL 9500.
• AttachaCable Connect model via locking Twist-Lock connector to
the TROLL’s RuggedCable—see the box on the next page.
TROLL COM TO COMPUTER
Plug an RS232 TROLL Com into a serial port on a desktop/laptop PC
or a RuggedReader.
Plug a USB into a USB port on a desktop/laptop PC. Install drivers
and check the virtual COM port—see the box below.
After connections are made, you are ready to launch the software and
program the MP TROLL 9500.
USB TROLL Com
When you plug in a USB TROLL Com, the USB drivers downloaded dur-
ing Win-Situ installation will be installed as follows:
• Windows2000,WindowsVista:Whennewhardwareisdetected,the
drivers are installed automatically.
• WindowsXP:FollowtheinstructionsintheFoundNewHardware
Wizard. Select the option “Install software automatically.”
After installation, you will need to determine which COM port the con-
nected USB TROLL Com is using:
• Windows2000&WindowsXP:ControlPanel>System>Hardware>
DeviceManager>Ports.Clicktheplussigntodisplaytheports.
• WindowsVista:ControlPanel>System>DeviceManager(User
permissionrequired)>Ports.Clicktheplussigntodisplaytheports.
REMEMBER THE COM PORT NUMBER! You will need it when connect-
ing to the TROLL 9500 in software.
(continued on page 16)
USB connections
USB port
Serial port
RS232 connections
Direct Connect
TROLL Coms
Cable Connect TROLL Coms
15
TROLL 9500 Operator’s Manual 0095110 rev. 007 01/09
TWIST-LOCK CABLE CONNECTIONS
RuggedCable mates to the TROLL 9500 and to Cable Connect
TROLL Coms with a bayonet-type Twist-Lock connector.
1. Remove the soft protective caps from the TROLL 9500 and the
cable.
TIP: Keep the dust caps to protect the connector pins and
o-ring when the connectors are not mated.
2. Takeamomenttolookattheconnectors.Eachhasaatside.
Note the pins on the body connector (one on each side) and the
diagonal slots on the cable connector (one on each side).
3. Slide back the sleeve on the cable connector.
4. Orienttheatsidessotheywillmateup,andinsertthebody
connector firmly into the cable connector.
5. Slide the sleeve on the cable toward the body until the pin on the
body pops into the round hole in the slot on the cable.
6. Grasp the textured section of the cable connector in one hand
and the body in the other. Push and twist firmly so that the pin
on the body slides along the slot on the cable and locks securely
into the other hole. The “click” ensures the cable is securely
attached.
To attach a Cable Connect TROLL Com, first remove the desiccant
from the cable (if present): Grasp the textured section of the cable
connector in one hand and the desiccant in the other. Twist in op-
posite directions to unlock the desiccant from the cable.
Orientthe“ats”sotheywillmateup,andinserttheTROLLCom
connector firmly into the cable connector.
Push, twist, and click to lock.
TROLL 9500
(or Cable Connect TROLL Com)
Cable
Flat
Flat
TROLL 9500
(or Cable
Connect
TROLL Com)
Cable
pin slot
Section 3: GettinG Started
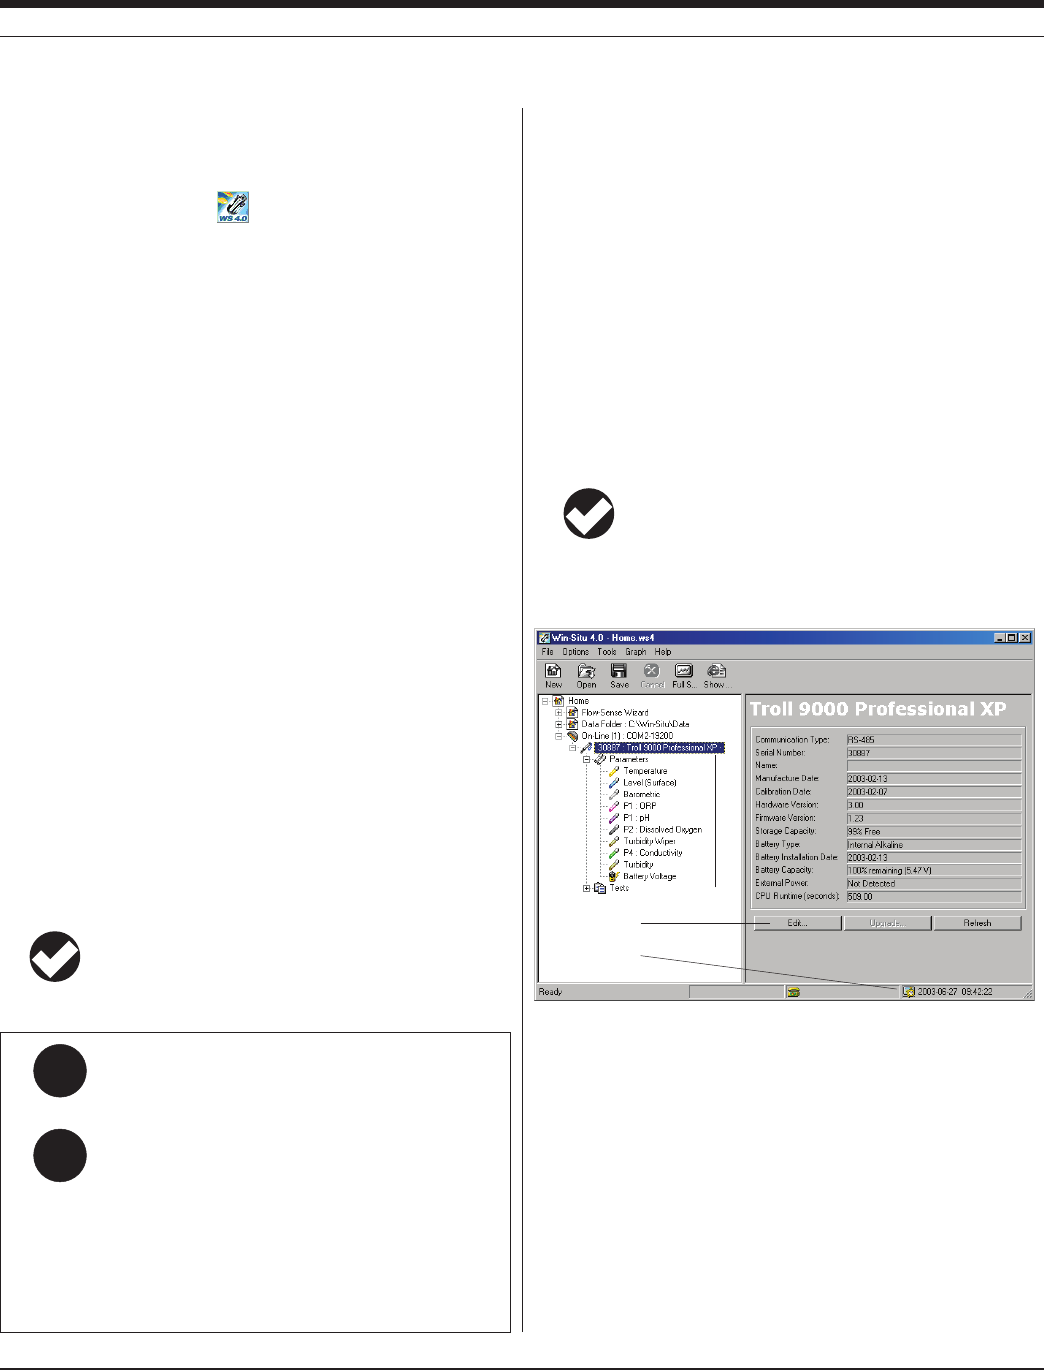
16 0095110 rev. 007 01/09
TROLL 9500 Operator’s Manual
Q:
A:
What do I do if the MP TROLL 9500 does not appear in
the Navigation tree?
First try double-clicking the connection. If the device still
does not appear, there may be a com mu nication problem.
Check these likely culprits:
• BesureyouselectedthecorrectCOMportforyourPC.
• Checkthatallcableconnectionsaretight.
• BesuretheMPTROLL9500hassufcientbatterypower,
or that external power is being supplied.
Select the device
Device clock
Set the clock
Section 3: GettinG Started
set the real-tiMe clock
Data collection schedules depend on the device’s real-time clock,
shown in the lower right corner of the desktop PC interface. If the
device clock is wrong, be sure to correct it before scheduling tests.
Set the clock as follows:
1. With the device selected in the Navigation tree, press Edit.
2. In the Device Wizard, select Clock.
3. Follow the instructions to synchronize the MP TROLL 9500’s inter-
nal real-time clock to the host computer.
4. When you finish the Wizard, Win-Situ sends the information to the
device and updates the display.
TIP: Due to the size of the PDA screen, the device clock is
not displayed in the Pocket-Situ interface. We recommend
you edit the device—Tap the device, tap Edit, tap Clock— to
synchronize the device clock to the PDA clock.
establish coMMUnication with the Mp troll
9500
1. Start Win-Situ 4 by double-clicking the shortcut created on the
desktop during installation .
Or tap the Pocket-Situ 4 shortcut on the PDA Start Menu.
2. The Connection Wizard starts to help you set up the port:
• Connection type:
• Direct,forusewhentheMulti-ParameterTROLL9500is
attached directly to the host PC
• Modemforadial-upmodem
• Spread-SpectrumRadio
• Devices connected: Select “one” to speed up connection to a
single device, or “more than one” for a network.
• Port: Select the COM port to which the device is attached. If
using a USB TROLL Com, be sure to select the correct COM
port (see the box on page 14). For a Modem connection, enter
the phone number—up to 40 characters; a comma designates a
pause.
• Baud Rate: Select any rate (19,200 is the default); baud rates
are automatically synchronized between devices and the host
PC.
• Name (optional): A default connection name is suggested.
• Tohavethewizardconnectautomaticallytotheattached
device(s), be sure the option Connect and find devices on
“Finish” is checked.
3. When you finish the Wizard, the software “finds” (connects to) the
device, and displays it in the Navigation tree.
TIP: For an introduction to the appearance and controls of
the user interface, turn to Section 4, Control Software.
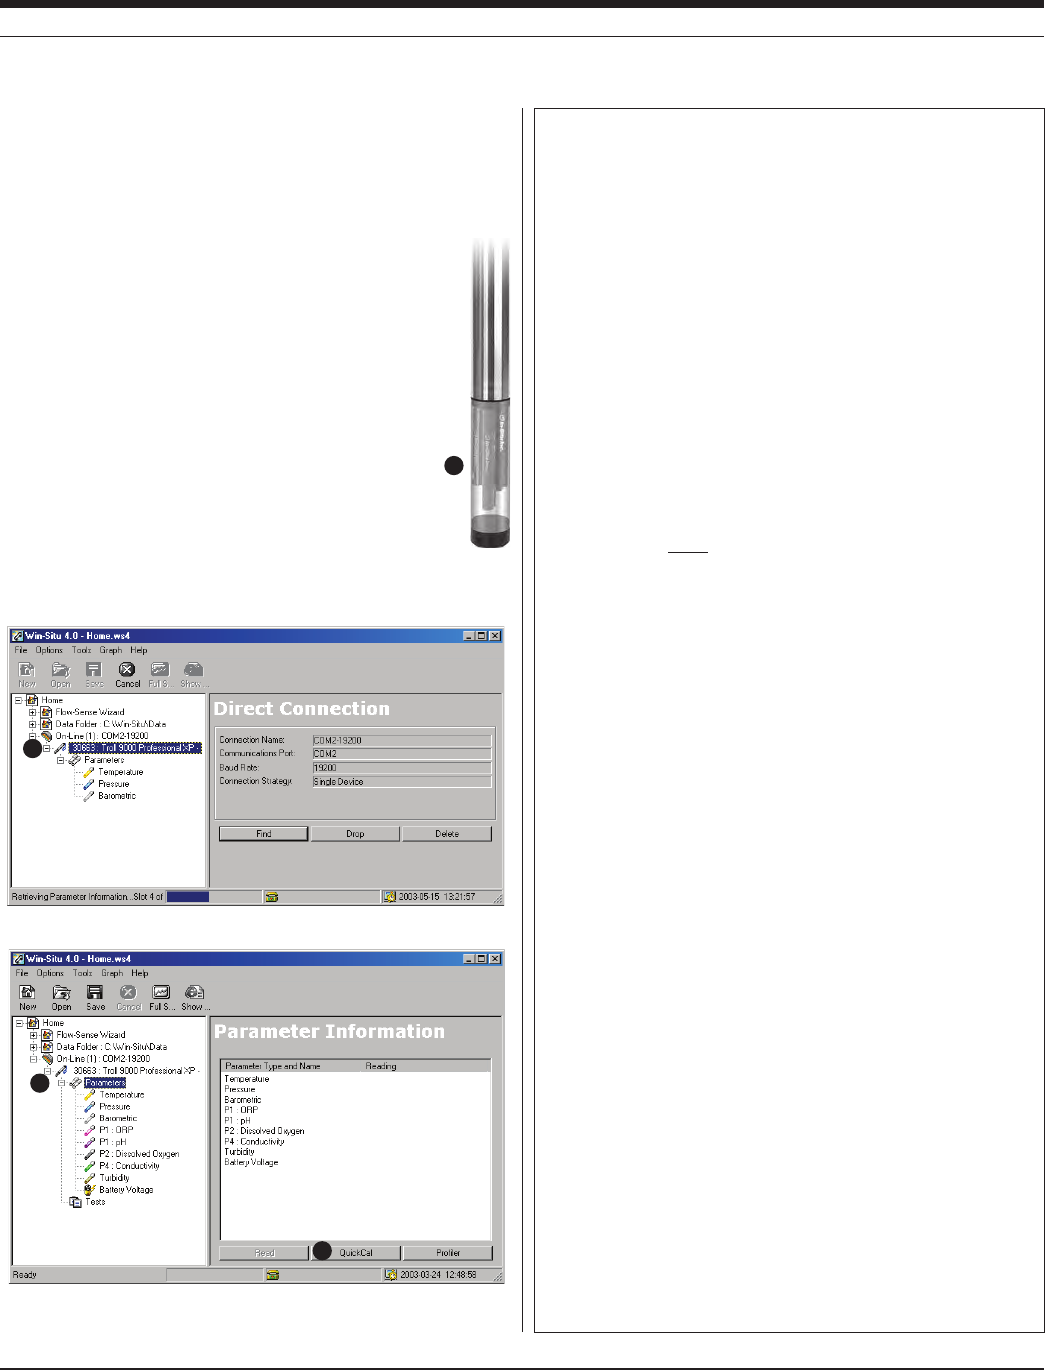
17 0095110 rev. 007 01/09
TROLL 9500 Operator’s Manual
QUick-cal the basic water-QUality sensors
You will need:
• MPTROLL9500withBasicsensorsinstalled(pHorpH/ORP,
polarographic D.O., Conductivity), plugs in any unused ports.
• CalCup.Removespongeifpresent.
• QuickCalsolution,atroomtemperature.Shakewell
before use.
1. Fill the Cal Cup with the Quick Cal solution. See guide-
lines in the sidebar on this page.
2. Remove the restrictor (if attached) and insert the front
end of the MP TROLL 9500 into the Cal Cup. Thread
the Cal Cup onto the body until seated against the o-
ring, then back off slightly to avoid overtightening.
3. Connect the MP TROLL 9500 to a PC and establish a
connection in Win-Situ 4 or Pocket-Situ 4.
4. Select the MP TROLL 9500 in the Navigation tree. The software
will automatically detect and display the installed sensors.
5. In the Navigation tree, click on Parameters.
6. In the Information pane, select QuickCal.
Section 3: GettinG Started
4
5
6
Quick-Cal Tips
• AQuickCalisthefastestwaytocalibratepH,conductivity,polaro-
graphic D.O., & ORP. But for best results, if your software supports it,
we recommend traditional calibration for pH, conductivity, and D.O., as
described in Sections 11-13.
• Be sure to condition a new polarographic D.O. sensor for 2-4 hours,
preferably overnight, before cal i brat ing. See Section 13 for information.
If the sensor is installed when you receive the instrument, it is condi-
tioned and ready to calibrate.
• GuidelinesforllingtheCalCupwithQuickCalsolution:
• Withafullcomplementofsensorsinstalled,usethelowerlineasa
guide (about half full).
• With1or2sensorsinstalled,lltotheupperline.
• Whencalibratingahigh-rangeconductivitysensor,insuretheside
ports are immersed in solution. Dislodge any bubbles that may
appear. For a Quick Cal with a full set of sensors, we suggest you fill
the Cal Cup above the line labeled “Recommended Fill Line - High.”
Useaboutahalf-inchofadditionaluid,dependingonthesensor
load. Some experimentation may be needed.
• WhenQuick-CalibratingpolarographicD.O.withahigh-rangeconduc-
tivity sensor installed, the increased fill level suggests handling with
carewhenyouinverttheCalCupatstep11—allowtheexcessuidto
spill into a sink, or remove the Cal Cup from the instrument and pour
someuidout,re-attachtheCalCup,theninvertitandloosentheend
cap to achieve the correct atmospheric pressure for a polarographic
D.O. calibration. The D.O. sensor membrane should be in air, the
temperature sensor should be completely submerged.
• Forbestaccuracy,conductivitysensorsshouldbewettedfor15-30
minutes immediately prior to calibration. This immersion can be in either
clean water or the Quick Cal solution.
• Forbestresultsattemperaturesatorbelow15°C,de-selectthecon-
ductivity sensor when perfoming a Quick-Cal; follow up with a single-
parameter calibration uisng 8000 microSiemens/cm.
• If an RDO Optical Dissolved Oxygen sensor is installed, use the special
soft plastic cal insert (it has an orange base) to Quick Cal the standard
sensors, since the standard Cal Cup will not fit when the RDO sensor
is installed. Fill the cal insert with calibration solution, slide it up around
the sensors, including the RDO cable, and use the RDO restrictor as a
support during calibration.
• If your MP TROLL 9500 includes a turbidity wiper, insure the pad does
not absorb Quick Cal solution. Either carefully remove the wiper head
(see Wiper Maintenance in Section 18), or soak the front end of the
TROLL in water before calibrating; allow the pad to become saturated.
• QuickCalisnotavailableforthesesensors:Nitrate,Ammonium,Chlo-
ride, Turbidity, Optical D.O. Traditional calibrations should be performed
for best results from these sensors.
2

18 0095110 rev. 007 01/09
TROLL 9500 Operator’s Manual
The Quick Calibration Wizard starts. A screen like this is displayed.
7. Insure there is a check beside the sensors you wish to Quick-Cal.
8. Click Next. The pH, ORP, and Conductivity screen appears.
9. Click Run to start the calibration.
The display will continuously update as readings are taken and
compared against the stabilization criteria (see sidebar).
All 3 parameters must indicate NOMINAL or STABLE before the
calibration can continue.
• WhenpH,ORP,andconductivityareSTABLE,thepolarographic
D.O. calibration screen is displayed automatically if a polaro-
graphic D.O. sensor is installed.
Section 3: GettinG Started
Q:
A:
What is the difference between NOMINAL and STABLE?
To meet the criteria for a valid calibration point, the change
(deviation) in sensor response is monitored over time. The
software is looking for the calibration solution temperature
and the sensor readings to settle over a specific time period.
The criteria for STABLE are designed to meet the published
specifications. The NOMINAL criteria are designed to
shorten the calibration time when an approximate calibration
is acceptable. When the deviation falls within the limits of
the “loosened” specifications, NOMINAL is displayed in the
Status area, and the Accept button becomes available to
store the current calibration point.
Accepting a NOMINAL value may save considerable time.
In some cases, especially if the sensors have been soaking
in the solution for several minutes prior to calibration, the
accuracy achieved by accepting a nominal value may be
very similar to that obtained by waiting for complete stability.
7
8
9
Status indicators during stabilization:
NOT TESTED may be displayed before the calibration begins.
UNSTABLE indicates the sensor response does not meet the
criteria for a valid calibration point. All parameters start out at
“Unstable” status.
NOMINAL indicates the change in the sensor response over
time meets a relaxed stability criterion. “Nominal” stability will
occur first, and can be accepted to shorten the calibration time.
STABLE indicates the change in the sensor response over time
meets the stability criteria for a Quick Cal.
Reading: Current sensor response (in indicated units).
Deviation: Change in response between the last two readings.
This enables you to follow the progress of the stabilization, but
deviation from the previous reading is not necessarily the best
indicator of stability as the software is looking at longer-term
trends.
Run button: Starts the calibration
Accept button: Becomes available when Nominal stability is
reached (see below)
Stop button: Stops the current phase of the calibration
Back button: Goes to the previous screen (when available)
Next button: Proceeds to the next screen (when available)
Cancel button: Cancels the calibration
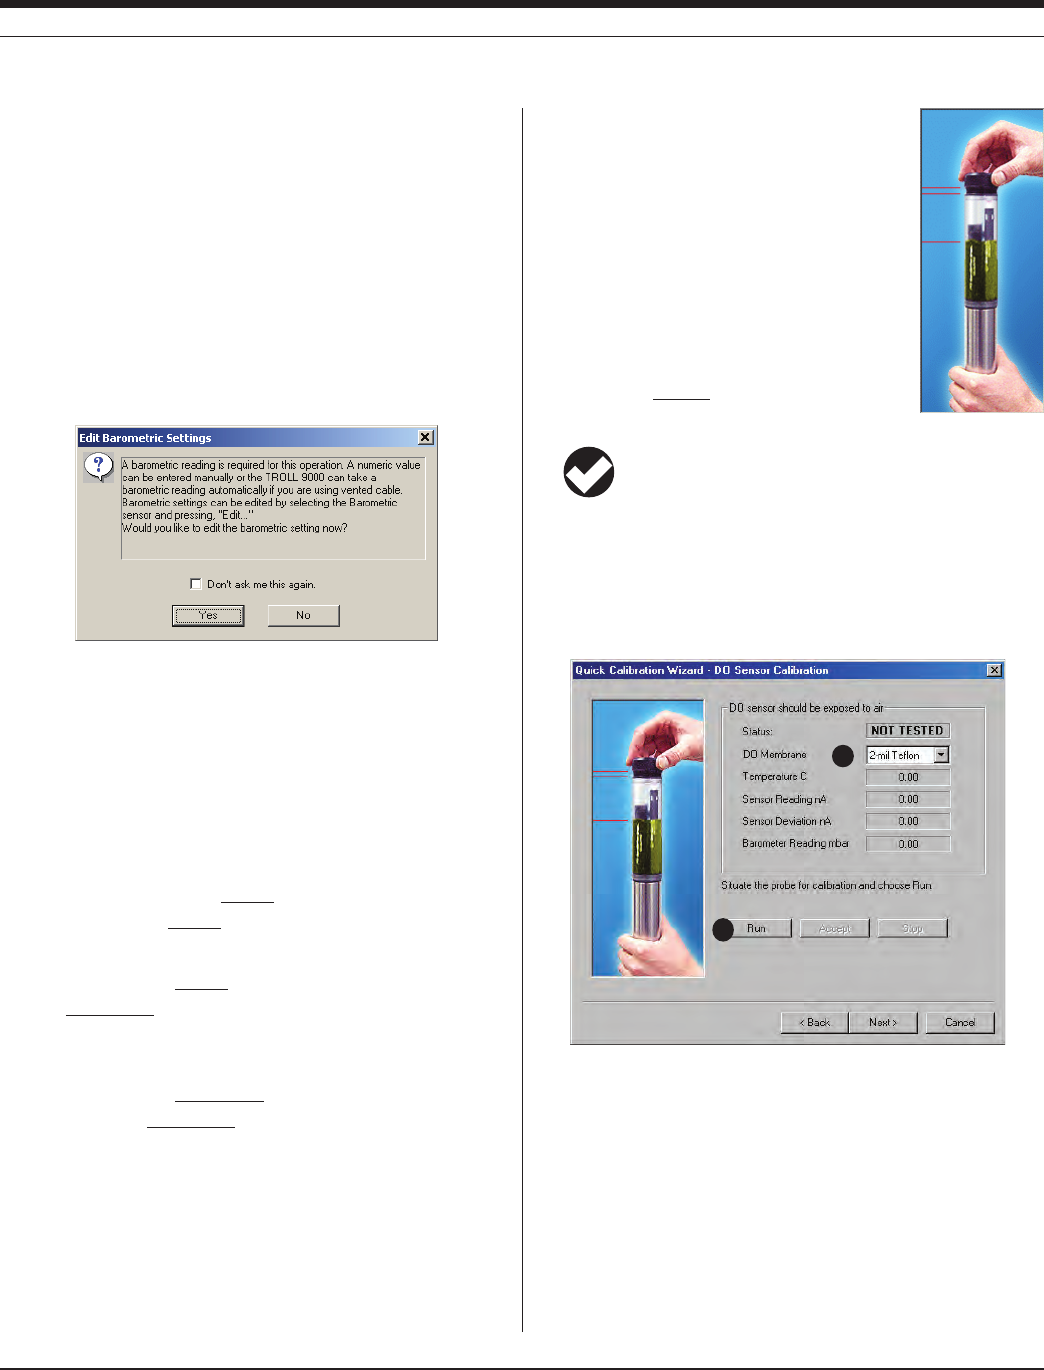
19 0095110 rev. 007 01/09
TROLL 9500 Operator’s Manual
• Alternatively,youmayclickAccepttostoretheearlyvalues.The
Accept button becomes available when NOMINAL or STABLE is
indicated for all 3 parameters.
• IfthereisnopolarographicD.O.sensor,theQuickCaliscom-
plete. Go to step 14.
If performing a Polarographic Dissolved Oxygen calibration,
continue with steps 10-13.
10. Polarographic Dissolved Oxygen: Before the D.O. segment of
the Quick Cal Wizard starts, you will be asked how you want to
handle barometric pressure.
Barometric pressure is important in converting measurement of
D.O. concentration to percent saturation, and a value is required
for accurate calibration. If the TROLL 9500 cable is vented, an
accurate barometric pressure value can be read from the onboard
barometric pressure sensor. If the TROLL cable is non-vented,
then a barometric pressure value should be entered manually.
Do one of the following in this screen:
• IftheTROLL9500isonvented cable now and will take mea-
surements using vented cable, click No — and you may want to
check the “Don’t ask me this again” box.
• Ifthedeviceisonvented cable now but will take measurements
on non-vented cable, click Yes. In the Edit Barometric Channel
screen, check the box indicating non-vented cable for measure-
ments but vented cable for calibration/programming.
• Ifthedeviceisonnon-vented cable now and will take mea-
surements on non-vented cable, click Yes. In the Edit Baromet-
ric Channel screen, check the box indicating non-vented cable
for measurements and enter a barometric pressure value. For
help, see Section 9, Monitoring Barometric Pressure.
Section 3: GettinG Started
13
12
11. To complete the calibration, expose the polaro-
graphic D.O. sensor to air: Without discon-
necting the cable, invert the probe so that the
membrane at the tip of the sensor is in air and
thetemperaturesensorisimmersedinuid.
This will probably require you to remove the end
capfromtheCalCupandpoursomeuidout.
While you have the cap off, remove any drop-
lets on the membrane by blotting gently with a
clean swab or the corner of a tissue. Re-attach
the end cap loosely to insure the volume is not
pressurized.
TIP: For proper venting, loosen the end cap until a small
hole in the threads near the o-ring is at least partly visible.
12. In the DO calibration screen, select the membrane type, stamped
onthemembranemodule(ifnotindicated,select1-milTeon).
13. Click Run to begin the stabilization.
The display will continuously update as readings are taken and
compared against the stabilization criteria (see sidebar on the
previous page).
14. When the sensor response is STABLE (or alternatively, when you
accept the nominal value), the Quick Cal procedure is complete.
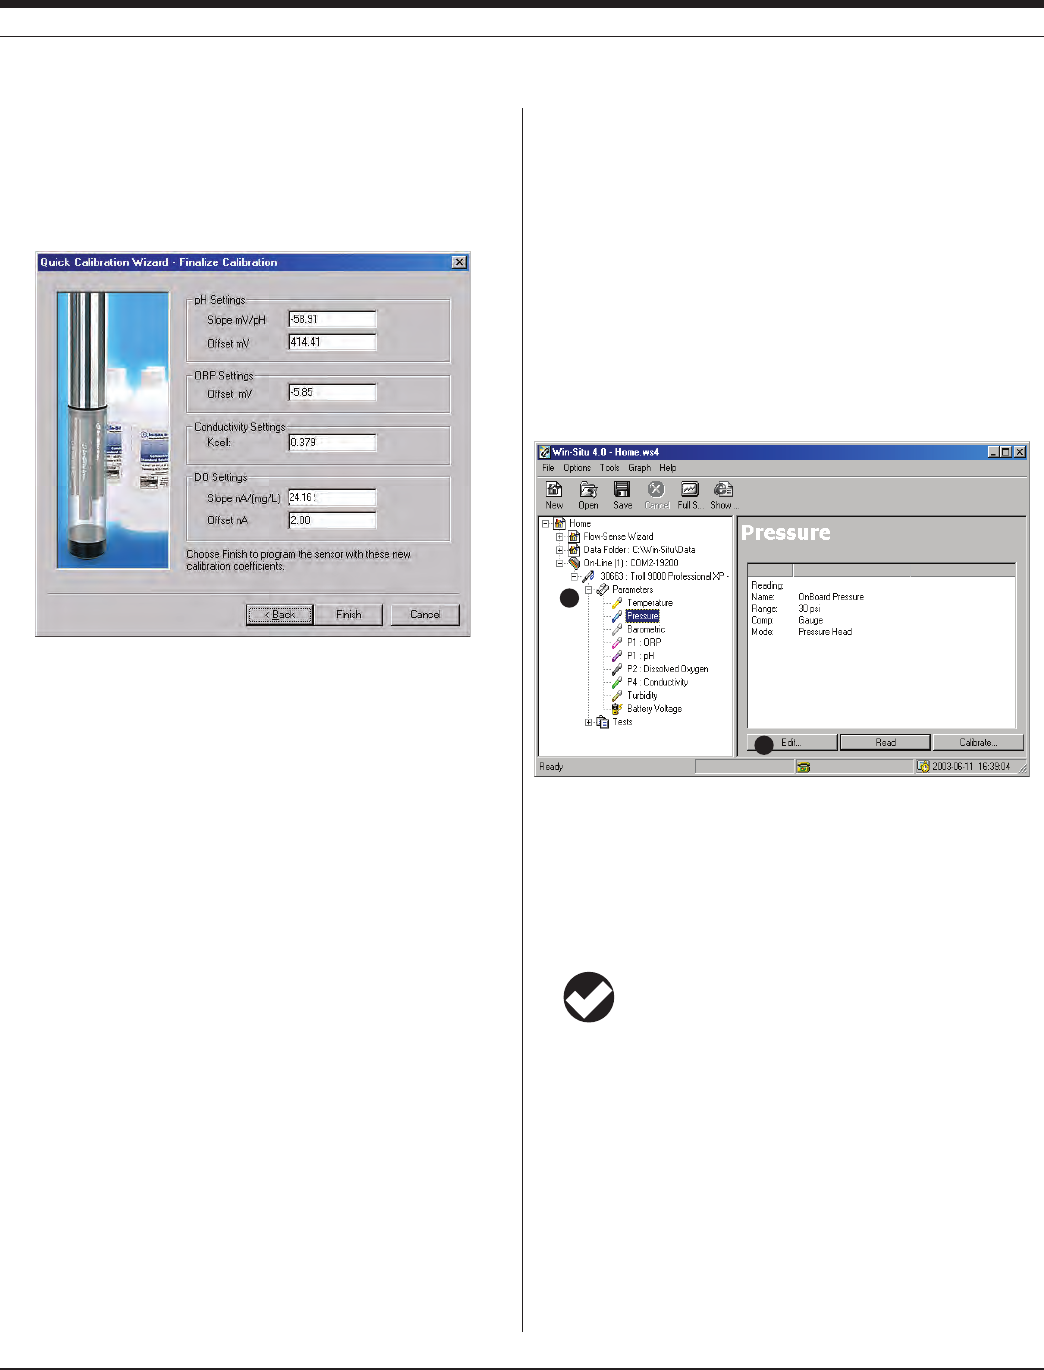
20 0095110 rev. 007 01/09
TROLL 9500 Operator’s Manual
The Wizard displays a final calibration screen like the one below
at the end of the Quick Calibration procedure. This information
is also stored in the Calibration Report. Click Finish to continue.
When you click Finish, the calibration information is written to the
sensors.
The calibrated sensors are ready to take measurements.
Ideally, you chould calibrate just before using the MP TROLL 9500.
However, if the the instrument will not be put to use immediately, store
it as follows:
• Leavethesensorsinstalled.RemovetheCalCupandrinseit
and the sensors. Add about 50-100 mL of tap water to the Cal
Cup. Return the probe to the Cal Cup for transport to the field.
calibrate the extenDeD sensors
For some sensors, the Quick-Cal procedure is not available. A tradi-
tional calibration is recommended. To calibrate, select the sensor in
the Parameters list and click or tap Calibrate to launch a Calibration
Wizard. Complete calibration information is in the following sections of
this manual:
RDO Optical Dissolved Oxygen Section 13 (second part)
Ammonium Section 15
Chloride Section 16
Nitrate Section 17
Turbidity Section 18
set Up cUstoM pressUre/level MeasUre-
Ments
You can configure a pressure channel to display measurements just
the way you want them—as raw pressure head above the sensor, as
depth, or as water level with a reference. The specified settings are
easily changed from one mode to another, and any choice can be
redone or undone later, when viewing test data.
1. With the MP TROLL 9500 connected to a host PC, select the pres-
sure parameter in the Navigation tree.
2. Click or tap Edit....
The Parameter Wizard will help you enter the required information.
The choices are explained in greater detail in Section 7 below.
3. When you finish the Wizard, the information is written to the device
and the display is updated. The pressure channel is ready to take
measurements
TIP: For complete information on setting up the pressure
parameter, refer to Section 7 of this operator’s manual.
Section 3: GettinG Started
1
2

21 0095110 rev. 007 01/09
TROLL 9500 Operator’s Manual
1
2
Section 3: GettinG Started
set Up to loG Data (set Up a test)
A “test” is a set of instructions to the instrument’s internal data logger
for collecting a set of data—including which parameters to measure,
how often, and when to start. Section 6 below contains detailed infor-
mation on setting up tests.
1. With the MP TROLL 9500 connected to a host PC, click or tap
Tests in the Navigation tree.
2. Click or tap Add....
The Test Wizard will help you enter the information. The choices
are discussed in detail in Section 6 below.
3. When you finish the Wizard, Win-Situ sends the information to the
device and updates the display.
If you added “scheduled” test (indicated by in the Navigation
tree), it will start at its programmed time.
If you set up a test or a manual start (indicated by in the Navi-
gation tree), you can start it at any time by pressing the Start button
while connected in software.
TIP: For complete information on setting up tests, refer to
Section 7 of this operator’s manual.
coMplete the setUp
If real-time readings are not required, remove the TROLL Com from
the cable after programming.
Protect the “uphole” end of the cable with the cable dust cap or desic-
cant.
The cable dust cap is not waterproof. Be sure it is
positioned above the highest anticipated water level. Avoid
areas that may flood.
If cable will not be used, attach a Twist-Lock Hanger to the TROLL
9500.
The instrument is now ready for transport to the site where it will be
used to take measurements.

22
Multi-Parameter
Water Quality TROLL®
TROLL 9500 Operator’s Manual 0095110 rev. 007 01/09
4 control software
The interface from a desktop or laptop computer (PC) to the Multi-Pa-
rameter TROLL 9500 is provided by instrument control software called
Win-Situ® 4. Instrument control is accomplished through a familiar,
easy-to-use Navigation Tree interface.
For field use on a hand-held computer (PDA), optional Pocket-Situ 4
provides all of Win-Situ’s functionality and features in a convenient
field-portable platform.
Use Win-Situ or Pocket-Situ for these tasks:
• tocalibratewater-qualitysensors
• toconvertpressuremeasurementstodepthorlevelreadings
• tosetupdatacollectionschedules(“tests”)
• totakedirect“manual”readings
• totakecontinuousreal-timereadings(Proling)
• totransferdatafromtheMulti-ParameterTROLL9500tothe
host computer
• toviewloggeddataintextorgraphformat
• todeletedatafromtheMulti-ParameterTROLL9500inorderto
free up memory
• tomonitorbatteryandmemoryusage
• tosetthedeviceclock
• toupgradedevicermware(whenavailable)
• tochoosemeasurementunitsandothercustomdisplayoptions
• tomonitorindicatorwater-qualityparametersduringlow-ow
pumping
• toscheduleautomaticremotetransmissions(ifavailable)
TIP: For software system requirements, see Section 2,
Components & Features. Software installation is covered in
Section 3, Getting Started.
laUnchinG the software
WIN-SITU 4
Use one of the following methods:
• Double-clicktheshortcut created on the desktop during
installation.
• SelectWin-Situ4fromtheIn-SituIncprogramgroupontheWin-
dows Start menu.
POCKET-SITU 4
Tap Start to display the RuggedReader’s Start Menu. Select Pocket-
Situ 4.
• Ifyoudon’tseeashortcut,tapProgramsandselectPocket-Situ4
• Ifitlaunchesin“demo”mode,youcanactivateitwiththelicense
key and activation code from your In-Situ License Agreement
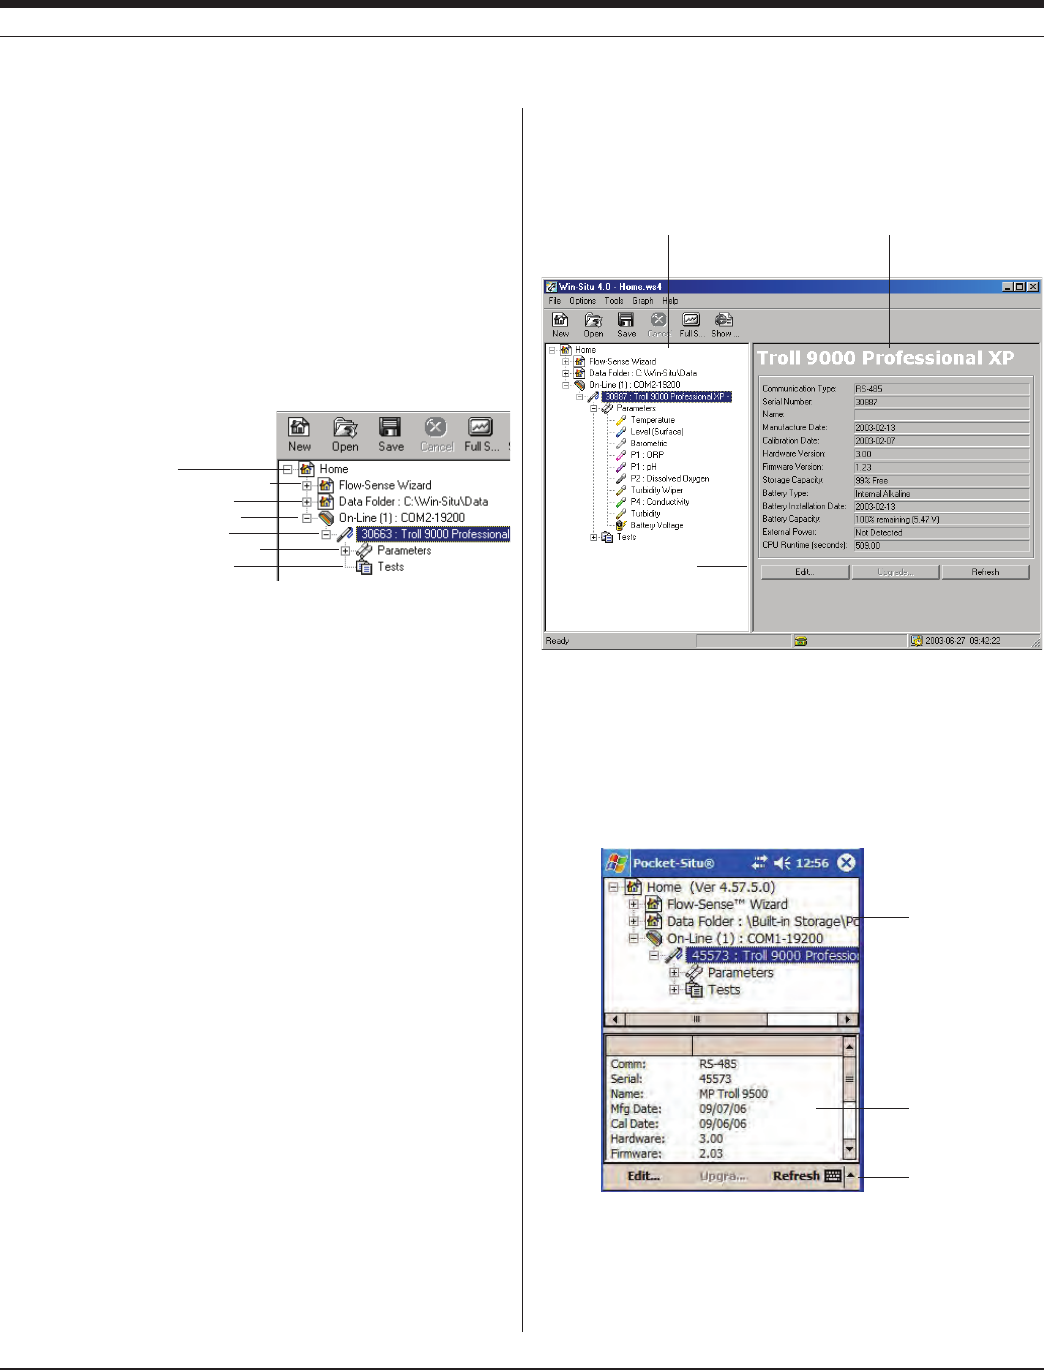
23 0095110 rev. 007 01/09
TROLL 9500 Operator’s Manual
Section 4: control SoFtware
Navigation tree
Actions
Information pane
The Win-Situ 4 Application Window (desktop/laptop PC)
The Pocket-Situ 4 Application Window (PDA)
Actions
Navigation
tree
Information
pane
the User interface
Win-Situ 4 and Pocket-Situ 4 use the familiar “Navigation tree” to
display your instrument network. The tree appears on the left of the
screen in Win-Situ, and at the top of the screen in Pocket-Situ. The
remainder of the screen is an “Information pane” with details about
the “node” you have selected in the tree. The selected node and its
information constitute a “view” in the interface.
THE NAVIGATION TREE
At the top of the tree is the
“Home” site (the host
computer). Below
this is the Flow-
Sense Wizard (see
Section 20), then the
Data Folder contain-
ing tests that have been
extracted from the device to the host computer. This is followed by
one or more connections (COM ports), and then one or more devices
(Multi-Parameter TROLLs or other In-Situ instruments) accessible
through each COM port. The Device node is further expandable to
show the parameters the device can measure and the tests contained
in the device’s memory.
The site, wizard, data folder, connection, devices, parameters, and
tests are all “nodes” in the Navigation tree. The symbol + means a
node can be expanded to show more nodes below it. Each selection
results in a unique “view” in the Navigation tree.
Site
Flow-Sense Wizard
Data Folder
Connection
Device
Parameters
Tests
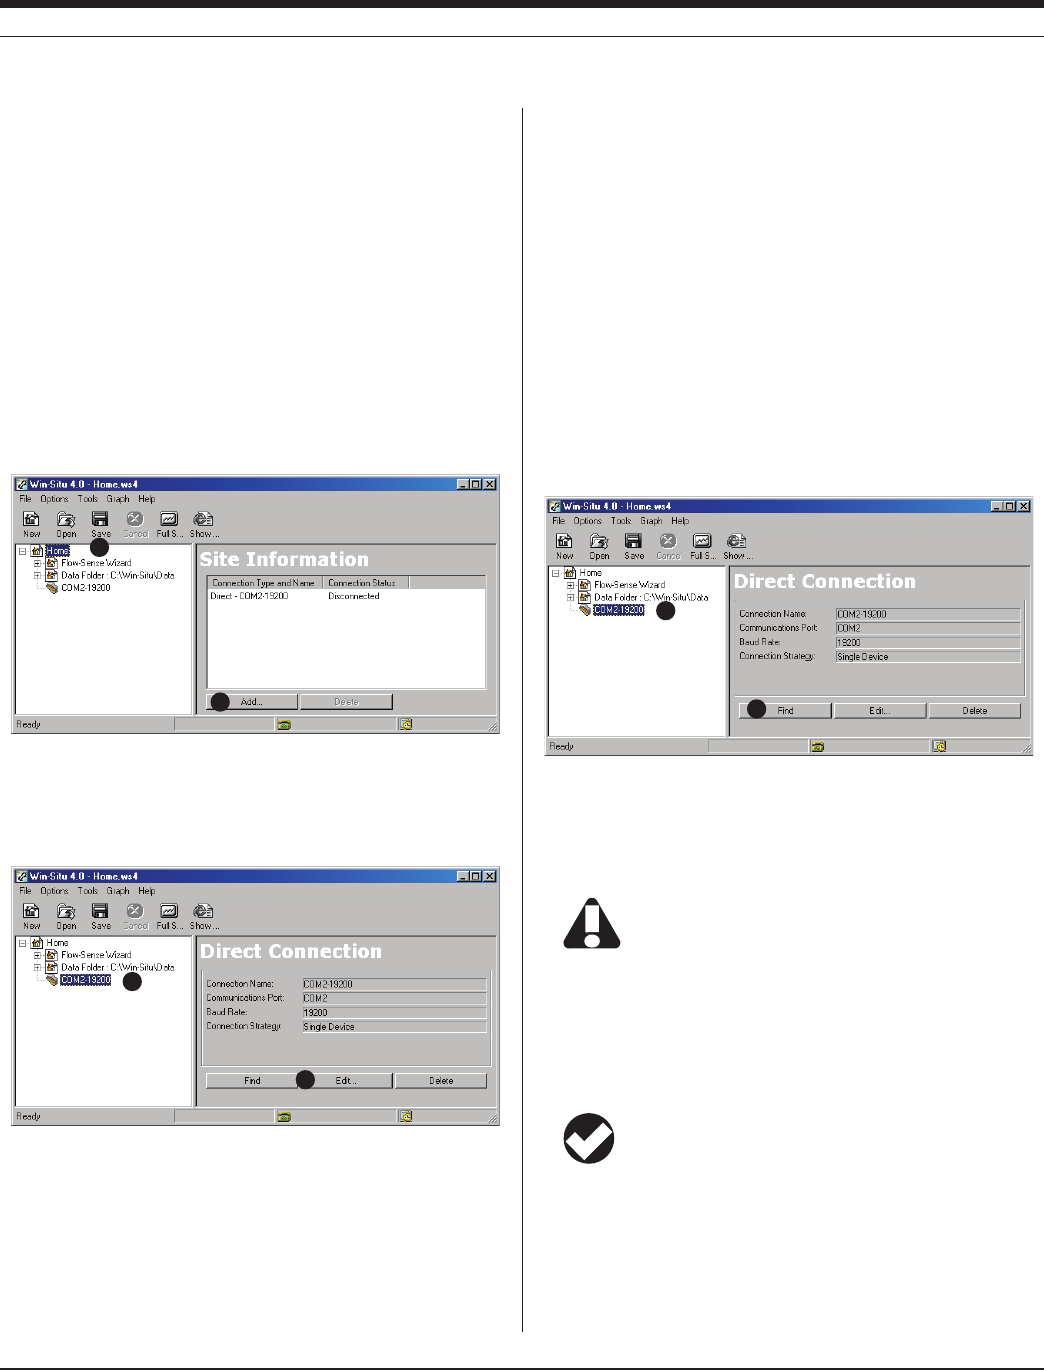
24 0095110 rev. 007 01/09
TROLL 9500 Operator’s Manual
software fUnctions
CONFIGURING THE PORT
When you start Win-Situ or Pocket-Situ for the first time, a new, empty
site called “Home” is displayed at the top of the Navigation tree. The
Connection Wizard starts automatically to help you add a connection
to the site, specifying your computer’s COM port, desired baud rate,
and other port properties.
To add a new connection to the site—or if the Connection Wizard does
not start automatically for some reason—proceed as follows:
1. Select the site.
2. Click or tap Add....
To change the properties of a connection:
1. Select the connection.
2. Click or tap Edit....
To delete a connection from the site:
1. Select the connection.
2. Click or tap Delete.
For additional information on the port properties prompted by the Con-
nection Wizard, refer to Section 3, Getting Started.
ESTABLISHING COMMUNICATION WITH THE MP TROLL 9500
New Connection
The last option in the Connection Wizard is to Connect and find de-
vices on “Finish.” If you select this option, the software will automati-
cally establish communication with the MP TROLL 9500.
If you did not select this option, proceed as for an existing connection .
Existing Connection
Each time you launch the software, the site and the connection saved
in your last session are displayed in the Navigation tree. To connect:
1. Select the connection.
2. Click Find. Or just double-click the connection.
Win-Situ or Pocket-Situ will open the connection, synchronize the
baud rate, locate the device, and display it in the Navigation tree.
3. Click to select the MP TROLL 9500 in the Navigation tree.
If the device’s remaining battery capacity is 5% or less, the
device may not be displayed in the tree. Replace the
batteries before continuing.
DISPLAYING DEVICE INFORMATION
When you select the MP TROLL 9500 in the Navigation tree, the soft-
ware first retrieves information about the device, then automatically
detects the installed sensors and displays them in the tree.
TIP: If one or more sensors is incorrectly installed, an error
message will be displayed. Simply remove the sensor and
install it in the correct position, then “refresh” the device to
display the sensors in the Parameters list.
With the MP TROLL selected in the Navigation tree, the Information
pane displays a wealth of information about the device, as shown in
the Win-Situ screen on the following page. You may need to scroll to
view all the information in Pocket-Situ.
1
2
2
1
2
1
Section 4: control SoFtware
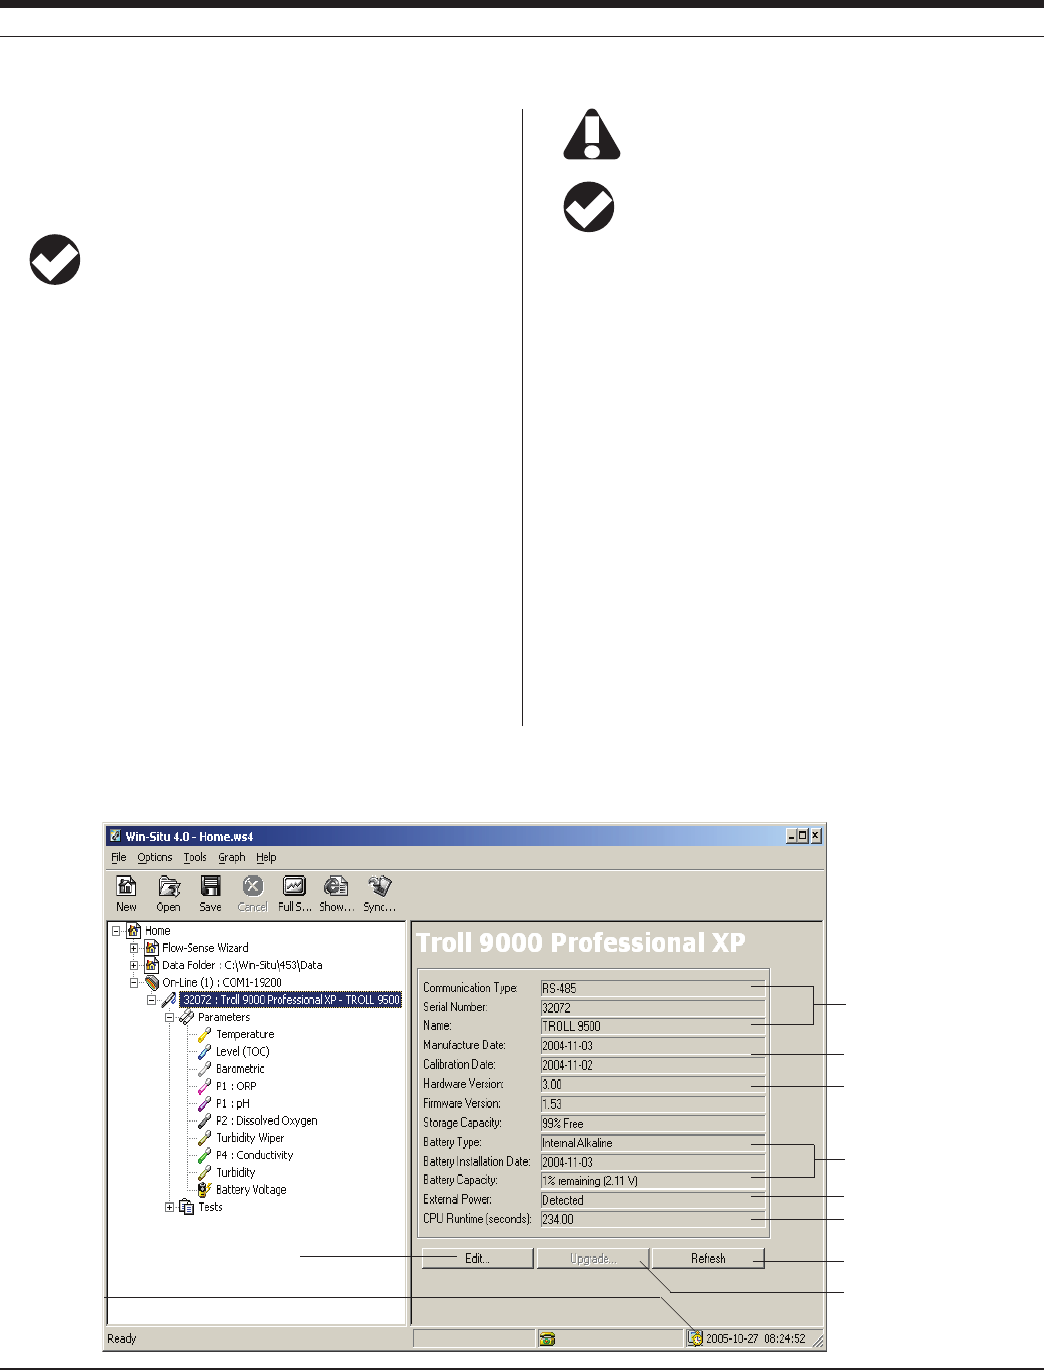
25
TROLL 9500 Operator’s Manual 0095110 rev. 007 01/09
The Information pane also provides buttons for actions you can
perform, such as upgrading the device features (if available), editing
the device properties (including the real-time clock), and refreshing
the connection.
Battery Capacity display: On battery power, the “loaded”
battery voltage is reported (i.e., the device is drawing current
from the batteries).
If external power is detected, an artificially high battery voltage may
be reported depending on the device hardware. Hardware versions
earlier than 3 report a constant, regulated voltage (approximately 3.3
V). Hardware version 3 will report the true battery voltage, but since
switching to external power removes the load from the battery the
number may change when you switch from external to battery and
vice-versa.
UPGRADING FIRMWARE AND FEATURES
Firmware Upgrade
New software releases may include a new version of firmware for the
MP TROLL 9500. If the software detects a newer version of firmware
than that currently loaded in the device, you will be prompted to up-
grade device firmware when you connect to the MP TROLL 9500. The
upgrade process is brief and software-assisted.
For best performance, we recommend you upgrade to new
firmware when prompted by the software.
TIP: In order for the software to detect it, the new firmware
must be located in the Firmware folder in the folder where
Win-Situ or Pocket-Situ is installed. Firmware is automati-
cally copied to these locations when new software is installed.
Features Upgrade
The MP TROLL 9500 is available in several models, each offering
a different feature set. Some models may be field-upgraded to take
advantage of a wider range of features. The field upgrade involves
keying in an upgrade code, issued by In-Situ when an upgrade is
purchased for a specific instrument serial number.
If you have an upgradable feature set, the Upgrade button will be
available in the Information pane when the device is selected in the
Navigation tree. If you have purchased a features upgrade for your
MP TROLL 9500, press Upgrade and key in the upgrade code issued
by In-Situ Inc. Follow the instructions in the Upgrade Wizard.
Section 4: control SoFtware
Date of factory calibration
Available memory
Time the unit has been “awake”
since last battery replacement
Battery information
Device identification
Click “Edit” to set the
clock, change the name,
or update battery data
“Upgrade” is active if a features
upgrade is available
Device View of an MP TROLL 9500
Device clock
“Refresh” requeries the device
Installed sensors
External power indicator (see tip)
The device displays its “family,” TROLL 9000, in the Navigation tree
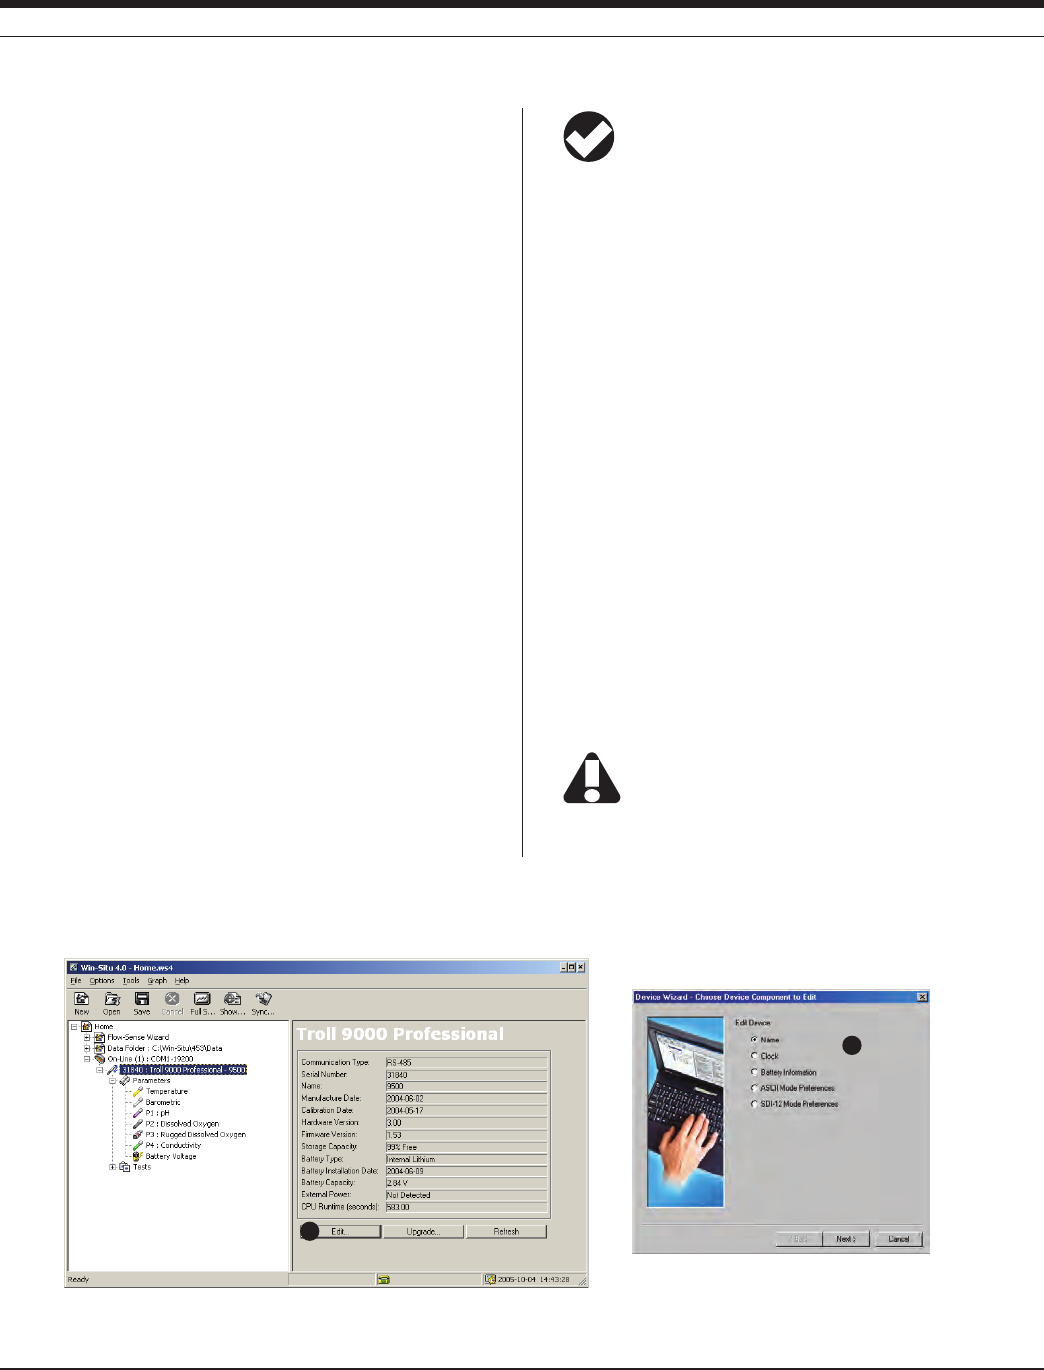
26
TROLL 9500 Operator’s Manual 0095110 rev. 007 01/09
EDITING THE DEVICE PROPERTIES
Setting a Device Name
The software recognizes each device on the network by its type and
serial number. In addition, you can assign a meaningful descrip-
tion—a well or site name, location coordinates, etc. This name will be
displayed in the Navigation tree and in the header of test data files.
1. With the MP TROLL 9500 connected to a host PC and selected in
the Navigation tree, press Edit....
2. In the Device Wizard, select Name, then Next.
3. Enter a new name for the device (up to 16 characters).
4. When you finish the Wizard, the information is sent to the device
and the display is updated.
Setting the Real-Time Clock
Data collection schedules depend on the device clock, shown in the
lower right corner of the desktop PC interface. If the clock is not cor-
rect, set it as follows:
1. With the MP TROLL 9500 connected to a host PC and selected in
the Navigation tree, press Edit....
2. In the Device Wizard, select Clock, then Next.
3. Follow the instructions to synchronize the MP TROLL 9500’s inter-
nal real-time clock to the host computer.
4. When you finish the Wizard, the information is sent to the device
and the display is updated.
TIP: Due to the size of the PDA screen, the device clock is not
displayed in the interface. We recommend you edit the device
as above to synchronize the device clock to the PDA clock.
Setting Battery Information
After replacing the batteries, update the device battery information:
1. With the MP TROLL 9500 connected to a host PC and selected in
the Navigation tree, press Edit....
2. In the Device Wizard, select Battery Information, then Next.
3. Select the appropriate battery type and enter the installation date.
4. When you finish the Wizard, the information is sent to the device
and the display is updated.
SDI-12 and ASCII Mode Preferences
Preferences for these communication modes may be set in the Device
Wizard.
1. With the MP TROLL 9500 connected to a host PC and selected in
the Navigation tree, press Edit....
2. In the Device Wizard, select the desired mode to edit, then Next.
3. Change the settings as appropriate.
To communicate via SDI-12, insure SDI-12 is enabled
(factory default) in the device. For telemetry applications,
SDI-12 should be disabled.
1
2
Editing the Device Properties
1. Select the device in the Navigation tree and click Edit. 2. Select the device property to edit.
Section 4: control SoFtware
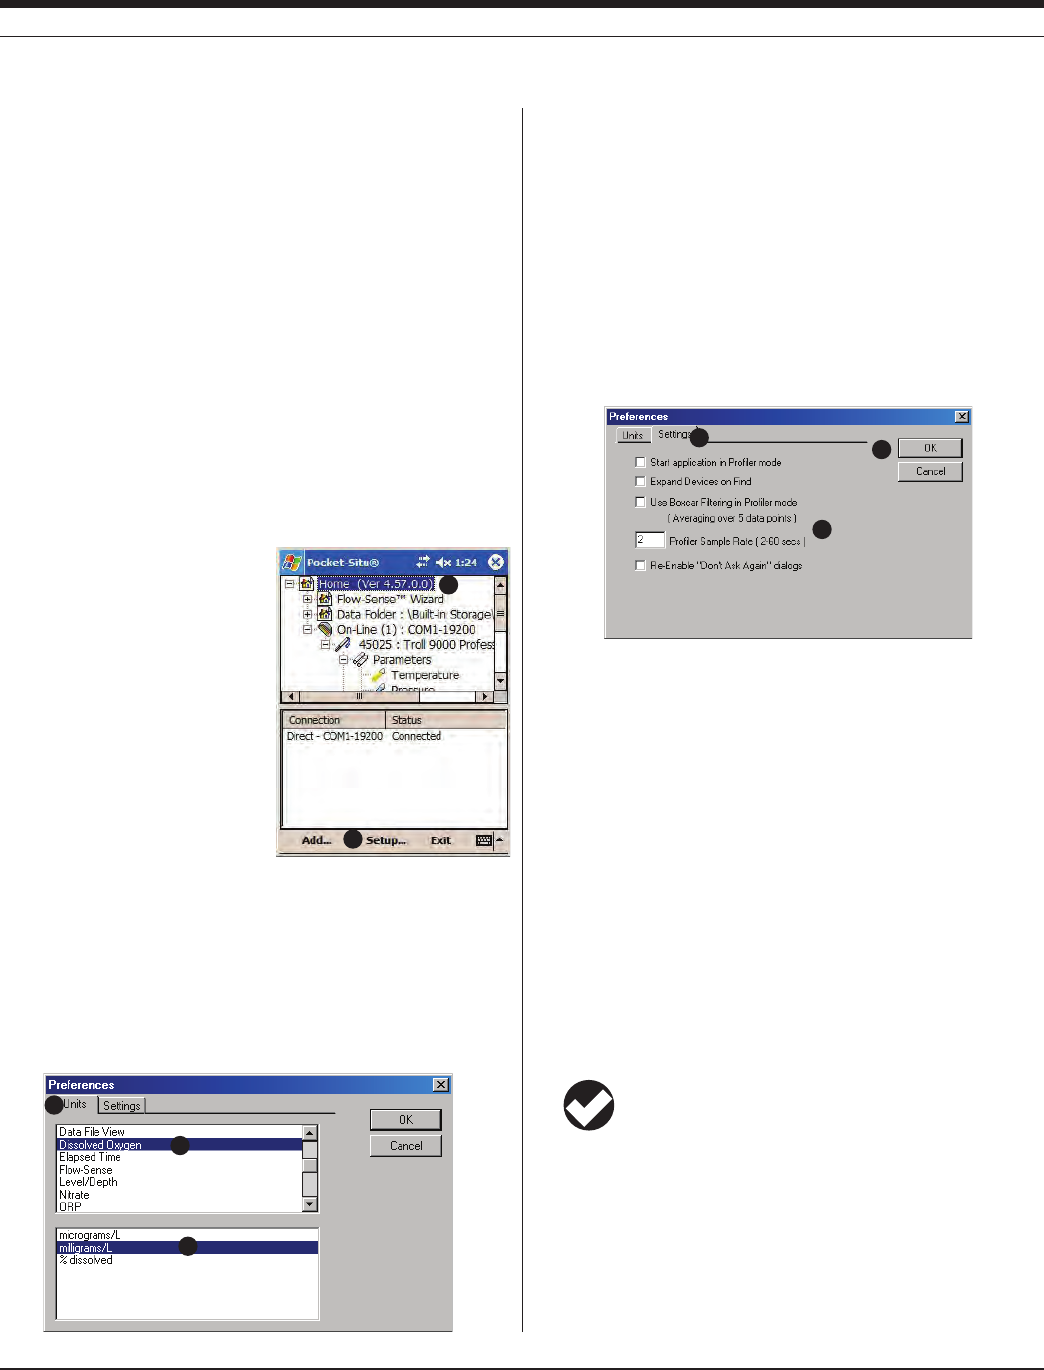
27 0095110 rev. 007 01/09
TROLL 9500 Operator’s Manual
CHOOSING MEASUREMENT UNITS AND OTHER PREFERENCES
Preferences can be set at any time, and are saved with the site. A
connection to the instrument is not required.
User-selectable preferences include:
• Parametermeasurementunits&elapsedtimeunits
• Dataleview—reportorgraph
• Calendardate&timeofdayformat
• MetricorEnglishunitsfortheFlow-SenseWizard
The following Settings Options are also available:
• StarttheapplicationinProlermode
• SpecifydesiredProlingrate
• Re-displaythe“Don’tAskAgain”dialogs
To display the Preferences window, do one of the following:
• InWin-Situ,selectPreferencesfromtheOptionsmenu.
• InPocket-Situ:
a. Tap the Home site in the Navi-
gation tree...
b. then tap Setup... in the com-
mand bar.
Units
Default units are used for the display of data unless you specify other
preferences. To set unit preferences, first display the Preferences
window as above.
1. Select the Units tab.
2. In the top of the Units window, select a parameter whose unit you
wish to change.
3. In the bottom of the window, select the unit you want for the high-
lighted measurement. Repeat for as many units as you like.
4. Do one of the following:
• ClickOK to apply the new units and close the window.
• ClicktheSettingstabtochangeothersettings.
Other Preferences
To change other aspects of Win-Situ/Pocket-Situ operation, first
display the Preferences window as above.
1. Click the Settings tab.
2. Select the options you want:
• StartapplicationinProlermode.Thiswilltakeeffectatyour
next session.
• Expand Devices on Find. This will take effect the next time you
click “Find.” The software will automatically display all nodes in
the device tree without any further action from you.
• SetdesiredProlingrate—theProlerdefaultrateis2seconds,
but you may select any rate from 2 to 60 seconds.
• Re-displaythe“Don’tAskAgain”dialogs.Thisappearsifyou
have selected “Don’t ask me this again” in any WIn-Situ or
Pocket-Situ dialog boxes.
Boxcar filtering is no longer available.
3. Select OK to close the window and apply the settings.
TIP: Preferences are saved with the site (on the PC), not in
the device.
Section 4: control SoFtware
a
b
2
3
1
1
2
3
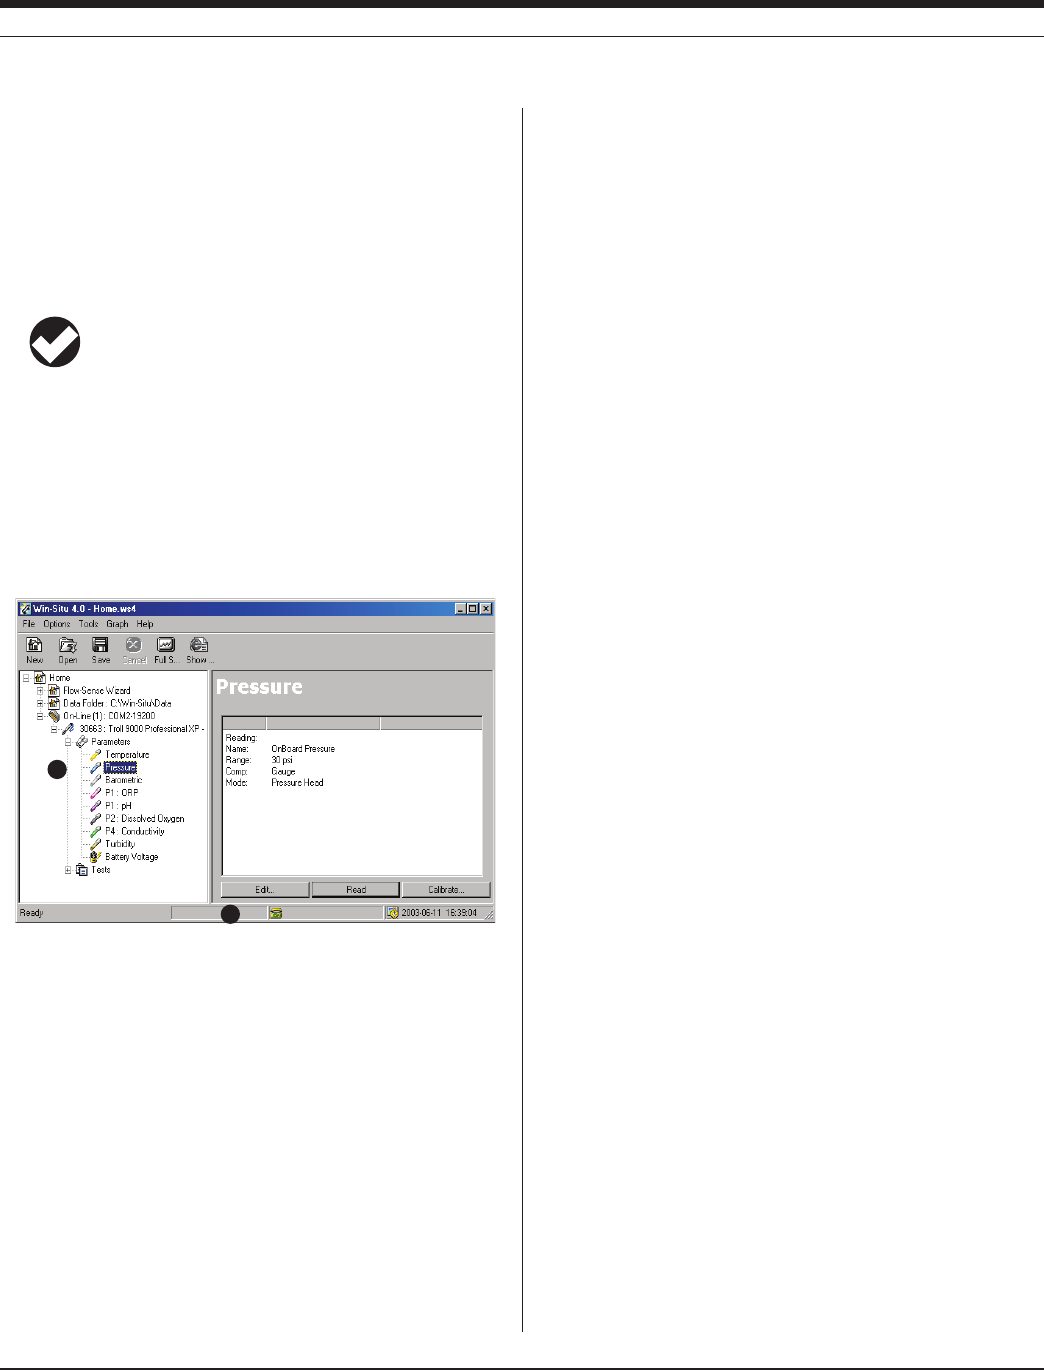
28 0095110 rev. 007 01/09
TROLL 9500 Operator’s Manual
CHOOSING PRESSURE DISPLAY & CONVERSION OPTIONS
Measurements from the optional pressure sensor may be displayed
as raw pressure head above the sensor, as depth, or as water level
with a reference. When measuring depth or level, you have a choice
of methods for conversion from pressure measurements. The speci-
fied settings are easily changed from one mode to another, and most
choices can be redone or undone later, when viewing test data.
TIP: For more on the pressure channel setup, refer to
Section 7.
To set the custom display options and pressure-to-level conversion
options for a pressure channel:
1. With the MP TROLL 9500 connected to a host PC and selected in
the Navigation tree, expand the Parameters node and select the
pressure parameter.
2. Click Edit....
The Parameter Wizard starts. Refer to Section 7 for complete
information on the display and conversion options.
3. When you finish the Wizard, the information is sent to the device
and the display is updated.
Section 4: control SoFtware
1
2
PERFORMING WATER-QUALITY CALIBRATIONS
Although satisfactory results may be achieved in some cases without
field-calibrating the water-quality sensors, for best results we recom-
mend a preliminary calibration procedure before the first field use, and
periodic checks and recalibrations as necessary.
The software provides several options for sensor calibration. Choose
a method based on the time you are willing to spend calibrating and
the accuracy you wish to achieve.
• Traditional Calibration guided by software wizards can achieve
accuracy and resolution equivalent to laboratory-based meters.
Some sensors require a single-point calibration, some present a
choice of single- or multi-point, requiring more than one calibration
standard.
A detailed, step-by-step description of each water quality calibra-
tion may be found in the relevant parameter section (Sections
11-18) of this manual.
• Quick Cal calibrates the basic sensors (pH, ORP, polarographic
D.O., conductivity) simultaneously to achieve adequate perfor-
mance with minimal labor.
Refer to Section 3, Getting Started, for the Quick Cal procedure.
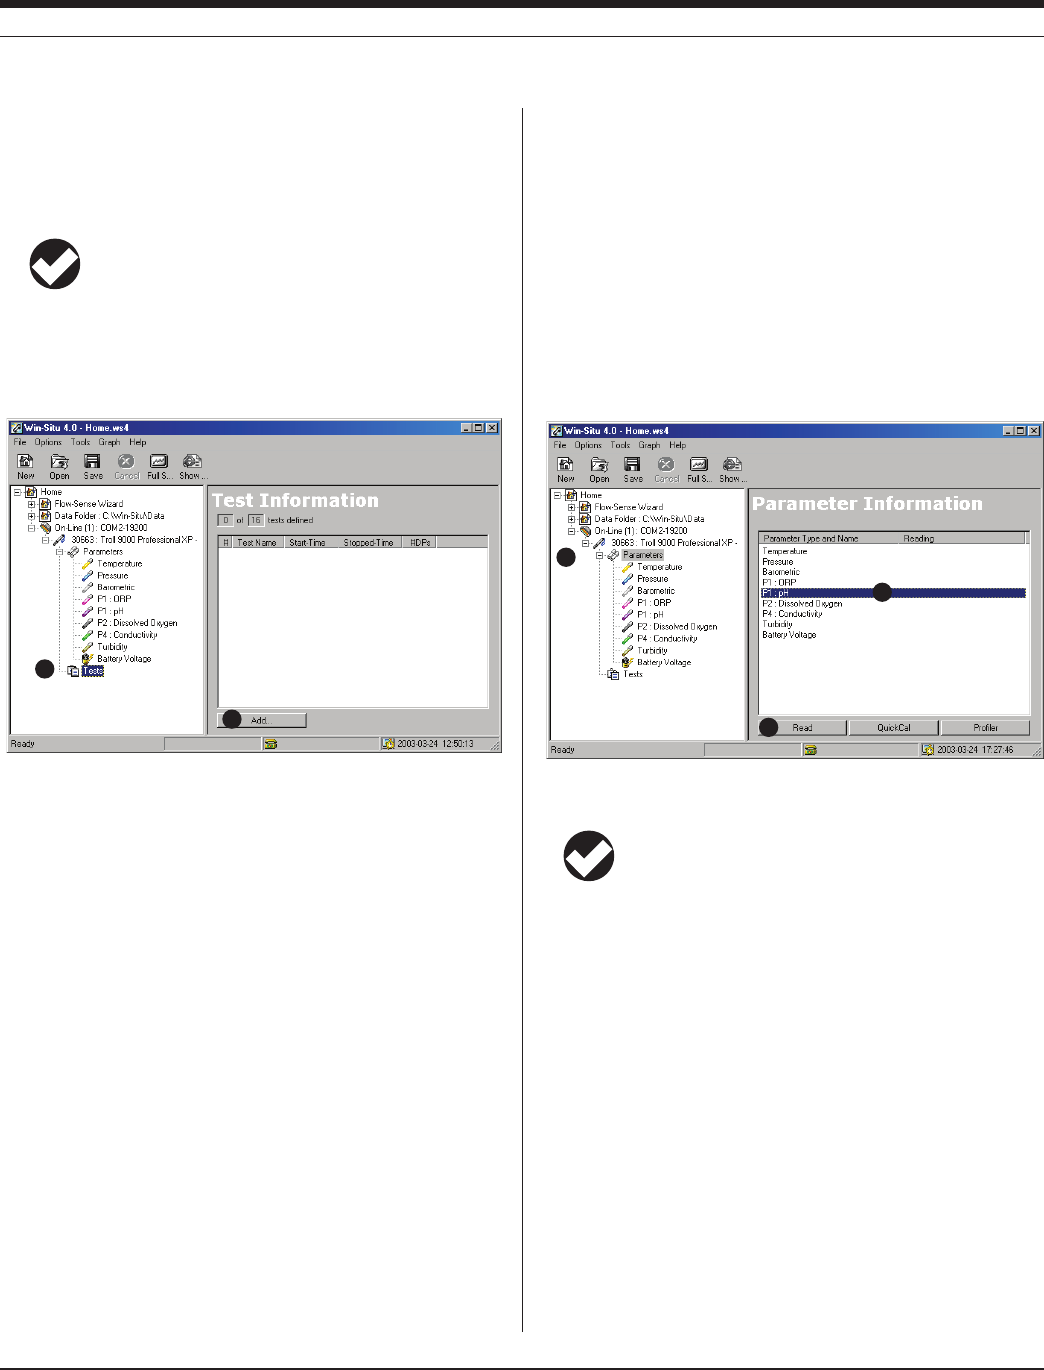
29 0095110 rev. 007 01/09
TROLL 9500 Operator’s Manual
LOGGING DATA (ADDING A TEST)
Logging data with the MP TROLL 9500 is called “running a test.” To
tell the instrument how to run the test—which parameters to measure,
how often, when to start, etc.—you “add” a test to the device.
TIP: For more on logging, extracting, viewing, and deleting
data, refer to Section 6.
1. With the MP TROLL 9500 connected to a host PC and selected in
the Navigation tree, click or tap Tests.
2. Click or tap Add....
The Test Wizard starts. See Section 6 for a description of the ele-
ments that constitute a complete test definition.
3. When you finish the Wizard, the information is sent to the device
and the display is updated.
Section 4: control SoFtware
1
2
3
1
2
TAKING “MANUAL” READINGS
The MP TROLL 9500 collects data in “tests” but you can get a quick
“manual” reading from any device apart from a test, even while a test
is running.
1. With the MP TROLL 9500 connected to a host PC and selected in
the Navigation tree, click or tap Parameters.
2. In the Information pane, select one or more parameters to read. To
select multiple parameters, hold the Control key while selecting.
(To display the CTRL key on a PDA, tap the keyboard symbol in
the Command bar.)
3. Click or tap Read.
TIP: For continuously updated real-time “manual” readings
of all parameters, select Profiler in the Information pane.
Refer to Section 5 for Profiler information.
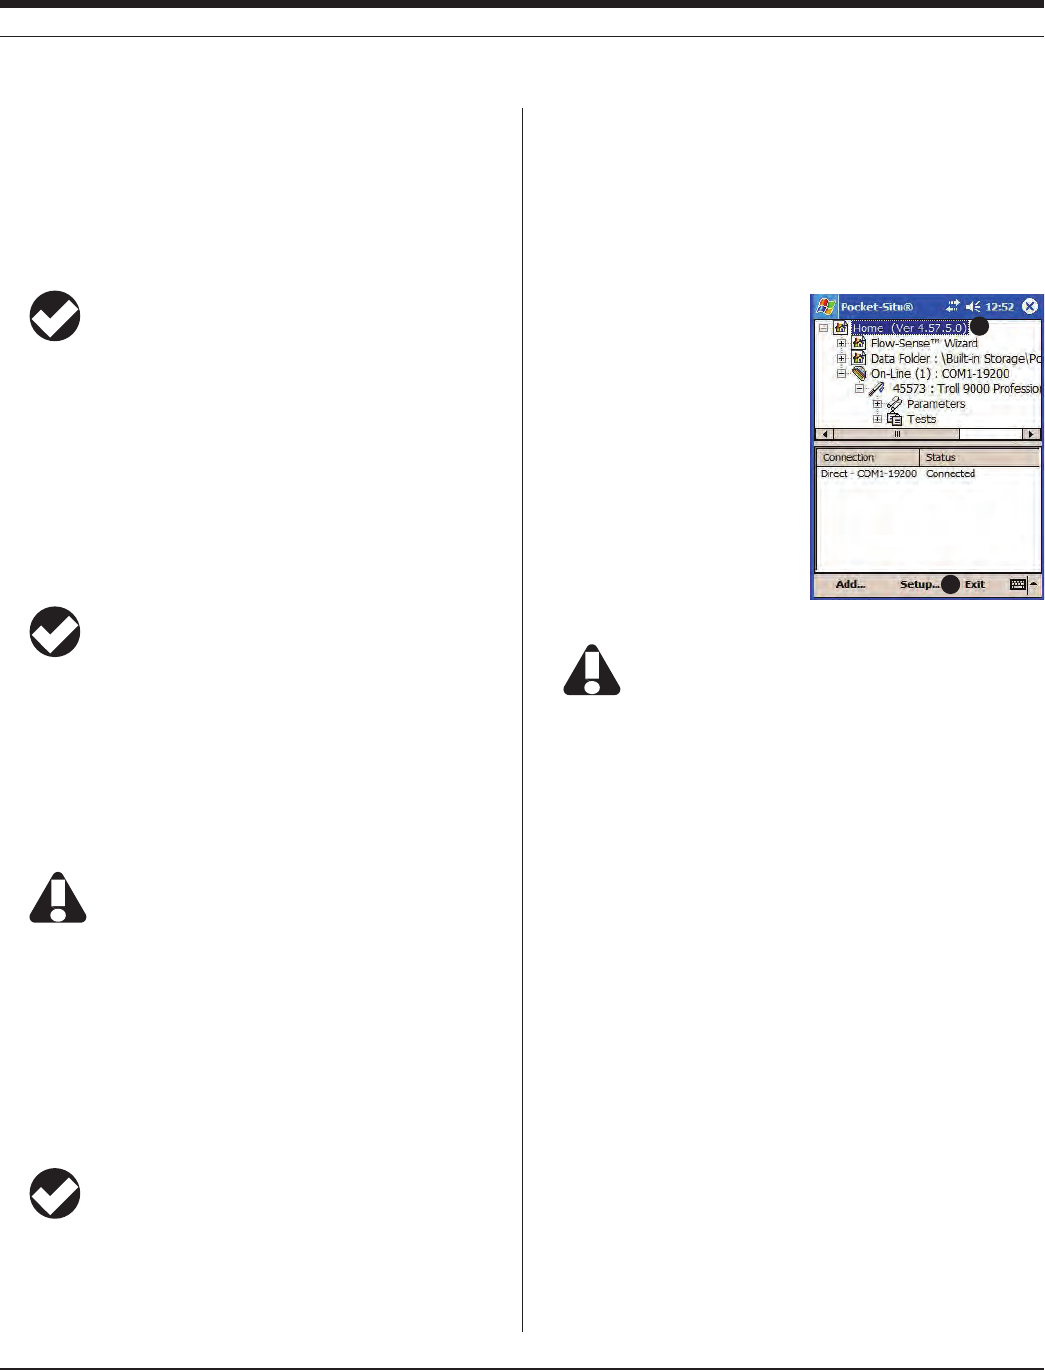
30 0095110 rev. 007 01/09
TROLL 9500 Operator’s Manual
Section 4: control SoFtware
EXTRACTING AND VIEWING DATA
Logged data (“tests”) reside in the MP TROLL 9500 until you “extract”
them. The extract operation copies test data from the device memory
to the host computer. Once a test has been extracted to the host
computer, it can be viewed. A test can be extracted and viewed at any
time, even while it or another test is running.
TIP: For more on logging, extracting, viewing, and deleting
data, refer to Section 6.
To extract a test:
1. With the MP TROLL 9500 connected to a host PC and selected in
the Navigation tree, expand the Tests node to display all the tests
in the device.
2. Select a test and click or tap Extract.
3. To view the test immediately, select the View option at the end of
the download.
TIP: After the test has been extracted to the host computer,
it will appear in the Data Folder node in the Navigation tree.
A connection to the instrument is not required to view the
extracted data.
DELETING DATA FROM INSTRUMENT MEMORY
The Extract operation copies a test data file to the host PC, but does
not remove it from the MP TROLL 9500. Test data files remain in the
Multi-Parameter TROLL 9500’s memory until you delete them. Delet-
ing tests frees up device memory.
CAUTION: Be sure to extract data you want to save before
deleting from the device. Once a test is deleted, the data
cannot be retrieved!
1. With the MP TROLL 9500 connected to a host PC and selected in
the Navigation tree, expand the Tests node to display all the tests
in the device.
2. Select a test and click Delete.
3. Click Yes to confirm your selection.
The selected test is deleted and the display is updated.
TIP: If a test is running in the device, the Delete button is
not available. You must stop the running test before tests
can be deleted. See “Stopping a Test” in Section 6.
exitinG the software
WIN-SITU 4
Select Exit from the File menu.
POCKET-SITU 4
1. Tap the Home site in the Naviga-
tion tree...
2. then tap Exit in the command
bar.
CAUTION: Be sure to Exit Pocket-Situ as described above
after each session. This releases allocated resources used
by Pocket-Situ, assuring that the COM port is available the
next time you connect to the MP TROLL 9500, or to a desktop PC
using ActiveSync.
1
2
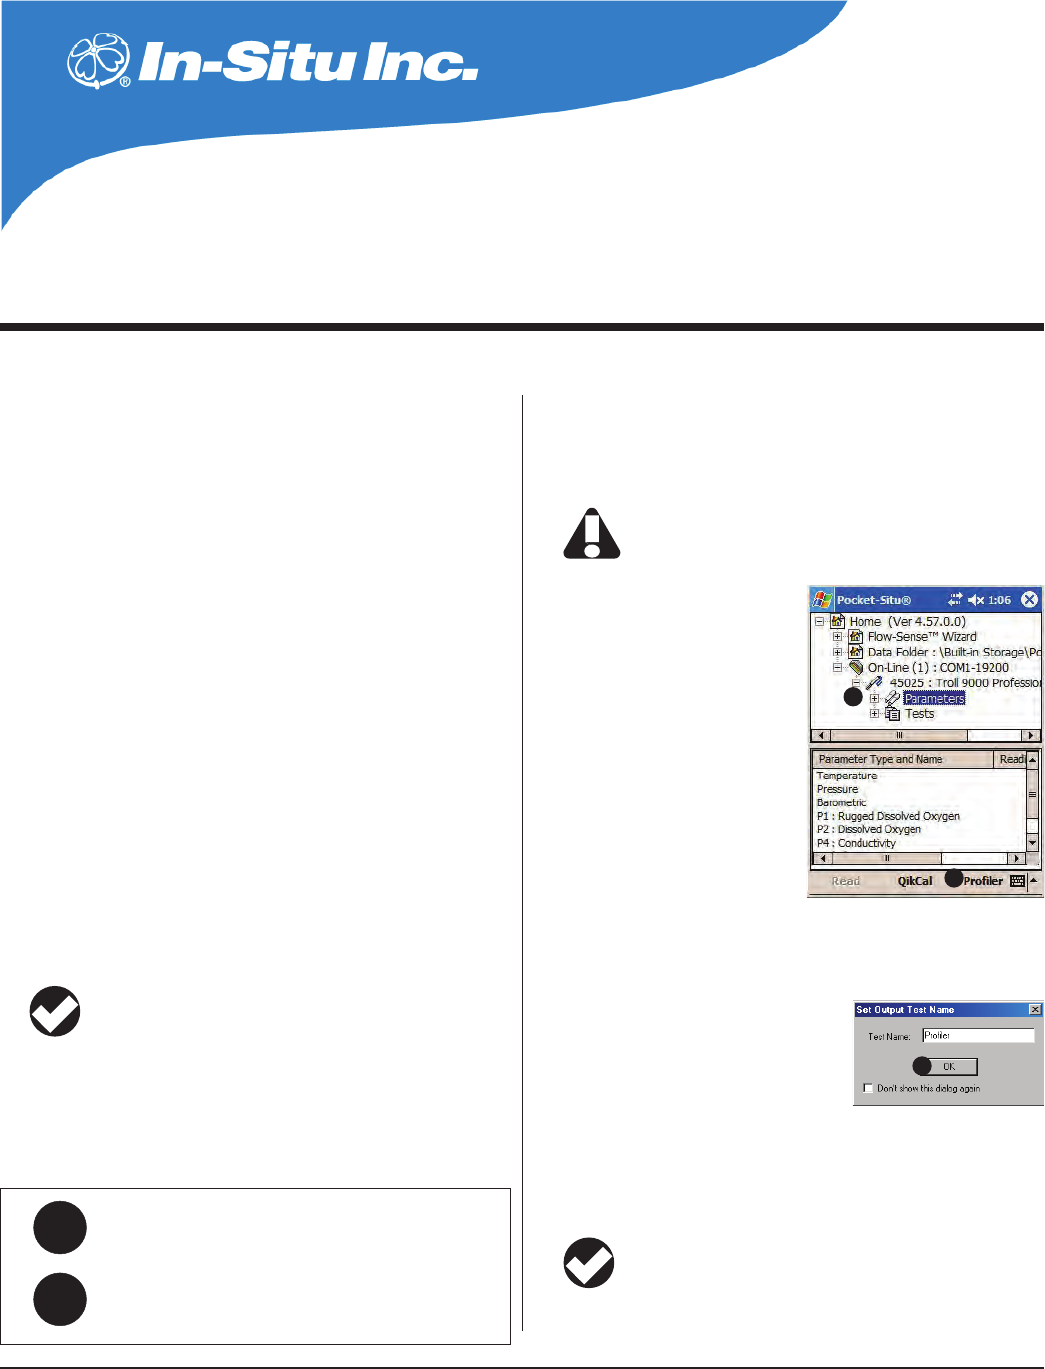
31
Multi-Parameter
Water Quality TROLL®
TROLL 9500 Operator’s Manual 0095110 rev. 007 01/09
5 profilinG
All models of the Multi-Parameter TROLL 9500 include a software
feature called the Profiler that delivers instant real-time readings on
all available channels. Readings are continuously updated as long as
the Profiler is running. This provides a convenient way to characterize
surface waters using a hand-held controller running Pocket-Situ.
profiler featUres
• Autodetect—thesoftwareautomaticallyidentiesall
properly connected sensors
• Continuouslyupdatedreadingsfromallavailablechannels
• OptionaldataloggingtotheconnectedPC
• OptionalstartdeviceinProlermode
• OptionalselectableProlerinterval(2-60seconds)
You will need—
• MPTROLL9500withwaterqualitysensorsinstalledand
calibrated
• RuggedCable
• CableconnectTROLLCom(RS232forRuggedReader)
• LaptopPCrunningWin-Situ4orRuggedReaderrunning
Pocket-Situ 4
startinG the profiler
TIP: If you set up the software to start in Profiler mode, steps
1-4 are done automatically when launching Win-Situ or
Pocket-Situ. For details on this setting, see Choosing
Measurement Units and Other Preferences in Section 4.
1. Connect the MP TROLL 9500 to a host PC and establish communi-
cation in Win-Situ 4 or Pocket-Situ 4.
2. Click to select the MP TROLL 9500 in the Navigation tree.
The software will automatically detect the installed sensors and
display them in the Information pane.
If one or more sensors is incorrectly installed, an error
message will be displayed. Remove the sensor, install it in
the correct position, and refresh the display before
continuing.
3. Click or tap Parameters in the
Navigation tree.
4. Click or tap Profiler to start the
Profiler.
5. You will be asked if you want to set a filename for logged Profiler
data (logging the data is optional)
• TousethedefaultnameclickOK.
• Tospecifyanothername,keyitin
and click OK.
• Toavoidthisquestioneachtime
you start the Profiler, check the option box and click OK.
In a moment, each active channel will be read sequentially, and the
readings will be displayed. Up to 8 channels can be shown.
TIP: Don’t let the PDA time out while Profiling. To locate this
setting in most PDAs, display the Start menu, select
Settings, System tab, Power.
5
3
4
Q:
A:
Can I do profiling if the MP TROLL 9500 is running a
test?
Yes, but you may need to wait to get a reading if the test
measurement interval is short. The Profiler will defer to the
test measurement schedule.

32 0095110 rev. 007 01/09
TROLL 9500 Operator’s Manual
• Readingsareupdatedapproximatelyevery2secondsasthe
Profiler cycles through the available channels in turn.
• Thecurrentlyselectedmeasurementunitisshownbeloweach
reading.
TIP: You can use the Setup option to change the Profiler’s
reading rate and/or the displayed units. See Customizing the
Profiler later in this section for details.
• Awindowwithoutareadingindicatesthechannelisnotavailableto
read, usually because there is no sensor installed in the port.
TIP: If a channel you wish to see is not displayed, click the
symbol below a reading you can do without and select the
channel you want to add from the list of available channels.
This is particularly useful for RDO readings.
GraphinG profiler Data
To see a graph of any channel during the current Profiler session, do
one of the following:
• Clickortapanyreading.
• ClickortapGraph, and select the channel from the drop-down list.
Readings for the selected channel since the start of profiling will be
displayed in graphical format.
The profiler can graph up to 300 readings. A range slider (scroll bar)
on the right side of the graph allows you to change the range of visible
data. Like the channel display, the graph will be continuously updated.
A range slider at the bottom of the graph lets you zoom in on a nar-
rower time period.
To switch back to the display of active channels, click Meter.
profilinG DissolveD oxyGen
The ability of the polarographic D.O. sensor to respond to a change
in the dissolved oxygen content of the medium—for the sensor to ac-
curately “see” a change—varies with the membrane thickness.
• A1-milmembranerespondsinabout1–2minutestosignicant
DO changes;
• A2-milmembranerespondsinabout1.5–3minutestosigni-
cant DO changes.
The RDO Optical D.O. sensor has a response time of T(90) = 30 sec
and T(95) = 37.
profilinG pressUre or Depth
Profiler readings from a pressure channel are displayed as pressure
head or depth according to the pressure channel setup. Refer to Sec-
tion 7 below for pressure display and conversion options. Level mode
readings with a user-entered reference are primarily for use in aquifer
tests.
TIP: Profiling with the MP TROLL’s default pressure settings
(no channel setup) will display pressure head in psi (pounds
per square inch). To display depth, edit the pressure channel
as described in Section 7.
profilinG tUrbiDity
The turbidity sensor requires a 5-second warmup before the first read-
ing. Subsequent readings do not require a warmup.
If a turbidity wiper accessory is installed in the TROLL 9500, it
performs an initial wipe of the sensor optics—this takes about 15
seconds—then displays the first turbidity reading. If the profiling rate
is longer than 15 seconds, this 15 second wipe will happen before
each reading. To avoid this delay, set the profiling rate to less than 15
seconds. See Customizing the Profiler later in this section for details.
Section 18 below has additional information on the turbidity wiper.
Section 5: proFilinG
<
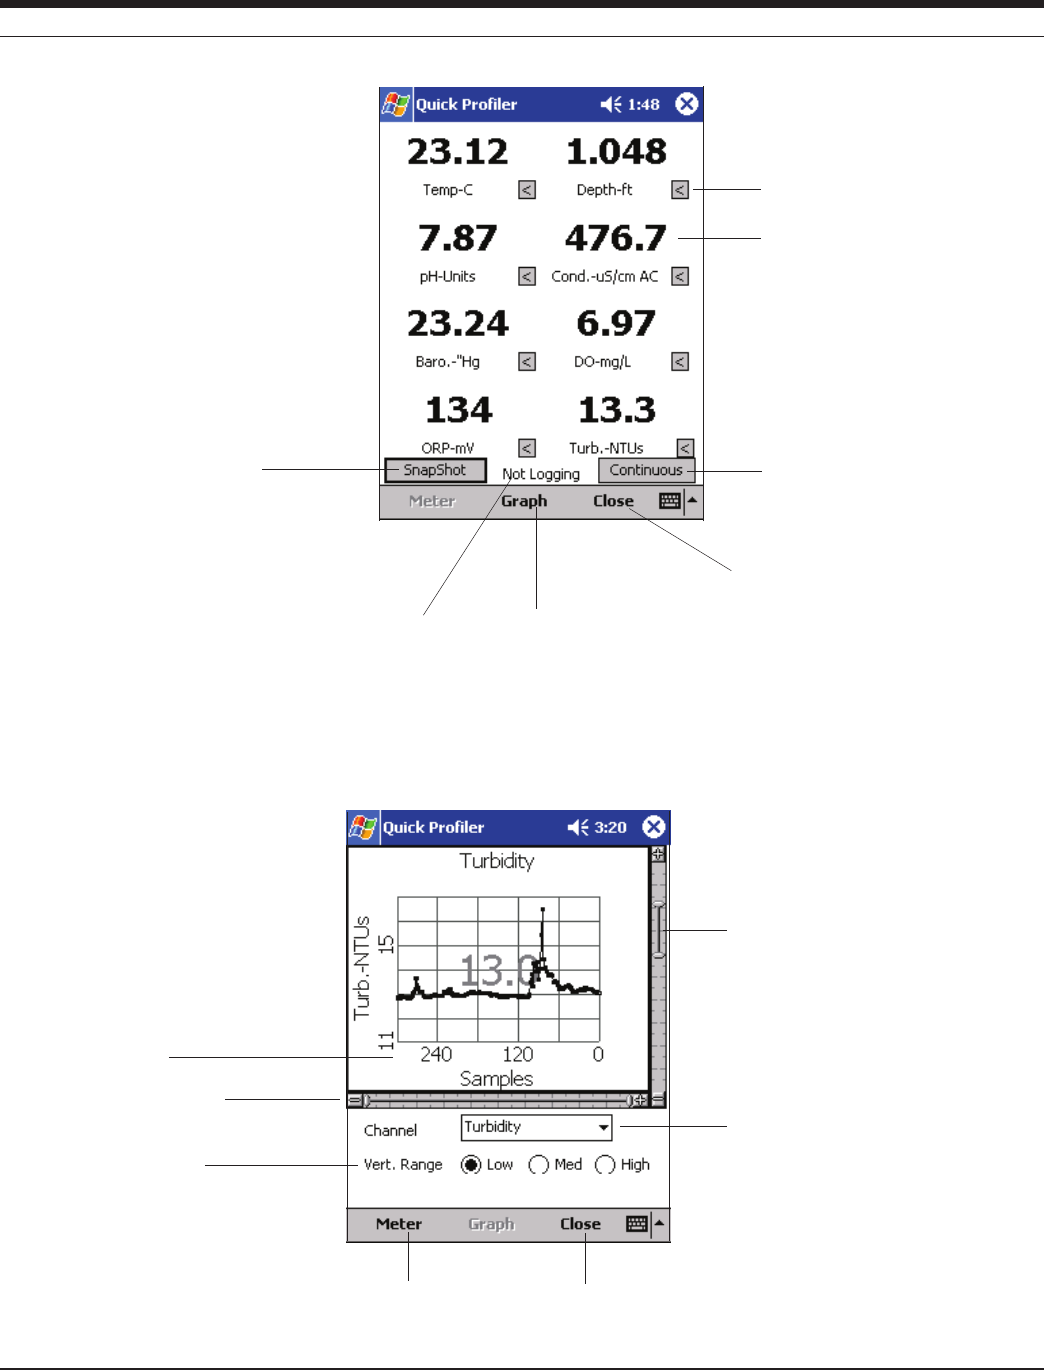
33
TROLL 9500 Operator’s Manual 0095110 rev. 007 01/09
Section 5: proFilinG
Close the Profiler and return to the
Parameter display
Display a graph of the data, starting with the first channel
Log next set of readings to
the Data Folder on the PC Log continuously updated readings to the
Data Folder on the PC. Changes to “Stop
Log” during continuous logging.
Select a different channel for display
in this position
Profiler logging status
Click any reading to display a
graph of the channel
Select the channel to graph
Y axis range slider.
Double-click to zoom fully out;
double-click again to restore
Close the Profiler and return
to the Parameter view
Return to the Profiler’s
channel display
Up to 300 readings (including
the current reading) can be
graphed
X axis range slider
Auto-scales the Y axis for the
selected range (available for
some channels)
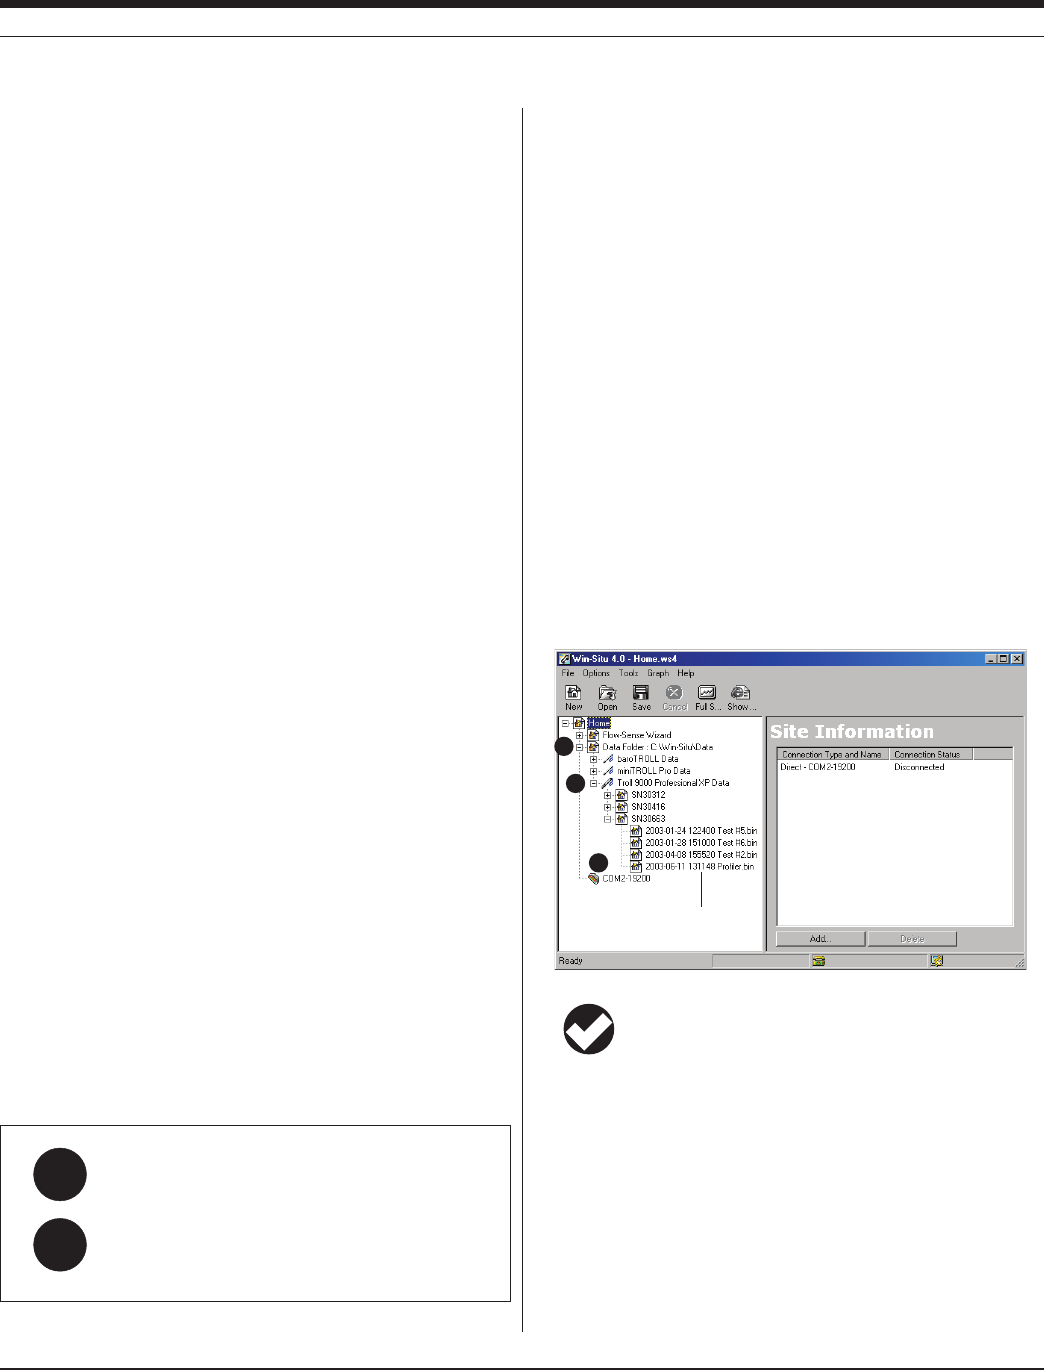
34 0095110 rev. 007 01/09
TROLL 9500 Operator’s Manual
Q:
A:
Can I see Dissolved Oxygen readings in mg/L and %
saturation at the same time?
Yes, so long as your preferred unit for DO is mg/L. Select
Dissolved Oxygen for one window, and Dissolved Oxygen
% Saturation for another window.
cUstoMizinG the profiler
Changing the Channels Displayed
The arrow below each Profiler reading displays a drop-down list
that may be used to assign a different channel to each position, if
desired. You can use this button to add a channel, such as RDO Opti-
cal Dissolved Oxygen, that is not displayed by default. However, only
8 channels can be shown.
Changing Measurement Units
Close the Profiler. In Win-Situ, select Preferences on the Options
menu. In Pocket-Situ, select the Home site, then tap Setup in the
command bar.
Changing the Sample Rate
Close the Profiler. In Win-Situ, select Preferences on the Options
menu, then select the Settings tab. In Pocket-Situ, select the Home
site, tap Setup in the command bar, then select the Settings tab. You
may select any sample rate between 2 and 60 seconds.
Starting in Profiler Mode
In Win-Situ, select Preferences on the Options menu, then select the
Settings tab. In Pocket-Situ, select the Home site, tap Setup in the
command bar, then select the Settings tab. Check ✔ Start application
in Profiler mode. This will take effect at your next session (or exit and
re-start to apply this setting).
loGGinG profiler Data
Profiler data may be logged to the connected PC while in the “Meter”
view.
• Snapshot: To log a single set of Profiler readings, click or tap the
SnapShot button in the “Meter” view.
• Continuous: To log continuous readings, click or tap the Continu-
ous button in the “Meter” view. Readings will be logged until you
cancel the operation by clicking Stop Log.
TO STOP LOGGING
The Snapshot function logs a single set of readings and stops logging
automatically.
In Continuous mode, click Stop Log. Note that this does not stop
Profiling; readings will continue to be updated on the screen.
RETRIEVING LOGGED PROFILER DATA
In either Snapshot or Continuous mode, Profiler data are logged to
the connected PC and accessible through the Data Folder. The data
may be retrieved at any time. A connection to the instrument is not
necessary.
To retrieve logged Profiler data:
1. Expand the Data Folder in the Navigation tree by tapping the +.
2. Expand the node for the device type and serial number.
3. Look for a data file named with date and time of the profiler read-
ing, and with the ending profiler.bin—or whatever custom name you
may have specified when starting the Profiler.
TIP: The time shown in the filename of a Profiler log is the
time the Profiler started, which may be different from the
time of the first data point logged. Similarly, the Elapsed
Time indicated in the Report view of a continuous Profiler log is the
elapsed time since the Profiler started.
For additional information on viewing data in the Data Folder, see the
section “Viewing Logged Data” at the end of Section 6 below.
exitinG the profiler
When you are ready to exit the Profiler, click Close. The Parameters
view will return to the screen.
Section 5: proFilinG
Logged Profiler data
1
2
3
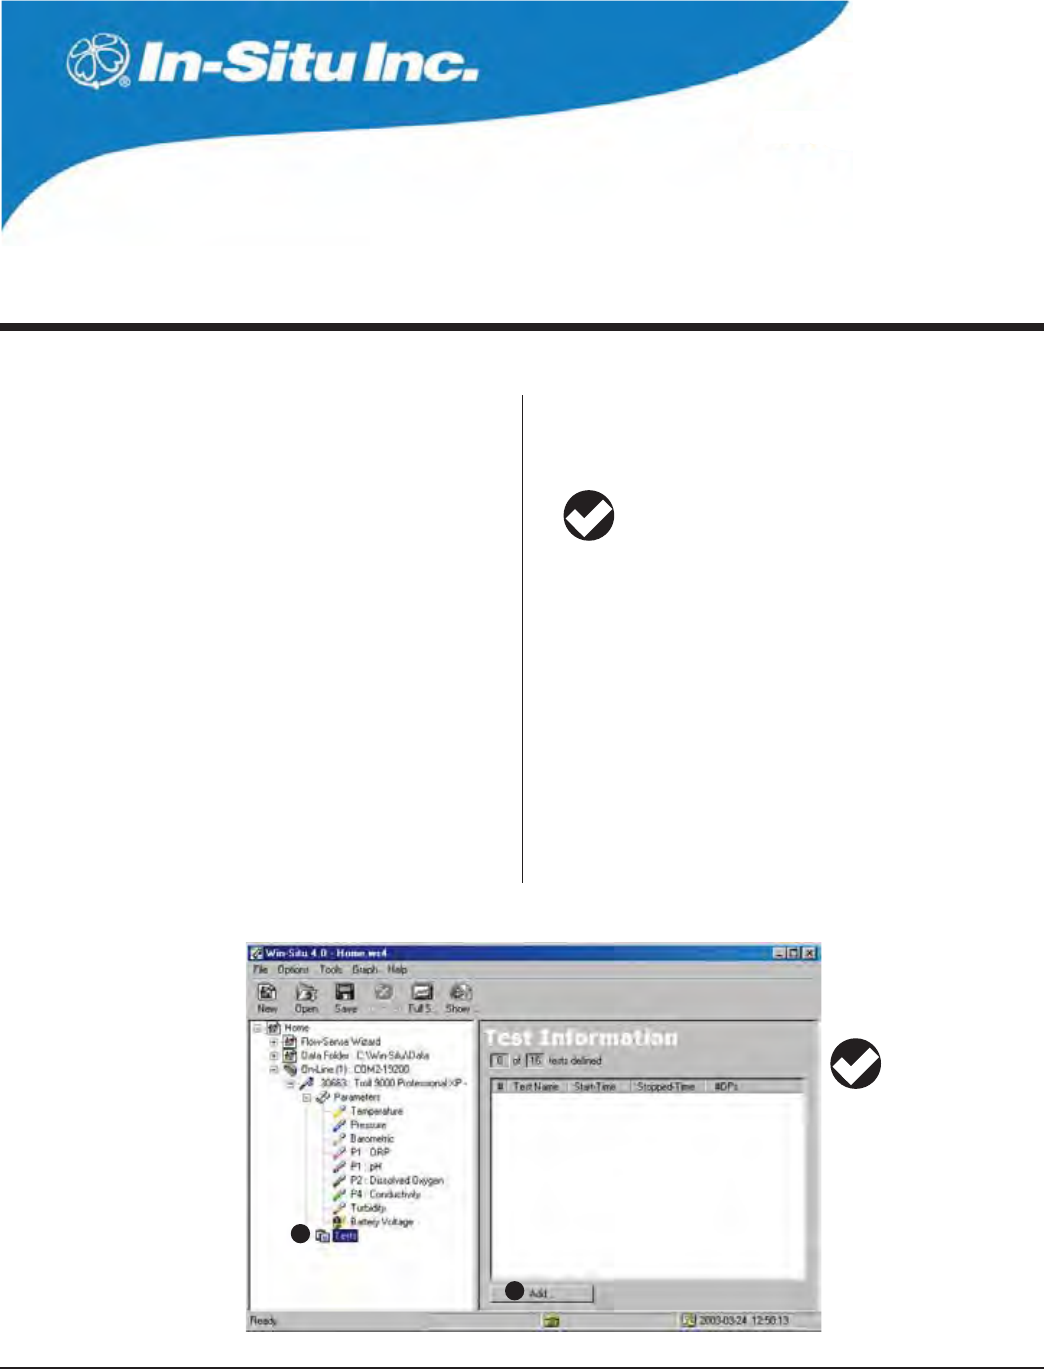
35
Multi-Parameter
Water Quality TROLL®
TROLL 9500 Operator’s Manual 0095110 rev. 007 01/09
TIP: Defining a test,
setting up a test,
adding a test—these
terms all mean the same thing
and may be used interchange-
ably in this manual.
6 LOGGING DATA
1
2
To add a test, (1) select the
T
ests node in the Naviga-
tion tree, (2) click Add.
Memory-equipped Professional models of the MP TROLL 9500 are
ideal for monitoring and recording water quality data. Logging sched-
ules can be set up in advance, and the collected data stored in the
device’s storage memory until needed.
Collecting a set of data with the instrument is called “running a test.”
A “test” is initially a set of user-defined instructions to the logger about
how to collect the data:
s WHICHPARAMETERSTOMEASURE
s HOWOFTENTOMEASURE
s WHENTOSTARTTAKINGANDLOGGINGMEASUREMENTS
After it has “run,” the completed test consists of a data file that was
logged following the instructions above.
Many of the things you do through Win-Situ or Pocket-Situ con-
trol software can be visualized as actions performed on tests. For
example,
s TOGIVETHEDEVICEINSTRUCTIONSFORCOLLECTINGDATAadd a test.
s WHENYOUWANTTHEDEVICETOENDDATACOLLECTIONstop a test.
s TOCOPYTESTDATAFROMTHE
device to a host computer:
extract the test.
These actions are initiated by buttons in the Information pane when
the device’s Tests node (group view of all tests) or a Single test is
selected in the Navigation tree.
Advantages of the Tests node (group view): (1) the Add
action is available, and (2) group operations such as delete
and extract can be performed on multiple tests simultane-
ously. For illustrations, see the box on page 39.
ADDING A TEST TO A DEVICE: THE TEST WIZARD
The Add action programs the MP TROLL to collect data. The Test
Wizard starts automatically to help you enter the required information.
1. With the MP TROLL 9500 connected to a host PC and selected in
the Navigation tree, click or tap Tests.
2. Click or tap Add. The Test Wizard starts. The choices are dis-
cussed below.
3. When you finish the Wizard, the information is written to the device
and the display is updated.
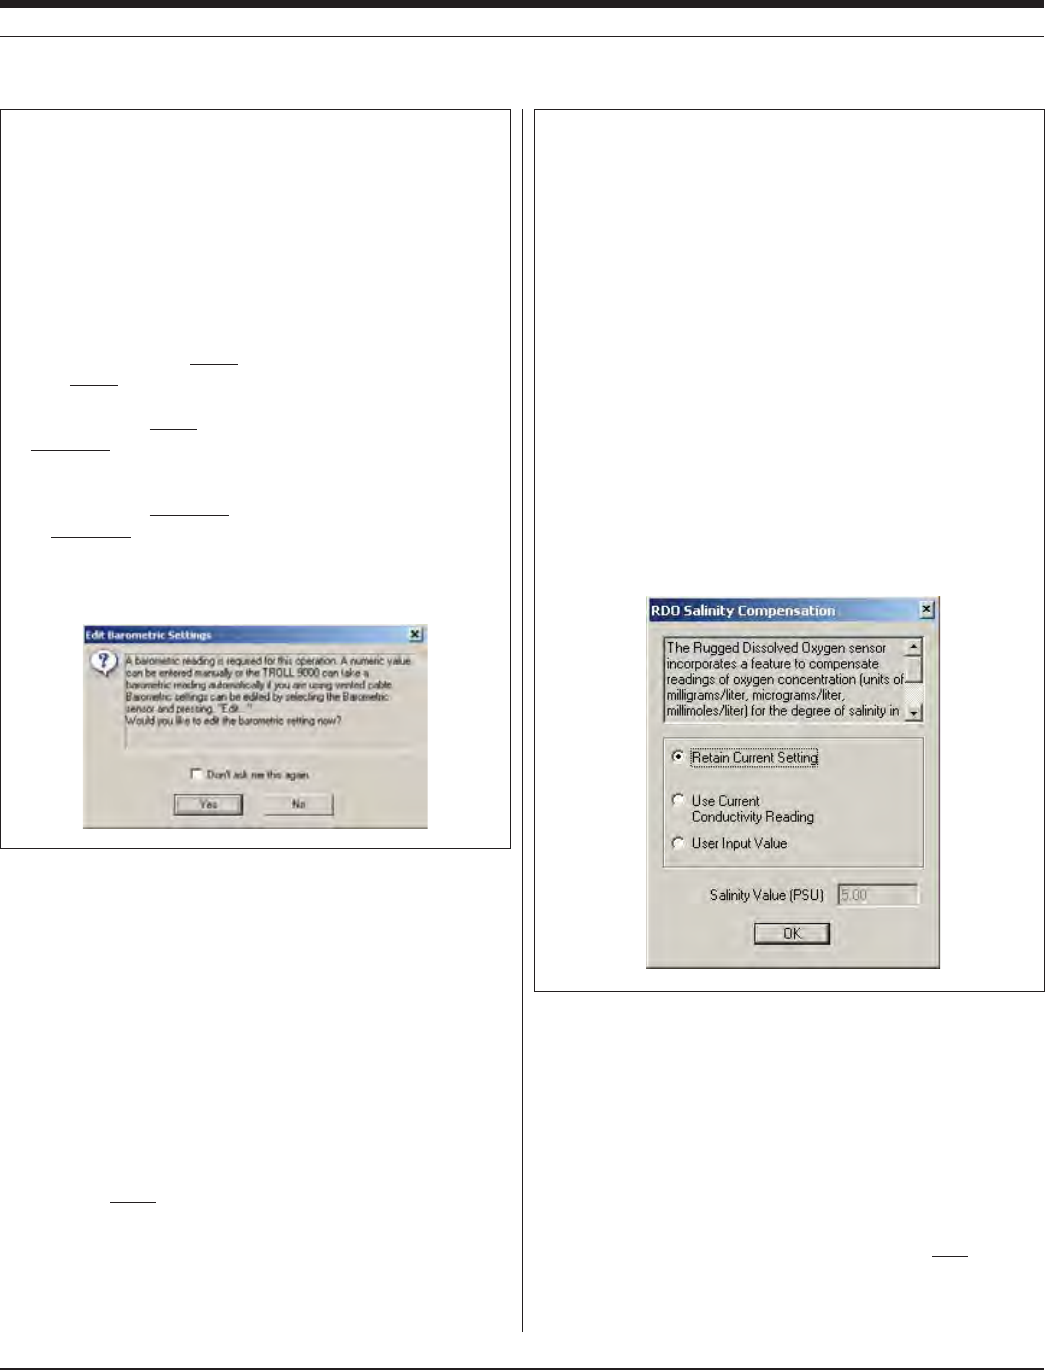
36
TROLL 9500 Operator’s Manual 0095110 rev. 007 01/09
TEST SETUP PARAMETERS
A complete test definition has five parts. The choices available in each
SCREENARETAILOREDTOREmECTYOURSELECTIONINEARLIERSCREENS
1. Test Name (Optional)
You may enter up to 16 characters to identify the test. A default name
is proposed. The test name is displayed in the Navigation tree, in the
test data file, and in the filename of tests extracted from the device to
the Data Folder on the host PC.
2. Parameters to Include
All available parameters are selected by default. De-select any
parameter you do not want to measure during this test by clearing the
checkbox. Remaining choices will be tailored to your selection.
The barometric pressure and temperature channels are automatically
included when water-quality channels are selected so that their read-
ings are available for compensating the measurements.
3. Measurement Schedule
The available schedules depend on your device’s firmware and the
parameters selected for inclusion in the test. This list is a quick over-
view. Additional details are given later in this section.
s Linear. All measurements are evenly spaced at a user-specified
interval, and all measurements are stored in the device memory.
s Event. Measurements are evenly spaced, but you can record an
“event” and conserve memory by having the device store only
measurements that differ from the previous stored measurement
of a designated parameter by a specified amount. Any available
With a D.O. sensor installed (polarographic or optical)—
Before the Test Wizard starts, you will be asked how you want to handle
barometric pressure. Barometric pressure is important in converting mea-
surement of D.O. concentration to percent saturation. If the TROLL 9500
cable is vented, an accurate barometric pressure value can be read from
the onboard barometric pressure sensor. If the TROLL cable is non-vented,
then a barometric pressure value should be entered manually.
The dialog box shown below asks if you wish to edit the barometric settings
in the absence of vented cable. Do one of the following:
s )FTHE42/,,ISONvented cable now and will take measurements
using vented cable, click No — and you may want to check the “Don’t
ask me this again” box.
s )FTHEDEVICEISONvented cable now but will take measurements using
non-vented cable, click Yes. In the Edit Barometric Channel screen,
check the box indicating non-vented cable for measurements but
vented cable for calibration/programming.
s )FTHEDEVICEISONnon-vented cable now and will take measurements
on non-vented cable, click Yes. In the Edit Barometric Channel screen,
check the box indicating non-vented cable for measurements and enter
a barometric pressure value. For help in supplying information if the
cable is not vented, see Section 9, Monitoring Barometric Pressure.
SECTION 6: LOGGING DATA
With an RDO® optical D.O. sensor installed—
Before the Test Wizard starts, you will be asked how you want to handle
salinity compensation. The sensor does not react to changes in salinity.
To compensate for the lower solubility of oxygen in salty water, a salinity
value stored in the sensor can be applied. This ensures that the reported
concentration of dissolved oxygen in the presence of significant water
salinity is accurate. The compensation algorithm is applied internally before
concentration is reported by the sensor. Choose one of the following:
s 2ETAIN#URRENT3ETTINGSHOWNBELOW
s 5SE#URRENT#ONDUCTIVITY2EADING)FACONDUCTIVITYSENSORISPRESENT
you may select the second option. However, the conductivity sensor
is subject to fouling, and any conductivity errors thus created will be
transmitted to the RDO sensor.
s 5SER)NPUT6ALUE7HENWORKINGINWATERSWITHACONSTANTANDKNOWN
salinity, and a conductivity sensor is not present, select this option and
enter the salinity value (in PSU, Practical Salinity Units). The fixed value
is effective in situations where the salinity variability is low. The value
can be changed at any time by selecting the RDO sensor in the Naviga-
tion tree and clicking “Edit,” then Edit Salinity.
37
TROLL 9500 Operator’s Manual 0095110 rev. 007 01/09
parameter may be selected for event comparisons, and the “delta”
or difference amount is prompted in the current basic parameter
unit.
s Linear Average. This type of test can smooth out anomalous highs
and lows that may occur, for example, when a water wave passes
over the instrument. Each stored measurement is the average of
several rapid measurements.
4. Measurement Interval
The interval specifies how often measurements will be taken during
this test. Enter any combination of Days, Hours, Minutes, & Seconds.
The minimum (fastest) allowable interval depends on your choice of
measurement schedule and the parameters included in the test. For
most parameters, the minimum interval is 5 seconds. If RDO Optical
Dissolved Oxygen is included, the minimum interval is 10 seconds.
5. Start Mode
Choose one of the following options for starting this test:
s Manual. A manual test can be started at any time while the MP
TROLL 9500 is connected to a PC by pressing the Start button.
This mode is useful when you want to synchronize the start of data
collection with an external event like starting a pump.
s Scheduled. A scheduled start test will start at the date and time
you specify. The time proposed by the software is the next hour on
the hour, calculated from the current device time plus 10 minutes.
Arrows beside the list boxes may be used to change the start time
and date, or key in the desired start time and date.
TIP: In entering the Scheduled Start time, keep in mind that
when this test starts, it will stop a running test.
The time proposed for a Scheduled start is the next hour on
the hour, calculated from the current device time plus 10
minutes. In Pocket-Situ this is your only indication of the
device time. If the proposed time is wrong, cancel test setup and set
the device clock before scheduling tests.
ENDING SETUP
After you select the test options and click Finish, the information will
be sent to the device and the new test will appear in the Navigation
tree.
To let you know which tests can be started with the Start button, the
software displays a different symbol for each start type:
Manual start test (you start)
Scheduled start test (starts by itself)
MORE ON MEASUREMENT SCHEDULES
LINEAR
In Linear sampling, all selected channels are measured at the same
Measurement Interval; all measurements are stored in memory.
EVENT
All selected parameters are measured at your chosen Measurement
Interval, but a data point (reading from all active channels) is stored
only if the measurement on the designated “event” channel exceeds a
user-defined value. This value is called “Delta” because it relates to a
change in the measurement. Here’s how it works:
Delta
Each measurement on the selected “event” channel (pressure, for
example) is compared to a reference. The initial reference is taken at
the start of the test. When a pressure measurement varies from the
reference by less than the Delta amount, the data point is not stored.
When a pressure measurement varies from the reference by more
than the Delta amount, the data point (all channel measurements) is
stored. The stored pressure measurement is called a “Delta point” and
becomes the new reference for comparison.
In an Event test, then, small and essentially insignificant changes are
not stored, but larger and more significant changes are. This scheme
will minimize the size of a data file by storing meaningful data.
SECTION 6: LOGGING DATA
Q:
A:
Where do I enter the stop time for the test?
You will not be asked for a stop time because the end of a
test cannot be programmed in advance. In most cases, the
only way to stop data collection is to connect to a PC, select
the test in the Navigation tree, and press the Stop button.
Exceptions: A test stops automatically under these conditions:
s WHENANOTHERSCHEDULEDTESTSTARTS
s WHENTHEDEVICESMEMORYISFULL)NTHISCASETHETESTMAYINDICATE
“ABEND” (ABnormal END) in the Navigation tree.
s if a loss of power occurs. In this case, the test may indicate
“ABEND” in the Navigation tree.
TIP: If you wish to schedule the end of data collection,
try this: Before starting your test, define another test to
start at the time you want the “real” test to stop. Select
a linear test with a long measurement interval—hours or days—
and minimal sensors to conserve battery power. Schedule this
test to start at the time you want the “real” test to end. The test
will start at its scheduled time, stopping the earlier test and
kicking into a sparse sampling schedule.
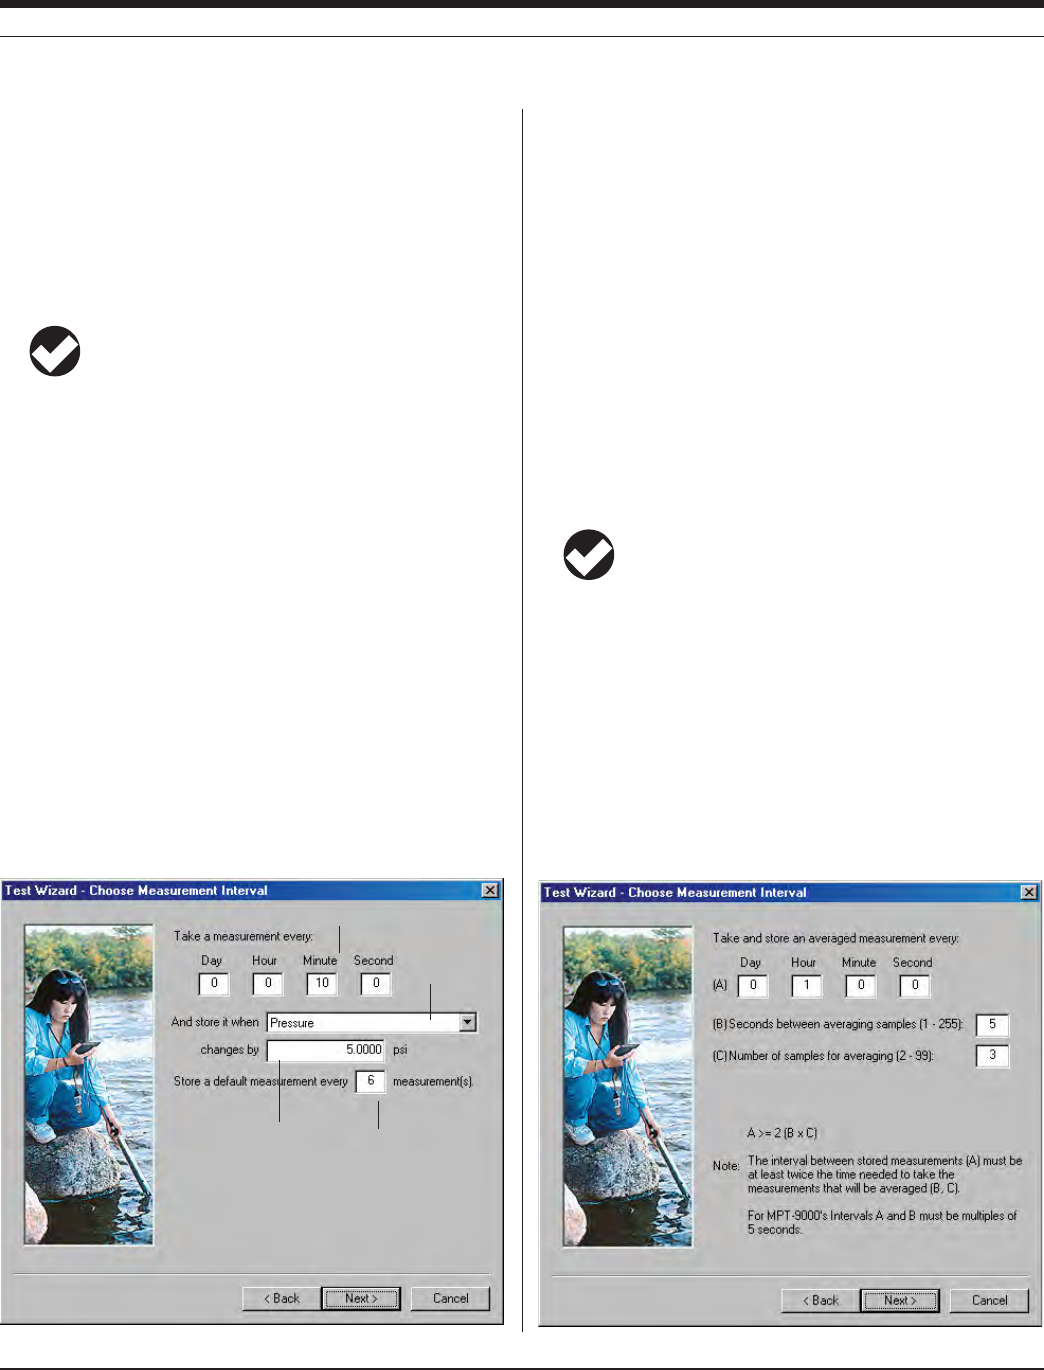
38
TROLL 9500 Operator’s Manual 0095110 rev. 007 01/09
SECTION 6: LOGGING DATA
Measurement Interval
“Delta” value Default storage
Event Test Setup
Event channel
EVENT (continued)
Minimum Delta Values
System accuracy is a function of many variables. It is theoretically
possible to choose a Delta value so small that random system noise,
however slight, might “look” sig nificant. We recommend that you enter
a reasonable Delta value for the parameter being measured to avoid
triggering an event storage when no event has occurred.
TIP: Units for the Event channel should be set to the “basic”
parameter unit (e.g., psi). Derived (software-calculated) units
are not available.
Default Storage
Consider a situation where there is virtually no change through time
in measured value. In this case, it is possible that almost no data
would be stored to the data file. To avoid the possiiblity that a test may
contain little or no stored data, sparse linear sampling also occurs
whereby data points are stored to the data file every n measurements
regardless of the measurement comparisons that are occurring. This
type of data is called “default storage.” For example, if the Measure-
ment Interval is 10 minutes and you specify a Default storage every 6
measurements—as shown in the event test setup screen below—then
data will be logged every hour regardless of the Delta comparisons.
Data gathered in an Event test consist of both “Delta points” and
“default storage.” There is no distinction made between them in the
actual data file since they both represent measurements of the same
physical property (pressure, temperature, conductivity, etc.).
LINEAR AVERAGE
This type of test can eliminate anomalous highs and lows that may oc-
cur—for example, if a wave passes over the instrument at the time a
measurement is made. For every measurement stored in the data file,
the device takes a specified number of mea surements at a specified
interval, averages them, and stores the average value.
You are prompted for
A the storage interval (how often an averaged measurement will
be stored in the data file)
B the interval between the rapid measurements that will be aver-
aged (1-255 seconds)
C the number of measurements that will be averaged for each
stored measurement (2-99
TIP: The storage interval (A) must be at least twice as long
as the rapid interval (B) times the number of measurements
for averaging (C). In the example shown below, 5 seconds x
3 = 15) seconds, so the storage interval would have to be at least 30
seconds.
In the linear average test example shown in the screen below, a
measurement will be logged every hour (A). The logged measurement
will consist of the average of 3 measurements (C) taken 5 seconds
apart (B).
Linear Average Test Setup
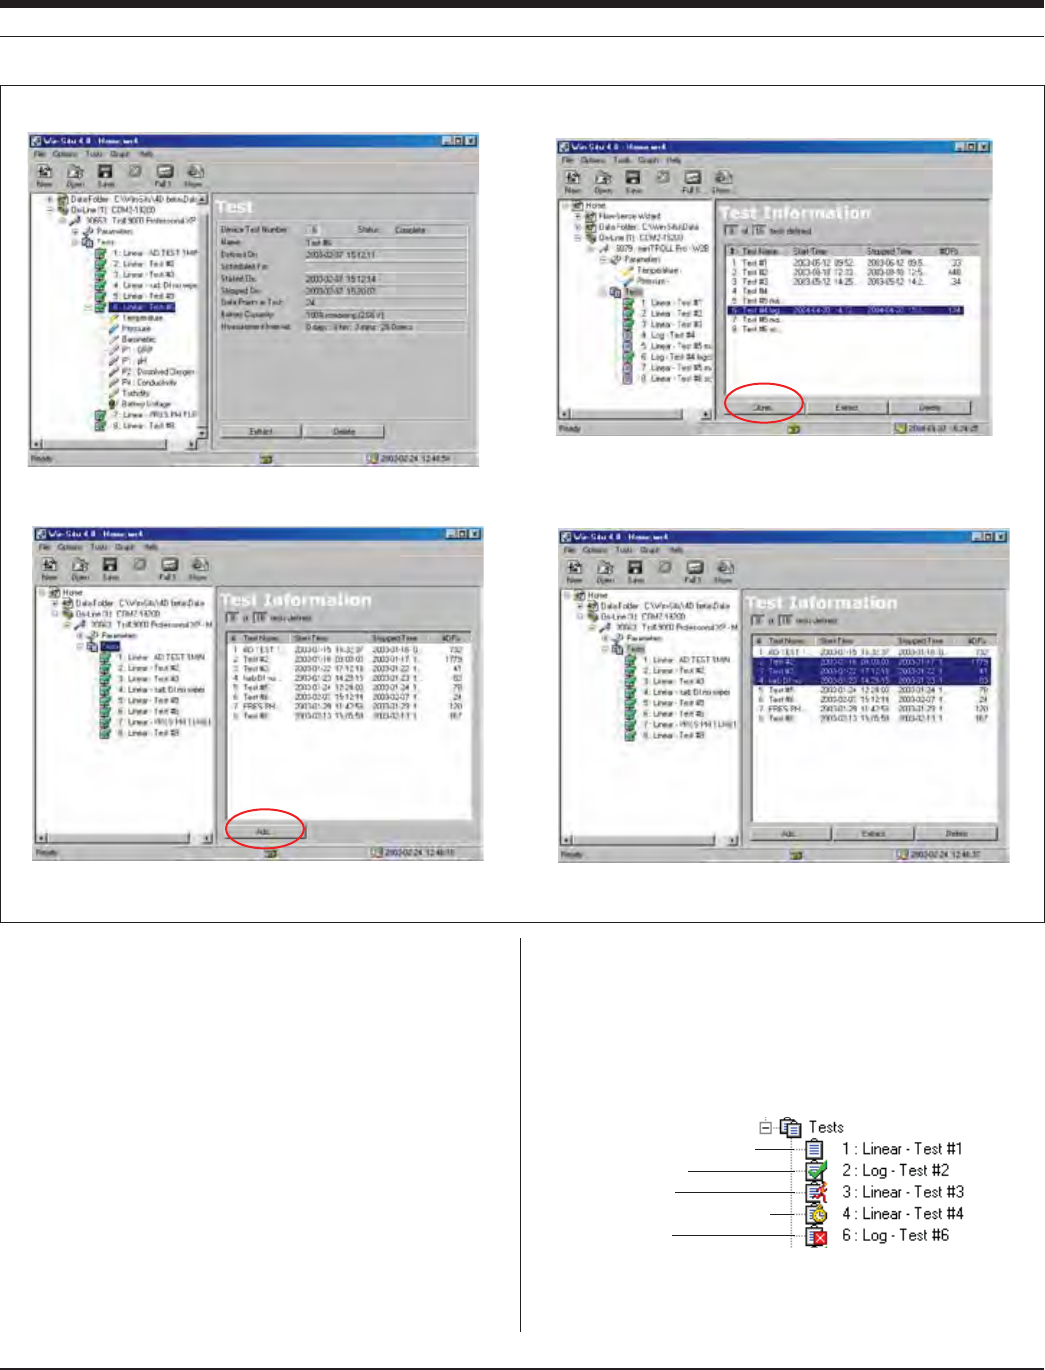
39
TROLL 9500 Operator’s Manual 0095110 rev. 007 01/09
OTHER TEST OPERATIONS
There are six basic test operations:
s Add...—programs the instrument to collect data. See the first part
of this section for details.
s Edit...—allows you to change the pre-programmed test setup
before the test runs. Editing a test launches the Test Wizard. See
the first part of this section for details.
s Start—starts the selected test if it has been defined for a manual
start.
s Stop—stops a running test.
s Extract—copies the selected test data from the instrument to the
host computer. A copy of the data remains in the instrument.
SECTION 6: LOGGING DATA
When a single test is selected in the Navigation tree, the Information pane
shows details about the selected test.
When the Tests node (group view) is selected, the Information pane shows all
tests and displays the Add... button. #DPs is the number of data points logged.
When multiple tests are selected in the Information pane, multiple tests may
be extracted or deleted simultaneously.
Single test view vs. Multiple test view
When a test is selected in the Information pane, the Clone... button is
available to copy the test definition—saves time in setting up tests.
Pending test—manual start
Completed test
Running test
Pending test—scheduled start
ABEND test
(came to an ABnormal END,
e.g., by losing power or
filling the memory)
s Delete—deletes the selected test from the instrument.
s Clone—makes a copy of the selected test definition setup.
The operations available depend on the status of the selected test. A
different symbol is displayed for each test status:
40
TROLL 9500 Operator’s Manual 0095110 rev. 007 01/09
STARTING A MANUAL START TEST
1. With the MP TROLL 9500 connected to a host C, select a pending
manual test in the Navigation tree.
2. Click or tap Start.
TIP: If a test is running in the device, the Start button is not
available. You must stop the running test before you can
start a new one. See “Stopping a Test” below.
3. You will be asked to confirm your selection.
4. After you confirm, the test starts and the display is updated.
TIP: Once a test starts, the following actions will not be
available: Add, Delete, Edit (device, parameter, test), Clone,
Calibrate.
STOPPING A TEST
The end of a test cannot be programmed in advance. In most cases,
the Stop button is the only way to stop a running test. Exceptions: A
test stops automatically when any of the following occurs:
s WHENANOTHERTESTSTARTS
s IFTHEDEVICEMEMORYlLLSUP
s IFPOWERISLOST
1. With the MP TROLL 9500 connected toa host PC, select a running
test in the Navigation tree.
2. Click or tap Stop. You will be asked to confirm your selection.
3. After you confirm, the test stops and the display is updated.
RETRIEVING LOGGED DATA
Retrieving, downloading, uploading, transferring—these terms are
sometimes used interchangeably to mean the act of copying data from
the place where it was logged to a host PC. The Extract operation in
Win-Situ or Pocket-Situ retrieves test data from the MP TROLL 9500
memory and saves it to a file on the host com puter. You may view the
file immediately after the download, or later.
1. With the MP TROLL 9500 connected to a host PC and selected in
the Navigation tree, click or tap Tests.
2. In the Information pane, select one or more tests to extract. To
select multiple tests, hold the CTRL key while selecting. (To display
the CTRL key on a PDA, tap the keyboard symbol.)
3. Click or tap Extract to extract the test(s).
When the extraction is complete, the name(s) and locations of the
test data file(s) on the host computer are displayed (see box on the
next page). If a selected test has been extracted previously, only
data logged since the last download is extracted and is automati-
cally appended to the original file.
The software presents two options after the extraction:
s View launches the data viewer to view the selected file.
s Done returns to the Tests view in the software.
TIP: The “Extract” operation puts a copy of a test data file
on your PC, but does not delete the test from the device. To
free up device mem ory, see Deleting Tests, next.
TIP: When extracting a large test to a PDA on battery power,
avoid letting the PDA time out during the transfer. To locate
this setting in most PDAs, display the Start menu, select
Settings, System tab, Power.
SECTION 6: LOGGING DATA
TIP: On a PDA, the Pocket-Situ \ Data folder is located
in the device’s non-volatile storage.
Q:
A:
Where do my extracted data files go?
Win-Situ 4 extracts tests to a folder named “Data” in the folder
where Win-Situ 4 is installed. The file structure looks like this:
Device serial number
Test start date (yyyy-mm-dd)
Test start time (hhmmss)
Test name
File type
Win-Situ \ Data \ SN30701 2004-02-12 150000 Test #3.bin
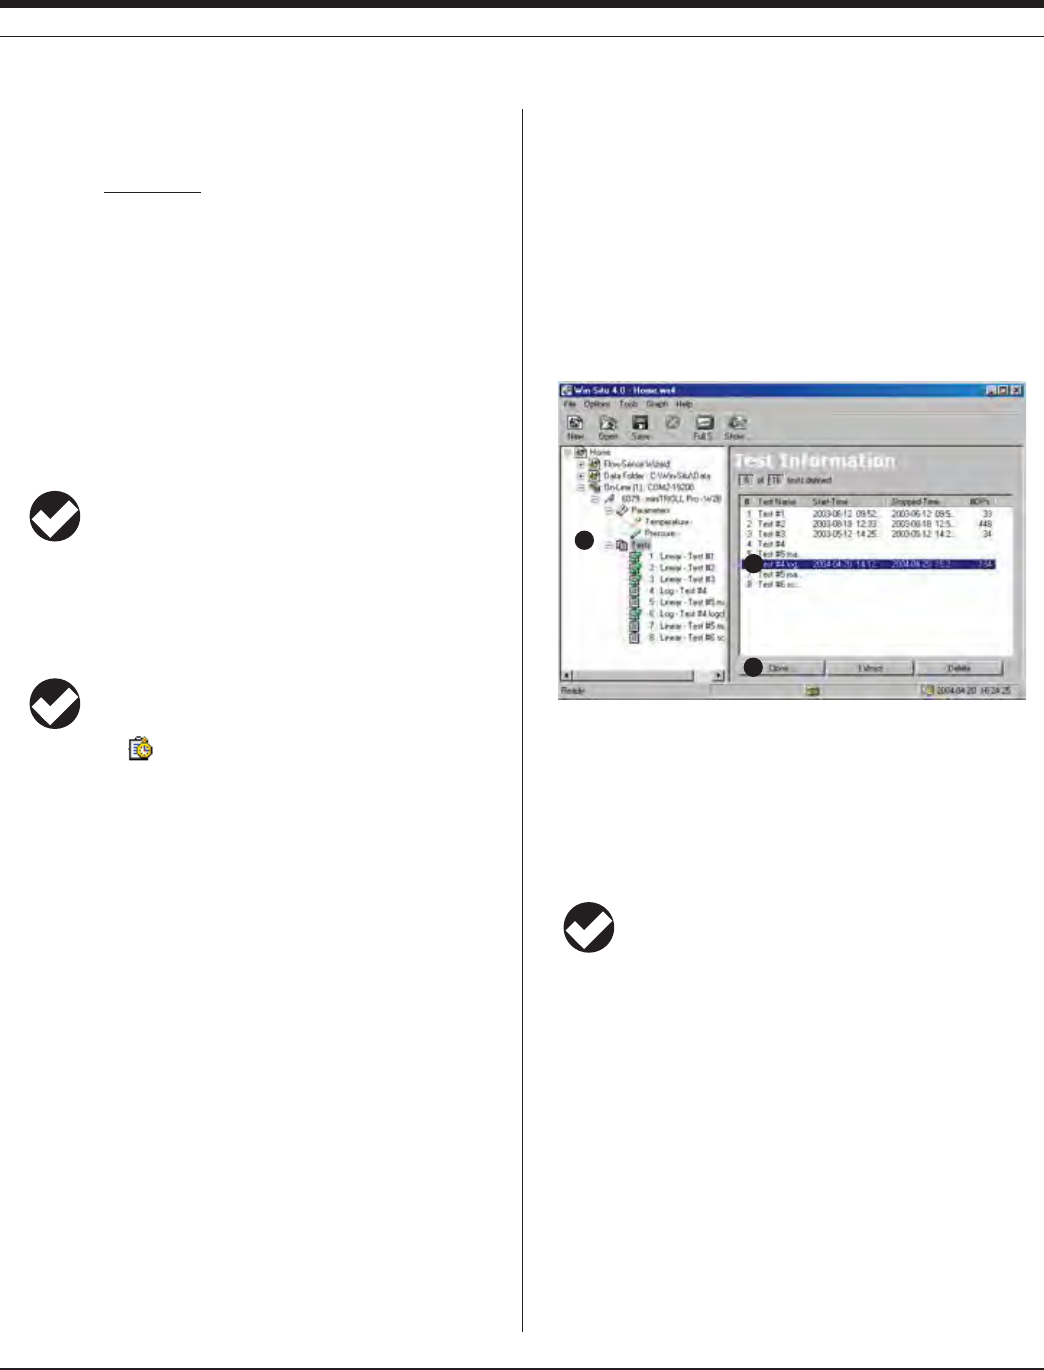
41
TROLL 9500 Operator’s Manual 0095110 rev. 007 01/09
DELETING TESTS
Tests are stored in the device memory until you delete them. The De-
lete operation permanently removes selected tests from the device,
and reorganizes the memory to optimize future data storage. Depend-
ing on how full the memory is, the process may take several minutes.
1. With the MP TROLL 9500 connected to a host PC and selected in
the Navigation tree, click or tap Tests.
2. In the Information pane, select one or more tests to delete. To
select multiple tests, hold the CTRL key while selecting. (To display
the CTRL key on a PDA, tap the keyboard symbol in the Command
bar.)
3. Click or tap Delete. You will be asked to confirm your selection.
TIP: If a test is running in the device, the Delete button is not
available. You must stop the running test before tests can be deleted.
See “Stopping a Test” above.
4. After you confirm, the selected test(s) are permanently removed
from the device.
TIP: The Delete procedure can be used to cancel a pending
scheduled test
3
1
2
SECTION 6: LOGGING DATA
CLONING A TEST
The Clone function lets you copy all the elements of an existing
test—the test name, selected channels, measurement schedule and
interval—without having to define a new test “from scratch.” You can
clone a pending test or a completed test.
1. With the MP TROLL 9500 connected to a host PC and selected in
the Navigation tree, click or tap Tests.
2. In the Information pane, select a test to clone.
3. Click or tap Clone to preview the test definition. The Wizard will still
present all the screens, but you can just click Next to get through
them quickly (or make any changes you want).
4. Click Finish to end the wizard. The information will be sent to the
device and the new test will appear in the Navigation tree.
TIP: The proposed start type for a cloned test will always be
Manual, regardless of the start type of the original test. This
avoids scheduling a test to start in the past.

42
TROLL 9500 Operator’s Manual 0095110 rev. 007 01/09
TRANSFERRING FILES FROM A PDA TO A DESKTOP
PC
If Win-Situ Sync (or its earlier release, Pocket-Sync 4) is installed on
your desktop PC, file transfer can be done automatically each time the
computers are connected in ActiveSync.
To transfer files “manually” proceed as follows. NOTE THAT MICRO-
SOFT ACTIVESYNC IS NEEDED TO CONNECT THE COMPUTERS
even with an In-Situ synchronization utility installed (Win-Situ
Sync or Pocket-Sync 4).
TIP: Install Microsoft ActiveSync on the desktop PC before
the first connection to the PDA. Be sure to exit your last
Pocket-Situ session. The following procedure is performed
from the desktop PC side.
1. With the computers connected and ActiveSync running, open up
Explore on the ActiveSync tool bar.
2. Double-click on “My Pocket PC.”
3. Browse to the folder where Pocket-Situ Data is stored. On some
PDAs this will be in a folder called “Storage Card” or “SD Card.” On
the RuggedReader, look in Built-in Storage. Open the Pocket-Situ
Data folder (double-click) to display a listing of your extracted data
(.bin) files.
SECTION 6: LOGGING DATA
1
2
4
4. Right-click the file(s) you want to transfer and select Copy or Cut.
Selecting Cut will remove the data file from the PDA.
5. Open My Computer or Windows Explorer for the desktop PC and
navigate to the folder where you want to place the data file(s).
When the cursor is in the desired folder, right-click, and select
Paste.
We recommend placing the files in the following locations to ensure
that they will be displayed properly in the Data Folder branch of the
Win-Situ Navigation tree. The In-Situ synchronization utility, if used,
will put the files in the proper locations automatically.
Test data files Data folder in the folder where Win-Situ 4 is
installed (normally, C:\Win-Situ\Data)
,OWmOWlLES ,OW&LOWSUBFOLDEROFTHE$ATAFOLDER
Calibration reports Calibration Reports folder in the folder where
Win-Situ 4 is installed. These will be acces-
sible from Win-Situ’s Tools menu.
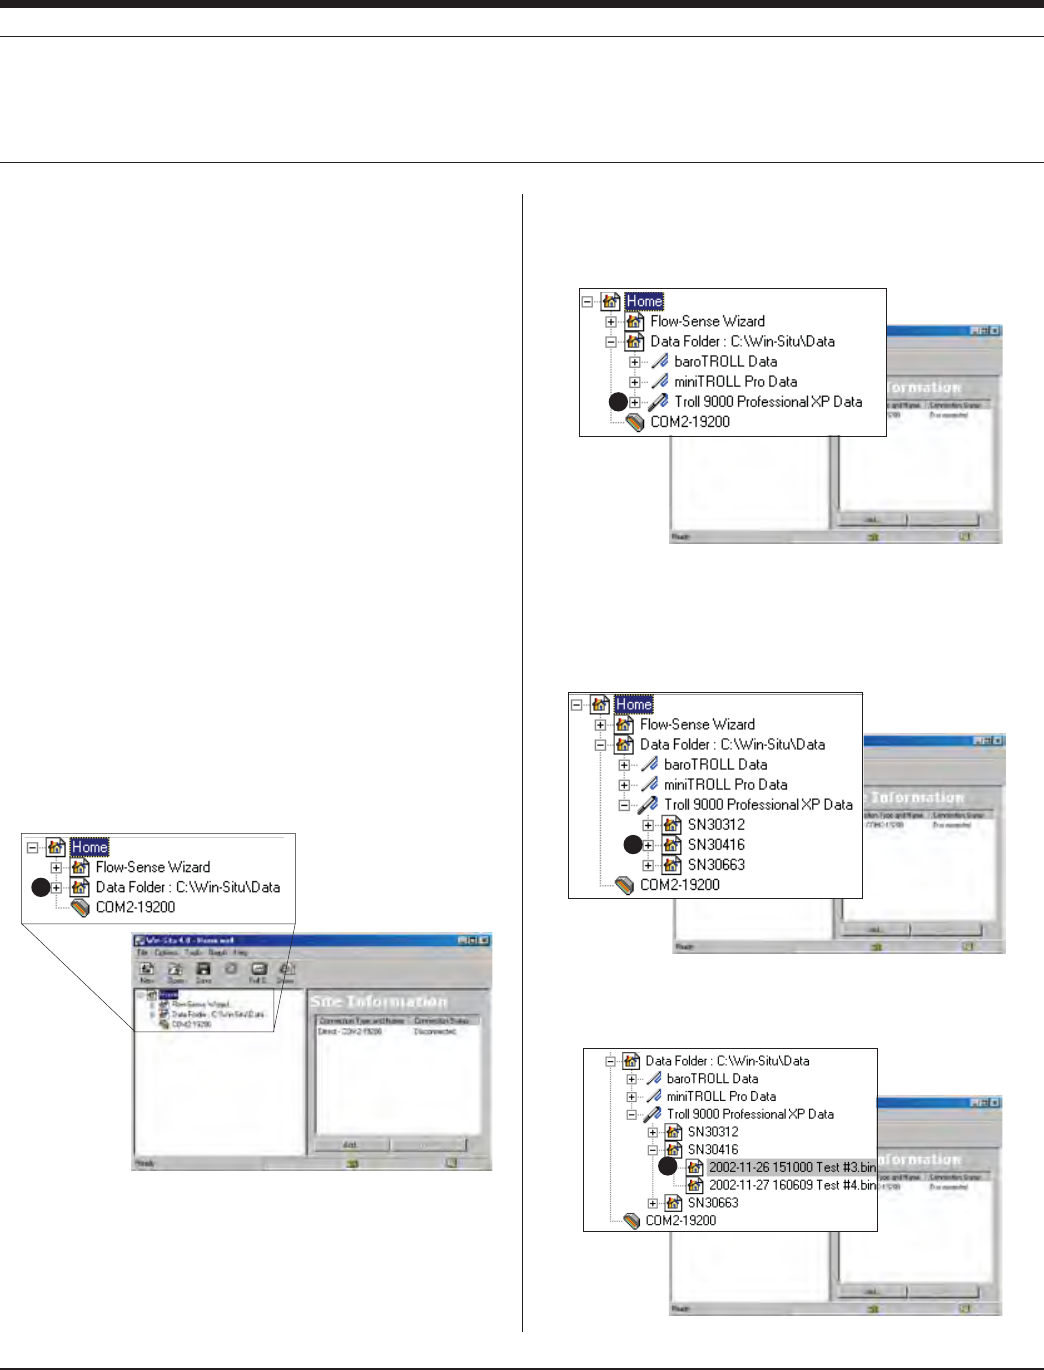
43
TROLL 9500 Operator’s Manual 0095110 rev. 007 01/09
2. The Data Folder has a node for data from each device type.
TROLL 9500 data will be listed under the TROLL 9000 “family”
device. Click the + beside the TROLL 9000 to expand the listing.
3. Device nodes are further subdivided by serial number. If tests from
multiple TROLL 9500s have been extracted, the serial number of
each will be displayed. Click the + beside the the serial number of
the unit whose data you want to view.
4. The serial number node contains the extracted tests and logged
Profiler data. Click to select the test you want to view.
1
VIEWING LOGGED DATA
2
3
4
Logged data sets from the Multi-Parameter TROLL 9500 are called
“tests.” Tests reside in the instrument until you extract them to the host
computer. Any test that has been extracted can be viewed in text or
graphical format. A test can be extracted and viewed at any time, even
while it or another test is running.
The software provides two routes to view test data:
s )FTHETESTISINTHEINSTRUMENTSMEMORYEXTRACTITANDSELECTTHE
View option at the end of the download. This launches the data
viewer.
s )FTHETESTHASBEENEXTRACTEDTOTHEHOSTCOMPUTERITWILLAPPEAR
in the Data Folder node in the Navigation tree. A connection to the
instrument is not required in order to view extracted data.
SELECTING DATA IN THE DATA FOLDER
The Data Folder appears below the Home site in the Navigation tree.
After data files have been extracted from the MP TROLL 9500 to the
Data Folder, the node can be expanded to show device type, serial
number, and extracted data files.
To view extracted test data:
1. Click the
+ sign beside the Data Folder to expand the listings.
SECTION 6: LOGGING DATA
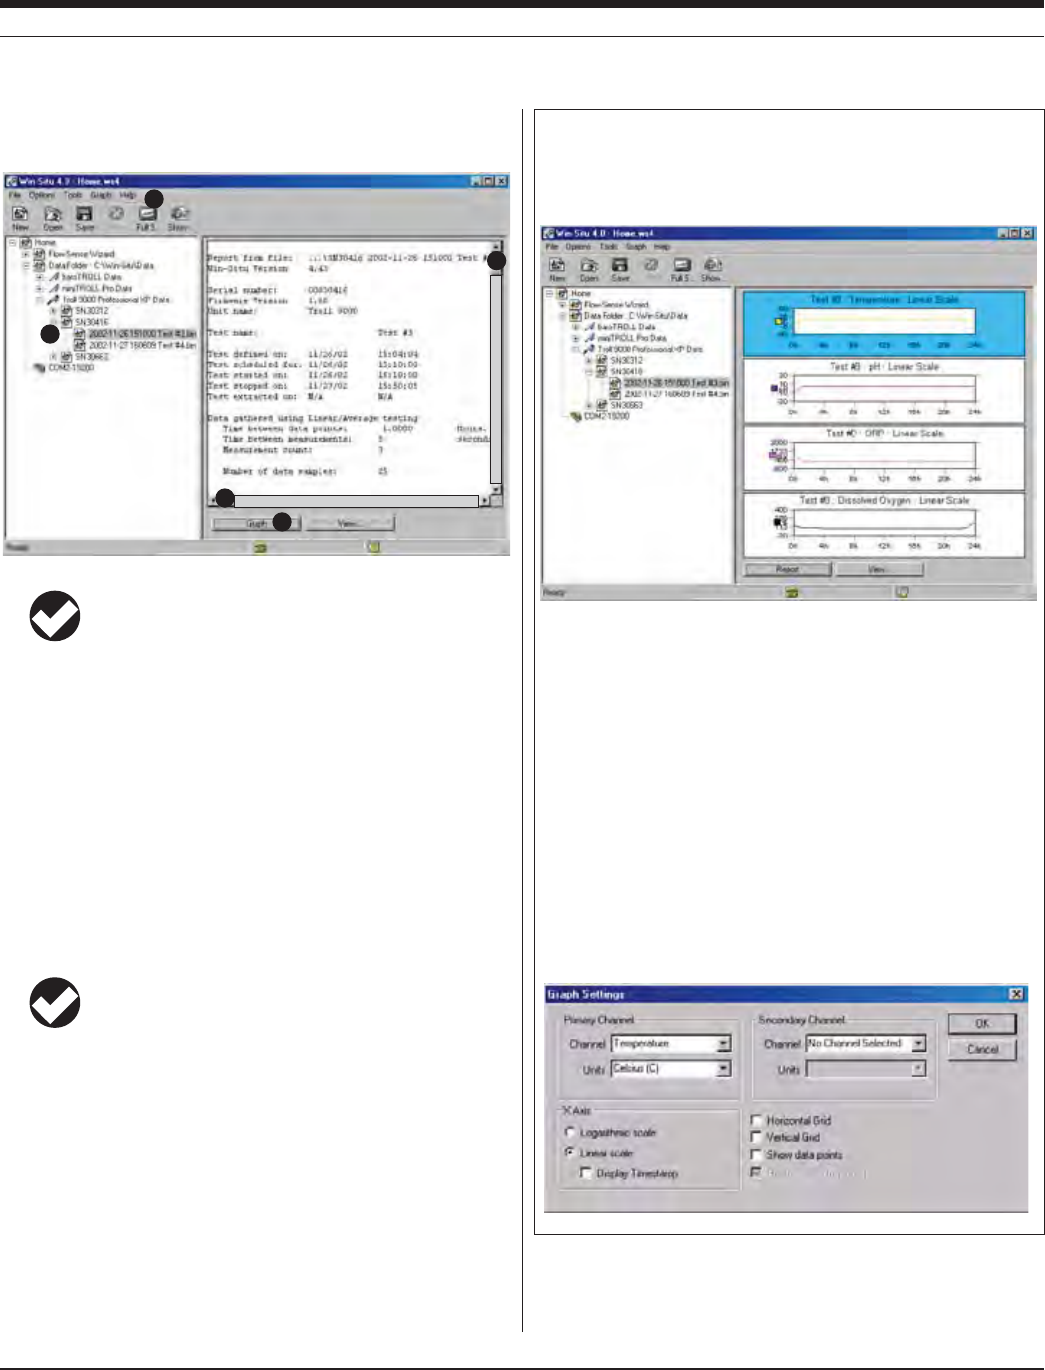
44
TROLL 9500 Operator’s Manual 0095110 rev. 007 01/09
Win-Situ Graphing Controls
The Graph button displays data from the first four test channels in graph
format. Time is shown on the X axis in the currently selected unit. The
axes are auto-ranged. Click any graph to select it for formatting.
Each graph can display one, two, or all test channels. To change the ap-
pearance and content of any graph, display the Graph menu or right-click
a graph. This provides access to the graph formatting options:
s CHANGEORADDCHANNELS
s ADDDATAPOINTINDICATORS
s ADDGRIDLINESTOONEORBOTHAXES
s ADDALOGARITHMICTIMESCALE
s CHANGETHERANGEOFTHE9DATAAXIS
s CHANGETHEPARAMETERUNITS
s add a time stamp to the X (time) axis
s ZOOMINONTHEGRAPH
Many of these options can be set in the Graph settings window:
The selected test is displayed in the Information pane—to the right
of the screen in Win-Situ, or at the bottom in Pocket-Situ.
TIP: The data file may appear in Report view or Graph view,
depending on the preferences saved in your last Win-Situ or
Pocket-Situ session.
5. To view the test data below the header in Report view:
s 5SETHEVERTICALANDHORIZONTALSCROLLBARSTOSCROLLTHROUGHTHE
data file.
s /RCLICK&ULL3CREENINTHESHORTCUTBARTOENLARGETHETEXTDIS-
play, and then use the scrollbars.
GRAPHING DATA
6. Click or tap Graph to display the individual parameter data in
graph format. See the sidebar on this page for Win-Situ graphing
controls, and on the next page for Pocket-Situ graphing controls.
TIP: You can easily switch from Graph view to Report view
and back using the Graph and Report buttons in the Infor-
mation pane. However, the view chosen in this way is not
“persistent” into your next session. To change the view so it always
comes up as Graph or Report, specify the desired Data File View in
Preferences (Options Menu) in Win-Situ or Setup in Pocket-Situ.
Win-Situ provides a range of options for viewing data in graph
format. Here are some things you may wish to try:
s 4OENLARGETHESELECTEDGRAPH#LICK&ULL3CREENINTHETOOLBARTHEN
go to the Graph menu and select a different Number of Graphs
s 4OSHOWTWOCHANNELSONTHEGRAPHSELECT'RAPH3ETTINGSONTHE
Graph menu, select a Primary channel and a Secondary Channel
s 4OSHOWALLCHANNELSONTHEGRAPHSELECT'RAPH3ETTINGSONTHE
Graph menu, choose All Channels Selected
SECTION 6: LOGGING DATA
4
5
6
5
5

45
TROLL 9500 Operator’s Manual 0095110 rev. 007 01/09
Pocket-Situ Graphing Controls
Pocket-Situ displays all the test channels in one graph. Time is shown on
the X axis in the currently selected unit. The axes are auto-ranged.
The left Y axis represents the first channel in the test (usually tempera-
ture), or the first channel selected in the View... option in the command
bar. The right Y axis represents the second channel.
Tap Graph or Text in the command bar to change the view.
The graph area may be resized as follows:
With the stylus (or other suitable pointer), press on the line that separates
the Navigation tree from the Information pane and drag it up or down to
resize the screen.
The View... option in the command bar launches wizards to help you
change the way test data are displayed.
s 3ELECT#HANNELSTO6IEW4AP.EXTTHENTAPACHECKBOXTOSHOW
or hide a channel. Tap Finish to return to the graph. The Y axes will
REmECTYOURSELECTION
s #HANGE5NITSANDOTHERPREFERENCES
s #HANGE#HANNEL3ETTINGS2EDElNETHEDISPLAYOPTIONSFORAPRES-
sure channel. Refer to Section 7 for details on the settings.
This graph was created with the following controls: Number of Graphs: One
Graph, All channels selected, Zoomed in on 11-22 minutes, Vertical grid.
CHANGING THE DATA DISPLAY
The View button launches wizards to let you change the way test data
are displayed.
s 3ELECT#HANNELSTO6IEW2EPORTVIEW4AP.EXTTHENTAPACHECK
box to show or hide a channel. Finish returns to the Report view.
s #HANGE5NITSANDOTHERPREFERENCES
s #HANGE#HANNEL3ETTINGS2EDElNETHEDISPLAYOPTIONSFORAPRES-
sure channel. Refer to Section 7 for details on the settings.
TRANSFERRING DATA TO EXCEL FROM WIN-SITU 4
1. Select Report view.
2. On the File menu, select Export to Excel. If Microsoft® Excel® is
properly installed on your PC, the data file will open in an Excel
spreadsheet.
PRINTING DATA IN WIN-SITU 4
To print the graph or report as currently displayed:
1. Select Graph or Report view as desired.
2. On the File menu, select Print graph or Print report.
Additional information is available from your printer documentation.
SAVING TEXT FILES FROM WIN-SITU 4
1. Select Report view.
2. On the File menu, select Save Report.
3. In the window that opens, supply a filename in the usual way; the
report will automatically be given a .TXT file type.
SECTION 6: LOGGING DATA
Switch to text view
To resize the graph,
drag the dividing line
with the stylus.
Select channels, change units
and other preferences
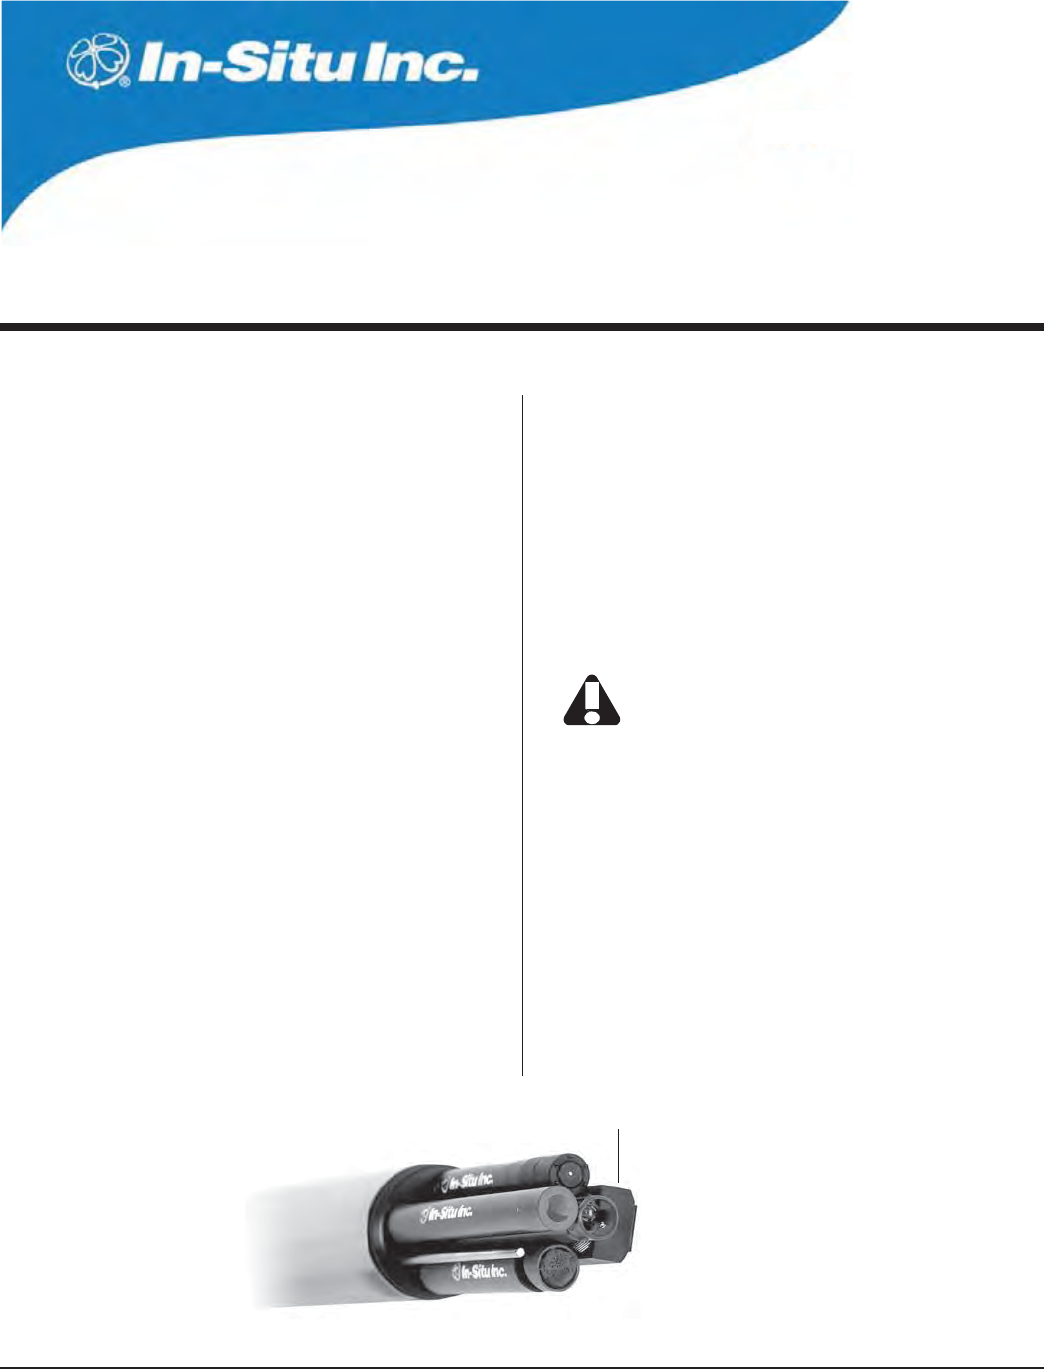
46
Multi-Parameter
Water Quality TROLL®
TROLL 9500 Operator’s Manual 0095110 rev. 007 01/09
7 MONITORING PRESSURE (WATER LEVEL)
Pressure sensor
WHY MONITOR PRESSURE?
Water level or pressure head readings are taken for a number of
reasons. In aquifer characterization, this type of data will help the user
determine important hydrologic parameters of an aquifer, including
hydraulic conductivity, transmissivity, permeability, storage coefficient,
dispersivity, and porosity. Some or all of these parameters are impor-
tant in the design of wells and well fields for various purposes.
In the design of a remediation system, the proper placement of wells
for monitoring or extraction is of paramount importance if the system
is to function effectively. Accurate data from slug and pump testing is
one of the primary tools employed for aquifer characterization in the
design process.
Step testing and constant-rate pump testing yield significant data in
determining proper pumping rates. Improper rates can lead to aquifer
depletion, salt water intrusion, and several other problems. Accurate
data in designing the system and monitoring the system is essential
for long-term success of the well and the proper maintenance of the
aquifer.
The collection and use of water level measurements in the mining
and coal bed methane industries are essential for the success of
the mines and wells. Data derived from pilot testing of water wells
constructed for coal bed methane extraction provide necessary
information on bottom-hole pressure and appropriate pumping rates
to accomplish the de-watering necessary to release the methane gas.
Monitoring of water levels assures efficient produc-
tion.
Water level measurements of
surface water by pressure
measurements yield significant
data about the overall health
of the hydrologic cycle. This
information is also useful to government, agriculture, and industry as
well as the scientific community when planning water use and when
adjudicating water rights issues.
THE PRESSURE SENSOR
The optional pressure sensor of the Multi-Parameter TROLL 9500, if
included, is permanently-installed and factory-calibrated. If your MP
TROLL 9500 was ordered without a pressure or turbidity sensor, there
will be a permanently installed plug in the pressure sensor slot. A
pressure sensor can be added at the factory.
Do not try to remove the pressure sensor or permanently
installed plug.
FACTORY CALIBRATION
The pressure sensor is calibrated across full pressure over a range of
½TO½#4HEPRESSUREREFERENCEISPROVIDEDBYAPRESSURECONTROL
and measurement system (PCMS) that supplies a calibrated and
certified pressure to the pressure sensor. The temperature reference
is provided by a water bath with a thermal homogeneity of 0.0008
½#ANDMEASUREDWITHCALIBRATEDANDCERTIlEDDIGITALTHERMOMETERS
The calibration process results in a data set of raw analog to digital
conversions (A/D readings) for both pressure and temperature from
the device versus actual pressure and actual temperature from the
calibrated references.
From a two-dimensional data set of tem-
perature A/D versus reference temperature,
and a three-dimensional data set of pressure
A/D versus temperature A/D and reference
pressure, numerical coefficients are gener-
ated to equations that map the MP TROLL
performance across all temperatures and
pressures.
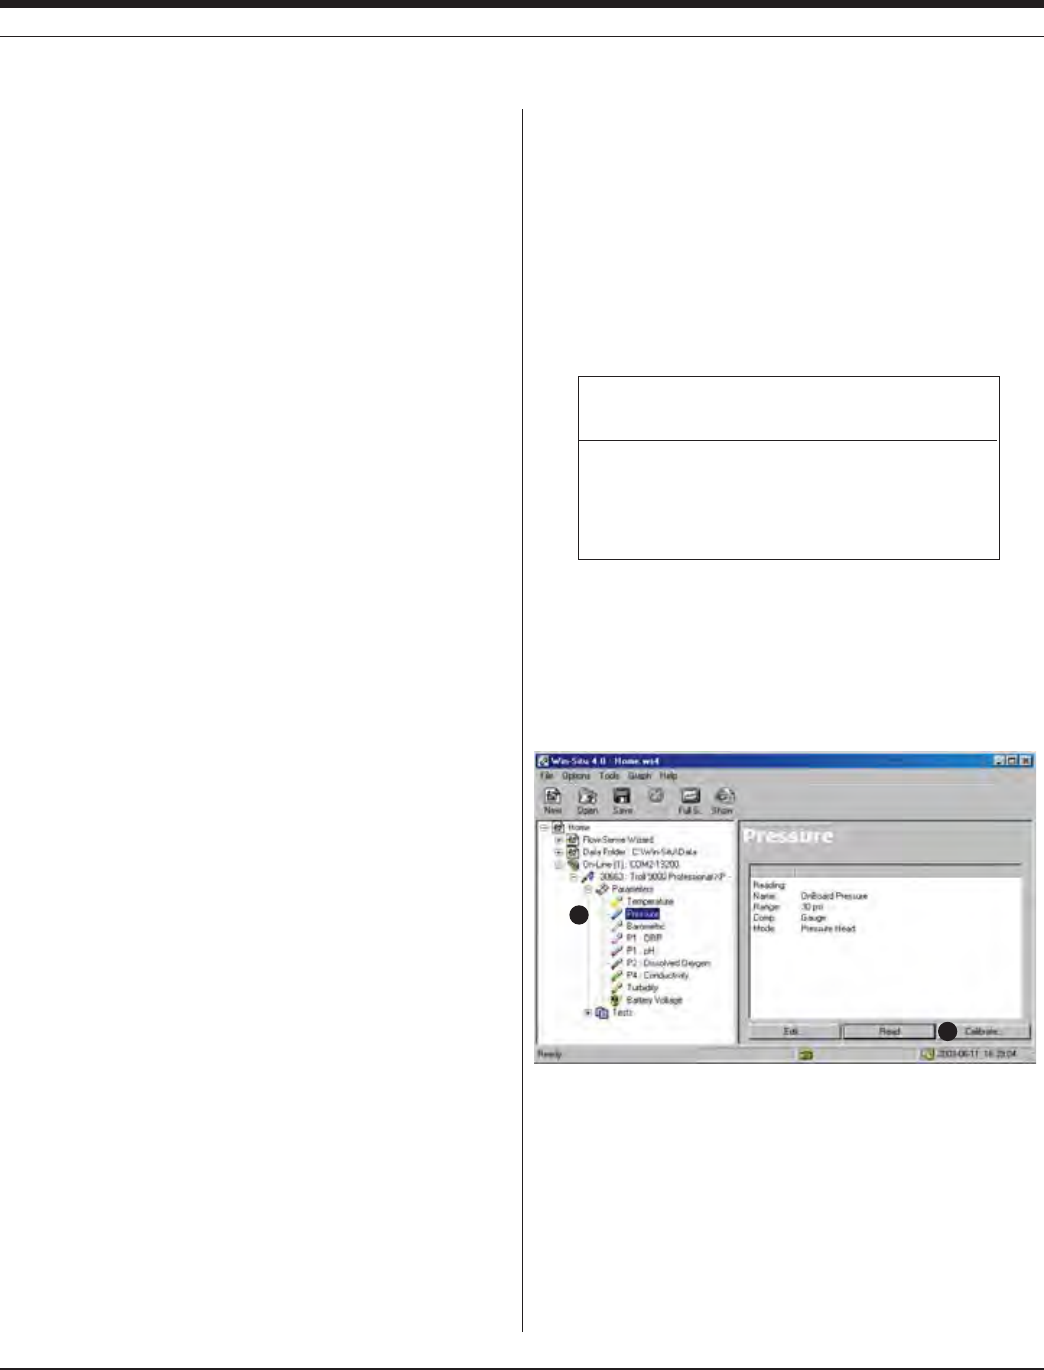
47
TROLL 9500 Operator’s Manual 0095110 rev. 007 01/09
OPERATING PRINCIPLE
A pressure transducer senses changes in pressure, measured in
force per square unit of surface area, exerted by a column of water
OROTHERmUIDABOVEANINTERNALMEDIAISOLATEDSTRAINGAUGE#OMMON
measurement units are pounds per square inch (psi) or newtons per
square meter (Pascals).
NON-VENTED (ABSOLUTE) VS. VENTED (GAUGED) SENSORS
A non-vented or “absolute” pressure sensor measures all pressure
forces detected by the strain gauge, including atmospheric pressure.
Its units are psia (pounds per square inch “absolute”), measured with
respect to zero pressure. Absolute pressure sensors are sometimes
called “sealed gauge” sensors.
Absolute pressure measurements are useful during vacuum testing, in
very deep aquifers where the effects of atmospheric pressure are neg-
ligible, and in unconfined aquifers that are open to the atmosphere.
With vented or “gauged” pressure sensors, a vent tube in the cable
applies atmospheric pressure to the back of the strain gauge. The
basic unit for vented measurements is psig (pounds per square inch
“gauge”), measured with respect to atmos pheric pressure. PSIG sen-
sors thus exclude the atmospheric or barometric pressure component.
This difference between absolute and gauged measurements may be
represented by a simple equation:
Pgauge = Pabsolute - Patmosphere
If your MP TROLL 9500 includes a pressure sensor, it is either abso-
lute or gauged. The pressure sensor type is not software-selectable.
However, psia measurements from absolute pressure sensors can be
readily compensated for atmospheric pressure in the software due to
the presence of the MP TROLL 9500’s onboard barometric pressure
sensor, as long as the instrument is connected to vented cable. See
“Correcting Absolute Pressure Readings for Barometric Pressure”
later in this section.
PRESSURE VS. DEPTH VS. LEVEL
Display options for pressure measurements are completely software-
selectable. Pressure sensor data may be displayed as raw pressure
head, as depth, or as water level with a reference. When choosing
depth or level, the software presents additional options for converting
from pressure readings (in psi) to depth or level (in feet or meters),
including a very accurate conversion that compensates pressure
READINGSFORmUIDDENSITYALTITUDEANDLATITUDE
ZEROING THE PRESSURE SENSOR
The following procedure may be used, with caution, to “zero” the
offset of a pressure sensor to correct for electronic drift. The drifted
offset is visible when the sensor is in air and reading other than zero.
It is recommended you do not zero the offset if it is outside the speci-
fied accuracy of your pressure sensor, as shown in the table below.
If the reading in air deviates from zero by more than the amounts
shown, you may want to consider a factory recalibration. See the Ap-
pendix for additional information on electronic drift.
1. With the MP TROLL connected to a host PC and selected in the
Navigation tree, click or tap the Pressure parameter in the Param-
eters list.
2. Click or tap Calibrate. You will be prompted to ensure the device is
in air.
3. When the device is in air, click Yes.
The current pressure reading will be set to zero. To check this, take a
reading with the “Read” button.
SECTION 7: MONITORING PRESSURE (WATER LEVEL)
1
2
Sensor Accuracy Acceptable Offset
range (% full scale) from zero
15 psig ± 0.05% FS ± 0.0075 psig
30 psig ± 0.05% FS ± 0.015 psig
100 psig ± 0.05% FS ± 0.05 psig
300 psig ± 0.05% FS ± 0.15 psig
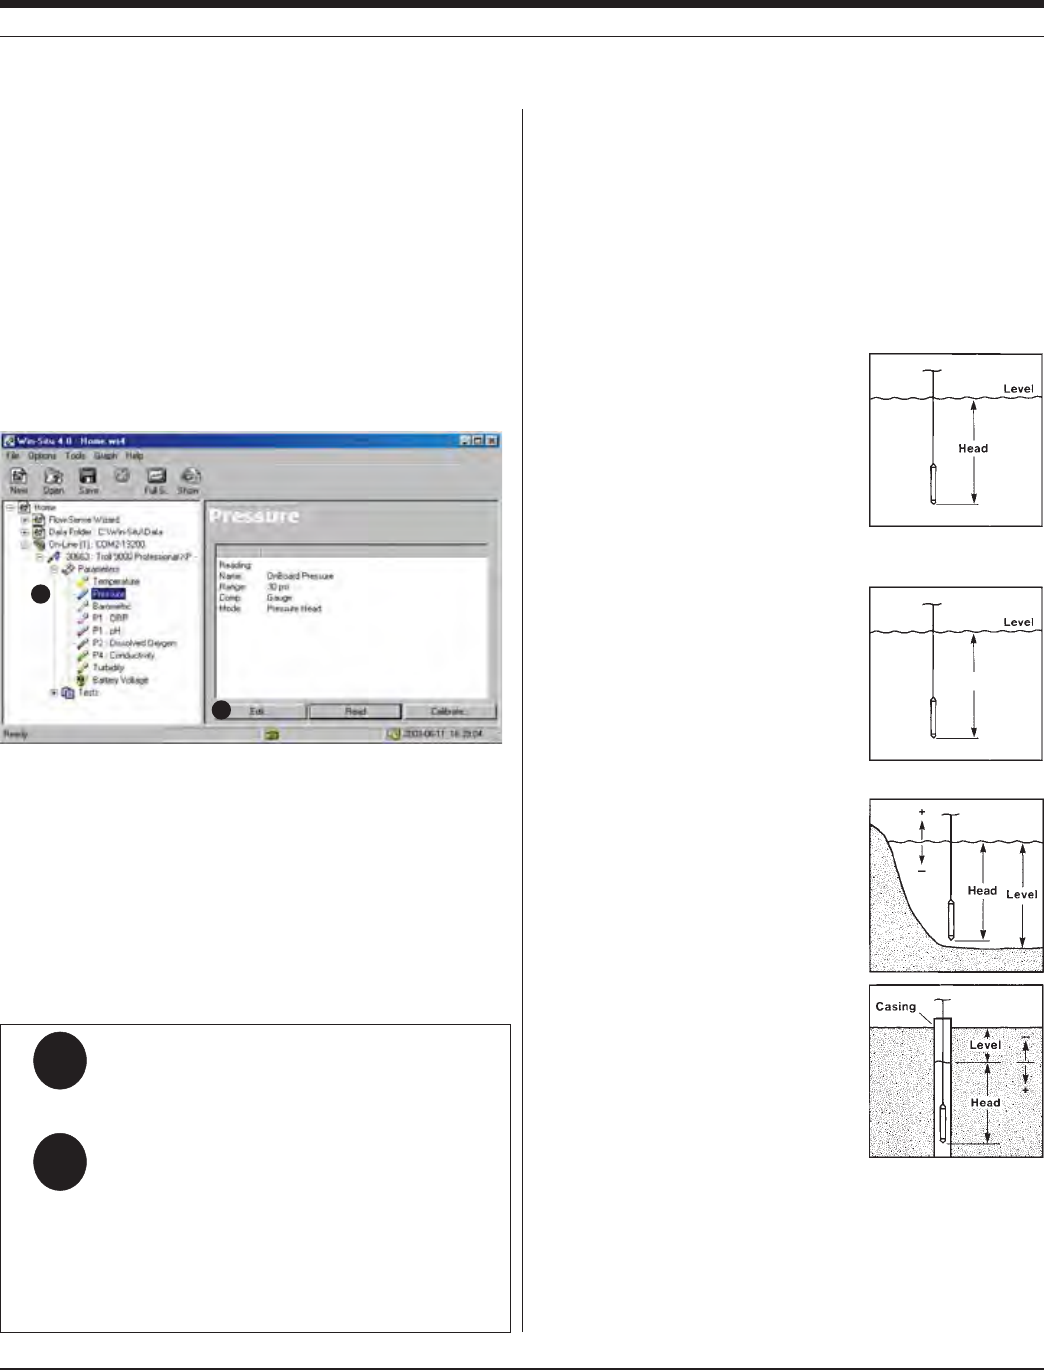
48
TROLL 9500 Operator’s Manual 0095110 rev. 007 01/09
Depth
SETTING UP PRESSURE MEASUREMENTS: THE PA-
RAMETER WIZARD
Win-Situ’s Parameter Wizard can help you configure a pressure chan-
nel to display measurements just as you want them. The specified set-
tings are easily changed from one mode to another, and any choice
can be redone or undone later, when viewing test data.
1. With the MP TROLL connected to a host PC and selected in the
Navigation tree, select the pressure parameter.
2. Click or tap Edit.... The Parameter Wizard starts. The choices are
discussed below.
3. When you finish the Wizard, Win-Situ sends the information to the
device and updates the display.
PRESSURE SETUP CHOICES
Win-Situ prompts for the following when editing a pressure channel.
You may not see all of these depending on your early choices.
1. NAME (OPTIONAL)
The pressure channel name is displayed in the Information pane and
in test data files. A default name is proposed. If you choose, you may
enter a custom name (up to 16 characters).
2. DISPLAY MODE
Select one of the following. Subsequent screens will be tailored to
your choice.
s Pressure Head displays the raw pres-
sure exerted by the column of water
above the pressure sensor, in kiloPas-
cals or pounds per square inch (psi). If
you choose this mode, click Finish to end
the Wizard. Then select units on Win-
Situ’s Options menu.
s Depth converts the pressure of the water
column to a depth reading, in meters,
centimeters, feet, or inches. If you
choose this mode, you will be asked to
choose a method for converting pressure
to depth. Then select units on Win-Situ’s
Options menu.
s Level - Surface: Commonly used for
surface water elevations. Data file read-
ings are “positive up.” Increasing water
levels will result in increasing readings.
Decreasing water levels correspond to
decreasing readings.
s Level - Top Of Casing: Commonly
used for drawdown in ground water wells.
This mode is “positive down.” Decreas-
ing water levels correspond to increasing
readings, because the water level is
getting further from the top of the well
casing. Increasing water levels result in
decreasing readings.
If you select depth or a level mode, you will be asked to choose a
method for converting pressure to depth or level. For a level mode,
you will be prompted to enter a level reference.
Q:
A:
What do I get with out-of-the-box pressure measure-
ments (no setup)?
The pressure channel defaults in Win-Situ and Pocket-Situ
result in the following measurements, with no setup:
s 0RESSUREHEADISMEASURED
s $EFAULTUNITSAREPSI
s .OCONVERSIONFROMPSITODEPTHLEVEL
Remember that all these settings can be changed quite
easily when you view the data after the test.
1
2
SECTION 7: MONITORING PRESSURE (WATER LEVEL)
49
TROLL 9500 Operator’s Manual 0095110 rev. 007 01/09
Liquid Density
4HECONVERSIONFROM03)UNITSTOMETERSORFEETOFmUIDREQUIRES
several conversion factors. One of these is the density (R) of the
AQUEOUSSOLUTIONBEINGMONITORED0UREGROUNDWATERAT½#HASA
density of 0.998 grams per cubic centimeter (g/cm3).
Use the values in the table for density if you do not otherwise know
it. However, since these data assume pure water, there is no ac-
commodation for other variables (such as salinity) that can affect
your actual water conditions. Alternatively, you could compute the
mUIDDENSITYUSINGTHEPROCEDUREGIVENINTHE!PPENDIX
Fluid density by temperature
Te m p . Density Temp. Density Temp. Density
½# GCM3 ½# GCM3 ½# GCM3)
1 0.999900 11 0.999605 21 0.997992
2 0.999941 12 0.999498 22 0.997770
3 0.999965 13 0.999377 23 0.997538
4 0.999973 14 0.999244 24 0.997296
5 0.999965 15 0.999099 25 0.997044
6 0.999941 16 0.998943 26 0.996783
7 0.999902 17 0.998774 27 0.996512
8 0.999849 18 0.998595 28 0.996232
9 0.999781 19 0.998405 29 0.995944
10 0.999700 20 0.998203 30 0.995646
3. CONVERTING PRESSURE TO DEPTH OR LEVEL
The conversion from pressure in pounds per square inch (psi) to
depth or level in meters or feet requires some knowledge of the
PROPERTIESOFTHEmUIDBEINGMONITOREDANDOPTIONALLYOFTHEDEVICES
location on the earth’s surface.
Conversion Using Specific Gravity
0RESSUREMAYBEADEQUATELYCONVERTEDTOFEETORMETERSOFmUIDUSING
a dimensionless specific gravity value. A specific gravity of 1.0 (char-
ACTERISTICOFPUREWATERAT½#ISADEQUATEFORMANYGROUNDWATER
applications.
Conversion Using Density, Latitude, and Elevation
Pressure in the English unit psi is first converted to the SI unit Pascal
(Pa). Conversion from Pascals to meters or feet requires two ad-
ditional values:
s Liquid Density.0UREGROUNDWATERAT½#HASADENSITYOF
g/cm3. A table of density by temperature appears on this page. The
Appendix includes a method to experimentally determine liquid
DENSITYIFTHEWORKINGmUIDISNOTPUREWATER
s Gravitational Acceleration. The acceleration due to gravity that
an object experiences is location-specific. Given your latitude and
elevation, Win-Situ can calculate a value for gravitational accelera-
tion for your location.
TIP: Either specific gravity or density, latitude & elevation
may be used to convert from pressure (psi) to depth/level
(meters or feet ). A gain in accuracy may be realized by
selecting the density, latitude & elevation option.
4. LEVEL REFERENCE
If you selected a level display mode (Surface or Top of Casing), you
will be prompted to enter a level reference. This is a user-specified
starting point for level display modes, and can be any value you
choose. Here are some examples:
s 3URFACE)FYOUCALCULATETHEWATERLEVELABOVEMEANSEALEVEL
(MSL) and enter this as the Level Reference, then data will be
displayed as elevations above MSL.
s 4OPOF#ASING)FYOUMEASURETHEDISTANCETOTHEWATERSURFACE
(DTW) from the top of the well casing and enter this number as the
Level Reference, then data will be displayed as DTW values.
s !,EVEL2EFERENCEOFISEQUIVALENTTOhZEROINGvTHEPROBE$ATA
will be displayed as changes, either positive or negative, from the
starting water level.
Reference Time
The MP TROLL takes a “snapshot” of the sensor’s raw pressure read-
ing, then your Level Reference is substituted. You can specify that the
snapshot be taken now or when the test starts. The data file will show
the Reference (raw pressure) Reading and when it was taken.
s Now: the pressure is measured when you finish setting up the
pressure parameter, and the value is stored until the test starts. All
measurements taken during the test will be relative to the water
level at the time you finished the wizard.
s Start of Test: the Reference measurement will be taken at time
t=0. All measurements taken during the test will be relative to the
water level at the moment the test starts.
TIP: After setting up the pressure channel with the desired
display options, select the units you want to see. Use Win-
Situ’s Options menu, or Pocket-Situ’s Setup button.
SECTION 7: MONITORING PRESSURE (WATER LEVEL)
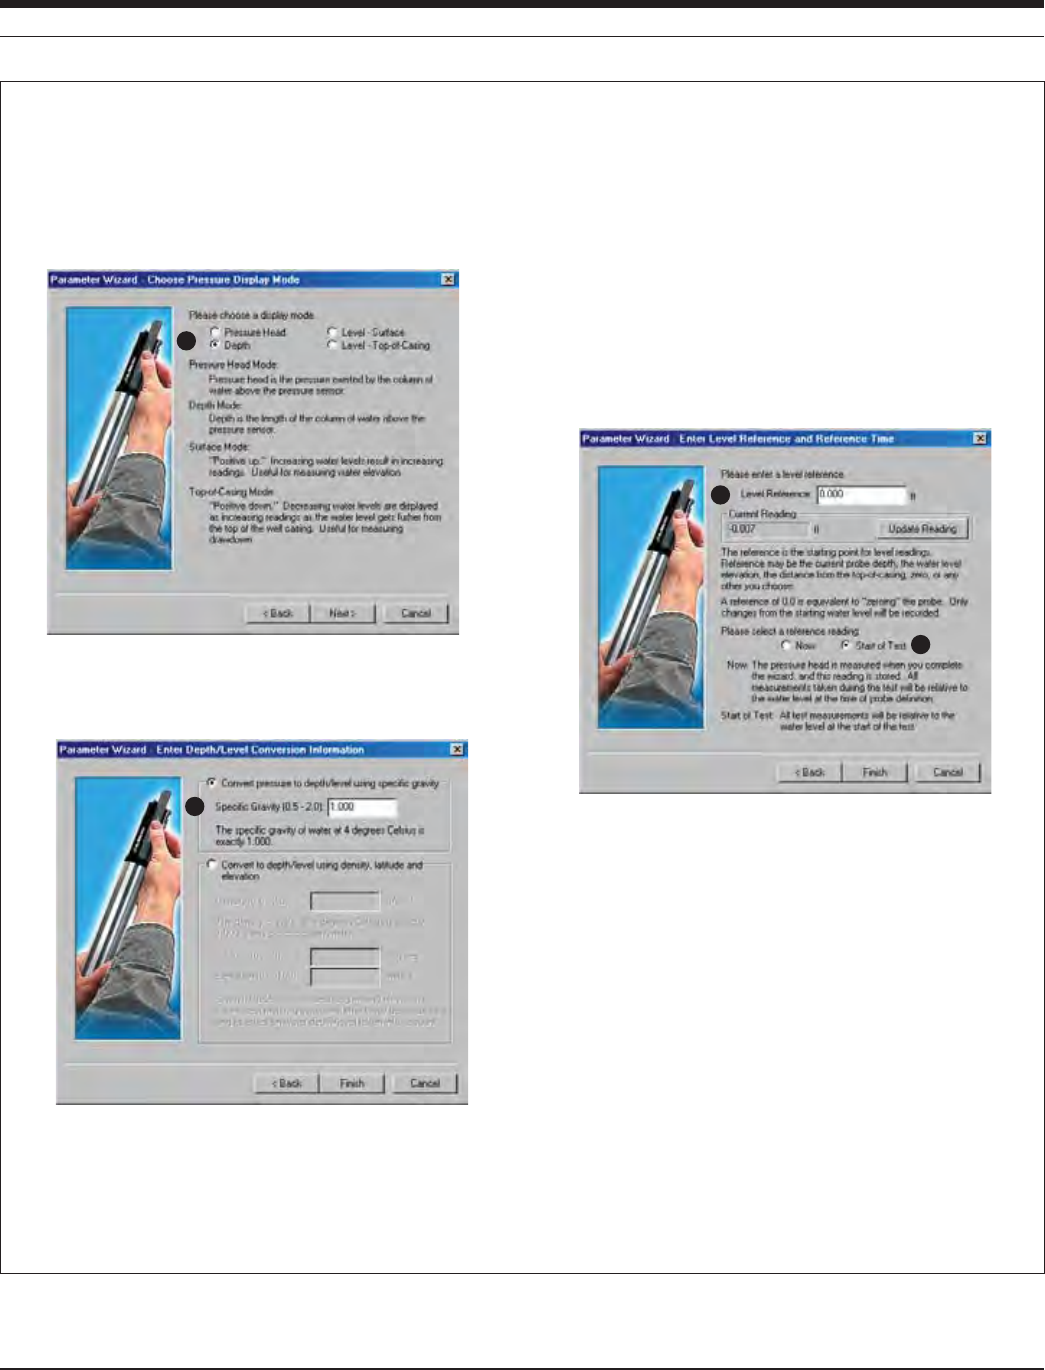
50
TROLL 9500 Operator’s Manual 0095110 rev. 007 01/09
For DEPTH:
1 Select Pressure in Parameters list, select Edit
2 Display Mode: Select Depth, click Next.
3 Select Depth/Level Conversion: Specific Gravity 1.0.
Click Finish.
QUICK SUMMARY OF PRESSURE SETUP
For SURFACE WATER MONITORING (install probe before
setting these):
Display Mode Level - Surface
Depth/Level Conversion Specific Gravity 1.0
Level Reference Current elevation or gauge
height of water surface
Reference Reading Now (with probe installed)
For AQUIFER TESTING:
1 Select Pressure in Parameters list, select Edit
Display Mode
Depth/Level Conversion Specific Gravity 1.0
2 Display Mode: Select Level - Top of Casing, click Next.
3 Select Depth/Level Conversion: Specific Gravity 1.0. Click Next.
4 Select Level Reference 0 & Reference Reading Start of Test.
Click Finish.
After setting the pressure mode, select the UNITS you want:
7IN3ITU/PTIONSMENU0REFERENCESSCROLLDOWNTOLEVEL/DEPTH, select unit, click OK
Pocket-Situ: Tap Home at top of screen, tap Setup at bottom of screen, scroll down to LEVEL/DEPTH, select unit, click OK
2
3
4
4
SECTION 7: MONITORING PRESSURE (WATER LEVEL)
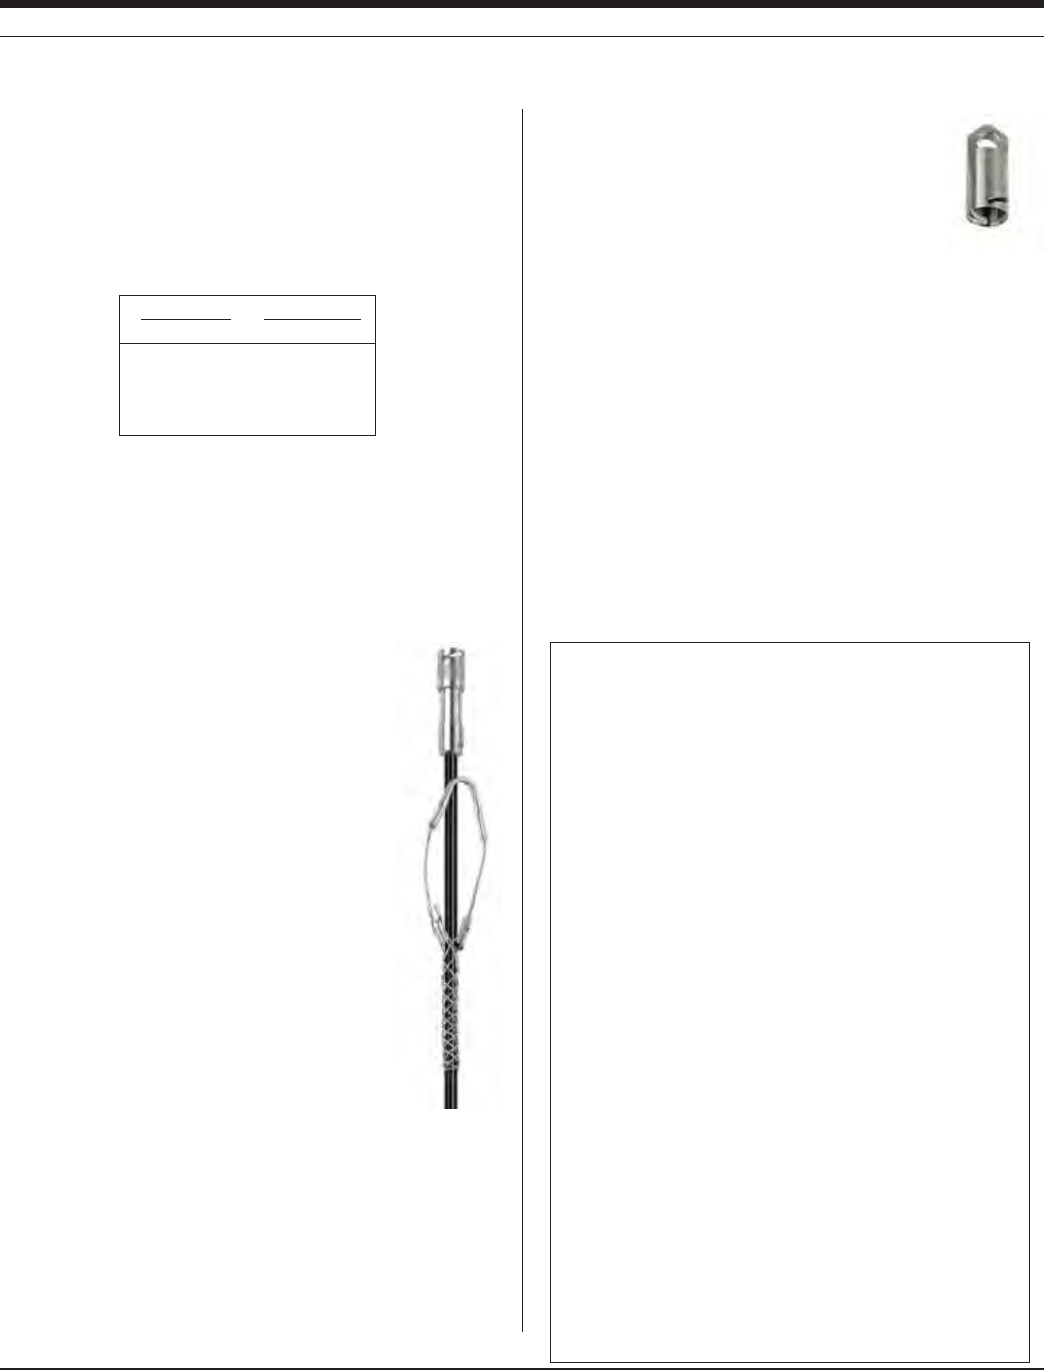
51
TROLL 9500 Operator’s Manual 0095110 rev. 007 01/09
INSTALLATION FOR PRESSURE/LEVEL MEASURE-
MENT
Position the instrument below the lowest anticipated water level, but
not so low that its range might be exceeded at the highest anticipated
level. Lower the MP TROLL 9500 gently to the desired depth.
If real-time readings are not required, remove the TROLL Com from
the cable after programming. Protect the “uphole” end of the cable
with the dust cap or optional desiccant. If cable will not be used, at-
tach a Twist-Lock Hanger to the TROLL 9500.
SECURING THE CABLE
The RuggedCable has a handy device called a Kellems® grip near
the surface end. You can slide it along the cable to
the desired position by compressing it. When you
pull on it, it tightens and stops sliding. You may need
to pull on both ends of the Kellems grip to properly
tighten it and keep it from slipping.
Use the loop of the Kellems grip to anchor the cable
to a convenient stationary object. It works well with
In-Situ’s “well dock” installation ring. Simply insert
the loop into the locking clip on the well dock, and
position the assembly on the top of a well. Insure the
cable is secured to prevent the instrument moving
while data is being logged.
STABILIZATION TIME
Allow the instrument to stabilize to the water condi-
tions for about an hour before starting a test. A gen-
erous stabilization time is always desirable. Even
though the cable is shielded, temperature stabiliza-
tion, stretching, and unkinking can cause apparent
changes in the probe reading. If you expect to
monitor water levels to the accuracy of the probe, it’s worth allowing
the extra time for the probe to stabilize to the test environment.
TWIST-LOCK HANGER INSTALLATIONS
The non-vented Twist-Lock hanger accessory can be
used to suspend a pre-programmed MP TROLL 9500
in a well or other site while taking data where baromet-
ric pressure changes are not crucial.
The Twist-Lock hanger allows use of inexpensive
hanging cable, and requires no direct communication and no cable
venting. This setup is ideal for use where barometric compensation of
pressure measurements is not required—in vacuum testing, uncon-
fined aquifers, or very deep applications where barometric pressure
effects are minimal.
s "ECAUSETHE4WIST,OCK(ANGERHASNOCOMMUNICATIONCAPABILI-
ties, you must program the MP TROLL 9500 before installation
s ,OGGEDPRESSUREDATAWILLSHOWTHEEFFECTSOFCHANGESINBARO-
metric pressure. However, post-processing tools may be used
to eliminate the effects of barometric pressure changes from the
data, if required. See “Correcting Absolute Pressure Readings for
Barometric Pressure” below for more information.
SECTION 7: MONITORING PRESSURE (WATER LEVEL)
Range Usable Depth
kPa PSI Meters Feet
103.4 15 11 35
206.8 30 21 69
689.5 100 70 231
2068 300 210 692
Pressure Sensor Pressure Ratings
Kellems grip
Installation Tips for Level/Depth/Pressure Monitoring
s .EVERLETAPROBEhFREEFALLvDOWNAWELL4HERESULTINGSHOCK
wave when it hits the water surface can damage the pres-
sure sensor strain gauge (the “waterhammer” effect), as well
as other sensors.
s )TISALWAYSWISETOCHECKTHELEVELOFWATERABOVETHE
probe, then move it and read again to be sure that the probe
is giving a reasonable reading and showing change. It might
not be located where you think it is — for example, it could
be wedged against the casing with a loop of cable hanging
below it. A probe in such a position might become dislodged
and move during the test, giving a false change in level. A
secure placement is critical to accurate level measurements.
s 7HENMONITORINGPRESSUREWITHVENTEDCABLEDONOTALLOW
the cable (and its internal vent tube) to kink or bend. If the
vent tube is obstructed, water level measurements can be
adversely affected. The vent tube can become kinked and
damage the internal components without any visible harm to
the outside of the cable. The recommended minimum bend
radius is 63.4 mm (about 2½ in) or more.
s $ONOTPOSITIONTHEINSTRUMENTBELOWTHELEVELOFTHEPUMP
in a pumping well. The pressure transients generated by
the pump will cause false level readings. Large pumps can
swallow the probe and cause permanent damage to both
the MP TROLL 9500 and the pump.

52
TROLL 9500 Operator’s Manual 0095110 rev. 007 01/09
CORRECTING ABSOLUTE PRESSURE READINGS
FOR BAROMETRIC PRESSURE
Pressure measured with an “absolute” or “non-vented” (psia) pressure
sensor includes all pressure forces detected by the strain gauge—at-
mospheric pressure as well as the pressure due to the water column.
“Gauged” or “vented” (psig) sensors remove the atmospheric pressure
component (pressure due to the atmosphere), so that atmospheric
pressure on a water surface is not doubled in the measurements from
a sensor under the water surface.
Barometric compensation of absolute pressure measurements, if
required, may be accomplished in a couple of ways.
MANUAL BAROMETRIC PRESSURE COMPENSATION
Using the MP TROLL’s Barometric Pressure Sensor
If your model of MP TROLL 9500 includes an onboard barometric
pressure sensor, and the instrument is attached to vented cable, the
barometric pressure sensor output can be used to correct measure-
ments from a submerged absolute (psia) pressure sensor. In this
case, set up the pressure channel in “pressure head” mode, and
select the same units for both the water pressure channel and the
barometric pressure channel. Set up and run a test that includes both
pressure channels. Extract (download) the data, and subtract the
barometric pressure measurements from the water pressure mea-
surements.
Using a Second Unit and a Spreadsheet
If a barometric pressure sensor is not present, and/or the cable is not
vented, barometric compensation of absolute pressure measurements
may be accomplished with the use of a separate device—a Baro
TROLL or Absolute miniTROLL—installed above the water surface,
taking barometric pressure measurements. Set up both devices to use
the same units and display mode—the only difference will be if a level
reference is used; in that case the barometric reference should be
zero, the downhole reference will be the water level. Schedule tests to
start at the same time in each unit. Extract (download) the data from
both tests, and subtract the barometric pressure measure ments from
the water pressure measurements (by hand or in a spreadsheet).
TIP: For additional information on correcting absolute
pressure measurements, see the Technical Note “Manual
Barometric Corrections” in the Downloads section of our
website at www.in-situ.com.
SECTION 7: MONITORING PRESSURE (WATER LEVEL)
AUTOMATIC BAROMETRIC PRESSURE COMPENSATION
A Baro Wizard in Win-Situ and Pocket-Situ allows for automatic
barometric pressure compensation of absolute pressure data, either
using a fixed user-specified value or by reference to a file of baro-
metric pressure data collected at the same time by a BaroTROLL or
other absolute (psia) instrument installed at the surface. The baro-
metrically corrected absolute pressure data may be saved in a new
file, if desired.
Collecting Barometric Pressure Data for Reference
Be sure to set the clock in the BaroTROLL (or other absoltue instru-
ment). Add a test. Ideally, this test should start before the test in the
Absolute MP TROLL 9500 starts and log data on approximately the
same schedule. Run the test. Extract the test (it is not necessary to
stop it.)
Collecting PSIA Data
Set the clock in the Absolute MP TROLL 9500. Add a test and run it as
usual. Extract this test also.
Using the Baro Wizard
The difference in pressure between a BaroTROLL at the surface and
a submerged MP TROLL 9500 with an absolute (psia) pressure sen-
sor can be calculated from extracted test data files. This task is simpli-
fied if the BaroTROLL test covers the entire duration of the Absolute
instrument’s test.
1. Launch Win-Situ 4 or Pocket-Situ 4. Connection to an instrument is
not necessary after the tests have been extracted.
2. In the data folder, select a test extracted from an MP TROLL 9500
with an Absolute pressure sensor (PSIA data).
3. On the Tools menu, select Baro Wiz.
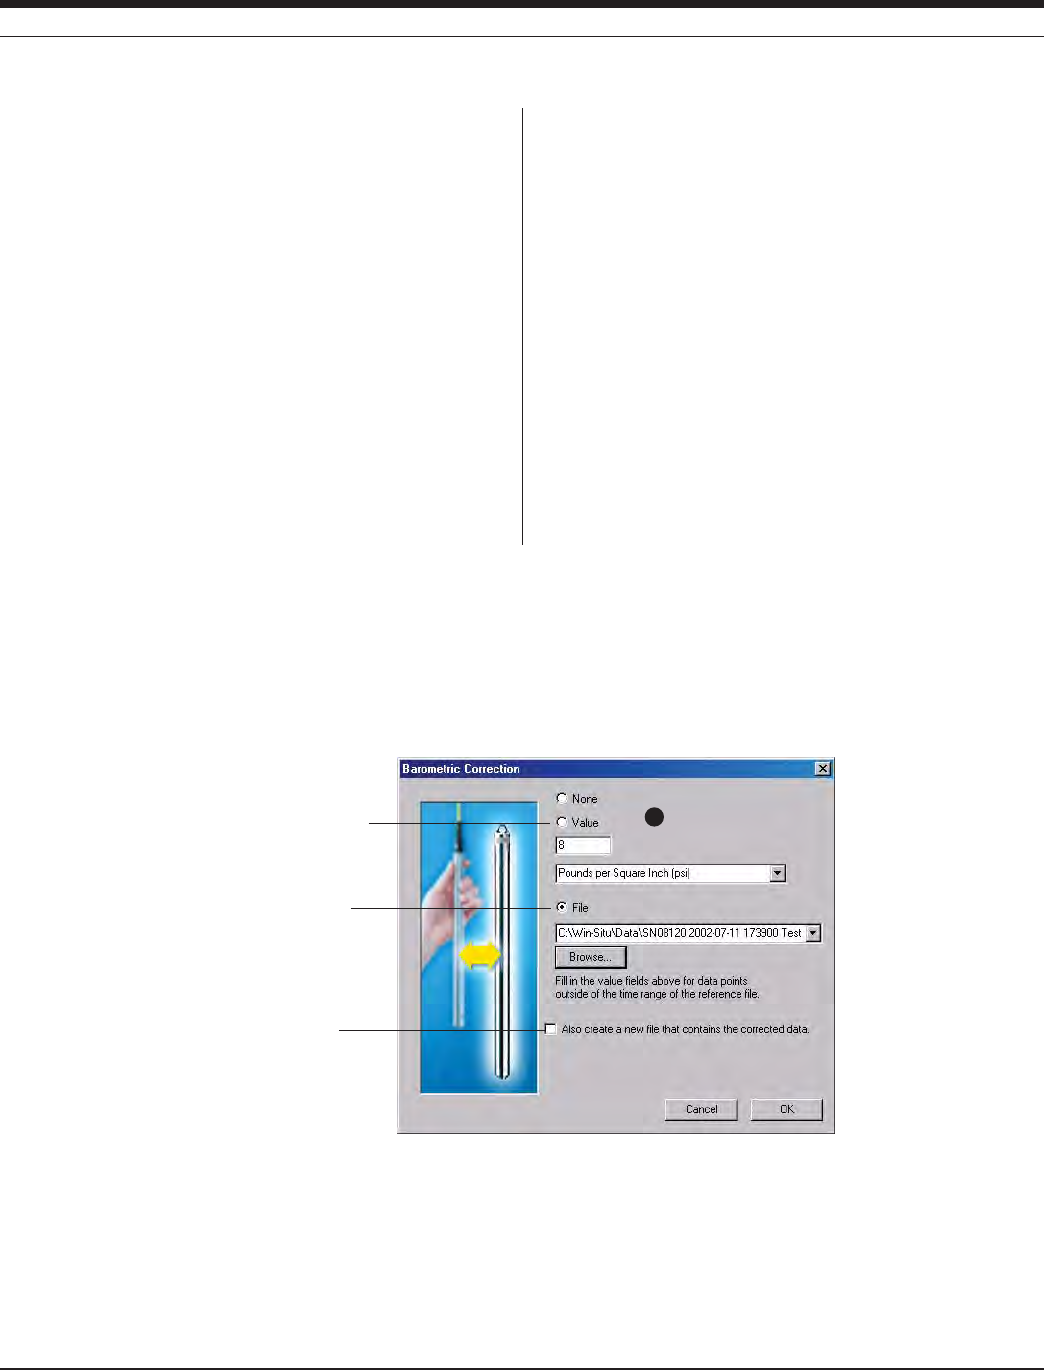
53
TROLL 9500 Operator’s Manual 0095110 rev. 007 01/09
SECTION 7: MONITORING PRESSURE (WATER LEVEL)
4. In the Barometric Correction window, select the type of correction
to be performed:
s .ONE
s 6ALUE%NTERABAROMETRICPRESSUREVALUETOBESUBTRACTEDFROM
all data points in the test file. Units are selectable, and your
entry is checked for validity. For example, in inches of mercury
the valid range is 14.3 to 33.5 (covering altitudes from the Alps
to the Dead Sea). You may not leave this entry blank, because
a fixed value will be needed even with a reference file (next op-
tion, see below) in case the time stamps in the two files do not
completely overlap.
s &ILE3ELECTATESTOFBAROMETRICPRESSUREDATACOLLECTEDBYA
BaroTROLL or other PSIA instrument. This becomes the Refer-
ence file from which barometric pressure corrections will be
derived. If the time stamps in the files do not overlap completely,
the fixed value will be applied.
5. To save the corrected data in a new file that will be automatically
named, check the create new file checkbox.
6. Click OK. The correction is performed immediately and the cor-
rected file is displayed.
RECALIBRATION RECOMMENDATIONS
Pressure sensor accuracy can be adversely affected by improper care
and handling, lightning strikes and similar surges, exceeding operating
temperature and pressure limits, physical damage or abuse, as well
as normal drift in the device’s electronic components. Aside from dam-
age to the sensor, the need for factory recalibration is dependent upon
the amount of drift a customer is willing to tolerate. Factory calibration
every 12-18 months is recommended. Contact In-Situ Customer Ser-
vice for information on the factory maintenance and calibration plan.
Calculations of the accuracy drift of the MP TROLL 9500 over time are
contained in the Appendix of this manual. Contact In-Situ Customer
Service for information on periodic check-ups and re cal ibration.
A single fixed correction is applied
to the entire PSIA test file
The content of a reference file of
barometric pressure data is used
to correct the PSIA test file
4
With a check here, the corrected
data is saved in a separate,
automatically named file
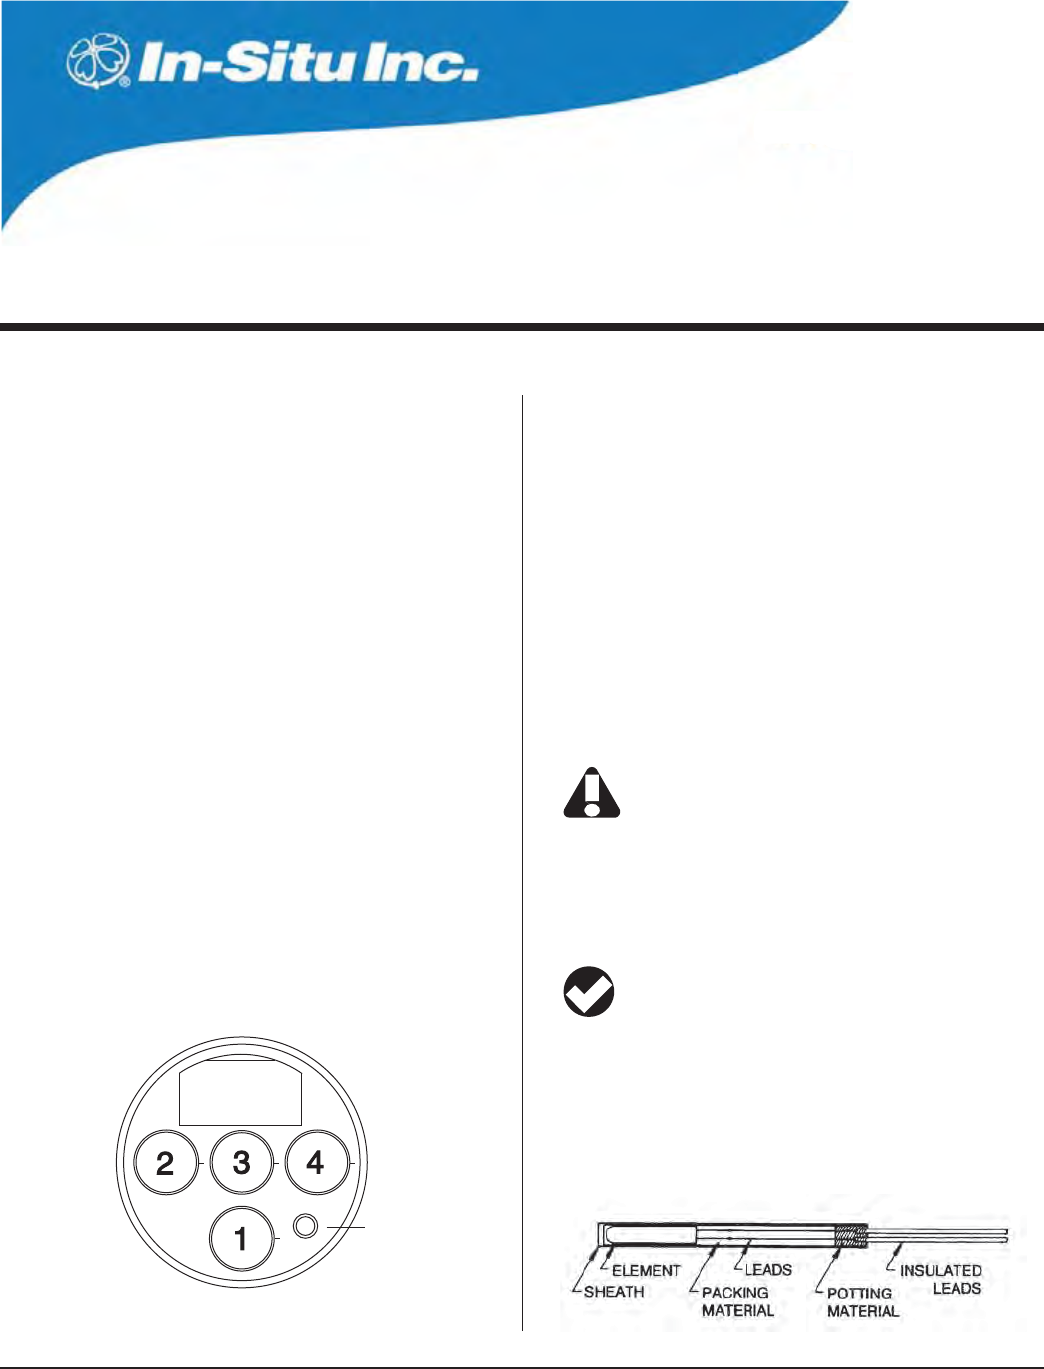
54
Multi-Parameter
Water Quality TROLL®
TROLL 9500 Operator’s Manual 0095110 rev. 007 01/09
8 MONITORING TEMPERATURE
Pressure/Turbidity
or plug
Temperature
End view of sensor block
Platinum Resistance Thermometer
WHY MONITOR TEMPERATURE?
Water temperature plays an important role in water chemistry, which in
TURNINmUENCESTHEBIOLOGICALACTIVITYANDGROWTHOFAQUATICORGANISMS
In general, the higher the water temperature, the greater the biological
activity and the rate of chemical reactions. An important example of
the effects of temperature on water chemistry is its impact on oxygen.
Warm water holds less oxygen than cool water; the maximum amount
of oxygen that can be dissolved in the water decreases as water
temperature increases.
Artificially high temperatures are often referred to as “thermal pol-
lution,” which may result from discharge of municipal or industrial
EFmUENTS4HERMALPOLLUTIONCANHAVEASIGNIlCANTECOLOGICALIMPACT
In running waters, particularly small urban streams, elevated tempera-
tures from road and parking lot runoff can be a serious problem for
populations of cool or cold-water fish.
Changes in the growth rates of cold-blooded aquatic organisms and
many biochemical reaction rates can often be approximated by the
“Q10 rule,” which predicts that growth rate will double if temperature
INCREASESBY½#½&WITHINTHEIRhPREFERREDvRANGE
Knowledge of water temperature is essential to the measurement of
dissolved oxygen, conductivity (salinity), pH, and many other water-
quality parameters. In limnological studies, water temperature as a
function of depth can be an important indicator. Industrial plants often
require data on water temperature for process use or heat-transmis-
sion calculations.
These are only a few of many reasons for measuring and recording
water temperature over the short or long term.
THE TEMPERATURE SENSOR
All models of the Multi-Parameter TROLL 9500 include a permanently
installed, factory-calibrated sensor for measuring solution tempera-
ture.
Do not try to remove the permanently installed
temperature sensor.
The MP TROLL 9500 temperature sensor is the Standard Platinum
Resistance Thermometer specified by the ITS-90 (International Tem-
perature Scale of 1990). A platinum resistance thermometer (PRT) is
a type of resistance temperature detector (RTD).
TIP: After a drop or shock, if the end of the temperature
sensor is slightly bent, it may be carefully bent by hand (no
tools, please!) back to its original alignment. Note that a
severe shock may affect the accuracy of the temperature sensor.

55
TROLL 9500 Operator’s Manual 0095110 rev. 007 01/09
ROLE OF THE SENSOR IN CALIBRATION
The temperature sensor has a primary function during calibration of
temperature-dependent water-quality parameters such as conductiv-
ity. When the calibration temperature is known, temperature compen-
sation can be provided during measurement of water-quality param-
eters. The temperature sensor also provides continuously updated
real-time measurements of solution temperature when profiling.
Ensure that the temperature sensor is immersed in at least one-half
inch of solution during calibration of all parameters. The fill line on the
Cal Cup serves as a guide to the recommended quantity of calibration
solution.
For best results, the water-quality sensors should be calibrated at the
same temperature that will be encountered in the field.
SOFTWARE FUNCTIONS
Conversion of resistance (measured by the PRT) to temperature is
automatic in the software. No user calibration is required.
The temperature channel is automatically included in tests so that
solution temperature is available to compensate water-quality data
from other channels.
Units
4EMPERATUREMAYBEDISPLAYEDINDEGREES#ELSIUS½#ORDEGREES
&AHRENHEIT½&
TIP: To change unit preferences: In Win-Situ, select
Preferences on the Options menu. In Pocket-Situ, select the
Home site, then tap Setup in the command bar.
REFERENCES
Eaton, A.D., L.S. Clesceri, E.W. Rice, and A.E. Greenberg, eds.,
Standard Methods for the Examination of Water and Wastewater,
21st edition, Washington, D.C.: American Public Health Associa-
tion, American Water Works Association, and Water Environment
Federation, 2005. Section 2550, Temperature.
EPA, Methods for Chemical Analysis of Water and Wastes,
EPA/600/4-79-020, revised March 1983. Method 170.1, Tempera-
ture, Thermometric. Approved at 40 CFR Part 136.
Mangum, B.W., and G.T. Furukawa, Guidelines for Realizing the ITS-
90, NIST Technical Note 1265, U.S. Department of Commerce,
1990.
Water on the Web (WOW). University of Minnesota project initially
funded by the National Science Foundation. On the web at wow.
nrri.umn.edu.
SECTION 8: MONITORING TEMPERATURE
56
Multi-Parameter
Water Quality TROLL®
TROLL 9500 Operator’s Manual 0095110 rev. 007 01/09
9 MONITORING BAROMETRIC PRESSURE
WHAT IS BAROMETRIC PRESSURE?
Barometric, or atmospheric, pressure is the force exerted by the
gases in the atmosphere everywhere on the surface of the earth.
Barometric pressure is greatest at or below sea level, and decreases
as altitude above sea level increases.
WHY MONITOR BAROMETRIC PRESSURE?
"AROMETRICPRESSUREINmUENCESTHEMEASUREMENTOFWATERLEVELSIN
water bodies that are open to the atmosphere. It also determines the
amount of atmospheric gases that can be dissolved in water; more
oxygen, for example, can be dissolved in water at higher barometric
PRESSURELOWERALTITUDE"AROMETRICPRESSUREADDITIONALLYINmUENCES
other water-quality parameters such as pH.
A logged record of barometric pressure data during a test can be used
to correct water level measurements made with an absolute pressure
SENSORTOFACTOROUTTHEEFFECTSOFBAROMETRICPRESSUREmUCTUATIONS
To measure barometric pressure, the probe must be vented
to the atmosphere. A submerged Multi-Parameter TROLL
on non-vented cable cannot accurately report barometric pressure.
If your MP TROLL 9500 is used with a non-vented backshell and/or
non-vented cable, a software correction can substitute for barometric
pressure venting. See the procedure in this section.
THE BAROMETRIC PRESSURE SENSOR
Most models of the Multi-Parameter TROLL 9500 include a per-
manent, factory-calibrated internal barometric pressure sensor. Its
primary function is in calibration and measurement of water-quality
parameters, such as dissolved oxygen, that are dependent upon baro-
METRICPRESSURE)TMAYALSOBEUSEDTOCOMPENSATEmUIDPRESSURE
measurements made with an absolute pressure sensor.
The sensor is automatically included in tests so that its value is avail-
able to compensate water-quality data from other channels.
Units
The following units are available for barometric pressure: Bars, mil-
liBars, inches of mercury (in. Hg or “ Hg), millimeters of mercury (mm
Hg), cm, pounds per square inch (psi)
TIP: To change unit preferences: In Win-Situ, select
Preferences on the Options menu. In Pocket-Situ, select the
Home site, then tap Setup in the command bar.
COLLECTING ACCURATE MEASUREMENTS WITHOUT
VENTED CABLE
Win-Situ and Pocket-Situ cannot determine whether the MP TROLL
9500 is on vented or non-vented cable. However, you can supply the
software with this information, and also enter a fixed barometric pres-
sure value to be used in the absence of cable venting.
Procedure:
1. Select the barometric channel in the Navigation tree.
2. Click or tap Edit.... The Edit Barometric Channel screen appears.
Several options are presented:
TIP: This screen can also be accessed during test setup and
dissolved oxygen calibration.
1
2
57
TROLL 9500 Operator’s Manual 0095110 rev. 007 01/09
Elevation Pressure
ft m in. Hg mm Hg PSI Bars
-1,000 -304.8 31.02 787.9 15.25 1.051
- 500 -152.4 30.47 773.8 14.94 1.030
0 0 29.92 760.0 14.70 1.013
500 152.4 29.38 746.4 14.43 0.995
1,000 304.8 28.86 732.9 14.18 0.977
1,500 457.2 28.33 719.7 13.90 0.958
2,000 609.6 27.82 706.6 13.67 0.942
2,500 762 27.31 693.8 13.41 0.924
3,000 914.4 26.81 681.1 13.19 0.909
3,500 1066.8 26.32 668.6 12.92 0.891
4,000 1219.2 25.84 656.3 12.70 0.875
4,500 1371.6 25.36 644.2 12.45 0.858
5,000 1524 24.89 632.3 12.23 0.843
5,500 1676.4 24.43 620.6 12.00 0.827
6,000 1828.9 23.98 609.0 11.77 0.811
6,500 1981.2 23.53 597.6 11.56 0.796
7,000 2133.6 23.09 586.4 11.34 0.781
7,500 2286 22.65 575.3 11.12 0.766
8,000 2438 22.22 564.4 10.90 0.751
8,500 2590.8 21.80 553.7 10.70 0.737
9,000 2743.2 21.38 543.2 10.50 0.723
9,500 2895.6 20.98 532.8 10.30 0.710
10,000 3048 20.58 522.6 10.10 0.696
10,500 3200.4 20.18 512.5 9.91 0.692
11,000 3352.8 19.79 502.6 9.73 0.670
11,500 3505.2 19.40 492.8 9.53 0.657
12,000 3657.6 19.03 483.3 9.35 0.644
12,500 3810 18.65 473.8 9.15 0.631
13,000 3962.4 18.29 464.5 8.97 0.618
13,500 4114.8 17.93 455.4 8.81 0.607
14,000 4267.2 17.57 446.4 8.63 0.595
14,500 4419.6 17.22 437.5 8.46 0.583
15,000 4572 16.88 428.8 8.28 0.571
15,500 4724.4 16.54 420.2 8.13 0.560
16,000 4876.8 16.21 411.8 7.96 0.549
16,500 5029.2 15.89 403.5 7.81 0.538
PRESSURE VS. ELEVATION
(based on U.S. Standard Atmosphere)
3. Do one of the following:
s )FTHIS-042/,,HASABAROMETRICPRESSURESENSORAND
vented cable, select “Use vented cable.” Go to step 5.
s )FTHEDEVICEISONnon-vented cable now and will take mea-
surements using non-vented cable, select “Use non-vented
cable or backshell.” Continue to step 4.
s )FTHE42/,,ISONvented cable now but will take measure-
ments on non-vented cable, select “Use non-vented cable
or backshell” and also check the last box so a reading can be
taken from the barometric pressure sensor while it is available.
4. Supply a barometric pressure value for the software to use in the
absence of vented cable. Choose one of these options:
s 3UPPLYAlXEDPRESSUREVALUEINYOURCHOICEOFUNITSSELECT
units by clicking the arrow on the list box). This value will be
used each time barometric pressure is required elsewhere in the
software—for example, when calibrating dissolved oxygen.
s %NTERYOURELEVATIONANDLETTHESOFTWARECALCULATEBAROMETRIC
pressure based on the values in the table on this page. Please
note that this fixed value will not be recalculated if the elevation
changes.
5. Click OK to store this information.
SECTION 9: MONITORING BAROMETRIC PRESSURE
bars 29.530 = inches of mercury
psi 2.036 = inches of mercury
atmosphere 101325 = Pascals
psi 6.894757 103 = Pascals
bars 14.50337 = psi
Conversions
3
5
4

58
Multi-Parameter
Water Quality TROLL®
TROLL 9500 Operator’s Manual 0095110 rev. 007 01/09
10 MONITORING WATER QUALITY: OVERVIEW
WHY MONITOR WATER QUALITY?
At a time of increasing demands on the finite natural resources of our
planet, public organizations and private individuals alike have become
acutely aware of the responsibility to maintain the quality of the earth’s
air and water supplies.
Recent rapid advances in knowledge and technology have made it
possible to deliver accurate, timely, and reliable data on processes
we cannot necessarily examine visually. New-generation sensors for
in-situ measurement of surface waters and groundwater can be an
efficient alternative to time- and labor-intensive programs of field sam-
pling and transportation to a laboratory for analysis, or can supple-
ment such programs. If it is possible to collect, interpret, and respond
in a timely fashion to accurate information about water supplies and
water quality, we can design better systems for protection of those
supplies.
Monitoring water-quality parameters can reveal much about the
presence and movement of natural and unnatural components of
water—the presence of harmful bacteria, potential pollution sources,
depletion of nutrient requirements for aquatic life, salt-water intrusion
into fresh water bodies, changes in water level or temperature that
can alert observers to the onset of an “event” that can adversely affect
the quality of the resource.
Monitoring water quality in surface and groundwater resources may
be required by Federal, state, or local regulations. Digital records of
monitoring can document compliance with guidelines and standards
mandated by regulatory bodies.
Profiling and logging water-quality data can provide timely information
on continually changing conditions—profiling to provide instantaneous
real-time feedback, logging to track trends and demonstrate compli-
ance.
THE SENSORS
The Multi-Parameter TROLL 9500 takes advantage of new technolo-
gies to monitor water-quality parameters in-situ with high accuracy.
Each sensor has been manufactured to our rigid specifications and is
designed to operate with the entire suite of sensors and with the MP
TROLL 9500 electronics. These “smart” sensors retain serial number
identification and calibration information, and are detected and identi-
fied by the instrument. A sensor may be calibrated in any MP TROLL
9500 and moved to another port that accepts the sensor type, or used
in another MP TROLL 9500, without recalibration. The most accurate
results will be obtained when a sensor is calibrated and operated in
the same MP TROLL 9500.
The water quality sensors available for the Multi-Parameter TROLL
9500 may be classed in two general types:
BASIC SENSOR SET
s P(
s #OMBINATIONP(/20/XIDATION2EDUCTION0OTENTIAL
s $ISSOLVED/XYGENPOLAROGRAPHIC$/
s #ONDUCTIVITYAND3PECIlC#ONDUCTANCE3ALINITY4OTAL
Dissolved Solids, Resistivity)
The pH sensor is a Single ISEs (ion-selective electrode). The Combi-
nation pH/ORP sensor is a Multiple ISE.
The Basic sensors can be factory-calibrated and pre-installed in the
MP TROLL 9500. They are ready for use right out of the box with a
brief Quick Cal. However, for best results, if your software supports
it, we recommend that you perform a traditional two-point calibration
for pH and DO, and a specific range calibration for conductivity as
described in sections 11-13 below. The accuracy that can be achieved
from the instrument is proportional to the time and care you put into
calibration.
59
TROLL 9500 Operator’s Manual 0095110 rev. 007 01/09
Q:
A:
Will a sensor work if installed in the wrong port?
Physically, a sensor may be plugged into any port. However,
a sensor that is detected in the wrong port for its type will
generate an error message in the software. The message
will let you know which port or ports the incorrectly installed
sensor should be moved to.
In this case, remove the offending sensor and install it in the
correct port. Then “refresh” the device view in the software
to update the display.
sensor
removal
tool
EXTENDED SENSOR SET
The Extended Sensor set includes:
s !MMONIUM
s #HLORIDE
s .ITRATE
s 4URBIDITYFACTORYINSTALLED
s 2$/® Optical Dissolved Oxygen
INSTALLING SENSORS
The diagram below represents a head-on view of the “sensor block”
in the front end of the MP TROLL 9500. There are four sensor ports,
plus permanently installed pressure and/or turbidity and temperature
sensors. Pressure and turbidity sensors are optional—if your instru-
ment does not include one or both of these sensors, there will be a
permanently installed plug in the port.
Do not try to remove the pressure or turbidity sensor or
permanently installed plug.
Although the sensor design permits any sensor to install into any
sensor port without damage to either the sensor or the instrument,
for proper functioning please insure that sensors are installed in their
intended ports, as shown in the diagram.
To install sensors:
1. Remove the restrictor or Cal Cup from the front end of the MP
TROLL 9500. This allows access to the sensor block shown below.
2. Remove the cap or storage bottle from the sensor. Retain the cap
or bottle for future storage and protection of the sensor. If the con-
nector end is covered with a cap, remove it also.
TIP: To ensure optimum membrane response for new ion-
selective electrodes (pH, ORP, nitrate, ammonium, chloride),
soak the sensor in calibration solution for at least 15 minutes
and up to several days before calibration.
3. Remove any moisture or dirt from the area around
the port where you will install the sensor, then use the
sensor removal tool to remove the plug from the port.
Retain the plug for use with fewer than 4 removable
sensors installed.
TIP: If you are installing a sensor in port 3 (the central port),
install it first. This will make it easier to install sensors in
other ports.
4. Remove any moisture or debris from the connector in the bottom of
the port with a clean swab or tissue.
5. Check lubrication of the sensor o-rings.
The sensor o-rings require generous lubrication before
installation. New sensors will be lubricated at the factory. If
the o-rings appear dry, apply a silicone lubricant before
installation.
6. Align the mark on the sensor with the alignment mark on the cor-
rect port (see diagram), or visually align the sensor connector pins
with the port connector pins.
7. Press the sensor firmly into the port until it is securely
seated. When properly inserted a small gap (width of
the sensor removal tool) remains between the instru-
ment body and the widest part of the sensor, for ease
of removal.
SECTION 10: MONITORING WATER QUALITY: OVERVIEW
sensor
insertion
tool
Conductivity
Pressure/Turbidity
(or plug)
Temperature
pH/ORP
or RDO
or pH
or ammonium
or chloride
or nitrate
RDO
or pH
or ammonium
or chloride
or nitrate
or turbidity wiper
End view of sensor block
alignment mark
D.O. (polarographic)
or ammonium
or chloride
or nitrate

60
TROLL 9500 Operator’s Manual 0095110 rev. 007 01/09
Q:
A:
What is the difference between NOMINAL and STABLE?
To meet the criteria for a valid calibration point, the change
(deviation) in sensor response is monitored over time. The
software is looking for the calibration solution temperature
and the sensor readings to settle over a specific time period.
The criteria for STABLE are designed to meet the published
specifications. The NOMINAL criteria are designed to
shorten the calibration time when an approximate calibration
is acceptable. When the deviation falls within the limits of
the “loosened” specifications, NOMINAL is displayed in the
Status area, and the Accept button becomes available to
store the current calibration point.
Accepting a NOMINAL value may save considerable time.
In some cases, especially if the sensors have been soaking
in the solution for several minutes prior to calibration, the
accuracy achieved by accepting a nominal value may be
very similar to that obtained by waiting for complete stability.
sensor
removal
tool
REMOVING SENSORS
Sensors may be removed for inspection, cleaning, routine mainte-
nance, and storage. Because the smart sensors retain calibration
information, they may be removed and re-installed—even in another
MP TROLL 9500— as often as necessary.
Remove a sensor by positioning the yoke of the sensor
removal tool at the point where the sensor enters the
sensor block. Firmly pry the sensor upward until it pops
out.
Sensor O-Rings
Two Viton® o-rings on each sensor provide a watertight seal against
water leakage into the instrument body. We recommend that you
inspect these o-rings each time you remove or install a sensor. Check
carefully for cracks, tears, splitting, shredding, and other damage. If
the o-rings are in good condition, apply silicone lubricant before in-
stalling the sensor again. Remove excess lubricant with a tissue, and
take care to keep grease away from the area around the connector at
the bottom of the sensor. Should lubricant get into this area, it can be
removed with a clean cotton swab.
If the o-rings become damaged to the extent that no longer provide an
effective seal, they should be replaced. Sensor o-rings and lubricant
are available from In-Situ Inc. or your distributor.
CALIBRATION OVERVIEW
The MP TROLL 9500 and its control software provide several options
for calibration of the water-quality sensors. Select the method that
suits the time you have at your disposal and the degree of accuracy
you want to achieve when measuring water-quality parameters.
Satisfactory results may be achieved using the Quick Cal procedure.
Some sensors can even return nominal results straight out of the box
using the factory-supplied default calibration coefficients. However,
for best results we recommend a full traditional calibration procedure
before the first field use, and periodic checks and recalibrations as
necessary thereafter.
4HEFOLLOWINGAVAILABLEOPTIONSAREBRIEmYDESCRIBEDINTHENEXTTWO
pages:
s 4RADITIONAL#ALIBRATION
s 1UICK#ALIBRATION
s /UTOF"OX
s &ACTORY$EFAULTS
TRADITIONAL CALIBRATION
A full traditional calibration, guided by software wizards, can achieve
the highest level of accuracy. Some sensors require a single-point
calibration, others present a choice of single- or multi-point, requir-
ing more than one calibration standard. A single-point calibration
gives good results in the range of values represented by the selected
calibration solution. When a wide range of values are expected, a
multi-point calibration is recommended.
With the sensor installed in the MP TROLL 9000 and immersed in
calibration solution, the sensor is powered at regular intervals and
its response is monitored. The difference (deviation) between the
minimum and maximum response over a predetermined time period
is tracked by the software. When the peaks of the response fall within
predetermined limits for the time period, the sensor response is
considered sufficiently stable to provide a valid calibration point. The
length of time and allowable deviation are specific to each sensor
type, and furthermore are specific to the determination of nominal
stability or complete stability. The time period of interest is shorter for
nominal stability than for complete stability, allowing for a shortening
of the calibration soak time while still returning a valid calibration point.
s !VAILABLEFOR!LLWATERQUALITYPARAMETERS
s 2EQUIREMENTS-042/,,SENSORSINSTALLED#AL#UP
and one or more calibration solutions for each parameter to be
calibrated. Suitable calibration solutions are supplied in In-Situ’s
individual calibration kits.
s 7HERETOlNDTHEMETHODINTHISMANUAL3ECTIONS
SECTION 10: MONITORING WATER QUALITY: OVERVIEW
61
TROLL 9500 Operator’s Manual 0095110 rev. 007 01/09
CALCUP
Base
QUICK CALIBRATION
A “Quick Cal” calibrates the Basic sensors simultaneously to achieve
adequate performance with minimal labor using a single “universal”
calibration solution.
s !VAILABLEFORP(/20POLAROGRAPHIC$ISSOLVED/XYGENAND
Conductivity.
s 2EQUIREMENTS-042/,,SENSORSINSTALLED#AL#UP
and Quick Cal solution.
s 7HERETOlNDTHEMETHODINTHISMANUAL3ECTION'ETTING
Started.
OUT OF THE BOX
Some sensors may be installed and used right out of the box using
factory-supplied default calibration coefficients.
s !VAILABLEFORP(/20AND#ONDUCTIVITY
s 2EQUIREMENTS-042/,,SENSORSINSTALLED
s 7HERETOlNDTHEMETHODINTHISMANUAL.OMETHODREQUIRED
plug-and-play.
DEFAULT COEFFICIENTS
This option resets the sensor’s factory defaults and is best when the
sensor is new.
s !VAILABLEFORP(/20AND4URBIDITY
s 7HERETOlNDTHEMETHODINTHISMANUAL3EEP(CALIBRATIONIN
Section 11, ORP calibration in Section 14, Turbidity calibration in
Section 18.
The cell constant for a conductivity sensor may be entered “by hand,”
without performing a complete calibration, if desired. See the proce-
dure in Section 12 below.
TIP: When using Pocket-Situ to perform calibrations, do not
let the PDA time out during the procedure. To locate this
setting in most PDAs, display the Start menu, select
Settings, System tab, Power.
PREPARING TO CALIBRATE
CALIBRATION KITS
Kits of calibration solutions for various parameters and ranges are
available from In-Situ Inc. Our calibration solutions are certified to
N.I.S.T. standards, packaged in quarts, each providing sufficient
mUIDFORATLEASTCALIBRATIONS+ITSINCLUDEDEIONIZEDWATERIFTHAT
substance is recommended for rinsing a particular sensor during
calibration.
The Quick Cal kit provides a convenient “universal” calibration solu-
tion, designed to calibrate multiple parameters simultaneously.
THE CALIBRATION CUP
The clear acrylic Cal Cup shipped with your MP TROLL 9500 is
used to hold solution during sensor calibration. When fitted with a
small moist sponge, it also provides a convenient way to protect and
hydrate the sensors of the MP TROLL 9500 between uses.
The base of the Cal Cup is removable so that the stirrer may be
attached for calibrations where continuous agitation of the solution is
recommended. A small hole in the threads of the base near the o-ring
permits venting during 100% dissolved oxygen calibration with the Cal
Cup and probe inverted.
The Cal Cup’s fill lines indicate the recommended amount of
solution for most calibrations, and ensures the temperature
sensor is immersed.
s 7ITHAFULLCOMPLEMENTOFSENSORSINSTALLEDUSETHE
lower line as a guide.
s 7ITHONLYORREMOVABLESENSORSINSTALLEDlLLTOTHE
upper line.
The temperature sensor should always be immersed in at
LEASTONEHALFINCHOFmUID
When attaching the Cal Cup to the front end of the MP TROLL 9500,
align carefully and thread the Cal Cup onto the body until seated
against the o-ring, then back off slightly to avoid overtightening.
When attaching the Cal Cup to the instrument body, be
careful not to overtighten.
SECTION 10: MONITORING WATER QUALITY: OVERVIEW
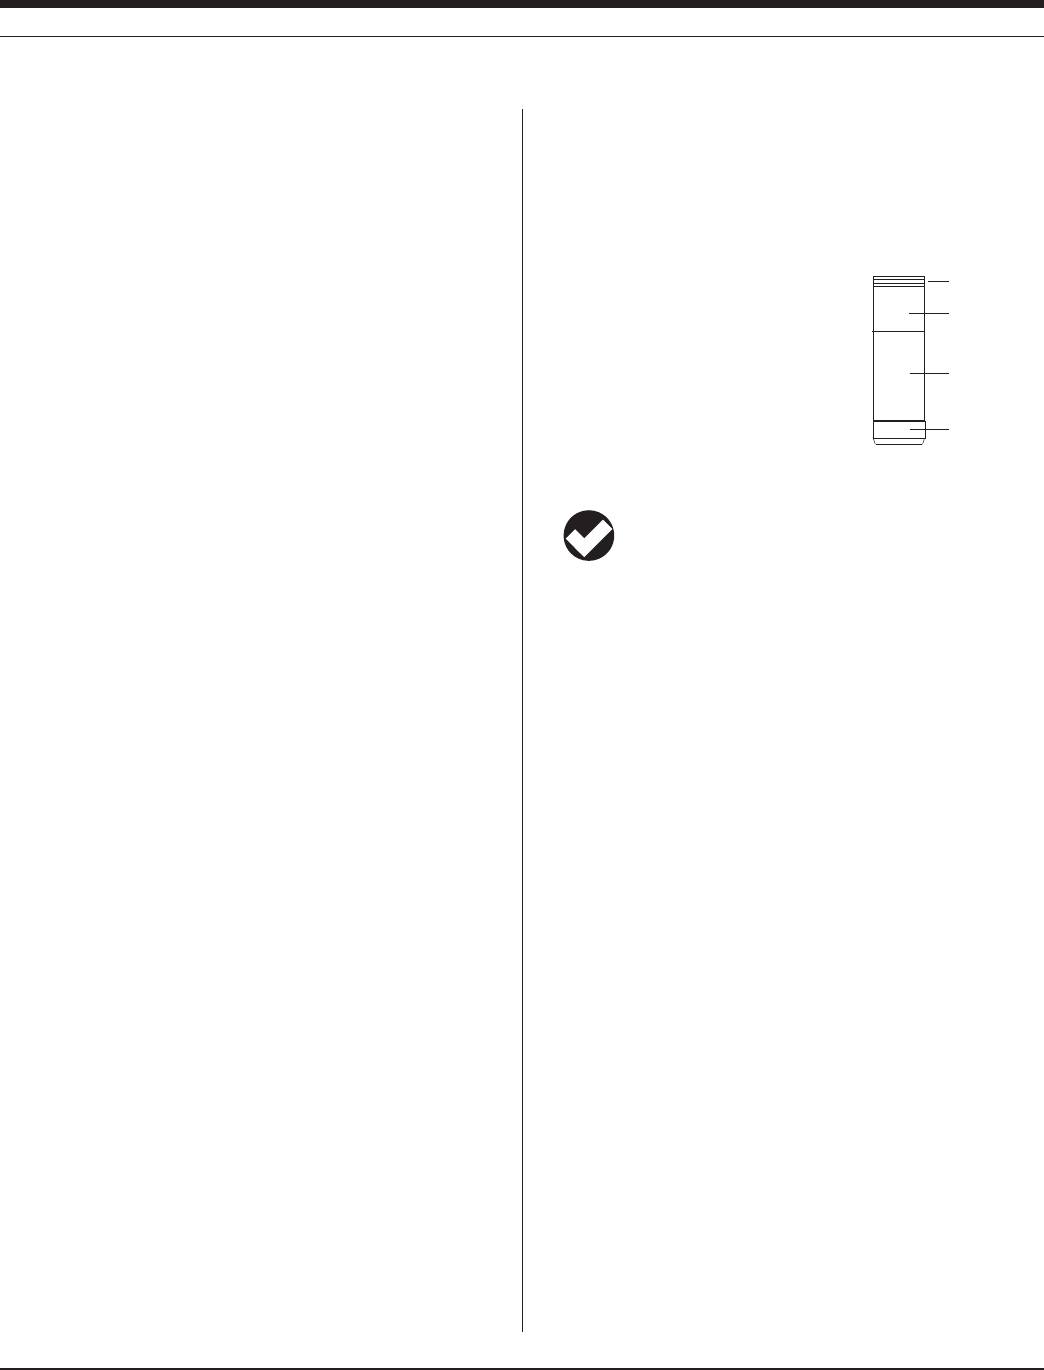
62
TROLL 9500 Operator’s Manual 0095110 rev. 007 01/09
Stirrer
Propeller
compartment
Battery com-
partment
Motor com-
partment
End cap
jl
off on
EFFECT OF TEMPERATURE ON CALIBRATION
The most successful calibrations reproduce field conditions as nearly
as possible, especially temperature. It is best to calibrate at the
expected field temperature.
RINSING
As a general guideline, we recommend you rinse the Cal Cup, the
front end of the MP TROLL 9500, and the installed sensors prior to
beginning calibration. This will remove trace contaminants or solutions
used in previous calibrations, and prepare the instrument for a clean
calibration.
A good way to do this is to fill the Cal Cup with water, attach to the
instrument, and shake vigorously. This may need to be done a couple
of times.
Rinse first in tap water, followed by a rinse with distilled or deionized
water.
Shake or wipe with a clean lint-free tissue to dry. It is not necessary to
dry thoroughly.
Some calibration procedures also recommend a rinse in the selected
calibration solution. In this case, drying is not necessary.
STIRRING
When to Stir?
The stirrer accessory should be used during a calibration procedure
if it will also be used during field use—for example, if the instrument
will be in stagnant or very slowly moving water. The more closely
CALIBRATIONCONDITIONSREmECTlELDCONDITIONSTHEMORESUCCESSFULTHE
calibration. This is especially important when calibrating the ISE sen-
sors (ammonium, chloride, and nitrate).
ISE sensors in close proximity to each other can sometimes create
interferences. Constant stirring can enhance the performance of the
ISE sensors.
Attaching the Stirrer for Calibration
To use the battery-powered stirrer for calibration, attach it to the MP
TROLL 9500 and Cal Cup as follows. See illustration C on the follow-
ing page.
1. Remove the restrictor (nose cone attached) from the MP TROLL
9500 and set it aside.
2. Remove the black end cap from the Cal Cup.
3. Screw the top of the stirrer (propeller end) to the bottom of the Cal
Cup (the end from which you just removed the end cap).
4. Fill Cal Cup to fill line with solution.
5. Attach Cal Cup/stirrer assembly to front end of MP TROLL 9500.
Starting the Stirrer
The stirrer is powered by two alkaline D-
cells (installed). To start the motor, tighten
the end cap.
The magnetic stir bar in the propeller
compartment will start to spin. The stir bar
is protected by a guard plate that may be
removed for cleaning if necessary.
TIP: Should the stir bar not start spinning, try giving it a
gentle nudge by sliding a narrow tool such as a screwdriver
or key between the protective bars of the guard plate.
To turn the stirrer off, back off the end cap until the stir bar stops spin-
ning.
CALIBRATION PROCEDURES
Refer to the following sections for specific calibration procedures and
guidelines:
Quick Cal Section 3
pH Section 11
Conductivity Section 12
Dissolved Oxygen (polarographic) Section 13, first half
Dissolved Oxygen (optical) Section 13, second half
ORP Section 14
Ammonium Section 15
Chloride Section 16
Nitrate Section 17
Turbidity Section 18
AFTER CALIBRATION
When you finish calibrating with any method, the following happens:
s 4HENEWLYCALCULATEDCALIBRATIONCOEFlCIENTSAREWRITTENTOTHE
“smart sensor” memory.
s 9OUHAVETHEOPTIONOFVIEWINGTHECALIBRATIONREPORT4HEREPORT
may be viewed immediately after calibration, or at any time. See
Calibration History, below.
s 4HESENSORSAREREADYTOTAKEMEASUREMENTS
SECTION 10: MONITORING WATER QUALITY: OVERVIEW
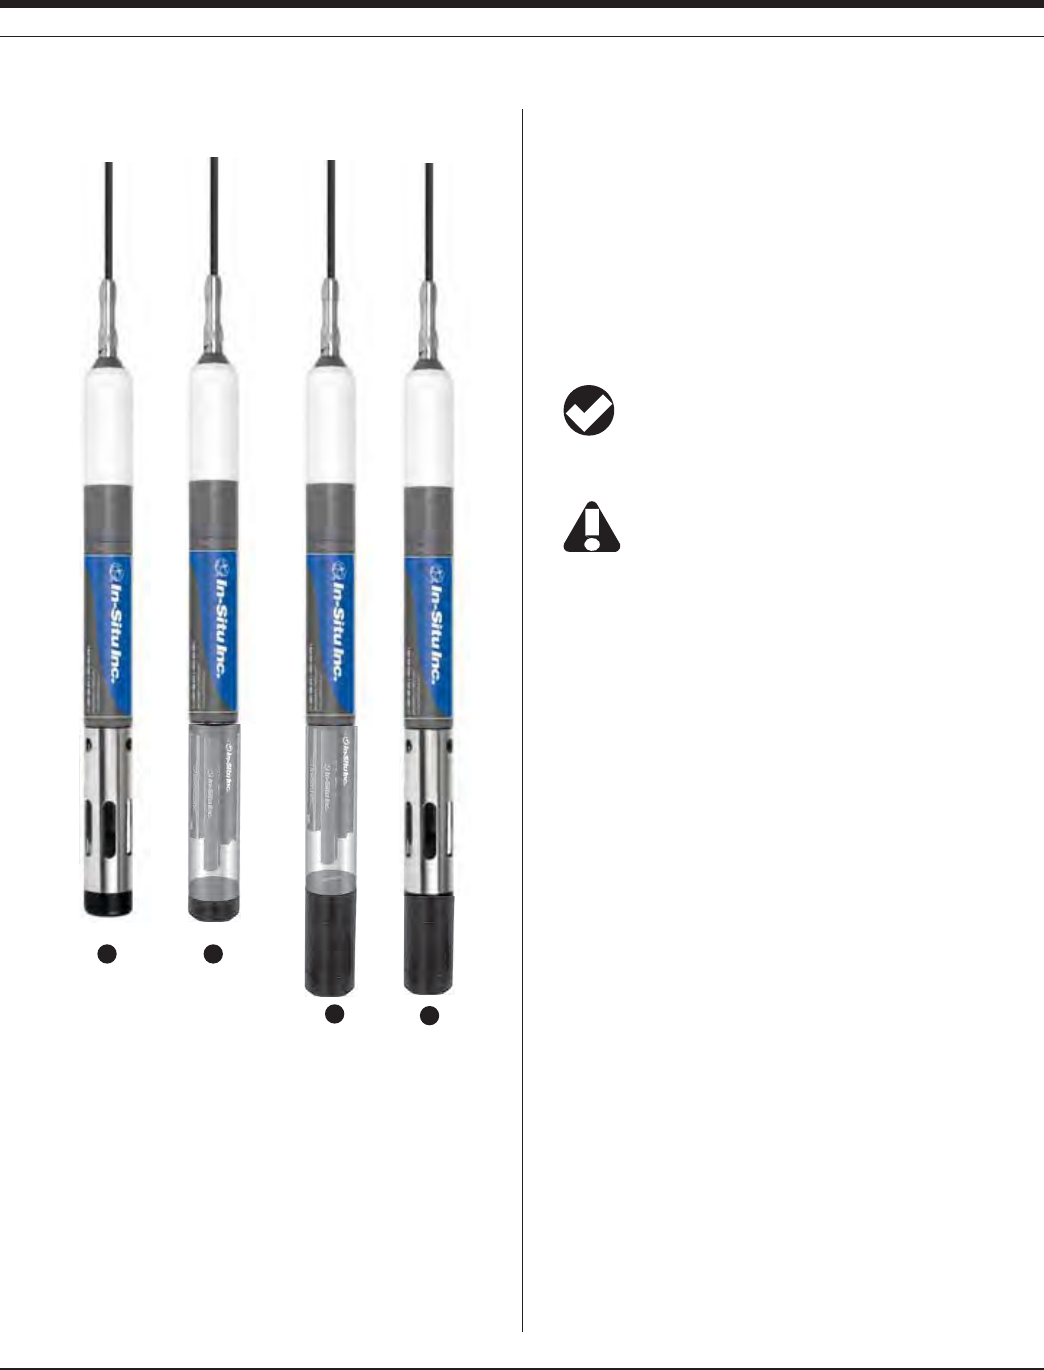
63
TROLL 9500 Operator’s Manual 0095110 rev. 007 01/09
MP TROLL 9500
A. with restrictor and nose cone
B. with Cal Cup in place of restrictor and nose cone
C. with Cal Cup and stirrer, for stirring calibrations
D. with Restrictor and stirrer, for monitoring water quality in
stagnant water
SENSOR STORAGE
It is best to calibrate just before field use. However, should you need
to store calibrated sensors, there are a couple of options:
s )FTHEINSTRUMENTWILLBEUSEDINADAYORSOLEAVETHESENSORSIN-
stalled. Remove the Cal Cup and rinse it and the sensors. Moisten
a sponge and place it in the bottom, or add a little water (deionized,
distilled, or tap) to the Cal Cup—just enough to create a moist
environment. Return the probe to the Cal Cup for transport to the
field site.
TIP: Deionized water is preferred over tap water, but it is not
essential; especially if the local tap water is of good quality.
To seal the Cal Cup against leakage, seat it lightly against
the o-ring on the instrument body. It is best not to over-
tighten.
s &ORLONGERSTORAGEREMOVETHESENSORSFROMTHE-042/,,
Store the conductivity sensor dry. Store the DO, pH, and pH/ORP
sensors in their storage bottles (located in the sensor kits): DO in
clean water, pH and pH/ORP in the solution they were shipped in,
or with a moist sponge in the sensor storage bottle to avoid deplet-
ing the reference solution.
CALIBRATION HISTORY
Each time a sensor is calibrated, the information is written to the
sensor, where it is stored until the next calibration. Details on the most
recent calibration are displayed by the software when a parameter is
selected in the Navigation tree.
The software also creates a calibration report in html format each time
a sensor is calibrated. A separate report is created for every calibra-
tion of every parameter—even for a calibration that was cancelled.
You have the option to view the report immediately after calibration.
Reports are stored for later retrieval and reference in a folder named
“Calibration Reports” in the folder where Win-Situ 4 or Pocket-Situ
4 is installed. Reports include a detailed record of date and time,
parameter, calibration type, number of calibration points, stimulus and
response, and calculated coefficients. An index in html format is also
created and updated each time a calibration is performed.
SECTION 10: MONITORING WATER QUALITY: OVERVIEW
D
C
BA
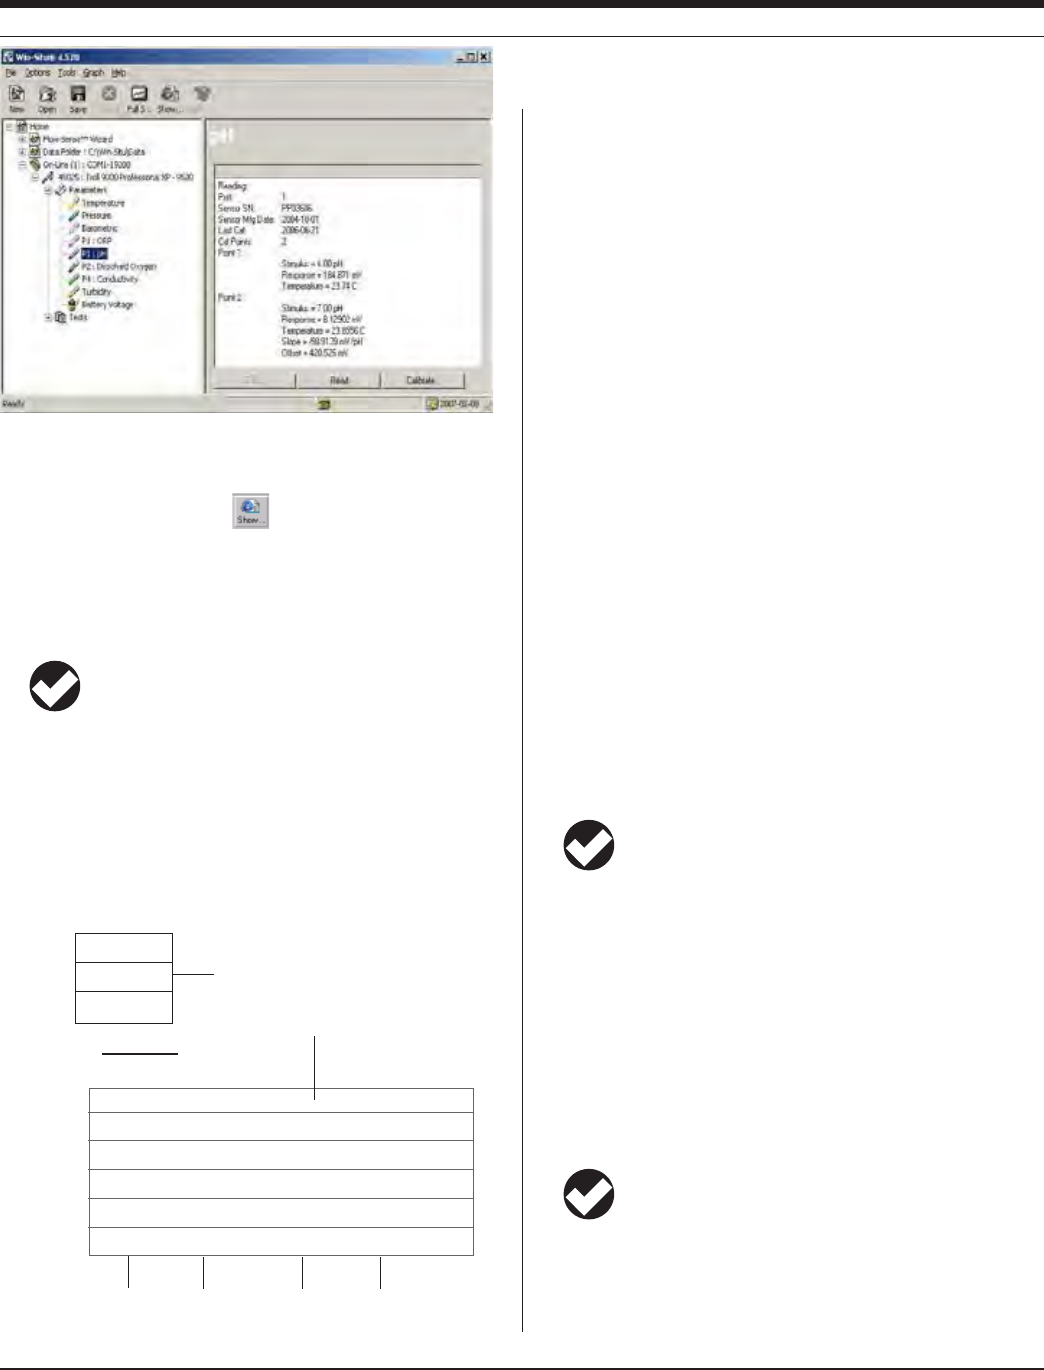
64
TROLL 9500 Operator’s Manual 0095110 rev. 007 01/09
SN32072
Files:
File Name
SN32072 2006-04-17 171530 TURB.html
SN32072 2006-06-18 102309 DO.html
SN32072 2006-08-14 134200 QuickCal.html
SN32072 2006-11-25 121530 PH.html
SN32072 2007-01-11 154322 Cond.html
Folders:
Folder
SN32072
SN45025
Example of a calibration report index
Click a folder to see its listings
Click a tile to open it
MP TROLL 9500
serial number
Cal Date Cal Time
(hhmmss)
Parameter
The calibration reports are accessible from the Tools Menu and the
Show Calibration Report button on the toolbar. They may also
be accessed like other files through Windows Explorer (desktop PC)
or File Explorer (PDA); they are not displayed in the Data Folder. They
may be viewed or printed to provide a complete calibration history.
TIP: Here’s how to find the calibration report indexes:
Desktop or laptop PC—Calibration Reports subfolder in the folder
where Win-Situ 4 is installed
PDA—Calibration Reports subfolder in the folder where Pocket-Situ
4 is installed
HOW OFTEN TO CALIBRATE
No sensor will remain in calibration forever. The calibration frequency
is almost completely determined by the chemical properties of the
mUIDBEINGMONITOREDANDTHEACCURACYYOUWISHTOACHIEVEFROM
the instrument. For example, when used in relatively clean water, in
a normal pH range, at a relatively stable temperature, some sensors
could remain in calibration for a couple of weeks or longer. On the
other hand, in surface water with a high nutrient content and wide
TEMPERATUREmUCTUATIONSTHESENSORSMAYNEEDTOBECLEANEDAND
recalibrated every few days. Your own measurement results are the
best guide to the need to recalibrate.
When a sensor or instrument is new, we recommend checking the
readings often (say, once a day) to get an idea of the stability of the
sensor.
#HANGESINmOWALSOAFFECTREADINGS#ONSTANTmOWWILLINCREASETHE
accuracy. This can be achieved with the stirring accessory.
The table below may be used as a very general guideline to how long
sensors may be expected to remain in calibration under optimum
conditions:
pH, ORP 1-2 months
Conductivity 2-3 months
D.O. (polarographic) 2-4 weeks
D.O. (optical, RDO) up to a year if foil is not damaged
ISEs 1 day
TIP: For additional information on calibration schedules, see
the Technical Note on Instrument Calibration in the
Downloads section at www.in-situ.com.
HOW TO CHECK IF A SENSOR IS STILL IN CALIBRATION
Immerse the sensor in a calibration standard of known value and at
the same temperature as the original calibration. Compare the sensor
reading to the solution value. Some drift is to be expected, but gener-
ally the readings should fall within the sensor’s accuracy specification.
If readings fall outside the accuracy specification by an amount that
is not acceptable for your current application, recalibration is recom-
mended. You will quickly learn by experience how often you need to
recalibrate a given sensor based on usage.
TIP: Quick Cal solution may be used for a quick check of
pH, ORP, and conductivity. Refer to the values printed on the
label.
SECTION 10: MONITORING WATER QUALITY: OVERVIEW
When you select the sensor . . .
. . . information
on the last
calibration is
shown
pH calibration information for a combination pH/ORP sensor in port 1
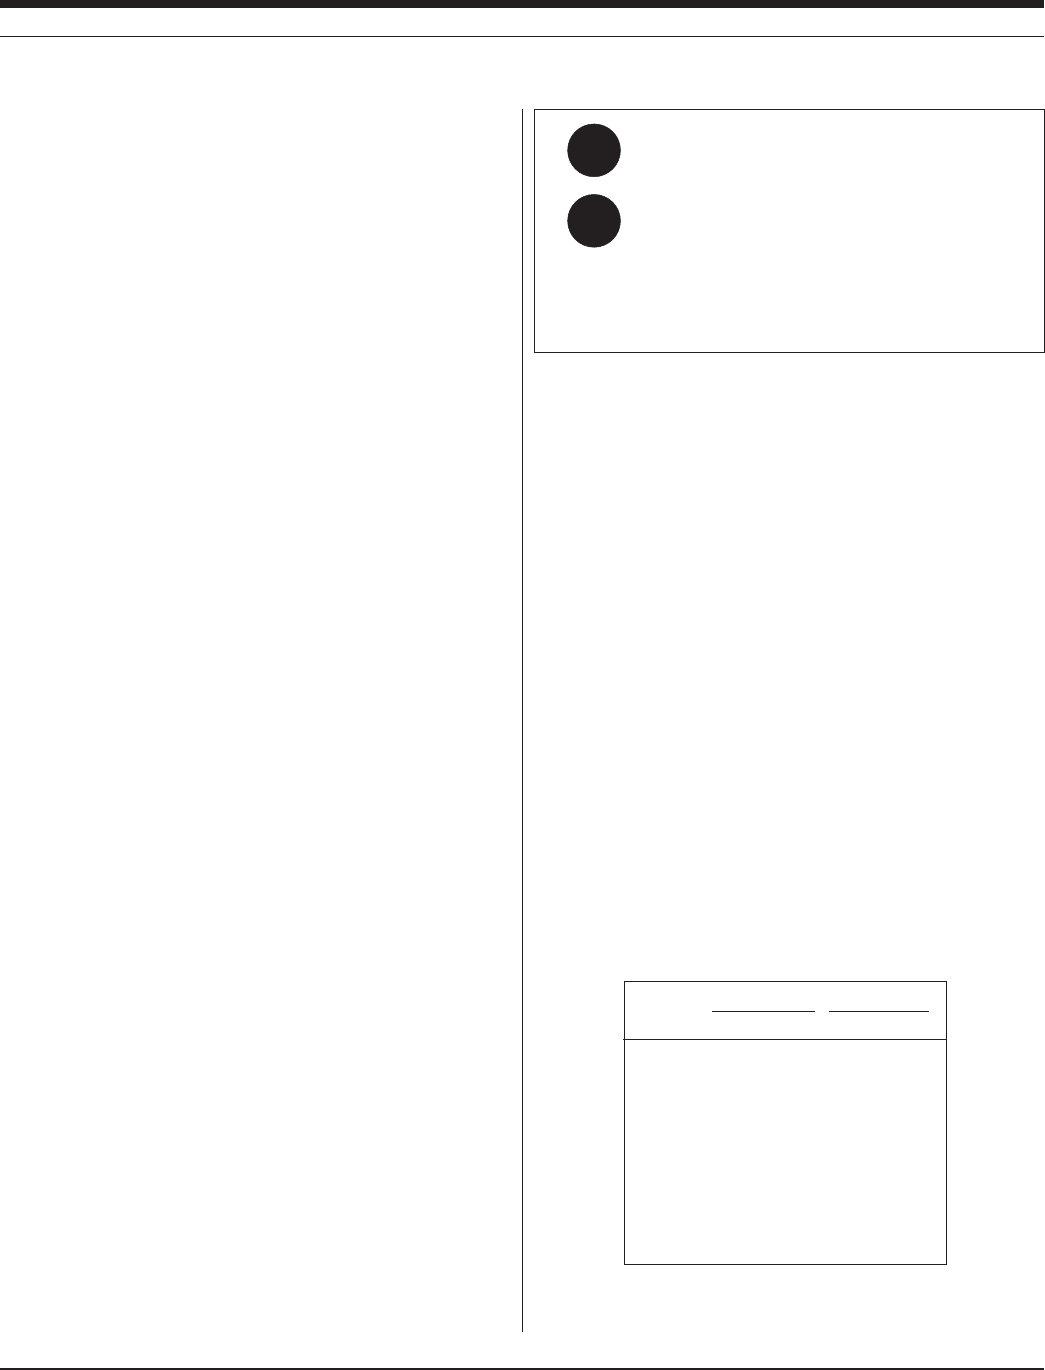
65
TROLL 9500 Operator’s Manual 0095110 rev. 007 01/09
WHEN TO REPLACE A SENSOR
After a certain amount of use even a complete recalibration will not
be able to accurately calculate calibration coefficients. The slope will
gradually become lower and lower. At this point the sensor should be
replaced. Specific slope guidelines for individual sensors are given in
the individual parameter sections below.
USING A STIRRER
In-Situ’s stirrer accessory provides continuous sample circulation or
agitation, which can improve the performance of water-quality sensors
in a number of applications.
Dissolved oxygen (DO) measurements drop in very stagnant water
due to depletion of oxygen next to the membrane. A slight perturbation
to the system will cause the DO measurements to return to normal.
Stirring is recommended if the instrument is anchored to a fixed struc-
ture in stagnant conditions—for example, attached to a pier in a calm
lake that has no underwater currents. If the wind is blowing and waves
are slightly moving the cable, then stirring is probably not necessary.
ISE sensors in close proximity to each other can sometimes create
interferences. Constant stirring can enhance the performance of the
ISE sensors.
Sample agitation can also help to improve sensor response time
when water-quality conditions are subject to change (e.g., in a moving
contaminant plume) and can speed up temperature stabilization.
Attaching the Stirrer for Field Use
The stirrer accessory is easily installed on the MP TROLL 9000. See
illustration D earlier in this section.
1. Remove the nose cone from the MP TROLL 9500. Leave the
restrictor attached to the instrument.
2. Screw the top of the stirrer (propeller end) to the stainless steel
restrictor in place of the nose cone.
3. Start the stirrer; see Starting the Stirrer earlier in this section.
The instrument is ready for use in stagnant water.
SECTION 10: MONITORING WATER QUALITY: OVERVIEW
Q:
A:
How can I find the serial number of a water quality sen-
sor—pH for example?
The software can display the sensor serial number. Do this:
1 Select pH in the Navigation tree
2 Look at the information displayed The serial number is
displayed in the Information pane on the right side of the
screen (or at the bottom on a PDA)
REFERENCES
Eaton, A.D., L.S. Clesceri, E.W. Rice, and A.E. Greenberg, eds.,
Standard Methods for the Examination of Water and Wastewater,
21st edition, Washington, D.C.: American Public Health Associa-
tion, American Water Works Association, and Water Environment
Federation, 2005.
A Fish Farmer’s Guide to Understanding Water Quality. LaDon
Swann, Dept. of Animal Sciences, Illinois-Indiana Sea Grant
Program, Purdue University. On the web at AquaNIC (Aquaculture
Network Information Center), aquanic.org.
Rundle, Chris C., A Beginners Guide to Ion-Selective Electrode
Measurements. Nico2000 Ltd., London, UK. On the web at www.
nico2000.net
Water on the Web (WOW). University of Minnesota project initially
funded by the National Science Foundation. On the web at wow.
nrri.umn.edu
Pressure Rating Usable Depth
Sensor PSI Meters Feet
pH 300 210 692
pH/ORP 300 210 692
Conductivity 350 246 807
$/POLAROGRAPHIC
Turbidity 350 246 807
Wiper 350 246 807
Chloride 100 70 231
Ammonium 20 14 46
Nitrate 20 14 46
RDO exceeds rating of the TROLL 9500
Water Quality Sensor Pressure Ratings
* Submersion and retrieval at up to 4 feet per second.

66
Multi-Parameter
Water Quality TROLL®
0095110 rev. 007 01/09
TROLL 9500 Operator’s Manual
11 pH
WHAT IS pH?
The term pH is derived from “p” meaning power and “H” for the ele-
ment hydrogen and literally means “power of hydrogen.” pH is defined
as the negative logarithm of the hydrogen ion activity (or concentra-
tion in moles/liter):
pH = - log [ H+] or [H+] = 10-pH
Water (H2O) dissociates into hydrogen ions (H+) and hydroxide ions
(OH–INAQUEOUSSOLUTION!T½#THEREAREX–7 moles/L of
hydrogen ions and 1.0 x 10⁻⁷ moles/L of hydroxide ions in pure water.
Thus the water is neutral (pH = 7) because there are equal amounts
of each ion. Addition of a substance with hydrogen or hydroxide ions
will shift the balance and cause the water to become either acidic or
basic.
The pH scale ranges from 0 (most acidic) to 14 (most basic or least
acidic). A change of 1 pH unit corresponds to a tenfold change in
hydrogen ion concentration.
WHY MEASURE pH?
A pH value indicates the amount of hydrogen ion that is present in an
aqueous environment. The hydrogen ion concentration gives an indi-
cation of the acidity of a substance. pH is an important measurement
in natural waters because most chemical and biochemical processes
are pH dependent. The physiological chemistry of most living organ-
isms can tolerate only small changes in pH and still provide the chemi-
cal reactions that sustain life. The solubility of many chemicals is pH
dependent. Thus, pH determines their availability to living organisms.
Natural waters usually have pH values in the range of 4 to 9. Most
natural waters are slightly basic (~ pH 8) because of the presence of
carbonates (CO3
2–) and bicarbonates (HCO3
–). Extremely fresh water
can even be slightly acidic (~ pH 6), depending on the concentration
of dissolved carbon dioxide (CO2). The carbon dioxide combines with
water to form a small amount of carbonic acid (H2CO3) and this pro-
cess lowers the pH. Nitrogen oxides (NOx) and sulfur dioxides (SO2)
from automobile exhaust and the burning of coal combine with water
in the atmosphere to form nitric (HNO3) and sulfuric acid (H2SO4).
This falls to the ground as acid rain and accumulates in surface water.
Runoff from mining spoils and the decomposition of plant materials
can also cause acidic surface water.
pH values below 5 in natural waters are generally considered to be
too acidic. Freshwater fish seem to do well in the pH range of 6 to 9.
Acidic drinking water is a concern because of its corrosive character-
istics to plumbing and appliances. pH also affects the ammonia/am-
monium (NH3/NH4
+) equilibrium in water. Even a small amount of
ammonia is detrimental to fish while a moderate amount of ammo-
nium is tolerated. At a pH of 6.5 almost all ammonia is in the form of
ammonium. However, as the pH becomes slightly basic, ammonium is
changed into harmful ammonia. The lethal dose of ammonia for trout
is only 0.2 mg/L.
THE pH SENSOR
pH electrodes use a potentiometric method to measure the pH of
a solution. The pH sensor consists of a pH-sensitive glass whose
voltage is proportional to the hydrogen ion concentration. A second
sensor (electrode) serves as a reference, which supplies a constant
stable output. Electrical contact is made with the solution using a
saturated potassium chloride (KCl) solution. The electrode behavior is
described by the Nernst equation:
Em = Eo + (2.3 RT/nF) log [H+]
where
E
m is the potential from the pH electrode,
Fluid pH units
Acid rain < 5
Distilled water 5.6
Most natural waters 8
Safe for freshwater fish 6-9
Properly chlorinated
swimming pool 7.2 - 7.6
Typical pH values
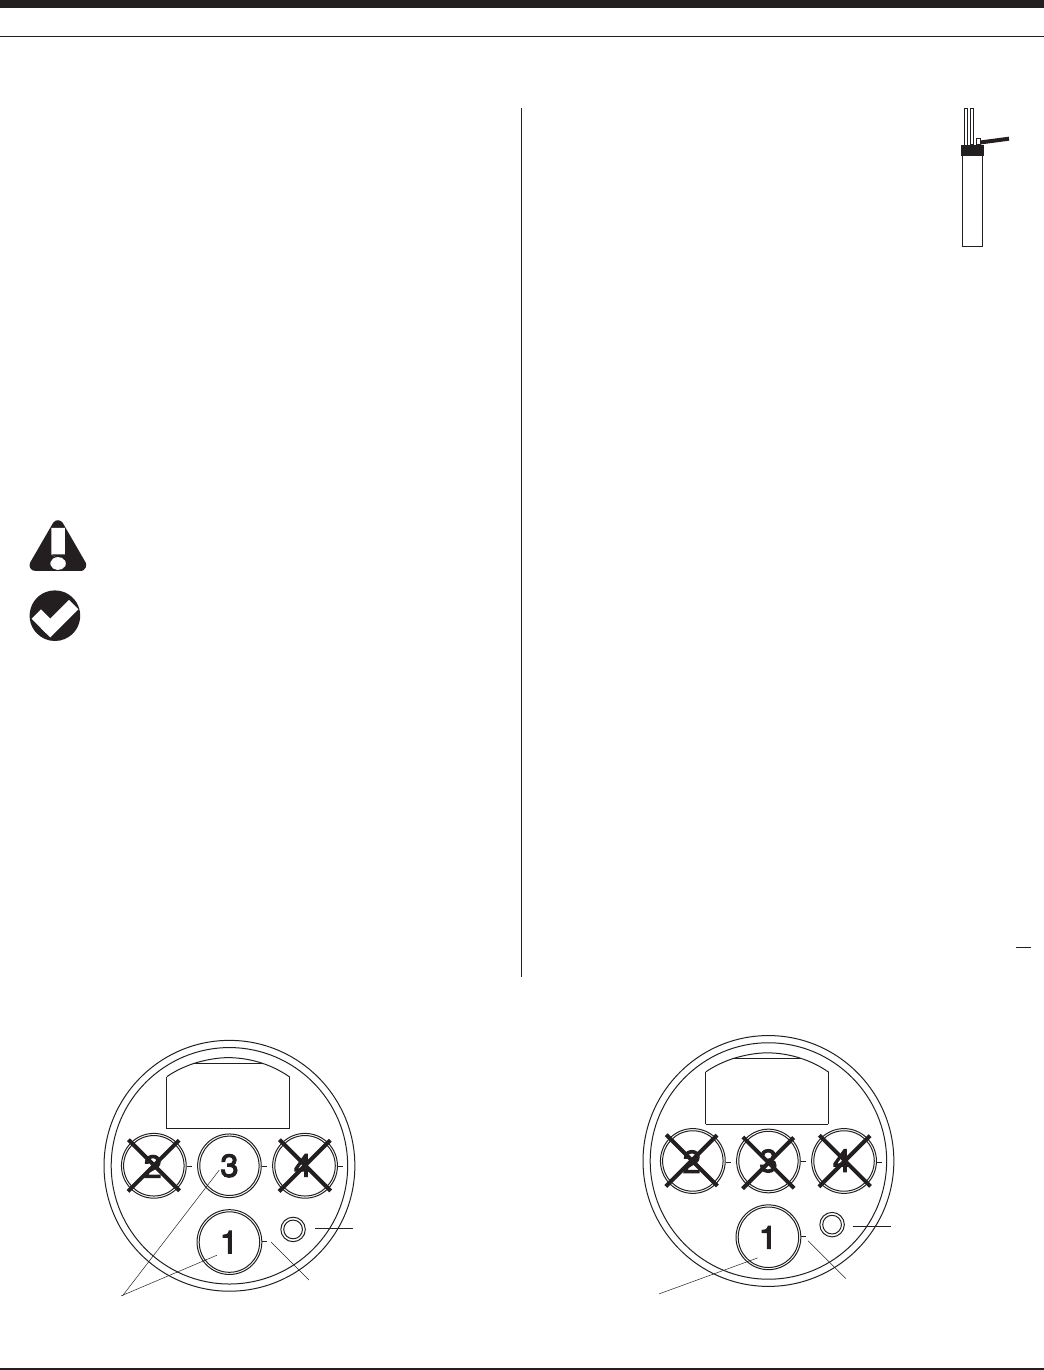
67
TROLL 9500 Operator’s Manual 0095110 rev. 007 01/09
sensor
removal
tool
E
o is related to the potential of the reference electrode,
R is the Gas Law constant,
F is Faraday’s constant,
T is the temperature in Kelvin,
n is the ionic charge (+1 for Hydrogen), and
[H+] is the hydrogen ion concentration in moles/L.
The MP TROLL 9500 reads the signal from the pH electrode, the
reference electrode, and the temperature and then calculates the pH
using the Nernst equation.
SENSOR INSTALLATION
The MP TROLL 9500 may be shipped with a pH or combination pH/
ORP sensor installed. If installation is necessary, unpack and install
the sensor in the MP TROLL 9500 as follows.
A combination pH/ORP sensor will work properly only in
port 1. A pH sensor may be installed in port 1 or 3.
TIP: To ensure optimum response for a new or previously
stored sensor, rinse off the soaking solution, then soak the
sensor in clean water for at least 15 minutes before calibrating.
1. Remove the restrictor or Cal Cup from the front end of the MP
TROLL 9500. This allows access to the sensor block shown below.
2. Remove the sensor hydration bottle and set aside for future use.
3. Rinse the sensor in clean water to remove the soaking solution.
Soak the sensor in clean water for at least 15 minutes before
calibrating.
4. Remove any moisture or dirt from the area around
the port where you will install the sensor, then use the
sensor removal tool to remove the plug from the port.
Retain the plug for future use.
5. Remove any moisture or dirt from the port connector
with a clean swab or tissue.
6. Remove the cap from the sensor connector. Check lubrication of
the o-rings. If they appear dry, apply a silicone lubricant before
installation.
7.
Visually align the sensor connector pins with the port connector pins.
8. Press the sensor into the port until you feel it dock with the port con-
nector. When properly inserted a small gap (the width of the sensor
removal tool) remains between the instrument body and the widest
part of the sensor, for ease of removal.
CALIBRATION
OVERVIEW
Several options are available for pH calibration.
s Quick Cal: Calibrates all basic sensors (pH, ORP, polarographic
D.O., conductivity) at the same time with one convenient solution. A
one-point calibration in pH 7; default slope, calculated offset.
s Traditional calibration–1 point: requires a single solution; results
in calculation of sensor offset for a single pH value (pH 4, 7, or
10). Select a calibration solution for the region of the pH range you
expect to measure. A one-point calibration may be used with good
results when the sensor is new.
s Traditional calibration–2 point: requires two solutions; results in
calculation of sensor slope and offset for one pH range (pH 4-7 or
pH 7-10). Choose solutions that bracket the expected pH range:
SECTION 11: PH
Pressure/Turbidity
(or plug)
Temperature
Install a pH/ORP
sensor in port 1
alignment mark
pH/ORP Sensor Position
Pressure/Turbidity
(or plug)
Temperature
Install a pH sensor in
port 1 or port 3
alignment mark
pH Sensor Positions
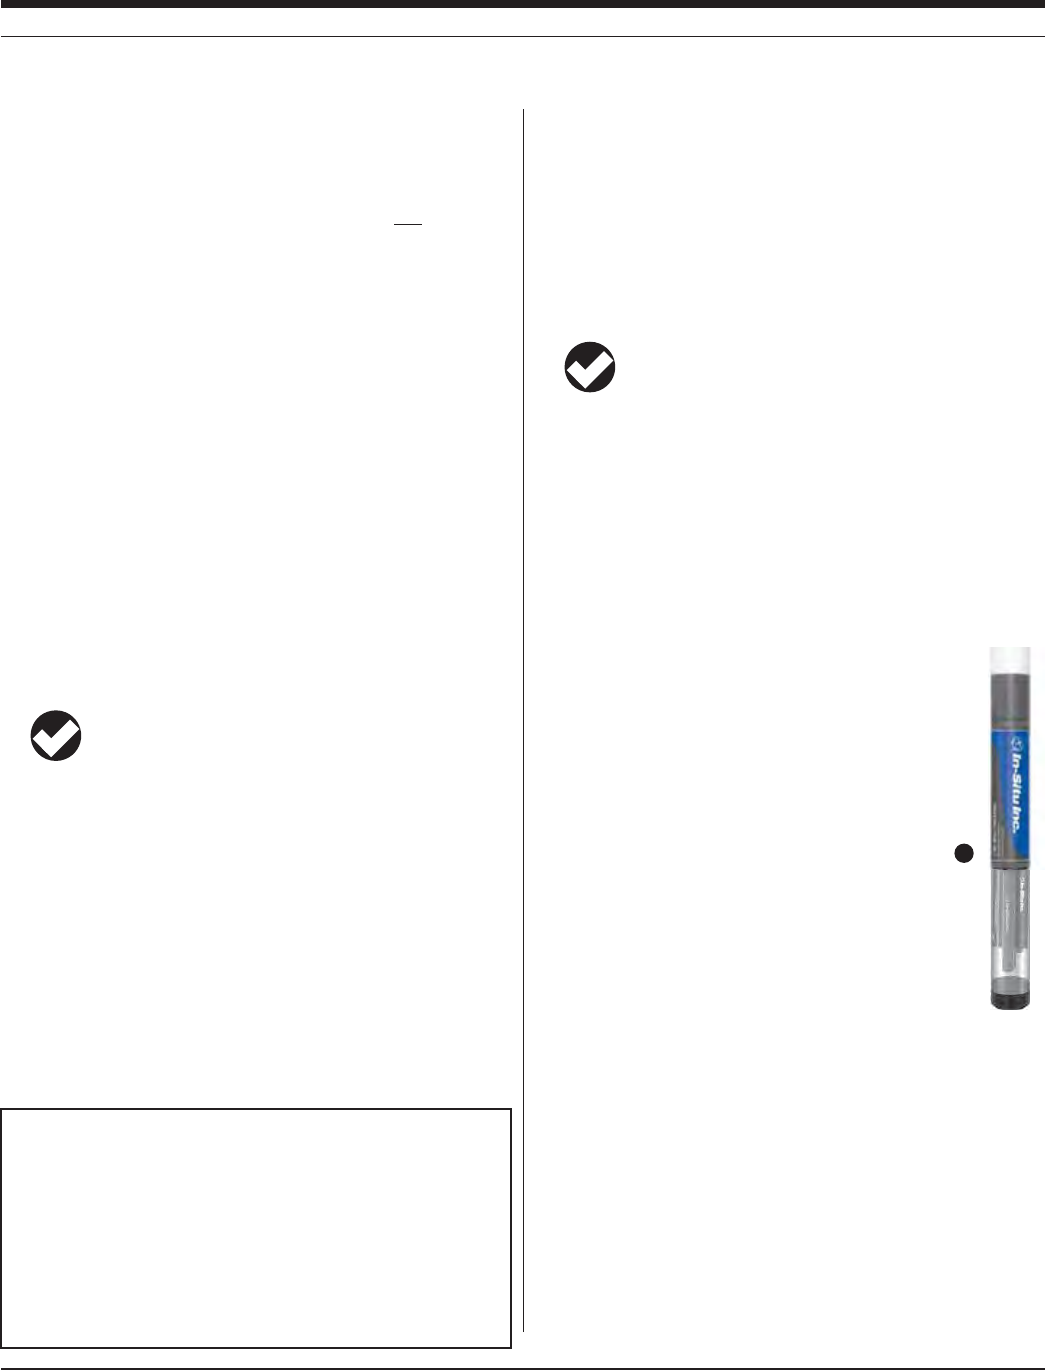
68
TROLL 9500 Operator’s Manual 0095110 rev. 007 01/09
s ANDP(BUFFERSOLUTIONSFORNEUTRALTOACIDICCONDITIONS
s ANDP(BUFFERSOLUTIONSFORNEUTRALTOBASICCONDITIONS
s Traditional calibration–3 point: requires three solutions; results in
calculation of slope and offset for 2 ranges (pH 4-7 and pH 7-10).
The correct slope for the pH values being monitored will automati-
cally be applied. A 3-point calibration is useful when the pH range
OFTHEENVIRONMENTALmUIDISCOMPLETELYUNKNOWN
s Resets the sensor’s factory defaults. No solutions are required.
Nominal vs. Stable
To shorten the calibration time, you have the option to accept the
calibration when “Nominal” stability conditions are achieved. If the
early value is accepted, the calibration point will be designated “USER
SET” in the calibration report. If the calibration report indicates that
calibration was performed through to stability then the instrument will
operate as intended by In-Situ’s quality standards.
CALIBRATION SOLUTIONS
Calibration solutions certified to N.I.S.T. standards are supplied in the
In-Situ pH Calibration Kit: pH 4, pH 7, pH 10 buffer, and deionized
water. Catalog No. 0032080. Solutions are also available separately.
TIP: Most solutions are usable beyond their stated expiration
date, depending on storage conditions; however, the results
cannot be guaranteed.
Primary standard buffer salts are available from the National Bureau
of Standards, and may be used in situations where extreme accuracy
is required. Commercially available pH buffers may be used.
RECOMMENDED CALIBRATION FREQUENCY
Calibration frequency will depend on the nature of the sample and the
degree of accuracy required. In clean water samples, the pH sensor
should retain its accuracy for 2-6 weeks before requiring recalibration.
Recalibrate the sensor—
s AFTERREPLACINGTHEREFERENCEJUNCTIONANDORTHElLLINGSOLUTION
s DURINGROUTINESCHEDULEDMAINTENANCE
s EVERYWEEKSINTHEABSENCEOFOTHERINDICATIONS
pH QUICK CAL
The procedure to Quick Cal the pH sensor (a 1-point calibration at pH
7), along with other sensors in the Basic Sensor Set, may be found in
Section 3, Getting Started.
To perform a more accurate traditional calibration, follow the proce-
dure below.
TIP: The pH calibration procedure is the same for pH
sensors and pH/ORP sensors.
TRADITIONAL pH CALIBRATION PROCEDURE
1. With a pH or pH/ORP sensor installed and plugs or sensors in the
other ports, rinse the front end of the MP TROLL 9500 in tap water,
then again in deionized water. Shake to dry.
For the most accurate results, follow this with a rinse in a portion of
the selected calibration solution.
2. Insure the black PVC base is attached to the Cal Cup, and fill the
Cal Cup to the fill line with the selected calibration
solution.
s "EGINWITHTHELOWESTBUFFERVALUEWHENPERFORM-
ing a multi-point calibration.
s 7ITHAFULLCOMPLEMENTOFSENSORSINSTALLEDUSE
the lower line as a guide.
s 7ITHORREMOVABLESENSORSINSTALLEDlLLTOTHE
upper line.
3. Insert the front end of the MP TROLL 9500 into the
open end of the Cal Cup. Thread the Cal Cup onto
the body until seated against the o-ring, then back
off slightly to avoid overtightening.
4. Connect the MP TROLL 9500 to a PC and establish
a connection in Win-Situ 4 or Pocket-Situ 4. Win-Situ screens are
illustrated here. The Pocket-Situ interface is similar, with the Navi-
gation tree at the top of the screen and the Information pane below
it.
SECTION 11: PH
3
RECOMMENDED CALIBRATION ORDER FOR PH AND ORP
The pH/ORP sensor requires separate calibrations for pH and ORP.
A suggested calibration scenario is as follows:
A. First, Quick-Cal ORP (plus, optionally, other installed Basic sen-
sors). For the procedure, see Section 3, Getting Started.
B. Then, perform a 2- or 3-point Traditional pH calibration as
described here.

69
TROLL 9500 Operator’s Manual 0095110 rev. 007 01/09
7
6
10
5. Select the MP TROLL 9500 in the Navigation tree.
The software will automatically detect and display the installed sen-
sors. If one or more sensors is installed in the wrong port, an error
message will be displayed. Simply remove the sensor and install it
in the correct position, then “refresh” the device before continuing.
6. Click to select pH in the Parameters list. The sensor serial number
(SN) and recent calibration information is displayed.
7. Select Calibrate to launch the pH Calibration Wizard. A screen like
this is displayed.
8. Select the number of calibration points for this calibration, and the
pH value of the calibration solution for each point. Cal point 1 is
the solution the sensor is soaking in now.
9. Select Next to continue.
10. In the next screen, select Run to begin the stabilization.
The display will continuously update as readings are taken and
compared against the stabilization criteria.
11. If doing a one-point calibration, go to step 14.
For a multi-point calibration, the Wizard returns to the screen
shown at step 10 and waits for you to situate the probe in the next
calibration solution and click Run.
8
9
SECTION 11: PH
Indicators during Calibration
s Status:
NOT
TESTED is displayed until you begin the calibration by selecting
Run.
UNSTABLE indicates the sensor response does not meet the criteria
for a valid calibration point.
NOMINAL indicates the sensor deviation meets early stabilization
criteria.
The Accept button becomes available when nominal stability is
achieved. You may accept the early value, or wait for complete stability.
If you accept the early value, the calibration point will be designated
“USER SET” in the calibration report. (For more on calibration reports,
see “Calibration History” in Section 10.)
STABLE is displayed when the readings have stabilized sufficiently to
take a valid calibration point. The calibration proceeds automatically to
the next screen.
s Sensor Reading: The current sensor response in milliVolts.
s Sensor Deviation: Change in sensor response between the last two
readings. This enables you to follow the progress of the stabilization,
but deviation from the previous reading is not necessarily the best
indicator of stability as the software is looking at longer-term trends.
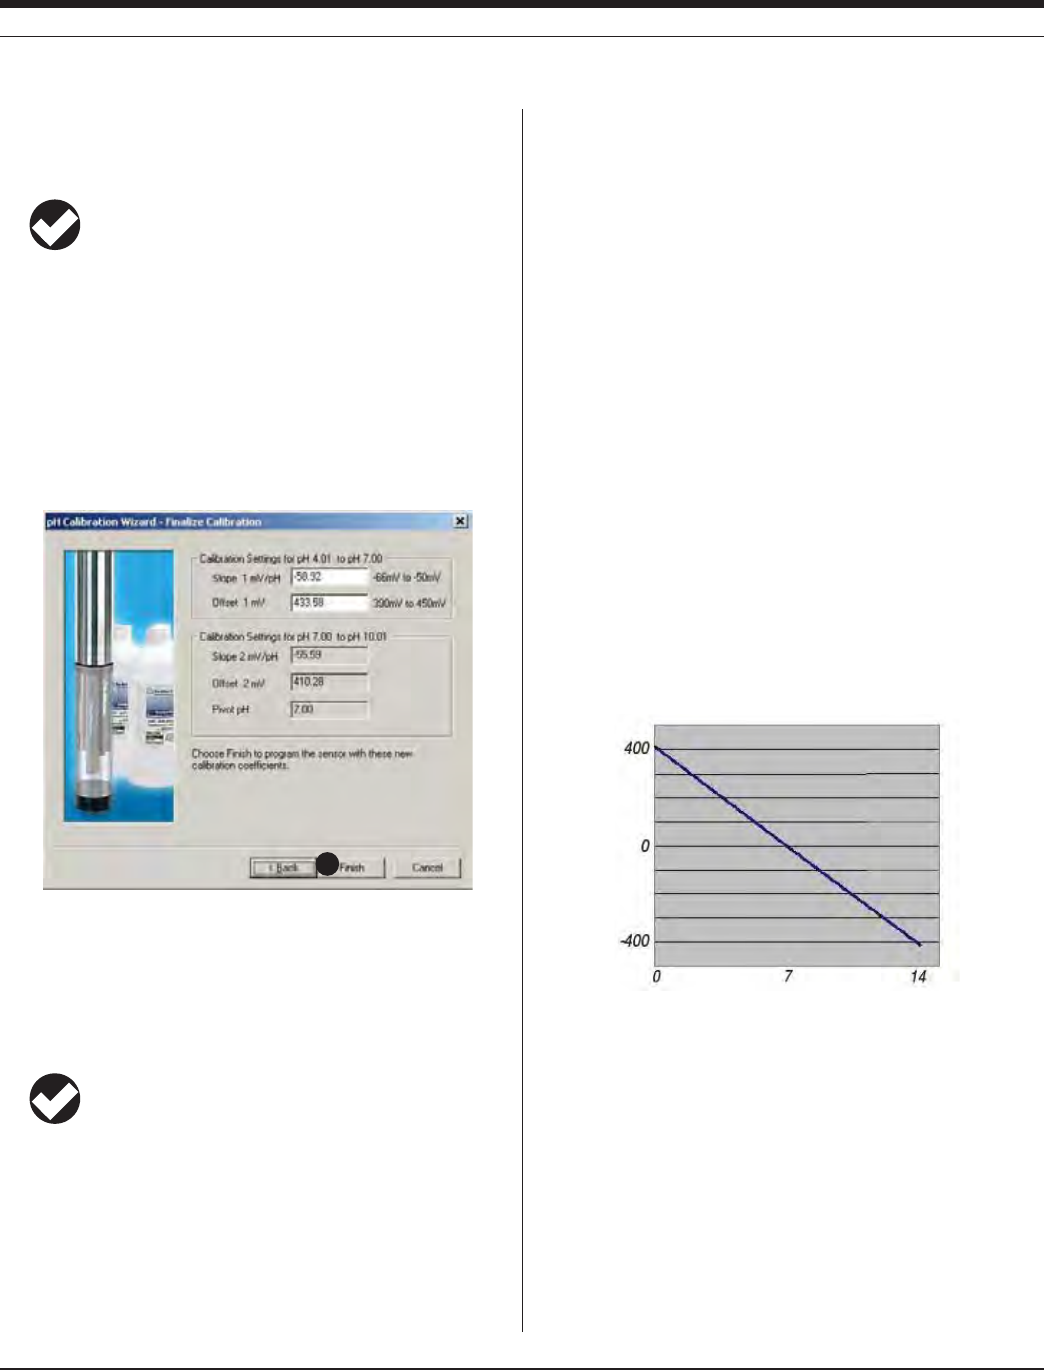
70
TROLL 9500 Operator’s Manual 0095110 rev. 007 01/09
12. Remove the Cal Cup, discard the first solution, rinse the Cal Cup
and the front end of the instrument, refill the Cal Cup with the
second solution, and attach it to the instrument.
TIP: The calibration solution may be flushed down the drain
with running water, or saved in a separate container and
used to rinse the next time you calibrate with the same solution.
13. Select Run to begin the stabilization for the second calibration
point. Status indicators and controls are the same as for the first
calibration point (step 10).
For a 3-point calibration, repeat steps 12 and 13.
14. The final screen shows the sensor slope and offset calculated
during calibration. For a 3-point calibration, 2 sets of coefficients
will be shown.
“Pivot pH” is the point at which the slope characteristics change
with a 3-point (2-range) calibration. The correct slope for the pH
values being monitored will automatically be applied.
15. Select Finish to program the sensor with the newly calculated
calibration coefficients.
TIP: You can look at the calibration report right after
calibrating, or at any time. See “Calibration History” in
Section 10 for details.
Options for storing the sensor:
s )FTHEINSTRUMENTWILLBEUSEDINADAYORSOLEAVETHESENSORS
installed. Remove the Cal Cup and rinse it and the sensors. Add
50-100 mL of tap water to the Cal Cup. Return the probe to the Cal
Cup for transport to the field site.
s &ORLONGERSTORAGESEE3ENSOR#AREAND(ANDLINGBELOW
RESETTING DEFAULT COEFFICIENTS
The sensor’s calibration may be reset back to factory defaults at any
time. As the sensor ages, the coefficients calculated during calibra-
tion will deviate more and more from the nominal values, which are
derived from new sensors. Default coefficients will give reasonable
results when the sensor is relatively new.
1. With a pH or combination pH/ORP sensor installed, establish a
connection to the instrument in Win-Situ 4 or Pocket-Situ 4.
2. Select pH in the Parameters list and click Calibrate.
3. In the first screen, select Use Nominal Coefficients, then Next.
4. In the final screen, click Finish to send the values to the sensor.
SENSOR SLOPE AND OFFSET
The pH calibration curve pivots around pH 7 (0 mV response). The
offset calculated by the software when calibrating at pH 7 will typically
be between 372-450 mV. If the offset falls much outside these limits,
replace the filling solution or the junction (see the following page).
The slope should fall between -54 mV/pH and -62 mV/pH. A calcu-
lated slope greater than -50 mV/pH or less than -66 mV/pH indicates
that the sensor requires maintenance (see the following page).
UNITS AND CALCULATED MEASUREMENTS
Readings from pH channel are displayed in pH units. No calculated
measurements are available.
USAGE RECOMMENDATIONS AND CAUTIONS
s 4EMPERATURECOMPENSATIONISPROVIDEDINTHESOFTWARETOACCOUNT
for measurements taken at temperatures different from the calibra-
tion temperature. For most accurate results, try to calibrate at the
same temperature as the expected sample temperature.
s !SMALLERRORINP(WILLOCCURINBASICSOLUTIONSP(THAT
CONTAINHIGHLEVELSOFSODIUMSALTS-DUETOSODIUMINTERFER-
ence. Contact In-Situ for more information.
15
SECTION 11: PH
mV
pH
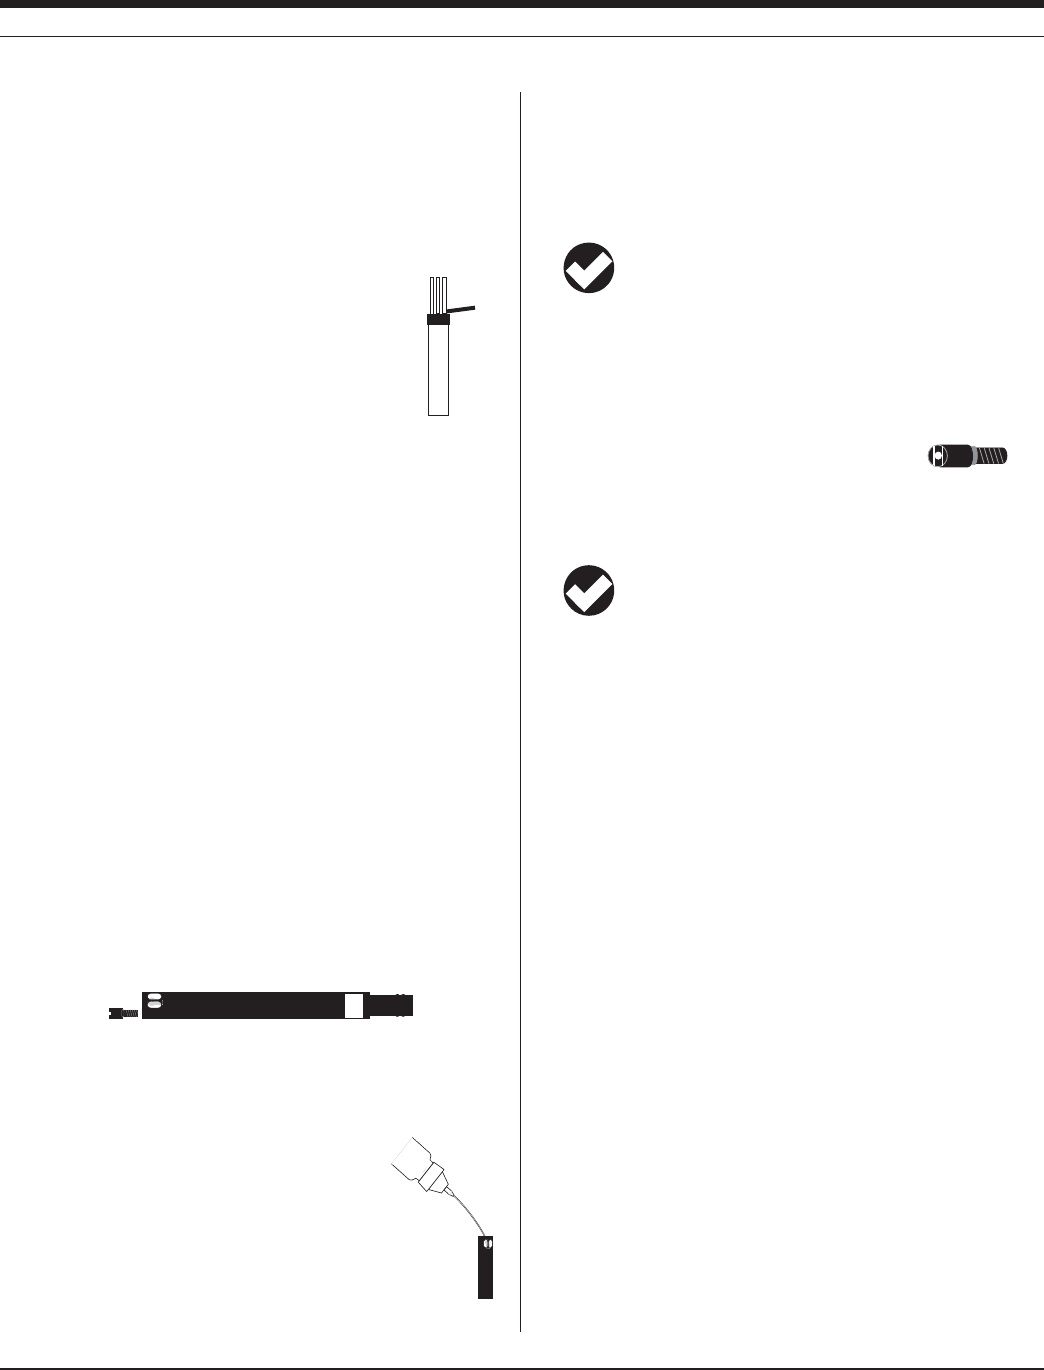
71
TROLL 9500 Operator’s Manual 0095110 rev. 007 01/09
sensor
removal
tool
s P(READINGSINpure water samples (<100μS/cm conductivity—also
known as “low ionic strength” samples) require up to 20 minutes
after calibration to stabilize and begin producing accurate results.
You may wish to condition the sensor after calibration in a low
conductivity solution.
SENSOR CARE AND HANDLING
SENSOR REMOVAL
Position the yoke of the sensor removal tool at the point
where the sensor enters the sensor block and pop the
sensor out.
MAINTENANCE/INSPECTION/CLEANING
If a film develops on the glass electrode, or if the sensing glass or
junction should become dehydrated, the sensor response may be
sluggish or erratic, or the sensor may fail to calibrate. In these cases,
rinse the sensor in 90% isopropyl alcohol, then soak it in storage
solution (Catalog No. 0065370) for at least an hour, or overnight if
needed. If this does not restore the response, try soaking in 0.1 M HCl
solution for 5-10 minutes, followed by a thorough rinse in clean water.
If the response has still not improved, replace the filling solution, or
possibly the junction.
Note: The following maintenance instructions apply to In-Situ’s new-
est pH sensor (cat. no. 0059510). Older sensors (cat. no. 0032000,
now discontinued) are not user-serviceable.
REPLACING THE FILLING SOLUTION
Replace the filling solution every five to six months, or when:
s 4HESENSORFAILSTOCALIBRATEWITHREASONABLESLOPEANDOFFSET
s 2EADINGSDRIFT
s 2EADINGSDURINGCALIBRATIONATP(AREOUTSIDETHERANGEÕM6
1. Unscrew the reference junction as shown.
2. Holding the sensor at an angle, shake out the filling solution.
3. Protect the connector end of the sensor with the soft cap it shipped
with, or wrap the sensor in a paper towel to prevent solution from
entering the electrical connector.
4. Using the dispenser cap on the filling solution
bottle, insert the tube into the bottom of the empty
reservoir. Squeeze a steady stream of solution into the
RESERVOIRUNTILITOVERmOWSANDNOBUBBLESAREOBSERVED
Continue to add solution while withdrawing the tube.
5. Screw in the reference junction, and hand-tighten until snug. Some
lLLINGSOLUTIONWILLOVERmOW7IPETHEEXCESSOFFTHESENSORBODY
6. Soak the sensor in tap water for at least 15 minutes.
7. Recalibrate the sensor.
If necessary, thoroughly clean the electrical connector to
remove filling solution: Using a disposable pipette, fill the
connector with isopropyl alcohol (70% to 100%). Shake to
dry. Repeat 3 times. Dry overnight. When thoroughly dry, recalibrate.
REPLACING THE JUNCTION
Replace the junction when the sensor fails to calibrate, even after
replacing the filling solution.
1. Unscrew the reference junction and discard.
2. Replace the solution and screw in a new junction as above.
3. Soak for 15 minutes in tap water, then recalibrate the sensor.
TIP: Keep the junction damp at all times to avoid a lengthy
rewetting process.
STORAGE
Short-Term Storage (several days)
Store in the Cal Cup in tap water.
Long-Term Storage (several weeks)
Remove the sensor and store it in the electrode storage bottle with
10-20 mL of storage solution (Catalog No. 0065370). Tighten the cap
to prevent drying. Prior to use, condition the sensor by rinsing with
deionized or tap water and soaking for 15 minutes.
REFERENCES
Eaton, A.D., L.S. Clesceri, E.W. Rice, and A.E. Greenberg, eds.,
Standard Methods for the Examination of Water and Wastewater,
21st edition, Washington, D.C.: American Public Health Associa-
tion, American Water Works Association, and Water Environment
Federation, 2005. Section 4500 H+, pH Value.
EPA, Methods for Chemical Analysis of Water and Wastes,
EPA/600/4-79-020, revised March 1983. Method 150.1, pH, Elec-
trometric; Method 150.2, pH, Electrometric (Continuous Monitor-
ing). Both approved at 40 CFR Parts 136 and 141.
SECTION 11: PH

72
Multi-Parameter
Water Quality TROLL®
0095110 rev. 007 01/09
TROLL 9500 Operator’s Manual
12 CONDUCTIVITY
Ultra-pure distilled water 0.05 μS/cm
Distilled water 1.0 μS/cm
Drinking water 50 to 300 μS/cm
Surface water 100 to 10,000 μS/cm
Sea water 40,000 to 55,000 μS/cm
Great Salt Lake 158,000 μS/cm
Typical Conductivity values
WHAT IS CONDUCTIVITY?
Electrical conductivity measures the ability of a material to carry an
electric current. Lakes, rivers, oceans, and underground aquifers
are typically good conductors because they contain dissolved salts
and minerals. These salts and minerals dissociate in the presence
of water to form negatively and positively charged particles called
anions and cations. Anions and cations provide a pathway for the
transportation of electrical charges throughout the aqueous medium.
For the most part, the higher the concentration of dissolved salts and
minerals in water, the better the conductor and the higher the electri-
cal conductivity. Deionized/distilled water is a poor conductor because
almost all anions and cations are removed during the deionization/dis-
tillation process.
WHY MEASURE CONDUCTIVITY?
Changes in the conductivity of a body of water are often used to indi-
cate an environmental event. For example, a drastic increase in the
electrical conductivity of an underground fresh water aquifer located
near the ocean could indicate the beginning of salt water intrusion.
On the other hand, an increase in the electrical conductivity of a small
lake that is completely surrounded by farmland may simply be the
result of runoff from a recent rain.
HOW IS CONDUCTIVITY MEASURED?
Conductance is the reciprocal of the resistance, in ohms, measured
between two opposing electrodes of a 1 cm cube at a specific temper-
ature. The unit 1/ohm or mho was given the name of Siemens (S) for
conductance. It is not practical to require all conductance cells to have
the dimensions of an exact cube. To enable the comparison of data
from experiments with different conductance cells, the conductance is
multiplied by the cell constant to give conductivity in Siemens per cen-
timeter (S/cm). Cell constants are determined for each sensor using a
standard solution of known conductivity. The cell constant depends on
the electrode area and the amount of separation or distance between
the electrodes.
Early conductivity measurements were performed using cells with two
electrodes. This method required using three conductivity cells with
different cell constants in order to span the range of 1 to 100,000 mi-
croSiemens per centimeter (μS/cm). Another inconvenience occurred
when deposits formed on the electrodes, thus reducing the measured
conductivity of the sample.
The modern four-electrode conductivity cell offers many advantages
over the two-electrode method. It contains two drive electrodes and
two sensing electrodes. The sensing electrodes are positioned in a
low current area so that electrode fouling is minimized. An alternat-
ing current is used to drive the cell. This reduces errors caused by
polarization resulting from the application of a direct current.
THE CONDUCTIVITY SENSORS
Two conductivity sensors are available, optimized
for performance in different areas of the conductivity
range. Chemically resistant electrodes are used for
lower reactivity in high conducting samples (carbon
electrodes in the low-range sensor, passivated stain-
less steel electrodes in the high-range sensor).
The conductivity sensors are shorter than the
other water quality sensors in order to distance the
conductivity cell from the KCl reference solutions in
other sensors. Low High
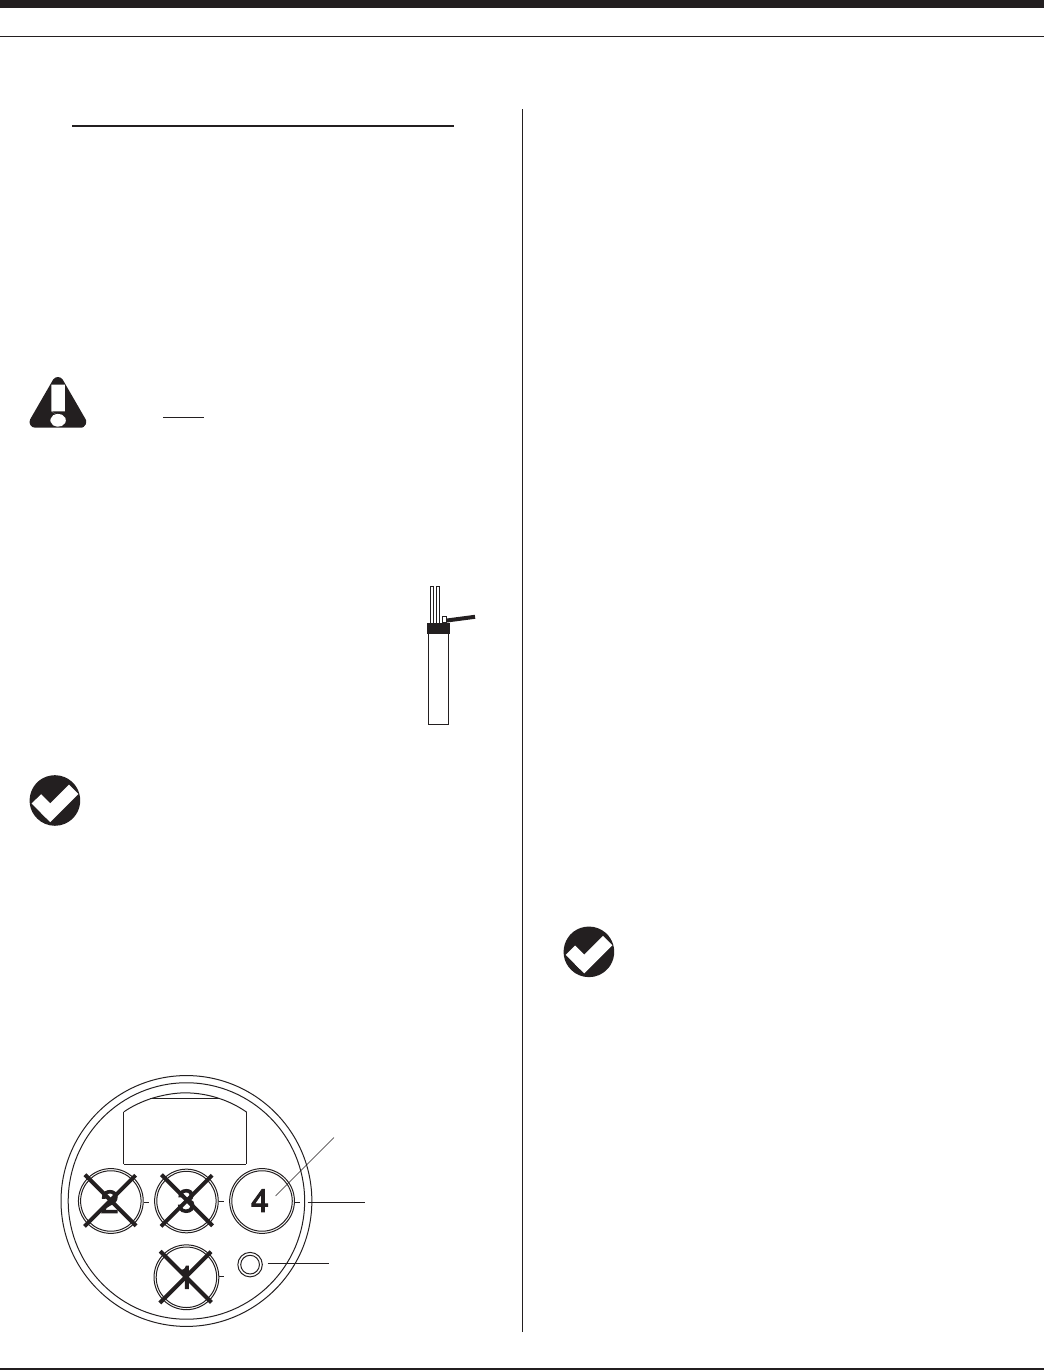
73
TROLL 9500 Operator’s Manual 0095110 rev. 007 01/09
Type Operating Range Cell Constant Range
Low 3 to 50,000 μS/cm 0.33 – 0.39 cm-1
High 70 to 200,000 μS/cm 4.4 – 5.8 cm-1
SENSOR INSTALLATION
The MP TROLL 9500 may be shipped with a conductivity sensor
already installed in port 4, as shown on the drawing below. If installa-
tion is necessary, unpack and install the conductivity sensor in port 4
as follows.
The conductivity sensor will function properly only when
installed in port 4.
1. Remove the restrictor from the front end of the MP TROLL 9500.
This allows access to the sensor block shown in the drawing below.
2. If there is a cap on the connector end of the sensor, remove it and
set it aside for future use.
3. Remove any moisture or dirt from the area around
port 4, then use the sensor removal tool to remove
the plug from the port. Retain the plug for future use.
4. Remove any moisture or dirt from the port connector
with a clean swab or tissue.
5. Check lubrication of the sensor o-rings.
TIP: The sensor o-rings require generous lubrication before
installation. New sensors will be lubricated at the factory. If
the o-rings appear dry, apply a silicone lubricant before installation.
6. Align the mark on the side of the sensor with the mark on the port.
7. Firmly press the sensor into the port until you feel it dock with the
connector at the bottom of the port. When properly inserted a small
gap (width of the sensor removal tool) remains between the widest
part of the sensor and the instrument body, for ease of removal.
CALIBRATION
OVERVIEW
The conductivity calibration calculates the cell constant for the con-
ductivity sensor. A one-point calibration is sufficient. Best results will
be obtained if you calibrate with the solution for the range you expect
to measure, and at the temperature you expect during field use.
Nominal vs. Stable
To shorten the calibration time, you have the option to accept the
calibration when “Nominal” stability conditions are achieved. If the
early value is accepted, the calibration point will be designated “USER
SET” in the calibration report. If the calibration report indicates that
calibration was performed through to stability then the instrument will
operate as intended by In-Situ’s quality standards.
CALIBRATION SOLUTIONS (PRIMARY STANDARDS)
Potassium chloride (KCl) calibration solutions certified to N.I.S.T.
standards are supplied in the In-Situ Conductivity Calibration Kits.
The value on the bottle indicates the solution’s specific conductance
CONDUCTIVITYAT½#3ELECTANAPPROPRIATESOLUTIONFORYOURAPPLICA-
tion from the following:
Fresh water 147 μS/cm solution
Fresh to brackish water 1,413 μS/cm solution
Brackish water 12,890 μS/cm solution
Sea water 58,670 μS/cm solution
The standard conductivity calibration kit includes a quart each of 147
μS/cm, 1,413 μS/cm, 12,890 μS/cm and deionized water. Catalog No.
0032090. Solutions are available separately, and specialized kits are
available for fresh and salt water applications.
TIP: Most solutions are usable beyond their stated expiration
date, depending on storage conditions; however, the results
cannot be guaranteed. The 147 μS/cm solution should be
refrigerated.
Calibrating with Other Solutions
A custom solution may be used if its specific conductance value (in
Ê3CMAT½#ISKNOWN#ALIBRATIONTOSECONDARYSTANDARDSMAY
also be performed. This involves a manual calculation of the cell
constant. See the procedure later in this section.
RECOMMENDED CALIBRATION FREQUENCY
Your own experience is the best guide to how often the conductivity
sensor will benefit from recalibration. Refer to the general guidelines
under “How Often to Calibrate” in Section 10, and to the tech note on
“Instrument Calibration.”
sensor
removal
tool
SECTION 12: CONDUCTIVITY
Conductivity sensor
goes here
Pressure/Turbidity
(or plug)
Temperature
alignment mark
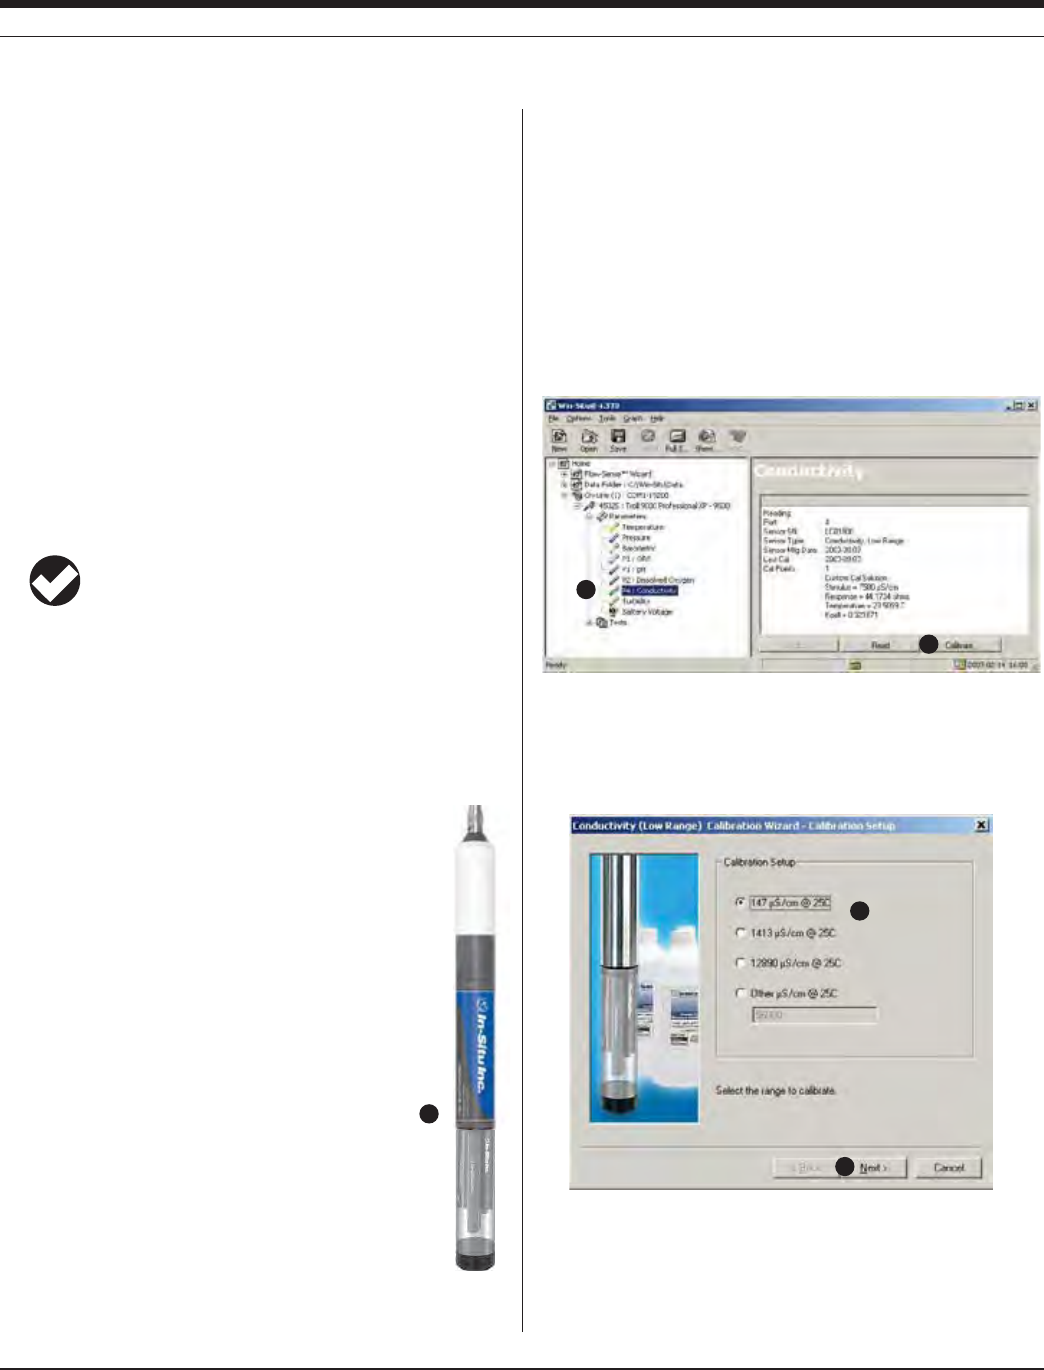
74
TROLL 9500 Operator’s Manual 0095110 rev. 007 01/09
CONDUCTIVITY QUICK CAL
The procedure to Quick Cal the conductivity sensor (a 1-point calibra-
tion at approximately 8,000 μS/cm), along with other sensors in the
Basic Sensor Set, may be found in Section 3, Getting Started. To
perform a more accurate calibration for a specific conductivity range,
follow the procedure below.
TRADITIONAL CONDUCTIVITY CALIBRATION PROCEDURE
1. With a conductivity sensor installed and plugs or sensors in the
other sensor ports, rinse the front end of the MP TROLL 9500.
To calibrate using a medium- to high-range solution, rinse in tap
water and shake to dry.
To calibrate using a low-range solution, it is important to rinse well;
we recommend a rinse with tap water, then with deionized water,
followed by a rinse with the solution to be used for calibration.
TIP: For highest accuracy, conductivity sensors should be
wetted for 15-30 minutes immediately prior to calibration.
This immersion can be in either clean water or the conductivity
calibration solution.
2. Insure the black PVC base is attached to the Cal Cup, and fill the
Cal Cup with the selected calibration solution.
s ,OWRANGESENSOR&ILLTOTHELOWERORUPPERLINEDEPENDINGON
the number of sensors installed (fewer sensors require more
solution).
s (IGHRANGESENSOR&ILLTOORABOVETHEUPPERLINE
depending on the sensor load. You need enough
solution to immerse the sensor’s side ports.
3. Insert the front end of the MP TROLL 9500 into the
open end of the Cal Cup. Thread the Cal Cup onto
the body until seated against the o-ring, then back
off slightly to avoid overtightening.
s ,OWRANGESENSORTHEOPENAREAOFTHESENSOR
should be completely immersed.
s (IGHRANGESENSORTHESIDEOPENINGSSHOULDBE
completely immersed.
s 4HETEMPERATURESENSORSHOULDBEIMMERSEDIN
about an inch of liquid.
s )FANYAIRBUBBLESAREVISIBLEONTHESENSORTAP
the sides or bottom of the Cal Cup to dislodge
them. Or invert the Cal Cup a couple of times.
4. Connect the MP TROLL 9500 to a PC and establish a connection
in Win-Situ 4 or Pocket-Situ 4. Win-Situ screens are illustrated
here. The Pocket-Situ interface is similar, with the Navigation tree
at the top of the screen and the Information pane below it.
5. Select the MP TROLL 9500 in the Navigation tree.
The software will detect and display the installed sensors. If any
sensor is installed in the wrong port, an error message will be
displayed. Simply remove the sensor and install it in the correct
position, then “refresh” the device before continuing.
6. Select conductivity in the Parameters list. The sensor serial num-
ber (SN), type, and recent calibration information is shown.
7. Select Calibrate.
The Conductivity Calibration Wizard starts. Available calibration
ranges will depend on the sensor installed (high or low range)
8. Select the calibration solution the sensor is soaking in.
For a custom solution, select Other and enter the Specific Conduc-
TANCEOFTHESOLUTIONCONDUCTIVITYCORRECTEDTO½#INÊ3CM
9. Select Next to continue.
7
6
8
9
SECTION 12: CONDUCTIVITY
3
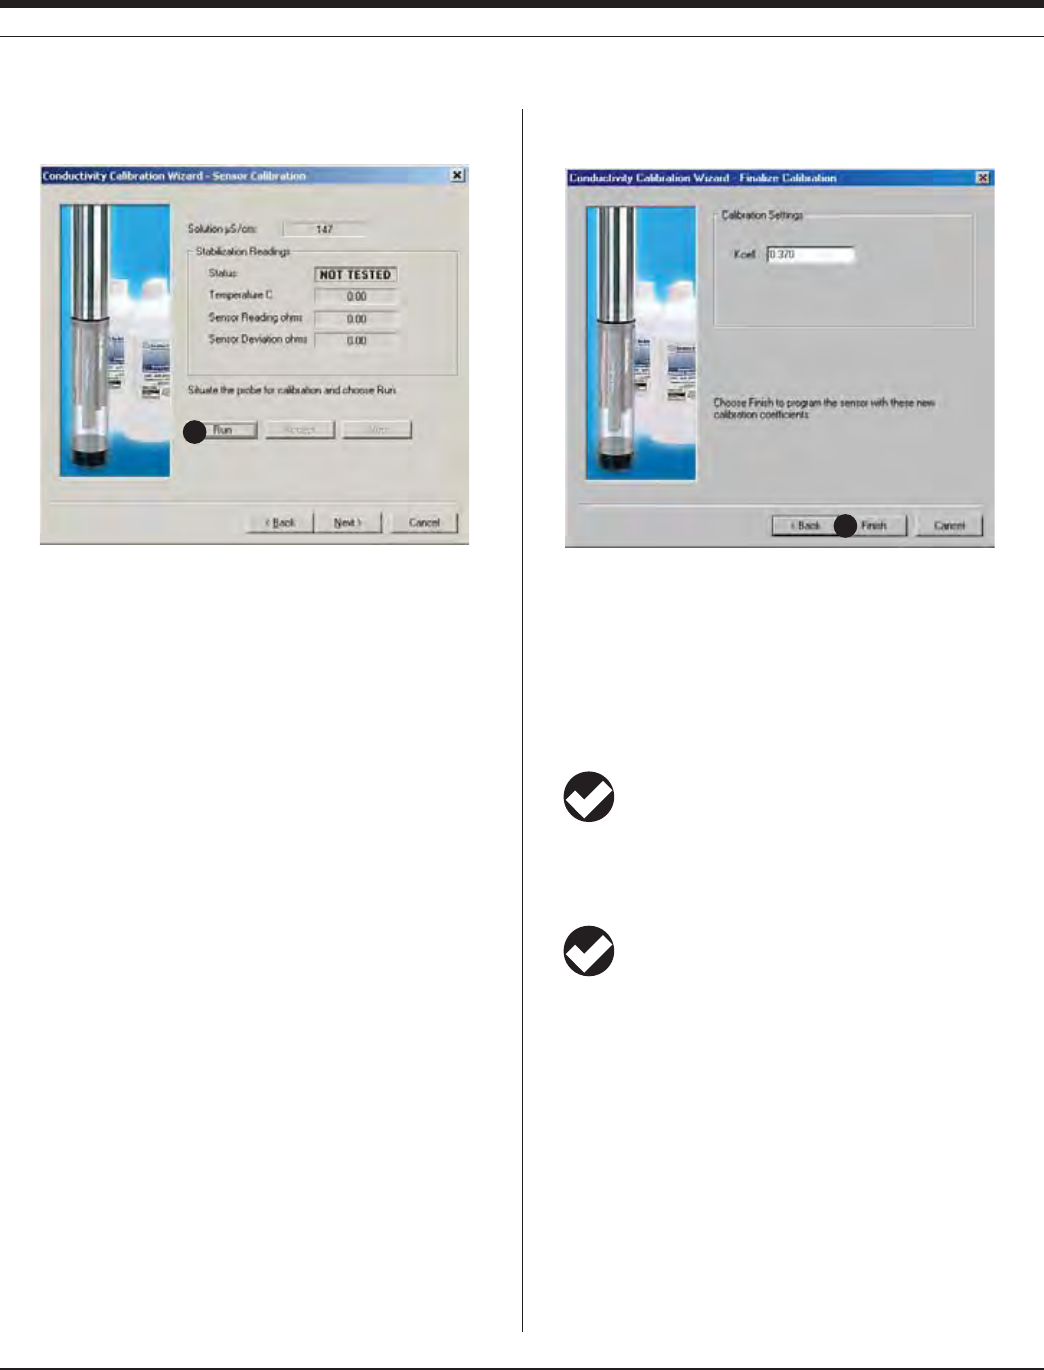
75
TROLL 9500 Operator’s Manual 0095110 rev. 007 01/09
10. In the next screen, select Run to begin the stabilization.
The display will continuously update as readings are taken and
compared against the stabilization criteria.
s 3TATUSINDICATORS
NOT TESTED is displayed until you begin the calibration by
selecting Run.
UNSTABLE indicates the sensor response does not meet the
criteria for a valid calibration point.
NOMINAL indicates the sensor deviation meets early stabiliza-
tion criteria.
The Accept button becomes available when nominal stability is
achieved. You may accept the early value, or wait for complete
stability. If you accept the early value, the calibration point will
be designated “USER SET” in the calibration report. (For more
on calibration reports, see “Calibration History” in Section 10.)
STABLE is displayed when the readings have stabilized suffi-
ciently to take a valid calibration point. The calibration proceeds
automatically to the next screen.
s 4EMPERATUREATTHETIMEOFCALIBRATIONISDISPLAYEDFORYOURINFORMA-
tion.
s 3ENSOR2EADING4HECURRENTSENSORRESPONSEINOHMS
s 3ENSOR$EVIATION#HANGEINSENSORRESPONSEBETWEENTHELASTTWO
readings. This enables you to follow the progress of the stabiliza-
tion, but deviation from the previous reading is not necessarily the
best indicator of stability as the software is looking at longer-term
trends.
11. The final screen shows the new cell constant (Kcell) calculated for
the selected range during the calibration process.
Typical cell constants:
Low-range sensor 0.32 – 0.39
High-range sensor 4.4 – 5.8
The displayed cell constant may be edited.
12. Select Finish to program the sensor with the displayed cell con-
stant.
TIP: You can look at the calibration report right after
calibrating, or at any time. See “Calibration History” in
Section 10 for details.
The conductivity sensor is now calibrated and ready to use in the
range for which it was calibrated.
TIP: The calibration solution may be flushed down the drain
with running water, or saved in a separate container and
used to rinse the sensors the next time you calibrate with the
same solution.
Options for storing sensors:
s )FTHEINSTRUMENTWILLBEUSEDINADAYORSOLEAVEALLTHESENSORS
installed in the MP TROLL 9500. The conductivity sensor does not
require any special storage conditions, but other sensors do. Refer
to the relevant sections of this manual for storage recommenda-
tions for other installed sensors.
s 2EMOVETHECONDUCTIVITYSENSORFROMTHE-042/,,RINSEIT
and store it dry.
12
10
SECTION 12: CONDUCTIVITY
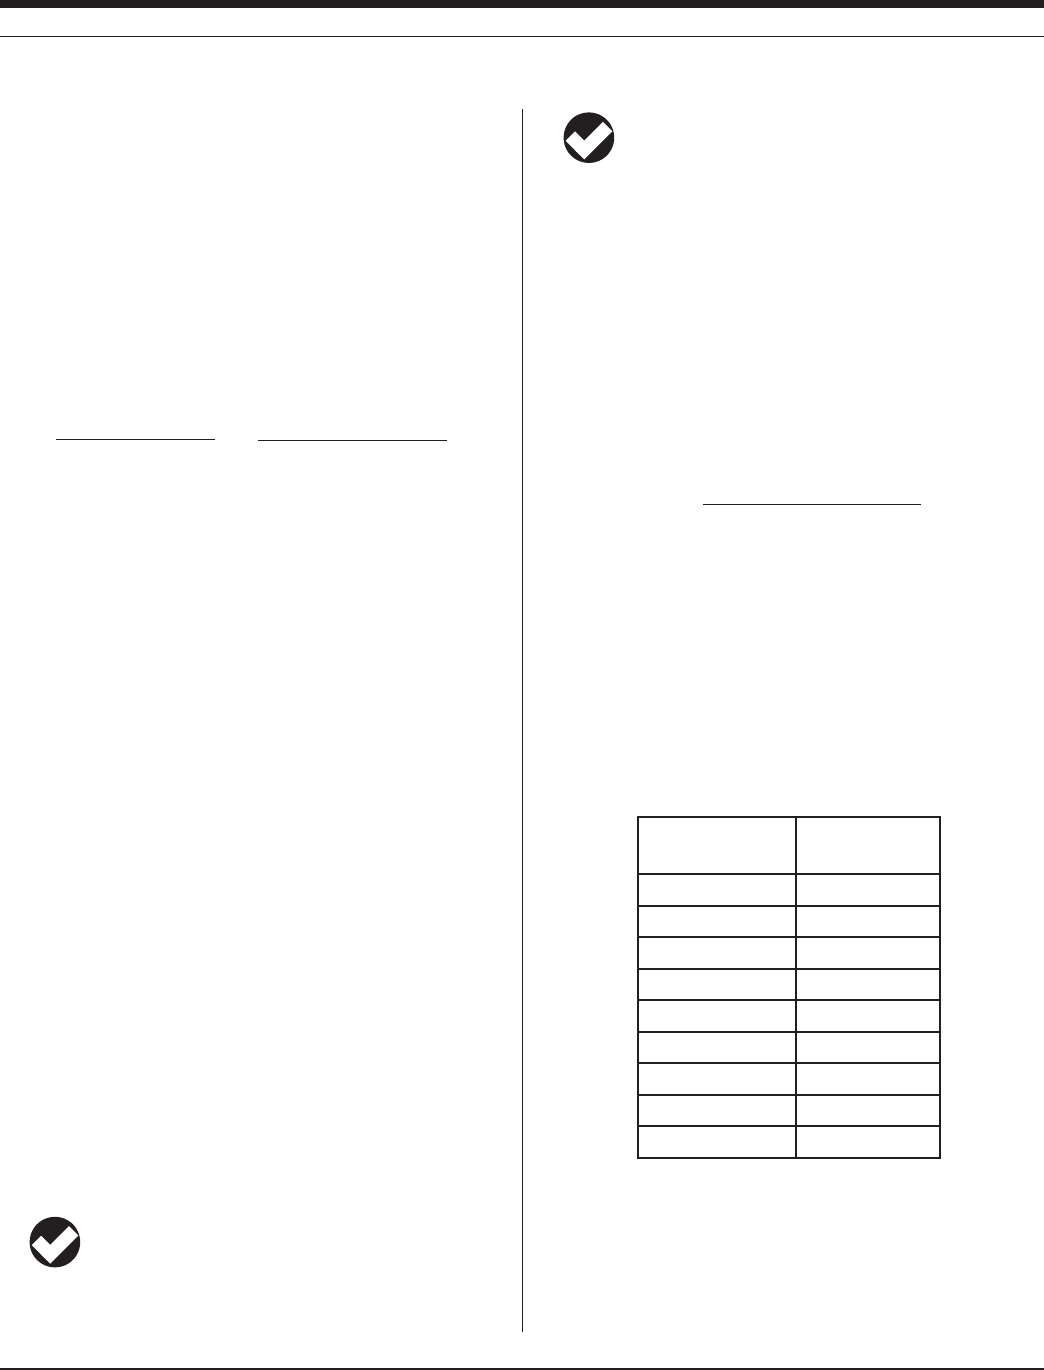
76
TROLL 9500 Operator’s Manual 0095110 rev. 007 01/09
USING A CONDUCTIVITY METER AS A SECONDARY STANDARD
If a conductivity meter is available for comparison, the cell constant
(Kcell) for the conductivity sensor can be calculated by hand and
entered manually into the software.
1. Note the current cell constant. Immerse the MP TROLL with con-
ductivity sensor in a solution. Take and record the reading.
2. Take and record a reading in the same solution with a conductivity
meter.
3. Solve the following for X:
4. This is the new cell constant. Enter this value in the software as
described below.
ENTERING A CELL CONSTANT MANUALLY
A cell constant may be entered “manually” without running a complete
calibration.
1. With a conductivity sensor installed, establish a connection to the
instrument in Win-Situ 4 or Pocket-Situ 4.
2. Select Conductivity in the Parameters list and click Calibrate.
3. Select Other, and key in any reasonable value. Press Next twice to
get to the final screen.
4. In the final screen, key in the desired cell constant.
5. Click Finish to send the new value to the sensor.
UNITS AND CALCULATED MEASUREMENTS
Basic Unit: AC
Absolute (or “actual”) conductivity, without temperature compensation,
is the basic unit for the conductivity sensor. Measurements may be
displayed in:
microSiemens per centimeter (μS/cm AC)
milliSiemens per centimeter (mS/cm AC)
The following units are also available for displaying derived measure-
ments calculated from the conductivity channel output:
TIP: To change unit preferences: In Win-Situ, select
Preferences on the Options menu. In Pocket-Situ, select the
Home site, then tap Setup in the command bar.
TIP: Since the specific ionic composition of all analytes
cannot be known, the conversions provided in the software
are reasonably good estimates of Specific Conductance and
Total Dissolved Solids. The resulting derived values should be
treated with caution.
Specific Conductance (SC)
3PECIlC#ONDUCTANCEISCONDUCTIVITYCORRECTEDTO½#4HESOFTWARE
ESTIMATESWHATTHECONDUCTIVITYWOULDBEAT½#TOENABLECOMPARI-
son between measurements made at different temperatures.
The conversion requires a temperature coefficient for the solution
being measured. By convention, the temperature coefficient for potas-
sium chloride (KCl) calibration standards is used. Specific conduc-
tance is calculated from:
where
AC is the actual conductivity in μS/cm
0.0191 is a nominal temperature coefficient for KCl solutions
Te m p . is the solution temperature in degrees C.
The correction factor of 0.0191 (1.91% / ½#FOR+#LSOLUTIONSISA
reasonable approximation for samples containing sodium and chloride
salts (i.e., seawater). For comparison, the table below lists correction
factors for other solution types.
Solution Correction factor
(%/oC)
5% H2SO40.96
10% HCl 1.32
5% NaOH 1.7
Dilute NH31.88
KCl salt (default) 1.91
NaCl salt 2.12
98% H2SO42.84
Ultrapure water 4.55
Sugar solution 5.64
Units: microSiemens per centimeter (μS/cm SC)
Current Kcell
Reading with this Kcell
X
Conductivity meter reading
=
AC
[1 + 0.0191 (Te m p . – 25.0)]
SC =
SECTION 12: CONDUCTIVITY

77
TROLL 9500 Operator’s Manual 0095110 rev. 007 01/09
Total Dissolved Solids (TDS)
A factor of 0.65 x specific conductance is used to estimate Total
Dissolved Solids (TDS). This was chosen for general applicability.
Remember that ions in solution will vary, and this general conversion
factor will not fit all situations exactly. Units: mg/L
Resistivity
The reciprocal of conductance is resistance. Resistivity is the resis-
tance times the cell constant. Resistivity is useful when monitoring
pure water. Units: Kohms cm
Salinity
Calculated from conductivity and temperature using the Practical
Salinity Scale adjusted for low salinities. Units: PSU (Practical Salinity
Units)
The original Practical Salinity Scale (1978) was considered valid for a
range of 2-42 PSU; “standard seawater” is defined as having a value
of exactly 35. In 1986, there was an adjustment to the scale for better
accuracy with low salinities. That adjusted scale is considered valid for
a range of 0-40 PSU. Above 2 PSU there is no significant difference
between the two scales. “Fresh” water would typically have values
below 1, and typically very close to 0.
USAGE RECOMMENDATIONS AND CAUTIONS
CONDUCTIVITY AND TEMPERATURE
Conductivity is a function of temperature. According to the EPA,
temperature variations and corrections represent the largest source
OFPOTENTIALERRORINCONDUCTIVITYMEASUREMENTS!½#CHANGEIN
temperature can cause a 0.2% change in conductivity.
3PECIlCCONDUCTANCEISTHECONDUCTIVITYOFASUBSTANCEAT½#AND
MEASUREMENTSAREUSUALLYSTANDARDIZEDTO½#WHENITISNECESSARY
to compare data. When the temperature of a sample and its conduc-
tivity at that temperature are known, the software can extrapolate the
CONDUCTIVITYTO½#
sensor
removal
tool
SENSOR CARE AND HANDLING
SENSOR REMOVAL
Position the yoke of the sensor removal tool at the point
where the sensor enters the sensor block and pry the
sensor upward.
MAINTENANCE/INSPECTION/CLEANING
#HECKTHESENSORFORFOULINGOFTHEELECTRODES)FNECESSARYmUSHTHE
sensor with water, or swish in a mild detergent solution and rinse with
tap water. A swab or soft-bristle brush may be gently used to clean
the electrodes. Remember that the electrodes are made of graphite,
which is soft and easily damaged.
STORAGE
Store the sensor dry.
REFERENCES
Eaton, A.D., L.S. Clesceri, E.W. Rice, and A.E. Greenberg, eds.,
Standard Methods for the Examination of Water and Wastewater,
21st edition, Washington, D.C.: American Public Health Associa-
tion, American Water Works Association, and Water Environment
Federation, 2005. Section 2510, Conductivity. Section 2520 B,
Salinity - Electrical Conductivity Method.
EPA, Methods for Chemical Analysis of Water and Wastes,
EPA/600/4-79-020, revised March 1983. Method 120.1, Conduc-
tance, Specific Conductance. Approved at 40 CFR Part 136.
The International Association for Physical Science of the Ocean
(IAPSO) Standard Seawater manufactured by Ocean Scientific In-
ternational is available in North America from Guildline Instruments
Inc. in Lake Mary, Florida.
SECTION 12: CONDUCTIVITY

78
Multi-Parameter
Water Quality TROLL®
0095110 rev. 007 01/09
TROLL 9500 Operator’s Manual
13 DISSOLVED OXYGEN
$/½#ATMPPM#HLORINE 14.6 mg/L
$/½#ATMPPM#HLORINE 9.09 mg/L
$/½#ATMPPM#HLORINE 6.77 mg/L
$/½#ATMPPM#HLORINE 7.35 mg/L
Safe level for most aquatic life MG,
* representative of solute concentration
Typical D.O. values
WHAT IS DISSOLVED OXYGEN?
The amount of dissolved oxygen (D.O.) in both natural water and
wastewater is a function of several parameters. D.O. is highly
dependent on temperature and atmospheric pressure. An increase
in temperature causes a decrease in the amount of oxygen that can
dissolve in water. On the other hand, higher atmospheric pressures
result in higher D.O. values. Salinity is also a factor. Oxygen solubility
is greater in freshwater than in saltwater. There are also chemical and
biochemical processes that affect D.O.
Most of the dissolved oxygen in water comes from the atmosphere,
but oxygen from the photosynthesis of aquatic plants is also a key
source. D.O. levels in lakes and other surface water will actually follow
a cyclic or diurnal pattern over the course of a day, rising and falling
as light intensity changes from dawn to dusk.
WHY MEASURE DISSOLVED OXYGEN?
Most aquatic life requires an average D.O. value greater than 5.0 mil-
ligrams dissolved oxygen per liter of water (mg/L) in order to survive.
!LTHOUGHTHEAMOUNTOFDISSOLVEDOXYGENINABODYOFWATERmUCTUATES
due to natural processes, large deviations from the norm are usually
a result of human activity. Changes in D.O. levels are usually the
result of a buildup in organic waste. Organic waste can enter surface
water from sewage treatment facilities, runoff from agricultural feed
lots or domestic areas and from industrial discharge. Organic wastes
often contain nitrates and phosphates. Nitrates and phosphates are
nutrients for aquatic plants and algae, stimulating overproduction
when present in excessive levels. Accelerated growth of blooms
increase the number of photosynthesizing plants, which temporar-
ily increases the amount of dissolved oxygen. However submerged
aquatic vegetation eventually experience a reduction in sunlight
due to increased coverage on the surface. This decrease in sunlight
leads to a reduction in photosynthesis and eventual death. Bacterial
processes take over and consume even more dissolved oxygen. Fish
and other aquatic species die due to lack of dissolved oxygen. This
tragic process is known as eutrophication.
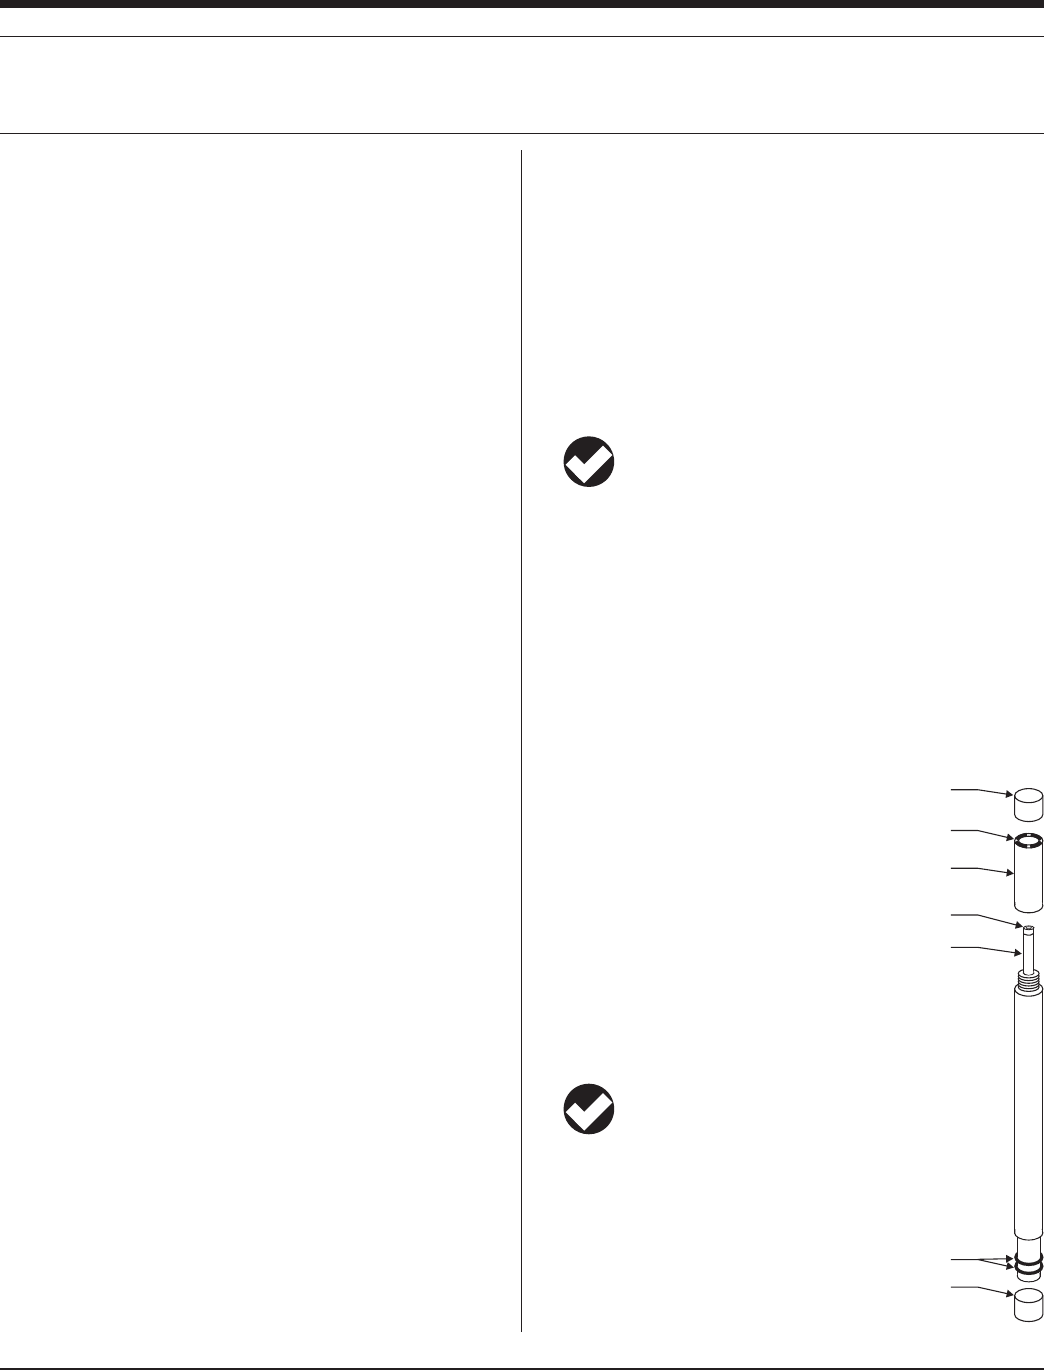
79
TROLL 9500 Operator’s Manual 0095110 rev. 007 01/09
THE POLAROGRAPHIC DISSOLVED OXYGEN SENSOR
THEORY OF OPERATION
The sensor is a Clark-type polarographic sensor consisting of two
metallic electrodes in contact with an electrolyte and separated from
the measurement water by a polymeric membrane. Dissolved oxygen
and other gases diffuse through the membrane into the electrolyte.
An electric potential is applied to the electrodes, which causes an
electrochemical reaction. Oxygen is reduced at the cathode:
O
2 + 2H2O + 4e– 4(OH)–
while silver is oxidized at the anode:
4Ag + 4Cl– 4AgCl + 4e–
The resulting current is proportional to the oxygen crossing the
membrane. The electric potential is carefully selected so that only the
dissolved oxygen is reduced.
The concentration of dissolved oxygen is usually reported in mil-
ligrams of oxygen per liter of water (mg/L), but the sensor actually
measures the partial pressure of dissolved oxygen. Other gases such
as nitrogen, carbon dioxide, and water vapor are also dissolved in
the water. The partial pressure of the oxygen is the fraction of the
oxygen multiplied by the total pressure of all the gases. This value is
also a function of water temperature and water salinity. The maximum
amount of oxygen that can be dissolved in water at a given atmo-
spheric pressure, water temperature, and salinity (100% D.O.) can be
calculated from first principles. D.O. measurements taken in the field
are then compared to the 100% D.O. value. D.O. measurements of
surface water are typically less than the 100% D.O. value due to the
presence of biological and chemical processes that consume oxygen.
Field measurements are corrected for changes in temperature, air
pressure, and salinity.
During the electrochemical process dissolved oxygen is consumed
while silver chloride (AgCl) is deposited on the anode. In time, both
processes will adversely affect the stability and accuracy of the D.O.
measurements. Depletion of oxygen near the membrane will cause
readings to decrease when measuring D.O. in stagnant water. The
use of a stirrer, or similar mechanism to increase water movement,
alleviates this problem.
SENSOR CONDITIONING
As soon as the software “recognizes” and displays the D.O. sensor
in port 2, powering of the D.O. channel begins. A low-level current
is applied continuously to the D.O. circuitry, resulting in continuous
polarization. This is similar to laboratory instruments for measur-
ing dissolved oxygen, which are always “on.” A certain amount of
conditioning or “warm-up” time is necessary for the sensor to return
accurate readings during calibration and use.
Before calibrating a new D.O. sensor, or a sensor with a new mem-
brane, we recommend that you allow a minimum of two hours for
conditioning. For stable long-term performance and faster stability
during calibration, we recommend 10 hours of conditioning. If the
D.O. sensor is installed when you receive the instrument, it will be
conditioned and ready to calibrate. If you remove the sensor, be sure
to allow for another period of conditioning before you calibrate.
TIP: Testing has shown that 10 hours of conditioning yields
very stable long-term performance.
SENSOR INSTALLATION
The MP TROLL 9500 may be shipped with a polarographic D.O. sen-
sor installed in port 2. When the sensor is shipped in the instrument, it
is pre-conditioned and ready for calibration.
If installation is necessary, unpack, fill, install, and condition a polaro-
graphic D.O. sensor as follows.
FILL THE MEMBRANE MODULE
New sensors are shipped with a dry membrane module loosely at-
tached.
1. Remove the soft protective caps from the
membrane end and the connector end of
the sensor.
2. Remove the membrane module from the
sensor body and fill with electrolyte as follows:
Holding the membrane module open-end up,
position the electrolyte dispenser against the side
of the module without touching the membrane. Fill
slowly.
TIP: To eliminate air bubbles, tap the side of the
module briskly with your fingernail.
3. Insert the sensor into the open end of the membrane
module. To minimize air, some of the electrolyte
SHOULDOVERmOWFROMTHEOPENENDASTHESENSORIS
inserted.
POLAROGRAPHIC MEASUREMENT OF DISSOLVED OXYGEN
SECTION 13: DISSOLVED OXYGEN—POLAROGRAPHIC
Membrane
Cathode
Membrane
module
Anode
o-rings
Cap
Cap
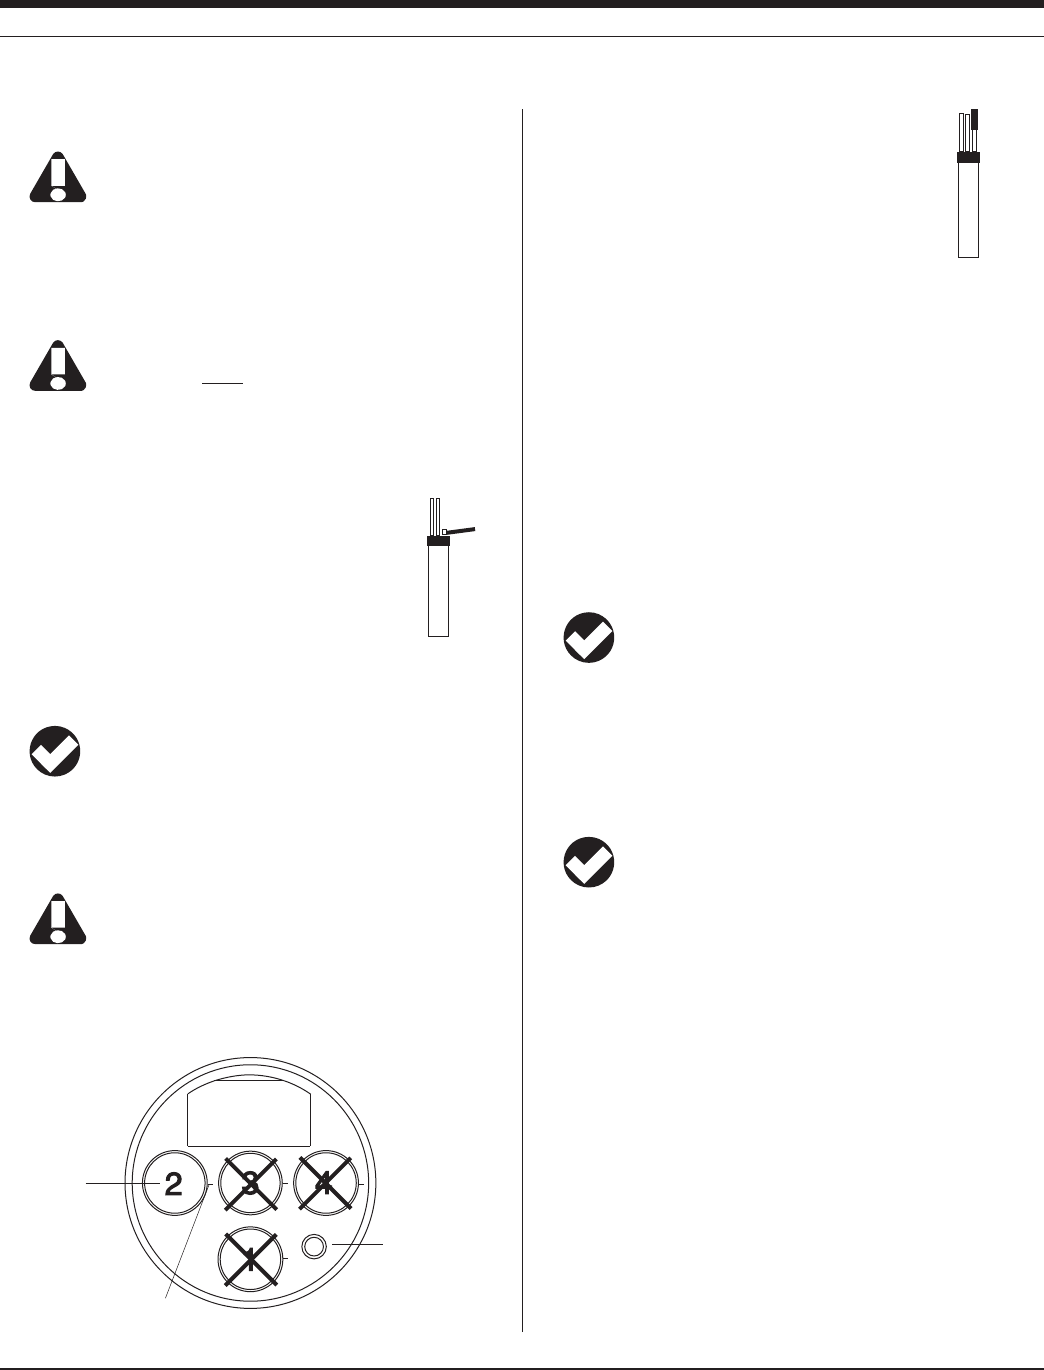
80
TROLL 9500 Operator’s Manual 0095110 rev. 007 01/09
4. Thread the membrane module to the D.O. sensor.
Be sure the membrane does not leak. You should not see
any drops on the surface. There should be no visible air
bubbles.
5. Install and condition the sensor as described below. Then you’re
ready to calibrate.
INSTALL THE SENSOR IN THE MP TROLL 9500
The polarographic D.O. sensor will function properly only
when installed in port 2.
1. Remove the restrictor or Cal Cup from the front end of the MP
TROLL 9500. This allows access to the sensor block shown in the
drawing below.
2. Remove any moisture or dirt from the area around
port 2, then use the sensor removal tool to remove
the plug or sensor from port 2. Retain the plug for
future use.
3. Remove any moisture or dirt from the port connector
with a clean swab or tissue.
4. Check lubrication of the sensor o-rings.
TIP: The sensor o-rings require generous lubrication before
installation. New sensors will be lubricated at the factory. If
the o-rings appear dry, apply a silicone lubricant before installation.
5. Handling the sensor by the sides, not the tip, align the mark on the
side of the sensor with the mark on the port.
Avoid touching the membrane at the tip of the sensor.
Contaminants on the membrane can change its properties
and affect measurements.
6. Use the sensor insertion tool to press the sensor into the port until
you feel it dock with the connector at the bottom. When properly
inserted a small gap (width of the sensor removal
tool) remains between the widest part of the sensor
and the instrument body, for ease of removal.
7. Turn the sensor “on” and condition it, as described
next.
CONDITION A NEWLY INSTALLED SENSOR
Condition a new sensor, or one with a new membrane, as follows:
1. Fill and install the sensor as described above.
2. Connect the MP TROLL 9500 to a PC and establish a connection
in Win-Situ 4 or Pocket-Situ 4.
3. Select the MP TROLL 9500 in the Navigation tree. All installed sen-
sors will be displayed.
Powering of the D.O. sensor begins as soon as the software rec-
ognizes the D.O. sensor and displays it in the Navigation tree. This
starts the conditioning process.
TIP: If you plan to calibrate 100% D.O. in air, condition the
sensor in a moist environment at ambient pressure—the
loosely attached Cal Cup with a small amount of clean water is ideal.
If you will be calibrating 100% D.O. in water, condition the sensor dry.
We recommend that you allow the sensor to condition for 2-10 hours
before calibrating. Testing has shown that 10 hours of conditioning
yields very stable long-term performance.
TIP: It is not necessary to maintain the computer connection;
conditioning continues as long as the sensor is installed.
CALIBRATION
OVERVIEW
Several options are available for calibrating a polarographic sensor.
s Quick Cal: Calibrates all Basic sensors (pH, ORP, polarographic
D.O., conductivity) at the same time with one convenient solution.
This is a 1-point 100% D.O. calibration in air at ambient pressure.
s Traditional calibration–1 point: 100% D.O. may be calibrated
either in air (saturated with water) at ambient pressure, or in water
(saturated with air—for example, using a bubbler). The water
method is generally more accurate, as it better represents actual
field D.O. measurement conditions.
s Traditional calibration–2 point: 100% D.O. may be calibrated
either in air or in water. 0% D.O. is calibrated in an oxygen-
sensor
removal
tool
sensor
insertion
tool
SECTION 13: DISSOLVED OXYGEN—POLAROGRAPHIC
Install polaro-
graphic D.O.
sensor here
Pressure/Turbidity
(or plug)
Temperature
alignment mark

81
TROLL 9500 Operator’s Manual 0095110 rev. 007 01/09
depleted solution such as sodium sulfite or nitrogen-saturated
water. A 2-point calibration is recommended
s WHENYOUEXPECTTOMEASUREVERYLOW$/VALUESMG,
s WHENREQUIREDBY3TANDARD/PERATING0ROCEDURES
Nominal vs. Stable
To shorten the calibration time, you have the option to accept the
calibration when “Nominal” stability is achieved. If the early value is
accepted, the calibration point will be designated “USER SET” in the
calibration report. If the calibration report indicates that calibration
was performed through to stability then the instrument will operate as
intended by In-Situ’s quality standards.
CALIBRATION SOLUTIONS & EQUIPMENT
100% D.O. calibrations may be performed in water saturated with air,
or in air saturated with water. Deionized water is available from In-Situ
Inc., but any clean water may be used. In-Situ’s bubbler calibration kit
is designed for an efficient water calibration.
An oxygen-depleted solution is used to calibrate the 0% D.O. Sodium
sulfite is available from In-Situ Inc. For a cleaner calibration, nitrogen-
saturated water may be used.
RECOMMENDED CALIBRATION FREQUENCY
Your own experience is the best guide to how often the polarographic
D.O. sensor will benefit from recalibration under conditions of normal
usage. Refer to the general guidelines under “How Often to Calibrate”
in Section 10, and the tech note on “Instrument Calibration.”
Until a new polarographic sensor has been thoroughly conditioned, it
may require more frequent calibration. In the absence of other indica-
tions, a calibration should be performed every 2-4 weeks.
In addition, the polarographic D.O. sensor should be conditioned for
2-4 hours and recalibrated in the following circumstances:
s AFTERCLEANINGTHESENSOR
s AFTERREPLACINGTHEMEMBRANEMODULE
s WHENTAKINGMEASUREMENTSATANELEVATIONDIFFERENTFROMTHATAT
which the sensor was last calibrated.
DISSOLVED OXYGEN CALIBRATION TIPS
The following discussion may help you to obtain the best results from
the polarographic D.O. calibration.
s Air or Water? The software provides two options for conducting a
100% D.O. calibration:
in air (saturated with water). This is the condition during a Quick
Cal in the inverted Cal Cup with the sensor membrane exposed
to air, temperature sensor submerged, and Cal Cup vented to
the atmosphere.
in water (saturated with air). In-Situ’s bubbler calibration kit
provides everything needed to create a vigorous bubbling action
to insure air-saturated water. The Cal Cup is not used.
Since dissolved oxygen measurements are typically made in water,
calibrating in water will often yield better results. When calibrated in
air, the membrane’s behavior in water must be estimated.
s 4HE$/CALIBRATIONPROCEDUREISVERYSENSITIVETOCHANGESIN
temperature. Ideally, it should be done in an area protected from
direct sunlight and away from ventilation ducts.
s 4HENATUREOFTHESENSORMEMBRANEINmUENCESTHERESPONSE"E
sure to note the membrane thickness before starting the calibra-
TION)FNOTHICKNESSISINDICATEDTHEMEMBRANEISMIL4EmON
Membrane thickness is more important with a 100% calibration in
air.
DISSOLVED OXYGEN QUICK CAL
The procedure to Quick Cal the polarographic D.O. sensor, along with
other Basic sensors, is in Section 3, Getting Started. This is a single-
point 100% calibration in air (saturated with water).
The following traditional calibration is recommended for use when
s THEUSERISREQUIREDTOENTERASPECIlCSTIMULUSATTHECALIBRATION
temperature and pressure,
s CALIBRATIONINWATERISPREFERRED
s ACALIBRATIONPOINTISNEEDED
TRADITIONAL DISSOLVED OXYGEN CALIBRATION PROCEDURE
You may select a 1-point or a 2-point calibration. The first point (100%
saturation) may be taken in air or in water.
Prepare the MP TROLL 9500 for water or air calibration as described
in Steps 1-6 on the following page.
SECTION 13: DISSOLVED OXYGEN—POLAROGRAPHIC
I did a Quick Cal. Why should I recalibrate D.O.?
The D.O. Quick Cal, especially if done through to stability,
can provide accurate measurement results. However, some
procedures require a look-up table for the stimulus at a given
temperature and pressure. This can be done in the traditional
D.O. calibration. Also, better measurement results will be
obtained when the 100% calibration is done in water saturated
with air. This procedure is not provided for in Quick Cal. In addi-
tion, the traditional calibration provides for a 0% (0 ppm, 0 mg/L)
calibration, which is recommended when measuring very low
D.O. values.
A:
Q:
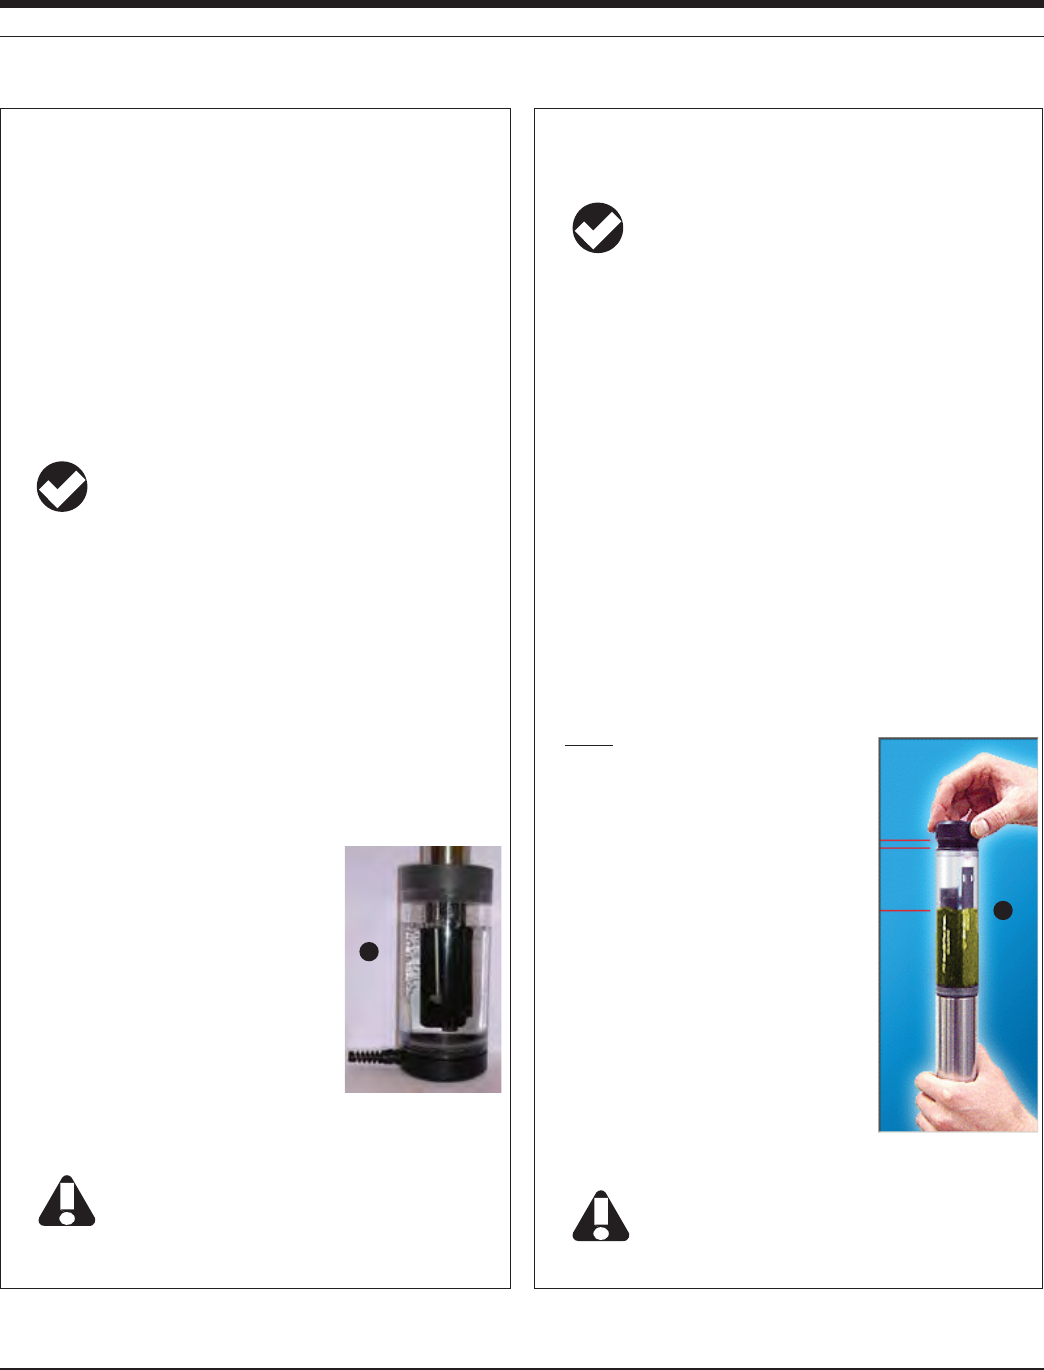
82
TROLL 9500 Operator’s Manual 0095110 rev. 007 01/09
SECTION 13: DISSOLVED OXYGEN—POLAROGRAPHIC
Preparation for 100% D.O. Calibration in Water
The bubbler cal kit for the Polarographic D.O. sensor comes with
(1) Battery-powered air pump and 2 alkaline D-cells, (2) Bubbler
cup with aquarium stone, tubing, check valve and pinch valve, (3)
Grey PVC adapter to support the TROLL 9500 in the top of the
bubbler cup.
1. Install the batteries in the portable air pump as shown in the
diagram on the inside of the lid.
2. Fill the bubbler container almost to the top with clean water. The
optimum amount depends on the volume of the sensors installed
in the MP TROLL 9500.
TIP: Tap water is fine, unless it is high in salinity. It is easier
to achieve 100% oxygen saturation in low-salinity water.
Distilled water is readily available and works well.
3. About 10 minutes before calibration, turn on the bubbler. Regu-
late bubbling with the pinch valve. For best results, run at the full
mOWRATETOACHIEVESATURATIONAFTERMINUTESYOUCANUSETHE
control valve to match the water turbulence conditions expected
in the field.
4. Before beginning the calibration procedure, note the membrane
thickness stamped on the membrane module.
5. With the D.O. sensor installed and plugs or sensors in the
other sensor ports, rinse the front end of the MP TROLL 9500
thoroughly in clean water to remove contaminants and traces of
mUIDSUSEDFOREARLIERCALIBRATIONS
6. When ready to calibrate, place the adapter
securely in the top of the bubbler housing
and insert the front (sensor) end of the MP
TROLL 9500 into the adapter.
s )NSURETHE$/SENSORISNOTINTHE
aeration path. Rotate as necessary to
prevent air bubbles from collecting on
the membrane surface.
s )NSURETHETEMPERATURESENSORISSUBMERGEDATLEASTv
mm) in the aerated water.
Allow a few minutes for the temperature to stabilize,
especially if you plan to enter a temperature dependent
value from a look-up table.
6
Preparation for 100% D.O. Calibration in Air
TIP: Before beginning the calibration procedure, check
the side of the membrane module for the membrane
thickness.
1. With the D.O. sensor installed and plugs or sensors in the
other sensor ports, rinse the front end of the MP TROLL 9500
thoroughly in clean water to remove contaminants and traces of
mUIDSUSEDFOREARLIERCALIBRATIONS
2. Dry the D.O. sensor membrane by shaking the probe and/or
gently wiping with a soft swab or the corner of a tissue.
3. Rinse the empty Cal Cup and attach it to the MP TROLL 9500.
Thread the Cal Cup onto the body until it is seated against the
o-ring, then back off slightly to avoid overtightening.
4. Invert the TROLL with Cal Cup attached and remove the black
end cap from the Cal Cup.
5. Gently fill the Cal Cup with clean water until the temperature
sensor is completely covered and the membrane at the tip of the
D.O. sensor is in air. If any water splashes onto the membrane,
gently blot the center of the membrane
with a clean cotton swab or the corner of
a soft lint-free tissue.
6. Loosely attach the end cap to the Cal
Cup. For proper venting, a small hole in
the threads of the cap should be at least
partly visible to achieve ambient pressure
conditions.
You may wish to use a clamp or other
support to maintain the TROLL 9500 in
this inverted position.
Allow a few minutes for the temperature to stabilize,
especially if you plan to enter a temperature dependent
value from a look-up table.
6
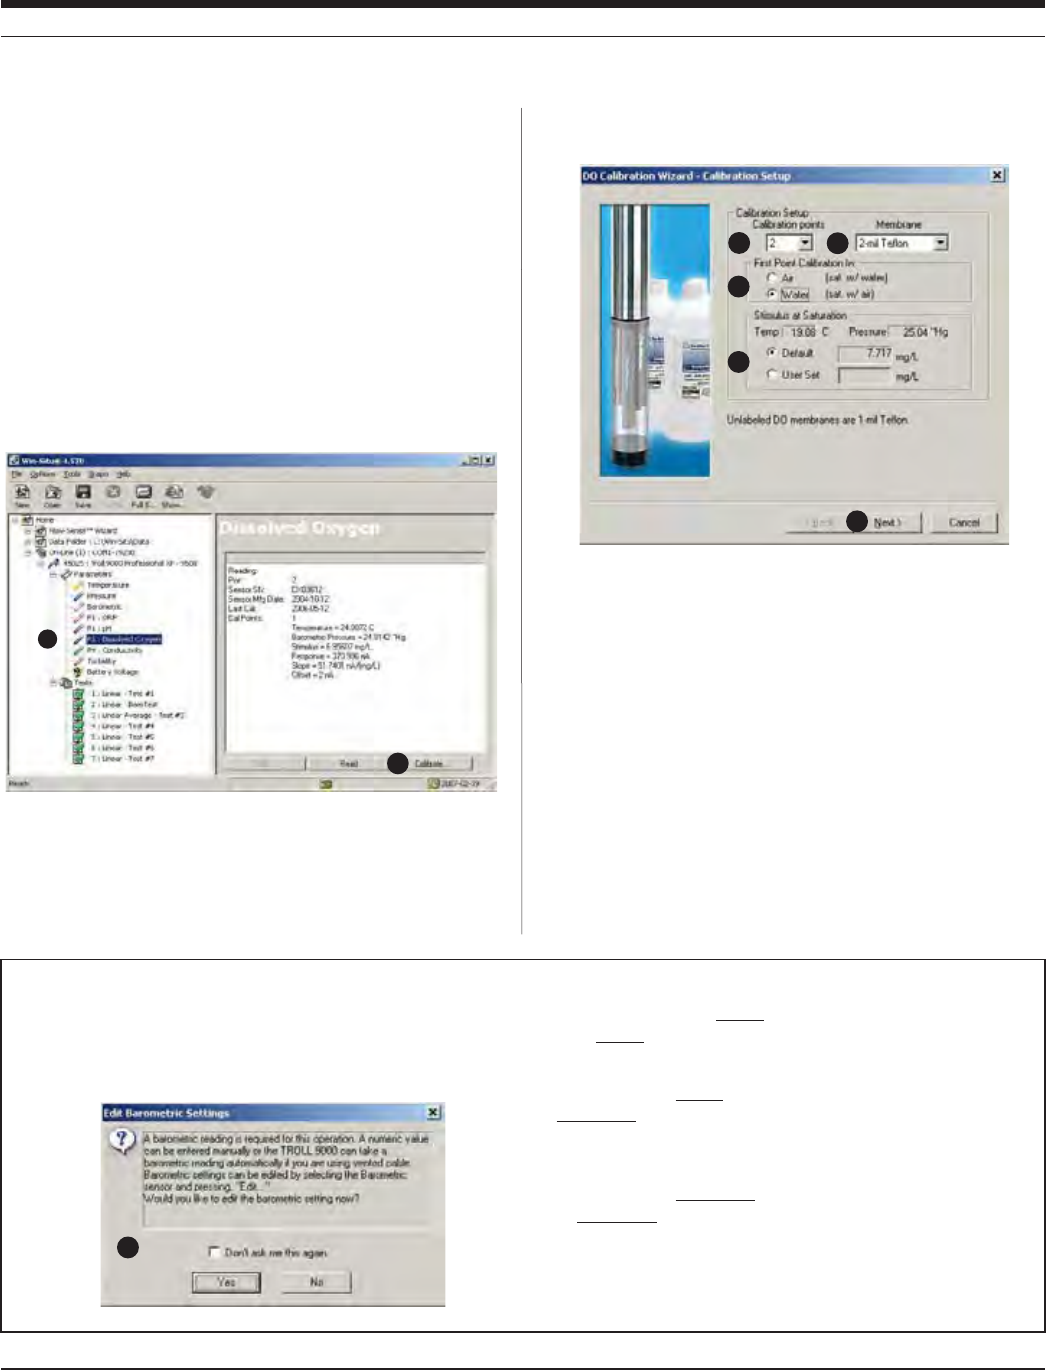
83
TROLL 9500 Operator’s Manual 0095110 rev. 007 01/09
7. If not already connected, connect the MP TROLL 9500 to a PC,
launch the software, and “find” the device. Win-Situ screens are
illustrated here. The Pocket-Situ interface is similar, with the Navi-
gation tree at the top and the Information pane below it.
8. Select the MP TROLL 9500 in the Navigation tree.
The software will automatically detect and display the installed sen-
sors.
9. Select Dissolved Oxygen in the Parameters list.
The sensor serial number (SN) and recent calibration information is
displayed, as shown in the screen below.
10. Select Calibrate.
11. Before the DO Calibration Wizard starts, you will be asked how
you want to handle barometric pressure. See the box below.
After dealing with barometric pressure the D.O. Calibration Wizard
displays a screen like the one below:
12. Select the number of calibration points.
1 point—100% D.O.
2 points—100% and 0% D.O.
13. Select the membrane type (stamped on membrane module, if not,
ITSMIL4EmON)FCALIBRATINGINWATERTHEMEMBRANETHICKNESSIS
not crucial. When calibrating in air, be sure the correct membrane
type is selected.
14. Select Air or Water as the medium for the first calibration point.
15. Select the stimulus at saturation:
s $EFAULT4HISVALUEISCALCULATEDBYTHESOFTWAREATTHECURRENT
temperature and barometric pressure.
s 5SER3ET%NTERAVALUEFROMALOOKUPTABLEIFREQUIRED
12 13
16
14
15
SECTION 13: DISSOLVED OXYGEN—POLAROGRAPHIC
Barometric pressure is important in converting measurement of D.O.
concentration to percent saturation, and a value is required for accurate
calibration. If the TROLL 9500 cable is vented, an accurate barometric
pressure value can be read from the onboard barometric pressure sensor. If
the TROLL cable is non-vented, then a barometric pressure value should be
entered manually.
Do one of the following:
s )FTHE42/,,ISONvented cable now and will take measurements
using vented cable, click No — and you may want to check the “Don’t
ask me this again” box.
s )FTHEDEVICEISONvented cable now but will take measurements using
non-vented cable, click Yes. In the Edit Barometric Channel screen,
check the box indicating non-vented cable for measurements but vented
cable for calibration/programming.
s )FTHEDEVICEISONnon-vented cable now and will take measurements
on non-vented cable, click Yes. In the Edit Barometric Channel screen,
check the box indicating non-vented cable for measurements and enter a
barometric pressure value. For help in supplying information if the cable
is not vented, see Section 9, Monitoring Barometric Pressure.
10
9
11

84
TROLL 9500 Operator’s Manual 0095110 rev. 007 01/09
16. Click Next to continue. A screen like this will be displayed:
17. Select Run to begin stabilization for the first calibration point.
The display will continuously update as readings are taken and
compared against the stabilization criteria.
s 3TATUSINDICATORS
NOT TESTED is displayed until you begin the calibration by
selecting Run.
UNSTABLE indicates the sensor response does not meet the
criteria for a valid calibration point.
NOMINAL indicates the sensor deviation meets early stabiliza-
tion criteria.
The Accept button becomes available when nominal stability is
achieved. You may accept the early value, or wait for com-
plete stability. If you accept the early value, the status will be
designated “USER SET” in the calibration report. (For more on
calibration reports, see “Calibration History” in Section 10.)
STABLE is displayed when the readings have stabilized suffi-
ciently to take a valid calibration point. The calibration proceeds
automatically to the next screen.
s 3ENSOR2EADING4HECURRENTSENSORRESPONSEINNANO!MPS
s 3ENSOR$EVIATION#HANGEINRESPONSEBETWEENTHELASTREAD-
ings. This enables you to follow the progress of the stabilization,
but the deviation from the previous reading is not necessarily the
best indicator of stability as the software is looking at longer-term
trends.
s #URRENTTEMPERATUREANDBAROMETRICPRESSUREARESHOWNTHESE
values are used to calculate the stimulus.
TIP: If the calibration stimulus was entered from a look-up
table at step 15 and the temperature is not as expected, you
may select Stop, then Back to retrieve the Setup page and
re-enter the User Set stimulus.
18. When readings have stabilized (or you click to Accept the Nomi-
nal result), the calibration will advance automatically.
If doing a 1-point calibration, go to step 20.
For a 2-point calibration, the Wizard displays a screen similar to
the one shown below and waits for you to situate the sensor in
oxygen-depleted medium—either the Cal Cup filled with sodium
sulfite solution, or a nitrogen-saturated water bath.This time, the
D.O. sensor membrane should be completely immersed in solu-
tion, as well as the temperature sensor.
Allow about 15 minutes for the sensor to stabilize in the medium.
19. Select Run to begin the stabilization for the 0% calibration point.
Controls and status indicators are the same as for the first calibra-
tion point (step 17).
In true 0% conditions, the sensor reading will be 10 nA or
less. If the sensor needs maintenance or there is oxygen in
the medium, readings will be higher than 10 nA and
complete stability will never be reached. If an accurate 0% calibration
is important to your application, do not accept Nominal. Cancel the
calibration, perform sensor maintenance and/or check the conditions,
and repeat the calibration.
SECTION 13: DISSOLVED OXYGEN—POLAROGRAPHIC
17
19
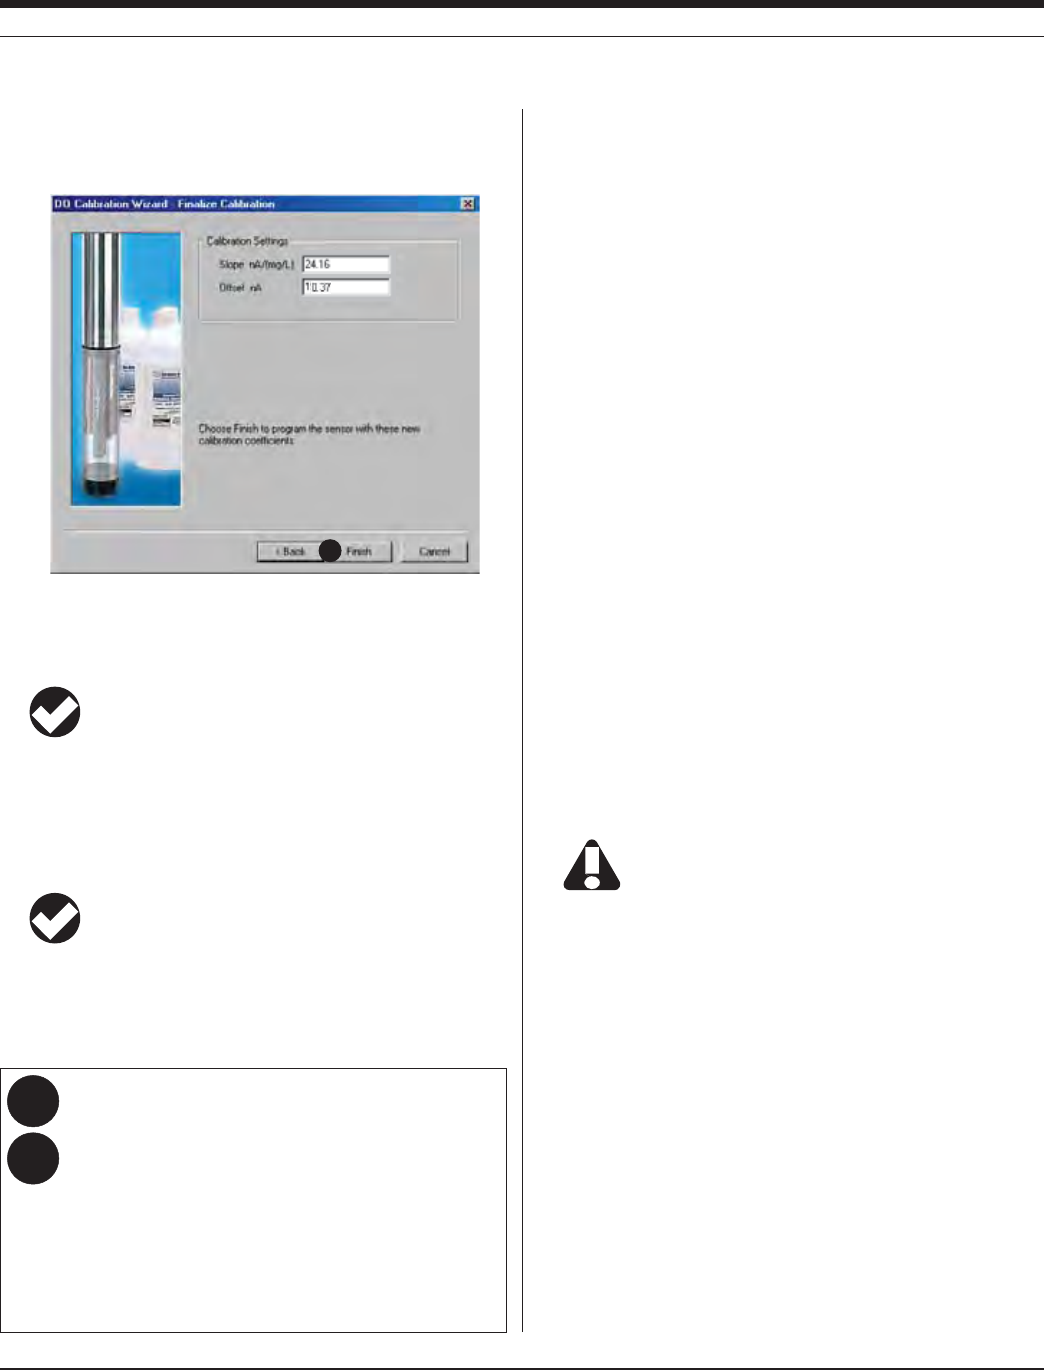
85
TROLL 9500 Operator’s Manual 0095110 rev. 007 01/09
20. When readings have stabilized (or you Accept the Nominal
value), the final screen is displayed. The calculated sensor slope
and offset are shown.
21. Select Finish to program the sensor with the new calibration coef-
ficients. The values will be written to the sensor and you will be
asked if you want to see the calibration report.
TIP: You can look at the calibration report right after
calibrating, or at any time. See “Calibration History” in
Section 10 for details.
Rinse the sensor and front end of the instrument very thoroughly after
calibrating in sodium sulfite solution. A good way to do this is to fill the
Cal Cup with water, attach to instrument, and shake vigorously. This
may need to be done a couple of times.
TIP: The calibration solution may be flushed down the drain
with running water, or saved in a separate container and
used to rinse the sensors the next time you calibrate with the
same solution.
After everything is thoroughly rinsed, the D.O. sensor is ready se.
Options for storing the sensor:
We recommend you leave the D.O. sensor installed in the instru-
ment; this will assure you are able to take fast D.O. measurements on
demand. A little water (distilled, deionized, or tap) or a damp sponge in
the Cal Cup will keep the sensor membrane moist.
Remember that, as long as the D.O. sensor is installed, it is being
conditioned.
If the sensor is removed from the instrument and then re-installed,
conditioning will begin as soon as the sensor is detected by the instru-
ment and displayed in the software.
SENSOR SLOPE AND OFFSET
The slope of a properly functioning sensor as calculated during the
calibration process will typically be in the following ranges, depending
on the membrane thickness:
1-mil membrane: between 30 and 67 nA/(mg/L)
2-mil membrane: between 15 and 34 nA/(mg/L)
If the calculated slope is much outside the stated range, the sensor
may need maintenance. Refer to “Sensor Care and Handling” below.
The default offset for Quick Cal and 1-point calibrations is 2 nA.
Offsets for 2-point calibrations should fall under 10 nA.
UNITS AND CALCULATED MEASUREMENTS
Four units are available for dissolved oxygen:
TIP: To change unit preferences: In Win-Situ, select
Preferences on the Options menu. In Pocket-Situ, select the
Home site, then tap Setup in the command bar.
s /XYGENCONCENTRATIONINMILLIGRAMSOFOXYGENPERLITEROFWATER
(mg/L). Since a liter of pure water weighs 1000 grams, and a
milligram is 1/1000 of a gram, this is equivalent to ppm (parts per
million).
s /XYGENCONCENTRATIONINMICROGRAMSOFOXYGENPERLITEROFWATER
(μg/L).
s /XYGENCONCENTRATIONINMICRO-OLARÊMOL,MG,X
s /XYGENSATURATIONin % —100% D.O. being the maximum amount
of oxygen that can be dissolved in water at a given atmospheric
pressure, water temperature, and salinity. % saturation output is
automatically corrected using the TROLL 9500’s temperature,
conductivity, and barometric pressure values (from a baro sensor
on vented cable or from a user-entered input). If no conductivity
sensor is present, salinity is assumed to be zero.
SECTION 13: DISSOLVED OXYGEN—POLAROGRAPHIC
Why does it take so long for the D.O. 100% to stabilize in
air?
Paying attention to several factors can assure the shortest
stabilization times possible within the stability algorithm:
s 4HESENSORMEMBRANEISPERFECTLYDRY
s 4HEAMBIENTTEMPERATUREISSTABLE
s 4HETEMPERATURESENSORISSUBMERGED
s 4HESENSORHASBEENFULLYCONDITIONED
If these conditions are met, the sensor response should stabi-
lize in 6-15 minutes.
20
A:
Q:

86
TROLL 9500 Operator’s Manual 0095110 rev. 007 01/09
USAGE RECOMMENDATIONS AND CAUTIONS
The amount of oxygen that can be dissolved in water decreases at
higher temperatures and decreases with increasing altitude (i.e., as
barometric pressure drops) and salinity. In other words, as water be-
comes warmer and saltier, it can hold less and less dissolved oxygen.
During tests that include the D.O. channel, the MP TROLL 9500
automatically measures barometric pressure and temperature for
compensation of D.O. readings.
The barometric pressure value at the time of calibration is stored in
the sensor and will be used to correct D.O. readings for weather-
INDUCEDPRESSUREmUCTUATIONSTAKENATTHESAMERELATIVEBAROMETRIC
pressure as the calibration. However, the large changes in barometric
pressure due to changes in elevation are best accommodated by per-
forming a recalibration. If you calibrate at sea level, for example, and
use the instrument in the mountains, you should perform a recalibra-
tion at the new altitude.
Be sure to supply a barometric pressure value to correctly
calculate dissolved oxygen measurements if the sensor will
be attached to suspension wire or non-vented cable. This
can be done during calibration or prior to setting up a test.
To assure you are able to take fast D.O. measurements on demand, it
is best to leave the D.O. sensor installed in the MP TROLL. This takes
full advantage of the conditioning and polarization that was accom-
plished during calibration. After replacing the TROLL 9500 batteries,
be sure to power the sensor for an hour or two before use, especially
if the batteries were out for a while.
During the first day, some drift is to be expected. After 24 hours or so,
the D.O. values can be expected to stabilize.
The D.O. sensor, like the other water-quality sensors, has been tested
to 350 psi pressure (246 m, 807 ft). We recommend gradual submer-
sion and retrieval—no faster than 4 ft per second.
STIRRING
Polarographic D.O. measurements drop in very stagnant water due to
depletion of oxygen next to the membrane. A slight perturbation to the
system will cause the D.O. measurements to return to normal.
Stirring is not necessary for a hand-held instrument, an instrument
ATTACHEDTOABOATORmOATINGOBJECTORINANYOTHERSITUATIONWHERE
the water is moving.
Stirring is recommended if the instrument is anchored to a fixed struc-
ture in stagnant conditions—for example, attached to a pier in a calm
lake that has no underwater currents. If the wind is blowing and waves
are slightly moving the cable, then stirring is probably not necessary.
Attaching the Stirrer
Install the stirrer accessory on the MP TROLL
9000 as follows:
1. Remove the nose cone from the MP TROLL
9500 and set it aside.
2. Screw the top of the stirrer (propeller end) to
the stainless steel restrictor in place of the
nose cone.
Starting the Stirrer
The stirrer is powered by two alkaline D-
cells (installed). To start the motor, tighten
the end cap.
The magnetic stir bar in the propeller
compartment will start to spin. The stir bar
is protected by a guard plate that may be
removed for cleaning if necessary.
TIP: If the stir bar does not start spinning, try giving it a
gentle nudge by sliding a narrow tool such as a screwdriver
or key between the protective bars of the guard plate.
To turn the stirrer off, back off the end cap until the stir bar stops spin-
ning.
Stirrer
Propeller
compartment
Battery
compartment
Motor
compartment
End cap
jl
off on
When do I need to stir and when can I skip it?
Use a stirrer for best results when measuring D.O. in still or
stagnant water.
If the water (or the person holding the instrument) is mov-
ing at all, you can probably safely skip the stirring. Any water
movement, as for example when the instrument is hand-held,
eliminates the need for the stirrer.
SECTION 13: DISSOLVED OXYGEN—POLAROGRAPHIC
Body
Restrictor
Stirrer installed
in place of nose
cone
A:
Q:
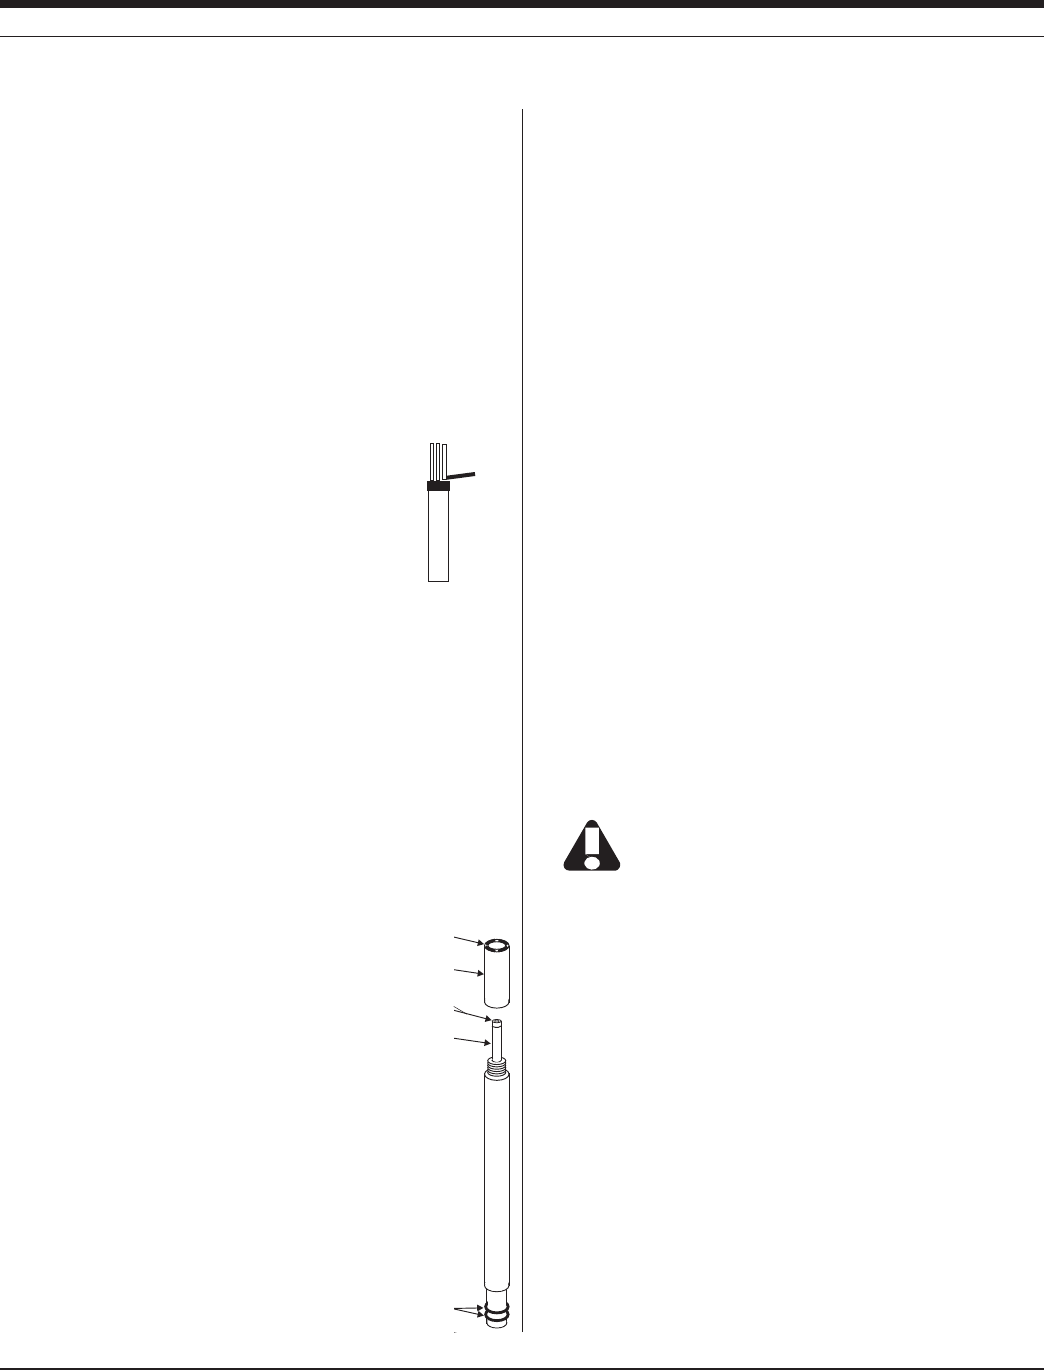
87
TROLL 9500 Operator’s Manual 0095110 rev. 007 01/09
SENSOR CARE AND HANDLING
The D.O. sensor kit includes the following items for routine mainte-
nance of the D.O. sensor:
s EXTRAMEMBRANEMODULE
s ELECTRODElLLINGSOLUTION+#LELECTROLYTE
s CLEANINGSOLUTIONANDBRUSH
s POLISHINGSTRIPSFORCATHODE
s STORAGEBOTTLE
s ORINGLUBRICANT
SENSOR REMOVAL
Position the yoke of the sensor removal tool at the point
where the sensor meets the sensor block and pry the
sensor upward.
Always handle the sensor by the sides. Avoid touching
the membrane at the sensor tip.
MAINTENANCE/INSPECTION
Inspect the sensor and membrane if readings begin to drift.
s #HECKFORDISCOLORATIONOFTHEELECTRODESDUETOSILVERCHLORIDE
(AgCl) deposition.
s )NSPECTTHEMEMBRANEFORINTEGRITYOFTHESURFACEFORTHEPRESENCE
of algal growth or other contaminants, for crystallization that may
indicate a leak in the membrane, and to ensure no air bubbles are
trapped under the membrane.
CLEANING THE ELECTRODES
Remove the membrane module and clean the electrodes as follows:
Cathode. Use a polishing strip to buff
the platinum cathode until it is shiny. This
removes any deposits, increasing the
chemically active surface of the electrode
for a stronger D.O. signal.
Anode. If the sensor appears to be exces-
sively discolored from its original matte
grey color, clean the anode with ammonia
and a soft brush. Extreme discoloration
may be removed by soaking for a half-hour
in ammonia before cleaning with a brush.
The surface of the anode should appear
uniform, but not necessarily mirror-like.
SECTION 13: DISSOLVED OXYGEN—POLAROGRAPHIC
Regular cleaning will prevent pitting of the anode surface, caused
by accumulated silver chloride deposition. Severe pitting cannot be
removed; the sole remedy is to replace the sensor.
After cleaning, rinse thoroughly and shake to dry. Then fill and attach
a new membrane module as follows.
REPLACING THE MEMBRANE MODULE
The D.O. sensor performs best in clean water. In environments with
high organic content, the membrane can become fouled. Rips, tears
and other damage will also affect membrane performance. For best
results, replace the membrane when the slope and offset calculated
during calibration change dramatically.
The current applied is so small that the electrolyte solution can be
expected to last longer than the membrane in most applications
To replace a membrane module:
1. Make sure the area around port 2 is free of dirt and moisture, then
remove the sensor. Remove and discard the used membrane
module.
2. Inspect and clean the sensor as needed (see above).
3. Fill a new membrane cap with electrolyte and attach it to the sen-
sor. Refer to “Fill the Membrane Module” earlier in this section.
4. Install and condition the sensor. Refer to “Condition a Newly
Installed Sensor” earlier in this section.
Remember to condition the sensor for at least 2 hours,
preferably 10 hours, before recalibrating with a new
membrane. Even with all visible air bubbles removed, a
certain amount of gas will be trapped under the membrane. The
conditioning period will remove this excess oxygen.
SENSOR LIFE
The sensor body may be expected to last indefinitely so long as
the silver coating is not rubbed off the anode during cleaning. The
membrane module should be inspected regularly and replaced when
it shows wear or damage and when the slope and offset calculated
during calibration change dramatically.
STORAGE
Short-Term Storage (up to a two weeks)
Store assembled with membrane immersed in water. A suitable stor-
age bottle is included in the sensor box.
sensor
removal
tool
Cathode
Membrane
Membrane module
Anode
Polarographic
Dissolved
Oxygen
Sensor
o-rings

88
TROLL 9500 Operator’s Manual 0095110 rev. 007 01/09
SECTION 13: DISSOLVED OXYGEN—POLAROGRAPHIC
Long-Term Storage
Remove the membrane module, rinse with deionized water, cap and
store dry.
REFERENCES
Eaton, A.D., L.S. Clesceri, E.W. Rice, and A.E. Greenberg, eds., Stan-
dard Methods for the Examination of Water and Wastewater, 21st
edition, Washington, D.C.: American Public Health Association,
American Water Works Association, and Water Environment Fed-
eration, 2005. Section 4500-O G, Oxygen (Dissolved), Membrane
Electrode Method.
EPA, Methods for Chemical Analysis of Water and Wastes,
EPA/600/4-79-020, revised March 1983. Method 360.1, Oxygen,
Dissolved, Membrane Electrode. Approved at 40 CFR Part 136.
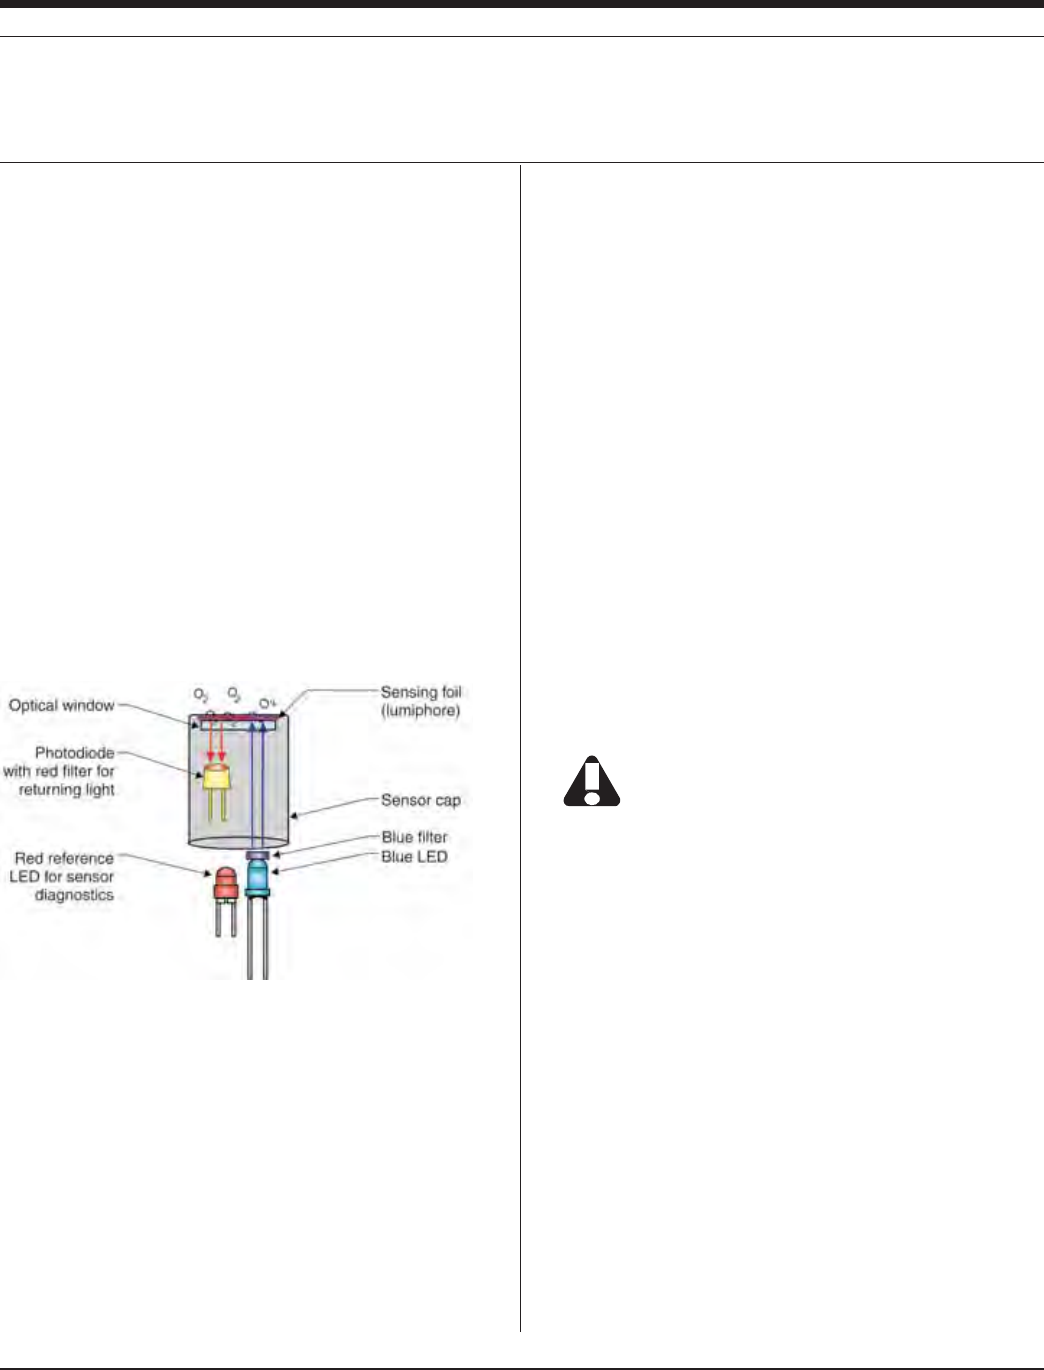
89
TROLL 9500 Operator’s Manual 0095110 rev. 007 01/09
THE RDO OPTICAL DISSOLVED OXYGEN SENSOR
The In-Situ RDO
® optical dissolved oxygen sensor measures dis-
solved oxygen using the principle of “dynamic luminescence quench-
INGv#ERTAINMOLECULESCALLEDhLUMIPHORESvmUORESCEWHENEXCITED
by light of a specific wavelength. Oxygen molecules act to quench this
mUORESCENCE4HELUMIPHORESINTHESENSORAREEMBEDDEDINAGAS
permeable sensing foil in a replaceable cap.
The sensor optics include a lens, blue LED and filter, red LED and
filter, and a photodetector. When the blue LED emits light, the sensing
foil emits red photons; the presence of oxygen in the foil causes a
reduction in red light detected by the photodiode. The phase differ-
ence between the blue excitation light and the returned red light is
measured, and the result is used to compute dissolved oxygen.
This method measures the “phase” (or delay) of the returned signal,
and is thus based on the “lifetime” rather than the “intensity” of the
luminescence.
COMPARISON TO POLAROGRAPHIC D.O. SENSOR
The RDO optical dissolved oxygen sensor offers several advantages
over the more traditional electrochemical cell. Its solid-state design
does not use membranes, filling solution, or other consumables. The
SENSORDOESNOTCONSUMEOXYGENTHUSITDOESNOTREQUIREmOWPAST
the sensor for measurement of DO. It does not require conditioning
before use. It exhibits very little drift, therefore it does not require
frequent calibration. In the absence of biofouling, it does not need
frequent routine maintenance.
OPTICAL MEASUREMENT OF DISSOLVED OXYGEN
The RDO Sensor and Salinity
Unlike an electrochemical cell, the RDO sensor does not respond to
changes in salinity. Since the absolute solubility of oxygen is lower
in saline water, it is advantageous to compensate DO concentration
readings (μg/L, mg/L, μmol/L) to ensure that the sensor accurately
reports the concentration of dissolved oxygen in the presence of sig-
nificant salinity. This can be accomplished by storing a salinity value in
the sensor before taking measurements. The compensation algorithm
is applied internally before concentration is reported. The degree of
compensation is minimal at very low salinities, and several percent of
reading at oceanic salinity levels.
The software prompts for a salinity value when you add a test. The
value can be changed at any time by selecting the RDO sensor in the
Navigation tree and clicking Edit, then “Edit RDO Salinity Value.”
SENSOR INSTALLATION
You will need—
s 42/,,WATERQUALITYINSTRUMENT
s !LKALINEBATTERIES
Alternatively use Saft LSH-20 3.6V lithium D cells. Use of
any other lithium battery will void the warranty of the RDO
sensor and the TROLL 9500.
s ,ATESTVERSIONOF42/,,lRMWARETHISCOMESLOADEDINA
new instrument, or is available with the download of new software
at www.in-situ.com
s 2$/SENSORPACKAGEWITH
s ,ATESTVERSIONOF7IN3ITU0OCKET3ITUSOFTWARETHISIS
shipped on a CD with a new TROLL 9500 instrument, or is avail-
able at www.in-situ.com.
s 42/,,#OMCOMMUNICATIONCABLE
s $ESKTOPLAPTOP0#OR2UGGED2EADER® handheld PC
UNPACK THE RDO CABLE CONNECT SENSOR
The RDO cable connect sensor arrives installed in a 3-part adapter/
restrictor/nose cone assembly. Remove the black restrictor and nose
SECTION 13: DISSOLVED OXYGEN—OPTICAL

90
TROLL 9500 Operator’s Manual 0095110 rev. 007 01/09
cone from the sensor and adapter assembly.
Nose cone
Restrictor
Adapter
RDO sensor
The soft Cal Cup insert enables calibration of the basic sensors when
the RDO sensor is installed. It contains
s !NEXTRASCREWFORTHEADAPTERPLATE
s !SPONGETOCREATEAMOISTENVIRONMENTFORTEMPORARYSTORAGE
of installed sensors that need to be kept wet
UNPACK THE RDO DIRECT CONNECT SENSOR
The RDO direct connect sensor ships in a box as shown below:
INSTALLING THE RDO SENSOR CAP
1. Remove the red protective dust cap from the sensor and save it for later use.
Protective dust cap Sensor cap
2. Use the supplied lens wipe to clean the lens of the sensor, if necessary.
3. Remove the RDO sensor cap from its shipping sleeve.
4. Align the arrow on the cap with the index mark on the sensor and
firmly press the cap onto the sensor, without twisting, until it seals
over the probe body.
Keep the cap in its sealed packaging until ready to install it.
Make sure that the o-ring is not pinched or rolled inside the cap.
The cap’s lifetime is 1 year after the first reading has been
taken. Install by the date printed on the packaging.
INSTALLING THE RDO SENSOR
1. If necessary, install batteries in the TROLL 9500 instrument.
Please exercise great care in handling, installing, and
shipping lithium batteries. Refer to the instructions, cautions
and MSDS packed with the batteries.
2. Remove the standard restrictor or Cal Cup from the TROLL 9500
instrument (if attached). This allows access to the sensor block.
3. Determine the installation port(s) for the RDO sensor. For the
cable connect, choose port 1 or 3. For the direct connect, you
must choose ports 2 and 3 (with the connector pins in port 3).
Cable Connect Direct Connect
4. Use the Sensor Removal tool to remove the plug or existing sensor
from the appropriate port. Port 1 is normally easier to access.
TIP: If installing in port 3, you may wish to remove the port 2
sensor temporarily (if installed).
5. Attach the RDO Sensor to the TROLL 9500:
a. Remove the soft cap from the connector end of the direct
connect RDO sensor. Attach the direct connect sensor and
any other remaining sensors (in ports 1 and 4), if applicable.
Proceed to step 6.
b. For the cable connect sensor, insert the front end of the TROLL
9500 instrument through the large hole in the adapter, alongside
the RDO sensor.
SECTION 13: DISSOLVED OXYGEN—OPTICAL
Lens wipe
Sensor cap
RDO sensor
Instruction sheet
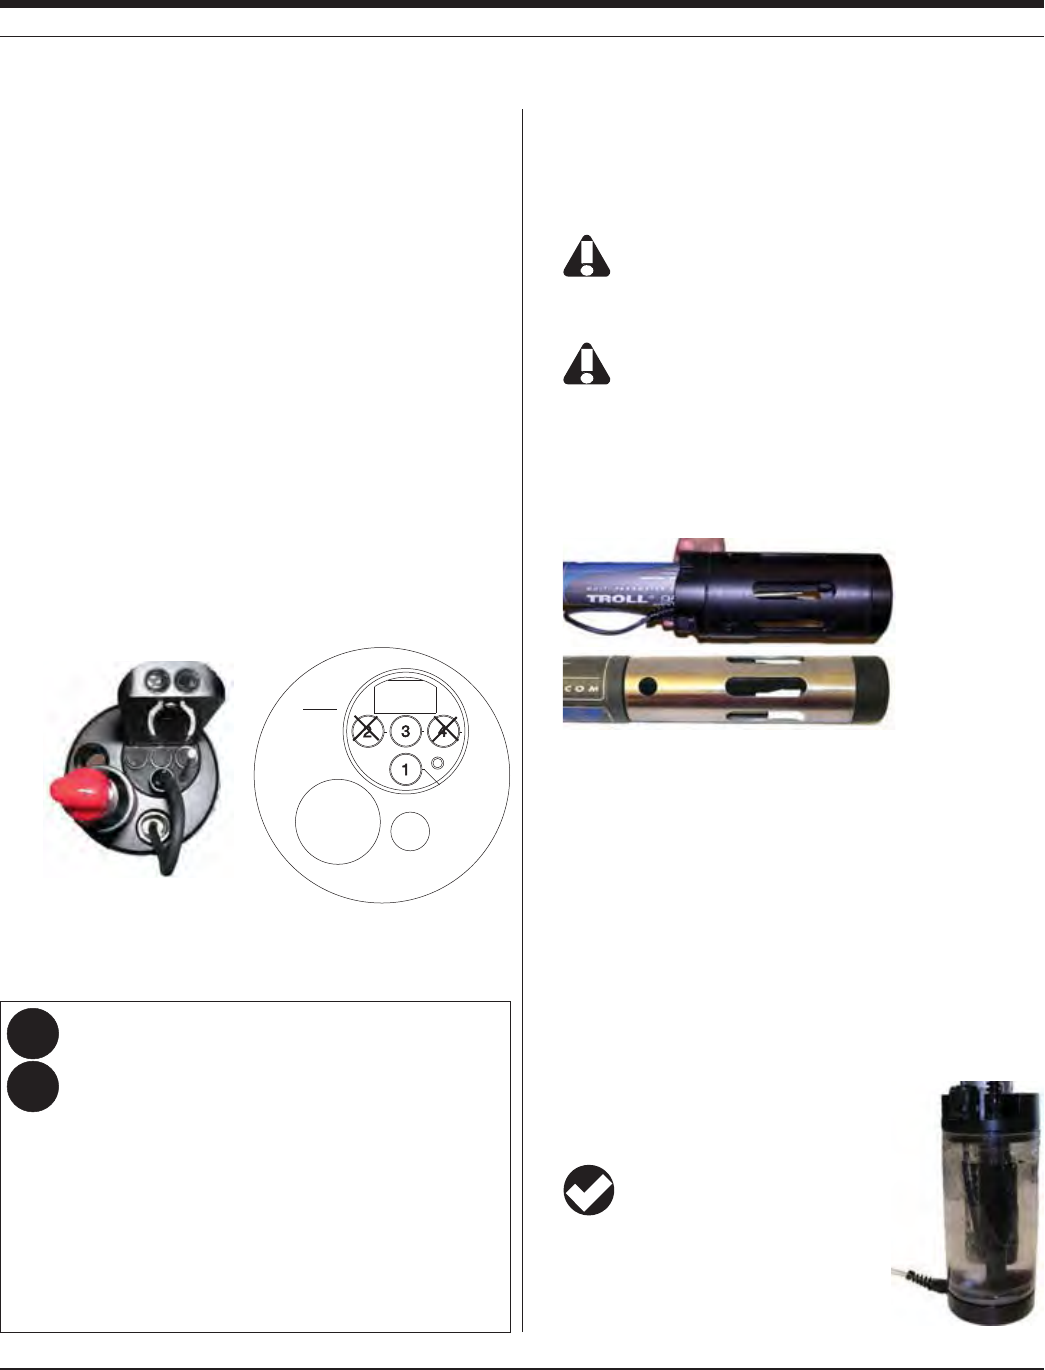
91
TROLL 9500 Operator’s Manual 0095110 rev. 007 01/09
C 0RESSUNTILTHEINSTRUMENTSSENSORBLOCKSURFACEISmUSHWITH
the adapter plate surface. Align the RDO sensor between sen-
sor ports 1 and 2. Align the open hole for the RDO sensor cable
beside port 1. Refer to the drawing below.
d. Tighten the adapter screw with a Phillips head screwdriver, not
overly tight.
e. Feed the short black cable up through the open hole, so it is on
the same side of the adapter plate as the TROLL 9500 sensor
block (refer to the drawing below).
f. Remove the soft cap from the connector end of the RDO sensor
cable harness. Align the mark on the side of the sensor with the
alignment mark on the selected port (1 or 3). Or just visually
align the 3-pin connector on the cable harness with the connec-
tor in the selected port.
g. Press the cable harness into the port until you feel it dock with
the con nector. When properly inserted a small gap (width of the
sensor removal tool) remains between the instrument body and
the widest part of the cable harness, for ease of removal.
Connected to the TROLL 9500, the RDO sensor looks like this:
Top of
RDO
sensor
Pressure/
Turbidity
Not to scale
Pull cable through
this hole
TROLL 9500
sensor block
RDO
adapter
plate Alignment
mark
SECTION 13: DISSOLVED OXYGEN—OPTICAL
6. Remove the RDO sensor cap from its shipping/storage sleeve.
Align the arrow with the index mark and firmly press the cap onto
the sensor, without twisting, until it seals over the probe body.
Make sure that the o-rings are not pinched or rolled between the
cap and the sensor.
Avoid allowing moisture, including atmospheric humidity,
inside the cap. Keep the cap in its sealed packaging until
you are ready to install it. Install promptly. Make sure that o-ring
grooves are dry and the o-ring is not rolled or pinched inside the cap.
The cap’s lifetime is 1 year after the first reading has been
taken with the TROLL 9500 instrument. Install by the date
printed on the packaging.
7. Perform a 2-point calibration on the sensor, as described below.
8. Attach the restrictor and nose cone. (If a turbidity sensor or
turbidity wiper are installed on the cable connect model, pull the
slack in the adapter cable up against the probe so that it does not
interfere with wiper movement or turbidity readings.)
Cable connect
Direct connect
9. If using the cable connect sensor, pull the slack in the adapter
cable up against the probe so that it does not interfere with wiper
movement or turbidity readings.
CALIBRATION
OVERVIEW
Nominal vs. Stable
To shorten the calibration time, you have the option to accept the
calibration when “Nominal” stability is achieved. If the early value is
accepted, the calibration point will be designated “USER SET” in the
calibration report. If the calibration report indicates that calibration
was performed through to stability then the instrument will operate as
intended by In-Situ Inc.’s quality standards. For
more on calibration reports, see Section 10 of
this manual.
TIP: During calibration, salinity is set to
0 PSU. A salinity value stored in the
sensor is restored after calibration is complete.
For more information on storing a fixed salinity
value in the sensor, see The RDO Sensor and
Salinity earlier in this chapter.
Why is there no Quick Cal option for the RDO sensor?
Quick Cal solution is used to calibrate sensors that are known
to drift and otherwise lose measurement accuracy on a time
scale shorter than desired for field use. Thus a Quick Cal pro-
vides a simple and potentially less accurate means to calibrate
the sensor but will improve the sensor accuracy as compared to
the state to which it may have drifted. It is less accurate but also
less costly than removing the instrument to a laboratory setting
to perform traditional multi-point calibrations.
Since the RDO sensor does not drift appreciably in media void
of biofouling, there is nothing to be gained from a Quick Cal. A
traditional 2-point laboratory calibration after cleaning or chang-
ing the sensor cap is adequate. If biofouling is detected, more
frequent cleaning and subsequent calibration may be needed.
Q:
A:
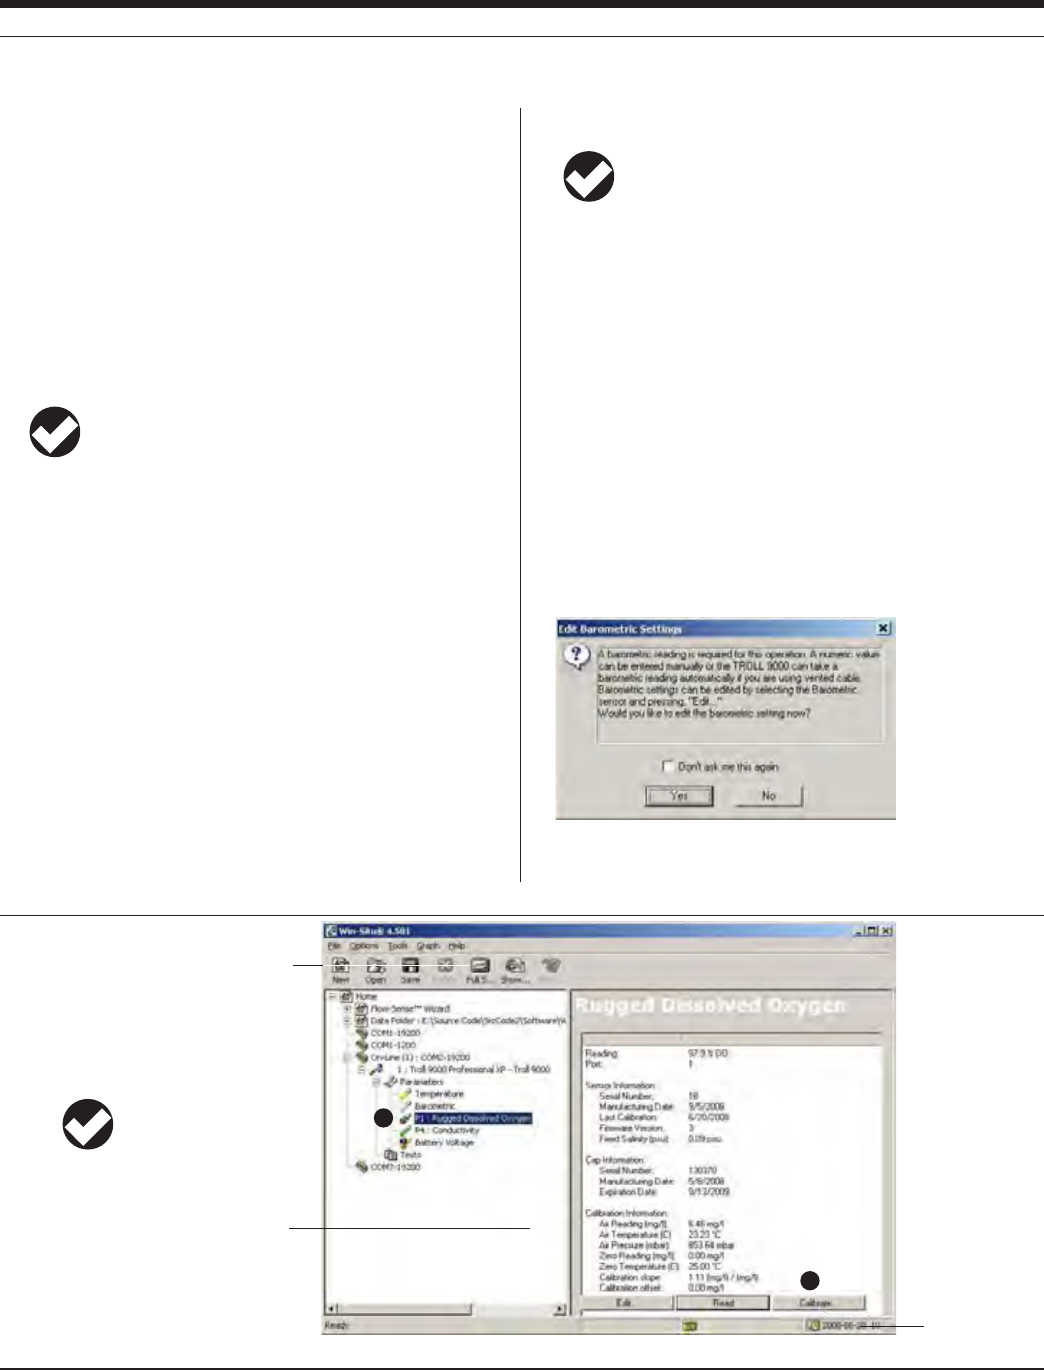
92
TROLL 9500 Operator’s Manual 0095110 rev. 007 01/09
Allow 5-10 minutes for temperature and oxygen equilibration.
TIP: The equilibration time depends on the condition of the
water with respect to temperature and exposure to air.
2. Connect the TROLL 9500 to a PC and establish a connection in
Win-Situ 4 or Pocket-Situ 4. Win-Situ screens are illustrated here.
The Pocket-Situ interface is similar, with the Navigation tree at the
top and the Information pane below it.
3. Select the TROLL 9500 in the Navigation tree. The software will
automatically detect and display the installed sensors.
4. Select Rugged Dissolved Oxygen in the Parameters list.
Information on the RDO sensor is shown, including its serial num-
ber (SN), the foil batch number, and recent calibration information,
as shown in the large screen at the bottom of the page.
5. Select Calibrate.
6. Before the RDO Calibration Wizard starts, you will be asked how
you want to handle barometric pressure. See the sidebar on
page 93.
CALIBRATION SOLUTIONS
100% DO calibration is performed in water saturated with air. For best
results, use the In-Situ RDO Bubbler Cal kit (Cat. No. 0048580).
0% DO calibration is performed in an oxygen-depleted solution. So-
dium sulfite (Na2SO3, Catalog No. 0017670) is available from In-Situ
Inc. Bubbled nitrogen may be used; in this case allow plenty of time
for the oxygen to be completely purged from the water.
RECOMMENDED CALIBRATION FREQUENCY
Calibration frequency is more predictable than with electrochemical DO
sensors, since the sensor does not drift appreciably. If the foil is not me-
chanically damaged or removed, calibration can last three months or more.
TIP: For best results, check the RDO sensor several times
per year in 100% air-saturated water.
TRADITIONAL 2-POINT CALIBRATION
Ideally, the RDO sensor should be calibrated under stable and con-
trolled conditions, like those found in a laboratory setting. However,
field calibration can also be performed. Calibration solutions should be
close in temperature to the sample matrix.
One or two calibration points can be taken. If only one point is taken,
the software uses the results of a previous calibration for the other point.
A 2-point calibration (100% and 0%) is recommended
s 7HENYOUEXPECTTOMEASUREVERYLOW$/VALUESMG,
s 7HENREQUIREDBY3TANDARD/PERATING0ROCEDURES
s !FTERREPLACINGTHESENSORCAPL
OXYGEN SATURATION POINT
1. Submerge the RDO sensor in a container of clean water aerated
with the In-Situ bubbler. Ensure that the sensor is completely
submerged and the sensor cap is not directly in the bubble stream.
4
5
Full Screen button
TIP: To see all of the infor-
mation pane, you can click
the “Full Screen” button on
the Win-Situ toolbar.
Device clock
SECTION 13: DISSOLVED OXYGEN—OPTICAL

93
TROLL 9500 Operator’s Manual 0095110 rev. 007 01/09
10. When readings have stabilized, the screen will appear similar to
the one below, and you have several choices:
s 3ELECTNext to display the Zero Oxygen Point screen. Continue
with step 11 to calibrate at 0%.
s 3ELECTNext, then Next again to finalize the calibration if you are
performing a one-point calibration. Go to step 14.
s 3ELECTRun to run the oxygen saturation point again if you
believe the sensor values are incorrect. Go back to step 9.
TIP: The warning box below will appear if the slope is out of
range. Repeat the 100% saturation calibration point.
ZERO OXYGEN POINT
11. Immerse the RDO sensor in an oxygen-depleted medium:
s 3ODIUMSULlTE.A2SO3) solution is generally reliable, if
somewhat messy. Use a laboratory beaker or In-Situ’s special
zero-point cal cup. Be sure the small well in front of the sensing
foil is filled with solution.
s .ITROGENBUBBLINGREQUIRESCONSIDERABLETIMEFOROXYGENTOBE
completely purged from the water.
s 3UBMERGETHESENSORCOMPLETELYANDCHECKTOBESURETHAT
there are no air bubbles on the sensing foil.
s !LLOWUPTOMINUTESFORTEMPERATUREEQUILIBRATION
SECTION 13: DISSOLVED OXYGEN—OPTICAL
7. Three calibration options appear. Select the first or second option:
s #ALIBRATE3TARTINGFROMVALUESSTOREDINTHESENSORUSERSETOR
factory defaults) for the 0% and 100% calibration, this allows the
user to redo one or both calibration points
s 2ESTOREDEFAULTSTHENCALIBRATE2ESTORESFACTORYDEFAULTSFOR
both 0% and 100%, then allows the user to redo one or both
calibration points.
s 2ESTOREDEFAULTSDONTCALIBRATE2ESTORESFACTORYDEFAULTSFOR
both
0% and 100%
saturation and closes the Calibration Wizard.
8. Follow the instructions for 100% oxygen calibration.
9. After allowing 5 to 10 minutes for temperature stabilization, click
the Run button. The display will continuously update as readings
are taken and compared against the stabilization criteria.
Barometric Pressure Options
Cable venting is essential to obtain accurate measurements, and the
software cannot tell if the cable is vented, so please take a moment
to supply this information. Do one of the following:
s )FTHE42/,,ISONVENTEDCABLENOWANDWILLBEDEPLOYED
on ented cable, click No — and you may want to check the
“Don’t ask me this again” box.
s )FTHEDEVICEISONVENTEDCABLENOWBUTWILLBEDEPLOYEDON
non-vented cable, click Yes. In the next screen, check the box
indicating non-vented cable for deployment but vented cable for
calibration/programming.
s )FTHEDEVICEISONNONVENTEDCABLENOWANDWILLBEDEPLOYEDON
non-vented cable, click Yes. In the next screen, check the box
indicating non-vented cable for deployment and enter a baromet-
ric pressure value.
For help, see Section 9, Monitoring Barometric Pressure.
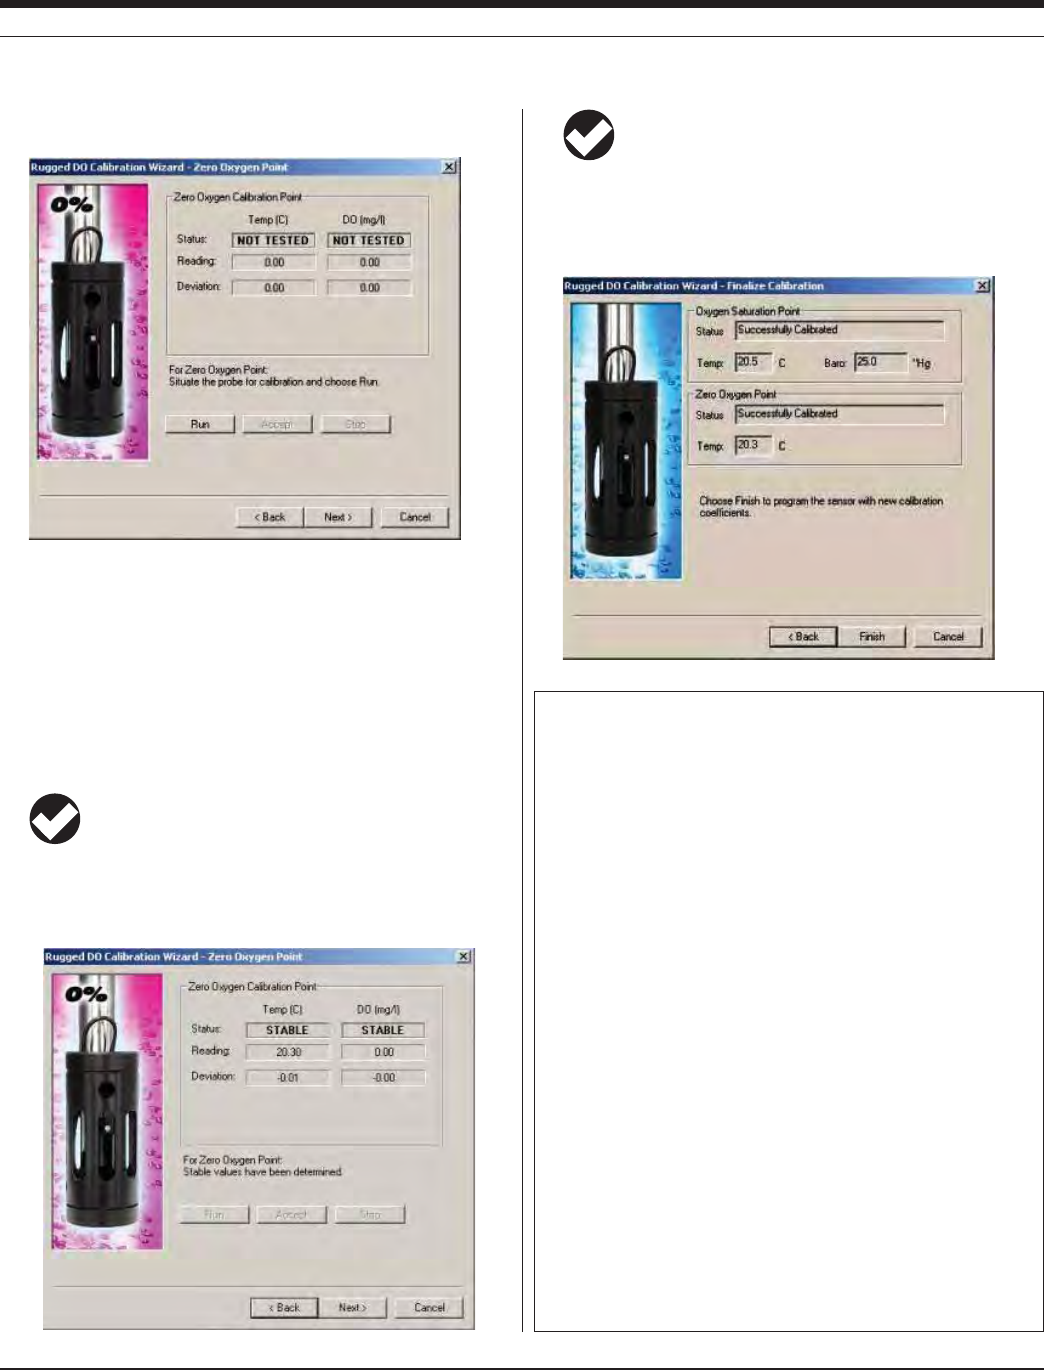
94
TROLL 9500 Operator’s Manual 0095110 rev. 007 01/09
TIP: A warning box will appear if the slope is out of range
(normal range is 0.9 to 1.1 with an offset of ±0.1). Repeat
the zero point.
FINALIZE THE CALIBRATION
14. The final calibration screen for a 1-point calibration at saturation
was performed. To finalize the calibration, click Finish.
SECTION 13: DISSOLVED OXYGEN—OPTICAL
12. When you are ready to take the calibration point, click or tap Run
in the Zero Oxygen Point screen.
The display will continuously update as readings are taken and
compared against the stabilization criteria. Controls and status
indicators are the same as for the 100% calibration point.
13. When readings have stabilized, the screen will appear similar to
the one shown in step 10, and you have two choices:
s 3ELECTNext to finalize the calibration. Continue with step 14.
s 3ELECTBack to calibrate the Oxygen Saturation point (step 9).
TIP: Sodium sulfite consumes oxygen aggressively. If
performing the oxygen saturation point next, be sure to rinse
the TROLL 9500 and RDO sensor thoroughly to avoid
cross-contamination.
s 3ELECTRun to run the oxygen saturation point again if you
believe the sensor values are incorrect. Go back to step 12.
Status indicators:
NOT TESTED appears until you begin the calibration by selecting Run.
UNSTABLE indicates the sensor response does not meet the criteria
for a valid calibration point.
NOMINAL indicates the deviation meets early stabilization criteria.
The Accept button becomes available when nominal stability is
achieved. You may accept the early value, or wait for complete stability. If
you accept the early value, the status will be designated “USER SET” in
the calibration report. (For more on calibration reports and the difference
between Nominal and Stable, see Section 10 of this manual.)
STABLE is displayed when the readings have stabilized sufficiently
to take a valid calibration point.
s 2EADING4HETEMPERATURESENSORRESPONSEISSHOWNINDEGREES
C, and RDO sensor response is shown in mg/L. Win-Situ auto-
matically detects stability in both parameters.
s $EVIATION#HANGEINRESPONSEBETWEENTHELASTREADINGS4HIS
enables you to follow the progress of the stabilization, but devia-
tion from the previous reading is not necessarily the best indicator
of stability as the software is looking at longer-term trends.
s #URRENTBAROMETRICPRESSUREINYOURSELECTEDUNIT
95
TROLL 9500 Operator’s Manual 0095110 rev. 007 01/09
SECTION 13: DISSOLVED OXYGEN—OPTICAL
The values will be written to the sensor and you will be asked if
you want to see the calibration report.
TIP: For more on Calibration Reports, see Section 10 of this
manual.
The RDO sensor is now calibrated and ready to take readings. To
confirm this, take a reading by selecting the RDO sensor in the Navi-
gation tree and clicking the Read button.
TIP: If the units for the reading are not what you expect, it is
easy to change the units selection: In Win-Situ, select
Preferences on the Options menu. In Pocket-Situ, select the
Home site, then tap Setup in the command bar.
Clean-up
Rinse the sensor and front end of the instrument very thoroughly after
calibrating in sodium sulfite solution to avoid cross-contamination. For
best results, always use fresh calibration solutions.
UNITS AND CALCULATED MEASUREMENTS
Four units are available for dissolved oxygen:
TIP: To change unit preferences: In Win-Situ, select
Preferences on the Options menu. In Pocket-Situ, select the
Home site, then tap Setup in the command bar.
s /XYGENCONCENTRATIONINMILLIGRAMSOFOXYGENPERLITEROFWATER
(mg/L). Since a liter of pure water weighs 1000 grams, and a mil-
ligram is 1/1000 of a gram, this is equivalent to ppm (parts per
million).
s
Oxygen concentration in micrograms of oxygen per liter of water
(μg/L).
This is equivalent to parts per billion (ppb).
s /XYGENCONCENTRATIONINMICRO-OLARÊMOL,MG,X
s /XYGENSATURATIONIN % —100% DO being the maximum amount
of oxygen that can be dissolved in water at a given atmospheric
pressure, water temperature, and salinity. The percent saturation
output is automatically corrected using the TROLL 9500 instru-
ment’s temperature, conductivity, and barometric pressure values
(from a baro sensor on vented cable or from a user-entered input).
If no conductivity sensor is present, salinity is assumed to be zero.
USAGE RECOMMENDATIONS AND CAUTIONS
The amount of oxygen that can be dissolved in water decreases at
higher temperatures and with increasing altitude (i.e., as baromet-
ric pressure drops) and salinity. In other words, as water becomes
warmer and saltier, it can hold less dissolved oxygen.
During tests that include the RDO channel, the TROLL 9500 instru-
ment automatically measures barometric pressure and temperature
for compensation of DO readings.
The barometric pressure value at the time of calibration is stored
in the sensor and will be used to correct DO readings for weather-
INDUCEDPRESSUREmUCTUATIONSTAKENATTHESAMERELATIVEBAROMETRIC
pressure as the calibration. However, the large changes in barometric
pressure due to changes in elevation are best accommodated by
performing a recalibration. If you calibrate at sea level, for example,
and deploy the instrument in the mountains, you should perform a
recalibration at the new altitude.
Exposure to direct sunlight can bleach the sensing foil over time but
this effect is minimized with the protection provided by the opaque
optical isolation layer. However, the frequent application of strong blue
light (blue LED during readings) will eventually have a bleaching effect
on the foil. In-Situ recommends sampling intervals of greater than 1
minute for long-term deployments.
Salinity
Since the absolute solubility of oxygen is lower in saline waters, it is
advantageous to compensate DO concentration readings (μg/L, mg/L,
μmol/L) to ensure that the sensor accurately reports the concentration
of dissolved oxygen in the presence of significant salinity. This can be
accomplished by storing a salinity value in the sensor before taking
measurements. The compensation algorithm is applied internally
before the concentration is reported. The degree of compensation is
minimal at very low salinities, and but may affect readings by several
percent at higher levels.
To store a salinity value in the RDO sensor, connect in Win-Situ 4 or
Pocket-Situ 4, select RDO in the Navigation tree, click Edit and in the
next screen select “Edit RDO Salinity Value.”
SENSOR CARE AND HANDLING
BIOFOULING
Organisms that produce or consume oxygen, if attached to the area
OFTHESENSINGFOILMAYARTIlCIALLYINmUENCETHESENSORSMEASURE-
ment of the oxygen in the surrounding water. In addition, the sensor’s
response time may be increased.
To avoid this the sensor should be cleaned at regular intervals de-
pending on the required accuracy and the fouling condition at the site.
96
TROLL 9500 Operator’s Manual 0095110 rev. 007 01/09
SECTION 13: DISSOLVED OXYGEN—OPTICAL
MAINTENANCE AND STORAGE
Cleaning the Sensor Cap
1. Leave the cap on the sensor!
2. Rinse the sensor with clean water from a squirt bottle or spray
bottle.
3. Gently wipe with a soft cloth or brush if biofouling is present.
4. If extensive fouling or mineral build-up is present, soak the cap
end in vinegar for 15 minutes, then soak in deionized water for 15
minutes.
Do not use organic solvents—they will damage the foil. Do
not remove the cap from the sensor prior to brushing.
After cleaning the sensor, perform a 2-point user calibration.
Cleaning the Optical Window (Perform only if changing the cap)
Remove the cap and gently wipe the window with the supplied lens
wipe.
Caution: Do not wet the lens area with water or any solution.
Cleaning the Sensor Body
With the sensor cap installed on sensor, gently scrub sensor body with
a soft brush. Soak in vinegar and DI water to remove mineral deposits
or extensive fouling as in step 4, above.
Storage
Prior to installation: Store in factory supplied container.
Installed: The RDO sensor can be stored wet or dry. When installed
with other sensors, it may be useful to store all sensors in a moist en-
vironment. In-Situ supplies recyclable plastic calibration and storage
sleeves, as well as calibration and storage vessels for this purpose.
Replacing the Sensor Cap
The sensor cap has a 1-year life after the TROLL 9500 instrument
takes its first RDO sensor reading. Replacement caps are available
from In-Situ Inc. or your authorized In-Situ distributor.
1. Pull the used sensor cap off of the sensor, without twisting.
2. Remove the existing o-rings from the sensor.
3. Use a lint-free cloth to remove any moisture from the sensor body.
Note: Ensure that there is no moisture in the o-ring grooves.
Avoid touching or cleaning the lens with anything other than
the supplied lens wipe.
RDO Sensor Summary
s 7HENAturbidity wiper is installed, be sure to pull the slack in
the RDO adapter cable back against the TROLL 9500 body so
it will not interfere with the wiper’s rotation.
s To calibrate the Basic sensors with RDO installed, fill the soft
plastic cal insert (it has an orange base) with calibration solu-
tion, slide it up around the sensors, including the RDO cable,
and use the RDO restrictor as a support during calibration.
s 4HE2$/SENSORWILLWORKPROPERLYONLYINport 1 or 3 of the
TROLL 9500. Remember that a combination pH/ORP sensor
will operate properly only in port 1, and a turbidity wiper acces-
sory only in port 3.
s "ASICsensors that require hydration (pH and pH/ORP) may
be stored in the calibration and storage sleeve for short periods
of time. For long-term storage, remove the RDO sensor—it is
not necessary to remove it from the adapter—with restrictor
and nose cone. Attach the standard TROLL 9500 Cal Cup with
a moist sponge in the bottom.
s 4HE2$/SENSORANDALL42/,,MATERIALSARESUITABLEFOR
MONITORINGINLOWmOWGROUNDWATERANDSURFACEWATERSITES
4. Use your finger to apply a layer of lubricant around the o-ring
grooves. Place the o-rings on the sensor. Apply another thin layer
of lubricant to the o-rings and grooves.
Note: Do not transfer grease to the lens or sensor pins.
5. Clean the lens on the sensor with the wipe provided in the kit and
allow to dry thoroughly. Inspect for scratches or dirt.
6. Remove the new cap from its sealed packaging and attach it to
the sensor, being careful to press firmly, without twisting, until
it seals over the probe body. Make sure that the o-rings are not
pinched or rolled between the cap and sensor.
7. Perform a 2-point calibration. No conditioning is required prior to
use.

97
Multi-Parameter
Water Quality TROLL®
0095110 rev. 007 01/09
TROLL 9500 Operator’s Manual
14 OXIDATION-REDUCTION POTENTIAL
Fluid ORP (mV)
Salt water aquarium ~ 350
(ARMFULTOAQUATICLIFE
Properly chlorinated
SWIMMINGPOOL
Typical ORP values
WHAT IS ORP?
Oxidation Reduction Potential (ORP) is a measure of a water system’s
capacity to either release or gain electrons in chemical reactions.
The process of oxidation involves losing electrons while reduction
involves gaining electrons. Oxidation and reduction (redox) reactions
control the behavior of many chemical constituents in drinking water,
wastewater, and aquatic environments. The reactivity and solubility
of critical elements in living systems is strongly dependent on redox
conditions. ORP values are used much like pH values to determine
water quality. While pH values characterize the relative state of a
system for receiving or donating hydrogen ions (acting as a base or
an acid), ORP values characterize the relative state of a system for
gaining or losing electrons. ORP values are affected by all oxidizing
and reducing agents, not just acids and bases.
WHY MEASURE ORP?
The effect that potable water has on plumbing is directly related to its
ORP value. Unfavorable values can cause excessive corrosion, lead-
ing to expensive repairs. ORP is one parameter that can be monitored
during the disinfecting process for drinking water, swimming pool
water, and spa water.
The life expectancy of bacteria in water is related to ORP. In fact,
studies have shown that the life span of bacteria in water is more
dependent on the ORP value than on the chlorine concentration. For
swimming pools at a normal pH value between 7.2 and 7.6, the ORP
value must be kept above 700 mV to kill unwanted organisms. Hypo-
chlorite or other oxidizing agents must be added when the ORP falls
below 700 mV. In contrast, natural waters need a much lower ORP
value in order to support life. Generally ORP values above 400 mV
are harmful to aquatic life. Ideally the ORP value in salt water aquari-
ums should be kept between 350 and 390 mV. ORP levels below 300
mV are to be avoided. An oxidizing environment is needed to convert
any ammonia (NH3) to nitrites (NO2
–) and nitrates (NO3
–). Ammonia
levels as low as 0.002 mg/l can be harmful to some fish species.
The determination of ORP is particularly worthwhile in water that
contains a relatively high concentration of a redox-active species, e.g.,
the salts of many metals (Fe2
+, Fe3
+) and strong oxidizing (chlorine)
and reducing (sulfite ion) agents. Thus, ORP can sometimes be
utilized to track the metallic pollution of ground- or surface water, or
TODETERMINETHECHLORINECONTENTOFWASTEWATEREFmUENT(OWEVER
ORP is a nonspecific measurement—that is, the measured potential
ISREmECTIVEOFACOMBINATIONOFTHEEFFECTSOFALLTHEDISSOLVEDSPECIES
in the medium. Because of this factor, the measurement of ORP in
relatively clean environmental water (ground, surface, estuarine, and
marine) has only limited utility unless a predominant redox-active
species is known to be present. Care is required not to “over-interpret”
ORP data unless specific information about the site is known.
THE pH/ORP SENSOR
The single-junction, three-electrode sensor uses a potentiometric
method to measure pH and ORP in a test solution. The pH electrode
consists of a pH-sensitive glass whose voltage is proportional to the
hydrogen ion concentration. The ORP electrode serves as an electron
donor or acceptor depending upon the test solution. The ref er ence
electrode supplies a constant stable output for comparison. Electrical
contact is made with the test solution using a saturated potassium
chloride (KCl) solution. The electrode behavior is described by the
Nernst equation:
Em = Eo - (RT/nF) ln {[ox] / [red]}
where
E
m is the potential from the ORP electrode,
E
o is related to the potential of the reference electrode,
R is the Gas Law constant,
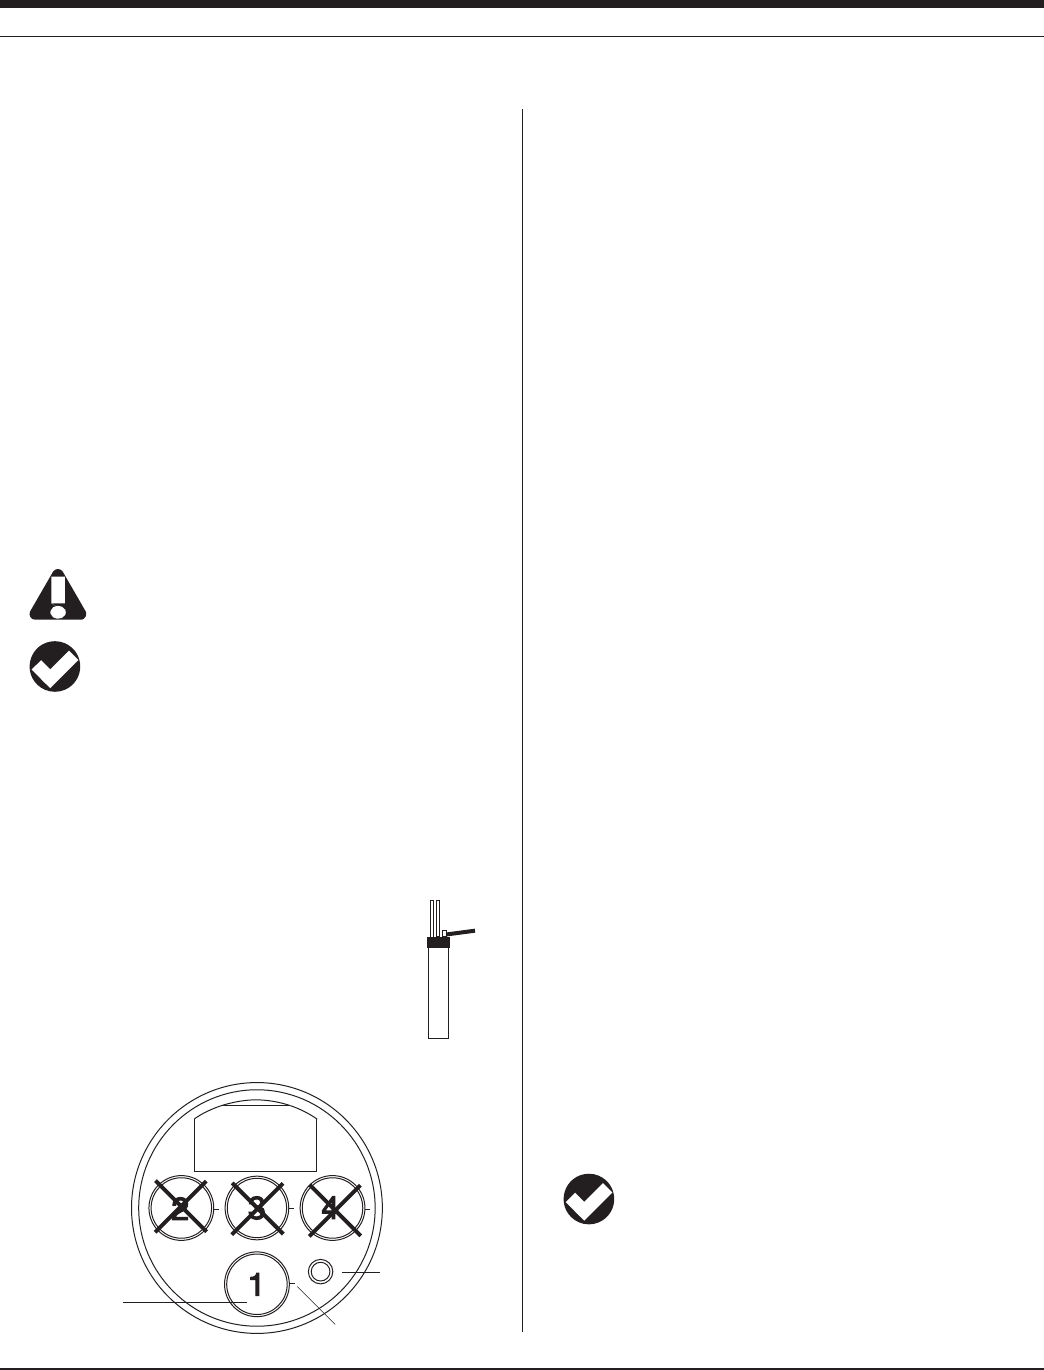
98
TROLL 9500 Operator’s Manual 0095110 rev. 007 01/09
sensor
removal
tool
Pressure/Turbidity
(or plug)
Temperature
Install pH/ORP
sensor in
port 1 only
alignment mark
pH/ORP Sensor Position
F is Faraday’s constant,
T is the temperature in Kelvin,
n is the number of electrons,
[ox] is the oxidant concentration in moles/L, and
[red] is the reductant concentration in moles/L.
Most natural waters contain many species that are involved in the
redox process so that it is not possible to calculate the ORP using
the Nernst equation. All redox species do however reach equilib-
rium. A Standard solution of known redox potential for a particular
ORP electrode is used to calibrate ORP. The sensor then gives a
calibrated response in mV when placed in a sample.
SENSOR INSTALLATION
The MP TROLL 9500 may be shipped with a pH/ORP sensor
installed. If installation is necessary, unpack and install the sensor in
port 1 of the MP TROLL 9500 as follows.
The combination pH/ORP sensor will work properly only
in port 1.
TIP: To ensure optimum response for a new or previously
stored sensor, rinse off the soaking solution, then soak the
sensor in clean water for at least 15 minutes before calibrating.
1. Remove the restrictor or Cal Cup from the front end of the TROLL
9500. This allows access to the sensor block shown below.
2. Remove the sensor hydration bottle and set aside for future use.
3. Rinse the sensor in clean water to remove the soaking solution.
Soak the sensor in clean water for at least 15 minutes before
calibrating.
4. Remove any moisture or dirt from the area around
port 1, then use the sensor removal tool to remove
the plug from the port. Retain the plug for future use.
5. Remove any moisture or dirt from the port connector with a clean
swab or tissue.
6. Remove the cap from the sensor connector. Check lubrication of
the o-rings. If they appear dry, apply a silicone lubricant.
7. Visually align the sensor connector pins with the port connector
pins.
8. Press the sensor firmly into the port until you feel it dock with the
port connector. When properly inserted a small gap (the width of
the sensor removal tool) remains between the widest part of the
sensor and the instrument body, for ease of removal.
CALIBRATION
OVERVIEW
A one-point calibration in a solution with a known potential at a given
temperature is sufficient to calibrate ORP. Software options:
s Quick Cal: Calibrates ORP (and optionally pH, polarographic D.O.,
and conductivity) at one time with one solution.
s Traditional calibration: A one-point calibration in a solution
specifically formulated for calibrating ORP. Results in calculation of
sensor offset.
s Default coefficients: Resets the sensor’s factory defaults. No
solutions are required.
Nominal vs. Stable
To shorten the calibration time, you have the option to accept the
calibration when “Nominal” stability conditions are achieved. If the
early value is accepted, the calibration point will be designated “USER
SET” in the calibration report. If the calibration was performed through
to stability (“STABLE” in the calibration report), the sensor will operate
as intended by In-Situ’s quality standards.
CALIBRATION SOLUTIONS
Only one solution is required for ORP calibration. Quick Cal and
ZoBell’s solution are available from In-Situ Inc. A custom solution may
be used in a Traditional calibration if its milliVolt value at the calibra-
tion temperature is known.
Please note that a pH/ORP sensor requires separate calibra-
tions for pH and ORP. The Quick Cal procedure produces
excellent results for ORP so long as the solution is stored as
recommended and used before its expiration date. After performing a
Quick Cal for ORP, we recommend a 2- or 3-point Traditional
calibration for pH, as described in Section 11 of this manual.
SECTION 14: ORP
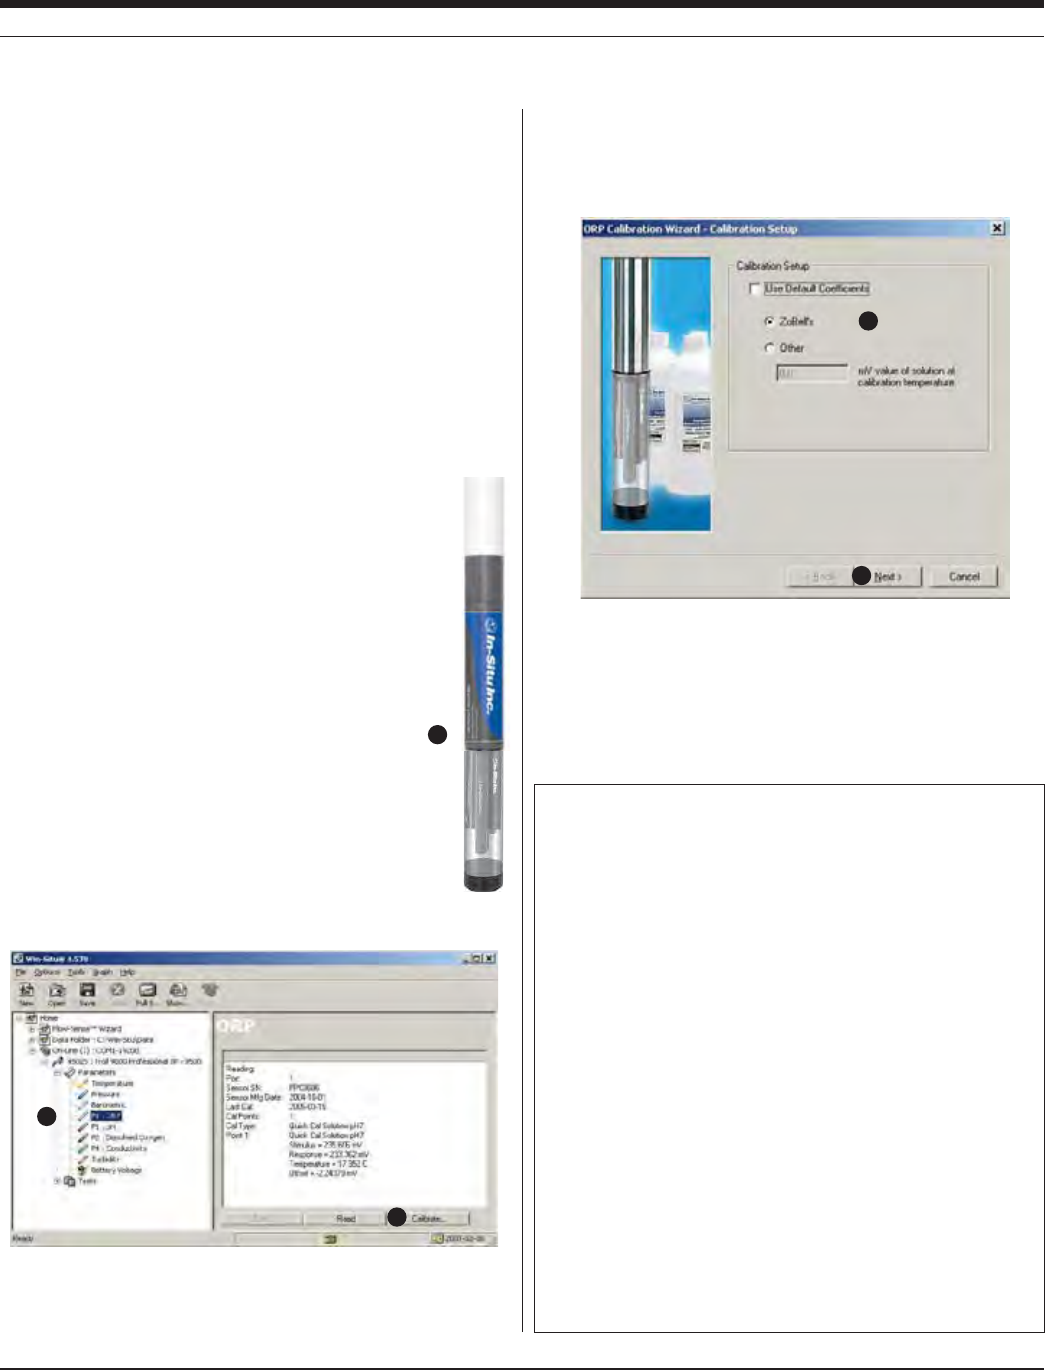
99
TROLL 9500 Operator’s Manual 0095110 rev. 007 01/09
3
6
7
8
9
Indicators during Calibration
s Status:
NOT TESTED is displayed until you begin the calibration by selecting
Run.
UNSTABLE indicates the sensor response does not meet the criteria
for a valid calibration point.
NOMINAL indicates the sensor deviation meets early stabilization
criteria.
The Accept button becomes available when nominal stability is
achieved. You may accept the early value, or wait for complete stability.
If you accept the early value, the calibration point will be designated
“USER SET” in the calibration report. (For more on calibration reports,
see “Calibration History” in Section 10.)
STABLE is displayed when the readings have stabilized sufficiently to
take a valid calibration point. The calibration proceeds automatically to
the next screen.
s Temperature is displayed for your information.
s Sensor Reading: The current sensor response in milliVolts.
s Sensor Deviation: Change in sensor response between the last two
readings. This enables you to follow the progress of the stabilization,
but deviation from the previous reading is not necessarily the best
indicator of stability as the software is looking at longer-term trends.
RECOMMENDED CALIBRATION ORDER FOR pH AND ORP
The pH/ORP sensor requires separate calibrations for pH and ORP. A
suggested calibration scenario is as follows:
A. First, Quick-Cal ORP (plus, optionally, other installed Basic sen-
sors). For the procedure, see Section 3, Getting Started.
B. Then, perform a 2- or 3-point Traditional pH calibration as de-
scribed in Section 11 of this manual.
TRADITIONAL ORP CALIBRATION PROCEDURE
If you wish to perform a traditional calibration with a dedicated ORP
calibration solution, use the following procedure.
1. With a pH/ORP sensor installed and plugs or sensors in the other
ports, rinse the front end of the MP TROLL 9500 in
clean water. For best results, rinse again in a portion
of the calibration solution.
2. Fill the Cal Cup with ZoBell’s or other custom ORP
calibration solution.
3. Attach the Cal Cup to the MP TROLL 9500. Thread
the Cal Cup onto the body until seated against the
o-ring, then back off slightly to avoid overtightening.
4. Connect the MP TROLL 9500 to a PC and establish a
connection in Win-Situ 4 or Pocket-Situ 4.
5. Select the MP TROLL 9500 in the Navigation tree.
The software will automatically detect and display the
installed sensors. (This can take a moment.)
6. Select ORP in the Parameters list. The sensor serial
number (SN) and recent calibration information is displayed.
7. Select Calibrate to launch the ORP Calibration Wizard.
8. In the ORP Calibration Wizard, select the solution the sensor is
soaking in. For ZoBell’s, the reference milliVolt value is available
in the software. For a custom solution, select “Other” and enter the
mV of the solution at the calibration temperature.
9. Select Next to continue.
10. In the next screen, select Run to begin the stabilization.
The display will continuously update as readings are taken and
compared against the stabilization criteria.
SECTION 14: ORP
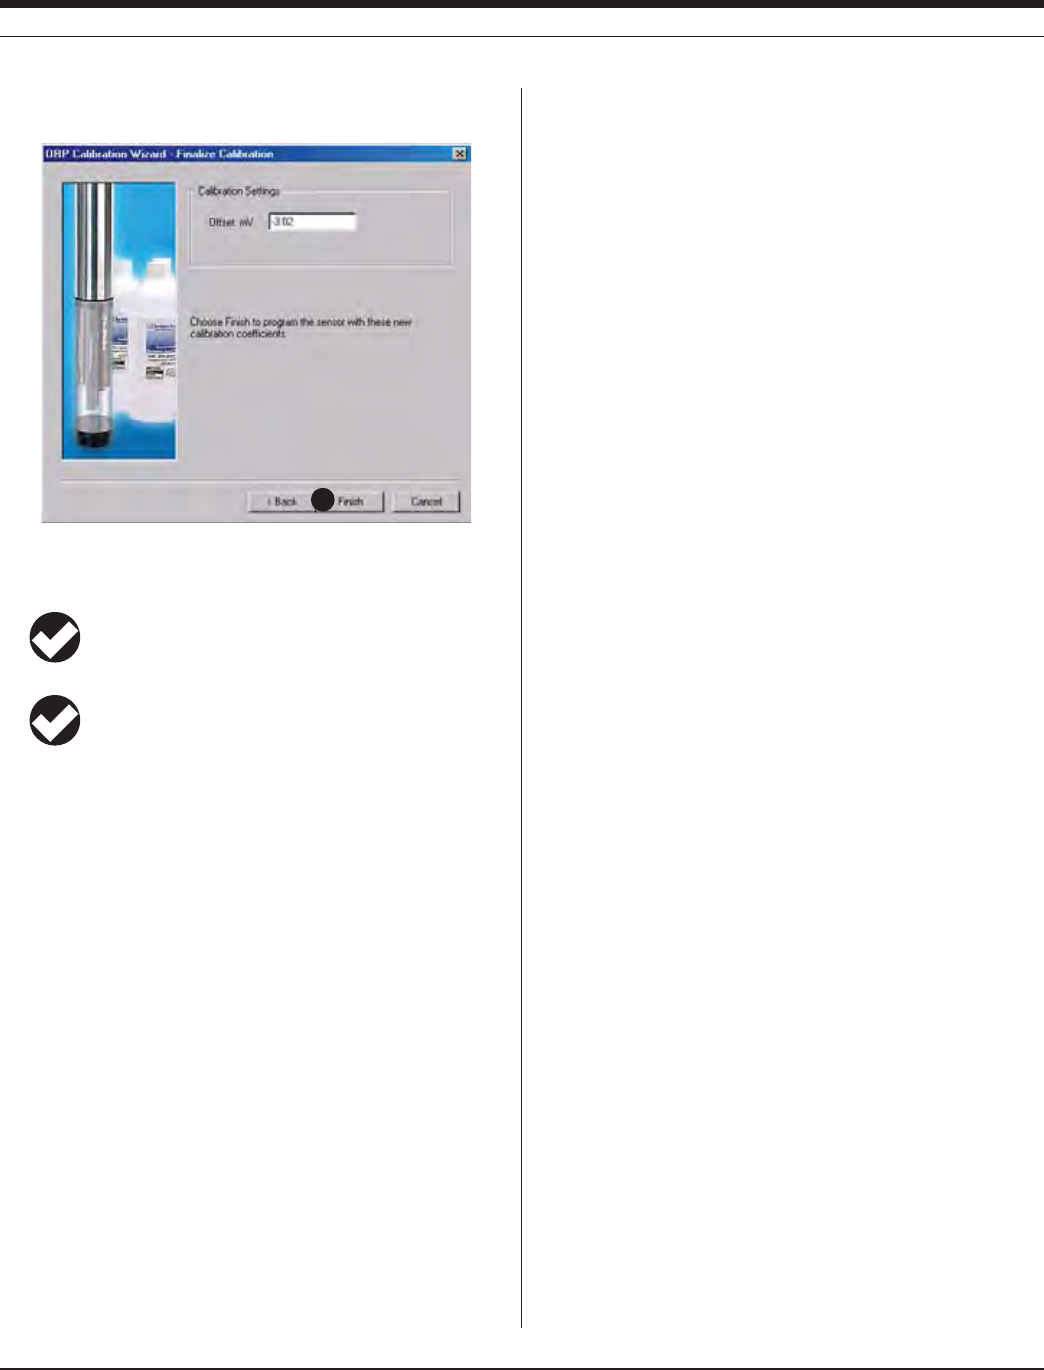
10 0
TROLL 9500 Operator’s Manual 0095110 rev. 007 01/09
11. The final screen shows the calculated sensor offset. This value
should be 0 mV ± 20 mV.
12. Select Finish to write this value to the sensor.
The ORP sensor is now calibrated and ready to use.
TIP: You can look at the calibration report right after
calibrating, or at any time. See “Calibration History” in
Section 10 for details.
TIP: The calibration solution may be flushed down the drain
with running water, or saved in a separate container and
used to rinse the next time you calibrate with the same solution.
Options for storing sensors:
s )FTHEINSTRUMENTWILLBEUSEDINADAYORSOLEAVETHESENSORS
installed. Remove the Cal Cup and rinse it and the sensors. Add
50-100 mL of tap water to the Cal Cup. Return the probe to the Cal
Cup for transport to the field site.
s &ORLONGERSTORAGESEETHESECTIONON3ENSOR#AREAND(ANDLING
later in this chapter.
RESETTING DEFAULT COEFFICIENTS
The sensor’s calibration may be reset back to factory defaults at any
time. This is a good option if the results of a recent calibration are
suspect because the cal solution has been exposed to air or has
otherwise deteriorated
1. With a pH/ORP sensor installed, establish a connection to the
instrument in Win-Situ 4 or Pocket-Situ 4.
2. Select ORP in the Parameters list and click Calibrate.
3. In the first screen, select Use Default Coefficients, then Next.
4. In the final screen, click Finish to send the values to the sensor.
SENSOR OFFSET
The offset for ORP is a traditional “zero offset,” and is typically 0 ± 20
mV. If the offset calculated during calibration is outside this range, in-
spect the sensor. If it is clean, then the fault was probably with the cal
solution (aging, exposure to air, etc.). In this case, resetting the factory
defaults for ORP can often restore the sensor performance.
UNITS AND CALCULATED MEASUREMENTS
ORP readings may be displayed in Volts or milli Volts. No calculated
measurements are available.
RECOMMENDED CALIBRATION FREQUENCY
Calibration frequency will depend on the nature of the sample and
the degree of accuracy required. In clean water samples, the sensor
could retain its accuracy for 2-6 weeks. Recalibrate the sensor—
s AFTERREPLACINGTHEREFERENCEJUNCTIONANDORTHElLLINGSOLUTION
s DURINGROUTINESCHEDULEDMAINTENANCE
s EVERYWEEKSINTHEABSENCEOFOTHERINDICATIONS
NORMALIZATION TO STANDARD HYDROGEN
ELECTRODE VALUES
ORP values are dependent on solution composition, temperature, and
sensor type. ORP (Eh) values reported in the literature are often nor-
malized to the standard hydrogen electrode as a standard reference
electrode. Since the standard hydrogen electrode is extremely fragile,
it is impractical to use in the field. In-Situ’s sensor uses a silver/silver-chlo-
ride reference electrode in place of the standard hydrogen electrode.
The following equation may be used to normalize the readings re-
ported by our sensor calibrated with our solution to standard hydrogen
electrode values (±50 mV).
ORPSHE = ORPobserved + {215.81 – TC [0.77942 + TC 0.001934]}
where ORPSHE is the sample potential relative to the standard
hydrogen electrode
ORPobserved is the sample potential relative to the In-Situ
reference electrode
T
C ISTHESAMPLETEMPERATUREIN½#
ORP measured by a sensor immersed in a solution should not be
equated with thermodynamic Eh. Differences may occur due to lack
of chemical equilibrium, presence of multiple redox couples, sensor
poisoning, and other factors.
In addition, like all platinum ORP electrodes, In-Situ’s pH/ORP sensor
may give unstable readings in solutions containing chromous, vana-
dous, titanous, and other ions that are stronger reducing agents than
hydrogen or platinum.
SECTION 14: ORP
12
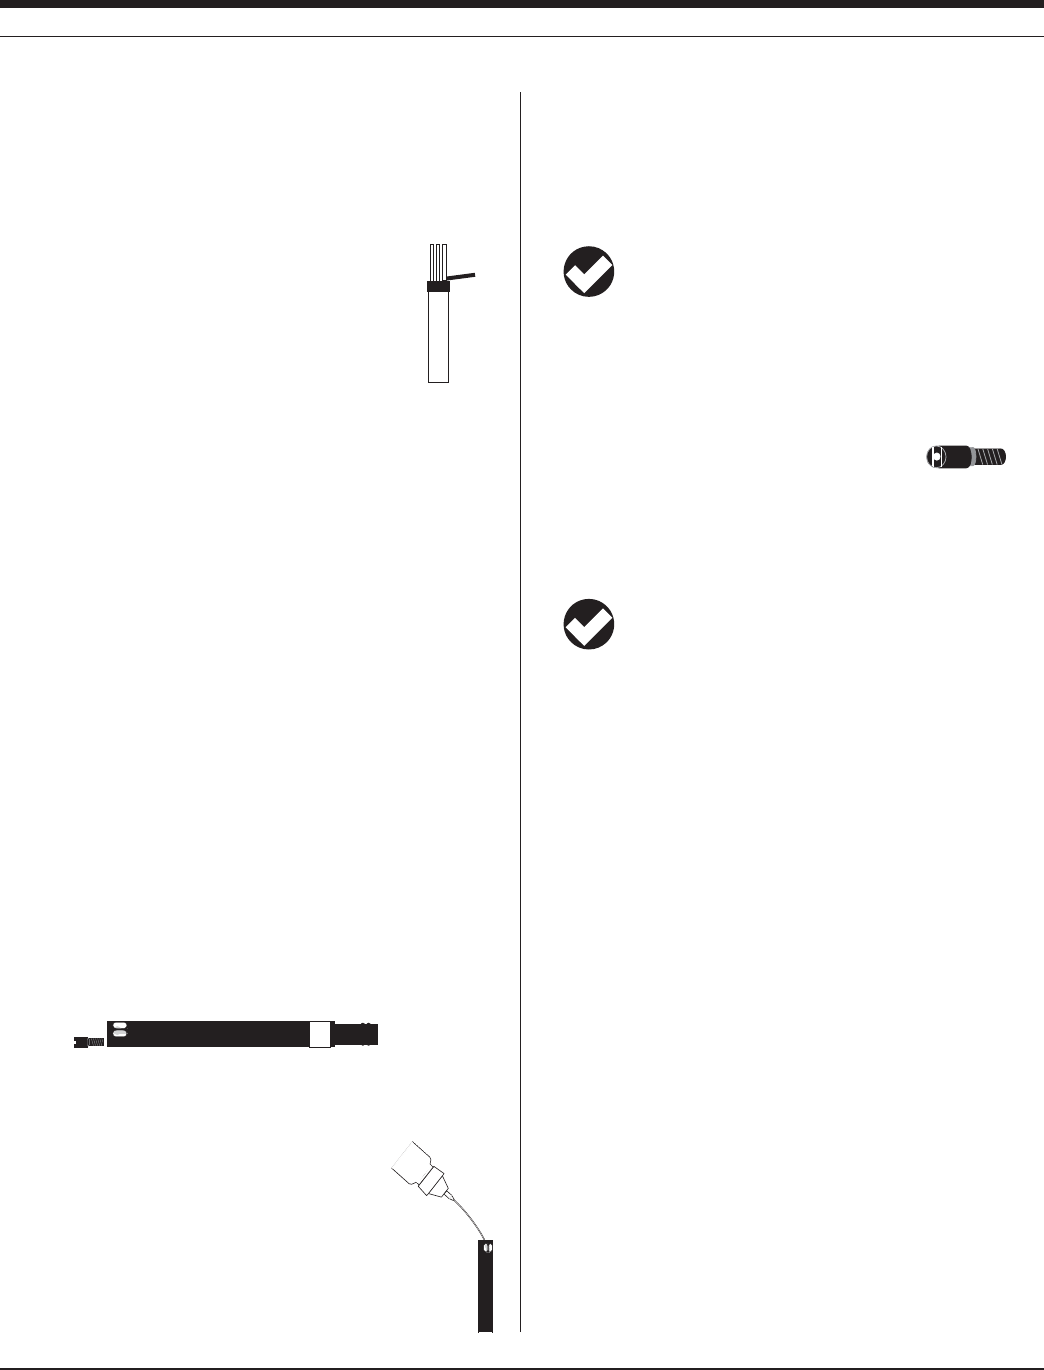
101
TROLL 9500 Operator’s Manual 0095110 rev. 007 01/09
sensor
removal
tool
USAGE RECOMMENDATIONS AND CAUTIONS
s /20READINGSVARYSLIGHTLYWITHTEMPERATUREBUTARENOTEASILYCOR-
rected because, unlike pH, the ORP value depends on the activity
of many ions in solution. pH values are more easily corrected
because they are due to the activity of one ion, H+.
SENSOR CARE AND HANDLING
SENSOR REMOVAL
Use the sensor removal tool to pop the sensor out.
MAINTENANCE/INSPECTION/CLEANING
If the platinum ORP sensor appears dull or fouled, it may be cleaned
with a swab dipped in alcohol. Rub gently until the platinum appears
shiny. Rinse in clean water.
If a film develops on the glass electrode, or if the sensing glass or
junction become dehydrated, the response may be sluggish or erratic,
or the sensor may fail to calibrate. In these cases, rinse the sensor
in 90% isopropyl alcohol, then soak in storage solution (Catalog No.
0065370) for at least an hour, overnight if needed. If this does not re-
store the response, try soaking in 0.1 M HCl solution for 5-10 minutes,
followed by a thorough rinse in clean water. If the response has still
not improved, replace the filling solution, or the junction.
Note: The following maintenance instructions apply to In-Situ’s newest
pH/ORP sensor (cat. no. 0059520). Older sensors (cat. no. 0032010
& 0032020, now discontinued) are not user-serviceable.
REPLACING THE FILLING SOLUTION
Replace the filling solution every 5-6 months, or when:
s 4HESENSORFAILSTOCALIBRATEWITHREASONABLESLOPEANDOFFSET
s 2EADINGSDRIFT
s 2EADINGSDURINGCALIBRATIONATP(AREOUTSIDETHERANGEÕM6
1. Unscrew the reference junction as shown.
2. Holding the sensor at an angle, shake out the old filling solution.
3. Protect the connector end of the sensor with the soft cap it shipped
with, or wrap the sensor in a paper towel to
prevent solution from entering the connector.
4. Using the dispenser cap on the filling solution bottle,
insert the tube into the bottom of the empty reservoir.
Squeeze a steady stream of solution into the reservoir until
ITOVERmOWSANDNOBUBBLESAREOBSERVED
Continue to add solution while withdrawing the tube.
5. Screw in the reference junction, and hand-tighten until snug. Some
lLLINGSOLUTIONWILLOVERmOW7IPETHEEXCESSOFFTHESENSORBODY
6. Soak the sensor in tap water for at least 15 minutes.
7. Recalibrate the sensor.
If necessary, thoroughly clean the electrical connector to
remove filling solution: Using a disposable pipette, fill the
connector with isopropyl alcohol (70% to 100%). Shake to
dry. Repeat 3 times. Dry overnight. When thoroughly dry, recalibrate.
REPLACING THE JUNCTION
Replace the junction when the sensor fails to calibrate, even after
replacing the filling solution.
1. Unscrew the reference junction and discard.
2. Replace the filling solution and screw in a new reference junction
as described above.
3. Soak for 15 minutes in tap water, then recalibrate the sensor.
TIP: Keep the junction damp at all times to avoid a lengthy
rewetting process.
STORAGE
Short-Term Storage (several days)
Store in the Cal Cup in tap water.
Long-Term Storage (up to several weeks)
Remove the sensor and store in the electrode storage bottle with
10-20 mL of storage solution (Catalog No. 0065370). Tighten the cap
to prevent drying. Prior to use, condition the sensor by rinsing with
deionized or tap water and soaking for 15 minutes.
REFERENCES
Eaton, A.D., L.S. Clesceri, E.W. Rice, and A.E. Greenberg, eds.,
Standard Methods for the Examination of Water and Wastewater,
21st edition, Washington, D.C.: American Public Health Associa-
tion, American Water Works Association, and Water Environment
Federation, 2005. Section 2580, Oxidation-Reduction Potential.
SECTION 14: ORP
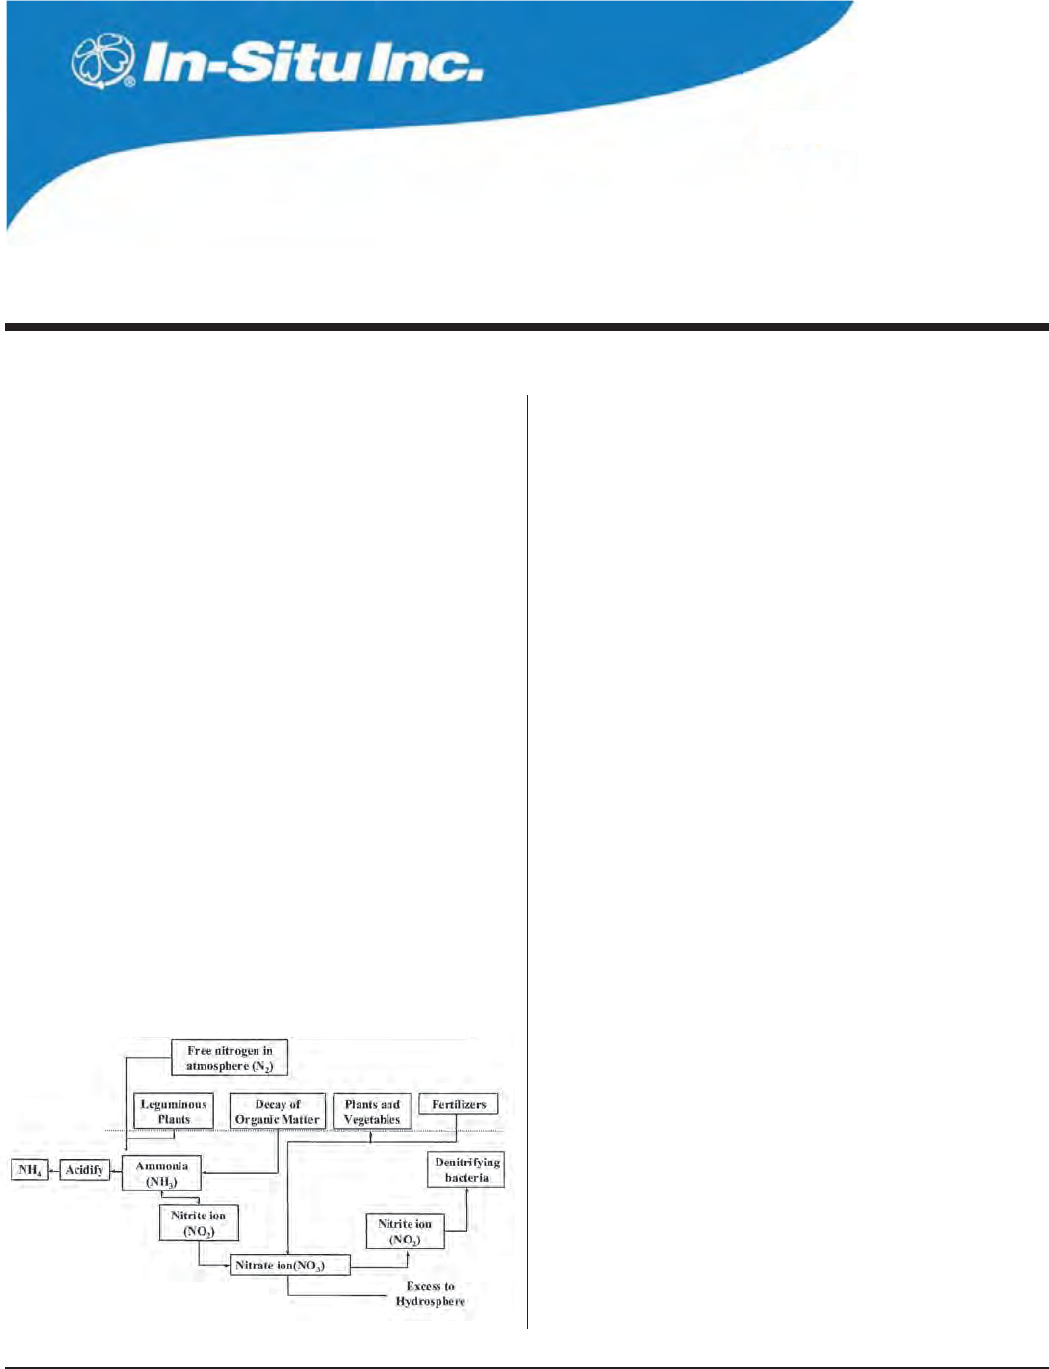
104
Multi-Parameter
Water Quality TROLL®
TROLL 9500 Operator’s Manual 0095110 rev. 007 01/09
15 AMMONIUM
WHAT IS AMMONIUM ?
Ammonium (NH4
+) is the ionized form of ammonia (NH3). Ammonia
and ammonium are naturally occurring forms of nitrogen, part of the
nitrogen cycle. In natural waters they exist in two forms: Dissolved
ammonia gas (NH3) is highly toxic to aquatic life, while ammonium,
the ionized form (NH4
+), is not. Both may be grouped together as
“total ammonia.”
The ammonia/ammonium equilibrium in water is closely related to pH
levels. At a pH of 6.5 almost all ammonia is in the form of ammonium.
However, as the pH increases (becomes more basic), ammonium is
changed into harmful ammonia. Ammonium ions are the predominant
species in most unpolluted natural water systems where the pH is
typically less than 9. Even a small amount of ammonia is detrimental
to fish while a moderate amount of ammonium is tolerated. The lethal
dose of ammonia for trout is only 0.2 mg/L.
WHY MEASURE AMMONIUM?
Major sources of ammonium are wastewater from sewage treatment
plants, and nitrogen in fertilizers which is transformed to ammonium in
soil by microorganisms. Ammonia/ammonium can be a key parameter
in the assessment of water and wastewater quality. Measurement of
ammonium can yield information on the composition and movement
of pollutants in groundwater and surface water, landfill leachate, runoff
from agricultural activities, waste concentrations in fisheries, and nutri-
ent levels in natural water bodies.
THE AMMONIUM SENSOR
The In-Situ sensor is an ion-selective electrode (ISE) that is selective
for the ammonium ion (NH4
+). It is a double-junction combination ISE
with a silver/silver-chloride reference half-cell, PVC sensing mem-
brane, and reference electrolyte gel. It measures the concentration in
parts per million of ammonium ion in solution (calculated as nitrogen,
ppm as N).
SENSOR PREPARATION
To ensure optimum membrane response, the ammonium sensor
should be thoroughly hydrated in an appropriate solution before
calibration. A good way to do this is to allow the sensor to soak in the
solution you plan to use for the first calibration point (lowest concen-
tration) for at least 15 minutes and up to several days before calibra-
tion and use.
s PPM.FORCALIBRATIONINTHELOWERRANGECONCENTRATIONSLESS
than 14 ppm N)
s PPM.FORCALIBRATIONINTHEUPPERRANGECONCENTRATIONSOF
ppm N and up)
The sensor kit includes an empty bottle for this purpose.
THE NITROGEN CYCLE
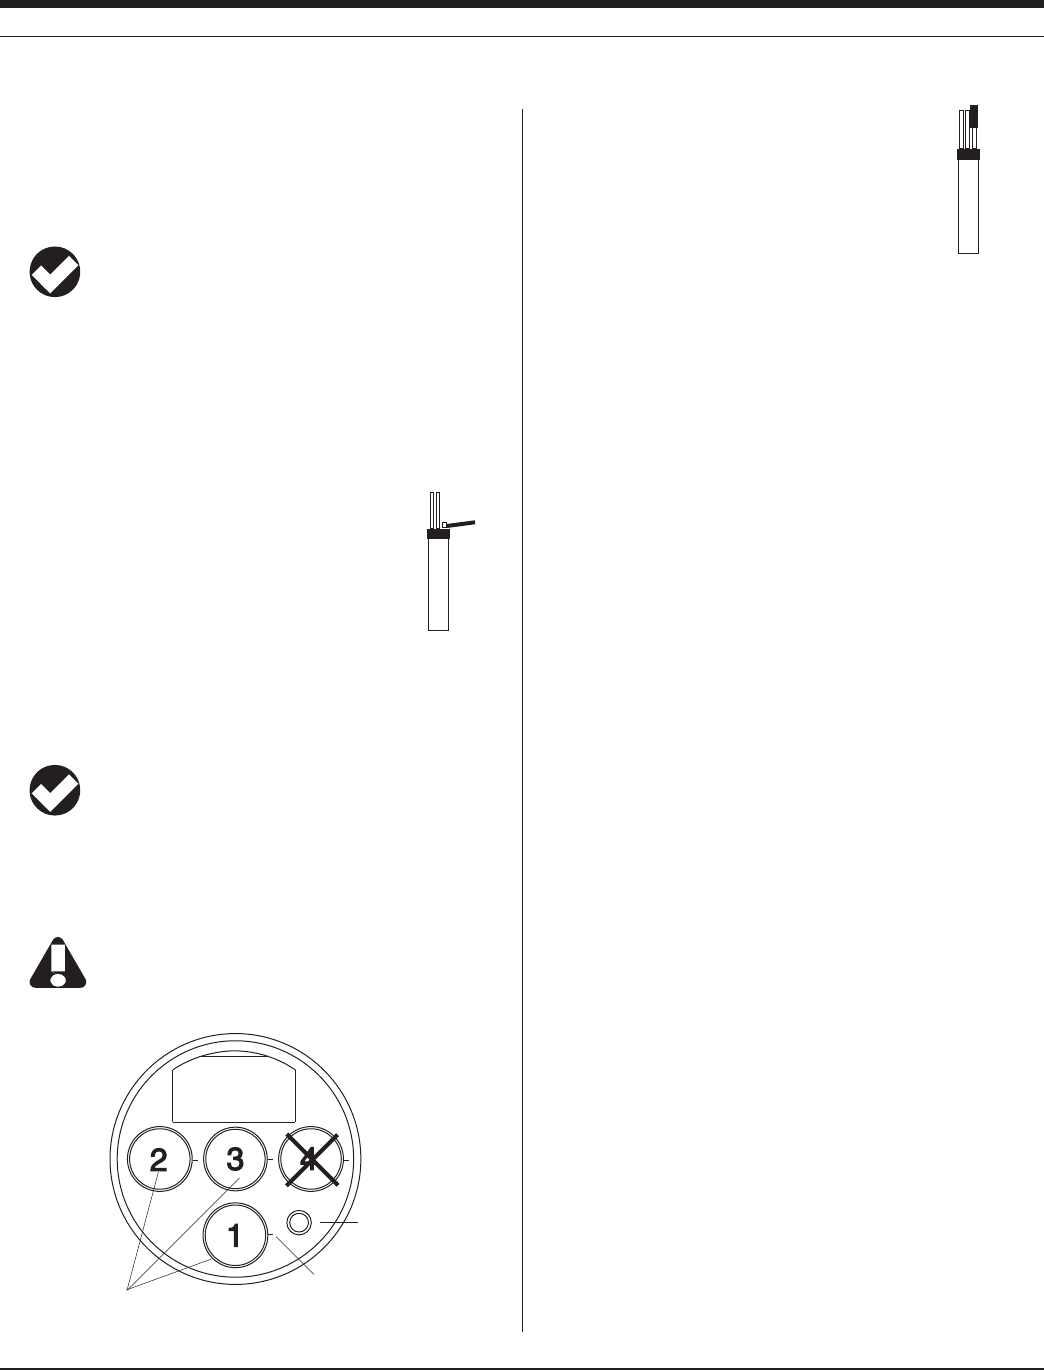
105
TROLL 9500 Operator’s Manual 0095110 rev. 007 01/09
SENSOR INSTALLATION
Unpack the ammonium sensor, hydrate it as above, and install in port
1, 2, or 3 in the sensor block at the front end of the MP TROLL 9500
as follows.
TIP: Remember that a polarographic D.O. sensor (if present)
will operate properly only in port 2 and a turbidity wiper
accessory only in port 3.
1. Remove the restrictor from the front end of the MP TROLL 9500.
This allows access to the sensor block depicted in the drawing
below.
2. Remove the sensor’s protective cap or storage bottle and set aside
for future storage of the sensor. If the connector end is covered
with a cap, remove it also.
3. Remove any moisture or dirt from the area around
the port where you will install the sensor, then use the
sensor removal tool to remove the plug from the port
where you will install the sensor.
4. Remove any moisture or dirt from the port connector with a clean
swab or tissue.
5. Check lubrication of the sensor o-rings.
TIP: The sensor o-rings require generous lubrication before
installation. New sensors will be lubricated at the factory. If
the o-rings appear dry, apply apply a silicone lubricant before
installation.
6. Handling the sensor by the sides, not the tip, align the mark on the
side of the sensor with the mark on the port.
Avoid touching the membrane at the tip of the sensor.
Contaminants on the membrane can change its properties
and affect measurements.
7. Use the sensor insertion tool to firmly press the
sensor into the port until you feel it dock with the
connector at the bottom. When properly inserted a
small gap (width of the sensor removal tool) remains
between the widest part of the sensor and the instru-
ment body, for ease of removal.
CALIBRATION
OVERVIEW
The software offers several options for ammonium calibration.
s Three-point bithermal (“two-temperature”) calibration. The first
two calibration points are taken in solutions of different concentra-
tions at the same temperature. The third point uses one of these
SOLUTIONSATATEMPERATURETHATISATLEAST½HIGHERORLOWER
depending on anticipated field conditions. This type of calibra-
tion allows determination of the sensor’s “isopotential point”—the
ion concentration at which changes in temperature do not cause
a change in sensor response (voltage). A three-point bithermal
calibration is recommended before the first use of the sensor, and
regularly thereafter, to insure accurate readings at all potential
temperatures.
s Two-point isothermal (“same temperature”) calibration using solu-
tions of two different concentrations. A two-point isothermal calibra-
tion calculates the sensor’s slope and offset but cannot compute
the isopotential point. For best results this type of calibration should
be carried out as close as possible to the temperature at which the
sensor will be used. Or, It may be performed after a previous three-
point bithermal calibration to recalculate the slope and offset of an
aging sensor while retaining the previously calculated isopotential
point.
s Single-point calibration. After the initial three-point bithermal cali-
bration has established the sensor slope, offset, and isopotential
point, a single-point calibration may be used with good results to
adjust the offset on a daily basis.
CALIBRATION SOLUTIONS
Ammonium chloride (NH4Cl) solutions certified to N.I.S.T. standards
are supplied in the In-Situ Ammonium Calibration Kits:
14.0 ppm as N
140 ppm as N
1400 ppm as N
sensor
removal
tool
sensor
insertion
tool
Pressure/Turbidity
(or plug)
Temperature
Ammonium sensor may be installed
in port 1, 2, or 3
alignment mark
SECTION 15: AMMONIUM
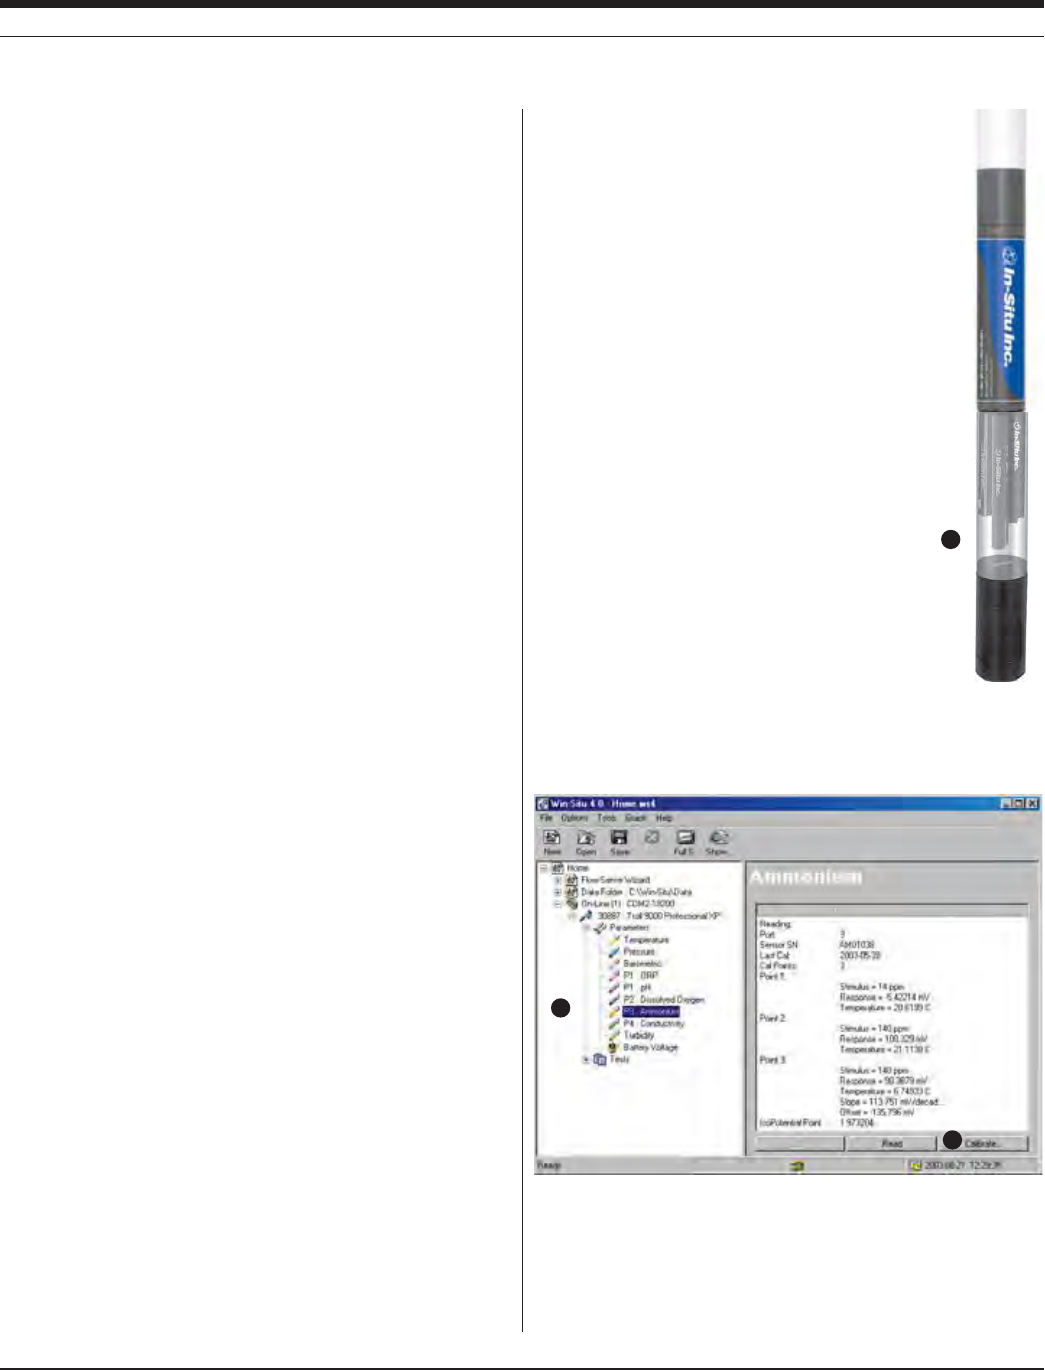
106
TROLL 9500 Operator’s Manual 0095110 rev. 007 01/09
Specialized calibration kits are available for calibrating the ammonium
sensor for low-range and high-range measurements:
Low range: two quarts each 14 ppm and 140 ppm
High range: two quarts each 140 ppm and 1400 ppm
RECOMMENDED CALIBRATION FREQUENCY
Ion-selective electrodes are inherently unstable and drift is quite
normal. To achieve the most accurate sensor response, we recom-
mend a complete three-point bithermal calibration once a week, with a
single-point calibration daily or after 4-6 hours of use.
PREPARING TO CALIBRATE
You will need:
s -042/,,WITHTHEHYDRATEDAMMONIUMSENSORINSTALLEDAND
sensors or plugs in the other sensor ports
s #AL#UP
s /NETWOORTHREEAMMONIUMCALIBRATIONSOLUTIONSSELECTEDFOR
the range you expect to measure. When performing a multi-point
calibration, begin with the lowest-concentration solution.
s &ORATHREEPOINTBITHERMALCALIBRATIONATEMPERATUREBATHORCON-
tainer of ice large enough to hold the Cal Cup (and stirrer, if used).
s 3TIRRER5SEASTIRRERDURINGCALIBRATIONIFITWILLALSOBEUSEDINTHE
field—for example, in stagnant or very slowly moving water. The
MORECLOSELYCALIBRATIONCONDITIONSREmECTlELDCONDITIONSTHEMORE
successful the calibration. For more information on the stirrer, see
“Stirring” in Section 10.
AMMONIUM CALIBRATION PROCEDURE
1. Rinse the Cal Cup and front end of the MP TROLL 9500 in clean
water. Shake to dry.
For best results, follow this with a rinse in a portion of the selected
calibration solution. Discard the rinse solution.
2. Insure the black PVC base (or the stirrer) is attached to the Cal
Cup, and fill the Cal Cup to the fill line with the selected calibration
solution.
s "EGINWITHTHELOWESTCONCENTRATIONWHENPERFORMINGAMULTI
point calibration.
s 7ITHAFULLCOMPLEMENTOFSENSORSINSTALLEDUSETHELOWERLINE
as a guide.
s 7ITHORREMOVABLESENSORSINSTALLEDlLLTOTHEUPPERLINE
3. Insert the front end of the MP TROLL 9500
into the open end of the Cal Cup. Thread the
Cal Cup onto the body until seated against the
o-ring, then back off slightly to avoid overtight-
ening.
To stabilize the instrument, you may wish to
use a calibration stand or other support.
4. Connect the MP TROLL 9500 to a PC and
establish a connection in Win-Situ 4 or Pocket-
Situ 4. Win-Situ screens are illustrated here.
The Pocket-Situ interface is similar, with the
Navigation tree at the top of the screen and
the Information pane below it.
5. Select the MP TROLL 9500 in the Navigation
tree.
The software will automatically detect and
display the installed sensors. If one or more
sensors is installed in the wrong port, an error
message will be displayed. Simply remove
the sensor and install it in the correct position,
then “refresh” the device before continuing.
6. Select Ammonium in the Parameters list. The sensor serial number
(SN) and recent calibration information is displayed.
7. Select Calibrate.
6
7
SECTION 15: AMMONIUM
3
Cal Cup
Stirrer
(optional)
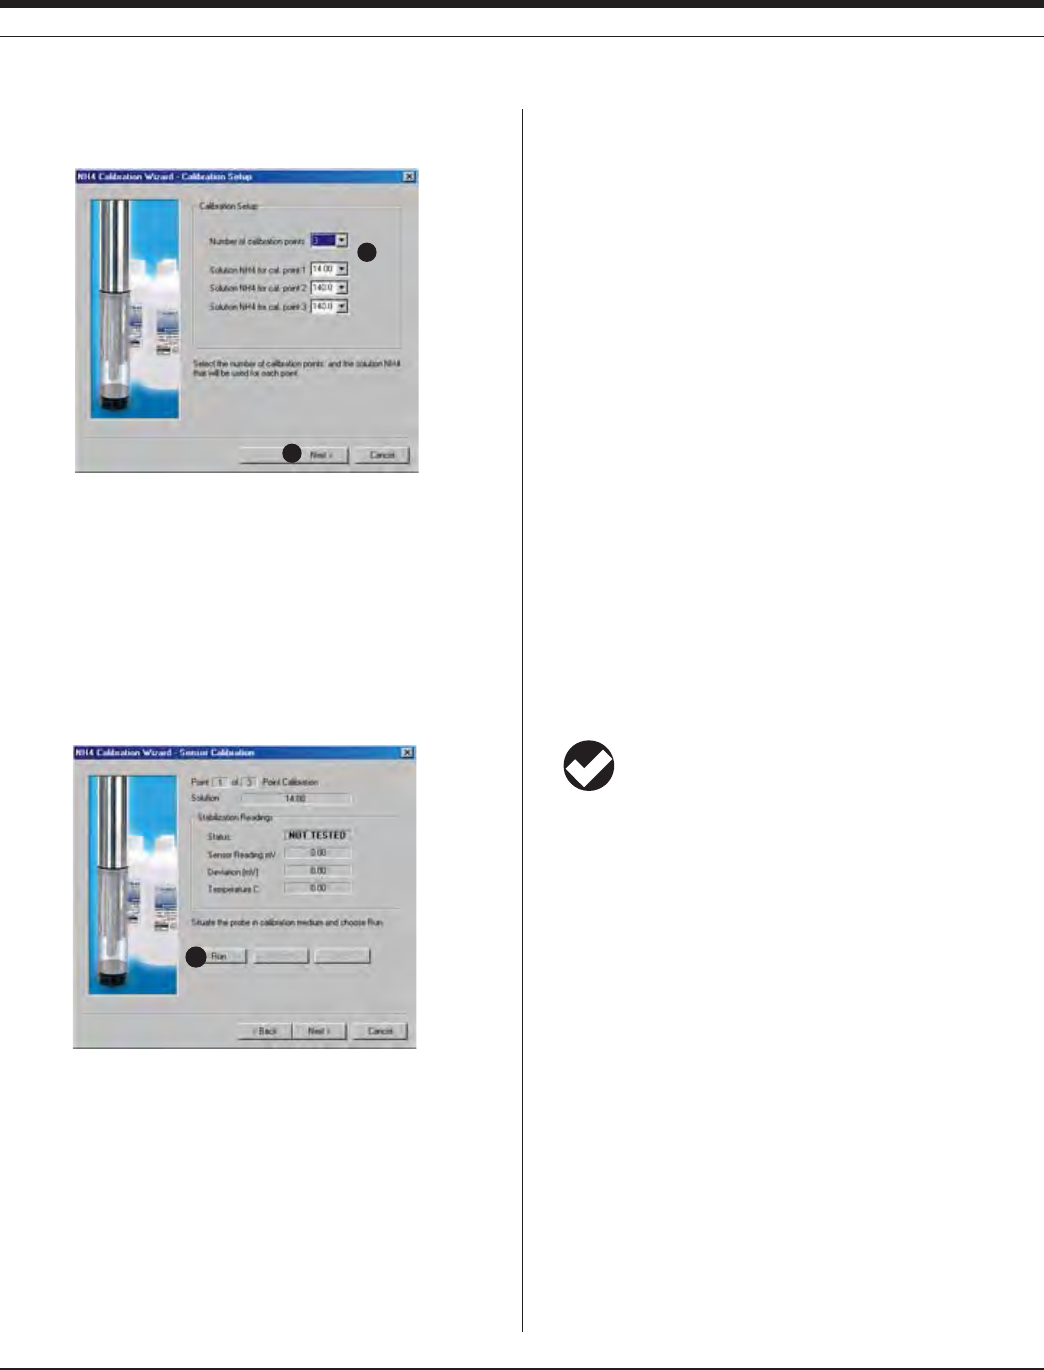
10 7
TROLL 9500 Operator’s Manual 0095110 rev. 007 01/09
The Ammonium Calibration Wizard starts. A screen like this is
displayed.
8. Select the number of calibration points for this calibration, and the
concentration (ppm) of the calibration solution for each point.
Cal point 1 is the solution the sensor is soaking in now, the lowest
concentration for a multi-point calibration. If doing a three-point
bithermal cal, choose cal point 3 to be the same as either cal point
1 or cal point 2.
9. Select Next to continue.
10. In the next screen, select Run to begin the stabilization.
The display will continuously update as readings are taken and
compared against the stabilization criteria.
s 3TATUSINDICATORS
NOT TESTED is displayed until you begin the calibration by
selecting Run.
UNSTABLE indicates the sensor response does not meet the
criteria for a valid calibration point.
NOMINAL indicates the sensor deviation meets early stabiliza-
tion criteria.
The Accept button becomes available when nominal stability is
achieved. You may accept the early value, or wait for complete
stability. If you accept the early value, the calibration point will
be designated “USER SET” in the calibration report. (For more
on calibration reports, see “Calibration History” in Section 10.)
STABLE is displayed when the readings have stabilized suffi-
ciently to take a valid calibration point. The calibration proceeds
automatically to the next screen.
s 3ENSOR2EADING4HECURRENTSENSORRESPONSEINMILLI6OLTS
s $EVIATION#HANGEINSENSORRESPONSEBETWEENTHELASTTWOREAD-
ings.
s #URRENTTEMPERATUREISALSODISPLAYED
11. If doing a single-point calibration, go to step 16.
For a multi-point calibration, the Wizard returns to the screen
shown at step 10 and waits for you to situate the probe in the next
calibration solution and click Run.
12. Remove the Cal Cup, discard the first solution, rinse the Cal Cup
and the front end of the instrument with clean water, followed by
a rinse in the next calibration solution, refill the Cal Cup with the
second solution, and attach it to the instrument.
TIP: The used calibration solution may be flushed down the
drain with running water, or saved in a separate container
and used as a rinse the next time you calibrate with the
same solution.
13. Select Run to begin the stabilization for cal point 2. Status indica-
tors and controls are the same as for cal point 1 (step 10).
Again wait for Stable status (or click Accept when Nominal is
indicated).
If doing a two-point calibration, go to step 16.
14. For the third calibration point, use the cal point 1 or cal point 2
solution (as specified in step 8) but change the temperature by at
LEAST½#!CONVENIENTWAYTODOTHISISTOMOVETHEPROBE#AL
Cup and all—into a temperature-controlled bath or container of
ice. Allow time for the sensor to reach thermal equilibration with
the solution temperature. With stirring or agitation, this should take
about 10 minutes, perhaps up to 30 minutes if left undisturbed.
15. When the temperature is stable, select Run for cal point 3.
When Nominal is accepted or Stable is indicated for cal point 3,
the final screen is displayed.
8
9
10
SECTION 15: AMMONIUM

108
TROLL 9500 Operator’s Manual 0095110 rev. 007 01/09
16. The final screen of the Calibration Wizard shows the sensor
slope and offset calculated during the calibration process. For a
three-point bithermal calibration, the calculated isopotential point
is shown. If a single-point calibration has been performed, the
isopotential point is the one calculated during the last three-point
bithermal calibration.
17. Select Finish to program the sensor with the newly calculated
calibration coefficients.
The ammonium sensor is now calibrated and ready to use.
TIP: You can look at the calibration report right after
calibrating, or at any time. See “Calibration History” in
Section 10 for details.
Options for storing sensors:
The ammonium sensor should calibrated immediately before use. If
storage is necessary, remove the sensor from the instrument and im-
merse in 14 ppm N solution, for later use in the low ammonium range,
or 140 ppm N solution, for use in the high range.
SENSOR SLOPE AND OFFSET
The expected slope for a new sensor is about 56 (± 2) mV per decade
of concentration (ppm). The calibration curve begins to deviate from
linear at about 1 ppm. The sensor’s zero offset is recalculated with
each single-point calibration.
UNITS AND CALCULATED MEASUREMENTS
Ammonium ion concentration is reported in ppm (equivalent to mg/L).
No calculated measurements are currently available.
USAGE RECOMMENDATIONS AND CAUTIONS
Ammonium Sensor
/PERATING4EMPERATURE ½#TO½#½&TO½&CONTINUOUS
TEMPERATURECANTOLERATEUPTO½#
½&INTERMITTENTLY
Pressure Rating 20 psi (14 m, 46 ft)
pH range up to 8.5
Do not submerge the ammonium sensor deeper than 46 ft
(14 m). Do not use in the basic pH range (8.5 or higher).
pH
The sensor’s pH range is that range over which a change in pH will
not cause a significant change in the measured voltage. It is the
plateau on a graph of pH against mV at constant concentration of the
detected ion. Outside this range, a change in pH may cause a signifi-
cant change in the measured mV.
TEMPERATURE
The higher the temperature, the shorter the lifetime of the electrode.
½#DIFFERENCEINTEMPERATURECAUSESAERRORATPPMUNLESSA
bithermal calibration is performed.
CONDUCTIVITY
In saline waters (conductivities of 1,000 μS/cm or higher), the pres-
ence of interfering ions such as sodium or potassium may limit the
usability of the ammonium sensor.
POTENTIAL INTERFERENCES
The following table lists concentrations of possible interfering ions that
cause 10% error at various levels of NH4
+.
17
Ion 100 ppm NH4
+ 10 ppm NH4
+ 1 ppm NH4
+
Cs+ 100 10 1
K+ 270 27 2.7
Tl+ 3100 310 31
H+ pH 1.6 pH 2.6 pH 3.6
Ag+ 270,000 27,000 2700
Li+ 35,000 3500 350
Na+ 11,100 1,100 110
SECTION 15: AMMONIUM

10 9
TROLL 9500 Operator’s Manual 0095110 rev. 007 01/09
SENSOR CARE AND HANDLING
SENSOR REMOVAL
Position the yoke of the sensor removal tool at the point
where the sensor meets the sensor block and pry the
sensor upward.
Avoid touching the membrane at the tip of the
sensor. Contaminants on the membrane can
change its properties and affect measurements.
MAINTENANCE/INSPECTION/CLEANING
As long as extreme pH and high organic solvent content is avoided,
the sensor should last for several months at room temperature.
Eventually some of the components will leach out, and this will affect
the response (detection limit and scope), but this can be compensated
through calibration.
If film buildup is visible on the membrane, rinse under a gentle stream
of clean water, or swish gently in a mild detergent solution, rinse well
with clean water, and shake to dry.
To avoid depletion of the reference solution, do not allow the sensor to
soak in pure water for more than a few minutes at a time.
The electrode is not customer-refillable.
STORAGE
Store the sensor immersed in 14 or 140 ppm N solution, depending
on usage requirements, rather than dry or in DI water.
REFERENCES
Eaton, A.D., L.S. Clesceri, E.W. Rice, and A.E. Greenberg, eds.,
Standard Methods for the Examination of Water and Wastewater,
21st edition, Washington, D.C.: American Public Health Associa-
tion, American Water Works Association, and Water Environment
Federation, 2005. Section 4500-NH3 Nitrogen (Ammonia). D. Am-
monia-Selective Electrode Method.
EPA, Methods for Chemical Analysis of Water and Wastes,
EPA/600/4-79-020, revised March 1983. Method 350.3, Nitrogen,
Ammonia, Potentiometric, Ion Selective Electrode. Approved at 40
CFR Part 136.
Rundle, Chris C., A Beginners Guide to Ion-Selective Electrode
Measurements. Nico2000 Ltd., London, UK. On the web at www.
nico2000.net
U.S. Geological Survey, Office of Water Quality Technical Memoran-
dum 93.12: Water Resources Division Nomenclature Conventions
for Reporting Concentrations of Ammonium Ions and Ammonia in
Natural Waters. August 26, 1993.
sensor
removal
tool
SECTION 15: AMMONIUM
110
Multi-Parameter
Water Quality TROLL®
TROLL 9500 Operator’s Manual 0095110 rev. 007 01/09
16 CHLORIDE
WHAT IS CHLORIDE?
Chloride (Cl–) is a highly soluble ion in water and can potentially be
present in high concentrations. Chloride enters the water supply when
runoff from rain or irrigation dissolves a variety of chloride-containing
salts in rock and soil. Freshwater sources, streams, lakes, and un-
derground aquifers typically have less than 10 ppm Cl–. Some waters
with as little as 250 ppm Cl– will taste salty to sensitive individuals,
especially if the sodium cation (Na+) is also present. Wastewater from
sewage or industrial facilities will normally contain higher amounts of
chloride. Chloride is naturally present in higher concentrations near
coastal areas where it can infiltrate canals and sewers.
WHY MEASURE CHLORIDE?
Chloride ions are not toxic to humans. However, a high chloride
content may harm some structures, especially those made of metal.
Chloride can increase the rate of corrosion on metals in the presence
of water. Vegetation is also sensitive to the amount of chloride in the
soil. Agriculturally productive soils can be turned into unproductive
wastelands over a period of time by irrigating with water containing
high amounts of chloride. The WHO (World Health Organization) has
established 100 ppm Cl– as a maximum for water used for irrigation,
while 250 ppm Cl– is the maximum for drinking water.
THE CHLORIDE SENSOR
The In-Situ sensor is an ion-selective electrode (ISE) that is selective
for the chloride ion (Cl–). It is a double-junction combination ISE with a
silver/silver-chloride reference half-cell, solid-state sensing electrode,
and reference electrolyte gel. It measures the concentration in parts
per million of chloride ion in solution (ppm Cl–).
SENSOR PREPARATION
To insure the chloride sensor is thoroughly hydrated, soak it in distilled
water for about 15 minutes before installation. The sensor kit includes
an empty bottle for this purpose. Unlike the ammonium and nitrate
sensors, the solid-state chloride sensor does not require soaking in a
solution of specific concentration.
SENSOR INSTALLATION
Unpack the chloride sensor, hydrate it as described above, and install
in port 1, 2, or 3 in the sensor block at the front end of the MP TROLL
9500 as follows.
TIP: Remember that a polarographic D.O. sensor (if present)
will operate properly only in port 2, and a turbidity wiper
accessory only in port 3 .
1. Remove the restrictor from the front end of the MP TROLL 9500.
This allows access to the sensor block depicted in the drawing
below.
Fresh water < 10 ppm Cl–
Sea water 20,000 ppm Cl–
Irrigation water standard (WHO) 100 ppm Cl–
Drinking water standard (WHO) 250 ppm Cl–
Typical Chloride values
Pressure/turbidity
(or plug)
Temperature
Chloride sensor may be installed
in port 1, 2, or 3
alignment mark
111
TROLL 9500 Operator’s Manual 0095110 rev. 007 01/09
2. Remove the sensor’s protective cap or storage bottle and set aside
for future storage of the sensor.
3. Remove any moisture or dirt from the area around
the port where you will install the sensor, then use the
sensor removal tool to remove the plug from the port
where you will install the sensor.
4. Remove any moisture or dirt from the port connector with a clean
swab or tissue.
5. Check lubrication of the sensor o-rings.
TIP: The sensor o-rings require generous lubrication before
installation. New sensors will be lubricated at the factory. If
the o-rings appear dry, apply apply a silicone lubricant before
installation.
6. Handling the sensor by the sides, not the tip, align the mark on the
side of the sensor with the mark on the port.
7. Use the sensor insertion tool to firmly press the
sensor into the port until you feel it dock with the
connector at the bottom. When properly inserted a
small gap (width of the sensor removal tool) remains
between the widest part of the sensor and the instru-
ment body, for ease of removal.
CALIBRATION
OVERVIEW
The software offers several options for chloride calibration.
s Three-point bithermal (“two-temperature”) calibration. The first
two calibration points are taken in solutions of different concentra-
tions at the same temperature. The third point uses one of these
SOLUTIONSATATEMPERATURETHATISATLEAST½HIGHERORLOWER
depending on anticipated field conditions. This type of calibra-
tion allows determination of the sensor’s “isopotential point”—the
ion concentration at which changes in temperature do not cause
a change in sensor response (voltage). A three-point bithermal
calibration is recommended before the first use of the sensor, and
regularly thereafter, to insure accurate readings at all potential
temperatures.
s Two-point isothermal (“same temperature”) calibration using solu-
tions of two different concentrations. A two-point isothermal calibra-
tion calculates the sensor’s slope and offset but cannot compute
the isopotential point. For best results this type of calibration should
be carried out as close as possible to the temperature at which the
sensor will be used. Or, it may be performed after a previous three-
point bithermal calibration to recalculate the slope and offset of an
aging sensor while retaining the previously calculated isopotential
point.
s Single-point calibration. After the initial three-point bithermal cali-
bration has established the sensor slope, offset, and isopotential
point, a single-point calibration may be used with good results to
adjust the offset on a daily basis.
CALIBRATION SOLUTIONS
Sodium chloride (NaCl) solutions certified to N.I.S.T. standards are
supplied in the In-Situ Chloride Calibration Kits:
35.5 ppm Cl–
355 ppm Cl–
3545 ppm Cl–
Specialized calibration kits are available for calibrating the chloride
sensor for low-range and high-range measurements:
Low range: two quarts each 35.5 ppm and 355 ppm
High range: two quarts each 355 ppm and 3545 ppm
RECOMMENDED CALIBRATION FREQUENCY
Ion-selective electrodes are inherently unstable and drift is quite
normal. To achieve the most accurate sensor response, we recom-
mend a complete three-point bithermal calibration once a week, with a
single-point calibration daily or after 4-6 hours of use.
PREPARING TO CALIBRATE
You will need:
s -042/,,WITHTHEHYDRATEDCHLORIDESENSORINSTALLEDAND
sensors or plugs in the other sensor ports
s #AL#UP
s /NETWOORTHREECHLORIDECALIBRATIONSOLUTIONSSELECTEDFORTHE
range you expect to measure. When performing a multi-point
calibration, begin with the lowest-concentration solution.
s &ORATHREEPOINTBITHERMALCALIBRATIONATEMPERATUREBATHORA
container of ice large enough to hold the Cal Cup (and stirrer, if
used).
s 3TIRRER5SEASTIRRERDURINGCALIBRATIONIFITWILLALSOBEUSEDINTHE
field—for example, in stagnant or very slowly moving water. The
MORECLOSELYCALIBRATIONCONDITIONSREmECTlELDCONDITIONSTHEMORE
successful the calibration. For more information on the stirrer, see
“Stirring” in Section 10.
sensor
removal
tool
sensor
insertion
tool
SECTION 16: CHLORIDE
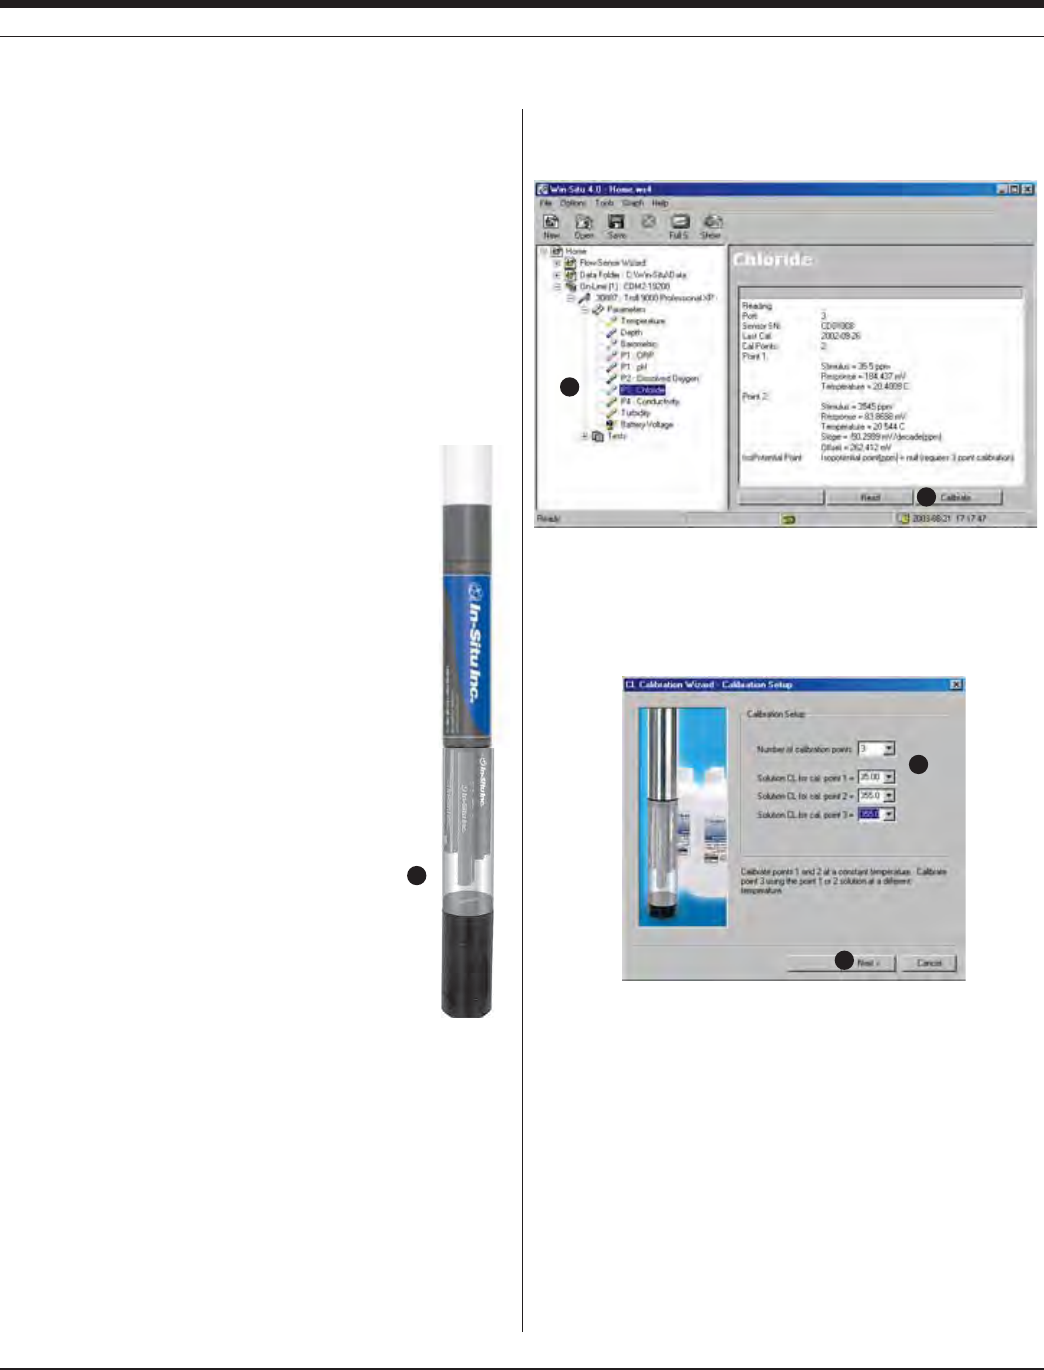
112
TROLL 9500 Operator’s Manual 0095110 rev. 007 01/09
CHLORIDE CALIBRATION PROCEDURE
1. Rinse the Cal Cup and front end of the MP TROLL 9500 in clean
water. Rinse very thoroughly if the chloride sensor has recently
been exposed to pH buffers during a pH calibration. Shake to dry.
For best results, follow this with a rinse in a portion of the selected
calibration solution. Discard the rinse solution.
2. Insure the black PVC base (or the stirrer) is attached to the Cal
Cup, and fill the Cal Cup to the fill line with the selected calibration
solution.
s "EGINWITHTHELOWESTCONCENTRATIONWHENPERFORMINGAMULTI
point calibration.
s 7ITHAFULLCOMPLEMENTOFSENSORSINSTALLED
use the lower line as a guide.
s 7ITHORREMOVABLESENSORSINSTALLEDlLL
to the upper line.
3. Insert the front end of the MP TROLL 9500
into the open end of the Cal Cup. Thread the
Cal Cup onto the body until seated against the
o-ring, then back off slightly to avoid overtight-
ening.
To stabilize the instrument, you may wish to
use a calibration stand or other support.
4. Connect the MP TROLL 9500 to a PC and
establish a connection in Win-Situ 4 or Pocket-
Situ 4. Win-Situ screens are illustrated here.
The Pocket-Situ interface is similar, with the
Navigation tree at the top of the screen and
the Information pane below it.
5. Select the MP TROLL 9500 in the Navigation
tree.
The software will automatically detect and display the installed sen-
sors. If one or more sensors is installed in the wrong port, an error
message will be displayed. Simply remove the sensor and install it
in the correct position, then “refresh” the device before continuing.
6. Select Chloride in the Parameters list. The sensor serial number
(S/N) and recent calibration information is displayed.
7. Select Calibrate.
The Chloride Calibration Wizard starts. A screen like this is dis-
played.
8. Select the number of calibration points for this calibration, and the
concentration (ppm) of the calibration solution for each point.
Cal point 1 is the solution the sensor is soaking in now, the lowest
concentration for a multi-point calibration. If doing a three-point
bithermal cal, choose cal point 3 to be the same as either cal point
1 or cal point 2.
9. Select Next to continue.
6
7
8
9
SECTION 16: CHLORIDE
3
Cal Cup
Stirrer
(optional)
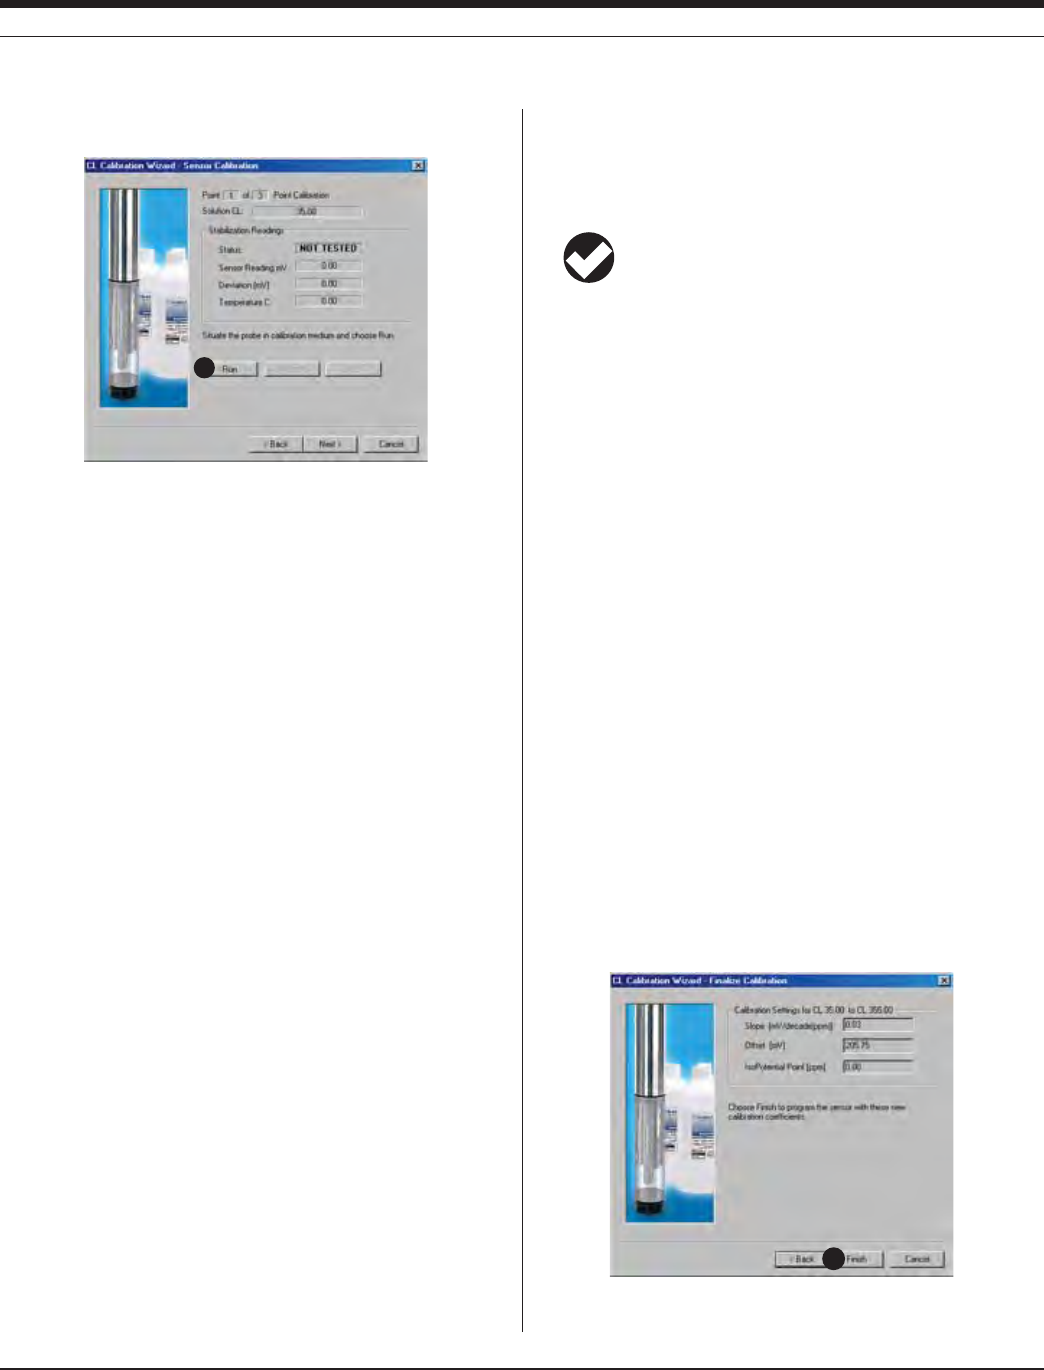
113
TROLL 9500 Operator’s Manual 0095110 rev. 007 01/09
10. In the next screen, select Run to begin the stabilization.
The display will continuously update as readings are taken and
compared against the stabilization criteria.
s 3TATUSINDICATORS
NOT TESTED is displayed until you begin the calibration by
selecting Run.
UNSTABLE indicates the sensor response does not meet the
criteria for a valid calibration point.
NOMINAL indicates the sensor deviation meets early stabiliza-
tion criteria.
The Accept button becomes available when nominal stability is
achieved. You may accept the early value, or wait for complete
stability. If you accept the early value, the calibration point will
be designated “USER SET” in the calibration report. (For more
on calibration reports, see “Calibration History” in Section 10.)
STABLE is displayed when the readings have stabilized suffi-
ciently to take a valid calibration point. The calibration proceeds
automatically to the next screen.
s 3ENSOR2EADING4HECURRENTSENSORRESPONSEINMILLI6OLTS
s $EVIATION#HANGEINSENSORRESPONSEBETWEENTHELASTTWOREAD-
ings.
s #URRENTTEMPERATUREISALSODISPLAYED
11. If doing a a single-point calibration, go to step 16.
For a multi-point calibration, the Wizard returns to the screen
shown at step 10 and waits for you to situate the probe in the next
calibration solution and click Run.
12. Remove the Cal Cup, discard the first solution, rinse the Cal Cup
and the front end of the instrument in clean water, followed by a
rinse in the next calibration solution, refill the Cal Cup with the
second solution, and attach it to the instrument.
TIP: The used calibration solution may be flushed down the
drain with running water, or saved in a separate container
and used as a rinse the next time you calibrate with the
same solution.
13. Select Run to begin the stabilization for cal point 2. Status indica-
tors and controls are the same as for cal point 1 (step 10).
Again wait for Stable status (or click Accept when Nominal is
indicated).
If doing a two-point calibration, go to step 16.
14. For the third calibration point, use the cal point 1 or cal point 2
solution (as specified in step 8) but change the temperature by at
LEAST½#!CONVENIENTWAYTODOTHISISTOMOVETHEPROBE#AL
Cup and all—into a temperature-controlled bath or container of
ice. Allow time for the sensor to reach thermal equilibration with
the solution temperature. With stirring or agitation, this should take
about 10 minutes, perhaps up to 30 minutes if left undisturbed.
15. When the temperature is stable, select Run for cal point 3.
When Nominal is accepted or Stable is indicated for cal point 3,
the final screen is displayed.
16. The final screen of the Calibration Wizard shows the calculated
sensor slope and offset. For a three-point bithermal calibration,
the isopotential point is shown. If a single-point calibration has
been performed, the isopotential point is the one calculated during
the last three-point bithermal calibration.
17. Select Finish to program the sensor with the newly calculated
calibration coefficients.
17
10
SECTION 16: CHLORIDE
114
TROLL 9500 Operator’s Manual 0095110 rev. 007 01/09
The chloride sensor is now calibrated and ready to use.
TIP: You can look at the calibration report right after
calibrating, or at any time. See “Calibration History” in
Section 10 for details.
Options for storing sensors:
The sensor should calibrated immediately before use. If storage is
necessary, remove the sensor from the instrument and immerse in 35
ppm Cl solution, for later use in the low chloride range, or 355 ppm Cl
solution, for use in the high range.
SENSOR SLOPE AND OFFSET
The expected slope for a new sensor is about 57 (± 2) mV per decade
of concentration (ppm). The calibration curve begins to deviate from
linear at about 10 ppm. The sensor’s zero offset is recalculated with
each single-point calibration.
UNITS AND CALCULATED MEASUREMENTS
Chloride ion concentration is reported in ppm (equivalent to mg/L). No
calculated measurements are available.
USAGE RECOMMENDATIONS AND CAUTIONS
Chloride sensor
/PERATING4EMPERATURE ½#TO½#½&TO½&CONTINUOUS
TEMPERATURECANTOLERATEUPTO½#
½&INTERMITTENTLY
Pressure Rating 100 psi (70 m, 231 ft)
pH range 2 to 12
Do not submerge the chloride sensor deeper than 231 ft
(70 m).
pH EFFECTS
The sensor’s pH range is that range over which a change in pH will
not cause a significant change in the measured voltage. It is the
plateau on a graph of pH against mV at constant concentration of the
detected ion. Outside this range, a change in pH may cause a signifi-
cant change in the measured mV.
POTENTIAL INTERFERENCES
The table on this page lists possible interfering ions that cause 10%
error at various levels of Cl–.
sensor
removal
tool
SENSOR CARE AND HANDLING
SENSOR REMOVAL
To remove the sensor, position the yoke of the sensor
removal tool at the point where the sensor meets the
sensor block and pry the sensor upward.
MAINTENANCE/INSPECTION/CLEANING
If a film should form on the top of the membrane, use a swab to
remove it, followed by a rinse in deionized water and soaking for a few
minutes in a solution of 35 ppm or 355 ppm Cl.
To avoid depletion of the reference solution, do not allow the sensor to
soak in pure water for more than a few minutes at a time.
The electrode is not customer-refillable.
STORAGE
Store the sensor immersed in 35 or 355 ppm Cl solution, depending
on usage requirements. For longer-term storage, it may be rinsed and
stored dry to avoid depletion of the reference solution.
Ion 100 ppm Cl– 10 ppm Cl– 1 ppm Cl–
OH– 8000 800 80
NH3 12 1.2 0.12
S2O3
2– 1 0.1 0.01
Br– 0.3 0.03 0.003
S2– 10-4 10-5 10-6
I– 5x10⁻⁵ 5x10⁻⁶ 5x10⁻⁷
CN– 2x10⁻⁵ 2x10⁻⁶ 2x10⁻⁷
Complexes with BI3+, Cd2+, Mn2+, Pb2+, Sn2+, Tl3+ and reduc-
ing agents
SECTION 16: CHLORIDE
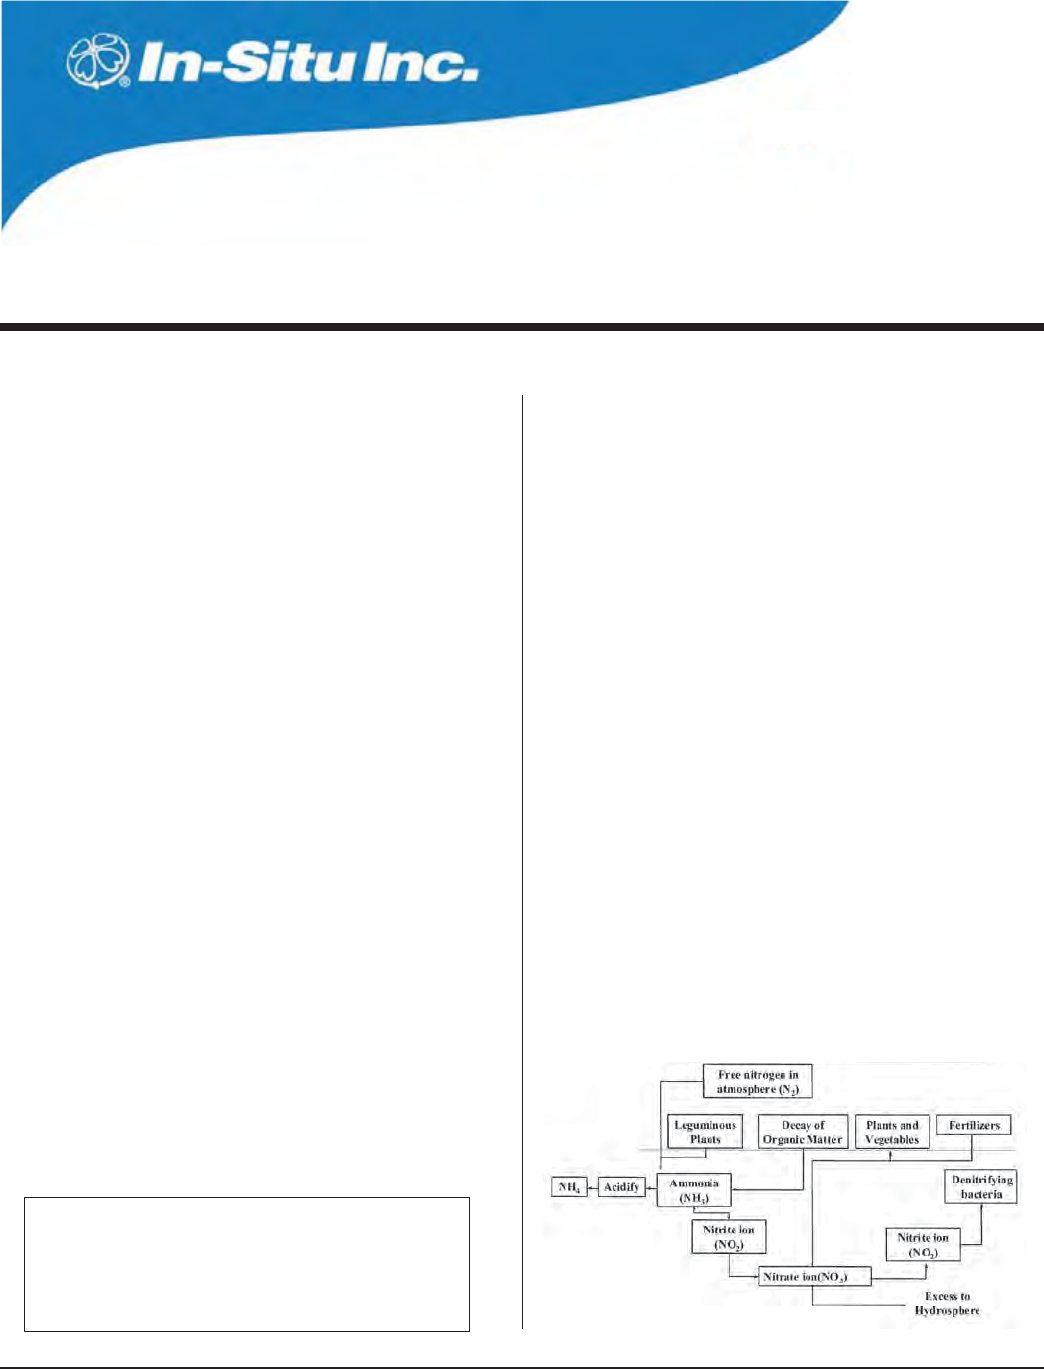
115
Multi-Parameter
Water Quality TROLL®
TROLL 9500 Operator’s Manual 0095110 rev. 007 01/09
17 NITRATE
Unpolluted groundwater 0.05 ppm N
Surface water 0.1 to 20 ppm N
Waste water ~ 30 ppm N
Drinking water standard (EPA) 10 ppm N
Typical Nitrate values
WHAT IS NITRATE ?
Nitrogen is an essential nutrient for plants and animals. It exists in the
environment in many different forms, constantly being replenished
as part of the nitrogen cycle. Nitrate (NO3
–) is one form of nitrogen in
the ecosystem that is very soluble in water. Nitrate enters the water
system when runoff from rainfall or irrigation washes through soils
that contain nitrate. The nitrate dissolves in the water and is carried to
nearby streams and lakes. It also permeates downward into the soil
where it may enter underground aquifers. The concentration of nitro-
gen in a body of water depends mostly upon the land cover and soil
type. Highest concentrations are associated with shallow groundwater
and agricultural use of the land. Agriculture is a large contributor to
the pollution of surface water and groundwater because of the use
of fertilizers that contain nitrate. Also, densely populated livestock
produce large quantities of manure that can be changed into nitrate
upon decay.
Nitrate remains in surface water until it is consumed as a nutrient by
plants or other organisms. Surface streams have nitrate concentra-
tions ranging from 0.1 to 20 ppm N. Levels as high as 30 ppm N are
FOUNDINWASTEWATERDISCHARGESANDWASTEWATEREFmUENTPLANTSWHILE
levels as low as 0.05 ppm N are found in unpolluted groundwater.
WHY MEASURE NITRATE?
High nitrate levels in drinking water are associated with health
problems. Nitrate is reduced to nitrite in the digestive system, where
it may then oxidize iron in the hemoglobin molecule of red blood cells
to form methemoglobin. Methemoglobin lacks the capacity to bind and
carry oxygen to tissues. As a result of this health risk, the EPA has
established 10 ppm N as the maximum limit of nitrate in drinking water
for the USA.
High levels of nitrate in lakes can lead to a process called eutrophi-
cation. Nitrates are nutrients for aquatic plants and algae, causing
overproduction when present in excessive levels. This accelerated
growth or bloom can eventually lead to a number of negative impacts
on the aquatic environment such as a reduction in dissolved oxygen,
which can lead to the death of fish and other aquatic life. Reduction of
sunlight to submerged aquatic vegetation due to increased coverage
on the surface causes a corresponding reduction in photosynthesis
and eventual death.
THE NITRATE SENSOR
The In-Situ sensor is an ion-selective electrode (ISE) that is selective
for the nitrate ion (NO3
–). It is a double-junction combination ISE with
a silver/silver-chloride reference half-cell, PVC membrane, and refer-
ence electrolyte gel. It measures the concentration in parts per million
of nitrate ion in solution (calculated as nitrogen, ppm as N).
The Nitrogen Cycle

116
TROLL 9500 Operator’s Manual 0095110 rev. 007 01/09
SENSOR PREPARATION
To ensure optimum membrane response, the nitrate sensor should
be thoroughly hydrated in an appropriate solution before calibration. A
good way to do this is to allow the sensor to soak in the solution you
plan to use for the first calibration point (lowest concentration) for at
least 15 minutes and up to several days before calibration and use.
s PPM.FORCALIBRATIONINTHELOWERRANGECONCENTRATIONSLESS
than 14 ppm N)
s PPM.FORCALIBRATIONINTHEUPPERRANGECONCENTRATIONSOF
ppm N and up)
The sensor kit includes an empty bottle for this purpose.
SENSOR INSTALLATION
Unpack the nitrate sensor, hydrate it as above, and install in port 1,
2, or 3 in the sensor block at the front end of the MP TROLL 9500 as
follows.
TIP: Remember that a polarographic D.O. sensor (if present)
will operate properly only in port 2 and a turbidity wiper
accessory only in port 3.
1. Remove the restrictor from the front end of the MP TROLL 9500.
This allows access to the sensor block depicted in the drawing
below.
2. Remove the sensor’s protective cap or storage bottle and set aside
for future storage of the sensor. If the connector end is covered
with a cap, remove it also.
3. Remove any moisture or dirt from the area around
the port where you will install the sensor, then use the
sensor removal tool to remove the plug from the port
where you will install the sensor.
4. Remove any moisture or dirt from the port connector with a clean
swab or tissue.
5. Check lubrication of the sensor o-rings.
TIP: The sensor o-rings require generous lubrication before
installation. New sensors will be lubricated at the factory. If
the o-rings appear dry, apply apply a silicone lubricant before
installation.
6. Handling the sensor by the sides, not the tip, align the mark on the
side of the sensor with the mark on the port.
Avoid touching the membrane at the tip of the sensor.
Contaminants on the membrane can change its properties
and affect measurements.
7. Use the sensor insertion tool to firmly press the
sensor into the port until you feel it dock with the
connector at the bottom. When properly inserted a
small gap (width of the sensor removal tool) remains
between the widest part of the sensor and the instru-
ment body, for ease of removal.
CALIBRATION
OVERVIEW
The software offers several options for nitrate calibration.
s Three-point bithermal (“two-temperature”) calibration. The first
two calibration points are taken in solutions of different concentra-
tions at the same temperature. The third point uses one of these
SOLUTIONSATATEMPERATURETHATISATLEAST½HIGHERORLOWER
depending on anticipated fieldconditions. This type of calibration al-
lows determination of the sensor’s “isopotential point”—the ion con-
centration at which changes in temperature do not cause a change
in sensor response (voltage). A three-point bithermal calibration
is recommended before the first use of the sensor, and regularly
thereafter, to insure accurate readings at all potential temperatures.
s Two-point isothermal (“same temperature”) calibration using solu-
tions of two different concentrations. A two-point isothermal calibra-
tion calculates the sensor’s slope and offset but cannot compute
the isopotential point. For best results this type of calibration should
be carried out as close as possible to the temperature at which the
sensor will be used. Or, It may be performed after a previous three-
point bithermal calibration to recalculate the slope and offset of an
aging sensor while retaining the previously calculated isopotential
point.
sensor
removal
tool
sensor
insertion
tool
Pressure/turbidity
(or plug)
Temperature
Nitrate sensor may be installed
in port 1, 2, or 3
alignment mark
SECTION 17: NITRATE
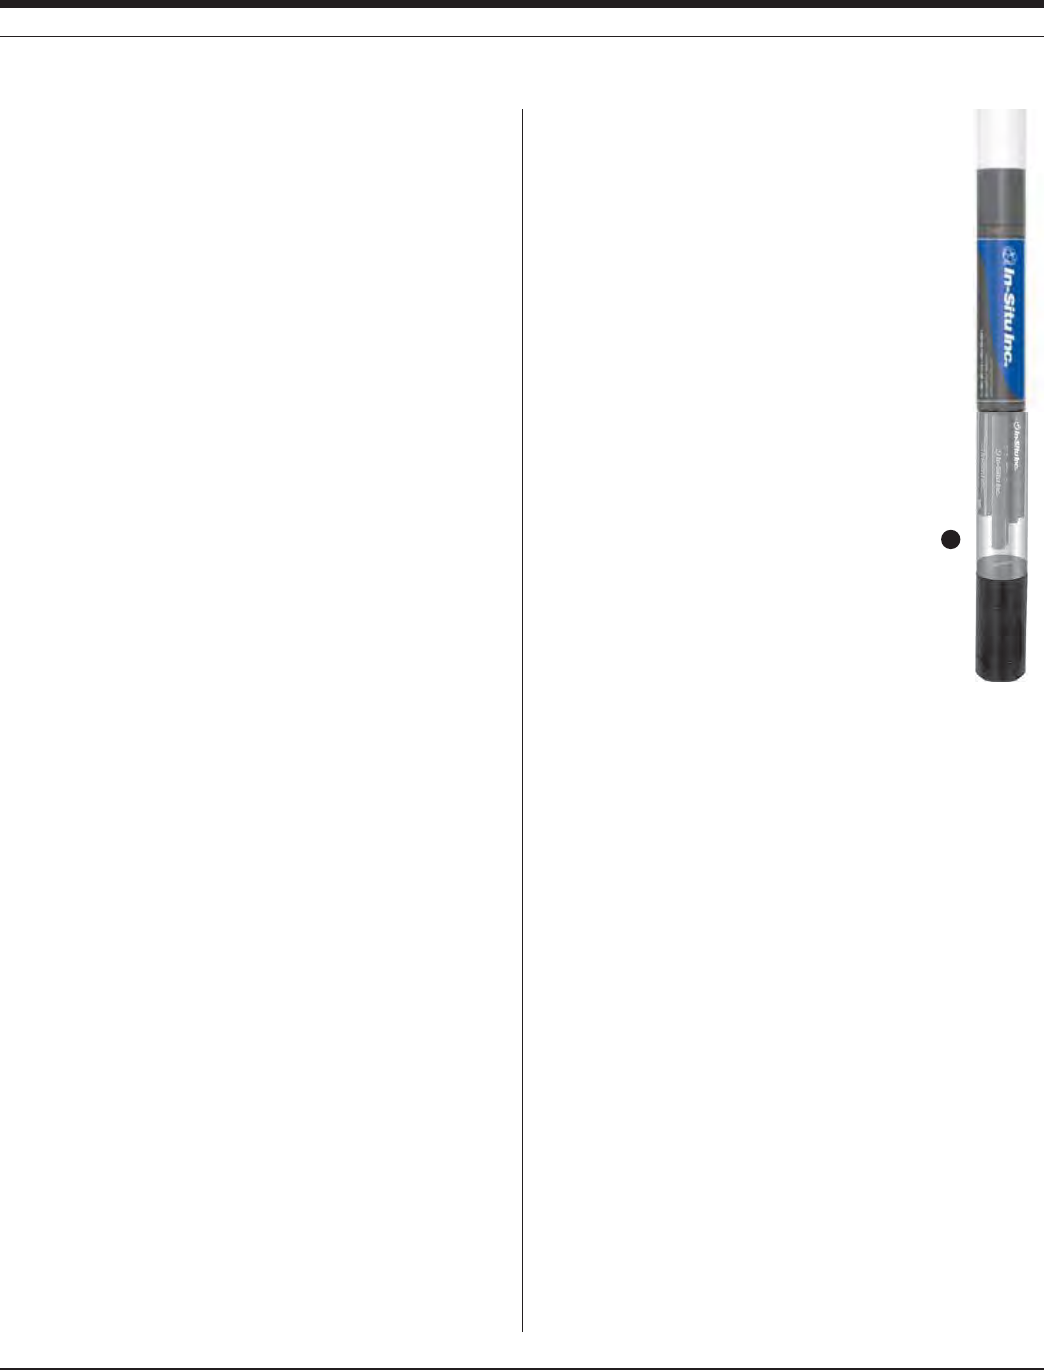
117
TROLL 9500 Operator’s Manual 0095110 rev. 007 01/09
s Single-point calibration. After the initial three-point bithermal cali-
bration has established the sensor slope, offset, and isopotential
point, a single-point calibration may be used with good results to
adjust the offset on a daily basis.
CALIBRATION SOLUTIONS
Potassium nitrate (KNO3) solutions certified to N.I.S.T. standards are
supplied in the In-Situ Nitrate Calibration Kits:
14.0 ppm as N
140 ppm as N
1400 ppm as N
Specialized calibration kits are available for calibrating the nitrate sen-
sor for low-range and high-range measurements:
Low range: two quarts each 14.0 ppm and 140 ppm
High range: two quarts each 140 ppm and 1400 ppm
RECOMMENDED CALIBRATION FREQUENCY
Ion-selective electrodes are inherently unstable and drift is quite
normal. To achieve the most accurate sensor response, we recom-
mend a complete three-point bithermal calibration once a week, with a
single-point calibration daily or after 4-6 hours of use.
PREPARING TO CALIBRATE
You will need:
s -042/,,WITHTHEHYDRATEDNITRATESENSORINSTALLEDANDSEN-
sors o0r plugs in the other sensor ports
s #AL#UP
s /NETWOORTHREENITRATECALIBRATIONSOLUTIONSSELECTEDFORTHE
range you expect to measure. When performing a multi-point
calibration, begin with the lowest-concentration solution
s &ORATHREEPOINTBITHERMALCALIBRATIONATEMPERATUREBATHORA
container of ice large enough to hold the Cal Cup (and stirrer, if
used).
s 3TIRRER5SEASTIRRERDURINGCALIBRATIONIFITWILLALSOBEUSEDINTHE
field—for example, in stagnant or very slowly moving water. The
MORECLOSELYCALIBRATIONCONDITIONSREmECTlELDCONDITIONSTHEMORE
successful the calibration. For more information on the stirrer, see
“Stirring” in Section 10.
NITRATE CALIBRATION PROCEDURE
1. Rinse the Cal Cup and front end of the MP
TROLL 9500 in clean water. Shake to dry.
For best results, follow this with a rinse in a
portion of the selected calibration solution.
Discard the rinse solution.
2. Insure the black PVC base (or the stirrer) is
attached to the Cal Cup, and fill the Cal Cup
to the fill line with the selected calibration solu-
tion.
s "EGINWITHTHELOWESTCONCENTRATIONWHEN
performing a multi-point calibration.
s 7ITHAFULLCOMPLEMENTOFSENSORSINSTALLED
use the lower line as a guide.
s 7ITHORREMOVABLESENSORSINSTALLEDlLL
to the upper line.
3. Insert the front end of the MP TROLL 9500
into the open end of the Cal Cup. Thread the
Cal Cup onto the body until seated against the
o-ring, then back off slightly to avoid overtight-
ening.
To stabilize the instrument, you may wish to use a calibration stand
or other support.
4. Connect the MP TROLL 9500 to a PC and establish a connection
in Win-Situ 4 or Pocket-Situ 4. Win-Situ screens are illustrated
here. The Pocket-Situ interface is similar, with the Navigation tree
at the top of the screen and the Information pane below it.
5. Select the MP TROLL 9500 in the Navigation tree.
The software will automatically detect and display the installed sen-
sors. If one or more sensors is installed in the wrong port, an error
message will be displayed. Simply remove the sensor and install it
in the correct position, then “refresh” the device before continuing.
SECTION 17: NITRATE
3
Cal Cup
Stirrer
(optional)
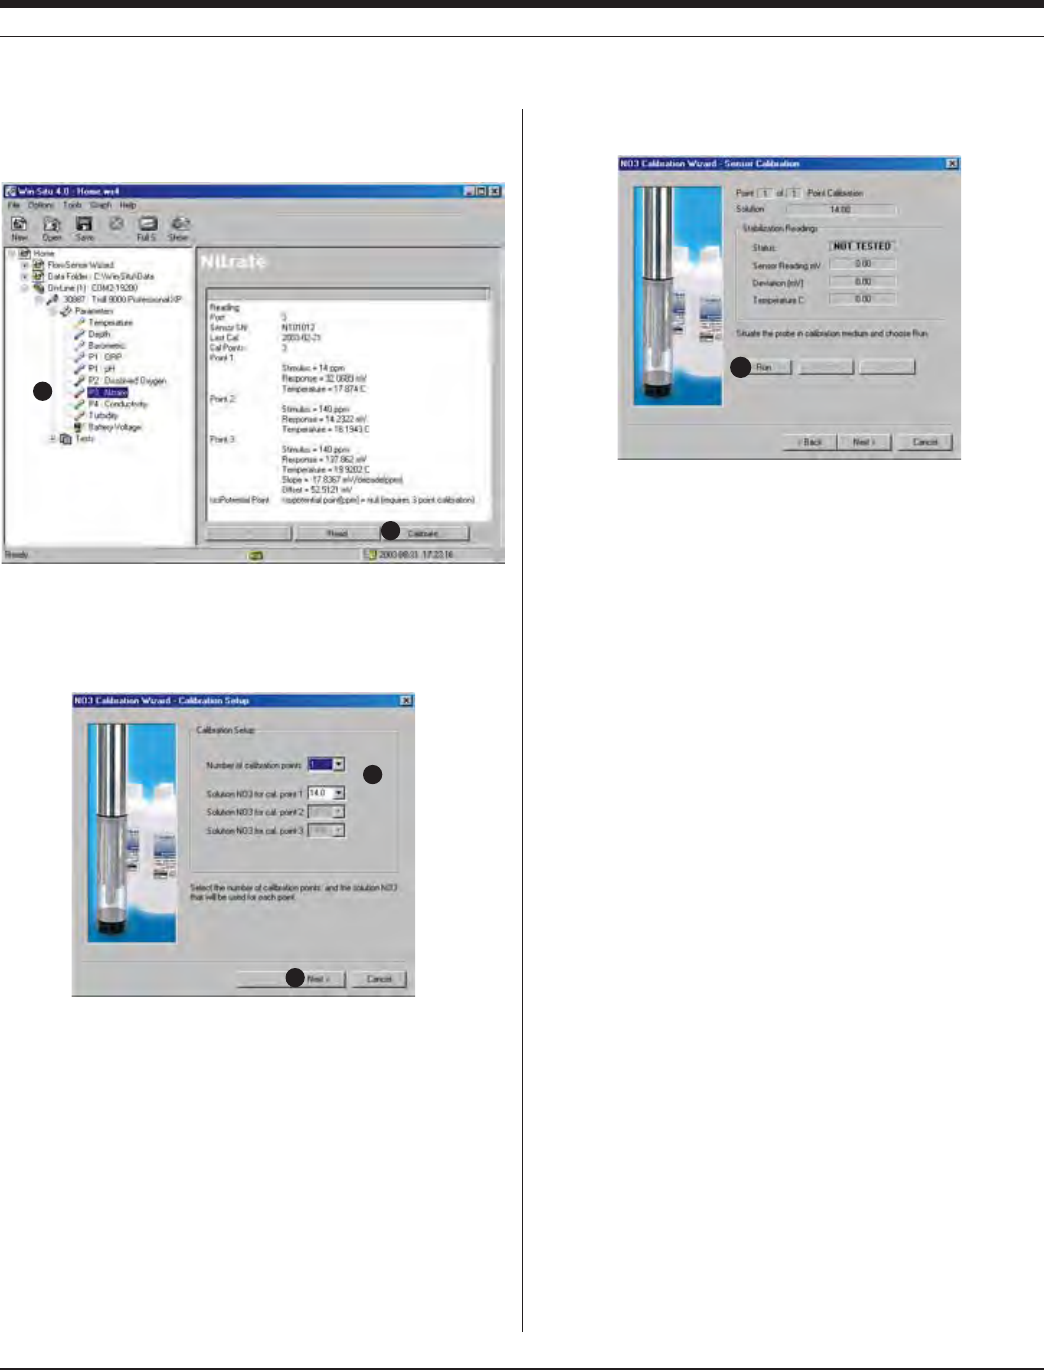
118
TROLL 9500 Operator’s Manual 0095110 rev. 007 01/09
6. Select Nitrate in the Parameters list. The sensor serial number
(SN) and recent calibration information is displayed.
7. Select Calibrate.
The Nitrate Calibration Wizard starts. A screen like this is dis-
played.
8. Select the number of calibration points for this calibration, and the
concentration (ppm) of the calibration solution for each point.
Cal point 1 is the solution the sensor is soaking in now, the lowest
concentration for a multi-point calibration. If doing a three-point
bithermal cal, choose cal point 3 to be the same as either cal point
1 or cal point 2.
9. Select Next to continue.
10. In the next screen, select Run to begin the stabilization.
The display will continuously update as readings are taken and
compared against the stabilization criteria.
s 3TATUSINDICATORS
NOT TESTED is displayed until you begin the calibration by
selecting Run.
UNSTABLE indicates the sensor response does not meet the
criteria for a valid calibration point.
NOMINAL indicates the sensor deviation meets early stabiliza-
tion criteria.
The Accept button becomes available when nominal stability is
achieved. You may accept the early value, or wait for complete
stability. If you accept the early value, the calibration point will
be designated “USER SET” in the calibration report. (For more
on calibration reports, see “Calibration History” in Section 10.)
STABLE is displayed when the readings have stabilized suffi-
ciently to take a valid calibration point. The calibration proceeds
automatically to the next screen.
s 3ENSOR2EADING4HECURRENTSENSORRESPONSEINMILLI6OLTS
s $EVIATION#HANGEINSENSORRESPONSEBETWEENTHELASTTWOREAD-
ings.
s #URRENTTEMPERATUREISALSODISPLAYED
11. If doing a single-point calibration, go to step 16.
For a multi-point calibration, the Wizard returns to the screen
shown at step 10 and waits for you to situate the probe in the next
calibration solution and click Run.
8
9
10
6
7
SECTION 17: NITRATE
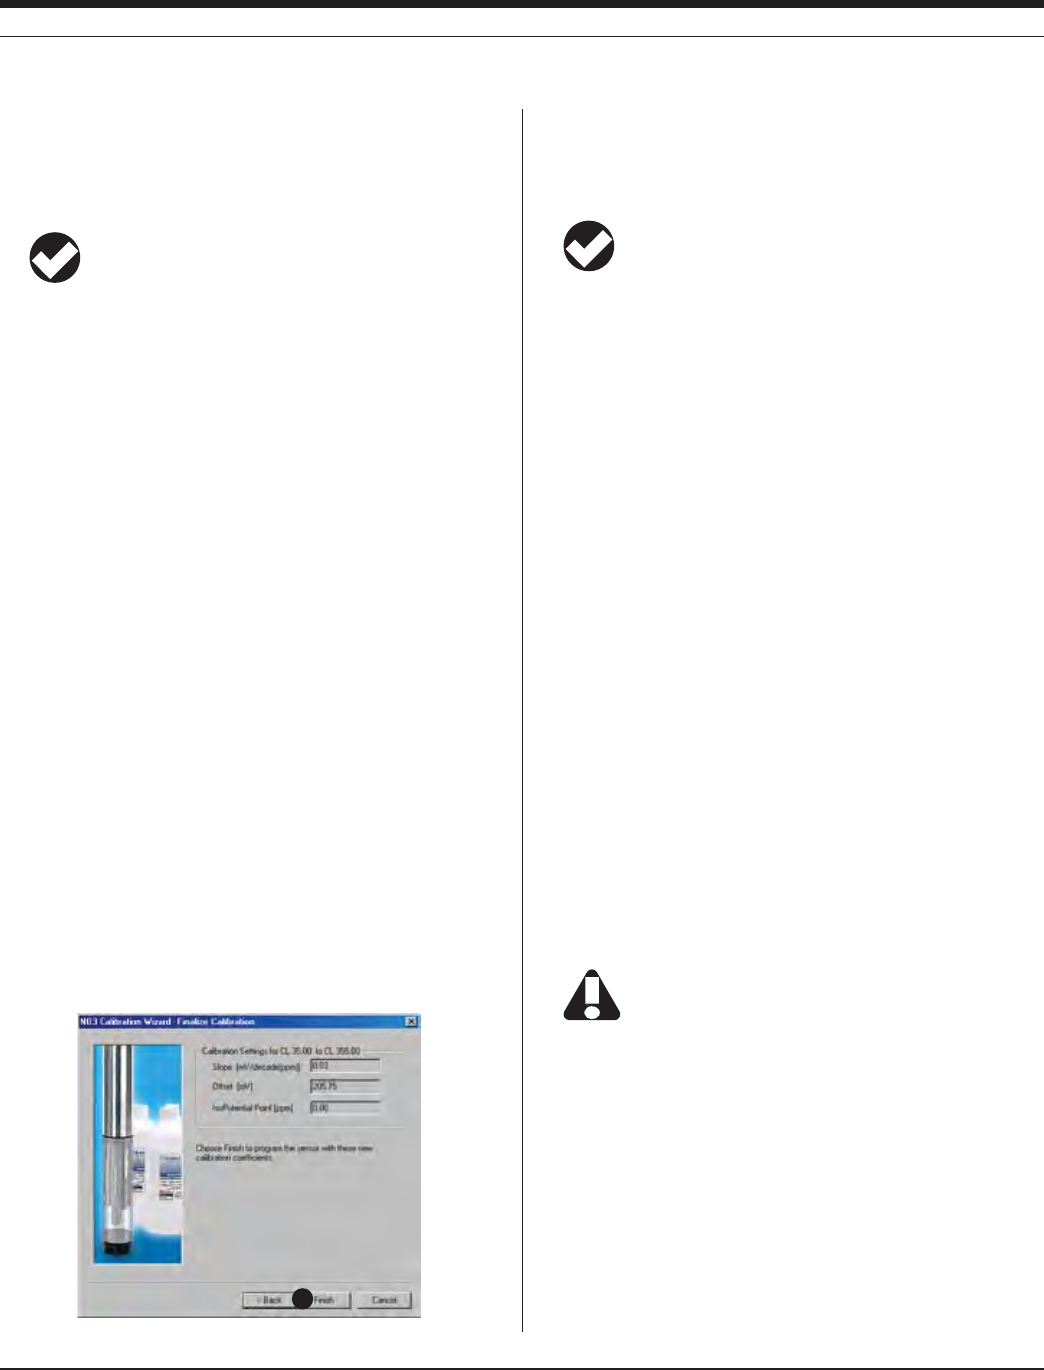
119
TROLL 9500 Operator’s Manual 0095110 rev. 007 01/09
12. Remove the Cal Cup, discard the first solution, rinse the Cal Cup
and the front end of the instrument with clean water, followed by
a rinse in the next calibration solution, refill the Cal Cup with the
second solution, and attach it to the instrument.
TIP: The used calibration solution may be flushed down the
drain with running water, or saved in a separate container
and used as a rinse the next time you calibrate with the
same solution.
13. Select Run to begin the stabilization for cal point 2. Status indica-
tors and controls are the same as for cal point 1 (step 10).
Again wait for Stable status (or click Accept when Nominal is
indicated).
If doing a two-point calibration, go to step 16.
14. For the third calibration point, use the cal point 1 or cal point 2
solution (as specified in step 8) but change the temperature by at
LEAST½#!CONVENIENTWAYTODOTHISISTOMOVETHEPROBE#AL
Cup and all—into a temperature-controlled bath or container of
ice. Allow time for the sensor to reach thermal equilibration with
the solution temperature. With stirring or agitation, this should take
about 10 minutes, perhaps up to 30 minutes if left undisturbed.
15. When the temperature is stable, select Run for cal point 3.
When Nominal is accepted or Stable is indicated for cal point 3,
the final screen is displayed.
16. The final screen of the Calibration Wizard shows the sensor
slope and offset calculated during the calibration process. For a
three-point bithermal calibration, the calculated isopotential point
is shown. If a single-point calibration has been performed, the
isopotential point is the one calculated during the last three-point
bithermal calibration.
17. Select Finish to program the sensor with the newly calculated
calibration coefficients.
The nitrate sensor is now calibrated and ready to use.
TIP: You can look at the calibration report right after
calibrating, or at any time. See “Calibration History” in
Section 10 for details.
Options for storing sensors:
The sensor should calibrated immediately before use. If storage is
necessary, remove the sensor from the instrument and immerse in 14
ppm N solution, for later use in the low nitrate range, or 140 ppm N
solution, for use in the high range.
SENSOR SLOPE AND OFFSET
The expected slope for a new sensor is about 57 (± 2) mV per decade
of concentration (ppm). The calibration curve begins to deviate from
linear at about 10 ppm. The sensor’s zero offset is recalculated with
each single-point calibration.
UNITS AND CALCULATED MEASUREMENTS
Nitrate ion concentration is reported in ppm (equivalent to mg/L). No
calculated measurements are available.
USAGE RECOMMENDATIONS AND CAUTIONS
Nitrate Sensor
/PERATING4EMPERATURE ½#TO½#½&TO½&CONTINUOUS
TEMPERATURECANTOLERATEUPTO½#
½&INTERMITTENTLY
Pressure Rating 20 psi (14 m, 46 ft)
pH range 2.5 to 11
Do not submerge the nitrate sensor deeper than 46 ft
(14 m).
TEMPERATURE
The higher the temperature, the shorter the lifetime of the electrode.
½#DIFFERENCEINTEMPERATURECAUSESAERRORATPPMUNLESSA
bithermal calibration is performed.
SECTION 17: NITRATE
17
12 0
TROLL 9500 Operator’s Manual 0095110 rev. 007 01/09
POTENTIAL INTERFERENCES
The following table shows concentrations of possible interfering ions
that cause 10% error at various levels of NO3
–.
SENSOR CARE AND HANDLING
SENSOR REMOVAL
Position the yoke of the sensor removal tool at the point
where the sensor meets the sensor block and pry the
sensor upward.
Avoid touching the membrane at the tip of the
sensor. Contaminants on the membrane can
change its properties and affect measurements.
MAINTENANCE/INSPECTION/CLEANING
As long as extreme pH and high organic solvent content is avoided,
the sensor should last for several months at room temperature.
Eventually some of the components will leach out, and this will affect
the response (detection limit and scope), but this can be compensated
through calibration.
If film buildup is visible on the membrane, rinse under a gentle stream
of clean water, or swish gently in a mild detergent solution, rinse well
with clean water, and shake to dry.
To avoid depletion of the reference solution, do not allow the sensor to
soak in pure water for more than a few minutes at a time.
The electrode is not customer-refillable.
STORAGE
Store the sensor immersed in 14 or 140 ppm N solution, depending
on usage requirements, rather than dry or in DI water.
REFERENCES
Eaton, A.D., L.S. Clesceri, E.W. Rice, and A.E. Greenberg, eds.,
Standard Methods for the Examination of Water and Wastewater,
21st edition, Washington, D.C.: American Public Health Associa-
tion, American Water Works Association, and Water Environment
Federation, 2005. Section 4500-NO3
– D. Nitrate Electrode Method.
EPA, Methods for Chemical Analysis of Water and Wastes,
EPA/600/4-79-020, revised March 1983. Method 350.3, Nitrogen,
Ammonia, Potentiometric, Ion Selective Electrode. Approved at 40
CFR Part 136.
Rundle, Chris C., A Beginners Guide to Ion-Selective Electrode
Measurements. Nico2000 Ltd., London, UK. On the web at www.
nico2000.net
sensor
removal
tool
Ion 100 ppm NO3
– 10 ppm NO3
– 1 ppm NO3
–
ClO4
– 0.01 0.001 0.0001
I– 0.5 0.05 0.005
ClO3
– 5 0.5 0.05
CN– 10 1 0.1
Br– 70 7 0.7
NO2
– 70 7 0.7
HS– 100 10 1
HCO3
– 1000 100 10
CO3
2– 2000 200 20
Cl– 3000 300 30
H2PO4
– 5000 500 50
HPO4
2– 5000 500 50
PO4
3– 5000 500 50
AcO– 20,000 2000 200
F– 60,000 6000 600
SO4
2– 100,000 10,000 1000
SECTION 17: NITRATE
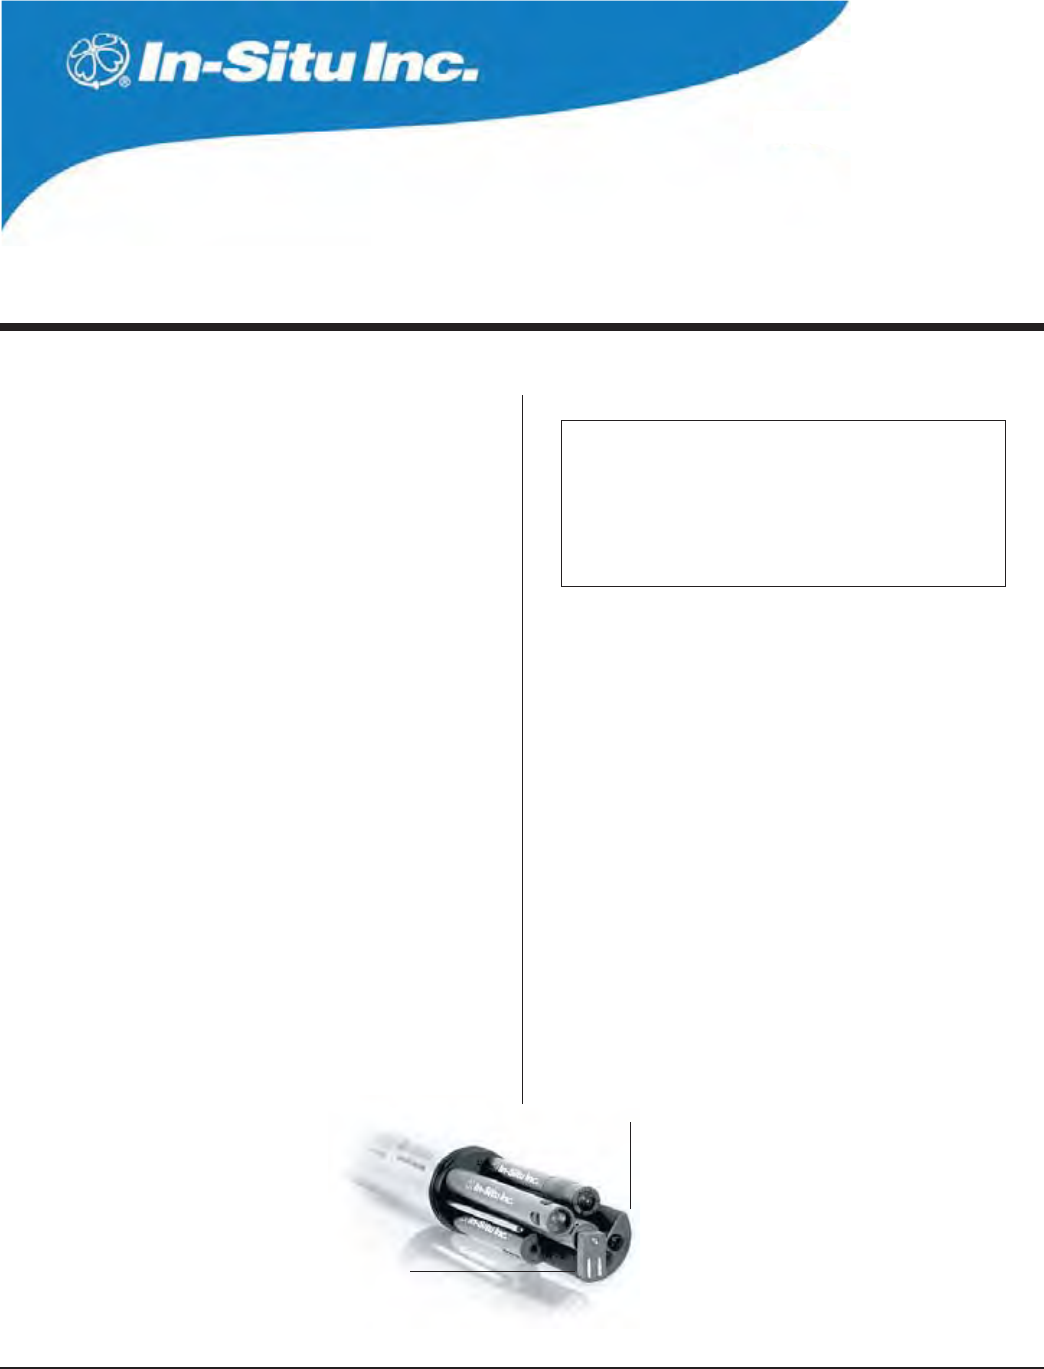
121
Multi-Parameter
Water Quality TROLL®
TROLL 9500 Operator’s Manual 0095110 rev. 007 01/09
WHAT IS TURBIDITY?
Turbidity is an indirect measure of the clarity or transparency of water,
and thus an important indicator of its condition and productivity.
Created by suspended matter and microscopic organisms, turbidity
causes light to be scattered and absorbed rather than transmitted
directly through water. Turbidity is the physical characteristic of the
solution that causes light scattering. Turbidity is the opposite of clarity.
The APHA reference work Standard Methods (Eaton and others,
2005) defines turbidity as “an expression of the optical property that
causes light to be scattered and absorbed rather than transmitted with
NOCHANGEINDIRECTIONORmUXLEVELTHROUGHTHESAMPLEv
Turbidity is not . . .
s ADIRECTMEASUREOFCLARITY
s AMEASUREOFCOLOR
s AMEASUREOFSUSPENDEDSOLIDSITISAMEASUREOFTHEIR
light-scattering abilities.
4HE)N3ITU4URBIDITYSENSORISINCONFORMANCEWITHTHE)3/
TURBIDITYSTANDARDWHICHSPECIlES½SCATTEREDLIGHT
WHY MEASURE TURBIDITY?
Turbidity measurements
s CANPROVIDEAREASONABLEESTIMATEOFTHEtotal suspended solids or
sediments (TSS) concentration in water.
s CANTELLUSSOMETHINGABOUTTHEHEALTH
of a natural water body. Clear water
lets light penetrate more deeply into a
lake or stream than does murky water.
This light allows photosynthesis to occur
and oxygen to be produced.
s CANBEAUSEFULINDICATOROFRUNOFFINTOSURFACEWATERSYSTEMS
s INmOWCELLORINLINEAPPLICATIONSWHENPUMPINGWATERATVERYLOW
rates, can provide a good indication of true formation water.
Higher turbidity levels make it more costly to treat surface water for
use as drinking water. Controlling turbidity may be an effective way to
protect against pathogens in drinking water.
Aesthetic considerations also play a role in our desire to quantify tur-
bidity: Most people would rather look at, drink, or swim in clear water
than in water that appears cloudy, and closely associate appearance
with the health of the body of water.
HOW IS TURBIDITY MEASURED?
Historical methods for measuring turbidity relied on subjective esti-
mates that depended largely on the eye of the beholder.
)NTHE*ACKSON#ANDLEMETHODFOREXAMPLEACANDLEmAMEISOB-
served through the length of a glass tube into which
AmUIDSAMPLEISPOUREDUNTILTHERAYSOFTRANSMIT-
TEDANDSCATTEREDLIGHTAPPEAREQUALANDTHEmAME
essentially disappears. Among several drawbacks to
this method, the reproducibility of standards formu-
lated from natural sediments was difficult to control.
The Secchi disk method used in limnological studies
involves submerging a weighted, black-and-white
painted metal plate until the pattern can no longer
Turbidity sensor
Optional wiper
18 TURBIDITY
EPA drinking water 0.3 - 0.5 NTU
Treated water 0 - 1 NTU
&RESHWATERvVISIBILITY < 10 NTU
Fresh water, 2.5” visibility 240 NTU
Short-term stress to aquatic life .45
Unsafe level for most aquatic life .45
Typical turbidity values
122
TROLL 9500 Operator’s Manual 0095110 rev. 007 01/09
be detected. The plate is then pulled up until it is visible again. The
average of the two depths provides an estimate of water clarity or
transparency.
Modern turbidimeters measure the loss in intensity of a light beam
as it passes through a solution containing suspended and dissolved
particles that are large enough to scatter the light. The method is
based upon a comparison of the intensity of light scattered by the
sample with the intensity of light scattered by a standard reference
suspension. The nephelometer is a particular type of turbidimeter
THATMEASURESTHEINTENSITYOFLIGHTSCATTEREDATRIGHTANGLES½TO
the incident light. This lessens the difficulty of differentiating small
changes against a large background. Standards for turbidity-measure-
ment instruments specify the light source, angle, wavelength, beam
width, and sample suspensions, among other factors. Many of today’s
commonly accepted procedures (e.g., Standard Methods, EPA, and
ISO) apply to laboratory bench-top instruments.
THE TURBIDITY SENSOR
The optional turbidity sensor of the Multi-Parameter TROLL 9500 is
permanently-installed and factory-calibrated. It may be a turbidity
sensor alone or a pressure/turbidity sensor combination. If your MP
TROLL 9500 was ordered without a turbidity sensor or a pressure
sensor, there will be a permanently installed plug in the pressure/tur-
bidity sensor slot. A turbidity sensor or combination pressure/turbidity
sensor can be added at the factory.
The In-Situ turbidity sensor is comprised of a matched solid-state
detector-emitter pair positioned at right angles. The light source is an
infrared LED, optimized for operation at 870 nanometers (nm). The
optical windows of the detector (photodiode) and emitter (LED) are
SCRATCHRESISTANTSAPPHIRE)3/HASSETADETECTIONANGLEOF½
and the light wavelength at 860 nm. The sensor uses active modula-
tion for ambient light rejection.
The In-Situ sensor is an electronic nephelometer which compares
THEINTENSITYOFLIGHTSCATTEREDBYTHEENVIRONMENTALmUIDWITHINTENSITY
of light scattered by a standard reference suspension. The higher
the intensity of scattered light, as measured in NTU’s, the higher the
turbidity. This measurement generally provides a very good correla-
tion with the concentration of particles in the water that affect clarity.
However, measurements of scattered light cannot be directly related
to a gravimetric equivalent, such as suspended sediment load, unless
a working curve for the specific sample is created.
THE TURBIDITY WIPER
The optional wiper accessory helps to keep the turbidity sensor optics
free of bubbles and fouling.
The wiper installs in port 3 of the MP TROLL 9500 like other remove-
able sensors. A positional brace aligns it with respect to the turbidity
sensor and keeps it stable in moving waters.
The wiper pad is adhesive-free, low-abrasion cotton material. The
pad is easily replaced when it becomes too soiled to clean the sensor
optics effectively.
Use of the wiper will significantly impact battery life. Lithium
batteries are recommended.
SECTION 18: TURBIDITY
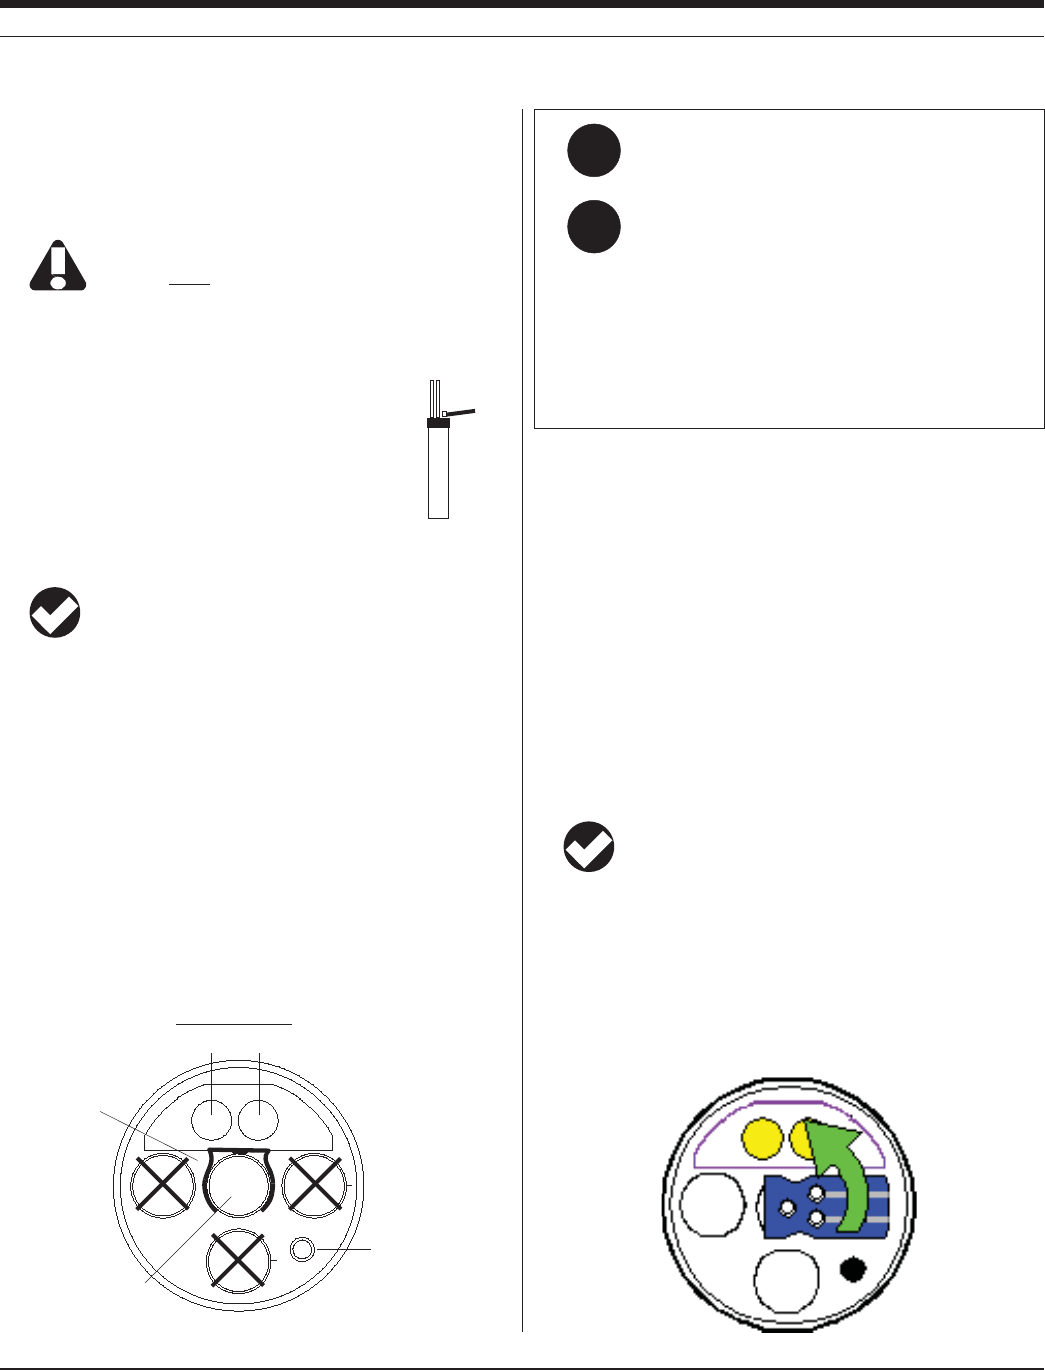
12 3
TROLL 9500 Operator’s Manual 0095110 rev. 007 01/09
1
2 3 4
Turbidity Sensor
Detector Emitter
Temperature
Install wiper
in port 3
Wiper
brack-
Q:
A:
What does the wiper do, and when is wiping neces-
sary?
The wiper helps keep the optical windows of the turbidity
sensor clear of bubbles and debris during measurements.
When the sensor is off, the wiper is parked in its “home”
position over sensor port 4. When a turbidity measurement is
called for—a manual reading, a scheduled reading during a
test, while calibrating or profiling—the wiper makes a full 360
degree sweep to clean the optics.
Wiping is not needed when the instrument is hand-held for
short periods (Profiling). Gently swishing the MP TROLL in
the water should serve to dispel air bubbles.
sensor
removal
tool
WIPER INSTALLATION
The MP TROLL 9500 may be shipped with the optional wiper already
installed in port 3, as shown on the drawing below. If installation is
necessary, unpack and install the wiper in port 3 as follows.
The turbidity wiper will function properly only when
installed in port 3.
1. Remove the restrictor from the front end of the MP TROLL 9500.
This allows access to the sensor block depicted in the drawing
below.
2. Use the sensor removal tool to remove the sensor or
plug from port 3. Retain the plug for future use. For
best access to port 3, you may need to remove sen-
sors or plugs from other ports as well.
3. Check lubrication of the o-rings on the connector end
of the wiper.
TIP: The wiper o-rings require generous lubrication before
installation. New wipers will be lubricated at the factory. If the
o-rings appear dry, apply apply a silicone lubricant before installation.
4. Visually align the connector on the wiper with the connector at the
bottom of port 3.
5. Press firmly until you feel the wiper dock with the port connector.
When properly inserted a small gap (width of the sensor removal
tool) remains between the wiper body and the instrument body.
6. Press the wiper into the bracket attached to the turbidity sensor.
7. After installing a new wiper, we recommend you access wiper con-
trol in the software while you can clearly see the wiper movement.
Connect in software, select the wiper, and click Wipe to ensure the
wiper passes over the turbidity sensor optics properly.
WIPER MOVEMENT
When the turbidity sensor is off—not taking a measurement—the
wiper head is “parked” over port 4. When a turbidity measurement
is requested, the wiper head passes over the optics, sweeping them
CLEANANDRETURNSTOITSPARKINGPLACE/NEhWIPEvCONSISTSOFA½
counter-clockwise sweep (viewed from the sensor end), as shown in
the drawing below. Wiping occurs automatically before turbidity read-
ings—manual reads, profiling, calibration, and tests—that are more
than 15 seconds apart. If readings are less than 15 seconds apart, the
wiper will wipe once, before the first reading.
A single wipe may be initiated in the software when the instrument
is idle to clear the turbidity optics of bubbles or debris. The wiper’s
movements are entirely software-controlled.
TIP: 15 seconds are alotted for a wipe cycle. This time is
generous to allow for slower wiper movement at very low
temperatures.
If readings—test, calibration, profiling—are more than 15 seconds
apart, the turbidity sensor will be wiped automatically before each
reading. If readings are less than 15 seconds apart, the wiper will
wipe the windows just once, before the first reading.
SECTION 18: TURBIDITY
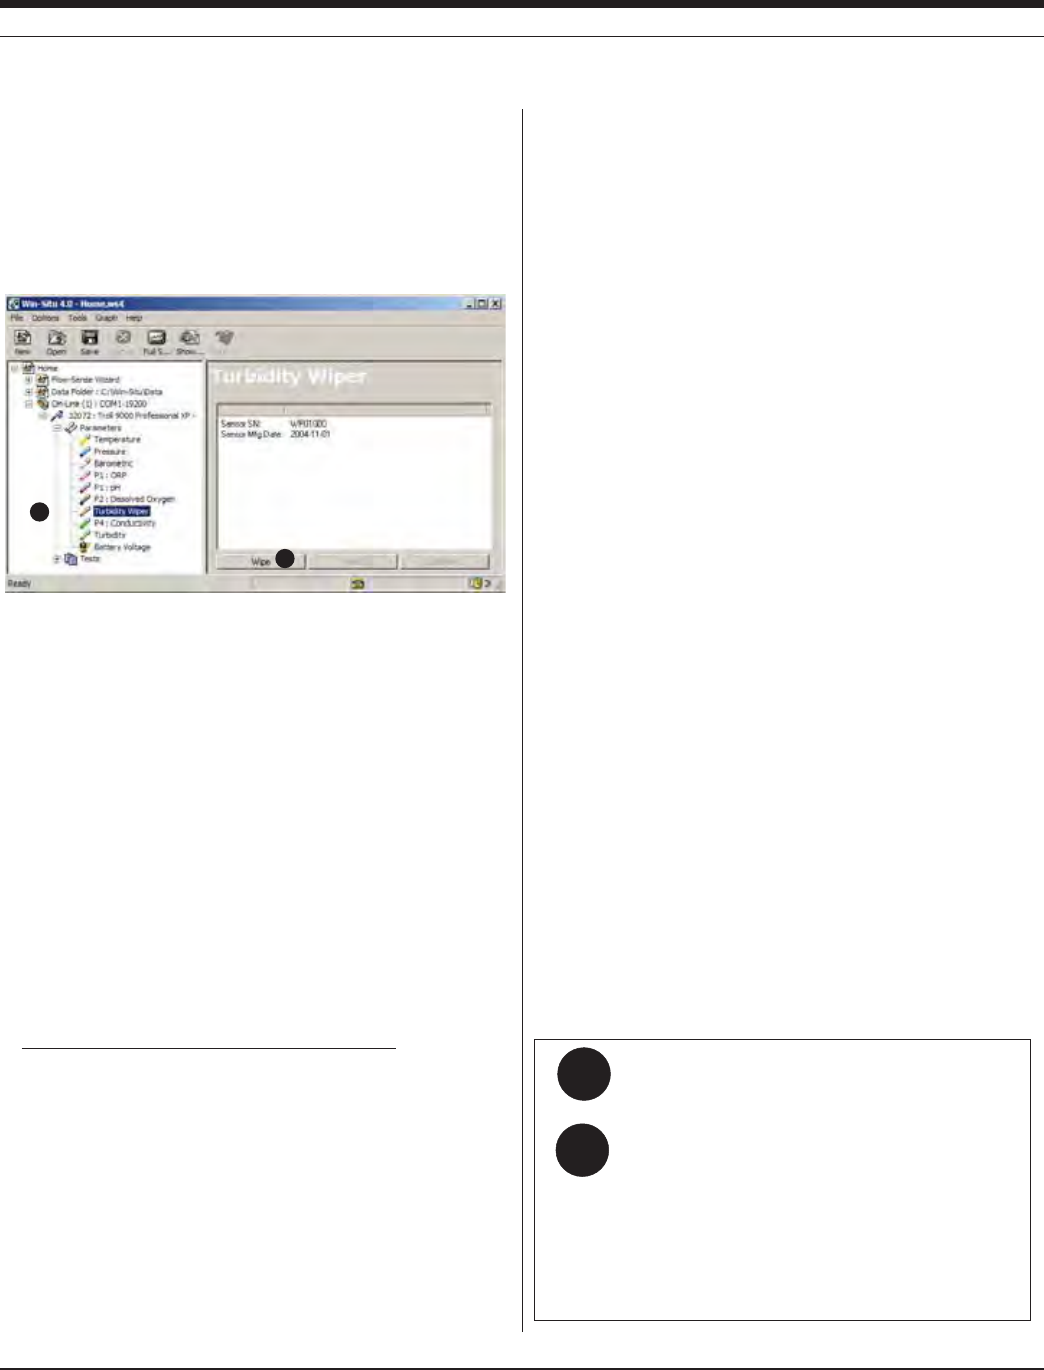
12 4
TROLL 9500 Operator’s Manual 0095110 rev. 007 01/09
Q:
A:
Why do I need to calibrate the turbidity sensor if it
has been calibrated in the factory?
A new turbidity sensor is ready to measure turbidity with
reference to suspended polymer standards. If you prefer
to reference turbidity measurements to Formazin rather
than polymer, a field calibration with Formazin should be
performed.
After cleaning the sensor, readings should be checked
with standards and a field calibration performed if
necessary.
MANUAL WIPE
To wipe the turbidity sensor optics manually:
1. With the wiper installed in port 3, connect the MP TROLL 9500 to a
PC and establish a connection in Win-Situ 4 or Pocket-Situ 4.
2. Select the Wiper in the Navigation tree.
3. Click Wipe. The wiper will pass once over the turbidity sensor
optics and return to its home position.
WIPER GUIDELINES AND PRECAUTIONS
s )FAWIPERISINSTALLEDDURINGA1UICK#ALOFTHE"ASICSENSORSSEE
Section 3, Getting Started), steps should be taken to insure the
wiper pad material does not absorb the Quick Cal solution. There
are two ways to do this.
– Remove the wiper head before doing the Quick Cal. Refer to
Wiper Maintenance guidelines later in this section for instruc-
tions on removing the wiper head.
– Alternatively, soak the front end of the instrument in plain water
before calibrating to allow the wiping pad to absorb sufficient
water to prevent its absorbing any Quick Cal solution.
s Do not attempt to move the wiper head by hand. Wiper move-
ment is software-controlled.
s 4HEWIPERPRESSUREMAYBEADJUSTEDIFNECESSARYSOTHATTHEPAD
is effectively cleaning the sapphire windows of the turbidity sensor
during movement. Refer to Wiper Maintenance guidelines later in
this section.
s 4HEWIPERPADORHEADMAYBEREPLACEDASNEEDED2EFERTO7IPER
Maintenance guidelines later in this section.
s 7HENAN2$/OPTICALDISSOLVEDOXYGENSENSORISINSTALLEDCHECK
to see that the RDO adapter cable is out of the way of wiper move-
ment.
CALIBRATION
FACTORY CALIBRATION
The turbidity sensor has been factory-calibrated to achieve a sensor
accuracy of ± 5% or 2 NTU (whichever is greater). The sensor is
calibrated over its full range, 0 to 2000 NTU, using polymer standards.
The resulting calibration coefficients are written to the sensor memory,
where they are stored permanently. They may be overlaid by perform-
ing a field calibration as described below, or may be recalled from the
sensor memory at any time.
The MP TROLL 9500’s turbidity sensor is ready to measure turbidity
without any user intervention. It is advisable to take a turbidity reading
first in your own calibration solution(s) as a check to ensure the ac-
curacy is within your operational standards and requirements. If this
result is satisfactory, a field calibration is not required.
FIELD CALIBRATION
Field calibration (or “user calibration”) is an overlay function that is
applied after the factory calibration math is done. The factory calibra-
tion applies across the entire range of NTU, and can be altered in the
field with a 1 to 4 point calibration procedure as described below to
compensate for effects of sensor fouling and other factors. You may
wish to perform a field calibration with standards other than polymer
(i.e., Formazin).
For best results, calibrate as close to field temperature as possible.
CALIBRATION SOLUTIONS
A nephelometer such as the In-Situ turbidity sensor should be
calibrated using standard reference suspensions having reproducible
light-scattering properties. The sensor has been factory-calibrated
with polymer suspensions, and the resulting calibration coefficients
take into account the light-scattering properties of the suspensions
and the sensor optics.
SECTION 18: TURBIDITY
2
3

12 5
TROLL 9500 Operator’s Manual 0095110 rev. 007 01/09
Polymer-based standards are submicron, non-surface charged, solid
spheres in matrixes of ultrapure water in homogeneous suspension;
this homogeneity allows linear dilutions. EPA approved the polymer
suspensions in 1984 as a calibration standard for turbidimeters.
Polymer suspensions are very stable, can withstand temperature
extremes, and have excellent lot-to-lot precision. A range of polymer
suspensions are available individually from In-Situ Inc. for calibrating
any expected turbidity range. They can be diluted with turbidity-free
water to achieve other NTU values (but see the cautions below).
Avoid vigorous mixing or agitation, which will create air bubbles and
lower the accuracy of the standards. It is advantageous to calibrate a
nephelometric turbidimeter with a standard that most closely matches
the size of the particulates you will be measuring.
Calibrating with Other Solutions
Formazin: If you wish to recalibrate with Formazin, keep these points
in mind.
s 2EQUIRESVERYCAREFULHANDLING
s -USTBESHAKENGENTLYANDALLOWEDTOSETTLEFORATLEASTMIN-
utes before use.
s 3HOULDNOTBEDILUTED
Diluting Polymer Suspensions: If you dilute polymer suspensions,
keep these points in mind:
s $ONOTDILUTEMORETHAN5SEGOODLABORATORYTECHNIQUES
s 3TORECAREFULLY06#BOTTLESARERECOMMENDED
s $ILUTINGPOLYMERSUSPENSIONSTAKESTHEMOUTOFTHECATEGORYOF
“primary standards”, they become “secondary standards.”
s )FNOTHANDLEDCAREFULLYTHEDILUTIONSCANBECOMEUNSTABLETHE
suspension of particles may be lost.
RECOMMENDED CALIBRATION FREQUENCY
Your own experience is the best guide to how often the turbidity sen-
sor will benefit from recalibration. The need for recalibration depends
on the condition of the optical windows, which in turn depends on
the environment. In a biologically active environment, cleaning and
calibration will be required more often. Periodic checks in calibration
solutions of known turbidity can be beneficial in indicating how well
the sensor is holding its calibration.
A field calibration is recommended
s IFYOUWISHTOREFERENCETURBIDITYMEASUREMENTSTOASTANDARDOTHER
than polymer.
s AFTERCLEANINGTHESENSORWINDOWSOFCONTAMINATION
s WHENREADINGSAPPEARTODRIFTORSHOWUNEXPECTEDLYHIGHORLOW
results.
IFALGALOROTHERGROWTHONTHEFRONTENDOFTHE-042/,,
CHANGESTHEREmECTIVEPROPERTIESOFTHEDEVICE
TURBIDITY CALIBRATION PROCEDURE
You will need:
s -042/,,WITHTURBIDITYSENSORWIPEROPTIONALPLUGSINANY
unused sensor ports.
s 4HERESTRICTORNOSECONEANDREMOVABLESENSORSIFANYTHATWILL
be installed when turbidity is measured.
s !LABORATORYBEAKERLARGEENOUGHTOHOLDTHEINSTRUMENTANDCALI-
bration solution.
s /NEORMORECALIBRATIONSTANDARDSFORTHEREGIONINWHICHYOUWISH
to calibrate. Several ranges from Very Low to Full are suggested in
the Calibration Wizard.
TIP: A 1-point to 4-point field calibration may be carried out
in any range. When performing a multi-point calibration,
begin with 0 NTU solution. For best measurement precision
the highest NTU value should exceed the readings you expect in the
field.
1. Rinse the front end of the MP TROLL 9500 with clean water. Shake
well to remove the rinse water; dry external surfaces (not the opti-
cal windows) with a clean tissue.
2. Pour the selected calibration standard into the beaker and insert
the MP TROLL 9500 into the solution.
The windows of the turbidity sensor should be immersed at least
¼” (a quarter of an inch) deep in the solution. If no wiper is present,
gently agitate the instrument to dispel any air bubbles.
SECTION 18: TURBIDITY
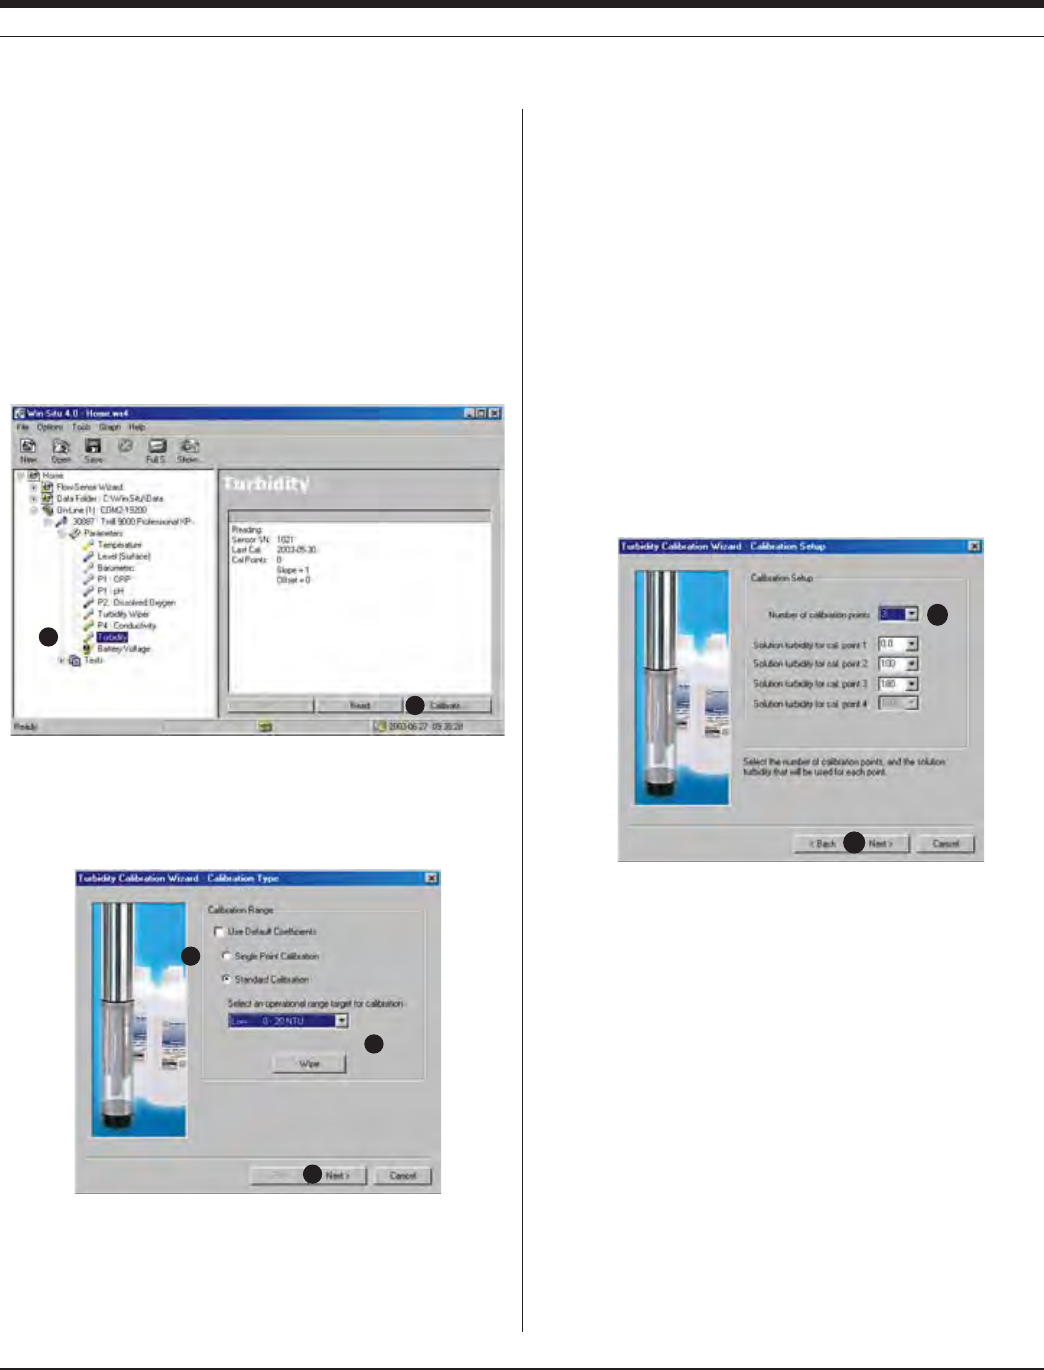
12 6
TROLL 9500 Operator’s Manual 0095110 rev. 007 01/09
s 3INGLE0OINT#ALIBRATION#LICKNext and go to step 12.
s 3TANDARD#ALIBRATIONDEFAULT
8. If you selected a Standard Calibration, select an operational range
target. The ranges are suggestions only; a 1- to 4-point calibration
may be performed in any range, using any standards
Note: If the software detects a turbidity wiper accessory, press-
ing the Wipe button will result in one complete wipe cycle of the
turbidity sensor optics.
9. Select Next to continue.
10. In the next screen, select the number of calibration points for this
calibration, and the turbidity value (in NTU) of the calibration solu-
tion for each point. One to four points (solutions) may be selected
for any operational range target selected in the previous screen.
When performing a multi-point calibration, cal point 1 must be
taken in a standard with a value of 0 NTU. Use clear water for
this. Purchased distilled or deionized water will generally measure
less than 0.5 NTU. Filtered water will have a lower NTU value.
11. Select Next to continue.
10
11
3. Connect the MP TROLL 9500 to a PC and establish a connection
in Win-Situ 4 or Pocket-Situ 4. Win-Situ screens are illustrated
here. The Pocket-Situ interface is similar, with the Navigation tree
at the top of the screen and the Information pane below it.
4. Select the MP TROLL 9500 in the Navigation tree.
The installed sensors will be displayed—including the turbidity
wiper, if installed in port P3.
5. Click to select Turbidity in the Parameters list. The sensor serial
number (S/N) and recent calibration information is displayed.
6. Select Calibrate.
The Turbidity Calibration Wizard starts. A screen like the one below
is displayed.
7. Select the type of calibration you wish to do:
s 5SE$EFAULT#OEFlCIENTSRESETSTHEFACTORYDEFAULTS)FYOUSELECT
this option, click Next and proceed to step 17.
SECTION 18: TURBIDITY
7
8
9
6
5
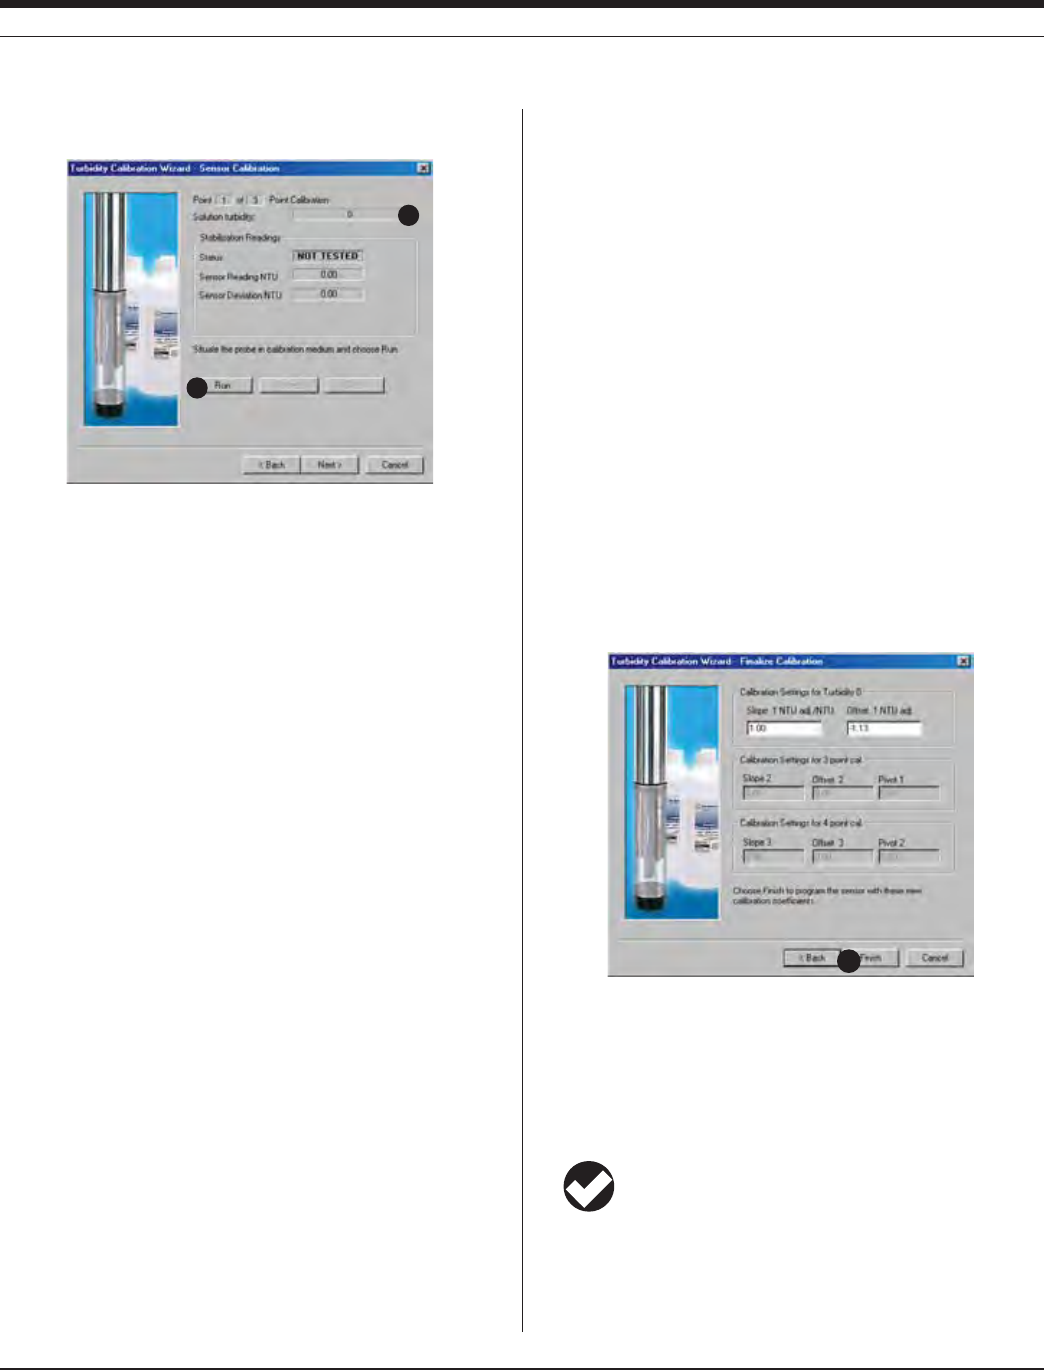
12 7
TROLL 9500 Operator’s Manual 0095110 rev. 007 01/09
13
12
18
A screen similar to the one shown below is displayed.
12. If you are performing performing a single-point calibration, enter
the value of the calibration standard (NTU). For a multi-point
calibration, the value of the first solution will be displayed.
13. When the sensor is situated in the calibration medium, select Run
to begin the stabilization.
The display will continuously update as readings are taken and
compared against the stabilization criteria.
s 3TATUSINDICATORS
NOT TESTED is displayed until you begin the calibration by
selecting Run.
UNSTABLE indicates the sensor response does not meet the
criteria for a valid calibration point.
NOMINAL indicates the sensor deviation meets early stabiliza-
tion criteria.
The Accept button becomes available when nominal stability is
achieved. You may accept the early value, or wait for complete
stability. If you accept the early value, the calibration point will
be designated “USER SET” in the calibration report. (For more
on calibration reports, see “Calibration History” in Section 10.)
STABLE is displayed when the readings have stabilized suffi-
ciently to take a valid calibration point. The calibration proceeds
automatically to the next screen.
s 3ENSOR2EADING4HECURRENTSENSORRESPONSEIN.45
s 3ENSOR$EVIATION#HANGEINSENSORRESPONSEBETWEENTHELASTTWO
readings.
s 4EMPERATURE
14. If doing a one-point calibration, go to step 17.
For a multi-point calibration, the Wizard returns to the screen
shown at step 13 and waits for you to situate the probe in the next
calibration solution and click Run.
15. Discard the first solution, rinse the beaker and the front end of the
instrument thoroughly, wipe off excess water, refill the beaker with
the second solution, and insert the MP TROLL 9500 as before.
16. Select Run to begin the stabilization for the second calibration
point. Status indicators and controls are the same as for the first
calibration point (step 13).
Again wait for stabilization, dump, rinse, dry, refill, Run, as many
times as necessary to collect a stable calibration point in each
solution.
17. The final screen shows the sensor slope and offset calculated dur-
ing the calibration process (or the default settings if you selected
that option at step 7). A slope and offset will be shown for each
calibration point.
“Pivot” designates the point at which the slope characteristics
change with a multi-point calibration. The correct slope for the
turbidity values being monitored will automatically be applied.
18. Select Finish to program the sensor with the newly calculated
calibration coefficients.
TIP: You can look at the calibration report right after
calibrating, or at any time. See “Calibration History” in
Section 10 for details.
SECTION 18: TURBIDITY

128
TROLL 9500 Operator’s Manual 0095110 rev. 007 01/09
RESETTING DEFAULT COEFFICIENTS
The sensor’s calibration may be reset back to factory defaults at any
time. As long as there is no contamination on the optical windows, this
will restore the factory accuracy (± 5% or 2 NTU).
1. Establish a connection to the instrument in Win-Situ 4 or Pocket-
Situ 4.
2. Select Turbidity in the Parameters list and click Calibrate.
3. In the first screen, select Use Default Coefficients, then Next.
4. In the final screen, click Finish to restore the sensor’s factory
calibration coefficients.
SENSOR SLOPE AND OFFSET
The offset is factory-set at 0 NTU. The zero offset may be recalculated
for any appropriate value by performing a single-point calibration
using a calibration standard of the desired NTU value. The sensor
response is very linear up to 200 NTU.
UNITS AND CALCULATED MEASUREMENTS
Two units are available for readings from the turbidity channel:
s .45S.EPHELOMETRIC4URBIDITY5NITS3ELECT.45WHENTHESEN-
sor has been calibrated with polymer suspensions.
s &.5S&ORMAZIN4URBIDITY5NITS3ELECT&.5WHENTHESENSORHAS
been calibrated with Formazin.
USAGE RECOMMENDATIONS AND CAUTIONS
The operational pressure rating of the turbidit y sensor is
150 psi. Do not submerge it deeper than 346 ft (105 m).
Avoid use of the stirrer accessory (recommended for monitoring dis-
solved oxygen in stagnant water) when measuring turbidity.
When used without a wiper, dirty sensor optics can be compensated
for to some extent by changing the offset.
Optical absorbancy (“color”) will lessen the turbidity signal.
Turbidity readings are temperature-commpensated.
The optics need 5 seconds warm-up time to take the first reading
later. Subsequent readings can be returned instantaneously.
COMMON INTERFERENCES
Light scattering depends upon the size, shape, refractive index, and
other characteristics of the particles and the wavelength of the light.
Optically black particles, such as those of activated carbon, may
absorb light and effectively decrease turbidity measurements.
Nephelometers are relatively unaffected by small changes in design
parameters and therefore are specified as the standard instrument for
measurement of low turbidities. Nonstandard turbidimeters, such as
forward-scattering devices, are more sensitive than nephelometers to
the presence of larger particles and are useful for process monitoring.
Reported turbidities are heavily dependent on the particulate matter
contained in the suspensions that are used to prepare instrument
calibration curves.
Due to current technological limitations, field turbidity measurement
is “a snapshot of averages,” Field measurements can be an excellent
indicator of in-situ turbidity; final determination for reporting purposes
should be conducted in a laboratory.
PROFILING TURBIDITY
The turbidity sensor’s 5-second warmup will result in a slight delay be-
fore the first Profiler reading for all parameters. Subsequent readings
can be taken within the Profiler’s 2-second cycling.
If a turbidity wiper accessory is installed, it performs an initial wipe of
the sensor optics—this takes about 15 seconds—then displays the
first turbidity reading. If the profiling rate is longer than 15 seconds,
this 15 second wipe will happen before each reading. To avoid this
delay, set the profiling rate to less than 15 seconds. See Customizing
the Profiler in Section 5 for details.
LOGGING TURBIDITY DATA
The wiper is activated automatically before turbidity readings during
tests, so long as the readings are 15 seconds or more apart. To
prolong battery life when running a wiper, we recommend the use
of external power or two internal lithium D-cells installed in the MP
TROLL 9500.
SENSOR CARE
INSPECTION/MAINTENANCE/CLEANING
The optical windows of the sensor are made of scratch-resistant
sapphire. The optical components are not user-serviceable. Serious
mechanical and temperature shock are about the only things that can
damage the LED. If you feel the instrument has suffered such dam-
age, contact In-Situ Technical Support.
However, the windows may need frequent cleaning, especially if used
in a biologically active environment. A wiper accessory can help to
prevent the accumulation of foreign material.
SECTION 18: TURBIDITY
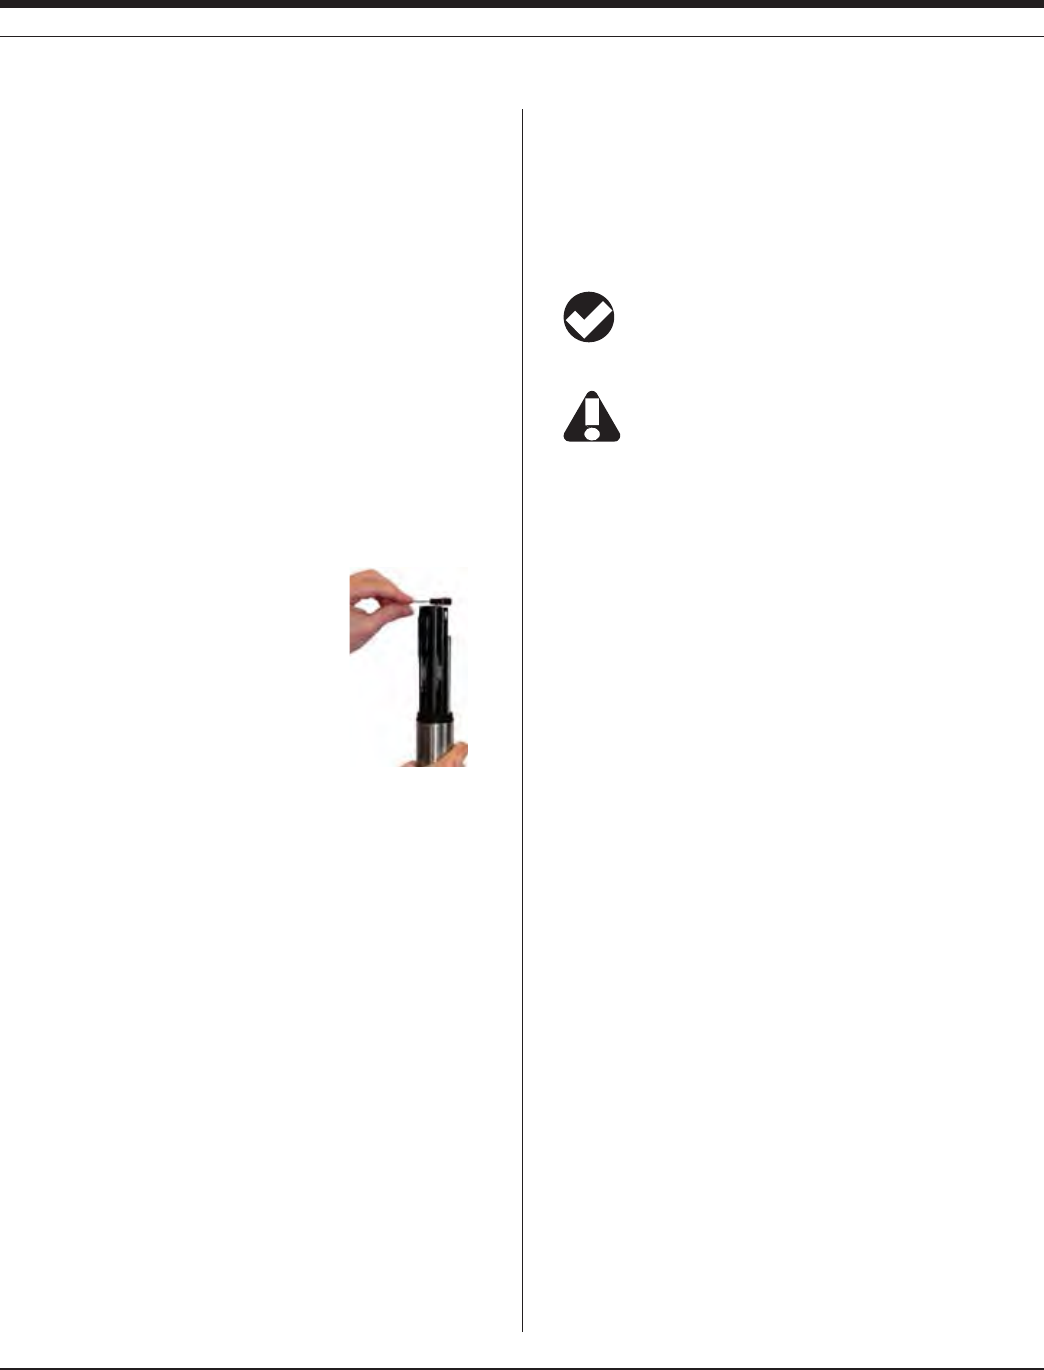
12 9
TROLL 9500 Operator’s Manual 0095110 rev. 007 01/09
Cleaning may be necessary if the optical windows of the sensor
become visibly contaminated by the gradual accumulation of foreign
material. Because the sensor is not removable, we recommend gentle
swabbing of the windows with a circular motion using plain water.
Solvents are not recommended, although an ammonia solution (e.g.,
grocery-store ammonia) may be used with good effect to remove
particularly stubborn materials.
A calibration check should be performed after cleaning, using calibra-
tion standards.
WIPER MAINTENANCE
The cotton wiper pad will require replacement periodically to maintain
its effectiveness in cleaning the turbidity sensor optics. The entire
head may be replaced, or just the pad. In either case, the wiper head
will need to be removed. A hex wrench is supplied for this purpose.
You do not need to remove the entire wiper; leave the wiper body
installed in port 3.
Replacement pads and wiper heads
are available from In-Situ Inc. or your
distributor.
Removing the Wiper Head
With the wiper parked over port 4, loosen
the set screw on the wiper head until you
can grasp the wiper head and gently pull
it out.
Replacing the Wiper Pad
1. Remove the wiper head as above. Remove and discard the used
pad.
2. Insert a new pad into the slots with the smooth side facing out, and
pull to eliminate slack. Excess material may be trimmed close to
the wiper head.
3. Position the head on the motor shaft with the pad facing down to-
WARDTHESENSORS4HEBUTTONATTHETOPOFTHESHAFTSHOULDBEmUSH
WITHTHEWIPERHEADSURFACE4IGHTENTHESETSCREWAGAINSTTHEmAT
of the motor shaft. Be very careful not to move the wiper head
in a lateral direction by hand after tightening.
4. If convenient, connect in software, select the wiper, and click Wipe
to ensure the wiper passes over the turbidity sensor optics prop-
erly.
Adjusting Wiper Pressure
If necessary, loosen the set screw on the wiper head and gently pull
the head up or press down lightly to ensure the pad just brushes the
optical windows when it passes over the turbidity sensor. Then re-
tighten the set screw. Be very careful not to move the wiper head
in a lateral direction by hand when engaged with the motor shaft.
TIP: The wiper head is at the best height when it just
brushes the optical windows of the turbidity sensor—too high
and it will not clean effectively; too low and it may not be able to spin.
If it is necessary to remove the entire wiper assembly, be
sure to use the sensor removal tool and grasp the body of
the wiper. Do not attempt to pull the wiper out by the head.
Wiper Replacement Parts Catalog No.
Replacement wiper head ....................................................... 0044520
Wiper pad replacement kit ...................................................... 0044530
REFERENCES
ASTM method D1889-88(A)
Eaton, A.D., L.S. Clesceri, E.W. Rice, and A.E. Greenberg, eds.,
Standard Methods for the Examination of Water and Wastewater,
21st edition, Washington, D.C.: American Public Health Associa-
tion, American Water Works Association, and Water Environment
Federation, 2005. Section 2130, Turbidity.
EPA, Methods for Chemical Analysis of Water and Wastes,
EPA/600/4-79-020, revised March 1983. Method 180.1, Turbidity,
Nephelometric. Approved at 40 CFR Part 136.
EPA, Methods for the Determination of Inorganic Substances in
Environmental Samples, EPA/600/R-93-100, August 1993. Method
180.1, Determination of Turbidity by Nephelometry, Revision 2.0.
Approved at 40 CFR Part 141.
International Organization for Standardization (ISO), 1999. Water
Quality—Determination of Turbidity, Method 7027.
Nollet, Leo M. L., ed. Handbook of Water Analysis. Marcel Dekker
Inc., New York, 2000.
U.S. Geological Survey, Methods for Analysis of Inorganic Substances
in Water and Fluvial Sediments, U.S. Department of the Interior,
Techniques of Water-Resources Investigations of the U.S. Geologi-
cal Survey, I-3860-85.
SECTION 18: TURBIDITY
To remove the wiper head,
use the supplied hex wrench
to loosen the set screw
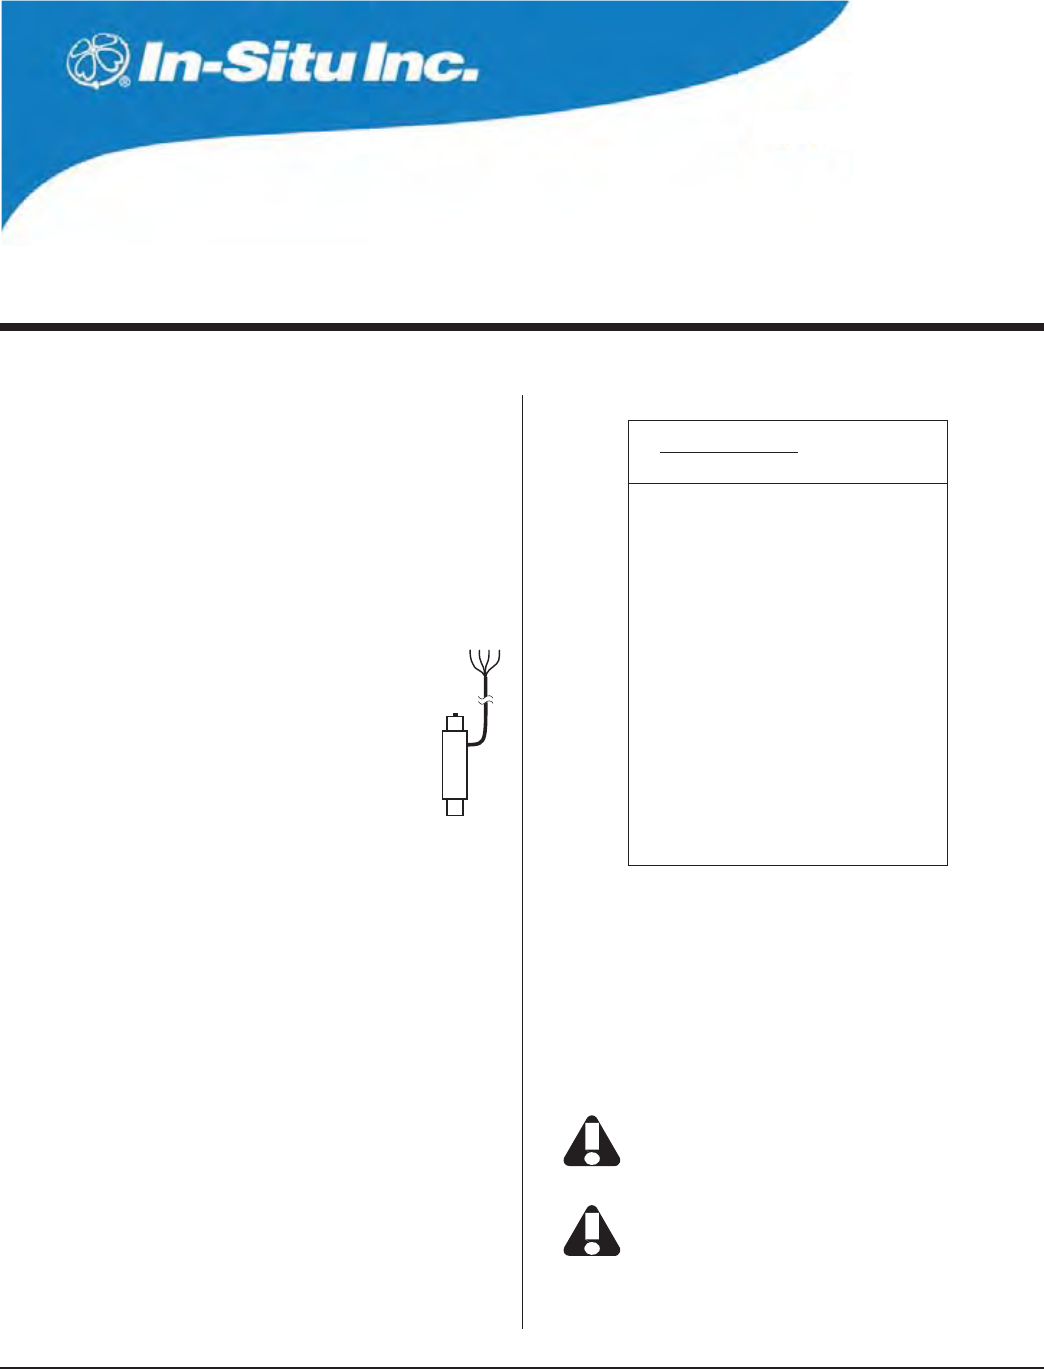
13 0
Multi-Parameter
Water Quality TROLL®
TROLL 9500 Operator’s Manual 0095110 rev. 007 01/09
Cable length Power supply
feet meters requirement
170 52 9.6 V
180 55 9.8 V
190 58 9.9 V
200 61 10.1 V
210 64 10.3 V
220 67 10.4 V
230 70 10.6 V
240 73 10.8 V
250 76 10.9 V
260 79 11.1 V
270 82 11.3 V
280 85 11.4 V
290 88 11.6 V
300 91 11.8 V
Table 19-1. Cable length & power supply requirements
19 SDI-12 OPERATION
SDI-12 is a serial digital interface that operates at 1200 baud. In-Situ’s
SDI-12 Adapter enables processing of the MP TROLL 9500’s sensor
measurements by a standard SDI-12 data recorder.
SDI-12 REQUIREMENTS
s -042/,,lRMWAREORLATER
s 3$)!DAPTERFORPROPERPOWERMANAGEMENT
s 3$)DATARECORDERCUSTOMERSUPPLIED
WIRING
Connect the stripped and tinned wires from the SDI-12
Adapter to the terminal block of an SDI-12 data recorder (or
to an SDI-12 network) as follows.
s 7()4%SERIALDATALINE
s ",!#+GROUNDLINE
s 2%$VOLTSUPPLYLINE
s '2%%.SHIELD
The data recorder or an external power supply may provide power
(9.6 - 16 V) to the 12V line. The shield should be terminated (ground-
ed) at the data recorder.
Minimum voltage supplied per the SDI-12 specification (9.6V) is
sufficient to power a TROLL 9500 on 170 ft (52 m) of RuggedCable.
Cables as long as 300 ft (91 m) may be used, depending on power
supplied. Before using cables longer than 170 ft (52 m) we recom-
mend that you measure the voltage at the Adapter. The table lists
power requirements for specific submersible cable lengths.
CONNECTIONS
Attach the Twist-Lock Connector on the MP TROLL’s RuggedCable to
the matching connector on the SDI-12 Adapter.
The Adapter is weather-resistant but not completely waterproof. It is
not designed to be exposed to the elements. Provide a weather-resis-
tant enclosure for optimum operation.
SDI-12 SUPPORT
The MP TROLL 9500 supports the SDI-12 Version 1.3 commands.
Data loggers that support SDI-12 Version 1.3 can usually send the
Version 1.3 commands to an SDI-12 “sensor” like the MP TROLL
automatically. These commands are listed later in this section. Ad-
ditional information may be found in an SDI-12 reference, such as that
listed at the end of this section. Or consult your SDI-12 data logger
documentation for more specific information.
Insure SDI-12 is enabled (factory default) on the 9500. In
Win-Situ 4 or Pocket-Situ 4, select the TROLL, click Edit...
select SDI-12 Mode Preferences.
Calibration of the water-quality sensors will need to be done
through Win-Situ 4 or Pocket-Situ 4 as SDI-12 protocols do
not support calibration.

131
TROLL 9500 Operator’s Manual 0095110 rev. 007 01/09
Order Parameter Unit
1 Pressure PSI
2 Temperature degrees Celsius
3 Barometric Pressure PSI
4 Turbidity NTU
5 pH pH
6 ORP milliVolts
7 Conductivity (Actual) μS/cm
8 D.O. (Polarographic) mg/L
9 Battery Voltage volts
10 Nitrate ppm
11 Ammonium ppm
12 Chloride ppm
13 RDO (Optical D.O.) mg/L
14 Conductivity (Specific) μS/cm
15 Salinity PSU
16 D.O. (Polarographic) % saturation
17 RDO (Optical D.O.) % saturation
18 Ammonia ppm
19 Total Dissolved Solids g/L
20 Resistivity kOhm-cm
Table 19-2. SDI-12 Parameter Reporting (Default Order)
SECTION 19: SDI-12 OPERATION
SENSOR IDENTIFICATION
In response to the “send identification” command, the MP TROLL
9500 will respond as follows:
The default sensor address is 0. The device supports software-
changeable addresses.
SENSOR VERIFICATION
In response to the Verification command, the MP TROLL 9500 will
respond as follows:
MAKING SDI-12 MEASUREMENTS
When measurements are made they will be taken on all sensors in-
stalled in the MP TROLL 9500. “Derived” or calculated measurements,
available in Win-Situ, are reported in SDI-12 for D.O. and conductivity.
For example, the D.O. sensors can report oxygen concentration in
milligrams per liter and saturation in percent. Specific conductance is
reported as well as conductivity.
TIP: SDI-12 protocols use the term “sensor” for a single SDI-
12 device with an address. In this usage, the MP TROLL
9500 is a “sensor,” even though it includes up to 11 installed
“sensors” in the In-Situ usage. The “sensors” in the In-Situ usage
cannot be addressed individually using SDI-12 protocols.
The default order in which parameters are reported, and the units for
each parameter, are listed in Table 19-2.
TIP: You can change the default order of parameters
reported in Win-Situ or Pocket-Situ like this:
1. Select the MP TROLL in the Navigation tree
2. Select Edit
3. In the dialog box, select “SDI-12 mode preferences”
According to the SDI-12 specification the Start Measurement com-
mand “aM!” can take up to 9 measurements. Since the MP TROLL
9500 can potentially report more than 9 measurements there are two
approaches to measuring all sensors:
s 5SETHE3TART#ONCURRENT-EASUREMENTCOMMANDhA#v4HIS
command supports up to 20 measurements.
s 5SETHE3TART!DDITIONAL-EASUREMENTCOMMANDShA-Nv4HE
logger would first issue an “aM!” command. If the command
responds with 9 measurements then the logger will send an “aM1!”
command (after reading the initial measurements with the “aD0!”
command), and read the measurements with the “aD0!” command.
This process is repeated, progressing through the value of “n”, until
the “aMn!” command responds with less than 9 measurements.
When parameters are read back over the SDI-12 bus via one of the
“aDn!” commands they will be reported in a fixed order (Table 19-2).
If a unit has duplicate transducers, only one will be reported under
this fixed-order reporting, by order of the port it is plugged into. For
example, if two pH sensors are plugged into ports 1 and 3, the sensor
in port 1 will be reported.
Note that the fixed reporting order can be changed as as described in
the tip on this page.
A measurement is returned for all possible MP TROLL parameters.
Sensor (MP TROLL 9500) model
Manufacturer (In-Situ Inc.)
Firmware version
SDI-12 compatability (version 1.3)
Serial number
Sensor address
013IN-SITU WQP100154030452 <CR><LF>
Firmware version (2 decimal places)
2-digit entity code
Hardware version (1 decimal place)
Serial number
Sensor address
0+030452+30+1.54+3.0+5+3.0+4.5 <CR><LF>
Battery type (0=none, 5=alkaline, 6=lithium)
Battery voltage
External power voltage

132
TROLL 9500 Operator’s Manual 0095110 rev. 007 01/09
SECTION 19: SDI-12 OPERATION
s )FASENSORPORTISEMPTYTHEUNITWILLREPORTREADINGSWITHVALUESOF
0.0.
s )FYOUEDITTHEDEVICETOSET3$)MODEPREFERENCESASDE-
scribed in the tip above, only the parameters you select will be
reported.
s If a sensor is reading out of its range, a value of -999999.9 will be
reported.
REDUNDANT LOGGING (WIN-SITU 4 AND SDI-12)
If your MP TROLL 9500 supports internal logging, the instrument is
capable of running tests (programmed in Win-Situ) while participating
in an SDI-12 network; however Win-Situ cannot communicate with the
MP TROLL 9500 while it is trans mitting SDI-12 data, and conversely,
the instrument cannot receive or respond to SDI-12 commands while
connected to a PC serial port.
This “redundant logging” feature means
s IFTHE3$)RECORDERSOMEHOWhLOSESvDATATHE-042/,,
data can be retrieved using Win-Situ.
IFTHE3$)RECORDERCEASESTOFUNCTIONDUETOPOWERLOSSTHE-0
TROLL 9500 will continue to collect new data using its own internal
batteries and clock.
TIP: Depending on the SDI-12 data recorder used, rapid
sample schedules during a test may result in SDI-12
“retries.”
EXTENDED (ISCO) COMMANDS
Extended commands allow the data sampler to identify both the data
channels and channel units that correspond to the ASCII formatted
mOATINGPOINTDATABEINGRETURNED)NRESPONSETOTHEhA802vCOM-
MANDTHERESPONSEWILLBEINTHEFORMhA)X)X)X#2,&vWHERE@A
ISTHEADDRESSEACH@)ISAPARAMETERIDENTIlERANDEACH@XSPECIlES
THEUNITSFORTHEPRECEDING@)
The data sampler will first issue either a measure or a concurrent
measure command. These commands return the number of channels
that will be reported in a subsequent read command. This number
will correspond with the number of pairs returned by the extended
commands.
If the expected number of “Ix” pairs is not returned in response to the
“aXPR0!” command, additional “aXPRx!” commands will be issued
until all pairs are received.
REFERENCE
SDI-12, A Serial-Digital Interface Standard for Microprocessor-Based
Sensors, version 1.3. SDI-12 Support Group, Logan, Utah, April 7,
2000. Available at www.sdi-12.org.

13 3
TROLL 9500 Operator’s Manual 0095110 rev. 007 01/09
SDI-12 V 1.3 COMMAND SET
NAME COMMAND RESPONSE & COMMENTS
!DDRESS1UERY A#2,&
4HEWILDCARDADDRESS@CHARACTERISSUPPORTEDONLYFORTHE!DDRESS1UERY
command. It is ignored as an invalid address for all other commands
!CKNOWLEDGE!CTIVE A A#2,&
"ASICADDRESSCHARACTERSINTHERANGE@TO@ANDEXTENDEDADDRESSCHARAC-
TERSINTHERANGES@!TO@:AND@ATO@ZARESUPPORTED!LLOTHERCHARACTERSARE
IGNOREDASANINVALIDADDRESS4HEDEFAULTADDRESSIS@
#HANGE!DDRESS A!B B#2,&
Software changeable addresses and the Change Address command are
supported
3END)DENTIlCATION A) ).3)45710VVVXXXXX#2,&
where vvv = device firmware 100 (153 = 1.53)
xxxxx = 5-digit device serial number
3TART6ERIlCATION A6 #2,&
One result is available immediately for reading by the Send Data command
3END$ATA A$A$ #2,&
Address + serial no. + 2-digit entity code + firmware version (2 decimal
places) + hardware version (1 decimal place) + battery type (0=none, 5=inter-
nal alkaline, 6=internal lithium) + battery voltage (1 decimal place) + external
power voltage (1 decimal place)
3TART-EASUREMENT A- N#2,&
Start Measurement with CRC aMC! n parameters will be available for reading by the Send Data command within
SECOND!SERVICEREQUESTA#2,&WILLBESENTWHENTHEPARAMETERS
are ready. The number of parameters returned is determined by the SDI-12
defaults shown in Table 19-2 (or edit the SDI-12 mode preferences)
3END$ATA A$A$ AVALUES#2,&ORAVALUES#2##2,&
!DDITIONAL-EASUREMENTS A-A- ATTTN#2,&
!DDITIONAL-EASUREMENTSWITH#2# A-#A-# ATTTN#2,&
3END$ATA A$A$ AVALUES#2,&ORAVALUES#2##2,&
3TART#ONCURRENT-EASUREMENT A# ATTTNN#2,&
3TART#ONCURRENT-EASUREMENTWITH#2# A## ATTTNN#2,&
3END$ATA A$A$ AVALUES#2,&ORAVALUES#2##2,&
!DDITIONAL#ONCURRENT-EASUREMENTS A#A# ATTTNN#2,&
!DDITIONAL#ONCURRENT-EASUREMENTSWITH#2# A##A## ATTTNN#2,&
Extended Commands
)3#/#OMPATABILITY A802A802 A)X)X)X)X#2,&
where each Ix is a character pair identifying the parameter and units for each
measurement. The number of Ix pairs equals the number of data values
returned for the Start Measurement and Start Concurrent commands, limited
to 19 per command. If the expected number of “Ix” pairs is not returned in
response to the “aXPR0!” command, additional “aXPRx!” commands will be
issued until all pairs are received
4HISCOMMANDMAYRESULTINASERVICEREQUEST
A 3ENSORADDRESS #OMMANDTERMINATOR #2,& 2ESPONSETERMINATOR
ttt Time (seconds) until measurement is ready n, nn Number of measurement values
SECTION 19: SDI-12 OPERATION
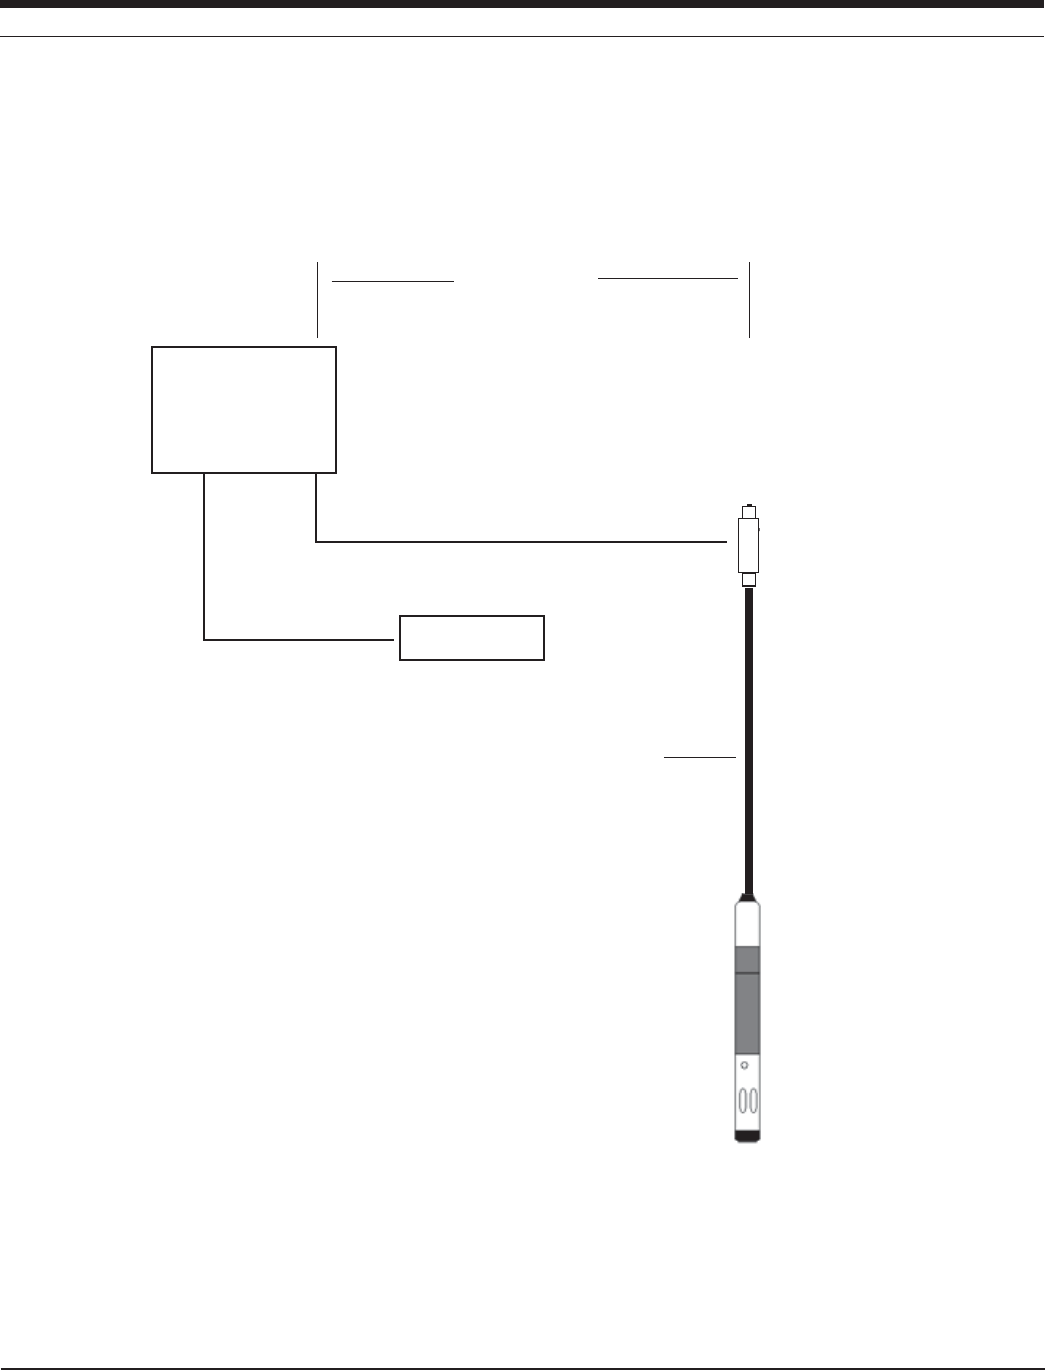
13 4
TROLL 9500 Operator’s Manual 0095110 rev. 007 01/09
SDI-12 Data Re-
corder (customer-
supplied)
MP
TROLL
9500
up to 300 ft (91 m) RuggedCable;
see Table 19-1 for power
requirements of cables longer than
170 ft (52 m)
to another SDI-12
device
Adapter
up to 200 ft (61 m)
SDI-12 Schematic Installation Diagram
SECTION 19: SDI-12 OPERATION
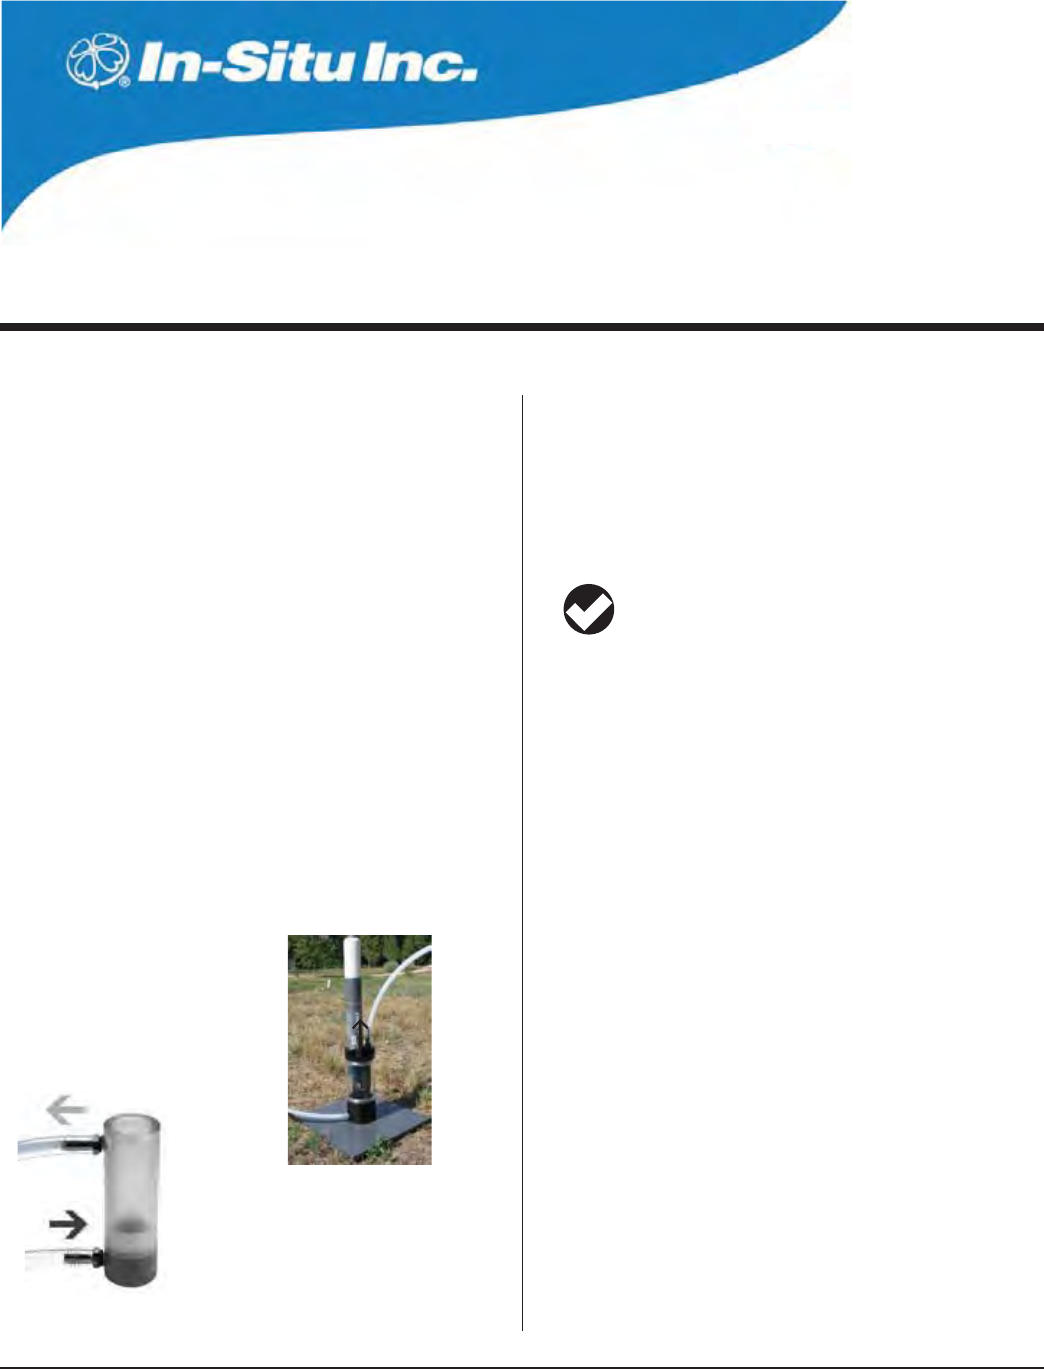
13 5
Multi-Parameter
Water Quality TROLL®
TROLL 9500 Operator’s Manual 0095110 rev. 007 01/09
20 LOW-FLOW MONITORING
Groundwater that has sat in a well casing for a period of time may not
adequately represent the formation water. Well purging can ensure
that fresh formation water is drawn into the casing for representa-
tive measurement of water temperature, pH, conductivity, and other
parameters. The well may be pumped to remove a predetermined
number of volumes of stagnant water from the well.
A more cost- and time-effective method of purging involves pumping
at very low flow rates with concurrent monitoring of water quality indi-
cator parameters until it is determined that true formation water is be-
ing monitored. The Flow-Sense Wizard in Win-Situ 4 and Pocket-Situ
4 automates this process to help determine when a representative
sample of formation water can be collected from a well for analy-
sis. Based on user input, the software calculates the volume of the
In-Situ flow cell and tubing, and the time to exchange one complete
volume at the specified pumping rate. The frequency of measuring
the water-quality indicator parameters is based on the time required
to completely evacuate one volume of the flow cell and tubing. Meter
and graphical views help to determine when the change in parameter
readings falls within the specified target range.
PREPARATION
s )NSTALL7IN3ITUFROMTHESOFTWARE#$OR)N3ITUWEBSITE
s )NSTALL0OCKET3ITUTOYOURDESKTOPLAPTOP0#FROMTHE#$OR
website, connect the computers in ActiveSync®, launch the Win-
Situ Software Manager, and follow the instructions to install Pocket-
Situ 4 on the RuggedReader
TIP: When using the RDO sensor for low-flow monitoring, be
sure to install the most recent version of Win-Situ 4 and
Pocket-Situ 4, available at www.in-situ.com.
s #ALIBRATETHEWATERQUALITYSENSORS
s (AVETHEFOLLOWINGSITEINFORMATIONREADYTOENTERINTHESOFTWARE
when prompted by the Flow-Sense Wizard:
s 7ELLDIAMETERANDTOTALDEPTH s 3CREENLENGTH
s $EPTHTOWATERLEVELTOPOFSCREENANDPLACEMENTOFPUMP
intake, referenced to a benchmark
s 0UMPMODELTYPE s 4UBINGTYPE
s4UBINGINNERDIAMETER s 4UBINGLENGTH
RDO SENSOR PREPARATION
Special preparation is in order if you plan to use the sub-4” RDO® opti-
cal dissolved oxygen sensor for low-flow monitoring. You will need:
RDO Optical Dissolved Oxygen sensor .................................. 0085070
Flow Cell for use with RDO sensor ......................................... 0057600
The RDO-ready flow cell includes hardware fittings for setting up the
flow cell and installing the RDO sensor.
PREPARE THE FLOW CELL
Connect valves and tubing to flow cell body. Attach spike or base
plate. Insert the calibrated TROLL 9500 into the flow cell. Turn on the
pump.
Flow cell for sub-4” TROLL 9500
MP TROLL 9500
OUTFLOW
INFLOW
Flow cell for sub-2” TROLL 9500
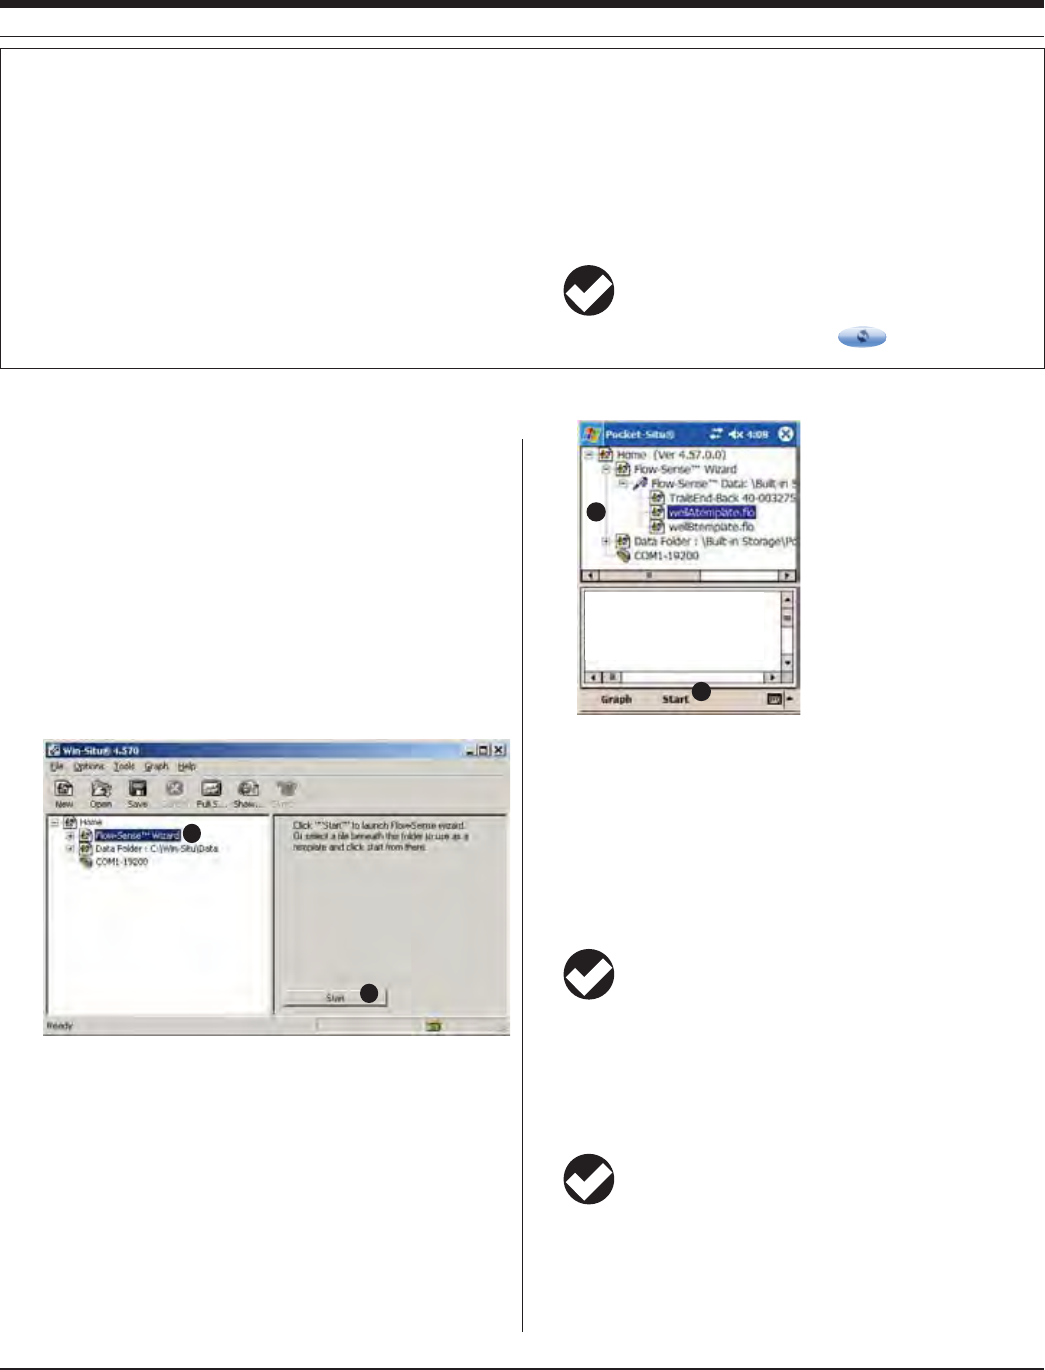
13 6
TROLL 9500 Operator’s Manual 0095110 rev. 007 01/09
START THE SOFTWARE
Connect the TROLL 9500 to the PC or PDA. Launch Win-Situ 4 or
Pocket-Situ 4. If you have not used the software before, take a mo-
ment to specify a connection type, COM port, and baud rate in the
Connection Wizard.
LAUNCH THE FLOW-SENSE WIZARD
1. Select one of the following ways to launch the Flow-Sense Wizard:
s Tools Menu: Select the Flow-Sense Wizard (not available in
Pocket-Situ)
s Navigation Tree: (a) Select the Flow-Sense Wizard in the
Navigation tree; (b) Click or tap Start in the Information pane.
a
b
s If you’ve used the Flow-Sense Wizard before—or copied
“template” files from a different PC—expand the Flow-Sense
Wizard folder by clicking on the +, then expand the Flow-Sense
Data folder. (a) Select a file or template. (b) Click or tap Start.
Input values from that file or template will be copied.
a
b
Company Name: Water West
Project Name: Central Valley
Site Name: New West Well
Well ID: 1562
VERIFY UNIT PREFERENCES
Before the Flow-Sense Wizard starts, you may wish to verify the cur-
rent unit selections. Length measurements in the Flow-Sense Wizard
default to metric (meters, centimeters), but you can enter and display
this data in English units (feet, inches) if you prefer. You may also wish
to verify the units for Conductivity, Dissolved Oxygen, ORP, pH, Tem-
perature, and Turbidity.
TIP: Flow units in the Flow-Sense Wizard will always be in
milliliters (mL). For best results, units should be consistent
between the desktop application and the PDA application.
To skip the settings verification, click Continue.
The Wizard will open the COM port and connect to the instrument.
If you have used the Wizard before, or launched the Wizard from an
EXISTINGmOlLEDATAENTRYVALUESWILLBESUPPLIED
TIP: The Wizard opens the COM port you used last (this is
stored in the Wizards.ini file in the Config subfolder in the
folder where Win-Situ is installed).
If several connections have been used in the past, the Wizard uses
the first “direct” connection it encounters in the tree.
If the Wizard is started without any connection information at all, it
will attempt to connect using COM 1 at a baud rate of 19200.
SECTION 20: LOW -FLOW MONITORING
CONFIGURE THE FLOW-SENSE WIZARD IN THE OFFICE
Text entry on a PDA in the field can be tedius. To simplify the task, we sug-
gest you run the Flow-Sense Wizard using Win-Situ 4 on a full-sized PC in
the office to prime the software with representative values. Then use Win-Situ
Sync to copy the “templates” created in this way to the PDA.
A Connect the TROLL 9500 you will use in the field to your desktop PC. The
device can be in air since the sampled data are not important.
B For each well you need to sample, execute the Wizard as described on
the following pages. The more information you can enter in advance, the
less you will have to tap in later with a stylus outdoors.
C Estimate any values you do not yet know (e.g., tubing length, pumping
rate, final drawdown).
D Let the stabilization phase run for at least one reading, then Accept.
E When the Wizard asks if you want to save the file, give each one a mean-
ingful name, for example:
“Well A template.flo”
“Well B template.flo”
F On your next ActiveSync connection, In-Situ’s synchronization utility Win-
Situ Sync will prompt you for Low Flow templates you wish to transfer to
the PDA
TIP: If Win-Situ Sync does not launch automatically, select it
from the In-Situ Inc. group in Programs on the Windows
Start Menu. Be sure the option Transfer data files from
Desktop to Field Unit is checked . Click to transfer files..
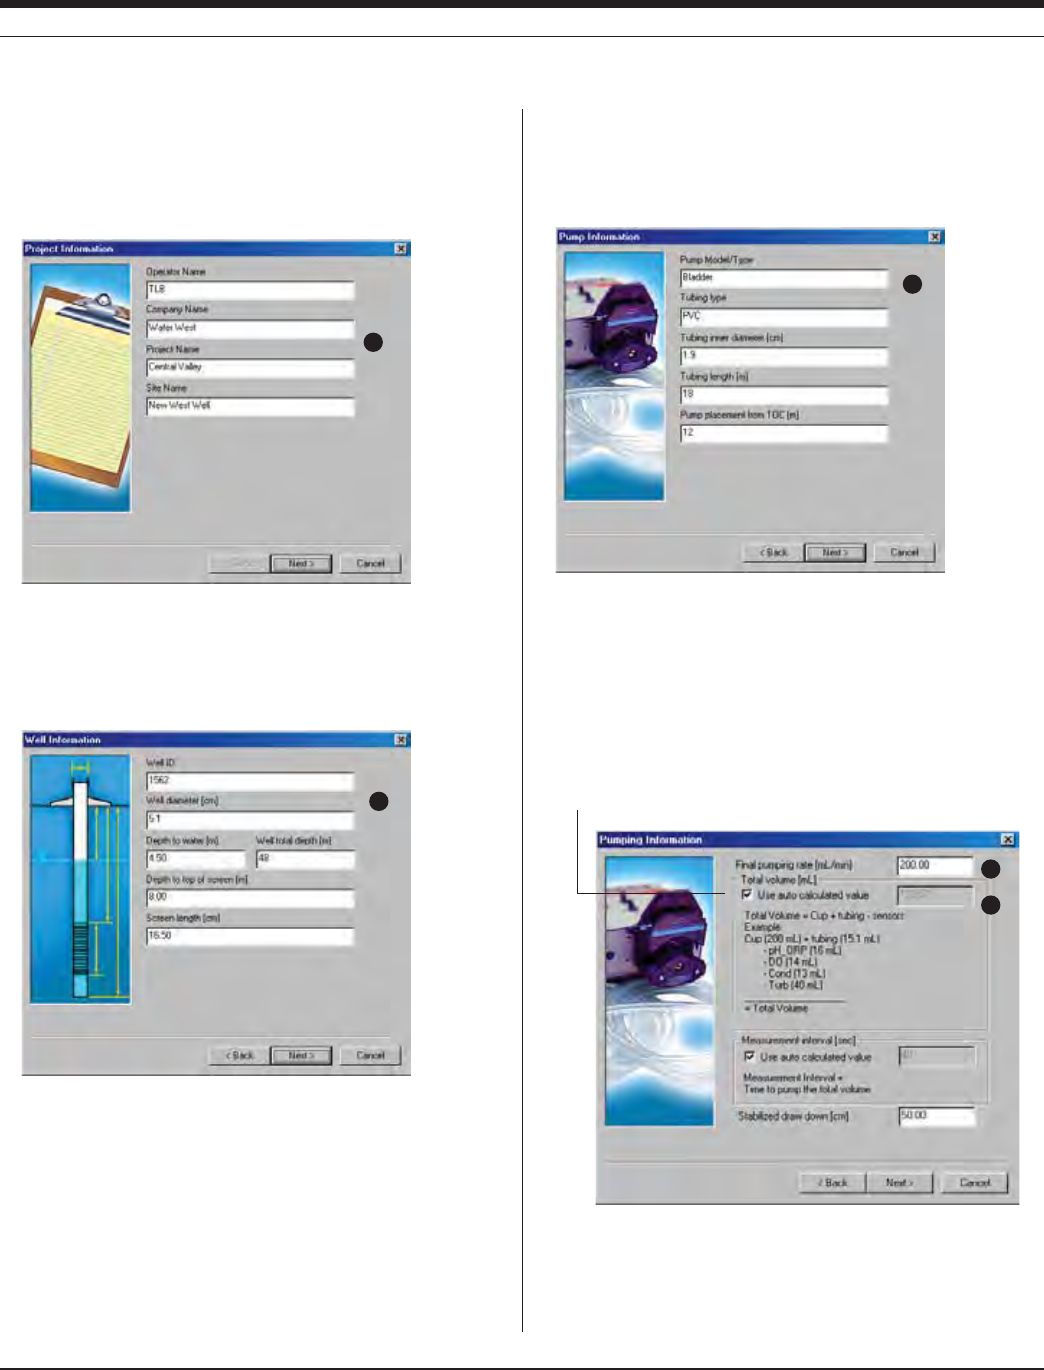
13 7 0095110 rev. 007 01/09
TROLL 9500 Operator’s Manual
SECTION 20: LOW -FLOW MONITORING
FLOW-SENSE WIZARD INPUT
1. The first input screen provides for entry of specific details about the
project. This information will be included in the output report. The
Project Name and Site Name will appear in the output file name.
1
Click or tap Next to continue.
2. In the next screen, enter information about the well. This informa-
tion will be included in the output report. The Well ID will appear in
the output file name.
2
Click or tap Next to continue.
3. In the next screen, enter details about the pump and tubing
(tubing information is used in later volume calculations). If
creating a template, estimate the tubing length and pump
placement.
3
Click or tap Next to continue.
The next screen requests pumping information
4. Final pumping rate: Enter in milliliters per minute. If creating a
template, accept the default or estimate the pumping rate.
5. Total volume—Auto Calculated Value: This is the software-
calculated volume of the cup (flow cell) and tubing, less the
displacement of installed sensors.
4
5
To specify a different volume, clear the “Auto” check box, and
enter the new volume (mL).
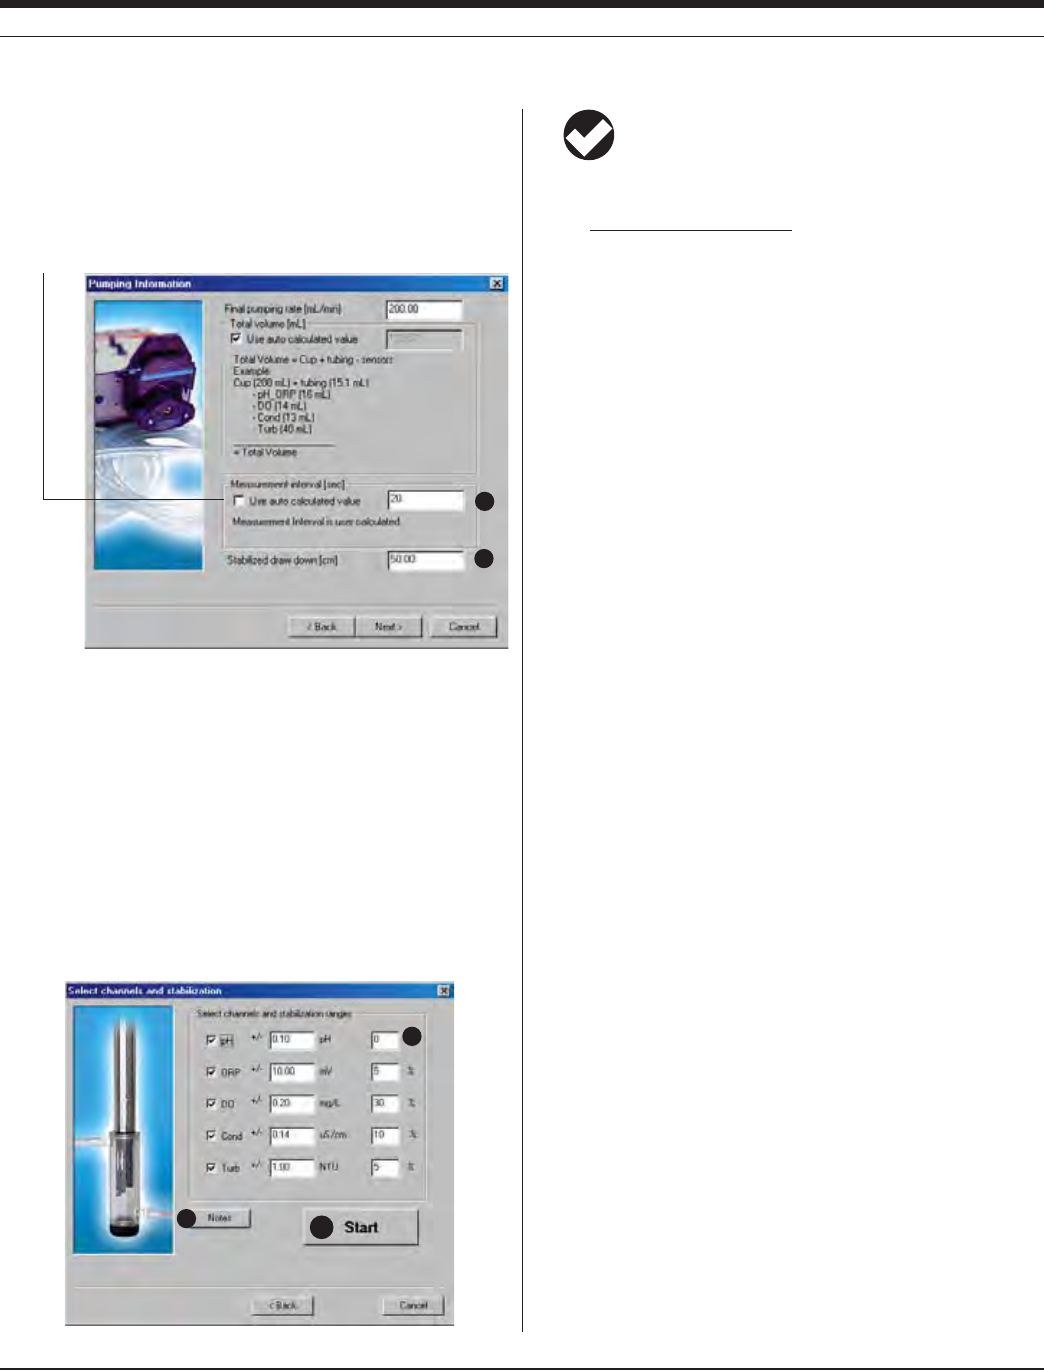
13 8 0095110 rev. 007 01/09
TROLL 9500 Operator’s Manual
6. Measurement interval—Auto Calculated Value: This is the
software-calculated time (seconds) for one complete exchange of
water in the calculated volume at the final pumping rate. In other
words, this is the time required to completely evacuate one volume
of the flow cell and tubing and draw in a new volume. Readings will
be taken at this interval unless you specify a different interval.
6
7
To specify a different interval, clear the “Auto” check box as shown
above, and enter the desired measurement interval (seconds).
7. Stabilized drawdown: Final drawdown from the initial water level
entered previously (measured with tape after pumping starts). If
creating a template, estimate the final drawdown.
Click or tap Next to continue.
8. The final screen displays the available parameters. Choose the
parameters to monitor and the target stability range for each
parameter. You can enter absolute values in parameter units or
percentage values
8
910
SECTION 20: LOW -FLOW MONITORING
TIP: If you want to enter percent values in the right column,
enter “1” as a default value in the absolute (middle) column.
The percentage range is calculated by the formula:
max - min of last 3 readings
last reading r100%
9. If you wish to add comments, click the Notes button. They will be
included in the output report.
10. Ensure the pump is on (unless you are creating a template), then
click or tap Start to begin the stabilization readings.
The sidebar on page 139 describes the stabilization readings
screen that is shown next.
11. When the readings appear stable, you are ready to save the data
and exit the software. Click or tap Accept.
If creating a template, let the stabilization phase run for at least
one reading, then click Accept.
SAVING THE LOW-FLOW DATA OR TEMPLATE
Click Save when a suggested output file name is displayed. You may
change this name if you like. After it is saved, the file will be displayed
in the Data Folder branch of the Navigation tree and will open in
the Information pane, like other test files extracted in Win-Situ 4 or
Pocket-Situ 4.
The file may be displayed in report format or as a graph in both Win-
Situ 4 and Pocket-Situ 4. (If you can’t see much on the PDA screen,
try scrolling to the right.) The top of the file presents well, site, and
project information. At the end of the file are the measurement data.
Additional functions are available through Win-Situ 4.
s 0RINTFILEMENU
s 'RAPHBUTTONIN)NFORMATIONPANE(OWEVERNOTETHATBETTER
graphical report output is available if you export to Excel.
s 3AVEASTEXTFILEFILEMENU
s %XPORTTO%XCELFILEMENU
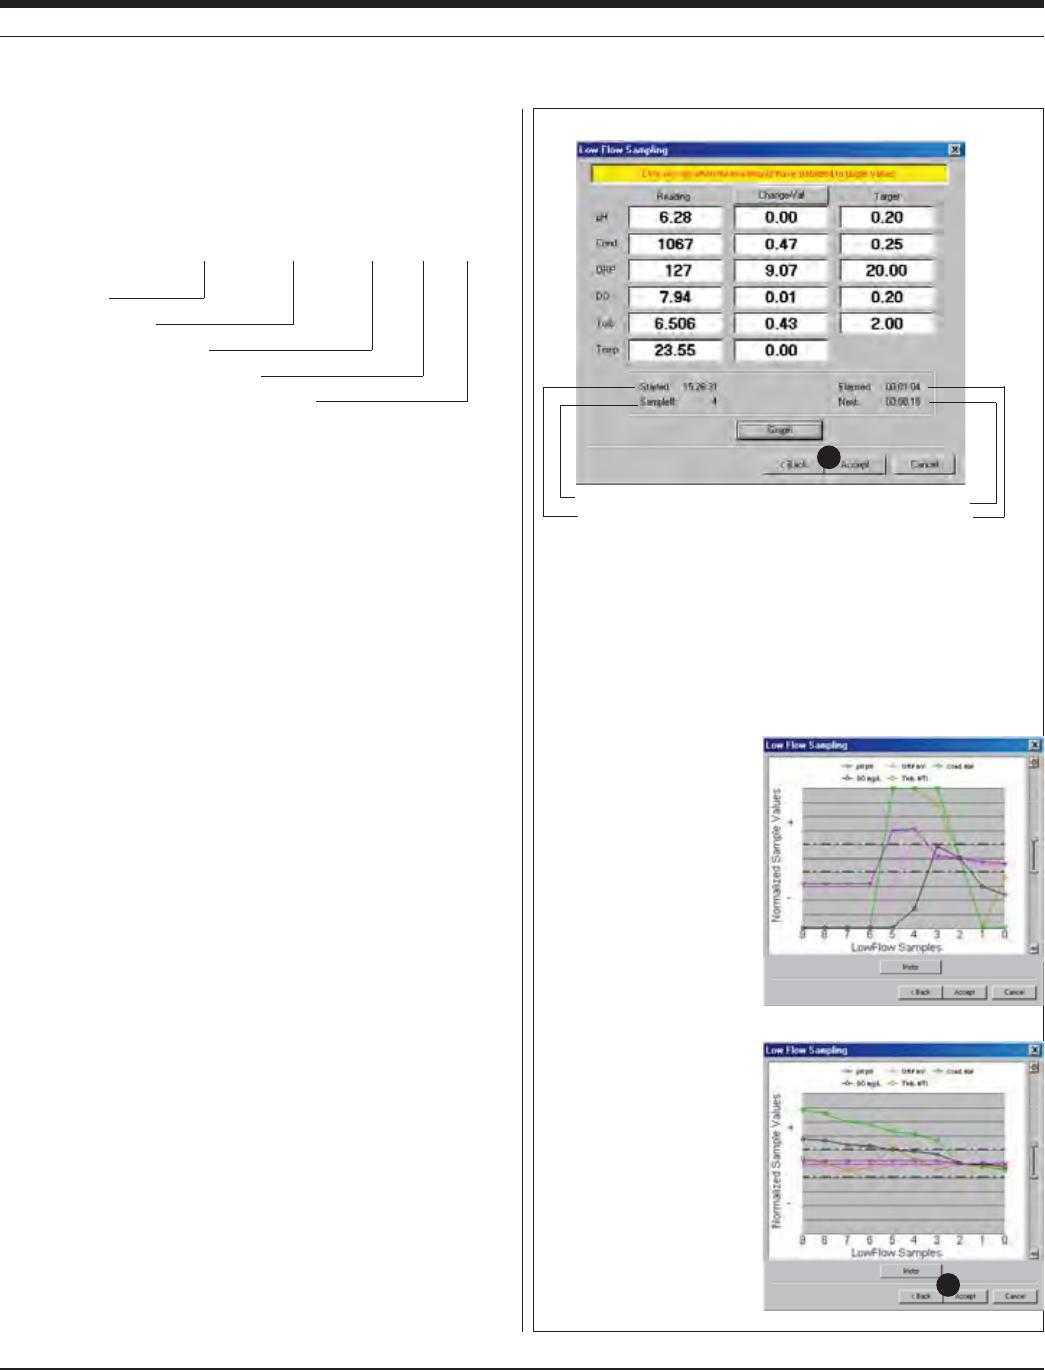
13 9 0095110 rev. 007 01/09
TROLL 9500 Operator’s Manual
OUTPUT
,OW&LOWlLESARESAVEDASlLESOFTYPEmOINAFOLDERNAMED&LOW
Sense Data under the Flow-Sense Wizard folder, and are accessible
in the Navigation tree. By default they are named as shown below:
&LOW3ENSE$ATA<#ENTRAL6ALLEY.EW7EST7ELLmO
Project name
Site name
Well ID
Date (m-dd-yyyy)
Low flow file designator
EXPORT TO EXCEL OPTION
To automatically create an output report in Microsoft® Excel® from
Win-Situ 4:
1. In the Win-Situ Navigation tree, select a low-flow data file. If it
opens in Graph view, select the Report button.
2. On the Win-Situ File Menu, select Export to Excel.
3. The report will open in an Excel spreadsheet.
USING A CUSTOM EXCEL TEMPLATE
The Win-Situ 4 installation includes an Excel template for creating an
output report (shown on the following page). This template is named
InSituLowFlow.xlt, and is automatically installed to the Templates
directory of the Microsoft operating system. Brief instructions for using
this template are included in the spreadsheet that opens when you
select Export to Excel.
To format an output report using the custom template,
1. After exporting a low flow data file to Excel, insert a new sheet
based on a template by right-clicking the tab at the bottom of the
screen in Excel.
2. Click Insert, then select the template InSituLowFlow.xlt.
3. When prompted by Excel, select “Enable Macros.”
An example of low flow data formatted in Excel using this template
is shown on the following page.
4. If desired, save the report as an .xls file.
SECTION 20: LOW -FLOW MONITORING
STABILIZATION READINGS—METER AND GRAPH
Time the Wizard started Elapsed time
No. of readings taken Countdown to next reading
11
s Reading: the current reading
s Change - Val: difference between the maxium and minimum
over the last 3 readings OR
s Change - %: difference between the current reading and the
third reading back, expressed as a percentage
s Target specified earlier in the Wizard (shown for Values)
To view this data in graphical form, click Graph.
The graph shows the change
and stabilization ranges of
all parameters. The “change
band,” between the heavy
dotted lines, represents a
composite target of all speci-
fied stability ranges. You can
drag the range finder up or
down, or expand the stability
region to zoom in.
The most recent readings
are shown on the right, ear-
lier readings on the left. 0
marks the latest reading. The
change band is centered on
the third point as a reference.
The graph can show up to
10 sets of readings. Change
is recalculated with each
reading.
Graph view of unstable change
Graph view of stabilized change
11
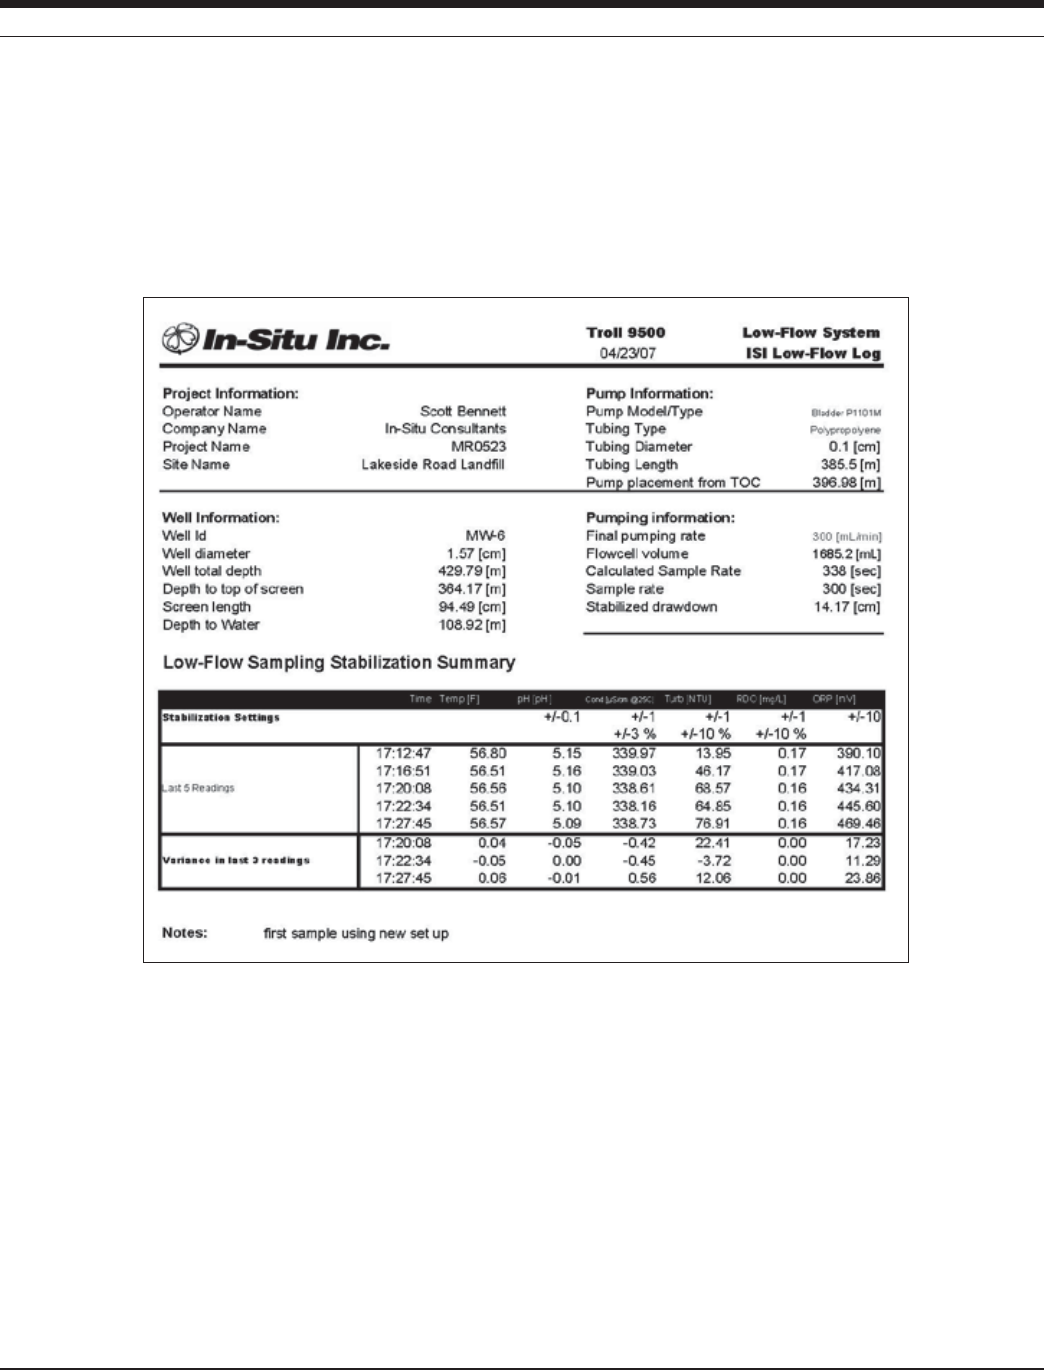
14 0
TROLL 9500 Operator’s Manual 0095110 rev. 007 01/09
SECTION 20: LOW -FLOW MONITORING
Sample of a Low-Flow output report using the Export to Excel function and the In-Situ template InSituLowFlow.
xlt. Normalized data = change in indicator parameters mapped from 0 to 1. A graph may be generated using
Win-Situ 4 and inserted manually into the report, if desired.
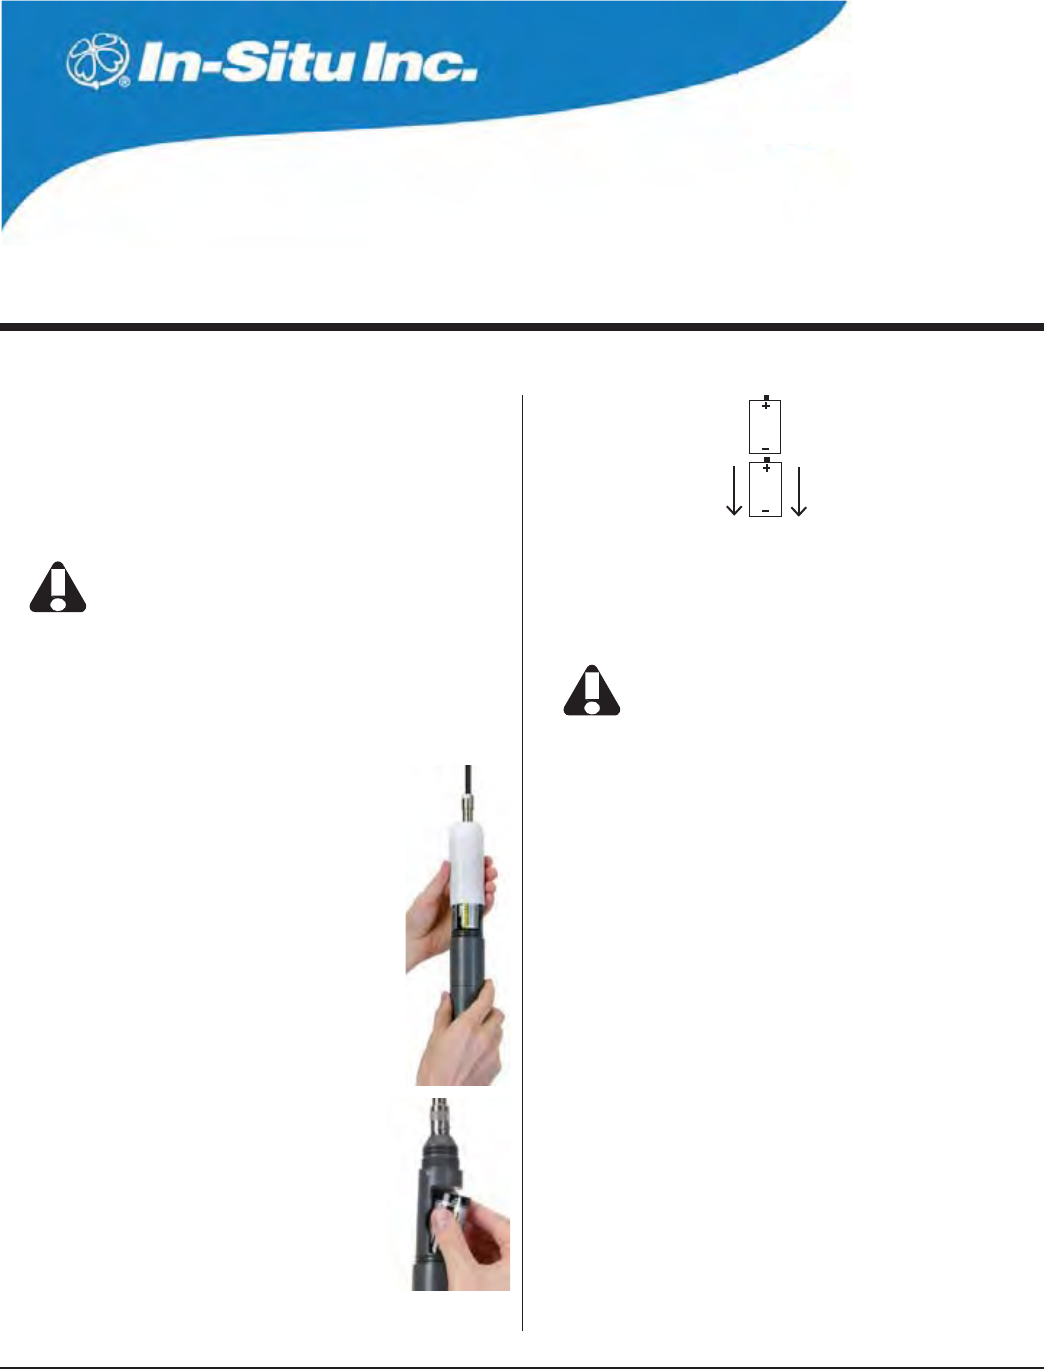
141
Multi-Parameter
Water Quality TROLL®
TROLL 9500 Operator’s Manual 0095110 rev. 007 01/09
21 CARE & MAINTENANCE
REPLACING BATTERIES
The MP TROLL 9500 uses—
s TWOSTANDARD6ALKALINE$CELLSOR
s TWO6LITHIUM$CELLSRECOMMENDEDFORUSEWITHAN2$/
optical dissolved oxygen sensor, and with a turbidity wiper
Use only Saft LSH-20 3.6V lithium D cells. Use of any
other lithium battery will void the product warranty.
Battery voltage and approximate percentage remaining is displayed
in the software interface when the instrument is connected to a PC.
Note: Due to the voltage supplied by two lithium D cells, the software
may report that the TROLL 9500 is operating on external power.
To replace batteries:
1. Unscrew and remove the white battery compart-
ment cover. If the cable is attached, slide the
battery compartment cover up onto the cable.
2. Press down slightly on the top battery to remove it,
or knock it out gently into your hand.
3. Tip the unit to slide the bottom battery out.
4. Insert the new batteries according to the dia-
gram on the inside of the battery compartment
(positive up for both).
5. Slide the white cover back down over the battery compartment and
hand-tighten to thread it to the instrument body.
Screw the cover down firmly to compress the o-rings and
create a waterproof seal. When properly assembled, the
o-rings will not be vsible.
6. At your next software connection in Win-Situ 4 or Pocket-Situ 4,
edit the device to update the battery information. (See “Editing the
Device Properties” in Section 4.)
O-RING SEALS
LUBRICATION
The Viton® o-rings used in the MP TROLL 9500 and other submersible
In-Situ instruments are crucial to insure the integrity of the water-
tight seal. We recommend that you inspect them each time they are
stressed (insertion/removal of sensors, attachment/removal of the
restrictor, battery replacement, etc.) for any indication of dirt, cracks,
tears, splitting, shredding, desiccation, and other damage. If the o-
rings are in good condition, apply silicone lubricant before re-assem-
bling the instrument. Remove excess lubricant with a lint-free tissue.
If the o-rings are damaged, they should be replaced, as described
below.
When lubricating the sensor o-rings, take special care to keep grease
away from the area around the connector at the bottom of the sen-
sors. Should lubricant get into this area, remove it with a clean cotton
swab.
Insert batteries negative side first,
positive side up

14 2 0095110 rev. 007 01/09
TROLL 9500 Operator’s Manual
REPLACEMENT
If the o-rings become damaged to the extent that no longer provide an
effective seal, they should be replaced. If there is any doubt whether
the o-rings should be replaced, it is best to err on the side of safety
and replace them.
Before replacing o-rings, clean all mating surfaces, including the
o-ring grooves.
O-rings and lubricant are included in the MP TROLL 9000 Mainte-
nance kit available from In-Situ Inc. or your distributor.
GENERAL CLEANING
Rinse the instrument body well, especially if it has been in contact
with contaminated media. Air-dry or wipe with a lint-free tissue.
Ultrasonic cleaning is not recommended.
STORAGE
Store the TROLL 9500 clean and dry. Place the protective red dustcap
on the cable end, or store with cable attached to protect the connector
pins and o-ring.
Store the instrument where it will be safe from mechanical shocks that
may occur, such as rolling off a bench onto a hard surface.
Protect the instrument from temperature extremes. Store within a tem-
PERATURERANGEOF½#TO½#½&TO½&
If the sensors are removed for storage, place plugs in the dry sensor
ports as protection from dust and dirt.
SENSOR STORAGE
For long-term storage, return the water-quality sensors to their original
packaging. Protect the lubricated o-rings from dust and dirt.
For up to a week, the sensors may be left in the instrument, with a
moist sponge in the bottom of the Cal Cup to provide a moist environ-
ment for those sensors that require it.
TWIST-LOCK CONNECTORS
Keep the pins on all connectors free of dirt and moisture by using the
soft protective dustcap when cable is not attached.
SECTION 21: CARE & MAINTENANCE
14 3
Multi-Parameter
Water Quality TROLL®
TROLL 9500 Operator’s Manual 0095110 rev. 007 01/09
22 TROUBLESHOOTING
Q:
A:
The MP TROLL 9500 rolled out of the back of my truck
and hit the ground pretty hard. It still talks. Is it OK to
use?
The instrument is pretty rugged, and can survive a few
drops and rolls. We hope the restrictor was on to protect
the sensors! First, check the joint between the body and the
restrictor. It should appear smooth and tight to preserve the
integrity of the water seal. Next, remove the restrictor and
insure the pressure sensor is snug against the sensor block.
Push it firmly into the sensor block if you see a gap. If the
temperature sensor is bent, straighten it gently but firmly by
hand (no tools, please).
If the instrument is dropped repeatedly on the nose cone,
check for damage to the batteries.
TROUBLESHOOTING CONNECTIONS
Problem: Win-Situ or Pocket-Situ cannot “find” (connect to) the MP
TROLL 9500. Error 6146 may be displayed.
Probable Cause: Wrong COM port selected, loose cable connec-
tions, device is taking a measurement as part of a test, batteries
are low, elastomer is worn
Suggested Remedy: Check the following:
s ALLCABLECONNECTIONSARETIGHT
s THEBACKENDISSECURELYATTACHEDTOTHEINSTRUMENT
s THECORRECT#/-PORTISSELECTED
s THEINTERNALBATTERYHASVOLTAGEREMAININGATTACHEXTERNAL
power
s )FATESTISRUNNINGTRYCONNECTINGAGAINSEVERALTIMESIF
necessary to “sneak” in between test data points.
Problem: Readings are in the wrong units
Probable Cause: Default units are being used
Suggested Remedy: Select the desired units on the Win-Situ Op-
tions menu, or select the Home site in Pocket-Situ and tap Setup in
the command bar
Problem: Pocket-Situ hangs
Suggested Remedy: Reset the PDA; see your PDA documentation
for details on hard and soft reset
TROUBLESHOOTING DATA COLLECTION (TESTS)
Problem: Test ABENDed (came to an “ABnormal END”)
Probable Cause: Device lost power or ran out of memory
Suggested Remedy: None; indication of ABEND in software cannot
be reversed. but data collected up until the time the test ABENDed
is likely to be fine
Check clock, check memory free, check device power
Problem: Scheduled test did not start
Probable Cause: Incorrect device clock, full memory, power removed
at time of first scheduled data point
Suggested Remedy: Synchronize device clock and reschedule test;
insure device has sufficient battery power and free memory; insure
device is powered at time of first scheduled data point

14 4 0095110 rev. 007 01/09
TROLL 9500 Operator’s Manual
TROUBLESHOOTING SENSORS
Problem: Sensor will not go into port
Probable Cause: (1) Insufficient lubrication on sensor o-rings. (2)
Incorrect sensor alignment.
Suggested Remedy: (1) Generously lubricate sensor o-rings with a
good silicone lubricant. Remove excess lubricant with a tissue, and
take care to keep grease away from the area around the connec-
tor at the bottom of the sensor. (2) Align the mark on the side of
the sensor (it looks like a small white “V”) with the tic mark on the
sensor port. If you have trouble locating these marks, visualize the
sensor block as a clock face, with the pressure/turbidity sensor or
plug at 12:00. The port alignment marks are at the 3:00 position for
each port.
Problem: Sensor will not come out of port
Probable Cause: Inability to grasp sensor
Suggested Remedy: Try the sensor removal tool. Insert it between
the widest part of the sensor and the instrument body and press
down on the handle, prying the sensor up until it pops out.
Problem: Software does not recognize sensor in port
Probable Cause: (1) Sensor is not firmly seated in port. (2) Excess
lubricant or dirt in port. (3) Sensor is in a wrong port for its type.
Suggested Remedy: (1) Re-insert the sensor: Align the mark on the
side of the sensor (it looks like a small white “V”) with the tic mark
on the sensor port. Use sensor insertion tool to press sensor firmly
into port until you feel it dock with the connector. When properly
inserted a only a very small gap (0.060-0.075 inch, the width of the
sensor removal tool) remains between the widest part of the sensor
and the instrument body. (2) Remove excess lubricant and/or dirt
from the connector on the sensor and from the connector in the
port.
(3) Insure the sensor is in the correct port for its type. Some
sensors will function properly in any port, others will work only in
specific ports. Refer to diagrams in section 3 or specific sensor
section of this manual. Remove sensor and re-install in correct
port, if necessary, then refresh device information in the software.
TROUBLESHOOTING CALIBRATION
Problem: The Cal Cup leaks when rinsing sensors
Probable Cause: Cal Cup is not tightened to probe body sufficiently
to seat against the o-ring
Suggested Remedy: Carefully align threads on Cal Cup with threads
on instrument body. Thread the Cal Cup onto the body until it is
seated against the o-ring, then back off slightly to avoid overtight-
ening.
Problem: The DO readings stabilized during the Quick Cal but now
the readings are off (too high or too low)
Probable Cause: (1) Too much solution in Cal Cup during the Quick
Cal to expose the DO sensor to air. (2) Cal Cup is too tightly sealed
during calibration.
Suggested Remedy: (1) The DO membrane must be exposed to air
for a valid 100% DO calibration. If the membrane is submerged
when you invert the Cal Cup during the Quick Cal, remove the
end cap and pour out some of the calibration solution until the
membrane is in air. (2) Loosen the end cap of the inverted Cal Cup
during DO calibration to avoid pressurizing the chamber.
SECTION 22: TROUBLESHOOTING
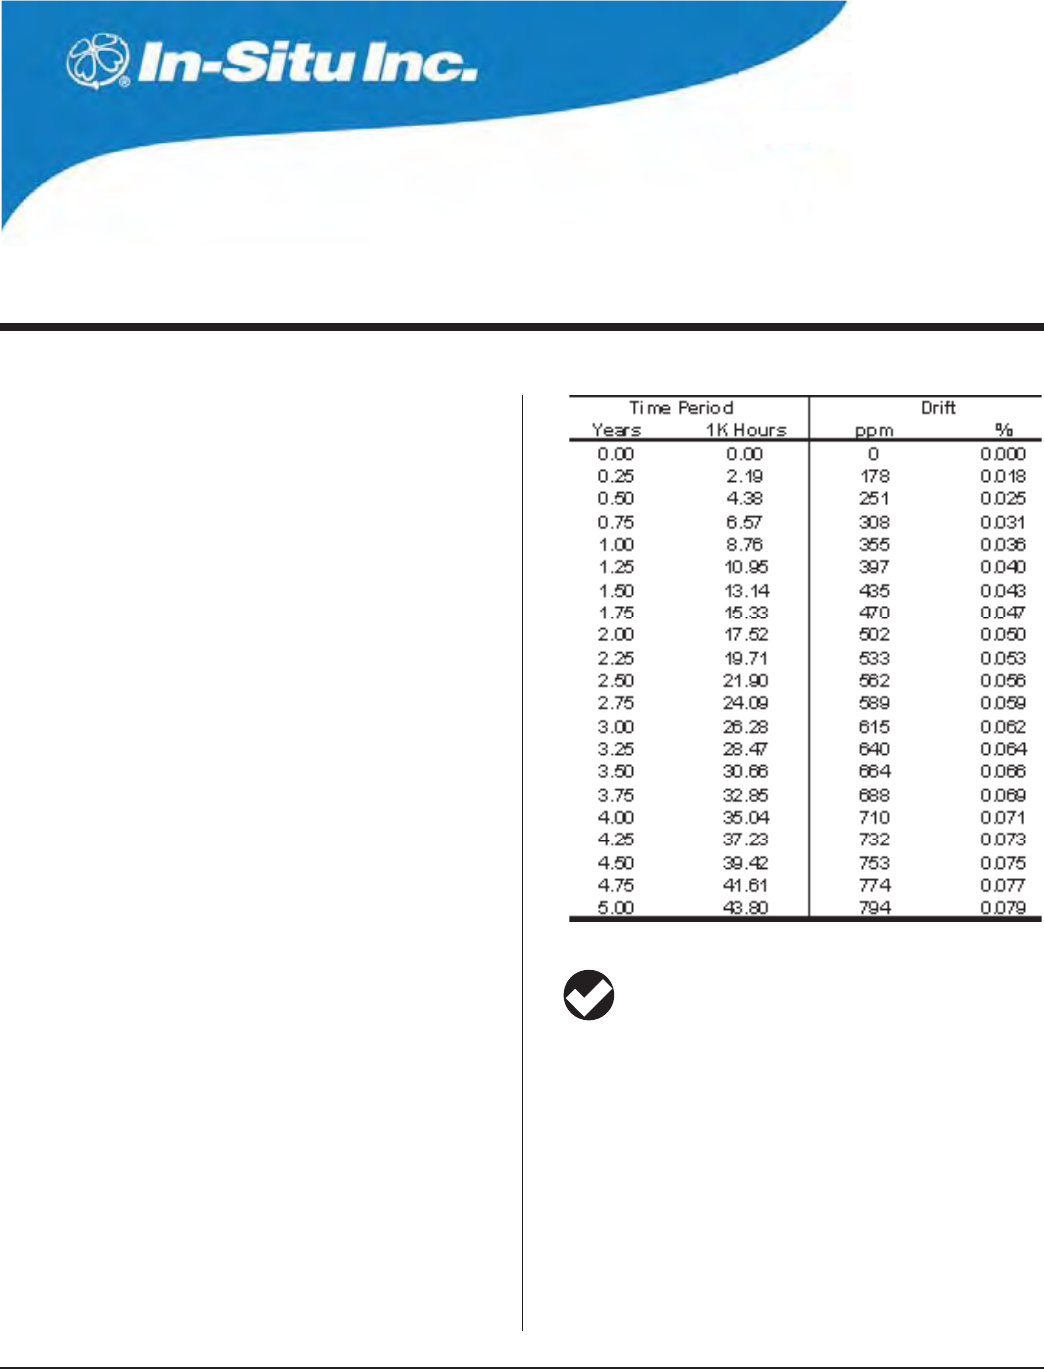
14 5
Multi-Parameter
Water Quality TROLL®
TROLL 9500 Operator’s Manual 0095110 rev. 007 01/09
APPENDIX
ELECTRONIC DRIFT AND DEVICE RECALIBRATION
The electronics of the Multi-Parameter TROLL 9500 will experience
accuracy drift over time. This drift applies to all channels and is addi-
tive to the initial calibration accuracy. Electronic drift does not apply to
user-calibrated sensors because the drift is compensated for during
calibration.
The system wide long-term drift is dominated by the stability of the
voltage reference used in the device. Other components exhibit long-
term drift of a much smaller magnitude.
The equation used to calculate drift over time is:
D = K (t / 1000 hours)
where:
D is the drift in ppm
K is the long term stability coefficient listed as ppm / 1000 hours
but actual units are ppm
t is the time expressed in hours
Using this information, the maximum drift over time is shown in the
table on this page.
DETERMINING DENSITY
The density of water in a well can be determined using an accurate
tape measure and a pressure transducer. A change in pressure is
recorded between two points as the transducer is lowered into the
water and the corresponding change in depth is recorded using the
measuring tape. Density is then calculated using a simple formula.
This method is valid if the pressure and depth measurements are
accurate and the water within the well is homogeneous throughout the
entire depth of the well.
TIP: The recommended frequency of factory recalibration of
the MP TROLL 9500 depends upon the amount of drift a
user is willing to tolerate. For example, if a drift of 0.025% is
acceptable, then the recalibration period is 6 months; if a drift of
0.05% is acceptable, then the recalibration period is 2 years.
14 6 0095110 rev. 007 01/09
TROLL 9500 Operator’s Manual
g x (L2 - L1)
(P2 – P1) x 6.894757
R =
Note: Density can also be measured using a hydrometer if it is pos-
sible to withdraw a water sample from the well. We recommend an
accuracy of ±0.0005.
Procedure
There are two possible methods for measuring the change in water
depth. Choose the method that is the most convenient and accurate.
s !TTACHTHETAPEMEASURETOTHETRANSDUCERCABLEUSINGANADHESIVE
(e.g., duct tape). The tape measure can be attached to the trans-
ducer itself or to a segment of the cable that will be adjacent to the
top of the well casing. Read the cable positions directly from the
measuring tape. The measuring device must have a resolution of
at least 1 mm or 1/16 in.
s !LTERNATIVELYMARKTHEPOSITIONSOFTHECABLEWITHANINDELIBLEFELT
tip pen. The distance between marks is then determined with a
tape measure after the corresponding cable segment is removed
from the well.
1. Lower the transducer into the well until it is submerged under about
one meter of water.
2. Secure the transducer at a fixed depth using the cable at the top of
the well casing. Wait an hour or so for the system to equilibrate.
3. Take an electronic pressure reading, manually, from the transducer
and record this measurement in PSI. This is measurement P1.
4. Read the tape measure relative to some fixed reference point (e.g.,
top of well casing) or mark the position on the cable with an indel-
ible pen. This is measurement L1.
5. Lower the transducer at least three meters deeper into the water
and repeat steps 3 and 4. These are measurements P2 and L2.
6. Density (R) in g/cm3 is calculated using the following:
where g is the gravitational acceleration for the location of the well
in m/s2. P must be in PSI units and L must be in meters. If using a
tape measure calibrated in feet, 1 ft = 0.3048 m (exactly).
An error of 0.001 m (1 mm) in the depth measurement
translates into an error of 0.00085 g/cm3 for density.
APPENDIX

14 7
Multi-Parameter
Water Quality TROLL®
TROLL 9500 Operator’s Manual 0095110 rev. 007 01/09
GLOSSARY
ABend: Indication in the software interface that a test has come to an
“ABnormal END”—usually because the device memory is full, or
power was lost.
ABS: Acrylonitrile Butadiene Styrene, a plastic material.
Absolute pressure sensor: Non-vented pressure sensor that measures
all pressure forces detected by the strain gauge, including atmo-
spheric pressure. Fluid levels measured with an absolute pressure
sensor must be corrected through subtraction of the atmospheric
pressure to obtain accurate fluid level measurements. Compare
Gauged pressure sensor.
AC: Absolute or Actual Conductivity.
Accuracy: Closeness of agreement between the result of a measure-
ment and the true value. Usually expressed as a deviation from
100% accuracy.
A/D (analog to digital) converter: Converts an electrical signal to a
numeric value that can be interpreted by a computer.
Ambient pressure (temperature): The pressure (temperature) of the
medium surrounding the sensor or instrument.
Ammonia (NH3): A toxic, colorless gas with a pungent odor, highly
water-soluble.
Ammonium (NH4
+): Solvated ammonium cation produced when am-
monia gas is dissolved in water.
Ammonium chloride (NH4Cl): A salt used to make ammonium and
chloride calibration standards.
Anion: Negatively charged ion (e.g., Cl–, NO3
–).
Atmospheric pressure: Pressure due to the atmosphere, altitude-de-
pendent.
Barometric pressure, see Atmospheric pressure
Bithermal: At two temperatures, e.g., a three-point calibration of an
ammonium, chloride, or nitrate sensor conducted at two different
temperatures.
Basic sensor set: pH, pH/ORP, conductivity, and polarographic (Clark
cell) dissolved oxygen; compare Extended sensor set.
Boxcar filtering: A smoothing scheme that looks at the 5 most recent
data points.
Cable, see Comunication cable, Network cable, RuggedCable, TROLL
Com, Vented cable
Calibration: The process of determining the response of a measure-
ment system to a known amount of the measured component in
order to permit the measurement of unknown samples.
Calibration, out-of-box: Use of new Basic sensors for the MP TROLL
9500 directly from the box, with factory-supplied calibration coeffi-
cients. Sensors should be calibrated after they are used and begin
to drift.
Calibration, Quick Cal: A rapid calibration procedure available for the
Basic sensors, using a single solution.
Calibration, traditional: Single- or multi-point methods for calibrating
water-quality sensors individually to gain higher accuracy.
Calibration coefficients: Sensor slope and offset that convert analog
measurements to user units; calculated during calibration.
Calibration cup: Clear PVC vessel that attaches to the front end of the
MP TROLL 9500 in place of the restrictor and holds the recom-
mended amount of calibration solution during calibration of the
water-quality sensors.
Calibration kit: Boxed set of standards for calibrating a specific water-
quality sensor for operation in a specific range.
Calibration solution, Calibration standard: A solution whose concentra-
tion is accurately known.

14 8 0095110 rev. 007 01/09
TROLL 9500 Operator’s Manual
Cation: Positively charged ion (e.g., NH4
+, Na+).
Cell constant: A value that describes a conductivity cell which is deter-
mined by electrode area and electrode separation.
Chloride (Cl–): Common anion in water that gives it a salty taste.
Chlorophyll: Green pigment in plants that transforms light energy into
chemical energy during photosynthesis.
Clone: Copy all elements of a selected test definition to a new test.
Combination electrode: A combination of a sensing or measurement
electrode and a reference electrode in one unit.
COM port: RS232 serial communication port on a PC.
Communication cable: see TROLL Com
Conductivity, electrical: A measure of the ability of an aqueous solution
to carry an electric current. Increases with increasing temperature.
Connection node: Node in the Win-Situ or Pocket-Situ Navigation
tree, representing the COM port on the host PC.
Data folder: Node in the Win-Situ or Pocket-Situ Navigation tree,
providing a view of tests that have been extracted from the device
memory to the host PC. The Data Folder can be expanded to show
the device type, device serial number, and test name.
Data point: In logged data, one reading from every channel being
sampled.
Density: Mass of a substance per unit volume (e.g., grams per liter,
g/L; grams per cubic centimeter, g/cm37ATERISMOSTDENSEAT½
Celsius.
Depth: The distance between the water surface and the pressure sen-
sor of the MP TROLL 9500. Converted from pressure units using
values selected by the user during pressure parameter setup.
Derived measurement: Value calculated in software from the output
of more than one sensor; e.g., salinity is derived from conductivity
and temperature.
Device node: Node in the Win-Situ or Pocket-Situ Navigation tree,
representing the connected MP TROLL 9500.
Digital DO: Proprietary method of powering the dissolved oxygen sen-
sor; digital pulsing eliminates the need to stir the sample to avoid
oxygen depletion.
Dissolved oxygen (DO): The amount of oxygen present in water and
available for respiration.
DO: Dissolved Oxygen.
Downhole cable, see RuggedCable
Drift: Gradual change in sensor response with time.
DSP: Digital signal processor.
Electrode: An electric conductor through which an electric current
enters or leaves a medium (such as an electrolyte).
Electrolyte: A chemical compound which when dissolved in water will
conduct an electric current; sensor filling solution.
Event test, Event sampling: Test measurement schedule in which the
selected parameters are measured at the same regular, unvarying
linear interval, but the data are logged only if the measurements
on the designated event channel exceed a user-specified value.
Conserves storage memory while logging all meaningful data.
Extended sensor set: Ammonium, chloride, nitrate, turbidity, and opti-
cal dissolved oxygen sensors; compare Basic sensor set.
Extract: Copy test data from the MP TROLL 9500 memory to a host
PC. Initiated by the Extract button when a test is selected in the
Navigation tree.
Firmware: Software program that resides in the memory of the MP
TROLL 9500; firmware can be field-upgraded.
Flow cell: Clear vessel with input and output ports for routing flow past
the sensors of the MP TROLL 9500; alternative to in-situ installa-
tion of the instrument where in-place installation is not possible or
practical.
Flow-Sense Wizard: Low-flow application in Win-Situ software for
monitoring water-quality indicator parameters in a flow cell during
low-flow pumping.
FNU: Formazin Turbidity Units; compare NTU
FS: Full scale.
Gauged pressure sensor: Pressure sensor that is vented to the
atmosphere; measures only pressure exerted by the water column,
excludes the atmospheric pressure component. Compare Absolute
pressure sensor; see also Vented cable.
HDPE: High-density polyethylene.
HIF: U.S. Geological Survey’s Hydrological Instrumentation Facility.
Home site: Default site node (top node) in the Win-Situ or Pocket-Situ
Navigation tree, representing the host computer.
GLOSSARY

149 0095110 rev. 007 01/09
TROLL 9500 Operator’s Manual
Host PC: Desktop computer running Win-Situ, or PDA running Pocket-
Situ, connected to the MP TROLL 9500 via TROLL Com or other
communication interface.
Interference: The presence of a species in a sample other than the
species being measured that causes erroneous values.
Ionic strength: A measure of the total effect of all the ions, both posi-
tive and negative, present in a solution.
ISA (Ionic Strength Adjustor): Solution of high ionic strength which can
be added to both sample and calibration solutions in equal propor-
tions before measurement to minimize differences in ionic strength.
ISE (Ion-Selective Electrode): An electrode which responds selectively
to the ions of a particular species in solution.
Isopotential point: The ion concentration at which changes in tempera-
ture do not cause a change in ISE sensor response (voltage).
Isothermal: At constant temperature.
Kcell, see Cell constant
KCl: Potassium chloride.
LED: Light-emitting diode, used in turbidity and Optical DO sensors.
Level reference: User-specified starting point for level readings;
entered during pressure parameter setup.
Level—Surface: A mode for displaying logged pressure measure-
ments; readings are positive up; useful for measuring surface
water; permits use of zero or other user reference.
Level—Top of Casing: A mode for displaying logged pressure mea-
surements; readings are positive down, as the water level draws
down from the top of the well casing; permits entry of zero or other
user reference.
Limnology: The science of the life and conditions for life in lakes,
ponds, and streams.
Linear average: Test measurement schedule in which each measure-
ment stored to the data file is the average of multiple closely-
spaced measurements.
Linear test, Linear sampling: Test measurement schedule in which the
selected parameters are measured at the same regular, unvarying
sample interval and all measurements are logged.
Log test, Log sampling: Test measurement schedule in which mea-
surements begin closely spaced and the interval between mea-
surements continuously increases. Short for Logarithmic sampling.
LSZH: Low smoke zero halide
μM, μmol/L: micro Molar, unit of dissolved oxygen concentration; to
convert to mg/L, divide by 31.25.
mg/L: Milligram per liter; equivalent to one part per million (ppm).
miniTROLL: In-Situ’s 0.72” diameter downhole pressure/temperature
smart probe.
Molarity (M): A unit of measure indicating concentration in moles of
solute per liter of solution.
Multi-ISE: An ion-selective electrode that measures more than one
parameter.
NaNO3: Sodium nitrate.
Na2SO3: Sodium sulfite.
Navigation tree: Left side of the Win-Situ application interface, or top
of the screen in Pocket-Situ, showing selectable nodes: Site, Data
Folder, Connection, Device, Parameters, Tests.
Nernst equation: The fundamental equation that relates the electrode
potential to the activity of measured ions in a solution.
NH4Cl: Ammonium chloride.
N.I.S.T.: National Institute of Standards and Technology, a non-regu-
latory federal agency within the U.S. Department of Commerce.
Formerly known as the National Bureau of Standards.
Nitrate (NO3
–): Oxidized form of nitrogen that is highly soluble in water,
present in soils, fertilizer, wastewater, etc.
Node: Element in the Navigation tree on the left side of the Win-Situ
interface, or at the top of the screen in Pocket-Situ. When a node
is selected, the remainder of the screen displays details about the
node. Nodes include the Site, Data Folder, Connection, Device,
Parameters (group node), single Parameter, Tests (group node),
single Test.
Non-vented pressure sensor, see Absolute pressure sensor
Nose cone: Detachable threaded protective stainless steel piece at
the front end of the MP TROLL 9500.
Nose cone stirrer, see Stirrer
NTU: Nephelometric turbidity unit, a measure of the intensity of light
scattered by a water sample. From nephelometer, a type of turbi-
GLOSSARY

150 0095110 rev. 007 01/09
TROLL 9500 Operator’s Manual
dimeter. Comparable to previously reported Formazin Turbidity Unit
(FTU), and Jackson Turbidity Unit (JTU).
Optode: optical electrode.
ORP, see Oxidation-reduction potential
Oxidation-reduction potential (ORP), also called “redox” potential
(from “reducing” and “oxidizing”): Voltage difference at an inert
electrode immersed in a reversible oxidation-reduction system;
measurement of the state of oxidation of the system.
Parameter node: Node in the Win-Situ or Pocket-Situ Navigation
tree, representing a single parameter (pressure, temperature, pH,
conductivity, etc.).
Parameters node: Node in the Win-Situ or Pocket-Situ Navigation
tree, providing a view of all parameters the device can measure.
Partial pressure: In a mixture of gases, the pressure a single gas
would exerted if it occupied the entire volume.
Pascal: Unit of pressure equal to the pressure resulting from a force of
1 newton acting uniformly over an area of 1 square meter.
PC: Desktop or laptop computer.
PDA (Personal Data Assistant): Generic term for a hand-held personal
computer.
pH: Term used to describe the hydrogen-ion activity of a system; the
negative logarithm of the activity of the hydrogen ions (H+) in the
solution.
Pocket PC: A type of PDA with an ARM processor and Pocket PC
(Windows Mobile) operating system.
Pocket-Situ: Win-Situ 4 software for supported PDAs.
PocketSync for Pocket-Situ: Synchronization utility that runs on a
desktop/laptop PC; automatically installs or updates Pocket-Situ on
a connected PDA; synchronizes data and other files between the
PDA and the PC where Win-Situ is installed
Polarization: Application of a direct or alternating current to a sensor.
Potassium chloride (KCl): A salt used to make conductivity calibration
standards.
ppm: Part-per-million; equivalent to a milligram per liter (mg/L).
Precision: The closeness of agreement between independent test
results obtained under stipulated conditions. A measure of the
reproducibility of a method.
Pressure: A type of stress which is exerted uniformly in all directions.
Its measure is the force exerted per unit area; e.g., pounds per
square inch (psi), newtons per square meter (pascals).
Pressure transducer: Instrument or component that detects a fluid
pressure and produces an electrical signal related to the pressure.
Professional: MP TROLL 9500 model containing memory; able to log
data; accommodates the Basic sensor set.
Professional XP: MP TROLL 9500 model with all features of the
Professional model and in addition allows use of the Extended
sensor set.
Profiler: MP TROLL 9500 model without memory; must be used with a
PC or PDA; accommodates the Basic sensor set.
Profiler XP: MP TROLL 9500 model with features of the Profiler and in
addition allows use of the Extended sensor set.
Profiling: Taking continuous real-time readings of all enabled param-
eters.
PRT: Platinum resistance thermometer, a type of resistance tempera-
ture detector (RTD).
psia: A pressure unit, pounds per square inch absolute, measured with
respect to zero pressure. All forces detected by the strain gauge
are measured, including atmospheric pressure.
psig: A pressure unit, pounds per square inch gauge, measured with
respect to atmospheric pressure. Thus the atmospheric pressure
component is excluded.
PSU: Practical Salinity Units, based on the Practical Salinity Scale.
Pulsing: Periodic low-frequency polarization of a dissolved oxygen
sensor.
Pump test, Pumping test: Aquifer characterization test that involves
pumping out a known volume of fluid from a well and measuring
the time of recovery to stable conditions.
Quick Cal: Rapid calibration procedure available for the MP TROLL
9500 Basic sensors that uses a single solution.
Quick Cal solution: A calibration standard of an appropriate chemical
composition to calibrate four parameters simultaneously (pH, ORP,
Dissolved Oxygen, Conductivity).
Quinhydrone: Dark green water-soluble compound, a 1:1 complex
of benzoquinone and hydroquinone used as an ORP calibration
standard when dissolved in pH buffer solution.
GLOSSARY

151 0095110 rev. 007 01/09
TROLL 9500 Operator’s Manual
Reading: Measurement from a single channel (parameter).
Redox potential, see Oxidation-reduction potential
Reference (water level measurements), see Level reference
Reference electrode: A standard electrode of known potential against
which the measurement or sensing electrode is compared.
Repeatability: Closeness of the agreement between the results of suc-
cessive measurements carried out under the same conditions.
Reproducibility: Closeness of the agreement between the results of
measurements of the same measurand carried out under nearly
identical conditions but after an intermediate change was made
and removed.
Resistance thermometer: Temperature sensor that changes electrical
resistance with temperature.
Resistivity: The reciprocal of conductivity; calculated from conductivity.
Resolution: The smallest unit that can be measured by a device over
its full range.
Response time: Time required for the MP TROLL to power a sensor
and the sensor to return an accurate reading.
Restrictor: Perforated stainless steel area of the MP TROLL 9500
between the nose cone and the body; protects the sensors and
allows free circulation of environmental fluid.
RDO: Rugged optical dissolved oxygen sensor
RS-485: Communications protocol using Recommended Standard
485 of the Electronic Industries Association (EIA-485) for the
orderly transfer of electrical data signals; a balanced (differential),
multipoint Interface Standard that uses two lines to transmit/receive
data and can operate at 100 Kbps with cable lengths up to 4000
feet.
RTD: Resistance temperature detector, a type of resistance thermom-
eter that has nominally 100 7AT½#
RuggedCable™: Waterproof, submersible, TPU-jacketed vented
or non-vented cable for a Multi-Parameter TROLL 9500; carries
power and communication signals; provides strain relief and a
means to anchor the instrument to a stationary object; Twist-Lock
connectors on both ends, Rugged (titanium) or Standard (carbon-
filled ABS plastic); halogen-free version available.
S, see Siemens
Salinity: A measure of the amount of salts dissovled in water, usually
expressed in parts per thousand (ppt); calculated from conductivity
and temperature.
Saturation: The point at which a substance contains a maximum
amount of another substance at a given temperature and pressure.
3#3PECIFIC#ONDUCTANCECONDUCTIVITYCORRECTEDTO½#
SDI-12: A serial-digital interface operating at 1200 baud.
Sensor kit: Package containing an In-Situ sensor, along with neces-
sary installation items and instructions for installing in the Multi-Pa-
rameter TROLL 9500.
SI: International System of Units.
Siemens (S): SI unit for conductivity, reciprocal of the ohm; this unit
was formerly known as the “mho” (ohm spelled backwards).
Site node: Topmost node in the Win-Situ or Pocket-Situ Navigation
tree, representing the host computer.
Slope: Sensor response vs. concentration (quantity). Slope and offset
are the coefficients calculated during calibration that convert ana-
log measurements to user units.
Slug test: Aquifer characterization test that involves “slugging” a well
with a known volume of fluid or solid and measuring the time of
recovery to stable conditions.
Soak time: Length of time a sensor is immersed in a calibration solu-
tion or sample, ideally at the same temperature at which measure-
ments will be taken.
Sodium nitrate (NaNO3): A salt used to make nitrate calibration stan-
dards.
3PECIFICCONDUCTANCE#ONDUCTIVITYOFASOLUTIONAT½#
Standard Methods: Approved methods of analyzing for water-quality
parameters, as specified in the reference work Standard Methods
for the Examination of Water and Wastewater, published jointly by
the American Public Health Association, American Water Works
Association, and Water Environment Federation.
Stirrer: Battery-powered motorized low-power stirring mechanism with
magnetic stirring bar for use during calibration and/or in stagnant
waters.
Submersible cable: Waterproof, quick-connect cable designed for sub-
mersion; Instrument backshell located at downhole end; surface
connector at surface end.
GLOSSARY

152 0095110 rev. 007 01/09
TROLL 9500 Operator’s Manual
Surface connector: Multi-function vented nylon connector at the sur-
face end of the MP TROLL’s submersible cable; accommodates a
variety of top-of-well devices for communications, networking, and
power supply.
TDS, see Total Dissolved Solids
Tefzel®: Dupont®’s modified ETFE fluoropolymer
Temperature, Solution temperature: Amount of heat present in the
solution in which the instrument is submerged.
Test: Instructions to the MP TROLL’s internal logger for collecting
data; the logged data from one set of instructions.
Test node: Node in the Win-Situ or Pocket-Situ Navigation tree, repre-
senting a single test.
Tests node: Node in the Win-Situ or Pocket-Situ Navigation tree,
providing a view of all tests currently stored in the device memory.
TOC (Top of Casing), see Level—Top of Casing
Torr: A unit of pressure, equal to 1/760 atmosphere.
Total Dissolved Solids (TDS): The amount of dissolved substances,
such as salts or minerals, in water remaining after evaporating the
water and weighing the residue. Calculated from conductivity.
TPU: Thermoplastic Polyurethane, a cable jacket option.
TROLL Com: Communication cable interface between MP TROLL
9500 and a desktop/laptop PC or RuggedReader handheld PDA.
Turbidity: A measure of the transparency of water.
Twist-Lock Hanger: Back end hanger without venting or communica-
tion capabilities; allows use of inexpensive hanging cable while
taking absolute (non-vented) pressure data with a preprogrammed
instrument.
Units: Measurement units; user-selectable in software interface.
Vented cable: RuggedCable with a vent tube that applies reference at-
mospheric pressure to the back of the pressure sensor diaphragm.
Vented pressure sensor, see Gauged pressure sensor
Vertical profile: Characterization of a water column from surface to
bottom (or vice-versa) through multiple real-time readings of the
water-quality parameters of interest taken at varying depths.
Win-Situ 4: Instrument control software for instrument setup, calibra-
tion, profiling, data logging, data retrieval and display.
ZoBell’s: A redox standard solution with a known state of oxidation-re-
duction potential (measured in milliVolts) used to calibrate ORP.
GLOSSARY

153
Multi-Parameter
Water Quality TROLL®
TROLL 9500 Operator’s Manual 0095110 rev. 007 01/09
Index
A
ABEND, 37, 39, 143
Accessories, 8–9
Accuracy specifications, 10–11
electronic drift, 145
ActiveSync, 9, 14, 30, 42, 136
Add... button
add connection, 24
add test, 29, 35
Altitude. See Elevation
Ammonia
pH and, 66, 104
Ammonium
about, 104
calibration, 105–108
interferences, 108
pH and, 66, 104
Ammonium sensor, 104–105
cleaning, 109
hydrating, 104
installing, 105
slope & offset, 108
storage, 109
Aquifer testing, 46
Atmospheric pressure. See Barometric pressure
B
Barometric pressure, 56
compensating pressure readings for, 47, 52
in dissolved oxygen measurements, 36, 86
sensor, 56
units, 56
vs. elevation (table), 57
without vented cable, 56
Baro TROLL, 52
Baro Wizard, 52–53
Basic Sensor Set, 58
Batteries, 7
displaying capacity, 25
installing, 12
replacing, 141
setting battery type, 26
Baud rate, 16
C
Cable, 6
communication cables, 7
field installation, 51
non-vented cable, 56–57
suspension wire, 6, 51
TROLL Com, 7, 14
vented cable, 47
Calibration, 28, 60–65
ammonium, 105–108
chloride, 111–114
conductivity, 73–76
dissolved oxygen, optical (RDO), 91–94
dissolved oxygen, polarographic, 80–84
frequency, 64
history, 63–64
kits, 61
nitrate, 116–118
nominal stability, 18, 60
ORP, 98–100
overview, 28, 60–61
pH, 67–70
pressure, 46, 145
Quick, 17–20
reports, 63–64
transferring to desktop PC, 42
resetting defaults, 61
rinsing, 62
stability, 60
stirring, 62
temperature and, 55, 62
traditional, 60
turbidity, 124–128
Calibration cup, 61, 144
Cancel a test, 41
Cell constant, 61, 72, 73
entering manually, 76
Chloride
about, 110
calibration, 111
interferences, 114
Chloride sensor, 110
cleaning, 114
hydrating, 110
installing, 110
slope & offset, 114
storage, 114
Clark D.O. sensor. See Dissolved oxygen sensor,
polarographic

154
INDEX
TROLL 9500 Operator’s Manual 0095110 rev. 007 01/09
Cleaning, 4, 142
ammonium sensor, 109
chloride sensor, 114
conductivity sensor, 77
dissolved oxygen sensor, optical (RDO), 96
dissolved oxygen sensor, polarographic, 87
nitrate sensor, 120
pH/ORP sensor, 101
pH sensor, 71
turbidity sensor, 128–129
Clock
setting, 26
Clone button, 39, 41
Communication cables, 7
Communication errors, 16, 143
COM port, 14, 16
Conductivity
about, 72
and temperature, 77
calibration, 73
Quick Cal, 74
units, 76
Conductivity sensor, 72
cell constant, 61, 73, 75, 76
installing, 73
maintenance, 77
storage, 77
Connection type, 16
Connection Wizard, 16, 24
Continuous button (Profiler), 34
Customer service, 3
D
Data files, 40. See also Tests
location, 40
name, 40
saving as text files, 45
transferring from PDA, 42
Data folder, 23, 34, 40, 42
viewing data in, 43–44
Date & time
adding to graph, 44
setting device clock, 26
Decontamination guidelines, 4
Default storage (event test), 38
Delete button
delete connection, 24
delete test, 41
Delta (event test), 37
Density. See Liquid density
Depth, measuring, 47, 48, 50
Depth rating, sensors, 51, 65
Derived measurements
from conductivity, 76–77
from dissolved oxygen, 85
Desiccant, 7
Device information, 24–25
Device node, 23
Display units, 27
Dissolved oxygen
about, 78
calibration, optical (RDO), 91–95
calibration, polarographic, 80–85
percent saturation, 85, 95
profiling, 32
Quick Cal, 17
units, 85
Dissolved oxygen sensor, optical (RDO), 89
ANDmOWCELL 135
barometric pressure compensation, 36
cleaning, 96
comparison to polarographic, 89–91
displaying in Profiler, 32
installing, 89–91
salinity compensation, 36, 89–91
Dissolved oxygen sensor, polarographic, 79–80
barometric pressure compensation, 36
cleaning, 87
conditioning, 17, 79, 80
filling, 79
installing, 79
slope & offset, 85
storage, 87
DO. See Dissolved oxygen
Don’t Ask dialogs, 27
Downloading data. See Extracting data
Drift, electronic, 145
E
Edit... button
edit barometric pressure, 56
edit connection, 24
edit device, 26
edit pressure, 28, 48–49
edit test, 39
Electrical conductivity. See Conductivity
Elevation
in pressure to level conversion, 49
vs. pressure (table), 57
Eutrophication, 78
Event test, 36, 37–38
Excel
CUSTOMLOWmOWTEMPLATE 139
exporting data to, 45
EXPORTINGLOWmOWDATATO 139
Expand devices on find, 27
Extended Sensor Set, 59
Extract button, 40
Extracting data, 30, 40
F
Features upgrade, 25
Find button, 24
expand devices on Find option, 27
Firmware upgrade, 3, 25
Flow-Sense Wizard
creating templates, 136
entering target values, 138
measurement interval, 138
output files, 139
preparation, 135
reports, 139

155
INDEX
TROLL 9500 Operator’s Manual 0095110 rev. 007 01/09
saving data, 138
setting unit preferences, 136
starting from a file or template, 136
starting from Navigation tree, 136
starting from Tools menu, 136
total volume, 137
Fluid density. See Liquid density
Formazin, 125
G
Graphing controls
Pocket-Situ, 45
Win-Situ, 44
Graphing data, 44
Profiler data, 32
Gravitational acceleration
in pressure to level conversion, 49
H
Home site, 23
I
Information pane, 23
Installation
accessories for, 9
cable grip, 51
sensors, 59
L
Level, measuring, 47, 50
Surface mode, 48
Top of Casing mode, 48
Level reference, 49
Linear average test, 37, 38
Linear test, 36, 37
Liquid density, 49
calculating, 145
in pressure to level conversion, 49
Logging data, 35–41. See also Tests
overview, 29
,OWmOWMONITORING 135–139
with RDO sensor, 135
,OWmOWSOFTWARE See Flow-Sense Wizard
M
Maintenance & calibration service, 3, 53
Manual start mode, 37
Measurement units, 27
Microsoft ActiveSync, 9, 14, 30, 42
Microsoft Excel, 45, 139
N
Name
connection, 16
data files, 34, 40
pressure channel, 48
test, 36
Navigation tree, 23
test status symbols in, 39
Nernst equation, 66, 97
Nitrate
about, 115
calibration, 116
interferences, 120
Nitrate sensor, 115
cleaning, 120
hydrating, 116
installing, 116
slope & offset, 119
storage, 120
Nominal stability, 18, 60
Nose cone, 6
O
Optical D.O. sensor. See Dissolved oxygen sen-
sor, optical (RDO)
O-rings, 141
sensor, 60
ORP
about, 97
calibration, 98
Quick Cal, 17
sensor offset, 100
units, 100–101
ORP sensor. See pH/ORP sensor
P
Parameter Wizard, 48
PDA
transferring data to desktop PC, 42
pH
about, 66
calibration, 67
in low ionic strength samples, 71
Quick Cal, 17, 68
pH/ORP sensor, 97
calibration, 68, 99
installing, 67, 98
maintenance, 101
resetting default coefficients, 70, 100
storage, 101
pH sensor, 66
installing, 67
maintenance, 71
resetting default coefficients, 70
slope & offset, 70
storage, 70, 71
usage, 70
Pocket-Situ
about, 9, 22
activating, 22
installing, 14
interface, 23
system requirements, 9
Power
external, 7, 25
internal, 7
Practical Salinity Scale, 77
Preferences, 27
Pressure
conversion to depth or level, 49
measuring, 46, 47
Pressure head mode, 48

156
INDEX
TROLL 9500 Operator’s Manual 0095110 rev. 007 01/09
Pressure rating, sensors, 51, 65
Pressure sensor
about, 46–47
absolute vs. gauged, 47
factory calibration, 46
field recalibration, 47
non-vented vs. vented, 47
recalibration, 53
zeroing, 47
Pressure setup, 48–50
summary, 50
Product specifications, 10–11
Profiling, 31–34
changing channels displayed, 32, 33, 34
changing measurement units, 34
changing sample rate, 27, 34
depth or level, 32
dissolved oxygen, 32
exiting the Profiler, 34
graphing data, 32
logging data, 34
retrieving data, 34
starting software in Profiler mode, 27, 34
starting the Profiler, 31
turbidity, 32, 128
PSIA, 47
PSIG, 47
Pumping tests, 46
Q
Quick Cal, 17–20, 28, 61
sensors that cannot use, 20
with RDO sensor installed, 17, 96
R
RDO sensor. See Dissolved oxygen sensor,
optical (RDO)
Real-time readings. See Profiling
Refresh button, 24, 25
Removing sensors, 60
Repair service, 3
Resistivity, 77
Restrictor, 6
RMA, 3
RuggedReader, 9, 14
S
Salinity, 77
and RDO sensor, 36, 89
Scheduled start mode, 37
SDI-12, 130–134
adapter, 130
commands, 131, 133
enable/disable, 26, 130
out-of-range readings, 132
wiring, 130
Seals
o-rings, 141
sensor o-rings, 60
Sensors, 58
ammonium, 104
barometric pressure, 56
chloride, 110
conductivity, 72
dissolved oxygen, optical (RDO), 89
installing, 13
nitrate, 115
o-rings, 60
pH, 66
pH/ORP, 97
pressure, 46
removing, 60
replacement, 65
serial number, 2, 65
specifications, 10
storage, 63
temperature, 54
turbidity, 122
Serial number, 2
Settings options, 27
Show Calibration Report button, 64
Slug tests, 46
Snapshot button (Profiler), 34
Software, 9. See also Win-Situ, Pocket-Situ
Software upgrade, 3
Specifications, 10–11
Specific conductance, 76
Specific gravity, 49
Stirrer, 62, 65
Stirring
and polarographic D.O. measurement, 86–88
during calibration, 62
Surface mode, 48
T
Technical support, 3
Temperature
about, 54
and calibration, 55, 62
units, 55
Temperature sensor, 54
Test name, 36
Tests, 35
adding to device, 21, 35
cancelling, 41
cloning, 41
deleting, 30, 41
event, 36, 37
extracting, 40
linear, 36, 37
linear average, 37, 38
manual start mode, 37
measurement interval, 37
measurement schedules, 36
printing, 45
saving as text files, 45
scheduled start mode, 37
setting up, 35
starting, 40
status symbols in Navigation tree, 39
stopping, 37, 40
viewing, 30, 43
Test setup, 35

15 7
INDEX
TROLL 9500 Operator’s Manual 0095110 rev. 007 01/09
Test Wizard, 35
Text files, 45
Top of Casing mode, 48
Total Dissolved Solids, 77
TROLL Com, 7, 14
USB drivers for, 14
Turbidity
about, 121–122
calibration, 124–128
calibration standards, 124
profiling, 32, 128
Turbidity sensor, 122
cleaning, 128–129
resetting default coefficients, 128
Turbidity wiper, 122–124
during Quick Cal, 17
installation, 123
maintenance, 129
“manual” wipe, 124
Twist-Lock connectors, 15
Twist-Lock hanger, 9, 51
U
Units, selecting, 27
Upgrading
features, 25
firmware, 3, 25
software, 3
Uploading data. See Extracting data
User reference. See Level reference
V
Vented cable, 47
Viewing data, 30, 43
W
Warranty provisions, 3
Water level. See Level, measuring
Win-Situ
about, 9, 22
exiting, 30
installing, 14
interface, 23
launching, 22
system requirements, 9
Win-Situ Software Manager, 14
Win-Situ Sync, 14, 42

221 East Lincoln Avenue Ft. Collins, Co. 80524 USA
Tel: 970.498.1500 800.446.7488 Fax: 970.498.1598
Declaration of Conformity
Manufacturer: In-Situ, Inc.
221 East Lincoln Avenue
Ft. Collins, Co. 80524
USA
Declares that the following product:
Product name: Multi-Parameter TROLL 9500
Model: WQP-100
Product Description: The Multi-Parameter Troll 9500 provides real-time readings for and logs up to 9 water-
level and water-quality parameters 7 of which are multi-configurable in addition to the
built-in temperature and barometric pressure parameters.
is in compliance with the following Directive
89/336/EEC for Electromagnetic Compatibility (EMC)
and meets or exceeds the following international requirements and compliance standards:
Immunity
EN 61326:1997, Electric Equipment for Measurement, Control and Laboratory Use
Emissions
Class A requirements of EN 61326:1997, Electric Equipment for Measurement, Control and
Laboratory Use
Supplementary Information:
The device complies with the requirements of the EU Directive 89/336/EEC, and the CE mark is affixed
accordingly.
Todd Campbell
New Product Development Program Manager
In-Situ, Inc.
October 28, 2005

Declaration of Conformity
Manufacturer: In-Situ, Inc.
221 East Lincoln Avenue
Fort Collins, CO 80524
USA
Declares that the following product:
Product name: TROLL Com
Model: USB TROLL Com
Product Description: RS485 to USB converter
is in compliance with the following Directive
89/336/EEC for Electromagnetic Compatibility (EMC) Directive
73/23/EEC for Safety Directive
and meets or exceeds the following international requirements and compliance standards:
Immunity
EN 61326, Electrical Equipment for Measurement, Control and Laboratory Use, Industrial
Location
Emissions
Class A requirements of EN 61326, Electrical Equipment for Measurement, Control and
Laboratory Use
Supplementary Information:
The device complies with the requirements of the EU Directives 89/336/EEC and 73/23/EEC, and the CE
mark is affixed accordingly.
Todd Campbell
New Product Development Program Manager
In-Situ, Inc.
June 17, 2006