Installation Guide (Native)
Installation%20Guide%20(Native)
Installation%20Guide%20(Native)
Installation%20Guide%20(Native)
Installation%20Guide%20(Native)
Installation%20Guide%20(Native)
User Manual: Pdf
Open the PDF directly: View PDF ![]() .
.
Page Count: 23

UiPath Orchestrator Azure Installation

Revision History
Date
Version
Author
Description
9th June 2016
2016.1
M.B.
Applied Template
8th June 2016
2016.2
C.S.
Created Document
UiPath Orchestrator Azure Installation Guide 1

Table of Contents
1. Installation in Azure
1.1. On Local Machine
2. ElasticSearch and Kibana Installation on a Server in Azure
2.1. Prerequisites
2.2. Configuring Windows Firewall
2.3. Setting Up JAVA_HOME
2.4. Installing ElasticSearch
2.5. Installing Kibana
2.6. Setting Kibana as Windows Service
3. ElasticSearch and Kibana Installation on AWS Using Amazon Service
3.1. Creating Amazon ES Domains (Console)
3.2. Configuring Amazon ES Domains (Console)
UiPath Orchestrator Azure Installation Guide 2
UiPath Orchestrator - Azure Installation
The guide is split in following sections:
1. Installation in Azure
2. Elasticsearch and Kibana installation on a server in Azure
3. Elasticsearch and Kibana installation on AWS using Amazon service
1. Installation in Azure
This installation guide is meant to deploy UiPath Orchestrator on a single Azure Web APP with virtual
directories.
1. WebApp Creation
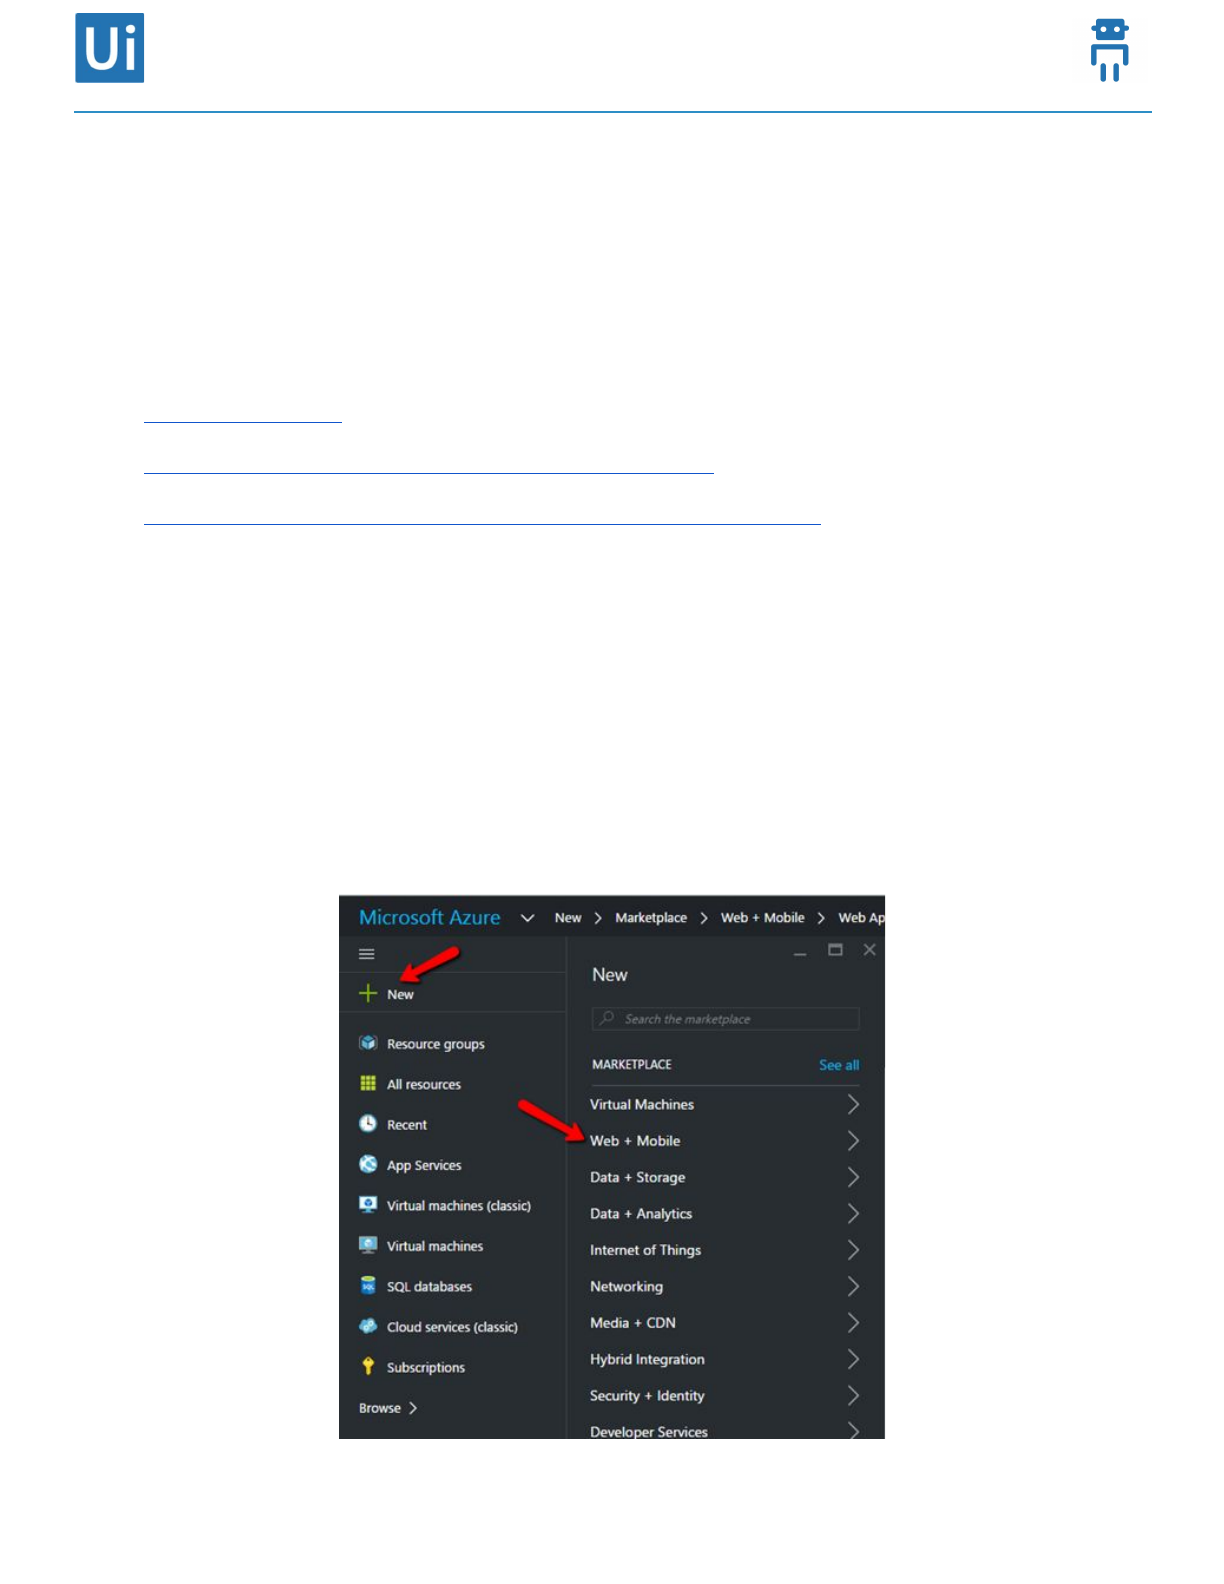
●Open Azure Dashboard
●Press New button and then select Web + Mobile from Marketplace
UiPath Orchestrator Azure Installation Guide 3
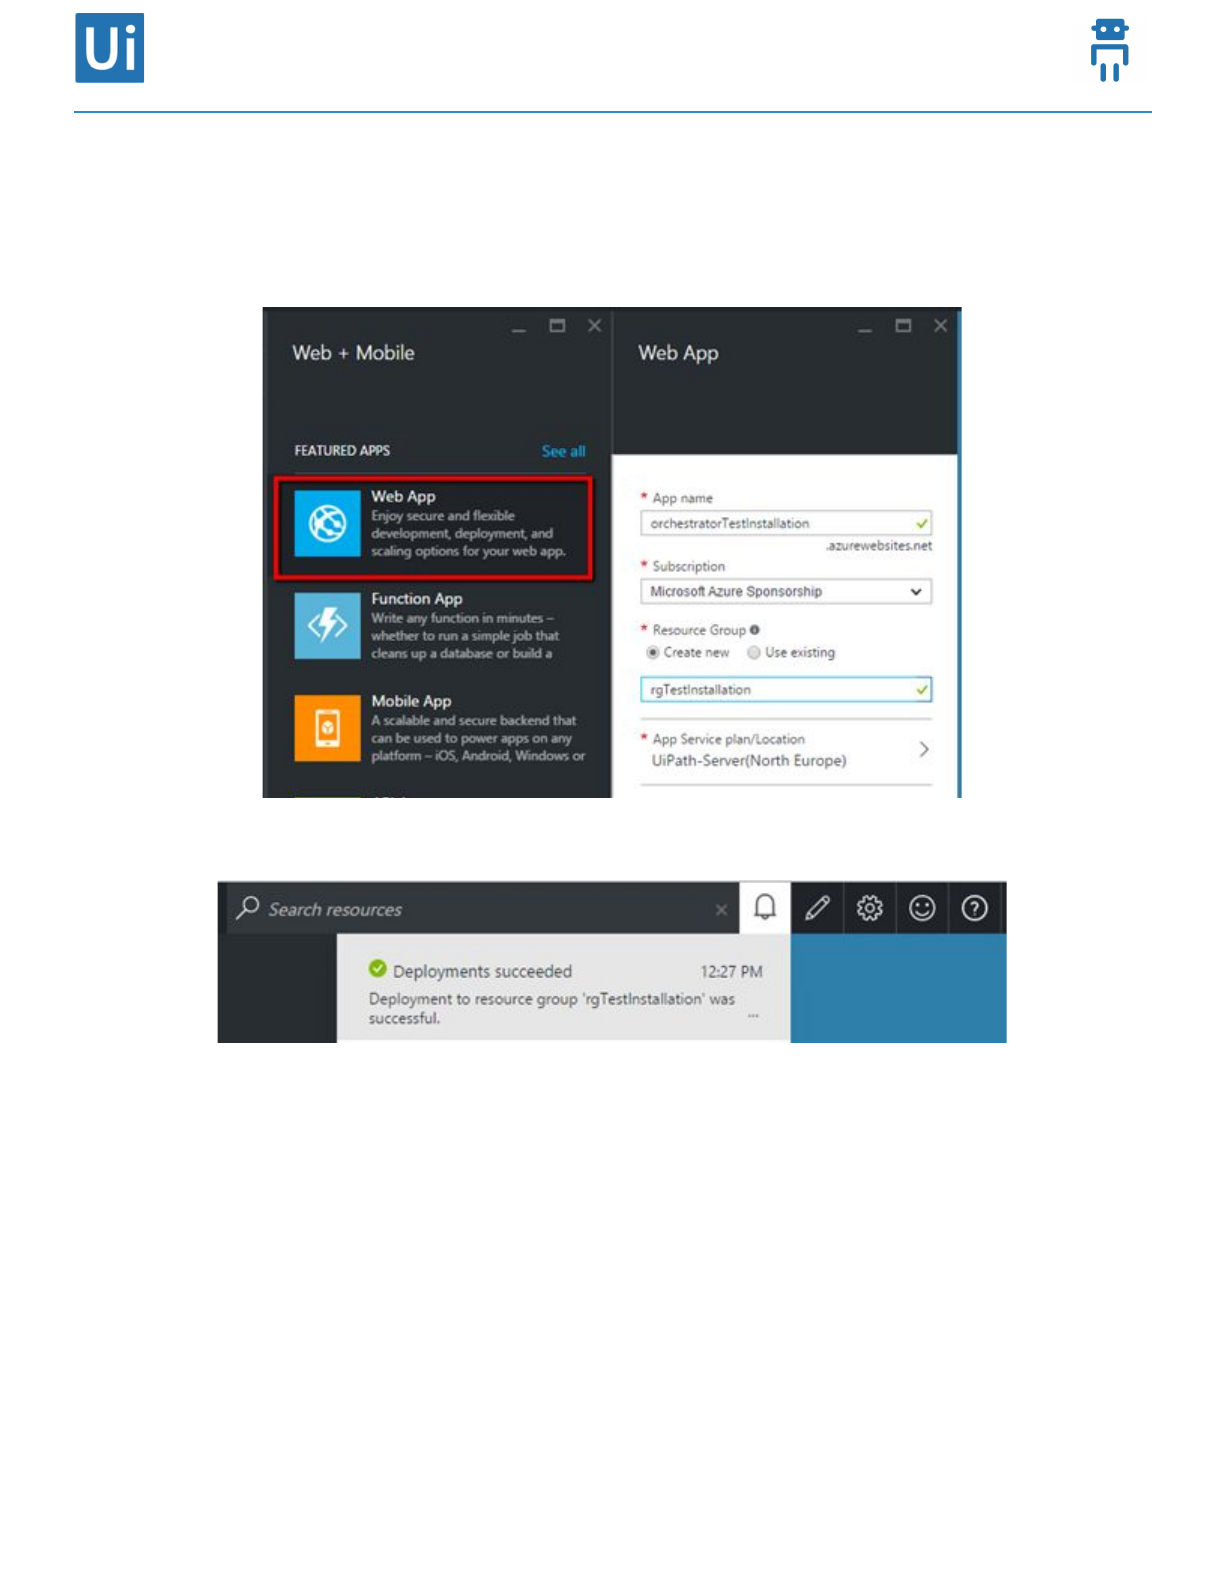
●From featured apps select WebApp. Input AppName, select Subscription, create (or select existing)
Resource Group, select App service.
●The successful creation of the WebApp will be visible in the upper right side of the screen
2. Virtual Folder creation
You need to create 5 virtual directories, each for a service of orchestrator plus the default one which
will represent the root. Each Virtual Directory must be an application.
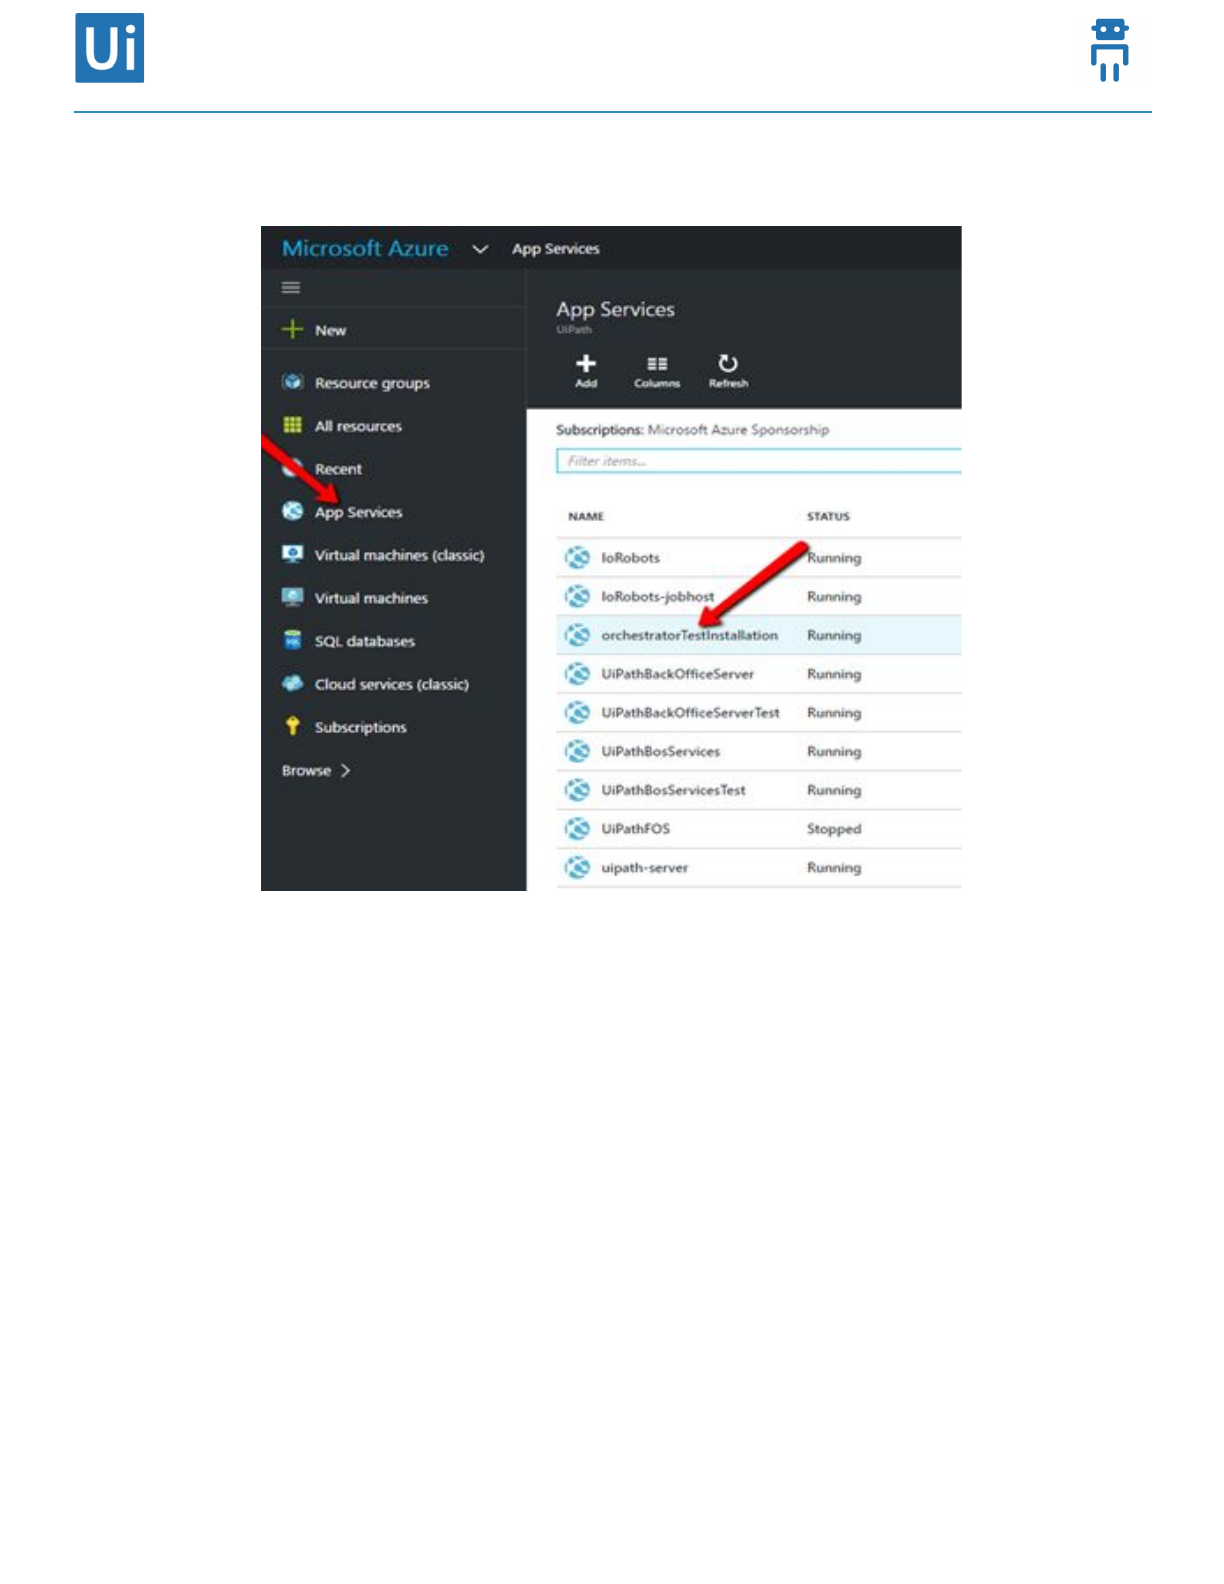
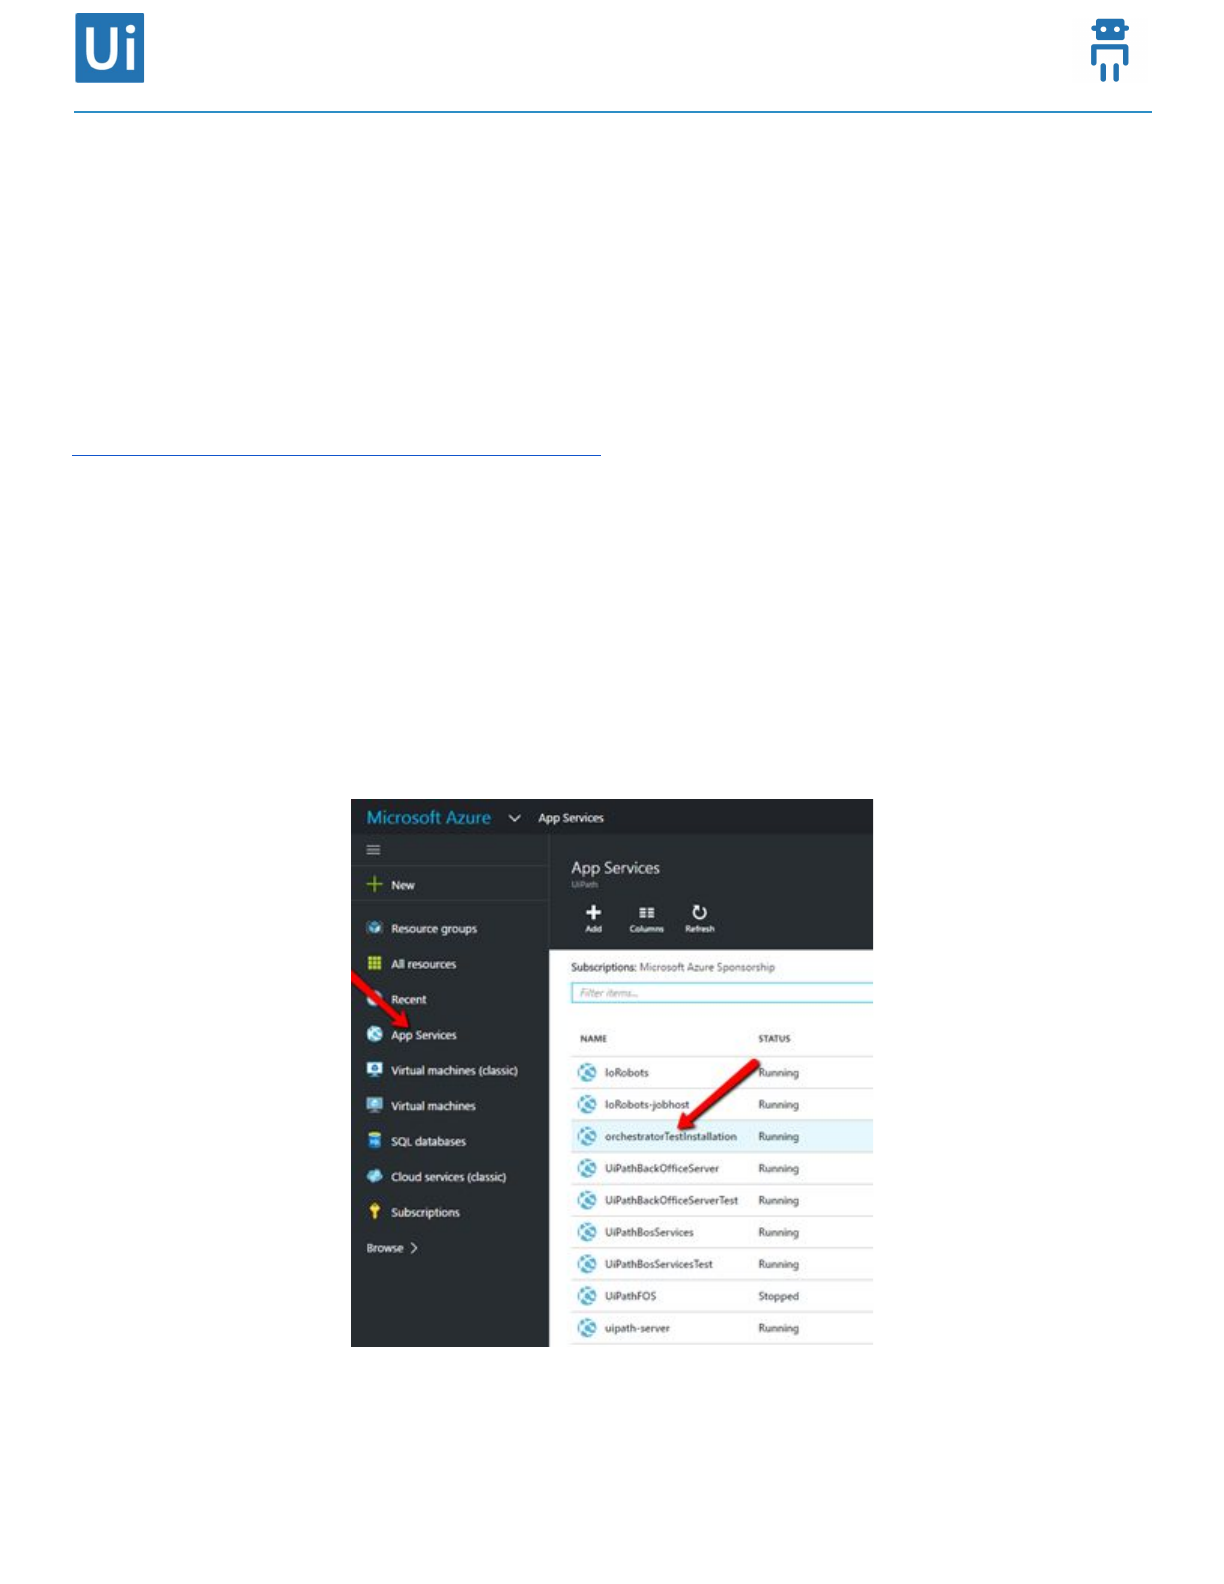
●Open Azure Dashboard
●From the left menu select App Services, then select the previous created WebApp
UiPath Orchestrator Azure Installation Guide 4
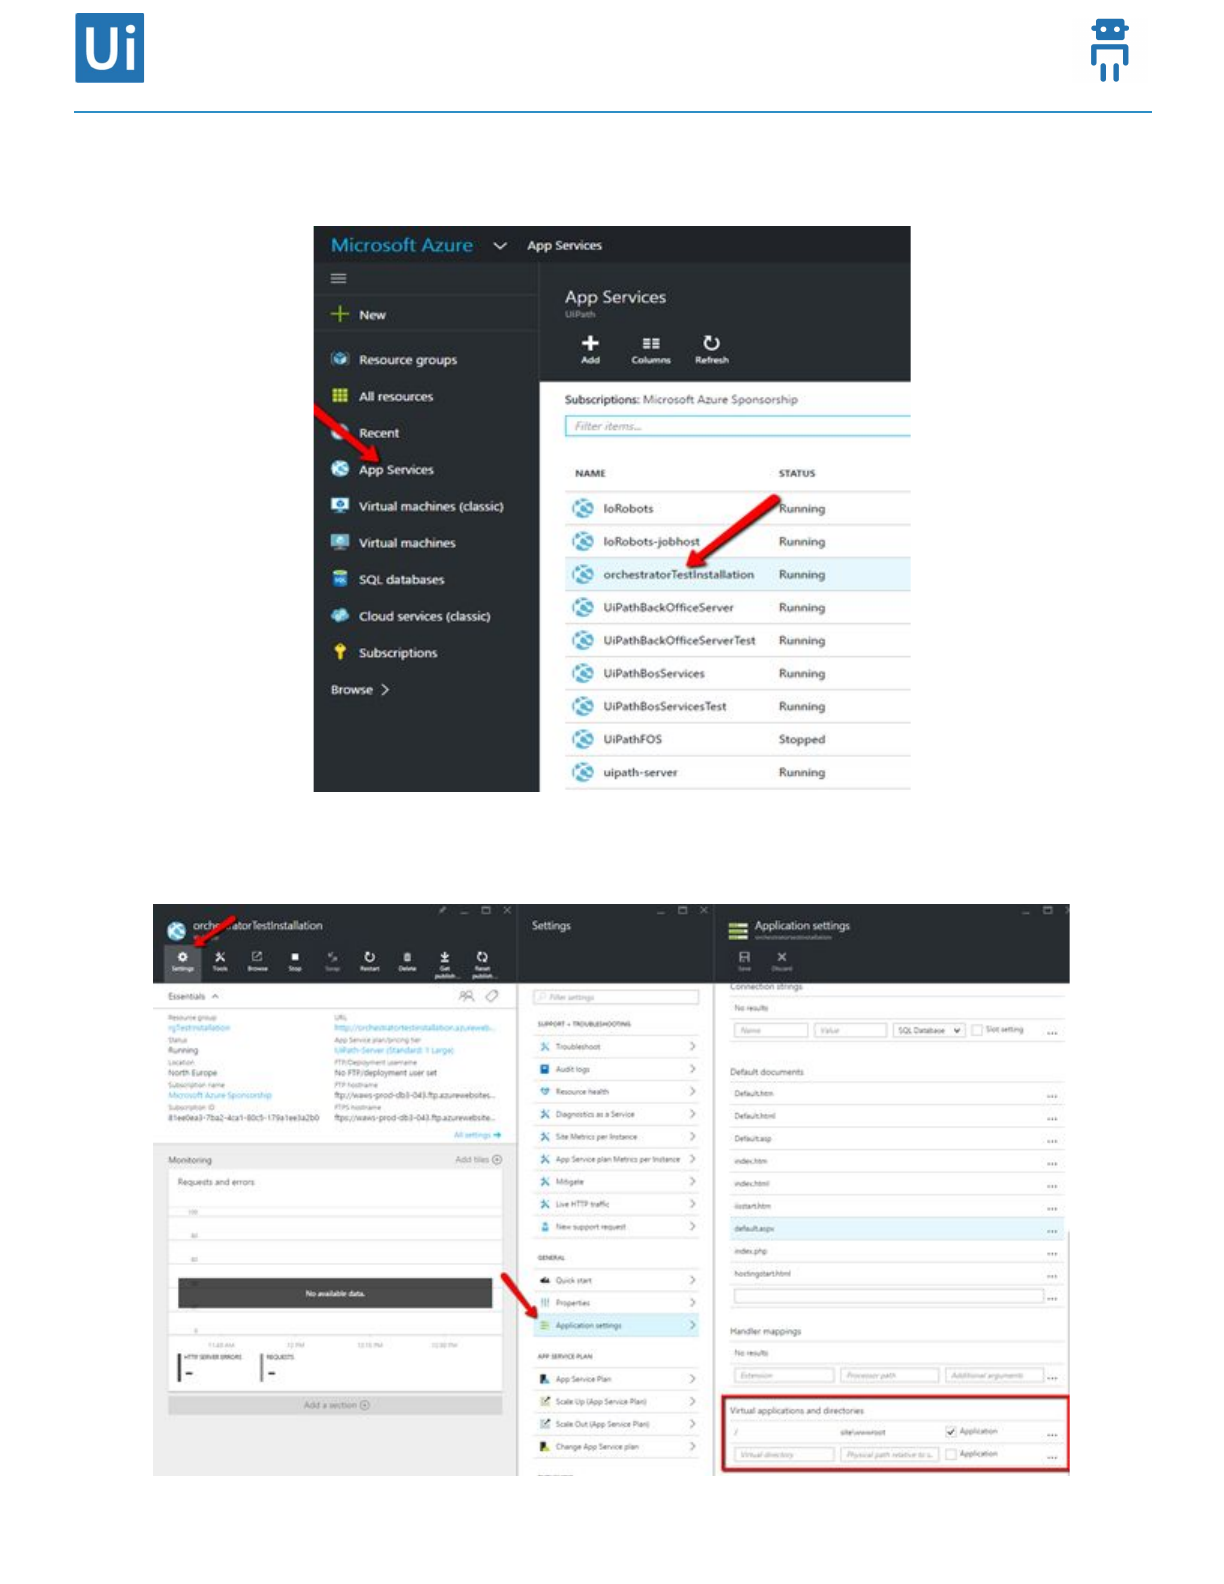
●Select Settings tab, then Application Settings. In the Application setting frame scroll down until
“Virtual applications and directories” is visible
UiPath Orchestrator Azure Installation Guide 5
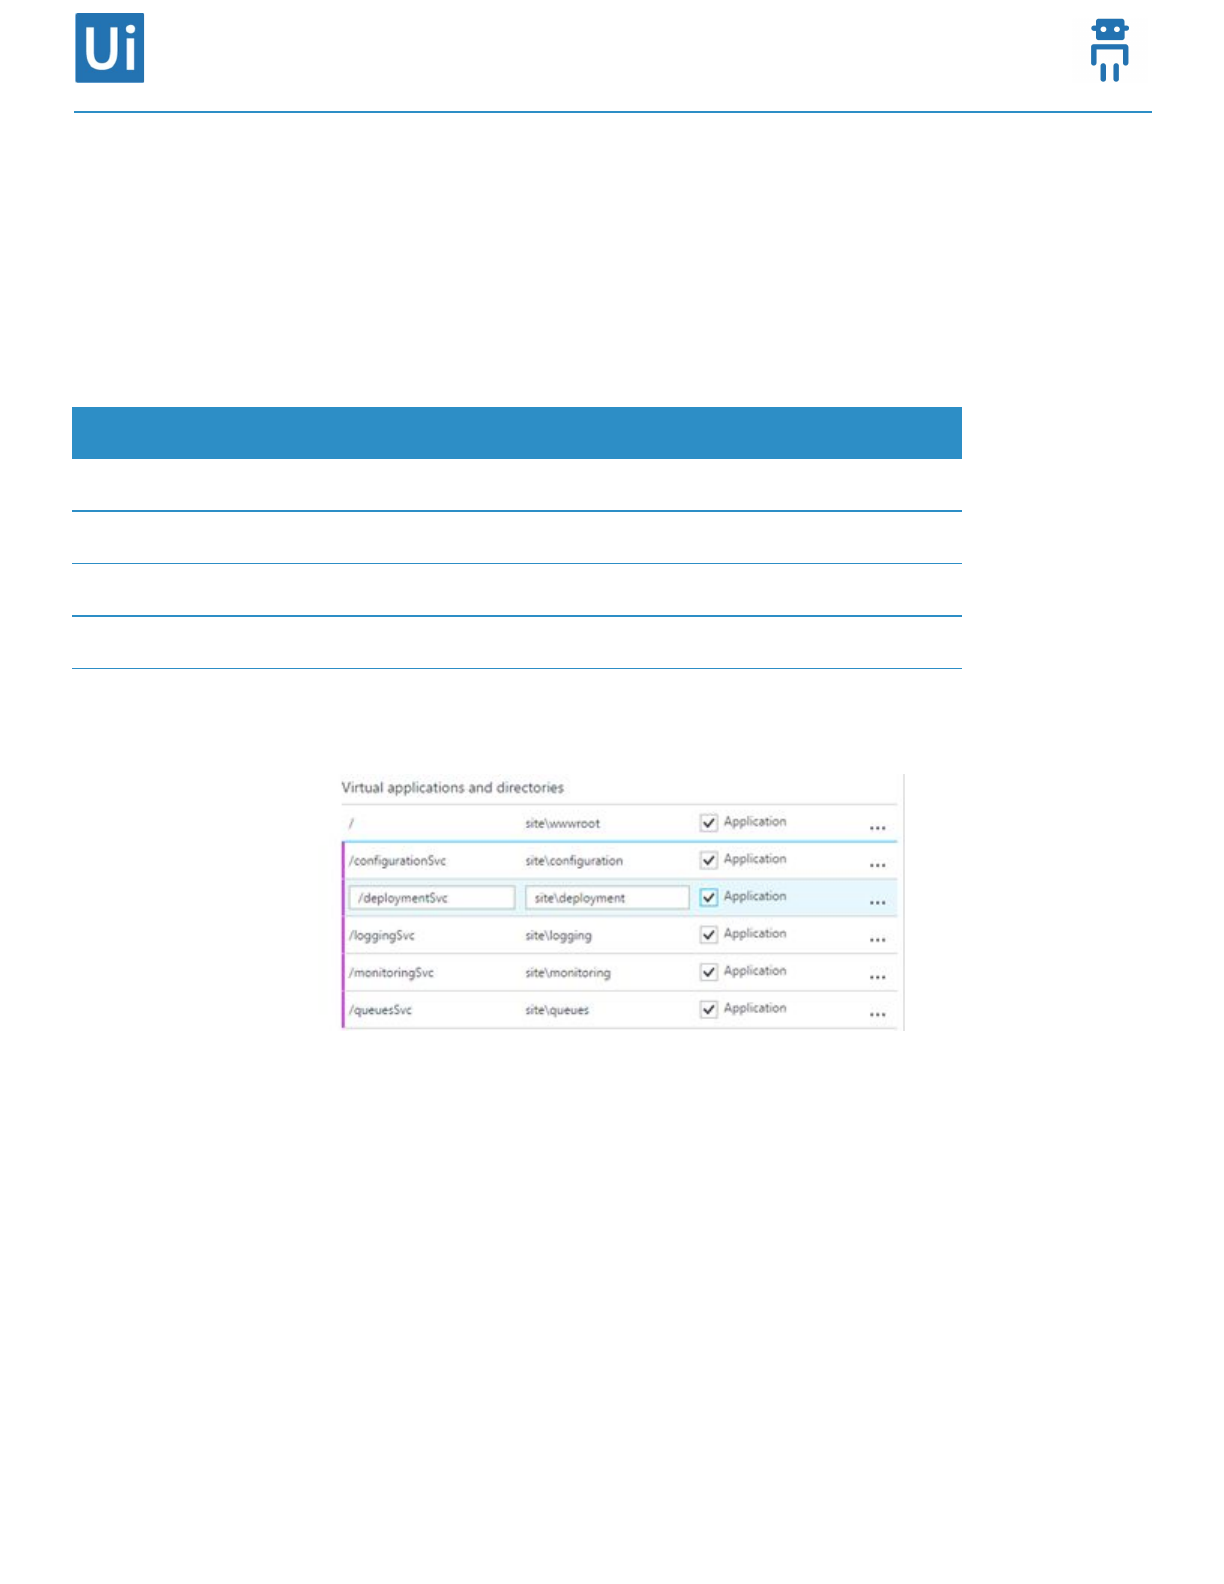
●Enter the VirtualDirectory name and PhysicalPath of the 5 virtual directories that must be created.
Naming Convention is:
●VirtualDirectory = /serviceNameSvc
●PhysicalPath = site\serviceName
Virtual Directory
Physical Path
/configurationSvc
site\configuration
/deploymentSvc
site\deployment
/loggingSvc
site\logging
/monitoringSvc
site\monitoring
/queuesSvc
site\queues
●After the folders are added, thick the Application checkbox for all of them.
●Press the Save button.
●The successful creation of the WebApp will be visible in the upper right side of the screen
BEFORE starting the deployment script, make sure you have the following
configuration:
1. Database connection string
●From the left menu select App Services, then select the previous created WebApp
UiPath Orchestrator Azure Installation Guide 6
●Select Settings tab, then Application Settings.
●Under “Connection strings” enter in the field “Name” value UiPathServerContext and in the field
“Value” the connection string pointing to an existing Database
●Thick “Slot settings” checkbox
●Press Save button
2. App Settings
●From the left menu select App Services, then select the previous created WebApp
UiPath Orchestrator Azure Installation Guide 7
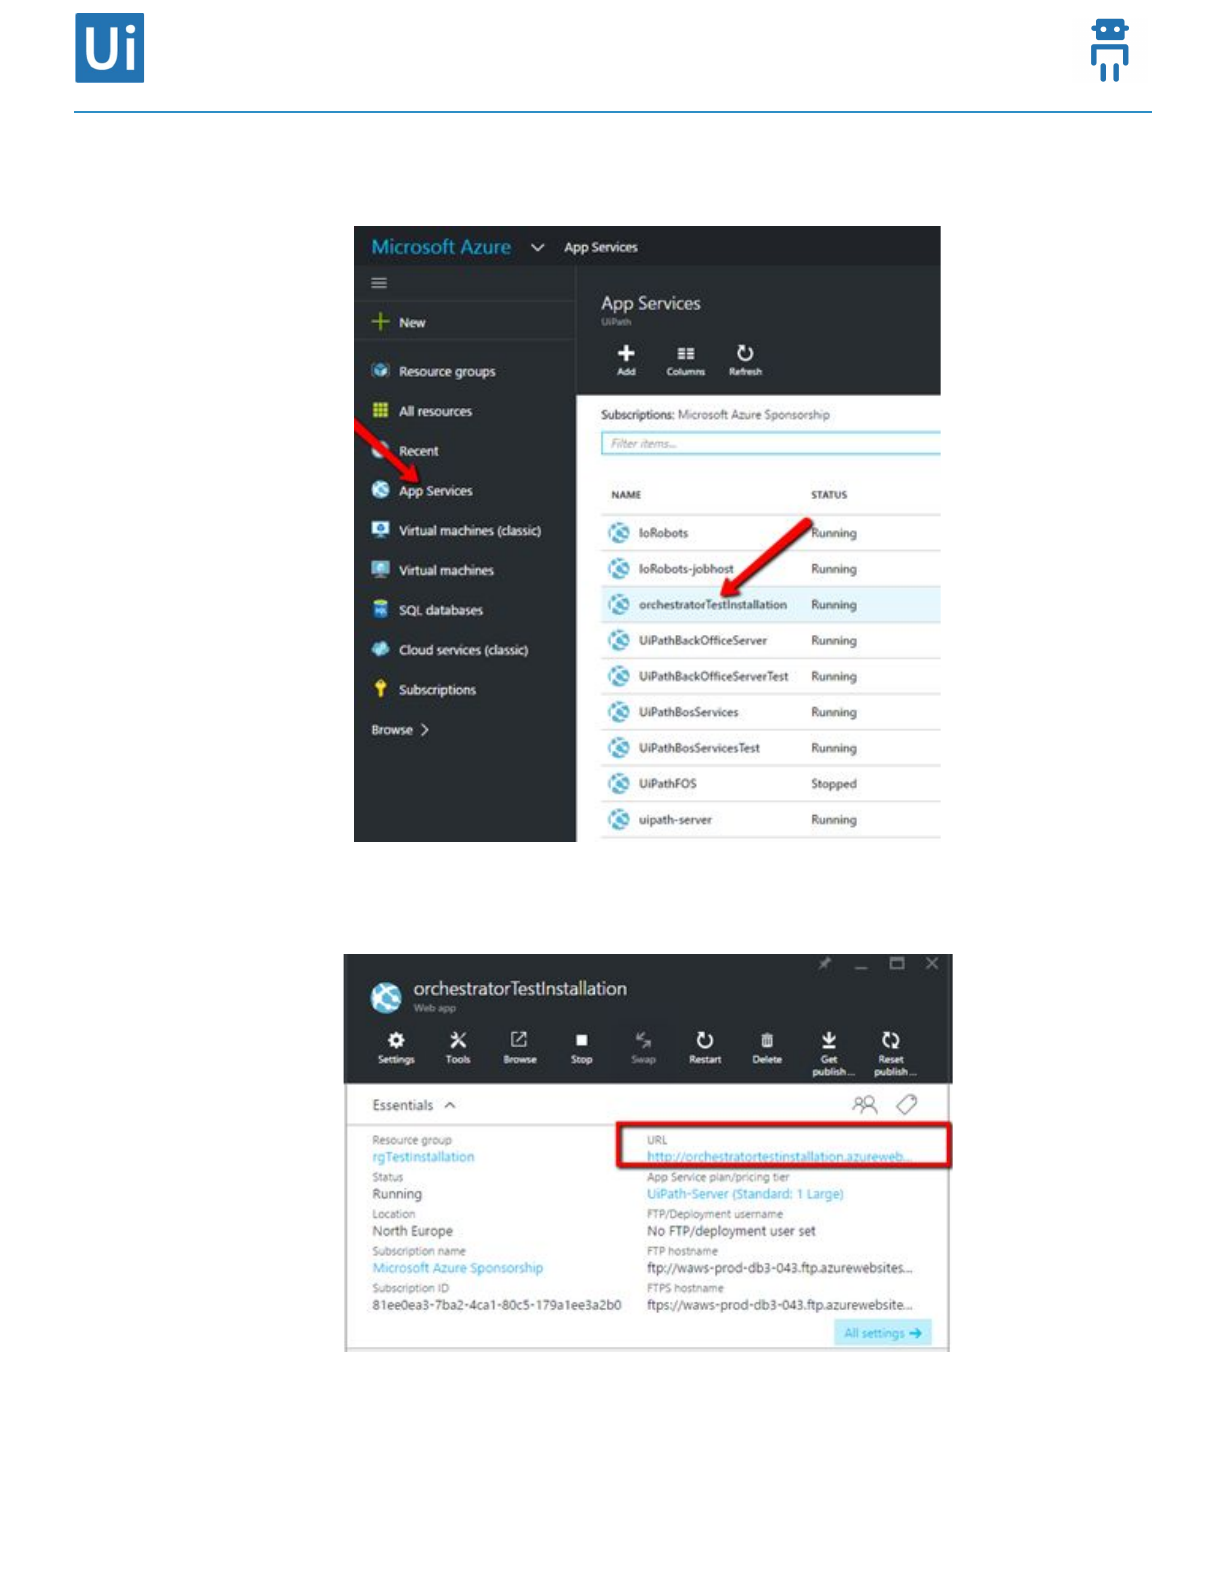
●Get the URL of the current webapp. This URL will be the baseUrl that we will use in the following
steps
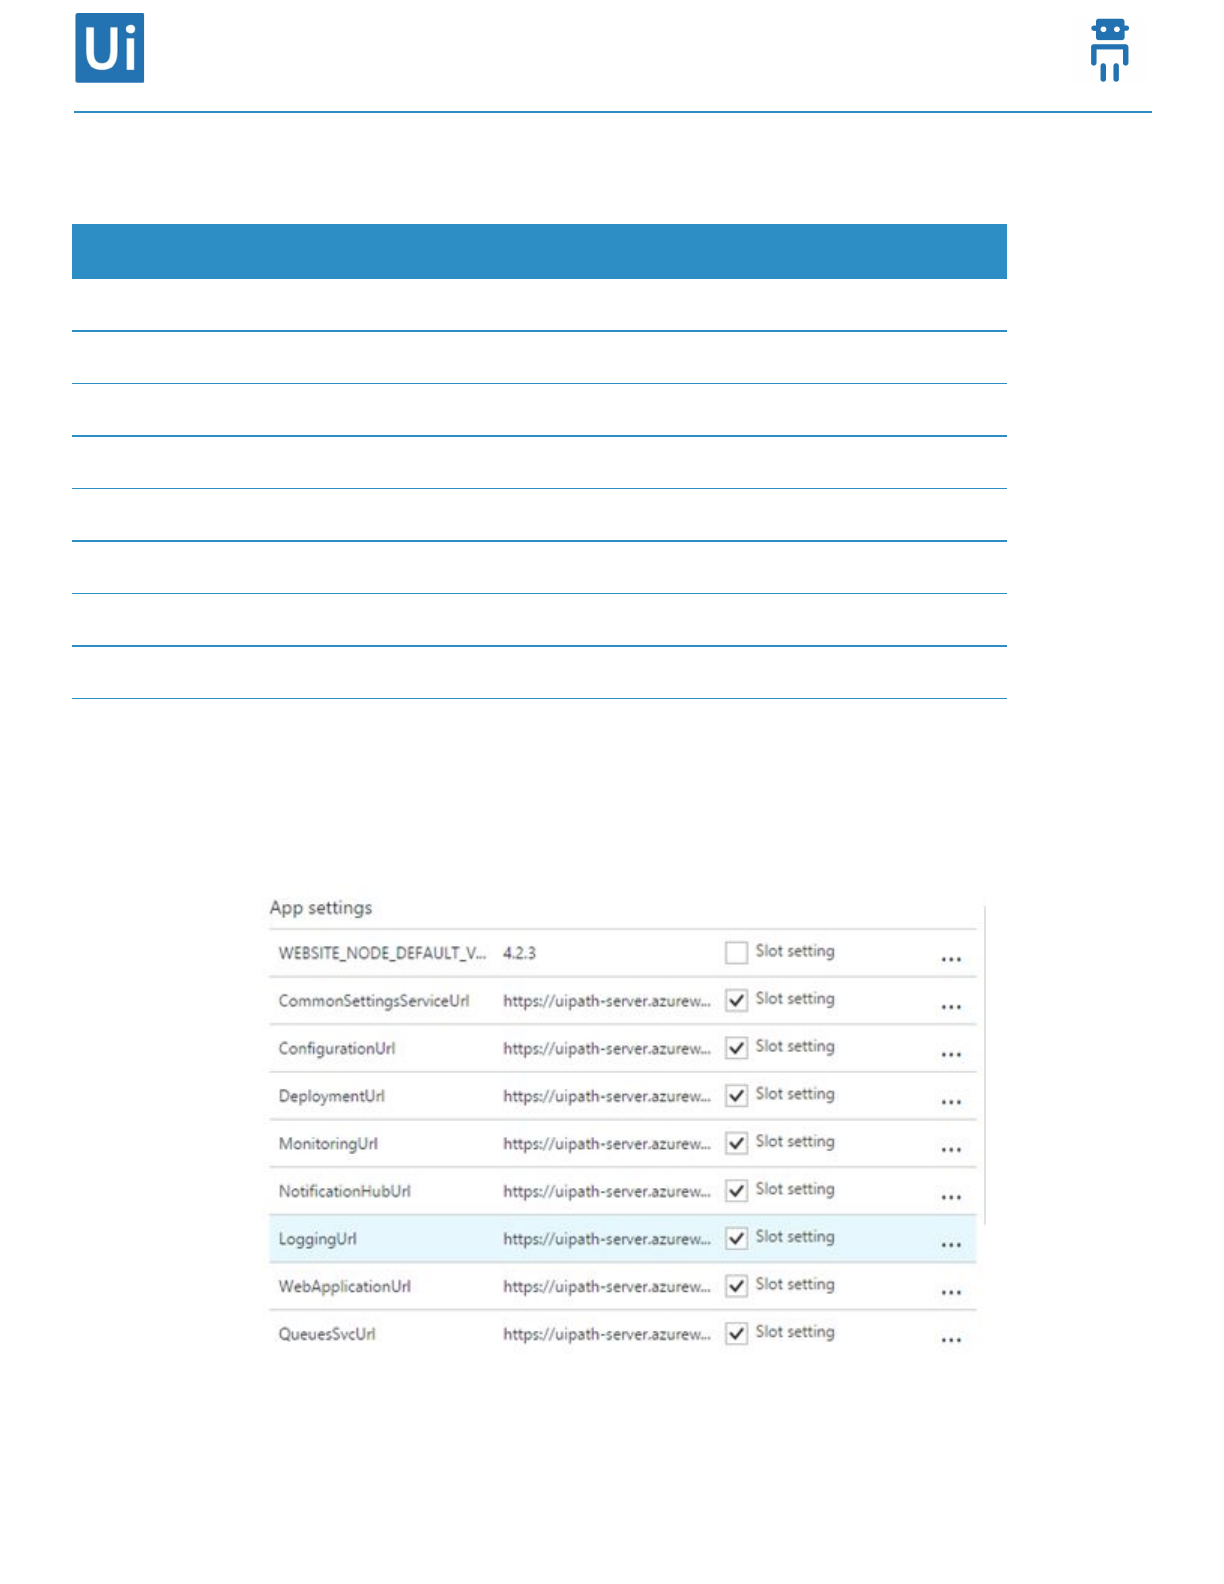
●Select Settings tab, then Application Settings.
●Under “App strings” insert values from the below table in the corresponding fields
UiPath Orchestrator Azure Installation Guide 8
Key
Value
CommonSettingsServiceUrl
baseURL/configurationSvc/
ConfigurationUrl
baseURL/configurationSvc/
DeploymentUrl
baseURL/deploymentSvc/
MonitoringUrl
baseURL/monitoringSvc/
NotificationHubUrl
baseURL/monitoringSvc/signalr/hubs
LoggingUrl
baseURL/loggingSvc/
WebApplicationUrl
baseUrl
QueuesSvcUrl
baseURL/queuesSvc/
EncryptionKey
3wkO1hkaXLwR9LZoRZIueIxG3GIEB/YMDZUWhD9AR8g
=
App setting view should look as in the below screenshot after adding the values:
●Press the Save button.
UiPath Orchestrator Azure Installation Guide 9
1.1. On Local Machine
1. Install MSDeploy
Use MSDeploy to push all the packages to the webapps. MSDeploy could be downloaded from:
http://www.iis.net/downloads/microsoft/web-deploy.
Check that MSDeploy is installed by opening the command prompt and running the following commands:
●cd "C:\Program Files (x86)\IIS\Microsoft Web Deploy V3"
●msdeploy /?
The help for msdeploy should be displayed when executing “msdeploy /?”
1. Get Publish profile from Azure
●Open A zure Dashboard
●From the left menu select App Services, then select the previous created WebApp
●Press Get publish profile button and save.PublishSettings file
UiPath Orchestrator Azure Installation Guide 10
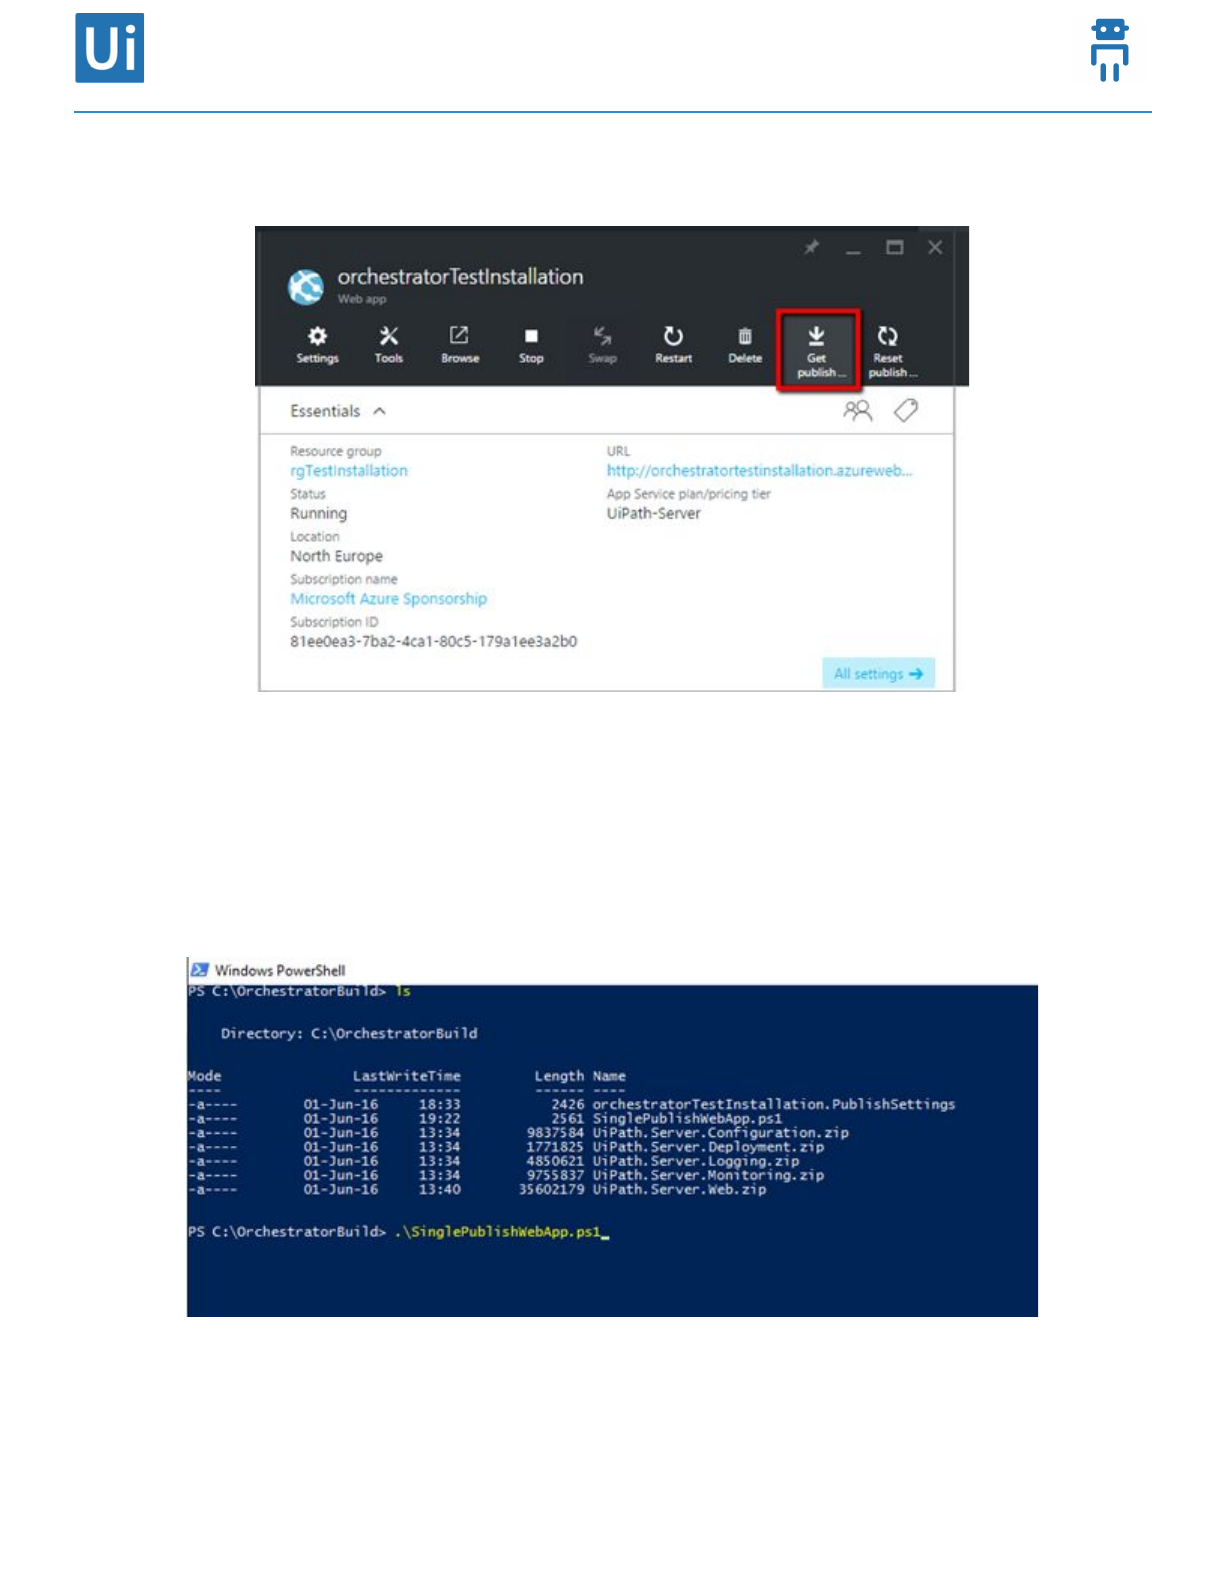
2. Download PowerShell Script.
Use the provided PowerShell Script to publish the packages to Azure App
3. Copy the Script and the .PublishSettings file to the same folder with the installation packages.
4. Open PowerShell console, navigate to the folder that contains orchestrator assets, and execute
SinglePublishWebApp.ps1.
5. Open Azure Dashboard and select the WebApp, then press restart.
UiPath Orchestrator Azure Installation Guide 11
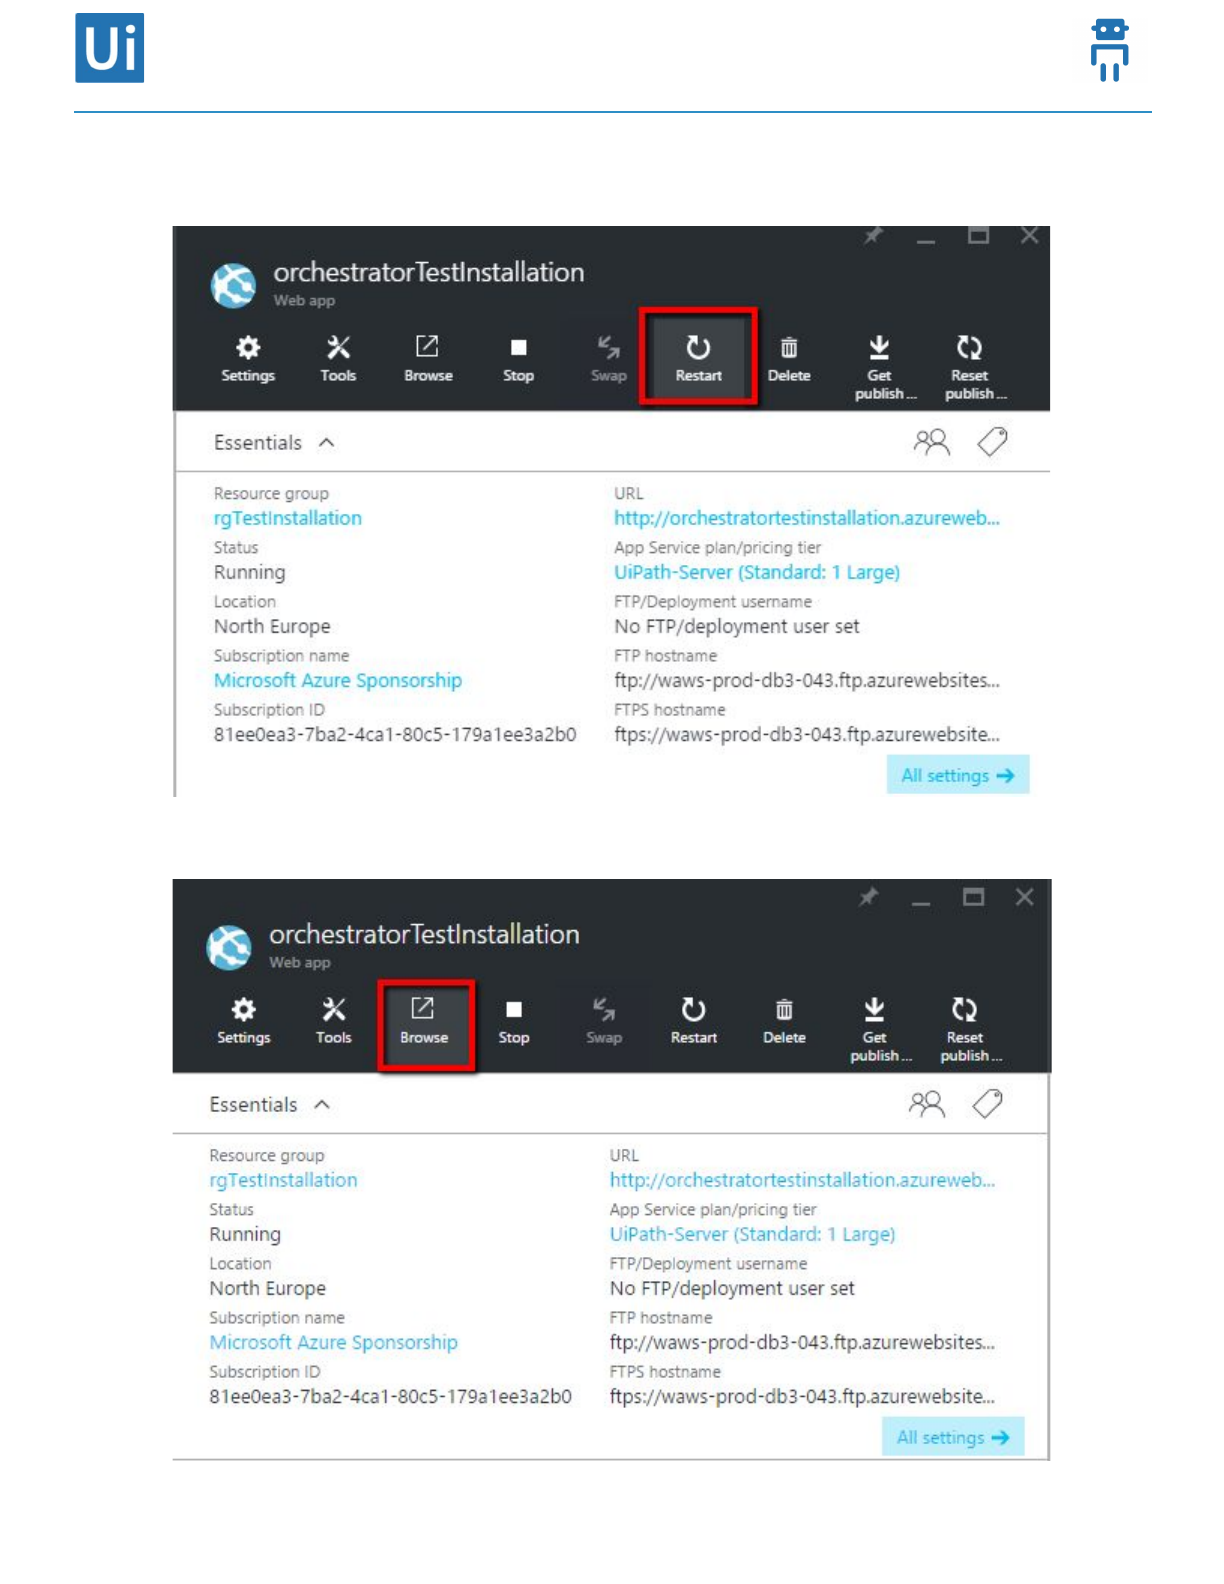
6. After webApp restart, press Browse to open Orchestrator
UiPath Orchestrator Azure Installation Guide 12
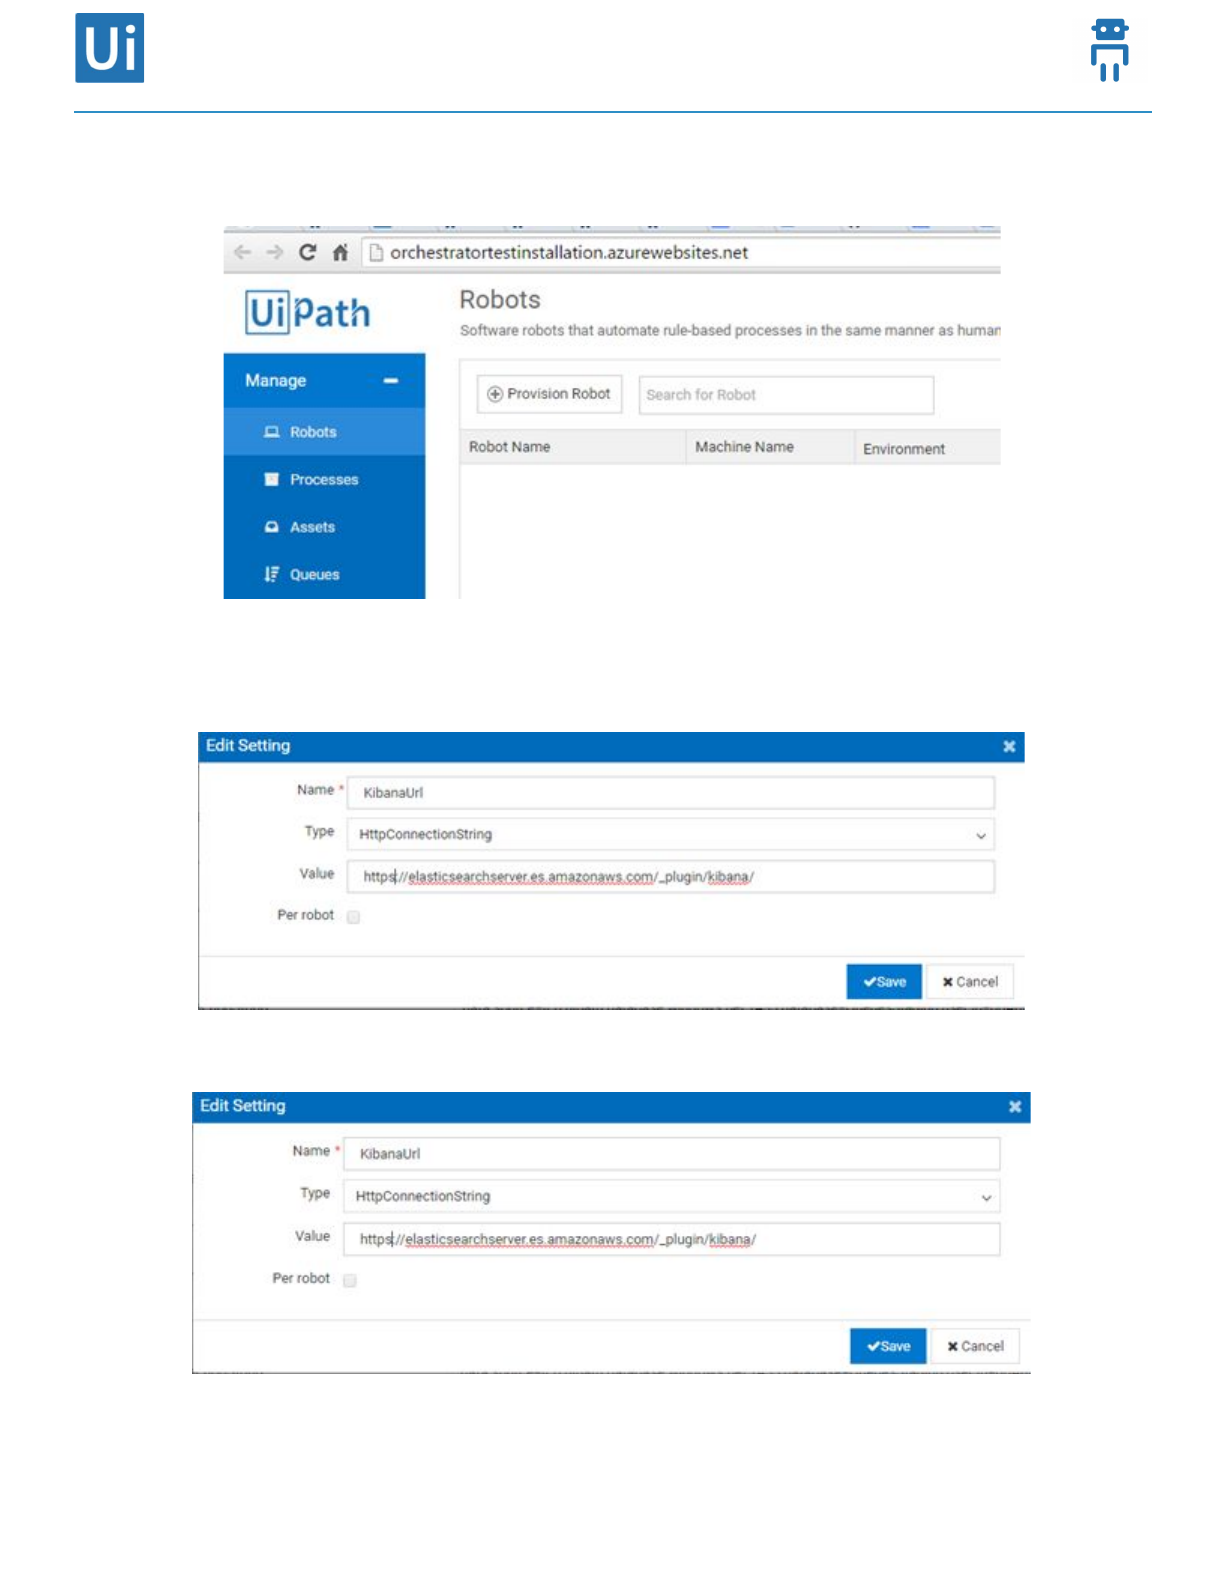
7. Open Settings page.
8. Edit ElasticSearchUrl and add the URL and port of the Elastic Search service/server
9. Edit KibanaUrl and add the URL for the Kibana service/server
10. Press Reload services configuration button and wait for the action to finish.
UiPath Orchestrator Azure Installation Guide 13

2. ElasticSearch and Kibana Installation on a
Server in Azure
2.1. Prerequisites
●Windows Server Operating System, version 2012 or 2014
●Java runtime installed. In order to download Java from the Oracle Technology Network website, you
need to go to the Oracle download page, select any product, then Accept Licence Agreement. After
that, you can use in another browser tab the exact URL that we provide later on for Java 8.6. For
example, go to this URL just to accept the license terms. Don’t download anything from here:
http://www.oracle.com/technetwork/java/javase/downloads/jdk8-downloads-2133151.html.
Download link: after you accepted the license agreement, you can click this link:
http://download.oracle.com/otn-pub/java/jdk/8u60-b27/jdk-8u60-windows-x64.exe.
●JAVA_HOME variable set
ElasticSearch
●Elasticsearch version 2.3.2
●Elasticsearch package:
https://download.elastic.co/elasticsearch/release/org/elasticsearch/distribution/zip/elasticsearch/
2.3.2/elasticsearch-2.3.2.zip
Kibana
●Kibana version 4.5.0
●Kibana plugin download page: https://download.elastic.co/kibana/kibana/kibana-4.5.0-windows.zip
2.2. Configuring Windows Firewall
●To access ElasticSearch & Kibana from other machines then you need to open the 9200
(ElasticSearch) and 5601 (Kibana) ports.
2.3. Setting Up JAVA_HOME
JAVA_HOME variable set. If the variable is not set please follow the next steps:
UiPath Orchestrator Azure Installation Guide 14
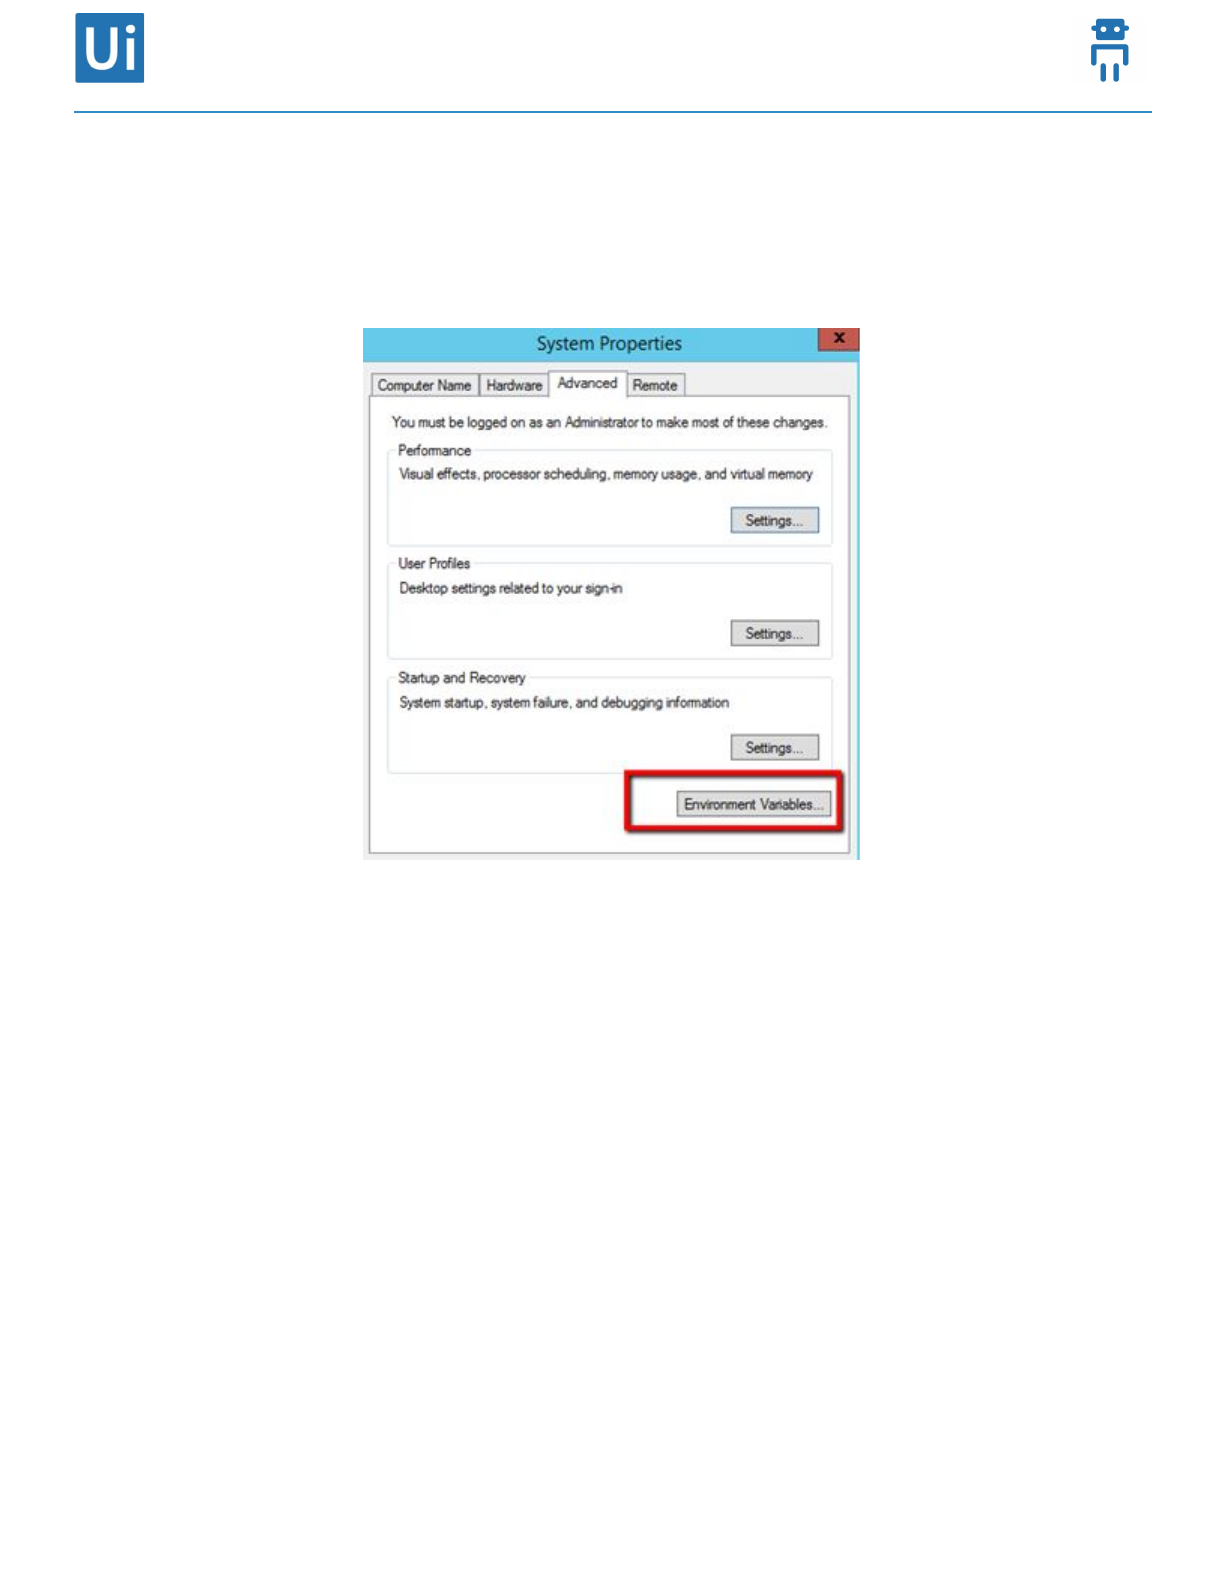
1. Edit environment variables -> select “Edit the system environment variables”.
2. Click on Advanced tab > Environment Variables.
3. Click New in the second half, under “System variables”.
UiPath Orchestrator Azure Installation Guide 15
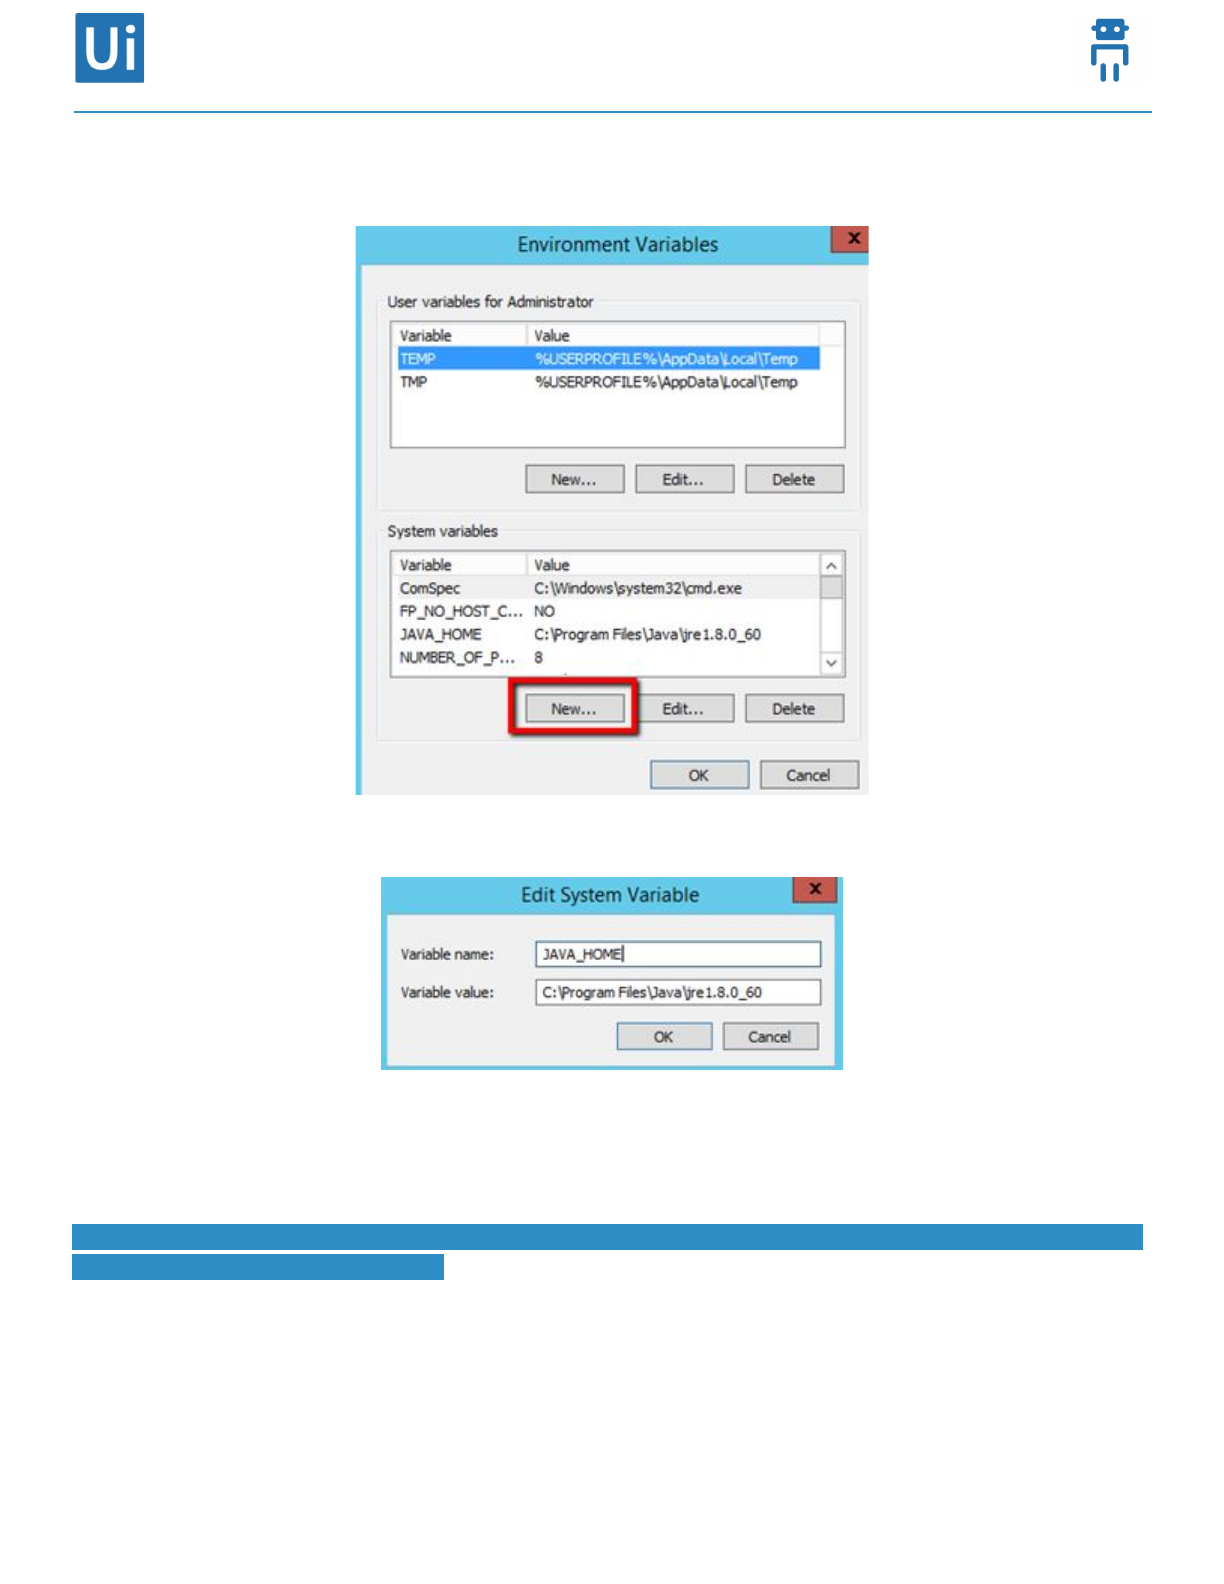
4. Set the variable and click OK.
2.4. Installing ElasticSearch
1. Unzip the elasticsearch package.
Note: When unzipping, do not create a new folder “elasticsearch-x.y.z” because the archive already contains
the folder called “elasticsearch-x.y.z”.
2. Start bin/elasticsearch.bat - it will open a cmd window.
3. In the bin folder open a cmd and run: “service.bat install” (install elasticsearch as service).
4. In the bin folder open a cmd and run: “service.bat start”.
UiPath Orchestrator Azure Installation Guide 16
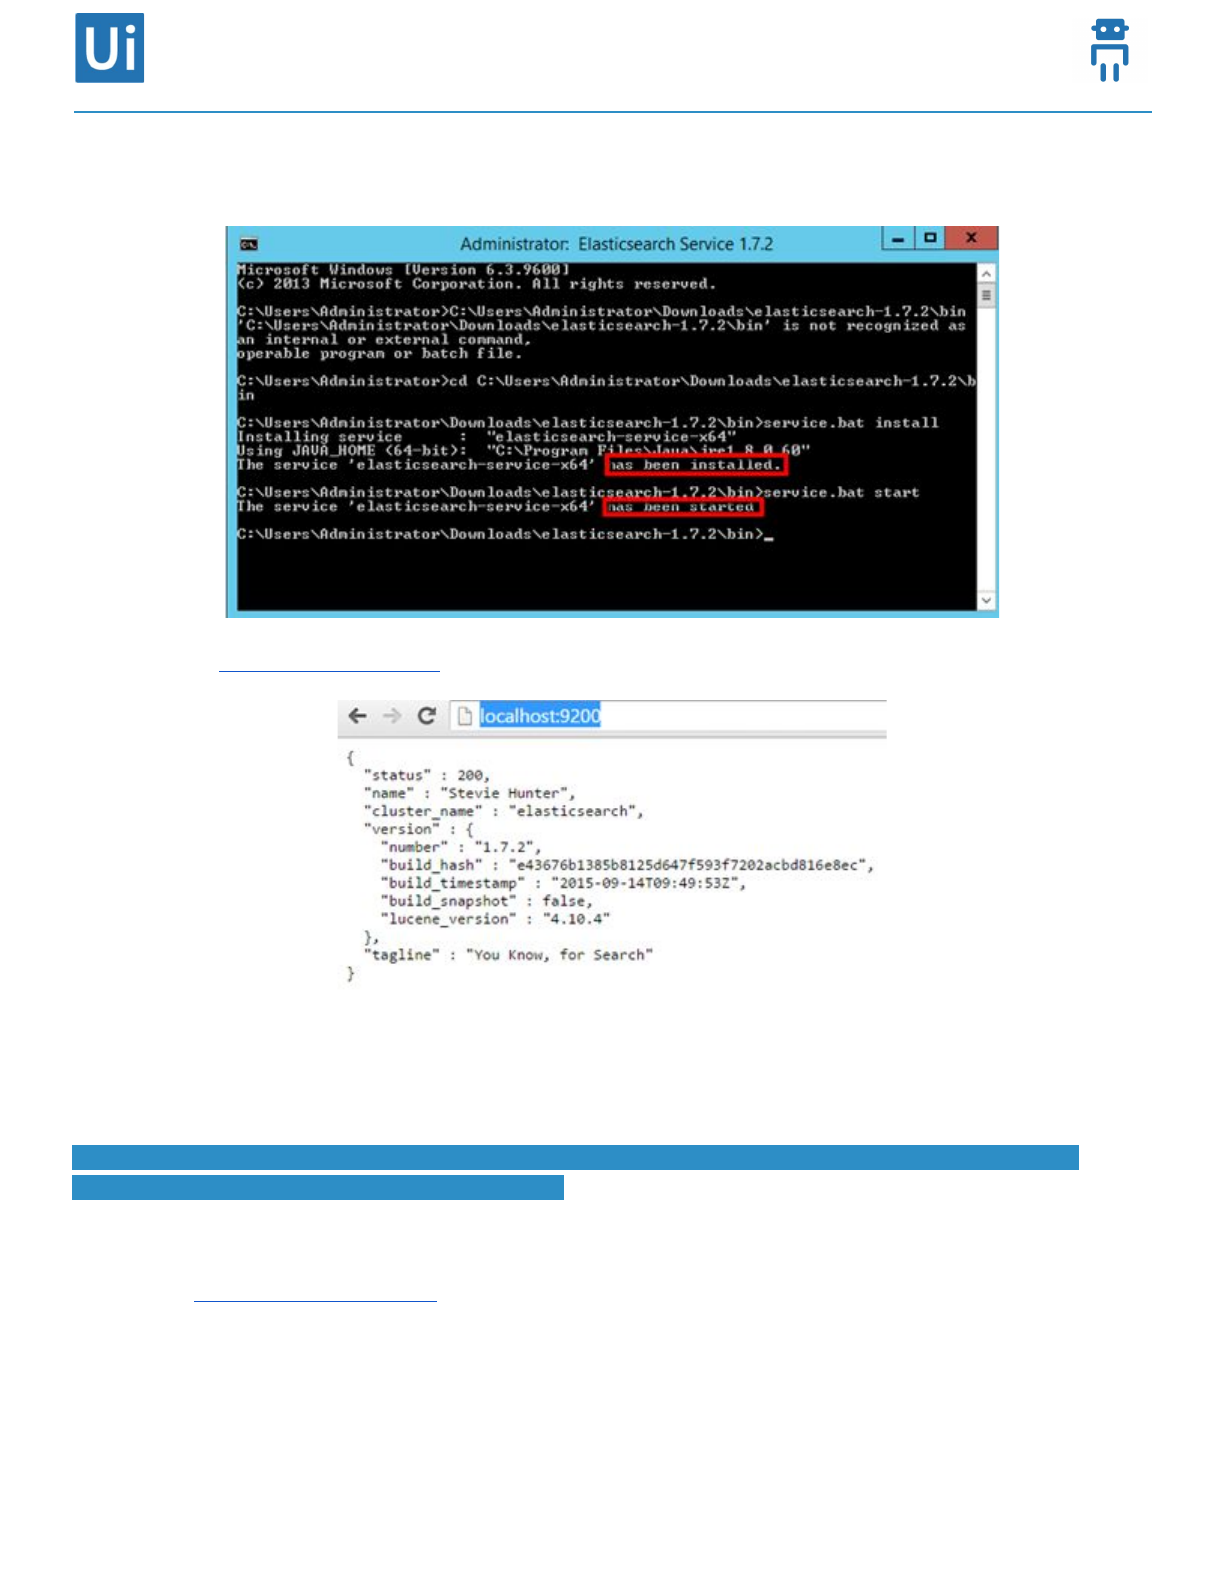
For test, open: http://localhost:9200/.
2.5. Installing Kibana
1. Unzip “kibana-x.y.z-windows.zip” archive.
Note: When unzipping, do not create a new folder “kibana-x.y.z-windows” because the archive already
contains the folder called “kibana-x.y.z-windows”.
2. Start KIBANA: C:\kibana-4.1.2-windows\bin; kibana.bat.
3. Test: http://servername:5601.
2.6. Setting Kibana as Windows Service
1. Open a command prompt as administrator
UiPath Orchestrator Azure Installation Guide 17

2. sc create "ElasticSearch Kibana 4.0.1" binPath= "C:\kibana-4.1.2-windows\bin\kibana.bat" depend=
"elasticsearch-service-x64" start= auto
Note: Be careful that each parameter has the “=” sign collated at the end without a space, then there is a
space before the value of the parameter.
Do not expect to see the Kibana service running. Because the underlined executable of the service is a BAT
file, it will not appear as Running.
However, the BAT file will start a program called “node.exe”. If that process is running, the Kibana service
and web site is working. Test with this URL: http://servername:5601.
3. ElasticSearch and Kibana Installation on AWS
Using Amazon Service
3.1. Creating Amazon ES Domains (Console)
1. Go to https://aws.amazon.com, and then choose Sign In to the Console.
2. Under Analytics, choose Elasticsearch Service.
3. Choose Create a new domain.
4. Alternatively, choose Get Started if this is the first Amazon ES domain that you will create for your
AWS account.
5. On the Name domain page, for Amazon ES domain name, type a name for your new domain, and then
choose Next.
6. For Instance count, choose the number of instances that you want.
7. You can choose up to twenty instances for each Amazon ES domain. We recommend that you
choose more than two instances to avoid potential Amazon ES issues, such as the split brain issue.
We also recommend that you have a replica for each index to avoid potential data loss. For more
information about replicas, see Shards and Replicas in the Elasticsearch documentation.
Note: You can use a T2 instance type only if the instance count for the cluster is 10 or fewer.
8. For Instance type, choose an instance type for the data nodes.
9. For a list of supported Amazon ES instance types, see the table that describes the
--elasticsearch-cluster-configure option for the AWS CLI.
UiPath Orchestrator Azure Installation Guide 18

Note: The sa-east-1 region does not support r3 and i2 instance types. The ap-northeast-2 region supports
m4 instance types instead of m3 instance types.
10. If you need to ensure cluster stability or if you have a domain that has more than 10 instances,
enable a dedicated master node. Dedicated master nodes increase cluster stability and are required
for a domain that has an instance count greater than 10. For more information, see Using Dedicated
Master Nodes.
●Select the Enable dedicated master check box.
●For Dedicated master instance type, choose an instance type for the dedicated master node.
Note: You can choose an instance type for the dedicated master node that differs from the instance type
that you choose for the data nodes. You can use a T2 instance type only if the instance count is 10 or fewer.
●For Dedicated master instance count, choose the number of instances for the dedicated
master node.
●We recommend choosing an odd number of instances to avoid potential Amazon ES issues,
such as the split brain issue. The default and recommended number is three.
11. (Optional) To provide high availability for cluster nodes, select the Enable zone awareness check box.
Zone awareness distributes Amazon ES cluster nodes across two Availability Zones in the same
region. If you enable zone awareness, you must have an even number of instances in the instance
count, and you also must use the Amazon ES API to replicate your data for your Amazon ES cluster.
This allows for the even distribution of shards across two Availability Zones. For more information,
see Using Zone Awareness for High Availability.
12. For Storage type, choose either Instance (the default) or EBS.
Use an EBS volume for storage rather than the storage attached to the selected instance type if your
Amazon ES domain requires more storage. Domains with very large indices or large numbers of
indices often benefit from the increased storage capacity of EBS volumes. If you choose EBS, the
following fields appear.
●For EBS volume type, choose an EBS volume type.
If you choose Provisioned IOPS (SSD) for the EBS volume type, for Provisioned IOPS, type the
baseline IOPS performance that you want.
●For EBS volume size, type the size of the EBS volume that you want to attach to each data
node.
Calculate the total amount of EBS-based storage for the Amazon ES domain using the following
formula: (number of data nodes) * (EBS volume size). For more information about supported EBS
volume types and sizes, see Configuring EBS-based Storage. The minimum and maximum size of an
UiPath Orchestrator Azure Installation Guide 19

EBS volume depends on both the specified EBS volume type and the instance type to which it is
attached. For specific limits, see the EBS Resource table in this guide.
13. For Automated snapshot start hour, choose the hour for automated daily snapshots of domain
indices. By default, the service takes an automated snapshot within an hour of midnight.
14. (Optional) Choose Advanced options.
●(Optional) If you want to configure access to domain sub-resources,
forrest.action.multi.allow_explicit_index, choose false.
Disabling this property prevents users from bypassing access control for sub-resources. For
more information about access control, see URL-based Access Control in the Elasticsearch
documentation. For more information about access policies for sub-resources, see
Configuring Access Policies.
●(Optional) For indices.fielddata.cache.size, specify the percentage of heap space to allocate
to the field data cache.
By default, this setting is unbounded. For more information about the field data cache, see
Field Data in the Elasticsearch documentation.
Tip: Many customers query rotating daily indices. We recommend that you begin benchmark testing
with indices.fielddata.cache.size configured to 40% of the JVM heap for most of these use cases.
However, if you have very large indices, you might need a larger field data cache.
15. Choose Next.
16. On the Set up access policy page, select a pre-configured policy from the Select a template
dropdown list and edit it to meet the needs of your domain. Alternatively, you can add one or more
Identity and Access Management (IAM) policy statements in the Edit the access policy box.
Amazon Elasticsearch Service offers several ways to configure access to your Amazon ES domains.
The console provides preconfigured access policies that you can customize to the specific needs of
your domain, as well as the ability to import access policies from other Amazon ES domains. The
service also allows you to specify separate, fine-grained access policies to each domain
sub-resource. For example, you can assign a different policy to each index in your Amazon ES
domain. For more information, see Configuring Access Policies.
17. Choose Next.
18. On the Review page, review your domain configuration, and then choose Confirm and create.
19. Choose OK.
UiPath Orchestrator Azure Installation Guide 20

Note: New domains take up to ten minutes to initialize. After your domain is initialized, you can upload data
and make changes to the domain.
3.2. Configuring Amazon ES Domains (Console)
1. Go to https://aws.amazon.com, and then choose Sign In to the Console.
2. Under Analytics, choose Elasticsearch Service.
3. In the navigation pane, under My domains, choose the domain that you want to update.
4. Choose Configure cluster.
5. On the Configure cluster page, update the configuration of the domain.
The cluster is a collection of one or more data nodes, optional dedicated master nodes, and storage
required to run Amazon ES and operate your domain.
●If you want to change the instance type for data nodes, for Instance type, choose a new
instance type.
Note: The sa-east-1 region does not support r3 and i2 instance types. The ap-northeast-2 region supports
m4 instance types instead of m3 instance types.
●If you want to change the instance count, for Instance count, choose an integer from one to
twenty.
●If you want to improve cluster stability or if your domain has an instance count greater than
10, enable a dedicated master node for your Amazon ES cluster.
For more information, see Using Dedicated Master Nodes.
i. Select the Enable dedicated master check box.
ii. For Dedicated master instance type, choose an instance type for the dedicated master
node.
iii. You can choose an instance type for the dedicated master node that differs from the
instance type that you choose for the data nodes.
iv. For Dedicated master instance count, choose the number of instances for the
dedicated master node.
v. We recommend choosing an odd number of instances to avoid potential Amazon ES
issues, such as the split brain issue. The default and recommended number is three.
UiPath Orchestrator Azure Installation Guide 21

● If you want to enable zone awareness, select the Enable zone awareness check box. If you
enable zone awareness, you must have an even number of instances in your instance count.
This allows for the even distribution of shards across two Availability Zones.
● If you want to change the hour during which the service takes automated daily snapshots of
the primary index shards of your Amazon ES domain, for Automated snapshot start hour,
choose an integer.
●Choose Advanced options.
i. (Optional) If you want to configure access to domain sub-resources,
forrest.action.multi.allow_explicit_index, choose false.
ii. Disabling this property prevents users from bypassing access control for
sub-resources. For more information about access control, see URL-based Access
Control in the Elasticsearch documentation. For more information about access
policies for sub-resources, see Configuring EBS-based Storage.
iii. For rest.action.multi.allow_explicit_index, choose false.
iv. (Optional) For indices.fielddata.cache.size, specify the percentage of heap space to
allocate to the field data cache.
v. By default, this setting is unbounded. For more information about the field data cache,
see Field Data in the Elasticsearch documentation.
Tip: Many customers query rotating daily indices. We recommend that you begin benchmark testing with
indices.fielddata.cache.size configured to 40% of the JVM heap for most of these cases. However, if you
have very large indices you might need a larger field data cache.
●Choose Submit.
UiPath Orchestrator Azure Installation Guide 22
