Installation Guide Chromeleon 7.2.6 User Manual
2017-10-25
User Manual: Pdf Installation Guide - Chromeleon 7.2.6 Installation Guide - Chromeleon 7.2.6 Chromeleon 7.2.6 ation ation Chromeleon Software freshwebmaterial :
Open the PDF directly: View PDF ![]() .
.
Page Count: 100
- Table of Contents
- 1 About the Documentation
- 2 System Requirements/Compatibility
- 3 Configure Windows for Chromeleon 7
- 4 Compatibility with Previous Chromeleon and PeakNet Versions
- 5 Install the Software
- 6 Post Installation Configuration
- 7 Install Thermo Scientific Instruments
- 8 Command-Line Installation/Setup
- 9 Configure Chromeleon 7
- 10 Remove Chromeleon 7 from a PC

Installation Guide
Chromeleon 7
Chromatography Data System
Software Version 7.2.6 • August 2017

Chromeleon 7
Installation Guide Page 3
Copyright
For Research Use Only. Not for use in diagnostic procedures.
Copyright © 2009-2017 Thermo Fisher Scientific Inc. All rights reserved.
Trademarks
Windows, Windows Vista, SQL Server, Visual C++, and Microsoft are registered
trademarks of Microsoft Corporation. Oracle is a registered trademark of Oracle
Corporation. Agilent is a registered trademark of Agilent Technologies. Acquity,
Acquity UPLC, and Waters are registered trademarks of Waters Corporation. NIST
is a registered trademark of the National Institute of Standards and Technology.
Intel and Core are registered trademarks of Intel Corporation. Adobe Reader is a
registered trademark of Adobe Systems Incorporated.
All other trademarks are property of Thermo Fisher Scientific Inc. and its
subsidiaries.
Thermo Fisher Scientific Inc. provides this document to its customers with a
product purchase to use in the product operation. The document is copyright
protected; any reproduction of the whole or any part of this document is strictly
prohibited, except with the written authorization of Thermo Fisher Scientific Inc.
This manual is provided “as is”. The contents of this manual are subject to being
changed, without notice, in future revisions.
Thermo Fisher Scientific Inc. makes no representations that this document is
complete, accurate, or error-free. Thermo Fisher Scientific Inc. assumes no
responsibility and will not be liable for any errors, omissions, damage, or loss that
might result from any use of this document, even if the information in the
document is followed properly.
This document is not part of any sales contract between Thermo Fisher Scientific
Inc. and a purchaser. This document shall in no way govern or modify any Terms
and Conditions of Sale. The Terms and Conditions of Sale shall govern all
conflicting information between the two documents.
Document History
Revision: 2.0, P/N 7229.0003, original document

Chromeleon 7
Page 4 Installation Guide
Table of Contents
1 About the Documentation....................................................... 8
1.1 About this Document .................................................... 8
1.2 Document Conventions ................................................. 9
1.3 Other Documents .......................................................... 9
2 System Requirements/Compatibility .................................... 10
2.1 Licensing Requirements/Compatibility ....................... 10
2.1.1 The License Key (Dongle) ................................. 10
2.1.2 The License File ................................................ 11
2.1.3 License Key (Dongle) Compatibility .................. 12
2.1.4 License File Compatibility ................................. 12
2.2 Supported Chromatography Instruments & Modules 13
2.3 PC Hardware Requirements ........................................ 13
2.4 Supported Operating Systems..................................... 15
2.4.1 Microsoft Windows 10 Enterprise ................... 15
2.4.2 Microsoft Windows 8.1 Pro ............................. 15
2.4.3 Microsoft Windows 7 ....................................... 16
2.4.4 Windows Monthly Rollups and Security-only
Updates ............................................................ 17
2.5 Installed Third-Party Software .................................... 18
2.5.1 Microsoft .NET Framework .............................. 18
2.5.2 Microsoft SQL Server Express .......................... 19
2.5.3 WibuKey Software ........................................... 20
2.6 Required Third-Party Software .................................... 21
2.6.1 Adobe Reader .................................................. 21
2.7 Additional Software ..................................................... 21
2.7.1 NIST Mass Spectral Search Program ................ 21
3 Configure Windows for Chromeleon 7 .................................. 22
3.1 Ensure that Windows Is Up To Date ............................ 22
3.1.1 Non-Internet Connected Computers ............... 22
3.2 Firewall Settings .......................................................... 23
3.3 Disable Power Management ....................................... 25
3.3.1 Disable Windows Power Management ............ 25

Chromeleon 7
Installation Guide Page 5
3.3.2 Disable USB Power Management .................... 25
3.4 Third-Party Software Interference .............................. 27
4 Compatibility with Previous Chromeleon and PeakNet
Versions ................................................................................. 28
4.1 Software Compatibility – Chromeleon 7 and 6 ........... 28
4.2 Software Compatibility – Chromeleon 7.2 and 7.1 ..... 28
4.3 Data Compatibility – Chromeleon 7 and 6 .................. 29
4.4 Data Compatibility – Chromeleon 7.2 and 7.1 ............ 30
4.5 Chromeleon 7.2 SR5 and 7.2 ....................................... 30
4.5.1 SDK and DDK Add-Ins ....................................... 30
5 Install the Software ............................................................... 31
5.1 Do you have Chromeleon 6? ....................................... 31
5.2 Chromeleon Activity Check ......................................... 31
5.3 Install Chromeleon 7 – Main and Service Release ...... 33
5.3.1 Installation Requirements ................................ 33
5.3.2 Upgrade Chromeleon 7 .................................... 34
5.3.3 Install Chromeleon ........................................... 34
5.4 Install Chromeleon 7 – Maintenance Update ............. 43
5.5 Install Optional Software Components ....................... 43
5.5.1 Software Packages Included in the Chromeleon
Setup ................................................................ 43
5.5.2 Software Packages requiring Separate
Installation ....................................................... 47
5.6 Installation Qualification ............................................. 48
5.7 Activate/Update a License .......................................... 50
5.7.1 Use a New Chromeleon 7.2 Dongle that Contains
a License File .................................................... 50
5.7.2 Use an Empty Dongle and a Separate License File
......................................................................... 52
5.8 Troubleshoot Software Installation ............................. 53
5.8.1 Installation on a PC with Identical Computer
Name and User Name ...................................... 55
5.8.2 Repair an Installation ....................................... 55

Chromeleon 7
Page 6 Installation Guide
6 Post Installation Configuration .............................................. 57
7 Install Thermo Scientific Instruments .................................... 58
7.1 Connect Modules via USB ........................................... 58
7.2 Load the USB Driver for a Module ............................... 59
7.3 Troubleshoot USB Issues ............................................. 60
8 Command-Line Installation/Setup ......................................... 62
8.1 Introduction to the Setup Process .............................. 62
8.2 Command Line Switches and Properties ..................... 63
8.2.1 Restrictions: Unattended Installation of the
Chromeleon USB Driver Package ..................... 63
8.2.2 Properties ......................................................... 64
8.2.3 Command-Line Switches .................................. 65
8.2.4 System Configuration Tasks/Parameters ......... 67
8.3 Response File ............................................................... 72
8.3.1 Components Section ........................................ 73
8.3.2 ConfigurationTasks Section .............................. 73
8.3.3 Response File Example ..................................... 74
8.4 Exit Codes .................................................................... 75
9 Configure Chromeleon 7 ....................................................... 76
9.1 Starting Points for Configuring Chromeleon 7 ............ 76
9.1.1 Chromeleon Services Manager ........................ 76
9.1.2 Chromeleon Tray Icon ...................................... 78
9.1.3 Chromeleon Administration Console ............... 79
9.2 Configure Instruments/Modules ................................. 80
9.3 Enable Automatic Start of the Instrument Controller
Service ......................................................................... 83
9.4 Configure Data Vaults ................................................. 84
9.4.1 Default Data Vault, XVault and Default Location
......................................................................... 84
9.4.2 The Data Vault Manager .................................. 85
9.4.3 Create a Standard Data Vault ........................... 87
9.4.4 Mount Chromeleon 6 Datasources .................. 89

Chromeleon 7
Installation Guide Page 7
9.5 Enable and Configure User Management ................... 91
10 Remove Chromeleon 7 from a PC ......................................... 94
10.1 Uninstall Chromeleon 7 ............................................... 94
10.2 Uninstall Thermo Scientific MS Software Components
95
10.3 Uninstall Third-Party Software .................................... 96
10.4 Remove Chromeleon 7 Data ....................................... 97

Chromeleon 7
Page 8 Installation Guide
1 About the Documentation
1.1 About this Document
Welcome to the Thermo Scientific™ Dionex™ Chromeleon™ 7
Chromatography Data System. This guide provides instructions
for performing the following operations on stand-alone
Chromeleon workstations:
• Installing/updating Chromeleon 7 main and service releases
(Chapter 5.3) or maintenance updates (Chapter 5.4), as well
as required third-party software components
• Basic configuration of Chromeleon 7 including basic
instructions for installing instruments
• Configuring Microsoft™ Windows™ for use with
Chromeleon 7.2.6
It also describes:
• Hardware and software requirements for installing
Chromeleon 7
• Software and data compatibility with previous Chromeleon
versions
To install multiple workstations that will be networked together,
or to add a station to an existing domain installation, please
contact the Thermo Fisher Scientific Service for support.

Chromeleon 7
Installation Guide Page 9
1.2 Document Conventions
The following formatting is used throughout the document to
indicate text with special importance.
Caution: Indicates text that must be followed carefully to
avoid potential problems.
Note: Indicates information of special interest.
Tip: Indicates information that will help you to use the
software more efficiently.
1.3 Other Documents
Other documents provided with Chromeleon will help you to
learn more about the Chromeleon software. Their scope is
described in the Documentation Overview, which is included with
the Chromeleon installation medium in printed form. The
documents are also available in electronic form via the
installation medium in the Documents folder.

Chromeleon 7
Page 10 Installation Guide
2 System Requirements/Compatibility
2.1 Licensing Requirements/Compatibility
In order to use Chromeleon you must have a valid license
matching the software version you are about to install.
A Chromeleon 7 license has two components:
• A hardware component called a USB license key (dongle)
• A license file that contains the license information
To activate a valid license, these two components must have the
same serial number and must be present at the same time.
You will be asked to insert the license key and to provide a
license file during the software installation process (Section 5.3).
If you do not have them at hand, you can activate a license later
(Section 5.7).
2.1.1 The License Key (Dongle)
The license key is a USB device (dongle). Together with a
matching license file, which is normally provided on the dongle, it
allows you to use Chromeleon software on the computer where
the license key is present. The license key and license file must be
present on the same computer but the licenses may be
distributed across a Chromeleon domain.

Chromeleon 7
Installation Guide Page 11
Caution: When you insert the dongle into a USB port on a
computer where Chromeleon 7 is installed, the license file is
transferred automatically to that computer. Before inserting
the dongle, you should therefore make sure that you have
selected the correct computer. If the license file is
automatically transferred to the wrong computer, you will
have to transfer it manually to the correct computer
afterwards.
Note: If the connection to the dongle is lost while
Chromeleon is running, Chromeleon will switch to grace
period mode and a corresponding message will be displayed
until the issue is resolved or the grace period expires (usually
one week). The same message will also be displayed when
you start Chromeleon Console.
Caution: The license key represents your purchase of
Chromeleon. Protect it as you would protect any other
valuable object.
2.1.2 The License File
The license file contains the license information, such as the
software version and the purchased software options.
The name of the license file is Chromeleon7_xxxxxx.cmlic, where
xxxxxx is the serial number of the license.
Note: The license file is automatically moved to the
appropriate location during the setup/license activation.
The license file is stored in the following location:
C:\ProgramData\Dionex\Chromeleon\

Chromeleon 7
Page 12 Installation Guide
Note: The path contains folders that are hidden by default.
To see the folders, enter the path in the Windows Explorer
address bar or press the Windows logo key + H.
2.1.3 License Key (Dongle) Compatibility
Chromeleon 7 has a different licensing mechanism compared to
Chromeleon 6.8 and older releases, including all PeakNet 6
releases. It still uses a USB license key (dongle), but instead of
using a key code, Chromeleon 7 requires the installation of a
matching license file.
The most recent generation of Chromeleon 6 license keys (green
USB dongles) can be used with Chromeleon 7, when a matching
license file is available.
It is possible to upgrade any previous Chromeleon/PeakNet
license key to a new Chromeleon 7 USB license key in
conjunction with a software upgrade.
2.1.4 License File Compatibility
Chromeleon 7 license files are bound to main versions of
Chromeleon. For example, a license file that was provided with
version 7.1 will support 7.1 SR1, but will not work with version
7.2. For the latter an upgrade must be purchased. The updated
license file will be provided with the upgrade. However, it is still
possible to operate 7.1 SR1 once the license has been upgraded
to 7.2.

Chromeleon 7
Installation Guide Page 13
2.2 Supported Chromatography Instruments
& Modules
Chromeleon 7 provides full control of a wide range of Thermo
Scientific instruments. In addition, some third-party instruments
are also supported. For details, refer to the List of Supported
Instruments in the Documents folder of the installation medium.
The List of Supported Instruments also lists the firmware versions
recommended for using various instruments with Chromeleon 7.
2.3 PC Hardware Requirements
The requirements described in this document represent
recommended configurations. Configuring your infrastructure to
less demanding specifications may be sufficient for some
applications, but is unlikely to provide satisfactory performance
overall.
Note: The hardware requirements in the table below have
been updated to reflect currently available computer
hardware to be used for optimal performance of the system.
Pre-installed hardware according to previous versions of the
Installation Guide is still supported.
Chromeleon 7
Page 14 Installation Guide
Processor Recommended:
Quad Core server CPU (for
example, Intel Xeon E5 or
similar)
RAM Recommended: 32 GB or higher
Hard Disk Recommended 120 GB*
* These hard disk requirements are set to enable storage of a substantial amount
of data. The software itself requires approximately 8 GB disk space on the C drive
(twice as much during an update). In addition, a few GB disk space must always
be available on the C drive for sequences cached in the XVault
( Section 9.4.1).
Optical Drive DVD
Display Minimum:
Recommended:
1024x768 resolution,
32-bit color
1280x1024, 1440 x 900 or
more
USB Ports license device:
Thermo Scientific
modules:
1 port
1 or more additional port(s)
Refer to the Chromeleon 7 Online Help for further
information with regard to specific modules.
Caution: Check with Thermo Fisher Scientific to determine
any additional requirements for the instruments you want to
connect. For example, expansion slots for controlling third-
party instruments via RS-232 or GPIB.
Tip: Contact Thermo Fisher Scientific for details about
requirements for installing Chromeleon in a domain.

Chromeleon 7
Installation Guide Page 15
2.4 Supported Operating Systems
Chromeleon 7.2.6 has been validated for stand-alone use on the
operating systems listed in the following subchapters.
Tip: Chromeleon 7 can also be installed on a server operating
system (Windows Server versions). Contact Thermo Fisher
Scientific for details.
2.4.1 Microsoft Windows 10 Enterprise
Chromeleon 7.2.6 can be operated on the 64-bit edition of
Microsoft Windows 10 Enterprise.
Note: The option Turn on fast startup (recommended)
should be disabled in the Windows 10 shutdown settings.
This ensures that the Chromeleon Instrument Controller
Service is stopped correctly on system shutdown and
prevents potential instrument connection issues when the
computer is powered up again.
2.4.2 Microsoft Windows 8.1 Pro
Chromeleon 7.2.6 can be operated on the 64-bit edition of
Microsoft Windows 8.1 Pro. Microsoft Windows 8 is not
supported.
Note: An internet connection is required for installing
Chromeleon 7 on a Microsoft Windows 8.1 Pro operating
system.

Chromeleon 7
Page 16 Installation Guide
2.4.3 Microsoft Windows 7
Chromeleon 7.2.6 can be operated on the 64-bit edition of
Windows 7 Professional SP1.
Use of the 32-bit version is strongly discouraged. An exception is
the MSQ Plus, which can only be run on 32-bit Windows 7
operating systems.

Chromeleon 7
Installation Guide Page 17
2.4.4 Windows Monthly Rollups and Security-only
Updates
For optimum security, it is recommended that you keep your
systems up to date with the latest Windows Monthly Rollups and
Security-only updates. However, there is always a risk that an
update may affect operation of Chromeleon. For example,
database transactions could be interrupted by updating
Microsoft™ SQL Server™ Express, or instrument control could be
interrupted while related system components are being updated.
Note: Thermo Fisher Scientific does not formally validate
Windows Monthly Rollups or Security-only updates.
Installation and testing of Monthly Rollups and Security-only
updates is the responsibility of the respective installation
site. Compatibility with every Monthly Rollup or Security-
only update cannot be guaranteed.
Install Monthly Rollups and Security-only updates as soon as
practicable in order to keep the window of vulnerability as small
as possible. You should briefly test the Monthly Rollup or
Security-only update in the context of the laboratory’s
installation and operating procedures.
One possible approach to verifying software integrity is as
follows:
1. Install the Monthly Rollup or Security-only update and
Chromeleon on a test PC.
2. Run a Chromeleon installation qualification (IQ) and a
Chromeleon operational qualification (OQ) in the
Chromeleon Console via Tools > Station Qualification. More
information on station qualification is provided in the
Chromeleon 7 Online Help under Administrating
Chromeleon > Station Qualification.

Chromeleon 7
Page 18 Installation Guide
3. Perform further performance qualification tests according to
the routines in your laboratory.
2.5 Installed Third-Party Software
The sections below are provided for reference only.
If not already present, the required third-party software
components are installed automatically during the setup. The
Chromeleon Installation Qualification (IQ, Section 5.6) reports
the status of many of these components. Should you experience
problems with any of the third-party software components, see
Section 5.8 for troubleshooting hints.
2.5.1 Microsoft .NET Framework
Chromeleon 7 requires and installs Microsoft .NET Framework,
versions 3.5 SP1 and 4.6.2.
Note: If you install Chromeleon on a PC with Windows 8.1
Pro or later, an internet connection is required. If no internet
connection is available, you have to manually install .NET
3.5 SP1 from the original Windows installation medium.
If the required .NET version is not already present, the necessary
files are installed before the actual Chromeleon 7 installation
starts. After installing .NET, a reboot may be required.
The Chromeleon Installation Qualification (IQ) reports the
installed .NET version(s).

Chromeleon 7
Installation Guide Page 19
Note: A change in the algorithm of Microsoft .NET
Framework version 4.5 may lead to very small relative
differences between calibration results that were calculated
using .NET 4.5 compared to results obtained using previous
.NET Framework versions. These differences may be seen in
polynoms of the 6th and 7th order and only in very rare
occasions.
2.5.2 Microsoft SQL Server Express
Chromeleon 7 uses Microsoft SQL Server 2014 Express SP2
(including the software development kit (SDK)) as the database
engine for working with standard (local) data vaults.
If no SQL Server Express edition is present, SQL Server 2014
Express SP2 is installed automatically during the Chromeleon
setup, including the necessary server and client components and
the corresponding software development kit (SDK). This takes
place before the actual Chromeleon 7 installation starts.
If an SQL Server version other than 2014 Express SP2 is already
present, the SQL Server will not be updated automatically.
The Chromeleon installation qualification (Section 5.4) reports
the installed SQL Server version. The IQ report will contain a
warning if a different version than SQL Server 2014 Express SP2
was found.
The installation events are logged in the following location (64-
bit computer): C:\Program Files (x86)\Microsoft SQL
Server\100\Setup Bootstrap\LOG\.
To understand the details in the log files, refer to the Microsoft
article "How to: View and Read SQL Server Setup Log Files" at
http://technet.microsoft.com/en-
us/library/ms143702(v=sql.105).aspx.

Chromeleon 7
Page 20 Installation Guide
Note: With Chromeleon 7 you can only create standard data
vaults locally on the hard drive of the PC that runs
Chromeleon 7. Standard data vaults can be shared over the
domain, but the connectivity, performance, and capacity are
limited by SQL Server Express.
Tip: To create multi-user data vaults, you need multi-user
optimized databases, namely Oracle™ and the multi-user
(non-Express) edition of MS SQL Server. Contact Thermo
Fisher Scientific for details.
2.5.3 WibuKey Software
Chromeleon 7 uses the WibuKey software as part of the software
licensing infrastructure.
The necessary files are automatically installed during the
installation process.
After the Chromeleon installation is complete, the Chromeleon
IQ checks whether the WibuKey Software is properly installed. If
not, an error is issued.
If you experience problems with licensing, you may try to
reinstall the WibuKey software from the Chromeleon 7
installation medium by running \Packages\WibuKey
Runtime\WkRuntime.exe.
The installation log file for the WibuKey software setup can be
found here (64-bit computer): C:\Program Files
(x86)\WIBUKEY\Setup\.

Chromeleon 7
Installation Guide Page 21
2.6 Required Third-Party Software
2.6.1 Adobe Reader
A PDF viewer such as the Adobe Reader is required for displaying
PDF content, for instance in the ePanel.
Tip: You can download the latest Adobe Reader version here:
https://acrobat.adobe.com/us/en/products/pdf-reader.html.
2.7 Additional Software
2.7.1 NIST Mass Spectral Search Program
The NIST Mass Spectral Search Program is not included in the
Chromeleon Setup.
If required, e.g. for the MS Library search, you can manually
install a demo version of the program from the installation
medium (Tools folder).
Note: An upgrade from an earlier Chromeleon version to
Chromeleon 7.2 SR5 or later may remove the NIST Mass
Spectral Search program (if installed) from your computer.
Please reinstall the NIST Mass Spectral Search program after
the Chromeleon upgrade, if necessary.

Chromeleon 7
Page 22 Installation Guide
3 Configure Windows for Chromeleon 7
This chapter describes how to prepare Windows for correct
operation of Chromeleon 7.
Caution: If you change the name or network path of the
computer after installing Chromeleon 7, data vaults will
become inaccessible. It is therefore recommended that you
define the computer name and path before you install
Chromeleon 7. If you need to change the computer name
after the installation of Chromeleon, contact Thermo Fisher
Scientific for support.
3.1 Ensure that Windows Is Up To Date
Before installing Chromeleon 7, make sure that Windows is
updated as described in Section 2.4.4. Wait until all updates have
successfully installed before installing Chromeleon 7.
3.1.1 Non-Internet Connected Computers
An internet connection is required for automatic Windows
updates and patches.

Chromeleon 7
Installation Guide Page 23
3.2 Firewall Settings
This section describes firewall settings used by Chromeleon.
Tip: The setup will attempt to configure the built-in Windows
firewall. For this, the Windows Firewall service must be
running. If you need to turn off the Windows firewall for
some reason, use the Windows Firewall program in the
Control Panel, but leave the Windows Firewall service
running.
Chromeleon uses the Net.Tcp Port Sharing Service for
communication between Chromeleon software components. The
Chromeleon setup therefore starts this service and changes the
Startup Type to Automatic.
Most Chromeleon software components use the TCP port 1325
(which is registered with IANA for use by Thermo Fisher
Scientific, see http://www.iana.org/assignments/port-
numbers). Port 1325 is added to the Exceptions list as
Chromeleon 7 Services.
On all supported Windows operating systems the configuration
enables the following:
• Incoming local port 1325
• Outbound remote port 1325
This is relevant for both public and domain profiles (specify this
under the Advanced settings of the Windows firewall).
The following software components are also added to the
Exceptions list:

Chromeleon 7
Page 24 Installation Guide
Chromeleon components
• Chromeleon 7 Real Time Kernel (CmDriver.exe)
• Chromeleon 7 Device Driver Host (CmDDKHost.exe)
SQL Server components
• SQL Database Service (sqlservr.exe)
• SQL Browser (sqlbrowser.exe)
Other components
• Accela PDA Manager (PDAManager.exe)
When ISQ Control is specified:
• ISQ (ISQ.InstControlServer.exe)
• ISQ Dashboard (ISQ.Dashboard.exe)
• ISQ Instrument Control App
(ISQ.InstrumentControlApp.exe)
When TSQ-8000 Control is specified:
• TSQ (TSQ.InstControlServer.exe)
• TSQ Dashboard (TSQ.Dashboard.exe)
• TSQ Instrument Control App
(TSQ.InstrumentControlApp.exe)
Note: The Chromeleon setup cannot configure third-party
firewalls. These have to be configured manually.
Third-party firewalls may cause problems during the
installation process. Make sure that third-party firewalls are
turned off before you install Chromeleon.

Chromeleon 7
Installation Guide Page 25
Depending on the instruments configured, there could be
additional firewall exceptions and rules required. Full details are
available in the Chromeleon 7 Online Help.
3.3 Disable Power Management
This section describes settings that should only be made on
Chromeleon stations that are directly connected to instruments.
Note: It is not recommended to disable power management
on Chromeleon client stations to which no instrument is
connected.
3.3.1 Disable Windows Power Management
If a computer goes into Standby or Hibernate mode while the
Chromeleon 7 Instrument Controller is running, the USB
subsystem will become unavailable. As a result, USB-dependent
devices (instruments and the license key) will stop functioning
and operation is interrupted.
To disable Windows power management:
1. From the Control Panel open the Power Options.
2. Select High Performance.
3. Click Change plan settings.
4. Set every drop-down list to Never.
5. Click Save Changes.
3.3.2 Disable USB Power Management
To avoid problems during instrument control, USB specific power
saving options must be turned off as well.

Chromeleon 7
Page 26 Installation Guide
To disable USB power management:
1. From the Control Panel open Hardware and Sound.
2. Click Device Manager.
3. Expand Universal Serial Bus Controllers.
Tip: On some systems, Universal Serial Bus Controllers may
be called USB Controller.
4. Right-click the USB Root Hub or Generic USB Hub (multiple
instances of each are possible) for which you want to change
the power savings options, and click Properties.
5. On the USB Root Hub (or Generic USB Hub) Properties
dialog box, click the Power Management tab.
6. Clear the Allow the computer to turn off this device to save
power option.
7. Repeat steps 4 to 6 above for all remaining USB instances.
Note: For instruments controlled by LAN, power
management of the LAN card that controls the instrument
must be disabled. This is achieved by performing steps
similar to those described above.

Chromeleon 7
Installation Guide Page 27
3.4 Third-Party Software Interference
Certain software, such as virus scanners and support assistance
tools, can be scheduled to perform tasks when the computer is
idle or has a low-level of CPU activity. This type of software can
interfere with data collection. It is recommended that programs
that can be scheduled in this way are either switched off or set to
run manually when the computer is not collecting data.
Tip: It is useful to know if any Chromeleon queues are
running when you install, update, or uninstall any Microsoft
products or other third-party software. You can use the
Chromeleon Activity Check to find out whether Chromeleon
related systems are active. See Section 5.2 for further
information.

Chromeleon 7
Page 28 Installation Guide
4 Compatibility with Previous
Chromeleon and PeakNet Versions
4.1 Software Compatibility – Chromeleon 7
and 6
Chromeleon 7 can co-exist with Chromeleon 6 (or PeakNet™ 6)
on the same computer. Chromeleon 7 is installed in a different
folder and does not affect the Chromeleon 6 installation. You can
use the Chromeleon 6 and 7 clients at the same time.
However, you cannot control instruments using the two software
versions at the same time.
Caution: You cannot control an instrument using the
Chromeleon 6 server and the Chromeleon 7 Instrument
Controller at the same time. When running Chromeleon 6
and 7 on the same computer, an instrument allocated to the
Chromeleon 6 server is not available to the Chromeleon 7
Instrument Controller (and vice versa).
To avoid conflicts between the Chromeleon 7 Instrument
Controller and the Chromeleon 6 server, do not enable the
options to start these services automatically.
4.2 Software Compatibility – Chromeleon 7.2
and 7.1
Parallel installation of different Chromeleon 7 versions (or service
releases) on the same PC is not supported. When
Chromeleon 7.2.6 is installed on a PC where an earlier version of
Chromeleon 7 is present, the earlier version will be upgraded. For
more details refer to Section 5.3.

Chromeleon 7
Installation Guide Page 29
4.3 Data Compatibility – Chromeleon 7 and
6
Chromeleon 7 provides access to Chromeleon 6 data and
maintains backward compatibility as much as possible.
Chromeleon 7 has been designed with focus on future
development. In rare scenarios this may result in minor
deviations when looking at legacy data in Chromeleon 7.
With Chromeleon 7, you can connect to datasources created
with previous Chromeleon 6/PeakNet 6 versions. You can view
the data, do temporary modifications and see the effect on the
results.
However, you cannot save the changes inside a Chromeleon 6
datasource. To permanently modify data originating from
Chromeleon 6, you must first copy the data from the
Chromeleon 6 datasource to a Chromeleon 7 data vault.
Note: (Oracle datasources only) To access Chromeleon 6
data on a computer that does not have Chromeleon 6
installed, first install the Microsoft ODBC driver for Oracle
that is part of the MDAC package. This is the only validated
ODBC driver for the connection to Oracle databases (the
Oracle-provided driver for ODBC will not work with
Chromeleon).
You cannot connect to a Chromeleon 7 data vault from older
Chromeleon/PeakNet versions.
It is not possible to import Chromeleon 6 panels to Chromeleon
7, nor the other way around.

Chromeleon 7
Page 30 Installation Guide
4.4 Data Compatibility – Chromeleon 7.2 and
7.1
Chromeleon 7.2 introduces features that require an update for
the database schema of 7.1 data vaults. It adds support such as
for MS instrument control, data visualization and processing,
import/export options, and intelligent run control functionality.
This update may prevent backward compatibility of data created
with the Chromeleon 7.2 Client software.
4.5 Chromeleon 7.2 SR5 and 7.2
4.5.1 SDK and DDK Add-Ins
If your Chromeleon installation (< Chromeleon 7.2 SR1) includes
SDK and/or DDK add-ins that are installed using a third-party
setup, the existing SDK and DDK add-ins will not be moved to the
new Thermo installation location.
To make the DDK and SDK add-ins available in 7.2 SR1 and later,
the following steps are required:
1. Uninstall the DDK and SDK drivers before you upgrade to
Chromeleon 7.2 SR1 and later.
2. Upgrade Chromeleon.
3. Re-install the DDK and SDK drivers again.
Alternatively, you can change the Chromeleon installation folder
to Program Files (x86)\Dionex\Chromeleon (Section 5.3 Install
Chromeleon 7).

Chromeleon 7
Installation Guide Page 31
5 Install the Software
5.1 Do you have Chromeleon 6?
If you do not have Chromeleon 6, start installing Chromeleon 7.
Follow the steps starting in Section 5.3.
If you have Chromeleon 6, read Chapter 4 about compatibility,
and decide whether you want to install Chromeleon on the same
PC where Chromeleon 6 is running, or on a different one:
To use Chromeleon 7 on the same PC where
Chromeleon 6 is running, follow Section 5.3.
To install Chromeleon 7 on a different PC with access to
your Chromeleon 6 data, follow Section 5.3. Read
Section 9.4.4 about mounting Chromeleon 6
datasources.
5.2 Chromeleon Activity Check
When you install, update, or uninstall Chromeleon or any other
software, it is useful to know whether any of the following
Chromeleon actions are active:
• Running queue(s)
• Running Smart Startup/Smart Shutdown
• Baseline monitoring
Chromeleon Activity Check is a stand-alone command-line
program that checks if Chromeleon related systems are ready.
You will find the program (ChromeleonActivityCheck.exe) on the
installation medium in the Tools > Chromeleon Activity Check
folder.

Chromeleon 7
Page 32 Installation Guide
Note: Chromeleon Activity Check requires Microsoft .NET
4.0 or higher. However, it does not require a Chromeleon
license or a Chromeleon system login.
To start the activity check:
1. On your installation medium, go to
Tools > Chromeleon Activity Check.
2. Copy the ChromeleonActivityCheck.exe file to a location of
your choice.
3. Open the Windows Command Prompt.
4. Navigate to the location of the
ChromeleonActivityCheck.exe file and run the program.
5. The following exit codes can be returned:
0: indicates that all Chromeleon actions are inactive
1: indicates active Chromeleon actions
You can use the wait command w to specify a wait time
(minutes) for the Chromeleon actions to become inactive. The
program will check for active actions until the wait time has
elapsed. The program will exit as soon as the actions have
become inactive or after the wait time has elapsed.
Example 1:
ChromeleonActivityCheck.exe /wait:5
The program will check the system status for active actions every
5 seconds over a wait time of 5 minutes.
Example 2:
ChromeleonActivityCheck.exe /wait:-1

Chromeleon 7
Installation Guide Page 33
The program will check the system status for active actions every
5 seconds infinitely until the system becomes inactive.
5.3 Install Chromeleon 7 – Main and Service
Release
Follow the subsequent steps to install Chromeleon 7.2.6. The
steps are similar for new installations and for upgrading existing
Chromeleon 7 installations. However, there are preliminary
considerations to take into account before upgrading an existing
Chromeleon 7 installation (Section 5.3.2)
5.3.1 Installation Requirements
Make sure the following requirements are fulfilled:
• The built-in Windows Firewall service must be running. If
you need to turn off the Windows firewall for some reason,
use the Windows Firewall Control Panel program (Control
Panel\System and Security\Windows Firewall), but leave
the Windows Firewall service running.
• Ensure that the person performing the installation has local
administrator privileges in Windows. Reboot the computer if
you are asked to do so. After the reboot, the administrator
who started the setup must log in again so that the
installation process can be completed correctly.
• Ensure that third-party firewalls are turned off.
Caution: Make sure that there is enough free drive space on
your PC. Otherwise, the installation will fail (Section 2.3 PC
Hardware Requirements).

Chromeleon 7
Page 34 Installation Guide
Setup time varies depending on the presence of third-party
components. For example, installing .NET Framework libraries
may take a considerable amount of time.
5.3.2 Upgrade Chromeleon 7
It is not required to uninstall previous versions of
Chromeleon/PeakNet 6 before installing Chromeleon 7.
The Chromeleon Setup checks current activities, for example,
running queues. If a queue is running, Chromeleon will report a
warning. You can select one of the following actions:
• Ignore – Select this option if you want to ignore the warning
and continue the installation. The Instrument Controller will
be stopped and the queue will be aborted.
• Retry – Select this option if you want to wait for the
queue(s) to finish and retry the installation of
Chromeleon 7.2.6. The state of the queues will be checked
again during the new installation attempt.
• Cancel – Select this option to cancel the installation.
5.3.3 Install Chromeleon
Note: Do not connect new instruments/modules via USB to
your PC until the Chromeleon software installation has
finished and the Chromeleon Installation Qualification (IQ)
has completed and passed.
1. Check Chapters 2 and 3 of this document and verify that all
requirements are met.
2. It is best to close all applications before starting the setup to
ensure that it can update relevant system files.

Chromeleon 7
Installation Guide Page 35
Note: Certain IT tools and anti-virus software may lock
system files and therefore require rebooting after the setup.
The installation of some of the third-party components (such
as .NET Framework) usually requires a reboot.
3. Start the installation: Insert the installation medium into
your PC. The AutoPlay window opens automatically. The
AutoPlay window offers links for exploring the installation
medium and for launching the setup program:
Figure 1: Chromeleon “AutoPlay” window
4. Click Run Setup.exe to start the installation procedure. If the
Microsoft .NET Framework is not yet present, the necessary
files are installed before the actual Chromeleon 7 installation
starts. After installation of the .NET software, a reboot may
be required.
Chromeleon 7
Page 36 Installation Guide
If the .NET 4.6.2 software is already present on the
computer, the Chromeleon setup window appears:
Figure 2: Chromeleon setup window
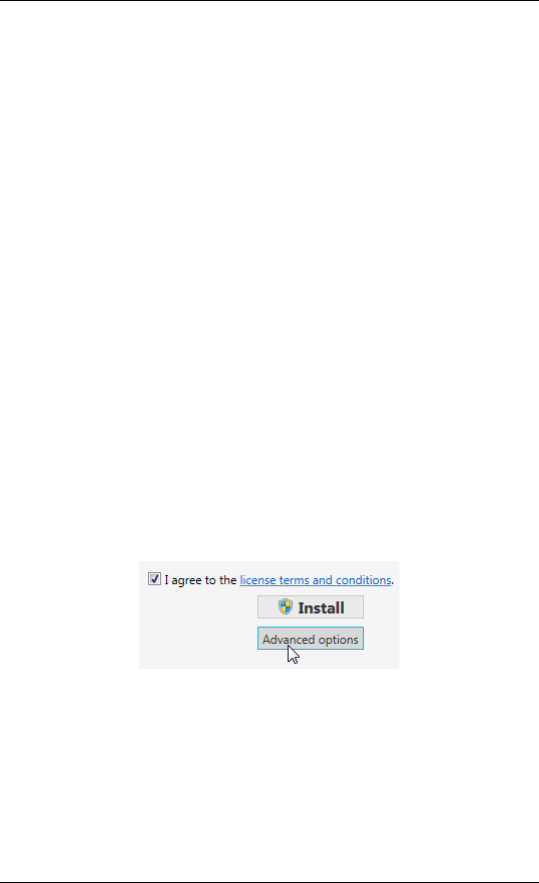
Before you can launch the installation, you must read and accept
the Chromeleon license terms and conditions. By accepting the
license terms and conditions, the Install and Advanced options
buttons will be enabled (Figure 2):
• Install: Launches the Chromeleon default installation that
includes all software components that are needed to control
most of the Thermo Scientific instruments, to view Thermo
Scientific mass spectrometry instrument methods, and to
control a large number of third-party instruments.
• Advanced options: Allows you to change the installation
path. This option is only available for a pristine installation of
Chromeleon. It is not available if you upgrade Chromeleon

Chromeleon 7
Installation Guide Page 37
from 7.2 SR1 or later. By default, Chromeleon is installed in
the following location:
C:\Program Files\Thermo\Chromeleon (32-bit systems)
C:\Program Files (x86)\Thermo\Chromeleon (64-bit
systems)
Note: The location of any other third-party software
package, for example, Microsoft SQL Server, cannot be
changed.
The Advanced options button also allows installation of the
following optional software components:
• Agilent Instrument Control Framework
• Agilent Chromeleon Drivers
• Waters Driver Pack 4
• Thermo Scientific mass spectrometry drivers
Note: The software components for Agilent (Agilent
Instrument Control Framework and Agilent Chromeleon
Drivers) can be installed together.
Select the check box(es) of the required software component(s)
and click Install to start the installation.
Tip: When you click Install, a User Account Control (UAC)
message is displayed. If you do not acknowledge it, the
message will time-out after 2 minutes and you will be asked
whether you want to cancel the setup. Click No to proceed
with the installation. To avoid this, do not leave the
installation unattended until the UAC prompt was displayed.
Chromeleon 7
Page 38 Installation Guide
Figure 3: Advanced installation options
Tip: You can install the optional software components any
time later (Section 5.5 Install Optional Software
Components). Detailed information about installing the
Thermo Scientific mass spectrometry drivers is provided in
the MS Software Installation Guide that is available on the
Chromeleon installation medium.
Chromeleon 7
Installation Guide Page 39
5. The setup program is executed that installs the different
software packages. Follow the on-screen instructions as they
appear. The setup starts with installing the required third-
party software components (Section 2.5), if they are not
already present.
Note: The installation of SQL Server Express and .NET
libraries can take 5-20 minutes. The installation of
Chromeleon files usually takes less than 5 minutes.
Note that the installation of the USB instrument drivers package
might trigger a Windows Security message depending on your
operating system:
Figure 4: USB driver installation
To install the Chromeleon USB Driver package, select Always
trust software from “Thermo Fisher Scientific” and click Install
to continue.
Chromeleon 7
Page 40 Installation Guide
Caution: (Windows 7 Professional Service Pack 1 and
Windows Server 2008 R2 SP2 only) The USB instrument
driver package requires the Windows Update KB3033929. If
the Update is not installed, the connection of all USB
modules might be interrupted. It is possible to install the
update after installing Chromeleon. The USB modules that
failed to connect will function after the update.
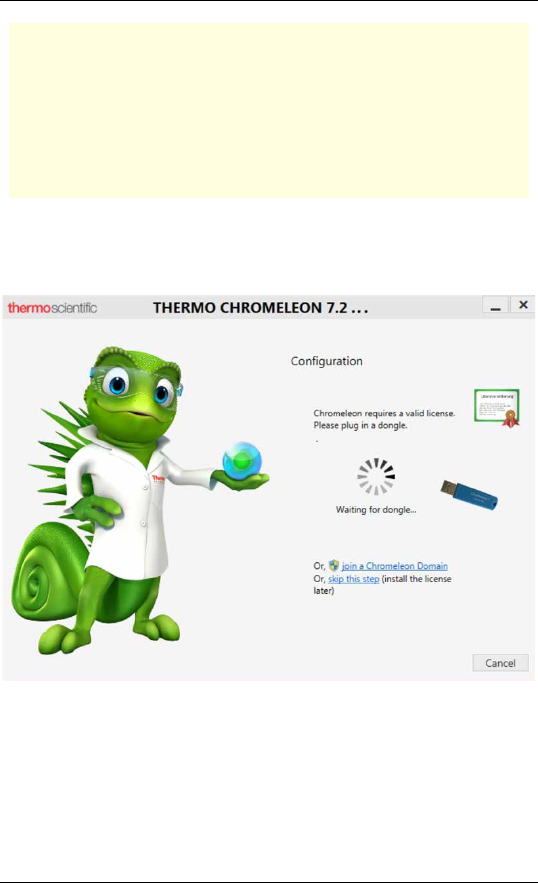
After installation of the software components, the license setup
window appears:
Figure 5: License setup window
Do one of the following:
• If a new blue dongle is available and the license file is still
stored on the dongle:
a. Insert the dongle into a USB port of the computer.

Chromeleon 7
Installation Guide Page 41
b. Wait until the setup confirms that it found both the
dongle and the file and transferred the file to the
computer.
c. Save a backup copy of the license file by following the
Save license file link in the dialog.
d. Click Continue.
• If a dongle and a license file are both available, but the
license file is stored on other media:
a. Select the Dongle option.
b. Insert the dongle into a USB port of the computer
c. Wait until the setup confirms that it found the dongle.
d. Install the license file by following the corresponding
link in the dialog.
e. Save the original medium with the dongle as a safety
copy.
f. Click Continue.
• If either the dongle or the license file is missing, or if the
previous procedures failed (for example, due to a mismatch
between the dongle and the file):
Click Skip.
You will have to provide a license after the setup has
finished, as described in Section 5.7.
Chromeleon 7
Page 42 Installation Guide
Tip: The Chromeleon Domain Controller option is for
domain installations. Contact Thermo Fisher Scientific to
learn more about the advantages a networked Chromeleon
installation may provide to your laboratory.
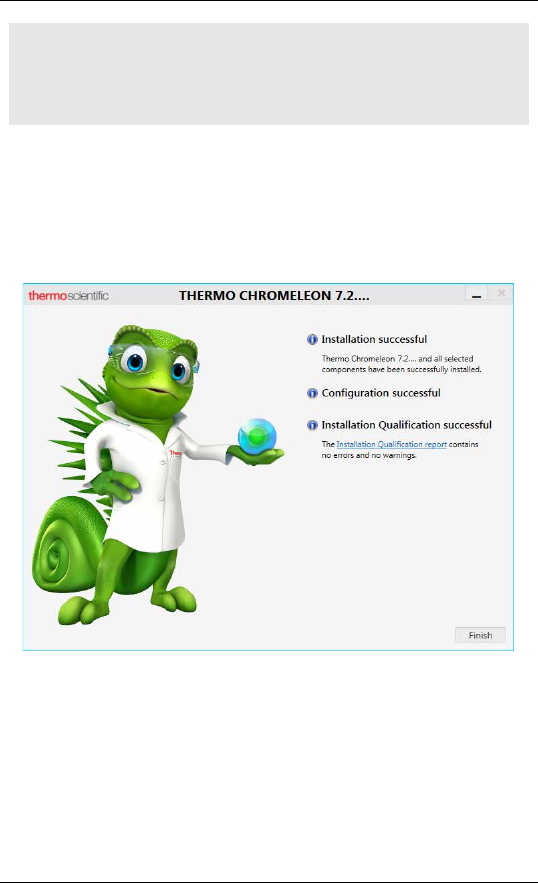
6. An installation qualification report will be created
(Section 5.6). To open the report, click the Installation
Qualification report link provided in the setup dialog
(Figure 6).
Figure 6: Chromeleon installation complete
You can also install Chromeleon using a command line for
remote installation (Chapter 8 Command-Line Installation).

Chromeleon 7
Installation Guide Page 43
5.4 Install Chromeleon 7 – Maintenance
Update
In order to install a Chromeleon maintenance update, an
installed Chromeleon main or service release is required. The
maintenance update can only be installed over the respective
main or service release it is based on.
If not yet present, install the Chromeleon main or service release
according to 5.3 Install Chromeleon 7 – Main and Service Release.
To install the maintenance update:
1. Insert the maintenance update installation medium into your
PC. The AutoPlay window opens.
2. Click Run Setup.exe to start the installation procedure.
3. Read and accept the Chromeleon license terms and
conditions.
4. Click Install to start the installation. The setup program is
executed. Follow the on-screen instructions.
5.5 Install Optional Software Components
5.5.1 Software Packages Included in the Chromeleon
Setup
The software components described as follows are part of the
Chromeleon setup package and can be installed at the user’s
option to enable control of the corresponding instruments.
THERMO SCIENTIFIC MASS SPECTROMETRY DRIVERS
The mass spectrometry drivers are required for controlling the
Thermo Scientific mass spectrometry instruments.

Chromeleon 7
Page 44 Installation Guide
Tip: The MS Software Installation Guide provides detailed
instructions about installing the individual MS instrument
drivers. The document also includes a list of the MS
instruments that are currently supported by Chromeleon.
The MS Software Installation Guide is provided on the
Chromeleon installation medium.
AGILENT INSTRUMENT CONTROL FRAMEWORK (ICF) AND LC
DRIVER PACKAGE
This software is required for controlling Agilent™ liquid and gas
chromatographs from Chromeleon.
The Packages folder provided on the Chromeleon installation
medium contains a ReadMe file with instructions for manual
installation. The Chromeleon and Agilent ICF - Quick Start Guide
in the Documents folder provides further information. It contains
basic information on how to configure the systems and how to
get started.
Note: The Agilent LC driver replaces the Agilent 1100 and
1200 drivers that are obsolete and will no longer be
maintained. The Agilent GC driver currently only supports
the Agilent 7697A Headspace Sampler.
WATERS DRIVER PACK 4
This software is required for controlling Waters™ Acquity UPLC™
system modules. For further information, the following
references are available:
• Driver Pack 4 Installation and Configuration Guide: Guide
provided by Waters with information about installation and
configuration of the Waters Driver Pack. The guide is
Chromeleon 7
Installation Guide Page 45
available on the Chromeleon installation medium
(Packages\Waters Driver Pack\Driver Pack).
• Chromeleon Instrument Configuration Manager Help: The
topic Installing Third-Party Modules – Waters Acquity UPLC
System contains instructions for installing the driver in
Chromeleon.
• List of Supported Instruments: The List of Supported
Instruments provides details about which Waters modules
can be controlled by Chromeleon and which of them
requires the installation of the Acquity driver. The List of
Supported Instruments is provided in the Documents folder
of the Chromeleon installation medium.
INSTALL OPTIONAL SOFTWARE COMPONENTS
1. Insert the Chromeleon installation medium into the PC.
2. Click Run Setup.exe to start installing the software
(Section 5.3, steps 1 to 3).
3. When the Chromeleon setup window appears:
Click the Advanced options button:
Figure 7: “Advanced options” button (Chromeleon setup window)

Chromeleon 7
Page 46 Installation Guide
Figure 8: Optional software packages (Chromeleon setup window)
Note: When you upgrade Chromeleon from version 7.2 SR1
or later, some of the advanced options may be disabled. To
install or remove an optional package, install Chromeleon
with the original settings first. Then run a Modify installation.
4. Select the respective check box of the package that you want
to install. Note that although multiple driver packages can be
selected, only one mass spectrometry driver is allowed per
computer. In addition, the MS driver must be installed on
the PC that is connected to the MS instrument.

Chromeleon 7
Installation Guide Page 47
Note: Depending on the Chromeleon software version not all
of the MS drivers might be included in the Chromeleon setup
program. You may have to install some of the drivers
manually. Refer to the MS Software Installation Guide, which
provides detailed instructions about installing the individual
MS instrument drivers.
5. Click Install to start installation of the selected software
package(s). The installation procedure will then continue as
described in Section 5.3 Install Chromeleon 7.
5.5.2 Software Packages requiring Separate
Installation
MASS SPECTROMETRY DRIVERS
For Chromeleon 7.2.6 the following MS drivers are provided as
separate installation package:
• MSQ Plus™ mass spectrometer
Please refer to the Chromeleon MS Software Installation Guide
and the Chromeleon Instrument Configuration Manager Help for
detailed installation instructions.
USB VIRTUAL COM PORT
Some of the Chromeleon drivers require the installation of a USB
virtual COM port. The driver software is provided as a separate
installation package.
The USB Virtual COM Port folder provided in the Drivers folder
of the Chromeleon installation medium contains the tested
driver version. The USB Virtual COM Port folder also contains a
ReadMe file with installation instructions.

Chromeleon 7
Page 48 Installation Guide
5.6 Installation Qualification
At the end of the installation process, Chromeleon automatically
runs an installation qualification (IQ), and creates a report. You
can view the report by clicking the Installation Qualification
report link on the last page of the setup.
Figure 9: Last page of installation wizard
Tip: To read the report later, click Start > All Programs >
Thermo Chromeleon 7 > Station IQ > Current IQ report. The
report opens in your default web browser.
Installation qualification compares current information about the
installed files against a reference list supplied by Thermo Fisher
Scientific. If there are any differences, a warning, or an error
message appears to indicate the following:

Chromeleon 7
Installation Guide Page 49
• Warning: A warning can indicate an obvious problem that
can be easily corrected; for example, by providing a valid
license file, installing more RAM in the PC, or starting
Windows services. A warning can also indicate that a file
does not have the expected time stamp or version. Usually,
no action is required for minor file discrepancies. If a
problem occurs nevertheless, try to repair the installation as
described in Section 5.8.2. If the problem persists, follow the
steps described in Section 5.8 to troubleshoot the
installation.
• Error: A vital component is missing or corrupt. Try to repair
the installation (Section 5.8.2). If this does not help, follow
the steps provided in Section 5.8 for troubleshooting.
Note: After initial installation of Chromeleon 7, the
installation qualification report may contain a warning about
a missing license. This is also the case if you click Skip in the
license setup dialog during the software installation. Follow
the steps in Section 5.7 to provide a valid license.
Tip: You can run the installation qualification at any time to
check if your installation is intact. To start installation
qualification, click Start > All Programs > Thermo
Chromeleon 7 > Station IQ > Station IQ. For more
information, press F1 in the Chromeleon IQ window.
Tip: All installation qualification reports (and also the
installation log files) can be easily accessed by clicking Start >
All Programs > Thermo Chromeleon 7 > Station IQ > All IQ
Reports. The physical location of the files is a (normally
hidden) directory. The location depends on the operating
system:
C:\ProgramData\Dionex\Chromeleon\IQ

Chromeleon 7
Page 50 Installation Guide
5.7 Activate/Update a License
The license is normally activated during the software installation
process (Section 5.3). This section describes how to do the
following:
• Activate a license when the license setup step was skipped
during the software installation
• Update the license for an existing installation (for example
after purchasing new licensed features for an existing
installation)
The processes are similar, but there is a difference depending on
where the license file is located:
• If a new light blue dongle containing the license file is used,
follow Section 5.7.1.
• If a license file is available on separate media, follow
Section 5.7.2.
5.7.1 Use a New Chromeleon 7.2 Dongle that
Contains a License File
Follow the steps below to activate or update a Chromeleon 7
station using a light blue dongle that has never been used before
and thus still contains the corresponding license file.
1. Make sure that Chromeleon 7 is already installed.
2. Connect the dongle to a USB port of the PC where the
license will be used. The Windows Found New Hardware
wizard may start at this point and install the necessary
drivers.
Chromeleon 7
Installation Guide Page 51
3. After a few seconds, the license file is automatically moved
(without a warning) to the computer, to the appropriate
location.
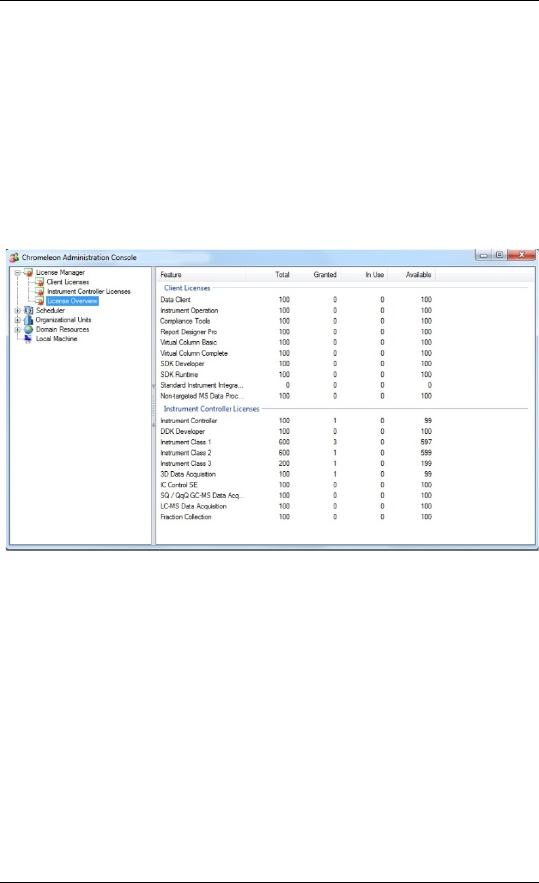
4. To check the installed licenses, start the Administration
Console: Start > Thermo Chromeleon 7 > Administration
Console. Select License Overview, Figure 10. The Total
column should display the appropriate number of licensed
options, Figure 10.
Figure 10: License overview of the Administration Console
5. Back up your license file and store it in a safe location. You
may need it in the future, for example if you want to move
the license to another computer, or if you want to restore
your Chromeleon station after a hard disk failure.
Section 2.1.2 describes the location where you can find the
license file that was moved from the dongle to the
computer.

Chromeleon 7
Page 52 Installation Guide
5.7.2 Use an Empty Dongle and a Separate License
File
Follow the steps below to do the one of the following:
• Activate a Chromeleon 7 station using a Chromeleon 6
(green) dongle
• Activate a Chromeleon 7 station using a Chromeleon 7 (light
blue) dongle that has been used before
• Modify licensing for a Chromeleon 7 station, for example
when a new license file has been received after an upgrade,
or when moving a license to another computer
Note: Make sure you have the license file that you want to
use. The serial number of the license file must match the
serial number of the dongle.
1. Connect the dongle to a USB port of the PC (Chromeleon 7
must be installed first).The Windows Found New Hardware
wizard may start at this point and install the necessary
drivers.
2. Open the Administration Console: Click Start > Thermo
Chromeleon 7 > Administration Console, and select License
Manager, Figure 11.
3. Click the Update License File link (Figure 11) and browse to
the license file you want to use. Select the file and click
Open. The license file is copied to its desired location
(Section 2.1.2).

Chromeleon 7
Installation Guide Page 53
Figure 11: License details
4. To check the installed licenses, select License Overview
(Figure 10). The Total column should display the appropriate
number of licensed options (Figure 10).
5. Store your license file in a safe location. You may need it in
the future, for example if you want to move the license to
another computer, or if you want to restore your
Chromeleon station after a hard disk failure.
5.8 Troubleshoot Software Installation
The setup process itself checks for various conditions and
provides useful hints/warnings for preventing installation issues.
Therefore always observe the instructions during setup. For
example, the setup checks the following:
• Does the user who started the setup have local
administrator privileges?
• Are the operating system requirements fulfilled?

Chromeleon 7
Page 54 Installation Guide
Make sure that all requirements and Windows configuration
steps described in Chapters 2 and 3 are fulfilled/performed.
To identify installation issues, check the installation qualification
report (Section 5.6) for errors and warnings. If you find errors, try
to repair the installation as described in Section 5.8.2.
Tip: Remember, that you can re-run installation qualification
at any time.
If you face installation problems, send the installation log files to
Thermo Fisher Scientific for support:
• Setup logs are located in:
C:\ProgramData\Dionex\Chromeleon\SetupLogs.
• Chromeleon logs are located in:
C:\ProgramData\Dionex\Chromeleon\Log.
• Installation qualification reports are located in:
C:\ProgramData\Dionex\Chromeleon\IQ.
Alternatively, you may access the installation qualification
reports via the Start menu:
Start > All Programs > Thermo Chromeleon 7 > Station IQ > All
IQ Reports
Large log files (> 25 MB) can be compressed (zipped).
You may also use the System Status Report to troubleshoot
installation problems. This status report can also be accessed via
the Start menu:
Start > All Programs > Thermo Chromeleon 7 > System Status
Report

Chromeleon 7
Installation Guide Page 55
Note: If you attempt to reinstall, modify or repair
Chromeleon, this action may fail. A sub-folder in the
%temp% folder of the first installation may not have been
removed and therefore interrupt the reinstallation,
modification or repair. To solve this problem do the
following:
1. Reboot your computer.
2. Delete the remaining folders in the %temp%.
3. Restart the Chromeleon setup.
5.8.1 Installation on a PC with Identical Computer
Name and User Name
Caution: The Chromeleon installation will fail on a PC where
the name of the computer and the logged-in user are
identical.
The reason is a limitation in SQL Server Express, which cannot
install if computer name and default user name are the same.
Before the installation, make sure that the computer name and
the name of the logged-in user are different.
If you accidently tried to install before changing the computer
name, the setup will be cancelled. Change the PC name to
something other than the logged in user name. Restart the
Chromeleon setup process.
5.8.2 Repair an Installation
Follow the instructions below to repair a Chromeleon 7
installation:
Note: You will need access to the Chromeleon installation
medium to repair an installation.

Chromeleon 7
Page 56 Installation Guide
1. Insert the Chromeleon installation medium into the PC.
2. Click Run Setup.exe. This starts the Chromeleon setup in
Maintenance mode.
Figure 12: Maintenance mode
3. Click Repair to run a repair installation.
4. Follow the on-screen instructions to repair the installation.
Note: It is not possible to repair the following Thermo
Scientific MS instrument drivers: ISQ Series, Exactive Series,
TSQ Series and MSQ Plus.
Note: It is not possible to repair a Thermo Foundation
software component.

Chromeleon 7
Installation Guide Page 57
6 Post Installation Configuration
The Post Installation Configuration is automatically executed at
the end of the Chromeleon setup. Thus it is separated from the
core installation of Chromeleon. In case of errors in the
Chromeleon configuration, fix the problem and re-run the post
installation program.
The Post Installation Configuration includes several configuration
tasks, such as:
• Configuring the license
• Connecting to a Chromeleon domain
• Installing standard local data vaults
• Updating local data vaults to the current database schema
You can also execute it as a standalone application
(PostInstallation.exe) after the Chromeleon installation:
1. Navigate to
C:\Program Files (x86)\Thermo\Chromeleon\bin
2. Click PostInstallation.exe to execute the Post Installation
Configuration application.
If you want to enable or disable tasks run by the Post Installation
Configuration, you must use command-line options. Refer to
Chapter 8 for further information.

Chromeleon 7
Page 58 Installation Guide
7 Install Thermo Scientific Instruments
This chapter describes how to install chromatography
instruments that are connected via USB to the PC.
Chromeleon can control chromatography instruments from other
manufacturers. (The List of Supported Instruments in the
Documents folder of the installation medium provides an
overview). Setup and requirements differ for each module. The
Chromeleon Instrument Configuration Manager Help provides
information about the supported modules and how to install
them.
Caution: Do not connect new instruments/modules via USB
to your PC until the Chromeleon software installation has
finished and the Chromeleon Installation Qualification (IQ)
has completed and passed.
To set up a system connected via USB do the following:
1. Connect all modules to each other and to the PC according
to the Operating Instructions of the modules and according
to Section 7.1.
2. Load the USB drivers for the module(s) according to
Section 7.2.
3. Add your chromatography instrument(s) to the system
configuration using the Instrument Configuration Manager
according to Section 9.2.
7.1 Connect Modules via USB
Most Thermo Scientific instruments are connected to the PC or
to each other via USB. Some of them (such as detectors that

Chromeleon 7
Installation Guide Page 59
acquire data at high rates) require USB 2.0 connections. Others
can be connected to USB 1.1 connections as well.
Some Thermo Scientific instruments have a built-in USB hub. The
hub may be USB 2.0 or 1.1; it may be powered or unpowered.
The following guidelines must be observed when connecting
modules via USB:
• Modules with USB 2.0 connection must be connected
directly to the PC (recommended for detectors) or to
another module with a USB 2.0 hub.
• Modules with USB 1.1 connection can be connected directly
to the PC or to another module with any kind of USB hub.
• A powered hub continues to function when the module is
switched off, maintaining communications for devices
connected to the hub.
• An unpowered hub only maintains connections while the
device is switched on.
The List of Supported Instruments (see Documents folder of the
installation medium) specifies what kind of USB connection an
instrument requires (and provides, if it has a hub).
7.2 Load the USB Driver for a Module
1. Turn on the computer first, but not the module.
2. Under the Windows operating system, log on using an
account with local administrator privileges.
3. Turn on the module using the main power switch.
4. Windows automatically detects the new module and
performs the USB installation.
Chromeleon 7
Page 60 Installation Guide
7.3 Troubleshoot USB Issues
Problem Remedial Action
Windows fails to detect the
module and launches a
wizard instead
This indicates that you connected
the module to the computer and
turned on the power for the first
time before you installed
Chromeleon. To resolve the
problem do the following:
1. Click Cancel to exit the
wizard.
2. Turn off the module and
unplug the USB cable from
the computer.
3. Install Chromeleon.
4. Reconnect the USB cable to
the computer and turn on
the power to the module.
Windows will now detect the
module and install the USB
software for the module
automatically.
Chromeleon audit trails
include error messages that
indicate interruption of USB
communications, such as:
"Error receiving status:
Error reading from <device
name> @ USB <address>.
The I/O operation has been
aborted because of either a
thread exit or an
application request. The
license is invalid."
This indicates that the Instrument
Controller PC entered Standby or
Hibernate mode while Chromeleon
was operating instruments /
collected data.
Follow Sections 3.3.1and 3.3.2 to
disable (USB) power management.

Chromeleon 7
Installation Guide Page 61
Problem Remedial Action
Windows Application and
System Event Logs may
include error messages
related to one or several of
the following:
• Chromeleon
• The disk I/O system
• W32time
• Other functions

Chromeleon 7
Page 62 Installation Guide
8 Command-Line Installation/Setup
This chapter describes how to do the following:
• Use command-line options (“switches”) and properties to
modify/override the tasks related to the installation and the
system configuration phases of the installation process
8.2
• Automate the installation process using a so-called response
file 8.3.
Caution: The procedures described in this chapter should be
performed by qualified administrators only. Perform tasks at
your own risk.
8.1 Introduction to the Setup Process
The Chromeleon setup process consists of three phases:
• Installation
• System Configuration
• Installation Qualification (IQ)
Aspects of these can be configured using command-line switches.

Chromeleon 7
Installation Guide Page 63
8.2 Command Line Switches and Properties
The setup program (Setup.exe) accepts command-line options
and properties. These can be used by system administrators to
trigger an unattended installation and to fine-tune the
installation and the configuration process.
8.2.1 Restrictions: Unattended Installation of the
Chromeleon USB Driver Package
Note: The restrictions described below are only applicable
for IPCs. They are also only relevant for customers who use
Thermo Fisher USB drivers for IC, LC, A2D and TRACE1110
equipment.
Do not use unattended (silent) mode if you are installing
Chromeleon 7 for the first time on a new Windows 7, Windows
8.1 or Windows Server 2008 computer. Doing so will prevent the
Chromeleon USB Driver package from being installed. To install
the Chromeleon USB Driver package, you must confirm the
Windows Security prompt by selecting Always trust software
from “Thermo Fisher Scientific” and clicking Install as shown in
Figure 4. This prompt is only issued during routine installation of
Chromeleon 7 using the Chromeleon setup kit.
Note: The Chromeleon USB Driver package can be installed
in unattended mode on Windows 7, Windows 8.1 or
Windows Server 2008 in the following cases:
• You are upgrading an existing installation of Chromeleon
where the Windows security prompt for the Chromeleon
USB Driver package was previously confirmed as
described above.

Chromeleon 7
Page 64 Installation Guide
• You are using image deployment to install Chromeleon,
and installation of the Chromeleon USB Driver package
was confirmed on the reference computer before the
image file was created.
8.2.2 Properties
Properties are defined via the command line using the following
syntax:
PROPERTY=PropertyValue
The following properties are available:
Property Description
InstallFolder
Specifies the installation folder.
The default installation folder (64-bit computers)
is C:\Program Files (x86)\Thermo\Chromeleon\.
LogFilesBacku
pDir Specifies the backup location of the setup log
files. The default location is
C:\ProgramData\Dionex\Chromeleon\SetupLogs
Note: Using a different location will prevent
the System Status Report tool from including
the setup log files for troubleshooting.
SuppressTeamV
iewerInstalla
tion
Prevents installation of the TeamViewer client
application. To actually suppress the installation
set the value to something else than 0.
WaitTimeMinut
esForSequence
QueuesIdle
The Chromeleon setup will abort the installation
if an active sequence queue is detected. Use this
property to specify a wait time (minutes) for the
sequence queue(s) to become idle.
Chromeleon will check for active queues every
minute until the wait time has elapsed:

Chromeleon 7
Installation Guide Page 65
Property Description
•
If there are still active queues, the
installation will be aborted.
• If no active queues can be detected, the
installation will be continued.
Note: Property names are case sensitive.
8.2.3 Command-Line Switches
In addition to properties, the setup program (Setup.exe) also
accepts numerous “switches”.
The following options are available:
Option Description
/?, /HELP
Shows a summary of the
information below.
<no option>,
/package,
/update
Installs or configures the product
using the default settings.
/repair
Repairs the product (or installs if
not installed).
/uninstall
Uninstalls the product.
/q, /quiet,
/s, /silent Installs or configures the product in
quiet mode without user
interaction.
/promptrestart
Prompts the user for restart if
necessary (default, recommended).
When used with the /q or /s
switch, the prompt will be
suppressed and the computer will
be restarted automatically when

Chromeleon 7
Page 66 Installation Guide
Option Description
needed.
/forcerestart
Always restarts the computer after
installation.
/norestart
Does not restart after the
installation is complete.
NOT RECOMMENDED!
/ib,
/ignoreblockers Ignores all blockers and forces
setup to continue.
NOT RECOMMENDED!
Blockers are circumstances that
the setup considers critical and
would therefore stop.
/l <path\file>,
/log <path\file> Logs the installation events to the
specified file/location (default
location is the %TEMP% folder.)
/c:<argument>,
/config:<argument> Determines the system
configuration tasks. 8.2.4
/sc, /skipconfig
Skips the System Configuration
phase. 8.2.4
/sq, /skipiq
Skips installation qualification.
/lc, /listcomponents
Lists all selectable components.
The installation of these
components can be enforced or
suppressed using a response file.
8.3
/rf:<path\file>,
/responsefile:<path\file>
Specifies the response file to be
used. 8.3

Chromeleon 7
Installation Guide Page 67
8.2.4 System Configuration Tasks/Parameters
In the System Configuration phase (Post Installation
Configuration, see Chapter 6) the installation process performs
several tasks. These tasks can be suppressed using the /config:
setup option.
For most arguments use True or False to enable or disable it.
By default these tasks will be executed (True).
The tables below list the system configuration tasks to be used as
arguments with the /config: option.
All system configuration steps can also be defined in a response
file, 8.3.2.
DATA VAULT RELATED TASKS
Argument Task
CreateChromeleonLocal Enables or disables the creation of
the ChromeleonLocal data vault.
CreateXVault Enables or disables the creation of
the standard XVault.
DataVaultsConfiguration Group Argument:
Enables or disables all data vault
related tasks:
• Create Chromeleon local data
vault
• Create XVault
• Update data vaults
• Update local data vault
security

Chromeleon 7
Page 68 Installation Guide
Argument Task
UpdateDataVaults Enables or disables updating the
database schema of existing local
data vaults.
UpdateDataVaultSecurity Runs a security update for local
data vaults.
DISCOVERY RELATED TASKS
Argument Task
DiscoveryUpdatePollingIn
terval
Specifies the update polling interval
in seconds. Values must be
between 1-600 seconds.
Domain Specifies the Chromeleon domain
to be joined (i.e. the host name of
the Chromeleon domain controller)
InheritCurrentDomainSett
ings
Can be used together with the
Domain switch. Uses the settings
of the current Chromeleon domain
controller for the new domain
controller.
OrgUnit Specifies the organizational unit of
the Chromeleon client. This
operation fails if a non-existing
organizational unit is specified.
PollForDiscoveryUpdates Specifies whether the Chromeleon
client should poll for Chromeleon
domain controller updates.
ReceiveDiscoveryPushNoti
fications
Specifies whether the Chromeleon
client should receive push
notifications form the Chromeleon

Chromeleon 7
Installation Guide Page 69
Argument Task
domain controller.
RequireEnhancedConnectio
nSecurity
With Chromeleon 7.2 SR5 new
certificates for the communication
between different Chromeleon
services and Chromeleon client
applications have been introduced
in order to enhance transport
security.
If you install Chromeleon 7.2 SR5 or
later on your server computers, but
keep older Chromeleon versions on
client computers, it is required to
run the outdated certificates in
parallel to ensure compatibility.
Note that this poses a security risk.
RequireEnhancedConnectionSe
curity:
• If you enable the argument,
the Chromeleon services will
communicate based on the
new certificate.
• If you disable the argument,
the old legacy hosts will be
started additionally and
enable clients with
Chromeleon versions <7.2 SR5
to connect.
SERVICE CONFIGURATION TASKS
Argument Task
EnableAndStartSqlServerS
ervice
Enables or disables starting of the

Chromeleon 7
Page 70 Installation Guide
Argument Task
SQL Server service.
EnableAndStartSqlBrowser
Service
Enables or disables starting of the
SQL Browser service.
ServicesConfiguration Group Argument:
Enables or disables all service
related tasks:
• SQL Server services tasks
• Chromeleon services tasks
StartCacheService Enables or disables starting the
Chromeleon Cache Service.
StartDataVaultService Enables or disables starting the
Chromeleon Data Vault Service.
StartDiscoveryService Enables or disables starting the
Chromeleon Discovery Service.
StartInstrumentService Enables or disables starting the
Chromeleon Instrument Controller
Service.
StartLicenseService Enables or disables starting the
Chromeleon License Service.
StartSchedulerService Enables or disables starting the
Chromeleon Scheduler Service.
StartServicesManager Enables or disables starting the
Chromeleon Services Manager.
StartUserService Enables or disables starting the
Chromeleon User Management
Service.

Chromeleon 7
Installation Guide Page 71
OTHER TASKS
Argument Task
AgilentICFApplicationCus
tomization
Enables or disables the Agilent ICF
application customization.
EncryptUserDatabase Enables or disables encryption of
the user database.
FirewallRulesConfigurati
on
Enables or disables the
configuration of the Windows
firewall by creating rules for
• SQL Browser
• SQL Server
MigrateSequenceQueues Enables or disables the migration
of sequence queues from isolated
storage.
PurgeChromeleonAddinsDat
abase
Removes an existing Chromeleon
Addins database.
SetMachineConfigurationT
ransactionsTimeout
Enables or disables the setting of
the machine configuration
transactions timeout.
The example below shows how to use the /config: option for the
following:
• Suppressing the update of the database schemas
• Defining a Chromeleon domain during a silent installation
(the command must be typed in one line)
setup.exe /s /c:UpdateDataVaults=False;Domain=”MyCMD”

Chromeleon 7
Page 72 Installation Guide
8.3 Response File
A response file can be used to customize unattended
installations. More specifically, use the response file for the
following:
• Provide command line properties/arguments in a structured
manner (Sections 8.3.1 and 8.3.2).
• Define which selectable components should be installed
(Section 8.3.1).
A response file is an XML document with up to three sections as
illustrated in the example in Section 8.3.3:
• Properties: defines optional setup properties to be used
(Section 8.2.2)
• Components: defines the requested install states of the
selectable components (Section 8.3.1)
• ConfigurationTasks: defines the requested run states of the
system configuration tasks (Sections 8.3.2 and 8.2.4)

Chromeleon 7
Installation Guide Page 73
8.3.1 Components Section
The default installation behavior when installing Chromeleon is
as follows:
• Standard components are always installed.
• Optional components must be expressly activated during
installation. Otherwise, they will not be installed.
However, you can override the default installation behavior using
the response file. This means that you can suppress or enforce
installation of standard and optional components.
To always enforce installation of a Chromeleon component:
1. Add the component to the response file (see the example in
Figure 13).
2. Set the following switch: RequestState="Present"
To always suppress installation of a Chromeleon component:
1. Add the component to the response file (see example in
Figure 13).
2. Set the following switch: RequestState="Absent"
Note: For an up-to-date list of selectable components, run
the setup with the /lc switch on the command prompt.
8.3.2 ConfigurationTasks Section
The tables in Section 8.2.4 list the system configuration tasks
within the response file.

Chromeleon 7
Page 74 Installation Guide
8.3.3 Response File Example
The example below shows a response file with the following
characteristics:
• Installation of Chromeleon in a specific folder
• Installation of selected optional software components
(Agilent ICF and Thermo Scientific TSQ Series), with exclusion
of standard components (Thermo Scientific Accela PDA Boot
Utility)
• Preventing schema updates of local data vaults
• Defining a Chromeleon domain
<ResponseFile>
<Properties>
<Property Name="InstallFolder"
Value="C:\Chromeleon" />
</Properties>
<Components>
<Component Name="AgilentICF"
RequestState="Present" />
<Component Name="ThermoAccelaPDABootUtility"
RequestState="Absent" />
<Component Name="ThermoTSQSeries"
RequestState="Present" />
</Components>
<ConfigurationTasks>
<Task Name="UpdateDataVaults"
Value="False" />
<Task Name="Domain"
Value="MyDomainServer" />
</ConfigurationTasks>
</ResponseFile>
Figure 13: Response file

Chromeleon 7
Installation Guide Page 75
8.4 Exit Codes
Exit codes indicate the level of success for a command. The
following table provides exit codes for Setup.exe.
Setup Status Restart not
required
Restart
required
Description
Success 0x00000000
[0]
0x00000bc2
[3010]
Successful
installation
Success but
incomplete
0x80040000
[-2147221504]
0x80048000
[-2147188736]
Successful
installation of all
vital packages,
but at least one
non-vital
package failed
Block 0x80044000
[-2147205120]
0x8004c000
[-2147172352]
A blocking
condition was
encountered
during
installation.
Cancel 0x00000642
[1602]
0x80048642
[-2147187134]
Installation was
canceled, or the
UAC failed or
timed out.
Incomplete –
restart
required
N/A 0x80048bc7
[-2147185721]
A restart is
required before
installation can
continue.
Failure 0x00000643
[1603]
0x80048643
[-2147187133]
A fatal error
occurred during
installation.

Chromeleon 7
Page 76 Installation Guide
9 Configure Chromeleon 7
This chapter describes configuration steps likely to be performed
for most stand-alone Chromeleon installations.
Note: You need Windows (local) administrator privileges
and/or the appropriate Chromeleon privileges to perform
some of the tasks described in this chapter. The UAC/admin
shield icon indicates whether administrator rights are
required.
Note: The paths mentioned in this chapter contain folders
that are hidden by default. If you do not see them, follow
instructions in the Windows Help on how to display hidden
files and folders.
9.1 Starting Points for Configuring
Chromeleon 7
You can start all configuration work for Chromeleon 7 from two
starting points:
• From the Chromeleon Services Manager, which is a
Chromeleon tool that appears minimized as the Chromeleon
tray icon in the notification area of the Windows taskbar
• From the Administration Console, which is a Chromeleon
tool that can be started via the Start menu
9.1.1 Chromeleon Services Manager
The Chromeleon Services Manager (Figure 14) does the
following:
Chromeleon 7
Installation Guide Page 77
• It shows the overall status of the Chromeleon service
components (Figure 14B).
• It provides a starting point for instrument control related
configuration work (Figure 14C, D, E).
Tip: Refer to the Glossary for further information on
Chromeleon services.
Figure 14: “Chromeleon Services Manager” window and tray icon
The Services Manager usually starts automatically. It appears
minimized as the Chromeleon tray icon (Figure 14A) next to the
clock in the notification area (also called system tray) of the
Windows taskbar.
To open the Chromeleon Services Manager window, click (or
right-click) the Chromeleon tray icon, Figure 14A.
If the Chromeleon tray icon is not present, you can start the
Services Manager by selecting Start > All Programs > Thermo
Chromeleon 7> Services Manager.

Chromeleon 7
Page 78 Installation Guide
Close the Chromeleon Services Manager window to minimize it
to the Chromeleon tray icon.
If a Chromeleon service does not start automatically, although
the Start service on system start check box is enabled, start the
service manually:
1. In Windows 10 Enterprise: Type services.msc in the Search
the web and Windows box.
2. In the search results, click services.msc. The Services window
opens.
3. In the list on the right side of the Services window, double-
click the respective Chromeleon service.
4. Click Start.
Note: If SQLEXPRESS and the Data Vault Service are not
started, first start SQLEXPRESS, then start the Data Vault
Service. If you first start the Data Vault Service, the data
vaults might not be available.
9.1.2 Chromeleon Tray Icon
The Chromeleon tray icon (Figure 14A) appears next to the clock
in the notification area (also called system tray) of the Windows
taskbar. It is the minimized version of the Services Manager. It
has the following functionality:
• It provides an easy way to open the Services Manager
window (via a click or a right-click on the tray icon).
• The tray icon and its tooltip (Figure 14F) show the status of
the Instrument Controller Service.

Chromeleon 7
Installation Guide Page 79
• Its context menu provides a shortcut for starting/stopping
the Instrument Controller Service (Figure 14C) and launching
the Instrument Configuration Manager (Figure 14D).
If the Chromeleon tray icon is not present in the notification
area, start it by clicking Start > All Programs > Thermo
Chromeleon 7 > Services Manager.
9.1.3 Chromeleon Administration Console
The Chromeleon Administration Console (Figure 15) provides the
starting point for most administrative tasks in Chromeleon:
• Managing licenses
• Scheduling data transfer among data vaults, for example for
archiving purposes
• Managing Chromeleon users, groups and privileges
• Configuring Global Policies, for example enabling User Mode
• Monitoring Discovery, in other words, checking which
resources (instruments and data vaults) are available in a
Chromeleon domain
• Managing data vaults installed on the local computer
Tip: Some of these features are only available in a domain
installation and are therefore not covered in this document.
Contact your local Thermo Fisher Scientific support to learn
more about the advantages a networked Chromeleon
installation may bring to your laboratory.

Chromeleon 7
Page 80 Installation Guide
Figure 15: Chromeleon Administration Console with left and right pane
To open the Chromeleon Administration Console select Start >
All Programs > Thermo Chromeleon 7 > Administration Console.
9.2 Configure Instruments/Modules
After the USB software for the module has been installed
(Section 7.1), install and configure the module in Chromeleon:
1. Start the Instrument Controller Service, either by right-
clicking the Chromeleon tray icon (Figure 14A) and selecting
Start Chromeleon Instrument Controller (Figure 14C’), or via
the Services Manager (Figure 14C).
2. The Chromeleon tray icon changes to indicate that the
Instrument Controller Service is starting . Wait until the
Instrument Controller Service is running idle .

Chromeleon 7
Installation Guide Page 81
Note: If the Chromeleon tray icon is not visible on the
taskbar, click Start > All Programs > Thermo Chromeleon 7 >
Services Manager to open the Services Manager and click
Start Instrument Controller.
3. Start the Chromeleon Instrument Configuration Manager by
choosing one of the following options:
Right-click the Chromeleon tray icon (Figure 14D’) and
click Configure Instruments.
-OR-
Click Configure Instruments in the Services Manager.
Note: You can close the Services Manager window if it is
open. If you close the window, the Instrument Controller
Service is not stopped.
4. You can click the plus sign next to the PC name to display the
items underneath (Figure 16A).
5. Select the instrument to which the module will be assigned,
or create a new instrument:
To create a new instrument, on the Edit menu, click Add
instrument…, or click the corresponding icon in the
toolbar, Figure 16B.
6. Click Add Module on the Edit menu, or click the
corresponding icon in the toolbar, Figure 16C.
7. On the Manufacturers list (Figure 16D), click Thermo
Scientific. On the Modules list (Figure 16E), click the module.
8. Chromeleon connects to the module, transfers the settings
from the module to Chromeleon, and automatically sets the

Chromeleon 7
Page 82 Installation Guide
options on the configuration dialog pages (Figure 16F)
accordingly. Confirm the related message with OK.
Tip: Most modules are connected via a USB interface. The
USB address is used by Chromeleon to detect a module. It
typically contains the serial number of the module, allowing
you to distinguish between modules when two or more
identical modules are present (such as two pumps of the
same model).
Click Browse and double-click on the USB number. Only the
USB addresses of corresponding modules are shown. For
example, when adding a UV detector, only the address(es) of
the UV detector(s) are shown.
9. On each configuration page, verify that the settings are
correct and define additional settings if needed. For
assistance, click Help (or press F1).
10. On the File menu, click Save Instrument Configuration, or
click the corresponding icon in the toolbar, Figure 16G. Close
the Instrument Configuration Manager.
Chromeleon 7
Installation Guide Page 83
Figure 16: Using the Instrument Configuration Manager
9.3 Enable Automatic Start of the Instrument
Controller Service
On computers that are physically connected to instruments
(Chromeleon workstations and Instrument Controller stations),
especially if they are controlled remotely from another PC with
Chromeleon (a Remote Client station), Thermo Fisher Scientific
recommends starting the Instrument Controller Service every
time the computer is started.

Chromeleon 7
Page 84 Installation Guide
Tip: If the PC is not connected physically to instruments
(Chromeleon Data Client and Remote Client stations), you
should not follow these steps, which would result in using
additional PC resources unnecessarily.
To enable automatic start of the Instrument Controller Service:
1. Open the Services Manager by clicking the Chromeleon tray
icon (in the notification area of the taskbar), or by clicking:
Start > All Programs > Thermo Chromeleon 7 > Services
Manager.
2. Enable the Start service at system start check box,
Figure 14E.
3. To start the service this time, click the Start Instrument
Controller button in the Services Manager, Figure 14C.
4. Close the Services Manager.
9.4 Configure Data Vaults
Tip: The Chromeleon 7 Help contains a chapter about
Backing Up Chromeleon Data, see Chromeleon 7 Help >
Administrating Chromeleon.
9.4.1 Default Data Vault, XVault and Default
Location
During the software installation, the standard data vault
ChromeleonLocal is automatically generated (in the
corresponding sub-folder) in the default location.
During the installation, another local data vault (an XVault™) will
be created. This is a special data vault that stores a cached copy

Chromeleon 7
Installation Guide Page 85
of the running sequences. The purpose of the XVault is to keep
instruments running and data accessible for processing during
network outages, but it is an essential part of stand-alone
installations as well. The XVault is hidden.
Tip: The default standard data vault and the XVault need no
configuration.
The default location for standard data vaults (Windows 7) is:
C:\ProgramData\Dionex\Chromeleon\DataVaults\<data vault
name>
9.4.2 The Data Vault Manager
The Data Vault Manager is a Chromeleon tool that helps you with
the following tasks:
• Creating a new data vault (Section 9.4.3):
You want to have data vaults with and without data
audit trails/versioning.
You want to separate data at a high level.
Note: You can separate data in various folders inside the
same data vault, and you can specify different access
rights/privileges for different folders.
To save space you want to move (archive) some data
from your “live” data vault.
Note: The database part of a standard data vault has a 10 GB
size limit. The database holds sample information, the
methods, and the audit trails, but not the raw data.

Chromeleon 7
Page 86 Installation Guide
Tip: Do not create too many data vaults. Running queries
(searching for data) is more efficient if the data is not
scattered across many different data vaults, because queries
can only work in one data vault at a time.
• Mounting/dismounting a Chromeleon 6 datasource
(Section 9.4.4): You may want to mount Chromeleon 6
datasources (read-only) that exist locally or on the network.
• Mounting/dismounting a Chromeleon 7 data vault: The
Discovery Service automatically finds Chromeleon 7 data
vaults in the domain. Manual dismounting/mounting is only
necessary for advanced administrative tasks like moving or
renaming a data vault. These are not covered in this
document.
To start the Data Vault Manager:
1. Open the Administration Console, click Local Machine in the
left pane (Figure 17).
2. Click Manage Data Vaults in the right pane.
3. Alternatively, click Start > All Programs > Thermo
Chromeleon 7 > Data Vault Manager.
4. The Data Vault Manager opens in a separate window
(Figure 17).
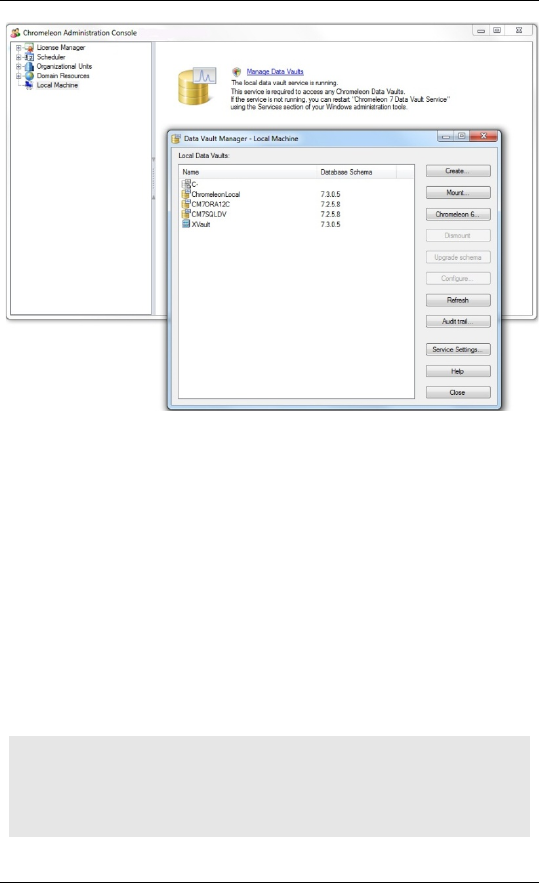
Chromeleon 7
Installation Guide Page 87
Figure 17: Starting the Data Vault Manager
9.4.3 Create a Standard Data Vault
With Chromeleon 7.2.6 a special SQL account for Chromeleon
will be created. This account will be used for administrative tasks
in the Data Vault Manager. If you want to do administrative tasks
without using the Data Vault Manager, for example, directly in
the database, only the user who installs Chromeleon will have
the administrative rights to do so. If additional administrative
SQL Server accounts are required, the user who installed
Chromeleon must add them.
Note: If you update Chromeleon from a previous version,
note that Chromeleon will not remove existing
administrative accounts. To increase security it might be
necessary to remove these administrative accounts.
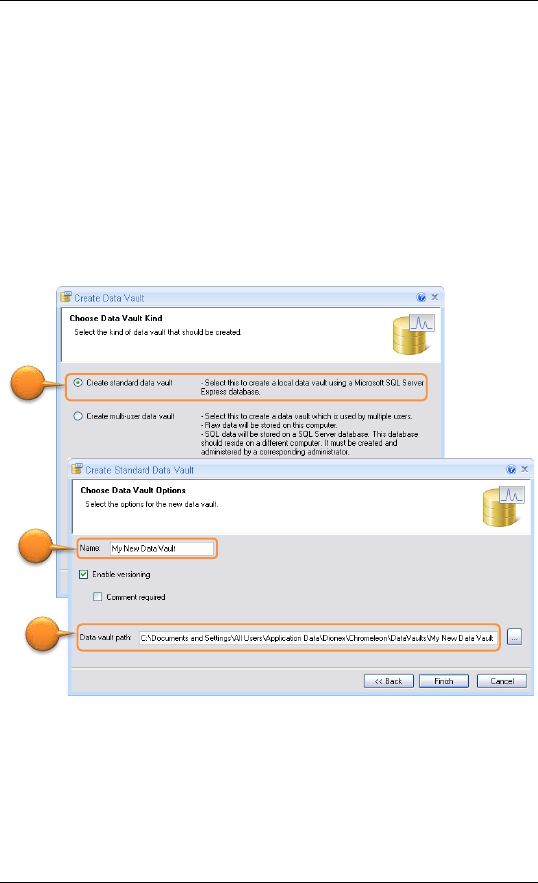
Chromeleon 7
Page 88 Installation Guide
To create a standard data vault:
1. Start the Data Vault Manager as described in Section 9.4.2.
2. In the Data Vault Manager – Local Machine window, click
Create…, Figure 17
3. Select the Create standard data vault option, Figure 18A.
Click Next.
4. Enter a name for the new data vault, Figure 18B.
5. Click Finish.
Figure 18: Creating a standard data vault.
A
B
C

Chromeleon 7
Installation Guide Page 89
Note: Thermo Fisher Scientific recommends keeping the
default path (Figure 18C).
This has the following advantages:
- It ensures automatic protection of the data vault via
standard Windows user rights.
- It allows easy backup of all your data from a single location
(see Chromeleon 7 Help: Administrating Chromeleon >
Backing Up Data).
If you create the data vault in a different location, such as on a
different hard drive, take care of protecting the data vault by
configuring Windows user rights:
• Deny access for ordinary users.
• Grant access for SQL Server and local system accounts.
9.4.4 Mount Chromeleon 6 Datasources
If you install Chromeleon 7 on a PC where Chromeleon 6 is
already installed, your mounted Chromeleon 6 datasources will
automatically become available (read-only) in Chromeleon 7. For
connecting other Chromeleon 6 datasources, follow the
subsequent steps.
To mount a Chromeleon 6 datasource:
1. Start the Data Vault Manager as described in Section 9.4.2
2. In the Data Vault Manager, click Chromeleon 6…,
(Figure 17E)
Note: When you try to access a Chromeleon 6 datasource
where access control is enabled, you have to provide a valid
Chromeleon 6 user ID and password.

Chromeleon 7
Page 90 Installation Guide
3. Click Browse… (Figure 19A) or Datasource manager…
(Figure 19B) in the dialog that opens.
4. Follow the familiar Chromeleon 6 steps.
Figure 19: Initial steps for mounting Chromeleon 6 datasources
Note: Chromeleon 7 actually utilizes the same registry keys
for storing datasource connection data as Chromeleon 6
does.
For common datasources:
HKEY_LOCAL_MACHINE\Software\Dionex\Chromeleon\Dat
asources\...
For not common datasources:
HKEY_CURRENT_USER\Software\Dionex\Chromeleon\Data
sources\...
Consequently, when Chromeleon 6 is installed on the same
PC, changes in Chromeleon 7 and Chromeleon 6 mutually
affect each other.
Note: On 64-bit Windows systems, the 32-bit registry editor
has to be used.
A B

Chromeleon 7
Installation Guide Page 91
9.5 Enable and Configure User Management
When User Mode is enabled, a logon is required to open
Chromeleon. Additionally, you can configure which resources
(such as data and instruments) certain users are allowed to work
with (Access Groups), and what they are allowed to do (Roles).
Two basic steps are necessary to start working with User Mode:
1. Enable User Mode:
In the left pane of the Administration Console
(Section 9.1.3), select Global Policies (Figure 20). On the
Security tab, select the User mode enabled option. Click
Save Changes.
In the confirmation dialog, enter the credentials of a
Chromeleon user that has the privilege to Manage Global
Policies (Figure 20). For the default credentials, see the
subsequent note.
2. Configure User Mode:
In the left pane of the Administration Console, expand the
User Database tree and use the sub-categories to configure
user management (Figure 21).
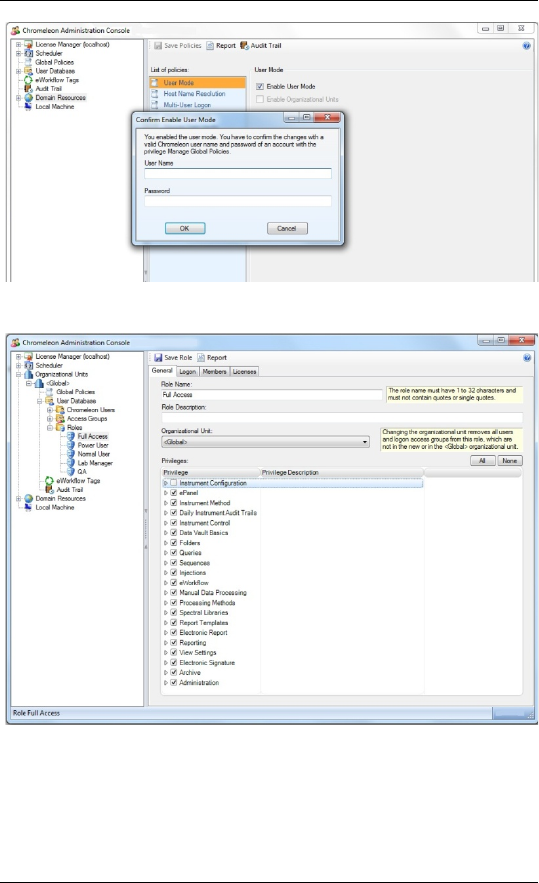
Chromeleon 7
Page 92 Installation Guide
Figure 20: Enable User Mode
Figure 21: Window for configuring roles

Chromeleon 7
Installation Guide Page 93
Note: The default User Name and Password are cmadmin
and admin, respectively. Do not delete the cmadmin user
and keep the Full Access role assigned to it. Change the
password, write it down and store it at a safe location. You
can then use this account for emergency situations, for
example, when ordinary administrators forget their
passwords or lock themselves out from certain areas.
Tip: To learn more about how to create user accounts, define
access groups and roles, refer to the Chromeleon 7 Help,
topic Administrating Chromeleon > User Management.
Tip: There is an example user database on the installation
medium: \Contributed Content\User Management
Templates\User Management.
The user database is an encrypted XML file (UserDb.EXML). It is
stored in the following location (location and file name cannot be
changed):
C:\ProgramData\Dionex\Chromeleon\UserManagement

Chromeleon 7
Page 94 Installation Guide
10 Remove Chromeleon 7 from a PC
Note: You must log on with local administrator privileges to
Windows to perform some of the steps in this chapter.
Note: The paths mentioned in this chapter contain folders
that are hidden by default. If you do not see them, follow
instructions in the Windows Help on how to display hidden
files and folders.
10.1 Uninstall Chromeleon 7
You can remove the Chromeleon program files from your
computer by following the instructions below.
Tip: These steps only remove the software components. All
your data and settings will be preserved. This has the
advantage that you can safely uninstall the software without
affecting your data.
1. Insert the Chromeleon installation medium into the PC. Click
Run Setup.exe. This starts the Chromeleon setup in
Maintenance mode.
-OR-
1. Alternatively, click Control Panel > Programs and Features.
Double-click the current Thermo Chromeleon program. This
starts the Chromeleon setup in Maintenance mode.

Chromeleon 7
Installation Guide Page 95
Figure 22: Maintenance mode
2. Click Uninstall.
3. Follow the onscreen instructions to remove the program
from the computer.
Note: Uninstalling Chromeleon will not remove the Thermo
Scientific MS software components.
10.2 Uninstall Thermo Scientific MS Software
Components
Uninstalling Chromeleon does not remove the following Thermo
Scientific software packages for mass spectrometry:
• Thermo Foundation

Chromeleon 7
Page 96 Installation Guide
• Thermo Scientific mass spectrometry drivers:
ISQ Series
ISQ EC (for HPLC and IC)
Exactive Series
TSQ Series
TSQ Quantiva
TSQ Endura
MSQ Plus
This is to ensure that these software packages continue to work
with other Thermo Scientific MS software packages.
If a software package is no longer useful to you, you can remove
it manually as follows:
1. In the Windows Control Panel, click Programs and Features.
2. Find the program you want to uninstall, right-click and select
Uninstall/Change.
3. Follow the on-screen instructions to remove the program.
4. If the wizard requests it, reboot your computer.
10.3 Uninstall Third-Party Software
Chromeleon relies on several third-party software components
(Section 2.5), which are installed during the setup process. To
avoid problems with software installed after Chromeleon, most
of them are not removed automatically when uninstalling
Chromeleon 7. You can remove several of these software
components manually following steps similar to removing
Chromeleon 7 (Section 10.1).

Chromeleon 7
Installation Guide Page 97
Caution: The software components listed below may be used
by various applications on your computer, not only
Chromeleon 7. Removing them may corrupt those
applications.
The following components will not be removed by the
Chromeleon 7 uninstall process:
• Microsoft SQL Server Express
The uninstall process will attempt to remove the following
components:
• Microsoft Visual C++ Redistributables
10.4 Remove Chromeleon 7 Data
Caution: The following steps will delete all locally stored
Chromeleon data (including chromatograms, custom
ePanels, instrument configuration, user database, etc.) from
the PC.
If you want to save the data, follow the steps in the section
Administrating Chromeleon > Backing Up Data > Backup
Procedure and Data File Location of the Chromeleon 7 Help
before you continue.
Reboot the computer (or stop the SQL Server (SQLEXPRESS)
service), then delete the following folder:
C:\ProgramData\Dionex\Chromeleon
Note: If you created local data vaults in locations other than
the default path, you will have to delete these separately.

Chromeleon 7
Page 98 Installation Guide
Index
.NET Framework, 15
Administration Console, 76
Administrator Privilege, 56,
73, 91
Automatic Service Start, 80
Backup, 81, 86
Chromeleon
Administration Console, 76
Data Vault Manager, 82
Installation Qualification,
45
Instrument Configuration
Manager, 77
Services Manager, 77
Tray Icon, 76
User Manager, 88
Chromeleon 6
Compatibility with ~, 25
Installing Chromeleon 7 in
Presence of ~, 28
Mounting Datasource, 86
Chromeleon Services
Manager, 74
Compatibility
Chromeleon 6 Data, 26
Chromeleon 6 Software, 25
Chromeleon 7 Software,
25, 27
PeakNet 6 Data, 26
PeakNet 6 Software, 25
Data Vault, 81
Creating, 84
Data Vault Manager, 82
Datasource
Mounting, 86
Default Data Vault, 81
Documentation
Conventions, 6
Overview, 6
Dongle, 7, 9
Firewall Settings, 20
Hardware Installation, 55
Hardware Requirements, 10
Installation
Configuration, 77
Hardware, 55
Software, 30
USB Modules, 55, 56
Installation Qualification (IQ),
45
Instrument Configuration
Manager, 77
Instrument Controller Service,
80
Instruments Supported, 9
Key Code, 9
License Activation, 47
License File, 8, 9
License Key, 7, 9
License Update, 47
Licensing Requirements, 7
Modules Supported, 9
Mounting Chromeleon 6
Datasource, 86
Operating System
Requirements, 12
PC Requirements, 10
PeakNet 6
Compatibility with ~, 25
Power Management
USB, 22
Windows, 22

Chromeleon 7
Installation Guide Page 99
Removing
Chromeleon 7 Data, 94
Chromeleon 7 Software, 91
Third-Party Software, 93
Requirements, 7
License, 7
Operating System, 12
PC Hardware, 10
Third-Party Software, 15
Security Updates, 14
Services Manager, 74, 77
Software Installation, 30
SQL Server Express, 16
Supported Instruments, 9
Supported Modules, 9
System Requirements, 7
Third-Party Software
Requirements, 15
Third-Party Software for
Instrument Control, 40
Tray Icon, 76
Troubleshooting
Hardware Installation, 57
Software Installation, 50
Uninstall
Chromeleon 7 Software, 91
Third-Party Software, 93
Uninstall
Chromeleon/PeakNet 6
Software, 31
USB Installation, 55, 56
USB Power Management, 22
User Manager, 88
User Mode, 88
WIBU-KEY Software, 17
Windows
Security Updates, 14
Windows 10 Enterprise, 13
Windows 7, 13
XVault, 81

© 2009-2017 Thermo Fisher Scientific Inc. All rights reserved.
Thermo Fisher Scientific Inc.
168 Third Avenue
Waltham,
MA 02451
USA
www.thermofisher.com
