Iso Buster 3.0 User Manual EN
User Manual: Pdf IsoBuster - 3.0 - User Manual User Guide for IsoBuster Software, Free Instruction Manual
Open the PDF directly: View PDF ![]() .
.
Page Count: 133 [warning: Documents this large are best viewed by clicking the View PDF Link!]
- IsoBuster
- Getting Started
- Features
- Data recovery
- Find Missing Files and Folders
- Create and complete a managed image file
- Check if all files are physically readable
- Try to find matching extensions for orphaned (nameless) files
- Generate a list of files with physical read errors
- Create a list of known erroneous sector addresses
- Perform a surface scan
- Play CD Audio
- CD-Text
- Extract From - To
- Directory tree and file information
- Sector View
- Add, Edit, Delete files in the list of files found based on their signature
- Options
- Options
- Communication (Interface)
- Communication (Read Settings)
- Communication (Read Remapping)
- Communication (Custom Read Remapping)
- File System Settings
- General File System Settings (Time Stamps)
- General File System Settings (Sorting)
- General File System Settings (Folder tree and file information)
- Plugins
- Recovery
- ISO File System Settings (Scan Options)
- ISO File System Settings (Text Conversions)
- ISO File System Settings (Mac)
- ISO File System Settings (Write Software specific)
- El torito (boot) patch
- UDF File System Settings (Scan Options)
- UDF File System Settings (Mac)
- UDF File System Settings (Streams)
- HFS File System Settings (Scan Options)
- HFS File System Settings (Mac)
- Files based on their signature
- IFO/VOB
- FAT File System Settings
- Language Support
- Image File Creation Settings
- GUI Settings
- Online Check
- Folders
- FAQ
- More Technical
- File Systems
- Icons next to files, folders and tracks
- CD/DVD Layout
- Track and Sector Modes
- Image File Layout
- Converting from/to different image file formats
- CD-i & VCD
- Bootable CD/DVD
- Write Applications and File Systems
- Errors during extraction
- Error Codes / Sense Codes
- Communication (Interface)
- Communication (Read Settings)
- Communication (Read Remapping)
- Communication (Custom Read Remapping)
- File System Settings
- General File System Settings
- Recovery
- MacBinary files
- Image File Creation Settings
- GUI Settings
- Online Check
- Folders
- No files present, only a track / session layout
- Use of command line parameters
- Show Extents
- Add customizable file-system
- Add, Edit, Delete extents
- Plugins

IsoBuster Features
IsoBuster is The Ultimate CD/DVD/BD/HD DVD data recovery tool !
Rescue lost files from a bad or trashed disc !
Save important documents, precious pictures or video from the family, your only system backup, ...
IsoBuster can do it all ! All common disc formats and file-systems are supported.
IsoBuster features :
o Data recovery from CD, DVD, BD and HD DVD.
o Better Error handling and several retry-mechanisms to aid you in getting the data anyway.
o The use of alternative ways to get to the data, get the best out of your CD/DVD-ROM drive.
o The use of alternative File-Systems to get to the data, make use of all content.
o CDs stay 'readable' after problems (such as Buffer Under-run).
o Read and Extraction of files, CD/DVD images, tracks and sessions from all optical media.
o Supports : CD-i, VCD, SACD, SVCD, CD-ROM, CD-ROM XA, CD-R, CD-RW, ...
o Supports : DVD-ROM, DVCD, DVD-RAM, DVD-R, DVD-RW, DVD+R, DVD+RW, DVD+R DL,
DVD-R DL, DVD+RW DL, ...
o Supports : DVD+VR, DVD+VRW, DVD-VM, DVD-VR, DVD-VRW, ...
o Supports : BD-ROM, BD-R, BD-R DL, BD-RE, BD-RE DL, BD-R SRM, BD-R RRM, BD-R
SRM+POW, BD-R SRM-POW, BDAV, BDMV
oSupports : HD DVD-ROM, HD DVD-R, HD DVD-R DL, HD DVD-RW, HD DVD-RW DL, HD
DVD-RAM, HD DVD-Video
o Mpg (*.dat) Extraction and dat2mpg 'in one'.
o Enormous File System coverage and ways to use them all (find the best one for your needs).
o ISO9660, Joliet, Romeo (Short File-names <-> Long File-names on mastered CDs)
o Big Endian (Motorola), Little Endian (Intel) (Windows vs. Unix, Mac and other systems' defaults)
o UDF 1.02 (e.g DVDs), UDF 1.5 (e.g. Packet writing on CD-R and CD-RW), UDF 2.01 - UDF
2.60, ...
o FAT 12, FAT 16 and FAT 32 support.
o HFS and HFS+, the Apple Mac file system.
o Full Mac properties, Resource Fork and MacBinary extraction support for ISO9660 and Joliet
o Full Mac properties, Resource Fork and MacBinary extraction support for UDF
o UDF Named Streams & Mac Resource Forks & Mac Properties to NTFS Alternate Data
Streams
o Rock Ridge (e.g. for Commodore users, Server use, etc.)
o VIDEO DVD interpretation based on IFO/BUP and VOB files
o Support for the VIDEO +VR standard
o Show and allow to extract the different recordings
o AUDIO DVD interpretation based on IFO/BUP and VOB files.
o Show and allow to extract the Audio recordings/tracks
o Information on and File system properties (must for FS developers)
o Scanning for lost files and folders (UDF, ISO, ...) .
o Find lost data on CD, DVD, BD and HD DVD created discs with drag and drop applications
(Direct CD, InCD, DLA, Instant-Write, Drag to disc, ...)
o Find lost pictures created and saved to CD with Mavica or other digital cameras.
o Find lost ISO9660/Joliet sessions
o Find files based on their signature.
o Ability to change the list of files found based on their signature, add, edit, delete file properties
to extract a file where on disc you want.
o Find lost IFO/VOB VIDEO/AUDIO File-Systems
o Find multiple sessions inside a single DVD+RW, DVD-RW, BD-RE or HD DVD-RAM track (e.g.
by Nero and Ashampoo on DVD+RW and DVD-RW)
o Auto find extensions based on file content to try and give an appropriate name to an orphaned
file.
o Support for Direct CD compressed files.
o Support for blanked DVD+RW media.
Page 1

o Support for Mount Rainier discs (CD and DVD) in Mount Rainier drives and in none MRW
capable drives.
o Automatic detection of Mount Rainier discs and automatic Method 2 and/or 3 remapping if
required.
o CD/DVD/BD/HD DVD Surface scan to see if there are physical read errors.
o Check if all files and folders are readable without having to extract to HD.
o Ability to make special image files (*.IBP / *.IBQ) which can be continued if not complete. This
allows you to make an image file of a CD/DVD/BD/HD DVD with many different drives, each drive
then completes the image file with parts it can read. So if many drives are able to read different
sections of a CD or DVD. Then you can use them all to complete one image files which then
contains *all* (or most) data.
o Compare Image Files with their checksum, provided via *.MD5 files.
o Single sector extraction. Extraction of CD/DVD/BD and HD DVD parts, fit to your needs.
o Sector Viewer. Check a sector's content in IsoBuster's editor and print or save to HD.
o Compile (and edit, save, print) lists of all files that contain physical read errors.
o Compile lists of all files, including their Logical block address (ideal to find the logical play order
for mp3 CDs)
o CD-Text support from CD, *.PXI, *.CCD and *.CUE image files.
o Creation of image files (*.iso, *.bin, *.tao)
o Creation of cuesheet files (*.cue)
o Creation of checksum files (*.MD5) for image files.
o Conversion of image files
o Handles opening of multi-file image files.
o Creation of multi-file image files or disc spanning to specified size
o Many other neat features the OS doesn't offer.
o Comprehensive help file
o Supports an enormous range of image files (see further)
o Automatic Online check to see if there is a newer version available.
o ...
o On top of this, Isobuster interprets CD image files, such as :
*.DAO (Duplicator), *.TAO (Duplicator), *.ISO (Nero, BlindRead, Creator), *.BIN (CDRWin), *.IMG
(CloneCD), *.CIF (Creator), *.FCD (Uncompressed), *.NRG (Nero), *.GCD (Prassi), *.P01 (Toast),
*.C2D (WinOnCD), *.CUE (CDRWin), *.CDI (DiscJuggler), *.CD (CD-i OptImage), *.GI (Prassi
PrimoDVD), *.PXI (PlexTools), *.PDI (Pinnacle), *.MDS (Alcohol xx%), *.MDF (Alcohol xx%), *.CCD
(CloneCD), *.VC4 (Virtual CD), *.000 (Virtual CD), *.B5T (BlindWrite), *.B5I (BlindWrite), *.DMG
(Apple Macintosh), *.000 (generic), *.aa (generic), *.IBP (IsoBuster), *.IBQ (IsoBuster), *.NCD (NTI
CD-maker).
o Support for 42 languages:
English, Dutch, Italian, French, Spanish, Portuguese, Brazilian Portuguese, Chinese (Simplified),
Chinese (Traditional), Czech, Danish, German, Icelandic, Greek, Serbian, Finnish, Polish, Romanian,
Swedish, Russian, Azerbaijan, Macedonian, Hebrew, Bulgarian, Hungarian, Slovakian, Afrikaans,
Norwegian, Ukrainian, Catalan, Slovenian, Lithuanian, Japanese, Galician, Estonian, Bosnian,
Croatian, Turkish, Indonesian, Korean, Arabic & Farsi. More Languages will follow.
Page 2

IsoBuster PRO
Starting from IsoBuster version 1.0 there's now the possibility to register a PRO version.
This does not mean that you need to download another version after registration.
The normal IsoBuster download can be changed to a PRO version.
Just unlock the PRO functionality with a Serial Key and Registration ID.
How to purchase a license and unlock PRO functionality.
PRO functionality unlocks high end data recovery from UDF CDs (And Image Files).
UDF is the File System used by Packet Write Applications such as Direct CD, InCD, Packet CD, DLA, ... .
UDF is also used on DVD and the occasional normal CD (next to other File Systems)
UDF is the preferred File System to be used with Mount Rainier.
Page 3
How to Register PRO functionality
Registering IsoBuster to get a PRO version is easy.
Order a key via Credit Card, Paypal, Bank Wire, Check, Cash, ... :
Click http://www.isobuster.com/buyisobusternow/ which will bring you to the Secure Online Pay site.
An IsoBuster registration costs $29.95 which is a small price for a powerful application ! If you choose any
of the amounts smaller than $29.95, no registration will be processed. However, feel free to select more than
one product ($29.95 included !) if you feel IsoBuster is worth more to you.
Once you have paid with your credit card, an automated script will send you a Registration Email,
Registration ID and Key within a few minutes. The confirmation Email will contain your payment confirmation
and also (so scroll down) the registration Email, ID and Key, along with useful information (Location of next
beta version, Help, ...). (Allow for a few hours delay in extremes but notify us
http://www.isobuster.com/isobustersupport.php when it takes more than 12 hours !)
Download and Install IsoBuster :
If you have not yet downloaded and installed IsoBuster, check out this section.
Once you have received the Registration ID and key via Email :
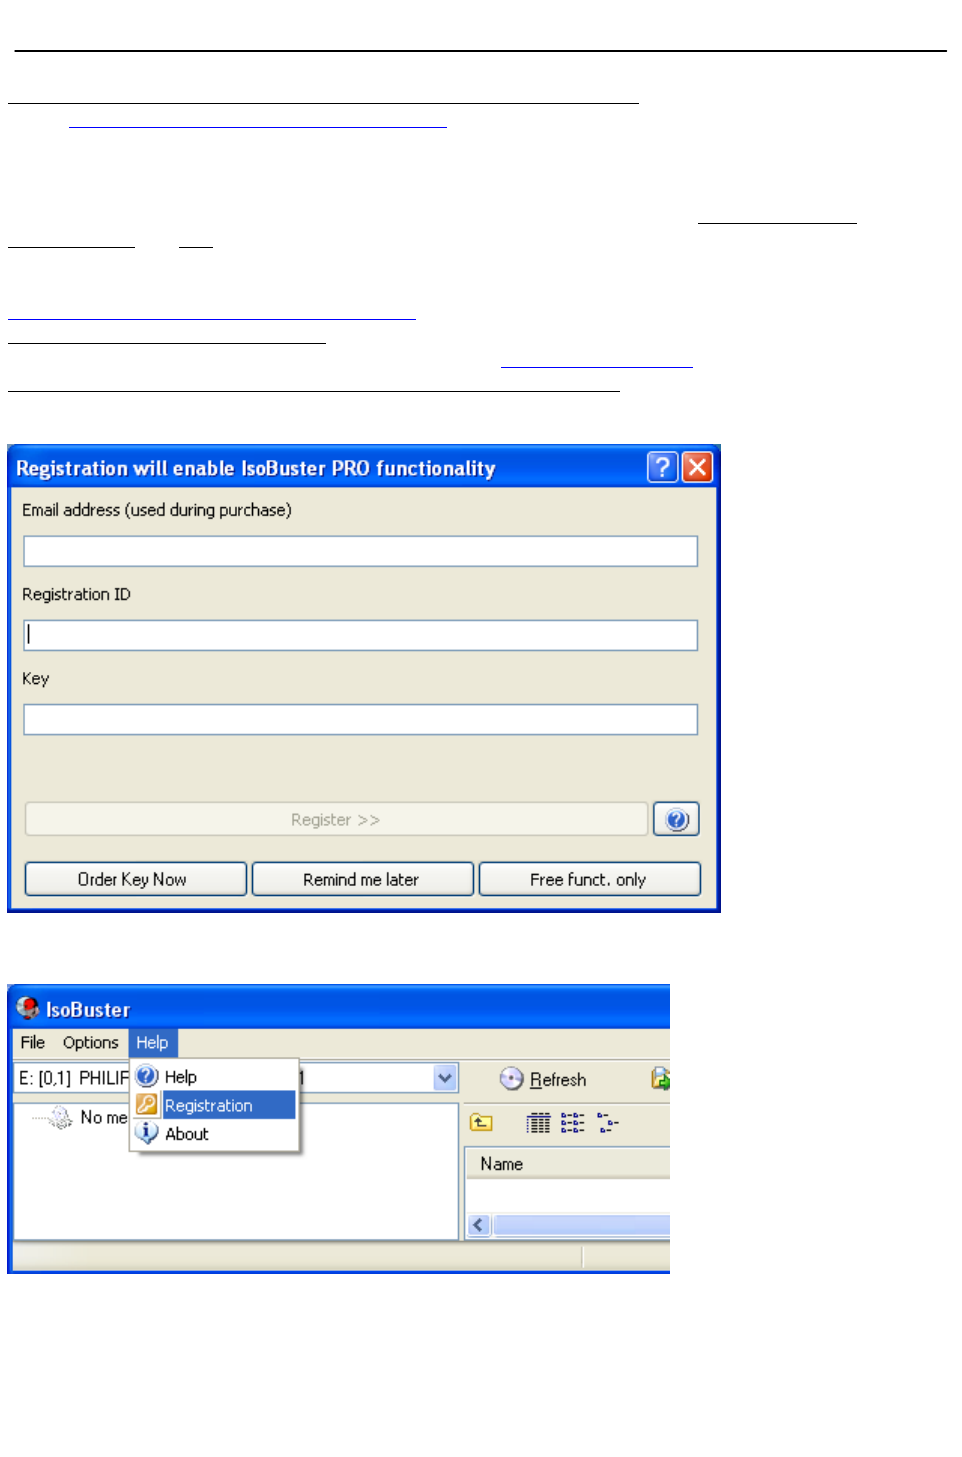
If you start IsoBuster for the very first time (after installation) you will get a registration dialog automatically.
See screen shot :
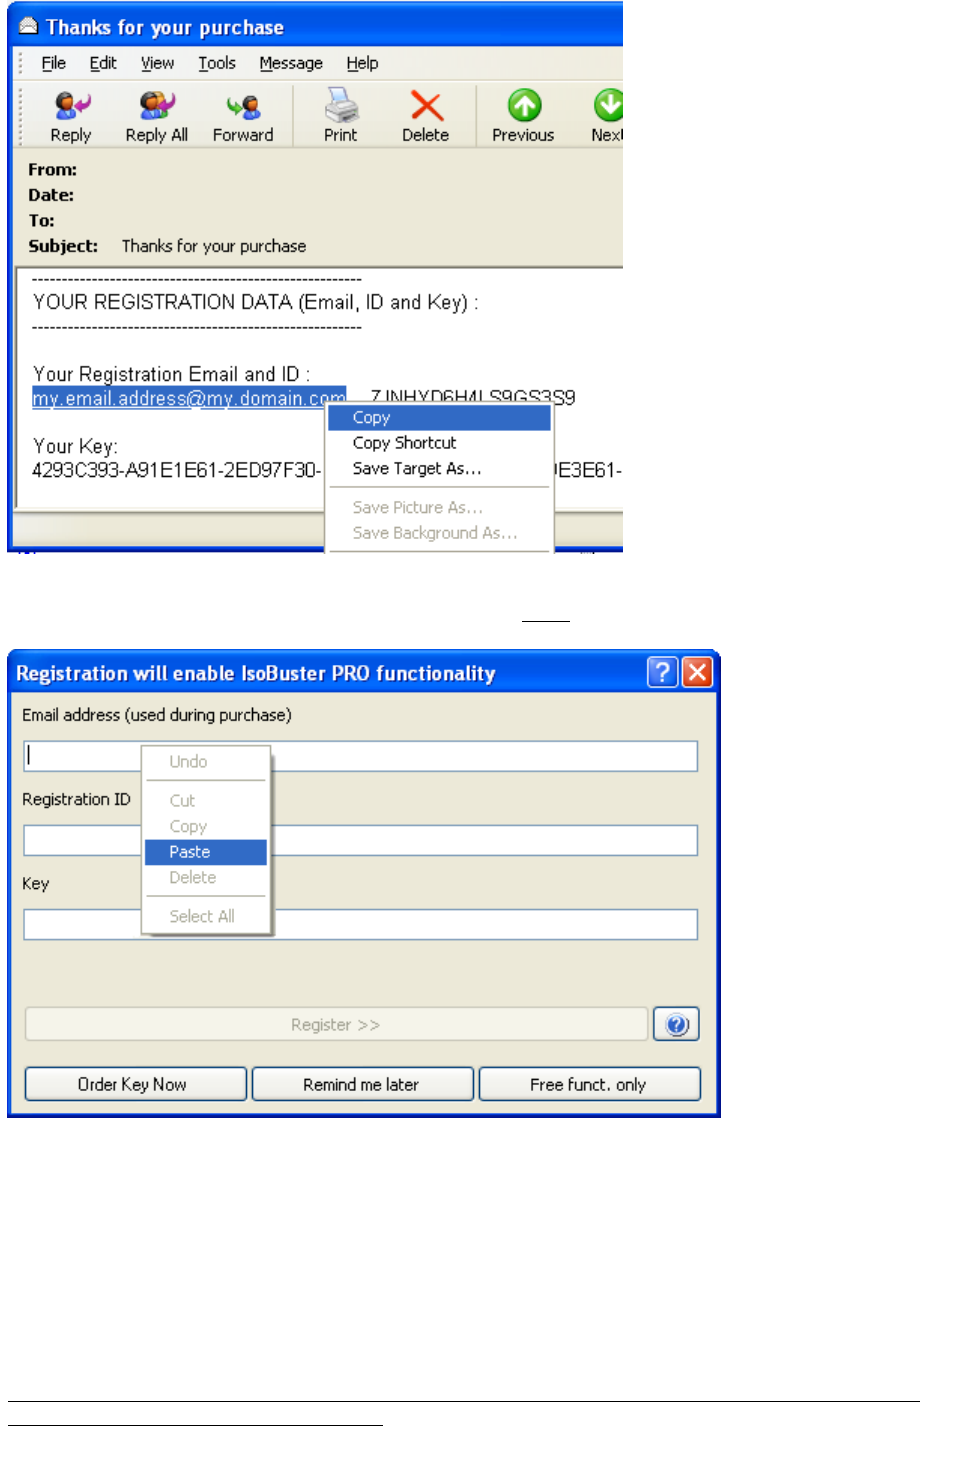
If you ran IsoBuster before and chose Free Functionality or Remind me later, Select "Registration" in the
main menu ("Help" / "Registration"). See Screen shot. This option will bring you to the registration dialog
(see previous screen shot).
Type in (or better yet : copy and paste from the registration mail) : the Registration Email, ID and Key in
the registration Dialog's Edit boxes.
Click the "Register >>" button which becomes active if the Email Address, ID and Key match and you will
unlock PRO functionality. As of now, this version will stay unlocked on your system. Even after uninstalling
and installing again, the version stays registered. If you update the program by installing a new version the
program will still be registered ! Just over-install the new version.
Page 4

In case of problems :
Problems Getting IsoBuster registered
Identify a registered version :
To find out if your version is properly registered or not, click the "About" option in the main menu : "Help" /
"About". If the About windows says "IsoBuster Pro" instead of just "IsoBuster" you have a registered
version. Additionally the about box says [Registered]
Page 5

Problems Registering IsoBuster Pro
Listed below are 5 possible questions you might have because for some reason you can't register the
product. Each question has an answer and should help you on your way. If you still have problems, don't
hesitate to contact Smart Projects. If you have a question about one of the listed Questions and Answers,
please mention which one.
1. You Cannot connect to the E-store (Where you purchase the product online) ?
Are you sure you are connected to the internet ?
Possibly the site is down ?
Please try again in a little while !
2. You entered the Registration Email, ID and Key in the Registration dialog but the Register
button stays disabled ?
A safety check in IsoBuster makes sure the Registration button only becomes active when the Registration
Email, ID and Key 'agree with each other' in a certain mathematical way. This is to make it obvious to the
user that incorrect data was entered so that the error can be corrected. The Email, ID and Key relationship is
complex and you cannot enable the registration button by accidently typing in a valid combination.
Do not try to enter another Email address. The email address that you used during purchase is now part of
the equation and has to be used.
The Registration Email, ID and Key have to be entered IDENTICALLY to what was sent to you via Email.
The easiest way is to copy and paste the content. (See further (topic 4) if you wonder what is meant with
'copy' and 'paste'). Copy and Paste is the best guarantee that you don't confuse a 0 (zero) for an 'O' (capital
'o') just to give an example.
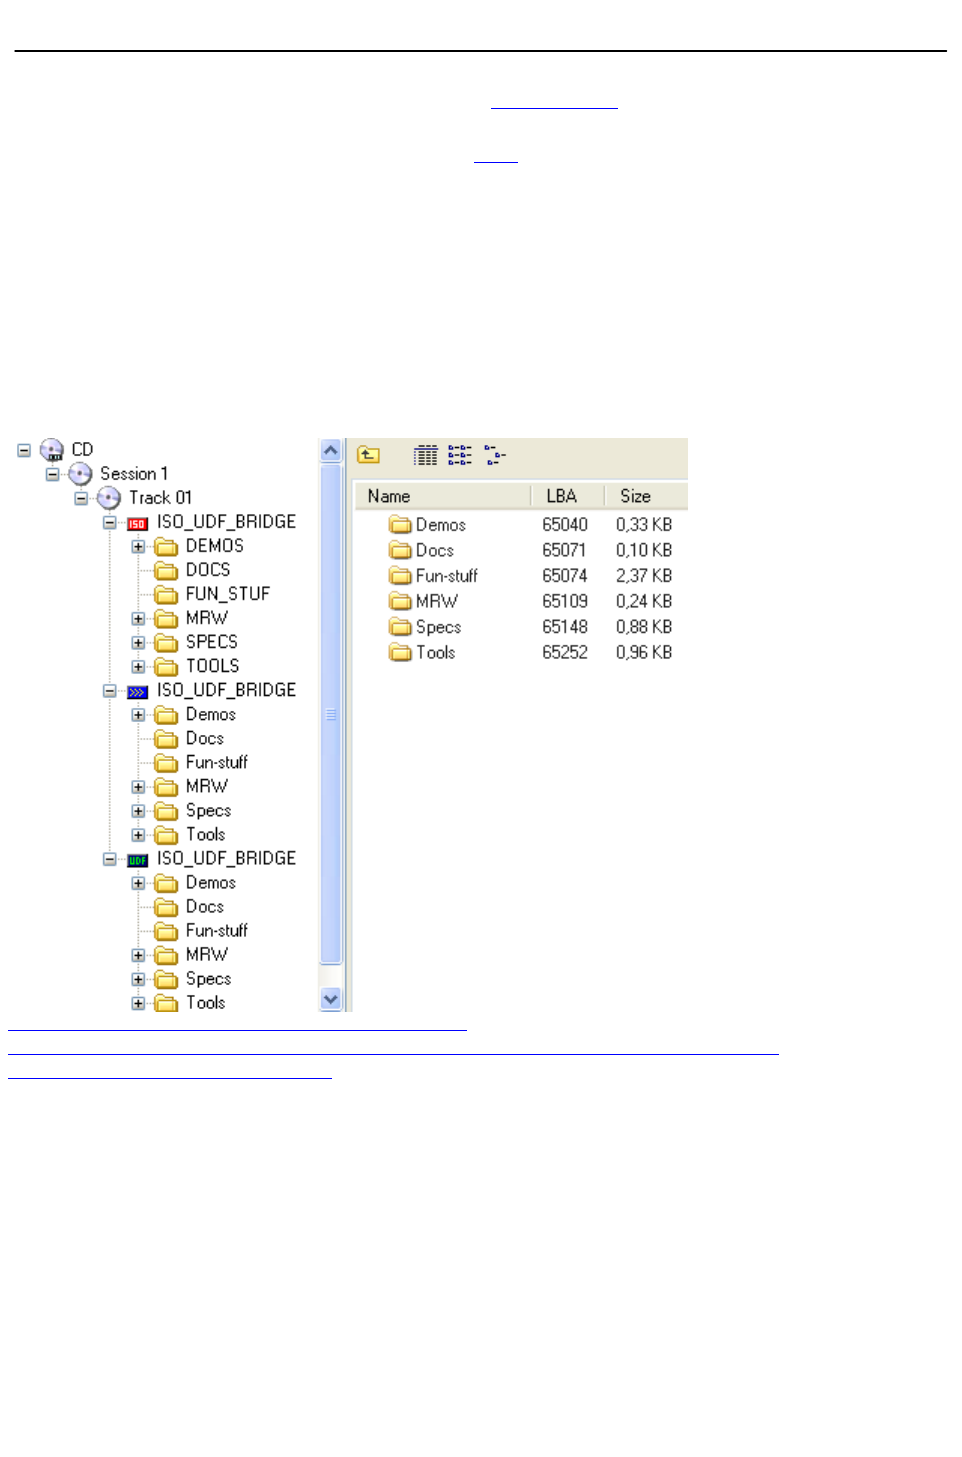
The Email:
Enter the email address that is mentioned in your "Thank you for your purchase" email. Do not use another
one, it won't work. If you provided a wrong email address, then use the wrong email address as that email
address is now part of your Email / ID / Key combination.
The ID :
The ID is a combination of 12 - 20 characters. You will recognise the ID of the E-store as part of the ID.
The Key :
Is ONE word and needs to be entered as such. 7 times 8 characters, separated by '-', so a total of 62
characters.
If you have an old ID / Key pair, where the email is part of the ID, Email and ID fused together with an
underscore ('_'), then you have an old key for the 1.x range of the program. Please check this page then.
3. You entered the Registration Email, ID and Key in the Registration dialog, clicked the
Registration button but got a message saying the Key is incorrect !?
Apparently the Email, ID and Key you entered passed the first safety but are nevertheless still incorrect !
The Registration Email address, ID and Key have to be entered identically to what was sent to you via Email.
The easiest way is to copy and paste the content. (See further if you wonder what is meant with 'copy' and
'paste')
Copy and Paste is the best guarantee that you don't confuse a 0 (zero) for an 'O' (capital 'o').
4. How do I 'Copy' and 'Paste' the Email addres, ID and Key in the Windows' Edit Box ?
Simple, really !
Page 6
In the Email : select the complete Email, or the complete ID or the complete Serial, next click the right
mouse button and choose "Copy". This will copy the selected text to the clipboard, which is memory
managed by Windows especially for this purpose. Choose Copy over Copy Shortcut because "Copy
Shortcut" adds text ("mailto:) to the Email which is undesired.
Next, position the cursor on the appropriate edit box in the registration window. If you copied the Email,
position the cursor in the Email edit box. If you copied the ID, position the cursor in the ID edit box. And the
same for the Key. Click the right mouse button again and this time choose "Paste". Paste copies the text
from the clipboard to the desired control.
For those who are a bit more skilled or would like to learn a new skill, you can also use the standard
Windows key combinations to do the same and it is much faster once you're used to it. You can use these
Windows key combinations in most applications and after a while you will notice they make life easier:
To copy the text from the email to the clipboard :
Select the Email, ID or Key in the Email. Press both keys 'ctrl' and 'c'. The text is now copied to the
clipboard. Next, position the cursor on the Email, ID or key edit box and press both keys : 'ctrl' and 'v'. You
now copied the content from the clipboard in the edit box control (in other words 'Paste').
5. The option to register is disabled (grayed out). You cannot evoke the registration window so
how can you enter the purchased key ?
Page 7

IsoBuster can not be registered again and again. Once registered the option is disabled. There's no need
to register again, your key stays valid even when you upgrade to a new version. If you could not resist to try
a 'not so legal' key found on the internet first this probably is the reason why you got stuck. I have no control
over what can be found on the internet and I have seen the funniest things. Don't despair, send me an email
explaining the situation (be honest, include your valid purchased ID and Serial) and I'll tell you how you can
remedy the problem.
If still no success, contact us: http://www.isobuster.com/isobustersupport.php
Mention the topic (above) that best matches the situation you are experiencing please.
Page 8

IsoBuster on the Web
IsoBuster can always be found here : http://www.isobuster.com/
To get the most recent, virus free, official build, always go through this website !
Or directly : http://www.isobuster.com/isobusterdownload.php
If you want to check out the latest and greatest stable in-between (beta) version,
use this link : http://www.isobuster.com/isobusterbetadownload.php
For support,
use this link : http://www.isobuster.com/isobustersupport.php
For Help (same help file but maybe a bit more up to date),
use this link : http://www.isobuster.com/help.php
To read the latest reviews and see the awards etc.
use this link : http://www.isobuster.com/reviews.php
To read people's testimonials
use this link : http://www.isobuster.com/testimonials.php
For Tips and Tricks and How-to manuals:
use this link : http://www.isobuster.com/tips.php
For news, what's new etc. :
use this link : http://www.isobuster.com/news.php
Page 9

Version History
Isobuster 3.0
Support for:
Thumb / Flash drives
SD disks / drives
Compact disks / drives
MMC disks / drives
SSD disks / drives
Jaz disks / drives
Zip disks / drives
Floppy disks / drives
HD disks / drives
NTFS
And more ...
Isobuster 2.8.5
Changes:
- A great deal of new extensions were added to the signature detection which happens during a search for
missing files and folders. Besides a large number of various files, picture formats and multimedia files there's
now also accurate detection of documents such as: *.wpd, *.sdw, *.odt, *.sxw, *.sxc, *.sxi, *.sxm, *.std,
*.ott, *.ots, *.ods, *.odb, *.odg, *.odf, *.odp, *.wb2, *.nsf, *.max and most Office document formats, such as
*.doc, *.docx, *.xls, *.xlsx, *.ppt, *.pptx, *mdb, *.pst, *.pub, *.vsd, *.rtf, *.db, *.one, *.wri, *.msi
- Command line support has been enhanced with a large number of new parameters and combinations.
Besides initiating "/scan" and extracting the files found based on their signature "sig:" there is now also the
possibility to extract "all:" tracks / sessions / file systems, dynamically change the names of the extract-to
files or folders, export file-lists ("/tree") based on a number of parameters/ tokens etc. Best check the details
in the help file for more information
Improvements:
- UDF scan for missing files improvements, so that in case of many references to VAT tables not the same
sectors are read again and again, and so that duplicate UDF FS are not listed anymore
- Updated EWF support to the latest and greatest status of the LibEWF project
- Ability to "OK to all" on Windows IO errors during extraction to avoid X amount of such dialogs when
multiple files are processed
- Always display a message after a forced online check, even if it is the most recent version, and even if the
user set not to display beta or final version warnings
- The cue file full path was displayed in the Save Dialog control instead of only the filename.
- Various other GUI improvements
Fixes:
- Small issue that caused some DVD IBP/IBQ images to be recognised as CD, so that they could not be
completed anymore
- Small issue that caused some IBP/IBQ images with gaps to be reported without gaps
- Fixed a very rare crash caused by a buggy UDF file system, while scanning for missing files and folders.
- The md5 file was not put in the proper folder when set to create automatically after image file creation.
- Fixed issue that caused the last found file, based on its signature, to be one block short in length.
Isobuster 2.8
Changes:
- Plugin support for IsoBuster: Opening image files
- Plugin support for IsoBuster: Creating image files
- Installing and/or loading plugins via the GUI and command line parameters
- Support for multi-file CUE sheets & PREGAP directive
- Wave file support when loading multi-file CUE sheets
- Support for *.RMG Image files
Improvements:
- Escape sequence in HFS support to deal with HFS bug so that certain HFS file-systems can still be found
- Add file-extensions only when no file extension is present yet for files in the HFS(+) file system
- Updated the HFS extensions database
- Workarounds for buggy ISO9660 file systems created by professional DVD mastering software (affecting
commercial DVDs)
- Improved IFO/VOB file system finding in case of badly mastered Video DVDs
- Show layer break address
Page 10

- Various other GUI improvements
Fixes:
- Fix so that CD-Text is shown again when present in a CDT file (associated to a CUE file)
- Fix so that the associated CDT file is also MD5'ed when the entire image file is MD5'ed
- HFS(+) Fix to find additional file extents (>8) that are referenced from the Overflow file.
- Fixed possibly incorrectly reported size of VIDEO_TS.VOB in the IFO/VOB file system
Isobuster 2.7
Changes:
- Support for interleaved files in the ISO9660 / Joliet file-system (rare but it can happen)
- Support for Right to Left reading languages and their optimized language dlls
- Proper print functionality from the View/Edit text window (formatting, copies, collate etc.)
Improvements:
- Hard coded ignore of drive "HUAWEI Mass Storage" which is a USB modem with CDFS and which returns
drive type CDROM, but it behaves badly and causes crashes
- Implemented *.cwk file-type recognition for found files based on their signature
- Ctrl-p (Print) and Ctrl-s (Save) implemented in the View/Edit text window
- Implemented ability to read raw on DVD in [Business] mode when the disc is Blank (some rare drives allow
this on readable media without TOC, but they return user data, which is then remapped to raw by IsoBuster)
- Program start-up speed improved by skipping network drives to avoid long delays
- Create MD5 of image filename dialog improved
- Various other GUI improvements
Fixes:
- In rare cases, on Windows OS with particular settings, the program would start with an "Invalid code page"
error. This has been fixed
- Fixed issue that made the online check occur despite the user saying No
- Fixed it so that the nag screen doesn't show at the first try
- Fix in CueSheet handling to better deal with image files containing different block sizes per track
Isobuster 2.6
Changes:
- Unicode support via all aspects of the Graphical User Interface (GUI), Dialogs etc.
- Full Unicode support during the installation (e.g. install Chinese on a US system etc.)
Improvements:
- Ability to select text encoding (Unicode, ANSI, UTF8, ..) when saving text from the editor window
- Ability to select text encoding (Unicode, ANSI, UTF8, ..) when saving file-system data (e.g. file-list) to a
text file
- Implemented *.qic file-type recognition for found files based on their signature
- During extraction of *.M2TS files, and when there's an error, the replace with zero block option is now
available
- Added support for localized Bytes / KB / MB / GB / TB when displaying a byte size (for instance in the
right panel)
- Implemented a workaround for badly mastered Roxio (Retrieve) UDF discs, possibly in combination with
spanning several discs
- Various other GUI improvements
Fixes:
- Fixed rare and not likely to happen crash during scanning for missing files and folders on a particular
dataset where structures resembled FAT but were not
Isobuster 2.5.5
Changes:
- Expert Witness Format image-file support (*.E01, *.S01, *.L01)
Improvements:
- Improved support for Japanese text in DVD-VR Label and Title
- Implemented *.orf file-type recognition for found files based on their signature
- Implemented *.ncd file-type recognition for found files based on their signature
- "Do not bother me with this message" option in message when going online
- Command line parameters: "/nodrives" and "/nosplash"
- Improved error message when it's impossible to open or create a file
- Improved font support in the editor window when displaying text other than sector view
- Do not prompt to make a CUE file if the actual image file was deleted after errors
- The Windows shell command "extract" will now start with "/nodrives"
- Various other GUI improvements
Page 11

Fixes:
- The program now prompts to overwrite a resource-fork-only file on an NTFS system (rare situation)
- Fixed double prompt for action when NTFS stream(s) and the main file would contain read errors
- When tracks are dragged and extracted, but are split into muliple files, all subfiles are now moved as well
from the Drag temp folder to the final folder
- Fixed very rare instance where aborting extraction of a track would cause the next track to be skipped
entirely
Isobuster 2.5
Changes:
- Support for UDF Named streams in the core engine
- Ability to extract UDF Named Streams to NTFS Alternate Data streams (default ON)
- Ability to show UDF Named streams as separate files, for analysis, a [Business] feature
- Support for UDF System streams (shown in a separate UDF file system)
- Ability to extract Mac Resource forks (from UDF / HFS or ISO9960) to NTFS Alternate Data streams
(default ON)
- Ability to extract Mac Properties (from UDF / HFS or ISO9960) to NTFS Alternate Data streams (combined
with resource forks)
- Ability to include folder information when creating a File List (Need to enable in Options)
- Implemented Command Line Parameter "/ep:" to avoid poppups during automated extraction
- Support for VMWare Hard Drive *.vmdk image files containing FAT
Improvements:
- Improvements to detect and find more FAT partitions
- Recognition of Dynamic partitions
- Improved support for *.gi multi-file image files
- Removed "This is a packet written disc. Errors are not abnormal on this disc" warning for all type discs
other than CD
- "UD.DAT", a typical BD mastering file, is now part of the files that are automatically recognized when
opening an image file.
- Ability to open and support for VMWare Floppy *.flp image files
- Do NOT prompt and ask if a file should be over-written when going through the temp folder (e.g. drag and
drop)
- Display 8 characters in a File List (e.g. 00000001) instead of 7, because for BD Dual Layer (which can
contain up to 50 GB) 8 characters are required
- Various GUI improvements and changes
Fixes:
- The Toolbar does not change the homepage anymore
- Fixed extremely rare exception error, seen only on one data set, during the "Find missing files and folders"
scan
- Fixed issue that prevented BD drive write-ability to be detected properly when no BD disc was mounted
- Fixed negative % progress when verifying files on DL BD discs with over 40 GB of data
IsoBuster 2.4
Changes
- FAT12, FAT16 and FAT32 support
- Show deleted files and folders from the FAT file-system immediately
- "Find Missing files and folders" now includes finding orphaned FAT folders
- "Find Missing files and folders" now includes finding FAT partitions
- Ability to automatically check the boot image file to see if it contains FAT and list its files and folders if
available (needs to be turned on in the options)
- Recognition of BDAV files via their signatures, during a scan for missing files and folders
- Custom remappping - Jump Offset and Jump Value - Via Options, [Business] feature for professionals
Improvements:
- Ability to show and use only short file-names from the FAT file-system
- Various options related to mounting and scanning for FAT files and folders
- Added more file-types to the file recognition by signature functionality
- Via Windows itself, right click image file "Extract" feature implemented
- Added *.dsk, *.ima, *.vhd and *.vfd support when opening disk image files (these files, when they contain
FAT, will open just fine)
- Date / Time and Size can now also be exported to a file-list
- Changed various default options on a system that hasn't had IsoBuster (recent version) installed yet
- Installer will ask to close IsoBuster when already running to avoid Windows overwrite errors (Installer error
Page 12

5)
- Display text in the listview (right pane) when folders are empty to avoid confusion
- Various other GUI improvements and changes
Bug Fixes:
- Fixed incorrect length for some boot image file-names
IsoBuster 2.3
Changes
- Support for DVD-VR (show different recordings)
- Support for DVD-VFR discs. Auto-detect the IFO / VOB / BUP file-sets
- Support for the DVD+VR standard on DVD-R/W discs
- Support for DVD+VR 2.0
Improvements:
- DVD+VR Title of recording shown (if available)
- DVD-VR Title of recording shown (if available)
- DVD+VR TimeStamp parsed and shown
- DVD+VR "ULEAD SYSTEMS" workarounds (2.0 without proper Video start address / 2.0 without version
byte set)
- Find -VR recordings while scanning (if enough UDF data is found as well)
- Show GMT Offset when date-time is known for an IFO file object
- Auto-recognition support for 2056 byte / block image files
- Added IsoBuster path to DOS box PATH variable
- SectorView via the command line
- Open / Close via the command line
- Set install exe's file-version
- Remember size of ListView Columns
- Display address of Metadata file in UDF properties window
- Improved Time and Date display in ListView. Take User-set variations in acount when present.
- Various smaller improvements.
Bug Fixes:
- Fix for UNC file-paths (and other protocols) when passed via the command line
IsoBuster 2.2
Changes
- Support for command line parameters (See help for syntax)
- Support for mkisofs El Torito Patch (boot image)(Enable in options)
- Support for spanned *.dmg image files. (*.dmg, *.002.dmgpart, *.003.dmgpart)
- Option to specify that extraction of image files is in *.ISO format, rather than *.TAO or *.BIN (See options)
- Image file extraction save dialog, 'save as type' allows to select between *.ISO and *.TAO or *.BIN
- Ability to hide [Business] features via options.
[Business type license]
- Show file extents. (Show the different parts of a file, when it is fragmented on disc)
- Ability to add (change) extents on custom created files (e.g. Lost and Found and Customizable file system)
- Ability to add a customizable file system (where you can add, edit files, for engineering purposes)
Improvements:
- Show [xx%] status in task bar at the bottom, during extraction.
- Improvements for UTF7 and UTF8 interpretation.
- More progress information is exposed when completing a managed image file.
- Various smaller GUI improvements, e.g. icons.
- Various smaller improvements.
- Turned off message asking to turn on admin rights on a system other than XP.
IsoBuster 2.1
Changes
- Added font recognition (e.g. true type) during the scan for missing files based on file signatures.
Improvements:
- Work around for bad behaving drives that return a start addres other than 0, for the first track on a DVD-R,
using certain commands
(e.g. seen with LITEON DVD-ROM LTD 163 but can quite possibly also occur with other drives)
- Work around for bad behaving drives that return a track length of 0, for tracks on DVD-R, using certain
commands
(e.g. seen with HL-DT-ST GDR8162B (fw 0015) but can quite possibly also occur with other drives)
- Updates, content and translations, in Help, Installer and Program resources.
Page 13

- Various graphical improvements for VISTA. Text cut due to window width, flickering of progress bar etc.
- Disabled Asynchronous Drag and Drop on VISTA systems again. Sometimes this lead to an error
message, the second time a drop was done.
- Various smaller improvements.
Bug Fixes:
- Various smaller bugfixes.
IsoBuster 2.0
Changes
- BD (Blu Ray) and HD DVD support.
- UDF 2.6.
- Implemented the ability to use other system installed code pages, such as MAC, SYMBOL, UTF8 etc., for
ISO9660.
- Properties for drives show, next to CD and DVD, also BD and HD DVD Read and Write capabilities.
- Installation and IsoBuster.exe are now code signed to make Windows (more or less) happy.
- Implemented ASynchronous Drag and Drop (file extraction) on VISTA systems to avoid the VISTA
over-write dialogue to become stuck under the IsoBuster window, which looks like a hang, but it isn't.
- VISTA style directory icons when ran on a VISTA system.
- Start with font Tahoma on XP or Segoe UI on VISTA.
- Smaller changes here and there.
Improvements:
- Default to SPTI on a VISTA system, even when the app is not running in admin mode.
- Now possible to drag files immediately to the XP writer drive letter (staging area)
- HTML help would not launch on VISTA due to OS changes. This is now correctly implemented.
- On VISTA the Panel with image-file-name was often not properly painted. Changed the Panel with a another
Windows component.
- File-extension associations setting in the installer now improved with 'set all', 'clear all' buttons.
- HFS(+) Mac File System, with multiple of 512 byte blocks support.
- Cut long boot image-file name to spec value (if not delimited by terminating zero) to avoid illegal filename
according to Windows.
- Improvements in the file-type-recognition code (files found based on their signature): *.qt, *.kbf
- Added *.VRO to the file-type list that gets the dialogue that also offers to replace with all zeroes on read
errors.
- Directory (Folder) names are now ALWAYS trimmed on the right side, if the file-system contains such
folder names. Windows cannot create a folder name with a trailing blank, so file extractions to that folder
would fail.
- Release SPTI handle immediately of all non-optical devices. No reason to keep it open during program
execution.
- Do not automatically suggest to create an IBP/IBQ file anymore if the "drive" is in fact an image file ! (any
image file).
- Properties' dialogues for files and folders now show the attributes (A,R,S,H,C)
- Various small improvements here and there.
Bug Fixes:
- In certain situations, with certain DVD discs, on certain DVD drives, not all sessions were seen. This is
now fixed in the new CD/DVD recognition engine.
- Fix in Boot Emulation size determination. Before, the actual amount of 512 byte blocks was not correctly
taken in account. In real life however the implementation was correctly dealing with most situations out there.
- Fixed that +VR recording-sizes were wrapped when the recording is larger than 4 GB
Check the older version history, for versions older than 2.0, here
Page 14

Installation
If you have not yet downloaded and installed IsoBuster, get IsoBuster here :
http://www.isobuster.com/isobusterdownload.php
Choose "All Languages" or "English only". This is up to you, the all languages version simply contains a lot
of extra language dlls so that you can choose your language interface inside the program.
Next you can install the program by double clicking the installation program. The install wizzard will
guide you through the process.
When you are asked if you want to register file extensions, "Which file types do you want associated with
IsoBuster", Check the Image File types you want IsoBuster to open automatically. The File Types you have
checked will automatically open in IsoBuster if you double click them. (E.g *.bin, *.iso, *.cif, ...).
This option might be a bit confusing. Image files are identical copies of CDs or DVDs, stored block per
block, in regular files which you can keep on a Hard Drive or any other medium. IsoBuster is able to open
these files and treat them as a regular CD or DVD discs. The extensions you can select in the "Select file
associations" window are extensions of such image files. Image files come in many flavours, created by
many different applications. Therefore there are so many different extensions listed in the "Select file
associations" window. Example : a *.ISO file is the most common image file variant out there and is
supported by different write applications. If you check (*.ISO) in the "Select file associations" window, after
installation, when you double click an .iso file, IsoBuster will automatically start and load the image file and
will show you all the files in the image, as if the image file were a CD or DVD. If your sole use will be Data
Recovery from CD or DVD then there is no need to check these extensions in the "Select file associations"
window. However if you want to keep IsoBuster installed on your system, then it makes sense to select
them anyway. Next time when you're confronted with an image file, IsoBuster will be installed and ready to
open the image file for you. More on this online: Installation guide for IsoBuster: "Select file associations"
explained.
Create a Desktop icon will leave a shortcut on your desktop
Create a Quick Launch icon will place a shortcut in the bottom right corner of the Windows taskbar (default
position)
For Your Information:
IsoBuster will ask you to enter the ID and Key on first startup. if you purchased a Key you can do this now.
Else select "Remind me later" or "Free Functionality only".
In case you have problems entering the Email address, ID and Key, check out this section.
An IsoBuster installation does NOT require you to reboot the system !
An IsoBuster installation does NOT load any special drivers and does NOT copy files to any other directory
than the directory in which you chose to install IsoBuster.
Uninstallation of the program:
You can easily uninstall the Software if you like. To uninstall click on the Windows "Start" button, click "
Smart Projects", click "IsoBuster" and finally click "Uninstall IsoBuster"
Or, alternatively, via the regular Windows uninstall functionality by clicking on the Windows "Start" button,
then clicking on the "Settings" button, then clicking on the "Control Panel" button, then clicking on the "
Add or Remove Programs" button, then selecting IsoBuster and finally clicking on the "Change/Remove"
button. Make sure the application is closed before starting the uninstallation process.
Page 15

Development
IsoBuster is a product of Smart Projects,
owned by Peter Van Hove, CEO, CTO, ... .
IsoBuster is developed entirely via Borland C++ Builder.
The knowledge it contains is largely gathered from experience, while working for a major player in the optical
industry. Specifications that have helped me implement the capabilities (to a certain extent) can be found
here :
http://www.ccs.neu.edu/home/bchafy/cdb/info/info.html
http://www.ecma.ch
http://www.unicode.org
http://www.osta.org
Furthermore, and not that I really had to use them, after all this stuff is my cup of tea, I also want to share
some good CD knowledge resources. Andy McFadden and Mike Richter have written some great online
FAQs :
http://www.cdrfaq.org
http://www.mrichter.com
For the support of the "Expert Witness Compression Format" (EWF) we rely on the work done by the Libewf
people:
http://sourceforge.net/projects/libewf/
Special thanks to Joachim Metz.
Page 16

File Locations
In the directory in which you installed IsoBuster, a folder called 'lang' was created. This folder contains all
the language plug-ins that are installed via the installer.
Suppose you want to install a later version plug-in for your language (e.g. you noticed on the website that
there's a later version Your_language.dll available). If you have downloaded this more recent version you can
simply copy the dll in the lang folder. If the file already exists, just copy over it. If Windows complains the
file is in use, shut down (all running copies of) IsoBuster, and try again.
In the same IsoBuster folder, another folder, 'help', was created during installation. This folder contains the
Help file that is loaded by IsoBuster when you press F1 or click the help button. You can download updated
or translated help files from the website: www.isobuster.com/isobustersupport.php
and place them in this folder.
Association is automatic. For instance if you have selected the French language then the French help file
will be loaded, same for Italian, Spanish etc.
Page 17
Starting with IsoBuster
Using IsoBuster is in fact easy. You just need to know a few things :
Scanning a CD / DVD / Image File layout and File-System(s) is done automatically, once the
device is selected.
Actions are triggered by selecting an object (track, file, directory, ...) and clicking the right mouse
button.
IsoBuster is many tools in one, don't let it confuse you. E.g. don't go creating an image file if you
just want to recover data etc.
When you select a drive or an image file, the CD / DVD in the drive or the image file will be scanned
automatically. The content will be listed immediately, the session(s), track(s) and file-systems.
If you don't see anything, it means IsoBuster could not detect anything or the device is still mounting the
media. In case of the latter, wait till the media is mounted properly by the drive. In most cases you can
monitor this by looking at the LED behavior of your CD/DVD/BD/HD DVD drive. There are cases when the
CD / DVD / BD / HD DVD reader will not mount media anymore because it is beyond recognition ! If the drive
doesn't mount the media, IsoBuster will of course also not be able to access the media.
An examples of what you can see :
For more information on track and session layouts.
For more information on File Systems, what are they, why different but identical ones, ...
For more information on Image Files.
Page 18

Select Drive / Image File
To select a drive you simply have to use the drop down box on the top left-hand side. All the
devices found during the system scan are listed there.
To open an image file, click on the Open Image File button in the toolbar.
Once an image file has been opened, a virtual device will be added to the drop down box on the top
left-hand side. The virtual device stays active and the image file stays loaded even when you switch
to another device in the drop down list. Only of the image is closed will the virtual device be removed
again. You can open an infinite number (system resources limited) of image files at the same time.
Each time you open an image file a new virtual device will be added to the drop down list. You can
then switch between image files by just selecting the preferred one via the drop down box.
The "Open Recent" option allows you to quickly open previously opened image files, if they are still
located at their previous location. You can remove files which are not present anymore on their
previous location by "Remove Obsolete". "Remove All" cleans the entire list. The list acts as a
FIFO: First In, First Out.
More on Image Files.
Page 19
Extract Options
Extraction of a file, directory, CD/DVD as image file, ... is easy ! Just select the object you want to extract,
right mouse click and choose Extract. In most cases the best choice is the choice offered in bold.
IsoBuster supports several extraction methods and they also slightly differ from object to object. But like
said, choose the Extraction method in bold and chances are you get what you wanted.
If you're a bit confused about the term 'extract' you could also see it as : Copy from the CD, DVD or image
file to another location (e.g. your Hard Drive)
Still, it is wise to read this through at least once to understand the possibilities.
Extraction methods :
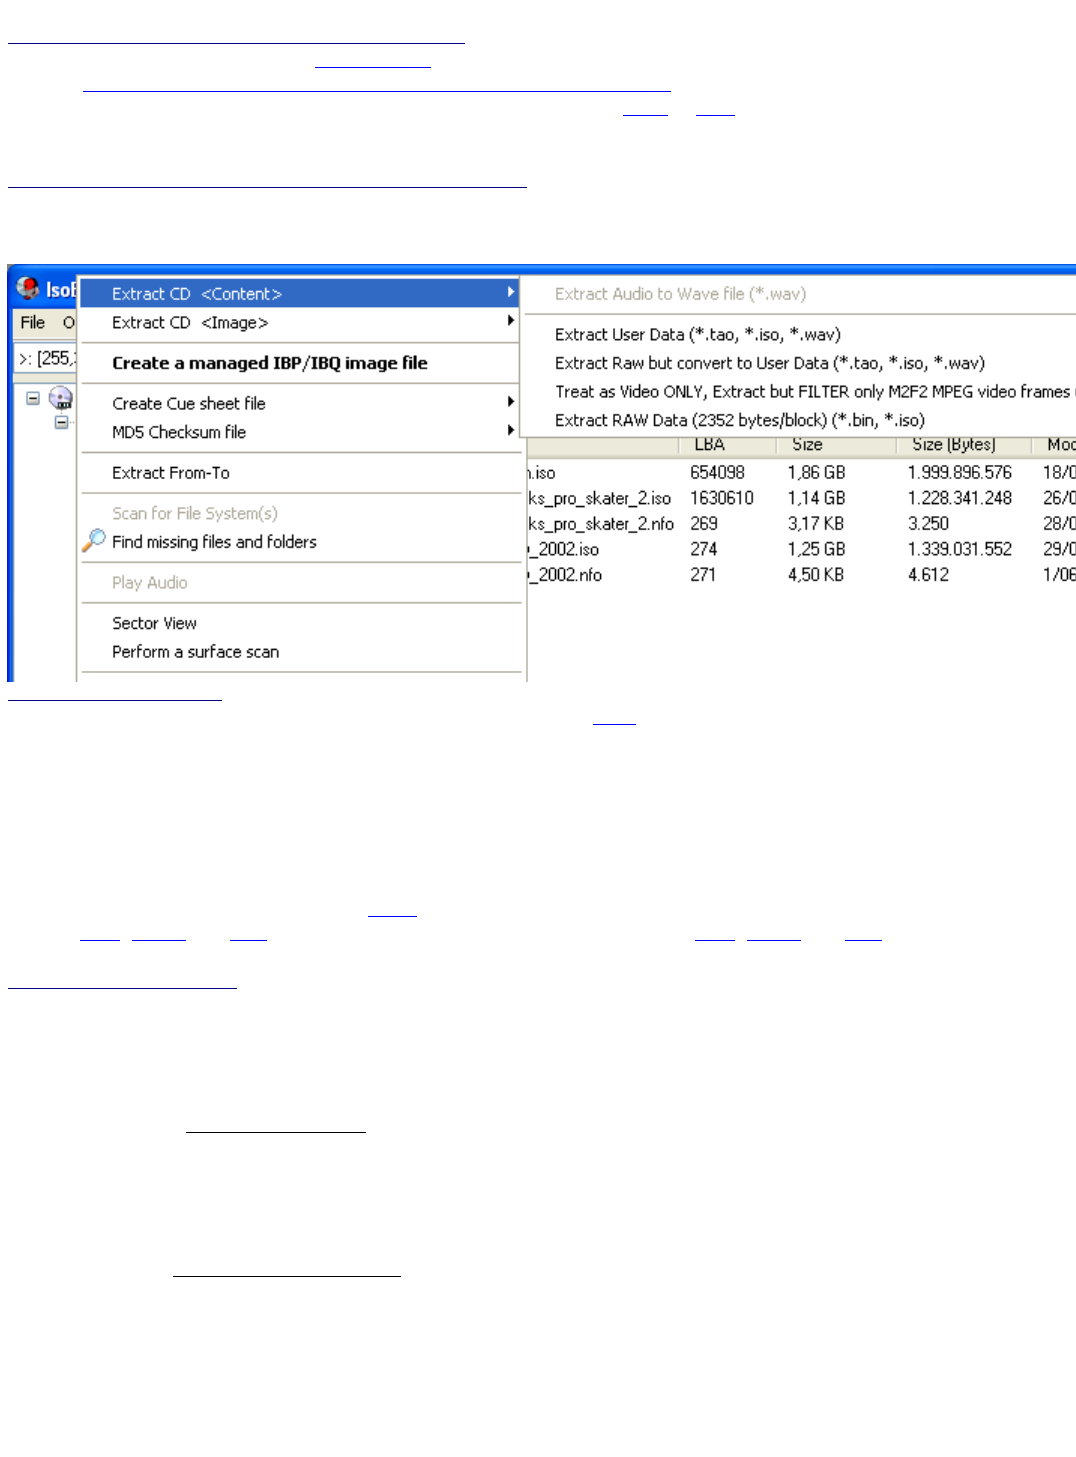
Extract
This will extract files and folders like they are meant to be extracted.
Only the 'user data' portion per block is saved to the files as the CD/DVD-ROM device is instructed to only
deliver this data. Files extracted in this way can be opened like any other normal file. In some cases
IsoBuster decides to actually use 'Extract but convert to User Data', but this happens seamless and you
shouldn't worry about this.
Extract User Data
This is actually the exact same mechanism as described in 'Extract'. (See above)
Extract Raw but convert to User Data
This method will extract all blocks Raw. This means that the CD/DVD-ROM drive is instructed to not only
deliver the user data portion per block but also to deliver the complete Raw block. IsoBuster (instead of the
drive) will then decide on the mode and extract the correct user data portion per block.
The resulting files and folders will be the same as if you extracted them normally ('Extract')
Extract but filter only M2F2 Mpg frames
This extraction method should only be used if you suspect certain tracks or folders contain Mpg Video Data
in Mode 2 Form 2 sectors, and if it is the Video Data you're after. This kind of Video Data can be found on
VCD, SVCD and CD-i. In fact, this option is what other smaller and dedicated apps call 'dat2mpg'. You can
extract a *.dat file from a Video CD like this en end up with the pure mpg video data, without the overhead
Windows extracts (if it even works under Windows). This 'clean' Video you need when you want to use the
mpg data as input for your own Video CDs.
If you use this method in an Image File, the image file will need to be recorded Raw. If not recorded Raw,
this option will be grayed out. DVDs only have one type of blocks and they contain only user data (there's
no such thing as special mode blocks for Video Data). So in case of DVD, this option will be grayed out.
Extract Raw
This method will extract all blocks Raw. In case of files and folders this choice is not a good idea. The
resulting files will contain a lot more than the actual file data and will appear to be corrupt. This option is
solely provided for engineering purposes. In case Image files are extracted, Raw becomes a lot more
appealing and is actually the preferred method in many cases.
If you use this method in an Image File, the image file will need to be recorded Raw. If not recorded Raw,
this option will be grayed out. DVDs only have one type of blocks and they contain only user data (there's
no such thing as Raw DVD data). So in case of DVD, this option will be grayed out.
Run
Will only work if you select one single file. That file will be extracted to the system's temporary folder (e.g.
C:\Windows\Temp) and will be run from there. This also means that if you run an executable (e.g. Setup.exe)
which requires or loads additional files on the CD or Image File (e.g. dlls) they will have to be extracted to the
same folder as well.
Extract and Run
Page 20
Extract and Run is actually the same as Run except that you are able to choose the location first.
Extraction of ALL files and folders (directories)
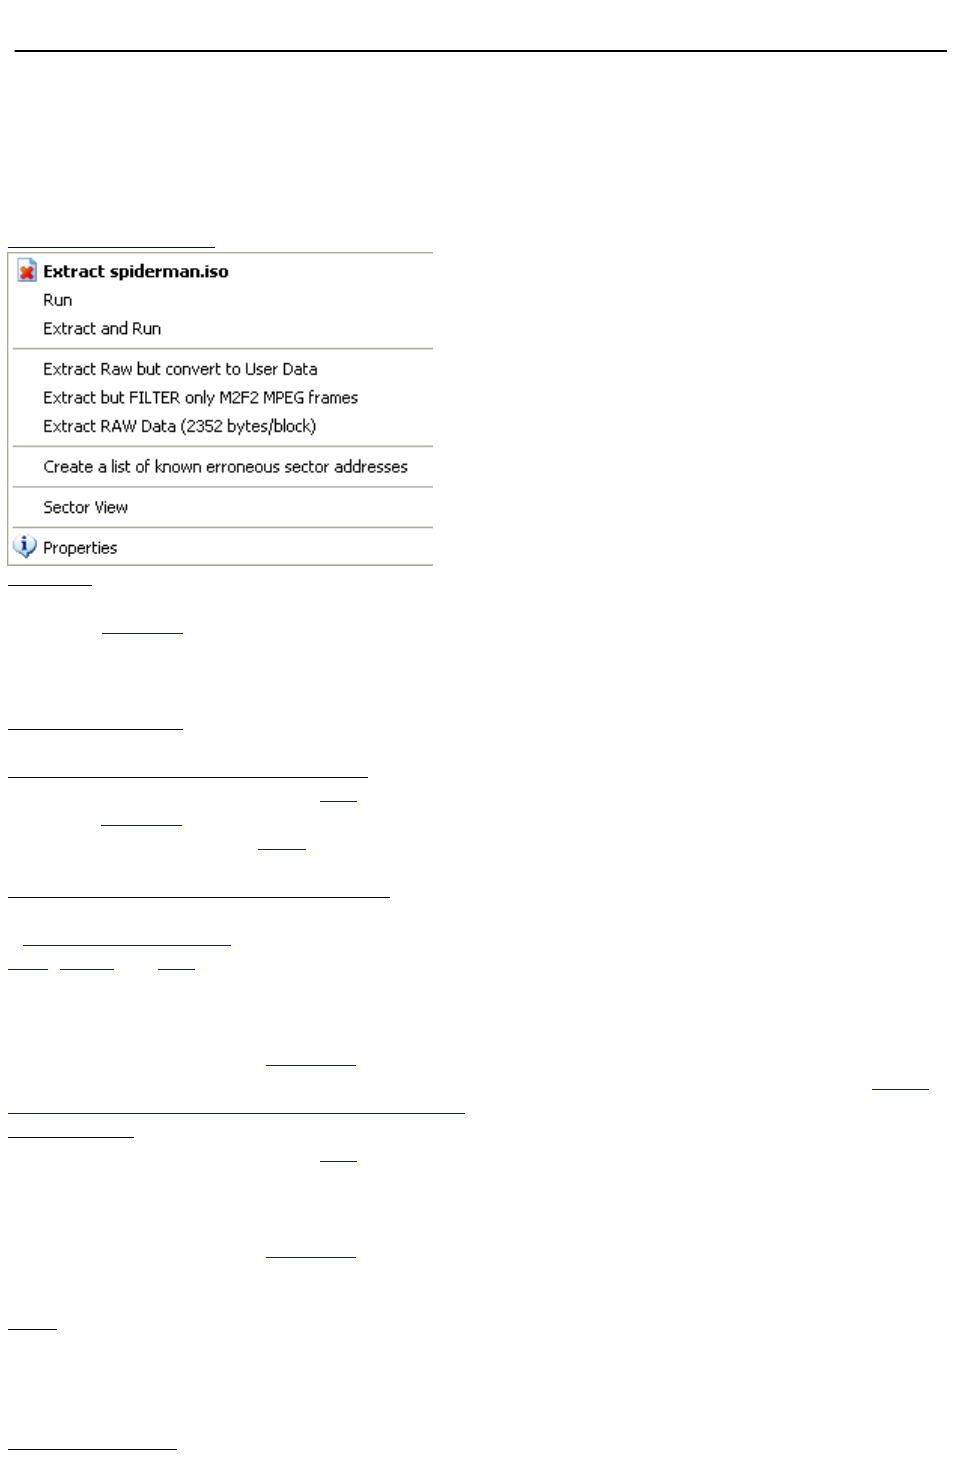
Possibly IsoBuster found multiple File-Systems and most likely they all point to the exact same files and
folders. Read the part about the different File Systems to make your choice. (In short, the icons directly
connected to the track icons are File Systems. Preferably choose the Joliet or UDF File System)
If you want to extract all files and folders of a CD or out of an image file, you best start from the File-System
of your choice. Right mouse click and Extract. Extract (in bold) is the best choice !
Extraction of selected files and/or folders (directories)
Select the file(s) and/or folder(s) you want to extract and choose Extract (Extract option in bold). To select
more than one object at a time, select them in the right-hand-side ListView. In the left-hand-side TreeView
you can only select one object at a time.
Extraction of a Track
The only real good reason to extract a track is to extract an audio track to a wave (*.wav) file. This
extraction method extracts the user data portion from every block but for audio this is actually exactly the
same as extracting Raw. A wave file is a raw audio track with a small header in the beginning of the file. If
you select 'Extract Raw' you end up with the same file but without the small header in the beginning of the
file.
For data tracks the story is different and except for engineering purposes there's not much use for extracted
data tracks to an image file. Extract the user data portion will extract exactly that to a *.tao file. In most
cases a *.tao file will then contain 2048 bytes per block. Extract Raw will extract to a *.bin file and all blocks
will contain 2352 bytes. Extract but filter M2F2 Mpg blocks will scan a track and will filter all Video blocks
(e.g. on VCD, SVCD and CD-i). This option is great when the File System of a VCD, SVCD and CD-i is
corrupt but you want to recover the video data from the tracks.
Extraction of a Session
Extracting a session can be done two ways : Extraction of the Content <Content> or Extraction to an
Image File <Image> . Similar to extracting a Track there are only a few good reasons to extract a session
and if you're not an expert I wouldn't bother.
<Content>
This will extract all the Tracks in this session one by one, using the Extraction method of your choice.
Read previous topic 'Extraction of a Track' to see what that means per track. The only good reason to
choose this if you want to extract all audio tracks of a session to wave (*.wav) files.
<Image>
This will extract a Session to an Image File. However, only in case of engineering skills this is really a good
idea. The resulting Image File will contain the blocks starting from the first block of the first track of this
session and ending with the last block of the last track of this session. To make an Extraction choice, look
into the next topic 'Extraction of a CD or DVD'
Page 21

Extraction of a CD or DVD
<Content> (All Sessions and tracks are extracted separately, one by one)
This is similar to <Content> extraction of a session. This will extract all the Tracks on the CD or DVD or
from the Image File one by one, using the Extraction method of your choice. Read previous topic 'Extraction
of a Track' to see what that means per track. The only good reason to choose this if you want to extract all
audio tracks of a session to wave (*.wav) files.
<Image> (THE Image File creation tool)
This is THE option if you want to create a Image File of your CD, DVD or if you want to convert the Image
File to another format. This extraction method will extract all blocks, starting from the very first to the very
last block, of your CD, DVD or Image File.
In case you're dealing with a normal data CD (e.g. a Windows installation disc) extracting the user data
alone is probably a good idea. However, when you suspect there are other modes on the CD as well (e.g.
Audio, M2F2 (e.g. VCD, SVCD and CD-i), ...) you better extract Raw. So in a sense extracting an Image
File raw is probably always the best idea !
ISO Image Files are extremely popular but they come in many different formats and some write applications
take them all but some are very picky in their choice.
If you extract an image raw you will create image files that are compatible with the majority of write
applications ! The resulting *.bin file can simply be renamed to an *.iso file. Yes, *.bin files and *.iso files
are often exactly the same !! Only (to my knowledge) Roxio creator does not like raw *.iso files. In that
case you better extract the image file to user data only and rename the resulting *.tao file to an *.iso file.
Converting Image Files to *.iso is exactly the same. Extract Raw to *.bin (=*.iso) and all the Image File
overhead stripped to the Raw essence. Extract user data only if you want to convert for Roxio Creator and
rename to *.iso.
If the Extract Raw option is grayed out this means that the source (DVD or Image File) does not allow to
extract raw. The reasons are simple. DVD only knows 2K blocks (2048 bytes user data) per block without
any overhead. There no such thing as Audio or Video mode blocks on DVD. Image Files may be recorded
with 'user data only' and so logically they can not be extracted raw as they only contain the user data.
Extract From - To
Extract From - To is a engineering tool and allows to extract blocks of your choice. It's a powerful feature if
you're in the engineering business. If you just want to extract data (Image Files or files and folders) then this
is not of much use to you. The Extraction options are thoroughly explained in 'Extraction of a CD or DVD'
<Image> section.
Errors : See 'Errors during Extraction'
Page 22

Data recovery
IsoBuster is a powerful data recovery tool. Support for all the different CD and DVD readers out there,
support of Image Files and support of all the different CD/DVD File-Systems.
Basically, when you select a drive and the drive contains the CD / DVD in question from which you want to
recover data, IsoBuster will immediately quick scan the content and offer you extraction methods.
How to start :
1) Insert the CD / DVD in your CD / DVD -ROM / BD / HD DVD drive.
Use a writer if you have one (Read here how to select a drive)
2) Wait untill the content is scanned and IsoBuster shows you the content:
(Read this to understand what content will be shown.)
3) In case you see the files and folders you were looking for :
Select what you want and Extract.
E.g. start from the File System of your choice.
4) In case you don't see the missing files,
(e.g. you only see one or more sessions with one or more tracks but no files)
then you better try the search function "[Find missing files and folders]".
Some advice :
In case the CD / DVD / BD / HD DVD is damaged or recorded very poorly you might run into the problem
that some readers can get to more data than others. Here you get into the grey zone where some devices
are still able to read data but others aren't. In case of big problems, try a number of CD / DVD drives, go to
your friends or neighbours and ask if you can try it in their CD / DVD ROM drive. Often you have more
success if you try CD/DVD-RW recorders instead of CD/DVD-ROM drives.
A great way to deal with this problem is by using the power of managed image files.
The moment some sectors are very hard to read some drives may time out very quickly but others may take
forever. That and the fact that IsoBuster retries in different ways to force the unit to spin down or to get to the
data in an alternative way, may result in what seems to be a hang situation. In fact IsoBuster is waiting for
the device to respond and that up to 30 seconds per command. So for 30 seconds IsoBuster seems non
responsive and because the command is retried immediately it may actually appear to be a lot longer. If
you're dealing with such a situation you might want to start up IsoBuster data extraction during the night and
check the result in the morning.
Also consider reading with a lesser retry count.
Data Recovery from Blanked CD-RWs :
This is a completely different problem. In case the CD-RW was blanked completely there's no way to get to
the data anymore. The data has been over-written and is gone.
In case a minimal or quick blank was chosen there is still a chance. However all the critical data in the TOC
and so on has been overwritten. The CD-RW Reader is under the impression that the media is empty and
will not allow to read in the data area. The only way to get to that data is by means of special hardware and
tools.
More information online: Quick erased (blanked) CD-RW vs. DVD-RW vs. DVD+RW, what's recoverable and
how.
Data Recovery from Blanked DVD+RWs :
This situation is not comparable to a blanked CD-RW and much depends :
- on the time it took to blank,
- on the type of DVD+RW writer,
- on the application
Bottom line : you stand a good chance of being able to recover data with IsoBuster. Just run IsoBuster free
and look for the files. If they're there, register IsoBuster and extract them. If the free version can't find the
files, the registered version won't either.
More information online: Quick erased (blanked) CD-RW vs. DVD-RW vs. DVD+RW, what's recoverable and
how.
Page 23
Find Missing Files and Folders
What is it
Suppose you created a CD or DVD with drag and drop software (e.g. Direct CD, InCD, VOB Instant write,
BHA B's gold, Packet CD, DLA, ...) and you come to the conclusion that suddenly part if not all data is gone.
Or you just deleted a file and suddenly realize you want the file back. In any of these cases this function of
IsoBuster might be a life-saver !
A scan for missing files and folders however is not limited to data written with drag and drop applications, it
also works for Video DVDs, Audio DVDs, CDs and DVDs written with standard write applications, Nero,
Creator, Sonic, ...
How
Select the Session where you lost the data (typically that is the last session or even only session (e.g. on
RW media)), and you select "Find missing files and folders". This means, position the cursor on the
session icon and right click. See screen shots for examples : (You can actually also start this test from the
CD icon, a Track icon or a File System icon)
What happens
When you select "Find missing files and folders" IsoBuster will prompt you with the question to create a
managed image file first. That is unless you told IsoBuster to not prompt you anymore. To change that
setting, check here. A managed image file can be a great tool because you only need to sit through a
possibly painful long wait once. Bad or damaged disc which are hard to read can take a long time to scan
through. So by making a managed image file first, you actually copy all data to a special file on the hard
drive and next work from there. So you only need to sit through the long wait once, after that is houndreds
times faster. If you were prompted to make the image file and you clicked yes, then the image file will load
automatically after creation and the scan will start on the managed image file.
If you are more experienced and already made a managed image file first, just load that file and work from
there. E.g. start the scan "Find missing files and folders"
If you are not working from a managed image file please read this
Before you start scanning the disc you might want to consider to change the Read Retry count. Do this
based on your experience with the CD-ROM/DVD-ROM reader you're using. E.g. if scanning takes a
loooooong time you could abort and restart with a much lower retry count. IsoBuster however will also
automatically apply a smart retry managing scheme to get to the best result. You should know however that
IsoBuster internally also reduces retry counts based on the type of errors and various conditions so usually
IsoBuster does this work for you already.
Action
The moment you select "Find missing files and folders" IsoBuster will read all sectors in the session.
During this full surface scan IsoBuster will try to find missing files, using a variety of different techniques. The
recovery action exists in three steps:
- First the UDF file system which could be found via the normal way is fully expanded.
- Next the entire surface is read and all relevant data is stored in memory.
Page 24
This goes far beyond UDF, all sorts of techniques are used to find the missing data.
- Finally all that data is processed and in worst cases still some CD/DVD access is required during that
action.
Now what
When the recovery process has ended, and with a bit of luck, IsoBuster will have found lost and/or deleted
files and directories. Files and directories linked in the 'UDF Lost And Found' root will have no name
because the name was unretrievable, these files and directories are orphans. Files and sub-directories in
these 'unnamed', 'lost' or 'orphaned' directories will have their original name again. Orphaned files will be
named "Recovered File" and orphaned directories will be called "Recovered Directory"
IsoBuster has a unique feature that scans all the orphaned files' content and tries to determine what the file
extension is. E.g. this way, and with a bit of luck, you will be able to distinguish .bmp, .gif, .jpg, .wav, and
many other file types.
This feature can be turned off.
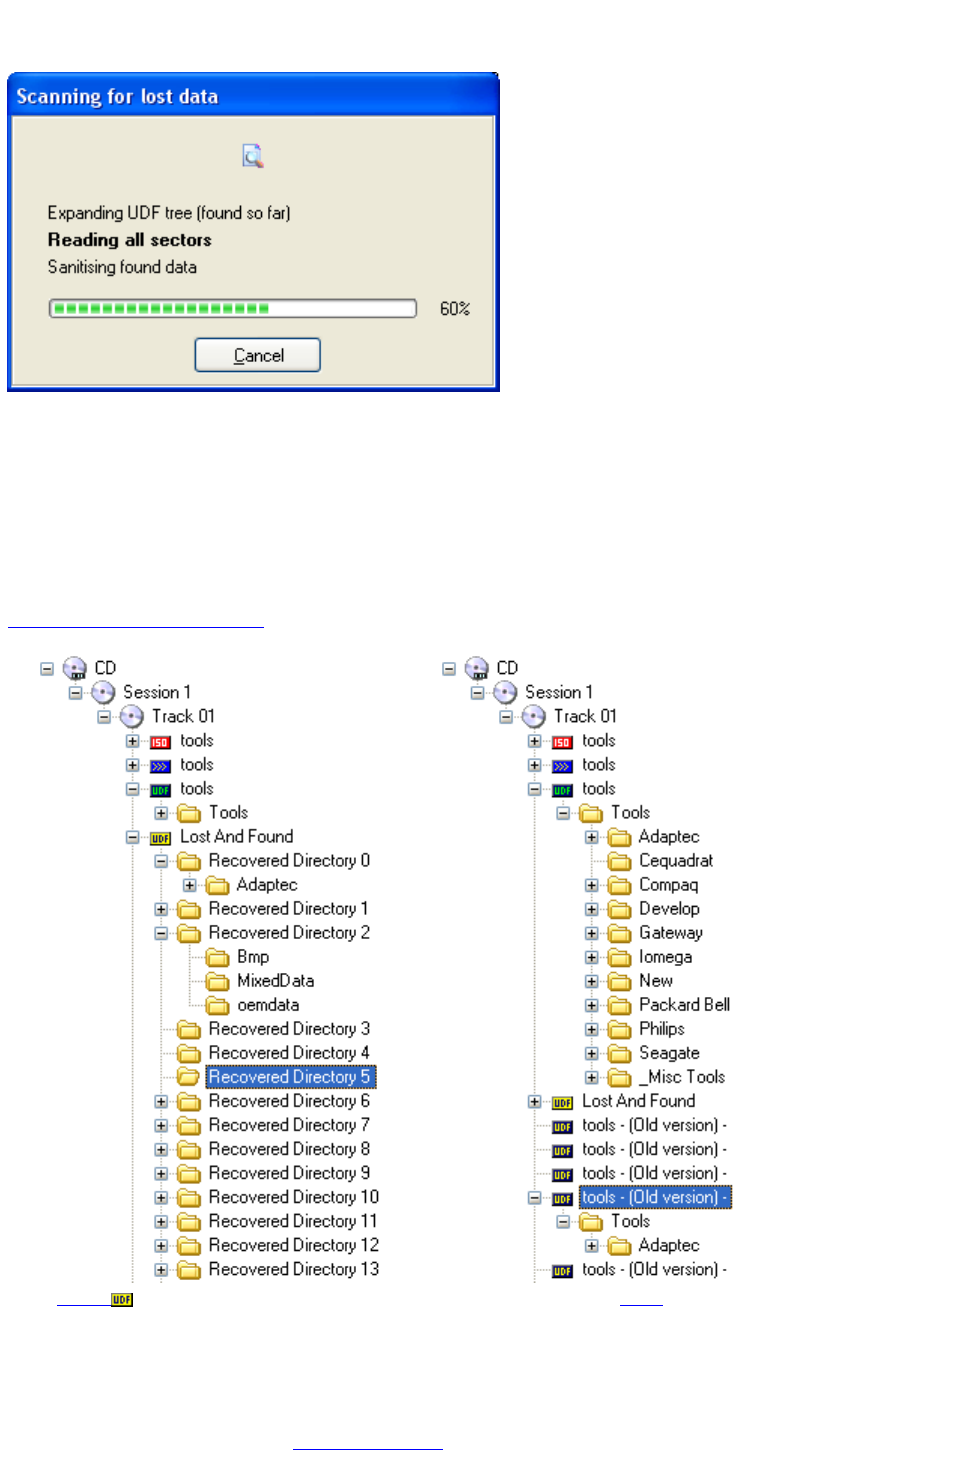
UDF data found
A B
The yellow 'UDF Lost And Found' root directory will be linked to a track icon in the selected session (left
pane). You can change a name (e.g. 'Recovered Directory 01' to 'My Pictures') by selecting that object (file
or folder, e.g. 'Recovered Directory 01') in the list view (the pane on the right) and by clicking once on that
object or by hitting F2. (try it and you'll see).
In case you did the recovery action on sequentially written media (e.g. what Drag and Drop applications do
on CD-R, DVD+R and DVD-R (some apps also allow to do this on Rewritable media)), you will notice that
IsoBuster also found all previous UDF file-systems. The previous file systems show an old version of the files
Page 25
and folders. This means that you can get back an old layout of files and directories, or this way you can
get back to an old version of a document you have edited a few times already. This option offers lots of
possibilities ... .
In case such older UDF file systems are found, they are attached with a blue UDF icon to one of the track
icons of the selected session. They are also marked with ' - (Old Version) - '.
Files found based on their signature
Similarly to the "UDF Lost and found" there will be a list of files found via their Signature. This list (blue
icon attached to the track icon ) may contain the exact same files as the "UDF Lost and found folder".
These files are simply found via an entirely different mechanism and hence you are offered an alternative for
when one of the mechanisms is not yielding to results.
DVD Video
If you ran the scan on Video and/or Audio DVDs there might be an extra AUDIO / VIDEO folder as well
listing found IFO/BUP and VOB files . Additionally this folder may feature the different recordings you did
on +VR(W) media and/or the different AUDIO recordings/tracks.
Extract recovered files
To recover found files and/or directories, just extract as you would normally extract a file or directory with
IsoBuster. Right click and choose Extract (the first or top option of the popup window). The screen shot
shows found files and directories.
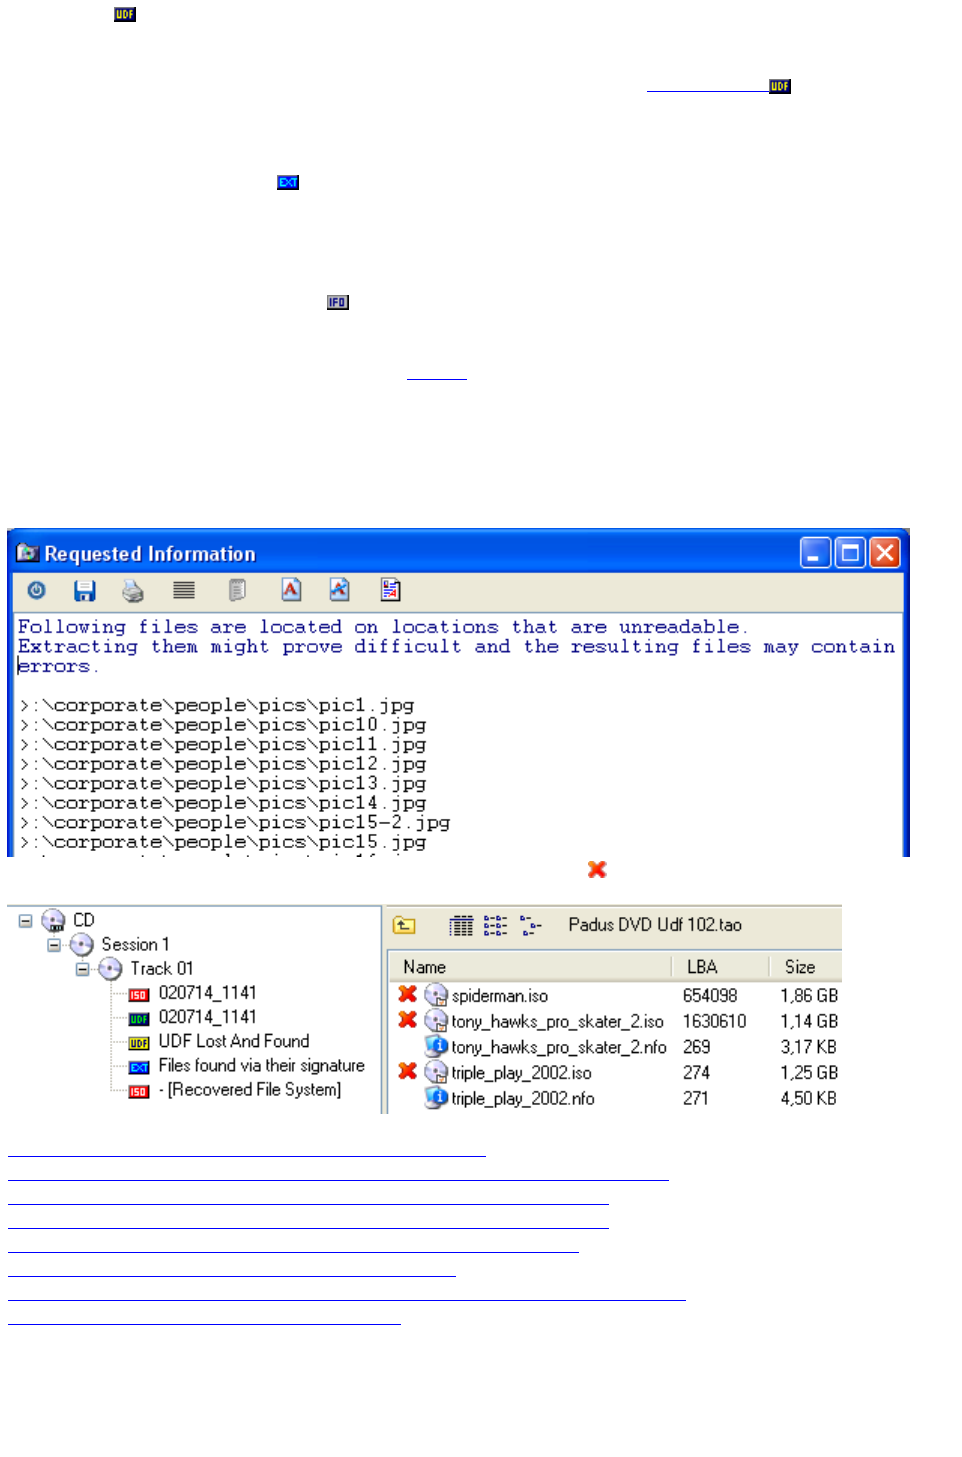
Errors
If IsoBuster detects errors during the scan, those sectors are marked. After the scan and if files are
affected by errors (e.g. the files are located in erroneous sectors) IsoBuster generates a list of all files that are
affected. You can edit, save, print, ... this list.
IsoBuster will also use the scan information to add an 'error' icon next to every file which is affected and
which is likely to be corrupt if you try and extract the file.
Also check these great online resources targetting specific but related tasks:
How to recover VIDEO data from a DVD with IsoBuster.
How to re-create a DVD from the full set of VIDEO_TS files on my hard drive.
How to re-author a DVD from one or more VOB files on my hard drive.
How to re-create a DVD from one or more VOB files on my hard drive.
How to fix a damaged video stream so that it can be played again.
Remove Scratches from CD or DVD compact discs.
Quick erased CD-RW vs. DVD-RW vs. DVD+RW, what's recoverable and how.
Using Sector View in search for missing files.
Page 26

Create and complete a managed image file
As of IsoBuster 1.9 it is possible to create and complete the so called managed image files. These files
consist out of a IBP file and one or more IBQ files.
You should always keep their name identical (besides the extension) and keep them in the same folder. In
other words, don't rename the IBP file to for instance x.IBP and the IBQ file to y.IBQ, because then they
won't link to each other anymore and IsoBuster won't be able to use them properly.
A managed image file (= combination of the earlier mentioned files) offers a way to stop extracting and
resume at a later date. And when there are errors, they are marked and these blocks can be re-read to fill
the gaps at a later date.
The BIG advantage of this feature is that you can create an image file of a disc by using one drive, but
afterwards you can take the disc to another drive and try to complete the image there. Often one drive can
read parts another drive can't and vica versa. So now you are able to complete an image of a disc by using
different equipment to try to get the best out of each and every drive you use. Please read further to
understand the possible problems. Additional advantages are that you now have the image on your hard drive
and can work of the image file which is many houndreds of times faster than working from the disc itself,
especially when there are hard to read errors. All functionality you would normally use on the disc itself you
can now use on the image file with much greater speed.
Creation
Creation of a managed image file, if not suggested to you automatically, can be created by right mouse
clicking the top most CD/DVD icon in the left hand side (TreeView) pane. The process looks much like
making an ordinary image file. After creation, either partially or completely, you have to load the file, just as
you would load any other image file. If creation was suggested to you before running a scan for missing files
and folders, and you said yes to that request, then the file is automatically loaded right after creation, before
the scan starts.
Completion
To complete a managed image file, load the image file (if not loaded already), right mouse click the top most
CD/DVD icon in the left hand side (TreeView) pane and you will find the option to complete the image file.
IsoBuster will prompt you to insert the disc in a drive, select that drive and continue the process.
If there are gaps due to bad reads, you can select to retry them. You can select to only complete the
image at the end. Or you have IsoBuster do them both.
Test to see if a disc is identical
After you start the image file completion sequence, and after you select a drive, IsoBuster will see if the disc
in the drive matches the disc in the image file. That is and extremely difficult task as there are many funky
CD and DVD formats out there and not all drives report the same layout for each disc each time. Optical
media comes in many many forms and depending on the drive's capabilities and make there are a lot of
different layouts possible for one single disc. IsoBuster tries to determine if the disc in the drive is the same
as the disc in the image file and to be able to do that it has to assume a lot of things sometimes.
It is therefore extremely important that you as a user always use the correct disc to complete an image
file. It is possible to complete an image file with a completely different disc, which has enough matching
features. So you could be mixing two discs inside one image file. Of course this also means that if you have
two identical disc copies, you can in fact use two bad discs to complete one good image of them. It simply
requires some common sense sometimes but then the engineering power that comes with it is gigantic.
If you understand the complexity involved then you will also understand that sometimes the layout is too
different to complete an image file with a certain disc. For instance if the drive you originally used to start
making the image file saw two tracks but the drive you are using now to complete the image file sees only
one track, then IsoBuster will fail the test and put up a message saying that the discs are too different. This
problem will mostly only be experienced when you try to use different drives. One drive generally returns the
same layout unless the drive has problems mounting the disc. If that appears to be the case, try mounting
the disc again by opening and closing the drive tray.
Example : Suppose one drive sees two tracks in a session and another drive sees only one track in that
same session, yet alle files fit perfectly in these one or two tracks, then still the layout is too different for
IsoBuster to complete the image file.
Ways to make sure you are always able to complete a managed image file with different hardware
Try to stick with hardware that has similar capabilities. E.g. a ROM drive will generally be much more
limited than a writer. So if you start making an image file with a ROM drive then the layout of the disc may
be very different from what the writer sees and the completion may never be initated. The same principle
goes for -R or +R or -RAM capable drives etc. A DVD+RW writer for instance may be very capable of reading
most of the content on a DVD-RW disc BUT may see a different track and session layout than what a DVD-
RW writer sees, simply because the DVD-RW writer understands more of the disc and hence sees a more
Page 27

complex or too different layout than what is stored in the file.
Quickly test if a disc can be completed by different hardware.
To counter the problems explained above you can do a small test. Start creation of a managed file but abort
the process immediately after it started. Next try different drives to complete the image. You will
immediately notice which drives are able to continue and for which drives IsoBuster says there is no disc
compatibility. Based on that small test you can then decide if it's worth it to start again, but this time right.
Influencing drive retries.
During managed image file creation IsoBuster reduces or increases retries as it sees fit, to get the best
result. Of course it still starts from the settings provided by you (or the default settings). During managed
image file completion and in particular when filling gaps the retries are less frequently reduced and the
process is much more persistent. Here too the process however starts from the settings provided. However,
realise that these settings are set per drive. So when you have a managed image file loaded, and you want
to reduce the start retry count for the drive that will do the actual reading, first select that drive, go to the
options and set the retry count for that drive. Don't set the retry count for the image file itself, as that won't
change anything for the drive that is doing the actual reading.
Seeing less (file) data in an image file than on the actual disc.
A managed image file is created from start till end and can be stopped before that end is reached. So it is
perfectly possible to have most of the data read into the file already but the end is still missing. A result may
be that the files are not shown or not properly shown. This is because certain file-systems rely on the very
last blocks of a track or session and only when these very last blocks are included in the image will suddenly
everything look ok. An example for instance is an open track/session on a CD-R created by drag and drop
software. The very last blocks contain the so called VAT and that VAT is important for the file-system, so
only when the image file is completed will suddenly all files look ok.
Page 28

Check if all files are physically readable
This option is available from every File System icon except from the Recovered UDF File System icon
because that would only redo what the scan for lost files and directories had already done.
After this scan, IsoBuster will automatically create a list of all files that are located in erroneous sectors.
As of this moment, files that are located in erroneous sectors will also be 'marked' with a special icon :
The list with erroneous files can always be recreated without the necessity to redo the scan. Just select the
File System icon and create the list via "Directory tree and file information".
Page 29

Try to find matching extensions for orphaned
(nameless) files
This option is available from the Recovered UDF File System icon : . So only available after a "Find
missing Files and Folders" action and when UDF recovery was enabled.
In fact this is done already automatically after the scan action if checked in the properties (default).
The option provides you the means to search for extensions again or in case the option wasn't checked yet.
Every file with no extension yet is opened partly (if not located in an erroneous sector) and IsoBuster
dynamically determines the extension (e.g. *.jpg, *.gif, *.bmp, *.wav, *.pdf, ...). Some extensions are more of
an educated guess, e.g. *.mp3. Some files are built up so that they can be several file types, IsoBuster then
adds several extensions which you will have to test, e.g. .xls.doc
Page 30

Generate a list of files with physical read errors
This option is available from the Recovered UDF File System icon : So only available after a "Find
missing Files and Folders" action and when UDF recovery was enabled.
In fact this is done already automatically after the scan action if checked in the properties (default).
This option builds up a list of all files in erroneous sectors and is in fact identical to the option : Directory
tree and file information / List files with read errors (in Edit Window) / Full Path
Special Note for Mac related content
Mac files often consist out of a data fork and a resource fork (see more here). When these files are
extracted to a Windows PC, only the part useful for Windows users is extracted. And hence only if that part
is located in unreadable areas will the file be labeled as unreadable. If in the options it is set to extract to a
MacBinary file, all parts of the file will be extracted, and in that case if any part of the file is located in an
unreadable area the file will be labeled as unreadable.
Page 31

Create a list of known erroneous sector addresses
This option is available when you right mouse click a file or track, session or CD/DVD icon. It allows you to
create a list of all erronous sectors covered by the object you selected. Either in a text file or in the Edit
window.
E.g. if a file is located on addresses x to x+10 and addresses x+3 and x+4 are unreadable, then the listing
will show those two files.
Note
A block can only be labeled as unreadable if it is truly read. So on startup you may find less errors per
object than after extraction of that object. On the other hand, sectors may be labeled unreadble immediately,
before reading them, because the program knows they are in an unreadable area.
Following actions do full surface scans and after completion all errors should be known, provided they are
repeatable (some hardware flip flops from time to time on bad sectors)
- Create a managed image file
- Find Missing Files and Folders
- Check if all files are physically readable
- Perform a surface scan
Special Note for Mac related content
Mac files often consist out of a data fork and a resource fork (see more here). When these files are
extracted to a Windows PC, only the part useful for Windows users is extracted. And hence only the errors
for the part that would be extracted to a PC are shown. If in the options it is set to extract to a MacBinary
file, all parts of the file will be extracted, and in that case all erronous blocks will be listed (if verified already)
Note for when files are immedately seen as unreadable, even when not read yet
It is possible that a file system says that files are located somewhere physically outside the media range.
E.g. after a power cut or buffer underrun or simply by faulty mastering it is possible that the track is too short
to contain the listed data. Such files are labeled immediately as unreadable with this icon : and will show
up in the list of unreadable files even when not read yet.
Note for when you check the errors of a track, session or full CD.
The errors known for that object are shown. So it is perfectly possible that no errors are shown for a full CD
whereas a lot of files are labeled as unreadable. In that case the files are physically located (according to the
file-system) on locations outside the tracks, in pre-gaps, session overhead or simply beyond the end. That's
also the reason why these files are labeled as unreadable then.
The other way around is also possible. It is perfectly possible to have a track with many read errors but with
all files intact and readable. An example of such a track would be a variable-packet track. The track was
written with many variable packets and between every packet there is often a zone that is unreadable.
However, a file system should balance the files so that none of them are in such a packet transition. The
software has no way of knowing where these transitions are, so hits them again and again when reading all
content (surface scan, making an image or scanning for lost data) and hence labels these sectors as
unreadable for that object.
Additionally, depending on the method the CD was written and depending on the drive you are using to do a
scan, the last two blocks of a track can often be unreadable. These so called run-out blocks are supposed to
contain no valid data and so usually no file is affected by these errors.
For more on files and other objects and listing the errors, read this.
Page 32

Perform a surface scan
This option is available from every CD/DVD icon.
After this scan, IsoBuster will inform you of the amount of errors encountered.
Errors on a disc are not necessarily always a problem. They might be located in areas where there is no
useful user data. E.g. sectors that are 'often' unreadable, depending on the media and the way the tracks
were written :
- The last two run-out blocks of a session
- The run-out, link and run-in blocks (7 blocks) between every packet (in case of packet writing)
After the scan, in case there are file-systems with files on the disc, files that are located in erroneous
sectors will also be 'marked' with a special icon :
The list with erroneous files can always be recreated without the necessity to redo the scan. Just select the
File System icon and create the list via "Directory tree and file information".
Page 33

Play CD Audio
IsoBuster supports Analog Play Audio. Right click and Audio Track and select Play Audio.
This will instruct the CD playback device (CD/DVD-ROM drive) to play the audio analogue.
Pros en cons :
Pro :
- Drive does it all. The system resources are not used at all
- It also works via the front jack of your CD/DVD-ROM
- No Digital Audio Extraction done by the system at high speed.
- Drive can play at 1x, so no spinning noises etc.
Con :
- (*)The audio cable needs to be connected at the back of the CD/DVD-ROM drive and must be connected
to the Audio card.
FYI, all devices have such an audio output and all Audio cards have such an input.
(*) That is if you want to hear the sound via the sound card and boxes (not if you want to listen through the
front audio jack).
If you're wondering, Analogue Audio playback is what is done by Windows 95 and 98. As of Windows ME
however, Audio playback is done digitally which means that Windows is actually reading the audio data and
is processing and converting the data by itself. As of WinXP the user can choose again in the advanced
device properties.
Reading the Audio data is also known as DAE (Digital Audio Extraction). It is what IsoBuster does when it
converts a track to a wave file, it is what other programs do when they rip the audio (e.g. to convert to mp3).
Page 34
CD-Text
CD-Text is extra Text information which can be encoded on Audio CDs. There's the possibility to have text
from the Album and text for every Track separately.
This text is encoded in the subchannel data in the lead-in of an audio CD.
IsoBuster finds and decodes CD-Text information automatically when :
The CD/DVD-ROM drive supports it !
There is actually CD-Text encoded on the Audio CD.
Or when there is CD-Text recorded in an image file and IsoBuster supports that format, E.g. *.PXI,
*.CCD, *.B5T and *.CUE image files
More and more drives these days support CD-Text. If you buy a drive now, chances are CD-Text is
supported. There are also plenty of Audio CDs out there with CD-Text although it is definitely not so that all
Audio CDs you can buy today contain CD-Text !
Page 35

Extract From - To
Starting from a Track, Session or CD / DVD icon you can Extract From - To.
A Window will pop up with the start address of the object you selected and a length of the object you
selected. However, you are free to manipulate the address and length as you like and so a powerful
engineering tool is available. Any sector at any location can be read (as long as the device allows it) and you
can use multiple extraction methods for this task.
To understand the Extraction Methods, please read : Extraction Options.
FYI (For Your Information) :
In the contents list (ListView on the righthand side) an LBA is shown for each session, track and file. This is
the starting LBA of the object. LBAs are always relative to the entire disk, with zero as the start. Suppose
you want to extract a part of a file which shows LBA 1234. To get LBA 0 to 4 of this file (five blocks) you
should extract LBA 1234 to 1238 from the track, session, or disk. Note the LBAs of the session and track
are not used in this calculation.
Page 36
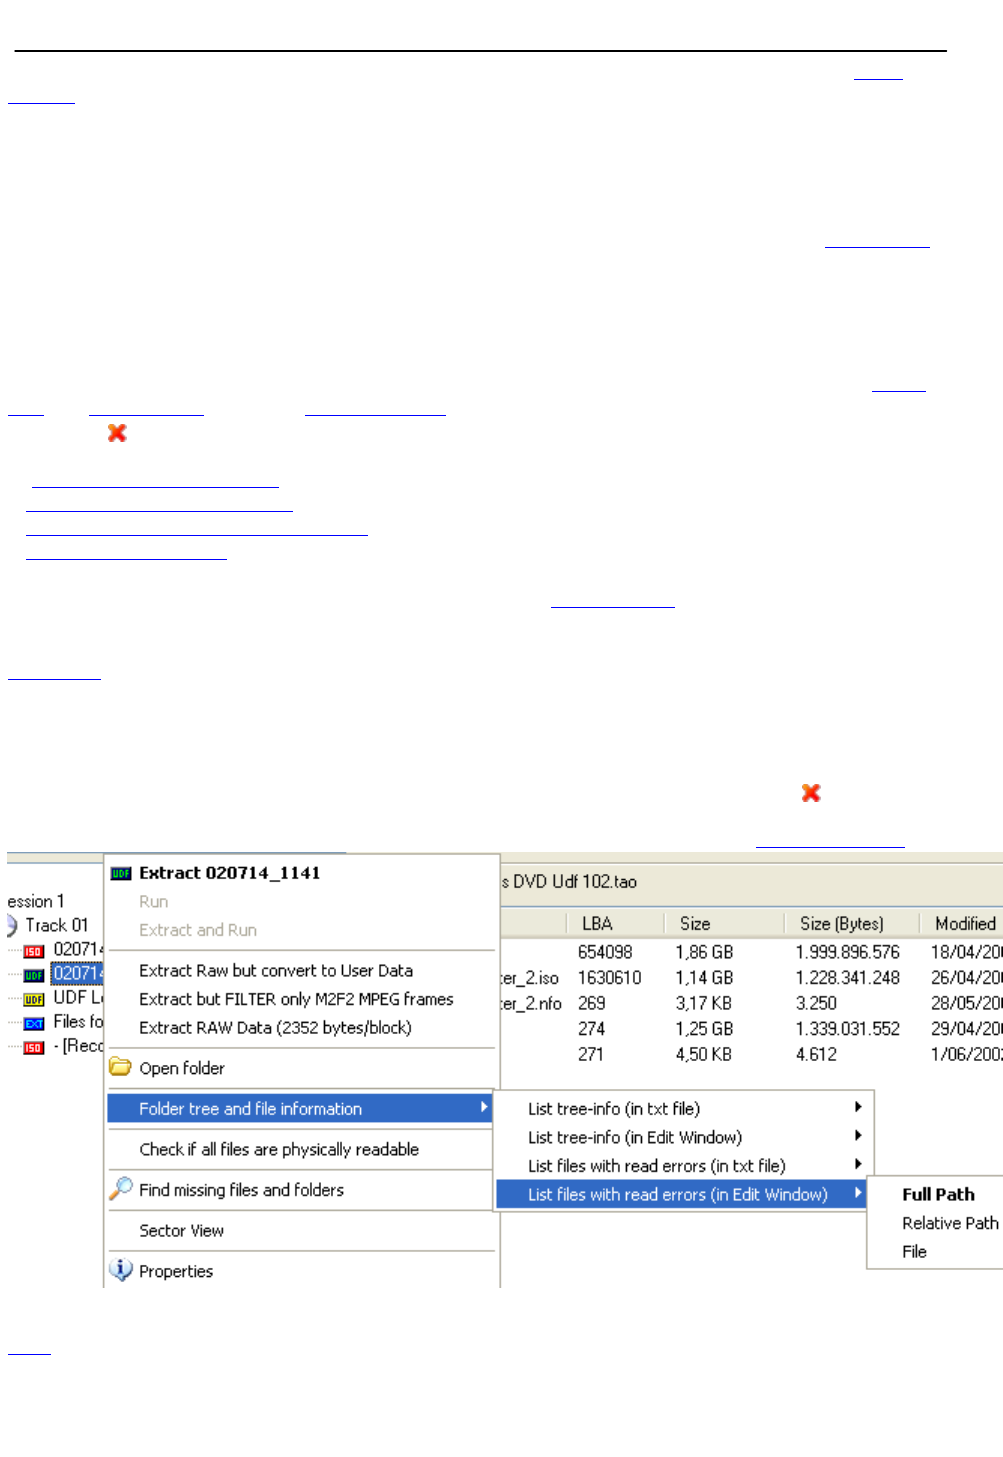
Directory tree and file information
You are able to extract the Files' layout to a text file or in to the IsoBuster editor and include the Block
Number. The block number is the physical location of the file on the CD. A low block number is on the
beginning of the CD, a high block number is at the end of the CD.
This option is especially handy for people that want to understand the logical order of files on a CD or DVD.
Imagine, you have an mp3 CD and an mp3 player but the mp3 player plays the mp3 files in the physical order
they are placed on CD. If you inspect the CD content via Windows you see that the files are not in the order
they are played.
This is because Windows sorts the files and they may also be arranged in another way in the File System
as well. Here such a file list comes in very handy !
It's easy to import in a MS Excel document and sort on the fields you like.
An almost similar option exists to copy the tree information of all erroneous files. These are files that are
located (fully or partially) in sectors that are physically unreadable.
Please bear in mind that if a sector has not been read yet it cannot be labeled as erronous yet. So files
seemingly OK are not always OK. Each time a sector has been read, the status is kept, so after a sector
view or a file extraction or even an Extract From-To. Therefore it is possible that a file gets labeled as
unreadable only after an extraction. To counter this and to test all sectors, perform one of these operations
first :
- Create a managed image file
- Find Missing Files and Folders
- Check if all files are physically readable
- Perform a surface scan
Special Note for Mac related content
Mac files often consist out of a data fork and a resource fork (see more here). When these files are
extracted to a Windows PC, only the part useful for Windows users is extracted. And hence only if that part
is located in unreadable areas will the file be labeled as unreadable. If in the options it is set to extract to a
MacBinary file, all parts of the file will be extracted, and in that case if any part of the file is located in an
unreadable area the file will be labeled as unreadable.
Note for when files are immedately seen as unreadable, even when not read yet
It is possible that a file system says that files are located somewhere physically outside the media range.
E.g. after a power cut or buffer underrun or simply by faulty mastering it is possible that the track is too short
to contain the listed data. Such files are labeled immediately as unreadable with this icon : and will show
up in the list of unreadable files even when not read yet.
To know which addresses inside a file or other object (e.g. track) are really erronous, check this option.
An example of a file dump :
---------------------------------------
LBA , File Name
---------------------------------------
0330412 , E:\CLOCK.WAV
0215836 , E:\Data\Data\Data\Data\Image-File.iso
0228850 , E:\Data\Data\Data\Data\teaser_3.exe
Page 37

0244480 , E:\Data\Data\Data\Image-File.iso
0257494 , E:\Data\Data\Data\teaser_3.exe
0273124 , E:\Data\Data\Image-File.iso
0286138 , E:\Data\Data\teaser_3.exe
0301768 , E:\Data\Image-File.iso
0314782 , E:\Data\teaser_3.exe
0330456 , E:\MAGIC.WAV
Page 38
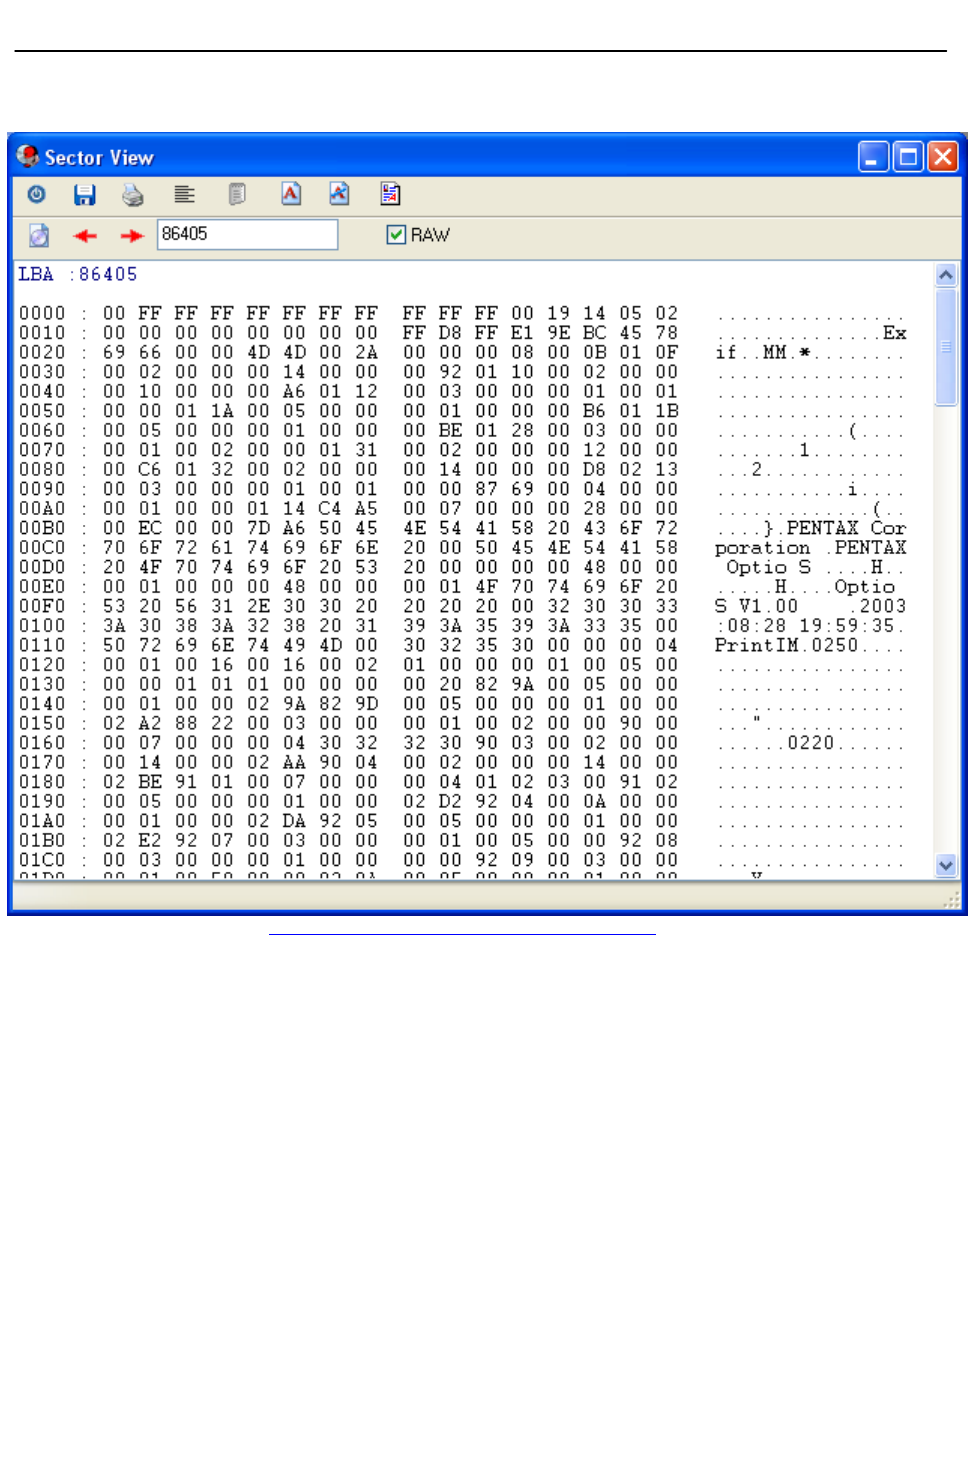
Sector Viewer
IsoBuster comes with a sector viewer. This tool is more for engineering purposes. If you're into CD / DVD /
BD / HD DVD access and File-Systems stuff then this is a great tool to do analysis.
Several normal edit functions are available as well. Save, Print, ... .
Relevant information online: Using Sector View in search for missing files.
Page 39
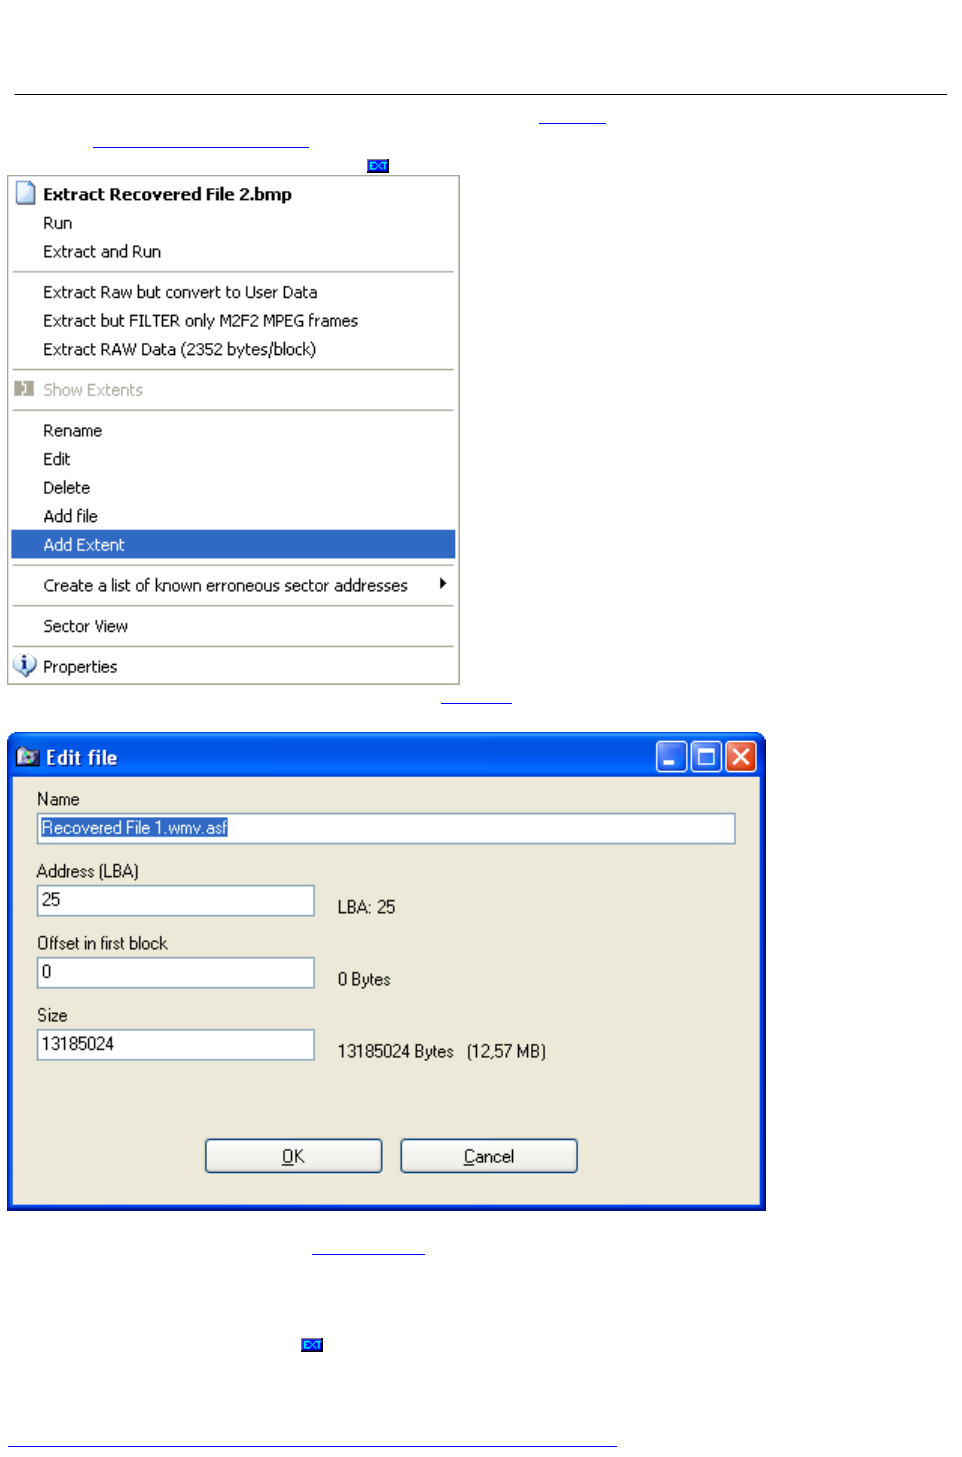
Add, Edit, Delete files in the list of files found based
on their signature
The availability of these options needs to be enabled via the Options in case of lost files and folders, not in
case of a customizable file system. Once enabled, they appear when you right mouse click on a file in the
list of files found based on their signature or on a file in the added customizable file system.
FYI: To create a list of lost and found files, read this part.
Add / Edit a file:
The use of this feature is straightforward. Suppose a file is found to start at an address (LBA x) but you
know, because you saw it with the sector viewer or you are exploring the engineering power of IsoBuster, that
the file starts a block later, then you can adjust the address to x+1. Or suppose you know that the file only
starts at a certain offset inside the block, then you can change that as well. Same approach for the byte
length of a file.
When you right mouse click the icon you can also add files to the list and change their properties. (same
for a customizable file system). It is also possible to remove files from the list. E.g. suppose you adjust one
file to be much bigger, then you may want to remove the files this new file now overlaps.
For more details and examples, also have a look at:
Creative editing of file properties in files found based on their signature
Page 40


Options
Communication: Preferred communication layer
Communication: Read Retry Settings
Communication: Remapping settings
Play with File System settings
Choose your language
Image file handling (creation of cue-sheet files and file-splitting)
Changes to the GUI (Graphical User Interface)
Automatic online check to see if there is a more recent version
Specify the temporary folder
Page 42
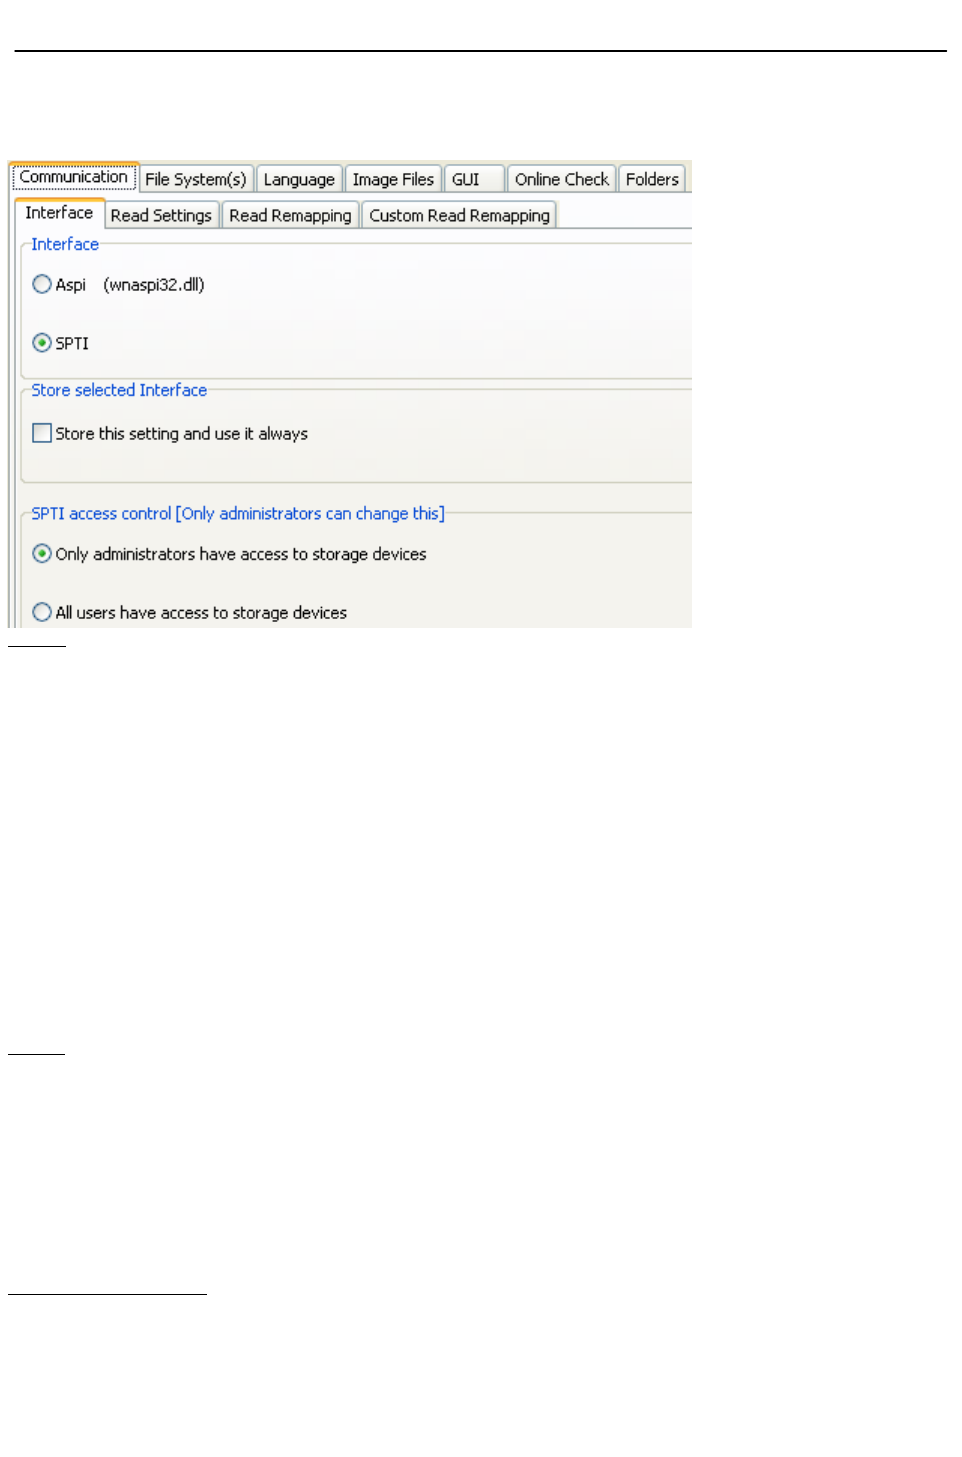
Communication (Interface)
Interface
IsoBuster is able to communicate directly with CD/DVD-ROM devices and hooks in the system right above
the device driver. This is done without the need to install proprietary drivers. IsoBuster makes use of Aspi
(An Adaptec interface) or SPTI an NT native interface.
Aspi (wnaspi32.dll) is standard installed on Windows 95, 98 and ME. Microsoft did Adaptec a big favor
here and the nice thing about it is that we can make use of it as well.
This interface is default selected under Windows 95, 98 and ME. Since SPTI cannot work under these OS,
the option to select SPTI is grayed out.
Updates for Aspi can be found on the Adaptec website. IsoBuster is able to work correctly with all versions
of Aspi, starting from the oldest Windows 95 version to the newer Windows ME version or the versions
downloadable from the Adaptec Website. Sometimes Aspi can become corrupt because some applications
install older parts of Aspi and destroy a good working combination of dll, vxd and registry entries. Funny
enough it's often Easy CD Creator that causes havoc. When this is the case, one can always download an
AspiChk utility from the Adaptec Website and check the installation. Or just run an update from the Adaptec
website. Or use Google.com and look for "fixaspi" or "forceaspi".
When IsoBuster doesn't find your drives or when IsoBuster crashes while starting up (only seen this happen
once), try to determine if the Aspi layer is working correctly ! If the interface 'seems' to work properly
(because it says so to IsoBuster) but then decides to crash when IsoBuster sends through the first command
.... then there's little IsoBuster can do about it !
Ahead (www.ahead.de) also offers a nicely working wnaspi32.dll with an almost exact interface. IsoBuster
works great with all versions of this dll too !
SPTI
SCSI Pass Through Interface is standard available on Windows NT4, 2K, XP and Vista. Under these OS,
Aspi is not installed by default. However, as a user, you could have installed Aspi or another application
might have done it for you.
There are two types of SPTI, SPTI and SPTI direct. IsoBuster uses both, taking care of and working around
lots of Windows bugs, especially in the first implementations (e.g. NT4).
Under NT4, 2K, XP and Vista IsoBuster will select SPTI by default but will also try Aspi if no drives can be
found via SPTI. In case of no Administrator rights, you may have no rights to access drives at low level via
SPTI and hence IsoBuster will not be able to list the drives. If this is the case, please ask your administrator
to change this setting:
SPTI Access control
Changing this is only necesarry when you don't find drives via SPTI but you know they are present in your
system. Only Administrators have the proper system rights to change this setting. So, if this option is not
available (greyed out), you will have to ask the administrator to log in and change the setting.
Changing this setting basically does the same as (which IsoBuster now does for you) :
Windows 2000 :
Open the "Local Security Policy" console by clicking on the start menu -> control panel -> administrative
Page 43

tools, and select local security policy. Then expand the "Local Policies" section and select "security
options". Change "Restrict CD-ROM access to locally logged-on user only." to ENABLED.
Windows XP :
Open the "Local Security Policy" console by clicking on the start menu -> control panel -> administrative
tools -> performance and maintenance, and select local security policy. Then expand the "Local Policies"
section and select "security options". Change "Devices: Restrict CD-ROM access to locally logged-on user
only." to ENABLED.
Store selected interface
If you want IsoBuster to always start with the selected interface, which may be different from the default
interface, select this checkbox
Read Retry Settings
Remapping settings
Custom remapping settings
Page 44

Communication (Read Settings)
Read Settings
Retries
During reading, IsoBuster will typically (and where possible) read more than one block at a time. If that fails
for some reason IsoBuster will read every block individually.
For both mechanisms a default retry count is set. You can change this per device using the sliders. This
change only affects IsoBuster behavior, no other application (e.g. the OS itself) is affected ! This setting is
not saved and next time when you start up IsoBuster the default setting will be used again.
In case reading takes very long, because there are many errors and the CD/DVD readers needs a long time
per block, you could consider to read with a lower retry count. If you notice that with more retries you don't
find the data either it is rather safe to go to a lower retry count and it will save you a lot of time.
Worst case, trying to read corrupted data, the drive needs 30 seconds per block. This times the retry count
and this times the amount of blocks which ranges from 330,000 (CD) to 2,200,000 (DVD). I don't need to
make you a picture of what that can mean to your precious time. Luckily and mostly only a smaller part of
the blocks is unreadable, hardly never will all data be too corrupt to read.
Delays
Especially with older drives, in combination with certain (hard to read) discs, it is sometimes possible that
when you select "retry" on a faulty read the data can be read anyway. This is a bit strange as IsoBuster
does a number of retries internally anyway and the only explanation seems to be that the drive needs some
time to "breath". E.g. the drive needs to cool down or spin down or there is a design flaw in hardware or
embedded software that causes this behavior. So if you are in this situation, e.g. you're extracting data from
a CD and each time you find yourself hitting retry after which the process continues normally, then this option
is for you. By setting a number of seconds in this option, IsoBuster will wait that long each time before the
read is retried. So the drive is allowed to spin down and correct whatever situation that causes this problem.
This option can cause a serious speed penalty, so use it only when you are sure it will help you !
Preferred communication layer
Remapping settings
Custom remapping settings
Page 45

Communication (Read Remapping)
Read Remapping Settings
Certain CD formats expect the CD reader to convert logical addresses to physical addresses on the media
(this is called remapping). E.g. suppose a directory field says file_X is located at address x then an
application (e.g. Windows) will issue a read command to address x to read the file. However, address x may
in fact be located at physical address y. The CD reading device must take this in account and fetch the data
from physical address y.
A good example of such discs are (with fixed packets) formatted CD-RW discs. E.g. the discs formatted by
Direct CD, InCD, DLA, Drag to disc etc. These discs require Method 2 remapping by the CD Reader.
If you buy a CD reader these days then this drive is perfectly aware of this type of CD-RW and will do the
conversion always. There are however OLD CD-ROM drives out there that can read from CD-RW (can deal
with the different reflectivity) but are not aware of the physical formats that were defined for CD-RW. These
drives will screw up your data because you will get data from wrong sectors/blocks/addresses. Often reading
from these CD-RW discs also works really bad on these drives because they try to read sectors that are not
meant to be read which causes spin downs and read errors and what more.
IsoBuster tries to detect these situations and will do the internal remapping that the drive is supposed to do.
This is fully automatic and is based on special media-drive tests that are implemented. It does remain
difficult to detect this always, the reader is not always cooperative in the sense that detection commands
return incorrect information and so on. You should only try switching the Method 2 option if you have an older
CD-ROM drive (All writers will do it OK) and a when you are trying to read a formatted CD-RW disc on which
the file and directory layout seen by IsoBuster is looking weird and all file content is wrong.
A much newer standard is the Mount Rainier or MRW standard which has also been defined for rewritable
media. On top of Method 2 remapping, this standard requires Method 3 remapping. Again this remapping
needs to be done by the drive. So a Mount Rainier drive will do the remapping automatically, unless the disc
is damaged and the drive gets confused. There are however millions of CD-RW and Method 2 capable drives
out there that do not know of this relatively new standard. There are also not too many of these discs going
around so at least that's not too worrying. Anyway, IsoBuster can detect Mount Rainier discs (with most
drives, preferably writers) and will do the Mount Rainier remapping (or Method 3 remapping) if the drive is not
capable to do it. IsoBuster will even do this on drives that are not Method 2 capable, so both the Method 2
and Method 3 remapping are done at the same time then. You should only try switching the Method 3 option
if you have an 'older' writer and a when you are trying to read a formatted Mount Rainier CD-RW or DVD+RW
disc on which the file and directory layout seen by IsoBuster is looking weird and all file content is wrong.
Preferred communication layer
Read Retry Settings
Custom remapping settings
Page 46

Communication (Custom Read Remapping)
Custom Read Remapping Settings
This is a [Business] feature intended for professional data recovery users that come across discs
sometimes where data appears to be shifted. Very rarely one comes across a bad disc where the data
appears to be shifted one or more blocks, starting at a certain block offset. Mostly this is due to a bug in the
mastering software that created the disc.
Identifying such a problem requires the help from some good hex editors and/or the Sector View feature in
IsoBuster.
The functionality is straightforward. A start address determines where IsoBuster will skip the set amount of
blocks.
Example: Suppose the file-system says that file x is located at address y and an investigator finds that the
file in reality is located at address y+1, and all data after this point appears to be shifted as well, then setting
this feature to skip 1 block starting at address y will suddenly fix everything. File x and all files and folders
behind it, located physically at higher addresses will then suddenly extract properly.
This feature's settings are not saved on exit of the program
Preferred communication layer
Read Retry Settings
Remapping settings
Page 47

File System Settings
IsoBuster is able to interpret a File System using all means a File System offers. Windows tends to use
one method only to get to the data whereas IsoBuster uses the different available structures and is able to
switch if one doesn't work properly. The user is also able to set one or more options to try and find the ideal
setting for a particular disc if the default settings doesn't work properly.
General
The general tab allows to set a few parameters used for all file-systems.
For an explanation on the possible settings, click here.
Recovery
The Recovery tab allows to set a few parameters used during the scanning for lost files and folders.
For an explanation on the possible settings, click here.
ISO
IsoBuster offers a set of options that apply for the ISO9660 File System and extensions.
Extensions such as Joliet, Rock Ridge and CD-i to a certain extent.
For an explanation on the possible settings :
Scan options (normal mounting of discs)
Text conversions
Mac properties and extraction methods
Write software specific options
El Torito (Boot)
UDF
IsoBuster interprets UDF based on the UDF rules but while doing so also already looks further to see if it
can't compensate for errors.
For an explanation on the possible settings :
Scan options (normal mounting of discs)
Mac properties and extraction methods
HFS
IsoBuster supports HFS and HFS+.
For an explanation on the possible settings :
Scan options (normal mounting of discs)
Resource Forks and extraction methods
IFO/VOB
IsoBuster is able to mount the pseudo file-system(s) based on IFO / BUP and VOB / VRO files. To find
entry points to this file-system, ISO9660 and/or UDF need to be (partially) available as well. If not this
file-system can still be found during the scan for missing files and folders.
For an explanation on extra settings, click here.
SIG
IsoBuster supports finding files based on their signature during the scan for lost files and folders.
FAT
IsoBuster supports FAT12, FAT16 and FAT32.
For an explanation on the possible settings :
Scan options (normal mounting of discs)
For an explanation on extra settings, click here.
Page 48

General File System Settings
Time Stamps
For every file and directory there is a time stamp and a time zone stored in the file-system. The time
stamp is typically the "Modified" time stamp of the file that was copied to the CD or DVD. The time zone is
typically the time zone of the system that was used to create the CD or DVD. So if the system was, for
instance, a British system and the time zone was set correctly on that system, then the time zone stored
on the disc, per file and directory, would be GMT 00:00. If that system was an American system, the time
zone would be between GMT -04:00 and GMT -08:00 or even GMT -09:00 for Alaska. In Japan for instance
the time zone would be GMT +09:00.
If you're interested in the different time zones and your system settings, double click the clock in the bottom
right hand side corner and play a bit with the "time zone" option.
A great site to check out the time in other places here : http://www.timeanddate.com/worldclock
IsoBuster, up to version 1.6 Beta 12, would always use the time stamp and ignore the time zone. So the
local time stamp of the file would be used to display the file-time in the right pane (ListView) of the program
and this same time stamp would be used to assign to the file after extraction via IsoBuster. This is in fact the
same as what Windows 9x (95, 98, ME) does for files in the ISO9660 and derivatives file-system.
As of Windows NT (NT4, 2K, XP) Windows converts the stored time stamp by taking the time zone of the
file, the time zone of the system and daylight saving time (when applicable) in account ! Windows NT does
that for all file systems. Windows 98 does this only for the UDF 1.02 file-system. Windows does this
conversion for display purposes but also assigns this time stamp to a file copied from CD or DVD. As of
IsoBuster version 1.6 Beta 13 this is now also the default setting.
For investigative purposes, following settings may be used to switch between the actual local time stamp
and the converted time stamp. Changes made here are stored and always applied unless you switch the
setting back.
To see the time zone of a file or directory, independent from following settings, right mouse click a file and
choose properties. The second tab of the properties window shows the time zone of the file or directory.
Display time stamp
Local time stamp, when the file was created, independent from time zones
Ignores time zones stored in the file-system and time zone of the system itself.
Relative time stamp, taking time zone of system and time zone of creation in account
Takes the time zone of the file or directory in account, together with the time zone of the system and
daylight saving time (when applicable).
Apply time stamp on extracted files
Local time stamp, when the file was created, independent from time zones
Ignores time zones stored in the file-system and time zone of the system itself.
Relative time stamp, taking time zone of system and time zone of creation in account
Takes the time zone of the file or directory in account, together with the time zone of the system and
daylight saving time (when applicable).
Time stamps of file-systems
Page 49

It is possible to display the time stamp of a file-system next to the file-system icon. The time stamp is then
displayed between square brackets, e.g. [01/03/2001 8:45:00]
or [N/A] when the file-stamp is not available, which is typically the case for recovered file-systems (e.g. UDF)
or the flat file list.
Page 50
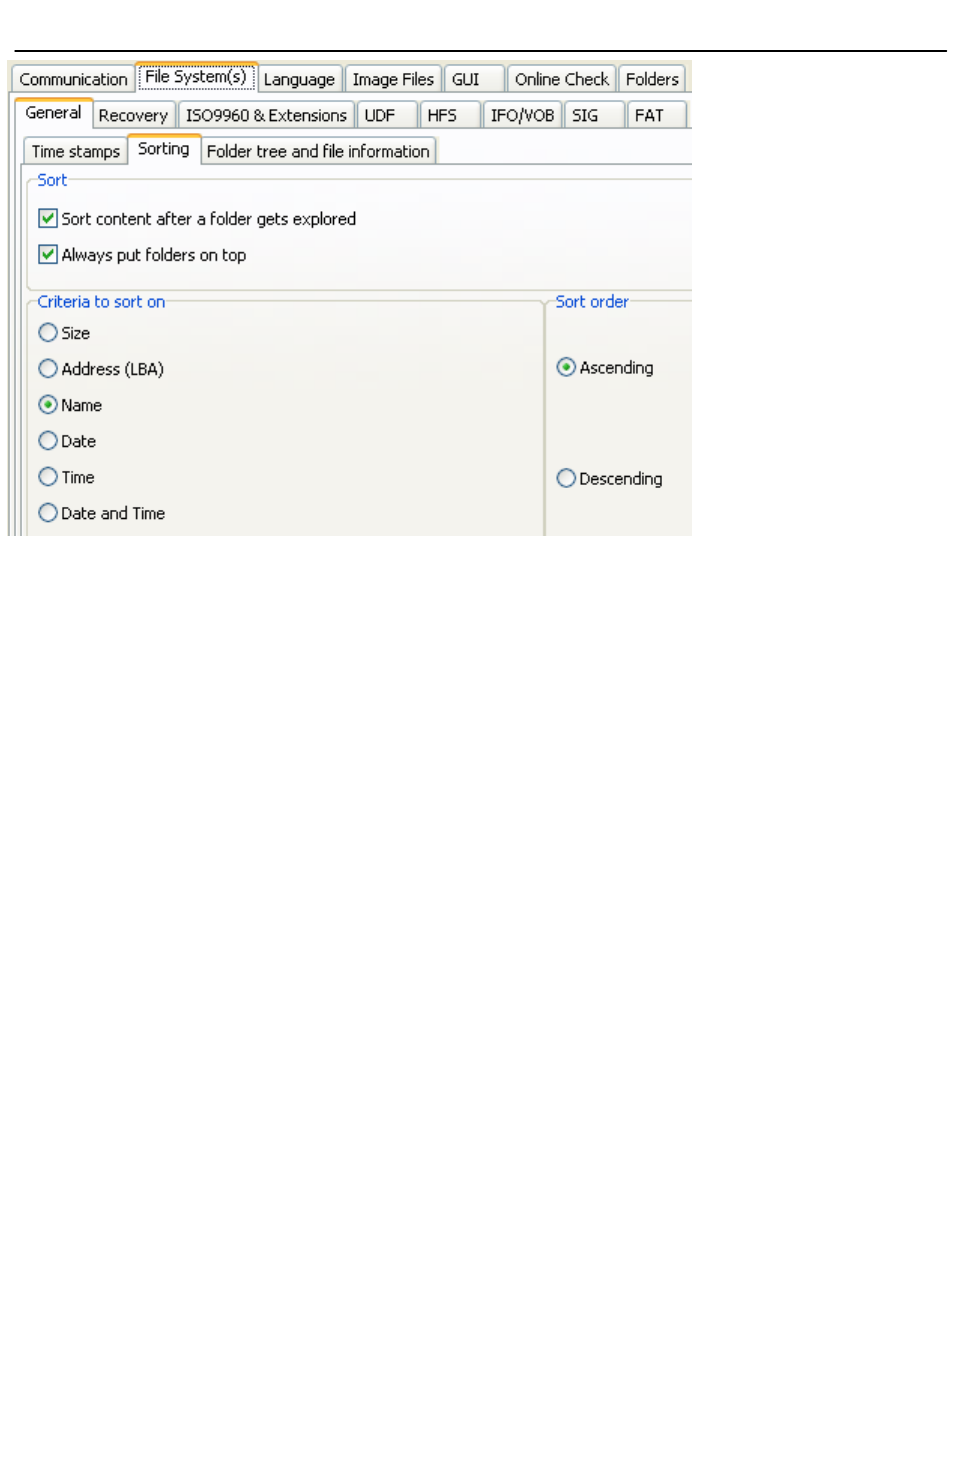
General File System Settings
Sorting
It is possible to have IsoBuster sort the data before it is first displayed. This could enhance the browsing
experience greatly, as IsoBuster is much used as a data browers to explore CD an DVD content. This
sorting happens immediately after the data has been read into memory, before it is displayed, and only
then. In other words, if you manually change the sort order of a window after it was displayed, and next
switch to another directory to come back to the previous directory again, then the sorting will still be the
same as what you manually did. It will not switch back to the sorting set here. The sorting option here is
only done right after the data is read in memory.
The criteria and sort order are self explanatory. Always put folders on top means that folders will always be
shown first in the list. (on the right hand side in the listview)
Page 51


Plugins
Plugins are a way to add functionality to IsoBuster.
Currently following functionality is available through plugins:
(PS.Several functions can be combined in one plugin)
Functionality
Multiple plugins can be loaded each time the program starts. Plugins can support one or more image file
types.
Opening Image files
Plugins can be used to load image file types that are not yet supported in IsoBuster, or to replace
IsoBuster's functionality. This way third party vendors or programmers can create plugins for proprietary or
closed book formats. The order in which plugins load is important when there is overlap between different
plugins. For instance when you double click or drag a file to IsoBuster and if two plugins support the same
image file type(s) then the first loaded one will be used and only if it signals that it cannot do the job will the
second one be tried, and so on. Plugins also have priority over IsoBuster's embedded functionality, so only if
the plugin signals it cannot do the job will IsoBuster be able to try it.
The image file types (e.g. extension *.xyz) that the loaded plugin(s) support are added to the back of the list
in the "open file" dialog, so that you can navigate to them. When you use this method to open an image file,
the selection you make in the "open file" dialog is important too. You can select the second or later listing of
an extension (extensions are listed for each plugin) and hence decide what plugin to try first. If you select an
embedded listed extension plugins are still tried first !
Creating Image files
Plugins can be used to create image file types that are not (yet) supported in IsoBuster. This way third
party vendors or programmers can create plugins for proprietary or closed book formats. At the moment
IsoBuster (<= 2.8) supports creating ISO/BIN/TAO + CUE or IBP + IBQ image files. You can extend that list
by loading plugins that create other image files as well.
If one or more plugins are loaded that support image file making then their supported extensions are listed
under the existing functionality "Extract CD <Image>" when you right mouse click the top most CD/DVD
icon in the left pane, after a disc or image file has been loaded. By simply selecting them you start the
making of an image file with that extension, based on the functionality in the plugin.
Loading and installing plugins
Installing plugins
Plugins can be installed (via Options), which means that they will be found (and loaded) each time IsoBuster
starts. When you first install a plugin it will also have to be loaded so that IsoBuster can find out what the
plugin actually supports. Once installed you can uninstall the plugin again, which means that it will not load
anymore next time you start IsoBuster. It will disappear from the list. It is also possible to just unload the
dll, and if you keep it unloaded while you close IsoBuster then next time IsoBuster starts the plugin will still
be unloaded. However it will still be installed, and hence it can easily be loaded again, via options. Installing
Page 53

a plugin's primary use is that the plugin will be found again each time the program starts, and in normal
cases the dll will also automatically be loaded then.
Loading plugins
A plugin needs to be loaded for it to work. Normal use is that plugins are installed once and are loaded each
time the program starts. It is however also possible to unload a plugin yet keep it installed. The status of the
plugins (installed / loaded) can be seen and changed in Options / Image Files / Plugins. Only via loaded
plugins (installed or not) is it possible to use their functionality (e.g. open image files or create image files).
Closely related:
Loading plugins via the command line
Latest news and available plugins on the website.
Page 54

Recovery
You can initiate a scan for missing data. During this scan IsoBuster uses various methods to find missing
files and folders. If you wish, e.g. for engineering purposes, you can disable individual tests that lead to data.
Include finding lost ISO9660/Joliet sessions:
It is possible that multiple ISO/Joliet (file-system) sessions were recorded in one single track or in one
single (physical) session. This is not according to the ISO/Joliet standard but it can happen. E.g. certain
applications do it on DVD+RW and DVD-RW or sometimes applications are unaware that the previous
session was not properly closed and they append a new session, but still in the old session. In case
IsoBuster cannot automatically find and mount these hidden file-systems, a scan for missing files and folders
will reveil the data and the file-systems will be found and created nevertheless.
Include finding UDF files and folders:
This scan has been present in IsoBuster as of version 1.1, but has been improved with every version and will
continue to improve as new write software applications and versions are released. This scan entirely bases
finding missing data on UDF file-system remains. Traces of UDF can lead to lost folders and files. IsoBuster
puzzles all this missing data together and is often able to retrieve the files-names, time-stamps,
folder-hierarchy etc.
Include finding IFO/VOB references:
Finding the IFO/VOB pseudo file-system on VIDEO and/or AUDIO DVDs is partially based on other
file-systems. So, in order to find this file-system there must be a valid ISO9660 and/or UDF file-system
present. If not, then this pseudo file-system can not be found. However, during a scan for missing data, any
such pseudo file-systems are found and made available after the scan. Furthermore Video recordings on
DVD+VR(W) may be found extra if they were not found via the IFO/VOB references.
Include finding files based on their signature:
Files are often recognizable based on parts of the data inside the file. This is however not an exact science
and fact of the matter is that some files are almost always found (e.g. *.jpg) and others are never found.
IsoBuster builds a flat file-list based on all file-signatures it encounters. This flat list then contains all
possible files with a file-length till the next encountered signature (unless you change that in the properties).
Obviously, because file-names are not recorded inside the file data itself, file-names and other properties of
the files are unknown. Nevertheless, for missing pictures, documents etc. this scan often proves to be a life
saver, e.g. when there is no ISO9660 or UDF to work with or when these file-systems are too corrupt to still
point to valid data.
Include finding FAT files and folders:
IsoBuster shows the deleted files and folders straight away in a separate FAT file-system. This is because
IsoBuster scans the file-system entries and also runs into the deleted entries this way. However, folders can
also become orphaned, which means that there is no reference pointing to them anymore. During a scan for
missing files and folders, and if this option is enabled, orphaned folders are found and displayed in a separate
FAT file-system. Additionally, IsoBuster also finds entirely new FAT file-systems if they are present. For
instance if the FAT file-system could not be found immediately due to certain unreadable sectors, or a FAT
file system that is located further on the disc, e.g. a second or higher FAT partition inside a hard drive image.
Page 55

ISO File System Settings
During interpretation of the File System, IsoBuster uses a number of structures and bases its analysis on a
number of fields in these structures. So is the PathTable located in one or more blocks on the CD/DVD and
the PathTable contains a list of all the directories. In fact, there are two PathTables, both on different
locations on the disc. One PathTable contains the directory addresses in the Big Endian notation and the
other PathTable contains the addresses in the Little Endian notation.
The Directory structures also contain the addresses in Big and Little Endian notation, but not in different
tables on different locations. One entry contains both the Big and Little Endian notation, it's just a matter of
choosing which one to use.
Windows doesn't use the Path Table and directly finds the Root directory in which it only uses the Little
Endian addresses. IsoBuster (by default) does use the PathTable because it is faster and if the Root
directory is corrupt, at least the other directories can still be found. IsoBuster uses the Big Endian
addresses by default because Windows doesn't use them, so IsoBuster offers an alternative. However, by
means of the Options IsoBuster can be set to use the same methods Windows uses. In those cases the
File System icons will be accompanied by a Windows flag icon.
An exception in all this is the CD-i File System. CD-i requires a PathTable, there's no way without it and
CD-i completely relies on the Big Endian addresses. So if Options are selected that contradict with these
requirements, then they will be ignored during the CD-i File System interpretation.
Mastering applications tend to neglect the things Windows doesn't use, e.g. the PathTable and the fields
containing the Big Endian addresses. Smart Projects watches and tries to steer application vendors in the
right direction (with success).
The Options :
Big Endian : The fields containing the Big Endian addresses and the PathTable containing the Big Endian
addresses will be used. This is the default setting.
Little Endian : The fields containing the Little Endian addresses and the PathTable containing the Little
Endian addresses will be used. This is the only setting known to Windows.
Ignore PathTable : This will force IsoBuster to start from the Root directory and forget the PathTable. This
will be the same mechanism Windows uses but it is not recommended. It is faster to work with a PathTable.
Only check this option if you fear the PathTable is not correct. This will hardly ever be the case (from
experience) and this option is more for engineering purposes.
Show both (Big and Little Endian) : This will show the File System based on the Big Endian tables and
the File System based on the Little Endian tables (See above for explanation).
Text conversions
Mac properties and extraction methods
Write software specific options
El Torito (Boot)
Page 56
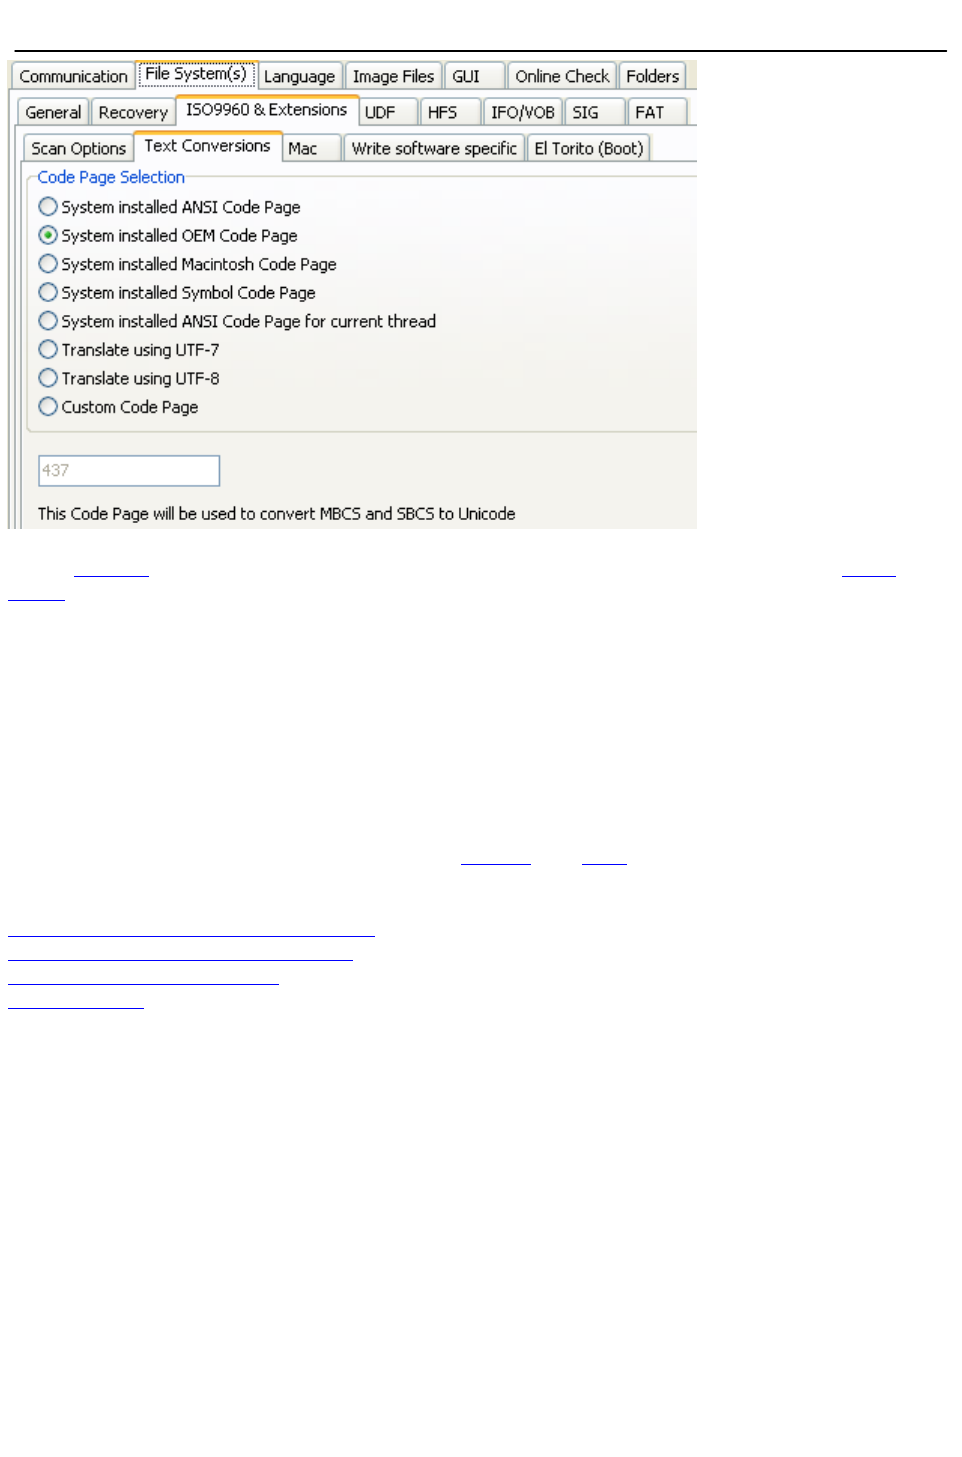
ISO File System Settings
Text Conversions :
In the ISO9660 file-system (the red ISO icon next to the root folder), texts are still stored using SBCS or
MBCS characters. SBCS (Single Byte Character Set) and MBCS (Multi Byte Character Set) text decoding
is based on system installed 'Code Pages'. These Code pages tell the OS but also IsoBuster how to decode
the text strings before displaying them on screen. For Latin character texts there really is no problem, but for
other character texts this often poses difficulties (e.g. Far and Middle East Asia and Europe). The code page
selection feature is there for the following reason : Some CD Mastering Applications use the ANSI Code page
to encode texts in the ISO file system where others use the OEM code page. Again, for Latin texts no
problem, but for some languages (typically texts where more than one byte per character is needed)
decoding then needs to be done using the same code page (which is not recorded on the CD). If not the
same code page is used then, some characters cannot be displayed properly. Real life situations
encountered, reported by Russian users, using Russian CDs on Russian systems but it's likely these
problems can also occur in the Far and Middle East. Hence this 'neat' feature (in the Options).
This problem does not exist in File Systems using Unicode (e.g. Joliet).
Code Page Selection : Select the Code Page you want to use to decode the texts or enter one yourself.
This option is really only useful for experienced power users.
Scan options (normal mounting of discs)
Mac properties and extraction methods
Write software specific options
El Torito (Boot)
Page 57
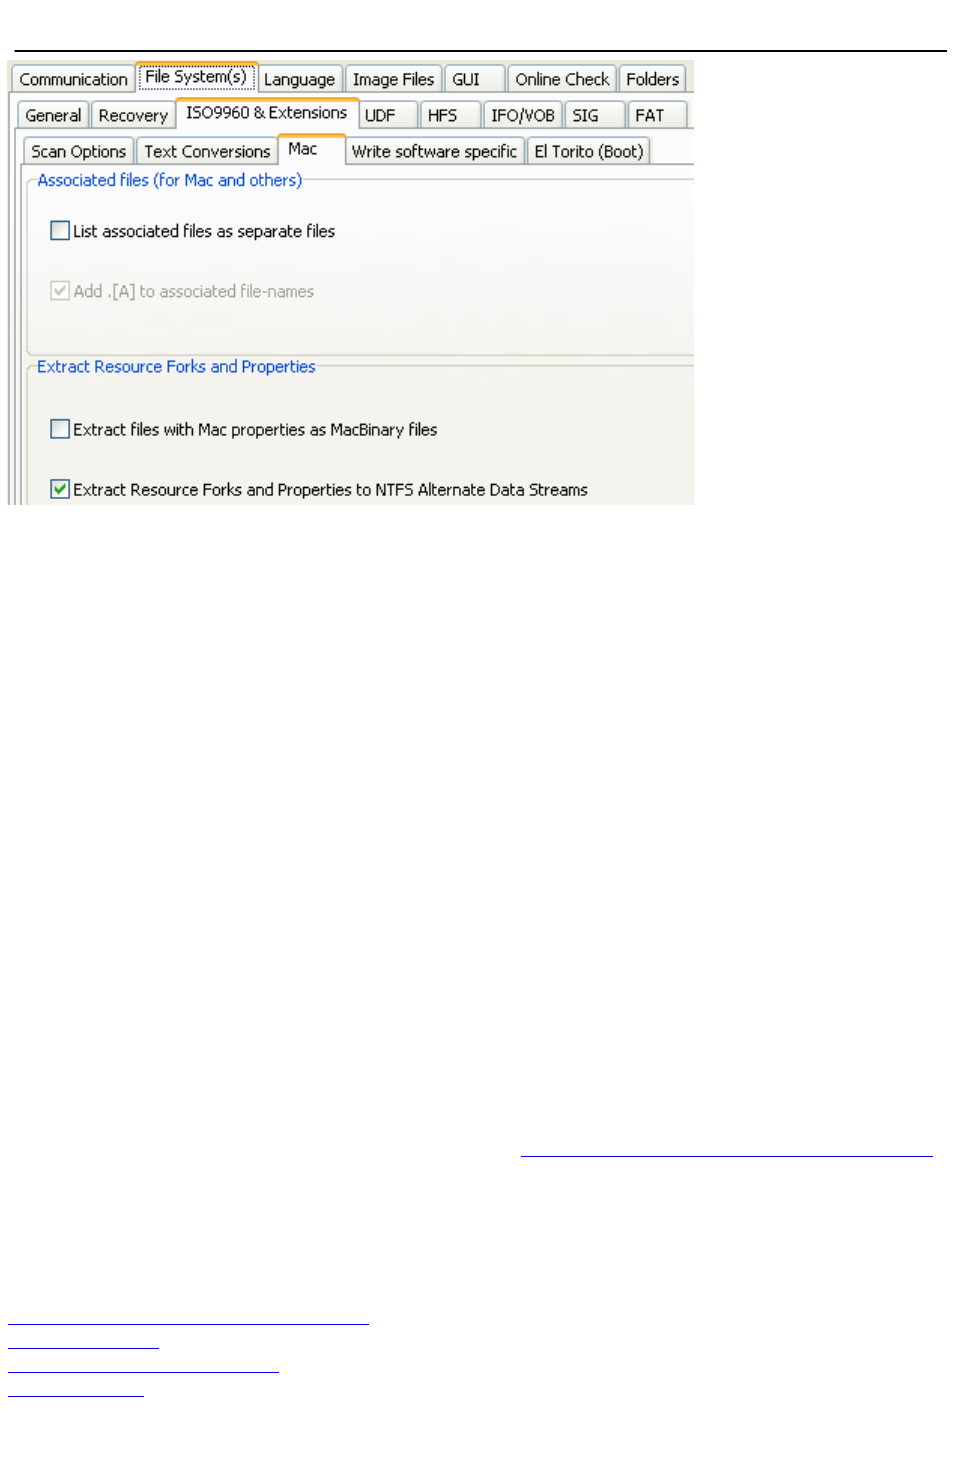
ISO File System Settings
Associated Files
Associated Files : The ISO9660 File System (also Joliet) can contain associated files. These files have
the exact same name as the file they are associated with. Windows ignores these files but other systems
often use them. E.g. Macintosh uses associated files to store the "Resource Fork" in. IsoBuster finds
associated files and automatically keeps track of them when they contain Mac properties as part of the
transparent Mac support. IsoBuster also extracts Mac Resource forks to an NTFS formatted Hard Disk, and
stores them in Alternate Data Streams. These streams are not visible to the user browsing the file system
with explorer, but they are there.
List associated files as separate files : You can however also set IsoBuster to display all associated files
as separate files. This is independent from their content. Also non-Mac / non-Resource-Fork associated
files are listed then.
Add .[A] to the associated file-names : Because associated files have the same file-name as the file
they are associated with, they cannot be extracted (copied) to a Windows system in the same folder, as
Windows does not accept two files with the same name in one folder. To be able to work around that easily
and to be able to extract all files of a folder to a Windows system folder, you can have IsoBuster add an .[A]
extension to the file name, to give the name a unique character.
Extracting Associated Files and/or Resource Forks as seperate files is basically not needed for anything
except for engineering purposes. E.g. to be able to inspect the content and properties (e.g. size) of the
Resource Fork; for designers, developers, engineers or technical people. IsoBuster transparantly takes care
of what to extract to a Windows system, in case the file has Mac Properties, so that the file is usable on the
Windows system. When you decide to extract files as MacBinary files, all Mac content is preserved, so that
files can be exchanged on non Mac systems but when they are taken to a Mac System, Mac is able to
re-create the two Forks and special Mac properties. MacBinary files are not understood by Windows, so can
generally not be opened with any software, yet they are ideal for exchange purposes when files eventually
need to end up on Mac systems again (e.g. sent via email).
Extract Resource Forks and Properties
Extract files with Mac properties as MacBinary files : Click here for an explanation on MacBinary files.
Extract Resource Forks and Properties to NTFS Alternate Data Streams :
Alternate Data Streams in an NTFS file system are a way to store extra metadata for a file, not in the file
body itself, but in a stream that is attached to the file. In fact, these Alternate Data Streams resemble Mac
"Resource Forks" in this respect. IsoBuster is able to convert the Resource Forks, that are stored in the
ISO9660 (or derivatives) file system, to NTFS Alternate Data streams, in a way that a Mac, accessing the
NTFS partition, is able to understand and use the Resource Forks and other Mac specific Properties again.
Scan options (normal mounting of discs)
Text conversions
Write software specific options
El Torito (Boot)
Page 58
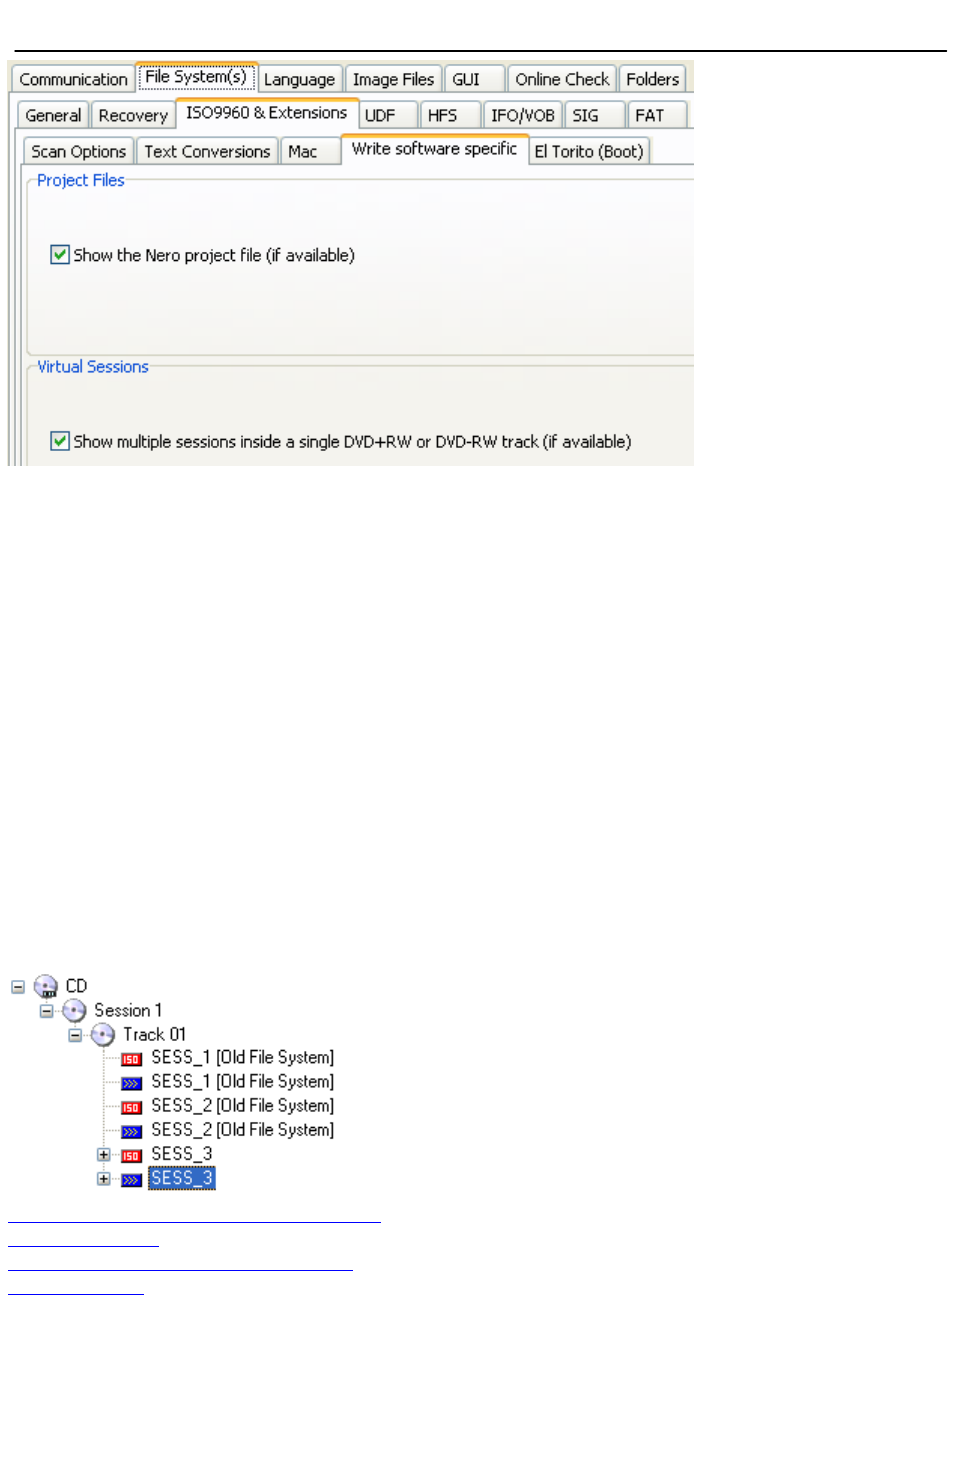
ISO File System Settings
Write Software specific
Sometimes write software(*) packages use undocumented tricks, stuff outside the specifications, to deal
with certain problems.
Project Files:
So does Nero for instance store its (*.NRI) project file for multi-session CDs and DVDs inside the ISO9660
file-system of the CD/DVD itself. This is Nero's unique way to make it possible to update changed files only,
in a next session. IsoBuster shows this project file, as a file inside the ISO9660 file-system, when it is
available and when the option is checked. Extraction of this file allows you to re-use the project, should you
have lost it, for a new CD or DVD for instance.
(*) With Write software, CD and DVD authoring software is meant, such as Nero, Ashampoo, ...
Virtual Sessions:
Another trick, on media that is primarily intended to be overwritten, to preserve older data and to reduce
over-write, which degrades media over time, is to append data as long as it is possible instead of over-writing
immediately. Because multi-session data appending, for all file-systems, relies on creating additional
physical sessions and because not all media allows this, e.g. DVD+RW, some software vendors have come
up with their own techniques. By overwriting only a very small portion each time they trick file-system drivers
in jumping to the new data which is written further out on the media. IsoBuster interprets all this data and
allows you to see all sessions. Because IsoBuster shows the physical layout of a disc (sessions and
tracks) and links file-systems to these tracks and sessions, these virtual sessions will in fact be located
inside only one physical session. So the way to spot them is if multiple file-systems of the same kind are
located inside one session. See following screenshot as an example :
Scan options (normal mounting of discs)
Text conversions
Mac properties and extraction methods
El Torito (Boot)
Page 59

El torito (boot)
Mkisofs boot patch
Bootable CD/DVDs made with mkisofs can contain some extra information on the size of the boot image.
The size of the boot image as recorded in the El Torito (specification) structures may in fact be wrong for the
generated boot image. The real size is then recorded in the special mkisofs structure. Mkisofs provides this
functionality because some BIOS can only deal with certain boot image sizes (in no emulation mode). So
the size in the El Torito structures is purposely wrong then, but the real size is recorded in the special
structure. IsoBuster will display (an extract if requested) the correct size, based on the mkisfs structure, if
this option is enabled.
Check boot images for FAT content and list files if FAT is present
Sometimes, not always, the boot file (*.img) of a bootable CD or DVD contains a FAT file-system. For
instance the boot image file of the Windows 98 installation disc is a 1.44 MB floppy image with a FAT12
file-system inside. If this option is enabled, IsoBuster checks the boot image file while mounting and if the
boot image file contains FAT, IsoBuster then adds a FAT file-system to the disc layout and shows all files
and folders inside the FAT file-system, in other words IsoBuster then shows the files and folders contained in
the boot image file.
Scan options (normal mounting of discs)
Text conversions
Mac properties and extraction methods
Write software specific options
Page 60

UDF File System Settings
Look for UDF on CD-i and true white-book Video CD (VCD) discs
Certain disc types simply don't contain a UDF file system. More specifically older standards such as the
CD-i and VCD discs. Looking for UDF doesn't take that much time so there's normally no real penalty to pay
but CD-i and VCD discs often have video data on the locations where IsoBuster tries to find UDF. This video
data is stored in M2F2 sectors which means that normal read commands (must) fail on those sectors. This
also means that IsoBuster will retry and look further to find other evidence of UDF and this can add a few
more seconds to the mounting process. So, if a real CD-i (according to the green book standard) or a real
VCD (according to the white book standard) is detected, IsoBuster will not try to find UDF by default. In case
of VCD, ... there are often variants out there that behave perfectly in most conditions but are not necessary
true white book VCDs. On these VCDs IsoBuster will still look for UDF.
Find Missing VAT
IsoBuster interprets UDF based on the UDF rules but while doing so also already looks further to see if it
can't compensate for errors. One extra feature which is default set on can be switched off. This feature
automatically looks for the last valid VAT.
A VAT is crucial for sequentially written media (e.g. Drag and Drop applications on write once media (CD-R,
DVD+R, DVD-R)). If a valid UDF file system is found but no VAT is found, the file positions can't be
determined properly. Therefore, in such a situation, IsoBuster will look for the last valid VAT if there was no
VAT where it was supposed to be.
If you run into this problem you stand a good chance that you miss the last added files and folders. At this
time it might be wise to scan all using the "Find Missing Files and Folders" option.
If there are many physical errors at the end of the disc, trying to find the VAT can result in a painfully long
wait. Therefore the option to stop looking for the VAT if there are too many errors is switched default on.
Both these options are not saved when the program is closed. Switch them on or off if you don't like the
default settings before you start investigating a disc
After : Find missing UDF Files and Folders
Generate a list of files with physical read errors
If checked, this option will be executed automatically after a Scan for lost files and folders. This list will be
compiled only if there are indeed files with physical read errors and the list will be displayed in IsoBuster's
Edit Window. The functionality is basically the same as what can be triggered manually.
Try to find matching extensions for orphaned (nameless) files
If checked, this option will be executed automatically after a Scan for lost files and folders but only if there
are really orphaned files. The functionality is the same as what can be triggered manually
Mac properties
Stream support
Page 61
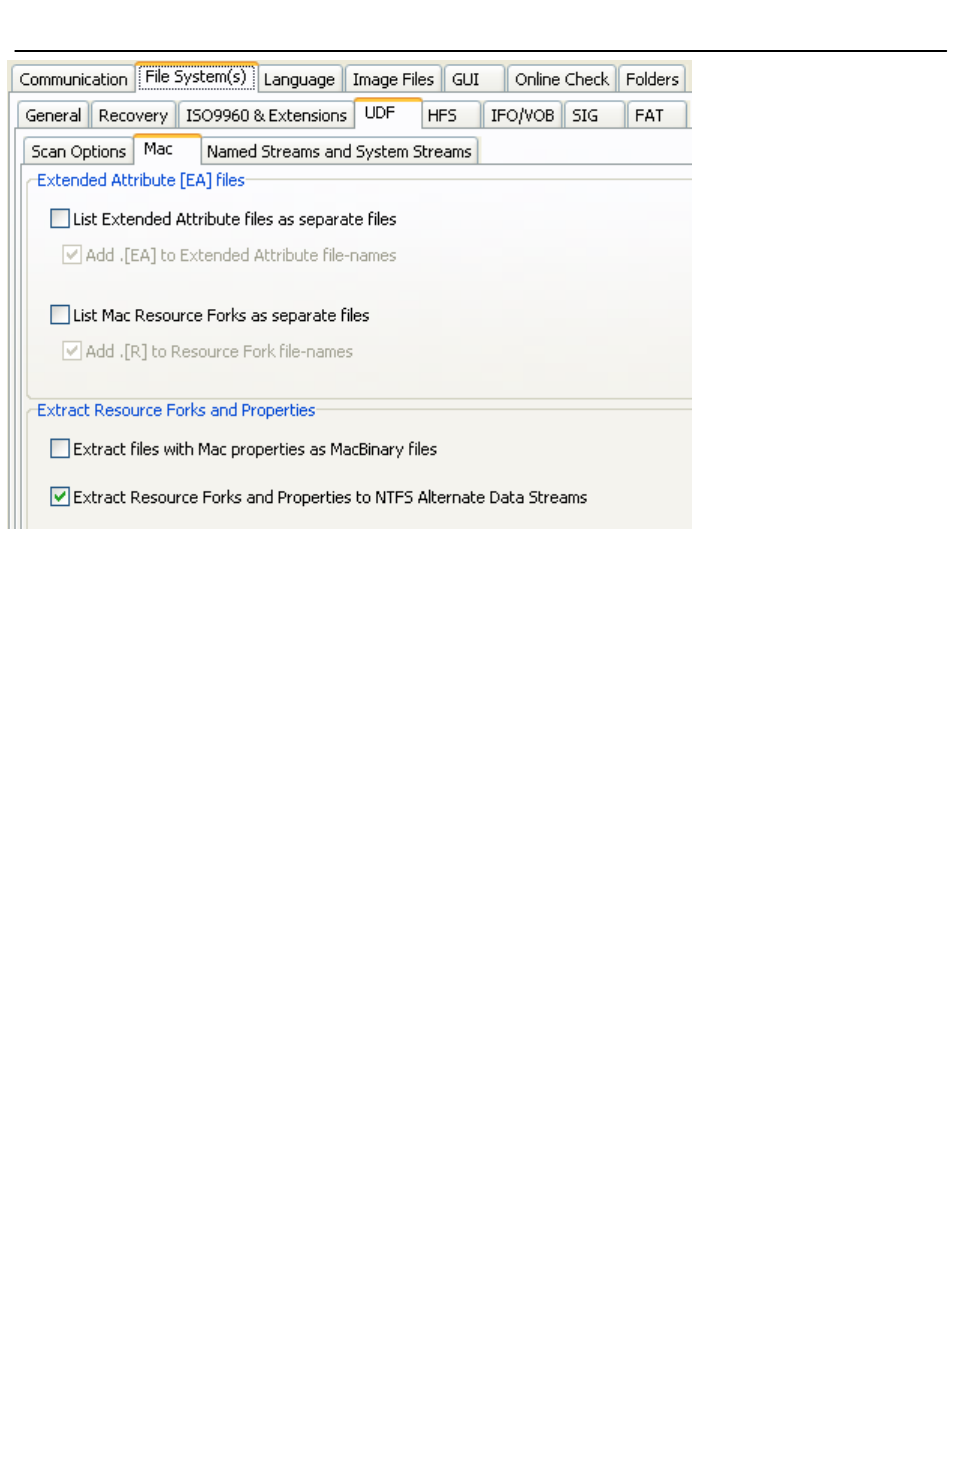
UDF File System Settings (Mac)
Extended Attribute Files
Extended Attribute Files : The UDF File System can contain Extended Attribute Files. These files have
the exact same name as the file they are associated with. Windows itself and Windows applications ignore
these files but other systems often use them. E.g. Macintosh uses associated files to store the "Resource
Fork" in. Be aware that Mac "Resource Forks" don't take up the complete associated file-size, instead,
"Resource Forks" start at a certain offset inside the extended attribute files. IsoBuster finds associated files
and automatically keeps track of them when they contain Mac properties and a Resource Fork as part of the
transparent Mac support.
List Extended Attribute Files as separate files : You can also set IsoBuster to display all extended
attribute-files as separate files. This is independent from their content. Also non-Mac / non-Resource-Fork
extended-attribute files are listed then.
Add .[EA] to the Extended Attribute Files' names : Because extended-attribute files have the same
file-name as the file they are associated with, they cannot be extracted (copied) to a Windows system in the
same folder, as Windows does not accept two files with the same name in one folder. To be able to work
around that easily and to be able to extract all files of one folder to a Windows system folder, you can have
IsoBuster add an .[EA] extension to the file name, to give the name a unique character.
List Mac Resource Forks as separate files : You can also set IsoBuster to display all Resource forks as
separate files. So, next to possibly displayed .EA files you also get Resource Fork files which are in fact
physically located inside the .[EA] files. But this way you get to see the start address of the Resource Fork,
the true length of the Resource Fork, the byte offset in the first block etc. Furthermore you get the unique
ability to extract the "true" Resource Forks from the disc without having to "peel open" the extended attribute
files first.
Add .[R] to the Resource Forks' names : Because Resource Forks have the same file-name as the file
they are associated with (The Data Fork), they cannot be extracted (copied) to a Windows system in the
same folder, as Windows does not accept two files with the same name in one folder. To be able to work
around that easily and to be able to extract all files of one folder to a Windows system folder, you can have
IsoBuster add an .[R] extension to the file name, to give the name a unique character.
Extracting Resource Forks as seperate files is basically not needed for anything except for engineering
purposes. E.g. to be able to inspect the content and properties (e.g. size) of the Resource Fork; for
designers, developers, engineers or technical people. IsoBuster transparantly takes care of what to extract
to a Windows system, in case the file has Mac Properties, so that the file is usable on the Windows system.
IsoBuster also extracts Mac Resource forks to an NTFS formatted Hard Disk, and stores them in Alternate
Data Streams. These streams are not visible to the user browsing the file system with explorer, but they are
there. When you decide to extract files as MacBinary files, all Mac content is preserved, so that files can be
exchanged on non Mac systems but when they are taken to a Mac System, Mac is able to re-create the two
Forks and special Mac properties. MacBinary files are not understood by Windows, so can generally not be
opened with any software, yet they are ideal for exchange purposes when files eventually need to end up on
Mac systems again.
Page 62

Extract Resource Forks and Properties
Extract files with Mac properties as MacBinary files : Click here for an explanation on MacBinary files.
Extract Resource Forks and Properties to NTFS Alternate Data Streams :
Alternate Data Streams in an NTFS file system are a way to store extra metadata for a file, not in the file
body itself, but in a stream that is attached to the file. In fact, these Alternate Data Streams resemble Mac
"Resource Forks" in this respect. IsoBuster is able to convert the Resource Forks, that are stored in the
UDF file system, to NTFS Alternate Data streams, in a way that a Mac, accessing the NTFS partition, is able
to understand and use the Resource Forks and other Mac specific Properties again.
Scan options (normal mounting of discs)
Stream support
Page 63

UDF File System Settings (Streams)
Named Streams
Extract Named Streams to NTFS Alternate Data Streams :
The UDF file system supports Named Streams. Streams are a way to store extra metadata for a file, not in
the file body itself, but in a stream that is attached to the file. When you extract files from the UDF file
system, and these files contain Named Streams, and you extract them to an NTFS formatted drive, , and this
option is checked, then IsoBuster will convert the UDF Named Streams to NTFS Alternate Data streams.
Show Named Streams as separate files (if available):
For this functionality you need a [Business] type license. When this option is checked, IsoBuster will
show and extract the Named Streams as separate files. Each file that contains one or more Named
Streams, will have those Streams listed below it, with the same name + ":" + the name of the stream. The
actual main file will still extract with its Named Streams to Alternate Data Streams when the option "Extract
Named Streams to NTFS Alternate Data Streams" is checked and when all conditions are met.
System Streams
Show Named Streams as separate files (if available) :
Besides Named Streams attached to files, UDF also supports streams for the file system itself. In other
words there can be streams for every UDF file system.
If this option is checked, and when there are in fact system streams available, then IsoBuster will spawn a
new UDF file system icon below the original file system icon, and IsoBuster will list the system stream(s)
which can be inspected and extracted like normal files.
Scan options (normal mounting of discs)
Mac properties
Page 64

HFS File System Settings
Look for HFS on CD-i and true white-book Video CD (VCD) discs
Certain disc types simply don't contain a HFS file system. More specifically older standards such as the
CD-i and VCD discs. Looking for HFS doesn't take that much time so there's normally no real penalty to pay
but why loose time if the check is not really needed anyway. So, if a real CD-i (according to the green book
standard) or a real VCD (according to the white book standard) is detected, IsoBuster will not try to find HFS
by default. In case of VCD, ... there are often variants out there that behave perfectly in most conditions but
are not necessary true white book VCDs. On these VCDs IsoBuster will still look for HFS.
Automatically add extensions to files (where possible)
Apple Mac doesn't use or at least doesn't need file-extensions. On Windows systems, the association with
a program is made via the file extension (e.g. .txt or .jpg or .htm). On Apple systems other means are used
to launch the file in the appropriate program. This causes the files, once extracted to your Windows
environment, not to be recognized properly. You need to know what type files they are to launch them in the
appropriate programs. IsoBuster does part of the work by automatically adding extensions where
appropriate. IsoBuster uses the file's properties to associate a likely extension. This is based on an
internally managed database and is not fail-save as some Apple programs use comparable properties.
However the results are very satisfying.
Mac supported file-names vs. Windows supported file-names.
Mac (HFS(+)) supports a number of characters in file-names that are not supported by Windows. When
you extract files or directories (folders) with names containing such illegal characters, IsoBuster replaces
them with an underscore '_'. For Instance, When the Mac CD contains a File-name "My\Data?/". Then
IsoBuster will extract that file to the Windows environment with following name : "My_Data__".
Following characters are not supported by Windows in file-names :
\\ , / , :, * , ? , " , < , > , |
Page 65

HFS File System Settings
Resource Forks
List Resource Forks as separate files : You can set IsoBuster to display all Resource forks as separate
files. This way you get to see the start address of the Resource Fork, the length of the Resource Fork etc.
Add .[R] to the Resource Forks' names : Because Resource Forks have the same file-name as the file
they are associated with (The Data Fork), they cannot be extracted (copied) to a Windows system in the
same folder, as Windows does not accept two files with the same name in one folder. To be able to work
around that easily and to be able to extract all files of one folder to a Windows system folder, you can have
IsoBuster add an .[R] extension to the file name, to give the name a unique character.
Extracting Resource Forks as seperate files is basically not needed for anything except for engineering
purposes. E.g. to be able to inspect the content and properties (e.g. size) of the Resource Fork; for
designers, developers, engineers or technical people. IsoBuster transparantly takes care of what to extract
to a Windows system, in case the file has Mac Properties, so that the file is usable on the Windows system.
IsoBuster also extracts Mac Resource forks to an NTFS formatted Hard Disk, and stores them in Alternate
Data Streams. These streams are not visible to the user browsing the file system with explorer, but they are
there. When you decide to extract files as MacBinary files, all Mac content is preserved, so that files can be
exchanged on non Mac systems but when they are taken to a Mac System, Mac is able to re-create the two
Forks and special Mac properties. MacBinary files are not understood by Windows, so can generally not be
opened with any software, yet they are ideal for exchange purposes when files eventually need to end up on
Mac systems again.
Extract Resource Forks and Properties
Extract files with Mac properties as MacBinary files : Click here for an explanation on MacBinary files.
Extract Resource Forks and Properties to NTFS Alternate Data Streams :
Alternate Data Streams in an NTFS file system are a way to store extra metadata for a file, not in the file
body itself, but in a stream that is attached to the file. In fact, these Alternate Data Streams resemble Mac
"Resource Forks" in this respect. IsoBuster is able to convert the Resource Forks, that are stored in the
HFS file system, to NTFS Alternate Data streams, in a way that a Mac, accessing the NTFS partition, is able
to understand and use the Resource Forks and other Mac specific Properties again.
Also do this for files with only a resource fork :
When IsoBuster does not extract Resource Forks to Alternate Data Streams, for instance when the option "
Extract Resource Forks and Properties to NTFS Alternate Data Streams " is off, or when the extraction
happens to a FAT file system, or to a network share where the file system of the remote drive is not known,
and when the file consists of only a Resource Fork, no Data Fork, then IsoBuster displays (and extracts) the
resource fork as a normal file. In other words, IsoBuster treats the Resource Fork as a Data Fork.
However, if you select this option, and if you are extracting to an NTFS partition, then files that consist of
only a Resource Fork will solely be extracted to the Alternate Data Stream (on the NTFS file system). There
will be no Data Fork, so there will be no content in the file body itself. The file will appear to be empty (zero
bytes), however there will be a stream attached to the file.
Scan options (normal mounting of discs)
Page 66

Files based on their signature
Limit the size of found files to:
Files are often recognizable based on parts of the data inside the file. This is however not an exact science
and fact of the matter is that some files are almost always found (e.g. *.jpg) and others are never found.
IsoBuster builds a flat file-list based on all file-signatures it encounters during a scan for lost data. This flat
list then contains all possible files with a file-length till the next encountered signature(*). Obviously, because
file-names are not recorded inside the file data itself, file-names and other properties of the files are unknown.
Nevertheless, for missing pictures, video, documents etc. this scan often proves to be a life saver, e.g. when
there is no ISO9660 or UDF to work with or when these file-systems are too corrupt to still point to valid data.
(*) Under some conditions you may be aware of the maximum file-length of the files. For instance if you
know that all files are *.jpg pictures made with your digital camera, and you know for instance that this
camera never produces files bigger than 2 MB (1024 KB), then you can set this as a maximum file-length.
IsoBuster will then keep this into account and will create files smaller, equal but never bigger than the set
length. This is simply a way to remove possible rubbish data that otherwise may be appended to the files.
Enable advanced editing, adding and deleting
In the list of files created based on their signature , it is possible to edit these files to change their start
address, offset and file byte length. It is also possible to add and remove files. The idea is that when you
know the file starts earlier, or later or is bigger or shorter, yet the automatic detection failed to see it, you
can always edit the properties before extraction. More advanced editing, adding and deleting:
Page 67


FAT File System Settings
Find and show deleted files and folders
During the mounting of the FAT file-system, IsoBuster also runs into deleted file and folder entries. These
deleted files and folders are automatically added to a separate FAT file-system. Uncheck this option if you
do not want this to happen automatically. Deleted folders will then be found as orphaned folders during a
scan for missing files and folders. Be careful: Deleted files and folders may in fact not be physically present
anymore on the disc ! IsoBuster found references pointing to them, but their bodies may have been
overwritten already with other files or folder information. The longer ago a file or folder was deleted, the lesser
the chance that the data is still truly present.
Look for FAT on CD-i and true white-book Video CD (VCD) discs
Certain disc types simply don't contain a FAT file system. In fact only random writeable media, with internal
defect management, such as DVD-RAM and BD-RE should be formatted and written with FAT. IsoBuster
relaxes that rule and looks on more types of media, but looking for FAT shouldn't happen on older standard
discs such as the CD-i and VCD for instance. It doesn't take that much time so there's normally no real
penalty to pay but CD-i and VCD discs often have video data on the locations where IsoBuster tries to find
FAT. This video data is stored in M2F2 sectors which means that normal read commands (must) fail on
those sectors. This also means that IsoBuster will retry and look further to find other evidence of FAT and
this can add a few more seconds to the mounting process. So, if a real CD-i (according to the green book
standard) or a real VCD (according to the white book standard) is detected, IsoBuster will not try to find FAT
by default. In case of VCD, ... there are often variants out there that behave perfectly in most conditions but
are not necessary true white book VCDs. On these VCDs IsoBuster will still look for FAT.
Only use the short file-names
FAT is still compatible with and still stores DOS 8.3 file names. Check this option if you want IsoBuster to
ignore the long file names (if they are present).
Check El Torito Boot Image for FAT and list the files/folders if FAT is present
Page 69
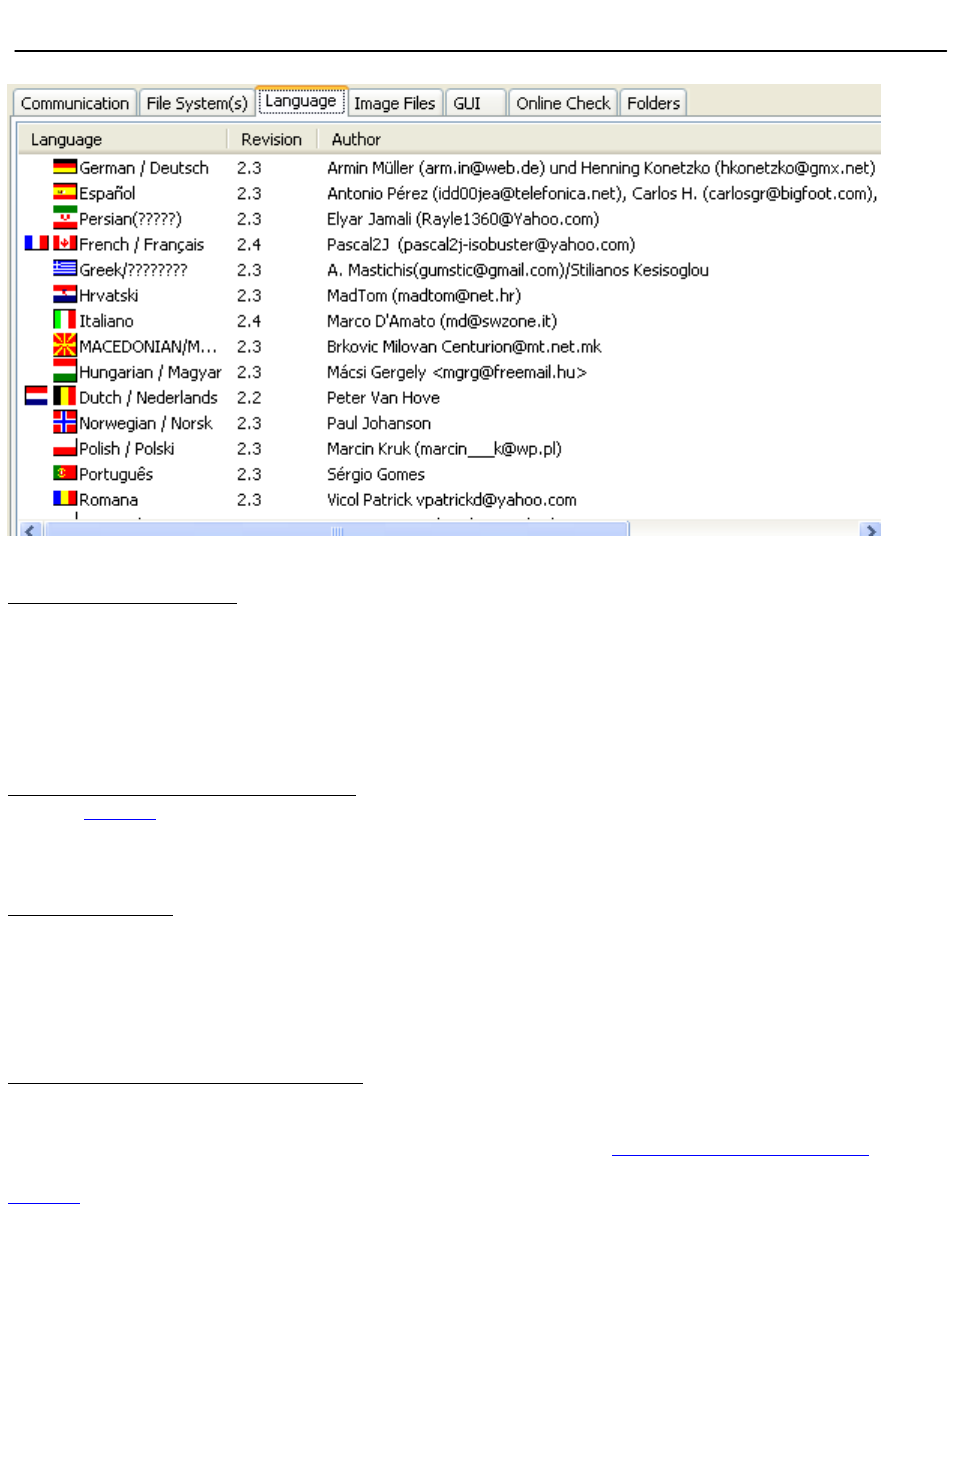
Language Support
IsoBuster is supported in many languages. Last time I counted there were 34 translations.
This is done by means of Language plug ins or dlls. They can found in the IsoBuster installation directory,
in the 'lang' directory.
Change the language :
To change a language, simply select the language you want and click 'OK' (See picture). As of now, this
language will be used.
For some languages you won't see proper text next to the flag icon. The reason for that is that these
languages use code pages that are not supported on your system. E.g. an American version Windows will
not support Japanese by default and next to the Japanese flag you will see underscores '_' or question marks
'?'. On a Japanese Windows version this will work perfect of course an the Japanese characters will be
shown. These are Windows limitations, no IsoBuster limitations.
Find an updated or new language :
On the Website, the latest versions of the translations can also always be found. To update a language,
simply download the dll and copy the dll in the 'lang' directory. Click yes when/if Windows prompts to
overwrite. If that doesn't work, the dll might be loaded by a currently running IsoBuster.
In that case, shut down IsoBuster an try again.
For the techies :
All displayed texts in IsoBuster use a MS Windows default font 'MS Sans Serif' and the Charset is set to
DEFAULT_CHARSET to be able to cope with all languages on all (many many) language versions of MS
Windows. For the Japanese translation this poses problems as (apparently) the Japanese installation is not
able to pick the correct font with these settings. Therefore IsoBuster has been enhanced to dynamically (no
user intervention required) change the Charset if needed. This kind of support is done by means of the
language dlls and is not something you should worry about.
The people behind the translations :
All translation have been done by people who kindly offered to translate to their native tongue. They did it for
free and their help is much appreciated. If you want to be a part of this group and your language is not yet in
the list, or you want to be a back-up for a language, send an Email to Translate@smart-projects.net to find
out if nobody else is already working on a the same language. Details on how to do it can be found on the
Website. Just follow the link 'Language' in the 'IsoBuster' section.
Page 70

Image File Creation Settings
IsoBuster can create image files. Supported features are creation of a cue-sheet file per CD/DVD image
and file splitting.
Split Image files in multiple files during creation :
For several reasons it can be interesting at times to create image files split up in several files. E.g.
Image.bin, Image.bin01, Image.bin02, Image.bin03, Image.bin04
IsoBuster can load these Multi-File images without a problem and you can still get all the data from these
split up image files.
One of the reasons for this feature is creating DVD image files on a Windows 98 FAT32 formatted HD.
FAT32 can only cope with max 2 GB files and DVD images are often 4 GB or larger. It is common practice
in this case to split up the images in chunks of 1 GB each, hence 1 GigaByte (1GB) or 1024 MegaBytes
(1024 MB) is the default setting. However you can create image file as small as 1 MB. The smaller the
setting, the more files will be created, so be careful that you don't overload your system by creating more
than 4000 image file chunks.
Note. IBQ files are automatically split up around the 1 GB file size boundary, if the size is set greater than
1 GB or not set at all.
Create Cue-sheet files (*.cue) :
Cue-sheet files (*.cue) were originally designed for CDRWin but they are commonly used and combined with
image files to have a feel for the track layout of the CD. Cue-sheet files (*.cue) are in fact text files (you can
open them with any text editor). The actual CD data is always contained in a different file (*.bin, *.iso, ...).
So if you open a *.cue file with IsoBuster, IsoBuster will know the track layout of the image but will get the
actual data from another file (*.bin, *.iso). This file's name is also contained in the *.cue file.
IsoBuster can also create these files. Default, IsoBuster will prompt you each time after you made an
image. However you can also set the option to always automatically create a cue-sheet file after creating an
image, or you can set it to not be bothered again.
Cue-sheet files have limitations !! They're nice to get the track layout of a session, but they do not support
Multi-Session discs. IsoBuster however adds features to the cue-sheet file so that Multi-session discs are
supported as well. These entries are preceded by "REM" so that other applications (that do not support
Multi-session cuesheet files) do not complain. However, if you load these cue-sheet files with IsoBuster
again, you get the full potential of these added features and you can see all sessions again properly.
Additionally to the option to create cue-sheet files after creating an image, and totally independent from this
option window, the right mouse click on a CD/DVD icon option also provides a means to create a cue-sheet
file, without creating an image itself. This feature is nice to create and share a layout of a disc without having
to create the entire image. There's once catch, cue-sheet files list the amount of bytes per block that were
extracted in the image. If you end up using a cuesheet file created with this option you have to make sure
that the block size matches with the image itself.
Create MD5-checksum files (*.md5) :
MD5 technology is great to flush large numbers of data through to in the end get a 16 BYTE checksum that
Page 71

is very unique. MD5 technology is used a lot as a means to identify if a file is still exactly the same as
before. Many files these days are accompanied by a *.md5 checksum file which contains the 16 BYTE
checksum. Third party checksum testers can then be used to verify if the file is still exactly the same as
before, e.g. to verify that the file hasn't been altered, edited, corrupted during transfer, ... .
IsoBuster also features MD5 check and creation functionality. It is possible to specify in this option to
always create an MD5 checksum file after an image file has been made.
The just created image file is then automatically opened and a checksum file is created from that image.
More on topic :
When an image file is opened by IsoBuster, a user can choose (right mouse button click on the CD/DVD
icon in the left pane) to create an md5 file from that image or to verify that image with an existing md5 file.
IsoBuster can even create an md5 file from a CD or DVD before an actual image has been made, the user
can choose between as if the extraction would occur for user data only (2048 bytes/block) or raw (2352
bytes/block). If an md5 file is opened with IsoBuster as if it were an image file, then IsoBuster will treat the
first file mentioned in the md5 file as an image file and will automatically do the MD5 verify for this file. If an
image file is in fact a combination of more than one files, then IsoBuster will handle that all automatically.
ISO / BIN / TAO :
Traditionally, IsoBuster has always created TAO and BIN image files. An image created with user data only
was a TAO file, an image with raw data was a BIN file. To avoid confusion and because ISO can be basically
either user data or raw data, it is possible for a user to set that IsoBuster always creates ISO files, no matter
if the content is raw or only user data. It is adviced then to also create a CUE file, as that file contains more
information on the way the image was extracted.
Files associated with IsoBuster :
IsoBuster supports a wide range of image files. During installation you can set which files should be
associated with IsoBuster. File association means that, if you click a file with a certain extension, that file will
automatically be launched inside IsoBuster. The option here enables you to associate when you forgot to do
so during installation, or to deactivate association when you so desire.
More on file associations during installation can be found online: Installation guide for IsoBuster: "Select file
associations" explained.
Page 72

GUI Settings
Changing the font.
Although IsoBuster uses a font that is supposed to work right on all localized Windows versions,
sometimes certain Windows versions contain other fonts that suit the language characters better (Maybe
even extra installed fonts). This option allows you to select another font so that your Japanese or Arabian or
... version looks better. This options also allows you to set ridiculous fonts in terms of size, type and maybe
color, but that's up to you. You can always hit the default button to set the font back to the design state.
Changing the icons.
IsoBuster will use the typically XP style icons on an XP system and will use more Win9x-2K style icons on
other systems by default. You can choose to always use XP style icons or not. Just play with the option to
see the result, it's harmless.
Show low priority (informational) icons.
IsoBuster shows a couple of icons next to files and folders if they posses certain properties. To avoid
confusion, a selection of these icons can be disabled. Icons showing properties such as "contains read
errors" can never be disabled.
Progress Bar during extraction.
Page 73

All IsoBuster versions up to version 1.5 have always shown a progress bar per file. One of the reasons was
that if a directory was extracted, it was not always known yet how many files and sub-directories that
directory contained and so it was impossible to calculate and show an exact progress bar.
In the mean time things have changed and there are a fair number of situations where the content of
sub-directories is already known and stored in memory. So in these cases showing a progress bar for an
entire operation is not that hard.
As of version 1.6 the progress bar is now always shown an calculated over an entire operation. This also
means that in case the sub-directory content is not known yet, that content will be scanned first ! So a
directory scanning operation that would occur during the extraction itself is now occurring before the actual
extraction starts. This does not mean that the entire operation will take longer ! In fact, often this reduces
the overall time needed for an extraction of directories with sub-directories.
For old times' sake, a progress bar per file (object) can be enabled again. And to make it really interesting,
both progress bars can be shown during the extraction operation
Beep.
Messages.
Page 74
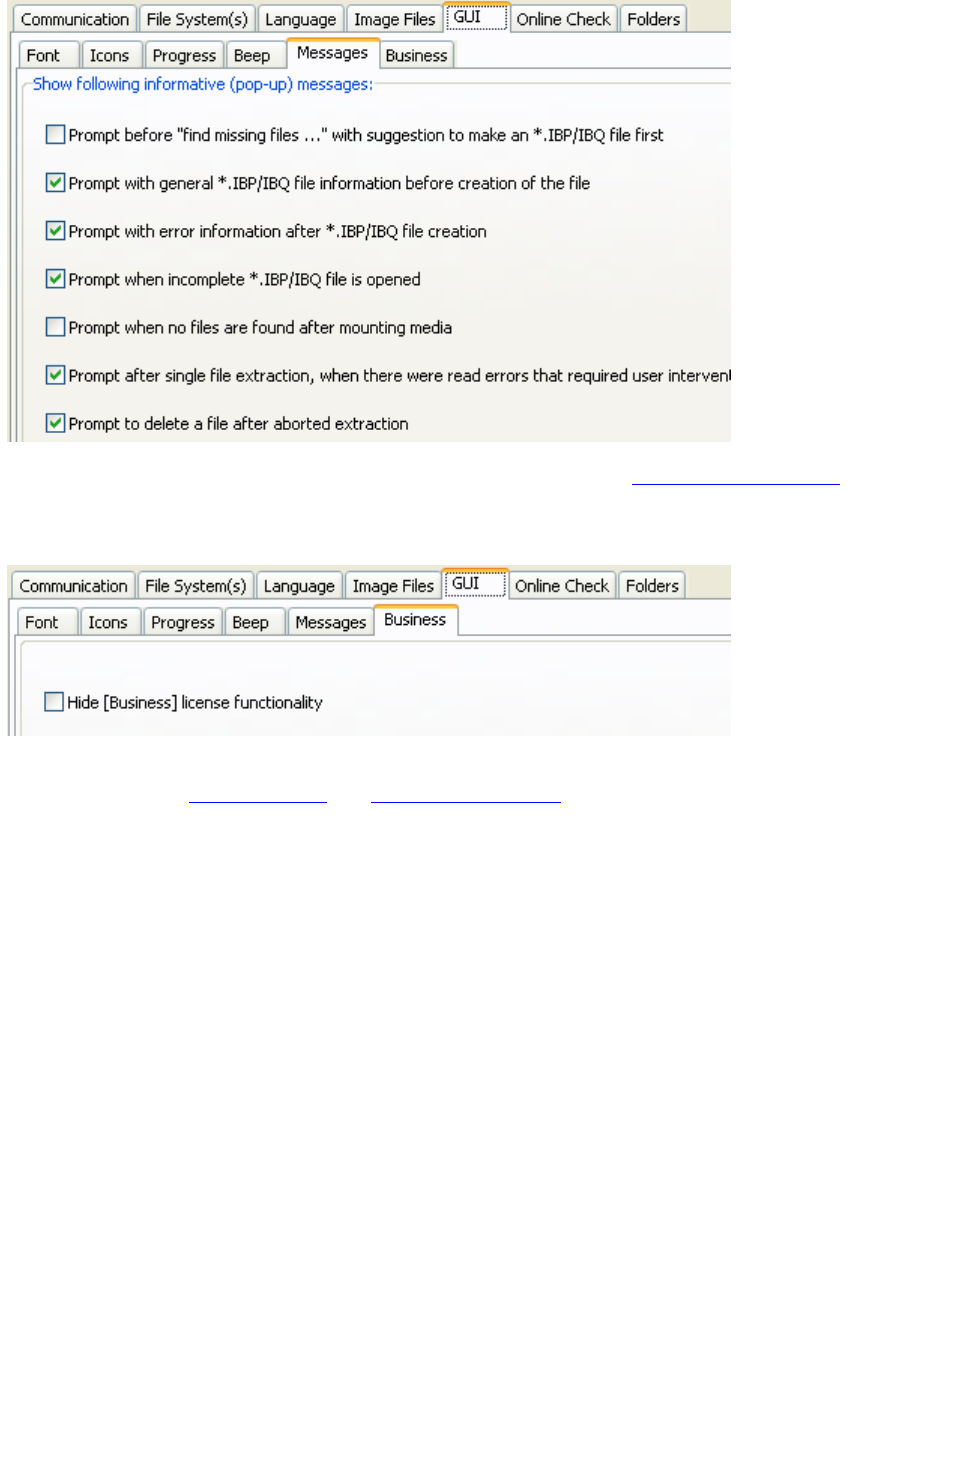
At certain moments you as a user can get prompted with a message, asking what to do. For some of
these messages, especially those related to creation and completion of managed IBP / IBQ files, you can set
not to be bothered again. This by means of a checkbox at the bottom of the message. If you want to enable
them again, you can do so by setting / resetting them here.
Business.
Since version 2.0 IsoBuster comes in two flavours. A personal version and a business version for
professionals. The business version has some special features, especially since version 2.2. These special
features (for instance viewing extents and adding/editing extents) can remain hidden. So instead of these
features showing up during right mouse click on an object, they are not shown at all when this option is
unchecked.
Page 75
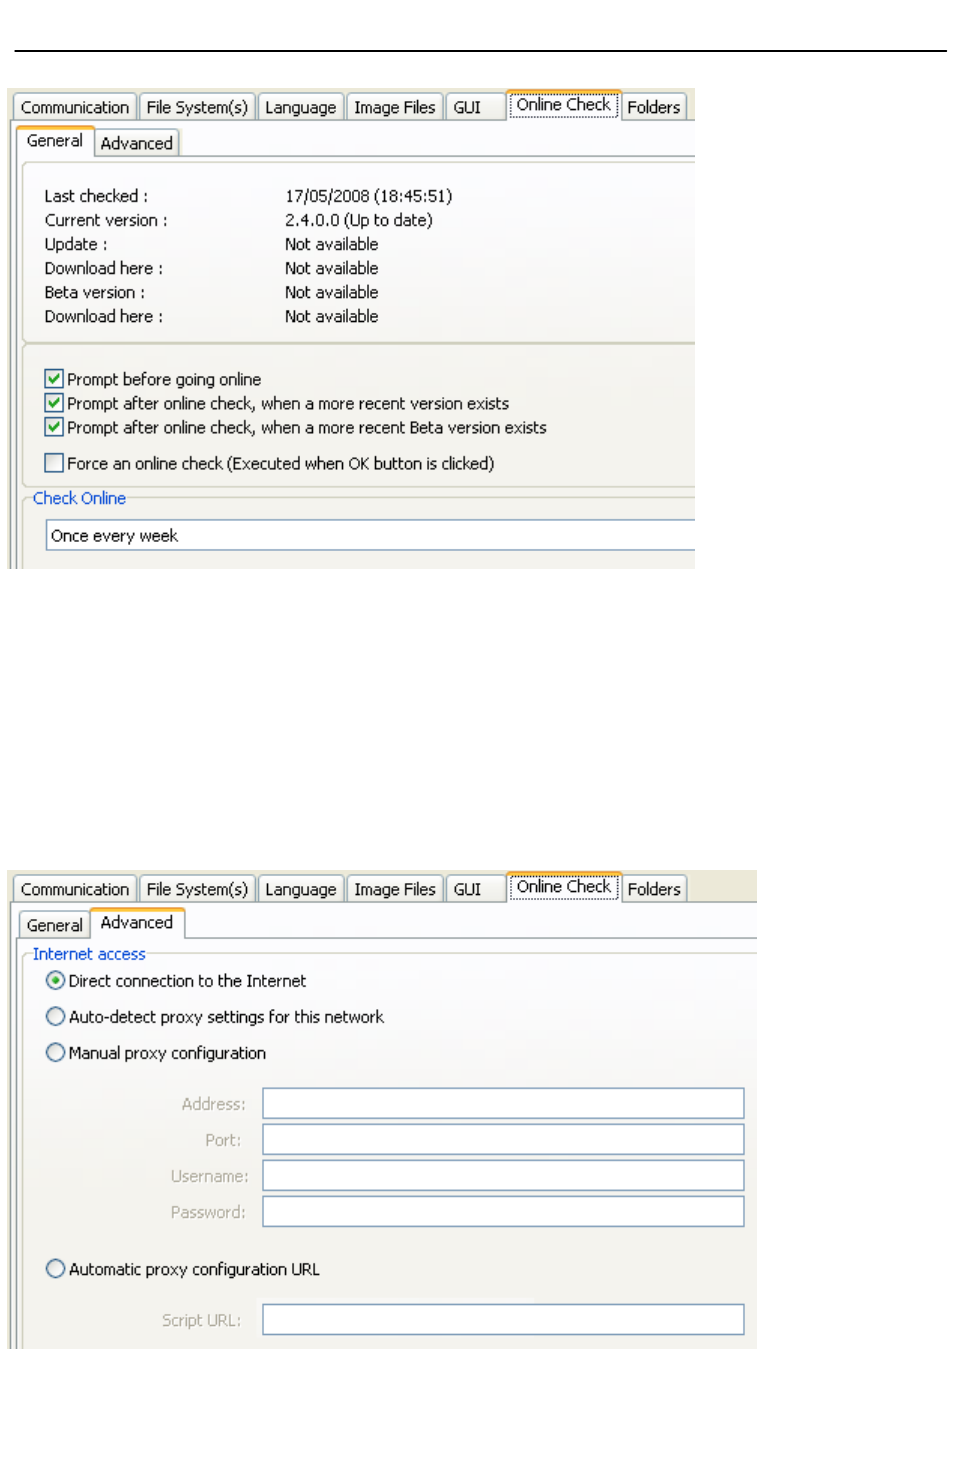
Online Check
General
Information.
The top half of the Online Check window contains information about the current program version and about
the most recent versions that can be found online. IF there is a more recent final build online then that
version will be mentioned together with a link where that version can be downloaded. IF there is a more
recent beta build online then that version will be mentioned together with a link where that version can be
downloaded.
Settings.
IsoBuster can be instructed to test automatically if there is a more recent version available. Set the most
appropriate interval, for instance once ever day or once ever week ... .
You can instruct IsoBuster to prompt you if there is a more recent version available. IsoBuster will perform
the check silently and will only prompt when there is indeed a newer version available.
Advanced
Advanced settings to be able to connect to the internet.
These settings make sense to those that need them, so not much explanation needs to be given. For the
averige user that can simply connect to the internet the default setting : "Direct connection to the internet
" should be selected.
Page 76

Folders
IsoBuster uses a temporary directory/folder for a number of reasons :
- When you Run a file, the file is extracted to the temp. folder from where it is launched.
- When you drag a file to a location, the file is first extracted to the temp. folder and next Windows moves it
to the appropriate location. This is because of Windows architecture. On a drag from the application, the
application has no means to know where Windows wants the file located. So the only way to work around
that is to extract to a temp. location and next allow Windows to do the relocating. (Other software, e.g.
Winzip works the same way)
- To place small text files in that are used in the Editor window, e.g. file-listings.
By allowing to choose a folder other than the system temp. folder you have full control over what location
IsoBuster uses.
Page 77

FAQ
Q1. The Application loaded but NO drives were present in the Selection Combobox ?
IsoBuster uses different ways to communicate with the CD-ROM devices in your system. Under Win95, 98
and ME this will be Aspi (Adaptec), under NT (4.0, Win2K, XP, VISTA) this will be SPTI (SCSI Pass Trough
Interface) by default. If both methods are present on the system IsoBuster allows to switch between them by
means of 'Options \ Communication'.
When not all devices or no device at all are found something is most likely wrong with these communication
interfaces. Try to upgrade or install Aspi to work around these issues. The wnaspi23.dll from Ahead also
works very nicely, e.g. under Windows XP. Just put the dll in the IsoBuster folder (e.g. in c:\program
files\smart projects\isobuster). You can find the dll here : http://www.nero.com/nero7/eng/ASPI_Driver.html
Contact Smart Projects if you think you've found an issue with Isobuster.
More Here.
Q2. How do I upgrade or 'fix' my Aspi layer ?
More Here.
Q3. What File Systems are supported ?
More Here.
Q4. What about Multi Session ?
All Multi Session CDs are supported. As a result you can see the file-systems per session and can retrieve
files you long thought were lost. Even better, if the last session can't be closed (writer problem), that session
is still accessible.
More Here.
Q5. What's the difference with Windows access to the CD ?
IsoBuster communicates directly to the Drive and doesn't use Windows' 'input' on the CD content. Both the
access and interpretation of the file system are done by this application. Resultantly this application can
read all sectors how and when it wants. It can 'see' CDs that Windows can't. It can retry as often as it wants
and interpret errors how it wants. IsoBuster can read/extract a lot more than Windows can ... think VCD,
SVCD, CD-i, ... .
Q6. What kind of drives are supported ?
All Atapi drives that are conform MMC/SFF8020i (rev 2.6) should work fine. This means 99 % of the drives
manufactured during the last 5 years. Before that ... you still have a GOOD chance your drive supports the
MMC commands. IsoBuster should now interpret the gross of all CD-ROM drives out there ! Lots of effort is
done to assure this.
Q7. What about IDE <-> SCSI ?
Both kind of drives work fine. A lot of time was invested to make sure SCSI is supported optimally.
Q8. I can select a drive but can't see the file-system on my CD ??
A 1000 possible issues ...
- Or the CD has a file system this application can't deal with ... (unlikely)
- Or the drive doesn't understand the ATAPI commands ...
- Or the CD is beyond recognition (scratches, bad sectors, ...)
Still ... All info is welcome. Specify CD title, OS it was meant for, Drive characteristics and name.
More Here.
Q9 I have a CD-i disc that can't be read ?
IsoBuster was tested on a range of 200 different CD-i titles. They all worked well except for two titles. After
investigation it turned out that the CD-ROM drives just couldn't read the requested sectors, because the
sector-layout was FAR beyond specifications or because they contained audio tracks. e.g. 'Uncover Tatjana'
could be read on my Sony drive, but not on my Philips drive. e.g. 'Het Nationale Muziekkado' couldn't be
read on either drive. Error : 05/64/00 : 'Illegal Mode for this track' (says it all ...)
Actually, 9 out of 10 chances when you have problems reading CD titles, the CD contains Audio tracks !!??
Besides a unique file-system these CDs have a unique Table of Contents (TOC) which fools the gross of all
CD-ROM drives. When audio tracks are present, the CD-ROMs often treat the data as audio in the pre-gap
which leads to all sorts of data corruption.
More Here.
Q10 What about interleaved files on CD-i ?
Not implemented in this application. I haven't seen such a CD yet and must assume they don't exist. If this
application detects such files, it will add a little square on the left side of the file icon.
Q11. What about Mac CDs ?
Mac CDs that have an ISO file system are recognized by all IsoBuster versions. As of version 1.7 IsoBuster
also supports the Mac unique file-systems HFS and HFS+
Macintosh files are often split in two ... the executable part and the assets part (associated file), known as
Page 78

Data Fork and Resource Fork
Both files have the same filename and are located in the same folder.
IsoBuster shows them as one file and extracts the most appropriate part to your Windows system. There is
also the option to merge the files to MacBinary format for Mac compatibility.
More Here.
Q12. What are those different Extraction types ?
More Here.
Q13. If I Extract the VCD *.dat file, the resulting file is smaller than when I extract with Windows ?
Yep. Windows, for some stupid reason, copies all sectors raw and adds a header to the file saying so.
This is why you afterwards need tools such as dat2mpg to convert it all again.
More Here on VCD and More Here on Extraction methods.
Q14. Mpg frame-rate related issues ....
More Here.
Q15. Resulting file contains 0 bytes
If you choose 'Extract but FILTER only M2F2 Mpg frames' on a file that does NOT contain mpg data, there
is nothing to extract ... . Furthermore ... 'Extract but FILTER only M2F2 Mpg frames' Extracts mpg data that
is formatted as such on the CD (e.g. VCD, SVCD, DVCD), located in M2F2 frames. *.mpg files on a normal
or standard CD will MOST LIKELY not be formatted as such ! These files need to be extracted using the
normal 'Extract' option !!
More Here.
Q16. What about the famous 'mixed form' files on CD-i
No Problemo ! This application reads all sectors raw and extract the user data portion based upon its own
interpretation of the sector's form.
More Here.
Q17. What is that 'Frame' thing you keep referring to ?
A CD contains frames (or blocks), each containing a certain amount of data. CDs generally contain
333.000 - 360.000 frames
DVDs a lot more ......... .
1 LBA (= Logical Block Address) = 1 Frame.
More Here.
Q18. And what about DVD ?
More Here.
Q19. Does this application interpret UDF File Systems ?
Yep !
More Here.
Q20. Can a CD (or DVD) contain more than one file system ?
Oh Yes ! Trick is that all those File systems must point to the same files and directories. Sometimes
there are deviations where both File systems are different (bad mastering software). e.g. DVDs must contain
UDF but in most cases they also contain an ISO File System. Joliet is an extension of ISO and can contain
long file-names. (Most CD-ROMs these days contain the Joliet extension on top of ISO9660)
More Here.
In case of Multi-Session, each session contains File systems too.
File Systems can often also be interpreted in different ways (several ways to go about it). Choosing a
certain path can lead to different results than when another path was chosen. E.g. 'same' tables stored on
several locations and different address notations (Intel <-> Motorola)
This application for instance interprets ISO in a different way than Windows does ! Mainly for the benefit of
reading CD-i and/or giving you the opportunity to read the data anyway if Windows (once again) refuses.
More Here.
In the TreeView on the left, IsoBuster will add an icon for every (known) file-system it encounters. In effect
you will have multiple pointers to the same files and directories.
Pick the File-system you want (e.g. Long file names <-> short file-names) and explore the CD. If one
reference doesn't work, you have the option to explore via another file-system. This is a real plus over
Windows, since Windows sticks with one file system and doesn't even bother to post an error message when
it encountered problems during file-system interpretation.
More Here.
Q21. Why do I get the DOS file-names when I browse the CD ?
IsoBuster looks for all file-systems it knows. Standard, 'all' CDs contain an ISO file system, ISO9660 is
limited to short file-names. Extensions such as Joliet however contain the long file-names. IsoBuster also
scans for Joliet, UDF, HFS, IFO/VOB, ... and adds a root in the TreeView on the left
More Here.
Page 79

Q22. File retrieval from CDs that weren't closed properly by the Write application.
This application can see and retrieve files from CDs that are not closed properly (e.g. after Buffer Underrun).
Limitation in this case is the drive in which you want to 'see' the CD. A writer has no problems reading these
sectors, but a normal CD-ROM might fail !! In case of Buffer Underrun, the File system most likely will point
to files that weren't recorded or were only partly recorded. Extracting these files will fail with errors such as :
05/21/??, 05/63/??, 06/3B/0F, ... . In all cases, Isobuster will read as much as possible and in all cases
interpret the data that could be read !!! (Unlike Windows which just stops on the first error)
Q23. Mpg seems screwed up or is causing mpg player to crash
When data is extracted using 'Extract but FILTER only M2F2 Mpg frames', each frame is checked for a
certain signature before it is copied to the resulting file. Sometimes frames (as part of files that are not really
mpg) contain this signature (accidentally). Hence the application thinks it is extracting mpg and the result is
not what you expected. (although not encountered yet and probably unlikely to happen). Even though mpg is
only extracted from Mode2Form2 frames. Also, I did see some strange mpg formats on certain CD-i's (Not
movies !) which caused problems with my mpg player as well. If the mpg is stored in a 'unique' way you can
run into all sorts of unpredictable problems, with any application ! A lot depends of the quality of the codecs
on your system, since CD-i for instance seems to be able to handle some very different mpg formats.
More Here on Extraction techniques and More Here on CD-i and DVD.
Q24. File size on HD is different from what this application says !
In an ISO file system, all file-sizes are stored as if the file is residing in Mode1 or Mode 2 Form 1 frames.
This means, 2KB per frame. This is needed to be able to calculate the amount of frames that needs to be
read ! However, on CD-i and CD-ROM XA discs certain files (e.g. *.dat and possibly *.rtf on Video discs) can
reside in M2F2 frames. So, more user data per frame. Result is a larger file on HD than what IsoBuster says
!
More Here on Extraction techniques and More Here on CD-i and DVD.
Q25. Can't read certain files from DVD-ROM discs ?
Device reports errors : 05/6F/xx. The DVD standard allows protection on some DVD files ... (*.vob files for
instance). The DVD will not return the data of the blocks where the file-data is stored unless the drive is first
told to give the data anyway. The way to 'tell' the drive to return the data is 'kind of' secret.
Isobuster (at least for now) can not read these files either. The moment you start your DVD decoding
software and start playing a DVD movie, the drive is 'unlocked' by this software ... . Once 'unlocked' we have
to deal with yet another issue .... Besides 'locked', these sectors are scrambled as well !
Q26. 'Device Reported' Error messages ...
When Isobuster can't access certain data, it will display the error message it got from the drive. (after
depleting the retry-mechanism). These error codes can differ depending on the manufacturer, although they
all should be conform MMC2. E.g. : 05/21/00 : 'Logical Block Address out of range'. E.g. : 03/11/00 :
'Unrecoverable read error'.
More Here on Error codes
Q27. 'Device reported' Error message when reading from CD Image on HD ??
Isobuster is a multi-layered application, designed that way that functionality can easily be used in other
'Smart Projects' Applications. At this stage you should think of it as a Front-End (Iso interpretation), a Middle
part (Command sequences) and a Basic Engine (CD-ROM access). (In reality there are a lot more layers
(objects, C++)). When doing File access, another 'Middle Part' is linked in the code that does the actual File
access. However, this 'Middle Part' behaves as if it were a CD-ROM accessing Command sequence. The
Front-End 'hardly' knows it is reading from a file instead of a CD. Hence the term 'Device reported' instead of
maybe 'Error while reading from CD-Image File'.
Q28. 'Device Reported' Error message xx/xx/xx ... means ... WHAT ????
As explained in Q26 and Q27, these messages are reported by the CD-ROM/DVD drive. To know exactly
what they mean you should look them up in the command spec for that particular device. Fortunately they
have to be conform to MMC(1,2,3).
This section covers the MMC Error codes. See if your error fits in here.
Q29. Can I edit Image-Files with IsoBuster
Nope, you cannot. The reason is complex as re-creating an image file sometimes is. Reasons are … If a
file changes size, it might very well be that the complete image has to be re-calculated. Depending of the
type of image file and depending on the application that's going to be used to write the image-file, EDC and
ECC code needs to be changed/added per block. The Iso and File-system might need complete re-doing …
and what about the possible UDF file system then ? Or what about changing one session and pointers to the
files from other session …. And I can think of a few more issues that would occur. Therefore I haven't even
started considering editing Image files.
Consider this when you turn to other applications that provide this service : Suppose you have an image
that contains ISO and Joliet but also UDF and all File Systems point to the same files .... If you edit the
Page 80

image file the ISO and Joliet File Systems are changed. Under Windows 95 it all seems to work great when
you create a CD from the altered image but under Windows 98 it works horrible and you have data corruption
and so on ... . That is because Windows 98 defaults to the UDF file system (which remained un-altered) and
the references to the files in the UDF file system are now all wrong ... .
Q30. Why are there multiple file-system icons in the window on the left ?
IsoBuster scans for all file-systems it knows. When it finds such a file-system it adds an icon in the
TreeView on the left. You can pick whichever file-system you like to retrieve the file(s) and directories.
More Here.
Q31. What do all those icons mean next to files and directories ?
IsoBuster handles a lot (not to say all) exceptions that ISO and Joliet know. Different from Windows
IsoBuster indicates these exceptions to help TroubleShooting. Should something go wrong with such
particular files / directories we (possibly) know where to start looking for the problem.
More Here.
Q32. I extracted an iso or tao or whatever file from a track, session or complete image using
IsoBuster, How do I write this to a CD-R.
Use a Write Application such as CDRWin, Nero, Creator, ...
More Here.
Q33. I want to re-create a CD (possibly change a few files) but want to safeguard boot-ability …
Any idea how I can do this ?
More Here.
Q33. I opened an Image file and don't see all the tracks ?
Correct ! IsoBuster is not able to detect multiple sessions or tracks in image-files. This kind of functionality
will get in there eventually but not for all image-file types simply because most of them don't contain this kind
of information. Exceptions are files that are opened with a *.cue file and *.pxi image files which are
completely (multi-track, multi-session, CD-Text, ...) supported.
More Here.
Q34. I use NT/2K or XP, have SPTI selected as communication interface and can't see any drives ?
Read the SPTI bit here.
Do you have DLA installed and is there a CD or DVD present in the drive that you cannot see with IsoBuster
? If so:
- close IsoBuster,
- eject the disc,
- start IsoBuster again, ...
Is the drive present now ? If yes, you can now mount the disc and IsoBuster remains able to access the
drive. Another piece of good advice is to upgrade DLA to the latest version.
DLA locks drives when there is media inside that DLA wants sole access for. Especially with older versions
of DLA this can cause the effect that no other application (besides Windows itself which then works through
DLA) can access the drive anymore. Version 1.6 of IsoBuster had a feature that penetrated this lock and
provided access anyway. This feature has again been removed in version 1.7 because :
- Recent versions of DLA, on Windows XP at least, do not require the special handling anymore to be able to
communicate with the drives.
- There were unpleasant side effects :
- It took twice as long to start up the application IF DLA system files were found present on the system.
- It sometimes could add 5-10-15 to even 30 seconds start-up time. Some, with many drives in the
system, claimed seeing delays of even 2 minutes sometimes.
These delays were caused by time-outs in the DLA system files. DLA engineers informed us that they in
term were facing Windows bugs that caused the time-outs.
- Some systems where DLA had been installed on at some time in the past, still contained some of these
active (running) system files, and caused startup delays as well.
- Check to see if this file is not still present in your system directory : VxBlock.dll
- For those who were happy with the feature of 1.6 ... it has not been removed completely but it has been
disabled. If you like to have it enabled again, mail us at support@smart-projects.net and we'll help you
activate the DLA feature again !
Q35. I takes too long, to forever, until IsoBuster has started up ... what gives ?
First of all, do you have DLA installed ? Or traces of DLA system files (check for VxBlock.dll in your
system files directory) ? If so, read the previous topic Q34.
Do you have a bad disc inside one of your drives ? IsoBuster, on start up, sends a number of information
commands to all drives. Some drives, when a disc is mounting (or trying to) in the drive, can cause long
delays before responding properly to these information commands, causing long delays at start-up. If this
appears to be the case, open the tray(s), start up IsoBuster, next close the tray(s) and let IsoBuster mount
Page 81

the disc(s).
Do you have disconnected network drives on your system ? Under Windows NT, 2K and XP, IsoBuster
scans all drive letters and sends a number of commands down to the device to see if it fits the profile,
meaning : is it an optical drive (or virtual optical drive). Disconnected network drives sometimes have the
annoying property to time-out on such information commands instead of simply returning an error right away.
These time-outs cause the application to start up slower. Unmap the problem network drives if you want to
get rid of the start-up delays.
Page 82

File Systems
Data CD and DVD discs contain one or more File Systems.
The File System describes where and how on the media the files and folders are located. A File System is
often confused with a TOC but it is not.
The TOC describes the session and track layout of a CD or DVD it does not describe the files and folders.
To understand the TOC better, read the section about the CD/DVD Layout.
In most cases the different File Systems point to the same files and the reason for the different File
Systems exists to support as many different Operating Systems as possible. In some cases however, File
Systems DO differ and one File System may for instance contain a driver to be able to read the other File
System.
IsoBuster scans for all File Systems it supports and will show them all ! This allows for the user to select
the File System he/she requires. It also provides alternative ways in case one File-System is corrupt but the
other one isn't ! It's is a very powerful feature of IsoBuster in it's quest to be able to recover 'all' data !
You will recognize a File System as the icon connected to a Track icon in the 'Session and Track layout' of
the CD/DVD.
IsoBuster fully supports :
ISO9660
The most common File System on all CDs and DVDs is the ISO9660 File System. It is however also the
oldest and has some major disadvantages such as short file names (8.3) and a directory structure which can
only be 8 levels deep. Because of these limitations it is almost always accompanied by one or more File
Systems that don't have these limitations. However you need it if you want to see the content of the CD in an
old DOS mode or an older Mac or Sun system.
Some mastering application sin against these limitations and allow to master ISO9660 with long file names
and more directories deep. This shouldn't be a problem as of Windows 95 OSR2 but these CDs might cause
problems in other systems. Of course IsoBuster has no problems with these CDs as well.
Sometimes this File System mentions for what system the CD was mastered. IsoBuster shows this with
following Icons :
SUN
MAC
ISO9660 is recorded in a number of duplicate structures (with different byte order)
You should also read the section Options \ File System settings as you are able to influence how ISO is
interpreted based on these duplicate structures.
Joliet
Joliet is in fact an extension of ISO9660 and in many ways exactly the same. Some File System Volume
Descriptors are different which allows OS to recognize this File System and prefer it if available. Joliet allows
long file names and a directory structure which is substantially deeper.
It will be used automatically (preferred above ISO9660) by Windows 95 or higher.
Rock Ridge
Rock Ridge is also an extension of ISO9660 but never really became the standard (Joliet did). It was very
popular on Commodore CDs and also was a way to allow for longer file names and more directories deep.
It is not supported by Windows and Windows will use the ISO9660 File System on such CDs
Who knows ?
This File System starts with its own Volume Descriptor which has all the characteristics of Joliet but points
to all the tables of the ISO9660 File System.
It is probably supported by Windows as I have only seen it on official Windows installation CDs. It is always
accompanied by Joliet as well and Joliet is preferred above this File-System.
CD-i File System
Another File System derived from ISO9660 standard but with some specific differences which prevent an
ISO9660 interpreting system to always correctly deal with this File-System. It only appears on CD-i discs
and these discs (besides this unique File System) also have some other 'features' which cause real problems
on normal systems.
CD-i is not supported by Windows 95 or higher.
El Torito - Bootable CD/DVD
Page 83

This is not really a File System, more an extra feature of the ISO9660 File System. CDs and DVDs can be
made bootable but then the ISO9660 File System needs to be present alongside with the El Torito Volume
Descriptor and a Virtual Floppy image. By just copying a Virtual Floppy image to a CD/DVD one does not
make the CD/DVD bootable ! The File System needs to be setup as well. More about this here.
Bootable CDs and DVDs (or the El Torito standard if you will) needs to be supported by the BIOS of your
PC system, not the Operating System. Older BIOS do not handle Bootable CDs well let alone bootable
DVDs.
UDF
UDF is the 'new' CD/DVD File System and it is already used in a number of situations. There also have
already been some major changes, so can you encounter UDF 1.02, UDF 1.5, UDF 2.01, UDF 2.5 and UDF
2.6.
- DVD-ROM discs should always contain a UDF File-System, preferably UDF 1.02.
- Packet Written Discs (CD-R and CD-RW), e.g. by Roxio Direct CD or Nero InCD use UDF 1.5
UDF 1.5 contains mechanisms to be able to append files and to be able to deal with defects on host side.
- Mount Rainier discs should contain UDF 1.02 again because the drive takes care of defect management.
UDF 1.02 is supported by Windows 98 or higher if the media is closed and contains a TOC. It is preferred
over Joliet and ISO9660 if found.
What's the difference between : , and :
: This is the UDF file system which was found via the normal way, the way it is intended to find and
explore a UDF file system, possible the same file system as found by other applications.
: This is a recovered UDF file system. It is assembled by putting all lost but found files and directories
together. Where possible the tree structure is respected, but the files and directories in the root can come
from everywhere. You can find this FS by using the function "Find missing files and folders".
: This is an old file system. This once would have been a green (normal icon) but afterwards files were
added, altered or removed or the application just decided to write a new file system. A sequentially written
media can contain lots of these and it allows you to go back in time looking at older documents and so on.
You can find these by using the function "Find missing files and folders".
HFS
HFS is the Apple Mac file-system. It is used on all types storage media from Hard Drive to CD and DVD.
HFS itself is quite old and limited with regards to supported storage space, character-sets etc. Windows
systems don't support HFS at all. IsoBuster supports HFS on CD and DVD when the media is inserted in a
normal CD/DVD drive.
Image-files however for other type media (e.g. Floppy, HD, Zip, etc.) are also supported by IsoBuster !
HFS+
HFS+ is the modern variant of HFS with support for large storage space, unicode and much much more.
IFO/VOB
This is not a true file-system, it is a collection of IFO and BUP files inside an existing file-system, but this
collection of files is used as a file-system by many (not all) standalone DVD Video / Audio players. This
pseudo file-system relies on ISO9660 and more importantly on UDF to find the entry points.
SIG (or EXT)
This is not a real file-system but a flat file-list based on file-signatures, hence the name "SIG" or "EXT"
from file-extension. This list is created during a scan for missing files and folders. More on this here.
FAT
FAT is a Microsoft invented file-system that has been around for a long time and it was first used on
floppies in the days of DOS. FAT can be used on random writable media that has internal defect
management. DVD-RAM and BD-RE are such media types, hence why FAT is supported by IsoBuster. FAT
comes in three flavours, FAT 12, FAT 16 and FAT 32, all three formats are supported by IsoBuster. The
number (12, 16 or 32) represents the amount of bits that are used to store a cluster address in. FAT32 is the
most commonly used FAT file-system today because media these days is large, hence can contain a lot of
sectors and clusters. Because FAT is used a lot on Hard Drives, Pen Drives / Memory sticks, Jazz and Zip
drives, floppies etc., IsoBuster can also open a lot of image files created from such media.
You may also want to read the section about : Write Applications and File Systems
Page 84

Icons next to files, folders and tracks
For following icons :
Red Icon containing text 'ISO'
Blue and Red Icon containing >>>
Blue Icon containing >>>
Black Icon containing text 'RR'
Black Icon containing text 'CD-i'
Blue Icon containing text 'UDF'
Yellow Icon containing text 'UDF'
Blue Icon containing text 'UDF'
Green Icon containing text 'HFS'
Grey Icon containing text 'HFS'
Blue Icon containing text 'EXT'
Grey Icon containing text 'IFO'
Brownish Icon containing the text 'FAT'
Multi-colored Apple Icon next to one of the other Ions in this list
Blue S icon
Go see : File Systems
Other icons :
Blue puzzle Icon
This icon can be placed next to a file or folder. It means that the file or folder is fragmented over the optical
disc, into different extents. Instead of one or a series of succeeding blocks the file or the file describing a
folder is located at different locations. E.g. if a file is partly located in a (defect management) sparing area
you would see this. Also in case of UDF or UDF converted to ISO you see this a lot for large files that
couldn't be recorded in one go. This icon is not shown by default and needs to be enabled in the options.
Blue puzzle Icon
If you choose to see the different extents of a file, all extents will be shown with a blue puzzle icon next to
them.
Red Plus Icon
This icon can be placed next to a track a session or a file icon. It means that IsoBuster felt the need to
compensate or alter what the drive returned to get to the data. E.g. CD-i discs are often not correctly
recognized by CD/DVD-ROM drives and IsoBuster tries to compensate for that (possibly assumes tracks at
certain locations) to be able to give access to the data.
Error Icon (this icon has priority over all other icons)
If during a scan physical errors were encountered and if the file is located in such erroneous sectors, then
this icon will be placed next to the file. It indicates that there will be difficulties extracting the file and that
after extraction the file might be corrupt. This icon is only put next to a file if a physical scan was initiated
first. There are several ways to do this :
- Find Missing Files and Folders
- Check if all files are physically readable
- Perform a surface scan
Blue Arrow Icon with text 'E'
This icon is purely informative and shows that the file is preceded by an Extended Attribute Record. This
Extended Attribute Record (XAR) contains extra data per file but doesn't really belong to the file. It is used by
certain OS but definitely not Windows. This icon is not shown by default and needs to be enabled in the
options.
Blue Arrow Icon with text 'ICB'
This icon is purely informative and shows that the file is located inside a UDF descriptor that describes the
file's properties. The file is hence smaller than one single block minus the size of the UDF descriptor itself.
This icon is not shown by default and needs to be enabled in the options.
Multi- Apple Icon next to a file
When the icon is placed next to a file it means that the ISO9660 File System describing the file contained
special Apple extensions.
Windows Icon
This icon can be placed next to a File System icon (See the icons on top of this page). It is displayed when
in the File System settings dialog Little Endian is selected for that File System.
Page 85

CD/DVD Layout
A CD or DVD contains pits and lands in a groove. And when a laser reads over these pits and lands (while
following the groove) a high frequent signal is created. From this high frequent signal logical 0 (zeroes) and 1
(ones) can be derived (through Analog to Digital circuitry). Pits and lands are terms used to originally
indicate a height difference (e.g. a pit is low and land is high) however pits and lands can also mean a
reflectivity difference (e.g. RW), so the height is the same but the reflectivity is different and so again logical 0
(zeroes) and 1 (ones) can be derived from the resulting high frequent signal.
The resulting binary data (zeroes and ones) is then mangled through several decoding mechanisms, each
time cutting off the error correction and household data (Level 1 and 2 error correction in case of CD). The
data is also de-interleaved and put together in addressable physical blocks in different areas. Areas like the
lead-in, the program area, the lead-out etc.
While physical addresses are being used internally by the optical device (CD/DVD-ROM drive) a host (OS,
application, ...) will be able to address logical blocks. Logical blocks can but do not necessarily match with
the physical blocks. There are several addressing methods (methods 1, 2 and 3) and they allow a drive to
'hide' physical sectors which a host doesn't need to see. E.g. run-in, link and run-out blocks in case of
packet writing, spare areas in case of Mount Rainier etc. ...
Every block which is made up of 2352 bytes can contain data in different modes. E.g. an Audio block
contains 2352 bytes of audio data. A Mode 1 Data block contains 2048 bytes of user data. The remainder of
the 2352 bytes was used to do third layer error correction and so on.
A continuous non-interrupted, in ascending order addressable, set of logical blocks of which the start
address is recorded in the TOC (or DVD structures) is called a track. A CD or DVD contains one or more
tracks and a track is always located in a session. So in fact the most simple CD or DVD layout is a disc
containing one session with one track. Tracks are made up from blocks which were mastered or recorded in
different modes but basically you can distinguish two different kinds of tracks. Audio tracks and Data tracks.
Audio tracks are always mastered or recorded in one mode : Audio. Data tracks can be recorded in the 2
modes 1 or 2 and in case of 2, different Forms are possible as well.
A session can contain one or more tracks. When a session is finalized, a TOC (or DVD structure) is
recorded in the lead-in of that particular session. So every session has it's own TOC containing the layout of
the session and the layout of the previous sessions. A CD/DVD-ROM drive will always look for the highest
session and will find the layout in the lead-in of the last session. Audio copy protections often rely on the
fact that standard audio players only look in the first lead-in to find the audio tracks in the first session. A
CD/DVD-ROM drive however looks in the highest session lead-in and that's where sometimes incorrect data
is stored about the first audio tracks so that they become inaccessible. A first session's lead-in is not
addressable. Lead-in and Lead-outs of the higher sessions are located in the program area and are
addressable but mostly not accessible by the host.
Then finally, now Blocks, Tracks and Sessions are understood ... a higher level order is the combination of
tracks and sessions.
An Audio CD contains a set of audio tracks in the first session. The Audio CD standard (Red book)
describes audio in the first session only.
A CD-Extra or Enhanced CD contains a combination of audio tracks and data tracks so that standard
audio players can play the audio tracks (as they only bother about the first session). CD/DVD-ROM players
report all the tracks, including the data track(s) in the second session and that's where an operating system
Page 86
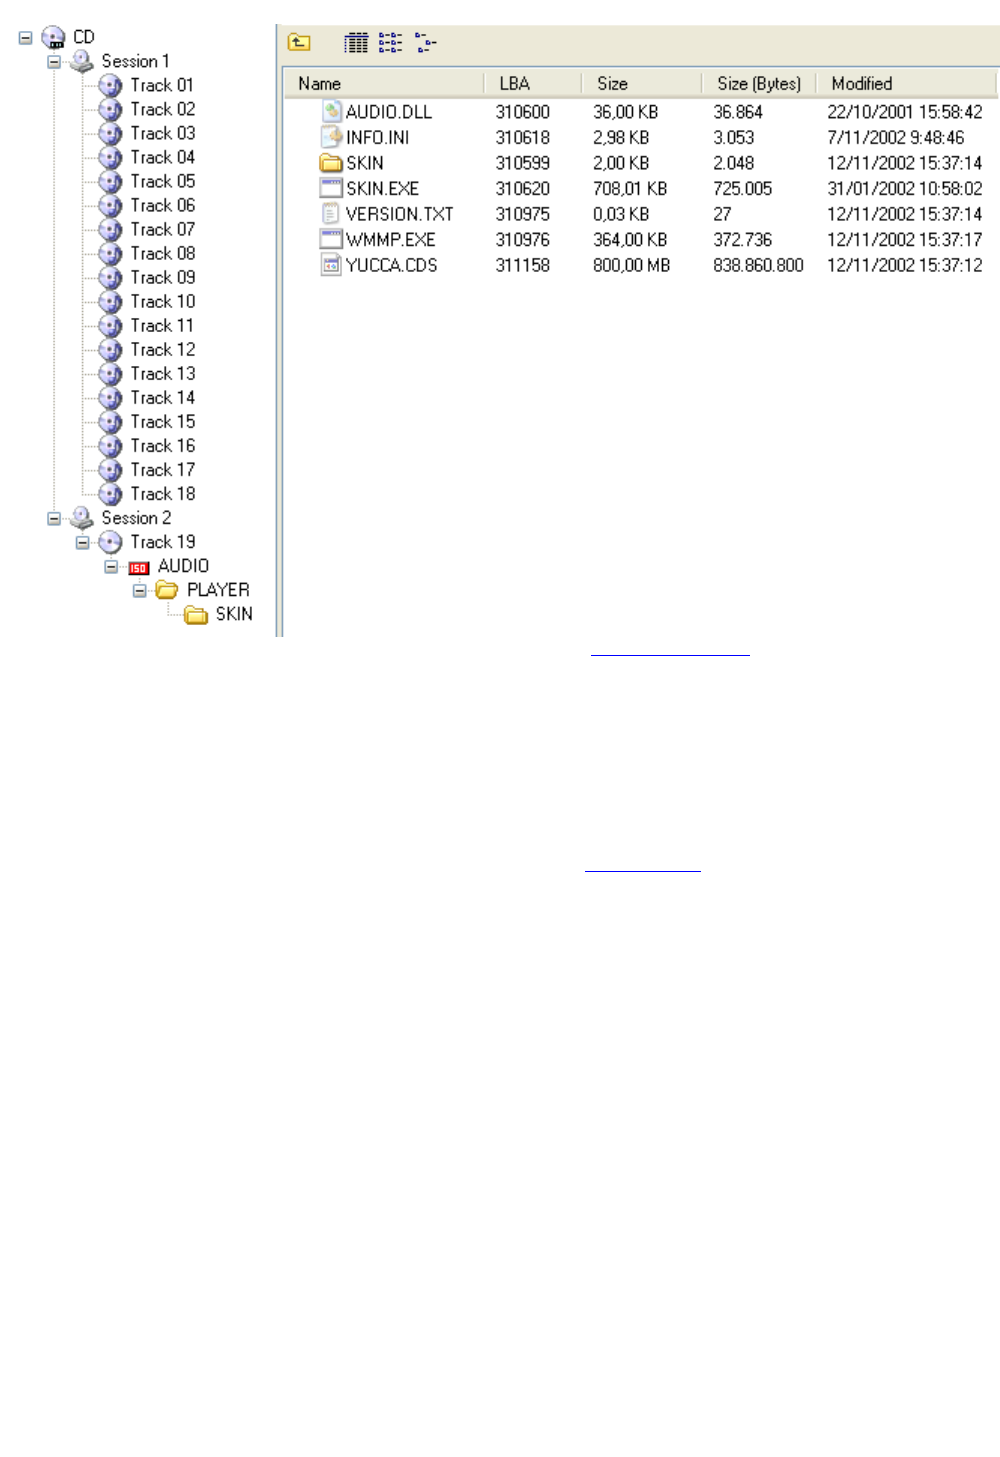
will look for File-Systems.
Another variant used to combine Audio with Data is the so called Mixed Mode CDs. They contain both
audio and data tracks in the first session. The first track is a data track (where the Operating system will
look for File System) the remaining tracks are audio tracks. A standard audio player of today will skip the
first data track and proceed with the audio tracks, older audio players could get into problems trying to play
the data tracks (Hence the use of Enhanced CD).
Multi-Session Data CD/DVD
Recording data CDs has become an every day thing and many people own a CD and/or DVD writer. Since
the media can often contain more data than it is used for while recording the option was created to add more
sessions. Every session contains its own File-Systems pointing to the different files and folders. The
strategy of the File-Systems on Multi-Session CDs is explained in File Systems.
Page 87

Page 88

Track and Sector Modes
On CD, Blocks and Tracks come in different Modes. On DVD it is simpler. There's only one type Track, a
data Track, and there's only one Data Block Mode.
To better understand how blocks fit in the picture, read the section about the CD/DVD Layout.
Basically we distinguish two kinds of tracks on CD, Audio Tracks and Data Tracks. Audio Tracks
because they contain audio blocks and Data Tracks because they contain data blocks.
In a Track, the mode can never change. Either a track contains all Audio blocks, All Mode 1 blocks or All
Mode 2 blocks. In case of Mode 2 there are however also two possible Forms, Form 1 and Form 2. Both
Form 1 and Form2 can exist together in one track.
So, a track made up of only Audio blocks is called an Audio Track. Audio tracks is what you find on Audio
CDs.
A track made up of Data blocks (Mode 1 or Mode2 (Optionally Form 1, Form 2)) is called a Data Track.
Data tracks contain the files and folders and Video data. E.g. Mp3 CDs contain Mp3 files in a data track,
there are no Mp3 tracks or something like that.
The different Modes that can exist on CD :
Audio (2352 bytes / block User Data, 2352 Bytes / block Raw data)
Mode 1 (2048 bytes / block User Data, 2352 Bytes / block Raw data)
Mode 2 (2336 bytes / block User Data, 2352 Bytes / block Raw data)
Mode 2 Form 1 (2048 bytes / block User Data, 2352 Bytes / block Raw data)
Mode 2 Form 2 (2324 bytes / block User Data, 2352 Bytes / block Raw data)
On DVD :
DVD mode (2048 bytes / block User Data, --- Bytes / block Raw data (There's no such thing as Raw
on DVD))
Mode 1 (M1) and Mode 2 Form 1 (M2F1) are the two modes that contain the normal data we are all used of.
This is because these blocks are the best protected. The remainder of the raw data is used to apply a third
layer error correction. The other modes don't have this third layer error correction. If you read a data CD with
Windows, you can bet the data is in M1 or M2F1 sectors. Windows doesn't allow anything else except on
certain CD layouts (VCD).
Video data on VCD and SVCD is mostly located in M2F2 sectors. This is because more data fits in these
blocks. The disadvantage is no third layer error correction but a green flash once in a while in the Video
stream is acceptable I guess. Windows will normally not allow to read files which are recorded in these kinds
of blocks. Only if a VCD, SVCD layout is recognized will Windows allow to read and play the *.dat files
containing the movie. IsoBuster of course extracts everything. In this case I suggest you read the Extraction
Options part to better understand the options.
Page 89

Image File Layout
An Image File is a single file that contains the complete CD content ordered in the same way as it appears
on CD or DVD. A CD or DVD contains blocks and so does an Image File.
If you want to understand the CD / DVD layout better, read this : CD / DVD Layout.
Once a CD / DVD layout is understood there isn't much more to say about Image Files other that despite
the simpleness of a CD / DVD layout there are lots of different Image Files out there.
The most simple ones are the *.iso or *.bin files which are really block per block files. The differences here
are the block-size and the amount of leading blocks (sort of header).
The more difficult ones are those thought of by the different Write Application Vendors (*.cif, *.nrg, ...).
Again they come in many different formats but they are also not necessary identical to the CD content.
Some of them omit data between tracks or add data in between the (supposing) contiguous data blocks
which makes it hard to seek and find the correct data. They contain headers and footers describing the
image files layout so that many different formats can exist. Unfortunately there are no Image File
specifications. IsoBuster's Image File support is completely done via backwards engineering.
More on converting from one type image file format to another format.
Page 90

Converting from/to different image file formats
Although it might not be obvious, IsoBuster is able to convert image files to the most common type image
file of all (the *.iso file, in combination with the cuesheet file *.cue).
The *.iso / *.cue file is supported by many write applications (e.g. Nero, FireBurner and CDRWin support the
bulk of the many different types of *.iso / *.cue out there)
How to convert an existing image file to a *.iso / *.cue which is the most common type image file :
Check the properties / Image File creation settings. Make sure the cuesheet file creation option is set to
"Always" or "Prompt" so that you are sure a cuesheet file is created when you do the conversion.
Click here for more on setting this option.
Next, open an image file, any kind, select the CD/DVD icon in the left TreeView pane, right mouse click,
choose Extract ... <Image>. Extract either User Data or Raw
know that *.iso files come in many flavours but both options User Data and Raw are the most common
ones.
- Use User Data if you are sure there is only normal data on the CD (so no audio tracks and not a Video CD)
- User Raw if you are unsure, this copes with all types of CD data : normal data, Audio tracks, Video CD, ...
- On DVD it's simple, there is only one type of data, User Data
The resulting file may not have the extension .iso. Not to worry, just rename the file and give it the
extension .iso. Many types of image files *.tao, *.bin, *.dao, *.img, .. can be renamed to .iso because .iso
comes in so many flavours. However, many applications are not able to detect the right flavor the way
IsoBuster can, hence the need for a cuesheet file.
Click here for more on Image extraction, scroll down to get more information on Extract ... <image>
When the extracting is done, IsoBuster will prompt you and ask if you would like a cuesheet file (*.cue) to
go with the extracted image or will create one automatically (depending on what you set in the options).
A cue-sheet file is in fact a text file with a .cue extension. Feel free to open such a file with your favorite
text editor to see how the track layout and block size is saved. You may also want to change the first line, if
you changed the extension of the extracted image file to .iso. E.g. change CD.tao to CD.iso on the first line
in the cue-file.
Click here for more on CueSheet files (*.cue)
Page 91
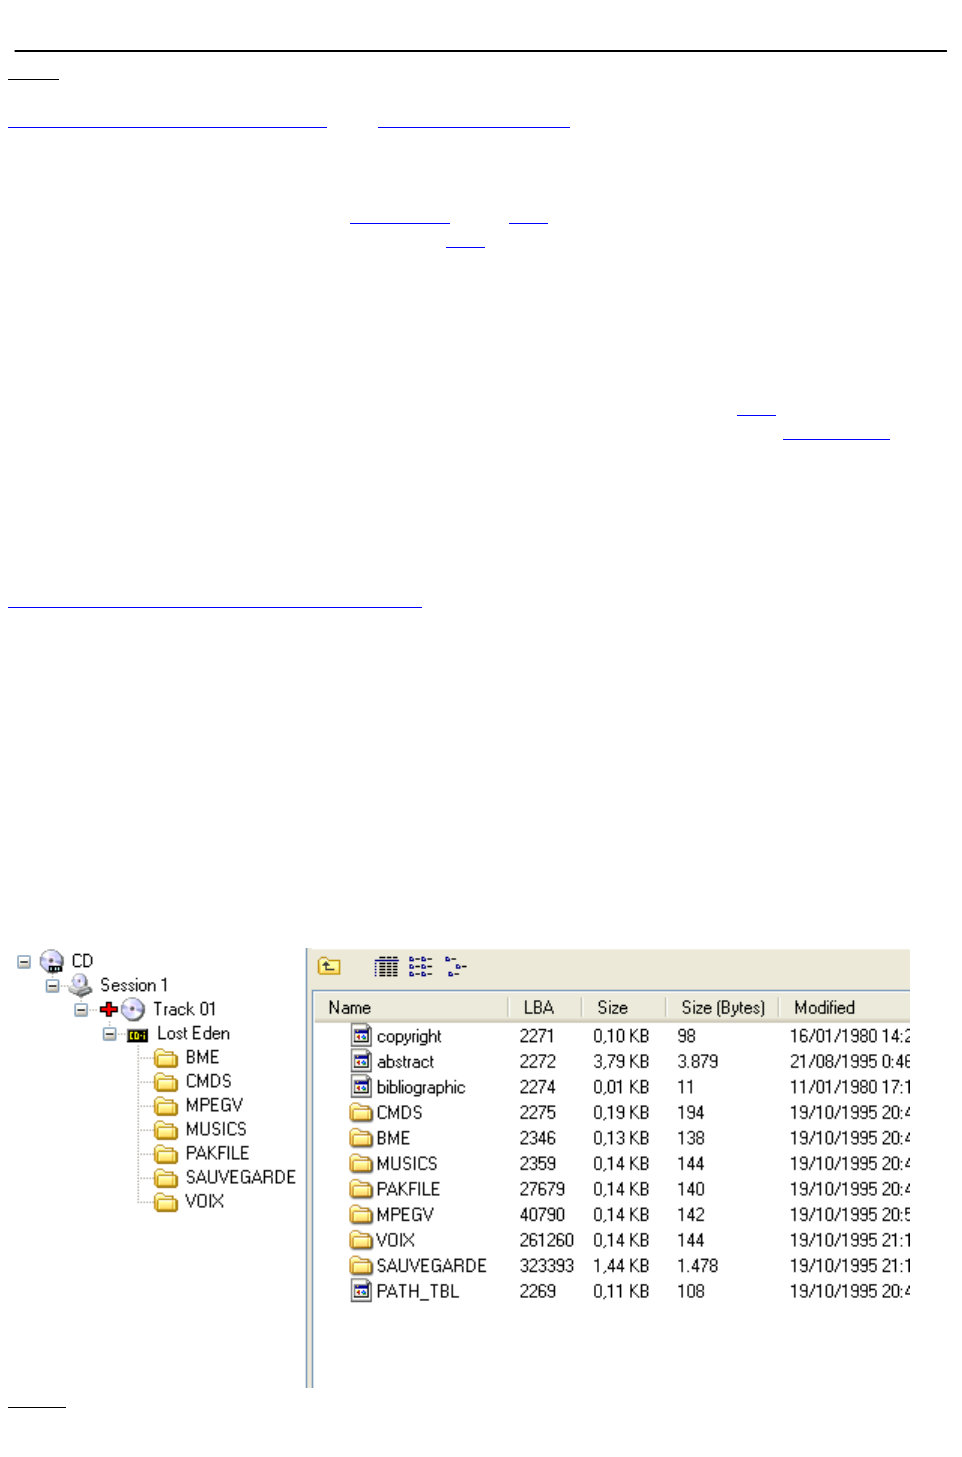
CD-i & VCD
CD-i
If you really want to know just about anything there is to know about CD-i ... Check out :
http://www.cdinteractive.co.uk/forum/ Or : http://www.icdia.co.uk
CD-i is an old Philips Standard and is actually called CD Interactive. CD-i discs were made for the CD-i
consoles and are according to the 'Green book' standard.
Because CD-i discs were designed to play only on CD-i players, deviations from normal CD standards were
allowed. The new standard was called 'Green book'. The TOC on a CD-i disc does not contain an entry for
the data track(s). Only audio tracks can be in the TOC. Consequence is that not many CD/DVD-ROM drives
see a track on the CD-i disc and if they do they often get the start address and length wrong. IsoBuster
however tries to compensate for that but if the drive (because the TOC is not right) refuses to do anything or
read right or whatever still recognizing problems can occur. Therefore it's often a good idea to try and read
the CD-i disc in more than one system. Some drives do it better than others.
If the CD-i disc does only contain data tracks you have the best chance of being able to mount the media
and browse the content. If there are audio tracks on the CD-i it will get extremely difficult to find a drive which
is able to read the CD-i correctly. Reason for this is that the data track is not in the TOC but the audio tracks
are, so almost all CD/DVD-ROM drives consider the CD-i to contain audio only (so in fact an audio CD).
Trying to read data from an audio CD is then not allowed by the units. Still it depends a bit on the layout
(some CD-i discs are finalized as CD-i (then it might still work) but often they are actually as CD-ROM/CDDA
discs so that they can play on standard audio players also).
With CD-i recognition there are no guarantees and it will certainly not improve as the format is long 'dead'
(Some might disagree ;-)) so modern CD/DVD-ROM drives don't tend to support it anymore.
The File System is also different on a CD-i disc.
For more about that, check out : File Systems.
A lot of 'Video CDs' were created in this Green book (CD-i) standard. These Video CDs are not according
to the White Book standard which became THE Video CD standard. So, these CD-i Video CDs don't tend to
work on PC (for all the reasons above) but IsoBuster tends to be able to get to the content because in most
cases the CD-i discs are finalized as CD-i and the contain Data only. These CD-i Video Discs do tend to
work in standalone Video CD players.
If you extract the mpg from a whitebook VCD 2.0, the mpg will be accepted by all VCD creating Write
Software. If you extract mpg that is not conform VCD 2.0 (e.g. from a CD-i), a lot of VCD creating apps will
complain. However, some of them still allow you to create a VCD from the stream (Yippee) (e.g. WinOnCD,
Adaptec VCD Creator 4.0).
Downside is that CD-i players check for CD format and then determine how the mpg format should look like.
Resultantly, the CD-i player will most likely freeze on this kind of mpg on a CD-ROM. HOWEVER ... The
whole intention of converting to CD-ROM is for the benefit of being able to view the mpg on PC ... And PC
Mpg decoding soft has NO problem with this !!
So, you are now able to 'back-Up' all your favorite CD-i movies to CD-ROMS that can be seen by Windows.
VCD
VCD or Video CD is a standard designed for Video content on CD, playable in standalone VCD players (The
Page 92
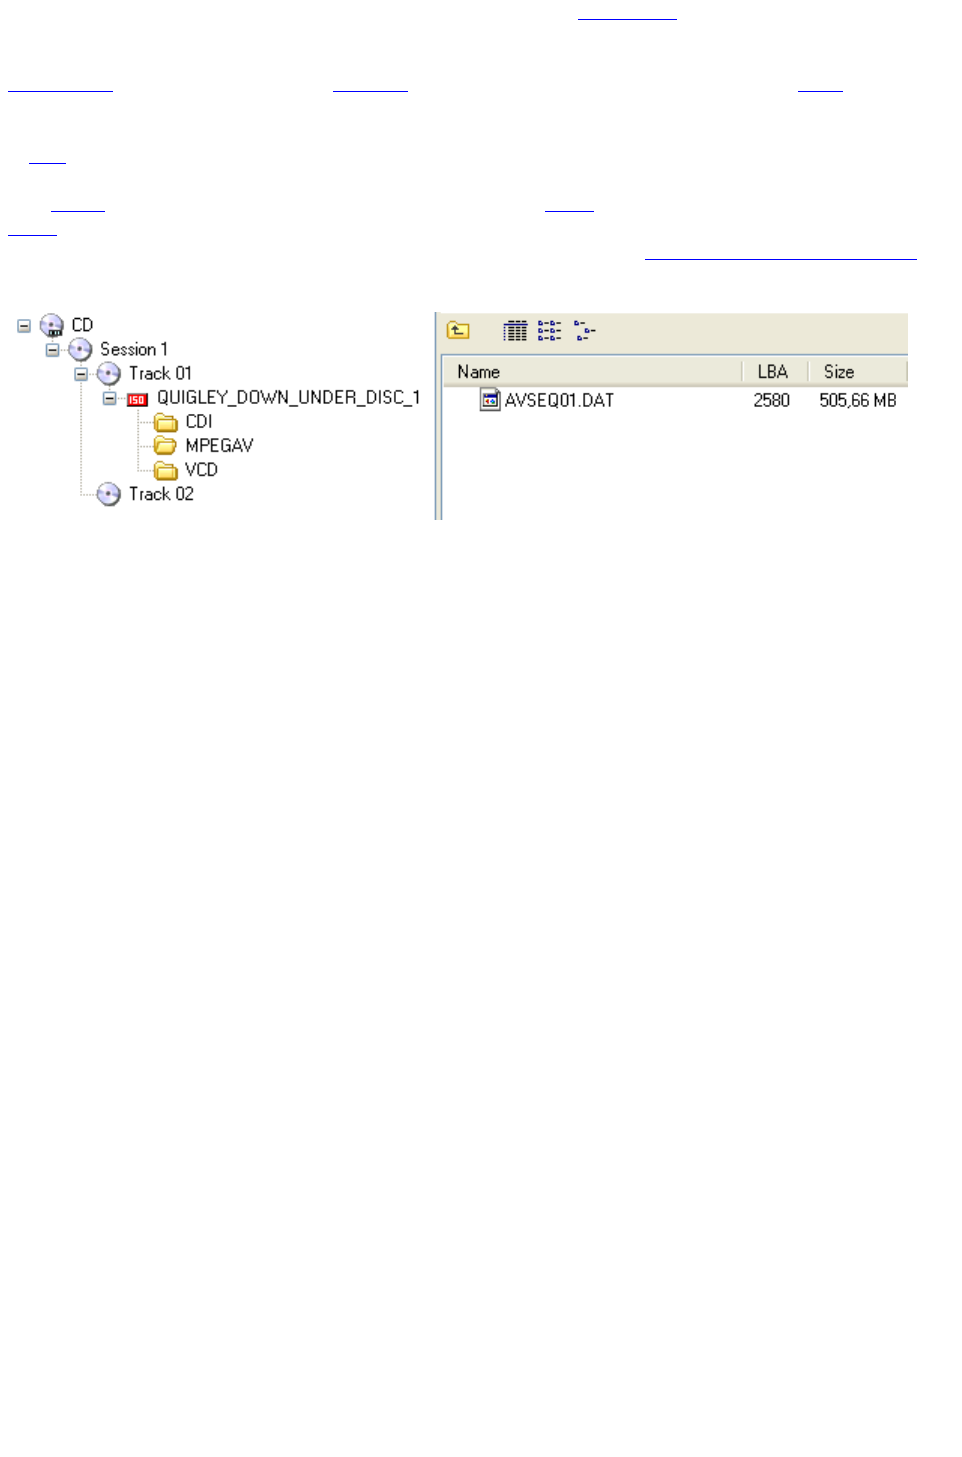
ones you place under you Television set). The standard is called 'White book'. White book VCDs are not to
be mistaken for Green book Video CDs.
VCDs are completely compatible with normal data CDs and the content should be easily accessible. The
File System on these CDs should be ISO9660 although occasionally one finds them with a Joliet File System
(in addition to ISO9660) also.
VCD CDs contain a fixed file and directory layout. A CDI folder with content so that the VCD can be played
in CD-i consoles as well and an MPEGAV folder containing the actual Video File (a *.DAT file). This *.DAT
file references data which is located in the second (and higher tracks if available). The second and higher
data tracks on VCDs contain the actual Video data, mainly in M2F2 sectors which can be interleaved with
M2F1 sectors.
So, if the File System is corrupt and one can't find the Video (*.dat) file, 'Extraction of the Mpg data only'
from the second or higher tracks is still possible via IsoBuster. IsoBuster features great and proven recovery
functionality for this kind of situations.
Page 93

Bootable CD/DVD
A bootable CD or DVD is build up according to the El Torito standard. This means that the ISO9660 File
System has an extension which provides information to a BIOS so that the BIOS knows where to boot from
and what files to load from where. Bootable CDs or DVDs are a BIOS thing, once the OS is up and running
the bootable structures are ignored.
It is not simply possible to copy a bootable floppy image onto CD or DVD and then hope the medium is now
bootable. The File System really needs to know and needs to provide special structures and volume
descriptors (in accordance with the El Torito standard).
If you want to create a bootable CD or DVD you need to use a mastering application that does it for you.
E.g. in Nero or Easy CD Creator you can check an option to make a bootable CD/DVD and the application
will then prompt you to insert a bootable floppy or use a bootable image.
Different ways to go about this :
Extract the bootable CD image file with IsoBuster or ... often the bootable image is also mentioned in the file
system as a normal file. In that case ... look for a file of about (mostly) 1.44 MB big and maybe compare the
start address of the file to the start address of the boot image given by Isobuster. If they're the same ... bingo
! Next use a nifty little application called img2dsk (http://retrograde.trustno1.org/index2.htm) and place the
image file content on a floppy. This little application breaks the image file down in floppy-sized blocks and
writes them to the floppy from start till end. When you next browse to the floppy, Windows drivers suddenly
can make sense of the data 'et voila' ... you can open/edit/replace the files. If the layout of the CD is less
important... (only in case of certain copy protections the layout (file locations) is really important)). Extract
all files from the CD (using IsoBuster or Windows). Leave the floppy in the floppy drive and start up your CD
Creator application (e.g. Nero, Easy CD Creator, ...). Re-create the CD from the content you just ripped of
the original. Choose to create a bootable CD. The application will prompt for a bootable floppy (the one you
just left in the floppy drive) and you will create the 'same' bootable CD with changed boot properties. If the
location of files may not be changed you'll need to do some engineering ... Create a new bootable image file
from the 'changed' floppy content. You'll need dsk2img for this task. Create an image file from the CD you
want to change. Now (and this is important) you will have a hard time just editing any kind of image file
(because of many reason, one of which is error correction code in some image files). The boot image is 'pure'
user data (no overhead) so you best start with an image file which contains the same kind of 'pure' user data.
So, extract the image as a *.tao image which is 2048 bytes per block (this is only true for 'true data CDs' (not
CD-i or Video CD)). Use IsoBuster to determine the location of the image file on CD (The Logical Block
Address (LBA)). In the image file, the boot-image file then starts at byte (2048 * LBA). Use a hex editor and
swap the content in the image file with the content of the changed boot image. Once this is done ... you can
use the image file to burn a CD.
Some good online resources on the subject :
http://www.nu2.nu/bootcd/
http://www.isobuster.com/tips.php?tips_page=7
IsoBuster can also deal with boot images that are not conform the specifications, made by mkisofs.
Additionally IsoBuster can also scan the boot image file to check if it contains a FAT file-system, and if it
does, list those files and folders.
Page 94

Write Applications and File Systems
This is just a list to understand what File Systems are put on a CD or DVD when a write application
masters the data (not just makes a copy of ... because then no new File System is created, the old one is
just copied).
'Classical' data mastering applications (such as Easy CD Creator, Nero, WinOnCD, ...) put on CD :
ISO9660: Almost always (which is a good idea for max. compatibility with other systems).
Joliet: Almost always (long file names ; not used on VCD (exceptions prove the rule))
UDF: Hardly ever (Nero offers the option to use it anyway)
'Classical' data mastering applications (such as Easy CD Creator, Nero, WinOnCD, ...) put on DVD :
ISO9660: Almost always (which is a good idea for max. compatibility with other systems)
Joliet: Almost always (long file names ; not used on Video DVD (exceptions prove the rule)). Some
versions of Creator seem to forget this File System which results in no long File Names. Under Windows
NT4 and Windows 95. If UDF is present, IsoBuster comes to the rescue !
UDF: Almost always (This File System is mandatory on DVD).
Packet writing software on CD and DVD (e.g. Direct CD, InCD, B's gold, DLA, Packet CD, ABCD, ...)
UDF: ALWAYS (This File System allows to add / delete / change files). Some or most applications reserve
room to be able to convert the UDF file System to another File System. E.g. Iso and Joliet on eject or when
the CD / DVD is full.
See 'File Systems' to understand what is what.
Page 95
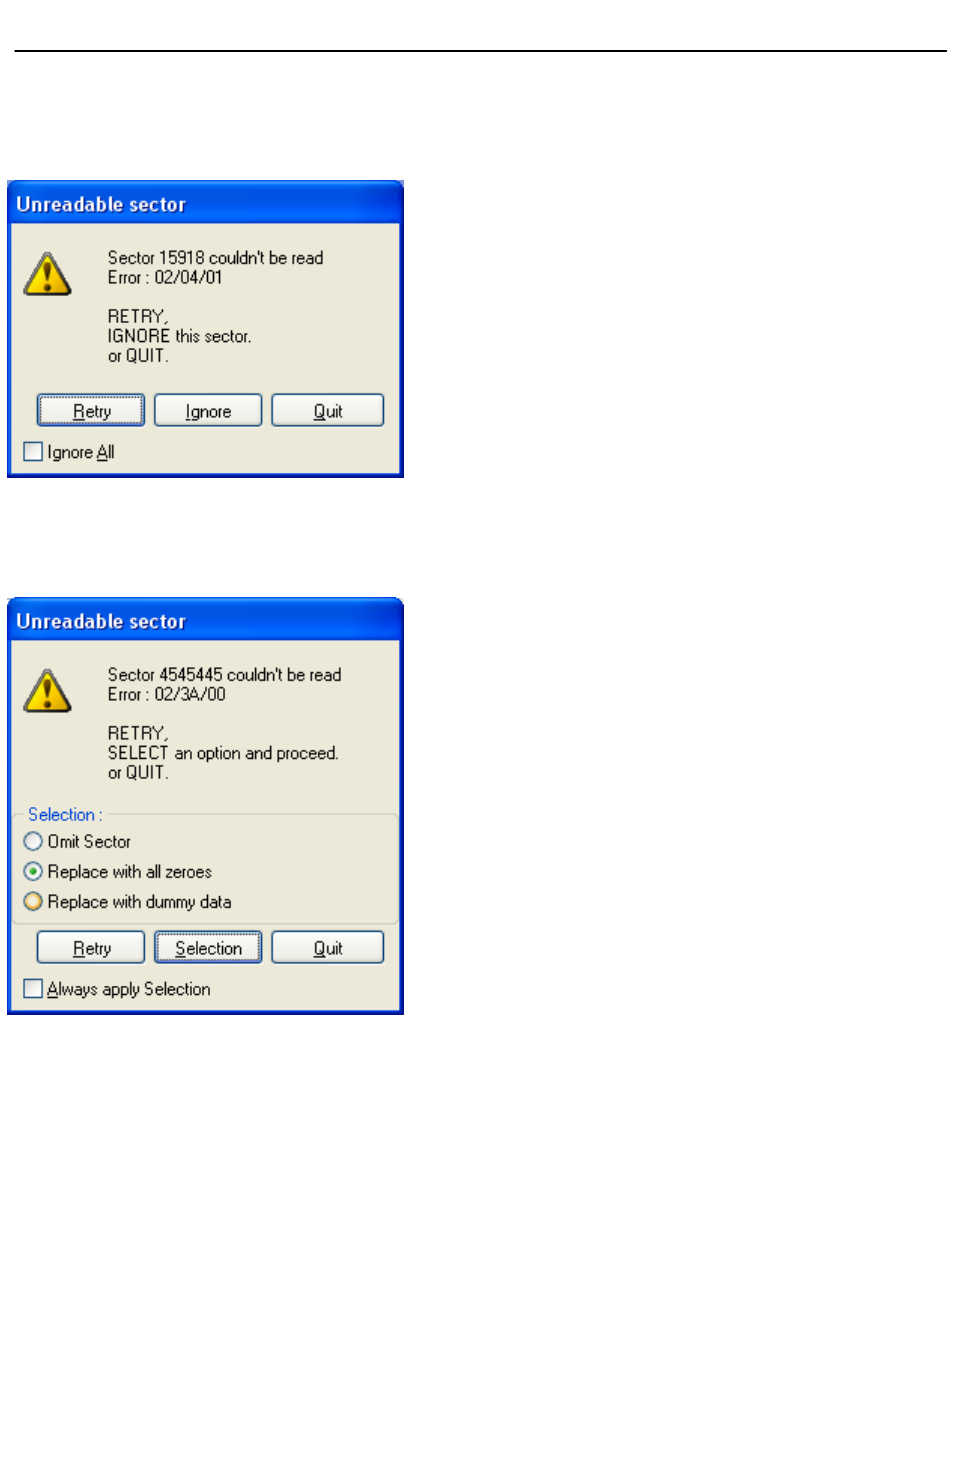
Errors during extraction
During extraction of data from an image file, a CD or a DVD one can get errors. It's not what you want ...
but it can happen. In case of an image file the reason is mostly that the data seems so garbled that no
sensible data can be derived anymore, or when the end of the file is reached. In case of CD or DVD it's the
CD/DVD-ROM device which returned an error. In that case NO data was returned.
If an errors occurs, IsoBuster offers several options, depending on the way how the extraction is done.
This Error Message can occur when you're extracting files and folders. It offers you the choice to RETRY
reading the sector, IGNORE the sector (no substituting data will be written for the missing sector) or to QUIT
extracting altogether. The option 'Ignore All' will make sure you're not prompted again during extraction and
all erroneous sectors will be omitted. Depending on the situation you may need to renew the 'Ignore All'
request when multiple objects are selected for extraction.
This Error Message can occur when you're extracting data (from CD, DVD or image file) to an image file,
but only the user data portion. It offers you to RETRY reading the sector, apply an option from the
SELECTION window or to QUIT. The possible selections are :
OMMIT data which means no substituting data will be written for the erroneous sector (this is the least likely
option you would need),
REPLACE with all zeroes which means the sector size will be written but containing zeroes only,
REPLACE with dummy data which means the sector size will be written with data different from zeroes.
The selection making most sense will be selected by default. Click the check box 'Always apply selection'
when you do not want to be prompted again during extraction. Depending on the situation you may need to
renew this request when multiple objects are selected for extraction.
Page 96

This Error Message can occur when you're extracting data (from CD, DVD or image file) to an image file,
raw. It offers you to RETRY reading the sector, apply an option from the SELECTION window or to QUIT. The
possible selections are :
OMMIT data which means no substituting data will be written for the erroneous sector (this is the least likely
option you would need),
REPLACE with all zeroes which means the sector size will be written but containing zeroes only,
REPLACE with user data all zeroes means that the replaced raw block will contain raw data completely
according to the CD standard (sync bytes, header, sub headers, EDC/ECC etc.) but with User data
containing all zeroes.
REPLACE with erroneous sector means that the replaced raw block will NOT contain raw data according to
the CD standard so that a copy tool will recreate the errors (e.g. some programs require errors on the CD).
The selection making most sense will be selected by default. Click the check box 'Always apply selection'
when you do not want to be prompted again during extraction. Depending on the situation you may need to
renew this request when multiple objects are selected for extraction.
Page 97

Error Codes / Sense Codes
Optical drives return error codes (or Sense codes like they're called in the industry) when something is the
matter or just to inform the host (PC, application) of a certain situation.
The standard that describes these messages (amongst other things) is MMC :
MMC-3 Revision 10e
Table A.1
Logical Unit Sense Key, ASC and ASCQ Assignments
SK ASC ASCQ
0 / 00 / 00 NO ADDITIONAL SENSE INFORMATION
B / 00 / 06 I/O PROCESS TERMINATED
5 / 00 / 11 AUDIO PLAY OPERATION IN PROGRESS
5 / 00 / 12 AUDIO PLAY OPERATION PAUSED
5 / 00 / 13 AUDIO PLAY OPERATION SUCCESSFULLY COMPLETED
5 / 00 / 14 AUDIO PLAY OPERATION STOPPED DUE TO ERROR
5 / 00 / 15 NO CURRENT AUDIO STATUS TO RETURN
4 / 00 / 17 CLEANING REQUESTED
3 / 02 / 00 NO SEEK COMPLETE
2 / 04 / 00 LOGICAL UNIT NOT READY, CAUSE NOT REPORTABLE
2 / 04 / 01 LOGICAL UNIT IS IN PROCESS OF BECOMING READY
2 / 04 / 02 LOGICAL UNIT NOT READY, INITIALIZING CMD. REQUIRED
2 / 04 / 03 LOGICAL UNIT NOT READY, MANUAL INTERVENTION REQUIRED
2 / 04 / 04 LOGICAL UNIT NOT READY, FORMAT IN PROGRESS
2 / 04 / 07 LOGICAL UNIT NOT READY, OPERATION IN PROGRESS
2 / 04 / 08 LOGICAL UNIT NOT READY, LONG WRITE IN PROGRESS
4 / 05 / 00 LOGICAL UNIT DOES NOT RESPOND TO SELECTION
3 / 06 / 00 NO REFERENCE POSITION FOUND
5 / 07 / 00 MULTIPLE PERIPHERAL DEVICES SELECTED
4 / 08 / 00 LOGICAL UNIT COMMUNICATION FAILURE
4 / 08 / 01 LOGICAL UNIT COMMUNICATION TIME-OUT
4 / 08 / 02 LOGICAL UNIT COMMUNICATION PARITY ERROR
4 / 08 / 03 LOGICAL UNIT COMMUNICATION CRC ERROR (ULTRA-DMA/32)
4 / 09 / 00 TRACK FOLLOWING ERROR
4 / 09 / 01 TRACKING SERVO FAILURE
4 / 09 / 02 FOCUS SERVO FAILURE
4 / 09 / 03 SPINDLE SERVO FAILURE
4 / 09 / 04 HEAD SELECT FAULT
6 / 0A / 00 ERROR LOG OVERFLOW
1 / 0B / 00 WARNING
1 / 0B / 01 WARNING - SPECIFIED TEMPERATURE EXCEEDED
1 / 0B / 02 WARNING - ENCLOSURE DEGRADED
3 / 0C / 00 WRITE ERROR
3 / 0C / 07 WRITE ERROR - RECOVERY NEEDED
3 / 0C / 08 WRITE ERROR - RECOVERY FAILED
3 / 0C / 09 WRITE ERROR - LOSS OF STREAMING
3 / 0C / 0A WRITE ERROR - PADDING BLOCKS ADDED
3 / 11 / 00 UNRECOVERED READ ERROR
3 / 11 / 01 READ RETRIES EXHAUSTED
3 / 11 / 02 ERROR TOO LONG TO CORRECT
3 / 11 / 05 L-EC UNCORRECTABLE ERROR
3 / 11 / 06 CIRC UNRECOVERED ERROR
3 / 11 / 0F ERROR READING UPC/EAN NUMBER
3 / 11 / 10 ERROR READING ISRC NUMBER
B / 11 / 11 READ ERROR - LOSS OF STREAMING
3 / 15 / 00 RANDOM POSITIONING ERROR
3 / 15 / 01 MECHANICAL POSITIONING ERROR
3 / 15 / 02 POSITIONING ERROR DETECTED BY READ OF MEDIUM
1 / 17 / 00 RECOVERED DATA WITH NO ERROR CORRECTION APPLIED
1 / 17 / 01 RECOVERED DATA WITH RETRIES
1 / 17 / 02 RECOVERED DATA WITH POSITIVE HEAD OFFSET
1 / 17 / 03 RECOVERED DATA WITH NEGATIVE HEAD OFFSET
1 / 17 / 04 RECOVERED DATA WITH RETRIES AND/OR CIRC APPLIED
1 / 17 / 05 RECOVERED DATA USING PREVIOUS SECTOR ID
1 / 17 / 07 RECOVERED DATA WITHOUT ECC - RECOMMEND REASSIGNMENT
1 / 17 / 08 RECOVERED DATA WITHOUT ECC - RECOMMEND REWRITE
1 / 17 / 09 RECOVERED DATA WITHOUT ECC - DATA REWRITTEN
1 / 18 / 00 RECOVERED DATA WITH ERROR CORRECTION APPLIED
1 / 18 / 01 RECOVERED DATA WITH ERROR CORR. & RETRIES APPLIED
1 / 18 / 02 RECOVERED DATA - DATA AUTO-REALLOCATED
1 / 18 / 03 RECOVERED DATA WITH CIRC
1 / 18 / 04 RECOVERED DATA WITH L-EC
1 / 18 / 05 RECOVERED DATA . RECOMMEND REASSIGNMENT
Page 98

1 / 18 / 06 RECOVERED DATA . RECOMMEND REWRITE
1 / 18 / 08 RECOVERED DATA WITH LINKING
5 / 1A / 00 PARAMETER LIST LENGTH ERROR
4 / 1B / 00 SYNCHRONOUS DATA TRANSFER ERROR
A / 1D / 00 MISCOMPARE DURING VERIFY OPERATION
5 / 20 / 00 INVALID COMMAND OPERATION CODE
5 / 21 / 00 LOGICAL BLOCK ADDRESS OUT OF RANGE
5 / 21 / 01 INVALID ELEMENT ADDRESS
5 / 21 / 02 INVALID ADDRESS FOR WRITE
5 / 24 / 00 INVALID FIELD IN CDB
5 / 25 / 00 LOGICAL UNIT NOT SUPPORTED
5 / 26 / 00 INVALID FIELD IN PARAMETER LIST
5 / 26 / 01 PARAMETER NOT SUPPORTED
5 / 26 / 02 PARAMETER VALUE INVALID
5 / 26 / 03 THRESHOLD PARAMETERS NOT SUPPORTED
5 / 26 / 04 INVALID RELEASE OF ACTIVE PERSISTENT RESERVATION
5 / 27 / 00 WRITE PROTECTED
5 / 27 / 01 HARDWARE WRITE PROTECTED
5 / 27 / 02 LOGICAL UNIT SOFTWARE WRITE PROTECTED
5 / 27 / 03 ASSOCIATED WRITE PROTECT
5 / 27 / 04 PERSISTENT WRITE PROTECT
5 / 27 / 05 PERMANENT WRITE PROTECT
7 / 27 / 06 CONDITIONAL WRITE PROTECT
6 / 28 / 00 NOT READY TO READY CHANGE, MEDIUM MAY HAVE CHANGED
6 / 28 / 01 IMPORT OR EXPORT ELEMENT ACCESSED
6 / 29 / 00 POWER ON, RESET, OR BUS DEVICE RESET OCCURRED
6 / 29 / 01 POWER ON OCCURRED
6 / 29 / 02 SCSI BUS RESET OCCURRED
6 / 29 / 03 BUS DEVICE RESET FUNCTION OCCURRED
6 / 29 / 04 DEVICE INTERNAL RESET
6 / 2A / 00 PARAMETERS CHANGED
6 / 2A / 01 MODE PARAMETERS CHANGED
6 / 2A / 02 LOG PARAMETERS CHANGED
6 / 2A / 03 RESERVATIONS PREEMPTED
5 / 2B / 00 COPY CANNOT EXECUTE SINCE INITIATOR CANNOT DISCONNECT
5 / 2C / 00 COMMAND SEQUENCE ERROR
5 / 2C / 03 CURRENT PROGRAM AREA IS NOT EMPTY
5 / 2C / 04 CURRENT PROGRAM AREA IS EMPTY
6 / 2E / 00 INSUFFICIENT TIME FOR OPERATION
6 / 2F / 00 COMMANDS CLEARED BY ANOTHER INITIATOR
2 / 30 / 00 INCOMPATIBLE MEDIUM INSTALLED
2 / 30 / 01 CANNOT READ MEDIUM . UNKNOWN FORMAT
2 / 30 / 02 CANNOT READ MEDIUM . INCOMPATIBLE FORMAT
2 / 30 / 03 CLEANING CARTRIDGE INSTALLED
2 / 30 / 04 CANNOT WRITE MEDIUM . UNKNOWN FORMAT
2 / 30 / 05 CANNOT WRITE MEDIUM . INCOMPATIBLE FORMAT
2 / 30 / 06 CANNOT FORMAT MEDIUM . INCOMPATIBLE MEDIUM
2 / 30 / 07 CLEANING FAILURE
5 / 30 / 08 CANNOT WRITE . APPLICATION CODE MISMATCH
5 / 30 / 09 CURRENT SESSION NOT FIXATED FOR APPEND
5 / 30 / 10 MEDIUM NOT FORMATTED
3 / 31 / 00 MEDIUM FORMAT CORRUPTED
3 / 31 / 01 FORMAT COMMAND FAILED
3 / 31 / 02 ZONED FORMATTING FAILED DUE TO SPARE LINKING
/ 34 / 00 ENCLOSURE FAILURE
/ 35 / 00 ENCLOSURE SERVICES FAILURE
/ 35 / 01 UNSUPPORTED ENCLOSURE FUNCTION
/ 35 / 02 ENCLOSURE SERVICES UNAVAILABLE
/ 35 / 03 ENCLOSURE SERVICES TRANSFER FAILURE
/ 35 / 04 ENCLOSURE SERVICES TRANSFER REFUSED
1 / 37 / 00 ROUNDED PARAMETER
5 / 39 / 00 SAVING PARAMETERS NOT SUPPORTED
2 / 3A / 00 MEDIUM NOT PRESENT
2 / 3A / 01 MEDIUM NOT PRESENT - TRAY CLOSED
2 / 3A / 02 MEDIUM NOT PRESENT - TRAY OPEN
6 / 3B / 0D MEDIUM DESTINATION ELEMENT FULL
6 / 3B / 0E MEDIUM SOURCE ELEMENT EMPTY
6 / 3B / 0F END OF MEDIUM REACHED
6 / 3B / 11 MEDIUM MAGAZINE NOT ACCESSIBLE
6 / 3B / 12 MEDIUM MAGAZINE REMOVED
6 / 3B / 13 MEDIUM MAGAZINE INSERTED
6 / 3B / 14 MEDIUM MAGAZINE LOCKED
6 / 3B / 15 MEDIUM MAGAZINE UNLOCKED
4 / 3B / 16 MECHANICAL POSITIONING OR CHANGER ERROR
Page 99

5 / 3D / 00 INVALID BITS IN IDENTIFY MESSAGE
2 / 3E / 00 LOGICAL UNIT HAS NOT SELF-CONFIGURED YET
4 / 3E / 01 LOGICAL UNIT FAILURE
4 / 3E / 02 TIMEOUT ON LOGICAL UNIT
6 / 3F / 00 TARGET OPERATING CONDITIONS HAVE CHANGED
6 / 3F / 01 MICROCODE HAS BEEN CHANGED
6 / 3F / 02 CHANGED OPERATING DEFINITION
6 / 3F / 03 INQUIRY DATA HAS CHANGED
4 / 40 / NN DIAGNOSTIC FAILURE ON COMPONENT NN (80H-FFH)
5 / 43 / 00 MESSAGE ERROR
4 / 44 / 00 INTERNAL TARGET FAILURE
B / 45 / 00 SELECT OR RESELECT FAILURE
4 / 46 / 00 UNSUCCESSFUL SOFT RESET
4 / 47 / 00 SCSI PARITY ERROR
B / 48 / 00 INITIATOR DETECTED ERROR MESSAGE RECEIVED
B / 49 / 00 INVALID MESSAGE ERROR
4 / 4A / 00 COMMAND PHASE ERROR
4 / 4B / 00 DATA PHASE ERROR
4 / 4C / 00 LOGICAL UNIT FAILED SELF-CONFIGURATION
B / 4D / NN TAGGED OVERLAPPED COMMANDS (NN = QUEUE TAG)
B / 4E / 00 OVERLAPPED COMMANDS ATTEMPTED
3 / 51 / 00 ERASE FAILURE
3 / 51 / 01 ERASE FAILURE - INCOMPLETE ERASE OPERATION DETECTED
4 / 53 / 00 MEDIA LOAD OR EJECT FAILED
5 / 53 / 02 MEDIUM REMOVAL PREVENTED
5 / 55 / 00 SYSTEM RESOURCE FAILURE
3 / 57 / 00 UNABLE TO RECOVER TABLE-OF-CONTENTS
6 / 5A / 00 OPERATOR REQUEST OR STATE CHANGE INPUT
6 / 5A / 01 OPERATOR MEDIUM REMOVAL REQUEST
6 / 5A / 02 OPERATOR SELECTED WRITE PROTECT
6 / 5A / 03 OPERATOR SELECTED WRITE PERMIT
6 / 5B / 00 LOG EXCEPTION
6 / 5B / 01 THRESHOLD CONDITION MET
6 / 5B / 02 LOG COUNTER AT MAXIMUM
6 / 5B / 03 LOG LIST CODES EXHAUSTED
1 / 5D / 01 FAILURE PREDICTION THRESHOLD EXCEEDED . Predicted Media
failure
1 / 5D / 02 LOGICAL UNIT FAILURE PREDICTION THRESHOLD EXCEEDED
1 / 5D / 03 FAILURE PREDICTION THRESHOLD EXCEEDED . Predicted Spare Area
Exhaustin
1 / 5D / FF FAILURE PREDICTION THRESHOLD EXCEEDED (FALSE)
6 / 5E / 00 LOW POWER CONDITION ON
6 / 5E / 01 IDLE CONDITION ACTIVATED BY TIMER
6 / 5E / 02 STANDBY CONDITION ACTIVATED BY TIMER
6 / 5E / 03 IDLE CONDITION ACTIVATED BY COMMAND
6 / 5E / 04 STANDBY CONDITION ACTIVATED BY COMMAND
5 / 63 / 00 END OF USER AREA ENCOUNTERED ON THIS TRACK
5 / 63 / 01 PACKET DOES NOT FIT IN AVAILABLE SPACE
5 / 64 / 00 ILLEGAL MODE FOR THIS TRACK
5 / 64 / 01 INVALID PACKET SIZE
4 / 65 / 00 VOLTAGE FAULT
5 / 6F / 00 COPY PROTECTION KEY EXCHANGE FAILURE . AUTHENTICATION
FAILURE
5 / 6F / 01 COPY PROTECTION KEY EXCHANGE FAILURE . KEY NOT PRESENT
5 / 6F / 02 COPY PROTECTION KEY EXCHANGE FAILURE .KEY NOT ESTABLISHED
5 / 6F / 03 READ OF SCRAMBLED SECTOR WITHOUT AUTHENTICATION
5 / 6F / 04 MEDIA REGION CODE IS MISMATCHED TO LOGICAL UNIT REGION
5 / 6F / 05 LOGICAL UNIT REGION MUST BE PERMANENT/REGION RESET COUNT
ERROR
3 / 72 / 00 SESSION FIXATION ERROR
3 / 72 / 01 SESSION FIXATION ERROR WRITING LEAD-IN
3 / 72 / 02 SESSION FIXATION ERROR WRITING LEAD-OUT
5 / 72 / 03 SESSION FIXATION ERROR . INCOMPLETE TRACK IN SESSION
5 / 72 / 04 EMPTY OR PARTIALLY WRITTEN RESERVED TRACK
5 / 72 / 05 NO MORE TRACK RESERVATIONS ALLOWED
3 / 73 / 00 CD CONTROL ERROR
1 / 73 / 01 POWER CALIBRATION AREA ALMOST FULL
3 / 73 / 02 POWER CALIBRATION AREA IS FULL
3 / 73 / 03 POWER CALIBRATION AREA ERROR
3 / 73 / 04 PROGRAM MEMORY AREA UPDATE FAILURE
3 / 73 / 05 PROGRAM MEMORY AREA IS FULL
3 / 73 / 06 RMA/PMA IS ALMOST FULL
0 / 00 / 00 NO ADDITIONAL SENSE INFORMATION
B / 00 / 06 I/O PROCESS TERMINATED
Page 100

2 / 04 / 00 LOGICAL UNIT NOT READY, CAUSE NOT REPORTABLE
2 / 04 / 01 LOGICAL UNIT IS IN PROCESS OF BECOMING READY
2 / 04 / 02 LOGICAL UNIT NOT READY, INITIALIZING CMD. REQUIRED
2 / 04 / 03 LOGICAL UNIT NOT READY, MANUAL INTERVENTION REQUIRED
2 / 04 / 04 LOGICAL UNIT NOT READY, FORMAT IN PROGRESS
2 / 04 / 07 LOGICAL UNIT NOT READY, OPERATION IN PROGRESS
2 / 04 / 08 LOGICAL UNIT NOT READY, LONG WRITE IN PROGRESS
4 / 05 / 00 LOGICAL UNIT DOES NOT RESPOND TO SELECTION
5 / 07 / 00 MULTIPLE PERIPHERAL DEVICES SELECTED
4 / 08 / 00 LOGICAL UNIT COMMUNICATION FAILURE
4 / 08 / 01 LOGICAL UNIT COMMUNICATION TIME-OUT
4 / 08 / 02 LOGICAL UNIT COMMUNICATION PARITY ERROR
6 / 0A / 00 ERROR LOG OVERFLOW
1 / 0B / 00 WARNING
1 / 0B / 01 WARNING - SPECIFIED TEMPERATURE EXCEEDED
1 / 0B / 02 WARNING - ENCLOSURE DEGRADED
5 / 1A / 00 PARAMETER LIST LENGTH ERROR
4 / 1B / 00 SYNCHRONOUS DATA TRANSFER ERROR
5 / 20 / 00 INVALID COMMAND OPERATION CODE
5 / 24 / 00 INVALID FIELD IN CDB
5 / 25 / 00 LOGICAL UNIT NOT SUPPORTED
5 / 26 / 00 INVALID FIELD IN PARAMETER LIST
5 / 26 / 01 PARAMETER NOT SUPPORTED
5 / 26 / 02 PARAMETER VALUE INVALID
6 / 28 / 00 NOT READY TO READY CHANGE, MEDIUM MAY HAVE CHANGED
6 / 29 / 00 POWER ON, RESET, OR BUS DEVICE RESET OCCURRED
6 / 29 / 01 POWER ON OCCURRED
6 / 29 / 02 SCSI BUS RESET OCCURRED
6 / 29 / 03 BUS DEVICE RESET FUNCTION OCCURRED
6 / 29 / 04 DEVICE INTERNAL RESET
6 / 2A / 00 PARAMETERS CHANGED
6 / 2A / 01 MODE PARAMETERS CHANGED
6 / 2A / 02 LOG PARAMETERS CHANGED
6 / 2F / 00 COMMANDS CLEARED BY ANOTHER INITIATOR
/ 34 / 00 ENCLOSURE FAILURE
/ 35 / 00 ENCLOSURE SERVICES FAILURE
/ 35 / 01 UNSUPPORTED ENCLOSURE FUNCTION
/ 35 / 02 ENCLOSURE SERVICES UNAVAILABLE
/ 35 / 03 ENCLOSURE SERVICES TRANSFER FAILURE
/ 35 / 04 ENCLOSURE SERVICES TRANSFER REFUSED
5 / 3D / 00 INVALID BITS IN IDENTIFY MESSAGE
2 / 3E / 00 LOGICAL UNIT HAS NOT SELF-CONFIGURED YET
4 / 3E / 01 LOGICAL UNIT FAILURE
4 / 3E / 02 TIMEOUT ON LOGICAL UNIT
6 / 3F / 00 TARGET OPERATING CONDITIONS HAVE CHANGED
6 / 3F / 01 MICROCODE HAS BEEN CHANGED
6 / 3F / 02 CHANGED OPERATING DEFINITION
6 / 3F / 03 INQUIRY DATA HAS CHANGED
4 / 40 / NN DIAGNOSTIC FAILURE ON COMPONENT NN (80H-FFH)
5 / 43 / 00 MESSAGE ERROR
4 / 44 / 00 INTERNAL TARGET FAILURE
B / 45 / 00 SELECT OR RESELECT FAILURE
4 / 46 / 00 UNSUCCESSFUL SOFT RESET
4 / 47 / 00 SCSI PARITY ERROR
B / 48 / 00 INITIATOR DETECTED ERROR MESSAGE RECEIVED
B / 49 / 00 INVALID MESSAGE ERROR
4 / 4A / 00 COMMAND PHASE ERROR
4 / 4B / 00 DATA PHASE ERROR
4 / 4C / 00 LOGICAL UNIT FAILED SELF-CONFIGURATION
B / 4D / NN TAGGED OVERLAPPED COMMANDS (NN = QUEUE TAG)
B / 4E / 00 OVERLAPPED COMMANDS ATTEMPTED
6 / 5A / 00 OPERATOR REQUEST OR STATE CHANGE INPUT
6 / 5A / 01 OPERATOR MEDIUM REMOVAL REQUEST
6 / 5B / 00 LOG EXCEPTION
6 / 5B / 01 THRESHOLD CONDITION MET
6 / 5B / 02 LOG COUNTER AT MAXIMUM
6 / 5B / 03 LOG LIST CODES EXHAUSTED
6 / 5D / 00 FAILURE PREDICTION THRESHOLD EXCEEDED
6 / 5D / FF FAILURE PREDICTION THRESHOLD EXCEEDED (FALSE)
4 / 65 / 00 VOLTAGE FAULT
4 / 00 / 17 CLEANING REQUESTED
3 / 02 / 00 NO SEEK COMPLETE
3 / 06 / 00 NO REFERENCE POSITION FOUND
4 / 09 / 00 TRACK FOLLOWING ERROR
Page 101

4 / 09 / 01 TRACKING SERVO FAILURE
4 / 09 / 02 FOCUS SERVO FAILURE
4 / 09 / 03 SPINDLE SERVO FAILURE
4 / 09 / 04 HEAD SELECT FAULT
3 / 11 / 00 UNRECOVERED READ ERROR
3 / 11 / 01 READ RETRIES EXHAUSTED
3 / 11 / 02 ERROR TOO LONG TO CORRECT
3 / 11 / 05 L-EC UNCORRECTABLE ERROR
3 / 11 / 06 CIRC UNRECOVERED ERROR
3 / 11 / 0F ERROR READING UPC/EAN NUMBER
3 / 11 / 10 ERROR READING ISRC NUMBER
3 / 15 / 00 RANDOM POSITIONING ERROR
3 / 15 / 01 MECHANICAL POSITIONING ERROR
3 / 15 / 02 POSITIONING ERROR DETECTED BY READ OF MEDIUM
1 / 17 / 00 RECOVERED DATA WITH NO ERROR CORRECTION APPLIED
1 / 17 / 01 RECOVERED DATA WITH RETRIES
1 / 17 / 02 RECOVERED DATA WITH POSITIVE HEAD OFFSET
1 / 17 / 03 RECOVERED DATA WITH NEGATIVE HEAD OFFSET
1 / 17 / 04 RECOVERED DATA WITH RETRIES AND/OR CIRC APPLIED
1 / 17 / 05 RECOVERED DATA USING PREVIOUS SECTOR ID
1 / 17 / 07 RECOVERED DATA WITHOUT ECC - RECOMMEND REASSIGNMENT
1 / 17 / 08 RECOVERED DATA WITHOUT ECC - RECOMMEND REWRITE
1 / 17 / 09 RECOVERED DATA WITHOUT ECC - DATA REWRITTEN
1 / 18 / 00 RECOVERED DATA WITH ERROR CORRECTION APPLIED
1 / 18 / 01 RECOVERED DATA WITH ERROR CORR. & RETRIES APPLIED
1 / 18 / 02 RECOVERED DATA - DATA AUTO-REALLOCATED
1 / 18 / 03 RECOVERED DATA WITH CIRC
1 / 18 / 04 RECOVERED DATA WITH L-EC
1 / 18 / 05 RECOVERED DATA . RECOMMEND REASSIGNMENT
1 / 18 / 06 RECOVERED DATA . RECOMMEND REWRITE
5 / 21 / 00 LOGICAL BLOCK ADDRESS OUT OF RANGE
2 / 30 / 00 INCOMPATIBLE MEDIUM INSTALLED
2 / 30 / 01 CANNOT READ MEDIUM . UNKNOWN FORMAT
2 / 30 / 02 CANNOT READ MEDIUM . INCOMPATIBLE FORMAT
2 / 30 / 03 CLEANING CARTRIDGE INSTALLED
2 / 30 / 07 CLEANING FAILURE
3 / 31 / 00 MEDIUM FORMAT CORRUPTED
2 / 3A / 00 MEDIUM NOT PRESENT
2 / 3A / 01 MEDIUM NOT PRESENT - TRAY CLOSED
2 / 3A / 02 MEDIUM NOT PRESENT - TRAY OPEN
3 / 57 / 00 UNABLE TO RECOVER TABLE-OF-CONTENTS
6 / 5E / 00 LOW POWER CONDITION ON
6 / 5E / 01 IDLE CONDITION ACTIVATED BY TIMER
6 / 5E / 02 STANDBY CONDITION ACTIVATED BY TIMER
6 / 5E / 03 IDLE CONDITION ACTIVATED BY COMMAND
6 / 5E / 04 STANDBY CONDITION ACTIVATED BY COMMAND
5 / 63 / 00 END OF USER AREA ENCOUNTERED ON THIS TRACK
5 / 64 / 00 ILLEGAL MODE FOR THIS TRACK
3 / 73 / 00 CD CONTROL ERROR
3 / 0C / 00 WRITE ERROR
3 / 0C / 07 WRITE ERROR - RECOVERY NEEDED
3 / 0C / 08 WRITE ERROR - RECOVERY FAILED
3 / 0C / 09 WRITE ERROR - LOSS OF STREAMING
3 / 0C / 0A WRITE ERROR - PADDING BLOCKS ADDED
5 / 27 / 00 WRITE PROTECTED
5 / 27 / 01 HARDWARE WRITE PROTECTED
5 / 27 / 02 LOGICAL UNIT SOFTWARE WRITE PROTECTED
5 / 27 / 03 ASSOCIATED WRITE PROTECT
5 / 27 / 04 PERSISTENT WRITE PROTECT
5 / 27 / 05 PERMANENT WRITE PROTECT
2 / 30 / 04 CANNOT WRITE MEDIUM . UNKNOWN FORMAT
2 / 30 / 05 CANNOT WRITE MEDIUM . INCOMPATIBLE FORMAT
5 / 30 / 08 CANNOT WRITE . APPLICATION CODE MISMATCH
5 / 30 / 09 CURRENT SESSION NOT FIXATED FOR APPEND
5 / 30 / 10 MEDIUM NOT FORMATTED
6 / 5A / 02 OPERATOR SELECTED WRITE PROTECT
6 / 5A / 03 OPERATOR SELECTED WRITE PERMIT
1 / 73 / 01 POWER CALIBRATION AREA ALMOST FULL
3 / 73 / 02 POWER CALIBRATION AREA IS FULL
3 / 73 / 03 POWER CALIBRATION AREA ERROR
3 / 73 / 04 PROGRAM MEMORY AREA UPDATE FAILURE
3 / 73 / 05 PROGRAM MEMORY AREA IS FULL
5 / 2C / 03 CURRENT PROGRAM AREA IS NOT EMPTY
5 / 2C / 04 CURRENT PROGRAM AREA IS EMPTY
Page 102

3 / 72 / 00 SESSION FIXATION ERROR
3 / 72 / 01 SESSION FIXATION ERROR WRITING LEAD-IN
3 / 72 / 02 SESSION FIXATION ERROR WRITING LEAD-OUT
5 / 72 / 03 SESSION FIXATION ERROR . INCOMPLETE TRACK IN SESSION
5 / 72 / 04 EMPTY OR PARTIALLY WRITTEN RESERVED TRACK
Notes:
1. All values are in hexadecimal
2. When no value for SK is given, the error is applicable to multiple sense
keys.
Page 103

Communication (Interface)
Interface
IsoBuster is able to communicate directly with CD/DVD-ROM devices and hooks in the system right above
the device driver. This is done without the need to install proprietary drivers. IsoBuster makes use of Aspi
(An Adaptec interface) or SPTI an NT native interface.
Aspi (wnaspi32.dll) is standard installed on Windows 95, 98 and ME. Microsoft did Adaptec a big favor
here and the nice thing about it is that we can make use of it as well.
This interface is default selected under Windows 95, 98 and ME. Since SPTI cannot work under these OS,
the option to select SPTI is grayed out.
Updates for Aspi can be found on the Adaptec website. IsoBuster is able to work correctly with all versions
of Aspi, starting from the oldest Windows 95 version to the newer Windows ME version or the versions
downloadable from the Adaptec Website. Sometimes Aspi can become corrupt because some applications
install older parts of Aspi and destroy a good working combination of dll, vxd and registry entries. Funny
enough it's often Easy CD Creator that causes havoc. When this is the case, one can always download an
AspiChk utility from the Adaptec Website and check the installation. Or just run an update from the Adaptec
website. Or use Google.com and look for "fixaspi" or "forceaspi".
When IsoBuster doesn't find your drives or when IsoBuster crashes while starting up (only seen this happen
once), try to determine if the Aspi layer is working correctly ! If the interface 'seems' to work properly
(because it says so to IsoBuster) but then decides to crash when IsoBuster sends through the first command
.... then there's little IsoBuster can do about it !
Ahead (www.ahead.de) also offers a nicely working wnaspi32.dll with an almost exact interface. IsoBuster
works great with all versions of this dll too !
SPTI
SCSI Pass Through Interface is standard available on Windows NT4, 2K, XP and Vista. Under these OS,
Aspi is not installed by default. However, as a user, you could have installed Aspi or another application
might have done it for you.
There are two types of SPTI, SPTI and SPTI direct. IsoBuster uses both, taking care of and working around
lots of Windows bugs, especially in the first implementations (e.g. NT4).
Under NT4, 2K, XP and Vista IsoBuster will select SPTI by default but will also try Aspi if no drives can be
found via SPTI. In case of no Administrator rights, you may have no rights to access drives at low level via
SPTI and hence IsoBuster will not be able to list the drives. If this is the case, please ask your administrator
to change this setting:
SPTI Access control
Changing this is only necesarry when you don't find drives via SPTI but you know they are present in your
system. Only Administrators have the proper system rights to change this setting. So, if this option is not
available (greyed out), you will have to ask the administrator to log in and change the setting.
Changing this setting basically does the same as (which IsoBuster now does for you) :
Windows 2000 :
Open the "Local Security Policy" console by clicking on the start menu -> control panel -> administrative
Page 104

tools, and select local security policy. Then expand the "Local Policies" section and select "security
options". Change "Restrict CD-ROM access to locally logged-on user only." to ENABLED.
Windows XP :
Open the "Local Security Policy" console by clicking on the start menu -> control panel -> administrative
tools -> performance and maintenance, and select local security policy. Then expand the "Local Policies"
section and select "security options". Change "Devices: Restrict CD-ROM access to locally logged-on user
only." to ENABLED.
Store selected interface
If you want IsoBuster to always start with the selected interface, which may be different from the default
interface, select this checkbox
Read Retry Settings
Remapping settings
Custom remapping settings
Page 105
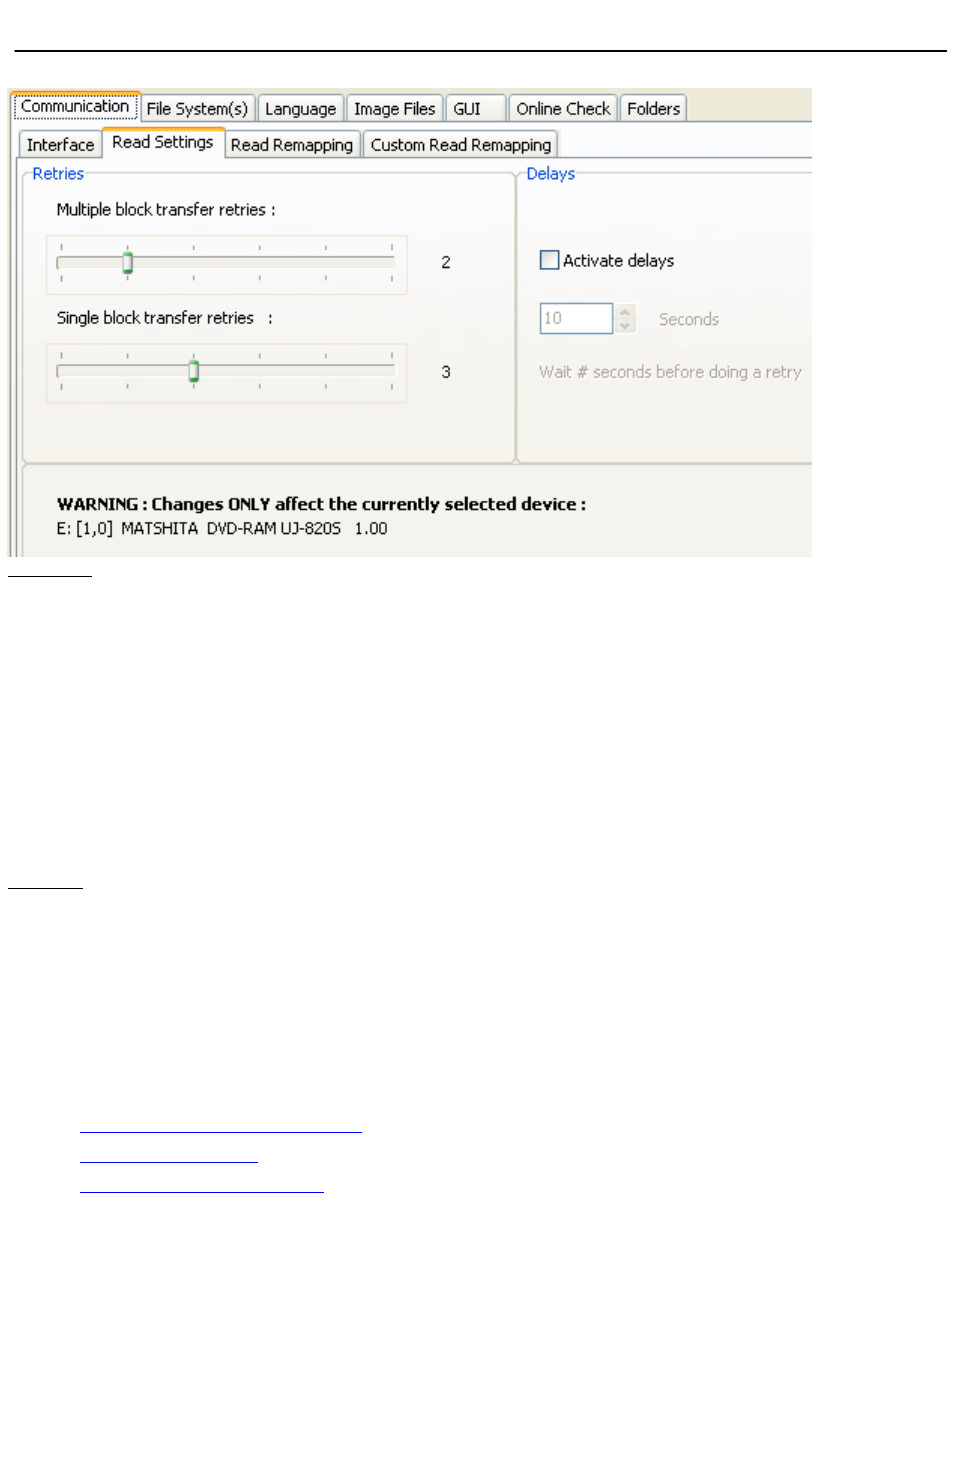
Communication (Read Settings)
Read Settings
Retries
During reading, IsoBuster will typically (and where possible) read more than one block at a time. If that fails
for some reason IsoBuster will read every block individually.
For both mechanisms a default retry count is set. You can change this per device using the sliders. This
change only affects IsoBuster behavior, no other application (e.g. the OS itself) is affected ! This setting is
not saved and next time when you start up IsoBuster the default setting will be used again.
In case reading takes very long, because there are many errors and the CD/DVD readers needs a long time
per block, you could consider to read with a lower retry count. If you notice that with more retries you don't
find the data either it is rather safe to go to a lower retry count and it will save you a lot of time.
Worst case, trying to read corrupted data, the drive needs 30 seconds per block. This times the retry count
and this times the amount of blocks which ranges from 330,000 (CD) to 2,200,000 (DVD). I don't need to
make you a picture of what that can mean to your precious time. Luckily and mostly only a smaller part of
the blocks is unreadable, hardly never will all data be too corrupt to read.
Delays
Especially with older drives, in combination with certain (hard to read) discs, it is sometimes possible that
when you select "retry" on a faulty read the data can be read anyway. This is a bit strange as IsoBuster
does a number of retries internally anyway and the only explanation seems to be that the drive needs some
time to "breath". E.g. the drive needs to cool down or spin down or there is a design flaw in hardware or
embedded software that causes this behavior. So if you are in this situation, e.g. you're extracting data from
a CD and each time you find yourself hitting retry after which the process continues normally, then this option
is for you. By setting a number of seconds in this option, IsoBuster will wait that long each time before the
read is retried. So the drive is allowed to spin down and correct whatever situation that causes this problem.
This option can cause a serious speed penalty, so use it only when you are sure it will help you !
Preferred communication layer
Remapping settings
Custom remapping settings
Page 106

Communication (Read Remapping)
Read Remapping Settings
Certain CD formats expect the CD reader to convert logical addresses to physical addresses on the media
(this is called remapping). E.g. suppose a directory field says file_X is located at address x then an
application (e.g. Windows) will issue a read command to address x to read the file. However, address x may
in fact be located at physical address y. The CD reading device must take this in account and fetch the data
from physical address y.
A good example of such discs are (with fixed packets) formatted CD-RW discs. E.g. the discs formatted by
Direct CD, InCD, DLA, Drag to disc etc. These discs require Method 2 remapping by the CD Reader.
If you buy a CD reader these days then this drive is perfectly aware of this type of CD-RW and will do the
conversion always. There are however OLD CD-ROM drives out there that can read from CD-RW (can deal
with the different reflectivity) but are not aware of the physical formats that were defined for CD-RW. These
drives will screw up your data because you will get data from wrong sectors/blocks/addresses. Often reading
from these CD-RW discs also works really bad on these drives because they try to read sectors that are not
meant to be read which causes spin downs and read errors and what more.
IsoBuster tries to detect these situations and will do the internal remapping that the drive is supposed to do.
This is fully automatic and is based on special media-drive tests that are implemented. It does remain
difficult to detect this always, the reader is not always cooperative in the sense that detection commands
return incorrect information and so on. You should only try switching the Method 2 option if you have an older
CD-ROM drive (All writers will do it OK) and a when you are trying to read a formatted CD-RW disc on which
the file and directory layout seen by IsoBuster is looking weird and all file content is wrong.
A much newer standard is the Mount Rainier or MRW standard which has also been defined for rewritable
media. On top of Method 2 remapping, this standard requires Method 3 remapping. Again this remapping
needs to be done by the drive. So a Mount Rainier drive will do the remapping automatically, unless the disc
is damaged and the drive gets confused. There are however millions of CD-RW and Method 2 capable drives
out there that do not know of this relatively new standard. There are also not too many of these discs going
around so at least that's not too worrying. Anyway, IsoBuster can detect Mount Rainier discs (with most
drives, preferably writers) and will do the Mount Rainier remapping (or Method 3 remapping) if the drive is not
capable to do it. IsoBuster will even do this on drives that are not Method 2 capable, so both the Method 2
and Method 3 remapping are done at the same time then. You should only try switching the Method 3 option
if you have an 'older' writer and a when you are trying to read a formatted Mount Rainier CD-RW or DVD+RW
disc on which the file and directory layout seen by IsoBuster is looking weird and all file content is wrong.
Preferred communication layer
Read Retry Settings
Custom remapping settings
Page 107

Communication (Custom Read Remapping)
Custom Read Remapping Settings
This is a [Business] feature intended for professional data recovery users that come across discs
sometimes where data appears to be shifted. Very rarely one comes across a bad disc where the data
appears to be shifted one or more blocks, starting at a certain block offset. Mostly this is due to a bug in the
mastering software that created the disc.
Identifying such a problem requires the help from some good hex editors and/or the Sector View feature in
IsoBuster.
The functionality is straightforward. A start address determines where IsoBuster will skip the set amount of
blocks.
Example: Suppose the file-system says that file x is located at address y and an investigator finds that the
file in reality is located at address y+1, and all data after this point appears to be shifted as well, then setting
this feature to skip 1 block starting at address y will suddenly fix everything. File x and all files and folders
behind it, located physically at higher addresses will then suddenly extract properly.
This feature's settings are not saved on exit of the program
Preferred communication layer
Read Retry Settings
Remapping settings
Page 108

File System Settings
IsoBuster is able to interpret a File System using all means a File System offers. Windows tends to use
one method only to get to the data whereas IsoBuster uses the different available structures and is able to
switch if one doesn't work properly. The user is also able to set one or more options to try and find the ideal
setting for a particular disc if the default settings doesn't work properly.
General
The general tab allows to set a few parameters used for all file-systems.
For an explanation on the possible settings, click here.
Recovery
The Recovery tab allows to set a few parameters used during the scanning for lost files and folders.
For an explanation on the possible settings, click here.
ISO
IsoBuster offers a set of options that apply for the ISO9660 File System and extensions.
Extensions such as Joliet, Rock Ridge and CD-i to a certain extent.
For an explanation on the possible settings :
Scan options (normal mounting of discs)
Text conversions
Mac properties and extraction methods
Write software specific options
El Torito (Boot)
UDF
IsoBuster interprets UDF based on the UDF rules but while doing so also already looks further to see if it
can't compensate for errors.
For an explanation on the possible settings :
Scan options (normal mounting of discs)
Mac properties and extraction methods
HFS
IsoBuster supports HFS and HFS+.
For an explanation on the possible settings :
Scan options (normal mounting of discs)
Resource Forks and extraction methods
IFO/VOB
IsoBuster is able to mount the pseudo file-system(s) based on IFO / BUP and VOB / VRO files. To find
entry points to this file-system, ISO9660 and/or UDF need to be (partially) available as well. If not this
file-system can still be found during the scan for missing files and folders.
For an explanation on extra settings, click here.
SIG
IsoBuster supports finding files based on their signature during the scan for lost files and folders.
FAT
IsoBuster supports FAT12, FAT16 and FAT32.
For an explanation on the possible settings :
Scan options (normal mounting of discs)
For an explanation on extra settings, click here.
Page 109

General File System Settings
Time Stamps
For every file and directory there is a time stamp and a time zone stored in the file-system. The time
stamp is typically the "Modified" time stamp of the file that was copied to the CD or DVD. The time zone is
typically the time zone of the system that was used to create the CD or DVD. So if the system was, for
instance, a British system and the time zone was set correctly on that system, then the time zone stored
on the disc, per file and directory, would be GMT 00:00. If that system was an American system, the time
zone would be between GMT -04:00 and GMT -08:00 or even GMT -09:00 for Alaska. In Japan for instance
the time zone would be GMT +09:00.
If you're interested in the different time zones and your system settings, double click the clock in the bottom
right hand side corner and play a bit with the "time zone" option.
A great site to check out the time in other places here : http://www.timeanddate.com/worldclock
IsoBuster, up to version 1.6 Beta 12, would always use the time stamp and ignore the time zone. So the
local time stamp of the file would be used to display the file-time in the right pane (ListView) of the program
and this same time stamp would be used to assign to the file after extraction via IsoBuster. This is in fact the
same as what Windows 9x (95, 98, ME) does for files in the ISO9660 and derivatives file-system.
As of Windows NT (NT4, 2K, XP) Windows converts the stored time stamp by taking the time zone of the
file, the time zone of the system and daylight saving time (when applicable) in account ! Windows NT does
that for all file systems. Windows 98 does this only for the UDF 1.02 file-system. Windows does this
conversion for display purposes but also assigns this time stamp to a file copied from CD or DVD. As of
IsoBuster version 1.6 Beta 13 this is now also the default setting.
For investigative purposes, following settings may be used to switch between the actual local time stamp
and the converted time stamp. Changes made here are stored and always applied unless you switch the
setting back.
To see the time zone of a file or directory, independent from following settings, right mouse click a file and
choose properties. The second tab of the properties window shows the time zone of the file or directory.
Display time stamp
Local time stamp, when the file was created, independent from time zones
Ignores time zones stored in the file-system and time zone of the system itself.
Relative time stamp, taking time zone of system and time zone of creation in account
Takes the time zone of the file or directory in account, together with the time zone of the system and
daylight saving time (when applicable).
Apply time stamp on extracted files
Local time stamp, when the file was created, independent from time zones
Ignores time zones stored in the file-system and time zone of the system itself.
Relative time stamp, taking time zone of system and time zone of creation in account
Takes the time zone of the file or directory in account, together with the time zone of the system and
daylight saving time (when applicable).
Time stamps of file-systems
Page 110

It is possible to display the time stamp of a file-system next to the file-system icon. The time stamp is then
displayed between square brackets, e.g. [01/03/2001 8:45:00]
or [N/A] when the file-stamp is not available, which is typically the case for recovered file-systems (e.g. UDF)
or the flat file list.
Page 111

Recovery
You can initiate a scan for missing data. During this scan IsoBuster uses various methods to find missing
files and folders. If you wish, e.g. for engineering purposes, you can disable individual tests that lead to data.
Include finding lost ISO9660/Joliet sessions:
It is possible that multiple ISO/Joliet (file-system) sessions were recorded in one single track or in one
single (physical) session. This is not according to the ISO/Joliet standard but it can happen. E.g. certain
applications do it on DVD+RW and DVD-RW or sometimes applications are unaware that the previous
session was not properly closed and they append a new session, but still in the old session. In case
IsoBuster cannot automatically find and mount these hidden file-systems, a scan for missing files and folders
will reveil the data and the file-systems will be found and created nevertheless.
Include finding UDF files and folders:
This scan has been present in IsoBuster as of version 1.1, but has been improved with every version and will
continue to improve as new write software applications and versions are released. This scan entirely bases
finding missing data on UDF file-system remains. Traces of UDF can lead to lost folders and files. IsoBuster
puzzles all this missing data together and is often able to retrieve the files-names, time-stamps,
folder-hierarchy etc.
Include finding IFO/VOB references:
Finding the IFO/VOB pseudo file-system on VIDEO and/or AUDIO DVDs is partially based on other
file-systems. So, in order to find this file-system there must be a valid ISO9660 and/or UDF file-system
present. If not, then this pseudo file-system can not be found. However, during a scan for missing data, any
such pseudo file-systems are found and made available after the scan. Furthermore Video recordings on
DVD+VR(W) may be found extra if they were not found via the IFO/VOB references.
Include finding files based on their signature:
Files are often recognizable based on parts of the data inside the file. This is however not an exact science
and fact of the matter is that some files are almost always found (e.g. *.jpg) and others are never found.
IsoBuster builds a flat file-list based on all file-signatures it encounters. This flat list then contains all
possible files with a file-length till the next encountered signature (unless you change that in the properties).
Obviously, because file-names are not recorded inside the file data itself, file-names and other properties of
the files are unknown. Nevertheless, for missing pictures, documents etc. this scan often proves to be a life
saver, e.g. when there is no ISO9660 or UDF to work with or when these file-systems are too corrupt to still
point to valid data.
Include finding FAT files and folders:
IsoBuster shows the deleted files and folders straight away in a separate FAT file-system. This is because
IsoBuster scans the file-system entries and also runs into the deleted entries this way. However, folders can
also become orphaned, which means that there is no reference pointing to them anymore. During a scan for
missing files and folders, and if this option is enabled, orphaned folders are found and displayed in a separate
FAT file-system. Additionally, IsoBuster also finds entirely new FAT file-systems if they are present. For
instance if the FAT file-system could not be found immediately due to certain unreadable sectors, or a FAT
file system that is located further on the disc, e.g. a second or higher FAT partition inside a hard drive image.
Page 112

MacBinary files
Extract files as MacBinary files
Apple Mac files usually exist out of two physical files, the "Data Fork" and the "Resource Fork". These two
files have an identical file-name and are shown by the Mac OS as only one file. This causes problems on
Windows systems because two different files with same name in one directory are not allowed. IsoBuster
shows these 'combined' files also as only one file and when you extract them with IsoBuster, IsoBuster
extracts the file(s) so that Windows can handle the data content. Should you want to take these files back
to a Mac later on then you will notice that the Mac can still handle them however the automatic link with a
program may be gone. E.g. if the file is a word document, clicking the file on the Mac OS may not launch
your Word editor anymore, however, when you start the editor and select "Open File" you can continue the
work.
If you extract the files as MacBinary files however, IsoBuster combines the two forks into one file according
to an existing standard, the MacBinary standard. The resulting files are not much useful under Windows and
you should not extract as MacBinary files if you intend to use the files on a Windows system (*). However if
you intend to transfer the files to Mac via email or network or ... then extracting as MacBinary files may prove
useful. For Mac there are several programs that can handle MacBinary files and they re-create the two
resource forks from the one MacBinary file. Stuffit Expander for instance does this.
(*) If you don't just Extract but instead choose Run or Extract and Run the files will never be extracted as
MacBinary, even when the option is set, because Run implies you want to execute the file on a Windows
system and on Windows systems MacBinary files are not much useful.
Page 113
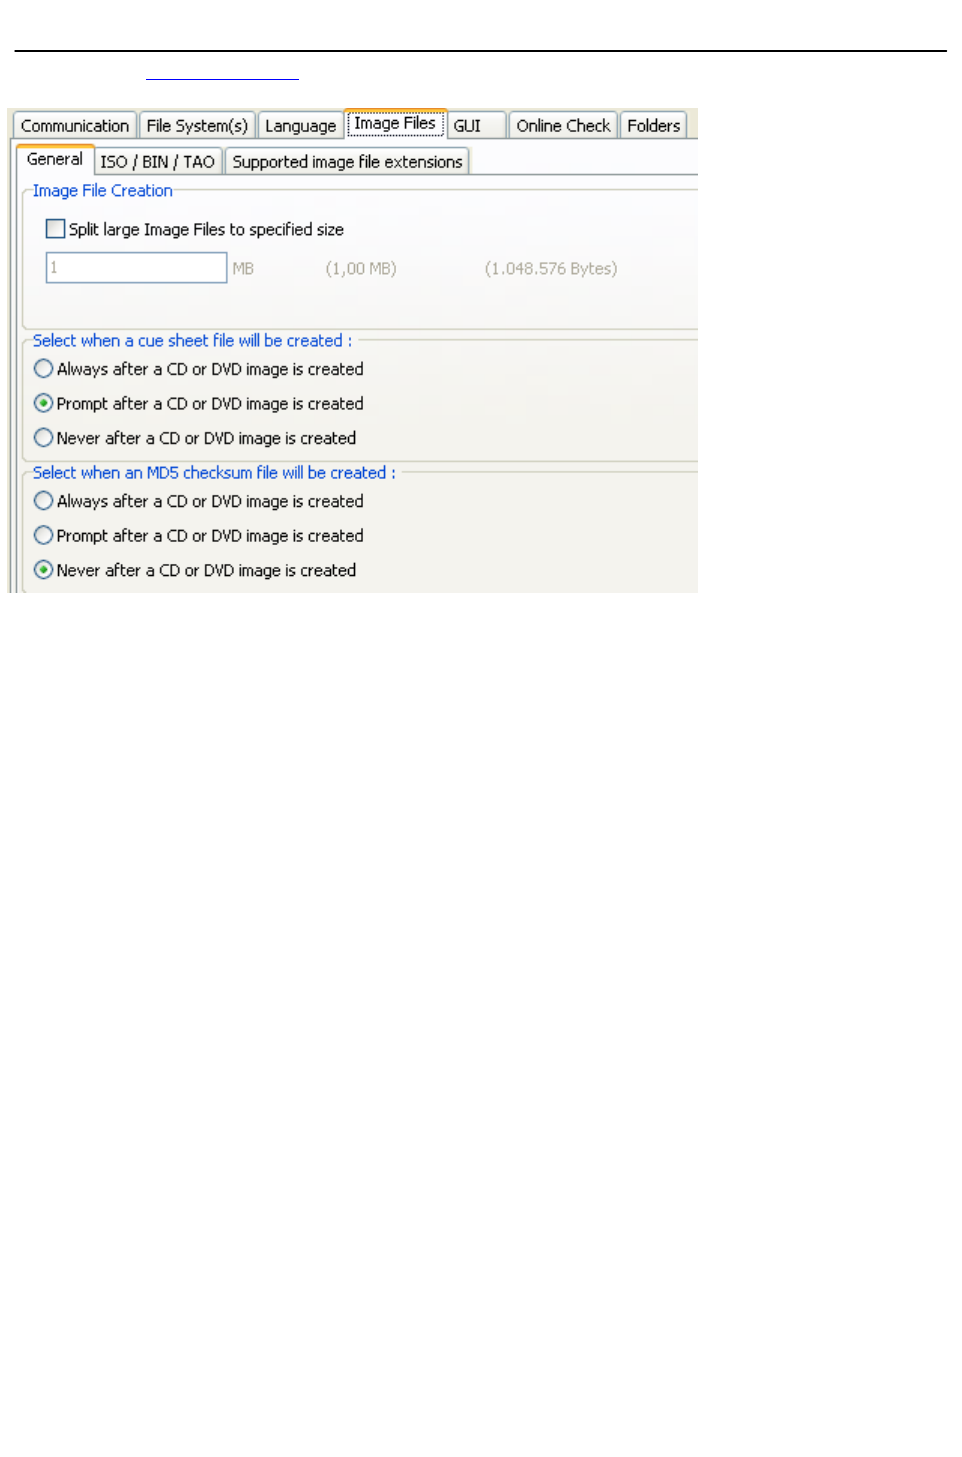
Image File Creation Settings
IsoBuster can create image files. Supported features are creation of a cue-sheet file per CD/DVD image
and file splitting.
Split Image files in multiple files during creation :
For several reasons it can be interesting at times to create image files split up in several files. E.g.
Image.bin, Image.bin01, Image.bin02, Image.bin03, Image.bin04
IsoBuster can load these Multi-File images without a problem and you can still get all the data from these
split up image files.
One of the reasons for this feature is creating DVD image files on a Windows 98 FAT32 formatted HD.
FAT32 can only cope with max 2 GB files and DVD images are often 4 GB or larger. It is common practice
in this case to split up the images in chunks of 1 GB each, hence 1 GigaByte (1GB) or 1024 MegaBytes
(1024 MB) is the default setting. However you can create image file as small as 1 MB. The smaller the
setting, the more files will be created, so be careful that you don't overload your system by creating more
than 4000 image file chunks.
Note. IBQ files are automatically split up around the 1 GB file size boundary, if the size is set greater than
1 GB or not set at all.
Create Cue-sheet files (*.cue) :
Cue-sheet files (*.cue) were originally designed for CDRWin but they are commonly used and combined with
image files to have a feel for the track layout of the CD. Cue-sheet files (*.cue) are in fact text files (you can
open them with any text editor). The actual CD data is always contained in a different file (*.bin, *.iso, ...).
So if you open a *.cue file with IsoBuster, IsoBuster will know the track layout of the image but will get the
actual data from another file (*.bin, *.iso). This file's name is also contained in the *.cue file.
IsoBuster can also create these files. Default, IsoBuster will prompt you each time after you made an
image. However you can also set the option to always automatically create a cue-sheet file after creating an
image, or you can set it to not be bothered again.
Cue-sheet files have limitations !! They're nice to get the track layout of a session, but they do not support
Multi-Session discs. IsoBuster however adds features to the cue-sheet file so that Multi-session discs are
supported as well. These entries are preceded by "REM" so that other applications (that do not support
Multi-session cuesheet files) do not complain. However, if you load these cue-sheet files with IsoBuster
again, you get the full potential of these added features and you can see all sessions again properly.
Additionally to the option to create cue-sheet files after creating an image, and totally independent from this
option window, the right mouse click on a CD/DVD icon option also provides a means to create a cue-sheet
file, without creating an image itself. This feature is nice to create and share a layout of a disc without having
to create the entire image. There's once catch, cue-sheet files list the amount of bytes per block that were
extracted in the image. If you end up using a cuesheet file created with this option you have to make sure
that the block size matches with the image itself.
Create MD5-checksum files (*.md5) :
MD5 technology is great to flush large numbers of data through to in the end get a 16 BYTE checksum that
Page 114
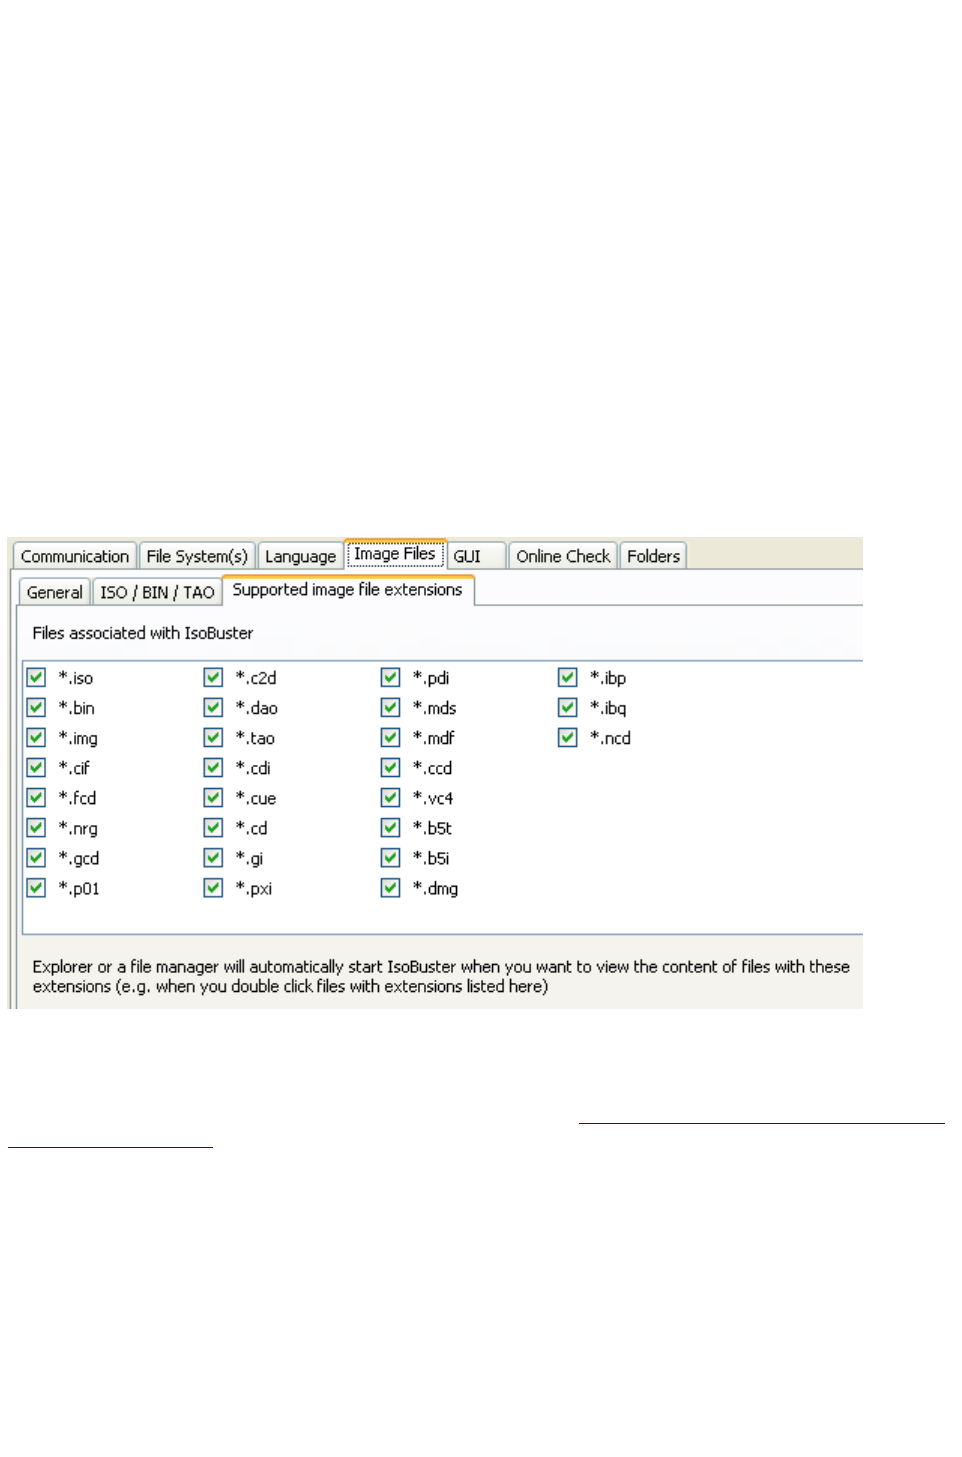
is very unique. MD5 technology is used a lot as a means to identify if a file is still exactly the same as
before. Many files these days are accompanied by a *.md5 checksum file which contains the 16 BYTE
checksum. Third party checksum testers can then be used to verify if the file is still exactly the same as
before, e.g. to verify that the file hasn't been altered, edited, corrupted during transfer, ... .
IsoBuster also features MD5 check and creation functionality. It is possible to specify in this option to
always create an MD5 checksum file after an image file has been made.
The just created image file is then automatically opened and a checksum file is created from that image.
More on topic :
When an image file is opened by IsoBuster, a user can choose (right mouse button click on the CD/DVD
icon in the left pane) to create an md5 file from that image or to verify that image with an existing md5 file.
IsoBuster can even create an md5 file from a CD or DVD before an actual image has been made, the user
can choose between as if the extraction would occur for user data only (2048 bytes/block) or raw (2352
bytes/block). If an md5 file is opened with IsoBuster as if it were an image file, then IsoBuster will treat the
first file mentioned in the md5 file as an image file and will automatically do the MD5 verify for this file. If an
image file is in fact a combination of more than one files, then IsoBuster will handle that all automatically.
ISO / BIN / TAO :
Traditionally, IsoBuster has always created TAO and BIN image files. An image created with user data only
was a TAO file, an image with raw data was a BIN file. To avoid confusion and because ISO can be basically
either user data or raw data, it is possible for a user to set that IsoBuster always creates ISO files, no matter
if the content is raw or only user data. It is adviced then to also create a CUE file, as that file contains more
information on the way the image was extracted.
Files associated with IsoBuster :
IsoBuster supports a wide range of image files. During installation you can set which files should be
associated with IsoBuster. File association means that, if you click a file with a certain extension, that file will
automatically be launched inside IsoBuster. The option here enables you to associate when you forgot to do
so during installation, or to deactivate association when you so desire.
More on file associations during installation can be found online: Installation guide for IsoBuster: "Select file
associations" explained.
Page 115
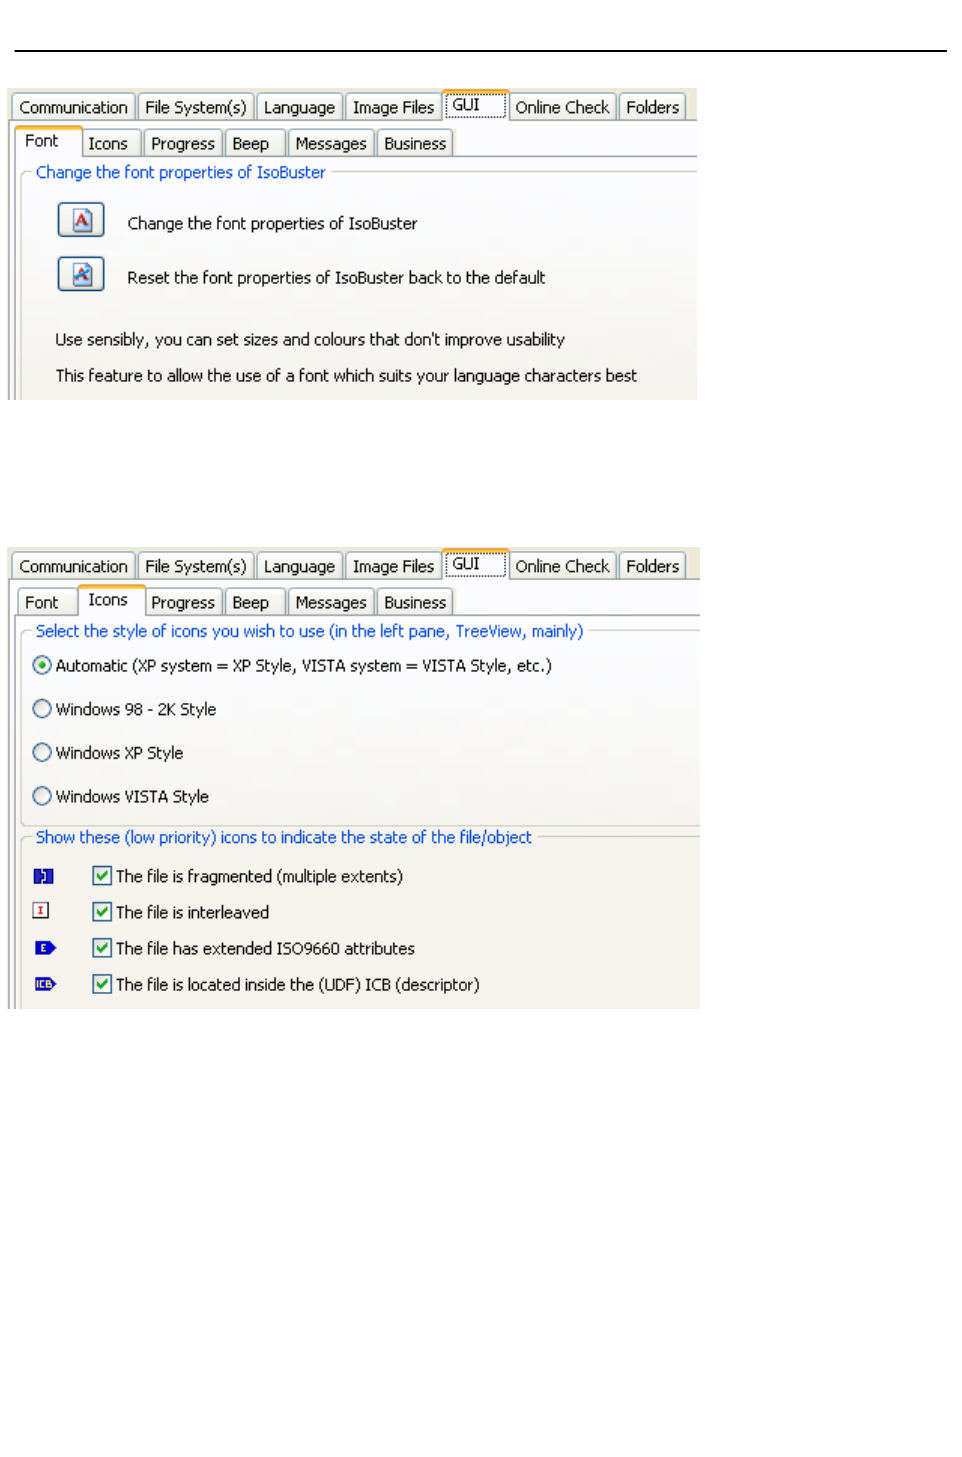
GUI Settings
Changing the font.
Although IsoBuster uses a font that is supposed to work right on all localized Windows versions,
sometimes certain Windows versions contain other fonts that suit the language characters better (Maybe
even extra installed fonts). This option allows you to select another font so that your Japanese or Arabian or
... version looks better. This options also allows you to set ridiculous fonts in terms of size, type and maybe
color, but that's up to you. You can always hit the default button to set the font back to the design state.
Changing the icons.
IsoBuster will use the typically XP style icons on an XP system and will use more Win9x-2K style icons on
other systems by default. You can choose to always use XP style icons or not. Just play with the option to
see the result, it's harmless.
Show low priority (informational) icons.
IsoBuster shows a couple of icons next to files and folders if they posses certain properties. To avoid
confusion, a selection of these icons can be disabled. Icons showing properties such as "contains read
errors" can never be disabled.
Progress Bar during extraction.
Page 116
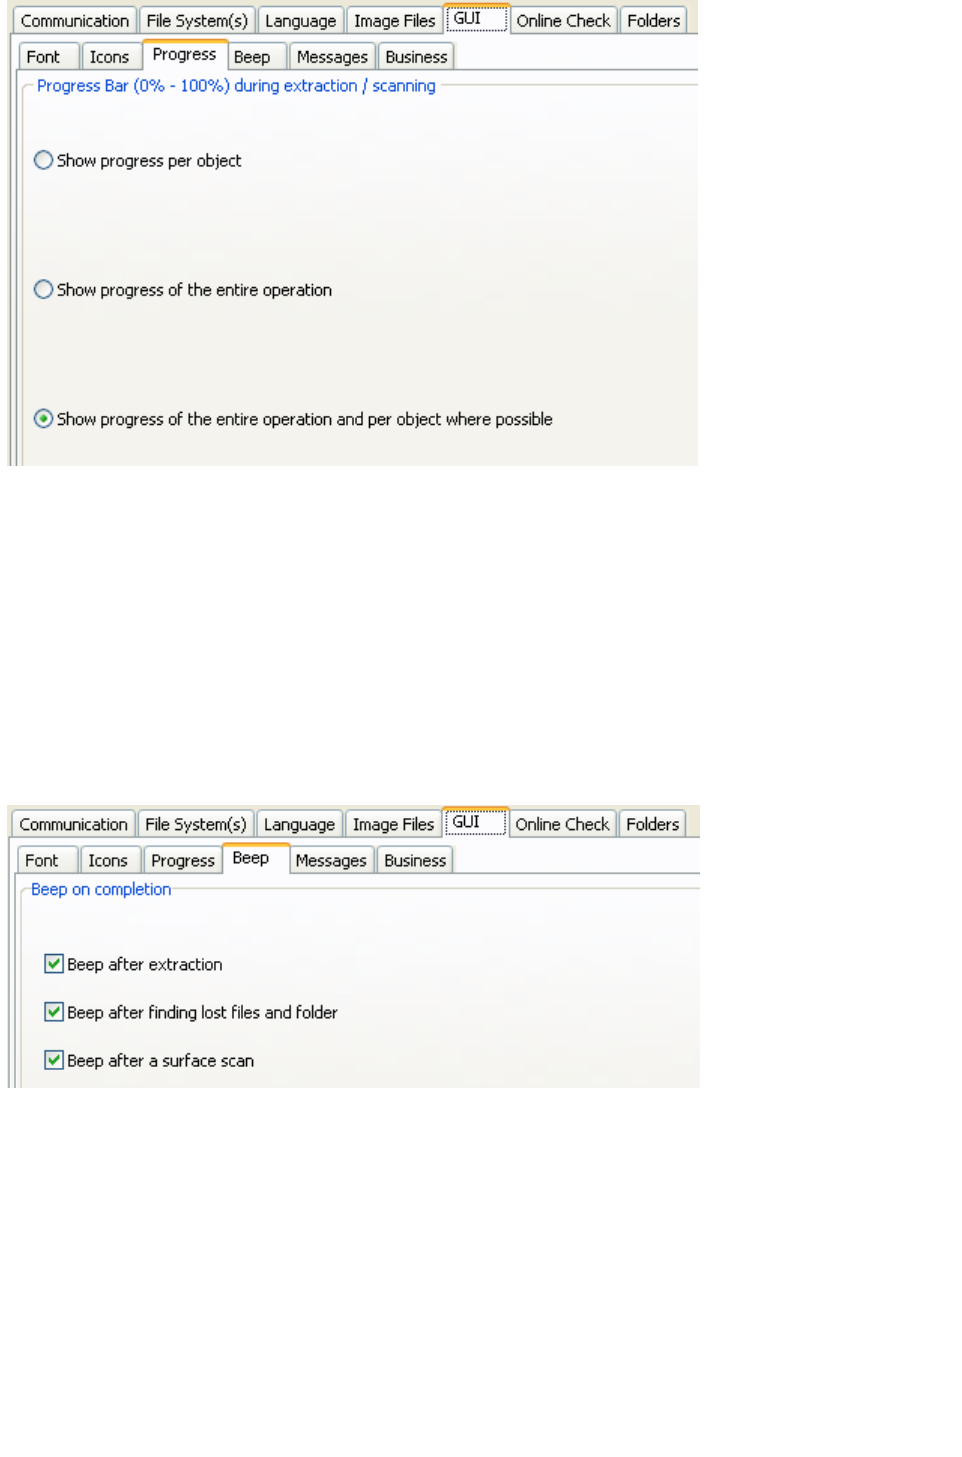
All IsoBuster versions up to version 1.5 have always shown a progress bar per file. One of the reasons was
that if a directory was extracted, it was not always known yet how many files and sub-directories that
directory contained and so it was impossible to calculate and show an exact progress bar.
In the mean time things have changed and there are a fair number of situations where the content of
sub-directories is already known and stored in memory. So in these cases showing a progress bar for an
entire operation is not that hard.
As of version 1.6 the progress bar is now always shown an calculated over an entire operation. This also
means that in case the sub-directory content is not known yet, that content will be scanned first ! So a
directory scanning operation that would occur during the extraction itself is now occurring before the actual
extraction starts. This does not mean that the entire operation will take longer ! In fact, often this reduces
the overall time needed for an extraction of directories with sub-directories.
For old times' sake, a progress bar per file (object) can be enabled again. And to make it really interesting,
both progress bars can be shown during the extraction operation
Beep.
Messages.
Page 117

At certain moments you as a user can get prompted with a message, asking what to do. For some of
these messages, especially those related to creation and completion of managed IBP / IBQ files, you can set
not to be bothered again. This by means of a checkbox at the bottom of the message. If you want to enable
them again, you can do so by setting / resetting them here.
Business.
Since version 2.0 IsoBuster comes in two flavours. A personal version and a business version for
professionals. The business version has some special features, especially since version 2.2. These special
features (for instance viewing extents and adding/editing extents) can remain hidden. So instead of these
features showing up during right mouse click on an object, they are not shown at all when this option is
unchecked.
Page 118

Online Check
General
Information.
The top half of the Online Check window contains information about the current program version and about
the most recent versions that can be found online. IF there is a more recent final build online then that
version will be mentioned together with a link where that version can be downloaded. IF there is a more
recent beta build online then that version will be mentioned together with a link where that version can be
downloaded.
Settings.
IsoBuster can be instructed to test automatically if there is a more recent version available. Set the most
appropriate interval, for instance once ever day or once ever week ... .
You can instruct IsoBuster to prompt you if there is a more recent version available. IsoBuster will perform
the check silently and will only prompt when there is indeed a newer version available.
Advanced
Advanced settings to be able to connect to the internet.
These settings make sense to those that need them, so not much explanation needs to be given. For the
averige user that can simply connect to the internet the default setting : "Direct connection to the internet
" should be selected.
Page 119

Folders
IsoBuster uses a temporary directory/folder for a number of reasons :
- When you Run a file, the file is extracted to the temp. folder from where it is launched.
- When you drag a file to a location, the file is first extracted to the temp. folder and next Windows moves it
to the appropriate location. This is because of Windows architecture. On a drag from the application, the
application has no means to know where Windows wants the file located. So the only way to work around
that is to extract to a temp. location and next allow Windows to do the relocating. (Other software, e.g.
Winzip works the same way)
- To place small text files in that are used in the Editor window, e.g. file-listings.
By allowing to choose a folder other than the system temp. folder you have full control over what location
IsoBuster uses.
Page 120

No files present, only a track / session layout
If you are looking at a CD or DVD with IsoBuster, or at the content of an image file, and the only thing
shown is a track and session layout (see picture) then IsoBuster could not find file-system file-data straight
away.
There can be different reasons for that.
1. No file-system data is present.
2. The critical sectors containing important file-system data to be able to immediately find files are
unreadable.
3. You are looking at a file which is not really an image file but another type file, e.g. a generic binary file with
.bin extension.
4. The image file is not properly recognised and IsoBuster is not able to parse the content correctly.
In most cases you will be after file data, in other words you want to get your missing jpg files back or any
other type of file that you saved on CD or DVD.
A mistake often made, due to the many possible uses for IsoBuster, is that people make an image file of a
track or session, because that's the only thing that seems the proper thing to do when you are new to this,
which then results in a *.bin or *.tao file. *.bin and *.tao files are very generic image files. They are just, and
simply, block per block copies of the track or session. They contain the exact same data as the original and
if no files could be found straight away on the real disc, then no files will be found in these image files.
What you likely want to do is to find the missing files. IsoBuster features powerful scanning functionality
to still find the missing data. If it's there, it should be found.
To look for this missing data, run the test "find missing files and folders". A dialog may pop up when you
insert a disc and suggest this test.
Additionally, before you actually run this test, you may decide to make a managed image file first.
Because then you can run the test "find missing files and folders" afterwards on an image file on your hard
disc, which is much faster. Please note that if you were prompted to run this test after you inserted a disc,
you will also be prompted to first make a managed image file. So just let the system guide you.
Page 121

Use of command line parameters
As of IsoBuster 2.2 there is support for (additional) command line parameters. Additional because before,
and as long as we can remember, IsoBuster has supported loading an image file via the command line.
First some general notes:
- IsoBuster is not a console application. When started with commands, IsoBuster's GUI will still load. All
messages and popups that would appear normally will still appear. If the task is such that user input is
required, that user input (e.g. clicking a button) will still need to happen.
- Commands can be in random order (that includes the path to an image file that needs to be loaded as well)
- If commands are repeated more than once, with different or same content, only the last occurance on the
line will be used.
- All commands start with a forward slash '/' except the loading of an image file. Image files are loaded by
simply providing the full path, which assures 100% backwards compatibility with older versions.
Destination path variables:
[Introduced in IsoBuster 2.8.5]
The destination paths used for "/ei","/ef" "/tree" can contain variables. They are especially useful when
combined with (but not limited to) "all" ("/t", "/s", "/ef:").
This way it is possible to (for instance) extract all file systems for all tracks and sessions and put each file
system in its own folder with a descriptive folder name, next export file lists of all files to those same created
folders, or give the file lists the same name as the folder they are referring to etc.
<%FI> : File System Index
<%FT> : File System Type
<%FN> : File System Name
<%TI> : Track Index
<%TN> : Track Name
<%SI> : Session Index
<%SN> : Session Name
Example:
isobuster.exe /d:d "/ei:c:\my extracted image files\track<%TI>.iso" /t:all
isobuster.exe /d:d "/ef:all:c:\extracted\<%FI><%FN>"
isobuster.exe /d:d "/ef:udf:c:\extracted\s:<%SI>-f:<%FI>(<%FN>)" /s:all
Loading an image file:
Simply provide the full path of the image file on the command line. Put between quotes to optimally support
long filenames and blanks in filenames.
Command:
no command
Example:
isobuster.exe "c:\my image files\image1.iso"
Auto-select a drive:
IsoBuster selects by default, the first drive that contains a disc (CD / DVD / BD / HD DVD) or, if no discs
are loaded, the first drive in the list. You can tell IsoBuster to select a specified drive on start up, no matter if
there is a disc in that drive or not. The drive is chosen by means of its drive letter (as IsoBuster detects it).
One character only (e.g. d or e or ...). This command has lower priority than loading an image file. If an
image file is loaded (see previous command) then that image file is selected by default and this command
has no impact at all.
Command:
/d:[drive letter]
Example:
To auto-select drive f:
isobuster.exe /d:f
Extraction of an image file:
With this command you can let IsoBuster start up, and make an image file of the selected disc
automatically. Selection of the disc depends on what drive is selected by IsoBuster. See previous command
for more on that. If you opened an image file at the same time (see first command) then the image file will be
selected and you will be making a new image file of the selected image file (e.g. convert nrg to ibp/ibq). If you
did not open an image file, nor specified a drive (see previous command), then the first drive with a disc
present will be selected. If you specified a drive (see previous command) then that drive will be used. If no
disc is present in that drive, then no extraction will happen. Also look at commands /et: /ef: /c /t: and /s:
Page 122

to discover more extraction power! If no extraction type is specified via the command /et: then the created
image will be of the managed kind (*.ibp / *.ibq). IsoBuster will make corrections to the filename extension in
case of a managed image file extraction (*.ibp), if the provided filename extension is not correct. No
corrections are made for the other extraction types. If no destination filename or foldername is provided,
IsoBuster will start extraction but will show the BrowseForFolder dialog so that a manual selection can be
made.
Command:
/ei:[destination path and filename]
Examples:
Extract the disc to an imagefile with provided name:
All three following examples will create the same files (created_image.ibp and created_image.ibq) because
managed image filename extensions are auto-corrected
isobuster.exe "/ei:c:\my image files\created_image1.iso"
isobuster.exe "/ei:c:\my image files\created_image1.ibp"
isobuster.exe "/ei:c:\my image files\created_image1"
Following example will create an ISO file with user data (cfr. TAO)
isobuster.exe "/ei:c:\my image files\created_image1.iso" /et:u
Following example will create an ISO file with raw data (cfr. BIN)
isobuster.exe "/ei:c:\my image files\created_image1.iso" /et:r
Extract the image file to a folder location:
Following example creates CD.ibp to the defined folder
isobuster.exe "/ei:c:\my image files\"
Following example creates CD.tao or CD.iso(*) to the defined folder
(*) depends on the image file extraction options (See ISO / BIN / TAO)
isobuster.exe "/ei:c:\my image files\" /et:u
Following example creates CD.bin or CD.iso(*) to the defined folder
(*) depends on the image file extraction options (See ISO / BIN / TAO)
isobuster.exe "/ei:c:\my image files\" /et:r
Without a destination path and filename, extraction will also start but will launch the BrowseForFolder dialog
isobuster.exe /ei:
Extraction Type (user data, raw or managed):
This command is used in combination with extraction commands: /ei: and /ef:
If it is absent, /ei: will internally default to /ei:m and /if: will internally default to /ef:u
Or in other words, image files are created managed and only user data is extracted for files and folders.
User data is practically always prefered in case of files and folders (raw only exists for engineering purposes).
(Managed does not exist for files and folders, only for image files).
Command:
/et:[Type[u][r][m]]
[Type] comes in three flavours:
u (User data)
r (Raw data)
m (Managed)
Example:
isobuster.exe "/ei:c:\my image files\" /et:m
Select a Track:
This command is used in combination with extraction commands: /ei: and /ef:
In case of /ei: (image file extraction) it is used to identify and extract a single track. This is only useful for
engineering purposes as an image of a single track is in most cases of not much use (unless it's the only
track). Only the image file of an entire CD is really useful for end users, but for those tinkering about the
functionality exists anyway.
In case of /ef: (file and folder extraction) it is used to identify the track that has the file system we want to
extract from. IsoBuster can find multiple file systems, including older ones in older sessions. If you specify
the track then you tell IsoBuster to use the file-systems attached to that particular track. If absent, IsoBuster
decides for itself and uses the most relevant file-system from the most relevant session/track. While this
feature can be useful, it makes more sense to use /s: (select a session) to tell IsoBuster from which
session's file-system(s) to extract.
In case of /scan (find missing files and folders) it is used to determine the session that needs to be
scanned.
A track index starts from 1. If you specify track 0 the command will simply be ignored. If both a track and
a session (see next) are selected, then the session selection is ignored and only the track selection is used.
Page 123

If a track index is provided and that particular track does not exist, then there will be no extraction and
IsoBuster will fail.
[Introduced in IsoBuster 2.8.5]
The index can also be "all" which means that the operation(s) that look at the track property ("/scan", "/ei",
"/ef") will execute in a loop for all tracks.
Command:
/t:[Index]
Example:
isobuster.exe "/ei:c:\my image files\" /et:m /t:1
isobuster.exe "/ei:c:\my wave files\" /t:all
Select a Session:
This command is used in combination with extraction commands: /ei: and /ef:
In case of /ei: (image file extraction) it is used to identify and extract a single session (all tracks of that
session in one file). This is only useful for engineering purposes as an image of a single session is mostly of
not much use (unless it's the only session). Only the image file of an entire CD is really useful for end users,
but for those tinkering about the functionality exists anyway.
In case of /ef: (file and folder extraction) it is used to identify the session that has the file system we want to
extract from. IsoBuster can find multiple file systems, including older ones in older sessions. If you specify
the session then you tell IsoBuster to use the file-systems attached to that particular session. If absent,
IsoBuster decides for itself and uses the most relevant file-system from the most relevant session.
In case of /scan (find missing files and folders) it is used to determine the session that needs to be scanned.
A session index starts from 1. If you specify session 0 the command will simply be ignored. If both a track
(see previous) and a session are selected, then the session selection is ignored and only the track selection
is used. If a session index is provided and that particular session does not exist, then there will be no
extraction and IsoBuster will fail.
[Introduced in IsoBuster 2.8.5]
The index can also be "all" which means that the operation(s) that look at the session property ("/scan",
"/ei", "/ef") will execute in a loop for all sessions.
Command:
/s:[Index]
Example:
isobuster.exe "/ei:c:\my image files\" /et:m /s:1
Extraction of entire file-systems (root) / files and folders:
With this command you can start up IsoBuster and extract one ore more files or folders automatically.
Selection of the disc depends on what drive is selected by IsoBuster.
See previous commands for more on that (e.g. loading an image file, extraction of an image file and
auto-select a drive). Also look at commands /et: /ei: /c /t: and /s: to discover more extraction power in
combination with this command. If no extraction type is specified via the command /et: then user data will be
extracted (which is almost always the sensible thing to do). If no track (/t:) or session (/s:) are definded then
IsoBuster will use the most plausible and relevant session / track / file-system to extract from. If no prefered
file-system is provided via this command then IsoBuster will decide on the most appropriate file system to
use (e.g. choose between UDF, ISO etc.). If there is a prefered file-system provided and that particular
file-system is not available then IsoBuster will not extract (and hence fail). If no file or foldernames to extract
are provided via this command then IsoBuster will extract the entire file-system, which means all files and
folders starting from the root of the selected file-system. If no destination filename or foldername is provided
IsoBuster will start extraction but will put up the BrowseForFolder or Save File dialog.
Command:
/ef:[FileSystem:][File or folder name (relative path) |][destination path and filename]
[FileSystem:] is always three characters and comes in following flavours:
iso: (Iso9660, Joliet, Rock Ridge, ... IsoBuster picks the most relevant one)
udf: (UDF)
hfs: (HFS and HFS+, IsoBuster chooses HFS+ over HFS)
ifo: (IFO, showing VOB and IFO files)
boo: (El Torito - Bootable image)
fat: (FAT)
sig: (Files found based on their signature, to be combined with the "/scan" command line parameter)
[Introduced in IsoBuster 2.8.5]
all: (All file systems found for relevant track or session) [Introduced in IsoBuster 2.8.5]
[File or folder name (relative path) |]
Page 124

A relative path to a folder or file, starting from the root (but without a drive letter)
Never start with a backlash, just the name or folder.
For instance:
picture.jpg (and picture.jpg exists in the root)
mypictures (and folder mypictures exists in the root)
mypictures\picture1.jpg (and picture1.jpg exists in subfolder mypictures (which is located in the root))
[destination path and filename]
Where the file / folders are extracted to. IsoBuster does not check destination folders throuroughly, so it
may proceed to extract to the required folder and then run into Windows errors. In other words, check if the
destination folder also exists before you start.
Examples:
Extract the complete (most appropriate) file-system (root) of the most relevant track/session:
Both examples will extract the content to existing folder "my extracted files" (or create that folder when not
existing yet (Works only one folder deep))
isobuster.exe "/ef:c:\my extracted files\"
isobuster.exe "/ef:c:\my extracted files"
Following example extracts the UDF file system (assume there's a choice between file-systems, and we
want UDF):
isobuster.exe "/ef:udf:c:\my extracted files"
Following example extracts a subfolder ("my docs") from the UDF file system
isobuster.exe "/ef:udf:mydocs|c:\my extracted files"
Following example extracts a particular file ("my docs\my letters\letter1.doc") from the ISO file system
(and from the second session (let's assume there are three sessions on this disc))
isobuster.exe "/ef:iso:mydocs\my letters\letter1.doc|c:\my extracted files" /s:2
Following example extracts a particular file ("VIDEO_TS\VTS_01_1.VOB") from the IFO file system and
extracts it with filename "movie.mpg"
isobuster.exe "/ef:ifo:VIDEO_TS\VTS_01_1.VOB|c:\my extacted files\movie.mpg"
Following example extracts the boot image file from a MS installation disc
isobuster.exe "/ef:boo:Microsoft Corporation.img|c:\my extracted files\"
Extraction Prompts:
[Introduced as of IsoBuster 2.5]
This command is used in combination with extraction commands: /ei: and /ef:
If it is absent, following default values are used: /ep:pbm and /ep:pfe, wich means that the GUI will prompt
when there is a read error, so that the user can make a selection, and that the GUI will prompt when a file is
about to be overwritten.
Command:
/ep:[Type]
[Type] comes in following flavours:
For error handling, when a read error is encountered:
pbm: Prompt with Best Matching GUI window
ria: Prompt with Retry Ignore Abort GUI window
rsa: Prompt with Retry Select Abort GUI window
oea: No Prompt, On Error: Abort extraction
oeo: No Prompt, On Error: Ommit the sector
oez: No Prompt, On Error: Zero (replace all data with null bytes, in case of raw only the user data is replaced
and the EDC/ECC is calculated)
oee: No Prompt, On Error: Error (replace the sector with erronous data)
All "No Prompt" options during extraction also cause prompts during file system exploration to be
suppressed.
For file over-write handling, when the file already exists:
pfe: Prompt with File Over-write GUI window
owr: No Prompt, Over-write the file
now: No Prompt, No Over-write (don't overwrite the file, leave as is and continue to the next file (if
appropriate))
Example:
isobuster.exe "/ei:c:\my image files\" /et:m /ep:oez /ep:owr
Open and Close a drive tray:
This command opens or closes the tray. Default it will open the selected drive's tray if closed, or close it if
already opened. This command can be issued up to 9 times on the command line, so that a drive can be
issued the same command a couple of times. For instance before and after an operation.
Page 125

Command:
/oc:[Type][Before or After][Wait]
[Type] is either o or c or missing. O for Open Tray and C for Close Tray and in case absent the tray will
open if closed or close if opened.
[Before or After] is either b or a or missing. B for before an operation (e.g. before extraction of a file), A for
after an operation (e.g. after creation of an image file). In case absent the command is executed before.
[Wait] is a number between 0 - 9 and stands for the amount of seconds that the application will poll the drive,
waiting for ready, after the application issued the Open/Close command. When no value is provided the
application will default to 0 in case of opening the tray, and 2 in case of closing the tray.
Example:
isobuster.exe /d:f /oc:c9 /oc:bc9 "/ef:c:\my extracted files\" /oc:oa
The example shows that the tray is closed before the extraction operation. The command is even issued
twice, just to make sure and the time-out is set to 9 seconds each time, so the application will wait (at the
most) 18 seconds (or less if the drive signals "ready") before the extraction operation starts. After the
extraction operation the drive tray is opened.
Scan for missing files and folders:
[Introduced in IsoBuster 2.8.5]
This command immediately starts the process that looks for missing files and folders
This command also automatically suppresses a few dialogs.
When this parameter is passed, the program won't ask if you want to scan, should the content be empty (no
found file-systems) after initial mount of the disc or image and it won't suggest to make an .ibp first either in
this case.
/scan is executed on the last session of a disc or image file unless /t (track) or /s (session) are specified. In
case a track is specified the scan is done on the session the track is in. In case a session is specified the
scan is done on the specified session. In case track or session are specified and have value "all" then all
sessions are scanned.
/scan can be combined with file or image extractions as it is executed before any extractions are executed.
Command:
/scan
Example:
isobuster.exe /d:f /scan "/ef:sig:c:\my extracted files\"
Export a file list:
[Introduced in IsoBuster 2.8.5]
This command allows you to build a file and folder list from a folder or an entire file system. It takes
parameters (tokens) as input that define the layout of the content that is written to the file
Command:
/tree:[FileSystem:][File or folder name (relative path) |][destination path and filename][?Custom string with
tokens/variables]
[?Custom string with tokens/variables] can be any string with following tokens/variables that are replaced by
their respective values:
<%LBA> Logical block address
<%LASTLBA> Last block address of a file.
<%BLOCKS> Number of blocks in a file, formatted (e.g. 33 or 9.475 or ...)
<%BLOCKSUNF> Number of blocks in a file, unformatted (e.g. 33 or 9475 or ...)
<%FULLPATH> Full path (e.g. d:\files\file1.txt)
<%RELPATH> Relative path (e.g. \files\file1.txt)
<%FILE> File (e.g. \file1.txt)
<%NAME> The name of the object (similar to FILE, but also works for file extents)
<%SIZE> Size of the file, formatted (e.g. 1.4 KB or 2,3 MB or 300 Bytes or ..)
<%BYTES> Size in bytes only, formatted (e.g. 300 or 2.345 or 44,555,000 or ...)
<%BYTESUNF> Size in bytes only, unformatted (e.g. 300 or 2345 or 44555000 or ...)
<%TIMEDATE> Time and date, formatted (e.g. 28/12/2005 23:22:42 or 12/28/2005 23:22:42 or ...)
<%TIME> Time , formatted (e.g. 23:22:42)
<%DATE> Date, formatted (e.g. 28/12/2005 or 12/28/2005 or ...)
<%GMT> GMT (e.g. GMT -08:00)
<%ATTRIB> The attributes (e.g. R or RHA or ..)
<%OFFSET> The offset in the first block of the file or extent (e.g. 0 or 348 or 512 or ...)
Example:
isobuster.exe /scan /t:all "/tree:all:k:\export\S<%SI>T<%TI>FS<%FI>(<%FT>)(<%FN>).txt?<%LBA>,
<%RELPATH>, <%BYTES>"
Page 126

Sector View:
This command immediately opens the sector view window and shows the chosen sector.
Command:
/sv:[Address]
Example:
isobuster.exe /d:f /sv:2000
Close IsoBuster automatically:
This command closes IsoBuster after the requested (via command line provided) task, for instance after an
extraction task (/ei: or /ef:)
Command:
/c
Example:
isobuster.exe "/ef:boo:Microsoft Corporation.img|c:\my extracted files\" /c
Minimize IsoBuster automatically:
This command minimizes IsoBuster after initialisation, before the requested (via command line provided)
task, for instance during an extraction task (/ei: or /ef:)
Command:
/m
Example:
isobuster.exe "/ef:ifo:VIDEO_TS\VTS_01_1.VOB|c:\my extacted files\movie.mpg" /c /m
Do not show the splash screen on startup of the program:
[Introduced in IsoBuster 2.5.5]
This command suppresses the splash screen that is shown when the program starts.
Command:
/nosplash
Example:
isobuster.exe "/ef:ifo:VIDEO_TS\VTS_01_1.VOB|c:\my extacted files\movie.mpg" /c /m /nosplash
Do not find nor query the drives on startup of the program:
[Introduced in IsoBuster 2.5.5]
This command suppresses the finding of drives when the program starts. The command can be used when
you are only interested in opening image files and when you need no drive support. It can potentionally
speed up program startup, especially when there is a disc mounted in one of the drives.
Command:
/nodrives
Example:
isobuster.exe "/ef:ifo:VIDEO_TS\VTS_01_1.VOB|c:\my extacted files\movie.mpg" /c /m /nosplash /nodrives
Log Error:
This command logs a simple error code to a file, in case IsoBuster could detect a problem before the
actual (via command line provided) task started. So it does not log read errors or intervention that was
required during an extraction process for instance. However, if the extraction started but was aborted, for
whatever reason, then there will still be an error value. The text file will contain ANSI SBCS text.
Command:
/l:[destination path and filename]
Errors values:
0 No Error (success).
1 No Tracks / Sessions found
2 Track Index provided but this track is not available
3 Session Index provided but this Session is not available
4 No File-system track found
5 No (or not a matching) File-system found
6 Folder name is already in use as filename
7 Not a matching file or folder found
10xx Extraction aborted by user
Example:
isobuster.exe "/ef:c:\my extracted files" "/l:c:\my extacted files\log.txt"
Log Error-String:
A basic string can be passed along to IsoBuster, to be put in the log file (see Log Error (command /l:)).
Make sure that this string contains the value %%u which is then replaced by the error code (see Log Error).
Command:
/l:txt:[Text]
Page 127

Example:
isobuster.exe "/ef:c:\my extracted files" "/l:c:\my extacted files\log.bat" "/l:txt:ECHO %%u"
Load plugin(s):
[Introduced in IsoBuster 2.8]
This command allows you to load one or more plugins. Plugins can be used to interpret image files and/or
to write image files
The command can be used multiple times on the command line, to be able to load several plugins at once.
Plugins have priority over the embedded functionality, should there be overlap.
Command:
/plugin:[path and filename of plugin]
Example:
isobuster.exe "c:\my image files\image1.iso" /plugin:c:\my_iso_plugin.dll
Page 128
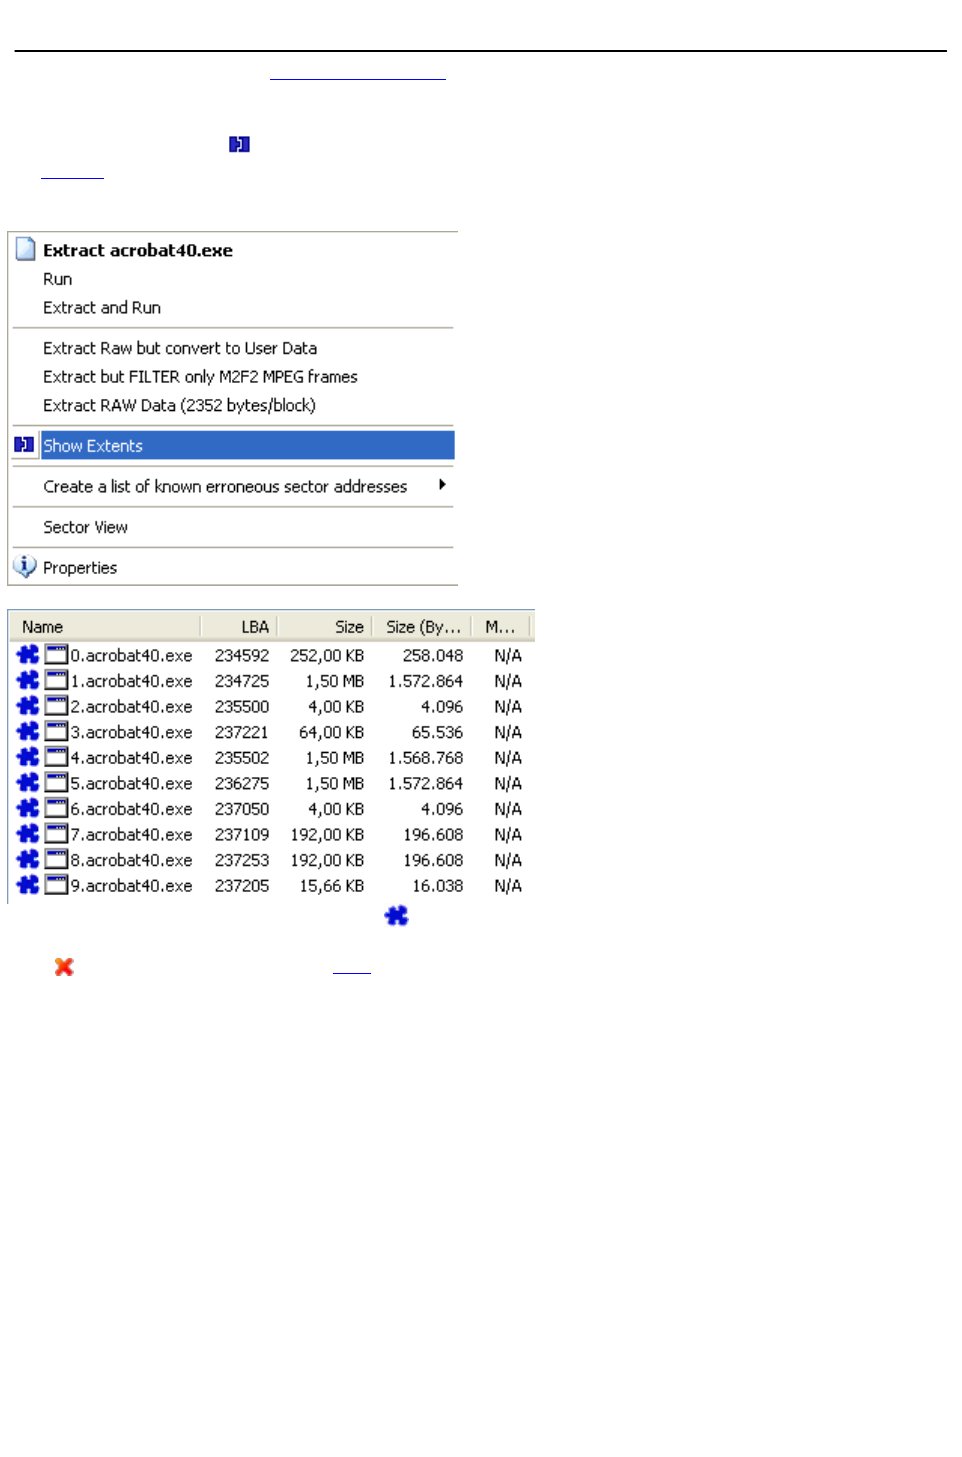
Show Extents
This is a [Business] feature (and it can be hidden)
A file can be fragmented on the disc. It then consists of different so called "extents". An extent is a part of
the file, with a start address, an offset in the block and a byte length. If a file consists of different extents,
this blue puzzle like icon is displayed next to it. That is, if you have enabled showing low priority icons in
the options.
Right mouse click a file that consists of different extents, and if you have a business type license, you can
select to show all the individual extents.
For example:
Each extent is associated with this icon:
PS. The puzzle icon has lowest priority. If an extent contains physical read errors, it is associated with this
icon: . E.g, read more about icons here.
Page 129

Add customizable file-system
This is a [Business] feature (and it can be hidden)
This feature is for engineers who want to define their own files, located somewhere on the disc.
It allows to create (add), edit and delete files, with variables defined by the engineer.
In other words, if you know a file exists on the disc, and it is located at address x and has length y, then
you can add a customizable file system, add a file to it with address x and length y and next extract that file
from the disc. Additionally you can influence the offset in the first block or add / change extents of that
custom created file.
To create a customizable file-system, right mouse click the track icon in the left view pane and make the
selection:
Adding, editing (including adding / changing extents) and deleting files is then done exactly like described
here, or in this article: Creative editing of file properties in files found based on their signature.
PS. when deleting a file in the list of files found based on their signature, you also affect the length of the file
that was located before that file (physical location). When you delete a file from the customizable file
system, no other file in that list is affected !
Page 130
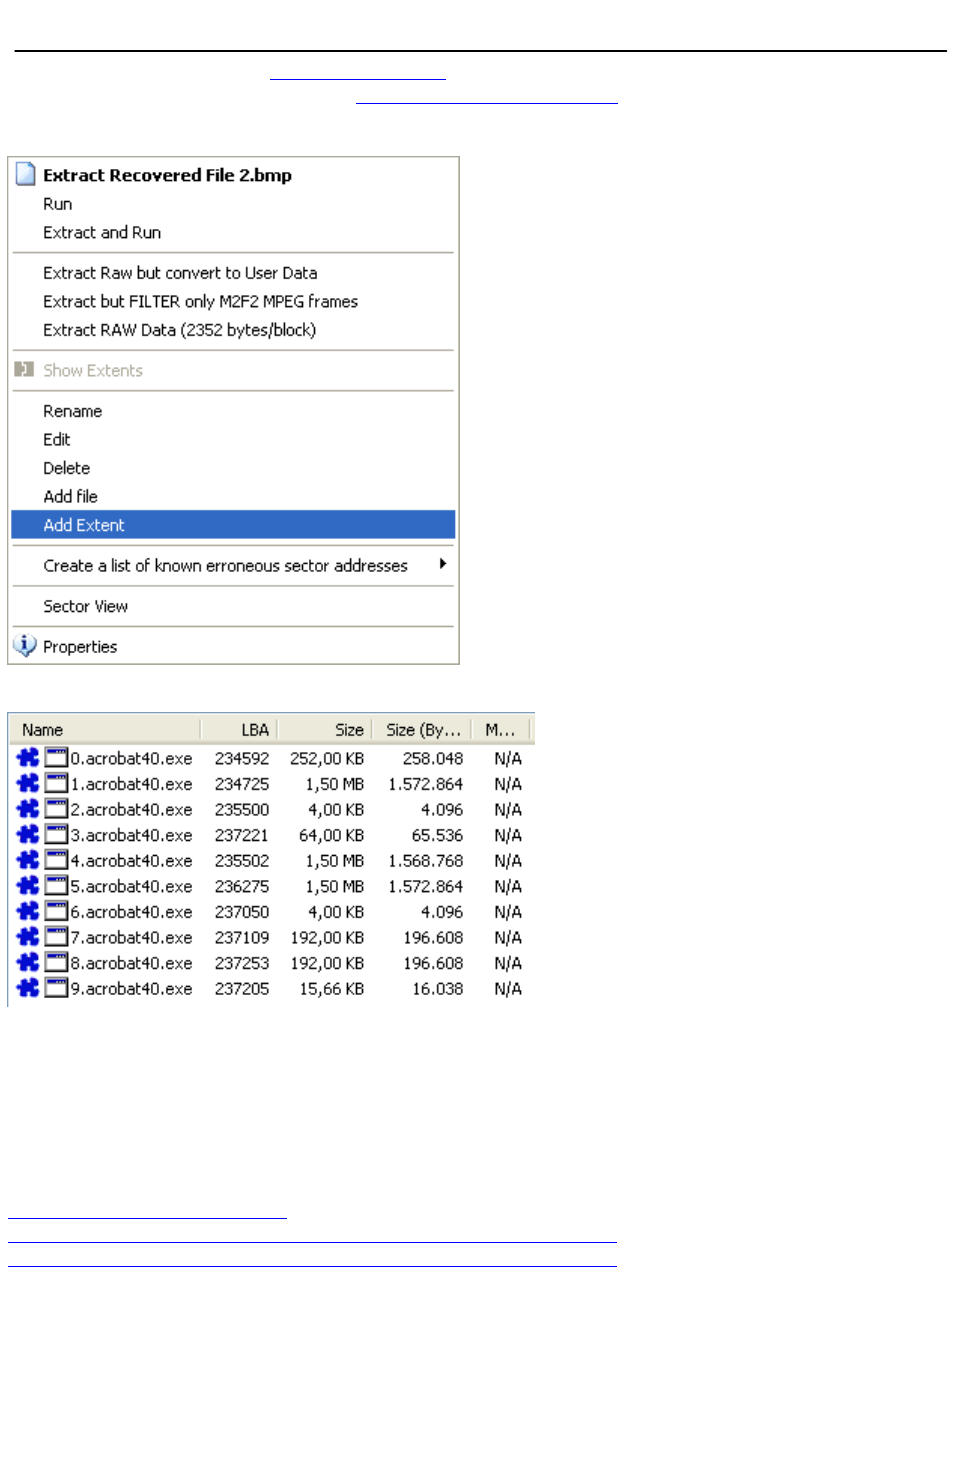
Add, Edit, Delete extents
This is a [Business] feature (and it can be hidden)
This feature is very much the same as adding, editing or deleting files in a customizable file system or in a
list of files found based on their signature.
In that case assume the file you want to add extents to is a folder, right mouse click it and add an extent.
In the extent view itself, you can right mouse click any extent and add another extent in the list, or change
an extent's properties.
Adding and editing is straightforward.
Just know that, the moment one or more extents are added to a file, the file is a combination of those
extents and hence the length is made up from the sum of the extents' lengths. It is not possible to have a file
length x and a combined extent length y. So the moment you add an extent, the length is influenced and if
you want to change the file length, you need to edit the individual extents. The same goes for the offset in
the first block. That offset is defined by the offset in the first extent. Change it in the extent and you change
it for the file, change it in the file and you automatically change it in the extent etc. ...
Closely related:
Add a customizable file system
Add, Edit, Delete files in the list of files found based on their signature
Creative editing of file properties in files found based on their signature.
Page 131
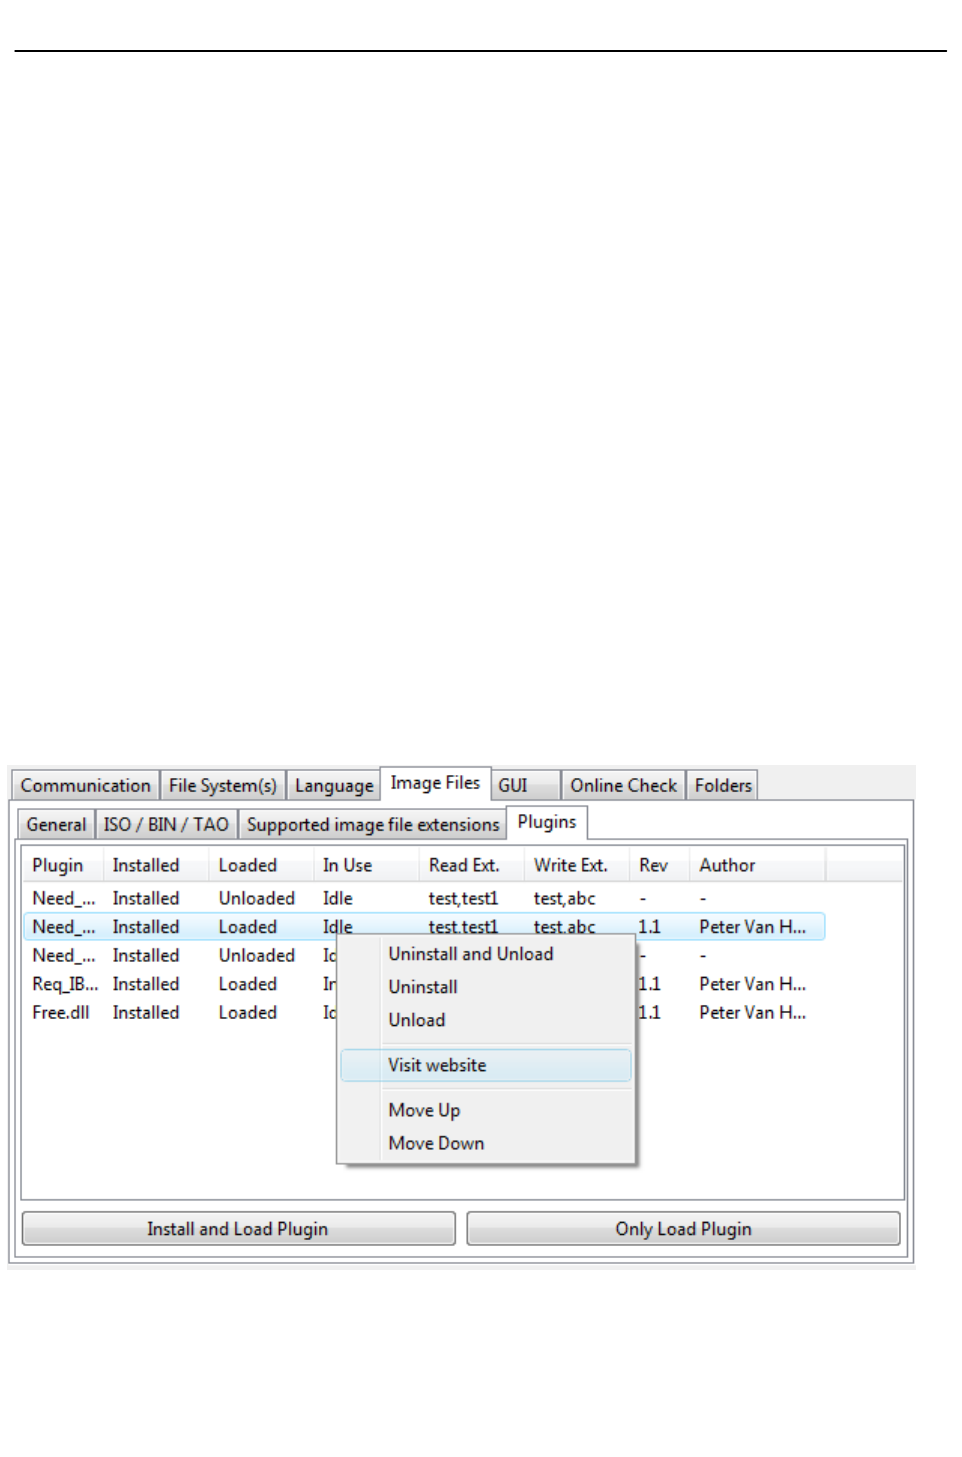
Plugins
Plugins are a way to add functionality to IsoBuster.
Currently following functionality is available through plugins:
(PS.Several functions can be combined in one plugin)
Functionality
Multiple plugins can be loaded each time the program starts. Plugins can support one or more image file
types.
Opening Image files
Plugins can be used to load image file types that are not yet supported in IsoBuster, or to replace
IsoBuster's functionality. This way third party vendors or programmers can create plugins for proprietary or
closed book formats. The order in which plugins load is important when there is overlap between different
plugins. For instance when you double click or drag a file to IsoBuster and if two plugins support the same
image file type(s) then the first loaded one will be used and only if it signals that it cannot do the job will the
second one be tried, and so on. Plugins also have priority over IsoBuster's embedded functionality, so only if
the plugin signals it cannot do the job will IsoBuster be able to try it.
The image file types (e.g. extension *.xyz) that the loaded plugin(s) support are added to the back of the list
in the "open file" dialog, so that you can navigate to them. When you use this method to open an image file,
the selection you make in the "open file" dialog is important too. You can select the second or later listing of
an extension (extensions are listed for each plugin) and hence decide what plugin to try first. If you select an
embedded listed extension plugins are still tried first !
Creating Image files
Plugins can be used to create image file types that are not (yet) supported in IsoBuster. This way third
party vendors or programmers can create plugins for proprietary or closed book formats. At the moment
IsoBuster (<= 2.8) supports creating ISO/BIN/TAO + CUE or IBP + IBQ image files. You can extend that list
by loading plugins that create other image files as well.
If one or more plugins are loaded that support image file making then their supported extensions are listed
under the existing functionality "Extract CD <Image>" when you right mouse click the top most CD/DVD
icon in the left pane, after a disc or image file has been loaded. By simply selecting them you start the
making of an image file with that extension, based on the functionality in the plugin.
Loading and installing plugins
Installing plugins
Plugins can be installed (via Options), which means that they will be found (and loaded) each time IsoBuster
starts. When you first install a plugin it will also have to be loaded so that IsoBuster can find out what the
plugin actually supports. Once installed you can uninstall the plugin again, which means that it will not load
anymore next time you start IsoBuster. It will disappear from the list. It is also possible to just unload the
dll, and if you keep it unloaded while you close IsoBuster then next time IsoBuster starts the plugin will still
be unloaded. However it will still be installed, and hence it can easily be loaded again, via options. Installing
Page 132

a plugin's primary use is that the plugin will be found again each time the program starts, and in normal
cases the dll will also automatically be loaded then.
Loading plugins
A plugin needs to be loaded for it to work. Normal use is that plugins are installed once and are loaded each
time the program starts. It is however also possible to unload a plugin yet keep it installed. The status of the
plugins (installed / loaded) can be seen and changed in Options / Image Files / Plugins. Only via loaded
plugins (installed or not) is it possible to use their functionality (e.g. open image files or create image files).
Closely related:
Loading plugins via the command line
Latest news and available plugins on the website.
Page 133
