The Hitchhiker’s Guide To Python Kenneth Reitz, Tanya Schlusser Best Practices For Development
the-hitchhikers-guide-to-python-kenneth-reitz
Kenneth%20Reitz%2C%20Tanya%20Schlusser-The%20Hitchhiker%E2%80%99s%20Guide%20to%20Python_%20Best%20Practices%20for%20Development
User Manual: Pdf
Open the PDF directly: View PDF ![]() .
.
Page Count: 322 [warning: Documents this large are best viewed by clicking the View PDF Link!]
- Copyright
- Table of Contents
- Preface
- Part I. Getting Started
- Part II. Getting Down to Business
- Part III. Scenario Guide
- Appendix A. Additional Notes
- Index
- About the Authors
- Colophon

Kenneth Reitz & Tanya Schlusser
The
H i t c h h i k e r ’ s
Guide to
P y t h o n
BEST PRACTICES FOR DEVELOPMENT


Kenneth Reitz and Tanya Schlusser
The Hitchhiker’s Guide to Python
Best Practices for Development
Boston Farnham Sebastopol Tokyo
Beijing Boston Farnham Sebastopol Tokyo
Beijing
978-1-491-93317-6
[LSI]
The Hitchhiker’s Guide to Python
by Kenneth Reitz and Tanya Schlusser
Copyright © 2016 Kenneth Reitz, Tanya Schlusser. All rights reserved.
Printed in the United States of America.
Published by O’Reilly Media, Inc., 1005 Gravenstein Highway North, Sebastopol, CA 95472.
O’Reilly books may be purchased for educational, business, or sales promotional use. Online editions are
also available for most titles (http://safaribooksonline.com). For more information, contact our corporate/
institutional sales department: 800-998-9938 or corporate@oreilly.com.
Editor: Dawn Schanafelt
Production Editor: Nicole Shelby, Nicholas Adams
Copyeditor: Jasmine Kwityn
Proofreader: Amanda Kersey
Indexer: WordCo Indexing Services, Inc.
Interior Designer: David Futato
Cover Designer: Randy Comer
Illustrator: Rebecca Demarest
September 2016: First Edition
Revision History for the First Edition
2016-08-26: First Release
See http://oreilly.com/catalog/errata.csp?isbn=9781491933176 for release details.
The O’Reilly logo is a registered trademark of O’Reilly Media, Inc. e Hitchhiker’s Guide to Python, the
cover image, and related trade dress are trademarks of O’Reilly Media, Inc.
While the publisher and the authors have used good faith efforts to ensure that the information and
instructions contained in this work are accurate, the publisher and the authors disclaim all responsibility
for errors or omissions, including without limitation responsibility for damages resulting from the use of
or reliance on this work. Use of the information and instructions contained in this work is at your own
risk. If any code samples or other technology this work contains or describes is subject to open source
licenses or the intellectual property rights of others, it is your responsibility to ensure that your use
thereof complies with such licenses and/or rights.
Dedicated to you

Table of Contents
Preface. . . . . . . . . . . . . . . . . . . . . . . . . . . . . . . . . . . . . . . . . . . . . . . . . . . . . . . . . . . . . . . . . . . . . . . xi
Part I. Getting Started
1. Picking an Interpreter. . . . . . . . . . . . . . . . . . . . . . . . . . . . . . . . . . . . . . . . . . . . . . . . . . . . . . . 3
The State of Python 2 Versus Python 3 3
Recommendations 4
So…3? 4
Implementations 5
CPython 5
Stackless 5
PyPy 6
Jython 6
IronPython 6
PythonNet 6
Skulpt 7
MicroPython 7
2. Properly Installing Python. . . . . . . . . . . . . . . . . . . . . . . . . . . . . . . . . . . . . . . . . . . . . . . . . . . 9
Installing Python on Mac OS X 9
Setuptools and pip 11
virtualenv 11
Installing Python on Linux 12
Setuptools and pip 12
Development Tools 13
virtualenv 14
Installing Python on Windows 15
v

Setuptools and pip 17
virtualenv 18
Commercial Python Redistributions 18
3. Your Development Environment. . . . . . . . . . . . . . . . . . . . . . . . . . . . . . . . . . . . . . . . . . . . . 21
Text Editors 22
Sublime Text 23
Vim 23
Emacs 25
TextMate 26
Atom 26
Code 27
IDEs 27
PyCharm/IntelliJ IDEA 29
Aptana Studio 3/Eclipse + LiClipse + PyDev 29
WingIDE 30
Spyder 30
NINJA-IDE 30
Komodo IDE 31
Eric (the Eric Python IDE) 31
Visual Studio 32
Enhanced Interactive Tools 32
IDLE 32
IPython 33
bpython 33
Isolation Tools 33
Virtual Environments 34
pyenv 36
Autoenv 36
virtualenvwrapper 37
Buildout 38
Conda 38
Docker 39
Part II. Getting Down to Business
4. Writing Great Code. . . . . . . . . . . . . . . . . . . . . . . . . . . . . . . . . . . . . . . . . . . . . . . . . . . . . . . . 43
Code Style 43
PEP 8 44
PEP 20 (a.k.a. The Zen of Python) 45
General Advice 46
vi | Table of Contents

Conventions 52
Idioms 54
Common Gotchas 58
Structuring Your Project 61
Modules 61
Packages 65
Object-Oriented Programming 66
Decorators 67
Dynamic Typing 68
Mutable and Immutable Types 69
Vendorizing Dependencies 71
Testing Your Code 72
Testing Basics 74
Examples 76
Other Popular Tools 80
Documentation 82
Project Documentation 82
Project Publication 83
Docstring Versus Block Comments 84
Logging 84
Logging in a Library 85
Logging in an Application 86
Choosing a License 88
Upstream Licenses 88
Options 88
Licensing Resources 90
5. Reading Great Code. . . . . . . . . . . . . . . . . . . . . . . . . . . . . . . . . . . . . . . . . . . . . . . . . . . . . . . . 91
Common Features 92
HowDoI 93
Reading a Single-File Script 93
Structure Examples from HowDoI 96
Style Examples from HowDoI 97
Diamond 99
Reading a Larger Application 100
Structure Examples from Diamond 105
Style Examples from Diamond 109
Tablib 112
Reading a Small Library 112
Structure Examples from Tablib 116
Style Examples from Tablib 124
Requests 126
Table of Contents | vii

Reading a Larger Library 126
Structure Examples from Requests 130
Style Examples from Requests 135
Werkzeug 140
Reading Code in a Toolkit 141
Style Examples from Werkzeug 148
Structure Examples from Werkzeug 149
Flask 155
Reading Code in a Framework 156
Style Examples from Flask 162
Structure Examples from Flask 163
6. Shipping Great Code. . . . . . . . . . . . . . . . . . . . . . . . . . . . . . . . . . . . . . . . . . . . . . . . . . . . . . 167
Useful Vocabulary and Concepts 168
Packaging Your Code 169
Conda 169
PyPI 170
Freezing Your Code 172
PyInstaller 174
cx_Freeze 176
py2app 177
py2exe 178
bbFreeze 178
Packaging for Linux-Built Distributions 179
Executable ZIP Files 180
Part III. Scenario Guide
7. User Interaction. . . . . . . . . . . . . . . . . . . . . . . . . . . . . . . . . . . . . . . . . . . . . . . . . . . . . . . . . . 185
Jupyter Notebooks 185
Command-Line Applications 186
GUI Applications 194
Widget Libraries 194
Game Development 200
Web Applications 200
Web Frameworks/Microframeworks 201
Web Template Engines 204
Web Deployment 209
8. Code Management and Improvement. . . . . . . . . . . . . . . . . . . . . . . . . . . . . . . . . . . . . . . 213
Continuous Integration 213
viii | Table of Contents

System Administration 214
Server Automation 216
System and Task Monitoring 220
Speed 223
Interfacing with C/C++/FORTRAN Libraries 232
9. Software Interfaces. . . . . . . . . . . . . . . . . . . . . . . . . . . . . . . . . . . . . . . . . . . . . . . . . . . . . . 237
Web Clients 238
Web APIs 238
Data Serialization 243
Distributed Systems 246
Networking 246
Cryptography 251
10. Data Manipulation. . . . . . . . . . . . . . . . . . . . . . . . . . . . . . . . . . . . . . . . . . . . . . . . . . . . . . . 259
Scientific Applications 260
Text Manipulation and Text Mining 264
String Tools in Python’s Standard Library 264
Image Manipulation 267
11. Data Persistence. . . . . . . . . . . . . . . . . . . . . . . . . . . . . . . . . . . . . . . . . . . . . . . . . . . . . . . . . 271
Structured Files 271
Database Libraries 272
A. Additional Notes. . . . . . . . . . . . . . . . . . . . . . . . . . . . . . . . . . . . . . . . . . . . . . . . . . . . . . . . . . 287
Index. . . . . . . . . . . . . . . . . . . . . . . . . . . . . . . . . . . . . . . . . . . . . . . . . . . . . . . . . . . . . . . . . . . . . . . 295
Table of Contents | ix

Preface
Python is big. Really big. You just won’t believe how vastly hugely mind-bogglingly
big it is.
This guide is not intended to teach you the Python language (we cite lots of great
resources that do that) but is rather an (opinionated) insider’s guide to our communi‐
ty’s favorite tools and best practices. The primary audience is new to mid-level
Python programmers who are interested in contributing to open source or in begin‐
ning a career or starting a company using Python, although casual Python users
should also find Part I and Chapter 5 helpful.
The first part will help you choose the text editor or interactive development environ‐
ment that fits your situation (for example, those using Java frequently may prefer
Eclipse with a Python plug-in) and surveys options for other interpreters that may
meet needs you don’t yet know Python could address (e.g., there’s a MicroPython
implementation based around the ARM Cortex-M4 chip). The second section dem‐
onstrates Pythonic style by highlighting exemplary code in the open source commu‐
nity that will hopefully encourage more in-depth reading and experimentation with
open source code. The final section briefly surveys the vast galaxy of libraries most
commonly used in the Python community—providing an idea of the scope of what
Python can do right now.
All of the royalties from the print version of this book will be directly donated to the
Django Girls, a giddily joyous global organization dedicated to organizing free
Django and Python workshops, creating open-sourced online tutorials, and curating
amazing first experiences with technology. Those who wish to contribute to the
online version can read more about how to do it at our website.
xi

Conventions Used in This Book
The following typographical conventions are used in this book:
Italic
Indicates new terms, URLs, email addresses, filenames, and file extensions.
Constant width
Used for program listings, as well as within paragraphs to refer to program ele‐
ments such as variable or function names, databases, data types, environment
variables, statements, and keywords.
Constant width bold
Shows commands or other text that should be typed literally by the user.
Constant width italic
Shows text that should be replaced with user-supplied values or by values deter‐
mined by context.
This element signifies a tip or suggestion.
This element signifies a general note.
This element indicates a warning or caution.
Safari® Books Online
Safari Books Online is an on-demand digital library that deliv‐
ers expert content in both book and video form from the
world’s leading authors in technology and business.
xii | Preface

Technology professionals, software developers, web designers, and business and crea‐
tive professionals use Safari Books Online as their primary resource for research,
problem solving, learning, and certification training.
Safari Books Online offers a range of plans and pricing for enterprise, government,
education, and individuals.
Members have access to thousands of books, training videos, and prepublication
manuscripts in one fully searchable database from publishers like O’Reilly Media,
Prentice Hall Professional, Addison-Wesley Professional, Microsoft Press, Sams, Que,
Peachpit Press, Focal Press, Cisco Press, John Wiley & Sons, Syngress, Morgan Kauf‐
mann, IBM Redbooks, Packt, Adobe Press, FT Press, Apress, Manning, New Riders,
McGraw-Hill, Jones & Bartlett, Course Technology, and hundreds more. For more
information about Safari Books Online, please visit us online.
How to Contact Us
Please address comments and questions concerning this book to the publisher:
O’Reilly Media, Inc.
1005 Gravenstein Highway North
Sebastopol, CA 95472
800-998-9938 (in the United States or Canada)
707-829-0515 (international or local)
707-829-0104 (fax)
We have a web page for this book, where we list errata, examples, and any additional
information. You can access this page at http://bit.ly/the-hitchhikers-guide-to-python.
To comment or ask technical questions about this book, send email to bookques‐
tions@oreilly.com.
For more information about our books, courses, conferences, and news, see our web‐
site at http://www.oreilly.com.
Find us on Facebook: http://facebook.com/oreilly
Follow us on Twitter: http://twitter.com/oreillymedia
Watch us on YouTube: http://www.youtube.com/oreillymedia
Preface | xiii

Acknowledgments
Welcome, friends, to e Hitchhiker’s Guide to Python.
This book is, to the best of my knowledge, the first of its kind: designed and curated
by a single author (myself—Kenneth), with the majority of the content provided by
hundreds of people from all over the world, for free. Never before in the history of
mankind has the technology been available to allow a beautiful collaboration of this
size and scale.
This book was made possible with:
Community
Love brings us together to conquer all obstacles.
Soware projects
Python, Sphinx, Alabaster, and Git.
Services
GitHub and Read the Docs.
Lastly, I’d like to extend a personal thank you to Tanya, who did all the hard work of
converting this work into book form and preparing it for publication, and the incred‐
ible O’Reilly team—Dawn, Jasmine, Nick, Heather, Nicole, Meg, and the dozens of
other people who worked behind the scenes to make this book the best it could be.
xiv | Preface

PART I
Getting Started
This part of the guide focuses on setting up a Python environment. It was inspired by
Stuart Ellis’s guide for Python on Windows, and consists of the following chapters
and topics:
Chapter 1, Picking an Interpreter
We compare Python 2 and Python 3, and share some interpreter options other
than CPython.
Chapter 2, Properly Installing Python
We show how to get Python, pip, and virtualenv.
Chapter 3, Your Development Environment
We describe our favorite text editors and IDEs for Python development.

1If you don’t do much low-level networking programming, the change was barely noticeable outside of the
print statement becoming a function. Otherwise, “unhappy with” is kind of a polite understatement—devel‐
opers responsible for large, popular web, socket, or networking libraries that deal with unicode and byte
strings had (or still have) extensive changes to make. Details about the change, direct from the first introduc‐
tion of Python 3 to the world, start off with: “Everything you thought you knew about binary data and Uni‐
code has changed.”
CHAPTER 1
Picking an Interpreter
The State of Python 2 Versus Python 3
When choosing a Python interpreter, one looming question is always present:
“Should I choose Python 2 or Python 3?” The answer is not as obvious as one might
think (although 3 is becoming more compelling every day).
Here is the state of things:
• Python 2.7 has been the standard for a long time.
•Python 3 introduced major changes to the language, which some developers are
unhappy with.1
•Python 2.7 will receive necessary security updates until 2020.
• Python 3 is continually evolving, like Python 2 did in years past.
You can now see why this is not such an easy decision.
3

2Someone who’s really amazingly together. We mean, who really knows where their towel is.
3Here’s a link to a high-level list of changes to Python’s Standard Library.
Recommendations
The way we see it, a truly hoopy frood2 would use Python 3. But if you can only use
Python 2, at least you’re still using Python. These are our recommendations:
Use Python 3 if…
•You love Python 3.
• You don’t know which one to use.
•You embrace change.
Use Python 2 if…
• You love Python 2 and are saddened by the future being Python 3.
• The stability requirements of your software would be impacted.3
•Software that you depend on requires it.
So…3?
If you’re choosing a Python interpreter to use, and aren’t opinionated, then use the
newest Python 3.x—every version brings new and improved standard library mod‐
ules, security, and bug fixes. Progress is progress. So only use Python 2 if you have a
strong reason to, such as a Python 2–exclusive library that has no adequate Python 3–
ready alternative, a need for a specific implementation (see “Implementations” on
page 5), or you (like some of us) love and are inspired by Python 2.
Check out Can I Use Python 3? to see whether any Python projects you’re depending
on will block adoption of Python 3.
For further reading, try Python2orPython3, which lays out some of the reasoning
behind a backward-incompatible break in the language specification, and links to
detailed specifications of the differences.
If you’re a beginner, there are far more important things to worry about than cross-
compatibility between all of the Python versions. Just get something working for the
system you’ve got, and cross this bridge later.
4 | Chapter 1: Picking an Interpreter

4The reference implementation accurately reflects the language’s definition. Its behavior is how all other imple‐
mentations should behave.
5C extension modules are written in C for use in Python.
Implementations
When people speak of Python, they often mean not just the language but also the
CPython implementation. Python is actually a specification for a language that can be
implemented in many different ways.
The different implementations may be for compatibility with other libraries, or
maybe for a little speed. Pure Python libraries should work regardless of your Python
implementation, but those built on C (like NumPy) won’t. This section provides a
quick rundown on the most popular implementations.
This guide presumes you’re working with the standard CPython
implementation of Python 3, although we’ll frequently add notes
when relevant for Python 2.
CPython
CPython is the reference implementation4 of Python, written in C. It compiles Python
code to intermediate bytecode which is then interpreted by a virtual machine. CPy‐
thon provides the highest level of compatibility with Python packages and C exten‐
sion modules.5
If you are writing open source Python code and want to reach the widest possible
audience, use CPython. To use packages that rely on C extensions to function, CPy‐
thon is your only implementation option.
All versions of the Python language are implemented in C because CPython is the
reference implementation.
Stackless
Stackless Python is regular CPython (so it should work with all of the libraries that
CPython can use), but with a patch that decouples the Python interpreter from the
call stack, making it possible to change the order of execution of code. Stackless intro‐
duces the contepts of tasklets, which can wrap functions and turn them into “micro-
threads” that can be serialized to disk for future execution and scheduled, by default
in round-robin execution.
Implementations | 5

The greenlet library implements this same stack-switching functionality for CPython
users. Much of the functionality has also been implemented in PyPy.
PyPy
PyPy is a Python interpreter implemented in a restricted statically typed subset of the
Python language called RPython, making certain kinds of optimization possible. The
interpreter features a just-in-time compiler and supports multiple backends, such as
C, Common Intermediate Language (CIL), and Java Virtual Machine (JVM) byte‐
code.
PyPy aims for maximum compatibility with the reference CPython implementation
while improving performance. If you are looking to increase performance of your
Python code, it’s worth giving PyPy a try. On a suite of benchmarks, it’s currently over
five times faster than CPython.
It supports Python 2.7, and PyPy3 targets Python 3. Both versions are available from
the PyPy download page.
Jython
Jython is a Python interpreter implementation that compiles Python code to Java
bytecode which is then executed by the JVM. Additionally, it is able to import and use
any Java class like a Python module.
If you need to interface with an existing Java code base or have other reasons for
needing to write Python code for the JVM, Jython is the best choice.
Jython currently supports up to Python 2.7.
IronPython
IronPython is an implementation of Python for the .NET framework. It can use both
Python and .NET framework libraries, and can also expose Python code to other lan‐
guages in the .NET framework.
Python Tools for Visual Studio integrates IronPython directly into the Visual Studio
development environment, making it an ideal choice for Windows developers.
IronPython supports Python2.7.
PythonNet
Python for .NET is a package that provides near seamless integration of a natively
installed Python installation with the .NET Common Language Runtime (CLR). This
is the inverse approach to that taken by IronPython, meaning PythonNet and IronPy‐
thon complement rather than compete with each other.
6 | Chapter 1: Picking an Interpreter

In conjunction with Mono, PythonNet enables native Python installations on non-
Windows operating systems, such as OS X and Linux, to operate within the .NET
framework. It can be run in addition to IronPython without conflict.
PythonNet supports from Python 2.3 up to Python 2.7; the installation instructions
are on the PythonNet readme page.
Skulpt
Skulpt is a JavaScript implementation of Python. It has not ported all of the CPython
standard library; the library has the modules math, random, turtle, image, unittest,
and parts of time, urllib, DOM, and re. It is intended for use in teaching. There is also
a way to add your own modules.
Notable examples of its use are Interactive Python and CodeSkulptor.
Skulpt supports most of Python 2.7 and Python 3.3. See the Skulpt GitHub page for
details.
MicroPython
MicroPython is an implementation of Python 3 optimized to run on a microcontrol‐
ler; it supports 32-bit ARM processors with the Thumb v2 instruction set, such as the
Cortex-M range used in low-cost microcontrollers. It includes these modules from
Python’s Standard Library, plus a few MicroPython-specific libraries for board details,
memory information, network access, and a modified version of the ctypes optimized
for smaller size. It is not the same as the Raspberry Pi, which has a Debian or other C-
based operating system, with Python installed. The pyboard actually uses MicroPy‐
thon as its operating system.
From here on out, we’re using CPython on a Unix-like system, on
OS X, or on a Windows system.
On to installation—grab your towel!
Implementations | 7

CHAPTER 2
Properly Installing Python
This chapter walks through CPython installation on the Mac OS X, Linux, and Win‐
dows platforms. Sections on packaging tools (like Setuptools and pip) are repetitive,
so you should skip straight to the section for your particular operating system, and
ignore the others.
If you are part of an organization that recommends you use a commercial Python
distribution, such as Anaconda or Canopy, you should follow your vendor’s instruc‐
tions. There is also a small note for you in “Commercial Python Redistributions” on
page 18.
If Python already exists on your system, do not, on any account,
allow anybody to change the symbolic link to the python exe‐
cutable to point at anything other than what it is already pointing
at. That would be almost as bad as reading Vogon poetry out loud.
(Think of the system-installed code that depends on a specific
Python in a specific place…)
Installing Python on Mac OS X
The latest version of Mac OS X, El Capitan, comes with its own Mac-specific imple‐
mentation of Python 2.7.
You don’t need to install or configure anything else to use Python. But we strongly
recommend installing Setuptools, pip, and virtualenv before you start building
Python applications for real-world use (i.e., contributing to collaborative projects).
You’ll learn more about these tools and how to install them later in this section. In
particular, you should always install Setuptools, as it makes it much easier for you to
use other third-party Python libraries.
9
1Other people have different opinions. The OS X Python implementation is not the same. It even has some
separate OS X–specific libraries. A small rant on this subject criticizing our recommendation is at the Stupid
Python Ideas blog. It raises valid concerns about collision of some names for people who switch-hit between
OS X’s CPython 2.7 and the canonical CPython 2.7. If this is a concern, use a virtual environment. Or, at the
very least, leave the OS X Python 2.7 where it is so that the system runs smoothly, install the standard Python
2.7 implemented in CPython, modify your path, and never use the OS X version. Then everything works fine,
including products that rely on Apple’s OS X–specific version.
2The best option is to pick Python 3, honestly, or to use virtual environments from the start and install nothing
but virtualenv and maybe virtualenvwrapper according to the advice of Hynek Schlawack.
3This will ensure that the Python you use is the one Homebrew just installed, while leaving the system’s origi‐
nal Python exactly as it is.
The version of Python that ships with OS X is great for learning, but it’s not good for
collaborative development. The version shipped with OS X may also be out of date
from the official current Python release, which is considered the stable production
version.1 So, if all you want to do is write scripts for yourself to pull information from
websites, or process data, you don’t need anything else. But if you are contributing to
open source projects, or working on a team with people that may have other operat‐
ing systems (or ever intend to in the future2), use the CPython release.
Before you download anything, read through the end of the next few paragraphs for
notes and warnings. Before installing Python, you’ll need to install GCC. It can be
obtained by downloading Xcode, the smaller Command-Line Tools (you need an
Apple account to download it), or the even smaller osx-gcc-installer package.
If you already have Xcode installed, do not install osx-gcc-installer.
In combination, the software can cause issues that are difficult to
diagnose.
While OS X comes with a large number of Unix utilities, those familiar with Linux
systems will notice one key component missing: a decent package manager. Home‐
brew fills this void.
To install Homebrew, open Terminal or your favorite OS X terminal emulator and
run the following code:
$ BREW_URI=https://raw.githubusercontent.com/Homebrew/install/master/install
$ ruby -e "$(curl -fsSL ${BREW_URI})"
The script will explain what changes it will make and prompt you before the installa‐
tion begins. Once you’ve installed Homebrew, insert the Homebrew directory at the
top of your PATH environment variable.3 You can do this by adding the following line
at the bottom of your ~/.prole file:
export PATH=/usr/local/bin:/usr/local/sbin:$PATH
10 | Chapter 2: Properly Installing Python

4A symbolic link is a pointer to the actual file location. You can confirm where the link points to by typing, for
example, ls -l /usr/local/bin/python3 at the command prompt.
5Packages that are compliant with Setuptools at a minimum provide enough information for the library to
identify and obtain all package dependencies. For more information, see the documentation for Packaging
and Distributing Python Projects, PEP 302, and PEP 241.
And then to install Python, run this once in a terminal:
$ brew install python3
Or for Python 2:
$ brew install python
By default, Python will then be installed in /usr/local/Cellar/python3/ or /usr/local/
Cellar/python/ with symbolic links4 to the interpreter at /usr/local/python3 or /usr/
local/python. People who use the --user option to pip install will need to work
around a bug involving distutils and the Homebrew configuration. We recommend
just using virtual environments, described in “virtualenv” on page 11.
Setuptools and pip
Homebrew installs Setuptools and pip for you. The executable installed with pip will
be mapped to pip3 if you are using Python 3 or to pip if you are using Python 2.
With Setuptools, you can download and install any compliant5 Python software over
a network (usually the Internet) with a single command (easy_install). It also ena‐
bles you to add this network installation capability to your own Python software with
very little work.
Both pip’s pip command and Setuptools’s easy_install command are tools to install
and manage Python packages. pip is recommended over easy_install because it
can also uninstall packages, its error messages are more digestible, and partial pack‐
age installs can’t happen (installs that fail partway through will unwind everything
that happened so far). For a more nuanced discussion, see pip vs easy_install in the
Python Packaging User Guide, which should be your first reference for current pack‐
aging information.
To upgrade your installation of pip, type the following in a shell:
$ pip install --upgrade pip
virtualenv
virtualenv creates isolated Python environments. It creates a folder containing all
the necessary executables to use the packages that a Python project would need. Some
Installing Python on Mac OS X | 11

6Advocates of this practice say it is the only way to ensure nothing ever overwrites an existing installed library
with a new version that could break other version-dependent code in the OS.
7For additional details, see the pip installation instructions.
people believe best practice is to install nothing except virtualenv and Setuptools and
to then always use virtual environments.6
To install virtualenv via pip, run pip at the command line of a terminal shell:
$ pip3 install virtualenv
or if you are using Python 2:
$ pip install virtualenv
Once you are in a virtual environment, you can always use the command pip,
whether you are working with Python 2 or Python 3, so that is what we will do in the
rest of this guide. “Virtual Environments” on page 34 describes usage and motivation
in more detail.
Installing Python on Linux
Ubuntu started releasing with only Python 3 installed (and Python 2 available via
apt-get) as of Wily Werewolf (Ubuntu 15.10). All of the details are on Ubuntu’s
Python page. Fedora’s release 23 is the first with only Python 3 (both Python 2.7 and 3
are available on releases 20–22), and otherwise Python 2.7 will be available via its
package manager.
Most parallel installations of Python 2 and Python 3 make a symbolic link from
python2 to a Python 2 interpreter and from python3 to a Python 3 interpreter. If you
decide to use Python 2, the current recommendation on Unix-like systems (see
Python Enhancement Proposal [PEP 394]) is to explicitly specify python2 in your
shebang notation (e.g., #!/usr/bin/env python2 as the first line in the file) rather
than rely on the environment python pointing where you expect.
Although not in PEP 394, it has also become convention to use pip2 and pip3 to link
to the respective pip package installers.
Setuptools and pip
Even if pip is available through a package installer on your system, to ensure you get
the most recent version, follow these steps.
First, download get-pip.py.7
Next, open a shell, change directories to the same location as get-pip.py, and type:
12 | Chapter 2: Properly Installing Python

8Packages that are compliant with Setuptools at a minimum provide enough information for it to identify and
obtain all package dependencies. For more information, see the documentation for Packaging and Distribut‐
ing Python Projects, PEP 302, and PEP 241.
$ wget https://bootstrap.pypa.io/get-pip.py
$ sudo python3 get-pip.py
or for Python 2:
$ wget https://bootstrap.pypa.io/get-pip.py
$ sudo python get-pip.py
This will also install Setuptools.
With the easy_install command that’s installed with Setuptools, you can download
and install any compliant8 Python software over a network (usually the Internet). It
also enables you to add this network installation capability to your own Python soft‐
ware with very little work.
pip is a tool that helps you easily install and manage Python packages. It is recom‐
mended over easy_install because it can also uninstall packages, its error messages
are more digestible, and partial package installs can’t happen (installs that fail partway
through will unwind everything that happened so far). For a more nuanced discus‐
sion, see “pip vs easy_install” in the Python Packaging User Guide, which should
be your first reference for current packaging information.
Development Tools
Almost everyone will at some point want to use Python libraries that depend on C
extensions. Sometimes your package manager will have these, prebuilt, so you can
check first (using yum search or apt-cache search); and with the newer wheels for‐
mat (precompiled, platform-specific binary files), you may be able to get binaries
directly from PyPI, using pip. But if you expect to create C extensions in the future,
or if the people maintaining your library haven’t made wheels for your platform, you
will need the development tools for Python: various C libraries, make, and the GCC
compiler. The following are some useful packages that use C libraries:
Concurrency tools
• The threading library threading
• The event-handling library (Python 3.4+) asyncio
• The coroutine-based networking library curio
•The coroutine-based networking library gevent
• The event-driven networking library Twisted
Installing Python on Linux | 13

Scientic analysis
• The linear algebra library NumPy
• The numerical toolkit SciPy
•The machine learning library scikit-learn
• The plotting library Matplotlib
Data/database interface
• The interface to the HDF5 data format h5py
• The PostgreSQL database adapter Psycopg
•The database abstraction and object-relational mapper SQLAlchemy
On Ubuntu, in a terminal shell, type:
$ sudo apt-get update --fix-missing
$ sudo apt-get install python3-dev # For Python 3
$ sudo apt-get install python-dev # For Python 2
Or on Fedora, in a terminal shell, type:
$ sudo yum update
$ sudo yum install gcc
$ sudo yum install python3-devel # For Python 3
$ sudo yum install python2-devel # For Python 2
and then pip3 install --user desired-package will be able to build tools that
must be compiled. (Or pip install --user desired-package for Python 2.) You
also will need the tool itself installed (for details on how to do this, see the HDF5
installation documentation). For PostgreSQL on Ubuntu, you’d type this in a terminal
shell:
$ sudo apt-get install libpq-dev
or on Fedora:
$ sudo yum install postgresql-devel
virtualenv
virtualenv is a command installed with the virtualenv package that creates isolated
Python environments. It creates a folder containing all the necessary executables to
use the packages that a Python project would need.
To install virtualenv using Ubuntu’s package manager, type:
$ sudo apt-get install python-virtualenv
or on Fedora:
14 | Chapter 2: Properly Installing Python

9Or consider IronPython (discussed in “IronPython” on page 6) if you want to integrate Python with the .NET
framework. But if you’re a beginner, this should probably not be your first Python interpreter. This whole
book talks about CPython.
$ sudo yum install python-virtualenv
Or via pip, run pip at the command line of a terminal shell, and use the --user
option to install it locally for yourself rather than doing a system install:
$ pip3 install --user virtualenv
or if you are using Python 2:
$ sudo pip install --user virtualenv
Once you are in a virtual environment, you can always use the command pip,
whether you are working with Python 2 or Python 3, so that is what we will do in the
rest of this guide. “Virtual Environments” on page 34 describes usage and motivation
in more detail.
Installing Python on Windows
Windows users have it harder than other Pythonistas—because it’s harder to compile
anything on Windows, and many Python libraries use C extensions under the hood.
Thanks to wheels, binaries can be downloaded from PyPI using pip (if they exist), so
things have gotten a little easier.
There are two paths here: a commercial distribution (discussed in “Commercial
Python Redistributions” on page 18) or straight-up CPython. Anaconda is much eas‐
ier, especially when you’re going to do scientific work. Actually, pretty much everyone
who does scientific computing on Windows with Python (except those developing C-
based Python libraries of their own) will recommend Anaconda. But if you know
your way around compiling and linking, if you want to contribute to open source
projects that use C code, or if you just don’t want a commercial distribution (what
you need is free), we hope you consider installing straight-up CPython.9
As time progresses, more and more packages with C libraries will have wheels on
PyPI, and so can be obtained via pip. The trouble comes when required C library
dependencies are not bundled with the wheel. This dependency problem is another
reason you may prefer commercial Python redistributions like Anaconda.
Use CPython if you are the kind of Windows user who:
• Doesn’t need Python libraries that rely on C extensions
•Owns a Visual C++ compiler (not the free one)
• Can handle setting up MinGW
Installing Python on Windows | 15

10 You must know at least what version of Python you’re using and whether you selected 32-bit or 64-bit Python.
We recommend 32-bit, as every third-party DLL will have a 32-bit version and some may not have 64-bit
versions. The most widely cited location to obtain compiled binaries is Christoph Gohlke’s resource site. For
scikit-learn, Carl Kleffner is building binaries using MinGW in preparation for eventual release on PyPI.
11 Anaconda has more free stuff, and comes bundled with Spyder, a better IDE. If you use Anaconda, you’ll find
Anaconda’s free package index and Canopy’s package index to be helpful.
12 Meaning you are 100% certain that any Dynamically Linked Libraries (DLLs) and drivers you need are avail‐
able in 64 bit.
13 The PATH lists every location the operating system will look to find executable programs, like Python and
Python scripts like pip. Each entry is separated by a semicolon.
• Is game to download binaries by hand10 and then pip install the binary
If you will use Python as a substitute for R or MATLAB, or just want to get up to
speed quickly and will install CPython later if necessary (see “Commercial Python
Redistributions” on page 18 for some tips), use Anaconda.11
If you want your interface to be mostly graphical (point-and-click), or if Python is
your first language and this is your first install, use Canopy.
If your entire team has already committed to one of these options, then you should
go with whatever is currently being used.
To install the standard CPython implementation on Windows, you first need to
download the latest version of Python 3 or Python 2.7 from the official website. If you
want to be sure you are installing a fully up-to-date version (or are certain you really,
really want the 64-bit installer12), then use the Python Releases for Windows site to
find the release you need.
The Windows version is provided as an MSI package. This format allows Windows
administrators to automate installation with their standard tools. To install the pack‐
age manually, just double-click the file.
By design, Python installs to a directory with the version number embedded (e.g.,
Python version 3.5 will install at C:\Python35\) so that you can have multiple versions
of Python on the same system without conflicts. Of course, only one interpreter can
be the default application for Python file types. The installer does not automatically
modify the PATH environment variable,13 so that you always have control over which
copy of Python is run.
Typing the full path name for a Python interpreter each time quickly gets tedious, so
add the directories for your default Python version to the PATH. Assuming that the
Python installation you want to use is in C:\Python35\, you will want to add this to
your PATH:
C:\Python35;C:\Python35\Scripts\
16 | Chapter 2: Properly Installing Python

14 Windows PowerShell provides a command-line shell and scripting language that is similar enough to Unix
shells that Unix users will be able to function without reading a manual, but with features specifically for use
with Windows. It is built on the .NET Framework. For more information, see Microsoft’s “Using Windows
PowerShell.”
15 The installer will prompt you whether it’s OK to overwrite the existing installation. Say yes; releases in the
same minor version are backward-compatible.
16 For additional details, see the pip installation instructions.
17 Packages that are compliant with Setuptools at a minimum provide enough information for the library to
identify and obtain all package dependencies. For more information, see the documentation for “Packaging
and Distributing Python Projects,” PEP 302, and PEP 241.
You can do this easily by running the following in PowerShell:14
PS C:\> [Environment]::SetEnvironmentVariable(
"Path",
"$env:Path;C:\Python35\;C:\Python35\Scripts\",
"User")
The second directory (Scripts) receives command files when certain packages are
installed, so it is a very useful addition. You do not need to install or configure any‐
thing else to use Python.
Having said that, we strongly recommend installing Setuptools, pip, and virtualenv
before you start building Python applications for real-world use (i.e., contributing to
collaborative projects). You’ll learn more about these tools and how to install them
later in this section. In particular, you should always install Setuptools, as it makes it
much easier for you to use other third-party Python libraries.
Setuptools and pip
The current MSI packaged installers install Setuptools and pip for you with Python,
so if you are following along with this book and just installed now, you have them
already. Otherwise, the best way to get them with Python 2.7 installed is to upgrade to
the newest release.15 For Python 3, in versions 3.3 and prior, download the script get-
pip.py,16 and run it. Open a shell, change directories to the same location as get-pip.py,
and then type:
PS C:\> python get-pip.py
With Setuptools, you can download and install any compliant17 Python software over
a network (usually the Internet) with a single command (easy_install). It also ena‐
bles you to add this network installation capability to your own Python software with
very little work.
Both pip’s pip command and Setuptools’s easy_install command are tools to install
and manage Python packages. pip is recommended over easy_install because it
can also uninstall packages, its error messages are more digestible, and partial pack‐
Installing Python on Windows | 17

age installs can’t happen (installs that fail partway through will unwind everything
that happened so far). For a more nuanced discussion, see “pip vs easy_install” in
the Python Packaging User Guide, which should be your first reference for current
packaging information.
virtualenv
The virtualenv command creates isolated Python environments. It creates a folder
containing all the necessary executables to use the packages that a Python project
would need. Then, when you activate the environment using a command in the new
folder, it prepends that folder to your PATH environment variable—the Python in the
new folder becomes the first one found, and the packages in its subfolders are the
ones used.
To install virtualenv via pip, run pip at the command line of a PowerShell terminal:
PS C:\> pip install virtualenv
“Virtual Environments” on page 34 describes usage and motivation in more detail.
On OS X and Linux, because Python comes installed for use by system or third-party
software, they must specifically distinguish between the Python 2 and Python 3 ver‐
sions of pip. On Windows, there is no need to do this, so whenever we say pip3, we
mean pip for Windows users. Regardless of OS, once you are in a virtual environ‐
ment, you can always use the command pip, whether you are working with Python 2
or Python 3, so that is what we will do in the rest of this guide.
Commercial Python Redistributions
Your IT department or classroom teaching assistant may have asked you to install a
commercial redistribution of Python. This is intended to simplify the work an orga‐
nization needs to do to maintain a consistent environment for multiple users. All of
the ones listed here provide the C implementation of Python (CPython).
A technical reviewer for the first draft of this chapter said we massively understated
the trouble it is to use a regular CPython installation on Windows for most users: that
even with wheels, compiling and/or linking to external C libraries is painful for
everyone but seasoned developers. We have a bias toward plain CPython, but the
truth is if you’re going to be a consumer of libraries and packages (as opposed to a
creator or contributor), you should just download a commercial redistribution and
get on with your life—doubly so if you’re a Windows user. Later, when you want to
contribute to open source, you can install the regular distribution of CPython.
18 | Chapter 2: Properly Installing Python

18 Intel and Anaconda have a partnership, and all of the Intel accelerated packages are only available using
conda. However, you can always conda install pip and use pip (or pip install conda and use conda)
when you want to.
It is easier to go back to a standard Python installation if you do
not alter the default settings in vendor-specific installations.
Here’s what these commercial distributions have to offer:
e Intel Distribution for Python
The purpose of the Intel Distribution for Python is to deliver high-performance
Python in an easy-to-access, free package. The primary boost to performance
comes from linking Python packages with native libraries such as the Intel Math
Kernel Library (MKL), and enhanced threading capabilities that include the Intel
Threading Building Blocks (TBB) library. It relies on Continuum’s conda for
package management, but also comes with pip. It can be downloaded by itself or
installed from https://anaconda.org/ in a conda environment.18
It provides the SciPy stack and the other common libraries listed in the release
notes (PDF). Customers of Intel Parallel Studio XE get commercial support and
everyone else can use the forums for help. So, this option gives you the scientific
libraries without too much fuss, and otherwise is a regular Python distribution.
Continuum Analytics’ Anaconda
Continuum Analytics’ distribution of Python is released under the BSD license
and provides tons of precompiled science and math binaries on its free package
index. It has a different package manager than pip, called conda, that also man‐
ages virtual environments, but acts more like Buildout (discussed in “Buildout”
on page 38) than like virtualenv—managing libraries and other external depen‐
dencies for the user. The package formats are incompatibile, so each installer
can’t install from the other’s package index.
The Anaconda distribution comes with the SciPy stack and other tools. Ana‐
conda has the best license and the most stuff for free; if you’re going to use a
commercial distribution—especially if you’re already comfortable working with
the command line already and like R or Scala (also bundled)—choose this. If you
don’t need all of those other things, use the miniconda distribution instead. Cus‐
tomers get various levels of indemnification (related to open source licenses, and
who can use what when, or whom gets sued for what), commercial support, and
extra Python libraries.
Commercial Python Redistributions | 19

ActiveState’s ActivePython
ActiveState’s distribution is released under the ActiveState Community License
and is free for evaluation only; otherwise it requires a license. ActiveState also
provides solutions for Perl and Tcl. The main selling point of this distribution is
broad indemnification (again related to open source licenses) for the more than
7,000 packages in its cultivated package index, reachable using the ActiveState
pypm tool, a replacement for pip.
Enthought’s Canopy
Enthought’s distribution is released under the Canopy Software License, with a
package manager, enpkg, that is used in place of pip to connect to Canopy’s pack‐
age index.
Enthought provides free academic licenses to students and staff from degree-
granting institutions. Distinguishing features from Enthought’s distribution are
graphical tools to interact with Python, including its own IDE that resembles
MATLAB, a graphical package manager, a graphical debugger, and a graphical
data manipulation tool. Like the other commercial redistributors, there is indem‐
nification and commercial support, in addition to more packages for customers.
20 | Chapter 2: Properly Installing Python

1If at some point you want to build C extensions for Python, check out “Extending Python with C or C++.” For
more details, see Chapter 15 of Python Cookbook.
CHAPTER 3
Your Development Environment
This chapter provides an overview of the text editors, integrated development envi‐
ronments (IDEs), and other development tools currently popular in the Python edit
→ test → debug cycle.
We unabashedly prefer Sublime Text (discussed in “Sublime Text” on page 23) as an
editor and PyCharm/IntelliJ IDEA (discussed in “PyCharm/IntelliJ IDEA” on page
29) as an IDE but recognize that the best option depends on the type of coding you
do and the other languages you use. This chapter lists a number of the most popular
ones and reasons for choosing them.
Python does not need build tools like Make or Java’s Ant or Maven because it is inter‐
preted, not compiled,1 so we do not discuss them here. But in Chapter 6, we’ll
describe how to use Setuptools to package projects and Sphinx to build documenta‐
tion.
We also won’t cover version control systems, as these are language-independent, but
the people who maintain the C (reference) implementation of Python just moved
from Mercurial to Git (see PEP 512). The original justification to use Mercurial, in
PEP 374, contains a small but useful comparison between today’s top four options:
Subversion, Bazaar, Git, and Mercurial.
This chapter concludes with a brief review of the current ways to manage different
interpreters to replicate different deployment situations while coding.
21

Text Editors
Just about anything that can edit plain text will work for writing Python code; how‐
ever, choosing the right editor can save you hours per week. All of the text editors
listed in this section support syntax highlighting and can be extended via plug-ins to
use static code checkers (linters) and debuggers.
Table 3-1 lists our favorite text editors in descending order of preference and articu‐
lates why a developer would choose one over the other. The rest of the chapter briefly
elaborates on each editor. Wikipedia has a very detailed text editor comparison chart
for those who need to check for specific features.
Table 3-1. Text editors at a glance
Tool Availability Reason to use
Sublime
Text • Open API/has free trial
• OS X, Linux, Windows
• It’s fast, with a small footprint.
• It handles large (> 2 GB) les well.
• Extensions are written in Python.
Vim • Open source/donations appreciated
• OS X, Linux, Windows, Unix
• You already love Vi/Vim.
• It (or at least Vi) is preinstalled on every OS except Windows.
• It can be a console application.
Emacs • Open source/donations appreciated
• OS X, Linux, Windows, Unix
• You already love Emacs.
• Extensions are written in Lisp.
• It can be a console application.
TextMate • Open source/need a license
• OS X only
• Great UI.
• Nearly all interfaces (static code check/debug/test) come
preinstalled.
• Good Apple tools—for example, the interface to xcodebuild (via
the Xcode bundle).
Atom • Open source/free
• OS X, Linux, Windows
• Extensions are written in JavaScript/HTML/CSS.
• Very nice GitHub integration.
Code • Open API (eventually)/free
• OS X, Linux, Windows (but Visual
Studio, the corresponding IDE, only
works on Windows)
• IntelliSense (code completion) worthy of Microsoft’s VisualStudio.
• Good for Windows devs, with support for .Net, C#, and F#.
• Caveat: not yet extensible (to come).
22 | Chapter 3: Your Development Environment

2Snippets are sets of frequently typed code, like CSS styles or class definitions, that can be autocompleted if you
type a few charaters and then hit the Tab key.
Sublime Text
Sublime Text is our recommended text editor for code, markup, and prose. Its speed
is the first thing cited when people recommend it; the number of packages available
(3,000+) is next.
Sublime Text was first released in 2008 by Jon Skinner. Written in Python, it has
excellent support for editing Python code and uses Python for its package extension
API. A “Projects” feature allows the user to add/remove files or folders—these can
then be searched via the “Goto Anything” function, which identifies locations within
the project that contain the search term(s).
You need PackageControl to access the Sublime Text package repository. Popular
packages include SublimeLinter, an interface to the user’s selection of installed static
code checkers; Emmett for web development snippets;2 and Sublime SFTP for remote
editing via FTP.
Anaconda (no relation to the commercial Python distribution of the same name),
released in 2013, by itself turns Sublime almost into an IDE, complete with static code
checks, docstring checks, a test runner, and capability to look up the definition of or
locate uses of highlighted objects.
Vim
Vim is a console-based text editor (with optional GUI) that uses keyboard shortcuts
for editing instead of menus or icons. It was first released in 1991 by Bram Moole‐
naar, and its predecessor, Vi, was released in 1976 by Bill Joy. Both are written in C.
Vim is extensible via vimscript, a simple scripting language. There are options to use
other languages: to enable Python scripting, set the build configuration flags when
building from the C source to --enable-pythoninterp and/or --enable-
python3interp before you build from source. To check whether Python or Python3
are enabled, type :echo has("python") or :echo has("python3"); the result will be
“1” if True or “0” if False.
Vi (and frequently Vim) is available out of the box on pretty much every system but
Windows, and there is an executable installer for Vim on Windows. Users who can
tolerate the learning curve will become extremely efficient; so much that the basic Vi
key bindings are available as a configuration option in most other editors and IDEs.
Text Editors | 23

3Just open the editor by typing vi (or vim) then Enter on the command line, and once inside, type :help then
Enter for the tutorial.
4To locate your home directory on Windows, open Vim and type :echo $HOME.
If you want to work for a large company in any sort of IT role, a
functioning awareness of Vi is necessary.3 Vim is much more fea‐
tureful than Vi, but is close enough that a Vim user can function in
Vi.
If you only develop in Python, you can set the default settings for indentation and
line wrapping to values compliant with PEP 8. To do that, create a file called .vimrc in
your home directory,4 and add the following:
set textwidth=79 " lines longer than 79 columns will be broken
set shiftwidth=4 " operation >> indents 4 columns; << unindents 4 columns
set tabstop=4 " a hard TAB displays as 4 columns
set expandtab " insert spaces when hitting TABs
set softtabstop=4 " insert/delete 4 spaces when hitting a TAB/BACKSPACE
set shiftround " round indent to multiple of 'shiftwidth'
set autoindent " align the new line indent with the previous line
With these settings, newlines are inserted after 79 characters and indentation is set to
four spaces per tab, and if you are inside an indented statement, your next line will
also be indented to the same level.
There is also a syntax plug-in called python.vim that features some improvements
over the syntax file included in Vim 6.1, and a small plug-in, SuperTab, that makes
code completion more convenient by using the Tab key or any other customized keys.
If you also use Vim for other languages, there is a handy plug-in called indent, which
handles indentation settings for Python source files.
These plug-ins supply you with a basic environment for developing in Python. If your
Vim is compiled with +python (the default for Vim 7 and newer), you can also use the
plug-in vim-flake8 to do static code checks from within the editor. It provides the
function Flake8, which runs PEP8 and Pyflakes, and can be mapped to any hotkey or
action you want in Vim. The plug-in will display errors at the bottom of the screen
and provide an easy way to jump to the corresponding line.
If you think it’s handy, you can make Vim call Flake8 every time you save a Python
file by adding the following line to your .vimrc:
autocmd BufWritePost *.py call Flake8()
Or, if you are already using syntastic, you can set it to run Pyflakes on write and show
errors and warnings in the quickfix window. Here’s an example configuration to do
that and also show status and warning messages in the status bar:
24 | Chapter 3: Your Development Environment

5We love Raymond Hettinger. If everyone coded the way he recommends, the world would be a much better
place.
set statusline+=%#warningmsg#
set statusline+=%{SyntasticStatuslineFlag()}
set statusline+=%*
let g:syntastic_auto_loc_list=1
let g:syntastic_loc_list_height=5
Python-mode
Python-mode is a complex solution for working with Python code in Vim. If you like
any of the features listed here, use it (but be aware it will slow down Vim’s launch a
little bit):
•Asynchronous Python code checking (pylint, pyflakes, pep8, mccabe), in any
combination
•Code refactoring and autocompletion with rope
• Fast Python folding (you can hide and show code within indents)
• Support for virtualenv
• The ability to search through Python documentation and run Python code
• Auto PEP8 error fixes
Emacs
Emacs is another powerful text editor. It now has a GUI but can still be run directly in
the console. It is fully programmable (Lisp), and with a little work can be wired up as
a Python IDE. Masochists and Raymond Hettinger5 use it.
Emacs is written in Lisp and was first released in 1976 by Richard Stallman and Guy
L. Steele, Jr. Built-in features include remote edit (via FTP), a calendar, mail send/
read, and even a shrink (Esc, then x, then doctor). Popular plug-ins include
YASnippet to map custom code snippets to keystrokes, and Tramp for debugging. It
is extensible via its own dialect of Lisp, elisp plus.
If you are already an Emacs user, EmacsWiki’s “Python Programming in Emacs” has
the best advice for Python packages and configuration. Those new to Emacs can get
started with the official Emacs tutorial.
There are three major Python modes for Emacs right now:
Text Editors | 25

6Electron is a platform to build cross-platform desktop applications using HTML, CSS, and JavaScript.
•Fabián Ezequiel Gallina’s python.el, now bundled with Emacs (version 24.3+),
implements syntax highlighting, indentation, movement, shell interaction, and a
number of other common Emacs edit-mode features.
•Jorgen Schäfer’s Elpy aims to provide a full-featured interative development envi‐
ronment within Emacs, including debugging, linters, and code completion.
•Python’s source distribution ships with an alternate version in the directory Misc/
python-mode.el. You can download it from the Web as a separate file from
launchpad. It has some tools for programming by speech, additional keystroke
shortcuts, and allows you to set up a complete Python IDE.
TextMate
TextMate is a GUI with Emacs roots that works only on OS X. It has a truly Apple-
worthy user interface that somehow manages to be unobtrusive while exposing all of
the commands with minimal discovery effort.
TextMate is written in C++ and was first released in 2004 by Allan Oddgard and
Ciarán Walsh. Sublime Text (discussed in “Sublime Text” on page 23) can directly
import TextMate snippets, and Microsoft’s Code (discussed in “Code” on page 27) can
directly import TextMate syntax highlighting.
Snippets in any language can be added in bundled groups, and it can otherwise be
extended with shell scripts: the user can highlight some text and pipe it as standard
input through the script using the Cmd+| (pipe) key combination. The script output
replaces the highlighted text.
It has built-in syntax highlighting for Apple’s Swift and Objective C, and (via the
Xcode bundle) an interface to xcodebuild. A veteran TextMate user will not have
problems coding in Python using this editor. New users who don’t spend much time
coding for Apple products are probably better off with the newer cross-platform edi‐
tors that borrow heavily from TextMate’s best-loved features.
Atom
Atom is a “hackable text editor for the 21st century,” according to the folks at GitHub
who created it. It was first released in 2014, is written in CoffeeScript (JavaScript) and
Less (CSS), and is built on top of Electron (formerly Atom Shell),6 which is GitHub’s
application shell based on io.js and Chromium.
26 | Chapter 3: Your Development Environment

7https://github.com/Microso/PTVS/wiki/Features-Matrix
Atom is extensible via JavaScript and CSS, and users can add snippets in any language
(including TextMate-style snippet definitions). As you’d expect, it has very nice Git‐
Hub integration. It comes with native package control and a plethora of packages
(2,000+). Recommended for Python development is Linter combined with linter-
flake8. Web developers may also like the Atom development server, which runs a
small HTTP server and can display the HTML preview within Atom.
Code
Microsoft announced Code in 2015. It is a free, closed source text editor in the Visual
Studio family, also built on GitHub’s Electron. It is cross-platform and has key bind‐
ings just like TextMate.
It comes with an extension API—check out the VS Code Extension Marketplace to
browse existing extensions—and merges what its developers thought were the best
parts of TextMate and Atom with Microsoft. It has IntelliSense (code completion)
worthy of VisualStudio, and good support for .Net, C#, and F#.
Visual Studio (the sister IDE to the Code text editor) still only works on Windows,
even though Code is cross-platform.
IDEs
Many developers use both a text editor and an IDE, switching to the IDE for larger,
more complex, or more collaborative projects. Table 3-2 highlights the distinguishing
features of some popular IDEs, and the sections that follow provide more in-depth
information on each one.
One feature frequently cited as a reason to go to a full IDE (outside of great code
completion and debugging tools) is the ability to quickly switch between Python
interpreters (e.g., from Python 2 to Python 3 to IronPython); this is available in the
free version of all of the IDEs listed in Table 3-2, Visual Studio now offers this at all
levels.7
Additional features that may or may not come free are tools that interface with ticket‐
ing systems, deployment tools (e.g., Heroku or Google App Engine), collaboration
tools, remote debugging, and extra features for using web development frameworks
such as Django.
IDEs | 27

Table 3-2. IDEs at a glance
Tool Availability Reason to use
PyCharm/Intellij
IDEA • Open API/paid professional edition
• Open source/free community
edition
• OS X, Linux, Windows
• Nearly perfect code completion.
• Good support for virtual environments.
• Good support for web frameworks (in the paid version).
Aptana Studio 3 /
Eclipse + LiClipse +
PyDev
• Open source/free
• OS X, Linux, Windows
• You already love Eclipse.
• Java support (LiClipse/Eclipse).
WingIDE • Open API/free trial
• OS X, Linux, Windows
• Great debugger (web)—best of the IDEs listed here.
• Extensible via Python.
Spyder • Open source/free
• OS X, Linux, Windows
• Data science: IPython integrated, and it is bundled with
NumPy, SciPy, and matplotlib.
• The default IDE in popular scientic Python distributions:
Anaconda, Python(x,y), and WinPython.
NINJA-IDE • Open source/donations appreciated
• OS X, Linux, Windows
• Intentionally lightweight.
• Strong Python focus.
Komodo IDE • Open API/text editor (Komodo
Edit) is open source
• OS X, Linux, Windows
• Python, PHP, Perl, Ruby, Node.
• Extensions are based on Mozilla add-ons.
Eric (the Eric
Python IDE) • Open source/donations appreciated
• OS X, Linux, Windows
• Ruby + Python.
• Intentionally lightweight.
• Great debugger (scientic)—can debug one thread while
others continue.
Visual Studio
(Community) • Open API/free community edition
• Paid professional or enterprise
edition
• Windows only
• Great integration with Microsoft languages and tools.
• IntelliSense (code completion) is fantastic.
• Project management and deployment assistance, including
sprint planning tools and manifest templates in the
Enterprise edition.
• Caveat: cannot use virtual environments except in the
Enterprise (most expensive) edition.
28 | Chapter 3: Your Development Environment

PyCharm/IntelliJ IDEA
PyCharm is our favorite Python IDE. The top reasons are its nearly perfect code
completion tools, and the quality of its tools for web development. Those in the sci‐
entific community recommend the free edition (which doesn’t have the web develop‐
ment tools) as just fine for their needs, but not as often as they choose Spyder
(discussed in “Spyder” on page 30).
PyCharm is developed by JetBrains, also known for IntelliJ IDEA, a proprietary Java
IDE that competes with Eclipse. PyCharm (first released in 2010) and IntelliJ IDEA
(first released in 2001) share the same code base, and most of PyCharm’s features can
be brought to IntelliJ with the free Python plug-in.
JetBrains recommends PyCharm for a simpler UI, or IntelliJ IDEA if you want to
introspect into Jython functions, perform cross-language navigation, or do Java-to-
Python refactoring. (PyCharm works with Jython but only as a possible choice for
interpreter; the introspection tools aren’t there.) The two are licensed separately—so
choose before you buy.
The IntelliJ Community Edition and PyCharm Commuity Edition are open sourced
(Apache 2.0 License) and free.
Aptana Studio 3/Eclipse + LiClipse + PyDev
Eclipse is written in Java and was first released in 2001 by IBM as an open, versatile
Java IDE. PyDev, the Eclipse plug-in for Python development, was released in 2003
by Aleks Totic, who later passed the torch to Fabio Zadrozny. It is the most popular
Eclipse plug-in for Python development.
Although the Eclipse community doesn’t push back online when people advocate for
IntelliJ IDEA in forums comparing the two, Eclipse is still the most commonly used
Java IDE. This is relevant for Python developers who interface with tools written in
Java, as many popular ones (e.g., Hadoop, Spark, and proprietary versions of these)
come with instructions and plug-ins for development with Eclipse.
A fork of PyDev is baked into Aptana’s Studio 3, which is an open source suite of
plug-ins bundled with Eclipse that provide an IDE for Python (and Django), Ruby
(and Rails), HTML, CSS, and PHP. The primary focus of Aptanta’s owner, Appcelera‐
tor, is the Appcelerator Studio, a proprietary mobile platform for HTML, CSS, and
JavaScript that requires a monthly license (once your app goes live). General PyDev
and Python support is there, but is not a priority. That said, if you like Eclipse and are
primarily a JavaScript developer making apps for mobile platforms with occasional
forays into Python, especially if you use Appcelerator at work, Aptana’s Studio 3 is a
good choice.
IDEs | 29

LiClipse was born out of a desire to have a better multilanguge experience in Eclipse,
and easy access to fully dark themes (i.e., in addition to the text background, menus
and borders will also be dark). It is a proprietary suite of Eclipse plug-ins written by
Zadrozny; part of the license fees (optional) go to keeping PyDev totally free and
open source (EPL License; the same as Eclipse). It comes bundled with PyDev, so
Python users don’t need to install it themselves.
WingIDE
WingIDE is a Python-specific IDE; probably the second most popular Python IDE
after PyCharm. It runs on Linux, Windows, and OS X.
Its debugging tools are very good and include tools to debug Django templates.
WingIDE users cite its debugger, the quick learning curve, and a lightweight footprint
as reasons they prefer this IDE.
Wing was released in 2000 by Wingware and is written in Python, C, and C++. It
supports extensions but does not have a plug-in repository yet, so users have to
search for others’ blogs or GitHub accounts to find existing packages.
Spyder
Spyder (an abbreviation of Scientific PYthon Development EnviRonment) is an IDE
specifically geared toward working with scientific Python libraries.
Spyder is written in Python by Carlos Córdoba. It is open source (MIT License), and
offers code completion, syntax highlighting, a class and function browser, and object
inspection. Other features are available via community plug-ins.
Spyder includes integration with pyflakes, pylint, and rope, and comes bundled with
NumPy, SciPy, IPython, and Matplotlib. It is itself bundled with the popular Scientific
Python distributions Anaconda, Python(x, y), and WinPython.
NINJA-IDE
NINJA-IDE (from the recursive acronym: “Ninja-IDE Is Not Just Another IDE”) is a
cross-platform IDE designed to build Python applications. It runs on Linux/X11, Mac
OS X, and Windows. Installers for these platforms can be downloaded from NINJA-
IDE’s website.
NINJA-IDE is developed in Python and Qt, open sourced (GPLv3 License), and is
intentionally lightweight. Out of the box, its best-liked feature is that it highlights
problem code when running static code checkers or debugging, and the ability to pre‐
view web pages in-browser. It is extensible via Python, and has a plug-in repository.
The idea is that users will add only the tools they need.
30 | Chapter 3: Your Development Environment

Development slowed for a while, but a new NINJA-IDE v3 is planned for some time
in 2016, and there is still active communication on the NINJA-IDE listserv. The com‐
munity has many native Spanish speakers, including the core development team.
Komodo IDE
Komodo IDE is developed by ActiveState and is a commercial IDE for Windows,
Mac, and Linux. KomodoEdit, the IDE’s text editor, is the open source (Mozilla pub‐
lic license) alternative.
Komodo was first released in 2000 by ActiveState and uses the Mozilla and Scintilla
code base. It is extensible via Mozilla add-ons. It suports Python, Perl, Ruby, PHP, Tcl,
SQL, Smarty, CSS, HTML, and XML. Komodo Edit does not have a debugger, but one
is available as a plug-in. The IDE does not support virtual environments, but does
allow the user to select which Python interpreter to use. Django support is not as
extensive as in WingIDE, PyCharm, or Eclipse + PyDev.
Eric (the Eric Python IDE)
Eric is open source (GPLv3 licence) with more than 10 years of active development. It
is written in Python and based on the Qt GUI toolkit, integrating the Scintilla editor
control. It is named after Eric Idle, a member of the Monty Python troupe, and in
homage to the IDLE IDE, bundled with Python distributions.
Its features include source code autocompletion, syntax highlighting, support for ver‐
sion control systems, Python 3 support, an integrated web browser, a Python shell, an
integrated debugger, and a flexible plug-in system. It does not have extra tools for web
frameworks.
Like NINJA-IDE and Komodo IDE, it is intentionally lightweight. Faithful users
believe it has the best debugging tools around, including the ability to stop and debug
one thread while others continue to run. If you wish to use Matplotlib for interactive
plotting in this IDE, you must use the Qt4 backend:
# This must come first:
import matplotlib
matplotlib.use('Qt4Agg')
# And then pyplot will use the Qt4 backend:
import matplotlib.pyplot as plt
This link is to the most recent documentation for the Eric IDE. Users leaving positive
notes on Eric IDE’s web page are almost all from the scientific computation (e.g.,
weather models, or computational fluid dynamics) community.
IDEs | 31

Visual Studio
Professional programmers who work with Microsoft products on Windows will want
Visual Studio. It is written in C++ and C#, and its first version appeared in 1995. In
late 2014, the first Visual Studio Community Edition was made available for free for
noncommercial developers.
If you intend to work with primarily with enterprise software and use Microsoft
products like C# and F#, this is your IDE.
Be sure to install with the Python Tools for Visual Studio (PTVS), which is a check‐
box in the list of custom installation options that is by default unchecked. The
instructions for installing with Visual Studio or after installing Visual Studio are on
the PTVS wiki page.
Enhanced Interactive Tools
The tools listed here enhance the interactive shell experience. IDLE is actually an
IDE, but not included in the preceding section because most people do not consider
it robust enough to use in the same way (for enterprise projects) as the other IDEs
listed; however, it is fantastic for teaching. IPython is incorporated into Spyder by
default, and can be incorporated into others of the IDEs. They do not replace the
Python interpreter, but rather augment the user’s chosen interpreter shell with addi‐
tional tools and features.
IDLE
IDLE, which stands for Integrated Development and Learning Environment (and is
also the last name of Monty Python member Eric Idle), is part of the Python standard
library; it is distributed with Python.
IDLE is completely written in Python by Guido van Rossum (Python’s BDFL—
Benevolent Dictator for Life) and uses the Tkinter GUI toolkit. Though IDLE is not
suited for full-blown development using Python, it is quite helpful to try out small
Python snippets and experiment with different features in Python.
It provides the following features:
• A Python shell window (interpreter)
• A multiwindow text editor that colorizes Python code
• Minimal debugging capability
32 | Chapter 3: Your Development Environment

IPython
IPython provides a rich toolkit to help you make the most out of using Python inter‐
actively. Its main components are:
• Powerful Python shells (terminal- and Qt-based)
•A web-based notebook with the same core features as the terminal shell, plus
support for rich media, text, code, mathematical expressions, and inline plots
•Support for interactive data visualization (i.e., when configured, your Matplotlib
plots pop up in windows) and use of GUI toolkits
• Flexible, embeddable interpreters to load into your own projects
•Tools for high-level and interactive parallel computing
To install IPython, type the following in a terminal shell or in PowerShell:
$ pip install ipython
bpython
bpython is an alternative interface to the Python interpreter for Unix-like operating
systems. It has the following features:
• Inline syntax highlighting
• Auto indentation and autocompletion
•Expected parameter list for any Python function
• A “rewind” function to pop the last line of code from memory and re-evaluate it
• The ability to send entered code to a pastebin (to share code online)
• The ability to save entered code to a file
To install bpython, type the following in a terminal shell:
$ pip install bpython
Isolation Tools
This section provides more details about the most widely used isolation tools, from
virtualenv, which isolates Python environments from each other, to Docker, which
virtualizes the entire system.
These tools provide various levels of isolation between the running application and
its host environment. They make it possible to test and debug code against different
versions of Python and library dependencies, and can be used to provide a consistent
deployment environment.
Isolation Tools | 33

8Or if you prefer, use Set-ExecutionPolicy AllSigned instead.
Virtual Environments
A Python virtual environment keeps dependencies required by different projects in
separate places. By installing multiple Python environments, your global site-packages
directory (where user-installed Python packages are stored) can stay clean and man‐
ageable, and you can simultaneously work on a project that, for example, requires
Django 1.3 while also maintaining a project that requires Django 1.0.
The virtualenv command does this by creating a separate folder that contains a soft‐
link to the Python executable, a copy of pip, and a place for Python libraries. It
prepends that location to the PATH upon activation, and then returns the PATH to its
original state when deactivated. It is also possible to use the system-installed version
of Python and system-installed libraries, via command-line options.
You can’t move a virtual environment once it’s created—the paths
in the executables are all hardcoded to the current absolute path to
the interpreter in the virtual environment’s bin/ directory.
Create and activate the virtual environment
Setup and activation of Python virtual environments is slightly different on different
operating systems.
On Mac OS X and Linux. You can specify the version of Python with the --python argu‐
ment. Then, use the activate script to set the PATH, entering the virtual environment:
$ cd my-project-folder
$ virtualenv --python python3 my-venv
$ source my-venv/bin/activate
On Windows. If you haven’t already, you should set the system execution policies to
allow a locally created script to run.8 To do this, open PowerShell as an administrator,
and type:
PS C:\> Set-ExecutionPolicy RemoteSigned
Reply Y to the question that appears, exit, and then, in a regular PowerShell, you can
create a virtual environment like so:
PS C:\> cd my-project-folder
PS C:\> virtualenv --python python3 my-venv
PS C:\> .\my-venv\Scripts\activate
34 | Chapter 3: Your Development Environment

9POSIX stands for Portable Operating System Interface. It comprises a set of IEEE standards for how an oper‐
ating system should behave: the behavior of and interface to basic shell commands, I/O, threading, and other
services and utilities. Most Linux and Unix distributions are considered POSIX compatible, and Darwin (the
operating system underneath Mac OS X and iOS) has been compatible since Leopard (10.5). A “POSIX sys‐
tem” is a system that is considered POSIX compatible.
Add libraries to the virtual environment
Once you have activated the virtual environment, the first pip executable in your
path will be the one located in the my-venv folder you just made, and it will install
libraries into the following directory:
•my-venv/lib/python3.4/site-packages/ (on POSIX9 systems)
•my-venv\Lib\site-packages (on Windows)
When bundling your own packages or projects for other people, you can use:
$ pip freeze > requirements.txt
while the virtual environment is active. This writes all of the currently installed pack‐
ages (which are hopefully also project dependencies) to the file requirements.txt. Col‐
laborators can install all of the dependencies in their own virtual environment when
given a requirements.txt file by typing:
$ pip install -r requirements.txt
pip will install the listed dependencies, overriding dependency specifications in sub‐
packages if conflicts exist. Dependencies specified in requirements.txt are intended to
set the entire Python environment. To set dependencies when distributing a library, it
is better to use the install_requires keyword argument to the setup() function in
a setup.py file.
Be careful to not use pip install -r requirements.txt outside
of a virtual environment. If you do, and anything in require‐
ments.txt is a different version than the one installed on your com‐
puter, pip will overwrite the other version of the library with the
one specified in requirements.txt.
Deactivate the virtual environment
To return to normal system settings, type:
$ deactivate
For more information, see the Virtual Environments docs, the official virtualenv docs,
or the official Python packaging guide. The package pyvenv, which is distributed as
part of the Python standard library in Python versions 3.3 and above, does not
Isolation Tools | 35

replace virtualenv (in fact, it is a dependency of virtualenv), so these instructions
work for all versions of Python.
pyenv
pyenv is a tool that allows multiple versions of the Python interpreter to be used at
the same time. This solves the problem of having different projects that each require
different versions of Python, but you would still need to use virtual environments if
the dependency conflict was in the libraries (e.g., requiring different Django ver‐
sions). For example, you can install Python 2.7 for compatibility in one project, and
still use Python 3.5 as the default interpreter. pyenv isn’t just limited to the CPython
versions—it will also install PyPy, Anaconda, Miniconda, Stackless, Jython, and Iron‐
Python interpreters.
Pyenv works by filling a shims directory with a shim version of the Python interpreter
and executables like pip and 2to3. These will be the executables found if the direc‐
tory is prepended to the $PATH environment variable. A shim is a pass-through func‐
tion that interprets the current situation and selects the most appropriate function to
perform the desired task. For example, when the system looks for a program named
python, it looks inside the shims directory first, and uses the shim version, which in
turn passes the command on to pyenv. Pyenv then works out which version of
Python should be run based on environment variables, *.python-version files, and the
global default.
For virtual environments, there is the plug-in pyenv-virtualenv, which automates the
creation of different environments, and also makes it possible to use the existing
pyenv tools to switch to different environments.
Autoenv
Autoenv provides a lightweight option to manage different environment settings out‐
side of the scope of virtualenv. It overrides the cd shell command so that when you
change into a directory containing a .env file (e.g., setting the PATH and an environ‐
ment variable with a database URL), Autoenv automagically activates the environ‐
ment, and when you cd out of it, the effect is undone. It does not work in Windows
PowerShell.
Install it on Mac OS X using brew:
$ brew install autoenv
or on Linux:
$ git clone git://github.com/kennethreitz/autoenv.git ~/.autoenv
$ echo 'source ~/.autoenv/activate.sh' >> ~/.bashrc
and then open a new terminal shell.
36 | Chapter 3: Your Development Environment

virtualenvwrapper
virtualenvwrapper provides a set of commands that extend Python virtual environ‐
ments for more control and better manageability. It places all your virtual environ‐
ments in one directory and provides empty hook functions that can be run before or
after creation/activation of the virtual environment or of a project—for example, the
hook could set environment variables by sourcing the .env file within a directory.
The problem with placing such functions with the installed items is that the user
must somehow acquire these scripts to completely duplicate the environment on
another machine. It could be useful on a shared development server, if all of the envi‐
ronments were placed in a shared folder and used by multiple users.
To skip the full virtualenvwrapper installation instructions, first make sure virtualenv
is already installed. Then, on OS X or Linux, type the following in a command termi‐
nal:
$ pip install virtualenvwrapper
Or use pip install virtualenvwrapper if you are using Python 2, and add this to
your ~/.prole:
export VIRTUALENVWRAPPER_PYTHON=/usr/local/bin/python3
and then add the following to you ~/.bash_prole or favorite other shell profile:
source /usr/local/bin/virtualenvwrapper.sh
Finally, close the current terminal window, and open a new one to activate your new
profile, and virtualenvwrapper will be available.
On Windows, use virtualenvwrapper-win instead. With virtualenv already installed,
type:
PS C:\> pip install virtualenvwrapper-win
Then, on both platforms, the following commands are the most commonly used:
mkvirtualenv my_venv
Creates the virtual environment in the folder ~/.virtualenvs/my_venv. Or on
Windows, my_venv will be created in the directory identified by typing %USERPRO
FILE%\Envs on the command line. The location is customizable via the environ‐
ment variable $WORKON_HOME.
workon my_venv
Activates the virtual environment or switches from the current environment to
the specified one.
deactivate
Deactivates the virtual environment.
Isolation Tools | 37

10 An egg is a ZIP file with a specific structure, containing distribution content. Eggs have been replaced by
wheels as of PEP 427. They were introduced by the very popular (and now de facto) packaging library, Setup‐
tools, which provides a useful interface to the Python Standard Library’s distutils. You can read all about the
differences between the formats in “Wheel vs Egg” in the Python Packaging User Guide.
rmvirtualenv my_venv
Deletes the virtual environment.
virtualenvwrapper provides tab-completion on environment names, which really
helps when you have a lot of environments and have trouble remembering their
names. A number of other convenient functions are documented in the full list of vir‐
tualenvwrapper commands.
Buildout
Buildout is a Python framework that allows you to create and compose recipes—
Python modules containing arbitrary code (usually system calls to make directories
or to check out and build source code, and to add non-Python parts to the project,
such as a database or a web server). Install it using pip:
$ pip install zc.buildout
Projects that use Buildout would include zc.buildout and the recipes they need in
their requirements.txt, or would directly include custom recipes with the source code.
They also include the configuration file buildout.cfg, and the bootstrap.py script in its
top directory. If you run the script by typing python bootstrap.py, it will read the
configuration file to determine which recipes to use, plus each recipe’s configuration
options (e.g., the specific compiler flags and library linking flags).
Buildout gives a Python project with non-Python parts portability—another user can
reconstruct the same environment. This is different from the script hooks in Virtua‐
lenvwrapper, which would need to be copied and transmitted along with the require‐
ments.txt file to be able to re-create a virtual environment.
It includes parts to install eggs,10 which can be skipped in the newer versions of
Python that use wheels instead. See the Buildout tutorial for more information.
Conda
Conda is like pip, virtualenv, and Buildout together. It comes with the Anaconda dis‐
tribution of Python and is Anaconda’s default package manager. It can be installed via
pip:
$ pip install conda
And pip can be installed via conda:
38 | Chapter 3: Your Development Environment

11 YAML YAML Ain’t Markup Language, is a markup language intended to be both human-readable and
machine-readable.
12 A virtual machine is an application that emulates a computer system by imitating the desired hardware and
providing the desired operating system on a host computer.
$ conda install pip
The packages are stored on different repositories (pip pulls from http://
pypi.python.org, and conda pulls from https://repo.continuum.io/), and they use dif‐
ferent formats, so the tools are not interchangeable.
This table created by Continuum (the creators of Anaconda) pro‐
vides a side-by-side comparison of all three options: conda, pip,
and virtualenv.
conda-build, Continuum’s analogue to Buildout, can be installed on all platforms by
typing:
conda install conda-build
Like with Buildout, the conda-build configuration file format is called a “recipe,” and
the recipes are not limited to using Python tools. Unlike Buildout, the code is speci‐
fied in shell script, not Python, and the configuration is specified in YAML,11 not
Python’s ConfigParser format.
The main advantage of conda over pip and virtualenv is for Windows users—Python
libraries built as C extensions may or may not be present as wheels, but they are
almost always present on the Anaconda package index. And if a package is not avail‐
able via conda, it is possible to install pip and then install packages hosted on PyPI.
Docker
Docker helps with environment isolation like virtualenv, conda, or Buildout, but
instead of providing a virtual environment, it provides a Docker container. Containers
provide greater isolation than environments. For example, you can have containers
running, each with different network interfaces, firewalling rules, and a different
hostname. These running containers are managed by a separate utility, the Docker
Engine, that coordinates access to the underlying operating system. If you’re running
Docker containers on OS X, Windows, or on a remote host, you’ll also need Docker
Machine, which interfaces with the virtual machine(s)12 that will run the Docker
Engine.
Docker containers were originally based on Linux Containers, which were themselves
originally related to the shell command chroot. chroot is kind of a system-level ver‐
Isolation Tools | 39

13 A virtual environment inside of a Docker container will isolate your Python environment, preserving the OS’s
Python for the utilities that may be needed to support your application—in keeping with our advice to not
install anything via pip (or anything else) in your system Python directory.
sion of the virtualenv command: it makes it appear that the root directory (/) is at a
user-specified path instead of the actual root, providing a completely separate user
space.
Docker doesn’t use chroot, and it doesn’t even use Linux Containers anymore (allow‐
ing the universe of Docker images to include Citrix and Solaris machines), but the
Docker Containers are still doing about the same thing. Its configuration files are
called Dockerfiles, which build Docker images that can then be hosted on the Docker
Hub, the Docker package repository (like PyPI).
Docker images, when configured correctly, can take up less space than environments
created using Buildout or conda because Docker users the AUFS union file system,
which stores the “diff” of an image, instead of the whole image. So, for example, if
you want to build and test your package against multiple releases of a dependency,
you could make a base Docker image that contains a virtual environment13 (or Build‐
out environment, or conda environment) containing all of the other dependencies.
You’d then inherit from that base for all of your other images, adding only the single
changing dependency in the last layer. Then, all of the derived containers will contain
only the different new library, sharing the contents of the base image. For more infor‐
mation, see the Docker documentation.
40 | Chapter 3: Your Development Environment

PART II
Getting Down to Business
We’ve got our towels, a Python interpreter, virtual environments, and an editor or
IDE—we’re ready to get down to business. This part does not teach you the language;
“Learning Python” on page 289 lists great resources that already do that. Instead, we
want you to come out of this part feeling froody, like a real Python insider, knowing
the tricks of some of the best Pythonistas in our community. This part includes the
following chapters:
Chapter 4, Writing Great Code
We briefly cover style, conventions, idioms, and gotchas that can help new Pytho‐
nistas.
Chapter 5, Reading Great Code
We take you on a guided tour of parts of our favorite Python libraries, with the
hope that you’ll be encouraged to do more reading on your own.
Chapter 6, Shipping Great Code
We briefly talk about the Python Packaging Authority and how to load libraries
to PyPI, plus options to build and ship executables.

1Originally stated by Ralph Waldo Emerson in Self-Reliance, it is quoted in PEP 8 to affirm that the coder’s best
judgment should supercede the style guide. For example, conformity with surrounding code and existing con‐
vention is more important than consistency with PEP 8.
CHAPTER 4
Writing Great Code
This chapter focuses on best practices for writing great Python code. We will review
coding style conventions that will be used in Chapter 5, and briefly cover logging best
practices, plus list a few of the major differences between available open source licen‐
ses. All of this is intended to help you write code that is easy for us, your community,
to use and extend.
Code Style
Pythonistas (veteran Python developers) celebrate having a language so accessible
that people who have never programmed can still understand what a Python program
does when they read its source code. Readability is at the heart of Python’s design,
following the recognition that code is read much more often than it is written.
One reason Python code can be easily understood is its relatively complete set of code
style guidelines (collected in the two Python Enhancement Proposals PEP 20 and
PEP 8, described in the next few pages) and “Pythonic” idioms. When a Pythonista
points to portions of code and says they are not “Pythonic,” it usually means that
those lines of code do not follow the common guidelines and fail to express the intent
in what is considered the most readable way. Of course, “a foolish consistency is the
hobgoblin of little minds.”1 Pedantic devotion to the letter of the PEP can undermine
readability and understandability.
43

PEP 8
PEP 8 is the de facto code style guide for Python. It covers naming conventions, code
layout, whitespace (tabs versus spaces), and other similar style topics.
This is highly recommended reading. The entire Python community does its best to
adhere to the guidelines laid out within this document. Some projects may stray from
it from time to time, while others (like Requests) may amend its recommendations.
Conforming your Python code to PEP 8 is generally a good idea and helps make code
more consistent when working on projects with other developers. The PEP 8 guide‐
lines are explicit enough that they can be programmatically checked. There is a
command-line program, pep8, that can check your code for conformity. Install it by
running the following command in your terminal:
$ pip3 install pep8
Here’s an example of the kinds of things you might see when you run pep8:
$ pep8 optparse.py
optparse.py:69:11: E401 multiple imports on one line
optparse.py:77:1: E302 expected 2 blank lines, found 1
optparse.py:88:5: E301 expected 1 blank line, found 0
optparse.py:222:34: W602 deprecated form of raising exception
optparse.py:347:31: E211 whitespace before '('
optparse.py:357:17: E201 whitespace after '{'
optparse.py:472:29: E221 multiple spaces before operator
optparse.py:544:21: W601 .has_key() is deprecated, use 'in'
The fixes to most of the complaints are straightforward and stated directly in PEP 8.
The code style guide for Requests gives examples of good and bad code and is only
slightly modified from the original PEP 8.
The linters referenced in “Text Editors” on page 22 usually use pep8, so you can also
install one of these to run checks within your editor or IDE. Or, the program auto
pep8 can be used to automatically reformat code in the PEP 8 style. Install the pro‐
gram with:
$ pip3 install autopep8
Use it to format a file in-place (overwriting the original) with:
$ autopep8 --in-place optparse.py
Excluding the --in-place flag will cause the program to output the modified code
directly to the console for review (or piping to another file). The --aggressive flag
will perform more substantial changes and can be applied multiple times for greater
effect.
44 | Chapter 4: Writing Great Code

2Tim Peters is a longtime Python user who eventually became one of its most prolific and tenacious core
developers (creating Python’s sorting algorithm, Timsort), and a frequent Net presence. He at one point was
rumored to be a long-running Python port of the Richard Stallman AI program stallman.el. The original
conspiracy theory appeared on a listserv in the late 1990s.
PEP 20 (a.k.a. The Zen of Python)
PEP 20, the set of guiding principles for decision making in Python, is always avail‐
able via import this in a Python shell. Despite its name, PEP 20 only contains 19
aphorisms, not 20 (the last has not been written down…).
The true history of the Zen of Python is immortalized in Barry Warsaw’s blog post
“import this and the Zen of Python.”
The Zen of Python by Tim Peters2
Beautiful is better than ugly.
Explicit is better than implicit.
Simple is better than complex.
Complex is better than complicated.
Flat is better than nested.
Sparse is better than dense.
Readability counts.
Special cases aren’t special enough to break the rules.
Although practicality beats purity.
Errors should never pass silently.
Unless explicitly silenced.
In the face of ambiguity, refuse the temptation to guess.
There should be one—and preferably only one—obvious way to do it.
Although that way may not be obvious at first unless you’re Dutch.
Now is better than never.
Although never is often better than *right* now.
If the implementation is hard to explain, it’s a bad idea.
If the implementation is easy to explain, it may be a good idea.
Namespaces are one honking great idea—let’s do more of those!
For an example of each Zen aphorism in action, see Hunter Blanks’ presentation
“PEP 20 (The Zen of Python) by Example.” Raymond Hettinger also put these princi‐
ples to fantastic use in his talk “Beyond PEP 8: Best Practices for Beautiful, Intelligible
Code.”
Code Style | 45

3di is a shell utility that identifies and shows lines that differ between two files.
General Advice
This section contains style concepts that are hopefully easy to accept without debate,
and often applicable to languages other than Python. Some of them are direct from
the Zen of Python, but others are just plain common sense. They reaffirm our prefer‐
ence in Python to select the most obvious way to present code, when multiple options
are possible.
Explicit is better than implicit
While any kind of black magic is possible with Python, the simplest, most explicit
way to express something is preferred:
Bad Good
def make_dict(*args):
x, y = args
return dict(**locals())
def make_dict(x, y):
return {'x': x, 'y': y}
In the good code, x and y are explicitly received from the caller, and an explicit dictio‐
nary is returned. A good rule of thumb is that another developer should be able to
read the first and last lines of your function and understand what it does. That’s not
the case with the bad example. (Of course, it’s also pretty easy when the function is
only two lines long.)
Sparse is better than dense
Make only one statement per line. Some compound statements, such as list compre‐
hensions, are allowed and appreciated for their brevity and their expressiveness, but it
is good practice to keep disjoint statements on separate lines of code. It also makes for
more understandable diffs3 when revisions to one statement are made:
Bad Good
print('one'); print('two')print('one')
print('two')
if x == 1: print('one')if x == 1:
print('one')
if (<complex comparison> and
<other complex comparison>):
# do something
cond1 = <complex comparison>
cond2 = <other complex comparison>
if cond1 and cond2:
# do something
46 | Chapter 4: Writing Great Code

Gains in readability, to Pythonistas, are more valuable than a few bytes of total code
(for the two-prints-on-one-line statement) or a few microseconds of computation
time (for the extra-conditionals-on-separate-lines statement). Plus, when a group is
contributing to open source, the “good” code’s revision history will be easier to deci‐
pher because a change on one line can only affect one thing.
Errors should never pass silently / Unless explicitly silenced
Error handling in Python is done using the try statement. An example from Ben
Gleitzman’s HowDoI package (described more in “HowDoI” on page 93) shows when
silencing an error is OK:
def format_output(code, args):
if not args['color']:
return code
lexer = None
# try to find a lexer using the Stack Overflow tags
# or the query arguments
for keyword in args['query'].split() + args['tags']:
try:
lexer = get_lexer_by_name(keyword)
break
except ClassNotFound:
pass
# no lexer found above, use the guesser
if not lexer:
lexer = guess_lexer(code)
return highlight(code,
lexer,
TerminalFormatter(bg='dark'))
This is part of a package that provides a command-line script to query the Internet
(Stack Overflow, by default) for how to do a particular coding task, and prints it to
the screen. The function format_output() applies syntax highlighting by first search‐
ing through the question’s tags for a string understood by the lexer (also called a
tokenizer; a “python”, “java”, or “bash” tag will identify which lexer to use to split and
colorize the code), and then if that fails, to try inferring the language from the code
itself. There are three paths the program can follow when it reaches the try state‐
ment:
•Execution enters the try clause (everything between the try and the except), a
lexer is successfully found, the loop breaks, and the function returns the code
highlighted with the selected lexer.
•The lexer is not found, the ClassNotFound exception is thrown, it’s caught, and
nothing is done. The loop continues until it finishes naturally or a lexer is found.
Code Style | 47
•Some other exception occurs (like a KeyboardInterrupt) that is not handled,
and it is raised up to the top level, stopping execution.
The “should never pass silently” part of the zen aphorism discourages the use of over‐
zealous error trapping. Here’s an example you can try in a separate terminal so that
you can kill it more easily once you get the point:
>>> while True:
... try:
... print("nyah", end=" ")
... except:
... pass
Or don’t try it. The except clause without any specified exception will catch every‐
thing, including KeyboardInterrupt (Ctrl+C in a POSIX terminal), and ignore it; so
it swallows the dozens of interrupts you try to give it to shut the thing down. It’s not
just the interrupt issue—a broad except clause can also hide bugs, leaving them to
cause some problem later on, when it will be harder to diagnose. We repeat, don’t let
errors pass silently: always explicitly identify by name the exceptions you will catch,
and handle only those exceptions. If you simply want to log or otherwise acknowl‐
edge the exception and re-raise it, like in the following snippet, that’s OK. Just don’t
let the error pass silently (without handling or re-raising it):
>>> while True:
... try:
... print("ni", end="-")
... except:
... print("An exception happened. Raising.")
... raise
Function arguments should be intuitive to use
Your choices in API design will determine the downstream developer’s experience
when interacting with a function. Arguments can be passed to functions in four dif‐
ferent ways:
def func(positional, keyword=value, *args, **kwargs):
pass
Positional arguments are mandatory and have no default values.
Keyword arguments are optional and have default values.
An arbitrary argument list is optional and has no default values.
An arbitrary keyword argument dictionary is optional and has no default values.
Here are tips for when to use each method of argument passing:
48 | Chapter 4: Writing Great Code

Positional arguments
Use these when there are only a few function arguments, which are fully part of
the function’s meaning, with a natural order. For instance, in send(message,
recipient) or point(x, y) the user of the function has no difficulty remember‐
ing that those two functions require two arguments, and in which order.
Usage antipattern: It is possible to use argument names, and switch the order of
arguments when calling functions—for example, calling send(recipi
ent="World", message="The answer is 42.") and point(y=2, x=1). This
reduces readability and is unnecessarily verbose. Use the more straightforward
calls to send("The answer is 42", "World") and point(1, 2).
Keyword arguments
When a function has more than two or three positional parameters, its signature
is more difficult to remember, and using keyword arguments with default values
is helpful. For instance, a more complete send function could have the signature
send(message, to, cc=None, bcc=None). Here cc and bcc are optional and
evaluate to None when they are not passed another value.
Usage antipattern: It is possible to follow the order of arguments in the definition
without explicitly naming the arguments, like in send("42", "Frankie",
"Benjy", "Trillian"), sending a blind carbon copy to Trillian. It is also possi‐
ble to name arguments in another order, like in send("42", "Frankie",
bcc="Trillian", cc="Benjy"). Unless there’s a strong reason not to, it’s better
to use the form that is the closest to the function definition: send("42",
"Frankie", cc="Benjy", bcc="Trillian").
Never is often better than right now
It is often harder to remove an optional argument (and its logic
inside the function) that was added “just in case” and is seemingly
never used, than to add a new optional argument and its logic
when needed.
Arbitrary argument list
Defined with the *args construct, it denotes an extensible number of positional
arguments. In the function body, args will be a tuple of all the remaining posi‐
tional arguments. For example, send(message, *args) can also be called with
each recipient as an argument: send("42", "Frankie", "Benjy", "Tril
lian"); and in the function body, args will be equal to ("Frankie", "Benjy",
"Trillian"). A good example of when this works is the print function.
Caveat: If a function receives a list of arguments of the same nature, it’s often
more clear to use a list or any sequence. Here, if send has multiple recipients, we
Code Style | 49

can define it explicitly: send(message, recipients) and call it with send("42",
["Benjy", "Frankie", "Trillian"]).
Arbitrary keyword argument dictionary
Defined via the **kwargs construct, it passes an undetermined series of named
arguments to the function. In the function body, kwargs will be a dictionary of all
the passed named arguments that have not been caught by other keyword argu‐
ments in the function signature. An example of when this is useful is in logging;
formatters at different levels can seamlessly take what information they need
without inconveniencing the user.
Caveat: The same caution as in the case of *args is necessary, for similar reasons:
these powerful techniques are to be used when there is a proven necessity to use
them, and they should not be used if the simpler and clearer construct is suffi‐
cient to express the function’s intention.
The variable names *args and **kwargs can (and should) be
replaced with other names, when other names make more sense.
It is up to the programmer writing the function to determine which arguments are
positional arguments and which are optional keyword arguments, and to decide
whether to use the advanced techniques of arbitrary argument passing. After all,
there should be one—and preferably only one—obvious way to do it. Other users will
appreciate your effort when your Python functions are:
• Easy to read (meaning the name and arguments need no explanation)
•Easy to change (meaning adding a new keyword argument won’t break other
parts of the code)
If the implementation is hard to explain, it’s a bad idea
A powerful tool for hackers, Python comes with a very rich set of hooks and tools
allowing you to do almost any kind of tricky tricks. For instance, it is possible to:
• Change how objects are created and instantiated
•Change how the Python interpreter imports modules
• Embed C routines in Python
All these options have drawbacks, and it is always better to use the most straightfor‐
ward way to achieve your goal. The main drawback is that readability suffers when
50 | Chapter 4: Writing Great Code

using these constructs, so whatever you gain must be more important than the loss of
readability. Many code analysis tools, such as pylint or pyflakes, will be unable to
parse this “magic” code.
A Python developer should know about these nearly infinite possibilities, because it
instills confidence that no impassable problem will be on the way. However, knowing
how and particularly when not to use them is very important.
Like a kung fu master, a Pythonista knows how to kill with a single finger, and never
to actually do it.
We are all responsible users
As already demonstrated, Python allows many tricks, and some of them are poten‐
tially dangerous. A good example is that any client code can override an object’s prop‐
erties and methods: there is no “private” keyword in Python. This philosophy is very
different from highly defensive languages like Java, which provide a lot of mecha‐
nisms to prevent any misuse, and is expressed by the saying: “We are all responsible
users.”
This doesn’t mean that, for example, no properties are considered private, and that
proper encapsulation is impossible in Python. Rather, instead of relying on concrete
walls erected by the developers between their code and others’ code, the Python com‐
munity prefers to rely on a set of conventions indicating that these elements should
not be accessed directly.
The main convention for private properties and implementation details is to prefix all
“internals” with an underscore (e.g., sys._getframe). If the client code breaks this
rule and accesses these marked elements, any misbehavior or problems encountered
if the code is modified are the responsibility of the client code.
Using this convention generously is encouraged: any method or property that is not
intended to be used by client code should be prefixed with an underscore. This will
guarantee a better separation of duties and easier modification of existing code; it will
always be possible to publicize a private property, but making a public property pri‐
vate might be a much harder operation.
Return values from one place
When a function grows in complexity, it is not uncommon to use multiple return
statements inside the function’s body. However, to keep a clear intent and sustain
readability, it is best to return meaningful values from as few points in the body as
possible.
The two ways to exit from a function are upon error, or with a return value after the
function has been processed normally. In cases when the function cannot perform
correctly, it can be appropriate to return a None or False value. In this case, it is better
Code Style | 51

to return from the function as early as the incorrect context has been detected, to flat‐
ten the structure of the function: all the code after the return-because-of-failure state‐
ment can assume the condition is met to further compute the function’s main result.
Having multiple such return statements is often necessary.
Still, when possible, keep a single exit point—it’s difficult to debug functions when
you first have to identify which return statement is responsible for your result. Forc‐
ing the function to exit in just one place also helps to factor out some code paths, as
the multiple exit points probably are a hint that such a refactoring is needed. This
example is not bad code, but it could possibly be made more clear, as indicated in the
comments:
def select_ad(third_party_ads, user_preferences):
if not third_party_ads:
return None # Raising an exception might be better
if not user_preferences:
return None # Raising an exception might be better
# Some complex code to pick the best_ad given the
# available ads and the individual's preferences...
# Resist the temptation to return best_ad if succeeded...
if not best_ad:
# Some Plan-B computation of best_ad
return best_ad # A single exit point for the returned value
# will help when maintaining the code
Conventions
Conventions make sense to everyone, but may not be the only way to do things. The
conventions we show here are the more commonly used choices, and we recommend
them as the more readable option.
Alternatives to checking for equality
When you don’t need to explicitly compare a value to True, or None, or 0, you can just
add it to the if statement, like in the following examples. (See “Truth Value Testing”
for a list of what is considered false).
Bad Good
if attr == True:
print 'True!'
# Just check the value
if attr:
print 'attr is truthy!'
# or check for the opposite
if not attr:
print 'attr is falsey!'
# but if you only want 'True'
if attr is True:
print 'attr is True'
52 | Chapter 4: Writing Great Code
Bad Good
if attr == None:
print 'attr is None!'
# or explicitly check for None
if attr is None:
print 'attr is None!'
Accessing dictionary elements
Use the x in d syntax instead of the dict.has_key method, or pass a default argu‐
ment to dict.get():
Bad Good
>>> d = {'hello': 'world'}
>>>
>>> if d.has_key('hello'):
... print(d['hello']) # prints 'world'
... else:
... print('default_value')
...
world
>>> d = {'hello': 'world'}
>>>
>>> print d.get('hello', 'default_value')
world
>>> print d.get('howdy', 'default_value')
default_value
>>>
>>> # Or:
... if 'hello' in d:
... print(d['hello'])
...
world
Manipulating lists
List comprehensions provide a powerful, concise way to work with lists (for more
information, see the entry in The Python Tutorial). Also, the map() and filter()
functions can perform operations on lists using a different, more concise syntax:
Standard loop List comprehension
# Filter elements greater than 4
a = [3, 4, 5]
b = []
for i in a:
if i > 4:
b.append(i)
# The list comprehension is clearer
a = [3, 4, 5]
b = [i for i in a if i > 4]
# Or:
b = filter(lambda x: x > 4, a)
# Add three to all list members.
a = [3, 4, 5]
for i in range(len(a)):
a[i] += 3
# Also clearer in this case
a = [3, 4, 5]
a = [i + 3 for i in a]
# Or:
a = map(lambda i: i + 3, a)
Use enumerate() to keep a count of your place in the list. It is more readable than
manually creating a counter, and it is better optimized for iterators:
>>> a = ["icky", "icky", "icky", "p-tang"]
>>> for i, item in enumerate(a):
Code Style | 53

4A max of 80 characters according to PEP 8, 100 according to many others, and for you, whatever your boss
says. Ha! But honestly, anyone who’s ever had to use a terminal to debug code while standing up next to a rack
will quickly come to appreciate the 80-character limit (at which code doesn’t wrap on a terminal) and in fact
prefer 75–77 characters to allow for line numbering in Vi.
5See Zen 14. Guido, our BDFL, happens to be Dutch.
... print("{i}: {item}".format(i=i, item=item))
...
0: icky
1: icky
2: icky
3: p-tang
Continuing a long line of code
When a logical line of code is longer than the accepted limit,4 you need to split it over
multiple physical lines. The Python interpreter will join consecutive lines if the last
character of the line is a backslash. This is helpful in some cases, but should usually
be avoided because of its fragility: a whitespace character added to the end of the line,
after the backslash, will break the code and may have unexpected results.
A better solution is to use parentheses around your elements. Left with an unclosed
parenthesis on an end-of-line, the Python interpreter will join the next line until the
parentheses are closed. The same behavior holds for curly and square braces:
Bad Good
french_insult = \
"Your mother was a hamster, and \
your father smelt of elderberries!"
french_insult = (
"Your mother was a hamster, and "
"your father smelt of elderberries!"
)
from some.deep.module.in.a.module \
import a_nice_function, \
another_nice_function, \
yet_another_nice_function
from some.deep.module.in.a.module import (
a_nice_function,
another_nice_function,
yet_another_nice_function
)
However, more often than not, having to split a long logical line is a sign that you are
trying to do too many things at the same time, which may hinder readability.
Idioms
Although there usually is one—and preferably only one—obvious way to do it, the
way to write idiomatic (or Pythonic) code can be non-obvious to Python beginners at
first (unless they’re Dutch5). So, good idioms must be consciously acquired.
54 | Chapter 4: Writing Great Code

Unpacking
If you know the length of a list or tuple, you can assign names to its elements with
unpacking. For example, because it’s possible to specify the number of times to split a
string in split() and rsplit(), the righthand side of an assignment can be made to
split only once (e.g., into a filename and an extension), and the lefthand side can con‐
tain both destinations simultaneously, in the correct order, like this:
>>> filename, ext = "my_photo.orig.png".rsplit(".", 1)
>>> print(filename, "is a", ext, "file.")
my_photo.orig is a png file.
You can use unpacking to swap variables as well:
a, b = b, a
Nested unpacking works, too:
a, (b, c) = 1, (2, 3)
In Python 3, a new method of extended unpacking was introduced by PEP 3132:
a, *rest = [1, 2, 3]
# a = 1, rest = [2, 3]
a, *middle, c = [1, 2, 3, 4]
# a = 1, middle = [2, 3], c = 4
Ignoring a value
If you need to assign something while unpacking, but will not need that variable, use
a double underscore (__):
filename = 'foobar.txt'
basename, __, ext = filename.rpartition('.')
Many Python style guides recommend a single underscore (_) for
throwaway variables rather than the double underscore (__) rec‐
ommended here. The issue is that a single underscore is commonly
used as an alias for the gettext.gettext() function, and is also
used at the interactive prompt to hold the value of the last opera‐
tion. Using a double underscore instead is just as clear and almost
as convenient, and eliminates the risk of accidentally overwriting
the single underscore variable, in either of these other use cases.
Creating a length-N list of the same thing
Use the Python list * operator to make a list of the same immutable item:
>>> four_nones = [None] * 4
>>> print(four_nones)
[None, None, None, None]
Code Style | 55

6By the way, this is why only hashable objects can be stored in sets or used as dictionary keys. To make your
own Python objects hashable, define an object.__hash__(self) member function that returns an integer.
Objects that compare equal must have the same hash value. The Python documentation has more informa‐
tion.
But be careful with mutable objects: because lists are mutable, the * operator will cre‐
ate a list of N references to the same list, which is not likely what you want. Instead,
use a list comprehension:
Bad Good
>>> four_lists = [[]] * 4
>>> four_lists[0].append("Ni")
>>> print(four_lists)
[['Ni'], ['Ni'], ['Ni'], ['Ni']]
>>> four_lists = [[] for __ in range(4)]
>>> four_lists[0].append("Ni")
>>> print(four_lists)
[['Ni'], [], [], []]
A common idiom for creating strings is to use str.join() on an empty string. This
idiom can be applied to lists and tuples:
>>> letters = ['s', 'p', 'a', 'm']
>>> word = ''.join(letters)
>>> print(word)
spam
Sometimes we need to search through a collection of things. Let’s look at two options:
lists and sets.
Take the following code for example:
>>> x = list(('foo', 'foo', 'bar', 'baz'))
>>> y = set(('foo', 'foo', 'bar', 'baz'))
>>>
>>> print(x)
['foo', 'foo', 'bar', 'baz']
>>> print(y)
{'foo', 'bar', 'baz'}
>>>
>>> 'foo' in x
True
>>> 'foo' in y
True
Even though both boolean tests for list and set membership look identical, foo in y
is utilizing the fact that sets (and dictionaries) in Python are hash tables,6 the lookup
performance between the two examples is different. Python will have to step through
each item in the list to find a matching case, which is time-consuming (the time dif‐
ference becomes significant for larger collections). But finding keys in the set can be
done quickly, using the hash lookup. Also, sets and dictionaries drop duplicate
56 | Chapter 4: Writing Great Code

entries, which is why dictionaries cannot have two identical keys. For more informa‐
tion, see this Stack Overflow discussion on list versus dict.
Exception-safe contexts
It is common to use try/finally clauses to manage resources like files or thread
locks when exceptions may occur. PEP 343 introduced the with statement and a con‐
text manager protocol into Python (in version 2.5 and beyond)—an idiom to replace
these try/finally clauses with more readable code. The protocol consists of two
methods, __enter__() and __exit__(), that when implemented for an object allow
it to be used via the new with statement, like this:
>>> import threading
>>> some_lock = threading.Lock()
>>>
>>> with some_lock:
... # Make Earth Mark One, run it for 10 million years ...
... print(
... "Look at me: I design coastlines.\n"
... "I got an award for Norway."
... )
...
which would previously have been:
>>> import threading
>>> some_lock = threading.Lock()
>>>
>>> some_lock.acquire()
>>> try:
... # Make Earth Mark One, run it for 10 million years ...
... print(
... "Look at me: I design coastlines.\n"
... "I got an award for Norway."
... )
... finally:
... some_lock.release()
The standard library module contextlib provides additional tools that help turn
functions into context managers, enforce the call of an object’s close() method, sup‐
press exceptions (Python 3.4 and greater), and redirect standard output and error
streams (Python 3.4 or 3.5 and greater). Here is an example use of contextlib.clos
ing():
>>> from contextlib import closing
>>> with closing(open("outfile.txt", "w")) as output:
... output.write("Well, he's...he's, ah...probably pining for the fjords.")
...
56
Code Style | 57

7In this case, the __exit__() method just calls the I/O wrapper’s close() method, to close the file descriptor.
On many systems, there’s a maximum allowable number of open file descriptors, and it’s good practice to
release them when they’re done.
but because __enter__() and __exit__() methods are defined for the object that
handles file I/O,7 we can use the with statement directly, without the closing:
>>> with open("outfile.txt", "w") as output:
output.write(
"PININ' for the FJORDS?!?!?!? "
"What kind of talk is that?, look, why did he fall "
"flat on his back the moment I got 'im home?\n"
)
...
123
Common Gotchas
For the most part, Python aims to be a clean and consistent language that avoids sur‐
prises. However, there are a few cases that can be confusing to newcomers.
Some of these cases are intentional but can be potentially surprising. Some could
arguably be considered language warts. In general, though, what follows is a collec‐
tion of potentially tricky behaviors that might seem strange at first glance, but are
generally sensible once you’re aware of the underlying cause for the surprise.
Mutable default arguments
Seemingly the most common surprise new Python programmers encounter is
Python’s treatment of mutable default arguments in function definitions.
What you wrote:
def append_to(element, to=[]):
to.append(element)
return to
What you might have expected to happen:
my_list = append_to(12)
print(my_list)
my_other_list = append_to(42)
print(my_other_list)
A new list is created each time the function is called if a second argument isn’t
provided, so that the output is:
[12]
[42]
58 | Chapter 4: Writing Great Code

What actually happens:
[12]
[12, 42]
A new list is created once when the function is defined, and the same list is used
in each successive call: Python’s default arguments are evaluated once when the
function is defined, not each time the function is called (like it is in say, Ruby).
This means that if you use a mutable default argument and mutate it, you will
have mutated that object for all future calls to the function as well.
What you should do instead:
Create a new object each time the function is called, by using a default arg to sig‐
nal that no argument was provided (None is often a good choice):
def append_to(element, to=None):
if to is None:
to = []
to.append(element)
return to
When this gotcha isn’t a gotcha:
Sometimes you can specifically “exploit” (i.e., use as intended) this behavior to
maintain state between calls of a function. This is often done when writing a
caching function (which stores results in-memory), for example:
def time_consuming_function(x, y, cache={}):
args = (x, y)
if args in cache:
return cache[args]
# Otherwise this is the first time with these arguments.
# Do the time-consuming operation...
cache[args] = result
return result
Late binding closures
Another common source of confusion is the way Python binds its variables in clo‐
sures (or in the surrounding global scope).
What you wrote:
def create_multipliers():
return [lambda x : i * x for i in range(5)]
What you might have expected to happen:
for multiplier in create_multipliers():
print(multiplier(2), end=" ... ")
print()
A list containing five functions that each have their own closed-over i variable
that multiplies their argument, producing:
Code Style | 59

0 ... 2 ... 4 ... 6 ... 8 ...
What actually happens:
8 ... 8 ... 8 ... 8 ... 8 ...
Five functions are created; instead all of them just multiply x by 4. Why? Python’s
closures are late binding. This means that the values of variables used in closures
are looked up at the time the inner function is called.
Here, whenever any of the returned functions are called, the value of i is looked
up in the surrounding scope at call time. By then, the loop has completed, and i
is left with its final value of 4.
What’s particularly nasty about this gotcha is the seemingly prevalent misinfor‐
mation that this has something to do with lambda expressions in Python. Func‐
tions created with a lambda expression are in no way special, and in fact the same
exact behavior is exhibited by just using an ordinary def:
def create_multipliers():
multipliers = []
for i in range(5):
def multiplier(x):
return i * x
multipliers.append(multiplier)
return multipliers
What you should do instead:
The most general solution is arguably a bit of a hack. Due to Python’s aforemen‐
tioned behavior concerning evaluating default arguments to functions (see
“Mutable default arguments” on page 58), you can create a closure that binds
immediately to its arguments by using a default argument:
def create_multipliers():
return [lambda x, i=i : i * x for i in range(5)]
Alternatively, you can use the functools.partial() function:
from functools import partial
from operator import mul
def create_multipliers():
return [partial(mul, i) for i in range(5)]
When this gotcha isn’t a gotcha:
Sometimes you want your closures to behave this way. Late binding is good in
lots of situations (e.g., in the Diamond project, “Example use of a closure (when
the gotcha isn’t a gotcha)” on page 109). Looping to create unique functions is
unfortunately a case where it can cause hiccups.
60 | Chapter 4: Writing Great Code

Structuring Your Project
By structure we mean the decisions you make concerning how your project best
meets its objective. The goal is to best leverage Python’s features to create clean, effec‐
tive code. In practical terms, that means the logic and dependencies in both your
code and in your file and folder structure are clear.
Which functions should go into which modules? How does data flow through the
project? What features and functions can be grouped together and isolated? By
answering questions like these, you can begin to plan, in a broad sense, what your
finished product will look like.
The Python Cookbook has a chapter on modules and packages that describes in detail
how __import__ statements and packaging works. The purpose of this section is to
outline aspects of Python’s module and import systems that are central to enforcing
structure in your project. We then discuss various perspectives on how to build code
that can be extended and tested reliably.
Thanks to the way imports and modules are handled in Python, it is relatively easy to
structure a Python project: there are few constraints and the model for importing
modules is easy to grasp. Therefore, you are left with the pure architectural task of
crafting the different parts of your project and their interactions.
Modules
Modules are one of Python’s main abstraction layers, and probably the most natural
one. Abstraction layers allow a programmer to separate code into parts that hold
related data and functionality.
For example, if one layer of a project handles interfacing with user actions, while
another handles low-level manipulation of data, the most natural way to separate
these two layers is to regroup all interfacing functionality in one file, and all low-level
operations in another file. This grouping places them into two separate modules. The
interface file would then import the low-level file with the import module or from
module import attribute statements.
As soon as you use import statements, you also use modules. These can be either
built-in modules (such as os and sys), third-party packages you have installed in
your environment (such as Requests or NumPy), or your project’s internal modules.
The following code shows some example import statements and confirms that an
imported module is a Python object with its own data type:
>>> import sys # built-in module
>>> import matplotlib.pyplot as plt # third-party module
>>>
>>> import mymodule as mod # internal project module
>>>
Structuring Your Project | 61

8If you’d like, you could name your module my_spam.py, but even our friend the underscore should not be
seen often in module names (underscores give the impression of a variable name).
>>> print(type(sys), type(plt), type(mod))
<class 'module'> <class 'module'> <class 'module'>
To keep in line with the style guide, keep module names short and lowercase. And be
sure to avoid using special symbols like the dot (.) or question mark (?), which would
interfere with the way Python looks for modules. So a filename like my.spam.py8 is
one you should avoid; Python would expect to find a spam.py file in a folder named
my, which is not the case. The Python documentation gives more details about using
dot notation.
Importing modules
Aside from some naming restrictions, nothing special is required to use a Python file
as a module, but it helps to understand the import mechanism. First, the import
modu statement will look for the definition of modu in a file named modu.py in the
same directory as the caller if a file with that name exists. If it is not found, the
Python interpreter will search for modu.py in Python’s search path recursively and
raise an ImportError exception if it is not found. The value of the search path is
platform-dependent and includes any user- or system-defined directories in the envi‐
ronment’s $PYTHONPATH (or %PYTHONPATH% in Windows). It can be manipulated or
inspected in a Python session:
import sys
>>> sys.path
[ '', '/current/absolute/path', 'etc']
# The actual list contains every path that is searched
# when you import libraries into Python, in the order
# that they'll be searched.
Once modu.py is found, the Python interpreter will execute the module in an isolated
scope. Any top-level statement in modu.py will be executed, including other imports,
if any exist. Function and class definitions are stored in the module’s dictionary.
Finally, the module’s variables, functions, and classes will be available to the caller
through the module’s namespace, a central concept in programming that is particu‐
larly helpful and powerful in Python. Namespaces provide a scope containing named
attributes that are visible to each other but not directly accessible outside of the
namespace.
In many languages, an include file directive causes the preprocessor to, effectively,
copy the contents of the included file into the caller’s code. It’s different in Python: the
included code is isolated in a module namespace. The result of the import modu
statement will be a module object named modu in the global namespace, with the
62 | Chapter 4: Writing Great Code

attributes defined in the module accessible via dot notation: modu.sqrt would be the
sqrt object defined inside of modu.py, for example. This means you generally don’t
have to worry that the included code could have unwanted effects—for example,
overriding an existing function with the same name.
Namespace Tools
The functions dir(), globals(), and locals() help with quick namespace introspec‐
tion:
•dir(object) returns a list of attributes that are accessible via the object
•globals() returns a dictionary of the attributes currently in the global name‐
space, along with their values.
•locals() returns a dictionary of the attributes in the current local namespace
(e.g., within a function), along with their values.
For more information, see “Data model” in Python’s official documentation.
It is possible to simulate the more standard behavior by using a special syntax of the
import statement: from modu import *. However, this is generally considered bad
practice: using import * makes code harder to read, makes dependencies less com‐
partmentalized, and can clobber (overwrite) existing defined objects with the new
definitions inside the imported module.
Using from modu import func is a way to import only the attribute you want into
the global namespace. While much less harmful than from modu import * because it
shows explicitly what is imported in the global namespace. Its only advantage over a
simpler import modu is that it will save you a little typing.
Table 4-1 compares the different ways to import definitions from other modules.
Table 4-1. Dierent ways to import denitions from modules
Very bad
(confusing for a reader)
Better
(obvious which new names are
in the global namespace)
Best
(immediately obvious where
the attribute comes from)
from modu import *
x = sqrt(4)
from modu import sqrt
x = sqrt(4)
import modu
x = modu.sqrt(4)
Is sqrt part of modu? Or a built-in?
Or dened above? Has sqrt been modied or redened
in between, or is it the one in modu?Now sqrt is visibly part of modu’s
namespace.
Structuring Your Project | 63

As mentioned in “Code Style” on page 43, readability is one of the main features of
Python. Readable code avoids useless boilerplate text and clutter. But terseness and
obscurity are the limits where brevity should stop. Explicitly stating where a class or
function comes from, as in the modu.func() idiom, greatly improves code readability
and understandability in all but the simplest single-file projects.
Structure Is Key
Though you can structure a project however you like, some pitfalls to avoid are:
Multiple and messy circular dependencies
If your classes Table and Chair in furn.py need to import Carpenter from work‐
ers.py to answer a question such as table.is_done_by(), and if the class Carpen
ter needs to import Table and Chair, to answer carpenter.what_do(), then you
have a circular dependency—furn.py depends on workers.py, which depends on
furn.py. In this case, you will have to resort to fragile hacks such as using import
statements inside methods to avoid causing an ImportError.
Hidden coupling
Each and every change in Table’s implementation breaks 20 tests in unrelated
test cases because it breaks Carpenter’s code, which requires very careful surgery
to adapt the change. This means you have too many assumptions about Table in
Carpenter’s code.
Heavy use of global state or context
Instead of explicitly passing (height, width, type, wood) to each other, Table and
Carpenter rely on global variables that can be modified and are modified on the
fly by different agents. You need to scrutinize all access to these global variables
to understand why a rectangular table became a square, and discover that remote
template code is also modifying this context, messing with table dimensions.
Spaghetti code
Multiple pages of nested if clauses and for loops with a lot of copy-pasted pro‐
cedural code and no proper segmentation are known as spaghetti code. Python’s
meaningful indentation (one of its most controversial features) makes it hard to
maintain this kind of code, so you may not see too much of it.
Ravioli code
This is more likely in Python than spaghetti code. Ravioli code consists of hun‐
dreds of similar little pieces of logic, often classes or objects, without proper
structure. If you never can remember whether you have to use FurnitureTable,
AssetTable or Table, or even TableNew for your task at hand, you might be
swimming in ravioli code. Diamond, Requests, and Werkzeug (in the next chap‐
64 | Chapter 4: Writing Great Code

9Thanks to PEP 420, which was implemented in Python 3.3, there is now an alternative to the root package,
called the namespace package. Namespace packages must not have an __init__.py and can be dispersed across
multiple directories in sys.path. Python will gather all of the pieces together and present them together to the
user as a single package.
ter) avoid ravioli code by collecting their useful but unrelated pieces of logic into
a utils.py module or a utils package to reuse across the project.
Packages
Python provides a very straightforward packaging system, which extends the module
mechanism to a directory.
Any directory with an __init__.py file is considered a Python package. The top-level
directory with an __init__.py is the root package.9 The different modules in the pack‐
age are imported in a similar manner as plain modules, but with a special behavior
for the __init__.py file, which is used to gather all package-wide definitions.
A file modu.py in the directory pack/ is imported with the statement import
pack.modu. The interpreter will look for an __init__.py file in pack and execute all of
its top-level statements. Then it will look for a file named pack/modu.py and execute
all of its top-level statements. After these operations, any variable, function, or class
defined in modu.py is available in the pack.modu namespace.
A commonly seen issue is too much code in __init__.py files. When the project’s
complexity grows, there may be subpackages and sub-subpackages in a deep direc‐
tory structure. In this case, importing a single item from a sub-sub-package will
require executing all __init__.py files met while traversing the tree.
It is normal, even good practice, to leave an __init__.py empty when the package’s
modules and subpackages do not need to share any code—the HowDoI and Dia‐
mond projects that are used as examples in the next section both have no code except
version numbers in their __init__.py files. The Tablib, Requests, and Flask projects
contain a top-level documentation string and import statements that expose the
intended API for each project, and the Werkzeug project also exposes its top-level
API but does it using lazy loading (extra code that only adds content to the name‐
space as it is used, which speeds up the initial import statement).
Lastly, a convenient syntax is available for importing deeply nested packages: import
very.deep.module as mod. This allows you to use mod in place of the verbose repeti‐
tion of very.deep.module.
Structuring Your Project | 65

Object-Oriented Programming
Python is sometimes described as an object-oriented programming language. This
can be somewhat misleading and needs to be clarified.
In Python, everything is an object, and can be handled as such. This is what is meant
when we say that functions are first-class objects. Functions, classes, strings, and even
types are objects in Python: they all have a type, can be passed as function arguments,
and may have methods and properties. In this understanding, Python is an object-
oriented language.
However, unlike Java, Python does not impose object-oriented programming as the
main programming paradigm. It is perfectly viable for a Python project to not be
object oriented—that is, to use no (or very few) class definitions, class inheritance, or
any other mechanisms that are specific to object-oriented programming. These fea‐
tures are available, but not obligatory, for us Pythonistas. Moreover, as seen in “Mod‐
ules” on page 61, the way Python handles modules and namespaces gives the
developer a natural way to ensure the encapsulation and separation of abstraction lay‐
ers—the most common reasons to use object orientation—without classes.
Proponents of functional programming (a paradigm that, in its purest form, has no
assignment operator, no side effects, and basically chains functions to accomplish
tasks), say that bugs and confusion occur when a function does different things
depending on the external state of the system—for example, a global variable that
indicates whether or not a person is logged in. Python, although not a purely func‐
tional language, has tools that make functional programming possible, and then we
can restrict our use of custom classes to situations where we want to glue together a
state and a functionality.
In some architectures, typically web applications, multiple instances of Python pro‐
cesses are spawned to respond to external requests that can happen at the same time.
In this case, holding some state into instantiated objects, which means keeping some
static information about the world, is prone to race conditions, a term used to describe
the situation where, at some point between the initialization of the state of an object
(usually done with the Class.__init__() method in Python) and the actual use of
the object state through one of its methods, the state of the world has changed.
For example, a request may load an item in memory and later mark it as added to a
user’s shopping cart. If another request sells the item to another person at the same
time, it may happen that the sale actually occurs after the first session loaded the item,
and then we are trying to sell inventory already flagged as sold. This and other issues
led to a preference for stateless functions.
Our recommendation is as follows: when working with code that relies on some per‐
sistent context or global state (like most web applications), use functions and proce‐
dures with as few implicit contexts and side effects as possible. A function’s implicit
66 | Chapter 4: Writing Great Code

context is made up of any of the global variables or items in the persistence layer that
are accessed from within the function. Side eects are the changes that a function
makes to its implicit context. If a function saves or deletes data in a global variable or
in the persistence layer, it is said to have a side effect.
Custom classes in Python should be used to carefully isolate functions with context
and side effects from functions with logic (called pure functions). Pure functions are
deterministic: given a fixed input, the output will always be the same. This is because
they do not depend on context, and do not have side effects. The print() function,
for example, is impure because it returns nothing but writes to standard output as a
side effect. Here are some benefits of having pure, separate functions:
•Pure functions are much easier to change or replace if they need to be refactored
or optimized.
•Pure functions are easier to test with unit-tests there is less need for complex
context setup and data cleaning afterward.
•Pure functions are easier to manipulate, decorate (more on decorators in a
moment), and pass around.
In summary, for some architectures, pure functions are more efficient building blocks
than classes and objects because they have no context or side effects. As an example,
the I/O functions related to each of the file formats in the Tablib library (tablib/
formats/*.py—we’ll look at Tablib in the next chapter) are pure functions, and not
part of a class, because all they do is read data into a separate Dataset object that per‐
sists the data, or write the Dataset to a file. But the Session object in the Requests
library (also coming up in the next chapter) is a class, because it has to persist the
cookie and authentication information that may be exchanged in an HTTP session.
Object orientation is useful and even necessary in many cases—for
example, when developing graphical desktop applications or
games, where the things that are manipulated (windows, buttons,
avatars, vehicles) have a relatively long life of their own in the com‐
puter’s memory. This is also one motive behind object-relational
mapping, which maps rows in databases to objects in code, dis‐
cussed further in “Database Libraries” on page 272.
Decorators
Decorators were added to Python in version 2.4 and are defined and discussed in
PEP 318. A decorator is a function or a class method that wraps (or decorates)
another function or method. The decorated function or method will replace the origi‐
nal function or method. Because functions are first-class objects in Python, this can
Structuring Your Project | 67

be done manually, but using the @decorator syntax is clearer and preferred. Here is
an example of how to use a decorator:
>>> def foo():
... print("I am inside foo.")
...
...
...
>>> import logging
>>> logging.basicConfig()
>>>
>>> def logged(func, *args, **kwargs):
... logger = logging.getLogger()
... def new_func(*args, **kwargs):
... logger.debug("calling {} with args {} and kwargs {}".format(
... func.__name__, args, kwargs))
... return func(*args, **kwargs)
... return new_func
...
>>>
>>>
... @logged
... def bar():
... print("I am inside bar.")
...
>>> logging.getLogger().setLevel(logging.DEBUG)
>>> bar()
DEBUG:root:calling bar with args () and kwargs {}
I am inside bar.
>>> foo()
I am inside foo.
This mechanism is useful for isolating the core logic of the function or method. A
good example of a task that is better handled with decoration is memoization or cach‐
ing: you want to store the results of an expensive function in a table and use them
directly instead of recomputing them when they have already been computed. This is
clearly not part of the function logic. As of PEP 3129, starting in Python 3, decorators
can also be applied to classes.
Dynamic Typing
Python is dynamically typed (as opposed to statically typed), meaning variables do
not have a fixed type. Variables are implemented as pointers to an object, making it
possible for the variable a to be set to the value 42, then to the value “thanks for all the
fish”, then to a function.
The dynamic typing used in Python is often considered to be a weakness, because it
can lead to complexities and hard-to-debug code: if something named a can be set to
many different things, the developer or the maintainer must track this name in the
68 | Chapter 4: Writing Great Code

10 Instructions to define your own types in C are provided in the Python extension documentation.
code to make sure it has not been set to a completely unrelated object. Table 4-2 illus‐
trates good and bad practice when using names.
Table 4-2. Avoid using the same variable name for dierent things
Advice Bad Good
Use short functions or methods to
reduce the risk of using the same
name for two unrelated things.
a = 1
a = 'answer is {}'.format(a)
def get_answer(a):
return 'answer is {}'.format(a)
a = get_answer(1)
Use dierent names for related
items when they have a dierent
type.
# A string ...
items = 'a b c d'
# No, a list ...
items = items.split(' ')
# No, a set ...
items = set(items)
items_string = 'a b c d'
items_list = items.split(' ')
items = set(items_list)
There is no efficiency gain when reusing names: the assignment will still create a new
object. And when the complexity grows and each assignment is separated by other
lines of code, including branches and loops, it becomes harder to determine a given
variable’s type.
Some coding practices, like functional programming, recommend against reassigning
variables. In Java, a variable can be forced to always contain the same value after
assignment by using the final keyword. Python does not have a final keyword, and it
would be against its philosophy. But assigning a varible only once may be a good dis‐
cipline; it helps reinforce the concept of mutable versus immutable types.
Pylint will warn you if you reassign a variable to two different
types.
Mutable and Immutable Types
Python has two kinds of built-in or user-defined10 types:
# Lists are mutable
my_list = [1, 2, 3]
my_list[0] = 4
print my_list # [4, 2, 3] <- The same list, changed.
# Integers are immutable
Structuring Your Project | 69

11 An example of a simple hashing algorithm is to convert the bytes of an item to an integer, and take its value
modulo some number. This is how memcached distributes keys across multiple computers.
x = 6
x = x + 1 # The new x occupies a different location in memory.
Mutable types
These allow in-place modification of the object’s content. Examples are lists and
dictionaries, which have mutating methods like list.append() or dict.pop()
and can be modified in place.
Immutable types
These types provide no method for changing their content. For instance, the vari‐
able x set to the integer 6 has no “increment” method. To compute x + 1, you
have to create another integer and give it a name.
One consequence of this difference in behavior is that mutable types cannot be used
as dictionary keys, because if the value ever changes, it will not hash to the same
value, and dictionaries use hashing11 for key storage. The immutable equivalent of a
list is the tuple, created with parentheses—for example, (1, 2). It cannot be changed
in place and so can be used as a dictionary key.
Using properly mutable types for objects that are intended to be mutable (e.g.,
my_list = [1, 2, 3]) and immutable types for objects that are intended to have a
fixed value (e.g., islington_phone = ("220", "7946", "0347")) clarifies the intent
of the code for other developers.
One peculiarity of Python that can surprise newcomers is that strings are immutable;
attempting to change one will yield a type error:
>>> s = "I'm not mutable"
>>> s[1:7] = " am"
Traceback (most recent call last):
File "<stdin>", line 1, in <module>
TypeError: 'str' object does not support item assignment
This means that when constructing a string from its parts, it is much more efficient to
accumulate the parts in a list, because it is mutable, and then join the parts together to
make the full string. Also, a Python list comprehension, which is a shorthand syntax to
iterate over an input to create a list, is better and faster than constructing a list from
calls to append() within a loop. Table 4-3 shows different ways to create a string from
an iterable.
70 | Chapter 4: Writing Great Code

12 We should admit that even though, according to PEP 3101, the percent-style formatting (%s, %d, %f) has been
deprecated now for over a decade, most old hats still use it, and PEP 460 just introduced this same method to
format bytes or bytearray objects.
Table 4-3. Example ways to concatenate a string
Bad Good Best
>>> s = ""
>>> for c in (97, 98, 98):
... s += unichr(c)
...
>>> print(s)
abc
>>> s = []
>>> for c in (97, 98, 99):
... s.append(unichr(c))
...
>>> print("".join(s))
abc
>>> r = (97, 98, 99)
>>> s = [unichr(c) for c in r]
>>> print("".join(s))
abc
The main Python page has a good discussion on this kind of optimization.
Finally, if the number of elements in a concatenation is known, pure string addition is
faster (and more straightforward) than creating a list of items just to do a "".join().
All of the following formatting options to define cheese do the same thing:12
>>> adj = "Red"
>>> noun = "Leicester"
>>>
>>> cheese = "%s %s" % (adj, noun) # This style was deprecated (PEP 3101)
>>> cheese = "{} {}".format(adj, noun) # Possible since Python 3.1
>>> cheese = "{0} {1}".format(adj, noun) # Numbers can also be reused
>>> cheese = "{adj} {noun}".format(adj=adj, noun=noun) # This style is best
>>> print(cheese)
Red Leicester
Vendorizing Dependencies
A package that vendorizes dependencies includes external dependencies (third-party
libraries) within its source, often inside of a folder named vendor, or packages. There
is a very good blog post on the subject that lists the main reasons a package owner
might do this (basically, to avoid various dependency issues), and discusses alterna‐
tives.
Consensus is that in almost all cases, it is better to keep the dependency separate, as it
adds unnecessary content (often megabytes of extra code) to the repository; virtual
environments used in combination with setup.py (preferred, especially when your
package is a library) or a requirements.txt (which, when used, will override dependen‐
cies in setup.py in the case of conflicts) can restrict dependencies to a known set of
working versions.
If those options are not enough, it might be helpful to contact the owner of the
dependency to maybe resolve the issue by updating their package (e.g., your library
Structuring Your Project | 71

many depend on an upcoming release of their package, or may need a specific new
feature added), as those changes would likely benefit the entire community. The cav‐
eat is, if you submit pull requests for big changes, you may be expected to maintain
those changes when further suggestions and requests come in; for this reason, both
Tablib and Requests vendorize at least some dependencies. As the community moves
into complete adoption of Python 3, hopefully fewer of the most pressing issues will
remain.
Testing Your Code
Testing your code is very important. People are much more likely to use a project that
actually works.
Python first included doctest and unittest in Python 2.1, released in 2001, embrac‐
ing test-driven development (TDD), where the developer first writes tests that define
the main operation and edge cases for a function, and then writes the function to pass
those tests. Since then, TDD has become accepted and widely adopted in business
and in open source projects—it’s a good idea to practice writing the testing code and
the running code in parallel. Used wisely, this method helps you precisely define your
code’s intent and have a more modular architecture.
Tips for testing
A test is about the most massively useful code a hitchhiker can write. We’ve summar‐
ized some of our tips here.
Just one thing per test. A testing unit should focus on one tiny bit of functionality and
prove it correct.
Independence is imperative. Each test unit must be fully independent: able to run
alone, and also within the test suite, regardless of the order they are called. The impli‐
cation of this rule is that each test must be loaded with a fresh dataset and may have
to do some cleanup afterward. This is usually handled by setUp() and tearDown()
methods.
Precision is better than parsimony. Use long and descriptive names for testing func‐
tions. This guideline is slightly different than for running code, where short names
are often preferred. The reason is testing functions are never called explicitly.
square() or even sqr() is OK in running code, but in testing code, you should have
names such as test_square_of_number_2() or test_square_negative_number().
These function names are displayed when a test fails and should be as descriptive as
possible.
Speed counts. Try hard to make tests that are fast. If one test needs more than a few
milliseconds to run, development will be slowed down, or the tests will not be run as
72 | Chapter 4: Writing Great Code

often as is desirable. In some cases, tests can’t be fast because they need a complex
data structure to work on, and this data structure must be loaded every time the test
runs. Keep these heavier tests in a separate test suite that is run by some scheduled
task, and run all other tests as often as needed.
RTMF (Read the manual, friend!). Learn your tools and learn how to run a single test or
a test case. Then, when developing a function inside a module, run this function’s
tests often, ideally automatically when you save the code.
Test everything when you start—and again when you nish. Always run the full test suite
before a coding session, and run it again after. This will give you more confidence
that you did not break anything in the rest of the code.
Version control automation hooks are fantastic. It is a good idea to implement a hook
that runs all tests before pushing code to a shared repository. You can directly add
hooks to your version control system, and some IDEs provide ways to do this more
simply in their own environments. Here are the links to the popular systems’ docu‐
mentation, which will step you through how to do this:
•GitHub
•Mercurial
•Subversion
Write a breaking test if you want to take a break. If you are in the middle of a develop‐
ment session and have to interrupt your work, it is a good idea to write a broken unit
test about what you want to develop next. When coming back to work, you will have
a pointer to where you were and get back on track faster.
In the face of ambiguity, debug using a test. The first step when you are debugging your
code is to write a new test pinpointing the bug. While it is not always possible to do,
those bug catching tests are among the most valuable pieces of code in your project.
If the test is hard to explain, good luck nding collaborators. When something goes wrong
or has to be changed, if your code has a good set of tests, you or other maintainers
will rely largely on the testing suite to fix the problem or modify a given behavior.
Therefore, the testing code will be read as much as—or even more than—the running
code. A unit test whose purpose is unclear is not very helpful in this case.
If the test is easy to explain, it is almost always a good idea. Another use of the testing
code is as an introduction to new developers. When other people will have to work
on the code base, running and reading the related testing code is often the best thing
they can do. They will (or should) discover the hot spots, where most difficulties
arise, and the corner cases. If they have to add some functionality, the first step
should be to add a test and, by this means, ensure the new functionality is not already
a working path that has not been plugged into the interface.
Testing Your Code | 73

Above all, don’t panic. It’s open source! The whole world’s got your back.
Testing Basics
This section lists the basics of testing—for an idea about what options are available—
and gives a few examples taken from the Python projects we dive into next, in Chap‐
ter 5. There is an entire book on TDD in Python, and we don’t want to rewrite it.
Check out Test-Driven Development with Python (O’Reilly) (obey the testing goat!).
unittest
unittest is the batteries-included test module in the Python standard library. Its API
will be familiar to anyone who has used any of the JUnit (Java)/nUnit (.NET)/CppU‐
nit (C/C++) series of tools.
Creating test cases is accomplished by subclassing unittest.TestCase. In this exam‐
ple code, the test function is just defined as a new method in MyTest:
# test_example.py
import unittest
def fun(x):
return x + 1
class MyTest(unittest.TestCase):
def test_that_fun_adds_one(self):
self.assertEqual(fun(3), 4)
class MySecondTest(unittest.TestCase):
def test_that_fun_fails_when_not_adding_number(self):
self.assertRaises(TypeError, fun, "multiply six by nine")
Test methods must start with the string test or they will not run.
Test modules (files) are expected to match the pattern test*.py by
default but can match any pattern given to the --pattern keyword
argument on the command line.
To run all tests in that TestClass, open a terminal shell; and in the same directory as
the file, invoke Python’s unittest module on the command line, like this:
$ python -m unittest test_example.MyTest
.
----------------------------------------------------------------------
Ran 1 test in 0.000s
OK
Or to run all tests in a file, name the file:
74 | Chapter 4: Writing Great Code

$ python -m unittest test_example
.
----------------------------------------------------------------------
Ran 2 tests in 0.000s
OK
Mock (in unittest)
As of Python 3.3, unittest.mock is available in the standard library. It allows you to
replace parts of your system under test with mock objects and make assertions about
how they have been used.
For example, you can monkey patch a method like in the following example (a mon‐
key patch is code that modifies or replaces other existing code at runtime.) In this
code, the existing method named ProductionClass.method, for the instance we cre‐
ate named instance, is replaced with a new object, MagicMock, which will always
return the value 3 when called, and which counts the number of method calls it
receives, records the signature it was called with, and contains assertion methods for
testing purposes:
from unittest.mock import MagicMock
instance = ProductionClass()
instance.method = MagicMock(return_value=3)
instance.method(3, 4, 5, key='value')
instance.method.assert_called_with(3, 4, 5, key='value')
To mock classes or objects in a module under test, use the patch decorator. In the
following example, an external search system is replaced with a mock that always
returns the same result (as used in this example, the patch is only for the duration of
the test):
import unittest.mock as mock
def mock_search(self):
class MockSearchQuerySet(SearchQuerySet):
def __iter__(self):
return iter(["foo", "bar", "baz"])
return MockSearchQuerySet()
# SearchForm here refers to the imported class reference
# myapp.SearchForm, and modifies this instance, not the
# code where the SearchForm class itself is initially
# defined.
@mock.patch('myapp.SearchForm.search', mock_search)
def test_new_watchlist_activities(self):
# get_search_results runs a search and iterates over the result
self.assertEqual(len(myapp.get_search_results(q="fish")), 3)
Testing Your Code | 75

Mock has many other ways you can configure it and control its behavior. These are
detailed in the Python documentation for unittest.mock.
doctest
The doctest module searches for pieces of text that look like interactive Python ses‐
sions in docstrings, and then executes those sessions to verify that they work exactly
as shown.
Doctests serve a different purpose than proper unit tests. They are usually less
detailed and don’t catch special cases or obscure regression bugs. Instead, they are
useful as an expressive documentation of the main use cases of a module and its com‐
ponents (an example of a happy path). However, doctests should run automatically
each time the full test suite runs.
Here’s a simple doctest in a function:
def square(x):
"""Squares x.
>>> square(2)
4
>>> square(-2)
4
"""
return x * x
if __name__ == '__main__':
import doctest
doctest.testmod()
When you run this module from the command line (i.e., python module.py), the
doctests will run and complain if anything is not behaving as described in the doc‐
strings.
Examples
In this section, we’ll take excerpts from our favorite packages to highlight good test‐
ing practice using real code. The test suites require additional libraries not included
in the packages (e.g., Requests uses Flask to mock up an HTTP server) which are
included in their projects’ requirements.txt file.
For all of these examples, the expected first steps are to open a terminal shell, change
directories to a place where you work on open source projects, clone the source
repository, and set up a virtual environment, like this:
$ git clone https://github.com/username/projectname.git
$ cd projectname
$ virtualenv -p python3 venv
76 | Chapter 4: Writing Great Code

$ source venv/bin/activate
(venv)$ pip install -r requirements.txt
Example: Testing in Tablib
Tablib uses the unittest module in Python’s standard library for its testing. The test
suite does not come with the package; you must clone the GitHub repository for the
files. Here is an excerpt, with important parts annotated:
#!/usr/bin/env python
# -*- coding: utf-8 -*-
"""Tests for Tablib."""
import json
import unittest
import sys
import os
import tablib
from tablib.compat import markup, unicode, is_py3
from tablib.core import Row
class TablibTestCase(unittest.TestCase):
"""Tablib test cases."""
def setUp(self):
"""Create simple data set with headers."""
global data, book
data = tablib.Dataset()
book = tablib.Databook()
#
# ... skip additional setup not used here ...
#
def tearDown(self):
"""Teardown."""
pass
def test_empty_append(self):
"""Verify append() correctly adds tuple with no headers."""
new_row = (1, 2, 3)
data.append(new_row)
# Verify width/data
self.assertTrue(data.width == len(new_row))
self.assertTrue(data[0] == new_row)
Testing Your Code | 77

13 Note that unittest.TestCase.tearDown will not be run if the code errors out. This may be a surprise if
you’ve used features in unittest.mock to alter the code’s actual behavior. In Python 3.1, the method
unittest.TestCase.addCleanup() was added; it pushes a cleanup function and its arguments to a stack that
will be called one by one after unittest.TestCase.tearDown() or else called anyway regardless of whether
tearDown() was called. For more information, see the documentation on unittest.TestCase.addCleanup().
def test_empty_append_with_headers(self):
"""Verify append() correctly detects mismatch of number of
headers and data.
"""
data.headers = ['first', 'second']
new_row = (1, 2, 3, 4)
self.assertRaises(tablib.InvalidDimensions, data.append, new_row)
To use unittest, subclass unittest.TestCase, and write test methods whose
names begin with test. The TestCase provides assert methods that check for
equality, truth, data type, set membership, and whether exceptions are raised—
see the documentation for more details.
TestCase.setUp() is run before every single test method in the TestCase.
TestCase.tearDown() is run after every single test method in the TestCase.13
All test methods must begin with test, or they will not be run.
There can be multiple tests within a single TestCase, but each one should test
just one thing.
If you were contributing to Tablib, the first thing you’d do after cloning it is run the
test suite and confirm that nothing breaks. Like this:
(venv)$ ### inside the top-level directory, tablib/
(venv)$ python -m unittest test_tablib.py
..............................................................
----------------------------------------------------------------------
Ran 62 tests in 0.289s
OK
As of Python 2.7, unittest also includes its own test discovery mechanisms, using
the discover option on the command line:
(venv)$ ### *above* the top-level directory, tablib/
(venv)$ python -m unittest discover tablib/
..............................................................
----------------------------------------------------------------------
78 | Chapter 4: Writing Great Code

Ran 62 tests in 0.234s
OK
After confirming all of the tests pass, you’d (a) find the test case related to the part
you’re changing and run it often while you’re modifying the code, or (b) write a new
test case for the feature you’re adding or the bug you’re tracking down and run that
often while modifying the code. The following snippet is an example:
(venv)$ ### inside the top-level directory, tablib/
(venv)$ python -m unittest test_tablib.TablibTestCase.test_empty_append
.
----------------------------------------------------------------------
Ran 1 test in 0.001s
OK
Once your code works, you’d run the entire test suite again before pushing it to the
repository. Because you’re running these tests so often, it makes sense that they
should be as fast as possible. There are a lot more details about using unittest in the
standard library unittest documentation.
Example: Testing in Requests
Requests uses py.test. To see it in action, open a terminal shell, change into a tem‐
porary directory, clone Requests, install the dependencies, and run py.test, as
shown here:
$ git clone -q https://github.com/kennethreitz/requests.git
$
$ virtualenv venv -q -p python3 # dash -q for 'quiet'
$ source venv/bin/activate
(venv)$
(venv)$ pip install -q -r requests/requirements.txt # 'quiet' again...
(venv)$ cd requests
(venv)$ py.test
========================= test session starts =================================
platform darwin -- Python 3.4.3, pytest-2.8.1, py-1.4.30, pluggy-0.3.1
rootdir: /tmp/requests, inifile:
plugins: cov-2.1.0, httpbin-0.0.7
collected 219 items
tests/test_requests.py ........................................................
X............................................
tests/test_utils.py ..s....................................................
========= 217 passed, 1 skipped, 1 xpassed in 25.75 seconds ===================
Testing Your Code | 79

Other Popular Tools
The testing tools listed here are less frequently used, but still popular enough to men‐
tion.
pytest
pytest is a no-boilerplate alternative to Python’s standard unittest module, meaning it
doesn’t require the scaffolding of test classes, and maybe not even setup and teardown
methods. To install it, use pip like usual:
$ pip install pytest
Despite being a fully featured and extensible test tool, it boasts a simple syntax. Creat‐
ing a test suite is as easy as writing a module with a couple of functions:
# content of test_sample.py
def func(x):
return x + 1
def test_answer():
assert func(3) == 5
and then running the py.test command is far less work than would be required for
the equivalent functionality with the unittest module:
$ py.test
=========================== test session starts ============================
platform darwin -- Python 2.7.1 -- pytest-2.2.1
collecting ... collected 1 items
test_sample.py F
================================= FAILURES =================================
_______________________________ test_answer ________________________________
def test_answer():
> assert func(3) == 5
E assert 4 == 5
E + where 4 = func(3)
test_sample.py:5: AssertionError
========================= 1 failed in 0.02 seconds =========================
Nose
Nose extends unittest to make testing easier:
$ pip install nose
80 | Chapter 4: Writing Great Code

Nose provides automatic test discovery to save you the hassle of manually creating
test suites. It also provides numerous plug-ins for features such as xUnit-compatible
test output, coverage reporting, and test selection.
tox
tox is a tool for automating test environment management and testing against multi‐
ple interpreter configurations:
$ pip install tox
tox allows you to configure complicated multiparameter test matrices via a simple
ini-style configuration file.
Options for older versions of Python
If you aren’t in control of your Python version but still want to use these testing tools,
here are a few options.
unittest2. unittest2 is a backport of Python 2.7’s unittest module which has an
improved API and better assertions than the ones available in previous versions of
Python.
If you’re using Python 2.6 or below (meaning you probably work at a large bank or
Fortune 500 company), you can install it with pip:
$ pip install unittest2
You may want to import the module under the name unittest to make to make it eas‐
ier to port code to newer versions of the module in the future:
import unittest2 as unittest
class MyTest(unittest.TestCase):
...
This way if you ever switch to a newer Python version and no longer need the
unittest2 module, you can simply change the import in your test module without the
need to change any other code.
Mock. If you liked “Mock (in unittest)” on page 75 but use a Python version below
3.3, you can still use unittest.mock by importing it as a separate library:
$ pip install mock
xture. fixture can provide tools that make it easier to set up and tear down database
backends for testing. It can load mock datasets for use with SQLAlchemy, SQLObject,
Google Datastore, Django ORM, and Storm. There are still new releases, but it has
only been tested on Python 2.4 through Python 2.6.
Testing Your Code | 81

14 For those interested, there’s some discussion about adding Markdown support for the README files on PyPI.
Lettuce and Behave
Lettuce and Behave are packages for doing behavior-driven development (BDD) in
Python. BDD is a process that sprung out of TDD (obey the testing goat!) in the early
2000s, wishing to substitute the word “test” in test-driven development with “behav‐
ior” to overcome newbies’ initial trouble grasping TDD. The name was first coined by
Dan North in 2003 and introduced to the world along with the Java tool JBehave in a
2006 article for Better Soware magazine that is reproduced in Dan North’s blog post,
“Introducing BDD.”
BDD grew very popular after the 2011 release of e Cucumber Book (Pragmatic
Bookshelf), which documents a Behave package for Ruby. This inspired Gabriel Fal‐
co’s Lettuce, and Peter Parente’s Behave in our community.
Behaviors are described in plain text using a syntax named Gherkin that is human-
readable and machine-processable. The following tutorials may be of use:
•Gherkin tutorial
•Lettuce tutorial
•Behave tutorial
Documentation
Readability is a primary focus for Python developers, in both project and code docu‐
mentation. The best practices described in this section can save both you and others a
lot of time.
Project Documentation
There is API documentation for project users, and then there is additional project
documentation for those who want to contribute to to the project. This section is
about the additional project documentation.
A README file at the root directory should give general information to both users
and maintainers of a project. It should be raw text or written in some very easy to
read markup, such as reStructured Text (recommended because right now it’s the
only format that can be understood by PyPI14) or Markdown. It should contain a few
lines explaining the purpose of the project or library (without assuming the user
knows anything about the project), the URL of the main source for the software, and
some basic credit information. This file is the main entry point for readers of the
code.
82 | Chapter 4: Writing Great Code

15 Other tools that you might see are Pycco, Ronn, Epydoc (now discontinued), and MkDocs. Pretty much
everyone uses Sphinx and we recommend you do, too.
An INSTALL file is less necessary with Python (but may be helpful to comply with
licence requirements such as the GPL). The installation instructions are often
reduced to one command, such as pip install module or python
setup.py install and added to the README file.
A LICENSE file should always be present and specify the license under which the
software is made available to the public. (See “Choosing a License” on page 88 for
more information.)
A TODO file or a TODO section in README should list the planned development
for the code.
A CHANGELOG file or section in README should compile a short overview of the
changes in the code base for the latest versions.
Project Publication
Depending on the project, your documentation might include some or all of the fol‐
lowing components:
•An introduction should provide a very short overview of what can be done with
the product, using one or two extremely simplified use cases. This is the 30-
second pitch for your project.
•A tutorial should show some primary use cases in more detail. The reader will
follow a step-by-step procedure to set up a working prototype.
•An API reference is typically generated from the code (see “Docstring Versus
Block Comments” on page 84). It will list all publicly available interfaces, param‐
eters, and return values.
•Developer documentation is intended for potential contributors. This can include
code conventions and the general design strategy of the project.
Sphinx
Sphinx is far and away the most popular15 Python documentation tool. Use it. It con‐
verts the reStructured Text markup language into a range of output formats, includ‐
ing HTML, LaTeX (for printable PDF versions), manual pages, and plain text.
There is also great, free hosting for your Sphinx documentation: Read the Docs. Use
that, too. You can configure it with commit hooks to your source repository so that
rebuilding your documentation will happen automatically.
Documentation | 83

Sphinx is famous for its API generation, but it also works well for
general project documentation. The online Hitchhiker’s Guide to
Python is built with Sphinx and is hosted on Read the Docs.
reStructured Text
Sphinx uses reStructured Text, and nearly all Python documentation is written using
it. If the content of your long_description argument to setuptools.setup() is
written in reStructured Text, it will be rendered as HTML on PyPI—other formats
will just be presented as text. It’s like Markdown with all the optional extensions built
in. Good resources for the syntax are:
• The reStructuredText Primer
•reStructuredText Quick Reference
Or just start contributing to your favorite package’s documentation and learn by read‐
ing.
Docstring Versus Block Comments
Docstrings and block comments aren’t interchangeable. Both can be used for a func‐
tion or class. Here’s an example using both:
# This function slows down program execution for some reason.
def square_and_rooter(x):
"""Return the square root of self times self."""
...
The leading comment block is a programmer’s note.
The docstring describes the operation of the function or class and will be shown
in an interactive Python session when the user types help(square_and_rooter).
Docstrings placed at the beginning of a module or at the top of an __init__.py file will
also appear in help(). Sphinx’s autodoc feature can also automatically generate docu‐
mentation using appropriately formatted docstrings. Instructions for how to do this,
and how to format your docstrings for autodoc, are in the Sphinx tutorial. For further
details on docstrings, see PEP 257.
Logging
The logging module has been a part of Python’s Standard Library since version 2.3. It
is succinctly described in PEP 282. The documentation is notoriously hard to read,
except for the basic logging tutorial.
84 | Chapter 4: Writing Great Code

Logging serves two purposes:
Diagnostic logging
Diagnostic logging records events related to the application’s operation. If a user
calls in to report an error, for example, the logs can be searched for context.
Audit logging
Audit logging records events for business analysis. A user’s transactions (such as
a clickstream) can be extracted and combined with other user details (such as
eventual purchases) for reports or to optimize a business goal.
Logging Versus Print
The only time that print is a better option than logging is when the goal is to display
a help statement for a command-line application. Other reasons why logging is better
than print:
•The log record, which is created with every logging event, contains readily avail‐
able diagnostic information such as the filename, full path, function, and line
number of the logging event.
•Events logged in included modules are automatically accessible via the root log‐
ger to your application’s logging stream, unless you filter them out.
•Logging can be selectively silenced by using the method logging.Logger.setLe
vel() or disabled by setting the attribute logging.Logger.disabled to True.
Logging in a Library
Notes for configuring logging for a library are in the logging tutorial. Another good
resource for example uses of logging is the libraries we mention in the next chapter.
Because the user, not the library, should dictate what happens when a logging event
occurs, one admonition bears repeating:
It is strongly advised that you do not add any handlers other than NullHandler to your
library’s loggers.
The NullHandler does what its name says—nothing. The user will otherwise have to
expressly turn off your logging if they don’t want it.
Best practice when instantiating loggers in a library is to only create them using the
__name__ global variable: the logging module creates a hierarchy of loggers using dot
notation, so using __name__ ensures no name collisions.
Here is an example of best practice from the Requests source—place this in your
project’s top-level __init__.py:
Logging | 85

# Set default logging handler to avoid "No handler found" warnings.
import logging
try: # Python 2.7+
from logging import NullHandler
except ImportError:
class NullHandler(logging.Handler):
def emit(self, record):
pass
logging.getLogger(__name__).addHandler(NullHandler())
Logging in an Application
The Twelve-Factor App, an authoritative reference for good practice in application
development, contains a section on logging best practice. It emphatically advocates
for treating log events as an event stream, and for sending that event stream to stan‐
dard output to be handled by the application environment.
There are at least three ways to configure a logger:
Pros Cons
Using an INI-
formatted le It’s possible to update conguration while running using
the function logging.config.listen() to listen
for changes on a socket.
You have less control (e.g., custom
subclassed lters or loggers) than
possible when conguring a logger in
code.
Using a dictionary
or a JSON-formatted
le
In addition to updating while running, it is also possible to
load from a le using the json module, in the standard
library since Python 2.6.
You have less control than when
conguring a logger in code.
Using code You have complete control over the conguration. Any modications require a change to
source code.
Example conguration via an INI le
More details about the INI file format are in the logging configuration section of the
logging tutorial. A minimal configuration file would look like this:
[loggers]
keys=root
[handlers]
keys=stream_handler
[formatters]
keys=formatter
[logger_root]
level=DEBUG
handlers=stream_handler
[handler_stream_handler]
86 | Chapter 4: Writing Great Code

class=StreamHandler
level=DEBUG
formatter=formatter
args=(sys.stderr,)
[formatter_formatter]
format=%(asctime)s %(name)-12s %(levelname)-8s %(message)s
The asctime, name, levelname, and message are all optional attributes available from
the logging library. The full list of options and their definitions is available in the
Python documentation. Let us say that our logging configuration file is named log‐
ging_cong.ini. Then to set up the logger using this configuration in the code, we’d
use logging.config.fileConfig():
import logging
from logging.config import fileConfig
fileConfig('logging_config.ini')
logger = logging.getLogger()
logger.debug('often makes a very good meal of %s', 'visiting tourists')
Example conguration via a dictionary
As of Python 2.7, you can use a dictionary with configuration details. PEP 391 con‐
tains a list of the mandatory and optional elements in the configuration dictionary.
Here’s a minimal implementation:
import logging
from logging.config import dictConfig
logging_config = dict(
version = 1,
formatters = {
'f': {'format':
'%(asctime)s %(name)-12s %(levelname)-8s %(message)s'}
},
handlers = {
'h': {'class': 'logging.StreamHandler',
'formatter': 'f',
'level': logging.DEBUG}
},
loggers = {
'root': {'handlers': ['h'],
'level': logging.DEBUG}
}
)
dictConfig(logging_config)
logger = logging.getLogger()
logger.debug('often makes a very good meal of %s', 'visiting tourists')
Logging | 87

16 As of this writing, they were the Academic Free License v. 2.1 or the Apache License, Version 2.0. The full
description of how this works is on the PSF’s contributions page.
Example conguration directly in code
And last, here is a minimal logging configuration directly in code:
import logging
logger = logging.getLogger()
handler = logging.StreamHandler()
formatter = logging.Formatter(
'%(asctime)s %(name)-12s %(levelname)-8s %(message)s')
handler.setFormatter(formatter)
logger.addHandler(handler)
logger.setLevel(logging.DEBUG)
logger.debug('often makes a very good meal of %s', 'visiting tourists')
Choosing a License
In the United States, when no license is specified with your source publication, users
have no legal right to download, modify, or distribute it. Furthermore, people can’t
contribute to your project unless you tell them what rules to play by. You need a
license.
Upstream Licenses
If you are deriving from another project, your choice may be determined by
upstream licenses. For example, the Python Software Foundation (PSF) asks all con‐
tributors to Python source code to sign a contributor agreement that formally licenses
their code to the PSF (retaining their own copyright) under one of two licenses.16
Because both of those licenses allow users to sublicense under different terms, the
PSF is then free to distribute Python under its own license, the Python Software
Foundation License. A FAQ for the PSF License goes into detail about what users can
and cannot do in plain (not legal) language. It is not intended for further use beyond
licensing the PSF’s distribution of Python.
Options
There are plenty of licenses available to choose from. The PSF recommends using one
of the Open Source Institute (OSI)–approved licenses. If you wish to eventually con‐
tribute your code to the PSF, the process will be much easier if you start with one of
the licenses specified on the contributions page.
88 | Chapter 4: Writing Great Code

17 All of the licenses described here are OSI-approved, and you can learn more about them from the main OSI
license page.
Remember to change the placeholder text in the template licenses
to actually reflect your information. For example, the MIT license
template contains Copyright (c) <year> <copyright holders>
on its second line. Apache License, Version 2.0 requires no modifi‐
cation.
Open source licenses tend to fall into one of two categories:17
Permissive licenses
Permissive licenses, often also called Berkeley Software Distribution (BSD)–style
licenses, focus more on the user’s freedom to do with the software as they please.
Some examples:
•The Apache licenses—version 2.0 is the current one, modified so that people
can include it without modification in any project, can include the license by
reference instead of listing it in every file, and can use Apache 2.0–licensed
code with the GNU General Public License version 3.0 (GPLv3).
•Both the BSD 2-clause and 3-clause licenses—the three-clause license is the
two-clause license plus an additional restriction on use of the issuer’s trade‐
marks.
•The Massachusetts Institute of Technology (MIT) licenses—both the Expat
and the X11 versions are named after popular products that use the respec‐
tive licenses.
•The Internet Software Consortium (ISC) license—it’s almost identical to the
MIT license except for a few lines now deemed to be extraneous.
Copyle licenses
Copyleft licenses, or less permissive licenses, focus more on making sure that the
source code itself—including any changes made to it—is made available. The
GPL family is the most well known of these. The current version is GPLv3.
The GPLv2 license is not compatible with Apache 2.0; so code
licensed with GPLv2 cannot be mixed with Apache 2.0–licensed
projects. But Apache 2.0–licensed projects can be used in GPLv3
projects (which must subsequently all be GPLv3).
Choosing a License | 89

18 tl;dr means “Too long; didn’t read,” and apparently existed as editor shorthand before popularization on the
Internet.
Licenses meeting the OSI criteria all allow commercial use, modification of the soft‐
ware, and distribution downstream—with different restrictions and requirements. All
of the ones listed in Table 4-4 also limit the issuer’s liability and require the user to
retain the original copyright and license in any downstream distribution.
Table 4-4. Topics discussed in popular licenses
License family Restrictions Allowances Requirements
BSD Protects issuer’s trademark
(BSD 3-clause) Allows a warranty (BSD 2-clause and
3-clause) —
MIT (X11 or
Expat), ISC Protects issuer’s trademark
(ISC and MIT/X11) Allows sublicensing with a dierent
license —
Apache version
2.0 Protects issuer’s trademark Allows sublicensing, use in patents Must state changes made to
the source
GPL Prohibits sublicensing with a
dierent license Allows a warranty, and (GPLv3 only)
use in patents Must state changes to the
source and include source code
Licensing Resources
Van Lindberg’s book Intellectual Property and Open Source (O’Reilly) is a great
resource on the legal aspects of open source software. It will help you understand not
only licenses, but also the legal aspects of other intellectual property topics like trade‐
marks, patents, and copyrights as they relate to open source. If you’re not that con‐
cerned about legal matters and just want to choose something quickly, these sites can
help:
•GitHub offers a handy guide that summarizes and compares licenses in a few
sentences.
•TLDRLegal18 lists what can, cannot, and must be done under the terms of each
license in quick bullets.
•The OSI list of approved licenses contains the full text of all licenses that have
passed their license review process for compliance with the Open Source Defini‐
tion (allowing software to be freely used, modified, and shared).
90 | Chapter 4: Writing Great Code

1For a book that contains decades of experience about reading and refactoring code, we recommend Object-
Oriented Reengineering Patterns (Square Bracket Associates) by Serge Demeyer, Stéphane Ducasse, and Oscar
Nierstrasz.
2A daemon is a computer program that runs as a background process.
CHAPTER 5
Reading Great Code
Programmers read a lot of code. One of the core tenets behind Python’s design is
readability, and one secret to becoming a great programmer is to read, understand,
and comprehend excellent code. Such code typically follows the guidelines outlined
in “Code Style” on page 43 and does its best to express a clear and concise intent to
the reader.
This chapter shows excerpts from some very readable Python projects that illustrate
topics covered in Chapter 4. As we describe them, we’ll also share techniques for
reading code.1
Here’s a list of projects highlighted in this chapter in the order they will appear:
•HowDoI is a console application that searches the Internet for answers to coding
questions, written in Python.
•Diamond is a Python daemon2 that collects metrics and publishes them to
Graphite or other backends. It is capable of collecting CPU, memory, network,
I/O, load and disk metrics. Additionally, it features an API for implementing cus‐
tom collectors to gather metrics from almost any source.
•Tablib is a format-agnostic tabular dataset library.
•Requests is a HyperText Transfer Protocol (HTTP) library for human beings (the
90% of us who just want an HTTP client that automatically handles password
91

authentication and complies with the half-dozen standards to perform things like
a multipart file upload with one function call).
•Werkzeug started as a simple collection of various utilities for Web Service Gate‐
way Interface (WSGI) applications and has become one of the most advanced
WSGI utility modules.
•Flask is a web microframework for Python based on Werkzeug and Jinja2. It’s
good for getting simple web pages up quickly.
There is a lot more to all of these projects than what we’re mentioning, and we really,
really hope that after this chapter you’ll be motivated to download and read at least
one or two of them in depth yourself (and maybe even present what you learn to a
local user group).
Common Features
Some features are common across all of the projects: details from a snapshot of each
one show very few (fewer than 20, excluding whitespace and comments) lines of code
on average per function, and a lot of blank lines. The larger, more complex projects
use docstrings and/or comments; usually more than a fifth of the content of the code
base is some sort of documentation. But we can see from HowDoI, which has no doc‐
strings because it is not for interactive use, that comments are not necessary when the
code is straightforward. Table 5-1 shows common practices in these projects.
Table 5-1. Common features in the example projects
Package License Line count Docstrings
(% of lines)
Comments
(% of lines)
Blank lines
(% of lines)
Average
function length
HowDoI MIT 262 0% 6% 20% 13 lines of code
Diamond MIT 6,021 21% 9% 16% 11 lines of code
Tablib MIT 1,802 19% 4% 27% 8 lines of code
Requests Apache 2.0 4,072 23% 8% 19% 10 lines of code
Flask BSD 3-clause 10,163 7% 12% 11% 13 lines of code
Werkzeug BSD 3-clause 25,822 25% 3% 13% 9 lines of code
In each section, we use a different code-reading technique to figure out what the
project is about. Next, we single out code excerpts that demonstrate ideas mentioned
elsewhere in this guide. (Just because we don’t highlight things in one project doesn’t
mean they don’t exist; we just want to provide good coverage of concepts across these
examples.) You should finish this chapter more confident about reading code, with
examples that reinforce what makes good code, and with some ideas you’d like to
incorporate in your own code later.
92 | Chapter 5: Reading Great Code

3If you run into trouble with lxml requiring a more recent libxml2 shared library, just install an earlier version
of lxml by typing: pip uninstall lxml;pip install lxml==3.5.0. It will work fine.
HowDoI
With fewer than 300 lines of code, The HowDoI project, by Benjamin Gleitzman, is a
great choice to start our reading odyssey.
Reading a Single-File Script
A script usually has a clear starting point, clear options, and a clear ending point. This
makes it easier to follow than libraries that present an API or provide a framework.
Get the HowDoI module from GitHub:3
$ git clone https://github.com/gleitz/howdoi.git
$ virtualenv -p python3 venv # or use mkvirtualenv, your choice...
$ source venv/bin/activate
(venv)$ cd howdoi/
(venv)$ pip install --editable .
(venv)$ python test_howdoi.py # Run the unit tests.
You should now have the howdoi executable installed in venv/bin. (You can look at it
if you want by typing cat `which howdoi` on the command line.) It was auto-
generated when you ran pip install.
Read HowDoI’s documentation
HowDoI’s documentation is in the README.rst file in the HowDoI repository on
GitHub: it’s a small command-line application that allows users to search the Internet
for answers to programming questions.
From the command line in a terminal shell, we can type howdoi --help for the usage
statement:
(venv)$ howdoi --help
usage: howdoi [-h] [-p POS] [-a] [-l] [-c] [-n NUM_ANSWERS] [-C] [-v]
[QUERY [QUERY ...]]
instant coding answers via the command line
positional arguments:
QUERY the question to answer
optional arguments:
-h, --help show this help message and exit
-p POS, --pos POS select answer in specified position (default: 1)
-a, --all display the full text of the answer
-l, --link display only the answer link
HowDoI | 93

-c, --color enable colorized output
-n NUM_ANSWERS, --num-answers NUM_ANSWERS
number of answers to return
-C, --clear-cache clear the cache
-v, --version displays the current version of howdoi
That’s it—from the documentation we know that HowDoI gets answers to coding
questions from the Internet, and from the usage statement we know we can choose
the answer in a specific position, can colorize the output, get multiple answers, and
that it keeps a cache that can be cleared.
Use HowDoI
We can confirm we understand what HowDoI does by actually using it. Here’s an
example:
(venv)$ howdoi --num-answers 2 python lambda function list comprehension
--- Answer 1 ---
[(lambda x: x*x)(x) for x in range(10)]
--- Answer 2 ---
[x() for x in [lambda m=m: m for m in [1,2,3]]]
# [1, 2, 3]
We’ve installed HowDoI, read its documentation, and can use it. On to reading actual
code!
Read HowDoI’s code
If you look inside the howdoi/ directory, you’ll see it contains two files: an __init__.py,
which contains a single line that defines the version number, and howdoi.py, which
we’ll open and read.
Skimming howdoi.py, we see each new function definition is used in the next func‐
tion, making it is easy to follow. And each function does just one thing—the thing its
name says. The main function, command_line_runner(), is near the bottom of how‐
doi.py.
Rather than reprint HowDoI’s source here, we can illustrate its call structure using
the call graph in Figure 5-1. It was created by Python Call Graph, which provides a
visualization of the functions called when running a Python script. This works well
with command-line applications thanks to a single start point and the relatively few
paths through their code. (Note that we manually deleted functions not in the How‐
DoI project from the rendered image to legibly fit it on the page, and slightly recol‐
ored and reformatted it.)
94 | Chapter 5: Reading Great Code
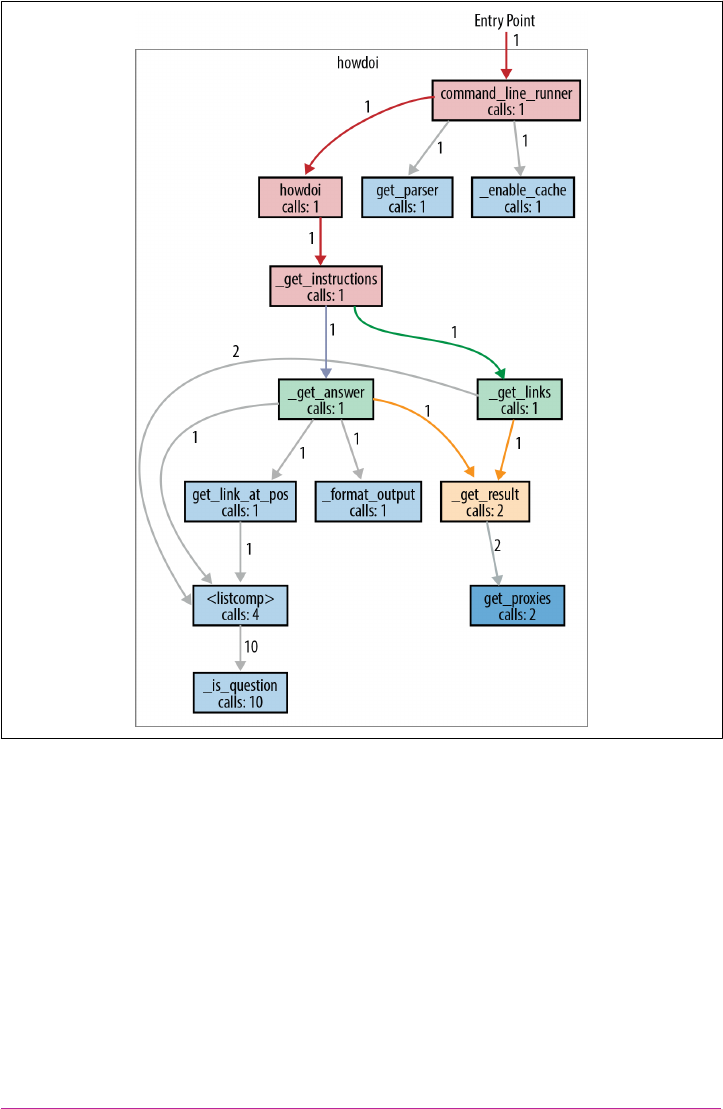
Figure 5-1. Clean paths and clear function names in this howdoi call graph
The code could have been all one large, incomprehensible spaghetti function. Instead,
intentional choices structure the code into compartmentalized functions with
straightforward names. Here’s a brief description of the execution depicted in
Figure 5-1: command_line_runner() parses the input and passes the user flags and
the query to howdoi(). Then, howdoi() wraps _get_instructions() in a try/except
statement so that it can catch connection errors and print a reasonable error message
(because application code should not terminate on exceptions).
The primary functionality is in _get_instructions(): it calls _get_links() to do a
Google search of Stack Overflow for links that match the query, then calls
HowDoI | 95

_get_answer() once for each resulting link (up to the number of links that the user
specified on the command line—the default is just one link).
The _get_answer() function follows a link to Stack Overflow, extracts code from the
answer, colorizes it, and returns it to _get_instructions(), which will combine all
of the answers into one string, and return it. Both _get_links() and _get_answer()
call _get_result() to actually do the HTTP request: _get_links() for the Google
query, and _get_answer() for the resulting links from the Google query.
All _get_result() does is wrap requests.get() with a try/except statement so
that it can catch SSL errors, print an error message, and re-raise the exception so that
the top-level try/except can catch it and exit. Catching all exceptions before exiting
is best practice for application programs.
HowDoI’s Packaging
HowDoI’s setup.py, above the howdoi/ directory, is a good example setup module
because in addition to normal package installation, it also installs an executable
(which you can refer to when packaging your own command-line utility). The setup
tools.setup() function uses keyword arguments to define all of the configuration
options. The part that identifies the executable is associated with the keyword argu‐
ment entry_points:
setup(
name='howdoi',
##~~ ... Skip the other typical entries ...
entry_points={
'console_scripts': [
'howdoi = howdoi.howdoi:command_line_runner',
]
},
## ~~ ... Skip the list of dependencies ...
)
The keyword to list console scripts is console_scripts.
This declares the executable named howdoi will have as its target the function
howdoi.howdoi.command_line_runner(). So later when reading, we will know
command_line_runner() is the starting point for running the whole application.
Structure Examples from HowDoI
HowDoI is a small library, and we’ll be highlighting structure much more elsewhere,
so there are only a few notes here.
96 | Chapter 5: Reading Great Code

Let each function do just one thing
We can’t reiterate enough how beneficial it is for readers to separate out HowDoI’s
internal functions to each do just one thing. Also, there are functions whose sole pur‐
pose is to wrap other functions with a try/except statement. (The only function with
a try/except that doesn’t follow this practice is _format_output(), which leverages
try/except clauses to identify the correct coding language for syntax highlighting,
not for exception handling.)
Leverage data available from the system
HowDoI checks and uses relevant system values, such as urllib.request.getprox
ies(), to handle the use of proxy servers (this can be the case in organizations like
schools that have an intermediary server filtering the connection to the Internet), or
in this snippet:
XDG_CACHE_DIR = os.environ.get(
'XDG_CACHE_HOME',
os.path.join(os.path.expanduser('~'), '.cache')
)
How do you know that these variables exist? The need for urllib.request.getprox
ies() is evident from the optional arguments in requests.get()—so part of this
information comes from understanding the API of libraries you call. Environment
variables are often utility-specific, so if a library is intended for use with a particular
database or other sister application, those applications’ documentation list relevant
environment variables. For plain POSIX systems, a good place to start is Ubuntu’s list
of default environment variables, or else the base list of environment variables in the
POSIX specification, which links to various relevant other lists.
Style Examples from HowDoI
HowDoI mostly follows PEP 8, but not pedantically, and not when it restricts read‐
ability. For example, import statements are at the top of the file, but standard library
and external modules are intermixed. And although the string constants in
USER_AGENTS are much longer than 80 characters, there is no natural place to break
the strings, so they are left intact.
These next excerpts highlight other style choices we’ve previously advocated for in
Chapter 4.
Underscore-prexed function names (we are all responsible users)
Almost every function in HowDoI is prefixed with an underscore. This identifies
them as for internal use only. For most of them, this is because if called, there is the
HowDoI | 97

possibility of an uncaught exception—anything that calls _get_result() risks this—
until the howdoi() function, which handles the possible exceptions.
The rest of the internal functions (_format_output(), _is_question(),
_enable_cache(), and _clear_cache()) are identified as such because they’re simply
not intended for use outside of the package. The testing script, howdoi/
test_howdoi.py, only calls the nonprefixed functions, checking that the formatter
works by feeding a command-line argument for colorization to the top-level how
doi.howdoi() function, rather than by feeding code to howdoi._format_output().
Handle compatibility in just one place (readability counts)
Differences between versions of possible dependencies are handled before the main
code body so the reader knows there won’t be dependency issues, and version check‐
ing doesn’t litter the code elsewhere. This is nice because HowDoI is shipped as a
command-line tool, and the extra effort means users won’t be forced to change their
Python environment just to accommodate the tool. Here is the snippet with the
workarounds:
try:
from urllib.parse import quote as url_quote
except ImportError:
from urllib import quote as url_quote
try:
from urllib import getproxies
except ImportError:
from urllib.request import getproxies
And the following snippet resolves the difference between Python 2 and Python 3’s
Unicode handling in seven lines, by creating the function u(x) to either do nothing
or emulate Python 3. Plus it follows Stack Overflow’s new citation guideline, by citing
the original source:
# Handle Unicode between Python 2 and 3
# http://stackoverflow.com/a/6633040/305414
if sys.version < '3':
import codecs
def u(x):
return codecs.unicode_escape_decode(x)[0]
else:
def u(x):
return x
Pythonic choices (beautiful is better than ugly)
The following snippet from howdoi.py shows thoughtful, Pythonic choices. The func‐
tion get_link_at_pos() returns False if there are no results, or else identifies the
98 | Chapter 5: Reading Great Code

links that are to Stack Overflow questions, and returns the one at the desired posi‐
tion (or the last one if there aren’t enough links):
def _is_question(link):
return re.search('questions/\d+/', link)
# [ ... skip a function ... ]
def get_link_at_pos(links, position):
links = [link for link in links if _is_question(link)]
if not links:
return False
if len(links) >= position:
link = links[position-1]
else:
link = links[-1]
return link
The first function, _is_question(), is defined as a separate one liner, giving clear
meaning to an otherwise opaque regular expression search.
The list comprehension reads like a sentence, thanks to the separate definition of
_is_question() and meaningful variable names.
The early return statement flattens the code.
The additional step of assigning to the variable link here…
…and here, rather than two separate return statements with no named variable
at all, reinforces the purpose of get_link_at_pos() with clear variable names.
The code is self-documenting.
The single return statement at the highest indentation level explicitly shows that
all paths through the code exit either right away—because there are no links—or
at the end of the function, returning a link. Our quick rule of thumb works: we
can read the first and last line of this function and understand what it does.
(Given multiple links and a position, get_link_at_pos() returns one single link:
the one at the given position.)
Diamond
Diamond is a daemon (an application that runs continuously as a background pro‐
cess) that collects system metrics and publishes them to downstream programs like
MySQL, Graphite (a platform open sourced by Orbitz in 2008 that stores, retrieves,
Diamond | 99

and optionally graphs numeric time-series data), and others. We’ll get to explore good
package structure, as Diamond is a multifile application, much larger than HowDoI.
Reading a Larger Application
Diamond is still a command-line application, so like with HowDoI, there’s still a clear
starting point and clear paths of execution, although the supporting code now spans
multiple files.
Get Diamond from GitHub (the documentation says it only runs on CentOS or
Ubuntu, but code in its setup.py makes it appear to support all platforms; however,
some of the commands that default collectors use to monitor memory, disk space,
and other system metrics are not on Windows). As of this writing, it still uses
Python 2.7:
$ git clone https://github.com/python-diamond/Diamond.git
$ virtualenv -p python2 venv # It's not Python 3 compatible yet...
$ source venv/bin/activate
(venv)$ cd Diamond/
(venv)$ pip install --editable .
(venv)$ pip install mock docker-py # These are dependencies for testing.
(venv)$ pip install mock # This is also a dependency for testing.
(venv)$ python test.py # Run the unit tests.
Like with the HowDoI library, Diamond’s setup script installs executables in venv/
bin/: diamond and diamond-setup. This time they’re not automatically generated—
they’re prewritten scripts in the project’s Diamond/bin/ directory. The documentation
says that diamond starts the server, and diamond-setup is an optional tool to walk
users through interactive modification of the collector settings in the configuration
file.
There are a lot of additional directories, and the diamond package is underneath Dia‐
mond/src in this project directory. We are going to look at files in Diamond/src (which
contains the main code), Diamond/bin (which contains the executable diamond), and
Diamond/conf (which contains the sample configuration file). The rest of the directo‐
ries and files may be of interest to people distributing similar applications but is not
what we want to cover right now.
Read Diamond’s documentation
First, we can get a sense of what the project is and what it does by scanning the online
documentation. Diamond’s goal is to make it easy to gather system metrics on clus‐
ters of machines. Originally open sourced by BrightCove, Inc., in 2011, it now has
over 200 contributors.
After describing its history and purpose, the documentation tells you how to install it,
and then says how to run it: just modify the example configuration file (in our down‐
100 | Chapter 5: Reading Great Code

4When you daemonize a process, you fork it, detach its session ID, and fork it again, so that the process is
totally disconnected from the terminal you’re running it in. (Nondaemonized programs exit when the termi‐
nal is closed—you may have seen the warning message “Are you sure you want to close this terminal? Closing
it will kill the following processes:” before listing all of the currently running processes.) A daemonized pro‐
cess will run even after the terminal window closes. It’s named daemon after Maxwell’s daemon (a clever dae‐
mon, not a nefarious one).
load it’s in conf/diamond.conf.example), put it in the default location (/etc/diamond/
diamond.conf) or a path you’ll specify on the command line, and you’re set. There’s
also a helpful section on configuration in the Diamond wiki page.
From the command line, we can get the usage statement via diamond --help:
(venv)$ diamond --help
Usage: diamond [options]
Options:
-h, --help show this help message and exit
-c CONFIGFILE, --configfile=CONFIGFILE
config file
-f, --foreground run in foreground
-l, --log-stdout log to stdout
-p PIDFILE, --pidfile=PIDFILE
pid file
-r COLLECTOR, --run=COLLECTOR
run a given collector once and exit
-v, --version display the version and exit
--skip-pidfile Skip creating PID file
-u USER, --user=USER Change to specified unprivileged user
-g GROUP, --group=GROUP
Change to specified unprivileged group
--skip-change-user Skip changing to an unprivileged user
--skip-fork Skip forking (damonizing) process
From this, we know it uses a configuration file; by default, it runs in the background;
it has logging; you can specifiy a PID (process ID) file; you can test collectors; you can
change the process’s user and group; and it by default will daemonize (fork) the pro‐
cess.4
Use Diamond
To understand it even better, we can run Diamond. We need a modified configura‐
tion file, which we can put in a directory we make called Diamond/tmp. From inside
the Diamond directory, type:
(venv)$ mkdir tmp
(venv)$ cp conf/diamond.conf.example tmp/diamond.conf
Then edit tmp/diamond.conf to look like this:
Diamond | 101

### Options for the server
[server]
# Handlers for published metrics.
handlers = diamond.handler.archive.ArchiveHandler
user =
group =
# Directory to load collector modules from
collectors_path = src/collectors/
### Options for handlers
[handlers]
[[default]]
[[ArchiveHandler]]
log_file = /dev/stdout
### Options for collectors
[collectors]
[[default]]
# Default Poll Interval (seconds)
interval = 20
### Default enabled collectors
[[CPUCollector]]
enabled = True
[[MemoryCollector]]
enabled = True
We can tell from the example configuration file that:
There are multiple handlers, which we can select by class name.
We have control over the user and group that the daemon runs as (empty means
to use the current user and group).
We can specify a path to look for collector modules. This is how Diamond will
know where the custom Collector subclasses are: we directly state it in the con‐
figuration file.
We can also store configure handlers individually.
Next, run Diamond with options that set logging to /dev/stdout (with default format‐
ting configurations), that keep the application in the foreground, that skip writing the
PID file, and that use our new configuration file:
(venv)$ diamond -l -f --skip-pidfile --configfile=tmp/diamond.conf
To end the process, type Ctrl+C until the command prompt reappears. The log out‐
put demonstrates what collectors and handlers do: collectors collect different metrics
102 | Chapter 5: Reading Great Code
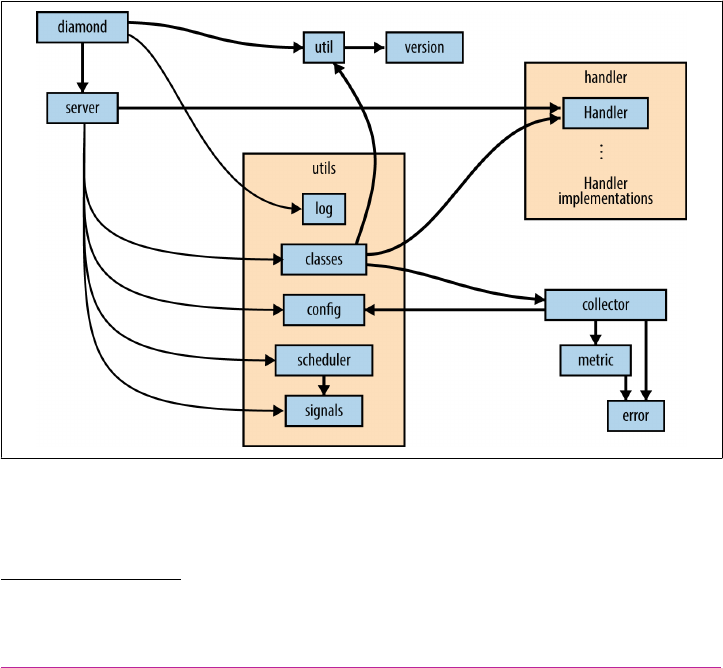
5In PyCharm, do this by navigating in the menu bar to PyCharm → Preferences → Project:Diamond → Project
Interpreter, and then selecting the path to the Python interpreter in the current virtual environment.
(such as the MemoryCollector’s total, available, free, and swap memory sizes), which
the handlers format and send to various destinations, such as Graphite, MySQL, or in
our test case, as log messages to /dev/stdout.
Reading Diamond’s code
IDEs can be useful when reading larger projects—they can quickly locate the original
definitions of functions and classes in the source code. Or, given a definition, they
can find all places in the project where it is used. For this functionality, set the IDE’s
Python interpreter to the one in your virtual environment.5
Instead of following each function as we did with HowDoI, Figure 5-2 follows the
import statements; the diagram just shows which modules in Diamond import which
other modules. Drawing sketches like these helps by providing a very high-level look
for larger projects: you hide the trees so you can see the forest. We can start with the
diamond executable file on the top left and follow the imports through the Diamond
project. Aside from the diamond executable, every square outline denotes a file (mod‐
ule) or directory (package) in the src/diamond directory.
Figure 5-2. e module import structure of Diamond
Diamond | 103

Diamond’s well-organized and appropriately named modules make it possible to get
an idea of what the code is doing solely from our diagram: diamond gets the version
from util, then sets up logging using utils.log and starts a Server instance using
server. The Server imports from almost all of the modules in the utils package,
using utils.classes to acess both the Handlers in handler and the collectors,
config to read the configuration file and obtain settings for the collectors (and the
extra paths to the user-defined collectors), and scheduler and signals to set the
polling interval for the collectors to calculate their metrics, and to set up and start the
handlers processing the queue of metrics to send them to their various destinations.
The diagram doesn’t include the helper modules convertor.py and gmetric.py, which
are used by specific collectors, or the over 20 handler implementations defined in the
handler subpackage, or the over 100 collector implementations defined in the proj‐
ect’s Diamond/src/collectors/ directory (which is installed elsewhere when not
installed the way we did for reading—that is, using PyPI or Linux package
distributions, instead of source). These are imported using
diamond.classes.load_dynamic_class(), which then calls the function dia
mond.util.load_class_from_name() to load the classes from the string names given
in the configuration file, so the import statements do not explicitly name them.
To understand why there is both a utils package and a util module, you have to dig
into the actual code: the util module provides functions related more to Diamond’s
packaging than to its operation—a function to get the version number from ver
sion.__VERSION__, and two functions that parse strings that identify either modules
or classes, and import them.
Logging in Diamond
The function diamond.utils.log.setup_logging(), found in src/diamond/utils/
log.py, is called from the main() function in the diamond executable when starting the
daemon:
# Initialize logging
log = setup_logging(options.configfile, options.log_stdout)
If options.log_stdout is True, setup_logging() will set up a logger with default
formatting to log to standard output at the DEBUG level. Here’s the excerpt that does
that:
##~~ ... Skip everything else ...
def setup_logging(configfile, stdout=False):
log = logging.getLogger('diamond')
if stdout:
log.setLevel(logging.DEBUG)
104 | Chapter 5: Reading Great Code

streamHandler = logging.StreamHandler(sys.stdout)
streamHandler.setFormatter(DebugFormatter())
streamHandler.setLevel(logging.DEBUG)
log.addHandler(streamHandler)
else:
##~~ ... Skip this ...
Otherwise, it parses the configuration file using logging.config.file.fileCon
fig() from the Python Standard Library. Here is the function call—it’s indented
because it’s inside the preceding if/else statement, and a try/except block:
logging.config.fileConfig(configfile,
disable_existing_loggers=False)
The logging configuration ignores keywords in the configuration file that aren’t
related to logging. This is how Diamond can use the same configuration file for both
its own and the logging configuration. The sample configuration file, located in Dia‐
mond/conf/diamond.conf.example, identifies the logging handler among the other
Diamond handlers:
### Options for handlers
[handlers]
# daemon logging handler(s)
keys = rotated_file
It defines example loggers later in the configuration file, under the header “Options
for logging,” recommending the logging config file documentation for details.
Structure Examples from Diamond
Diamond is more than an executable application—it’s also a library that provides a
way for users to create and use custom collectors.
We’ll highlight more things we like about the overall package structure, and then dig
into how exactly Diamond makes it possible for the application to import and use
externally defined collectors.
Separate dierent functionality into namespaces (they are one honking great idea)
The diagram in Figure 5-2 shows the server module interacting with three other
modules in the project: diamond.handler, diamond.collector, and diamond.utils.
The utils subpackage could realistically have contained all of its classes and functions
in a single, large util.py module, but there was an opportunity to use namespaces to
separate code into related groups, and the development team took it. Honking great!
All of the implementations of Handlers are contained in diamond/handler (which
makes sense), but the structure for the Collectors is different. There’s not a directory,
only a module diamond/collector.py that defines the Collector and ProcessCollec
Diamond | 105

6In Python, an abstract base class is a class that has left certain methods undefined, with the expectation that
the developer will define them in the subclass. In the abstract base class, this function raises a NotImplemente
dError. A more modern alternative is to use Python’s module for abstract base classes, abc, first implemented
in Python 2.6, which will error when constructing an incomplete class rather than when trying to access that
class’s unimplemented method. The full specification is defined in PEP 3119.
7This is a paraphrase of a great blog post on the subject by Larry Cuban, a professor emeritus of education at
Stanford, titled “The Difference Between Complicated and Complex Matters.”
tor base classes. All implementations of the Collectors are defined instead in Dia‐
mond/src/collectors/ and would be installed in the virtual environment under venv/
share/diamond/collectors when installing from PyPI (as recommended) rather than
from GitHub (like we did to read it). This helps the user to create new implementa‐
tions of Collectors: placing all of the collectors in the same location makes it easier for
the application to find them and easier for library users to follow their example.
Finally, each Collector implementation in Diamond/src/collectors is in its own direc‐
tory (rather than in a single file), which makes it possible to keep each Collector
implementation’s tests separate. Also honking great.
User-extensible custom classes (complex is better than complicated)
It’s easy to add new Collector implementations: just subclass the diamond.collec
tor.Collector abstract base class,6 implement a Collector.collect() method, and
place the implementation in its own directory in venv/src/collectors/.
Underneath, the implementation is complex, but the user doesn’t see it. This section
shows both the simple user-facing part of Diamond’s Collector API and the complex
code that makes this user interface possible.
Complex versus complicated. We can boil down the user experience of working with
complex code to be something like experiencing a Swiss watch—it just works, but
inside there are a ton of precisely made little pieces, all interfacing with remarkable
precision, in order to create the effortless user experience. Using complicated code, on
the other hand, is like piloting an airplane—you really have to know what you’re
doing to not crash and burn.7 We don’t want to live in a world without airplanes, but
we do want our watches to work without us having to be rocket scientists. Wherever
it’s possible, less complicated user interfaces are a good thing.
The simple user interface. To create a custom data collector, the user must subclass the
abstract class, Collector, and then provide, via the configuration file, the path to that
new collector. Here is an example of a new Collector definition from Diamond/src/
collectors/cpu/cpu.py. When Python searches for the collect() method, it will look
in the CPUCollector for a definition first, and then if it doesn’t find the definition, it
106 | Chapter 5: Reading Great Code

will use diamond.collector.Collector.collect(), which raises the NotImplemente
dError.
Minimal collector code would look like this:
# coding=utf-8
import diamond.collector
import psutil
class CPUCollector(diamond.collector.Collector):
def collect(self):
# In Collector, this just contains raise(NotImplementedError)
metric_name = "cpu.percent"
metric_value = psutil.cpu_percent()
self.publish(metric_name, metric_value)
The default place to store the collector definitions is in the directory venv/share/
diamond/collectors/; but you can store it wherever you define in the collectors_path
value in the configuration file. The class name, CPUCollector, is already listed in the
example configuration file. Except for adding a hostname or a hostname_method spec‐
ification either in the overall defaults (under the text in the configuration file) or in
the individual collector’s overrides, as shown in the following example, there need not
be any other changes (the documentation lists all of the optional collector settings):
[[CPUCollector]]
enabled = True
hostname_method = smart
The more complex internal code. Behind the scenes, the Server will call
utils.load_collectors() using the path specified in collectors_path. Here is
most of that function, truncated for brevity:
def load_collectors(paths=None, filter=None):
"""Scan for collectors to load from path"""
# Initialize return value
collectors = {}
log = logging.getLogger('diamond')
if paths is None:
return
if isinstance(paths, basestring):
paths = paths.split(',')
paths = map(str.strip, paths)
load_include_path(paths)
for path in paths:
##~~ Skip lines that confirm 'path' exists.
Diamond | 107
for f in os.listdir(path):
# Are we a directory? If so, process down the tree
fpath = os.path.join(path, f)
if os.path.isdir(fpath):
subcollectors = load_collectors([fpath])
for key in subcollectors:
collectors[key] = subcollectors[key]
# Ignore anything that isn't a .py file
elif (os.path.isfile(fpath)
##~~ ... Skip tests confirming fpath is a Python module ...
):
##~~ ... Skip the part that ignores filtered paths ...
modname = f[:-3]
try:
# Import the module
mod = __import__(modname, globals(), locals(), ['*'])
except (KeyboardInterrupt, SystemExit), err:
##~~ ... Log the exception and quit ...
except:
##~~ ... Log the exception and continue ...
# Find all classes defined in the module
for attrname in dir(mod):
attr = getattr(mod, attrname)
# Only attempt to load classes that are subclasses
# of Collectors but are not the base Collector class
if (inspect.isclass(attr)
and issubclass(attr, Collector)
and attr != Collector):
if attrname.startswith('parent_'):
continue
# Get class name
fqcn = '.'.join([modname, attrname])
try:
# Load Collector class
cls = load_dynamic_class(fqcn, Collector)
# Add Collector class
collectors[cls.__name__] = cls
except Exception:
##~~ log the exception and continue ...
# Return Collector classes
return collectors
Break up the string (first function call); otherwise, the paths are lists of string
paths to where the user-defined custom Collector subclasses are defined.
108 | Chapter 5: Reading Great Code

8Python has a recursion limit (a maximum number of times a function is allowed to call itself) that’s relatively
restrictive by default, to discourage excessive use of recursion. Get your recursion limit by typing import
sys; sys.getrecursionlimit().
9Programming languages that can do this are said to have rst-class functions—functions are treated as first-
class citizens, like any other object.
This recursively descends the paths given, inserting every directory into
sys.path so that later the Collectors can be imported.
Here’s the recursion—load_collectors() is calling itself.8
After loading the subdirectories’ collectors, update the original dictionary of cus‐
tom collectors with the new ones from those subdirectories.
Since the introduction of Python 3.1, the importlib module in Python’s standard
library provides a preferred way to do this (via the module impor
tlib.import_module; parts of importlib.import_module have also been back‐
ported to Python 2.7). This demonstrates how to programmatically import a
module given the string module name.
Here’s how to programmatically access attributes in a module given just the
string attribute name.
Actually, load_dynamic_class may not be necessary here. It re-imports the mod‐
ule, checks that the named class is actually a class, checks that it’s actually a Col‐
lector, and if so returns the newly loaded class. Redundancies sometimes occur in
open source code written by large groups.
Here’s how they get the class name to use later when applying the configuration
file options given only the string class name.
Style Examples from Diamond
There’s a great example use of a closure in Diamond that demonstrates what was said
in “Late binding closures” on page 59 about this behavior often being desirable.
Example use of a closure (when the gotcha isn’t a gotcha)
A closure is a function that makes use of variables available in the local scope that
would otherwise not be available when the function is called. They can be difficult to
implement and understand in other languages, but are not hard to implement in
Python, because Python treats functions just like any other object.9 For example,
functions can be passed around as arguments, or returned from other functions.
Diamond | 109

Here’s an example excerpt from the diamond executable that shows how to implement
a closure in Python:
##~~ ... Skip the import statements ...
def main():
try:
##~~ ... Skip code that creates the command-line parser ...
# Parse command-line Args
(options, args) = parser.parse_args()
##~~ ... Skip code that parses the configuration file ...
##~~ ... Skip code that sets up the logger ...
# Pass the exit upstream rather then handle it as an general exception
except SystemExit, e:
raise SystemExit
##~~ ... Skip code that handles other exceptions related to setup ...
try:
# PID MANAGEMENT
if not options.skip_pidfile:
# Initialize PID file
if not options.pidfile:
options.pidfile = str(config['server']['pid_file'])
##~~ ... Skip code to open and read the PID file if it exists, ...
##~~ ... and then delete the file if there is no such PID ...
##~~ ... or exits if there is already a running process. ...
##~~ ... Skip the code that sets the group and user ID ...
##~~ ... and the code that changes the PID file permissions. ...
##~~ ... Skip the code that checks whether to run as a daemon, ...
##~~ ... and if so detaches the process. ...
# PID MANAGEMENT
if not options.skip_pidfile:
# Finish initializing PID file
if not options.foreground and not options.collector:
# Write PID file
pid = str(os.getpid())
try:
pf = file(options.pidfile, 'w+')
except IOError, e:
log.error("Failed to write child PID file: %s" % (e))
sys.exit(1)
pf.write("%s\n" % pid)
110 | Chapter 5: Reading Great Code

10 PID stands for “process identifier.” Every process has a unique identifier that is available in Python using the
os module in the standard library: os.getpid().
pf.close()
# Log
log.debug("Wrote child PID file: %s" % (options.pidfile))
# Initialize server
server = Server(configfile=options.configfile)
def sigint_handler(signum, frame):
log.info("Signal Received: %d" % (signum))
# Delete PID file
if not options.skip_pidfile and os.path.exists(options.pidfile):
os.remove(options.pidfile)
# Log
log.debug("Removed PID file: %s" % (options.pidfile))
sys.exit(0)
# Set the signal handlers
signal.signal(signal.SIGINT, sigint_handler)
signal.signal(signal.SIGTERM, sigint_handler)
server.run()
# Pass the exit upstream rather then handle it as a general exception
except SystemExit, e:
raise SystemExit
##~~ ... Skip code that handles any other exceptions ...
##~~ ... and all of the rest of the script.
When we skip code, the missing parts will be summarized by a comment pre‐
ceded by two tildes (##~~ like this).
The reason for the PID10 file is to make sure the daemon is unique (i.e., not acci‐
dentally started twice), to communicate the associated process ID quickly to
other scripts, and to make it evident that an abnormal termination has occurred
(because in this script, the PID file is deleted upon normal termination).
All of this code is just to provide context leading up to the closure. At this point,
either the process is running as a daemon (and now has a different process ID
than before) or it will skip this part because it’s already written its correct PID to
the PID file.
Diamond | 111

This (sigint_handler()) is the closure. It is defined inside of main(), rather
than at the top level, outside of any functions, because it needs to know whether
to look for a PID file, and if so where to look.
It gets this information from the command-line options, which it can’t obtain
until after the call to main(). That means all of the options related to the PID file
are local variables in main’s namespace.
The closure (the function sigint_handler()) is sent to the signal handler and
will be used to handle SIGINT and SIGTERM.
Tablib
Tablib is a Python library that converts between different data formats, storing data in
a Dataset object, or multiple Datasets in a Databook. Datasets stored in the JSON,
YAML, DBF, and CSV file formats can be imported, and datasets can be exported to
XLSX, XLS, ODS, JSON, YAML, DBF, CSV, TSV, and HTML. Tablib was first released
by Kenneth Reitz in 2010. It has the intuitive API design typical of Reitz’s projects.
Reading a Small Library
Tablib is a library, not an application, so there isn’t a single obvious entry point like
there is with HowDoI and Diamond.
Get Tablib from GitHub:
$ git clone https://github.com/kennethreitz/tablib.git
$ virtualenv -p python3 venv
$ source venv/bin/activate
(venv)$ cd tablib
(venv)$ pip install --editable .
(venv)$ python test_tablib.py # Run the unit tests.
Read Tablib’s documentation
Tablib’s documentation starts off immediately with a use case, and then goes into
describing its capabilities in more detail: it provides a Dataset object that has rows,
headers, and columns. You can do I/O from various formats to the Dataset object.
And the advanced usage section says you can add tags to rows, and create derived
columns that are functions of other columns.
Use Tablib
Tablib is a library, not an executable like HowDoI or Diamond, so you can open a
Python interactive session and have the expectation that you can use use the help()
112 | Chapter 5: Reading Great Code

function to explore the API. Here’s our example of the tablib.Dataset class, the dif‐
ferent data formats, and how I/O works:
>>> import tablib
>>> data = tablib.Dataset()
>>> names = ('Black Knight', 'Killer Rabbit')
>>>
>>> for name in names:
... fname, lname = name.split()
... data.append((fname, lname))
...
>>> data.dict
[['Black', 'Knight'], ['Killer', 'Rabbit']]
>>>
>>> print(data.csv)
Black,Knight
Killer,Rabbit
>>> data.headers=('First name', 'Last name')
>>> print(data.yaml)
- {First name: Black, Last name: Knight}
- {First name: Killer, Last name: Rabbit}
>>> with open('tmp.csv', 'w') as outfile:
... outfile.write(data.csv)
...
64
>>> newdata = tablib.Dataset()
>>> newdata.csv = open('tmp.csv').read()
>>> print(newdata.yaml)
- {First name: Black, Last name: Knight}
- {First name: Killer, Last name: Rabbit}
Read Tablib’s code
The file structure under tablib/ looks like this:
tablib
|--- __init__.py
|--- compat.py
|--- core.py
|--- formats/
|--- packages/
The two directories, tablib/formats/ and tablib/packages/, will be discussed in a few
sections.
Python supports module-level docstrings as well as the docstrings we’ve already
described—a string literal that is the first statement in a function, class, or class
method. Stack Overflow has good advice on how to document a module. For us, this
means another way to explore source code is by typing head *.py in a terminal shell
Tablib | 113

while in the directory at the top level of the package—to show all of the module doc‐
strings at once. Here’s what we get:
(venv)$ cd tablib
(venv)$ head *.py
==> __init__.py <==
""" Tablib. """
from tablib.core import (
Databook, Dataset, detect, import_set, import_book,
InvalidDatasetType, InvalidDimensions, UnsupportedFormat,
__version__
)
==> compat.py <==
# -*- coding: utf-8 -*-
"""
tablib.compat
~~~~~~~~~~~~~
Tablib compatiblity module.
"""
==> core.py <==
# -*- coding: utf-8 -*-
"""
tablib.core
~~~~~~~~~~~
This module implements the central Tablib objects.
:copyright: (c) 2014 by Kenneth Reitz.
:license: MIT, see LICENSE for more details.
"""
We learn that:
The top-level API (the contents of __init__.py are accessible from tablib after an
import tablib statement) has just nine entry points: the Databook and Dataset
classes are mentioned in the documentation, detect could be for identifying for‐
matting, import_set and import_book must import data, and the last three
classes—InvalidDatasetType, InvalidDimensions, and UnsupportedFormat—
look like exceptions. (When code follows PEP 8, we can tell which objects are
custom classes from their capitalization.)
114 | Chapter 5: Reading Great Code

tablib/compat.py is a compatibility module. A quick look inside will show that it
handles Python 2/Python 3 compatibility issues in a similar way to HowDoI, by
resolving different locations and names to the same symbol for use in tablib/
core.py.
tablib/core.py, like it says, implements the central Tablib objects like Dataset and
Databook.
Tablib’s Sphinx Documentation
Tablib’s documentation provides a good example use of Sphinx because it’s a small
library, and it makes use of a lot of Sphinx extensions.
The documenation’s current Sphinx build is at Tablib’s documentation page. If you
want to build the documentation yourself (Windows users will need a make command
—it’s old but works fine), do this:
(venv)$ pip install sphinx
(venv)$ cd docs
(venv)$ make html
(venv)$ open _build/html/index.html # To view the result.
Sphinx provides a number of theme options with default layout templates and CSS
themes. Tablib’s templates for two of the notes on the left sidebar are in docs/_tem‐
plates/. Their names are not arbitrary; they’re in basic/layout.html. You can find that
file in the Sphinx themes directory, which can be located by typing this on the com‐
mand line:
(venv)$ python -c 'import sphinx.themes;print(sphinx.themes.__path__)'
Advanced users can also look in in docs/_themes/kr/, a custom theme that extends the
basic layout. It is selected by adding the _themes/ directory to the system path, setting
html_theme_path = ['_themes'] and setting html_theme = 'kr' in docs/conf.py.
To include API documentation that’s automatically generated from the docstrings in
your code, use autoclass::. You have to copy the docstring formatting in Tablib for
this to work:
.. autoclass:: Dataset
:inherited-members:
To get this functionality, you have to answer “yes” to the question about including the
“autodoc” Sphinx extension when you run sphinx-quickstart to create a new
Sphinx project. The :inherited-members: directive also adds documentation for the
attributes inherited from parent classes.
Tablib | 115

Structure Examples from Tablib
The primary thing we want to highlight form Tablib is the absence of the use of
classes in the modules in tablib/formats/—it’s a perfect example of the statement we
made earlier about not overusing classes. Next, we show excerpts of how Tablib uses
the decorator syntax and the property class to create derived attributes like the data‐
set’s height and width, and how it dynamically registers file formats to avoid duplicat‐
ing what would be boilerplate code for each of the different format types (CSV,
YAML, etc.).
The last two subsections are a little obscure—we look at how Tablib vendorizes
dependencies, and then discuss the __slots__ property of new class objects. You can
skip these sections and still lead a happy, Pythonic life.
No needless object-oriented code in formats (use namespaces for grouping functions)
The formats directory contains all of the defined file formats for I/O. The module
names, _csv.py, _tsv.py, _json.py, _yaml.py, _xls.py, _xlsx.py, _ods.py, and _xls.py are
prefixed with an underscore—this indicates to the library user that they are not
intended for direct use. We can change directories into formats, and search for classes
and functions. Using grep ^class formats/*.py reveals there are no class defini‐
tions, and using grep ^def formats/*.py shows that each module contains some or
all of the following functions:
•detect(stream) infers the file format based on the stream content.
•dset_sheet(dataset, ws) formats the Excel spreadsheet cells.
•export_set(dataset) exports the Dataset to the given format, returning a for‐
matted string with the new format. (Or, for Excel, returning a bytes object—or a
binary-formatted string in Python 2.)
•import_set(dset, in_stream, headers=True) replaces the contents of the
dataset with the contents of the input stream.
•export_book(databook) exports the Datasheets in the Databook to the given
format, returning a string or bytes object.
•import_book(dbook, in_stream, headers=True) replaces the contents of the
databook with the contents of the input stream.
This is an example of using modules as namespaces (after all, they are one honking
great idea) to separate functions, rather than using unnecessary classes. We know
each function’s purpose from its name: for example, formats._csv.import_set(),
formats._tsv.import_set(), and formats._json.import_set() import datasets
from CSV, TSV, and JSON-formatted files, respectively. The other functions do data
116 | Chapter 5: Reading Great Code
exporting and file format detection, when possible, for each of Tablib’s available for‐
mats.
Descriptors and the property decorator (engineer immutability when the API would benet)
Tablib is our first library that uses Python’s decorator syntax, described in “Decora‐
tors” on page 67. The syntax uses the @ symbol in front of a function name, placed
directly above another function. It modifies (or “decorates”) the function directly
below. In the following excerpt, property changes the functions Dataset.height and
Dataset.width into descriptors—classes with at least one of the __get__(),
__set__(), or __delete__() (“getter”, “setter”, or “delete”) methods defined. For
example, the attribute lookup Dataset.height will trigger the getter, setter, or delete
function depending on the context in which that attribute is used. This behavior is
only possible for new-style classes, discussed momentarily. See this useful Python
tutorial on descriptors for more information.
class Dataset(object):
#
# ... omit the rest of the class definition for clarity
#
@property
def height(self):
"""The number of rows currently in the :class:`Dataset`.
Cannot be directly modified.
"""
return len(self._data)
@property
def width(self):
"""The number of columns currently in the :class:`Dataset`.
Cannot be directly modified.
"""
try:
return len(self._data[0])
except IndexError:
try:
return len(self.headers)
except TypeError:
return 0
This is how to use a decorator. In this case, property modifies Dataset.height
to behave as a property rather than as a bound method. It can only operate on
class methods.
Tablib | 117

When property is applied as a decorator, the height attribute will return the
height of the Dataset but it is not possible to assign a height to the Dataset by
invoking Dataset.height.
Here is what the height and width attributes look like when used:
>>> import tablib
>>> data = tablib.Dataset()
>>> data.header = ("amount", "ingredient")
>>> data.append(("2 cubes", "Arcturan Mega-gin"))
>>> data.width
2
>>> data.height
1
>>>
>>> data.height = 3
Traceback (most recent call last):
File "<stdin>", line 1, in <module>
AttributeError: can't set attribute
So, data.height can be accessed like an attribute, but it’s not settable—it’s calculated
from the data and so is always current. This is ergonomic API design: data.height is
easier to type than data.get_height(); it’s clear what the meaning of data.height is;
and because it is calculated from the data (and the property is not settable—only the
“getter” function is defined), there isn’t a danger that it will be out of sync from the
correct number.
The property decorator can only be applied to attributes of classes, and only to
classes that derive from the base object object (e.g., class MyClass(object) not
class MyClass()—inheritance from object is always the case in Python 3).
This same tool is used to create Tablib’s data import and export API in the various
formats: Tablib does not store the string value for each of the CSV, JSON, and YAML
outputs. Rather, the Dataset attributes csv, json, and yaml are properties, like Data
set.height and Dataset.width in the preceding example—they call a function that
generates the result from the stored data or parses the input format and then replaces
the core data. But there’s only one dataset.
When data.csv is on the left of an equals sign, the property’s “setter” function is
called, to parse the dataset from the CSV format. And when data.yaml is on the right
of an equals sign, or alone, the “getter” is called, to create a string with the given for‐
mat from the internal dataset. Here is an example:
>>> import tablib
>>> data = tablib.Dataset()
>>>
>>> data.csv = "\n".join((
... "amount,ingredient",
... "1 bottle,Ol' Janx Spirit",
118 | Chapter 5: Reading Great Code
... "1 measure,Santraginus V seawater",
... "2 cubes,Arcturan Mega-gin",
... "4 litres,Fallian marsh gas",
... "1 measure,Qalactin Hypermint extract",
... "1 tooth,Algolian Suntiger",
... "a sprinkle,Zamphuor",
... "1 whole,olive"))
>>>
>>> data[2:4]
[('2 cubes', 'Arcturan Mega-gin'), ('4 litres', 'Fallian marsh gas')]
>>>
>>> print(data.yaml)
- {amount: 1 bottle, ingredient: Ol Janx Spirit}
- {amount: 1 measure, ingredient: Santraginus V seawater}
- {amount: 2 cubes, ingredient: Arcturan Mega-gin}
- {amount: 4 litres, ingredient: Fallian marsh gas}
- {amount: 1 measure, ingredient: Qalactin Hypermint extract}
- {amount: 1 tooth, ingredient: Algolian Suntiger}
- {amount: a sprinkle, ingredient: Zamphuor}
- {amount: 1 whole, ingredient: olive}
data.csv on the lefthand side of the equals sign (assignment operator) invokes
formats.csv.import_set(), with data as the first argument, and the string of
Gargle Blaster ingredients as its second argument.
data.yaml alone invokes formats.yaml.export_set(), with data as its argu‐
ment, outputting the formatted YAML string for the print() function.
The “getter”, “setter”, and also a “deleter” function can be bound to a single attribute
using property. Its signature is property(fget=None, fset=None, fdel=None,
doc=None), in which fget identifies the “getter” function
(formats.csv.import_set()), fset identifies the “setter” function
(formats.csv.export_set()), and fdel identifies the “deleter” function, which is left
as None. We will see the code where the formatting properties are set, programmati‐
cally, next.
Programmatically registered le formats (don’t repeat yourself)
Tablib places all of the file formatting routines in the formats subpackage. This struc‐
ture choice makes the main core.py module cleaner and the entire package modular;
it’s easy to add new file formats. Although it would have been possible to paste
chunks of nearly identical code and import each file format’s import and export
behaviors separately, all of the formats are programmatically loaded into the Dataset
class to properties named after each format.
Tablib | 119

11 ASCII is default in Python 2, and UTF-8 is default in Python 3. There are multiple allowed ways to communi‐
cate encoding, all listed in PEP 263. You can use the one that works best with your favorite text editor.
We’re printing the entire contents of formats/__init__.py in the following code exam‐
ple because it’s not too large a file, and we want to show where formats.available is
defined:
# -*- coding: utf-8 -*-
""" Tablib - formats
"""
from . import _csv as csv
from . import _json as json
from . import _xls as xls
from . import _yaml as yaml
from . import _tsv as tsv
from . import _html as html
from . import _xlsx as xlsx
from . import _ods as ods
available = (json, xls, yaml, csv, tsv, html, xlsx, ods)
This line explicitly tells the Python interpreter that the file encoding is UTF-8.11
Here’s the definition of formats.available, right in formats/__init__.py. It’s also
available via dir(tablib.formats), but this explicit list is easier to understand.
In core.py, rather than about 20 (ugly, hard to maintain) repeated function definitions
for each format option, the code imports each format programmatically by calling
self._register_formats() at the end of the Dataset’s __init__() method. We’ve
excerpted just Dataset._register_formats() here:
class Dataset(object):
#
# ... skip documentation and some definitions ...
#
@classmethod
def _register_formats(cls):
"""Adds format properties."""
for fmt in formats.available:
try:
try:
setattr(cls, fmt.title,
property(fmt.export_set, fmt.import_set))
except AttributeError:
setattr(cls, fmt.title, property(fmt.export_set))
120 | Chapter 5: Reading Great Code
except AttributeError:
pass
#
# ... skip more definitions ...
#
@property
def tsv():
"""A TSV representation of the :class:`Dataset` object. The top
row will contain headers, if they have been set. Otherwise, the
top row will contain the first row of the dataset.
A dataset object can also be imported by setting
the :class:`Dataset.tsv` attribute. ::
data = tablib.Dataset()
data.tsv = 'age\tfirst_name\tlast_name\n90\tJohn\tAdams'
Import assumes (for now) that headers exist.
"""
pass
The @classmethod symbol is a decorator, described more extensively in “Decora‐
tors” on page 67, that modifies the method _register_formats() so that it
passes the object’s class (Dataset) rather than the object instance (self) as its
first argument.
The formats.available is defined in formats/__init__.py and contains all of the
available formatting options.
In this line, setattr assigns a value to the attribute named fmt.title (i.e., Data
set.csv or Dataset.xls). The value it assigns is a special one; prop
erty(fmt.export_set, fmt.import_set) turns Dataset.csv into a property.
There will be an AttributeError if fmt.import_set is not defined.
If there is no import function, try to assign just the export behavior.
If there is neither an export nor an import function to assign, just don’t assign
anything.
Each of the file formats is defined as a property here, with a descriptive docstring.
The docstring will be retained when property() is called at tag or to assign
the extra behaviors.
Tablib | 121

The \t and \n are string escape sequences that represent the Tab character and a
newline, respectively. They’re all listed in Python’s string literals documentation.
But We Are All Responsible Users
These uses of the @property decorator are not like the uses of similar tools in Java,
where the goal is to control the user’s access to data. That goes against the Python phi‐
losophy that we are all responsible users. Instead, the purpose of @property is to sepa‐
rate the data from view functions related to the data (in this case, the height, width,
and various storage formats). When there doesn’t need to be a preprocessing or post‐
processing “getter” or “setter” function, the more Pythonic option is to just assign the
data to a regular attribute and let the user interact with it.
Vendorized dependencies in packages (an example of how to vendorize)
Tablib’s dependencies are currently vendorized (meaning they are shipped bundled
with the code—in this case, in the directory packages) but may be moved to a plug-in
system in the future. The packages directory contains third-party packages included
inside Tablib to ensure compatibility, rather than the other option, which is to specify
versions in the setup.py file that will be downloaded and installed when Tablib is
installed. This technique is discussed in “Vendorizing Dependencies” on page 71; the
choice for Tablib was made both to reduce the number of dependencies the user
would have to download, and because sometimes there are different packages for
Python 2 and Python 3, which are both included. (The appropriate one is imported,
and their functions set to a common name, in tablib/compat.py). That way, Tablib can
have one single code base instead of two—one for each version of Python. Because
each of these dependencies has its own license, a NOTICE document was added to
the top level of the project directory that lists each dependency’s license.
Saving memory with __slots__ (optimize judiciously)
Python prefers readability over speed. Its entire design, its Zen aphorisms, and its
early influence from educational languages like ABC are all about placing user-
friendliness above performance (although we’ll talk about more optimization options
in “Speed” on page 223).
The use of __slots__ in tablib is a case where optimization matters. This is a slightly
obscure reference, and it’s only available for new-style classes (described in a few
pages), but we want to show that it’s possible to optimize Python when necessary.
This optimization is only useful when you have tons of very small objects by reducing
the footprint of each class instance by the size of one dictionary (large objects would
make this small savings irrelevant, and fewer objects make the savings not worth it).
Here is an excerpt from the __slots__ documentation:
122 | Chapter 5: Reading Great Code

By default, instances of classes have a dictionary for attribute storage. This wastes space
for objects having very few instance variables. The space consumption can become
acute when creating large numbers of instances.
The default can be overridden by defining __slots__ in a class definition. The
__slots__ declaration takes a sequence of instance variables and reserves just enough
space in each instance to hold a value for each variable. Space is saved because
__dict__ is not created for each instance.
Normally, this isn’t something to care about—notice that __slots__ doesn’t appear in
the Dataset or Databook classes, just the Row class—but because there can be thou‐
sands of rows of data, __slots__ is a good idea. The Row class is not exposed in tablib/
__init__.py because it is a helper class to Dataset, instantiated once for every row.
This is how its definition looks in the beginning part of the definition of the Row class:
class Row(object):
"""Internal Row object. Mainly used for filtering."""
__slots__ = ['_row', 'tags']
def __init__(self, row=list(), tags=list()):
self._row = list(row)
self.tags = list(tags)
#
# ... etc. ...
#
The problem now is that there is no longer a __dict__ attribute in the Row instances,
but the pickle.dump() function (used for object serialization) by default uses
__dict__ to serialize the object unless the method __getstate__() is defined. Like‐
wise, during unpickling (the process that reads the serialized bytes and reconstructs
the object in memory), if __setstate__() is not defined, pickle.load() will load to
the object’s __dict__ attribute. Here is how to get around that:
class Row(object):
#
# ... skip the other definitions ...
#
def __getstate__(self):
slots = dict()
for slot in self.__slots__:
attribute = getattr(self, slot)
slots[slot] = attribute
return slots
def __setstate__(self, state):
Tablib | 123
for (k, v) in list(state.items()):
setattr(self, k, v)
For more information about __getstate__() and __setstate__() and pickling, see
the __getstate__ documentation.
Style Examples from Tablib
We have one single style example from Tablib—operator overloading—which gets
into the details of Python’s data model. Customizing the behavior of your classes
makes it easier for those who use your API to write beautiful code.
Operator overloading (beautiful is better than ugly)
This code section uses Python’s operator overloading to enable operations on either
the Dataset’s rows or columns. The following first sample code shows interactive use
of the bracket operator ([ ]) for both numerical indices and column names, and the
second one shows the code that uses this behavior:
>>> data[-1]
('1 whole', 'olive')
>>>
>>> data[-1] = ['2 whole', 'olives']
>>>
>>> data[-1]
('2 whole', 'olives')
>>>
>>> del data[2:7]
>>>
>>> print(data.csv)
amount,ingredient
1 bottle,Ol' Janx Spirit
1 measure,Santraginus V seawater
2 whole,olives
>>> data['ingredient']
["Ol' Janx Spirit", 'Santraginus V seawater', 'olives']
When using numbers, accessing data via the bracket operator ([]) gives the row
at the specified location.
This is assignment using the bracket operator …
… it becomes 2 olives instead of the original one.
This is deletion using a slice—2:7 denotes all of the numbers 2,3,4,5,6 but not
7.
124 | Chapter 5: Reading Great Code

See how the recipe afterward is much smaller.
It is also possible to access columns by name.
The part of the Dataset code that defines the behavior of the bracket operator shows
how to handle access both by column name and by row number:
class Dataset(object):
#
# ... skip the rest of the definitions for brevity ...
#
def __getitem__(self, key):
if isinstance(key, str) or isinstance(key, unicode):
if key in self.headers:
pos = self.headers.index(key) # get 'key' index from each data
return [row[pos] for row in self._data]
else:
raise KeyError
else:
_results = self._data[key]
if isinstance(_results, Row):
return _results.tuple
else:
return [result.tuple for result in _results]
def __setitem__(self, key, value):
self._validate(value)
self._data[key] = Row(value)
def __delitem__(self, key):
if isinstance(key, str) or isinstance(key, unicode):
if key in self.headers:
pos = self.headers.index(key)
del self.headers[pos]
for row in self._data:
del row[pos]
else:
raise KeyError
else:
del self._data[key]
First, check whether we are seeking a column (True if key is a string) or a row
(True if the key is an integer or slice).
Here the code checks for the key to be in self.headers, and then…
Tablib | 125

…explicitly raises a KeyError so that access by column name behaves as one
would expect a dictionary to. The whole if/else pair is not necessary for the
operation of the function—if it were omitted, a ValueError would still be raised
by self.headers.index(key) if key were not in self.headers. The only pur‐
pose for this check is to provide a more informative error for the library user.
This is how the code determines whether key was a number or a slice (like 2:7).
If a slice, the _results would be a list, not a Row.
Here is where the slice is processed. Because the rows are returned as tuples, the
values are an immutable copy of the acual data, and the dataset’s values (actually
stored as lists) won’t accidentally be corrupted by an assignment.
The __setitem__() method can change a single row but not a column. This is
intentional; there is no way provided to change the content of an entire column;
and for data integrity, this is probably not a bad choice. The user can always
transform the column and insert it at any position using one of the methods
insert_col(), lpush_col(), or rpush_col().
The __delitem__() method can either delete a column or a row, using the same
logic as __getitem__().
For more information about additional operator overloading and other special meth‐
ods, see the Python documentation on Special method names.
Requests
On Valentine’s day in 2011, Kenneth Reitz released a love letter to the Python com‐
munity: the Requests library. Its enthusiastic adoption emphatically makes the case
for intuitive API design (meaning the API is so straightforward you almost don’t
need documentation).
Reading a Larger Library
Requests is a larger library than Tablib, with many more modules, but we’ll still
approach reading it the same way—by looking at the documentation and following
the API through the code.
Get Requests from GitHub:
$ git clone https://github.com/kennethreitz/requests.git
$ virtualenv -p python3 venv
$ source venv/bin/activate
(venv)$ cd requests
(venv)$ pip install --editable .
126 | Chapter 5: Reading Great Code

12 If you need a vocabulary refresh, RFC 7231 is the HTTP semantics document. If you scan the table of con‐
tents and read the introduction, you’ll know enough about the scope to tell whether the definition you want is
covered, and where to find it.
(venv)$ pip install -r requirements.txt # Required for unit tests
(venv)$ py.test tests # Run the unit tests.
Some tests may fail—for example, if your service provider intercepts 404 errors to
give some advertising page, you won’t get the ConnectionError.
Read Requests’s documentation
Requests is a bigger package, so first just scan the section titles from the Requests
documentation. Requests extends urrlib and httplib from Python’s standard library
to provide methods that perform HTTP requests. The library includes support for
international domains and URLs, automatic decompression, automatic content
decoding, browser style SSL verification, HTTP(S) proxy support, and other features,
which are all defined by the Internet Engineering Task Force (IETF) standards for
HTTP in their requests for comment (RFCs) 7230 through 7235.12
Requests strives to cover all of the IETF’s HTTP specifications, using only a handful
of functions, a bunch of keyword arguments, and a few featureful classes.
Use Requests
Like with Tablib, there is enough information in the docstrings to use Requests
without actually reading the online documentation. Here’s a brief interaction:
>>> import requests
>>> help(requests) # Shows a usage statement and says to see `requests.api`
>>> help(requests.api) # Shows a detailed API description
>>>
>>> result = requests.get('https://pypi.python.org/pypi/requests/json')
>>> result.status_code
200
>>> result.ok
True
>>> result.text[:42]
'{\n "info": {\n "maintainer": null'
>>>
>>> result.json().keys()
dict_keys(['info', 'releases', 'urls'])
>>>
>>> result.json()['info']['summary']
'Python HTTP for Humans.'
Read Requests’s code
Here are the contents of the Requests package:
Requests | 127

$ ls
__init__.py cacert.pem exceptions.py sessions.py
adapters.py certs.py hooks.py status_codes.py
api.py compat.py models.py structures.py
auth.py cookies.py packages/ utils.py
cacert.pem is a default certificate bundle to use when checking SSL certificates.
Requests has a flat structure, except for a packages directory that vendorizes (con‐
tains the external libraries) chardet and urllib3. These dependencies are impor‐
ted as requests.packages.chardet and requests.packages.urllib3, so
programmers can still access chardet and urllib3 from the standard library.
We can mostly figure out what’s happening thanks to well-chosen module names, but
if we want a little more imformation, we can again peek at the module docstrings by
typing head *.py in the top-level directory. The following lists displays these module
docstrings, slightly truncated. (It doesn’t show compat.py. We can tell from its name,
especially because it’s named the same as in Reitz’s Tablib library, that it takes care of
Python 2 to Python 3 compatibility.)
api.py
Implements the Requests API
hooks.py
Provides the capabilities for the Requests hooks system
models.py
Contains the primary objects that power Requests
sessions.py
Provides a Session object to manage and persist settings across requests (cookies,
auth, proxies)
auth.py
Contains the authentication handlers for Requests
status_codes.py
A lookup table mapping status titles to status codes
cookies.py
Compatibility code to be able to use cookielib.CookieJar with requests
adapters.py
Contains the transport adapters Requests uses to define and maintain connec‐
tions
exceptions.py
All of Requests’ exceptions
128 | Chapter 5: Reading Great Code

structures.py
Data structures that power Requests
certs.py
Returns the preferred default CA certificate bundle listing trusted SSL certificates
utils.py
Provides utility functions that are used within Requests that are also useful for
external consumption
Insights from reading all of the headers:
•There is a hook system (hooks.py), implying the user can modify how Requests
works. We won’t discuss it in depth because it will take us too far off topic.
•The main module is models.py, as it contains “the primary objects that power
Requests.”
• The reason sessions.Session exists is to persist cookies across multiple requests
(that might occur during authentication, for example).
• The actual HTTP connection is made by objects from adapters.py.
•The rest is kind of obvious: auth.py is for authentication, status_codes.py has the
status codes, cookies.py is for adding and removing cookies, exceptions.py is for
exceptions, structures.py contains data structures (e.g., a case-insensitive dictio‐
nary), and utils.py contains utility functions.
The idea to put communication separately in adapters.py is innovative (at least to this
writer). It means models.Request, models.PreparedRequest, and models.Response
don’t actually do anything—they just store data, possibly manipulating it a bit for pre‐
sentation, pickling, or encoding purposes. Actions are handled by separate classes
that exist specifically to perform an action, like authentication or communication.
Every class does just one thing, and each module contains classes that do similar
things—a Pythonic approach most of us already adhere to with our function defini‐
tions.
Requests | 129

13 These are defined in section 4.3 of the current Hypertext Transfer Protocol request for comments.
Requests’s Sphinx-Compatible Docstrings
If you are starting a new project and using Sphinx and its autodoc extension, you will
need to format your docstrings so that Sphinx can parse them.
The Sphinx documentation is not always easy to search for what keywords to place
where. Many people actually recommend copying the docstrings in Requests if you
want to get the format right, rather than find the instructions in the Sphinx docs. For
example, here is the definition of delete() in requests/api.py:
def delete(url, **kwargs):
"""Sends a DELETE request.
:param url: URL for the new :class:`Request` object.
:param \*\*kwargs: Optional arguments that ``request`` takes.
:return: :class:`Response <Response>` object
:rtype: requests.Response
"""
return request('delete', url, **kwargs)
The Sphinx autodoc rendering of this definition is in the online API documentation.
Structure Examples from Requests
Everyone loves the Requests API—it is easy to remember and helps its users to write
simple, beautiful code. This section first discusses the design preference for more
comprehensible error messages and an easy-to-memorize API that we think went
into creation of the requests.api module, and then explores the differences between
the requests.Request and urllib.request.Request object, offering an opinion on
why requests.Request exists.
Top-level API (preferably only one obvious way to do it)
The functions defined in api.py (except request()) are named after HTTP request
methods.13 Each request method is the same except for its method name and the
choice of exposed keyword parameters, so we’re truncating this exerpt from requests/
api.py after the get() function:
# -*- coding: utf-8 -*-
"""
requests.api
~~~~~~~~~~~~
130 | Chapter 5: Reading Great Code
This module implements the Requests API.
:copyright: (c) 2012 by Kenneth Reitz.
:license: Apache2, see LICENSE for more details.
"""
from . import sessions
def request(method, url, **kwargs):
"""Constructs and sends a :class:`Request <Request>`.
:param method: method for the new :class:`Request` object.
:param url: URL for the new :class:`Request` object.
:param params: (optional) Dictionary or bytes to be sent in the query string
for the :class:`Request`.
... skip the documentation for the remaining keyword arguments ...
:return: :class:`Response <Response>` object
:rtype: requests.Response
Usage::
>>> import requests
>>> req = requests.request('GET', 'http://httpbin.org/get')
<Response [200]>
"""
# By using the 'with' statement, we are sure the session is closed, thus we
# avoid leaving sockets open which can trigger a ResourceWarning in some
# cases, and look like a memory leak in others.
with sessions.Session() as session:
return session.request(method=method, url=url, **kwargs)
def get(url, params=None, **kwargs):
"""Sends a GET request.
:param url: URL for the new :class:`Request` object.
:param params: (optional) Dictionary or bytes to be sent in the query string
for the :class:`Request`.
:param \*\*kwargs: Optional arguments that ``request`` takes.
:return: :class:`Response <Response>` object
:rtype: requests.Response
"""
kwargs.setdefault('allow_redirects', True)
return request('get', url, params=params, **kwargs)
Requests | 131
The request() function contains a **kwargs in its signature. This means extra‐
neous keyword arguments will not cause an exception, and it hides options from
the user.
The documentation omitted here for brevity describes every keyword argument
that has an associated action. If you use **kwargs in your function signature, this
is the only way the user can tell what the contents of **kwargs should be, short of
looking at the code themselves.
The with statement is how Python supports a runtime context. It can be used
with any object that has an __enter__() and an __exit__() method defined.
__enter()__ will be called upon entering the with statement, and __exit__()
will be called upon exit, regardless of whether that exit is normal or due to an
exception.
The get() function specifically pulls out the params=None keyword, applying a
default value of None. The params keyword argument relevant for get because it’s
for terms to be used in an HTTP query string. Exposing selected keyword argu‐
ments gives flexibility to the advanced user (via the remaining **kwargs) while
making usage obvious for the 99% of people who don’t need advanced options.
The default for the request() function is to not allow redirects, so this step sets it
to True unless the user set it already.
The get() function then simply calls request() with its first parameter set to
"get". Making get a function has two advantages over just using a string argu‐
ment like request("get", ...). First, it becomes obvious, even without docu‐
mentation, which HTTP methods are available with this API. Second, if the user
makes a typographical error in the method name, a NameError will be raised ear‐
lier, and probably with a less confusing traceback, than would happen with error
checking deeper in the code.
No new functionality is added in requests/api.py; it exists to present a simple API for
the user. Plus, putting the string HTTP methods directly into the API as function
names means any typographical error with the method name will be caught and iden‐
tified early, for example:
>>> requests.foo('http://www.python.org')
Traceback (most recent call last):
File "<stdin>", line 1, in <module>
AttributeError: 'module' object has no attribute 'foo'
>>>
>>> requests.request('foo', 'http://www.python.org')
<Response [403]>
132 | Chapter 5: Reading Great Code

14 The module http.cookiejar was previously cookielib in Python 2, and urllib.requests.Request was pre‐
viously urllib2.Request in Python 2.
The Request and PreparedRequest objects (we’re all responsible users)
__init__.py exposes Request, PreparedRequest, and Response from models.py as part
of the main API. Why does models.Request even exist? There’s already a url
lib.requests.Request in the standard library, and in cookies.py there is specifically a
MockRequest object that wraps models.Request so that it works like url
lib.requests.Request for http.cookiejar.14 That means whatever methods are
needed for the Request object to interface with the cookies library are intentionally
excluded from requests.Request. What is the point of all this extra work?
The extra methods in MockRequest (which exists to emulate url
lib.request.Request for the cookie library) are used by the cookie library to man‐
age cookies. Except for the get_type() function (which usually returns “http” or
“https” when using Requests) and the unverifiable property (True for our case),
they’re all related to the URL or the request headers:
Related to the header
add_unredirected_header()
Add a new key, value pair to the header.
get_header()
Get a specific name in the header dictionary.
get_new_headers()
Get the dictionary containing new headers (added by cookielib).
has_header()
Check whether a name exists in the header dictionary.
Related to the URL
get_full_url()
Does just what it says.
host and origin_req_host
Properties that are set by calling the methods get_host() and get_ori
gin_req_host(), respectively.
get_host()
Extract the host from the URL (e.g., www.python.org from https://
www.python.org/dev/peps/pep-0008/).
Requests | 133

15 This method makes it possible to handle cross-origin requests (like getting a JavaScript library hosted on a
third-party site). It is supposed to return the origin host of the request, defined in IETF RFC 2965.
get_origin_req_host()
Call get_host().15
They’re all access functions, except for MockRequest.add_unredirected_header().
The MockRequest docstring notes that “the original request object is read-only.”
In requests.Request, data attributes are instead directly exposed. This makes all of
the accessor functions unnecessary: to get or set the headers, access request-
instance.headers. It’s just a dictionary. Likewise, the user can just get or change the
string URL: request-instance.url.
The PreparedRequest object is initialized empty, and is populated with a call to
prepared-request-instance.prepare(), filled with the relevant data (usually from
the calling the Request object). It’s at this point that things like correct capitalization
and encoding are applied. The object’s contents will, once prepared, be ready to send
to the server, but every attribute is still directly exposed. Even PreparedRe
quest._cookies is exposed, although its prepended underscore is a gentle reminder
that the attribute is not intended for use outside of the class, without forbidding such
access (we are all responsible users).
This choice exposes the objects to user modification, but they are much more reada‐
ble, and a little bit of extra work inside of PreparedRequest corrects capitalization
issues and allows use of a dictionary in place of a CookieJar (look for the if isin
stance()/else statement):
#
# ... from models.py ...
#
class PreparedRequest():
#
# ... skip everything else ...
#
def prepare_cookies(self, cookies):
"""Prepares the given HTTP cookie data.
This function eventually generates a ``Cookie`` header from the
given cookies using cookielib. Due to cookielib's design, the header
will not be regenerated if it already exists, meaning this function
can only be called once for the life of the
:class:`PreparedRequest <PreparedRequest>` object. Any subsequent calls
to ``prepare_cookies`` will have no actual effect, unless the "Cookie"
header is removed beforehand."""
134 | Chapter 5: Reading Great Code

if isinstance(cookies, cookielib.CookieJar):
self._cookies = cookies
else:
self._cookies = cookiejar_from_dict(cookies)
cookie_header = get_cookie_header(self._cookies, self)
if cookie_header is not None:
self.headers['Cookie'] = cookie_header
These things may not seem like a big deal, but it’s small choices like these that make
an API intuitive to use.
Style Examples from Requests
The style examples from Requests are a good example use for sets (which we think
aren’t used often enough!) and a look at the requests.status_codes module, which
exists to make the style of the rest of the code simpler by avoiding hardcoded HTTP
status codes everywhere else in the code.
Sets and set arithmetic (a nice, Pythonic idiom)
We haven’t yet shown an example use of Python sets in action. Python sets behave
like sets in math—you can do subtraction, unions (the or operator), and intersections
(the and operator):
>>> s1 = set((7,6))
>>> s2 = set((8,7))
>>> s1
{6, 7}
>>> s2
{8, 7}
>>> s1 - s2 # set subtraction
{6}
>>> s1 | s2 # set union
{8, 6, 7}
>>> s1 & s2 # set intersection
{7}
Here’s one, down toward the end of this function from cookies.py (with the label ):
#
# ... from cookies.py ...
#
def create_cookie(name, value, **kwargs):
"""Make a cookie from underspecified parameters.
By default, the pair of `name` and `value` will be set for the domain ''
and sent on every request (this is sometimes called a "supercookie").
"""
Requests | 135

result = dict(
version=0,
name=name,
value=value,
port=None,
domain='',
path='/',
secure=False,
expires=None,
discard=True,
comment=None,
comment_url=None,
rest={'HttpOnly': None},
rfc2109=False,)
badargs = set(kwargs) - set(result)
if badargs:
err = 'create_cookie() got unexpected keyword arguments: %s'
raise TypeError(err % list(badargs))
result.update(kwargs)
result['port_specified'] = bool(result['port'])
result['domain_specified'] = bool(result['domain'])
result['domain_initial_dot'] = result['domain'].startswith('.')
result['path_specified'] = bool(result['path'])
return cookielib.Cookie(**result)
The **kwargs specification allows the user to provide any or none of the key‐
word options for a cookie.
Set arithmetic! Pythonic. Simple. And in the standard library. On a dictionary,
set() forms a set of the keys.
This is a great example of spliting a long line into two shorter lines that make
much better sense. No harm done from the extra err variable.
The result.update(kwargs) updates the result dictionary with the key/value
pairs in the kwargs dictionary, replacing existing pairs or creating ones that didn’t
exist.
Here the call to bool() coerces the value to True if the object is truthy (meaning
it evaluates to True—in this case, bool(result['port']) evaluates to True if it’s
not None and it’s not an empty container).
The signature to initialize cookielib.Cookie is actually 18 positional arguments
and one keyword argument (rfc2109 defaults to False). It’s impossible for us
average humans to memorize which position has which value, so here Requests
136 | Chapter 5: Reading Great Code

takes advantage of being able to assign positional arguments by name as keyword
arguments, sending the whole dictionary.
Status codes (readability counts)
The entire status_codes.py exists to create an object that can look up status codes by
attribute. We’re showing the definition of the lookup dictionary in status_codes.py
first, and then an excerpt of code that uses it from sessions.py:
#
# ... excerpted from requests/status_codes.py ...
#
_codes = {
# Informational.
100: ('continue',),
101: ('switching_protocols',),
102: ('processing',),
103: ('checkpoint',),
122: ('uri_too_long', 'request_uri_too_long'),
200: ('ok', 'okay', 'all_ok', 'all_okay', 'all_good', '\\o/', '✔'),
201: ('created',),
202: ('accepted',),
#
# ... skipping ...
#
# Redirection.
300: ('multiple_choices',),
301: ('moved_permanently', 'moved', '\\o-'),
302: ('found',),
303: ('see_other', 'other'),
304: ('not_modified',),
305: ('use_proxy',),
306: ('switch_proxy',),
307: ('temporary_redirect', 'temporary_moved', 'temporary'),
308: ('permanent_redirect',
'resume_incomplete', 'resume',), # These 2 to be removed in 3.0
#
# ... skipping the rest ...
#
}
codes = LookupDict(name='status_codes')
for code, titles in _codes.items():
for title in titles:
setattr(codes, title, code)
if not title.startswith('\\'):
setattr(codes, title.upper(), code)
Requests | 137

All of these options for an OK status will become keys in the lookup dictionary.
Except for the happy person (\\o/) and the check mark (✔).
The deprecated values are on a separate line so that the future delete will be clean
and obvious in version control.
The LookupDict allows dot-access of its elements like in the next line.
codes.ok == 200 and codes.okay == 200.
And also codes.OK == 200 and codes.OKAY == 200.
All of this work for the status codes was to make the lookup dictionary codes. Why?
Instead of very typo-prone hardcoded integers all over the code, this is easy to read,
with all of the code numbers localized in a single file. Because it starts as a dictionary
keyed on the status codes, each status code integer only exists once. The possibility of
typos is much, much lower than if this were just a bunch of global variables manually
embedded into a namespace.
And converting the keys into attributes instead of using them as strings in a dictio‐
nary again reduces the risk of typographical errors. Here’s the example in sessions.py
that’s so much easier to read with words than numbers:
#
# ... from sessions.py ...
# Truncated to only show relevant content.
#
from .status_codes import codes
class SessionRedirectMixin(object):
def resolve_redirects(self, resp, req, stream=False, timeout=None,
verify=True, cert=None, proxies=None,
**adapter_kwargs):
"""Receives a Response. Returns a generator of Responses."""
i = 0
hist = [] # keep track of history
while resp.is_redirect:
prepared_request = req.copy()
if i > 0:
# Update history and keep track of redirects.
hist.append(resp)
new_hist = list(hist)
resp.history = new_hist
try:
138 | Chapter 5: Reading Great Code

resp.content # Consume socket so it can be released
except (ChunkedEncodingError, ContentDecodingError, RuntimeError):
resp.raw.read(decode_content=False)
if i >= self.max_redirects:
raise TooManyRedirects(
'Exceeded %s redirects.' % self.max_redirects
)
# Release the connection back into the pool.
resp.close()
#
# ... skipping content ...
#
# http://tools.ietf.org/html/rfc7231#section-6.4.4
if (resp.status_code == codes.see_other and
method != 'HEAD'):
method = 'GET'
# Do what the browsers do, despite standards...
# First, turn 302s into GETs.
if resp.status_code == codes.found and method != 'HEAD':
method = 'GET'
# Second, if a POST is responded to with a 301, turn it into a GET.
# This bizarre behavior is explained in Issue 1704.
if resp.status_code == codes.moved and method == 'POST':
method = 'GET'
#
# ... etc. ...
#
Here’s where the status code lookup codes is imported.
We describe mixin classes later in “Mixins (also one honking great idea)” on page
153. This mixin provides redirect methods for the main Session class, which is
defined in this same file but not shown in our excerpt.
We’re entering a loop that’s following the redirects for us to get at the content we
want. The entire loop logic is deleted from this excerpt for brevity.
Status codes as text are so much more readable than unmemorizable integers:
codes.see_other would otherwise be 303 here.
And codes.found would be 302, and codes.moved would be 301. So the code is
self-documenting; we can tell meaning from the variable names; and we’ve avoi‐
Requests | 139

16 Since then, PEP 333 has been superseded by a specification updated to include some Python 3–specific
details, PEP 3333. For a digestible but very thorough introduction, we recommend Ian Bicking’s WSGI tuto‐
rial.
ded the possibility of littering the code with typographical errors by using dot-
notation instead of a dictionary to look up strings (e.g., codes.found instead of
codes["found"]).
Werkzeug
To read Werkzeug, we need to know a little about how web servers communicate with
applications. The next paragraphs try to give as short an overview as possible.
Python’s interface for web application-to-server interaction, WSGI, is defined in
PEP 333, which was written by Phillip J. Eby in 2003.16 It specifies how a web server
(like Apache) communicates with a Python application or framework:
1. The server will call the application once per HTTP request (e.g., “GET” or
“POST”) it receives.
2. That application will return an iterable of bytestrings that the server will use to
respond to the HTTP request.
3. The specification also says the application will take two parameters—for exam‐
ple, webapp(environ, start_response). The environ parameter will contain all
of the data associated with the request, and the start_response parameter will
be a function or other callable object that will be used to send back header (e.g.,
('Content-type', 'text/plain')) and status (e.g., 200 OK) information to the
server.
That summary glosses over about a half-dozen pages of additional detail. In the mid‐
dle of PEP 333 is this aspirational statement about the new standard making modular
web frameworks possible:
If middleware can be both simple and robust, and WSGI is widely available in servers
and frameworks, it allows for the possibility of an entirely new kind of Python web
application framework: one consisting of loosely-coupled WSGI middleware compo‐
nents. Indeed, existing framework authors may even choose to refactor their frame‐
works’ existing services to be provided in this way, becoming more like libraries used
with WSGI, and less like monolithic frameworks. This would then allow application
developers to choose “best-of-breed” components for specific functionality, rather than
having to commit to all the pros and cons of a single framework.
Of course, as of this writing, that day is doubtless quite far off. In the meantime, it is a
sufficient short-term goal for WSGI to enable the use of any framework with any
server.
140 | Chapter 5: Reading Great Code

About four years after, in 2007, Armin Ronacher released Werkzeug, with the intent
of filling that hopeful need for a WSGI library that can be used to make WSGI appli‐
cations and middleware components.
Werkzeug is the largest package we are reading, so we’ll highlight just a few of its
design choices.
Reading Code in a Toolkit
A software toolkit is a collection of compatible utilities. In Werkzeug’s case, they’re all
related to WSGI applications. A good way to understand the distinct utilities and
what they’re for is to look at the unit tests, and that’s how we’ll approach reading
Werkzeug’s code.
Get Werkzeug from GitHub:
$ git clone https://github.com/pallets/werkzeug.git
$ virtualenv -p python3 venv
$ source venv/bin/activate
(venv)$ cd werkzeug
(venv)$ pip install --editable .
(venv)$ py.test tests # Run the unit tests
Read Werkzeug’s documentation
Werkzeug’s documentation lists the main things it provides—an implementation of
the WSGI 1.0 (PEP 333) specification, a URL routing system, the capability to parse
and dump HTTP headers, objects that represent HTTP requests and HTTP respon‐
ses, session and cookie support, file uploads, and other utilities and community add-
ons. Plus, a full-featured debugger.
The tutorials are good, but we’re using the API documentation instead to see more of
the library’s components. The next section takes from Werkzeug’s wrappers and rout‐
ing documentation.
Use Werkzeug
Werkzeug provides utilities for WSGI applications, so to learn what Werkzeug pro‐
vides, we can start with a WSGI application, and then use a few of Werkzeug’s utilit‐
ies. This first application is a slightly changed version of what’s in PEP 333, and
doesn’t use Werkzeug yet. The second one does the same thing as the first, but using
Werkzeug:
def wsgi_app(environ, start_response):
headers = [('Content-type', 'text/plain'), ('charset', 'utf-8')]
start_response('200 OK', headers)
yield 'Hello world.'
Werkzeug | 141

# This app does the same thing as the one above:
response_app = werkzeug.Response('Hello world!')
Werkzeug implements a werkzeug.Client class to stand in for a real web sever when
doing one-off testing like this. The client response will have the type of the
response_wrapper argument. In this code, we create clients and use them to call the
WSGI applications we made earlier. First, the plain WSGI app (but with the response
parsed into a werkzeug.Response):
>>> import werkzeug
>>> client = werkzeug.Client(wsgi_app, response_wrapper=werkzeug.Response)
>>> resp=client.get("?answer=42")
>>> type(resp)
<class 'werkzeug.wrappers.Response'>
>>> resp.status
'200 OK'
>>> resp.content_type
'text/plain'
>>> print(resp.data.decode())
Hello world.
Next, using the werkzeug.Response WSGI app:
>>> client = werkzeug.Client(response_app, response_wrapper=werkzeug.Response)
>>> resp=client.get("?answer=42")
>>> print(resp.data.decode())
Hello world!
The werkzeug.Request class provides the contents of the environment dictionary
(the environ argument above to wsgi_app()) in a form that’s easier to use. It also
provides a decorator to convert a function that takes a a werkzeug.Request and
returns a werkzeug.Response into a WSGI app:
>>> @werkzeug.Request.application
... def wsgi_app_using_request(request):
... msg = "A WSGI app with:\n method: {}\n path: {}\n query: {}\n"
... return werkzeug.Response(
... msg.format(request.method, request.path, request.query_string))
...
which, when used, gives:
>>> client = werkzeug.Client(
... wsgi_app_using_request, response_wrapper=werkzeug.Response)
>>> resp=client.get("?answer=42")
>>> print(resp.data.decode())
A WSGI app with:
method: GET
path: /
query: b'answer=42'
142 | Chapter 5: Reading Great Code

So, we know how to use the werkzeug.Request and werkzeug.Response objects. The
other thing that was featured in the documentation was the routing. Here’s an excerpt
that uses it—callout numbers identify both the pattern and its match:
>>> import werkzeug
>>> from werkzeug.routing import Map, Rule
>>>
>>> url_map = Map([
... Rule('/', endpoint='index'),
... Rule('/<any("Robin","Galahad","Arthur"):person>', endpoint='ask'),
... Rule('/<other>', endpoint='other')
... ])
>>> env = werkzeug.create_environ(path='/shouldnt/match')
>>> urls = url_map.bind_to_environ(env)
>>> urls.match()
Traceback (most recent call last):
File "<stdin>", line 1, in <module>
File "[...path...]/werkzeug/werkzeug/routing.py", line 1569, in match
raise NotFound()
werkzeug.exceptions.NotFound: 404: Not Found
The werkzeug.Routing.Map provides the main routing functions. The rule
matching is done in order; the first rule to match is the one selected.
When there are no angle-bracket terms in the rule’s placeholder string, it only
matches on an exact match, and the second result from urls.match() is an
empty dictionary:
>>> env = werkzeug.create_environ(path='/')
>>> urls = url_map.bind_to_environ(env)
>>> urls.match()
('index', {})
Otherwise, the second entry is a dictionary mapping the named terms in the rule
to their value—for example, mapping 'person' to the value 'Galahad':
>>> env = werkzeug.create_environ(path='/Galahad?favorite+color')
>>> urls = url_map.bind_to_environ(env)
>>> urls.match()
('ask', {'person': 'Galahad'})
Note that 'Galahad' could have mached the route named 'other', but it did not
—but 'Lancelot' did—because the first rule to match the pattern is chosen:
>>> env = werkzeug.create_environ(path='/Lancelot')
>>> urls = url_map.bind_to_environ(env)
>>> urls.match()
('other', {'other': 'Lancelot'})
Werkzeug | 143

And an exception is raised if there are no matches at all in the list of rules:
>>> env = werkzeug.test.create_environ(path='/shouldnt/match')
>>> urls = url_map.bind_to_environ(env)
>>> urls.match()
Traceback (most recent call last):
File "<stdin>", line 1, in <module>
File "[...path...]/werkzeug/werkzeug/routing.py", line 1569, in match
raise NotFound()
werkzeug.exceptions.NotFound: 404: Not Found
You’d use the map to route a request to an appropriate endpoint. The following code
continues on from the predceding example to do this:
@werkzeug.Request.application
def send_to_endpoint(request):
urls = url_map.bind_to_environ(request)
try:
endpoint, kwargs = urls.match()
if endpoint == 'index':
response = werkzeug.Response("You got the index.")
elif endpoint == 'ask':
questions = dict(
Galahad='What is your favorite color?',
Robin='What is the capital of Assyria?',
Arthur='What is the air-speed velocity of an unladen swallow?')
response = werkzeug.Response(questions[kwargs['person']])
else:
response = werkzeug.Response("Other: {other}".format(**kwargs))
except (KeyboardInterrupt, SystemExit):
raise
except:
response = werkzeug.Response(
'You may not have gone where you intended to go,\n'
'but I think you have ended up where you needed to be.',
status=404
)
return response
To test it, use the werkzeug.Client again:
>>> client = werkzeug.Client(send_to_endpoint, response_wrapper=werkzeug.Response)
>>> print(client.get("/").data.decode())
You got the index.
>>>
>>> print(client.get("Arthur").data.decode())
What is the air-speed velocity of an unladen swallow?
>>>
>>> print(client.get("42").data.decode())
Other: 42
>>>
>>> print(client.get("time/lunchtime").data.decode()) # no match
144 | Chapter 5: Reading Great Code

You may not have gone where you intended to go,
but I think you have ended up where you needed to be.
Read Werkzeug’s code
When test coverage is good, you can learn what a library does by looking at the unit
tests. The caveat is that with unit tests, you’re intentionally looking at the “trees” and
not the “forest”—exploring obscure use cases intended to ensure the code doesn’t
break, rather than looking for interconnections between modules. This should be OK
for a toolkit like Werkzeug, which we expect to have modular, loosely coupled com‐
ponents.
Because we familiarized ourselves with how the routing and the request and response
wrappers work, werkzeug/test_routing.py and werkzeug/test_wrappers.py are good
choices to read for now.
When we first open werkzeug/test_routing.py, we can quickly look for interconnection
between the modules by searching through the entire file for the imported objects.
Here are all of the import statements:
import pytest
import uuid
from tests import strict_eq
from werkzeug import routing as r
from werkzeug.wrappers import Response
from werkzeug.datastructures import ImmutableDict, MultiDict
from werkzeug.test import create_environ
Of course, pytest is used here for testing.
The uuid module is used in just one function, test_uuid_converter(), to con‐
firm that the conversion from string to a uuid.UUID object (the Universal Unique
Identifier string uniquely identifying objects on the Internet) works.
The strict_eq() function is used often, and defined in werkzeug/tests/
__init__.py. It’s for testing, and is only necessary because in Python 2 there used
to be implicit type conversion between Unicode and byte strings, but relying on
this breaks things in Python 3.
The werkzeug.routing module is the one that’s being tested.
The Reponse object is used in just one function, test_dispatch(), to confirm
that werkzeug.routing.MapAdapter.dispatch() passes the correct information
through to the dispatched WSGI application.
Werkzeug | 145

These dictionary objects are used only once each, ImmutableDict to confirm that
an immutable dictionary in werkzeug.routing.Map is indeed immutable, and
MultiDict to provide multiple keyed values to the URL builder and confirm that
it still builds the correct URL.
The create_environ() function is for testing—it creates a WSGI environment
without having to use an actual HTTP request.
The point of doing the quick searching was to quickly see the interconnection
between modules. What we found out was that werkzeug.routing imports some spe‐
cial data structures, and that’s all. The rest of the unit tests show the scope of the rout‐
ing module. For example, non-ASCII characters can be used:
def test_environ_nonascii_pathinfo():
environ = create_environ(u'/лошадь')
m = r.Map([
r.Rule(u'/', endpoint='index'),
r.Rule(u'/лошадь', endpoint='horse')
])
a = m.bind_to_environ(environ)
strict_eq(a.match(u'/'), ('index', {}))
strict_eq(a.match(u'/лошадь'), ('horse', {}))
pytest.raises(r.NotFound, a.match, u'/барсук')
There are tests to build and parse URLs, and even utilities to find the closest available
match, when there wasn’t an actual match. You can even do all kinds of crazy custom
processing when handling the type conversions/parsing from the path and the URL
string:
def test_converter_with_tuples():
'''
Regression test for https://github.com/pallets/werkzeug/issues/709
'''
class TwoValueConverter(r.BaseConverter):
def __init__(self, *args, **kwargs):
super(TwoValueConverter, self).__init__(*args, **kwargs)
self.regex = r'(\w\w+)/(\w\w+)'
def to_python(self, two_values):
one, two = two_values.split('/')
return one, two
def to_url(self, values):
return "%s/%s" % (values[0], values[1])
map = r.Map([
r.Rule('/<two:foo>/', endpoint='handler')
], converters={'two': TwoValueConverter})
a = map.bind('example.org', '/')
146 | Chapter 5: Reading Great Code

route, kwargs = a.match('/qwert/yuiop/')
assert kwargs['foo'] == ('qwert', 'yuiop')
Similarly, werkzeug/test_wrappers.py does not import much. Reading through the
tests gives an example of the scope of available functionality for the Request object—
cookies, encoding, authentication, security, cache timeouts, and even multilanguage
encoding:
def test_modified_url_encoding():
class ModifiedRequest(wrappers.Request):
url_charset = 'euc-kr'
req = ModifiedRequest.from_values(u'/?foo=정상처리'.encode('euc-kr'))
strict_eq(req.args['foo'], u'정상처리')
In general, reading the tests provides a way to see the details of what the library pro‐
vides. Once satisfied that we have an idea of what Werkzeug is, we can move on.
Tox in Werkzeug
Tox is a Python command-line tool that uses virtual environments to run tests. You
can run it on your own computer (tox on the command line), so long as the Python
interpreters you’re using are already installed. It’s integrated with GitHub, so if you
have a tox.ini file in the top level of your repository, like Werkzeug does, it will auto‐
matically run tests on every commit.
Here is Werkzeug’s entire tox.ini configuration file:
[tox]
envlist = py{26,27,py,33,34,35}-normal, py{26,27,33,34,35}-uwsgi
[testenv]
passenv = LANG
deps=
# General
pyopenssl
greenlet
pytest
pytest-xprocess
redis
requests
watchdog
uwsgi: uwsgi
# Python 2
py26: python-memcached
py27: python-memcached
pypy: python-memcached
# Python 3
py33: python3-memcached
Werkzeug | 147

py34: python3-memcached
py35: python3-memcached
whitelist_externals=
redis-server
memcached
uwsgi
commands=
normal: py.test []
uwsgi: uwsgi
--pyrun {envbindir}/py.test
--pyargv -kUWSGI --cache2=name=werkzeugtest,items=20 --master
Style Examples from Werkzeug
Most of the major style points we made in Chapter 4 have already been covered. The
first style example we chose shows an elegant way to guess types from a string, and
the second one makes a case for using the VERBOSE option when defining long regular
expressions—so that other people can tell what the expression does without having to
spend time thinking through it.
Elegant way to guess type (if the implementation is easy to explain, it may be a good idea)
If you’re like most of us, you’ve had to parse text files and convert content to various
types. This solution is particularly Pythonic, so we wanted to include it:
_PYTHON_CONSTANTS = {
'None': None,
'True': True,
'False': False
}
def _pythonize(value):
if value in _PYTHON_CONSTANTS:
return _PYTHON_CONSTANTS[value]
for convert in int, float:
try:
return convert(value)
except ValueError:
pass
if value[:1] == value[-1:] and value[0] in '"\'':
value = value[1:-1]
return text_type(value)
Key lookup for Python dictionaries uses hash mapping, just like set lookup.
Python doesn’t have switch case statements. (They were proposed and rejected
148 | Chapter 5: Reading Great Code

17 re.VERBOSE allows you to write more readable regular expressions by changing the way whitespace is treated,
and by allowing comments. Read more in the re documentation.
for lack of popularity in PEP 3103.) Instead, Python users use if/elif/else, or as
shown here, the very Pythonic option of a dictionary lookup.
Note that the first conversion attempt is to the more restrictive type, int, before
attempting the conversion to float.
It is also Pythonic to use try/except statements to infer type.
This part is necessary because the code is in werkzeug/routing.py, and the string
being parsed is part of a URL. It’s checking for quotes and unquoting the value.
text_type converts strings to Unicode in a way that’s both Python 2 and
Python 3 compatible. It’s basically the same thing as the u() function highlighted
in “HowDoI” on page 93.
Regular expressions (readability counts)
If you use lengthy regular expressions in your code, please use the re.VERBOSE17
option and make it comprehensible to the rest of us humans, like this snippet from
werkzeug/routing.py:
import re
_rule_re = re.compile(r'''
(?P<static>[^<]*) # static rule data
<
(?:
(?P<converter>[a-zA-Z_][a-zA-Z0-9_]*) # converter name
(?:\((?P<args>.*?)\))? # converter arguments
\: # variable delimiter
)?
(?P<variable>[a-zA-Z_][a-zA-Z0-9_]*) # variable name
>
''', re.VERBOSE)
Structure Examples from Werkzeug
The first two examples related to structure demonstrate Pythonic ways to leverage
dynamic typing. We cautioned against reassigning a variable to different values in
“Dynamic Typing” on page 68 but didn’t mention any benefits. One of them is the
ability to use any type of object that behaves in the expected way—duck typing. Duck
Werkzeug | 149

18 That is, if it’s callable, or iterable, or has the correct method defined …
typing approaches types with the philosophy: “If it looks like a duck18 and quacks like
a duck, then it’s a duck”.
They both play in different ways on ways that objects can be callable without being
functions: cached_property.__init__() allows initialization of a class instance to be
used like an ordinary function call, and Response.__call__() allows a Response
instance to itself be called like a function.
The last excerpt uses Werkzeug’s implementation of some mixin classes (that each
define a subset of the functionality in Werkzeug’s Request object) to discuss why
they’re a honking great idea.
Class-based decorators (a Pythonic use of dynamic typing)
Werkzeug makes use of duck typing to make the @cached_property decorator. When
we talked about property when describing the Tablib project, we talked about it like
it’s a function. Usually decorators are functions, but because there is no enforcement
of type, they can be any callable: property is actually a class. (You can tell it’s intended
to be used like a function because it is not capitalized, like PEP 8 says class names
should be.) When written like a function call (property()), property.__init__()
will be called to initialize and return a property instance—a class, with an appropri‐
ately defined __init__() method, works as a callable. Quack.
The following excerpt contains the entire definition of cached_property, which sub‐
classes the property class. The documentation within cached_property speaks for
itself. When it is used to decorate BaseRequest.form in the code we just saw, the
instance.form will have the type cached_property and will behave like a dictionary
as far as the user is concerned, because both the __get__() and __set__() methods
are defined. The first time BaseRequest.form is accessed, it will read its form data (if
it exists) once, and then store the data in instance.form.__dict__ to be accessed in
the future:
class cached_property(property):
"""A decorator that converts a function into a lazy property. The
function wrapped is called the first time to retrieve the result,
and then that calculated result is used the next time you access
the value::
class Foo(object):
@cached_property
def foo(self):
# calculate something important here
150 | Chapter 5: Reading Great Code

return 42
The class has to have a `__dict__` in order for this property to
work.
"""
# implementation detail: A subclass of Python's built-in property
# decorator, we override __get__ to check for a cached value. If one
# choses to invoke __get__ by hand, the property will still work as
# expected because the lookup logic is replicated in __get__ for
# manual invocation.
def __init__(self, func, name=None, doc=None):
self.__name__ = name or func.__name__
self.__module__ = func.__module__
self.__doc__ = doc or func.__doc__
self.func = func
def __set__(self, obj, value):
obj.__dict__[self.__name__] = value
def __get__(self, obj, type=None):
if obj is None:
return self
value = obj.__dict__.get(self.__name__, _missing)
if value is _missing:
value = self.func(obj)
obj.__dict__[self.__name__] = value
return value
Here it is in action:
>>> from werkzeug.utils import cached_property
>>>
>>> class Foo(object):
... @cached_property
... def foo(self):
... print("You have just called Foo.foo()!")
... return 42
...
>>> bar = Foo()
>>>
>>> bar.foo
You have just called Foo.foo()!
42
>>> bar.foo
42
>>> bar.foo # Notice it doesn't print again...
42
Werkzeug | 151

Response.__call__
The Response class is built using features mixed into the BaseResponse class, just like
Request. We will highlight its user interface and won’t show the actual code, just the
docstring for BaseResponse, to show the usage details:
class BaseResponse(object):
"""Base response class. The most important fact about a response object
is that it's a regular WSGI application. It's initialized with a couple
of response parameters (headers, body, status code, etc.) and will start a
valid WSGI response when called with the environ and start response
callable.
Because it's a WSGI application itself, processing usually ends before the
actual response is sent to the server. This helps debugging systems
because they can catch all the exceptions before responses are started.
Here is a small example WSGI application that takes advantage of the
response objects::
from werkzeug.wrappers import BaseResponse as Response
def index():
return Response('Index page')
def application(environ, start_response):
path = environ.get('PATH_INFO') or '/'
if path == '/':
response = index()
else:
response = Response('Not Found', status=404)
return response(environ, start_response)
""""
# ... etc. ...
In the example from the docstring, index() is the function that will be called in
response to the HTTP request. The response will be the string “Index page”.
This is the signature required for a WSGI application, as specified in PEP 333/
PEP 3333.
Response subclasses BaseResponse, so response is an instance of BaseResponse.
See how the 404 response just requires the status keyword to be set.
And, voilà, the response instance is itself callable, with all of the accompanying
headers and details set to sensible default values (or overrides in the case where
the path is not “/”).
152 | Chapter 5: Reading Great Code
So, how is an instance of a class callable? Because the BaseRequest.__call__ method
has been defined. We show just that method in the following code example.
class BaseResponse(object):
#
# ... skip everything else ...
#
def __call__(self, environ, start_response):
"""Process this response as WSGI application.
:param environ: the WSGI environment.
:param start_response: the response callable provided by the WSGI
server.
:return: an application iterator
"""
app_iter, status, headers = self.get_wsgi_response(environ)
start_response(status, headers)
return app_iter
Here’s the signature to make BaseResponse instances callable.
Here’s where the start_response function call requirement of WSGI apps is sat‐
isfied.
And here’s where the iterable of bytes is returned.
The lesson here is this: if it’s possible in the language, why not do it? We promise after
realizing we could add a __call__() method to any object and make it callable, we
were inspired to go back to the original documentation for a good re-read of Python’s
data model.
Mixins (also one honking great idea)
Mixins in Python are classes that are intended to add a specific functionality—a
handful of related attributes—to a class. Python, unlike Java, allows for multiple
inheritance. This means that the following paradigm, where a half-dozen different
classes are subclassed simultaneously, is a possible way to modularize different func‐
tionality into separate classes. “Namespaces,” sort of.
Modularization like this is useful in a utility library like Werkzeug because it commu‐
nicates to the user which functions are related and not related: the developer can be
confident that attributes in one mixin are not going to be modified by any functions
in another mixin.
Werkzeug | 153

In Python, there isn’t anything special to identify a mixin, other
than the convention of appending Mixin to the end of the class
name. This means if you don’t want to pay attention to the order of
method resolution, all of the mixins’ methods should have distinct
names.
In Werkzeug, sometimes methods in a mixin may require certain attributes to be
present. These requirements are usually documented in the mixin’s docstring:
# ... in werkzeug/wrappers.py
class UserAgentMixin(object):
"""Adds a `user_agent` attribute to the request object which contains
the parsed user agent of the browser that triggered the request as a
:class:`~werkzeug.useragents.UserAgent` object.
"""
@cached_property
def user_agent(self):
"""The current user agent."""
from werkzeug.useragents import UserAgent
return UserAgent(self.environ)
class Request(BaseRequest, AcceptMixin, ETagRequestMixin,
UserAgentMixin, AuthorizationMixin,
CommonRequestDescriptorsMixin):
"""Full featured request object implementing the following mixins:
- :class:`AcceptMixin` for accept header parsing
- :class:`ETagRequestMixin` for etag and cache control handling
- :class:`UserAgentMixin` for user agent introspection
- :class:`AuthorizationMixin` for http auth handling
- :class:`CommonRequestDescriptorsMixin` for common headers
"""
There is nothing special about the UserAgentMixin; it subclasses object, though,
which is the default in Python 3, highly recommended for compatibility in
Python 2, and which should be done explicitly because, well, “explicit is better
than implicit.”
UserAgentMixin.user_agent assumes there is a self.environ attribute.
When included in the list of base classes for Request, the attribute it provides
becomes accessible via Request(environ).user_agent.
154 | Chapter 5: Reading Great Code

Nothing else—this is the entire body of the definition of Request. All functional‐
ity is provided by the base class or the mixins. Modular, pluggable, and as froody
as Ford Prefect.
New-Style Classes and object
The base class object adds default attributes that other built-in options rely on.
Classes that don’t inherit from object are called “old-style classes” or “classic classes”
and are removed in Python 3. It’s the default to inherit from object in Python 3,
meaning all Python 3 classes are “new-style classes.” New-style classes are available in
Python 2.7 (actually with their current behavior since Python 2.3), but the inheritance
must be written explicitly, and (we think) should always be written.
There are more details in the Python documentation on new-style classes, a tutorial
here, and a technical history of their creation in this post. Here are some of the differ‐
ences (in Python 2.7; all classes are new-style in Python 3):
>>> class A(object):
... """New-style class, subclassing object."""
...
>>> class B:
... """Old-style class."""
...
>>> dir(A)
['__class__', '__delattr__', '__dict__', '__doc__', '__format__',
'__getattribute__', '__hash__', '__init__', '__module__', '__new__',
'__reduce__', '__reduce_ex__', '__repr__', '__setattr__', '__sizeof__',
'__str__', '__subclasshook__', '__weakref__']
>>>
>>> dir(B)
['__doc__', '__module__']
>>>
>>> type(A)
<type 'type'>
>>> type(B)
<type 'classobj'>
>>>
>>> import sys
>>> sys.getsizeof(A()) # The size is in bytes.
64
>>> sys.getsizeof(B())
72
Flask
Flask is a web microframework that combines Werkzeug and Jinja2, both by Armin
Ronacher. It was created as a joke and released on April Fool’s Day, 2010, but quickly
Flask | 155

19 A reference to Ruby on Rails, which popularized web frameworks, and which is much more similar to Djan‐
go’s style of “everything included,” rather than Flask’s style of “nearly nothing included” (until you add plug-
ins). Django is a great choice when the things you want included are the things Django provides—it was
made, and is fantastic for, hosting an online newspaper.
20 WSGI is a Python standard, defined in PEP 333 and PEP 3333 for how an application can communicate with
a web server.
became one of Python’s most popular web frameworks. He had released Werkzeug a
few years earlier in 2007 as a “Swiss Army knife of Python web development,” and
(we presume) was probably a little frustrated at its slow adoption. The idea for Werk‐
zeug was to decouple the WSGI from everything else so that developers could plug in
their own choice of utilities. Little did he know how much we’d appreciate a few more
“rails.”19
Reading Code in a Framework
A software framework is just like a physical framework—it provides the underlying
structure to build a WSGI20 application: the library user provides components that the
main Flask application will run. Our goal in reading will be to understand the frame‐
work structure and what precisely it provides.
Get Flask from GitHub:
$ git clone https://github.com/pallets/flask.git
$ virtualenv venv # Python 3 is usable but discouraged for now
$ source venv/bin/activate
(venv)$ cd flask
(venv)$ pip install --editable .
(venv)$ pip install -r test-requirements.txt # Required for unit tests
(venv)$ py.test tests # Run the unit tests
Read Flask’s documentation
Flask’s online documentation starts out with a seven-line implementation of a web
app, and then summarizes Flask: it’s a Unicode-based WSGI-compliant framework
that uses Jinja2 for HTML templating and Werkzeug for WSGI utilities like URL
routing. It also has built-in tools for development and testing. There are also tutorials,
so the next step is easy.
Use Flask
We can run the flaskr example that we downloaded with the GitHub repository. The
documents say it’s a small blog site. From within the top ask directory:
(venv)$ cd examples/flaskr/
(venv)$ py.test test_flaskr.py # Tests should pass
(venv)$ export FLASK_APP=flaskr
156 | Chapter 5: Reading Great Code

21 The Python call stack contains the instructions that are in progress, being run by the Python interpreter. So if
function f() calls function g(), then function f() will go on the stack first, and g() will be pushed on top of
f() when it’s called. When g() returns, it is popped off of (removed from) the stack, and then f() will con‐
tinue where it left off. It is called a stack, because conceptually it works the same way a dish washer will
approach a stack of plates—new ones go on the top, and you always deal with the top ones first.
(venv)$ flask initdb
(venv)$ flask run
Read Flask’s code
The ultimate goal of Flask is to create a web application, so really it isn’t so different
from the command-line applications Diamond and HowDoI. Rather than another
diagram tracing the flow of function calls through the code, this time we’ll step
through Flask by running the flaskr example app with a debugger; we’ll use pdb—the
Python debugger—in the standard library.
First, add a breakpoint to askr.py, which will be activated when that point in the
code is reached, causing the interactive session to enter the debugger:
@app.route('/')
def show_entries():
import pdb; pdb.set_trace() ## This line is the breakpoint.
db = get_db()
cur = db.execute('select title, text from entries order by id desc')
entries = cur.fetchall()
return render_template('show_entries.html', entries=entries)
Next, close the file and type python on the command line to enter an interactive ses‐
sion. Rather than starting a server, use Flask’s internal testing utilities to simulate an
HTTP GET request to the / location where we just placed the debugger:
>>> import flaskr
>>> client = flaskr.app.test_client()
>>> client.get('/')
> /[... truncated path ...]/flask/examples/flaskr/flaskr.py(74)show_entries()
-> db = get_db()
(Pdb)
The last three lines are from pdb: we see the path (to askr.py), the line number (74),
and the method name (show_entries()) where we stopped. The line (-> db =
get_db()) shows the statement that will be executed next if we were to step forward
in the debugger. And the (Pdb) prompt reminds us that we are using the pdb debug‐
ger.
We can navigate up or down the stack21 by typing u or d, respectively, at the command
prompt. See the pdb documentation under the header “Debugger Commands” for a
complete list of the commands you can type. We can also type variable names to see
Flask | 157

them, and any other Python command; we can even set the variables to different val‐
ues before we continue on in the code.
If we go up the stack one step, we see what called the show_entries() function (with
the breakpoint we just installed): it’s a flask.app.Flask object with a lookup dictio‐
nary named view_functions that maps string names (like 'show_entries') to func‐
tions. We also see the show_entries() function was called with **req.view_args.
We can check what req.view_args is from the interactive debugger command line by
just typing its name (it’s the empty dictionary — {}, meaning no arguments):
(Pdb) u
> /[ ... truncated path ...]/flask/flask/app.py(1610)dispatch_request()
-> return self.view_functions[rule.endpoint](**req.view_args)
(Pdb) type(self)
<class 'flask.app.Flask'>
(Pdb) type(self.view_functions)
<type 'dict'>
(Pdb) self.view_functions
{'add_entry': <function add_entry at 0x108198230>,
'show_entries': <function show_entries at 0x1081981b8>, [... truncated ...]
'login': <function login at 0x1081982a8>}
(Pdb) rule.endpoint
'show_entries'
(Pdb) req.view_args
{}
We can simultaneously follow along through the source code, if we want to, by open‐
ing the appropriate file and going to the stated line. If we keep going up the stack, we
can see where the WSGI application is called:
(Pdb) u
> /[ ... truncated path ...]/flask/flask/app.py(1624)full_dispatch_request()
-> rv = self.dispatch_request()
(Pdb) u
> /[ ... truncated path ...]/flask/flask/app.py(1973)wsgi_app()
-> response = self.full_dispatch_request()
(Pdb) u
> /[ ... truncated path ...]/flask/flask/app.py(1985)__call__()
-> return self.wsgi_app(environ, start_response)
If we type u any more, we end up in the testing module, which was used to create the
fake client without having to start a server—we’ve gone as far up the stack as we want
to go. We learned that the application flaskr is dispatched from within an instance of
the flask.app.Flask class, on line 1985 of ask/ask/app.py. Here is the function:
class Flask:
## ~~ ... skip lots of definitions ...
def wsgi_app(self, environ, start_response):
"""The actual WSGI application. ... skip other documentation ...
"""
158 | Chapter 5: Reading Great Code
ctx = self.request_context(environ)
ctx.push()
error = None
try:
try:
response = self.full_dispatch_request()
except Exception as e:
error = e
response = self.make_response(self.handle_exception(e))
return response(environ, start_response)
finally:
if self.should_ignore_error(error):
error = None
ctx.auto_pop(error)
def __call__(self, environ, start_response):
"""Shortcut for :attr:`wsgi_app`."""
return self.wsgi_app(environ, start_response)
This is line number 1973, identified in the debugger.
This is line number 1985, also identified in the debugger. The WSGI server
would receive the Flask instance as an application, and call it once for every
request—by using the debugger, we’ve found the entry point for the code.
We’re using the debugger in the same way as we used the call graph with HowDoI—
by following function calls—which is also the same thing as reading through code
directly. The value of using the debugger is that we avoid looking at all of the addi‐
tional code that may distract or confuse us. Use the approach that is most effective for
you.
After going up the stack using u, we can go back down the stack using d and will end
up back at the breakpoint, labeled with the *** Newest frame:
> /[ ... truncated path ...]/flask/examples/flaskr/flaskr.py(74)show_entries()
-> db = get_db()
(Pdb) d
*** Newest frame
From there, we can advance through a function call with the n (next) command, or
advance in as short a step as possible with the s (step) command:
(Pdb) s
--Call--
> /[ ... truncated path ... ]/flask/examples/flaskr/flaskr.py(55)get_db()
-> def get_db():
(Pdb) s
> /[ ... truncated path ... ]/flask/examples/flaskr/flaskr.py(59)get_db()
-> if not hasattr(g, 'sqlite_db'):
##~~
##~~ ... do a dozen steps to create and return the database connection...
Flask | 159

##~~
-> return g.sqlite_db
(Pdb) n
> /[ ... truncated path ... ]/flask/examples/flaskr/flaskr.py(75)show_entries()
-> cur = db.execute('select title, text from entries order by id desc')
(Pdb) n
> /[ ... truncated path ... ]/flask/examples/flaskr/flaskr.py(76)show_entries()
-> entries = cur.fetchall()
(Pdb) n
> /[ ... truncated path ... ]/flask/examples/flaskr/flaskr.py(77)show_entries()
-> return render_template('show_entries.html', entries=entries)
(Pdb) n
--Return--
There’s a lot more, but it’s tedious to show. What we get out of it is:
Awareness of the Flask.g object. A little more digging reveals it is the global
(actually local to the Flask instance) context. It exists to contain database con‐
nections and other persistent things like cookies that need to survive outside of
the life of the methods in the Flask class. Using a dictionary like this keeps vari‐
ables out of the Flask app’s namespace, avoiding possible name collisions.
The render_template() function isn’t much of a surprise, but it’s at the end of
the function definition in the askr.py module, meaning we’re essentially done—
the return value goes back to the calling function from the Flask instance that we
saw when traversing up the stack. So we’re skipping the rest.
The debugger is useful local to the place that you’re inspecting, to find out precisely
what’s happening before and after an instant, the user-selected breakpoint, in the
code. One of the big features is the ability to change variables on the fly (any Python
code works in the debugger) and then continue on stepping through the code.
160 | Chapter 5: Reading Great Code

Logging in Flask
Diamond has an example of logging in an application, and Flask provides one of log‐
ging in a library. If all you want to do is avoid “no handler found” warnings, search
for “logging” in the Requests library (requests/requests/__init__.py). But if you want to
provide some logging support within your library or framework, Flask’s logging pro‐
vides a good example to follow.
Flask-specific logging is implemented in ask/ask/logging.py. It defines the logging
format strings for production (with logging level ERROR) and for debugging (with log‐
ging level DEBUG), and follows the advice from the Twelve-Factor App to log to
streams (which direct to one of wsgi.errors or sys.stderr, depending on the con‐
text).
The logger is added to the main Flask application in ask/ask/app.py (the code snip‐
pet skips over anything that’s not relevant in the file):
# a lock used for logger initialization
_logger_lock = Lock()
class Flask(_PackageBoundObject):
##~~ ... skip other definitions
#: The name of the logger to use. By default the logger name is the
#: package name passed to the constructor.
#:
#: .. versionadded:: 0.4
logger_name = ConfigAttribute('LOGGER_NAME')
def __init__(self, import_name, static_path=None, static_url_path=None,
##~~ ... skip the other arguments ...
root_path=None):
##~~ ... skip the rest of the initialization
# Prepare the deferred setup of the logger.
self._logger = None
self.logger_name = self.import_name
@property
def logger(self):
"""A :class:`logging.Logger` object for this application. The
default configuration is to log to stderr if the application is
in debug mode. This logger can be used to (surprise) log messages.
Here some examples::
app.logger.debug('A value for debugging')
app.logger.warning('A warning occurred (%d apples)', 42)
Flask | 161
app.logger.error('An error occurred')
.. versionadded:: 0.3
"""
if self._logger and self._logger.name == self.logger_name:
return self._logger
with _logger_lock:
if self._logger and self._logger.name == self.logger_name:
return self._logger
from flask.logging import create_logger
self._logger = rv = create_logger(self)
return rv
This lock is used toward the end of the code. Locks are objects that can only be
posessed by one thread at a time. When it is being used, any other threads that
want it must block.
Like Diamond, Flask uses the configuration file (with sane defaults, that aren’t
shown here, so the user can simply do nothing and get a reasonable answer) to
set the logger name.
The Flask application’s logger is initially set to none so that it can be created later
(in step ).
If the logger exists already, return it. The property decoration, like earlier in this
chapter, exists to prevent the user from inadvertently modifying the logger.
If the logger doesn’t exist yet (it was initialized to None), then use the lock created
in step and create it.
Style Examples from Flask
Most of the style examples from Chapter 4 have already been covered, so we’ll only
discuss one style example for Flask—the implementation of Flask’s elegant and simple
routing decorators.
Flask’s routing decorators (beautiful is better than ugly)
The routing decorators in Flask add URL routing to target functions, like this:
@app.route('/')
def index():
pass
The Flask application will, when dispatching a request, use URL routing to identify
the correct function to generate the response. The decorator syntax keeps the routing
code logic out of the target function, keeps the function flat, and is intuitive to use.
162 | Chapter 5: Reading Great Code
It’s also not necessary—it exists only to provide this API feature to the user. Here is
the source code, a method in the main Flask class defined in ask/ask/app.py:
class Flask(_PackageBoundObject):
"""The flask object implements a WSGI application ...
... skip everything else in the docstring ...
"""
##~~ ... skip all but the routing() method.
def route(self, rule, **options):
"""A decorator that is used to register a view function for a
given URL rule. This does the same thing as :meth:`add_url_rule`
but is intended for decorator usage::
@app.route('/')
def index():
return 'Hello World'
... skip the rest of the docstring ...
"""
def decorator(f):
endpoint = options.pop('endpoint', None)
self.add_url_rule(rule, endpoint, f, **options)
return f
return decorator
The _PackageBoundObject sets up the file structure to import the HTML tem‐
plates, static files, and other content based on configuration values specifying
their location relative to the location of the application module (e.g., app.py).
Why not name it decorator? That’s what it does.
This is the actual function that adds the URL to the map containing all of the
rules. The only purpose of Flask.route is to provide a convenient decorator for
library users.
Structure Examples from Flask
The theme for both of the structure examples from Flask is modularity. Flask is inten‐
tionally structured to make it easy to extend and modify almost everything—from the
way that JSON strings are encoded and decoded (Flask supplements the standard
library’s JSON capability with encodings for datetime and UUID objects) to the
classes used when routing URLs.
Application specic defaults (simple is better than complex)
Flask and Werkzeug both have a wrappers.py module. The reason is to add appropri‐
ate defaults for Flask, a framework for web applications, on top of Werkzeug’s more
Flask | 163

general utility library for WSGI applications. Flask subclasses Werkzeug’s Request
and Response objects to add specific features related to web applications. For exam‐
ple, the Response object in ask/ask/wrappers.py looks like this:
from werkzeug.wrappers import Request as RequestBase, Response as ResponseBase
##~~ ... skip everything else ...
class Response(ResponseBase):
"""The response object that is used by default in Flask. Works like the
response object from Werkzeug but is set to have an HTML mimetype by
default. Quite often you don't have to create this object yourself because
:meth:`~flask.Flask.make_response` will take care of that for you.
If you want to replace the response object used you can subclass this and
set :attr:`~flask.Flask.response_class` to your subclass.
"""
default_mimetype = 'text/html'
Werkzeug’s Response class is imported as ResponseBase, a nice style detail that
makes its role obvious and allows the new Response subclass to take its name.
The ability to subclass flask.wrappers.Response, and how to do it, is docu‐
mented prominently in the docstring. When features like this are implemented,
it’s important to remember the documentation, or users won’t know the possibil‐
ity exists.
This is it—the only change in the Response class. The Request class has more
changes, which we’re not showing to keep the length of this chapter down.
This small interactive session shows what changed between Flask’s and Werkzeug’s
Response classes:
>>> import werkzeug
>>> import flask
>>>
>>> werkzeug.wrappers.Response.default_mimetype
'text/plain'
>>> flask.wrappers.Response.default_mimetype
'text/html'
>>> r1 = werkzeug.wrappers.Response('hello', mimetype='text/html')
>>> r1.mimetype
u'text/html'
>>> r1.default_mimetype
'text/plain'
>>> r1 = werkzeug.wrappers.Response('hello')
>>> r1.mimetype
'text/plain'
164 | Chapter 5: Reading Great Code

The point of changing the default mimetype was just to make a little less typing for
Flask users when building response objects that contain HTML (the expected use
with Flask). Sane defaults make your code much, much easier for the average user.
Sane Defaults Can Be Important
Sometimes defaults matter a lot more than just for ease of use. For example, Flask sets
the key for sessionization and secure communication to Null by default. When the
key is null, an error will be raised if the app attempts to start a secure session. Forcing
this error means users will make their own secret keys—the other (bad) options
would be to either silently allow a null session key and insecure sessionization, or to
provide a default key like mysecretkey that would invariably not be updated (and
thus be used in deployment) by many.
Modularity (also one honking great idea)
The docstring for flask.wrappers.Response let users know that they could subclass
the Response object and use their newly defined class in the main Flask object.
In this excerpt from ask/ask/app.py, we highlight some of the other modularity
built into Flask:
class Flask(_PackageBoundObject):
""" ... skip the docstring ...
"""
#: The class that is used for request objects. See :class:`~flask.Request`
#: for more information.
request_class = Request
#: The class that is used for response objects. See
#: :class:`~flask.Response` for more information.
response_class = Response
#: The class that is used for the Jinja environment.
#:
#: .. versionadded:: 0.11
jinja_environment = Environment
##~~ ... skip some other definitions ...
url_rule_class = Rule
test_client_class = None
session_interface = SecureCookieSessionInterface()
##~~ .. etc. ..
Here’s where the custom Request class can be substituted.
Flask | 165

And here is the place to identify the custom Response class. These are class
attributes (rather than instance attributes) of the Flask class, and are named in a
clear way that makes it obvious what their purpose is.
The Environment class is a subclass of Jinja2’s Environment that has the ability to
understand Flask Blueprints, which make it possible to build larger, multifile
Flask applications.
There are other modular options that are not shown because it was getting repet‐
itive.
If you search through the Flask class definition, you can find where these classes are
instantiated and used. The point of showing it to you is that these class definitions
didn’t have to be exposed to the user—this was an explicit structural choice done to
give the library user more control over how Flask behaves.
When people talk about Flask’s modularity, they’re not just talking about how you can
use any database backend you want, they’re also talking about this capability to plug
in and use different classes.
You’ve now seen some examples of well-written, very Zen Python code.
We highly recommend you take a look at the full code of each of the programs dis‐
cussed here: the best way to become a good coder is to read great code. And remem‐
ber, whenever coding gets tough, use the source, Luke!
166 | Chapter 5: Reading Great Code

1Rumor has it they prefer to be called the “Ministry of Installation.” Nick Coghlan, the BDFL-delegate for
packaging related PEPs, wrote a thoughtful essay on the whole system, its history, and where it should go on
his blog a few years ago.
CHAPTER 6
Shipping Great Code
This chapter focuses on best practices for packaging and distributing Python code.
You’ll either want to create a Python library to be imported and used by other devel‐
opers, or create a standalone application for others to use, like pytest.
The ecosystem around Python packaging has become a lot more straightforward in
the past few years, thanks to the work of the Python Packaging Authority (PyPA)1—
the people who maintain pip, the Python Package Index (PyPI), and much of the
infrastructure relevant to Python packaging. Their packaging documentation is stel‐
lar, so we won’t reinvent the wheel in “Packaging Your Code” on page 169, but we will
briefly show two ways to host packages from a private site, and talk about how to
upload code to Anaconda.org, the commercial analogue to PyPI run by Continuum
Analytics.
The downside of distributing code through PyPI or other package repositories is that
the recipient must understand how to install the required version of Python and be
able and willing to use tools such as pip to install your code’s other dependencies.
This is fine when distributing to other developers but makes the method unsuitable
for distributing applications to end users who aren’t coders. For that, use one of the
tools in “Freezing Your Code” on page 172.
Those making Python packages for Linux may also consider a Linux distro package
(e.g., a .deb file on Debian/Ubuntu; called “build distributions” in Python documen‐
tation). That route is a lot of work to maintain, but we give you some options in
167

“Packaging for Linux-Built Distributions” on page 179. This is like freezing, but with
the Python interpreter removed from the bundle.
Finally, we’ll share a pro tip in “Executable ZIP Files” on page 180: if your code is in a
ZIP archive (.zip) with a specific header, you can just execute the ZIP file. When you
know your target audience has Python installed already, and your project is purely
Python code, this is a fine option.
Useful Vocabulary and Concepts
Until the PyPA’s formation, there wasn’t actually a single, obvious way to do packag‐
ing (as can be seen from this historical discussion on Stack Overflow). Here are the
most important vocabulary words discussed in this chapter (there are more defini‐
tions in the PyPA glossary):
Dependencies
Python packages list their Python library depenencies either in a requirements.txt
file (for testing or application deployment), or in the install_requires argu‐
ment to setuptools.setup() when it is called in a setup.py file.
In some projects there can be other dependencies, such as a Postgres database, a
C compiler, or a C library shared object. These may not be explicitly stated, but if
absent will break the build. If you build libraries like these, Paul Kehrer’s seminar
on distributing compiled modules may help.
Built distribution
A format of distribution for a Python package (and optionally other resources
and metadata) that is in a form that can be installed and then run without further
compilation.
Egg Eggs are a built distribution format—basically, they’re ZIP files with a specific
structure, containing metadata for installation. They were introduced by the
Setuptools library, and were the de facto standard for years, but were never an
official Python packaging format. They have been replaced by wheels as of
PEP 427. You can read all about the differences between the formats in “Wheel vs
Egg” in the Python Packaging User Guide.
Wheel
Wheels are a built distribution format that is now the standard for distribution of
built Python libraries. They are a packaged as ZIP files with metadata that pip
will use to install and uninstall the package. The file has a .whl extension, by con‐
vention, and follows a specific naming convention that communicates specifically
what platform, build, and interpreter it is for.
168 | Chapter 6: Shipping Great Code

2There appear to be two URLs mirroring the same content at the moment: https://python-packaging-user-
guide.readthedocs.org/ and https://packaging.python.org.
Aside from having Python installed, regular Python packages, written only in Python,
don’t need anything but other Python libraries that can be downloaded from PyPI (or
eventually Warehouse—the upcoming newer location for PyPI) to run. The difficulty
(which we tried to get ahead of with the extra installation steps in Chapter 2) comes
when the Python library has dependencies outside of Python—on C libraries or sys‐
tem executables, for example. Tools like Buildout and Conda are meant to help, when
the distribution gets more complicated than even the Wheel format can handle.
Packaging Your Code
To package code for distribution means to create the necessary file structure, add the
required files, and define the appropriate variables to comform to relevant PEPs and
the current best practice described in “Packaging and Distributing Projects” in the
Python Packaging Guide,2 or the packaging requirements of other repositories, like
http://anaconda.org/.
“Package” Versus “Distribution Package” Versus “Installation
Package”
It may be confusing that we’re using package to mean so many different things. Right
now, we are talking about distribution packages, which include the (regular Python)
packages, modules, and additional files needed to define a release. We also sometimes
refer to libraries as installation packages; these are the top-level package directories
that contain an entire library. Finally, the humble package is, as always, any directory
containing an __init__.py and other modules (*.py files). The PyPA keeps a glossary
of packaging-related terms.
Conda
If you have Anaconda’s redistribution of Python installed, you can still use pip and
PyPI, but your default package manager is conda, and your default package reposi‐
tory is http://anaconda.org/. We recommend following this tutorial for building pack‐
ages, which ends with instructions on uploading to Anaconda.org.
If you are making a library for scientific or statistical applications—even if you don’t
use Anaconda yourself—you will want to make an Anaconda distribution in order to
easily reach the wide academic, commercial, and Windows-using audiences that
choose Anaconda to get binaries that work without effort.
Packaging Your Code | 169

3PyPI is in the process of being switched to the Warehouse, which is now in an evaluation phase. From what
we can tell, they are changing the UI, but not the API. Nicole Harris, one of the PyPA developers, wrote a
brief introduction to Warehouse, for the curious.
4If you have Python 3.4 or higher without pip, you can install it on the command line with python -m
ensurepip.
PyPI
The well-established ecosystem of tools such as PyPI and pip make it easy for other
developers to download and install your package either for casual experiments, or as
part of large professional systems.
If you’re writing an open source Python module, PyPI, more properly known as e
Cheeseshop, is the place to host it.3 If your code isn’t packaged on PyPI, it will be
harder for other developers to find it and to use it as part of their existing process.
They will regard such projects with substantial suspicion of being either badly man‐
aged, not yet ready for release, or abandoned.
The definitive souce for correct, up-to-date information about Python packaging is
the PyPA-maintained Python Packaging Guide.
Use testPyPI for Testing and PyPI for Real
If you are just testing your packaging settings, or teaching someone
how to use PyPI, you can use testPyPI and run your unit tests
before pushing a real version to PyPI. Like with PyPI, you must
change the version number every time you push a new file.
Sample project
The PyPA’s sample project demonstrates the current best practice for packaging a
Python project. Comments in the setup.py module give advice, and identify relevant
PEPs governing options. The overall file structure is organized as required, with help‐
ful comments about each file’s purpose and what it should contain.
The project’s README file links back to the packaging guide and to a tutorial about
packaging and distribution.
Use pip, not easy_install
Since 2011, the PyPA has worked to clear up considerable confusion and considerable
discussion about the canonical way to distribute, package, and install Python libra‐
ries. pip was chosen as Python’s default package installer in PEP 453, and it is
installed by default with Python 3.4 (first released in 2014) and later releases.4
170 | Chapter 6: Shipping Great Code

The tools have a number of nonoverlapping uses, and older systems may still need
easy_install. This chart from the PyPA compares pip and easy_install, identify‐
ing what each tool does and does not offer.
When developing your own code, you’ll want to install using pip install --
editable . so that you can continue to edit the code without reinstalling.
Personal PyPI
If you want to install packages from a source other than PyPI, (e.g., an internal work
server for proprietary company packages, or packages checked and blessed by your
security and legal teams), you can do it by hosting a simple HTTP server, running
from the directory containing the packages to be installed.
For example, say you want to install a package called MyPackage.tar.gz, with the fol‐
lowing directory structure:
.
|--- archive/
|--- MyPackage/
|--- MyPackage.tar.gz
You can run an HTTP server from the archive directory by typing the following in a
shell:
$ cd archive
$ python3 -m SimpleHTTPServer 9000
This runs a simple HTTP server running on port 9000 and will list all packages (in
this case, MyPackage). Now you can install MyPackage using any Python package
installer. Using pip on the command line, you would do it like this:
$ pip install --extra-index-url=http://127.0.0.1:9000/ MyPackage
Having a folder with the same name as the package name is crucial
here. But if you feel that the structure MyPackage/MyPackage.tar.gz
is redundant, you can always pull the package out of the directory
and install with a direct path:
$ pip install http://127.0.0.1:9000/MyPackage.tar.gz
Pypiserver
Pypiserver is a minimal PyPI-compatible server. It can be used to serve a set of pack‐
ages to easy_install or pip. It includes helpful features like an administrative com‐
mand (-U) which will update all its packages to their latest versions found on PyPI.
Packaging Your Code | 171

S3-hosted PyPI
Another option for a personal PyPI server is to host on Amazon’s Simple Storage Ser‐
vice, Amazon S3. You must first have an Amazon Web Service (AWS) account with
an S3 bucket. Be sure to follow the bucket naming rules—you’ll be allowed to create a
bucket that breaks the naming rules, but you won’t be able to access it. To use your
bucket, first create a virtual environment on your own machine and install all of your
requirements from PyPI or another source. Then install pip2pi:
$ pip install git+https://github.com/wolever/pip2pi.git
And follow the pip2pi README file for the pip2tgz and dir2pi commands. Either
you’ll do:
$ pip2tgz packages/ YourPackage+
or these two commands:
$ pip2tgz packages/ -r requirements.txt
$ dir2pi packages/
Now, upload your files. Use a client like Cyberduck to sync the entire packages folder
to your S3 bucket. Make sure you upload packages/simple/index.html as well as all
new files and directories.
By default, when you upload new files to the S3 bucket, they will have user-only per‐
missions. If you get HTTP 403 when trying to install a package, make sure you’ve set
the permissions correctly: use the Amazon web console to set the READ permission of
the files to EVERYONE. Your team will now be able to install your package with:
$ pip install \
--index-url=http://your-s3-bucket/packages/simple/ \
YourPackage+
VCS support for pip
It is possible to pull code directly from a version control system using pip; to do so,
follow these instructions. This is another alternative to hosting a personal PyPI. An
example command using pip with a GitHub project is:
$ pip install git+git://git.myproject.org/MyProject#egg=MyProject
In which the egg does not have to be an egg—it is the name of the directory in your
project that you want to install.
Freezing Your Code
To freeze your code means to create a standalone executable bundle you can distrib‐
ute to end users who do not have Python installed on their computer—the distributed
file or bundle contains both the application code and the Python interpreter.
172 | Chapter 6: Shipping Great Code

5Freezing Python code on Linux into a Windows executable was attempted in PyInstaller 1.4, but dropped in
1.5 because it didn’t work well except for pure Python programs (so, no GUI applications).
Applications such as Dropbox, Eve Online, Civilization IV, and BitTorrent client—all
primarily written in Python—do this.
The advantage of distributing this way is that your application will just work, even if
the user doesn’t already have the required (or any) version of Python installed. On
Windows, and even on many Linux distributions and OS X, the right version of
Python will not already be installed. Besides, end user software should always be in an
executable format. Files ending in .py are for software engineers and system adminis‐
trators.
A disadvantage of freezing is that it increases the size of your distribution by about 2–
12 MB. Also, you will be responsible for shipping updated versions of your applica‐
tion when security vulnerabilities to Python are patched.
Check the License When Using C Libraries
You should check the licensing for every package you use all the way up your tree of
dependencies, for all operating systems. But we want to particularly call out Windows
because all Windows solutions need MS Visual C++ dynamically linked libraries
(DLLs) to be installed on the target machine. You may or may not have permission to
redistribute specific libraries and must check your license permissions before distrib‐
uting your app (see Microsoft’s legal message about Visual C++ files for more infor‐
mation). You can also optionally use the MinGW compiler (Minimalist GNU for
Windows), but because it’s a GNU project, the licensing may be restrictive in the
opposite (must always be open and free) way.
Also, MinGW and the Visual C++ compilers aren’t completely the same, so you
should check whether your unit tests still run as you expected after using a different
compiler. This is getting into the weeds, so ignore all of this if you don’t frequently
compile C code on Windows—but, for example, there are still a few problems with
MinGW and NumPy. There is a post recommending a MinGW build with static tool‐
chains on the NumPy wiki.
We compare the popular freezing tools in Table 6-1. They all interface with distuils in
Python’s Standard Library. They cannot do cross-platform freezes,5 so you must per‐
form each build on the target platform.
The tools are listed in the order they will appear in this section. Both PyInstaller and
cx_Freeze can be used on all platforms, py2app only works on OS X, py2exe only
works on Windows, and bbFreeze can work on both UNIX-like and Windows sys‐
Freezing Your Code | 173

6As we’ll see when looking at other installers, the challenge is not just in finding and bundling the compatible
C libraries for the specific version of a Python library, but also in discovering peripheral configuration files,
sprites or special graphics, and other files that aren’t discoverable to the freezing tool by inspecting your
source code.
tems, but not OS X, and it has not yet been ported to Python 3. It can generate eggs,
though, in case you need this ability for your legacy system.
Table 6-1. Freezing tools
pyInstaller cx_Freeze py2app py2exe bbFreeze
Python 3 Yes Yes Yes Yes —
License Modied GPL Modied PSF MIT MIT Zlib
Windows Yes Yes — Yes Yes
Linux Yes Yes — — Yes
OS X Yes Yes Yes — —
Eggs Yes Yes Yes — Yes
Support for
pkg_resourcesa — — Yes — Yes
One-le modebYes — — Yes —
a pkg_resources is a separate module bundled with Setuptools that can be used to dynamically nd dependencies. This is a
challenge when freezing code because it’s hard to discover dynamically loaded dependencies from the static code. PyInstaller,
for example, only says they will get it right when the introspection is on an egg le.
b One-le mode is the option to bundle an application and all its dependencies into a single executable le on Windows.
InnoSetup and the Nullsoft Scriptable Install System (NSIS) are both popular tools that create installers and can bundle code
into a single .exe le.
PyInstaller
PyInstaller can be used to make applications on OS X, Windows, and Linux. Its pri‐
mary goal is to be compatible with third-party packages out of the box—so the freeze
just works.6 They have a list of PyInstaller supported packages. Supported graphical
libraries include Pillow, pygame, PyOpenGL, PyGTK, PyQT4, PyQT5, PySide (except
for Qt plug-ins), and wxPython. Supported scientific tools include NumPy, Matplot‐
lib, Pandas, and SciPy.
PyInstaller has a modified GPL license “with a special exception which allows [any‐
one] to use PyInstaller to build and distribute non-free programs (including com‐
mercial ones)”—so the license(s) you must comply with will depend on the libraries
you used to develop your code. Their team even provides instructions for hiding the
source code for those making commercial applications or wanting to prevent others
from altering the code. But do read the license (consult a lawyer if it’s important or
https://tldrlegal.com/ if it’s not that important) if you need to modify their source code
to build your app, because you may be required to share that change.
174 | Chapter 6: Shipping Great Code

The PyInstaller Manual is well organized and detailed. Check the PyInstaller require‐
ments page to confirm that your system is compatible—for Windows, you need XP or
later; for Linux systems, you’ll need several terminal applications (the documentation
lists where you can find them); and for OS X, you need version 10.7 (Lion) or later.
You can use Wine (a Windows emulator) to cross-compile for Windows while run‐
ning under Linux or OS X.
To install PyInstaller, use pip from within the same virtual environment where you
are building your app:
$ pip install pyinstaller
To create a standard executable from a module named script.py, use:
$ pyinstaller script.py
To create a windowed OS X or Windows application, use the --windowed option on
the command line like this:
$ pyinstaller --windowed script.spec
This creates two new directories and a file in the same folder where you executed the
pyinstaller command:
• A .spec file, which can be rerun by PyInstaller to re-create the build.
•A build folder that holds some log files.
•A dist folder, that holds the main executable and some dependent Python libra‐
ries.
PyInstaller puts all the Python libraries used by your application into the dist folder,
so when distributing the executable, distribute the whole dist folder.
The script.spec file can be edited to customize the build, with options to:
• Bundle data files with the executable.
•Include runtime libraries (.dll or .so files) that PyInstaller can’t infer automati‐
cally.
• Add Python runtime options to the executable.
This is useful, because now the file can be stored with version control, making future
builds easier. The PyInstaller wiki page contains build recipes for some common
applications, including Django, PyQt4, and code signing for Windows and OS X.
This is the most current set of quick tutorials for PyInstaller. Now, the edited
script.spec can be run as an argument to pyinstaller (instead of using script.py
again):
$ pyinstaller script.spec
Freezing Your Code | 175

When PyInstaller is given a .spec file, it takes all of its options from
the contents of that file and ignores command-line options, except
for: --upx-dir=, --distpath=, --workpath=, --noconfirm, and --
ascii.
cx_Freeze
Like PyInstaller, cx_Freeze can freeze Python projects on Linux, OS X, and Windows
systems. However, the cx_Freeze team does not recommend compiling for Windows
using Wine because they’ve had to manually copy some files around to get the app to
work. To install it, use pip:
$ pip install cx_Freeze
The easiest way to make the executable is to run cxfreeze from the command line,
but you have more options (and can use version control) if you write a setup.py script.
This is the same setup.py as is used by distutils in Python’s Standard Library—
cx_Freeze extends distutils to provide extra commands (and modify some others).
These options can be provided at the command line or in the setup script, or in a
setup.cfg configuration file.
The script cxfreeze-quickstart creates a basic setup.py file that can be modified and
version controlled for future builds. Here is an example session for a script named
hello.py:
$ cxfreeze-quickstart
Project name: hello_world
Version [1.0]:
Description: "This application says hello."
Python file to make executable from: hello.py
Executable file name [hello]:
(C)onsole application, (G)UI application, or (S)ervice [C]:
Save setup script to [setup.py]:
Setup script written to setup.py; run it as:
python setup.py build
Run this now [n]?
Now we have a setup script, and can modify it to match what our app needs. The
options are in the cx_Freeze documentation under “distutils setup scripts.” There are
also example setup.py scripts and minimal working applications that demonstrate
how to freeze applications that use PyQT4, Tkinter, wxPython, Matplotlib, Zope, and
other libraries in the samples/ directory of the cx_Freeze source code: navigate from
the top directory to cx_Freeze/cx_Freeze/samples/. The code is also bundled with the
installed library. You can get the path by typing:
$ python -c 'import cx_Freeze; print(cx_Freeze.__path__[0])'
176 | Chapter 6: Shipping Great Code
Once you are done editing setup.py, you can use it to build your executable using one
of these commands:
$ python setup.py build_exe
$ python setup.py bdist_msi
$ python setup.py bdist_rpm
$ python setup.py bdist_mac
$ python setup.py bdist_dmg
This is the option to build the command-line executable.
This is modified by cx_Freeze from the original distutils command to also handle
Windows executables and their dependencies.
This is modified from the original distutils command to ensure Linux packages
are created with the proper architecture for the current platform.
This creates a standalone windowed OS X application bundle (.app) containing
the dependencies and the executable.
This one creates the .app bundle and also creates an application bundle, then
packages it into a DMG disk image.
py2app
py2app builds executables for OS X. Like cx_Freeze, it extends distutils, adding the
new command py2app. To install it, use pip:
$ pip install py2app
Next, autogenerate a setup.py script using the command py2applet, like this:
$ py2applet --make-setup hello.py
Wrote setup.py
This makes a basic setup.py, which you can modify for your needs. There are exam‐
ples with minimal working code and the appropriate setup.py scripts that use libraries
including PyObjC, PyOpenGL, pygame, PySide, PyQT, Tkinter, and wxPython in
py2app’s source code. To find them, navigate from the top directory to py2app/exam‐
ples/.
Then, run setup.py with the py2app command to make two directores, build and dist.
Be sure to clean the directories when you rebuild; the command looks like this:
$ rm -rf build dist
$ python setup.py py2app
For additional documentation, check out the py2app tutorial. The build may exit on
an AttributeError. If so, read this tutorial about using py2app—the variables
Freezing Your Code | 177

scan_code and load_module may need to be preceded with underscores: _scan_code
and _load_module.
py2exe
py2exe builds executables for Windows. It is very popular, and the Windows version
of BitTorrent was made using py2exe. Like cx_Freeze and py2exe, it extends distutils,
this time adding the command py2exe. If you need to use it with Python 2, download
the older version of py2exe from sourceforge. Otherwise, for Python 3.3+, use pip:
$ pip install py2exe
The py2exe tutorial is excellent (apparently what happens when documentation is
hosted wiki-style rather than in source control). The most basic setup.py looks like
this:
from distutils.core import setup
import py2exe
setup(
windows=[{'script': 'hello.py'}],
)
The documentation lists all of the configuration options for py2exe and has detailed
notes about how to (optionally) include icons or create a single file executable.
Depending on your own license for Microsoft Visual C++, you may or may not be
able to distribute the Microsoft Visual C++ runtime DLL with your code. If you can,
here are the instructions to distribute the Visual C++ DLL alongside the .exe file;
otherwise, you can provide your application’s users with a way to download and
install the Microsoft Visual C++ 2008 redistributable packge or the Visual C++ 2010
redistributable packge if you’re using Python 3.3 or later.
Once you have modified your setup file, you can generate the .exe into dist directory
by typing:
$ python setup.py py2exe
bbFreeze
The bbFreeze library currently has no maintainer and has not been ported to
Python 3, but it is still frequently downloaded. Like cx_Freeze, py2app, and py2exe, it
extends distutils, adding the command bbfreeze. In fact, older versions of bbFreeze
were based on cx_Freeze. The appeal here may be for those who maintain legacy sys‐
tems and would like to packge built distributions into eggs to be used across their
infrastructure. To install it, use pip:
$ pip install bbfreeze # bbFreeze can't work with Python3
178 | Chapter 6: Shipping Great Code

7Some people may have heard these called “binary packages” or “installers”; the official Python name for them
is “built distributions”—meaning RPMs, or Debian packages, or executable installers for Windows. The wheel
format is also a type of built distribution, but for various reasons touched on in a micro-rant about wheels it is
often better to make platform-specific Linux distributions like described in this section.
It is light on documentation, but has build recipes for Flup, Django, Twisted, Matplot‐
lib, GTK, and Tkinter, among others. To make executable binaries, use the command
bdist_bbfreeze like this:
$ bdist_bbfreeze hello.py
It will create a directory dist in the location where bbfreeze was run that contains a
Python interpreter and an executable with the same name as the script (hello.py in
this case).
To generate eggs, use the new distutils command:
$ python setup.py bdist_bbfreeze
There are other options, like tagging builds as snapshots or daily builds. Get more
usage information using the standard --help option:
$ python setup.py bdist_bbfreeze --help
For fine-tuning, you can use the bbfreeze.Freezer class, which is the preferred way
to use bbfreeze. It has flags for whether to use compression in the created ZIP file,
whether to include a Python interpreter, and which scripts to include.
Packaging for Linux-Built Distributions
Creating a Linux built distribution is arguably the “right way” to distribute code on
Linux: a built distribution is like a frozen package, but it doesn’t include the Python
interpreter, so the download and install are about 2 MB smaller than when using
freezing.7 Also, if a distribution releases a new security update for Python, your appli‐
cation will automatically start using that new version of Python.
The bdist_rpm command from the distutils module in Python’s Standard Library
makes it trivially easy to produce an RPM file for use by Linux distributions like Red
Hat or SuSE.
Caveats to Linux Distribution Packages
Creating and maintaining the different configurations required for each distribution’s
format (e.g., *.deb for Debian/Ubuntu, *.rpm for Red Hat/Fedora, etc.) is a fair
amount of work. If your code is an application that you plan to distribute on other
platforms, then you’ll also have to create and maintain the separate config required to
freeze your application for Windows and OS X. It would be much less work to simply
Packaging for Linux-Built Distributions | 179

create and maintain a single config for one of the cross-platform freezing tools
described in “Freezing Your Code” on page 172, which produce standalone executa‐
bles for all distributions of Linux, as well as Windows and OS X.
Creating a distribution package is also problematic if your code is for a version of
Python that isn’t currently supported by a distribution. Having to tell end users of
some Ubuntu versions that they need to add the “dead-snakes” PPA using sudo apt-
repository commands before they can install your .deb file makes for an unpleasant
user experience. Not only that, but you’d have to maintain a custom equivalent of
these instructions for every distribution, and worse, have your users read, under‐
stand, and act on them.
Having said all that, here are links to the Python packaging instructions for some
popular Linux distributions:
•Fedora
•Debian and Ubuntu
•Arch
If you want a faster way to package code for all of the flavors of Linux out there, you
may want to try the effing package manager (fpm). It’s written in Ruby and shell, but
we like it because it packages code from multiple source types (including Python)
into targets including Debian (.deb), RedHat (.rpm), OS X (.pkg), Solaris, and others.
It’s a great fast hack but does not provide a tree of dependencies, so package main‐
tainers may frown upon it. Or Debian users can try Alien, a Perl program that con‐
verts between Debian, RedHat, Stampede (.slp), and Slackware (.tgz) file formats, but
the code hasn’t been updated since 2014, and the maintainer has stepped down.
For those interested, Rob McQueen posted some insights about deploying server apps
at work, on Debian.
Executable ZIP Files
It’s a little-known secret that Python has been able to execute ZIP files containing a
__main__.py since version 2.6. This is a great way to package pure Python apps
(applications that don’t require platform-specific binaries). So, if you have a single file
__main__.py like this:
if __name__ == '__main__':
try:
print 'ping!'
except SyntaxError: # Python 3
print('ping!')
And you create a ZIP file containing it by typing this on the command line:
180 | Chapter 6: Shipping Great Code

$ zip machine.zip __main__.py
You can then send that ZIP file to other people, and so long as they have Python, they
can execute it on the command line like this:
$ python machine.zip
ping!
Or if you want to make it an executable, you can prepend a POSIX “shebang” (#!) to
the ZIP file—the ZIP file format allows this—and you now have a self-contained app
(provided Python is reachable via the path in the shebang). Here is an example that
continues on from the previous code:
$ echo '#!/usr/bin/env python' > machine
$ cat machine.zip >> machine
$ chmod u+x machine
And now it’s an executable:
$ ./machine
ping!
Since Python 3.5, there is also a module zipapp in the Standard
Library that makes it more convenient to create these ZIP files. It
also adds flexibility so that the main file need no longer be called
__main__.py.
If you vendorize your dependencies by placing them inside your current directory,
and change your import statements, you can make an executable ZIP file with all
dependencies included. So, if your directory structure looks like this:
.
|--- archive/
|--- __main__.py
and you are running inside a virtual environment that has only your dependencies
installed, you can type the following in the shell to include your dependencies:
$ cd archive
$ pip freeze | xargs pip install --target=packages
$ touch packages/__init__.py
The xargs commands takes standard input from pip freeze and turns it into the
argument list for the pip command, and the --target=packages option sends the
installation to a new directory, packages. The touch command creates an empty file if
none exists; otherwise, it updates the file’s timestamp to the current time. The direc‐
tory structure will now look something like this:
.
|--- archive/
|--- __main__.py
Executable ZIP Files | 181

|--- packages/
|--- __init__.py
|--- dependency_one/
|--- dependency_two/
If you do this, make sure to also change your import statements to use the packages
directory you just created:
#import dependency_one # not this
import packages.dependency_one as dependency_one
And then just recursively include all of the directories in the new ZIP file using zip
-r, like this:
$ cd archive
$ zip machine.zip -r *
$ echo '#!/usr/bin/env python' > machine
$ cat machine.zip >> machine
$ chmod ug+x machine
182 | Chapter 6: Shipping Great Code

PART III
Scenario Guide
At this point, you have Python installed, you’ve selected an editor, you know what it
means to be Pythonic, you’ve read a few lines of great Python code, and you can share
your own code with the rest of the world. This part of the guide will help you choose
libraries to use in your project, whatever you decide to do, by sharing our communi‐
ty’s most common approaches to specific coding scenarios, grouped by similar use:
Chapter 7, User Interaction
We cover libraries for all types of user interaction, from console applications to
GUIs, and web applications.
Chapter 8, Code Management and Improvement
We describe tools for systems administration, tools to interface with C and C++
libraries, and ways to improve Python’s speed.
Chapter 9, Soware Interfaces
We summarize libraries used for for networking, including asynchronous libra‐
ries and libraries for serialization and cryptography.
Chapter 10, Data Manipulation
We survey the libraries that provide symbolic and numerical algorithms, plots,
and tools for image and audio processing.
Chapter 11, Data Persistence
Last, we highlight some of the differences between the popular ORM libraries
that interact with databases.

CHAPTER 7
User Interaction
Libraries in this chapter help developers write code that interacts with end users. We
describe the Jupyter project—it’s unique—then cover the more typical command-line
and graphical user interfaces (GUIs), and finish with a discussion of tools for web
applications.
Jupyter Notebooks
Jupyter is a web application that allows you to display and execute Python interac‐
tively. It’s listed here because it’s a user-to-user interface.
Users view Jupyter’s client interface—written in CSS, HTML, and JavaScript—in a
web browser on the client machine. The client communicates with a a kernel written
in Python (or a number of other languages) that executes blocks of code and
responds with the result. Content is stored on the server machine in “notebook”
(*.nb) format—text-only JSON divided into a series of “cells” that can contain HTML,
Markdown (a human-readable markup language like what’s used on wiki pages), raw
notes, or executable code. The server can be local (on the user’s own laptop), or
remote like the sample notebooks at https://try.jupyter.org/.
The Jupyter server requires at least Python 3.3 and has been made compatible with
Python 2.7. It comes bundled with the most recent versions of commercial Python
redistributions (described in “Commercial Python Redistributions” on page 18) such
as Canopy and Anaconda, so no further installation is required with these tools, pro‐
vided you can compile and build C code on your system, as we discussed in Chap‐
ter 2. After the proper setup, you can install Jupyter from the command line with pip:
$ pip install jupyter
A recent study using Jupyter in the classroom found it to be an effective and popular
way to create interactive lectures for students new to coding.
185
Command-Line Applications
Command-line (also called console) applications are computer programs designed to
be used from a text interface, such as a shell. They can be simple commands—such as
pep8 or virtualenv—or interactive, like the python interpreter or ipython. Some
have subcommands, such as pip install, pip uninstall, or pip freeze—all of
which have their own options in addition to pip’s general options. All of them are
likely started in a main() function; our BDFL has shared his opinion about what
makes a good one.
We’ll use an example pip call to name the components that can be present when
invoking a command-line application:
$ pip install --user -r requirements.txt
The command is the name of the executable being invoked.
Arguments come after the command and do not begin with a dash. They may
also be referred to as parameters or subcommands.
Options begin with either one dash (for single characters, such as -h) or else with
two dashes (for words, such as --help). They may also be referred to as flags or
switches.
The libraries in Table 7-1 all provide different options for parsing arguments or pro‐
vide other useful tools for command-line applications.
Table 7-1. Command-line tools
Library License Reasons to use
argparse PSF license • In the Standard Library.
• Gives you standard argument and option parsing.
docopt MIT license • Gives you control over the layout of your help message.
• Parses the command line according to the utility conventions dened in the POSIX
standard.
plac BSD 3-clause
license • Autogenerates the help message from an existing function signature.
• Parses the command-line arguments behind the scenes, passing them directly to your
function.
186 | Chapter 7: User Interaction

Library License Reasons to use
click BSD 3-clause
license • Provides decorators to make the help message and parser (a lot like plac)
• Lets you compose multiple subcommands together
• Interfaces with other Flask plug-ins (Click is independent from Flask, but originally written
to help users compose together command-line tools from dierent Flask plug-ins without
breaking things, so it is already used in the Flask ecosystem)
clint Internet Software
Consortium (ISC)
license
• Provides formatting features like colors, indentation, and columnar displays for your text
output
• Also provides type checking (e.g., check against a regex, for an integer, or a path) in your
interactive input
•Gives you direct access to the argument list, with some simple ltering and grouping tools
cli Apache 2.0
license • Provides a structured framework for a large Python project with multiple subcommands
• Builds an interactive environment to use the subcommands, with no additional coding
In general, you should try and use tools provided in Python’s Standard Library first,
and only add other libraries to your project when they offer something you want that
the Standard Library doesn’t have.
The following sections provide more details about each of the command-line tools
listed in Table 7-1.
argparse
The module argparse (which replaces the now deprecated optparse) exists in Python’s
Standard Library to help with parsing command-line options. The command-line
interface provided by the HowDoI project uses argparse—you can refer to it when
building your own command-line interface.
Here is the code to generate the parser:
import argparse
#
# ... skip a lot of code ...
#
def get_parser():
parser = argparse.ArgumentParser(description='...truncated for brevity...')
parser.add_argument('query', metavar='QUERY', type=str, nargs='*',
help='the question to answer')
parser.add_argument('-p','--pos',
help='select answer in specified position (default: 1)',
default=1, type=int)
parser.add_argument('-a','--all', help='display the full text of the answer',
Command-Line Applications | 187

action='store_true')
parser.add_argument('-l','--link', help='display only the answer link',
action='store_true')
parser.add_argument('-c', '--color', help='enable colorized output',
action='store_true')
parser.add_argument('-n','--num-answers', help='number of answers to return',
default=1, type=int)
parser.add_argument('-C','--clear-cache', help='clear the cache',
action='store_true')
parser.add_argument('-v','--version',
help='displays the current version of howdoi',
action='store_true')
return parser
The parser will parse the command line and create a dictionary that maps each argu‐
ment to a value. The action='store_true' indicates the option is intended as a flag
that, if present on the command line, will be stored as True in the parser’s dictionary.
docopt
docopt’s core philosophy is that documentation should be beautiful and understanda‐
ble. It provides one main command, docopt.docopt(), plus a few convenience func‐
tions and classes for power users. The function docopt.docopt() takes developer-
written POSIX-style usage instructions, uses them to interpret the user’s command-
line arguments, and returns a dictionary with all of the arguments and options parsed
from the command line. It also appropriately handles the --help and --version
options.
In the following example, the value of the variable arguments is a dictionary with
keys name, --capitalize, and --num_repetitions:
#!/usr/bin env python3
"""Says hello to you.
Usage:
hello <name>... [options]
hello -h | --help | --version
-c, --capitalize whether to capitalize the name
-n REPS, --num_repetitions=REPS number of repetitions [default: 1]
"""
__version__ = "1.0.0" # Needed for --version
def hello(name, repetitions=1):
for rep in range(repetitions):
print('Hello {}'.format(name))
if __name__ == "__main__":
from docopt import docopt
188 | Chapter 7: User Interaction

arguments = docopt(__doc__, version=__version__)
name = ' '.join(arguments['<name>'])
repetitions = arguments['--num_repetitions']
if arguments['--capitalize']:
name = name.upper()
hello(name, repetitions=repetitions)
Since version 0.6.0, docopt can be used to create complex programs with subcom‐
mands that behave like the git command or Subversion’s svn command. It can even
be used when a subcommand is written in different languages. There is a complete
example application that mocks up a reimplementation of the git command that
explains how.
Plac
Plac’s philosophy is that all of the information necessary to parse a command invoca‐
tion is in the target function’s signature. It is a lightweight (around 200 lines) wrapper
around the Python Standard Library’s argparse and provides one main command,
plac.plac(), which infers the argument parser from the function signature, parses
the command line, and then invokes the function.
The library was supposed to be named Command-Line Argument Parser (clap) but
that ended up becoming taken a few days after its author chose the name, so it’s Plac
—clap in reverse. The usage statements aren’t informative, but look how few lines this
example takes:
# hello.py
def hello(name, capitalize=False, repetitions=1):
"""Says hello to you."""
if capitalize:
name = name.upper()
for rep in range(repetitions):
print('Hello {}'.format(name))
if __name__ == "__main__":
import plac
plac.call(hello)
The usage statement looks like this:
$ python hello.py --help
usage: hello.py [-h] name [capitalize] [repetitions]
Says hello to you.
positional arguments:
name
capitalize [False]
repetitions [1]
Command-Line Applications | 189

optional arguments:
-h, --help show this help message and exit
If you want to typecast (convert to the correct type) any of the arguments before you
pass them to the function, use the annotations decorator:
import plac
@plac.annotations(
name = plac.Annotation("the name to greet", type=str),
capitalize = plac.Annotation("use allcaps", kind="flag", type=bool),
repetitions = plac.Annotation("total repetitions", kind="option", type=int)
def hello(name, capitalize=False, repetitions=1):
"""Says hello to you."""
if capitalize:
name = name.upper()
for rep in range(repetitions):
print('Hello {}'.format(name))
Also, plac.Interpreter provides a lightweight way to make a very quick interactive
command-line application. Examples are with plac’s interactive mode documentation.
Click
The main purpose of Click (the “Command Line-Interface Creation Kit”) is to help
developers create composable command-line interfaces with as little code as possible.
The Click documentation clarifies its relation to docopt:
The aim of Click is to make composable systems, whereas the aim of docopt is to build
the most beautiful and hand-crafted command-line interfaces. These two goals conflict
with one another in subtle ways. Click actively prevents people from implementing
certain patterns in order to achieve unified command-line interfaces. You have very lit‐
tle input on reformatting your help pages for instance.
Its defaults will satisfy most developers’ needs, but it’s highly configurable for power
users. Like Plac, it uses decorators to tie the parser definitions to the functions that
will use them, keeping command-line argument management out of the functions
themselves.
The hello.py application with Click looks like this:
import click
@click.command()
@click.argument('name', type=str)
@click.option('--capitalize', is_flag=True)
@click.option('--repetitions', default=1,
help="Times to repeat the greeting.")
def hello(name, capitalize, repetitions):
"""Say hello, with capitalization and a name."""
if capitalize:
190 | Chapter 7: User Interaction

1docopt uses neither optparse nor argparse and relies on regular expressions to parse the docstring.
name = name.upper()
for rep in range(repetitions):
print('Hello {}'.format(name))
if __name__ == '__main__':
hello()
Click parses the description from the command’s docstring and creates its help mes‐
sage using a custom parser derived from the Python Standard Library’s now depre‐
cated optparse, which was more compliant with the POSIX standard than argparse.1
The help message looks like this:
$ python hello.py --help
Usage: hello.py [OPTIONS] NAME
Say hello, with capitalization and a name.
Options:
--capitalize
--repetitions INTEGER Times to repeat the greeting.
--help Show this message and exit.
But the real value of Click is its modular composability—you can add an outer group‐
ing function, and then any other click-decorated functions in your project will
become subcommands to that top-level command:
import click
@click.group()
@click.option('--verbose', is_flag=True)
@click.pass_context
def cli(ctx, verbose):
ctx.obj = dict(verbose = verbose)
if ctx.obj['verbose']:
click.echo("Now I am verbose.")
# The 'hello' function is the same as before...
if __name__ == '__main__':
cli()
The group() decorator makes a top-level command that runs first, before execut‐
ing the invoked subcommand.
The pass_context decorator is how to (optionally) pass objects from the grou‐
ped command to a subcommand, by making the first argument a
click.core.Context object.
Command-Line Applications | 191

That object has a special attribute ctx.obj that can be passed to subcommands
that use an @click.pass_context decorator.
Now instead of calling the function hello(), call the function that was decorated
with @click.group()—in our case, cli().
Clint
The Clint library is, like its name says, a collection of “Command-Line INterface
Tools.” It supports features such as CLI colors and indentation, a simple and powerful
column printer, iterator-based progress bars, and implicit argument handling. This
example shows the colorization and indentation tools:
"""Usage string."""
from clint.arguments import Args
from clint.textui import colored, columns, indent, puts
def hello(name, capitalize, repetitions):
if capitalize:
name = name.upper()
with indent(5, quote=colored.magenta(' ~*~', bold=True)):
for i in range(repetitions):
greeting = 'Hello {}'.format(colored.green(name))
puts(greeting)
if __name__ == '__main__':
args = Args()
# First check and display the help message
if len(args.not_flags) == 0 or args.any_contain('-h'):
puts(colored.red(__doc__))
import sys
sys.exit(0)
name = " ".join(args.grouped['_'].all)
capitalize = args.any_contain('-c')
repetitions = int(args.value_after('--reps') or 1)
hello(name, capitalize=capitalize, repetitions=repetitions)
Clint’s indent is a context manager—intuitive to use in the with statement. The
quote option prefixes each line with a bold magenta ~*~.
The colored module has eight color functions and an option to turn coloring off.
The puts() function is like print() but also handles the indentation and quot‐
ing.
192 | Chapter 7: User Interaction

Args provides some simple filtering tools for the argument list. It returns another
Args object, to make it possible to chain the filters.
Here’s how to use the args made by Args().
cli
cliff (the Command-Line Interface Formulation Framework) is a framework for
building command-line programs. The framework is meant to be used to create mul‐
tilevel commands that behave like svn (Subversion) or git, and interactive programs
like a Cassandra shell or a SQL shell.
cliff’s functionality is grouped into abstract base classes. You have to implement
cliff.command.Command once for every subcommand, and then cliff.commandman
ager.CommandManager will delegate to the correct command. Here is a minimal
hello.py:
import sys
from argparse import ArgumentParser
from pkg_resources import get_distribution
from cliff.app import App
from cliff.command import Command
from cliff.commandmanager import CommandManager
__version__ = get_distribution('HelloCliff').version
class Hello(Command):
"""Say hello to someone."""
def get_parser(self, prog_name):
parser = ArgumentParser(description="Hello command", prog=prog_name)
parser.add_argument('--num', type=int, default=1, help='repetitions')
parser.add_argument('--capitalize', action='store_true')
parser.add_argument('name', help='person\'s name')
return parser
def take_action(self, parsed_args):
if parsed_args.capitalize:
name = parsed_args.name.upper()
else:
name = parsed_args.name
for i in range(parsed_args.num):
self.app.stdout.write("Hello from cliff, {}.\n".format(name))
class MyApp(cliff.app.App):
def __init__(self):
Command-Line Applications | 193
super(MyApp, self).__init__(
description='Minimal app in Cliff',
version=__version__,
command_manager=CommandManager('named_in_setup_py'),
)
def main(argv=sys.argv[1:]):
myapp = MyApp()
return myapp.run(argv)
cliff uses argparse.ArgumentParser directly for its command-line interface.
Get the version from setup.py (the last time pip install was run).
get_parser() is required by the abstract base class—it should return an arg
parse.ArgumentParser.
take_action() is required by the abstract base class—it runs when the Hello
command is invoked.
The main application subclasses cliff.app.App, and is responsible for setting up
logging, I/O streams, and anything else that globally applies to all subcommands.
The CommandManager manages all of the Command classes. It uses the
entry_points content from setup.py to find the command names.
GUI Applications
In this section, we first list widget libraries—toolkits and frameworks that provide
buttons, scroll bars, progress bars, and other prebuilt components. We also quickly
list game libraries at the end.
Widget Libraries
In the context of GUI development, widgets are buttons, sliders, scroll bars, and other
commonly used UI control and display elements. With them, you don’t have to deal
with low-level coding like identifying which button (if any) was underneath the
mouse when it was clicked, or even lower-level tasks, like the different windowing
APIs used by each operating system.
When you’re new to GUI development, the first thing you want is something that’s
easy to use—so that you can learn how to make GUIs. For that we recommend
Tkinter, already in Python’s Standard Library. After that, you probably care about the
194 | Chapter 7: User Interaction

structure and function of the toolkit underlying the library, so we group libraries by
toolkits, listing the more popular ones first.
Table 7-2. GUI widget libraries
Underlying
library
(language)
Python
library
License Reasons to use
Tk (Tcl) tkinter Python Software
Foundation license • All of the dependencies are already bundled with Python.
• It provides standard UI widgets like buttons, scroll bars, text
boxes, and a drawing canvas.
SDL2 (C) Kivy MIT, or
LGPL3 (before 1.7.2) • It can be used to make an Android app.
• It has multitouch features.
• It is optimized to C when possible, and uses the GPU.
Qt (C++) PyQt GNU General Public
License (GPL) or
Commercial
• It provides a consistent look and feel across platforms.
• Many applications and libraries already rely on Qt, (e.g., the Eric
IDE, Spyder, and/or Matplotlib), so it may already be installed.
• Qt5 (which can’t be used alongside Qt4) provides utilities to
make an Android app.
Qt (C++) PySide GNU Lesser General
Public License (LGPL) • It’s a drop-in replacement for PyQt with a more permissive
license.
GTK (C)
(GIMP Toolkit) PyGObject
(PyGi) GNU Lesser General
Public License (LGPL) • It provides Python bindings for GTK+ 3.
• It should be familiar to those who already develop for the
GNOME desktop system.
GTK (C) PyGTK GNU Lesser General
Public license (LGPL) • Only use this if your project already uses PyGTK; you should be
porting old PyGTK code to PyGObject.
wxWindows
(C++) wxPython wxWindows license
(a modied LGPL) • Provides a native look and feel by directly exposing the various
windowing libraries for each platform.
• This means parts of your code will be dierent for each platform.
Objective C PyObjC MIT license • Provides an interface to (and from) Objective C.
• Will give a native feel for your OS X project.
• It cannot be used on other platforms.
GUI Applications | 195

2Tcl, originally Tool Command Language, is a lightweight language created by John Ousterhout in the early
1990s for integrated circuit design.
3In addition to supporting the usual mouse, it can handle touch: TUIO (an open source touch and gesture
protocol and API), Nintendo’s Wii remote, WM_TOUCH (the Windows touch API), USB touchscreens using
HidTouch Apple’s products, and others.
The following sections provide more detail on the different GUI options for Python,
grouped by each one’s underlying toolkit.
Tk
The module Tkinter in Python’s Standard Library is a thin object-oriented layer on
top of Tk, the widget library written in the language Tcl. (Both are usually written
together as Tcl/Tk.2) Because it’s in the Standard Library, it’s the most convenient and
compatible GUI toolkit in this list. Both Tk and Tkinter are available on most Unix
platforms, as well as on Windows and OS X.
There’s a good multilanguage Tk tutorial with Python examples at TkDocs, and more
information available on the Python wiki.
Also, if you have a standard distribution of Python, you shoud have IDLE, a GUI
interactive coding environment written entirely in Python that is part of Python’s
Standard Library—you can launch it from the command line by typing idle, or view
all of its source code. You can find the path where it’s installed by typing this in a
shell:
$ python -c"import idlelib; print(idlelib.__path__[0])"
There are many files in the directory; the main IDLE application is launched from the
module PyShell.py.
Likewise, for an example use of the drawing interface, tkinter.Canvas, see the code
for the turtle module. You can find it by typing this in a shell:
$ python -c"import turtle; print(turtle.__file__)"
Kivy
Kivy is a Python library for development of multitouch enabled media rich applica‐
tions. Kivy is actively being developed by a community, has a permissive BSD-like
license, and operates on all major platforms (Linux, OS X, Windows, and Android).
It’s written in Python and does not use any underlying windowing toolkit—it inter‐
faces directly with SDL2 (Simple DirectMedia Layer), a C library that provides low-
level access to user input devices,3 and audio, plus access to 3D rendering using
OpenGL (or Direct3D for Windows). It has some widgets (they’re in the module
kivy.uix), but not nearly as many as the most popular alternatives, Qt and GTK. If
196 | Chapter 7: User Interaction

you’re developing a traditional desktop business application, Qt or GTK are probably
better.
To install it, go to the Kivy downloads page, find your operating system, download
the correct ZIP file for your version of Python, and follow the instructions linked for
your operating system. The code comes with a directory of over a dozen examples
that demonstrate different parts of the API.
Qt
Qt (pronounced “cute”) is a cross-platform application framework that is widely used
for developing software with a GUI, but can also be used for non-GUI applications.
Plus, there is a Qt5 version for Android. If you already have Qt installed (because
you’re using Spyder, Eric IDE, Matplotlib, or other tools using Qt), you can check
your version of Qt from the command line by using:
$ qmake -v
Qt is released under the LGPL license, allowing you to distribute binaries that work
with Qt so long as you don’t change Qt. A commercial license will get you add-on
tools like data visualization and in-application purchasing. Qt is a framework—it pro‐
vides some prebuilt scaffolding for different types of applications. Both Python inter‐
faces to Qt, PyQt and PySide, don’t do well with documentation, so your best option
is Qt’s actual C++ documentation. Here are brief descriptions of each:
PyQt
Riverbank Computing’s PyQt is more up to date than PySide (which doesn’t yet
have a Qt5 version). To install, follow the documentation for PyQt4 installation
or PyQt5 installation. PyQt4 only works with Qt4, and PyQt5 only works with
Qt5. (We suggest Docker, a user-space isolation tool discussed in “Docker” on
page 39, if you really have to develop using both—just to not have to deal with
changing your library paths.)
Riverbank Computing also publishes pyqtdeploy, a PyQt5-only GUI tool that
generates platform-specific C++ code you can use to build binaries for distribu‐
tion. For more information, check out these PyQt4 tutorials and PyQt5 examples.
PySide
PySide was released while Nokia owned Qt, because they couldn’t get Riverside
Computing, the makers of PyQt, to change PyQt’s license from GPL to LGPL. It
is intended to be a drop-in replacement for PyQt, but tends to lag PyQt in devel‐
opment. This wiki page describes the differences between PySide and PyQt.
To install PySide, follow the instructions in the Qt documentation; there is also a
page to help you write your first PySide application.
GUI Applications | 197

4GIMP stands for GNU Image Manipulation Program. GTK+ was built to support drawing in GIMP, but
became popular enough that people wanted to make a whole desktop windowing environment with it—hence
GNOME.
GTK+
The GTK+ toolkit (which stands for the GIMP4 Toolkit) provides an API to the back‐
bone of the GNOME desktop environment. Programmers might choose GTK+ over
Qt either because they prefer C and are more comfortable looking in GTK+’s source
code when they have to, or because they have programmed GNOME applications
before and are comfortable with the API. The two libraries with Python bindings to
GTK+ are:
pyGTK
PyGTK provides Python bindings for GTK+ but only currently supports the
GTK+ 2.x API (not GTK+ 3+). It is no longer being developed, and its team rec‐
ommends PyGTK not be used for new projects and that existing applications be
ported from PyGTK to PyGObject.
PyGObject (aka PyGI)
PyGObject provides Python bindings that give access to the entire GNOME soft‐
ware platform. It is also known as PyGI because it makes use of, and provides a
Python API for, GObject Introspection, which is an API bridge between other
languages and GNOME’s core C libraries, GLib, provided they follow the con‐
vention used to define a GObject. It is fully compatible with GTK+ 3. The Python
GTK+ 3 Tutorial is a good place to start.
To install, get the binaries from the PyGObject download site, or on OS X, install
it with homebrew using brew install pygobject.
wxWidgets
The design philosophy behind wxWidgets is that the best way for an app to get a
native look and feel is to use the API native to each operating system. Both Qt and
GTK+ now also can use other windowing libraries than X11 under the hood, but Qt
abstracts them, and GTK makes them look like you’re programming GNOME. The
benefit of using wXWidgets is that you are directly interfacing with each platform,
and the license is much more permissive. The problem, though, is that you now have
to handle each platform slightly differently.
The Python extension module that wraps wxWidgets for Python users is called wxPy‐
thon. It at one point was the most popular windowing library in Python, possibly
because of its philosophy of using native interface tools, but now the workarounds in
Qt and GTK+ seem to have become good enough. Still, to install it, go to http://
198 | Chapter 7: User Interaction

5But the creation of Swift may have reduced that demand—it’s almost as easy as Python, so if you’re just writ‐
ing for OS X, why not just use Swift and do everything native (except for calculations, which still would bene‐
fit from scientific libraries like NumPy and Pandas)?
www.wxpython.org/download.php#stable and download the appropriate package for
your OS, and get started with their wxPython tutorial.
Objective-C
Objective-C is the proprietary language used by Apple for the OS X and iOS operat‐
ing systems, and providing access to the Cocoa framework for application develop‐
ment on OS X. Unlike the other options, Objective-C is not cross-platform; it is only
for Apple products.
PyObjC is a bidirectional bridge between the OS X Objective-C languages and
Python, meaning it not only allows Python access to the Cocoa framework for appli‐
cation development on OS X, but allows Objective-C programmers to access Python.5
The Cocoa framework is only available on OS X, so don’t choose
Objective-C (via PyObjC) if you’re writing a cross-platform appli‐
cation.
You will need to have Xcode installed, as described in “Installing Python on Mac
OS X” on page 9, because PyObjC needs a compiler. Also, PyObjC works only with
the standard CPython distribution—not with other distributions like PyPy or Jython
—and we recommend using the Python executable provided by OS X, because that
Python was modified by Apple and configured specifically to work with OS X.
To make your virtual environment using your system’s Python interpreter, use the
whole path when invoking it. If you do not want to install as the super user, install
using the --user switch, which will save the library under $HOME/Library/
Python/2.7/lib/python/site-packages/:
$ /usr/bin/python -m pip install --upgrade --user virtualenv
Activate the environment, enter it, and install PyObjC:
$ /usr/bin/python -m virtualenv venv
$ source venv/bin/activate
(venv)$ pip install pyobjc
This takes a while. PyObjC comes bundled with py2app (discussed in “py2app” on
page 177), which is the OS X–specific tool to create distributable standalone applica‐
tion binaries. There are sample applications on the PyObjC examples page.
GUI Applications | 199

Game Development
Kivy has become really popular really quickly, but has a much larger footprint than
the libraries listed in this section. It was categorized as a toolkit because it provides
widgets and buttons but is frequently used to build games. The Pygame community
hosts a Python game developer website that welcomes all game developers, whether
or not they’re using Pygame. The most popular game development libraries are:
cocos2d
cocos2d is released under the BSD license. It builds on top of pyglet, providing a
framework to structure your game as a set of scenes connected via custom work‐
flows, all managed by a director. Use it if you like the scene-director-workflow
style they use as described in the documentation, or want pyglet for drawing, plus
SDL2 for joystick and audio. You can install cocos2D using pip. For SDL2, check
your package manager first, then download from the SDL2 site. The best way to
get started is with their example cocos2d applications.
pyglet
pyglet is released under the BSD license. It’s a set of lightweight wrappers around
OpenGL, plus tools for presenting and moving sprites around a window. Just
install it—pip should be all you need because most every computer has OpenGL
—and run some of the example applications, including a complete Asteroids
clone in fewer than 800 lines of code.
Pygame
Pygame is released under the Zlib license, plus the GNU LGPLv2.1 for SDL2. It
has a large, active community, with tons of Pygame tutorials, but it has been
using SDL1, a prior version of the library. It isn’t available on PyPI, so check your
package manager first, and if they don’t have it, download Pygame.
Pygame-SDL2
Pygame-SDL2 was recently announced as an effort to reimplement Pygame with
an SDL2 backend. It is released under the same licenses as Pygame.
PySDL2
PySDL2 runs on CPython, IronPython, and PyPy, and is a thin Python interface
to the SDL2 library. If you want the lightest-weight interface to SDL2 in Python,
this is your library. For more information, see the PySDL2 tutorial.
Web Applications
As a powerful scripting language adapted to both fast prototyping and bigger
projects, Python is widely used in web application development (YouTube, Pinterest,
Dropbox, and The Onion all use it).
200 | Chapter 7: User Interaction

Two of the libraries we profiled in Chapter 5—“Werkzeug” on page 140, and “Flask”
on page 155 were related to building web applications. With them, we briefly
described the Web Server Gateway Interface (WSGI), a Python standard defined in
PEP 3333 that specifies how web servers and Python web applications communicate.
This section will look at Python web frameworks, their templating systems, the
servers they interface with, and the platforms they run on.
Web Frameworks/Microframeworks
Broadly speaking, a web framework consists of a set of libraries and a main handler
within which you can build custom code to implement a web application (i.e., an
interactive website providing a client interface to code running on a server). Most
web frameworks include patterns and utilities to accomplish at least the following:
URL routing
Match an incoming HTTP request to a particular Python function (or callable).
Handling Request and Response objects
Encapsulate the information received from or sent to a user’s browser.
Templating
Inject Python variables into HTML templates or other output, allowing program‐
mers to separate an application’s logic (in Python) from the layout (in the tem‐
plate).
Development web service for debugging
Run a miniature HTTP server on development machines to enable rapid devel‐
opment; often automatically reloading server-side code when files are updated.
You shouldn’t have to code around your framework. It should already provide the
things you need—tested and used by thousands of other developers—so if you still
don’t find what you need, keep exploring the many other available frameworks (e.g.,
Bottle, Web2Py, CherryPy). A technical reviewer also noted we should mention Fal‐
con, which is a framework specifically for building RESTful APIs (i.e., not for serving
HTML).
All of the libraries in Table 7-3 can be installed using pip:
$ pip install Django
$ pip install Flask
$ pip install tornado
$ pip install pyramid
Web Applications | 201

Table 7-3. Web frameworks
Python library License Reasons to use
Django BSD license • It provides structure—a mostly prebuilt site where you design the layout and the
underlying data and logic.
• It also autogenerates an administrative web interface, where nonprogrammers can
add or delete data (like news articles).
•It is integrated with Django’s object-relational mapping (ORM) tool.
Flask BSD license • It allows you total control over what is in your stack.
• It provides elegant decorators that add URL routing to any function you choose.
• It frees you from the structure provided by either Django or Pyramid.
Tornado Apache 2.0 license • It provides excellent asynchronous event handling—Tornado uses its own HTTP
server.
• It also gives you a way to handle many WebSockets (full duplex, persistent
communication over TCPa) or other long-duration connection out of the box.
Pyramid Modied BSD
license • It provides some prebuilt structure—called a scaolding—but less than Django,
allowing you to use any database interface or templating library you wish (if any).
• It is based on the popular the Zope framework, and on Pylons, both predecessors
of Pyramid.
a Transmission Control Protocol (TCP) is a standard protocol that denes a way for two computers to establish a connection
and communicate with each other.
The following sections provide a more detailed look at the web frameworks in
Table 7-3.
Django
Django is a “batteries included” web application framework and is an excellent choice
for creating content-oriented websites. By providing many utilities and patterns out
of the box, Django aims to make it possible to build complex, database-backed web
applications quickly while encouraging best practices in code that uses it.
Django has a large and active community, and many reusable modules that can be
directly incorporated into a new project or customized to fit your needs.
There are annual Django conferences in the United States and in Europe—the major‐
ity of new Python web applications today are built with Django.
202 | Chapter 7: User Interaction

6It was inspired by the Twisted project’s Twisted Web server, which is a part of the Tornado networking toolkit.
If you wish things existed in Tornado that don’t, look into Twisted, because it’s probably implemented them.
But be warned that Twisted is notoriously hard for beginners.
7Actually, their WSGI documentation says “Use WSGIContainer only when there are benefits to combining
Tornado and WSGI in the same process that outweigh the reduced scalability.”
Flask
Flask is a microframework for Python, and is an excellent choice for building smaller
applications, APIs, and web services. Rather than aiming to provide everything you
could possibly need, Flask implements the most commonly used core components of
a web application framework, like URL routing, HTTP request and response objects,
and templates. Building an app with Flask is a lot like writing standard Python mod‐
ules, except some functions have routes attached to them (via a decorator, like in the
code sample shown here). It’s really beautiful:
@app.route('/deep-thought')
def answer_the_question():
return 'The answer is 42.'
If you use Flask, it is up to you to choose other components for your application, if
any. For example, database access or form generation/validation are not built into
Flask. This is great, because many web applications don’t need those features. If yours
do, there are many available extensions, such as SQLAlchemy for a database, or
pyMongo for MongoDB and WTForms for forms.
Flask is the default choice for any Python web application that isn’t a good fit for
Django’s prebuilt scaffolding. Try these example Flask applications for a good intro‐
duction. If you want to run multiple applications (the default for Django), use appli‐
cation dispatching. If instead you want to duplicate behaviors for sets of subpages
within an app, try Flask’s Blueprints.
Tornado
Tornado is an asynchronous (event-driven and nonblocking, like Node.js) web
framework for Python that has its own event loop.6 This allows it to natively support
the WebSockets communication protocol, for example. Unlike the other frameworks
in this section, Tornado is not a WSGI application. It can be made to run either as a
WSGI application or as a WSGI server through their module tornado.wsgi, but even
the authors ask “what’s the point?”7 seeing as WSGI is a synchronous interface and the
purpose of Tornado is to provide an asynchronous framework.
Tornado is a more difficult and less frequently used web framework than Django or
Flask—use it only if you know the performance gain of using an asynchronous
framework is worth the additional time you will spend programming. If you do, a
Web Applications | 203

8Separation of concerns is a design principle that means good code is modular—each component should do
just one thing.
good place to start is with their demo applications. Well-written Tornado applications
are known to have excellent performance.
Pyramid
Pyramid is a lot like Django, except with a heavier focus on modularity. It comes with
a smaller number of built-in libraries (fewer “batteries” included), and encourages
users to extend its base functionality through shareable templates they call scaolds.
You register the scaffold, and then invoke it when creating a new project using their
command pcreate to build your project’s scaffolding—like Django’s django-admin
startproject project-name command, but with options for different structures,
different database backends, and URL routing options.
Pyramid does not have a large user base, unlike Django and Flask, but those who use
it are passionate about it. It’s a very capable framework, but not as popular a choice
for new Python web applications right now.
Here are a few Pyramid tutorials to start with. Or, for a page you can use to sell Pyra‐
mid to your boss, try this portal to all things Pyramid.
Web Template Engines
Most WSGI applications exist to respond to HTTP requests and serve content in
HTML or other markup languages. Template engines are in charge of rendering this
content: they manage a suite of templating files, with a system of hierarchy and inclu‐
sion to avoid unnecessary repetition, and fill the static content of the templates with
the dynamic content generated by the application. This helps us adhere to the con‐
cept of separation of concerns8—keeping only the application logic in the code, and
delegating presentation to the templates.
Template files are sometimes written by designers or frontend developers, and com‐
plexity in the pages can make coordination difficult. Here are some good practices
both for the application passing dynamic content to the template engine, and for the
templates themselves:
Never is oen better than right now
Template files should be passed only the dynamic content that is needed for ren‐
dering the template. Avoid the temptation to pass additional content “just in
case”: it is easier to add some missing variable when needed than to remove a
likely unused variable later.
204 | Chapter 7: User Interaction

9Rendering is rarely the bottleneck in a web app, though—it’s usually the data access.
Try to keep logic out of the template
Many template engines allow for complex statements or assignments in the tem‐
plate itself, and many allow some Python code to be evaluated in the templates.
This convenience can lead to uncontrolled growth in complexity and often
makes it harder to find bugs. We’re not 100% against it—practicality beats purity
—just contain yourself.
Keep the JavaScript separate from the HTML
It is often necessary to mix JavaScript templates with HTML templates. Preserve
your sanity, and isolate the parts where the HTML template passes variables to
the JavaScript code.
All of the template engines listed in Table 7-4 are second-generation, with good ren‐
dering speed9 and features added thanks to experience with older template languages.
Table 7-4. Template engines
Python library License Reasons to use
Jinja2 BSD license • It’s Flask’s default and bundled with Django.
• It is based on the Django Template Language, with just a little more logic allowed
in the templates.
• Jinja2 is the default engine for Sphinx, Ansible, and Salt—if you’ve used them,
you know Jinja2.
Chameleon Modied BSD license • The templates are themselves valid XML/HTML.
• It is similar to the Template Attribute Language (TAL) and its derivatives.
Mako MIT license • It’s Pyramid’s default.
• It’s designed for speed—for when your template rendering is actually a
bottleneck.
• It allows you to put a lot of code in your templates—Mako is kind of like a Python
version of PHP.
The following sections describe the libraries in Table 7-4 in more detail.
Jinja2
Jinja2 is our recommended templating library for new Python web applications. It is
Flask’s default engine, the default engine for the Python documentation generator
Sphinx and can be used in Django, Pyramid, and Tornado. It uses a text-based tem‐
Web Applications | 205

plate language and can thus be used to generate any type of markup, not just HTML.
It allows customization of filters, tags, tests, and globals. Inspired by the Django tem‐
plate language, it adds features like a little bit of in-template logic, which saves tons of
code.
Here are some important Jinja2 tags:
{# This is a comment -- because of the hash + curly braces. #}
{# This is how to insert a variable: #}
{{title}}
{# This defines a named block, replaceable by a child template. #}
{% block head %}
<h1>This is the default heading.</h1>
{% endblock %}
{# This is how to do iteration: #}
{% for item in list %}
<li>{{ item }}</li>
{% endfor %}
Here’s an example of a website in combination with the Tornado web server,
described in “Tornado” on page 203:
# import Jinja2
from jinja2 import Environment, FileSystemLoader
# import Tornado
import tornado.ioloop
import tornado.web
# Load template file templates/site.html
TEMPLATE_FILE = "site.html"
templateLoader = FileSystemLoader( searchpath="templates/" )
templateEnv = Environment( loader=templateLoader )
template = templateEnv.get_template(TEMPLATE_FILE)
# List for famous movie rendering
movie_list = [
[1,"The Hitchhiker's Guide to the Galaxy"],
[2,"Back to the Future"],
[3,"The Matrix"]
]
# template.render() returns a string containing the rendered HTML
html_output = template.render(list=movie_list, title="My favorite movies")
# Handler for main page
class MainHandler(tornado.web.RequestHandler):
def get(self):
# Returns rendered template string to the browser request
206 | Chapter 7: User Interaction

self.write(html_output)
# Assign handler to the server root (127.0.0.1:PORT/)
application = tornado.web.Application([
(r"/", MainHandler),
])
PORT=8884
if __name__ == "__main__":
# Set up the server
application.listen(PORT)
tornado.ioloop.IOLoop.instance().start()
A base.html file can be used as base for all site pages. In this example, they would be
implemented in the (currently empty) content block:
<!DOCTYPE HTML PUBLIC "-//W3C//DTD HTML 4.01//EN">
<html lang="en">
<html xmlns="http://www.w3.org/1999/xhtml">
<head>
<link rel="stylesheet" href="style.css" />
<title>{{title}} - My Web Page</title>
</head>
<body>
<div id="content">
{# In the next line, the content from the site.html template will be added #}
{% block content %}{% endblock %}
</div>
<div id="footer">
{% block footer %}
© Copyright 2013 by <a href="http://domain.invalid/">you</a>.
{% endblock %}
</div>
</body>
The next code example is our site page (site.html), which extends base.html. The con‐
tent block here will be automatically inserted into the corresponding block in
base.html:
<!{% extends "base.html" %}
{% block content %}
<p class="important">
<div id="content">
<h2>{{title}}</h2>
<p>{{ list_title }}</p>
<ul>
{% for item in list %}
<li>{{ item[0]}} : {{ item[1]}}</li>
{% endfor %}
</ul>
</div>
</p>
{% endblock %}
Web Applications | 207

Chameleon
Chameleon Page Templates (with file extension *.pt) are an HTML/XML template
engine implementation of the Template Attribute Language (TAL), TAL Expression
Syntax (TALES), and Macro Expansion TAL (Metal) syntaxes. Chameleon parses the
Page Templates and “compiles” them into Python bytecode to increase loading speed.
It is available for Python 2.5 and up (including 3.x and PyPy) and is one of the two
default rendering engines used by “Pyramid” on page 204. (The other is Mako,
described in the next section.)
Page Templates add special element attributes and text markup to your XML docu‐
ment: a set of simple language constructs let you control the document flow, element
repetition, text replacement, and translation. Because of the attribute-based syntax,
unrendered page templates are valid HTML and can be viewed in a browser and even
edited in WYSIWYG (what you see is what you get) editors. This can make round-
trip collaboration with designers and prototyping with static files in a browser easier.
The basic TAL language is simple enough to grasp from an example:
<html>
<body>
<h1>Hello, <span tal:replace="context.name">World</span>!</h1>
<table>
<tr tal:repeat="row 'apple', 'banana', 'pineapple'">
<td tal:repeat="col 'juice', 'muffin', 'pie'">
<span tal:replace="row.capitalize()" /> <span tal:replace="col" />
</td>
</tr>
</table>
</body>
</html>
The <span tal:replace="expression" /> pattern for text insertion is common
enough that if you do not require strict validity in your unrendered templates, you
can replace it with a more terse and readable syntax using the pattern ${expression},
as follows:
<html>
<body>
<h1>Hello, ${world}!</h1>
<table>
<tr tal:repeat="row 'apple', 'banana', 'pineapple'">
<td tal:repeat="col 'juice', 'muffin', 'pie'">
${row.capitalize()} ${col}
</td>
</tr>
</table>
</body>
</html>
208 | Chapter 7: User Interaction

But remember the full <span tal:replace="expression">Default Text</span>
syntax also allows for default content in the unrendered template.
Being from the Pyramid world, Chameleon is not widely used.
Mako
Mako is a template language that compiles to Python for maximum performance. Its
syntax and API are borrowed from the best parts of other templating languages like
Django and Jinja2 templates. It is the default template language included with the
Pyramid web framework (discussed in “Pyramid” on page 204) web framework. An
example template in Mako looks like this:
<%inherit file="base.html"/>
<%
rows = [[v for v in range(0,10)] for row in range(0,10)]
%>
<table>
% for row in rows:
${makerow(row)}
% endfor
</table>
<%def name="makerow(row)">
<tr>
% for name in row:
<td>${name}</td>\
% endfor
</tr>
</%def>
It is a text markup language, like Jinja2, so it can be used for anything, not just XML/
HTML documents. To render a very basic template, you can do the following:
from mako.template import Template
print(Template("hello ${data}!").render(data="world"))
Mako is well respected within the Python web community. It is fast and allows devel‐
opers to embed a lot of Python logic into the page, which we know we cautioned
against—but in times when you think it’s necessary, this is the tool that allows it.
Web Deployment
The two options we’ll cover for web deployment are either to use web hosting (i.e.,
pay a vendor like Heroku, Gondor, or PythonAnywhere to manage your server and
your database for you), or to set up your own infrastructure on a machine provided
by a virtual private server (VPS) host like Amazon Web Services or Rackspace. We’ll
quickly cover both.
Web Applications | 209

10 Pinax bundles popular Django templates, apps, and infrastructure to make starting a Django project faster.
Hosting
Platform as a Service (PaaS) is a type of cloud computing infrastructure which
abstracts and manages infrastructure (e.g., setting up the database and web server,
and keeping up with security patches), routing, and scaling of web applications.
When using a PaaS, application developers can focus on writing application code
rather than concerning themselves with deployment details.
There are dozens of competing PaaS providers, but the ones in this list specifically
focus on the Python community. Most offer some sort of free tier or trial to start:
Heroku
Heroku is our recommended PaaS for deploying Python web applications. It sup‐
ports Python 2.7–3.5 applications of all types: web applications, servers, and
frameworks. A set of command-line tools is provided for interfacing with both
your Heroku account and the actual database and web servers that support your
application, so you can make changes without using a web interface. Heroku
maintains detailed articles on using Python with Heroku, as well as step-by-step
instructions on how to set up your first application.
Gondor
Gondor is run by a small company and focuses on helping businesses find suc‐
cess with Python and Django. Its platform is specialized for deploying Django
and Pinax10 applications and uses. Gondor’s platform is Ubuntu 12.04 with
Django 1.4, 1.6, and 1.7 and a subset of Python 2 and 3 implementation listed
here. It can automatically configure your Django site if you use local_settings.py
for site-specific configuration information. For more information, see Gondor’s
guide to deploying Django projects; a command-line interface tool is also avail‐
able.
PythonAnywhere
PythonAnywhere supports Django, Flask, Tornado, Pyramid, and many of the
other web application frameworks we didn’t describe, like Bottle (no framework,
like Flask, but with a much smaller community) and web2py (great for teaching).
Its pricing model is related to compute time—rather than charging more, com‐
putations are throttled once they go over a daily maximum—which is good for
cost-conscious developers.
Web servers
With the exception of Tornado (which comes with its own HTTP server), all of the
web application frameworks we discussed are WSGI applications. This means they
210 | Chapter 7: User Interaction

11 A reverse proxy fetches information from another server on behalf of a client and returns it to the client as if
it come from the reverse proxy.
12 Load balancing optimizes performance by delegating work across multiple computing resources.
must interact with a WSGI server as defined in PEP 3333 in order to receive an
HTTP request and send back an HTTP response.
The majority of self-hosted Python applications today are hosted with a WSGI server
such as Gunicorn, either by itself—WSGI servers can often be used as standalone
HTTP servers—or behind a lightweight web server such as Nginx. When both are
used, the WSGI servers interact with the Python applications while the web server
handles tasks better suited for it—static file serving, request routing, distributed
denial-of-service (DDoS) protection, and basic authentication. The two most popular
web servers are Nginx and Apache, described here:
Nginx
Nginx (pronounced “engine-x”) is a web server and reverse proxy11 for HTTP,
SMTP, and other protocols. It is known for its high performance, relative simplic‐
ity, and compatibility with many application servers (like WSGI servers). It also
includes handy features like load balancing,12 basic authentication, streaming,
and others. Designed to serve high-load websites, Nginx is gradually becoming
quite popular.
Apache HTTP server
Apache is the most popular HTTP server in the world, but we prefer Nginx. Still,
those new to deployment may want to start with Apache and mod_wsgi, which is
regarded as the easiest WSGI interface out there. There are tutorials in each
framework’s documentation for mod_wsgi with Pyramid, mod_wsgi with
Django, and mod_wsgi with Flask.
WSGI servers
Standalone WSGI servers typically use less resources than traditional web servers and
provide top performance benchmarks for Python WSGI Servers. They can also be
used in conjunction with Nginx or Apache, which would serve as reverse proxies. The
most popular WSGI servers are:
Gunicorn (Green Unicorn)
Gunicorn is the recommended choice for new Python web applications—a pure-
Python WSGI server used to serve Python applications. Unlike other Python web
servers, it has a thoughtful user interface and is extremely easy to use and config‐
ure. Gunicorn has sane and reasonable defaults for configurations. However,
some other servers, like uWSGI, are tremendously more customizable (but there‐
fore are much more difficult to effectively use).
Web Applications | 211

Waitress
Waitress is a pure-Python WSGI server that claims “very acceptable perfor‐
mance.” Its documentation is not very detailed, but it does offer some nice func‐
tionality that Gunicorn doesn’t have (e.g., HTTP request buffering); it doesn’t
block when a slow client takes time to respond—hence the name “Wait”-ress.
Waitress is gaining popularity within the Python web development community.
uWSGI
uWSGI is a full stack for building hosting services. We don’t recommend using it
as a standalone web router unless you know why you need it.
But uWSGI can also run behind a full web server (such as Nginx or Apache)—a
web server can configure uWSGI and an application’s operation over the uwsgi
protocol. uWSGI’s web server support allows for dynamically configuring
Python, passing environment variables and further tuning. For full details, see
uWSGI magic variables.
212 | Chapter 7: User Interaction

1Fowler is an advocate for best practices in software design and development, and one of continuous integra‐
tion’s most vocal proponents. The quote is excerpted from his blog post on continuous integration. He hosted
a series of discussions about test-driven development (TDD) and its relationship to extreme development with
David Heinemeier Hansson (creater of Ruby on Rails) and Kent Beck (instigator of the extreme programming
(XP) movement, with CI as one of its cornerstones).
CHAPTER 8
Code Management and Improvement
This chapter covers libraries used to manage or simplify the development and build
process, system integration, server management, and performance optimization.
Continuous Integration
Nobody describes continuous integration better than Martin Fowler:1
Continuous Integration is a software development practice where members of a team
integrate their work frequently, usually each person integrates at least daily—leading to
multiple integrations per day. Each integration is verified by an automated build
(including test) to detect integration errors as quickly as possible. Many teams find that
this approach leads to significantly reduced integration problems and allows a team to
develop cohesive software more rapidly.
The three most popular tools for CI right now are Travis-CI, Jenkins, and Buildbot—
which are all listed in the following sections. They are frequently used with Tox, a
Python tool to manage virtualenv and tests from the command line. Travis is for mul‐
tiple Python interpreters on a single platform, and Jenkins (most popular) and Build‐
bot (written in Python) can manage builds on multiple machines. Many also use
Buildout (discussed in “Buildout” on page 38) and Docker (discussed in “Docker” on
page 39) to rapidly and repeatably build complex environments for their test battery.
213

2On GitHub, other users submit pull requests to notify owners of another repository that they have changes
they’d like to merge.
Tox
Tox is an automation tool providing packaging, testing, and deployment of Python
software right from the console or CI server. It is a generic virtualenv management
and test command-line tool that provides the following features:
•Checks that packages install correctly with different Python versions and inter‐
preters
• Runs tests in each of the environments, configuring your test tool of choice
•Acts as a frontend to continuous integration servers, reducing boilerplate and
merging CI and shell-based testing
Install it using pip:
$ pip install tox
System Administration
The tools in this section are for managing and monitoring systems—server automa‐
tion, system monitoring, and workflow management.
Travis-CI
Travis-CI is a distributed CI server which builds tests for open source projects for
free. It provides multiple workers that run Python tests and seamlessly integrates with
GitHub. You can even have it comment on your pull requests2 whether this particular
set of changes breaks the build or not. So if you are hosting your code on GitHub,
Travis-CI is a great and easy way to get started with continuous integration. Travis-CI
can build your code on a virtual machine that is running Linux, OS X, or iOS.
To get started, add a .travis.yml file to your repository with this example content:
language: python
python:
- "2.6"
- "2.7"
- "3.3"
- "3.4"
script: python tests/test_all_of_the_units.py
branches:
only:
- master
214 | Chapter 8: Code Management and Improvement

3REST stands for “representational state transfer.” It’s not a standard or a protocol, just a set of design princi‐
ples developed during the creation of the HTTP 1.1 standard. A list of relevant architectural constraints for
REST is available on Wikipedia.
4OpenStack provides free software for cloud networking, storage, and computation so that organizations can
host private clouds for themselves or public clouds that third parties can pay to use.
This will get your project tested on all the listed Python versions by running the given
script and will only build the master branch. There are a lot more options you can
enable, like notifications, before and after steps, and much more. The Travis-CI docs
explain all of these options and are very thorough. To use Tox with Travis-CI, add a
Tox script to your repository, and change the line with script: in it to become:
install:
- pip install tox
script:
- tox
In order to activate testing for your project, go to the Travis-CI site and log in with
your GitHub account. Then activate your project in your profile settings and you’re
ready to go. From now on, your project’s tests will be run on every push to GitHub.
Jenkins
Jenkins CI is an extensible continuous integration engine and currently the most pop‐
ular CI engine. It works on Windows, Linux, and OS X and plugs in to “every Source
Code Management (SCM) tool that exists.” Jenkins is a Java servlet (the Java equiva‐
lent of a Python WSGI application) that ships with its own servlet container, so you
can run it directly using java --jar jenkins.war. For more information, refer to
the Jenkins installation instructions; the Ubuntu page has instructions for how to
place Jenkins behind an Apache or Nginx reverse proxy.
You interact with Jenkins via a web-based dashboard, or its HTTP-based RESTful
API3 (e.g., at http://myServer:8080/api), meaning we can use HTTP to communicate
with the Jenkins server from remote machines. For examples, look at Apache’s Jen‐
kins Dashboard or the Pylons project’s Jenkins Dashboard.
The most frequently used Python tool to interact with the Jenkins API is python-
jenkins, created by the OpenStack4 infrastructure team. Most Python users configure
Jenkins to run a Tox script as part of the build process. For more information, see the
documentation for using Tox with Jenkins and this guide to set up Jenkins with mul‐
tiple build machines.
Buildbot
Buildbot is a Python system to automate the compile/test cycle to validate code
changes. It works like Jenkins in that it polls your source control manager for
System Administration | 215

changes, builds and test your code on multiple computers according to your instruc‐
tions (with built-in support for Tox), and then tells you what happened. It runs
behind a Twisted web server. For an example of what the web interface looks like,
here is Chromium’s public buildbot dashboard (Chromium powers the Chrome
browser).
Because Buildbot is pure Python, it’s installed via pip:
$ pip install buildbot
The 0.9 version has a REST API, but it is still in beta, so you won’t be able to use it
unless you expressly specify the version number (e.g., pip install build
bot==0.9.00.9.0rc1). Buildbot has a reputation for being the most powerful, but
also the most complex of the continuous integration tools. To get started, follow their
excellent tutorial.
Server Automation
Salt, Ansible, Puppet, Chef, and CFEngine are server automation tools that provide
an elegant way for system administrators to manage their fleet of physical and virtual
machines. They all can manage Linux, Unix-like systems, and Windows machines.
We’re of course partial to Salt and Ansible, as they’re written in Python. But they’re
still new, and the other options are more widely used. The following sections provide
a quick summary of these options.
For the record, folks at Docker say that they expect system automa‐
tion tools like Salt, Ansible, and the rest to be complemented by, and
not replaced by Docker—see this post about how Docker fits into
the rest of DevOps.
Salt
Salt calls its master node the master and its agent nodes minions, or minion hosts. Its
main design goal is speed—networking by default is done using ZeroMQ, with TCP
connections between the master and its “minions,” and members of the Salt team
have even written their own (optional) transmission protocol, RAET, which is faster
than TCP and not as lossy as UDP.
Salt supports Python versions 2.6 and 2.7 and can be installed via pip:
$ pip install salt # No Python 3 yet ...
After configuring a master server and any number of minion hosts, we can run arbi‐
trary shell commands or use prebuilt modules of complex commands on our min‐
ions. The following command lists all available minion hosts, using ping in salt’s test
module:
216 | Chapter 8: Code Management and Improvement

5Except for Salt-SSH, which is an alternative Salt architecture, probably created in response to users wanting
an Ansible-like option from Salt.
$ salt '*' test.ping
You can filter minion hosts by either matching the minion ID, or by using the grains
system, which uses static host information like the operating system version or the
CPU architecture to provide a host taxonomy for the Salt modules. For example, the
following command uses the grains system to list only the available minions running
CentOS:
$ salt -G 'os:CentOS' test.ping
Salt also provides a state system. States can be used to configure the minion hosts. For
example, when a minion host is ordered to read the following state file, it will install
and start the Apache server:
apache:
pkg:
- installed
service:
- running
- enable: True
- require:
- pkg: apache
State files can be written using YAML, augmented by the Jinja2 template system, or
can be pure Python modules. For more information, see the Salt documentation.
Ansible
The biggest advantage of Ansible over the other system automation tools is that it
does not require anything (except Python) to be permanently installed on client
machines. All of the other options5 keep daemons running on the clients to poll the
master. Their configuration files are in the YAML format. Playbooks are Ansible’s
configuration, deployment, and orchestration documents, and are written in YAML
with Jinja2 for templating. Ansible supports Python versions 2.6 and 2.7 and can be
installed via pip:
$ pip install ansible # No Python 3 yet...
Ansible requires an inventory file that describes the hosts to which it has access. The
following code is an example of a host and playbook that will ping all the hosts in the
inventory file. Here is an example inventory file (hosts.yml):
[server_name]
127.0.0.1
Here is an example playbook (ping.yml):
System Administration | 217

---
- hosts: all
tasks:
- name: ping
action: ping
To run the playbook:
$ ansible-playbook ping.yml -i hosts.yml --ask-pass
The Ansible playbook will ping all of the servers in the hosts.yml file. You can also
select groups of servers using Ansible. For more information about Ansible, read the
Ansible documentation. The Servers for Hackers Ansible tutorial is also a great and
detailed introduction.
Puppet
Puppet is written in Ruby and provides its own language—PuppetScript—for config‐
uration. It has a designated server, the Puppet Master, that’s responsible for orches‐
trating its Agent nodes. Modules are small, shareable units of code written to
automate or define the state of a system. Puppet Forge is a repository for modules
written by the community for Open Source Puppet and Puppet Enterprise.
Agent nodes send basic facts about the system (e.g., the operating system, kernel,
architecture, IP address, and hostname) to the Puppet Master. The Puppet Master
then compiles a catalog with information provided by the agents on how each node
should be configured and sends it to the agent. The agent enforces the change as pre‐
scribed in the catalog and sends a report back to the Puppet Master.
Facter (yes, spelled with an “-er”) is an interesting tool that ships with Puppet and
pulls basic facts about the system. These facts can be referenced as a variable while
writing your Puppet modules:
$ facter kernel
Linux
$
$ facter operatingsystem
Ubuntu
Writing Modules in Puppet is pretty straightforward: Puppet Manifests (files with the
extension *.pp) together form Puppet Modules. Here is an example of Hello World in
Puppet:
notify { 'Hello World, this message is getting logged into the agent node':
#As nothing is specified in the body, the resource title
#is the notification message by default.
}
218 | Chapter 8: Code Management and Improvement

Here is another example, with system-based logic. To reference other facts, prepend a
$ sign to the variable name—for instance, $hostname, or in this case, $operatingsys
tem:
notify{ 'Mac Warning':
message => $operatingsystem ? {
'Darwin' => 'This seems to be a Mac.',
default => 'I am a PC.',
},
}
There are several resource types for Puppet, but the package-file-service paradigm is
all you need for for the majority of the configuration management. The following
Puppet code makes sure that the OpenSSH-Server package is installed in a system
and the sshd service (the SSH server daemon) is notified to restart every time the
sshd configuration file is changed:
package { 'openssh-server':
ensure => installed,
}
file { '/etc/ssh/sshd_config':
source => 'puppet:///modules/sshd/sshd_config',
owner => 'root',
group => 'root',
mode => '640',
notify => Service['sshd'], # sshd will restart
# whenever you edit this
# file
require => Package['openssh-server'],
}
service { 'sshd':
ensure => running,
enable => true,
hasstatus => true,
hasrestart=> true,
}
For more information, refer to the Puppet Labs documentation.
Chef
If Chef is your choice for configuration management, you will primarily use Ruby to
write your infrastructure code. Chef is similar to Puppet, but designed with the oppo‐
site philosophy: Puppet provides a framework that simplifies things at the expense of
flexibility, while Chef provides nearly no framework—its goal is to be very extensible,
and so it is more difficult to use.
System Administration | 219

Chef clients run on every node in your infrastructure and regularly check with your
Chef server to ensure your system is always aligned and represents the desired state.
Each individual Chef client configures itself. This distributed approach makes Chef a
scalable automation platform.
Chef works by using custom recipes (configuration elements), implemented in cook‐
books. Cookbooks, which are basically packages for infrastructure choices, are usually
stored in your Chef server. Read DigitalOcean’s tutorial series on Chef to learn how to
create a simple Chef server.
Use the knife command to create a simple cookbook:
$ knife cookbook create cookbook_name
Andy Gale’s “Getting started with Chef” is a good starting point for Chef beginners.
Many community cookbooks can be found on the Chef Supermarket—they’re a good
starting point for your own cookbooks. For more information, check out the full Chef
documentation.
CFEngine
CFEngine has a tiny footprint because it’s written in C. Its main design goal is robust‐
ness to failure, accomplished via autonomous agents operating in a distributed net‐
work (as opposed to a master/client architecture) that communicate using Promise
Theory. If you want a headless architecture, try this system.
System and Task Monitoring
The following libraries all help system administrators monitor running jobs but have
very different applications: Psutil provides information in Python that can be
obtained by Unix utility functions, Fabric makes it easy to define and execute com‐
mands on a list of remote hosts via SSH, and Luigi makes it possible to schedule and
monitor long-running batch processes like chained Hadoop commands.
Psutil
Psutil is a cross-platform (including Windows) interface to different system informa‐
tion (e.g., CPU, memory, disks, network, users, and processes)—it makes accessible
within Python information that many of us are accustomed to obtaining via Unix
commands such as top, ps, df, and netstat. Get it using pip:
$ pip install psutil
Here is an example that monitors for server overload (if any of the tests—net, CPU—
fail, it will send an email):
# Functions to get system values:
from psutil import cpu_percent, net_io_counters
220 | Chapter 8: Code Management and Improvement

# Functions to take a break:
from time import sleep
# Package for email services:
import smtplib
import string
MAX_NET_USAGE = 400000
MAX_ATTACKS = 4
attack = 0
counter = 0
while attack <= MAX_ATTACKS:
sleep(4)
counter = counter + 1
# Check the CPU usage
if cpu_percent(interval = 1) > 70:
attack = attack + 1
# Check the net usage
neti1 = net_io_counters()[1]
neto1 = net_io_counters()[0]
sleep(1)
neti2 = net_io_counters()[1]
neto2 = net_io_counters()[0]
# Calculate the bytes per second
net = ((neti2+neto2) - (neti1+neto1))/2
if net > MAX_NET_USAGE:
attack = attack + 1
if counter > 25:
attack = 0
counter = 0
# Write a very important email if attack is higher than 4
TO = "you@your_email.com"
FROM = "webmaster@your_domain.com"
SUBJECT = "Your domain is out of system resources!"
text = "Go and fix your server!"
BODY = string.join(
("From: %s" %FROM,"To: %s" %TO,"Subject: %s" %SUBJECT, "",text), "\r\n")
server = smtplib.SMTP('127.0.0.1')
server.sendmail(FROM, [TO], BODY)
server.quit()
For a good example use of Psutil, see glances, a full terminal application that behaves
like a widely extended top (which lists running process by CPU use or a user-
specified sort order), with the ability of a client-server monitoring tool.
Fabric
Fabric is a library for simplifying system administration tasks. It allows you to SSH to
multiple hosts and execute tasks on each one. This is convenient for system adminis‐
tration or application deployment. Use pip to install Fabric:
$ pip install fabric
System Administration | 221

Here is a complete Python module defining two Fabric tasks—memory_usage and
deploy:
# fabfile.py
from fabric.api import cd, env, prefix, run, task
env.hosts = ['my_server1', 'my_server2'] # Where to SSH
@task
def memory_usage():
run('free -m')
@task
def deploy():
with cd('/var/www/project-env/project'):
with prefix('. ../bin/activate'):
run('git pull')
run('touch app.wsgi')
The with statement just nests the commands in so that in the end deploy() becomes
this for each host:
$ ssh hostname cd /var/ww/project-env/project && ../bin/activate && git pull
$ ssh hostname cd /var/ww/project-env/project && ../bin/activate && \
> touch app.wsgi
With the previous code saved in a file named fable.py (the default module name fab
looks for), we can check memory usage with our new memory_usage task:
$ fab memory_usage
[my_server1] Executing task 'memory'
[my_server1] run: free -m
[my_server1] out: total used free shared buffers cached
[my_server1] out: Mem: 6964 1897 5067 0 166 222
[my_server1] out: -/+ buffers/cache: 1509 5455
[my_server1] out: Swap: 0 0 0
[my_server2] Executing task 'memory'
[my_server2] run: free -m
[my_server2] out: total used free shared buffers cached
[my_server2] out: Mem: 1666 902 764 0 180 572
[my_server2] out: -/+ buffers/cache: 148 1517
[my_server2] out: Swap: 895 1 894
and we can deploy with:
$ fab deploy
Additional features include parallel execution, interaction with remote programs, and
host grouping. The examples in the Fabric documentation are easy to follow.
222 | Chapter 8: Code Management and Improvement

Luigi
Luigi is a pipeline management tool developed and released by Spotify. It helps devel‐
opers manage the entire pipeline of large, long-running batch jobs, stitching together
things such as Hive queries, database queries, Hadoop Java jobs, pySpark jobs, and
any tasks you want to write yourself. They don’t all have to be big data applications—
the API allows you to schedule anything. But Spotify made it to run their jobs over
Hadoop, so they provide all of these utilities already in luigi.contrib. Install it with
pip:
$ pip install luigi
It includes a web interface, so users can filter for their tasks and view dependency
graphs of the pipeline workflow and its progress. There are example Luigi tasks in
their GitHub repository, or see the Luigi documentation.
Speed
This chapter lists the Python community’s most common approaches to speed opti‐
mization. Table 8-1 shows your optimization options, after you’ve done the simple
things like profiling your code and comparing options for code snippets to first get all
of the performance you can directly from Python.
You may have already heard of the global interpreter lock (GIL)—it is how the C
implementation of Python allows multiple threads to operate at the same time.
Python’s memory management isn’t entirely thread-safe, so the GIL is required to
prevent multiple threads from running the same Python code at once.
The GIL is often cited as a limitation of Python, but it’s not really as big of a deal as it’s
made out to be—it’s only a hindrance when processes are CPU bound (in which case,
like with NumPy or the cryptography libraries discussed soon, the code is rewritten
in C and exposed with Python bindings). For anything else (like network I/O or file
I/O), the bottleneck is the code blocking in a single thread while waiting for the I/O.
You can solve blocking problems using threads or event-driven programming.
We should also note that in Python 2, there were slower and faster versions of libra‐
ries—StringIO and cStringIO, ElementTree and cElementTree. The C implementa‐
tions are faster, but had to be imported explicitly. Since Python 3.3, the regular
versions import from the faster implementation whenever possible, and the C-
prefixed libraries are deprecated.
Speed | 223

Table 8-1. Speed options
Option License Reasons to use
Threading PSFL • Allows you to create multiple execution threads.
• Threading (when using CPython, because of the GIL) does not use multiple processes;
the dierent threads switch when one is blocking, which is useful when your
bottleneck is some blocking task, like wating on I/O.
•There is no GIL in some other implementations of Python, like Jython and IronPython.
Multiprocessing/
subprocess PSFL • Tools in the multiprocessing library allow you to actually spawn other Python
processes, bypassing the GIL.
• And subprocess allows you to launch multiple command-line processes.
PyPy MIT license • It’s a Python interpreter (Python 2.7.10 or 3.2.5 right now) that provides just-in-time
compilation to C when possible.
•Eortless: no coding necessary, and it usually gives a good boost.
• It’s a drop-in replacement for CPython that usually works—any C libraries should use
the CFFI, or be on the PyPy compatibility list.
Cython Apache
license • It provides two ways to statically compile Python code: the rst choice is to use an
annotation language, Cython (*.pxd).
• The second choice is to statically compile pure Python and use Cython’s provided
decorators to specify object type.
Numba BSD license • It provides both a static (via its pycc tool) or a just-in-time runtime compiler to
machine code that uses NumPy arrays.
• It requires Python 2.7 or 3.4+, the llvmlite library, and its dependency, the LLVM (Low-
Level Virtual Machine) compiler infrastructure.
Weave BSD license • It provides a way to “weave” a few lines of C into Python, but only use it if you’re
already using Weave.
• Otherwise, use Cython—Weave is now deprecated.
PyCUDA/gnumpy/
TensorFlow/
Theano/PyOpenCL
MIT/
modied
BSD/BSD/
BSD/MIT
• These libraries provide dierent ways to use a NVIDIA GPU, provided you have one
installed, and can install NVIDIA’s CUDA toolchain.
• PyOpenCL can use processors other than NVIDIA’s use other processors
• They each have a dierent application—for example, gnumpy is intended to be a
drop-in replacement for NumPy.
Direct use of
C/C++ libraries — • The speed improvement is worth the extra time you’ll need to spend coding in C/C++.
224 | Chapter 8: Code Management and Improvement

6David Beazley has a great guide (PDF) that describes how the GIL operates. He also covers the new GIL (PDF)
in Python 3.2. His results show that maximizing performance in a Python application requires a strong
understanding of the GIL, how it affects your specific application, how many cores you have, and where your
application bottlenecks are.
7Here is a full derivation of the method. Basically you’re throwing darts at a 2 x 2 square, with a circle that has
radius = 1 inside. If the darts land with equal likelihood anywhere on the board, the percent that are in the
circle is equal to Pi / 4. Which means 4 times the percent in the circle is equal to Pi.
Jeff Knupp, author of Writing Idiomatic Python, wrote a blog post about getting
around the GIL, citing David Beazley’s deep look6 into the subject.
Threading and the other optimization options in Table 8-1 are discussed in more
detail in the following sections.
Threading
Python’s threading library allows you to create multiple threads. Because of the GIL
(at least in CPython), there will only be one Python process running per Python
interpreter, meaning there will only be a performance gain when at least one thread is
blocking (e.g., on I/O). The other option for I/O is to use event handling. For that, see
the paragraphs on asyncio in “Performance networking tools in Python’s Standard
Library” on page 247.
What happens in Python when you have multiple threads is the kernel notices that
one thread is blocking on I/O, and it switches to allow the next thread to use the pro‐
cessor until it blocks or is finished. All of this happens automatically when you start
your threads. There’s a good example use of threading on Stack Overflow, and the
Python Module of the Week series has a great threading introduction. Or see the
threading documentation in the Standard Library.
Multiprocessing
The multiprocessing module in Python’s Standard Library provides a way to bypass
the GIL—by launching additional Python interpreters. The separate processes can
communicate using a multiprocessing.Pipe, or by a multiprocessing.Queue, or
share memory via a multiprocessing.Array and multiprocessing.Value, which
implement locking automatically. Share data sparingly; these objects implement lock‐
ing to prevent simultaneous access by different processes.
Here’s an example to show that the speed gain from using a pool of worker processes
isn’t always proportional to the number of workers used. There’s a trade-off between
the computational time saved and the time it takes to launch another interpeter. The
example uses the Monte Carlo method (of drawing random numbers) to estimate the
value of Pi:7
Speed | 225

>>> import multiprocessing
>>> import random
>>> import timeit
>>>
>>> def calculate_pi(iterations):
... x = (random.random() for i in range(iterations))
... y = (random.random() for i in range(iterations))
... r_squared = [xi**2 + yi**2 for xi, yi in zip(x, y)]
... percent_coverage = sum([r <= 1 for r in r_squared]) / len(r_squared)
... return 4 * percent_coverage
...
>>>
>>> def run_pool(processes, total_iterations):
... with multiprocessing.Pool(processes) as pool:
... # Divide the total iterations among the processes.
... iterations = [total_iterations // processes] * processes
... result = pool.map(calculate_pi, iterations)
... print( "%0.4f" % (sum(result) / processes), end=', ')
...
>>>
>>> ten_million = 10000000
>>> timeit.timeit(lambda: run_pool(1, ten_million), number=10)
3.141, 3.142, 3.142, 3.141, 3.141, 3.142, 3.141, 3.141, 3.142, 3.142,
134.48382110201055
>>>
>>> timeit.timeit(lambda: run_pool(10, ten_million), number=10)
3.142, 3.142, 3.142, 3.142, 3.142, 3.142, 3.141, 3.142, 3.142, 3.141,
74.38514468498761
Using the multiprocessing.Pool within a context manager reinforces that the
pool should only be used by the process that creates it.
The total iterations will always be the same; they’ll just be divided between a dif‐
ferent number of processes.
pool.map() creates the multiple processes—one per item in the iterations list,
up to the maximum number stated when the pool was initialized (in multiproc
essing.Pool(processes)).
There is only one process for the first timeit trial.
10 repetitions of one single process running with 10 million iterations took 134
seconds.
There are 10 processes for the second timeit trial.
10 repetitions of 10 processes each running with one million iterations took 74
seconds.
226 | Chapter 8: Code Management and Improvement

The point of all this was that there is overhead in making the multiple processes, but
the tools for runing multiple processes in Python are robust and mature. See the mul‐
tiprocessing documentation in the Standard Library for more information, and check
out Jeff Knupp’s blog post about getting around the GIL, because it has a few para‐
graphs about multiprocessing.
Subprocess
The subprocess library was introduced into the Standard Library in Python 2.4 and
defined in PEP 324. It launches a system call (like unzip or curl) as if called from the
command line (by default, without calling the system shell), with the developer
selecting what to do with the subprocess’s input and output pipes. We recommend
Python 2 users get an updated version with some bugfixes from the subprocess32
package. Install it using pip:
$ pip install subprocess32
There is a great subprocess tutorial on the Python Module of the Week blog.
PyPy
PyPy is a pure-Python implementation of Python. It’s fast, and when it works, you
don’t have to do anything to your code, and it just runs faster for free. You should try
this option before anything else.
You can’t get it using pip, because it’s actually another implementation of Python.
Scroll through the PyPy downloads page for your correct version of Python and your
operating system.
Here is a slightly modified version of David Beazley’s CPU bound test code, with an
added loop for multiple tests. You can see the difference between PyPy and CPython.
First it’s run using the CPython:
$ # CPython
$ ./python -V
Python 2.7.1
$
$ ./python measure2.py
1.06774401665
1.45412397385
1.51485204697
1.54693889618
1.60109114647
And here is the same script, and the only thing different is the Python interpreter—
it’s running with PyPy:
$ # PyPy
$ ./pypy -V
Python 2.7.1 (7773f8fc4223, Nov 18 2011, 18:47:10)
Speed | 227

8It is possible for a language to both be strongly and dynamically typed, as described in this Stack Overflow
discussion.
[PyPy 1.7.0 with GCC 4.4.3]
$
$ ./pypy measure2.py
0.0683999061584
0.0483210086823
0.0388588905334
0.0440690517426
0.0695300102234
So, just by downloading PyPy, it went from an average of about 1.4 seconds to around
0.05 seconds—more than 20 times faster. Sometimes your code won’t even double in
speed, but other times you really do get a big boost. And with no effort outside of
downloading the PyPy interpreter. If you want your C library to be compatible with
PyPy, follow PyPy’s advice and use the CFFI instead of ctypes in the Standard Library.
Cython
Unfortunately, PyPy doesn’t work with all libraries that use C extensions. For those
cases, Cython (pronounced “PSI-thon”—not the same as CPython, the standard C
implementation of Python) implements a superset of the Python language that lets
you write C and C++ modules for Python. Cython also allows you to call functions
from compiled C libraries, and provides a context, nogil, that allows you to release
the GIL around a section of code, provided it does not manipulate Python objects in
any way. Using Cython allows you to take advantage of Python’s strong typing8 of
variables and operations.
Here’s an example of strong typing with Cython:
def primes(int kmax):
"""Calculation of prime numbers with additional Cython keywords"""
cdef int n, k, i
cdef int p[1000]
result = []
if kmax > 1000:
kmax = 1000
k = 0
n = 2
while k < kmax:
i = 0
while i < k and n % p[i] != 0:
i = i + 1
if i == k:
p[k] = n
k = k + 1
result.append(n)
228 | Chapter 8: Code Management and Improvement
n = n + 1
return result
This implementation of an algorithm to find prime numbers has some additional
keywords compared to the next one, which is implemented in pure Python:
def primes(kmax):
"""Calculation of prime numbers in standard Python syntax"""
p= range(1000)
result = []
if kmax > 1000:
kmax = 1000
k = 0
n = 2
while k < kmax:
i = 0
while i < k and n % p[i] != 0:
i = i + 1
if i == k:
p[k] = n
k = k + 1
result.append(n)
n = n + 1
return result
Notice that in the Cython version you declare integers and integer arrays to be com‐
piled into C types while also creating a Python list:
# Cython version
def primes(int kmax):
"""Calculation of prime numbers with additional Cython keywords"""
cdef int n, k, i
cdef int p[1000]
result = []
The type is declared to be an integer.
The upcoming variables n, k, and i are declared as integers.
And we then have preallocated a 1000-long array of integers for p.
What is the difference? In the Cython version, you can see the declaration of the vari‐
able types and the integer array in a similar way as in standard C. For example, the
addtional type declaration (of integer) in the cdef int n,k,i allows the Cython
compiler to generate more efficient C code than it could without type hints. Because
the syntax is incompatible with standard Python, it is not saved in *.py files—instead,
Cython code is saved in *.pyx files.
What’s the difference in speed? Let’s try it!
Speed | 229

import time
# activate pyx compiler
import pyximport
pyximport.install()
# primes implemented with Cython
import primesCy
# primes implemented with Python
import primes
print("Cython:")
t1 = time.time()
print primesCy.primes(500)
t2 = time.time()
print("Cython time: %s" %(t2-t1))
print("")
print("Python")
t1 = time.time()
print(primes.primes(500))
t2 = time.time()
print("Python time: {}".format(t2-t1))
The pyximport module allows you to import *.pyx files (e.g., primesCy.pyx) with
the Cython-compiled version of the primes function.
The pyximport.install() command allows the Python interpreter to start the
Cython compiler directly to generate C-code, which is automatically compiled to
a *.so C-library. Cython is then able to import this library for you in your Python
code, easily and efficiently.
With the time.time() function, you are able to compare the time between these
two different calls to find 500 prime numbers. On a standard notebook (dual-
core AMD E-450 1.6 GHz), the measured values are:
Cython time: 0.0054 seconds
Python time: 0.0566 seconds
And here the output of an embedded ARM BeagleBone machine:
Cython time: 0.0196 seconds
Python time: 0.3302 seconds
Numba
Numba is a NumPy-aware Python compiler (just-in-time [JIT] specializing compiler)
that compiles annotated Python (and NumPy) code to LLVM (Low-Level Virtual
Machine) through special decorators. Briefly, Numba uses LLVM to compile Python
down to machine code that can be natively executed at runtime.
230 | Chapter 8: Code Management and Improvement

If you use Anaconda, install Numba with conda install numba; if not, install it by
hand. You must already have NumPy and LLVM installed before installing Numba.
Check the LLVM version you need (it’s on the PyPI page for llvmlite), and download
that version from whichever place matches your OS:
•LLVM builds for Windows.
•LLVM builds for Debian/Ubuntu.
•LLVM builds for Fedora.
•For a discussion of how to build from source for other Unix systems, see “Build‐
ing the Clang + LLVM compilers”.
•On OS X, use brew install homebrew/versions/llvm37 (or whatever version
number is now current).
Once you have LLVM and NumPy, install Numba using pip. You may need to help
the installer find the llvm-cong file by providing an environment variable LLVM_CON
FIG with the appropriate path, like this:
$ LLVM_CONFIG=/path/to/llvm-config-3.7 pip install numba
Then, to use it in your code, just decorate your functions:
from numba import jit, int32
@jit
def f(x):
return x + 3
@jit(int32(int32, int32))
def g(x, y):
return x + y
With no arguments, the @jit decorator does lazy compilation—deciding itself
whether to optimize the function, and how.
For eager compilation, specify types. The function will be compiled with the given
specialization, and no other will be allowed—the return value and the two argu‐
ments will all have type numba.int32.
There is a nogil flag that can allow code to ignore the Global Interpreter Lock, and a
module numba.pycc that can be used to compile the code ahead of time. For more
information, see Numba’s user manual.
GPU libraries
Numba can optionally be built with capacity to run on the computer’s graphics pro‐
cessing unit (GPU), a chip optimized for the fast, parallel computation used in
Speed | 231

modern video games. You’ll need to have a NVIDIA GPU, with NVIDIA’s CUDA
Toolkit installed. Then follow the documentation for using Numba’s CUDA JIT with
the GPU.
Outside of Numba, the other popular library with GPU capability is TensorFlow,
released by Google under the Apache v2.0 license. It provides tensors (mutidimen‐
sional matrices) and a way to chain tensor operations together, for fast matrix math.
Currently it can only use the GPU on Linux operating systems. For installation
instructions, see the following pages:
•Installing TensorFlow with GPU support
•TensorFlow installation without GPU support
For those not on Linux, Theano, from the University of Montréal, was the de facto
matrix-math-over-GPU libary in Python until Google posted TensorFlow. Theano is
still under active development. It has a page dedicated to using the GPU. Theano sup‐
ports Windows, OS X, and Linux operating systems, and is available via pip:
$ pip install Theano
For lower-level interaction with the GPU, you can try PyCUDA.
Finally, people without a NVIDIA GPU can use PyOpenCL, a wrapper for Intel’s
OpenCL library, which is compatible with a number of different hardware sets.
Interfacing with C/C++/FORTRAN Libraries
Each of the libraries described in the following sections are very different: both CFFI
and ctypes are Python libraries, F2PY is for FORTRAN, SWIG can make C objects
available in multiple languages (not just Python), and Boost.Python is a C++ library
that can expose C++ objects to Python and vice versa. Table 8-2 goes into a little
more detail.
Table 8-2. C and C++ interfaces
Library License Reasons to use
CFFI MIT license • It provides the best compatibility with PyPy.
• It allows you to write C code from within Python that can be compiled to build a
shared C library with Python bindings.
ctypes Python Software
Foundation
license
• It’s in the Python Standard Library.
• It allows you to wrap existing DLLs or shared objects that you didn’t write or don’t
have control over.
• It provides the second-best compatibility with PyPy.
232 | Chapter 8: Code Management and Improvement

9Special care must be taken when writing C extensions to make sure you register your threads with the inter‐
preter.
Library License Reasons to use
F2PY BSD license • This lets you use a FORTRAN library.
• F2PY is a part of NumPy, so you should be using NumPy.
SWIG GPL
(output is not
restricted)
• It provides a way to autogenerate libraries in multiple languages, using a special le
format that is neither C nor Python.
Boost.Python Boost Software
license • It’s not a command-line tool; it’s a C++ library that can be included in the C++ code
and used to identify which objects to expose to Python.
C Foreign Function Interface
The CFFI package provides a simple mechanism to interface with C from both CPy‐
thon and PyPy. CFFI is recommended by PyPy for the best compatibility between
CPython and PyPy. It supports two modes: the inline application binary interface
(ABI) compatibility mode (see the following code example) allows you to dynami‐
cally load and run functions from executable modules (essentially exposing the same
functionality as LoadLibrary or dlopen), and an API mode, which allows you to build
C extension modules.9
Install it using pip:
$ pip install cffi
Here is an example with ABI interaction:
from cffi import FFI
ffi = FFI()
ffi.cdef("size_t strlen(const char*);")
clib = ffi.dlopen(None)
length = clib.strlen("String to be evaluated.")
# prints: 23
print("{}".format(length))
The string here could be lifted from a function declaration from a C header file.
Open the shared library (*.DLL or *.so).
Now we can treat clib as if it were a Python module and just call functions we
defined with dot notation.
Speed | 233

ctypes
ctypes is the de facto library for interfacing with C/C++ from CPython, and it’s in the
Standard Library. It provides full access to the native C interface of most major oper‐
ating systems (e.g., kernel32 on Windows, or libc on *nix), plus support for loading
and interfacing with dynamic libraries—shared objects (*.so) or DLLs—at runtime. It
brings along with it a whole host of types for interacting with system APIs and allows
you to easily define your own complex types, such as structs and unions, and allows
you to modify things like padding and alignment if needed. It can be a bit crufty to
use (because you have to type so many extra characters), but in conjunction with the
Standard Library’s struct module, you are essentially provided full control over how
your data types get translated into something usable by a pure C/C++ method.
For example, a C struct defined like this in a file named my_struct.h:
struct my_struct {
int a;
int b;
};
could be implemented as shown in a file named my_struct.py:
import ctypes
class my_struct(ctypes.Structure):
_fields_ = [("a", c_int),
("b", c_int)]
F2PY
The Fortran-to-Python interface generator (F2PY) is a part of NumPy, so to get it,
install NumPy using pip:
$ pip install numpy
It provides a versatile command-line function, f2py, that can be used three different
ways, all documented in the F2PY quickstart guide. If you have control over the
source code, you can add special comments with instructions for F2PY that clarify
the intent of each argument (which items are return values and which are inputs),
and then just run F2PY like this:
$ f2py -c fortran_code.f -m python_module_name
When you can’t do that, F2PY can generate an intermediate file with extension *.pyf
that you can modify, to then produce the same results. This would be three steps:
$ f2py fortran_code.f -m python_module_name -h interface_file.pyf
$ vim interface_file.pyf
$ f2py -c interface_file.pyf fortran_code.f
Autogenerate an intermediate file that defines the interface between the FOR‐
TRAN function signatures and the Python signatures.
234 | Chapter 8: Code Management and Improvement

Edit the file so that it correctly labels input and output variables.
Now compile the code and build the extension modules.
SWIG
The Simplified Wrapper Interface Generator (SWIG) supports a large number of
scripting languages, including Python. It’s a popular, widely used command-line tool
that generates bindings for interpreted languages from annotated C/C++ header files.
To use it, first use SWIG to autogenerate an intermediate file from the header—with
*.i suffix. Next, modify that file to reflect the actual interface you want, and then run
the build tool to compile the code into a shared library. All of this is done step by step
in the SWIG tutorial.
While it does have some limits (it currently seems to have issues with a small subset
of newer C++ features, and getting template-heavy code to work can be a bit ver‐
bose), SWIG provides a great deal of power and exposes lots of features to Python
with little effort. Additionally, you can easily extend the bindings SWIG creates (in
the interface file) to overload operators and built-in methods, and effectively re-cast
C++ exceptions to be catchable by Python.
Here is an example that shows how to overload __repr__. This excerpt would be
from a file named MyClass.h:
#include <string>
class MyClass {
private:
std::string name;
public:
std::string getName();
};
And here is myclass.i :
%include "string.i"
%module myclass
%{
#include <string>
#include "MyClass.h"
%}
%extend MyClass {
std::string __repr__()
{
return $self->getName();
}
}
%include "MyClass.h"
Speed | 235

There are more Python examples in the SWIG GitHub repository. Install SWIG using
your package manager, if it’s there (apt-get install swig, yum install
swig.i386, or brew install swig), or else use this link to download SWIG, then fol‐
low the installation instructions for your operating system. If you’re missing the Perl
Compatible Regular Expressions (PCRE) library in OS X, use Homebrew to install it:
$ brew install pcre
Boost.Python
Boost.Python requires a bit more manual work to expose C++ object functionality,
but it is capable of providing all the same features SWIG does and then some—for
example, wrappers to access Python objects as PyObjects in C++, as well as the tools
to expose C++ objects to Python. Unlike SWIG, Boost.Python is a library, not a
command-line tool, and there is no need to create an intermediate file with different
formatting—it’s all written directly in C++. Boost.Python has an extensive, detailed
tutorial if you wish to go this route.
236 | Chapter 8: Code Management and Improvement

1The TCP/IP (or Internet Protocol) suite has four conceptual parts: Link layer protocols specify how to get
information between a computer and the Internet. Within the computer, they’re the responsibility of network
cards and the operating system, not of the Python program. Internet layer protocols (IPv4, IPv6, etc.) govern
the delivery of packages of bits from a source to a destination—the standard options are in Python’s socket
library. Transport layer protocols (TCP, UDP, etc.) specify how the two endpoints will communicate. The
options are also in the socket library. Finally, application layer protocols (FTP, HTTP, etc.) specify what the
data should look like to be used by an intended application (e.g., FTP is used for file transfer, and HTTP is
used for hypertext transfer)—Python’s Standard Library provides separate modules implementing the most
common protocols.
CHAPTER 9
Software Interfaces
This chapter will first show you how to use Python to get information from APIs that
are used now to share data between organizations, and then highlight the tools that
most Python-powered organizations would use to support communication within
their own infrastructure.
We already discussed Python’s support for pipes and queues across processes in “Mul‐
tiprocessing” on page 225. Communicating between computers requires the comput‐
ers at both ends of the conversation use a defined set of protocols—the Internet
adheres to the TCP/IP suite.1 You can implement UDP yourself over sockets, Python
provides a library called ssl for TLS/SSL wrappers over sockets, and asyncio to imple‐
ment asynchronous transports for TCP, UDP, TLS/SSL, and subprocess pipes.
But most of us will be using the higher-level libraries that provide clients implement‐
ing various application-level protocols: ftplib, poplib, imaplib, nntplib, smtplib,
telnetlib, and xmlrpc. All of them provide classes for both regular and TLS/SSL
wrapped clients (and urllib exists for HTTP requests, but recommends the Requests
library for most uses).
237

The first section in this chapter covers HTTP requests—how to get data from public
APIs on the Web. Next is a brief aside about serialization in Python, and the third
section describes popular tools used in enterprise-level networking. We’ll try to
explicitly say when something is only available in Python 3. If you’re using Python 2
and can’t find a module or class we’re talking about, we recommend checking this list
of changes between the Python 2 and Python 3 Standard Libraries.
Web Clients
The Hypertext Transfer Protocol (HTTP) is an application protocol for distributed,
collaborative, hypermedia information systems and is the foundation of data commu‐
nication for the World Wide Web. We’re focusing this entire section on how to get
data from the Web using the Requests library.
Python’s standard urllib module provides most of the HTTP capabilities you need,
but at a low level, that requires quite a bit of work to perform seemingly simple tasks
(like getting data from an HTTPS server that requires authentication). The documen‐
tation for the urllib.request module actually says to use the Requests library
instead.
Requests takes all of the work out of Python HTTP requests—making your integra‐
tion with web services seamless. There’s no need to manually add query strings to
your URLs, or to form-encode your POST data. Keep-alive (persistent HTTP connec‐
tions) and HTTP connection pooling are available through the request.ses
sions.Session class, powered by urllib3, which is embedded within Requests
(meaning you don’t need to install it separately). Get it using pip:
$ pip install requests
The Requests documentation goes into more detail than what we’ll cover next.
Web APIs
Nearly everybody, from the US Census to the Dutch National Library, has an API
that you can use to get the data they want to share; and some, like Twitter and Face‐
book, allow you (or the apps you use) to also modify that data. You may hear the term
RESTful API. REST stands for representational state transfer—it is a paradigm that
informed how HTTP 1.1 was designed, but is not a standard, protocol, or require‐
ment. Still, most web service API providers follow the RESTful design principles.
We’ll use some code to illustrate common terms:
import requests
result = requests.get('http://pypi.python.org/pypi/requests/json')
238 | Chapter 9: Software Interfaces

The method is part of the HTTP protocol. In a RESTful API, the API designer
chooses what action the server will take, and tells you in their API documenta‐
tion. Here is a list of all of the methods, but the ones commonly available in
RESTful APIs are GET, POST, PUT, and DELETE. Usually, these “HTTP verbs” do
what their meaning implies, getting data, changing data, or deleting it.
The base URI is the root of the API.
Clients would specify a specific element they want data on.
And there may be an option for different media types.
That code actually performed an HTTP request to http://pypi.python.org/pypi/
requests/json, which is the JSON backend for PyPI. If you look at it in your browser,
you will see a large JSON string. In Requests, the return value of an HTTP request is a
Response object:
>>> import requests
>>> response = requests.get('http://pypi.python.org/pypi/requests/json')
>>> type(response)
<class 'requests.models.Response'>
>>> response.ok
True
>>> response.text # This gives all of the text of the response
>>> response.json() # This converts the text response into a dictionary
PyPI gave us the text in JSON format. There isn’t a rule about the format to send data
in, but many APIs use JSON or XML.
JSON parsing
Javascript Object Notation (JSON) is exactly what it says—the notation used to define
objects in JavaScript. The Requests library has built a JSON parser into its Response
object.
The json library can parse JSON from strings or files into a Python dictionary (or list,
as appropriate). It can also convert Python dictionaries or lists into JSON strings. For
example, the following string contains JSON data:
json_string = '{"first_name": "Guido", "last_name":"van Rossum"}'
It can be parsed like this:
import json
parsed_json = json.loads(json_string)
and can now be used as a normal dictionary:
print(parsed_json['first_name'])
"Guido"
Web Clients | 239

You can also convert the following to JSON:
d = {
'first_name': 'Guido',
'last_name': 'van Rossum',
'titles': ['BDFL', 'Developer'],
}
print(json.dumps(d))
'{"first_name": "Guido", "last_name": "van Rossum",
"titles": ["BDFL", "Developer"]}'
simplejson for Earlier Versions of Python
The json library was added to Python 2.6. If you’re using an earlier version of Python,
the simplejson library is available via PyPI.
simplejson provides the same API as the json module in Python’s Standard Library
but is updated more frequently than Python is. Also, developers who use older ver‐
sions of Python can still use the features available in the json library by importing
simplejson. You can use simplejson as a drop-in replacement for json like this:
import simplejson as json
After importing simplejson as json, the preceding examples will all work as if you
were using the standard json library.
XML parsing
There is an XML parser in the Standard Library (xml.etree.ElementTree’s parse()
and fromstring() methods), but this uses the Expat library and creates an Element
Tree object that preserves the structure of the XML, meaning we have to iterate down
it and look into its children to get content. When all you want is to get the data, try
either untangle or xmltodict. You can get both using pip:
$ pip install untangle
$ pip install xmltodict
untangle
untangle takes an XML document and returns a Python object whose structure
mirrors the nodes and attributes. For example, an XML file like this:
<?xml version="1.0" encoding="UTF-8"?>
<root>
<child name="child1" />
</root>
can be loaded like this:
240 | Chapter 9: Software Interfaces

import untangle
obj = untangle.parse('path/to/file.xml')
and then you can get the child element’s name like this:
obj.root.child['name'] # is 'child1'
xmltodict
xmltodict converts the XML to a dictionary. For example, an XML file like this:
<mydocument has="an attribute">
<and>
<many>elements</many>
<many>more elements</many>
</and>
<plus a="complex">
element as well
</plus>
</mydocument>
can be loaded into an OrderedDict instance (from the collections module in
Python’s Standard Library) like this:
import xmltodict
with open('path/to/file.xml') as fd:
doc = xmltodict.parse(fd.read())
and then you can access elements, attributes, and values like this:
doc['mydocument']['@has'] # is u'an attribute'
doc['mydocument']['and']['many'] # is [u'elements', u'more elements']
doc['mydocument']['plus']['@a'] # is u'complex'
doc['mydocument']['plus']['#text'] # is u'element as well'
With xmltodict, you can also roundtrip the dictionary back to XML with the
unparse() function. It has a streaming mode suitable for handling files that don’t
fit in memory, and it supports namespaces.
Web scraping
Websites don’t always provide their data in comfortable formats such as CSV or
JSON, but HTML is also structured data—this is where web scraping comes in.
Web scraping is the practice of using a computer program to sift through a web page
and gather the data that you need in a format most useful to you while at the same
time preserving the structure of the data.
Web Clients | 241
More and more now, as sites offer APIs, they explicitly request you
to not scrape their data—the API presents the data they are willing
to share, and that’s it. Before getting started, check around the web‐
site you’re looking at for a Terms of Use statement, and be a good
citizen of the Web.
lxml
lxml is a pretty extensive library written for parsing XML and HTML documents very
quickly, even handling some amount of incorrectly formatted markup in the process.
Get it using pip:
$ pip install lxml
Use requests.get to retrieve the web page with our data, parse it using the html
module, and save the results in tree:
from lxml import html
import requests
page = requests.get('http://econpy.pythonanywhere.com/ex/001.html')
tree = html.fromstring(page.content)
This is a real web page, and the data we show are real—you can visit the page in
your browser.
We use page.content rather than page.text because html.fromstring()
implicitly expects bytes as input.
Now, tree contains the whole HTML file in a nice tree structure that we can go over
in two different ways: XPath or CSSSelect. They are both standard ways to specify a
path through an HTML tree, defined and maintained by the World Wide Web Con‐
sortium (W3C), and implemented as modules in lxml. In this example, we will use
XPath. A good introduction is W3Schools XPath tutorial.
There are also various tools for obtaining the XPath of elements from inside your web
browser, such as Firebug for Firefox or the Chrome Inspector. If you’re using
Chrome, you can right-click an element, choose “Inspect element”, highlight the code,
right-click again and choose “Copy XPath”.
After a quick analysis, we see that in our page the data is contained in two elements—
one is a div with title buyer-name, and the other is a span with the class item-price:
<div title="buyer-name">Carson Busses</div>
<span class="item-price">$29.95</span>
Knowing this, we can create the correct XPath query and use lxml’s xpath function
like this:
242 | Chapter 9: Software Interfaces

# This will create a list of buyers:
buyers = tree.xpath('//div[@title="buyer-name"]/text()')
# This will create a list of prices
prices = tree.xpath('//span[@class="item-price"]/text()')
Let’s see what we got exactly:
>>> print('Buyers: ', buyers)
Buyers: ['Carson Busses', 'Earl E. Byrd', 'Patty Cakes',
'Derri Anne Connecticut', 'Moe Dess', 'Leda Doggslife', 'Dan Druff',
'Al Fresco', 'Ido Hoe', 'Howie Kisses', 'Len Lease', 'Phil Meup',
'Ira Pent', 'Ben D. Rules', 'Ave Sectomy', 'Gary Shattire',
'Bobbi Soks', 'Sheila Takya', 'Rose Tattoo', 'Moe Tell']
>>>
>>> print('Prices: ', prices)
Prices: ['$29.95', '$8.37', '$15.26', '$19.25', '$19.25',
'$13.99', '$31.57', '$8.49', '$14.47', '$15.86', '$11.11',
'$15.98', '$16.27', '$7.50', '$50.85', '$14.26', '$5.68',
'$15.00', '$114.07', '$10.09']
Data Serialization
Data serialization is the concept of converting structured data into a format that
allows it to be shared or stored—retaining the information necessary to reconstruct
the object in memory at the receiving end of the transmission (or upon read from
storage). In some cases, the secondary intent of data serialization is to minimize the
size of the serialized data, which then minimizes disk space or bandwidth require‐
ments.
The sections that follow cover the Pickle format, which is specific to Python, some
cross-language serialization tools, compression options in Python’s Standard Library,
and Python’s buffer protocol, which can reduce the number of times an object is
copied before transmission.
Pickle
The native data serialization module for Python is called Pickle. Here’s an example:
import pickle
# Here's an example dict
grades = { 'Alice': 89, 'Bob': 72, 'Charles': 87 }
# Use dumps to convert the object to a serialized string
serial_grades = pickle.dumps( grades )
# Use loads to de-serialize an object
received_grades = pickle.loads( serial_grades )
Some things cannot be pickled—functions, methods, classes, and ephemeral things
like pipes.
Data Serialization | 243

According to Python’s Pickle documentation, “The pickle module
is not secure against erroneous or maliciously constructed data.
Never unpickle data received from an untrusted or unauthenticated
source.”
Cross-language serialization
If you’re looking for a serialization module that has support in multiple languages,
two popular options are Google’s Protobuf and Apache’s Avro.
Also, Python’s Standard Library includes xdrlib to pack and unpack Sun’s External
Data Representation (XDR) format, which is independent of operating system and
transport protocol. It’s much lower level than the preceding options and just concate‐
nates packed bytes together, so both the client and server must know the type and
order of packing. Here’s an example of what a server receiving data in XDR format
could look like:
import socketserver
import xdrlib
class XdrHandler(socketserver.BaseRequestHandler):
def handle(self):
data = self.request.recv(4)
unpacker = xdrlib.Unpacker(data)
message_size = self.unpacker.unpack_uint()
data = self.request.recv(message_size)
unpacker.reset(data)
print(unpacker.unpack_string())
print(unpacker.unpack_float())
self.request.sendall(b'ok')
server = socketserver.TCPServer(('localhost', 12345), XdrHandler)
server.serve_forever()
The data could be of variable length, so we added a packed unsigned integer (4
bytes) with the message size first.
We had to already know we were receiving an unsigned int.
Read the rest of the message on this line first,…
…and on the next line, reset the unpacker with the new data.
We must know a priori that we’ll receive one string and then one float.
Of course, if both sides were actually Python programs, you’d be using Pickles. But if
the server was from something totally different, this would be the corresponding
code for a client sending the data:
244 | Chapter 9: Software Interfaces
import socket
import xdrlib
p = xdrlib.Packer()
p.pack_string('Thanks for all the fish!')
p.pack_float(42.00)
xdr_data = p.get_buffer()
message_length = len(xdr_data)
p.reset()
p.pack_uint(message_length)
len_plus_data = p.get_buffer() + xdr_data
with socket.socket() as s:
s.connect(('localhost', 12345))
s.sendall(len_plus_data)
if s.recv(1024):
print('success')
Pack all of the data to be sent first.
Next, pack the message length separately…
…and prepend it to the whole message.
Compression
Python’s Standard Library also contain support for data compression and decompres‐
sion using the zlib, gzip, bzip2, and lzma algorithms, and the creation of ZIP- and tar-
format archives. To zip a Pickle, for example:
import pickle
import gzip
data = "my very big object"
# To zip and pickle:
with gzip.open('spam.zip', 'wb') as my_zip:
pickle.dump(data, my_zip)
# And to unzip and unpickle:
with gzip.open('spam.zip', 'rb') as my_zip:
unpickled_data = pickle.load(my_zip)
The buer protocol
Eli Bendersky, one of Python’s core developers, wrote a blog post about reducing the
number of in-memory copies Python makes of the same data by using memory buf‐
fers. With his technique, you can even read from a file or socket into an existing
buffer. For more information, see Python’s buffer protocol documentation and
Data Serialization | 245

PEP 3118, which suggested enhancements that were implemented in Python 3 and
backported to Python 2.6 and above.
Distributed Systems
Distributed computer systems collectively accomplish a task (like game play, or an
Internet chat room, or a Hadoop calculation) by passing information to each other.
This section first lists our most popular libraries for common networking tasks, and
then discusses cryptography, which comes hand in hand with this kind of communi‐
cation.
Networking
In Python, communication for connected networks is usually handled with asynchro‐
nous tools or threads, to get around the single-thread limitation of the Global Inter‐
preter Lock. All of the libraries in Table 9-1 solve the same problem—getting around
the GIL—with different numbers and with varying amounts of additional features.
Table 9-1. Networking
Library License Reasons to use
asyncio PSF license • Provides an asynchronous event loop to manage communication with nonblocking sockets and
queues, as well as any user-dened coroutines.
• Also includes asynchronous sockets and queues.
gevent MIT license • Is tightly coupled with libev, the C library for asynchronous I/O.
• Provides a fast WSGI server built on libev’s HTTP server.
• It also has this great gevent.monkey module that has patching functions for the standard
library, so third-party modules written with blocking sockets can still be used with gevent.
Twisted MIT license • Provides asynchronous implementations of newer protocols—for example, GPS, Internet of
Connected Products (IoCP), and a Memcached protocol.
• It has integrated its event loop with various other event-driven frameworks, like wxPython or GTK.
• It also has a built in SSH server and client tools.
PyZMQ LGPL
(ZMQ) and
BSD
(Python
part)
license
• Lets you set up and interface with nonblocking message queues using a socket-style API.
• It provides socket behaviors (request/response, publish/subscribe, and push/pull) that support
distributed computing.
• Use this when you want to build your own communication infrastructure; it has “Q” in its name,
but is not like RabbitMQ—it could be used to build something like RabbitMQ, or something with a
totally dierent behavior (depending on the socket patterns chosen).
246 | Chapter 9: Software Interfaces

2A socket is three things: an IP address including port, a transport protocol (like TCP / UDP), and an I/O
channel (some sort of file-like object). The Python documentation includes a great intro to sockets.
3The queue doesn’t require an IP address or protocol, as it’s on the same computer—you just write some data
to it and another process can read it. It’s like the multiprocessing.Queue, but here the I/O is done asynchro‐
nously.
Library License Reasons to use
pika BSD license • Provides a lightweight AMQP (communication protocol) client to connect with RabbitMQ or other
message brokers.
• Also includes adapters for use in Tornado or Twisted event loops.
• Use this with a message broker like RabbitMQ when you want a lighter weight library (no web
dashboard or other bells and whistles) that lets you push content to an external message broker
like RabbitMQ.
Celery BSD license • Provides an AMQP client to connect with RabbitMQ or other message brokers.
• Also has an option to store task states in a backend that can use dierent popular options like a
database connection via SQLAlchemy, Memcached, or others.
• Also has an optional web administration and monitoring tool called Flower.
• Can be used with a message broker like RabbitMQ for an out-of-the-box message broker system.
Performance networking tools in Python’s Standard Library
asyncio was introduced in Python 3.4 and includes ideas learned from the developer
communities, like those maintaining Twisted and gevent. It’s a concurrency tool, and
a frequent application of concurrency is for network servers. Python’s own documen‐
tation for asyncore (a predecessor to asyncio), states:
There are only two ways to have a program on a single processor do “more than one
thing at a time.” Multi-threaded programming is the simplest and most popular way to
do it, but there is another very different technique, that lets you have nearly all the
advantages of multi-threading, without actually using multiple threads. It’s really only
practical if your program is largely I/O bound. If your program is processor bound,
then pre-emptive scheduled threads are probably what you really need. Network
servers are rarely processor bound, however.
asyncio is still only in the Python Standard Library on a provisional basis—the API
may change in backward-incompatible ways—so don’t get too attached.
Not all of it is new—asyncore (deprecated in Python 3.4) has an event loop, asynchro‐
nous sockets2 and asynchronous file I/O, and asynchat (also deprecated in
Python 3.4) had asynchronous queues.3 The big thing asyncio adds is a formalized
implementation of coroutines. In Python, this is formally defined as both a coroutine
function—a function definition beginning with async def rather than just def (or
Distributed Systems | 247

uses the older syntax, and is decorated with @asyncio.coroutine)—and also the
object obtained by calling a coroutine function (which is usually some sort of compu‐
tation or I/O operation). The coroutine can yield the processor and thus be able to
participate in an asynchronous event loop, taking turns with other coroutines.
The documentation has pages and pages of detailed examples to help the community,
as it’s a new concept for the language. It’s clear, thorough, and very much worth
checking out. In this interactive session, we just want to show the functions for the
event loop and some of the classes available:
>>> import asyncio
>>>
>>> [l for l in asyncio.__all__ if 'loop' in l]
['get_event_loop_policy', 'set_event_loop_policy',
'get_event_loop', 'set_event_loop', 'new_event_loop']
>>>
>>> [t for t in asyncio.__all__ if t.endswith('Transport')]
['BaseTransport', 'ReadTransport', 'WriteTransport', 'Transport',
'DatagramTransport', 'SubprocessTransport']
>>>
>>> [p for p in asyncio.__all__ if p.endswith('Protocol')]
['BaseProtocol', 'Protocol', 'DatagramProtocol',
'SubprocessProtocol', 'StreamReaderProtocol']
>>>
>>> [q for q in asyncio.__all__ if 'Queue' in q]
['Queue', 'PriorityQueue', 'LifoQueue', 'JoinableQueue',
'QueueFull', 'QueueEmpty']
gevent
gevent is a coroutine-based Python networking library that uses greenlets to provide
a high-level synchronous API on top of the C library libev event loop. Greenlets are
based on the greenlet library—miniature green threads (or user-level threads, as
opposed to threads controlled by the kernel) that the developer has the freedom to
explicitly suspend, jumping between greenlets. For a great deep dive into gevent,
check out Kavya Joshi’s seminar “A Tale of Concurrency Through Creativity in
Python.”
People use gevent because it is lightweight and tightly coupled to its underlying C
library, libev, for high performance. If you like the idea of integrating asynchronous
I/O and greenlets, this is the library to use. Get it using pip:
$ pip install gevent
Here’s an example from the greenlet documentation:
>>> import gevent
>>>
>>> from gevent import socket
>>> urls = ['www.google.com', 'www.example.com', 'www.python.org']
248 | Chapter 9: Software Interfaces

>>> jobs = [gevent.spawn(socket.gethostbyname, url) for url in urls]
>>> gevent.joinall(jobs, timeout=2)
>>> [job.value for job in jobs]
['74.125.79.106', '208.77.188.166', '82.94.164.162']
The documentation offers many more examples.
Twisted
Twisted is an event-driven networking engine. It can be used to build applications
around many different networking protocols, including HTTP servers and clients,
applications using SMTP, POP3, IMAP or SSH protocols, instant messaging and
much more. Install it using pip:
$ pip install twisted
Twisted has been around since 2002 and has a loyal community. It’s like the Emacs of
coroutine libraries—with everything built in—because all of these things have to be
asynchronous to work together. Probably the most useful tools are an asynchronous
wrapper for database connections (in twisted.enterprise.adbapi), a DNS server
(in twisted.names), direct access to packets (in twisted.pair), and additional pro‐
tocols like AMP, GPS, and SOCKSv4 (in twisted.protocols). Most of Twisted now
works with Python 3—when you pip install in a Python 3 environment, you’ll get
get everything that’s currently been ported. If you find something you wanted in the
API that’s not in your Twisted, you should still use Python 2.7.
For more information, consult Jessica McKellar and Abe Fettig’s Twisted (O’Reilly). In
addition, this webpage shows over 42 Twisted examples, and this one shows their lat‐
est speed performance.
PyZMQ
PyZMQ is the Python binding for ZeroMQ. You can get it using pip:
$ pip install pyzmq
ØMQ (also spelled ZeroMQ, 0MQ, or ZMQ) describes itself as a messaging library
designed to have a familiar socket-style API, and aimed at use in scalable distributed
or concurrent applications. Basically, it implements asynchronous sockets with
queues attached and provides a custom list of socket “types” that determine how the
I/O on each socket behaves. Here’s an example:
import zmq
context = zmq.Context()
server = context.socket(zmq.REP)
server.bind('tcp://127.0.0.1:5000')
while True:
message = server.recv().decode('utf-8')
print('Client said: {}'.format(message))
Distributed Systems | 249
server.send(bytes('I don't know.', 'utf-8'))
# ~~~~~ and in another file ~~~~~
import zmq
context = zmq.Context()
client = context.socket(zmq.REQ)
client.connect('tcp://127.0.0.1:5000')
client.send(bytes("What's for lunch?", 'utf-8'))
response = client.recv().decode('utf-8')
print('Server replied: {}'.format(response))
The socket type zmq.REP corresponds to their “request-response” paradigm.
Like with normal sockets, you bind the server to an IP and port.
The client type is zmq.REQ—that’s all, ZMQ defines a number of these as con‐
stants: zmq.REQ, zmq.REP, zmq.PUB, zmq.SUB, zmq.PUSH, zmq.PULL,
zmq.PAIR. They determine how the socket’s sending and receiving behaves.
As usual, the client connects to the server’s bound IP and port.
So, these look and quack like sockets, enhanced with queues and various I/O patterns.
The point of the patterns is to provide the building blocks for a distributed network.
The basic patterns for the socket types are:
request-reply
zmq.REQ and zmq.REP connect a set of clients to a set of services. This can be for a
remote procedure call pattern or a task distribution pattern.
publish-subscribe
zmq.PUB and zmq.SUB connect a set of publishers to a set of subscribers. This is a
data distribution pattern—one node is distributing data to other nodes, or this
can be chained to fan out into a distribution tree.
push-pull (or pipeline)
zmq.PUSH and zmq.PULL connect nodes in a fan-out/fan-in pattern that can have
multiple steps, and loops. This is a parallel task distribution and collection pat‐
tern.
One great advantage of ZeroMQ over message-oriented middleware is that it can be
used for message queuing without a dedicated message broker. PyZMQ’s documenta‐
tion notes some enhancements they added, like tunneling via SSH. The rest of the
documentation for the ZeroMQ API is better on the main ZeroMQ guide.
250 | Chapter 9: Software Interfaces

4The birth of the cryptography library, and some of the backstory for the motivation behind this new effort, is
described in Jake Edge’s blog post “The state of crypto in Python.” The cryptography library it describes is a
lower-level library, intended to be imported by higher-level libraries like pyOpenSSL that most of us would
use. Edge quotes Jarret Raim and Paul Kehrer’s talk about the State of Crypto in Python, saying their test suite
has over 66,000 tests, run 77 times per build.
RabbitMQ
RabbitMQ is an open source message broker software that implements the Advanced
Message Queuing Protocol (AMQP). A message broker is an intermediary program
that receives messages from senders and sends them to receivers according to a pro‐
tocol. Any client that also implements AMQP can communicate with RabbitMQ. To
get RabbitMQ, go to the RabbitMQ download page, and follow the instructions for
your operating system.
Client libraries that interface with the broker are available for all major programming
languages. The top two for Python are pika and Celery—either can be installed with
pip:
$ pip install pika
$ pip install celery
pikapika is a lightweight, pure-Python AMQP 0-9-1 client, preferred by RabbitMQ.
RabbitMQ’s introductory tutorials for Python use pika. There’s also an entire
page of examples to learn from. We recommend playing with pika when you first
set up RabbitMQ, regardless of your final library choice, because it is straightfor‐
ward without the extra features and so crystallizes the concepts.
Celery
Celery is a much more featureful AMQP client—it can use either RabbitMQ or
Redis (a distributed in-memory data store) as a message broker, can track the
tasks and results (and optionally store them in a user-selected backend), and has
a web administration tool/task monitor, Flower. It is popular in the web develop‐
ment community, and there are integration packages for Django, Pyramid,
Pylons, web2py, and Tornado (Flask doesn’t need one). Start with the Celery
tutorial.
Cryptography
In 2013, the Python Cryptographic Authority (PyCA) was formed. They are a group
of developers all interested in providing high-quality cryptography libraries to the
Python community.4 They provide tools to encrypt and decrypt messages given the
appropriate keys, and cryptographic hash functions to irreversibly but repeatably
obfuscate passwords or other secret data.
Cryptography | 251

Except for pyCrypto, all of the libraries in Table 9-2 are maintained by the PyCA.
Almost all are built on the C library OpenSSL, except when noted.
Table 9-2. Cryptography options
Option License Reason to use
ssl and hashlib
(and in Python 3.6, secrets) Python Software Foundation
license • Hashlib provides a decent password hashing algorithm,
updated at the schedule of Python versions, and ssl provides
an SSL/TLS client (and server, but it may not have the latest
updates).
• Secrets is a random number generator suitable for
cryptographic uses.
pyOpenSSL Apache v2.0 license • It uses the most up-to-date version of OpenSSL in Python and
provides functions in OpenSSL that aren’t exposed by the
Standard Library’s ssl module.
PyNaCl Apache v2.0 license • It contains Python bindings for libsodium.a
libnacl Apache license • It’s the Python interface to libsodium for people who are
using the Salt Stack.
cryptography Apache v2.0 license
or BSD license • It provides direct access to cryptographic primitives built on
OpenSSL. The higher-level pyOpenSSL is what most of us
would use.
pyCrypto Public Domain • This library is older, and built using its own C library, but was
in the past the most popular cryptography library in Python.
bcrypt Apache v2.0 license • It provides the bcrypt hash function,b and is useful for
people who want that or have previously used py-bcrypt.
a libsodium is a fork of the Networking and Cryptography library (NaCl, pronounced “salt”); its philosophy is to curate specic
algorithms that are performant and easy to use.
b The library actually contains the C source code and builds it on installation using the C Fast Function Interface we described
earlier. Bcrypt is based on the Blowsh encryption algorithm.
The following sections provide additional details about the libraries listed in
Table 9-2.
ssl, hashlib, and secrets
The ssl module in Python’s Standard Library provides a socket API (ssl.socket) that
behaves like a standard socket, but is wrapped by the SSL protocol, plus ssl.SSLCon
text, which contains an SSL connection’s configurations. And http (or httplib in
252 | Chapter 9: Software Interfaces

Python 2) also uses it for HTTPS support. If you’re using Python 3.5, you also have
memory BIO support—so the socket writes I/O to a buffer instead of its destination,
enabling things like hooks for hex encoding/decoding before write/upon read.
Major security enhancements happened in Python 3.4—detailed in the release notes
—to support newer transport protocols and hash algorithms. These issues were so
important that they were backported to Python 2.7 as described in PEP 466 and
PEP 476. You can learn all about them in Benjamin Peterson’s talk about the state of
ssl in Python.
If you’re using Python 2.7, be sure you have at least 2.7.9, or that
your version at least has incorporated PEP 476—so that by default
HTTP clients will perform certificate verification when connecting
using the https protocol. Or, just always use Requests because that
has always been its default.
The Python team recommends using the SSL defaults if you have no special require‐
ments for your security policy for client use. This example showing a secure mail cli‐
ent is from the section within the documentation for the ssl library, “Security
considerations,” which you should read if you’re going to use the library:
>>> import ssl, smtplib
>>> smtp = smtplib.SMTP("mail.python.org", port=587)
>>> context = ssl.create_default_context()
>>> smtp.starttls(context=context)
(220, b'2.0.0 Ready to start TLS')
To confirm that a message didn’t get corrupted during transmission, use the hmac
module, which implements the Keyed-Hashing for Message Authentication (HMAC)
algorithm described in RFC 2104. It works with a message hashed with any of the
algorithms in the set hashlib.algorithms_available. For more, see the Python
Module of the Week’s hmac example. And if it’s installed, hmac.compare_digest()
provides a constant-time comparison between digests to help protect against timing
attacks—where the attacker attempts to infer your algorithm from the time it takes to
run the digest comparison.
Python’s hashlib module can be used to generate hashed passwords for secure storage
or checksums to confirm data integrity during transmission. The Password-Based
Key Derivation Function 2 (PBKDF2), recommended in NIST Special Publication
800-132, is currently considered one of the best options for password hashing. Here’s
Cryptography | 253

5A salt is a random string that further obfuscates the hash; if everyone used the same algorithm, a nefarious
actor could generate a lookup table of common passwords and their hashes, and use them to “decode” stolen
password files. So, to thwart this, people append a random string (a “salt”) to the password—they just also
have to store that random string for future use.
6Anybody can join the PyCA’s cryptography-dev listserv to keep up with development and other news…and
the OpenSSL listserv for OpenSSL news.
an example use of the function using a salt5 and 10,000 iterations of the Secure Hash
Algorithm 256-bit hash (SHA-256) to generate a hashed password (the choices for
different hash algorithms or iterations let the programmer balance robustness with a
desired response speed):
import os
import hashlib
def hash_password(password, salt_len=16, iterations=10000, encoding='utf-8'):
salt = os.urandom(salt_len)
hashed_password = hashlib.pbkdf2_hmac(
hash_name='sha256',
password=bytes(password, encoding),
salt=salt,
iterations=iterations
)
return salt, iterations, hashed_password
The secrets library was proposed in PEP 506 and will be available starting with
Python 3.6. It provides functions for generating secure tokens, suitable for applica‐
tions such as password resets and hard-to-guess URLs. Its documentation contains
examples and best-practice recommendations to manage a basic level of security.
pyOpenSSL
When Cryptography came out, pyOpenSSL updated its bindings to use Cryptogra‐
phy’s CFFI-based bindings for the OpenSSL library and joined the PyCA umbrella.
pyOpenSSL is separate from the Python Standard Library on purpose so that it can
release updates at the speed of the security community6—it’s built on the newest
OpenSSL, and not, like Python is, built on the OpenSSL that comes with your operat‐
ing system (unless you build it yourself against a newer version). Generally if you’re
building a server, you’d want to use pyOpenSSL—see Twisted’s SSL documentation
for an example of how they use pyOpenSSL.
Install it using pip:
$ pip install pyOpenSSL
and import it with the name OpenSSL. This example shows a couple of the functions
available:
254 | Chapter 9: Software Interfaces

7If you’re paranoid, want to be able to audit 100% of your crypto code, don’t care that it’s a tad slow, and aren’t
so interested in having the most current algorithms and defaults, try TweetNaCl, which is a single file crypto
library that fits in 100 tweets. Because PyNaCl bundles libsodium in its release, you can probably just drop in
TweetNaCl and still run most everything (however, we didn’t try this option).
>>> import OpenSSL
>>>
>>> OpenSSL.crypto.get_elliptic_curve('Oakley-EC2N-3')
<Curve 'Oakley-EC2N-3'>
>>>
>>> OpenSSL.SSL.Context(OpenSSL.SSL.TLSv1_2_METHOD)
<OpenSSL.SSL.Context object at 0x10d778ef0>
The pyOpenSSL team maintains example code that includes certificate generation, a
way to start using SSL over an already-connected socket, and a secure XMLRPC
server.
PyNaCl and libnacl
The idea behind libsodium, the C library backend for both PyNaCl and libnacl, is to
intentionally not provide users with many choices—just the best one for their situa‐
tion. It does not support all of the TLS protocol; if you want that, use pyOpenSSL. If
all you want is an encrypted connection with some other computer you’re in control
of, with your own protocols of your choosing, and you don’t want to deal with
OpenSSL, then use this.7
Pronounce PyNaCl as “py-salt” and libnacl as “lib-salt”—they’re
both derived from the NaCl (salt) library.
We recommend PyNaCl over libnacl because it’s under the PyCA umbrella, and you
don’t have to install libsodium separately. The libraries are virtually the same—
PyNaCl uses CFFI bindings for the C libraries, and libnacl uses ctypes—so it really
doesn’t matter that much. Install PyNaCl using pip:
$ pip install PyNaCl
And follow the PyNaCl examples in its documentation.
Cryptography
Cryptography provides cryptographic recipes and primitives. It supports Python 2.6–
2.7, Python 3.3+, and PyPy. The PyCA recommends the higher-level interface in
pyOpenSSL for most uses.
Cryptography | 255

Cryptography is divided into two layers: recipes and hazardous materials (hazmat).
The recipes layer provides a simple API for proper symmetric encryption, and the
hazmat layer provides low-level cryptographic primitives. Install it using pip:
$ pip install cryptography
This example uses a high-level symmetric encryption recipe—the only high-level
function in this library:
from cryptography.fernet import Fernet
key = Fernet.generate_key()
cipher_suite = Fernet(key)
cipher_text = cipher_suite.encrypt(b"A really secret message.")
plain_text = cipher_suite.decrypt(cipher_text)
PyCrypto
PyCrypto provides secure hash functions and various encryption algorithms. It sup‐
ports Python version 2.1+ and Python 3+. Because the C code is custom, the PyCA
was wary of adopting it, but it was also the de facto cryptography library for Python
for years, so you’ll see it in older code. Install it using pip:
$ pip install pycrypto
And use it like this:
from Crypto.Cipher import AES
# Encryption
encryption_suite = AES.new('This is a key123', AES.MODE_CBC, 'This is an IV456')
cipher_text = encryption_suite.encrypt("A really secret message.")
# Decryption
decryption_suite = AES.new('This is a key123', AES.MODE_CBC, 'This is an IV456')
plain_text = decryption_suite.decrypt(cipher_text)
bcrypt
If you want to use the bcrypt algorithm for your passwords, use this library. Previous
users of py-bcrypt should find it easy to transition, because it is compatible. Install it
using pip:
pip install bcrypt
It only has two functions: bcrypt.hashpw() and bcrypt.gensalt(). The latter lets
you choose how many iterations to use—more iterations will make the algorithm
slower (it defaults to a reasonable number). Here’s an example:
>>> import bcrypt
>>>>
>>> password = bytes('password', 'utf-8')
>>> hashed_pw = bcrypt.hashpw(password, bcrypt.gensalt(14))
256 | Chapter 9: Software Interfaces

>>> hashed_pw
b'$2b$14$qAmVOCfEmHeC8Wd5BoF1W.7ny9M7CSZpOR5WPvdKFXDbkkX8rGJ.e'
We store the hashed password somewhere:
>>> import binascii
>>> hexed_hashed_pw = binascii.hexlify(hashed_pw)
>>> store_password(user_id=42, password=hexed_hashed_pw)
and when it’s time to check the password, use the hashed password as the second
argument to bcrypt.hashpw() like this:
>>> hexed_hashed_pw = retieve_password(user_id=42)
>>> hashed_pw = binascii.unhexlify(hexed_hashed_pw)
>>>
>>> bcrypt.hashpw(password, hashed_pw)
b'$2b$14$qAmVOCfEmHeC8Wd5BoF1W.7ny9M7CSZpOR5WPvdKFXDbkkX8rGJ.e'
>>>
>>> bcrypt.hashpw(password, hashed_pw) == hashed_pw
True
Cryptography | 257

CHAPTER 10
Data Manipulation
This chapter summarizes the popular Python libraries related to data manipulation:
numeric, text, images, and audio. Almost all of the libraries described here serve a
unique purpose, so this chapter’s goal is to describe these libraries, not compare them.
Unless noted, all of them can be installed directly from PyPI using pip:
$ pip install library
Table 10-1 briefly describes these libraries.
Table 10-1. Data tools
Python
library
License Reason to use
IPython Apache 2.0
license • Provides enhanced Python interpreter, with input history, integrated debugger, and
graphics and plots in-terminal (with the Qt-enabled version).
Numpy BSD 3-clause
license • Provides multidimensional arrays and linear algebra tools, optimized for speed.
SciPy BSD license • Provides functions and utilities related to engineering and science, from linear algebra
to signal processing, integration, root nding, statistical distributions, and other topics.
Matplotlib BSD license • Provides scientic plotting.
Pandas BSD license • Provides series and DataFrame objects that can be sorted, merged, grouped,
aggregated, indexed, windowed, and subset—a lot like an R Data Frame or the
contents of a SQL query.
259

Python
library
License Reason to use
Scikit-Learn BSD 3-clause
license • Provides machine learning algorithms, including dimensionality reduction
classication, regression, clustering, model selection, imputing missing data, and
preprocessing.
Rpy2 GPLv2 license • Provides an interface to R that allows execution of R functions from within Python, and
passing data between the two environments.
SymPy BSD license • Provides symbolic mathematics, including series expansions, limits, and calculus,
aiming to be a full computer algebra system.
nltk Apache license • Provides comprehensive natural language toolkit, with models and training data in
multiple languages.
pillow / PIL Standard PIL
license
(like MIT)
• Provides huge number of le formats, plus some simple image ltering and other
processing.
cv2 Apache 2.0
license • Provides computer vision routines suitable for real-time analysis in videos, including
already-trained face and person detection algorithms.
Scikit-Image BSD license • Provides image processing routines—ltering, adjustment, color separation, edge,
blob, and corner detection, segmentaton, and more.
Nearly all of the libraries described in Table 10-1 and detailed in the rest of this chap‐
ter depend on C libraries, and specifically on SciPy, or one of its dependencies,
NumPy. This means you may have trouble installing these if you’re on a Windows
system. If you primarily use Python for analyzing scientific data, and you’re not
familiar with compiling C and FORTRAN code on Windows already, we recommend
using Anaconda or one of the other options discussed in “Commercial Python Redis‐
tributions” on page 18. Otherwise, always try pip install first and if that fails, look
at the SciPy installation guide.
Scientic Applications
Python is frequently used for high-performance scientific applications. It is widely
used in academia and scientific projects because it is easy to write and performs well.
Due to its high performance nature, scientific computing in Python often utilizes
external libraries, typically written in faster languages (like C, or FORTRAN for
matrix operations). The main libraries used are all part of the “SciPy Stack:” NumPy,
SciPy, SymPy, Pandas, Matplotlib, and IPython. Going into detail about these libra‐
260 | Chapter 10: Data Manipulation

1ATLAS is an ongoing software project that provides tested, performant linear algebra libraries. It provides C
and FORTRAN 77 interfaces to routines from the well-known Basic Linear Algebra Subset (BLAS) and Linear
Algebra PACKage (LAPACK).
ries is beyond the scope of this book. However, a comprehensive introduction to the
scientific Python ecosystem can be found in the Python Scientific Lecture Notes.
IPython
IPython is an enhanced version of Python interpreter, with color interface, more
detailed error messages, and an inline mode that allows graphics and plots to be dis‐
played in the terminal (Qt-based version). It is the default kernel for Jupyter note‐
books (discussed in “Jupyter Notebooks” on page 185), and the default interpreter in
the Spyder IDE (discussed in “Spyder” on page 30). IPython comes installed with
Anaconda, which we described in “Commercial Python Redistributions” on page 18.
NumPy
NumPy is part of the SciPy project but is released as a separate library so people who
only need the basic requirements can use it without installing the rest of SciPy.
NumPy cleverly overcomes the problem of running slower algorithms on Python by
using multidimensional arrays and functions that operate on arrays. Any algorithm
can then be expressed as a function on arrays, allowing the algorithms to be run
quickly. The backend is the Automatically Tuned Linear Algebra Software (ATLAS)
library,1 and other low-level libraries written in C and FORTRAN. NumPy is compat‐
ible with Python versions 2.6+ and 3.2+.
Here is an example of a matrix multiplication, using array.dot(), and “broadcast‐
ing,” which is element-wise multiplication where the row or column is repeated
across the missing dimension:
>>> import numpy as np
>>>
>>> x = np.array([[1,2,3],[4,5,6]])
>>> x
array([[1, 2, 3],
[4, 5, 6]])
>>>
>>> x.dot([2,2,1])
array([ 9, 24])
>>>
>>> x * [[1],[0]]
array([[1, 2, 3],
[0, 0, 0]])
Scientic Applications | 261

SciPy
SciPy uses NumPy for more mathematical functions. SciPy uses NumPy arrays as the
basic data structure, and comes with modules for various commonly used tasks in
scientific programming, including linear algebra, calculus, special functions and con‐
stants, and signal processing.
Here’s an example from SciPy’s set of physical constants:
>>> import scipy.constants
>>> fahrenheit = 212
>>> scipy.constants.F2C(fahrenheit)
100.0
>>> scipy.constants.physical_constants['electron mass']
(9.10938356e-31, 'kg', 1.1e-38)
Matplotlib
Matplotlib is a flexible plotting library for creating interactive 2D and 3D plots that
can also be saved as manuscript-quality figures. The API in many ways reflects that of
MATLAB, easing transition of MATLAB users to Python. Many examples, along with
the source code to re-create them, are available in the Matplotlib gallery.
Those who work with statistics should also look at Seaborn, a newer graphics library
specifically for statistics visualization that is growing in popularity. It is featured in
this blog post about getting started in data science.
For web-capable plots, try Bokeh, which uses its own visualization libraries, or Plotly,
which is based on the JavaScript library D3.js, although the free version of Plotly may
require storing your plots on their server.
Pandas
Pandas (the name is derived from Panel Data) is a data manipulation library based on
NumPy which provides many useful functions for accessing, indexing, merging and
grouping data easily. The main data structure (DataFrame) is close to what could be
found in the R statistical software environment (i.e., heterogeneous data tables—with
strings in some columns and numbers in others—with name indexing, time series
operations and auto-alignment of data). But it also can be operated on like a SQL
table or Excel Pivot Table—using methods like groupby() or functions like pan
das.rolling_mean().
Scikit-Learn
Scikit-Learn is a machine learning library that provides dimension reduction, missing
data imputation, regression and classification models, tree models, clustering, auto‐
matic model parameter tuning, plotting (via matplotlib), and more. It is well docu‐
262 | Chapter 10: Data Manipulation

2One popular tool that makes use of Python numbers is SageMath—a large, comprehensive tool that defines
classes to represents fields, rings, algebras and domains, plus provides symbolic tools derived from SymPy
and numerical tools derived from NumPy, SciPy, and many other Python and non-Python libraries.
mented and comes with tons of examples. Scikit-Learn operates on NumPy arrays but
can usually interface with Pandas data frames without much trouble.
Rpy2
Rpy2 is a Python binding for the R statistical package allowing the execution of R
functions from Python and passing data back and forth between the two environ‐
ments. Rpy2 is the object-oriented implementation of the Rpy bindings.
decimal, fractions, and numbers
Python has defined a framework of abstract base classes to develop numeric types
from Number, the root of all numeric types, to Integral, Rational, Real, and Com
plex. Developers can subclass these to develop other numeric types according to the
instructions in the numbers library.2 There is also a decimal.Decimal class that is
aware of numerical precision, for accounting and other precision-critical tasks. The
type hierarchy works as expected:
>>> import decimal
>>> import fractions
>>> from numbers import Complex, Real, Rational, Integral
>>>
>>> d = decimal.Decimal(1.11, decimal.Context(prec=5)) # precision
>>>
>>> for x in (3, fractions.Fraction(2,3), 2.7, complex(1,2), d):
... print('{:>10}'.format(str(x)[:8]),
... [isinstance(x, y) for y in (Complex, Real, Rational, Integral)])
...
3 [True, True, True, True]
2/3 [True, True, True, False]
2.7 [True, True, False, False]
(1+2j) [True, False, False, False]
1.110000 [False, False, False, False]
The exponential, trigonometric, and other common functions are in the math library,
and corresponding functions for complex numbers are in cmath. The random library
provides pseudorandom numbers using the Mersenne Twister as its core generator.
As of Python 3.4, the statistics module in the Standard Library provides the mean and
median, as well as the sample and population standard deviation and variance.
Scientic Applications | 263

SymPy
SymPy is the library to use when doing symbolic mathematics in Python. It is written
entirely in Python, with optional extensions for speed, plotting, and interactive ses‐
sions.
SymPy’s symbolic functions operate on SymPy objects such as symbols, functions,
and expressions to make other symbolic expressions, like this:
>>> import sympy as sym
>>>
>>> x = sym.Symbol('x')
>>> f = sym.exp(-x**2/2) / sym.sqrt(2 * sym.pi)
>>> f
sqrt(2)*exp(-x**2/2)/(2*sqrt(pi))
These can be symbolically or numerically integrated:
>>> sym.integrate(f, x)
erf(sqrt(2)*x/2)/2
>>>
>>> sym.N(sym.integrate(f, (x, -1, 1)))
0.682689492137086
The library can also differentiate, expand expressions into series, restrict symbols to
be real, commutative, or a dozen or so other categories, locate the nearest rational
number (given an accuracy) to a float, and much more.
Text Manipulation and Text Mining
Python’s string manipulation tools are often why people start using the language to
begin with. We’ll cover some highlights from Python’s Standard Library quickly, and
then move to the library nearly everyone in the community uses for text mining: the
Natural Language ToolKit (nltk).
String Tools in Python’s Standard Library
For languages with special behavior of lowercase characters, str.casefold() helps
with lowercase letters:
>>> 'Grünwalder Straße'.upper()
'GRÜNWALDER STRASSE'
>>> 'Grünwalder Straße'.lower()
'grünwalder straße'
>>> 'Grünwalder Straße'.casefold()
'grünwalder strasse'
Python’s regular expression library re is comprehensive and powerful—we saw it in
action in “Regular expressions (readability counts)” on page 149, so we won’t add
264 | Chapter 10: Data Manipulation

3On Windows, it currently appears that nltk is only available for Python 2.7. Try it on Python 3, though; the
labels that say Python 2.7 may just be out of date.
4The Punkt tokenizer algorithm was introduced by Tibor Kiss and Jan Strunk in 2006, and is a language-
independent way to identify sentence boundaries—for example, “Mrs. Smith and Johann S. Bach listened to
Vivaldi” would correctly be identified as a single sentence. It has to be trained on a large dataset, but the
default tokenizer, in English, has already been trained for us.
more here, except that the help(re) documentation is so complete that you won’t
need to open a browser while coding.
Finally, the diib module in the Standard Library identifies differences between
strings, and has a function get_close_matches() that can help with misspellings
when there are a known set of correct answers (e.g., for error prompts on a travel
website):
>>> import difflib
>>> capitals = ('Montgomery', 'Juneau', 'Phoenix', 'Little Rock')
>>> difflib.get_close_matches('Fenix', capitals)
['Phoenix']
nltk
The Natural Language ToolKit (nltk) is the Python tool for text analysis: originally
released by Steven Bird and Edward Loper to aid students in Bird’s course on Natural
Language Processing (NLP) at the University of Pennsylvania in 2001, it has grown to
an expansive library covering multiple languages and containing algorithms for
recent research in the field. It is available under the Apache 2.0 license and is down‐
loaded from PyPI over 100,000 times per month. Its creators have an accompanying
book, Natural Language Processing with Python (O’Reilly), that is accessible as a
course text introducing both Python and NLP.
You can install nltk from the command line using pip.3 It also relies on NumPy, so
install that first:
$ pip install numpy
$ pip install nltk
If you’re using Windows, and can’t get the NumPy installed using pip to work, you
can try following the instructions in this Stack Overflow post. The size and scope of
the library may unnecessarily scare some people away, so here’s a tiny example to
demonstrate how easy simple uses can be. First, we need to get a dataset from the
separately downloadable collection of corpora, including tagging tools for multiple
languages and datasets to test algorithms against. These are licensed separate from
nltk, so be sure to check your selection’s individual license. If you know the name of
the corpus you want to download (in our case, the Punkt tokenizer,4 which we can
use to split up text files into sentences or words), you can do it on the command line:
Text Manipulation and Text Mining | 265

$ python3 -m nltk.downloader punkt --dir=/usr/local/share/nltk_data
Or you can download it in an interactive session—“stopwords” contains a list of com‐
mon words that tend to overpower word counts, such as “the”, “in”, or “and” in many
languages:
>>> import nltk
>>> nltk.download('stopwords', download_dir='/usr/local/share/nltk_data')
[nltk_data] Downloading package stopwords to /usr/local/share/nltk_data...
[nltk_data] Unzipping corpora/stopwords.zip.
True
And if you don’t know the name of the corpus you want, you can launch an interac‐
tive downloader from the Python interpreter by invoking nltk.download() without
its first argument:
>>> import nltk
>>> nltk.download(download_dir='/usr/local/share/nltk_data')
Then we can load the dataset we care about, and process and analyze it. In this code
sample, we are loading a saved copy of the Zen of Python:
>>> import nltk
>>> from nltk.corpus import stopwords
>>> import string
>>>
>>> stopwords.ensure_loaded()
>>> text = open('zen.txt').read()
>>> tokens = [
... t.casefold() for t in nltk.tokenize.word_tokenize(text)
... if t not in string.punctuation
... ]
>>>
>>> counter = {}
>>> for bigram in nltk.bigrams(tokens):
... counter[bigram] = 1 if bigram not in counter else counter[bigram] + 1
...
>>> def print_counts(counter): # We'll reuse this
... for ngram, count in sorted(
... counter.items(), key=lambda kv: kv[1], reverse=True):
... if count > 1:
... print ('{:>25}: {}'.format(str(ngram), '*' * count))
...
>>> print_counts(counter)
('better', 'than'): ********
('is', 'better'): *******
('explain', 'it'): **
('one', '--'): **
('to', 'explain'): **
('if', 'the'): **
('the', 'implementation'): **
('implementation', 'is'): **
>>>
266 | Chapter 10: Data Manipulation
>>> kept_tokens = [t for t in tokens if t not in stopwords.words()]
>>>
>>> from collections import Counter
>>> c = Counter(kept_tokens)
>>> c.most_common(5)
[('better', 8), ('one', 3), ('--', 3), ('although', 3), ('never', 3)]
The corpora are loaded lazily, so we need to do this to actually load the stop‐
words corpus.
The tokenizer requires a trained model—the Punkt tokenizer (default) comes
with a model trained on English (also default).
A bigram is a pair of adjacent words. We are iterating over the bigrams and
counting how many times they occur.
The sorted() function here is being keyed on the count, and sorted in reverse
order.
The '{:>25}' right-justifies the string with a total width of 25 characters.
The most frequently occurring bigram in the Zen of Python is “better than.”
This time, to avoid high counts of “the” and “is”, we remove the stopwords.
In Python 3.1 and later, you can use collections.Counter for the counting.
There’s a lot more in this library—take a weekend and go for it!
SyntaxNet
Google’s SyntaxNet, built on top of TensorFlow, provides a trained English parser
(named Parsey McParseface) and the framework to build other models, even in other
languages, provided you have labeled data. It is currently only available for
Python 2.7; detailed instructions for downloading and using it are on SyntaxNet’s
main GitHub page.
Image Manipulation
The three most popular image processing and manipulation libraries in Python are
Pillow (a friendly fork of the Python Imaging Library [PIL]—which is good for for‐
mat conversions and simple image processing), cv2 (the Python bindings for Open‐
Source Computer Vision [OpenCV] that can be used for real-time face detection and
other advanced algorithms), and the newer Scikit-Image, which provides simple
image processing, plus primitives like blob, shape, and edge detection. The following
sections provide some more information about each of these libraries.
Text Manipulation and Text Mining | 267

Pillow
The Python Imaging Library, or PIL for short, is one of the core libraries for image
manipulation in Python. Its was last released in 2009 and was never ported to
Python 3. Luckily, there’s an actively developed fork of PIL called Pillow—it’s easier to
install, runs on all operating systems, and supports Python 3.
Before installing Pillow, you’ll have to install Pillow’s prerequisites. Find the instruc‐
tions for your platform in the Pillow installation instructions. After that, it’s straight‐
forward:
$ pip install Pillow
Here is a brief example use of Pillow (yes, the module name to import from is PIL not
Pillow):
from PIL import Image, ImageFilter
# Read image
im = Image.open( 'image.jpg' )
# Display image
im.show()
# Applying a filter to the image
im_sharp = im.filter( ImageFilter.SHARPEN )
#Saving the filtered image to a new file
im_sharp.save( 'image_sharpened.jpg', 'JPEG' )
# Splitting the image into its respective bands (i.e., Red, Green,
# and Blue for RGB)
r,g,b = im_sharp.split()
# Viewing EXIF data embedded in image
exif_data = im._getexif()
exif_data
There are more examples of the Pillow library in the Pillow tutorial.
cv2
OpenSource Computer Vision, more commonly known as OpenCV, is a more
advanced image manipulation and processing software than PIL. It is written in C
and C++, and focuses on real-time computer vision. For example, it has the first
model used in real-time face detection (already trained on thousands of faces; this
example shows it being used in Python code), a face recognition model, and a person
detection model, among others. It has been implemented in several languages and is
widely used.
In Python, image processing using OpenCV is implemented using the cv2 and
NumPy libraries. OpenCV version 3 has bindings for Python 3.4 and above, but the
cv2 library is still linked to OpenCV2, which does not. The installation instructions
268 | Chapter 10: Data Manipulation

5These steps worked for us: first, use brew install opencv or brew install opencv3 --with-python3.
Next, follow any additional instructions (like linking NumPy). Last, add the directory containing the OpenCV
shared object file (e.g., /usr/local/Cellar/opencv3/3.1.0_3/lib/python3.4/site-packages/) to your path; or to only
use it in a virtual environment, use the add2virtualenvironment command installed with the virtualenv‐
wrapper library.
in the OpenCV tutorial page have explicit details for Windows and Fedora, using
Python 2.7. On OS X, you’re on your own.5 Finally, here’s an option using Python 3
on Ubuntu. If the installation becomes difficult, you can downlad Anaconda and use
that instead; they have cv2 binaries for all platforms, and you consult the blog post
“Up & Running: OpenCV3, Python 3, & Anaconda” to use cv2 and Python 3 on Ana‐
conda.
Here’s an example use of cv2:
from cv2 import *
import numpy as np
#Read Image
img = cv2.imread('testimg.jpg')
#Display Image
cv2.imshow('image',img)
cv2.waitKey(0)
cv2.destroyAllWindows()
#Applying Grayscale filter to image
gray = cv2.cvtColor(img, cv2.COLOR_BGR2GRAY)
#Saving filtered image to new file
cv2.imwrite('graytest.jpg',gray)
There are more Python-implemented examples of OpenCV in this collection of tuto‐
rials.
Scikit-Image
A newer library, Scikit-Image, is growing in popularity, thanks partly to having more
of its source in Python and also its great documentation. It doesn’t have the full-
fledged algorithms like cv2, which you’d still use for algorithms that work on real-
time video, but it’s got enough to be useful for scientists—like blob detection and
feature detection, plus it has the standard image processing tools like filtering and
contrast adjustment. For example, Scikit-image was used to make the image compo‐
sites of Pluto’s smaller moons. There are many more examples on the main Scikit-
Image page.
Text Manipulation and Text Mining | 269

1Relational databases were introduced by in 1970 by Edgar F. Codd, who, while working at IBM, wrote “A Rela‐
tional Model of Data for Large Share Data Banks.” It was ignored until 1977, when Larry Ellison started a
company—which would eventually become Oracle—based on its technology. Other competing ideas, like
key-value stores and hierarchical database models, were largely ignored after the success of relational data‐
bases, until the recent not only SQL (NoSQL) movement revived nonrelational storage options in a cluster
computing setting.
2It’s CongParser in Python 2—see the configparser documentation for the precise dialect understood by the
parser.
CHAPTER 11
Data Persistence
We mentioned ZIP compression and pickling already in “Data Serialization” on page
243, so there isn’t much left to cover besides databases in this chapter.
This chapter is mostly about Python libraries that interface with relational databases.
These are the kinds of database we normally think about—they contain structured
data stored in tables and are accessed using SQL.1
Structured Files
We already mentioned tools for JSON, XML, and ZIP files in Chapter 9, and pickling
and XDR when talking about serialization. We recommend PyYAML (get it via pip
install pyyaml) to parse YAML. Python also has tools in its Standard Library for
CSV, *.netrc used by some FTP clients, *.plist files used in OS X, and a dialect of the
Windows INI format via congparser.2
271

3The dbm library stores key-value pairs in an on-disk hash table. The precise way that this happens depends
on whether it’s using the gdbm, ndbm, or “dumb” backend. The “dumb” one is implemented in Python and
described in the documentation. The other two are in the gdbm manual. With ndbm there’s an upper bound
on the value sizes stored. The file is locked when opened for writing unless (with gdbm only) you open the
database file with an ru or wu, and even then, updates in write mode may not be visible on the other connec‐
tions.
4Although the Structured Query Language (SQL) is an ISO standard, database vendors choose how much of
the standard to implement, and can add their own features. This means a Python library that serves as a data‐
base driver must understand the dialect of SQL that is spoken by the database it interfaces with.
Also, there’s a persistent key-value store available via the shelve module in Python’s
Standard Library. Its backend is the best available variant of the database manager
(dbm—a key-value database) on your computer:3
>>> import shelve
>>>
>>> with shelve.open('my_shelf') as s:
... s['d'] = {'key': 'value'}
...
>>> s = shelve.open('my_shelf', 'r')
>>> s['d']
{'key': 'value'}
You can check which database backend you’re using like this:
>>> import dbm
>>> dbm.whichdb('my_shelf')
'dbm.gnu'
And you can get the GNU implementation of dbm here for Windows, or check your
package manager (brew, apt, yum) first, then try the dbm source code.
Database Libraries
The Python Database API (DB-API2) defines a standard interface for database access
in Python. It’s documented in PEP 249 and in a more detailed introduction to
Python’s DB-API. Nearly all Python database drivers conform to this interface, so
when you just want to query a database in Python, choose any one that connects to
the database that you are using: sqlite3 for the SQLite database, psycopg2 for Postgres,
and MySQL-python for MySQL, for example.4
Code with lots of SQL strings and hardcoded columns and tables can quickly become
messy, error-prone, and hard to debug. The libraries in Table 11-1 (except for sqlite3,
the SQLite driver) provide a database abstraction layer (DAL) that abstracts away the
structure, grammar, and data types of SQL to present an API.
Because Python is an object-oriented language, the database abstraction can also
implement object-relational mapping (ORM) to provide a mapping between the
272 | Chapter 11: Data Persistence

5Defined in Martin Fowler’s Patterns of Enterprise Application Architecture. For more information on what goes
into Python’s ORM designs, we recommend the SQLAlchemy entry in the “Architecture of Open Source
Applications,” and this comprehensive list of links related to Python ORMs from FullStack Python.
Python objects and the underlying database, plus operators on attributes in those
classes that represent an abstracted version of SQL in Python.
All of the libraries in Table 11-1 (with the exception of sqlite3 and Records) provide
an ORM, and their implementations use one of two patterns:5 the Active Record pat‐
tern, where records simultaneously represent the abstracted data and interact with
the database; and the Data Mapper pattern, where one layer interfaces with the data‐
base, another layer presents the data, and in between is a mapper function that per‐
forms the necessary logic to convert between the two (essentially performing the logic
of a SQL view outside of the database).
When performing queries, both the Active Record and Data Mapper patterns behave
about the same, but in the Data Mapper pattern, the user must explicitly state table
names, add primary keys, and create helper tables to support many-to-many relation‐
ships (like on a receipt, where one transaction ID would be associated with multiple
purchases) — all of that is done behind the scenes when using the Active Record pat‐
tern.
The most popular libraries are sqlite3, SqlAlchemy, and the Django ORM. Records is
in a category of its own—as more of a SQL client that provides many options for out‐
put formatting—and the remaining libraries can be thought of as standalone, lighter
weight versions of the Django ORM underneath (because they all use the ActiveRe‐
cord pattern), but with different implementations, and very different and unique
APIs.
Table 11-1. Database libraries
Library License Reasons to use
sqlite3 (driver, not ORM) PSFL • It’s in the Standard Library.
• It’s good for sites with low or moderate trac that only need the simpler data
types and a few queries—it’s got low latency because there’s no network
communication.
•It’s good for learning SQL or Python’s DB-API, or prototyping a database
application.
Database Libraries | 273

Library License Reasons to use
SQLAlchemy MIT license • It provides a Data Mapper pattern with a two-layer API that has an ORM top
layer resembling the API in other libraries, plus a low-level layer of tables
directly attached to the database.
•It gives you explicit control (via the lower level Classical Mappings API) over
the structure and schemas in your database; this is useful, for example, if your
database administrators are not the same people as your web developers.
•Dialects: SQLite, PostgreSQL, MySQL, Oracle, MS-SQL Server, Firebird, or
Sybase (or register your own).
Django ORM BSD license • It provides the Active Record pattern that can generate the database
infrastructure implicitly from the user-dened models in the application.
• It’s tightly coupled with Django.
• Dialects: SQLite, PostgreSQL, MySQL, or Oracle; alternatively, use a third-party
library: SAP SQL Anywhere, IBM DB2, MS-SQL Server, Firebird, or ODBC.
peewee MIT license • It provides an Active Record pattern, but that’s because the tables you dene
in the ORM are the tables you see in the database (plus an index column).
• Dialects: SQLite, MySQL, and Postgres (or add your own).
PonyORM AGPLv3 • It provides an Active Record pattern with an intuitive generator-based syntax.
• There is also an online GUI Entity-Relationship diagram editor (to draw the
data model that denes the tables in a database and their relationship to each
other) that can be translated to SQL code that will create the tables.
•Dialects: SQLite, MySQL, Postgres, and Oracle (or add your own).
SQLObject LGPL • It was one of the rst to use the ActiveRecord pattern in Python.
• Dialects: SQLite, MySQL, Postgres, Firebird, Sybase, MAX DB, MS-SQL Server (or
add your own).
Records (query interface,
not ORM) ISC license • It provides a simple way to query a database and generate a report document:
SQL in, XLS (or JSON or YAML or CSV or LaTex) out.
• Plus a command-line interface that can be used for interactive querying or
one-line report generation.
•It uses the powerful SQLAlchemy as its backend.
The following sections provide additional details about the libraries listed in
Table 11-1.
274 | Chapter 11: Data Persistence

sqlite3
SQLite is a C library that provides the database behind sqlite3. The database is stored
as a single file, by convention with the extension *.db. The “when to use SQLite” page
says it’s been demonstrated to work as a database backend for websites with hundreds
of thousands of hits per day. Their page also has a list of SQL commands that SQLite
understands, and you can consult the W3Schools’ quick SQL reference for instruc‐
tions on how to use them. Here’s an example:
import sqlite3
db = sqlite3.connect('cheese_emporium.db')
db.execute('CREATE TABLE cheese(id INTEGER, name TEXT)')
db.executemany(
'INSERT INTO cheese VALUES (?, ?)',
[(1, 'red leicester'),
(2, 'wensleydale'),
(3, 'cheddar'),
]
)
db.commit()
db.close()
The allowable SQLite types are NULL, INTEGER, REAL, TEXT, and BLOB (bytes), or you
can do other stuff that’s in the sqlite3 documentation to register new data types (e.g.,
they implement a datetime.datetime type that is stored as TEXT).
SQLAlchemy
SQLAlchemy is a very popular database toolkit—Django comes with an option to
switch from its own ORM to SQLAchemy, it’s the backend for the Flask mega-tutorial
to build your own blog, and Pandas uses it as its SQL backend.
SQLAlchemy is the only library listed here to follow Martin Fowler’s Data Mapper
pattern instead of the more frequently implemented Active Record pattern. Unlike
the other libraries, SQLAlchemy not only provides an ORM layer but also a general‐
ized API (called the Core layer) for writing database-agnostic code without SQL. The
ORM layer is stacked on top of the Core layer, which uses Table objects that directly
map to the underlying database. The mapping between these objects and the ORM
must be done explicitly by the user, so it takes more code to get started, and can be
frustrating for those who are new to relational databases. The benefit is a far greater
control over the database—nothing is created unless you explicitly put it there.
SQLAlchemy can run on Jython and PyPy, and supports Python 2.5 through the lat‐
est 3.x versions. The next few code snippets will show the work required to create a
many-to-many object mapping. We’ll create three objects in the ORM layer: Cus
tomer, Cheese, and Purchase. There can be many purchases for one customer (a
many-to-one relation), and the purchase can be for many types of cheese (a many-to-
Database Libraries | 275

many relation). The reason we’re doing this in such detail is to show the unmapped
table purchases_cheeses—it does not need to be present in the ORM because its
only purpose is to provide a linkage between the types of cheese and the purchases.
Other ORMs would create this table silently in the background—so this shows one of
the big differences between SQLAlchemy and the other libraries:
from sqlalchemy.ext.declarative import declarative_base
from sqlalchemy import Column, Date, Integer, String, Table, ForeignKey
from sqlalchemy.orm import relationship
Base = declarative_base()
class Customer(Base):
__tablename__ = 'customers'
id = Column(Integer, primary_key=True)
name = Column(String, nullable=False)
def __repr__(self):
return "<Customer(name='%s')>" % (self.name)
purchases_cheeses = Table(
'purchases_cheeses', Base.metadata,
Column('purch_id', Integer, ForeignKey('purchases.id', primary_key=True)),
Column('cheese_id', Integer, ForeignKey('cheeses.id', primary_key=True))
)
class Cheese(Base):
__tablename__ = 'cheeses'
id = Column(Integer, primary_key=True)
kind = Column(String, nullable=False)
purchases = relationship(
'Purchase', secondary='purchases_cheeses', back_populates='cheeses'
)
def __repr__(self):
return "<Cheese(kind='%s')>" % (self.kind)
class Purchase(Base):
__tablename__ = 'purchases'
id = Column(Integer, primary_key=True)
customer_id = Column(Integer, ForeignKey('customers.id', primary_key=True))
purchase_date = Column(Date, nullable=False)
customer = relationship('Customer')
cheeses = relationship(
'Cheese', secondary='purchases_cheeses', back_populates='purchases'
)
def __repr__(self):
return ("<Purchase(customer='%s', dt='%s')>" %
(self.customer.name, self.purchase_date))
276 | Chapter 11: Data Persistence
6There’s a great explanation of Python metaclasses on Stack Overflow.
The declarative base object is a metaclass6 that intercepts the creation of each
mapped table in the ORM and defines a corresponding table in the Core layer.
Objects in the ORM layer inherit from the declarative base.
This is an unmapped table in the core layer—it’s not a class and not derived from
the declarative base. It will correspond the table purchases_cheeses in the data‐
base and exists to provide the many-to-many mapping between cheeses and pur‐
chase IDs.
Compare that with Cheese—a mapped table in the ORM layer. Under the hood,
Cheese.__table__ is created in the core layer. It will correspond to a table named
cheeses in the database.
This relationship explicitly defines the relationship between the mapped classes
Cheese and Purchase: they are related indirectly through the secondary table pur
chases_cheeses (as opposed to directly via a ForeignKey).
back_populates adds an event listener so that when a new Purchase object is
added to Cheese.purchases, the Cheese object will also appear in Pur
chase.cheeses.
This is the other half of the plumbing for the many-to-many relationship.
Tables are explicitly created by the declarative base:
from sqlalchemy import create_engine
engine = create_engine('sqlite://')
Base.metadata.create_all(engine)
And now the interaction, using objects in the ORM layer, looks the same as in the
other libraries with ORMs:
from sqlalchemy.orm import sessionmaker
Session = sessionmaker(bind=engine)
sess = Session()
leicester = Cheese(kind='Red Leicester')
camembert = Cheese(kind='Camembert')
sess.add_all((camembert, leicester))
cat = Customer(name='Cat')
sess.add(cat)
sess.commit()
Database Libraries | 277

7Django Girls is a phenomenal charity organization of brilliant programmers dedicated to providing free
Django training in a celebratory environment to women around the world.
import datetime
d = datetime.date(1971, 12, 18)
p = Purchase(purchase_date=d, customer=cat)
p.cheeses.append(camembert)
sess.add(p)
sess.commit()
You must explicitly commit() to push changes to the database.
Objects in the many-to-many relationship aren’t added during instantiation—
they have to be appended after the fact.
Here are a few sample queries:
>>> for row in sess.query(Purchase,Cheese).filter(Purchase.cheeses):
... print(row)
...
(<Purchase(customer='Douglas', dt='1971-12-17')>, <Cheese(kind='Camembert')>)
(<Purchase(customer='Douglas', dt='1971-12-17')>, <Cheese(kind='Red Leicester')>)
(<Purchase(customer='Cat', dt='1971-12-18')>, <Cheese(kind='Camembert')>)
>>>
>>> from sqlalchemy import func
>>> (sess.query(Purchase,Cheese)
... .filter(Purchase.cheeses)
... .from_self(Cheese.kind, func.count(Purchase.id))
... .group_by(Cheese.kind)
... ).all()
[('Camembert', 2), ('Red Leicester', 1)]
This is how to do the many-to-many join across the purchases_cheeses table,
which is not mapped to a top-level ORM object.
This query counts the number of purchases of each kind of cheese.
To learn more, see the SQLAlchemy documentation.
Django ORM
The Django ORM is the interface used by Django to provide database access. Their
implementation of the Active Record pattern is probably the closest one in our list to
the Ruby on Rails ActiveRecord library.
It is tightly integrated with Django, so usually you only use it because you’re making a
Django web application. Try the Django ORM tutorial from Django Girls if you want
to follow along while building a web application.7
278 | Chapter 11: Data Persistence

If you want to try out Django’s ORM without making a whole web app, copy this skel‐
eton GitHub project to use only Django’s ORM, and follow its instructions. There
may be some differences across versions of Django. Ours settings.py looks like this:
# settings.py
DATABASES = {
'default': {
'ENGINE': 'django.db.backends.sqlite3',
'NAME': 'tmp.db',
}
}
INSTALLED_APPS = ("orm_only",)
SECRET_KEY = "A secret key may also be required."
Every abstracted table in the Django ORM subclasses the Django Model object, like
this:
from django.db import models
class Cheese(models.Model):
type = models.CharField(max_length=30)
class Customer(models.Model):
name = models.CharField(max_length=50)
class Purchase(models.Model):
purchase_date = models.DateField()
customer = models.ForeignKey(Customer)
cheeses = models.ManyToManyField(Cheese)
The ForeignKey relationship denotes a many-to-one relationship—the customer
can make many purchases, but a purchase is associated with a single customer.
Use OneToOneField for a one-to-one relation.
And use ManyToManyField to denote a many-to-many relationship.
Next, we have to execute a command to build the tables. On the command line, with
the virtual environment activated, and in the same directory as manage.py, type:
(venv)$ python manage.py migrate
With the tables created, here’s how to add data to the database. Without the
instance.save() method, the data in the new row will not make it to the database:
leicester = Cheese.objects.create(type='Red Leicester')
camembert = Cheese.objects.create(type='Camembert')
leicester.save()
camembert.save()
doug = Customer.objects.create(name='Douglas')
doug.save()
Database Libraries | 279

# Add a time of purchase
import datetime
now = datetime.datetime(1971, 12, 18, 20)
day = datetime.timedelta(1)
p = Purchase(purchase_date=now - 1 * day, customer=doug)
p.save()
p.cheeses.add(camembert, leicester)
Objects must be saved to be added to the database and must be saved to be added
in inserts that cross-reference other objects.
You must add objects in a many-to-many mapping separately.
Querying via the ORM looks like this in Django:
# Filter for all purchases that happened in the past 7 days:
queryset = Purchase.objects.filter(purchase_date__gt=now - 7 * day)
# Show who bought what cheeses in the query set:
for v in queryset.values('customer__name', 'cheeses__type'):
print(v)
# Aggregate purchases by cheese type:
from django.db.models import Count
sales_counts = (
queryset.values('cheeses__type')
.annotate(total=Count('cheeses'))
.order_by('cheeses__type')
)
for sc in sales_counts:
print(sc)
In Django, the filtering operator (gt, greater than) is appended after a double
underscore to the table’s attribute purchase_date—Django parses this under the
hood.
Double underscores after a foreign key identifier will access the attribute in the
corresponding table.
In case you haven’t seen the notation, you can put parentheses around a long
statement and break it across lines for legibility.
The query set’s annotate clause adds extra fields to each result.
peewee
The primary goal of peewee is to be a lightweight way for people who know SQL to
interact with a database. What you see is what you get (you neither manually build a
280 | Chapter 11: Data Persistence
top layer that abstracts the table structure behind the scenes, like SQLAlchemy, nor
does the library magically build a bottom layer underneath your tables, like Django
ORM). Its goal is to fill a different niche than SQLAlchemy—doing a few things, but
doing them quickly, simply, and Pythonically.
There is very little “magic,” except to create primary keys for the tables if the user
didn’t. You’d create a table like this:
import peewee
database = peewee.SqliteDatabase('peewee.db')
class BaseModel(peewee.Model):
class Meta:
database = database
class Customer(BaseModel):
name = peewee.TextField()
class Purchase(BaseModel):
purchase_date = peewee.DateField()
customer = peewee.ForeignKeyField(Customer, related_name='purchases')
class Cheese(BaseModel):
kind = peewee.TextField()
class PurchaseCheese(BaseModel):
"""For the many-to-many relationship."""
purchase = peewee.ForeignKeyField(Purchase)
cheese = peewee.ForeignKeyField(Cheese)
database.create_tables((Customer, Purchase, Cheese, PurchaseCheese))
peewee keeps model configuration details in a namespace called Meta, an idea
borrowed from Django.
Associate every Model with a database.
A primary key is added implicitly if you don’t explicitly add it.
This adds the attribute purchases to Customer records for easy access but doesn’t
do anything to the tables.
Initialize data and add it to the database in one step with the create() method, or
initialize it first, and add it later—there are configuration options to control autocom‐
mitting and utilities to do transactions. Here it’s done in one step:
leicester = Cheese.create(kind='Red Leicester')
camembert = Cheese.create(kind='Camembert')
cat = Customer.create(name='Cat')
Database Libraries | 281

8Transaction contexts allow you to roll back executions if an error occurs in an intermediate step.
import datetime
d = datetime.date(1971, 12, 18)
p = Purchase.create(purchase_date=d, customer=cat)
PurchaseCheese.create(purchase=p, cheese=camembert)
PurchaseCheese.create(purchase=p, cheese=leicester)
Directly add an object (like cat), and peewee will use its primary key.
There’s no magic for the many-to-many mapping—just add new entries man‐
ually.
And query like this:
>>> for p in Purchase.select().where(Purchase.purchase_date > d - 1 * day):
... print(p.customer.name, p.purchase_date)
...
Douglas 1971-12-18
Cat 1971-12-19
>>>
>>> from peewee import fn
>>> q = (Cheese
... .select(Cheese.kind, fn.COUNT(Purchase.id).alias('num_purchased'))
... .join(PurchaseCheese)
... .join(Purchase)
... .group_by(Cheese.kind)
... )
>>> for chz in q:
... print(chz.kind, chz.num_purchased)
...
Camembert 2
Red Leicester 1
There is a collection of add-ons available, that include advanced transaction support8
and support for custom functions that can hook data and execute prior to storage—
for example, compression or hashing.
PonyORM
PonyORM takes a different approach to the query grammar: instead of writing an
SQL-like language or boolean expressions, it uses Python’s generator syntax. There’s
also a graphical schema editor that can generate PonyORM entities for you. It sup‐
ports Python 2.6+ and Python 3.3+.
To accomplish its intuitive syntax, Pony requires that all relationships between tables
be bidirectional—all related tables must explicitly refer to each other, like this:
282 | Chapter 11: Data Persistence
import datetime
from pony import orm
db = orm.Database()
db.bind('sqlite', ':memory:')
class Cheese(db.Entity):
type = orm.Required(str)
purchases = orm.Set(lambda: Purchase)
class Customer(db.Entity):
name = orm.Required(str)
purchases = orm.Set(lambda: Purchase)
class Purchase(db.Entity):
date = orm.Required(datetime.date)
customer = orm.Required(Customer)
cheeses = orm.Set(Cheese)
db.generate_mapping(create_tables=True)
A Pony database Entity stores an object’s state in the database, connecting the
database to the object through its existence.
Pony uses standard Python types to identify the type of the column—from str to
datetime.datetime, in addition to the user-defined Entities like Purchase, Cus
tomer, and Cheese.
lambda: Purchase is used here because Purchase is not yet defined.
The orm.Set(lambda: Purchase) is the first half of the definition of the one-to-
many Customer to Purchase relation.
The orm.Required(Customer) is the second half of the one-to-many Customer to
Purchase relationship.
The orm.Set(Cheese) relationship, combined with the orm.Set(lambda: Pur
chase) in define a many-to-many relationship.
With the data entities defined, object instantiation looks like it does in the other libra‐
ries. Entities are created on the fly and committed with the call to orm.commit():
camembert = Cheese(type='Camembert')
leicester = Cheese(type='Red Leicester')
cat = Customer(name='Cat')
doug = Customer(name='Douglas')
d = datetime.date(1971, 12, 18)
Database Libraries | 283
day = datetime.timedelta(1)
Purchase(date=(d - 1 * day), customer=doug, cheeses={camembert, leicester})
Purchase(date=d, customer=cat, cheeses={camembert})
orm.commit()
And querying—Pony’s tour de force—really does look like it’s pure Python:
yesterday = d - 1.1 * day
for cheese in (
orm.select(p.cheeses for p in Purchase if p.date > yesterday)
):
print(cheese.type)
for cheese, purchase_count in (
orm.left_join((c, orm.count(p))
for c in Cheese
for p in c.purchases)
):
print(cheese.type, purchase_count)
This is what a query looks like using Python’s generator syntax.
The orm.count() function aggregates by counting.
SQLObject
SQLObject, first released in October 2002, is the oldest ORM in this list. Its imple‐
mentation of the Active Record pattern—as well as its novel idea to overload the stan‐
dard operators (like ==, <, <=, etc.) as a way of abstracting some of the SQL logic into
Python, which is now implemented by almost all of the ORM libraries—made it
extremely popular.
It supports a wide variety of databases (common database systems MySQL, Postgres,
and SQLite, and more exotic systems like SAP DB, SyBase, and MSSQL) but currently
only supports Python 2.6 and Python 2.7. It’s still actively maintained, but has
become less prevalent with the adoption of SQLAlchemy.
Records
Records is a minimalist SQL library, designed for sending raw SQL queries to various
databases. It’s basically Tablib and SQLAlchemy bundled together with a nice API and
a command-line application that acts like a SQL client that can output YAML, XLS,
and the other Tablib formats. Records isn’t by any means a replacement for ORM
libraries; a typical use case would be to query a database and create a report (e.g., a
monthly report saving the recent sales figures to a spreadsheet). Data can be used
programatically, or exported to a number of useful data formats:
>>> import records
>>> db = records.Database('sqlite:///mydb.db')
284 | Chapter 11: Data Persistence

>>>
>>> rows = db.query('SELECT * FROM cheese')
>>> print(rows.dataset)
name |price
-------------|-----
red leicester|1.0
wensleydale |2.2
>>>
>>> print(rows.export('json'))
[{"name": "red leicester", "price": 1.0}, {"name": "wensleydale", "price": 2.2}]
Records also includes a command-line tool that exports data using SQL, like this:
$ records 'SELECT * FROM cheese' yaml --url=sqlite:///mydb.db
- {name: red leicester, price: 1.0}
- {name: wensleydale, price: 2.2}
$ records 'SELECT * FROM cheese' xlsx --url=sqlite:///mydb.db > cheeses.xlsx
NoSQL database libraries
There is also an entire universe of not only SQL databases—a catchall for any data‐
base that people are using that’s not a traditional relational database. If you look on
PyPI, things can get confusing, with a few dozen similarly named Python packages.
We recommend searching specifically on the main project’s site for Python to get an
opinion on the best library for a product (i.e., run a Google search for “Python
site:vendorname.com”). Most of these provide a Python API and quickstart tutorials
for how to use it. Some examples:
MongoDB
MongoDB is a distributed document store. You can think of it like a giant Python
dictionary that can live on a cluster, with its own filter and query language. For
the Python API, see MongoDB’s getting started with Python page.
Cassandra
Cassandra is a distributed table store. It provides fast lookup and can tolerate
wide tables but is not inteded for joins—rather, the paradigm is to have multiple
duplicate views of the data that are keyed on different columns. For more on the
Python APIs, see the planet Cassandra page.
HBase
HBase is a distributed column store (in this context, column store means data are
stored like (row id, column name, value), allowing for very sparse arrays such
as a dataset of “from” and “to” links for websites that make up the Web). It is built
on top of Hadoop’s Distributed File System. For more information about Python
APIs, see HBase’s “supporting projects” page.
Database Libraries | 285

Druid
Druid is a distributed column store intended to collect (and optionally aggregate
before it stores) event data (in this context, column store means the columns can
be ordered and sorted, and then storage may be compressed for faster I/O and
smaller footprint). Here is a link to Druid’s Python API on GitHub.
Redis
Redis is a distributed in-memory key value store—the point is to reduce latency
by not having to do disk I/O. You could store frequent query results for faster
web lookup, for example. Here is a list of Python clients for Redis that highlights
redis-py as their preferred interface, and here is the redis-py page.
Couchbase
Couchbase is another distributed document store, with a more SQL-like API (as
compared to MongoDB’s JavaScript-like API)—here is a link to Couchbase’s
Python SDK.
Neo4j
Neo4j is a graph database, intended to store objects with graph-like relationships.
Here is a link to Neo4j’s Python guide.
LMDB
LMDB, the Symas Lightning Memory-mapped Database is a key-value store
database with a memory-mapped file, meaning the file doesn’t have to be read
from the beginning to get to the part where the data is—so the performance is
near the speed of an in-memory store. Python bindings are in the lmdb library.
286 | Chapter 11: Data Persistence

APPENDIX A
Additional Notes
Python’s Community
Python has a rich, inclusive, global community dedicated to diversity.
BDFL
Guido van Rossum, the creator of Python, is often referred to as the BDFL—the
Benevolent Dictator for Life.
Python Software Foundation
The mission of the Python Soware Foundation (PSF) is to promote, protect, and
advance the Python programming language, and to support and facilitate the growth
of a diverse and international community of Python programmers. To learn more, see
the PSF’s main page.
PEPs
PEPs are Python Enhancement Proposals. They describe changes to Python itself, or
the standards around it. People interested in Python’s history, or in language design in
general, would find them all really interesting—even the ones that eventually get
rejected. There are three different types of PEPs, defined in PEP 1:
287
Standards
Standards PEPs describe a new feature or implementation.
Informational
Informational PEPs describe a design issue, general guidelines, or information to
the community.
Process
Process PEPs describe a process related to Python.
Notable PEPs
There are a few PEPs that could be considered required reading:
PEP 8—Style Guide for Python Code
Read this. All of it. Follow it. The pep8 tool will help.
PEP 20—e Zen of Python
PEP 20 is a list of 19 statements that briefly explain the philosophy behind
Python.
PEP 257—Docstring conventions
PEP 257 contains the guidelines for semantics and conventions associated with
Python docstrings.
You can read more at the PEP index.
Submitting a PEP
PEPs are peer reviewed and accepted/rejected after much discussion. Anyone can
write and submit a PEP for review. The diagram in Figure A-1 illustrates what hap‐
pens after a draft PEP is submitted.
Figure A-1. Overview of the PEP review process
288 | Appendix A: Additional Notes

Python conferences
The major events for the Python community are developer conferences. The two
most notable conferences are PyCon, which is held in the United States, and its Euro‐
pean sibling, EuroPython. A comprehensive list of conferences is maintained at
http://www.pycon.org/.
Python user groups
User groups are where Python developers meet in person to present or talk about
Python topics of interest. A list of local user groups is maintained at the Python Soft‐
ware Foundation wiki.
Learning Python
These are some of our favorite references, grouped by level and application.
Beginners
e Python Tutorial
This is Python’s official tutorial. It covers all the basics and offers a tour of the
language and the Standard Library. Recommended for those who need a quick-
start guide to the language.
Python for Beginners
This tutorial focuses on beginner programmers. It covers many Python concepts
in depth. It also teaches you some advanced constructs in Python like lambda
expressions and regular expressions. It concludes with the tutorial “How to
access a MySQL db using Python.”
Learn Python
This interactive tutorial is an easy, nonintimidating way to get introduced to
Python. It takes the same approach used on the popular website Try Ruby—there
is an interactive Python interpreter built into the site that allows you to go
through the lessons without having to install Python locally.
Python for You and Me
This book is an excellent resource for learning all aspects of the language and is
good for those who prefer learning from a traditional book rather than a tutorial.
Online Python Tutor
This site gives you a visual step-by-step representation of how your program
runs. Python Tutor helps people overcome a fundamental barrier to learning
programming by understanding what happens as the computer executes each
line of a program’s source code.
Additional Notes | 289

Invent Your Own Computer Games with Python
This book is for those with no programming experience at all. Each chapter has
the source code for a game, and these example programs are used to demonstrate
programming concepts to give the reader an idea of what programs “look like.”
Hacking Secret Ciphers with Python
This book teaches Python programming and basic cryptography for absolute
beginners. The chapters provide the source code for various ciphers, as well as
programs that can break them.
Learn Python the Hard Way
This is an excellent beginner programmer’s guide to Python. It covers “hello
world” from the console to the Web.
Crash into Python
This site, also known as Python for Programmers with 3 Hours, gives developers
who have experience with other languages a crash course on Python.
Dive Into Python 3
This book is good for those ready to jump into Python 3. It’s a good read if you
are moving from Python 2 to 3 or if you already have some experience program‐
ming in another language.
ink Python: How to ink Like a Computer Scientist
This book attempts to give an introduction to basic concepts in computer science
through the use of the Python language. The focus was to create a book with
plenty of exercises, minimal jargon, and a section in each chapter devoted to
debugging. It explores the various features available in the Python language and
weaves in various design patterns and best practices.
The book also includes several case studies which have the reader explore the
topics discussed in the book in greater detail by applying those topics to real-
world examples. Case studies include designing a GUI and Markov Analysis.
Python Koans
This online tutorial is a Python version of Edgecase’s popular Ruby Koans. It’s an
interactive command-line tutorial teaching basic Python concepts using a test-
driven approach: by fixing assertion statements that fail in a test script, the stu‐
dent progresses in sequential steps to learning Python.
For those accustomed to languages and figuring out puzzles on their own, this
can be a fun, attractive option. For those new to Python and programming, hav‐
ing an additional resource or reference will be helpful.
290 | Appendix A: Additional Notes

A Byte of Python
This is a free introductory book that teaches Python at the beginner level—it
assumes no previous programming experience. There is an a version for Python
2.x and a version for Python 3.x
Learn to Program in Python with Codecademy
This Codecademy course is for the absolute Python beginner. This free and inter‐
active course provides and teaches the basics (and beyond) of Python program‐
ming while testing the student’s knowledge as she progresses through the
tutorials. It also also features a built-in interpreter for receiving instant feedback
on your coursework.
Intermediate
Eective Python
This book contains 59 specific ways to improve writing Pythonic code. At 227
pages, it is a very brief overview of some of the most common adapations pro‐
grammers need to make to become efficient intermediate-level Python program‐
mers.
Advanced
Pro Python
This book is for intermediate to advanced Python programmers who are looking
to understand how and why Python works the way it does and how they can take
their code to the next level.
Expert Python Programming
This book deals with best practices in programming Python, and is focused on
the more advanced crowd. It starts with topics like decorators (with caching,
proxy, and context manager case studies), method resolution order, using
super() and meta-programming, and general PEP 8 best practices.
It has a detailed, multichapter case study on writing and releasing a package and
eventually an application, including a chapter on using zc.buildout. Later chap‐
ters detail best practices such as writing documentation, test-driven develop‐
ment, version control, optimization, and profiling.
A Guide to Python’s Magic Methods
This handy resource is a collection of blog posts by Rafe Kettler that explain
“magic methods” in Python. Magic methods are surrounded by double under‐
scores (e.g., __init__) and can make classes and objects behave in different and
magical ways.
Additional Notes | 291

For Engineers and Scientists
Eective Computation in Physics
This field guide, by Anthony Scopatz and Kathryn D. Huff, is intended for early
graduate students who are starting to use Python in any scientific or engineering
field. It includes snippets for searching through files using SED and AWK, and
provides tips on how to accomplish every step in the research chain, from data
collection and analysis to publication.
A Primer on Scientic Programming with Python
This book, by Hans Petter Langtangen, mainly covers Python’s usage in the scien‐
tific field. In the book, examples are chosen from mathematics and the natural
sciences.
Numerical Methods in Engineering with Python
This book by Jaan Kiusalaas puts the emphasis on modern numerical methods
and how to implement them in Python.
Annotated Algorithms in Python: with Applications in Physics, Biology, and Finance
This tome, by Massimo Di Pierro, is a teaching tool intended to demonstrate the
algorithms used by implementing them in straightforward ways.
Miscellaneous Topics
Problem Solving with Algorithms and Data Structures
This book covers a range of data structures and algorithms. All concepts are illus‐
trated with Python code along with interactive samples that can be run directly in
your browser.
Programming Collective Intelligence
This book introduces a wide array of basic machine learning and data mining
methods. The exposition is not very mathematically formal, but rather focuses on
explaining the underlying intuition and shows how to implement the algorithms
in Python.
Transforming Code into Beautiful, Idiomatic Python
This video, by Raymond Hettinger, will show you how to take better advantage of
Python’s best features and improve existing code through a series of code trans‐
formations: “When you see this, do that instead.”
Fullstack Python
This site offers a complete top-to-bottom resource for web development using
Python from setting up the web server, to designing the frontend, choosing a
database, optimizing/scaling, and more. As the name suggests, it covers every‐
thing you need to build and run a complete web app from scratch.
292 | Appendix A: Additional Notes

References
Python in a Nutshell
This book covers most cross-platform Python usage, from its syntax, to built-in
libraries, to advanced topics such as writing C extensions.
e Python Language Reference
This is Python’s online reference manual. It covers the syntax and the core
semantics of the language.
Python Essential Reference
This book, written by David Beazley, is the definitive reference guide to Python.
It concisely explains both the core language and the most essential parts of the
Standard Library. It covers Python 3 and Python 2.6.
Python Pocket Reference
This book, written by Mark Lutz, is an easy-to-use reference to the core language,
with descriptions of commonly used modules and toolkits. It covers Python 3
and Python 2.6.
Python Cookbook
This book, written by David Beazley and Brian K. Jones, is packed with practical
recipes. It covers the core Python language as well as tasks common to a wide
variety of application domains.
Writing Idiomatic Python
This book, by Jeff Knupp, contains the most common and important Python idi‐
oms in a format that maximizes identification and understanding. Each idiom is
presented as a recommendation of a way to write some commonly used piece of
code, followed by an explanation of why the idiom is important. It also contains
two code samples for each idiom: the “harmful” way to write it and the
“idiomatic” way. There are different editions for Python 2.7.3+ and for
Python 3.3+.
Documentation
Ocial documentation
The official Python Language and Library documentation can be found here for
Python 2.x, and here for Python 3.x.
Ocial packaging documentation
The most current instructions for packaging your Python code will always be in
Python’s official packaging guide. And remember that testPyPI exists so you can
confirm that your packaging works.
Additional Notes | 293

Read the Docs
Read the Docs is a popular community project that hosts documentation for
open source software. It holds documentation for many Python modules, both
popular and exotic.
pydoc
pydoc is a utility that is installed when you install Python. It allows you to quickly
retrieve and search for documentation from your shell. For example, if you
needed a quick refresher on the time module, pulling up documentation would
be as simple as typing this into a command shell:
$ pydoc time
which is essentially equivalent to opening the Python REPL and running:
>>> help(time)*
News
Our favorite places to get Python news are listed here in alphabetical order:
Name Description
/r/python The Reddit Python community where users contribute and vote on Python-related news.
Import Python Weekly A weekly newsletter containing Python articles, projects, videos, and tweets.
Planet Python An aggregate of Python news from a growing number of developers.
Podcast.__init__ A weekly podcast about Python and the people who make it great.
Pycoder’s Weekly A free weekly Python newsletter for Python developers by Python developers (it highlights
interesting projects and includes articles, news, and a jobs board).
Python News The news section in the ocial Python website. It briey highlights the news from the Python
community.
Python Weekly A free weekly newsletter featuring curated news, articles, new releases, and jobs related to Python.
Talk Python to Me A podcast on Python and related technologies.
294 | Appendix A: Additional Notes

Index
A
abstraction layers, 61-65
ActivePython, 20
ActiveState, 20
Advanced Message Queuing Protocol (AMQP),
251
Amazon S3, 172
Anaconda, 19, 38
Ansible, 217
Apache HTTP server, 211
Apache licenses, 89
applications, using logging in, 86
Aptana Studio 3, 29
arbitrary argument list, 49
arbitrary keyword argument dictionary, 50
argparse module, 187
argument passing, code style for, 48-52
Atom, 26
Autoenv, 36
B
bbFreeze, 178
bcrypt, 256
Beazley, David, 225, 227
Beck, Kent, 213
Behave, 82
Bendersky, Eli, 245
Berkeley Software Distribution (BSD)-style
licenses, 89
Blanks, Hunter, 45
block comments, docstrings vs., 84
Bokeh, 262
Boost.Python, 236
bpython, 33
breaking tests, 73
BSD (Berkeley Software Distribution)-style
licenses, 89
buffer protocol, 245
Buildbot, 215
Buildout, 38
built distribution
defined, 168
packaging for Linux, 179
C
C Foreign Function Interface (CFFI), 233
C/C++
Boost.Python, 236
CFFI (C Foreign Function Interface), 233
ctypes and, 234
licensing issues, 173
SWIG and, 235
__call__() method, 152
Canopy, 20
Cassandra, 285
Celery, 251
CFFI (C Foreign Function Interface), 233
Chameleon Page Templates, 208
Chef, 219
CI (see continuous integration)
circular dependencies, 64
class-based decorators, 150
classes
custom, user-extensible, 106
mixins, 153
new-style vs. old-style, 155
Click, 190-192
295

cliff (Command-Line Interface Formulation
Framework), 193
closures
Diamond project example, 109
late binding, 59
cmath library, 263
cocos2d, 200
Codd, Edgar F., 271
code
complex vs. complicated, 106
continuing a long line of, 54
reading (see reading great code)
shipping (see shipping great code)
testing (see testing your code)
writing great (see writing great code)
Code (text editor), 27
code management/improvement, 213-236
continuous integration, 213
speed optimization, 223-236
system administration, 214-223
code style, 43-60
common gotchas, 58-60
conventions, 52-54
Diamond examples, 109-112
error handling, 47
explanations of implementations, 50
explicit vs. implicit, 46
Flask examples, 162
function arguments, 48-52
general advice, 46-52
HowDoI examples, 97-99
idioms, 54-58
PEP 20, 45
PEP 8, 44
Requests examples, 135-140
return values and, 51
sparsity vs. density, 46
Tablib examples, 124-126
"we are all responsible users" philosophy, 51
Werkzeug examples, 148
command-line applications, 186-194
argparse, 187
Click, 190-192
cliff, 193
Clint, 192
docopt, 188
plac, 189
commercial Python distributions, 18-20
community, Python, 287-289
complex code, complicated code vs., 106
Conda, 38, 169
context, global, 64
continuous integration (CI), 213
Buildbot, 215
Jenkins, 215
tox, 214
Continuum Analytics, 19
conventions
accessing dictionary elements, 53
alternatives to checking for equality, 52
code style and, 52-54
continuing a long line of code, 54
manipulating lists, 53
copyleft licenses, 89
Córdoba, Carlos, 30
coroutines, 247
Couchbase, 286
coupling, hidden, 64
CPython, 5
Stackless Python and, 5
Windows installation, 15-17
cross-language data serialization, 244
Cryptography (Python package), 254, 255
cryptography libraries
bcrypt, 256
Cryptography, 255
hashlib, 253
libnacl, 255
libraries, 251-257
PyCrypto, 256
PyNaCl, 255
pyOpenSSL, 254
secrets, 254
ssl, 252
ctypes, 234
custom classes, user-extensible, 106
cv2, 268
cx_Freeze, 176
Cython, 228-230
D
data compression, 245
data manipulation libraries, 259-269
comparison of libraries, 259
cv2, 268
decimal, fractions, and numbers, 263
image manipulation, 267-269
IPython, 261
296 | Index

matplotlib, 262
nltk, 265-267
NumPy, 261
Pandas, 262
Pillow, 268
Rpy2, 263
scientific applications, 260-264
Scikit-Image, 269
Scikit-Learn, 262
SciPy, 262
string tools in Python’s standard library,
264-267
SymPy, 264
SyntaxNet, 267
text manipulation/mining, 264-267
data persistence, 271-286
database libraries, 272-286
(see also database libraries)
structured files and, 271
data serialization, 243-246
buffer protocol, 245
compression, 245
cross-language serialization, 244
Pickle, 243
database libraries, 272-286
Django ORM, 278-280
NoSQL libraries, 285-286
peewee, 280-282
PonyORM, 282
Records, 284
SQLAlchemy, 275-278
sqlite3, 275
SQLObject, 284
decimal.Decimal class, 263
decorators
class-based (in Werkzeug project), 150
project structure and, 67
@property decorator, 122
routing (Flask project example), 162
Tablib examples, 117-119
default arguments, mutable, 58
defaults
application-specific (Flask project), 163
sane, 165
dependencies
circular, 64
packaging and, 168
vendorizing, 71, 122
development environment, 21-40
enhanced interactive tools, 32
IDEs, 27-32
isolation tools, 33-40
text editors, 22-27
virtual environments, 34-36
development tools, 13-14
Diamond, 99-112
closure example, 109
complex vs. complicated code, 106
internal code complexity, 107-109
logging, 104
reading code, 103-104
reading documentation, 100
running, 101
separating functionality into namespaces,
105
structure examples from, 105-109
style examples from, 109-112
user interface, 106
user-extensible custom classes, 106
dictionary elements, accessing, 53
dictionary, logging via, 87
difflib module, 265
distributed systems
gevent, 248
networking, 246-251
performance networking tools in Python’s
standard library, 247
PyZMQ, 249
RabbitMQ, 251
software interfaces for, 246-251
Twisted, 249
distributing code (see shipping great code)
distribution packages, 169
Django, 202
Django Girls, xi
Django ORM, 278-280
Docker, 39
docopt, 188
docstrings
block comments vs., 84
Sphinx-compatible, in Requests project, 130
documentation, 82
docstrings vs. block comments, 84
project documentation, 82
project publication, 83
Sphinx tool for, 83
double underscore (__), 55
Druid, 286
Index | 297

duck typing, 149
dynamic typing, 68
E
easy_install, 170
Eby, Phillip J., 140
Eclipse, 29
eggs, 168
Ellison, Larry, 271
Elpy, 26
Emacs, 25
enhanced interactive tools, 32
bpython, 33
IDLE, 32
IPython, 33
Enthought, 20
equality, alternatives to checking for, 52
Eric (the Eric Python IDE), 31
error handling, code style for, 47
F
F2PY (Fortran-to-Python) interface generator,
234
Fabric, 221
Falco, Gabriel, 82
Fettig, Abe, 249
file formats, programmatically registered,
119-122
fixture (testing tool), 81
Flask, 155-166, 203
application-specific defaults, 163
logging, 161-162
modularity, 165
reading code, 157-160
reading documentation, 156
routing decorators, 162
structure examples, 163-166
style examples, 162
using, 156
Fortran-to-Python (F2PY) interface generator,
234
Fowler, Martin, 213, 273, 275
framework (see software framework)
framework, reading code in, 156-160
freezing code, 172-179
bbFreeze, 178
comparison of popular tools for, 173
cx_Freeze, 176
defined, 172
py2app, 177
py2exe, 177
PyInstaller and, 174
function arguments, 48-52
function definitions, 58
function names, underscore-prefixed, 97
functional programming, 66
functionality, separating into namespaces, 105
functions, decorators and, 67
G
Gale, Andy, 220
Gallina, Fabián Ezequiel, 26
game development, GUI applications for, 200
gevent, 248
Gleitzman, Benjamin, 47, 93
Global Interpreter Lock (GIL), 223, 231, 246
global state/context, 64
Gondor, 210
GPU libraries, for speed optimization, 231
GTK+, 198
GUI applications, 194-200
game development, 200
GTK+, 198
Kivy, 196
Objective-C, 199
Qt, 197
Tk, 196
wxWidgets, 198
Gunicorn (Green Unicorn), 211
H
Hansson, David Heinemeier, 213
hashlib module, 253
HBase, 285
Heroku, 210
Hettinger, Raymond, 45
hidden coupling, 64
Homebrew, 10
hooks, version control automation, 73
hosting, 210
HowDoI, 93-99
compatibility handling, 98
leveraging data from system, 97
limiting functions to doing just one thing,
97
packaging, 96
Pythonic coding choices, 98
reading a single-file script, 93-96
298 | Index

structure examples from, 96
style examples from, 97-99
underscore-prefixed function names, 97
HTTP (Hypertext Transfer Protocol), 238
I
IDEs (integrated development environments),
27-32
Aptana Studio 3, 29
Eclipse, 29
Eric, 31
IntelliJ IDEA, 29
Komodo IDE, 31
LiClipse, 30
NINJA-IDE, 30
PyCharm, 29
PyDev, 29
Spyder, 30
Visual Studio, 32
WingIDE, 30
idioms (idiomatic Python)
code style, 54-58
creating a length-N list of the same thing, 55
exception-safe contexts, 57
ignoring a value, 55
unpacking, 55
IDLE (Integrated Development and Learning
Environment), 32
image manipulation, 267-269
cv2, 268
Pillow, 268
Scikit-Image, 269
immutable types, 69-71
implementations, Python, 5-7
clarity of explanations of, 50
CPython, 5
IronPython, 6
Jython, 6
MicroPython, 7
PyPy, 6
PythonNet, 6
Skulpt, 7
Stackless, 5
independence, in code testing, 72
INI file, logging via, 86
installation packages, 169
installation, Python, 9-20
commercial Python redistributions, 18-20
Linux, 12-15
Mac OS X, 9-12
Windows, 15-18
Integrated Development and Learning Environ‐
ment (IDLE), 32
integrated development environments (see
IDEs)
Intel Distribution for Python, 19
IntelliJ IDEA, 29
interfaces, software (see software interfaces)
Internet Software Consortium (ISC) licenses,
89
IPython, 33, 261
IronPython, 6
ISC (Internet Software Consortium) licenses,
89
isolation tools, 33-40
Autoenv, 36
Buildout, 38
Conda, 38
Docker, 39
pyenv, 36
virtual environments, 34-36
virtualenvwrapper, 37
J
Jenkins CI, 215
Jinja2, 155, 205-207
Joshi, Kavya, 248
Joy, Bill, 23
JSON, parsing for web APIs, 239
Jupyter notebooks, 185
Jython, 6
K
keyword arguments, 49
Kiss, Tibor, 265
Kivy, 196
Knupp, Jeff, 225
Komodo IDE, 31
L
late binding closures, 59
Lettuce, 82
libnacl, 255
library, using logging in a, 85
libsodium, 255
licenses
C libraries and, 173
Index | 299

options, 88
resources on legal aspects of, 90
selection process, 88-90
upstream, 88
LiClipse, 30
Lindberg, Van, 90
Linux
built distribution packaging, 179
caveats to distribution packages on, 179
Python installation on, 12-15
virtual environment creation/activation on,
34
list (*) operator, 55
list comprehension, 70
lists, manipulating, 53
LMDB, 286
logging, 84-88
Diamond project, 104
directly in code, 88
Flask project, 161-162
in a library, 85
in an application, 86
print vs., 85
via a dictionary, 87
via INI file, 86
Luigi, 223
lxml, 242
M
Mac OS X
Python installation on, 9-12
virtual environment creation/activation on,
34
Mako, 209
Massachusetts Institute of Technology (MIT)
licenses, 89
math library, 263
matplotlib, 262
McKellar, Jessica, 249
McQueen, Rob, 180
memory, saving with __slots__, 122
methods, decorators and, 67
MicroPython, 7
Microsoft Code text editor, 27
MIT (Massachusetts Institute of Technology)
licenses, 89
mixins, 153
Mock, 75, 81
modularity, Flask, 165
modules, 61-65, 62
MongoDB, 285
monkey patch, 75
Moolenaar, Bram, 23
multiprocessing, 225-227
mutable default arguments, 58
mutable types, 69-71
N
namespace tools, 63
namespaces
for grouping functions in Tablib project,
116
separating functionality into, 105
Neo4j, 286
networking, 246-251
gevent, 248
performance tools in Python’s standard
library, 247
PyZMQ, 249
RabbitMQ, 251
Twisted, 249
new-style classes, 155
Nginx, 211
NINJA-IDE, 30
nltk (Natural Language ToolKit), 265-267
North, Dan, 82
Nose, 80
NoSQL database libraries, 285-286
Numba, 230, 231
numbers library, 263
NumPy, 234, 261
O
object class, new-style classes and, 155
object-oriented programming, Python-specific
approach to, 66-67
object-relational mapping (ORM), 272
Objective-C, 199
Oddgard, Allan, 26
old-style classes, 155
open-source licenses, 89
OpenCV (OpenSource Computer Vision), 268
operator overloading, 124-126
optional arguments, 49
ORM (object-relational mapping), 272
300 | Index

P
packages, 65
project structure and, 65
various definitions of, 169
packaging, 169-172
(see also shipping great code)
conda package manager, 169
HowDoI project, 96
PyPI for, 170-172
Pandas, 262
Parente, Peter, 82
peewee, 280-282
PEP 20 (the Zen of Python), 45
PEP 8, 44
PEPs (Python Enhancement Proposals),
287-289
permissive licenses, 89
Peters, Tim, 45
Pickle, 243
pika, 251
Pillow, 268
pipeasy_install vs., 170
Python installation on Linux, 12
Python installation on Mac OS X, 11
Python installation on Windows, 17
VCS support for, 172
plac, 189
platform as a service (PaaS), 210
Plotly, 262
PonyORM, 282
positional arguments, 49
precision, in code testing, 72
print, logging vs., 85
programmatically registered file formats,
119-122
project
documentation, 82
publication, 83
structuring (see structuring your project)
@property decorator, 122
Psutil, 220
publication, 83
Punkt tokenizer, 265
Puppet, 218-219
pure functions, 67
py.test, 80
py2app, 177
py2exe, 177
PyCA (Python Cryptographic Authority), 251
PyCharm, 29
PyCrypto, 256
PyDev, 29
pyenv, 36
Pygame, 200
Pygame-SDL2, 200
pyglet, 200
PyInstaller, 174
PyNaCl, 255
pyOpenSSL, 254
PyPA (Python Packaging Authority), 167
PyPI
for downloads/installations, 170-172
for proprietary packages, 171
for testing, 170
pip vs. easy_install, 170
Pypiserver, 171
S3-hosted, 172
sample project, 170
VCS support for pip, 172
Pypiserver, 171
PyPy, 227
Pyramid, 204
PySDL2, 200
Python (generally), 3-7
community, 287-289
documentation, 293
implementations, 5-7
installation (see installation, Python)
news sites, 294
Python 2 vs. Python 3, 3-4
references for learning, 289-293
Python 2
Python 3 vs., 3-4
reasons for staying with, 4
Python 2.7, new-style classes, 155
Python 3
new-style classes and object, 155
Python 2 vs., 3-4
reasons for adopting, 4
Python Cryptographic Authority (PyCA), 251
Python Enhancement Proposals (PEPs),
287-289
Python Packaging Authority (PyPA), 167
Python Software Foundation, 88, 287
Python Tools for Visual Studio, 6
Python-mode (Vim), 25
python.el, 26
Index | 301

PythonAnywhere, 210
PythonNet (Python for .NET), 6
PyZMQ, 249
Q
Qt, 197
R
RabbitMQ, 251
race conditions, 66
random library, 263
ravioli code, 64
reading great code, 91-166
common features among example projects,
92
Diamond project, 99-112
(see also Diamond)
Flask project, 155-166
(see also Flask)
HowDoI project, 93-99
(see also HowDoI)
Requests project, 126-140
(see also Requests library)
Tablib project, 112-126
(see also Tablib)
Werkzeug project, 140-155
(see also Werkzeug)
Records (SQL library), 284
Redis, 286
regular expressions, 149
Reitz, Kenneth, 112, 126
Requests library, 126-140
HTTP and, 238
reading code, 127-129
reading documentation, 127
Request and PreparedRequest objects,
133-135
sets and set arithmetic, 135
Sphinx-compatible docstrings, 130
status codes, 137-140
structure examples, 130-135
style examples from, 135-140
testing your code in, 79
top-level API, 130-132
using, 127
requirements.txt, 35
Response class, with __call__ () method, 152
RESTful APIs, 238
reStructured Text, 84
return values, 51
Ronacher, Armin, 141, 155
routing decorators, 162
Rpy2, 263
S
S3 (see Amazon S3)
SageMath, 263
Salt, 216
sane defaults, 165
Schäfer, Jorgen, 26
scientific applications, libraries for, 260-264
decimal, fractions, and numbers, 263
IPython, 261
matplotlib, 262
NumPy, 261
Pandas, 262
Rpy2, 263
Scikit-Learn, 262
SciPy, 262
SymPy, 264
Scikit-Image, 269
Scikit-Learn, 262
SciPy, 262
secrets library, 254
separation of concerns, 204
serialization (see data serialization)
server automation, 216-220
Ansible, 217
CFEngine, 220
Chef, 219
Puppet, 218-219
Salt, 216
sets, 135
Setuptools
Python installation on Linux, 12
Python installation on Mac OS X, 11
Python installation on Windows, 17
shim, 36
shipping great code, 167-182
executable ZIP files, 180
freezing code, 172-179
packaging, 169-172
packaging for Linux built distributions, 179
vocabulary and concepts, 168
side effects, 67
Simple Storage Service (S3) (see Amazon S3)
simplejson, 240
302 | Index

Simplified Wrapper Interface Generator
(SWIG), 235
Skinner, Jon, 23
Skulpt, 7
__slots__, 122
software interfaces, 237-257
cryptography, 251-257
data serialization, 243-246
for distributed systems, 246-251
(see also distributed systems)
web APIs, 238-243
web clients, 238-243
software toolkit, 141-147
spaghetti code, 64
speed optimization, 223-236
Boost.Python, 236
CFFI (C Foreign Function Interface), 233
ctypes, 234
Cython, 228-230
F2PY, 234
GPU libraries, 231
interfacing with C/C++ or FORTRAN libra‐
ries, 232-236
multiprocessing, 225-227
Numba, 230
PyPy, 227
subprocess library, 227
SWIG, 235
threading, 225
speed, code testing, 72
Sphinx
and docstrings in Requests project, 130
for documentation, 83
reStructured Text, 84
Tablib documentation, 115
Spyder, 30
SQLAlchemy, 275-278
sqlite3, 275
SQLObject, 284
ssl module, 252
Stackless Python, 5
Stallman, Richard, 25
status codes, 137-140
Steele, Guy L., Jr., 25
string tools, 264-267
nltk, 265-267
SyntaxNet, 267
structured files, 271
structuring your project, 61-72
decorators, 67
Diamond examples, 105-109
dynamic typing, 68
Flask examples, 163-166
modules, 61-65
object-oriented programming, 66-67
packages, 65
Requests examples, 130-135
signs of poor structure, 64
Tablib examples, 116-124
vendorizing dependencies, 71
Werkzeug examples, 149-155
Strunk, Jan, 265
style, code (see code style)
Sublime Text, 23
subprocess library, 227
SWIG (Simplified Wrapper Interface Genera‐
tor), 235
SymPy, 264
SyntaxNet, 267
system administration
code management/improvement, 214-223
Jenkins, 215
server automation, 216-220
system/task monitoring, 220-223
Travis-CI, 214
system/task monitoring, 220-223
Fabric, 221
Luigi, 223
Psutil, 220
T
Tablib, 112-126
descriptors and property decorator, 117-119
namespaces for grouping functions, 116
operator overloading, 124-126
programmatically registered file formats,
119-122
reading code, 113-115
reading documentation, 112
saving memory with __slots__, 122
Sphinx documentation, 115
structure examples from, 116-124
style examples from, 124-126
testing your code in, 77-79
using, 112
vendorized dependencies in packages direc‐
tory, 122
TCP/IP, 237
Index | 303

TDD (test-driven development), 72
template engines (see web template engines)
test-driven development (TDD), 72
testing your code, 72-82
basics, 74-76
Behave, 82
doctest, 76
examples, 76-79
fixture, 81
in Requests, 79
in Tablib, 77-79
Lettuce, 82
Mock, 75, 81
Nose, 80
options for older versions of Python, 81
py.test, 80
tips, 72
tox, 81
Travis-CI for, 214
unittest, 74
Unittest 2, 81
testPyPI, 170
text editors, 22-27
Atom, 26
Code, 27
Emacs, 25
Sublime Text, 23
TextMate, 26
Vim, 23-25
text manipulation/mining, 264-267
nltk, 265-267
string tools in Python’s standard library,
264-267
SyntaxNet, 267
TextMate, 26
threading, 225
Tk, 196
toolkit (see software toolkit)
Tornado, 203
Totic, Aleks, 29
toxCI and, 214
testing your code with, 81
Werkzeug and, 147
Travis-CI, 214
TweetNaCL, 255
Twisted, 249
types
dynamic, 68
guessing (Werkzeug project example), 148
mutable/immutable, 69-71
U
underscore-prefixed function names, 97
underscores, throwaway variables and, 55
unittest, 74, 75, 81
Unittest 2, 81
unpacking, 55
untangle, 240
upstream licenses, 88
user interaction, 185-212
command-line applications, 186-194
(see also command-line applications)
GUI applications, 194-200
(see also GUI applications)
Jupyter notebooks, 185
web application development, 200-212
(see also web application development)
user interface, Diamond, 106
uWSGI, 212
V
value, ignoring, 55
van Rossum, Guido, 32, 287
variables
dynamic typing, 68
late binding closures, 59
VCS (version control system), 172
vendorizing/vendorized dependencies, 71, 122,
181
version control automation hooks, 73
Vi, 23
Vim, 23-25
virtual environments, 34-36
adding libraries to, 35
creating/activating, 34
deactivating, 35
virtualenv command, 34
Python installation on Linux, 14
Python installation on Mac OS X, 11
Python installation on Windows, 18
virtualenvwrapper, 37
Visual Studio, 32
W
Waitress, 212
Walsh, Ciarán, 26
304 | Index

"we are all responsible users", 51, 122
web APIs, 238-243
JSON parsing, 239
lxml, 242
web scraping, 241
XML parsing, 240
web application development, 200-212
deployment, 209-212
frameworks/microframeworks, 201-204
template engines, 204-209
web clients, software interfaces for, 238-243
web deployment, 209-212
hosting, 210
web servers, 210
WSGI servers, 211
web frameworks/microframeworks, 201-204
Django, 202
Flask, 203
Pyramid, 204
Tornado, 203
web scraping, 241
Web Server Gateway Interface (WSGI) servers,
211
web servers, 210
web template engines, 204-209
Chameleon, 208
Jinja2, 205-207
Mako, 209
Werkzeug, 140-155
class based decorators, 150
Flask and, 155
guessing types, 148
mixins, 153
reading code, 145-147
reading documentation, 141
regular expressions in, 149
Response.__call__, 152
structure examples from, 149-155
style examples from, 148
tox in, 147
using, 141-144
wheels, 168
widget libraries, 194-199
GTK+, 198
Kivy, 196
Objective-C, 199
Qt, 197
Tk, 196
wxWidgets, 198
Windows
C++ licensing issues, 173
Python installation on, 15-18
virtual environment creation/activation on,
34
WingIDE, 30
writing great code, 43-90
code style, 43-60
(see also code style)
documentation, 82
license selection, 88-90
logging, 84-88
structuring your project, 61-72
testing your code, 72-82
WSGI (Web Server Gateway Interface) servers,
211
wxWidgets, 198
X
XML, parsing for web APIs, 240
xmltodict, 241
Z
Zadrozny, Fabio, 29
Zen of Python (PEP 20), 45
ZeroMQ, PyZMQ and, 249
ZIP files, for packaging pure Python apps, 180
Index | 305

About the Authors
Kenneth Reitz is the product owner of Python at Heroku and a Fellow at the Python
Software Foundation. He is well known for his many open source projects, specifi‐
cally Requests: HTTP for Humans.
Tanya Schlusser is her mom’s primary Alzheimer’s caregiver, and an independent
consultant who uses data to drive strategic decisions. She’s delivered over 1,000 hours
of data science training to individual students and corporate teams.
Colophon
The animal on the cover of e Hitchhiker’s Guide to Python is the Indian brown
mongoose (Herpestes fuscus), a small mammal native to the forests of Sri Lanka and
southwest India. It is very similar to the short-tailed mongoose (Herpestes brachyu‐
rus) of southeast Asia, of which it may be a subspecies.
The Indian brown mongoose is slightly larger than other species of mongoose, and is
distinguished by its pointed tail and furry hind legs. Their fur varies from dark brown
on their bodies to black on their legs. They are rarely seen by humans, suggesting that
they are nocturnal or crepuscular (active at dawn and dusk).
Until recently, data on the Indian brown mongoose was sparse and their population
was thought to be vulnerable. Improved scientific monitoring has discovered a fairly
large population, especially in southern India, so their status has been upgraded to
Least Concern. Another population of the Indian brown mongoose was also recently
discovered on the island of Viti Levu in Fiji.
Many of the animals on O’Reilly covers are endangered; all of them are important to
the world. To learn more about how you can help, go to animals.oreilly.com.
The cover image is from Lydekker’s Royal Natural History. The cover fonts are URW
Typewriter and Guardian Sans. The text font is Adobe Minion Pro; the heading font
is Adobe Myriad Condensed; and the code font is Dalton Maag’s Ubuntu Mono.
