Kofax Kapow Administrator's Guide Administrators EN
User Manual: Pdf
Open the PDF directly: View PDF ![]() .
.
Page Count: 76
- Table of Contents
- Preface
- Introduction
- Runtime
- Tomcat Management Console
- Tomcat Deployment
- Advanced Configuration
- WebSphere Management Console
- Audit Log for Management Console
- SQL Scripts for Kapow Tables

Kofax Kapow
Administrator's Guide
Version: 10.2.0.1
Date: 2017-09-29
© 2017 Kofax. All rights reserved.
Kofax is a trademark of Kofax, Inc., registered in the U.S. and/or other countries. All other trademarks
are the property of their respective owners. No part of this publication may be reproduced, stored, or
transmitted in any form without the prior written permission of Kofax.

Table of Contents
Preface.......................................................................................................................................................... 5
Related Documentation...................................................................................................................... 5
Training............................................................................................................................................... 5
Getting Help for Kofax Products........................................................................................................ 5
Chapter 1: Introduction.............................................................................................................................. 7
Upgrade Notes....................................................................................................................................7
Create a Backup......................................................................................................................7
Install Management Console................................................................................................... 7
Upgrade Management Console Configuration........................................................................ 7
Restore the Backup.................................................................................................................8
Chapter 2: Runtime..................................................................................................................................... 9
RoboServer......................................................................................................................................... 9
Start RoboServer................................................................................................................... 10
Production Configuration....................................................................................................... 14
RoboServer Configuration................................................................................................................ 16
Enter License in Embedded Management Console..............................................................17
Embedded Management Console Configuration.................................................................. 18
Security............................................................................................................................................. 18
RoboServer TLS Configuration............................................................................................. 19
Restrictions.............................................................................................................................19
Request Authentication..........................................................................................................19
Configure RoboServer Logging............................................................................................. 20
Certificates........................................................................................................................................ 21
Install HTTPS Certificates..................................................................................................... 22
Install HTTPS Client Certificates........................................................................................... 23
Install API Client Certificates.................................................................................................24
Install API Server Certificate................................................................................................. 24
RoboServer Configuration - Headless Mode................................................................................... 25
JMS Mode.........................................................................................................................................28
Management Console in JMS Mode.....................................................................................28
RoboServer Options in JMS Mode....................................................................................... 29
Queues and Topics................................................................................................................30
JMX Server Configuration................................................................................................................ 32
Default RoboServer Project..............................................................................................................32
3

Kofax Kapow Administrator's Guide
Change the RAM Allocation.............................................................................................................32
Troubleshoot RoboServer Service Startup.......................................................................................33
Chapter 3: Tomcat Management Console.............................................................................................. 34
Tomcat Deployment.......................................................................................................................... 34
Install Management Console on Tomcat...............................................................................35
Configure ManagementConsole.war..................................................................................... 35
Spring Configuration Files..................................................................................................... 36
Troubleshooting......................................................................................................................36
Create a New Database........................................................................................................37
Create a Tomcat Context File............................................................................................... 38
Start Tomcat...........................................................................................................................40
Enter License Information......................................................................................................41
Project Permissions............................................................................................................... 43
Security.................................................................................................................................. 47
Deployment Checklist............................................................................................................ 48
Advanced Configuration................................................................................................................... 50
LDAP and SiteMinder Integration..........................................................................................50
Configure JMS Mode.............................................................................................................54
High Availability......................................................................................................................57
URI Encoding.........................................................................................................................63
Password Encryption............................................................................................................. 63
SSL Endpont Verification.......................................................................................................64
Chapter 4: WebSphere Management Console....................................................................................... 67
Chapter 5: Audit Log for Management Console....................................................................................69
Audit Log Reference.........................................................................................................................70
Chapter 6: SQL Scripts for Kapow Tables............................................................................................. 76
4

Preface
This guide includes administration information for Kapow including:
• Runtime
• Tomcat Management Console
Related Documentation
In addition to the Administrator's Guide, the Kapow documentation set includes the following
documentation.
• Installation Guide
• Developer's Guide
• User's Guide
Training
Kofax offers both classroom and computer-based training to help you make the most of your Kofax Kapow
solution. Visit the Kofax website at www.kofax.com for details about the available training options and
schedules.
Getting Help for Kofax Products
Kofax regularly updates the Kofax Support site with the latest information about Kofax products.
To access some resources, you must have a valid Support Agreement with an authorized Kofax Reseller/
Partner or with Kofax directly.
Use the tools that Kofax provides for researching and identifying issues. For example, use the Kofax
Support site to search for answers about messages, keywords, and product issues. To access the Kofax
Support page, go to www.kofax.com/support.
The Kofax Support page provides:
• Product information and release news
Click a product family, select a product, and select a version number.
• Downloadable product documentation
Click a product family, select a product, and click Documentation.
• Access to product knowledge bases
5

Kofax Kapow Administrator's Guide
Click Knowledge Base.
• Access to the Kofax Customer Portal (for eligible customers)
Click Account Management and log in.
To optimize your use of the portal, go to the Kofax Customer Portal login page and click the link to
open the Guide to the Kofax Support Portal. This guide describes how to access the support site, what
to do before contacting the support team, how to open a new case or view an open case, and what
information to collect before opening a case.
• Access to support tools
Click Tools and select the tool to use.
• Information about the support commitment for Kofax products
Click Support Details and select Kofax Support Commitment.
Use these tools to find answers to questions that you have, to learn about new functionality, and to
research possible solutions to current issues.
6

Chapter 1
Introduction
This guide is intended for system administrators who deploy Kapow in the enterprise environment.
Upgrade Notes
If you are running a previous version of Management Console, this topic describes how to upgrade to the
latest version.
Upgrading includes the following steps:
1. Create a backup of your data from the previous version of Management Console.
2. Install a new version of the Management Console.
3. Update the Management Console configuration.
4. Restore the backup.
Create a Backup
Check the online documentation of your previous version of Management Console to learn how to create
a backup.
Users upgrading from version 9.x can also consult our notes on upgrading and the Data Migration Tutorial
topic in the Installation Guide.
Install Management Console
Follow the next steps in this guide to learn how to install the Management Console. If you are upgrading
from 8.1 or later you can reuse your old Configuration.xml, see next section.
Upgrade Management Console Configuration
If you are upgrading from version 8.0 or earlier, you will have to re-configure your new Management
Console from scratch. Prior to version 8.1 some configuration was done in web.xml this is no longer the
case. You may no longer copy or modify the web.xml.
As of version 8.2 , LDAP integration is no longer container-managed. If you used LDAP for authentication
in a previous version, you should remove the Realm definition in the ManagementConsole.xml inside
Tomcat's conf/Catalina/localhost/. LDAP integration is now configured in WEB-INF/login.xml, as described
in LDAP Integration
7

Kofax Kapow Administrator's Guide
Restore the Backup
Check the Management Console user's guide for details on how to restore a backup.
8
Chapter 2
Runtime
Kapow offers a number of tools for executing the robots you have developed. The following sections
describe these tools:
• RoboServer is a server application that allows remote clients to execute robots. It is configured using
both the Management Console and the RoboServer Settings application (for advanced configuration,
such as security and authentication).
• The Management Console allows you to schedule execution of Robots, view logs and extracted data.
Also provides a dashboard for monitoring system health, and a centralized place where settings for
clusters of RoboServers can be configured.
Note Timezone definitions are embedded in the bundled JRE. In case there are changes to the
definitions since the release date, the JRE can be updated using the Timezone Updater Tool provided
by Oracle. Refer to the Oracle website for further information.
RoboServer
RoboServer runs robots created in Design Studio. Robots can be started in various ways; either
scheduled to run at specific times by the Management Console, called via a REST web service, through
the Java or .NET APIs or from a Kapplet.
Important The minimal Linux installation must include the following packages to be able to run Robots
created with Default browser engine.
•libX11.so.6
•libGL.so.1
•libXext.so.6
Use yum install or sudo apt-get command to install necessary libraries on a Linux platform.
Also make sure the system has some fonts installed. This might be necessary in case a headless Linux
install is used, because some of the Linux installation packages do not contain fonts.
In order for RoboServer to be able to execute robots, it must be activated by a Management Console.
A RoboServer is active when it belongs to a cluster in a Management Console with a valid license, and
sufficient KCUs have been assigned to the cluster. The RoboServer also receives settings from the
Management Console where they are configured on the clusters. Please refer to Management Console for
more information on the administration of RoboServers and clusters.
9
Kofax Kapow Administrator's Guide
Start RoboServer
RoboServer can be started in several different ways:
• By clicking the RoboServer program icon (or the Start Management Console program icon which starts
both the Management Console and RoboServer).
• By invoking it from the command line.
• By running it as a service. See Starting Servers Automatically below.
To invoke RoboServer from the command line, open a Command Prompt window, navigate to the bin
folder in the Kapow installation folder and type:
RoboServer
If all necessary parameters are specified in the roboserver.settings configuration file, the RoboServer
starts.
If any of the necessary parameters is missing, the RoboServer specifies an error and displays the usage
help and available parameters.
RoboServer Parameters
The command line for starting a RoboServer may include the following parameters:
RoboServer [-s <service:params>] [-mcUrl <url>] [-cl <Cluster Name>]
[-b <url>] [-jmsNamespace <name>] [-p <port number>]
[-sslPort <port number>] [-v]
Regardless of how you start RoboServer, it accepts the parameters in the following table. Note that you
can edit all the parameters in the RoboServer Settings utility. See RoboServer Configuration for more
details.
Parameter Description
-s
-service <service:params>
This parameter specifies a RQL or JMX service that
RoboServer should start. This parameter must be specified
at least once, and may be specified multiple times to start
multiple services in the same RoboServer. The available
services depend on your installation.
Example: -service socket:50000
Example: -service jmx:50100
-mcUrl <arg> Required parameter. Specify which Management
Console to register to in the following format:
http[s]://
<username>:<password>@<hostname>:<port
number>
Example: -mcUrl http://
admin:password@localhost:8080/
ManagementConsole
10
Kofax Kapow Administrator's Guide
Parameter Description
-cl
-cluster <Cluster Name>
Required parameter. This parameter automatically
registers the roboserver with the specified cluster on
the Management Console. In the following example the
roboserver registers itself with the Production cluster.
Example: -cl Production
Example: -mcUrl http://
admin:password@localhost:8080/
ManagementConsole -cl Production
-eh
-externalHost <name>
Explicitly specifies the name or IP address of the
RoboServer's host. *
This parameter should be specified when the host address
is different from what a RoboServer discovers on the local
machine, such as when running with NAT in the cloud, or
when you run the RoboServer in a Docker container.
Example: -eh 10.10.0.123
-ep
-externalPort <port number>
Explicitly specifies the port number of the RoboServer's
host. *
This parameter should be specified when the host port is
different from what a RoboServer discovers on the local
machine, such as when running with NAT in the cloud, or
when you run the RoboServer in a Docker container.
-v
-verbose
This optional parameter causes RoboServer to output
status and runtime events.
-b
-brokerUrl <url>
The URL of the message broker (when running a JMS
service).
-jmsNamespace <name> Namespace for JMS destinations. Default is Kapow.
-p
-port <port-number>
This is shorthand for calling -s socket:<port-
number>
Example:-port 50000
-sslPort <port number> This is a shorthand for writing -s ssl:<port number>
Available services
-service socket:<portNumber> <portNumber>: The port number for the socket-service to
listen on.
-service ssl:<portNumber> <portNumber>: The port number for the socket-service to
listen on.
-service
jmx:<jmx_port_Number>,<jmx_rmi_url>
<jmx_port_Number>: The port number for the JMX
service to listen on.
<jmx_rmi_url>: Optional RMI host and port for the JMX
service. Use if you need to connect through a firewall.
Example: -service jmx:example.com:51001
-service jms:<number> <number>: A number that uniquely identifies the
RoboServer on this host.
Example: -service jms:1
11

Kofax Kapow Administrator's Guide
* Specified name or IP address and a port number for the RoboServer host is not valid when working in
JMS mode.
To set passwords, either use the RoboServer Settings utility or the ConfigureRS tool. For more
information, see RoboServer Configuration and RoboServer Configuration - Headless Mode.
Important Kapow
Kapow version 10, all RoboServers must auto register to the Management Console. Therefore, the
URL and credentials for the Management Console along with the cluster name must be specified when
starting a RoboServer (either at the command line as in the following example or using the RoboServer
Settings application on the General tab under Register to a Management Console option).
RoboServer.exe -mcUrl http://admin:admin@localhost:8080/ManagementConsole -cluster
Production -service socket:50000
Start Servers Automatically
If your installation includes any server functionality, you can configure it to start the servers automatically.
When referring to "server functionality", we mean RoboServers and the Management Console (license
server). In fact these two functionalities are provided by the same server program, RoboServer, depending
on the arguments supplied to it when it starts.
The RoboServer Parameters topic contains a detailed description of the command-line arguments for
the RoboServer program. To enable the RoboServer program to execute robots, specify the -service
argument. Similarly, the -MC argument enables the Management Console functionality (see Management
Console (License Server) in the Installation Guide).
The following topics details how to start RoboServer automatically on Windows and Linux.
Start Servers on Windows
To make RoboServer start automatically on Windows, you need to add it as a Windows service. We
will show how to add and remove Windows services using the ServiceInstaller.exe program that is
included in the Kofax Kapow installation.
Add Windows Services
To run RoboServer as a service you need to install it first using the ServiceInstaller.exe program.
The following is a general example outlining the command-line arguments to this program (although
displayed on multiple lines here, this is a one-line command):
ServiceInstaller.exe -i RoboServer.conf wrapper.ntservice.account=Account
wrapper.ntservice.password.prompt=true wrapper.ntservice.name=Service-
name wrapper.ntservice.starttype=Start-method wrapper.syslog.loglevel=INFO
wrapper.app.parameter.1="First-Argument" wrapper.app.parameter.2="Second-argument"
wrapper.ntservice.account
The account of the user that has to run RoboServer. Kapow stores configuration in the user's
directory and it is important to choose a user that has the correct configuration.
If RoboServer has to run as a domain user you need to enter the account in the form domain
\account
If RoboServer has to run as a regular user you need to enter the account in the form .\account
12

Kofax Kapow Administrator's Guide
Note For security reasons, do not use the LocalSystem account for the RoboServer service's
login. If LocalSystem is used, the following error occurs when webkit (default) robots run:
"Could not establish connection to WebKitBrowser. Failed to connect to bus."
wrapper.ntservice.password.prompt
The value true will prompt the user for the password for the account. If you
prefer to enter the password on the command line, you must instead use
wrapper.ntservice.password=whatever-the-password-is.
wrapper.ntservice.name
The name of the service to install. The name of the service can not contain spaces.
wrapper.ntservice.starttype
AUTO_START if the service should be started automatically when the system is restarted.
DELAY_START if the service should be started after a short delay.
DEMAND_START if you want to start the service manually.
wrapper.syslog.loglevel
Redirect the console output from RoboServer to the event log.
wrapper.app.parameter.*
The arguments for RoboServer. You can enter as few or as many as needed. For a list of
RoboServer arguments, please refer to the Starting RoboServer section in the Administrator's
Guide.
When the service is installed, the user is granted the "log on as a service" rights. If the service
fails to start, check that the right is granted by opening gpedit.msc and (on Windows 7) navigate to
Computer Configuration > Windows Settings > Security Settings > Local Policies > User Rights
Assignment > Log on as a service and add the user.
The following are examples of installing RoboServers in different configurations:
• This script creates a Windows Service that only starts the Management Console. This is the
recommended configuration as the Management Console should run under its own JVM if possible.
The name of the Windows Service can be changed as needed:
ServiceInstaller.exe -i RoboServer.conf wrapper.ntservice.account=.
\USER_NAME_HERE wrapper.ntservice.password.prompt=true
wrapper.ntservice.name="RoboServer10.2.0.1_MC" wrapper.ntservice.starttype=MANUAL
wrapper.syslog.loglevel=INFO wrapper.app.parameter.1="-p"
wrapper.app.parameter.2="PORT NUMBER FOR MC RS TO RUN ON"
wrapper.app.parameter.3="-mcUrl" wrapper.app.parameter.4="http://localhost:8080"
wrapper.app.parameter.5="-cl" wrapper.app.parameter.6="NAME OF CLUSTER -
Production or Non Production"
• The following scripts install services that start two RoboServers: one on port 50000 and the other
on 50001. The service name can be different:
ServiceInstaller.exe -i RoboServer.conf wrapper.ntservice.account=.
\USER_NAME_HERE wrapper.ntservice.password.prompt=true
wrapper.ntservice.name="RoboServer10.2.0.1_50000"
wrapper.ntservice.starttype=AUTO_START wrapper.syslog.loglevel=INFO
wrapper.app.parameter.1="-service" wrapper.app.parameter.2="socket:50000"
13

Kofax Kapow Administrator's Guide
ServiceInstaller.exe -i RoboServer.conf wrapper.ntservice.account=.
\USER_NAME_HERE wrapper.ntservice.password.prompt=true
wrapper.ntservice.name="RoboServer10.2.0.1_50001"
wrapper.ntservice.starttype=AUTO_START wrapper.syslog.loglevel=INFO
wrapper.app.parameter.1="-service" wrapper.app.parameter.2="socket:50001"
Remove Windows Services
To uninstall a service you can run the following command:
ServiceInstaller.exe -r RoboServer.conf wrapper.ntservice.name=Service-name
wrapper.ntservice.name
The name of the service to remove.
Start Servers on Linux
The simplest way to make RoboServer start automatically on Linux is to use crontab. Use the following
command to create or edit the list of scheduled jobs in Linux for the desired user (it may be easiest to do
this either as root or as that particular user):
crontab -u someUser -e
To the list of scheduled jobs add for example:
@reboot $HOME/Kapow_10.2.0.1/bin/RoboServer -p 50000
or
@reboot $HOME/Kapow_10.2.0.1/bin/RoboServer -p 50000 -MC
This way the RoboServer program will be started with the indicated command-line arguments upon
reboot. Note that you must identify the bin directory under the actual installation folder.
Shut Down RoboServer
RoboServer can be shut down using the command line tool ShutDownRoboServer. Run
ShutDownRoboServer without arguments to see the various options for how to shut down the server,
particularly how to handle any robots currently running on the server.
Production Configuration
RoboServer runs robots created with Design Studio. Robots can be started in various ways; either
scheduled to run at specific times by the Management Console, called via a REST web service, through
the Java or .NET APIs or from a Kapplet.
In order to get a stable and performing production environment, you may have to tweak some of the
default RoboServer parameters. We will look at the following configuration options:
• Number of RoboServer instances
• Memory allocation
14

Kofax Kapow Administrator's Guide
• Number of concurrent robots
• Automatic memory overload detection
RoboServer runs on Oracle's Java Virtual Machine (JVM), which in turn runs on top of an operating
system (OS), which runs on top of your hardware. JVM's and OS's are patched, hardware architecture
changes, and each new iteration aims to bring better performance. Although we can give some general
guidelines about performance, the only way to make sure you have the optimal configuration is to test it.
As a general rule you get a little more performance by starting two instances of RoboServer. The JVM
uses memory management known as garbage collection (GC). On most hardware only a single CPU core
is active during GC, which leaves 75% of the CPU idle on a quad-core CPU. If you start two instances of
RoboServer, one instance can still use the full CPU while the other in running GC.
The amount of concurrent robots a RoboServer can run depends on the amount of CPU available,
and how fast you can get the data RoboServer needs to process. The number of concurrent robots is
configured in the Management Console cluster settings. A robot running against a slow website will use
a lot less CPU than a robot running against a website with a fast response time, and here is why. The
amount of CPU used by a program can be described with the following formula
CPU (core)% = 1 - WaitTime/TotalTime
If a robot takes 20 seconds to execute, but 15 seconds are spent waiting for the website, it is only
executing for 5 seconds, thus during the 20 seconds it is using an average of 25% (of a CPU core). The
steps in a robot are executed in sequence, which means that a single executing robot will only be able
to utilize one CPU core at a time. Most modern CPUs have multiple cores, so a robot that executes in 20
seconds, but waits for 15 seconds, will in fact only use about 6% of a quad-core CPU.
By default RoboServer is configured to maximally run 20 robots concurrently. The number of concurrent
robots is configured in the Management Console cluster settings. If all your robots use 6% CPU, the CPU
will be fully utilized when you are running 16-17 robots concurrently. If you start 33 of these 6% robots
concurrently, you will overload RoboServer; because the amount of CPU available is constant, the result
is that each robot will take twice as long to finish. In the real world the CPU utilization of a robot may be
anywhere between 5-95% of a CPU core, depending on robot logic and the website it interacts with. As a
result it is hard to guess or calculate the correct value for the max concurrent robots, the only way to be
sure you have the right value is to do a load test and monitor the RoboServer CPU utilization, as well as
the robot runtime as load increases.
Another parameter that may affect the number of concurrent robots each RoboServer can handle is
the amount of memory. The amount of memory used by robots can vary from a few megabytes (MB) to
hundreds of MB. By default RoboServer is configured to use 2048MB. Check Change the RAM Allocation
to see how to control memory allocation. If you don't provide enough memory to RoboServer, you run
the risk of crashing it with an out of memory error. To ensure proper memory allocation, monitor memory
utilization during your load tests. The JVM does not allocate all of the available memory, but it reserves
it from the OS (this is why allocating more than 1200 MB frequently fails on 32bit Windows). Once the
JVM starts to use the memory, it is not given back to the OS. To find the optimal memory allocation, run
a series of load tests that push the CPU to 100%. After each test is complete, check how much of the
reserved memory was actually used by the JVM (the java.exe process). If all 2048MB (default) were used,
increase (usually double) the memory and run the test again. At some point the JVM will not use all of
the reserved memory, and the number of the used memory reflects the actual memory requirement and
should be specified for the RoboServer.
15
Kofax Kapow Administrator's Guide
Since RoboServer will crash if it runs out of memory, RoboServer tries to prevent this from occurring.
Before RoboServer starts a new robot it will check the memory utilization. If it is above 80% it will queue
the robot instead of starting it; this greatly reduces the risk of crashing RoboServer if the memory
allocation is configured incorrectly. This mechanism is often referred to as the 80% memory threshold. The
threshold value is configurable through the system property kapow.memoryThreshold=80.
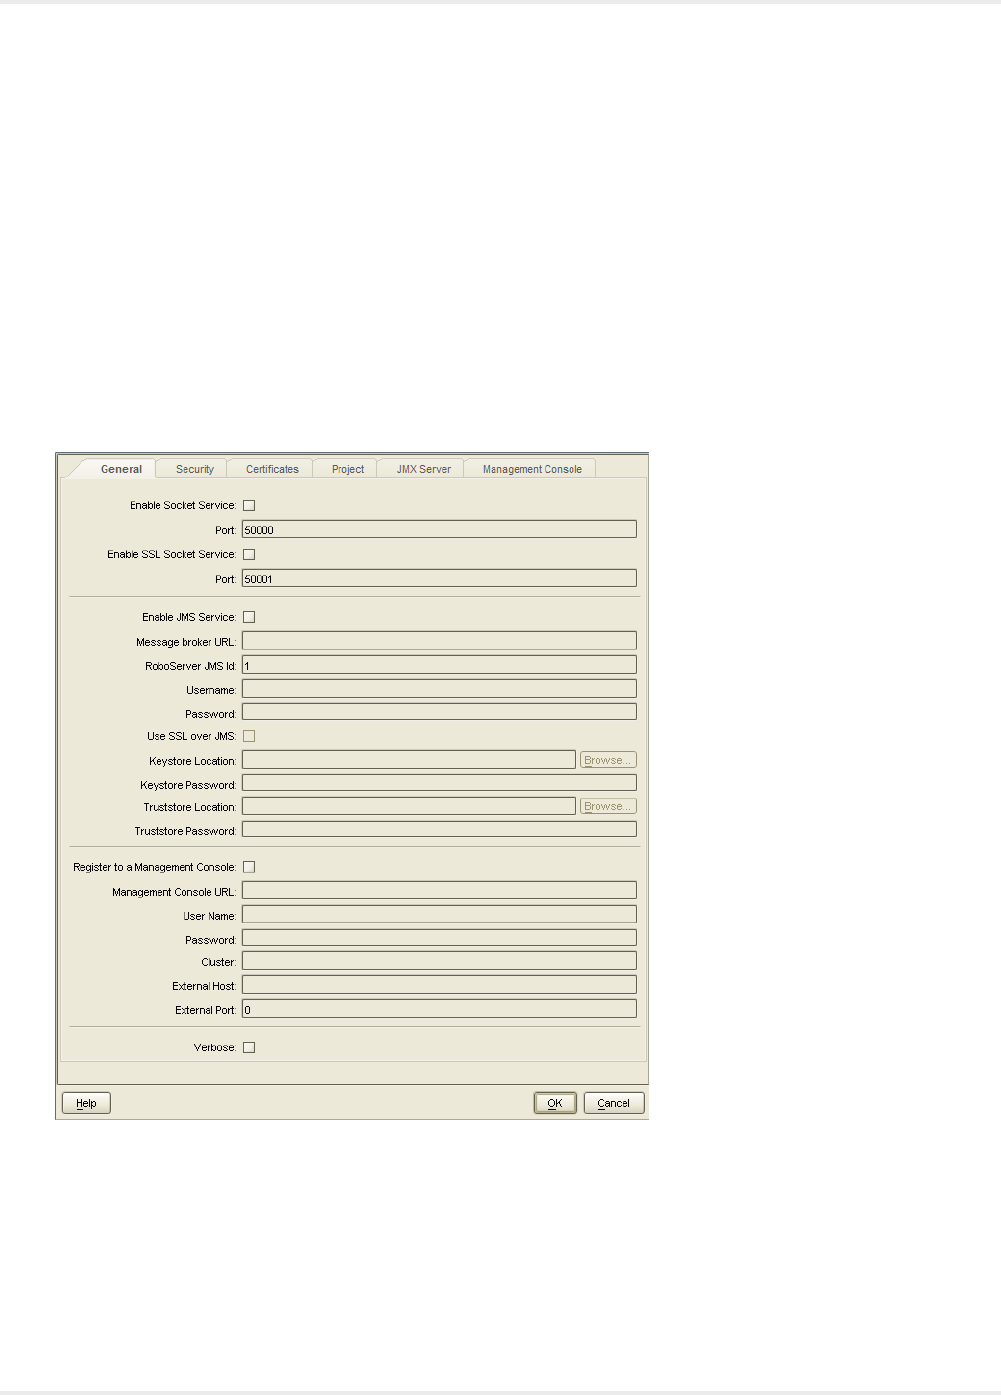
RoboServer Configuration
You can configure RoboServer through the RoboServer Settings application. RoboServer Settings can be
started from the Windows Start menu.
Settings Main Window
Using this application, you can configure the following:
• General: Socket service options, enable and configure JMS Service options, Management Console
connection options including RoboServer host settings, and the Verbose option.
• Security: Security settings such as authentication and permissions.
• Certificates: The use of certificates.
16

Kofax Kapow Administrator's Guide
• Project: The location of the default project.
• JMX Server: JMX Server Configuration.
• Management Console: embedded Management Console configuration.
After changing any of the settings, click OK to store the new settings, and then restart any RoboServers
that are running, to make the changes take effect.
Starting from Kapow version 10, all RoboServers must auto register to the Management Console.
Therefore, the URL and credentials for the Management Console along with the cluster name must be
specified when starting the RoboServer (either at the command line or using the RoboServer Settings
application).
The name or IP address and the port number of the RoboServer's host should be specified when those
parameters are different from what a RoboServer discovers on the local machine, such as when running
with NAT in the cloud, or when you run the RoboServer in a Docker container.
Kapow contains several command-line tools to help you modify the settings in batch mode. For example,
you can create several users with specified permissions. See Configuring RoboServer in Headless Mode.
If you need to change the maximum amount of RAM that RoboServer can use, see Change the RAM
Allocation.
Enter License in Embedded Management Console
Before you can enter license information into Management Console, you need to start it. If you use an
embedded Management Console, start it as follows. See Tomcat Deployment for information about
Tomcat Management Console.
Windows
Use the Start Management Console item in the Start menu.
To start the Management Console from the command line, run the following command in the bin subfolder
of the installation folder.
RoboServer -p 50000 -MC
Linux
Start Management Console from the command line. It is part of the RoboServer program, which is found
in the bin directory under the installation directory.
$./RoboServer -p 50000 -MC
Auto-start
As an alternative, if you later set up auto-start of the Management Console as described in Start
RoboServer, you may select to do that now instead of starting Management Console manually.
Once the Management Console is started, you must open its GUI in a browser. On Windows, you can
do that with the aid of the Management Console item in the Start menu. On all platforms, you can open
a browser and go to http://localhost:50080/. Accept the license terms and enter your license information,
including your license keys.
17

Kofax Kapow Administrator's Guide
Embedded Management Console Configuration
RoboServer contains an embedded web server which runs the Management Console. The web server
is part of RoboServer, but is activated only when RoboServer is started with the -MC option enabled.
By default, the web server will listen on port 50080, and thus the Management Console web interface is
available on:
http:// host:50080/
Protocols and Ports
You can configure the web server to be accessible through HTTP and HTTPS on separate ports. If a
protocol is enabled, a port number must be chosen; the defaults are port 50080 (HTTP) and port 50443
(HTTPS).
To enable HTTPS, a server certificate in JKS format must be stored in a file called webserver.keystore
in the Certificates/Web folder in the installation. If a certificate password other than the default
(changeit) must be used, enter it in the Certificate Password field.
Enable Administration Security
The Management Console can be accessed not only from the same computer (localhost), but also from
others. One of the points of having a Management Console is that it coordinates execution of robots, and
thus it typically must be accessible to many clients.
To mitigate the potential security risk of having access to the Management Console from other machines,
you can enable an administrator password. Select the Enable User Management option and enter the
administrator user name and password. You must use these credentials both when you publish a robot to
theManagement Console from Design Studio and when you access the web interface from a browser.
You can also restrict who is allowed to upload JDBC driver to the embedded Management Console
(see more about uploading JDBC drivers here). Possible choices are Not Allowed, where no one can
upload JDBC drivers, "Admin from localhost," which means that the admin user can upload drivers when
accessing the Management Console from the local machine; and finally, "Admin from any host," which
means the admin user can always upload JDBC drivers.
Security
On the RoboServer settings Security tab, you specify RoboServer TLS configuration, general security
restrictions, whether authentication is required for accessing the RoboServer, and audit logging
preferences.
Allow File System and Command Line Access
Enables RoboServer to create and edit files on the computer.
Accept JDBC Drivers from Management Console
Distributes JDBC drivers from the Management Console to the RoboServer.
18

Kofax Kapow Administrator's Guide
Command Time-Out
Specifies how long the RoboServer must wait for a reply from a command, such as click or scroll mouse
from a remote device.
RoboServer TLS Configuration
Kapow provides means for setting up TLS communication between Automation Device and RoboServer.
The communication uses certificates for encrypting the communication. The encryption uses a public -
private key structure for securing the connection.
In TLS Configuration Settings on the Security tab, you can specify whether to use the built-in set of
certificates or specify some other.
• To use the Kapow certificates, select Use Default TLS Configuration
• To use other certificates, clear the Use Default TLS Configuration box and specify the following paths
to private and public keys as well as to the trusted certificates folder in the corresponding fields.
See Use TLS Communication in Kapow help for more information.
Restrictions
You can specify whether the RoboServer is allowed file system and command line access. By default,
this is not allowed. If you enable it, however, robots running on RoboServer are allowed to access the file
system and, using the Execute Command Line step, execute arbitrary commands on the machine running
RoboServer.
Note Enabling file system and command line access IS a security risk, and you should carefully
consider whether it is necessary. If enabled, you should make sure the machine is not accessible from
outside the local network, and/or you should require user authentication. Having a RoboServer with file
system and command line access running on a machine accessible from the Internet and not requiring
authentication, opens up the machine to the outside, and anyone can modify the file system according to
the access rights of the user running RoboServer.
You can also disable accepting JDBC drivers from the Management Console. When activating
RoboServers, the Management Console also sends settings to them. By default, this includes any JDBC
drivers that have been uploaded to the Management Console. If a malicious user has gained administrator
access to the Management Console, he could upload equally malicious jar files which would then be sent
to the RoboServers. If the admin Management Console user is only allowed to upload JDBC drivers from
the localhost, the preceding would occur only if the attacker is in fact sitting in front of the machine running
the Management Console, or has gained access to, for instance, a VPN (in which case you probably have
bigger problems). So in general, it should not be necessary to disable accepting JDBC drivers. If you
do, you can make JDBC drivers available to the RoboServer by manually putting them into the lib/jdbc
directory of the installation folder as described here.
Request Authentication
To protect your RoboServer against unauthorized access, you can turn on authentication. This has effect
on all RoboServers run from your Kapowinstallation, including a RoboServer started as a service or from a
command line.
19
Kofax Kapow Administrator's Guide
To turn on authentication, select the Require RoboServer Authentication check box. To run robots on a
v with authentication turned on, you have to add users by clicking the add button. This will insert a new
unnamed user. You can then fill out the information about the user including the username which will then
be shown in the list of users.
A user is configured using the properties in the following table.
User Properties
Property Description
Username This is the username used by the user when accessing
the v.
Password This is the password used by the user when accessing
the RoboServer.
Comments Here you can write a comment about the user.
Start Robot This enables the user to start robots on the RoboServer.
Stop Robot This enables the user to stop robots on the RoboServer.
Shutdown RoboServer This enables the user to shutdown the RoboServer from
the Management Console.
To run robots on a RoboServer configured with authorization, the caller must provide proper credentials. In
the Management Console, this is done in the settings. When running a robot via the Java API, credentials
are provided as explained in Execution Parameters.
Configure RoboServer Logging
To automatically have every HTTP and FTP request made by RoboServer logged, select the Log
HTTP/FTP Traffic option. This will log HTTP and FTP requests using the Log4J logger specified by
log4j.logger.kapow.auditlog. Log4J is configured by the log4j.properties file in the Configuration folder in
the application data folder.
The audit log includes all requests to both web pages and all of its resources. Here's an excerpt from the
log produced by loading the front page of Google:
02-29 13:51:21 INFO kapow.auditlog - google google.com http://google.com/ 301 0
02-29 13:51:21 INFO kapow.auditlog - google www.google.com http://www.google.com/ 200 81688
02-29 13:51:22 INFO kapow.auditlog - google www.google.com http://www.google.com/extern_js/f/
CgJkYRICZGsrMEUjtw.js 200 328960
02-29 13:51:22 INFO kapow.auditlog - google www.google.com http://www.google.com/
extern_chrome/d9924a47b8c72e1a.js 200 43796
02-29 13:51:23 INFO kapow.auditlog - google ssl.gstatic.com http://ssl.gstatic.com/gb/js/
sem_6501b4b3093bbedb61d2e.js 200 31642
The log contains the following information:
• Timestamp
• Log level (INFO)
• Logger (kapow.auditlog)
• Robot name
20

Kofax Kapow Administrator's Guide
• Hostname
• Request URL
• HTTP/FTP response code
• Number of bytes loaded from the response body
Certificates
A key problem in establishing secure communications is to make sure that you're communicating with the
right party. It is not sufficient just to request identity information from the other party - there must also be a
way to verify this information before you can trust it. Certificates provide a solution to this, as they embody
both a party's identity information (including that party's hostname and public key) and a signature from
a trusted third party who vouches for the correctness of the identity information. A certificate should be
trusted only:
• If the hostname stated within the certificate matches the hostname of the site that it comes from
(otherwise it is a record of someone else's identity, which amounts to using false credentials).
• And if the certificate is signed by a third party that you trust.
• (Additionally, the certificate expiration date and the like should be checked, but we will not be
concerned with these details here.)
We will not go into the technical details of the signing process, other than mentioning that it is based on
public/private key cryptography. A signature for a certificate is the (fairly compact) result of a complex
calculation that involves both the contents of the certificate and the signer's private key, and which cannot
be reproduced without that same private key. The signature can be verified by doing another calculation
that involves the contents of the certificate, the signature and the signer's public key. This calculation
will tell whether the certificate matches the signature and thus is genuine. Note that the public key only
enables you to verify a signature, not generate one. Thus the public key will not enable anyone to fake a
certificate.
The signing party must never give the private key to anyone, but will distribute the public key as widely
as possible. However, one issue still remains before you can trust a signature: You must be sure that you
have a genuine copy of the signing party's public key. Public keys for well-known signing authorities like
VeriSign are distributed with every browser and Java Runtime, and your trust in the signature (and thus
the certificate) is in fact based on your trust in the way the browser or Java Runtime was installed.
It is possible to create your own signing authority by creating a public/private key pair and distributing the
public key. This is done by embedding the public key in a certificate (a so-called self-signed certificate). Of
course a party receiving such a certificate will not trust it based on its signature, but because he trusts you
and the way that the certificate was communicated to him.
In order to make this scheme more flexible in actual implementation, it is possible to delegate the authority
to sign. That is, the signature on a certificate may not actually be from a third party that you trust, but
rather from yet another party who can display a certificate that you will trust. This may be extended to
any number of levels, representing a chain of trust. To make verification practical, the signed certificate
contains copies of all the certificates associated with the chain of trust (the last one being a self-signed
root certificate). At least one of the certificates in this chain should be previously trusted by you.
Certificates are used in four different ways on RoboServer, corresponding to the four properties on the
"Certificates" tab. Two of these have to do with how robots access web servers as part of their execution:
21

Kofax Kapow Administrator's Guide
Verify HTTPS Certificates
A robot may need to verify the identity of a web server that it accesses (via HTTPS). Such a verification
is routinely (and invisibly) done by ordinary browsers in order to detect phishing attacks. However, the
verification often is not necessary when robots collect information, because the robots only access those
well-known web sites that they have been written for. Thus the verification it is not enabled by default.
If enabled, verification is done in the same way a browser does it: The web server's certificate is checked
based on an installed set of trusted HTTPS certificates similar to those you can configure in a browser.
HTTPS Client Certificates
This is almost the same as described above, but in the opposite direction. A robot may need to access
a web server which wants to verify the identity of the client (robot) that accesses it. Presumably the web
server contains confidential or commercial data that should be passed on only to clients with a proven
identity. This identity is represented by a HTTPS client certificate.
Two other properties have to do with authentication in the communication between RoboServer and API
clients that want robots to be executed on RoboServer. These properties apply only when clients connect
to RoboServer via the secure socket based RQL protocol. The main purpose of the secure protocol is
to encrypt communication, but with a little configuration it will also provide authentication, i.e., identity
verification:
Verify API Client Certificates
RoboServer is able to verify the identity of any client that connects to it in order to execute robots. This
verification is disabled by default.
If enabled, the mechanics of verification is the same as for HTTPS certificates even though the purpose is
quite different. The connecting client's certificate is checked based on an installed set of trusted API client
certificates.
API Server Certificate
RoboServer also has a server certificate that it will present to connecting clients. This certificate has a
dual purpose: It makes the encryption side of SSL work (for this reason RoboServer comes with a default
self-signed certificate), and it identifies this particular RoboServer to the clients.
The default API server certificate is the same for all RoboServers and thus is not any good for
identification. If your clients need to verify the identity of the RoboServer they connect to, as described in
SSL, you must create and install a unique API Server Certificate for each RoboServer.
Install HTTPS Certificates
When a robot accesses a web site over HTTPS, it will verify the site's certificate (if the Verify HTTPS
Certificates check box is selected). Verification is done based two sets of trusted certificates: the set of
root certificates and an additional set of server certificates.
The root certificates are installed with Kapow just as root certificates are installed with your browser. They
are found in the Certificates/Root folder in the application data folder.
Some HTTPS sites may use certificate authorities that are not included by default. In this case, you
need to install the appropriate certificates for Kapow to load from these sites. Most often, these would be
installed in the Certificates/Server folder in the application data folder.
22
Kofax Kapow Administrator's Guide
To be precise, it does not matter - for the purpose of handling HTTPS sites - whether you add certificates
to the set of root certificates or to the set of server certificates. However, please note that the root
certificates have a broader scope, as they are also used when checking API client certificates.
To install a certificate, you need to obtain the certificate as a PKCS#7 certificate chain, as a Netscape
certificate chain, or as a DER-encoded certificate. You install the certificate by copying it to either of the
two folders mentioned above. The name of the file containing the certificate does not matter.
The following example explains how to install a server certificate for the website https://www.foo.com. The
example is based on Internet Explorer.
Note You must install the certificates on all installations that need to load from the particular HTTPS
sites.
1. Open https://www.foo.com in Internet Explorer.
2. Select File > Properties > Certificates.
A Certificates window appears.
3. Click Install Certificate.
4. Click Next twice, click Finish, and exit the certificate window.
Now you have installed the certificate in your browser. The next step is to export it to a file.
5. Click Tools > Internet Options.
The Internet Options window appears.
6. On the Content tab, click the Certificates button.
7. Locate the installed certificate, which is typically on the Other People tab.
8. Select the certificate and click Export.
9. Click Next twice.
10. In the application data folder, save the certificate as foo.cer in the Certificates/Server subfolder.
11. Restart all your running RoboServers.
Install HTTPS Client Certificates
When a robot accesses a HTTPS site, it may need to provide its own certificate to the web server. This is
set up in the robot's Default Options or in the step-specific Options. One way to provide the certificate is to
reference one of those that have been configured into the Kapowinstallation.
Note The HTTPS client certificates must be configured into all Kapow installations that need to run the
robot.
1. On the RoboServer Settings Certificates tab, under the list of HTTPS client certificates, click the
icon.
2. When prompted, select a certificate file, which must be in PKCS12 format.
3. Enter the password used to encrypt the certificate file.
4. Optionally change the unique ID assigned to the certificate by clicking the icon.
The ID is used later in the robot to select the certificate.
23

Kofax Kapow Administrator's Guide
Install API Client Certificates
When API clients connect to RoboServer over SSL, RoboServer will verify the certificates presented to it
(If the Verify API Client Certificates check box is selected). Verification means that RoboServer will reject
connections from clients that fail verification, and is done based on two sets of trusted certificates: The set
of root certificates and an additional set of API client certificates.
The root certificates are installed with Kapow just as root certificates are installed with your browser. They
are found in the Certificates/Root folder in the application data folder. These are the same root certificates
which are used for checking HTTPS certificates; however, root certificates probably will play a much
smaller role when verifying API clients.
This is because in most cases, you will create your own self-signed API client certificates rather than
use (expensive) certificates issued by official signing authorities. You should install your API client
certificates in the Certificates/API/TrustedClients folder in the application data folder so that RoboServer
will recognize them.
Technically speaking, it does not matter - for the purpose of verifying connecting API clients - whether you
add API client certificates to the set of root certificates or to the set of API client certificates. However the
guidelines given above will help you avoid problems caused by the fact that the root certificates are also
(even mainly) used when checking HTTPS certificates.
You can generate a self-signed certificate for your API client with the Java keytool command as follows:
keytool -genkey -keystore client.p12 -alias client -keyalg RSA -storetype "PKCS12"
You will be prompted for the following information: Name (domain), name of Organizational Unit,
Organization, City, State, Country and password. Do not forget the password, there is no way to retrieve it
if lost. This call of keytool will put the certificate into the keystore client.p12. You then must extract it into a
separate file:
keytool -export -keystore client.p12 -alias client -storetype "PKCS12" -file
client.pub.cer
You will be prompted for the password used when the certificate was generated. The output file
client.pub.cer is what should be copied into the Certificates/API/TrustedClients folder in the application
data folder.
Install API Server Certificate
For technical reasons, RoboServer must have a server certificate that it can present to API clients when
they connect to it using SSL. During installation, a default self-signed certificate is installed. This certificate
is invalid for identification purposes since it is the same for all RoboServers, and should be replaced if the
API clients need to verify the identity of the RoboServer.
1. On the RoboServer Settings Certificates tab, click Change.
2. On the file selection window, select the certificate.
3. When prompted, enter the certificate password.
The certificate is imported and the following properties appear: Issued To, Issued By, and Expires.
4. Use the following Java keytool command to generate a new self-signed certificate for RoboServer:
keytool -genkey -keystore server.p12 -alias server -keyalg RSA -storetype "PKCS12"
24

Kofax Kapow Administrator's Guide
5. When prompted, enter the following information:
• Organizational Unit
• Organization
• City
• State
• Country
• password
Note Be sure to note the password, because it cannot be retrieved if lost.
The certificate is saved in the keystore file server.p12, which can be imported.
RoboServer Configuration - Headless Mode
Kapow ships with several utilities to configure your RoboServer from a command line. The utilities are
located in the bin subfolder of the Kapow installation folder. Note that the configuration files are user-
dependent and stored in the user folder. For more information, see the Important Folders topic in the
Kapow Installation Guide.
• ConfigureRS: Sets the JMX password and the Management Console password in the RoboServer
settings file (roboserver.settings).
• ConfigureMC: Sets Management Console administrator and certificate passwords in the mc.settings
file.
• ConfigureRSUser: Adds and removes users and updates user credentials in the rsusers.xml file.
Information in this file is used to authenticate API requests.
For help on usage, run utilities with an -h option.
To set a connection to the Management Console that the RoboServer will register to, type the following
command:
ConfigureRS -mcUrl http://admin:password@localhost:8080/ManagementConsole
To create a user user1 with Password1 password and all permissions type the next command:
ConfigureRSUser user1 Password1 -a
To enable authentication of API requests, you must open rsusers.xml and change the enabled attribute to
true, as shown in the following example.
Sample rsusers.xml configuration file
<?xml version="1.0" encoding="UTF-8"?>
<userConfiguration enabled="true">
<users>
<user username="user1" password_hash="20c7628c31534b8718a1da00435505e4262e3f4dc305">
<startRobot/>
<stopRobot/>
<shutdownRoboServer/>
</user>
25

Kofax Kapow Administrator's Guide
</users>
</userConfiguration>
Sample roboserver.settings configuration file
# Settings file for RoboServer. Some configurations contains encrypted passwords and should
not be edited by hand, these should be modified using dedicated commandline tools.
# The directory of use on RoboServer when the API used the DefaultRoboLibrary. On windows \
must be escaped like this
c:\\\\users\\AppData\\Local\\Kapow\\...
defaultProject = /home/mikael.nilsson/Kapow/trunk
# Should RoboServer be allowed to access the fileSystem, or call commands/scripts. Values:
true/false
sec_allow_file_system_access = false
# Will RoboServer accept JDBC drivers sent from the Management Console. Values: true/false
sec_accept_jdbc_drivers = true
# Should RoboServer log all loaded URLs to the log4j audit log. Values true/false
sec_log_http_traffic = false
# If enabled RoboServer will check credentials for API requests. Values: true/false
sec_authenticate_api_requests = false
# If enabled RoboServer generate an error when accessing a https site without a valid
certificate. Values: true/false
cert_verify_https_certificates = false
# If enabled, RoboServer will only allow SSL connections from trusted client. Values true/false
cert_verify_api_certificates = false
# Configures if the the JMX service should be enabled
enable_jmx = false
# The port number for the JMX service to listen on.
jmx_port_Number = 50100
# If enabled, input for robots is exposed through JMX. Values: true/false
jmx_show_inputs = true
# Heartbeat notification interval, in seconds
jmx_heartbeat_interval = 0
# Configure if JMX should use RMI
enable_jmx_rmi = false
# Optional RMI host and port for the JMX service. Use if you need to connect through a
firewall. Example: example.com:51001
jmx_rmi_url =
# Enables authentication for JMX requests. Values: true/false
jmx_enable_authentication = true
# The user-name used for JMX authentication
jmx_username =
# The password used for JMX authentication. This should be created using the ConfigureRS
command line tool.
jmx_password =
# Configures if the socket service should be enabled
enable_socket_service = false
# Configures which port the RoboServer should be listening on
port = 50000
# Configures if the ssl socket service should be enabled
enable_ssl_socket_service = false
26

Kofax Kapow Administrator's Guide
# Configures which ssl port the RoboServer should be listening on
ssl_port = 50001
# Configures if the JMS service should be enabled
enable_jms_service = false
# Configures which id the RoboServer should have when running JMS
jms_id = 1
# Configures the URL of the message broker when running JMS
broker_url =
# Configures if the RoboServer should register to a Management Console
enable_mc_registration = false
# Specify which Management Console to register to formatted as: http[s]://<hostname>:<port
number>
mc_URL =
# The user name to use for authentication to the Management Console
mc_username =
# The password to use for authentication to the Management Console
mc_password =
# Specifies which cluster the RoboServer should be registered to
cluster =
# Causes RoboServer to output status and runtime events
verbose = false
Sample mc.settings configuration file
# Settings file for Management Console. Passwords should not be edited by hand, but using the
'ConfigureMC' command line utility.
# Should the MC web-server start a HTTP listener. Values true/false
mc_http = true
# Configures the port of the http listener.
mc_http_port = 50080
# Should the MC web-server start a HTTPs listener. Values true/false
mc_https = false
# Configures the port of the HTTPS listener.
mc_https_port = 50443
# Password for the certificate used by the HTTPs listener. This should be created using the
ConfigureMC command line tool.
mc_https_cert_password = 3W2MTrL/b2k=
# Enables MC internal user management, to support multi user scenarios. Values: true/false
mc_enable_usermanagement = true
# The user-name of the MC super user.
mc_admin_user =admin
# The passwordHash of the MC super user. This is a salted SHA-256 hash.
mc_admin_password
=7800451255702ef8ae5f5fa0337833059d80b81d5af5872bdeafed230bab479896b6df4f63b25a24
# Configures which hosts are allowed to upload JDBC jar files to MC. Values: NONE, LOCALHOST,
ANY_HOST
mc_allow_jdbc_upload = LOCALHOST
27

Kofax Kapow Administrator's Guide
JMS Mode
Apart from socket mode, robots can communicate with RoboServers via message brokers using Java
Message Service or JMS. To start the system in JMS mode, first start the JMS broker. The Management
Console and RoboServers cannot start if the broker is not started or unaccessible. We recommend
starting the Management Console before starting the RoboServers.
It takes some time (depending on network speed) for the RoboServers to register to the Management
Console and for the Management Console to discover that the RoboServers are online.
See Configure JMS Mode for information on how to configure Kapow to use JMS.
Note Starting from Kapow version 10, all RoboServers must auto register to the Management Console.
Therefore, the URL and credentials for the Management Console along with the cluster name must be
specified when starting the RoboServer (either at the command line or using the RoboServer Settings
application).
Advantages of Running in JMS Mode
When Kapow runs in JMS mode, the system is more resilient towards network errors between the
RoboServers, the JMS broker, and the Management Console. Although, it cannot handle a network
breakdown lasting hours, it can handle short network problems in terms of minutes.
It is possible to use the standard feature of ActiveMQ to provide broker redundancy for increased stability.
Also, the support for writing custom clients to communicate with the RoboServers is greatly improved.
With KCP (the Kapow Control Protocol) clients can be created in any major programming language (see
Kapow Control Protocol in the Kapow Developer's Guide).
When running JMS, the robots are not queued on the individual RoboServers. Instead, the RoboServers
within a cluster all share a common queue, which is managed by the JMS broker. When a RoboServer is
ready to start a new robot run, it picks a robot from the queue. This has two major advantages:
• Queued robots are not lost due to failure in the communication between the Management Console and
the RoboServers.
• Robot cannot get stuck on a RoboServer queue while other RoboServers are idle, thus the pool of
RoboServers is used more effectively.
As opposed to the socket mode configuration, in JSM mode it is not necessary to open custom ports for
the communication between the Management Console and the RoboServers. The only ports needed are
those for the Management Console UI (default 8080) and the port used for communication with the JMS
broker (default 61616).
To some extent robot run may be queued on the common execution queue while the RoboServers are
unavailable, such as, not started yet. Note that the execution requests do not time out.
Management Console in JMS Mode
To configure the Management Console to run in JMS mode, set jmsEnabled to "true" in the
Configuration.xml file. The brokerUri, name space, message time to live, and broker credentials are
also specified in Configuration.xml.
28
Kofax Kapow Administrator's Guide
For example, to change the message time to live, in the JMSConfiguration bean, add the
customTimeToLive property with an entry for each JMS message type to alter the message time to live.
The key is the message type and the value is the time to live in milliseconds as in the following example.
<property name="customTimeToLive">
<map>
<entry key="Execute" value="1200000"/>
<entry key="Cancel" value="1300000"/>
</map>
</property>
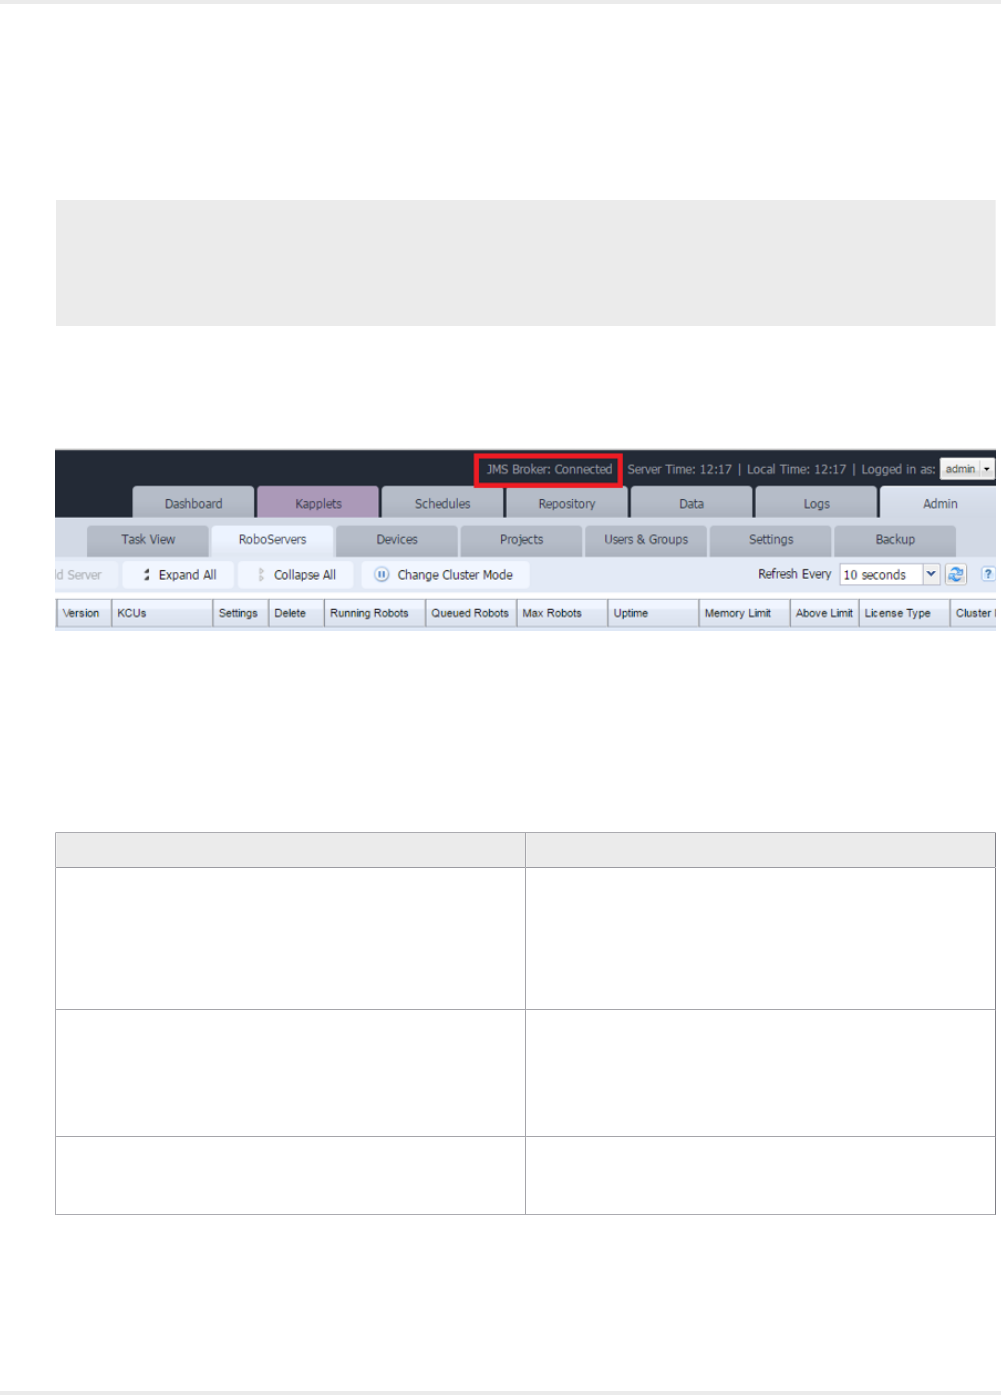
After the broker starts, you can start the Management Console. If the Management Console is unable to
reach the broker upon start up, it does not start. In that case, fix the problem and restart the Management
Console. Once started successfully, the Management Console reports that it is connected to the broker as
shown below.
If the Management Console loses the connection to the broker, it reports it in the UI and logs a message.
Once the Management Console re-establishes the connection, it returns to normal operation.
RoboServer Options in JMS Mode
The RoboServer now accepts the following options related to JMS.
Option Description
-service jms:<id> Starts a JMS service understanding both RQL and
KCP. The jms id together with the IP address of the
RoboServer host uniquely identifies the RoboServer. A
RoboServer may only define one JMS service. JMS and
sockets service (SSL or otherwise) cannot co-exist on
the same RoboServer.
-brokerUrl Specifies the URL of the broker. For example,
failover://(tcp://localhost:61616)?
startupMaxReconnectAttempts=3&timeout=15000
Refer to the broker documentation for the format of this
parameter.
-jmsNamespace Specifies the name space the RoboServer uses on
the broker. It must match the name space used by the
Management Console. Default is "Kapow".
It is mandatory to specify a JMS service and a broker URL when running JMS. You can either do it using
command line options or the RoboServer Settings application.
29

Kofax Kapow Administrator's Guide
If the RoboServer is unable to connect to the broker during start up, it does not start. If the RoboServer
loses the connection to the broker during normal operation, it will continue to execute robots, but will
not receive new execution request until the connection is re-established. If the connection is lost for
an extended period of time, the Management Console considers the RoboServer to be offline until the
connection is re-established. Unless otherwise specified in Configuration.xml, the grace interval is set
to one minute. For a highly loaded system or slow network, increase the interval.
Queues and Topics
JMS queues and topics used by Kapow are named
<namespace>.<protocol>.<cluster>.<destination> where namespace is defined in
Configuraton.xml for the Management Console and in roboserver.settings or in the command line
for the RoboServer (the default is Kapow). The protocol is either RQL, which is used by the Management
Console or KCP for custom clients using the Kapow Control Protocol based on protobuf (see Kapow
Control Protocol in the Kapow Developer's Guide). The cluster name is defined in the Admin >
RoboServer tab of the Management Console. Since the destinations are cluster specific, there is no risk
that messages for one cluster conflicts with messages from other clusters. Finally, the destination is one of
the following.
• Execute
• Control
• ControlServer
• Status
• Result
The destinations are created on the fly once the Management Console and RoboServers are started and
can be viewed using the ActiveMQ Console.
30
Kofax Kapow Administrator's Guide
Message Time to Live
The default time to live for messages is ten minutes. That is, if a message resides on a queue for
more than ten minutes without being consumed, it is deleted. The time to live configuration is essential
for execution requests. That is, if an execution request is not picked up by a RoboServer within ten
minutes from being placed on the execution queue, it is deleted and the robot run is effectively lost and
a message is written to the log. The intention is that the Management Console and other clients do not
send out execution request faster than the RoboServers can process them. If this happens, the number
of execution request should be scaled down or the RoboServers capability to execute robots should be
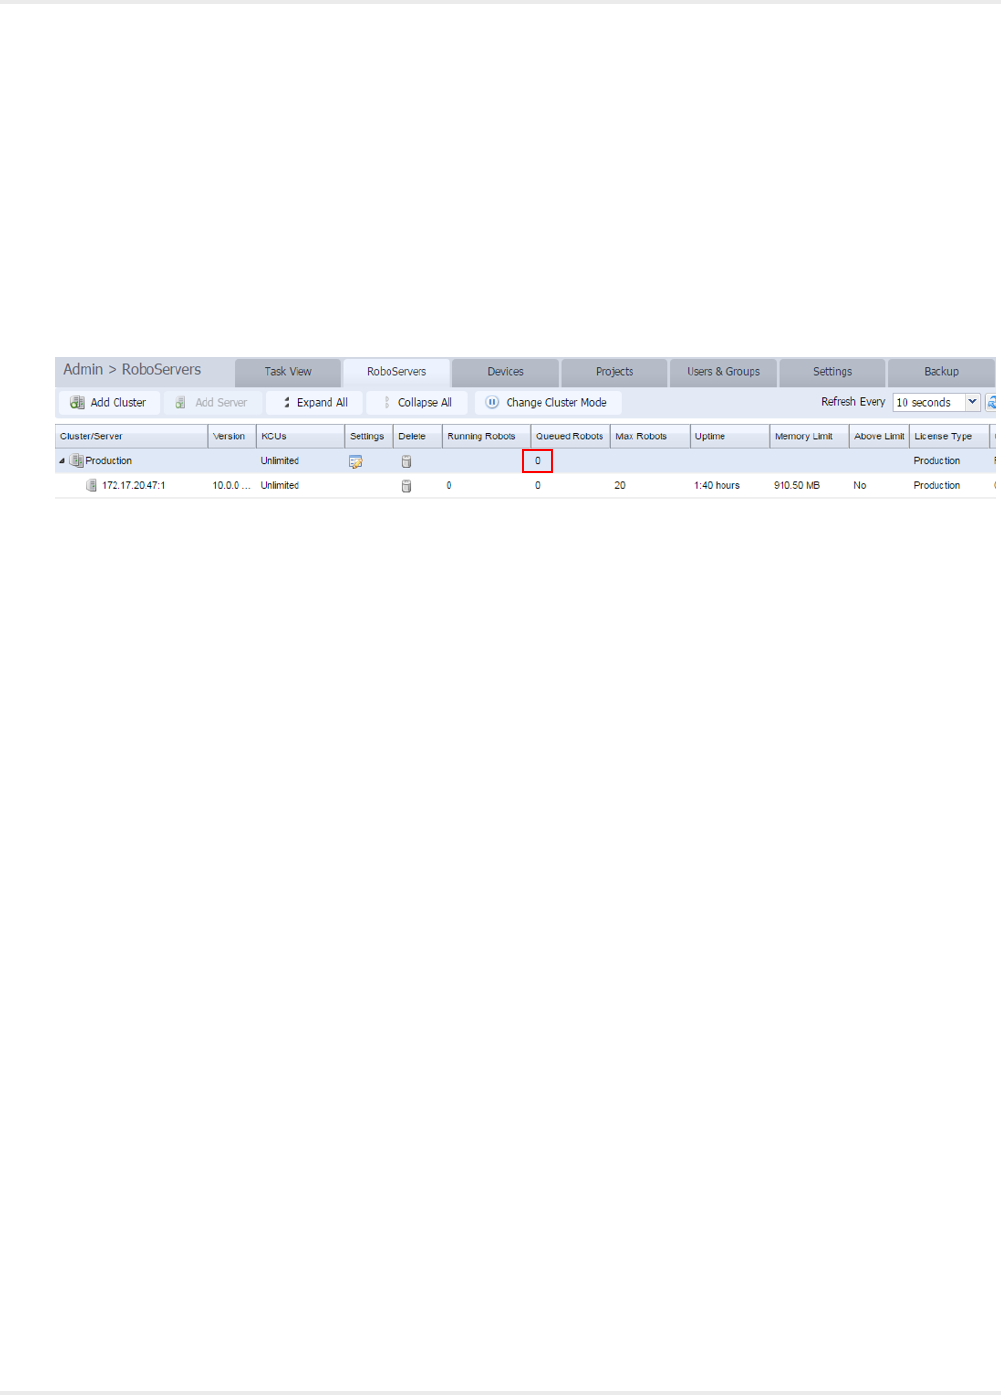
scaled up. To determine whether this is the case or not, monitor the logs and the size of the execution
queue in the Admin > RoboServer view of the Management Console as shown below.
Execute Queue
All RoboServers ready to accept robot runs are listening for execute request on the execute queue. That
is, the queue is common for all RoboServers on the cluster. One of the available RoboServers picks up
the request and the others continue to listen for other requests. Which RoboServer receives the request is
arbitrary. Depending on the duration of the robot runs uneven loads may be seen from time to time. If the
robot runs have short or similar run time duration, the load should be more even.
Unless otherwise configured in the broker, the execute queue is unbounded by default. You can set a
bound in the Management Console Configuration.xml file. The bound only applies to the execute
queue used by the Management Console. If the Management Console is requested to start a robot run
either via a schedule or a direct run while the execute queue is full, the run fails and the corresponding
message is written to the log.
Control topic
The control topic is solely used for stopping a robot run. All RoboServers subscribe to the control topic.
The Management Console may broadcast a message to all RoboServers to stop a robot run identified by
the execution id. The RoboServer running the robot stops the robot and reports back that it is stopped. If
the robot is no longer running, the message is ignored silently.
ControlServer Queue
Each RoboServer listens to the control server queue using a message selector to receive messages that
are intended for a particular RoboServer. A RoboServer is identified by its IP address and the JMS id,
for example, 127.0.0.1:1. The Management Console uses the queue for: shutting down a RoboServer,
enabling profiling, and requesting a status update of running robots.
Status Topic
The RoboServers broadcast messages to this topic and the Management Console subscribes to it.
The RoboServer broadcasts a ping every 30 seconds on the topic to inform the Management Console
that it is alive. If the Management Console has not received a ping from the RoboServers within a certain
interval, the Management Console considers the RoboServer to be offline and the robot runs are lost.
Unless otherwise specified in Configuration.xml, the interval is set to one minute. For a highly loaded
system or slow network, increase the interval.
31

Kofax Kapow Administrator's Guide
The RoboServer also reports statistics information about robot run every 20 seconds. This information is
used to update the dashboards of the Management Console and stored in a database for creating more
advanced reports using Analytics for Kapow.
Finally, if the RoboServer broadcasts the status of running robots, it is shown in the robot run-time view at
the bottom of the Admin > RoboServer tab.
Result Queue
The RoboServers send results to this queue about events occurring during a robot run, for example, robot
started, failed, or ended. The queue is also used for sending results of robot runs.
JMX Server Configuration
You can use the embedded JMX server to monitor the running RoboServer through tools such as
JConsole. Enable JConsole by providing an argument on the RoboServer command line (see the
RoboServer User's Guide for further information.)
Hiding Sensitive Robot Input
The Show Inputs option controls whether robot input parameters are shown in the management interface.
This makes it possible to hide security sensitive information such as passwords.
JMX Server Access
By default, the JMX server can be accessed by all clients with access to the correct port on the server. By
selecting the Use Password option, the selected user name and password are required when connecting.
Heartbeat Notifications
If an interval (in seconds) greater than 0 is specified, the JMX server sends out a heartbeat notification
with the given interval, as long as the RoboServer is running and responding to queries.
Default RoboServer Project
You can set the location of the default RoboServer project folder in the on the RoboServer Settings Project
tab. By default, the folder is set to the default robot project created in during the installation process. See
the Design Studio User's Guide for more information on robot projects.
The RoboServer default project is used only by the API. When executing a robot from the API, any
references it has to types, snippets or other resources are resolved by looking in the default project.
Change the RAM Allocation
As installed, each Kapow application is configured with a maximum amount of RAM that it may use. This
amount usually is plenty for ordinary work, but if you run many robots in parallel on RoboServer, or if some
robots use much RAM, it may be necessary to increase the allocation.
You can change the allocation for any of the applications by editing its .conf file, found in the bin
subfolder of the installation folder.
32

Kofax Kapow Administrator's Guide
For RoboServer, the file to edit is: bin/RoboServer.conf.
For Design Studio, the file to edit is: bin/DesignStudio.conf.
To edit the file, perform the following steps.
1. Open the corresponding .conf file in a text editor.
2. Find the line containing the wrapper.java.maxmemory parameter.
3. Un-comment the line (remove the leading #) and edit its value.
For example, to permit a roboserver to use up to 4GB of RAM, enter the following:
wrapper.java.maxmemory=4096.
Note If the .conf file does not contain the wrapper.java.maxmemory line, add the whole line to the
file.
An allocation this high is possible only on the 64-bit version of Kapow. Also, the .conf file can be
edited only by the user who installed Kapow, such as the Windows administrator.
Troubleshoot RoboServer Service Startup
If your service does not start, look for RoboServer messages in the Windows event log. Make sure you
have installed the service with the wrapper.syslog.loglevel=INFO argument. For more information, see
Kapow Initial Configuration in the Installation Guide.
33
Chapter 3
Tomcat Management Console
By default, Management Console is run as an embedded component inside RoboServer, which makes
for easy installation. As an alternative, it can be deployed as a regular web application on a standalone
Tomcat web server version 7.0.56 or later.
Important If your setup requires access to the Management Console outside of your corporate intranet,
set up TLSv1.0 (or a later version of TLS) to work with your Tomcat server.
The following table lists the differences in the feature set.
Management Console Features and Configuration
Feature Embedded Standalone J2SE Web Container
Authentication Single-user defined in Settings.
Users and Roles managed by
Management Console Administrator.
Users and Roles managed by
Management Console Administrator.
Role based security through Active
Directory or other LDAP provider.
Single Sign-On using SiteMinder.
Management Console data store Embedded Derby database Container managed Data Source
(supported platforms)
Note The derby JDBC driver is not distributed with the Enterprise Management Console. See Apache
Derby Web site for Derby JDBC driver download information. We recommend using MySQL or other
enterprise-class database with your Enterprise Management Console.
Instructions on configuring an embedded Management Console can be found in the Kapow online help. To
start an embedded Management Console, see Starting the Management Console under the Management
Console topic.
Tomcat Deployment
We will now detail how to install the Management Console on a stand alone J2SE web container. For this
guide we have chosen Tomcat, and the distribution has been tested on Tomcat 7.0.56, 7.0.59, and 8.0.20.
Your J2SE web container must be using the Java 8 runtime or later. Visit the Oracle Java SE Downloads
site and download the latest Java 8 release.
34

Kofax Kapow Administrator's Guide
Important If your setup requires access to the Management Console outside of your corporate intranet,
set up TLSv1.0 (or a later version of TLS) to work with your Tomcat server.
Install Management Console on Tomcat
Prerequisites
• Install the latest java 1.8 update from the Oracle web site: http://www.oracle.com/technetwork/java/
javase/downloads/index.html
• Download tomcat from the Apache web site: https://tomcat.apache.org/download-70.cgi
• Install tomcat and set user password.
Installation
1. Download full Kapow installer and proceed with the installation. Select the Management Console
WAR option during the installation.
2. Copy the ManagementConsole.war file from the WebApps directory in the Kapow installation to the
webapps directory on the Tomcat server and configure the .war file.
3. Create a ManagementConsole.xml Tomcat context file on the Tomcat server at conf/Catalina/
localhost/. See Create a Tomcat Context File for details.
4. Edit webapps/manager/WEB-INF/web.xml file on Tomcat to be able to upload applications.
<multipart-config>
<!-- 150MB max -->
<max-file-size>152428800</max-file-size>
<max-request-size>152428800</max-request-size>
<file-size-threshold>0</file-size-threshold>
</multipart-config>
5. Start Tomcat.
6. Enter License Information
Configure ManagementConsole.war
The Management Console application comes in the form of a Web Application Archive (WAR file) named
ManagementConsole.war, which is located in the /WebApps folder in the Kapow installation folder.
The version of ManagementConsole.war that ships with Kapow is configured to run embedded inside
RoboServer. Before you can deploy it as a standalone application on Tomcat, it must be reconfigured to fit
your environment.
A WAR file is compressed using a compressed zip file. To access the configuration files, you must extract
the zip file. Once the configuration files are updated, you re-zip and deploy ManagementConsole.war to
your Tomcat server.
The table below contains a list of the configuration files relative to the root of the unzipped
ManagementConsole.war.
35
Kofax Kapow Administrator's Guide
Configuration Files
File Configures Notes
WEB-INF/Configuration.xml Clustering, password encryption,
REST-Plugin
If you copy the version of the file from
8.1, it will automatically be upgraded
once you start the Management
Console
WEB-INF/login.xml Administrators and users, this is
where you integrate with LDAP
WEB-INF/classes/log4j.properties application logging
Spring Configuration Files
Configuration.xml and login.xml are all Spring configuration files (www.springsource.org) and share the
same general syntax which we will outline here.
Spring is configured through a series of beans, and each bean has properties that configure a piece of
code inside the application. The general syntax:
<bean id="id" class="SomeClass">
<property name="myName" value="myValue"/>
</bean>
File Configures
id="id" The id of the bean is an internal handle, that the application use to refer to
the bean. It is also referred to as the bean's name.
class="SomeClass" The class identifies the code component which the bean configures.
<property name="myName"
value="myValue"/>
Defines a property with the name myName and the value myValue.
This configures a property on the code component defined by the class
attribute.
In Kapow versions prior to 9.3, user access credentials were defined manually in the login.xml file.
Starting from version 9.3, user management is performed using the Users & Groups tab under the Admin
tab in the Management Console. In the enterprise version of Kapow, user management is enabled by
default. See the Users Tab topic for more details. User population from previous installations can be
performed using the Kapow backup functionality. For LDAP integration you still need to edit the login.xml
file.
Troubleshooting
If you have any problems during the installation, you should check the Tomcat log in the /logs folder
in your Tomcat installation. During the configuration process it is often easier to run Tomcat from the
command line, as it will then print error messages directly in the command line window.
36
Kofax Kapow Administrator's Guide
Create a New Database
We strongly recommend that you create a new database for the tables used by the Management Console.
There are two requirements to the database.
• Unicode support
• Case-sensitive comparison
Unicode support is needed because non-ASCII characters, like Danish Æ, German ß or Cyrillic Ё may
be given as input to robots. This input is stored in the database, and without Unicode support these
characters may be stored incorrectly.
Case-sensitive comparison is needed because it is possible to upload a robot named a.robot and another
named A.robot. Without case-sensitive comparison, uploading the latter would override the first.
Database servers handles Unicode and case-sensitive comparison very differently. The following list
contains recommendations for the supported database systems.
Recommendations for Unicode Support and Case-Sensitive Comparison
Database Recommendations
IBM DB2 Create the database using CODESET UTF-8
MySQL 5.x Create the database with utf8_bin collation:
CREATE DATABASE KAPOW_MC COLLATE utf8_bin
Oracle We use NVARCHAR2, NCLOB types for Unicode. For
case-sensitive comparison ensure that NLS_COMP is
set to BINARY
Microsoft SQL Server 2005/2008 We use NVARCAR, NTEXT types for Unicode.
For case-sensitive comparison create the
database with a Case-Sensitive collation such as
SQL_Latin1_General_CP1_CS_AS:
CREATE DATABASE KAPOW_MC COLLATE
SQL_Latin1_General_CP1_CS_AS
Sybase Adaptive Server Enterprise We use NVARCAR, NTEXT types for Unicode. For case-
sensitive comparison ensure that the sort order is binary
(see sp_helpsort).
The scripts below use NVARCHAR(255) NOT NULL
UNIQUE, due to index limitations this will not work on an
ASE with 2K page size, unless you modify the scripts to
use NVARCHAR(200) NOT NULL UNIQUE (or install on
a 4/8/16K page server)
The tables used by the Management Console can be grouped into 3 categories: Platform tables, logging
tables, and data view tables. The platform tables hold information exclusive to the Management Console
such as the uploaded robots and their scheduling information, while the logging and data view tables are
shared with RoboServer.
37

Kofax Kapow Administrator's Guide
User Privileges
When the Management Console starts, it automatically tries to create the required platform tables and
logging tables (if not already created by RoboServer). This means that the user account used to access
the database must have the CREATE TABLE and ALTER TABLE privileges as well as the CREATE
TEMPORARY TABLES privilege to restore a backup. Oracle users also need the CREATE SEQUENCE
privilege. If this is not possible you can ask your Database administrator to create the tables using the
scripts below.
Additionally the user must be allowed to SELECT, INSERT, UPDATE, DELETE for the system to work
properly.
SQL Scripts for Management Console Tables
SQL scripts are included with your copy of Kapow in the documentation\sql directory. See SQL Scripts
for Kapow Tables for details.
The Management Console uses a 3rd party scheduling component called Quartz. Quartz also requires
a number of tables which must reside among the other platform tables. These tables are also created
automatically when the Management Console starts, or may be created manually using the scripts in the
SQL Scripts for Kapow Tables.
Create a Tomcat Context File
In an enterprise environment, databases are often accessed through a data source. This guide will show
you how to configure your Tomcat with a data source that connects to a local MySQL database server.
In Tomcat, data sources are defined within the applications context. The context may be declared
either embedded or external to the application. When the context is embedded, it is defined in the file
context.xml, which must be located inside the WAR file inside the META-INF folder. When declared
externally the file must be located in Tomcat's /conf/Catalina/localhost folder and the name of
the file must be ManagementConsole.xml (same name as the deployed WAR file). Although Tomcat
recommends deploying with an embedded context, as it provides a single deployment unit, we will use an
external context definition in this guide, as it makes modifying the file easier. Once you have refined your
configuration, you can embed the context file and deploy the War file to your production environment.
Add Platform Data Source
Create the file ManagementConsole.xml on Tomcat in the conf/Catalina/localhost folder and add the
following content.
Note If you use Tomcat version 7.0.66 to 7.0.67 or 8.0.29 to 8.0.31, add the
mapperContextRootRedirectEnabled="true" parameter to the first line of the context file as follows
<Context useHttpOnly="true" mapperContextRootRedirectEnabled="true">.
<Context useHttpOnly="true">
<!-- Default set of monitored resources -->
<WatchedResource>WEB-INF/web.xml</WatchedResource>
<Resource name="jdbc/kapow/platform" auth="Container" type="javax.sql.DataSource"
maxActive="100" maxIdle="30" maxWait="-1"
38
Kofax Kapow Administrator's Guide
validationQuery="/* ping */" testOnBorrow="true"
username="MyUser" password="MyPassword" driverClassName="com.mysql.jdbc.Driver"
url="jdbc:mysql://localhost:3306/KAPOW_MC?
useUnicode=yes&characterEncoding=UTF-8&rewriteBatchedStatements=true"/>
</Context>
The url parameter above is a JDBC URL. The username and password attributes are used by Tomcat to
create a connection pool used when connecting to the database.
The data sources are defined differently for other databases. For instance, if you are using Microsoft SQL
Server 2005/2008, the relevant three lines above should instead be:
username="MyUser" password="MyPassword"
driverClassName="com.microsoft.sqlserver.jdbc.SQLServerDriver"
validationQuery="SELECT 1" testOnBorrow="true"
url="jdbc:sqlserver://localhost:1433;DatabaseName=MyDbName"/>
Note that if you are using Microsoft SQL Server, you need to configure it to use mixed mode
authentication. Generally, you should consult the JDBC documentation to identify which values to use in
the data sources.
The URL jdbc:mysql://localhost:3306/KAPOW_MC?useUnicode=yes&characterEncoding=UTF-8
refers to a database named KAPOW_MC in your local MySQL. For MySQL it is recommended that you
add ?seUnicode=yes&characterEncoding=UTF-8 to all connection strings, otherwise the JDBC driver
will not handle Chinese, Japanese or other 3-byte utf-8 characters correctly, since we can't have & directly
inside the context xml file, we must encode it as &
rewriteBatchedStatements=true instructs the MySQL JDBC driver batch inserts/updates and should
give improved insert performance for kapplet robots.
The driverClassName parameter controls which JDBC driver is used; each database vendor provides a
JDBC driver for their database, which you will have to download. The JDBC driver, typically a single .jar
file, must be copied into the /lib folder on Tomcat 6/7, or commons/lib on Tomcat 5.5.
The validationQuery is used by Tomcat to verify that the connection obtained from the connection pool
is still valid (as the database server may have closed the connection). The validation query is lightweight
and uses very few resources on the database server, this list contains validation queries for the supported
databases.
Validation Queries
Database Query
MySQL /* ping */
Microsoft SQL Server 2005/2008 SELECT 1
Sybase Adaptive Server Enterprise SELECT 1
IBM DB2 VALUES(1)
Oracle SELECT 1 FROM DUAL
Note that the MySQL JDBC driver supports a special lightweight /* ping */ 'request', check JConnector
manual section 6.1 for details
39
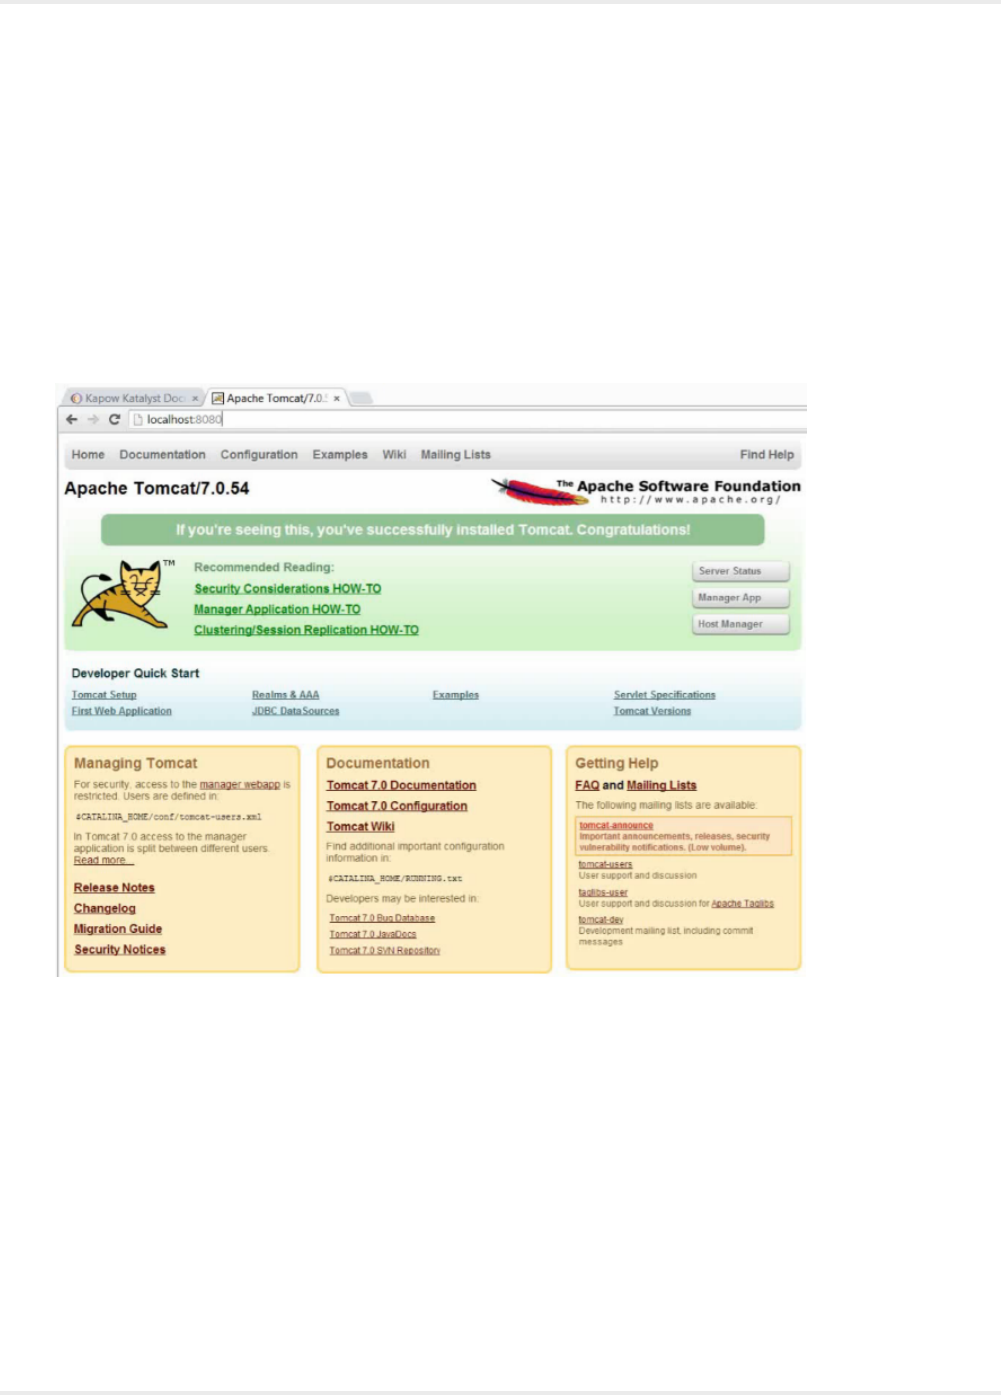
Kofax Kapow Administrator's Guide
For more information on context configuration and data sources, see JNDI Resources HOW-TO and JNDI
data source HOW-TO.
We are now ready to start the Tomcat server.
Start Tomcat
Start your Tomcat server, wait a couple of seconds for the application to be deployed, then navigate to
http://localhost:8080/. You should see the following page.
No Providers Apache Start Page
By default there is only one set of credentials (user name - admin, password - admin) with administrator
privileges. Later you can change password and create other users and groups on the Users Tab under
the Admin tab in the Management Console.
40
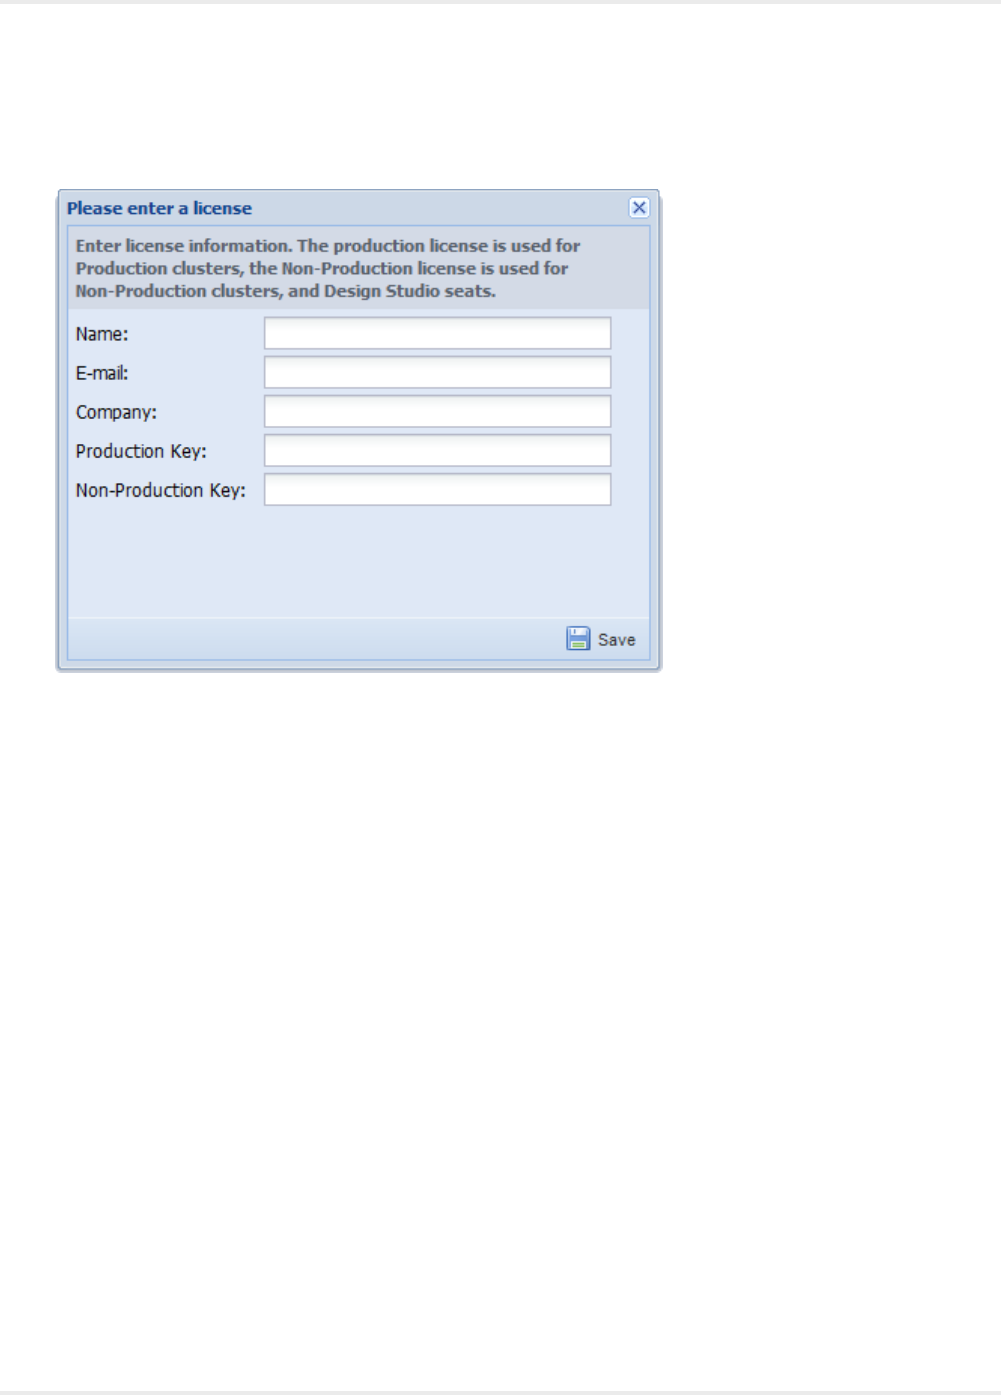
Kofax Kapow Administrator's Guide
After logging in, the license window is displayed.
Enter License Window
42
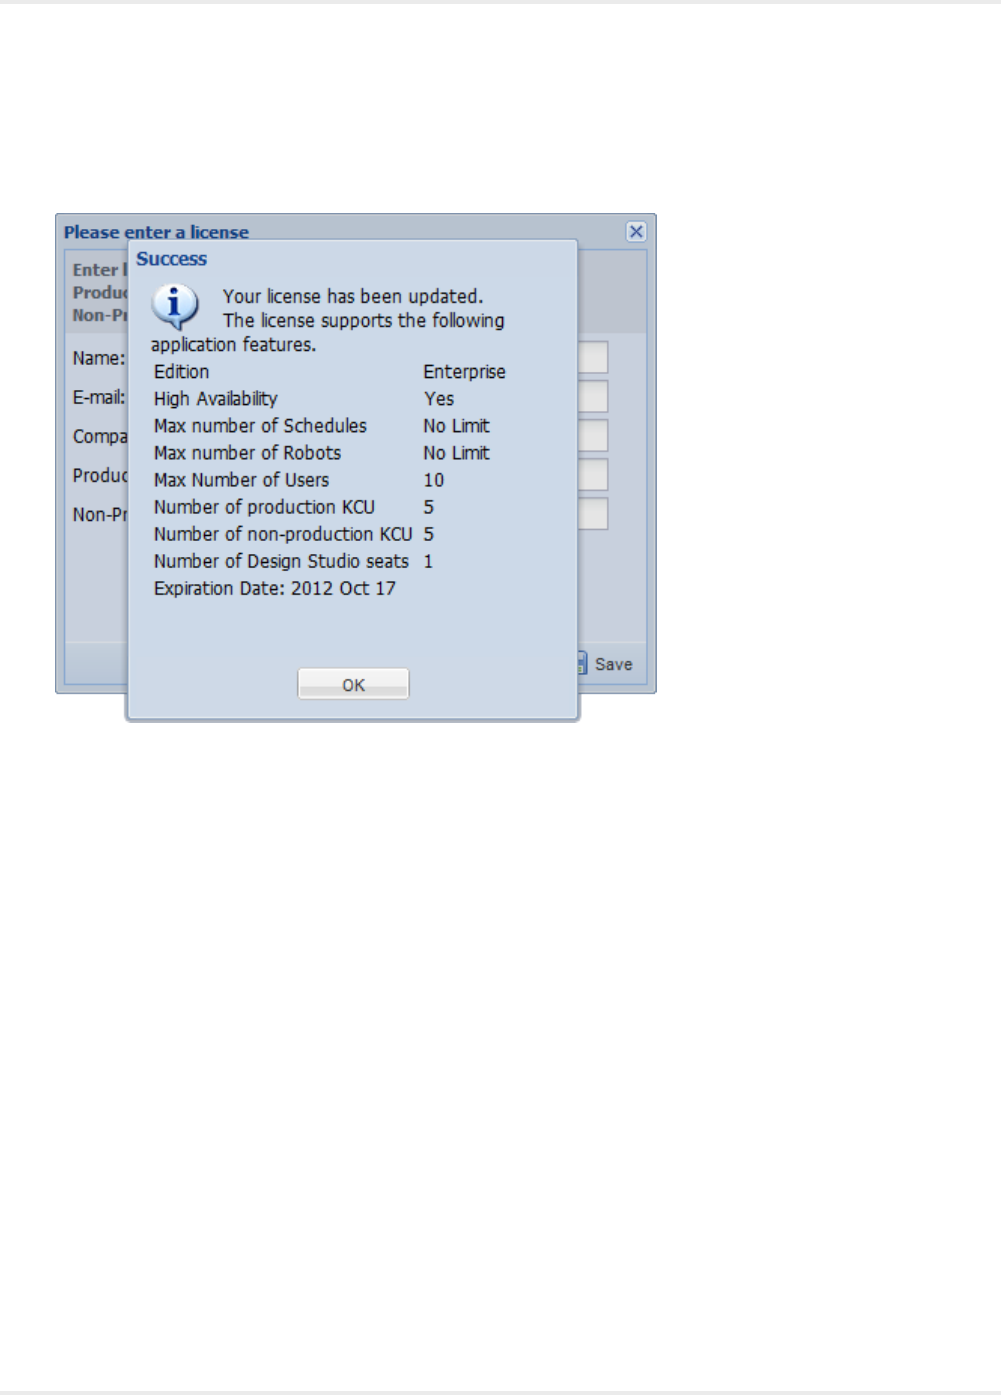
Kofax Kapow Administrator's Guide
Now enter the Kofax Kapow license information and click Save. You should see the following dialog box
displaying which features are enabled by your license key.
License Updated
Project Permissions
The admin user account used to log in bypasses the normal project permissions applied to regular
users, because admin is the superuser. The superuser can not be a member of any group, and has an
unrestricted access to all projects.
To change the admin password and create new users and groups, go to the Admin tab and then click the
Users and Groups tab. The security model is role-based; after you create a user, you must add this user
to one or more groups associated with specific roles in one or more projects.
43
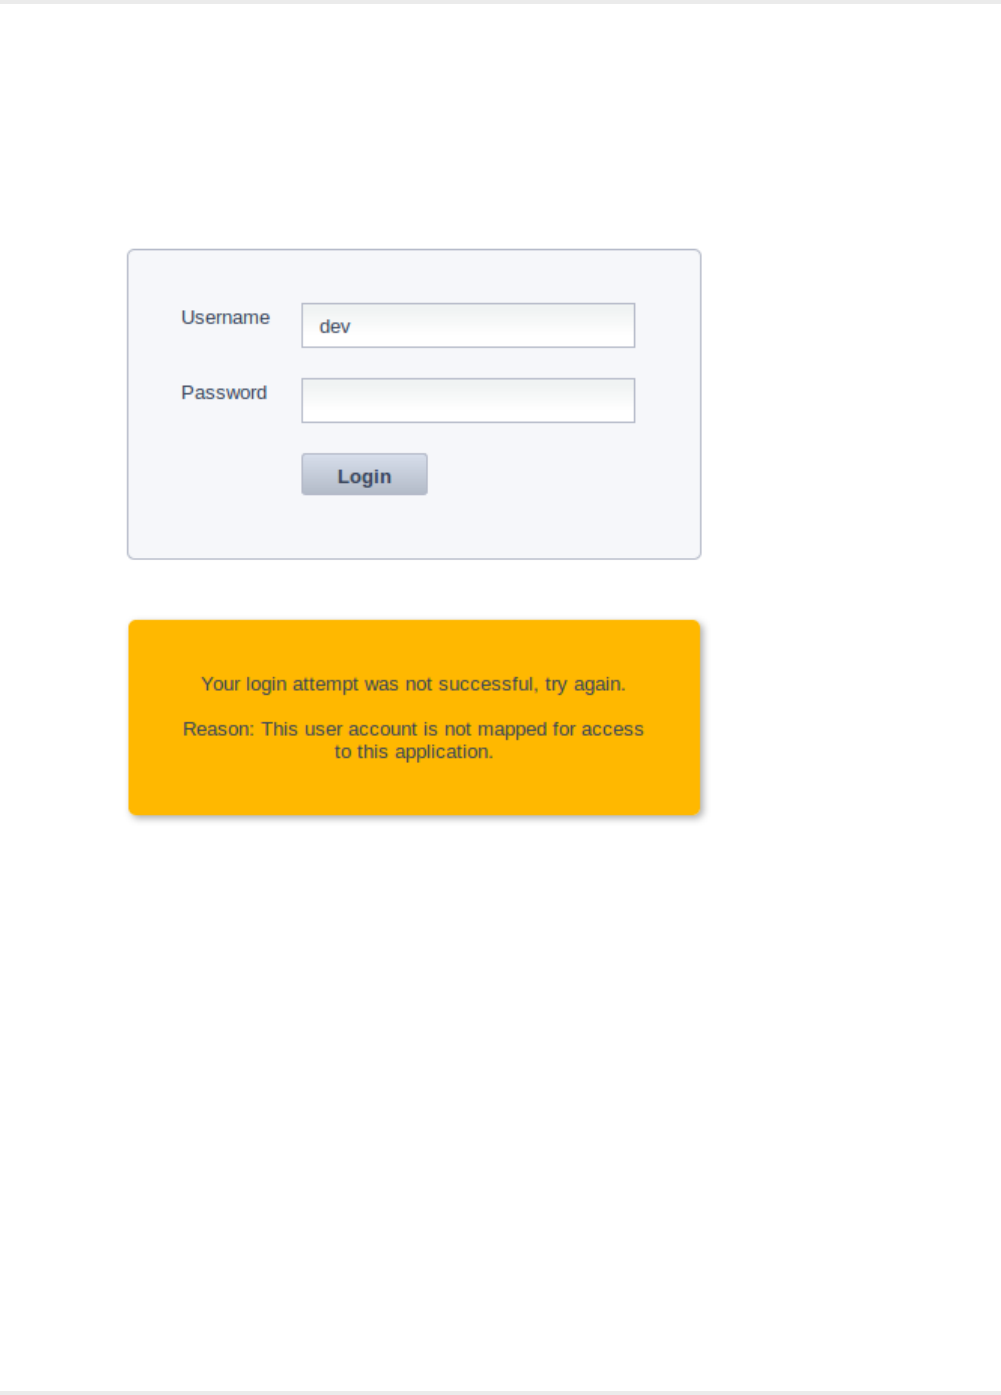
Kofax Kapow Administrator's Guide
Create DEVELOPER group, then create a user dev and add this user to the DEVELOPER group. Try to
log in with this user credentials. You should see the following screen:
User Not Mapped
For non-administrator users, permissions are based on the user's group membership. The dev user is a
member of the group DEVELOPER, and since we have not given users in the DEVELOPER group access
to any projects, they are not able to log in.
44
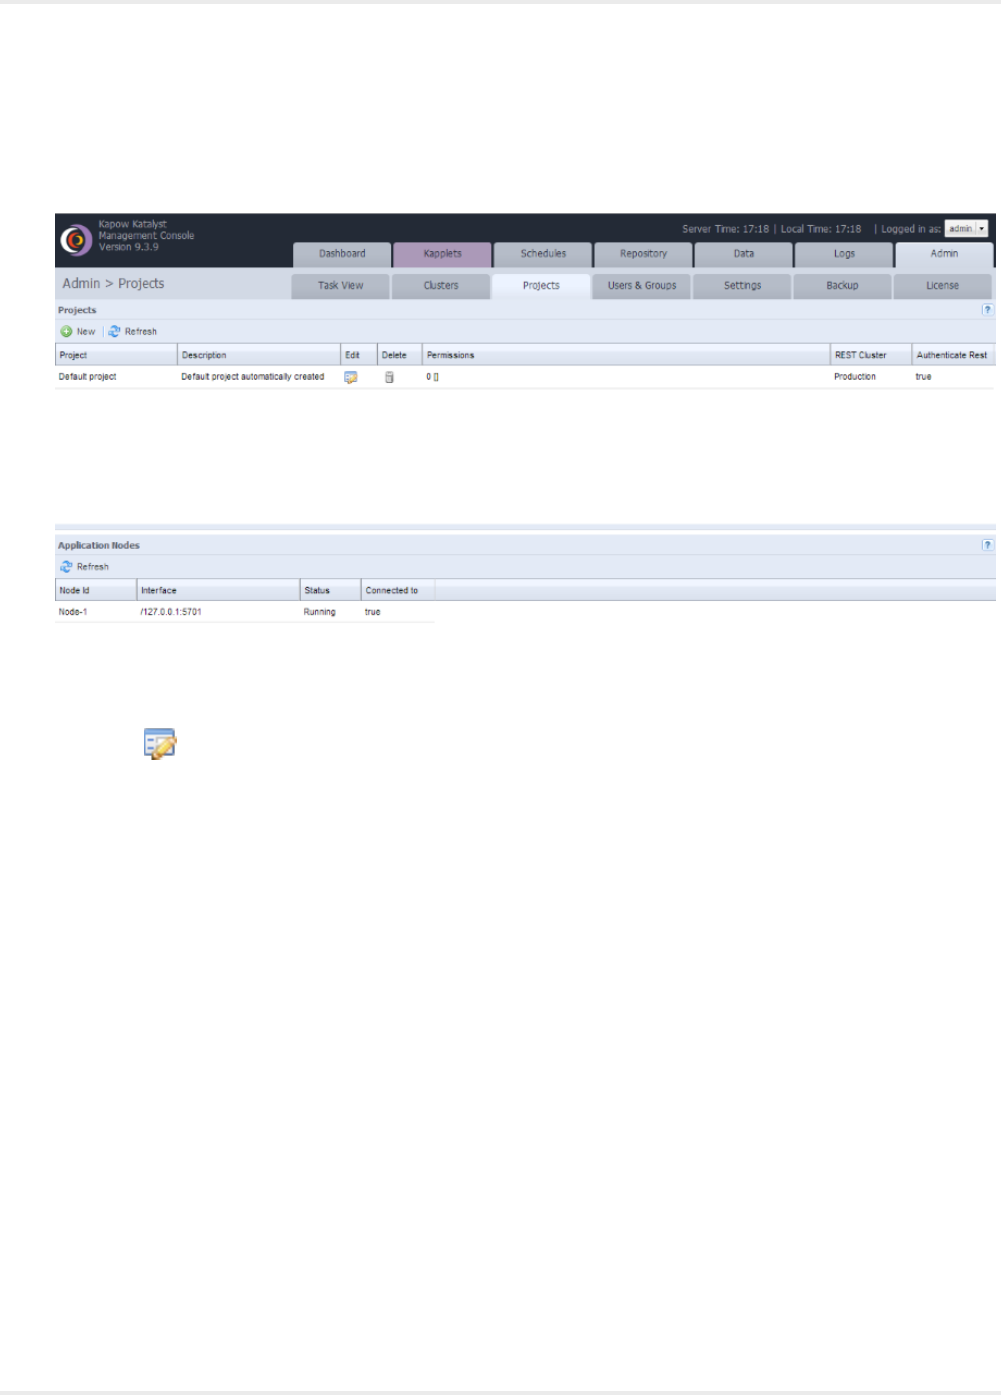
Kofax Kapow Administrator's Guide
To allow the dev user to log in, we must log in as administrator and go to the Projects tab which is a sub
tab of the Admin tab. It looks like this:
Initial Project Permissions
In the Permission column, there are 0 permission mappings.
Click Edit to open the Edit Project dialog box and go to the Permissions tab. There is a grid with
columns Project Role, and Security Group. A project role determines a set of actions that may be
performed inside the Management Console, such as uploading robots, creating schedules, viewing logs
etc. Within a project you assign a project role to a security group. That way, all users of the selected
security group will be able to perform the actions allowed by the assigned project role.
Click Add Permission to add permissions in this project. This adds a new line to the grid, and inserts a
dropdown box allowing us to select a project role. Select the project role developer. Now double click
45
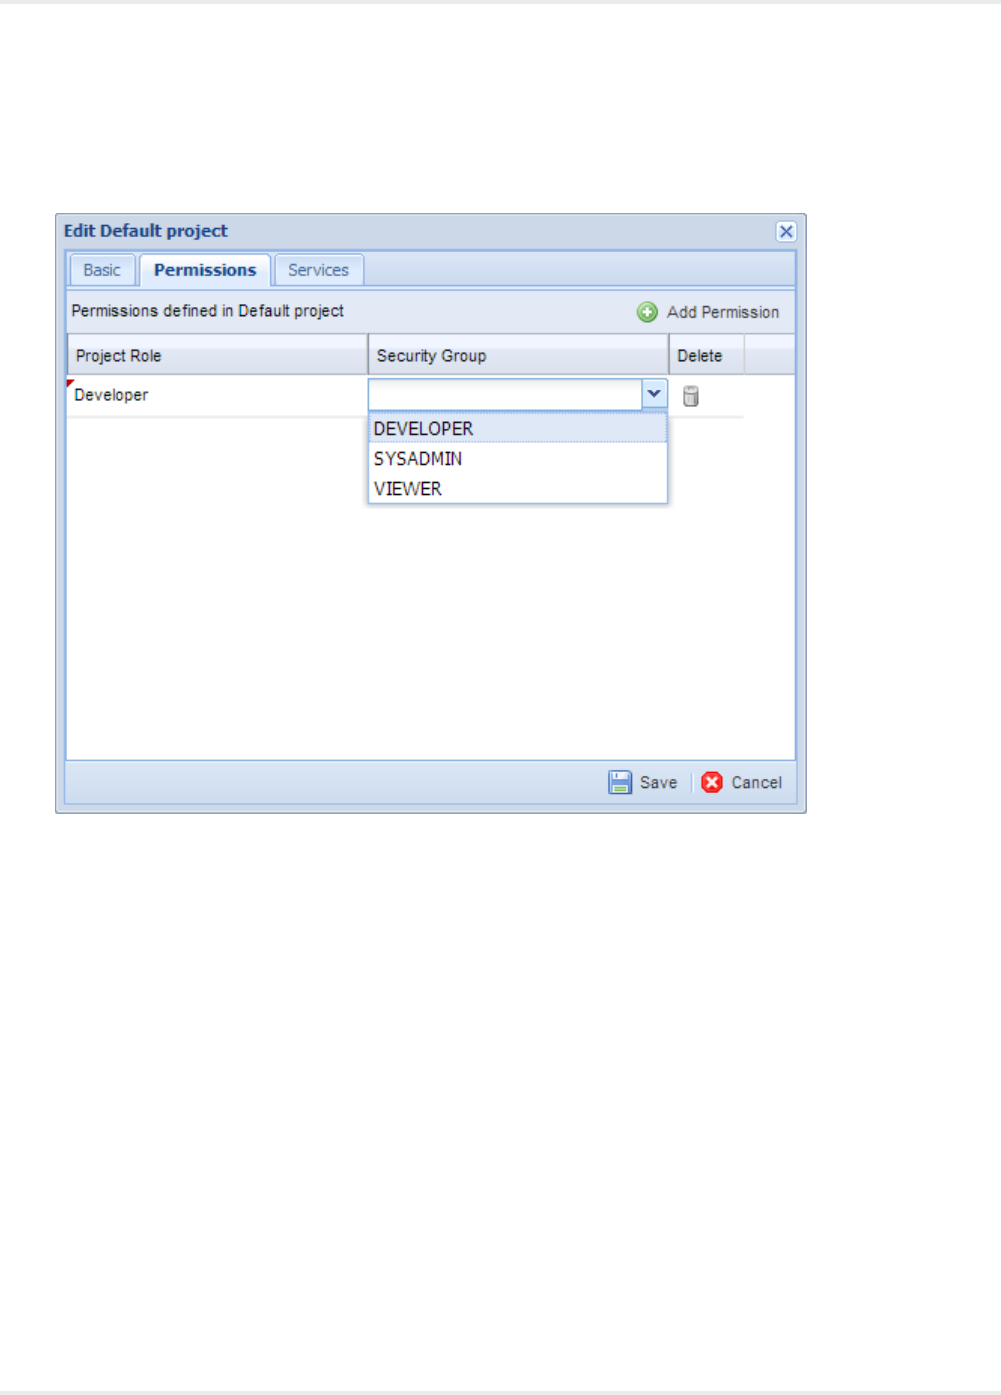
Kofax Kapow Administrator's Guide
in the Security Group column and select the DEVELOPER security group (of which our dev user is a
member). It should look like this:
Adding Project Permissions
Now click Save.
All members of the DEVELOPER group can now perform the actions allowed by the role developer.
Let's log in as the dev user and see how the permissions are reflected in the Management Console.
You log out by clicking the menu button in the upper right corner, then log in as the dev user. Now go to
46
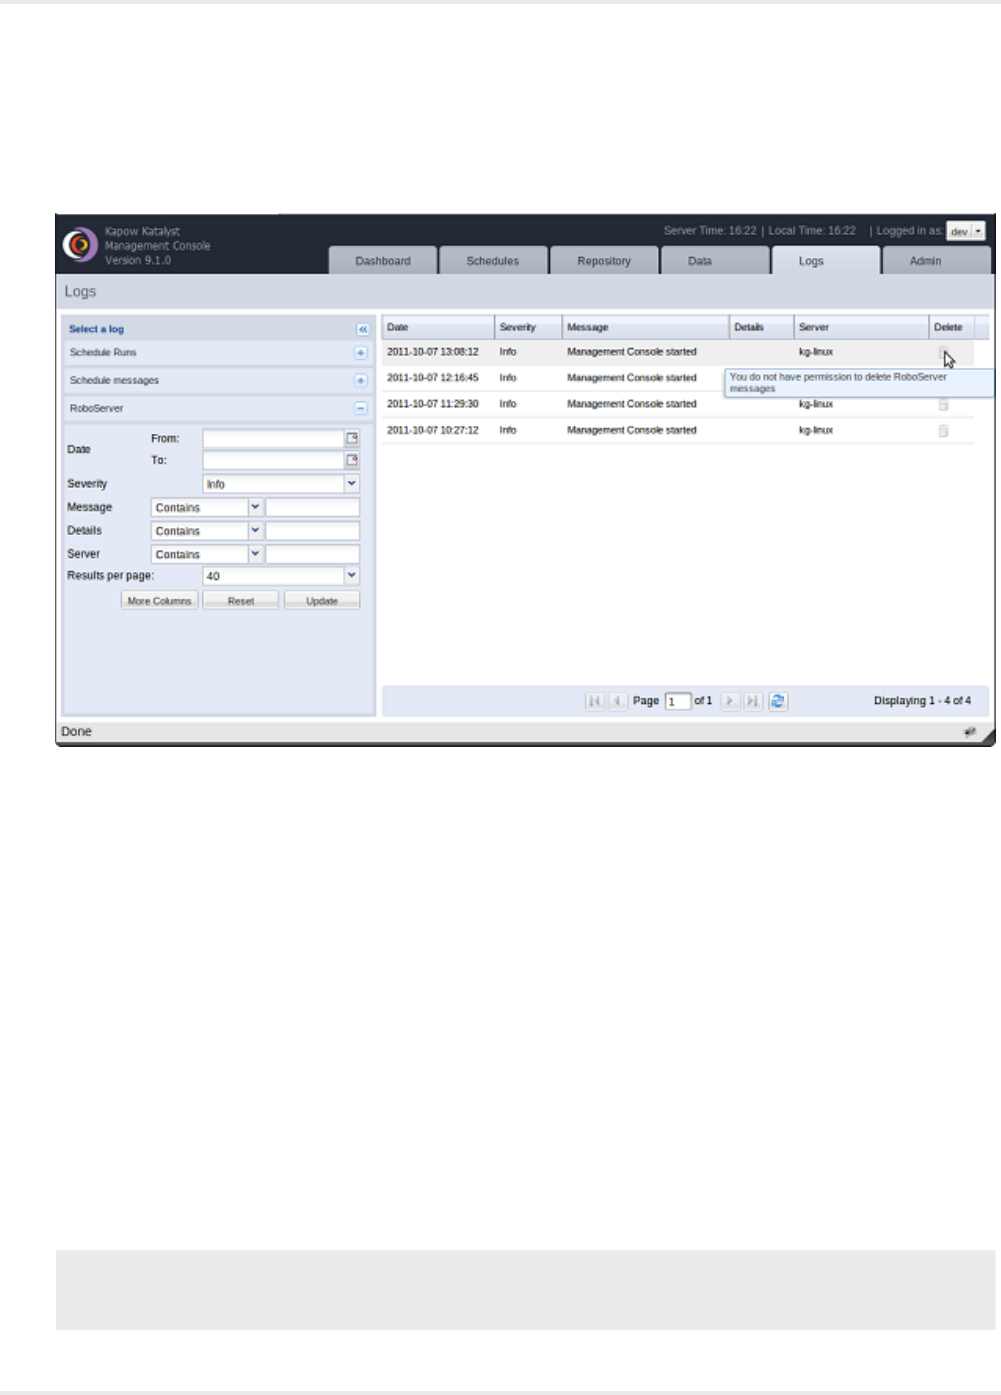
Kofax Kapow Administrator's Guide
the Logs tab, select the RoboServer log in the left pane. Notice how the delete button is disabled, and
hovering gives a tooltip message that you do not have permissions to delete RoboServer messages.
View Logs But Not Delete
You can assign multiple roles to the same security group, and you can assign the same role to multiple
security groups. If a user holds multiple roles, he can do anything that at least one of the roles allow. With
multiple projects in Management Console, users of different projects can be completely separated by
assigning their groups to project-specific roles.
The predefined roles are suggestions, but you can add any number of additional roles, or change the
existing roles to fit your needs.
Actions that can be performed on the Settings, Backup and License tabs (sub tabs to Admin) are only
available to users that are members of the Administrator group.
For using your LDAP user accounts, see the Advanced Configuration>LDAP Integration topic.
Security
In the WEB-INF/Configuration.xml file, it is possible to configure some additional security settings for the
Management Console.
The security configuration section of the file looks like this:
<bean id="securityConfiguration" class="com.kapowtech.mc.config.SecurityConfiguration">
<property name="allowScriptExecution" value="false"/>
<property name="jdbcDriverUpload" value="LOCALHOST"/>
47
Kofax Kapow Administrator's Guide
</bean>
It contains two security settings which are described below.
As part of a schedule, a user may configure a script that is used for Pre/Post processing, e.g. before/after
any robots in the schedule are executed. These scripts must be located on the Management Console
computer's file system. For security reasons, the running of external scripts is disabled by default. To allow
external scripts to execute, you should change the value of the allowScriptExecution property to true.
If you use a pre/post-processing script in a schedule, and scripts are disabled by the administrator, the
schedule will fail immediately with the following message Scripts have been disabled by the administrator.
without executing any robots. Users can save schedules with pre/post-processing scripts even if the
feature is disabled. NB: Even if external scripts are disabled, you can still use the pseudo script command
"runrobot: test.robot" as part of pre- or post-processing.
By default, only the admin user when accessing the Management Console from the localhost is allowed
to upload JDBC drivers. To change this behavior, modify the jdbcDriverUpload property. The following are
the possible values, the property can have:
• NONE: upload of JDBC drivers is not allowed for any users
• LOCALHOST: the default value, the admin user is allowed to upload drivers if accessing the
Management Console from the localhost
• ANY_HOST: the admin user is allowed to upload drivers from any host
Deployment Checklist
Use the following checklist to ensure that all deployment tasks are completed in the proper order.
Deployment Checklist
Item Description
Download and install a
supported version of Apache
Tomcat Server
If your setup requires access to the Management Console outside of your corporate
intranet, make sure SSL is set up to work with your Tomcat server.
Download and install Java 8
(JDK 1.8.0_40 or later)
Management Console will not initialize correctly if Apache Tomcat is started using
any version of Java other than Java 8.
Ensure that the JAVA_HOME
variable is pointed to the Java
8 installation.
Start up the Apache Tomcat
and confirm that the Apache
Tomcat server will come
online before attempting to
deploy the Management
Console application.
• You can use the catalina run command from the \bin directory to start the server.
• Going to http://localhost:8080 in the browser should display the default Apache
Tomcat start up page.
48
Kofax Kapow Administrator's Guide
Item Description
From a Kapow
installation, locate the
ManagementConsole.war file
that will be deployed under
the Apache Tomcat \webapps
directory
Expect errors on the initial start up of the application at this point, because the
server has not been configured yet. We are simply unpacking the .war file so
that we can easily gain access to the files we will need to edit to complete the
installation and configuration process.
Turn the Apache Tomcat
server off.
Create a new database to
be used by the Enterprise
Management Console to hold
its configuration.
• Select one of the support platforms.
• The Kapow installation contains the CREATE and DROP SQL scripts needed
to create all the required database tables. See SQL Scripts for Kapow Tables
for details. Note that these scripts only need to be used if the user account that
the application will use to connect to the database does not have the CREATE
privileges on the schema.
Create the DB user account
to be used by the application
to connect to the database via
JDBC.
Create the Tomcat Context
file: ManagementConsole.xml
• Validation query to be specified is database specific. The online help has all
accepted values for all supported databases.
• Do not forget to update the Username, Password, and DatabaseName
parameters in the JDBC URL string with the correct values for your database.
Prior to starting up the
application, notice that
the Management Console
database (as specified in the
ManagementConsole.xml)
does not have any tables
related to the Management
Console process at this time.
• When the application is started, the needed database tables are automatically
created if they are not present assuming that the DBUser account has the
CREATE privileges.
• If the user does not have the CREATE privileges, the CREATE SQL scripts
can be found in the documentation\sql directory in your Kapow installation
directory. See SQL Scripts for Kapow Tables for details.
Do not forget to deploy the
necessary JDBC .jar file under
the Apache Tomcat installation
directory.
• Deploying to <APACHE_TOMCAT_INSTALL_DIR>\lib makes it available to ALL
apps running under Tomcat.
• Deploying to <APACHE_TOMCAT_INSTALL_DIR>\webapps
\ManagementConsole\WEB-INF\lib makes the JDBC .jar file only
accessible to the Management Console application itself.
Restart the Apache Tomcat
Server
Confirm the Tomcat main home page loads: http://localhost:8080
Try to login to the Enterprise
Management Console as user
- admin, password - admin
http://localhost:8080/ManagementConsole
Enter the Kapow Software
License Keys
See Enter License Information.
49

Kofax Kapow Administrator's Guide
Advanced Configuration
LDAP and SiteMinder Integration
The installation guide shows you how to authenticate users using the internal user management. This
topic describes how to use LDAP and SiteMinder authentication.
LDAP Integration
To use LDAP for authentication, enable the LDAP authentication and edit the ldap definition in the
login.xml file.
To enable the LDAP authentication, set the useLdap property to true as follows:
<bean id="authenticationConfiguration"
class="com.kapowtech.scheduler.server.spring.security.AuthenticationConfiguration">
<property name="useLdap" value="true"/>
<property name="useSiteMinder" value="false"/>
</bean>
In login.xml, you can find the following definition:
<bean id="ldapDirectories" class="com.kapowtech.mc.config.LdapDirectories" lazy-init="true">
<property name="directories">
<list>
<!-- List of security groups which will be application administrators.
Users in these groups will have all permissions. Only users in these groups
can
access the backup tab and create and restore backups -->
<bean class="com.kapowtech.mc.config.LdapDirectory">
<property name="adminGroups">
<list>
<value>KAPOWADMIN</value>
</list>
</property>
<property name="ldapServerURL" value="ldap://ldap.kapowdemo.com:389"/>
<property name="userDn" value="CN=LDAP
test,CN=Users,DC=kapowdemo,DC=local"/>
<property name="password" value="change-me"/>
<property name="userSearchBase"
value="OU=Users,OU=TheEnterprise,DC=kapowdemo,DC=local"/>
<property name="userSearchFilter"
value="(userPrincipalName={0}@kapowdemo.local)"/>
<property name="userSearchSubtree" value="true"/>
<property name="groupSearchBase" value="OU=Security
Groups,OU=TheEnterprise,DC=kapowdemo,DC=local"/>
<property name="groupSearchFilter" value="(member={0})"/>
<property name="groupRoleAttribute" value="cn"/>
<property name="groupSearchSubtree" value="true"/>
<property name="allGroupsFilter" value="(cn=*)"/>
<property name="fullNameAttribute" value="displayName"/>
<property name="emailAttribute" value="userPrincipalName"/>
<property name="referral" value="follow"/>
</bean>
</list>
</property>
</bean>
50
Kofax Kapow Administrator's Guide
This defines a list of ldapDirectory beans named ldap and represents a list of connections to LDAP
servers. Kapow supports multi-forest LDAP integration, so you can specify several connections to LDAP
directories. Each bean defines a number of properties that controls the LDAP integration. If you are
familiar with the way Tomcat integrates to LDAP, this should be quite familiar as well.
Important Group names must be unique across all ldap servers in the list.
Kapow supports LDAPS (LDAP over SSL) with Management Console. To use LDAPS, the
ldapServerURL property must be set as follows:
<property name="ldapServerURL" value="ldaps://<hostname>:<port>"/>
By default the LDAPS port is 636.
Deployment Checklist
Property Description
ldapServerURL The URL to the LDAP server. This uses either the ldap:// or ldaps:// protocol.
userDn The DN (distinguished name) used to log in to LDAP to authenticate other users.
password The password for the userDN account. As the password will be stored in clear text
in this file you should use an account that only has 'read' access.
userSearchBase Subdirectory in the LDAP tree where users can be found.
userSearchFilter Filter that is applied to find the username.
userSearchSubtree Set to true if users may be located in the subdirectory of the userSearchBase.
groupSearchBase Subdirectory in the LDAP tree where groups can be found.
groupSearchFilter Filter that is applied to identify the users in this group.
groupRoleAttribute Attribute that holds the group name.
groupSearchSubtree Set to true if groups may be located in the subdirectory of the groupSearchBase
convertToUpperCase Should the group names be converted to upper case, true by default.
allGroupsFilter Optional. Controls which groups are displayed when creating project permissions,
see below.
fullNameAttribute Attribute to fetch the full name of the user.
emailAttribute Attribute to fetch the email of the user.
referral Set to "follow" to allow redirection to sub nodes in the LDAP tree.
To use an LDAP account to administer the Management Console, you must add one of the groups that
you are a member of to the adminGroups bean in login.xml, as described in Project Permissions . Note
that anyone who is a member of a group listed in adminGroups is a Management Console administrator,
so you may want to create a new LDAP group for this purpose. Use the upper case group name if
convertToUpperCase is true.
When you select a project permission in the Management Console, you can see that all the group names
are pulled from LDAP to populate the list. The groups are located by using the groupRoleAttribute to
construct a filter to fetch all groups. Sometimes you do not want all LDAP groups displayed here, in which
51

Kofax Kapow Administrator's Guide
case override this behavior by providing your own filter. This is done by adding an additional property to
the LdapLogin.
<property name="allGroupsFilter" value="(cn=*)"/>: Finds all group names, if the group name is
in the cn attribute (this is the default).
If you only want to find groups starting with the letter 'e' you can use the following code
<property name="allGroupsFilter" value="(cn=E*)"/>
The filter uses basic LDAP queries. See LDAP documentation for more complex queries.
Checklist for solving SSL connection errors when using LDAPS
If you experience errors connecting using LDAPS, check the following:
• LDAPS requires that the certificate presented by the LDAP server is trusted by the java running the
tomcat. Import the public certificate to the Java keystore that your application uses.
• Make sure certificates are imported into the correct truststore, such as if you have multiple instances of
JRE or JDK.
• Make sure the correct truststore is in use. If -Djavax.net.ssl.trustStore is configured, it overrides
the location of the default truststore.
• If connecting to a mail server, such as Exchange, ensure that authentication allows plain text.
• Verify that the target server is configured to serve SSL correctly. This can be done with the SSL Server
Test tool.
• Check if your anti virus tool has "SSL Scanning" that blocks SSL and TLS. Disable this feature or set
exceptions for the target addresses.
SiteMinder Integration
The Management Console supports pre-authentication using SiteMinder SSO. With SiteMinder the
identity of the user is established before accessing the Management Console, and the user's identity
is communicated through a HTTP header. The identity of the user must be in the form of an LDAP
distinguished name, for the Management Console to resolve the user's LDAP group memberships.
SiteMinder integration is disabled by default. You can enable it by setting the useSiteMinder property to
true in the login.xml file as follows:
<bean class="com.kapowtech.scheduler.server.spring.security.AuthenticationConfiguration"
id="authenticationConfiguration">
<property name="useLdap" value="false"/>
<property name="useSiteMinder" value="true"/>
</bean>
<bean class="com.kapowtech.mc.config.SiteMinderConfiguration" id="siteMinderConfiguration">
<property name="headerName" value="sm_userdn"/>
<property name="accountAttribute" value="sAMAccountName"/>
<property name="accountAttributePattern" value="(.*)"/>
</bean>
After you enable the SiteMinder integration, specify the name of the HTTP header which contains the
user's distinguished name. The accountAttribute property identify which of the user's LDAP attributes
is used as an account name (The default uses the sAMAccountName, which is the user's Windows
login name). The accountAttributePattern property specifies how the account name is parsed from
52

Kofax Kapow Administrator's Guide
the attribute value. accountAttributePattern must be a regular expression (with a single group of
parentheses identifying the account name) , the (.*) value in the accountAttributePattern property
means everything in the attribute. If you wanted to extract the account name form the users email address
the configuration, you can specify the following:
<bean class="com.kapowtech.mc.config.SiteMinderConfiguration" id="siteMinderConfiguration">
<property name="headerName" value="sm_userdn"/>
<property name="accountAttribute" value="userPrincipalName"/>
<property name="accountAttributePattern" value="([^@]*)@.*"/>
</bean>
([^@]*)@.* will match an email address and extract everything before @ as the account name.
Since SiteMinder uses part of the LDAP login configuration, you need to add a user group to the
adminGroups bean, before you can start configuring the Management Console.
It is not possible to logout of the system, since the presence of the SiteMinder header means that you are
always authenticated. To logout, close your browser.
Limitations
SiteMinder integration only works when the Management Console is accessed through the browser.
However if Management Console is accessed by applications which are not browsers, you need to bypass
the SiteMinder authentication mechanism for some URLs. These clients include the following:
Design Studio
Robot developers need to access Management Console to obtain a developer seat license, to upload
robots, and get database configurations and other settings stored in Management Console. This
requires access to the following URLs (relative to the context path where Management Console is
deployed).
• /License/*
• /secure/Repository/*
• /IDESettings/*
Access to above URLs is protected by basic authentication.
REST services
REST service is protected by basic authentication by default, but robots can be exposed without
authentication as REST services. Such services are typically invoked by external applications. REST
uses /rest/* URL.
Example: Complete login.xml file
<?xml version="1.0" encoding="UTF-8" standalone="no"?>
<beans xmlns="http://www.springframework.org/schema/beans" xmlns:xsi="http://www.w3.org/2001/
XMLSchema-instance" xsi:schemaLocation=" http://www.springframework.org/schema/
beans http://www.springframework.org/schema/beans/spring-beans-3.0.xsd">
<!-- This file is only used when deployed in standalone mode -->
<!-- version of the file, used when upgrading from previous versions -->
<bean class="com.kapowtech.scheduler.server.license.StringBasedVersion"
id="loginVersion">
<property name="fullVersion" value="9.3.0"/>
</bean>
<!-- Default is internal User management. To enable LDAP change useLdap property to true
-->
53

Kofax Kapow Administrator's Guide
<bean class="com.kapowtech.scheduler.server.spring.security.AuthenticationConfiguration"
id="authenticationConfiguration">
<property name="useLdap" value="false"/>
<property name="useSiteMinder" value="false"/>
</bean>
<!-- SiteMinder pre authentication integration -->
<bean class="com.kapowtech.mc.config.SiteMinderConfiguration"
id="siteMinderConfiguration">
<property name="headerName" value="sm_userdn"/>
<!-- the LDAP attribute that holds the account name, and a pattern to extract the
name for the attribute value. Defaults work with Windows AD -->
<property name="accountAttribute" value="sAMAccountName"/>
<property name="accountAttributePattern" value="(.*)"/>
</bean>
<!-- usesr for demo ldap
test/Kapow4Ever, engineering , CN=Test
Testesen,OU=Users,OU=TheEnterprise,DC=kapowdemo,DC=local
lisa/Kapow4Ever, Finance, CN=Lisa
Fromfinance,OU=Users,OU=TheEnterprise,DC=kapowdemo,DC=local
jim/Kapow4Ever, Marketing CN=Jim
Frommarketing,OU=Users,OU=TheEnterprise,DC=kapowdemo,DC=local
-->
<bean id="ldapDirectories" class="com.kapowtech.mc.config.LdapDirectories" lazy-init="true">
<property name="directories">
<list>
<bean id="ldap" class="com.kapowtech.mc.config.LdapDirectory">
<property name="adminGroups">
<list>
<value>KAPOWADMIN</value>
</list>
</property>
<property name="ldapServerURL" value="ldap://<hostname>:389"/>
<property name="userDn" value="CN=LDAP test,CN=Users,DC=kapowdemo,DC=local"/>
<property name="password" value="change-to-passowrd"/>
<property name="userSearchBase"
value="OU=Users,OU=TheEnterprise,DC=kapowdemo,DC=local"/>
<property name="userSearchFilter" value="(userPrincipalName={0}@kapowdemo.local)"/>
<property name="userSearchSubtree" value="true"/>
<property name="groupSearchBase" value="OU=Security
Groups,OU=TheEnterprise,DC=kapowdemo,DC=local"/>
<property name="groupSearchFilter" value="(member={0})"/>
<property name="groupRoleAttribute" value="cn"/>
<property name="groupSearchSubtree" value="true"/>
<property name="convertToUpperCase" value="true"/>
<property name="allGroupsFilter" value="cn=E*"/>
<property name="fullNameAttribute" value="displayName"/>
<property name="emailAttribute" value="userPrincipalName"/>
<property name="referral" value="follow"/>
</bean>
</list>
</property>
</bean>
</beans>
Configure JMS Mode
To enable JMS mode in Kapow, perform the following steps.
54

Kofax Kapow Administrator's Guide
Note Running JMS is not supported when running in High Availability mode nor when running the
Management Console in embedded mode.
1. Install a broker, such as Apache ActiveMQ (see http://activemq.apache.org for more
information).Once the broker is installed, set JAVA_HOME to use the latest JDK and run
activemq.bat. Instead of manually setting JAVA_HOME and starting activemq.bat, you can create
the bat file in ...\apache-activemq-5.13.3\bin and run it. The content of the .bat file can be as
follows.
set JAVA_HOME=C:\Program Files\Java\jdk1.8.0_25\
activemq.bat start
Important If you want to configure access for Kapow clients using the ActiveMQ broker,
set up the users as described in the ActiveMQ documentation and ensure that the user has
administrator rights to create and use all destinations prefixed with name space used by the
clients (the default name space is "Kapow"). Also, the user must have administrator rights to use
temporary destinations. The user and password must be configured in the Management Console
configuration.xml file and either on the RoboServer command line or using the RoboServer
Settings application on the General tab.
The ActiveMQ broker persists all Kapow messages. Ensure that the broker has sufficient resources
to store the messages.
2. Install Management Console on Tomcat (see Tomcat Management Console).
Edit ...\\webapps\ManagementConsole\WEB-INF>Configuration.xml and set <property
name="jmsEnabled" value="true"/>.
3. Change the following lines
• In <CATALINA_HOME>/webapps/ManagementConsole/WEB-INF
<property name=”brokerUri” value=”failover://(tcp://localhost:61616)?
startupMaxReconnectAttempts=3”/>
• In the Roboserver connection line
-brokerUrl failover://(tcp://localhost:61616)?startupMaxReconnectAttempts=3
See RoboServer Options in JMS Mode for information on the available parameters.
4. Configure the RoboServers to use JMS services instead of sockets services, such as change "-
service socket:50000" to "-service jms:1". For each RoboServer, configure the broker URL
using the "-brokerUrl" option and specify the cluster it belongs to. RoboServer configuration can
either be done on the command line or using the RoboServer Settings application.
Start RoboServer. For example, RoboServer.exe -mcUrl http://admin:admin@localhost:8080/
ManagementConsole -cluster Production -service jms:1 -brokerUrl failover://(tcp://
localhost:61616)?startupMaxReconnectAttempts=3
Note Starting from Kapow version 10, all RoboServer must auto register to the Management
Console. Therefore, the URL and credentials for the Management Console along with the cluster
name must be specified when starting the RoboServer (either at the command line as in the
previous example or using the RoboServer Settings application).
55

Kofax Kapow Administrator's Guide
5. Start the Management Console and remove any socket-based RoboServers from the cluster
configurations on the Admin > RoboServers tab.
Running JMS and socket mode robots at the same time is not supported. In the JMS configuration,
all RoboServers, the Management Console and other clients must run in JMS mode.
Use MySQL in ActiveMQ
By default ActiveMQ uses KahaDB. It is necessary to change settings to use any enterprise-class
database. In this topic we use MySQL as an example.
1. Locate the conf\activemq.xml file in your ActiveMQ installation folder.
• Add a MySQL datasource bean.
Note Depending on the version of ActiveMQ, the datasource bean can either be in the dbcp or
dbcp2 package.
• Comment out the persistence adapter for KahaDB.
• Add a persistence adapter for MySQL.
2. Add MySQL database driver (mysq-connector-java-5.1.34-bin.jar) to the lib subdirectory of
the ActiveMQ installation directory.
3. Create an ActiveMQ schema in your MySQL database.
Beans code example.
<beans ...>
...
</bean>
<!-- MySql DataSource Sample Setup -->
<bean id="mysql-ds" class="org.apache.commons.dbcp2.BasicDataSource" destroy-
method="close">
<property name="driverClassName" value="com.mysql.jdbc.Driver"/>
<property name="url" value="jdbc:mysql://localhost:3306/activemq"/>
<property name="username" value="root"/>
<property name="password" value="root"/>
<property name="maxActive" value="200"/>
<property name="poolPreparedStatements" value="true"/>
</bean>
<broker ...>
...
<!-- Comment out the default storage adapter
<persistenceAdapter>
<kahaDB directory="${activemq.data}/kahadb"/>
</persistenceAdapter>
-->
<persistenceAdapter>
<jdbcPersistenceAdapter dataSource="#mysql-ds" />
</persistenceAdapter>
...
</broker>
...
</beans>
56
Kofax Kapow Administrator's Guide
MySQL datasource code example.
<!-- MySql DataSource Sample Setup -->
<bean id="mysql-ds" class="org.apache.commons.dbcp.BasicDataSource" destroy-method="close">
<property name="driverClassName" value="com.mysql.jdbc.Driver"/>
<property name="url" value="jdbc:mysql://localhost:3306/activemq"/>
<property name="username" value="root"/>
<property name="password" value="root"/>
<property name="maxActive" value="200"/>
<property name="poolPreparedStatements" value="true"/>
</bean>
Multi-Broker Setup
You can set up several brokers in JMS mode to increase stability and enable failover.
Note JMS mode is not supported in high availability mode.
Perform the following steps to configure multi-broker usage. In this example we use MySQL as a
database.
1. Install ActiveMQ on two computers. In this example they are host1 and host2.
2. Add the following files to the lib subdirectory of each ActiveMQ installation directory.
•commons-dbcp-1.4.jar (see https://commons.apache.org/proper/commons-dbcp/ for details)
•commons-pool-1.6.jar (see https://commons.apache.org/proper/commons-pool/ for details)
3. Change activemq.xml file on each ActiveMQ computer to use MySQL database as described in
Use MySQL in ActiveMQ.
4. Change the brokerUri property in <CATALINA_HOME>/webapps/ManagementConsole/WEB-INF/
Configuration.xml to use both ActiveMQ hosts as follows.
<property name=”brokerUri” value=”failover://(tcp://host1:61616,tcp://
host2:61616)?startupMaxReconnectAttempts=3”/>
5. Start both ActiveMQ hosts before starting RoboServers.
6. Specify both ActiveMQ hosts in the RoboServer connection string as follows.
–brokerUrl failover://(tcp://host1:61616,tcp://host2:61616)?
startupMaxReconnectAttempts=3
High Availability
If high availability (failover) is required you can configure multiple Management Console instances to work
together as a cluster. The following components must be clustered to achieve full failover.
Cluster Components
Component Description
Load balancer An HTTP load balancer is required to distribute requests between multiple Tomcat
servers.
57
Kofax Kapow Administrator's Guide
Component Description
Clustered platform database The Management Console stores schedules, robots etc. in the platform database. In
a failover scenario the platform database should run on a clustered DBMS to avoid
a single point of failure.
Tomcat session replication Although the Management Console doesn't store any data directly in the user's
session (except during Import/Export), the session holds the user's authentication
information.
If session replication is not enabled, the user will have to login again if the Tomcat
he is currently connected to crashes.
Apache Tomcat Connector mod_jk is an Apache module used to connect the Tomcat servlet container with web
servers such as Apache, iPlanet, Sun ONE (formerly Netscape) and even IIS using
the Apache JServ Protocol.
Hazelcast Hazelcast (www.hazelcast.com) is used to cluster data structures over multiple
JVMs. Inside the Management Console this is used to provide clustering of vital
data structures, and to provide intercommunication between application instances.
Here is a example: When you run a robot on RoboServer, a thread is required to
process the status messages returned by RoboServer. This thread will be running
inside a concrete Tomcat instance. In a clustered environment, a user trying to stop
the robot may in fact be generating the stop request on another Tomcat instance
than the instance running the robot. In that case the stop request is broadcast
through Hazelcast to all instances and the instance running the robot will receive it
and act to stop the robot.
Multiple Management Console Instances
You should have two or more identical Tomcat installations, and deploy the same version of
ManagementConsole.war on them all. Make sure the web.xml, Configuration.xml, login.xml, and roles.xml
files are the same across all the instances.
Install and Configure Components
This topic describes how to install and configure necessary components for high availability configuration
using multicast clustering. In this configuration we will set up two host computers: one host (host1)
contains Tomcat server and a database, another host (host2) contains Tomcat server and Apache server
as a load balancer.
Step-by-Step Procedure
The following procedure helps you to install components for high availability configuration.
1. Set up a database on "host1" computer.
2. Download Tomcat from the Apache web site: https://tomcat.apache.org/download-70.cgi, install
Tomcat on both hosts, and set user password. See Tomcat Deployment for more information.
3. Install Management Console on Tomcat on both hosts.
4. Start Tomcat application on both computers and make sure they go online. You should have two
identical Tomcat installations, and deploy the same version of ManagementConsole.war on them
all. Make sure the web.xml, Configuration.xml, login.xml, and roles.xml files are the same on both
installations.
5. Shut down Tomcat servers.
58

Kofax Kapow Administrator's Guide
6. Download Apache server from the Apache web site: http://httpd.apache.org/download.cgi#apache24.
Install the Apache server on "host2" and start the Apache service. See Apache doc for details: http://
httpd.apache.org/docs/
7. Download Apache mod_jk connector from the Apache web site: https://tomcat.apache.org/download-
connectors.cgi.
• Unzip the files to a directory on your disk.
• Copy mod_jk.so file to the <host2>\module directory.
• Edit <host2>\conf\httpd.conf as follows:
LoadModule jk_module modules/mod_jk.so
<IfModule mod_jk.c>
JkWorkersFile "<apache>\conf\workers.properties"
JkLogFile "<apache>\logs\mod_jk.log"
JkLogLevel error
JkLogStampFormat "[%a %b @d %H:%M:%S %Y] "
JkRequestLogFormat "%w %V %T"
</IfModule>
JkMount /ManagementConsole/* loadbalancer
JkMount /ManagementConsole loadbalancer
• Create a <host2>\conf\workers.conf file with the following content:
worker.list=host1, host2, loadbalancer
worker.host1.host=<ip address>
worker.host1.port=8009
worker.host1.type=ajp13
worker.host1.lbfactor=1
worker.host2.host=<ip address>
worker.host2.port=8009
worker.host2.type=ajp13
worker.host2.lbfactor=1
worker.loadbalancer.type=lb
worker.loadbalancer.balance_workers=host1, host2
Where <ip address> is the address of the host computers running Tomcat.
8. For both Tomcat servers enter the following lines to the conf\server.xml file.
<Engine name="Catalina" defaultHost="localhost" jvmRoute="jvm1">
<Cluster className="org.apache.catalina.ha.tcp.SimpleTcpCluster"/>
For more information, see Tomcat Session Replication.
9. On each Tomcat server, edit webapps\ManagementConsole\WEB-INF\Configuration.xml file as
follows. Note that you must specify valid IP addresses of the host computers on your network.
<!-- Cluster configuration -->
<bean id="cluster" class="com.kapowtech.mc.config.ClusterConfig" >
<property name="port" value="5701"/>
<property name="interface" value="10.10.*.*"/>
<!-- Uncomment the line below to enable clustering via multicast. Your license must
support High Availability for this to work -->
<property name="joinConfig" ref="multicastCluster"/>
<!-- or uncomment this line to enable clustering via TCP-IP. Your license must support
High Availability for this to work-->
<!--property name="joinConfig" ref="tcpCluster"/-->
</bean>
<!-- definition for a TCP cluster. You need to add peers to this list, so each
client can locate at least one other functioning cluster member -->
<bean id="tcpCluster" class="com.kapowtech.mc.config.TcpJoinConfig" lazy-init="true">
59

Kofax Kapow Administrator's Guide
<property name="peers">
<list>
<bean class="com.kapowtech.mc.config.TcpPeer">
<property name="host" value="10.10.0.47"/>
<!-- port is only needed if the other machine is not using the same port as this
instance-->
<!--property name="port" value="5701"/-->
</bean>
<bean class="com.kapowtech.mc.config.TcpPeer">
<property name="host" value="10.10.0.57"/>
<!-- port is only needed if the other machine is not using the same port as this
instance-->
<!--property name="port" value="5701"/-->
</bean>
</list>
</property>
</bean>
For more information, see Hazelcast Replication.
Now you can log in to the Management Console on the load balancer by navigating to <host2>:80/
ManagementConsole, where "host2" is the name of the computer running Apache server. Once you log
in, go to Admin > Projects tab. Under Application Nodes you should see two nodes with correct IP
addresses.
Load Balancer Startup
This section describes how to determine if the application started correctly.
If the ManagementConsole.xml (context configuration) or web.xml files are invalid, the application
cannot be deployed on Tomcat, and requests normally return 404 (since you will hit the Tomcat's ROOT
application which does not have anything deployed on /ManagementConsole/).
Any other errors encountered during application startup are shown to the user when the application loads.
This way you do not always have to check the log to figure out why the application did not load correctly.
This is, however, a bit impractical as the application returns 200 OK even if there are errors during startup.
Also, if authentication is enabled, you have to login before you can see the error messages.
To make it easier for load balancers to see if the application started correctly, you can make a request to
the URL /ManagementConsole/Ping. This either returns HTTP status code 200 if the application loaded
correctly, or 500 with a stack trace of the error.
Tomcat Session Replication
Session replication is configured in /conf/server.xml. Here is an example that uses multicast for instance
discovery (Tomcat 5.5).
<Cluster className="org.apache.catalina.cluster.tcp.SimpleTcpCluster"
managerClassName="org.apache.catalina.cluster.session.DeltaManager"
expireSessionsOnShutdown="false"
useDirtyFlag="true"
notifyListenersOnReplication="true"
printToScreen="true">
<Membership
className="org.apache.catalina.cluster.mcast.McastService"
mcastAddr="228.0.0.4"
mcastPort="45564"
mcastFrequency="500"
60

Kofax Kapow Administrator's Guide
mcastDropTime="3000"/>
<Receiver
className="org.apache.catalina.cluster.tcp.ReplicationListener"
tcpListenAddress="auto"
tcpListenPort="4002"
tcpSelectorTimeout="100"
tcpThreadCount="6"/>
<Sender
className="org.apache.catalina.cluster.tcp.ReplicationTransmitter"
replicationMode="pooled"
ackTimeout="150000"
waitForAck="true"/>
<Valve className="org.apache.catalina.cluster.tcp.ReplicationValve"
filter=".*\.gif;.*\.js;.*\.jpg;.*\.png;.*\.htm;.*\.html;.*\.css;.*\.txt;"/>
<Deployer className="org.apache.catalina.cluster.deploy.FarmWarDeployer"
tempDir="/tmp/war-temp/"
deployDir="/tmp/war-deploy/"
watchDir="/tmp/war-listen/"
watchEnabled="false"/>
<ClusterListener
className="org.apache.catalina.cluster.session.ClusterSessionListener"/>
</Cluster>
You also have to set the jvmRoute attribute on the <Engine> element in server.xml:
<Engine jvmRoute="tomcat2" name="Catalina" defaultHost="MyHost">
Note If you are using mod_jk as a poor man's load balancer, the value of the jvmRoute has to match the
name listed in the workers.properties file references by the mod_jk configuration.
See your Tomcat documentation for details.
Hazelcast Replication
The most basic Hazelcast settings can be edited in Configuration.xml, while more advanced settings such
as SSL encryption must be configured in /WEB-INF/Hazelcast.xml
When Management Console starts, it creates a Hazelcast node on port 5701 (or the next available port
that is available). By default this Hazelcast node will bind to IP address 127.0.0.1. You will have to change
the bind address to a public IP/host name before it can participate in a cluster. This is done by modifying
the interface property of the cluster bean in Configuration.xml. It might look like this:
<bean id="cluster" class="com.kapowtech.mc.config.ClusterConfig" >
<property name="port" value="26000"/>
<property name="interface" value="10.0.0.*"/>
.......
</bean>
The * is used as a wildcard, in this case the application will try bind to the 'first' interface that has an IP
address starting with 10.0.0. It is possible, but not recommended to use *.*.*.* as you may end up binding
to 127.0.0.1, or another virtual interface.
61
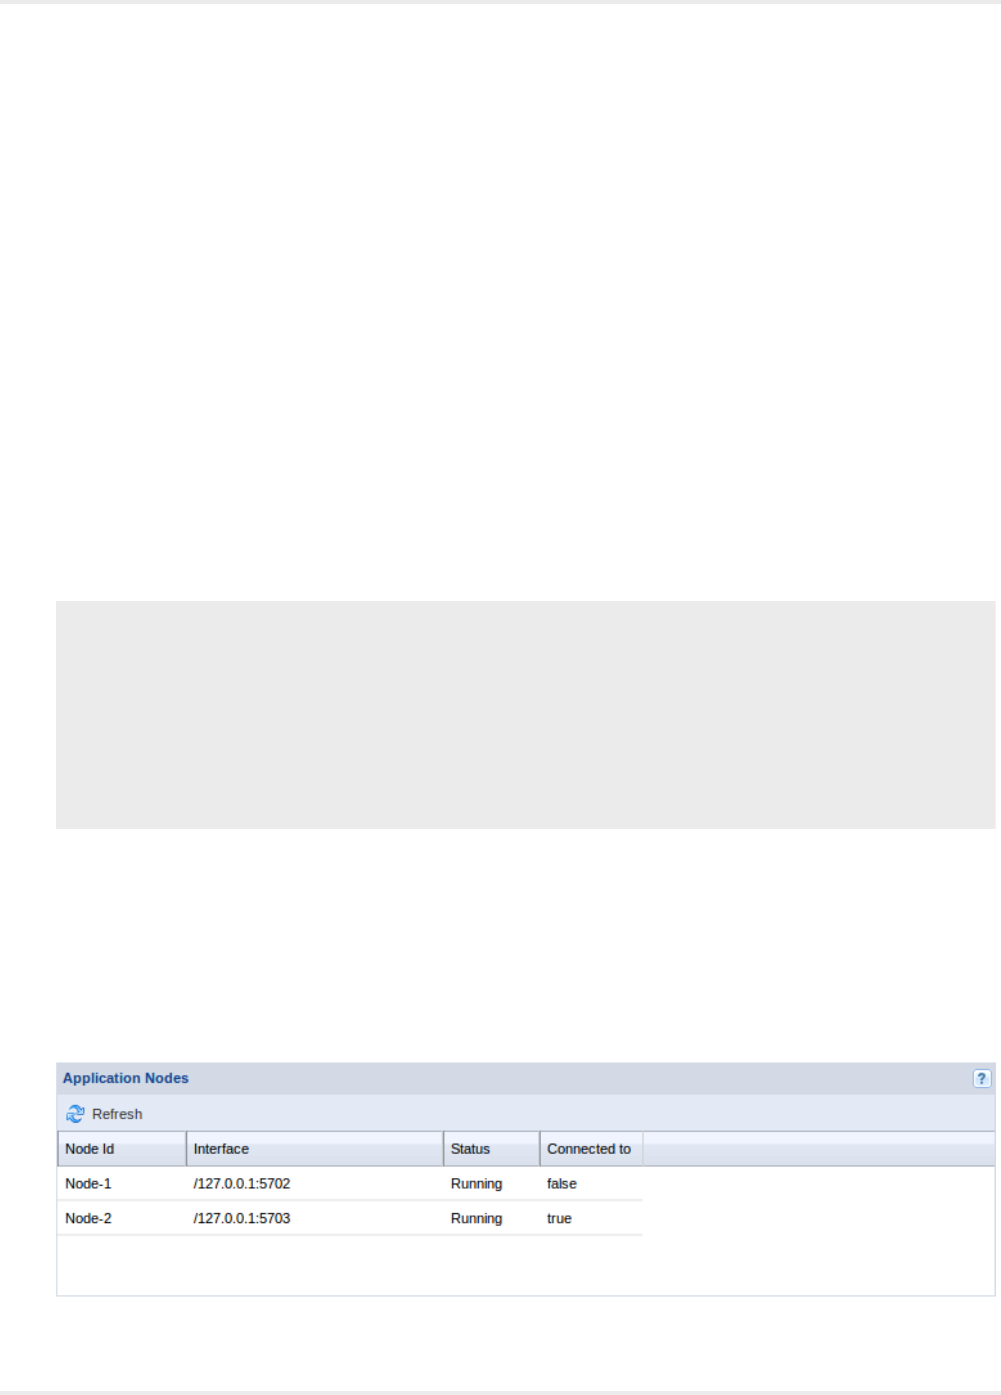
Kofax Kapow Administrator's Guide
When you start additional instances of Management Console, their Hazelcast instances will try to find
any existing Hazelcast node and join the cluster. This discovery can be done through multicast or through
TCP/IP.
To use multicast discovery you must modify the cluster bean in Configuration.xml. This is done my un-
commenting the following line:
<property name="joinConfig" ref="multicastCluster"/>
multicastCluster is a reference to the multicastCluster bean, which defines the multicast group and port.
You may change it to fit your network topology.
If your network doesn't allow multicast you will have to use the tcpCluster. That is done by un-commenting
this line instead:
<property name="joinConfig" ref="tcpCluster"/>
The tcpCluster bean contains a list of TcpPeer, one for each other Hazelcast node. If you use the same
TCP port for all Hazelcast nodes you don't need to specify a port number (each node will assume that its
peers are running on the same port as itself). If you have two nodes configured in a TCP cluster it could
look like this:
<bean id="tcpCluster" class="com.kapowtech.mc.config.TcpJoinConfig">
<property name="peers">
<list>
<bean class="com.kapowtech.mc.config.TcpPeer">
<property name="host" value="10.0.0.25"/>
</bean>
<bean class="com.kapowtech.mc.config.TcpPeer">
<property name="host" value="10.0.0.26"/>
</bean>
</list>
</property>
</bean>
Notice that both nodes are in the list. This means that regardless which node starts first it will be able
to find its peer. It also allows you to use identical Configuration.xml files in both applications. Also, TCP
ports numbers are not defined, so each peer will try to connect to the other one on the same port as it is
listening on itself.
Application Nodes
You can verify that the application is properly clustered by going to the Projects tab, and look at the
Application Nodes section in the bottom of the page. Here you should see something like this:
62

Kofax Kapow Administrator's Guide
This means that the cluster currently consists of two nodes. The interface column will list the IP/host
and port that Hazelcast is using for inter-cluster communication. The Connected to column informs you
which of the two nodes you are connected to at the moment. If you shut down the server you are currently
connected to, you will automatically be re-routed to another live instance by the load balancer.
If you right click on an application node a context menu will appear, here you can request a thread dump
from any node, this may be useful for debugging purposes.
URI Encoding
If you plan to upload robots with names that contain non-ASCII characters, like Danish ÆØÅ or German ß
to the repository, you have to configure the URI Encoding on your web container to UTF-8.
On Tomcat this is done on the <connector> definition found in server.xml file inside the /conf folder. Here
you add the attribute URIEncoding="UTF-8" like this:
<Connector port="8080" URIEncoding="UTF-8"....../>
Password Encryption
As of version 8.2 the Management Console uses certificate based (public-, private-key) encryption when
storing passwords. When you import from a previous version password will automatically be re-encrypted
using the new certificate based algorithm.
The certificate and the matching private key is stored in a Java keystore, Management Console ships with
a keystore that contains a default certificate and private key. Since all customers get the same keystore
we recommend that you create your own keystore, otherwise anyone will be able to load your exports and
potentially get your passwords.
Create Your Own Keystore
If you have already started the Management Console you will need to upgrade the certificate. The
keystore must be in pkcs12 format, and can be created using the keytool application that comes with the
Java SDK (which can be downloaded from Oracle.com, currently available here). The following command
creates a new pkcs12 keystore with a certificate that is valid for 365 days.
keytool -genkey -alias mc -keyalg RSA -validity 3650 -keystore mc.p12 -storetype pkcs12
You will be prompted for password, and the information that will be stored in the X.509 private key. The
command will create a file mc.p12 (the value from the -keystore argument) in the current directory. -validity
3650 means the certificate will be valid for 10 years.
Note We don't recommend that you use a certificate issued by a certificate authority (CA) since pkcs12
holds both the private key and the public certificate, and the password to the private key will be written in
clear text as part of the application configuration.
To instruct Management Console to use the new certificate, change the Configuration.xml file. The file is
located inside the ManagementConsole.war web archive, which must be unpacked, see Deploying into
Tomcat for details. Inside Configuration.xml you will find the following entry:
63

Kofax Kapow Administrator's Guide
<bean id="keyStore" class="com.kapowtech.mc.config.KeyStoreConfig" >
<property name="location" value="/WEB-INF/mc.p12"/>
<property name="password" value="changeit"/>
<property name="alias" value="mc"/>
</bean>
Here you must specify the location, password and alias of the keystore. If you copy the keystore into
ManagementConsole.war the location must be relative to the root of the application. If you want to refer to
a keystore stored in the file system, the location must start with file://, and must be an absolute reference
to the keystore location.
Upgrading the Keystore
The first time Management Console starts, it creates a checksum using the private key from the keystore,
this allows it to detect when the keystore has been replaced, and verify that passwords can in fact be
decrypted with the provided certificate. If you have already started Management Console before installing
your own keystore, you have to configure Management Console to perform a password conversion.
Important Upgrading the keystore is available only for the Management Console keystore that stores
passwords in schedule input objects. It cannot be used to upgrade passwords stored in the password
store or any other encrypted passwords.
To upgrade the keystore, copy the current keystore file into a new location, such as your users home
folder, then modify Configuration.xml to create a password converter with a reference to the old keystore:
<bean id="oldKeyStore" class="com.kapowtech.mc.config.KeyStoreConfig" >
<property name="location" value="file:///home/roboserver/mc.p12"/>
<property name="password" value="changeit"/>
<property name="alias" value="mc"/>
</bean>
<bean id="passwordConverter"
class="com.kapowtech.scheduler.server.service.PasswordConverter">
<constructor-arg ref="oldKeyStore"/>
</bean>
This configures a password converter to use the previous certificate to decrypt any existing passwords
and checksum (you will have to provide correct location, alias and password for the old keystore), and
use the new private key (as configured above) to re-encrypt passwords and create a new checksum. The
conversion will occur the next time the Management Console is started, the conversion occurs while the
application is starting and may take some time if there are many schedules. You don't have to remove
the oldKeyStore and passwordConverter beans from Configuration.xml, as the password conversion is
only triggered when the checksum and keystore is out-of-sync, and after the conversion the checksum will
match the new keystore).
SSL Endpont Verification
When you create a new Cluster you can select that you want the communication with the RoboServers to
be SSL encrypted, this prevents anyone from "listening" to the network and extracting critical information
exchanged between the two parties.
In addition to encryption, SSL also offer endpoint validation. This is to ensure that you don't exchange
critical information with a third party, either due to misconfiguration, or because you DNS has been
64

Kofax Kapow Administrator's Guide
hacked. For this to work you need to configure RoboServer to trust your Management Console and
configure Management Console to trust your RoboServers.
This requires you to edit files inside ManagementConsole.war, so make sure you Tomcat server is not
running when you perform this modification.
Certificates
You will need to create two certificates, one for Management Console and one for RoboServer, each
certificate contains a private and a public key. Creating a certificate and exporting the public key is
described here, in general it is a good idea to read the entire section of the help the discusses certificates,
especially the section on API Client/Server certificates.
Endpoint verification can be separated into two parts, making RoboServer trust Management Console and
making Management Console trust RoboServer, each of these are configured individually, and you don't
have to configure both.
Make RoboServer Trust Management Console
You now have to tell Management Console to use the private key when creating the SSL connection to
RoboServer. This is done by modifying /WEB-INF/certs.xml found inside the WAR file. Here you will need
to provide the location, and the password for the certificate, which could look like this:
<bean id="sslCertificationConfiguration"
class="com.kapowtech.mc.config.SSLVerificationConfiguration">
...
<property name="privateCertificateLocation" value="file:///home/roboserver/client.p12"/>
<property name="privateCertPassword" value="changeit"/>
</bean>
Management Console is now using it private key when establishing SSL connections, once Management
Console's public key is deployed in RoboServer's /TrustedClients folder it will allow the RoboServer to
verify that it is connected to the right Management Console. You can read about the /TrustedClients here
Remember to enable Verify API Client Certificates in RoboServer Settings, and deploy the public key on
all RoboServers in the cluster.
Make Management Console Trust RoboServer
RoboServer already comes with a API certificate installed, so you have to create a new certificate
and replace the pre-configured. First create the certificate as described above, then start RoboServer
Settings and go to the Certificates tab, and click the change button, select the certificate, and enter the
password when prompted. RoboServer will now use the new certificate when creating SSL connection
with Management Console (and other API clients).
Now you need to configure Management Console to only trust SSL connections from RoboServers with
the correct certificate. Like Management Console's client certificate this is (partly) configured in /WEB-INF/
certs.xml, using the following two options:
<bean id="sslCertificationConfiguration"
class="com.kapowtech.mc.config.SSLVerificationConfiguration">
<property name="verifyRoboServerCert" value="true"/>
<property name="checkHostName" value="true"/>
...
65

Kofax Kapow Administrator's Guide
</bean>
The option for verifying RoboServer certificates is a simple boolean flag (true/false), this is because you
have to import the RoboServers public key into the JRE's default keystore. The JRE's default keystore is a
file named cacerts located at /jre/lib/security/.
To import RoboServer's public key into cacerts, you use use the following command:
keytool -import -alias RoboServer -keystore cacerts -trustcacerts -file server.pub.cer
You will be prompted for a password, which is changeit unless you have changed it. The alias will have to
be unique, so if you created a separate certificate for each RoboServer, you will have to add a suffix. Also
note that the references to cacerts and server.pub.cer are relative in this example.
The checkHostName option ensures that Management Console will only talk to the RoboServer if it
presents the correct certificate AND is contacted using the hostname written inside the RoboServer's
certificate. Note that localhost and 127.0.0.1 is not considered the same host when it comes to hostname
checks.
Troubleshooting
Troubleshooting can be quite hard as there is virtually no information available if SSL connections can't be
established, but it is important to know that:
• Management Console will not start if it can't find the certificate, or if the password is wrong.
• When you change RoboServer's certificate in RoboServer settings, it checks that the password is
correct before storing the certificate.
If Management Console can't connect to a RoboServer the following may help you troubleshoot:
• Is RoboServer running. Try to telnet to the socket to be sure.
• Is the RoboServer host name correct (if checkHostName is enabled).
• Is the v public key imported into cacerts. Use keytool -list -v -keystore cacerts -alias RoboServer if you
give -alias it lists all certificates.
• Has Management Console s public certificate been copied to RoboServers /TrustedClients folder.
• Check expiration date. The public key contains the expiration data of the private key, and can be
opened/view in both Windows and Linux.
66
Chapter 4
WebSphere Management Console
By default, Management Console is run as an embedded component inside RoboServer, which makes for
easy installation. As an alternative, it can be deployed on a WebSphere server version 8.5.5.x.
The following procedure helps you set up Management Console and your WebSphere software to work
together.
Note Some of the configuration steps may required WebSphere server restart.
1. Download full Kapow installer and proceed with the installation. Select the Management Console
WAR option during the installation.
2. Open and log in to the WebSphere Administrative Console.
3. Set the following Java Virtual Machine Custom properties. To set the properties, in the left pane
of the WebSphere Administrative Console navigate to Servers > Server Types > WebSphere
Application Servers and click the application server that you will use to run Kapow Management
Console. After that go to Process definition > Java Virtual Machine > Custom properties.
Name Value
com.ibm.crypto.provider.DoRSATypeChecking false
com.ibm.websphere.persistence.ApplicationsExcludedFromJpaProcessing *
4. Configure ManagementConsoleWebsphere.war file.
The Management Console application comes in the form of a Web Application Archive (WAR file)
named ManagementConsoleWebsphere.war, which is located in the /WebApps folder in the Kapow
installation folder. Before you can deploy it as a standalone application on WebSphere, it must be
reconfigured to fit your environment.
A WAR file is compressed using a compressed zip file. To access the configuration files,
you must extract the zip file. Once the configuration files are updated, you re-zip and
deploy ManagementConsoleWebsphere.war to your WebSphere server. See Configure
ManagementConsole.war for more information.
a. Extract the login.xml file located at WEB-INF/login.xml in the
ManagementConsoleWebsphere.war file.
b. Define the administrator role for Management Console by adding the following bean to the
login.xml file. See LDAP Integration for more information.
<bean id="webSphereConfiguration"
class="com.kapowtech.mc.config.WebSphereConfiguration" lazy-init="true">
<property name="adminGroups">
<list>
<value>KapowAdmin</value>
</list>
</property>
67

Kofax Kapow Administrator's Guide
</bean>
Note Provide the value in the bean in a form specified in the WebSphere server, such as add
a prefix or suffix if necessary.
c. Re-zip the ManagementConsoleWebsphere.war file adding the edited login.xml.
5. Add the LDAP repository to the realm for Kapow under Security > Global security > Federated
repositories. For example:
Repository KapowDemo, DC=kapowdemo,DC=local.
6. Specify a datasource under Resources > JDBC > Data sources. We strongly recommend that
you create a new database for the tables used by the Management Console. You can use a derby
database embedded into the WebSphere, but we recommend using MySQL or other enterprise-class
database. See Create a New Database for details.
7. Deploy the ManagementConsoleWebsphere.war file as follows:
a. Navigate to Applications > New Application and follow the procedure to install a new
enterprise application from a local file system.
b. Using the Fast Path in the application installation, change the following:
• Application name, such as ManagementConsole.
•Target Resource JNDI Name to the designated JNDI name of your configured data source
binding the resource reference jdbc/kapow/platform to the default data source.
• The Context Root to /mc.
8. For the ManagementConsole application set Class loader order to Classes loaded with local
class loader first under Enterprise Applications > ManagementConsole > Class loader.
9. Select Enable application security in the Global Security settings.
10. Map security role to users and groups under Enterprise Applications > ManagementConsole >
Security role to user/group mapping.
Once the setup procedure is complete, restart the WebSphere server and try to login to the Enterprise
Management Console as user: admin, password: admin.
68
Chapter 5
Audit Log for Management Console
Audit log for Management Console logs all users' operations in the Management Console including API
calls. By configuring the log4j.properties file, you can log the information to a file or a database. The
following are examples for different configurations. On a Windows system, the log4j.properties file is
located at: User home\AppData\Local\Kapow\version\Configuration.
Note All variables that are in bold and italic need to be changed.
Logging to a File
#Log4j log to file configuration example
log4j.appender.auditLog=org.apache.log4j.FileAppender
#Configure the file path and maximum file size before rollover
log4j.appender.auditLog.File=logFilePath/logFileName.log
log4j.appender.auditLog.MaxFileSize=100KB
log4j.appender.auditLog.layout=org.apache.log4j.PatternLayout
log4j.appender.auditLog.layout.ConversionPattern=%d - %m%n
log4j.category.auditLog=DEBUG, auditLog
log4j.additivity.auditLog=false
Logging to Database
Note The instructions below use MySQL database as an example, but other supported databases can
be used for logging by using their specific jdbc drivers and url connections.
To enable audit logging to MySQL database of the Management Console running with the embedded
roboserver, perform the following steps:
1. Copy MySQL connector jar file to the lib subfolder of the Kapow installation folder (where the
kapowtech-common.jar and platform.jar are located), for example, mysql-connector-
java-5.1.26-bin.jar.
2. Create a database table where you want to log the data to. The following is a MySQL script for
creating tables:
CREATE TABLE LOGS
(
DATED timestamp NOT NULL,
LEVEL VARCHAR(10) NOT NULL,
MESSAGE VARCHAR(1000) NOT NULL
);
69

Kofax Kapow Administrator's Guide
Important To prevent loss of information, make sure the message column has a minimum varchar
size of 600.
3. Add the following lines to the log4j.properties file:
#Log4j log to MySQL database configuration example
log4j.appender.auditLog=org.apache.log4j.jdbc.JDBCAppender
log4j.appender.auditLog.URL=jdbc:mysql://localhost/YourDatabaseSchemaName
# Set Database Driver
log4j.appender.auditLog.driver=com.mysql.jdbc.Driver
# Set database user name and password
log4j.appender.auditLog.user=UserName
log4j.appender.auditLog.password=Password
# Set the SQL statement to be executed
log4j.appender.auditLog.sql=INSERT INTO LOGS VALUES ('%d{yyyy-MM-dd HH:mm:ss}','%p','%m')
# Define the xml layout for file appender
log4j.appender.auditLog.layout=org.apache.log4j.PatternLayout
log4j.category.auditLog=DEBUG, auditLog
log4j.additivity.auditLog=false
Note Define the database schema name, user name, password and the table name that you
created in the database.
To enable audit logging to MySQL database of the Management Console running with the Tomcat,
perform the following steps:
1. Copy MySQL connector jar file to the lib directory under apache tomcat, for example, mysql-
connector-java-5.1.26-bin.jar.
2. Steps 2 and 3 are the same as for the Management Console running with the embedded roboserver.
The log4j.properties file is located under tomcat directory\webapps\Management Console
\WEB-INF\classes.
Audit Log Reference
This section provides a list of operations that are logged when they are executed successfully or fail due
to access restrictions. Log file examples are also provided for your reference.
Login Events
RoboServers are using credentials to register to the Management Console, therefore all user logins are
logged. When a RoboServer starts, there is a login event in the audit log from the user that was given
access to the RoboServer.
Logged Operations
The logged operations are grouped by tabs in the Management Console.
70

Kofax Kapow Administrator's Guide
Robots tab
• Upload robot
• Delete robot
• Move robot (Set Folder)
• Run robot
• Generate API code for robot
• Run robot via REST
• Run robot via SOAP
• Download robot
Types tab
• Upload type
• Delete type
• Move type (Set Folder)
• Create table for type (Generate and execute SQL)
Snippets tab
• Upload snippet
• Delete snippet
• Move snippet (Set Folder)
Resources tab
• Upload resource
• Delete resource
• Move resource (Set Folder)
Databases tab
• Add new database mapping
• Delete database mapping
• Edit database mapping
OAuth tab
• Add new OAuth application
• Edit OAuth application
• Delete OAuth application
• Add OAuth user
• Verify OAuth user
• Edit OAuth user
• Delete OAuth user
Schedules tab
• Create schedule
• Activate schedule
• Deactivate schedule
• Run schedule
71

Kofax Kapow Administrator's Guide
• Edit schedule
• Delete schedule
• Run schedule
Kapplets tab
• Create Kapplet
• Edit Kapplet
• Run Kapplet
• Delete Kapplet
• Create Kapplet schedule
• Update Kapplet flow
• Update Kapplet property
• Delete Kapplet property
• Delete Kapplet icon
• Upload file to Kapplet
Dashboard tab
View of dashboard windows (those that are shown)
Data tab
• View tables from the mapping tree
• View data for selected table
• Delete data from table
• Export data as Excel/XML/CSV for selected data rows
• View the exported file list
• Delete the file from exported file list
Logs tab
Delete logs
Admin main tab
The following tabs are located in the Admin main tab.
Task View tab
Stop task
Clusters tab
• Add roboserver
• Delete roboserver
• Add Cluster
• Rename Cluster
• Edit(e.g assign KCU) Cluster
• Delete Cluster
• Change Cluster Mode
• Delete Databases/Proxy Servers
• Update Databases/Proxy Servers
72

Kofax Kapow Administrator's Guide
• Update Logging
• Update Profiling
• Update Robot Execution
Projects tab
• Create project
• Edit project
• Delete project
Managing Users and Groups tab
• Create user
• Edit user
• Delete user
• Reset password for user
• Create group
• Edit group
• Delete group
If the LDAP is enabled, the following is logged:
• Update LDAP user details (email, full name)
• Create new LDAP user
Settings tab
Update settings
Backup tab
• Create backup
• Restore backup
• Export project
• Import Project
License tab
License update
API calls
• Get Management Console version and DTD information
• Get project/cluster list
• Delete file
• Upload/download/update/move file
• Get robot signature
• Add/remove roboserver
• Rename robot
If you rename a robot in Design Studio, the system first logs the "delete" operation and then the
"upload" operation due to the implementation. When you use API rename method directly, the system
only logs the "rename" operation.
73

Kofax Kapow Administrator's Guide
Example: Log Examples
Here are some examples of how the robot execution logs look like in different scenarios. MySQL is used
as the logging database and the log message consists of timestamp, logging level and detail message.
Robot run from REST call
A robot that is started by REST call, first logs the robot name with id, execution id and task id; and then
the user who started the robot with the project name and task id.
2015-11-27 16:42:26 INFO Robot Wait60 with id = 17 execution id =
-1-9-67f20877bebb task id = 9 has requested to start
2015-11-27 16:42:26 INFO admin run Robot f1/f2/f3/Wait60.robot from Project
Default project with task id = 9 from REST
Robot run from SOAP call
2015-11-27 16:34:24 INFO Robot Wait60 with id = 17 execution id =
-1-1-67f20877bebb task id = 1 has requested to start
2015-11-27 16:34:24 INFO admin run Robot f1/f2/f3/Wait60 from Project Default
project with task id = 1 from SOAP
Robot run started from UI
This robot was started from the Management Console: Management Console > Repository Main tab >
Robot tab > Run now
2015-11-27 16:35:56 INFO Robot Wait60 with id = 17 execution id =
-1-2-67f20877bebb task id = 2 has requested to start
2015-11-27 16:35:56 INFO admin run Robot Wait60 with id = 17 task id = 2
Kapplet triggered by time
2015-12-01 09:05:42 INFO Robot Wait60 with id = 17 execution id =
-1-9-189caec518edd task id = 9 has requested to start - from Kapplet
Kapplet triggered by user
The log messages can be referenced by Kapplet id and task id. The execution log messages with postfix
"- from Kapplet, started by user" also indicates that this robot was triggered by a manual Kapplet run.
For example, "MultipleTaskKapplet" schedule contains 3 robots: ExampleRobot1, ExampleRobot2,
ExampleRobot3. When a user manually runs the Kapplet, the log messages should look like following:
2015-12-02 10:51:52 INFO admin start Kapplet MultipleTaskKapplet with id =
b368f548-995c-4bc4-8c2a-5c48a0e60e6d
2015-12-02 10:51:52 INFO Robot ExampleRobot1 with task id = 58 has been queued for
Kapplet MultipleTaskKapplet with id = b368f548-995c-4bc4-8c2a-5c48a0e60e6d
2015-12-02 10:51:52 INFO Robot ExampleRobot2 with task id = 59 has been queued for
Kapplet MultipleTaskKapplet with id = b368f548-995c-4bc4-8c2a-5c48a0e60e6d
2015-12-02 10:51:52 INFO Robot ExampleRobot3 with task id = 60 has been queued for
Kapplet MultipleTaskKapplet with id = b368f548-995c-4bc4-8c2a-5c48a0e60e6d
2015-12-02 10:51:52 INFO Robot ExampleRobot1 with id = 1 execution id =
-1-58-1dc33f3a2a44b task id = 58 has requested to start - from Kapplet, started by user
2015-12-02 10:51:52 INFO Robot ExampleRobot2 with id = 39 execution id =
-1-59-1dc33f3a2a44b task id = 59 has requested to start - from Kapplet, started by user
2015-12-02 10:51:52 INFO Robot ExampleRobot3 with id = 20 execution id =
-1-60-1dc33f3a2a44b task id = 60 has requested to start - from Kapplet, started by user
74

Kofax Kapow Administrator's Guide
Schedule triggered by time
No log.
Schedule triggered by user
Log messages can be referenced by schedule id and task id. The execution log messages with postfix
"- from schedule, started by user" also indicates this robot was triggered by a manual schedule run. For
example, "MultipleTaskSchedule" schedule contains 4 robot jobs: ExampleRobot1, ExampleRobot2,
ExampleRobot2, ExampleRobot3. When a user manually runs the schedule, the log messages should
look like following:
2015-12-02 10:50:22 INFO admin start Schedule MultipleTaskSchedule with id =
373284858997185
2015-12-02 10:50:22 INFO Robot ExampleRobot1 with task id = 53 has been queued for
schedule MultipleTaskSchedule with id = 373284858997185
2015-12-02 10:50:22 INFO Robot ExampleRobot2 with task id = 54 has been queued for
schedule MultipleTaskSchedule with id = 373284858997185
2015-12-02 10:50:22 INFO Robot ExampleRobot2 with task id = 55 has been queued for
schedule MultipleTaskSchedule with id = 373284858997185
2015-12-02 10:50:22 INFO Robot ExampleRobot3 with task id = 56 has been queued for
schedule MultipleTaskSchedule with id = 373284858997185
2015-12-02 10:50:22 INFO Robot ExampleRobot1 with id = 1 execution id =
3816-53-1dc33f3a2a44b task id = 53 has requested to start - from schedule, started by user
2015-12-02 10:50:22 INFO Robot ExampleRobot2 with id = 39 execution id =
3816-54-1dc33f3a2a44b task id = 54 has requested to start - from schedule, started by user
2015-12-02 10:50:23 INFO Robot ExampleRobot2 with id = 39 execution id =
3816-55-1dc33f3a2a44b task id = 55 has requested to start - from schedule, started by user
2015-12-02 10:50:23 INFO Robot ExampleRobot3 with id = 20 execution id =
3816-56-1dc33f3a2a44b task id = 56 has requested to start - from schedule, started by user
75
Chapter 6
SQL Scripts for Kapow Tables
The SQL scripts for creating and dropping tables in your database are located in the documentation\sql
directory in your Kapow installation directory. For example, C:\Program Files (x86)\Kapow 10.2.0.1
x32\documentation\sql on the Windows system. The name of the script file includes the name of the
database the script is intended for.
Note SQL scripts are installed together with Kapow documentation and when you install Design Studio.
SQL Scripts for Database Tables
The sql directory contains four subdirectories with different scripts as follows:
•altosoftsession: Scripts for creating and dropping tables for single sign on with Altosoft
•logdb: Scripts for creating and dropping logdb tables
•mc: Scripts for creating and dropping Management Console tables
•statistics: Scripts for creating and dropping Statistics (KAFKA) tables
Important The IBM DB2 database must have a table space with a page size of at least 8192 KB to
create all tables.
The Management Console uses a 3rd party scheduling component called Quartz. Quartz also requires
a number of tables which must reside among the other platform tables. These tables are also created
automatically when the Management Console starts, or may be created manually using the scripts.
The following is a Quartz verification script.
select count(*) from QRTZ_SIMPLE_TRIGGERS;
select count(*) from QRTZ_BLOB_TRIGGERS;
select count(*) from QRTZ_CRON_TRIGGERS;
select count(*) from QRTZ_TRIGGER_LISTENERS;
select count(*) from QRTZ_CALENDARS;
select count(*) from QRTZ_FIRED_TRIGGERS;
select count(*) from QRTZ_LOCKS;
select count(*) from QRTZ_PAUSED_TRIGGER_GRPS;
select count(*) from QRTZ_SCHEDULER_STATE;
select count(*) from QRTZ_JOB_LISTENERS;
select count(*) from QRTZ_TRIGGERS;
select count(*) from QRTZ_JOB_DETAILS;
76
