Kofax Kapow User's Guide Users EN
KofaxKapowUsersGuide_EN
User Manual: Pdf
Open the PDF directly: View PDF ![]() .
.
Page Count: 532 [warning: Documents this large are best viewed by clicking the View PDF Link!]
- Table of Contents
- Introduction
- Tutorials
- Design Studio
- Introduction to Design Studio
- Design Studio User Interface
- General Editing
- Types
- Step Actions and Data Converters
- Patterns
- Expressions
- Projects and Libraries
- Interact with Databases
- Robot Structure
- Write Well-Structured Robots
- Determine the Page Type
- Use Tag Finders
- Submit a Form
- Loop Through Tags on a Page
- Loop Through HTML Pages
- Use Wait Criteria
- Extract Content from HTML
- Extract Content From an HTML Table
- Local Files Usage in Robots
- Load an Excel Page from a Variable
- Extract Content from Excel
- Test Cell Types in Excel
- Loop in Excel
- Work with Variables in the Windows View
- Work with JSON
- Handle Errors
- Create and Reuse Snippets
- Make Robust Robots
- Reuse Sessions
- Modify an Existing Type
- Configure Robots
- Migrate a Robot to a Different Browser Engine
- Configure Variables
- Device Automation
- Introduction to Device Automation
- Get Started with Device Automation
- Reference to Automation Device
- Use RDP Connection
- Device Automation Editor
- Configure Automation Device
- Finders in Device Automation
- Device Automation Steps
- Assign Step
- Break Step
- Click Step
- Conditional Step
- Connect To Device Step
- Enter Text Step
- Extract Clipboard Step
- Extract Contents
- Extract Image Step
- Extract Text From Image Step
- Extract Tree as XML Step
- Extract Value Step
- Freeze Tree Step
- Group Step
- Guarded Choice Step
- Loop Step
- Move Mouse Step
- Open Step
- Press Key Step
- Remote Device Action Step
- Return Step
- Set Clipboard Step
- Scroll Step
- Throw Step
- Try-Catch Step
- Automate Terminals
- Use TLS Communication
- Expressions in Device Automation
- Variables in Device Automation
- Limits in Numbers
- Manage Remote Device
- Debug Robots
- Design Studio Settings
- Management Console
- Kapow Kapplets
- Reference
- Design Studio
- Step Action
- Assign Variable
- Branch Point
- Calculate Key
- Call REST Web Service
- Call SOAP Web Service
- Change Proxy
- Clear Named Tags/Ranges
- Clear Web Storage
- Click
- Close Window
- Convert Variables
- Copy File
- Crawl Pages
- Create Cookie
- Create Page
- Delete File
- Delete from Database
- Device Automation
- Divide Table
- Divide Text
- Do Nothing
- End Step
- Enter Password
- Enter Text
- Execute Command Line
- Execute JavaScript
- Execute SQL
- Extract
- Extract As HTML
- Extract Binary Content
- Extract Cell
- Extract Column in Data Row
- Extract Cookie
- Extract Form Parameter
- Extract from Flash
- Extract from PDF
- Extract Hyperlink
- Extract Image
- Extract JSON
- Extract Path
- Extract Property Name
- Extract Screenshot
- Extract Selected Option
- Extract Sheet Name
- Extract Source
- Extract Tag Attribute
- Extract Target
- Extract URL
- Extract Web Storage
- Find In Database
- For Each Browser Window
- For Each Data Row
- For Each File
- For Each Item
- For Each Option
- For Each Property
- For Each Radio Button
- For Each Tag
- For Each Tag Path
- For Each Text Part
- For Each URL
- Generate Error
- Get File Info
- Get Iteration
- Group Step
- Hide Tag
- Insert Columns
- Insert Content
- Insert JSON
- Insert Rows
- Insert Sheet
- Insert Tag
- Load File
- Load Page
- Load Web Storage
- Loop Field Values
- Loop in Excel
- Lookup Password
- Make Directory
- Make Snapshot
- Move Mouse From
- Move Mouse To
- New Window
- Next
- Normalize Table
- Obsolete Step
- Open Variable
- Press Key
- Query Database
- Raw HTTP
- Refind Object
- Remove Attribute
- Remove Columns
- Remove Content
- Remove Cookie
- Remove JSON
- Remove Rows
- Remove Sheet
- Remove Table Rows
- Remove Tag
- Remove Tag Range
- Remove Tags
- Rename File
- Repeat
- Replace Tag
- Restore Session
- Resume Browser
- Return Value
- Rewrite Page
- Rewrite Style Sheet
- Save Session
- Scroll
- Scroll To
- Select File
- Select Multiple Options
- Select Option
- Select Radio Button
- Send Email
- Set Attribute
- Set Checkbox
- Set Column Width
- Set Content
- Set Content of Cell
- Set Content of Column
- Set Content of Row
- Set Current Window
- Set Format of Cells
- Set Hyperlink on Cell
- Set Information Property
- Set JSON
- Set Named JSON
- Set Named Range
- Set Named Tag
- Set Property Name
- Set Row Height
- Set Sheet Name
- Set Tag
- Set Tag Name
- Set Text
- Set Value of Cell
- Snippet Step
- Stop
- Store In Database
- Store in HBase Table
- Test Cell Type
- Test File Existence
- Test JSON Type
- Test Page Type
- Test Row
- Test Tag
- Test URL
- Test Value
- Test Variables
- Test Window
- Transform XML
- Transpose Table
- Try
- Unhide Tag
- View as CSV
- View as Excel
- View as JSON
- View as XML
- Wait
- Write File
- Write Log
- Data Converters
- Add Text
- Add To CSV
- Advanced Extract
- Ampersand Decode
- Ampersand Encode
- Base64 Decode
- Base64 Encode
- Boolean Converter
- Capitalize
- Compute MD5 Checksum
- Convert Binary to Text
- Convert from Excel Date
- Convert HTML to Text
- Convert Text to Binary
- Convert to Excel Date
- Convert to Lower Case
- Convert to Upper Case
- Convert Using JavaScript
- Convert Using List
- Count Tags
- Evaluate Expression
- Extract
- Extract Date
- Extract List
- Extract Number
- Extract Year
- Format Date
- Format HTML
- Format Number
- Get Property
- Get Time Between Dates
- Get Variable
- If Then
- Make URL Absolute
- Make URL Relative
- Modify Date
- Remove Non-Printable Characters
- Remove Spaces
- Remove Special Characters
- Remove Tags
- Replace Pattern
- Replace Text
- Unquote Text
- URL Decode
- URL Encode
- The Type Editor
- Creating and Deleting Tables
- Protocols
- Robot Libraries
- Upload to Management Console
- Other Topics
- Robot Configuration
- Options
- Plugin Simulation from JSON Variable
- Step Configuration
- Windows
- Named Tags, Ranges, and JSON
- Tag, Range, and JSON Finders
- Patterns
- Expressions
- Error Handling
- POST Requests as URLs
- The Library Protocol
- Value Selector
- URL Selector
- Keyboard Help
- Browser Tracer
- Variable Validation Errors
- Supported Features in Excel
- XML Data Mapper
- URL Blocking
- Web Authentication
- Step Action
- RoboServer
- Management Console
- Java API
- Using Proxy Services
- Kapow Limitations
- Design Studio

Kofax Kapow
User's Guide
Version: 10.2.0.1
Date: 2017-09-29
© 2017 Kofax. All rights reserved.
Kofax is a trademark of Kofax, Inc., registered in the U.S. and/or other countries. All other trademarks
are the property of their respective owners. No part of this publication may be reproduced, stored, or
transmitted in any form without the prior written permission of Kofax.

Table of Contents
Chapter 1: Introduction.............................................................................................................................. 9
Getting Support...................................................................................................................................9
Chapter 2: Tutorials.................................................................................................................................. 11
Beginner Tutorials.............................................................................................................................11
Introduction.............................................................................................................................11
Robot Beginner's Tutorial...................................................................................................... 12
Kapplet Beginner's Tutorial....................................................................................................15
Type Beginner's Tutorial........................................................................................................ 17
Advanced Tutorials........................................................................................................................... 18
Branches, Robot States, and Execution Flow.......................................................................18
Looping Basics.......................................................................................................................20
Try Step................................................................................................................................. 24
Excel.......................................................................................................................................27
Data Conversion.................................................................................................................... 29
Patterns.................................................................................................................................. 31
Snippets................................................................................................................................. 37
Date Extraction - Simple Case..............................................................................................40
Date Extraction - Tricky Case............................................................................................... 41
API..........................................................................................................................................41
Chapter 3: Design Studio.........................................................................................................................45
Introduction to Design Studio...........................................................................................................46
Robots.................................................................................................................................... 46
Snippets................................................................................................................................. 55
Variables and Types.............................................................................................................. 55
Libraries and Robot Projects.................................................................................................56
Naming policy........................................................................................................................ 57
Design Studio User Interface........................................................................................................... 58
Menu Bar............................................................................................................................... 59
Toolbar....................................................................................................................................61
My Projects View................................................................................................................... 62
Shared Projects View............................................................................................................ 63
Databases View..................................................................................................................... 63
Editors View........................................................................................................................... 64
Robot Editor........................................................................................................................... 65
3

Kofax Kapow User's Guide
Type Editor.............................................................................................................................70
Text Editor..............................................................................................................................70
General Editing................................................................................................................................. 70
Types.................................................................................................................................................72
Type Attributes....................................................................................................................... 73
Step Actions and Data Converters.................................................................................................. 73
Patterns.............................................................................................................................................74
Expressions.......................................................................................................................................77
Experiment with Expressions................................................................................................ 78
Edit Expressions.................................................................................................................... 79
Projects and Libraries.......................................................................................................................80
Manipulate Robot Projects.................................................................................................... 81
Organize Robot Files.............................................................................................................82
Work with Shared Projects....................................................................................................82
Interact with Databases....................................................................................................................84
Map Databases......................................................................................................................84
Types and Databases............................................................................................................86
Database Warnings............................................................................................................... 86
Create Database Tables........................................................................................................ 87
Store Data in Databases....................................................................................................... 88
Robot Structure.................................................................................................................................91
Write Well-Structured Robots........................................................................................................... 92
Determine the Page Type................................................................................................................ 94
Use Tag Finders............................................................................................................................... 94
Tag Paths...............................................................................................................................94
Tag Finder Properties............................................................................................................ 96
Configure Tag Finders........................................................................................................... 97
Submit a Form..................................................................................................................................97
Form Basics........................................................................................................................... 98
Determine the Step Action.................................................................................................. 100
Use the Loop Form Actions................................................................................................ 100
Upload Files......................................................................................................................... 101
Use the Context Menu on the Page View.......................................................................... 101
Loop Through Tags on a Page...................................................................................................... 102
Loop Through Tags with the Same Class...........................................................................102
Loop Through Tags with Different Classes......................................................................... 104
Loop Through HTML Pages...........................................................................................................105
First Page Links to All Other Pages................................................................................... 105
4

Kofax Kapow User's Guide
Each Page Links to Next.................................................................................................... 106
Use Wait Criteria............................................................................................................................ 108
Extract Content from HTML........................................................................................................... 113
Extract Text.......................................................................................................................... 114
Extract Binary Data..............................................................................................................114
Use the Context Menu in the Page View............................................................................114
Perform Common Tasks...................................................................................................... 115
Extract Content From an HTML Table........................................................................................... 118
Handle Table Content Irregularities..................................................................................... 118
Handle Table Structure Irregularities................................................................................... 119
Local Files Usage in Robots..........................................................................................................119
Load an Excel Page from a Variable.............................................................................................121
Extract Content from Excel............................................................................................................ 122
Extract Values from Cells.................................................................................................... 123
Extract a Sheet Name.........................................................................................................124
Extract as HTML..................................................................................................................124
Test Cell Types in Excel.................................................................................................................125
Loop in Excel..................................................................................................................................126
Loop Over Sheets and Rows.............................................................................................. 127
Loop Over Merged Cells..................................................................................................... 128
Work with Variables in the Windows View.....................................................................................129
Open a Variable...................................................................................................................129
Modify a Variable................................................................................................................. 130
Work with JSON............................................................................................................................. 131
JSON Terminology............................................................................................................... 131
JSON MIME Type................................................................................................................132
JSON and Step Actions...................................................................................................... 132
JSON as a JavaScript Object............................................................................................. 134
Handle Errors..................................................................................................................................134
Error Handling Alternatives..................................................................................................135
Shortcuts for Common Cases............................................................................................. 136
At Target...............................................................................................................................138
Looping.................................................................................................................................139
Try Catch............................................................................................................................. 140
Identify Error Handling in Robot View.................................................................................141
Create and Reuse Snippets...........................................................................................................142
Variables and Snippets........................................................................................................142
Snippet Best Practices........................................................................................................ 144
5

Kofax Kapow User's Guide
Make Robust Robots......................................................................................................................145
Reuse Sessions..............................................................................................................................145
Modify an Existing Type................................................................................................................. 147
Configure Robots............................................................................................................................147
Show Changes from Default Robot Configuration.............................................................. 148
Migrate a Robot to a Different Browser Engine.............................................................................151
Migrating a Robot to the Classic Browser.......................................................................... 151
Migrating a Robot to the Default Browser...........................................................................151
Configure Variables........................................................................................................................ 152
Device Automation..........................................................................................................................153
Introduction to Device Automation...................................................................................... 154
Get Started with Device Automation................................................................................... 155
Reference to Automation Device.........................................................................................155
Use RDP Connection.......................................................................................................... 157
Device Automation Editor.................................................................................................... 158
Configure Automation Device..............................................................................................160
Finders in Device Automation............................................................................................. 169
Device Automation Steps.................................................................................................... 181
Automate Terminals............................................................................................................. 205
Use TLS Communication.....................................................................................................213
Expressions in Device Automation......................................................................................214
Variables in Device Automation...........................................................................................225
Limits in Numbers................................................................................................................226
Manage Remote Device......................................................................................................226
Debug Robots.................................................................................................................................228
Basic Debugging..................................................................................................................228
Debug from the Current Location in Design Mode............................................................. 230
Return to Design Mode from a Debugging Location...........................................................230
Use Breakpoints...................................................................................................................230
Single Stepping....................................................................................................................231
Step Into...............................................................................................................................231
Design Studio Settings................................................................................................................... 231
General.................................................................................................................................232
Text Files..............................................................................................................................232
Robot Editor......................................................................................................................... 232
Device automation............................................................................................................... 233
Local Databases.................................................................................................................. 233
Proxy Servers...................................................................................................................... 234
6

Kofax Kapow User's Guide
Certificates........................................................................................................................... 235
Bug Reporting...................................................................................................................... 236
Management Consoles........................................................................................................236
Chapter 4: Management Console..........................................................................................................238
Introduction to Management Console Structure............................................................................ 238
Naming Policy...................................................................................................................... 239
Start the Management Console..................................................................................................... 239
Management Console Configuration and User Interface...............................................................240
Dashboard............................................................................................................................240
Kapplets............................................................................................................................... 242
Schedules.............................................................................................................................243
Repository............................................................................................................................ 250
Data......................................................................................................................................263
Logs......................................................................................................................................264
Admin................................................................................................................................... 267
Add Database Type.............................................................................................................289
JMX................................................................................................................................................. 290
OAuth.............................................................................................................................................. 291
Supported Service Providers...............................................................................................291
Add Applications.................................................................................................................. 291
Add Users............................................................................................................................ 293
Write Robots........................................................................................................................ 296
Schedule Robots with Credentials...................................................................................... 297
Out of Band Applications.....................................................................................................298
Chapter 5: Kapow Kapplets................................................................................................................... 300
Building and Maintaining Kapplets................................................................................................. 300
Creating Kapplets................................................................................................................ 300
Using the Kapplet Studio.....................................................................................................301
Installing and Using Kapplets.........................................................................................................305
Invoking Kapplets.................................................................................................................305
Creating Email Notifications from Kapplets.........................................................................306
Scheduling Kapplets............................................................................................................ 306
Customizing Kapplet Branding....................................................................................................... 307
Chapter 6: Reference.............................................................................................................................. 308
Design Studio................................................................................................................................. 308
Step Action...........................................................................................................................308
Data Converters...................................................................................................................428
The Type Editor................................................................................................................... 469
7

Kofax Kapow User's Guide
Creating and Deleting Tables.............................................................................................. 474
Protocols.............................................................................................................................. 474
Robot Libraries.....................................................................................................................475
Upload to Management Console.........................................................................................476
Other Topics.........................................................................................................................476
RoboServer..................................................................................................................................... 519
Start RoboServer................................................................................................................. 519
RoboServer Configuration................................................................................................... 523
RoboServer Configuration - Headless Mode...................................................................... 524
Management Console.....................................................................................................................527
Other Topics.........................................................................................................................527
Java API......................................................................................................................................... 529
Using Proxy Services..................................................................................................................... 530
Kapow Limitations...........................................................................................................................530
8

Chapter 1
Introduction
Kofax Kapow is a platform for application integration and process automation. It can integrate applications
that were not built to be connected and automate processes across such heterogeneous systems; cloud/
SaaS applications with premise systems, legacy systems with modern web applications, back office
systems with partner websites.
With our visual editor Design Studio, you click through the applications and data sources you want to
integrate and create an automated workflow.
In Kapow, these workflows are known as robots. As you build a robot, you are free to navigate through the
applications as you integrate them. You can login to applications, extract data parts of a page, enter data
into forms or search boxes, make menu selections, and scroll through multiple pages. Your robot can also
access databases, files, APIs, and web services, exporting data from one application and loading it into
another; transforming data as necessary along the way.
Device Automation in Kapow helps you automate Windows and Java applications on your network
computers. Device Automation replaces manual processes by controlling an application on a desktop or a
terminal. See Device Automation for details.
Once built, robots are uploaded to a repository in the Management Console. From here, they can be
scheduled for batch-execution on the RoboServer or executed on-demand via Java or C# APIs, tailored
REST services that are instantaneously available once the robots have been added to the repository, or
exposed as special-purpose end-user web applications called Kapplets.
The Management Console is also responsible for load balancing, failover, monitoring of RoboServer
health and management of user roles and permissions.
Getting Support
Customer Support
If you are having any kind of problems using Kofax Kapow, please go to http://services.kofax.com/support
portal that can help you solve problems when using Kofax Kapow.
In many of the Kofax Kapow applications, you can also send a bug report from within the application. To
do this, select Report Bug in the Help menu. Please provide as much information as possible about the
bug and what you did just before the bug occurred.
Kofax Customer Portal and Knowledge Base
Kapow customers who are active on maintenance also are entitled to obtain access to the Kofax
Customer Portal, which includes solutions to commonly found problems, as well as a Knowledge Base
containing implementation tips and tricks, and more.
9

Kofax Kapow User's Guide
Support Policy
For support policy, visit the Kofax End of Sale / End of Support Announcements page on the Kofax
support portal.
10

Chapter 2
Tutorials
The topics in this section contain links to video tutorials that help you perform different tasks in Kapow. On
each tutorial page you can also find a transcript of the video.
Note You need Internet connection to view the video tutorials.
Beginner Tutorials
This section contains several tutorials that provide an overview of Kapow as well as guide you through
your first project in this product. Make sure to install and set up Kapow correctly before proceeding with
these tutorials. Click the links to videos to play them.
Note You need Internet connection to view the video tutorials.
Introduction
Introduction tutorial.
This is the first of our beginner tutorials which will guide you safely through your first project with Kapow.
In this first video, you will get an overview of the workflow involved when working with Kapow along with
an introduction to the main program called Design Studio. Before watching these tutorials, make sure you
have installed and set up Kapow correctly. Please follow the relevant parts of the Installation Guide.
Kapow to put it simply is a platform which enables you to fully automate any process that you would be
able to perform in a browser via your mouse and keyboard.
Please sit back and watch as you are taken through the general procedure from idea to automated
process.
It all starts with an idea of a process you want to automate. In these Beginner Tutorials we want to
automatically extract the most recent stories from a website called News Magazine.
Our first step will be to check out the website. What exactly do we want?
When we feel confident about what we want to achieve, we will open Design Studio, the program used
to create the automated processes. The first time you open Design Studio you will get a welcome screen
which links to this Beginner Tutorial, along with the rest of the documentation. Click OK and you will be
able to see the main window of Design Studio.
On the left side we have the projects view. Right now it contains only the default project which includes
a collection of example files and a Tutorials folder where samples of the files we will be creating in these
Beginner Tutorials can be found.
11

Kofax Kapow User's Guide
Double clicking the file called Post.type in the projects view, opens it in the type editor, which is used
to edit and create this kind of file. A type defines what kind of data can be stored in a variable of that
type. If you are unfamiliar with types and variables, you can think of a variable as a bucket which can
hold objects, like text or images, and the type can be thought of as the mold which produces that type of
bucket.
This particular type is designed to contain the information we will be extracting from the News Magazine
website. In the very last tutorial we will get into the process of creating a type.
The extraction of stories from News Magazine is performed by an automated process called a robot. Think
of a robot as an automation of any process you would perform in a web browser.
Double clicking the file called NewsMagazine.robot, also from the Tutorials folder, opens up the robot
editor, which is used to edit and create robot files.
The Robot View at the top of the editor displays the structure of the robot. Each step corresponds to an
action performed by the robot. Going through the steps in the Robot View the robot loads News Magazine,
navigates to the most recent articles and extracts a title and a preview of each story by using a loop. The
robot then finally returns the collected values
Clicking the second step in the Robot View executes the Load Page action and we see that News
Magazine loads in the Browser View below. As we will see later, the Browser View makes it really intuitive
to build a robot.
The next tutorial will show you how to build this robot yourself.
Once we have automated the process of extraction with the robot, we will upload that robot to the
Management Console. The Management Console is a web-based application for managing the
operational aspects of Kapow. From the robot we can create a Kapplet, which publishes the robot as an
app for yourself and others to use.
The final product will be a Kapplet which automatically extracts the most recent stories from News
Magazine and returns them for the user to view and download.
You are now ready to start building your first robot. Start the Beginner Tutorials by watching the Robot
Beginner's Tutorial.
Robot Beginner's Tutorial
Robot beginner's tutorial video.
General Introduction
This is the second of four beginner tutorials which will guide you all the way through your first project with
Kofax Kapow. It is advised to start with the Overview video before starting this tutorial.
You are about to learn how to build a robot in Kapow's Design Studio. Please feel free to follow along on
your computer.
Specific Introduction
In Kofax Kapow, robots are used to automate processes that can be performed in a web browser. Robots
can mimic and automate any set of mouse and keyboard instructions that you would otherwise have to
perform manually.
12

Kofax Kapow User's Guide
In these beginner tutorials it is the goal to automate the process of extracting the most recent stories from
News Magazine which is a site built specifically for these tutorials. There is a link to the site in the text
associated with this video. (http://kapowsoftware.com/tutorial/news-magazine/index.html.) Under the tab
Most Recent News, we find the three most recent articles on News Magazine. From these we want to
extract their title and the short article preview that is given. We will design our robot to do all this.
Creating a New Robot
With Design Studio running, create a new robot by right-clicking the default project and choosing New >
Robot.... A window opens, asking for the name of our new robot. Since this is our first robot we will
call it MyFirstRobot.robot. Click next. Now direct the robot to the front page of News Magazine (http://
kapowsoftware.com/tutorial/news-magazine/index.html) and click finish.
The robot editor opens and News Magazine loads. Notice that the new robot file has automatically been
selected in the projects view on the left.
The Robot Editor
In the robot editor we have five different main views.
There's the browser view which shows us the loaded page exactly like we'd expect to see it in a browser.
Under the browser view, the html view shows the html of the loaded page.
At the very top there's the robot view where you can see the actions performed by the robot. Actions can
be anything from clicking a link to storing data in a database. The active step is highlighted in green and
steps to the left of the active step have been executed. Right now the End-step, which is the small round
step, is the active step and the load page step has been executed. We will get back to the meaning of the
End-step later on.
The step view on the right is used to configure the action performed by the active step. Since our current
active step, the End-step, does not have any properties to configure, the step view contains only a
description of the step.
Finally the variables view specifies any variables used by the robot for input, output or for storing data
during execution.
The Browser View
Use the browser view to navigate to the page we want to extract from. A double click in the browser view
corresponds to a single click in a regular browser. Double click the Most Recent News tab to get to the
stories we want to extract.
Notice that a new step is created and executed in the robot view and the Most Recent News page is
loaded in the browser view.
Scroll down the page and see the three news articles that we want to extract from.
If we single-click within the browser view, a green box appears around the HTML tag in which we have
clicked. This green box marks the selected tag in the browser view. By selecting a tag and right clicking it,
a menu appears which presents some actions that can be applied to the selected tag. We will use this in a
moment.
Looping Through Tags
13

Kofax Kapow User's Guide
The next step is to make a loop which iterates through the three most recent articles. To do this we simply
select any tag within the tag of the first article. Select for example the picture. Now, right-click in the
selected tag and choose Loop > For Each Tag. A For Each Tag step appears in the robot view, and in the
browser view a blue box appears around the first article in our loop.
The For Each Tag step has arrows which can be used to iterate through the loop. Use these to iterate
through the three articles and confirm that they are selected properly by the blue box. Clicking the arrows
will not alter the robot in any way, but they can help us ensure that the loop has the expected iterations.
Use the left-most arrow to return to the first article.
The function of the end step now becomes apparent. The loop will loop over every step bounded by the
For Each Tag step and the End step. Note that we cannot add any steps after the End step.
Adding a Variable
Now, before we can extract anything we need to add a variable to contain the text we are going to extract.
As mentioned in the Introduction tutorial I have already prepared a type called post to use with this robot.
Right click the white box in the variables view in the lower right corner and select Add Variable of
Complex Type > post. A window opens in which we may configure the variable. Let us keep the default
settings and click OK.
A variable of the selected type now appears in the variables view. It contains the two attributes title and
preview, which correspond to what we want to extract.
Extracting
Looking at the browser view again we are now ready to make the extractions. Click then right-click the title
of the post marked with the blue box and choose Extract > Extract Text > title. Extracting within the blue
box, called the named tag, ensures that the other iterations of the loop will extract the corresponding titles
and previews from the other posts.
Now do the same for the article preview. Click and right-click the preview text and choose Extract >
Extract Text > preview. Notice that the extracted text is now shown in the variables view. Also notice that
two extraction steps have been added and executed in the robot view. Use the arrows on the For Each
Tag step, while looking at the variables view, to observe that the text is extracted properly from the other
posts as well.
The Return Value Step
To output the collected data we now need to insert a return value step into our robot. Right-click the end
step and go to the submenu "Insert Step Before" and choose Action Step. This inserts a new Action Step
before the end step.
Use the dropdown in the Step Action View on the right to choose the Return Value action for this step. The
Step View now changes to show the properties of the Return Value action. We see that the variable we
added earlier has been chosen by default. The robot is now ready to be tested in the debugger.
The Debugger
Switch to Debug mode by clicking the Debug button above the Robot View.
The bottom part of the robot editor is now replaced with panels containing various tools to monitor the
execution of the robot. The default tab in the main panel shows Input and Output. Run the robot by
14

Kofax Kapow User's Guide
choosing Run from the Debug menu. The robot should now successfully execute and the output should
be shown in the main panel. We have now successfully built a robot that extracts the three most recent
articles from the News Magazine website.
If the execution fails for some reason, you can either redo the tutorial and check all the steps or check the
NewsMagazine.robot, which is a robot identical to the one we have just built. The News Magazine robot
can be found in the Tutorials folder in the default project.
Next step is to upload the robot to the Management Console and create a Kapplet. Move on to the
Management Console tutorial or if you need help on specific topics go to help.kapowsoftware.com.
Kapplet Beginner's Tutorial
Kapplet Beginner's Tutorial video.
This is the third of four beginner tutorials which will guide you safely through your first project with Kofax
Kapow. It is advised to watch the overview video and complete the robot tutorial before following this
tutorial.
You are about to learn how to use the Management Console and KappZone to run robots as Kapplets.
Please feel free to follow along on your computer.
The Management Console is a web-based application for managing the operational aspects of Kofax
Kapow. First of all, the Management Console acts as a repository for robots and types. It also includes a
KappZone which enables you to create and manage Kapplets. Kapplets are robots or collections of robots
that have been published as apps, easy to distribute and run.
This tutorial will show you how to upload the News Magazine robot to the Management Console, and
publish it as a Kapplet in the KappZone.
Open Design Studio and MyFirstRobot, the robot we created in the Beginner Tutorial on Robots. Then
ensure that the robot editor is in Design Mode by clicking the Design Button at the top left corner of the
robot editor.
To upload the robot to the Management Console, select Upload to Remote Management Console from the
Tools menu. Everything should already be correctly configured so just press Upload. The robot, along with
any types associated with it will now be uploaded to the Management Console.
Click the link that appears to the Management Console. This should open your browser in the Repository
of the Management Console.
The Repository contains any robots, types and other files uploaded to the Management Console. Observe
that the News Magazine robot has been listed. Similarly click the Types tab to check that the associated
type has been uploaded correctly.
To create a Kapplet from the robot, go to the KappZone tab at the top of the page. This opens a page with
a link to the KappZone. Click it and the KappZone will open in a new window. The KappZone is where you
can add, remove and edit Kapplets.
To create a Kapplet click Add New Kapplet at the top of the repository. Call the new Kapplet "News
Magazine" and click Create Kapplet. The Kapplet has now been created and we are taken to the
configuration page of our new Kapplet.
15

Kofax Kapow User's Guide
The new Kapplet is so far disabled, which is indicated by the switch at the top of the page. This means
that the Kapplet is only visible to administrators. We will enable the Kapplet as soon as we are done with
the configuration.
There are two pages in the configuration of the Kapplet: Identity and Pages, of which Identity is selected.
On the identity page it is possible to edit the name, description and icon of the Kapplet. As description I
will write "Extracts the most recent news from News Magazine" and for the icon I use the News Magazine
logo which I have previously saved to my computer.
Going now to the pages section of the Kapplet Configuration, we need to configure what our Kapplet
actually does. Kapplet functionality is structured by pages and even the simplest Kapplet has at least two
pages, namely a start page and a result history page.
From the Start Page the user will be able to either start the Kapplet right away or Schedule the Kapplet
to start automatically at specific times. Whenever the Kapplet is started, it will run all robots added to the
Start Page.
The Result History page archives results returned from the executed robots.
Click Add Action on the start page, then click Add New Robot, choose the robot we uploaded, click Select
Robot and click OK.
This adds an action to our Start Page with a button labeled "Start Kapplet". It also automatically adds
a new page called Post to our Kapplet. Click the Post page on the left. This page will display a specific
result from the Kapplet after it has been chosen by the user from the Result History page.
Right now it displays a table containing the content of the title attribute from each result. Clicking edit on
the table we can add the preview attribute to our table and click OK. The Post page will now display both
the title and the preview from each of the extracted stories from News Magazine.
Click to apply the changes, enable the Kapplet, and go to the menu on the right. It appears when hovering
your mouse over the square in the top right corner. From the menu it is possible to go to My KappZone or
just the KappZone. You can think of the KappZone as a repository which holds all the installable Kapplets.
My KappZone however, contains only the Kapplets which have been installed to your account.
Click on All under KappZone. We can now see that the News Magazine Kapplet has appeared in the
KappZone. Hovering over it, we see that we can either install, edit or delete the Kapplet. Go ahead and
install it. Immediately we are able to open the Kapplet. Going to My KappZone through the menu bar on
the right, we also see that the News Magazine Kapplet has been added to My KappZone.
Click on the icon to open the Kapplet. The Start Page and the Result History page of our Kapplet are now
displayed. From the start page we can either schedule the Kapplet or just run it once by clicking Start
Kapplet. Just go ahead and click Start Kapplet.
The first result now appears in the Result History page. Click it to open the Post page showing the result
and scroll to the right until the entire Post page with results appears in your browser.
And so, finally our goal has been fulfilled. We have created automated process with a robot and published
it as a Kapplet, easy for users to install and use.
The next tutorial will teach you how to create a type in Design Studio.
16

Kofax Kapow User's Guide
Type Beginner's Tutorial
Type Beginner's Tutorial video.
General Introduction
This is the fourth of four beginner tutorials which will guide you through your first project with Kofax
Kapow. It is advised to complete the other Beginner Tutorials before this tutorial.
You are about to learn how to build a type in Kapow's Design Studio. Please feel free to follow along on
your computer.
Introduction to Types
In Kofax Kapow, variables are used by robots to store data in. Robots use variables as input, output or to
store temporary values during execution. These variables are categorized by types. Examples of types
are text, image, PDF, number and so on. The given examples are all what we call simple types. That is,
types which are predefined in Design Studio.
Alternately we can create our own Complex Types. Think of a complex type as a bucket of simple types.
Let me explain with an example.
In these beginner tutorials we have been automating the process of extracting and storing the most recent
stories from News Magazine. From these three articles we extracted the title and the short piece of text
that is given. The title can be held by a variable of the simple type short text and the preview by a variable
of the simple type long text. We have to design our complex type to contain each one of these.
Creating a New Type
With Design Studio open, create a new complex type by right-clicking the default project and choosing
New>>Type... A window opens, requesting a name for the new type. Since this is our first type we will call
it MyFirstType.type. Click finish and the type editor opens. Notice that the type we just created has now
been highlighted in the projects view on the left.
Adding Attributes
The most important part of the type editor is the list of attributes associated with our new type. Attributes
describe the different values that a variable of our complex type can contain. Each attribute has a name, a
type, and a list of other properties associated with it.
Let's start by making the title attribute. Add a new attribute by clicking the plus sign in the lower left corner
of the attribute list. A new window opens in which we can configure the new attribute. Name the attribute
"title" and select for it the type "Short Text". Short Text is a simple type which can contain text, no longer
than one line. Click OK to add the attribute to our complex type.
Likewise add an attribute named preview to contain the short article preview. This attribute should be of
the type Long Text which defines a text longer than one line.
What we have now made is a complex type from which we can make variables in a robot. Variables of the
type MyFirstType will then be able to hold two values; title and preview. Save the type by choosing save
from the file menu.
17

Kofax Kapow User's Guide
Changing the robot
MyFirstType.type is now exactly the same as the complex type post.type which we used in the Beginner
Tutorial on robots. If we open MyFirstRobot.robot we can now switch the post variable for a variable with
the type MyFirstType.
Do this by right clicking the post variable in the variables view and choosing edit variable. In the Edit
Variable window that opens, choose MyFirstType as the type for this variable and click OK.
The last step is to save and upload the modified robot to the Management Console. It will automatically
take the place of the previously uploaded version.
Congratulations you have now fully completed your first project with Kofax Kapow.
Advanced Tutorials
This section contains tutorials on advanced topics of Kapow.
Branches, Robot States, and Execution Flow
This tutorial explains the concepts of Branches, Robot State, and Execution Flow.
This tutorial will explain how and why to use branches in you robots. In the process it will be necessary to
introduce the concept Robot States and discuss robot execution flow in general.
If you have completed the beginner tutorials you will know that robot execution starts at the leftmost step
and continues sequentially to the end step, where robot execution terminates. This is an example of a
linear robot with no Branch Points.
Before showing you the branch point we have to introduce the concept of Robot States. At every step, the
robot has various elements which make up its state. The most important elements are the currently open
windows and frames and current values of variables, but the state also includes cookies, authentications
and so on.
All of these elements make up the robot state.
Back in the robot view we have now introduced a branch point. It's been inserted by selecting Add Branch
from the Edit menu in Design Studio.
The robot now sequentially executes each branch from top to bottom. Every time the robot reaches an
end step, execution continues from the next branch.
So why go through the trouble of using multiple branches, instead of having a completely linear robot?
Well there are many answers to this question but the most important reason is that the robot reverts to
its previous state every time execution goes back to a branch point. As we talked about before, state
includes open pages, variable values, and so on, so every time the robot goes back to the branch point, it
returns to the page it was on when it passed that branch point and forgets everything that happened in the
branch.
Let me show you an example of how to use this.
18

Kofax Kapow User's Guide
I'm currently working on a robot which searches the site Momondo for travels to three different
destinations but from the same departure city. The robot enters departure city into a form, then splits into
three branches and enters three different destinations and clicks to search. Clicking the branch point we
enter the state which the robot has when it splits into multiple branches. This is the state which the robot
reverts to each time a new branch is executed. This means that the robot does not have to load the site
and input the departure city three times, wasting time and CPU power. The robot simply rolls back and
continues where it left off, entering a new destination into the form for each branch.
You can use this technique every time one page has to be handled in multiple different ways. We can
even join these three branches again since they all use the same steps for the last part of the branch.
To redirect an arrow, first select it by holding Ctrl then clicking on it. Then drag the end of the arrow to the
step to which you want to connect it.
You can also create a new arrow by dragging from the right side of one step to the left side of another.
As you may have guessed, you can make some pretty creative robot trees in this fashion, but don't panic!
The execution flow is determined by one simple rule and one rule only.
Once execution reaches an end step, execution will continue from the next branch of the most recently
reached branch point.
Let me repeat that for you.
Once execution reaches an end step, execution will continue from the next branch of the most recently
reached branch point.
Once execution reaches an end step, execution will continue from the next branch of the most recently
reached branch point.
It's pretty intuitive once you get the hang of it.
Okay I have a confession. There are other rules which govern execution flow and there is one exception
to the rule mentioned before: For Each loops.
For Each loops include the For Each Tag action, the For Each Window action, the For Each URL action,
etc.
If you have completed the beginner's tutorials, you have used a For Each Tag loop in your robot, and
know how it works. Now we have a new way to think about For Each loops. You can think of a For Each
loop step as a branch point where each iteration of the loop corresponds to a branch.
In other words: Once execution reaches an end step, execution will continue from the next branch of
the most recently reached branch point or from the next iteration of the most recently reached loop step,
whichever comes first.
Loops can be used very effectively in constellation with branches.
There are also other aspects which can make robot execution flow non-linear. One of the most prominent
is Error Handling. When an error occurs at a specific step, the error handling of that step decides where
the robot will continue execution from. Keep this in mind. To learn more about error handling click the
question mark at the top right corner of the Error Handling tab.
So what if I want to keep some information from one branch to the next? Well, let's talk a little bit more
about robot states, because not all elements are kept in the robot state. Global variables for example
19

Kofax Kapow User's Guide
are totally linear in time throughout execution of the robot and never revert to earlier values when the
robot rolls back to former states. This means that you can transfer information among branches or among
iterations of a loop.
You can convert any variable to a global variable by checking the checkbox Global when adding the
variable to your robot.
Also note that Try Steps look similar to Branch Points but they are not the same. Try Steps are only
activated by error handling.
Looping Basics
Basic looping in your robots video.
This tutorial will give you an introduction to looping within your robots. In particular we will be looking at
the types of loops which can be accessed directly from the Browser View.
Looping is both touched upon in the Beginner Tutorial Videos and in the video on Branches, Robot States,
and Execution Flow. If you have no experience with looping, I highly recommend you to take a look at
these videos before proceeding with this video. Take special notice of the way loops alter the execution
flow.
The most useful robots are often those which perform a large quantity of actions, simply those which get
a lot done. Often this includes performing the same operations in a number of similar cases. An example
is the NewsMagazine robot used in the Beginner Tutorials. This robot uses a For Each Tag step to extract
text from several blog posts. The For Each Tag step is just one of many loop steps to which the same
logic applies. They all somehow let you perform the same procedure in a number of related situations.
The most basic loop steps are categorized as For Each Tag Loops, because they all somehow loop
through tags in the current window. Let me go through these basic loops one at a time.
For Each Tag
The first of three loop steps we are going to discuss in this video is the loop literally called For Each Tag.
For Each Tag loops over each tag of a given name directly within the found tag. The first tag in the loop
has been indicated by the blue box in this screenshot of the source view. I now overlay the screenshot
with lighter blue boxes to show the following iterations of the loop.
For Each Tag is the loop step which I find myself using most often, simply because of its mixture of
flexibility and ease of use. It is also the loop step which we used in the Beginner Tutorial Videos.
Whenever I need to loop over a selection of similar tags, like the products listed on this page, the first
thing I try is to right click the first element that I want and select Loop >> For Each Tag. Design Studio then
sets up a For Each Tag loop which loops through tags similar to the one I right clicked.
I can now iterate through the loop, using the arrows on the For Each Tag step, to view all the named tags
formed by the loop. As discussed in the Beginner Tutorial Videos the blue box formed by a loop is called
a named tag and is used as a point of orientation for Tag Finders of following steps, so if we insert a step
which extracts the price of the first product, the following prices will be extracted likewise in subsequent
iterations of the loop. This is the way all loops, considered in this video, operate.
20

Kofax Kapow User's Guide
Sometimes, however, it does cause problems to insert the loop, like here on vimeo.com. I right click
the first element that I want and choose the For Each Tag loop, but the resulting loop only includes the
topmost listed video. We can see this by trying to go to the next iteration. This results in a window opening
to tell us that we have reached the last iteration of the loop.
To fix this I have to go directly to the configuration of the loop step where, in this case, I need to remove
the specification of class to loop over. Design Studio guessed that we only wanted tags with the class top
but really we want to loop over every listed item, independent of class. I delete the class specification and
the loop now works as expected.
To use For Each Tag effectively you should study the different ways to configure the For Each Tag step.
For Each Table Row/Column
For the following loops it should be mentioned that they are often interchangeable and a given situation
may be handled in any number of ways. I will try to teach you the basic principles of each loop type so you
can be intelligent about which type you choose, but there is no single correct way of doing things.
The two next types of loop steps we will look at are both derivatives of the For Each Tag step, but they
have more specific uses. They are called For Each Table Row and For Each Table Column and they
respectively loop through rows and columns of a table. As with the For Each Tag step they have been
conveniently implemented in the right click menu.
In this screenshot the first row is shown with the named tag marked 1 and the first column is the named
tag marked 2. As you can see, combining the two types of loops will let you loop over every element in a
table.
To insert a loop over table rows or columns, right click on any table element and select the appropriate
action from the Loop submenu. You may either choose to include or exclude the first row or column.
I have now inserted a loop which loops through each column of the newest Ikea furniture. Notice that the
name of the loop step is For Each Tag. Instead of having a unique step for looping through tables, the For
Each Tag step has just been automatically configured to loop through columns in a table.
For Each Tag Path
The next type of For Each Tag loop is called For Each Tag Path. It is very similar to For Each Tag, which
we just discussed.
The difference between the two is that For Each Tag Path loops over tags that are at any level inside the
found tag whereas For Each Tag only loops over tags that are directly inside the found tag.
Sometimes the tags you want to loop over are not all directly inside one parent tag, or possibly the tags
you want to loop over are all on different levels then you will need to use the For Each Tag Path loop.
Notice in this example how the div tags looped over are all within a td and a tr tag and are therefore not
directly within the found tag.
The easiest way to determine whether to use For Each Tag or For Each Tag Path is to look at the page
structure in the Source View.
For Tags with Class
21

Kofax Kapow User's Guide
Just like For Each Table Row and Column were derivatives of the For Each Tag loop as is the For Tags
with Class a derivative of the For Each Tag Path loop. As an example of the For Each Tag Path loop let
me show you how to use this derived version.
Okay, now let us delete the table column loop we set up and take a look at the For Tags with Class. This
loop iterates over all tags with the same value of their class attribute, which is often the case for tags with
similar content. This time we have to be a bit more specific which tag we select before right clicking and
we also have to keep an eye on the source view.
Usually using this loop goes something like this: As we click on the tags containing each product we
look in the source view and notice that they all have the same class, namely productContainer. Once
we realize this we can simply right click on one of the tags and choose Loops >> For Tags with Class >>
productContainer. We then iterate through the loop to check that the named tags match our expectations.
Again notice that the inserted step is not called For Tags with Class but rather For Each Tag Path, which
has simply been configured to perform the specific task.
For Each URL
The last loop we will take a look at is the For Each URL action, which is in a category by itself.
For Each URL simply loops through each URL inside the found tag. It is often useful if you need to extract
or click on every link in a specific area of a page, regardless of the context of the link.
For Each URL is most easily inserted by selecting the tag containing the links you would like to loop over,
then right clicking the selection and choosing Loop >> For Each URL.
I have now set up a loop which iterates through each URL in this article. It by default skips duplicate
URLs.
Let's leave the For Each URL action at that. Just note that For Each URL has a number of configuration
possibilities which can be changed in the step view.
Finally I have two notes that will help you when using loops.
Note 1
Just to spell out what I said in the video on Branches, Robot States, and Execution Flow: A For Each loop
step, like any of those in this video, executes every subsequent step in the robot view for every iteration
of the loop, so if you want your robot to continue execution beyond the loop, then you will have to insert a
separate branch before the loop step. This branch will then be executed after the loop has finished.
Note 2
It is often nice to be able to break a loop or skip an iteration based on certain conditions. If we for example
reach an iteration where one of the steps within the loop cannot be performed, it would often be logical to
skip this iteration altogether.
As mentioned in the video on Branches, Robot States, and Execution Flow this can be done by adjusting
the Error Handling of the step that fails. In the Step Error Handling View you can choose Next Iteration or
Break Loop if an error occurs at this step.
At default this option is set to Skip Following Steps which corresponds to letting the robot hit an end
step at its current execution position. In other words, if an error occurs at this step, the robot will go back
and execute the next branch of the most recently reached branch point or the next iteration of the most
22

Kofax Kapow User's Guide
recently reached loop step, however it will also cause an API Exception and Log an Error as indicated by
the check boxes.
These were just the basics of looping. To learn more check out the Loops in Forms and Repeat-Next Loop
videos. Also feel free to go to help.kapowsoftware.com to read about loops in greater detail.
Loops in Forms
A video demo of the loop steps which apply to forms.
This tutorial will give insight into types of loops which are useful when working with forms. It is a direct
continuation of the Looping Basics video, and will extend on the knowledge obtained there.
Many of the loops discussed in this video will have a form similar to the For Each Tag loops from the
Looping Basics video but the form loops are all different from the For Each Tag loops in that they don't
assign Named Tags for each iteration, instead they perform some other action for each element they work
on.
For Each Loops in Forms
There are two For Each Loops and one other loop specifically designed to be used with forms. They are
called For Each Radio Button, For Each Option and Loop Field Values.
I will be demonstrating each of the Form Loops on this library search page.
For Each Radio Button does what you would expect; it selects one radio button in a group for each
iteration. The easiest way to insert the step is to right click a radio button and select For Each Radio
Button in the Loop submenu. Iterating through the loop we see that each radio button is selected
sequentially.
The next form specific loop is called For Each Option. It loops through options in a drop down list. Again
it is easily selected from the right click menu. Once selected; a window appears asking whether you
would like to skip any of the options of the drop down. This is useful for skipping any options that are not
appropriate for what you want to do. In this case I will loop through all the options. Each option is now
selected when clicking the arrows on the loop step.
The last loop I want to discuss in relation to forms is called Loop Field Values . This is not a For Each loop,
which means that it is used slightly differently from the other loops I have described. It can be used on
any text input field to loop through listed values that are then inserted into the field. One value for each
iteration of the loop. Again we simply right click and select the Loop Field Values option. We can now
choose which types of values to loop through. We can either choose one of the predefined options or we
can compile our own list of values that we would like the robot to input. Since we are searching a library
I will compile my own list consisting of Hemingway, Shakespeare, and Poe. Iterating through the loop we
now observe that the stated authors are entered in to the text input field.
That concludes this video on Loops in Forms. To learn more go to help.kapowsoftware.com.
Repeat-Next
Click to open a video demo introducing the Repeat-Next loop.
This tutorial will give insight into an advanced but very useful loop called a Repeat-Next loop, which works
particularly well for looping through pages where each page leads to the next.
23

Kofax Kapow User's Guide
We will build upon the skills learned in the Looping Basics video, so make sure to watch that first.
Repeat-Next
This loop type is the oddball in the looping family, or maybe you could argue that it is not even part of the
family because the way this loop is designed is totally different from all the other loop steps in Design
Studio.
First of all the Repeat Next loop consists of two individual steps which need to be used collaboratively to
have any kind of effect.
The concept is actually pretty simple: you place a Repeat step followed at some point by a Next step.
When execution reaches the Next step, execution will revert back to the Repeat step and proceed
execution from there, marking one iteration of the loop. If a Next step is not reached after the Repeat step
then the loop will terminate.
The catch here, and also what makes the Repeat-Next loop so genius, is that while most of the robot state
is reverted at the beginning of each iteration, the page reached at the Next step is actually transferred to
the next iteration of the loop. So unlike the other loops we have looked at where the entire robot state is
reverted at the beginning of each iteration, we can handle a different page in each iteration of the Repeat-
Next loop.
Demo
A typical example of using the Repeat Next loop is when looping through multiple pages of search results.
We insert a Repeat step … followed by a step which clicks to get to the next page … and then a Next step
… It's as simple as that to loop through all the pages. We can now use the arrows on the Repeat step to
iterate through the loop and observe that a new page is loaded for every iteration.
Of course we still need a way to terminate the loop. This can be done by setting the error handling of the
Click step to "break loop". If the click step does not find a link to the next page, we assume that we must
have reached the last page and the loop breaks.
If we then want to perform some steps on each page, we can add a branch step after the Repeat step
… and add a new top branch. In this new branch we can add loops and other steps without them being
influenced by the Click and Next actions in the other branch. I can for example add a loop over all
the search results on each page … extract information from each result … and return that collected
information. In total I get a robot which extracts every result from every page of the search. We can get
an idea about the execution flow by single-stepping through the robot in Debug Mode. I have sped up the
recording so you can clearly see how all search results are extracted, one page at a time.
Remember the form in which the Repeat-Next loop is used here. A top branch which executes the steps
you want to perform on each page and a lower branch which loads the next page and calls the next
iteration of the loop. This constellation is useful and very common when using this type of loop.
Note that setting the error handling of a step to "Next Iteration" does not work with Repeat-Next loops. In
order to proceed to the next iteration, a Next step must have been executed.
Try Step
Click to see a video explaining how to use the try step to set up conditions and error handling in your
robots.
24

Kofax Kapow User's Guide
This video will demonstrate how to use try steps when building robots in Design Studio. Applications of
the try step are crucial for building robust robots acting on a dynamic web environment where changes
in structure are commonplace. Use cases include trying multiple different strategies for interacting with
or extracting from a website, and setting up conditional statements in a robot. We will go through two
examples in this video, demonstrating the two use cases, starting with the latter.
As a first example we'll be using ExtractFromTable.robot, which is a basic robot that extracts data from a
table on the News Magazine website. It can be found under Robots in the Examples folder of the default
project. I open the robot and hide the projects view.
Once open, you will notice that the robot has only one path to follow in the robot view until it reaches this
diamond shaped step called a try step. What a try step does is set up multiple alternatives for the robot
to try. A try step can have any number of alternatives which are shown as dashed arrows emerging from
the right side of the try step. If an alternative succeeds the robot continues as usual, ignoring any other
alternatives from that try step. If an alternative does not succeed, however, the robot goes back to the try
step and tries the next alternative.
To use try steps it is therefore important to understand what I means for an alternative to "succeed" or "not
succeed"? Let me try to demonstrate with this example robot.
ExtractFromTable is a simple robot that extracts person information from a table by using a loop. Clicking
the "for each tag" step and scrolling down reveals the table which the robot extracts from. Inside the loop,
which loops through the rows in the table, the four pieces of information for each person are assigned to
different attributes of the person variable. The try step is used to assign either true or false to the isMale
attribute, based on the value of the last column in the table, called sex. The column can have either one of
two values, "Male" or "Female" and we want to assign true or false to the isMale attribute respectively.
To test the value in the sex column, a Test Tag step has been inserted in the first alternative. Test Tag
is a step which can conduct an action based on whether the found tag matches a specified pattern.
Clicking the Test Tag step we see that the found tag is the cell in the sex column of the row from which
we are extracting in the current iteration, and the pattern to match is simply set to "male" and only
matches against text, ignoring case. If the pattern matches, the step then does what is specified in the
Error Handling Tab. Under Error Handling the step has been set to "Try Next Alternative", which is also
indicated by the small icon in the upper left corner of the step. This means that if the sex is male, and the
pattern is thereby matched, the Test Tag step will do what is specified under Error Handling and try the
next alternative. The second alternative therefore, has a step that assigns "true" to the isMale attribute. If
the pattern is however not matched, the Test Tag step does nothing and execution proceeds normally to
the next step, which assigns false to the isMale attribute.
In other words, an alternative can be said to succeed if no errors which specify to try next alternative are
encountered, and can be said to not succeed if such an error is encountered. As soon as one alternative
succeeds, all other alternatives are skipped.
In the example I just went through, the error was generated by the Test Tag step, but usually errors are
caused by steps which are unable to perform their actions. This is most often because steps cannot
find a certain tag or loading of certain content times out, but it could be anything that stops a step from
performing its action.
Executing the example robot in debug mode you will see that the correct values are assigned to the
isMale attribute. True values are indicated by check marks and false values are indicated by the absence
thereof.
25

Kofax Kapow User's Guide
To give you an even better understanding of how the try step works, let me show a more complex, yet
common, use case. In Design Studio I have this robot which needs to log into a site and extract some
data, which is only available upon login. The page used by the robot is of course the familiar News
Magazine page. The robot is called Login and is available from the examples folder. If you have closed the
Projects View, it can be reopened from the Window menu.
Look at the robot view to get an overview: In the login process, the robot uses save and restore session
in such a manner that the robot logs into the site and saves the session on the first run. Consecutive
runs will then load the saved session instead of performing the login sequence again. At some point the
session expires and the robot will have to log in and save a new session. Most robot executions will thus
be able to restore a session and be able to skip the entire login procedure.
So… we have three different scenarios to test for: either it is the first time the robot executes and there is
no saved session, or there is a saved session which is already logged in, or there is a saved session but it
has expired.
Looking at the robot view, there are two alternative paths for the robot to take, depending on whether it is
able to use the stored session or not. To show each case, let's try simulating them by clicking through the
robot.
The first time the robot is executed there is no saved session. The robot will first try the topmost
alternative from the try step, but if I try executing the Restore Session step it will fail, since there is no
session to restore. When this step fails, it will cause an error, triggering error handling which is set to
"Try Next Alternative". The robot will therefore have to execute the second alternative, which follows this
lowermost branch, loading News Magazine, clicking to get to the login page, entering username and
password, clicking to login, saving the session for future executions of the robot, clicking again to get to
the data we want to extract, and finally extracting the specific text. We have now simulated the first run of
the robot.
Going back to the first step in the robot, let's simulate the second run. In all executions following the first,
the session should restore successfully, so following the topmost alternative the session is restored, the
robot clicks to open the page that we want to extract data from, and finally the data is extracted - simple.
We now want to replicate what happens if the robot is to execute after the login session has expired. To do
this, open Logout.robot from the examples folder. The logout robot restores the saved session and clicks
logout on the News Magazine page. In this way we are emulating expiration of the login session, rather
than actually waiting the 10 minutes it takes for the session to timeout and expire on this specific page.
Click the end step in the logout robot to execute all steps.
Going back to the login robot click the step named "Click site data" to make it the active step and click
refresh in the toolbar to re-execute all steps up until the active step. After all the steps have executed
again, notice that the page shown in the browser view looks as though we are still logged into News
Magazine. This is because the saved session also contains the entire robot state, including the html of the
page we were on when the session was saved. Restoring the session therefore does not properly refresh
the page to show us its current state. Clicking on the extract step to execute the click step will however
refresh the browser to show us that we are no longer logged in. The extract step therefore fails to extract
the data we want, causes an error and tries the next alternative from the try step, which logs in and saves
a new session for future use.
Thus the login robot handles all three cases and thereby ensures that the robot always logs in before
extracting the data which is otherwise not available.
26

Kofax Kapow User's Guide
To summarize on what we have looked at in this video, from a try step spring multiple alternative routes
for the robot to take. An alternative succeeds unless it has a step that causes an error and specifies to
"Try Next Alternative" in the Error Handling Tab. Only the first alternative that succeeds is executed, the
others are completely ignored. If an alternative does not succeed, the robot goes back and tries the next
alternative.
Here are a couple of tips when using try steps:
As we saw in the first example, any condition steps, meaning steps with "Test" in their names, work well
together with the try step.
If no alternatives of a try step succeed then the try step itself generates an error. Specify what action to
take in the error handling tab of the try step itself.
You can give a try step a name by double clicking below it in the robot view.
When specifying to "try next alternative" under error handling for any step, you can also choose which try
step to go back to based on their names. This means you can have nested try steps allowing for complex
robot structures.
That concludes this video on the topic of try steps.
Excel
Click to watch a video explaining how to read data from Excel documents.
Starting from Kapow version 9.2, robots have a whole new way of handling Excel documents. Instead
of being converted into html-pages, Excel is now shown as a spreadsheet directly in the Page View in
Design Studio. In this video we will give an overview of the features of the Spreadsheet View and take you
through the process of building a robot which extracts from an Excel document. Feel free to follow along
on your own machine.
An example of a robot which loads an Excel document can be found in the examples folder of the default
project, and has the name excel.robot.
Go ahead and open the robot. Excel documents can be loaded in the same way as regular pages are
loaded, either from a URL or from a file on your machine or server. In this particular robot it is loaded by
clicking a link, which is performed by the step named Click PersonData.xlsx.
Click the Loop Rows step to view the document. The spreadsheet now appears in the page view, with
rows and columns named and arranged like you are used to it from Excel. This particular document
contains tables with person data.
There are two different sheets with 100 entries in each. It is possible to switch between the two sheets in
the lower left corner of the Page View. It is also possible to see the document information by clicking the
leftmost tab. In this video however, I will focus on Sheet1.
From the drop down menu in the lower right corner of the page view it is possible to look at the
unformatted values of the document or the raw formulas. Changing this view will also affect the extracted
values when inserting a new step, so I am going to change it back to showing formatted values.
27

Kofax Kapow User's Guide
A cell is selected by clicking on it and it is even possible to select a range of cells by clicking and dragging,
or clicking on a row or column name to select the entire row or column. The upper left corner selects the
entire spreadsheet.
I will now delete the loop step and all the extract steps from the robot and demonstrate how easy it is to
extract from an Excel document. I drag to select the steps, then hit the delete button on my keyboard.
To the new Spreadsheet View belongs a whole family of new step actions, which enable you to loop,
extract, and test cells. Just like in the browser view these functions are available from the right click menu
as I will show you in a moment.
First we want to insert a loop step which loops through all the rows of the table. First I click the upper left
corner of the Spreadsheet View to select the entire spreadsheet. Then I right click inside the selected area
- meaning anywhere inside the Spreadsheet View- and select Loop>>Loop Table Row>>Exclude First
Row. I am excluding the first row since we are not interested in the header values.
The Loop in Excel step now sets the first row to loop over as the Named Range. Clicking the arrows on
the loop step will show how the other rows are selected. It is now possible to extract from the Named
Range and, because of the loop, corresponding values will then be extracted from all the other rows.
To extract first the ID, I right click the ID value and select Extract > Extract Number > ID. I click OK in the
wizard that appears, which is already properly configured.
Likewise I can now extract the first name as a text into the name variable, the age as a number into the
age variable and the gender as a Boolean into the isMale variable. The gender value is either true for
male or false for female.
To show that the entire table can now be extracted, I switch to debug mode by clicking the icon in the
upper left corner and clicking run in the toolbar. All 100 values from the Excel document now appear in the
list of results.
Writing to Excel
Click to watch a video tutorial on how to write to an Excel document.
This tutorial video will show you how to make a robot that automatically creates an excel document based
on data extracted from a website. Please feel free to pause the video along the way so you can follow the
steps on your own computer.
With Design Studio open, we go into the Examples folder in the default project. Under Robots, we find and
open the example robot called TableExtract.robot. This is a robot which extracts person data from a table
on the website News Magazine. We can see the table by clicking on the loop step.
Before moving on, make sure you familiarize yourself with this robot. We will modify the robot to write the
extracted data into excel.
We first need to clean up the robot a bit. We start by deleting the two first steps, which are only there to
display help about the original robot.
Then we add a new type to the robot by right clicking in the Variables view and choosing Add Variable of
Complex Type > PersonListExcel. This type contains an Excel attribute, which the robot will write to.
Let's call the variable personList and mark it as Global. Having a global variable ensures that we can add
content to the spread sheet over multiple iterations of a loop in our robot. We click OK.
28

Kofax Kapow User's Guide
To modify our Excel variable, we must open it in the page view. We right click personList and choose
Insert Step >> Open Variable >> personList.list. This inserts and executes an Open Variable step in the
Robot View and, although the sheet empty, we can now see the content of our personList variable.
Next, we add a header for each column in the table we are extracting from. To insert content into Excel,
we right click a cell and choose Modify >> Set >> Text. This opens a dialog where we can specify the
value to insert. We write "id" and click OK.
Then we repeat this process for the next three cells which we call "name", "age" and "isMale". It's now
time to make the robot insert the extracted data into this spread sheet. We click on the end step of the
robot. An error might occur, stating that the Test Tag step stopped execution. This is an intended error. To
get around it, use the lower alternative from the Try Step.
We switch to the Excel window by right clicking it and choosing Set as Current Window. This inserts and
executes a Set Current Window step in the Robot View.
Before we can insert new content into the Excel variable, we must extend the sheet with a new row. We
select the entire sheet by clicking the upper left corner of the Excel View. Then we can right click on the
sheet and choose Modify > Insert > Rows > Last. A dialog opens, asking how many rows to insert. We
only need to insert one row for each iteration so we press OK. This will insert a new row as the last row in
our sheet and mark it as a named range.
We can now select the named range by clicking the second row on the very left side of the Excel View.
We then right click the selected row and chooseModify > Set > Content of Row > person to insert the
data extracted from News Magazine.
Stepping thought the iterations of the loop, we can see how multiple rows of content are added to our
Excel variable.
So now we have a robot which creates and writes to an Excel variable. To get full usage of our robot,
we need to make it save the Excel variable as a document on the hard drive. To this extent, we insert
a branch just before our loop step. The lower branch will be executed after the loop has finished all
iterations.
Stepping into the lower branch, we add a new action step and select for it the Write File action, which can
be found under the File System category.
To configure the Write File step, we need to give a file path. I will simply place the file at the root of my C:
\ drive and call it simpleExcel.xlsx. You may choose to place it wherever you want. The file content should
be our personList variable.
Running the robot in Debug Mode will now write the Excel variable as a document at the specified
location. If we open the file, we see that our spread sheet looks as expected.
This was a very simple example of how to write to excel in a robot. For a more advanced example take a
look at ExcelAdvanced.robot in the examples folder or read about the capabilities of writing to excel in the
documentation in Kapow help.
Data Conversion
Click to watch a video describing how to perform data conversion in robots.
29

Kofax Kapow User's Guide
Sometimes when designing a robot we need to convert some text or numbers using simple or complex
conversion rules. The question is: how do we do this easily in Design Studio?
In this video we will be talking about this field.
It may not look like much but it is actually a very powerful tool when building robots and it pops up
everywhere in the Design Studio interface.
The field is called a Data Converter List, and for now let's regard it as a black box. It may take an input in
the form of a value from, for example, a variable or extracted text; but input is not a strict necessity. The
input, if present, is given by the placement of the Data Converter List and is always stated somewhere
above it.
The Data Converter List has exactly one output, which is either stored in a variable or handled otherwise
below.
In short, a Data Converter List is used to manipulate text and numbers within robots, but although it is
possible to perform both text and number manipulation with the Data Converter List, input and output is
strictly speaking always interpreted as text.
Some use examples include extracting the name from an email address,..
..multiplying a number by two,..
or adding three days and two hours to a given date.
Let's take a look at the interior.
As the name Data Converter List implies, the field contains a list which you can add a variety of different
converters to by clicking the plus icon. These converters all manipulate the input in some way.
Here is an example where we have the Kapow Software website URL as the input. We start with no
converters in the converter list so the output is the same as the input. By adding the Extract converter we
can extract the middle part of the URL. Don't worry about how the converters work for now. We will get
back to that.
Then we can add a converter which converts the text to upper case.
The two converters are then chained together in series so the output of the first flows into the input of the
second.
The order in which the converters are listed represents the order in which they are performed. The order
can be changed by clicking the arrows. In this case it makes no difference to the end result.
Converters can be deleted by clicking the minus.
Clicking the pen and paper icon opens a window used to configure the converter. This window also opens
when the converter is first added to the list.
The Converter configuration window always contains the two important fields Test Input and Test Output
which, as the names imply, demonstrate the input and output from the given converter.
Learn how to use the different converters by clicking the question mark in the configuration window.
Clicking it opens the documentation. Here you can also read about Expressions and Patterns. Knowing
how to use these is an invaluable skill when working with data converters.
30

Kofax Kapow User's Guide
For example if you need to use mathematical operations to manipulate a number, expressions are
needed. I can multiply the input by two by using the converter called evaluate expression. Let's take a
closer look at the expression used to perform this operation. It converts the input to a number and then
multiplies it by two. Remember that all input and output from converters is text so we need to convert the
input to a number before applying any mathematical operations to it.
Here are some examples of the use of data converter lists in Design Studio.
The data converter list you will find the most useful is probably the one located in the Extract step action. It
allows you to convert any extracted text before storing it in a variable.
Let me show you an example of how to use this.
I'm in the process of creating a robot which extracts job offerings from LinkedIn. For now it simply loads
the page and loops through the tags which contain job descriptions. I would like to extract the location of
each job but it's stated in the same tag as two other pieces of information, namely company name and
date. The three pieces of information are only separated by hyphens.
I start by extracting the entire text into a variable called location. I then select the Extraction step in the
robot view and add an extract converter to the data converter list of the extraction step. The extract
converter uses a pattern to decide which part of the input should be extracted and used as output. In this
case we want to extract everything within the first and the second hyphen.
After finishing the pattern we can see that the Test Output field reflects the text we wanted to extract.
Selecting the end step and iterating through the loop we can see that the location has successfully been
extracted from each of the job descriptions.
As you can see, converters are quickly implemented and extremely effective.
Lastly I'll give you a couple of tips on the use of data converters.
Tip 1: Many fields in Design Studio can be changed to data converter lists. This may be done by choosing
Converters from the Value Selector located at the right side of the field.
Tip 2: One of the most useful converters is the Replace Pattern converter. It combines expressions and
patterns to provide powerful text manipulation.
Tip 3: In addition to the restricted one input of data converter lists, additional variables can be fetched by
using expressions. This allows us to combine data from several variables.
Thank you for watching this short introduction to data converters.
For more information on the available converters, see Data Converters in the Reference section.
Patterns
Click to watch a video on patterns and their use in Design Studio. The first half is a lecture like
presentation of the syntax, the second half looks closer at some use-case examples in Design Studio.
Answers to the problems given in the video can be found at the bottom of the page.
Hello. This video will take a closer look at regular expressions, called patterns in Kapow. The first half
of the video will be a lecture-like presentation of the syntax including wild cards, sets, subpatterns,
repetition operators, alternate subpatterns, and subpattern references. The second half will go through
31
Kofax Kapow User's Guide
three examples in Design Studio using patterns to create conditions and tag finders and to perform
data conversion. If you're already familiar with regular expressions you might want to skip directly to the
examples.
As mentioned earlier, regular expressions are called patterns in Kapow, and will be referred to as patterns
for the remainder of this video.
The Wild Card
A pattern is a way to put a string of characters into more general terms by using symbols to represent
strings of characters. You might be familiar with the concept from doing searches on your computer where
it is sometimes possible to use wild card symbols to represent any character. Doing a search for 'ca*' (the
asterisk being the wild card in this example) might return both "cap", "car", "can", and so on. Patterns
embrace this same concept while expanding to a much more extensive syntax, which will be presented
here.
Kapow uses the Perl5 syntax for its patterns. In this syntax the wild card character is symbolized with
'.' (a dot or period) which corresponds to any single character including all symbols, whitespaces, and
any other special characters you could think of. This correspondence is called matching so the pattern
'ca.' is for example said to match "cap", "car", "can", or any other string of "c" followed by "a" followed by
any single character. Similarly the pattern '.a.' matches "nap", "tan", "sad", or any other string of three
characters with an "a" as the middle character. It does however not match "an" since each '.' in the pattern
has to match up against exactly one character. Similarly it does not match "cans" since the pattern has to
match the entire string, not just part of it.
We can test whether a pattern matches a given string directly in Design Studio by using the Pattern
Editor. The Pattern Editor can for example be found by inserting a Test Tag step into a robot and clicking
"Edit…" below the pattern field in the step action view. The Pattern Editor has three sections. At the top
it is possible to type in a pattern, which is then matched to the string typed into the Input field on the left.
Clicking the Test button or using the shortcut Ctrl+Enter will tell you whether the pattern matches the input.
Try typing '.a.' in the Pattern field and "can" in the Input field. Then use the shortcut Ctrl+Enter. The Output
field will now display "The pattern matches the input." We can ignore the rest of the output for now. If
we on the other hand type just "an" in the input field and press Ctrl+Enter we receive the message that
"The pattern does not match the input." As I go over more of the pattern syntax, try to experiment with the
Pattern Editor to test your understanding of the material.
Although not stated explicitly we are now able to match in two different ways, either we can match
character to character (ie. The pattern 'a' matches the string "a") or we can use the wild card symbol '.' to
match any character. Additional direct character matching includes the ones listed in the table here.
Pattern Matches the string
'\n' A line break character.
'\r' A carriage return character.
'\t' A tab character.
'\.' "."
'\\' "\"
Any other symbol used by the pattern syntax can also be explicitly matched by preceding it by a backslash
'\'.
32
Kofax Kapow User's Guide
Sets
Next step is to match a semi known character. By semi known I mean that we only want to match the
character with one character in a set of characters. A set of characters is stated in a pattern by using
'[]' (brackets). An example is '[abc]' (the set of a, b, c) which will match to either "a", "b" or "c" but will not
match to any other characters than these three.
If you wish to include a range of characters to a set it can be done using a '-' (dash or hyphen). '[abc]' can
therefore be written as '[a-c]' (the set of characters: a through c). Using words '[a-c]' means match any
character in the range from "a" to "c". The two ways of defining sets can be combined to get something
like '[a-dkx-z]' (the set of a through d, k, and x through z) which is similar to writing '[abcdkxyz]' (out all
those characters in a set) or saying match any character which is either in the range "a" to "d", is "k", or is
in the range "x" to "z".
It is also possible to define sets negatively by using '[^]' (a caret at the beginning of the set). An example is
'[^a-c]' (the negative set of a through c) which will match any one character excluding "a", "b", and "c".
In the Pattern Editor, try using sets to match (1) any digit (2) any whitespace character (3) anything that
is not a digit. You can pause the video if you want to take a moment to think about these problems before
seeing the answers (the answers are all given at the bottom of this page).
There are certain shortcuts which can be used for sets that are often used. Here is a table showing some
of the most important ones.
Shorthand form Set
'\d' '[0-9]' (Any digit)
'\D' '[^0-9]' (Any non-digit)
'\s' '[ \n\r\t]' (Any whitespace character)
'\S' '[^ \n\r\t]' (Any non-whitespace character)
'\w' '[a-zA-Z0-9_]' (Any word character)
'\W' '[^a-zA-Z0-9_]' (Any non-word character)
Note The shorthand form can also be used inside sets. For example '[\d\w]' includes all digit and
whitespace characters.
Subpatterns
Next we will need to talk about subpatterns within patterns. Terms we have talked about so far such as a
character 'a', a set '[abc]', an escaped character '\d' or the wildcard '.' can each be seen as a subpattern.
Alternatively we can create our own subpatterns by grouping together other subpatterns using '()'. We
could for example create a subpattern from '[ctb]an' by writing '([ctb]an)'.
It is important to recognize these since I will now be introducing some operators which work on the entire
subpattern they follow.
Repetition Operators
Operators in patterns allow us to match repetitions of a subpattern by following them with one of the
operators given in the table.
Repetition Operator Meaning
'{m,n}' where n ≥ m Matches between m and n repetitions (inclusively) of the
preceding subpattern.
33
Kofax Kapow User's Guide
Repetition Operator Meaning
'{m,}' Matches m or more repetitions of the preceding
subpattern.
For example, the pattern 'a{1,}' would match the string "a", "aa", "aaa", or any number of repetitions of 'a'.
The pattern '([bn]a){3,3}' would match 'banana', 'babana', 'nabana', or any other string of either "b" or "n"
followed by "a" repeated three times. Try it out for yourself.
As for the sets, there are also shorthand versions of the most useful repetition operators as shown in this
table.
Shorthand operator Corresponds to
'{m}' '{m,m}'
'?' '{0,1}'
'*' '{0,}'
'+' '{1,}'
Try using what we have learned so far to match (4) anything (5) either "color" spelled without a "u" or
"colour" spelled with a "u" (6) any four digit number. The answers follow (at the bottom of the page).
One of the often used patterns is '.*' which matches anything: any string even if it's empty.
Now try extending this and find patterns that match (7) any text containing at least one digit (8) any text
containing just one digit. Here is a list of the syntax you may need (video only).
The syntax used in the answers is very useful when matching specific subpatterns within a string.
Alternative Subpatterns
We discussed how to match alternative characters earlier, but what about matching alternative
subpatterns? If we have N subpatterns 'p1' through 'pN' , we can match any one of these subpatterns
using '(p1|p2|…|pN)' (parentheses and vertical bars as shown here). The pattern given here '(abc|a{5}|\d)'
would for example match with either "abc", "aaaaa" or any number.
Try using alternative subpatterns to make a pattern that matches (9) a string which does not contain just
one digit. Here, again, is the syntax you might need. And here is the answer: (page bottom)
There is no not operator in the syntax, instead the answer uses two alternatives. The first alternative
matches a string with no digits, the second matches any string containing at least two digits.
Subpattern References
The last major part of the syntax to cover is subpattern references. Any substring, "s1" through "sN",
matched by a parenthesized subpattern, '(p1)' through '(pN)' in any one pattern, can be referenced to by
using '\1' through '\N' where each subpattern is numbered in order from left to right as they are stated in
the pattern. Matching '([chm])(at)' to "cat" for example, we could use the reference '\1' to refer to "c" and
'\2' to refer to "at".
The entire pattern can always be matched by '\0'.
Notice here that we are referring to the string matched by that subpattern rather than the subpattern itself.
A reference to the subpattern '(abc)' would of course yield 'abc' whereas a reference to the subpattern
'(\d)' would only match whatever digit was matched by the original subpattern.
As an example consider matching a string containing a quote by using the pattern '.*(['"]).*\1.*' (anything
followed by a single or double quote followed by anything followed by a reference followed by anything).
This may look confusing but the only thing you really need to notice is that the reference will match the
same type of quote which was matched by the subpattern. In other words, this pattern would match both
34

Kofax Kapow User's Guide
the string He said "hello" with double quotes and He said 'hello' with single quotes. I have purposefully not
quoted the two strings here to avoid confusion.
As I will show you later in Design Studio, subpatterns can also be referred to in certain expressions
outside of patterns. This is useful when extracting certain parts of a matched string. Taking our quotes
example we could add parentheses around the subpattern enclosed by quotes '.*(['"])(.*)\1.*'. Now we are
able to extract the quote in Design Studio.
Here is another problem. Try using subpattern references to match (10) four of the same digit (11) a string
where at least two characters are the same. … The answers are given (at the bottom of the page) here.
Fewer Repetitions
When using subpattern references it is handy to know the following. By default, the repetition pattern
operators (*, +, {...}) will match as many repetitions of the preceding pattern as possible. You can put a "?"
after a repetition operator to instead make it match as few repetitions as possible.
(12) Try matching a subpattern to the first occurrence of a digit in a string. … the answer is given (at the
bottom of the page) here.
Removing '?' would result in matching the subpattern to the last occurrence of a digit in the string.
Using Patterns in Design Studio
Now that we have learned the syntax of patterns it is time to look at the various use-cases in Design
Studio.
Conditions
Creating conditions is the first way of using patterns intelligently in robots. The Test Tag step action is
particularly relevant in this context so let's go over a common use case.
I here have a robot which extracts from LinkedIn, all engineering jobs they have listed for Denmark. The
robot uses a loop to extract the URL, title, and company name from each job and return them to the
user. But let's say I only want to extract from jobs which contain the words "Copenhagen" and "software",
indicating that they are probably looking for software engineers in Copenhagen.
First, I insert a new step after the For Each step and assign to it the Test Tag action by clicking on the
new step to select it and choose Test Tag from the drop down in the step action view. I ensure that the tag
finder finds the entire job post of the current iteration of the loop. Then I iterate through the loop until I find
a job offering which matches the criteria I am about to set. This makes it easier to test that the pattern I
write will actually work.
Going to the action tab in the step view, I first choose to match only against text (not the entire HTML),
then press edit on the pattern. I am now in the Pattern Editor and I can type a pattern to be matched.
Since I do not know the order in which the two words "software" and "Copenhagen" might occur, I
need to make two alternative subpatterns. In the first alternative I can have Copenhagen followed by
anything followed by software. In the second alternative I write the same but in reverse order. Finally I add
"any text" before and after the alternatives and press Ctrl+Enter to test whether the pattern matches. It
matches!
I close the Pattern Editor and set the Test Tag step to Skip the Following Steps if the Pattern Does Not
Match the Found Tag. This way the job post will be skipped if it does not contain the two words specified.
I now go ahead and run the robot in Debug Mode. As expected only few results are extracted and they
should all contain the words Software and Copenhagen.
Tag Finders
Patterns can also be used in tag finders. This can be very useful if you know the structure of the
information you are looking for but you do not know where on the page it is located. This robot for
35

Kofax Kapow User's Guide
example goes to multiple different sites to extract the price of a certain pair of headphones. Since we
cannot know where on the page to find the price, patterns play a crucial part in determining exactly this.
Let me show you how to set up the extraction step. I'll delete the one I already have, insert a new step
and choose for it the Extract action. To configure the step I start by inserting a number converter which
extracts the number from any text I might extract. Then I choose to extract into the price attribute of the
variable I have made for this robot.
Going to the Finders tab in the step view, I click plus to add a Tag Finder. I locate the price on the page.
I can see that it is secluded in its own tag, with nothing else in that tag. This is typical so we will let our
pattern match this case. In the Finders View there is a field called Tag Pattern. Immediately we can write
the pattern '\$[\d\.]+' (dollar sign followed by one or more digits or dots). The pattern is designed to match
any tag containing only a dollar sign followed by a decimal number. I click the magnifying glass in the
upper right corner of the page view, which shows me what the Tag Finder finds. Unfortunately it finds the
cart balance instead of the headphone price. The cart balance will always be $0 for these kinds of sites,
so to avoid this mistake, I will make sure that the first digit in my tag is not a zero. Fortunately, the steep
price of headphones ensures that the price will never start with a zero. Rewriting the pattern I get '\$[1-9]
[\d\.]+' (dollar sign followed by a digit which is not a zero followed by one or more digits or dots) which
finds the correct price on the page when I click the magnifying glass.
Before testing the robot I go to the error handling tab of the Extract step and choose to Ignore and
Continue on error. If the Tag Finder fails to find the price on the page it should just return the default value
of the price attribute which is set to -1. This gives me a clear indication that the robot was not able to find
the price. Going to Debug Mode and Looking at the results from an earlier execution of this robot, we see
that many of the prices are extracted correctly. The method is of course flawed but it can be surprisingly
effective at times.
Data Conversion
The final use for patterns is to convert data from one form into another… For this we can either use one of
the data converter lists embedded in a step or use the dedicated Convert Variables step.
In this very simple example, I am extracting the author and date from a blog post. Unfortunately, the two
pieces of information are contained by the same string of text and are therefore extracted collectively by
the extract step. I will now show you how to separate these two pieces of information using patterns in
data converters.
The extract step has a data converter list located in the step action view. The data converter list can be
used to convert the extracted text before it is assigned to a variable. I click the plus and choose Extract
to insert a data converter which can extract part of the string. A new window opens where I can configure
the Extract data converter. At the top there is a pattern, and at the bottom there is a test input and a test
output similar to those of the Pattern Editor. The idea with the Extract converter is to write a pattern which
matches the entire input string, and then specify the subpattern to be extracted by using parentheses. By
default, the entire string is matched AND extracted, resulting in identical input and output strings.
If I want to exclude something from the extracted string I just have to write it outside of the subpattern. Let
me precede the subpattern with '.* by ' (any text followed by "space", b, y, "space"). Now the entire string
is still matched, but only the name of the author will be part of the substring, and therefore the authors
name will be extracted as shown in the Test Output field. The plain text ' by ' forces the two instances of
'.*' (any text) to match the date and the author name respectively.
I can now close the configuration window and execute the extract step. The author name is now correctly
assigned to my variable.
Let me go back to the extract step and quickly demonstrate another converter which uses patterns. I
remove Extract and add the Advanced Extract converter instead. Then I write the same pattern as I used
before except that I make subpatterns out of both instances of '.*' (any text). The Test Output is now still
36
Kofax Kapow User's Guide
the same as the Test Input. This is because Advanced Extract enables me to choose which subpattern I
would like to extract by using subpattern references in the Output Expression field.
In expressions, subpattern references are made using the '$' symbol followed by the reference number.
Right now the expression refers to the entire matched pattern but if I change it to '$1' I only get the first
subpattern, extracting the date, and if I write '$2' I only get the author name which is matched by the
second subpattern.
Note that it is also possible to add text, combine subpatterns, and do simple string manipulation using
the expression field. For example I could write an expression which recombines the two substrings but in
reverse order. For more information on expressions click the question mark next to the expressions field.
Finally I would also like to recommend the Replace Pattern data converter, which replaces instances of a
specified pattern in a string.
Those were the final words on patterns. Feel free to review any parts of the video you found useful or go
to help.kapowsoftware.com to find even more answers.
Answers to Problems
Problem Number Answer
1 '[0-9]'
2 '[ \n\r\t]'
3 '[^0-9]'
4 '.*'
5 'colou?r'
6 '\d{4}'
7 '.*\d.*'
8 '\D*\d\D*'
9 '(\D*|.*\d.*\d.*)'
10 '(\d)\1{3}'
11 '.*(.).*\1.*'
12 '.*?(\d).*'
Snippets
Click to watch a video describing how to use snippets to share steps among robots.
Creating complex robots can quickly become a messy affair which hogs precious screen real-estate.
Putting steps into groups is an easy way to clean up such a robot and simplify the steps it takes to reach
the end result.
To group steps you simply select the steps you want to group then press the group button in the tool bar
above the robot editor.
Furthermore you can give each group a name when you create it. This makes it easier to keep track of the
specific function of the group.
37

Kofax Kapow User's Guide
Collecting independent parts of a complex robot into simple groups makes the robot much easier to
understand for yourself and others.
Naming groups to remember their insides is essential. We could for example have a group that logs into a
site, performs a complex conversion, stores values in a database, or looks something up online.
Thinking about it, I actually have a login group in one of my robots which I would also like to use in some
of my other robots. Now I could of course start copying and pasting this group into some of my other
robots. That would solve the problem for now but if I needed to change the login procedure in the future
then I would have to copy the modified group step into all my robots again.
Let me introduce the snippet concept. A snippet is created and edited as a group step but is stored in a
separate file and can be used as a custom step in as many robots as you want.
Having the step information stored in a separate file from the robots, means that changing the snippet in
one robot will change it in all of the other robots as well. This can save a lot of time and greatly simplify
your robots.
…In addition to containing steps, snippets can also include a list of variables used by the snippet.
It could for example be a login variable containing username and password. This variable is then
automatically available in every robot using this snippet.
CREATING A SNIPPET
Let me show you how this all works in Design Studio.
Here is a robot which logs into Zoho CRM, looks up some contact information, extracts it and returns it.
The login procedure of this robot has been grouped and would be perfect to have handy for other robots
which are also to perform tasks on Zoho.
Creating a snippet from the steps that perform the login sequence couldn't be easier. I simply select the
group I already made. Then I select Convert Group to Snippet from the tool bar above the robot editor.
Design Studio now prompts for a name and I choose the name LoginZoho which was already the name of
the group.
The snippet is then created which is visualized by the small snippet icon in the lower left corner of the box.
Furthermore the newly created snippet file has been selected in the projects view and the snippet has
also been opened in the snippet editor in a new tab. The snippet editor will open every time we modify our
snippet in a robot.
I switch to the LoginZoho snippet editor. The snippet editor looks very much like the robot editor. It has
a snippet view showing the steps of the snippet, a step view showing the action performed by the active
step in the snippet view and a variables view as we know it from the robot editor. Instead of the browser
view, the snippet editor has a configuration view where we can write a description of the snippet.
Note that in the snippet editor we can only make modifications to the configuration view and the variables
view. If we want to make modifications to the steps in the snippet we will need to do that in the context of a
robot editor.
As you may have noticed when looking at the snippet view, the two steps which use the Login variable
have been marked with error indicators, pointing out that the variable is not yet present in the snippet.
38

Kofax Kapow User's Guide
Accordingly, the last thing we have to do to complete our snippet is to add the Login variable to the
snippet. This will ensure that the login credentials will be available to any robot which uses this snippet.
I add it by simply right clicking the variables view and choosing the appropriate type, exactly as I would
have done in a robot. In the variable configuration window that now appears I have to ensure that I
configure the variable to match the one in the robot precisely. The variable name is correct so I just need
to check Use as Input and add default values to the attributes… then I click OK.
Now we have a fully functional LoginZoho snippet.
USING THE SNIPPET
Let me show you how to add the snippet to another robot. Here's a new robot which I also want to perform
some task on Zoho. A snippet step is inserted by choosing Insert Snippet Step Before from the tool bar.
An undefined snippet step now appears in the robot. I then choose the LoginZoho snippet from the
dropdown in the step view of the snippet step.
The snippet has now been inserted into the robot and can be executed by clicking the end step…
As seen in the variables view, the login variable from the snippet is now available for the robot to use.
The small snippet icon to the left of the variable indicates that this variable belongs to the snippet. That
means that we cannot edit the variable directly in the robot, but only in the snippet editor. It also means
that removing the Login snippet from the robot will remove the variable as well.
If we want the variable to be in the robot permanently then we have to add it manually to the robot, giving
it the same name, type and configuration as the login variable from the snippet. This new variable will then
take the place of the snippet variable.
Now, if I make a change to the snippet in any of its instances, all the other instances will also be changed.
If I for example switch the places of the Enter Username and Enter Password steps and then go back to
the first robot, we see that the order of the two steps has been changed here as well.
TIPS
To round off this video let me give you some tips when working with snippets.
TIP 1
Often you can end up with robots having huge variables containing everything needed for that robot.
When creating snippets you should ultimately split these variables such that only the attributes needed in
the snippet will be included in the snippet variable.
In general you should try to create your types based on function rather than making them robot specific.
TIP 2
To make the snippet as independent from the rest of the robot as possible, make sure to put any non-
default robot configuration directly into the steps in the snippet where necessary.
In other words if you have clicked here, then here and made any changes that are important to the steps
in the snippet, then make sure to click here in step view for the steps of the snippet and make the same
changes.
TIP 3
39

Kofax Kapow User's Guide
Always document the context of the snippet by writing a description in the snippet configuration view.
Date Extraction - Simple Case
Click to watch a video showing how to modify the News Magazine robot to extract article dates.
This tutorial will show you how to easily extract dates from any website using the Date Extraction step in
your robot. The tutorial consists of two parts. This first part is a follow-along tutorial with a simple example,
the second part is a real case scenario showing a trickier example.
Please feel free to follow along on your computer for this first part.
If you have completed the beginner tutorials you might remember the News Magazine robot. It extracts
the most recent stories from News Magazine which is a site made for tutorial purposes. We want to modify
the robot to also extract the date and time from the most recent articles.
Start Design Studio and open the Type called post from the Beginner Tutorials folder in the default project.
Add a new attribute called date and give it the type Date. Now save the Type, close the Type Editor and
open the NewsMagazine robot from the same folder.
Click the Return Value step in the robot view. The robot will now execute to this step. I am going to close
the projects view and the source view to get some more space to work with.
Scroll down in the browser view and locate the date and time given above each picture. We are going to
add a step which extracts the date and time from each of the three articles.
To do this we right click the tag containing time and date and select Extract > Extract Date > choose the
variable post.date.
A new window opens which will help us extract the date into the standard date format which is the only
format accepted by the simple type Date and thus by our post.date variable.
Let's look at the important parts of Extract Date Configuration window. The field Test Input shows the raw
text as extracted. In the field called Pattern we will write the pattern of the date exactly as it is stated in the
extracted text. Right now the pattern is "dd MM yyyy" which means that the date consists of date, month
and year, separated by spaces.
We see that this corresponds to the format of the date in the extracted text. Design Studio has deduced
the pattern for us so if we just want to extract the date we don't have to modify anything. The field Test
Output shows us the date in the standard date format as extracted from the Test Input.
Let's say that we also want to extract the exact time that each article was published. This means that we
have to expand our pattern to also capture this information. Keeping an eye on the Test Input, add " *
hh:mm" to the Pattern. Notice that the Test Output changes to incorporate the time of day.
Let me explain the pattern we added. Spaces and the colon correspond to their respective characters in
the Test Input. Asterisk corresponds to "at" in the Test Input but can in general be used to represent any
number of non-whitespace characters. "hh" means hours and "mm" means minutes. To get a full list of
things to put in the Pattern field you can click the question mark at the top right of the window.
Click OK. We have now successfully extracted the time and date from each article. Test the robot in
Debug Mode to confirm this.
40

Kofax Kapow User's Guide
Date Extraction - Tricky Case
Click to watch a video demo showing how to extract dates when date information is spread into multiple
places.
This video will show you how to extract the date and time on a site that has date information spread into
multiple places. It is recommended to complete the tutorial on Simple Date Extraction before watching this
video.
I have made this robot to extract my Skype call history. It logs into Skype and loops through a table which
contains my history. The only problem is that the year is not stated directly in the date and time column but
only in the blue bar above. Somehow I have to combine the two pieces of information. Luckily this is easily
done using converters.
Before entering the loop I add a step which extracts the text in the top bar into the variable called Year.
Inside the loop I insert a new step which I choose to have the Extract action. Then I select the date tag
from the first row of the table and use the yellow square button to the right of the Address Bar to use it in
the Extract step.
Now, to combine this extraction with the Year variable, I add a converter under the Action tab of the extract
step. I choose the converter called Evaluate Expression which allows me to append the value from the
variable Year to the extracted date.
An Evaluate Expression Configuration window opens. The Test Input field shows the date as extracted. In
the Expression field I simply write "INPUT" with capital letters, which is the extracted date. I follow this by
a plus and a space in quotation marks, this adds a space after the date. Then I add another plus followed
by "Year", representing the variable containing the year which we extracted earlier.
Looking at the Test Output I verify that the two extractions have been combined into one text. To learn
more about expressions I can click the question mark next to the Expression field. Click OK.
I now add another converter, the same as used in the Simple Date Extraction Tutorial, called Extract Date.
The Output of the previous converter is used as input for this converter.
The configuration window opens for the Extract Date converter and I insert a new Format pattern and
delete the default one given by Design Studio. Now, just as in the Simple Date Extraction Tutorial, I add
the pattern to extract the date from the test input and let the converter convert the date to the standard
date format. "MM dd hh:mm MM yyyy". The month is given two times but that is not a problem. The first
occurrence will simply be ignored.
I click OK, choose to extract into the Date variable and check that the date and time has been extracted
successfully.
That concludes this tutorial and demo on extraction of dates.
API
Click to watch a video, which takes you through the creation of a robot that uses JSON and a REST call to
access the LinkedIn API.
41

Kofax Kapow User's Guide
Introduction
This video will take a look at how to utilize the power of REST web services, APIs, OAuth and JSON in the
creation of a robot. Specifically we will go through the process of automating the posting of a share to a
LinkedIn account based on content extracted from another website. This process involves the following:
1. creating an app through a LinkedIn developer account
2. looking at the LinkedIn documentation reference and understanding how the share API works
3. creating a robot which extracts from News Magazine and posts to LinkedIn through a REST call to
the LinkedIn share API, and finally
4. scheduling execution of the robot and adding users to it from the Management Console.
After watching, you should be able to access and call the LinkedIn API. Even if you are only interested in
other APIs, this video will still serve as a fine introduction.
OAuth and the LinkedIn API
Before we can start working on the robot in Design Studio, we need to get access to the LinkedIn API.
This is only possible with a developer account, but fortunately it is quite easy to get one. Start by going to
developer.linkedin.com and sign in in the upper right corner. In the popup window that opens, type your
username and password and allow the LinkedIn Developer Network to access your account.
Once you have successfully logged in, click on the link to API Keys, in the dropdown in the upper right
corner. This will give you a list of the applications associated with your account. The list should be empty
unless you have already created some LinkedIn applications. Add a new application, and fill in the form.
Apart from filling in all the required fields, you should also check off any permission that your robot might
need. Since we need to post to the users account, we will check the rw_nus permission. When you are
done, click Add Application at the bottom.
LinkedIn now gives us back a page showing the OAuth credentials needed to access their API. We leave
the page open so we can have access to these credentials when we need them.
In a new tab, we open developer.linkedin.com again. This time we go to the Documentation dropdown box
and click REST APIs. We need to find the part of the API which lets us share something to an account on
the user's behalf. We choose Share and Social Streaming in the Documentation Menu on the right, then
choose Share API from the submenu. Now we are on the page for documentation of the Share API.
Scrolling down a bit, we see what a sample payload for the Share API looks like. The example is in XML,
but we will be posting using a JSON payload instead. The translation from XML to JSON is pretty straight
forward as we will see. Above the example is a table which shows all the fields available to the Share API.
It is possible to set a comment, a title, a url, an image and a description.
JSON and REST call
Now that we have OAuth credentials for the LinkedIn API, it is time to start building our robot. We
create a new robot called LinkedInShare. Then we add a variable of the type OAuthCredentials, name it
credentials and mark it as an input variable. It is important to make it an input variable so we will later be
able to schedule the robot in the Management Console. Then we give it the following default values which
will let us call the LinkedIn API: We write LinkedIn in the serviceProvider attribute, copy the API Key to the
consumerKey attribute, Secret Key to consumerSecret, OAuth User Token to accessToken, and OAuth
User Secret to accessTokenSecret. As you might notice, there is no strict naming convention these four
tokens. Hence the names differ between LinkedIn and Design Studio. Then we click OK.
We now need to create a new type: One into which we can extract the front page article from a website
called News Magazine. We create a new type and call it Share.type. For this type we should name each
attribute according to the input fields specified by the Share API. Going back to the documentation of the
42

Kofax Kapow User's Guide
Share API, we see that the fields we are worried about are called title, submitted-url, submitted-image-url,
and description.
In Design Studio we add the four corresponding attributes to our type: title as a short text, …
submitted_url as a short text, … submitted_image_url as a short text, … and finally description as a long
text. Note that we use an underscore instead of a hyphen since hyphens can't be used in valid attribute
names. Luckily, LinkedIn does not distinguish between the two. That's it! We save the Share type.
Going back to the robot, it is time to start the fun part, which is building the robot. We start by adding two
variables, one of the type we just created, and one of the simple type JSON. The JSON type variable
should be able to contain the JSON payload which will be used in the API call.
Starting with the jsonPayload variable, we add it to the robot and edit the default value of the variable to
reflect a payload template. I have made the template ahead of time. You can copy the template for the
payload from the text associated with this video:
{
"comment" : "News Magazine article of the day",
"visibility" : {
"code" : "anyone"
}
}
The payload template contains a default value for the comment field. This could be created dynamically
if you wanted to. It also contains a value for the visibility of the share with the code "anyone". This means
that anyone, not just connections, will be able to see what we post to the user's profile. Save the variable.
We then add a variable of the type Share.
Now all we need to do, is to load News Magazine, extract from the front page story, add that content to the
payload and call the LinkedIn API with a Call REST Web Service step.
News Magazine is most easily loaded by inserting a snippet step and choosing the snippet
LoadNewsMagazine for it. This is one of the snippets that comes with the default project when you install
Kofax Kapow.
Executing the snippet step, we are able to see the front page of News Magazine. From the featured
article on the front page, we extract the title, url, image url and description into the share variable. The
url is extracted from "Continue Reading" and the image url is extracted by right clicking the image and
extracting the url. …
To build the payload we now have to open the jsonPayload variable. This can be done by right clicking
it and choosing insert step>>open variable. The value is now showed in the JSON view. Click the plus
icon in the toolbar above the JSON view to expand all lists and objects and view the entire content of the
variable.
Inserting the content from News Magazine into the payload is very easy. Simply right click the comment
property and choose Modify>>Insert>>After. In the Name field we write "content". For the Value field,
choose Generate From Variable from the value selector on the right. Now we can choose our share
variable in the field called Variable to Format. Click OK to finish.
The JSON payload should now have been correctly formatted for our REST call. We insert a new action
step as the last step before the end step and choose for it the Call REST Web Service action. All we need
to do is configure this step and the robot will then be ready to be deployed. Here is how to do it.
From the Share API documentation we copy the URL and paste it into the URL field.
The request method is POST, which is also stated in the API documentation.
43

Kofax Kapow User's Guide
From the dropdown just below the request method, we choose that we want to specify the raw body of the
request rather than individual parameters.
For the request body we select variable from the value selector and choose our JSON payload variable.
Correspondingly we choose application/json as the content type.
Going down to the bottom of the Step Action, we need to specify credentials for the REST call. We have
already prepared these. Choose OAuth as authentication type, and select the OAuthCredentials variable.
That was the final step in finishing the robot and it should now be ready to for deployment. First however,
we will run it in debug mode to check that it works as expected.
We switch to debug mode and run the robot. If it is successful, there should not be any error messages.
Next, we log into LinkedIn to check that the share has been posted successfully. It may take a while
before the share appears.
Once we have ensured that everything looks good, it is time to upload the robot to the Management
Console in order to schedule it and add multiple users.
Schedule the robot
Going back to Design Mode from Debug Mode, we upload the robot to the Management Console and click
the link that appears to the Management Console. Since our robot uses the OAuthCredentials type as
input variable, setting up the scheduling is a bit different than you might be used to. Here is how to do it.
In the repository, we go to the OAuth section. Here we add a new application, namely our LinkedIn
application. We name it "LinkedInShare", choose LinkedIn as our service provider, copy our application
API Key to the consumerKey field, and our Secret Key to the consumerSecret field. We leave the Scope
and Callback fields as they are and click save.
Then we add a user. We call the user "user1", click next and click the link to authorize the user. In a
new window, our application will now request permission to access whatever LinkedIn account we are
logged in to. Allow access and the Callback page will confirm that permission has been granted. Close the
window or tab to go back to the Management Console.
Now we click next, and then finish, to finally add the user to our application. Multiple users can be added
in this way, but let's keep it simple and stick to just one user at the moment..
Clicking on the Schedules tab, we are now going to create a schedule for the robot. We configure the
schedule, give it a name, set it to run daily, and add a job to the job list. We choose to add a single robot
and select the LinkedInShare robot. In the last step of the dialog, we choose the user we created for
OAuth and click finish and save the schedule.
The task has now been completed. We have set up an automated process which uses the LinkedIn API to
post daily updates to a LinkedIn profile.
You should now be able to use the LinkedIn API. If you want to learn more about the using OAuth
to access sites like Salesforce, Facebook, and Twitter, please consult the documentation at
help.kapowsoftware.com, where you will find a section called OAuth in the Management Console User's
Guide.
44

Chapter 3
Design Studio
Design Studio is the application for creating robots and types. In Design Studio, you can also debug your
robots and create database tables for types that need to be stored in databases.
Design Studio, an integrated development environment (IDE) for robot development, is all you need to
design robots and types.
Robots are programmed in an easy-to-understand visual programming language with its own syntax
(structure) and semantics (meaning). To support you in the construction of robots, Design Studio provides
powerful programming features, including interactive visual programming, full debugging capabilities, an
overview of the program state, and easy access to context-sensitive online help.
Design Studio also lets you create the types that are used by robot variables for data extraction and input.
With Design Studio Type Editor, you can design types that are modeled after real-world data. In the most
common case, a type is designed to hold the data that a robot extracts from a data source.
Organization
The Design Studio section of help is structured as follows: First, you are introduced to the essential
concepts of Design Studio. Then you are taken on a tour of the user interface and provided with an
overview of the core building blocks of any robot. With the basics firmly in place, we get to the tutorials
that show you how to use Design Studio to create robots that do something useful. The tutorials get
gradually more advanced until you are ready to create robots that perform the tasks defined by you. The
tutorials are the meat and bone of this section of help and it is important that you master them before
proceeding.
Before You Read On
Before you proceed, we recommend that you read Introduction to Kofax Kapow, which will introduce you
to Design Studio and the context it is used in, and take you through basic tutorials.
Note To access tutorials, you must have access to the Internet.
To work with Design Studio, you should have a basic understanding of programming, HTML, and
JavaScript.
Other Resources
Additional information on Design Studio is available in the reference documentation.
45
Kofax Kapow User's Guide
Introduction to Design Studio
Design Studio is a programming environment for creating robots and designing types. Robots are
created using a special-purpose programming language with its own syntax and semantics. Like other
programming environments, Design Studio uses several concepts that you, as a robot designer, must
understand to fully comprehend the workings of Design Studio. The purpose of the introduction is to
define the most important concepts and we recommend that you refer back to this section whenever
necessary. The Design Studio concepts becomes clearer as you explore Design Studio and start creating
robots.
Robots
The most important concept in Design Studio is a robot. A robot is a program designed to accomplish
some task involving a data source, usually a web site, but it could also be an Excel document or a
database. Typically, one robot is written per task per data source. For example, you would create one
robot for extracting news from http://cnn.com, another robot for extracting news from http://yahoo.com and
yet another robot for extracting product information from an online product catalog.
Basically, a robot can be programmed to do (automatically) everything you can do in a browser, and to
extract data from a database or an Excel document to combine with data stored in a database or file.
Robot Execution Mode
Kapow Design Studio supports two design-time robot execution modes: Minimal Execution (Direct) and
Smart Re-execution (Full). This topic provides details about the two modes.
When creating a new robot, you can select execution mode in the new robot wizard. Use the Design
Mode tab of the robot configuration to view or change the execution mode. Note that the choice of robot
execution mode only impacts the execution in Design Mode, and not in Debug Mode or at runtime in
RoboServer.
Minimal Execution (Direct)
The Minimal Execution (Direct) mode is the traditional Design Studio execution mode. All robots written in
versions prior to 9.5 will use this execution mode, which is also the default mode for new robots.
When you click a step in Minimal Execution mode in the robot graph, Design Studio takes the shortest
direct path to that step, skipping any previous branches and iterations that are not on the direct path.
Consider the example below:
46
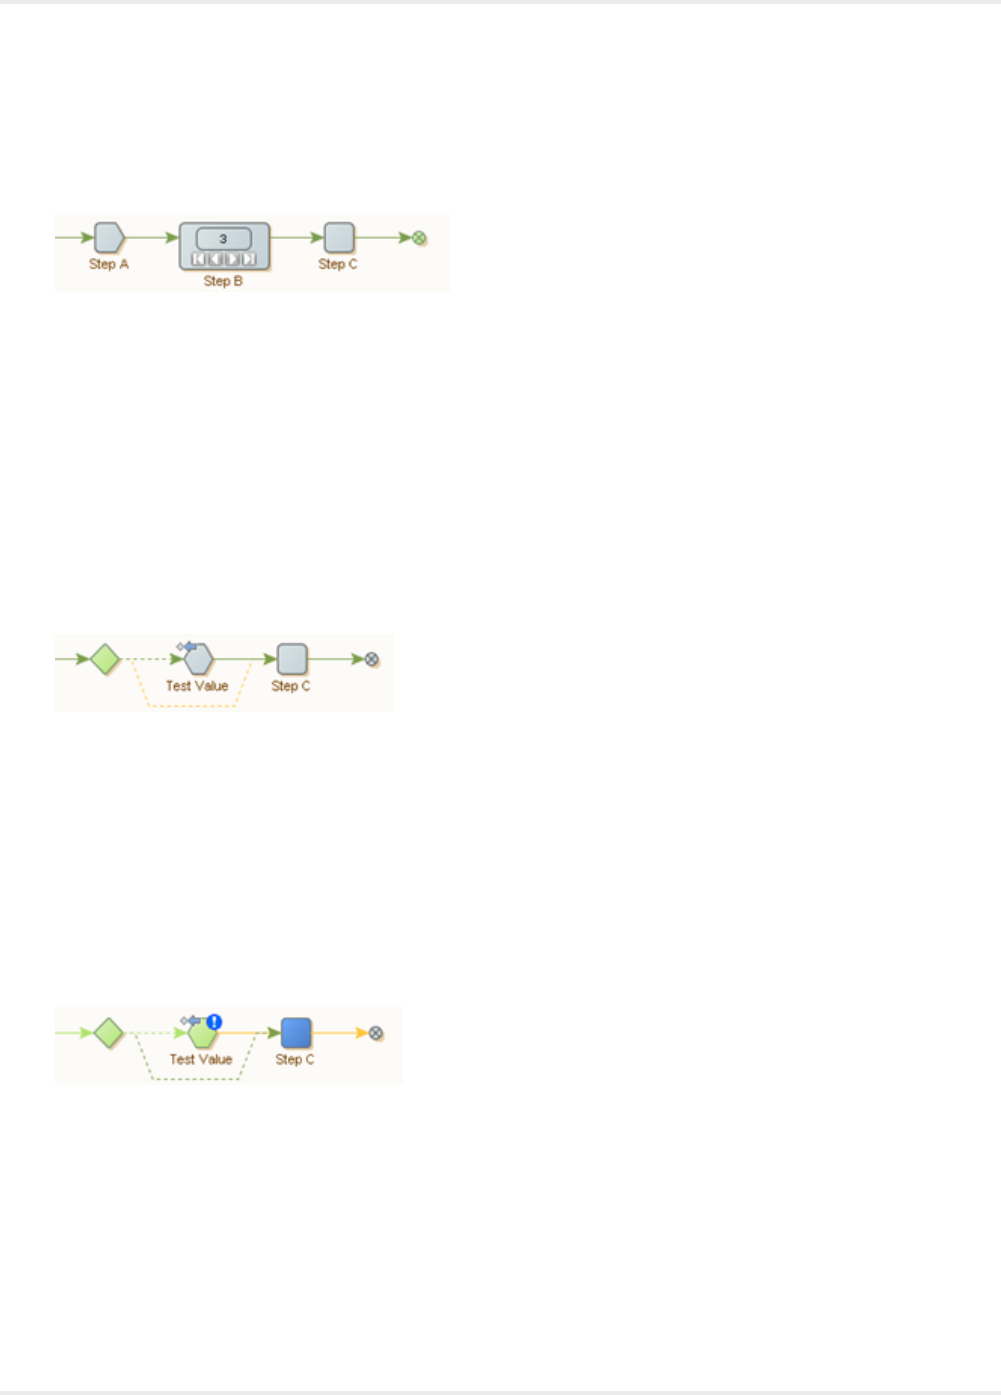
Kofax Kapow User's Guide
During runtime execution, the robot would normally execute steps A, B, C and D before reaching step E.
But in Design Mode, clicking step E result only in the execution of steps A and D.
Similarly, if the step resides inside a loop, only the selected iteration is executed.
Since the iteration counter is set to 3, clicking step C cause only step A, B and C to be executed once,
where step B selects the third iteration.
The Minimal Execution mode is optimized towards executing as few steps as possible. This mode is
useful when you have large robots and steps that take considerable time to execute, such as steps that
interact with complex websites. Generally, we recommend Minimal Execution for most data collection use
cases and for robots that perform significant interaction with external sites.
The drawback of Minimal Execution mode is that it requires user assistance to select the path to a given
step whenever it cannot execute directly to the step using the default path; for example, try steps in a path
may prevent a robot from following the topmost branch.
See the following example.
When clicking step C, Minimal Execution mode is not able to proceed if the test fails in the Test Value
step. In this case, the user must explicitly click the bottom branch of the try step first, to guide the
execution path towards step C.
Smart Re-Execution (Full)
In Smart Re-execution mode, the way that the robot is executed in Design mode is similar to the way it is
executed at runtime or in Debug mode.
As an example, when you click step C in the following robot, it automatically executes through the bottom
branch of the Try construct when the test fails in the Test Value step:
The blue exclamation mark icon on the Test Value step indicates that the error handling to Try Next
Alternative was triggered.
With loop steps, all iterations up to and including the selected iteration are executed when clicking a step
inside the loop.
In the following example, clicking step C causes execution of three iterations of the loop.
47
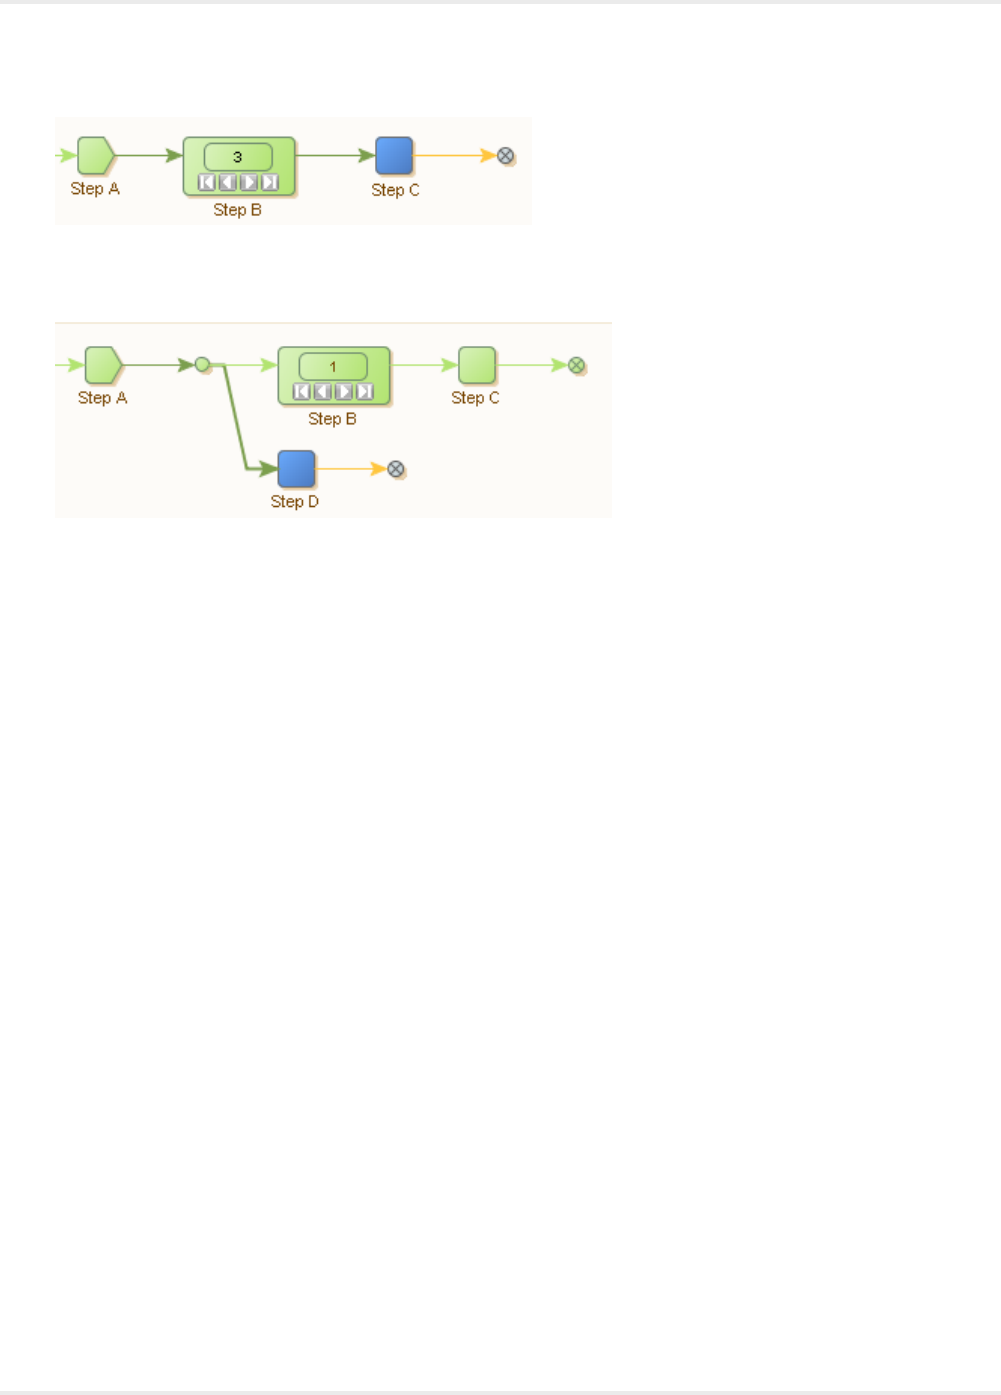
Kofax Kapow User's Guide
Further, if clicking a step in a branch below a loop, all iterations of the loop are executed. As an example,
see the following robot.
Clicking step D causes execution of step A and repeated execution of steps B and C (as many times as
there are iterations in loop B) before finally stopping at step D.
The Smart Re-execution mode is particularly useful when working with global variables, and when you
have subsequent steps in the robot that depend on accurate variables. This mode may be useful for
building a payload for a web service (REST or SOAP) call, or constructing an Excel document. The XML
or Excel document that is being populated resides in a global variable, while its content is added during
the execution of a loop. In a branch below the loop that populates the document, the robot takes the entire
document and posts it to a web service or similar. In this case, the Smart Re-execution mode makes it
easier to build the robot, as it ensures that the document is populated when testing the web service call in
Design Mode.
In Smart Re-execution, the interaction with the external world in the form of websites, databases, or web
services is cached. Caching avoids re-execution of steps unless the prerequisite for storing the execution
result has changed (such as a variable that determines which URL to load). Smart Re-execution has a
higher memory footprint than the Minimal Execution mode.
The Smart Re-execution mode is the only mode that supports Device Automation workflow.
We do not recommend Smart Re-execution mode for large robots with significant interaction with the
external world, or for long-running robots. The execution time as well as memory usage are too high in
these cases.
48
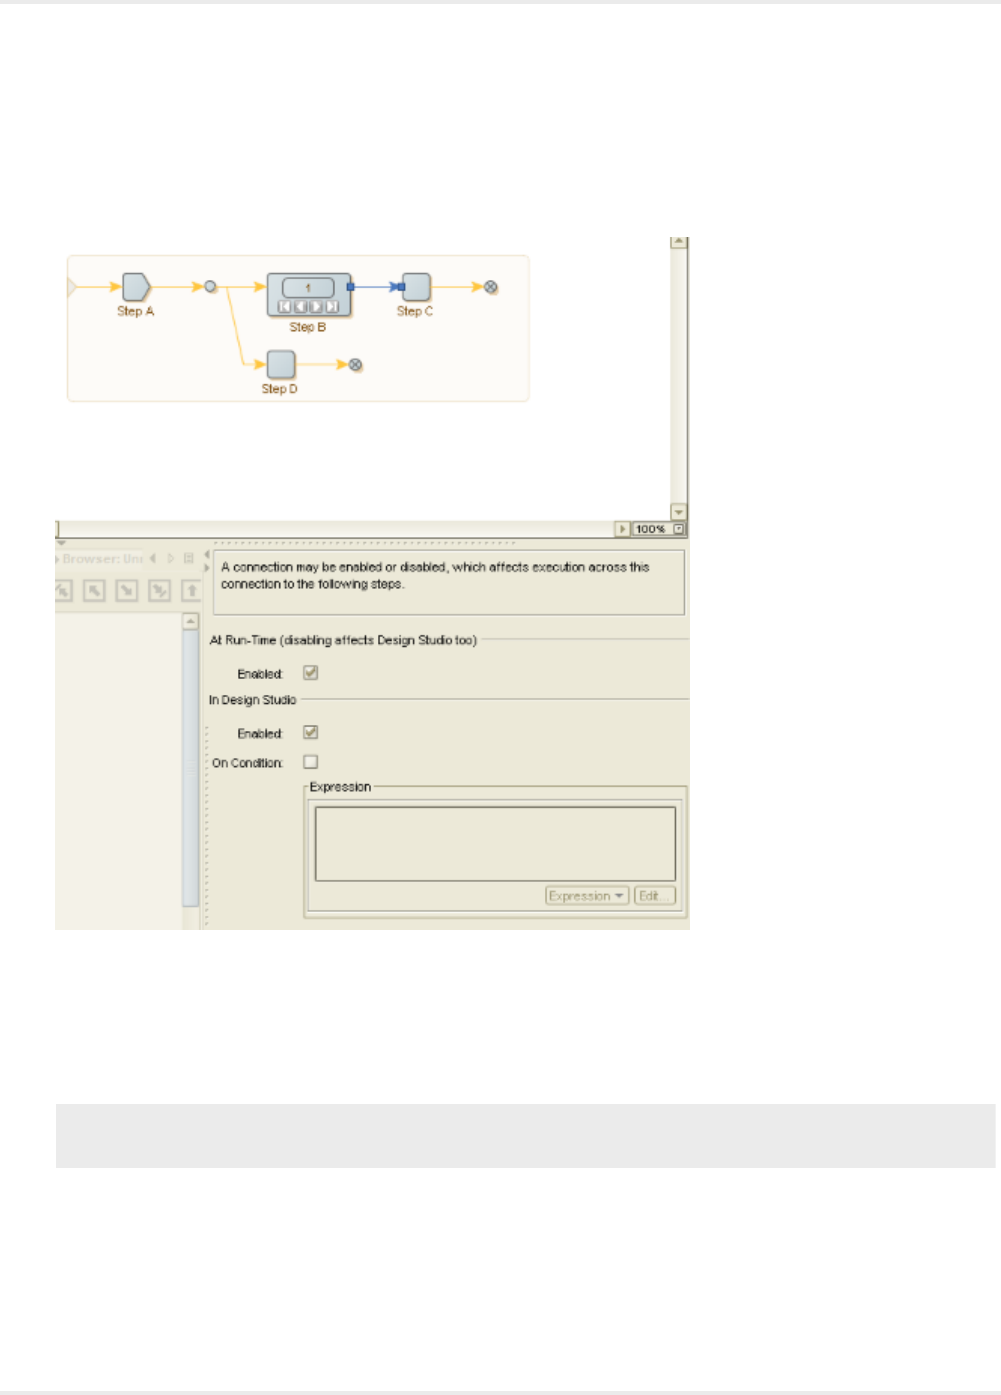
Kofax Kapow User's Guide
To cut down on the execution time while designing the robot, you can right-click a branch and disable it in
Design Studio. A similar setting can be applied in Debug Mode. Additionally, you can disable the branch
based on a specified condition in select iterations.
Connection configuration
The Design Mode tab of the robot configuration also features an option "Avoid External Re-execution".
When checked, it is ensured that steps are never re-executed, even when the cached result of the
previous execution cannot be used. In this case, you can still edit the robot, but without a current input
state to work on. Use this option only to meet requirements for interaction with the external word to avoid
re-execution (for example, if re-execution would result in incorrect or duplicate data in a partner's system).
Important Some step actions are not available in the Smart Re-execution mode. For a list of unavailable
steps, see the "Execution Mode" section in the Kapow Limitations topic.
The Robot State
When a robot is executed, it works on a robot state, which consists mainly of four elements:
• Windows
• Variables
49
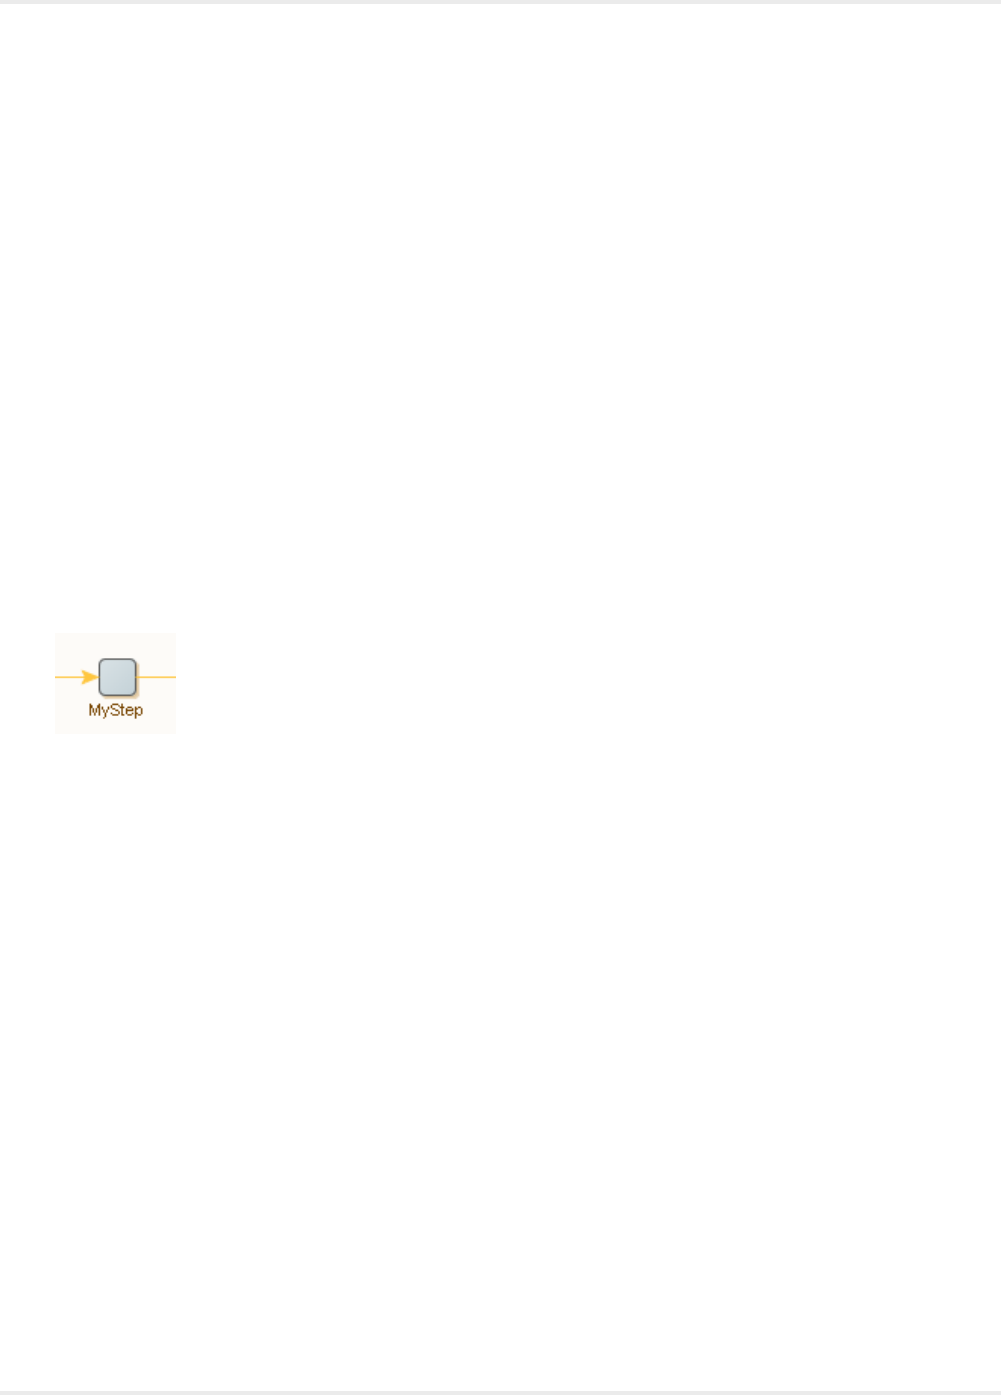
Kofax Kapow User's Guide
• Cookies
• Authentications
The Windows element corresponds to the currently open windows, each containing a page. This page
could be an HTML page, a spreadsheet, an XML page etc. The page has a given Page Type depending
on what type of page is loaded into the window and the look of the Page View and the steps you can
insert in your robot depend on this type. At least one window is always open, and one window is marked
as the current window. The variables element contains the current values of the variables. The cookies
and authentications elements are the HTTP cookies and authentications, respectively, received during
communication with a web server.
Steps
A robot is made up of steps, which are building blocks in a robot program.
There are four types of steps:
• Action
• Try
• Group
• End
A step works on a robot state and processes it according to the configuration of the step. A step has an
input robot state and generates an output robot state. The only exception is the End step. End steps mark
the end of a branch in a robot, but not the end of a robot. For example, the robot does not necessarily
stop execution after an end step. End steps are the only steps in a robot that do not have outgoing
connections.
Steps may have properties, such as a step name, a list of tag finders, a step action and error handling.
While Action steps have all these properties, other types of steps only have some.
The step name provides a symbolic name for the step, such as "Extract Headline" and "Load Search
Page." In the preceding robot, the step name is "MyStep".
The finders find the elements (HTML/XML tags or Excel cells) in the page that the step action should
work on. Some step actions require a single element, whereas others can handle more than one element.
Some step actions accept no elements at all. There are two kinds of finders: Tag Finders that find tags in
HTML or XML pages and Range Finders that find cells in Excel pages.
The step action is the action that the step performs. The action is the "heart and brain" of the step, and it
is the selection of the right step action that is the challenge of robot writing. For example, an Extract action
can extract the text from a tag in an HTML page and store it in a variable. A Click action can load the
URL residing in an <a>-tag and replace the page of the current window in the robot state with the newly
loaded HTML page. An action usually changes the robot state. For example, the Extract action changes
the variables, and the Click action may change the pages/windows, the cookies and the authentications.
50
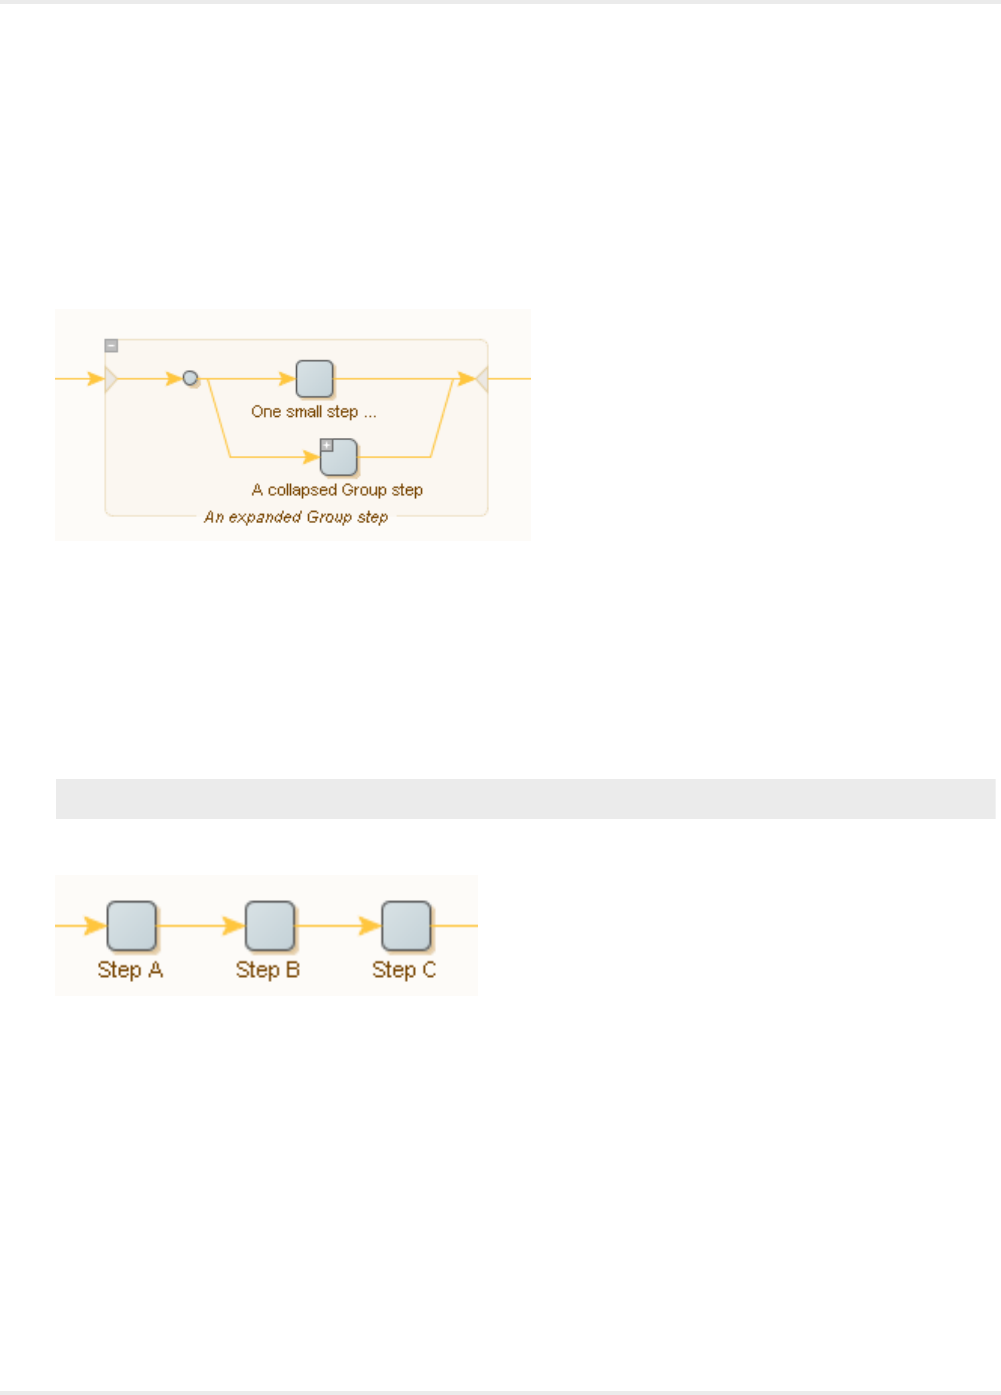
Kofax Kapow User's Guide
A step can be executed. A step that is executed accepts a robot state as input and, by applying the finders
and step action in turn, produces an output robot state. The output robot state is then passed to the
following step and becomes its input robot state. Some step actions are "termed loop" actions and steps
having such actions are called "loop steps." A loop step may generate zero or more output robot states,
and cause the following steps to be executed once for each of them.
You can group steps together in expandable Group Steps. The figure below shows an example of an
expanded Group step with a collapsed Group step inside it.
A step is valid if it is properly configured so that execution can be attempted. For example, if a step has no
action, it is invalid since execution cannot be attempted.
A step definition also specifies error handling.
Connections and Execution Flow
Use connections to determine the execution flow between steps.
Note Examples in this topic are based on the Minimal Execution (Direct) design-time execution mode.
Consider the following simple robot:
This robot consists of three steps: Step A, Step B, and Step C. Assuming that no errors occur, and that
each step generates exactly one output robot state, the robot is executed as follows: An initial robot state
is generated and used as input to Step A (being the first step). Step A produces an output robot state.
This output robot state is the input robot state of Step B. Similarly, Step B produces a robot state, which is
the input robot state of Step C. Once Step C has executed and produced an output robot state, execution
completes. In short, the execution of steps is described as follows: "A, B, C."
Sometimes, a step generates no output robot state when executed. This happens when an error or a test
step causes execution to continue somewhere else in the robot (see Conditions and Error Handling).
Steps containing a loop action may process the input state several times, each time outputting a distinct
robot state. Consider the following robot where step B contains a loop action:
51
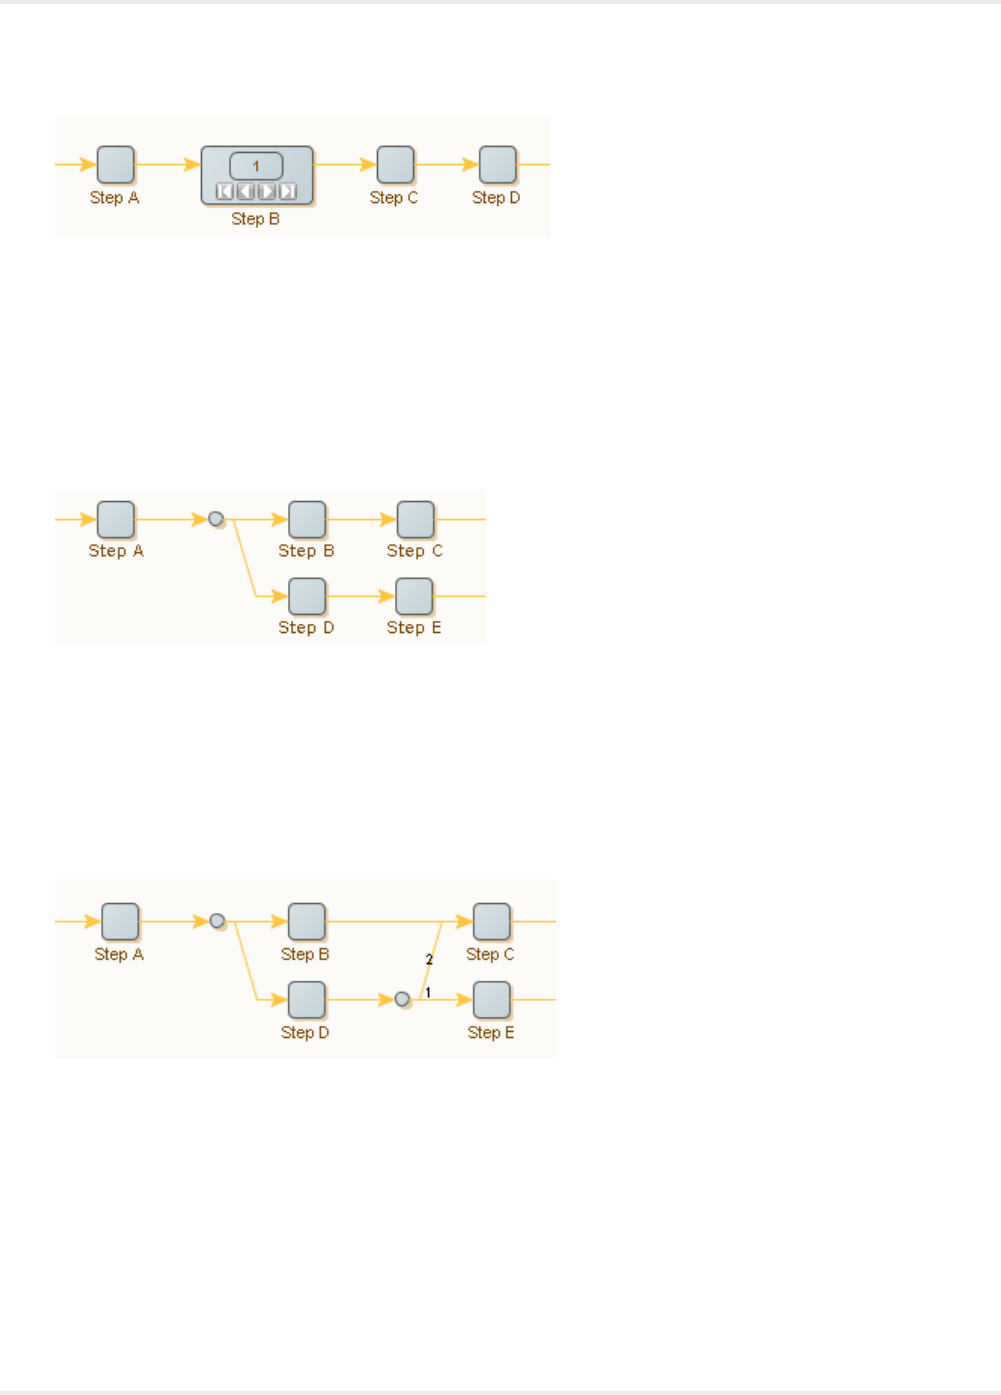
Kofax Kapow User's Guide
Assuming that there are no errors or test steps, that step B outputs three robot states, and that all other
steps output exactly one robot state, the steps are executed in the following order: "A, B[1], C, D, B[2], C,
D, B[3], C, D", where B[ N ] refers to the N th iteration of the loop action contained in step B. Note that the
output robot states by step B are different robot states: each iteration will output a new robot state. Hence,
step C will receive a new input robot state each time it is executed.
See the Branches, Robot States, and Execution Flow tutorial for more information.
A step can connect to more than one step. This is called "branching". Consider the following robot:
In this robot, step A is followed by a branch point, where the connection splits out in two branches. One
branch consists of step B and step C, and another consists of step D and step E. All branches coming
out of a branch point are executed, one after another. Therefore, assuming that no errors or test steps
change the control flow and that each step generates exactly one output robot state, the preceding robot
is executed as follows: A, B, C, D, E. However, it is important to note that step B and step D each receives
a copy of the same output robot state produced by step A.
Branches can merge, and in complicated ways. Consider the following robot:
This robot illustrates how connections can be explicitly ordered. In this robot, the branches of step D
are executed in the order specified by the numbers: step E is executed before step C. If an order is not
specified (by numbers), connections are executed top-down. Thus, assuming that there are no test steps,
that no errors occur, and that each step generates exactly one output robot state, the robot is executed as
follows: A, B, C, D, E, C. The first time step C is executed, it receives the output robot state produced by
step B; the second time step C is executed, it receives the output robot state produced by step D.
Sometimes you want to select (execute) only one of several branches, depending on circumstances. The
Conditions and Error Handling topic shows how to do this.
52
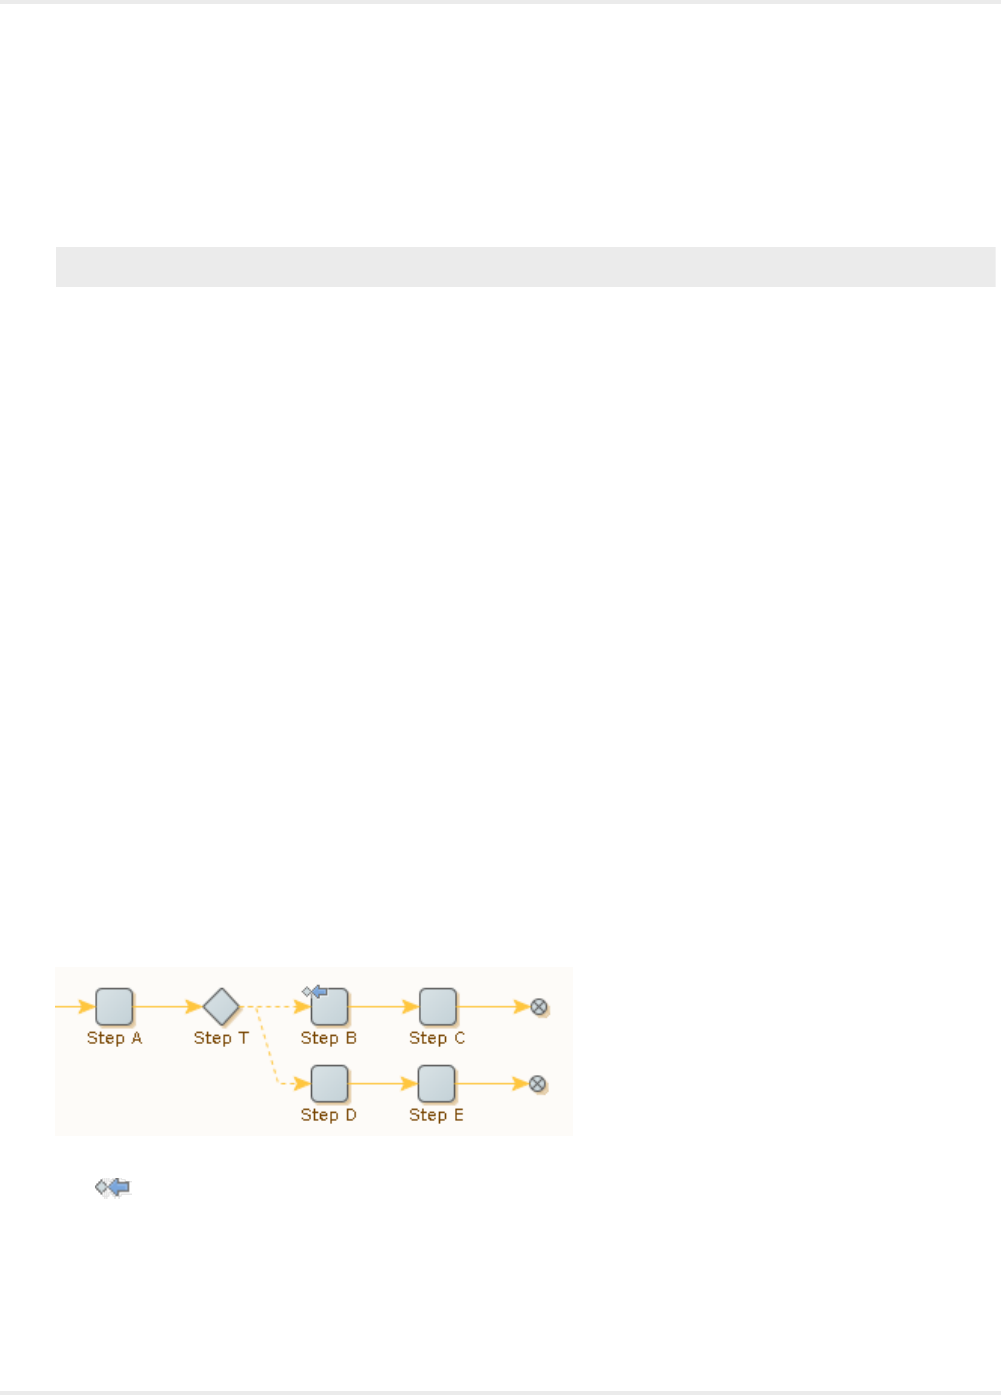
Kofax Kapow User's Guide
Conditions and Error Handling
A robot may use different approaches in different cases. The cases may be distinguished either based on
explicit tests; by evaluation of conditions, or because errors occur and need to be handled.
Note Examples in this topic are based on the Minimal Execution (Direct) design-time execution mode.
Conditions change the flow of execution based on the content of the input robot state (such as the
presence of a particular tag in an HTML page). Error handling is about changing the flow of execution
when particular errors occur (for example, some anchor tag is not found on the HTML page as expected
and cannot be clicked). Often a situation can be seen both ways: An anchor tag should be clicked if
found (this is a condition), or the robot can try and click it to handle the error (if it is not found). In some
cases, what is commonly thought of as a condition is too complex to be written up as such (for example,
a condition saying "if this particular page can be loaded without error"). In such a case, try and load the
page and treat any error as an indication that the condition failed.
Other errors are signs of genuine problems with the robot or the web site being accessed. For example,
the web site may be down and cause a page loading error, or a tag finder might fail to find a needed tag
due to a dramatic page layout change of an HTML page. A particular error may be considered a failed
condition in some circumstances, and a genuine error in other circumstances. The interpretation depends
on the robot.
Because of this blurred boundary between conditional execution and error handling, Design Studio
provides both features in a unified way. For every step, you can configure what to do in case an error
occurs. Furthermore, steps with a test action (based on a condition of some sort) reuse the same
approach, meaning that if the condition is not met, the (default) action is applied as if an error occurred.
For each step in the robot, you can configure the desired reaction to errors. Two useful error handling
options are described here; see How to Handle Errors for information on the other options. The first option
is closely linked to the Try step.
The Try step is similar to a branch point because it may have several branches going out from it. It differs
from a branch point because branches beyond the first one are executed only if a step on the preceding
branch encounters an error which it handles based on the Try Next Alternative option. Consider the
following robot and assume that each ordinary step is expected to output exactly one robot state:
The icon indicates that step B is configured to handle errors by "Trying Next Alternative."
If Step B executes successfully, step execution is as follows: "A, T, B, C." Because the first branch going
out from T executes without error, the second branch is not executed at all.
53
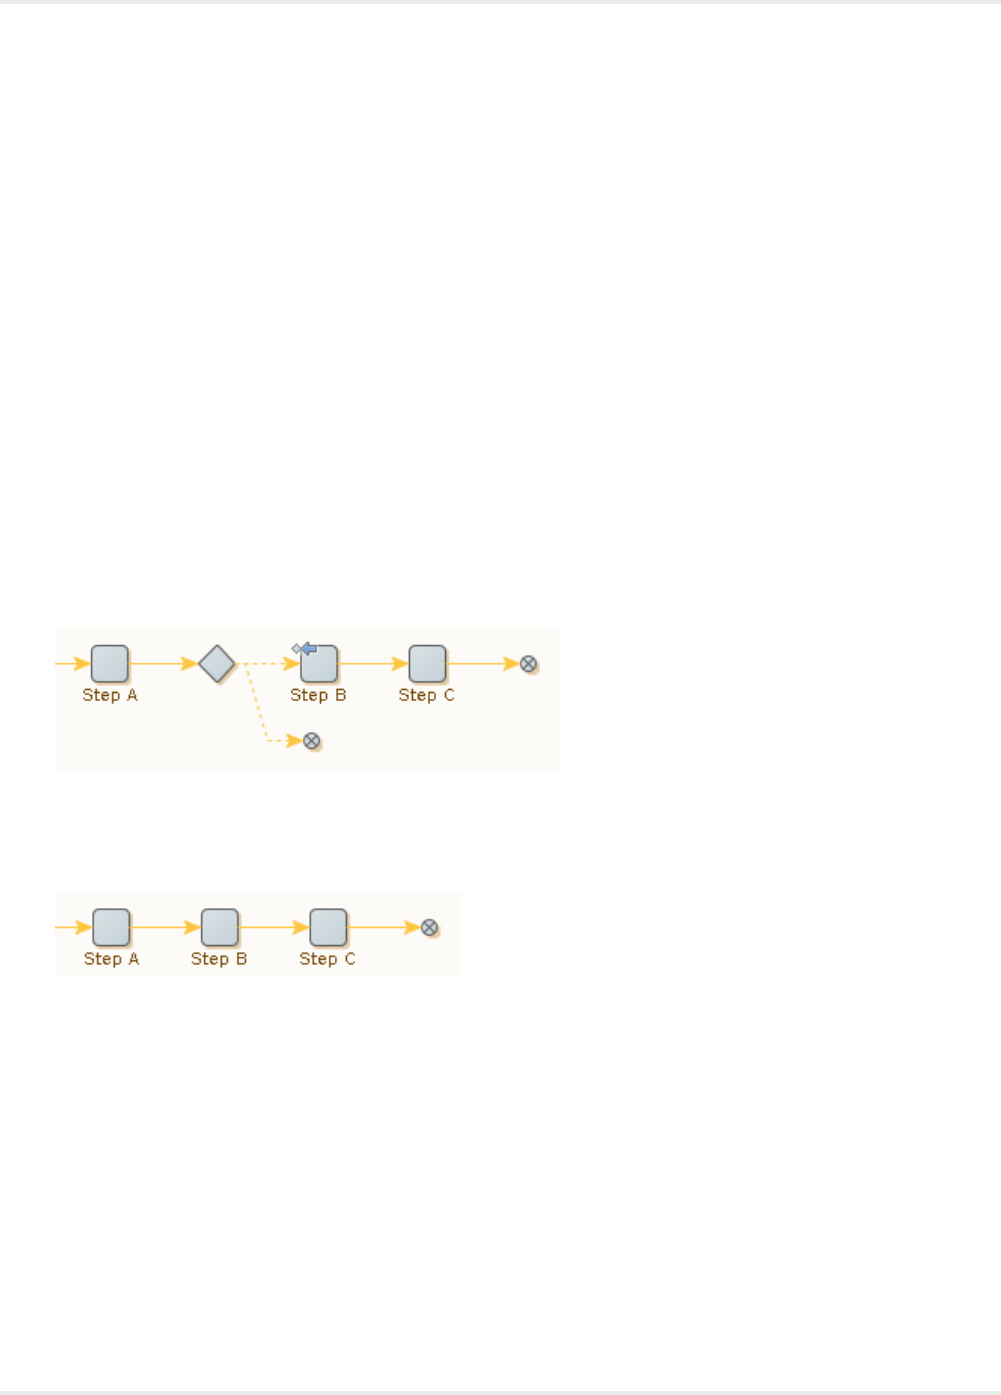
Kofax Kapow User's Guide
If, on the other hand, Step B encounters an error, then the execution of steps is as follows: "A, T, B, T, D,
E." After the error in Step B is handled, execution does not continue at the following step, but instead at
the beginning of the next branch going out from the Try step.
Each branch from a Try step represents one possible way to proceed from that point. Steps near the
beginning of each branch probe if execution along the branch is a viable approach (and otherwise effect
a "Try Next Alternative"), while later steps do the actual work when the branch turns out to be the right
one for the case at hand. The probing steps near the beginning of a branch may be either test steps, or
any kind of steps that, if they encounter an error, indicate that this branch is not the way to proceed. There
may be any number of such branches going out from a Try step.
As with ordinary programming languages such as Java, JavaScript, C# or similar, the preceding robot
is similar to an "if-then-else" construct: The first branch after the Try step contains the condition (the "if"
part) and the "then" part, while the last branch contains the "else" part. Should there be more than two
branches, then the ones between the first and the last ones are like "else-if" parts.
If the first branch attempts to do some action that may error, the example can also be likened to a "try-
catch" construct: The first branch is the "try" part, while the second branch is like the "catch" part.
Another error handling option, Skip Following Steps, provides a more compact way of expressing a
common special case, which is exemplified by the following robot. The step that can encounter an error is
the first one on the first branch, and the second branch does nothing.
The effect is to skip execution of the steps after step B if it encounters an error. The same effect can be
achieved without the Try step by using the error handling option "Skip Following Steps" (which is the
default), in the following way.
Location and Location Code
When an error is handled, it is possible to report it back to the caller of the robot, or to log it. In both cases,
a message is included that briefly describes the error, together with a location and location code for the
step that encountered the error.
The location of the step that encountered the error is the list of steps (including iteration numbers)
necessary to execute to reach that step from the first step. Consider the following robot.
54
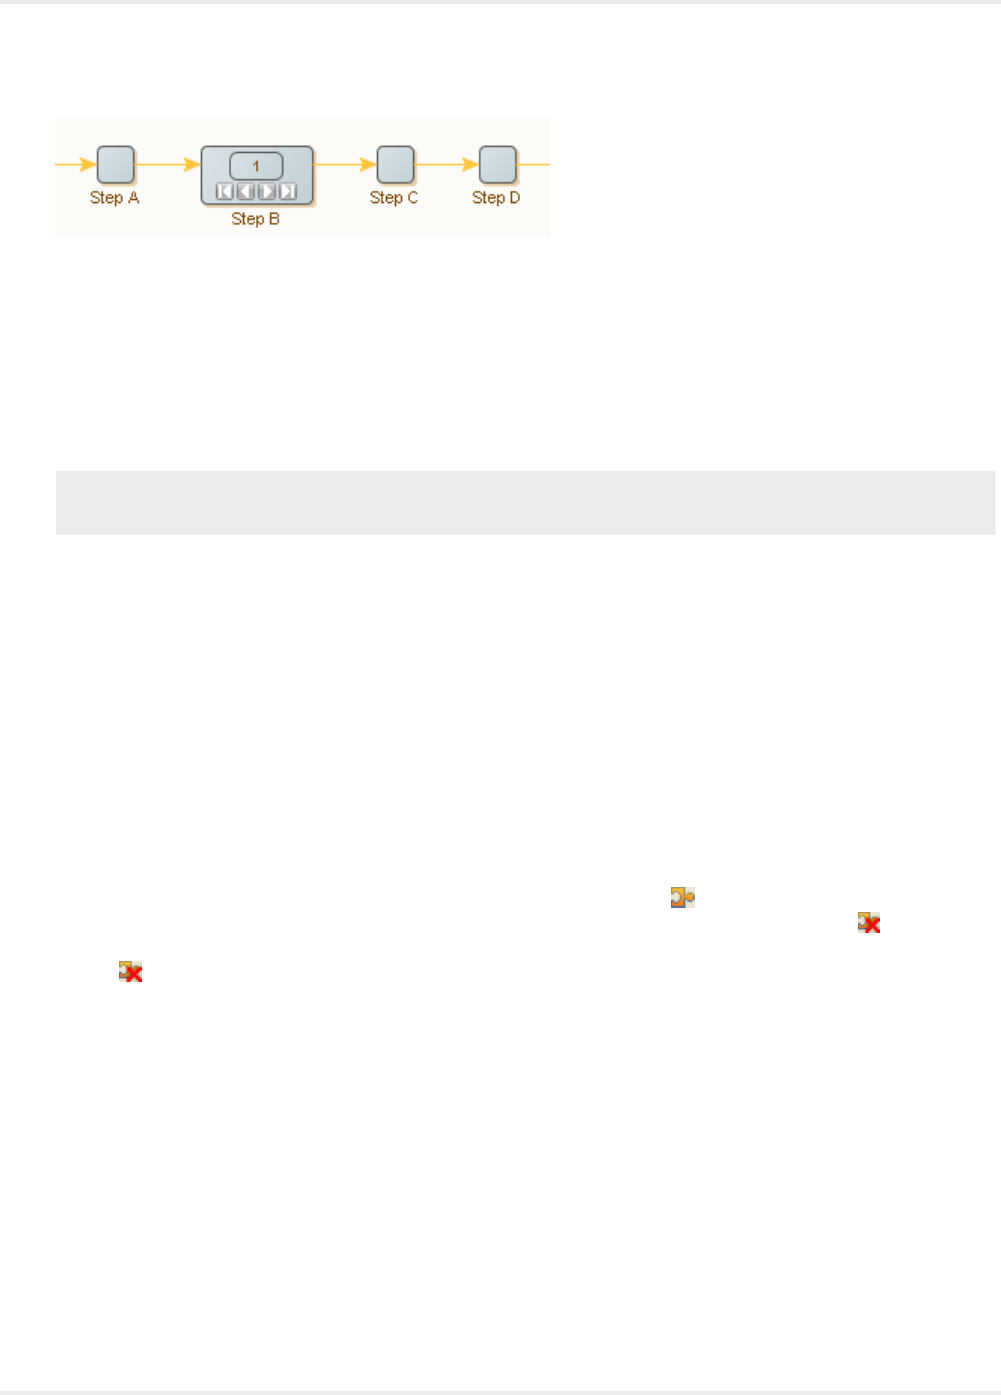
Kofax Kapow User's Guide
If Step C reports an error on the second iteration of Step B, the location is written as: "step A - step B[2]
- step C." Note that the location contains the step names and iteration numbers, separated by hyphens.
Branch points are omitted.
The location code is similar to the location, but the name of each step is replaced by a unique identifier for
that step, thereby avoiding name clashes. For the preceding location example, the location code may be:
{a-i1-a}. Use the location code in Design Studio to go directly to the step that reported the error (using
Go To Location on the Edit menu).
Important The iteration number in the location and location code is 0 indexed, so the first iteration is:
{a-i0-a}
Snippets
A snippet is a group of steps that can be reused in several robots. A snippet is maintained in a file
separate from the robot. Whenever the contents of a snippet is changed in one robot, it is automatically
updated in other robots that uses the same snippet. A snippet is inserted into a robot using the Snippet
step, and edited in-line. Snippets contents cannot be edited without being inserted into a robot.
For additional information, see the Snippets tutorial.
The Snippet step inside a robot is in many ways similar to a Group step. Although, the steps inside a
Group step are part of the robot, the steps inside a Snippet step are maintained in a separate file and can
be reused in other robots inside the same project. A robot is incomplete and cannot execute if a snippet
that it references is not present in the project.
After selecting a group of steps to convert to a reusable snippet, click "Create snippet from selection."
If only a single group step is selected, it can be converted to a reusable snippet by clicking "Convert
snippet to group." A snippet can be easily embedded into a robot by clicking the "Convert snippet to
group" icon after selecting a snippet step.
A snippet can also define a set of variables included in the set of variables of any robot that uses the
snippet.
A snippet can have a description. This is edited in the Snippet Editor and is shown on every occurrence of
that snippet in robots.
Variables and Types
Variables and Types are important concepts in Design Studio.
Every variable can be associated with a default initial value that it retains unless the robot explicitly
reassigns it, which it often will as values are extracted and manipulated during the execution. Most robots
output the values of variables, by returning them to the caller or inserting them in a database. Robots
55
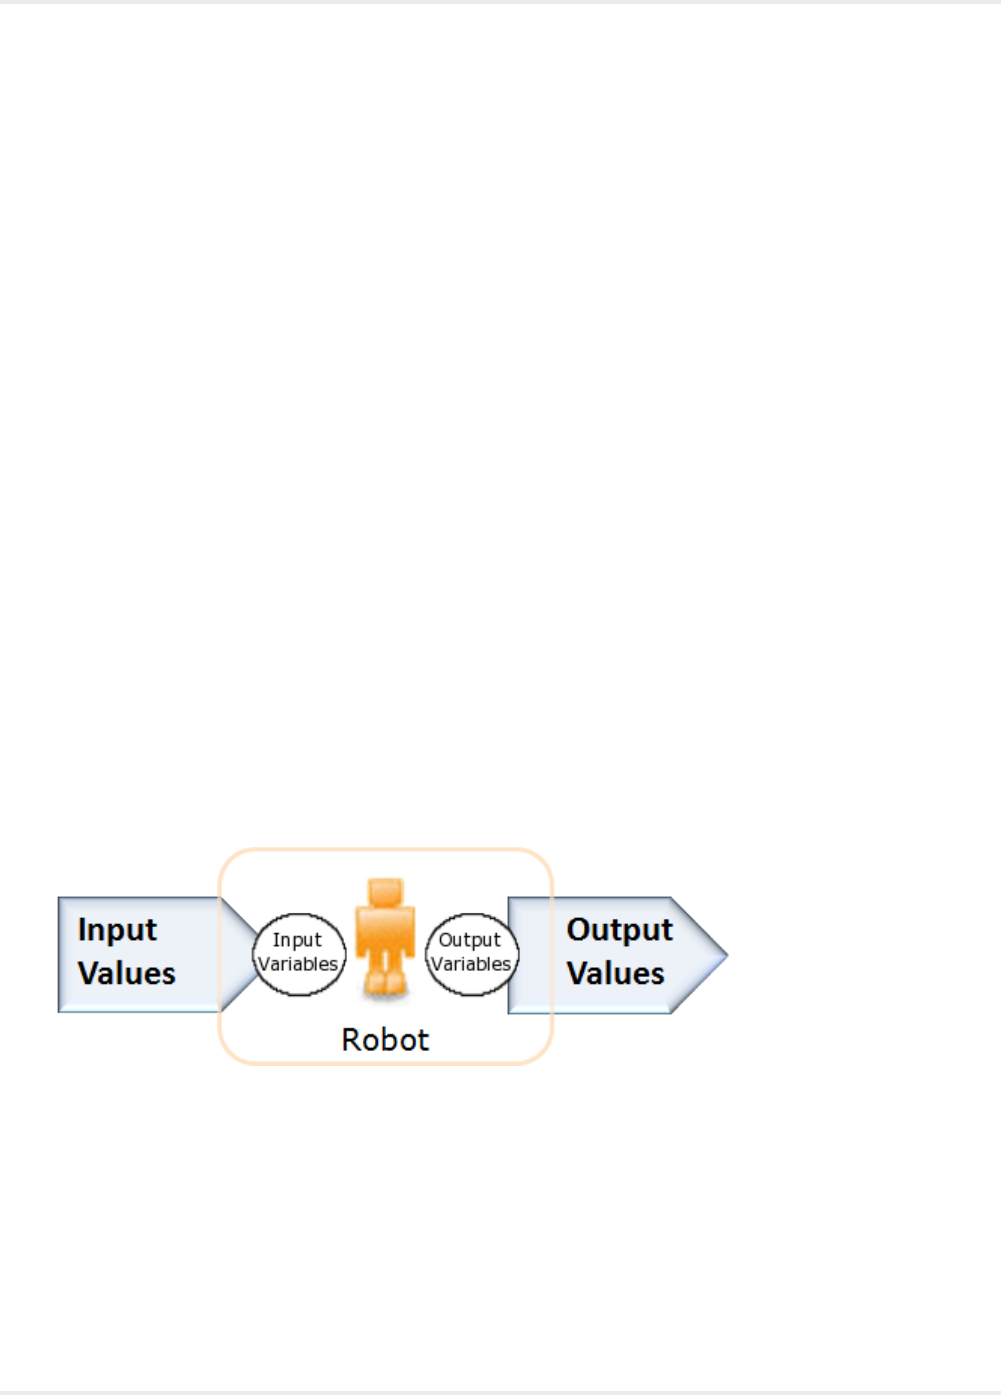
Kofax Kapow User's Guide
can also take input values which are assigned to specific variables marked as receiving their values from
input. These are called input variables.
You define each variable as either complex or simple.
Simple Variable
A simple variable does not define any attributes, but only represents the type of a single value. Thus, a
variable of a simple type contains a single value, for example a text string, and is referred to only by its
variable name, such as Username. Simple types are built-in and cannot be edited, or created.
• Useful when extracting temporary data or as global counters.
• Commonly used as temporary variables, internal to the robot.
• You cannot use a simple type for input variables.
• You cannot output the value of a simple type.
Complex Variable
A complex variable defines a set of attributes. Each complex variable denotes several (named) values.
We generally refer to each attribute such as "title" as a separate variable such as "Book" and denote its
value using the fully qualified attribute name, such as Book.title. You can create complex types within
Design Studio to suit your needs.
Complex variable values are output in various ways. For example, a robot extracting news from a web site
might output the values of news variables; each news variable would have a complex type with attributes
such as headline, bodyText, date, and author; and each news value to output would comprise a possibly
unique subvalue for each named attribute.
For robots containing input variables, they must be specified as part of the robot's input with values
assigned to the input variables. For example, a shopping robot that orders books at http://amazon.com
might depend on input values containing user and book information. These might be assigned to two
input variables in the robot called "user" and "bookInfo" of type "User" and "BookInfo." The following figure
shows how a robot accepts input values and generates output values.
The figure shows robot input-output. Input values are assigned to input variables, and the values of some
variables are output. Only variables of complex types can be assigned from input or have their values
output.
Libraries and Robot Projects
Robots and types are organized in libraries. A library is a collection of robot definitions, type definitions
and other files needed to execute the contained robots. A library serves as the deployment unit for robots.
56

Kofax Kapow User's Guide
Use a library to bundle robots and their required files when you want to distribute and deploy the robots in
a runtime environment, such as RoboServer.
In Design Studio, you can work on one or more robot projects at any time. The purpose of a robot project
is to develop a robot library. A robot project contains the robot library that you are developing a given
set of robots in, as well as other files that are useful for your work on the robot library. Files placed in the
library may also be accessed by robots using a special library protocol.
Thus, a robot project is what you work on when you are developing robots, and a robot library is how you
distribute and deploy your work.
Shared projects are deployed on a Management Console and connected to a project on your local Design
Studio computer. Management Console projects can be shared between several Design Studios. The
Shared Projects View provides visual indication of the status of the shared project files as well as tips with
descriptions.
Naming policy
Kapow imposes the following naming policy, which applies to project names, schedule names, folder
names (paths), and folder items including robots, types, snippets, and resources uploaded through the
API.
• Illegal system characters are allowed, but they generate a warning message.
• System reserved words are allowed, but they generate a warning message.
• Empty names are not allowed, and they generate an error message.
• Names that exceed 243 characters are not allowed, and they generate an error message.
• Names with special HTML formatting are allowed, but they generate a warning. The HTML formatting is
removed.
Note the use of a period "." in file names:
• Files and folders starting with a period “.” are treated as hidden (hence all files in hidden folders are
also hidden) and they are not shown on the project tree.
• Hidden files are not included in project synchronization.
• Robots, snippets, types, texts, and database mapping files cannot have names starting with a period
".".
• Folders cannot have names starting with period ".".
Name Conversion Algorithm
Typed name Result
'<t> aaa </tag>'
Note ' ' denotes the start and end of the string.
'aaa'
Note The HTML tags <t> and </tag> are removed.
The space before and after the actual folder/project/
schedule name is also removed.
57

Kofax Kapow User's Guide
Typed name Result
'< t> hello ' '< t> hello'
Note The tag < t> is kept because it is not a valid
HTML tag. The space after the actual name is
removed.
'com1 /*** /& @' 'com1/***/& @'
Note Because "com1" is a reserved word for some
operating systems, it generates a warning; however,
it is a valid name for a folder, project, or schedule.
An asterisk "*" is an illegal character. Kapow accepts
it as a valid name but generates a warning. Note
that entering a name with reserved words and illegal
characters can result in errors when other users
download the project to local computers where the
operating system does not support the names as
valid file names.
HTML entity numbers such as & are converted
to actual characters.
Design Studio User Interface
This topic introduces the Design Studio user interface and begins the tour to the following elements (or
others):
•Menu bar
•Tool bar
•My Projects view
•Shared Projects view
•Databases view
•Editors view
•Robot Editor
•Type Editor
•Text Editor
We recommend that you start the Design Studio to follow the user interface tour. Note, however, that the
tour explores the Design Studio user interface as it appears at startup if you do not create or load a robot.
To view the Design Studio main window, you must have a valid, activated license. See the Kofax Kapow
Installation Guide for details on licensing.
58

Kofax Kapow User's Guide
Menu Bar
The menu bar is located at the top of the Design Studio window.
59
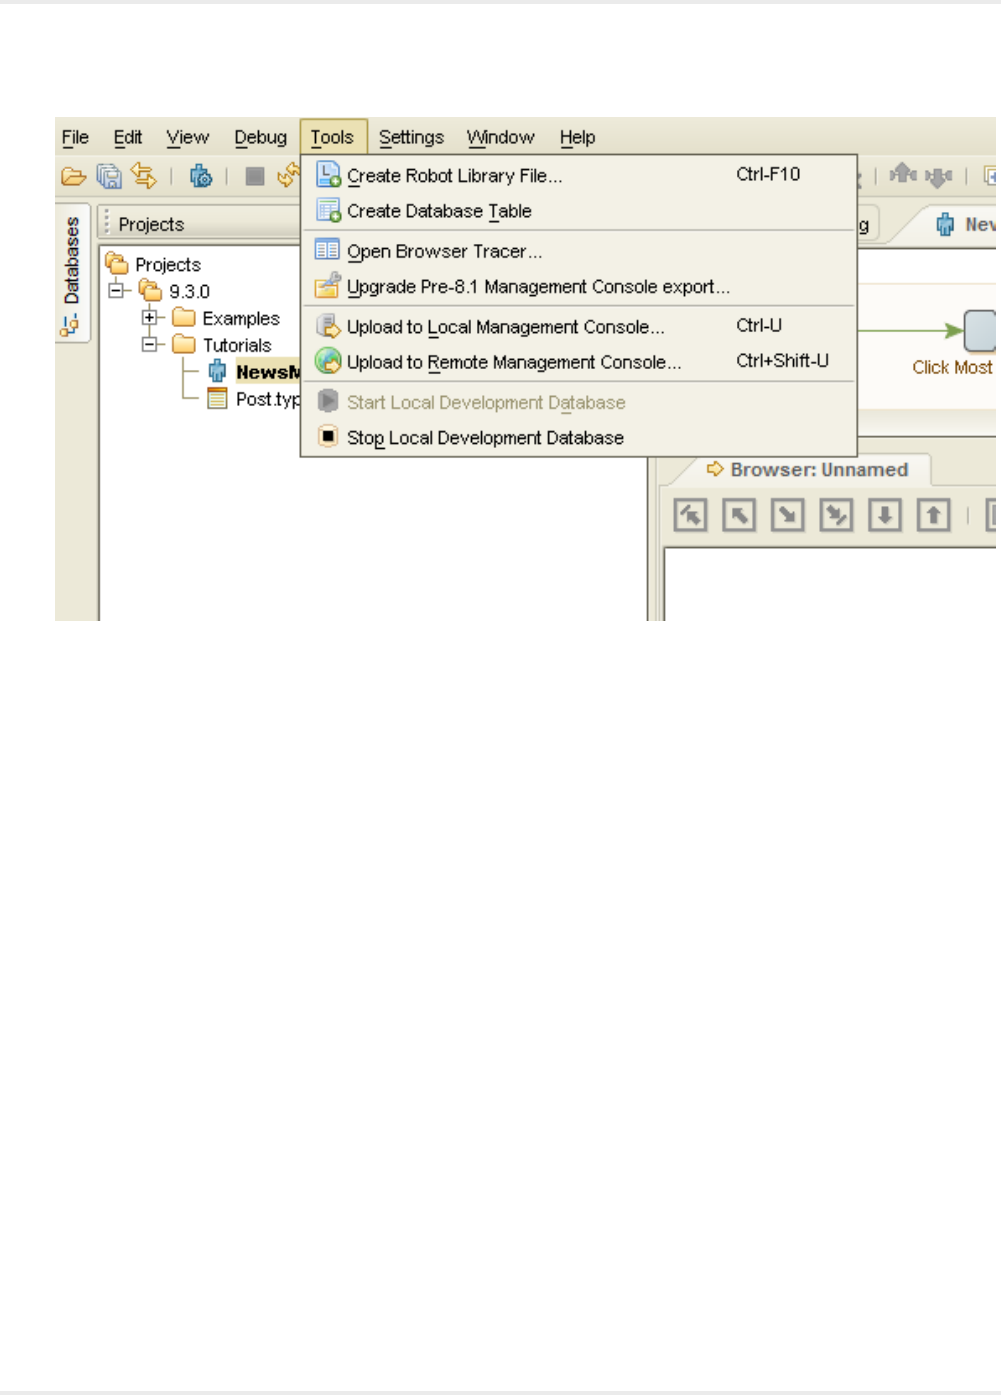
Kofax Kapow User's Guide
The available menus and included items are based on the type of file that is open in the Editor view. The
following menus are always available even if no file is open (some items may be disabled):
• The File menu includes items for manipulating files, projects, and so on.
• The Options menu includes items for changing default settings and defining proxy servers or database
connections.
• The Window menu includes items to change the layout of the user interface, such as Reset Layout.
• The Help menu includes links to the online reference help, documentation, and technical support
information.
As soon as you open a file, such as a robot, the Edit menu is added to the available menus:
• The Edit menu offers a range of edit actions that you can perform on the opened file. The available
actions depend on the type of the file, but it always contains the Undo and Redo actions.
If you open a type or a robot file, one more menu becomes available:
• The Tools menu lets you perform tasks related to the type of the file, such as generation of database
table (for types), or deployment of robots to the Management Console (for robots).
If you open a robot file, three more menus may be available:
• The View menu lets you perform actions on the view or open additional views that are not open by
default.
• The Debug menu contains actions related to the debugger.
• The Breakpoints menu contains actions related to the breakpoints in the debugger, such as adding and
removing breakpoints. This menu is only available when the Robot Editor is in debug mode.
60
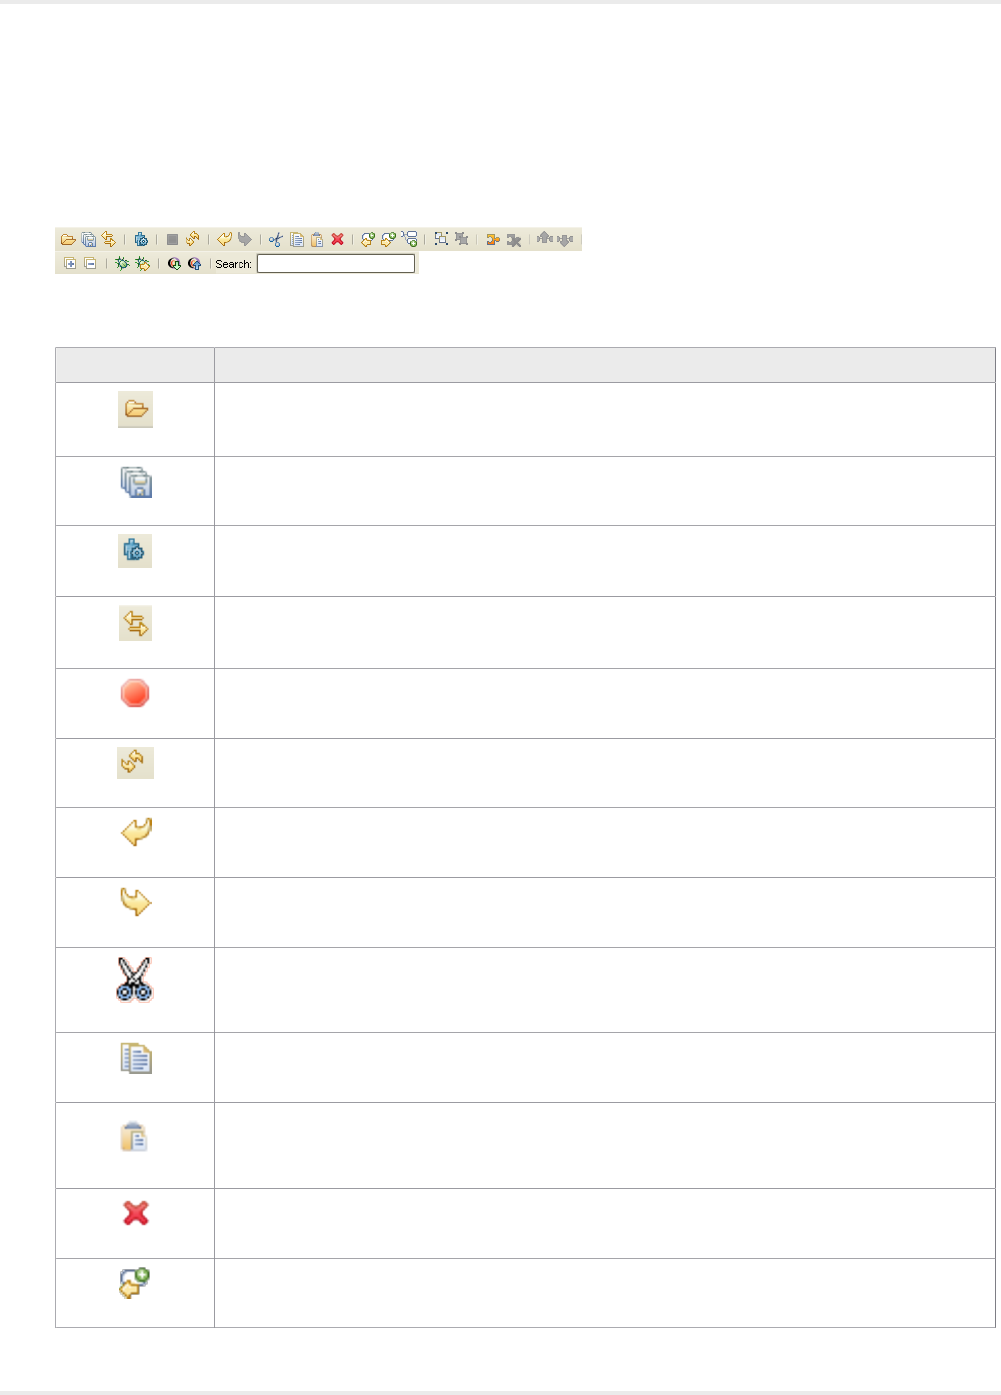
Kofax Kapow User's Guide
Toolbar
The Toolbar buttons let you perform many actions that are also available on the menus.
The available buttons change, depending on which editor is active in the Editors view.
Icon Description
Open Project
Save All Files
Configure Robot
Synchronize All
Stop - Escape
Refresh
Undo
Redo
Cut
Copy
Paste Before
Delete
Insert step before selected step
61
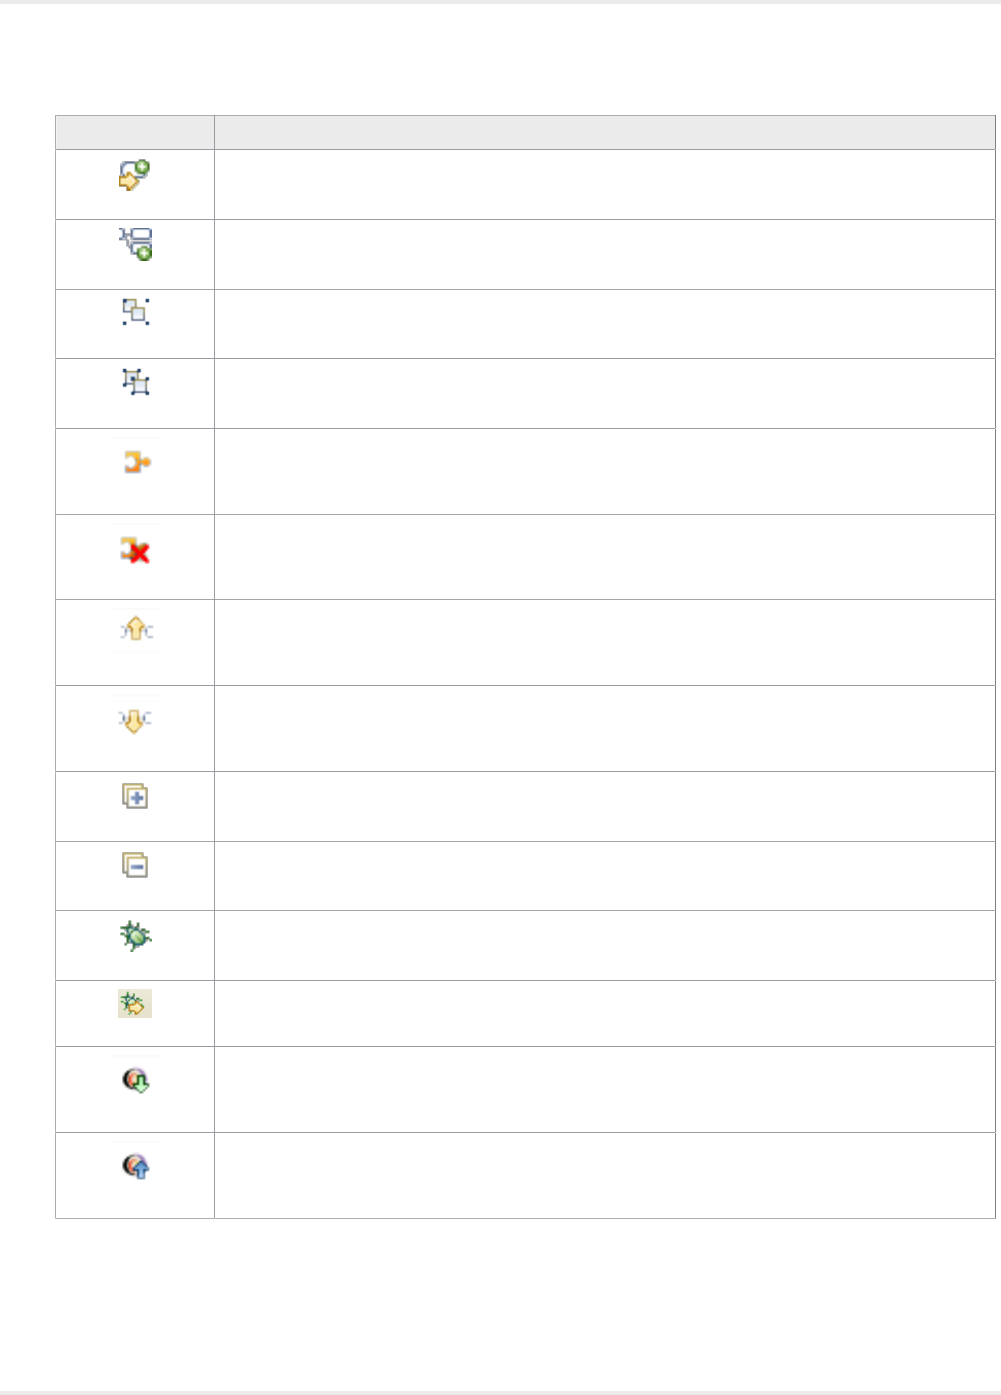
Kofax Kapow User's Guide
Icon Description
Insert step after selected step
Add branch from selected step
Group
Ungroup
Create snippet from selection
Convert snippet to group
Move step or connection up
Move step or connection down
Expand All
Collapse All
Switch to Debug Mode
Start Debug from current location
Download robot from Management Console
Upload robot to Management Console
My Projects View
The My Projects view is located under the toolbar icons in the Design Studio main window.
62
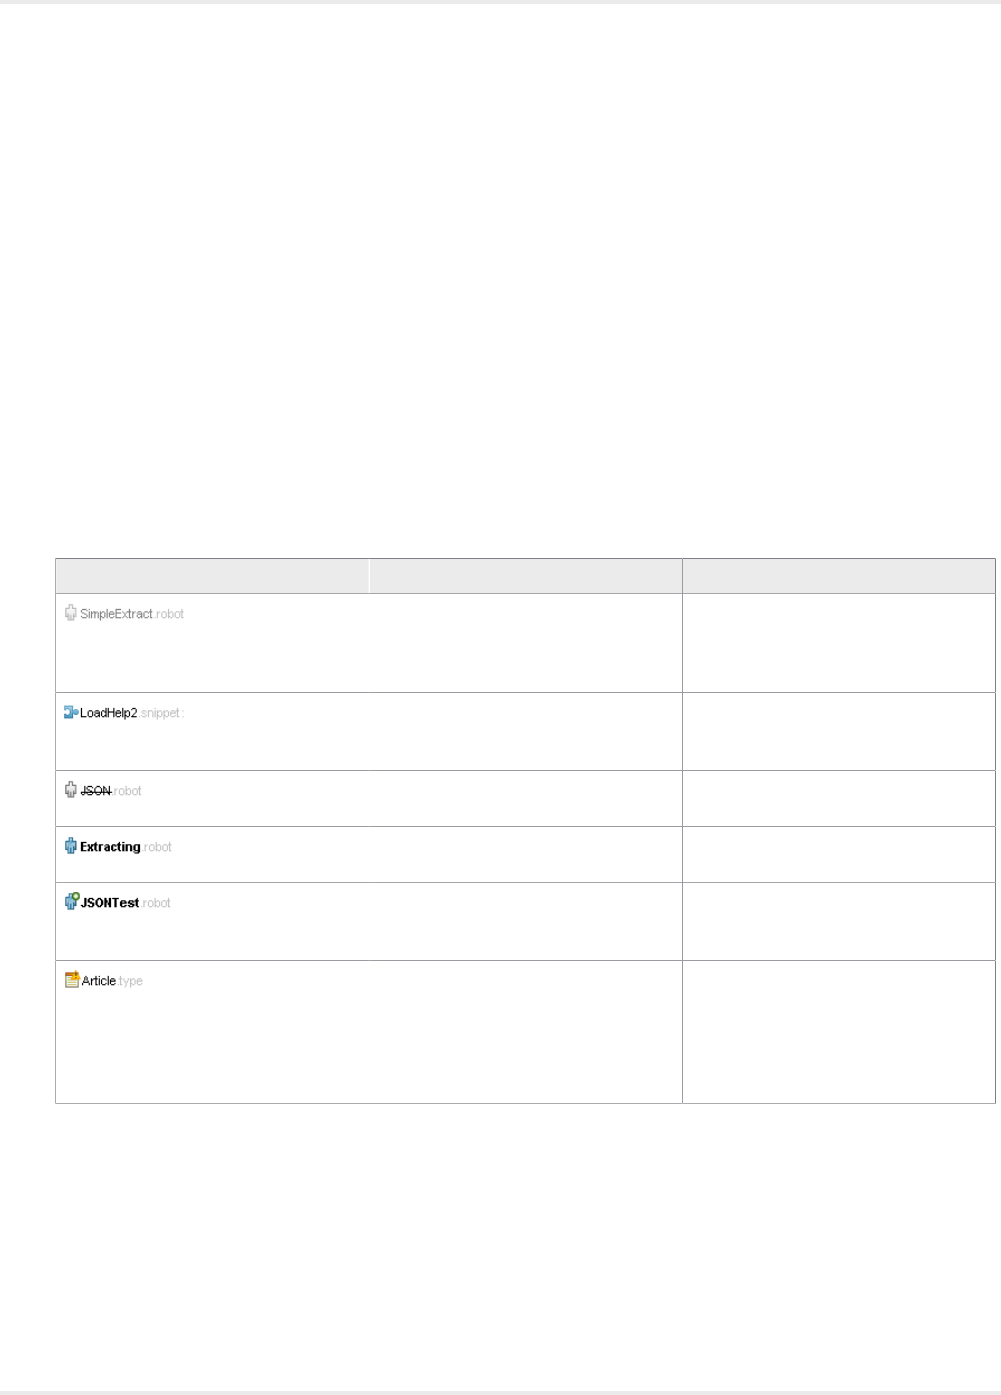
Kofax Kapow User's Guide
The My Projects view shows an expanding/collapsing tree structure representing the robot projects that
are open in Design Studio. Click a + or - in this tree to expand or collapse the corresponding subtree. This
view can contain as many opened robot projects as you like. In the My Projects view, you can right-click
to open a context menu to perform various actions, such as creating a new robot in a folder, or opening a
previously saved robot.
Shared Projects View
The Shared Projects view is located in the lefthand pane of the Design Studio main window under the My
Projects view. You can rearrange the views by dragging them to different locations.
The Shared Projects view shows an expanding/collapsing tree structure representing the robot projects
for the Management Consoles that you are connected to. If any projects in the Shared Projects view are
shared with the Design Studio on your computer, both project views will contain those projects. Depending
on the status of the files in the shared project, downloaded, updated, and deleted files have a different
appearance. You can synchronize your local project with the Management Console project using different
strategies. The following table shows project files with different statuses. The Shared Projects view also
provides tips and explain synchronization problems.
Icon Description Meaning
Dimmed robot icon and name An object in a shared project exists
on the connected Management
Console, but has not been
downloaded to your Design Studio.
Normal icon and object name An object in a shared project is
in sync with remote Management
Console.
Normal icon with object name
crossed out
The object is deleted in the project on
your computer.
Normal icon with name in bold The file has been changed locally
and needs to be synchronized.
Icon with a plus sign and name in
bold
A new file in your local project is not
yet uploaded to the Management
Console.
Object icon has a yellow sign with an
exclamation mark
Conflict exists between your local
copy and remote project. For
example, the object was deleted on a
remote Management Console. When
synchronizing, select how to resolve
the conflict.
Databases View
The Databases view shows databases for Design Studio and any connected Management Console.
63
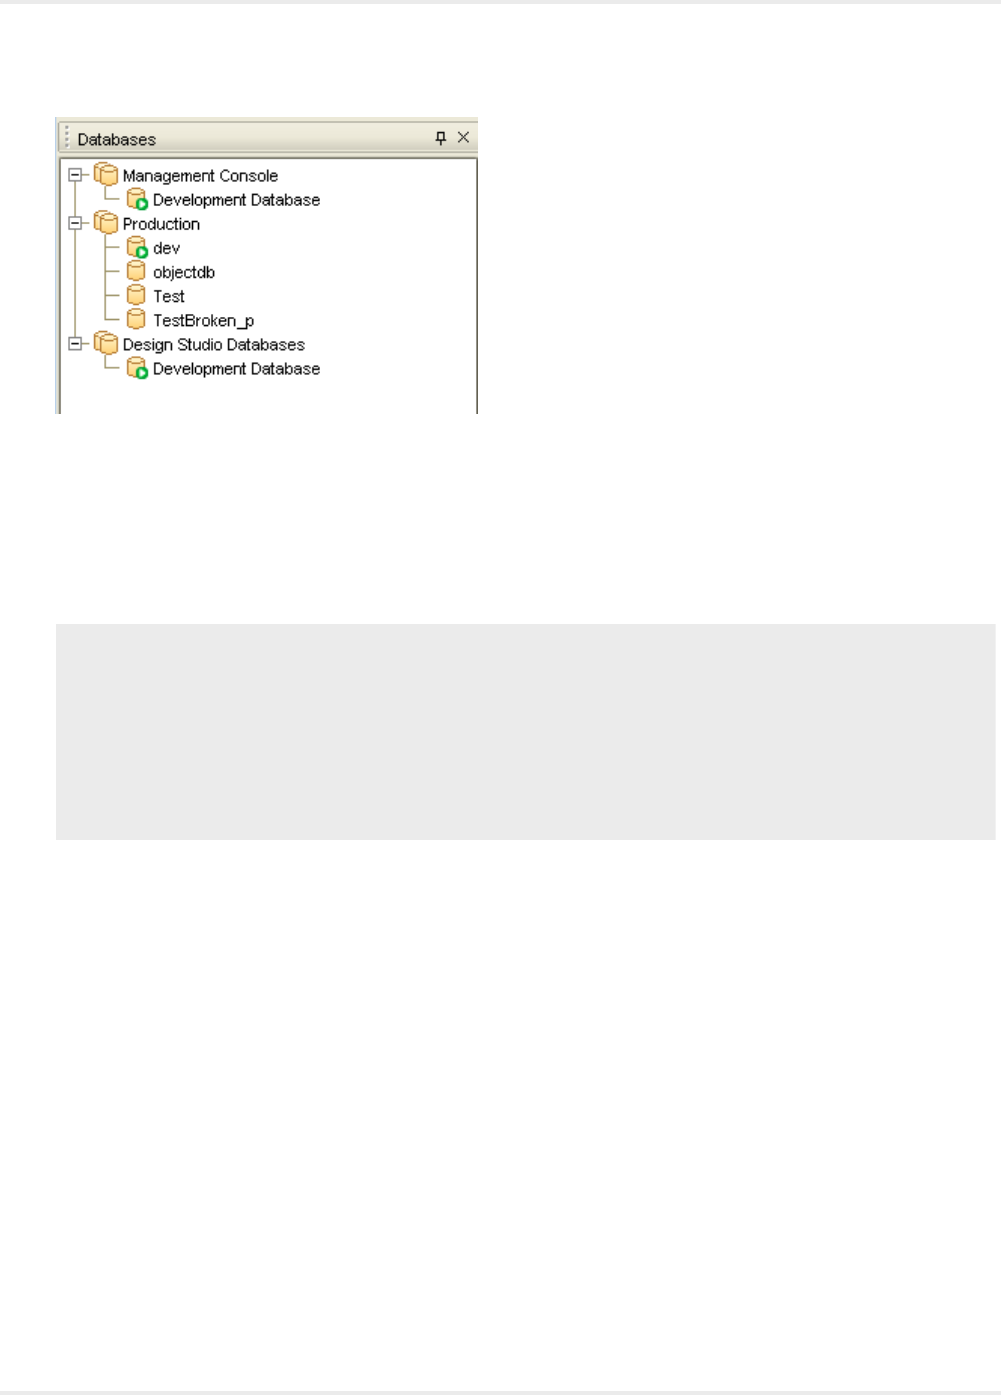
Kofax Kapow User's Guide
To configure connections to the Management Console, navigate to Settings > Design Studio Settings >
Management consoles
The databases are fetched via database mappings in the Management Console. To have the databases
displayed in the Design Studio Databases view, database mappings must exist for the cluster databases
you want to share with Design Studio users. Unmapped cluster databases are not displayed in Design
Studio.
Important The database mappings, types, and drivers are fetched from a Management Console only
when the connection between the Management Console and you copy of Design Studio is established
or refreshed during the following events:
• Adding a Management Console connection to Design Studio
• Starting Design Studio with an existing Management Console connection
• Refreshing the Management Console connection (to refresh, select the Management Console node in
the Databases view tree and click Refresh).
Editors View
Use the Editors view to edit your robots and types. You can have many editors open at the same time, but
only one editor is shown. The editors are shown as tabs at the top of the Editors view and you can click a
tab to switch to another editor. There are three kinds of editors:
• The Robot Editor in which you edit a robot.
• The Type Editor in which you edit a complex type containing one or more attributes.
• The Text Editor in which you edit a plain text file.
64
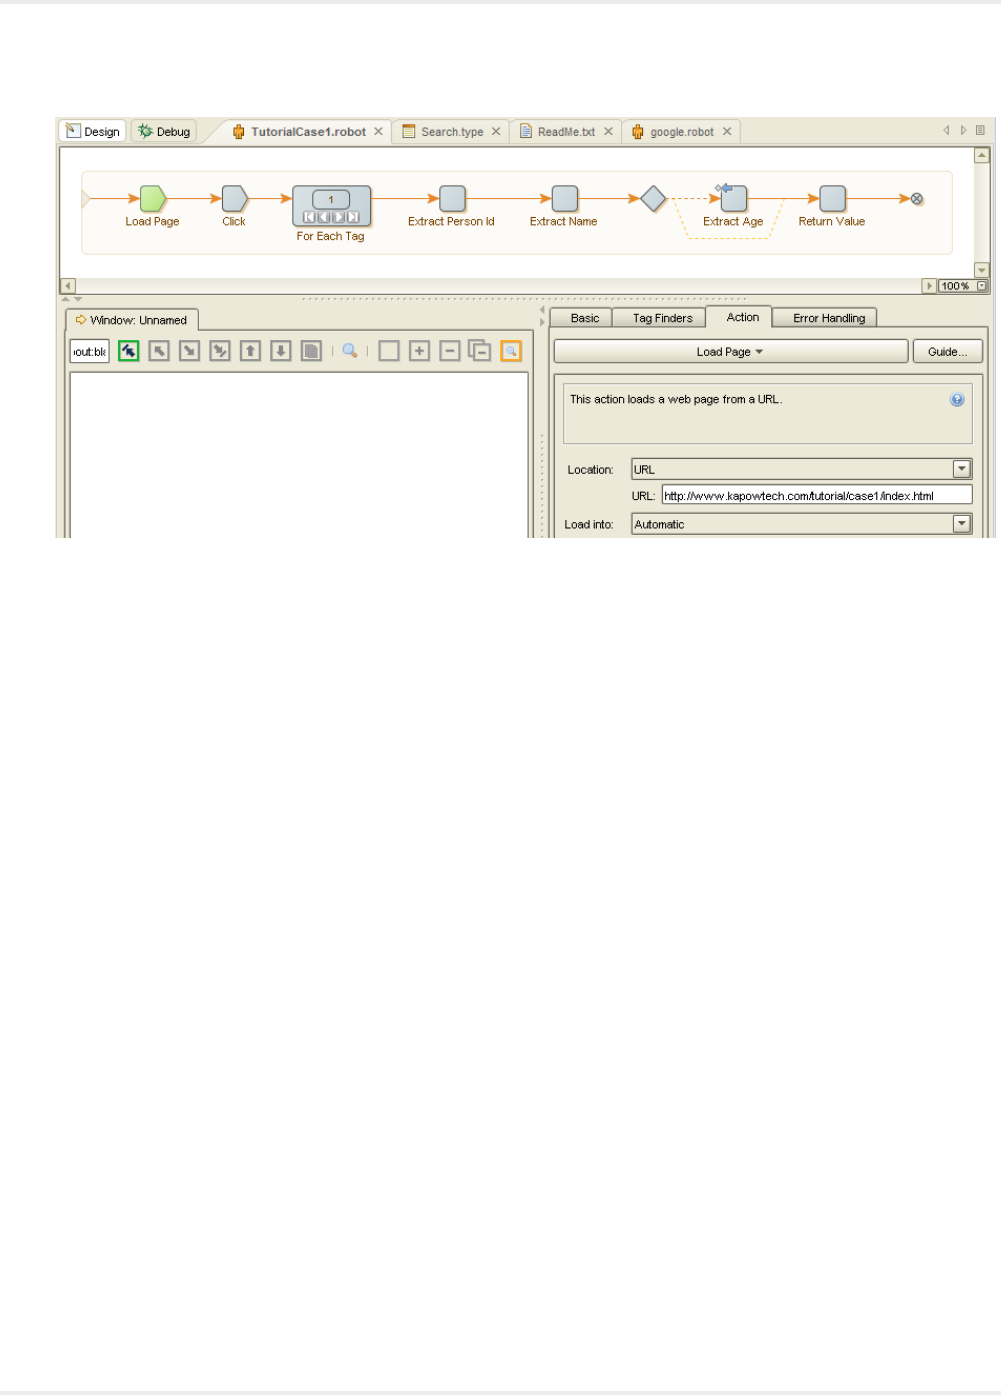
Kofax Kapow User's Guide
Robot Editor
Use the Robot Editor to edit robots. When you open a robot, it appears in a new Robot Editor placed in a
new tab on the Editors view. The Robot Editor has two modes: design (default mode) and debug. Select
a mode by clicking a mode button in the left corner of the Robot Editor. Depending on which mode you
select, the appearance and availability of options may vary.
Each view consists of several subviews. For the design mode these are the following:
•Robot View
•Windows View
•Step View
•Variables View
•Frames View
Robot View
The Robot View is located at the top of the Robot Editor under the tabs. The Robot view shows you the
robot program: the steps and connections that make up the robot. In this view you navigate the robot
steps. Select a step to edit its structure such as delete, move, or connect steps.
Current Step
In the Robot View there is a notion called a "current step". The basic idea is that the partial robot that
you are building is actually executed while you are building it. The current step marks the position in this
execution and the Studio shows the state in the Page view and the Variables view.
The current step is marked in green. Click a step to execute the robot up to that step. The selected step
becomes the current step. While the robot is executing, the step you clicked is shown in yellow. When
execution reaches the step, it becomes the new current step and appears in green. If execution cannot
reach the clicked step (for example, an HTML page does not load), the execution stops at the valid step,
which becomes the new current step. If you click a step the robot has already executed, no execution
65

Kofax Kapow User's Guide
occurs, but the new step becomes the new current step. You always configure the current step in the Step
view.
Current Execution Path
The Current Execution Path is the path in the robot that the execution performed to get to the current step.
The robot continues on this path until it reaches a branch or an end node. The current execution path is
marked by a darker color on the connections. You can change the current execution path by clicking a
connection, which will result in the connection being included in the path.
Select Items
To select a series of steps or connections, press and hold the Ctrl key and click the items. You can also
hold down the left mouse button and drag it over the steps to select. Click anywhere outside the robot to
deselect currently selected steps and connections.
When steps or connections are selected, you can apply actions to them. For example, to insert a new
step, select a step and click the Insert Step After on the toolbar. You can also right-click a step or
connection to select an action from a list.
Note When you right-click a step or connection, it is automatically selected.
Edit Actions
The Robot Editor lets you perform a long range of actions on steps and connections. These include
standard editor actions such as copy, paste, cut and delete, and actions that affect the execution of the
robot in the design view, such as changing the iteration of a loop. You can perform actions on either the
current step (if no other step is selected), selected steps or selected connections. Perform an action by
clicking the corresponding toolbar button or by using the context menus on the selected elements.
You can configure another step by selecting it (by Ctrl-clicking it or dragging a selection box around it) and
pressing the F2 key or selecting Configure Step on the context menu.
For more information, see General Editing.
Windows View
The Windows view is located under the Robot view in the Robot Editor. In the Windows view, you can see
a part of the current robot state: the part of the robot state that has to do with loaded pages. The state
shown is the input state to the current step.
In the Windows view, you see the Page views of the windows in the current robot state. When loading
from a URL, several windows may be opened, each containing a page. The current window is marked
with an arrow. If the opened page contains non-HTML content, you can preview the page depending on
the type of the content. Use the Preview button to change the type of the content. You can preview CSV,
JSON, text, Excel, XML, and binary content and apply step actions to them.
If you use the Classic browser engine, for each window, the Page view is split into several sub views
depending on the type of the page. For example, if the loaded page is an HTML page, the Page view has
sub views. There are five types of pages: HTML, XML, JSON, Excel and Binary. HTML and Binary use the
same view and the other page types use their own specialized Page views.
Note To view XML content with the applied XSLT transformation in the windows view, select Configure
Robot > Default Options: Configure > Legacy tab > Format Handling: Classic loading and clear
the Convert XML to HTML option.
66

Kofax Kapow User's Guide
To see the Cookies view of the state of the current step, you can open the Cookies window from the View
menu. Cookies are added to this list as the robot loads web pages that use cookies.
Similarly, you can open the Authentications window from the View menu to see the authentications of the
current state.
Step View
The Step View shows the configuration of the current step. Click the tabs to view and edit the following
properties:
•Basic: Includes the name of the step and any associated comments. Steps with an attached comment
are shown with a name in bold in the Robot View. You can rest the mouse pointer on a step to view the
comment.
•Finders: View and configure the list of finders of the step. You normally configure the finders by right-
clicking an element in the Page view. See Using the Tag Finders.
•Action: View and configure the action for the step. For a description of the available actions, see Step
Actions and Data Converters.
•Error Handling: See how the current step handles errors. See Handling Errors.
Variables View
The Variables View includes a list of variables. When you select a variable from the list, the associated
details appear on the righthand side of the view. The view shows the variable values for the current step of
robot execution, and cannot be edited.
• Right-click the variables list to access a list of variable types. You can add or remove variable types
using this list. You can also remove the selected variable using this list.
• Click Edit to modify the initial variable values, or double-click an item in the variable list. A variable view
similar to the Variables View window appears. This window displays the values of the variables before
any step has been executed, and you can edit them.
When writing and testing a robot, you use initial input variable values. When a robot runs in production,
the input variables are initialized to values determined by the application running the robot.
Note If the application does not provide values, the robot run will fail.
Initial values for variables are the values that they have at the start of the robot (for example, at the first
step). The values apply when you are writing, testing, and running the robot in production.
Frames View
The Frame view is located next to the Variables tab at the bottom right corner of Design Studio.
67
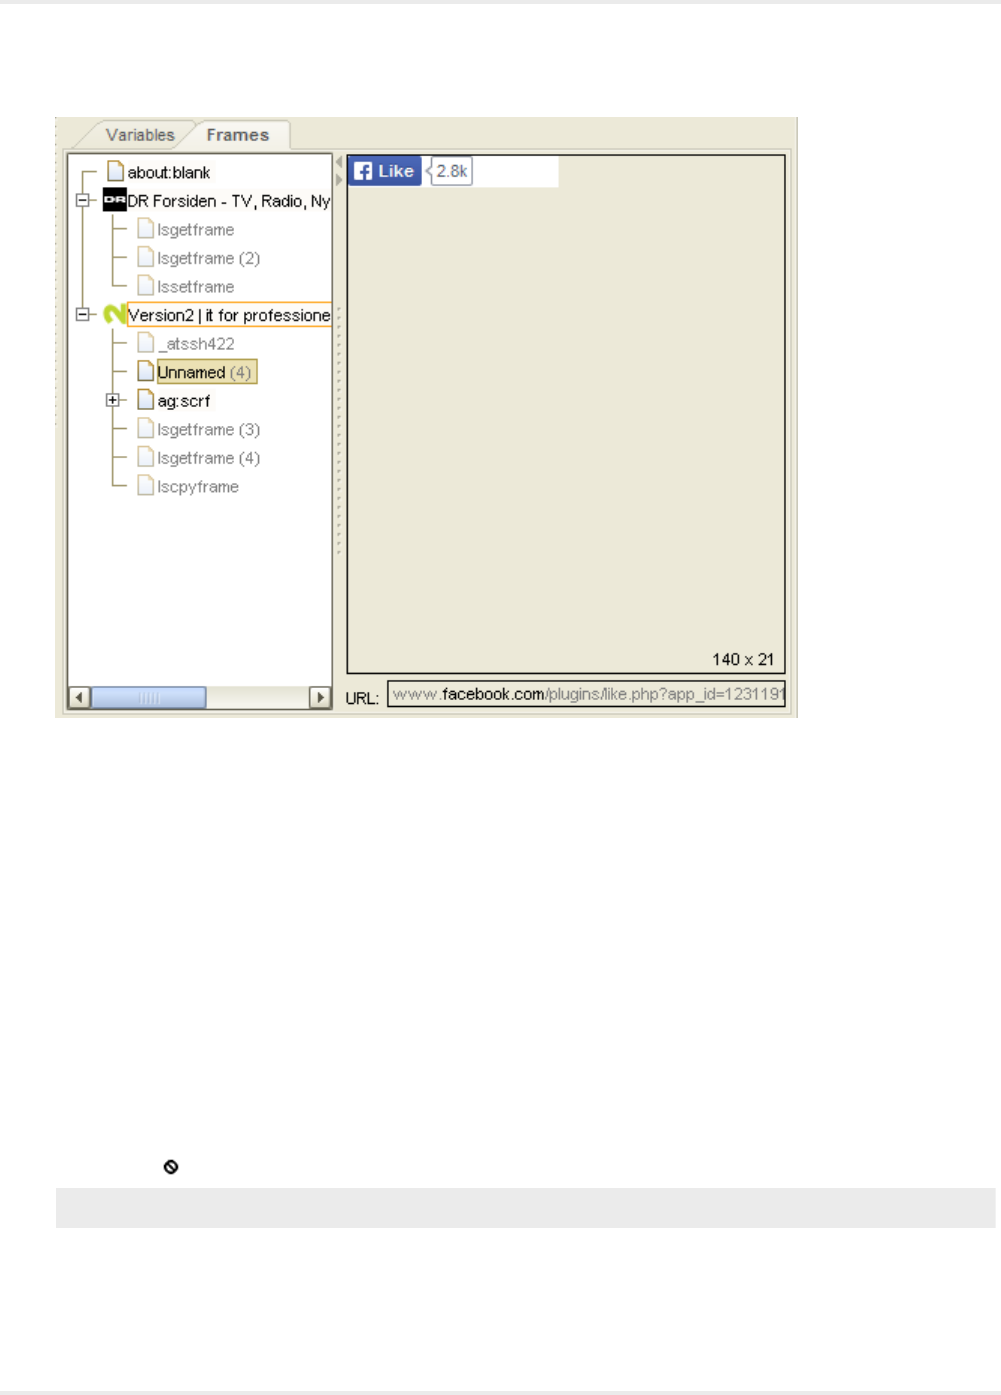
Kofax Kapow User's Guide
The Frames tab shows all top-level browser frames and all their sub-frames in a tree. The view also
contains a preview panel showing details about the selected frame. Starting from Design Studio version
9.6, the Frames view is the only place to get an overview of the frames. The labels of the top-level frames
in the Frames tree are the same as the tab titles in the Page view. If the HTML page shown in the frame
has a title, it is shown, otherwise the URL is shown. The labels of sub-frames are shown by their names
(Unnamed (n) if they have no name).
A node in the Frames tree may have various decorations such as:
• An orange box around a label: the frame is the current window.
• A gray box around a label: the frame is currently selected in the page view.
• Light gray background color around the label: the frame is open in the page view.
• The label and the icon is dimmed: the frame has no view (its viewport is zero height or zero width).
The Frames Preview panel next to the Frames tree shows details about the selected in the tree frame.
The details shown are the URL and a small rendering of the browser view of the frame with an overlay
showing the size of the frame, for example 1263 x 1024. If a frame is blocked by URL blocking, then this is
shown with both in the preview and in the tree.
Note The Frames Preview panel is only available for robots designed with the Default browser engine.
68
Kofax Kapow User's Guide
Frame View Actions
There are a number of actions associated with the nodes of the frame tree.
•Set as Current Window: inserts a "Set Current Window" step into the robot which is configured to open
the frame with the name of the selected node (the name is shown in the tooltip on the node).
•Close Window: inserts a step in the robot to close the frame
•Open/Close: opens or closes a frame in the page view (a tab). Only works on non-toplevel frames
since the top-level frames are always open. Note that this command does not insert any step into the
robot.
•Block URL: opens a dialog box for editing a URL blocking pattern for the frame and add this pattern to
the robot's list of Blocked URL Patterns
•Select in Browser View: selects the frame element in the browser view that defined the frame. If the
frame containing the element is not open in the Page view, then this frame is opened.
Note These actions are also available on the browser view tabs of the page view.
Debug Mode
The Robot Editor contains a specialized mode for debugging robots. Click Debug or Design on the
toolbar to switch between design and debug modes. This is also available on the Design Studio Main
Window toolbar. Alternatively, to debug from the current step in Design Studio, click Debug.
The top of the Robot Editor in debug mode also contains a Robot view, similar to that of the design mode.
Note The Robot View in debug mode has a current step only when you are actually debugging the
robot. This current step is not always the same as the current step in the Robot View in the design
mode.
In the main panel, you see the results of the debugging process divided into various tabs.
•Input/Output: List of all used variables and all values returned during debugging.
•API Exceptions: List of API exceptions reported during debugging.
•Log: The processing log generated during debugging. Some actions, particularly those that take a
while to execute, such as the Loop Form action, write status information to this log. Step errors are also
logged if configured to do so.
•State: Whenever the debugging process is temporarily stopped, the State tab shows the robot state
that is input to the current step. The State tab contains several sub-tabs.
•Variables: Lists the variables.
•Window, Cookies, and Authentication: Shows the state with associated dialogs.
•Local Storage and Session Storage: Shows the HTML5 objects that have persisted locally.
•API Exception: Generated at the current step. For all API Exceptions (and related errors), you can
click the Goto button to navigate to the step that generated the error. The step that generated the
error becomes the current step in Design Studio.
•Summary: An overview of the number of variables returned or written to a database and generated API
exceptions so far during the debugging process.
•Stop When: Specify the criteria required to temporarily stop the debugging process.
69

Kofax Kapow User's Guide
•Steps to Skip: Select steps to skip such as Store in Database, Delete from Database, Execute SQL,
Execute Command Line, or Send Email.
For details, see Debugging Robots.
Type Editor
Use the main window to configure the currently edited type. Among other things, you can configure the
attributes of the type in the Attribute table. You can add new attributes, remove attributes, change their
order, and configure attributes using the buttons below the Attribute table.
Text Editor
The Text Editor is a simple editor for plain text files (.txt) such as Readme files. The allowed extensions
that the editor can open are .txt, .java, .jsp, .js, .log, .html, .xml, and .csv. The editor does not use the
information that these extensions imply about file content. All files are treated as plain text files (no syntax
highlighting).
General Editing
This topic gives a few general hints related to editing robots in Design Studio. These hints apply to when
you make changes to a robot in the Step View, to a type in the Type Editor or to a text in the Text Editor.
Copy, Paste, or Cut
Use keyboard shortcuts to cut, copy, and paste items In Design Studio.
•Ctrl-C Copy
•Ctrl-V Paste
•Ctrl-X Cut
In addition, in most lists, such as the list of finders for a step, you can use Ctrl-Shift-C to copy all items in
the list.
Group and Ungroup Steps
To group steps, select multiple steps and click Group on the toolbar. You can also right-click a step and
select from the list.
Some selections cannot be grouped. A group step must have exactly one ingoing connection and exactly
one outgoing connection, and this must also hold for the selection of steps that you want to group. The
only exception is when a selection of steps does not have any outgoing connection. In this case, you can
group the selection, but the topmost End step must be connected to the end of the group. Take a look at
the following example.
70
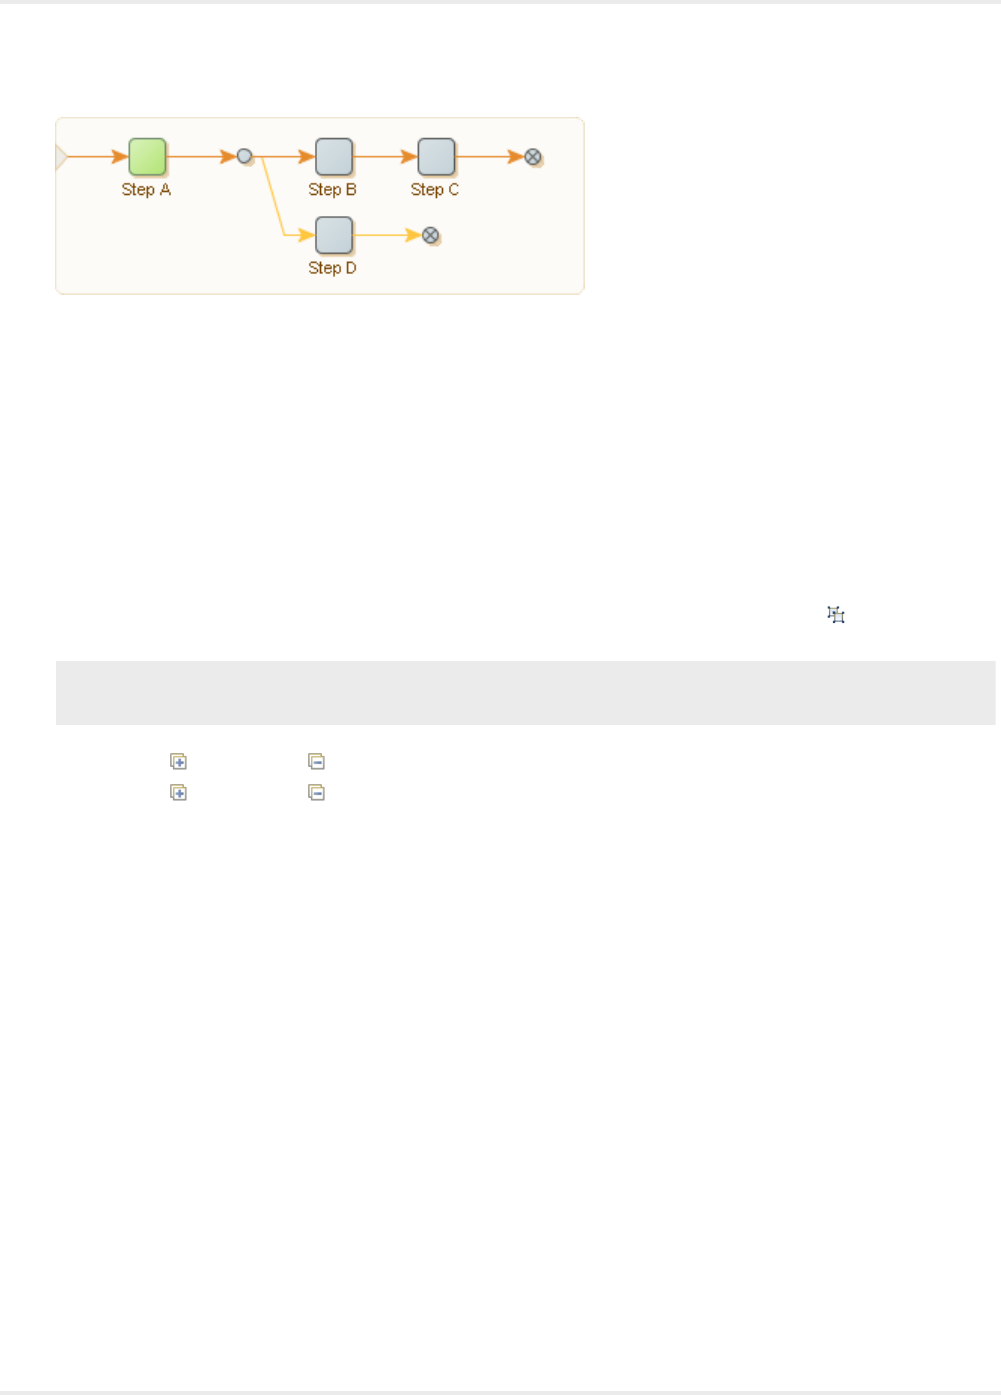
Kofax Kapow User's Guide
In this robot, the following are examples of steps you can group:
• All the steps
• Any single action step alone, such as Step A, Step B, etc.
• The branch point, step B, step C and the end step after step C
The following are some examples of steps you cannot group:
• the branch point and Step B (more than one outgoing connection)
• steps B, C, D and the two End steps (more than one ingoing connection)
You can select an expanded group step by either clicking (while holding down the Ctrl key) close to the
connection or by including it in a drag selection.
To ungroup a step or collection of steps, select the items to ungroup and click Ungroup on the toolbar,
or from the context menu on the steps.
Note The Group and Ungroup actions are inverse. If you group a selection of steps and immediately
ungroup them again, the structure of the robot is unchanged.
Use expand and collapse from the toolbar to perform the action on all groups.
Use expand and collapse from the context menu to perform the action on the selected group or
groups.
The Expand and Collapse options on the context menu on steps do the same, but they are restricted to
the Group steps in the selection.
Drag and Drop
In addition to actions, you can edit robot elements directly using drag and drop. As soon as you drag a
step, special indicators appear showing valid drop locations. You can also select and move multiple steps
at one time.
• To move a connection endpoint, select the connection and move the mouse to one of the handles at
the end. Next, click the handle and move it to a new location. As soon as you click a handle, special
indicators appear, showing where you may connect it.
• To abort a drag and drop action, move the mouse outside the robot and let go of the mouse button as
shown in the following figure.
71
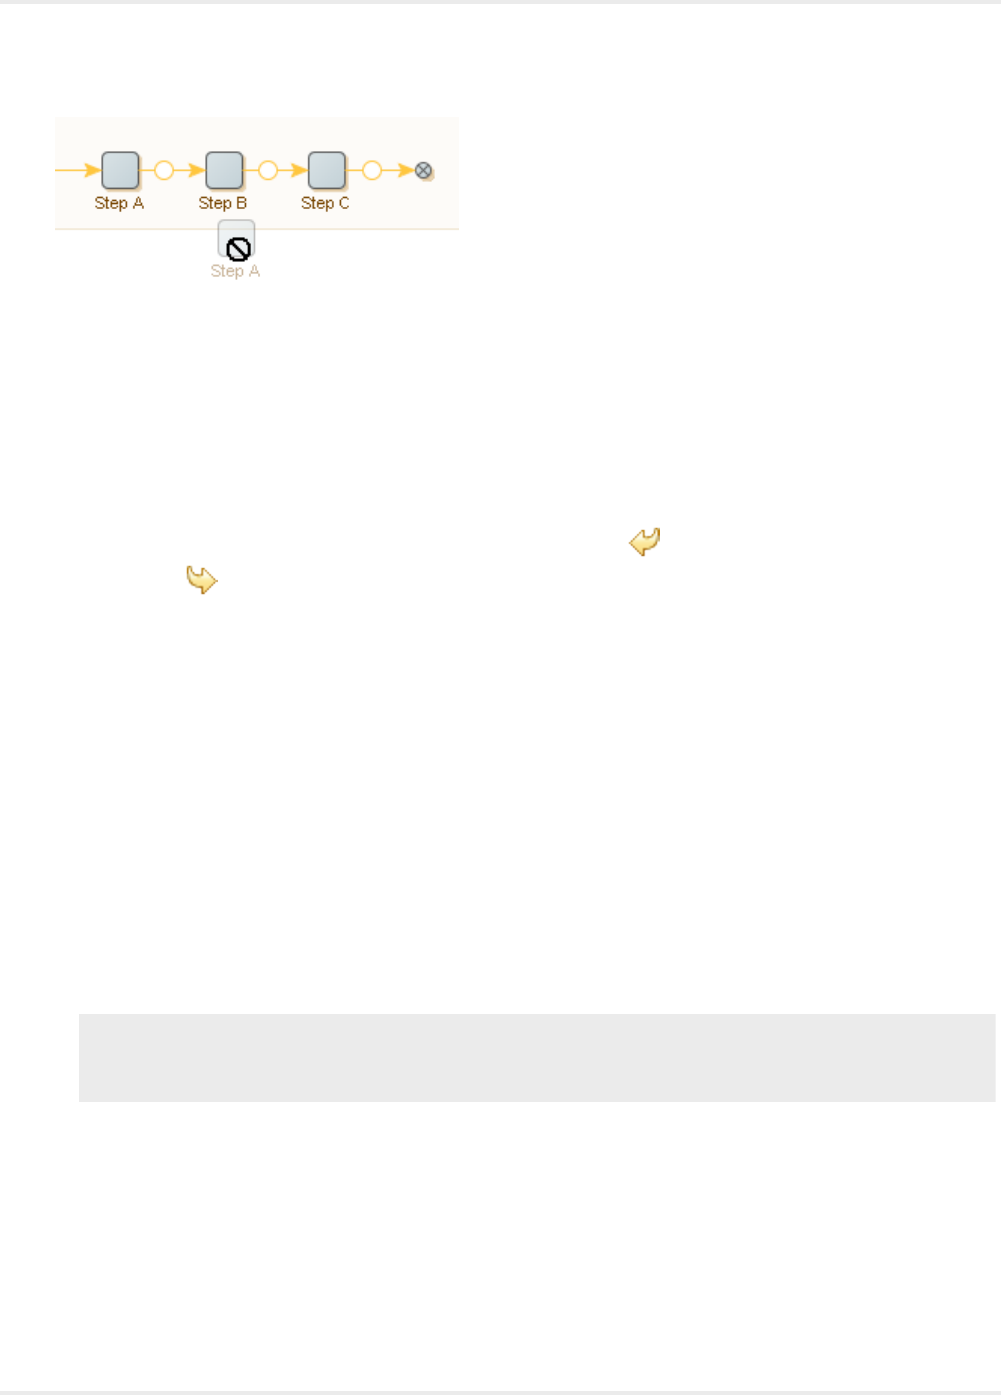
Kofax Kapow User's Guide
Add a New Connection
You can also create new connections using the mouse. Place the cursor near the end of a step so that an
indicator appears (an orange circle with a green halo). Click the indicator and a new arrow appears. Keep
the left mouse button pressed; move the mouse and a new connection will follow your mouse when you
move it. New indicators appear and you can move the mouse to drop the new connection end point by
releasing the left mouse button.
Undo and Redo Changes
While editing a robot, you can undo and redo every action. Click or select Ctrl-Z to undo an action.
Similarly, click or select Ctrl-Y to redo an action.
Step Validation
As you edit your robot, the Robot View validates each step. Invalid steps are underlined in red. You can
move the mouse to an invalid step to view an explanation of error.
Types
Write and maintain Types to define parameters used in a robot.
It is important that you configure all of the relevant properties. Otherwise, the type may not perform as
expected, or it may be invalid.
Types must have:
• A valid name. Type names must begin with a letter or an underscore and can only contain letters, digits,
and underscores.
Note In Design Studio, the name does not include an extension. For example, a type with the file
name ExampleType.type is available in Design Studio as ExampleType. For more information about
naming, see Naming policy.
• A unique name. Two types in the same project must not have the same name.
• A type kind which indicates how the type will be used.
You can select the type kind using the "Type kind" drop-down list below the Attribute Table. Normally, it
is not necessary to select anything as the type kind "Standard Type" is always used unless you need the
legacy type kind "Database Output Type." See the reference documentation on Design Studio for more
information.
72
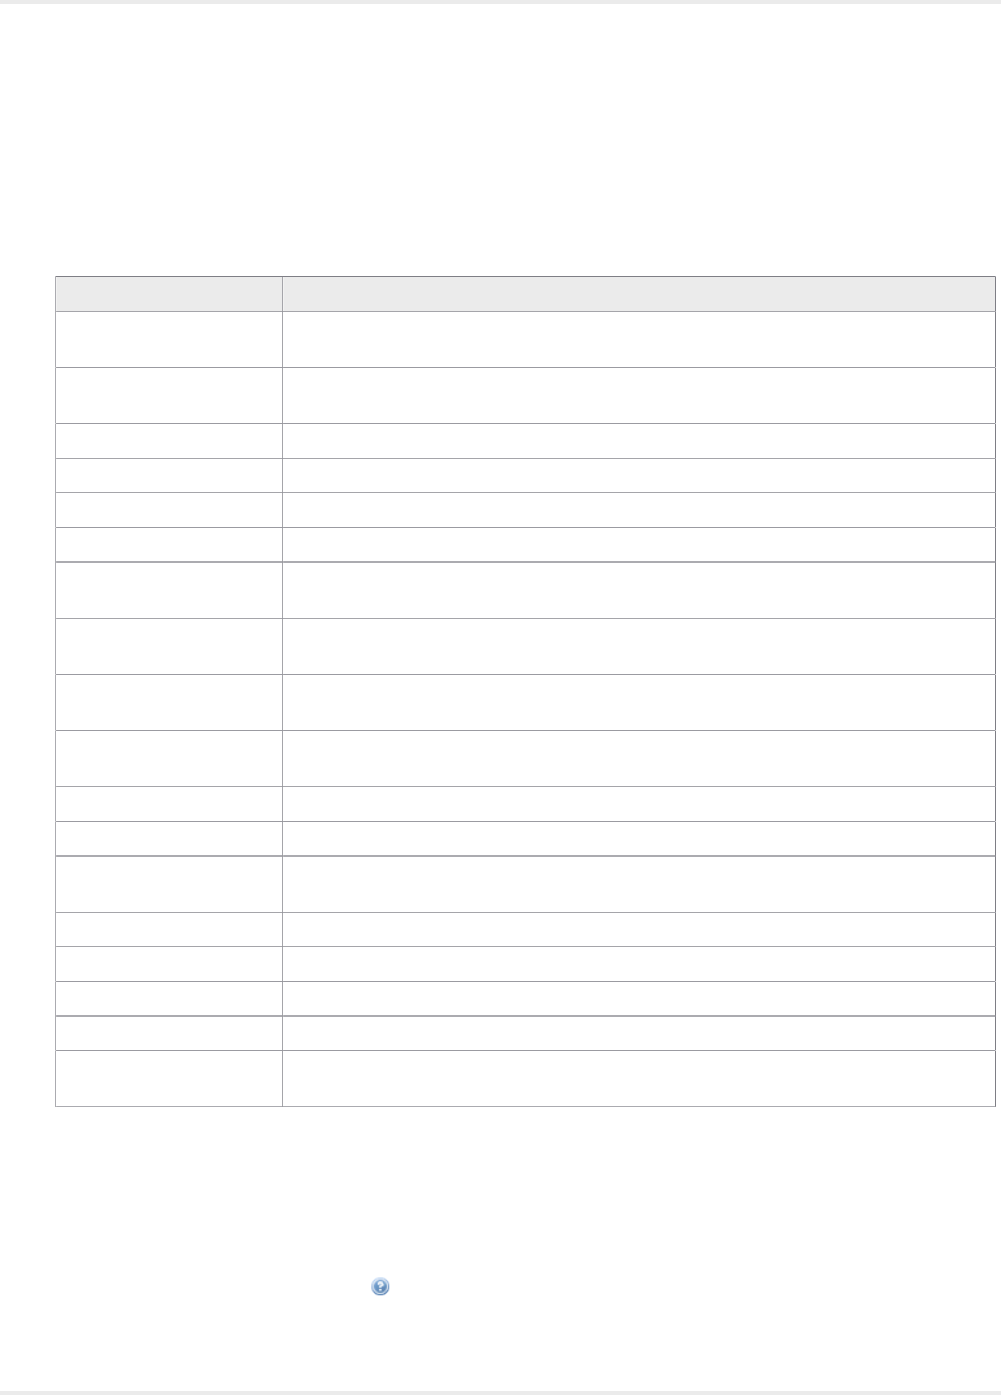
Kofax Kapow User's Guide
Type Attributes
The attributes within a type must also be correctly added and configured in order for the type to be valid.
You must specify both a name and a type for each attribute. The available attribute types are listed in the
following table.
Attribute Type Description
Integer An integer, such as 12. The possible range is from -9223372036854775808 to
9223372036854775807, both inclusive.
Number A number, such as 12.345. The possible range is from ±2.2×10−308 to ±1.8×10308 with
slightly more than 15 digits of accuracy.
Boolean A boolean value; either "true" or "false".
Character A single character, such as "A".
Short Text A short text. Displayed in a one-line text field.
Long Text A long text. Displayed in a multi-line text box.
Password A password. Displayed in a password field that shows asterisks instead of the
characters in the password.
HTML An HTML clip. This is the same as a Long Text, except that you can preview the clip in
a browser window.
XML An XML document. This is the same as a Long Text, except that only well-formed XML
documents are allowed.
Date A date, which must use the form yyyy-mm-dd hh:mm:ss.n, such as "1992-04-25
10:33:06.0".
Binary Binary data; any sequence of bytes.
Image An image. This is the same as Binary Data, except that you can preview the image.
PDF A PDF document. This is the same as Binary Data, except that you can preview the
PDF document.
Session A session (containing cookies, authentications, etc.).
Currency A currency code, as defined by the ISO-4217 standard, such as "EUR" for Euro.
Country A country code, as defined by the ISO-3166 standard, such as "DE" for Germany.
Language A language code, as defined by the ISO-639 standard, such as "de" for German.
JSON A JSON value is either a JSON text or JSON Simple type where the JSON Simple type
is either a JSON literal, a number, or a string.
Step Actions and Data Converters
In Design Studio, a short description is shown with each action and data converter. Click More next
to the description to see additional information about the action or data converter associated with the
description. You can also click help to get onscreen assistance associated with a selected step action
or data converter.
73
Kofax Kapow User's Guide
Several of the actions, such as Extract, can run extracted text through a list of data converters and sort
the result in a variable.
A data converter processes extracted text based on parameters you define. For example, the Extract
Number data converter accepts an input text containing a number and outputs a text containing the same
number in a standardized format.
Because a data converter takes a text as input and outputs another text, data converters can be chained
so that the output of one data converter becomes the input to the next data converter. The final output
is the text output of the last data converter in the data converter list. For example, if the list of data
converters contains the converter Convert to Upper Case, followed by a Remove Spaces data converter,
the input text to the list is "R oboMa ker", is output as "ROBOMAKER".
Patterns
If you are new to patterns, we suggest you watch the introduction video on patterns.
A pattern is a formal way of describing a text. For example, the text "32" can be described as a text
containing two digits. However, other texts also contain two digits, such as "12" and "00" and can therefore
also be described as a text containing two digits. We can express this by the pattern \d\d which is a formal
way of expressing that a text must contain two and only two digits (\d is the symbol for a digit). We say
that these texts match this pattern. Design Studio patterns follow the Perl5 syntax.
A pattern is composed of normal characters and special symbols. Each special symbol carries its own
special meaning. For example, the special symbol "." (dot) means any single character and matches all
single characters, such as "a", "b", "1", "2", ...
The table below provides an overview of the most commonly used special symbols.
Special synbol Description
. Any single character, such as "a", "1", "/", "?", ".", etc.
\d Any decimal digit, such as "0", "1", ..., "9".
\D Any non-digit, that is the same as ".", but excluding "0", "1", ..., "9".
\s Any white space character, such as " " and line break.
\S Any non-white space character, i.e. same as ".", but excluding white space (such as " " and
line break).
\w Any word (alphanumeric) character, such as "a", ..., "z", "A", ..., "Z", "0", ..., "9".
\W Any non-word (alphanumeric) character, i.e. same as ".", but excluding "a", ..., "z", "A", ..., "Z",
"0", ..., "9".
Examples
• The pattern ".an" matches all text lengths of three ending with "an", such as "can" and "man" but not
"mcan".
• The pattern "\d\d\s\d\d" matches all text lengths five starting with two digits followed by a white space
and ending with two digits, such as "01 23" and "72 13" but not "01 2s".
74
Kofax Kapow User's Guide
• If you want a special character, such as "." or "\", to act as a normal character, you can escape it by
adding a "\" (backslash) in front of it. If you wish to match exactly the "." character, instead of any single
character, you should write "\.".
For example, the pattern "m\.n\\o" only matches the text "m.n\o".
• You can organize a pattern into subpatterns by the use of parentheses: "(" and ")".
For example, the pattern "abc" can be organized as "(a)(bc)".
• All single characters are considered subpatterns.
For example, in the pattern "abc", each single character "a", "b", and "c" is considered a subpattern.
Subpatterns are useful when applying pattern operators. The following table provides an overview of the
available pattern operators.
Operator Description
? Matches the preceding subpattern, or the empty text.
* Matches any number of repetitions of the preceding subpattern, or the empty text.
+ Matches one or more repetitions of the preceding subpattern.
{m} Matches exactly m repetitions of the preceding subpattern.
{m,n} Matches between m and n repetitions (inclusive) of the preceding subpattern.
{m,} Matches m or more repetitions of the preceding subpattern.
a|b Matches whatever the expression a would match, or whatever the expression b would
match.
Examples
• ".*" matches any text, such as "Design Studio", "1213" and "" (the empty text)
• "(abc)*" matches any number of repetitions of the text "abc", such as "", "abc", "abcabc", and
"abcabcabc", but not "abca"
• "(\d\d){1,2}" matches either two or four digits, such as "12" and "6789", but not "123"
• "(good)?bye" matches "goodbye" and "bye"
• "(good)|(bye)" matches "good" and "bye"
As with other special characters, you can escape the special characters that appear in pattern operators
by adding a "\" backslash in front of the character.
Subpatterns are useful when you want to extract specific text pieces from a text. When you make a
subpattern using parentheses, you can extract the part of the text that is matched by that subpattern.
For example, consider the pattern "abc (.*) def (.*) ghi". This pattern has two subpatterns that are made
by means of parentheses. If the pattern is matched against the text "abc 123 def 456 ghi", the first of
those subpatterns will match the text "123", and the second subpattern will match the text "456". In an
expression (see Expressions), you can refer to these subpattern matches by writing "$1" and "$2". For
example, the expression "X" + $1 + "Y"+ $2 + "Z" will produce the result "X123Y456Z". This is a very
important extraction technique in Design Studio.
By default, the repetition pattern operators (*, +, {...}) will match as many repetitions of the preceding
pattern as possible. You can put a "?" after the operator to turn it into an operator that matches as few
repetitions as possible. For example, consider the pattern ".*(\d\d\d).*". If the pattern is matched against
the text "abc 123 def 456 ghi", the subpattern "(\d\d\d)" will match the second number in the text ("456"),
75
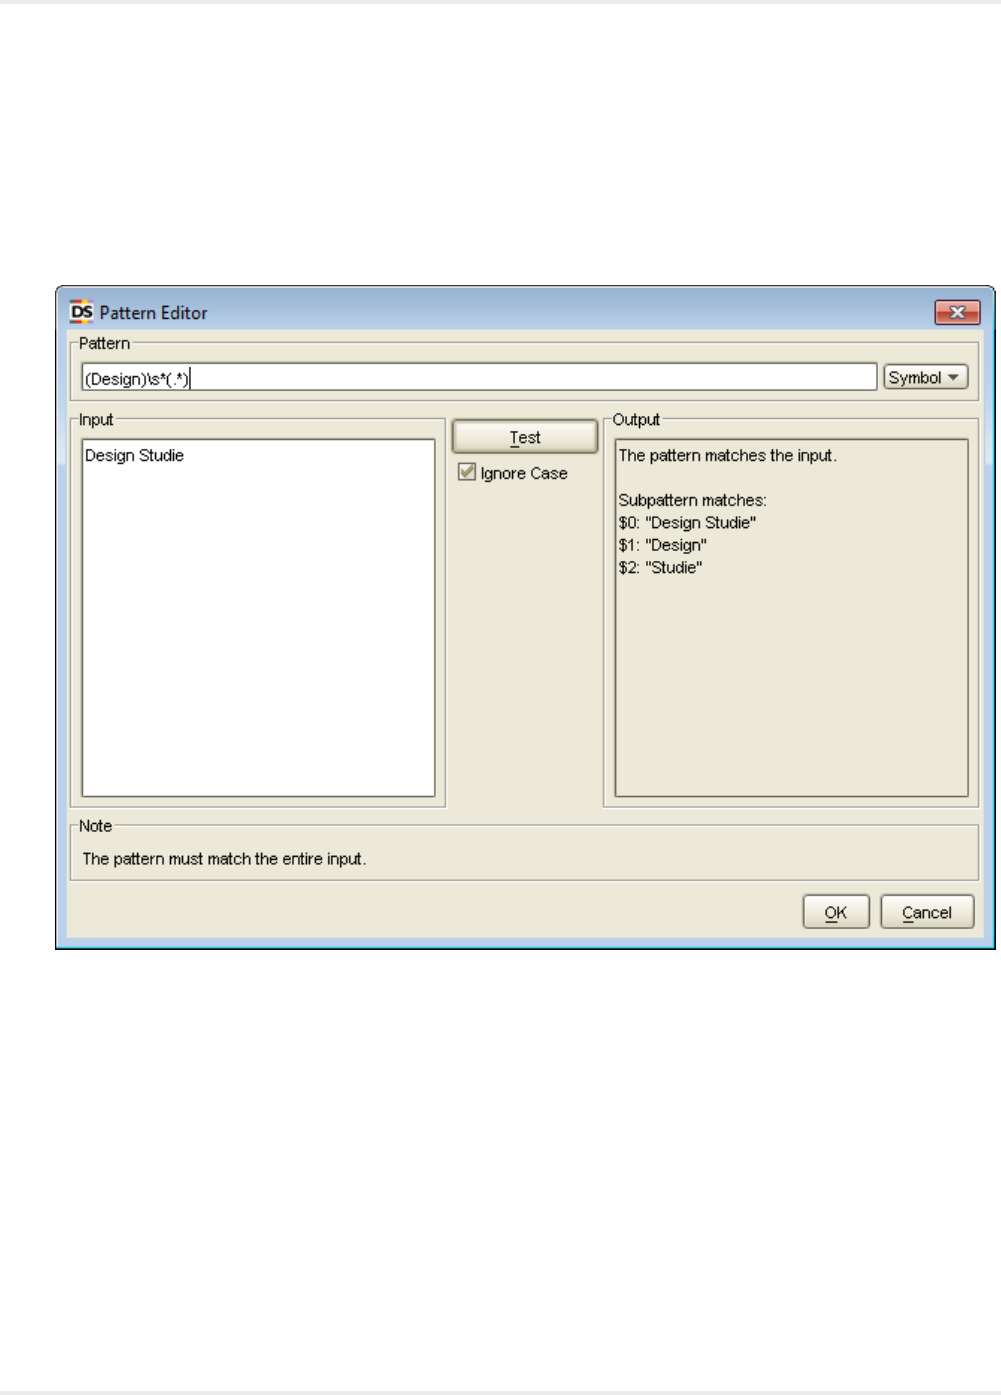
Kofax Kapow User's Guide
since the first *-operator will match as many repetitions as possible. If you put a "?" after the *-operator,
so that the pattern becomes ".*?(\d\d\d).*", the subpattern "(\d\d\d)" will match the first number in the text
("123"), since the *?-operator will match as few repetitions as possible.
We recommend that you experiment with patterns on your own. The best way to do this is to launch
Design Studio and find a place where you can enter a pattern, such as in the Test Tag action. Then, click
the Edit button to the right of the pattern field, to open the following Pattern Editor window.
In the Pattern Editor you can enter a pattern and test whether it matches the test input text in the Input
panel. When you open the window, Design Studio usually sets the test input text to the text that the
pattern is matched against if the given step is executed on the current input robot state. However, you can
also edit the test input text yourself, to try the pattern on other inputs. To test the pattern, click the Test
button. The result of the matching appears in the Output panel.
The Symbol button is very useful when you want to enter a special symbol in the pattern. When you click
it, a menu is shown, from which you can select the symbol to insert in the pattern. This way, you don't
have to memorize all the special symbols and their meanings.
For more on the available special symbols and patterns, refer to documentation on Patterns.
76
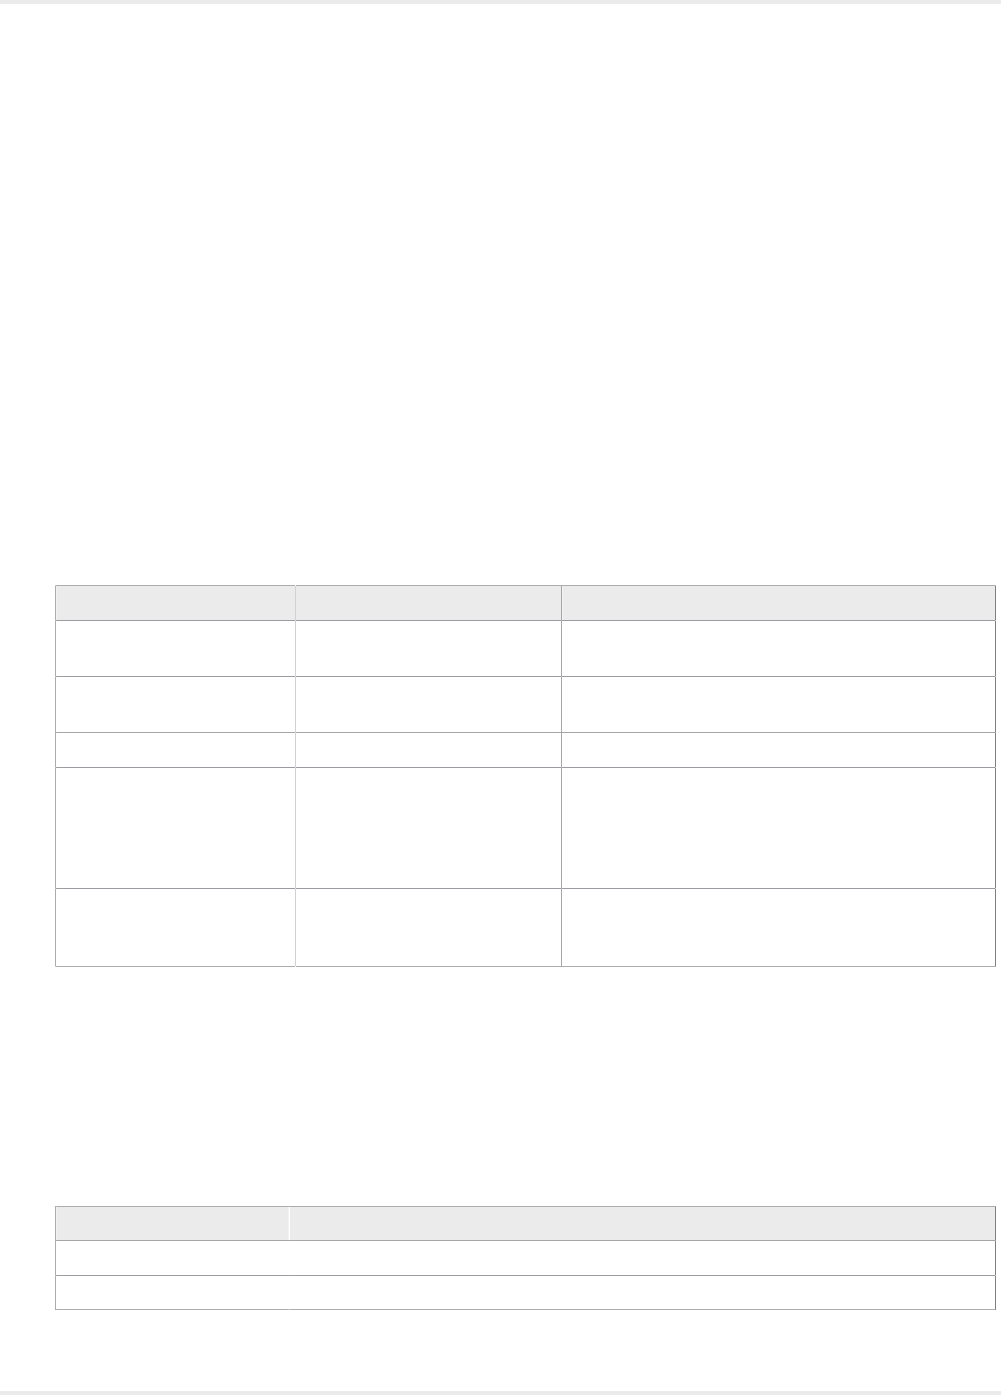
Kofax Kapow User's Guide
Expressions
An expression typically evaluates to a text. For example, the expression
"The author of the book " + Book.title + " is " + Book.author + "." evaluates to the text "The author of the
book Gone with the Wind is Margaret Mitchell.", if the variables Book.title and Book.author contain the
texts "Gone with the Wind" and "Margaret Mitchell", respectively.
You can also do numeric calculations within the expression. For example, if the variable Book.price
contains the price of a book, you can multiply it by 100 using the following expression:
Book.price * 100
The following table provides an overview of the most commonly used sub-expression types. For
a complete overview of all available sub-expression types, see the reference documentation on
expressions.
Commonly Used Sub-Expression Types
Sub-Expression Type Notation Description
Text Constant "text" or >>text<< Evaluates to the specified text, e.g. "Margaret
Mitchell", or >>Margaret Mitchell<<.
Variables variablename.attributename Evaluates to the value of the specified variable, e.g.
"Book.author" might evaluate to "Margaret Mitchell".
Current URL URL Evaluates to the URL of the current page.
Subpattern Match $n Evaluates to the text matched by subpattern in an
associated pattern (if any). For example, this is used
in the Advanced Extract data converter, as shown
below. $0 evaluates to the text matched by the entire
pattern.
Function func(args) Evaluates the specified function by passing it the
specified arguments and converting its result to a
text.
Note that you can specify a text constant using either the quote notation or the >>text<< notation, for
example "Margaret Mitchell" or >>Margaret Mitchell<<. If you use the quote notation, and you want a
quote character to appear inside the text, you have to write it as two quote characters. For example,
write "This is some ""quoted"" text" to get the text "This is some "quoted" text". If you use the >>text<<
notation, anything can appear inside the text, except ">>" and "<<". Thus, you can write quotes directly, as
in >>This is some "quoted" text<<. The >>text<< notation is useful for long texts that contain many quote
characters, such as HTML.
The following table shows the most commonly used functions in expressions.
Function Description
toLowerCase(arg) Converts the argument to lowercase.
round(arg) Rounds the argument to the nearest integer.
77

Kofax Kapow User's Guide
For example, the expression "The discount is " + round((Item.oldPrice - Item.newPrice) / Item.oldPrice) +
"%." evaluates to "The discount is 10%." when the item's old price is $99.95 and the new price is $89.95.
Experiment with Expressions
We recommend that you experiment with expressions on your own. The best way to experiment with
expressions is to launch Design Studio and open an existing robot.
1. In Design Studio, select the Extract action for the current step.
2. Add an Advanced Extract data converter.
3. Click the Configuration icon to configure the data converter.
The Advanced Extract Configuration Window appears.
78
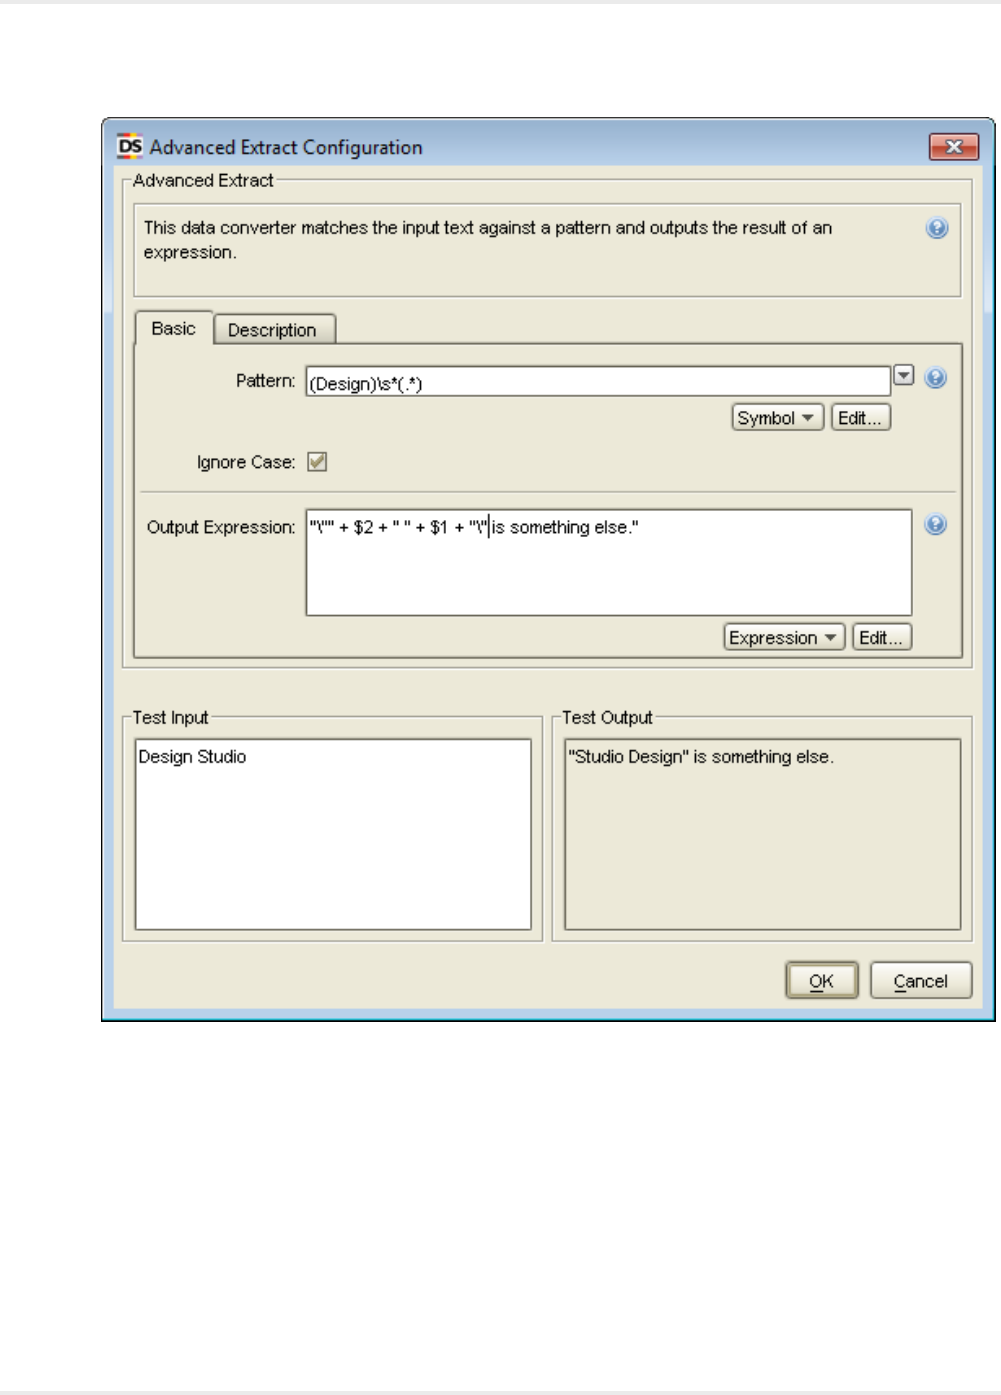
Kofax Kapow User's Guide
In the shown example, note the use of the $n notation to extract parts of the input text.
4. Change the input text in the text area to the left.
5. Next, change the Pattern property.
6. Change the Output Expression property.
Review the results in the right area, while typing the expression.
Edit Expressions
1. On the Advanced Extract Configuration window, in the Output Expression field, click Edit.
The Expression Editor appears.
79
Kofax Kapow User's Guide
2. In the Expression field, enter an expression, or click Expression to select one from the list. Options
include Constant, Variables, Operators, Special Character, Functions, Page Properties, and Robot
Properties with additional sub-expression functions.
Expression values appear in the Input and Output sections.
Note Testing functionality is not available everywhere in Design Studio.
3. Click OK.
Projects and Libraries
When working in Design Studio, you can have any number of projects open at any time. The purpose of
a project is to develop a library containing a collection of robots and the files required by these robots.
Typically, you create a project for each separate usage of robots, such as one project for each application
in your company that uses robots. Two projects cannot share files; a type always belongs to one project,
and the scope of a type is the project it belongs to.
A project is a folder located anywhere in the file system. The project folder can have any name you want,
but must contain the Library sub-folder.
80

Kofax Kapow User's Guide
Note See Naming policy for more information about naming.
Library
This folder contains the library of the project.
Place all robot files, type files, and other files used by the robots, such as files that are loaded from the
robot library in the Library folder. You can organize the files in the Library folder using subfolders as
appropriate.
The following example shows a project folder named NewsAndStocksProject for a project that develops a
robot library for extracting news from news sites and stock quotes from stock sites.
NewsAndStocksProject/
Library/
News/
CNN.robot
Reuters.robot
News.type
Stocks/
Nasdaq.robot
NYSE.robot
Stocks.type
Note that this project has a Library folder with robot and type files divided into News and Stocks
subfolders.
When you close Design Studio, it remembers the projects and files open. The next time you open Design
Studio, it will open the same projects and files.
Current Project
In Design Studio you can work with many projects, but the other applications in Kapow, such as
RoboServer, always work on a specific project, referred to as the current project. When you install Kapow,
a default project is created. This project is selected as current. If you open Design Studio the first time,
this current project is the only opened project. If you close all projects before you close Design Studio, the
next time you open Design Studio it opens the selected current project.
You can change the current project selection using the Settings application, specifying the path to your
new project folder in the Current Project Folder property in the Project tab, and then clicking OK to close
Settings. Please see the Kofax Kapow Developer's Guide for more information.
Shared Project
Shared project is a project that is deployed on a Management Console and connected to a project
on your local Design Studio computer. Management Console project can be shared between several
Design Studios, thus several people can edit a project. When your shared project is out of sync with the
project on the Management Console, the Shared Projects View visualizes the status of each object in the
project. You can use different strategies when synchronizing your local copy with one deployed on the
Management Console.
Manipulate Robot Projects
Use the following procedures to open, close, and create projects.
• To open an existing project, on the File menu, select Open Project and select a project folder. The
Open Project window appears.
81

Kofax Kapow User's Guide
• To close a project, in the My Projects view, right-click the project. The Project window appears. Click
Close.
You can also close all projects from the File menu.
• To create a new project, do the following:
1. On the File menu, select New Project.
The New Project window appears.
2. Enter the name and location for the project.
3. Click Finish.
A new project is created in the location you specified. The project folder name is the same name you
assigned to the project.
Example
If you entered the name MyProject and the location: C:/KapowProjects then the following folders are
created:
C:/KapowProjects/MyProject
C:/KapowProjects/MyProject/Library
Organize Robot Files
When you want to distribute and deploy your robot library in a runtime environment, such as RoboServer,
you can pack the robot library into a single file called a robot library file.
This will pack together all files contained in the robot library of the file in the current editor and save the
result as a single file with a name that you assigned. Before creating the robot library file, save all open
files, such as robots and types, to include the most current changes.
You can make the robot library file available to RoboServer and execute robots from the robot library. See
the Kofax Kapow Developer's Guide for more information.
1. In Design Studio, save all open project files such as robots and types.
2. On the Tools menu, select Create Robot Library File.
The Select Robot Library Output File appears.
3. Navigate to the location to use for your library.
Use the icons on the toolbar to change to Details or List view, move up one level, or create a new
folder.
4. In the File Name field, enter a name for the library.
5. Click OK.
The system creates the robot library file.
6. Click OK.
Work with Shared Projects
Once you connect to one or more Management Consoles, the Shared Projects view displays all
projects deployed on all Management Consoles that you have access to. If projects and objects are not
downloaded to your local computer, they are listed but not available. The Design Studio does not track
such projects.
82

Kofax Kapow User's Guide
Uploading a Project to a Management Console
To upload a project to a Management Console, perform the following:
1. Right-click a project in the My Projects View and select Upload on the context menu; or select a
project and click Uopload to Management Console on the Tools menu.
2. Select the Management Console and project that the files will be uploaded to in the Upload to
Management Console window.
Click Remember this (as a shared project) if you want to keep this project as shared and
synchronize it between the Design Studio and the Management Console.
3. Click Upload to complete the procedure.
After you upload a project to the Management Console, the project appears in the Admin > Projects tab
and all project files appear in the Repository tab of the selected Management Console.
Downloading a Project from a Management Console
To download a project from a Management Console, perform the following:
1. Right-click a project in the Shared Projects View and select Download on the context menu; or
select a project and click Download from Management Console on the Tools menu.
2. Select the name for the project and its location in the Select Project Name and Location window.
3. Click Finish to download the project.
After you download a project from the Management Console, the project also appears in the My Projects
View and you can edit the project files locally.
Synchronizing Projects
After you edit the files of the shared project on your computer, you can synchronize your local files with
those deployed on the Management Console. Because a shared project can be accessed by several
people, you might come across a synchronization conflict. The Design Studio provides messages and
descriptions for you to understand what the conflict is, and how you can resolve it. Note that changed
dependent files such as Types and Snippets can also prevent your robot from functioning properly. If you
use Download to synchronize your project, the files are downloaded from the Management Console and
your local changes are lost. If you use Upload, your local files are uploaded to the Management Console
and any changes made by other people are lost (but those changes might as well be stored on their local
computers). In any conflict situation, when changes made by you or other people can be lost, the Design
Studio opens the Synchronize window for you to select the synchronization option.
The following table provides synchronization examples.
Status Synchronization Option Result
The shared project files have been
edited on your computer. No others
who have access to the same project
on the Management Console edited
the files.
Upload Your changes are uploaded to the
shared project on the Management
Console. If you select Synchronize,
the default option is to upload
your changes to the Management
Console.
The shared project files are changed
on the Management Console. You
know who edited the files and what
the changes are.
Download Changed files from the Management
Console are downloaded to your
local project.
83

Kofax Kapow User's Guide
Status Synchronization Option Result
You edited the shared project files on
your computer. Someone else edited
the files and uploaded them to the
Management Console while you were
editing the same files.
Synchronize This is a conflict situation and you
need to decide which changes to
keep. In the Synchronize window
you can select to either upload
your changes to the Management
Console, download the files from the
Management Console, or just keep
your files without synchronizing them
with the Management Console.
Interact with Databases
You can use Design Studio to interact with databases. For details, see the following topics.
•Map Databases
•Types and Databases
•Database Warnings
•Create Database Tables
•Store Data in Databases
Map Databases
Robots may need to access databases through various database accessing steps (such as Store In
Database). You must provide a reference to a named database for these steps. The named databases
used by a robot must be accessible from the RoboServers in order for the robot to be executed
successfully on RoboServers.
While designing robots in Design Studio, it is convenient to use local databases that are not available
from the RoboServers. Rather than having to remember to change the named databases on the various
database accessing steps before deploying a robot, Design Studio has an extra layer of abstraction to
help overcome this problem: the database mapping. The mapping mechanism maps a named database
in a database access step of a robot to a Design Studio database. As long as the robot is executed from
within Design Studio, the named databases of the database accessing steps are mapped to the Design
Studio databases specified by the mappings. The Design Studio user can use local databases while
designing and testing robots without having to change the referenced named databases of the database
accessing steps before deploying the robots.
Using database mappings also makes it easy for the Design Studio user to create the robot store values
in a different database: it is a matter of reconfiguring the mapping to make it point to a different database.
A database mapping is a small configuration file defining which database to map to and whether Design
Studio should display various warnings helping the user correctly configure the mapping and the
referenced database. The name of the mapping is the file name of the configuration file. This means
that if you create a mapping with the file name "objectdb," the database that the mapping points to will
be accessible under the name "objectdb" in robots. Note that the databases may have the same names
across different Management Consoles, to distinguish them when creating database mappings in Design
Studio. A database name in the list includes a management console name as in the following example.
84
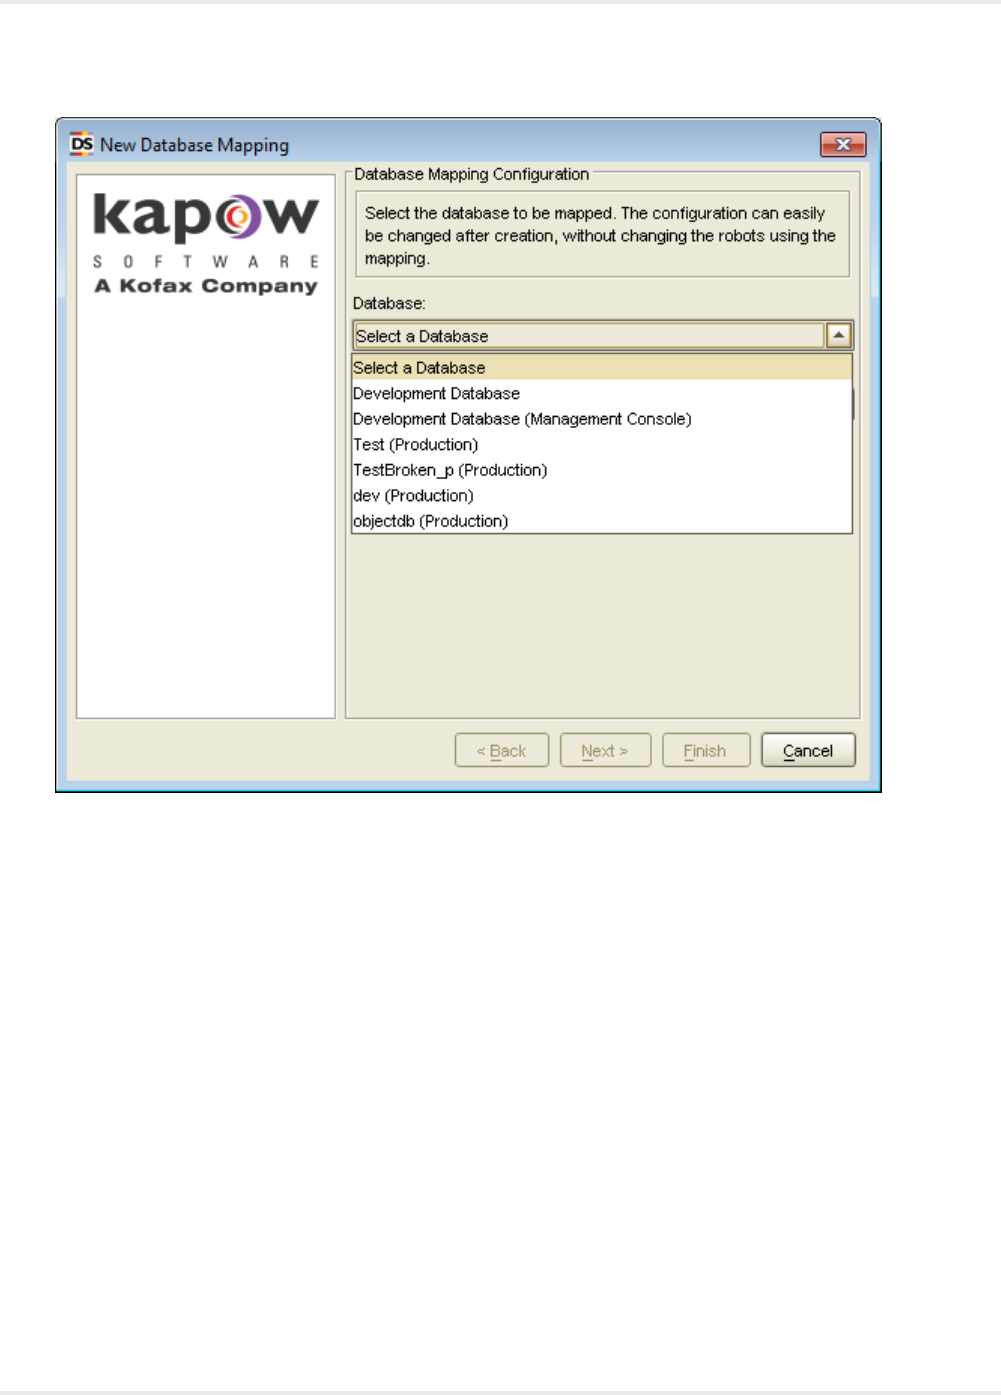
Kofax Kapow User's Guide
The following steps show several ways to create a database mapping in Design Studio.
1. On the File menu, select New Database Mapping.
A wizard appears.
2. Select a database and a project and click Next.
3. Enter a database mapping name and click Finish.
When the wizard is finished, the mapping is created in the selected project and folder and is usable
by robots.
Database View
1. In the database view, right-click the database to associate with a project.
2. Select Add to Project and select the project to add the database to.
3. Enter the name to use for the database mapping. This is the mapping file name and the name the
database will be accessible under.
Notice that a name is suggested. This is the default database name, and the name used to access
this database in other Kapow applications apart from Design Studio.
85

Kofax Kapow User's Guide
Unmapped Database
In Design Studio, when you open a robot using a database you do not have a mapping for, a warning is
displayed.
1. Open a robot using an unmapped database.
A warning appears, recommending a mapping with the name of the database referenced in the
robot. This allows you to quickly run robots sent to you from developers who have other databases
defined - without modifying the robots.
2. Complete the steps in the wizard.
Types and Databases
If your robot writes the values of variables to a database, the types of these variables need to define which
attributes must be part of the key used to store the values in the database. The database key for the value
is calculated as a secure hash of the attributes marked to be part of the database key.
You can also specify a storage name as part of your attribute definition. This is an optional different name
to use when storing the attribute.
When saving values to database storage using the Store in Database action, the appropriate database
table must exist in an available database. The table is required to contain columns matching the attributes
of the type.
See Creating and Deleting Database Tables for more information on how Design Studio can assist you
in setting up the appropriate database tables. Consult Settings in Design Studio for more information on
setting up database connections in Design Studio.
Database Warnings
Database warnings help you configure the database mappings, the robots and the referenced databases
correctly. The warning system automatically monitors for potential problems such as type validation
issues, missing tables, or missing database mappings and if an issue arises, a warning message is
displayed in a status bar.
86
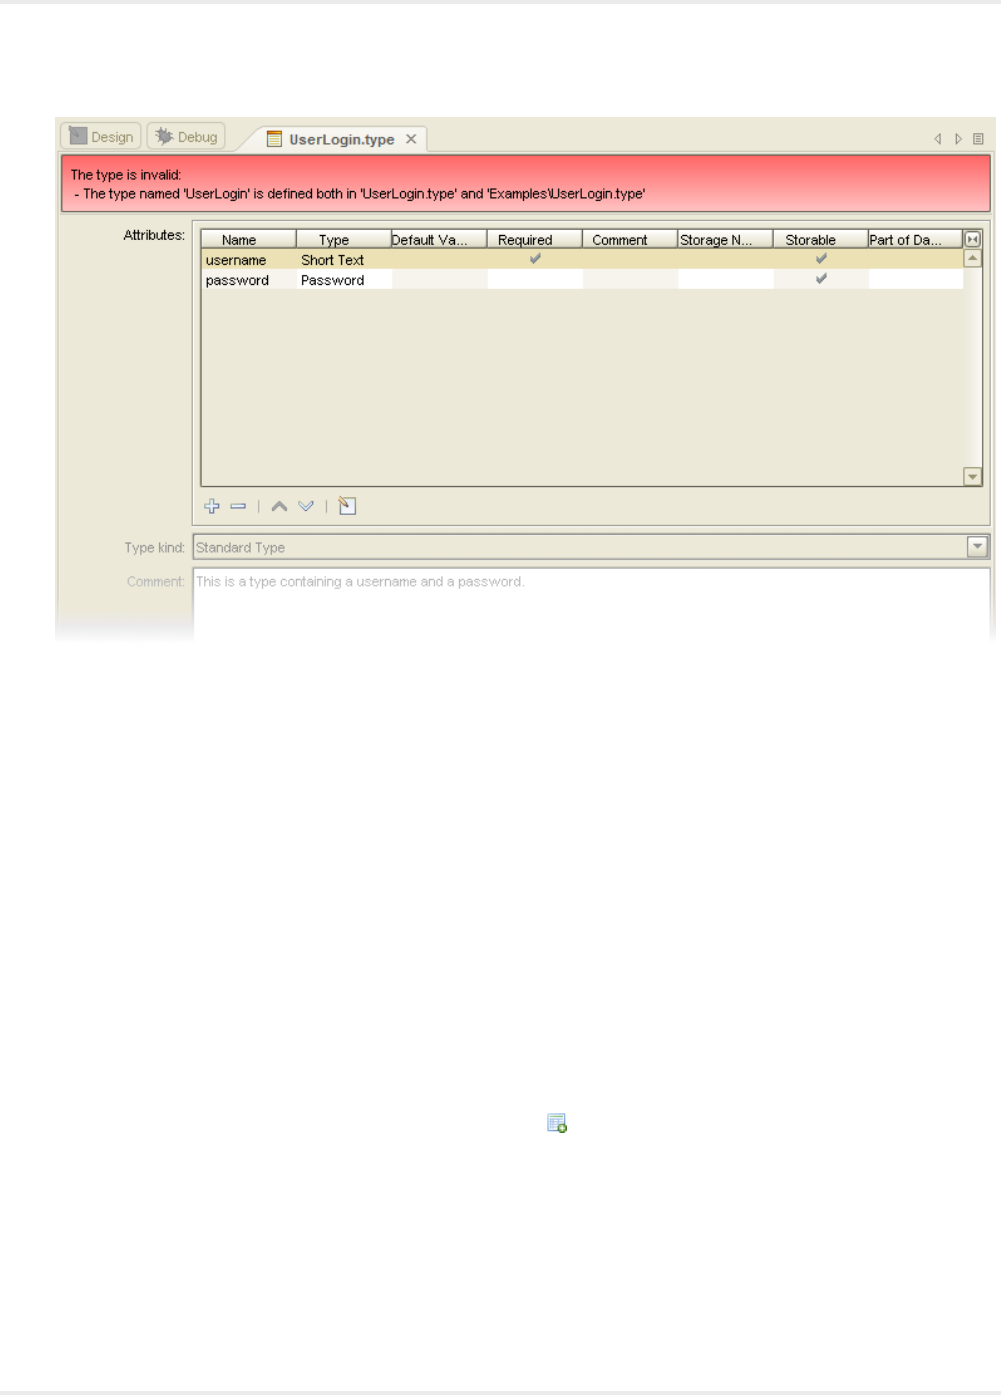
Kofax Kapow User's Guide
Also, the warning system will monitor which databases names are used in robots and assist in creating
any missing mappings. The system performs a shallow monitoring of the databases, which means that
it does not constantly ping the databases to see if they are online, but rather updates the information as
needed. The system caches the table structures of the relevant database tables and uses this cache to
compute any warnings to prevent an excessive number of database queries. The cache is recreated when
Design Studio knows something has happened that requires it. Any external modifications of the database
tables or the database availability are not monitored. There is the option of rebuilding the database cache
for a single database or for all databases. This option is available through the database view, and through
and through warnings, as applicable. For instance, to recreate the cache for a database, right-click it in the
Database view and select Refresh.
Create Database Tables
To store extracted variable values in a database, you create matching tables in the database. Design
Studio can assist in creating these tables by examining the types you have created, and generating the
appropriate SQL. When storing the value from a variable of some type, tables representing that type must
be present in the database.
1. In the Tools menu, select Create Database Table .
The Create Database Table window appears.
2. Enter a name for your database.
3. Define the database type, and table types that you want to create.
4. Click Generate SQL.
The system suggests a SQL statement for creating the tables.
5. Modify, execute, or save the statement.
87

Kofax Kapow User's Guide
The SQL shown is a recommended suggestion: you can change the statement to fit your needs,
if required. For example, you might change the column type for a Short Text attribute from
"VARCHAR(255)" to "VARCHAR(50)" to conserve database space, or you could add an auto-
incrementing primary key. However, under normal circumstances, you should not modify the table
name or any column names, or remove any of the columns.
Note If the database table already exists, it is dropped from the database when executing the SQL
(because of the DROP TABLE statement at the beginning).
Store Data in Databases
This section explains how Kofax Kapow database storage works.
Object Keys
The tables you create for a type in a database have a column for each of the attributes in your type,
plus an additional 7 household fields, named: ObjectKey, RobotName, ExecutionId, FirstExtracted,
LastExtracted, ExtractedInLastRun, and LastUpdated. The most important field is ObjectKey, as it is the
primary key for the table.
Note The reason for the name "ObjectKey" is found in the terminology previously used in Kofax Kapow.
Previously, types and variables were called "objects." To adhere to the new terminology, "ObjectKey"
should be called "ValueKey." Renaming it would cause quite a lot of backward compatibility problems,
though, and therefore it has been allowed to keep its old name.
The ObjectKey for a type is what uniquely identifies values extracted from variables of that type when
stored in a database. You have to figure out what uniquely identifies values of the type. If you are building
a car repository, the VIN number may be enough to provide unique identification of each car. If you are
collecting baseball results, you may need the year, team names, ballpark, and date to uniquely identify
each match.
As you build the type you can select how the ObjectKey is going to be calculated. This is done by
checking the "part of database key" option when creating a new attribute. For our car example, the VIN
number would be the only attribute marked as part of the database key, for the baseball match example,
the attributes year, team names, ballpark, and date would all be marked as part of database key.
The robot developer may also specify the key directly on the Store in Database action, to override the
default algorithm defined on the type.
The attributes that are not part of database key are sometimes referred to as non-key fields. For example,
the car might have a price attribute, but even if the price changed we would still consider it the same car.
Store in Database
Kofax Kapow provides three actions for managing values in a database: Store in Database, Find in
Database, Delete from Database. The Find and Delete actions are simple, but Store in Database does
more than just store the value.
Store in Database may insert a new value into the table, or update an existing value that was previously
stored. Here is a list of exactly what happens.
1. When storing the value of some variable, the ObjectKey is calculated based on the variable's values
of the attributes which in the variable's type are marked Part of Database Key. If the robot developer
specifies a key on the action, this key is used instead.
2. Using the calculated key, a check is made to see if the value already exists in the database.
88
Kofax Kapow User's Guide
3. If the value does not exist, a new row is inserted into the database (under this ObjectKey).
4. If the value already exists, it is updated, and all the non-key attributes are written to the table (under
this ObjectKey).
Household fields
Whenever a value is inserted all the 7 household fields are updated. On update, only some fields change.
The following table provides an overview.
Field Description Changed on
ObjectKey The primary key for this value Insert
RobotName The name of the robot that stored this
value.
Insert and Update
ExecutionId The execution id for the robot
execution that stored this value.
Insert and Update
FirstExtracted The first time the value was stored. Insert
LastExtracted The last time the value was stored. Insert and Update
LastUpdated The date when the value was last
updated.
Update
ExtractedInLastRun If the value was extracted in the
latest run (uses 'y' and 'n').
Insert and Update
After each robot execution (in which the robot used Store in Database), all values previously collected by
this robot, but not stored during this run, will have ExtractedInLastRun set to "n" and LastUpdated set to
"now", indicating that the value was not found on the website during the latest run.
Note If a value was found in the previous run, but no non-key fields have changed, then LastUpdated
is not updated. However, if the value was not found in the previous run, but in a run prior to that,
LastUpdated is updated even if the non-key fields have not changed. This means that the value was
deleted from the site and then reappeared later.
Harvest Tables
The tables created by Kofax Kapow are often referred to as harvest tables, as the robots are harvesting
data into them.
To find out what information was available on a website the last time the robot was run, you can use the
following SQL command:
SELECT * FROM table WHERE ExtractedInLastRun = 'y'
If you are running queries against a table at the same time as a robot is storing data into the table, the
result is comprised of data from the previous run, mixed with whatever data the executing robot has
stored so far. We recommend that you copy the data out of the harvest tables and into a different set of
production tables, so you can run queries against a stable data set.
There are many solutions where robots are used to store data in a database, but most of them fall under
one of the three scenarios listed in the following table.
89

Kofax Kapow User's Guide
Scenario Description
Repository matching website
(small data sets)
The idea is to have a repository that matches the items on a website 1-to-1.
The easiest way to accomplish this is have a truncated production table (deleting
all rows) every time the robot is done executing, and then copy every record where
ExtractedInLastRun='y' from the harvest table into this table. This works well
for small data sets.
Repository matching website
(large data sets)
Same as above, but the data set is too large to copy all data after every robot
execution. Instead we want to update the production table after each robot
execution, based on the changes that occur.
This is where the LastUpdated field comes in handy. All values that have been
updated have a LastUpdated field value larger than the start time of the robot. You
can get the start time from the database logging tables, or you can have the robot
store it somewhere.
To detect deleted values, use the following command:
SELECT * FROM table WHERE LastUpdated > 'StartTime' AND
ExtractedInLastRun = 'n'
To detect new values:
SELECT * FROM table WHERE LastUpdated > 'StartTime' AND
ExtractedInLastRun = 'y' AND FirstExtracted > 'StartTime'
To detect updated values
SELECT * FROM table WHERE LastUpdated > 'StartTime' AND
ExtractedInLastRun = 'y' AND FirstExtracted < 'StartTime'
Then update your Production table accordingly.
Historic data The default setup allows you to see when a value was first extracted and when it
was last updated, but you cannot see which run of the robot the value was found in.
In this case, you should copy all the data from your harvest table into another table
after the robot run, but in your new table the ObjectKey should not be a primary
key. Instead, create an extra column called RUN_ID and use it together with the
ObjectKey to create a compound primary key. If you don't need a RUN_ID you could
simply create an auto-incremented column and use that as the primary key of your
secondary table. Truncate the harvest table before each run.
You don't have to copy all the household fields to your production table; only the ObjectKey is required for
you to update your production tables
Concurrency Considerations
If you have multiple robots storing values of the same type to the same database, be aware of the
following considerations.
• Every time a value is stored, the RobotName column is updated. If you have two robots storing the
same value (as identified by ObjectKey), only the last one will show after the robots are done executing.
• If two robots store the same value at exactly the same time, you get an error. They both find that the
value is not in the table and try to insert it, but only one of them will succeed. In most cases, the error
can be ignored because it is the same value.
• If you run the same robot twice at the same time and the robot stores data in a database, you break
the way the ExtractedInLastRun column is used. When the first robot is done executing, it updates the
ExtractedInLastRun to "n" for all values it has not stored. This includes all values stored by the second
robot so far. Later when the second robot finishes, it sets ExtractedInLastRun to "n" for all values stored
by the first robot, completely negating the first run.
90

Kofax Kapow User's Guide
Value Relations
The storage system does not provide an automated way of managing relations between values. If you
have a value of type Person and one of type Address, and you want to link them, you have to maintain
this link.
The easiest way to create a link is to have the ObjectKey of the Person value be a foreign key in the
Address value that should be linked to this person.
If the ObjectKey is calculated automatically from the type, you can use the Calculate ObjectKey action to
generate the key and assign it to each of the address values before you store them.
You should be careful when building robots with connections between stored values. If an error occurs
when you store the Person value, make sure that no Address values are stored.
ObjetKey Caveats
If you are using MySQL, Oracle or Sybase, review these important ObjectKeys rules.
• On Oracle empty string is stored as null.
• On Sybase, an empty string is stored as " " (a string with a single space).
• MySQL does not have millisecond precision in timestamps.
These three cases all result in a potential loss of data when the data is stored in the database. The
ObjectKey is calculated inside the robot based on the data in the given variable. If you later load the value
from the database and try to recalculate the ObjectKey, the ObjectKey is different if data loss occurred in
any of the attributes marked as part of database key.
Robot Structure
Robots mimic human behavior; they do (more or less) what you do when you are looking for content on
the Internet using a browser: You start by searching for the content. Once found, you read and process it.
Similarly, most robots can be divided into two parts: a navigation part and an extraction part.
Navigation is concerned with "getting to where the content is." Navigation mainly includes loading pages
and submitting forms. When navigating in Design Studio, you typically use the Click action to navigate
through and among web pages.
Extraction is concerned with "getting the right content." Extraction mainly includes selecting, copying,
and normalizing content from a web page that you navigate to. When extracting in Design Studio, you
typically use the Test Tag action to skip uninteresting ("noisy") content, the Extract action to copy content
into variables, and the data converters for normalizing the content so that it gets the format you want, such
as the right date and number format. Once extracted, you output the value with the Store in Database or
Return Value action.
A typical robot starts with one or more steps, each containing a Load Page or Click action to navigate
to the interesting content on a web site. It proceeds with one or more steps, each containing an Extract
action, and ends with a step storing or returning the extracted value.
Note that in many robots the navigation and extraction parts overlap because the content to extract is
located on several pages. Again, this is similar to looking for content yourself; often, you have to visit
several pages to get the content you want.
91
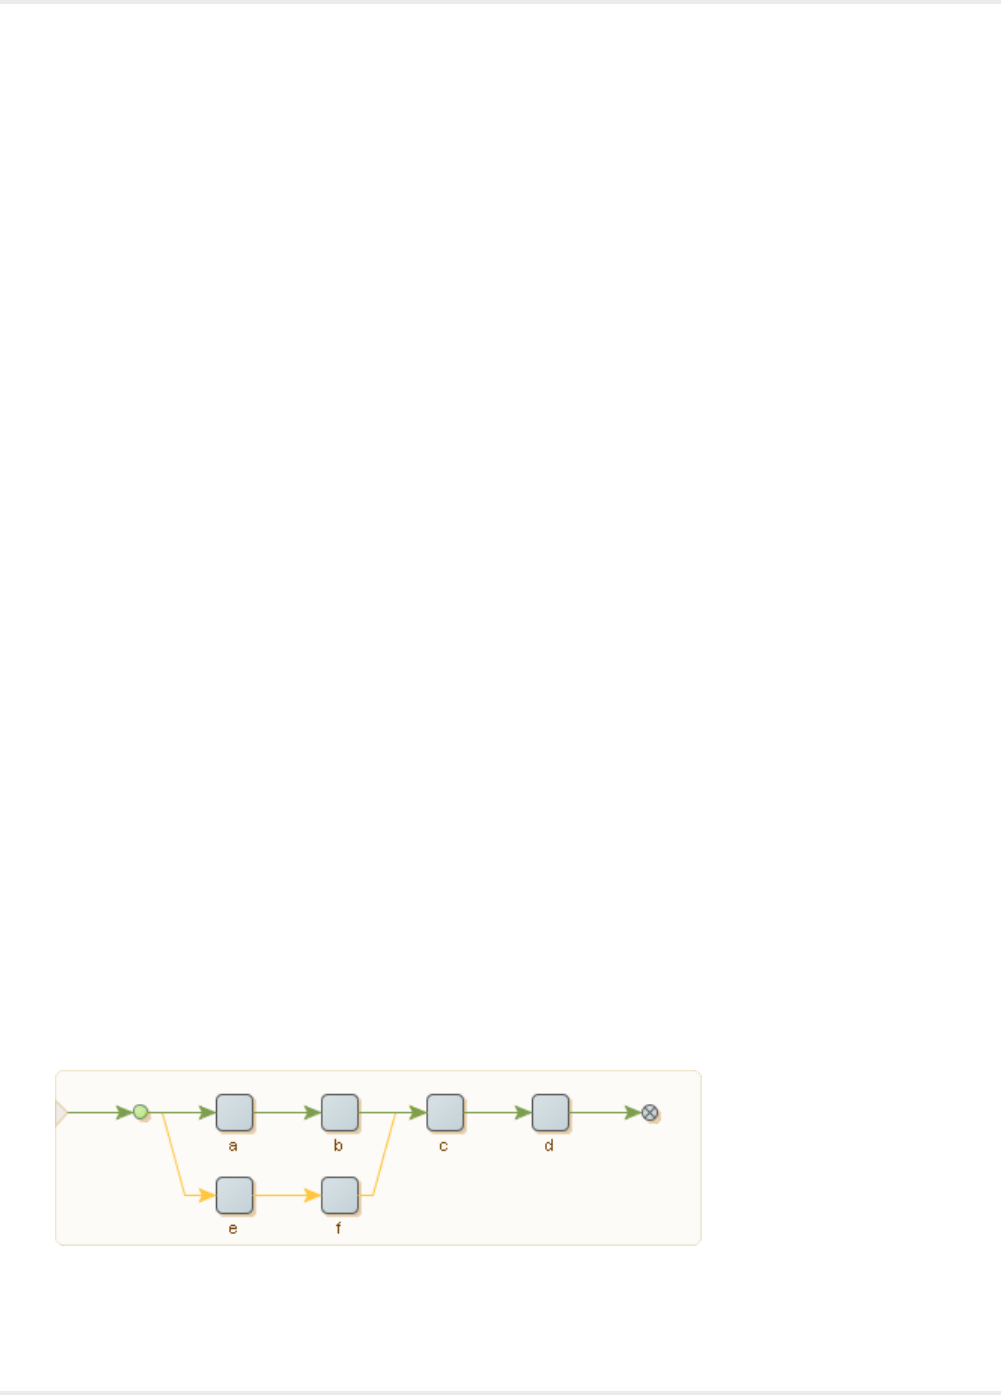
Kofax Kapow User's Guide
Most robots include other actions than the ones mentioned above, such as a For Each Tag action for
loading several similar looking pages or extracting values from several similar looking table rows. Because
robots have different tasks, they have different needs. For this reason, we have included a considerable
number of step actions and data converters in Design Studio. Start by familiarizing yourself with the basic
and most commonly used step actions and data converters, and then begin to explore. Experience shows
that you can create most robots using only a handful of step actions and data converters. So, find your
own favorite step actions and data converters and stick to them until you feel a need to explore others.
Write Well-Structured Robots
Writing well-structured robots is essential because each robot is a program. Writing unstructured robots
is like writing books with no chapters or table of contents. Writing well-structured robots is important
because:
• It helps document the robots.
• It makes it easier to maintain the robots.
• It makes it easier to find your way around the robots.
A side-effect of writing well-structured robots is that is that it can also make them load faster in Design
Studio. As a result, robots are generally more responsive when they are edited in Robot View.
The two main tools for writing well-structured robots are Snippet steps and Group steps. Both step types
are a way to take a part of a robot, give it a descriptive name, and pack it up in a single step. This way
you can forget what the part of the robot does in detail and concentrate on the overall structure of the
robot. This concept is similar to those in other programming languages, such as methods, functions, and
procedures.
You use a group step to pack up and hide steps that perform a well-defined task. Give the step a
descriptive name, such as Login to site X, Report error. It is important to give a relatively short descriptive
name to the group step that describes what the steps inside the group do. If you cannot provide a good
name, then it may be because the group does not perform a well-defined task. By introducing a group
step you help document your robot, because the name describes what this part of the robot does.
Although snippets are mainly introduced to share functionality between robots, they can also be used
inside a single robot to help structure it. If you have a collection of steps in a robot used in several
branches, such as connections from different parts of the robot joining at the start of the steps, you can
replace such steps sharing by introducing a snippet containing the steps.
The following robot structure uses snippets and groups instead of joining connections.
The last two steps c and d are shared by the two branches starting with the steps a and c. In real life you
probably have a much larger robot and more than two branches sharing steps in this way, and the steps
92

Kofax Kapow User's Guide
involved may be far apart. As a result, it may be difficult to get an overview of the robot. As a first step
towards getting a better structured robot, you can introduce a snippet step containing the steps c and d as
follows.
You can edit the steps inside the snippet steps and still be sure that the changes are shared in the two
branches. You can structure the robot further by putting both branches into a group step:
Finally, you can use the two group steps and get the following simple robot.
This resulting robot does two tasks, one performed by Group1 and the other performed by Group2. By
giving these two groups descriptive names, the robot has a more logical structure than the original robot.
Admittedly this is a very simple example, but when robots get beyond a certain size and contain
connections crisscrossing the Robot View they can become overly complex. Restructuring the robot in the
manner described above may help ensure that the robot overview is manageable.
93
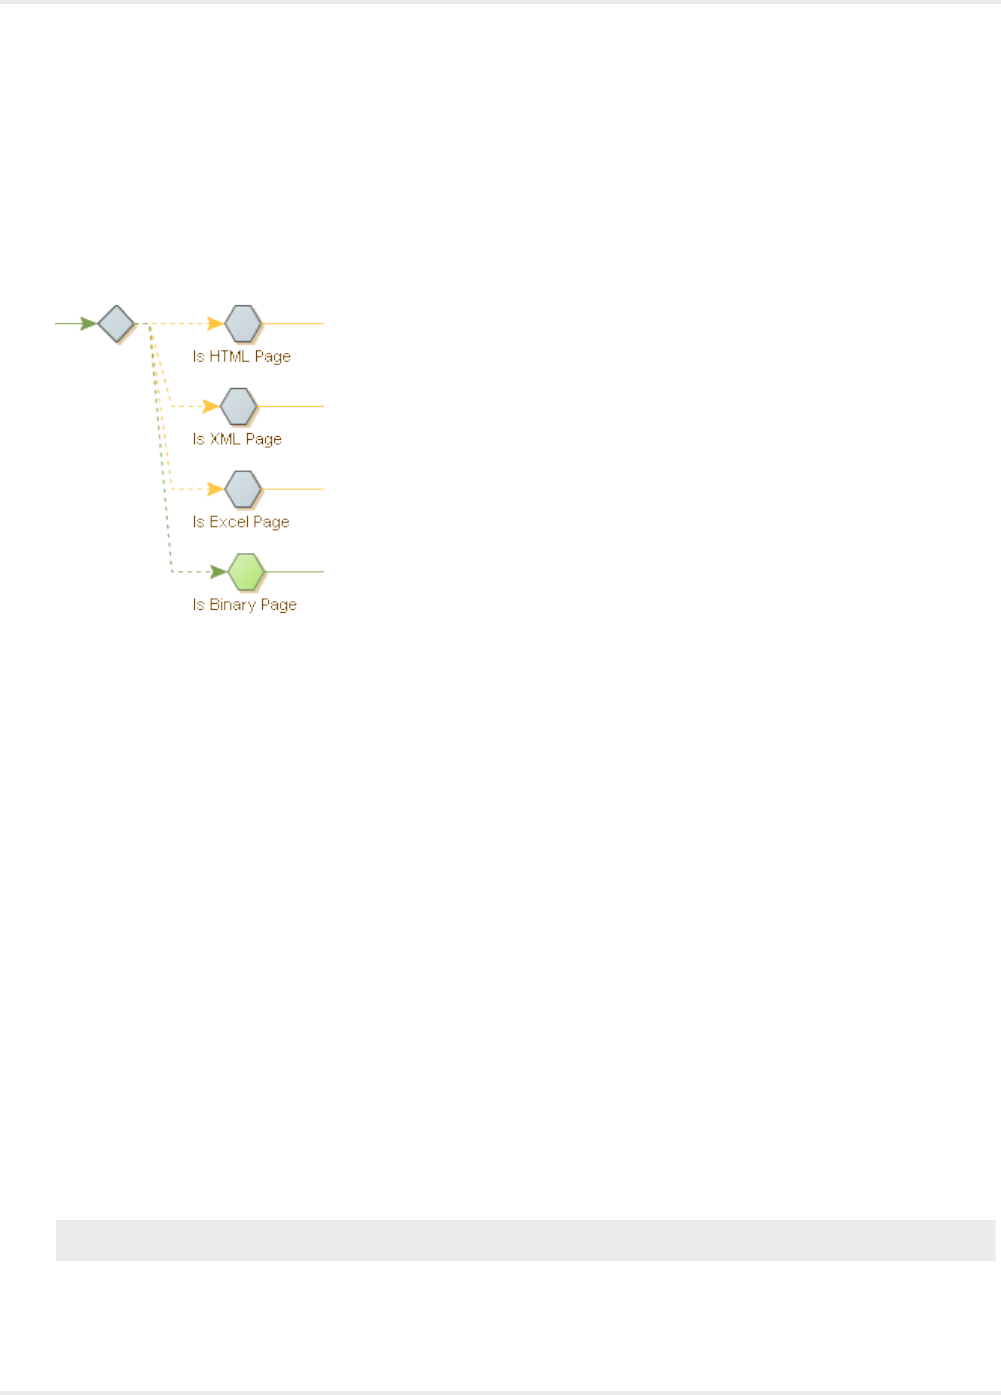
Kofax Kapow User's Guide
Determine the Page Type
You can create a Try step to identify the type of loaded page. Valid page types include HTML, XML, Excel,
and Binary.
1. In the Designer, after a Load Page step, insert a Try step.
2. On the branch, Insert an action step and select Test > Test Page Type.
3. On the Action tab, Page Type field, select HTML.
4. On the Basic tab, change the Step Name to Is HTML Page.
5. Select the try step and click Add Branch.
6. Repeat 2 through 5, with Page Type set to XML, and the Step Name to Is XML Page.
7. Repeat 2 through 5, with Page Type set to Excel, and the Step Name to Is Excel Page.
8. Repeat 2 through 4, with Page Type set to Binary, and the Step Name to Is Binary Page.
Once the robot runs, the page type is highlighted.
Use Tag Finders
Use Tag Finders to find a tag on an HTML/XML page. The most common use of a Tag Finder is in a step,
where the Tag Finder locates the tag to which you want to apply an action. The list of Tag Finders for the
current step is located in the Tag Finders tab of the Step View.
Tag Paths
A tag path is a compact text representation of where a tag is located on a page. Consider this tag path:
html.body.div.a
This tag path refers to an <a>-tag inside a <div>-tag inside a <body>-tag inside an <html>-tag.
94

Kofax Kapow User's Guide
A tag path can match more than one tag on the same page. For example, the tag path above will match
all of the <a>-tags on this page, except the third one:
<html>
<body>
<div>
<a href="url...">Link 1</a>
<a href="url...">Link 2</a>
</div>
<p>
<a href="url...">Link 3</a>
</p>
<div>
<a href="url...">Link 4</a>
<a href="url...">Link 5</a>
<a href="url...">Link 6</a>
</div>
</body>
</html>
You can use indexes to refer to specific tags among tags of the same type at that level. Consider this tag
path:
html.body.div[1].a[0]
This tag path refers to the first <a>-tag in the second <div>-tag in a <body>-tag inside an <html>-tag. So,
on the page above, this tag path would only match the "Link 4" <a>-tag. Note that indexes in tag paths
start from 0. If no index is specified for a given tag on a tag path, the path matches any tag of that type at
that level, as we saw in the first tag path above. If the index is negative, the matching tags are counted
backwards starting with the last matching tag which corresponds to index -1. Consider this tag path:
html.body.div[-1].a[-2]
This tag path refers to the second-to-last <a>-tag in the last <div>-tag in a <body>-tag inside an <html>-
tag. So, on the page above, this tag path would only match the "Link 5" <a>-tag.
You can use an asterisk ('*') to mean any number of tags of any type. Consider this tag path:
html.*.table.*.a
This tag path refers to an <a>-tag located anywhere inside a <table>-tag, which itself can be located
anywhere inside an <html>-tag. There is an implicit asterisk in front of any tag path, so you can simply
write "table" instead of "*.table" to refer to any table tag on the page. The only exception is tag paths
starting with a punctuation mark ('.'), which means that there is no implicit asterisk in front of the tag path,
so the tag path must match from the first (top-level) tag of the page.
With asterisks, you can create tag paths that are more robust against changes in the page, since you can
leave out insignificant tags that are liable to change over time, such as layout related tags. However, using
asterisks also increases the risk of accidentally locating the wrong tag.
You can provide a list of possible tags by separating them with '|', as in the following tag path:
html.*.p|div|td.a
This tag path refers to an <a>-tag inside a <p>-, <div>-, or <td>-tag located anywhere inside an <html>-
tag.
95

Kofax Kapow User's Guide
In a tag path, text on a page is referred to just as any other tag, using the keyword "text". Although text is
not technically a tag, it is treated and viewed as such in a tag path. For example, consider this HTML:
<html>
<body>
<a href="url...">Link 1</a>
<a href="url...">Link 2</a>
</body>
</html>
The tag path "html.body.a[1].text" would refer to the text "Link 2."
Tag Finder Properties
This topic describes the properties to use to configure a Tag Finder.
Find Where
Specifies where to find the tag relative to a named tag. The default value is "Anywhere in Page," meaning
that named tags are not used to find the tag.
Tag Path
The tag path as described in Tag Paths.
Attribute Name
The tag must have a specific attribute, for example "align."
Attribute Value
The tag must have an attribute with a specific value. If the Attribute Name property is set, the attribute
value is bound to that specific attribute name.
•Equals Text: The attribute value must match a specified text. Note that the text must match the entire
attribute value.
•Containing Text: The attribute value must contain the specified text.
•Pattern: The attribute value must match a pattern. Note that the pattern must match the entire attribute
value.
Tag Pattern
A pattern that the tag must match (including all tags inside it), for example ".*<b>.*Stock Quotes.*</b>.*".
Some caution should be observed in using this property, since it can have considerable impact on the
performance of your robot. This is because the Tag Pattern may be applied many times throughout a page
just to find the one tag that it matches. One way to try and avoid this is to choose Text Only for the Match
Against property.
Match Against
The Tag Pattern should match only the text or the entire HTML of the tag. The default is to match only the
text because this is normally much faster.
Tag Depth
Determines which tag to use if matching tags are contained inside each other. The default value is Any
Depth. This value accepts all matching tags. If you select Outermost Tag, only the outermost tags are
accepted, and similarly, if you select Innermost Tag, only the innermost tags are accepted.
96
Kofax Kapow User's Guide
Tag Number
Determines which tag to use if more than one tag matches the tag path and the other criteria. You specify
the number of the tag to use, either counting forwards from the first tag or counting backwards from the
last tag that matches.
For example, if you set the tag path to "table," the Tag Attribute property to "align=center," and the Tag
Pattern property to ".*Business News.*," then the Tag Finder would locate the first <table>-tag that is
center aligned and that contains the text "Business News."
Configure Tag Finders
There are multiple ways to define the tag path for a tag finder. Design Studio builds the path automatically
when you interact with the browser\HTML\DOM path views to create an action or right-click and select
"use this tag" or "use only this tag." Alternatively, you can manually define the tag path.
In the Page View, click Tag Finder to see the tag found by the Tag Finder.
Configure Tag Finders using one of the following methods:
• To configure Tag Finders manually, enter details in the Finder tab.
• To configure Tag Finders automatically, select a tag in the Page View and click Set Selected Node in
Finder . This configures the Tag Finder to find the selected tag using a tag path in simple mode.
• To configure Tag Finders from a context menu, in the Page View, right-click a tag. If you select Use
Tag from the menu, the Tag Finder is configured to find the right-clicked tag using a tag path in simple
mode. Similarly, if you choose another action from the menu, it selects a corresponding step action and
configures the Tag Finder to find the right-clicked tag.
• To configure Tag Finders for a step action, select a new step action. Some actions, when selected,
configure the Tag Finders so that they find the tags typically used for that action. For example, the
Submit Form action uses one Tag Finder and sets its tag path to "form" to locate the first <form>-tag in
the page.
1. In the Designer, right-click a node and select Insert Step > Action Step,
2. Select an Action from the list.
3. On the Actions tab, define attributes based on the Action selected.
Required attributes are indicated with warning symbol.
Submit a Form
Submitting a form is a common task in a robot. For example, you may need to submit a search form to
get the search results you want to extract, or you may need to submit an order form to make an order
transaction. In some cases, you do not need to actually submit the form, but simply want to create a URL
that represents the form submission, or modify the current values in the form.
The recommended and simplest way of submitting a form in Design Studio is similar to the way you
submit a form in an ordinary browser.
1. Fill in the form details.
97

Kofax Kapow User's Guide
You can use the following actions:
• Enter Text
• Enter Password Select Option
• Select Option
• Select Multiple Options
• Set Checkbox
• Select Radio Button
2. Click the form submission button.
You can also loop through field values (text input) options or radio buttons by using the following
actions:
• Loop Field Values
• For Each Option
• For Each Radio Button
Form Basics
Consider the following example of a book search form, first shown as HTML, then as it appears in a
browser.
<html>
<body>
<form action="http://www.books.com/search.asp" method="get">
Author:
<input type="text" name="book_author">
<p>
Title:
<input type="text" name="book_title">
<p>
Language:
<select name="book_language">
<option value="lang_0" selected>English</option>
<option value="lang_1">French</option>
<option value="lang_2">German</option>
<option value="lang_3">Spanish</option>
</select>
<p>
Format:
<input type="checkbox" name="book_format" value="format_pb">Paperback
<input type="checkbox" name="book_format" value="format_hc">Hardcover
<input type="checkbox" name="book_format" value="format_ab">Audiobook
<p>
Reader Age:
<input type="radio" name="reader_age" value="age_inf">Infant
<input type="radio" name="reader_age" value="age_teen">Teenager
<input type="radio" name="reader_age" value="age_adult" checked>Adult
<p>
<input type="submit" value="Search">
</form>
</body>
</html>
98
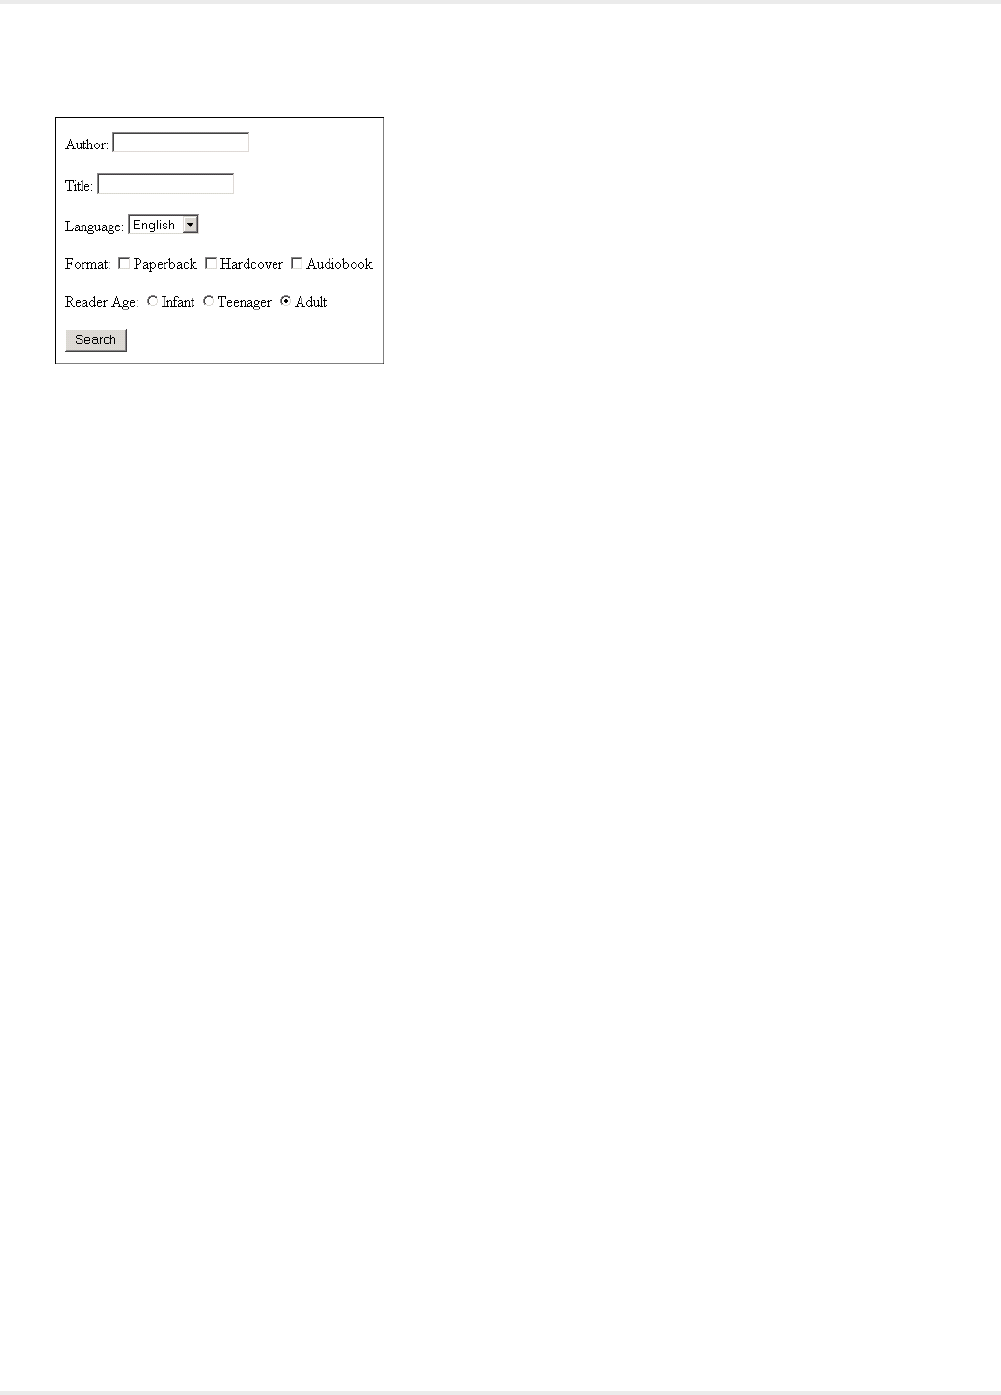
Kofax Kapow User's Guide
A form contains a number of fields. For example, the first <input>-tag in the example form defines a
field named "book_author". Note that the name of a field is usually different from what the user sees in
a browser. For example, the "book_author" field will appear to be named "Author" in the browser, not
"book_author".
A field can be defined by more than one tag. For example, the "book_format" field is defined by three
<input>-tags in the example form. Tags that use the same field name and are of the same field type (text
field, radio button, check box, etc.) define the same field.
A field can be assigned one or more values. For example, the "book_format" field can be assigned
the value "format_pb" to select paperback format. Note that, like the field name, the value assigned
to a field is usually different from what the user sees in a browser. For example, the user will see the
text "Paperback", not the value "format_pb", when choosing the paperback format. Depending on the
field type, some fields can be assigned more than one value at the same time. For example, since
"book_format" is a check box field, we could assign both the value "format_pb" and the value "format_hc"
to the "book_format" field to select both the paperback format and the hardcover format.
Most fields have a default value. The default value is the value that is initially assigned to the field in the
form. For example, the "book_language" field has the default value "lang_0", because of the "selected"
attribute.
A form is submitted by sending the current values of the fields to the web site. Only fields that have one
or more current values are sent. For example, if none of the check boxes of the "book_format" field in the
example form are checked, no value is sent for that field.
In a browser, the submission of a form usually happens when the user clicks a submit button. There are
two kinds of submit buttons: normal submit buttons and image submit buttons. Normal submit buttons are
defined using a <button>-tag or an <input>-tag, in both cases with the "type" attribute set to "submit". If
a normal submit button has a field name and value, that field is sent with the specified value when the
button is clicked.
Image submit buttons are defined using an <input>-tag with the "type" attribute set to "image". An image
submit button defines two fields, named "button name.x" and "button name.y", where button name is the
name contained in the "name" attribute of the <input>-tag. If the <input>-tag has no "name" attribute, the
fields are named "x" and "y". When an image submit button is clicked, these two fields are assigned the x-
and y-coordinates of the position in the image where the mouse was clicked. Some web sites use this for
creating image maps with different behavior depending on where the user clicks.
Some forms use JavaScript. For example, the <form>-tag may have an "onsubmit" attribute that
contains JavaScript to be executed before the form is submitted. Similarly, an <input>-tag may have an
99

Kofax Kapow User's Guide
"onclick" attribute that contains JavaScript to be executed when the user clicks on the field. The robot will
automatically execute this JavaScript.
For performance reasons, you may decide to ignore the JavaScript execution when submitting the form.
To do this, you must clear the "Execute JavaScript" option in the options in the form submitting step.
Determine the Step Action
The simplest way to submit a form is to fill in the form using the appropriate actions. For more complex
submissions, you can loop through a form to get the desired result.
Consider the book search example form.
• To search for books in all available languages and for all reader ages, the site may not allow such a
general search. You can loop through the languages and reader ages, making a form submission for
each combination of language and age. To do this, use the Loop Form actions:
• Loop Field Values
• For Each Option
• For Each Radio Button
• The Loop Form actions does not submit the form, so this must be done separately in a subsequent
Click action that clicks one of the submit buttons of the form.
• To loop over a combination of field values, place several steps with Loop Form actions after each other
prior to the Click action that submits the form.
• To create a URL that represents a submission of the form, use the Extract URL action on the form's
submit button.
Use the Loop Form Actions
There are three Loop Form actions: Loop Field Values, For Each Option and For Each Radio Button. The
three actions correspond to the three kinds of form controls for text input (INPUT elements with type "text"
and TEXTAREA elements), options (SELECT elements) and radio buttons (INPUT elements with type
"radio"). Watch the video below or read on to learn how to use these loops.
See Loops in Forms tutorial for more information.
To loop over a form, you need to decide which form controls to loop over and in which order (this
determines the order in which output values are generated). Next, insert a step for each with the loops
with the corresponding Form action. This can be done by right-clicking the control in the Page view and
choosing Forms > <form action> from the context menu, where <form action> is the appropriate action.
For example, if the control is a text input control, you would choose Forms > Loop Field Values.
Every time a Loop Form action is executed, a value is changed in a form control element in the HTML
page. This corresponds to what you would have done manually in a browser. If the form control has a
JavaScript event attached to it, this event would be fired and some JavaScript executed. In some cases
this JavaScript may change the form, such as the options of a SELECT element. In this case you must be
careful and choose the right order in which to loop over the controls to ensure that the right options are
available to the robot when it needs them. Normally, if you follow the order that you would use when doing
this manually in a browser, it should work just fine.
Once all the Loop Form action steps have been inserted in the robot, you should add a step with a Click
action that clicks one of the submit buttons of the form.
100

Kofax Kapow User's Guide
Upload Files
Some forms contain file fields that allow you to upload files. A file field is defined by an <input>-tag of type
file, such as the following:
<INPUT type="file" name="attachedFile">
In the Select File action, there are two ways to upload a file using a file field.
1. The first way is to upload a file from the file system. To do this, select File in Local File System from
the list and enter the file name. When the form is submitted, the specified file is loaded from the file
system and uploaded as part of the form submission.
Note The file name must be an absolute file name, including the drive name, if any, and the
directory path to the file.
2. The second and most common way to upload a file is to specify the file contents to upload, instead
of loading the file from the file system. To do this, select File Contained in Variable from the list.
Then, you may select the variable that holds the file contents from the File Content list. Typically, you
get the contents from either a binary variable in which you have downloaded the file earlier using the
Extract Target action, or from a variable containing text that you have extracted earlier.
Optionally, you can specify the content type and the file name of the file. The content type should be the
MIME type of the contents, optionally followed by a charset. You may use one of the predefined content
types, acquire it from an attribute or specify a custom content type. For example, the content type could
look like this for an image:
image/gif
and like this for a plain text:
text/plain; charset=iso-8859-1
Note that when downloading files using Extract Target, you can store the content type and file name of
the downloaded data in other variables. You can then use this information when uploading the file with the
Select File action.
Use the Context Menu on the Page View
You can use the context menu in the Page View as a shortcut for selecting and configuring the Submit
Form and Loop Form actions.
1. To select the Submit Form or Loop Form action in the current step, right-click inside a <form>-tag in
the Page View.
2. In the context menu, Forms submenu, select Use Submit Form or Use Loop Form.
3. If the current step contains a Submit Form or Loop Form action, in the Page View, Forms submenu,
right-click a field and select Add Assignment to Field in the Forms submenu.
A dialog box appears.
4. Assign a field value.
101
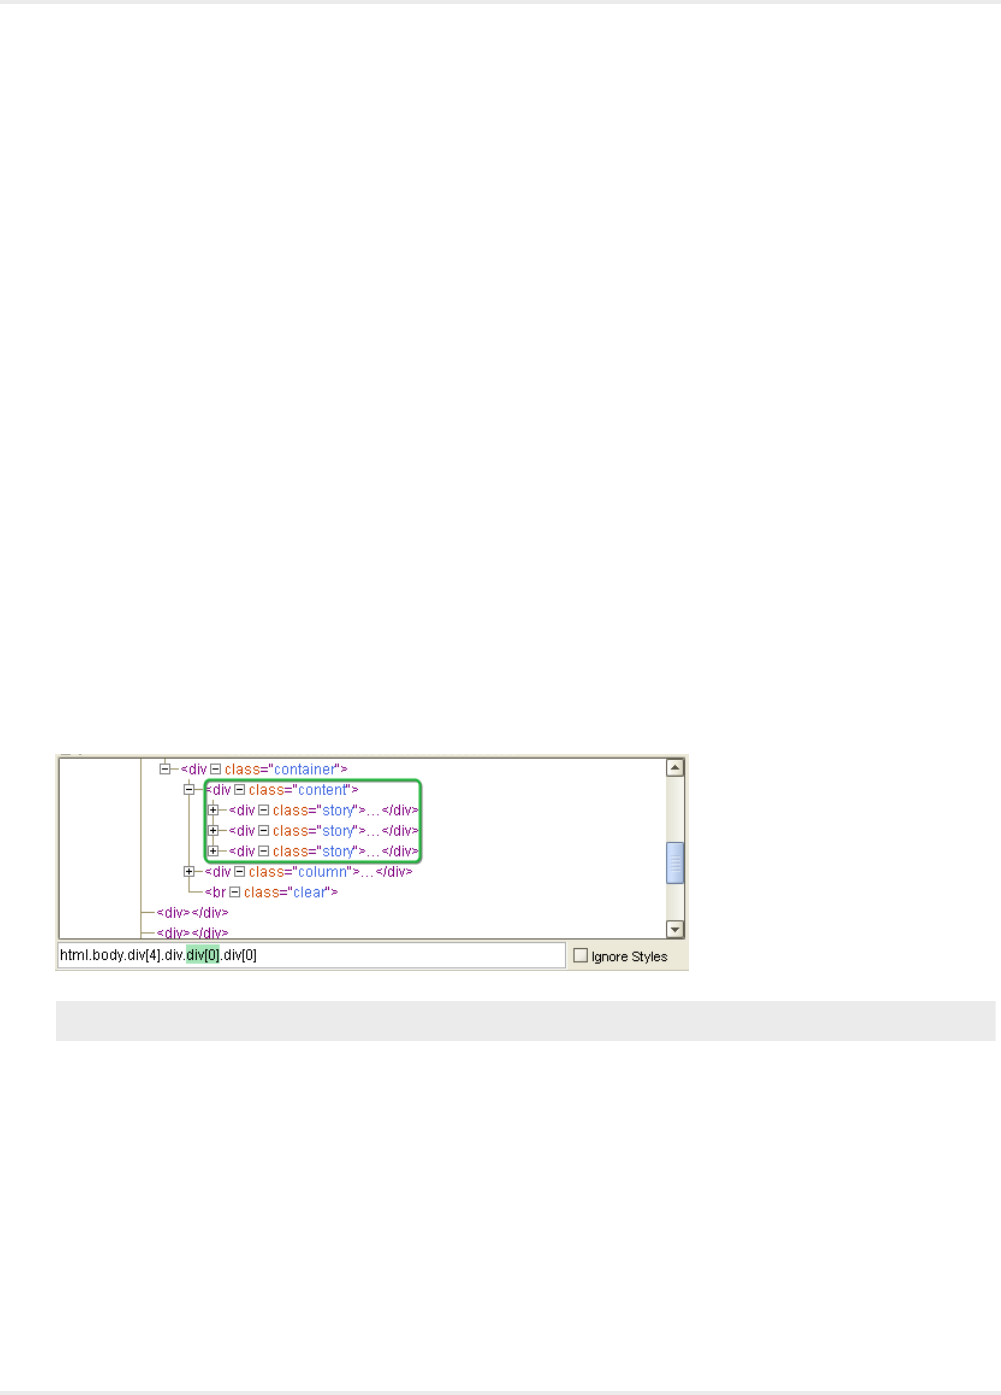
Kofax Kapow User's Guide
5. If the current step contains a Loop Form action, in the Forms submenu, right-click a field and select
Add Looping over Field to loop through the field.
6. A dialog box appears where you can configure a One field with values to loop through field group
for the field.
7. If the current step contains a Submit Form or Loop Form action, in the Page View, right-click a
submit button.
8. In the Forms submenu, click Select Submit.
Loop Through Tags on a Page
A robot often needs to loop through elements on a page to perform some action on each element. For
example, you might be interested in extracting certain properties from each result in a search or from each
row in a table. The following topics explain how to do this:
•Loop Through Tags with the Same Class
•Loop Through Tags with Different Classes
Keep in mind, with multiple different types of loop steps, there are many ways to handle the same
situation.
Loop Through Tags with the Same Class
There are a couple of ways to set up a loop. The first way is the easiest if it is viable, and involves looping
over tags that all share a class attribute.
Note Each div element has the attribute class="story".
To determine whether looping through tags with the same class is possible, find the elements in the
HTML view. In the case shown above, it is possible to loop through the three div tags with the attribute
class="story".
1. Right-click the first tag and selectLoop > For Tags with Class > story.
102
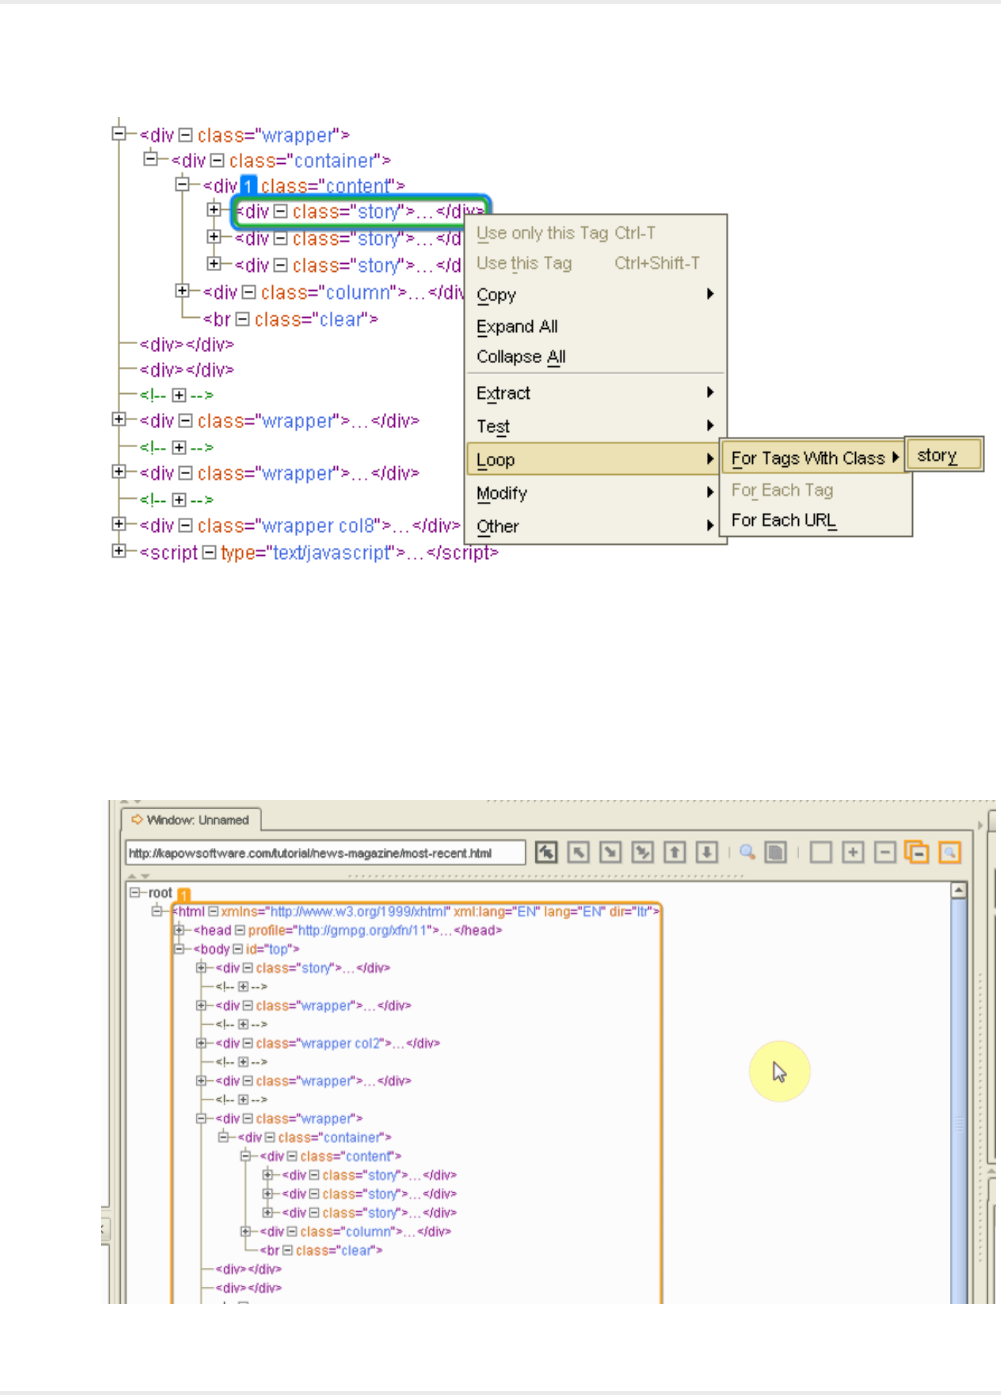
Kofax Kapow User's Guide
This creates a For Each Tag Path step in the robot, which loops through all elements on the page
with the given class.
2. On the Loop step, use the arrows to ensure that the correct tags are included in the loop.
There might be other tags on the page that you do not wish to include in the loop but that use the
given class. These can be excluded from the loop with an easy fix.
3. To exclude tags with the selected class, click For Each Tag Path.
Review the HTML view.
103
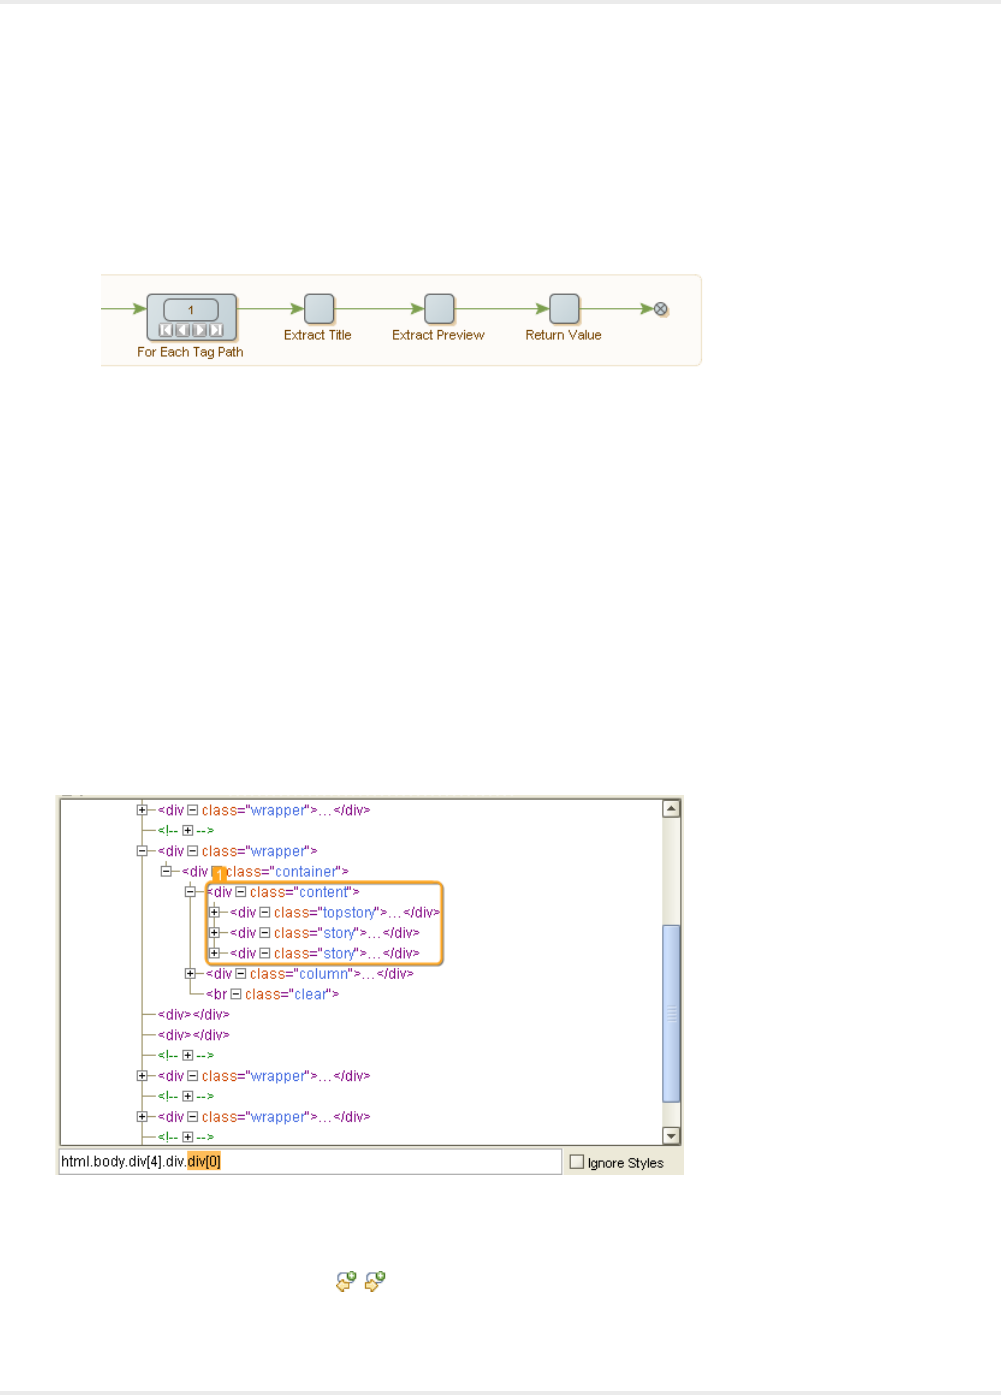
Kofax Kapow User's Guide
The For Each Tag Path has automatically included the entire page as the found tag. Notice the tag
with class="story" near the top of the page. It is being purposely excluded from the loop.
4. Change the found tag to force the robot to only loop through tags within another given tag.
Once the loop has been successfully created, any steps added after the For Each Tag Path step is
repeated for each iteration of the loop.
Steps after the loop step are executed for each iteration.
In the example above showing the robot view, the robot extracts two pieces of text, a title and a
preview, and return those values, for each iteration of the loop.
Loop Through Tags with Different Classes
Looping through tags with the same class is a common scenario, but not the most simple one you might
run into. Often it is necessary to loop through tags that do not all have the same class. An alternative
scenario will be explored here.
The For Each Tag step is very efficient in most cases where For Tags With Class fails. The For Each
Tag step loops over all types of tags, which are directly inside the found tag. It does take a little more
configuration than just right-click and insert. Here is how to use it.
Use For Each Tag to loop over each tag of a given type, which is directly inside the found tag.
Note that the found tag contains three div tags, but they do not all have the same class. In this scenario,
use For Each Tag to handle the differences.
1. Insert an empty New Step and select the For Each Tag action.
104
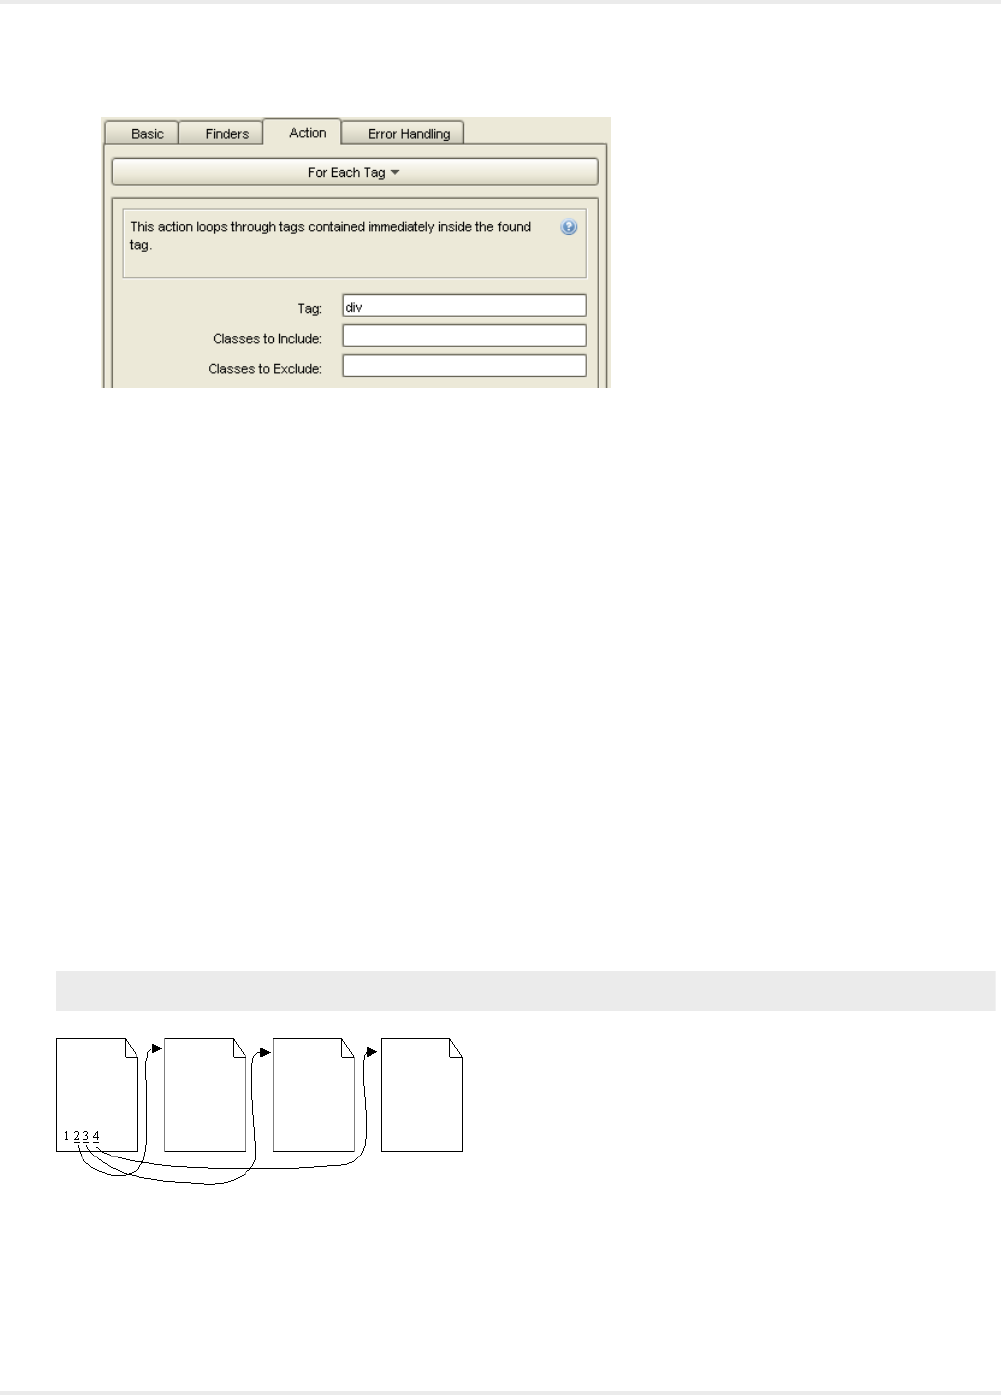
Kofax Kapow User's Guide
2. In the Page View, select the Found tag.
3. In the Step Action View, Tag field, select the tag type.
In the preceding example, the tag type is div.
4. Add steps after the For Each Tag step.
These steps are repeated for each iteration of the loop.
Loop Through HTML Pages
A robot often needs to loop through pages. For example, many web sites that present the results of a
search request will do so over several pages, each containing e.g. 20 results from the search. To get the
search results, you need to loop through the pages and process one page at a time. The following topics
explain how to do this.
•First Page Links to All Other Pages
•Each Page Links to Next
First Page Links to All Other Pages
When the first page contains direct links to all other pages, you can follow a link to access any page
directly from the first page.
Note The first page can also contain a link to itself.
In this example, you can easily loop through pages using a For Each Tag step, as shown in this excerpt
from a robot.
105
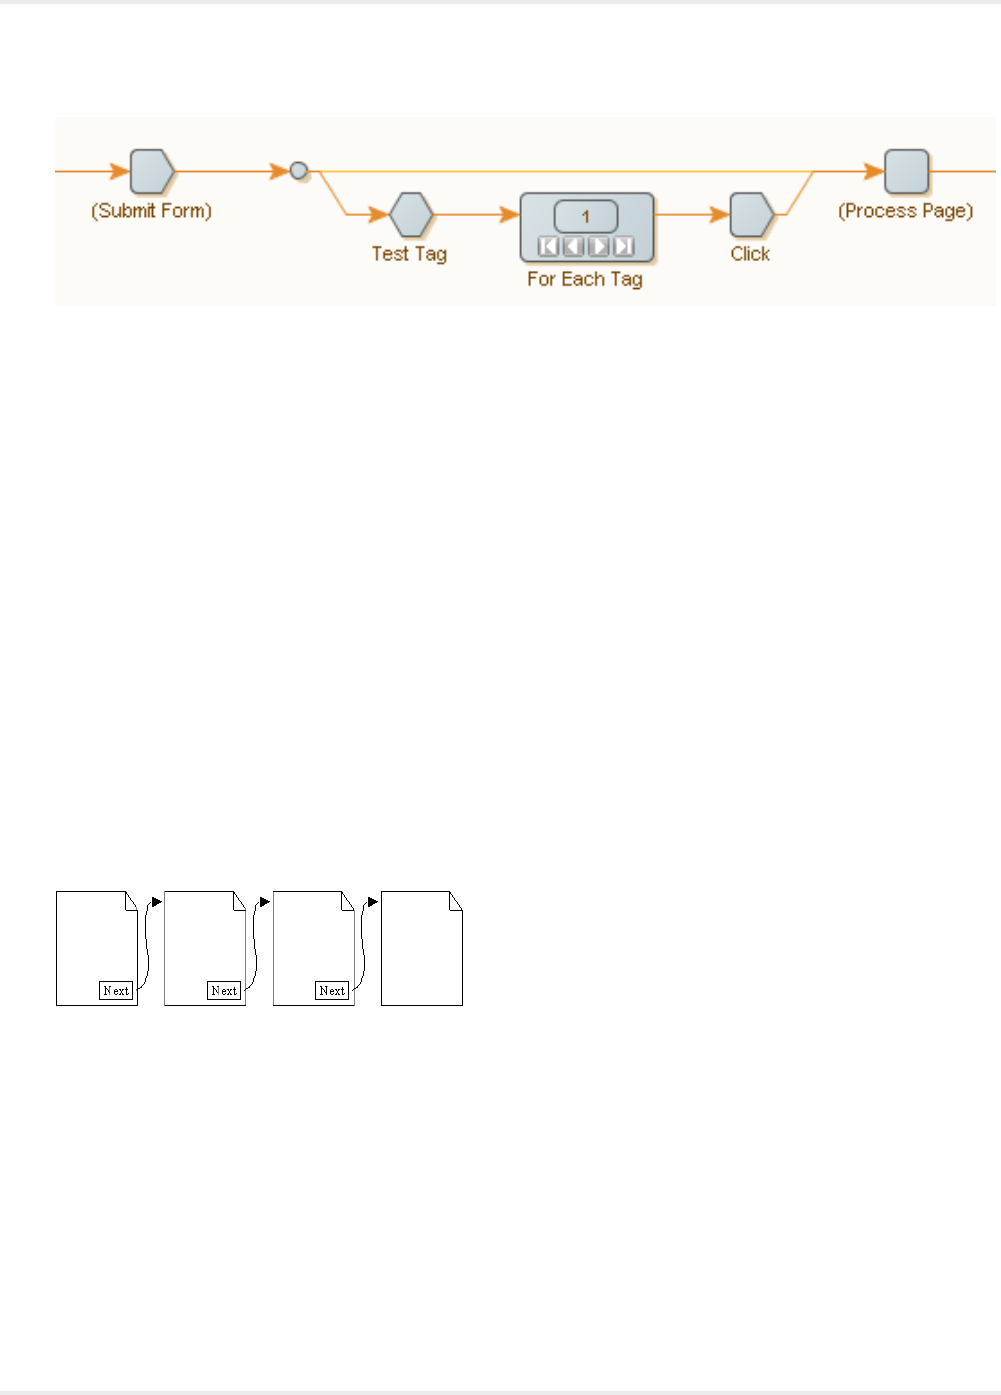
Kofax Kapow User's Guide
In this illustration, the robot loops through the result pages from a search request, symbolized by the
Submit Form step.
The first result page is processed directly, shown by the connection from the form submission step directly
to the Process Page step.
The remaining pages loop through using the For Each Tag action in the second branch.
The Test Tag step checks to confirm there is more than one page.
• If the first page links to multiple pages:
1. Loop through the tags containing the links to the pages.
2. Load each page using a Click action.
3. Continue to page processing.
• If the first page links to itself:
1. Configure the For Each Tag action to skip this first link.
The first page is not processed twice.
Each Page Links to Next
Pages are linked to a subsequent page, typically with a link at the bottom to the next page.
Use the Repeat action to loop through such pages. This action loops through the pages that are supplied
to it by another action named Next. See the Repeat-Next tutorial for more information.
Repeat and Next must be used collaboratively to have any effect.
1. On the first page add a Repeat step.
2. Insert additional actions as required.
3. Insert a Next step.
When the robot execution reaches the next step, it reverts back to the repeat step and executes
another iteration of the steps. The page is transferred to the repeat step and a new page is loaded
with each iteration.
106
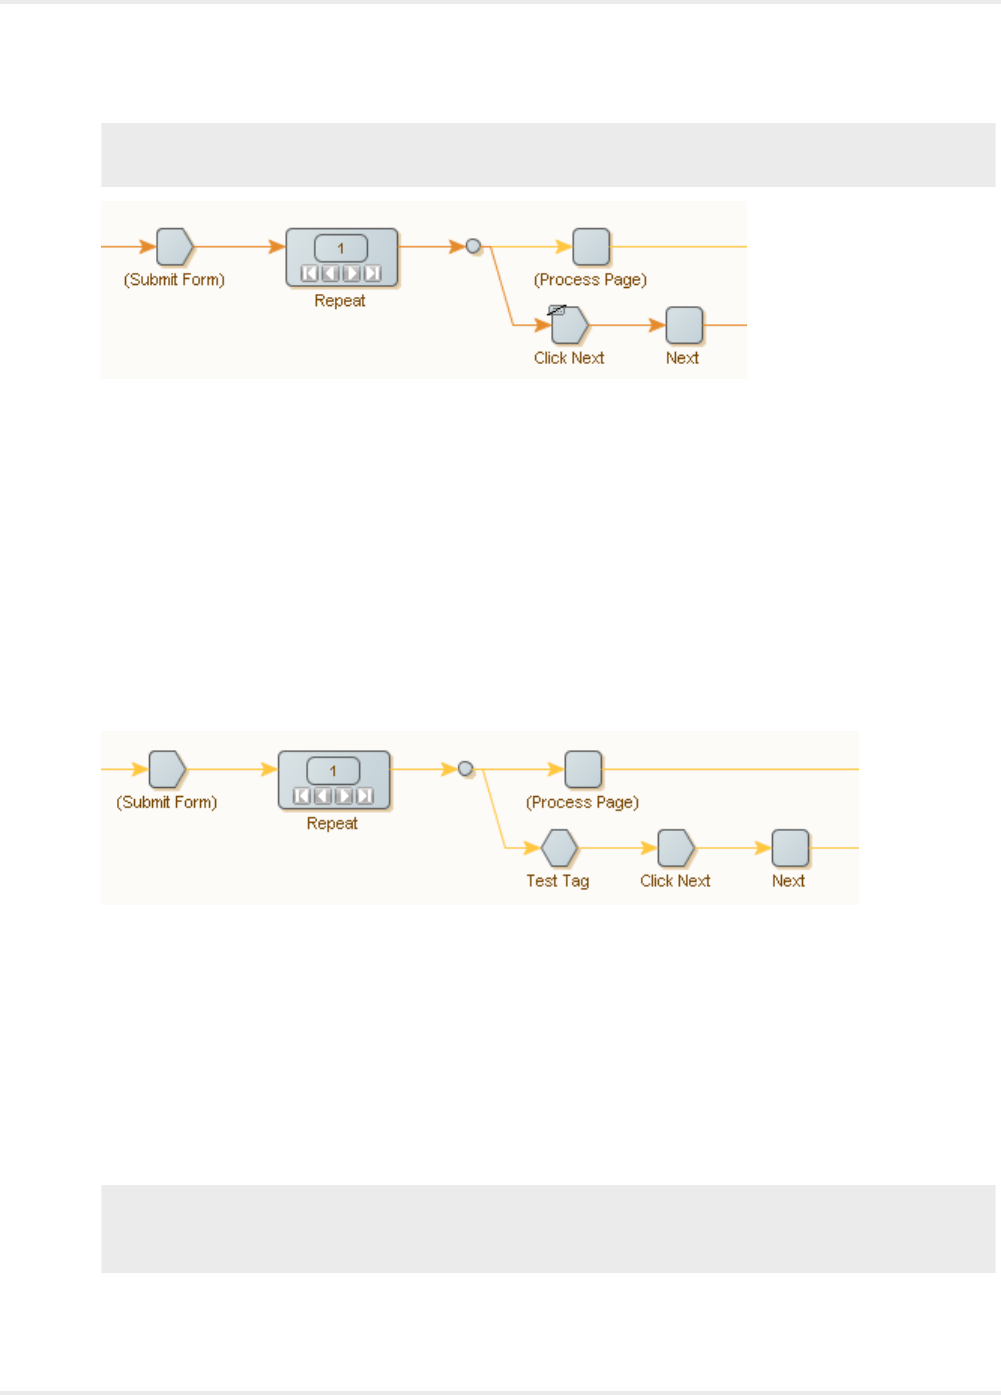
Kofax Kapow User's Guide
Note You can add other loops between the repeat and next steps to extract additional information
from the page, as needed.
Here, like before, we are looping through the result pages from a search request, symbolized by the
Submit Form step.
The form submission step will output the first result page, which we give to the Repeat action. In the
first branch from the Repeat action, we process the current page. In the second branch, we load the
next page by clicking its link. The Next action sends the page back to the Repeat action, which will
output it in the next iteration. When the last page is reached, the Click action generates an error. To
do this, the Click step is configured to terminate the loop. In the Click step, this is done in the Error
Handling tab by setting the Then property to Break Loop.
4. To terminate the loop, In the Error Handling tab, set the Then property to Break Loop.
If the process does not find a Next page, the process terminates.
See Handling Errors for more information.
An alternative way of handling the last page is shown in the following robot excerpt:
You can use a Test Tag action in a second branch to detect when the last page has been reached.
The Test Tag action checks that the page contains a next-page link, for example by looking for an
<a>-tag containing the text Next. If the page contains such a link, we load this page and give it to the
Next action. When the last page is reached, the Test Tag action stops execution down the second
branch, and no new page is given to the Repeat action, causing the loop to end.
Finding the link to the next page can be tricky. A common mistake is to find the previous-page link on
some pages instead of the next-page link, because the layout of the pages changes slightly between
the first page, the subsequent pages, and the last page. Another common mistake is to not detect
the last page reliably. You may have to configure the tag finders of the steps carefully to make things
work (see Using Tag Finders).
Note When you are working with a robot in Design Studio, you may not always be able to step
correctly back and forth between iterations of a Repeat action. If you are not sure whether Design
Studio has gotten it right, click Refresh to update.
107

Kofax Kapow User's Guide
Use Wait Criteria
Wait criteria in the Continue when option are powerful instruments to help you build robots that are faster
and more reliable than in versions prior to 9.6.
Note Wait criteria are available when using the Default browser engine. To use wait criteria, select the
Execute JavaScript option on the JavaScript Execution tab in the Options dialog box.
Every robot step, which requires the browser to start running, can now be configured with a set of criteria
to pinpoint when the processing of an action (such as a click or a page load) has completed enough for
the robot to continue.
The Continue when feature, combined with the built-in algorithm allows for browser steps to run only as-
long-as-needed for the robot to be able to continue. Also the user can now point and click an element on
the page and create a new stop criterion for the browser step.
Wait criteria can be specified in the following step actions:
• Click
• Close Window
• Create Page
• Enter Password
• Enter Text
• Execute JavaScript
• For Each Option
• For Each Radio Button
• Insert Tag
• Load Page
• Loop Field Values
• Move Mouse From
• Move Mouse To
• Press Key
• Raw HTTP
• Replace Tag
• Scroll
• Scroll To
• Select File
• Select Multiple Options
• Select Option
• Select Radio Button
• Set Checkbox
All robots created in Kapow version 9.6 and later have their default waiting set to Page Stops Changing
for 500 ms. You can see this setting on the Advanced tab of the Robot Configuration window. All wait-
criteria-enabled steps have a default No Page Changes for 500 ms wait criterion with the enabled
108
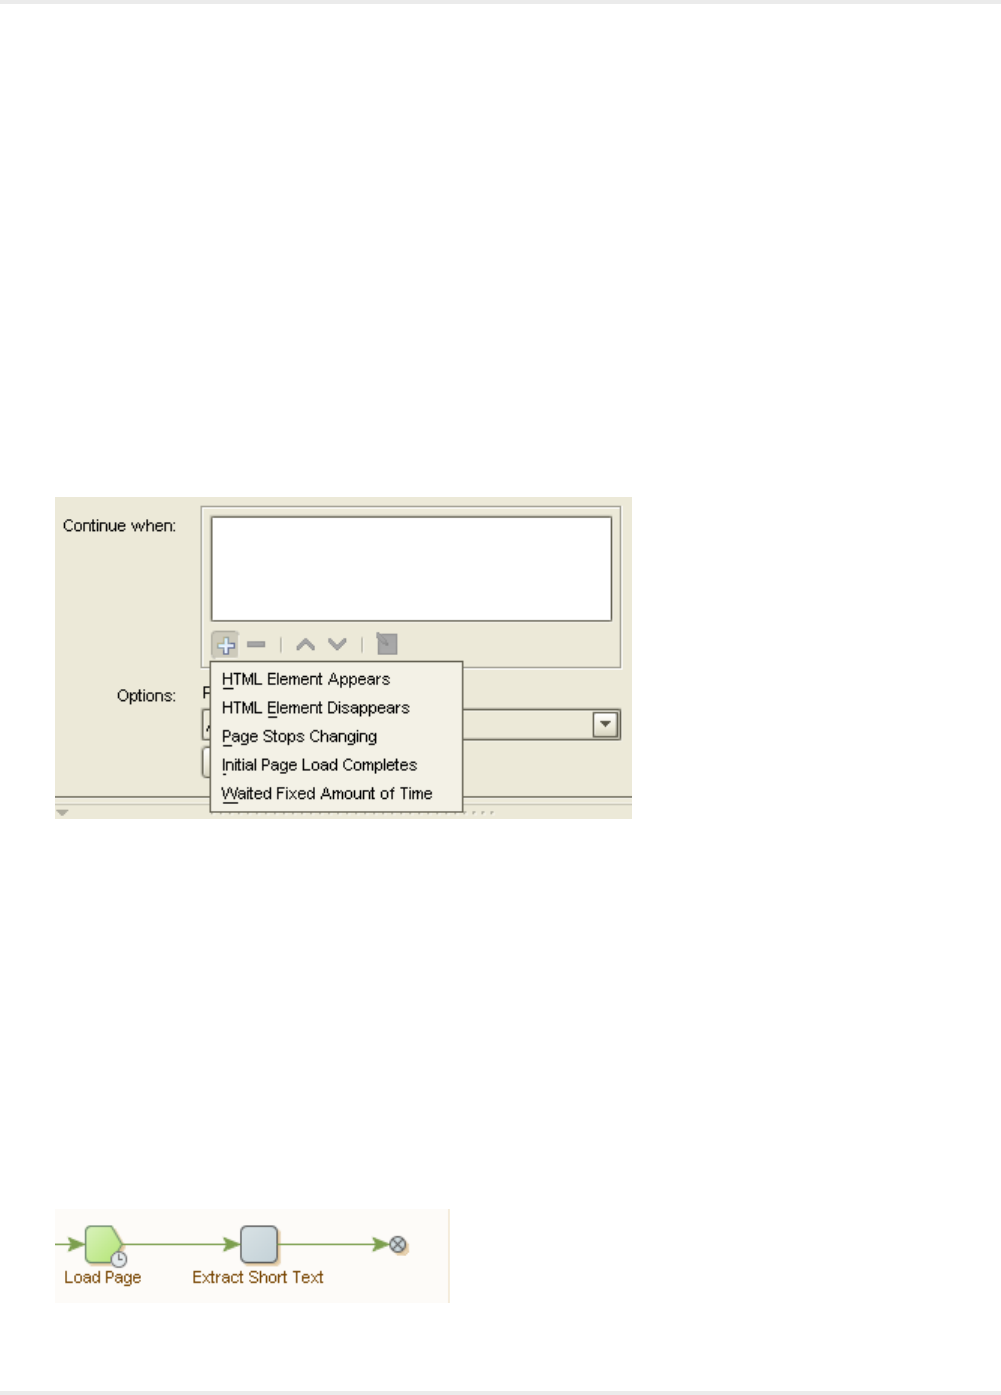
Kofax Kapow User's Guide
Resume button, which can be seen in the Result View. this wait criterion is always grayed out in the Wait
view and always met. All other browser steps have a default Initial Page Load Complete wait criterion with
the disabled Resume button. This criterion is also always grayed out in the Wait view and always met.
If you migrate the Default browser engine robot to a Classic browser engine robot, the following rules are
applied:
• If a step in the Default browser robot has a specified wait criteria, this step in the Classic browser robot
is set to Wait Real-Time for Timer Events=true
• If a step in the Default browser robot has Legacy timing, in addition to Wait Real-Time for Timer
Events=true, this step in the Classic browser robot has Max Wait for Timer Events set to the time
specified in Legacy timing.
• If you migrate the same robot back to the Default browser robot, wait criteria are not restored.
Adding Wait Criteria
To specify a wait criterion for a step, click + in the Continue when field and select a criterion:
To add Wait criteria from the Browser and Source view after execution of a wait-criteria-enabled step,
right-click the browser or source view, choose Wait for from the menu, and select a criterion. The step
is re-executed after the criterion is added, which is shown by the Re-execute step button in the wait
criterion configuration window.
Once the criteria are added, you can add, remove, move up, move down, and edit wait criteria using the
panel under the list. Right-clicking a wait criterion in the Continue when list, opens an option menu to
copy, cut, and paste a criterion.
You can add more than one wait criterion to a step. If you have several wait criteria, execution stops when
any wait criterion is met. You can have several met wait criteria such as if you are waiting for two HTML
elements that appear on the same load, or if you are waiting for an element on the main frame, and Initial
Page Load Completes is set.
If adding a wait criteria to a wait-criteria-disabled step from a shortcut menu, the criteria is added to the
previous wait-criteria-enabled step. For example, if you try to add a wait criterion after the Extract step as
in the following example:
109

Kofax Kapow User's Guide
the criterion will be added to the Load Page step.
Wait View
The Wait view shows the results of wait criteria execution as well as disabled wait criteria.
Right-clicking a criterion in the list opens a shortcut menu. You can enable, disable, and delete a criterion
as well as open properties for the selected criterion. For HTML Element Appears, you can select an
element found in the DOM in the Browser view.
This view also shows whether the page was completely loaded. If the page is loaded completely, the
Resume button is disabled. If the page is not completely loaded, because of the short timeout, the
Resume button is disabled and you need to extend the timeout.
The Resume button in the Wait view is used to resume the browser operation after a wait criterion is
met. If you have several wait criteria and one of them is met, clicking the Resume button marks the met
wait criteria with a grey sign and the browser continues working until the next wait criterion is met. Once
all criteria are met, clicking the Resume button starts loading the page during the time specified in the
Timeout for Each Attempt option in the Options dialog box.
Note The Resume button is enabled for wait-criteria-enabled steps.
For default wait criteria you can click the Resume button as many times as you want. For non-default
wait criteria, you can click the Resume button only once.
If a wait criterion is displayed without an icon, the criterion is not met.
Wait Criteria Properties
Each wait criterion except Initial Page Load Completes has its settings. To configure a wait criterion, either
double-click a criterion in the Continue when or Wait view, click in the Continue when view or right-
click a criterion in the Wait view and select Properties.
Disabling Wait Criteria
Wait criteria can be disabled and enabled in its configuration window. By default all criteria are
enabled. To disable a wait criterion, clear the Wait criterion enabled check box. When a wait criterion
is disabled, it is not taken into account during the step execution.
Note You can right-click a wait criterion and use the shortcut menu to disable and enable a criterion.
After you disable or enable a wait criterion, the previous step is re-executed.
110

Kofax Kapow User's Guide
Ignore All Pending Loads When Met
Each wait criterion except Initial Page Load Completes has the Ignore All Pending Loads When Met
option that stops loading a page when a wait criterion is met. This option can help in cases when a
wait criterion is already met, but timers continue execution and loading does not stop. This option
is not selected by default. If the browser was stopped by this option, a warning sign is added to the
green icon in the Wait view.
HTML Element Appears
This criterion is met when a specified HTML element is present in the DOM tree. This criterion
configuration is similar to the Tag Finders tab in "Step Configuration", except for two elements in the
Found Element Must be group:
• Enabled: If this option is selected, execution must stop when result = !element.disabled;
• Visible: if this option is selected, execution must stop when result = style.display !== "none"
&& style.visibility !== "hidden";
If HTML Element Appears criterion is met, it is marked in the Browser and Source views when you
use the Select in Browser View command on the Wait view option menu.
HTML Element Disappears
This criterion is met when a specified HTML element disappears from the DOM tree. This criterion
configuration is similar to the Tag Finders tab in "Step Configuration", except for an additional
property: Initial element Detection that contains two options.
• If you select Element is Found on Page option, the robot waits until an element appears on the
page and only after that the robot waits for the element to disappear from the DOM tree.
• If you select Wait for Fixed Amount of Time option, the robot waits the specified time and then
verifies if element exists in DOM.
• If the element is present in the DOM tree, the robot waits until the element disappears.
• If the element is not present in the DOM tree, the wait criteria is met and the robot proceeds to
the next step, even if the element has not appeared in DOM since the beginning of page load.
Page Stops Changing
This criterion is met if the DOM tree is not changing for the specified time. To set the time, open the
criterion properties and specify a timeout in milliseconds in the Timeout (ms) text box.
Initial Page Load Completes
This wait criterion is met when the initial page load completes similar to the Javascript onload event.
Note Though this criterion does not have the Stop All Loads When Met option, by default the
loading stops when all loads are met.
Waited Fixed Amount of Time
This wait criterion is met when the execution is waited for a specified time. To set the time, open the
criterion properties and specify a time in milliseconds in the Wait (ms) text box.
Old Robots in Kapow 9.6 and Later
When you open your Default Browser robots created in Kapow version prior to 9.6, you can see the
following Default Waiting settings on the Advanced tab of the Robot Configuration dialog box.
111
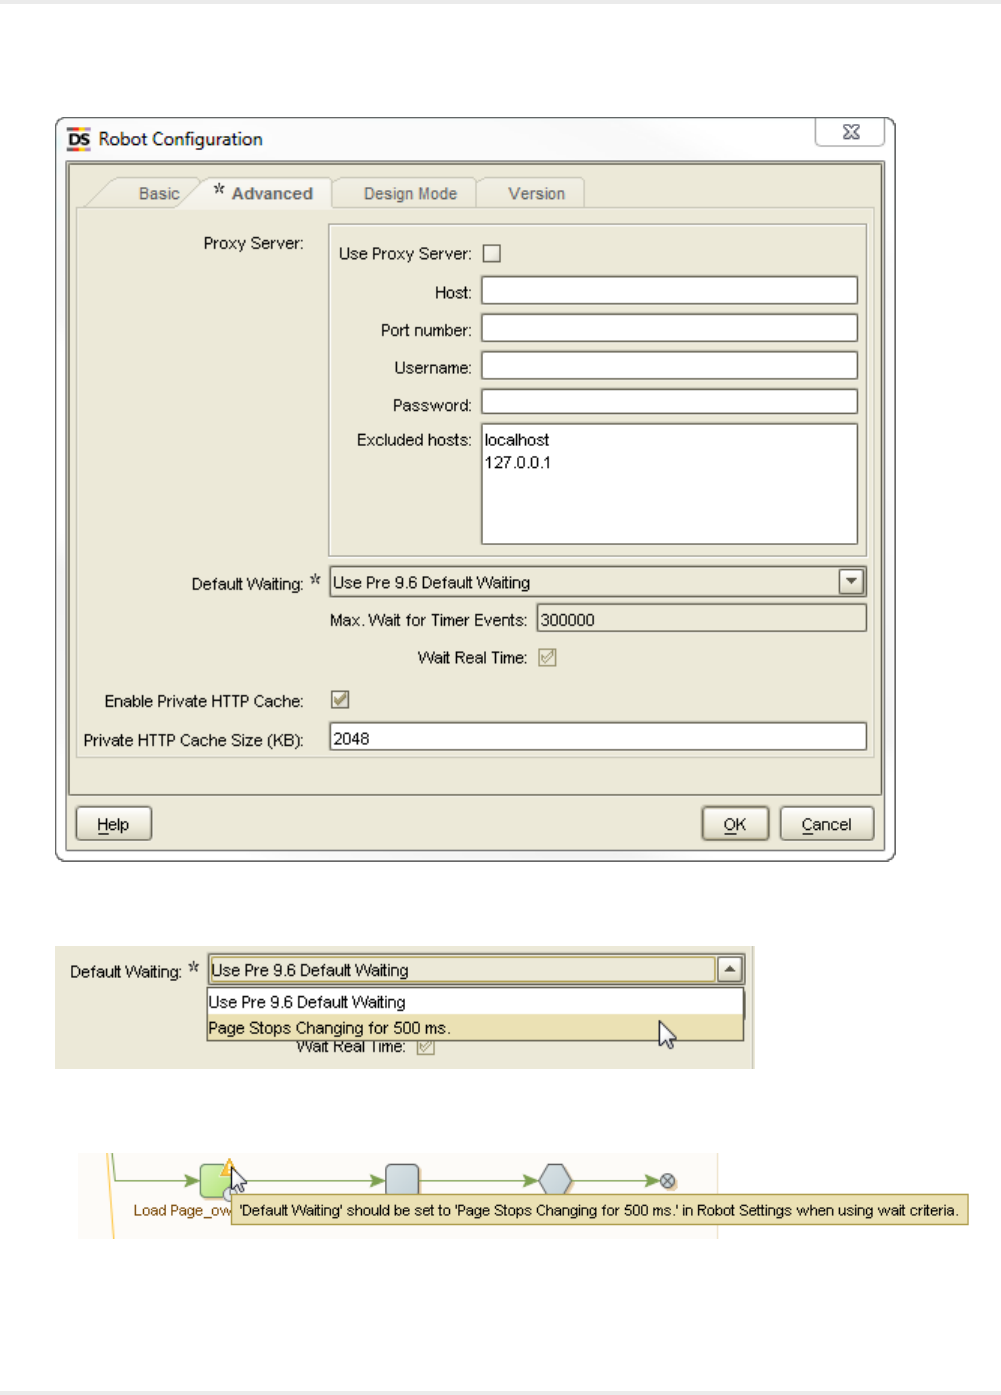
Kofax Kapow User's Guide
Default Waiting settings for Robots from previous releases is Use Pre 9.6 Default Waiting. For such robots
you can change this setting to Page Stops Changing for 500 ms.
• If Default Waiting is set to Use Pre 9.6 Default Waiting, adding a new wait criterion to a step produces a
warning.
• If Default Waiting is set to Use Pre 9.6 Default Waiting and the step is set to use the Legacy Timing wait
criterion, changing the Default Waiting to Page Stops Changing for 500 ms produces an error.
112
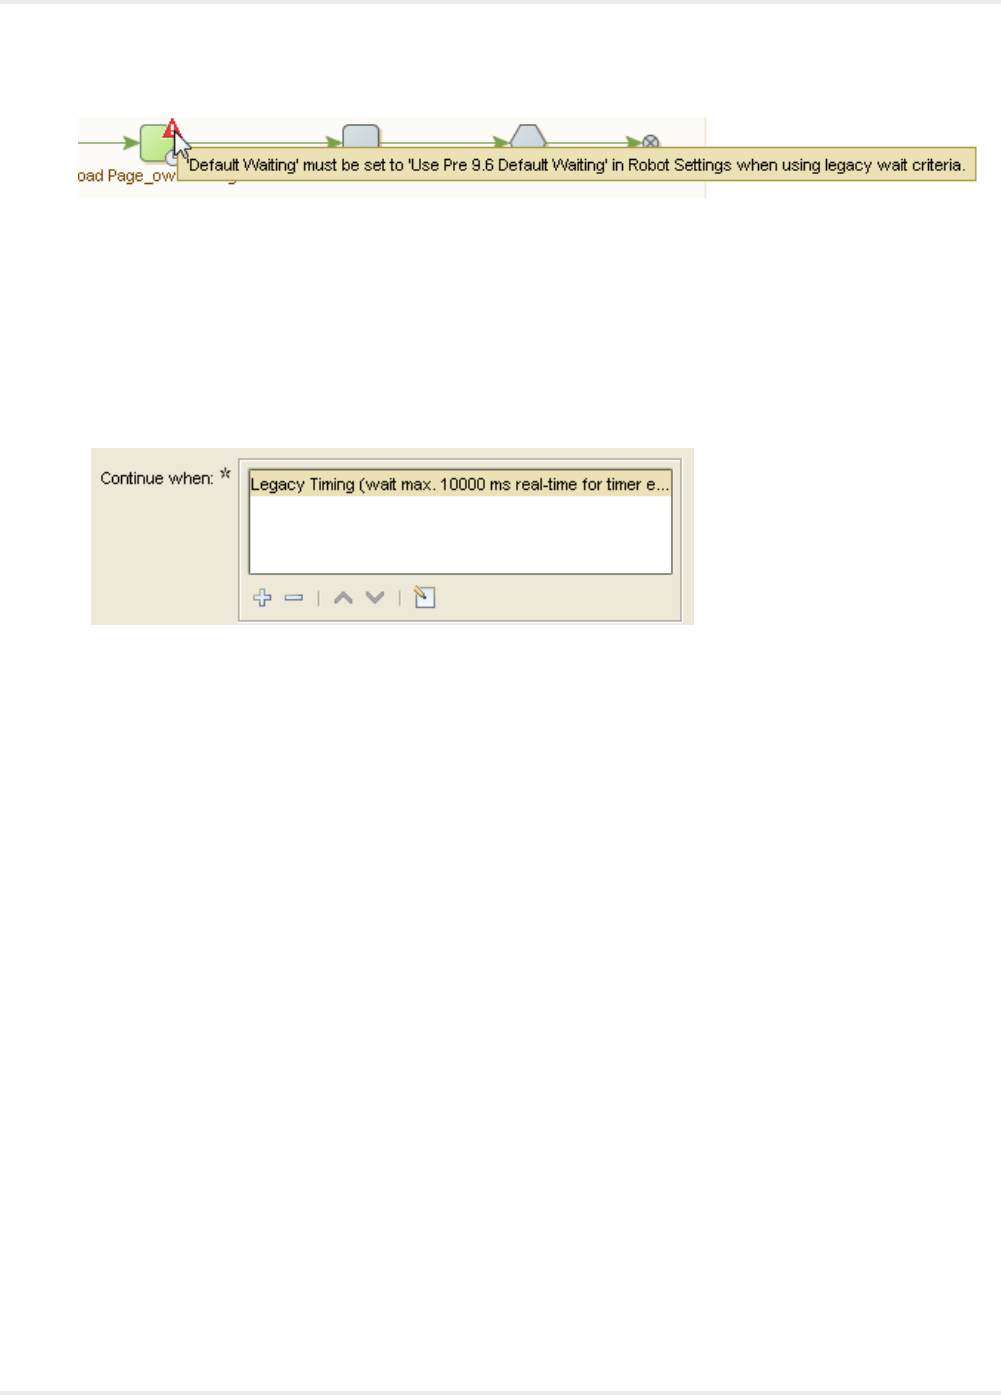
Kofax Kapow User's Guide
Upgrading Existing Robots to 9.6
If you open your robots created in Kapow version prior to 9.6 (9.3, 9.4, 9.5), depending on the Max. Wait
for Timer Events and Wait Real-Time for Timer Events settings, you must perform different steps to use
new wait criteria in your robots:
Max. Wait for Timer Events and Wait Real-Time for Timer Events settings are not default
If Max. Wait for Timer Events and Wait Real-Time for Timer Events settings are not set as default in
your robots, Design Studio adds a non-editable Legacy Timing criteria to your robot.
This wait criterion is always green after step execution. If you add any new wait criterion, Legacy
Timing is automatically removed and you can take advantage of the new Wait criteria.
Max. Wait for Timer Events and Wait Real-Time for Timer Events settings are default
If Max. Wait for Timer Events and Wait Real-Time for Timer Events settings are set as default in your
robots, you need to perform the following to switch to the new default settings when updating an
existing robot to 9.6: go to the File > Configure Robot dialog box, click the Advanced tab and clear
the Use Pre 9.6 Default Waiting check box. Now you can take advantage of the new Wait criteria in
your robots.
Fixing Page Load
In some cases when a robot uses the Use Pre 9.6 Default Waiting or Legacy Timing options, after loading
the page you get the Page loading completed message, but the page is not completely loaded. This
might happen when previous page loads were aborted. To fix page load, remove the Use Pre 9.6 Default
Waiting option by changing it to the Page Stops Changing option and use a new wait criterion on the step.
Extract Content from HTML
Design Studio has six step actions for extracting content from a tag in an HTML page:
• The Extract action is used to extract text content from the tag, optionally including the HTML tags.
• The Extract URL action is used to extract a URL from a tag attribute containing a URL, and make that
URL absolute.
• The Extract Tag Attribute action is used to extract the value of a tag attribute.
113

Kofax Kapow User's Guide
• The Extract Target action is used to extract binary data such as images and PDF files, but it handles
any kind of binary data.
• The Extract Form Parameter action is used to extract a form parameter from a form URL in the found
tag and then store its value in a variable.
• The Extract Selected Option action is used to extract the selected option from a <select>-tag and then
store it in a variable.
To reformat (or normalize) the extracted content, use the Extract and Extract Tag Attribute actions and
configure data converters in the list.
There are two actions to extract data from various binary data formats, for example, PDF or Flash. These
are different from the preceding actions in that they extract the data and produce an HTML page that
contains the data in a structured form that lets your robot access the data. These actions are used in an
initial step before the actual data extraction, in which you may loop over the produced HTML and extract
text.
• The Extract Text from PDF action is used to extract text from a PDF document contained as binary
data in a selected attribute.
• The Extract from Flash action is used to extract data from a Flash object in a found tag.
Extract Text
1. On the Action tab, select Extract.
2. To extract short text, such as a product name or a price, extract as Only Text.
This extracts the text between the tags.
3. To extract longer text with sections, headings, and so on, you can select as plain text. If you want the
text to appear close to how it appears in a browser, extract the text as Structured Text.
4. To extract with special markup, such as brackets surrounding the headings, select Structured Text.
Structured Text has rudimentary support for special markup.
5. If the markup requirements cannot be fulfilled using the Structured Text option, select Advanced
Structured Text.
This option allows you to set mappings from the HTML tags into your proprietary markup.
Extract Binary Data
Extract binary data using the Extract Target action.
On the Action tab, select Extract Target.
The URL data is loaded and stored in a variable, or directly into a file.
Typically, binary variables are used to store the loaded data. The available types of binary variables
include Binary, Image, PDF, and Session. They are all equivalent except that the Image, PDF, and
Session types allow you to preview the data.
Use the Context Menu in the Page View
1. Right-click the text or tag to extract from, or right-click the link to load from.
2. On the Extraction context menu, select the appropriate option.
114
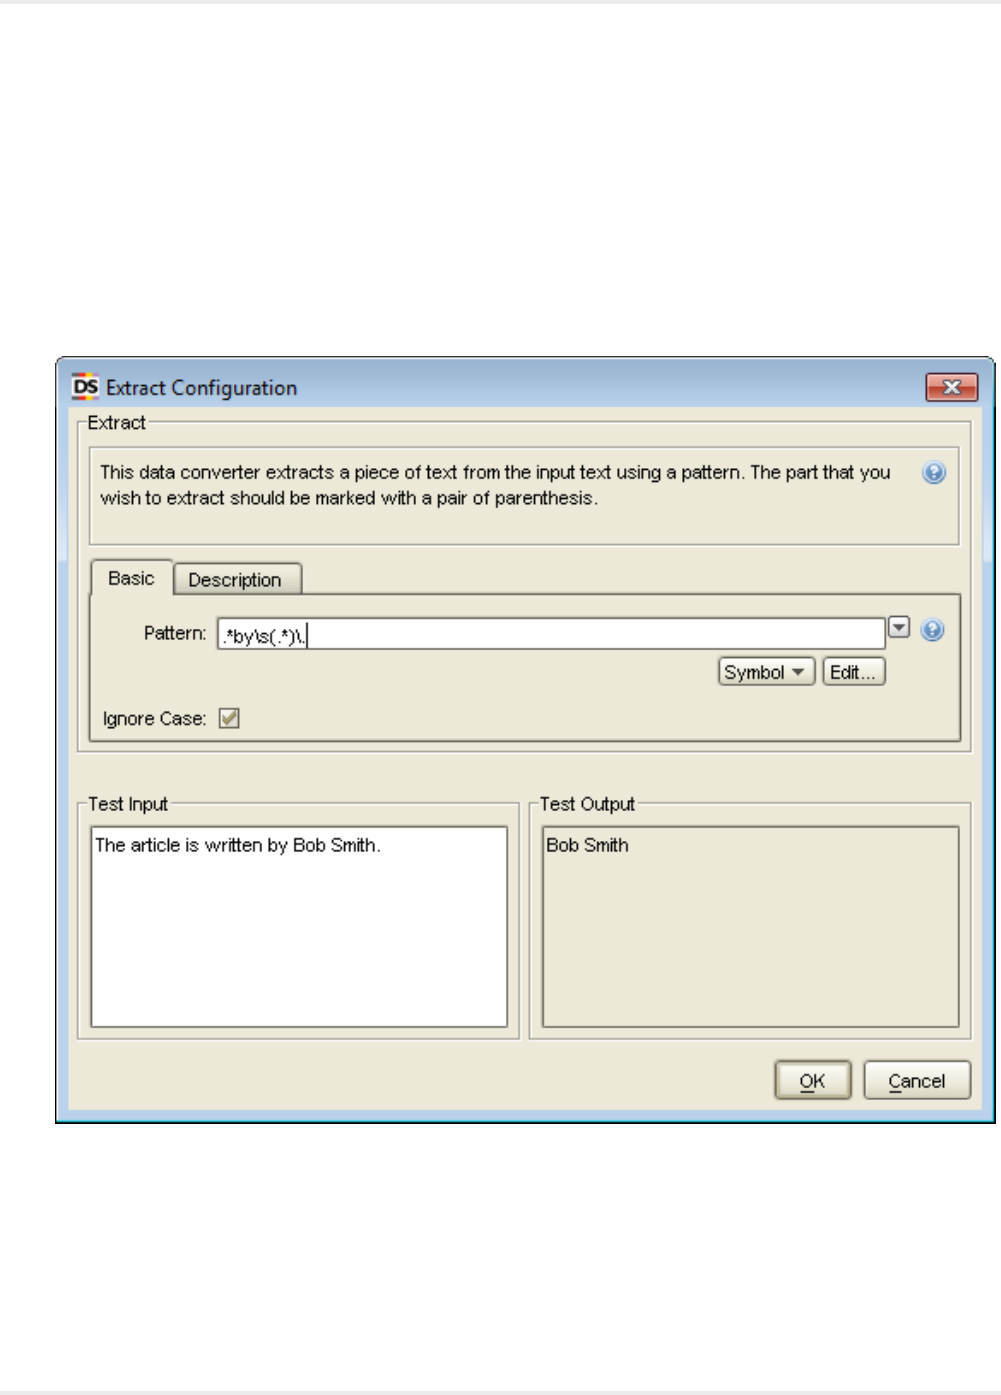
Kofax Kapow User's Guide
Perform Common Tasks
Extracting Only Part of a Text
To extract only a part of the text in a tag, you can use patterns on the text in the tag. For example, you
might want to extract the name "Bob Smith" from the following text: "The article is written by Bob Smith."
To do this, use the Extract data converter (do not confuse this with the Extract step action) and configure it
as described in this topic.
In this example, the pattern used is ".*by\s(.*)\.", which means that the text between "by" and the period
will be matched by the subpattern. For more information, see Patterns.
1. Open Extract Configuration, and select the Basic tab.
2. In the Pattern field, enter the text pattern to extract.
Configure the Pattern property to match the entire text, with the text to extract matched by a
subpattern, enclosed by parentheses.
115

Kofax Kapow User's Guide
Converting Content
To normalize content, use Conversion, such as replacing text with another text. For example, suppose you
want to normalize country codes to their natural language description, such as normalizing "US" to "United
States."
• For plain text conversions, use the Convert Using List data converter.
• For conversions based on patterns or expressions, use the If Then data converter.
Extracting and Formatting Numbers
1. To extract a number from content, add an Extract Number data converter.
2. To perform additional number formatting, use the Format Number data converter.
Extracting the Date from Text
Extracting dates should be done in the same fashion as extracting numbers.
1. To extract a date from text, add an Extract Date data converter to your robot.
Extract Date uses patterns to extract the date. The pattern does not have to match the entire text,
only the date. The extracted date is converted to standard date format.
2. To perform additional date formatting, use the Format Date data converter.
116
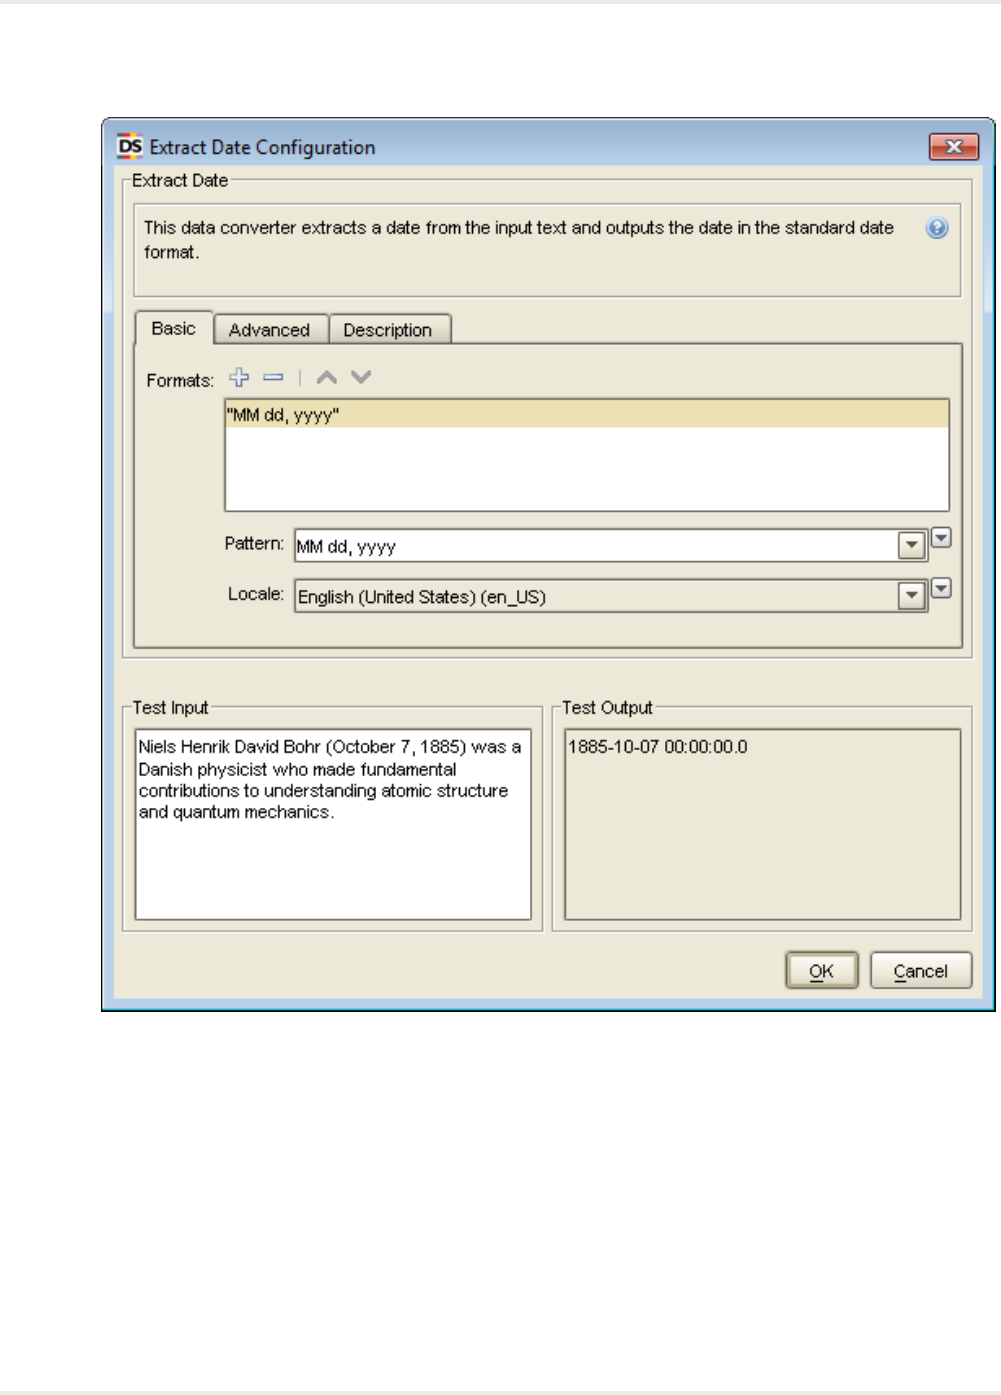
Kofax Kapow User's Guide
See the Simple Date Extraction and Complex Date Extraction tutorials for additional information.
Extracting Only a Subset of the Tags in a Found Tag
Sometimes, you want to extract from a range of tags rather than a single tag.
For example, consider the case of extracting the body text of an article, where the body text is made up
of individual sections, each in their own tag, and where information about the article title and author is
contained in some other tags. To extract only the body text without the article title and author, use the
Extract action to extract the text, and configure the action so that only the range of tags spanning the body
is extracted.
1. On the Action tab, select Extract.
117
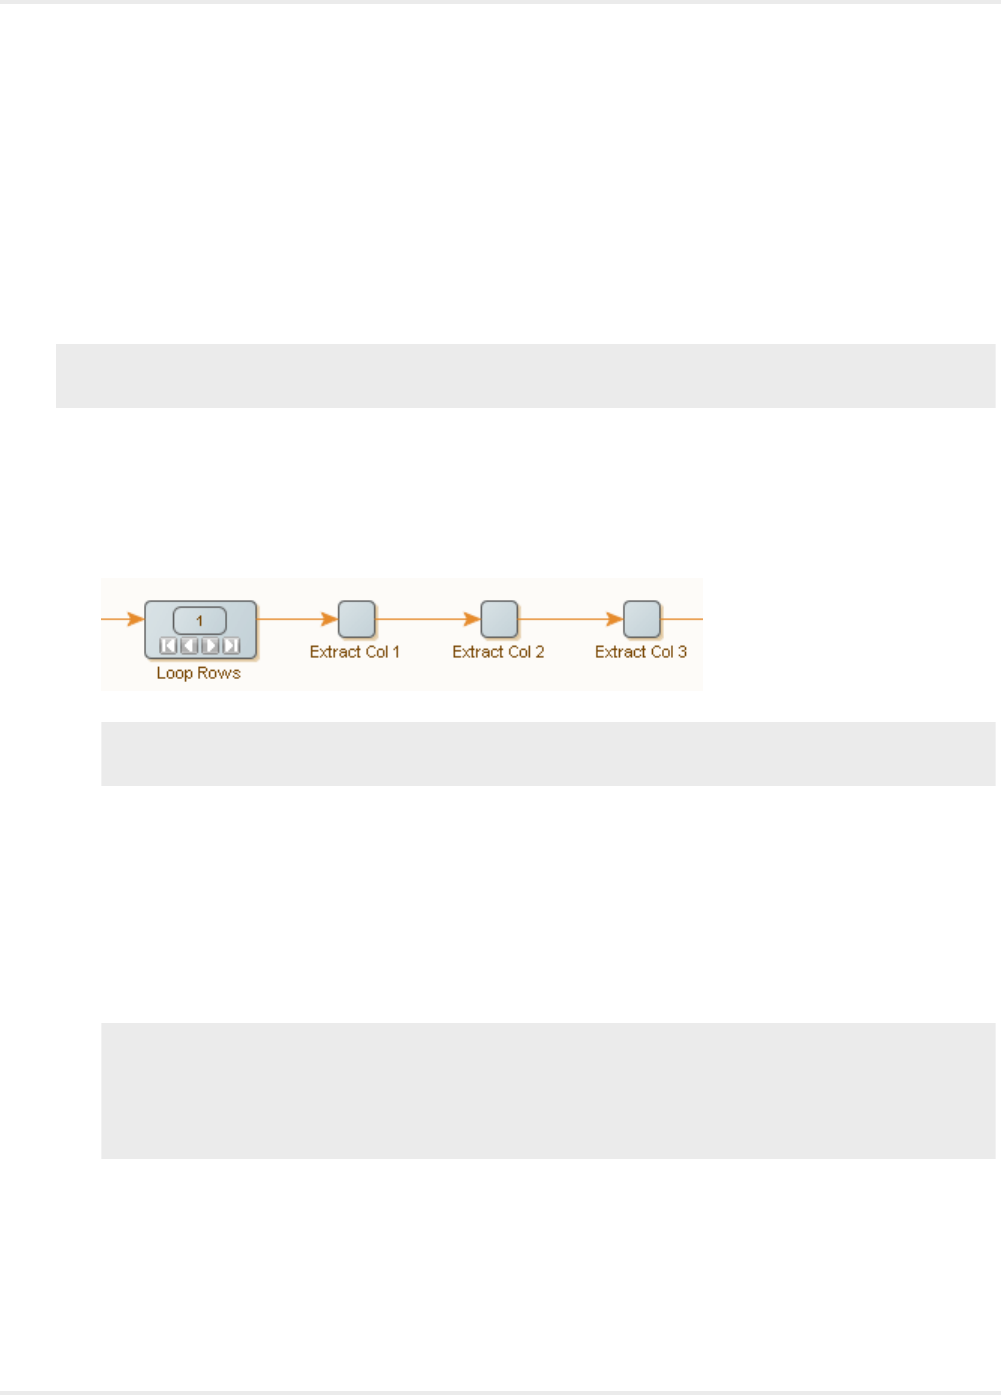
Kofax Kapow User's Guide
2. Specify the first tag in the range.
3. Specify the last tag in the range.
Extract Content From an HTML Table
HTML tables can be irregular in both content and structure. Design Studio has been designed to deal with
such irregularities as described in this topic.
Note The techniques described in this topic are not limited to table content and structure irregularities.
You can also use this technique to handle other tag irregularities.
1. Insert a Loop Rows step in your robot.
2. Configure the Loop Rows step with a For Each Tag action that loops through the <tr>-tags in the
<tbody>-tag of a <table>-tag.
3. Add steps to extract content from a cell (column-wise) in a table row.
Example
Note If the table content is perfectly regular in both content and structure, you can extract the
content as described in How to Extract Content from HTML.
Handle Table Content Irregularities
Cell content in the same table column may differ in format. For example, a cell can be empty, contain
"Bob" (first name), or contain "Bob Smith" (first name and last name).
1. To handle content irregularities, in the extraction step, add an If Then data converter.
2. Configure If and Else If properties to match each format variation.
The corresponding Then properties extract the matching subpattern.
Note The Extract action only allows you to extract one value. In the "Bob Smith" case, which
contains two values (first name and last name), you must create two steps: one that extracts the
first name and one that extracts the last name. Both steps contain an Extract action with an If Then
data converter so that the first step extracts the first name (if any), and the second step extracts the
last name (if any).
118
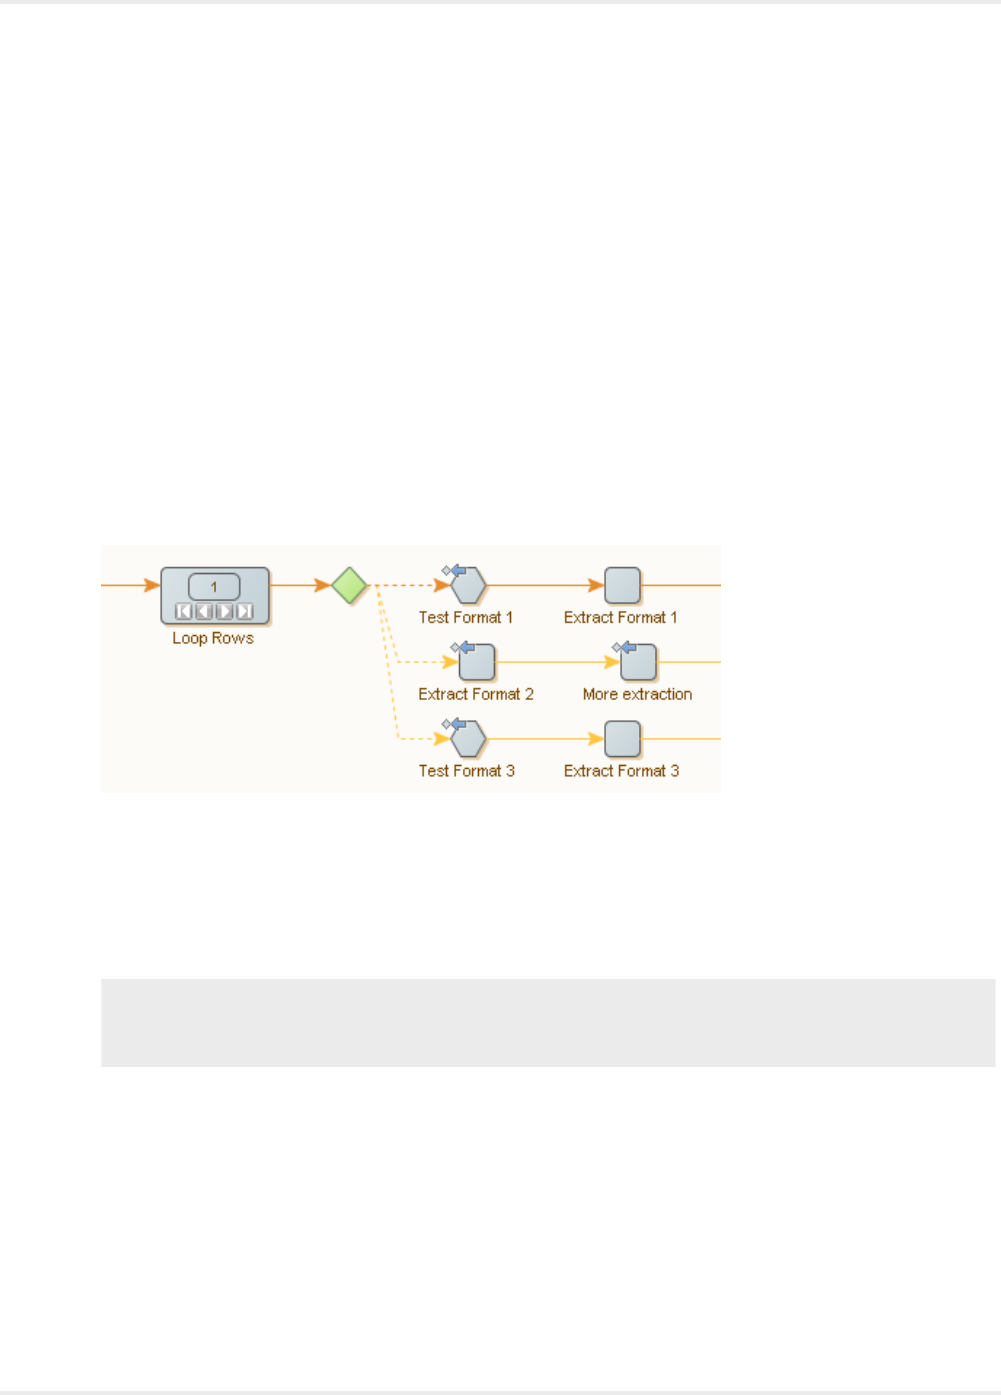
Kofax Kapow User's Guide
Handle Table Structure Irregularities
Table rows may vary in the number of cells they contain. A common way of dealing with such irregularities
is to test the format of each table row. For example, you might want to consider only rows containing a
certain number of cells, or only rows containing a specific text.
1. Follow each For Each Tag step with a Try step.
2. Configure the Try step to loop through the table rows.
Each Try step branch handles one format. This can be done by starting each branch with a
conditional step with "Try Next Alternative" error handling, for example a Test Tag action that accepts
all rows matching some format (written as a pattern).
3. Follow the conditional step with one or more extraction steps that assume the format accepted by the
conditional action.
It is sometimes possible to combine the conditional step and the extraction; to just try to do the
extraction of a format and if it fails, try the next one.
The following robot uses both approaches.
Note that the extraction of the second format is a two-step process. Because Try Next Alternative
error handling is set up on both steps, the third branch is tried if either of the two steps fails. This
represents a fairly complicated condition on the second branch.
When this robot is run, each branch is executed in turn until one succeeds. This implies that the
conditions in later branches do not have to repeat the conditions from earlier branches; it is known
that they failed.
Note You are not required to separate the branches beyond the conditional steps. If two or more
branches share extraction steps, you may want to merge the branches after the steps that are
different.
Local Files Usage in Robots
You can use Robots to load many types of files including HTML, Excel, CSV, and regular text files. This
enables robots to extract data from a variety of sources.
• The following file types can be loaded natively by robots: HTML, XML, Excel, and JSON.
• Other file types can be loaded but are converted to HTML before being handled by the robot: plain text,
CSV and PDF.
119

Kofax Kapow User's Guide
There are two procedures to load file types. If the file is located on the Internet, it is loaded using the
Load Page action, specifying the URL of the file or using the Click action, clicking a link to the file. This
automatically loads the file up in the page view. If the file is located on your system, load the file in
the following way to ensure that the file is also available upon uploading the robot to the Management
Console to be scheduled or added to a Kapplet.
All file types, except PDF, are loaded in the following way:
1. Add a binary type variable to the robot. (O)
2. In the Add Variable form, add a binary type variable to the robot.
Note Other variable types such as PDF and HTML can also be used, but are not as flexible as the
binary type and may not permit user input.
3. Enter a name.
4. In the Type and Initial/Test values, select an option from the list.
5. Select the Global and Use as Input options as required.
Note The difference between checking and not checking Use as Input only matters if the robot is
to be scheduled or used in a Kapplet in the Management Console. An input variable is definable by
the user, and so the file will be interchangeable each time the robot is run. On the other hand, if the
file should be the same each time the robot is run, there is no need to use an input variable.
6. Click Load to load a test file.
If you have not selected Use as Input, this test file is the final file.
A variable with an attribute of the type binary is added to a robot. It is defined as an input variable to
allow users to input other files in Kapplets and Schedules.
An excel file is loaded into the attribute.
7. Next, on the Action tab, select Create Page.
8. In the Contents list, select the file.
This is used to load the file into the Page View. Before the step works, it should be configured to load
the correct type of file.
To load the file content from the binary variable, a Create Page step is used. For the Contents field,
the value selector is set to variable, and the binary type variable is chosen. Afterwards, the step is
configured to load the correct type of content.
9. Click Configure.
10. On the Page Loading tab, Page Content Type, select Same for All Pages.
120
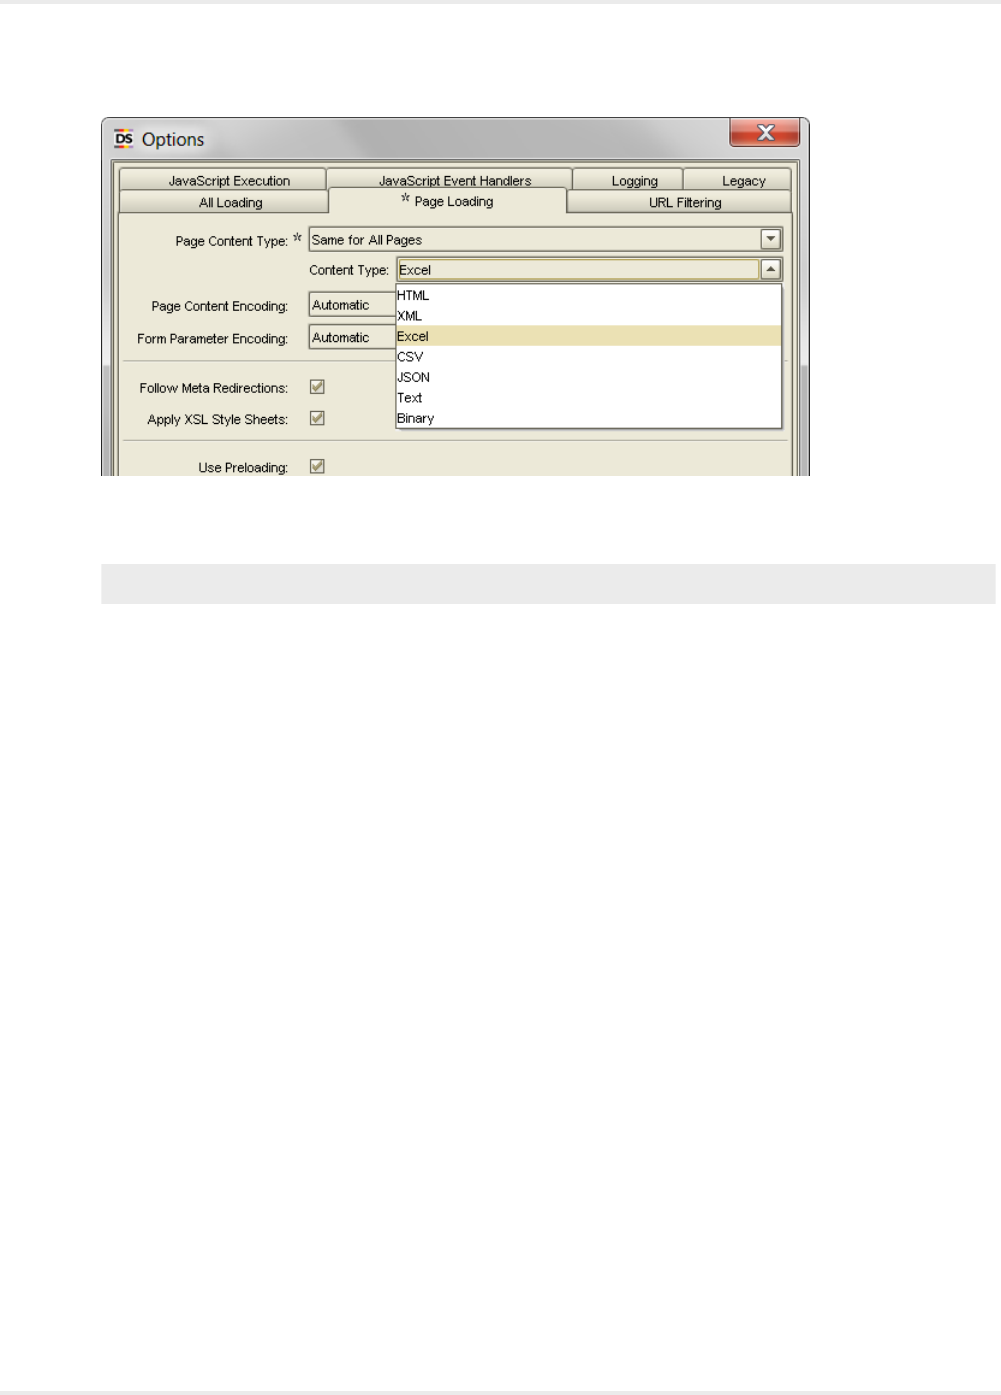
Kofax Kapow User's Guide
11. In the Content Type field, select the type of content you loaded.
The Create Page step loads the file into the Page View.
Note To load PDF files, see Extract from PDF.
To use an input file for a schedule, see Adding a Single Robot in the Management Console.
Load an Excel Page from a Variable
Even though the most common way to load a page in Design Studio is using a Load Page step, a
robot may also receive Excel documents as input in a Binary attribute. You may want to load the Excel
document into the robot to loop and extract data from Excel documents.
1. In your robot workflow, insert a Create Page step.
2. Configure the step to get its content from a Binary attribute.
3. On the Create Page step, Options configuration, Page Loading tab, set the Page Content Type to
Same for All Pages.
4. In the Content Type field, select Excel.
121
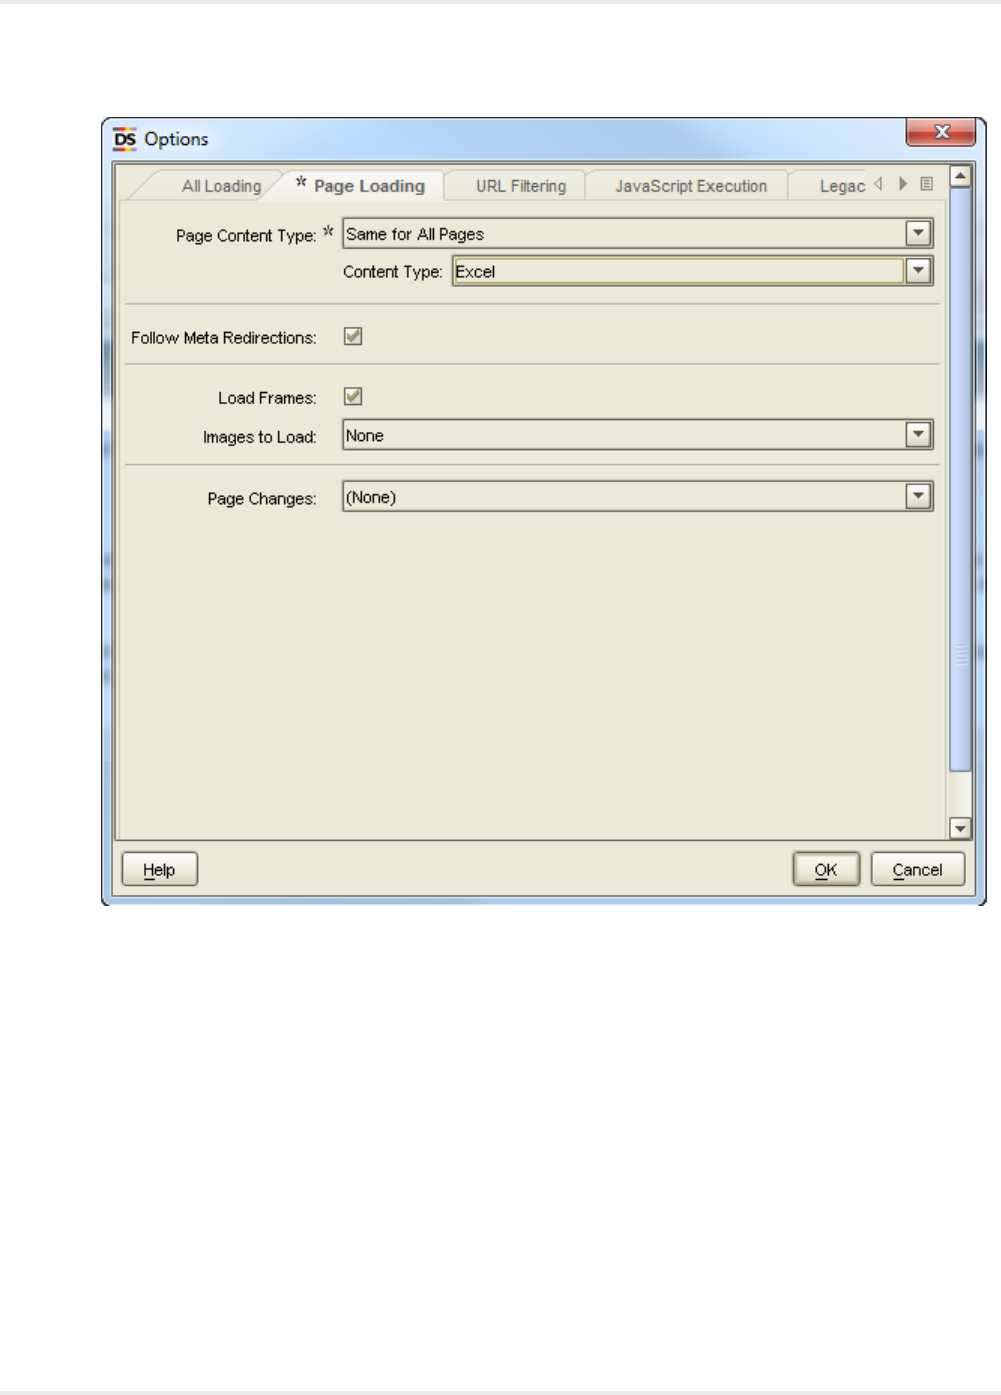
Kofax Kapow User's Guide
The robot can now recognize the Binary data from Excel pages.
Extract Content from Excel
Design Studio has three steps for extracting content from a spreadsheet:
• The Extract Cell step is used to extract text content from the found range.
• The Extract Sheet name step is used to extract the sheet name of the sheet of the found range.
• The Extract As HTML step is used to extract the found range of a spreadsheet as an HTML page
containing a table with the cells of the range into a variable.
For the Extract Cell and Extract As HTML steps you can specify what to extract from the cells. This is
controlled by the value of the Extract This option. The choice here is the same as the View Modes for the
Spreadsheet View. The possible options are described in this topic.
122

Kofax Kapow User's Guide
Formatted Values
The extracted values are what you see in Excel and the values of dates and numbers are extracted
formatted, which means that numbers may have fewer decimals than the actual values of the cells.
Plain Value
The extracted values are the actual values that Excel would show if the values of the cells were not
formatted. For example, numbers would not have rounding of decimals.
Formulas
If a cell contains a formula, it is extracted or otherwise, it is the same value as for the Plain Values option
is extracted.
If you create the steps by right-clicking the Spreadsheet View, the value of Extract This is set to the value
of the selected View Mode. If you set the View Mode to Formulas and then right-click in the page view
and select Extract > Extract Text from the context menu (into a text variable), the Extract This option of
the Extract Cell action step is set to Formulas.
You may need to reformat (or normalize) the extracted content, and the Extract Cell action allows you to
do this by configuring a list of data converters.
In the Spreadsheet view, right-click to create a step.
Select the desired extract step and specify necessary parameters
Extract Values from Cells
Use the Extract Cell step to extract the content of a cell or a range of cells into a variable.
1. On the Action tab, select Extract Cell.
2. Select an option in the Extract This field.
123
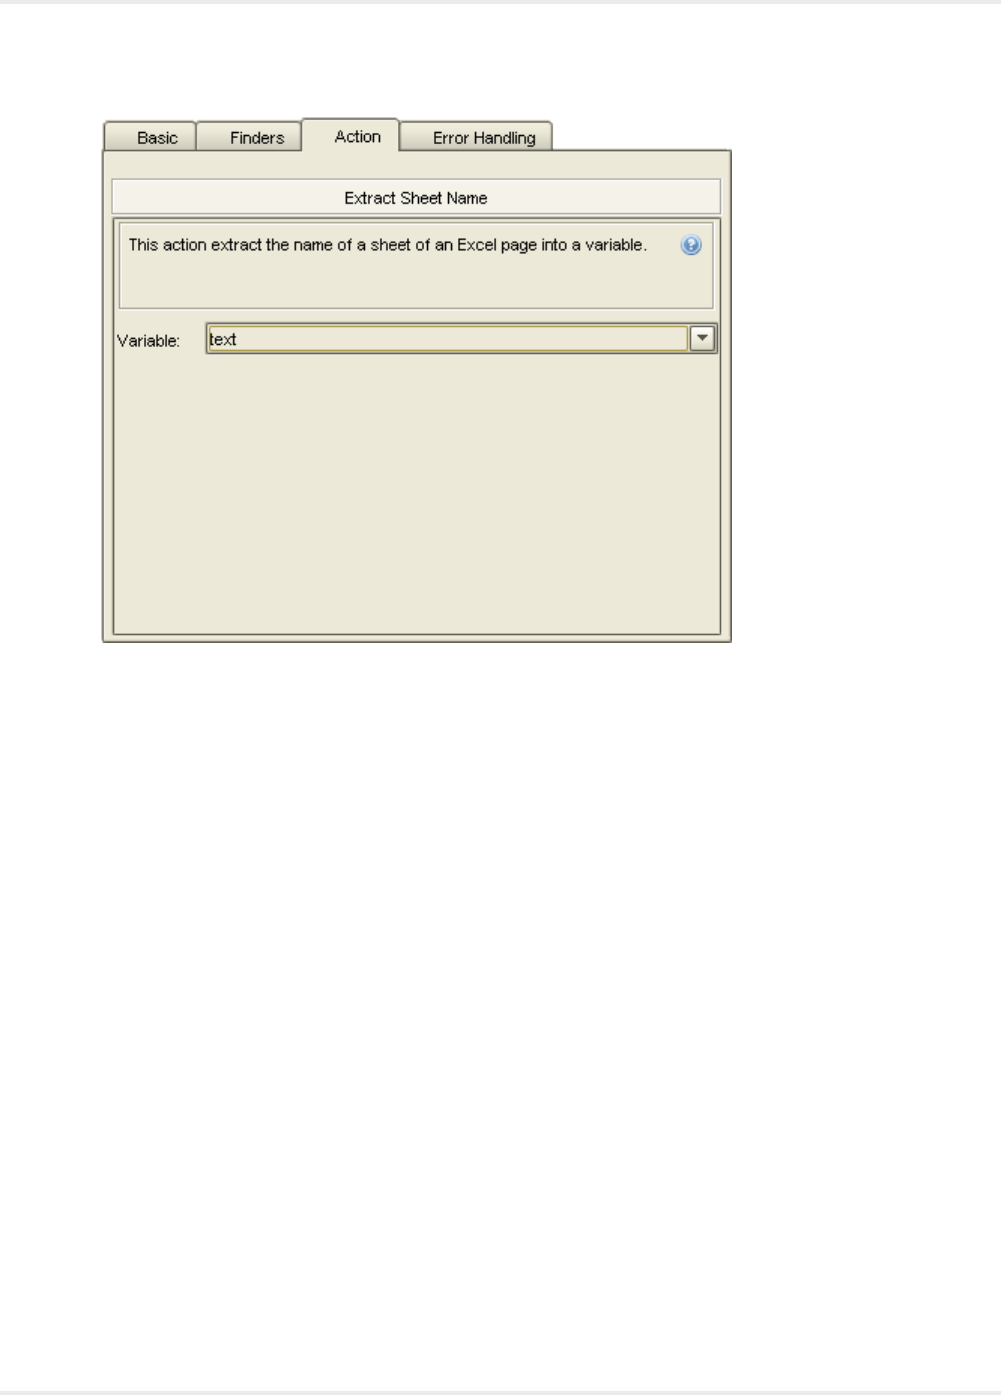
Kofax Kapow User's Guide
If the found range is a single cell, the value of this cell is extracted. If the found range contains more
than one cell, the values of the cells are extracted as text in which the cells are tab separated and
rows are separated by new lines. In both cases, the extracted value stored in the variable is created
by applying the converters to the extracted value.
The value extracted from a cell is essentially the content of the cell in Excel taking the value of the
Extract This option into account. For a blank cell, the value is the empty string, and if a cell is part of
a merged cell such as C4:D6 (created in Excel by merging cells), the extracted value is blank unless
the cell is the top left cell C4 of the merged cells.
Extract a Sheet Name
The Extract Sheet Name step is used to extract the name of a sheet. This step is useful when combined
with a Test Value step to skip a sheet with a given name while looping over all sheets. This step is also
useful to extract a sheet name to an attribute of a variable of complex type so that it becomes part of a
returned value.
1. On the Extract Sheet Name step, Action tab, select Extract Sheet Name.
2. In the Variable field, select text.
This action extracts the name of an Excel page into a variable.
Extract as HTML
The Extract As HTML step is used to extract part of a spreadsheet document as HTML source code
stored in a structured text variable, such as HTML type. The extracted code contains the extracted
range (in a header tag), such as Sheet1:A1:H17, which means that the name of the sheet is contained
in the code. The cells of the found range are placed in a table in the generated code. This step is mainly
for obtaining an HTML version of part of a spreadsheet so that it may be returned for the robot and
124

Kofax Kapow User's Guide
presented in a browser. It is also possible to use the step in a robot to create an HTML page with the
extracted code using a Create Page step. We do not recommend using the Extract As HTML step to
convert a spreadsheet into an HTML page to access its content in that way, because it might result in poor
performance of the robot.
Test Cell Types in Excel
To test the content of a cell in an Excel page, first extract the cell content, and then use a Test Values step
to perform the actual test. This is essentially the same as what you would do in other page types, such as
HTML. To determine the cell type of a cell would not be straightforward or even possible by just extracting
the content of a cell and subsequently performing a test on it; for example, there is no way to determine
whether a cell is blank or contains an empty text. Fortunately, Design Studio contains a step to perform
such a test: the Test Cell Type step.
You can test six different cell types. They correspond directly to what you can test for in Excel using
functions such as ISTEXT or ISNUMBER.
Blank
Corresponds to the Excel function ISBLANK.
Text
Corresponds to the Excel function ISTEXT.
Number
Corresponds to the Excel function ISNUMBER. This type also includes dates since they are represented
as numbers in Excel.
Logical
Corresponds to the Excel function ISLOGICAL, which correlates to the type Boolean in Design Studio.
Error
Corresponds to the Excel function ISERROR.
Formula
Corresponds to the Excel function ISFORMULA.
The Test Cell Type works like any other test step. It tests that the cell type in the found range matches
a specified type, and based on the result, determines whether to continue along the branch or skip the
following steps. The step is described in further detail in Test Cell Type.
An important property of the Test Cell Type step is that it can test the type of many steps simultaneously.
For example, consider how you would test an entire empty row. This test could be useful when looping
over a document containing several identically structured tables separated by blank lines. The following
figure shows how to configure the Test Cell Type step. In this example, the branch following the step is
skipped, if the cells in the found range are all blank.
125
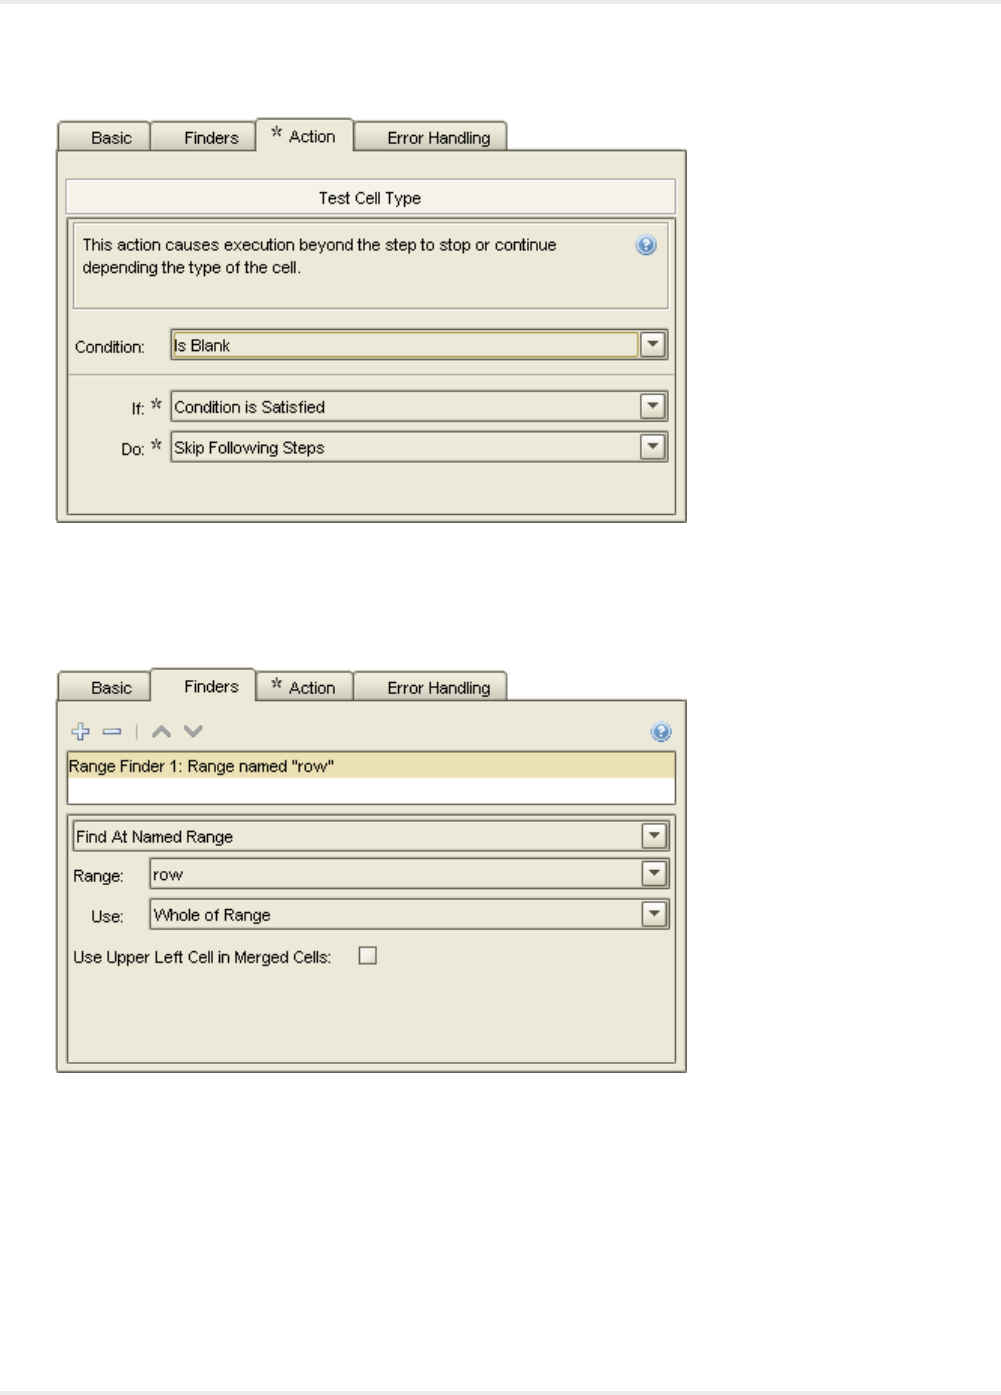
Kofax Kapow User's Guide
The following figure shows how to configure the Range Finder such that it finds an entire row. In this case
we have a named range called "row" that is set by a Loop in Excel step looping over rows and occurring
before the Test Cell Type step. We have specified that the result should the entire row, by selecting Whole
of Range for the Use property.
Loop in Excel
Looping in Excel is in many ways similar to looping in HTML, but much simpler due to the simpler
structure of Excel. Essentially you may loop over all the sheets in a document or you may loop over the
cells of a sheet either by looping over the rows, columns or cells of a found range. To loop in Excel you
use the Loop in Excel step. This step has many options in common with steps that loop in HTML, such as
"First index" and "increment," which are described in detail in the reference documentation.
126
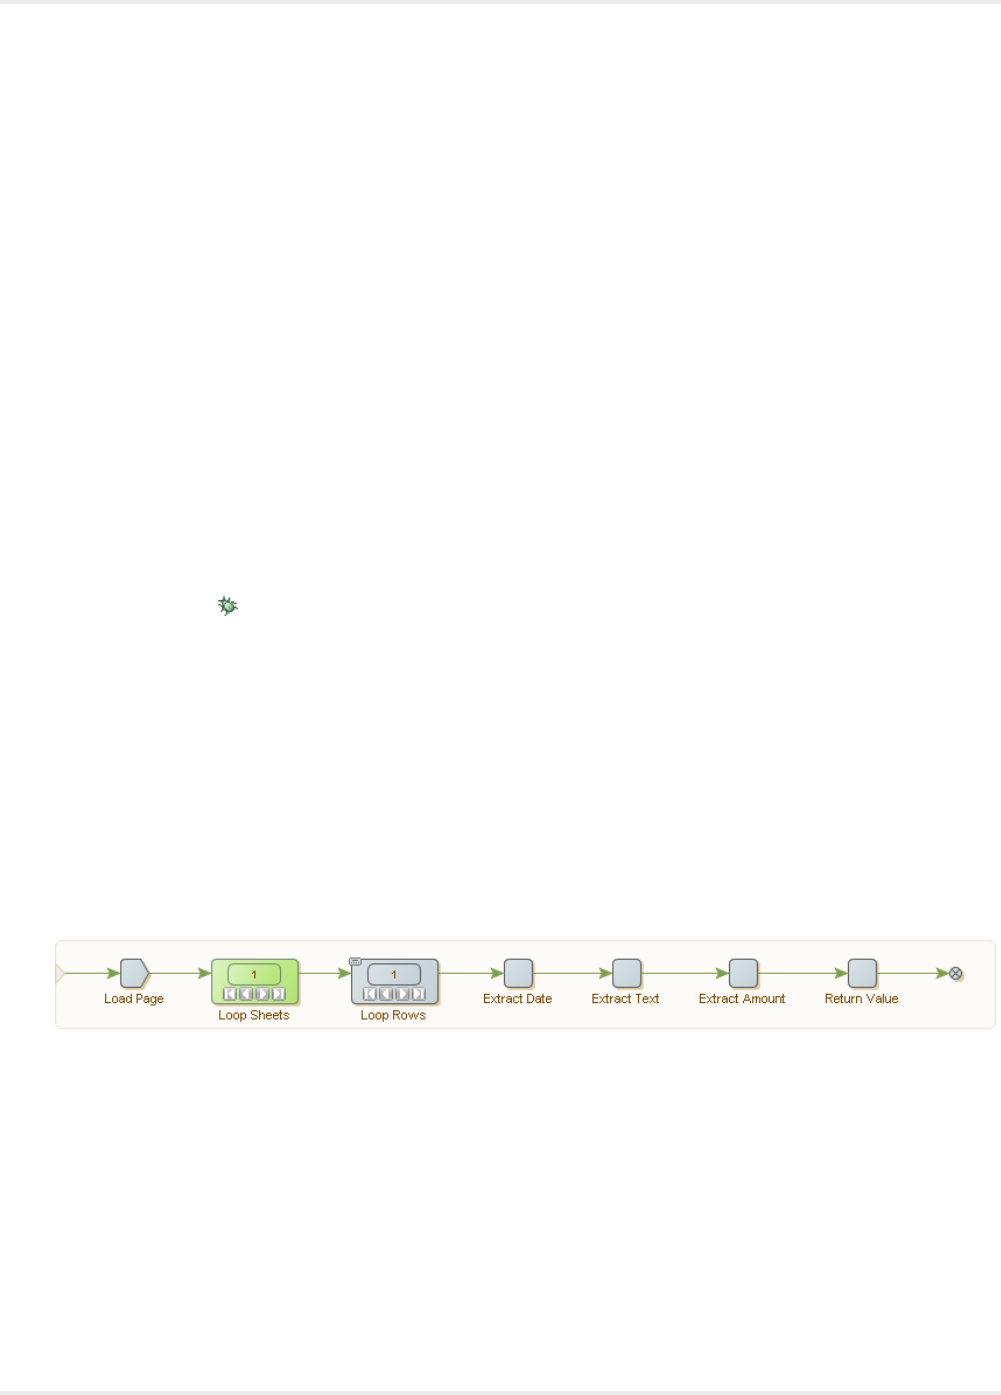
Kofax Kapow User's Guide
You can insert a loop step that loops through all the rows in a table.
1. In the "Using a robot which loads from an Excel document," click the upper left corner of the Excel
view to select the entire spreadsheet.
2. Right-click inside the selected area.
A list of options appears.
3. Select Loop > Loop Table Rows > Exclude First Row.
This excludes the header row of the spreadsheet from the search. The Loop in Excel step now sets
the first cell in the loop as the named range.
It is now possible to extract from the named range, and because of the loop, corresponding values
are extracted from the other rows.
4. Right-click the top cell in a column just below the header and select the information to extract. For
example, to extract a series of identifies, right-click the first cell in the ID column and select Extract,
Extract Number, ID.
A wizard appears with the Format Pattern correctly configured.
5. Click OK.
The wizard closes.
6. Repeat steps 4 and 5 for each Named Value to extract.
7. Click Debug to switch to debug mode.
8. On the toolbar, click Run.
The values appear in the results.
See the Excel tutorial for more information.
Loop Over Sheets and Rows
You can create a robot to loop in an Excel document with multiple sheets containing tables and with the
same type of data. For example, each sheet in the Excel spreadsheet to display account information for
a separate month of the year. In this case, you would have your robot first loop over the sheets and then
over the rows of each sheet. You may also like to handle situations where the document contains a sheet
that does not contain data of the same type as the other sheets, such as a blank sheet. The following
image shows the structure of such a robot.
The first step in this robot is a Load Page step that loads the Excel document from a URL. The robot then
contains a Loop in Excel step that loops over all the sheets of the document. For each iteration of this
first loop step, the robot executes another Loop in Excel step that loops over each row of the sheet. The
step looping over rows has its Error Handling property Then set to Next Iteration, which means that if the
range finder of the step fails to match a range the size of the table, it goes to the next iteration.
This simplified error handling will handle the simple situation where a sheet is blank, but not situations
where a sheet contains a table with entirely different types of data. In general, you would have to insert a
step to extract part of the sheet followed by a step to test the structure. One example could be extracting
the column headers and testing that they have some given structure. The following image shows the error
handling added to a robot.
127
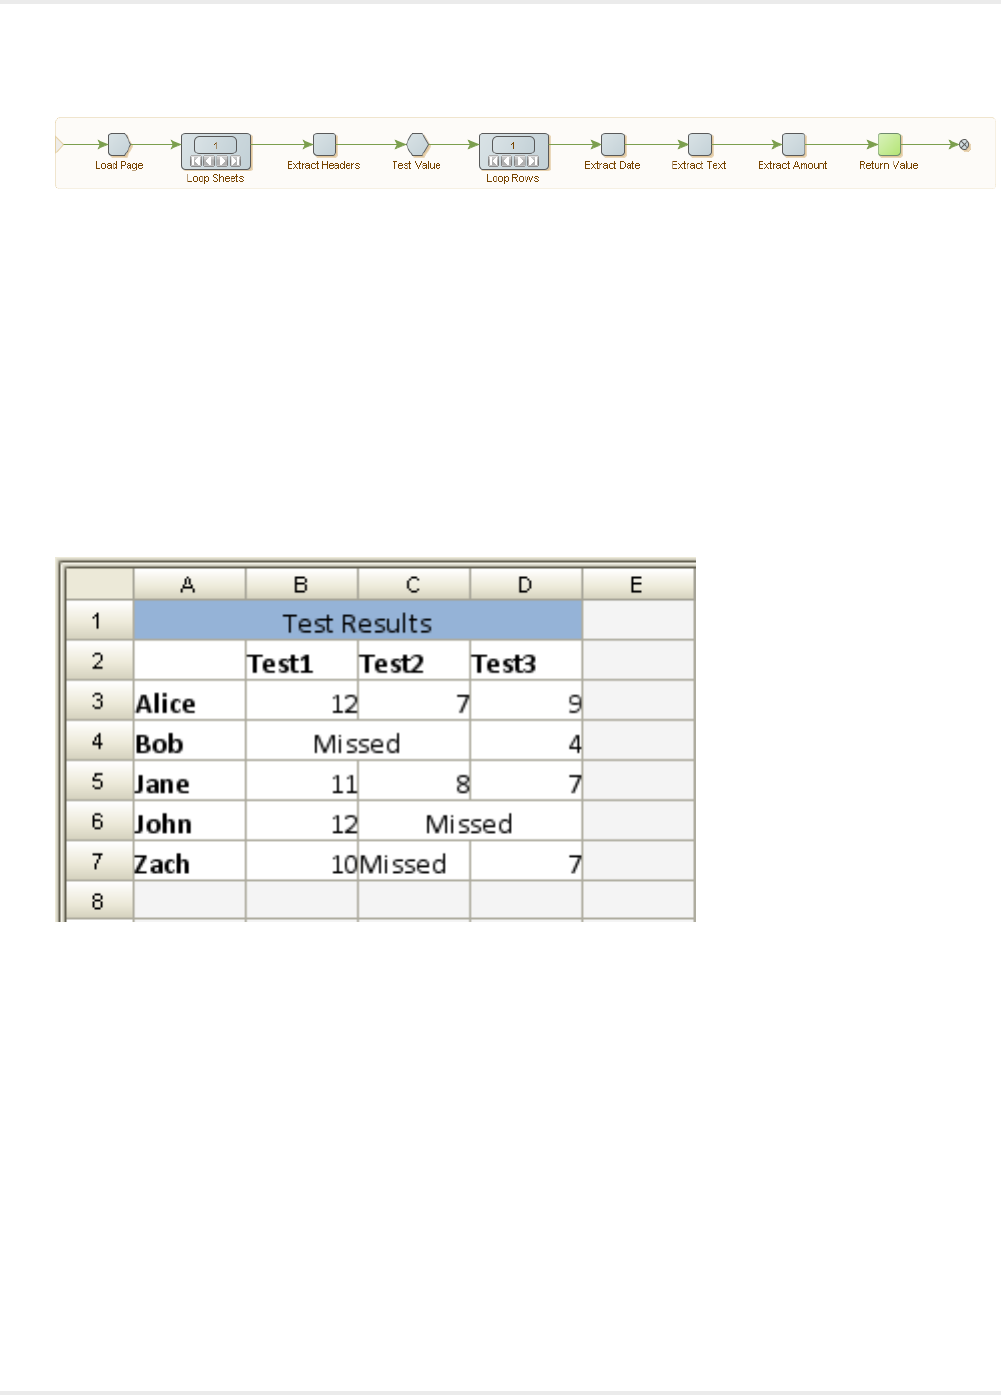
Kofax Kapow User's Guide
In this example, the Extract Cell step named Extract Headers, extracts the first row of the sheet into
a variable and the Test Value step has a condition that tests the value. If the value matches, the robot
executes the next step (the Loop Rows step). If not, the robot skips the following steps; the Do property of
the Test Value step will Skip Following Steps.
Loop Over Merged Cells
A merged cell in Excel is two or more adjacent cells merged into one cell and shown as one. You can
configure your robot to loop over merged cells. The content of a merged cell is stored in the upper left
cell of the cells and all other cells are blank. Looping over a table that contains merged cells can cause
extraction problems. For example, if you look at the following sheet that shows test results for students,
notice that some student have missed their test and in some cases, two tests are shown using a merged
cell.
Looping over the rows to extract the student test results may fail to extract the results correctly when a
student has missed a test since the text "Missed" is not a number. To correct this, you can insert a test
to search for the term "Missed" and then store the value 0 for a failed result. This test does not work for
situations where the cell has merged. In the preceding example, this would work fine for the cell B4 since
it contains the value "Missed," but it would fail to work for C4 since the content would be a blank value.
Instead of having yet another test for blank cells, you can use an If Then data converter on all Range
Finders to identify a single cell inside a merged cell, and return the upper left cell of the merged cell.
1. On the Finders tab, description field, enter Range Finder 1: Column at +2(in range named "row").
2. In the Range field, select row.
3. In the Use field, select Column At Position.
4. In the Column field, select By Index.
5. In the Offset field, enter the integer2.
128
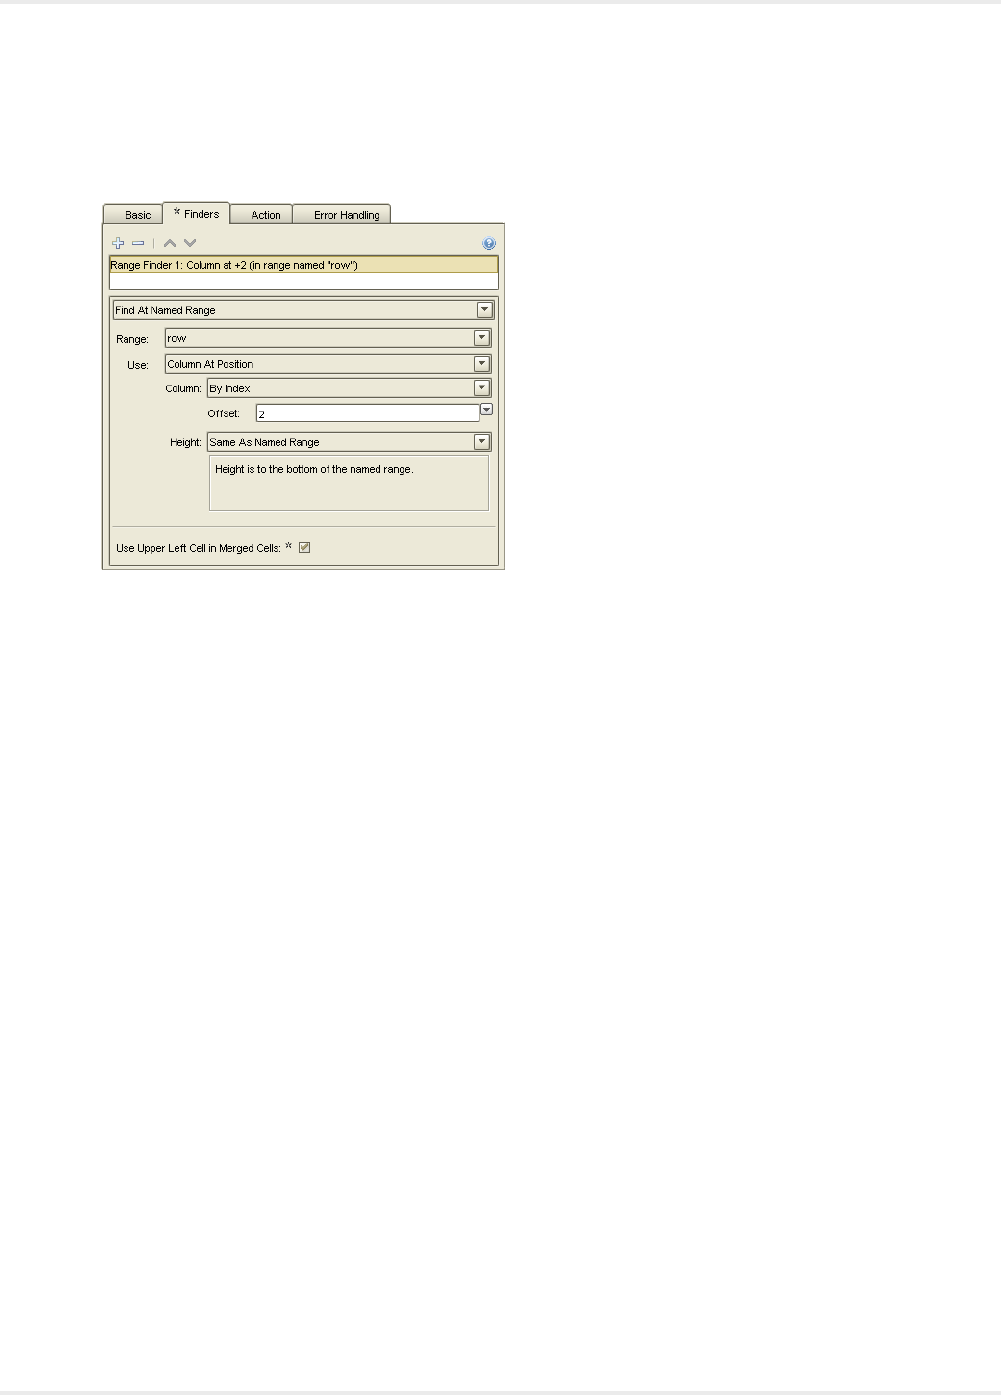
Kofax Kapow User's Guide
6. In the Height field, select Same as Named Range and enter the description, Height is to the
bottom of the named range.
7. Select Use Upper Left Cell in Merged Cells.
8. In the Action tab, Extract This field, select Formatted Values.
9. In the Converters field, enter an If Then statement. For example, if contains "Missed" then "0"
Else INPUT.
The Extract cell tests for the text "Missed" and uses 0 for the result. If Missed is not found it uses the
extracted value.
Work with Variables in the Windows View
The Windows View shows part of the current robot state, such as a loaded HTML page or a JSON
document. Variables or attributes of certain simple types (XML, JSON and Excel) can also be shown in
a tab in the Windows View. When a variable is shown in the Windows View, you may operate on it in the
same way as other documents loaded in the Windows View. For example, you can extract, test, and loop
over, and in most cases you can also modify the variable.
As an example you may want to call a web service that takes some XML as input, and as output also
returns some XML. You may then create the input XML using an XML variable that you modify using a
step action that works on the content of the window showing the variable. When it has the desired form,
you may feed it as input to a web service step action. You can have this web service step action store the
response in another XML variable, which you may then loop over and extract data from.
Open a Variable
To work with a variable (or an attribute) in a window, you must first open the variable in a new window. You
do this with an Open Variable step action.
The easiest way to do this is to right-click the variable in the Variables View and select the menu option
Insert Step > Open Variable.
1. In the Variables View, right-click the variable and select Insert Step > Open Variable.
129
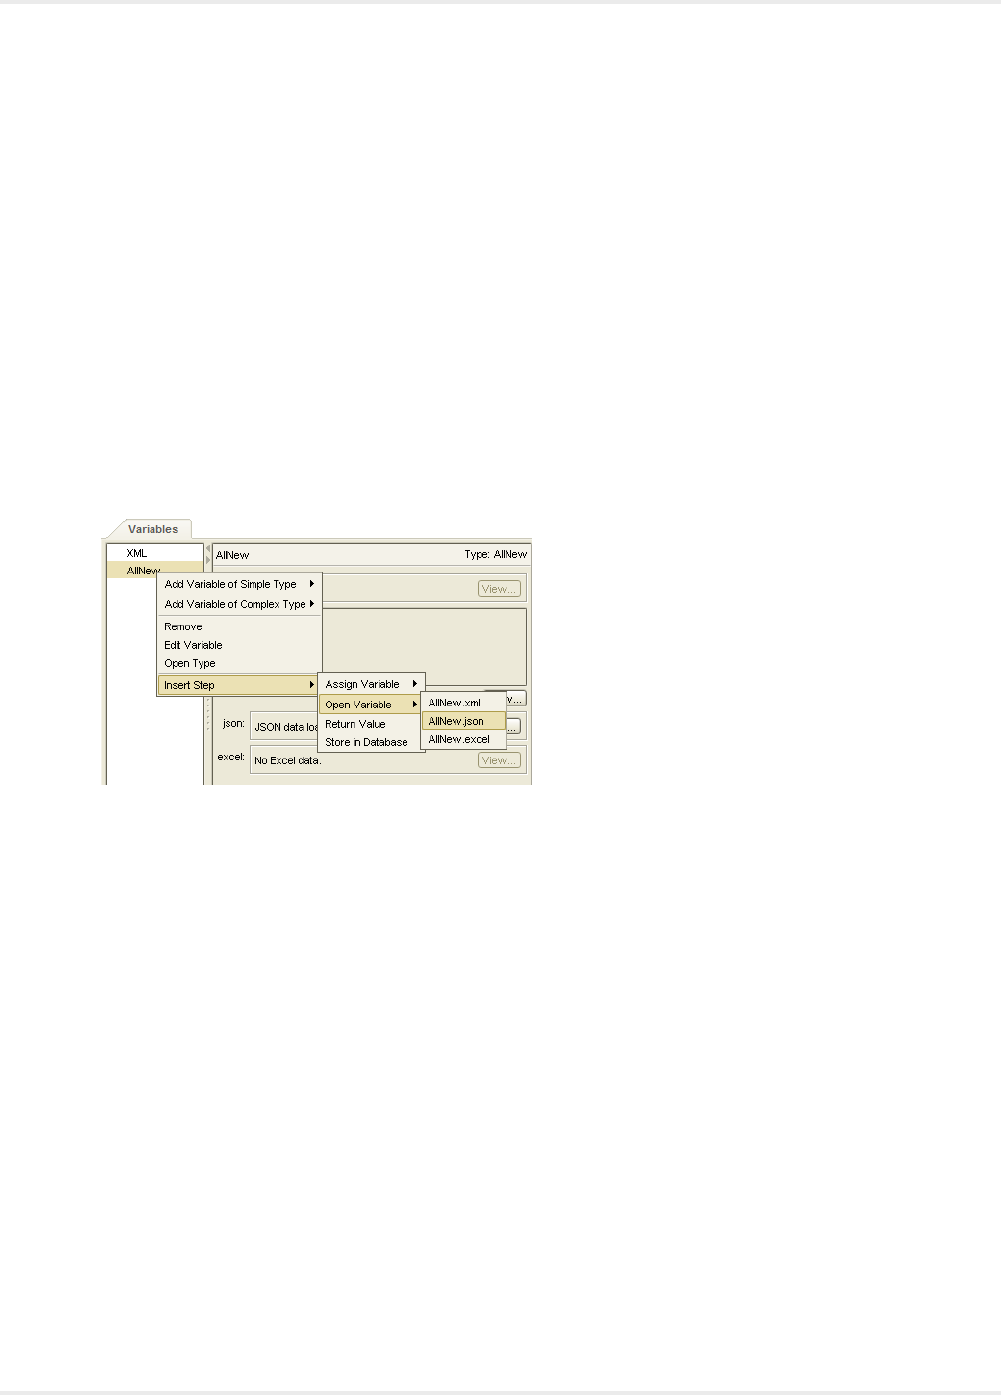
Kofax Kapow User's Guide
When this step is executed, a new window shows the content of the variable. In this way the Open
Variable step action behaves much like the Load Page step action.
If the variable is already open, no new window is opened; but the window containing the variable
becomes the new current window. In this way the Open Variable step action behaves differently from
the Load Page step action and more like the Set Current Window step action.
Even though the step action is call Open Variable, it also works on attributes of variables if they are
also of a type that may be opened in a window.
Once a variable (or attribute) is open, you work on it just as you would on a document (such as an
XML document) loaded from a URL.
You can insert a step action to operate on the variable by right-clicking in the view. The insert steps
will work on the current window whether it is loaded (opened) from a variable or a URL. The only real
difference is that document loaded from a URL may not be modified, and it is considered immutable.
To modify a document you must first extract it into a variable and then modify it.
2. On the Variables tab, right-click XML or All New and select configuration options.
The following figure shows how to open an attribute of a JSON variable of complex type.
An Open Variable step is inserted in your robot before the current step.
3. Right-click the variable and insert a step action to operate on the variable.
Modify a Variable
You can modify XML and JSON variables. Both variable types have a range of dedicated step actions
that may be used to modify them. For example, the Set Attribute sets the value of an existing attribute or
adds a new attribute to an XML tag, the Set Property Name step action changes the name of a property
on a JSON object, etc. You can also modify a variable by using a step action that operates directly on the
variable, such as Assign Variable. In that case, the view will reflect the changes.
Step actions that modify XML variables through the current window:
•Set Tag
•Set Content
•Set Text
•Set Tag Name
•Set Attribute
•Insert Content
•Remove Tag
130

Kofax Kapow User's Guide
•Remove Content
•Remove Attribute
Step actions that modify JSON variables through the current window:
•Set JSON
•Set Property Name
•Insert JSON
•Remove JSON
When a variable of type XML or JSON is shown in the current window, the menu option for inserting the
step actions are available in the context menu (right-click menu) in the window. Only those relevant for
the given type are shown. Some may be disabled, if the current choice in the view is not relevant. For
example, Remove Attribute will not be enabled if the selected tag does not have any attributes.
Work with JSON
JSON (JavaScript Object Notation) is a lightweight data-interchange format that resembles JavaScripts
literal notation such as { "x" : 5 , "y" : 7 }.
JSON is a text format, but in robots the JSON structure is represented and viewed similar to the way XML
is represented. JSON is treated as its own data format (exactly as HTML, XML and Excel) with its own
Page Type. It is not transformed into XML as it was in previous versions of Design Studio. The Test Page
Type step action can verify that the content of the current windows is JSON.
In Windows View, JSON is loaded from a URL or from variables/attributes of simple type JSON. A
dedicated view is available to view JSON variables opened in both the Windows View and the Variables
View, along with dedicated step actions that work only on JSON.
The following is an example of a JSON text:
{ "answer" : 42,
"people" : [ { "firstName" : "Arthur",
"lastName" : "Dent" },
{ "firstName" : "Ford",
"lastName" : "Prefect" } ] }
JSON Terminology
A JSON text is either an object, { "a" : 5 } or an array e.g. [1, 2, 3]. A JSON value is either a
JSON text or JSON Simple type where a JSON Simple type is either a JSON literal, a number, a string. A
JSON literal is false, null or true. The literals false and true are called Booleans. A number may be either
an integer or a floating point number. There is no limit on the precision or size of numbers, but as soon
as they are converted to another representation, the limitation of that representation must of course be
respected. For example, if an integer is extracted to an integer variable then the value must be between
-263 and 263-1; otherwise the extraction step will produce an error. JSON strings must start and end with a
double quotation mark (") and may contain any Unicode character except ", \ or control character (these
characters may be escaped using \, such as \", \\ and \r. The JSON format is described in RFC 4627 on
the https://www.ietf.org website.
131

Kofax Kapow User's Guide
JSON Syntax
JSON Text = JSON Object | JSON Array
JSON Object = {} | { Properties }
JSON Array = [] | [items ]
Properties = Property,Properties
Property = String :JSON Value
Items = JSON Value,Items JSON Value = JSON Text | String | Number | false | null | true
String = "" | "Characters "
Characters = Character Characters
Character = any Unicode character except ", \ or control character | \" | \\ | \/ | \b | \f | \n | \r | \t | \u 4 hex
digitsNumber = a number very much like a C or Java number
JSON MIME Type
The MIME media type for JSON text is as follows:
application/json
Strictly speaking, not all JSON values are valid for this MIME type. It might be that implementers of
services that accept or return JSON may be more liberal and accept and return JSON values. Kofax
Kapow has chosen to follow this more liberal approach to JSON. To that end, a JSON variable may
contain a JSON value and the JSON view can display that value.
When data is loaded from a URL and the MIME-type is application/json, the loaded JSON is shown in the
JSON Page View. If this is not the case, you can specify that the data represents JSON. To do this, on the
Load Page step, set the Page Content type to JSON. You can also use this method when the data is not
loaded from a source where a MIME-type is available, such as in Create Page step action.
JSON and Step Actions
A number of step actions work only on JSON; the data presented in the current window must be JSON
(and not JSON in the legacy format where JSON has been translated into XML). These step actions are
found in the step action category called JSON in the Step Action Selector on the Action tab of the Step
View. But the easiest way to select them is to use the context menu (right-click menu) in the Windows
View when the current window contains JSON. See the following sample image.
132
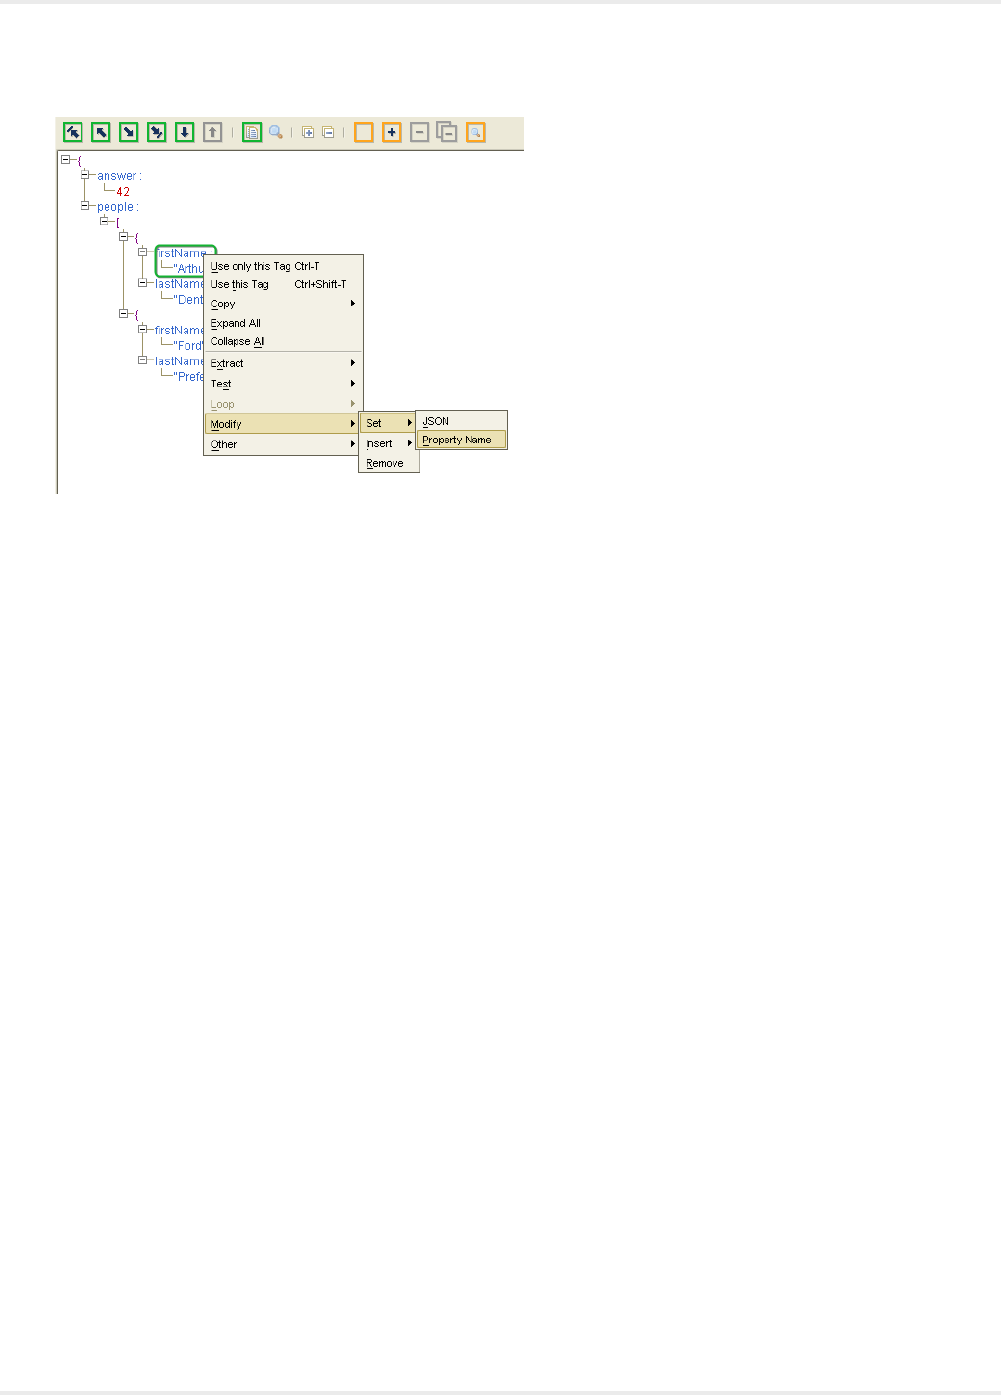
Kofax Kapow User's Guide
Two step actions can extract from a JSON value:
•Extract JSON. This step action always extracts a JSON value. For exampl, if the selection in the view
is a property, it is the value of the property that is extracted. It is in many ways similar to the Extract
step that extracts from HTML and XML, except that it is simpler because of the simpler data format; no
distinction exists between markup and text.
•Extract Property Name. This step action extracts the name of a property.
Two step actions can loop over a JSON text:
•For Each Property. This step action loops over each property of a JSON object
•For Each Item. This step action loops over each JSON value of a JSON array.
Both of step actions will for each iteration set a part of the JSON value in question as named JSON
(similar to a named tag). This cannot be global when iterating over a variable, since changing the value
of a variable during the iteration may change the value in such a way that iteration may fail, such as if an
item is removed from the list iterated over.
Four step actions can modify JSON (only if the JSON is in a variable):
•Set JSON. Replaces the selected part of a JSON value with a new JSON value.
•Set Property Name. Sets the property name to a new name on a selected property.
•Insert JSON. Inserts a new property in a JSON object or a new item (JSON value) in a JSON array.
There are several options on where to insert the new property or item, such as first or last. Consult the
reference documentation for the step action for a full list.
•Remove JSON. Removes the selected part of a JSON value, such as a property from a JSON object or
an item from a JSON array.
Finally, two more step actions work on JSON:
•Test JSON. This step action tests the "type" of a JSON value to determine whether it is an object,
array, string, etc.
•Set Named JSON. This step action is similar to its corresponding step action for other types of data,
such as Set Named Tag and Set Named Range. It defines a named reference to a part of a JSON value
133
Kofax Kapow User's Guide
so that it can be used as a reference when finding other parts of a JSON value in subsequent steps.
Shown as blue boxes in the view.
JSON as a JavaScript Object
Consider a converter stack in a step action that contains a Convert Using JavaScript converter. This
converter gets access to the output from the previous converter as a variable named INPUT to use in the
JavaScript used by the converter. The value of the INPUT variable is always a String.
The following table shows possible conversion values for the INPUT variable.
INPUT Value JavaScript (OUTPUT =) Result (OUTPUT value)
5 OUTPUT = INPUT 5
5 OUTPUT = INPUT + 3 53
5 OUTPUT = eval(INPUT) 5
5 OUTPUT = eval(INPUT) + 3 8
5 OUTPUT = eval(INPUT + 3) 53
5 OUTPUT = eval(INPUT + " + 3") 8
[1,2,3] OUTPUT = INPUT[0] [
[1,2,3] OUTPUT = eval(INPUT)[0] 1
{ “a”: 5 } OUTPUT = eval(INPUT).a “Syntax Error”
{ “a”: 5 } OUTPUT = eval("var x=" + INPUT + "; x;").a; 5
Note the following when converting JSON to JavaScript:
• INPUT is a variable bound to a string value. Therefore, any operation that you perform on INPUT is
a string operation. For example, + is string concatenation. That is why INPUT + 3 becomes 53 in the
example above.
• The function "eval" only accepts correct JavaScript as input and {"a":5} is not a syntactically correct
JavaScript line, but var x = {"a":5} is, which is why the last example above is the one that works.
Handle Errors
A step in a robot may generate an error when it is executed. For example, this happens if the tag finders
cannot find the tag to work on, or if the step action generates an error. You can configure test steps to
act as if an error occurred if the test fails. The default behavior of a robot is to report and log the error
immediately, and to omit execution of the steps beyond the one that failed. However, by configuring the
error handling properties of the steps in the robot, you can change this behavior. For example, you can
make the robot skip a step that generates an error, or you can make it try alternative branches.
134
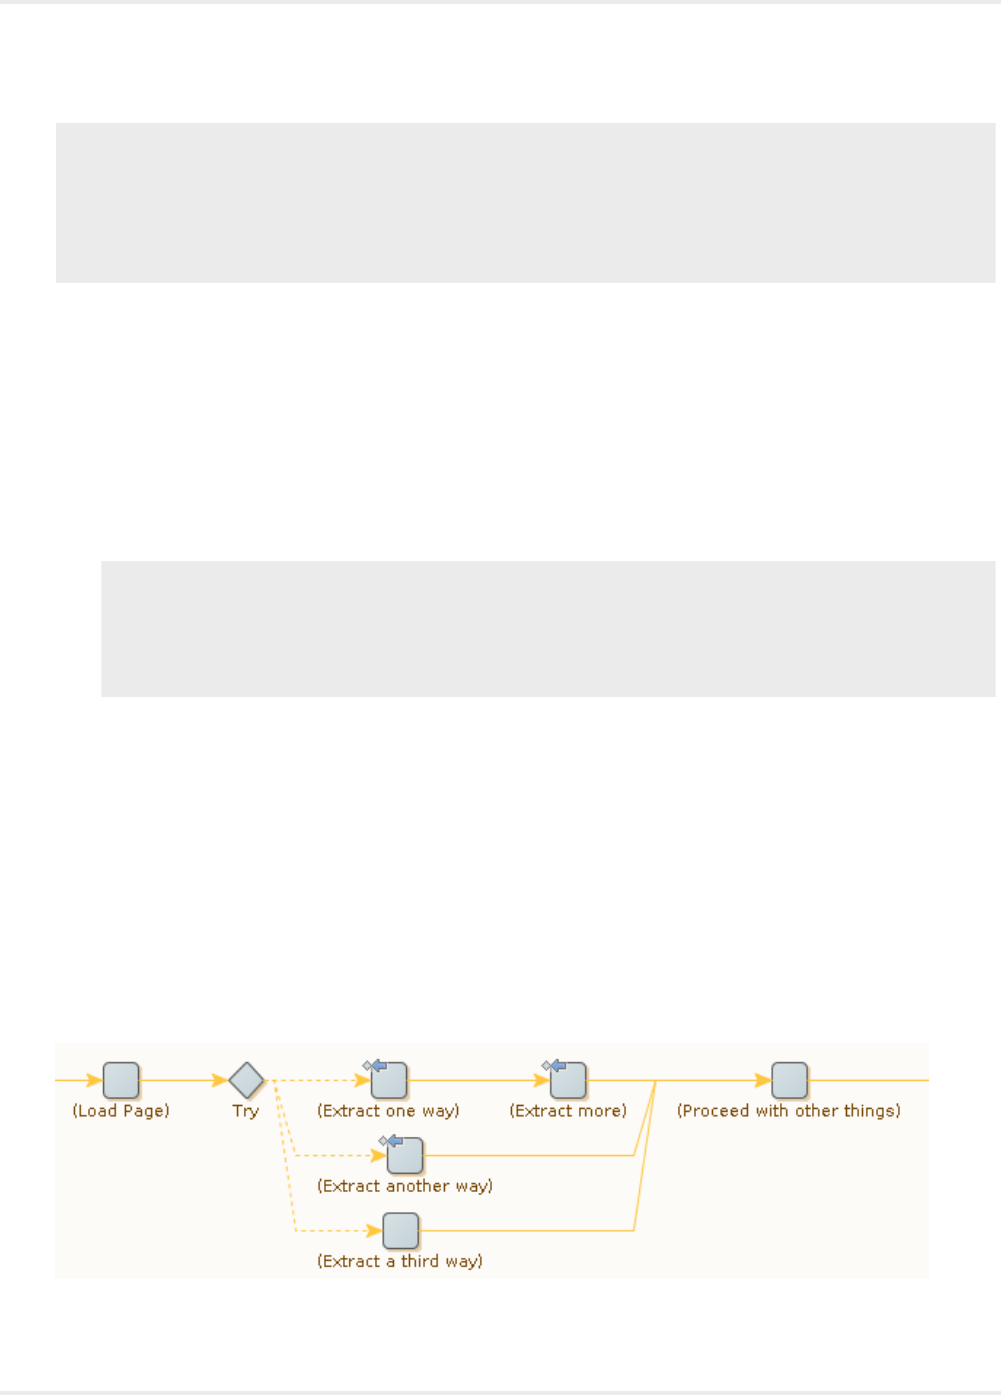
Kofax Kapow User's Guide
Note The error handling behavior described in this help system applies to runtime execution of a robot
(such as execution in RoboServer or in debug mode), not to the execution in design mode in Design
Studio. In design mode, an error is normally reported immediately, and the execution of the subsequent
steps is aborted. One exception is when the step is configured to "Ignore and Continue" in case of
errors, in which case Design Studio does ignore the error and executes the next step, just as it would
during runtime execution.
The following shows how to handle API Exceptions and Logging errors:
1. In the Step View, Error Handling tab, select an error handling option.
1. Select API Exception to report the error back to the caller of the robot. This is most useful
when the robot is executed by a client via one of the APIs and runs in RoboServer. In this case
the error is sent back to the caller via the API as a RobotErrorResponse, which causes an
exception at the caller side, at least when using the default RQLHandler. See the Error Handling
in Reference for the details when the robot is executed in other ways.
2. Select Log as Error to log the error. Logging happens in different ways depending on whether
the robot is run in the Design Studio or in RoboServer.
Note You can select or clear the check boxes, which may be marked with an asterisk * to indicate
they are set to a non-default value. For details, see Showing Changes from Default, which explains
how to remove the asterisk and revert to the default value. When the default value applies (that
is, when no asterisk is present), be aware that the default varies according to how the error is
handled.
2. In the Then field, select an option from the list.
This value defines how and where robot execution continues after an error is encountered. The
possible options are described with examples in the following sections. For detailed descriptions, see
the reference documentation.
Error Handling Alternatives
You can select several alternative methods to handle errors. See Conditions and Error Handling for an
error handling overview.
Suppose that some part of a web page has varying structure and layout, but always comes down to one of
three cases. In each case there is information to extract. It can be done by attempting the extraction one
case at a time. If it fails, the next case is tried, until the third one, which we assume will succeed.
135
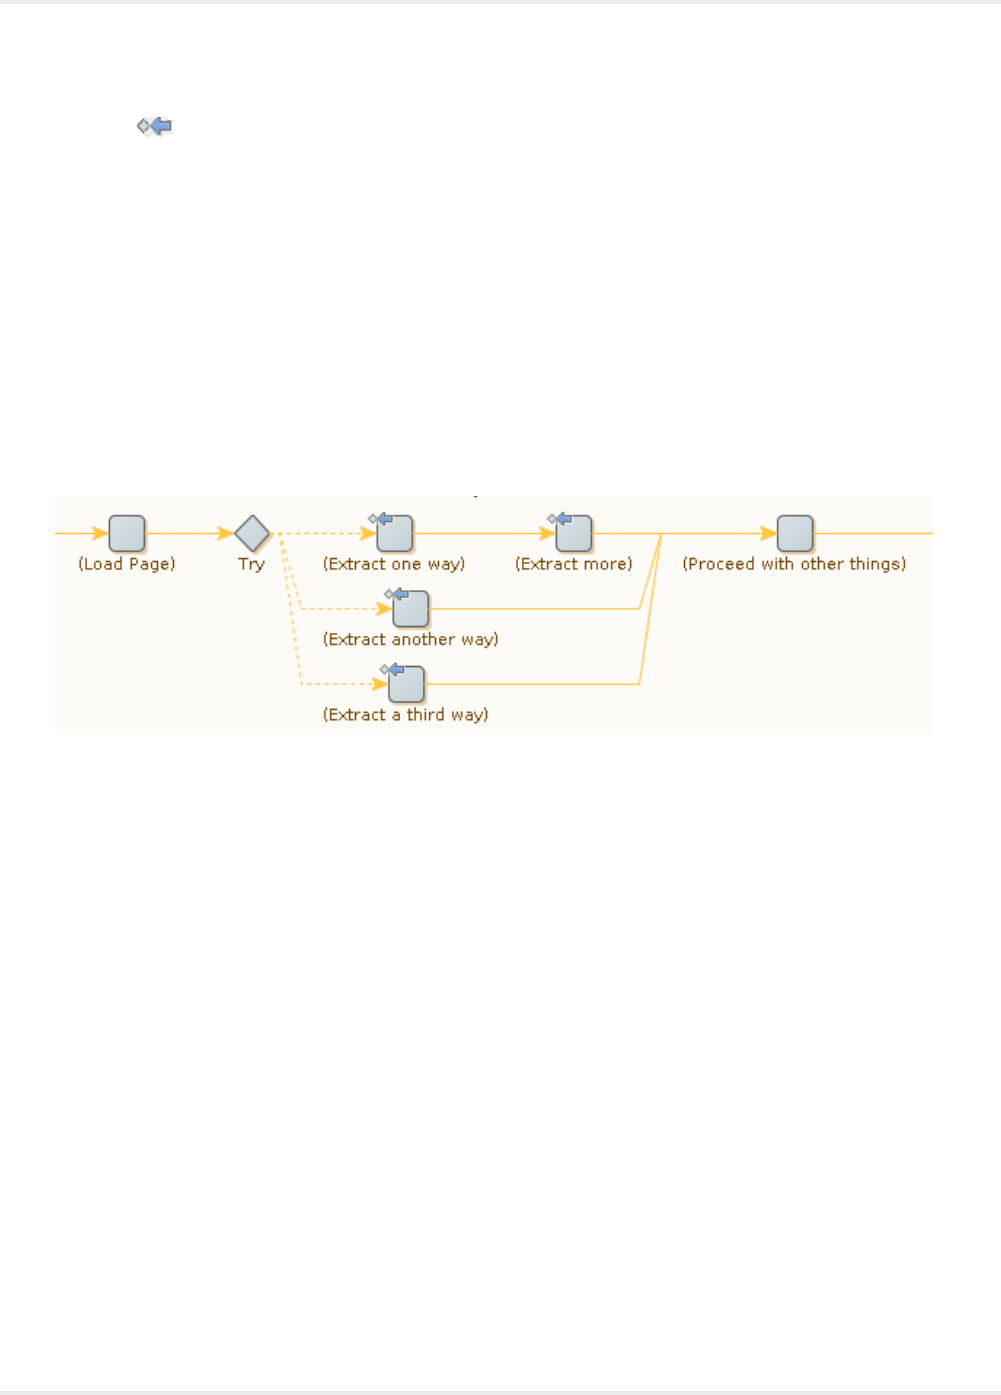
Kofax Kapow User's Guide
Note the (Try Next Alternative) icons on the Extract steps. If extraction fails, the next branch from the
Try step is executed (if a branch coming out of a Try step succeeds, the next branch is not executed). The
Extract steps do two things at the same time: They do extraction from the web page, and if it cannot be
done, they ensure that the next approach is tried. Note that if either of the two steps on the first branch
fails, the second branch is executed; this is an example of how the "success condition" for a branch can
be expressed by a combination of steps.
This approach works best if the "third way" of extracting is bound to work (for example, by applying a fixed
set of default values rather than actually extracting data from the web page). If the third branch accesses
the web page as the first two branches do, it may not be wise to assume that it will succeed. The next time
the robot is run, the web site may have changed so much that none of the three strategies succeeds, and
the robot should be able to respond in a reasonable manner.
The easiest way to respond is to report the problem back to the caller and log it, giving up on doing the
extraction and whatever would follow. This can be achieved by making the third branch inform the Try step
if it fails to do its work, similar to the first two branches.
(For a Try step, Skip Following Steps means that no additional action is taken beyond reporting and
logging.)
Alternatively, it is possible to make the Try step propagate the problem back to an earlier Try step for
handling. For more information, see Try-Catch.
Shortcuts for Common Cases
Try steps and Try Next Alternative error handling are very flexible tools. Used in the proper way, they
support many different ways to handle errors, and in this topic, we will show a couple of simple and
common cases. In fact, these cases are so common that they are also supported by specialized error
handling options.
Skip Following Steps
In many cases, a robot must be able to handle optional elements on a web page. That is, if the elements
are present, they must be handled (for example, data must be extracted), but if they are absent, the
handling of elements can be skipped. Their absence is not an error, but an expected situation. This can be
expressed as follows in a robot. Step A tests if the elements are present (by trying to extract something),
while steps B and C do further processing that depends on the success of step A.
136
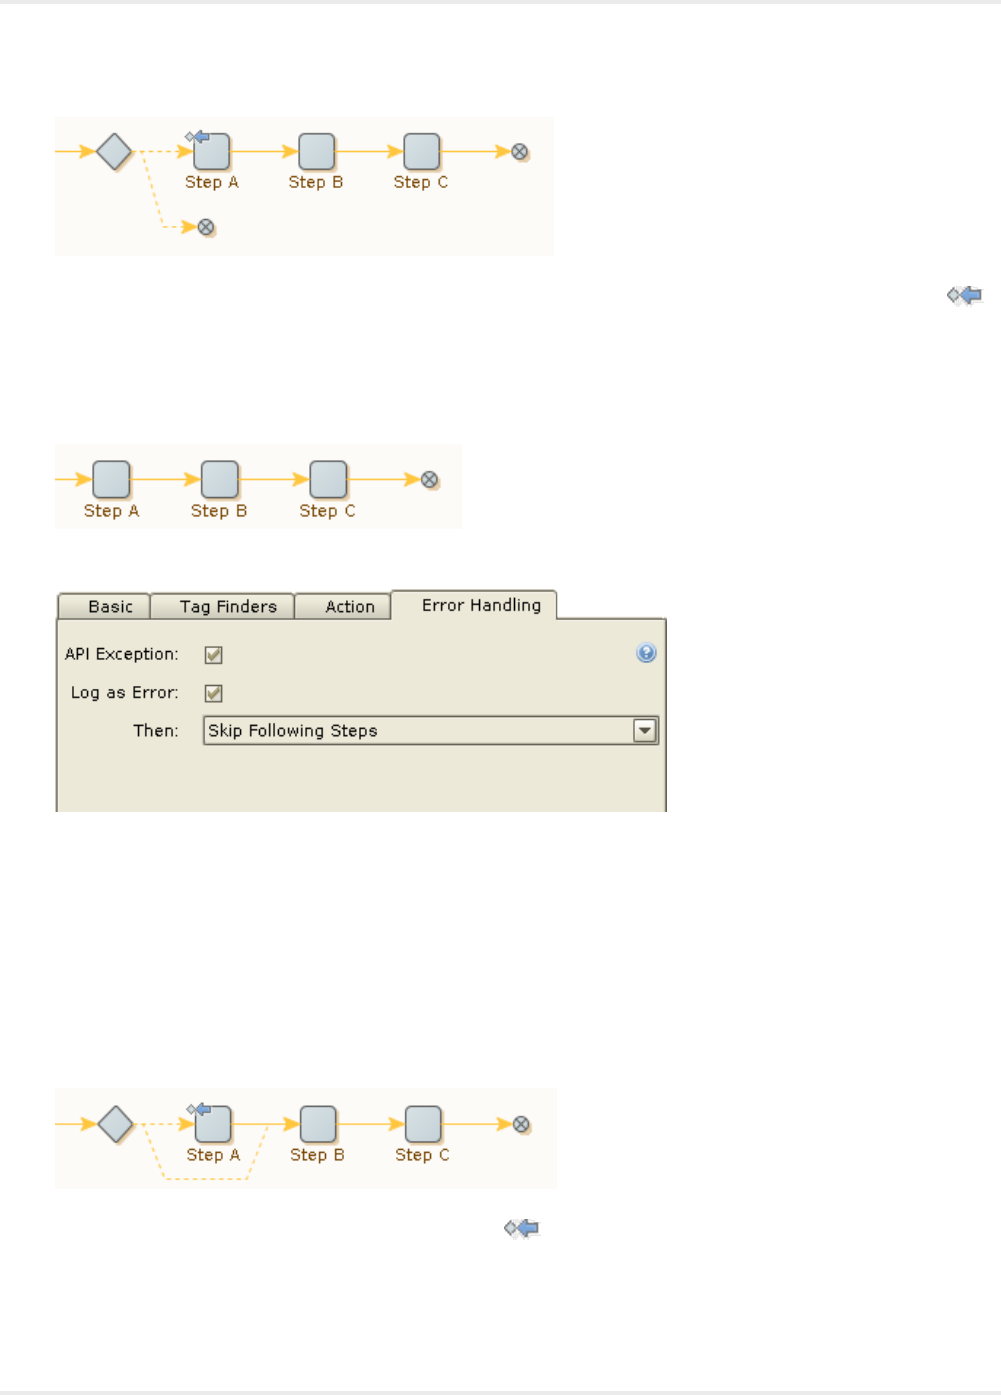
Kofax Kapow User's Guide
If step A is not successful (because elements are missing on the web page), its Try Next Alternative ( )
error handling sends notice to the Try step (which is unnamed in this example). This causes the second
and empty branch to be executed, after which execution of the whole branch that starts in the Try step is
done. Thus steps B and C are not executed if step A is not successful.
This situation happens so often that a specific error handling option, Skip Following Steps, is introduced
as a shortcut. It makes it possible to simplify the example as follows.
The error handling for step A is configured as follows. This is the default configuration for all new steps.
Strictly speaking, you need to clear the API Exception and Log as Error check boxes to get exactly the
same behavior as shown with the Try step. This is because the default values for these check boxes are
different for the two ways to do error handling.
Note that if step B had been similar to step A (that is, if step B had also had Try Next Alternative error
handling), this same shortcut could be used.
Ignore and Continue
Sometimes, some action (such as extraction) needs to be done if some condition is met, and otherwise it
can be skipped. Subsequent steps do not depend on the result (or a proper default for the result has been
set up in advance). This case can be expressed as follows.
If step A is not successful, its Try Next Alternative ( ) error handling causes the second and empty
branch from the (unnamed) Try step to be executed. After this, execution continues at step B with the
same robot state that was input to step A, thus step A is effectively skipped.
137

Kofax Kapow User's Guide
This can also be done without the Try step by using the error handling option Ignore and Continue ( )
on step A.
One interesting possibility is to have the situation logged even though it is otherwise ignored. This can be
achieved by configuring error handling on step A as follows.
The same can be done if you prefer to use the method with a Try step.
At Target
By its very nature, Try Next Alternative error handling refers to a Try step. This Try step must be a prior
step on the current execution path, that is, it must be one of the steps whose execution led up to the
current step. Otherwise the "next alternative" part of Try Next Alternative does not make much sense.
Consider a robot with several Try steps on the current execution path. In this situation, the robot will be
in the process of executing a "current branch" relative to each of these Try steps, and for each of them
the "next branch" is different. For example, in the following robot, if an error occurs in step B, Try Next
Alternative continues execution using one of the following approaches.
• The next branch at the rightmost Try step, so that execution skips step C and continues at step D
• The next branch at the leftmost Try step, causing execution to skip both steps C and D and continues at
step E
You can define the option on the Error Handling tab. The following example shows the error handling
configuration for step B.
138
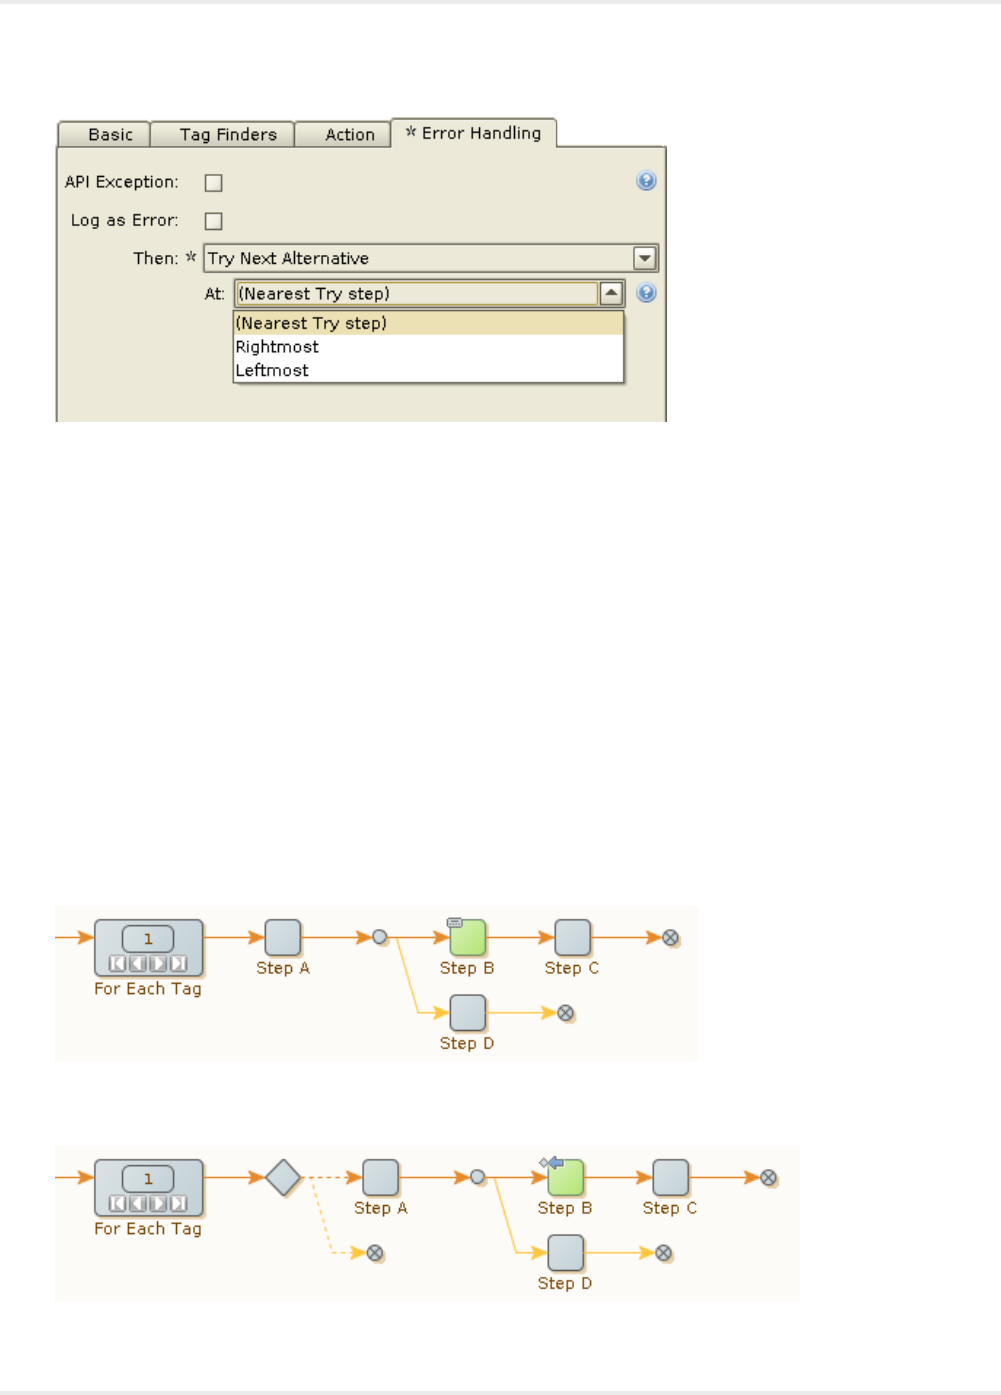
Kofax Kapow User's Guide
The default is the Nearest Try step, but you can select other Try steps on the execution path. The
reference to the Try step is by name; if several Try steps have the same name, the nearest (rightmost)
one with that name is implied. This can be used to advantage as described in Try-Catch.
While this example only describes At targets in relation to Try Next Alternative error handling, you can use
such references with the Next Iteration and Break Loop error handling options described in Looping. In
those cases, the references go to loop steps rather than Try steps.
Looping
Sometimes when an error occurs or a test fails, the proper reaction is to abandon execution of the current
iteration of a loop, or the whole loop. This is supported by two specialized error handling options.
Next Iteration
In the following robot, step B has error handling for Next Iteration. If an error occurs during execution
of this step, execution of the current loop iteration is stopped. Steps C and D are not executed; instead
execution continues at step A with a robot state that reflects the next tag among those that the loop step
iterates over.
This error handling option is a shortcut, as you can achieve the same effect with the aid of Try Next
Alternative and a Try step.
139
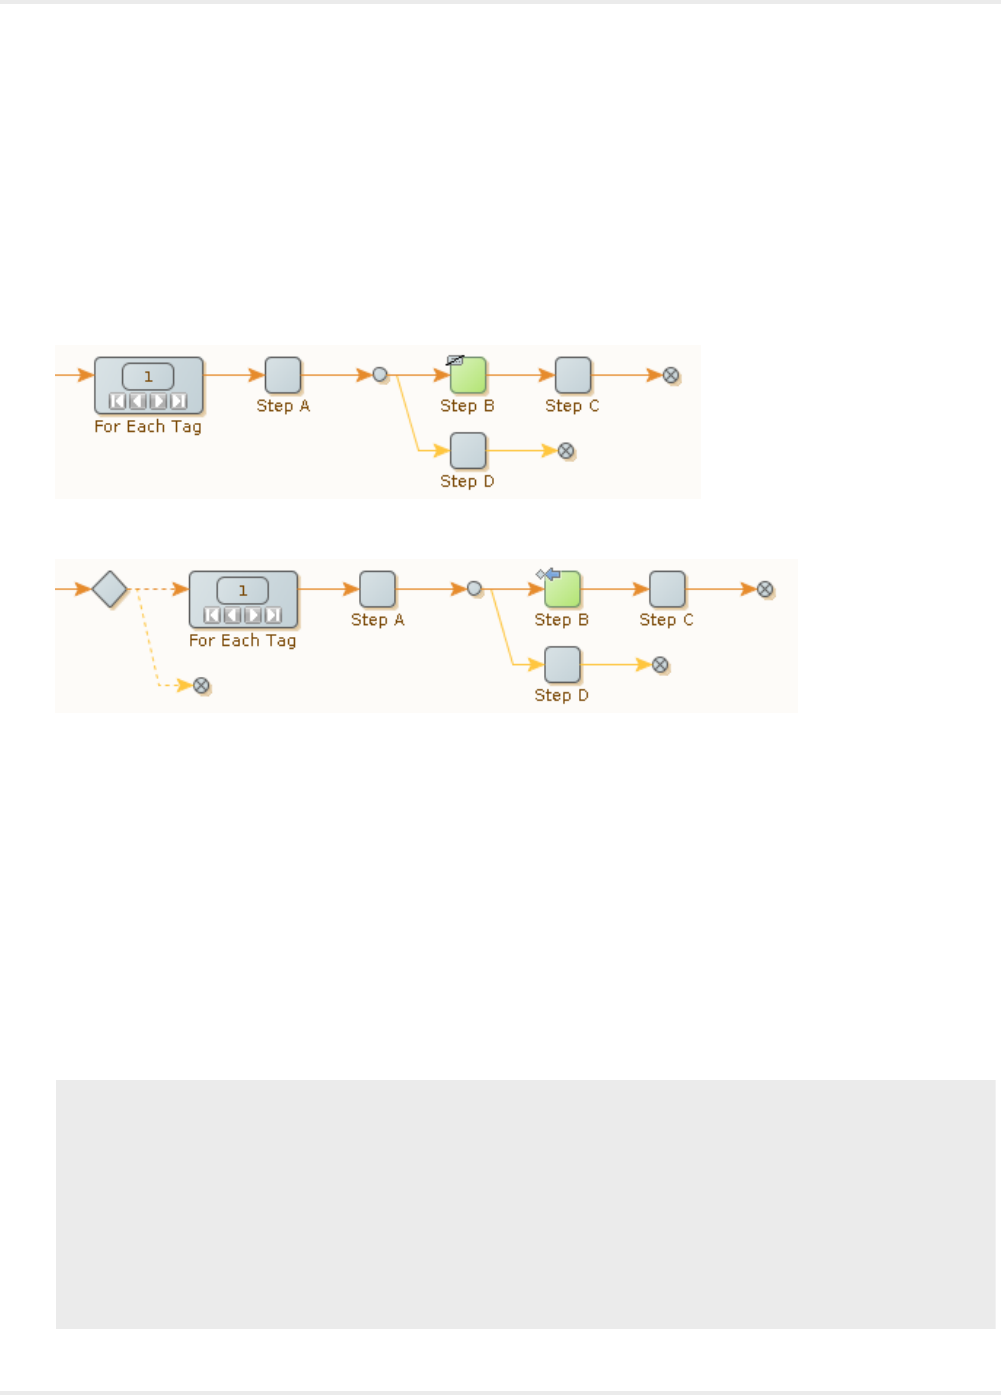
Kofax Kapow User's Guide
Note that this transformation in general requires use of At Targets because other Try steps may interfere.
If the robot contains several loops steps after each other, it is possible to select the one in which to go to
the next iteration.
Next Iteration does not work with Repeat-Next loops. The word "next" has very different implications for
the browser state in these two cases.
Break Loop
Instead of completing a single iteration of the loop with Next Iteration, you can use Break Loop to abort the
whole loop.
This error handling option is a shortcut. The following robot will have the same effect:
Note that unlike Next Iteration, Break Loop does not work with Repeat-Next loops.
Try Catch
When Try Next Alternative error handling is used with an explicit At reference to a target Try step, the
step is identified by its name. Most often, the fine distinction between the target step and its name is
not important, but it can be exploited to provide exception handling functionality similar to the try-catch
constructs in Java or C#.
In those programming languages, a section of code between "try" and "catch" has special error handling.
If a specific error is signaled within this section (by "throwing" a named "exception"), the piece of code
following the similarly named "catch" is executed. Try-catch constructs can be nested, and a named
"exception" is always handled by the innermost enclosing "catch" with a matching name. For example:
try {
... code ...
try {
... inner code ...
throw new E(); // caught by innermost "catch"
}
catch (E e) {
... inner handling code ...
}
... more code ...
throw new E(); // caught by outermost "catch"
}
catch (E e) {
... outer handling code ...
140
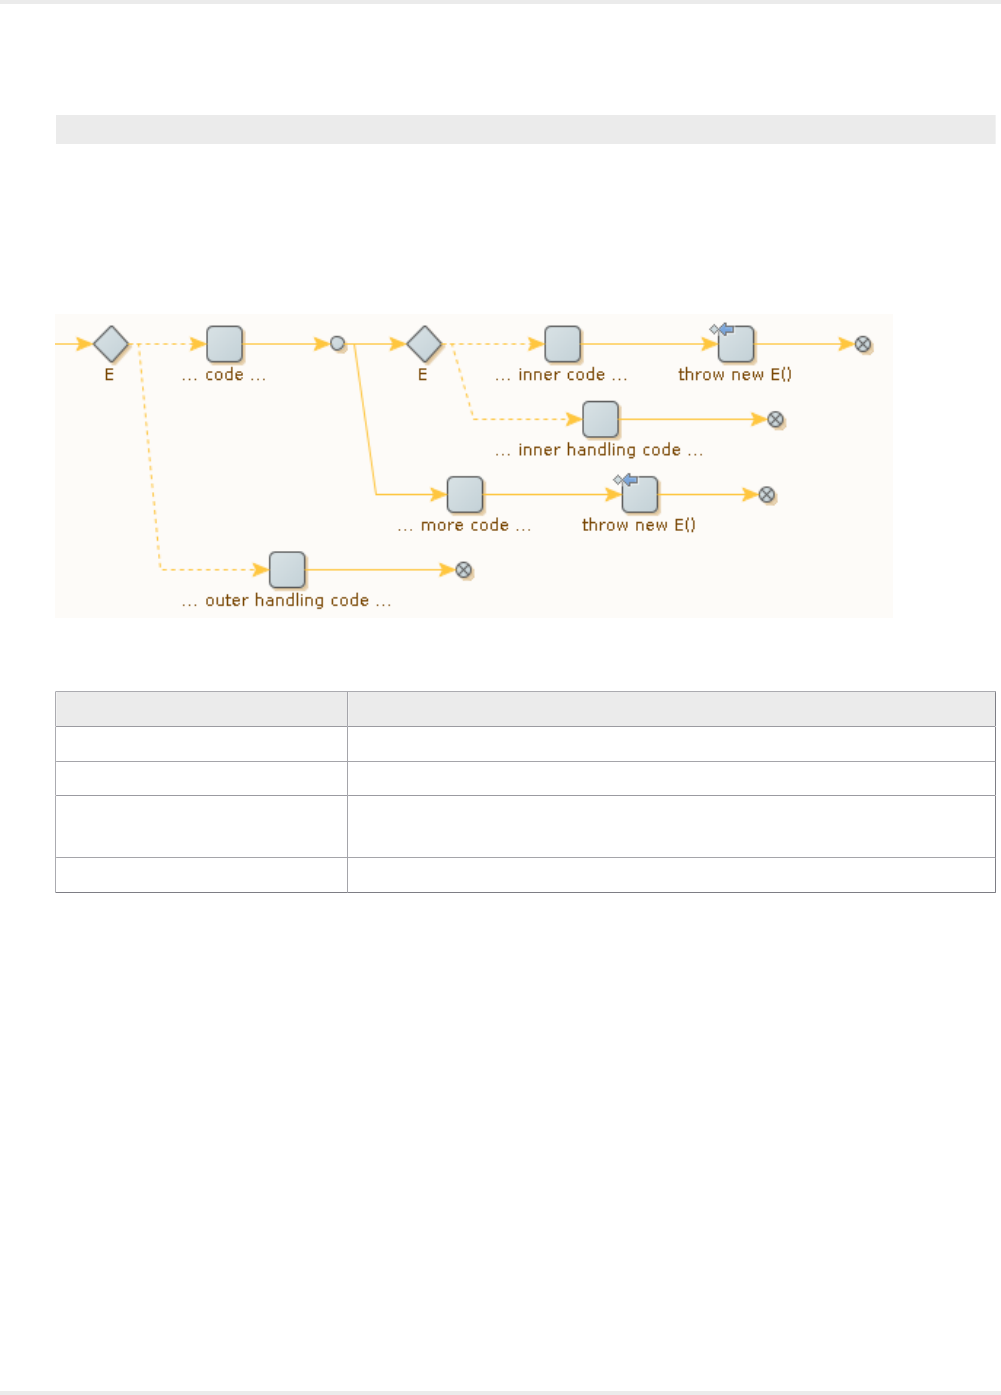
Kofax Kapow User's Guide
}
In robots, something similar can be done with Try steps. Remember that an "At" reference to a Try step
with a given name always means the nearest prior step with that name (along the current execution path).
It is permitted to use the same name for several Try steps, even on the same execution path. Thus each
try-catch construct is modeled with a Try step having the same name as the "exception." The Try step
has two branches: one for the code part of the "try" construct, and one for the code part of the "catch"
construct.
The correspondence between the Java/C# syntax and the Design Studio terms is described in the table.
Java / C# Syntax What to use in Design Studio
try { ...code... } The first branch of a Try step (the steps correspond to code)
Name of an exception Name of a Try step
throw new E()
within the code of a try
Handling an error with "Try Next Alternative at E"
catch E { ...code... } The second branch of a Try step named "E" (the steps correspond to code)
Thus, the core idea is: When Try steps are used for error handling, name the Try steps after the error
situations they handle. The advantages are:
• The naming helps make the purpose of each Try step clear.
• When errors are handled on a general level (with a Try step more to the left in the robot), it is still easy
to do specialized handling in some cases (with the aid of a second Try step with the same name).
Identify Error Handling in Robot View
Robot steps containing special error handling are marked with a small symbol in Robot View. The symbol
is based on the type of error handling defined for the step to help users visually identify steps containing
custom error handling. If you do not want to have steps with custom error handling marked, you can
disable this feature on the Options menu in the Design Studio.
See Robot Editor for more information.
141

Kofax Kapow User's Guide
Create and Reuse Snippets
A snippet can be created in three ways.
1. From a selection of steps:
(must be steps that can be grouped and not a single Group step)
1. Select one or more stems and click Create snippet from selection .
2. Enter a name for the new snippet.
3. Create a snippet of that name containing the select steps.
4. Insert a new Snippet step instead of the selected steps.
2. Turn a group step into a snippet step:
1. Select a Group step and click Convert group to a snippet .
2. Enter a name for the new snippet.
3. Create a snippet of that name containing the group steps.
4. Insert a new Snippet step instead of the selected Group step.
3. Create a snippet from a new snippet:
1. On the File menu, select New Snippet.
2. Enter a name for the new snippet.
An empty snippet appears in your project and the Snippet editor opens.
Note You cannot edit the snippet contents (the steps inside the snippet) inside this editor,
3. Edit the description and referenced variables list as needed.
Variables and Snippets
Just like steps anywhere in a robot, the steps in a snippet can use variables. The steps of snippets are
always edited inside a robot. In that context the variables defined on the robot can be used in the snippet.
Reusing the snippet in another robot requires you to define the variables used by the steps in the snippet
on each robot that uses the snippet.
A snippet can define its own variables. Open the snippet in its own editor to define variables on the
snippet. If the snippet already contains steps using variables that existed in the robot where the snippet
was edited, the steps are marked with a red flag.
142
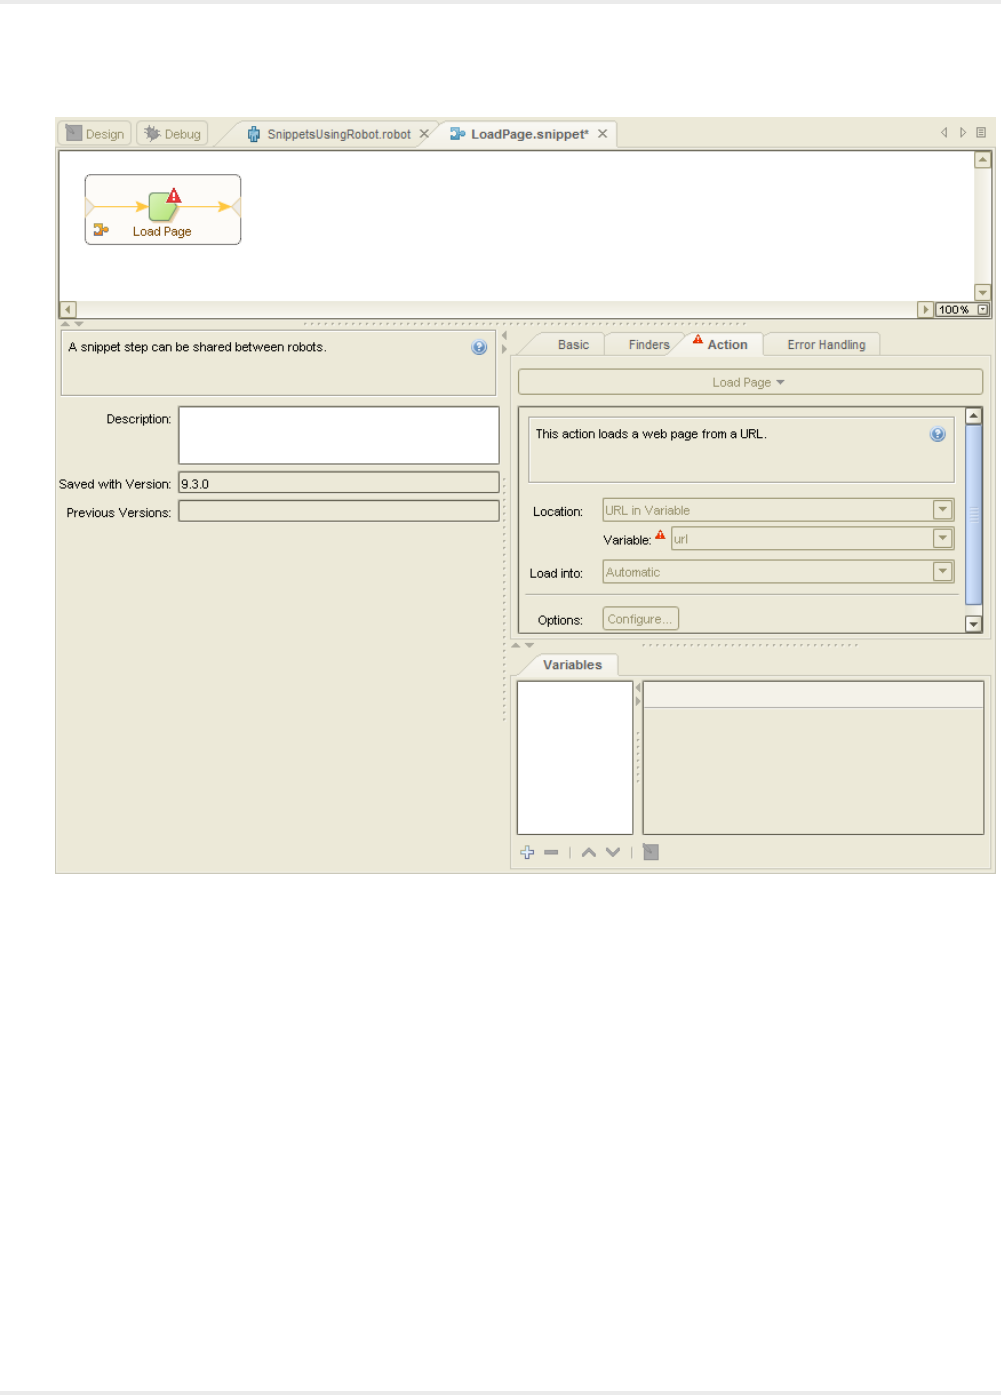
Kofax Kapow User's Guide
The preceding image shows a snippet in its own editor, that uses a variable not defined on the snippet
itself.
Notice the active variables editor in the lower right corner, exactly as on robots.
If a snippet defines variables, using the snippet in a robot automatically adds the snippet variables to the
set of variables for the robot.
143
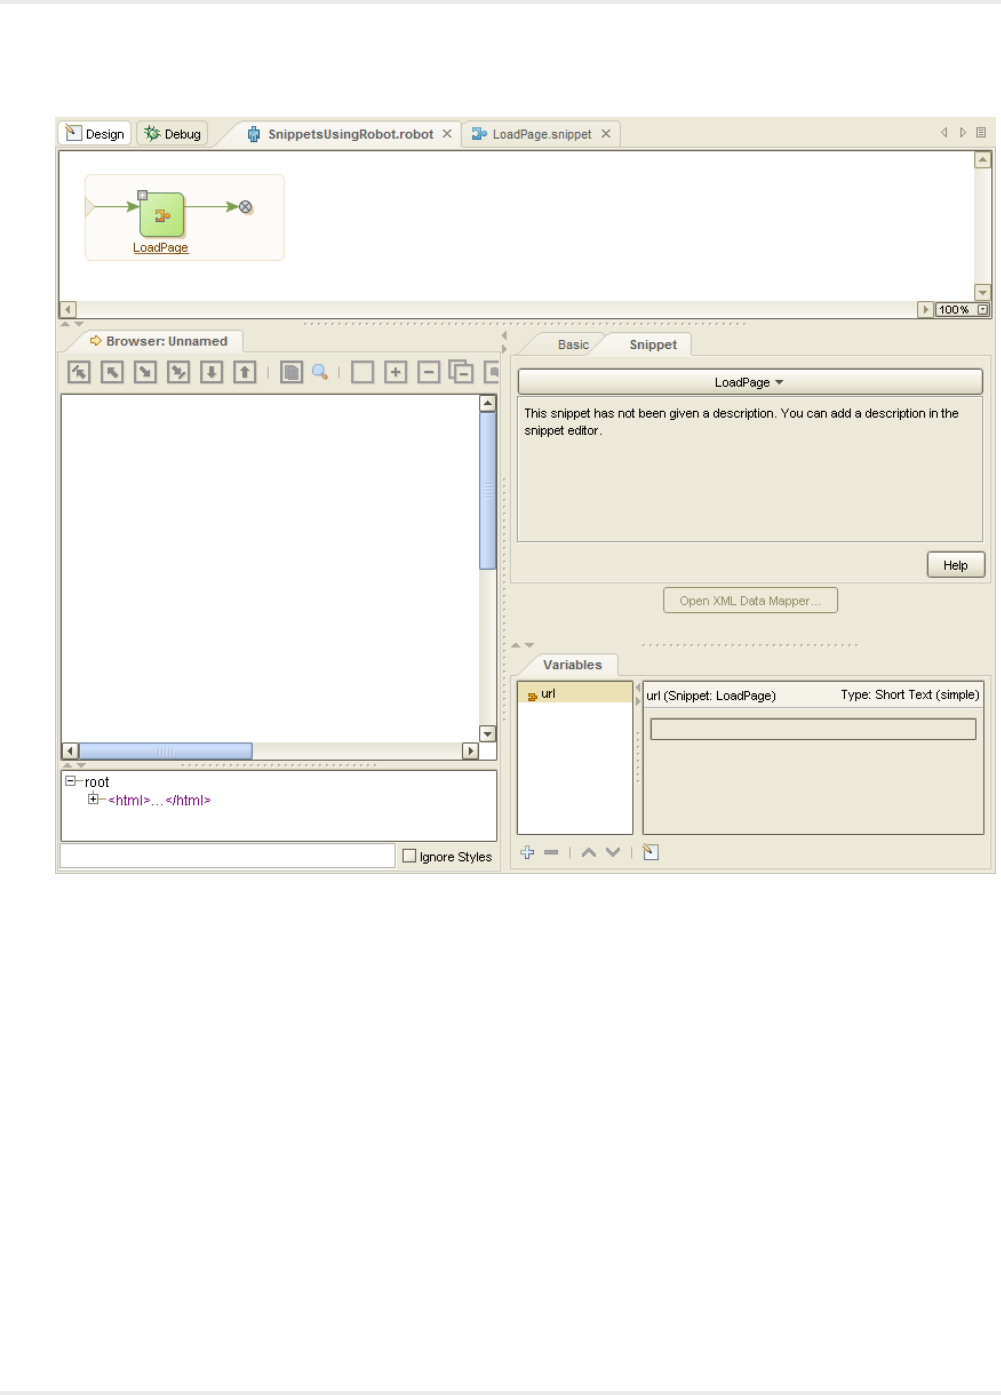
Kofax Kapow User's Guide
The preceding image shows a robot that uses a snippet that defines a variable 'url'.
Notice the variables imported from snippets are marked in the variables list.
A robot should not contain variable definitions by the same name as variables defined in the snippets it
uses. If it does, the variable types must match.
Removing a snippet from a robot also removes the variables imported by that snippet.
Snippet Best Practices
Consider the following snippet best practices.
• Put the non-default robot configuration used to execute the steps inside the snippet, on the steps of the
snippet. This way you do not need to remember to set them on each robot using the snippet.
• When inserting a snippet into a robot, take care that names of variables defined on the snippet do not
conflict with variables defined on the robot. Design Studio cannot handle a situation where a variable
defined on the snippet has the same name as a variable defined on the robot. It is a good practice to
144

Kofax Kapow User's Guide
define variables on the snippet when they need to work in another context. This makes reuse of the
snippet easier.
• In the snippet description, document the context in terms of named tags and/or windows required by the
snippet.
• Use caution when including snippets inside snippets. A snippet may contain snippet steps referencing
other snippets. However, a snippet cannot contain a circular reference (such as a cyclic reference
where the snippet contains itself). If a snippet contains a circular reference, Design Studio reports an
error.
Make Robust Robots
Web sites often change without notice. Such changes may result in the robot failing to do its task, unless
you are careful. Robustness is the term used to describe how well robots cope with web site changes. The
more changes the robot can deal with (and still work correctly), the more robust it is.
Robustness, however, comes at a price. It is more challenging and time-consuming to write robust robots
than to write shaky robots. It involves analyzing the web site in question, and understanding how it
responds in various situations, such as when a registration form is filled out incorrectly. In a sense, writing
robust robots involves a kind of reverse engineering of the web site logic, and usually the only way to do
this is through exploration.
The two different approaches to robustness each serves a different purpose:
• Succeed as much as possible.
• Fail if not perfect.
Succeeding as much as possible might, for a robot extracting news type variables, mean that it should
extract as many news items as possible. In Design Studio, you use conditional actions, Try steps, and
data converters to deal with different layouts, missing information, and strangely formatted content.
Failing when things are not perfect might, for an order submission robot, mean that it should fail
immediately if it cannot figure out how to enter a field correctly, or the order result page does not match
an exact layout. In this sense, failing does not mean to generate an API exception. Instead, it means that
the robot should return a value dedicated to describing errors and failure causes. Robots taking input
variables often fail, rather than succeed as much as possible. In Design Studio, you can use dedicated
error type variables, error handling, and conditional actions to detect and handle unexpected situations.
For more information on Design Studio techniques to make robots more robust, consult the following
sections: Extracting Content from HTML, Extracting Content From an HTML Table, Handling Errors, and
Using Tag Finders.
Reuse Sessions
A session is the result of browsing on a website, and consists of the page, the page URL and the cookies
and authentications obtained in the course. However, obtaining a session where the desired information is
easily reached can require a number of navigation steps such as logging in.
145
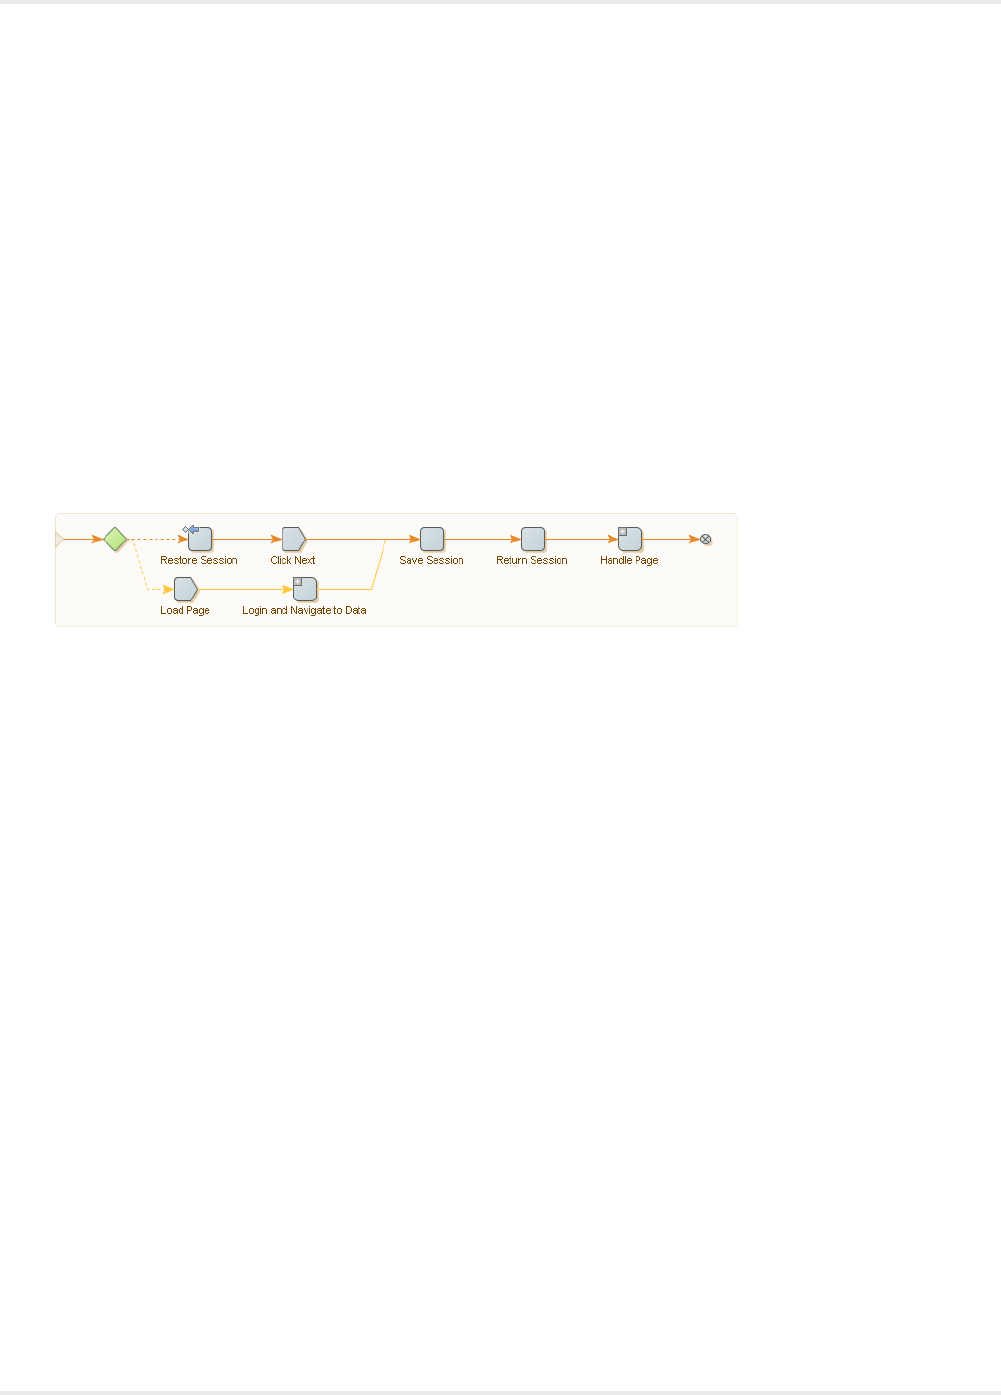
Kofax Kapow User's Guide
If a robot is run frequently enough, and the response time needs to be very small, getting to a suitable
session in the robot can require more time than is available. However, if the session is obtained once, and
then shared between robots and robot runs, then great time savings is achieved.
Two step actions are used for session reuse:
1. The Save Session action: Saves a session in a variable.
2. The Restore Session action: Restores a session from a variable.
Example
Assume that we have a robot that logs in to a web site to collect and return data. However, the data that
we seek to collect is distributed over many linked pages, such as with a next page link. We want the first
invocation of the robot to log in to the site and return the data of the first page, and each subsequent
invocation should then return a new chunk of data (the next page). We want to share the session of
a logged-in user between robot invocations, but we also want to remember how much data we have
returned. The robot could look something like the following example.
When the robot is called, it will first try to restore a session from an input variable. If one exists, that
session is used and the next step clicks a next page link to get a fresh page of data. If no session is
passed to the robot, the step fails, and the second alternative is executed, which does the logging in and
also navigates to the relevant page on the site where the data may be found.
If the robot execution gets through one of the two alternative branches, it reaches the Save Session step.
This saves the session to use the next time the robot is called. But for this to be possible, we need to
return the session to the caller of the robot. This is handled by the Return Session step, which is a normal
Return Value step that returns the value of a variable containing the session (the variable is of a type that
has an attribute of attribute type Session in which our Save Session step stored the session). Finally, if the
robot reaches the end of the data (no next page link exists on the page), then the Click Next set produces
an error. This is ignored by the robot, because we set Error Handling to Skip Following Steps, but if we
have a check mark in API exception, the caller would get an exception. For example, if the robot is called
from Java, uses the check mark to know that the end of data has been reached.
After the session is saved, the remaining steps of the robot extract the data from the page, such as by
looping over a table and returning a value for each row.
Note that in Design Studio, robot execution is not controlled by the natural flow of a robot run. It is
controlled by the user interaction.
1. To store the session, select the step following the Save Session step.
2. Select the Restore Session action.
146

Kofax Kapow User's Guide
Modify an Existing Type
If you need to change a type after writing robots using variables of that type, be cautious. Your robots
might stop working if you do something wrong.
You should take care when performing any of the following changes to a type that is already used by
variables in existing robots; otherwise, you cannot use those variables (however, the robots may still be
loaded without the variables):
• Change the name of a type.
• Delete a type.
• Remove or rename an attribute in a type if, in a robot, one or more variables of that type have assigned
values different from the default for that attribute.
• Change the attribute type of an attribute if, in a robot, one or more variables of that type have assigned
values that are not compatible with the new attribute type.
If your robot is open while you make any of the preceding changes, you see a red status bar at the top
of the Robot Editor with a text explaining the problem. The status bar also contains a button that you can
click to reload the robot with the compromising variables removed. You can also solve the problems by
making the appropriate changes to your types. If you do this, you can return to your robot and continue
working.
The following changes to a type can be automatically carried over to robots without having to remove any
variables of that type (you may have to reload), but some errors might be generated when the robots are
executed (you can subsequently fix the errors):
• Change the name of an attribute.
• Change the Required property of an attribute from false to true.
• Add a new attribute that has the Required property set to true.
• Delete or rename an attribute that is assigned a value in a variable.
• Change the attribute type of an attribute that is assigned a value in a variable.
You can always make the following changes, without affecting existing robots:
• Change the Required property of an attribute from true to false.
• Change a comment (no matter where).
• Add a new attribute that has the Required property set to false.
Configure Robots
1. On the Design Studio toolbar, select Configure Robot . You can also select Configure Robot from
the File menu.
The Robot Configuration window appears.
2. On the Basic tab, click Configure.
3. Configure default options that apply to all step actions of the robot.
A step action can override global options as needed.
4. Click OK.
147

Kofax Kapow User's Guide
5. In the Robot Comment field, enter an optional comment.
This comment is useful if you want to document how the robot works, what should be taken into
account when editing the robot, etc.
6. On the Advanced tab, you can specify an optional proxy server to use for all page and data loading
performed by the robot.
This property is used infrequently. Typically, it is better to specify one or more proxy servers under
Design Studio settings. See Proxy Servers for details. The proxy server specified for a particular
robot overrides proxy servers specified any other way. Furthermore, you can use the Change Proxy
action to change the proxy service during robot execution.
Show Changes from Default Robot Configuration
At times it is difficult to see non-standard parts of a robot configuration. For example, a Page Load
step might be assigned a longer timeout than the default value of 60.0. To investigate the non-standard
configurations, you may have to navigate through Design Studio to locate a property that is changed from
the default setting. You would also need to remember the default values for all the properties.
In Design Studio, you can use Show Changes to avoid these manual steps. Properties with a well-defined
default value are marked with an asterisk * next to the property name if the value is changed, as shown in
the following figure.
148
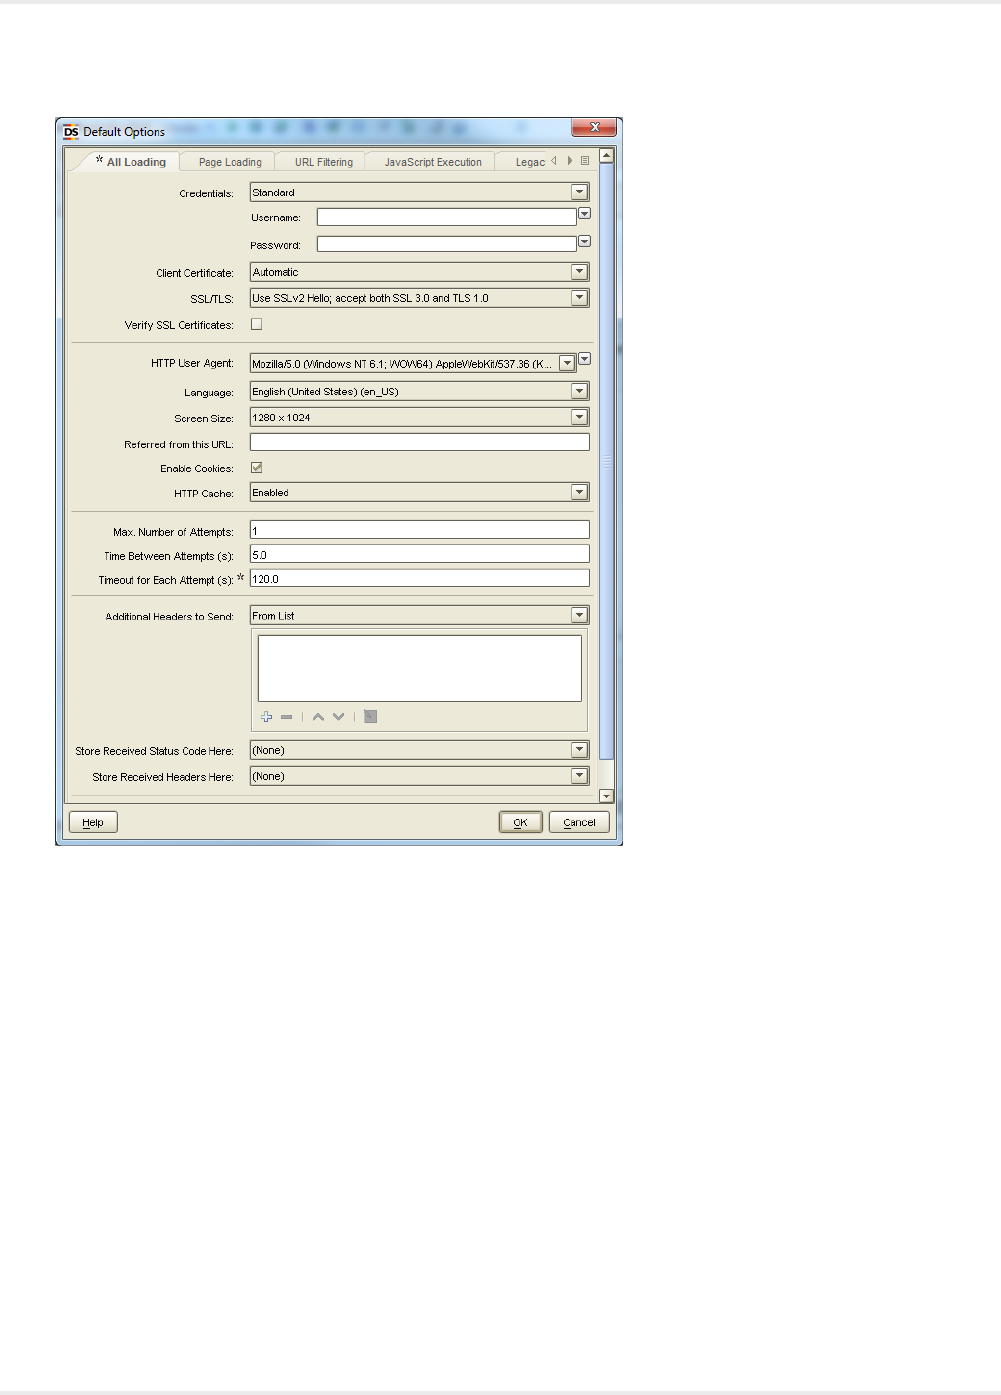
Kofax Kapow User's Guide
Notice that the tab also displays an asterisk. This indicates that some property on the tab is changed.
Right-click the property name or the asterisk to reset the value to its default. The context menu typically
displays the default value.
149
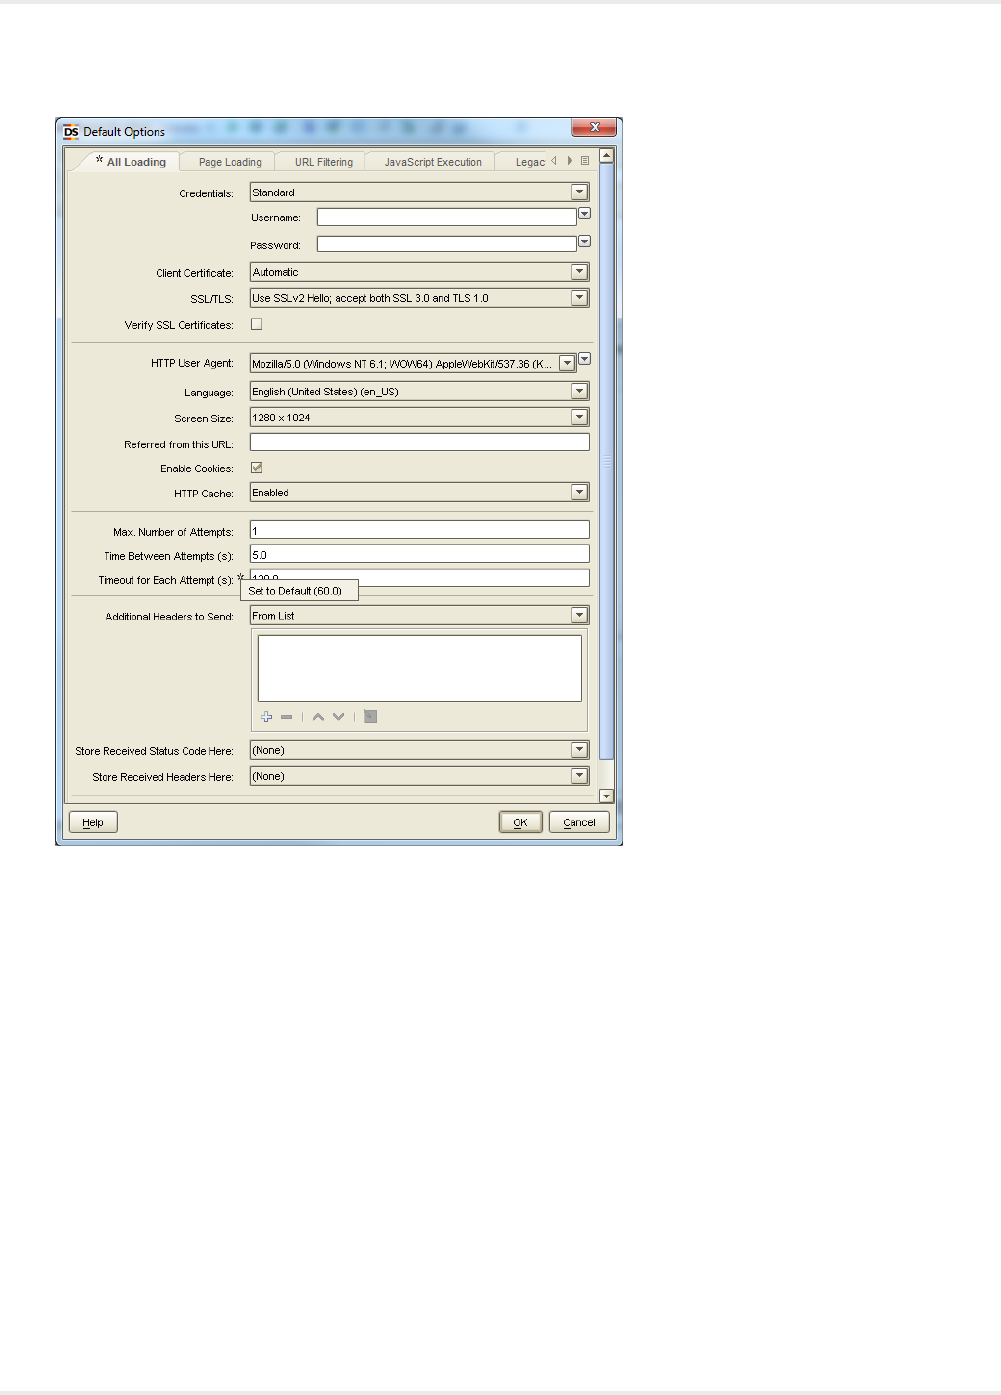
Kofax Kapow User's Guide
The preceding figure shows the Timeout for Each Attempt property on the Options dialog box.
Show Changes works differently on the Options window when it is used to configure step options. You can
generally configure options in two places:
• From the Robot Configuration
• On steps that may depend on these options
In both places, you click a button to open the Options window to configure the options, but the default
value is different for each situation. If you open the window from Robot Configuration, the default is a fixed
application default, which displays the values provided by Design Studio. If you open the window from a
step configuration, the default is the one defined under Robot Configuration (robot default). That is, a step
inherits the option values from the robot configuration unless they are explicitly changed for the step. For
example, if the option "Enable Cookies" is cleared in the robot configuration, all steps that depend on this
option also use this setting unless you have explicitly changed them for the step. An asterisk on a step
option indicates the step uses a value different from the one defined in the robot configuration, which is
not necessarily different from the application default.
There is another way in which an asterisk on the step's Options dialog has a different meaning than on the
Robot Configuration's Option window. For options on the step's Option window, an asterisk means that the
150

Kofax Kapow User's Guide
given option is deliberately set to a fixed value, which is not necessarily different from the corresponding
Robot Configuration value. Also, the value is not influenced by any changes in the corresponding Robot
Configuration value. For example, if initially the Timeout for Each Attempt property for a step is set to
120 and the corresponding value under the Robot Configuration is 60, an asterisk appears next to the
option. If the Robot Configuration value is changed to 120 so that the two values are actually the same,
the step's value is still marked with an asterisk. If the value for the robot is again changed from 120, the
value for the step stays unchanged at 120. If you change the step's value back to its default value (the
value from the Robot Configuration) using the context menu or double-click, the step's value uses the
Robot Configuration value and subsequently follows any changes made.
Another situation where the default value may depend on other configuration choices applies to error
handling step configuration.
Migrate a Robot to a Different Browser Engine
Kapow uses a browser to interact with web sites or web applications. Kapow currently comes with two
different browsers, each optimized for different purposes: the Classic engine for legacy web applications
and the Default (Webkit) engine for modern web applications. However, these browsers might not be
compatible with every internal application or Internet web site. If you encounter problems using any of
the browsers, you can migrate your robot to other browser type in the Design Studio using the following
procedure.
Migrating a Robot to the Classic Browser
1. Right-click a robot in the tree view and select Migrate.
2. Select files that you want to migrate, such as robots and snippets and click Next.
3. Specify whether to backup your files, select the backup method and click Finish on the Backup step.
After Kapow migrates your robot, you can see that the color of the robot icon has changed.
Note When migrating a Webkit robot that has steps with legacy waiting criterion, this waiting
criterion is converted to "Wait real time for timer events" and "Max wait for time out."
Migrating a Robot to the Default Browser
1. Right-click a robot in the tree view and select Migrate.
2. Select files that you want to migrate, such as robots and snippets and click Next.
3. Specify whether to backup your files, select the backup method and click Finish on the Backup step.
After Kapow migrates your robot, you can see that the color of the robot icon has changed.
Note When migrating a robot from the Classic to the Default browser engine, the robot is checked
for the "Wait real time for timer events" or "Max wait for time out" settings in the robot configuration.
If the settings are found, Design studio shows a warning that these configuration settings will be
lost during the migration. This is applicable only to the robot configuration. If any step has the "Wait
real time for timer events" or "Max wait for time out" settings, they will be converted into a legacy
waiting criterion.
151
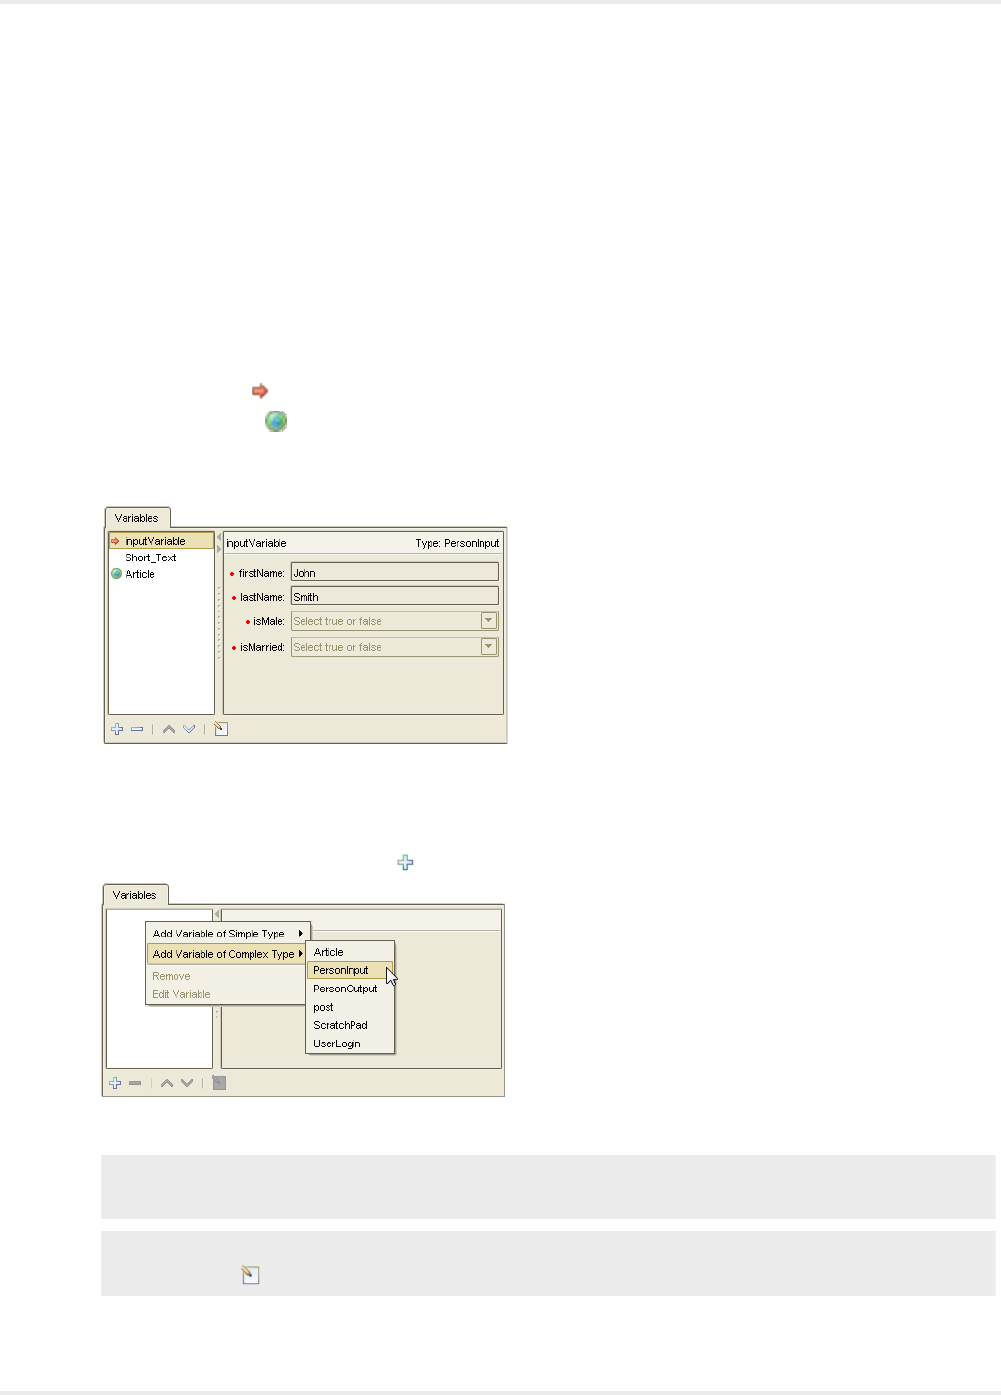
Kofax Kapow User's Guide
Configure Variables
When creating a new robot, you usually start by configuring its variables. Of course, you can reconfigure
the variables at any time during the robot's lifetime, such as changing the initial value of a variable.
1. In the Robot Editor, below the Step View, select Variables View.
The variables you specify become part of the robot state given as input to the first step of the robot.
The Variables View shows a list of variables, together with details on the selection. The icon next to
the variable indicates the variable type as follows:
• Input Variable
• Global Variable
The following Variables view contains three variables: one input variable, one normal variable, and
one global variable.
The Variables View shows the values of the variables at the current step. Because these values
result from the execution of the robot, you cannot change them directly. However, you can add or
remove variables.
2. To add a new variable, click Add , or right-click the Variable and select a type.
The Edit Variable window appears.
Note If the variable is added using the right-click method, where a type is already selected, the
window opens with the pre-selected type.
Note This is also the window used to configure an existing variable, either by double-clicking it or
by clicking the button.
3. In the Edit Variable window, enter a name for the variable.
152

Kofax Kapow User's Guide
The name must adhere to naming standards. For example, spaces are not allowed. When you click
OK, you are notified if the name is invalid. Change an invalid name or click Cancel.
Note Use the variable configuration window to edit initial values. In other words, this dialog box
does not, as the Variables view, show current values. The values you provide are used at the start
of the execution.
4. Select a variable type.
See Variables and Types for more information about types and their connection to variables.
5. Complete the input fields based on the type.
Use these fields to provide the variable with initial values. You do not have to manually give the
variable a name.
6. Click OK.
If you have not entered a name, you are prompted to generate a name from the type name.
7. Use the Global and Use as Input check boxes to configure a variable as input to the robot or global.
If a variable is used as input, it makes it possible to supply the robot with values for that variable
when running it on a RoboServer. For input variables, the values entered for attributes should be
regarded as test input and used only when you are working with the robot in Design Studio. When
the robot is run on RoboServer, the input values are overridden (replaced) by values supplied by the
client that runs the robot. Note that variables of simple types cannot be used as input, as their usage
is as temporary variables, which are internal to the robot.
8. If you want the variable to keep its value during the entire robot execution, select Global.
Global variables provide a way to create counters and do other kinds of computation across
iterations and branches. Global variables can also be used for accumulation of data across iterations
or branches, such as accumulating a text consisting of comma-separated values.
This is different from normal variables, whose values are not kept across loop iterations and
branches.
Note In Design Studio, the values of the global variables depend on which steps you have
executed to get to the current step. Unless care is taken to execute the right sequence of steps, the
values are different from when the robot is actually executed.
9. To remove a variable, right-click the variable and select Remove.
Alternatively, select a variable and click Delete below the list.
Device Automation
Introduced in Kapow 10, Device Automation is a powerful feature. Use this feature to automate any work
process involving computer applications such as:
• Native Windows applications
• Native Java applications
• Legacy terminal applications
• Other applications presenting a GUI on a Windows system, such as Citrix clients
See Introduction to Device Automation for more information.
153

Kofax Kapow User's Guide
Note Device Automation requires a Desktop Automation license.
Introduction to Device Automation
Requires a Desktop Automation License
Device Automation lets you create robots that can automate work processes involving Windows and Java
applications on your networked computers. Device Automation is a part of the overall Kapow automation
capabilities. Because Device Automation is substantially different from website and database automation,
Design Studio has a dedicated workflow language, editor and steps for this purpose.
Device Automation Workflow
Device Automation workflow is a sequence of steps that are executed one after the other. The steps
model how a user would interact with the application that is being automated. Device Automation
workflows are contained inside a single step action called Device Automation, which itself is part of a
normal robot. A robot can contain multiple Device Automation steps, each with their own workflow. A robot
can contain other types of steps. The robot can be executed as any other Kapow robot from a schedule,
via the API, via Kapplets or manually during development or testing.
Device Automation Editor
Device Automation workflow is edited in the Device Automation Editor. The editor presents a view of the
robot and the applications being automated along with details on the robot state and buttons to control the
robot manually. See Device Automation Editor for details.
Steps
Steps are the basic building blocks of a workflow in Device Automation, just as they are in website Robot
Language. In Device Automation, all steps have one entry point and one exit point, except for a few steps
that have no exit point. Some steps are simple steps and merely perform one action such as moving a
mouse or pressing a key. Other steps, called composite steps, may contain additional steps. Composite
steps are used to group steps that belong together or to handle branching and other ways to control how
execution proceeds. For the complete list of steps, see Device Automation Steps.
Steps in Device Automation are typically granular and handle smaller tasks. For example, there is no
inherent error handling on every step type. Instead, dedicated steps exist specifically to handle errors
during execution.
Devices
The purpose of Device Automation is automated control of applications. The applications run on devices
(computers, servers or virtual machines) that can be remotely accessed over a network. A robot performs
Device Automation by connecting with an Automation Device Agent running on the remote device, unless
the device is running a terminal, where the connection is direct from the robot. For details about handling
devices and setting up the agents, see Configure Automation Device.
Device Automation Workflows Compared to Website Robots
Kapow was originally designed for accessing HTML at a time when HTML pages were mostly static. In
those cases the state of the application (web page) can be tracked internally in the robot. By contrast, the
Device Automation functionality is designed to automate remote applications where the state resides in
the application. In this case, the state is external to the robot.
Execution of steps in Device Automation move forward only. The state of the execution is on the remote
device and it is not possible to undo by going back in the workflow. As a consequence, when designing
154

Kofax Kapow User's Guide
your workflow, newly inserted steps are not executed until you explicitly select to do so in the Device
Automation Editor.
Branching only occurs as part of composite steps, such as the Conditional Step. The branches are
alternative branches, so only one branch is chosen when a workflow is executed. This differs from website
robots where branches are executed sequentially one after the other, and the state is reverted at the start
of each branch.
In Device Automation, error handling differs because it is not specified for every step. Instead, a try-catch
step explicitly catches errors occurring within its scope and defines how to handle them.
In general, when designing a Device Automation workflow, think how a user interacts with the user
interface of the application you are automating. For example, if you need to type some text in the text field,
first click the field and then insert a step that types the text.
Device Automation has features that allow the robot designer to design the automation to gauge the
external state of the application and react appropriately. For example, a click on a button can be made
to wait until the button appears. Or a step can detect that an application is already started, to avoid
starting another instance. When you design a workflow, guards and finders are used to wait for specific
states of the application, ensuring that the robot finds the required elements and interacts with them as
expected. Guards are described in the Guarded Choice Step and finders are described in Finders in
Device Automation.
See Get Started with Device Automation for steps to automate remote devices.
Get Started with Device Automation
1. Install and configure Device Automation on remote devices that run the applications you wish to
automate. See Configure Automation Device. If you want only to automate terminal application, skip
this step.
2. Create a robot in Design Studio using Smart Re-execution mode.
3. In the created robot, insert an action step and choose the Device Automation action.
4. Configure input values, output mappings, and required devices on the step. See Automation Device
mapping and Reference to Automation Device. If you want only to automate terminal application,
skip the configuration for required devices.
5. Click Edit to open the Device Automation Editor. In this editor, you can design your automation
workflow. You can also run the workflow to see it in action.
6. Run a robot to automate the devices.
Reference to Automation Device
Before editing a robot with a Device Automation step, provide a device reference by clicking Add in
the Required Devices field on the Action tab of the Device Automation step. In the Add Device window,
select either Static Reference or Dynamic Reference. Note that "local" reference is always available
by default whether any other references is provided or not.
Note When automating terminal computers, do not install the Automation Device Agent and do not
provide Automation Device reference.
155

Kofax Kapow User's Guide
Static Reference
Static reference implies that you created one or more Automation Device mappings to choose from. The
robot automates the devices associated with the selected mapping. Mapping information is required for
automating Windows devices and it is not required for automating terminals. If you change the mapping,
click Refresh in Design Studio to renew the connection.
Dynamic Reference
This type of reference helps you connect to Automation Devices in Single User Mode, such as by using
the Remote Desktop Protocol (RDP) connection. Specify a mapping name to use in the Connect to
Device step. All other connection parameters are specified within the Device Automation workflow. Once
the Dynamic Reference connection was used by the robot in the Device Automation step and device is
connected, the connection stays alive and you can use this reference (and this device) in the next Device
Automation steps in your robot.
Automation Device Mapping
Mapping of an automation device makes it possible to access this device from a project in Design Studio.
We recommend using the Management Console Based Device Mapping option, because this way you
can always be sure that the robots you create will work on the dedicated Management Console with the
specified Automation Devices despite changes in the network infrastructure.
The Device Mapping option in the Device Mapping Configuration is recommended for developing and
debugging your robot in Design Studio.
Note For automating terminal devices, do not install the Device Automation service on your remote
computer or create a device mapping in the Management Console.
Map Automation Device
1. Click New Automation Device Mapping on the File menu or right-click a project in the Projects list
and select New > Automation Device Mapping.
2. If you started the Automation Device Mapping wizard from the File menu, provide a name and
select a project that the device will be associated with. Otherwise, provide a name of the Automation
Device. Click Next.
3. In the Automation Device Mapping Configuration step, select either Management Console Based
Device Mapping or Device Mapping.
Management Console Based Device Mapping
This option helps you connect to Automation Devices using mappings in the Management Console.
Before creating a new device mapping, open Management Console and create one or more device
mappings. The labels you specify in the Required Label option must match the labels specified for
mappings in the Management Console.
Configure the following.
•Management Console: Select the Management Console to use the mappings from.
•Cluster Name: Type the cluster name on the selected Management Console.
156

Kofax Kapow User's Guide
•Required Labels: Type one or more labels for the Automation Devices. The labels must be
separated by commas.
Device Mapping
This option helps you connect to Automation Devices directly. Configure the following.
•Host: Type the Automation Device host name or IP address.
•Port: Type the port number to connect to the Automation Device.
•Token: Type the token specified in the remote hub settings on the selected Automation Device.
Configure Device Mapping
To edit the Automation Device Mapping, either double-click the device mapping in a project, or right-
click the device mapping and select Configure. In the Configure Device Mapping window, select either
Management Console Based Device Mapping or Device Mapping.
Management Console Based Device Mapping
This option helps you connect to Automation Devices using mappings in the Management Console.
Configure the following.
•Management Console: Select the Management Console to use the mappings from.
•Cluster Name: Type the cluster name on the selected Management Console.
•Required Labels: Type one or more labels of the Automation Devices. The labels must be separated
by commas.
Device Mapping
This option helps you connect to Automation Devices directly. Configure the following.
•Host: Type the Automation Device host name or IP address.
•Port: Type the port number to connect to the Automation Device.
•Token: Type the token specified in the remote hub settings on the selected Automation Device.
Use RDP Connection
This topic shows how to set up the RDP connection in your robot with the Device Automation step.
Prerequisites
To use RDP your environment must comply with the requirements for the Lock Screen feature.
1. Install Device Automation Service on remote devices. Configure the service to work in single user
mode and specify a token. See Configure the Automation Device Agent.
2. Specify Dynamic Reference for the Device Automation step and click Edit.
3. In the Device Automation workflow, insert the Open Step.
4. In the Open step, select local in the Device list and specify the URI for the RDP connection, such as
rdp://admin:AdminPassword@Server1.
Once the robot executes the Open step, an RDP connection is established. To check that the RDP
connection is established, look for the kapowlock process in the Windows Task Manager. If the
process is present in the list of processes on the computer executing your robot, the connection is
active.
157
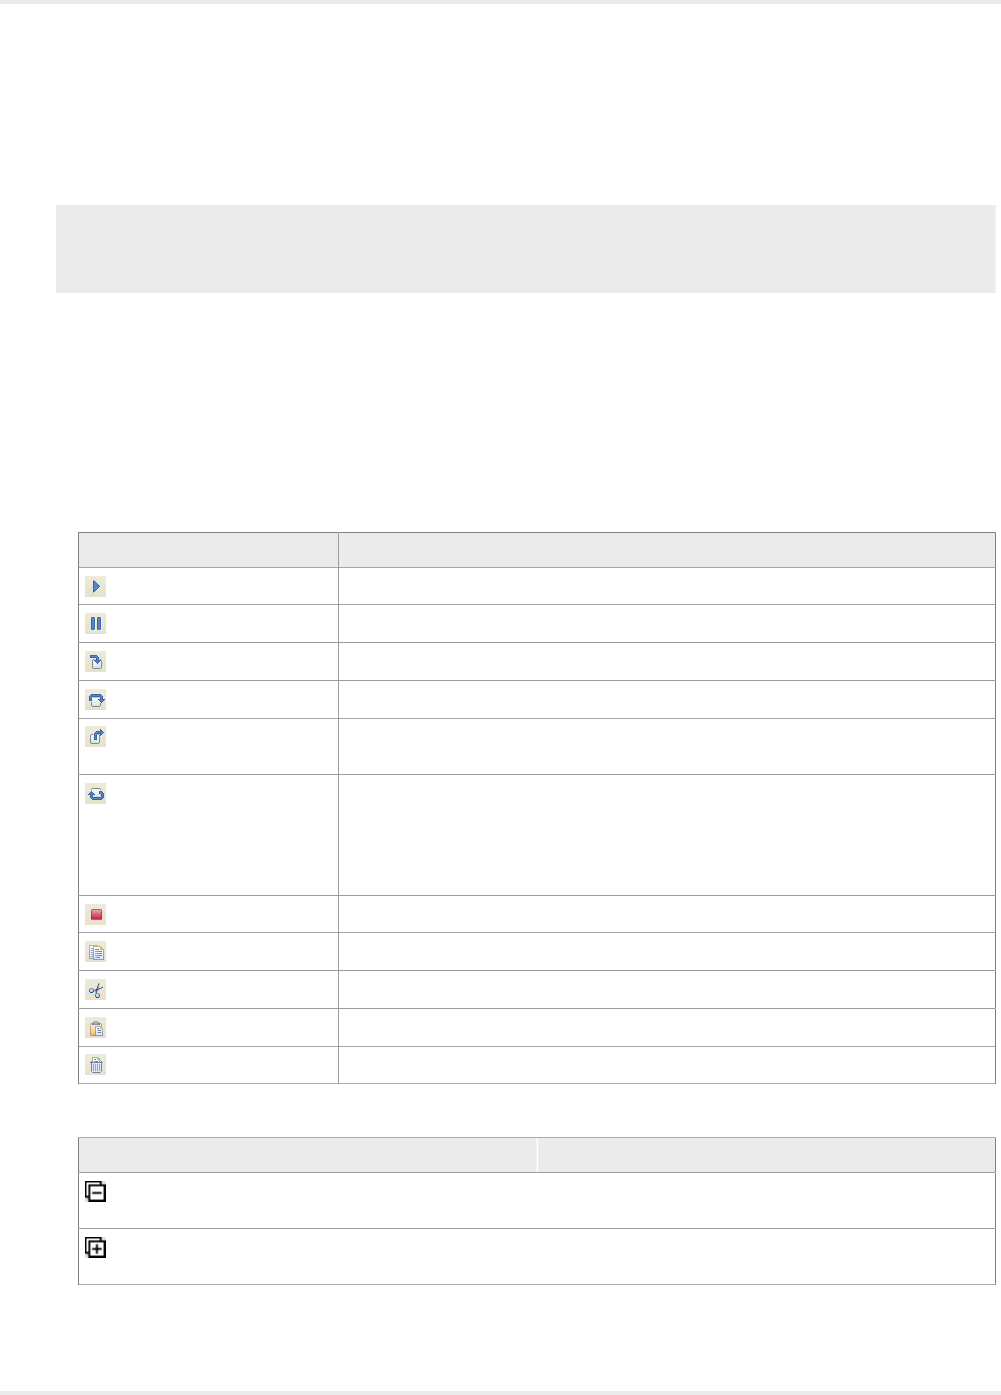
Kofax Kapow User's Guide
5. Insert the Connect To Device Step to automate the remote device. We recommend setting up
timeout and some retry attempts to make sure the RDP connection is established. Once this step is
executed, you should see available applications in the Automation Device view.
Note Only one RDP connection to a specific device can exist at a time, but you can have several RDP
connections to different devices. A new RDP connection to the same device closes any existing RDP
connection on this device.
Device Automation Editor
The Device Automation Editor contains the following windows. You can undock and move any of the
editor's windows to make editing more convenient.
•Automation Workflow: Contains a workflow of steps as well as variables and expressions. Buttons at
the top of this window help you navigate the steps of the workflow. You can go forward in the workflow
using the Start Execution, Step Into, Step Over, and Step Out buttons; you can also pause or reset the
execution of the robot. To select several steps, hold the Crtl key and click the steps.
Button Description
Start Execution Starts automation workflow execution.
Pause Pauses automation workflow execution.
Step Into Opens a step to go through all its branches separately.
Step Over Executes a step with all its branches.
Step Out Completes the execution of all branches in a step and goes out of the step to the
main workflow.
Go to Next Iteration Enabled when the current program point is inside a Loop step. Press the button
to execute until the same program point is reached again. The loop can be
executed more than once if the program point is skipped in some iterations. If
there are no more iterations, the execution stops at the program point outside
the Loop step.
Reset Resets the execution of the Device Automation workflow.
Copy Copies selected steps.
Cut Cuts selected steps.
Paste Pastes steps from the clipboard.
Delete Deletes selected steps.
Click the plus and minus signs to open and close elements in the Automation Workflow view.
Button Description
Collapse Collapses all steps and other elements in the
Automation Workflow pane.
Expand Expands all steps and other elements in the
Automation Workflow pane.
158
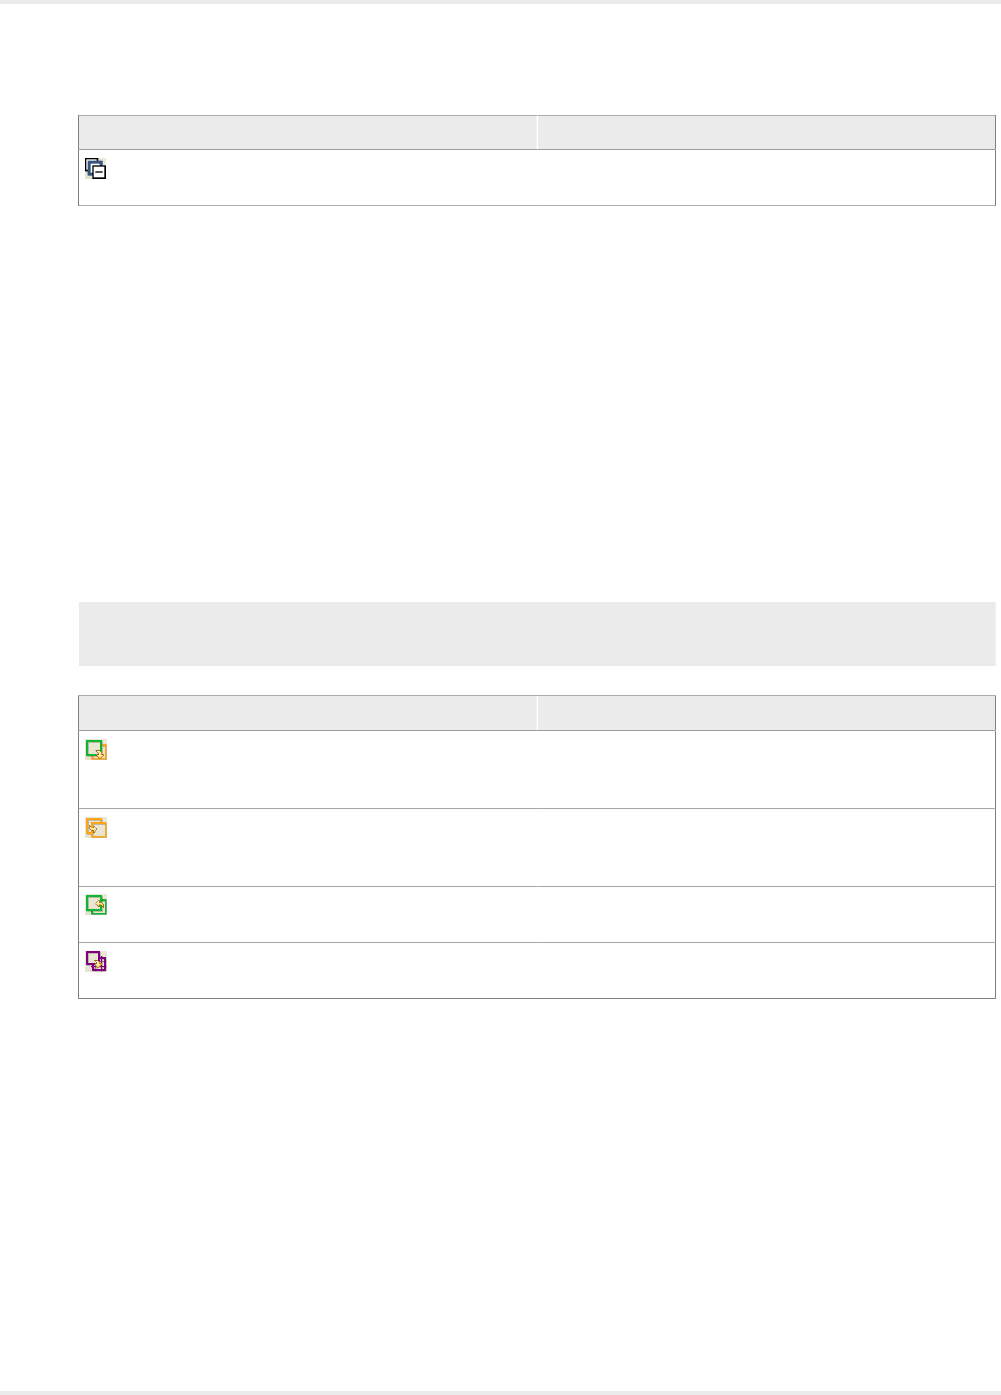
Kofax Kapow User's Guide
Button Description
Collapse all but selection Collapses all steps and other elements except the
selected ones.
Newly inserted steps are not executed unless you click Step Into or Step Over in the Automation
Workflow view.
Zoom in the Automation Workflow View
For your convenience, you can zoom in and out in the Automation Workflow view the same way you
zoom in a web browser.
• To zoom in use: Ctrl and + or Ctrl + mouse wheel scroll up
• To zoom out use: Ctrl and – or Ctrl + mouse wheel scroll down
•Automation Device View: Shows tabs with open application windows and a widget tree with
available elements. You can select elements in the interface or select images and insert steps by right-
clicking the selected element or image. The top left corner of the Automation Device view shows the
coordinates of the mouse relative to the top left corner of the application window. When you select an
element in the view, along with the window coordinates, it shows the coordinates relative to the top left
corner of the selected element.
Note Sometimes it is not possible to select cell elements in tables in the application view. You can
select cell elements in the widget tree and add step actions from the tree view.
•Button Description
Create finder for selection Replaces the selected in the Automation Workflow
view finder with a finder that matches the selection in
the Automation Device View.
Show next location found Shows the next element that matches the finder. The
button's tooltip also provides the number of matched
elements.
Select Next Node Matching Click Moves selection to the next node that matches the
selection in the Automation Device View.
Toggle between Simple and Nine Grid Image Finder Changes image selection from simple to nine-grid and
back.
Workflow State view: Shows state of the workflow execution, such as variable values. When Kapow
detects that a binary variable contains an image, the image is displayed in the view. Kapow detects GIF,
JPEG, BMP, TIFF and PNG images. The image tooltip shows the MIME type of the image and its size
(width and height).
159
Kofax Kapow User's Guide
•Output Log: Contains workflow execution messages.
Save and Revert Changes
When you click Save in the Device Automation Editor, you save the entire robot and not only the device
automation workflow. When you click OK in the Device Automation Editor, the editor closes and the edited
workflow is saved in the Device Automation step action. If you want to cancel the editing of the workflow,
click OK and then click Undo (Ctrl-Z) in the robot editor.
Configure Automation Device
Device Automation Prerequisites
This topic provides a list of components that must be installed and configured on the Automation Devices
(remote computers you want to automate) before you can use Kapow.
Java Access Bridge
To automate Java programs or Java applets on remote devices with Kapow, install Java 32-bit on your
device (JRE or JDK) and enable the Java Access Bridge in the Java Runtime Environment used by the
application. We recommend using the latest available Java version.
For JRE 7 or Later
To enable Java Access Bridge for Java version 7 or later, navigate to the bin directory in the Java
installation directory and run the following command.
jabswitch -enable
For JRE6
Follow this procedure to install Java Access Bridge 2.0.2 on a Windows 32-bit system. For older
applications that require Java version 1.6, copy the following files to the specified destination
directories, where %WINDOWSHOME% is the directory where Microsoft Windows is installed (for
example, C:\WINDOWS), and %JAVAHOME% is the directory where your JDK or JRE is installed.
The following are examples of directory names for Java SE 6 Update 24.
•JDK: C:\Program Files\Java\jdk1.6.0_24\jre
•JRE: C:\Program Files\Java\jre6
160
Kofax Kapow User's Guide
The following table lists Java Access Bridge Windows libraries and related files for Windows 32-bit
systems.
Java Access Bridge File Destination Directory
WindowsAccessBridge.dll %WINDOWSHOME%\SYSTEM32
JavaAccessBridge.dll %JAVAHOME%\bin
JAWTAccessBridge.dll %JAVAHOME%\bin
accessibility.properties %JAVAHOME%\lib
access-bridge.jar %JAVAHOME%\lib\ext
jaccess.jar %JAVAHOME%\lib\ext
For more information, search the Downloads page on the Oracle web site ( http://www.oracle.com/
technetwork/java/javase/downloads/) to locate and download jab-2-0-2. For installation instructions,
see installing-jab-32-bit on the http://docs.oracle.com website.
Perform the following to test that you have installed Java Access Bridge properly.
1. Run the SwingSet2 application and then run the JavaMonkey.exe application.
2. Select File > Refresh Tree in the Java Monkey application and the SwingSet2 application should
appear.
Alternatively, you can use the JavaFerret.exe application.
Device Automation on Windows
If you get the error: "Module automationnative not found," install the following update.
https://support.microsoft.com/en-us/kb/2999226
On some systems Windows Update is not available, but there is a workaround to install updates.
1. Create a c:\temp\976571 folder.
2. Use the following command to extract the contents of the MSU file:
Expand -F:* c:\kb976571\Windows6.1-KB976571-v2-x64.msu c:\temp\976571
This command extracts multiple files, from Windows6.1-KB976571-v2-x64.cab.
3. Run the following command:
DISM.exe /Online /Add-Package /PackagePath:c:\temp\976571\Windows6.1-KB976571-v2-
x64.cab
For more information, see How to use DISM to install a hotfix from within Windows on the Microsoft
Technet website https://blogs.technet.microsoft.com.
Prerequisites for Internet Explorer
To automate Internet Explorer using the Device Automation feature, check the following requirements.
• In Internet Explorer 7 and higher on Windows Vista and Windows 7, set the same value (either On
or Off) in the Protected Mode settings for each zone. To open the Protected Mode settings in Internet
Explorer, select Tools > Internet options and click the Security tab. For each zone, select the Enable
Protected Mode option and select the same security level.
• For IE 10 and higher, disable the Enhanced Protected Mode in the Security settings on the Advanced
tab of the Internet Options window.
161

Kofax Kapow User's Guide
• For IE 11 only, check that a FEATURE_BFCACHE subkey with a DWORD value named iexplore.exe is
present in the registry on the target computer. This subkey enables the driver to maintain a connection
to the instance of Internet Explorer it creates. For 32-bit Windows, examine the HKEY_LOCAL_MACHINE
\SOFTWARE\Microsoft\Internet Explorer\Main\FeatureControl\FEATURE_BFCACHE
key in the registry editor. For 64-bit Windows, examine the HKEY_LOCAL_MACHINE\SOFTWARE
\Wow6432Node\Microsoft\Internet Explorer\Main\FeatureControl\FEATURE_BFCACHE key. If the
FEATURE_BFCACHE subkey is not present, create it and create a DWORD value named iexplore.exe with
the value "0" in the key.
• Set the browser zoom level to 100% to align the native mouse events with the correct coordinates.
Note In some cases, out-of-browser Silverlight applications can interfere with Device Automation. The
cause of the problem is the Internet Explorer subdriver. To disable the IE subdriver, clear the Extended
Internet Explorer Support option on the Windows tab of the Device Automation Service configuration
window.
SAP Prerequisites
To automate SAP application using the Device Automation feature, enable scripting on both the server
and the client sides.
• On the client, go to SAP GUI Options and enable scripting. Also, turn off notifications, because they
interrupt the automation process.
• To enable scripting on the SAP server, perform the following steps. Note that you must have
administrative privileges to change the sapgui/user_scripting parameter.
1. Log on to your SAP server.
2. Run transaction RZ11. Specify the parameter name sapgui/user_scripting and click Display.
If Parameter name is unknown appears in the status bar, this indicates that you are missing the
current support package. Check your installed packages.
3. Change the value to TRUE.
4. Click Save.
Note that some elements, such as scroll bars, are only available if you run the SAP client on a machine
with a Windows Classic desktop theme.
Configure the Automation Device Agent
Once your computers meet all the necessary requirements for device automation, you can install and
configure the Automation Device Agent.
1. If you need to automate Java applications, install Java 32-bit (JRE or JDK) on remote devices and
check that the Java Access Bridge is enabled on your devices.
2. Download and run the Kapow Device Automation installer on your device.
3. Start the Device Automation Service from the Start menu. Once the service starts, you can see its
status by looking at the icon in the notification area.
Icon Status
Device Automation Service is starting and trying to
connect to the configured Management Console.
162
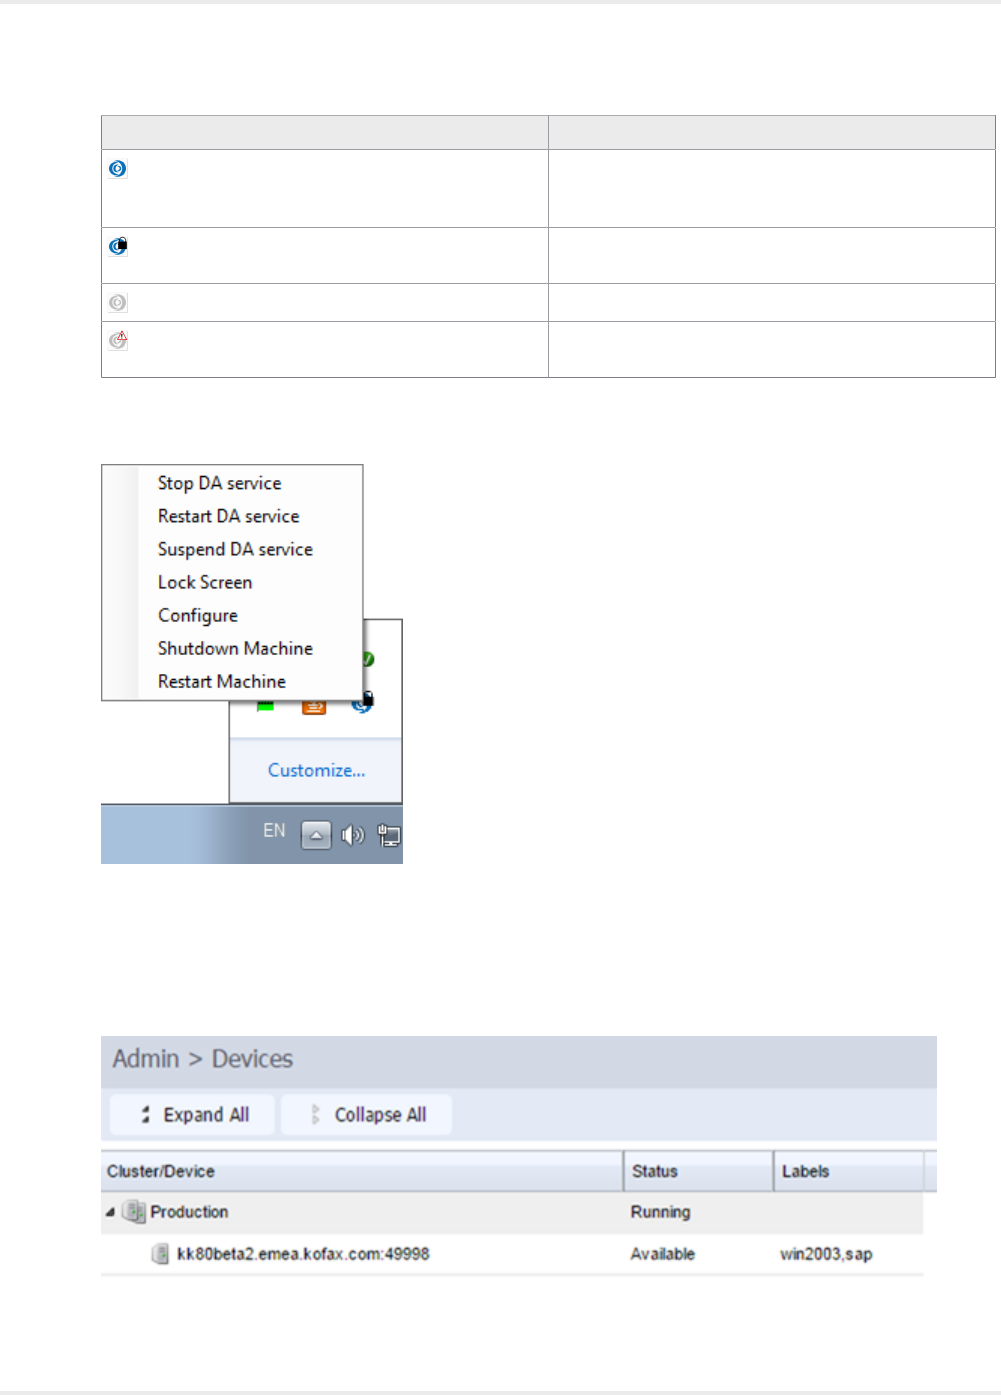
Kofax Kapow User's Guide
Icon Status
Device Automation Service is running and either
connected to a Management Console or running in
single user mode depending on configuration.
Device Automation Service is running and in use by
RoboServer or Design Studio.
Device Automation Service is not running.
Device Automation Service is not running due to an
error.
4. To edit the Device Automation Service options, right-click the Device Automation Service icon in the
notification area and select Configure. This opens the Device Automation Service window. After
changing the options, click Save and Restart.
To manually edit the options, open the server.conf file on your Automation Device. The file is
located in Users > UserName > AppData > Local > Kapow10.2.0.1 directory where UserName is
the name of the user the service is running under.
See the table with Device Automation Service options below.
5. Check that the device is registered in the Management Console under Admin > Devices tab.
163
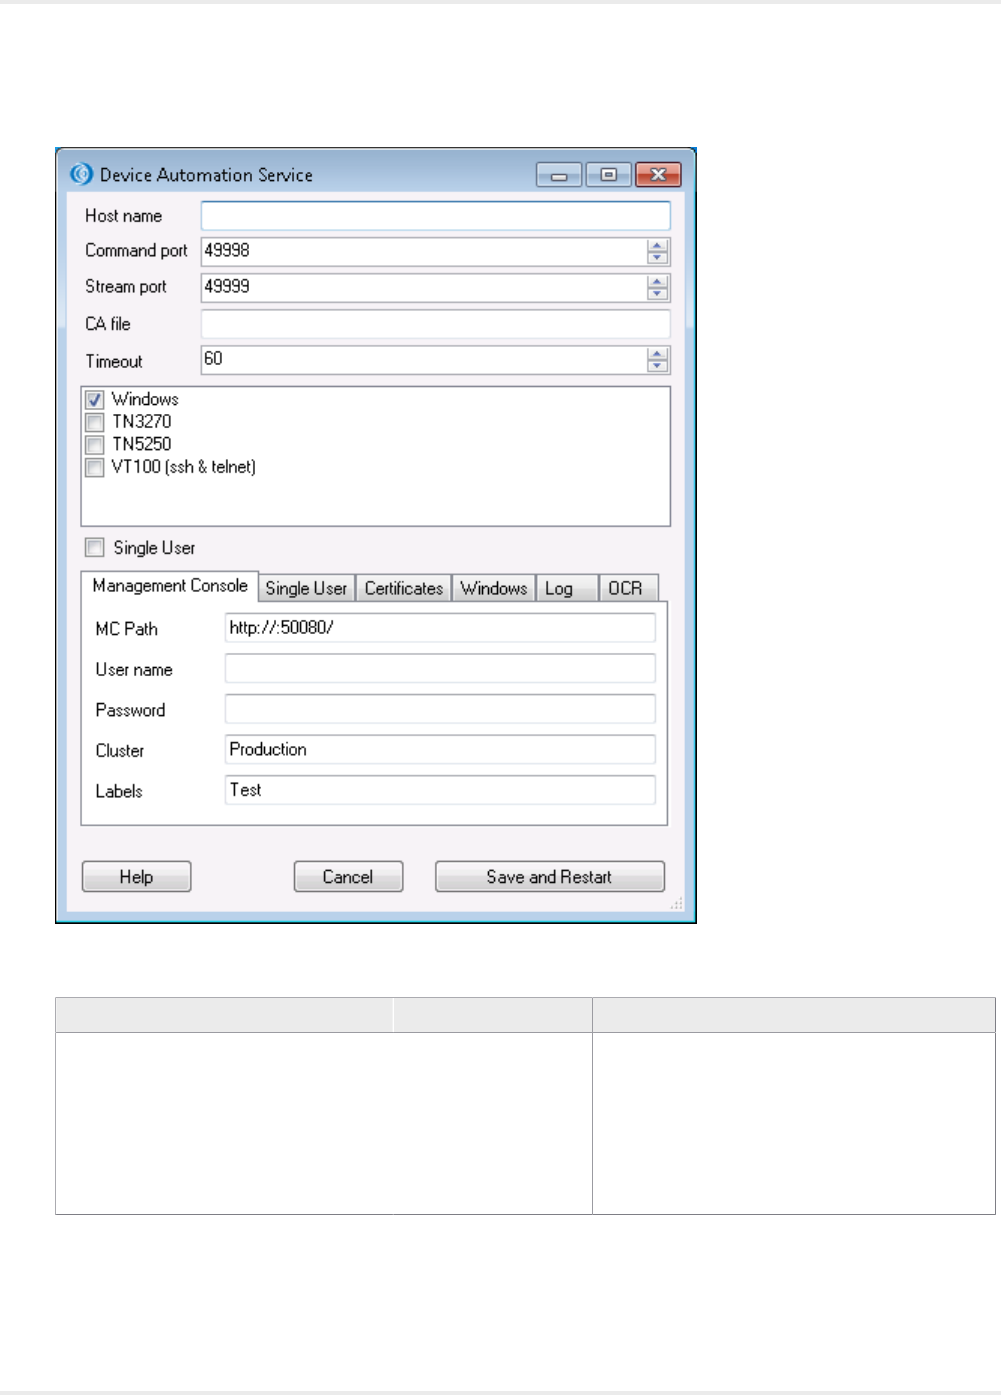
Kofax Kapow User's Guide
The following is a Device Automation Service configuration window.
The following table lists the available Device Automation Service options.
Configuration Window Option server.conf Option Value and Description
Single User
Clear (default)
Select for direct connection to the
Automation Device from Design Studio
or when using the RDP connection.
"singleUser" false (default)
true
Set to false to automatically register the
Device Automation Service with the specified
Management Console.
For direct connection to the Automation Device,
set to true and specify a token.*
164

Kofax Kapow User's Guide
Configuration Window Option server.conf Option Value and Description
Host name "hostName" Name or IP address of the computer running the
Device Automation Service.
If a computer has multiple names or IP
addresses, specify the one that RoboServers
and Design Studio contact this Automation
Device Agent with. That is, the host name or IP
address must be reachable from RoboServers
and Design Studio.
Command port "commandPort" 49998 (default)
Reassign this port for the Automation Device if
necessary.
Stream port "streamPort" 49999 (default)
This port is used to send data between Design
Studio and Device Automation Service. If
streamPort is set to "0", the Device Automation
Service selects a random port number.
You might need to reassign the streamPort if
there is a firewall between Design Studio and the
Automation Device.
CA file "caFile" empty (default)
You can communicate with the Management
Console using SSL. If the default certificate in
node.js is not used, you can specify a path to
another certificate file using this parameter.
Timeout "commandTimeout" This option specifies the timeout for command
execution in seconds. If a command cannot be
completed in a specified time, the service sends
a notification and execution of the robot stops.
Token on Single User tab "token" empty (default)
If the "singleUser" option is set to false,
leave this option empty. If you use the
direct connection to the Automation Device
("singleUser": true), specify a token. It
can be any token you define.
List of drivers to load at startup, such as
Windows, TN3270, TN5250, VT100
Windows (default)
"drivers" ["automationnative"] (default)
You can select drivers to load at startup.
Windows is the default driver for automating
native Windows and Java applications. Leave
this parameter as is.
To access a terminal from the Automation
Device, select the corresponding driver.
165
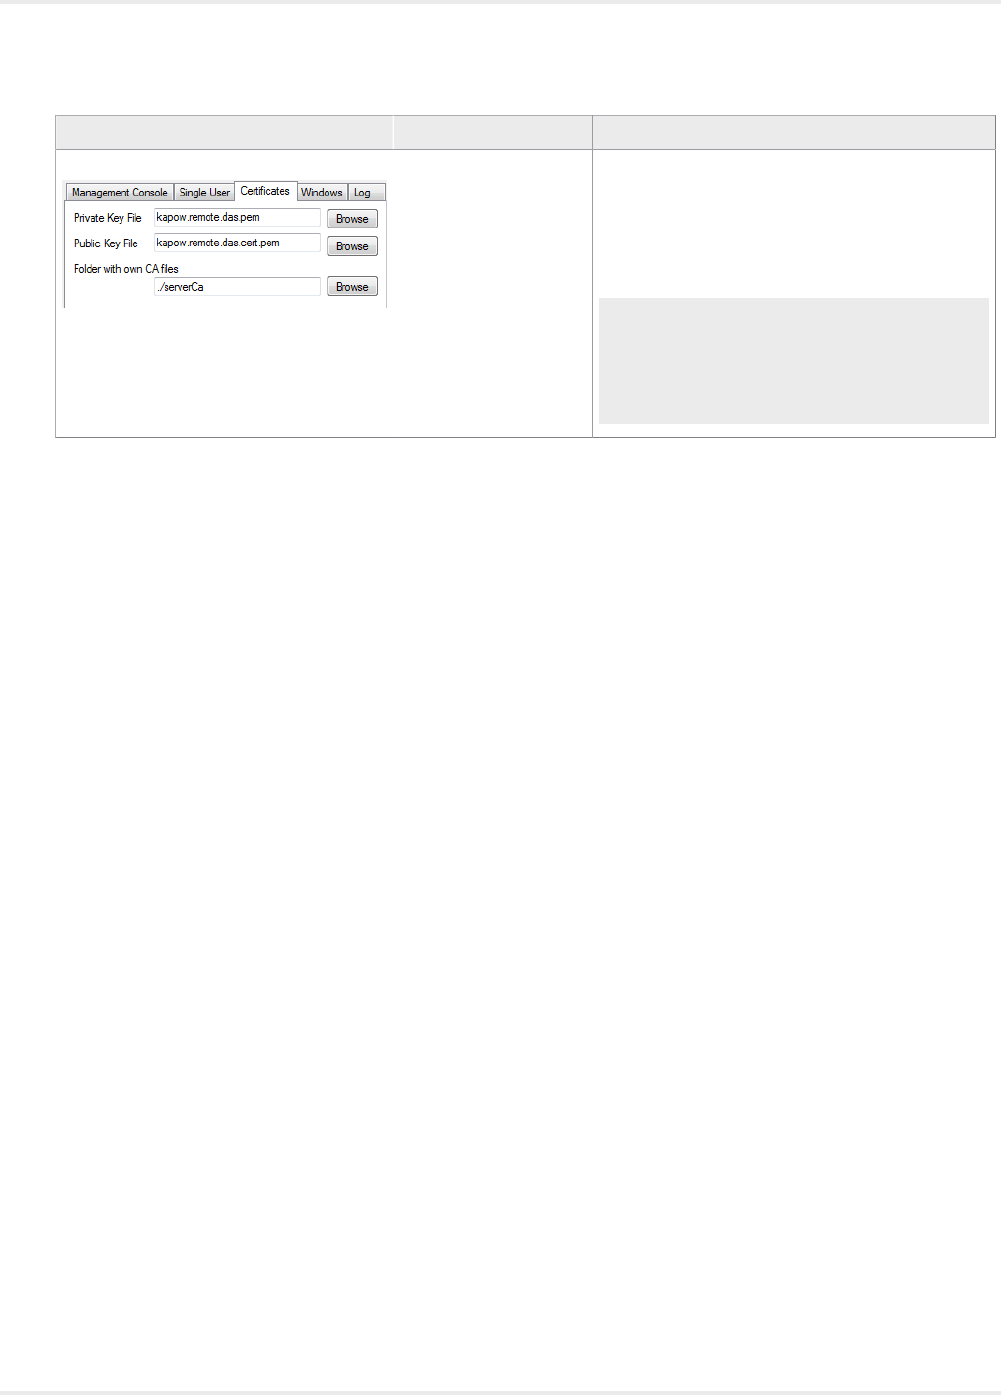
Kofax Kapow User's Guide
Configuration Window Option server.conf Option Value and Description
Certificates tab "tlsServerConfig" Kapow provides TLS communication between
Automation Device and RoboServer or Design
Studio. The communication uses certificates for
encrypting the communication. The following
is a cerver.conf file code extract. For more
information see Use TLS Communication.
"tlsServerConfig": {
"key": "kapow.remote.das.pem",
"cert":
"kapow.remote.das.cert.pem",
"ca": "./serverCa"
},
166
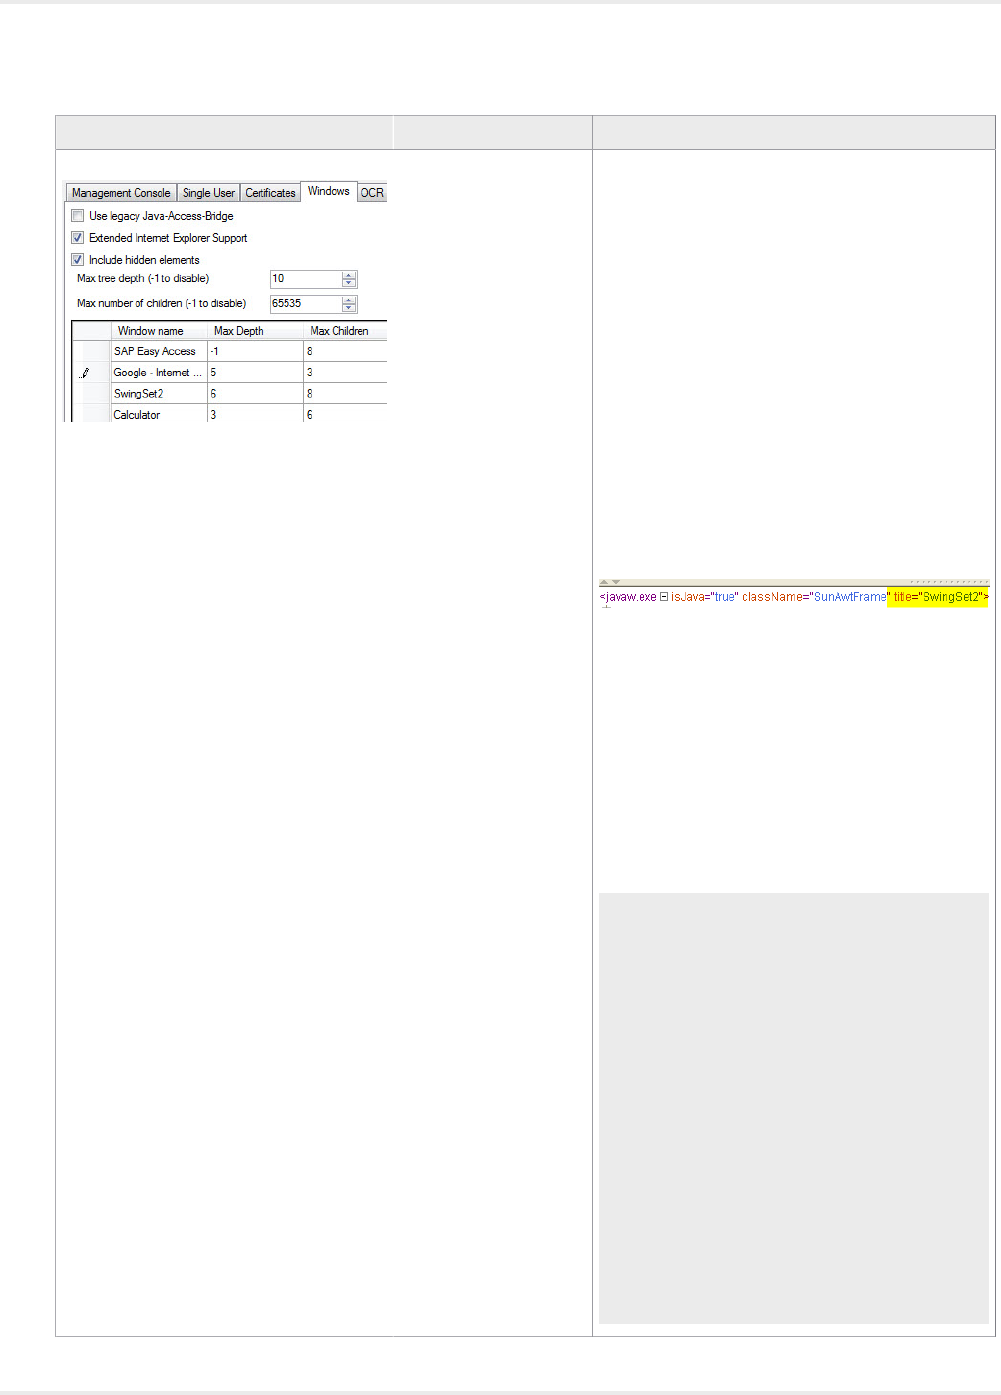
Kofax Kapow User's Guide
Configuration Window Option server.conf Option Value and Description
Windows tab "automationnative" "useLegacy": In some situations the Java
Access Bridge does not work and it can help to
switch to legacy mode. Default is false.
"maxTreeDepth": The maximum number
of nested elements shown in the Automation
Device View in Design Studio.
•-1: no restrictions.
•65535: the maximum number of elements.
defaultMaxTreeDepth and
DefaultMaxChildrenCount set the default
tree depth and a maximum number of children
elements each node shows for all application
windows in the view. You can set restrictions
on a particular application window in the table
below the Max number of children option or
by specifying maxDepth and maxChildren
properties in the "window": [] property. For
the window name use the title attribute.
"ieSupport": Support for working with
Internet Explorer on the Automation Device.
See Prerequisites for Internet Explorer for more
information.
"includeHidden": Specifies whether to
extract the entire widget tree of an application.
Default is true. If the option is set to false,
Kapow skips elements that are reported as off-
screen, such as list boxes or tables with many
elements. Deselect (or set to false) this option
to reduce the time needed to extract the tree.
"automationnative": {
"useLegacy": false,
"maxTreeDepth": {
"defaultMaxTreeDepth": 10,
"DefaultMaxChildrenCount":
65535,
"window": [
{ "name": "SAP Easy Access",
"maxDepth": -1,
"maxChildren": 8 },
{ "name": "Google - Internet
Explorer",
"maxDepth": 5,
"maxChildren": 3 },
{ "name": "SwingSet2",
"maxDepth": 6,
"maxChildren": 8 },
{ "name": "Calculator",
"maxDepth": 3,
"maxChildren": 6 }
]
},
"ieSupport": true
"includeHidden": true }
167
Kofax Kapow User's Guide
Configuration Window Option server.conf Option Value and Description
Log tab
This tab helps you open the log file to examine for any errors and shows the version and location of the service file.
OCR tab "ocrConfig" "defaultLanguage": "eng"
Specifies a language to perform an OCR
operation. By default, Kapow installs the English
language. See Change Default OCR Language
for language installation instructions.
Management Console Options
"hostName" Name or IP address of the Management
Console the device must register with.
"port" Connection port of the specified Management
Console.
"schema" Connection protocol of the specified
Management Console.
MC Path
Connection protocol, name or IP
address, port number, and path of the
Management Console the device must
register with. The format is as follows:
http://10.10.0.136:50080.
"path" empty (default)
The part of the path to the standalone
Management Console after the port
number. For example, if your Management
Console is deployed on Tomcat at
http://computer.domain.com:8080/
ManagementConsole/, specify "/
ManagementConsole/" in this parameter.
Leave this parameter empty for the embedded
Management Console installation.
User name "user" empty (default)
User name to authenticate on the specified
Management Console.
Password "password" empty (default)
Password to authenticate on the specified
Management Console.
"pingInterval" 5000 (default)
Time interval for the Device Automation Service
to ping the Management Console.
Cluster "cluster" Production (default)
Cluster name on the specified Management
Console.
Labels "labels" "label1,label2" (default)
Labels to distinguish the Automation Devices.
* The direct connection to the Automation Device is recommended for creating and debugging a robot in
Design Studio as well as for using with RDP connection.
168
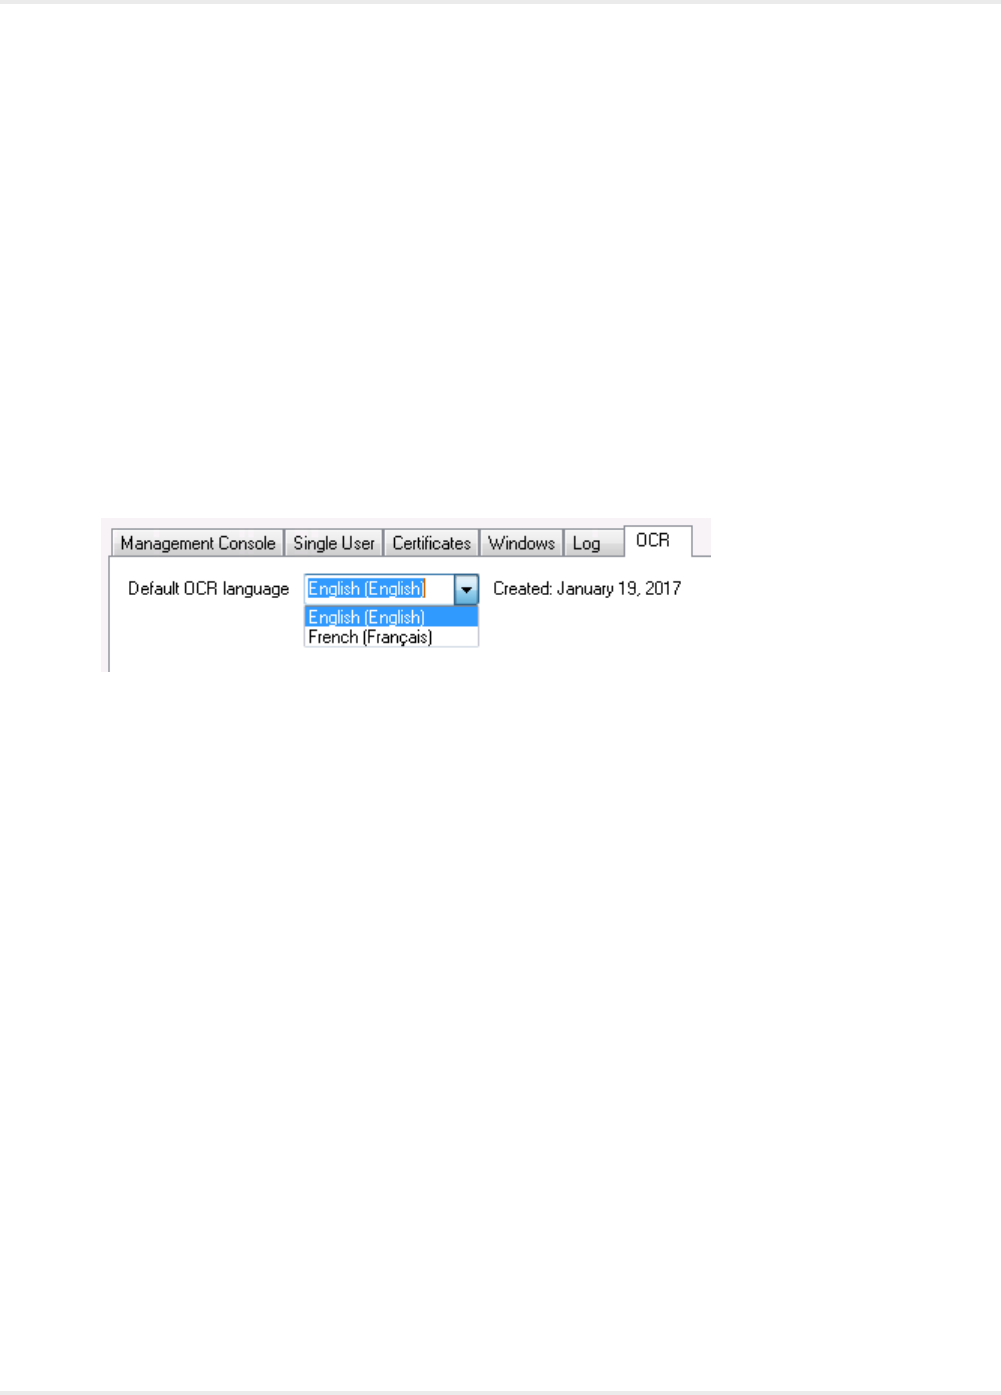
Kofax Kapow User's Guide
Change Default OCR Language
Kapow uses the Tesseract OCR engine to capture text from images. By default, Kapow installs the
English language for OCR. When your robot performs text recognition in the Extract Text From Image
Step, Kapow uses the language selected on the OCR tab of the Device Automation Service window. To
change the default language for OCR, perform the following steps.
1. Download the .traineddata file for the required language from the https://github.com/tesseract-ocr/
tessdata. For example, the file for the French language is fra.traineddata.
2. Copy downloaded trained data file to DeviceAutomationService\lib\tessdata in the Device
Automation service installation directory. Example:
C:\Program Files (x86)\Kapow DeviceAutomation 10.1.0 x32\DeviceAutomationService
\lib\tessdata
3. Right-click the Device Automation icon in the notification area and select Configure.
4. Click the OCR tab and select a language in the Default OCR language list.
Click Save and Restart.
Finders in Device Automation
The finder is an important concept in Device Automation. A finder describes how to find an element you
want to perform an action on. For example:
• To open an application, the finder determines which device to do it on.
• To click a button, the finder determines where to click.
• To extract text, the finder determines where to look for the text.
Finders are created automatically when you insert an action step by right-clicking in the Automation
Device View. Design Studio attempts to construct a finder that reliably finds the element you intend to
perform an action on.
If you insert a step directly, by clicking in the Automation Workflow view, the finder is empty and you
have to configure the finder to specify the target of the action.
You can always examine the finder used in a step by expanding the box labeled Finder.
169
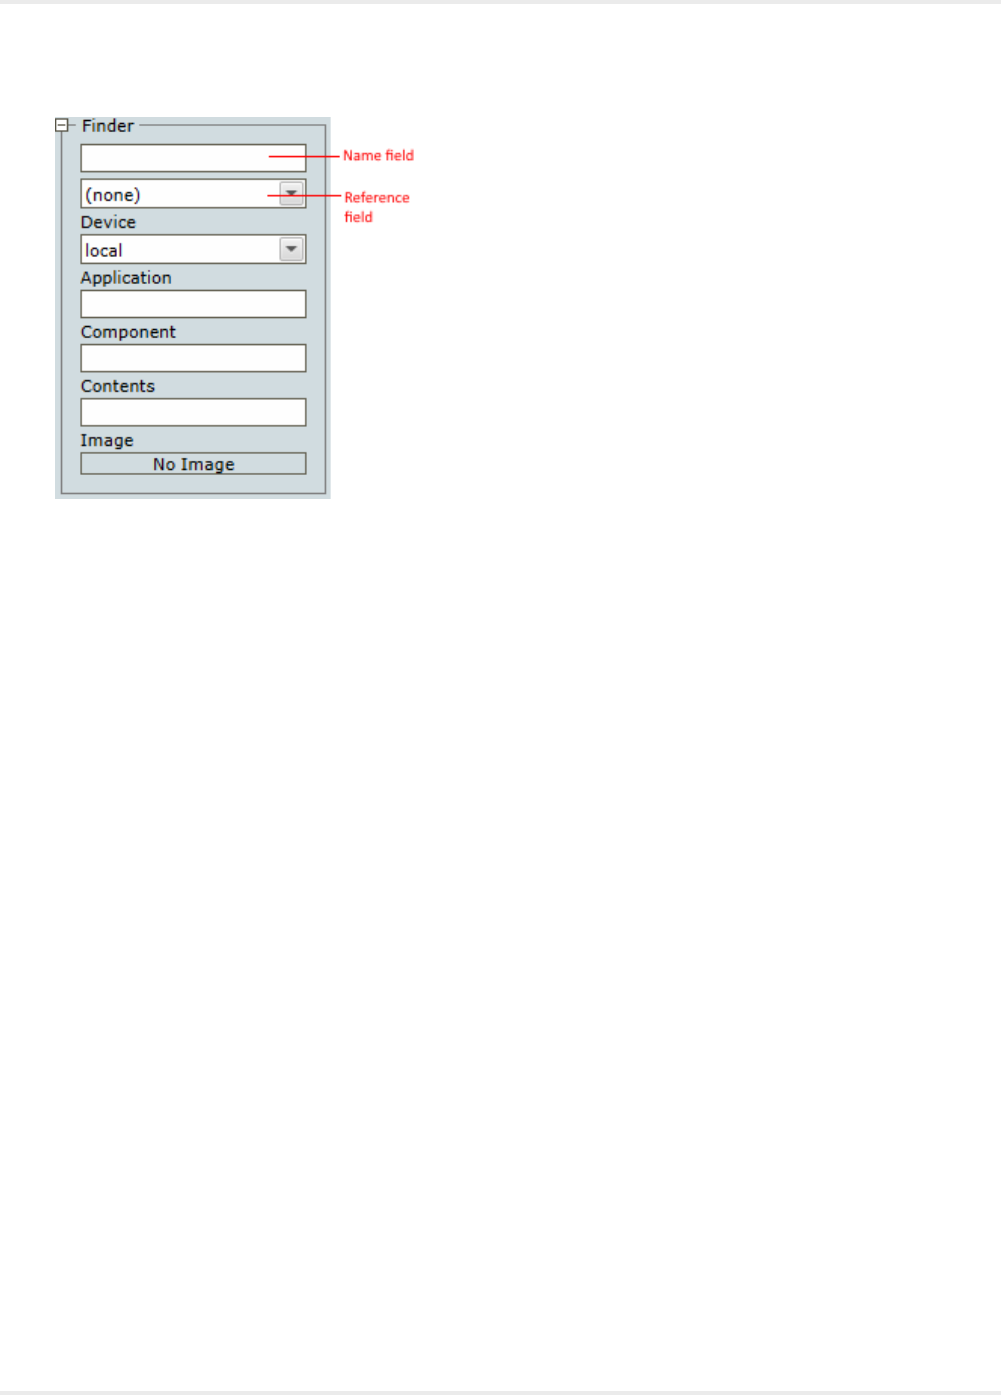
Kofax Kapow User's Guide
Types of Finders
There are four main types of finders.
1. Device finder
2. Application finder
3. Component finder
4. Image finder
Each is increasingly more complex than the previous one and finds a more specific result. All finders have
a name field and a reference field. See Reusable Finders for details.
The different types of finders are defined by the amount of selectors they contain.
Device Finder
A device finder only consists of a device selector. This is a drop-down list containing the names of devices
that the robot can access. The devices are listed under Required Devices in the Action tab of the Device
Automation step.
The Device finder can be used in the Open Step to select the device where you want to open an
application.
Application Finder
The Application finder consists of an application selector in addition to the device selector. When the
Application finder is used, the device selector first finds a specific device and the application selector then
chooses a particular application running on that device. The application selector uses CSS selector syntax
as described in Selector Syntax.
The Application finder can be used in the Press Key Step to select an application that receives the key
press.
170

Kofax Kapow User's Guide
Note On some configurations the application selector is ignored. For example, a key press is sent
indiscriminately to the device and whatever application has focus (is in front) at the time receives the
key press. In such cases you must ensure that the required application has focus when the action is
performed.
Component Finder
The most common finder is the Component finder. It has the Application finder selector, a component
selector, and a content selector.
The component selector is used to find a specific component within an application, such as an input field
or a button. The component selector uses CSS selector syntax as described in Selector Syntax.
The content selector is optional. It searches for matching text content among the found components using
the three preceding selectors. The content selector is used to distinguish between elements that only vary
in the content they contain. For example, if a component selector finds both an OK and a Cancel button,
the content selector can distinguish the text "Cancel" and target specifically the Cancel button. Content
selectors are written using regular expression syntax.
A component finder can be used in the Extract Value Step to select the component to extract the value
from.
Note The component finder also shows an Image field with the text "No Image". This is only used in
image finders and can be ignored.
Image Finder
The Image finder has all the selectors of a Component finder plus an image selector.
The image selector has two forms: A simple image selector and a 9-grid selector (described in Nine-Grid
Image Finder).
You can use an image finder when the element you want to interact with is not found in the application
tree, but it has a distinct graphical appearance.
Image finders are not used by default, but they can replace the Component finder in any step that uses
one. To use an image finder:
1. Drag a rectangular selection (marked in purple) in the Automation Device view around the graphical
element you want to find. You can modify the rectangle by dragging its sides, or just draw a new
rectangle.
2. Insert a step by right-clicking inside the selection. The step should contain an image finder made
from the selection.
Selector Syntax
The application and component selector use the syntax of CSS selectors, which provides a powerful way
to express what elements should be selected.
The general pattern of a selector is as follows:
elementName[attributeName="attributeValue"]
For example, to find the explorer.exe application window with the title "Documents" you would use the
following pattern:
171
Kofax Kapow User's Guide
explorer.exe[title="Documents"]
Selector patterns can also be nested with the greater than sign (>) denoting parent-child relation and a
blank space denoting ancestor-descendant relation. Fo example, to find a button that is a child of a toolbar
element that is somewhere among the descendants of a window element, you could use the following
pattern:
window toolbar > button
Advanced Selector Syntax
Kapow supports most of the advanced selector syntax. The following table lists supported operators and
how they work.
Pattern Meaning
* Any element
E An element of type E
E[foo] An E element with a "foo" attribute
E[foo="bar"] An E element for which the "foo" attribute value is exactly
equal to "bar"
E[foo~="bar"] An E element for which the "foo" attribute value is a list
of whitespace-separated values, one of which is exactly
equal to "bar"
E[foo^="bar"] An E element for which the "foo" attribute value begins
exactly with the string "bar"
E[foo$="bar"] An E element for which the "foo" attribute value ends
exactly with the string "bar"
E[foo*="bar"] An E element for which the "foo" attribute value contains
the substring "bar"
E:root An E element, root of the document
E:nth-child(n) An E element, the nth child of its parent
E:nth-last-child(n) An E element, the nth child of its parent, counting from
the last one
E:nth-of-type(n) An E element, the nth sibling of its type
E:nth-last-of-type(n) An E element, the nth sibling of its type, counting from
the last one
E:first-child An E element, first child of its parent
E:last-child An E element, last child of its parent
E:first-of-type An E element, first sibling of its type
E:last-of-type An E element, last sibling of its type
E F An F element descendant of an E element
E > F An F element child of an E element
E + F An F element immediately preceded by an E element
E ~ F An F element preceded by an E element
172
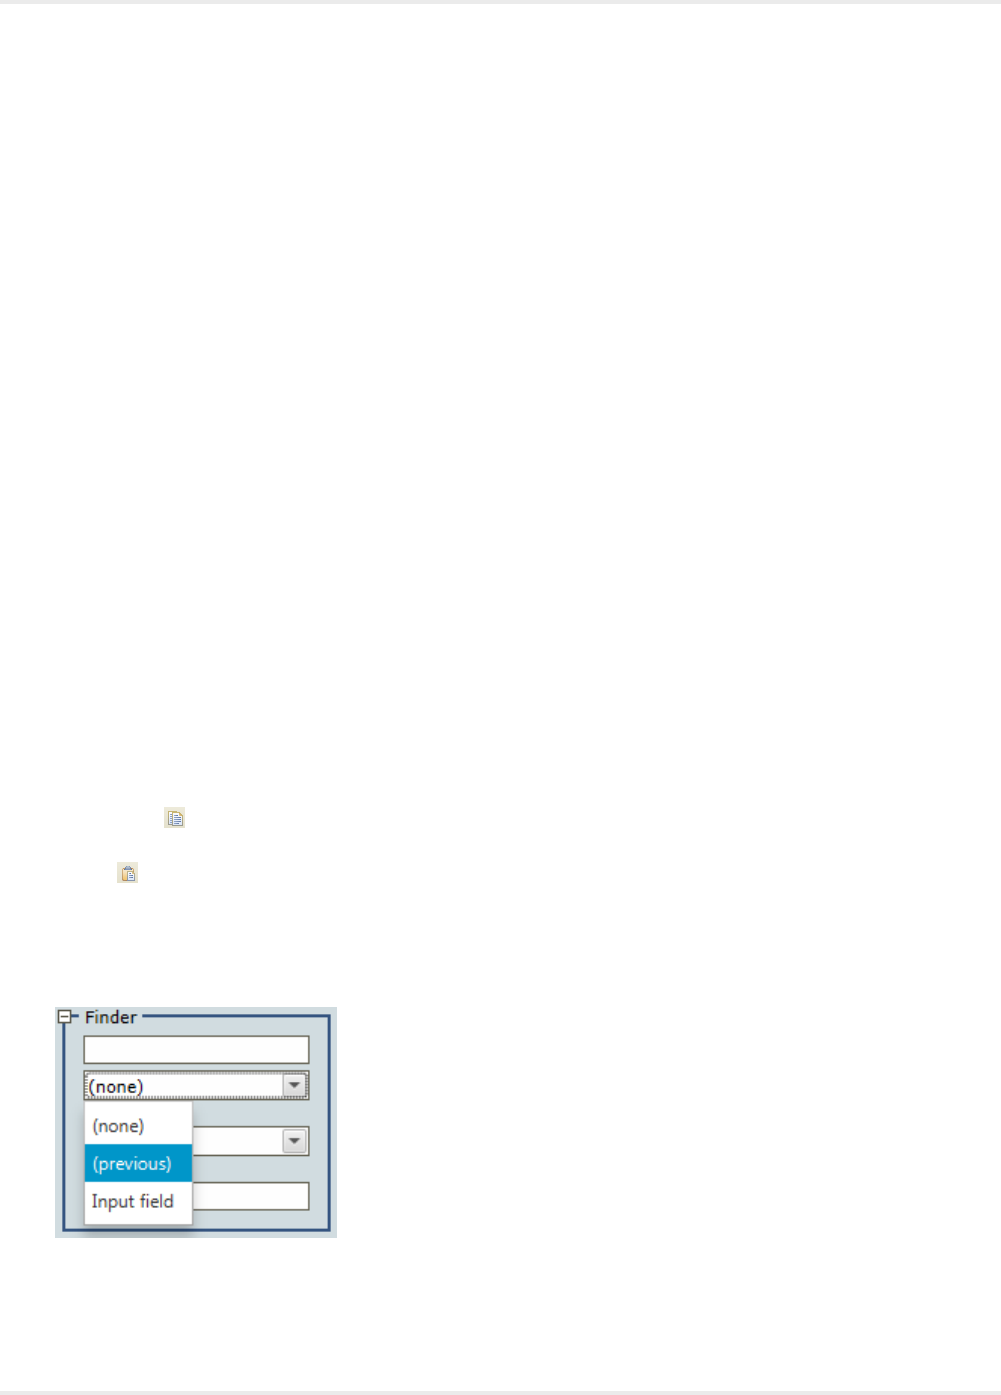
Kofax Kapow User's Guide
Multiple Attributes
You can use multiple attributes in a selector with the pattern to uniquely identify an application window:
element[attribute1=”value1”][attribute2=”value2”][attribute3=”value3”]
For example, to find a button that has both visible=”true” and a name that begins with ”Save,” you can
use:
button[visible=”true”][name^=”Save”]
Reusable Finders
Creating a reliable finder is important for the stability of the automation process. In some cases it can be
challenging and involve manual modification of the selectors in the finder. Once you are satisfied with how
a finder works, you can reuse it in many places.
Another reason for reuse is to ensure consistency. If many steps perform actions on the same element, it
makes sense to have all the steps use the exact same finder. This ensures that there is no disagreement
as to what the element is.
A finder can be reused three ways:
• Copy and paste a finder
• Reference the previous finder
• Reference the finder by name
Copy and Paste a Finder
Copying and pasting a finder is the most fragile method of reuse. This method can be practical in
situations when you want to create a finder but do not want to start with an empty finder.
To copy a finder, select the finder in the Automation Workflow view and either press Ctrl+C, or click the
copy button on the toolbar.
To paste a copied finder, select the finder you want to overwrite and either press Ctrl+V or click the paste
button on the toolbar.
Reference the Previous Finder
The reference to the previous is the most useful and common way to reuse a finder. Such a reference is
marked (previous) in the reuse drop-down list in the second field from the top of a finder. In this case the
current finder reuses the selectors of the most recently used finder.
When a chain of finders use the previous finder, this means they all share the configuration of the first
non-previous finder. Editing all the finders in the chain is performed by editing the first finder.
173
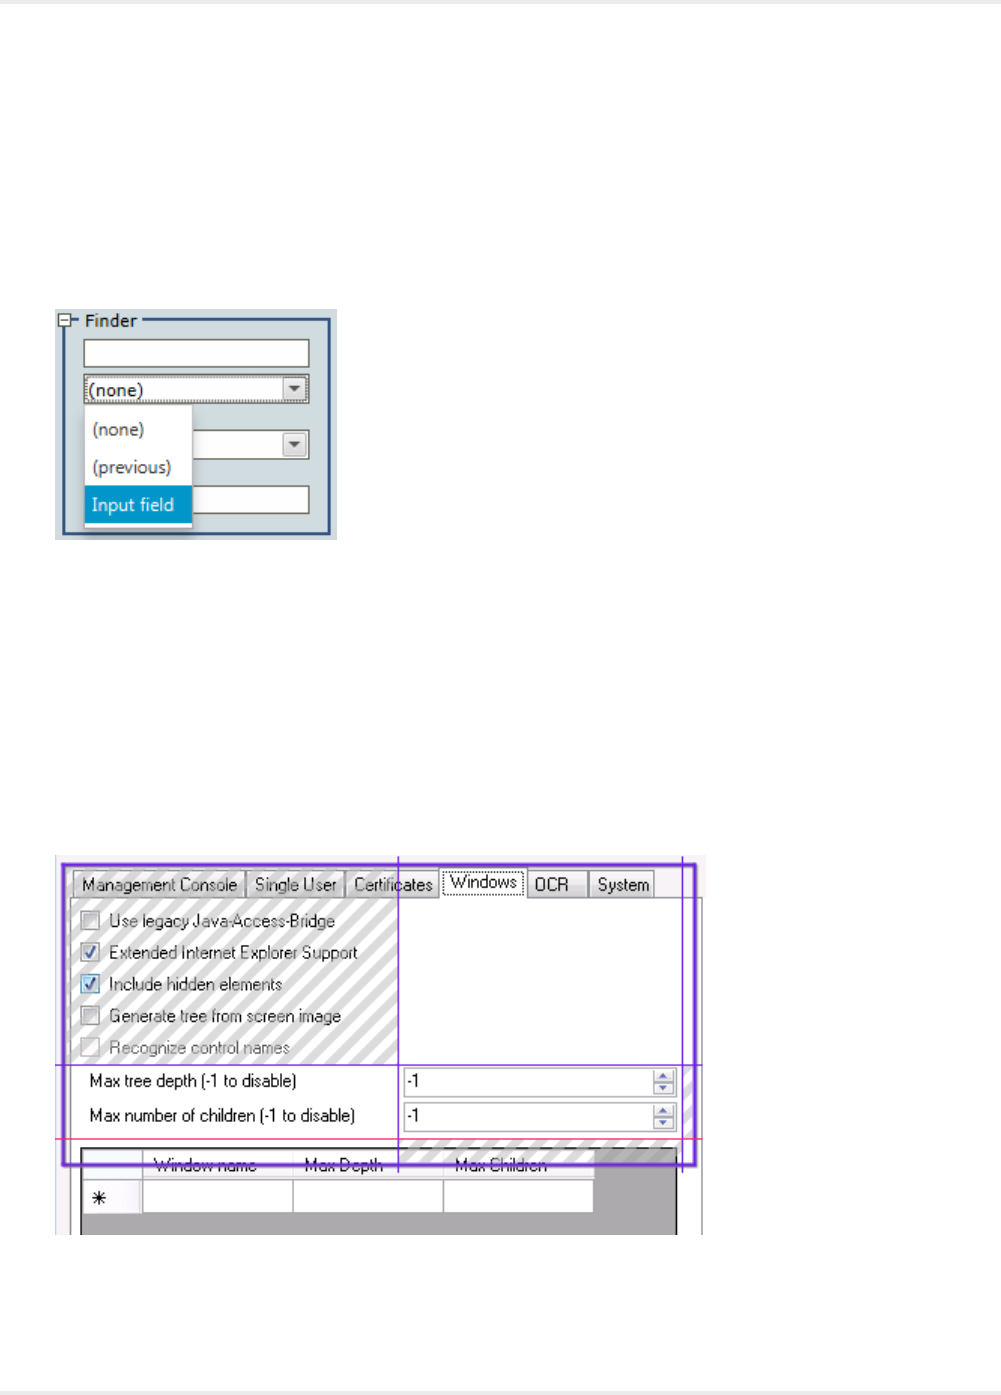
Kofax Kapow User's Guide
For most steps created from the Automation Device view, the finders automatically contain references to
the previous finder.
Reference a Named Finder
References to named finders are useful when the finder you want to reuse is not the previous finder. To
reuse a finder by name, you must have a finder with a name. To name a finder, type the name into the
name field (the first field from the top of a finder). Once you have one or more named finders, they appear
as options on the reuse drop-down list for subsequent finders.
When a finder reuses another finder, it shares the configuration of that finder. Editing the named finder
affects all the finders that reference it.
Nine-Grid Image Finder
Nine-grid image finder is a type of Image finder that can be used to find elements of different size in the
Automation Device View. You can use this finder primarily to find buttons or text fields. An element in this
context is a sub image that is searched for when evaluating the image finder. When creating the finder,
you can define up to nine elements to find. If a nine-grid finder is used for extraction, the central element is
extracted. If the finder is used with the Move Mouse Step, the pointer is moved to the central element with
regard to the offsets defined in the step.
In the image above, the striped cells are excluded from the finder evaluation.
174
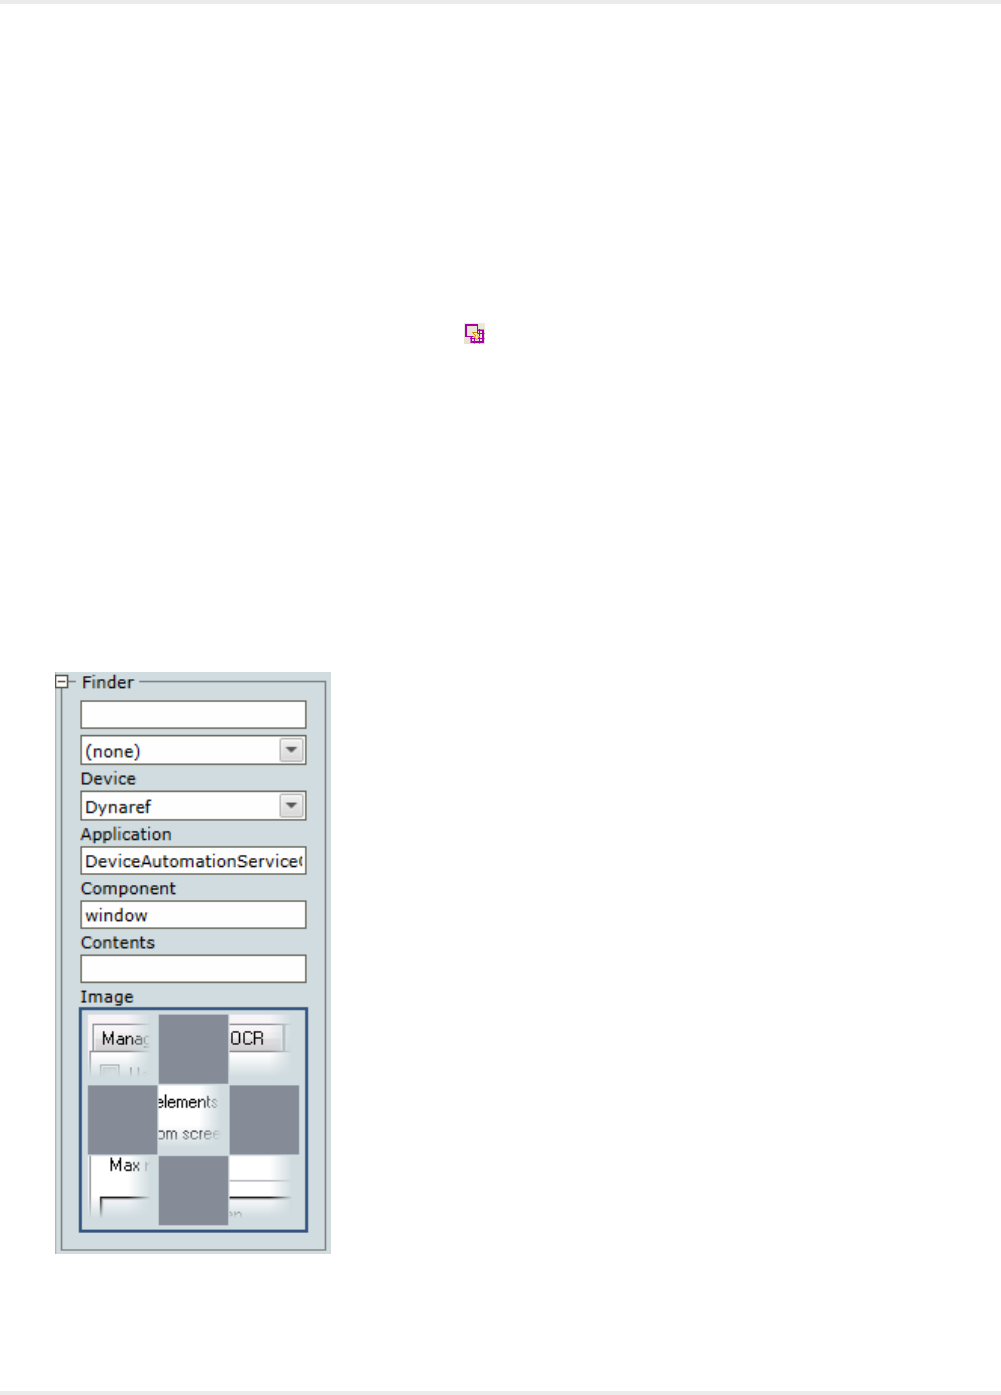
Kofax Kapow User's Guide
Prerequisites
• You must define enough elements, so that the center element dimensions can be calculated, such as
two diagonal corners or top and left side elements.
• The included elements are searched for in a pixel by pixel manner with no relaxation on the match.
• Each element must be at least 1x1 pixel in size.
Add Nine-Grid Finder
To create a nine-grid image finder, drag a box in the Automation Device View similarly to the image
finder and click the image finder toggle button . Moving the bars inside the finder helps you change the
elements in the nine grid finder. You can move a bar inside the finder using a mouse or by clicking it and
using arrow keys. You can modify the rectangle by dragging its sides or by drawing a new rectangle.
To include an element in the finder evaluation, right-click an element and select Include Cell When
Finding. To exclude an element, right-click a cell and select Exclude Cell When Finding. You can
also use Ctrl+Click to include and exclude elements. Included elements are transparent while excluded
elements are striped with grey diagonal lines. Note that by default all corner elements are included in the
nine-grid finder.
To return to the simple image finder, click the image finder toggle button again.
Work with Nine-Grid Finder in the Workflow View
Once you add a step with a nine-grid finder, you should be able to see it in the Automation Workflow view.
The nine-grid finder only shows the included elements in the workflow view. The excluded elements are
grey. Clicking an element in the finder toggles the inclusion state.
175
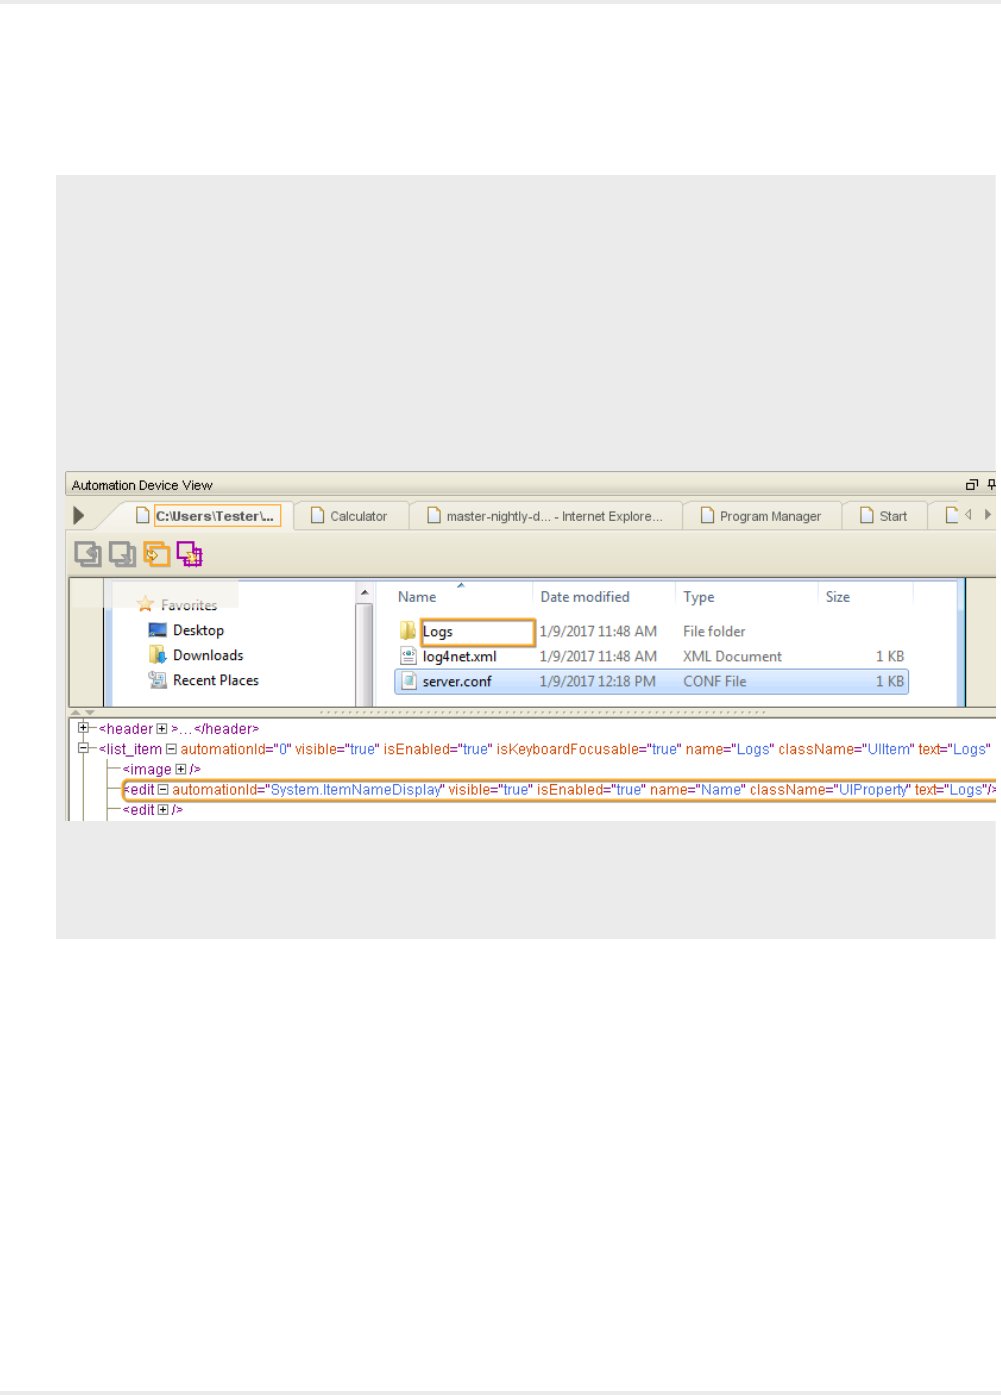
Kofax Kapow User's Guide
The image is scaled and clipped to better see the details of small elements and avoid showing huge
images.
Example: Finder Examples
The following are examples of finders that locate one or more elements in the file list of Windows
Explorer.
Note If a finder locates several nodes, you can cycle through found elements by clicking the "Show
next location found" button.
Finding the first "edit" element that is a child of "list"
• Selector: ":nth-of-type"
• Finder: "list edit:nth-of-type(1)"
Finding the second "edit" element that is a child of "list"
• Selector: ":nth-of-type"
• Finder: "list edit:nth-of-type(2)"
176
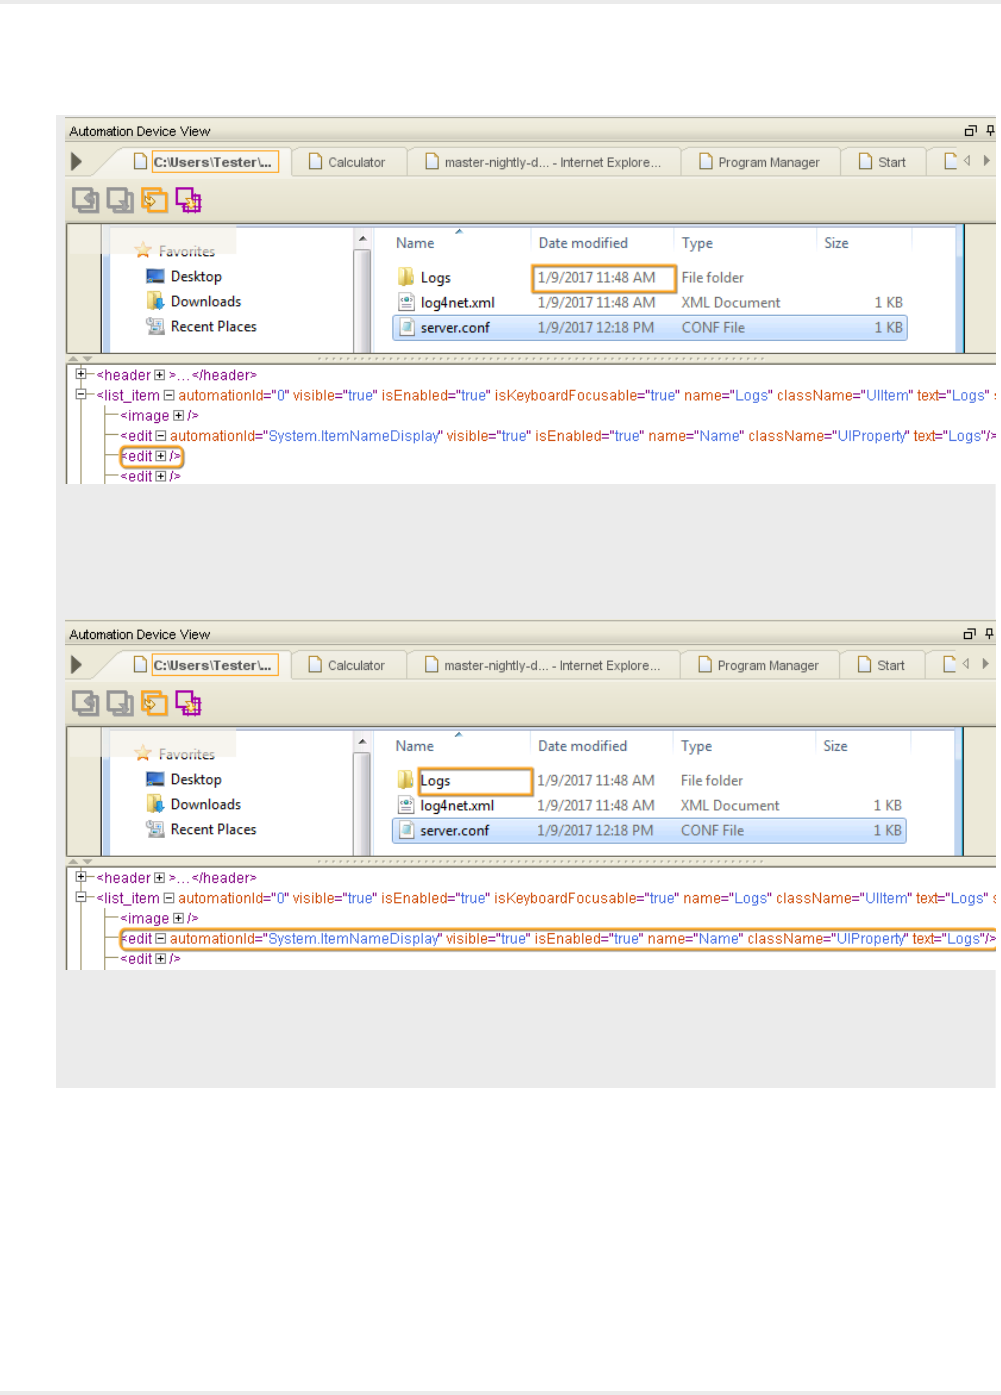
Kofax Kapow User's Guide
Finding an "edit" element that is the second child
• Selector: ":nth-child"
• Finder: "list edit:nth-child(2)"
Finding an "edit" element that is a descendant of "list"
• Selector: <space>
• Finder: "list edit"
177

Kofax Kapow User's Guide
Finding a "list_item" element that is a child of "list"
• Selector: >
• Finder: "list > list_item"
Finding an "edit" element that has a "text" attribute with the "server.conf" value
• Selector: <attribute>
• Finder: "edit[text="server.conf"]"
178
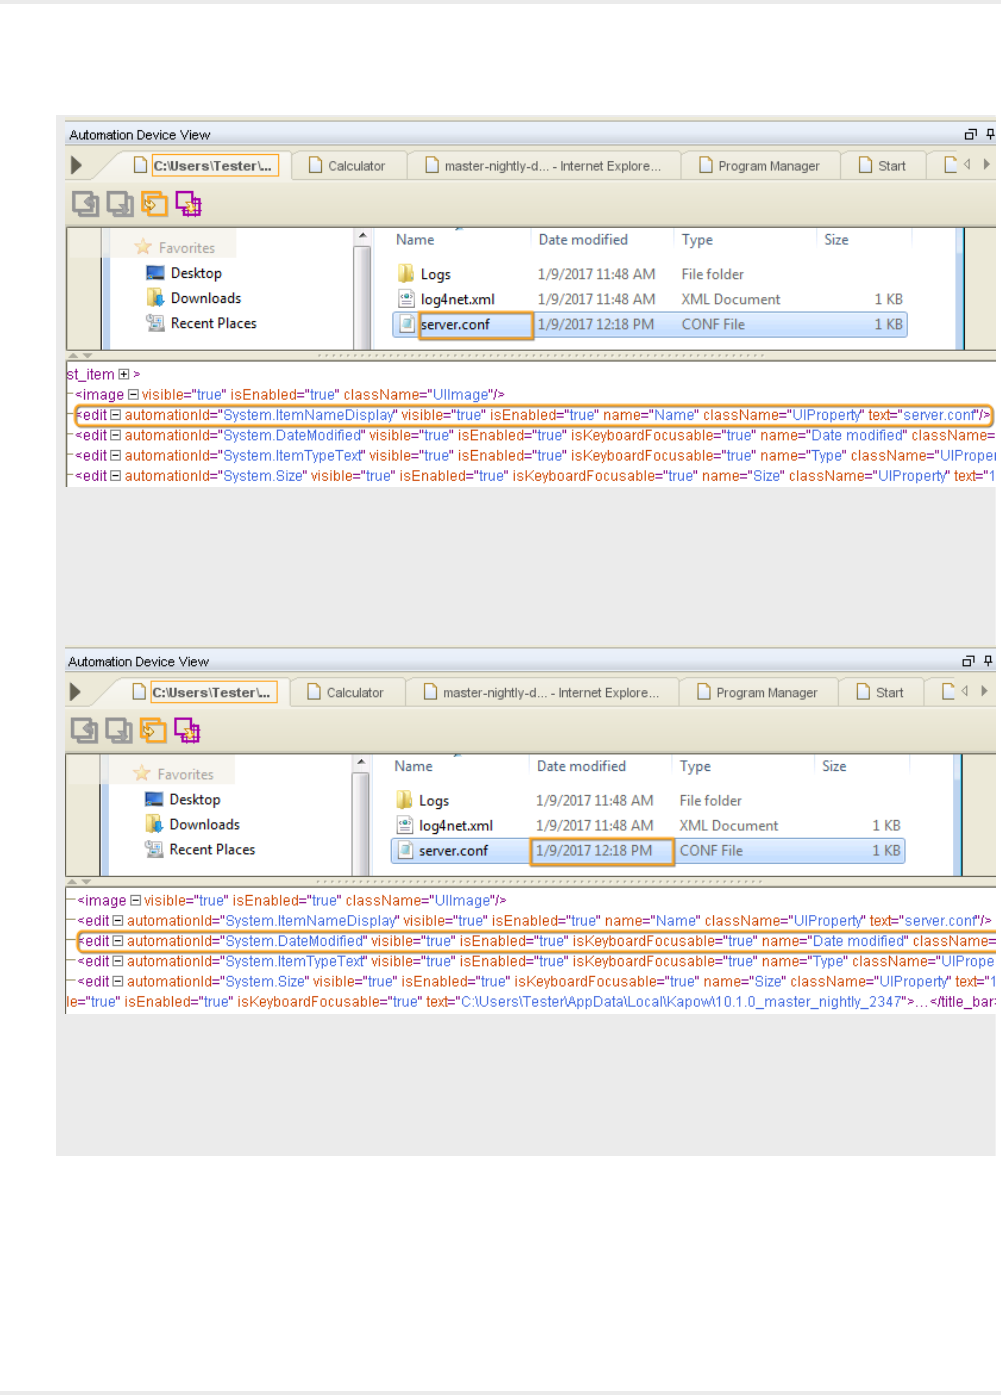
Kofax Kapow User's Guide
Finding an "edit" element located immediately after the element that has a "text" attribute with the
"server.conf" value
• Selector: +
• Finder: "edit[text="server.conf"] + edit"
Finding an "edit" element located anywhere after the element that has a "text" attribute with the
"server.conf" value
• Selector: ~
• Finder: "edit[text="server.conf"] ~ edit"
179

Kofax Kapow User's Guide
Finding the first "list" element anywhere
• Selector: ":first-child"
• Finder: "list:first-child"
Use multiple attributes in finder
In the following example, a finder with a conjunction of two attributes is used to click the Paste button in
the Windows Paint application.
The paste icon has the same name, but it does not have the isEnabled flag. Design Studio generates
this finder for the Paste drop-down button.
• Application: mspaint.exe
• Finder: split_button[isEnabled="true"][name="Paste"]
180
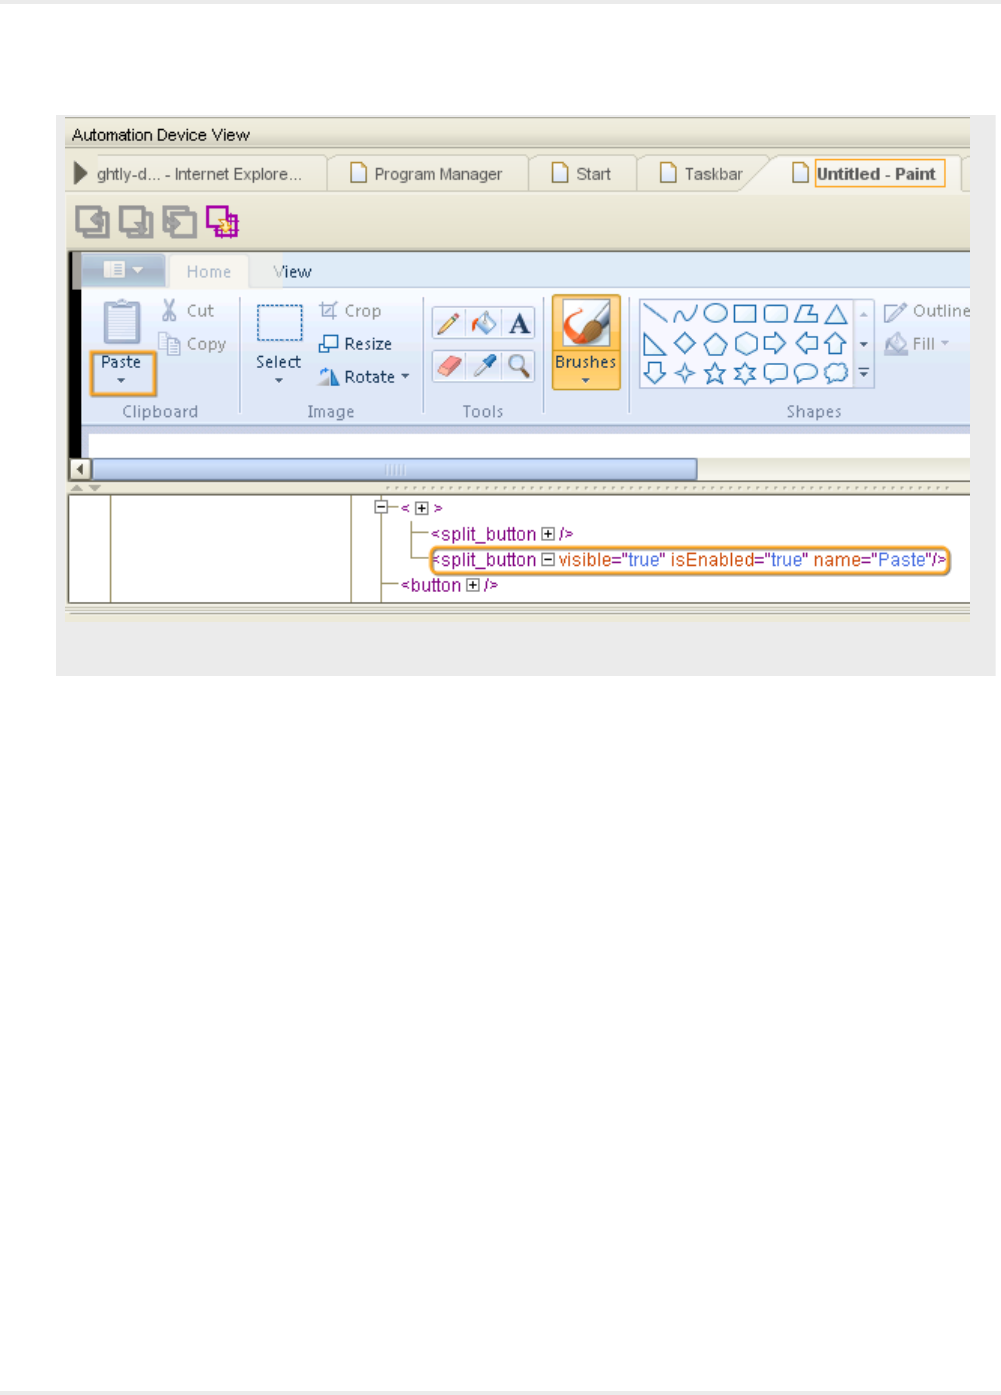
Kofax Kapow User's Guide
Device Automation Steps
This topic provides information on Device Automation step actions.
•Assign Step
•Break Step
•Click Step
•Conditional Step
•Connect To Device Step
•Enter Text Step
•Extract Clipboard Step
•Extract Contents
•Extract Image Step
•Extract Text From Image Step
•Extract Tree as XML Step
•Extract Value Step
•Freeze Tree Step
•Group Step
•Guarded Choice Step
•Loop Step
•Move Mouse Step
•Open Step
181

Kofax Kapow User's Guide
•Press Key Step
•Remote Device Action Step
•Return Step
•Scroll Step
•Set Clipboard Step
•Throw Step
•Try-Catch Step
Assign Step
This step assigns a value to a variable. Note that the value in the Expression field must match the variable
type.
Properties
•Name: Name of the step.
•Variable: Variable name.
•Expression: Variable value. You can use expressions and other variables in this field. See Expressions
in Device Automation for more information.
Break Step
This step helps you break out of the Loop step. It must be used only inside the Loop step. You can use
several Break steps inside one loop.
Click Step
The Click step is one of the most commonly used actions (unless you are automating a terminal) in device
automation. With a Click (and Move Mouse) step your robot can start and close programs, work with
programs interfaces, perform drag-and-drop operations, select text, and perform many other actions that a
user can perform with a pointing device.
182
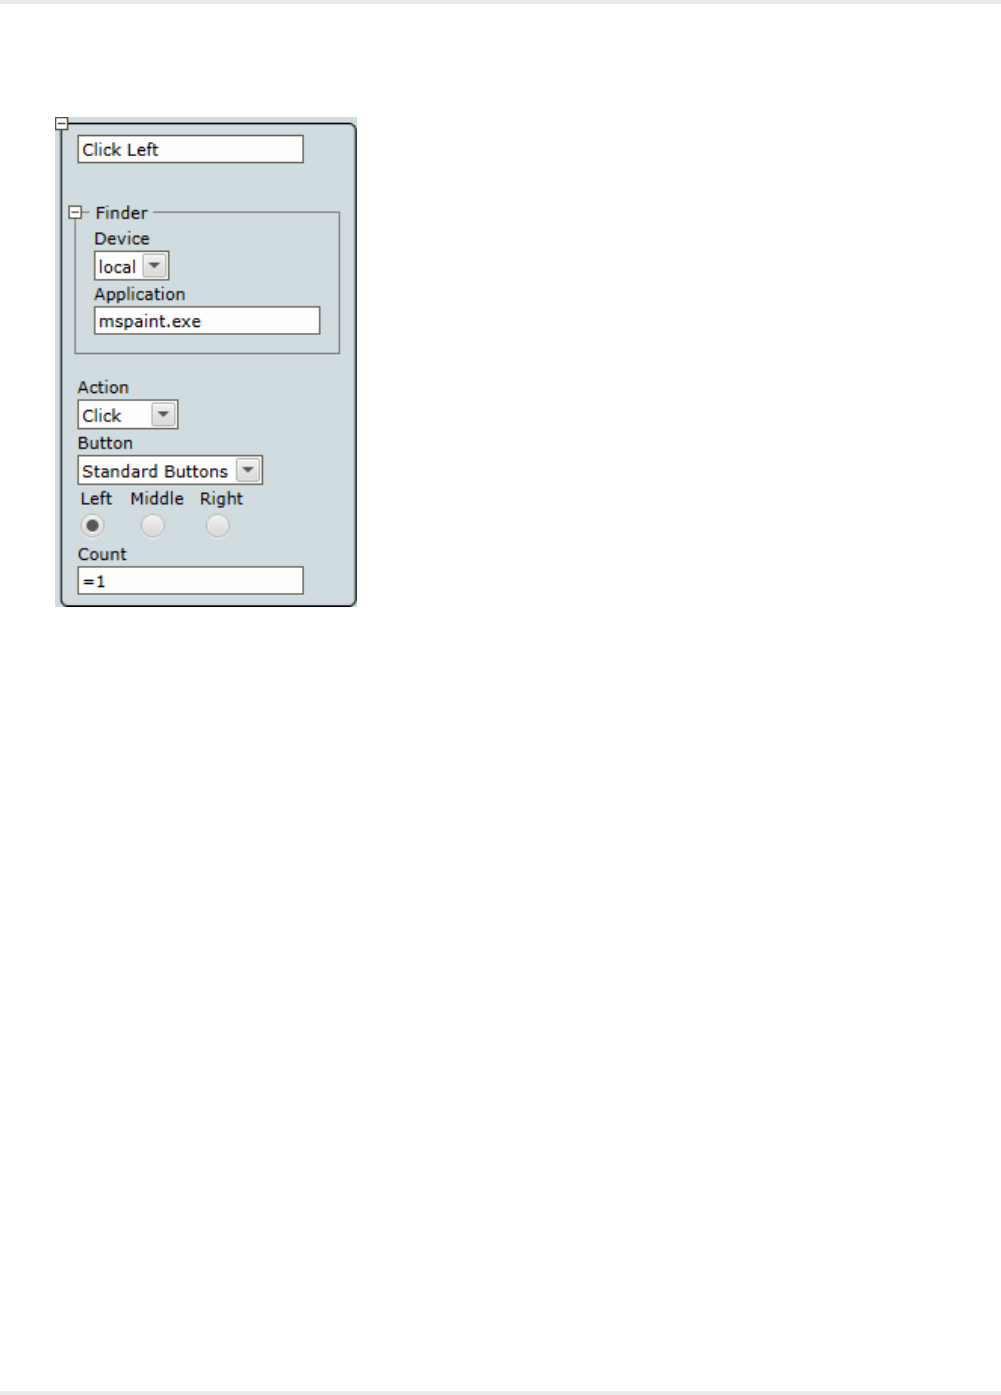
Kofax Kapow User's Guide
Properties
Name
Name of the step.
Finder
Device: Select the name of the automation device.
Application: Specify the name of the application the action is performed in.
Action
Contains three mouse actions:
•Click: Clicks in the interface.
•Press: Presses the mouse button without releasing it.
•Release: Releases the mouse button.
Button
Select Standard Buttons or Calculated Button of the pointing device.
•Standard Buttons: Left, Middle, Right
•Calculated Button: When this option is selected, specify a mouse button symbolic constant name of
the virtual-key code. See Microsoft documentation for the list of virtual-key codes.
Count
Specify how many times to perform the action. The format is an equal sign and a number, such as =1. For
example, for the double-click, specify =2.
183
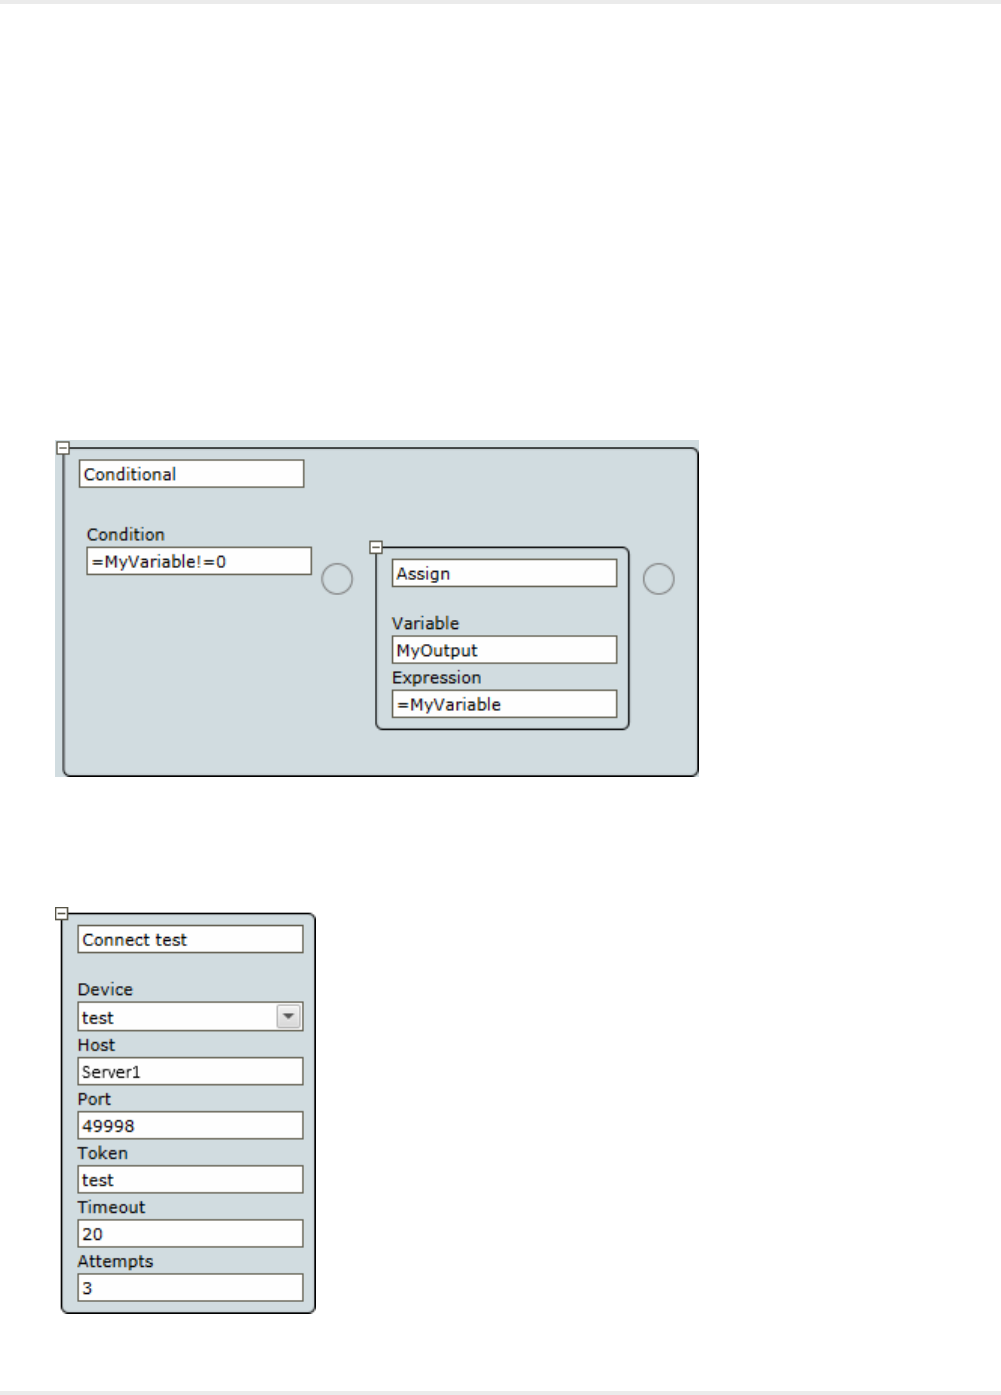
Kofax Kapow User's Guide
Conditional Step
In this step you can specify a Boolean condition that affects the execution of the steps in your robot. This
step is often used within the Loop Step.
Properties
Name
Name of the step.
Condition
A boolean condition.
Connect To Device Step
This step helps you connect to a remote device.
184

Kofax Kapow User's Guide
Properties
Name
Name of the step.
Device
Select the dynamic reference name you want to use. This reference name is specified in the Required
Devices property of the Device Automation step. The list shows only dynamic references.
Host
Enter Automation Device name or IP address.
Port
Specify the command port to use with your Automation Device (default 49998). This port is specified in the
Device Automation Service configuration.
Token
Specify a token name. The token must match the name specified for the selected Automation Device in
the Token field on the Single User tab of the Device Automation Service configuration.
Important The Device Automation Service must be in the Single User mode. See Configure the
Automation Device Agent
Timeout
Specify the connection attempt timeout in seconds.
Attempts
Specify the number of connection attempts. Note that there is a few seconds delay between each
connection attempt.
Enter Text Step
In this step your robot can type text into a text field. You can provide the necessary text directly in the Text
field of the step or use the text from a variable.
Properties
Name
Name of the step.
Finder
Device: Select the name of the automation device.
Application: Specify the name of the application the action is performed in.
Text
Either type in the text directly or specify a variable with text. The variable name must be preceded by an
equal sign, such as =EnterTextVariable.
Extract Clipboard Step
This step extracts information from the clipboard to a variable.
185
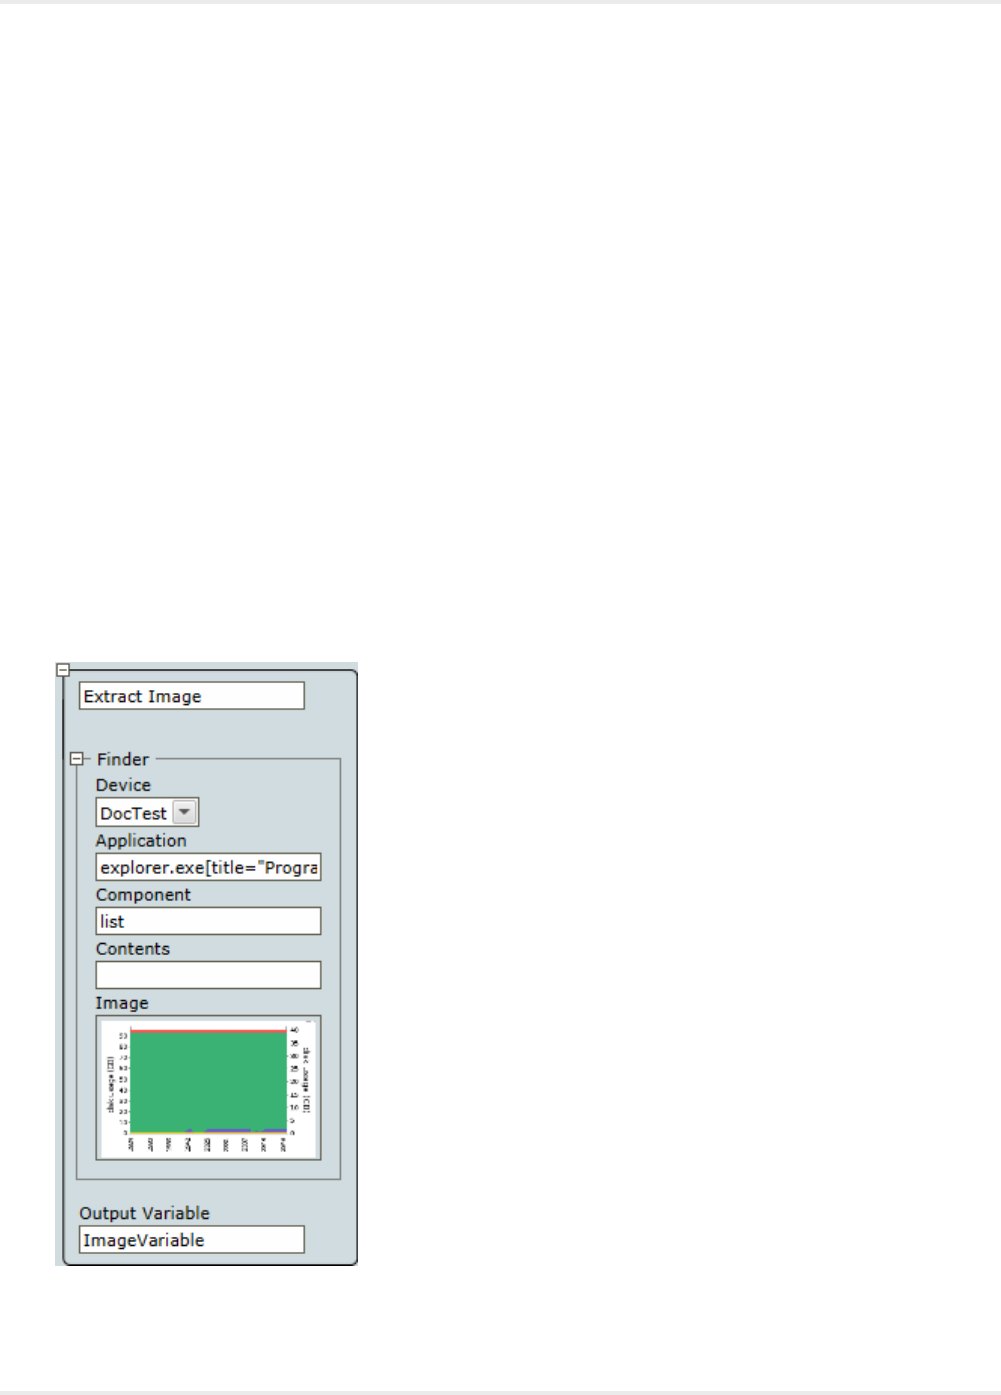
Kofax Kapow User's Guide
Properties
Name
Name of the step.
Device
Select the name of the automation device.
Variable
Variable name to store extracted values.
Extract Contents
This is a type of Extract Value Step. This step can extract a value located outside any attribute. The step
is usually used when working with a browser in the Device Automation workflow. When you insert the
Extract Contents step, the Value Of field is automatically filled with the content value.
Extract Image Step
This step extracts an image from the selected area on the screen and saves it in a binary type variable.
You can select an image in the Automation Device View by pressing the mouse button and drawing a
selection rectangle. You can modify the rectangle by dragging its sides or just draw a new rectangle.
186

Kofax Kapow User's Guide
Properties
Name
Name of the step.
Finder
Device: Select the name of the automation device.
Application: Specify the name of the application the action is performed in.
Component: Set the application component name, such as button, window, pane, etc.
Contents: A regular expression to find an element by its value. This parameter is usually used when
working with a browser in the Device Automation workflow.
Image: A screen shot of the selected area stored as an image.
Output Variable
Specify a binary variable to store the image.
Note It is not possible to extract an image from cell elements in tables.
Extract Text From Image Step
This step helps you extract text from an image. Kapow uses the Tesseract OCR engine to capture text
from images. English language is included in the installation. See Change Default OCR Language for
more information.
Note It is not possible to extract text from cell elements in tables.
187
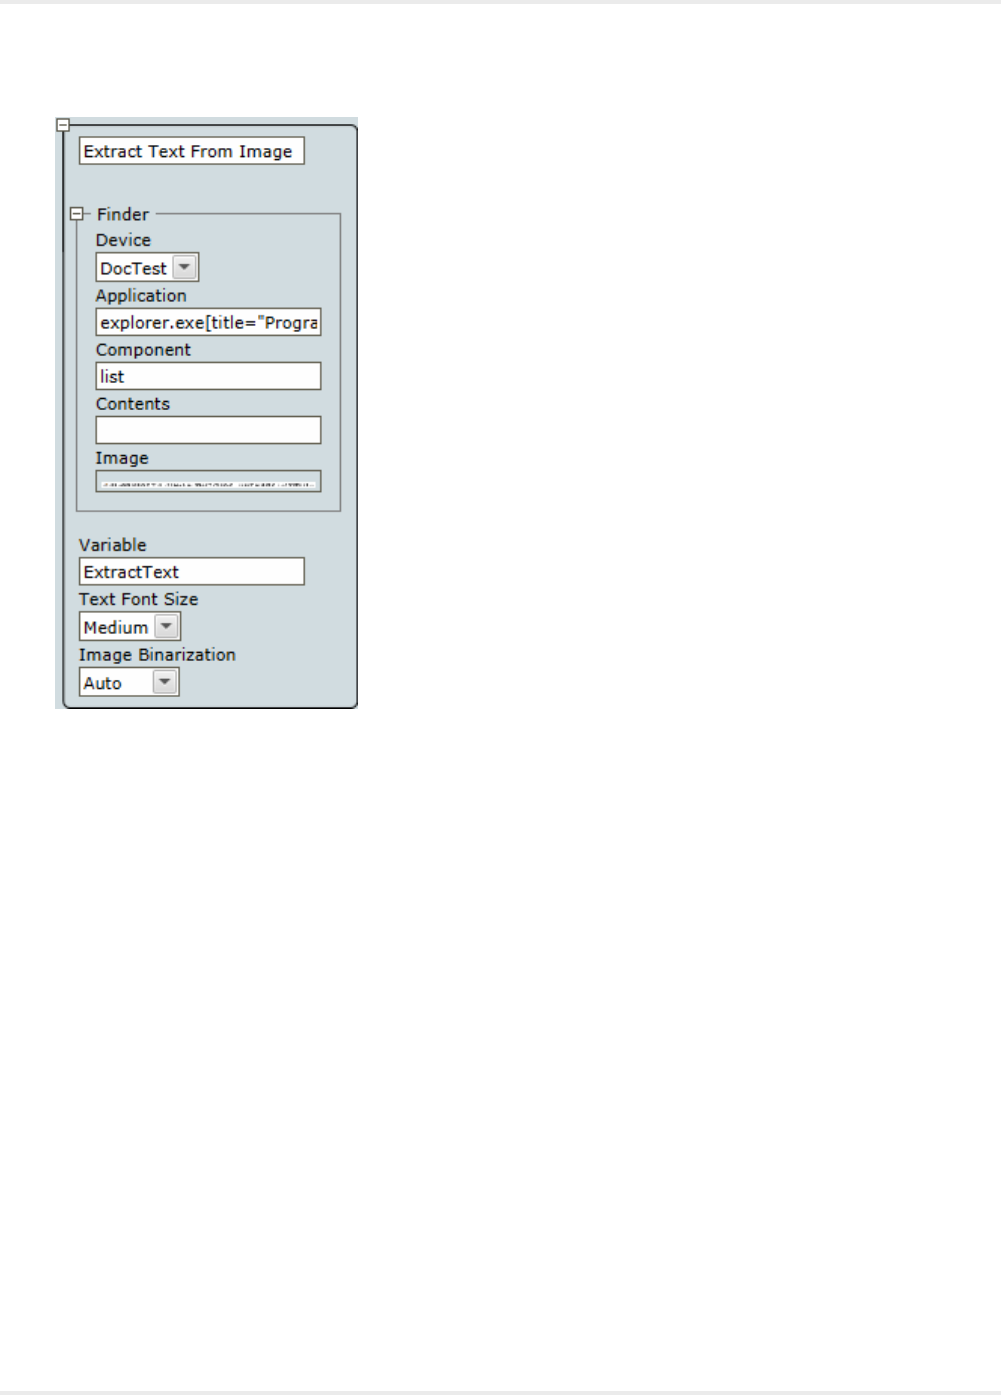
Kofax Kapow User's Guide
Properties
Name
Name of the step.
Variable
Specify a variable to store the extracted text.
Text Font Size
• Small: Font smaller than 12px.
• Medium (Default): Font size between 12px and 24px.
• Large: Font more than 24px.
Note that your font size choice affects the speed of text analysis and recognition. For example, when a
large image is analyzed, selecting Large speeds up the analysis two or three times compared to Medium.
On the contrary, selecting Small reduces recognition speed two or three times compared to Medium. Try
different settings and choose the best in terms of speed and recognition results.
Image Binarization
• Auto: Tesseract algorithm is used to prepare an image for text recognition.
• Custom: Kapow algorithm is used to prepare an image for text recognition. See Tweaking Text
Recognition for more information.
Threshold Delta
None
188

Kofax Kapow User's Guide
Positive
• Small
• Medium
• Large
Negative
• Small
• Medium
• Large
Tweaking Text Recognition
By default, Kapow uses the Tesseract algorithm for OCR that produces acceptable results most of
the time. Before the text is recognized, the algorithm converts an image with text to a black-and-white
image and performs some other adjustments to make the text stand out. In case the recognizable text
blends with the background and recognition result is not good, you can change to Custom in the Image
Binarization option and adjust the Threshold Delta options to produce acceptable results.
The following is an image copied from the screen for recognition.
The following are internal image adjustment results from the Kapow algorithm for text recognition. Each
image is labeled with a set of Threshold Delta options. In complicated cases, try different options and
choose the best in terms of recognition results.
Threshold Delta: None
Threshold Delta: Positive Medium
189
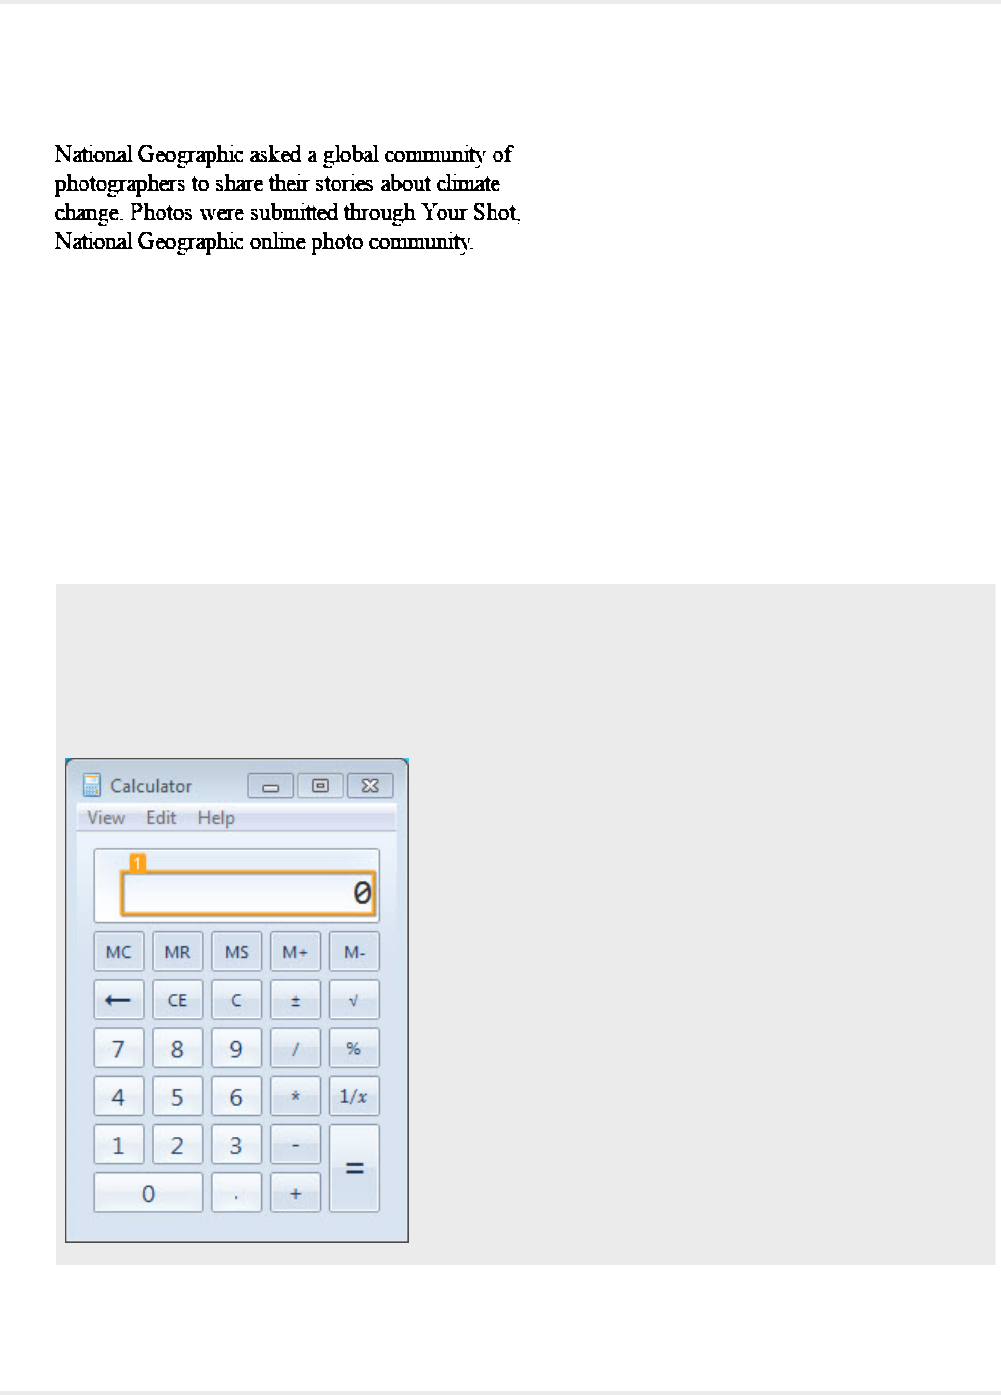
Kofax Kapow User's Guide
Threshold Delta: Negative Medium
Extract Tree as XML Step
This step helps you extract a part of the widget tree and save it in a variable as an XML string.
Properties
Name
Name of the step.
Variable
Variable name to store the extracted XML string.
Example: Selected tree and XML string
The following figures show a part of the Calculator widget tree exported to a variable XML string.
Note The order of exported attributes in a variable can be different from the widget tree in the
Automation Device view.
190
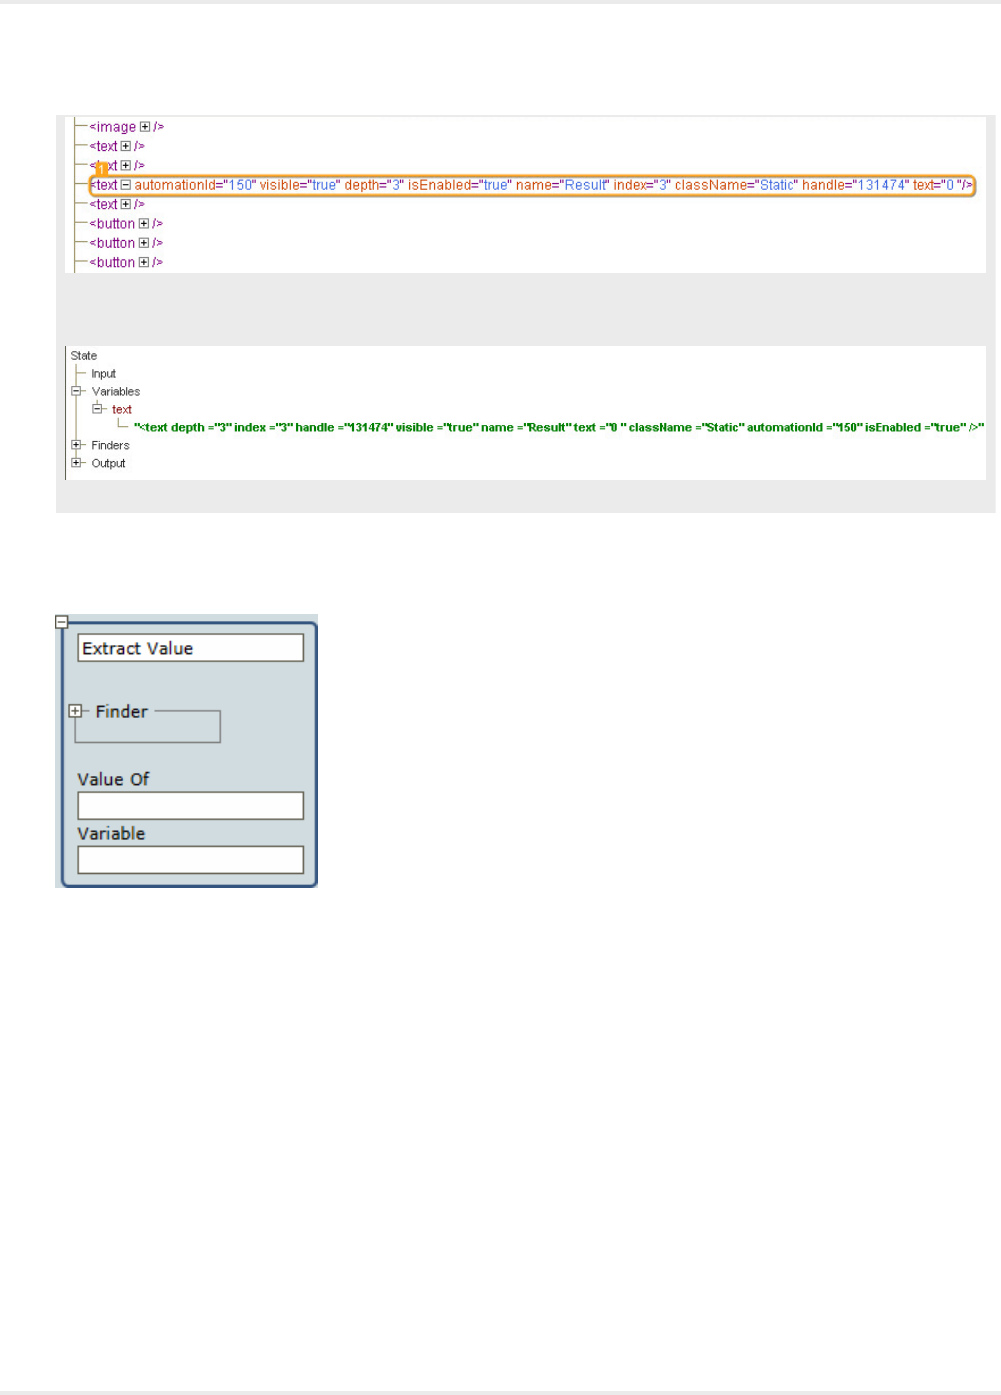
Kofax Kapow User's Guide
The following is an XML string exported to a variable.
Extract Value Step
This step extracts values of element attributes.
Properties
Name
Name of the step.
Value Of
Specify one or more attributes to extract.
Variable
Variable name to store the extracted values.
Freeze Tree Step
Freeze Tree step is a group step that freezes the application tree refresh in the Device Automation Editor
when executing steps in the workflow. While the steps within the Freeze Tree step execute, the application
tree is not reloaded. Once the execution flow is outside the Freeze Tree group, the application tree is
191
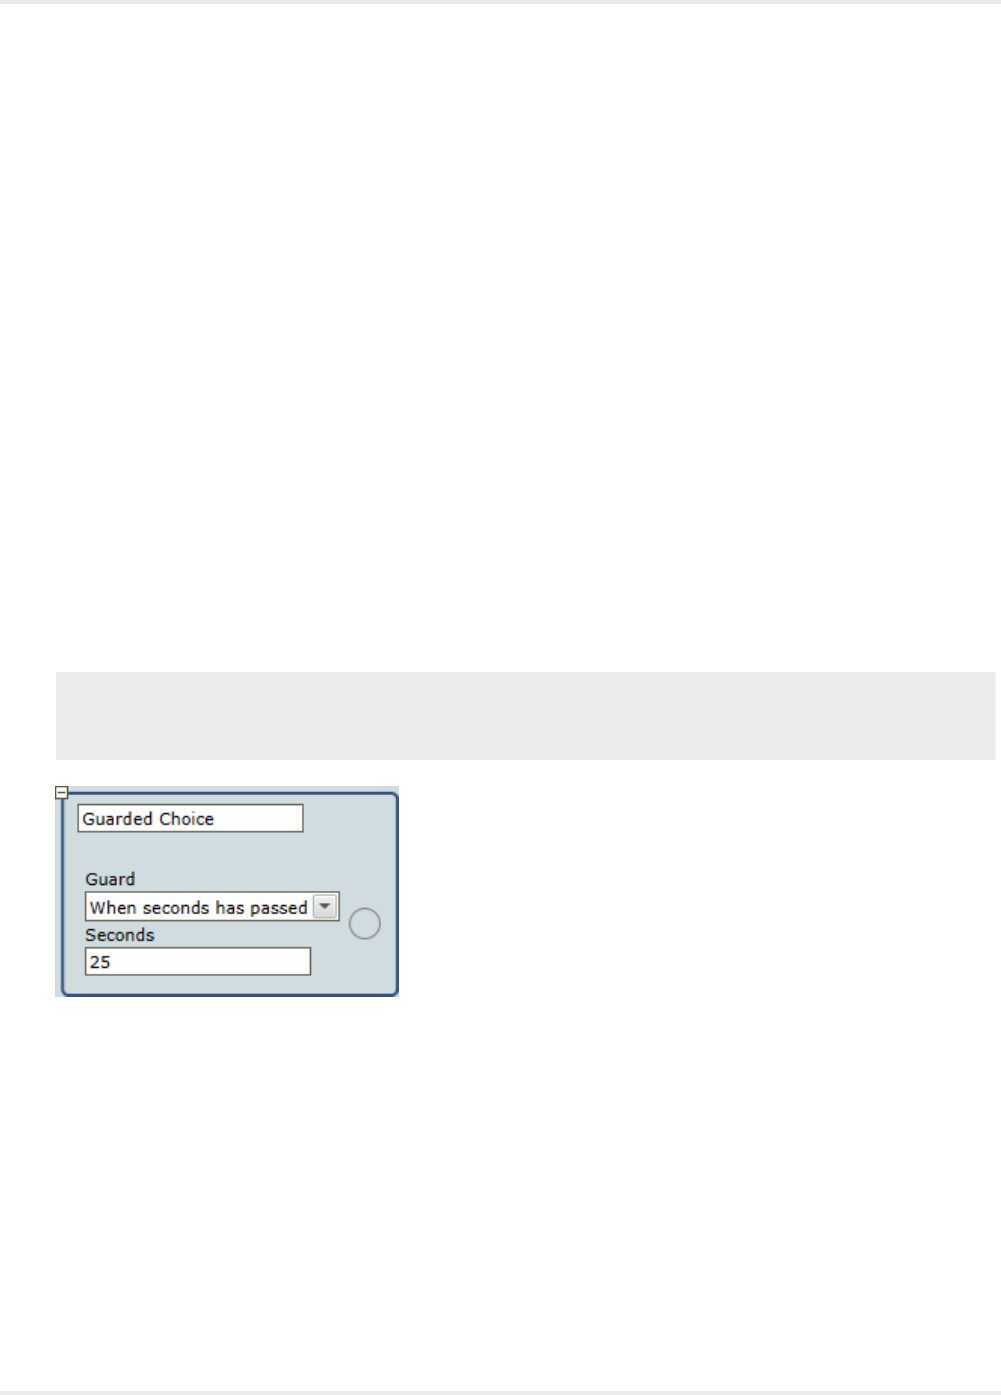
Kofax Kapow User's Guide
reloaded. This step can help you greatly increase performance while executing cyclic operations on static
windows, such as tables, spreadsheets, forms, and the like.
Group Step
This step combines several steps into a group. In the Group step, you can create local variables that are
available only within a group. If you want your step to use a local variable, include the step into the group
with the local variable. You can create steps in a group or use the cut and paste operations to include
existing steps in a group.
Guarded Choice Step
The guarded choice step is used to set up a number of conditions, each associated with some actions.
Whichever condition or guard is satisfied first, its associated actions or steps are executed. This is often
used to ensure that an interface element, such as a button, is present before trying to move to and click it.
To avoid waiting indefinitely, a timeout guard is added. In Kapow you can use location and timeout guards
to make sure the robot finds the required elements and works as designed.
In some cases Kapow adds guards automatically when you insert a step, such as Click or Press steps.
The following guards are available.
When seconds has passed
This is a timeout guard that waits a specified time before executing the next step in your robot.
Note A default 60-second guard is inserted in the following steps when they are added via the
Application View: Click, Scroll Mouse, Enter text, Extract text and Extract Contents (from Extract
value), Extract Image, Extract text from image, Press key.
Tree Stop Changing
A timeout guard that waits a specified time after the last application tree change before executing a step.
The timeout is specified in milliseconds.
A Finder must be specified for each of the following location guards.
192
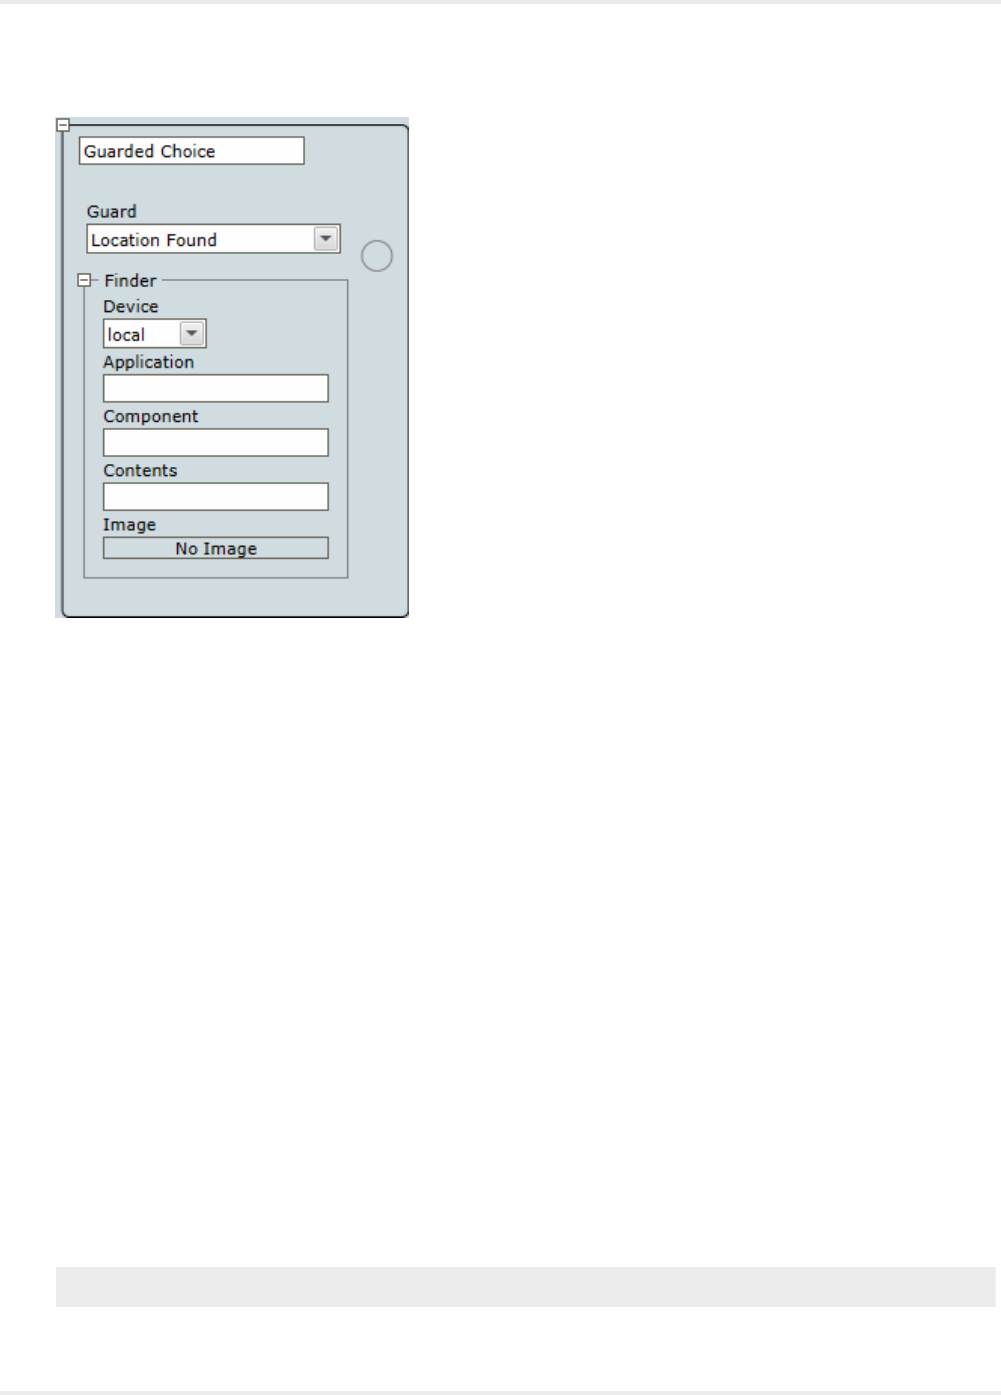
Kofax Kapow User's Guide
Location Found
Location guard that makes sure the element is found via a specified finder.
Location Not Found
Location guard that makes sure the element is not found via a specified finder.
Location Removed
Finds an element via a specified finder and waits until the element is removed before executing the next
step.
Tips and Tricks
Open documents directly
You do not need to launch the application first and then open the document. Instead, just open the
document and it will launch the associated program.
Watch out for accessibility detection
• When opening applications: Opening Adobe Reader using Device Automation shows the Accessibility
Setup Assistance window. Usually this is a one time setup, but if you have desktops being spawned on
demand, it may require your robot to handle it.
• When opening files: When a PDF file is opened, the Adobe Reader asks if the screen reader should
process the document.
After pasting text into a field, use a guard for the next step
A guard verifies that the contents of the text field match what you pasted for the next action. Otherwise,
the full value may not yet be in the field if you press Enter right after the paste operation.
Note This tip does not apply to password fields.
193

Kofax Kapow User's Guide
Loop Step
A Loop step is a group of steps accompanied by a Break step to break out of the loop. To loop with a
condition, use a Conditional Step inside the loop. To loop by waiting for something to happen on a device,
use a Guarded Choice Step instead.
Press the Go to Next Iteration button to execute until the same program point is reached again. The loop
can be executed more than once if the program point is skipped in some iterations. If there are no more
iterations, the execution stops at the program point outside the Loop step.
Move Mouse Step
This step moves the mouse to a specified location on the screen. When you add the Click Step from
the Automation Device View, the Move Mouse step is added automatically before the Click step. Mouse
coordinates are relative to the top left corner of the window. X is the horizontal axis that goes from left to
right and Y is the vertical axis that goes from top to bottom.
194
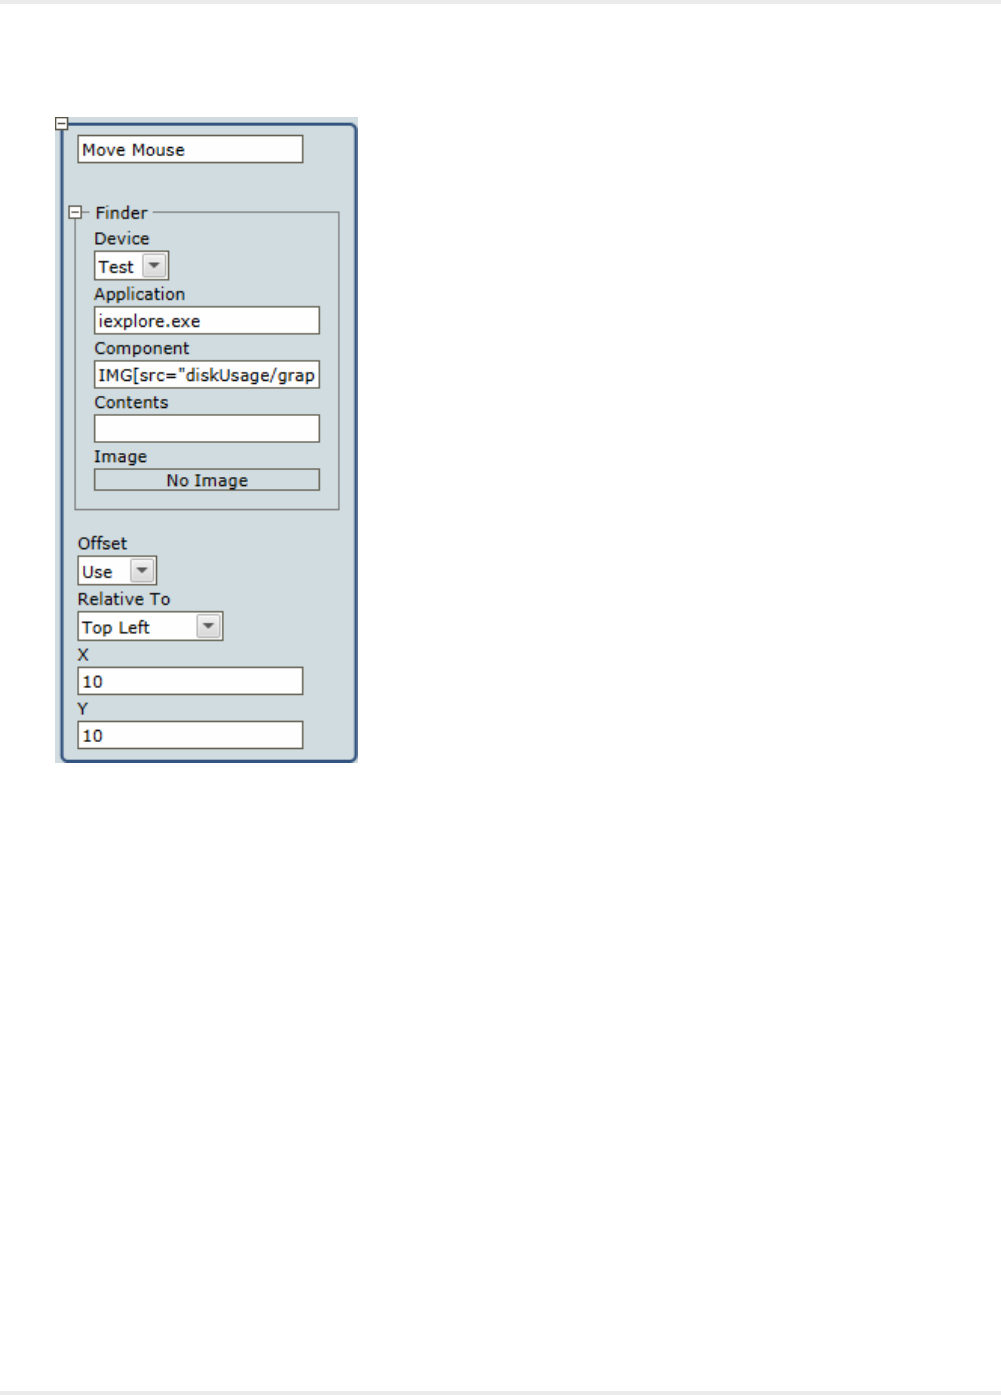
Kofax Kapow User's Guide
Properties
Offset
• None: Does not use any coordinates offset and moves to the center of the selected element. It is
equivalent to the following:
Relative to set to Center with x=0, y=0
• Use: Specify the offset in pixels using the following options.
Relative To
This option specifies the starting point to calculate the offset.
• Top Left: Top left corner of the window or the selected element with x=0 and y=0.
• Top: Middle of the top border of the window or the selected element with y=0.
• Top Right: Top right corner of the window or the selected element with y=0.
• Left: Middle of the left border of the window or the selected element with x=0.
• Center: Middle of the window or the selected element.
• Right: Middle of the right border of the window or the selected element.
• Bottom Left: Bottom left corner of the window or the selected element with x=0.
• Bottom: Middle of the bottom border of the window or the selected element.
• Bottom Right: Bottom right corner of the window or the selected element.
195

Kofax Kapow User's Guide
X
Specifies a horizontal offset relative to the selected starting point. Positive numbers move the mouse to
the right of the starting point. Negative numbers move the mouse to left of the starting point.
Y
Specifies a vertical offset relative to the selected starting point. Positive numbers move the mouse down
from the starting point. Negative numbers move the mouse upward from the starting point.
Open Step
Opens an application on the Automation Device or locally. For example, a headless terminal is opened on
the local device if its driver is enabled on the local device.
Properties
Device
Select the device where you want to open an application.
URI
• Specify the path to the application to open. Use forward slashes in the path. For example:
•C:/Program Files/SAP/FrontEnd/SAPgui/saplogon.exe
•="C:/Program Files/SAP/FrontEnd/SAPgui/saplogon.exe"
• For the built-in Windows applications, you can specify the process name, such as calc.exe.
• For the RDP connection, specify the following:
rdp://<username>\<domain>:<password>@<hostname>?<param1>=<value1>&<param2>=<value2>
Where available parameters are:
• d: domain (or type domain as part of username in URL)
• c: working directory
• n: client hostname
• g: desktop geometry (WxH)
• e: disable encryption (French TS)
• E: disable encryption from client to server
• C: use private color map
• a: connection color depth
• z: enable RDP compression
• x: RDP5 experience (m[odem 28.8], b[roadband], l[an] or hex nr.)
• P: use persistent bitmap caching
• 0: attach to console
• 4: use RDP version 4
• 5: use RDP version 5 (default)
For example: rdp://admin:AdminPassword@Server1
Press Key Step
This action presses a specified key.
196
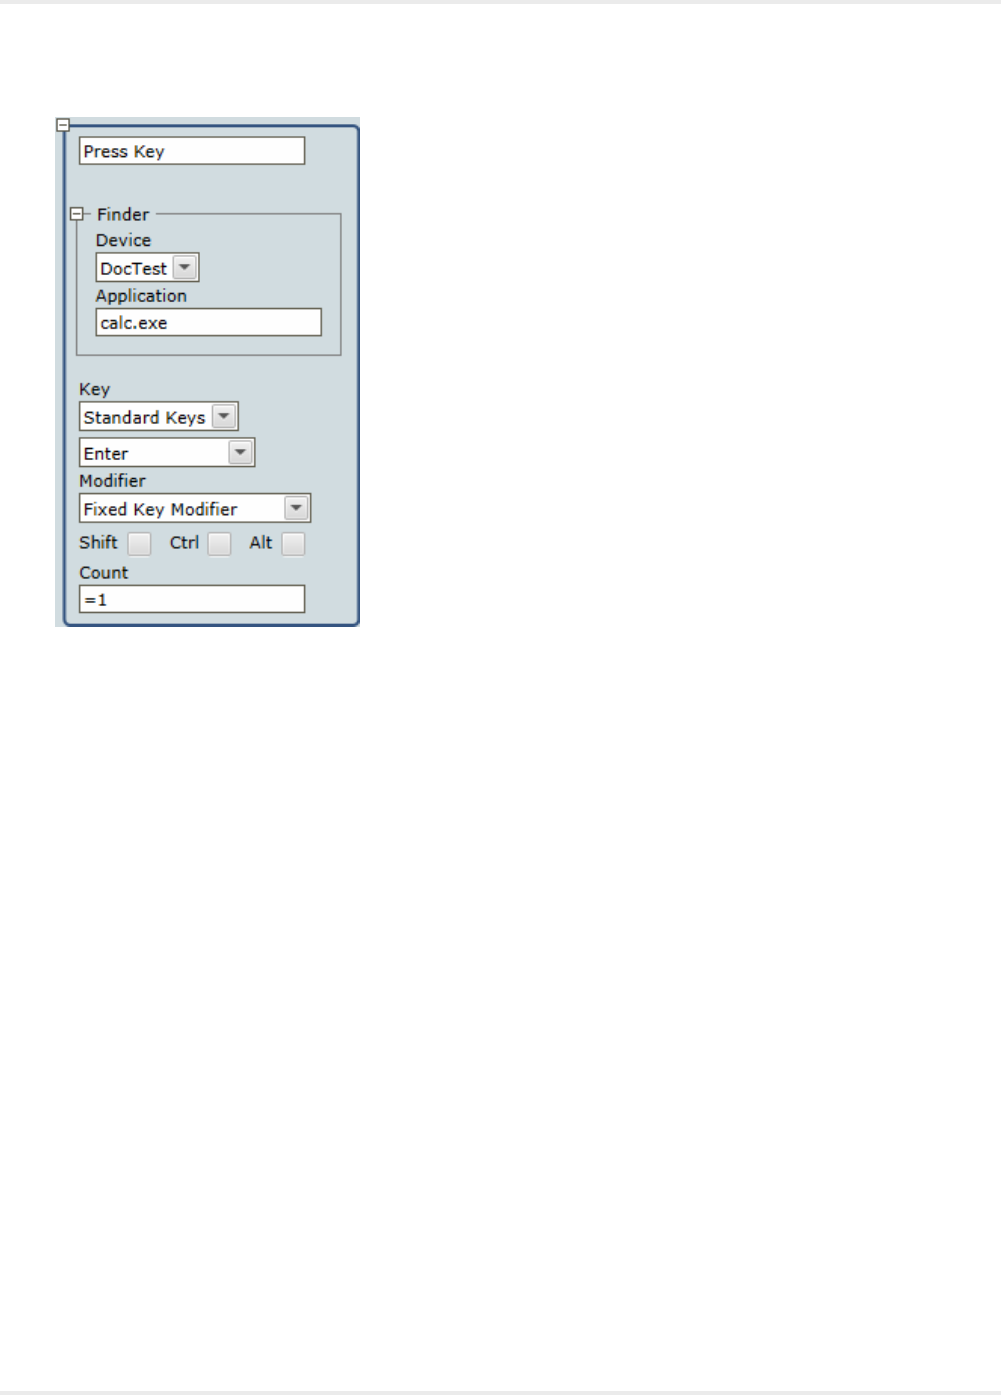
Kofax Kapow User's Guide
Properties
Name
Name of the step.
Finder
Device: Select the name of the automation device.
Application: Specify the name of the application the action is performed in.
Key
Select Standard Keys or Calculated Keys.
•Standard Keys: Select from the standard keyboard keys, such as letters, numbers, punctuation marks,
arrow keys, function keys, and more.
•Calculated Key: When this option is selected, specify a symbolic constant name of the virtual-key code
in the Key Code field. See Microsoft documentation for the list of virtual-key codes.
Modifier
Select a key modifier:
•Fixed Key Modifier: Contains three standard key modifiers, such as Shift, Ctrl, Alt.
•Calculated Key Modifier: When this option is selected, specify a symbolic constant name of the
virtual-key code for a modifier.
Count
Specify how many times to perform the action. The format is an equal sign and a number, such as =1.
197

Kofax Kapow User's Guide
Remote Device Action Step
The Device Action step can perform some actions with the Device Automation Service running on a
remote computer.
Properties
Name
Name of the step.
Device
Select the remote device to manage the service on.
Action
•Suspend: Suspends the device. To restore the service operation, a user or an administrator needs to
manually start the Device Automation Service on the device.
•Shutdown: Stops the service, which makes the remote device unavailable.
•Restart: Stops and starts the service. A robot or Design Studio loses the connection to the device and
must be reloaded to restore it.
•Lock Screen: Locks the screen on the remote device. This action requires a password as a parameter.
See Use Lock Screen for more information.
•Restart Machine: Restarts a computer running the Device Automation Service.
•Shutdown Machine: Shuts down a computer running the Device Automation Service.
Return Step
This is a final step in robot execution that outputs variable values. Specify variables in the Return step in
the same order as the types in the Output section of the automation workflow. This step is mandatory in
the robot. Leave the step empty if you do not want to output any variable value.
You can use more than one Return step, but once the first Return step is executed, robot execution stops.
This might be helpful in conditional steps when you check the condition and output variable values if they
comply with the condition. If the condition is not met, the robot continues executing.
Properties
Name
Contains the name of the step.
Values
Specify variables with values you want to output. Note that the order of variables must match the list of
types in the Output section. If all variables are the same type, the order is not important.
Set Clipboard Step
This step assigns a value to the clipboard of the Automation Device.
198
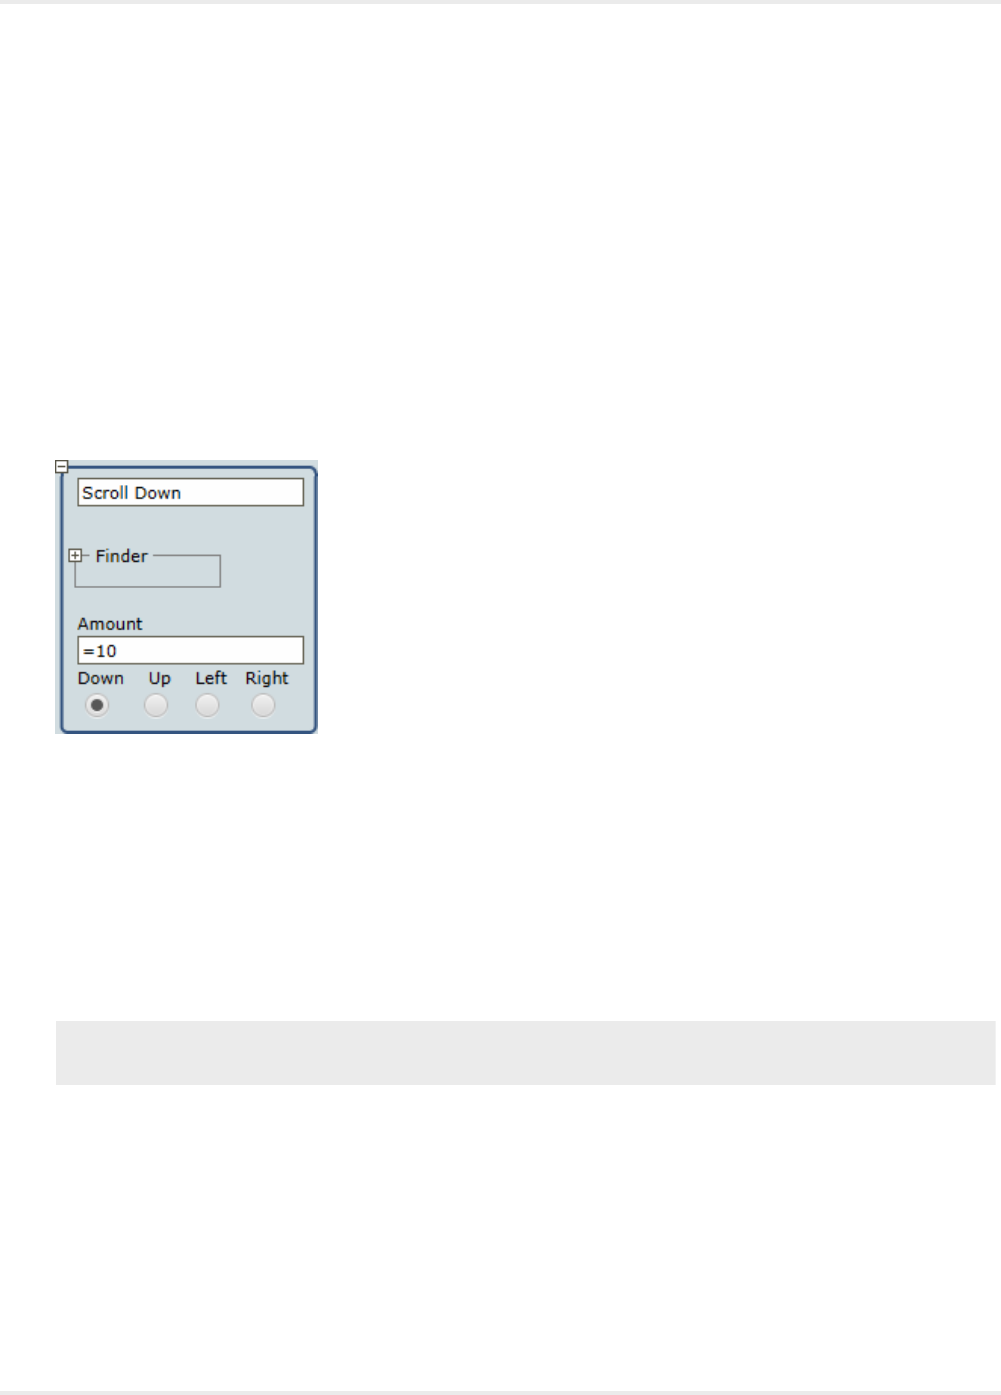
Kofax Kapow User's Guide
Properties
Name
Name of the step.
Device
Select the name of the automation device.
Contents
Specify a value to copy to clipboard. You can specify a variable name in this field.
Scroll Step
This step helps you scroll in the program windows.
Properties
Name
Specify the name of the step.
Amount
Specify the amount to scroll. The value in this field equals the number of notches of the mouse scroll
wheel. Initially one notch equals 3 lines of text in text editors. You can change this parameter in the Mouse
Properties window on the Automation Device. You can use both positive and negative numbers. For
example, if you select Down and use a negative number, the element scrolls up.
Note Make sure you correctly select an element to scroll. If an element cannot be selected, try clicking
the element first and then use Scroll.
Throw Step
This step throws an exception to indicate an error and handle it at another place in the Device Automation
workflow.
When other workflow steps encounter errors, they also throw exceptions. Errors discovered by logic in the
workflow and errors discovered by steps are handled in the same way. See Try-Catch Step for the list of
exceptions thrown by other workflow steps.
199

Kofax Kapow User's Guide
Whichever way an exception is thrown, it is caught and handled by the closest Try-Catch Step containing
the specified exception in a Catch branch. If there is no such Try-Catch Step, the exception is set to be
"not handled" within the workflow. In that case, execution of the workflow as well the Device Automation
step stops, and the error is handled as specified on the Error Handling tab of the Device Automation
step.
A typical use of the Throw step is in conjunction with timeout guards. A timeout occurs when an intended
interaction with the Device (for example, set by a Location Found guard) is not possible. In some cases
when a timeout occurs, it is possible to do something else and thus recover. When recovering is not
possible, use the Throw step to communicate the failure in a structured way. This makes it possible to
add a Try-Catch Step to properly handle an error (for example, by backing out of the interaction with the
Device).
Using the same exception name for similar errors in different places in the workflow (that is, in different
Throw steps) makes it possible to handle all errors in the same Try-Catch step. Therefore, the exception
name should provide a classification of the error situation, not all the details.
This step throws an exception and robot execution stops. This step is helpful when designing and
debugging your robot. For example, if you want to know when a 60 second timeout guard waits for 60
seconds without any action, insert the Throw step into a timeout guard with a text similar to "60 seconds
timeout has passed." If you see your message during the execution, it means the guard waited for 60
seconds and nothing happened.
The Throw step cannot be inserted in the Finally block of the Try-Catch step.
Properties
Name
Contains the name of the step.
Exception
Name of the exception. This name must adhere to the variable name rules. See Naming policy.
Try-Catch Step
This step helps you perform an action and catch one or more exceptions that might result from the action.
The step consists of a number of branches divided into three parts.
• Try branch: The topmost part that specifies an action to perform.
• Catch branches: Specifies one or more exceptions that may be thrown when the action in the Try
branch is executed; and what action to perform if that happens. You can have more than one Catch
branch and each of them can list any number of exceptions that are handled in the same way.
• Finally branch: Specifies an action to perform. This branch is always executed last regardless of the Try
and Catch execution results.
Exceptions may be thrown either explicitly by means of the Throw Step, or because other steps encounter
errors during execution. The exceptions thrown are called Predefined Exceptions.
200
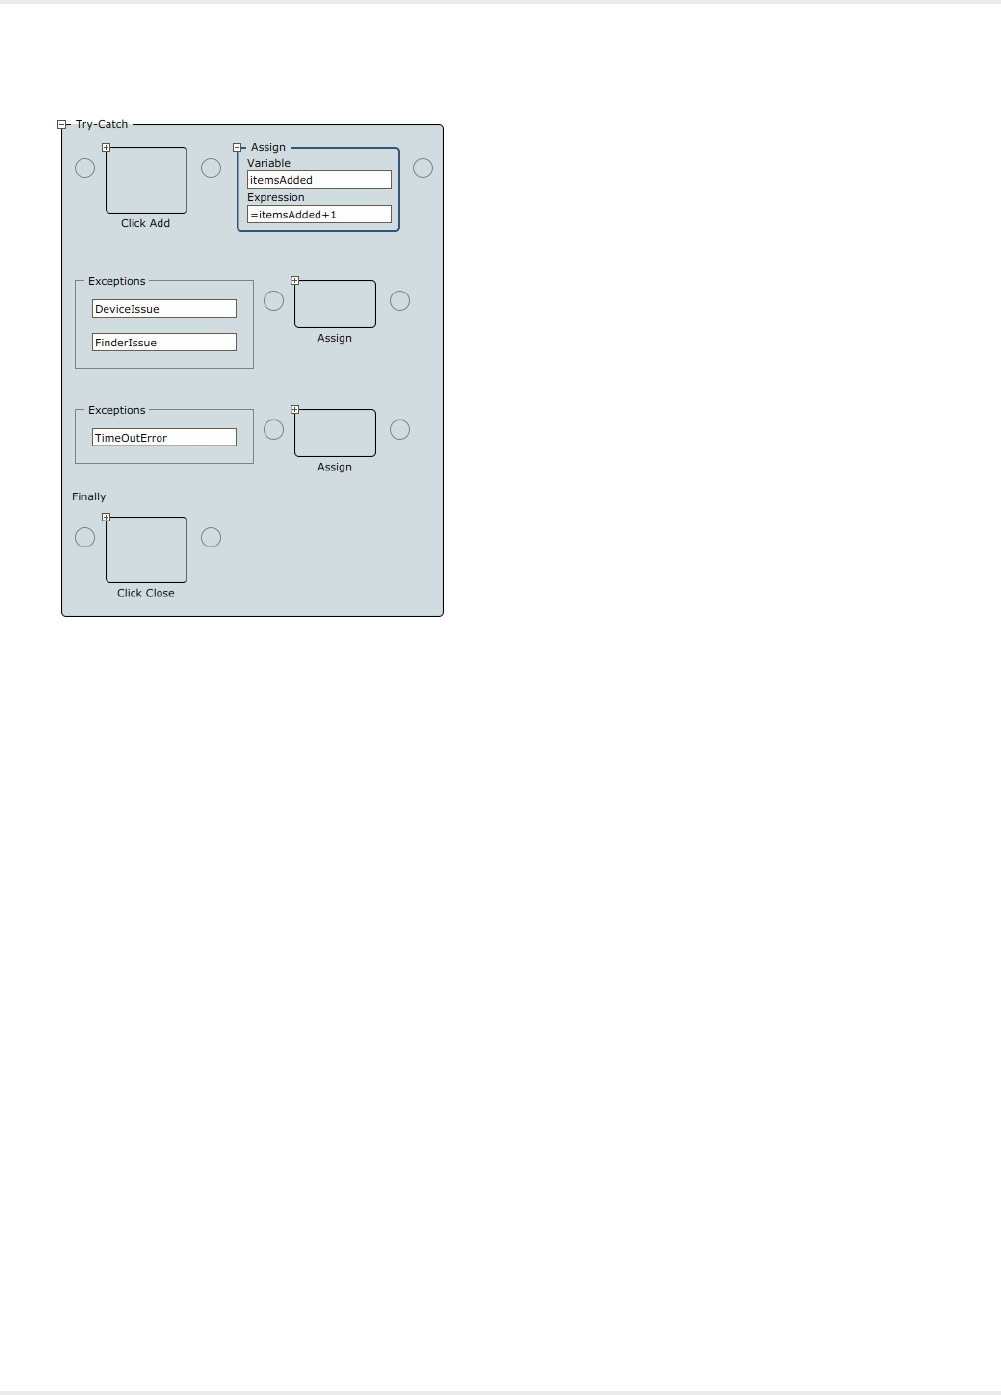
Kofax Kapow User's Guide
Properties
Name
Contains the name of the step.
Try
Specify an action to perform. If an exception is expected as a result of an action, specify the exception in
the Catch block.
Exceptions
Specify one or more exceptions you expect to catch.
Each Catch branch consists of a list of exceptions and, to the right of that, the action to perform if
execution of the Try branch throws one of these exceptions.
Each exception is given a name, corresponding to the exception name used in a Throw step or a
predefined exception name (listed below).
When an exception is added or edited in a Catch branch, the editor proposes those exceptions that may
be thrown inside the Try branch and which are not yet listed in a Catch branch.
Finally
Specifies the action to perform just before leaving the Try-Catch step.
Execution
Execution of the Try-Catch step can be a bit more complex than other steps. The most common execution
cases are the simplest and explained first. The most complex cases appear when the Finally branch
contains steps (is not empty).
In all cases, execution of the Try-Catch step begins by executing the Try branch. This can end normally, or
by an exception thrown by one of its steps.
201

Kofax Kapow User's Guide
Most common cases: Finally branch is empty
Try branch ends normally
Execution proceeds with the step after the entire Try-Catch step. That is, the Catch branches are not
executed in this case.
Try branch ends with an exception thrown
From the step that throws an exception, execution proceeds directly to the beginning of the Catch
branch that lists the exception.
More complex cases: Finally branch is empty
Try branch ends with an exception thrown, but no Catch branch lists that exception
This case is treated as if the Try-Catch step itself throws the exception, which is handled the same
way as when any other step throws an exception. All cases listed here apply.
Note This strategy ("treated as if the Try-Catch step itself throws an exception") is used in many
other cases.
If all Try-Catch steps have empty Finally branches, the workflow logic searches for a matching Catch
branch in the surrounding Try-Catch steps, which Try branches contain this Try-Catch step. If such
a Catch branch cannot be found in any surrounding Try-Catch step, the exception is set to "not
handled" within the workflow. In such a case, execution of the workflow as well the containing Device
Automation step stops, and the error is handled as specified on the Error Handling tab of the Device
Automation step.
If any Try-Catch step also has a Finally branch, the execution is similar, but with executing one "throw"
at a time.
Try branch ends by an exception thrown and the appropriate Catch branch does the same
The exception thrown in the Catch branch is not handled by the Catch branches in the same Try-
Catch step. Instead, this is treated as if the Try-Catch step itself throws that exception. The details are
as described in the previous case.
A note on nested Try-Catch steps
An exception that is handled by a Try-Catch step is not handled by a surrounding Try-Catch step.
Once the Catch branch that can handle the exception is found, the exception is considered fully
handled and is "forgotten". Execution of the Catch branch starts and proceeds in the normal way.
Thus each exception is handled only once.
Most complex cases: Finally branch is not empty
In these cases the steps in the Finally branch are executed just before execution leaves the Try-Catch
step, no matter how the execution goes. The following cases show how this works out in detail for each of
the cases discussed above.
Try branch ends normally
Execution proceeds with the steps in the Finally branch. What happens afterwards depends on how
execution of the Finally branch ends.
• If execution of the Finally branch ends normally, execution proceeds with the step after the entire
Try-Catch step.
• If an exception is thrown during execution of the Finally branch, it is treated as if the Try-Catch step
itself throws that exception.
Try branch ends with an exception thrown and the Catch branch ends normally
After executing of the Catch branch, the logic is exactly as in the previous case.
202

Kofax Kapow User's Guide
Try branch ends with an exception thrown, but no Catch branch lists that exception
In this case the exception is "remembered" and execution proceeds with the steps in the Finally
branch. What happens afterwards depends on how execution of the Finally branch ends.
• If execution of the Finally branch ends normally, execution proceeds as if the Try-Catch step itself
throws the "remembered" exception again.
• If an exception is thrown during the execution of the Finally branch, it is not handled by the Catch
branches in the same Try-Catch step. Instead, this is treated as if the Try-Catch step itself throws
that exception (that is, the exception that was thrown by the Finally branch). The "remembered"
exception is effectively "forgotten" at this point.
Try branch ends with an exception thrown and the appropriate Catch branch does the same
This is handled as in the previous case, except that the "remembered" exception is the one thrown
by the Catch branch rather than the one thrown by the Try branch. As shown above, the exception
thrown by the Try branch is fully handled and "forgotten" at the moment when execution of the Catch
branch begins.
Predefined Exceptions
When a step encounters an error during execution, it throws one of the following exceptions. These
exceptions can also be thrown explicitly by Throw steps if needed.
When thrown because of step errors, the predefined exceptions include a message explaining the issue.
This message is made available if the exception is not handled by a Try-Catch step in the workflow, but
instead terminates the execution of the Device Automation step.
You can recognize predefined exceptions by the "Issue" at the end of names.
•FinderIssue: Thrown if a finder fails to find an element
•DeviceIssue: Thrown if a problem on a device or a driver that prevents the execution of a step
•IncorrectValueIssue: Thrown if the value of an expression is not suitable where it is used, such as -1
in "one".substring(-1)
•ExtractIssue: Thrown if the Extract step fails to extract anything
•DivisionByZeroIssue: Thrown if a division by zero (or modulo by zero) occurs during the evaluation of
an expression
•OverFlowIssue: Thrown if an overflow occurs in the evaluation of an expression
•ConversionIssue: Thrown if during the evaluation of an expression a conversion from one type to
another fails, such as "one".integer()
Whenever an expression is a part of a step, execution of the step can throw the following exceptions:
•IncorrectValueIssue
•DivisionByZeroIssue
•OverflowIssue
•ConversionIssue
The following table lists exceptions that can be thrown by steps, finders and other workflow elements.
Expression issues are any of the issues thrown by the steps with expressions.
Workflow Elements Exception
Steps
203

Kofax Kapow User's Guide
Workflow Elements Exception
Click DeviceIssue, FinderIssue, Expression issues
Enter Text DeviceIssue, FinderIssue, Expression issues
Press Key DeviceIssue, FinderIssue, Expression issues
Scroll DeviceIssue, FinderIssue, Expression issues
Move Mouse DeviceIssue, FinderIssue, Expression issues
Set Clipboard DeviceIssue, Expression issues
Assign Expression issues
Extract Value DeviceIssue, FinderIssue, Expression issues,
ExtractIssue
Extract Clipboard DeviceIssue
Extract Image DeviceIssue, FinderIssue, Expression issues,
ExtractIssue
Extract Tree As XML DeviceIssue, FinderIssue, Expression issues,
ExtractIssue
Extract Text From Image DeviceIssue, FinderIssue, Expression issues
Loop None
Conditional Expression issues
Group None
With DeviceIssue, FinderIssue, Expression issues
Guarded Choice Depends on the guards as listed in the table below
Try-Catch None
Break None
Throw None
Return Expression issues
Open DeviceIssue, Expression issues
Connect To Device DeviceIssue, Expression issues
Remote Device Action / Lock Screen command DeviceIssue, Expression issues
Remote Device Action / other DeviceIssue
Expressions
Any expression IncorrectValueIssue, DivisionByZeroIssue,
OverFlowIssue, ConversionIssue
Guards
When seconds have passed Expression issues, IncorrectValueIssue
Location Found Expression issues, DeviceIssue, FinderIssue
Location Not Found Expression issues, DeviceIssue, FinderIssue
204
Kofax Kapow User's Guide
Workflow Elements Exception
Location Removed Expression issues, DeviceIssue, FinderIssue
Stop Tree Changing Expression issues, IncorrectValueIssue, DeviceIssue,
FinderIssue
Finders
Device Finder DeviceIssue
Application Finder DeviceIssue, FinderIssue, Expression issues
Component Finder DeviceIssue, FinderIssue, Expression issues
The Guarded Choice step may throw the following exceptions, depending on the guards used in the step:
Guard Exception
When seconds have passed Expression issues
any other DeviceIssue, FinderIssue, Expression issues
Automate Terminals
Kapow supports connection to and interaction with 3270, 5250 and stream-based (vt2xx) terminals.
Note You do not need to install the Device Automation service on your remote computer or create a
device mapping in the Management Console when automating a terminal device.
The terminals do not support mouse operations even though the Move Mouse and Click steps can be
inserted. The terminals must be operated using keyboard keys.
Fonts
Kapow bundles several fonts for the terminals to render their screens. They are located at:
C:\Program Files\Kapow 10.2.0.1\nativelib\hub\windows-x32\XXX\fonts
Where XXX is a three-digit number for internal purposes.
If a terminal connection is established with a host that uses characters that are not found in the bundled
fonts, the characters render as squares on the screen. This can be fixed by adding the path to a Truetype
font in the fontlist.txt file found in the same Kapow font directory. For example:
C:\TerminalFonts\MyTerminalFont.ttf
tn5250 Terminals
To connect to 5250 terminals, use the following connection string:
tn5250://<hostname>:<portnumber>?env.TERM=<terminal type>.
Where hostname is the terminal name or IP address, portnumber is the terminal connection port number,
and env.TERM is the value of the client terminal type after the mode is switched by the URL. The default
terminal type is "IBM-3179-2". Note that env.TERM parameter is valid for the tn5250 terminal only. Kapow
supports the following terminal types:
• "IBM-3477-FC"
• "IBM-3477-FG"
• "IBM-3180-2"
205

Kofax Kapow User's Guide
• "IBM-3179-2" (Default)
• "IBM-3196-A1"
• "IBM-5292-2"
• "IBM-5291-1"
• "IBM-5251-11"
The 5250 terminal used a special keyboard with many keys that are not available on present day PC
keyboards. To enter such keys, the following calculated keys may be used in the Press Key Step.
• VK_RETURN
• VK_TAB
• VK_BACKTAB
• VK_UP
• VK_DOWN
• VK_LEFT
• VK_RIGHT
• VK_CLEAR
• VK_BACKTAB
• VK_F1
• VK_F2
• VK_F3
• VK_F4
• VK_F5
• VK_F6
• VK_F7
• VK_F8
• VK_F9
• VK_F10
• VK_F11
• VK_F12
• VK_F13
• VK_F14
• VK_F15
• VK_F16
• VK_F17
• VK_F18
• VK_F19
• VK_F20
• VK_F21
• VK_F22
• VK_F23
• VK_F24
206

Kofax Kapow User's Guide
• VK_ROLLDN
• VK_ROLLUP
• VK_BACK
• VK_HOME
• VK_END
• VK_INSERT
• VK_DELETE
• VK_RESET
• VK_PRINT
• VK_HELP
• VK_SYSREQ
• VK_CLEAR
• VK_REFRESH
• VK_FIELDEXIT
• VK_TESTREQ
• VK_TOGGLE
• VK_ERASE
• VK_ATTENTION
• VK_DUPLICATE
• VK_FIELDMINUS
• VK_FIELDPLUS
• VK_PREVWORD
• VK_NEXTWORD
• VK_PREVFLD
• VK_NEXTFLD
• VK_FIELDHOME
• VK_EXEC
• VK_MEMO
• VK_COPY_TEXT
• VK_PASTE_TEXT
See the 5250 terminal documentation for more information.
See Basic Terminal Tutorial for information on how to connect to and extract information from a 5250
terminal.
Character Encoding
To specify character encoding of the host, add a charset query parameter to the URI. For example:
tn5250://hostname:port?LineCodePage=cp838
Kapow supports the following character sets for tn5250 terminals:
Character name Host codepage
US/Canada cp037 (default)
207

Kofax Kapow User's Guide
Character name Host codepage
Multinational cp500
thai cp838
3270 Terminals
Kapow supports 3279-4 color 80x43 terminal, which is the default of the underlying terminal emulator.
The 3270 terminal used a special keyboard with some keys that are not available on present day PC
keyboards. To enter such keys, the following calculated keys may be used in the Press Key Step.
• VK_RETURN
• VK_TAB
• VK_BACKTAB
• VK_Up
• VK_Down
• VK_Left
• VK_Right
• VK_F1
• VK_F2
• VK_F3
• VK_F4
• VK_F5
• VK_F6
• VK_F7
• VK_F8
• VK_F9
• VK_F10
• VK_F11
• VK_F12
• VK_F13
• VK_F14
• VK_F15
• VK_F16
• VK_F17
• VK_F18
• VK_F19
• VK_F20
• VK_F21
• VK_F22
• VK_F23
• VK_F24
• VK_ATTENTION
208
Kofax Kapow User's Guide
• VK_BACKSPACE
• VK_CLEAR
• VK_DELETE
• VK_DUPLICATE
• VK_HOME
• VK_INSERT
• VK_PA1
• VK_PA2
• VK_PA3
Character Encoding
To specify character encoding of the host, add a charset query parameter to the URI. For example:
tn3270://hostname:port?charset=cp930
Kapow supports the following character sets for tn3270 terminals:
Character name Host codepage
belgian 500
belgian-euro 1148
bracket 037
brazilian 275
chinese-gb18030 1388
cp1047 1047
cp870 870
finnish 278
finnish-euro 1143
french 297
french-euro 1147
german 273
german-euro 1141
greek 423
hebrew 424
icelandic 871
icelandic-euro 1149
italian 280
italian-euro 1144
japanese-kana 930
japanese-latin 939
norwegian 277
209
Kofax Kapow User's Guide
Character name Host codepage
norwegian-euro 1142
russian 880
simplified-chinese 935
slovenian 870
spanish 284
spanish-euro 1145
swedish 278
swedish-euro 1143
thai 1160
traditional-chinese 937
turkish 1026
uk 285
uk-euro 1146
us-euro 1140
us-intl 037
SSH / Telnet Settings (vt2xx)
The underlying Kapow SSH client is based on PuTTY and can potentially be configured to access any
system that PuTTY can access. You can configure all the same parameters as you can with a PuTTY
session, but instead of requiring the actual PuTTY client to define sessions, you can define session
settings by adding parameters to the connection URL.
The headless terminal does not automatically detect the code page on the server. This is why sending
and receiving non-ASCII characters requires you to specify the code-page to use for character encoding
and decoding. If you do not specify a code page, the robot assumes the server's locale is set to UTF-8.
You can specify the code page by using the LineCodePage parameter. The Kapow terminal is built using
"libicu" for character encoding. Use the libicu converter explorer at http://demo.icu-project.org/icu-bin/
convexp?s=ALL to inspect code pages and their aliases. The list of supported character sets equals that
of ICU (International Components for Unicode) library. See ICU documentation for details.
The following is a list of the most commonly used parameters for the stream-based terminals.
TermWidth Sets the terminal width (default is 80).
TermHeight Sets the terminal height (default is 24).
PublicKeyFile Specifies the path to a PuTTY formatted *private* key.
TerminalType Sets the terminal type (default is "xterm").
LineCodePage Specifies the code-page to use for character encoding
and decoding (default is UTF-8).
To set the parameters on your session, append them to the URI when you enter the value into the Open
step.
210

Kofax Kapow User's Guide
ssh://<username>@<hostname>?TermWith=160&TermHeight=48&LineCodePage=UTF-16
SSH Authentication and Security Guide
When automating applications using SSH, the user can be authenticated in four different ways.
1. The underlying ssh client will prompt for a password. Enter the password using "Enter Text" step
followed by a "Press Key" step (return).
2. An unencrypted private key can be placed on the file system of Design Studio and your
RoboServers. Add the PublicKeyFile=<path to key> line to the connection URL. The connection
URL could look like the following.
ssh://<username>@<hostname>?PublicKeyFile=<path to key file>
It is important that the key file is PuTTY formatted. On Linux you can use puttygen to transform an
open-ssh private key.
3. An encrypted private key can be placed on the file system of Design Studio and your RoboServers.
Add PublicKeyFile=<path to key> to the connection URL. The underlying ssh client should
prompt for a password upon connection. To enter the password, use "Enter Text" step followed by a
"Press Key" step (return).
4. Use Pageant on Windows and ssh-agent on Linux with an encrypted key on the local file system.
• On Windows, run Pageant as the same user running the RoboServer and add the key.
• On Linux, run ssh-agent and ssh-add and copy the SSH_AUTH_SOCK and SSH_AGENT_PID
environment variables to the RoboServer and Design Studio environment. You can do it by
appending the lines to RoboServer.conf and DesignStudio.conf as follows.
•set.SSH_AUTH_SOCK=<value as outputted from ssh-agent>
•set.SSH_AGENT_PID=<value as outputted from ssh-agent>
Or by having them already in your environment when starting the RoboServer and Design Studio.
The authentication methods above are listed from the least secure to the most secure as follows.
1. Anyone able to read the robot can extract the password and log onto the system.
2. The attacker would have to have the private key from your file system, so obtaining the robot from a
Management Console is not enough.
3. The attacker would need both the robot and the private key file.
4. The attacker would need to obtain the password for the private key to gain access.
Use TLS/SSL
Kapow supports TLS/SSL communication in terminals. To use TLS/SSL, open either stn3270 or stn5250
terminal in the open step of the Device Automation workflow. For example, stn3270://hostname:2023.
Note that Kapow does not verify the certificate presented by the server.
Basic Terminal Tutorial
See Automate Terminals for information on terminal prerequisites and settings.
211

Kofax Kapow User's Guide
In this tutorial we will connect to a 5250 terminal, login, run some commands, and extract information from
the terminal.
1. Open an existing project or create a new project (in Smart Re-Execution (Full) mode) and add a new
Device Automation step.
2. Add variables that will contain a login name and a password to log in to terminal. Also add a
variable that will contain the output text. Add the variable with the output to the Return step
(=textVariableName).
3. In the Device Automation editor, add the Open step with the following parameters: Open, OpenStep,
local and specify the URI of the terminal. In this tutorial we connect to the 5250 terminal. Generally,
the connection string is as follows: tn5250://<hostname>:<portnumber>?env.TERM=<terminal
type>. We will use the following connection string: tn5250://Kapow_5250terminal:11623. Note
that env.TERM parameter is valid for the tn5250 terminal only.
Where tn5250 is the terminal type, Kapow_5250terminal is the terminal name or IP address, and
:11623 is the terminal connection port number. We omitted the env.TERM parameter to connect
to a default terminal type (IBM-3179-2). See Supported tn5250 Driver Terminals in the Automate
Terminals.
Note To re-run your Device Automation workflow for a terminal with an Open step, close the Device
Automation Editor, refresh your project in Design Studio, and open the Device Automation step
again. If you re-run the robot without closing the terminal, another terminal window opens and the
robot may fail to execute.
Click Step Into to execute a step.
4. If the terminal needs an Enter key press, right-click the terminal in the Automation Device View and
select the Press Key step. By default it selects Enter as a key.
5. Right-click the User ID field in the terminal in the Automation Device View and select Enter Text >
From Variable > login and select the variable that contains the user name. Click Step Into to type
this text into the text field.
6. To shift to the Password field, add the Press Key step and in the Key field select Standard Keys >
Tab. Click Step Into. The cursor should move to the Password field.
7. Right-click the Password field in the terminal window and select Enter Text > From Variable and
select the variable with the password. To actually type this text into the text field, click Step Into.
8. To log in, right-click the terminal in the Automation Device View and select Press Key (Enter by
default).
9. If the terminal needs an Enter key press, right-click the terminal in the Automation Device View and
select Press Key. By default it selects Enter as a key.
10. After you execute the required commands, you can extract the information from the terminal window.
To extract a text line, right-click a row, select Extract Context into > variableName. Click Step Into.
The Variables branch in the Workflow State view shows the value you extracted.
To take a screen shot of the entire terminal window (you need to add a binary variable to the Return
step (=binaryVariableName) beforehand), select the screen element in the Automation Device View
and click Extract Image into > binaryVariableName. Later you can convert the information from the
binary variable to an image in your website robot. Click Step Into.
212
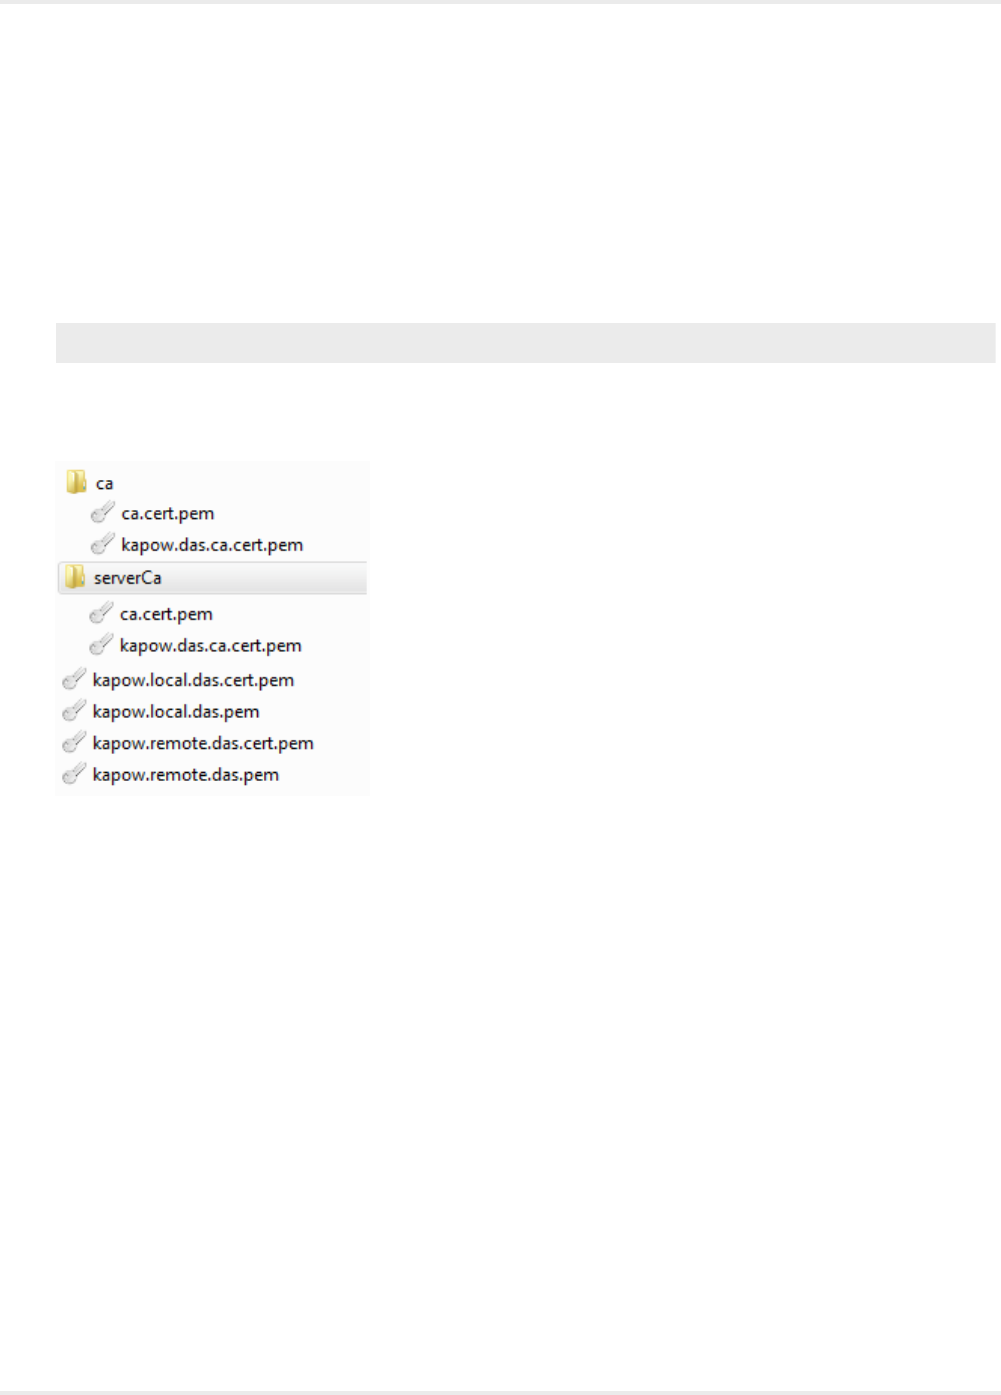
Kofax Kapow User's Guide
Once you extract the information from the terminal, you can return to the website robot editor window and
use the extracted information.
Use TLS Communication
Kapow provides a means for setting up TLS communication between Automation Device and RoboServer
or Design Studio. The communication uses certificates for encrypting the communication. The encryption
uses a public-private key structure for securing the connection.
Note Password protected certificates are not supported.
The key files must be in the "pem" format, which is the most common format for openSSL.
The installation package for Device Automation Service includes six files and two folders.
The ca.cert.pem is a public key file signed by a private key created by Kapow. It acts as the root
certificate for this trust chain of keys. The kapow.das.ca.cert.pem is another signed certificate that is
signed by the root private key. These two files exist in both the ca and the serverCa folder. If you do not
have any specific security requirements, these files can be used out of the box.
The kapow.local.das.pem is the private key file used by the local hub that exists on the RoboServer and
Design Studio. The kapow.local.das.cert.pem is the public key signed by the underlying private key for
kapow.das.ca.cert.pem.
The kapow.remote.das.pem is the private key file used by the Device Automation Service.
The kapow.remote.das.cert.pem is the public key signed by the underlying private key for
kapow.das.ca.cert.pem.
The files have the same code for Automation Device and RoboServer or Design Studio.
The Automation Device must have the kapow.remote.* files along with the serverCa folder containing
the ca.cert files.
The RoboServer or Design Studio must have kapow.local.* files and the ca folder containing the
ca.cert files.
213

Kofax Kapow User's Guide
When using homemade certificates, the certificates (signed public key files) of trusted authorities must be
in the ca folder (serverCa for Automation Device). Node.js checks the certificates from the Automation
Device for trust (certificates are trusted if there is a chain of signed certificates to a certificate in the ca/
serverCa folder). If the certificate from the Automation Device is trusted, the Device Automation Service
verifies the certificates from the RoboServer or Design Studio in the same manner.
The RoboServer or Design Studio requires just the certificates to be trusted. The same certificate is used
from multiple Automation Devices, so the Automation Device name does not have to match the "common
name" in the certificate.
If you want to change the certificates to your own validated or homemade certificates, you can do it in two
ways.
• Recommended
1. Get new server certificates and install them on the Automation Device by copying the private key
and the public key to a folder on the device. Use the Certificates tab in the Device Automation
Service configuration window to change the path of the certificates to the new ones.
2. Get the new client certificates for Design Studio and install them on a computer running Design
Studio. Open the Device Automation tab in Design Studio Settings window and specify the paths
to the client certificates.
3. Get the new client certificates for the RoboServer and install them. On the Security tab of the
RoboServer dialog box, specify the path to the new certificates.
• Alternative
• Rename custom certificates to appropriate Kapow names, such as kapow.local.das.pem,
kapow.local.das.cert.pem, and so on. Overwrite the supplied certificates with the new ones.
Expressions in Device Automation
This section describes expressions in Device Automation and how they are edited and evaluated.
Many properties on Device Automation steps can either be specified as plain value (for instance, a
number), or as an expression. An expression is evaluated and then the result of this evaluation is used
for the property where plain values are used directly as the value of the property. For instance, the Count
property on the Click step could be specified as a number, such as 2, but could also be specified as an
expression, such as clickCount where clickCount is a variable defined in the scope of the step and
given a value somewhere else in the Device Automation workflow.
Expressions in Device Automation are very similar to expressions in most common programming
languages, such as Java, C#, JavaScript, etc. They consist of constants, variables, operations (addition,
subtraction, multiplication, comparison operations, logic operation, and etc.), and functions. The following
are a few examples of expressions:
•(1 + 2)*3
•x > 0 || x <= 6
•max(x, 10)
•"hello".substring(3)
Expressions are typed and these types are the same as variables have. This means that operation and
function may only be applied to operands of a certain type. Depending on the operand type, it returns a
value of a given type when evaluated. For example, addition of two operands of type Integer provides a
214
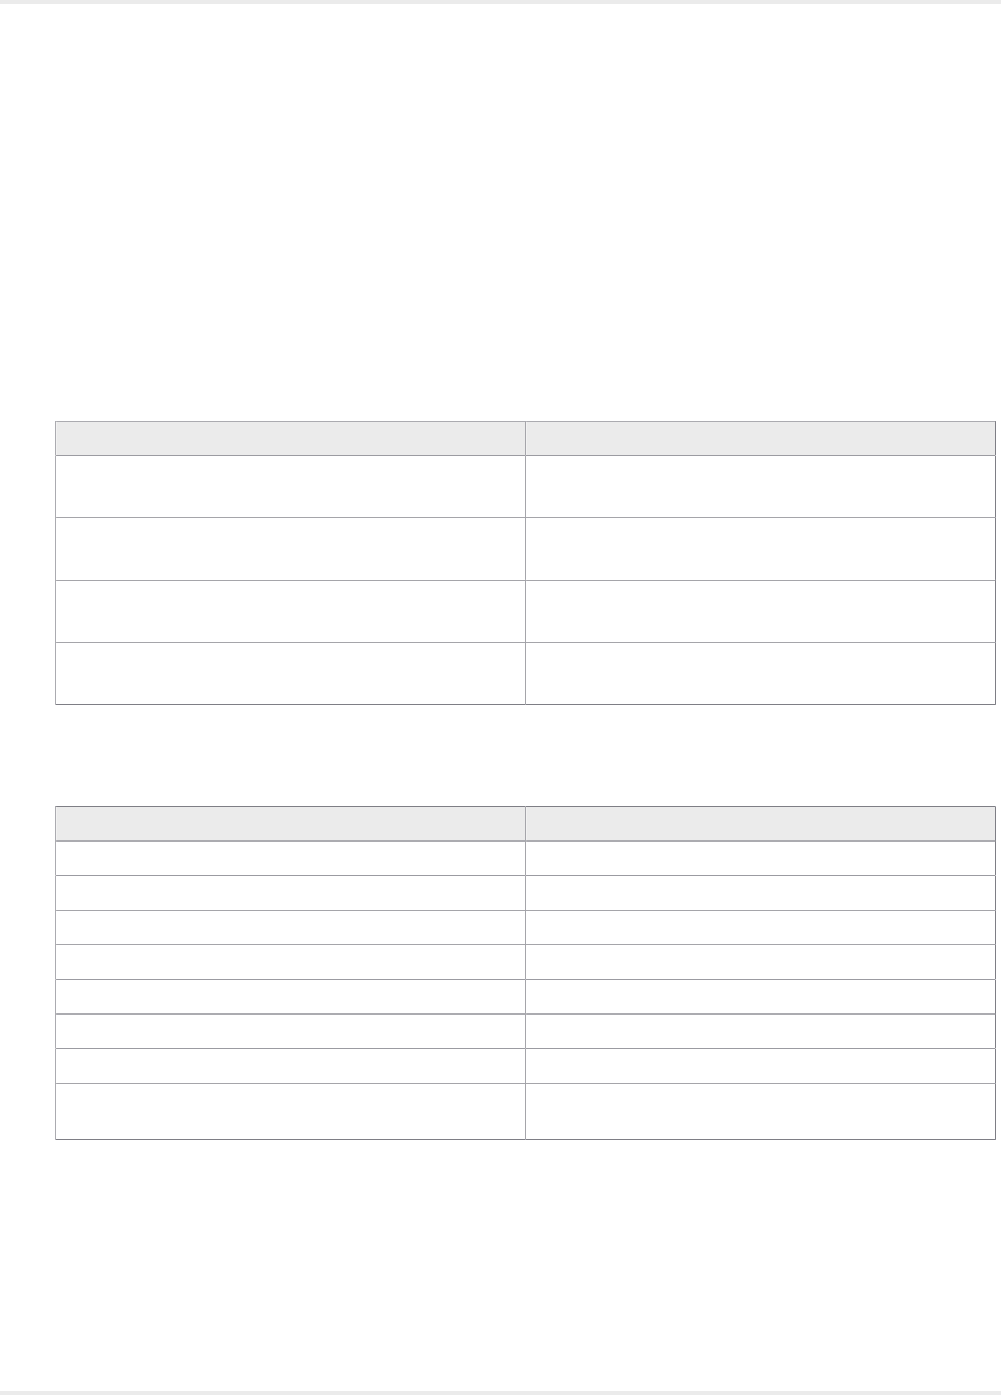
Kofax Kapow User's Guide
result of type Integer, such as 1+2 evaluates to 3. If the type of the operands is Number, then the result
is of type Number, such as 1.0+2.0 evaluates to 3.0. The type of an expression is statically checked
before the expression is evaluated and a type error in an expression is reported as an error in the Device
Automation workflow.
Evaluation of an expression cannot change the state of the workflow, that is you cannot assign a value to
a variable inside the expression. Only steps can do this, for instance the Assign step assigns a value to a
variable and this value may come from evaluating an expression.
The following sections explain different components of expressions.
Constants
Constants are values of the following simple types.
Type Example
Integer 42
-17
Number 3.14159
-.33
Boolean true
false
Text "Hello"
"First"
Text values must not contain double quotes (") since this terminates the Text value. Instead use \" when
you need a double quote in your Text value. The backslash sign (\) is generally used for special characters
in Text values that you cannot write directly in expressions. The special characters are:
Character Description
\n line break
\r carriage return
\f form feed
\" double quote
\t tab
\b backspace
\\ the backslash character itself
\uXXXX Unicode character coded in a hexadecimal number, for
example "\u002A" is an alternative way of writing "*"
Variables
Variables in an expression can be any variables or input parameters defined in a workflow that are in
scope at the location of the expression. Input parameters are always in scope, because their scope is the
entire workflow. Variables are in scope if they are defined at the top level of the workflow or inside a Group
step.
215

Kofax Kapow User's Guide
Operations
An operation is an expression consisting of an operator and some operands. In the expression 1+2, + is
the operator and 1 and 2 are the operands. So the operator defines an operation that should be performed
on the value of the operands when the expression is evaluated. In this section we describe the operators
that can occur in expressions. In most cases the operation that these operators perform is straightforward.
If you are familiar with expressions in programming languages, you can skip this description and consult
the summary table below.
Arithmetic operations
Expressions support normal arithmetic operations, such as addition (+), subtraction (-), multiplication
(*), division (/), and modulo (%). Each of the operations take two operands that can have any
combination of type Integer and Number. If at least one of the operands is of type Number, the result
type is also Number. Otherwise it is of type Integer.
When using an addition operation (+), if one of the operands is Text and the other operand is of type
Integer, Number, Boolean or Text, the result type is Text. For example, "a" + 1 evaluates to the text
"a1". The value of the operand that is not of Text type is converted into text and then the values of the
two operands are concatenated into the resulting text. The subtraction operation - can also be used
as negation of numbers, such as -x where x is of type Integer or Number. The operator % is called a
modulo, or remainder operator. It returns the remainder after division of two operands, for example, 5
% 2 returns 1. More precisely it is defined mathematically as follows:
x % y = x - trunc(x / y) * y
where
trunc(x) = sgn(x) * floor(|x|)
Evaluation of an arithmetic operation may result in an exception thrown. This can happen for addition,
subtraction, multiplication, and division operations if the result is outside the limit for numbers, such
as overflow if a Number value is too big, in which case an OverflowIssue exception is thrown. The
division and modulus operators throw a DivisionByZeroIssue exception if the value of the second
operand is zero. For example:
•17 % 2 evaluates to 1
•-17.3 % 2.0 evaluates to -1.3
Equality operators
There are two equality operators in workflow expressions.
•== Determines if the value of one operand is equal to another
•!= Determines if the value of one operand is not equal to another
These operators work on operands of all types, but the type of the operands must be the same, for
instance, you cannot compare a Number to an Integer.
Relational operators
Relational operators determine if one operand is less than or greater than another operand. The
operands must be numbers, that is of type Integer or Number and the types of the operands in an
expression must be the same. There are four relational operators:
Operator Description
<less than
<= less than or equal to
>greater than
216
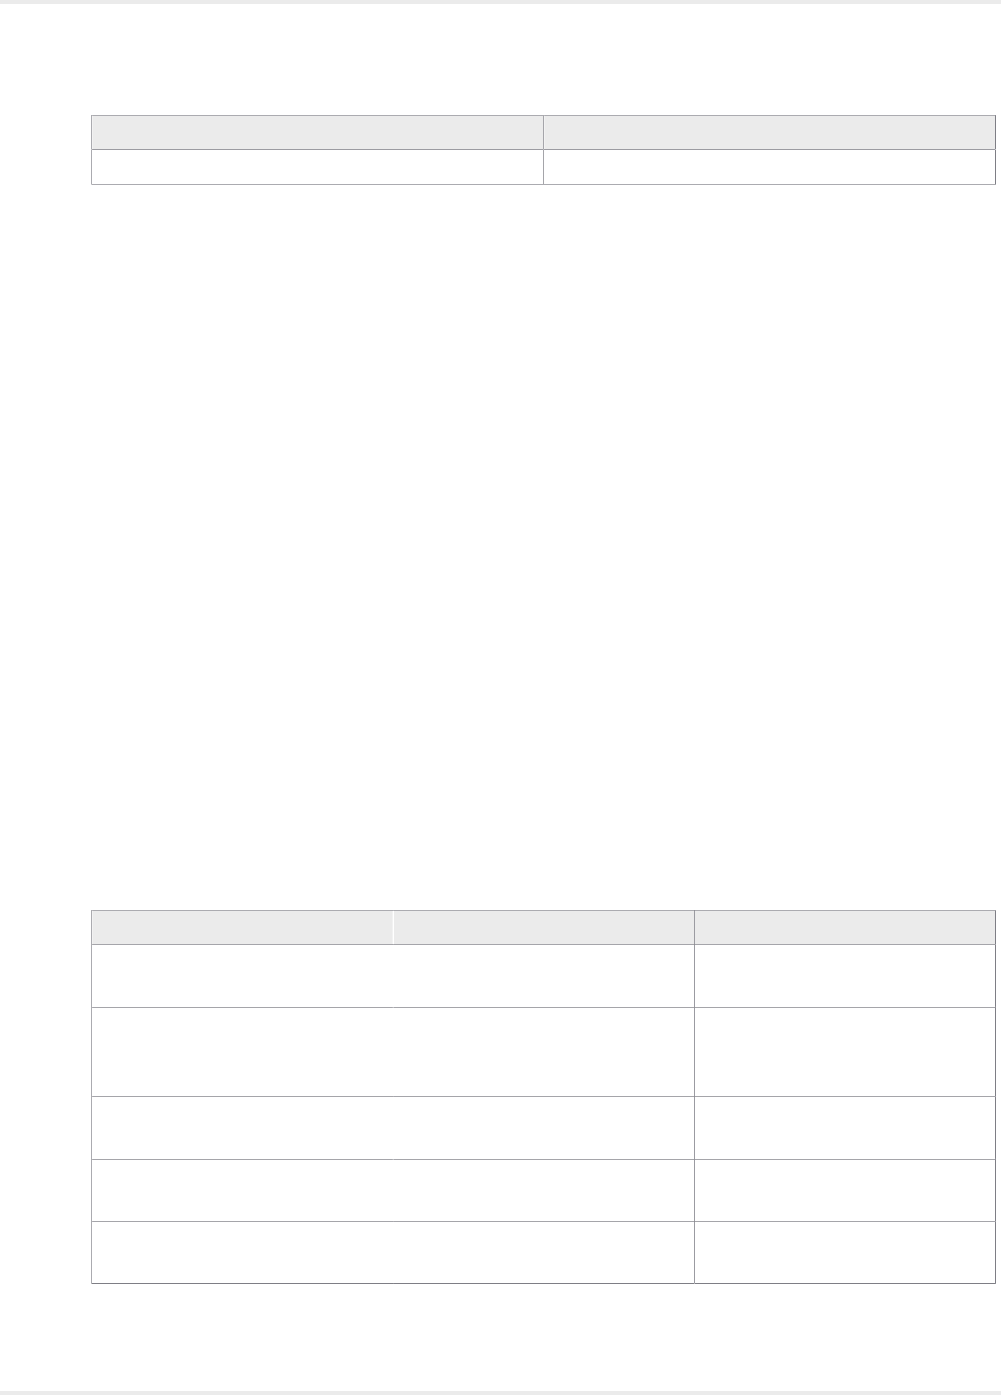
Kofax Kapow User's Guide
Operator Description
>= greater than or equal to
Logical operators
There are two binary (taking two operands) logical operators: AND (&&) and OR (||), and one unary
(takes one operand): NOT (!). They are defined for Boolean operands and their return type is also
Boolean. The && operator returns true if the value of both of its operands is true and false in any other
case. The || operator returns true if the value of at least one of its operands is true and false in case
they are both false. The ! operator returns true if the value of the operand is false and returns false if
the operand is true.
Evaluation of the && and || operators is slightly different from evaluation of most other operators.
Normally all operands are evaluated before the operator is evaluated, but for the && and || operators
the first operand is evaluated first and if this is enough to determine the result of the operation, the
second argument is not evaluated. For example, in x==1 || x==2 if x is 1, the second part of the
expression (x==2) is not evaluated.
Conditional operator
Conditional operator takes three operands and has the following form:
<Op>?<Op>:<Op>
where <Op> can be any operand with some restrictions. For example, x==1?0:1 evaluates to 0 if the
value of x is 1 and to 1 otherwise. The type of the first operand must be Boolean and the other two
operands can be of any type, but must be the same.
Evaluation of the conditional operator is also slightly different from the evaluation of most other
operators. For the conditional operator, the first operand is evaluated first and then depending on its
value, only one of the other two operands is evaluated. If the first operand is true (or false) then the
second (or third) operand is evaluated and the result is the result of this evaluation. This also means
that even if an evaluation error occurs in the operand that is not evaluated, this does not lead to an
exception thrown. For example, in x == 0.0? 1.0: 1/x if x has value 0.0, 1/x is not evaluated and
no DivisionByZeroIssue exception is thrown.
Summary of operators
The table below lists the expression operators.
Operator Description Examples
+Addition or text concatenation 1+2
"hello " + name
-Subtraction or negation 1-2
5-2.9
-5
*Multiplication 42*2
1.0*17
/Division 1/2
1/2.0
%Modulus x % 2
2.5 % 1.0
217
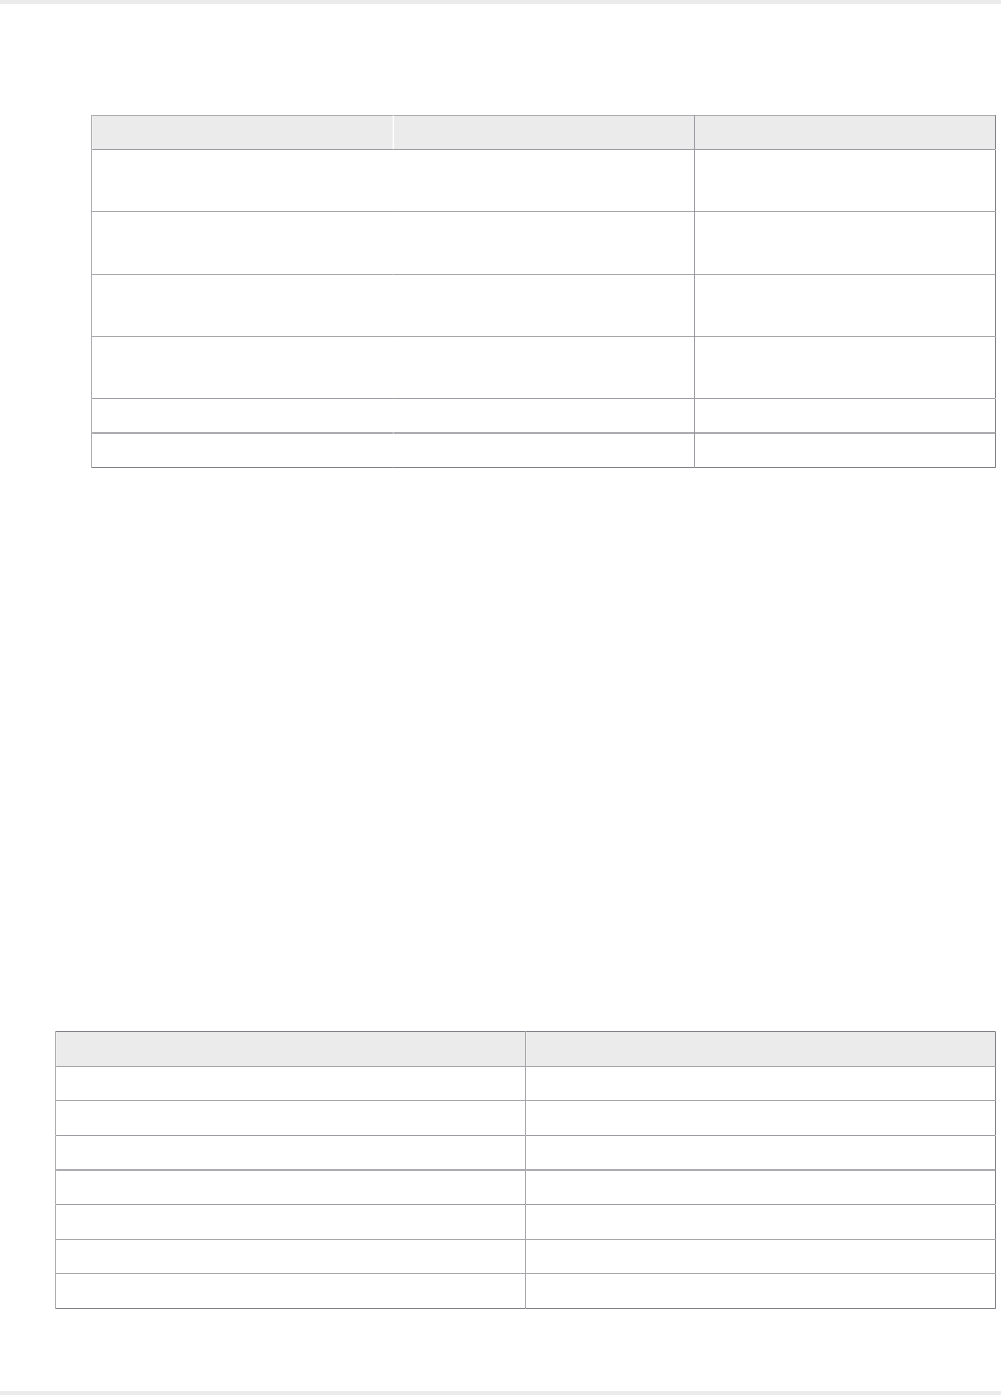
Kofax Kapow User's Guide
Operator Description Examples
==,!= Equals, not equals true == false
x != 0
<,<= Less than, less than or equals 0 < 1
1.0 <= 0.0
>,>= Greater than, greater than or equals 0 > 1
1.0 >= 0.0
&&,|| Logical AND, logical OR true || x
false && y
!Logical NOT !true
_?_:_ Conditional operator x>0? x: 0
Parenthesis
You can use parenthesis to determine the order of evaluation in an expression and alter the result
obtained from the expression. For example, the expression 1+2*3 evaluates to 7, but if you insert a
parenthesis as follows: (1+2)*3, the result changes to 9, because the content of the parenthesis is
evaluated before the surrounding operator.
Function
Expressions can also contain function calls. There are two ways to call a function. The first is called a
direct function call and looks like this: f(<Op>,…,<Op>), such as max(1,2). The other is called a method
function call and it looks like this: <Op>.f(<Op>,…,<Op>), for example, 1.max(2). The two ways are
related as follows:
<Op>.f(<Op>,…,<Op>) is the same as f(<Op>,…,<Op>).
Functions are similar to operators in that the operands must have certain types and the result type
depends on the types of the operands. For example, the function max that determines the maximum of two
numbers can be called with operands of type Integer or Number and the return type is the same as the
type of the operands.
If during the evaluation a function gets an operand value that is incorrect, such as outside the expected
range, an IncorrectValueIssue exception is thrown.
Kapow provides the following functions.
Numeric functions
Function Result type
abs(Integer) Integer
abs(Number) Number
ceil(Number) Integer
floor(Number) Integer
round(Number) Integer
trunc(Number) Integer
max(Integer, Integer) Integer
218
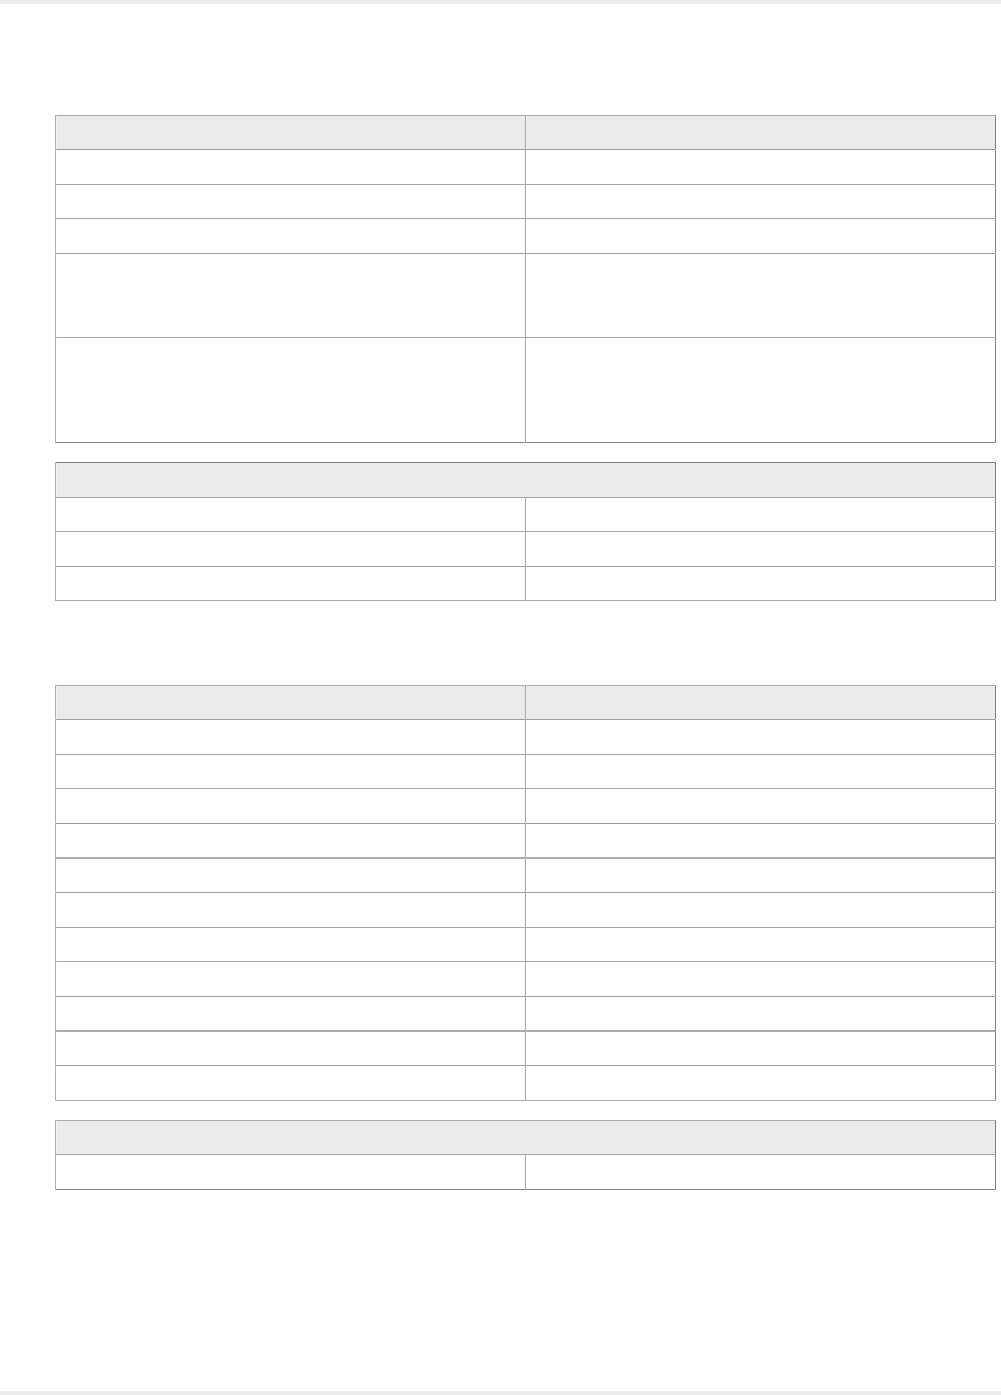
Kofax Kapow User's Guide
Function Result type
max(Number, Number) Number
min(Integer, Integer) Integer
min(Number, Number) Number
random() Number
Returns a random number greater than or equal to 0.0
and less than 1.0.
random(Integer, Integer) Integer
Returns a random integer greater than or equal to the
value of the first operand and less than or equal to the
value of the second operand.
Examples
abs(-2) evaluates to 2
1.5.round(9) evaluates to 2
random(1,6) evaluates to an integer value between 1 and 6
Text functions
Function Result type
length(Text) Integer
substring(Text, Integer) Text
substring(Text, Integer, Integer) Text
indexOf(Text, Text) Integer
contains(Text, Text) Boolean
trim(Text) Text
capitalize(Text) Text
startsWith(Text, Text) Boolean
endsWith(Text, Text) Boolean
toLowerCase(Text) Text
toUpperCase(Text) Text
Example
"workflow".substring(5) evaluates to "low"
Conversion functions
Conversion functions convert values from one type to another. Conversion may fail if the value of the
operand does not represent a value that can be converted into a value of the result type.
219

Kofax Kapow User's Guide
Function Result type
integer(Number) Integer
The number must be an integer value, for example 1.0
integer(Text) Integer
The text must be a text representation of an integer, such
as "42"
number(Integer) Number
number(Text) Number
Text must be a text representation of a number, such as
"17.7"
text(Integer) Text
text(Number) Text
text(Boolean) Text
Examples
2.0.integer() evaluates to 2
2.1.text() evaluates to "2.1"
true.text() evaluates to "true"
Limits for number values
Integers
The largest integer that can be represented is 1E34-1. This is a 1 followed by 34 zeros. If you have
this number and add 1 to it, you get an OverflowIssue exception. Likewise the smallest integer value
that can be represented is -1E34+1. So all integer values must be in the interval from -1E34+1 and to
1E34-1 (both included).
Numbers
Representation of numbers matches the IEEE 754R Decimal128 that uses 34 decimal digits and a
representation of the exponent in the range of −2147483648 to +2147483648. If evaluation of an
expression leads to a number outside the range, you get an OverflowIssue exception.
See Limits in Numbers for more information.
Expression Editor
The Expression Editor is an interactive editor that opens when you click an input field in the Device
Automation editor and if the given field supports entering an expression. The editor consists of two
horizontal panes. The upper pane is the input pane to enter and edit the expression and the lower pane
is the result pane. The result pane can show the result of evaluating the expression, an error message, or
both. The following errors can be shown:
• Parse errors: The syntax of the expression is incorrect.
• Type errors: There is a type error in the expression or the result does not have the correct type.
• Evaluation errors: Some error occurred while evaluating the expression, such as division by zero.
220
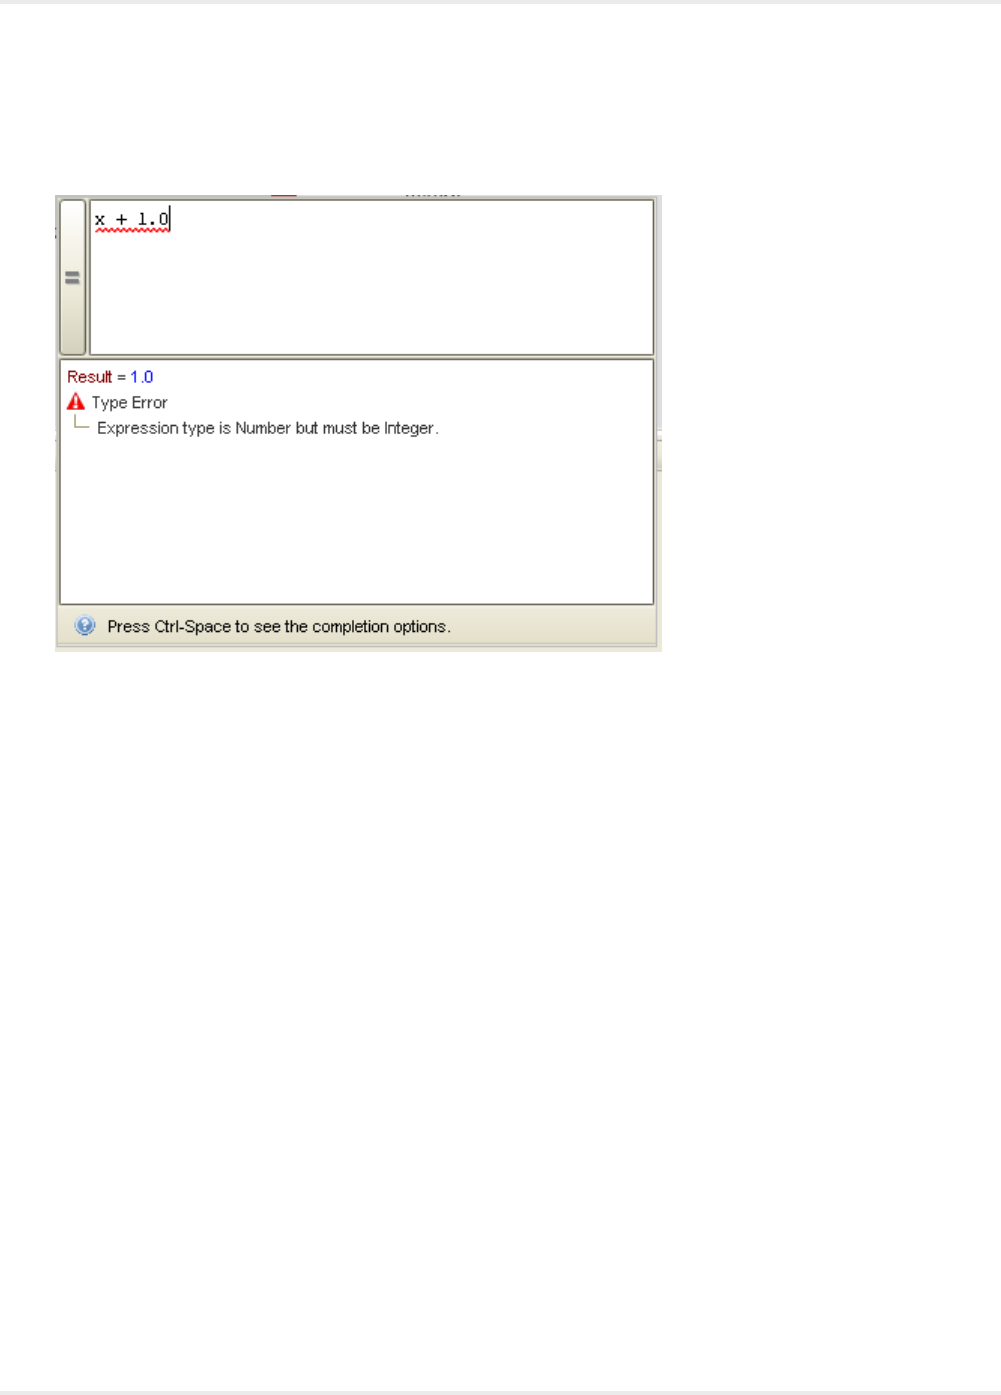
Kofax Kapow User's Guide
In the following example, the expression is x + 1.0 where x is a variable of Integer type. The expression
is correctly typed, but since the result is assigned to the variable of Integer type, an error message shows
that the result type of the expression is not the expected one.
You can copy the result of the expression and the error message from the lower pane of the editor by right
clicking it and selecting Copy Value. If the value is a record type, the result is shown as a tree and each
attribute value can be copied separately. Password and Binary values cannot be copied.
To close the Expression Editor, click outside the editor or press Esc.
Editor Modes
The editor has a mode button to the left of the upper pane that switches between an expression and a
value mode. The editor in the figure above is in the Expression mode. When the editor is in the Value
mode, the mode button is blank. When the editor is in the expression mode, the button shows an equals
sign (=). You can use the keyboard shortcut Ctrl-E to switch between the two modes.
Value Mode
In the value mode, the entered value is simply interpreted as a value, such as a Text, a Boolean, a
Number, etc. and no evaluation takes place. The result panel shows the result. The only error that can be
shown is when the result type is incorrect.
221
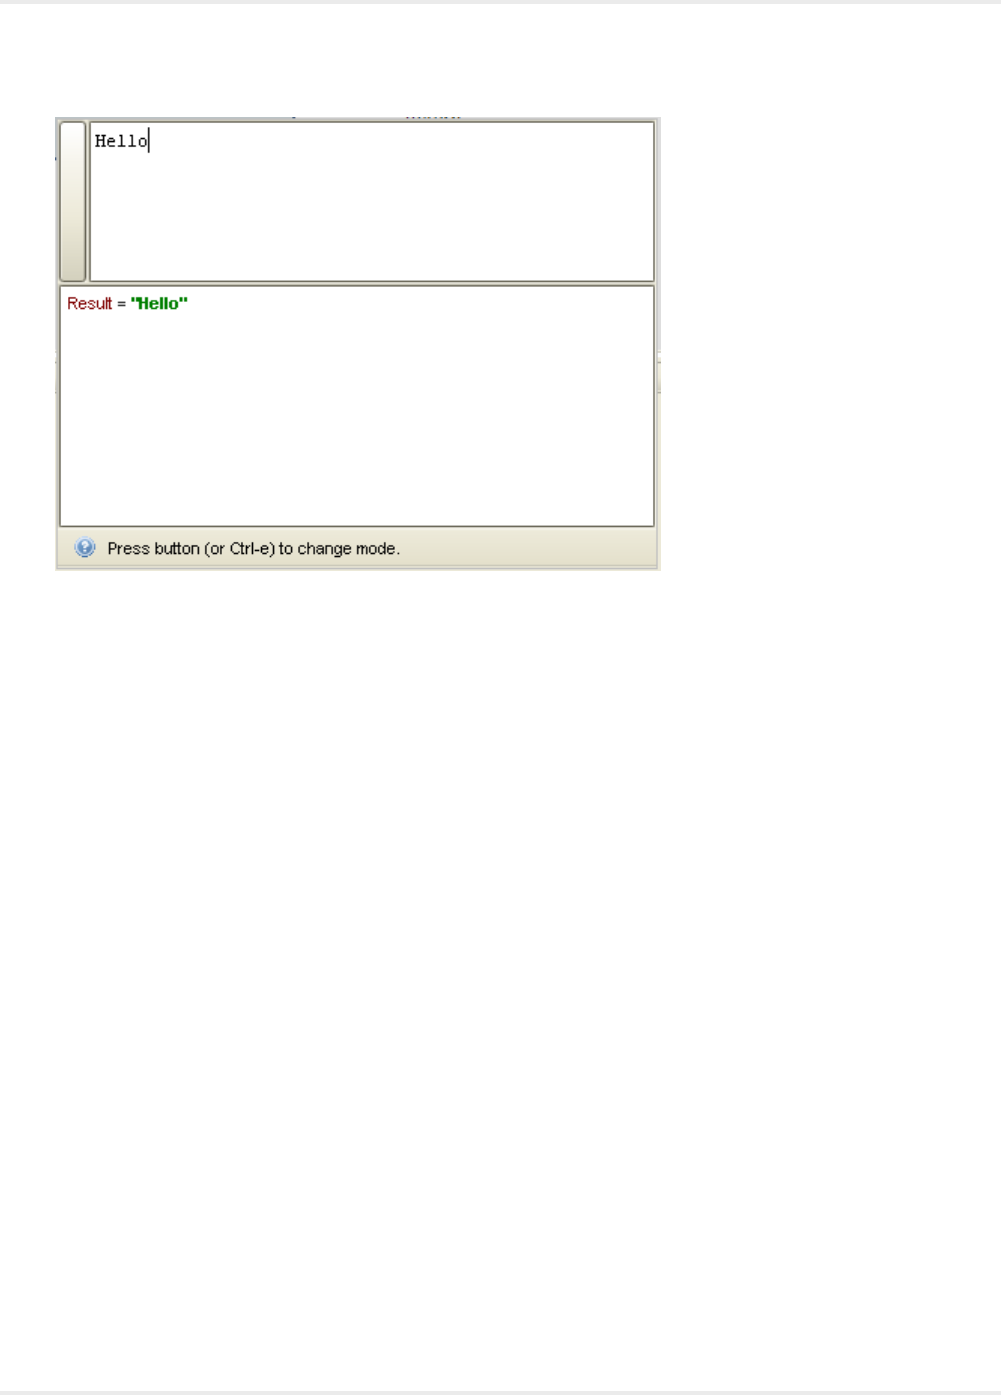
Kofax Kapow User's Guide
Expression Mode
In the expression mode, everything you type in the input pane is interpreted as an expression and
checked for syntax and type errors. If you are editing an expression at the current program point and there
are no errors, it is evaluated and its result is displayed. The evaluation happens while you are typing so
that you always know what the state of your expression is. If you are editing an expression that is not at
the current program point, it is evaluated if it does not contain any variables, that is if its value does not
depend on the current state.
If there is an error during evaluation of an expression, for example divide by zero, the Result pane reports
this by showing the name of the exception and a message describing the issue. You can copy the name of
the exception by right-clicking it and selecting Copy Value.
222
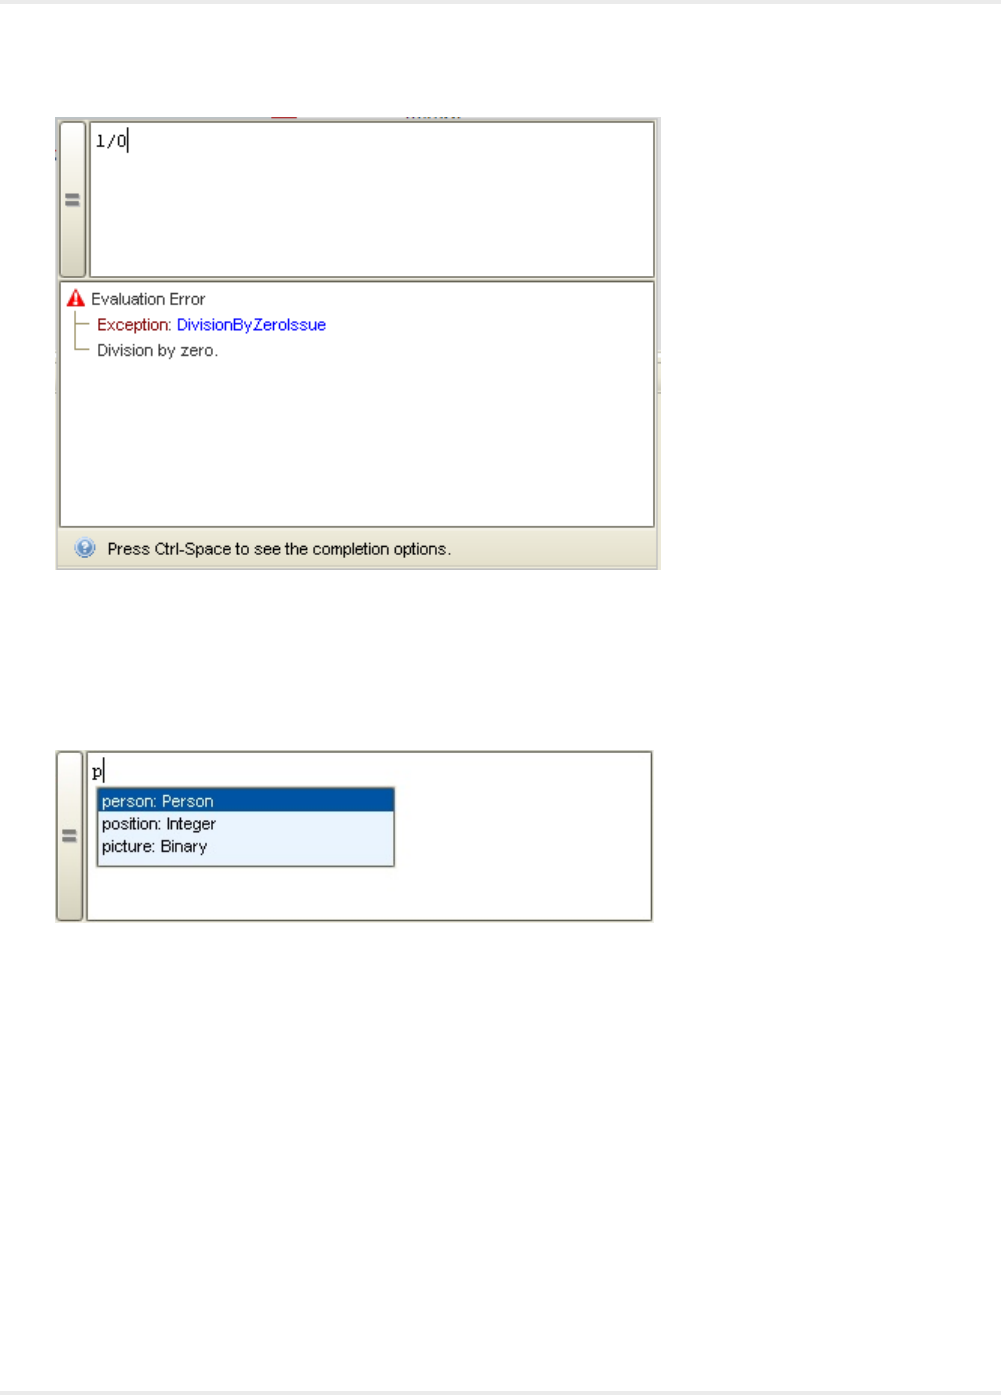
Kofax Kapow User's Guide
Text completion in the expression mode helps entering names of variables, field names, and function
names. The text completion window automatically appears when you type something that has a
completion help. For example, if you start typing a variable name and there is a variable starting with what
you have already typed, the completion window appears. If you press a dot (.) after a variable of record
type, the completion window shows a list of completion options corresponding to the fields of the record
type. The following example shows completion help after typing "p".
If you press a dot (.) after a sub-expression of simple type, the completion window shows a list of
completion options corresponding to the function for which the first argument has the same simple type.
223
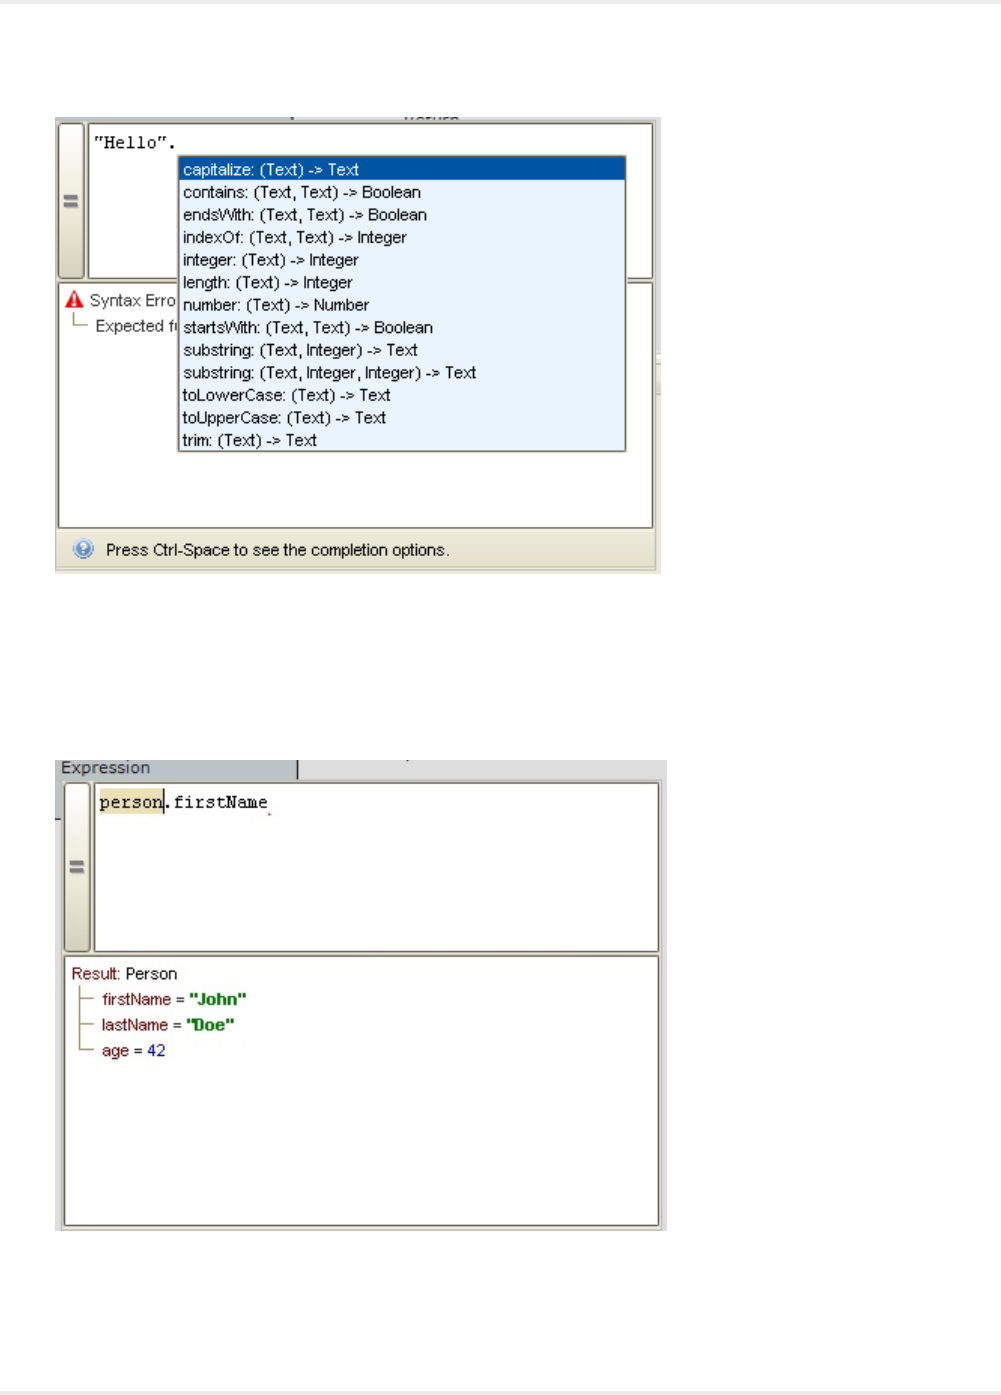
Kofax Kapow User's Guide
To navigate the options in the completion list, use the arrow keys or a mouse. To select an option in the
completion list, press Enter, Tab, or double-click the option. To open the completion window without typing
anything, press Ctrl+Space. To close the completion window, click outside the window or press Esc.
If a part of an expression is selected in the input pane and this selection corresponds to a proper sub-
expression (one that may be evaluated on its own), the value of this sub-expression is shown in the result
pane as in the following figure.
If you select the name of a function in the Input pane, a description of this function is shown in the Result
pane as shown below.
224
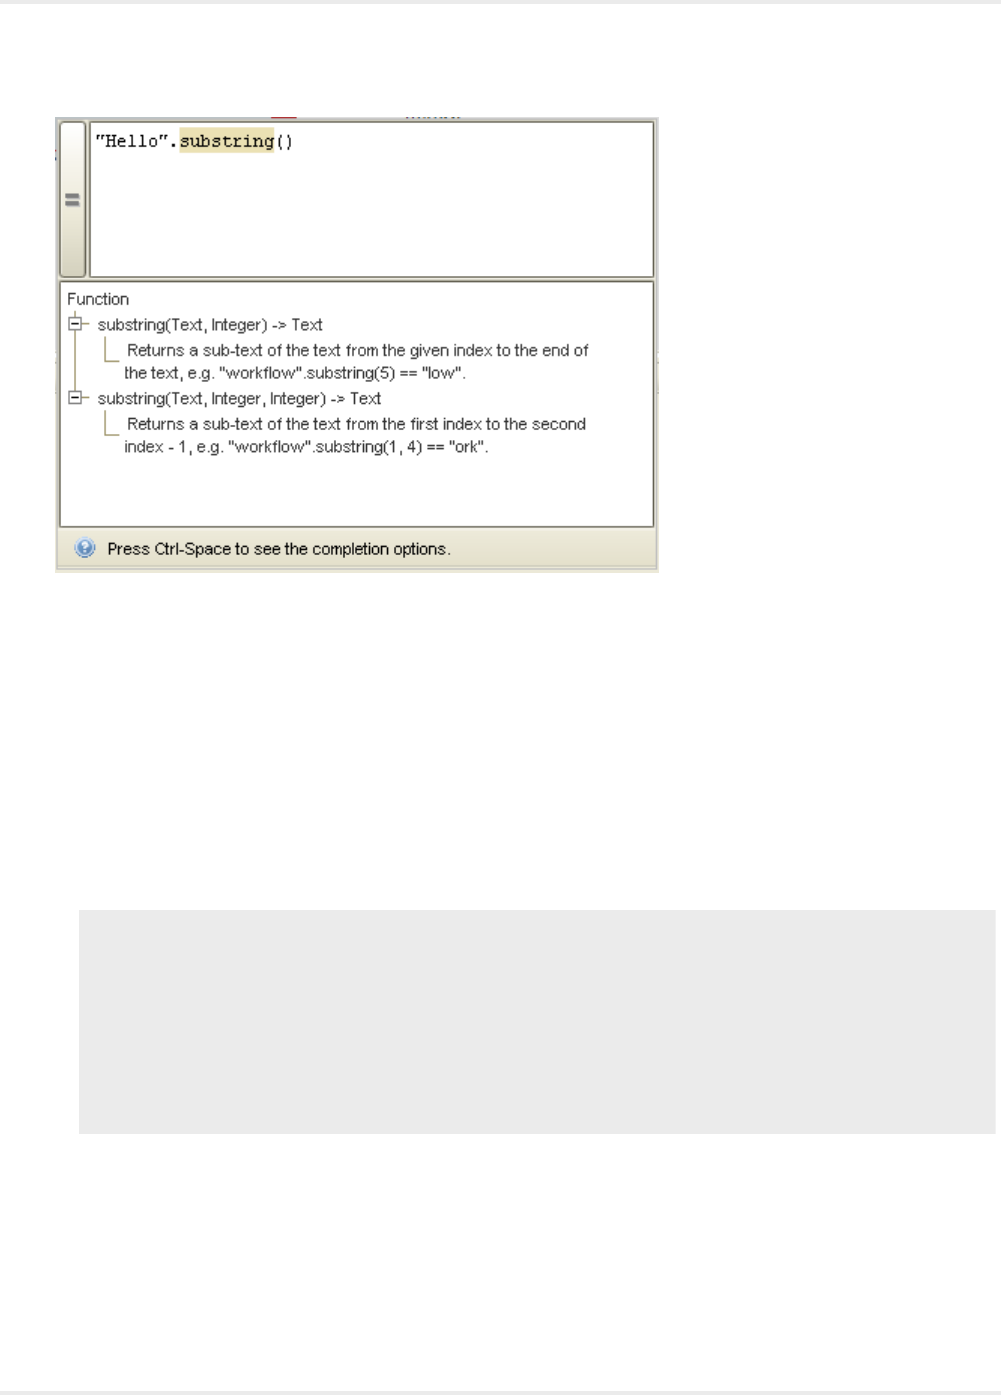
Kofax Kapow User's Guide
Variables in Device Automation
The Device Automation workflow can take input from a website robot and use the same variable types
with some additions.
• You can use a complex variable and its attributes as input to Device Automation workflow.
• You can use all complex types from your project to create Record variables in Device Automation
workflow. Record variables are variables created within the Device Automation workflow.
• You can assign Record variables to each other.
• You can assign attributes of Record variables to values with the same type or to another attributes or
simple variables with the same type.
Note All the shortcut menus in the Automation Device view that use variables let you choose a field
from Record type variables.
For example, the Enter Text Step can get its value from fields of complex variables and if the type
of the selected variable is not text, a conversion function is inserted to convert the value to text.
Variables and fields of types that cannot be converted to text do not appear in the list.
For the extract step you can also extract to fields of complex variables, but the type of the field must
match the type of the extracted data, such as text or binary (for images). Only variables of the correct
type appear on the menu.
• Local variables can be created and used only in Group Steps. If you want your step to use a local
variable, include the step into the group with the local variable.
• Password type variables in Device Automation can transfer their value from and to a password type
variable created in a website robot. You cannot manually assign a value of the password type variable
in the Device Automation workflow.
225

Kofax Kapow User's Guide
The following is a list of variable types available by default with their initial values.
• Binary: Empty
• Boolean: "False"
• Integer: "0"
• Number: "0"
• OAuthCredentials: Empty
• Password: Empty
• Text: Empty
For more information about variables in Kapow, see Variables and Types.
Limits in Numbers
Device Automation workflow and website robots have different number formats. In website robots
the value stored in a variable is a double (binary64 as specified by the IEEE 754 standard). In
Device Automation, variables store numbers in IEEE 754R decimal128 format, which uses 34
decimal digits and an exponent range of −2147483647 to +2147483648 (= 2^31). When storing
values in a Device Automation workflow, rounding may occur and you can expect some loss of
precision. For example, if a number has more than 34 digits and the last one is .5, it is rounded off,
so the .5 becomes .0. For example, 1234567890123456789012345678901234567890.0 becomes
1234567890123456789012345678901235000000. Integers can get large, but the number of significant
figures can only be 34 digits.
You can use numbers up to: 9.9999999999…E2147483647 and numbers as small as 0.1E-2147483646.
They are the largest and smallest numbers that you can convert from Text to Number, such as by writing
“0.1E-2147483646”.number() in an expression. You can get higher numbers using multiplication, but it
might cause an overflow error. The limits for our representation of Numbers gives you the following:
“9.9999999999…9E2147483647”.number() converts to 1.0E2147483648 if there are more than 34 digits
in the number, but 9.9999999999…9E2147483647 if there are fewer than 34 digits.
“0.1E-2147483646”.number() converts to 1.0E-2147483647.
Manage Remote Device
You can perform the following actions using the Device Automation Service shortcut menu.
226
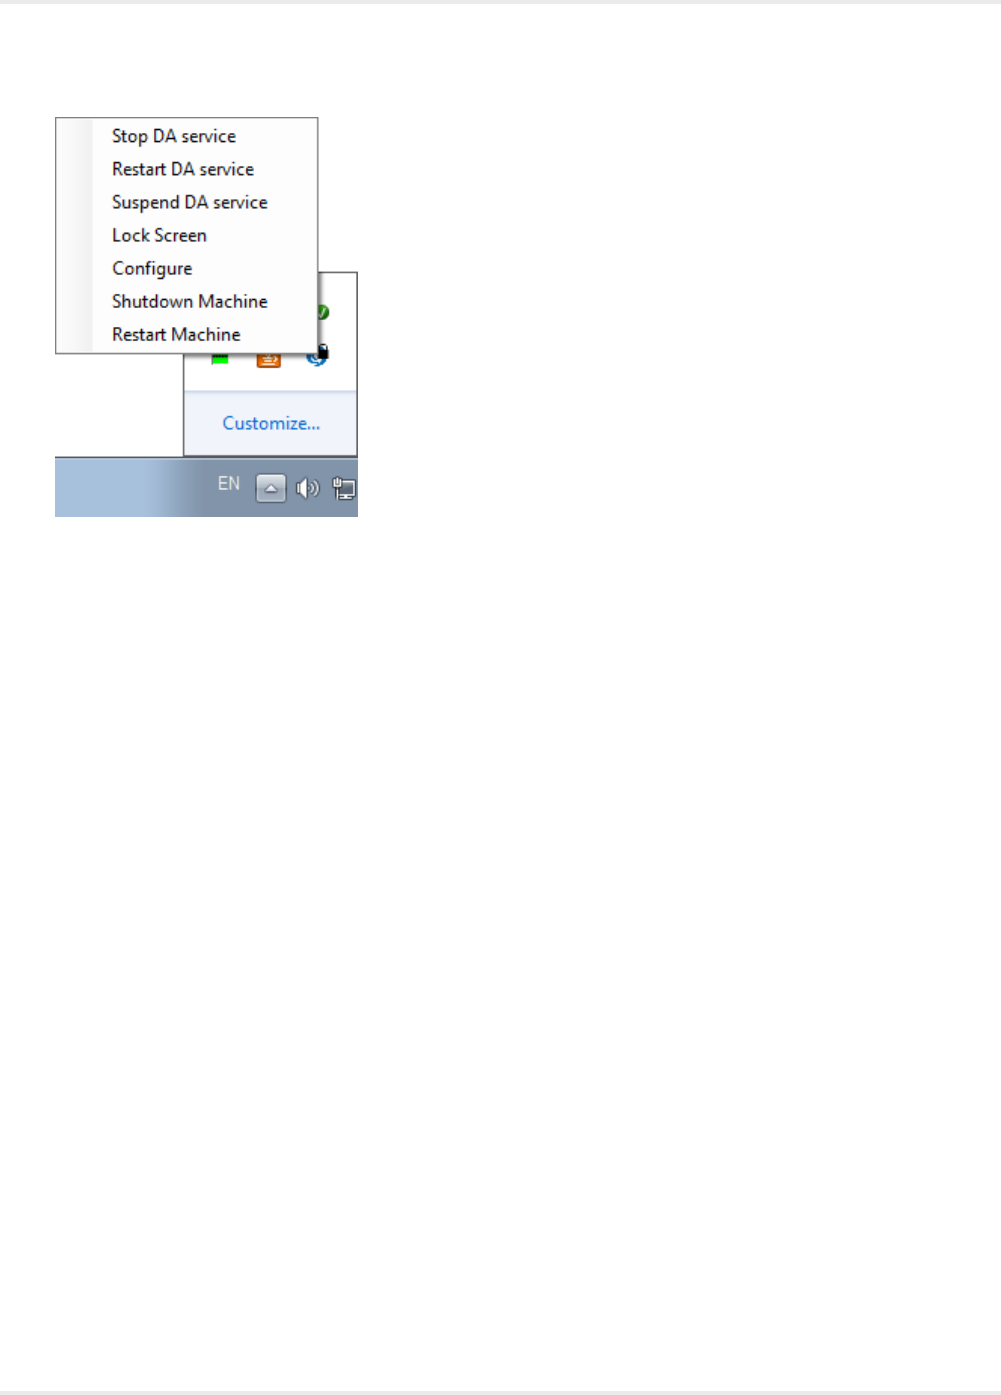
Kofax Kapow User's Guide
Manage the Device Automation Service
The following commands help you manage the Device Automation Service running on a remote computer.
•Stop DA service: Stops the service, which makes the remote device unavailable.
•Restart DA service: Stops and starts the service. A robot or Design Studio loses the connection to the
device and must be reloaded to restore it.
•Suspend DA service: Suspends the device. If suspended, the service is displayed as suspended
in the Management Console. To restore the service operation, a user or an administrator needs to
manually start the Device Automation Service on the device.
Use Lock Screen
In some cases it is necessary to lock computer screens when working with Automation Devices. You
can lock a screen by using the Lock Screen command on the Device Automation Service menu. Before
locking your device screen, make sure the service is running and it is in the connected state. To lock a
screen, right-click the Device Automation Service icon and select Lock Screen.
Lock Screen Usage Prerequisites
To use the Lock Screen feature with Device Automation, your device must meet the following
requirements.
• Remote Desktop connection must be enabled.
• The user under which the Device Automation Service runs must be allowed to connect via Remote
Desktop (as a member of the Admin group or the Remote Desktop group) and use a password.
• The effective group policy of Computer Configuration > Administrative Templates > Windows
Components > Remote Desktop Services > Remote Desktop Session Host > Security > "Always
prompt for password upon connection" must be off.
• Port 3389 must be open.
• The Automation Device cannot be a domain controller.
227
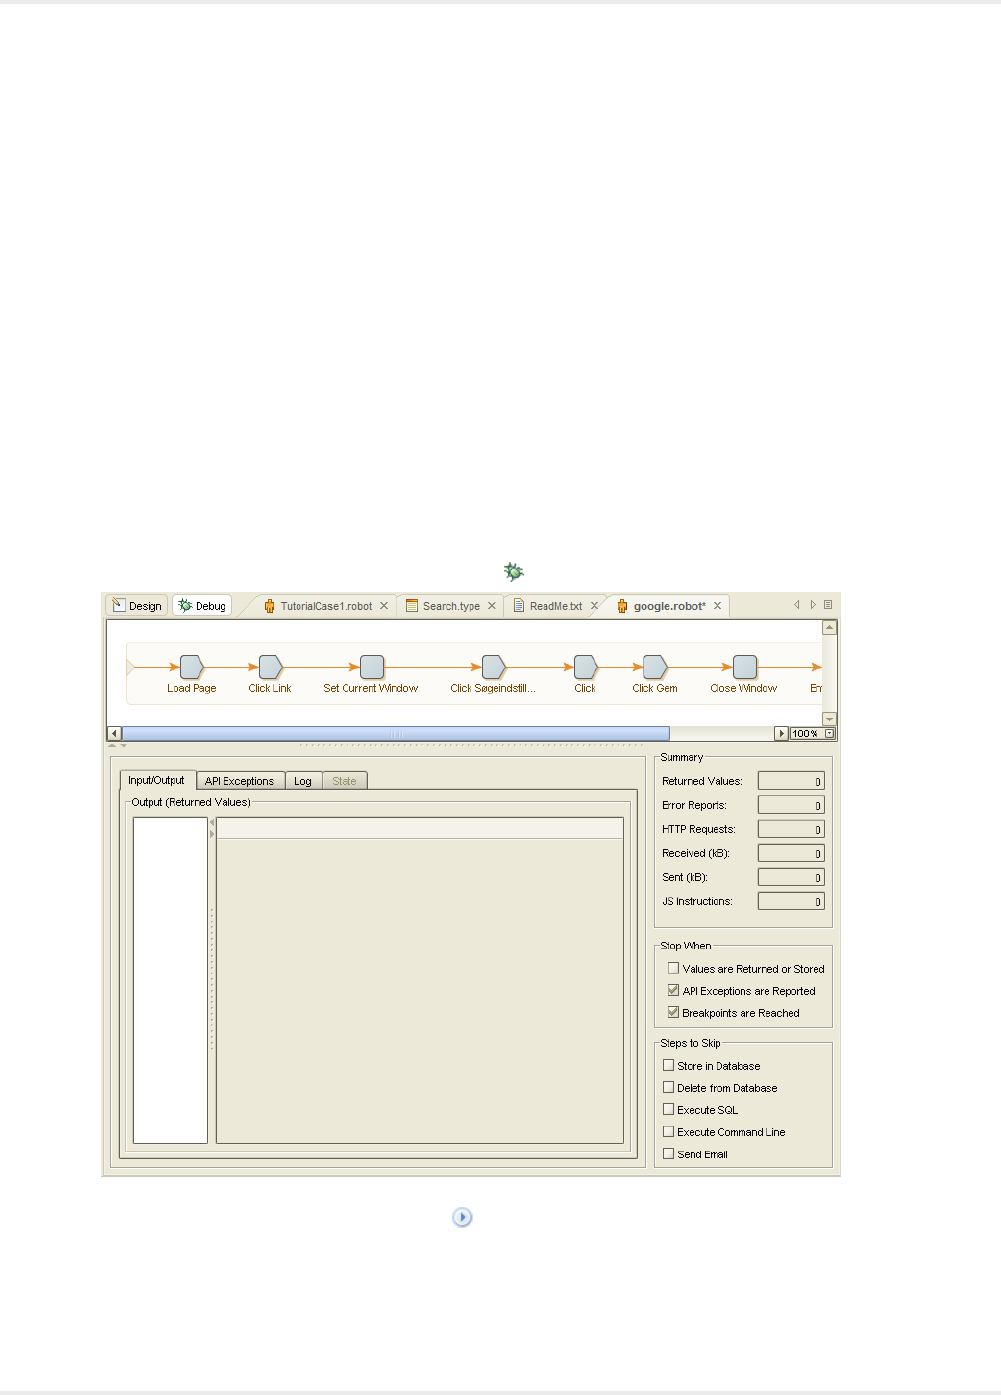
Kofax Kapow User's Guide
Manage the Automation Device
The following shortcut menu commands help you restart and shut down the computer running Device
Automation Service.
•Shutdown Machine: Shuts down the computer.
•Restart Machine: Restarts the computer.
Debug Robots
This section explains how to debug a robot using the debug mode built into Design Studio. To confirm that
the robot does what you expect, use debug mode to execute a robot the same way it will be executed by
RoboServer.
Basic Debugging
1. To switch to debug mode, click Debug Mode or the Debug button in Design Studio.
2. To start debugging the robot, click Play .
3. In the Robot view you can watch the robot execute in debug mode.
You can also watch the results in the main panel.
228

Kofax Kapow User's Guide
In the Input/Output tab:
• The Input panel shows the input variables.
Note If the robot has no input variables, the Input panel is not shown.
• The Output panel shows all values returned so far during the execution.
• The API Exceptions tab shows all API exceptions generated during the execution.
• The Log tab shows what has been written to the log during the execution.
• The State tab shows the robot state, if any.
• The Summary panel (to the right of the main panel), shows a summary of the execution. This
summary contains the number of returned values, the number of API exceptions generated,
statistics on the number of HTTP requests, the amount of sent and received data, and the number
of JavaScript instructions executed.
Note It is important to understand that execution in debug mode is independent of the execution
done in design mode in Design Studio. Therefore, debug mode has its own current step and its
own current robot state, independent of the current step and current robot state in design mode. In
debug mode, the current step is the step that is about to be executed, or is being executed in the
debugging process, and the current robot state is the input to that step.
4. Click Stop to stop debugging.
You can stop the debugging at any time.
5. To stop debugging when a certain event occurs, enter a Stop When action.
Here, you can select whether the debugging should stop when values are returned, when API
exceptions are reported, and when breakpoints are reached.
Of course, debugging always stops when the execution of the robot has completed.
When debugging has stopped, you can see the reason for the stop in the status bar at the bottom of
the Robot Editor.
If the debugging has stopped before the execution of the robot is complete, you can watch the
current robot state in the State tab. The Variables, Windows, Cookies, and Authentications sub-tabs
show the robot state in the same way as in the State View in Design Studio. The API Exception sub-
tab shows the API exception, if the execution stopped because an API exception was reported.
6. If debugging has stopped before the execution of the robot is complete, click Play to resume
debugging.
You can also click Restart to restart debugging. This cancels the current debugging process and
makes the debugger ready to start a new debug operation from the start of the robot.
Note The debugging is also restarted automatically whenever the current robot is modified or
replaced by another robot in Design Studio.
7. If the robot has input variables, you can edit the variables in the Input panel. Press Enter to restart
debugging with the new input values.
You cannot edit the input values while a debug is running. To change the input values, you must first
restart the debugging.
229

Kofax Kapow User's Guide
Debug from the Current Location in Design Mode
1. To start debugging from the current location, in Design Studio, Design Mode, click Return From
Location .
The Robot Editor switches to debug mode and executes, as directly as possible, to the location that
is current in design mode.
When that location is reached, debugging is stopped.
2. Click Play to continue debugging from this location.
This feature is useful to debug a part of the robot, such as a specific branch or a specific iteration of a
loop action.
If Design Studio is already debugging the robot when you click Return From Location , it must
restart the debugging before it executes to the location, and prompts you for permission.
3. Click OK.
Return to Design Mode from a Debugging Location
During debugging, you can return to a location using Go To Design, or GOTO. The following steps
demonstrate returning to Design Mode for both options.
1. When debugging has stopped at some location in the robot, in debug mode, click Go To Design
Location to switch back to design mode at the same location.
This allows you to closely examine that location in design mode, and perhaps modify the steps
around that location, or modify some other part of the robot.
Alternatively, you can switch to design mode and go to the location where a value was returned.
2. On the Input/Output tab, select the value in the Output panel and click Goto in the lower right corner.
This is useful if a value has not been extracted correctly, and you want to find out why.
You can also switch to design mode and go to the location where an API exception was reported, or
where an error occurred.
3. When you view an API exception in the API Exceptions tab or the API Exception sub-tab in the
State tab, click Goto next to the location code to go to the location where the API exception was
generated. Click Goto to the right of a specific error, to go to the location where that error occurred.
This is useful when you want to find the reason for the error and fix the problem.
4. When finished with design mode, you can resume the debugging. If you haven't modified the robot,
you can click Play .
If you have modified the robot, the debugging is automatically restarted, so you cannot resume it
directly. Instead, you can click Debug From Location to start a new debugging session from the
current location in design mode.
Use Breakpoints
While debugging, you can set a breakpoint to make Design Studio stop at a specific step.
1. In the Robot View, right-click a step and select Toggle Breakpoint.
The breakpoint is indicated by the Breakpoint icon in the step.
During debugging, Design Studio stops at the breakpoint.
2. To stop debugging when a certain action takes place, enter Stop When parameters.
230
Kofax Kapow User's Guide
3. Click Play to resume debugging.
4. To remove a breakpoint, right-click the step and select Toggle Breakpoints.
5. To remove all breakpoints from multiple steps, select one or more steps and click Remove
Breakpoints.
All breakpoints are removed from the selected steps.
6. To remove all breakpoints in a robot, click Remove All Breakpoints
All breakpoints are removed from the robot.
Single Stepping
You can use single stepping to execute one step at a time in debug mode. Single Stepping is useful if you
want to examine the execution very closely.
Note You can single-step when Design Studio is ready to start a new debug, or when it has stopped
during a debug.
1. To execute the next step, click Single Step .
When that step has been executed, execution is stopped.
2. Click Single Step again to execute the next step, and so on.
3. To resume normal execution, click Play at any step.
Step Into
1. If you used the Group step to create a group containing several steps, create a breakpoint at the
group step in the same way a step was created at any other step.
• If the group is collapsed using Single Stepping, Design Studio treats the group as a single step
and will not enter any of the grouped steps.
• If the group is expanded, the steps in the group are visited when using single stepping.
• If a group is collapsed, using the Step Into icon, instead of the Single Step icon, it results in
the debugger stepping into the group and visiting each step.
2. To leave the group and advance the debugger to the step following the Group step, click Step Out
.
Design Studio Settings
Use the following tabs on the Design Studio Settings window to set preferences for Design Studio:
•General Settings
•Text Files
•Robot Editor
•Local Databases
•Device automation
•Proxy Servers
•Certificates
231
Kofax Kapow User's Guide
•Bug Reporting
•Management Consoles
General
When you open the Design Studio Settings window, the General tab appears by default. Use this tab to
set general preferences for Design Studio.
The following table describes options on the General tab.
Option Description
When switching to Design Studio Indicates what happens when the user switches to Design Studio.
Maximum number of recent projects Lists the maximum number to include in the local history of recent Design
Studio projects. Users can access the list by selecting File > Recent
projects.
Maximum number of recent files Lists the maximum number to include in the local history of recent Design
Studio files. Users can access the list by selecting File > Recent files.
Reopen projects on startup When selected, the most recent project is reopened when Design Studio
is started.
Show welcome screen at startup When selected, the Welcome screen is shown when Design Studio is
started.
Create backup files When selected, backup files are created whenever a saved file is
changed. Backup file names end with a tilde (~) character.
Text Files
Use the "Text files" tab to set preferences for text files used in Design Studio.
The following table describes options on the "Text files" tab.
Option Description
Default file encoding Specifies the default encoding of text files.
Default line separator Specifies the default line separator in text files.
Default tab size Specifies the default tab stop in text files.
Robot Editor
Use this tab to set preferences for the Robot editor.
The following table describes options on the "Robot editor" tab.
Option Description
Show tooltips on steps When this checkbox is selected, tooltips are shown for robot steps.
Show error handling on steps When selected, robot steps with custom error handling are marked with a
symbol.
232
Kofax Kapow User's Guide
Option Description
Show breakpoints on steps When selected, robot steps with a breakpoint are marked with a symbol.
When the debugger is run, execution is stopped at the step that is marked.
Default zoom factor Lists the zoom factor to apply when robots are opened in the robot editor.
You can manually adjust the zoom factor from the lower right corner of the
robot editor.
Maximum number of open robots Lists the maximum number of robots to open in the robot editor. Upon
attempts to exceed the maximum, the user is prompted to close a robot.
Maximum number of open snippets The maximum number of open snippets in the editor. If the maximum
number of snippets have been opened, the user is asked to select which
snippet(s) to close when attempting to open more snippets.
Source view font Specifies the point size of the text font in the source view (the bottom section
of Design Studio).
Device automation
Use this tab to set preferences for device automation.
The following options are available.
Option Description
Command Time-Out (sec.) Specifies how long the Design Studio must wait for a
reply from a command, such as click or scroll mouse
from an Automation Device.
Local Hub TLS Configuration Settings
See Use TLS Communication for more information.
Use Default TLS Configuration Use files provided by Kapow for TLS communication
between Design Studio and Automation Devices.
Private Key File Path to a private key file used by the local hub that exists
on the Design Studio computer.
Public Key File Path to a public key file signed by the underlying private
key.
Trusted Certificates Folder Folder to store trusted certificates.
Local Databases
Use the "Local databases" tab to create a database in Design Studio. Note that databases created in
Design Studio are only available in Design Studio.
To make the database available both in Design Studio and on the server, the databases must be
configured in the Management Console.
A list of created connections are shown in the left pane. You can create new connections, remove
connections, or change their order using the buttons below the list. The currently selected connection is
configured in the right side of the "Local databases" window. The field name, host, type and schema are
mandatory and must be specified.
233
Kofax Kapow User's Guide
The different database types are defined in the Management Console and automatically distributed to
Design Studio at startup. New database types must be created in the Management Console.
Option Required Description
Name Yes A name for uniquely identifying the database in Kofax Kapow. The name is used
for internally referencing the database and it may only contain alphanumeric
characters and underscores.
Host Yes The host name of the database server. This can be an IP address, or the fully
qualified domain name, such as myhost.kapowtech.com.
Type Yes The type of database, such as Oracle. The different types of databases are
configured in Management Console and provided automatically at Design Studio
startup.
Schema Yes The name of the database schema (or catalog).
User Name No The user name for the database.
Password No The password for the database.
Max Active
Connection
Yes The maximum number of concurrent connections to the database that Kofax
Kapow (RoboServer or Design Studio) create. The connections are managed
by a connection pool, which means that existing connection is reused before
creating new connections.
Max Idle Connection Yes The maximum number of idle connections allowed. If more connections are
created due to a heavy load, they are closed automatically when no longer
needed.
To test the current connection, click Test Connection.
Note This will only test the connection to the database; it will not test that you have the proper
permissions in the database.
Connecting to Oracle: If you are using an Oracle database, In the Username field, you must enter a
username and a role. For example, if the username is "sys" and the role is "sysdba," you should enter
"sys as sysdba" in the Username field.
Proxy Servers
Use the Proxy Servers tab to specify the number of proxy servers that can be used by Design Studio.
The following table describes options on the "Proxy servers" tab.
Option Description
Use Proxy Server When selected, the use of a Proxy Server is enabled.
Host The host name of the proxy server, which can be an IP address, or the fully qualified
domain name, such as myproxy.kapowtech.com.
Port Number The port number on the proxy server. Leave this blank to use the default proxy server
port 8080.
User Name The user name to use if the proxy server requires a login.
Password The password to use if the proxy server requires a login.
234
Kofax Kapow User's Guide
Option Description
Excluded Hosts Here, you can specify a list of host names that the proxy server should not be used
for. Specify one host name per line. Each host name can be an IP address or a fully
qualified domain name, such as www.kapowtech.com.
Use the Import button under the proxy server list to import a list of proxy servers. The file may hold an
arbitrary number of proxy server definitions, each of which must comply with the following format:
proxyName.proxyServerUse = true
proxyName.proxyServerHost = host name or IP address
proxyName.proxyServerPort = port number
proxyName.proxyServerUserName = user name
proxyName.proxyServerPassword = password
proxyName.proxyServerExcludedHostNames = list of hosts
Where proxyName is a name to identify a particular proxy server. Each proxy server must have its own
unique proxyName.
When multiple proxy servers are specified, a new proxy server is selected every time a robot is run.
You can also specify a proxy server for an individual robot. This is done when you configure the robot
in the Robot Configuration window in Design Studio. Such a proxy server overrides the proxy servers
specified here. See Configuring Robots for more information. Furthermore, the proxy server is changed
during robot execution with the Change Proxy action.
See Using Proxy Services for more details.
Certificates
Use the Certificates tab to specify whether a robot should verify the identity of a web server that it
accesses via HTTPS. Such a verification is routinely (and invisibly) done by ordinary browsers to detect
phishing attacks. However, the verification is often not necessary when robots collect information,
because the robots only access the web sites that they have specifically been written for. Thus the
verification it is not enabled by default.
Verification is done in the same way a browser performs verification.
The web server's certificate is checked based on an installed set of trusted HTTPS certificates similar to
those you can configure in a browser. See the Kofax Kapow Developer's Guide for more information about
HTTP certificates.
The following table describes the options on the Certificates tab.
Option Description
Verify HTTPS Certificates When selected, a robot verifies a web site's certificate when accessing it over
HTTPS. Verification is done based two sets of trusted certificates: the set of root
certificates and an additional set of server certificates.
HTTPS Client Certificates A list of client certificates that the robots can use. Use the buttons under the list to
add or remove certificates.
235
Kofax Kapow User's Guide
Note that root certificates are installed with Design Studio just as root certificates are installed with your
browser. They are found in the Certificates/Root folder in the application data folder. See the Kofax Kapow
Installation Guide for more information.
Some HTTPS sites may use certificate authorities that are not included by default. In this case, you need
to install the appropriate certificates for Design Studio to load from these sites. Most often, these would be
installed in the Certificates/Server folder in the application data folder.
For the purpose of handling HTTPS sites, it does not matter whether you add certificates to the set of root
certificates or the set of server certificates.
To install a certificate, you need to obtain the certificate as a PKCS#7 certificate chain, a Netscape
certificate chain, or a DER-encoded certificate. You install the certificate by copying it to one of the folders
mentioned above. The name of the file containing the certificate does not matter.
Bug Reporting
Use the Bug Reporting tab to set preferences for emailing bug reports related to internal Design Studio
errors. When an internal error occurs in Design Studio, the user can send a bug report with details about
the error. The user can also send a bug report manually, by selecting the Report Bug action from the Help
menu.
Users are generally encouraged not to change the default settings on this tab unless absolutely
necessary.
Option Description
Mail server Lists the mail server to use when sending bug reports.
Send email to Lists the email address to which bug reports should be sent.
Management Consoles
Use the Management Consoles tab to configure connection settings to Management Consoles. The
URL must be unique, but you can configure several connections to the same Management Console
with different protocols, user names and passwords. The first time you start Design Studio and specify a
license server, that server is automatically added to the list of Management Consoles.
Name
Name of the Management Console.
URL
A URL to connect to the Management Console. Specify the protocol by typing either HTTP or HTTPS and a
port number. For example, http://localhost:50080/. You can also use an IP address in this field.
User Name
The user name required to access the Management Console, if any.
Password
The user's password, if any.
Show DB warnings
When selected, database warnings, such as missing tables, are shown at the top of the robot editor.
236

Kofax Kapow User's Guide
Accept JDBC drivers
When selected, JDBC drivers are distributed from Management Console to Design Studio. Users should
rarely need to disable this option.
Use as Password Store
Select to use the current Management Console as a password store. This option affects where the Lookup
Password step acquires authentication information.
237

Chapter 4
Management Console
The Management Console is a web-based interface providing point and click monitoring and management
of the Kapow platform servers.
In the Management Console, you can:
• Enable collaboration and sharing using the repository.
• Manage user roles and permissions, and centrally administer the solution.
• Schedule robots from the repository.
• Browse extracted data and export to MS Excel.
• Access detailed logs of production results and errors.
• Monitor RoboServer health and resource usage in a graphical dashboard.
• Configure clusters of multiple RoboServers.
• Deploy robots from Design Studio to the repository.
• Run Kapplets.
Before proceeding, you may want to take the Management Console Beginner's Tutorial.
Introduction to Management Console Structure
The Management Console is divided into five functional areas.
Dashboard
The Dashboard gives you a quick overview of the Management Console. The information is presented
through portlets, which show the health of your RoboServers, schedules, and robots.
Kapplets
A Kapplet is a web-based user interface used to run a robot without any programming.
Schedules
A schedule is a plan for running one or more robots, typically at pre-planned points in time and in a
repeating fashion. A schedule does not run robots itself; it merely provides the plan for when the robots
should be run (which is done by passing them to the configured servers).
Repository
Robots, type definitions and resources can be uploaded from Design Studio to the Management Console
repository or uploaded manually through the web interface of the Management Console. Uploaded robots
can be executed as part of a Schedule or through client code that executes robots using the Kapow Java
or C# APIs. You can also use the APIs to programmatically query or update the repository.
238

Kofax Kapow User's Guide
Data
The Data View allows you to see the data your robots have stored in databases or to export this data to
Excel or XML.
Logs
Use logs to view the execution history of your schedules. If database logging is enabled, you can also
view the RoboServer logs which contain details of every robot execution.
Admin
Use the Admin section to configure settings for the Management Console. It also enables you to
manage the clusters of RoboServers and their settings, as well as manage projects and permissions.
This is also where you configure the license and create/restore backups.
Note Some features such as High Availability may not be available, depending on your license key.
Naming Policy
Note the limitations when using "." in file names:
• It is not possible to upload files and create folders starting with “.”.
• It is not possible to create a database (under cluster) and a database mapping (under project) using a
name starting with ".".
Start the Management Console
The Management Console component is an optional part of a RoboServer. You start the Management
Console by starting a RoboServer and instructing it to function as a Management Console, it may still
also run the RoboServer functionality. For information on starting and using a RoboServer, see the Kofax
Kapow Administrator's Guide.
A RoboServer with Management Console functionality may be started with the Start Management
Console item in the Start menu (on Windows). On Linux and Unix variants, you can use the command
line:
RoboServer -MC
This starts a RoboServer as Management Console only, and thus is not capable of running any robots.
The Management Console's web interface is accessible by connecting to the port configured in Settings.
See the "RoboServer Configuration" in the Kofax Kapow Administrator's Guide for more information
on Configuring the Embedded Management Console. If you start the Management Console this way, it
cannot be restarted or shut down via Control Center or the ShutDownRoboServer program.
You can also use the following command to start the Management Console:
RoboServer -p 50000 -MC
This starts a RoboServer listening on a socket at port 50000, and providing Management Console
functionality via a web interface on a configured port (the port is configured in Settings).
239

Kofax Kapow User's Guide
Regardless of how the Management Console is started, a license key must be entered into the web
interface before it can function as a license server for RoboServer and Design Studio instances.
For production scenarios, we recommend that you start one RoboServer with the Management Console
but not add that RoboServer to a cluster. That way, you prevent Management Console starvation that
may occur if it is denied access to resources that are in use by the RoboServer. After setting up the
RoboServer running the Management Console, you can start as many RoboServers as you like using the
parameter -p 50000. These are the only RoboServers that should be added to the RoboServer Clusters
on the Clusters tab.
Management Console Configuration and User Interface
The Management Console has a web-based user interface, which makes it easy to access from any
machine on the same network. If it is installed on the machine named hostname, you simply need to point
your browser to:
http://hostname:50080
The port number 50080 is configurable as described in "Configuring the Embedded Management
Console" in the Kofax Kapow Administrator's Guide.
Use the tabs at the top of the window to navigate within the Management Console.
Most subsections of the Management Console display items of a certain type in a table. When there are
many items to display, they are divided into pages. The Schedules per page setting can be used to select
how many items (schedules in this case) to display at the same time. Please note that this number does
not adapt automatically to the height of the browser window. Thus empty space below the table does not
always mean that you are seeing the last items - it may also mean that the "per page" setting is too low
compared to the window height.
At the bottom of the table you can navigate between the individual pages of display, thus moving upwards
and downwards within the same table. The button refreshes the display.
The tables support sorting. Click any column heading to sort by that column. Click the same column
heading again to reverse the sorting order. Sorting is performed on the whole table, not on each page
individually. Thus if you have more than one "page," you may see a completely different set of rows if you
change the sorting order.
Starting from Kapow version 10, all RoboServers must auto register to the Management Console.
Therefore, the URL and credentials for the Management Console along with the cluster name must be
specified when starting the RoboServer (either at the command line or using the RoboServer Settings
application).
Dashboard
The Dashboard contains portlets which display the status of various areas of your system. When you first
access the dashboard it will contain four portlets; add additional portlets to the dashboard by selecting
them from the list, and pressing the Add button.
240
Kofax Kapow User's Guide
If you have a large screen, you may benefit from selecting to display the portlets in 3 columns rather than
2. Each portlet contains a toolbar with four buttons.
The first button minimizes the portlet, the second refreshes the portlets data, the third displays info about
the portlet, the fourth closes the portlet (it may be added again). Whenever you add, remove, or rearrange
any of the portlets on the dashboard, the layout is stored in a cookie inside your browser so that the next
time you visit the dashboard, your previous layout is restored.
To get more information, point to the datapoint on a graph. You can see the time and value of the
datapoint as well as the name of the series, such as the RoboServer name.
The dashboard contains the following portlets:
Most Errors, by Robot - last 100 runs
The graph shows the 100 latest runs for the 10 robots with the most errors (relative to extracted values).
You can click a point on the graph, and the Management Console will switch to the log view, and display
the information for this particular run. Notice that the Y-axis is logarithmic. For this graph to work you must
enable database logging on at least one cluster.
Summary, last 24 hours
Displays a summary for each project in the Management Console. Use this view to see the 20 most recent
executions of each schedule. The health bar gives a quick overview of the status of each project and
schedule. Each color on the health bar denotes the status of the schedule execution:
Red
Indicates that at least one schedule error occurred. A schedule error is any non-robot error that
occurred during the execution of the robot.
Orange
Indicates that at least one of the robots that executed in this schedule gave an error (and that there
were no schedule errors).
Yellow
Indicates that the schedule was ignored because it was already executing.
Green
Schedule executed successfully; no schedule errors or robot errors.
The size of each color on the health bar is relative to the number or schedule runs with the given status.
RoboServer memory usage
Displays the memory usage over time (last 55 hours) for each RoboServer listed on the Clusters Tab
241

Kofax Kapow User's Guide
RoboServer CPU usage
Displays the CPU usage of the RoboServer process. If you have multiple RoboServers, there will be a
graph for each one.
RoboServer KCU usage
Displays the KCU usage of each of the RoboServers.
RoboServer Wait Time
The time a RoboServer has waited for KCU to become available. If there is any wait time, the
performance of you robots can be increased by acquiring a license with more KCUs.
Total bytes loaded
Displays the total bytes loaded (last 55 hours) for each RoboServer listed on the Clusters tab. The graph
resets at midnight.
Total executed robots
Displays the number of executed robots (last 55 hours) on each RoboServer listed on the Clusters tab.
The graph resets at midnight.
Concurrent robots
Displays the number of concurrent robots for each RoboServer listed on the Clusters tab. The graph
resets at midnight.
Total HTTP requests
Displays the total number of HTTP requests loaded by each RoboServer listed on the Clusters tab. The
graph resets at midnight.
Records in Log Database
Displays the number of records for "Robot run," "Robot message," "Schedule run," and "Schedule
message" in the log database (make sure to configure the log database in Admin > Settings tab. See
Logs for more details).
Records in Analytics Database
Displays the number of records for all RoboServers.
Note The availability of the Analytics functionality depends on the license.
Kapplets
In the Management Console, Kapplets are separate entities you can manage on the Kapplets tab.
Select this tab to view the subsections.
KappZone
View all Kapplets you are currently allowed to use. From here you can install Kapplets to be available in
My KappZone. See Invoking Kapplets.
242
Kofax Kapow User's Guide
Repository
View a list of currently defined Kapplets . Here you can view, delete, and edit Kapplet definitions. To create
new Kapplets, open the Kapplets User area. See Creating Kapplets.
Branding
Kapplet Administrators use the Branding tab to customize the basic appearance of Kapplets. See
Customizing Kapplet Branding.
Note Not all Management Console users can use or administer Kapplets. Rights are assigned in the
project Permissions tab. Note that security options are not as strict for the Standard edition, which gives
all users permission to view and edit Kapplets.
See Kapow Kapplets for information about building and using Kapplets.
Schedules
The Schedules subsection enables you to manage the schedules on this Management Console. A
schedule denotes a selection of robots and plans for running them. Running the schedule means running
the selected robots (in parallel or sequence) optionally executing pre- and post-run scripts or robots.
The following information is displayed for each schedule in the list of schedules. The information is
presented in columns. Some of the columns are hidden by default, and can be shown by clicking the down
arrow on the column header, and selecting the columns.
Column Description
Active When Active, the schedule runs as planned. You may want to make a schedule
inactive for several reasons, such as:
• Because the function performed by the schedule currently is not needed.
• Because errors have been found in the robots and you don't want the
schedule to run before you have fixed these errors.
• Because you want to trigger the schedule manually each time it should run.
This may be appropriate for some robots and schedules, for example for
preparation or clean-up tasks.
Name The name of the schedule.
Project Name The name of the project that the schedule belongs to (useful when the 'All'
project is selected).
Robot count A combination of total and active robots. If all robots are active it will simply list
the number of active robots; if 2 of 3 robots are active it will list 2 (3).
Total robots (hidden by default) The total number of robots in the schedule. (To see the robots, edit the
schedule as described below.)
Active robots (hidden by default) The number of active robots in the schedule. (To see the robots, edit the
schedule as described below.)
Next Run The time when the schedule is planned to run next.
Previous Run The time when the schedule was last run.
Interval The planned interval between two consecutive runs of the schedule.
Total Runs How many times the schedule has been run.
243

Kofax Kapow User's Guide
Column Description
Created By (hidden by default) The name of the user that created this schedule.
Modified By (hidden by default) The name of the user that last modified this schedule.
Object DB (hidden by default) (The Object DB is a legacy feature, and used with collection robots prior to
version 7.2.)
The name of the database to store values extracted by this schedule's robots.
When not empty, a Database Storage Environment is passed along with the
robots to RoboServer.
RoboManager DB (hidden by
default)
(The RoboManager DB is a legacy feature, and used with collection robots
prior to version 7.2.)
The name of the database to store log information data about robots run
via this schedule. When not empty, a Database Robot Info Environment
and a Database Message Environment is passed along with the robots to
RoboServer.
Cluster (hidden by default) The cluster that the schedule executes on.
Delete Click this button to delete the schedule.
Edit Click to edit the schedule or to view more details on a specific schedule. You
can also edit a schedule by double-clicking the row.
Run/Stop Click to manually run the schedule. This is especially useful for inactive
schedules.
If the schedule is already running, it will be stopped. That is, all its running
robots are stopped as quickly as possible. The schedule is displayed as
"running" until all its robots stop executing.
Errors The number of schedule errors during the last run of the schedule. Schedule
errors do not include robot errors. Schedule errors prevent the schedule from
running, such as a deleted cluster or errors in pre- or post-processing.
Note To see Errors (and Robot Errors), make sure the log database is set
up in the Management Console settings (see Settings->Log Database)
and that database logging is enabled on the RoboServers via the logging
cluster settings. For more information, see Logs.
Robot Errors The number of robot errors that occurred in robots run by this schedule.
To create a new schedule, click Add above the list of schedules. If the current project selection is All,
when clicking the Add button, you have to select an actual project before you can add a new schedule.
To copy an existing schedule, right click a schedule and select Create Copy.
Clicking in the "Edit" column or double-clicking anywhere in the row for an existing schedule brings up
the "Edit Schedule" dialog box, which is useful for changing the schedule or viewing all details about it.
244
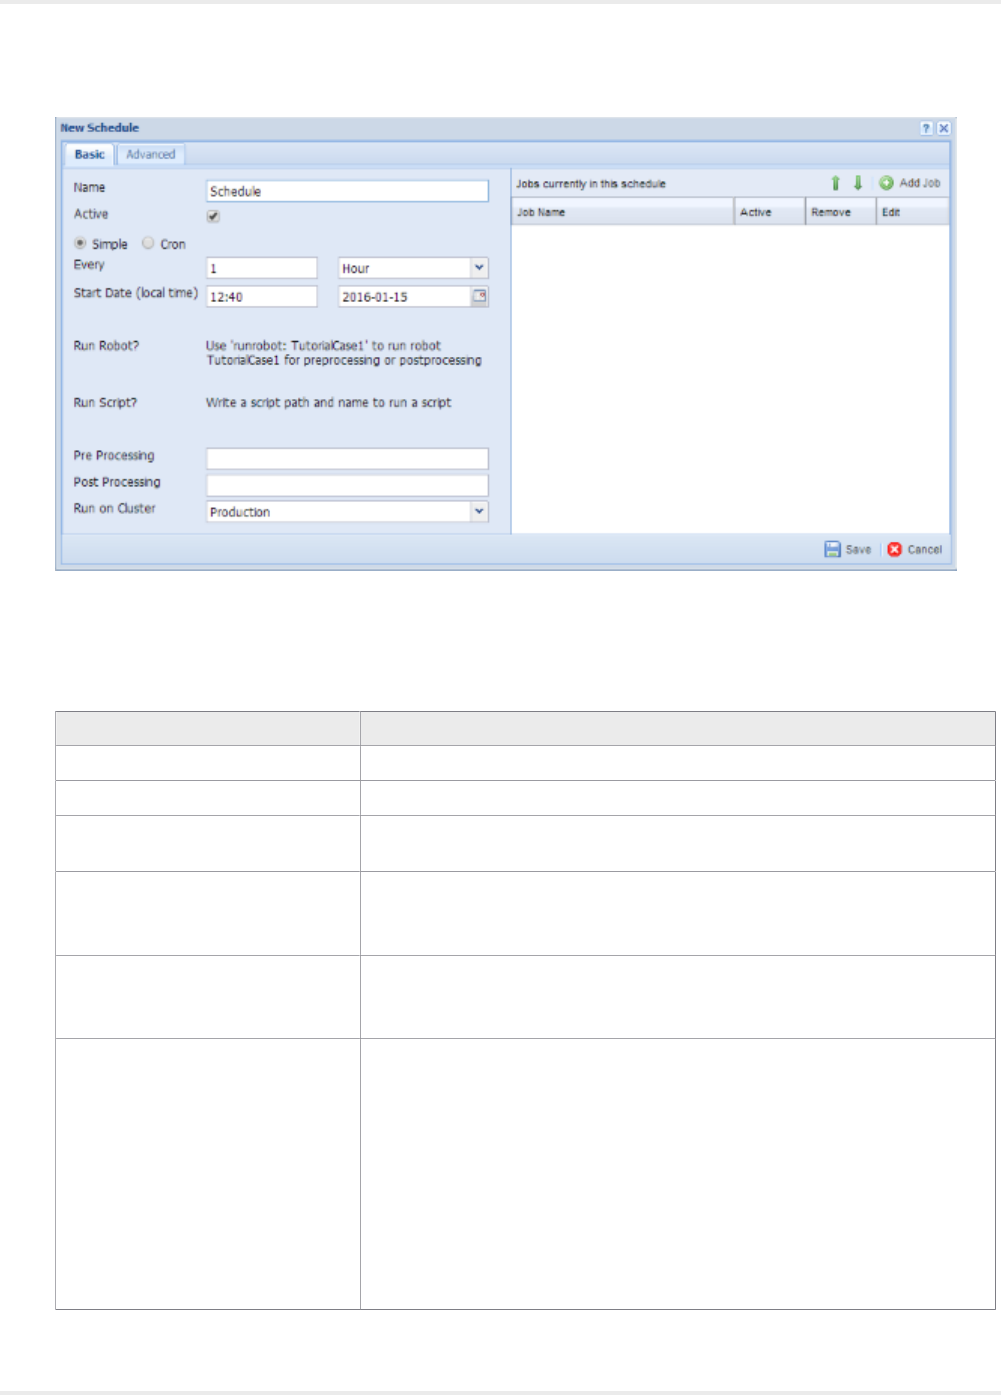
Kofax Kapow User's Guide
The dialog box contains two tabs: "Basic" and "Advanced". The Basic tab contains everything necessary
for setting up a normal schedule. On the Advanced tab you can configure runtime constraints.
The following information can be configured for schedules:
Field Description
Name The name of the schedule.
Active An active schedule is marked with a check mark.
Simple / Cron Used to select between two different ways of defining the time plan for a
schedule.
Every (Available only for Simple schedules.)
The desired time interval between two consecutive runs of the schedule. This
is entered as an integral number with a unit, such as "1 minute" or "3 hours".
Pattern (Available only for Cron schedules.)
A pattern defining when the schedule should be run. See Cron Schedule for
details of the format.
Pre-processing The name of a script or robot that will be run as part of the schedule, before
any other robots are run.
• To run a script, the "Allow File System and Command Line Access" must
first be enabled in the RoboServer settings. These settings are found in the
installation folder or from the start menu on Windows. The script file can
be a windows .cmd or a Linux.sh file. The field must contain the absolute
location of the file, such as c:\scripts\truncatedb.cmd. You
must remember to copy the scripts when importing projects or restoring
backups.
• For a robot, use for example runrobot: TutorialCase1 to run the
TutorialCase1 robot from the repository.
245
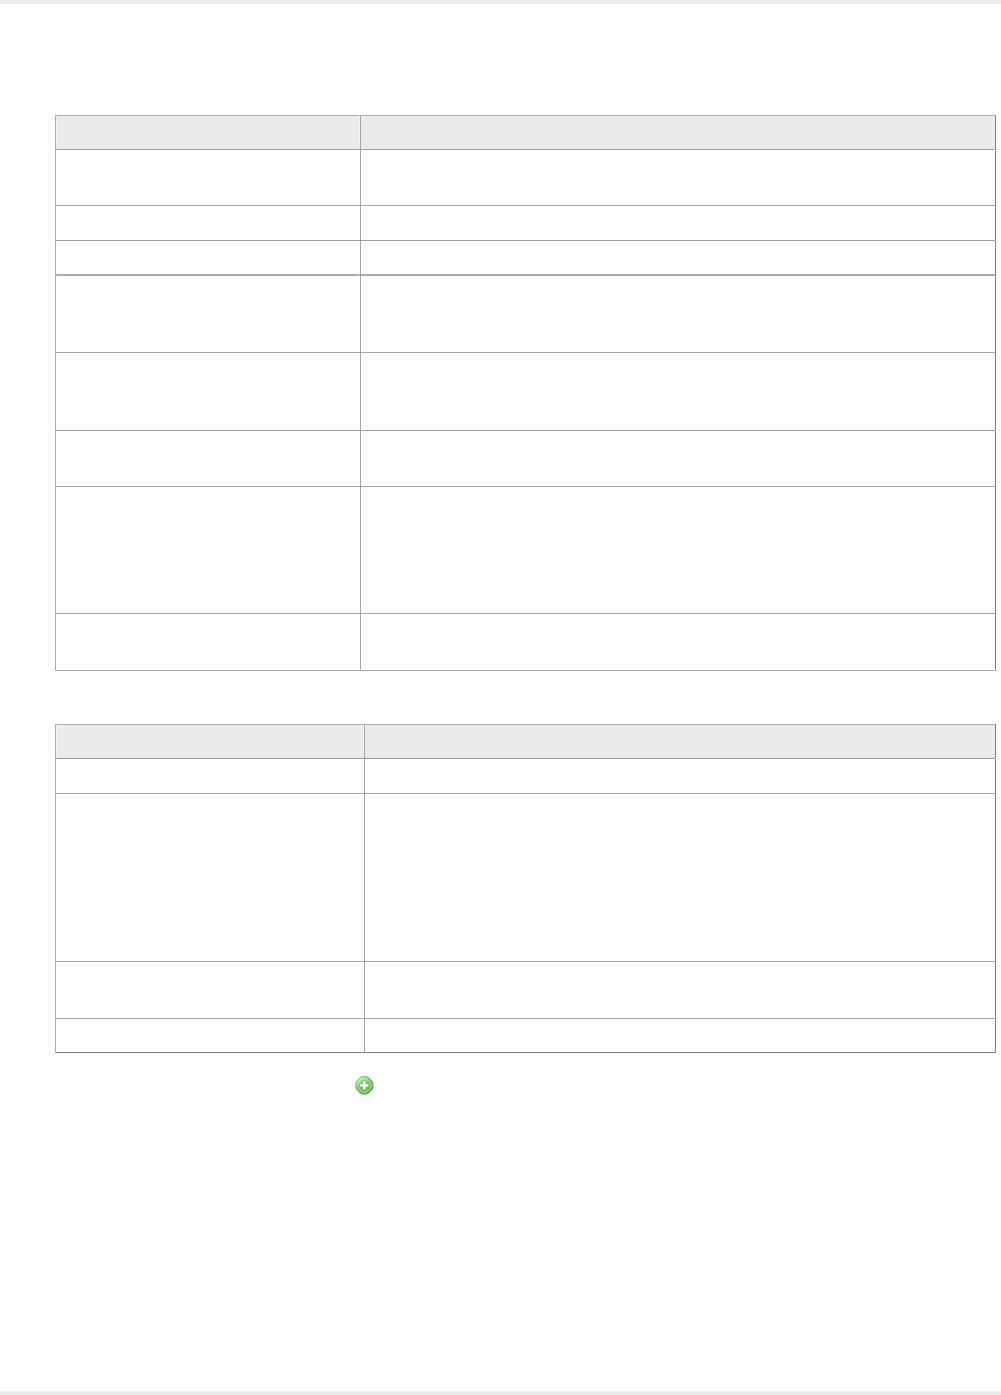
Kofax Kapow User's Guide
Field Description
Post-processing The name of a script or robot to run as part of the schedule, after all other
robots have been run. See pre-processing above for details.
Run on cluster The name of the cluster to run this schedule on.
Robots (to the right) See the table with a list of jobs below.
Execution Time Limit (Advanced
tab)
Set the maximum execution time for each robot in the schedule. When a robot
has executed for this period of time, the server will stop it, and an error will be
logged.
Extracted Values Limit (Advanced
tab)
Select the maximum number of values each robot may output. If the robot
outputs more than this number of values, the server will stop it, and an error
will be logged.
Run robots sequentially (Advanced
tab)
If checked, the robots will execute in the order listed on the basic tab.
Use Email Notification (Advanced
tab)
Check to receive an email whenever a robot fails. If several robots in a
schedule fail, you will get one email for each robot each time the schedule
runs.
Email notification works only if you configure an SMTP server in the Options
Tab and enter the desired email addresses in the following field.
Email Addresses (Advanced tab) A comma-separated list of email addresses to which notifications are sent.
The first listed address is used as both a sender and receiver address.
On the right-hand side you see the list of jobs that will run when the schedule triggers.
Column Description
Job Name The display name of the job. This is selected when the job is created.
Active When Active, the job runs when the schedule is run. You may want to make a
single job within a schedule inactive for several reasons, such as:
• Because the function performed by the job currently is not needed.
• Because errors have been found in the robots and you don't want the
schedule to run before you have fixed these errors.
• Because you want to trigger the job manually each time it should run.
Remove Click to remove the job from this schedule. This will not delete any robots
referred to by the jobs.
Edit Click to edit the job.
To add jobs to the schedule, click Add Job in the upper right-hand corner. This will open a wizard that
will take you through the steps of creating a job.
The Help button in the upper right-hand corner of the Schedules tab opens the Management Console help
in your browser.
Alternate schedule creation
It is also possible to create a schedule from the Robots Tab. This is done by selecting any number
of robots, right-clicking and choosing Create Schedule from the context menu. This opens the New
Schedule window with the robots already added.
246
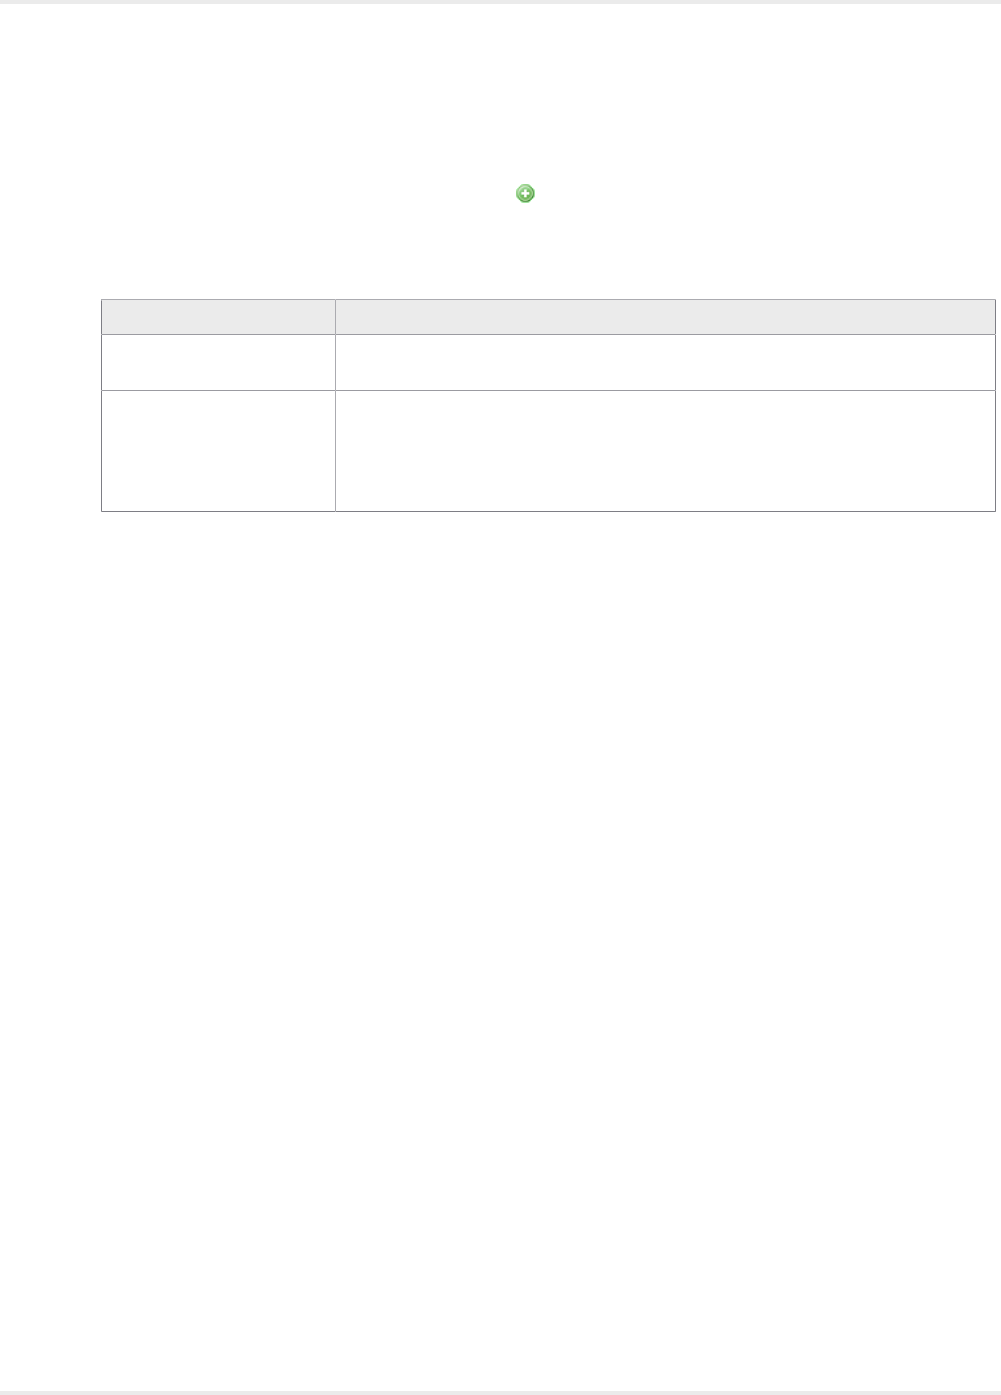
Kofax Kapow User's Guide
Add Jobs
1. On the New Schedule window, Basic tab, click Add Job.
A wizard appears to guide you through the job creation.
2. On the Select job type window, select an option. Available options include "A single robot" and "A
group of robots based on name".
Job Type Description
Single Robot This option adds a job that runs a single robot. If you need to pass input to a
robot, specify the necessary parameters.
Multiple Robots This option adds a job that runs any number of robots which path name matches
a given criteria. The criterion are: "Robot path starts with", "Robot path contains",
and "Robot path matches pattern". The robot groups are evaluated every time
the schedule starts; therefore, new robots matching the selected criteria will
automatically run.
3. Click Next.
See the Add a Single Robot or Add a Group of Robots topics based on the Job Type you select.
Add a Single Robot
The wizard for adding a single robot contains one to four steps, depending on the robot you select. The
wizard follows the flow outlined in this topic. The four rectangles correspond to the four possible steps.
247
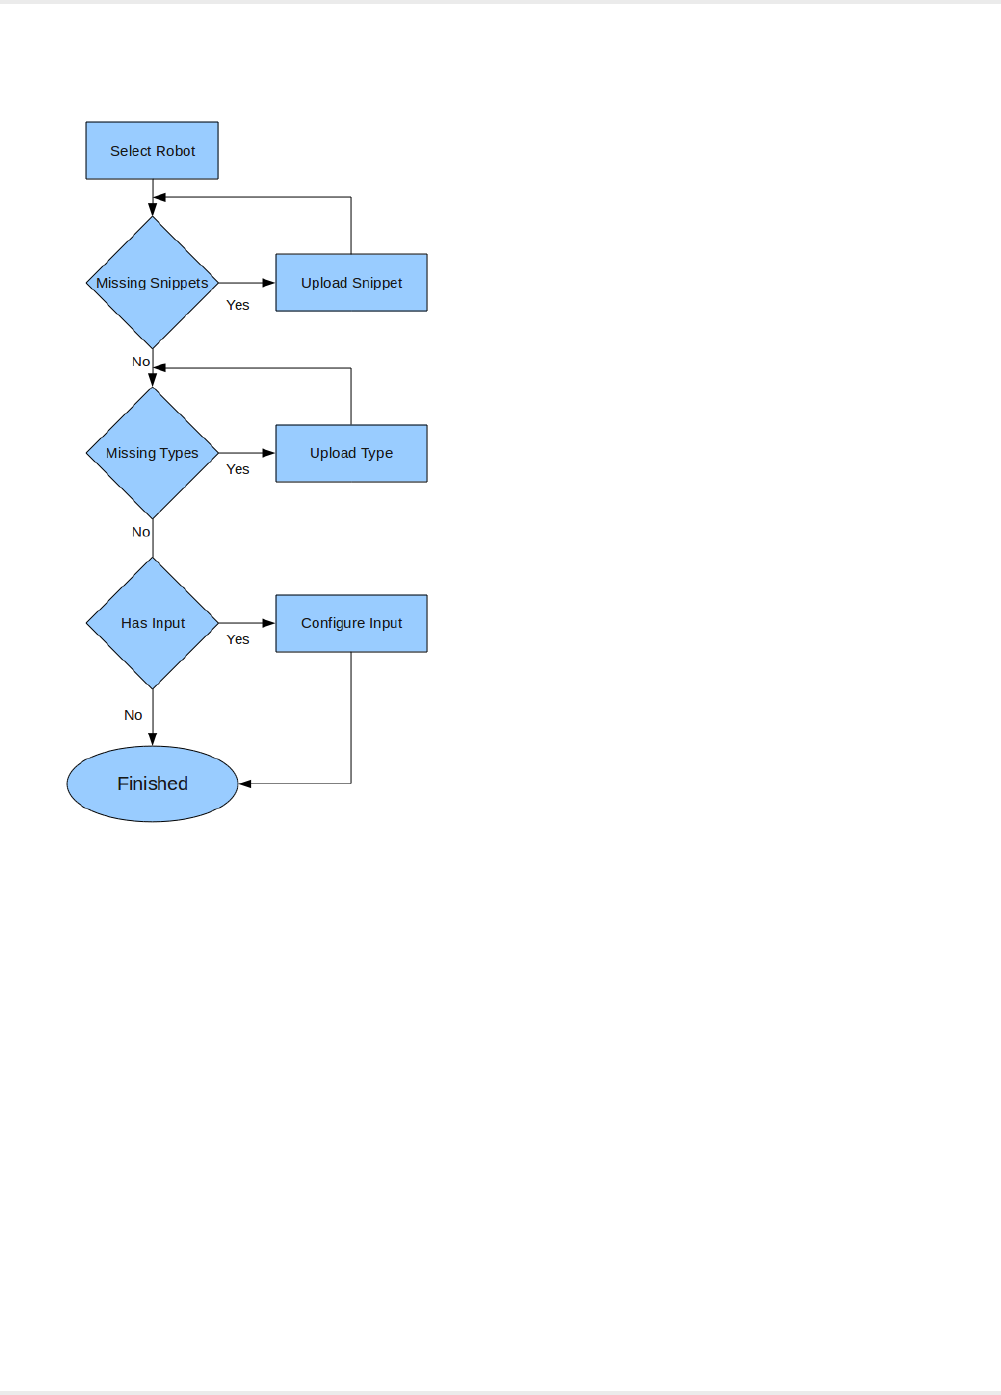
Kofax Kapow User's Guide
1. Select a robot in the Robot list of the Select Robot step.
2. If all snippets and types used by the robot are already uploaded, and the robot does not have any
input variables, you can click Finish; otherwise click Next.
If the selected robot uses any snippets that have not been uploaded to the Management Console
repository, you must upload them now.
3. In the "Upload missing snippets" window, browse to the missing snippet and click Upload. You can
also specify a folder in the "Select folder" list.
If the selected robot uses any types which have not been uploaded to the Management Console
repository, you must upload them now.
4. In the " Upload missing types" window, browse to the missing type and click Upload. You can also
specify a folder in the "Select folder" list.
The configure input for your robot window appears.
5. Configure the robot input used when it runs as part of this schedule.
248

Kofax Kapow User's Guide
6. If an attribute is of a binary type, you can use the drop down list to select a resource that is already
uploaded, or click Upload to upload one.
If an attribute is required, it is underlined with red.
7. Complete all required fields and click Finish.
Add a Group of Robots
You can select to add a single job that will run all robots with path names that match the given criteria.
The criteria is evaluated when the schedule is run, so any robots uploaded after the job is created will be
included if they match the configured criteria.
Because the criteria is evaluated at runtime, any errors such as missing snippets/types will be logged
as errors in the Schedule Run log. The same is true if a robot that uses input variables is run because it
matches the criteria.
The wizard for creating a group based on a path name criteria contains a single step.
249
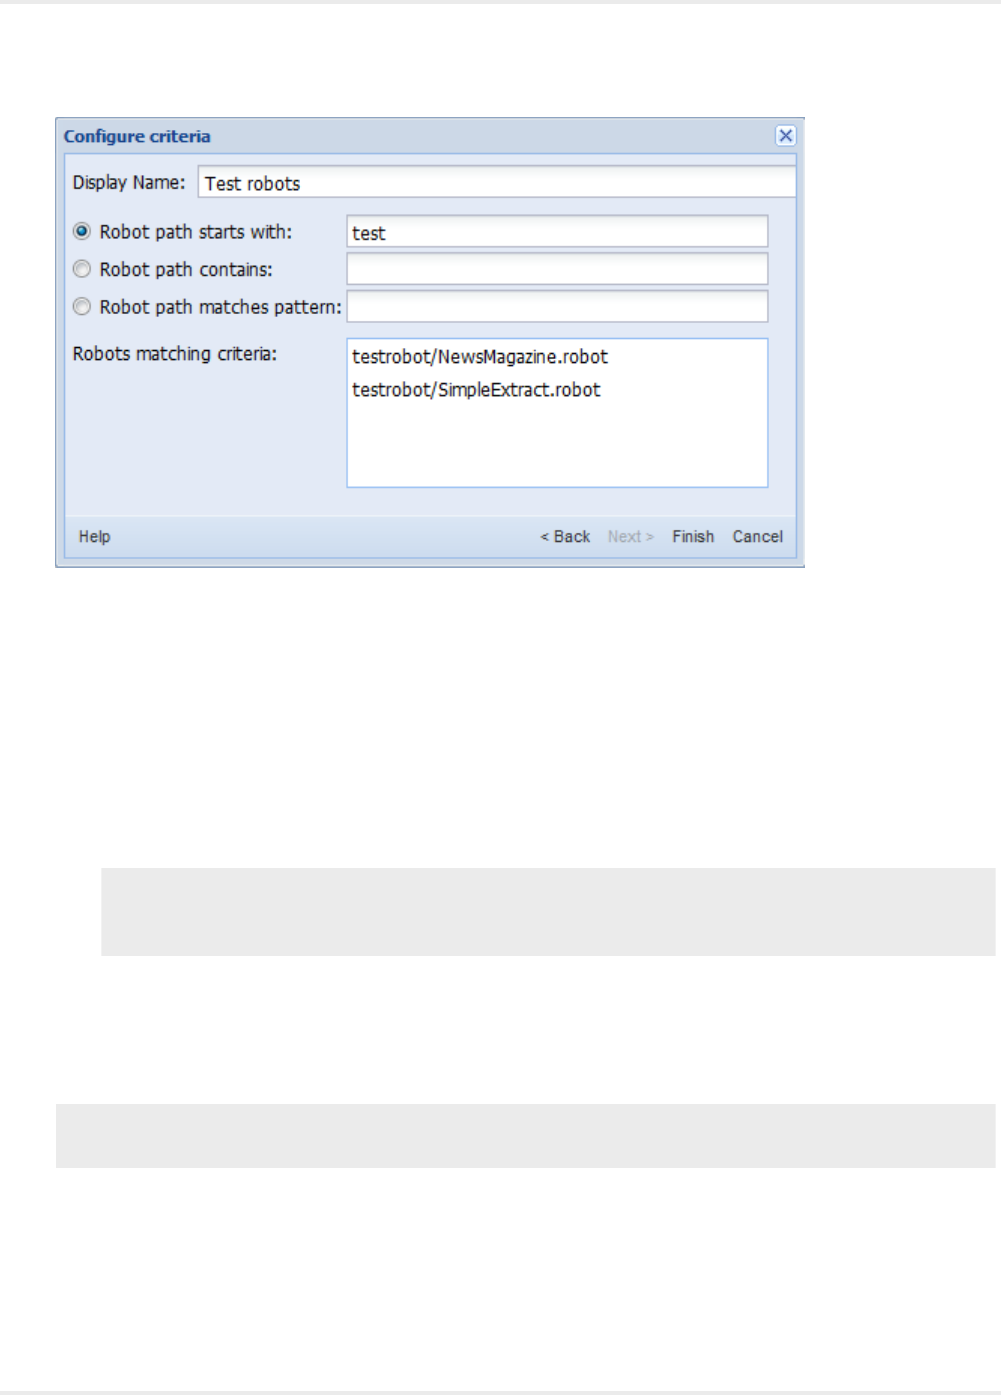
Kofax Kapow User's Guide
1. On the "Configure criteria" window, select the criteria type. Available options are the following:
"Robot path starts with", "Robot path contains", and "Robot path matches pattern".
The list at the bottom will display one or more robots matching the selected criteria. As long as you
don't edit the Display Name field, it will change depending on your criteria selection, but once you
start editing it, the automatic naming is disabled.
2. Click Finish.
You can click Finish even if no robots match the configured criteria, since you can later upload a
robot that will match.
If you have many robots it may take some time to refresh the list of robots matching the selected
criteria.
Note When this job type is added to a schedule configured to run its jobs sequentially, you
cannot control the order within the group of robots matching the criteria (but they will be executed
sequentially).
Repository
The Management Console keeps a repository of robots, types, snippets, resources and OAuth
credentials. Topics in the Repository chapter help you manage your assets.
Note You can filter the list of items in the table by applying filters in the Filter text box. See Filtering for
more information.
Robots
This subsection helps you manage the robots in the repository on a per project basis. In order for robots
to be able to run in a schedule, they have to be uploaded to the repository. When the robot is uploaded,
it is copied into the repository. Thus, if changes are later made to the robot in Design Studio, it needs to
250

Kofax Kapow User's Guide
be uploaded again (this can easily be done from within Design Studio). Doing so will not remove the robot
from schedules with which it is already associated. Rather, these schedules will use the new version of the
robot the next time they run.
Each robot belongs to a project. At the top of the Robots tab, you can select the project for which robots
are shown.
Within a given project, you cannot have two different robots with the same name in the repository. They
will be considered the same robot, and the one you upload last will overwrite the previous one. Different
projects can contain robots with the same name.
The robots are displayed in a table, with a default of 40 robots per page. The information is structured in
columns as follows.
Note You can filter the list of items in the table by applying filters in the Filter text box. See Filtering for
more information.
Column Description
Name The name of the robot. If the robot uses a type or a snippet which is not
present in the repository, the name will be marked in red.
Folder The name of the folder specified to store the robot files. By default, the files
are stored in the Root folder. You can create a new folder to store the files. The
folder name is displayed in the column if the selected folder is other than Root.
Folders are also shown as part of the robot name in the Robot Runs view on
the Logs tab. When deleting a robot, you can delete an empty folder.
Project Name The name of the project that the robot belongs to (useful when viewing all
projects).
Version The Kofax Kapow version last used when editing the robot.
Size The size of the robot in bytes.
Schedules The names of the schedules that will run the robot.
Delete Click to delete the robot from the repository. The robot is automatically
removed from any schedules used to run it. If you don't have a copy of the
robot in the file system, it is irrevocably lost.
Input Types Types used in input variables in the robot. To execute the robot, .type files
corresponding to each of these types must be present
Returned Types Types of values returned by the robot. When executing the robot via the
API, it may return values of these types. To execute the robot, .type files
corresponding to each of these types must be present.
Stored Types Types of values stored in a database by the robot. To execute the robot, .type
files corresponding to each of these types must be present.
Snippets used Names of the snippets used by this robot. If a robot uses snippet A and snippet
A uses snippet B, only snippet A will be listed here.
Created By (hidden by default) The user name of the user who first uploaded the robot. This feature is only
available when running a stand-alone Management Console.
Modified By (hidden by default) The user name of the user who last modified the robot. This feature is only
available when running a stand-alone Kofax Kapow.
251
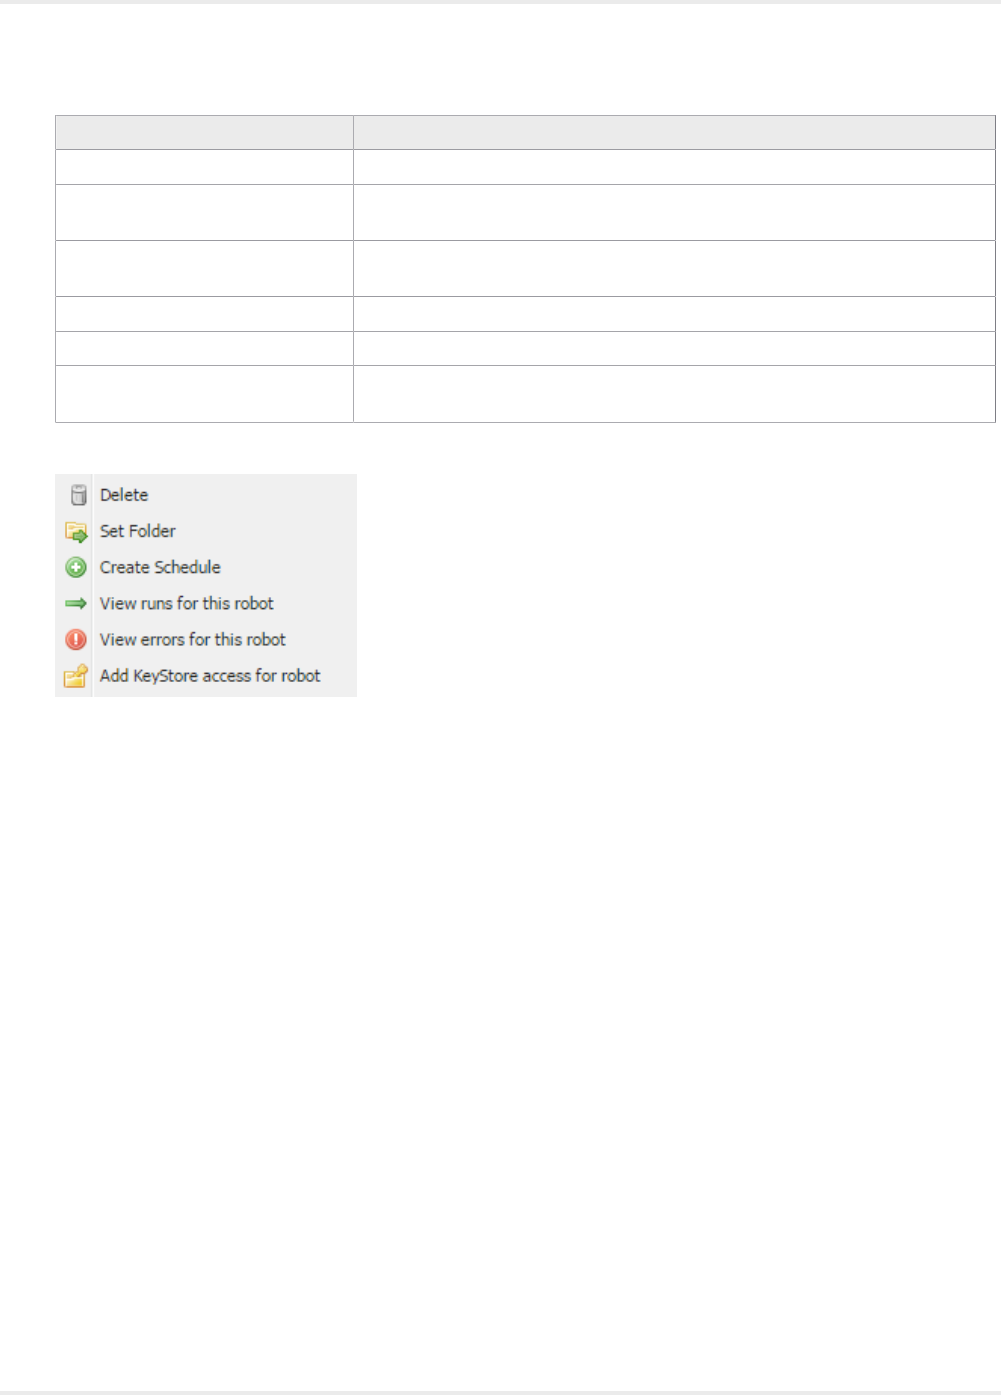
Kofax Kapow User's Guide
Column Description
Last Modified The date of the most recent modification of the robot.
Run Now Click this button to start immediate execution of the robot on RoboServer. This
feature is not available for robots that take input.
API Click this button to see an example Java or C# code for executing the robot on
RoboServer.
REST This will open a window that allows you to invoke the robot as a REST service.
SOAP This will open a window that allows you to invoke the robot via SOAP.
Download Click to download a copy of the robot from the repository and save it to the file
system.
Right-clicking a robot brings up the following menu:
The Delete, Set Folder, and Create Schedule options are available when multiple robots are selected. If
you have multiple robots selected and create a schedule, the New Schedule dialog box will open with all
the selected robots added. If any robot added this way requires input, you will have to add it later.
Clicking "Add Robot" in the upper left corner opens a window for uploading a new robot. If you upload
a robot with the same name as an existing one, the existing one will be replaced, with no changes to
schedules that run it. If you upload a new robot, it is not added to a schedule automatically; you will need
to do this yourself.
An alternative way of uploading a robot is to use one of the Upload functions in Design Studio. This works
in exactly the same way, except that Design Studio also uploads the necessary types and snippets. If your
Management Console Repository contains multiple projects, you will be prompted to choose which project
to upload the robot into.
Execute Robots
Once a robot has been uploaded to the Management Console, it can be executed in 4 different ways.
Most often you will execute robots as part of a schedule or as a Kapplet, but they can also be executed
programmatically either through the Java/.Net APIs or as RESTful services.
API
On the Robots tab, click the API column to access the code generation window, where you can generate
template code for Java or .NET.
252
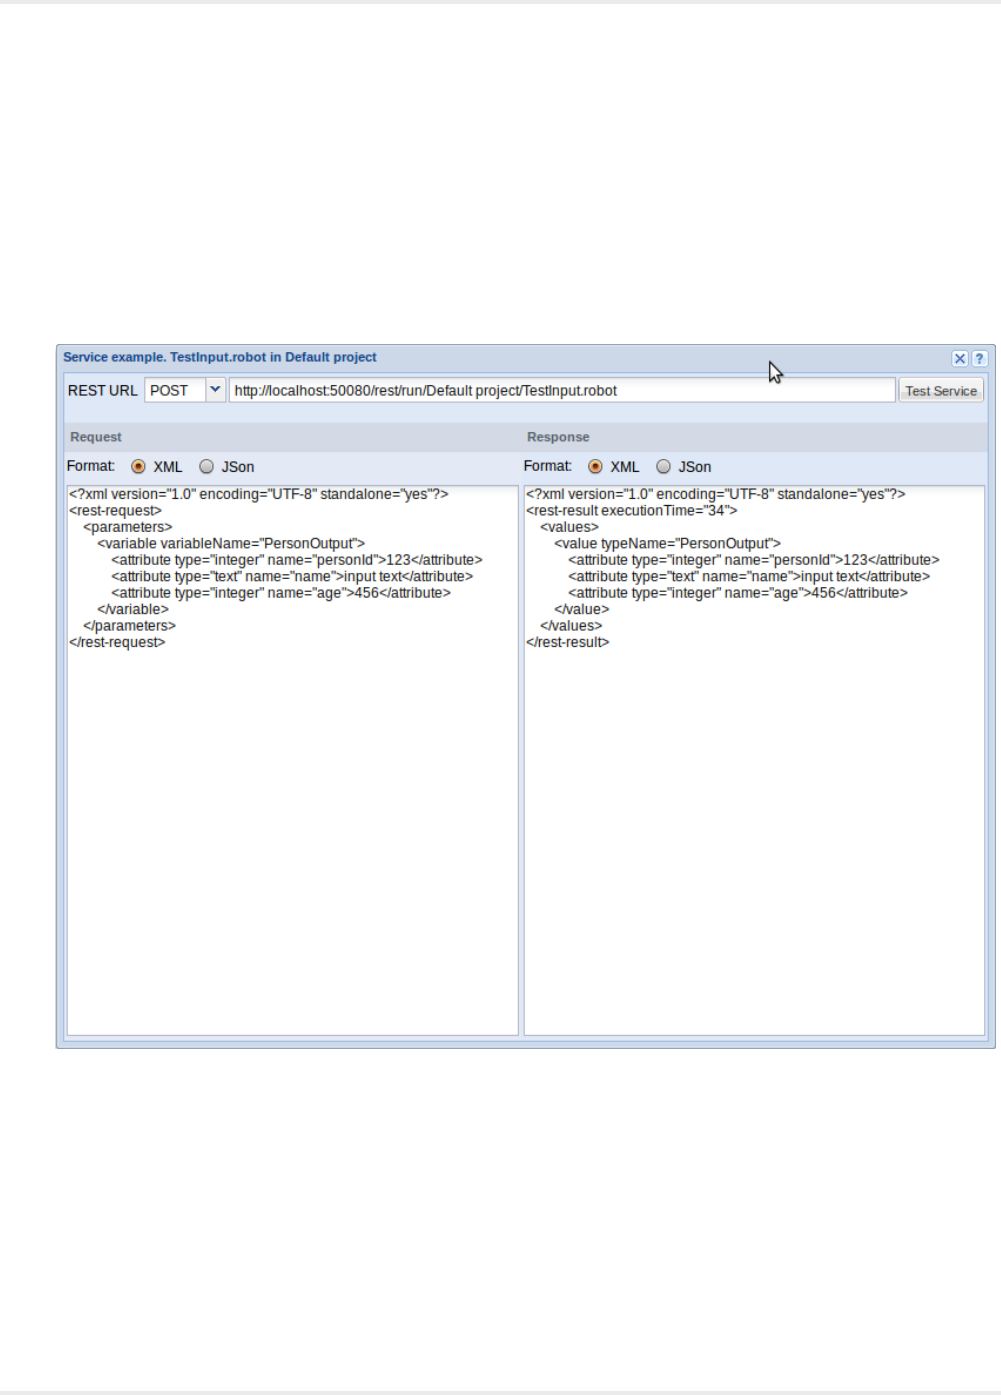
Kofax Kapow User's Guide
Before you start using the API to execute robots, we recommend you to read the relevant chapters in the
Kofax Kapow Developer's Guide to understand how the API works.
REST
You can execute robots as RESTful services. This allows you to invoke a robot from any programming
language, or directly from a browser using JavaScript.
On the Repository > Robots tab you can find a column named REST. Clicking this column brings up a
window that allows you to test your robot as a service.
Use the Request pane of the service window to construct a request. Click Test Service to execute the
robot. The result is then displayed in the Response pane of the window.
The format buttons allow you to configure the formats of the request and responses while testing, but
when you call the service from code, the format is controlled by the Accept and Content-Type HTTP
headers. The Accept header specifies the desired response format, and the Content-Type header
specifies the request format.
Robots that require input must be invoked using POST. Robots without input may be invoked using either
GET or POST.
253

Kofax Kapow User's Guide
REST services are easily invoked from a robot by using the "Call REST Web Service" action.
If the project or robot name contains any non-ASCII characters, make sure that the URL is encoded
properly (UTF-8 URL encoding). This is automatically done in robots, but if the service is called from code,
the developer is responsible for encoding the URL.
Note Robots that run as services will stop the first time the robot generates an API exception. This is
different from scheduled robots, which will continue to run regardless of any API exception generated
by the robot. You should think of REST services as something short-lived, such as a Google search or
translating a sentence.
Each robot that is run as a service uses a request thread. When the Management Console is running
embedded in a RoboServer, there is a maximum of 40 request threads. These 40 threads are used for all
types of HTTP requests, such as users accessing the Management Console, uploads from Design Studio,
and the Repository API. If you need to run a higher number of concurrent REST services, you will need to
install a standalone version of the Management Console on Tomcat so that you can control the number of
request threads.
SOAP
Robots can initiate SOAP requests to communicate with programs installed on other computers, pass
necessary information, and return a response.
On the Repository > Robots tab click the SOAP column to access a window for editing and testing your
SOAP request.
254
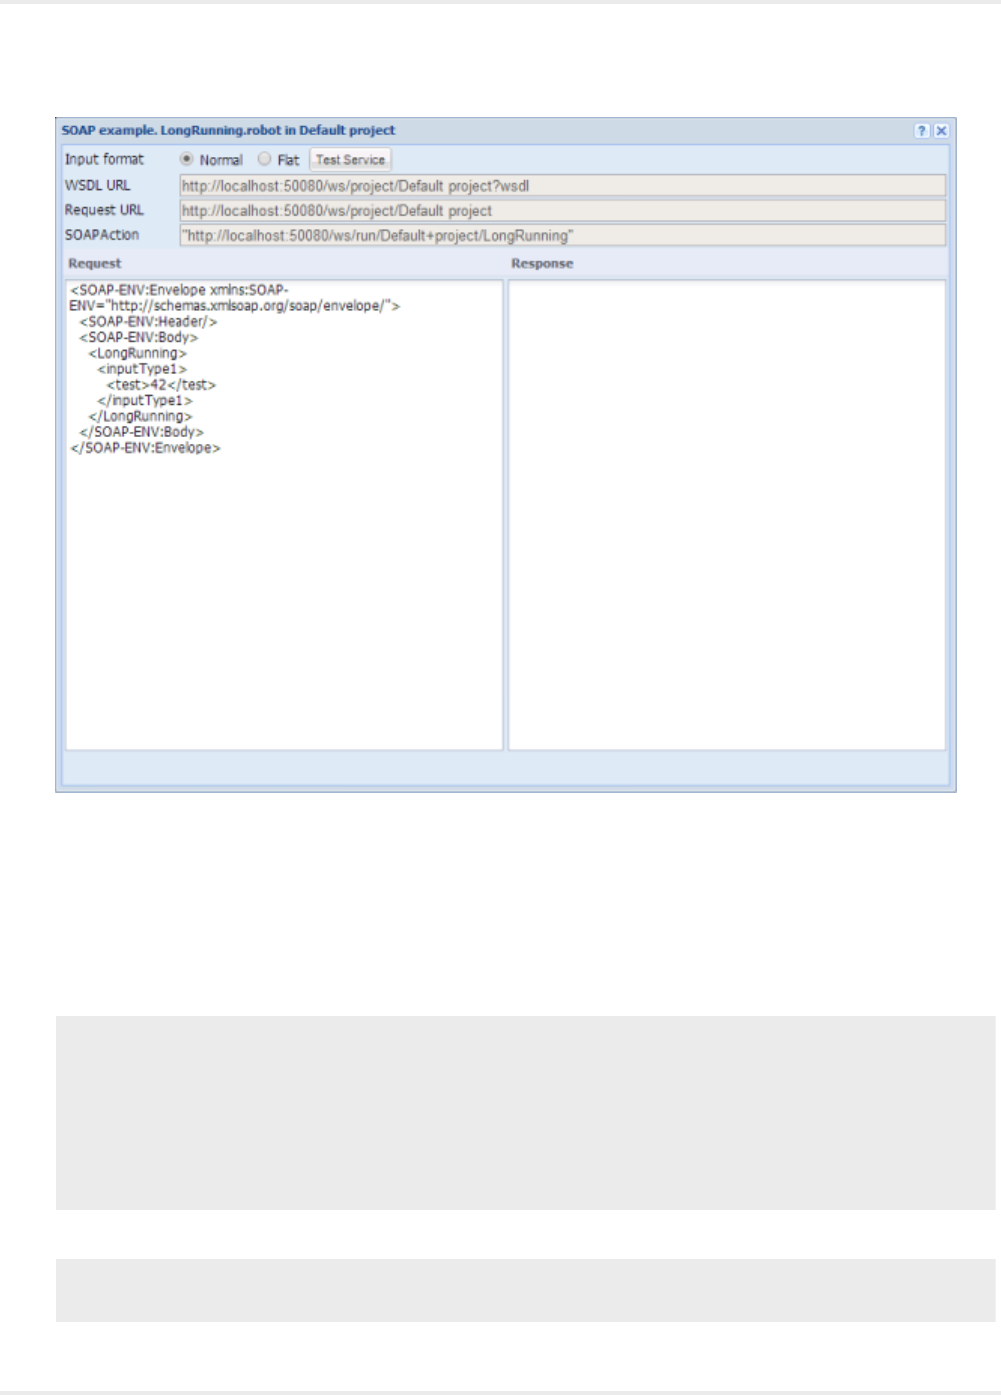
Kofax Kapow User's Guide
Use the Request pane in the service window to construct a request. Click Test Service to execute the
robot. The result is then displayed in the Response pane.
Input Format
"Normal" or "flat" refers to the structure of a SOAP request message. For example, if a robot myRobot
expects input variables var1 and var2, both of a type that has attributes attr1 and attr2, then "normal"
would expect a SOAP message that looks like the following
<myRobot>
<var1>
<attr1>Some value</attr1>
<attr2>Another value</attr2>
</var1>
<var2>
<attr1>More input</attr1>
<attr2>and some more</attr2>
</var2>
</myRobot>
The "flat" structure would require the SOAP message to look as follows:
<myRobot>
<var1__attr1>Some value</var1__attr1>
<var1__attr2>Another value</var1__attr2>
255

Kofax Kapow User's Guide
<var2__attr1>More input</var2__attr1>
<var2__attr2>and some more</var2__attr2>
</myRobot>
The flat structure was introduced for compatibility reasons.
WSDL URL
The URL for the WSDL of the project that this robot belongs to. Note that this URL is identical for all robots
of the same project.
Request URL
When running a robot, an HTTP POST request should be sent to this URL.
SOAPAction
When running a robot, a HTTP header called SOAPAction should be present with the value shown.
Request
This field is pre-filled with an example SOAP message. All input attributes will have default/test values. It
can be edited before pressing Test Service.
Response
A non-editable field which contains output from a robot run.
If there are errors in the input parameters or errors during the robot run, a SOAP Fault message is shown
(containing a reason and some details for the error).
Important Notes
• Project names can contain characters that are not allowed in WSDL; therefore project names might
be different in WSDL/SOAP messages. More specifically, all characters not a-z, A-Z, 0-9, or _ will be
replaced by _.
• Similarly, robot names may appear different. They are converted similarly to project names, but when a
robot name is changed, a special suffix (such as _1234) is also added.
• Currently SOAP 1.1 is supported.
Types
This subsection lists the types that have been uploaded to the Management Console Repository. At the
top of the Types tab, you can select the project which types should be displayed.
When a schedule runs, the robots linked to it are executed on RoboServer. Many robots require types as
definitions of either input, output or both. These types must be added to the repository (in the same project
as the robot) or running the robot will fail.
When you upload a type to the repository, it is copied into the repository. Thus, if changes are made later
to the type in Design Studio, it needs to be uploaded again. Since each type name must be unique (within
each project), uploading the type again overwrites the previous version.
You can create database tables from types.
Multiple types with the same name can be uploaded only if they are placed in separate projects.
256

Kofax Kapow User's Guide
Note You can filter the list of items in the table by applying filters in the Filter text box. See Filtering for
more information.
The following information is displayed for each type.
Column Description
Name The name of the type.
Folder The name of the folder specified to store types. By default, the files are stored
in the Root folder. You can create a new folder to store the files. The folder
name is displayed in the column if the selected folder is other than Root.
When deleting a type, you can choose to delete an empty folder.
Size The size of the type in bytes.
Project Name Displays the project the type belongs to (useful when viewing all projects).
Delete Click to delete the type from the Repository. If you don't have a copy of the
type in the file system, it is irrevocably lost.
Last modified The timestamp for the last change of this type.
Download Click to download a copy of the type from the Repository and save it in the file
system.
Created By (not shown by default) The user name of the user who first uploaded the type. This feature is only
available when running a stand-alone Kofax Kapow using LDAP.
Modified By (not shown by default) The user name of the user who last modified the type. This feature is only
available when running a stand-alone Kofax Kapow using LDAP.
1. Click Add Type in the upper left corner
The Upload type window appears.
Note Types may implicitly be uploaded with the aid of Design Studio. This happens when you
use Design Studio to upload a robot that uses the type. Because Design Studio knows about the
dependencies between robots and types, it always uploads the necessary types along with the
robot.
2. To remove a type, click in the Delete column.
You will be prompted to confirm the deletion. If the type is used by a robot or snippet, the
confirmation message will include the usage count. If you delete a type that is used by a robot or
snippet, the robot (or robots using the snippet) will no longer be able to execute. You can also delete
an empty folder.
Create Database Table from Types
To create a database table from one or more types uploaded to the Management Console, follow the
procedure.
1. Select one or more types on the Types tab under the Repository tab.
2. Right-click the selected types and choose Create database table.
The Create table window appears.
257
Kofax Kapow User's Guide
3. In the Create table window, select one of the configured database mappings defined in a project and
select whether to generate SQL code to drop tables. Click Generate SQL.
A SQL editor opens, containing SQL code to generate (and drop If you selected Generate SQL to
drop tables) the tables from the selected types on the selected database. Edit the code and click
Execute SQL.
After the SQL code has been executed, a message is issued with an execution state (success or
errors with description). Click OK to dismiss the message and close the windows.
Snippets
This subsection lists the snippets that have been uploaded to the Management Console Repository. At the
top of the Snippets tab, you can select the project which snippets should be displayed.
When a schedule runs, the robots linked to it are executed on RoboServer. Some robots use snippets,
which must be available in the repository (in the same project as the robot) or running the robot will fail.
When you upload a snippet to the repository, it is copied into the repository. Thus, if changes are later
made to the snippet in Design Studio, it needs to be uploaded again. Since each snippet name must be
unique (within each project), uploading the snippet again overwrites the previous version.
Note You can filter the list of items in the table by applying filters in the Filter text box. See Filtering for
more information.
The following information is displayed for each snippet.
Name Description
Name The name of the snippet.
Folder The name of the folder specified to store snippets. By default, the files are stored
in the Root folder. You can create a new folder to store the files. The folder name
is displayed in the column if the selected folder is other than Root. When deleting a
snippet, you can delete an empty folder.
Input Types Displays the project the snippet belongs to (useful when viewing all projects).
Returned Types Types used in input variables in the snippet. To use this snippet in a robot, the .type
files corresponding to each of these types must be present.
Stored Types Types of values returned by the snippet. To use this snippet in a robot, the .type
files corresponding to each of these types must be present.
Snippets used Types of values stored in a database by the snippet. To use this snippet in a robot,
the .type files corresponding to each of these types must be present.
Size Name of the snippets used by this snippet. If a snippet uses snippet A and snippet
A uses snippet B, only snippet A will be listed here.
Delete The size of the snippet in bytes.
Created By (hidden by default) Click to delete the snippet from the Repository. If you don't have a copy of the
snippet in the file system, it is irrevocably lost.
Modified By (hidden by default) The user name of the user who last modified the snippet. This feature is only
available when running a stand-alone Kofax Kapow using LDAP.
Last modified The timestamp for the last change of this snippet.
258
Kofax Kapow User's Guide
Name Description
Download Click to get a copy of the snippet out of the Repository and save it in the file
system.
1. To add a snippet, click Add Snippet in the upper left corner.
The "Upload snippet" window appears.
You may upload multiple snippets by the same name only if they are placed in separate projects.
Note Snippets may implicitly be uploaded with the aid of Design Studio. This happens when you
use Design Studio to upload a robot that uses the snippet. Because Design Studio knows about the
dependencies between robots and snippets, it always uploads the necessary snippets along with
the robot.
2. To remove a snippet, click in the Delete column.
You will be prompted to confirm the delete. If the type is used by a robot or snippet, the confirmation
message will include the usage count. If the snippet is used by other snippets or robots, the
confirmation message will include the usage count. If you delete a snippet that is used by a robot (or
a snippet used by this robot), the robot will no longer be able to execute. Any robot that is missing a
required snippet, will be listed with its name in a red font on the Robots tab. When deleting a snippet,
you can delete an empty folder.
Resources
This tab shows the resources uploaded to the Management Console. These resources can be used as
input for scheduled robots that have an input variable with binary attributes. (See Using Local Files in
Robots for information on how to add and load such a variable to the robot.)
Note You can filter the list of items in the table by applying filters in the Filter text box. See Filtering for
more information.
The following information is displayed for each resource.
Column Description
Name The name of the resource.
Folder The name of the folder specified to store resources. By default, the files are
stored in the Root folder. You can create a new folder to store the files. The
folder name is displayed in the column if the selected folder is other than Root.
When deleting a resource, you can delete an empty folder.
Size The size of the resource in bytes.
Project Name The name of the project the resource belongs to (useful when viewing all
projects).
Delete Click to delete the resource from the Repository. If you don't have a copy of
the resource in the file system, it is irrevocably lost.
Download Click to download a copy of the resource from the Repository and save it to
the file system.
259
Kofax Kapow User's Guide
Column Description
Created By (not shown by default) The user name of the user who first uploaded the resource. This column will
only contain relevant information when running a stand-alone version of Kofax
Kapow that has an individual user login.
Modified By (not shown by default) The user name of the user who last modified the resource. This column will
only contain relevant information when running a stand-alone version of Kofax
Kapow that has an individual user login.
1. In the upper left corner of the tab, click Add Resource.
The Upload resources window appears.
2. Browse for the file to upload.
3. Select a project from the Into Project list.
4. Click Upload.
Resources added in the dialog box for configuring input for a scheduled robot, or added directly from
Design Studio are then uploaded.
Device Mappings
This tab shows mapped Automation Devices available for robots. You can create mappings to the devices
on this tab from the Design Studio.
Note You can filter the list of items in the table by applying filters in the Filter text box. See Filtering for
more information.
The following information is displayed for each device mapping.
Column Description
Mapping Name of the device mapping.
Label Label of the device mapping. You can use the labels to filter the devices you
want to automate with your robot.
Edit Click to modify mapping settings in the Edit Device Mapping dialog box.
Delete Click to delete the mapping from the Management Console.
To create a new Automation Device mapping, click New Device Mapping on the Device Mappings tab,
specify the new mapping name and labels, and click Save.
Databases
This tab lists database mappings of the selected project. You can link your robot to different databases
in a cluster by using mappings and you can create new mappings on this tab. Database mappings have
project scope; you cannot have database mapping objects with the same name in one project. After you
install Kapow, a default database mapping "objectdb" is added to the Default Project, which is pointing to
the Production cluster's default Development Database.
260
Kofax Kapow User's Guide
Important Database mapping in the Management Console was introduced in version 9.6.0. Previous
versions of RoboServers would not be able to use it, but instead will use the pre 9.6 version mechanism
of connecting to the database.
You can use space, parentheses, and hyphens for database mapping names. For example,
"Development Database (MySQL)" is a valid database mapping name.
Note You can filter the list of items in the table by applying filters in the Filter text box. See Filtering for
more information.
Column Description
Name Database mapping name.
Project Name The name of the project that the mapping is assigned to (useful when viewing
all projects).
Database Name of the database the object is mapped to.
Cluster Name of the cluster the object is mapped to.
Edit Click to modify mapping settings in the Edit Database Mapping dialog box.
Delete Click to delete the mapping from the Management Console.
Note If you delete the last mapping of a database, this database will not
be available in the Design Studio even if a cluster has been selected to
provide Design Studio with shared databases.
For more information on database mapping, see Map Databases in the Design Studio section.
OAuth
This tab contains the OAuth applications and users that have been authenticated using the Management
Console. The credentials of the users can be used as input to robots in a schedule, allowing them to
access APIs on behalf of the authenticated user without having access to the username and password.
Please consult the OAuth section of the documentation for more information on how to create and
manage robots that access APIs that are protected by OAuth.
Password Store
Password Store is designed to grant access to different systems without disclosing sensitive information.
This tab shows available and assigned Password Store entries. You can create new and edit existing
entries. You can grant access to Design Studio and Management Console robots by creating new
Password Access entries.
This tab contains two panes:
•Passwords
•Password Access
261
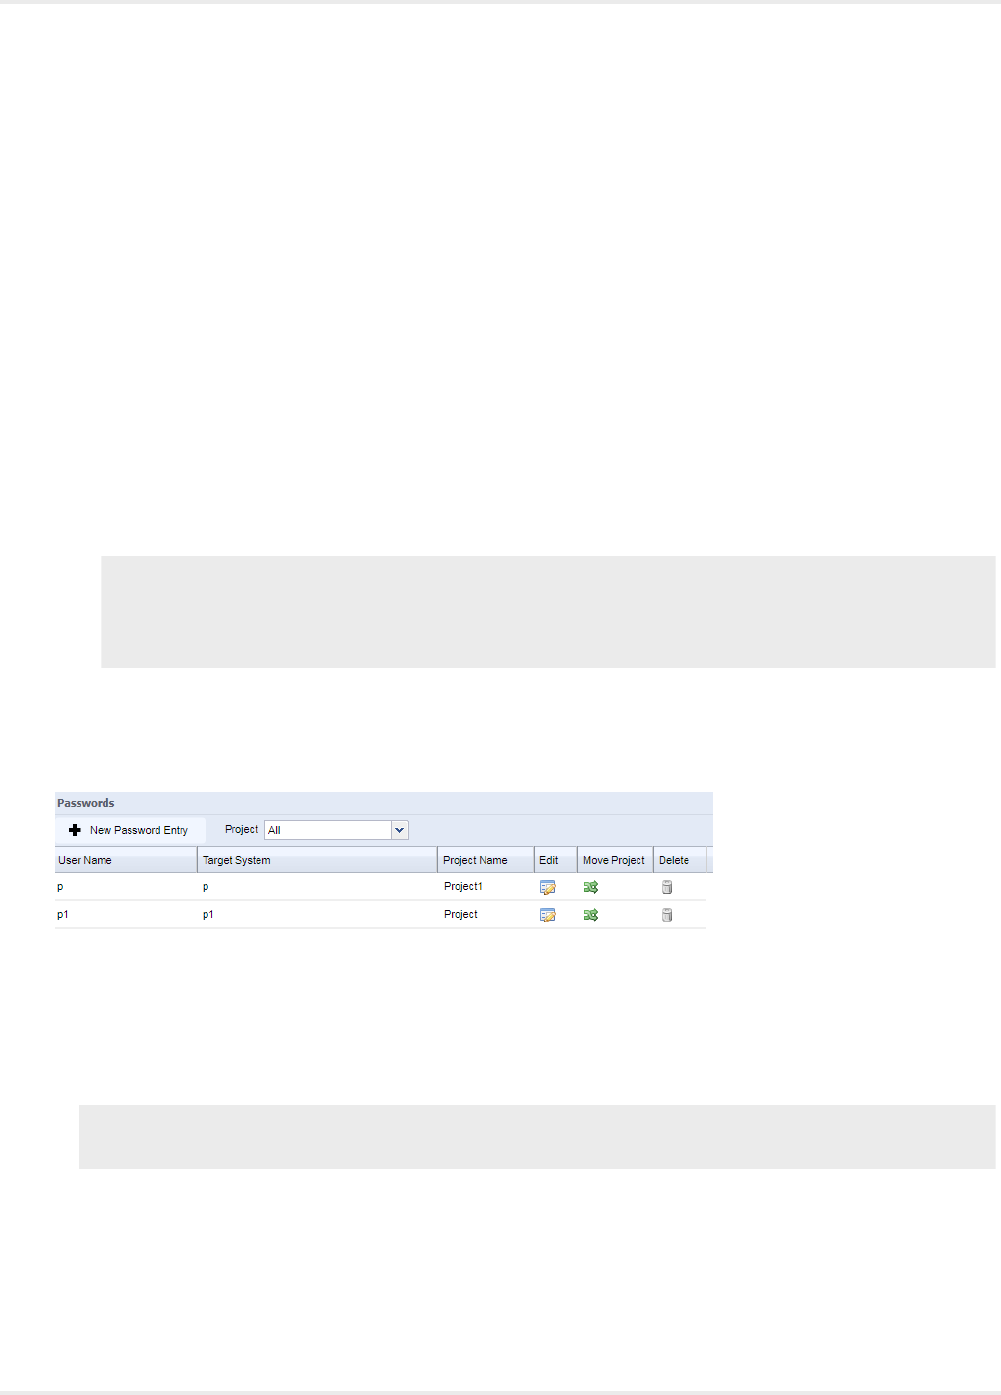
Kofax Kapow User's Guide
Use Password Store
The following are general steps for using Password Store with the Lookup Password step.
1. On the selected Management Console, create Password entries on the Passwords pane of the
Repository > Password Store tab.
2. On the Management Consoles tab of the Design Studio Settings window, specify the Management
Console to store passwords and select Use as Password Store.
3. Insert the Lookup Password step in your robot and note the Password Access token that Design
Studio provides on this step. Provide the token to the Management Console administrator.
4. The administrator creates a new Password Access entry on the Password Access pane of the
Repository > Password Store tab using the token from the Lookup Password step in Design
Studio.
5. Once the robot is ready for deployment, upload your robot to the Management Console. When the
robot is uploaded, the administrator performs the security check of the robot and creates a new
Password Access entry for the uploaded robot.
Important Every time you upload your robot or any of its components, such as types, snippets,
and so on to the Management Console, a new Password Access entry must be created for the
robot. Previous entries are kept in the Password Access list and the administrator can delete them
manually.
Passwords
This pane lists available Password entries and helps you create new and edit existing entries.
Create New Password Entry
To create a new Password entry, click New Password Entry and fill in the following fields:
• User Name: Type in a user name to access the specified target system.
• Target System: Provide a description of the system to access.
Note When you insert the Lookup Password step, the step's Target System property value must
match the Target System value of the Password entry.
• Password: Type in a password to access the target system.
• Re-type: Re-type the password.
The Edit window of the password entry contains the same fields as the New Password Entry window.
262

Kofax Kapow User's Guide
Move Project
Password Store access is project-based. You can see password entries assigned to projects that you
have access to. Management Console Administrator can move password entries between projects
for project administrators to manage password entries and grant access to target systems. To move a
password entry from one project to another, click Move Project and specify the target project in the
Move window. The Merge entries option in the Move window helps you merge entries with identical user
names and target systems.
Password Access
This pane lists Password entries assigned to robots.
Create New Password Access Entry for Design Studio Robot
To create a new access entry, click New Password Access Entry and fill in the following fields:
• Password Access Token: Enter the token provided by the Design Studio on the Lookup Password step.
• Description: Specify a description to identify an entry in the list.
• Password Entries: Select one or more Password entries in the Available list and add them to the
Assigned list using arrows.
Create New or Edit Password Access Entry for Uploaded Robot
To create a new Password Access entry for the uploaded robot or edit the existing one, right-click the
robot in the Repository > Robots tab and select Add/edit Password Access for robot. Fill in the
following fields:
• Password Access: The token is generated automatically by the Management Console. Do not change
it.
• Description: Specify a name to identify an entry in the list.
• Password Entries: Select one or more Password entries in the Available list and add them to the
Assigned list using arrows.
Data
The Data view allows you to view and export data extracted by Robots.
263
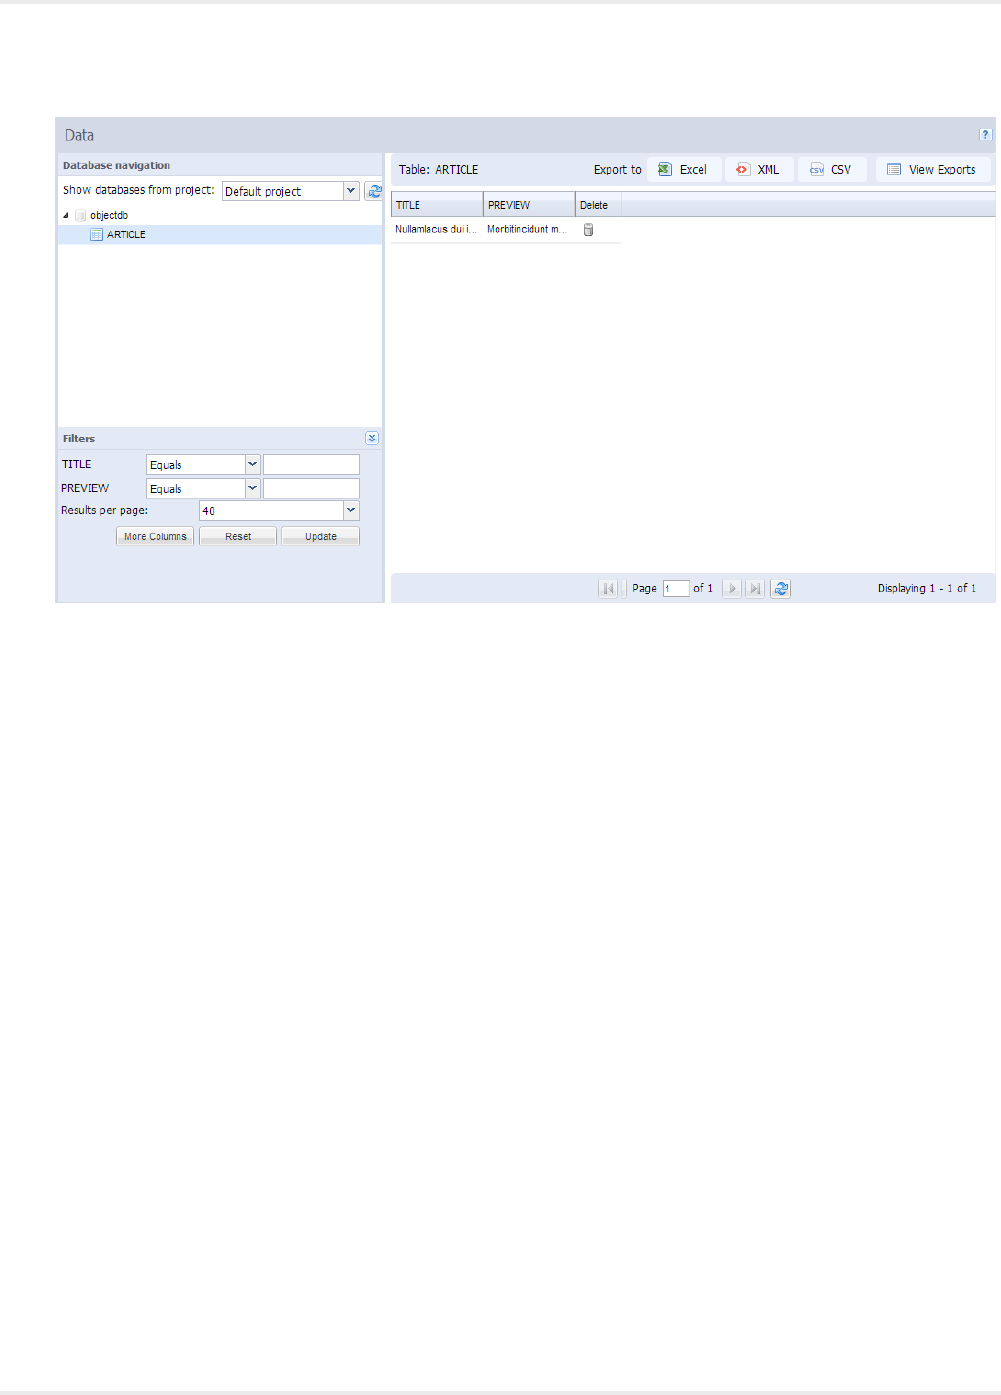
Kofax Kapow User's Guide
In the upper left corner of the Data view, you can see the Database navigation tree along with a project
selector. You can view data from the databases for each project. To view data from a given project, select
it, and the database mappings defined in that project will be shown in the database navigation tree. Next
to the project selector is a refresh button for use when the databases have changed, in which case it will
re-populate the database navigation tree to show the new information.
When you click a database mapping name, the tree opens, and you can see the various schemas in the
database. When you click a schema you can see the Kapow tables in that schema. When you click a
table, the contents of that table are loaded into the data grid on the right pane. Once the data is loaded,
a number of filters become visible in the Filters window. The filters work exactly like the filters on the
Logging Tab. Binary and longtext attributes are not filterable.
If you click the Delete column, a window will open allowing you to delete one or more rows for the table.
Double clicking a row will bring up a window with the content of that row, allowing you to copy the data.
Above the data grid, you can see an Export bar, containing 4 buttons. The first 3 buttons allow you to
export the table data to either Excel, XML, or CSV format. The fourth button allows you to see previous
export, and download them again. The exports are automatically deleted the next time the Management
Console starts, also the oldest exports are deleted when the number of exports exceeds 100. There is no
limit to the number of rows you can export to CSV or XML, but Excel files are limited to 10000 records, to
prevent the system from running out of memory.
The list of schemas/catalogs available under each database in the navigation tree, is controlled by the
permissions of the user who's credentials are used (in the cluster settings database configuration).
Logs
This tab is used to view the logs created by the Management Console and by the RoboServers' database
logging. The Schedule Runs and Schedule Messages are Management Console logs that report
264
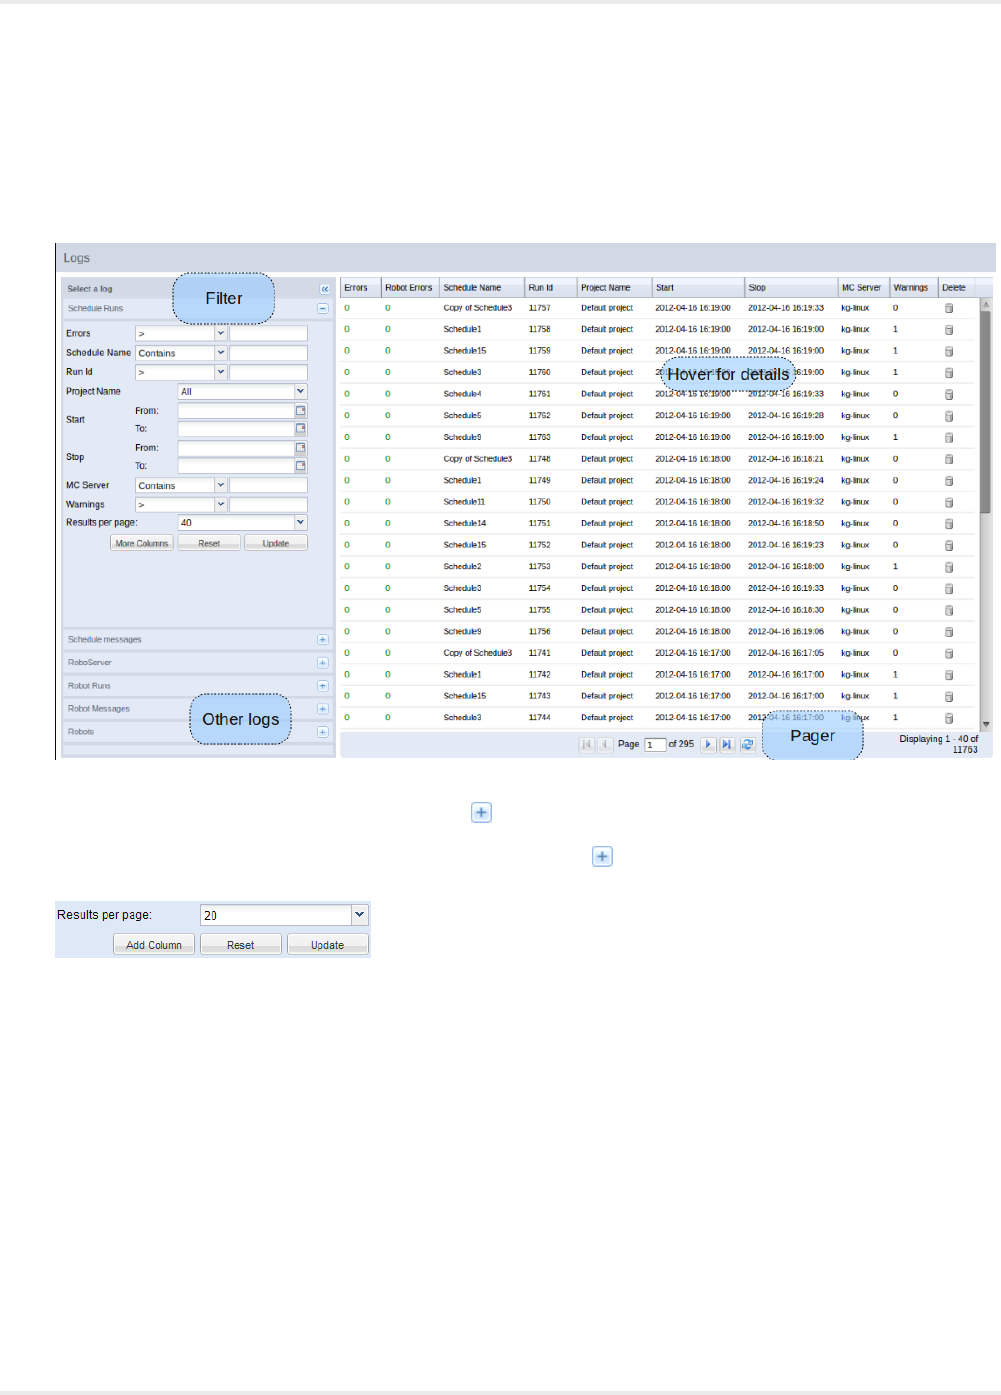
Kofax Kapow User's Guide
information on schedules. The remaining logs are RoboServer logs containing information on the
status of the RoboServers and on robots and robot runs. Both the Management Console logs and the
RoboServers logs are written to the logging database, thus requiring that a logging database be set up
in the Management Console settings (see Log Database) and that database logging is enabled on the
RoboServers via the logging cluster settings.
You select one of the log views, by clicking the icon next to the log to view.
The page layout for each log is identical. When you click the a number of filters are displayed to the
left, and the data is loaded into the grid to the right. A "Results per page" field is available under the filters.
• Add Column adds columns to and removes columns from the grid to the right.
• Reset clears any filter configuration entered.
• Update loads the grid with data based on the configuration of the filters.
• The list box controls the number of results per page (for the next update).
If there are more results than the number selected per page, you can navigate to the next page using
the controls under the data grid. Pressing Enter in any filter text field triggers an update of the grid.
You can set up the retention policy for your logs in the RoboServer Log Database by specifying a number
of days to keep the logs and a number of messages in the robot run. The logs are cleaned on a daily
basis by deleting the oldest messages first. The default values are 10 days and 500 messages.
265

Kofax Kapow User's Guide
Schedule Runs
Displays execution information for each schedule that executes, such as when the schedule started and
when it finished.
Use the context menu to navigate to the individual schedule message, or to the robots that were executed
as part of this schedule run.
If you click in the Delete column, a window opens to delete the run and messages. When deleting, you
always have to delete the messages, but you can keep the run information if you like. You can delete this
run and messages, or all runs or messages matching the current filter. Deleting many runs or messages
might take some time.
Schedule Messages
Displays individual message entries for a given schedule run. This allows you to see exactly why a
schedule failed to run.
Note To find robot errors for a given schedule run, select "View robot view errors" from the context
menu.
You can delete one or more records by clicking the Delete column. This will open a window in which you
can select to delete only this message, all messages matching the current filter, or all RoboServer log
messages (the option to delete message matching a filter is disabled if there are more than 500 matching
results. This is due to performance).
Note To see Schedule Runs and Schedule Messages, set up log database (see Log Database) and
enable logging on the RoboServers via the logging cluster settings.
RoboServer
Displays general messages from RoboServer or the Management Console. Double-click or use the
context menu to open the message in a separate window, making it easier to copy the error message.
You can delete one or more records by clicking the Delete column. This will open a window in which you
can select to delete only this message, all messages matching the current filter, or all RoboServer log
messages (the option to delete message matching a filter is disabled if there are more than 500 matching
results. This is due to performance).
Robots
This is a simple summary view of all robots ever run (for as long as data is available). If you double-click a
row or use the context menu, you will navigate to all runs for the given robot.
Robot Runs
Displays information for each robot run. This log contains a number of extra fields that are not shown by
default, but can be added by clicking the Add Column below the filters. Double-clicking a row takes you to
all messages logged during this run, which is also available through the context menu. The context menu
also allows you to view all runs for the same robot, or view the input this robot was given when this run
was executed.
If you click the Delete column, a window opens allowing you to delete the run and messages. When
deleting, you always have to delete the messages, but you can keep the run information if you like. You
can delete this run and messages, or all runs or messages matching the current filter. Deleting many runs
or messages might take some time.
266

Kofax Kapow User's Guide
Robot Messages
Displays individual error messages belonging to a robot run. Double-clicking a row brings up a window
that allows you to easily copy the error message. Using the context menu, you can navigate to the run this
message belongs to.
For robot errors, the Location Code column in the data grid contains a link. When you click the link a
small .robotDebug file is downloaded. If you open the file with Design Studio, the robot will be loaded, the
input from the run will be set, and the robot will navigate to the location of the error, allowing you to quickly
debug errors.
Admin
Use this tab to administer the Management Console.
Task View
Display the robots and other tasks executed by the Management Console.
RoboServers
Add or delete RoboServers and clusters, and configure cluster settings. View running robots.
Devices
View available Automation Devices registered with the Management Console.
Projects
Create and delete projects.
Users
View information on the Management Console users.
Settings
Configure Management Console settings.
Backup
Create and restore backups and import/export projects.
License
Enter license information or view information on the current license and Design Studio seats in use.
Task View
The Task view shows the scheduled robots, as well as pre- and post-processing tasks that have been
started by the Management Console's Scheduler. The Task view gives an overview of the current activity
across all servers and robots; if you want to know about the outcome of previous robot runs, you should
inspect the Logs.
Because of update delays, short-running robots may never (or almost never) appear on this tab.
The following information is displayed for all currently running robots.
Column Description
Name The name of the task that is running.
267
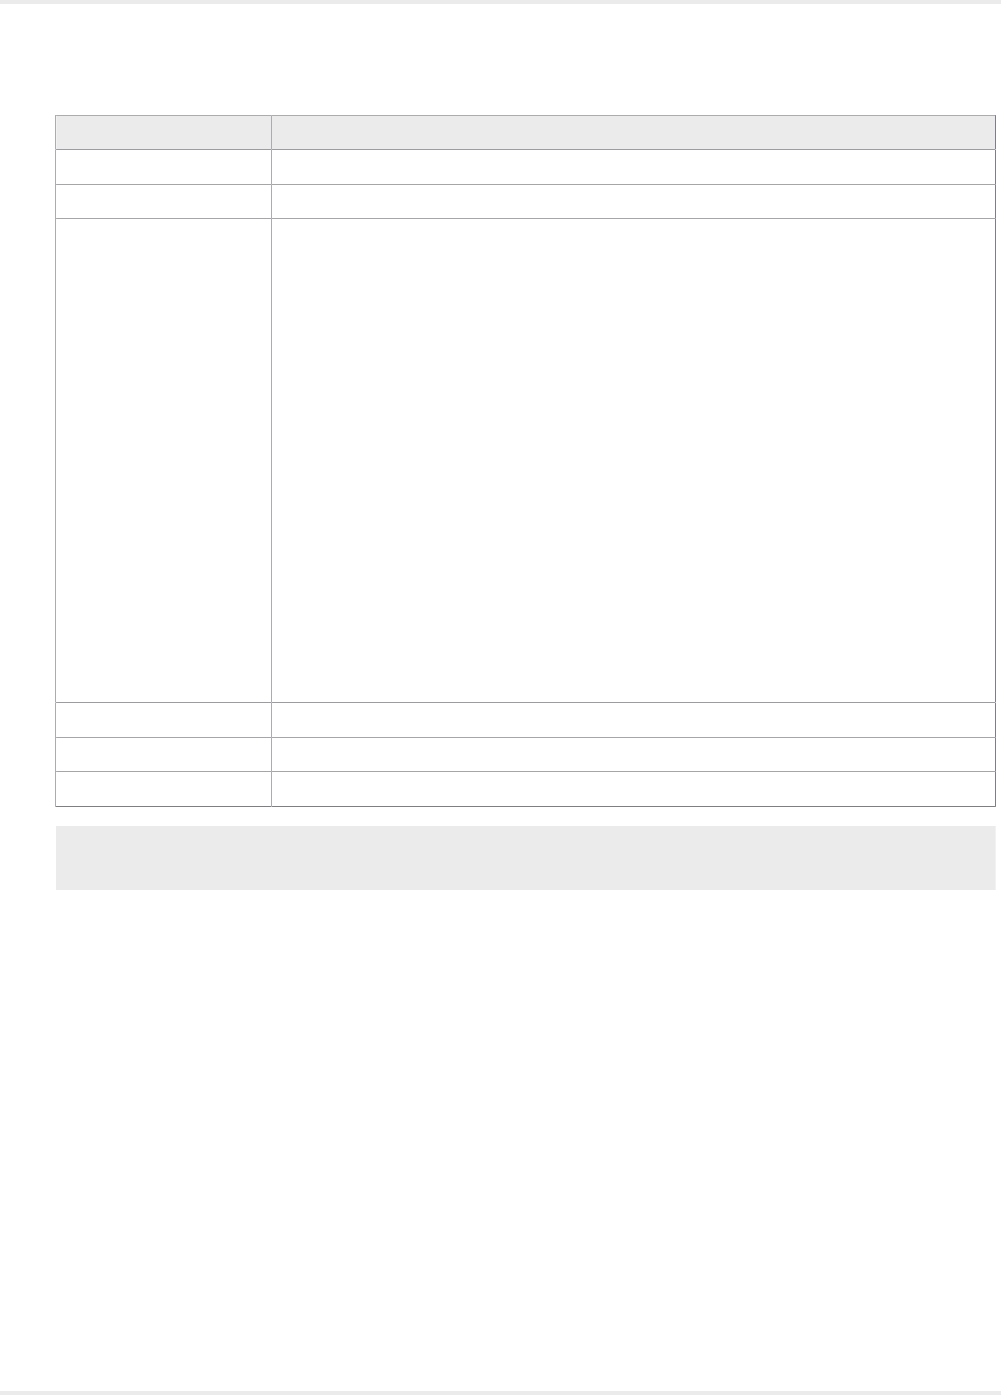
Kofax Kapow User's Guide
Column Description
Schedule The name of the schedule that the task runs within.
Project Name The name of the project that the task belongs to.
Status The task may be in one of the following states:
Queued
The task is queued and waiting for execution. A task may be queued for the following
reasons:
No Servers
There are currently no servers in the cluster, or all servers are offline. The task will
start to execute when a server is added, or an offline server comes online.
No Capacity
All servers are executing at maximum capacity. The task will start to execute when
other tasks finish and capacity becomes available, or if additional server are added to
the cluster.
Waiting for other task
The task may be waiting for another task to finish. Post-processing may not be run
until all robots have finished, and robots may not be run before pre-processing has
finished. Also, if robots on a schedule are configured for sequential execution, robots
will remain queued until the previous robot completes.
Running
The task is currently executing.
Last status change The time of the last status change.
Stop Click to stop the task even though it has not finished running.
Input This column shows a summary of inputs for the running robot.
Note When you point to a column, a pop-up text shows all the available information whereas the text in
the actual column is usually shortened due to lack of space.
RoboServers
This section enables you to manage clusters and RoboServers known to the Management Console. All
servers in the list can be monitored using the portlets on the Dashboard. By default, the list contains one
cluster containing one RoboServer, namely the one that also runs the Management Console functionality.
In larger setups with multiple RoboServers and clusters, we recommend that the Management Console
be deployed on a standalone web container (if license permits), or on a RoboServer that is not used for
running robots. See the Kofax Kapow Administrator's Guide for additional information about configuring
the Management Console.
The following information is displayed for each server. Note that for RoboServers version earlier than 9.4,
some of the information is not available.
268
Kofax Kapow User's Guide
Column Description
Cluster/Server For Clusters
The name of the cluster that is suffixed by SSL if the cluster uses SSL. If the cluster
has unapplied settings, they are also shown here in blue. If the cluster has invalid
settings, the name will be displayed in red.
For RoboServers
The name and port of the RoboServer. If the RoboServer is incorrectly configured, the
name will be displayed in red. If you hover over the red name, a tooltip will inform you
of the error.
Version The version of the software on the running RoboServer.
KCU The number of KCUs assigned to this cluster. KCUs in a cluster are distributed evenly
between online RoboServers in the cluster. To adjust the KCUs on a cluster, click the
Assign KCUs button.
Running Robots The number of robots currently running on the RoboServer.
Queued Robots The number of queued robots on the RoboServer
Max Robots The maximum number of concurrent robots on the RoboServer. Can be configured in
the Clusters settings.
Uptime The uptime of the RoboServer. Allows you to see when the server was started or
restarted.
Command line (hidden) The command line the RoboServer was started with.
CPU count (hidden) Number of CPUs assigned to the RoboServer process, for example if CPU affinity has
been assigned.
Memory Limit The maximum amount of memory assigned to the JVM the RoboServer runs in.
Above Limit Shows whether the server is operating above its memory threshold (80% default). If
this limit is reached, the RoboServer will queue the robot instead of starting it.
Duration (Accum.) Shows the total time the RoboServer has been in the Above Limit state.
Max Queue (hidden) The maximum number of robots that can be queued on the RoboServer. Can be set in
the Clusters settings.
License Type The license type of the RoboServer: Production or Non-Production.
Cluster Mode/Server Status For clusters, shows the Cluster Mode. For RoboServers, shows if the server is Online
or Offline.
Temp Profiling Indicates whether profiling has been temporarily enabled for a given server. The
setting will be cleared upon server restart.
Last Updated Click to delete the cluster/server from the Management Console. This will remove any
associated information from the Dashboard portlets.
Settings Click to modify cluster settings in the Cluster Settings dialog box.
Delete Click Delete to delete the cluster/server from the Management Console. This will
remove any associated information from the Dashboard portlets.
The Robot Runtime view contains detailed information about running robots. The top bar of the Robot
Runtime view contains the following:
• Robot on: - Shows which cluster or server the view currently displays robots for.
269
Kofax Kapow User's Guide
• Filter by - Helps you to filter the list by Robot, Project, or Execution Id, or to disable the filter by
selecting the blank line. Filter matching is case sensitive and the filter will select those robots that
contain the entered text as a substring in either the Robot, Project, or Execution Id field.
• Robots per page - Limits the maximum number of robots displayed on a page.
• Refresh Every - Sets the refresh rate of the view (default is one second).
Click the column header to sort any column in ascending or descending order. The default sorting is by
Start Time Client.
Double-click a row in the table to open the Robot's information in a window. The window shows the same
information available in the Robot Runtime view that it is a snapshot of the information at the time you
open the window. The information is not updated even if the robot stops executing.
Click Refresh to refresh the information in the table.
The following information is displayed for each running or recently completed robot. The table shows
Robots either from one RoboServer or from all RoboServers if a Cluster is selected.
Column Description
Robot Name of the robot
Server Name of the server that runs the robot
Project Name of the project that the Robot belongs to. View the list of projects on the
Repository > Robots tab.
Robot URL A URL that the Robot is identified by. When you build the execute request for
a RoboServer, you can either specify a file://URL or a Library:/, which specifies
whether the robot should be loaded from the file system or the library.
• File system URL - file://C:/Kapow/Robots/Library/Input.robot
• The Library URL - Library:/Input.robot
The execute request for a Robot may look like this:
Request request = new Request("Library:/Input.robot")
Robot Library A type of Robot library. The following types exist:
• Design Studio Robot Library
• Embedded File-based Robot Library
• Repository Robot Library
• URL File-based Robot Library
• URL Folder-based Robot Library
See "Programming with Robots" in the KapowDeveloper's Guide for more
information. Also see Robot Libraries in the Reference section of this help
system.
Start Time Client The time when the Robot was started. The time is displayed in time zone of the
browser running the Management Console.
Execution ID Robot execution ID.
Current Step The step the Robot is currently executing.
Execution Path The sequence of steps the Robot has performed.
270
Kofax Kapow User's Guide
Column Description
Location Code A code assigned to a step that you can view in Design Studio.
Step Execution Time Current step execution time in seconds.
Executed Steps Limit Shows the maximum number of steps the robot is allowed to execute. If the
limit is reached, the robot is stopped.
Status Robot's current status.
• Running - Currently running
• Queued - Queued for running when possible
• Completed - Finished executing on RoboServer. This status is assigned to
Robots that:
• Completed successfully
• Completed with errors
• Failed
• Were forced to stop
Robots with Completed status are removed from the table after one minute
from completion.
KCU Point Cost KCU points spent for running the Robot. KCU Point Cost is equal to KCU-Point
Usage from Design Studio.
KCU Wait Amount of time the Robot has been unable to execute because the KCU Points
(for this second) had already been spent.
Loaded Bytes Bytes loaded during a Robot execution.
Extracted Values Limit An upper limit on the number of object extractions. If the robot extracts more
objects than indicated by this property, then an error message is generated or
the robot is stopped.
Execution Time Limit An upper limit on the total robot execution time. If the robot does not complete
within this time limit, then an error message is generated and the robot is
stopped. The property value is specified in seconds.
Last Output Time The time when the last extraction was performed.
Emails Sent The number of emails sent by the robot.
Stopping Whether the robot is in the process of shutting down.
Output Count The number of objects that the robot has generated.
Executed Steps The number of steps the robot has executed.
Stop If Connection Lost When this flag is set, the robot will stop if it loses the connection to the
Management Console.
Stop On API Exception When this flag is set, the robot will stop if it generates an API exception.
Log Click to open the Log tab.
Stop Click to stop robot execution.
Schedule Click to open the Edit Schedule dialog box.
271

Kofax Kapow User's Guide
Create a Cluster
When you create a cluster, specify the name of the cluster and the cluster type. If you create a non-
production cluster, you can assign KCU from the non-production license, and similarly if you create a
production cluster, you can assign KCU from the production license. If you select the SSL option, all
RoboServers in the cluster must use the SSL RQL service.
After creating a cluster, you can add RoboServers to the cluster.
Context Menu
The grid contains a context menu, which has rarely used functionality that is not available from the bottom
menu. The following are context menu items:
Cluster Settings
Brings up the Cluster Setting dialog box.
Stop RoboServer
Brings up a dialog box that allows you to stop/reboot the selected RoboServer.
Dump Threads
Sends a request to the selected RoboServer to perform a full thread dump, which opens in a separate
window. It is also possible to get a thread dump of the Management Console. For details see "Tomcat
Management Console" in the Kofax Kapow Administrator's Guide.
Load Distribution and Failover
When a cluster needs to execute a robot, it finds the RoboServer with the highest number of available
slots. Available slots are calculated based on how many robots are already running on the RoboServer
and how many robots it can run concurrently (the maximum concurrent robots in the Clusters Settings.)
If a RoboServer in a cluster goes offline, the KCU is automatically distributed evenly among the remaining
RoboServers.
Change the Cluster Mode
You can set three different modes to a cluster: Normal, Maintenance or Pending Maintenance. The
Maintenance mode is used to set clusters into a mode where nothing is run on them. The point is to be
able to update cluster settings in a way that ensures that all robots in a given schedule use the same
settings, and that settings are not changed in the middle of schedule runs. The table below explains the
different modes.
Cluster Mode Description
Normal Cluster operates normally with schedules and individual robots executed as expected.
Cluster settings are not "applied" to the RoboServers so that settings are not changed in
the middle of schedule runs.
Maintenance No robots are allowed to run on the cluster (unless initiated from the API, as described
after the table). For cluster settings to be applied to the RoboServers, a cluster MUST be
in Maintenance mode.
272

Kofax Kapow User's Guide
Cluster Mode Description
Pending Maintenance When you select one of the following ways to set a cluster to Maintenance mode,
Pending Maintenance mode goes into effect until all robots stop running on the cluster.
Stop All Robots and Schedules Now
Attempts to stop all currently running robots. Any queued robots are de-queued and not
run. This is the fastest way of setting a cluster to Maintenance mode.
Finish Currently Running Tasks and Stop
Ensures that all robots that have been started and are currently running will finish before
the cluster goes into Maintenance mode. A schedule running several robots where some
are queued and some running, will only have its currently running robots run; any queued
robots are de-queued.
Finish Currently Running Schedules and Stop
Ensures that all running and queued robots are finished. This means that any started
schedules will finish before the cluster is set into Maintenance mode.
1. Click Change Cluster Mode above the cluster list.
The Change Cluster Mode window appears.
Note You can also right-click a cluster in the list and select the appropriate submenu item.
2. In the Cluster field, select the cluster to change.
3. In the Cluster Mode field, select a Maintenance option to transition into Maintenance mode.
The cluster modes are, as the name implies, only relevant on a cluster level. As such, they are
a way for the Management Console to control when tasks can be executed on clusters. They do
not, however, control the individual RoboServers. This means that robots started from the API are
not stopped when going into Maintenance mode. Therefore, the settings of a RoboServer can be
updated while API robots are running. It is guaranteed, though, that a robot will not have its settings
updated during its execution. For instance, if databases are updated while one or more API robots
are running, the robots will use the databases that were configured when they started. Next time they
are run, they will use the new settings.
Configure Cluster Settings
The cluster settings are sent to each RoboServer in the cluster. Through the cluster settings one can
configure, for instance, which databases are available for robots executing on the RoboServers.
273
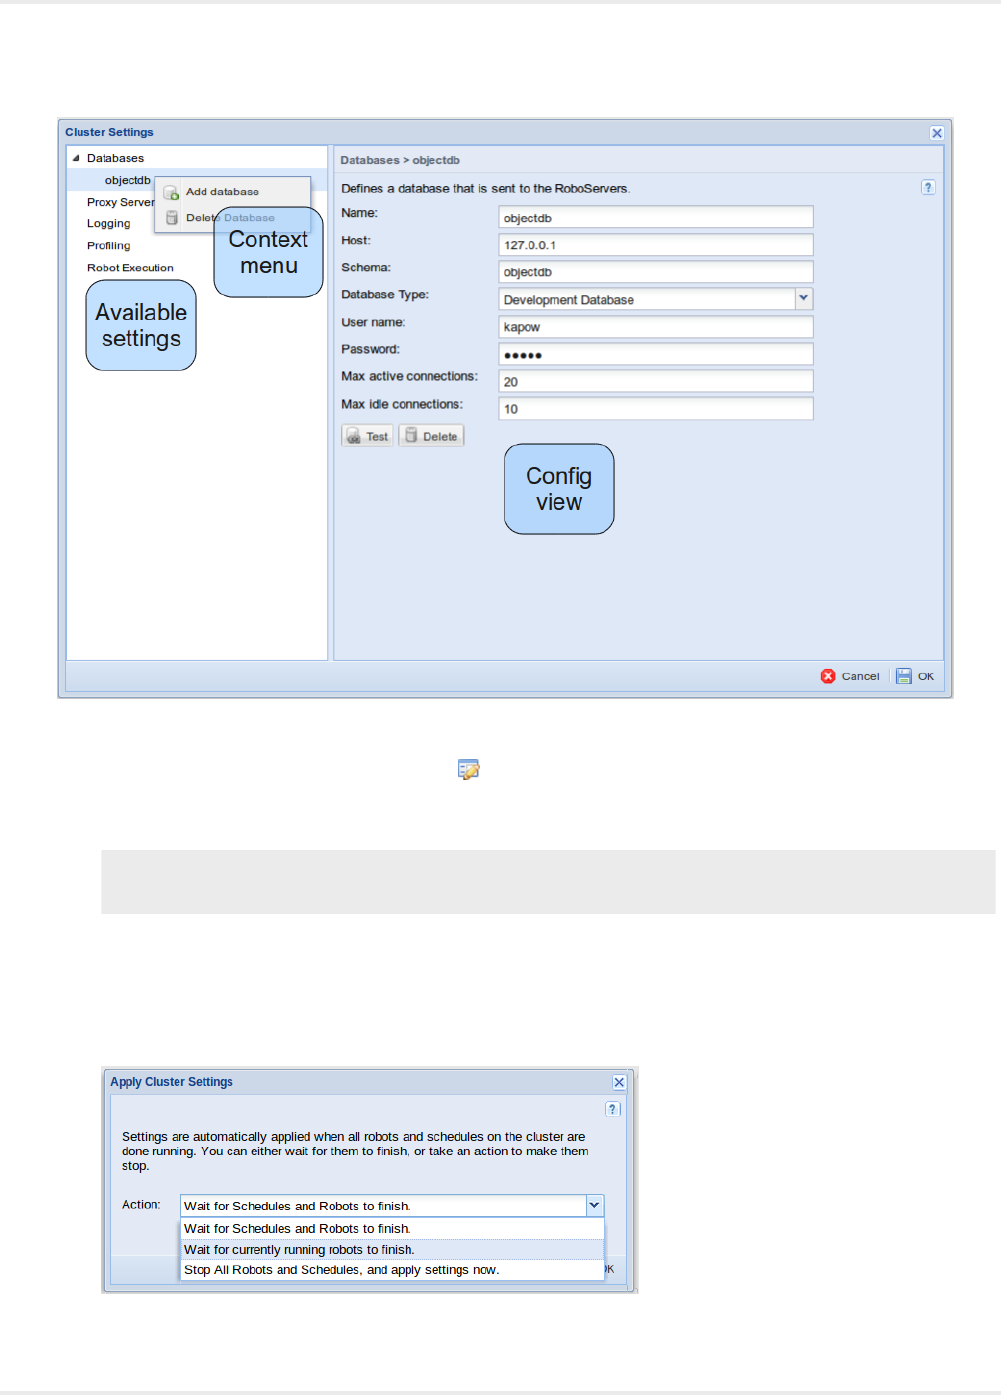
Kofax Kapow User's Guide
1. Right-click a cluster and select Cluster Settings.
Optionally, in the Settings column, click .
The Cluster Settings window appears.
2. Configure the options as needed.
Note When modifying the cluster settings, any changes are indicated in bold so that one has an
overview of the changes made before confirming by clicking OK.
3. Click OK.
In order for the settings to be sent to the RoboServers, they must first be applied. Applying settings
is done by setting the cluster into maintenance mode (see cluster modes for more information). If the
cluster is in maintenance mode, when you click OK, the settings are applied right away. If the cluster
is not in maintenance mode, the following window appears:
274

Kofax Kapow User's Guide
4. In the Action field of the Apply Cluster Settings window, select how you want to transition the cluster
into Maintenance mode in order to apply settings.
When the settings are applied, the cluster returns to Normal mode.
Cluster Databases
You can add or delete a database on the Databases menu of the Cluster Settings window.
The databases defined on a cluster are available to robots running on the cluster RoboServers via
database mappings. A database uses a database type. Database types are defined in the Management
Console settings.
If a cluster is selected to provide Design Studio with Shared Databases and database mappings pointing
to these databases exist in the Repository, the databases that are defined on the cluster are also available
in Design Studio. You can check database mappings on the Repository > Databases tab.
For users upgrading from pre 9.2.0 versions, it is possible to import databases from the legacy
db.properties files in which databases were previously defined. This is done by selecting the Databases
node in the tree, and clicking Import Databases From File. This will open a window in which the contents
of the file can be pasted.
See Database Connections for more information on database properties.
To add a new database, you can either select the database category, and click Add Database, or right-
click the database category and click Add.
Note To connect to a specific database, Kapow needs the JDBC driver for this database type. The driver
can be downloaded from the provider of the database. For example, sqljdbc4.jar that is used with a
Microsoft SQL Server database can be downloaded from the Microsoft website. To provide the driver for
Kapow to use, upload it to the Management Console under Admin > Settings > Database Drivers >
Upload Driver Jar.
By default, you can upload driver jars to the Management Console when you connect to it as
administrator from localhost (otherwise, the Upload Driver Jar button is disabled). This setting can be
changed in RoboServer Settings > Management Console tab > JDBC Driver Upload. Important:
start RoboServer Setting as the user running the Management Console process. After making changes
in the RoboServer Settings, restart the Management Console for the changes to take effect.
The Add Development Database button creates a database connection to the pre-installed Kapow
development database.
1. On the Cluster Settings > Databases window, select Add Database.
Optionally, you can right-click the database category and click Add.
Note To import databases from legacy properties files, select the database category and click
Import Databases From File.
When the window appears, paste the contents of the file to import.
2. Complete the following database detail.
• Name
• Host
275

Kofax Kapow User's Guide
• Schema
• Database Type
• User name
• Password
• Max active connections
• Max idle connections
3. Click Test.
4. Click OK.
Proxy Servers
You can configure a list of proxy servers to use on the RoboServers. If only a single proxy server is
defined, that one is used. If a list of proxy servers is defined, for the first connection a random proxy server
is selected. The following connections then use the proxy servers in round-robin order.
See Using Proxy Services for more details on using proxy and Design Studio, Proxy Servers for more
information on proxy server properties.
To add a new proxy server, either select the proxy server category and click Add Proxy Server, or right-
click the proxy server category and click Add. You can import proxy servers from legacy properties files by
selecting the proxy servers category and clicking Import Proxy Servers From File. This opens a window
in which you can paste the contents of the file to import. The file must have the format described at the
bottom of the Proxy Servers topic.
1. On the Cluster Settings window, Proxy Servers, select Add Proxy Server.
Optionally, you can right-click the proxy server category and click Add.
Note To import proxy servers from legacy properties files, select the proxy server category and
click Import proxy servers from legacy property files.
A window appears in which you can paste the contents of the file to import.
2. Complete the following Proxy Server details.
• Host name
• Port number
• User name
• Password
• Excluded host names
3. Click OK.
Cluster Logs
You can enable or disable logging options for the cluster RoboServers.
Database Logging
If database logging is enabled, the RoboServers will log to the RoboServer Log Database defined in the
Design Studio settings. If Log Robot Input To Database is selected, the robot inputs are logged to the
database.
276
Kofax Kapow User's Guide
Note A RoboServer log database MUST be configured and enabled for database logging to work. If no
database has been configured, the cluster settings will be invalid (you will be informed of this, so you
can correct the problem).
log4J
Using log4j you can control where the log goes using an ordinary log4j.properties file. The log4j.properties
file is located in the Configuration directory of the Kapow Application Data Folder, for example, C:\Users
\name.lastname\AppData\Local\Kapow\10.2.0.1\Configuration. See the Kofax Kofax Kapow
Installation Guide for more information.
The default log4j.properties file logs all robot run information, robot messages and server messages into
a file. The logs are placed in the Logs folder in the application data folder. More advanced setups include
storing in the Windows event log, rotating files, and the syslog. See the log4j manual for details.
When enabling this log, RoboServer will log using three different loggers.
Logger Description
log4j.logger.kapow.servermessagelog Used for server logging that is not tied to a particular robot run.
log4j.logger.kapow.robotrunlog Used to log information about starting and stopping robots, including the
execution time.
log4j.logger.kapow.robotmessagelog Used to log robot messages, such as information related to error handling.
Also includes profiling, if it is set up to be output to the log.
E-mail Logging
This will send an e-mail whenever a robot logs an error message or the server has an error message.
Property Description
To Address Who should receive the e-mail. You can add multiple addresses
separated by ",".
From Address The from address to be used on the e-mails.
Profiling
If you enable profiling of robots you can see the execution time for the individual steps and the entire
robot. This is very useful if you have a slow running robot and want to improve performance.
Profiling is configured using the following properties.
Property Description
Output Type If you choose Summary, only one statement summarizing the execution is
written to the profiling log for each robot execution. If you choose Detailed, a
detailed statement is written to the profiling log for every step executed in a
robot, provided the execution time of the step is above the threshold defined
by the Threshold property.
Output Target This controls where the profiling information is sent: to the console, a file, or
the log.
Threshold This threshold defines the smallest execution time (in milliseconds) for a step
to warrant inclusion in profiling information.
277
Kofax Kapow User's Guide
Property Description
Log page URL in wait messages If checked, the page URL is printed before the page load wait time.
Robot Execution
Use this section to define properties for RoboServer robot execution. Specify how many robots can run
concurrently on the (individual) RoboServers, and how many can be queued. See "Product Configuration"
in the "Runtime" section of the Kofax Kapow Adminisrator's Guide for help on assigning the proper values.
Property Description
Max concurrent robots Maximum number of robots allowed to execute
concurrently on each RoboServer.
Max queued robots Maximum number of robots allowed to reside in the
queue on each RoboServer.
Devices
This tab shows available Automation Devices that are registered with the Management Console. To
register an Automation Device in the Management Console, specify the Management Console's details
and set the "singleUser" option to false in the Automation Device Agent configuration file. For more
information, see Automation Device Mapping.
The following information is displayed for each device.
Column Description
Cluster/Device For Clusters
The name of the cluster.
For Devices
Either IP address or name of the Automation Device and a port used to connect
to the device.
Status Current status of the device. The status can be as follows.
• Available: The Automation Device Agent is running and no one is connected
to the device.
• In Use: The Automation Device Agent is running and either a Design Studio
or a RoboServer is connected to the device. Note that only one connection
can be established with the automation device.
• Offline: Either the remote device is off or the Automation Device Agent is not
started.
Label Label of the device mapping. You can use the labels to filter the devices you
want to automate with your robot.
Projects
Use the Projects section of the Admin tab to configure which projects are available in the Management
Console.
278

Kofax Kapow User's Guide
Projects are a way to segment robots, types, snippets, resources and schedules. Robots only have
access to the type, snippets and resources contained in the project they belong to. Names of robots,
types, etc. also need only be distinct within a project.
Note that if you delete a project, all of the robots, types, snippets, resources, and schedules associated
with it are deleted as well.
By default, the Management Console contains a single project.
When deploying the Management Console on a standalone web container, you can also configure project
permissions for users based on their group membership (for instance LDAP groups). For details, see
the "Tomcat Management Console" section of "Project Permissions" in the Kofax Kapow Administrator's
Guide.
The project name is used as a foreign key in the log tables to determine who has permission to view
the log files. This means that when you rename a project, all existing Robot Runs and Robot Messages
belonging to this project must be updated to reflect the new name. Otherwise they will not show up when
the logs are filtered by project. If the Management Console is connected to the logging database when
you rename a project, the Management Console will automatically rename the Robot Run/Message
entries in the log database. However if it is not connected, or the connection is lost during the update, the
administrator must manually run the following SQL to update the log tables.
UPDATE ROBOT_RUN SET projectName = '<newName>' where projectName = '<oldName>';
UPDATE ROBOT_MESSAGE SET projectName = '<newName>' where projectName = '<oldName>';
Where <oldName> is the old project name, and <newName> is the new project name.
Rest and SOAP Services
Robots can be exposed as Rest or SOAP services. If you open the Services tab of the "Edit project" dialog
box, you can configure the runtime for these services.
279
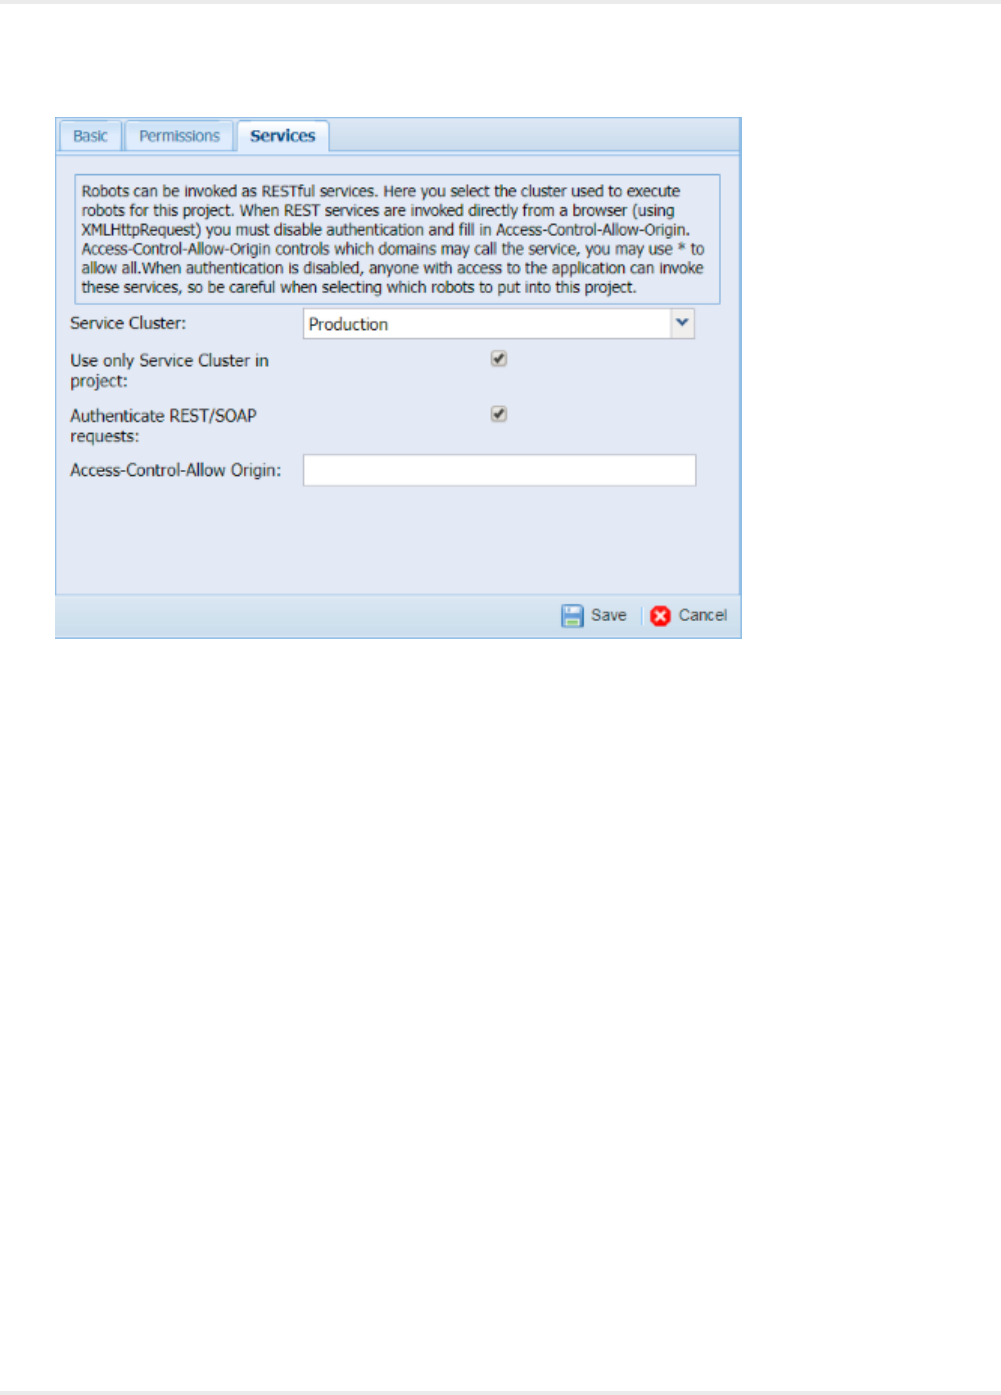
Kofax Kapow User's Guide
Service Cluster is a cluster used to run REST services in the current project. REST services always use
the selected service cluster. If you select Use only Service Cluster in project, Management Console
hides all other clusters and use the service cluster for all schedules, when generating code, and when
running robots from the robot menu. Note that when you select Use only Service Cluster in project, you
must select a Service Cluster.
By default, Rest/SOAP services are protected by basic authentication. When invoking the services directly
from a browser (using XMLHttpRequest), you have to disable the authentication, as you would otherwise
be exposing login credentials in the JavaScript source files. When calling Rest/SOAP services from
a programming language like Java, Ruby, C#, etc, it is a good idea to have the services protected by
authentication (assuming that you can keep the credentials stored in a secure manner).
There are certain restrictions when calling a Rest/SOAP service from a browser, unless the service is
located on the same web server as the web page from which it is invoked. When calling a Rest/SOAP
service from another domain (referred to as CORS Cross-Origin Resource Sharing), you have to include
certain headers for the client to be allowed to process a resource from another domain. The Access-
Control-Allow Origin is one such header. If you call a Rest/SOAP service in a cross-domain fashion,
you must specify the domain, from which the page that generated the request was loaded. If a page on
http://example.com contains a page with JavaScript that generates a request to a service located on
http://kapowsoftware.com, then the service response from http://kapowsoftware.com must contain the
header Access-Control-Allow-Origin: http://example.com or built-in security mechanisms in the browser
will prevent it from processing the cross-origin response. You may use * as a wildcard, which means that
any domain can invoke your Rest/SOAP service in a cross-domain fashion.
280
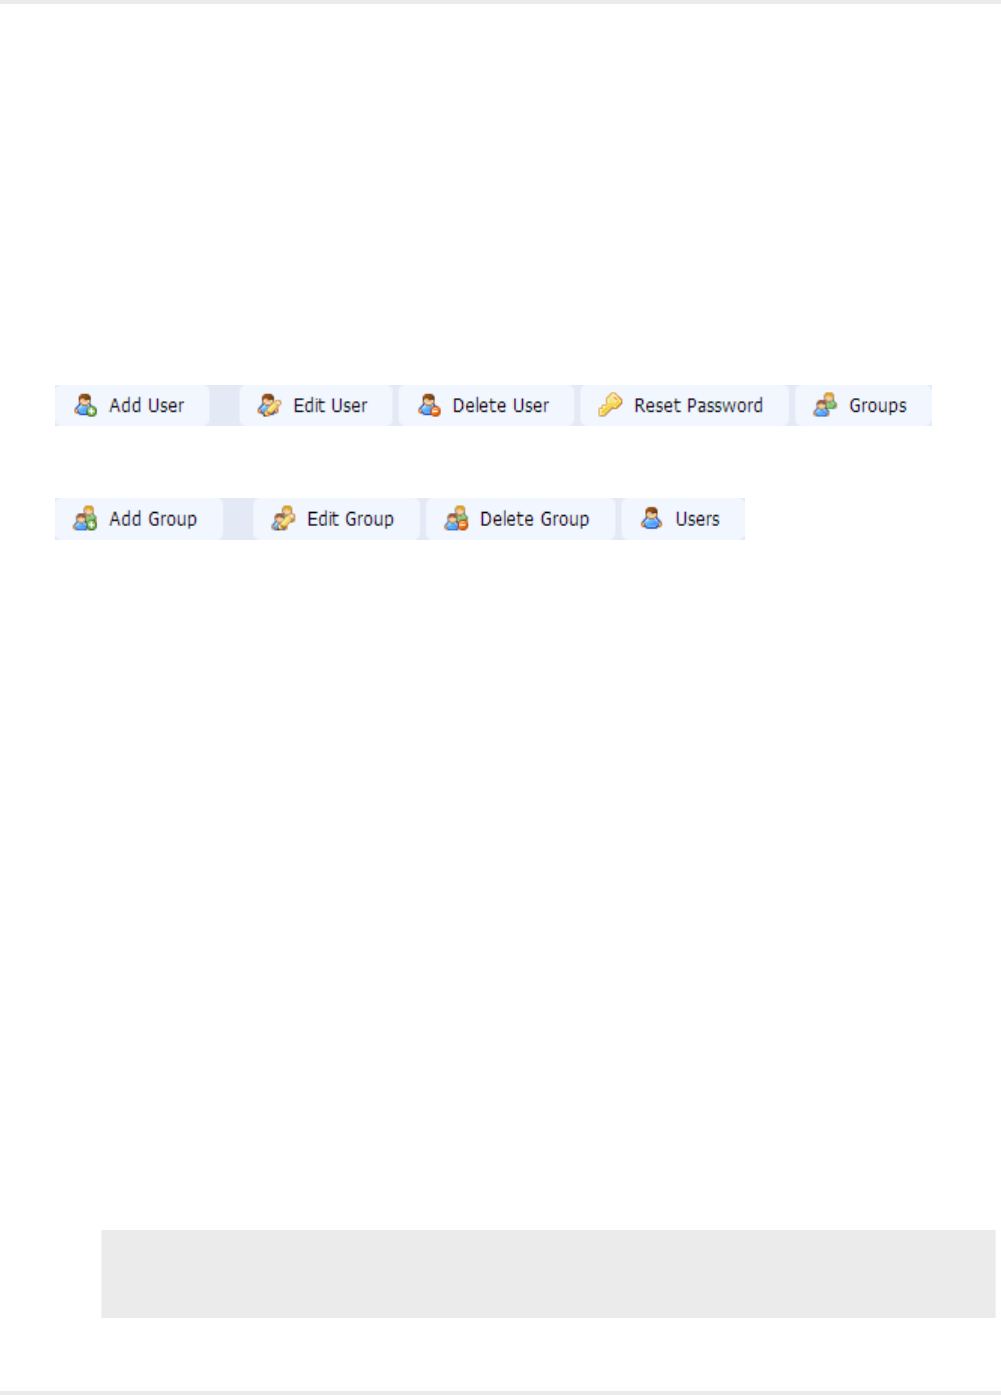
Kofax Kapow User's Guide
Manage Users and Groups
Use this tab to manage users and groups that can be granted access to the Management Console and
projects. The security model is role-based; that is after you create a user, you must add him or her to
one or more groups, which are associated with specific roles in one or more projects. It is a good idea
to create groups first, because a user will not be able to login, until he or she is added to a group that is
granted a view role inside at least one project.
The Users tab helps you create new users and edit, remove, and reset passwords for selected users. To
manage groups, click Groups. To go back to the Users tab, click Users.
The Groups tab helps you create, remove, and edit groups.
The following information can help you understand some Kofax Kapow user management principles.
There are two ways to run the Management Console: embedded in a RoboServer with any license and on
a standalone Tomcat server (requires enterprise license). For information about Management Console on
Tomcat, see "Tomcat Management Console" in Kofax Kapow Administrator's Guide.
When the Management Console runs in embedded mode, there are two types of user management,
single user or multi user. This is configured using the RoboServer Settings (RoboServerSettings.exe)
application located in the /bin subfolder of the Kofax Kapow installation folder.
To enable multi user mode, do the following:
1. In the Kofax Kapow installation folder, /bin subfolder, double-click RoboServerSettings.exe to run
the RoboServer Settings application.
2. On the Management Console tab, select Enable User Management.
You can also specify an administrator name and password.
3. On the General tab, select Register to a Management Console and specify the URL, name,
password and cluster name for the Management Console where you want to enable multi user
mode.
4. Restart the Management Console for the changes to take effect.
Depending on your license and the way you run the Management Console, you can manage user
access as follows:
• Single user - only available in Embedded mode
• Internal user management - available in both Embedded and Standalone mode
• External user management (LDAP or CA SiteMinder) - only available in Standalone mode with
enterprise license
Note When you run the Enterprise version on a Tomcat server, Management Console is always in
the multi-user mode and you can choose to manage your users either in the Management Console
(like in the embedded mode) or get the user credentials from your corporate LDAP server.
281
Kofax Kapow User's Guide
Settings
Use this tab to configure the Management Console. Click Save for the changes to take effect. Additional
options, which affect how you connect to the Management Console (such as port numbers and security
settings) are configured in the Settings application as described in the Embedded Management Console
Configuration topic of the Kofax Kapow Administrator's Guide.
RoboServer Authentication
In this section, you configure the credentials (user name and password) that the Management Console
will use when running robots on the RoboServers belonging to the configured clusters. The Management
Console will use the same set of credentials for all RoboServers. These credentials must match the
configuration as described in the Requiring Authentication section of the Kofax Kapow Administrator's
Guide for all the configured RoboServers.
RoboServer Purge
If this option is selected, Management Console automatically removes offline RoboServers from the list of
RoboServers on the Admin > Roboserver tab. If the RoboServer goes online, it automatically registers
with the Management Console and appears in the list of RoboServers.
RoboServer Log Database
This is the logging database used by the Management Console to store Schedule Runs and Schedule
Messages as well as all RoboServers belonging to clusters where database logging has been enabled in
the cluster settings. The database is configured in the same way as the cluster databases.
The following cleanup thresholds can be configured for the RoboServer log database.
Property Description
Keep robot and schedule statistics for
(day)
Specify the number of days to keep the robot and schedule statistics.
According to the cleanup settings you define, the old data is deleted on
a daily basis.
Max messages in robot run Specifies the maximum number of messages in a single robot run. The
robot message logging stops for the specific run when the number of
robot messages exceeds this threshold.
The cleanup deletes the oldest robot runs and the messages for
the deleted runs. If you experience performance problems with the
log database, you can lower this threshold. To store more historic
messages, you can increase this threshold.
To use a database for logging, you must prepare your database server by either creating a new database
(schema), or simply making sure an existing database is available. You must obtain a username and
password with rights to create tables, drop tables, create indexes, drop indexes, select, insert, update,
and delete in the database.
Both the Management Console and RoboServer will create the log tables automatically when they are
started (if the tables do not already exist). However, you may also create them using the Scripts for
Creating Database Tables.
282

Kofax Kapow User's Guide
Scripts for Creating Database Tables
The SQL scripts for creating and dropping tables in your database are located in the documentation\sql
directory in your Kapow installation directory. For example, C:\Program Files (x86)\Kapow 10.2.0.1
x32\documentation\sql on the Windows system. The name of the script file includes the name of the
database the script is intended for.
Note SQL scripts are installed together with Kapow documentation and if you install Design Studio.
SQL Scripts for Database Tables
The sql directory contains four subdirectories with different scripts as follows:
•altosoftsession: Scripts for creating and dropping tables for single sign on with Altosoft
•logdb: Scripts for creating and dropping logdb tables
•mc: Scripts for creating and dropping Management Console tables
•statistics: Scripts for creating and dropping Statistics (KAFKA) tables
Important The IBM DB2 database must have a table space with a page size of at least 8192 KB to
create all tables.
The Management Console uses a 3rd party scheduling component called Quartz. Quartz also requires
a number of tables which must reside among the other platform tables. These tables are also created
automatically when the Management Console starts, or may be created manually using the scripts.
The following is a Quartz verification script.
select count(*) from QRTZ_SIMPLE_TRIGGERS;
select count(*) from QRTZ_BLOB_TRIGGERS;
select count(*) from QRTZ_CRON_TRIGGERS;
select count(*) from QRTZ_TRIGGER_LISTENERS;
select count(*) from QRTZ_CALENDARS;
select count(*) from QRTZ_FIRED_TRIGGERS;
select count(*) from QRTZ_LOCKS;
select count(*) from QRTZ_PAUSED_TRIGGER_GRPS;
select count(*) from QRTZ_SCHEDULER_STATE;
select count(*) from QRTZ_JOB_LISTENERS;
select count(*) from QRTZ_TRIGGERS;
select count(*) from QRTZ_JOB_DETAILS;
Analytics Database
This tab helps you to set up your connection to the database used by the Kofax Insight dashboards. The
database is configured similarly to the RoboServer Log Database.
The following cleanup threshold can be configured for the Analytics database.
Property Description
Keep RoboServer statistics for (day) Specify the number of days to keep the statistics for. According to the
cleanup settings you define, the old data is deleted on a daily basis.
283
Kofax Kapow User's Guide
You must prepare your database server by either creating a new database (schema), or simply making
sure an existing database is available. You must obtain a username and password with rights to create
tables, drop tables, create indexes, drop indexes, select, insert, update, and delete in the database. For
more information, see RoboServer Log Database.
If you plan to using HTTP request authentication in Kofax Insight, create a single sign-on database.
Note The availability of the Analytics functionality depends on the license. If you have a license for
Analytics, the Analytics Database configuration panel is present on the Admin > Settings tab in the
Management Console.
SMTP Server
This section allows you to configure a mail server used for sending notifications to Kapplet users (if
notification is selected when starting the Kapplet), and for sending e-mail log messages if e-mail logging
has been enabled in the cluster databases.
NOTE: for Kapplet notification e-mails to work, a from address must also be specified under Kapplet
Result.
The SMTP server is configured using the following properties.
Property Description
Host The SMTP server host name.
Port The SMTP server port.
User If the SMTP server requires authentication then enter the user name here.
Password If the SMTP server requires authentication then enter the password here.
Encryption • NONE: Credentials and email are sent in clear text.
•TLS: TLS encryption is used. This only works if the SMTP server has a trusted certificate
(if the server has a self-signed certificate it must be exported and imported into the JVM's
truststore using the keytool utility). Uses the STARTTLS SMTP extension.
•SMTPS: SMTP over SSL. A secure channel of communication is established, over which
the Credentials a email is sent. This is rarely supported by SMTP servers, but will work
even if the server uses a self-signed certificate.
Base URL
The application base URL is used to generate results links in Kapplets, so that the e-mails contain results
residing on the Management Console server.
Note Typically, the base URL is configured automatically, and it is not necessary to change it.
Proxy Server
This section allows you to specify the proxy server through which the Management Console connects to
external servers, for instance when generating OAuth security tokens for accessing external APIs.
The proxy server is configured using the following properties.
284

Kofax Kapow User's Guide
Property Description
Use Proxy Server True if a proxy server should be used, false to use a direct connection.
Host The proxy server host name.
Port The proxy server port.
User If the proxy server requires authentication, enter the user name here.
Password If the proxy server requires authentication, enter the password here.
Kofax Insight Dashboards
You can enable Kofax Insight dashboards in Kapplets and specify a server URL to connect to.
After you select Allow Dashboards and specify a URL in the Server URL, restart your Kapplets. The Main
Navigation menu should contain the NEW DASHBOARD menu item.
To create a new Kapplet with a connection to the Kofax Insight dashboards, click NEW DASHBOARD and
specify all necessary parameters.
You can also specify the single sign-on parameters.
Single Sign-On
You can configure a database connection to a single sign-on (SSO) database that will be used for HTTP
request authentication by the Kofax Insight dashboards. Create the SSO database beforehand just
like other databases for use with Kofax Insight. All necessary tables are created by Kapow. For more
information, see Kofax Analytics for Kapow Administrator's Guide.
Specify all parameters for the kapplet to connect to the database that is used by the Kofax Insight
dashboards.
• Host: Specify a server name that runs the database used by the Kofax Insight dashboards.
• Schema: Specify a schema name.
• Database type: Select a database type from the list.
• User name: Type a user name to connect to the selected database.
• Password: Type a password to connect to the selected database.
Shared Databases
Shared databases are sent to all Design Studio clients being activated by (getting license from) the
Management Console.
To simplify the user interface, these databases are configured on a cluster.
• To make databases available in a certain cluster and in Design Studio clients, select the cluster in the
Shared Databases window and make sure a database mapping exists that points to this database. You
can check database mappings on the Repository > Databases tab. Choose All Clusters to make
databases from all clusters available in Design Studio clients.
• To define a special set of databases that are available for Design Studio, you can create a special
cluster. This approach may be useful if you prefer not to send production databases to Design Studio.
The default cluster named Production is automatically created for shared databases.
285
Kofax Kapow User's Guide
Kapplet Result
Use this section to configure Kapplet results settings.
Property Description
From address Sets the e-mail address used to send results emails. Note that results e-mails also
require a properly configured SMTP server.
Database Types
You can define the database type, such as MySQL. A database type consists of the following properties.
Property Description
Name The name identifying the database type.
JDBC driver The JDBC driver class of the driver (the driver must be uploaded under Database
Drivers).
Connection URL template A template string defining how connection URLs for databases of the given type
look. Possible variables to use in the template string are the following:
${ServerName}
Defines the server name (host) of the database server.
${Schema}
Defines the schema (or database/catalog depending on database vendor) of the
database.
An example of a connection string template is 'jdbc:mysql://${ServerName}/
${Schema}'. This string defines the connection string for a MySQL database
running on the default port (no port is specified), on the server given by
${ServerName} and using the schema given by ${Schema}. The variables are
given values when databases of the given type are created (see the cluster
databases section.
Validation query The validation query for a database is the query to use when validating
connections to the given database. Such queries vary greatly between different
types of databases.
The database types are also sent to Design Studio clients.
To add a new database type, select the database type category, and click Add Database Type.
Alternatively, right-click the Database Type category and select Add Database Type.
Note Kapow does not support adding new database types. However, you can modify the database
types in order to add a type that defines a database server running on a non-standard port or requiring a
different authentication method.
Database Drivers
The Database Drivers section contain uploaded database JDBC drivers. These drivers are required by
the various databases types. As with database types, uploaded database drivers are also sent to Design
Studio clients. Note that if you run your Management Console on, for instance, a MySQL database, you
need to provide Tomcat with the MySQL driver. This means that MySQL databases will work when used
in the Management Console (on the Log tab or when testing the connection). However, for the MySQL
286

Kofax Kapow User's Guide
databases to also work on all RoboServers, it is necessary to upload the MySQL driver here so that it can
be sent to the RoboServers (and Design Studio).
Note The Derby JDBC driver is not distributed with the Enterprise Management Console. See Apache
Derby Web site for Derby JDBC driver download information. We recommend using MySQL or another
enterprise-class database with your Enterprise Management Console.
Hint
On certain database types, you may need to tweak parameters or settings to store files larger
than a certain size. For instance, on MySQL databases, you may have to increase the value of the
"max_allowed_packet" variable, which in many installations is set to 1 MB (meaning that database drivers
larger than 1 MB cannot be stored). Please consult the documentation for your database if you encounter
problems when uploading drivers. To help identify any problems, you will receive an error message, and
the Management Console log will contain further details.
Security Note
By default, only the admin user is allowed to upload JDBC drivers while accessing the Management
Console from the localhost. If you are running the Management Console in embedded mode, you can
change this behavior in the RoboServer Settings application. Refer to the "Embedded Management
Console Configuration" section in the Kofax Kapow Administrator's Guide, for further details. If you are
running the Management Console in Tomcat, refer to the "Security" section under "Tomcat Management
Console" in the Kofax Kapow Administrator's Guide.
Back Up Management Console
Use the Backup tab to copy all or part of the Management Console configuration into a file for backup or
export purposes. If necessary, you can use the file to perform a restore or import operation.
Note You can restore backups created in Kofax Kapow version 9.2 or later. For earlier versions, contact
Kapow technical support for assistance in migrating your data.
It is important to understand the difference between creating/restoring a backup and exporting/importing a
project.
A backup contains all of the Management Console configuration including all schedules and all projects
in the repository, and can be restored only in its entirety. It may be used to restore the system after data
loss, or when upgrading to a later version of Kofax Kapow. In the latter case, you will create a backup of
the old instance of the Management Console and restore it into the new instance. See Restoring a Backup
for more information on restoring from an instance of the Management Console prior to release 8.1.
Note Prior to release 8.1, "Create Backup" was named "Export"; the term "export" is now used only for
"Export Project."
Use Export Project to create a file with information pertaining to a single project. This comprises the
schedules, robots, types, and resources within the project. Such a file may be used to copy schedules,
robots, and so on, from one Kofax Kapow system to another, for example when moving from a test
environment into production. It is possible to import into an existing project on the target system; in this
case, items from the file are merged into the project, overriding present items when names match. It is
also possible to do a selective import that includes only some items.
287

Kofax Kapow User's Guide
Creating a Backup
1. To create a backup, in Admin > Backup, click Create Backup.
The Create Backup window appears.
2. Click Create Backup.
3. When the backup is complete, select Click to download.
You can open the backup files, or click Save.
Exporting a Project
When exporting a project, you must select the desired project in this window. Then click Create to create
the desired backup/export file; this may take a while. When the file is ready, a download link appears. The
link is active only while the window is open; you cannot copy the link and use it after closing the window.
1. To export a project, in Admin > Backup, click Export Project.
The Create Export window appears.
2. Select the project to export.
3. Click Create Export.
4. When the export project is complete, select Click to download.
You can open the export files, or click Save.
Restoring a Backup
When restoring an export from a Management Console prior to release 8.1: As described above, it is
possible to restore from a backup made with an earlier release of the Management Console. Three
caveats should be kept in mind: First, the terminology was changed in release 8.1. Previously, the term
"export" was used for what is now named "backup". That is, if you want to migrate contents from a
Management Console prior to release 8.1, you must use its "Export" function to create an export file.
Secondly, this file must be converted to the new backup file format with the aid of the "Upgrade Pre-8.1
Management Console Export" feature in the Tools menu of Design Studio. Thirdly, the new project based
permissions introduced in 8.2 mean that permissions from a previous version can not be upgraded
automatically. After you restore an older backup, you have to assign project permissions manually.
Note Starting from Kapow 9.5.0, the threshold for cleanup has been changed from a number of records
to a number of days; thus the number of days is set to 10 in case of old backup with a number of records
50000 or more (the old default). If the number of records is less, the number of days is scaled back
accordingly.
1. To restore a backup, in Admin > Backup, click Restore Backup.
The Restore Backup window appears.
2. Browse to the backup file to restore.
3. Click Restore.
4. When the restore is complete, click OK and then click Close.
Importing a Project
1. To import a backup, in Admin > Backup, Click Import Project.
The Import Project window appears.
288

Kofax Kapow User's Guide
2. Select the items to import.
Available options include:
• Import Schedules
• Import Robots, Types and Snippets
• Import Resources
• Import OAuth
• Import Master Kapplets
• Import Permissions
3. Browse to the backup file to import.
4. Click Import.
5. When the import is complete, click OK and then click Close.
License
Use the License tab to enter a new license or view the current license. The Management Console has
room for two license keys: A Production and a Non-Production key. If your production environment is
completely separated from your development/QA environment, you need to install two Management
Consoles: one contains the Production license key, while the other contains the Non-Production license
key. In mixed environments, a single Management Console should contain both keys.
This tab also shows information on the Design Studio seats currently in use (Design Studio clients that
have received a license from this Management Console and are currently active).
Note Some items in the list are shown only if you have appropriate license. For example, if you have a
license for Analytics, the Kofax Analytics for Kapow: Yes item appears in the About the Current License
table.
Add Database Type
This topic provides steps to add a modified database type in the Management Console. As an example,
we will add a Microsoft SQL Server that requires Windows Integrated Security.
1. In the Management Console, go to Admin > Settings tab and click Database Types.
2. Click Add Database Type.
3. Specify the following values:
• Name: Microsoft SQL Server (Integrated Security)
• JDBC driver: com.microsoft.sqlserver.jdbc.SQLServerDriver
• Connection URL template: jdbc:sqlserver://${ServerName};databaseName=
${Schema};integratedSecurity=true
• Validation query: SELECT 1
Click Save to add the database type to the list.
4. Download the "Microsoft JDBC Driver 4.0 for SQL Server" from the Microsoft web site, and extract it
to a folder on your disk.
289

Kofax Kapow User's Guide
5. Copy sqljdbc_auth.dll to the \lib\jdbc directory in the Kapow installation folder. The
file is located in the extracted folder under Microsoft JDBC Driver 4.0 for SQL Server
\sqljdbc_4.0\enu\auth\x64 or \86 folder.
If there are RoboServers running on other computers, the sqljdbc_auth.dll must be installed on
each one.
6. Upload the sqljdbc.jar file to the Management Console. Select Database Drivers in the Admin >
Settings tab and click Upload Driver Jar. Browse for the corresponding JDBC driver. The .jar
file is located in the extracted folder under Microsoft JDBC Driver 4.0 for SQL Server
\sqljdbc_4.0\enu.
7. Restart Kapow Management Console.
You can now connect to the database that uses the newly created database type on the Admin >
Clusters tab of the Management Console.
Notes on Microsoft SQL Server for Windows Integrated Security
• If you do not copy the required database .dll file, use the 32-bit version of the auth .dll instead of the 64-
bit, or if you do not restart the Management Console, you may get the following error message: "Error
connecting to the database: This driver is not configured for integrated authentication."
• If the server is not part of the domain, you may get the following error: "Error connecting to the
database: Login failed. The login is from an untrusted domain and cannot be used with Windows
authentication."
See the following topics for more details about using databases in Kapow.
•Database Types
•Database Drivers
•Shared Databases
•Interact with Databases
JMX
The Management Console offers a small amount of information via the JMX protocol. The information
exposed through JMX is experimental, and should not be considered a public API.
The Management Console exposes the following MBeans:
Name Description
DistributionController Information on executing schedules, and cluster configuration.
FileBackedDataExporter Information on exports created from the Data View.
RobotLibraryGenerator Allows you to control the internal caching of Robot Libraries within the
Management Console.
TaskQueuePerformanceTracker Allows you to profile the distributed Task queue between two clustered
Management Console instances.
The MBeans are accessible via JConsole and Java VisualVM (+MBean plugin). Both are included in JDK
1.6+ or any other JMX client.
290

Kofax Kapow User's Guide
OAuth
OAuth is an open standard for authorization used with many popular APIs such as Twitter and Facebook.
It provides a means for applications (and in the case of Kofax Kapow: Robots) to access data or perform
actions on a user's behalf without having direct access to the user's login credentials. For instance, a
robot can use Twitter's API to extract the most recent mentions of a user, such as @KapowSoftware,
using access tokens provided by that user but without having explicit access to @KapowSoftware's Twitter
password.
The Management Console is used to generate access tokens, which are stored securely in a key store.
The access tokens can be passed on as input to robots in a schedule. As always, the robots that perform
the actual API calls and handle the returned data are created in Design Studio.
Supported Service Providers
In OAuth terminology, a service provider is the provider of the web service. Kofax Kapow supports the
following service providers. Documentation on the APIs of each service provider can be found on their
respective websites.
• Dropbox
https://www.dropbox.com/developers
• Facebook
https://developers.facebook.com
• Google
https://console.developers.google.com/apis/library
• LinkedIn
https://developer.linkedin.com
• Salesforce
https://developer.salesforce.com
• Twitter
https://dev.twitter.com
• Yelp
https://www.yelp.com/developers
Add Applications
To access the API of a service provider, you must create an application with that service provider. Creating
an application will provide you with a consumer key (also known as API key or application key) and a
consumer secret (also known as API secret or application secret).
To create an application, log in to the developer community of the service provider, select Create New
Application, or similar option, and fill out the required information. See Supported Service Providers for
links to service providers documentation for developers. In this topic we take a look at how this is done at
Twitter.
1. First, log into https://apps.twitter.com (creating a new account if necessary), and click Create New
App in the top right corner.
291
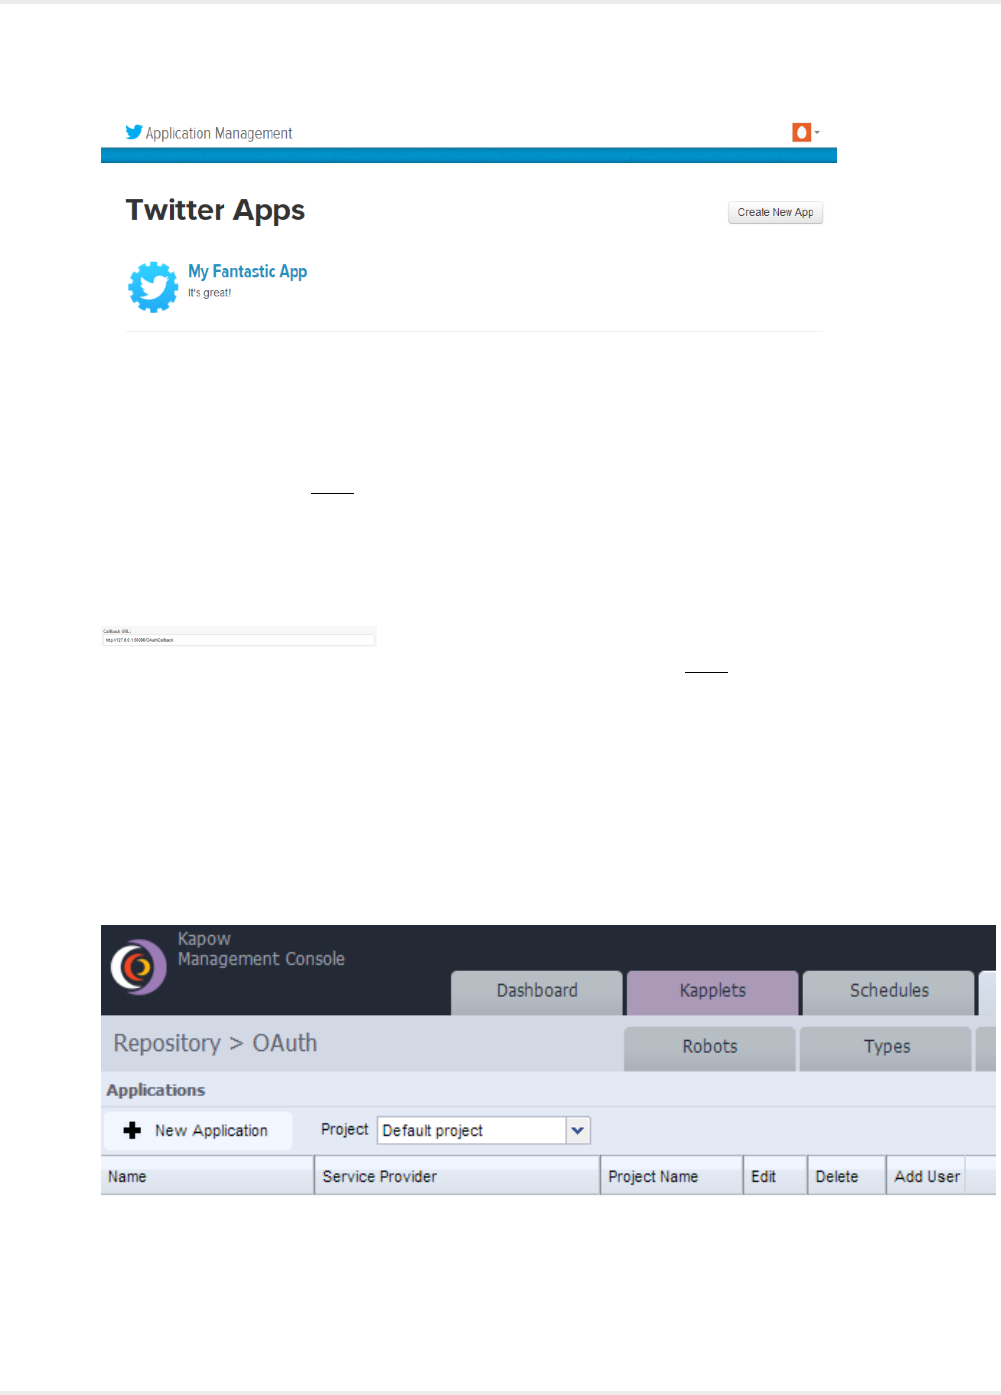
Kofax Kapow User's Guide
2. Fill out the required information, such as the name and description of the application, and read
through Twitter's terms of service before accepting.
One of the fields in the form is a Callback URL. This is the URL that Twitter will redirect a browser
to after the user has accepted to let your application interact with the Twitter account on the
user's behalf. This field must be set to the path OAuthCallback under the folder in which the
Management Console is deployed. For instance, if running with an embedded Management
Console, it runs at http://localhost:50080/. In this case, the callback URL would be specified
to http://localhost:50080/OAuthCallback. However, beware that some service providers do
not allow a callback URL containing localhost. Twitter is one of those providers, so we will use
http://127.0.0.1:50080/OAuthCallback instead.
Alternatively (and this is required by some service providers), you must specify the hostname or non-
loopback IP address of the machine on which you are running the Management Console. Since this
page is loaded by the browser of the authenticating user, this need not be a public hostname or IP
address.
After creating the application, a summary of the application appears. You must copy some of these
values into Management Console.
3. Open Management Console in a browser. Use the same IP address or hostname that was entered
as callback URL.
In the example below, we point our browser to http://127.0.0.1:50080/.
4. Navigate to Repository > OAuth and click New Application.
5. Select a name for the application (this does not need to be the same name as what is used when
you created the application at the service provider) and select the service provider (in this case
Twitter).
292
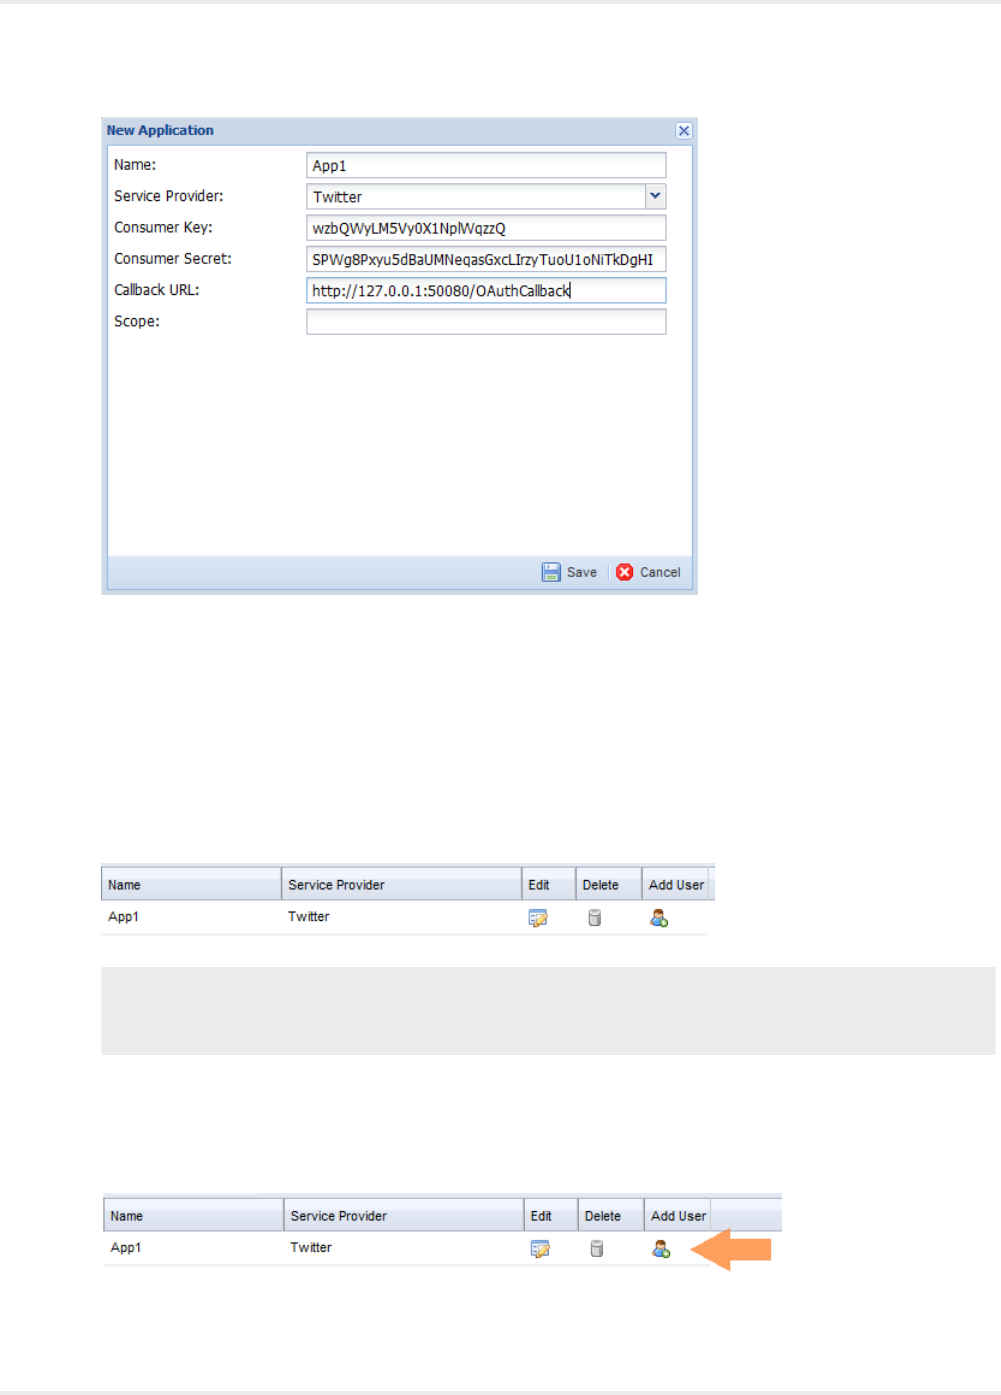
Kofax Kapow User's Guide
The consumer key and consumer secret must be copied from the summary page of the application
presented by the service provider.
6. Enter the same callback URL you entered in step 3 and click Save.
Some service providers additionally require that you specify a scope; for example, what parts of the
API that a user will authorize the application to access. For instance, when accessing Google, the
scope https://www.google.com/analytics/feeds/ must be specified if the application should be
allowed to access the Google Analytics Data API. Twitter does not use the scope field, so this will be
left blank in this example.
You have now set up an OAuth application in the Management Console.
Note If you edit the application later, the consumer secret is displayed as "(encrypted)" for security
reasons. To change the consumer secret, simply replace this value in the input field with the new
consumer secret; otherwise, leave as-is when editing an application.
Add Users
1. In the Add User column, click the Add User icon next to the application you created in Adding
Applications.
293
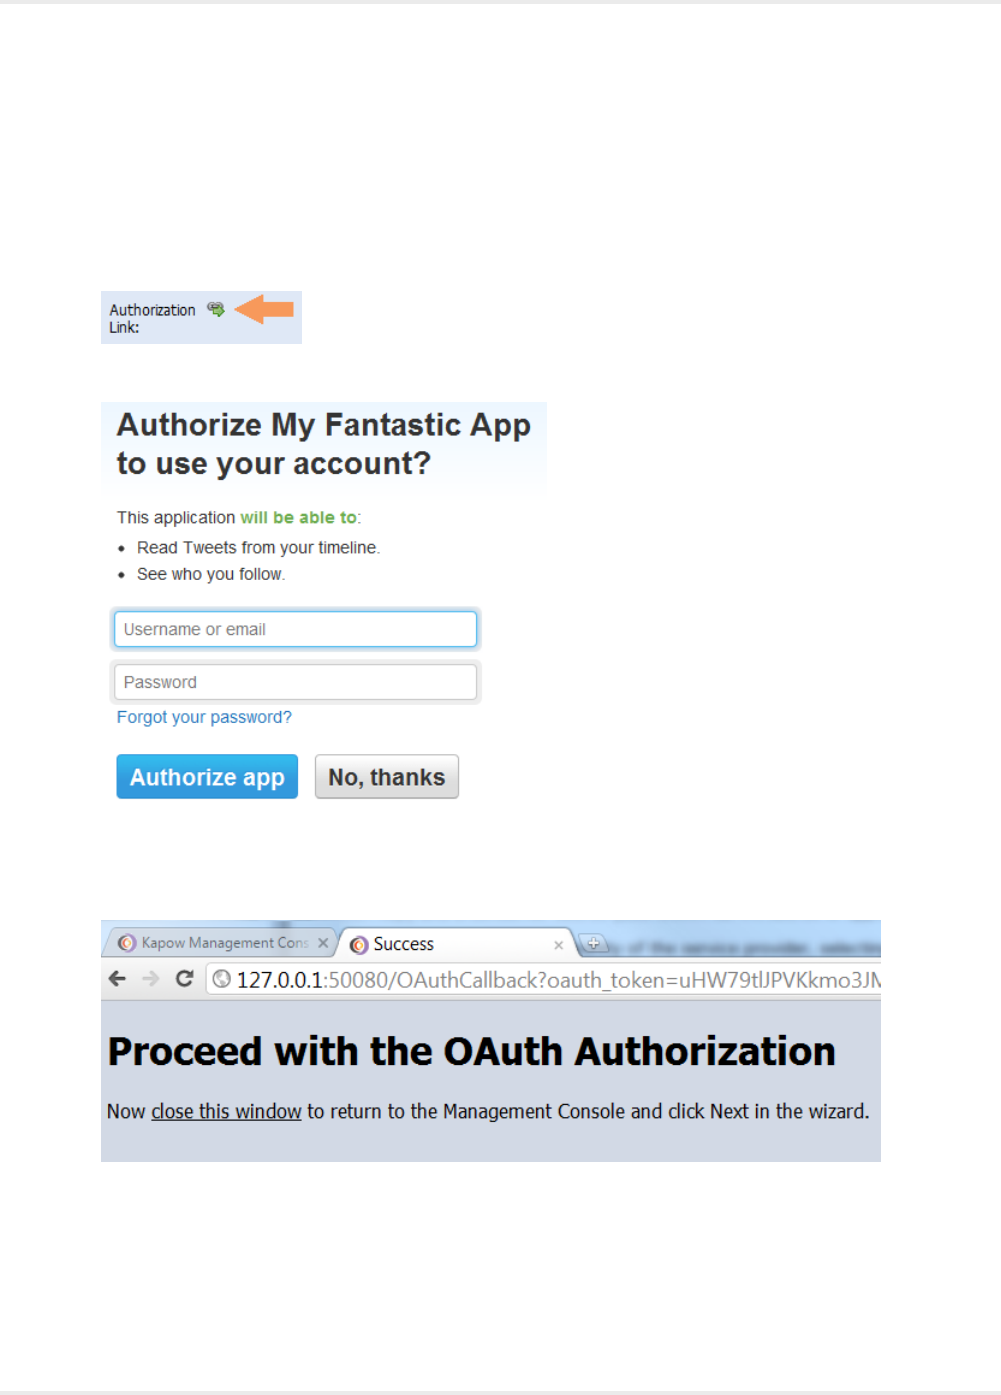
Kofax Kapow User's Guide
The Add User wizard appears.
2. In the User Name field, enter a name for the user.
This does not need to map to the username used by the service provider. It is only used inside the
Management Console.
3. Click Next.
4. Click the Authorization Link.
This opens the service provider's website. At Twitter, this looks as follows:
5. Enter the username and password and click Authorize app.
The service provider now forwards you to the callback URL. If the authorization was successful, the
Proceed with OAuth Authorization page appears.
6. Close the browser tab and return to the Management Console.
7. In the wizard, click Next.
You will see the access tokens that can be used for accessing the service provider on the user's
behalf. They have been securely stored in the Management Console's key store and can now be
used as input to schedules.
294
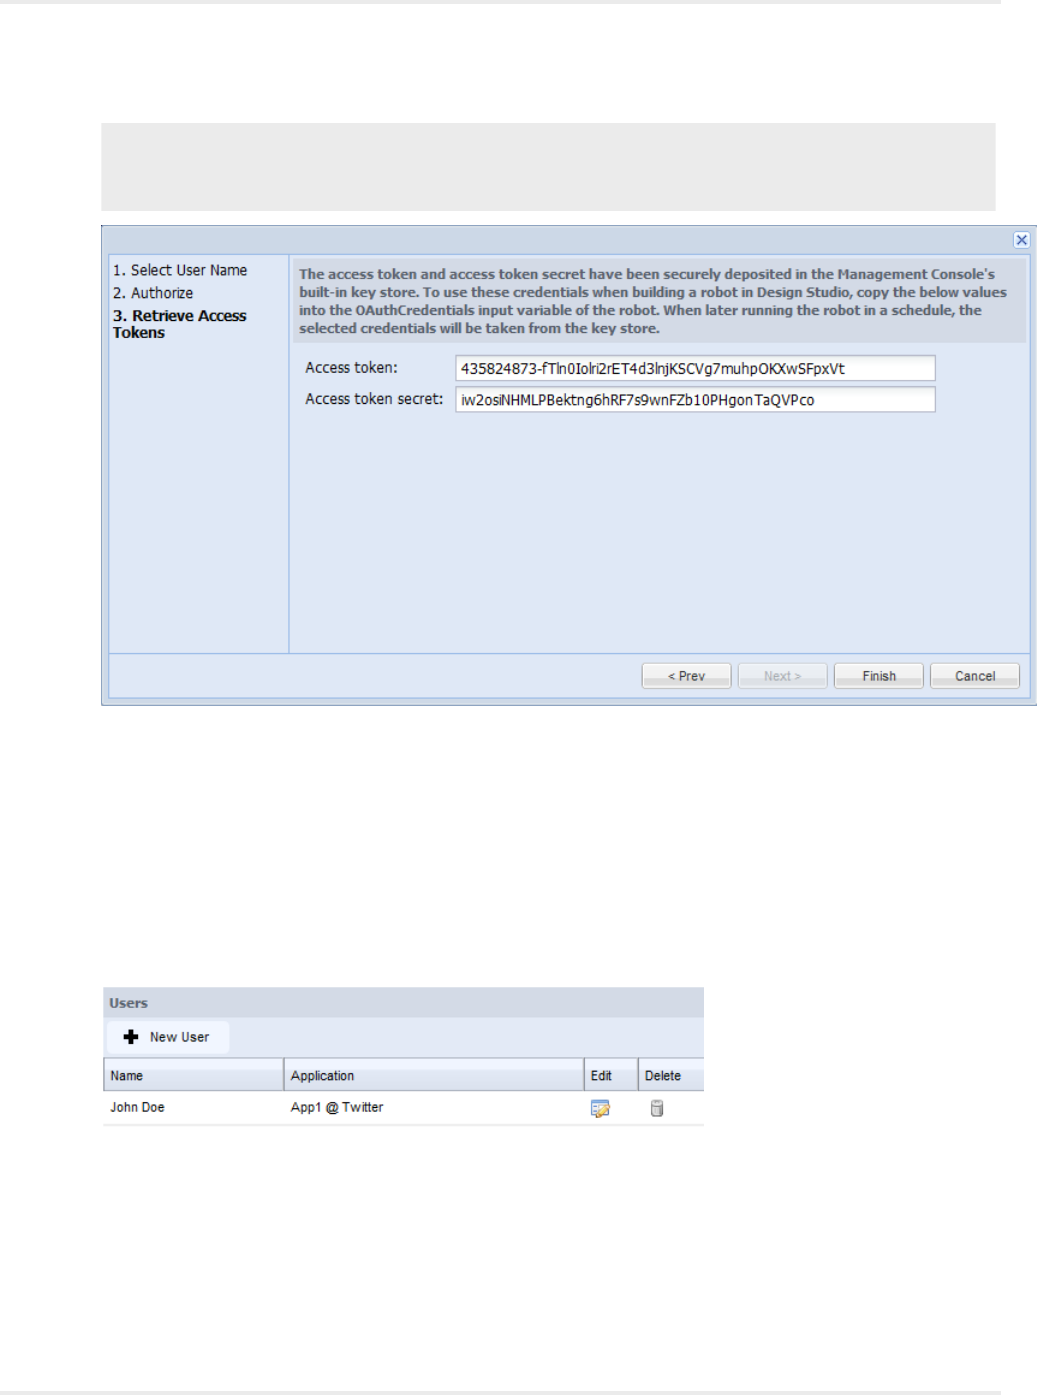
Kofax Kapow User's Guide
Note You will need sample access tokens as test input for the robot that we will build in a later step.
Copy the values into a text editor such as Notepad. For security reasons, you will not be able to
retrieve them from the key store in unencrypted form after clicking Finish.
At Twitter, we get both an access token and an access token secret. Service providers that use
OAuth 2.0 do not use an access token secret, so they will only return an access token. Some service
providers will additionally return a refresh token. This is used when the access tokens returned by
the service provider are only short-lived. Robots can then use the refresh token to obtain new access
tokens without a user having to re-authorize through the Management Console. To create robots
against the API of a service provider, you must copy all of the tokens displayed at the final step of the
wizard.
8. Click Finish.
The User section appears on the OAuth tab.
If you edit the user later, the access token, access token secret and refresh token are displayed as
"(encrypted)" for security reasons. To change any of these, simply replace this value in the input field
with the value; otherwise, leave as-is when editing a user.
295
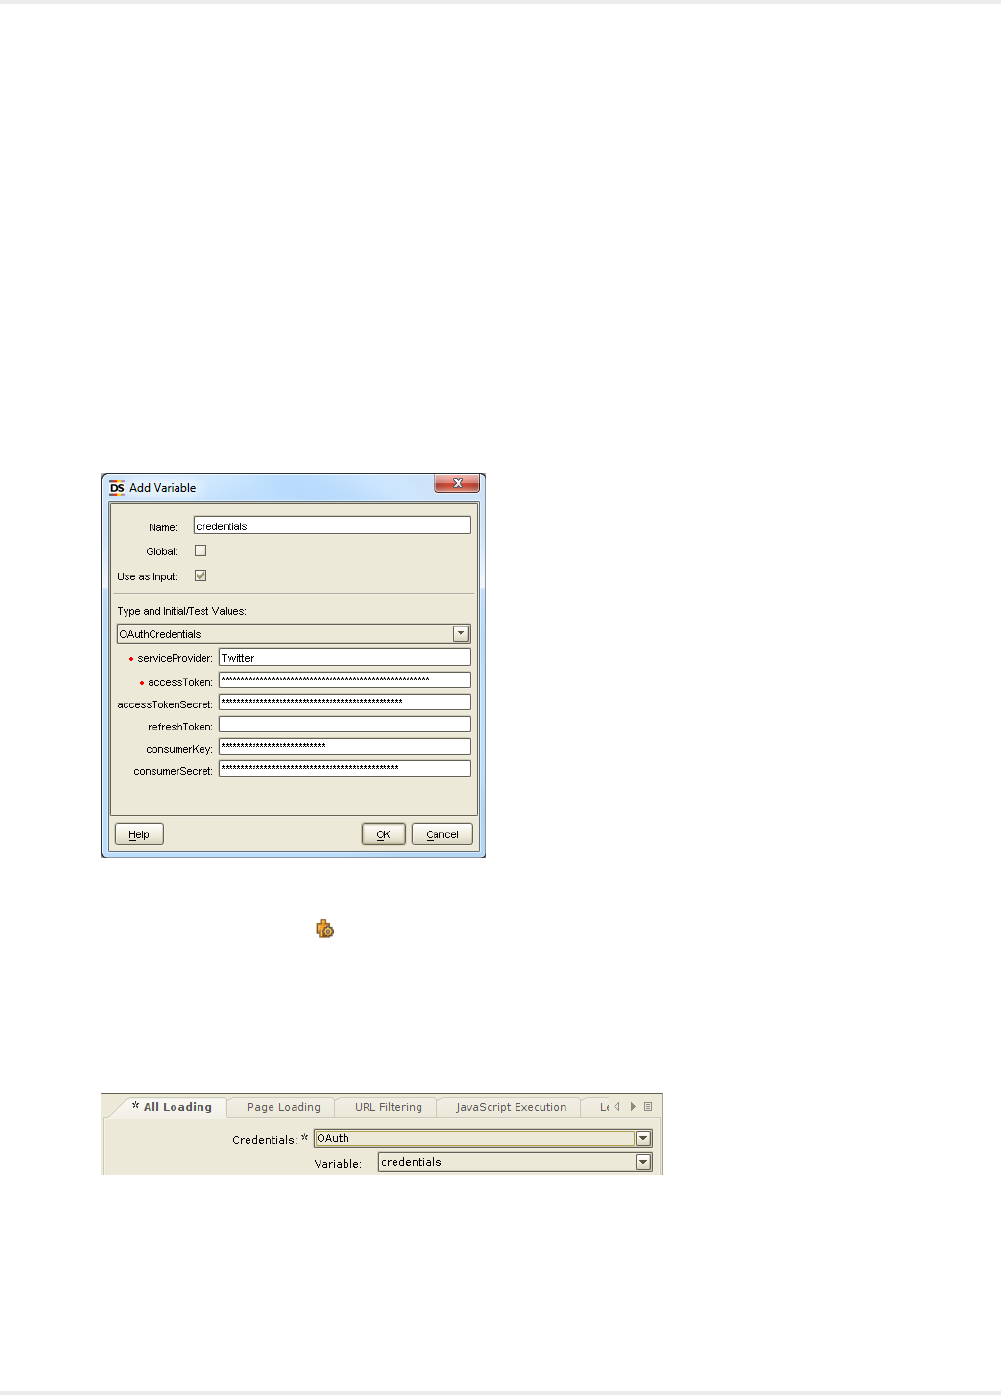
Kofax Kapow User's Guide
Write Robots
In the following procedure, you will write a robot that accesses a REST API that uses OAuth as its
authentication mechanism. As an example, you use the Twitter REST API to obtain the most recent
statuses by the authenticating user and the users he or she follows.
1. Start Design Studio and create a new robot.
Do not enter a URL in the wizard. You will not be able to access the REST API before authentication.
2. Add a new input variable of type OAuthCredentials.
3. In the serviceProvider field, type Twitter.
4. Enter the access token and access token secret that was obtained when you went through the
user authorization process in the Management Console wizard. Also enter the consumer key and
consumer secret of the Twitter application.
5. Click OK.
6. Click Configure Robot .
The robot configuration window appears.
7. On the Basic tab, click Configure.
8. On the All Loading tab, locate Credentials and switch it from standard username/password
authentication to OAuth.
9. Select the input variable you just added.
You should now see the XML that has been returned, containing the most recent statuses in the
user's timeline, as above.
10. Click OK in both dialogs.
The robot is now configured to use OAuth and using the specified credentials when running in
Design Studio. You can now start accessing Twitter's API. For instance, to see the most recent
296
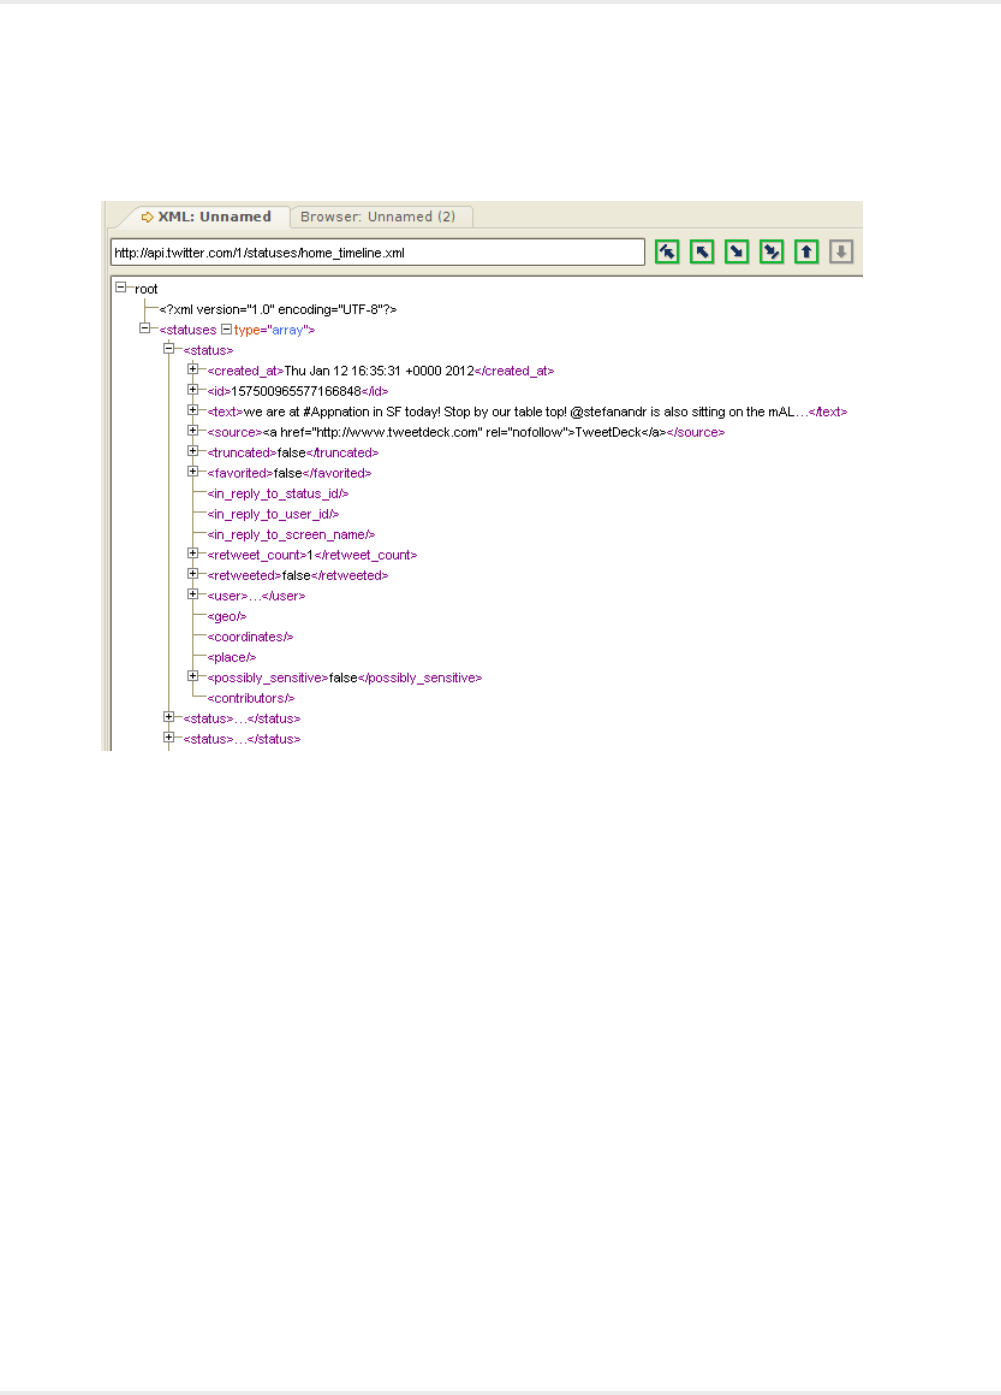
Kofax Kapow User's Guide
status updates by the authenticating user and the users he or she follows, you can access the URL
http://api.twitter.com/1/statuses/home_timeline.xml.
11. Enter that URL in the address bar of Design Studio and press Enter.
You should now see the XML that has been returned, containing the most recent statuses in the
user's timeline.
Schedule Robots with Credentials
1. Save and upload the robot created in Writing Robots.
2. Open the Management Console in a browser and create a new schedule.
3. To add the robot to the schedule, in the wizard click Add robot.
4. Click Next until you reach the Configure input step.
297
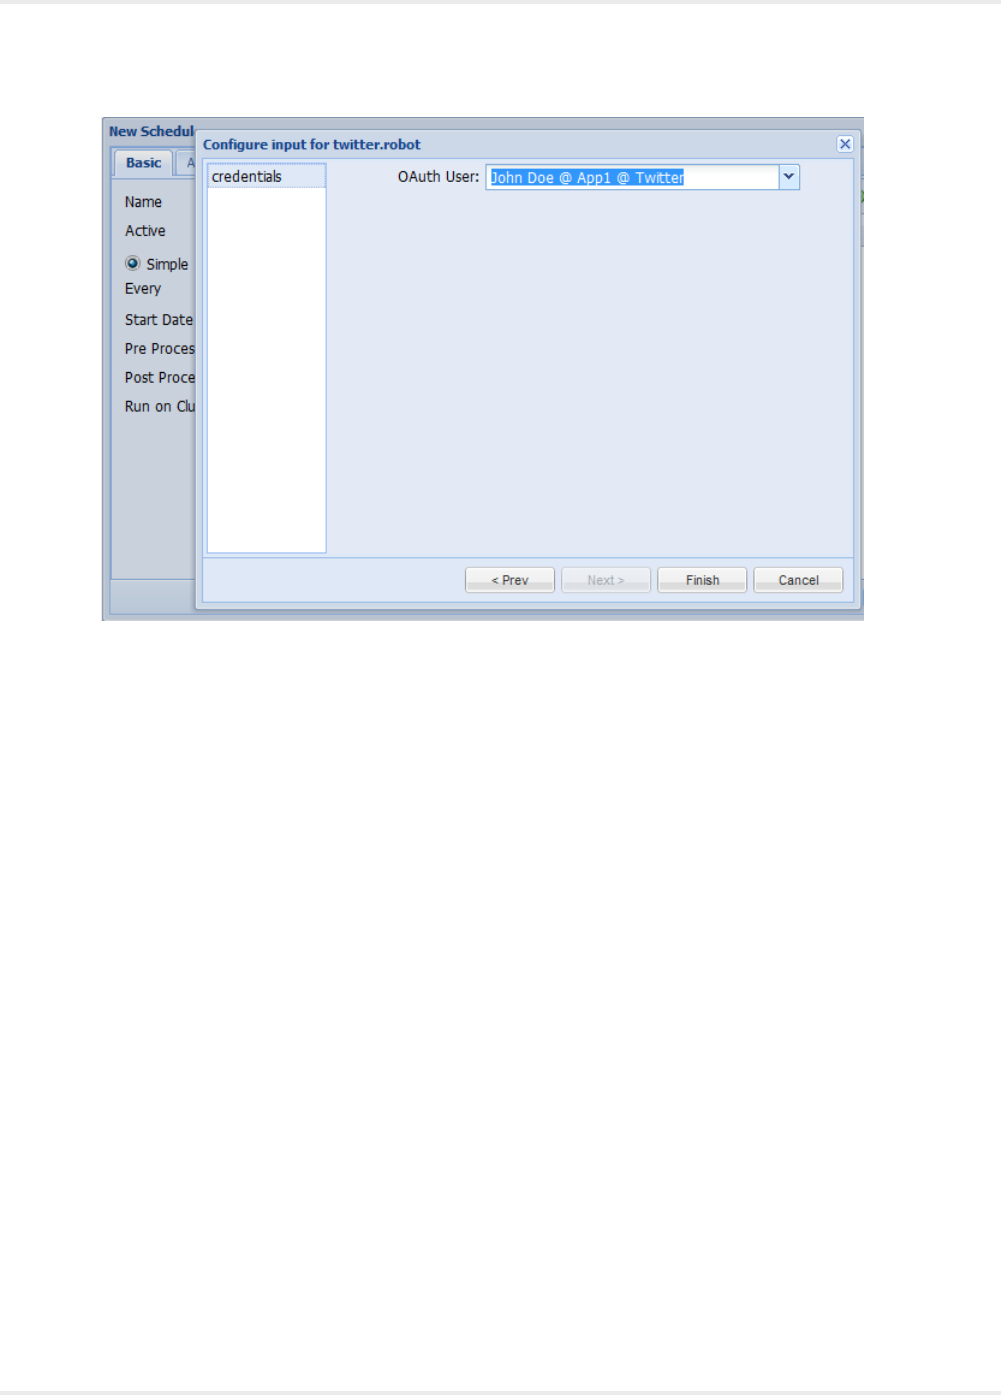
Kofax Kapow User's Guide
5. Select the OAuth user whose credentials you want to use when running the robot in this schedule.
This auto-populates the service provider, access tokens, consumer key and consumer secret fields
when the robot is run on RoboServer.
6. Click Finish and save the schedule.
The robot is now ready to run.
Out of Band Applications
Some service providers also offer a mechanism to authorize OAuth applications without using a callback.
This is known as out-of-band. Management Console also supports out-of-band authorization. The
application created at your service provider must be registered as an out-of-band application; at Twitter
this is done simply by leaving the callback URL field blank. Other service providers use the special value
"oob" to signify an out-of-band application.
1. Leave the callback URL field blank or use oob based on service provider requirements.
2. When you register the application in Management Console, leave the callback URL field blank here.
When adding users to the application, clicking the authorization link will not redirect back to the
Management Console. Instead, the service provider will present a verifier or PIN.
298
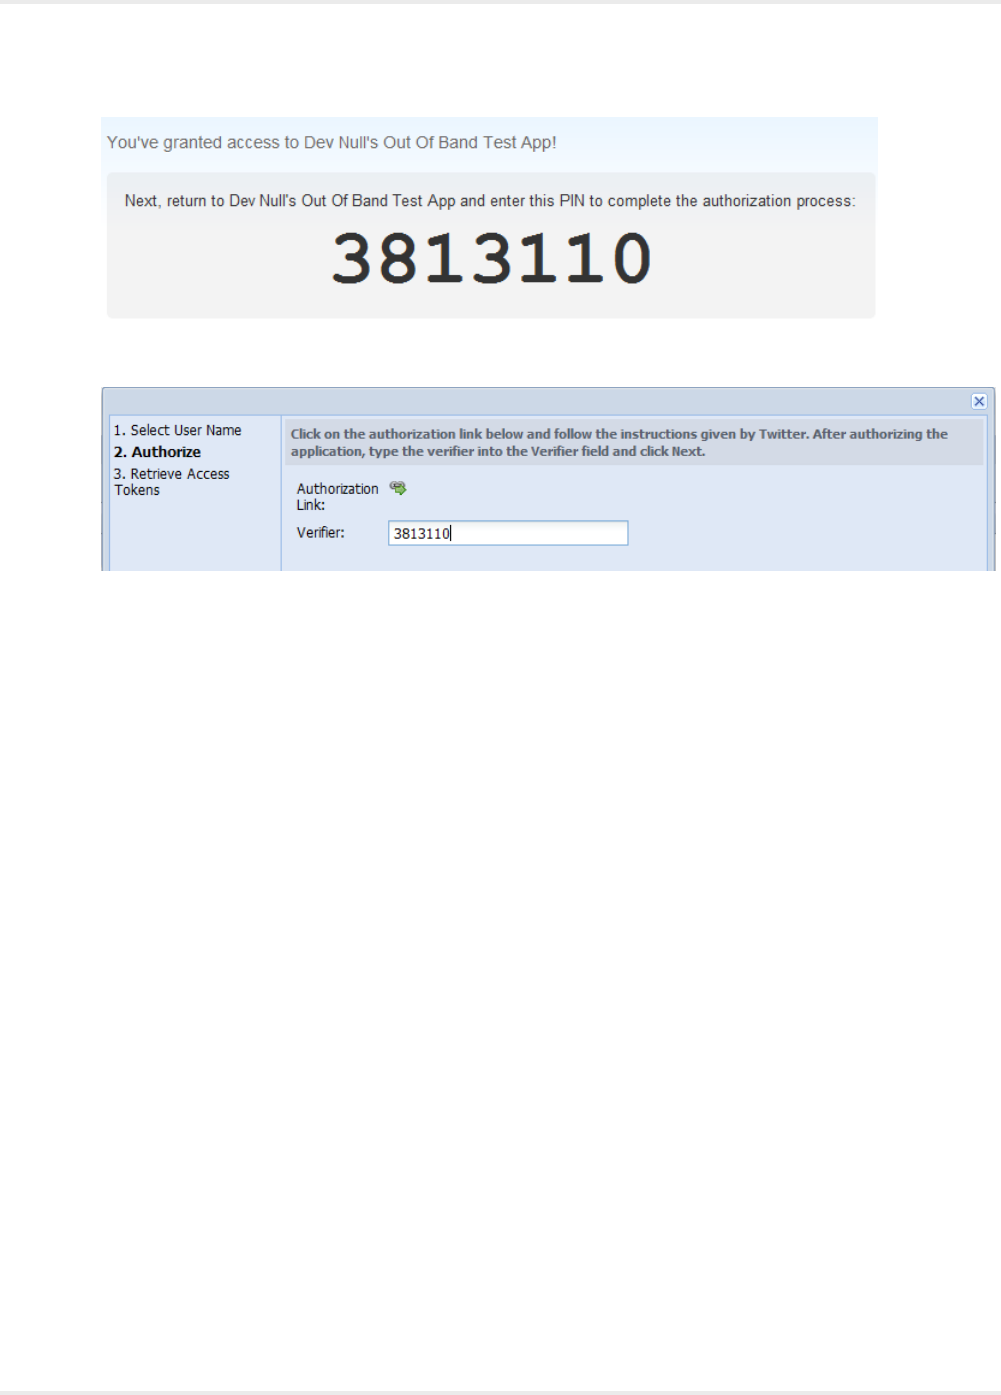
Kofax Kapow User's Guide
3. In the Verifier field, enter the PIN provided by your service provider.
4. Click Next.
299

Chapter 5
Kapow Kapplets
Kapow Kapplets expose a friendly user interface to robots. A Kapplet Administrator can make execution
of one or more robots available to users. These users do not need not know anything about robots as
they will interact with the robots through the provided Kapplet. A Kapplet can be customized to match the
terminology of the end-users; an icon and a description can also be attached.
A Kapplet is build and maintained by a Kapplet Administrator in the Kapplet Studio. When the Kapplet is
ready for use it is made available for all Kapplet Users through the KappZone where the users can install
the Kapplets into their individual My KappZone. Kapplet Users keep their own list of Installed Kapplets in
My KappZone or bookmark Kapplets in their browser.
Kapplets build on the user/role management of the Management Console. With the Management Console
deployed in a stand-alone application server, Kapplet Administrators use LDAP to manage which users
have access to Kapplet-exposed robots in which projects.
Building and Maintaining Kapplets
The topics in this section provide information about creating Kapplets and using the Kapplet Studio.
Creating Kapplets
1. In the Kapplet User area such as the KappZone, click Add New Kapplet.
Alternatively, on the Main Navigation Menu, click New Kapplet.
the Add New Kapplet window appears.
2. Enter a name for the Kapplet.
3. Associate the Kapplet with a project.
300
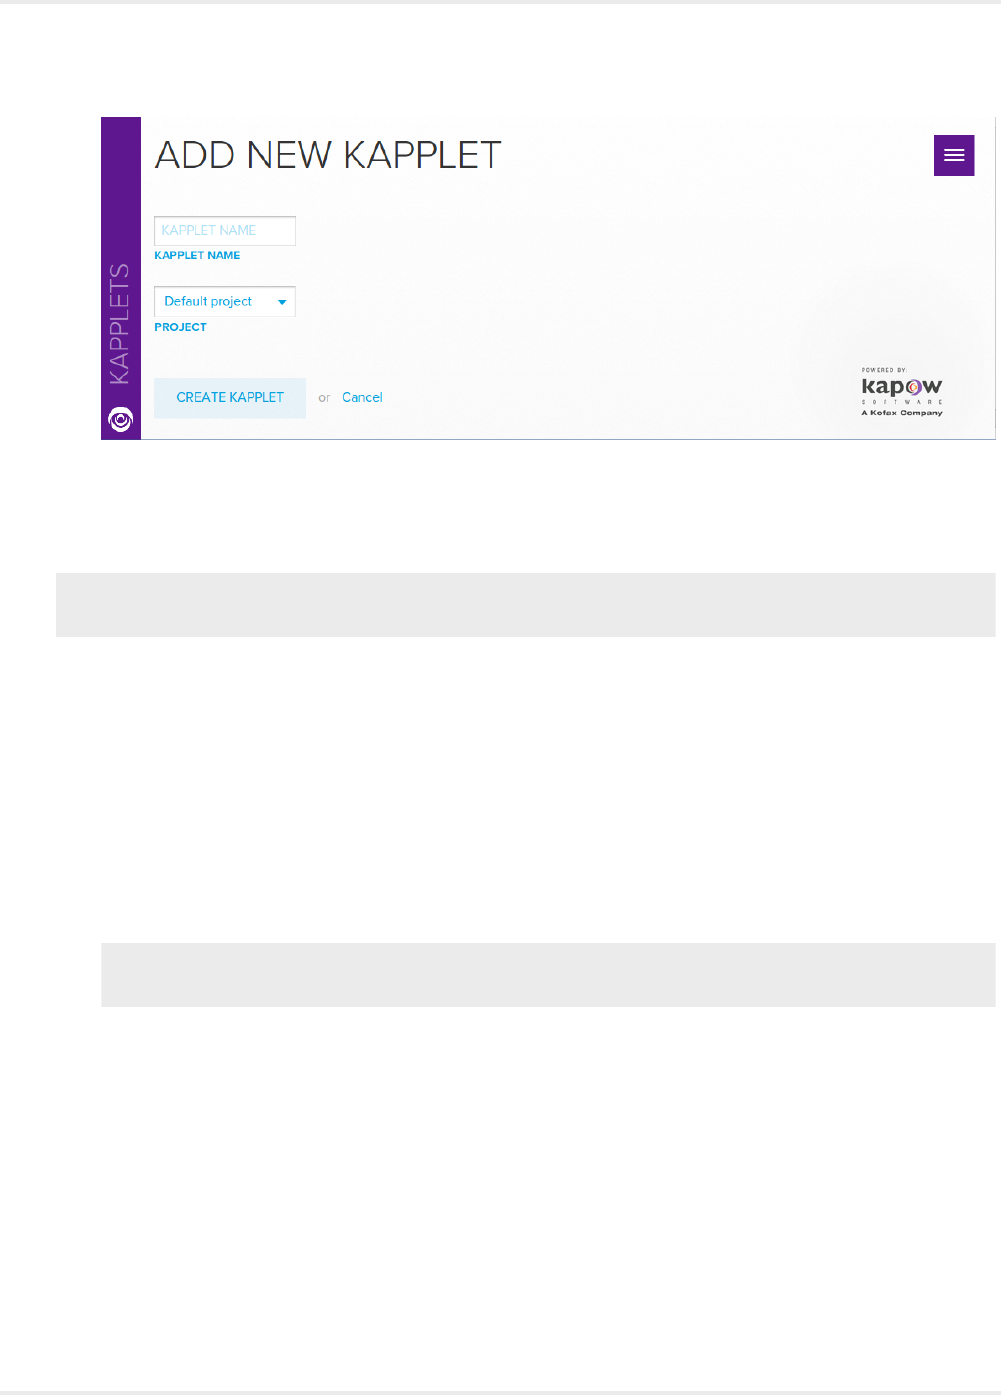
Kofax Kapow User's Guide
Using the Kapplet Studio
Use Kapplet Studio to enter general Kapplet information such as name, comment, and icon.
Note The Identity Section is only shown if no robots have been added to the Kapplet. If robots have
been added, the Pages Section appears.
1. Open a newly created Kapplett to view the Identity Section.
2. In the Identify section enter a Kapplet name.
Enter additional information as required.
3. Click Pages.
The Pages Section appears.
4. Configure the Kapplet.
On the left hand side the present collection of Kapplet Page Definitions is enumerated in the form of
clickable titled page icons. Each of these icons denotes a functional page/part of the Kapplet under
construction. Some pages are mandatory for all functional Kapplets while others depend on the
actual functionality.
Note The Start Page and the Result History Page are mandatory. These pages govern how input is
collected for the Start Action and how the result history is shown, respectively.
1. Configure the Start Page.
2. Configure the Results History Page.
3. Configure the remaining pages as required.
The remaining pages govern how the results produced by the Start Action is presented and
interacted with.
5. At the top of the Kapplet Studio, click Apply Changes.
301
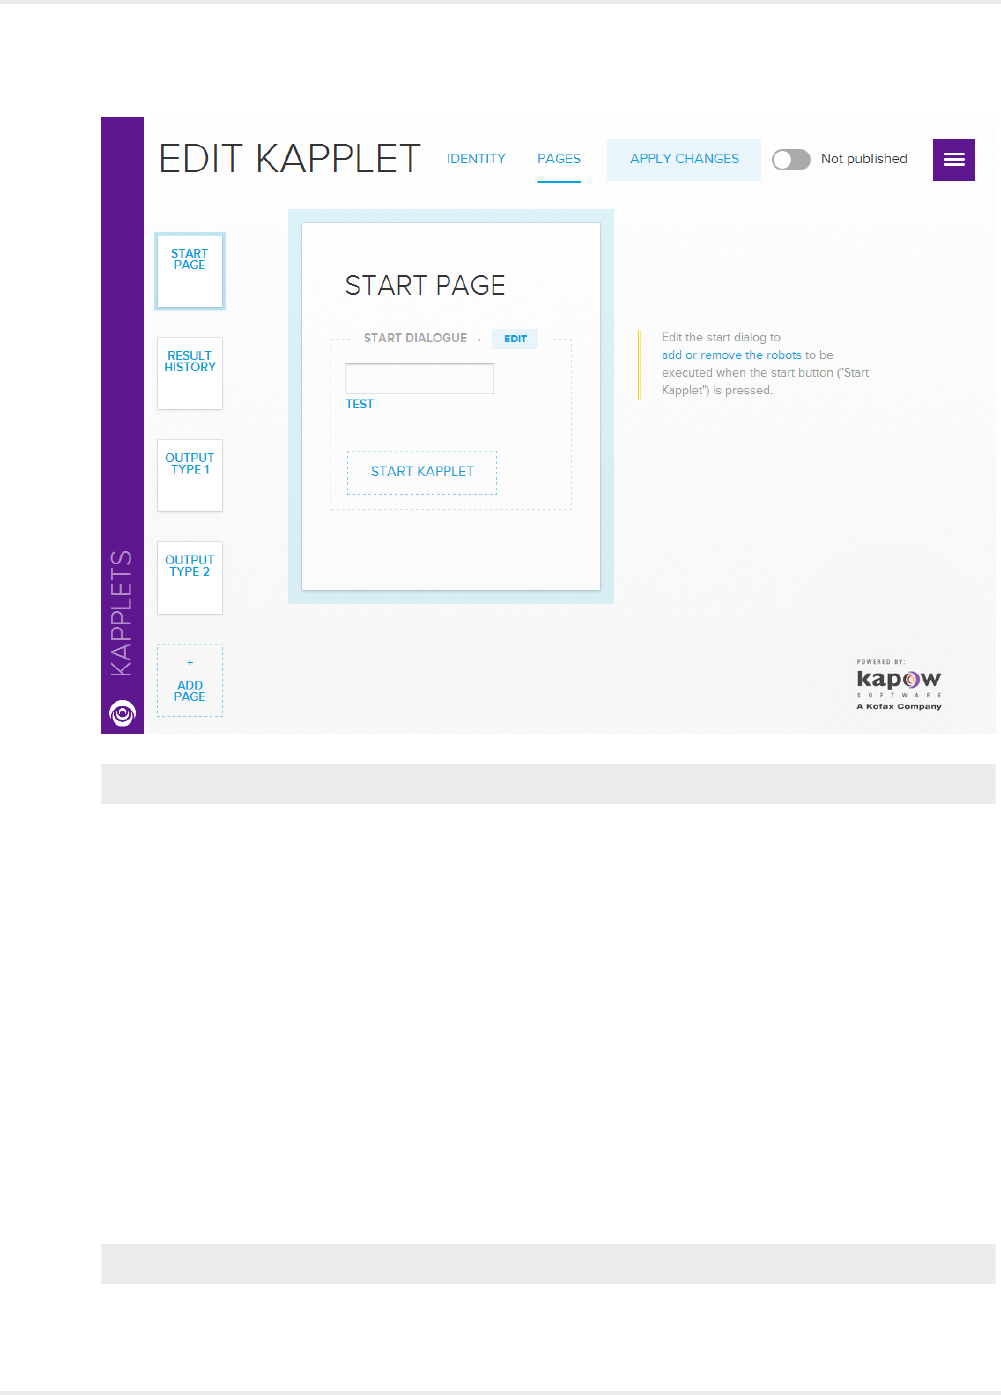
Kofax Kapow User's Guide
Important You must apply changes, otherwise the changes will be lost.
Configuring the Start Page
1. Open the Pages Section.
The contents of this page depends on the robots associated to the Start Action. When no robots are
associated, the page is empty. A robot can be added simply by clicking the 'Add Robots' area.
2. To add a robot, click Add Robots area.
the Add Start Action page appears.
3. Use Add Start Robots to select a robot for the Action.
4. Click Add New Robot.
The selection page lists your available robots.
5. To select a robot click a robot icon and then click Select Robot.
A list the attributes of the input variables defined by the added robots appears. For each attribute
the Kapplet Administrator can then decide whether a fixed value should be associated (and the field
then hidden from the user) or it should give rise to an input field. For example, an added 'test' robot
expects a single variable 'input' with two attributes - one of which is user input and the other is fixed.
Note When you point to a robot name, you can see the path of the robot file.
6. Click OK.
302

Kofax Kapow User's Guide
the Kapplet Administrator returns to the Pages Section where the Start Page now shows an outline of
the page that will be presented to Kapplet Users when they run the Kapplet.
7. The Kapplet Administrator can also change the user experience by interacting with the outline, such
as the page title, the order and labels of fields, and the start button label.
Note The Pages Section also lists output types (if any) on the left hand side.
Using OAuth in Kapplets
If a robot that you add to a Kapplet contains an OAuth input for connecting to a service provider, the Edit
Kapplet screen contains the Configure OAuth Credentials section.
1. To connect to a service provider, select Configure OAuth Credentials.
2. Select an Application from the list.
The application start page appears.
3. Click Connect.
The authorization process will be initiated asking the user to grant access. Having completed that
flow, the Connect button disappears.
To see the authorizations stored for the user, you can use Settings in the main menu.
Connecting to Kofax Insight Dashboards
Kofax Insight gives organizations the ability to rapidly assemble, analyze and visualize immense amounts
of complex data to improve decision making, operational effectiveness and profitability. Kapow Kapplets
provide means to connect to Kofax Insight Dashboards using single sign-on mechanism. Use the following
steps to create a dashboard kapplet.
1. In Kapow Management Console select Admin > Settings > Kofax Insight Dashboards.
2. Click Allow Dashboards.
3. Specify a Server URL of the server hosting an Insight dashboard.
4. To configure single sign-on parameters, select Admin > Settings > Single Sign-On and specify
necessary parameters to connect to the database used by the Kofax Insight.
5. In Kapow Management Console go to Kapplets and open the KappZone.
Note If KappZone is already open, restart your KappZone.
6. On Main menu and click New Dashboard.
The Add New Dashboard window appears.
7. Specify parameters to connect to Kofax Insight.
1. Specify a name in the DASHBOARD NAME. This is a display name for your Kapplet.
2. In the Project list, select a Kapow project you want to get statistics on.
3. Leave other fields empty.
Note If nothing is specified, the Kofax Insight uses its default parameters, or the default parameters
for the user if single sign-on is enabled.
8. Click Create Dashboard.
303
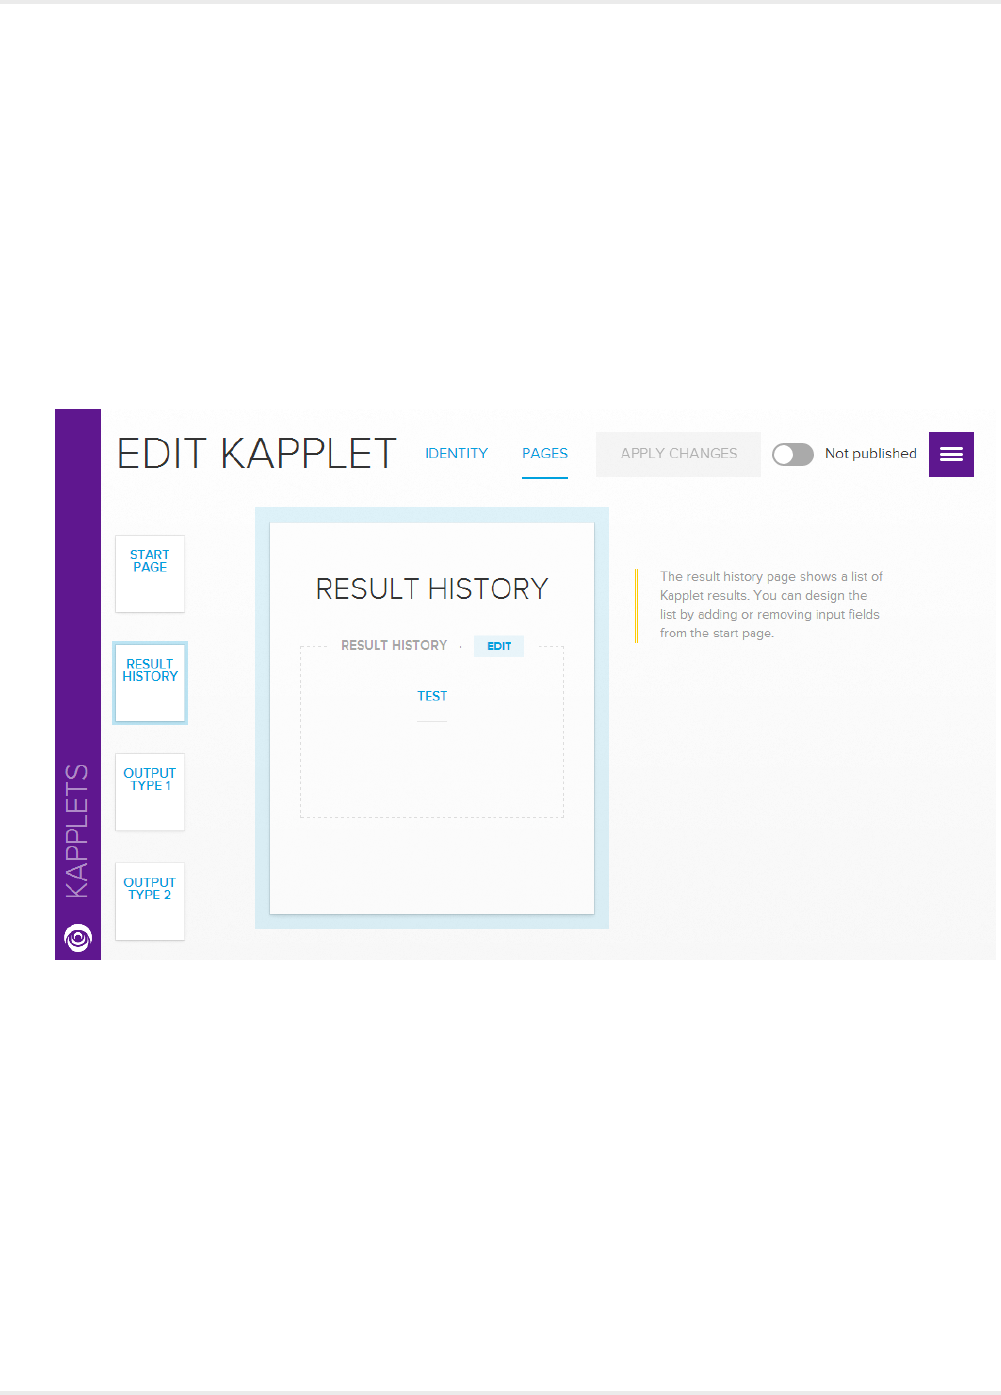
Kofax Kapow User's Guide
Configuring the Result History Page
Every Kapplet has a Result History Page allowing Kapplet Users to access the results of past and present
Kapplet runs. This page shows the results as list of items, each corresponding to a particular past run and
consisting of a timestamp and an enumeration of the input parameters given to the start action of the run
in question.
In the Kapplet Studio an outline of the Result History Page can be previewed and some aspects can be
customized - however only the page title as of yet. As shown below the 'test' example robot gives rise to
a list of elements consisting of a timestamp (not shown) and a single input value corresponding to the
'iterations' parameter.
Adding a Commit Action
Once a Result Page is set up to show a tabular view of a dataset produced by the Start Action, the
Commit Action can be added to the Kapplet. This window allows you to select a robot to facilitate a
commit of selected table rows into, a database, a web-service, or an actual website. The robot must
take as input data of the same type as presented in the selection table, and must return the result of the
commit in the form of a single object of a type different from the input type.
Returned types will change the actual selection table, such that the returned information can be shown
together with the original information once the Commit Action has finished.
1. In the Result Page Table section, click Add Robots.
The Add New Commit Action window appears.
2. Click OK.
304

Kofax Kapow User's Guide
Once the Commit Action has been added, the Kapplet is (again) correctly configured and can now be
used to collect, select, and commit data.
Important To make the Kapplet available to Kapplet Users, the Kapplet Administrator must publish
the Kapplet.
3. Select an appropriate toggle at the top of the window.
Installing and Using Kapplets
For Kapplet Users that are now Kapplet Administrators, Kapow Kapplets will typically be accessed
directly from the web browser by adding KappZone to the Management Console URL. For instance, if the
Management Console is deployed at http://localhost:50080/, Kapplets can be accessed directly at http://
localhost:50080/kappzone.
Note Un-Installed Kapplets allow the user to install while Installed Kapplets allow the user to open (run).
Users have access to Kapplets in the KappZone tab. When the user installs a Kapplet an instance of the
Kapplet is made available in the users My KappZone. Any given Kapplet can only be installed once by a
particular Kapplet User. An Installed Kapplet can be run both from My KappZone (click it) and KappZone
(click 'open').
Users can bookmark Installed Kapplets from My KappZone in their browser, and they can "star" Installed
Kapplets to add them to their display of favorites. In this way the user can navigate smoothly to the most
often used Kapplets.
To bookmark a Kapplet, identify the Kapplet URL shown in the browser. You can simply bookmark the
current page.
Open the KappZone and click Favorites to show Installed Kapplets for the curent user. o
Invoking Kapplets
To run an Installed Kapplet, simply click it - either in My KappZone or in My Favorites, and fill out all of
the required fields and click the Start button. In the example below the 'test' Kapplet requires only the
'iterations' field to be filled.
When using a Kapplet, the Kapplet User generally sees a view like the one shown above, where all active
Kapplet Pages are shown simultaneously in left-to-right order starting with the Start Page, the Result
History Page, and then Result Pages if relevant. Note, that until the Kapplet has been started, or an active
Kapplet Run has been selected from the Result History Page only the Start Page and the Result History
Page are shown.
Once the Kapplet is started a corresponding new Kapplet Run will be listed on the Result History Page
and the corresponding Result Pages will be displayed to the right of the Result History Page. The active
(not yet deleted) Kapplet Runs are always stored and can be re-found in the Result History Page of the
corresponding Installed Kapplet. The corresponding Result Pages can be opened by clicking the relevant
Result History Page entry. The above example shows the results of the 'test' Kapplet configures in the
prequel. Selections in the table can be committed resulting in the output shown below.
305
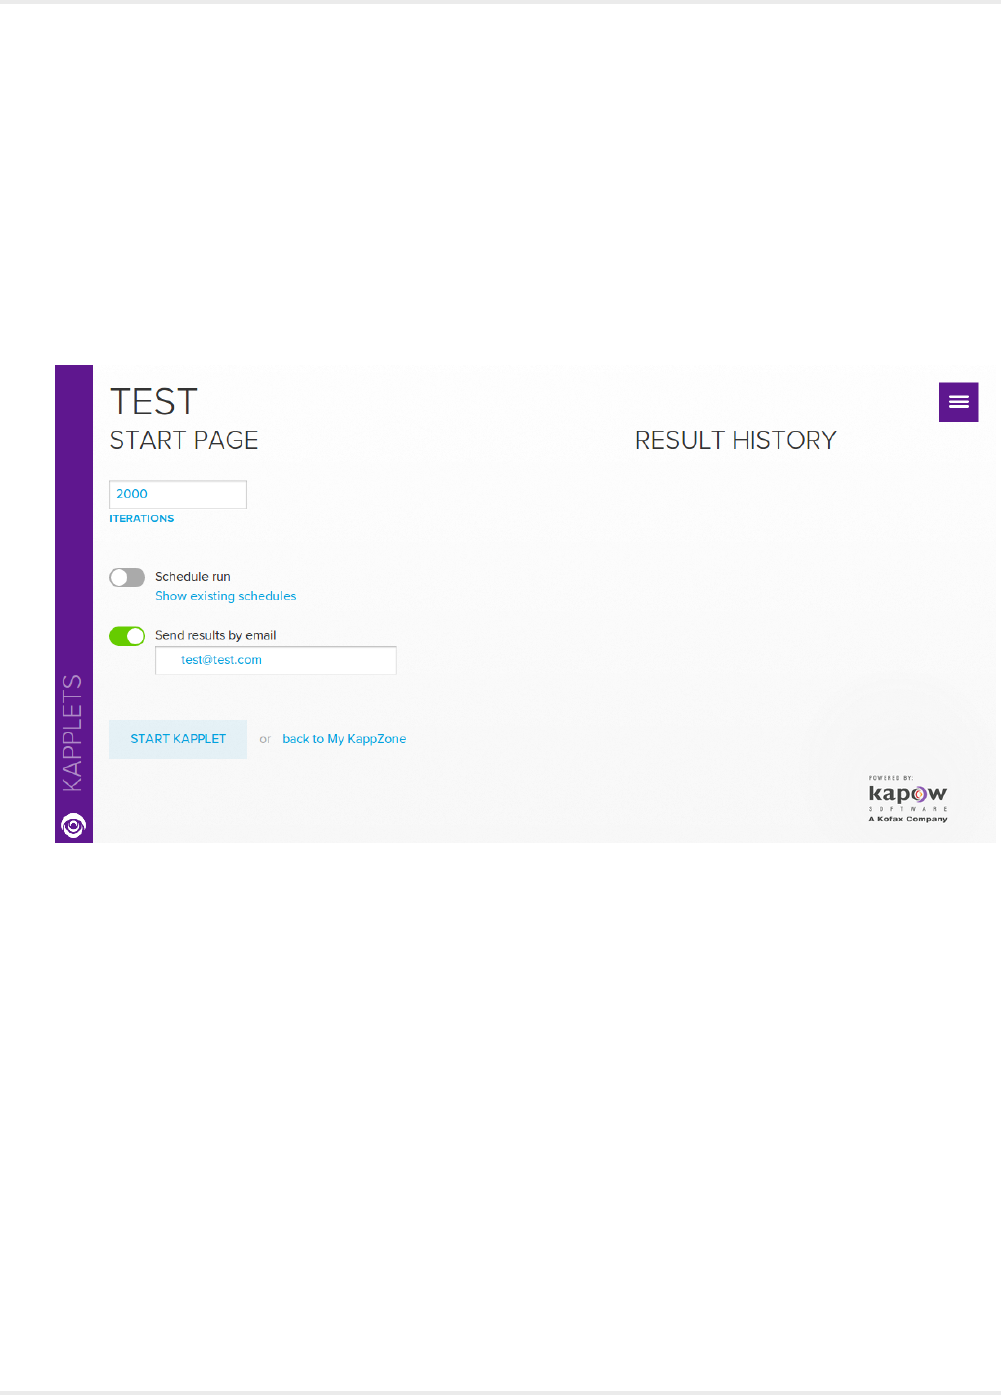
Kofax Kapow User's Guide
If the user want to work further with a tabulated Kapplet result in a 3rd party program then the Kapplet
result can be downloaded in the Excel format.
Creating Email Notifications from Kapplets
For long-running Kapplets, you may not want to sit around waiting for the result page to populate. You can
enter an email address when starting a Kapplet Run and will receive an email when the result is ready.
Below is an Installed Kapplet where the SMTP server is configured and the Kapplet User's email address
has been entered.
1. Enable Send results by email.
This option is only present if an SMTP server is configured in the Management Console and a 'from'
address is configured for Kapplets.
2. In the Send results by email field, enter a valid email address.
3. Click START KAPPLET.
When the Start Action is complete, an email is sent to the email address.
Scheduling Kapplets
You can run Kapplets at a predefined interval, such as every day at noon or every Friday at 4.50 pm.
1. To schedule a Kapplet, in the Schedule run section, select a run option from the list and complete the
appropriate schedule information.
Note, that the time specification will be interpreted, as is, in the time zone of the server running the
Management Console. Also notice that the Start button changes to a Schedule button when the
'Schedule run' option is toggled.
306

Kofax Kapow User's Guide
Once the Kapplet is scheduled it will run periodically as specified by the Kapplet User. The schedules
configuredfor an Installed Kapplet can be listed in the left-hand side of the screen by clicking the
'Show existing schedules' link. An example of this list is shown below.
When the Kapplet User lists the Installed Kapplets the schedule is shown on the Kapplet.
2. To delete a schedule, select the schedule and click the delete icon in the left-hand schedule list.
Notice that scheduling and email notification can be combined for Kapplets.
Customizing Kapplet Branding
You can customize the branding of KappZone and My KappZone to comply with your corporate color
scheme, as well as to replace the Kapow logo with your own.
1. In the Management Console, Branding, Kapplets, Branding section, select Custom.
Note A preview of the logo and color is shown on the right.
2. In Drop the logo here or click to upload, browse to the logo you want to use. You can also drag and
drop the new logo to the area if this functionality is supported by your browser.
The new logo appears at the top of My KapZone and KapZone windows. A smaller version of the
logo also appears on some subpages.
3. In the Brand Color area, specify the background color code.
4. In the Contrast section, select a contrast option.
This color is used for the My KapZone text, as well as some icons placed on top of the selected
background color. It is recommended that you specify a light contrast color for dark backgrounds, or
a dark contrast color if you specify a light background color.
307
Chapter 6
Reference
Contents
•Design Studio
•RoboManager
•RoboServer
•Management Console
•Java API
•Environments
Design Studio
Design Studio is the Kapow application for writing and debugging robots.
Design Studio is an integrated development environment (IDE) for robots. Design Studio is all you
need for writing robots in an easy-to-understand visual programming language. To support you in the
construction of robots, Design Studio provides powerful programming features, including interactive visual
programming, full debugging capabilities, an overview of the program state, and easy access to context-
sensitive online help.
For an in-depth description of the Design Studio, see Design Studio.
Step Action
This topic provides an overview of the available step actions.
Standard
This category contains the most commonly used step actions.
Action Description
Assign Variable Assigns a value to a variable.
Create Page Creates a new page.
Device Automation Creates a step to automate Windows and Java applications on your network
computers.
Load Page Loads a web page from a URL.
Return Value Returns a value from the robot.
Store in Database Stores a value in a database.
308
Kofax Kapow User's Guide
Action Description
Test Value Causes execution beyond the step to stop or continue depending on a boolean
value.
Assign/Transform Variable
This category contains the most commonly used step actions.
Action Description
Assign Variable Assigns a value to a variable.
Convert Variables Converts the values of one or more variables by running them through data
converters and storing the results in the same or other variables.
Transform XML Transforms XML using XSLT.
Browser Session
This category contains step actions for saving and restoring entire browser sessions, as well as for
extracting and manipulating cookies and HTML 5 web storage.
Action Description
Save Session Saves a session in a variable for later restoration by another robot run.
Restore Session Restores a session in a variable previously saved by another robot run.
Extract Cookie Extracts the value of a cookie matching patterns for name, domain and path.
Create Cookie Creates a cookie with the specified domain, path, name and (optionally) value.
Remove Cookie Removes one or more cookies matching patterns for name, domain, path and
value.
Extract Web Storage Extracts data from the local and/or session storage. The data is stored in a
variable in JSON format.
Load Web Storage Loads data into the local and/or session storage. The data must be specified in
JSON format.
Clear Web Storage Clears data in the local and/or session storage.
Browser Windows
This category contains step actions for opening, selecting and closing browser windows.
Action Description
New Window Creates a new window.
Set Current Window Selects another window as the current window, such as the window that
subsequent steps will work on.
Close Window Closes a window.
Call Web Service
This category contains step actions for calling REST and SOAP web services.
309
Kofax Kapow User's Guide
Action Description
Call REST Web Service Calls a REST web service and loads the result into the current window or stores it
in a variable.
Call SOAP Web Service Submits a SOAP XML request to a web service and returns a SOAP XML
response.
Click/Move Mouse
This category contains step actions that mimic clicking or moving the mouse to and from elements in the
browser view.
Action Description
Click Emulates a mouse click on the found tag.
Move Mouse To Emulates a mouse move to the found tag.
Move Mouse From Emulates a mouse move away from the found tag.
Scroll Emulates scrolling a document or tag.
Scroll To Emulates scrolling the found tag into view.
Database
This category contains step actions that can store, retrieve, query or delete items in databases.
Action Description
Store in Database Stores a value in a database.
Find in Database Finds a value in a database.
Calculate Key Calculates the key used to store the value of the selected variable.
Delete from Database Deletes an value in a database.
Query Database Submits an SQL query to a database, and loops through the results.
Execute SQL Executes an SQL statement on a database.
Store in HBase Table Stores a value in a HBase Table.
Enter Data in Form
This category contains step actions for entering data in web forms.
Action Description
Enter Text Enters a text into a text field in a form.
Enter Password Enters a password into a password field in a form.
Press Key Emulates pressing Enter in a form.
Select Option Selects an option in a drop-down box or a list box in a form.
Select Multiple Options Selects multiple options in a list box in a form. Note: This action can only be used
for list boxes, not drop-down boxes.
Set Checkbox Selects or clears a check box in a form.
Select Radio Button Selects a radio button in a form.
310
Kofax Kapow User's Guide
Action Description
Select File Selects a file to upload in a file field of a form.
Extract
This category contains step actions for extracting data. Data may be extracted in text or HTML form from
a web site, or from other formats such as PDF, CSV, Excel and Flash. It is also possible to extract images
or specific data about the HTML or XML source such as attribute values or link URLs.
Action Description
Extract Extracts some text, runs it through a list of data converters, and stores the result
in a variable.
Extract Cell Extracts content from an Excel page, runs it through a list of data converters, and
stores the result into a variable.
Extract Selected Option Extracts the text or value of the selected option, runs it through a list of data
converters, and stores the result in a variable.
Extract URL Extracts a URL from the found tag and stores it in a variable.
Extract Image Extracts an image and stores it in a variable or a file. It can optionally store the
content type and file name of the image in other variables.
Extract Screenshot Extracts an image from the current page and saves it in a variable.
Extract Target Extracts data from a URL target and stores it in a variable or a file. It can
optionally store the content type and file name of the loaded data in other
variables.
Extract Tag Attribute Extracts a tag attribute from the found tag, runs it through a list of data converters,
and stores it in a variable.
Extract Form Parameter Extracts a form parameter from a form URL in the found tag.
Extract from Flash Extracts content from a Flash object.
Extract from PDF Extracts text from a PDF document contained in a variable.
Extract Binary Content Extracts binary content from the current window.
File System
This category contains step actions for accessing the file system. You may read, write and modify files and
directories, loop over files in a directory, or test for the existence of a given file.
Action Description
Load File Loads data from a file, either into the browser window or to a variable.
For Each File Loops through the files in a directory.
Write File Writes a new file or appends to an existing file.
Test File Existence Causes execution beyond the step to stop or continue depending on whether a
specific file exists.
Get File Info Fetches metadata about a file in the file system.
Copy File Copies a file on the local file system where the robot is executed. The action
generates an error if the destination file exists.
311
Kofax Kapow User's Guide
Action Description
Delete File Deletes the specified file or directory.
Make Directory Creates a new directory.
Rename File Renames a file or directory on the local file system where the robot is executed.
The action generates an error if the destination (New Name) exists.
Loop
This category contains step actions for looping. You may loop through HTML structures, windows,
comma-separated values, form values, Excel ranges, or crawl entire domains. For looping through HTML
structures, you have two options: For Each Tag and For Each Tag Path. The For Each Tag step action
is the simpler of the two; it is used to loop through the immediate children of the found tag, while the For
Each Tag path can loop through similar tags at any depth within the found tag. To loop through a number
of pages connected by Next links or the like, you must use the Repeat and Next step actions.
Action Description
For Each Tag Loops through tags contained immediately inside the found tag.
For Each Tag Path Loops through tags contained at any level inside the found tag.
For Each URL Loops through the URLs contained in the found tag.
For Each Window Iterates through the browser windows, setting each in turn as the current window.
For Each Text Part Splits a text at a specified delimiter and loops through the parts.
For Each Option Loops through the options in a drop-down box or list box in a form, selecting one
option in each iteration.
For Each Radio Button Loops through a group of radio buttons, selecting one of the radio buttons in each
iteration. The found tag must be one of the radio buttons in the group.
Loop Field Values Loops through the specified values, entering one value in the text field in each
iteration.
Loop in Excel Loops over the rows, columns, cells in the found range or over all the sheets in
the Excel page.
Repeat Creates a repeat loop together with the Next action.
Next Requests another iteration in a repeat loop created using the Repeat action.
Crawl Pages Crawls pages, each iteration outputting the next crawled page.
Get Iteration Gets the current iteration of an enclosing loop step.
Load Page
This category contains step actions for loading pages from a given URL or creating a new page based on
already extracted content. If required, you can also specify the page load request at the basic HTTP level.
Action Description
Load Page Loads a web page from a URL.
Create Page Creates a new page.
Raw HTTP Performs a Raw HTTP request of the selected method.
312
Kofax Kapow User's Guide
Make Snapshot
This category contains step actions for saving offline snapshots of web pages. To save an offline HTML
copy of a page and its resources, use Make Snapshot. To save multiple interlinked HTML pages, use
Rewrite Page and Rewrite Style Sheet.
Action Description
Make Snapshot Creates a snapshot of the current window, including its frames and resources.
Rewrite Page Extracts the HTML content of the current window and additionally rewrites and
outputs the links to style sheets, images and other pages.
Rewrite Style Sheet Acts as a helper for Rewrite Page. It task is to rewrite links to other style sheets or
images in a given style sheet.
Modify Page
This category contains step actions for modifying the current web page, e.g. by removing, replacing or
inserting content.
Action Description
Insert Tag Inserts a new tag.
Replace Tag Replaces the found tag with a new tag.
Remove Tags Removes tags from found tags. The Remove rules are executed in the order
listed below. Any tags matching one or more of the Except rules are not removed.
Defining no Remove rules defaults to removing all tags.
Remove Tag Range Removes a range of tags.
Hide Tag Hides the found tag.
Unhide Tag Unhides the found tag.
Divide Text Divides the text in the found tag into pieces.
Divide Table Divides the input <table>-tag into several sub <table>-tags, one of which is output
in each iteration.
Remove Table Rows Removes from the input <table>-tag all rows (<tr>-tags) that do not have a
specified number of columns (<td>- and <th>-tags).
Transpose Table Transposes (flips) the input <table>-tag by mirroring its <td>-tags along the top-
left to bottom-right diagonal.
Normalize Table Normalizes a table by inserting extra cells to eliminate rowspan and colspan. The
content from the original cell is copied to the new cells.
Other
This category contains various other step actions.
Action Description
Set Named Tag Marks the found tag as a named tag, so it can be used as a reference when
finding tags in subsequent steps.
Set Named Range Marks the found range as a named range, so that it can be used as a reference
when finding ranges in subsequent steps.
313
Kofax Kapow User's Guide
Action Description
Clear Named Tags/Ranges Unmarks a selected named tag or range, or all named tags/ranges, so they are no
longer be named in the subsequent steps.
Do Nothing Does nothing.
Wait Waits for a specified period of time.
Stop Causes the execution of the robot to stop without errors.
Generate Error Generates an error.
Execute Command Line Executes a command line or shell script. Ensure RoboServer has sufficient
privileges for this operation
Change Proxy Changes the proxy server.
Execute JavaScript Executes JavaScript.
Lookup Password Retrieves a user password from the Password Store.
Output
This category contains step actions for returning values to the API that called this robot, sending e-mail
and writing to files or logs.
Action Description
Return Value Returns a value from the robot.
Send Email Sends an email. Note that the email is not sent during execution in Design mode
in Design Studio.
Write File Writes a new file or appends to an existing file.
Write Log Writes a message to the log. This is useful when debugging a robot.
Test
This category contains conditional actions for testing, such as stopping the execution down the current
branch if some condition is satisfied. This condition may depend on the contents of the found tag, a
variable, or the existence of a given window.
Action Description
Test Tag Causes execution down the current branch to stop or continue, depending on the
contents of the found tag.
Test URL Causes execution down the current branch to stop or continue, depending on the
URL contained in the found tag.
Test Value Causes execution beyond the step to stop or continue, depending on a boolean
value.
Test Variables Causes execution beyond the step to stop or continue, depending on one or more
variable values.
Test Row Tests the number of columns in a table row.
Test Window Causes execution beyond the step to stop or continue, depending on whether a
specific window exists.
314
Kofax Kapow User's Guide
Action Description
Test Page Type Causes execution beyond the step to stop or continue, depending on the type of
the page.
Test Cell Type Tests the cell type, such as Blank or Number of the found range and causes
execution beyond the step to stop or continue depending on whether all cells in
the range are of the given type.
Excel
This category contains actions that are specially designed for Excel pages.
Action Description
Extract Cell Extracts content from an Excel page, runs it through a list of data converters, and
stores the result into a variable.
Extract Sheet Name Extracts the name of a sheet in a spreadsheet document and stores it in a
variable.
Extract Hyperlink Extracts a hyperlink from a cell in a spreadsheet.
Loop in Excel Loops through different elements of a spreadsheet.
Extract As HTML Extracts a part of a spreadsheet document as an HTML table and stores it in a
variable.
Set Content of Cell Inserts the specified content to a spreadsheet cell.
Set Value of Cell Sets the value of a cell.
Set Content of Column Sets the content of a column in a spreadsheet from a variable of complex type.
Set Content of Row Sets the content of a row in a spreadsheet from a variable of complex type.
Set Format of Cells Sets the format of one or more cells in a spreadsheet.
Set Sheet Name Sets the sheet name.
Set Hyperlink on Cell Inserts a hyperlink to a cell.
Set Column Width Sets the width of a column in a spreadsheet.
Set Row Height Sets the height of a row in points.
Set Information Property Sets the value of an information property in a spreadsheet.
Insert Sheet Inserts a new sheet in a spreadsheet.
Insert Rows Inserts one or more rows in a spreadsheet.
Insert Columns Inserts one or more columns in a spreadsheet.
Remove Sheet Removes the selected sheet from a spreadsheet.
Remove Rows Removes the selected rows from a spreadsheet.
Remove Columns Removes the selected columns from a spreadsheet.
Test Cell Type Tests the type of one or more cells.
Set Named Range Marks the found range as a named range, so that it can be used as a reference
when finding ranges in subsequent steps.
315

Kofax Kapow User's Guide
Assign Variable
This action assigns a value to a variable. In most cases the value is a simple type. If the source of the
value is another variable, the value a complex type if the variable itself (such as test), rather than a field
(such as test.result), is selected from the list of variables. In all cases, the type of the target variable must
be compatible with the incoming value.
Properties
Configure the Assign Variable action using the following properties.
Value
The value to assign to the variable. Use the Value Selector to specify the value.
Variable
The variable to assign the value to.
Branch Point
A Branch Point marks a point in a robot where execution is divided into several branches.
When robot execution reaches a Branch Point each branch is executed sequentially unless execution of a
branch is terminated by an error. In that case execution continues from the point specified under the Error
Handling tab in the step action view of the step where the error occurred.
The order in which the branches are executed is top down unless the outgoing connections are annotated
with numbers, in which case the branches are executed in the order indicated by these.
Each branch is executed in the same state (page in the Page View, Cookies, etc.), except for global
variables which will survive from one branch to the next. Any change to the outside world will also persist
from one branch to the next. Such changes could be writing to a file, storing in a database, submitting a
form on a web site, e.g. anything that has an effect in the real world (fx. buying a book on Amazon).
Branch Points have no properties and will be inserted or deleted automatically depending on whether they
are needed or not. If the End step from a branch is removed leaving only one branch, the branch point will
be deleted automatically.
Videos
You can view a brief video about Branches, Robot States, and Execution Paths, which is relevant to the
understanding of Branch Points.
Calculate Key
This step provides the possibility to calculate the key for a variable value. The value must be of a complex
type, i.e. of a type that is specified in a .type file and not one of the built-in simple types such as Number.
At least one attribute in the type must be marked 'Part of Database Key'. Knowing the key of a value can
be useful if it needs to be linked to another value (for instance as a secondary key in another table), or
linked to data stored in a file.
316

Kofax Kapow User's Guide
Properties
Variable
Select the variable for which to calculate the key. Note to customers with legacy robots (older than version
7.2):The type of the variable must have a Standard type kind and not the specialized Database Output
type kind which exists only for legacy purposes.
Key (output)
The variable in which the calculated key will be stored. The variable can be both a simple type variable
and an attribute of a complex type variable.
Call REST Web Service
The Call REST Web Service action sends a request to a REST web service and returns the web service's
response, which may be for instance XML, JSON or HTML. The response is either presented in HTML
form as the current page or stored in a variable.
If the web service returns a fault, the message is not returned by the action. Instead, the action will
generate an error which can be handled using the standard error handling mechanisms.
Properties
The Call REST Web Service action can be configured using the following properties:
URL
The base URL of the web service, excluding parameters. The URL can be specified in several ways using
a URL Selector.
Request
Here, you specify the type of request to be made. REST supports four basic operations:
GET
Used for querying data. For GET requests, you can specify a number of parameters as name/value
pairs. Click '+' to add a new parameter.
POST
Used for updating selected parts of data. For POST requests, you can either specify a number of
parameters as name/value pairs or give the entire body of the request. If you specify the request
with parameters, you must select whether to use POST (application/x-www-form-urlencoded) or
MULTIPART (multipart/form-data) to encode the parameters. If you give the entire ('raw') body of the
request, you must specify the content type of the request data.
For POST and PUT requests, MULTIPART encoding can be selected to enable file uploads. If a binary
variable is selected as the value of a File Upload parameter, the bytes are submitted as-is. If Base 64
encoding is desired, the value of the parameter should be an expression base64Encode(data) where
data is the name of the variable containing the binary value. In that case, it is also recommended to
specify the value base64 as Content Transfer Encoding - otherwise, this field can normally be left
blank.
Important
317

Kofax Kapow User's Guide
PUT
Used for replacing data. See POST for a description of the different ways of specifying a PUT request.
Delete
Used for deleting data. For DELETE requests, you can specify a number of parameters as name/
value pairs. Click '+' to add a new parameter.
Accept
The content types that will be accepted as response. By default, any type of response will be accepted.
The accepted content types can be specified in several ways using a Value Selector.
Encoding
The encoding that will be used to encode special characters in the request. The encoding used for
decoding the response, is controlled using the step option, on the Page Loading Tab.
Output
Here, you select what happens to the output of the web service call.
Load in browser
The result is loaded into the current window, just as if it had been the result of a Load Page action.
You may configure the behavior of the browser using the Options property described below.
Store in variable
The result is stored in the selected variable.
Options
Here you can override the robot's options with the step's own options. An option that is marked with an
asterisk in the Options Dialog will override the one from the robot's configuration. All other options will be
the same as specified for the robot.
Call SOAP Web Service
The Call SOAP Web Service action sends a SOAP XML request to a web service and returns the web
service's SOAP XML response. The response is either presented in XML (or HTML) form as the current
page or set as the value of an XML variable.
There are two ways of creating the SOAP request:
• Manual Entry mode
• Assisted Entry mode
Assisted Entry
This mode helps in creating a SOAP request message. It parses the WSDL file, shows operations
available for the Web Service and allows entering parameters for those operations.
Working in the Assisted Entry mode is done in the following way:
• load a WSDL file,
• select an operation,
• set values for the parameters,
• invoke the step.
318

Kofax Kapow User's Guide
Manual Entry
Since SOAP requests can be quite complex, you will typically use an external tool to generate the request
and paste it into the SOAP XML Request property. The request can be dynamically altered by specifying
XML from Expression to create a template SOAP request substituting literal values by expressions.
If the web service returns a SOAP fault, the message is not returned by the action. Instead, the action will
generate an error which can be handled using the standard error handling mechanisms.
Properties for Assisted Entry
The Call SOAP Web Service action in the Assisted Entry mode can be configured using the following
properties:
WSDL
Here you specify the WSDL file in a dialog window. The value can be set by using:
Load from URL
Provide a URL to a valid WSDL file.
Provide custom WSDL
Input contents of the WSDL file into the text area.
Operation
A list of operations available for the Web Service associated with the provided WSDL file is presented
after specifying the WSDL file . Choose one of the operations.
Parameters
Shows a list of parameters for the selected operation. An editor for the currently selected parameter is
shown below the list. There are two types of parameters:
• Simple types - the value can be specified in several ways using a Value Selector,
• Complex types - an XML stub is created, e.g. it allows you to add and remove items for array types.
Validate Against Schema
If checked, the XML of complex parameter types will be validated against the XML schema specified in
the WSDL.
Log Request Message
If checked, the body of the SOAP request will be logged.
Web Service URL
The location of the web service operation is specified here. If set to "Automatic" (which is the default
option), the web service URL is derived from the WSDL. Alternatively, the value can be specified in
several ways using a Value Selector.
Properties for Manual Entry
The Call SOAP Web Service action in the Manual Entry mode can be configured using the following
properties:
319

Kofax Kapow User's Guide
Web Service URL
The location of the web service operation is specified here. Web services generally use the HTTP
protocol. The value can be specified in several ways using a Value Selector.
SOAP Action
This property can contain an optional SOAP action. The value can be specified in several ways using a
Value Selector. The SOAP action is sent as part of the HTTP headers. The SOAP action is typically, but
not always, a URL specifying the requested action
SOAP Request
This property must contain a valid SOAP XML request. By default the XML can be specified literally. To
dynamically create the SOAP XML request you can choose XML from Expression or XML from Variable.
SOAP Version
This property specifies which version of the SOAP specification to use for sending the SOAP request.
SOAP 1.1 and SOAP 1.2 are supported. When specifying SOAP 1.1 the Content-Type will be set to text/
xml and the (optional) SOAP Action will be set using an additional HTTP header. When specifying SOAP
1.2 the Content-Type will be application/soap+xml and the (optional) SOAP Action will be set as the action
parameter of the Content-Type HTTP header.
Common Properties
The Call Web Service action can be configured using the following common properties as well:
Output
Choose whether to output the SOAP response as an XML page or as the value of an XML Variable. In
robots created with Kofax Kapow 7.2 or earlier, this may be Output Result as HTML Page, meaning that
the XML will be transformed to an HTML representation.
Options
The robot's options can be overridden with the step's own options. An option that is marked with an
asterisk in the Options Dialog will override the one from the robot's configuration. All other options will be
the same as specified for the robot.
Change Proxy
This action changes the proxy server used in subsequent steps. Hereby, it allows the robot to switch
between multiple proxy servers during its execution or use a specified proxy.
To use this action with auto select, you must specify a list of proxy servers that the action should switch
between. See Specifying a Proxy Server for information on how to do this.
At each execution of the Change Proxy action a new proxy server is selected from the list. The proxy
servers are selected in the order that they appear on the list, with the first one being chosen randomly at
the first execution of the Change Proxy action.
See Using Proxy Services for more details.
Properties
The Change Proxy action can be configured using the following properties:
320

Kofax Kapow User's Guide
Remove Cookies
Specifies whether to remove all cookies when the proxy is changed. If the proxy is used to stay
anonymous then cookies should be removed when changing proxy.
Auto Select
If checked, the step will select the next (round robin) proxy from the properties file described in Specifying
a Proxy Server. It will test that it is possible to connect to the proxy before selecting it. If Auto Select is not
checked it will use the proxy specified manually in the properties explained below
Host Name
Specify the host name of the proxy.
Port Number
Specify the port number of the proxy.
User Name
Specify the user name to use for authenticating against the proxy.
Password
Specify the password to use for authenticating against the proxy.
Excluded hosts
Specify a list containing hosts that should be excluded from the proxy. Each host must be on a separate
line.
Clear Named Tags/Ranges
This action unmarks a selected named tag or range, or all named tags and ranges, so that these will no
longer be named in the subsequent steps.
Properties
The Clear Named Tags/Ranges action can be configured using the following properties:
Named Tags/Ranges to Clear
Specify which named tags or ranges to unmark, either a single one selected by name or all named tags
and ranges in the current window.
Clear Web Storage
The Clear Web Storage step action clears data in the local and/or session storage. The local and session
storages are used by some websites to persist larger amounts of data that can normally be stored in a
cookie.
Related Step Actions
The Load Web Storage step action can be used to load new data into the local and/or session storage, or
replace existing data. It does not remove the existing data, unless it overwrites it with a new value.
The Extract Web Storage step action is used to extract data from the local and/or session storage.
321

Kofax Kapow User's Guide
Properties
Clear Local Storage
When checked, the storage items from the local storage will be cleared. In a browser, the local storage is
normally persisted across browser sessions, similarly to persistent cookies.
Clear Session Storage
When checked, the storage items from the session storage will be cleared. In a browser, the session
storage is normally persisted for as long as the browser window or tab exists, similarly to a session
cookie.
Key Pattern
If you wish to clear only the stored items with a particular key, you can specify a pattern that matches the
key of interest. If you leave the field blank, all storage items will be cleared regardless of their keys. If you
do specify a pattern, note that it must match the entire key.
Domain Pattern
If you wish to clear only the stored items that belong to a particular domain, you can specify a pattern that
matches the domain of interest. If you leave the field blank, storage items of all domains will be cleared. If
you do specify a pattern, note that it must match the entire domain.
Click
This action emulates a mouse click on the found tag.
This is the most common action to use for navigation such as following links, submitting forms, etc. It
can be used when the robot should perform the same action as the browser when clicking on something.
Depending on the found tag, the Click action will perform the necessary page loading, form submissions,
JavaScript execution, and so on.
To emulate a mouse movement instead of a click, use the Move Mouse To and Move Mouse From
actions.
Properties
Double-Click
Specify whether to emulate a double-click or a single click.
Right-Click
Specify whether to emulate a right-click or a left click.
Coordinates
When set to Automatic, the browser will select relevant coordinates to click. Alternatively, you can specify
exactly which coordinates to click. These are specified in pixels relative to the upper left of the component
(such as an image or button) clicked.
Options
he robot's options can be overridden with the step's own options. An option that is marked with an asterisk
in the Options Dialog will override the one from the robot's configuration. All other options will be the same
as specified for the robot.
322

Kofax Kapow User's Guide
Close Window
This action closes a window.
In Design Studio inserting a Close Window step is easily done by right-clicking on the window's tab and
then choosing Close Window.
Properties
The Close Window action can be configured using the following properties:
Window to Close
Specify the window that should be closed (see the discussion on how to identify a window).
Options
The robot's options can be overridden with the step's own options. An option that is marked with an
asterisk in the Options Dialog will override the one from the robot's configuration. All other options will be
the same as specified for the robot.
Convert Variables
This action converts the values of one or more variables by running them through data converters and
storing the results in the same or other variables. The Convert Variables action is used to convert values
extracted from a particular web site to the values required in the variable(s) to return. It is also used for
converting values in an input variable to the values used on a particular web site.
For every variable that should be converted, a conversion to the list of conversions should be added. Each
conversion takes the value of a selected variable, passes it through the selected data converters, and
writes the result in another (or the same) selected variable.
The two selected variables can be the same variable, or different variables, depending on where the
converted variable value should be stored. A variable value can simply be copied from one variable to
another by not selecting any data converters in the conversion.
Properties
The Convert Variables can be configured using the following properties:
Conversions
Specify the list of conversions to use.
Conversion Properties
The Convert Variables can be configured using the following properties:
From
Specify the variable holding the value to convert.
323

Kofax Kapow User's Guide
Conversions
Specify the list of data converters to apply to the variable value. This list may be empty, e.g. if the value of
one variable should merely be copied to another variable.
To
Specify the variable in which to store the result of the conversion. This may be the same variable as
specified in the "From" property or a different variable.
Videos
You can view a brief video giving an introduction to the Data Converter List and how to perform specific
conversio .
Copy File
This action copies a file on the local file system where the robot is executed.
Note that the action is only performed during execution in Design mode in Design Studio, if the option
Execute in Design Mode has been selected.
Properties
The Copy File action can be configured using the following properties:
Source File
This is the file system path or a file URL of the source file to be copied. This can be specified in several
ways using a Value Selector. The path must be absolute, including the drive name, if any, and the
directory path to the directory. Alternatively, it can be a file URL, e.g. file:/C:/temp/myFile, in which case it
must be URL encoded. The separators / and \ may be used interchangeably.
Destination File
This is the file system path or a file URL of the destination file. This can be specified in several ways using
a Value Selector. The path must be absolute, including the drive name, if any, and the directory path to
the directory. Alternatively, it can be a file URL, e.g. file:/C:/temp/myFile, in which case it must be URL
encoded. The separators / and \ may be used interchangeably.
Execute in Design Mode
If this is enabled, the action will be executed in Design Mode inside Design Studio. If this is disabled, the
action will do nothing when navigating the robot in Design Mode.
Crawl Pages
The Crawl Pages action loops through the pages of a web site. In effect, it crawls the web site one web
page at a time. Hence, the first iteration crawls the first page, the second iteration crawls the second page,
and so on.
Note The Crawl Pages step action only exists in the Classic browser, it cannot be used in Webkit.
The Crawl Pages action accepts a loaded page as part of the input, such as the start page of the web site.
The output contains the next crawled web page.
324

Kofax Kapow User's Guide
Properties
The Crawl Pages action can be configured using the following properties:
Basic Tab
Crawling Strategy
This property specifies the strategy (i.e. method) of crawling. The Breadth First crawling strategy crawls a
web site in order to minimize the page depth. The Depth First crawling strategy crawls a web site in order
to maximize the page depth.
Maximum Depth
This property specifies the maximum depth of a page. The depth of a page is its distance from the first
page measured in number of clicks and/or number of items that the mouse must be moved over (e.g. in a
popup menu). The depth of the first page is zero. If a page exceeds the maximum depth, then it will not be
crawled.
Ignore Pages with Errors
This property specifies whether pages with errors are skipped silently. Note that an error is only generated
if this property is unchecked, and if the general options of the action do not specify that the particular type
of error (e.g. JavaScript error or load error) should be ignored.
Options
The robot's options can be overridden with the step's own options. An option that is marked with an
asterisk in the Options Dialog will override the one from the robot's configuration. All other options will be
the same as specified for the robot.
Crawling Tab
Crawl these Windows
These properties specify which windows are crawled.
The starting point of the crawling is the current window and - if the Frames property is checked - its
frames. Other top-level windows present at the start will only be crawled if the Popup Windows property is
checked, and not until new pages have been loaded into them.
Frames
This property specifies whether frames are crawled.
Popup Windows
This property specifies whether popup windows are crawled. Popup windows are defined as top-level
windows other than the window that was current window at the start of the crawling.
Click these Tags
These properties specify the HTML tags that the Crawl Pages action should attempt to click.
Links
Hyper links (A tags).
Buttons
Tags with input type="button", input type="submit" and input type="image" tags.
325

Kofax Kapow User's Guide
Image Maps
Images with client side image maps. Note that the image tag itself must be within the crawled area of
the page, while the map need not.
Other Clickable Tags
Tags with JavaScript onClick event handlers.
Other
Automatically Handle Popup Menus
This property specifies whether to automatically include popup menus in the crawled area of the page.
It only takes effect if a partial area of the page has been selected for crawling, either by setting up one
or more tag finders for the first page or - for subsequent pages - by making a Crawling Rule with a
Crawl Selected Parts of Page definition.
Move Mouse Over Tags
This property specifies whether the mouse should be moved over tags that support the relevant
JavaScript event handlers (onMouseOver, onMouseEnter or onMouseMove). This is typically
necessary for popup menus.
Rules Tab
The first page is handled specially: Whether it's output is determined by the Output the Input Page
property on the Output tab. If only a particular area of the first page should be crawled, the area(s) are
selected using tag finders on the Crawl Pages step.
For pages other than the first page, crawling rules can be set up.
Crawling Rules
Each crawling rule has the following properties:
Apply to these Pages
This property specifies a condition on the URLs of the pages to which this rule applies.
How to Crawl
This property specifies how the page should be crawled.
Crawl Entire Page
The entire page should be crawled.
Crawl Selected Parts of Page
Only parts of the page should be crawled. The included and excluded areas of the page are specified
using tag finders, which can be advantageously copied from a step. If no included areas are specified,
the entire page - except the specified excluded areas - is crawled.
Do Not Crawl
None of the page(s) should be crawled.
Output the Page
This property specifies whether the page should be output.
326

Kofax Kapow User's Guide
Rule Description
Here, you may specify a custom description of the crawling rule. This description will be shown in the list
of crawling rules.
In the case that multiple rules apply to a given page, the last rule in the list that applies to the page
overrides the preceding rules and takes effect. This provides an opportunity to e.g. first create a general
rule, which states that all pages with the domain yourdomain.com should be crawled and then later add a
specific rule, which states that the page http://yourdomain.com/uninteresting.html should not be crawled.
For all Other Pages
This property specifies how pages are handled. Excluded are the first page and pages with specific rules.
Crawl Entire Page
The entire page is crawled and output.
Do Not Crawl
The page is neither crawled nor output.
Crawl Only These Domains
This property specifies the domains that may be crawled. If left blank, all domains may be crawled.
Multiple domains can be specified, separated by spaces
Note A specified page not crawl and not output will not be loaded if the link that points to it is an anchor
or area tag with no JavaScript event handlers. If there are JavaScript event handlers involved, or if the
page is loaded through JavaScript execution in general, you should be aware that it may be loaded
anyhow. Still, it will not be output.
If at any time during the crawling one of the windows (be it a frame or a top-level window) should be
output, all of the windows will be made available to the steps following the step with the Crawl Pages
action.
Visited Pages Tab
Skip Already Visited Pages
This property specifies whether already visited pages should be skipped, which is usually the case. The
following properties specify how visited pages are detected:
Detect Already Visited Pages by URL
This property specifies whether visited pages should be detected using their URL. For anchor tags
with no JavaScript event handlers, this is done by checking the linked URL so the page will not be
loaded a second time. In other cases (buttons, tags with JavaScript event handlers etc.) and for
anchor tags with a non-visited linked URL, the resolved URL of the page is checked after it has been
loaded.
Detect Already Visited Pages by Content
This property specifies whether visited pages should be detected by content. This ensures
that pages with different URLs but identical content are not crawled again. For instance, http://
www.yourdomain.com/ and http://www.yourdomain.com/index.html may point to the same page even
though the URLs are different.
327

Kofax Kapow User's Guide
Output Tab
Output the Input Page
This property specifies whether the first page should be output. If enabled, the output of the first iteration
(iteration 1) equals the input.
Output Page Again if Changed
This property specifies whether a given page should be output again if clicking or moving the mouse over
some tag does not result in a page load. For instance, moving the mouse over an item that opens a popup
menu will not result in a page load, so if you want to process the page with the popup menu visible, this
property must be checked. Note that regardless of the value of this property, the page is always crawled
again to detect any added tags.
Show Overview Page
This property specifies whether to open a new window showing an overview page. The overview page
contains a list of the URLs from each step up to the current point of the crawling. The URLs of pages that
were visited but not output are shown in gray.
Store Current Depth Here
This property specifies a variable into which the current depth is stored.
Store Current Path Here
This property specifies a variable into which the current path is stored. The elements of the path are
separated by semicolon, where each element consists of a space-separated list of the URLs at the current
point of the crawling
Crawling an Entire Site
1. Add a step with the Load Page action that loads the main page.
2. Add a new step and choose the Crawl Pages action.
3. On the Rules tab, add a Crawling Rule that applies to all pages in the site, e.g. by specifying the
domain that the pages belong to or by making a pattern that the URL should match. For these pages,
the rule should specify "Crawl Entire Page" and "Output the Page".
4. On the Rules tab, set the "For all Other Pages" property to "Do Not Crawl".
5. After the step with the Crawl Pages action, add steps to handle each page, e.g. by extracting
information into returned variables.
Crawling a Popup Menu
You can discover all pages linked directly to a popup menu without continually crawling from these pages.
We do not wish to continue crawling from these pages.
1. Add a step with the Load Page action that loads the main page.
2. Add a new step and choose the Crawl Pages action.
3. Select the menu bar as named tag.
4. Notice that the "Automatically Handle Popup Menus" option on the Crawling tab is checked.
5. On the Rules tab, add a Crawling Rule saying that for "All URLs" we "Do Not Crawl", but "Output the
Page".
328

Kofax Kapow User's Guide
6. After the step with the Crawl Pages action, add steps to handle each page, e.g. by extracting
information into returned variables.
Create Cookie
The Cookie Creator creates a cookie with the specified domain, path, name and (optionally) value and
adds it to the set of current cookies. If a cookie with the specified domain, path and name already exists,
the old cookie is replaced by the new cookie.
Properties
The Create Cookie action can be configured using the following properties:
Domain
Specify the domain of the cookie. The domain can be specified in several ways using a Value Selector.
Path
Specify the path of the cookie. The path can be specified in several ways using a Value Selector.
Name
Specify the name of the cookie. The name can be specified in several ways using a Value Selector.
Value
Specify the value of the cookie. The value can be specified in several ways using a Value Selector. This
property is optional.
Secure
If checked the cookie is sent when loading from the given domain via HTTPs, if not set the cookie is set
when loading from the domain via HTTP.
HTTP Only
If checked the cookie is a HTTP Only cookie. That is, the cookie will only be used when transmitting HTTP
(or HTTPS) requests, but its value will not be available to client side script (such as JavaScript).
Create Page
The Create Page action creates a new page which replaces the old page in the current window. The
page is processed similarly to what takes place in the Load Page step action. This also entails that any
JavaScript present in the HTML of the new page will be executed, unless JavaScript execution is disabled
in the options. The Create Page action may also be used to load non-HTML pages, e.g. XML documents.
Properties
The Create Page action can be configured using the following properties:
Contents
The content of the new page can be specified in several ways using a Value Selector. It is for instance
possible to acquire the contents from a variable, be it a variable with text or even binary content. The type
of the content (e.g. HTML) will be detected automatically. If the automatic detection is insufficient or if the
content should be loaded differently (e.g. to load an HTML document as plain text), you can override the
content type detection in the options.
329

Kofax Kapow User's Guide
Page URL
Here, you specify the page URL of the new page. This is, among other things, used to resolve any relative
links or resource references in the page. This can be specified in several ways using a Value Selector.
Options
The robot's options should be overridden with the step's own options. An option that is marked with an
asterisk in the Options Dialog will override the one from the robot's configuration. All other options will be
the same as specified for the robot.
Delete File
This action deletes a file or a directory on the local file system where the robot is executed.
Note that the action is only performed during execution in Design mode in Design Studio, if the option
Execute in Design Mode has been selected.
Properties
The Delete File action can be configured using the following properties:
File or Directory
This is the file system path or a file URL for the file or directory to be deleted. This can be specified in
several ways using a Value Selector. The path must be absolute, including the drive name, if any, and the
directory path to the directory. Alternative it can be a file URL, e.g. file:/C:/temp/newDir, in which case it
must be URL encoded. The separators / and \ may be used interchangeably.
Delete Non Empty Directories
This is an option that is only relevant if deleting a directory. If not selected the action will only delete empty
directories. If selected the action will delete the directory including all files and subdirectories and it will do
so recursively for all the subdirectories.
Execute in Design Mode
If this is enabled, the action will be executed even in Design Mode inside Design Studio. If this is disabled,
the action will do nothing when you navigate the robot in Design Mode.
Delete from Database
This step allows you to delete a value previously stored in a database. The database connection must be
configured in Settings
Properties
This step allows you to delete a value previously stored in a database. The database connection must be
configured in Settings
Database
Specify the database to delete from. Select or hard code a value at design time, or dynamically construct
the database name at runtime using a variable, an expression or converters - an error will occur if no
database with this name exists when the robot is executed.
330

Kofax Kapow User's Guide
Variable
Select the complex type variable containing the value to delete.
Key
Specify the unique key for the value to delete. The key may be defined in the variable (by marking
attributes as "Part of Database Key" in the variable type), or can be defined using a Value Selector
(excluding the value-parameter).
Execute in Design Mode
If this is enabled, the step will be executed even in Design Mode inside Design Studio. If this is disabled,
the step will do nothing when you navigate the robot in Design Mode.
Device Automation
This action creates a device automation step. Before using the Device Automation feature, you must
configure Automation Devices and specify a reference to an Automation Device (not required when
automating terminals).
Properties
Configure the Device Automation step using the following properties.
Input Value
Provide an input value for the device automation workflow. If you provide values in this property before
editing a new device automation step, when you click Edit, the values are automatically added to the
Device Automation workflow.
Output Mapping
Assign a variable to hold the output value from the Device Automation step.
Required Devices
Specify the way to connect to an Automation Device for the Device Automation step. You can select
Static Reference or Dynamic Reference. After selecting Static Reference, specify an Automation Device
Mapping to use. If you select Dynamic Reference, specify a mapping name to use in the Connect to
Device step. See Reference to Automation Device for more information. Once the Dynamic Reference
connection was used by the robot and device is connected, the connection stays alive and can be used by
the next Device Automation steps in your robot.
Workflow: Edit
Click Edit to open the Device Automation Editor to edit the Device Automation workflow.
See Device Automation for more information.
Divide Table
The Divide Table action is a loop action capable of dividing a table into one or more sub-tables. The Divide
Table action searches the rows in a table to find one or more dividers and then splits the table into several
sub tables based on these dividers. A row is a divider if at least one of the specified criteria is satisfied.
Properties
The Divide Table action can be configured using the following properties.
331

Kofax Kapow User's Guide
Divide at Rows Matching this Pattern
In this field a pattern can be entered. A table row that matches the pattern is considered a divider and will
cause the creation of a new table. Note that the pattern must match the entire row.
Divide at Rows Not Matching this Pattern
In this field a pattern can be entered. A table row that does not match the pattern is considered a divider
and will cause the creation of a new table. Note that the pattern must match the entire row to prevent the
row from becoming a divider.
Include This in Row Matching
Specifies what should be included from a row when matching against the pattern.
• "Only Text" specifies that only the text should be included.
• "HTML" specifies that the whole HTML should be included.
Ignore Case in Row Matching
Specifies whether case should be ignored during row matching. Check this property if case should be
ignored.
Divide at Rows with Min. No. of Columns and Divide at Rows with Max. No. of Columns
These properties specify an interval for the number of table columns in a row. If the number of columns in
a row is within the interval the row is considered a divider, thus resulting in a new table.
First Sub Table Number
The number of the first sub table to loop from. The number can be specified to count either forward from
the first sub table, or backwards from the last sub table.
Last Sub Table Number
The number of the last sub table to loop to. The number can be specified to count either forward from the
first sub table, or backwards from the last sub table.
Place Divider Row in Table Header
If this property is checked then the located divider row will be placed inside a <thead>-tag of the sub table.
If it is not checked then the divider is kept as in the sub table.
This property does not apply when dividing tags in XML documents.
Examples
Assume the found tag looks like this:
<table>
<tbody>
<tr>
<th> Model </th>
<th> Description </th>
<th> Price </th>
</tr>
<tr>
<td> XXX </td>
<td> New Model </td>
<td> 200 </td>
</tr>
<tr>
<th> Model </th>
<th> Description </th>
<th> Price </th>
</tr>
<tr>
332

Kofax Kapow User's Guide
<td> YYY </td>
<td> Old Model </td>
<td> 100.5 </td>
</tr>
</tbody>
</table>
If the Divide at Rows Matching this Pattern property is set to ".*descript.*" and the Place Divider Row in
Table Header property is not checked, the output in the first iteration will be:
<table>
<tbody>
<tr>
<th> Model </th>
<th> Description </th>
<th> Price </th>
</tr>
<tr>
<td> XXX </td>
<td> New Model </td>
<td> 200 </td>
</tr>
</tbody>
</table>
and in the second iteration:
<table>
<tbody>
<tr>
<th> Model </th>
<th> Description </th>
<th> Price </th>
</tr>
<tr>
<td> YYY </td>
<td> Old Model </td>
<td> 100.5 </td>
</tr>
</tbody>
</table>
Divide Text
The Divide Text action divides the text contained in the found tag into pieces using a pattern and an
expression. It is useful when looping over these pieces in a subsequent step.
Properties
The Divide Text action is configured using the following properties:
Pattern
Specify a pattern that will be matched against the text in the found tag. For every match of the pattern,
the expression in the Output Expression field will be evaluated. The found tag will then be replaced by
a <span>-tag, which, for each match of the pattern, contains the result of the expression surrounded by
another <span>-tag.
Ignore Case
If this property is checked, then the pattern matching will be case insensitive.
333

Kofax Kapow User's Guide
Output Expression
This field contains an expression that is evaluated for every match of the pattern.
Example
If the found tag is the "Kapow Software" text on this page:
<html>
<body>
<p>
Kapow Software
</p>
</body>
</html>
and the Pattern is set to "\S+\s?" (meaning at least one non-whitespace character, followed by an optional
whitespace), and the Output Expression is set to "$0" (meaning the entire matched text), then the output
will be:
<html>
<body>
<p>
<span>
<span>Kapow</span>
<span>Software</span>
</span>
</p>
</body>
</html>
Do Nothing
The Do Nothing action does nothing.
This action is useful when adding comments to a robot.
End Step
The End Step marks the end of a branch in a robot.
This step is a useful marker to have at the end of a branch, since clicking on it enables all steps in the
branch to execute. Without it another step would have to be inserted at the end in order to be able to
execute the last step of the branch.
The End Step is not associated with any action and is comparable to an action step with a Do Nothing
action when it comes to its execution. An End Step cannot be deleted, but several branches may share
the same End Step.
Note he End Step does not stop execution of a robot. For this you should use an action step with a Stop
action.
Enter Password
This action enters a password in a password field in a form.
334

Kofax Kapow User's Guide
This action is similar to the Enter Text action, except that when a fixed password is specified, the
password is not visible to the user in Design Studio and in saved robot files.
The found tag must be a password field.
Note that entering the password may trigger execution of JavaScript if there are any registered event
handlers on the password field.
Properties
The Enter Password action can be configured using the following properties:
Password to Enter
Specify the password to enter in the password field. The value can be specified in several ways using a
Value Selector.
Obtain focus by
Indicates how you want the robot to set focus to the selected tag.
Select all text before typing
Indicates if the existing password should be selected before entering the password.
Options
The robot's options can be overridden with the step's own options. An option that is marked with an
asterisk in the Options Dialog will override the one from the robot's configuration. All other options will be
the same as specified for the robot.
Enter Text
This action enters a text in a found tag, which must be either a text field, a text area, a password field, a
file field, a hidden field, or a tag whose content is editable.
To enter a fixed password in a password field, consider using the Enter Password action instead in order
to prevent the password from being visible to the user in Design Studio and in saved robot files.
Note that entering the text may trigger execution of JavaScript if there are any registered event handlers
on the field or tag.
Properties
The Enter Text action can be configured using the following properties:
Text to Enter
Specify the text to enter. The value can be specified in several ways using a Value Selector.
Obtain focus by
On some websites it is necessary to set focus on the input field before entering text. Use the Obtain
focus by option to set focus on the input field.
Select all text before typing
Sometimes it might be necessary to select the existing text in a field to ensure that it is overwritten when
entering new text. Use the Select all text before typing option to select the existing text in a field.
335

Kofax Kapow User's Guide
Execute Command Line
This action executes a command line (external program)
Properties
The Execute Command Line can be configured with the following options
Command Line
The command line to execute. The value is configured using a Value Selector On Windows the command
line is used as an argument to "cmd.exe /C". On other platforms the command line is used as an
argument to "/bin/sh -c"
Extract
f the program writes text to the console, the extraction of the text is configured here, the options are
• "Nothing" extracts nothing
• "Stdout" extracts the text written to stdout into a variable
• "Stderr" extracts the text written to stderr into a variable
• "Separate stdout and stderr" extracts the text written to stdout and stderr into two separate variables
• "Joined stdout and stderr" extracts the text written to stdout into a single variable
If the program writes non-ASCII characters to the console, you can specify the encoding used to read
the text. On western European Windows versions the console will most likely uses cp858 also known
as "Latin-1, MS-dos, with Euro". Other platforms will most likely have to use utf-8 for encoding to read
console text, but this is environment specific.
Store Exit Code Here
Specifies the variable the exit code will be stored in. When a program is done executing it returns an exit
code, specifying the status of the execution. 0 means success, other values indicate some kind of error,
but the meaning of the error is program specific (although there is some consensus in the area, fx. a value
of 2 usually means File not found). If no variable is specified, the exit code will be discarded.
Execute in Design Mode
If this is enabled, the action will be executed even in Design Mode inside Design Studio. If this is disabled,
the action will do nothing when you navigate the robot in Design Mode.
Note The program inherits the working directory and environments from Design Studio
Note The step has no timeout, and will wait until the external program completes
Execute JavaScript
This action executes JavaScript on the current page, or your own custom JavaScript.
Note that most step actions will automatically execute relevant JavaScript as part of their operation,
so you generally do not need to use the Execute JavaScript action unless you have special needs for
executing JavaScript.
336

Kofax Kapow User's Guide
The Execute JavaScript action supports the following ways in which HTML can contain JavaScript:
• <script>-tags, which can contain multiple lines of JavaScript to be executed, or can refer to external
JavaScript files.
• event handlers, which may appear as special attributes on tags, and they always begin with "on", such
as, onClick or onMouseOver. They may also be attached from JavaScript without being visible in the
HTML source.
• JavaScript URLs, which specify the JavaScript: Protocol with values for tag attributes where there can
be a URL, e.g. <a href="javascript:open()">
Properties
The Execute JavaScript action can be configured using the following properties.
JavaScript
This property specifies which JavaScript you want to execute:
•JavaScript in All <script> Tags executes all of the <script>-tags in the current page.
•JavaScript in Selected <script> Tag executes a single found <script>-tag.
•JavaScript in URL executes the JavaScript in a JavaScript URL, as specified by the JavaScript:
Protocol.
•JavaScript in Event Handler executes the JavaScript in an event handler in a tag. The specific event
handler that should be executed must be chosen from the dropdown box.
•Custom JavaScript executes your own custom JavaScript.
•Custom JavaScript from Expression executes your own custom JavaScript. This is similar to the
Custom JavaScript option, except that an expression can be entered instead of a fixed text. For a list of
JavaScript functions check Convert Using JavaScript
Options
The robot's options can be overridden with the step's own options. An option that is marked with an
asterisk in the Options Dialog will override the one from the robot's configuration. All other options will be
the same as specified for the robot.
Execute SQL
The Execute SQL action submits an SQL statement to a database and optionally stores the number of
affected rows in a variable. Any other results returned by the database are ignored. In other words, this
action is intended for SQL insert, update, and delete statements, but can also be used to invoke stored
procedures and the like. The SQL is specified using an expression.
Note that the SQL is not executed during execution in Design mode in Design Studio.
Important Do not execute use <Some Other DB> command in the SQL statements, because this will
change the results of all future SQL commands (in the same robot or others).
Properties
The Execute SQL action can be configured using the following properties:
337

Kofax Kapow User's Guide
Database
Choose which database this action should submit its query to by using the drop-down list of databases
available to Design Studio.
SQL
This field must contain a valid SQL statement in the form of an expression. The value of this expression is
submitted to the chosen database.
Modified Rows
Choose a text or integer variable in which to store the number of rows affected by the SQL statement. This
is optional.
Execute in Design Mode
If this is enabled, the step will be executed even in Design Mode inside Design Studio. If this is disabled,
the step will do nothing when navigating the robot in Design Mode.
Extract
The Extract action extracts text and stores it in a variable.
There is possibilities for specifying what content should be extracted such as only the text, or everything
including the tags. Before the text is stored, it can be processed using a list of data converters, and
optionally trimmed for leading and trailing spaces.
The simplest way to use the Extract action is to extract from a single found tag. It is also possible to
extract from a tag range, i.e. all tags from one found tag to another found tag.
Properties
The Extract action can be configured using the following properties:
Extract From
Specifies the part of the found tag that will be extracted.
•Found Tag specifies that the entire found tag should be extracted.
•Tag Range specifies that a range of tags should be extracted. Begin and end tags and whether or not
to include these tags in the range can be selected.
Extract This
Specifies what content should be extracted.
•Only Text specifies that only the text should be extracted.
•Structured Text specifies that only the text should be extracted, but that it should be structured
similarly to how it would appear in a browser. The system can guess at the location of a heading, and
insert text before and/or after. Properties:
Include Aligned Tables and Images
Specifies that the tables and images that are aligned to the left or right of the text are included in
the output text. Disabling this can sometimes result in removing the desired content.
Include URLs
Specifies that the actual URLs in link tags will be included in the output text.
338

Kofax Kapow User's Guide
Include Image Text Alternatives
Specifies that the text representation of images will be included in the output text.
Include Form Fields
Specifies that the text representation of form fields will be included in the output text.
Insert This Before a Heading
Specifies that this action should guess at the location of headings and insert the specified text
before them.
Insert This After a Heading
Specifies that this action should guess at the location of headings and insert the specified text after
them.
•Advanced Structured Text specifies that only the text should be extracted, but that it should be
structured similarly to how it would appear in a browser. Tag names can be converted into any text.
Properties:
Include Aligned Tables and Images
Specifies that the tables and images that are aligned to the left or right of the text are included in
the output text. Disabling this can sometimes result in removing the desired content.
Include URLs
Specifies that the actual URLs in link tags will be included in the output text.
Include Image Text Alternatives
Specifies that the text representation of images will be included in the output text.
Include Form Fields
Specifies that the text representation of form fields will be included in the output text.
Tag Conversions
Specifies the tag conversions to use. A tag conversion is on the form tag=text. For instance
"<h1>=<head1>" and "</h1>=</head1>" would convert HTML headings level 1 to special <head1>-
tags. Please note that the right sides of the conversions can be anything, they need not be ordinary
tags.
•HTML specifies that the whole HTML should be extracted.
Format HTML
Specifies that the HTML should be pretty-printed.
Encode URLs
Specifies that URLs in attribute values should be HTML encoded. This is highly recommended, as
it is necessary to generate standard compliant HTML that will work consistently across different
browsers. In some cases when the HTML is to be subjected to simple processing for recognizing
and comparing URLs it may, however, be necessary to leave the URLs unencoded.
Extract Relative URLs
Specifies that all URLs should be extracted as relative. Thus, if present, the base part of the URL is
removed.
•XML specifies that the whole XML should be extracted. This only works if the page is an XML page.
339

Kofax Kapow User's Guide
Include XML Declaration
Specifies that the XML Declaration (e.g. <?xml version="1.0" encoding="UTF-8"?>) should,
if present, be included in the extracted XML. This mean that one may extract part of an XML
document an get a new XML document with a proper declaration at the top.
Converters
An optional list of data converters that should process the text.
Trim Spaces
If selected, spaces at the start and end of the text will be removed before storing the text in the variable.
Variable
Specifies the variable in which to store the extracted text.
Extract As HTML
The Extract As HTML action extracts a part of a spreadsheet document as an HTML table and stores it
in a variable. The range finder of the step determines what is extracted and this may be either a part of a
single sheet or all the information properties.
Properties
The Extract Cell action can be configured using the following properties:
Include Headers
This property specifies whether or not to include the spreadsheet headers (1,2,3,4 and A,B,C,D, etc.) in
the generated table.
Extract This
This specifies what is extracted from the cells, but have no effect for extraction of information properties.
There are three possible choices:
• "Formatted Values" specifies that the formatted should be extracted, e.g. numbers will be extracted as
the view shows these and not the internal representation with extra decimal point.
• "Plain Values" specifies that the internal representation is extracted, e.g. numbers are extracted with
full precision and dates are extracted as number of days since January 1, 1900. Cells for which there
are no difference between formatted and plain values, e.g. cells containing text or logical values, the
extracted values are the same as for "Formatted Values".
• "Formulas" specifies that the formulas should be extracted. For cells that do not contain a formula the
extracted values are the same as for "Plain Values".
Variable
The variable to store the generated HTML table in.
Extract Binary Content
This action extracts binary content from the Browser View. If a step has loaded binary content into the
Browser View this data will not be shown, but the data may be extracted into a binary variable using
Extract Binary Content in the next step.
340

Kofax Kapow User's Guide
Properties
The Extract Binary Content action can be configured using the following properties:
Store Data In
The variable in which to store the binary content. This must be a binary variable.
Content Type
The variable in which to store the content type of the data.
File Name
The variable in which to store the original file name from the location where the data was loaded from,
e.g. the file name from the URL. This name may for instance be needed if saving to a file happens in a
subsequent step in the robot.
Extract Cell
The Extract Cell action extracts content from a spreadsheet document, runs it through a list of data
converters, and stores the result into a variable.
Properties
The Extract Cell action can be configured using the following properties:
Extract This
This specifies what is extracted from the cell. There are three possible choices:
• "Formatted Values" specifies that the formatted should be extracted, e.g. numbers will be extracted as
the view shows these and not the internal representation with extra decimal point.
• "Plain Values" specifies that the internal representation is extracted, e.g. numbers are extracted with
full precision and dates are extracted as number of days since January 1, 1900. Cells for which there
are no difference between formatted and plain values, e.g. cells containing text or logical values, the
extracted values are the same as for "Formatted Values".
• "Formulas" specifies that the formulas should be extracted. For cells that do not contain a formula the
extracted values are the same as for "Plain Values".
Converters
An optional list of data converters that should process the content.
Variable
The variable to assign the value to.
Extract Column in Data Row
This action extracts data from a cell in the current range to a variable. The range is a row in a CSV file
produced by the For Each Data Row step. To use the Extract Column in Data Row step, first create and
configure the For Each Data Row step.
341

Kofax Kapow User's Guide
Properties
Finders Tab
• Context: The name of the range of cells from the For Each Data Row step.
• Column: Name of the column or its index (starts from 1).
Action Tab
• Converters: An optional list of data converters that should process the content.
• Variable: The variable to assign the value to.
Extract Cookie
The Extract Cookie action extracts the value of a cookie from the set of current cookies. The cookie is
selected using regular expressions for domain, path and/or name. If more than one cookie matches the
patterns, the value is extracted from the
Properties
The Extract Cookie action can be configured using the following properties:
Domain Pattern
Specify a pattern that matches the domain of the cookie. The pattern must match the entire domain of the
cookie.
Path Pattern
Specify a pattern that matches the path of the cookie. The pattern must match the entire path of the
cookie.
Name Pattern
Specify a pattern that matches the name of the cookie. The pattern must match the entire name of the
cookie.
Variable
Here you specify the variable in which to store the extracted value.
Extract Form Parameter
The Extract Form Parameter action extracts a form parameter from a form URL in the found tag and
stores the value in a variable.
Properties
The Extract Form Parameter action can be configured using the following properties:
Form Parameter Name
Specifies the name of the form parameter.
Converters
Data converters to apply to the extracted value before storing it in the variable.
342

Kofax Kapow User's Guide
Variable
The variable in which to store the resulting value.
Encoding Used in URL
Specifies the character encoding used in the URL. If the extracted value contains incorrect characters,
change this encoding to the encoding used in the page that contains the URL, or the page that contains
the form from which the URL was created. The most commonly used encodings in form URLs are
Unicode (UTF-8) and Latin-1 (ISO-8859-1).
Example
Consider this found tag:
<a href="http://www.abc.com/search?author=Johnson">
Search
</a>
If Form Parameter Name is set to "author", the value "Johnson" will be extracted and stored in the
selected variable.
Extract from Flash
This action extracts content from a Flash object in a found tag.
Static text, HTML fragments and images will be extracted from the Flash object and presented as an
HTML page. Contained URLs, references to other Flash objects and configuration files will be converted
to links in a list at the bottom of the page.
Properties
The Extract from Flash action can be configured using the following properties:
Include images
Specifies whether images should be extracted from the Flash object or not.
Options
The robot's options can be overridden with the step's own options. An option that is marked with an
asterisk in the Options Dialog will override the one from the robot's configuration. All other options will be
the same as specified for the robot.
Extract from PDF
This action extracts text and images from a PDF document contained as binary data in a selected binary
variable.
Typically, the PDF document has been downloaded into the variable using an Extract Target step. The
output from the "Extract from PDF" action is an HTML page containing the text and images extracted from
the PDF document. In subsequent steps, the desired information can then be extracted from the page, in
the same way as for other HTML pages.
Note that PDF documents do not contain structure information such as tables or paragraphs, only
positions of texts and graphics, that might or might not be positioned to look like tables or paragraphs.
343

Kofax Kapow User's Guide
This can make it difficult to extract the desired information from PDF documents. However, the Extract
from PDF step will apply some heuristics to group the text into HTML paragraphs based on the available
position information.
Properties
The "Extract Text from PDF" action can be configured using the following properties:
PDF Variable
The binary variable containing the PDF document as binary data.
Include Images
Specifies whether embedded images should be extracted. Note that not all images and graphics can
be extracted from PDF documents; it depends on the way they have originally been embedded in the
document.
Include Form XObjects
This option enables extraction of the Form XObjects from the PDF. Form XObjects groups objects within a
PDF file. The objects may include text, images, vector elements, and etc. Form XObjects is usually used
to store objects that are referenced multiple times within a document.
Include Positioning
Specifies whether the positions of the texts should be extracted. The positions may be useful to derive the
structure of the document.
Include Formatting
Specifies whether the formatting (font names, sizes etc.) of the texts should be extracted. Like the
positions, the formatting may be useful to derive the structure of the document.
Merge Text
As default the converter that generated the HTML from the PDF will merge text that is on the same line
into one HTML element even if these are represented as different text in the PDF document. Though this
may often desirable, it may in some cases have the effect that text that originally far apart will be merges
together and appear to be right next to each other. A typical case where it would be desirable to turn
this feature off is if the document contains more than one column. Turning the feature off will attempt to
preserve the column structure.
Extract Hyperlink
This action extracts a hyperlink from a cell in a spreadsheet.
Properties
The Extract Hyperlink action can be configured using the following properties:
Converters
An optional list of data converters that should process the content.
Variable
The variable to assign the value to.
344

Kofax Kapow User's Guide
Extract Image
This action extracts an image from the found tag and stores it in a variable or to a file.
The action can also optionally store the actual content type and file name of the extracted image in other
variables.
Properties
The Extract Image action can be configured using the following properties.
Store In
Specifies where to store the extracted image. There are two choices for this:
Variable
Specifies the variable in which to store the extracted data. The variable must be of type Image or
Binary. Using the specialized Image variable is recommended as it will be possible to see a preview of
the extracted image in the Variables view.
File
Specifies the file to write the data to
File Name
Specifies the name and extension of the file.
Auto
With this option a file name is generated automatically using the following strategy:
1. First the content disposition header of the response is inspected to see if it has a filename
parameter and if so that name will be used.
2. Next the URL is inspected to see if it contains a file name and if so that name will be used.
3. If none of the above options succeed then an error is generated.
Value, Variable, Expression and Converters
The value can be specified in several ways using a Value Selector.
Directory
Specifies the directory where the file will be placed. The value can be specified in several ways using
a Value Selector.
Create Directories
Specifies whether to create all the directories, in the specified path, that does not exist. If the option is
selected the directories are created. If the option is not selected the directories must exist and if not an
error is generated.
Override Strategy
This specifies a strategy for what to do when the selected file already exists.
Override File
Any existing file will be replaced.
345

Kofax Kapow User's Guide
Never Override File
Ensures that an existing file will never be replaced. If the file exists then an error is generated.
Create a New File
This option ensures that a new file will always be created. If a file with the selected name already
exists then a new unique file name will be generated for the new file. This new file name will be
the originally selected file name with a serial number added to the end just before the extension,
e.g. myImage_1.png where _1 was added to the original file name myImage.png.
Store Meta Data In
Specifies variables to be used to store meta data about the extracted image.
Content Type
Specifies an optional variable in which to store the content type of the image. For example, the
content type could look like this: image/gif
File Name
Specifies the optional variable in which to store the file name of the extracted image. If the image is
saved to a file then the file name will be the full path of the file actually used. If the image is loaded
into a variable then the file name will be the file name of the original resource (obtained from the URL
or from the content disposition header for the response).
Options
The robot's options can be overridden with the step's own options. An option that is marked with an
asterisk in the Options Dialog will override the one from the robot's configuration. All other options will be
the same as specified for the robot.
Extract JSON
The Extract JSON step action extracts the part of a JSON value found by the JSON finder as a JSON
value into a variable. The extracted value must itself be valid JSON, e.g. an object, array or a basic value.
In other word you cannot extract a name/value pair"answer" : 42 even if you can select it in the view.
Selecting such a name/value pair and extracting from it will result in only the value (42) being extracted.
Properties
The Extract JSON action is configured using the following properties:
Converters
An optional list of data converters that should process the text.
Variable
Specifies the variable in which to store the extracted text.
Extract Path
The Extract Path step action extracts the absolute path of the element found by the finder on the step.
Path in this respect is to be thought of in a very general sense. In HTML and XML it is a tag path, e.g.
html.body.div.text, in Excel it is a range, e.g. Sheet1!A5:B7 and in JSON it is the path used in JSON
finders, e.g. @top:.a[5].b. The path extracted is always an absolute path, i.e. not relative to a named tag,
346

Kofax Kapow User's Guide
range etc. and without any wildcard (*) symbols. It is the kind of paths you see in the target views at the
bottom of the Page Views, e.g. the Tag Path View in HTML/XML or the Cell Range View in Excel.
The extracted path may be used in the Finders of other steps in the Path property by referring to the
variable containing the path.
Properties
The Extract Path action is configured using the following properties:
Variable
Specifies the variable in which to store the extracted path.
Extract Property Name
The Extract Property Name step action extracts the property name of a JSON value found by the JSON
finder into a variable. The found item must be a property declaration (name/value pair) on an object, e.g.
"answer" : 42..
Properties
The Extract JSON Property Name action is configured using the following properties:
Converters
An optional list of data converters that should process the text.
Variable
Specifies the variable in which to store the extracted name.
Extract Screenshot
This action extracts the whole page, or a part of it, as an image and saves it to a variable.
The tag finder specifies which area to extract. Use the tag path * to extract the whole page.
Properties
The Extract Screenshot action can be configured using the following properties:
Padding
Padding for the extraction are as follows. Note that positive values make the area larger, negative values
make it smaller. The value can be specified in several ways using a Value Selector.
Left (px)
Extra left margin (in pixels). May be negative.
Top (px)
Extra top margin (in pixels). May be negative.
Right (px)
Extra right margin (in pixels). May be negative.
347

Kofax Kapow User's Guide
Bottom (px)
Extra bottom margin (in pixels). May be negative.
Variable
The variable to assign the value to. It must may an image or binary variable.
Image Format
The format of the image. The possible values are PNG, JPG, BMP and GIF.
Load Images
Loads all images on page, if not already performed by the Load Page step (or similar).
Timeout (ms)
Timeout (in milliseconds) to use when loading images.
Extract Selected Option
The Extract Selected Option action extracts the selected option from a <select>-tag and stores it in a
variable.
Either the option text or its value can be extracted. Before the text is stored, it can be processed using a
list of data converters, and optionally trimmed for leading and trailing spaces.
Properties
The Extract action can be configured using the following properties:
Extract Value
If selected, the value of the selected option will be extracted rather than the option text itself.
Converters
An optional list of data converters that can process the text.
Trim Spaces
If selected, spaces at the beginning and the end of the text will be removed before storing the text in the
variable.
Variable
Specifies the variable in which to store the extracted text.
Extract Sheet Name
The Extract Sheet Name action extracts the name of a sheet in an spreadsheet document and stores it in
a variable. The sheet is identified with the aid of a Range Finder.
Properties
The Extract Sheet Name action can be configured using the following property:
Variable
The variable to store the sheet name in. This has to be a text variable.
348

Kofax Kapow User's Guide
Extract Source
This action stores the previewed data in a variable.
The step action only works on a preview.
Properties
The Extract Source action can be configured with the following properties:
Source
The type of source to extract from. Choose either Binary or Text. If the source is text, an encoding can be
explicitly defined. The default encoding is the encoding provided by the web server.
Extract Data To
The variable to extract data to.
Extract Tag Attribute
This action extracts a tag attribute from the found tag, runs it through a list of data converters, and stores
the result in a variable.
Properties
The Extract Tag Attribute action can be configured using the following properties:
Tag Attribute Name
The name of the tag attribute to extract.
Converters
The data converters to apply to the attribute value.
Variable
The variable to store the result into.
Example
Consider this found tag:
<img
src="mypicture.gif">
Assume that Tag Attribute Name has been set to "src", and that the Variable property has been set to
"TemporaryData.shortText0". This will store the value "mypicture.gif" in the "shortText0" attribute of the
"TemporaryData" variable.
Extract Target
This action extracts data from a target URL and stores it in a variable or to a file. If the selected variable
can not store the actual data (such as attempting to store a PDF file in an XML variable), an error may be
generated when executing the action.
349

Kofax Kapow User's Guide
The action can also optionally store the actual content type and file name of the extracted data in user
specified variables.
Properties
The Extract Target action can be configured using the following properties:
Location
This property specifies which target URL to extract from.
URL
Enter the URL directly in the text field provided. Note that standard URLs using the HTTP protocol
can be written in shorthand. For example, "http://www.kapowtech.com" can be written instead as
"www.kapowtech.com".
URL in Found Tag
Specifies that the found tag contains the URL.
URL in Variable
Specifies that the URL should be read from a specified variable.
URL from Expression
Specifies an expression as the URL to open.
URL from Converters
Specifies a list of data converters whose output is used as the URL to open.
URL Loaded when Clicking
Specifies that the found node should be clicked, and the URL that would have been loaded as a result
of this is used. For instance, if the result of clicking the found node resulted in a form submission, the
data loaded by the Load Page step action will be the result of the form submission.
Store In
This specifies where to store the extracted data. There are two choices for this:
Variable
Specifies the variable in which to store the extracted data. The variable must be one of the following
type: Binary, Image, PDF, Text, HTML, XML, or Excel.
File
Specifies the file which to write the data to.
Note If a robot is in the Direct (Minimal Execution) Design Mode, then Store In File will work only in
the Debug mode and on the RoboServer.
If a robot is in the Full Execution (Smart Re-execution) Design Mode, then Store In File will work
both in the Design and Debug modes.
File Name
Specifies the name and extension of the file.
350

Kofax Kapow User's Guide
Auto
With this option a file name is generated automatically using the following strategy:
1. First the content disposition header of the response is inspected to see if it has a filename
parameter and if so that name is used.
2. Next the URL is inspected to see if it contains a file name and if so that name is used.
3. If none of the above options succeed then an error is generated.
Value, Variable, Expression and Converters
The value can be specified in several ways using a Value Selector.
Directory
Specifies the directory where the file will be placed. The value can be specified in several ways
using a Value Selector.
Create Directories
Specifies whether to create all the directories in the specified path that does not already exist. If
the option is selected the directories are created. If the option is not selected the directories must
exist and if not then an error is generated.
Override Stratagy
Specifies a strategy for what to do when the selected file already exists.
Override File
Any existing file is replaced
Never Override File
Ensures that an existing file will never be replaced. If the file already exists then an error is
generated.
Create a New File
Ensures that a new file is always created. If a file with the selected name already exists, a new
unique file name is generated for the file. This new file name will be the originally selected file
name with a serial number added to the end just before the extension, such as myData_1.dat
where _1 was added to the original file name myData.dat.
Store Meta Data In:
Specify variables to be used to store meta data about the extracted data.
Content Type
This specifies an optional variable in which to store the content type of the data. For example, the
content type could look like this for an image:
image/gif
and like this for a plain text:
text/plain; charset=iso-8859-1
351

Kofax Kapow User's Guide
File Name
This specifies the optional variable in which to store the file name of the extracted data. If the data is
saved to a file then the file name will be the full path of the file actually used. If the data is loaded into
a variable then the file name will be the file name of the original resource (obtained from the URL or
from the content disposition header for the response).
Options
The robot's options can be overridden with the step's own options. An option that is marked with an
asterisk in the Options Dialog will override the one from the robot's configuration. All other options will be
the same as specified for the robot.
Extract URL
Extracts a URL from a tag and stores it in a variable. If the URL is relative, it can be converted to an
absolute URL using the URL of the current page.
The URL can be extracted from an attribute, e.g. in the case of an <a>-tag with a href attribute. It can
also be extracted as if the tag was clicked, e.g. in the case of a button whose onClick event handler loads
a new page or submits a form. If the tag is a <form>-tag, either the value of the action attribute can be
extracted or the URL that corresponds to the form submission (also when the POST method is used) can
be extracted.
Properties
The Extract URL action can be configured using the following properties:
Extract How
Determines how the extraction is done
Automatic
The way to extract the URL is determined automatically.
From Tag Attribute
The URL can be extracted directly from the relevant attribute of the tag for the following tags:
• <a>
• <area>
• <form>
• <frame>
• <iframe>
• <script>
• <img>
• <input type="image">
• <param>
• <link>
• <meta>
• <body>, <table>, <tr>, <td> or <th> where the tag has a background attribute
The From Tag Attribute extraction has two additional properties:
352

Kofax Kapow User's Guide
Execute JavaScript URLs
If the tag attribute contains a JavaScript URL and this property is checked, the JavaScript URL
is executed in the hope that it will result in the load of a non-Javascript URL. No actual loading is
done, however. If this property is not checked, the JavaScript URL itself is extracted.
Convert to Absolute URL
If this is checked, relative URLs are converted to absolute URLs.
Click Without Loading
The URL is extracted as if the tag was clicked, except that no loading is done. This can be useful for
tags with onClick / onMouseDown / onMouseUp event handlers, or for buttons that submit forms.
Submit Form Without Loading
The URL is extracted as if the form was submitted, except that no actual requests are sent to the
server. This type of extraction can only be applied to <form>-tags. To submit using a submit button,
select the Click Without Loading extraction instead, using the submit button as the found tag.
Variable
The variable used to store to store the extracted URL.
Options
The robot's options can be overridden with the step's own options. An option that is marked with an
asterisk in the Options Dialog will override the one from the robot's configuration. All other options will be
the same as specified for the robot.
Extract Web Storage
The Extract Web Storage step action extracts data from the local and/or session storage from the current
browser session. The local and session storages are used by some websites to persist larger amounts
of data than can be stored in a cookie. The extracted web storage data is stored in a variable in JSON
format. To further process the extracted data in a robot, a Create Page step can be used if it is configured
to use the variable as input. The JSON will then be loaded into the browser view and additional steps can
be added in order to, for instance, loop through the extracted values.
Properties
The Extract Web Storage action can be configured using the following properties:
Include Local Storage
When checked, the storage items from the local storage will be included in the extracted data. In a
browser, the local storage is normally persisted across browser sessions, similarly to persistent cookies.
Include Session Storage
When checked, the storage items from the session storage will be included in the extracted data. In
a browser, the session storage is normally persisted for as long as the browser window or tab exists,
similarly to a session cookie.
353

Kofax Kapow User's Guide
Key Pattern
If only the stored items with a particular key are to be extracted, a pattern that matches the key of interest
can be specified. If the field is left blank, all storage items will be included regardless of their keys. If a
pattern is specified, note that it must match the entire key.
Domain Pattern
If only the stored items that belong to a particular domain are to be extracted, a pattern that matches the
domain of interest can be specified. If the field is left blank, storage items of all domains will be included. If
a pattern is specified, note that it must match the entire domain.
Output
The variable in which to store the extracted storage. The storage will be extracted in JSON format.
Find In Database
Find a value of complex type which was previously stored in a database. If the value is not found an
error is generated; if the value is found it will be loaded. The database connection must be configured in
Settings.
Properties
Find in Database can be configured using the following properties
Database
The database in which to find the value. A value can either be selected or hard coded at design time,
or the database name can be dynamically constructed at runtime using a variable, an expression or
converters - An error will occur if no database with this name exists when the robot is executed.
Variable
Select the variable to load the found value into. If any storable attribute has been added to its type since
the value was stored, the value can not be loaded by using Find in Database. The variable must be of a
regular complex type and not a specialized Database Output Types that existed prior to 7.2.
Key
The unique key for the value to find. This must be the key used when the value was stored. The key
may have been defined in the type as "Part of Database Key", or it is can be defined using a variable, an
expression or converters. If a value with the given key exists, the value will be loaded from the database
into the variable. If no value was stored with the given key an error is generated; this error may be
handled like any other error.
Only Override Empty Attributes
If this option is enabled, only empty attributes will be overridden with values loaded from the database.
This provides the possibility to extract data before using Find in Database, and not have the extracted
attribute values overridden.
For Each Browser Window
This action loops through the open browser windows (including frames and popup windows), selecting
each in turn as the current window, i.e. the window that subsequent steps will work on.
354

Kofax Kapow User's Guide
For Each Data Row
This action loops through data rows in a CSV file. To use this step, load a CSV file using the Load File
step. On the Preview window, click Select action and select Open. This action automatically adds a View
as CSV step. Now you can use the For Each Data Row and Extract Column in Data Row steps.
Properties
Range Name
Specifies a name for the cell range the action loops through.
• Auto: Design Studio automatically assigns a name.
• Named: Provide a name for the range.
The result of this step is a named range (a row) of cells that can be used to extract data in the Extract
Column in Data Row step.
For Each File
This action loops through the files in a directory.
The action loops through the files in the specified directory, optionally including the files contained in
subdirectories as well (directly and indirectly). In each iteration, the file name of the current file, including
the file path, will be stored in the selected variable.
If a file name pattern is specified, only the files whose file name matches this pattern will be included. Note
that the pattern is matched against the file name without the path, and must match the entire name.
Properties
The For Each File action can be configured using the following properties:
Directory Name
The name of the directory to loop through. The name can be specified in several ways using a Value
Selector. The name must be an absolute directory name, including the drive name, if any, and the path to
the directory.
Include Subdirectories
If this option is checked, the files contained in subdirectories (directly and indirectly) of the directory will be
included; otherwise only files contained directly in the directory itself will be included.
File Name Pattern
If a pattern is specified here, only files whose name matches this pattern will be included. The pattern is
matched against the file name without the path, and must match the entire name.
Store File Names Here
The variable in which to store the current file name in each iteration. The file name stored is the entire file
name, including the drive name, if any, and the directory path.
355

Kofax Kapow User's Guide
For Each Item
The For Each Item action loops through all items of a JSON array. In each iteration, the appropriate item is
marked as a named JSON.
The For Each Item action does not work on global variable.
Properties
The For Each Item action can be configured using the following properties:
Name
Has two options, Auto or Named.Auto gives the item a name which is number. The first Auto-numbered
item will have number 1, the next number 2 etc. Note that the number may change if additional Auto-
numbered items are inserted before this step (on the same page).Named gives the item a fixed and
explicitly stated name, which has several advantages:
• It is easier to remember what the named item identifies if it has a well-chosen name
• An explicitly named item is not affected if another named item is inserted before it
• If you use the same name again in Set Named JSON, the name will simply be made to refer to the new
item (useful for stateful in-page looping)
Keep Existing Named Items
If checked, the existing named items will be kept, otherwise these will be unmarked as named items and
only the found item will be a named item after this step.
For Each Option
This action loops through the options in a drop-down box or list box, selecting one option in each iteration.
The found tag must be a <select>-tag.
Note that selecting the options may trigger execution of JavaScript, if there are any registered event
handlers on the <select>-tag.
To select options without looping, use the Select Option or Select Multiple Options action.
Please see the Loops in Forms tutorial for more information.
Properties
The For Each Option action can be configured using the following properties:
Skip these Options
If any of the options should be skipped in the loop, they should be specified here.
Options
The robot's options can be overridden with the step's own options. An option that is marked with an
asterisk in the Options Dialog will override the one from the robot's configuration. All other options will be
the same as specified for the robot.
356

Kofax Kapow User's Guide
For Each Property
The For Each Property action loops through all properties (name/value pairs) of a JSON object. In each
iteration, the appropriate property is marked as a named JSON.
The For Each Property action does not work on global variable.
Properties
The For Each Property action can be configured using the following properties:
Name
Has two options, Auto or Named.Auto gives the item a name which is number. The first Auto-numbered
item will have number 1, the next number 2 etc. Note that the number may change if additional Auto-
numbered items are inserted before this step (on the same page).Named gives the item a fixed and
explicitly stated name, which has several advantages:
• It is easier to remember what the named item identifies if it has a well-chosen name
• An explicitly named item is not affected if another named item is inserted before it
• If you use the same name again in Set Named JSON, the name will simply be made to refer to the new
item (useful for stateful in-page looping)
Keep Existing Named Items
If checked, the existing named items will be kept, otherwise these will be unmarked as named items and
only the found item will be a named item after this step.
For Each Radio Button
This action loops through a group of radio buttons, selecting one of the radio buttons in each iteration.
The found tag must be one of the radio buttons in the group, not a tag containing all of the radio buttons.
Note that selecting the radio buttons may trigger execution of JavaScript, if there are any registered event
handlers on the buttons.
To select a radio button without looping, use the Select Radio Button action.
Please see the Loops in Forms tutorial for more information.
Properties
The For Each Radio Button action can be configured using the following properties:
Options
The robot's options can be overridden with the step's own options. An option that is marked with an
asterisk in the Options Dialog will override the one from the robot's configuration. All other options will be
the same as specified for the robot.
357

Kofax Kapow User's Guide
For Each Tag
The For Each Tag action loops through a group of tags. In each iteration, the appropriate tag is marked as
a named tag.
Most often, the loop should loop from the beginning to the end, such as looping through all the <tr>-tags of
a table. However, it is also possible to configure the For Each Tag action to loop through only some of the
tags, such as the last n tags in a sequence.
The For Each Tag action is similar to the For Each Tag Path action. The main difference is that the For
Each Tag action only finds the immediate children of the found tag, whereas the For Each Tag Path action
searches the entire subtree.
See the Basic Introduction to Looping tutorial for more information.
Properties
The For Each Tag action can be configured using the following properties:
Tag
The name of the tags to loop through, for example, tr.
Classes to Include
Specify the classes of nodes to include in the result. Conjunction (logical AND) is denoted by space and
disjunction (logical or) is denoted by |. Conjunction takes precedence over disjunction, for example class1
class2 specifies the nodes that are both of class1 and class2, class1 | class2 | class3 specifies the nodes
that are either of class1, class2, or class3, whereas class1 class2 | class3 class4 specifies the nodes that
are either both of class1 and class2 or both of class 3 and class4.
Classes to Exclude
Specify the classes of nodes to exclude from the result. Conjunction (logical AND) is denoted by space,
disjunction (logical or) is denoted by |, and the explicit absence of classes is denoted by $. Conjunction
takes precedence over disjunction, for example class1 class2 specifies the nodes that are both of class1
and class2, class1 | $ specifies the nodes that are either of class1 or of no class at all, class1 | class2
| class3 specifies the nodes that are either of class1, class2, or class3, whereas class1 class2 | class3
class4 specifies the nodes that are either both of class1 and class2 or both of class 3 and class4.
First Tag Number
The number of the first tag to include in the loop. The number can be specified to count either forward
from the first tag, or backward from the last tag.
Last Tag Number
The number of the last tag to include in the loop. The number can be specified to count either forward
from the first tag, or backward from the last tag.
Tag Number Increment
Make the loop skip tags. For example, if an increment of 2 is specified, the loop will skip every second tag
Loop Backwards
Select that the loop should loop through the matching tags in reverse order. Please note that the loop will
go through exactly the same tags as if it were looping forward just in reversed order. This means that the
358

Kofax Kapow User's Guide
First Tag Number is referring to first tag in the selection of tags to loop over and not the first tag visited
when looping (actually it will be the last).
Number of Tags to Include Before
The number of tags (of the same name) before the named tag to include in each output.
Number of Tags to Include After
The number of tags (of the same name) after the named tag to include in each output.
Tag Name
Has two options, Auto or Named.Auto gives the tag a name which is number. The first Auto-numbered
tag will have number 1, the next number 2 etc. Note that the number may change if additional Auto-
numbered tags are inserted before this step (on the same page).Named gives the tag a fixed and explicitly
stated name, which has several advantages:
• It is easier to remember what the named tag identifies if it has a well-chosen name
• An explicitly named tag is not affected if another named tag is inserted before it
• If you use the same name again in Set Named Tag, the name will simply be made to refer to the new
tag (useful for stateful in-page looping)
Keep Existing Named Tags
If this option is selected, existing named tags are kept along with the named tag marking the result of each
iteration. If this option is not selected, existing named tags are removed, and each output state will only
contain the named tag marking the result of the iteration.
Example
Consider this found tag:
<tbody>
<tr>...
<tr>...
<tr>...
<tr>...
<tr>...
</tbody>
With Tag Name set to "tr", First Tag Number set to 0 (From First), andLast Tag Number set to 1 (From
Last), the For Each Tag action will loop through <tr>-tags 0, 1, 2, and 3. In each iteration, the named tag
set by the action will be the appropriate <tr>-tag as shown below:
Iteration Named Tag
1 <tr>-tag 0
2 <tr>-tag 1
3 <tr>-tag 2
4 <tr>-tag 3
For Each Tag Path
The For Each Tag Path action loops through all tags of a given type in the subtree of the found tag. In
each iteration, the appropriate tag is marked as a named tag.
359

Kofax Kapow User's Guide
The For Each Tag Path action is very similar to the For Each Tag action. The main difference is that the
For Each Tag action only finds the immediate children of the found tag whereas the For Each Tag Path
action searches the entire subtree
See the Basic Introduction to Looping tutorial for more information.
Properties
The For Each Tag Path action can be configured using the following properties:
Tag Path
Specify the tag path which is to be looped through. The tag path is specified as in a Tag Finder. All of the
matching tags in the entire subtree will be found.
Classes to Include
Specify the classes of tags to include in the result. Conjunction (logical AND) is denoted by space and
disjunction (logical or) is denoted by |. Conjunction takes precedence over disjunction, for example class1
class2 specifies the tags that are both of class1 and class2, class1 | class2 | class3 specifies the tags that
are either of class1, class2, or class3, whereas class1 class2 | class3 class4 specifies the tags that are
either both of class1 and class2 or both of class 3 and class4.
Classes to Exclude
Specify the classes of tags to exclude from the result. Conjunction (logical AND) is denoted by space,
disjunction (logical or) is denoted by |, and the explicit absence of classes is denoted by $. Conjunction
takes precedence over disjunction, for example class1 class2 specifies the tags that are both of class1
and class2, class1 | $ specifies the tags that are either of class1 or of no class at all, class1 | class2 |
class3 specifies the tags that are either of class1, class2, or class3, whereas class1 class2 | class3 class4
specifies the tags that are either both of class1 and class2 or both of class 3 and class4.
First Tag Number
The number of the first matching tag to include in the loop. The number can be specified to count either
forward from the first tag, or backward from the last tag.
Last Tag Number
The number of the last matching tag to include in the loop. The number can be specified to count either
forward from the first tag, or backward from the last tag.
Tag Number Increment
Make the loop skip tags. For example, an increment of 2 is specified, the loop will skip every second tag.
Loop Backwards
Select that the loop should loop through the matching tags in reverse order. Please note that the loop will
go through exactly the same tags as if it were looping forward just in reversed order. This means that the
First Tag Number is referring to first tag in the selection of tags to loop over and not the first tag visited
when looping (actually it will be the last).
Tag Name
Has two options, Auto or Named.Auto gives the tag a name which is number. The first Auto-numbered
tag will have number 1, the next number 2 etc. Note that the number may change if additional Auto-
numbered tags are inserted before this step (on the same page).Named gives the tag a fixed and explicitly
stated name, which has several advantages:
• It is easier to remember what the named tag identifies if it has a well-chosen name
360

Kofax Kapow User's Guide
• An explicitly named tag is not affected if another named tag is inserted before it
• If you use the same name again in Set Named Tag, the name will simply be made to refer to the new
tag (useful for stateful in-page looping)
Keep Existing Named Tags
If this option is selected, existing named tags are kept along with the named tag marking the result of each
iteration. If this option is not selected, existing named tags are removed, and each output state will only
contain the named tag marking the result of the iteration.
Example
Consider this found tag:
<table>
<tbody>
<tr>
<td> 1 </td>
<td> 2 </td>
</tr>
</tbody>
</table>
Set the Tag Path to td. The first iteration will set a named tag to <td> 1 </td> and in the next iteration, the
named tag will be <td> 2 </td>
Now consider this found tag:
<table>
<tbody>
<tr>
<td>
<table>
<tbody>
<tr>
<td> 1 </td>
<td> 2 </td>
</tr>
</tbody>
</table>
</td>
<td> 3 </td>
</tr>
</tbody>
</table>
Set the Tag Path to tr.td. The first iteration will set a named tag to
<td><table><tbody><tr><td> 1
</td><td> 2
</td></tr></tbody></table></td>
and in the next iteration, the named tag will be
<td> 3 </td>
361

Kofax Kapow User's Guide
For Each Text Part
This action splits a text at a specified delimiter pattern and loops through the part, assigning the next text
part to a selected variable in each iteration.
Properties
The For Each Text Part step action can be configured using the following properties:
Input
The string to split can be specified in several ways using a Value Selector. If the contents of a tag should
be split, you must first extract the tag text into a variable using the Extract step action.
Delimiter
Specify the delimiter at which to split the text.
See the example below where we split a text using "," as delimiter.
Output
Specifies the variable in which the text part will be stored in each iteration.
Skip Empty Output
If checked, the loop will skip iterations whose output would have been a text of length zero. For example
if looping over the text "a,b,,c", the loop only contains three iterations (outputting "a", "b" and "c") if this
property is checked. If the "Skip Empty Output" property is left unchecked, the loop contains four iterations
(outputting "a", "b", "" and "c").
Example
We have the following input text:
apple,pear,banana,grape,kiwi,pineapple
We want to iterate over the fruits and perform some action for each; for example store the name of the
fruit in a database.
As delimiter, we specify: ,
and as output variable we select Fruit.name.
In the first iteration, the Fruit.name variable will contain the value apple, in the second iteration it will
contain the value pear. The entire loop will contain six iterations and in the final iteration the Fruit.name
variable will contain the value pineapple.
For Each URL
The For Each URL action loops through the URLs contained in the found tag, optionally skipping duplicate
URLs. The tags containing the URLs can be located at any depth inside the found tag. In each iteration,
the appropriate tag is marked as a named tag.
See the Basic Introduction to Looping tutorial for more information.
362

Kofax Kapow User's Guide
Properties
The For Each URL action can be configured using the following properties:
URL Tags
Specifies the HTML tags whose URLs to loop through.
First URL Number
The number of the first URL to include in the loop. The number can be specified to count either forward
from the first URL, or backward from the last URL.
Last URL Number
The number of the last URL to include in the loop. The number can be specified to count either forward
from the first URL, or backward from the last URL.
Loop Backwards
Select that the loop should loop through the matching tags in reverse order. Please note that the loop will
go through exactly the same tags as if it were looping forward just in reversed order. This means that the
First Tag Number is referring to first tag in the selection of tags to loop over and not the first tag visited
when looping (actually it will be the last).
URL Pattern
A pattern to match against each URL. The Action property then determines whether the URL should be
skipped or not. The pattern must match the entire URL. If no pattern is specified, no pattern matching is
done.
Action
If set to "Skip URLs that Match Pattern", all URLs that match the pattern will be skipped. If set to "Skip
URLs that Do Not Match Pattern", all URLs that do not match the pattern will be skipped.
Skip Duplicate URLs
Specifies whether duplicate URLs (i.e. multiple identical URLs) should be skipped and hence not be
looped through. Check this property the same URL should not be looped through more than once. (This is
usually the case.)
Tag Name
Has two options, Auto or Named.Auto gives the tag a name which is number. The first Auto-numbered
tag will have number 1, the next number 2 etc. Note that the number may change if additional Auto-
numbered tags are inserted before this step (on the same page).Named gives the tag a fixed and explicitly
stated name, which has several advantages:
• It is easier to remember what the named tag identifies if it has a well-chosen name
• An explicitly named tag is not affected if another named tag is inserted before it
• If you use the same name again in Set Named Tag, the name will simply be made to refer to the new
tag (useful for stateful in-page looping)
Keep Existing Named Tags
f this option is selected, existing named tags are kept along with the named tag marking the result of each
iteration. If this option is not selected, existing named tags are removed, and each output state will only
contain the named tag marking the result of the iteration.
363

Kofax Kapow User's Guide
Generate Error
This action generates an error.
Useful if a situation has been detected that should be considered an error, such as if an error page has
been received from a web site when trying to perform a certain action on the site. Using the Generate
Error action, a robot error can be generated that will be handled like other errors that occur during the
execution of a robot.
If it is just important to log that a certain situation has occurred and then continue execution along the
current branch, consider using Write Log instead.
Properties
The Generate Error action can be configured using the following properties:
Error Message
The error message to include in the error. The error message can be specified in several ways using a
Value Selector. If no error message is specified, a default error message will be used.
Get File Info
This action fetches meta data about a file in the file system.
Properties
The Get File Info action can be configured using the following properties:
File Name
The name of the file to look for. The name can be specified in several ways using a Value Selector. The
name must be an absolute file name, including the drive name, if any, and the directory path to the file.
Store Last Modified In
Specifies the variable in which to store the last modified date.
Store Size In
Specifies the variable in which to store the size of the file, measured in bytes. This is the actual size of the
file contents, not the file size on disk.
Get Iteration
This action gets the current iteration of an enclosing loop step and stores it in a variable.
When looping through a list of objects, this action is useful if the number of the current object that you are
extracting is important.
Properties
The Get Iteration action can be configured using the following properties:
364

Kofax Kapow User's Guide
Loop Step
The number of the loop step whose iteration to get, either counting forward from the first loop step in the
robot, or backward from the immediately enclosing loop step. For example, if 2 is entered and "From Last"
is chosen, the iteration of the second innermost enclosing loop step will be chosen.
Store Iteration Here
The variable to store the iteration in.
Group Step
The Group Step is designed to contain other steps which can then be hidden by collapsing the group step
into a single step and it is a convenient way to structure your robot. Grouping steps inside Group steps
has no effect on the execution of a robot.
Group steps contain an expand/collapse icon (+/-) located at the top left corner. Clicking on this will
expand/collapse the group step. When the group step is collapsed it will look similar to an ordinary step
and all the steps inside will be hidden. When the group step is expanded its contained steps will be visible
and have a layout that will resemble what you would see if these were not grouped. Group steps may
also be expanded or collapsed by using the Expand All / Collapse All buttons on the Toolbar which will
perform these actions on all group steps in the robot, or by the Expand Groups / Collapse Groups which
will perform these actions on all groups in the selection.
Steps are grouped (create a new group step containing the steps) by selecting the steps to group and
using the Group action found in the Toolbar, the Edit menu or in the popup menu on steps. Only steps that
form a subgraph may be grouped. This means that all steps must be directly connected to another step
in the selection. There can only be one connection entering the selection (coming from a step outside the
selection). All connections leaving the selection leading to steps outside the selection will be connected to
the end of the group.
Steps are un-grouped (remove the group step, but keeping the grouped steps) by selecting the group
steps to un-group and using the Ungroup action found in the Toolbar, the Edit menu or in the popup menu
on steps.
At the beginning and end of the group step (when the group is expanded) a triangular marker can be
noticed. This marks the entry and exit of the group step and if a right click is performed on one of these
markers it will be possible to perform a selection of actions on the group step using the popup menu that
appears, e.g. insert a branch at the start of the group.
Hide Tag
This action hides the found tags.
The hiding is done by configuring the style attribute of the tags. That is, the tags are kept in the page, but
configured using styles to be invisible on the page.
This action is particularly useful if tags should not be visible when clipping from the page. Hiding the
tags instead of removing them avoids breaking things like JavaScript that may rely on the page having a
specific structure and contents.
Properties
The Hide Tag action can be configured using the following properties:
365

Kofax Kapow User's Guide
Adjust Layout Accordingly
If this option is selected, the hiding will be done in such a way that the layout of the page adjusts in order
to use the space that was taken up by the tag. If this option is not selected, the hiding will be done in such
a way that the tag continues to take up the same space in the layout, but is just not shown.
Insert Columns
This action inserts one or more columns in a spreadsheet.
Properties
The Insert Columns action can be configured using the following properties:
Insert Where
This option specifies where to insert the columns. Options are:
• First
• Before (Default)
• After
• Last
Number of Columns
The number of columns to insert.
Set as Named Range
Range name options are:
• Auto (Default)
• Named If you select Named, specify a name.
• If you select Named, specify a name.
Range Name
Has two options, Auto or Named.Auto gives the range a name which is number. The first Auto-numbered
range will have number 1, the next number 2 etc. Note that the number may change if additional Auto-
numbered ranges are inserted before this step (on the same page).Named gives the range a fixed and
explicitly stated name, which has several advantages:
• It is easier to remember what the named range identifies if it has a well-chosen name
• An explicitly named range is not affected if another named range is inserted before it
• If you use the same name again, the name will simply be made to refer to the new range (useful for
stateful in-page looping)
Insert Content
This action inserts the specified content into a document relative to the found tag.
The step action only works on XML variables. Note that this step neither validates the XML nor resolves
entities.
366

Kofax Kapow User's Guide
Properties
The Insert Content action can be configured using the following properties:
New Content
The new content to insert.
Insert Tag Where
Choose where to insert the new tag relative to the found tag. Options are:
• As First Child of Found Tag
• As Last Child of Found Tag
• Before Found Tag
• After Found Tag
Note that tags can not be inserted in a text node. Instead, the surrounding tag must be selected.
Set as Named Tag
Select this property to set a named tag on the item.
Auto
Gives the item a name which is number. The first auto-numbered item is 1, the next is 2, and etc.
Named
Gives the item a fixed and explicitly stated name.
See Named Tags, Ranges, and JSON for details.
Insert JSON
This action inserts a new property (name/value pair) into a JSON object or a new item into a JSON array.
The step action only works on JSON variables.
Properties
The Insert JSON action can be configured using the following properties:
Insert What
This option defines a new property to insert. If this option is used then the found JSON value must be an
object otherwise an error is produced. The new property is defined by the two properties:
Object Property
This option defines a new property to insert. If this option is used then the found JSON value must be
an object otherwise an error is produced. The new property is defined by the two properties:
Name
This is the name of the new property. This must of course be a valid property name, e.g. quotation
marks should be escaped.
367

Kofax Kapow User's Guide
Value
This is the value of the property which must be a valid JSON value, e.g. if you want to insert a text
this must be quoted.
Array Item
This option defines a new item to insert. If this option is used then the found JSON value must be an
array otherwise an error is produced. The new property is defined by the two properties:
Value
This is the value of the item which must be a valid JSON value, that is. if you want to insert a text
this must be quoted.
Insert Where
Choose where to insert the new JSON relative to the found JSON value. The options are:
Before
This will insert the property or item before the found JSON.
First
This will insert the property or item as the first property in a JSON object or array.
Last
This will insert the property or item as the first property in a JSON object or array.
After
This will insert the property or item after the found JSON.
Set as Named JSON
Select this property to set a named JSON on the item.
Auto
Gives the item a name which is number. The first auto-numbered item is 1, the next is 2, and etc.
Named
Gives the item a fixed and explicitly stated name.
See Named Tags, Ranges, and JSON for details.
Insert Rows
This action inserts one or more rows in a spreadsheet.
Properties
The Insert Rows action can be configured using the following properties:
Insert Where
This option specifies where to insert the rows. Options are:
• First
368

Kofax Kapow User's Guide
• Before (Default)
• After
• Last
Number of Rows
The number of rows to insert.
Set as Named Range
Range name options are:
• Auto (Default)
• Named If you select Named, specify a name.
Range Name
Has two options, Auto or Named.
Auto gives the range a name which is number. The first Auto-numbered range will have number 1, the
next number 2 etc. Note that the number may change if additional Auto-numbered ranges are inserted
before this step (on the same page).Named gives the range a fixed and explicitly stated name, which has
several advantages:
• It is easier to remember what the named range identifies if it has a well-chosen name
• An explicitly named range is not affected if another named range is inserted before it
• If you use the same name again, the name will simply be made to refer to the new range (useful for
stateful in-page looping
Insert Sheet
This action inserts a new sheet in a spreadsheet.
Properties
The Insert Sheet action can be configured using the following properties:
Insert Where
This option specifies where to insert the rows. Options are:
• First
• Before (Default)
• After
• Last
Name
This option specifies a name of the inserted sheet.
Insert Tag
The Insert Tag action inserts a new tag. Any JavaScript present in the HTML of the new tag will be
executed, unless JavaScript execution is disabled in the options.
369

Kofax Kapow User's Guide
Properties
The Insert Tag action can be configured using the following properties:
HTML of New Tag
Specify the HTML of the new tag. The HTML can be specified in a number of ways as described below.
Insert Tag Where
Choose where to insert the new tag relative to the found tag. Options are:
• As First Child of Found Tag
• As Last Child of Found Tag
• Before Found Tag
• After Found Tag
Note the following rules:
• If a new tag is inserted before an <html>, <head>, or <body> tag, it will become the first tag in <body> if
the document contains a <body> tag. Otherwise, it will become the first tag in <html>.
• If you insert the new tag after a <head> tag, it will become the first tag in <body>.
• If you insert the new tag after a <html> or <body> tag, it will become the last tag in <body>.
• HTML tags can not be inserted in a text node. Instead, the surrounding tag must be selected.
Options
The robot's options can be overridden with the step's own options. An option that is marked with an
asterisk in the Options Dialog will override the one from the robot's configuration. All other options will be
the same as specified for the robot.
Specifying the HTML
The HTML of the new tag can be specified in the following ways:
HTML
Simply write the HTML of the new tag.
HTML from Expression
Write an expression whose result is used as the HTML of the new tag.
HTML from Expression and Pattern
Write a pattern which is matched against the found tag, and an expression whose result is used as the
HTML of the new tag. Use this way of specifying the HTML if parts of the found tag should be used when
creating the HTML of the new tag.
Pattern
A pattern which is matched against the found tag for the Insert Tag action. The pattern must match the
entire found tag, otherwise an error will be generated.
Match Against
Specifies what the pattern should be matched against from the found tag.
• "Only Text" specifies that the pattern should be matched only against the text in the found tag.
• "HTML" specifies that the pattern should be matched against the HTML of the found tag.
370

Kofax Kapow User's Guide
Ignore Case
If this is checked, the pattern is matched against the input without regard to the character case; e.g.
"KaPoW" is considered equal to "kApow".
Expression
This field contains an expression whose result is used to create the new tag. The expression can refer
to the submatches of the pattern in the Pattern field using the $n notation. For example, enter $1 in
the expression to get the first submatch in the pattern (i.e. the text that matches the contents of the
first pair of parentheses in the pattern).
HTML Converted from XML Variable
Choose an XML variable whose content will be transformed to HTML and used as the HTML of the new
tag.
Load File
This action loads a file, either into the browser or to a variable.
Properties
The Load File action can be configured using the following properties:
File Name
This property specifies the path to the file to load. The path may be constructed using an expression or
converter.
Output
This specifies what to do with the file contents; either load it into the browser or store it in a variable.
Options
The robot's options can be overridden with the step's own options. An option that is marked with an
asterisk in the Options Dialog will override the one from the robot's configuration. All other options will be
the same as specified for the robot.
Load Page
This action loads a page from a URL obtained either from a link on the current page, or from somewhere
else. Note that loading from a link on the current page is usually easier done by using the Click action to
perform a click on that link.
Properties
The Load Page action can be configured using the following properties:
Location
This property specifies which URL to open. The URL can be specified in several ways using a URL
Selector.
371

Kofax Kapow User's Guide
Load Into
This property specifies which window to load the page into. The window can be an existing one or a new
one. The following options are available:
• Automatic specifies that the page should be loaded into the same window as a browser would. If the
page is loaded from a URL in the found tag, this will take into account "target" attributes etc. on the
found tag.
• Existing Window specifies that the page should be loaded into a selected existing window (see the
discussion on how to identify a window).
• New Window specifies that the page should be loaded into a new window. An optional name for the
new window can be specified, and it can be selected which window should be registered as the opener
of the new window (see the discussion on how to identify a window).
Options
The robot's options can be overridden with the step's own options. An option that is marked with an
asterisk in the Options Dialog will override the one from the robot's configuration. All other options will be
the same as specified for the robot.
Load Web Storage
The Load Web Storage step action loads data into the local and/or session storage. The local and session
storages are used by some websites to persist larger amounts of data that can normally be stored in a
cookie.
The data to load can be specified in the data field (see below for an example of how to do this), but this
step action can also be used to load storage data that has been extracted using an Extract Web Storage
step action.
Properties
The Load Web Storage action can be configured using the following properties:
Data
Specify the data to load into the local and/or session storage. Normally, this data is taken from a variable
that stores the result of having used the Extract Web Storage action, but the data can also be entered or
generated specifically.
The data must be specified in JSON format and must be specified as an array of objects. Each object
must contain the following properties:
storage-type
The storage type must be either "session" or "local". Session storage will be loaded into the current
window and will persist as long as its top-level window exists, similarly to a session cookie. Local storage
is shared between all of the browser windows, similarly to a persistent cookie.
domain
The domain whose sites have access to the storage.
storage
An array of items that comprise the storage. Each item is an object with the following properties:
372

Kofax Kapow User's Guide
key
The name that is used to look up the item in the storage.
value
The stored value, which must be of type String.
Example
In this example, we wish to define one storage item named "help" with the value "http://
help.kapowsoftware.com" in the local storage, and two storage items in the session storage, namely
"product" with the value "Kofax Kapow" and "version" with the value "10". All storage items will be defined
for the domain "www.kapowsoftware.com".
We enter the following data into the Load Web Storage step action:
[
{ "storage-type": "local",
domain: "www.kapowsoftware.com",
storage: [
{ key: "help",
value: "http://help.kapowsoftware.com"
}
]
},
{ "storage-type": "session",
domain: "www.kapowsoftware.com",
storage: [
{ key: "product",
value: "Kofax Kapow"
},
{ key: "version",
value: "10"
}
]
}
]
Loop Field Values
This action loops through a list of values, entering one into a text field in each iteration.
The found tag must be a <textarea> tag or an <input> tag of type "text" or "password".
Note that entering the value may trigger execution of JavaScript if there are any registered event handlers
on the <input> or <textarea> tag.
To enter text without looping, use the Enter Text action.
See the Loops in Forms tutorial for more information.
Properties
The Loop Field Values action can be configured using the following properties:
Values
The values to loop through. These can be either:
373

Kofax Kapow User's Guide
a...z
The letters from a-z, in alphabetical order.
aa...zz
The two-letter combinations of a-z, in alphabetical order.
Number range
A range of integers. The numbers that define the endpoints of the range must be specified, as well as
the size of the step taken in each iteration. E.g. setting "From" to 0, "To" to 100 and "Step" to 10 will
cause the step to loop through the sequence 0, 10, 20, 30, 40, 50, 60, 70, 80, 90, 100.
List of values
Explicitly specify the values to loop through. The values must be separated by commas or placed on
separate lines, and may be quoted with double quotes. Using the Value Selector, a list from e.g. a
variable can be obtained.
Options
The robot's options can be overridden with the step's own options. An option that is marked with an
asterisk in the Options Dialog will override the one from the robot's configuration. All other options will be
the same as specified for the robot.
Loop in Excel
The Loop in Excel action loops through different elements of a spreadsheet. An element in this context
could be a sheet, a column, a row or a cell and is identified by the step's Range Finder. In each iteration,
the appropriate element is marked as anamed range.
Properties
The Loop in Excel action can be configured using the following properties:
Loop Over
This determines what kind of element the action will loop over. There are 4 possibilities for this:
Sheets
The action will loop over sheets in the spreadsheet document. No range finder is needed for this
choice.
Columns
The action will loop over the columns in the range found by the range finder.
Rows
The action will loop over the rows in the range found by the range finder.
Cells
The action will loop over the cells in the range found by the range finder.
First Index
The number of the first element to include in the loop. The number can be specified to count either
forward from the first element, or backward from the last element.
374

Kofax Kapow User's Guide
Last Index
The number of the last element to include in the loop. The number can be specified to count either forward
from the first element, or backward from the last element.
Increment
Make the loop skip elements. For example, if an increment of 2 is specified, the loop will skip every
second element.
Loop Backwards
Select that the loop should loop through the matching elements in reverse order. Please note that the loop
will go through exactly the same elements as if it were looping forward just in reversed order. This means
that the First Index is referring to first element in the selection of elements to loop over and not the first
element visited when looping (actually it will be the last when looping backwards).
Range Name
Has two options, Auto or Named.Auto gives the range a name which is number. The first Auto-numbered
range will have number 1, the next number 2 etc. Note that the number may change if additional Auto-
numbered ranges are inserted before this step (on the same page).Named gives the range a fixed and
explicitly stated name, which has several advantages:
• It is easier to remember what the named range identifies if it has a well-chosen name
• An explicitly named range is not affected if another named range is inserted before it
• If you use the same name again in Set Named Range, the name will simply be made to refer to the new
range (useful for stateful in-page looping)
Lookup Password
This action retrieves a user password from the Password Store and stores it in a variable. This step
action is designed to use sensitive information without disclosing it. You can store the retrieved password
in a password type variable and use it in the Device Automation step. Before your robot can retrieve
password information, the Management Console administrator must create a Password Access entry in
the Management Console with the token provided by Design Studio on the Lookup Password step.
Important Every time you upload your robot or any of its components, such as types, snippets, and so
on to the Management Console, a new Password Access entry must be created for the robot. Previous
entries are kept in the Password Access list and the administrator can delete them manually.
Properties
The Lookup Access action can be configured using the following properties:
User Name
Specify the name of the user to get a password for.
Target System
Specify the external system to get a password for. The value you type in this filed must match the value in
the Target System property of the Password entry.
375

Kofax Kapow User's Guide
Note The target systems can be configured by an administrator to provide passwords for the same user
on different systems, such as production, pre-production, and development. The Target System can also
be used to partition the access to different parts of virtual machines if customers have a credit checking
automation in one partition and an accounting summarization in another partition.
Variable
Name of the Password type variable to store the retrieved password.
Make Directory
This action creates a new directory on the local file system where the robot is executed.
Note that the action is only performed during execution in Design mode in Design Studio, if the option
Execute in Design Mode has been selected.
Properties
The Make Directory action can be configured using the following properties:
Directory
This is the file system path or a file URL for the directory to be created. This can be specified in several
ways using a Value Selector. The path must be absolute, including the drive name, if any, and the
directory path to the directory. Alternatively it can be a file URL, e.g. file:/C:/temp/newDir, in which case it
must be URL encoded. The separators / and \ may be used interchangeably.
Generate Error if Directory Exist
Makes the action generate an error if the directory already exists.
Create Directories
Specifies whether to create the necessary directories on the path before creating the directory. If not
selected, then the action will fail if any directory on the path does not exist.
Execute in Design Mode
If this is enabled, the action will be executed even in Design Mode inside Design Studio. If this is disabled,
the action will do nothing when you navigate the robot in Design Mode.
Make Snapshot
The Make Snapshot step action takes the page located in the current window and stores it in the file
system, including any style sheets and images necessary to display the page as it was at the time when
the snapshot was made. No JavaScript or server interaction is necessary to view the page at a later time -
even if the content was dynamically generated.
Related Step Actions
For downloading a large number of interlinked pages, reuse shared resources and preserve links between
the offline snapshots, consider using the Rewrite Page step action. Robots using the Rewrite Page step
action need an external controller application to feed it URLs of pages and resources to download.
376

Kofax Kapow User's Guide
Properties
The Make Snapshot step action can be configured using the following properties:
Output Folder
The folder in which to output the snapshot. The main page (corresponding to the document in the current
window) will be outputted in a file named index.html.
Download Resources
When enabled, images and other resources that have not already been loaded by the previous step
actions will be downloaded and saved as part of the snapshot.
Options
The robot's options can be overridden with the step's own options. An option that is marked with an
asterisk in the Options Dialog will override the one from the robot's configuration. All other options will be
the same as specified for the robot.
Move Mouse From
This action emulates a mouse move away from the found tag.
This action is useful for closing JavaScript-based menus that open when the mouse is moved over them
and close when the mouse is moved away from them.
To emulate a mouse movement to a tag, use the Move Mouse To action. To emulate a mouse click instead
of a movement, use the Click action.
Properties
The Move Mouse From action can be configured using the following properties:
Options
The robot's options can be overridden with the step's own options. An option that is marked with an
asterisk in the Options Dialog will override the one from the robot's configuration. All other options will be
the same as specified for the robot.
Move Mouse To
This action emulates a mouse move to the found tag.
This action is useful for triggering JavaScript-based menus that open when the mouse is moved over
them.
To emulate a mouse movement away from a tag, use the Move Mouse From action. To emulate a mouse
click instead of a movement, use the Click action.
Properties
The Move Mouse To action can be configured using the following properties:
377

Kofax Kapow User's Guide
Options
The robot's options can be overridden with the step's own options. An option that is marked with an
asterisk in the Options Dialog will override the one from the robot's configuration. All other options will be
the same as specified for the robot.
New Window
This action creates a new window.
Properties
The New Window action can be configured using the following properties:
Window Name
The name of the new window, if any. Leave the field empty if the new window should be unnamed.
Window Opener
The window that should be registered as the opener of the new window, if any (see the discussion on how
to identify a window). The opener relationship may be important to JavaScript executing in the windows
Next
This action requests another iteration in a repeat loop created using the Repeat action.
In each iteration of the repeat loop, another iteration can be requested using the Next action. The
windows, pages, etc. at the Next step will be sent back to the Repeat step and will become the output
from the Repeat step in the next iteration. If no Next step is executed in a given iteration, that iteration will
be the last one, and the repeat loop will end.
See the Repeat action for further information.
Please see the Repeat - Next tutorial for more information.
Normalize Table
This action normalizes a table by introducing extra cells where rowspan and colspan are used, which
makes iterating over table columns or rows easier. The normalization only works if colSpan/rowSpan is
part of the HTML source, not if it is created using CSS.
Since this action modifies the page, it can cause JavaScript or form submission to stop working, as these
may rely on the structure of the page. This is however rarely a problem since the action is usually applied
to data tables from which there is no futher navigation.
Properties
Delete from Database can be configured using the following properties
Do not copy form fields
Is thi soption is selected, any form fields (input, select, button, textarea) will not be copied when extra cells
are inserted.
378
Kofax Kapow User's Guide
Examples
colSpan
Before
1 2
3
4 5
After
1 2
3 3
4 5
rowSpan
Before
1 X2
X3
4 X
56X
After
12X
32X
34X
56X
colSpan and rowSpan
Before
1 2 4
5
7
3
6
88888
After
12334
55336
77336
88888
379

Kofax Kapow User's Guide
Obsolete Step
Some of the steps have been either replaced or removed in the newer versions of Kapow.
The step you are trying to get help for might have been created in one of the previous versions of the
program. Please refer to the online help of the corresponding version of Kapow.
If you want to edit your robot in the newer version of Kapow, replace the obsolete step with one of the
existing steps if possible. Refer to Release Notes document and Upgrading Kapow topic in the Kapow
Installation Guide for upgrade instructions. Use our customer support portal for solving any problem you
might have using Kofax Kapow.
Open Variable
This action opens a variable attribute - or a variable of simple type - in the view, making it possible to
manipulate it through here. This provides a way to visually adjust the contents of variables, making it
easier to, for instance, form the precise content required for a web service parameter.
The step action only works on XML, JSON or Excel variables.
Properties
The Open Variable action can be configured using the following property:
Variable
This property specifies which variable to open. The variable must be of type XML, JSON or Excel to be
loaded in this way. Note, that pre-9.3 robots use a now deprecated XML attribute type, so these will have
to be upgraded to the new XML type in order to be opened. For variables of simple type, this is done by
editing the variable and selecting the new XML type. For variables of complex types, the relevant .type file
must be changed to use the new XML attribute type instead of the old.
Press Key
This action emulates pressing a key on the keyboard.
The found tag can be any tag, that can assume focus and receive keyboard events.
This action is useful for sending key presses, like <TAB>.
Properties
The Press Key action can be configured using the following properties:
Key to press
The key to press.
Predefined
Select from the list. The list of predefined keys contains the most commonly used keys.
380

Kofax Kapow User's Guide
Value
Specify a value of the key to press. The value must be one of the Qt key codes in a decimal number. For
the key names used by Qt, see http://doc.qt.io/qt-4.8/qt.html#Key-enum.
Variable
Specify a variable that contains the key code of the key to press. The key code must be one of the Qt key
codes in a decimal number.
Expression
Specify an expression.
Converters
Specify a converter.
Focus on element
Focus on the element before pressing the key.
Options
The robot's options can be overridden with the step's own options. An option that is marked with an
asterisk in the Options Dialog will override the one from the robot's configuration. All other options will be
the same as specified for the robot.
Query Database
The Query Database action submits an SQL query to a database and loops through the results. The SQL
should be specified using an expression. At each iteration of the result loop, the values of the current row
in the result set can be assigned to variables.
Properties
The Query Database action can be configured using the following properties:
Database
Choose which database this action should submit its query to by using the drop-down list of databases
available to Design Studio.
SQL Query
This field must contain a valid SQL query in the form of an expression. The value of this expression is
submitted to the chosen database. The "Edit" popup dialog allows the SQL query to be tested, showing a
sample of the output.
Variables Map
Specify the mapping from result columns to variables. Click the plus sign to add a new mapping and the
minus sign to remove an existing one. A mapping consists of a column name and a variable name. The
column name must match the name of a column returned by the SQL Query, and the variable name is
chosen from a list of existing variables. Note, that the type of the column should match the type of the
chosen variable. Otherwise, an error may be generated during execution. That is, trying to store a text
column in an integer variable will cause an error.
381

Kofax Kapow User's Guide
Retrieve While Looping
If this is enabled, result rows are retrieved from the database only as they are needed by the loop,
iteration by iteration. See the note below on execution.
First Row in Design Mode
Used only in Design Mode in Design Studio, this is the number of the first iteration or query result row that
will be accessible (counting from 1). See the note below on execution.
Rows to Use in Design Mode
Used only in Design Mode in Design Studio, this specifies the maximum number of result rows to make
available for iteration. See the note below on execution.
Note: Depending on whether Retrieve While Looping is disabled or enabled, retrieval of the result rows is
done in two different ways:
• Disabled: The result rows are all retrieved and saved in memory before the first iteration is executed.
Thus, the database connection will be reserved for the shortest possible length of time, and the results
will not be affected by any steps that are part of the loop (for example, Store In Database steps). On
the other hand, available memory puts a limit to the number of result rows that can be handled without
error. (This was the only option available until release 8.3).
• Enabled: The results rows are retrieved from the database one at a time as they are needed for
executing each iteration of the loop. Thus, the step will be able to handle very large numbers of result
rows but will hold the database connection open until all iterations of the loop have finished execution.
As a side effect, the results may be affected if you make changes to the database tables referenced by
the SQL query while the loop executes. However, many factors work together to determine whether the
changes will in fact be visible in any particular situation.
In Debug Mode in Design Studio, retrieving while looping implies that the database connection will be held
open while execution is stopped at a breakpoint or during single-stepping. If the database has a timeout
for inactive connections, you may see a database error when you continue execution of the robot after a
long pause.
In Design Mode in Design Studio, result rows will always be retrieved before the loop starts, thus Retrieve
While Looping is effectively disabled. This is done to make it possible to switch between different iterations
interactively. In order to limit the amount of memory used for this, the First Row in Design Mode and Rows
to Use in Design Mode together specify a subset of result rows to load. For example, if
• First Row in Design Mode = 301
• Rows to Use in Design Mode = 100
then the loop will iterate over result rows 301 to 400 (provided the SQL query returns so many rows).
Raw HTTP
The Raw HTTP action sends a HTTP request to a web server. How the response is treated depends on
the method, but in general the status code and the response headers are returned in variables defined as
part of the page load options.
Properties
The Raw HTTP action can be configured by its properties:
382

Kofax Kapow User's Guide
Location
This property specifies which URL to open. The URL can be specified in several ways using a URL
Selector.
Method
Here you specify which method to use:
• GET is used for performing a GET HTTP request.
• POST is used for performing a POST HTTP request. For POST requests specify a number of
parameters as name/value pairs or give the entire body of the request. If the request is specified
with parameters, you must selected whether to use POST (application/x-www-form-urlencoded) or
MULTIPART (multipart/form-data) to encode the parameters. If the entire ('raw') body of the request is
given, the content type of the request data must be specified.
• PUT is used for performing PUT HTTP requests. For PUT requests specify a number of parameters as
name/value pairs or give the entire body of the request.
The following settings are common for GET, POST, and PUT requests.
Parameters
Here you can specify a number of parameters as name/value pairs. Click '+' to add a new
parameter.
For POST and PUT requests, MULTIPART encoding can be selected to enable file uploads. If
a binary variable is selected as the value of a File Upload parameter, the bytes are submitted
as-is. If Base 64 encoding is desired, the value of the parameter should be an expression
base64Encode(data) where data is the name of the variable containing the binary value. In
that case, it is also recommended to specify the value base64 as Content Transfer Encoding -
otherwise, this field can normally be left blank.
Accept
This is the content types that will be accepted as response. By default, any type of response will be
accepted. The accepted content types can be specified in several ways using a Value Selector.
Encoding
This is the encoding that will be used to encode special characters in the request.
Store In
This is the name of a required variable in which to store the result.
• HEAD is used for performing a HEAD HTTP request. Since the HEAD request does not return any data
as part of its response (only a status code and the response headers) it uses variables defined as part
of the page load options to access this. A GET request can be used to simulate a HEAD request. This
will result in a GET HTTP request being sent that will be aborted as soon as the header information is
received i.e. the entire response will not be loaded.
• OPTIONS is used for performing an OPTIONS HTTP request. Since the OPTIONS request does
not return any data as part of its response (only a status code and the response headers) it uses
variables defined as part of the page load options to access this. The response would normally include
header fields that indicate optional features implemented by the server and applicable to the requested
resource (URL), e.g. Allow: OPTIONS, TRACE, GET, HEAD
Options
The robots options can be overridden with the steps own option. The option that are changed will override
the ones from the robots configuration and will be marked with an asterisk in the Options dialog.
383

Kofax Kapow User's Guide
Note If additional request headers are needed, this can also be configured under Options.
Refind Object
This step has been deprecated, as it can't be used with the new storage mechanism, described in
Storing data in databases
This action attempts to refind an object in storage, e.g. a database. If the object can be refound, then
execution along the current branch will stop. Otherwise, extraction will continue past the step containing
the Refind Object action. As a result, the Refind Object action is a means to minimize robot execution
time.
Properties
The Refind Object action can be configured using the following properties:
Variable
The object which is affected can be selected by choosing one from the Object drop-down box. The objects
available in the drop-down box are the configured output objects.
Attributes to use for Refinding
This box is a list of object attributes that will uniquely identify the object in the storage. The Refind Object
action will try to find an object in storage that matches with what you have found so far at this point in
the robot execution. If such an object exists, there is little point in continuing, as the rest of the fields are
probably also correct in storage.
You should try to select as few object attributes as possible, while still maintaining global uniqueness
during the entire lifetime of the object.
You should not include object attributes which either are not present in all of the objects or which could
change during the lifetime of the object.
Remove Attribute
This action removes an attribute from a tag in XML.
The step action only works on XML variables. Note that this step neither validates the XML nor resolves
entities.
Properties
The Remove Attribute action can be configured using the following property:
Attribute Name
The name of the attribute to remove.
Remove Columns
This action removes selected columns from a spreadsheet.
384

Kofax Kapow User's Guide
Remove Content
This action remove all the content of a tag. In other words it clears the content of a tag leaving back only
the tag itself.
The step action only works on XML variables. Note that this step neither validates the XML nor resolves
entities.
Properties
The Remove Content action has no properties.
Remove Cookie
The Remove Cookie action removes one or more cookies from the set of current cookies.
Properties
The Remove Cookie action can be configured using the following properties:
Domain Pattern
Specify a pattern that matches the domain of the cookie. The pattern must match the entire domain of the
cookie.
Path Pattern
Specify a pattern that matches the path of the cookie. The pattern must match the entire path of the
cookie.
Name Pattern
Specify a pattern that matches the name of the cookie. The pattern must match the entire name of the
cookie.
Value Pattern
Specify a pattern that matches the value of the cookie. The pattern must match the entire value of the
cookie.
Example
Consider a cookie named "PREF" having domain ".kapowtech.com", path "/" and value "123". This cookie
can be removed by setting Name Pattern to "PREF". However, this will remove all cookies named "PREF"
regardless of their domain, path or value. So if only this cookie should be removed (assuming that this is
the only cookie with this name, domain and path), set Domain Pattern to ".kapowtech.com", Path Pattern
to "/", Name Pattern to "PREF" and Value Pattern to "123".
In order to remove all cookies unconditionally, set all patterns to ".*".
Remove JSON
This action removes the found JSON from a JSON value. The the action will either remove a property
(name/value pair) from an object, an item from an array or the entire JSON value (in which case the result
will be an empty JSON value).
385

Kofax Kapow User's Guide
The step action only works on JSON variables.
Properties
The Remove JSON action has no properties.
Remove Rows
This action removes selected rows from a spreadsheet.
Remove Sheet
This action removes a selected sheet from a spreadsheet.
Remove Table Rows
This action will remove all rows (<tr>-tags) in the input <table>-tag that do not have a certain number of
columns (<td>- and <th>-tags).
Properties
The Remove Table Rows action can be configured using the following properties:
Min. Number of Columns
Enter the minimum number of columns which should always be in a table row.
Max. Number of Columns
Enter the maximum number of columns which are allowed in a table row.
Any rows that do not have a number of columns that lie in the range [Min. Number of Columns; Max.
Number of Columns] will be removed.
If all rows in the table end up being removed, the Remove Table Rows action will generate an error.
Example
Consider the input:
<table>
<tbody>
<tr><td> 1 </td></tr>
<tr><td> 2 </td><td> 2 </td></tr>
<tr><td> 3 </td><td> 3 </td><td> 3 </td></tr>
</tbody>
</table>
Assume that:
• Min. Number of Columns is set to 1
• Max. Number of Columns is set to 2
This setting will remove the last row with the three <td>-tags.
386

Kofax Kapow User's Guide
Remove Tag
The Remove Tag action removes the found tag from its parent node.
The step action only works on XML variables. Note that this step neither validates the XML nor resolves
entities.
Remove Tag Range
The Remove Tag Range action removes a range of tags, i.e. all tags from one tag to another tag.
Properties
The Remove Tag Range action can be configured using the following properties:
Begin Tag
Specifies the begin tag of the tag range to remove.
Remove Begin Tag
Determines whether or not the begin tag should be removed.
End Tag
Specifies the end tag of the tag range to remove.
Remove End Tag
Determines whether or not the end tag should be removed.
Remove Tags
The Remove Tags action removes tags from the found tags that match the specified criteria, based on two
sets of rules.
Set-up
The Remove Tags action is configured by defining a set of rules for tags to remove, and a set of rules to
except tags from the deletion rules.
Adding and removing rules from the lists
To add a rule to one of the two lists, click the '+' below the list. Removing a rule is done by selecting the
rule in the list, and clicking the '-' below. Reordering of the rules can be done using the arrows below the
list. After adding a rule, it can be edited using the 'edit' button below the list.
Note Defining no rules in the list of remove rules, will remove all tags that are not matched by any of the
except rules.
The rule editor
On the rule editor, that pops up upon clicking '+' or 'edit' below a list, a choice of three different methods
for matching the tags to be either removed or excluded from removal is presented.
The choice is between:
•Tags with this name will match all tags with the exact name written in 'Tag Name'.
387

Kofax Kapow User's Guide
•Tags with this name and attribute will match all tags with the exact name written in 'Tag Name' and
matching the criteria for the attributes.
•Tags matching this pattern will match a regular expression against the start tags including their
attributes (everything between < and >). Tag matching patterns can be inverted to match all tags, that
does not match the pattern.
•Texts matching this pattern will match a regular expression against the texts inside the found tags. If
the regular expression is left empty, it will match all texts.
•Comments will match all comments.
Properties for the tag matching methods
The 'include children' option
Checking the 'include children' checkbox (default) means including the children for this rule. For
remove rules, this means not only removing the tag (and its corresponding end tag) but also removing
all contents of the tag. For except rules, this means keeping also the children (even if any of the
children matches a remove rule).
This option is strongest for the except rules. That means, if a tag is matched by one of the remove
rules, which is set to include its children, if any of the child tags of that tag matches one of the except
rules, the child tag is kept (including its children).
Options for the 'Tags with this name' matching method
Tag Name
Specifies the exact name of the tags matched by this rule.
Options for the 'Tags with this name and attribute' matching method
Tag Name
Specifies the exact name of the tags matched by this rule. This option can be left blank, if tags
should only be matched on the attribute criteria.
Attribute Name
Specifies the exact name of the attribute to match.
Attribute Value Pattern
Specifies a pattern that must match the attribute value of the specified attribute.
Options for the 'Tags matching this pattern' matching method
Tag Name
Specifies the exact name of the tags matched by this rule.
Invert Pattern
Select this option to make the rule match all tags, that do not conform to this pattern.
Options for the 'Texts matching this pattern' matching method.
Pattern
Specifies a pattern that must match the text. Leaving this pattern blank, will make it match all texts.
Options for the 'Comments' matching method.
This method has no options, and will always match all comments. Use tag finders to point out specific
comments to be deleted.
388

Kofax Kapow User's Guide
Rename File
This action renames a file or a directory on the local file system where the robot is executed.
Note that the action is only performed during execution in Design mode in Design Studio, if the option
Execute in Design Mode has been selected.
Properties
The Rename File action can be configured using the following properties:
File or Directory
This is the the system path or a file URL for the file or directory to be renamed. This can be specified in
several ways using a Value Selector. The path must be absolute, including the drive name, if any, and the
directory path to the directory. Alternative it can be a file URL, such as file:/C:/temp/oldFile.txt, in which
case it must be URL encoded. The separators / and \ may be used interchangeably.
New Name
The is the new name of the file or directory. This is actually a relative path so it can be used to move
files to a different location by specifying a new name that contains a directory structure, such as ../
SomeOtherFolder/newText.txt
Execute in Design Mode
If this is enabled, the action will be executed even in Design Mode inside Design Studio. If this is disabled,
the action will do nothing when you navigate the robot in Design Mode.
Repeat
This action creates a repeat loop together with the Next action.
The Repeat action marks the start of the repeat loop. In a subsequent step, another iteration of the loop
can be requested using a Next action. The windows, pages, etc. at the Next step will be sent back to
the Repeat step and will become the output from the Repeat step in the next iteration. If no Next step is
executed in a given iteration, that iteration will be the last one, and the repeat loop will end.
The Repeat action is particularly useful for looping through pages that are connected with next-page links,
like this:
See Pages where Each Page Links to Next in the Design Studio section for examples on how to use the
Repeat action.
For more information, also see the Repeat-Next tutorial.
389

Kofax Kapow User's Guide
Replace Tag
The Replace Tag action replaces the found tag with a new tag. Any JavaScript present in the HTML of the
new tag will be executed, unless JavaScript execution is disabled in the options.
Properties
The Replace Tag action can be configured using the following properties:
HTML of New Tag
Specify the HTML of the new tag. The HTML can be specified in a number of ways as described later in
this topic.
Options
The robot's options can be overridden with the step's own options. An option that is marked with an
asterisk in the Options Dialog will override the one from the robot's configuration. All other options will be
the same as specified for the robot.
Specifying the HTML
The HTML of the new tag can be specified in the following ways:
HTML
Simply write the HTML of the new tag.
HTML from Expression
Write an expression whose result is used as the HTML of the new tag.
HTML from Expression and Pattern
Write a pattern which is matched against the found tag, and an expression whose result is used as the
HTML of the new tag. Use this way of specifying the HTML if parts of the found tag should be used when
creating the HTML of the new tag.
Pattern
A pattern which is matched against the found tag for the Replace Tag action. The pattern must match
the entire found tag, otherwise an error will be generated.
Match Against
Specifies what the pattern should be matched against from the found tag.
• "Only Text" specifies that the pattern should be matched against only the text in the found tag.
• "HTML" specifies that the pattern should be matched against the HTML of the found tag.
Ignore Case
If this is checked, then the pattern is matched against the input without regard to the character case;
e.g. "KaPoW" is considered equal to "kApow".
Expression
This field contains an expression whose result is used as the HTML of the new tag. The expression
can refer to the submatches of the pattern in the Pattern field using the $n notation. For example, you
390

Kofax Kapow User's Guide
can enter $1 in the expression to get the first submatch in the pattern (i.e. the text that matches the
contents of the first pair of parentheses in the pattern).
HTML Converted from XML Variable
Choose an XML variable whose content will be transformed to HTML and used as the HTML of the new
tag.
Use Default Options
If checked, the default options of the robot are used (configured as part of the robot configuration).
Otherwise, the specific options configured in the Options property below are used.
Options
Configure the options to use if the Use Default Options property is not checked.
Restore Session
The Restore Session action restores a session previously saved in a variable by another robot run using
the Save Session action. See the help on Save Session for more information on reusing sessions.
If no session exists with the given parameters (e.g. has not been saved yet), the Restore Session action
produces an error.
Properties
The Restore Session action can be configured using the following properties:
Restore From
Variable
Select a Session Variable.
Note The Session Pool option has been removed from the step. If an old robot with the Session Pool
option is opened, a warning with a tooltip is displayed.
Resume Browser
This action resumes the browser and lets it run after either specified wait criteria are met or the browser
becomes idle (whichever comes first).
Specify wait criteria for this step. See Use Wait Criteria for more information.
Return Value
This action returns a value from the robot.
The value is returned back to the client that initiated this robot run. This would normally be Java or .Net
code using the Kapow API to execute robots on RoboServer. The Return Value step action is also used to
return values as Kapplet results and REST responses.
391

Kofax Kapow User's Guide
Prior to version 7.2 of Kapow the returned value may also be handled by a storage environment, that
stored the value in a database. From Kapow version 7.2 and forward, values are stored in databases
using the Store in Database action.
Properties
The Return Value action can be configured using the following properties:
Variable
Select the variable whose value should be returned.
If Missing Required Attributes
Here you select what should happen if one or more of the required attributes are missing.
Rewrite Page
The Rewrite Page step action takes the HTML page located in the current window, extracts the HTML
content of that page and any frames that it may have and additionally outputs the links to other pages as
well as the URLs of images, style sheets and other resources that the page depends on. Later, the page
can be viewed offline exactly as it was at the time of the extraction.
All JavaScript and event handlers will be removed from the extracted HTML because the extracted HTML
represents the result obtained from having already loaded the page and its frames and executed any
JavaScript that could generate additional content. All URLs of the page will be rewritten, first according to
a user-specified transformation and then they will be converted relative URLs. URLs in inline style sheets
will also be rewritten.
The external style sheets whose URLs are outputted by the step action should be run though the Rewrite
Style Sheet step action which applies a similar transformation; rewriting URLs of imported style sheets
and images referenced in the style sheet.
The Rewrite Page step action is intended to be used in robots that have an external controller that feeds
URLs of pages, style sheets and other resources to be rewritten into the robot.
Related Step Actions
To create a quick offline snapshot of a page, the Make Snapshot step action can be used. It does not
require that the robot is controlled by an external application but will - in a single step - download and save
all necessary resources in the file system, forming a complete, stand-alone snapshot.
Unlike the Rewrite Page step action, the Make Snapshot step action does not preserve links between
different snapshots and does not reuse shared resources between snapshots.
Note Execution of this step is controlled by the license key.
Properties
The Rewrite Page step action can be configured using the following properties:
392

Kofax Kapow User's Guide
Original Page URL
Specify the variable containing the original URL of the page in the current window. This is the URL that
was used to load the page. Note that the current URL of the page may be different if the server redirected
to a different page than the one that was requested.
Data Converters
The data converters that specify the transformation to perform on the URLs of the page. This can be used
to specify the transformation from URL to a location in the file system. The data converters should output
an absolute URL (which may be a file URL), which the step action will automatically convert to a URL
that is relative to the original page URL. For advanced URL rewriting, we recommend the Convert Using
JavaScript data converter.
Extracted Pages
The variable in which to store the extracted pages. The step action will extract the HTML of the page in
the current window as well as HTML for each of the frames. This will be outputted in JSON format, which
also contains both the original URL and rewritten URL for each of the pages. Only the main page will
however have its original URL specified.
To load the JSON output into a window, use the Create Page step action with the name of the variable
containing the JSON as its source of content. In the Options of the step, you may need to explicitly specify
that the content type is JSON and that the encoding is UTF-8.
URLs
The variable in which to store the extracted URLs. The step action will extract the URLs of all pages,
images, style sheets and other resources directly linked to by the page and its frames. Note that the style
sheets and pages linked to may themselves contain URLs; these are not included in the list.
The URLs are outputted in JSON format, giving both the original URL as well as the absolute rewritten
URL of each URL. Also, the type of URL is given, which is determined by the context in which the URL
occurs - for instance, all URLs found in <IMG> tags are marked with type IMAGE.
The available types are:
PAGE
A link found in an anchor tag. Note that this does not imply anything about the content type of that
page, as it has not yet been loaded.
IMAGE
An image.
STYLESHEET
An external CSS style sheet.
RESOURCE
A binary resource, for instance a PDF found in a frame or a Flash object.
To load the JSON output into a window, use the Create Page step action with the name of the variable
containing the JSON as its source of content. In the Options of the step, you may need to explicitly specify
that the content type is JSON and that the encoding is UTF-8.
393

Kofax Kapow User's Guide
Rewrite Style Sheet
The Rewrite Style Sheet step action is to be used in conjunction with the Rewrite Page step action.
It rewrites all of the URLs found in a style sheet according to a user-specified transformation and
additionally converts them so that they are relative to the style sheet URL.
The Rewrite Style Sheet step action is intended to be applied on the URLs of the external style sheets
found by the Rewrite Page step action. It is important that the URL transformation (specified by a list of
data converters) of these two step actions are the same.
Note Execution of this step is controlled by the license key.
Properties
Style Sheet URL
The URL of the style sheet to load. If acquired from the output of a Rewrite Page step action, this is found
in the originalURL property of an extracted URL of type STYLESHEET.
Data Converters
The data converters that specify the transformation to perform on the URLs of the page. This can be used
to specify the transformation from URL to a location in the file system. The data converters should output
an absolute URL (which may be a file URL), that the step action will then automatically convert to a URL
that is relative to the original page URL. For advanced URL rewriting, we recommend the Convert Using
JavaScript data converter. As mentioned above, it is important that the data converters transform URLs in
the same way as the Rewrite Page step action that outputted the style sheet URL.
Output
The variable in which to store the rewritten style sheet.
URLs
The variable in which to store the extracted URLs. The step action will extract the URLs of all images and
imported style sheets directly referenced by the loaded style sheet. Note that the imported style sheets
may themselves contain URLs; these are not included in the list.
The URLs are outputted in JSON format, giving both the original URL as well as the absolute rewritten
URL of each URL. Also, the type of URL is given, which is determined by the context in which the URL
occurs - for instance, all URLs found in import statements are marked with type STYLESHEET.
The available types are:
IMAGE
An image.
STYLESHEET
An imported CSS style sheet.
To load the JSON output into a window, use the Open Variable step action with the name of the variable
containing the JSON as its source of content. In the Options of the step, you may need to explicitly specify
that the content type is JSON and that the encoding is UTF-8.
394

Kofax Kapow User's Guide
Options
The robot's loading options can be overridden with the step's own options. An option that is marked with
an asterisk in the Options window will override the one from the robot's configuration. All other options will
be the same as specified for the robot.
Save Session
The Save Session action saves a browser session. To transfer a session between robots, the variable
containing the session can be stored in a database and restored by other robots reading it from the
database. If you have a solution utilizing Kapow API, you can have the session as an output from the
robot and then use it as an input for another robot.
By default the complete browser state is saved. If this requires too much space, a partial state can be
saved consisting of the page, the page URL and the associated cookies and authentications.
The session is stored in a variable and can be later restored by another robot run using the Restore
Session action.
Properties
The Save Session action can be configured using the following properties:
Save Where
Variable
Select a Session Variable.
Note The Session Pool option has been removed from the step. If an old robot with the Session Pool
option is opened, a warning with a tooltip is displayed.
Save Complete Browser State
Choose whether to save the complete browser state, or only a partial state consisting of the page, the
page URL and the associated cookies and authentications.
Scroll
This action emulates scrolling a page or tag. It is particularly useful on sites where the full contents does
not appear until the page or content tag has been scrolled. Note that the scroll step does not change the
position of scroll bars in the browser view.
Most commonly, the Scroll step action is used to scroll an entire document, in which no tag finder should
be added to the step. To scroll a particular tag that has its own scroll bar, add a tag finder that selects that
tag.
Properties
The Scroll action can be configured using the following properties:
395

Kofax Kapow User's Guide
Horizontal Scroll
Specify the number of pixels to scroll to the right, relative to the current scroll position. Specify a negative
number to scroll to the left. The value can be specified in several ways using a Value Selector.
Vertical Scroll
Specify the number of pixels to scroll down, relative to the current scroll position. Specify a negative
number to scroll up. The value can be specified in several ways using a Value Selector.
Options
The robot's options can be overridden with the step's own options. An option that is marked with an
asterisk in the Options Dialog will override the one from the robot's configuration. All other options will be
the same as specified for the robot.
Scroll To
This action scrolls the found tag into view. It is particularly useful on sites where the full contents -
including images - only appear when a specific area of the page would be visible to the user interacting
with the browser.
Properties
The Scroll To action can be configured using the following properties:
Options
The robot's options can be overridden with the step's own options. An option that is marked with an
asterisk in the Options Dialog will override the one from the robot's configuration. All other options will be
the same as specified for the robot.
Select File
This action selects a file to upload in a file field.
The found tag must be the <input>-tag of type file.
Properties
The Select File action can be configured using the following properties:
File to Select
Specifies the file to upload. The file must be obtained from one of the following locations:
File Contained in Variable
The file contents is read from a variable.
File Name
Specify the file name. The value can be specified in several ways using a Value Selector.
File Content Type
Specify the content type of the file. See below how it may be specified.
396

Kofax Kapow User's Guide
File Contents
Select the variable that holds the contents of the file.
File in Local File System
The file is located in the local file system.
File Name
Specify the file name. The value can be specified in several ways using a Value Selector.
File Content Type
Specify the content type of the file. See below how it may be specified.
Options
The robot's options can be overridden with the step's own options. An option that is marked with an
asterisk in the Options Dialog will override the one from the robot's configuration. All other options will be
the same as specified for the robot.
Specifying the File Content Type
The file content type can be specified in the following ways:
Automatic
The content type will be automatically determined from the content.
From Variable
The content type is specified by a variable in an object. For example, the variable should contain the text
"image/gif" for a GIF image.
Predefined
The content type is selected from a list.
Custom
The content type is specified directly, e.g. "text/plain" for text contents.
Select Multiple Options
This action selects multiple options in a list box.
The found tag must be a <select>-tag with multi-selection enabled, i.e. with a "multiple" attribute present.
Note that selecting the options may trigger execution of JavaScript, if there are any registered event
handlers on the <select>-tag.
To select a single option in a drop-down box or list box, use the Select Option action. To loop through
options, use the For Each Option action.
Properties
The Select Multiple Options action can be configured using the following properties:
397

Kofax Kapow User's Guide
Options to Select
The options to select. You may either select ALL options or specify exactly the options to select. The list of
options may be left empty to not select any options.
Keep Existing Selections
Specifies whether existing selections in the list box should be kept. If this is not selected, and if no
options have been selected in the Options to Select property, all existing selections in the list box will be
unselected, and no new selections will be made.
Options
The robot's options can be overridden with the step's own options. An option that is marked with an
asterisk in the Options Dialog will override the one from the robot's configuration. All other options will be
the same as specified for the robot.
Select Option
This action selects an option in a drop-down box or a list box.
The found tag must be the <select>-tag of the drop-down/list box, not the <option>-tag for the option to
select.
Note that selecting the option may trigger execution of JavaScript, if there are any registered event
handlers on the <select>-tag.
To select multiple options at the same time in a list box, use the Select Multiple Options action. To loop
through options, use the For Each Option action.
Properties
The Select Option action can be configured using the following properties:
Option to Select
The option to select. This can be specified in several ways using a Value Selector. Note that this value
must correspond to an <option>-tag inside the <select>-tag, and that it may match either the value as
it appears in the form, or the value shown for the option in the drop-down/list box. More specifically, the
matching is done as follows:
• If the value exactly matches the "value" attribute of an <option>-tag, the first such <option>-tag is
selected.
• Otherwise, if the value matches the "value" attribute of an <option>-tag without regard for leading or
trailing space characters, the first such <option>-tag is selected.
• Otherwise, if the value matches the text inside an <option>-tag without regard for leading or trailing
space characters, the first such <option>-tag is selected.
Ignore Case
When checked, matching of the option value is done case-insensitively.
Options
The robot's options can be overridden with the step's own options. An option that is marked with an
asterisk in the Options Dialog will override the one from the robot's configuration. All other options will be
the same as specified for the robot.
398

Kofax Kapow User's Guide
Select Radio Button
This action selects a radio button, thereby unselecting any other radio buttons in the same radio button
group.
The found tag must be an <input>-tag of type radio button.
Note that selecting the radio button may trigger execution of JavaScript, if there are any registered event
handlers on the radio buttons in that radio button group.
To loop through the radio buttons in a group, use the For Each Radio Button action.
Properties
The Select Radio Button action can be configured using the following properties:
Options
The robot's options can be overridden with the step's own options. An option that is marked with an
asterisk in the Options Dialog will override the one from the robot's configuration. All other options will be
the same as specified for the robot.
Send Email
The Send Email action sends an email.
Note The email is not sent during execution in Design mode in Design Studio.
Properties
The Send Email action can be configured using the following properties:
Message Tab
This tab contains the properties that allow you to specify the message content, sender and receiver.
FROM Address
Specifies the FROM Address (sender address) of the email. The value can be specified in several
ways using a Value Selector.
TO Address
Specifies the TO Addresses (receiver addresses) of the email. At least one To Address must be
specified and if there are more than one address these has to be separated by commas. The value
can be specified in several ways using a Value Selector.
CC Address
Specifies the CC Addresses (receiver addresses) of the email. These addresses are optional, but if
more than one address is specified the addresses has to be separated by commas. The value can be
specified in several ways using a Value Selector.
Subject
Specifies the subject of the email. The value can be specified in several ways using a Value Selector.
399

Kofax Kapow User's Guide
Message
Specifies the message body of the email. The value can be specified in several ways using a Value
Selector.
Message Type
Specifies the type of the message body, either text or HTML.
Server Tab
This tab contains the properties that allow you to configure the mail server to use.
Mail Server
Specifies the mail server to be used when sending the email. The value can be specified in several
ways using a Value Selector.
Port
Specifies the port number on the mail server to be used when sending the email. The appropriate port
number is most often 25 when SSL is not used, and 465 when using SSL. The value can be specified
in several ways using a Value Selector.
User
Specifies the user name to be used for authentication when sending the email. If left empty,
authentication is not done. The value can be specified in several ways using a Value Selector.
Password
Specifies the password to be used for authentication when sending the email. The value can be
specified in several ways using a Value Selector.
Encryption
Specifies if encryption should be used.
• NONE: Credentials and email are sent in clear text.
• TLS: TLS encryption is used. After connection the STARTTLS command is used to upgrade the
communication channel to TLS. This only works if the SMTP server has a trusted certificate (if the
server uses a self-signed certificate it must be exported and imported into the JVM's truststore
using the keytool utility)
• SMTPS: SMTP over SSL. A secure channel of communication is established, over which the
credentials and email is sent. This is rarely supported by SMTP servers, but will work even if the
servers certificate is self-signed.
Attachment Tab
This tab contains the properties that allow you to add an attachment to the e-mail.
Include Attachment
To add an attachment to the message, check this option.
Content
The content of the attachment to include. The value can be specified in several ways using a Value
Selector.
Content Type
Specifies the type of the attachment. If you select "Automatic", the type will be determined from the
extension of the given file name.
400

Kofax Kapow User's Guide
File Name
Specifies the type of the attachment. If you do not specify one, a default name will be generated.
Set Attribute
This action inserts or updates an attribute on the found tag with a specified name and value. If the found
tag contain an attribute with the given name its value is updated with the specified value otherwise a new
attribute is inserted with the value specified.
The step action only works on XML variables. Note that this step neither validates the XML nor resolves
entities.
Properties
The Set Attribute action can be configured using the following properties:
Attribute Name
The name of the attribute to set or update.
Value
The value of the attribute. This will be correctly encoded according the rules for encoding attribute values
in the given type of document, e.g. XML.
Set Checkbox
This action checks or clears a checkbox.
The found tag must be an <input>-tag of type checkbox.
Note that setting the checkbox may trigger execution of JavaScript, if there are any registered event
handlers on the checkbox.
Properties
The Set Checkbox action can be configured using the following properties:
Set Checkbox to
Specifies the state that the checkbox should be set to, i.e. checked or cleared. The state is specified using
a Value Selector. The resulting value must be either "true", "on", "1", or "checked" to check the checkbox,
and either "false", "off", "0", or "unchecked" to clear the checkbox.
Options
The robot's options can be overridden with the step's own options. An option that is marked with an
asterisk in the Options Dialog will override the one from the robot's configuration. All other options will be
the same as specified for the robot.
Set Column Width
This action sets the width of a column in a spreadsheet. The width is specified in a number of characters.
401

Kofax Kapow User's Guide
Properties
The Set Column Width action can be configured using the following properties:
Width
This property specifies the width of a column. Options are:
• Value - Sets the value directly
• Variable - Specifies a variable that stores the width value.
• Expression - Creates an expression to specify the width.
• Converters - Specifies a data converter to set the column width.
Set Content
This action sets the specified content on a tag.
The step action only works on XML variables. Note that this step neither validates the XML nor resolves
entities.
Properties
The Set Content action can be configured using the following properties:
Content Modification Mode
This property specifies which tag to modify. You can select from Set Existing Tag and Set Root Tag
options.
New Content
The new content to insert.
Set Content of Cell
This action inserts the specified content to a spreadsheet cell.
Properties
The Set Content of Cell action can be configured using the following properties:
Content
This property specifies the content of a cell. Options are:
• Value - Sets the value directly
• Variable - Specifies a variable that stores the value.
• Expression - Creates an expression to specify the value.
• Converters - Specifies a data converter to set the value.
Format
This property specifies the format of a cell. Options are:
• Value - Sets a value directly
402

Kofax Kapow User's Guide
• Variable - Specifies a variable that stores the value.
• Expression - Creates an expression to specify the value.
• Converters - Specifies a data converter to set the value.
Set Content of Column
This action sets the content of a column in a spreadsheet from a variable of complex type. The attribute
values of the variable is inserted consecutively beneath each other starting from the first cell of the found
range.
Properties
The Set Content of Column action can be configured using the following properties:
Variable
This property specifies the name of a variable that stores the cell values.
Date Format
If any of the inserted cell values is a date then this property may be used to specify the date format of the
cell. Options are:
• Value - Sets the format directly
• Variable - Specifies a variable that stores the format.
• Expression - Creates an expression to specify the format.
• Converters - Specifies a data converter to set the format.
Set Content of Row
This action sets the content of a row in a spreadsheet from a variable of complex type.
Properties
The Set Content of Row action can be configured using the following properties:
Variable
This property specifies the name of a variable that stores the row values.
Date Format
If any of the inserted cell values is a date then this property may be used to specify the date format of the
cell. Options are:
• Value - Sets the format directly
• Variable - Specifies a variable that stores the format.
• Expression - Creates an expression to specify the format.
• Converters - Specifies a data converter to set the format.
403

Kofax Kapow User's Guide
Set Current Window
This action selects another window as the current window, i.e. the window that subsequent steps will work
on.
In Design Studio, an easy way to insert a Set Current Window step is to right-click on the window's tab
and choose Set as Current Window.
Properties
The Set Current Window action can be configured using the following properties:
Window to Set as Current
The window that should be selected as the current window (see Identifying a Window on how to identify a
window).
You can use the following options to set a current window:
•Window Name: finds a window by its name as displayed in the window's tab
•Window in Found Tag: this option makes the window created by the found tag as the one to make
current. The found tag must be a FRAME, IFRAME, OBJECT or EMBED element.
Set Format of Cells
This action sets the format of one or more cells in a spreadsheet.
Properties
The Set Format of Cell action can be configured using the following properties:
Format
The format of the data to insert. Options are:
• Value - Sets the format directly
• Variable - Specifies a variable that stores the format.
• Expression - Creates an expression to specify the format.
• Converters - Specifies a data converter to set the format.
Set Hyperlink on Cell
This action inserts a hyperlink to a cell.
Properties
The Set Hyperlink on Cell action can be configured using the following properties:
URL
This property specifies the address of a link. Options are:
• Value - Sets the link address directly
• Variable - Specifies a variable that stores the link address.
404

Kofax Kapow User's Guide
• Expression - Creates an expression to specify the link address.
• Converters - Specifies a data converter to set the link address.
Use default link style
This property specifies whether the default style for link should be set on the cell, i.e. text is underlined
and has blue foreground color.
Set Information Property
This action sets the value of an information property in a spreadsheet.
Properties
The Set Information action can be configured using the following properties:
Name
This property specifies the name of the information property.
Value
This property specifies the content of the value. Options are:
• Value - Sets the value directly
• Variable - Specifies a variable that stores the value.
• Expression - Creates an expression to specify the value.
• Converters - Specifies a data converter to set the value.
Set JSON
This step action replace the entire found part of a JSON value with a new JSON value. The new value
must be a valid JSON value, suc as an object { "answer" : 42 } or a quoted string "Life, the Universe and
Everything".
The step action only works on JSON variables.
Properties
The Set JSON action can be configured using the following properties:
New Content
The new JSON value.
The value can be specified in several ways using an extended version of the Value Selector. This value
selector contains the usual 4 ways to specify the value and an extra very useful selector: Generate From
Variable. This selector automatically generates JSON from a variable of complex type. E.g. if you have a
variable with a type that has two attributes: name and age and the values of these are "Joe" and 23 then
the generated JSON could look like: { "name" : "Joe", "age" : 23 }.
405

Kofax Kapow User's Guide
Set Named JSON
This action marks the found JSON as a named JSON, so that it can be used as a reference when finding
other parts of a JSON value in subsequent steps.
This is useful if several steps should work relative to this.
Properties
The Set Named JSON action can be configured using the following properties:
Name
Has two options, Auto or Named.Auto gives the item a name which is number. The first Auto-numbered
item will have number 1, the next number 2 etc. Note that the number may change if additional Auto-
numbered items are inserted before this step (on the same page).Named gives the item a fixed and
explicitly stated name, which has several advantages:
• It is easier to remember what the named item identifies if it has a well-chosen name
• An explicitly named item is not affected if another named item is inserted before it
• If you use the same name again in Set Named JSON, the name will simply be made to refer to the new
item (useful for stateful in-page looping)
Keep Existing Named Items
If checked, the existing named items will be kept, otherwise these will be unmarked as named items and
only the found item will be a named item after this step.
Set Named Range
This action marks the found range as a named range, so that it can be used as a reference when finding
ranges in subsequent steps.
This is useful if several steps should work relative to this range.
Properties
The Set Named Range action can be configured using the following properties:
Range Name
Has two options, Auto or Named.Auto gives the range a name which is number. The first Auto-numbered
range will have number 1, the next number 2 etc. Note that the number may change if additional Auto-
numbered ranges are inserted before this step (on the same page).Named gives the range a fixed and
explicitly stated name, which has several advantages:
• It is easier to remember what the named range identifies if it has a well-chosen name
• An explicitly named range is not affected if another named range is inserted before it
• If you use the same name again in Set Named Range, the name will simply be made to refer to the new
range (useful for stateful in-page looping)
406

Kofax Kapow User's Guide
Keep Existing Named Ranges
If checked, the existing named ranges will be kept, otherwise these will be unmarked as named ranges
and only the found range will be a named range after this step.
Set Named Tag
This action marks the found tag as a named tag, so that it can be used as a reference when finding tags in
subsequent steps.
This is useful if several steps should work relative to this tag.
Properties
The Set Named Tag action can be configured using the following properties:
Tag Name
Has two options, Auto or Named.Auto gives the tag a name which is number. The first Auto-numbered
tag will have number 1, the next number 2 etc. Note that the number may change if additional Auto-
numbered tags are inserted before this step (on the same page).Named gives the tag a fixed and explicitly
stated name, which has several advantages:
• It is easier to remember what the named tag identifies if it has a well-chosen name
• An explicitly named tag is not affected if another named tag is inserted before it
• If you use the same name again in Set Named Tag, the name will simply be made to refer to the new
tag (useful for stateful in-page looping)
Keep Existing Named Tags
If checked, the existing named tags will be kept, otherwise these will be unmarked as named tags and
only the found tag will be a named tag after this step.
Set Property Name
This action replaces the property name of the found JSON object with a new name. The value of the
property remains unchanged.
The step action only works on JSON variables.
Properties
The Set Property Name action can be configured using the following properties:
Name
The new name of the property. This must of course be a valid property name, e.g. quotation marks should
be escaped.
Set Row Height
This action sets the height of a row in points.
407

Kofax Kapow User's Guide
Properties
The Set Content action can be configured using the following properties:
Height
This property specifies the height of a row. Options are:
• Value - Sets the row height directly
• Variable - Specifies a variable that stores the row height.
• Expression - Creates an expression to specify the row height.
• Converters - Specifies a data converter to set the row height.
Set Sheet Name
This action sets the sheet name.
Properties
The Set Content action can be configured using the following properties:
Name
This property specifies the name of a sheet. Options are:
• Value - Sets the name directly
• Variable - Specifies a variable that stores the name.
• Expression - Creates an expression to specify the name.
• Converters - Specifies a data converter to set the name.
Set Tag
This step action replace the entire found tag with new content. The step action is similar to the Set
Content step action, but where the later only replaces the content of the tag the Set Tag step action also
replaces the tag it self.
The step action only works on XML variables. Note that this step neither validates the XML nor resolves
entities.
Properties
The Set Tag action can be configured using the following properties:
New Content
The new content for the entire tag.
Set Tag Name
This action replaces the name of the found tag with a new name and optionally copies the attributes of the
found tag to the new tag. The child nodes of the tag are preserved.
408

Kofax Kapow User's Guide
The step action only works on XML variables. Note that this step neither validates the XML nor resolves
entities.
Properties
The Set Tag Name action can be configured using the following properties:
Content Modification Mode
This property specifies the mode in which to modify the source.
Tag Name
The new name of the tag. This must of course be a valid tag name for the given document type.
Clear Attributes
If the property is set then all the attributes of the found tag are removed. If not then the attributes are
copied to the new tag.
Set Text
This step action replace the content of the found tag with a text. The step action is similar to the Set
Content step action, but where the later insert the given text as markup, the Set Text step action insert the
text either ampersand encoded or as CDATA.
The step action only works on XML variables. Note that this step neither validates the XML nor resolves
entities.
Properties
The Set Text action can be configured using the following properties:
Text
The text to insert.
Encoding
The way the text should be encoded. There are two choices:
• "Ampersand" specifies that the text should be ampersand encode when inserted, e.g. < becomes <.
• "CDATA" specifies that the text should be placed in a CDATA section.
Set Value of Cell
This action sets the value of a cell.
Properties
The Set Value of Cell action can be configured using the following properties:
Type
This property specifies the type of the value. Options are:
• Text
• Number
409

Kofax Kapow User's Guide
• Logical
• Date
• Formula
Value
This property specifies the content of the value. Options are:
• Value - Sets the value directly
• Variable - Specifies a variable that stores the value.
• Expression - Creates an expression to specify the value.
• Converters - Specifies a data converter to set the value.
Format
This property specifies the format of a cell. Options are:
• Value - Sets a format directly
• Variable - Specifies a variable that stores the format.
• Expression - Creates an expression to specify the format.
• Converters - Specifies a data converter to set the format.
Snippet Step
The Snippet step is used to insert a Snippet into a robot. A snippet is a sub-part of a robot that may be
reused several times either in one robot or across robots. Snippets consists of two parts: a number of
connected steps and a set of variables. When a snippet is inserted into a robot via a Snippet step the
steps of the snippet is inserted at its location and the variables of the snippet is added to the variables of
the robot.
Snippet steps are similar to Group steps. Just as Group steps Snippet steps contain an expand/collapse
icon (+/-) located at the top left corner. Clicking on this will expand/collapse the snippet step and like group
steps the inserted steps must be such that they have one entry point and one exit point. But unlike group
steps, if the steps inside a Snippet step are modified then the corresponding snippet is changed and all
other Snippet steps referring to the snippet will change their contained steps.
Please see the introduction to Snippets tutorial for more information.
Properties
The Snippet step is configured using the following properties:
Step Name
This is an optional name for the step. If you enter value for this then this is what is shown in the Robot
View below the step. If no step name is provided then the snippet's name is shown instead. When this is
the case the name is shown underlined.
Step Comment
This is a comment describing the snippet step. This is not a comment describing the snippet itself, which
should be edited directly on the snippet when this is open in an editor.
410

Kofax Kapow User's Guide
Snippet
This is the name of the snippet. This refers to a snippet of that name inside the same project as the robot
containing the Snippet step. By selecting a different name from the choice box then a new snippet is
inserted at the snippet step's location. If the snippet has a comment then this is shown under the choice
box.
Stop
This action causes the execution of the robot to stop without errors. That is, none of the remaining
iterations, branches or steps in the robot are executed.
Store In Database
This step provides the opportunity to store a variable in a database. The database connection must be
configured in Design Studio Settings.
Please read the section on Storing Data in Databases before using this step in a robot.
Properties
Store in Database can be configured using the following properties:
Database
Controls which database the variable will be stored in. A value can either be selected or hard coded
at design time, or the database name can be dynamically constructed at runtime using a variable, an
expression or converters - An error will occur if no database with this name exists when the robot is
executed.
Variable
Select the variable to store. This must be a regular variable and not a simple type variable.
Key
The unique key for the variable which is stored. The key may be defined in the type (by marking variables
as "Part of Database Key"), or defined using a variable, an expression or converters. If a value with the
given key already exists, this step will override (SQL Update) the existing record; if no value with this key
exists, a new record will be inserted.
Execute in Design Mode
If this is enabled, the step will be executed even in Design Mode inside Design Studio. If this is disabled,
the step will do nothing when you navigate the robot in Design Mode.
Store in HBase Table
This step provides the opportunity to store a variable in a HBase Table. The connection settings are
configured in the step.
The description below assumes that the general architecture of the HBase cluster is understood. See the
notes below for a description of how the data is inserted into the HBase Table.
411

Kofax Kapow User's Guide
Properties
Store in HBase Table is configured using the following properties:
ZooKeeper Quorum Hostnames
The list of hostnames used for connecting to the underlying ZooKeeper Quorum that directs access to
HBase. The Quorum should give access to a HBase master holding the table the variable will be stored
in. A value can either be selected or hard coded at design time, or the list can be dynamically constructed
at runtime using a variable, an expression or converters - An error will occur if no database with this name
exists when the robot is executed.
HBase Table
Controls which HBase table the variable will be stored in. A value can either be selected or hard coded at
design time, or the table name can be dynamically constructed at runtime using a variable, an expression
or converters - An error will occur if no database with this name exists when the robot is executed.
Column Family
Controls which column family the variable will be stored in. A value can either be selected or hard coded
at design time, or the column family name can be dynamically constructed at runtime using a variable,
an expression or converters - An error will occur if no database with this name exists when the robot is
executed.
Variable
Select the variable to store. This must be a regular variable and not a simple type variable.
Key
The unique key for the variable which is stored. The key may be defined in the type (by marking variables
as "Part of Database Key"), or defined using a variable, an expression or converters. If a value with the
given key already exists, this step will update the existing record; if no value with this key exists, a new
record will be inserted. See note below for important information on the key.
Execute in Design Mode
If this is enabled, the step will be executed even in Design Mode inside Design Studio. If this is disabled,
the step will do nothing when you navigate the robot in Design Mode.
412

Kofax Kapow User's Guide
Note
As all data (including keys and column names) stored by HBase are arrays of bytes, Design Studio will
convert all data to byte arrays using UTF-8 encoding before inserting into the table.
The variable data is written to the row with the key specified in the attribute key. If the key is set to be
composed of the attributes marked as "Part of Database Key", the key is the concatenation of the value
of those attributes separated by underscores (and ordered as in the type editor). For example, if writing
a variable of type Company with two ordered attributes marked "Part of Database Key":
• Name = Kapow
• Year = 1999
the resulting key is Kapow_1999. Note that if choosing a binary attribute as part of the key, a hash of the
value will be used instead of the actual value. Furthermore, an underscore present in the attribute values
used as "Part of Database Key" will be replaced by double underscores.
Writing data to the HBase table is done by putting the value of each attribute in a column having the
same qualifier as the name of the attribute. The columns are located in the column family specified.
All data in the variable, including the attributes selected to be "Part of Database Key" is written to each
row. The two house-hold fields RobotName and ExecutionId described in the section on Storing Data
in Databases are updated in the table every time the step is executed. The remaining five house-hold
fields from that page are not stored in the table. No specific timestamp is chosen for the write, it is up to
HBase to choose a reasonable value. Using the example from above and Column Family = cf, the data
inserted is (ignoring the timestamp): Kapow_1999 => [cf:Name = Kapow, cf:Year = 1999, cf:RobotName
= XXXX, cf:ExecutionId = YYYY]
Test Cell Type
This action tests the type of a cell or cells. The types are the data types of Excel: Text, Number, Logical
(boolean), Blank, Error, Formula. These essentially corresponds to the Excel functions ISTEXT,
ISNUMBER, etc. If more than one cell is selected by the Range Finder, then all the found cells must
satisfy the condition of the test.
Properties
The Test Cell Type action is configured using the following properties:
Condition
This contains the condition that must hold. There are 6 possibilities for this:
Is Blank
This is true if and only if the found cells are blank. This corresponds to the Excel function ISBLANK.
Is Text
This is true if and only if the found cells all contains text. This corresponds to the Excel function
ISTEXT.
Is Number
This is true if and only if the found cells all contains numbers. This corresponds to the Excel function
ISNUMBER.
413

Kofax Kapow User's Guide
Is Logical
This is true if and only if the found cells all contains boolean. This corresponds to the Excel function
ISLOGICAL.
Is Error
This is true if and only if the found cells all contains errors. This corresponds to the Excel function
ISERROR.
Is Formula
This is true if and only if the found cells all contains formulas. this corresponds to the Excel function
ISFORMULA.
If
Specifies the exact condition to test for, and thus enables inversion of the stated condition. The default is
to test if the "Condition is Not Satisfied". If this is selected and the condition evaluates to false, execution
will be affected as indicated by the Do property; however if the condition evaluates to true, execution
will continue down the current branch. It is possible instead to test if the "Condition is Satisfied", which
reverses the outcome.
Do
Determines what happens when the condition and the If property together indicate that execution should
not continue down the current branch.
As Specified Under Error Handling
The Error Handling tab specifies in detail what to do.
Skip Following Steps
Execution down the current branch will stop.
Test File Existence
This action tests whether a specific file exists, to determine whether execution should continue down the
current branch or if something else should be done.
Properties
The Test File Existence action can be configured using the following properties:
File Name
The name of the file to look for. The name can be specified in several ways using a Value Selector. The
name must be an absolute file name, including the drive name, if any, and the directory path to the file.
If
Specifies the exact condition to test for, either that the "File Exists" or that the "File Does Not Exist". If
this condition is satisfied, execution will be affected as indicated by the Do property; if the condition is not
satisfied, execution will continue down the current branch.
Do
Determines what happens when the condition and the If property together indicate that execution should
not continue down the current branch.
414

Kofax Kapow User's Guide
As Specified Under Error Handling
The Error Handling tab specifies in detail what to do.
Skip Following Steps
Execution down the current branch will stop.
Test JSON Type
This action tests the type of a JSON value. The types are: Object, Array, String, Integer, Float, Boolean
and Null. Besides these it is also possible to test for two more general types: Basic and Number.
Properties
The Test JSON Type action is configured using the following properties:
Condition
This contains the condition that must hold. There are 9 possibilities for this:
Is Object
This is true if and only if the found JSON value is an object. This is a JSON value of the form {...}. It is
not equivalent to the JavaScript typeof operation which may also return object for an array since this is
considered an object in JavaScript.
Is Array
This is true if and only if the found is an Array. This is a JSON value of the form [...].
Is Simple
This is true if and only if the found JSON value is a Simple type. A Simple type is any JSON value that
is not an object or an array.
Is Integer
This is true if and only if the found JSON value is a Integer. This type is an arbitrary-precision
integer, but be you should be careful whenever you convert a JSON integer value to some other
representation of integers, e.g. in a integer variable, that this may result in overflow.
Is Float
This is true if and only if the found JSON value is a Float. This type is an arbitrary-precision number
that is not an integer, e.g. 23.345E-42, but be you should be careful whenever you convert a JSON
float value to some other number representation, e.g. in a number variable, that this may result in
overflow.
Is Number
This is true if and only if the found JSON value is an Integer or a Float.
Is String
This is true if and only if the found JSON value is a String. A string must begin and end with a
quotation marks ("), and various characters must be escaped with backslash (\), e.g. ", \, /, b, f, n, r, t,
uXXXX, and so on.
415

Kofax Kapow User's Guide
Is Boolean
This is true if and only if the found JSON value is a Boolean. That is, oner of the two value true or
false.
Is Null
This is true if and only if the found JSON value is the value null.
Note These condition are not mutually exclusive, such as "Is Number" and "Is Integer" are both true
for integer values
If
Specifies the exact condition to test for, and thus enables inversion of the stated condition. The default is
to test if the "Condition is Not Satisfied". If this is selected and the condition evaluates to false, execution
will be affected as indicated by the Do property; however if the condition evaluates to true, execution
will continue down the current branch. It is possible instead to test if the "Condition is Satisfied", which
reverses the outcome.
Do
Determines what happens when the condition and the If property together indicate that execution should
not continue down the current branch.
As Specified Under Error Handling
The Error Handling tab specifies in detail what to do.
Skip Following Steps
Execution down the current branch will stop.
Test Page Type
This action test the type of the page in the current window. There are currently 4 page types: HTML, XML,
Excel and Binary.
Properties
The Test Page Type action is configured using the following properties:
Page Type
This contains the page type to test for. There are 4 possibilities for this:
HTML
This is true if and only if the page in the current window is an HTML page. This does not necessarily
mean that the source was HTML, but only that after the page has been loaded it was passed or
converted to an HTML page and presented as such in the Page View.
XML
This is true if and only if the page in the current window is an XML page.
Excel
This is true if and only if the page in the current window is a spreadsheet document.
416

Kofax Kapow User's Guide
Binary
This is true if and only if the page in the current window is a Binary page.
If
Specifies the exact condition to test for, and thus enables inversion of the stated condition. The default is
to test if the "Condition is Not Satisfied". If this is selected and the condition evaluates to false, execution
will be affected as indicated by the Do property; however if the condition evaluates to true, execution
will continue down the current branch. It is possible instead to test if the "Condition is Satisfied", which
reverses the outcome.
Do
Determines what happens when the condition and the If property together indicate that execution should
not continue down the current branch.
As Specified Under Error Handling
The Error Handling tab specifies in detail what to do.
Skip Following Steps
Execution down the current branch will stop.
Test Row
The Test Row action tests the number of columns in a table row.
The found tag must be a <tr>-tag. Specify an interval defined by the Minimum Number of Columns and
Maximum Number of Columns and choose what to do if the number of columns is outside (or inside) the
specified interval.
Properties
The Test Row action can be configured using the following properties:
Minimum Number of Columns
Enter the minimum number of columns in a table row.
Maximum Number of Columns
Enter the maximum number of columns in a table row.
If
Specify the exact condition to test for, either that the "Row Matches" or that the "Row Does Not Match" the
interval. The row matches the interval if the number of columns in the row is within the specified limits. If
the stated condition is satisfied, execution will be affected as indicated by the Do property; if the condition
is not satisfied, execution will continue down the current branch.
Do
Determines what happens when the condition and the If property together indicate that execution should
not continue down the current branch.
As Specified Under Error Handling
The Error Handling tab specifies in detail what to do.
417

Kofax Kapow User's Guide
Skip Following Steps
Execution down the current branch will stop.
Test Tag
The Test Tag action makes a test to determine whether execution should be allowed to continue down the
current branch or if something else should be done. The test consists of matching the found tag against a
pattern.
Using a Test Tag action is the most common way of getting conditional execution in a robot.
Properties
The Test Tag action can be configured using the following properties:
Pattern
The pattern to match against the found tag. The pattern must match the entire found tag.
Match Against
Specifies what the pattern should be matched against from the found tag.
•Only Text specifies that the pattern should be matched against only the text in the found tag.
•HTML specifies that the pattern should be matched against the HTML of the found tag.
Ignore Case
If checked, the pattern matching will be case insensitive.
If
Specifies the exact condition to test for, either that the "Pattern Matches Found Tag" or that the "Pattern
Does Not Match Found Tag". If this condition is satisfied, execution will be affected as indicated by the Do
property; if the condition is not satisfied, execution will continue down the current branch.
Do
Determines what happens when the condition and the If property together indicate that execution should
not continue down the current branch.
As Specified Under Error Handling
The Error Handling tab specifies in detail what to do.
Skip Following Steps
Execution down the current branch will stop.
Converters
These data converters (if any are selected) are applied to the text or HTML of the found tag before the
pattern matching. If the data converters fail to produce any output, an error will be generated.
Test URL
This action tests the URL contained in the found tag, to determine whether execution should continue
down the current branch or if something else should be done.
418

Kofax Kapow User's Guide
The URL must be contained in a tag of one of the following types:
• <a href="URL">
• <area href="URL">
• <frame src="URL">
• <iframe src="URL">
• <script src="URL">
• <param value="URL">
• <meta http-equiv="Refresh" content="...; url=URL">
Properties
The Test URL action can be configured using the following properties:
URL Pattern
The pattern which the URL in the found tag should match. The pattern must match the entire URL.
If
Specifies the exact condition to test for, either that the "Pattern Matches URL" or that the "Pattern Does
Not Match URL". If the stated condition is satisfied, execution will be affected as indicated by the Do
property; if the condition is not satisfied, execution will continue down the current branch.
Do
Determines what happens when the condition and the If property together indicate that execution should
not continue down the current branch.
As Specified Under Error Handling
The Error Handling tab specifies in detail what to do.
Skip Following Steps
Execution down the current branch will stop.
Test Value
This action tests a Boolean value to determine whether execution should continue down the current
branch or if something else should be done. The action is among other things useful if the value of
a global variable should be checked. For example, the action can be used to check if a counter has
exceeded a given value.
Properties
The Test Value action is configured using the following properties:
Condition
Contains the condition. The condition must evaluate to either true or false. Any other value will produce
an error when the action is executed. The default way of specifying the condition is by entering an
expression. However, one the other options of the Value Selector can also be used.
If
Specifies the exact condition to test for, and thus enables inversion of the stated condition. The default is
to test if the "Condition is Not Satisfied". If this is selected and the condition evaluates to false, execution
419

Kofax Kapow User's Guide
will be affected as indicated by the Do property; however if the condition evaluates to true, execution
will continue down the current branch. It is possible instead to test if the "Condition is Satisfied", which
reverses the outcome.
Do
Determines what happens when the condition and the If property together indicate that execution should
not continue down the current branch.
As Specified Under Error Handling
The Error Handling tab specifies in detail what to do.
Skip Following Steps
Execution down the current branch will stop.
Example
In the following examples, the condition is specified using an expression. This is the default way of
specifying the condition.
Test if a text has a specific length:
ScratchPad.shortText1.length() == 28
Test multiple values at once:
PersonInput.isMale && PersonInput.isMarried
Test Variables
This action tests the value of one or more variables to determine whether execution should continue down
the current branch or if something else should be done. The action is useful for checking that the value in
an extracted variable are valid. For example, the action can be used to check that an extracted variable
matches the value in an input variable.
To specify the test, add one or more variable conditions. Each variable condition compares the value
of a selected variable against another value. Depending on the outcome of the comparisons, and on
your selection in the If property, execution will either continue down the current branch or be affected as
indicated by the Do property.
Properties
The Test Variables action is configured using the following properties:
Conditions
Contains the list of variable conditions. See below for more on how to configure a variable condition.
If
Determines what happens when the variable conditions have been tested.
No Conditions are Satisfied
Execution will continue down the current branch if one or more variable conditions are satisfied; if no
conditions are satisfied, execution will be affected as indicated by the Do property.
420

Kofax Kapow User's Guide
Any Condition is Not Satisfied
Execution will continue down the current branch only if all variable conditions are satisfied; if one or
more conditions are not satisfied, execution will be affected as indicated by the Do property.
Any Condition is Satisfied
Execution will continue down the current branch if no variable conditions are satisfied; if one or more
variable conditions are satisfied, execution will be affected as indicated by the Do property.
All Conditions are Satisfied
Execution will continue down the current branch if one or more variable conditions are not satisfied; if
all variable conditions are satisfied, execution will be affected as indicated by the Do property.
Do
Determines what happens when the condition and the If property together indicate that execution should
not continue down the current branch.
As Specified Under Error Handling
The Error Handling tab specifies in detail what to do.
Skip Following Steps
Execution down the current branch will stop.
Configuring a Variable Condition
A variable condition compares the value of a selected variable against another value. A variable condition
is configured using the following properties:
Variable
The variable (or variable attribute) whose value to test.
Operator
The operator to use when comparing the value of the variable to the other value. See below for a
description of the available operators.
Value
The value to compare the variable value against. The value can be specified in several ways using a
Value Selector.
Ignore Case
If this option is selected, the comparison will be done in a case-insensitive way.
Always Satisfied if Variable is Empty
If this option is selected, the variable condition will be satisfied whenever the selected variable has no
value, regardless of the outcome of the comparison.
Always Satisfied if Value is Empty
If this option is selected, the variable condition will be satisfied whenever the other value is empty,
regardless of the outcome of the comparison. This option is useful if comparing the value of an extracted
variable against a value in an input variable. If the input variable has no value for a specific attribute,
the test of whether the extracted variable attribute value matches the attribute value in the input variable
should usually be skipped. This is achieved by selecting this option.
421
Kofax Kapow User's Guide
The following operators are available in the Operator property:
Operator Description
= Tests whether the two values are equal.
<> Tests whether the two values are not equal.
< Tests whether the first value is less than the second value.
<= Tests whether the first value is less than or equal to the second value.
>= Tests whether the first value is greater than or equal to the second value.
> Tests whether the first value is greater than the second value.
contains Tests whether the first value contains one or more occurrences of the second
value. The test is done on the text representation of the values.
Note If the first value is empty, the test is never satisfied. Also, if the first
value is non-empty and the second value is empty, the test is always
satisfied.
does not contain Tests whether the first value does contain any occurrences of the second value.
The test is done on the text representation of the values. Note: If the first value
is empty, the test is always satisfied. Also, if the first value is non-empty and the
second value is empty, the test is never satisfied.
is contained in Tests whether the first value occurs one or more times in the second value. The
test is done on the text representation of the values. Note: If the second value is
empty, the test is never satisfied. Also, if the second value is non-empty and the
first value is empty, the test is always satisfied.
starts with Tests whether the first value starts with the second value. The test is done on
the text representation of the values. Note: If the first value is empty, the test
is never satisfied. Also, if the first value is non-empty and the second value is
empty, the test is always satisfied.
ends with Tests whether the first value ends with the second value. The test is done on
the text representation of the values. Note: If the first value is empty, the test
is never satisfied. Also, if the first value is non-empty and the second value is
empty, the test is always satisfied.
Note The exact meaning of the operators '<>', '<', '<=', '>=', '>' depends on the type of the selected
variable/attribute. For example, if the type is Short Text or Long Text, the comparison is done
lexicographically, while it is done numerically if the type is Number or Integer.
Test Window
This action tests whether a specific window exists, in order to determine whether execution should
continue down the current branch or if something else should be done.
Note that the window must exist when configuring the Test Window action, in order to be able to select the
window.
Properties
The Test Window action can be configured using the following properties:
422

Kofax Kapow User's Guide
Window
The window to check the existence of (see the discussion on how to identify a window.
If
Specifies the exact condition to test for, either that the Window Exists or that the Window Does Not Exist.
If this condition is satisfied, execution will be affected as indicated by the Do property; if the condition is
not satisfied, execution will continue down the current branch.
Do
Determines what happens when the condition and the If property together indicate that execution should
not continue down the current branch.
As Specified Under Error Handling
The Error Handling tab specifies in detail what to do.
Skip Following Steps
Execution down the current branch will stop.
Transform XML
The Transform XML action transforms an XML document contained in an XML variable using an XSLT
stylesheet. The stylesheet is specified as part of the action. The result of the transformation is stored in a
variable which can be of type XML, HTML, or Long Text.
Note The Transform XML step action supports XSLT version 1.0.
The output that the stylesheet generates must be of a type that can be stored in the selected output
variable. That is, if the output is to be stored in an XML variable, the stylesheet should specify <xsl:output
method="xml">. If the output is to be stored in an HTML variable, the stylesheet should specify <xsl:output
method="html">. If the output is to be stored in a text variable, the output method can be anything since
XML, HTML, and text can all be stored as text.
A common use-case is to use an Extract Target action to store XML from a website in an XML variable,
and then use a Transform XML action to transform the data and store it in the same XML variable. Finally,
the Create Page action can be used to create a page displaying the XML document by choosing HTML
Converted from XML Variable. This enables easy extraction of data from the transformed document using
the standard extraction actions.
Properties
The Transform XML action can be configured using the following properties:
Input Variable
Select the XML variable that contains the input to the transformation. A HTML or Long Text variable can
also be chosen, but it must contain valid XML.
XSLT Stylesheet
Specify the XSLT stylesheet to use for the transformation. In most cases the stylesheet will be specified as
fixed XML, but you can also create the stylesheet dynamically by choosing XML from Expression or XML
from Variable.
423

Kofax Kapow User's Guide
Output Variable
Select the variable where the result of the transformation should be stored. Variables of types XML,
HTML, and Long Text are allowed. The XSLT stylesheet must create output that can be stored in the
selected variable. Note, that the result can be stored in the same variable as the one chosen as XML
input.
Transpose Table
The Transpose Table action transposes a table. Transposing a table means turning rows into columns and
columns into rows while preserving the ordering between rows and between columns.
Example
As an example, consider the following table with 3 rows and 4 columns (including headers):
NAME John Michael Ross
HEIGHT 1.80 1.56 2.09
WEIGHT 75 93 64
Transposing this table yields the following table with 4 rows and 3 columns (including headers):
NAME HEIGHT WEIGHT
John 1.80 75
Michael 1.56 93
Ross 2.09 64
Note Transposing a table twice will not necessarily result in the original table.
Try
The Try step is used when it is necessary to try several alternative approaches to get a particular thing
done.
The Try step is similar to a branch point because it may have several branches going out from it. It differs
from a branch point because branches beyond the first one are executed only if a step on the preceding
branch activates the error handling option Try Next Alternative (or, in legacy robots, "Send Backwards"). A
detailed description can be found in the Design Studio help, Trying Several Alternatives.
Unhide Tag
This action unhides the found tags.
The unhiding is done by configuring the style attribute of the tags such that the tags becomes visible on
the page.
424

Kofax Kapow User's Guide
View as CSV
This action opens downloaded CSV content in a CSV view.
The step action only works on downloaded CSV content.
Properties
The View As CSV action can be configured with the following properties:
Use headers
This property is checked if the first row of the CSV document defines column names.
Separator Character
The separator used to parse the CSV document.
Quote Character
The quote used to parse the CSV document.
Additional Escape Character
The CSV-parser interprets the double quote character (") as an escape character if it is followed by
another double quote character. If an additional escape character is used, the user may provide it here.
Encoding
The encoding used for this CSV document.
Skip Top Lines
Sets the number of lines to skip from the top of the CSV-file. This is particularly useful if a system has
automatically appended a number of lines at the beginning of the CSV-file that are not part of the actual
CSV-data.
Skip Bottom Lines
Sets the number of lines to skip at the bottom of the CSV-file. This is particularly useful if a system has
automatically appended a number of lines at the end of the CSV-file that are not part of the actual CSV-
data.
View as Excel
This action opens downloaded Excel content in an Excel view.
The step action only works on downloaded Excel content.
Properties
There are not currently any properties.
View as JSON
This action opens downloaded JSON content in a JSON view.
The step action only works on downloaded JSON content.
425

Kofax Kapow User's Guide
Properties
The View As JSON action can be configured with the following properties:
Encoding
The encoding used for the JSON document.
View as XML
This action opens downloaded XML content in an XML view.
The step action only works on downloaded XML content.
Properties
There are not currently any properties.
Wait
This action waits for a specified period of time. Wait is only performed during runtime execution, not during
execution in Design mode in Design Studio.
Properties
The Wait action can be configured using the following properties:
Seconds
The number of seconds to wait. The value of seconds must be non-negative and can be specified in
several ways using a Value Selector.
Write File
This action writes a new file or appends to an existing file.
Note that the file is only written during execution in Design mode in Design Studio, if the option Execute in
Design Mode has been selected.
To test whether a given file exists, use the Test File Existence action.
If a CSV (Comma-Separated Value) file should be written, it can be done in two ways: Either write the file
one line at a time with Write File, using an Add To CSV data converter to create each line. Alternatively,
build up the desired file contents one line at a time in a global variable (again with the aid of the Add To
CSV data converter) and use Write File in the end (that is, in an additional branch) to write the file in one
piece.
In order to modify the global variable that holds the file contents, use an Assign Variable action that takes
its input from a Get Variable data converter pointing to the variable itself. This is then followed by the Add
To CSV data converter.
426

Kofax Kapow User's Guide
Properties
The Write File action can be configured using the following properties:
File Name
The name of the file. The name can be specified in several ways using a Value Selector. The name must
be an absolute file name, including the drive name, if any, and the directory path to the file.
File Content
The contents to write to the file. The contents can be specified in several ways using a Value Selector.
The contents can be either binary data or text. In the latter case, the character encoding selected in the
File Encoding property will be used for encoding the text as bytes. See above for how to use converters to
provide file contents for CSV, XML and JSON files.
File Encoding
If the contents to write to the file is text, this property specifies the character encoding to use for encoding
the text as bytes.
Append to File
Specifies whether a new file should always be created (overwriting any existing file with the same name),
or whether the contents should be appended to the file if it already exists. Note that Append to File only
adds new content at the end of an existing file, regardless of the file format. Therefore, this option should
only be used with text variables.
Create Directories
Specifies whether to create the necessary directories on the file path before creating a new file. If not
selected, then the action will fail if any directory on the path does not exist.
Execute in Design Mode
If this is enabled, the action will be executed even in Design Mode inside Design Studio. If this is disabled,
the action will do nothing when you navigate the robot in Design Mode.
Write Log
This action provides a opportunity to write information to the log system.
Exactly what the log system is, depends on how the robot is being run. If the robot is running in design
mode in Design Studio, the log information will be shown in the Log Window, which can be opened from
the View menu. If the robot is running in debug mode, the log will be shown in the Log tab. If the Robot
is run using RoboServer, the log information might be sent to a message database or somewhere else,
depending on the configuration of Kapow.
Properties
The Write Log action can be configured using the following properties:
Message
This field contains a message that is written to the log. The value of this can be specified in several ways
using a Value Selector.
427
Kofax Kapow User's Guide
Data Converters
This section provides an overview of the available data converters.
The descriptions of the data converters below refer to the concepts of patterns and expressions, both of
which are central text manipulation concepts in Kofax Kapow. For a description of these two concepts, see
Patterns and Expressions.
You can also view the Data Conversion tutorial.
Standard
This category contains the most commonly used data converters. The most common way to process a
text is to use Extract. It allows you to extract a piece of text using a pattern. To evaluate an expression,
use Evaluate Expression. To add a text, use Add Text. To convert a text using a list of conversion rules,
use Convert Using List. To get the value of a variable, use Get Variable.
Action Description
Extract This data converter extracts a piece of text from the input text using a pattern. The part
that you wish to extract should be marked with a pair of parenthesis.
Evaluate Expression This data converter outputs the result of an expression. The input text to the data
converter can be used in the expression by using the INPUT notation.
Add Text This data converter adds a text before or after the input text.
Convert Using List This data converter converts the input text to an output text using a list of conversions.
Get Variable This data converter fetches the value of a variable. The input text is ignored.
Extraction
This category contains data converters for extraction. The most commonly used one is Extract. It allows
you to extract a piece of text using a pattern. If you need more advanced extraction features, use
Advanced Extract. To apply the functionality of Advanced Extract multiple times on the same text, use
Extract List.
Action Description
Extract This data converter extracts a piece of text from the input text using a
pattern. The part that you wish to extract should be marked with a pair of
parenthesis.
Advanced Extract This data converter matches the input text against a pattern and outputs the
result of an expression.
Extract List This data converter finds all matches of a pattern, and for each match,
evaluates an expression. The output text is a list of the results of the
expression.
Text Formatting
This category contains data converters for various kinds of text formatting. To add a text, use Add Text.
To search and replace text, use Replace Text. To search and replace text using a pattern, use Replace
Pattern. To remove spaces from the input text, use Remove Spaces. To remove all special characters,
use Remove Special Characters. To remove all non-printable characters, use Remove Non-Printable
Characters. To change case, use Convert to Lower Case, Convert to Upper Case, or Capitalize.
428
Kofax Kapow User's Guide
Action Description
Add Text This data converter adds a text before or after the input text.
Replace Text This data converter finds and replaces matching text in the input text.
Replace Pattern This data converter replaces every match of a pattern with the result of an
expression.
Remove Spaces This data converter removes spaces from the input text.
Remove Special Characters This data converter replaces all special characters in the input text with
spaces.
Remove Non-Printable Characters This data converter removes all non-printable characters.
Convert to Lower Case This data converter converts all characters in the input text to lower case.
Convert to Upper Case This data converter converts all characters in the input text to upper case.
Capitalize This data converter capitalizes the input text, i.e. makes the first character in
every word upper case, and the remaining characters lower case.
Unquote Text This data converter unquotes text that has been enclosed in double or single
quotes.
Number Handling
This category contains data converters for handling numbers. To extract a number from a text, use Extract
Number. To format a number that is already in the standard number format, use Format Number.
Action Description
Extract Number This data converter extracts a number from the input text and outputs the
number in the standard number format.
Format Number This data converter reformats a number that is in the standard number format.
Date Handling
This category contains data converters for handling dates. To extract a date from a text, use Extract Date.
To extract a year from a text, use Extract Year. To format a date that is already in the standard date format,
use Format Date. To get the time between two dates, use Get Time Between Dates. To modify a date, use
Modify Date.
Action Description
Extract Date This data converter extracts a date from the input text and outputs the date in
the standard date format.
Extract Year This data converter extracts a year from a date in the input text.
Format Date This data converter reformats a date that is in the standard date format.
Get Time Between Dates This data converter allows you to find the difference between two dates. It
compares the date in the input text to a given date and calculates the difference,
measured in the selected unit.
Modify Date This data converter modifies the input date by adding or subtracting an amount
from a selected part of the date. If this causes that part of the date to overflow or
underflow, the other parts of the date will be updated accordingly. A time zone, in
which the modifications are performed, can be specified.
429
Kofax Kapow User's Guide
Action Description
To Excel Date Converts a date from a standard date format to an Excel format.
From Excel Date Converts a date from an Excel format to the standard date format.
HTML Handling
This category contains data converters for handling HTML. To remove all HTML tags from a text, use
Remove Tags. To convert HTML to plain, structured text, use Convert HTML to Text. To reformat (pretty-
print) HTML, use Format HTML. To count the number of times that a specific tag appears in the input text,
use Count Tags.
Action Description
Remove Tags This data converter removes HTML tags from the input text.
Convert HTML to Text This data converter converts the input HTML text to plain text, and structures the
text similarly to how it would appear in a browser.
Format HTML This data converter reformats (pretty-prints) the input HTML text.
Count Tags This data converter counts tags with the name matching exactly the name given
in the Tag Name field. If you want the converter to count only tags, that has
a corresponding end tag within the input string, check the 'Require End Tag'
checkbox.
Output Format Handling
This category contains data converters for handling output formats. Each data converter can format an
object into a specific output format and add it to the input text (supposed to be a previously created partial
result). Alternatively, any piece of text can be added to the input text according to the rules of the chosen
output format.
Action Description
Add to XML This data converter extends a piece of XML with another piece of XML,
optionally creating it first from a variable.
Encoding and Decoding
This category contains data converters for encoding and decoding.To decode or encode ampersands,
use Ampersand Decode or Ampersand Encode. To encode or decode URLs, use URL Encode or URL
Decode. To Base64 encode or decode binary data, use Base64 Encode or Base64 Decode.
Action Description
Ampersand Encode This data converter encodes characters with ampersand encodings, which is
replacing certain characters with "&<something>;".
Ampersand Decode This data converter decodes all HTML ampersand encodings into their real
characters.
URL Encode This data converter encodes characters with URL encodings.
URL Decode This data converter decodes all URL encodings into their real characters.
Base64 Encode This data converter encodes data using Base64 encoding.
Base64 Decode This data converter decodes Base64 encoded data.
Convert Binary to Text Converts a binary variable to text. The input text is ignored.
430
Kofax Kapow User's Guide
Action Description
Convert Text to Binary Converts a text variable to it binary Hex representation. The input text is ignored.
Other
This category contains various other data converters.
Action Description
Evaluate Expression This data converter outputs the result of an expression. The input text to the
data converter can be used in the expression by using the INPUT notation.
Convert Using List This data converter converts the input text to an output text using a list of
conversions.
Convert Using JavaScript This converter allows you to define the conversion using JavaScript. The input
is available in the INPUT variable, and the result of the conversion must be
assigned to the OUTPUT variable.
If Then The If Then data converter allows you to specify a list of if-then rules that
determine the output of the converter.
Get Variable This data converter fetches the value of a variable. The input text is ignored.
Get Property This data converter fetches the value of a property from a property list contained
in a variable.
Make URL Absolute This data converter makes a URL absolute.
Make URL Relative Make URL Relative
Compute MD5 Checksum This data converter computes an MD5 checksum of the input text.
Deprecated
This category contains data converters that have been replaced by newer versions or have otherwise
become obsolete. They are available only for backwards compatibility with robots written using earlier
versions of Design Studio. Do not use these data converters in new robots.
Add Text
This data converter provides the ability to add text before or after the input text.
Properties
The Add Text data converter is configured using the following properties:
Text to Add
This field contains the text to add to the input text.
Add Where
Select whether to add the text before or after the input text.
Description
Type in a description to be shown in the list of data converters. If there is no type in a description, one will
be generated.
431

Kofax Kapow User's Guide
Add To CSV
This data converter converts a variable to CSV format and adds it to the input text.
See the Write File action for help on how to use this data converter to create and write the contents of a
complete CSV file.
Properties
The Add To CSV data converter is configured using the following properties:
Variable to Format
Specify a variable, which will be formatted as CSV before being added at the end of the input text. The
CSV will include all of the attributes of the variable, except those not marked as "storable".
Create Header
If this is checked, a header row is created that matches the selected variable. The storage names (or by
default the names) of the variable's attributes are used as column titles in this header. If this property is left
unchecked, a data row is created containing the values of the variable's attributes.
Date Format Locale
When creating a data row, the desired locale for dates needs to be specified just as for the Format Date
data converter.
Date Format Pattern
When creating a data row, the desired date format pattern needs to be specified just as for the Format
Date data converter.
Field Separator
The desired separator between individual fields in a row. This can be either a comma or a TAB character.
When comma is selected, field values can optionally be put in quotes (" characters). In this case, quote
characters in field values are doubled (so that " becomes ""). For quoted, comma-delimited values you can
also specify whether the comma should be followed by a space or not.
Description
Type in a description to be shown in the list of data converters. If there is no type in a description, one will
be generated.
Advanced Extract
This data converter allows manipulation of the input text in a flexible way using a pattern and an
expression. The pattern can be used to extract text pieces from the input text, and these text pieces can
then be used in the expression to construct the output text.
Properties
The Advanced Extract data converter is configured using the following properties:
432

Kofax Kapow User's Guide
Pattern
Contains a pattern that is matched against the input text. Note that the pattern must match the entire input
text. Otherwise, the converter will fail, producing an error.
Ignore Case
If this option is selected, the pattern matching is case-insensitive, i.e. the pattern is matched against the
input text without regard for character case.
Output Expression
Contains an expression whose result becomes the output of the data converter. The expression can
refer to the submatches of the pattern using the $n notation. For example, $1 can be entered in the
expression to get the first submatch in the pattern (i.e. the text that matches the contents of the first pair of
parentheses in the pattern).
Description
Type in a description to be shown in the list of data converters. If there is no type in a description, one will
be generated.
Ampersand Decode
This data converter decodes all HTML ampersand encodings into their real characters.
Properties
The Ampersand Decode data converter can be configured using the following properties:
Convert NBSP To Regular Space
Specifies that should be converted to a regular space instead of a non-breakable space.
Description
Type in a description to be shown in the list of data converters. If there is no type in a description, one will
be generated.
Example
If the input text is
&alt; > & "
this data converter will output:
< > & "
Ampersand Encode
This data converter encodes characters with HTML ampersand encodings.
For more information, consult:
http://www.w3.org/TR/html401/charset.html#h-5.3.2
433

Kofax Kapow User's Guide
Properties
The Ampersand Encode data converter can be configured using the following properties:
Description
Type in a description to be shown in the list of data converters. If there is no type in a description, one will
be generated.
Example
If the input text is
< > & " á ç a
this data converter will output:
&alt; > & " á ç a
Base64 Decode
This data converter decodes Base64 encoded text data into binary.
Properties
The Base64 Decode data converter can be configured using the following properties:
Description
Type in a description to be shown in the list of data converters. If there is no type in a description, one will
be generated.
Example
If the input text is
yv66vg==
this data converter will output:
CA FE BA BE
Important The base64 Decode converter does not support dash ("-") and underscore ("_") characters,
therefore it is necessary to replace those characters before doing the Base64 decoding. Use "+" instead
of "-" and "/" instead of "_".
Base64 Encode
This data converter encodes binary data into a string using Base64 encoding.
434

Kofax Kapow User's Guide
Properties
The Base64 Encode data converter can be configured using the following properties:
Description
Type in a description to be shown in the list of data converters. If there is no type in a description, one will
be generated.
Example
If the input text is
CA FE BA BE
this data converter will output:
yv666vg==
Boolean Converter
The Boolean converter converts any pattern and returns a Boolean value: true or false if there is any
pattern found. If no pattern found, no value is returned and instead, a warning message is displayed on
top of the Test Input window.
Using the Boolean Converter
You can access the converter as follows:
• Extracting boolean data using the Extract action
On the Action tab, select Extract > Extract then click the plus sign under Converters and select
Boolean Handling > Extract Boolean.
• Using the right-click menu in the Page view
Right-click the text you want to extract from and select the appropriate option on the Extract menu.
Properties
The Boolean converter is configured using the following properties:
Formats
Displays defined patterns and expected results: true or false.
Pattern
The Pattern list contains default suggested patterns like yes, no and etc. You can also click the drop-down
box to the right of the Pattern list and choose from Value, Variable, Expression, or Converters.
Ignore Case
If this option is selected, the action ignores the case of the pattern's content.
Value
Select True or False from the list.
435

Kofax Kapow User's Guide
Test Input
Enter an input value for testing.
Test Output
A corresponding output is displayed according to the defined formats.
Converting rules
• By default, if the input text is a boolean value itself, the output is the same as the input. Note that it is
case sensitive. This rule only applies to lower case true and false.
• The order of the formats matters, that is the action starts searching for matching formats from the top.
When any matching pattern is found, the result is returned regardless of any other patterns located
below the found one.
Capitalize
This data converter capitalizes the input text. This means that the first character in every word will be
made upper case, while the remaining characters will be made lower case.
Properties
The Capitalize data converter can be configured using the following properties:
Words that Should not Be Capitalized
Contains the words that should not be capitalized. The words are separated by commas. For example, if
the words "in" and "the" should not be capitalized, set the property to "in, the".
Minimum Length of Words to Capitalize
The minimum length of the words that should be capitalized. For example, if this property is set to 3, all
words with fewer than 3 characters will not be capitalized.
Description
Type in a description to be shown in the list of data converters. If there is no type in a description, one will
be generated.
Example
If the input text is
'hello WORLD'
then the output text becomes:
'Hello World
Compute MD5 Checksum
The Compute MD5 Checksum data converter computes an MD5 checksum of the input text.
This data converter is useful for creating a digital fingerprint of a text or binary data, in order to easily
detect changes in the data at some later point. Since MD5 checksum can only be applied to binary data,
436

Kofax Kapow User's Guide
any string input must be encoded before the MD5 can be applied. If the checksum generated from text
is to be compared against a checksum generated by an external MD5 service, ensure that the external
service used the same encoding as the robot.
Any text can be given as input, including the hexadecimal text representation that will result if it is read
from an attribute containing binary data. The output of the data converter will be a 128-bit MD5 checksum
of the text, represented as a 32-digit hexadecimal number. For all practical purposes, this number can be
considered a unique identification of the input text. That is, in practice, two texts will never occur that result
in the same MD5 checksum.
Properties
The Compute MD5 Checksum data converter can be configured using the following properties:
Encoding
The encoding used to encode the text before applying the md5.
Description
Type in a description to be shown in the list of data converters. If there is no type in a description, one will
be generated.
Example
If the input text is
The quick brown fox jumps over the lazy dog
then the output will be:
9E107D9D372BB6826BD81D3542A419D6
Even small changes in the input text will result in a completely different output. For example, if you change
the 'd' in "dog" to an 'h', so that the input becomes:
The quick brown fox jumps over the lazy hog
then the output will be:
5681F8C64F7CA70B12E0B80435265203
Convert Binary to Text
Converts the contents of a binary variable to text, using the selected encoding. The input text is ignored.
This action is used when HTML, XML, or text files are passed as input to a robot through a binary
variable.
Properties
The Convert Binary to Text data converter is configured using the following properties:
437

Kofax Kapow User's Guide
Variable
The variable whose value to get. This must be a binary attribute.
Encoding
The encoding used to decode the bytes in the binary variable. Binary content which can be converted
into text is most often encoded in UTF-8, Latin-1 (ISO-8859-1), or Latin-1 (Windows-1252). If the text
generated by this conversion contains the character '#', the selected encoding is wrong or the character is
non-displayable.
Description
Type in a description to be shown in the list of data converters. If there is no type in a description, one will
be generated.
Convert from Excel Date
This data converter converts the date from an Excel number to a standard format.
Properties
The Convert from Excel Date data converter can be configured using the following properties:
Description
Type in a description to be shown in the list of data converters. If there is no type in a description, one will
be generated.
Example
If the input text is
1
then the output text becomes:
1900-01-01 00:00:00.0
Convert HTML to Text
This data converter converts the HTML input text to plain text, and structures the text similarly to how it
would appear in a browser.
Properties
The Convert HTML to Text data converter can be configured using the following properties:
Include Aligned Tables and Images
Specifies that the tables and images that are aligned to the left or right of the text are included in the
output text. Disabling this can sometimes result in removing the desired content.
Include URLs
Specifies that the actual URLs in link tags will be included in the output text.
438

Kofax Kapow User's Guide
Include Image Text Alternatives
Specifies that the text representation of images will be included in the output text.
Include Form Fields
Specifies that the text representation of form fields will be included in the output text.
Insert This Before a Heading
Specifies that this data converter should guess at the location of headings and insert the specified text
before them.
Insert This After a Heading
Specifies that this data converter should guess at the location of headings and insert the specified text
after them.
Keep Ampersand Encodings
Specifies that ampersand encodings will not be decoded. Text in script and style sheet will be respected.
Description
Type in a description to be shown in the list of data converters. If there is no type in a description, one will
be generated.
Convert Text to Binary
Converts the contents of a text variable into its binary Hex representation, using the selected encoding.
This step can be used to encode text as binary for file upload.
Properties
The Convert Text to Binary data converter is configured using the following properties:
Encoding
The encoding used to encode the text.
Description
Type in a description to be shown in the list of data converters. If there is no type in a description, one will
be generated.
Convert to Excel Date
This data converter converts the date to an Excel number that represents the same date in a spreadsheet.
Properties
The Convert to Excel Date data converter can be configured using the following properties:
Description
Type in a description to be shown in the list of data converters. If there is no type in a description, one will
be generated.
439

Kofax Kapow User's Guide
Example
If the input text is
1900-01-01 00:00:00.0
then the output text becomes:
1.0
Convert to Lower Case
This data converter converts all characters in the input text to lower case.
Properties
The To Lower Case data converter can be configured using the following properties:
Description
Type in a description to be shown in the list of data converters. If there is no type in a description, one will
be generated.
Example
If the input text is
"HELLO World"
then the output text becomes:
"hello world"
Convert to Upper Case
This data converter converts all characters in the input text to upper case.
Properties
The To Upper Case data converter can be configured using the following properties:
Description
Type in a description to be shown in the list of data converters. If there is no type in a description, one will
be generated.
Example
If the input text is
"hello World"
440

Kofax Kapow User's Guide
then the output text becomes:
"HELLO WORLD"
Convert Using JavaScript
This data converter provides the opportunity to specify the conversion using JavaScript. This data
converter may for instance be useful when working with advanced text manipulation such as URL
rewriting, or performing complex calculations.
The input to the converter is available in an implicitly defined INPUT variable. The result of performing
the conversion must be assigned to an OUTPUT variable. Helper functions can be defined and called if
needed. Note that access to the browser state from the JavaScript is not possible in this converter.
Properties
The Convert Using JavaScript data converter is configured using the following properties:
Script
The JavaScript to execute. This may be specified literally or created in several different ways using a
Value Selector
Description
Type in a description to be shown in the list of data converters. If there is no type in a description, one will
be generated.
Example: JavaScript Conversion
Example 1
To calculate the average of a comma-separated list of numbers, we configure the Convert Using
JavaScript data converter with the following script that performs the calculation:
var sum = 0;
var numbers = INPUT.split(",");
for (var i = 0; i < numbers.length; i++) {
sum += parseInt(numbers[i]);
}
OUTPUT = sum / numbers.length;
The JavaScript reads the list of numbers, e.g. "23,22,25,31,24" from the INPUT variable, splits it at
each comma using the built-in JavaScript split() function, iterates through the numbers to calculate
the sum (note that the parseInt() function is used to convert from string to integer; otherwise we would
be concatenating the strings rather than calculating the sum), and finally calculates the average and
assigns the result to the OUTPUT variable.
In the case where the input to the data converter is the string "23,22,25,31,24", the output of the
converter will thus be 25.
Example 2
441
Kofax Kapow User's Guide
To calculate the maximum of a comma-separated list of amounts, e.g. "$10.50,$13,$21.75,$7", we
configure the Convert Using JavaScript data converter with the following script that performs the
calculation:
function getNumber(amountWithDollarSign) {
return parseFloat(amountWithDollarSign.substring(1));
}
var amountsWithDollarSigns = INPUT.split(",");
var max = getNumber(amountsWithDollarSigns[0]);
for (var i = 1; i < amountsWithDollarSigns.length; i++) {
max = Math.max(max, getNumber(amountsWithDollarSigns[i]));
}
OUTPUT = max;
In the above JavaScript, we have defined a helper function named getNumber() that removes the
preceding dollar sign from the amount and converts the rest into a floating-point number. This function is
called repeatedly in script. The built-in JavaScript function Math.max() used to find the maximum of two
numbers; in each iteration, the highest number found so far is compared with the next number.
Finally, the highest number found is stored in the OUTPUT variable and becomes the output of the data
converter.
String Manipulation
The following methods are useful when converting String objects. Notice that strings are written inside ""
whereas regexp are written within //. A global g attribute at the end of a regexp indicates that the method
should apply to all matches.
Method Description
string.charAt(n) Returns the character with index n.
string.charCodeAt(n) Returns the Unicode value of the character with index n.
string.concat(value1, value2, ...) One or more values are concatenated to string.
String.fromCharCode(c1, c2, ...) Creates a new string from integers specifying the Unicode encodings of the
characters.
string.indexOf(substring)
string.indexOf(substring, start)
Returns the index of substring within string.start specifies the index at
which the search should start (0 being the first character in the string and
string.length-1 being the last. Default is 0).
string.lastIndexOf(substring)
string.lastIndexOf(substring, start)
Returns the position of the last occurrence of substring within string.start
specifies the index at which the search should start (0 being the first
character in the string and string.length-1 (which is default) being the last).
string.length Character length of string.
string.match(regexp) Searches string for matches with a regular expression regexp. Returns only
the first match unless regexp has the global attribute specified (g), by which
an array containing all results from the match is returned.
string.replace(regexp, replacement)
string.replace(substring,
replacement)
Searches string for matches with a substring or a regular expression and
replaces the first occurrence with replacement. If regexp has the global
attribute specified (g), all occurrences are replaced with replacement.
442
Kofax Kapow User's Guide
Method Description
string.search(regexp) Returns the index of the first character of the first match with a regular
expression.
string.slice(start, end) Returns a string containing all characters from start through end-1.
string.split(delimiter, limit) delimiter is a string or regular expression which specifies the places at which
to split string. Returns an array of strings. The array is no longer than limit
string.substr(start, length) Returns a copy of the substring starting from index start and being of the
length length.
string.substring(from, to) Returns the substring starting at position from and ending at to-1.
string.toLowerCase() Returns a copy of string converted to lower case.
string.toUpperCase() Returns a copy of string with all letters converted to upper case.
The Math Object
The following properties and methods are useful when doing mathematical computations. All angles are
measured in radians.
Property / Method Description
Math.E Returns Euler's number.
Math.LN10 Returns the natural logarithm of 10.
Math.LN2 Returns the natural logarithm of 2.
Math.LOG10E Returns the base-10 logarithm of E.
Math.LOG2E Returns the base-2 logarithm of E.
Math.PI Returns pi.
Math.SQRT1_2 Returns the square root of 1/2.
Math.SQRT2 Returns the square root of 2.
Math.abs(x) Returns the absolute value.
Math.acos(x) Computes arc cosine.
Math.asin(x) Returns arc sine.
Math.atan(x) Computes arc tangent.
Math.atan2(y, x) Computes the angle to a point. The input represent the usual (x,y)-
coordinates, but the order has been reversed.
Math.ceil(x) Rounds up a number.
Math.cos(x) The cosine function.
Math.exp(x) Takes e to the power of x.
Math.floor(x) Rounds down a number.
Math.log(x) Computes the natural logarithm.
Math.max(x1, x2, ...) Returns the largest of the numbers.
Math.min(x1, x2, ...) Returns the smallest of the numbers.
443
Kofax Kapow User's Guide
Property / Method Description
Math.pow(x,y) Computes x to the power of y
Math.random() Returns a random number between 0 and 1
Math.round(x) Rounds to nearest integer.
Math.sin(x) The sine function.
Math.sqrt(x) Computes the square root.
Math.tan(x) The tangent function.
Numbers
It is possible to convert from a Number to a String using String(number) and vice versa using
Number(string). Here are some of the useful methods of the Number object.
Method Description
number.toExponential(digits) Specifies the number of digits that will occur after the decimal point. Returns
a string representation of number in exponential notation.
number.toFixed(digits) Specifies the number of digits that will occur after the decimal point. Returns
a string representation of number that does not use exponential notation.
number.toPrecision(precision) Specifies the number of significant digits. Returns a string representation of
number with the specified number of significant digits.
number.toString(base) Returns a string representation of the number using the specified base.
Convert Using List
This data converter converts the input text to an output text using a list of conversions. The data converter
is useful when converting from the texts used on a particular website to the texts used here, or vice versa.
For example, the data converter can be used to convert between country names and country codes.
Specifying the list of conversions
The list of conversions is specified in the Conversions field. For example, a list of conversions from
country name to country code could look like this:
"Australia" = "AUS"
"Austria" = "AUT"
"Belgium" = "BEL"
"Brazil" = "BRA"
"Canada" = "CAN"
"China" = "CHN"
"Denmark" = "DNK"
"Egypt" = "EGY"
"Finland" = "FIN"
"France" = "FRA"
"Germany" = "DEU"
"Hungary" = "HUN"
"Iceland" = "ISL"
"India" = "IND"
"Ireland" = "IRL"
...
444

Kofax Kapow User's Guide
With this list of conversions, the input text "Australia" will be converted to "AUS", the input text "Austria"
will be converted to "AUT", etc.
The backslash character (\) can be used to enter special characters in the texts:
• \n for line break.
• \r for carriage return.
• \f for form document.
• \t for horizontal tab.
• \b for backspace.
• \" for double quote.
• \' for single quote.
• \\ for backslash itself.
• \uxxxx for the unicode character with encoding xxxx, where xxxx is four hexadecimal digits.
Quotes around a text can be omitted. In that case, all spaces at the start and end of the text will be
removed, the text cannot be empty, and the backslash notation can not be used to enter special
characters.
The list of conversions can contain empty lines and comment lines. A comment line starts with two
forward slash characters (//).
Handling the case where no conversion matches
The If No Matching Conversion option determines what happens in the case where the input text does not
match any of the conversions:
•Generate Error will cause an error to be generated by the data converter. The error will be handled
according to the configuration of the step that uses the data converter.
•Do Not Convert Text will prevent the input text from being converted, i.e. the input text will be used as
output text without any conversion.
•Convert to Default Text will cause the input text to be converted to the text specified in the Default Text
field.
Note: The text in the Default Text field is specified withoutquotes. If there needs to be a quote character
inside the text, it can be entered directly (do not use the \" notation).
Other Properties
The Convert Using List data converter can additionally be configured using the following properties:
Description
Type in a description to be shown in the list of data converters. If there is no type in a description, one will
be generated.
Count Tags
The Count Tags data converter counts the number of times that a specific tag appears in the input text. It
matches the tag name exactly.
445

Kofax Kapow User's Guide
Properties
The Count Tags data converter can be configured using the following properties:
Tag Name
In this field, you enter the name of the tag that you want to count, e.g. "tr".
Require End Tag
If this is checked, only the tags that have both start and end tags are counted.
Description
Type in a description to be shown in the list of data converters. If there is no type in a description, one will
be generated.
Evaluate Expression
This data converter provides an opportunity to evaluate an expression.
The input text to the data converter can be used in the expression by using the INPUT notation, see the
examples below.
Properties
The Evaluate Expression data converter is configured using the following properties:
Expression
Contains an expression whose result becomes the output of the data converter. The expression can refer
to the input text by using the INPUT notation, see the examples later in this topic.
Description
Type in a description to be shown in the list of data converters. If there is no type in a description, one will
be generated.
Examples
Get the current date and time can happen with this expression:
now()
If the input text is "The time is " and the current time should be added, this expression can be used:
INPUT + time(now())
Numeric calculations can also be performed. For example, if the integer attribute Item.price contains 95
and the number attribute Customer.discount contain 25.0 then the discount can be computed:
(Item.price * Customer.discount)/100
Likewise, if the input text is "10", it can be multiplied by 20 by using this expression:
toInteger(INPUT) + 20
446

Kofax Kapow User's Guide
Extract
This data converter provides a possibility to extract a text piece from the input text in a simple way using a
pattern. The piece to extract should be marked with a pair of parentheses (i.e. the extracted text piece is
the first submatch in the pattern).
For more advanced extraction options, e.g. to extract more than one piece of text or to have manipulation
options, use the Advanced Extract data converter instead.
Properties
The Extract data converter is configured using the following properties:
Pattern
Contains a pattern that is matched against the input text. The part of the input text to extract should be
marked with a pair of parentheses. Note that the pattern must match the entire input text. Otherwise, the
converter will fail, producing an error.
Ignore Case
If this option is selected, the pattern matching is case-insensitive, i.e. the pattern is matched against the
input text without regard for character case.
Description
Type in a description to be shown in the list of data converters. If there is no type in a description, one will
be generated.
Example
If the first word in the input text should be extracted, use the pattern
(\S*)\s?.*
This extracts the first sequence of non-whitespace characters.
Extract Date
This data converter finds and extracts a date. The extracted date is output in the standard date format.
Note: If a date that is already in the standard date format should be reformatted, use the Format Date data
converter instead.
See Date Extraction tutorials in the Advanced Tutorials section for additional information about date
extraction techniques.
Properties
The Extract Date data converter is configured using the following properties:
447

Kofax Kapow User's Guide
Basic
Formats
The date formats, in the order that they should be tried. The first date format that matches the input will
be applied. If none match, the data converter will generate an error. Click the '+' sign at the top of the
list to add a new date format. The data converter supports two kinds of date formats: Format patterns
and relative dates. Format patterns allow specification of a date using patterns like MM/dd yyyy hh:mm.
Missing month, date or year fields will be taken relative to today's date, depending on whether the date is
expected to belong to the past or the future - see the description of the Direction in time property. A format
pattern has the following properties:
Pattern
A pattern that specifies the format of the date to be extracted. See the Syntax of the Relative Date Pattern
section later in this topic.
Locale
Specifies the locale that is used in the input. This is for instance used if the input contains the names of
months or weekdays, as in 'Monday, 25 May 2009'.
Default Date
This option can be used to specify a date other than the current date to resolve incomplete dates. By
default the option is set to Current Date.
Advanced
This tab contains options for specifying a future or a past date. The date that the input should be
understood relative to. By default, this is the expression now(), which yields the current date and time.
Direction in time
Specify whether the date to be extracted is a past or future date. This allows the data converter to fill out
the missing information if the month and/or year is missing from the format pattern, or when extracting
from a relative date. For instance, if extracting from '3 hours ago', the direction in time should be set
to 'Past date' in order for the 3 hours to be subtracted from the date specified in 'Relative to', while the
direction in time should be set to 'Future date' if you are extracting from input like 'in 5 days'.
Default Time Zone
The default time zone of the date in the input text. If no time zone is selected, no default time zone is
used. If a time zone is selected, this time zone is used when no time zone is found in the input text.
Result Time Zone
The time zone to which the date should be converted. If no time zone is selected, no conversion will be
done. If a time zone is selected, the date found in the input text will be converted from its time zone (or
the default time zone; see above) to this time zone. If the date in the input text has no time zone and no
default time zone is selected, no conversion is done.
Constants
Specify language-dependent constants for extracting relative dates where some numbers may be written
out rather than specified with numbers. For instance, to be able to extract a date from the input 'Updated
an hour ago', a relative date format with the pattern 'HOURS hour[s] ago' must be specified and it is
important to make sure that the constant 'an = 1' is defined.
448
Kofax Kapow User's Guide
Description
Type in a description to be shown in the list of data converters. If there is no type in a description, one will
be generated.
Syntax of the Format Pattern
The following patterns can be combined to create the pattern in the Pattern property:
Pattern Description
yy Exactly two digit year
yyy Any year
yyyy Exactly four digit year
G Era marker (AD or BC)
MM One or two digit month, abbreviations or full names of months
dd One or two digit date
EEE Short weekday name (for example, Mon instead of Monday).
EEEE Full weekday name (that is Monday, Tuesday, etc).
hh or HH One or two digit hour
mm One or two digit minute
ss One or two digit second
a AM or PM marker
Z Time Zone identifier (e.g. "PST", "Central European Time" or "GMT+02:00")
* Skip any number of characters
Space Skip one or more white spaces
Any other character Skip that exact character
If the weekday patterns ('EEE' and 'EEEE') are used and the date pattern ('dd') is not used, then the
month and year patterns ('MM' and 'yy'/'yyy'/'yyyy') cannot be used. In this case, the date found is the next
day with a name matching the pattern. For example, if the pattern is 'EEEE' and the input is the following
text:
Wednesday
the date found is the next Wednesday.
If the weekday patterns are used together with the date pattern (and possibly the month and year
patterns), the weekday is discarded. For example, if the pattern is 'EEE, dd/MM/yyy' and the input is the
following text:
Mon, 16/03/2003
the date found is '2003-03-16 00:00:00.0' (ignoring whether this is a Monday or not).
449

Kofax Kapow User's Guide
Note: The 'EEE' pattern matches the short names of the weekdays (e.g. Mon, Tue etc.). If the pattern
should match the entire weekday name, use the 'EEEE' pattern. For example, if the input is the following
text:
Thus, let us meet on Wednesday
the pattern 'EEEE' should be used, since the pattern 'EEE' would match 'Thu' causing the Date Extractor
to find next Thursday.
Example: Format Patterns and Matching Dates
Format Pattern Matching Dates
dd/MM-yyy 7/6-78
24/12-2001
1/jan-2001
dd. MM yyy 4. jan 1993
4. january 93
yyyy G 2000 AD
Syntax of Relative Date Pattern
The following date fields can be used in the pattern in the Pattern property of a relative date:
Date Field Description
SECONDS Seconds
MINUTES Minutes
HOURS Hours
DAYS Days
MONTHS Months
YEARS Years
Note that time markers like "ago" are not automatically recognized by the step, therefore to extract a
relative date in the past, select Past date in the Direction in time list on the Advanced tab. The robot
then subtracts the extracted number from the current time.
To extract the date in the future, select Future date in the Direction in time list on the Advanced tab.
The robot then adds the extracted number to the current time.
For example, if you want to get the exact time of the "123 seconds ago" string, specify the following:
• On the Basic tab, select SECONDS sec[s] ago in the Pattern field and now() in Relative To.
• On the Advanced tab, select Past date in the Direction in time list.
The step then subtracts 123 seconds from the current time.
450

Kofax Kapow User's Guide
Example: Relative Date Patterns
Format Pattern Matching Dates
HOURS hour[s] ago 4 hours ago
an hour ago (if constant an = 1 is defined)
HOURS hour[s] and
MINUTES minute[s] ago
3 hours and 5 minutes ago
[HOURS
hour[s] ]MINUTES
minute[s] ago
4 hours 1 minute ago
15 minutes ago
Extract List
The Extract List data converter filters texts according to a pattern, and returns a concatenated text of all
matches.
Whereas the Advanced Extract data converter only matches the first instance of the pattern, this data
converter will return each possible match in succession.
Note that the pattern must not necessarily match the entire input text, which is a requirement for the
Advanced Extract data converter. In fact, most uses of this data converter will utilize patterns that start and
end at well-defined points (i.e. the pattern will most likely not need to contain ".*" at the beginning and end
of the pattern when performing a match for specific text embedded within a large input text).
Properties
The Extract List data converter can be configured using the following properties:
Pattern
Enter a pattern that is matched against the input.
Ignore Case
If this is checked, the matching against the pattern is done without regard for the character case, e.g.
"KaPoW" is considered equivalent to "KAPOW" and "kapow".
Output Expression
Enter an expression that specifies the output text.
Output Delimiter
Enter an optional text to indicate the delimiter that should be used to separate successive pattern matches
within the output text.
Description
Type in a description to be shown in the list of data converters. If there is no type in a description, one will
be generated.
451

Kofax Kapow User's Guide
Extract Number
This data converter finds and extracts a number and outputs it in the standard number format.
Note: If a number that is already in the standard number format should be reformatted, use the Format
Number data converter instead.
Properties
The Extract Number data converter is configured using the following properties:
Format Pattern
Contains a pattern that specifies the format of the number to be extracted. Either use one of the default
patterns, or see below for details about specifying a pattern.
Decimal Separator
Contains the possible decimal separators in the number to be extracted, e.g. ".". More than one separator
can be specified.
Thousands Separator
Contains the possible thousands separators in the number to be extracted, e.g. ",". More than one
separator can be specified.
Minus Sign
Contains the character to use as minus sign in the number, typically '-'.
Multiply By
Specifies a multiplication factor that will be multiplied to the extracted number.
Convert to Integer
If this field is checked, the extracted number will be converted to an integer.
Constants
Contains definitions of constants which may occur before or after the number to be extracted. For
each constant, the name (e.g. kilo) and the value (e.g. 1000) can be given as well as the position of
the constant (before and/or after the number to be extracted). Note that the name of a constant must
be precisely what comes before or after the number to be extracted. For instance, let the constants
configured be kilo=1000.0 and double=2.0. From the input "2 kilo", the number 2000.0 will be extracted,
but from the input "2 double kilo", only the number 2.0 will be extracted since no constants are named
double kilo.
Description
Type in a description to be shown in the list of data converters. If there is no type in a description, one will
be generated.
Specifying a format pattern
The format pattern provides a very flexible way of specifying the number format. However, the rules for
specifying the pattern can be somewhat difficult to understand, so finding the default pattern that matches
the required format in the best possible way, and then experimenting with changing that default pattern
might be an easier solution.
452
Kofax Kapow User's Guide
In a pattern, the following special characters can be used:
Special Character Description
0 A digit.
# A digit, but zero is not shown.
. The decimal separator, i.e. the character specified in the Decimal Separator
field.
, The thousands separator, i.e. the character specified in the Thousands
Separator field.
- The minus sign, i.e. the character specified in the Minus Sign field.
E In scientific notation, separates the mantissa and the exponent.
Note In the pattern, the '.' character is always used to select the decimal separator, regardless of what
is entered in the Decimal Separator field. The '.' character will then be replaced by the character in the
Decimal Separator field when the number is formatted. The same applies to the thousands separator
and minus sign.
Separate patterns can be specified for positive and negative numbers. This is done by specifying two
patterns separated by semicolon (';'). For example, use the pattern "#,##0.00;(#,##0.00)" if you want
negative numbers to be parenthesized instead of the default where the minus sign character is placed in
front of negative numbers.
Note If the input uses scientific notation with a large exponent (e.g. the number 6.023E23),Convert to
Integer should generally not be checked, since conversion of such large numbers to integers may give
inappropriate results.
Example: Extracting Numbers
Consider this input:
Price is USD 33,555.77.
WithFormat Pattern set to "###0.0",Decimal Separator set to ".",Thousands Separator set to ",",Minus
Sign set to "-",Multiply By set to "1.0",Convert to Integer not checked, and no Constants configured, the
number 33555.77 is extracted.
In the example above, if Convert to Integer is checked, the number 33556 is extracted.
Now, consider this input:
Price is USD 10.5 mill.
WithFormat Pattern set to "0.000",Decimal Separator set to ".",Thousands Separator set to ",",Minus
Sign set to "-",Multiply By set to "1.0",Convert to Integer checked, and Constants set to mill.=1000000.0
and bill.=1000000000.0, the number 10500000 is extracted.
In the example above, if Convert to Integer is not checked, the number 1.05E7 is extracted.
453
Kofax Kapow User's Guide
Extract Year
The Extract Year data converter extracts a year from a date in the input text. The date may be incomplete,
such as containing only the year.
Properties
The Extract Year data converter is configured using the following properties:
Locale
Specifies the locale that is used in the date.
Date Format Pattern
Contains a pattern that specifies the format of the date from which the year should be extracted. See the
syntax description below.
Max. Months Ahead
The maximum number of months to look ahead. This field takes effect only in the absence of an explicit
year when using the 'dd' and 'MM' patterns.
Max. Days Ahead
The maximum number of days to look ahead. This field takes effect only in the absence of an explicit
month when using the 'dd' and 'yyy' patterns.
Description
Type in a description to be shown in the list of data converters. If there is no type in a description, one will
be generated.
Syntax of the Date Format Pattern
The following patterns can be combined to create the pattern in the Date Format Pattern property:
Pattern Description
yy Exactly two digit year
yyy Any year
yyyy Exactly four digit year
MM One or two digit month, abbreviations or full names of months
dd One or two digit date
EEE Short weekday name (e.g. Mon instead of Monday).
EEEE Full weekday name (e.g. Monday).
hh or HH One or two digit hour
mm One or two digit minute
ss One or two digit second
a AM or PM marker
Z Time Zone identifier (e.g. "PST", "Central European Time" or "GMT
+02:00").
454
Kofax Kapow User's Guide
Pattern Description
* Skip any number of characters (this must be used in order to skip
alphanumeric characters a-z and A-Z)
Space Skip one or more white spaces
Any other non-alphanumeric character Skip that exact character (use * to skip alphanumeric characters)
If the weekday patterns ('EEE' and 'EEEE') are used and the date pattern ('dd') is not used, then the
month and year patterns ('MM' and 'yy'/'yyy'/'yyyy') cannot be used. In this case, the date found is the next
day with a name matching the pattern. For example, if the pattern is 'EEEE' and the input is the following
text:
Wednesday
the year found is the year of the next Wednesday.
If the weekday patterns are used together with the date pattern (and possibly the month and year
patterns), the weekday is discarded. For example, if the pattern is 'EEE, dd/MM/yyy' and the input is the
following text:
the year found is '2003'.
Note The 'EEE' pattern matches the short names of the weekdays (e.g. Mon, Tue etc.). If the pattern
should match the entire weekday name, use the 'EEEE' pattern. For example, if the input is the following
text:
Thus, let us meet on Wednesday
the pattern 'EEEE' should be used, since the pattern 'EEE' would match 'Thu' causing the Extract Year
data converter to find the year of the next Thursday.
Example: Date Format Pattern
Here are some examples of format patterns and matching dates:
Date Format Pattern Matching Dates
dd/MM-yyy 7/6/1978
24/12-2001
1-Jan-01
dd. MM yyy 4. jan 1993
4. january 93
Format Date
This data converter reformats a date. The input text must be a date in the standard date format, e.g.
"2001-02-25 14:32:49.0".
Note: If you want to convert a date to the standard date format, use the Extract Datedata converter.
455
Kofax Kapow User's Guide
Properties
The Format Date data converter is configured using the following properties:
Locale
This field specifies the locale that the date is to be formatted to.
Format Pattern
Contains a pattern that specifies the format of the date. Either use one of the default patterns, or see
below for details about specifying a pattern.
Description
Type in a description to be shown in the list of data converters. If there is no type in a description, one will
be generated.
Specifying a format pattern
The format pattern provides a very flexible way of specifying the date format. However, the rules for
specifying the pattern can be somewhat difficult to understand, so it might be easier to simply find the
default pattern that matches the required format best, and then experiment with changing that default
pattern.
In a pattern, the following special characters can be used:
Special Character Description Type Example
y,yy,yyy year Number 96
yyyy year Number 1996
M month Number 7
MM month Number 7
MMM month Text Jul
MMMM month Text July
d,dd day in month Number 10
(d)ddd day in month Number (0)010
E,EE,EEE day in week Text Tue
EEEE day in week Text Tuesday
D,DD,(D)DDD day in year Number (0)189
(F)F day of week in month Number (0)2 (2nd Wed in July)
w,(w)ww week in year Number (0)27
(W)W week in month Number (0)2
(H)H hour in day (0-23) Number (0)4 or (0)12
(k)k hour in day (1-24) Number (0)4 or (0)12
(K)K hour in am/pm (0-11) Number (0)0
(h)h hour in am/pm (1-12) Number (0)5 or (0)12
456

Kofax Kapow User's Guide
Special Character Description Type Example
(m)m minute in hour Number (0)30
(s)s second in minute Number (0)55
S,SS,(S)SSS millisecond Number (0)978
a am/pm marker Text PM
z,zz,zzz time zone Text PST
(z)zzzz time zone Text Pacific Standard Time
G era designator Text AD
' start/end of text not in input Delimiter 'o''clock' -> o'clock
'' single quote Literal "EEEE" -> "Friday"
Any characters in the pattern that are not letters in the range A-Z or a-z will be treated as text. For
instance, characters like ':', '.', ' ', '#' and '@' will appear in the resulting date even though they are not
enclosed in single quotes.
If the pattern is empty, the default date format for the selected locale is used.
Example: Output Dates
Examples of output dates if the locale is "English (United States)":
Format Pattern Example of output data
yyyy.MM.dd G 'at' hh:mm:ss z 1996.07.10 AD at 15:08:56 PDT
EEE, MMM d, ''yy Wed, July 10, '96
h:mm a 12:08 PM
hh 'o''clock' a, zzzz 12 o'clock PM, Pacific Daylight Time
K:mm a, z 0:00 PM, PST
yyyyy.MMMMM.dd GGG hh:mm aaa 1996.July.10 AD 12:08 PM
Format HTML
This data converter reformats (pretty-prints) the input HTML text.
Properties
The Format HTML data converter can be configured using the following properties.
Allow Missing End Tags
If selected, tags whose end tags are optional (e.g. <p>-tags) will be ended automatically. Selecting this
option is not necessary for HTML outputted directly from a step action.
457

Kofax Kapow User's Guide
Description
Type in a description to be shown in the list of data converters. If there is no type in a description, one will
be generated.
Format Number
This data converter reformats a number. The input text must be a number in the standard number format,
e.g. "12378.64".
Note: If a number should be converted to the standard number format, use the Extract Number data
converter.
Properties
The Format Number data converter is configured using the following properties:
Format Pattern
Contains a pattern that specifies the format of the number. Use one of the default patterns, or see below
for details about specifying a pattern.
Decimal Separator
Contains the decimal separator to use in the number, i.e. the separator between the integer and fraction
part of the number, for example '.' or ','.
Thousands Separator
Contains the thousands separator to use in the number, i.e. the separator between groups of thousands in
the integer part of the number, for example ',' or a space.
Minus Sign
Contains the character to use as minus sign in the number, typically '-'.
Description
Type in a description to be shown in the list of data converters. If there is no type in a description, one will
be generated.
Specifying a format pattern
The format pattern provides a very flexible way of specifying the number format. However, the rules for
specifying the pattern can be somewhat difficult to understand, so simply find the default pattern that
matches the required format best, and then experiment with changing that default pattern.
In a pattern, the following special characters can be used:
Special Character Description
0 A digit.
# A digit, but zero is not shown.
. The decimal separator, i.e. the character specified in the Decimal Separator field.
, The thousands separator, i.e. the character specified in the Thousands Separator field.
- The minus sign, i.e. the character specified in the Minus Sign field.
458

Kofax Kapow User's Guide
Special Character Description
E In scientific notation, separates the mantissa and the exponent.
Note In the pattern, the '.' character is always used to select the decimal separator, regardless of
what have been entered in the Decimal Separator field. The '.' character will then be replaced by
the character in the Decimal Separator field when the number is formatted. The same applies to the
thousands separator and minus sign.
Separate patterns can be specified for positive and negative numbers. This is done by specifying two
patterns separated by semicolon (';'). For example, the pattern "#,##0.00;(#,##0.00)" can be used if
negative numbers should be parenthesized instead of the default where the minus sign character is
placed in front of negative numbers.
Get Property
This data converter fetches the value of a property from a property list contained in a variable.
The variable must be of the Properties variable type.
The input text to the data converter is ignored.
Properties
The Get Property data converter is configured using the following properties:
Properties Variable
The variable containing the list of properties.
Property Name
The name of the property to get.
Use Default Value If No Property
Determines what to do if the property does not exist. If this option is selected, a default value is used
instead; otherwise an error is generated.
Default Value
The default value to use if the property does not exist, and a default value should be used instead.
Description
Type in a description to be shown in the list of data converters. If there is no type in a description, one will
be generated.
Get Time Between Dates
This data converter provides the possibility to find the difference between two dates. It compares the date
in the input text to a given date and calculates the difference.
The difference is measured in a selected unit, e.g. days or weeks. The input text must be a date in the
standard date format, e.g. "2001-02-25 14:32:49.0".
459

Kofax Kapow User's Guide
Properties
The Get Time Between Dates data converter is configured using the following properties:
Other Date
Specify the date to compare the input date with. The date can be specified in several ways using a Value
Selector. The date must be in the standard date format, e.g. "2001-02-25 14:32:49.0".
Get Difference as
Select what unit to get the difference in.
Get Integer Difference
Determines whether the difference should be rounded to an integer.
Get Signed Difference
Determines whether the difference should be with or without sign. If the difference should be signed, it will
be positive if the input date is after the other date, and negative in the opposite case.
Description
Type in a description to be shown in the list of data converters. If there is no type in a description, one will
be generated.
Example
If the input to the converter is "2008-03-01 12:00:00.0", and the other date is set to "2008-02-28
00:00:00.0", and the difference should be in days and with fraction, the result will be 2.5. Notice how the
converter accounts for the leap year.
Get Variable
This data converter fetches the value of a variable. The input text is ignored.
Properties
The Get Variable data converter is configured using the following properties:
Variable
The variable whose value to get.
Description
Type in a description to be shown in the list of data converters. If there is no type in a description, one will
be generated.
If Then
The If Then data converter allows for specification of a list of if-then rules that determine the output of the
converter.
The list can consist of multiple if conditions and has always one else block at the bottom, which provides
the default value.
460

Kofax Kapow User's Guide
Basic Conditions
If Contains, If Does Not Contain, If Starts With, and If Ends With condition types provide a check into
whether the input string contains, does not contain, starts with or ends with the given string accordingly.
If Matches Pattern and If Does Not Match Pattern condition types provide a check into whether the input
string matches or does not match a pattern.
Properties for Basic Conditions
The basic conditions of the If Then data converter can be configured using the following properties.
If Contains
If Does Not Contain
If Starts With
If Ends With
A text value is entered which is matched against the input text.
If Matches Pattern
If Does Not Match Pattern
In these fields a pattern is entered which is matched against the input text. Note that the entire input text
must match / not match the pattern.
Then
Specifies the output text if the value of the property above matches the input text. The value can be
specified in several ways using a Value Selector (without converters).
Ignore Case
If this is checked, the matching against the value of the first property is done without regard to the
character case, e.g. "KaPoW" is considered equivalent to "KAPOW" and "kapow".
Properties for Else
The else statement of the If Then data converter can be configured using the following property.
Then
Specifies the output text if no conditions matched the input text. The value can be specified in several
ways using a Value Selector (without converters). If this field is left blank, then the If Then converter
returns an empty text.
In the If Matches Pattern the expression in the Then attribute can refer to submatches of the pattern in the
preceding If Matches Pattern field using the $n notation.
In all the other conditions the INPUT keyword can be used to refer to the input text.
Other Properties
The If Then data converter can additionally be configured using the following properties:
461

Kofax Kapow User's Guide
Description
Type in a description to be shown in the list of data converters. If there is no type in a description, one will
be generated.
Examples
Let us assume that the input text is "911" and we want the output text to be "Porsche 911". Alternatively, if
the input text is anything other than "911", it should remain as is.
The If Then data converter should then be configured as follows:
• If Matches
• If Matches: 911
• Then (expression): "Porsche " + $0
• Ignore Case: [unchecked]
• Else
• Then (expression): $0
Make URL Absolute
The Make URL Absolute data converter converts a relative URL to an absolute one using the current URL
of the robot.
Properties
The Make URL Absolute data converter can be configured using the following properties:
Description
Type in a description to be shown in the list of data converters. If there is no type in a description, one will
be generated.
Examples
In these examples, the current URL of the robot is http://www.kapowtech.com
• If the input text is '~hello', then the output text becomes 'http://www.kapowtech.com/~hello'
• If the input text is 'hello', then the output text becomes 'http://www.kapowtech.com/hello'
• If the input text is 'test1/test2/../test', then the output text becomes 'http://www.www.kapowtech.com/
test1/test'
Make URL Relative
The Make URL Relative data converter converts an absolute URL to a relative one using the current URL
of the robot.
Properties
The Make URL Relative data converter can be configured using the following properties:
462

Kofax Kapow User's Guide
Base URL
The URL to make the input URL relative to.
Description
Type in a description to be shown in the list of data converters. If there is no type in a description, one will
be generated.
Examples
In these examples, the current URL of the robot is http://www.kapowtech.com
• If the input text is 'http://www.kapowtech.com/~hello', then the output text becomes '~hello'
• If the input text is 'http://www.kapowtech.com/hello', then the output text becomes 'hello'
• If the input text is 'http://www.kapowtech.com/test1/test2/../test', then the output text becomes 'test1/test'
Modify Date
This data converter modifies a date by adding or subtracting from a selected part of the date.
If the addition/subtraction causes the selected part of the date to overflow or underflow, the other parts of
the date will be updated accordingly.
The input text must be a date in the standard date format, e.g. "2001-02-25 14:32:49.0".
Properties
The Get Time Between Dates data converter is configured using the following properties:
Amount
The amount to add or subtract from the date. The amount is specified using a Value Selector. The value
must be an integer.
Part of Input Date to Modify
Select which part of the date to add or subtract from.
Function
Choose if the amount should be added or subtracted.
Time Zone
The time zone of the input date.
Description
Type in a description to be shown in the list of data converters. If there is no type in a description, one will
be generated.
Example
If the input to the converter is "2008-02-28 10:45:00.0" and two days should be added, the result will be
"2008-03-01 10:45:00.0". Notice how the month was updated and the leap day in 2008 was taken into
consideration.
463

Kofax Kapow User's Guide
Remove Non-Printable Characters
The Remove Non-Printable Characters data converter removes all non-printable characters.
More specifically, the following characters are removed:
• All characters below ASCII 32, except tab (#x0009), line document (#x000A), and carriage return
(#x000D).
• All characters in the intervals #xD800-#xDFFF and #xFFFE-#xFFFF.
Properties
The Remove Non-Printable Characters data converter can be configured using the following properties:
Description
Type in a description to be shown in the list of data converters. If there is no type in a description, one will
be generated.
Remove Spaces
This data converter removes spaces from the input text. Notice that non-breakable spaces (occur as
in the HTML) are treated as spaces.
Properties
The Remove Spaces data converter can be configured using the following properties.
Remove All Spaces
Removes all spaces from the input text.
Remove Start and End Spaces
Trims the text so that there are no spaces at its start and end.
Replace Multiple Spaces with Single Spaces
Replaces all occurrences of multiple spaces within the input text with single spaces.
Description
Type in a description to be shown in the list of data converters. If there is no type in a description, one will
be generated.
Example
If the input text is:
" hello world "
and Replace Multiple Spaces with Single Spaces is selected, then the output text becomes:
" hello world "
464

Kofax Kapow User's Guide
With Remove Start and End Spaces selected, the output text becomes:
"hello world"
With both Replace Multiple Spaces with Single Spaces and Remove Start and End Spaces selected, the
output text becomes:
"hello world"
And with Remove All Spaces selected, the output text becomes:
"helloworld"
Remove Special Characters
The Remove Special Characters data converter replaces all special characters with spaces in the input
text. Any character that is not a letter, a digit, or a comma/point appearing before a digit, is considered to
be a special character and is replaced by a space.
After applying the Remove Special Characters data converter, the Remove Spaces data converter can be
used to remove undesired spaces.
Properties
The Remove Special Characters data converter can be configured using the following properties:
Description
Type in a description to be shown in the list of data converters. If there is no type in a description, one will
be generated.
Remove Tags
The Remove Tags data converter removes HTML tags from the input text.
Properties
The Remove Tags data converter can be configured using the following properties.
Remove These Tags
Specifies the tags that should be removed.
• "All Tags" specifies that all tags should be removed. Optionally keep ampersand encodings in the text.
• "Selected Tags" specifies that only the selected tags should be removed. The tags names are
separated using commas, e.g. "html,body". Optionally keep ampersand encodings in the text.
Description
Type in a description to be shown in the list of data converters. If there is no type in a description, one will
be generated.
465

Kofax Kapow User's Guide
Replace Pattern
The Replace Pattern data converter replaces matches of a pattern with the result of an expression.
Properties
The Replace Pattern data converter can be configured using the following properties.
Pattern
Specifies a pattern to search for in the input text. Note that this pattern does not have to match the entire
input text.
Ignore Case
If this is checked, then the pattern matching is case-insensitive.
Replace Expression
Specifies an expression, whose result will replace the part of the text matched by the pattern.
Replace All
If this is checked, then all occurrences of the Pattern will be replaced by the Replace Expression. If not,
then only the first occurrence is replaced.
Description
Type in a description to be shown in the list of data converters. If there is no type in a description, one will
be generated.
Replace Text
This data converter finds and replaces matching text in the input text.
Properties
The Replace Text data converter can be configured using the following properties.
Find this Text
The text to search for in the input text.
Replace with this Text
The text to replace with.
Ignore Case
If this is checked, then the text matching is case-insensitive.
Replace All
If this is checked, then all occurrences of the text will be replaced by the new text. If not, then only the first
occurrence is replaced.
Match Whole Words Only
If this is checked, then text replacement will only take place for occurrences that are whole words and not
parts of larger words.
466

Kofax Kapow User's Guide
Description
Type in a description to be shown in the list of data converters. If there is no type in a description, one will
be generated.
Unquote Text
This data converter unquotes text that is enclosed in single or double quotes. Escaped quotes inside the
text are unescaped.
Properties
The Unquote Text data converter can be configured using the following properties.
Description
Type in a description to be shown in the list of data converters. If there is no description, one will be
generated.
Examples
If the input text is:
"Bob"
then the output text becomes:
Bob
If the input text is:
"Robert \"Bob\" Jones"
then the output text becomes:
Robert "Bob" Jones
If the input text is:
'Bob'
then the output text becomes:
Bob
If the input text is:
Bob
then the output text becomes:
Bob
467

Kofax Kapow User's Guide
URL Decode
This data converter decodes all URL encodings into their real characters.
The encoded characters are on the form %HH, where HH is the hexadecimal byte value. The encoded
characters are first decoded to bytes from this notation. The bytes are then converted to characters using
the selected character encoding.
Properties
The URL Decode data converter can be configured using the following properties:
Character Encoding
The character encoding to use for converting the bytes to characters.
Description
Type in a description to be shown in the list of data converters. If there is no type in a description, one will
be generated.
Example
If the selected character encoding is UTF-8, and the input text is:
x%2By%3Dz
the data converter will output:
x+y=z
URL Encode
This data converter encodes characters with URL encodings.
The characters that need to be encoded are first converted to bytes using the selected character
encoding, and the bytes are then represented on the form %HH, where HH is the hexadecimal byte value.
Properties
The URL Encode data converter can be configured using the following properties:
Character Encoding
The character encoding to use for converting the characters to bytes.
Description
Type in a description to be shown in the list of data converters. If there is no type in a description, one will
be generated.
468

Kofax Kapow User's Guide
Example
If the selected encoding is UTF-8, and the input text is:
x+y=z
the data converter will output:
x%2By%3Dz
The Type Editor
The Type Editor is used for writing and maintaining types that are used in Design Studio. With the Type
Editor, you can easily create and configure new types.
This section provides help on the user interface features of the Type Editor of Design Studio, including
detailed explanations of types and attribute configurations.
For more detailed information about the Type Editor, please consult the Design Studio User's Guide.
Type Configuration
In the main view of the Type Editor, the various properties of a type can be edited. This includes the
attributes of the type, the type kind, a comment attached to the type (optional) and a storage name
(optional).
A type must have a valid name. This name is simply the file name of the corresponding type file. This
name must contain only letters, digits, and underscores, and must begin with a letter or an underscore.
Additionally, it must be unique in the project. The name of a type is used as storage name unless a
storage name has been specifically configured (see below).
A type contains the following properties which can be configured in the Type Editor:
Attributes
The attributes that are added to the type are shown in the table. To add a new attribute, click the 'Add and
Configure New Attribute' button below the table. To remove an attribute, select the row with the attribute,
and click the 'Remove Attribute' button. To configure an attribute, click the 'Configure Attribute' button.
When you add or configure an attribute, the Attribute Configuration dialog will automatically pop up. Note
that to conserve space, not all columns in the table are shown by default. To change which columns are
shown, right-click on any of the column names.
Type Kind
The type kind selection of a type is available for legacy purposes. Normally, the 'Standard Type" type kind
should simply be used, meaning it is not necessary to configure this property. The drop-down allows the
following selections
• Standard Type indicates that the type is a standard type.
• Database Output Type (Legacy) indicates that the type is a Database Output type. This is a special type
required when storing data in a database created with versions of Kapow prior to 7.2. This type kind
exists only for backwards compatibility purposes. Database Output types require at least the following
attributes with the indicated attribute types:
469

Kofax Kapow User's Guide
Attribute Name Attribute Type
robotId Integer
robotRunId Integer
refindKey Refind Key
firstExtractionDate Date
latestExtractionDate Date
extractedInLatestRun Boolean
These attributes are required because when a value extracted from a variable of a database output
type is persisted to storage, Kofax Kapow will try to find a value with the same 'refindKey' in the
database. If such a value exists, it will be updated, and if not, the extracted value will be inserted.
The 'firstExtractedDate' is the date and time when the value was extracted for the first time, and the
'latestExtractedDate' is the date and time when the extracted value was inserted or updated for the last
time. The 'extractedInLatestRun' will be 'true' if the value was extracted in the latest robot run. If some
of these required attributes are missing from a database output type, the type will not be valid. The
Type Editor will warn you if this is the case, and provide you with the possibility of adding the missing
attributes.
Comment
Here you can add an optional comment to the type. The comment is only displayed in the Type Editor.
Storage Name
Here you can set a name to use when storing values from variables of this type, e.g. the table name in a
database, or the tag name in XML. If you leave this field blank, the name of the type will be used instead
for storage. The intended use of the type may put some constraints on the storage name; for example, if
values of the type are going to be stored in a database, you must avoid using a storage name which is the
same as some keyword in the database you intend to use.
Attribute Configuration
Here you can add an optional comment to the type. The comment is only displayed in the Type Editor.
Basic Tab
This tab contains the basic properties of an attribute.
Name
The name of the attribute. The name must be unique within the type. Also, the name must contain only
letters, digits, and underscores, and must begin with a letter or an underscore. Additionally, if no Storage
Name is set on the attribute, the Name will be used as Storage Name (row name in a database, column
header in a CSV file, or tag name in XML). Depending on the intended use of the type, this may impose
additional constraints on the name; for example, you may have to avoid naming the attribute the same as
a keyword in the database you intend to use.
Attribute Type
Choose the attribute type of the attribute from the list of attribute types.
470

Kofax Kapow User's Guide
Default Value
Set the default value for the attribute.
Required
If checked, this option serves two purposes:
• Variables of the type will not be stored (in a file or database) if the attribute doesn't have a value.
• Input variables of the type must have a value for the attribute or the robot execution will not start.
Comment
In this field you can add an optional comment for the attribute, which can be helpful for describing the
attribute in detail.
Advanced Tab
This tab contains the advanced properties of an attribute.
Storage Name
This is an optional different name to use when storing the attribute, e.g. the row name in a database,
the column header in a CSV file, or the tag name in XML. If you leave this field blank, the value from
the Name property will be used automatically for storage. The intended use of the type may put some
constraints on the storage name; for example, if values of the type are going to be stored in a database,
you must avoid using a storage name which is same as a keyword in the database you intend to use.
Visible
Select this option if the attribute should be visible in robots in Design Studio.
Storable
Select this option if this attribute should be stored when storing values of the type.
Part of Database Key
When storing values of a type in a database they need to be stored under a key. The key for the value
is calculated as a secure hash of the attributes that are part of the database key. Choosing a good key
is important when storing values in a database. You should make sure that the key attributes you select
are unique across all the values of the type. Good examples of keys are product numbers and URLs. If
you have stored data in the database, you should be very careful when changing this option. Any change
will cause all the robots to be unable to refind (update) existing values in the database. If you have the
correct setting for most of your robots but a single robot requires a different key calculation then you
should change the key field on the steps in the robot.
Show Separator Before
This option is marked if a separator should be shown before this attribute when the type is used in robots
in Design Studio.
Separator Title
The name of the separator.
Attribute Types
The following attribute types are available:
471

Kofax Kapow User's Guide
Integer
An integer, e.g. 12.
Number
A number, e.g. 12.345.
Boolean
A boolean value, i.e. either "true" or "false".
Short Text
A short text. Kofax Kapow will display a Short Text attribute in a one-line text field.
Character
A single character, e.g. "A".
A long text.
A long text. Kofax Kapow will display a Long Text attribute in a multi-line text box.
Password
A password text. Kofax Kapow will display a Password attribute in a password field that shows asterisks
instead of the characters in the password.
HTML
An HTML clip. This is the same as a Long Text, except that you can preview the clip in a browser window.
XML
An XML document. This is the same as a Long Text, except that only well-formed XML documents are
allowed.
XML
An XML document. This is the same as a Long Text, except that only well-formed XML documents are
allowed.
Date
A date. The date must be on the form yyyy-mm-dd hh:mm:ss.n, e.g. "1992-04-25 10:33:06.0".
Binary
Binary data, i.e. any sequence of bytes.
Image
An image. This is the same as Binary, except that you can preview the image.
PDF
A PDF document. This is the same as Binary, except that you can preview the PDF document.
Properties
A list of name/value pair properties. This is the same as a Long Text, except that the text represents a
list of properties, where each property is a name/value pair. For more on this attribute type, please see
Attribute Type.
Session
A session consisting of a page, the page URL, the referrer URL, cookies, authentications and a time
stamp.
472

Kofax Kapow User's Guide
Currency
A currency code, as defined by the ISO-4217 standard, e.g. "EUR" for Euro.
Country
A country code, as defined by the ISO-3166 standard, e.g. "DE" for Germany.
Language
A language code, as defined by the ISO-639 standard, e.g. "de" for German.
Refind Key
A special refind key used for refinding values.
JSON
A JSON value is either a JSON text or JSON Simple type where the JSON Simple type is either a JSON
literal, a number, or a string.
Properties Attribute Type
An attribute of the Properties attribute type contains a text that represents a list of properties, where each
property is a name/value pair.
The Properties attribute type is useful for representing a list of properties that may vary dynamically. If you
have a fixed set of properties, you should normally represent each property as an attribute instead.
Here is an example of a list of properties that an attribute of the Properties attribute type can contain:
"productName" = "Hydraulic Valve" "productNumber" = "53563-433" "productVendor" = "American Valves
Inc." "productWeight" = "3.45" ...
Each property must be on a separate line. A property line must consist of the property name, followed by
a '=', followed by the property value. A specific property can occur at most once in the list. The name of a
property cannot be empty, but the value can.
The name and value may be specified with or without quotes. When you use quotes, you can use the
backslash character (\) to enter special characters:
• \n for line break.
• \r for carriage return.
• \f for form feed.
• \t for horizontal tab.
• \b for backspace.
• \" for double quote.
• \' for single quote.
• \\ for backslash itself.
• \uxxxx for the unicode character with encoding xxxx, where xxxx is four hexadecimal digits.
If you do not use quotes around the name/value, all spaces at the start and end of the name/value will be
removed, you cannot specify an empty value, and you cannot use the backslash notation to enter special
characters.
The list of properties can contain empty lines and comment lines. A comment line starts with two forward
slash characters (//).
473
Kofax Kapow User's Guide
Creating and Deleting Tables
If you want to store your extracted variable values in a database, you will have to create matching tables.
Design Studio can assist you in creating these tables.
In the Tools menu, select 'Create Database Table' to open a window where you can choose the name of
your database and the type(s) that you want to create table(s) for. By clicking 'Generate SQL', you will
be shown a suggestion for an SQL statement for creating the table(s). By default the 'Add Drop Table'
checkbox is checked, which ensures that each 'CREATE TABLE' statement is preceded by a 'DROP
TABLE' statement to make sure the corresponding table is removed if it already exists. If a table does not
exist, this statement simply has no effect.
You can change the generated SQL to fit your needs before you execute it. For example, you could
change the column type for a text attribute from 'VARCHAR(255)' to 'VARCHAR(50)', or you could add an
auto-incrementing primary key. However, normally, you should not change the table name or any of the
column names, or remove any of the columns.
Protocols
A Protocol defines a mechanism for contacting RoboServer. Currently Kapow comes with three different
protocols, each with its own set of advantages and disadvantages.
Protocol Description
Socket Contacts RoboServer using a TCP socket. This is a simple, low-level protocol,
using XML or Java binary representation depending on the platform. See
description of properties below.
Random Distribution Given a list of protocols, each time the client makes a request, one of the protocols
will be chosen based on whether it is currently marked as available or not. This
provides simple fail-over if at least one of the RoboServers specified in the list is
available. While the random distribution protocol does not explicitly provide load
balancing, it can be used for that purpose. See description of properties below.
Properties
The protocols are configured using the following properties:
Socket
Host Name
The name of the host machine RoboServer is located on.
Port Number
The port number RoboServer is listening on. The default port number is 50000.
Random Distribution Protocol
Retry If Connection Lost
Enable this option to support transparent fail-over. If the connection to a RoboServer is lost while handling
a request, the protocol can re-submit the request to another RoboServer from the list. In order for this to
474
Kofax Kapow User's Guide
work correctly, the robot in question must be idempotent, meaning that repeated invocations of the robot
have the same effect as one. Typically this is the case with robots that do not cause permanent changes
in the sites they access.
Protocols
The list of protocols to distribute requests to. The random distribution policy select a protocol at random
for handling each individual request.
Depending on what plugins are installed into Kofax Kapow, other protocols may be available.
Robot Libraries
A robot library is a collection of Kofax Kapow robots and types. When RoboServer receives a request to
execute a robot it will search a robot library for the robot and associated types.
Robot Library Description
Default Robot Library RoboServer uses its current project robot library for looking up robots
and types.
This is very convenient during development as every time a fix is made
to a robot, the change is immediately available.
Robot Library File at URL RoboServer loads the library from the URL once and then caches the
library for a period of time. The cache timeout can be controlled by the
cache-timeout attribute in the deployment descriptor. See description of
properties below.
Robot Library Embedded in Request This option embeds the robot library in all requests sent to RoboServer.
RoboServer will then use this library to extract the robot and types
needed to fulfill the request.
Robot Library Folder at URL Instructs RoboServer to look up Robots relative to a specified URL.
See description of properties below.
Properties
The libraries are configured using the following properties:
Robot Library File at URL
URL
Location of the packaged robot library.
Allow Caching
Enable this option to allow RoboServer to cache the robot library. If RoboServer is not allowed to cache
the content of the URL, it retrieves the contents of the URL each time it receives a request. This is very
useful if you have a big robot library as it reduces the time it takes to start the robot.
Cache Timeout
The number of seconds RoboServer is allowed to cache the robot library. If the Allow Caching property is
not enabled, this setting has no effect.
475

Kofax Kapow User's Guide
Robot Library Folder at URL
URL
The URL to look up robots relative to.
Upload to Management Console
Publish your robot as well as the types and snippets it uses to a Management Console. This dialog box
appears when you upload your files from a local non-shared project to a shared project on a Management
Console. For the Management Console connection settings see Management Console.
Management Console
Select one of the Management Consoles from the list. The list contains Management Consoles that your
Design Studio is connected to.
Project
Select the project to upload to.
Remember (as shared project)
Select this option to link your project to the selected Management Console project.
Other Topics
This section contains reference help on some of the other important concepts that are used in the Design
Studio.
Robot Configuration
A robot is configured using the properties described below.
Basic Tab
Default Options
Here, you can configure the default options for the step actions of the robot. See Options for more
information.
Robot Comment
Here you can enter a comment about a robot.
Advanced Tab
Robot Id
This is a legacy property. A robot must have an id if you use the Database Storage Environment or
the Database Message Environment.
This property contains an optional id for the robot. This id must be unique among all robots. If you use
RoboManager, then you should use that application to keep track of robot ids. You can register your robot
476

Kofax Kapow User's Guide
in RoboManager and get an id for it by clicking "Register...". If you do not use RoboManager, you will have
to keep track of the robot ids yourself.
Proxy Server
This property specifies an optional proxy server to use for all page and data loading done by this particular
robot. You should use this property only rarely. Normally, it is better to specify one or more proxy servers
for the entire Kofax Kapow installation. This is most easily done in the Kofax Kapow Settings application.
See the Kofax Kapow Installation Guide for further details on this. The proxy server specified for a
particular robot will override proxy servers specified any other way.
HTTP Client
The client used to make HTTP requests to remote sites.
NTLM Authentication
Kofax Kapow has built-in support for the NTLM authentication scheme over HTTP (both for proxies and
target systems).
JCIFS Authentication (Classic browser only)
For Classic browser robots, in case Kofax Kapow cannot authenticate with your system, an alternative
NTLM authentication engine named JCIFS is available. To use JCIFS, download the JCIFS library version
1.3.16 JAR file from http://jcifs.samba.org and place it in the lib folder of your Kapow installation directory
and select "JCIFS" as the NTLM authentication to use in the configuration of the robot.
Enable Private HTTP Cache
Select this option to enable private HTTP caching. Pages received from a server marked with Cache-
Control: private contain information specific to a particular client and are not stored in the global HTTP
cache. To never cache such pages you should disable this option. To store such pages in a robot specific
cache you should enable this option. The downside to enabling private HTTP caching is using more
memory per robot. If you are running a large amount of robots on the same server, you can disable this
option to decrease their memory footprint.
Private HTTP Cache Size
This property specifies the maximum amount of memory to use for the private HTTP cache. The size
is specified in kilobytes. You should beware of setting this number high because each and every robot
instance running could potentially use this amount of memory in addition to its other state. All pages
stored in the HTTP cache are compressed, so simple pages with text content will require very little
memory. Also note, that only pages with Cache-Control: private or similiar will ever be stored in the private
HTTP cache. Pages marked for non-private caching will go into the global HTTP cache shared by all
robots.
Design Mode
Select the Design Mode Execution for your Robot. Available options are:
• Minimal Execution (Direct)
• Smart Re-execution (Full)
The Avoid External Re-execution option, which is available for Smart Re-execution, ensures that
steps are never re-executed, even when the cached result of the previous execution cannot be used. This
option should only be used when there are requirements from the interaction with the external world to
avoid re-execution, for example if this would result in incorrect or duplicate data in a partner's system.
477

Kofax Kapow User's Guide
Version
Shows the version of the saved robot and the version of the Design Studio the Robot was last edited in.
Options
Here, you can configure additional options of the action.
All Loading Tab
This tab contains general loading properties, used for both page loading and other types of loading.
Credentials
As credentials, you can either use standard username/password credentials or OAuth credentials. If you
select Standard, the following properties are available:
Username
This property specifies which username to use for login. The value can be specified in several ways
using a Value Selector. Note that this username is used only for HTTP and FTP based login. These
types of login normally cause a pop-up window prompt in a browser, and are different from the typical
and more commonly used form based method for login.
Password
This property specifies which password to use for login. The value can be specified in several ways
using a Value Selector. Note that this password is used only for HTTP and FTP based login. These
types of login normally cause a pop-up window prompt in a browser, and are different from the typical
and more commonly used form based method for login.
See Web Authentication for more information.
Alternatively, you can use OAuth credentials. OAuth is the preferred authentication mechanism for a
number of popular REST APIs. See OAuth on how to use OAuth in Design Studio and Management
Console.
Client Certificate
This property defines where to get a client certificate when loading from HTTPS URLs. The client
certificate may be given directly, or you may refer to one of those that have been installed as described in
HTTPS Client Certificates. The options are:
•Automatic Selects that one of the installed certificates which is marked as "default". If no certificates
have been installed, or none of the installed ones are marked as "default", no client certificate will be
used for the connection.
•Installed Certificate Selects one of the installed certificates by giving its ID, which was defined when it
was installed.
•Certificate from Variable The certificate is given as the value of a binary variable. The certificate's
password must be given as well, as the value of another variable.
•ID from Variable Selects one of the installed certificates by giving its ID as the value of a variable.
SSL/TLS
This property specifies the version of SSL/TLS to use when loading from HTTPS URLs. This is
configurable, because some sites give different results depending on the SSL/TLS version that is used, for
example because they do not work with TLS or because they do not accept the weaker security that SSL
478

Kofax Kapow User's Guide
provides. It is possible to select between SSLv3 or its successor TLS, or to accept both in negotiation with
the site. In either case, it is possible to specify that the protocol negotiation should be initiated with SSL
Hello or TLS Hello.
Verify SSL Certificates (Default browser only)
If this option is selected, the robot verifies the presented SSL certificate.
Browser to Emulate (Classic browser only)
This property specifies which browser you want the action to appear as when it loads something.
Appearing as an older browser can sometimes provide you with a simpler page. However, we generally
recommend that you stay with the default because this will normally cause the remote web server to serve
up JavaScript etc. that is compatible with Kofax Kapow's built-in browser.
For anonymization purposes, you should rather change the "HTTP User Agent" property which is
described below.
HTTP User Agent
This property specifies the exact text to send as the value of the HTTP User-Agent header. By default,
the user agent header value is derived from the "Browser to Emulate". Changing the User-Agent header
- perhaps in a random manner, obtaining the value from a variable - can be useful to better blend in with
other requests to a remote web server.
Language
This property specifies which browser language to appear to have, both when queried by JavaScript and
when loading something.
Screen Size
This property specifies which screen size to appear to have, if queried by JavaScript.
Flash Version (Classic browser only)
This property specifies which flash version to appear to support, if queried by JavaScript.
Referred from this URL
This property specifies which URL you want the action to appear to have been referred from when loading
something. If you do not specify a URL, the action will appear to be referred from the current page in the
robot.
Enable Cookies
This property specifies whether you want cookies to be enabled.
HTTP Cache
This property specifies how you want the robot to use HTTP caching.
Default browser engine
The default setting Enabled enables the HTTP Cache and caches HTTP responses based on the rules
of HTTP caching. Disabled option disables HTTP caching. Aggressive option overrides cache directives
and enables caching of the resources that are otherwise not cached. The Aggressive option may be
helpful to boost performance of high latency sites.
Classic browser engine
The default setting is Standard. Standard HTTP Cache mode enables the HTTP Cache and transparently
caches HTTP responses based on the rules of HTTP caching. Selecting Force Caching of JS and CSS
will override the rules of caching and force the robot to cache JavaScripts and style-sheets, in some cases
this will boost the performance of high latency sites. Selecting Disabled will disable all HTTP caching.
479

Kofax Kapow User's Guide
Max. Number of Attempts
This property specifies how many times you want to attempt execution of the action if a load error occurs.
The minimum value is "1".
Time Between Attempts (s)
This property specifies how many seconds to wait between each attempt to execute the action.
Timeout for Each Attempt (s)
This property specifies how many seconds each attempt to execute the action is allowed to take before
timing out. The value must be greater than zero.
Additional Headers to Send
This property specifies an optional variable that contains additional HTTP headers to send. The headers
must be represented as a text, in the same format as in an HTTP message.
Store Received Status Code Here
This property specifies an optional variable in which to store received HTTP responses status code. The
code will be an integer, and will correspond to the same response for which the received headers were
obtained.
Store Received Headers Here
This property specifies an optional variable in which to store received HTTP headers. The headers will be
represented as a text, in the same format as in an HTTP message.
Ignore Load Errors
This property specifies whether to ignore errors when the loading of a page or resource fails.
Page Loading Tab
This tab contains properties used specifically for loading pages.
Page Content Type
This property specifies the content type of the loaded pages. Usually, the "Automatic" setting should
suffice, but you may also directly specify a content type, either for all pages loaded in the action or for only
some of them, depending on their URL.
Page Content Encoding (Classic browser only)
This property specifies the character encoding of the loaded pages. The "Automatic" setting should work
in most circumstances, but it may be necessary to specifically set the encoding of the pages, either for
all pages and text resources (e.g. external JavaScript files) loaded in the action or for only some of them,
depending on their URL.
Form Parameter Encoding (Classic browser only)
This property specifies which character encoding to use for encoding field values when submitting a form.
Usually, the "Automatic" setting will be sufficient, but if you encounter problems with incorrect characters in
the submitted data, you can try to set a specific encoding here.
Follow Meta Redirections
This property specifies whether to follow <meta>-tag redirections, i.e. redirections defined by a <meta> in
a loaded page.
480

Kofax Kapow User's Guide
Apply XSL Style Sheets (Classic browser only)
This property specifies whether to apply referenced XSL style sheets when loading a page that contains
XML. For instance, an XML document intended to be displayed in a browser can contain a reference to an
XSL style sheet that transforms the XML document into HTML.
Use Preloading (Classic browser only)
Pre-load Javascript and style sheets in HTML documents, i.e. start loading the resources as soon as
the HTML response from the web server is received. Enabling this option cuts down on the time that
each step spends waiting for resource loads to complete because the loads are initiated before the robot
reaches a state where it must block until the resources are ready.
Load Frames
This property specifies whether to automatically load the frames of a page.
Load Unsupported Formats (Classic browser only)
This property specifies whether to load the content of unsupported formats. An unsupported format is
one that Design Studio cannot parse and present in the Page View, e.g. a video format. Often resources
of such formats may take long to load and the robot may not be able to access the content so loading
the content of the resource may just slow down the robots execution. The headers and status code are
always obtained from the response even if loading of the contents is turned off. An additional use of
this feature is to get the header information about a resource without loading it (in the case this is in an
unsupported format). This is slightly different than just using a HEAD request, since a HEAD request
only obtain the headers for the initial request and not resources obtained through META or JavaScript
redirects.
Images to Load
This property specifies whether to automatically load the images of a page. Usually, it is not necessary
for the robot to load the images, but you may choose to load the images of a page if you suspect that the
image loading has side-effects that are necessary for the navigation of the page. In that case, you may
choose to load all of the images on the page or only some, depending on their URL.
Max. Loads Per Window (Classic browser only)
This property specifies the maximum number of page loads per window allowed in the action. This can
be used for stopping the page loading if an infinite loop of redirections or reloads are encountered. Such
an infinite loop will eventually cause the action to time out anyway, but by detecting this earlier, you can
avoid putting excessive load on the web server that you are accessing. The action will generate an error if
it stops because the maximum number of page loads has been reached.
Max. Window Nesting (Classic browser only)
This property specifies the maximum number of window allowed nested inside each other. A window in
this context can mean several things. In a frameset each frame is a window, so the Max. Window Nesting
property specifies how many frames a loaded page can have inside each other. The action will generate
an error if it stops because the maximum number of nested windows has been reached. If you check the
Ignore Load Errors option, the step action will complete successfully and output a page containing no
more than the maximum number of nested windows. If you leave the field blank, there is no limit to the
window nesting level.
Page Changes
This property allows you to change the loaded pages on-the-fly before they are parsed. This is useful for
things like correcting syntax errors, solving other parsing problems, removing or changing tags, and so on.
481

Kofax Kapow User's Guide
The changes are done by specifying one or more data converters that will be applied to the pages before
the parsing. You can either specify data converters to apply on all pages, or data converters to apply to
individual pages depending on their URL.
The most common data converters to use for page changes are Replace Text, Replace Pattern,
and Remove Tags. When configuring the data converters, remember that they will be applied to the
original, unprocessed text of the page, before decoding of ampersand encodings etc. Therefore, it is
recommended that you obtain this text, e.g. using the View Source function of your standard browser. In
the data converter configuration window, you can paste the text into the input area in the lower left corner
and click the Test button to test that the converter performs the desired action on the text.
Note that if you want to make changes to JavaScript, use the JavaScript Changes property on the
JavaScript Execution tab instead.
Page Error Test (Classic browser only)
This property specifies a custom test for website errors based on the content of the page. Usually, a
website will send an error code when something goes wrong, but if this is not sufficient to detect errors,
this property can be used.
If Same for All Pages is selected, the test is performed on all pages. By selecting Depends on URL, you
may set up individual tests for particular (groups of) URLs.
You can specify a pattern that matches an error page (by selecting Pattern Matches Rejected Page), or
you can specify a pattern matching all other pages (by selecting Pattern Matches Accepted Page).
Output Page If Error (Classic browser only)
This property specifies whether or not to output a page even if the website sends an error code. If
disabled, any website error will cause the action to fail. If enabled, certain website errors are accepted and
the page is output, whereas all other server errors will still cause the action to fail. The accepted website
errors are 403 Forbidden, 404 Not Found, and 500 Internal Server Error.
Output Page If Timeout
This property specifies what occurs when the action times out. If disabled, the action fails in the event of a
timeout. If enabled, the result received so far is the output. Note the following for this property:
• When older Default browser (WebKit) robots that have False as default for this property are opened in
a new version of Kapow, "Output Page If Timeout" is set to False in the robot's browser configuration.
• When creating a new Default browser robot, the "Output Page If Timeout" property is set to true by
default.
• When creating a new Classic browser robot, the "Output Page If Timeout" property is set to false.
URL Filtering Tab
This tab controls the configuration of what URLs to block, for instance to block the loading of ad frames.
Filter URLs
This property specifies whether to block loading of certain URLs. The URLs to be blocked are specified as
pattern in the list of Included URL Patterns and Excluded URL Patterns, respectively. Only URLs occurring
in the following tags may be blocked:
Included URL Patterns
If specified, only URLs that match these patterns will not be blocked. Each pattern must be written on
a separate line. A URL that matches one of these patterns may still be blocked, if it matches one of the
482

Kofax Kapow User's Guide
"Blocked URL Patterns" specified below. A typical use of this property is to specify a pattern that matches
only URLs of a single domain, so that only frames and scripts from that domain are loaded.
• <frame src="URL">
• <iframe src="URL">
• <script src="URL">
If a URL is blocked no request is performed and content is left empty. In the case of frame and iframes
there will still be a new window in the page view and this will be showing a message explaining why the
load was not performed. An icon on the tab of the window in the page view will indicate that the URL
was blocked.
Blocked URL Patterns
This property specifies which URLs to block. This is specified by writing a list of patterns with one pattern
on each line.
JavaScript Execution Tab
This tab contains properties used for executing JavaScript. These properties allow you to customize
the JavaScript execution in case the default automatic execution does not work correctly. Note that
using the options of the Logging tab, the Log window in Design Studio can provide information about the
JavaScript execution performed during execution of the robot. You can use this window to understand
which JavaScripts are executed, which errors occur, and so on.
Note Some of the properties on this tab differ in the Default and Classic browser engines.
Execute JavaScript
This property specifies whether JavaScript should be executed.
Ignore JavaScript Errors (Classic browser only)
This property specifies whether errors that occur during JavaScript execution should be ignored. In many
cases, such errors can safely be ignored, as long as the outcome of the execution is as desired.
Ignore Alert Messages
f checked, an alert message produced by the JavaScript method alert() will be ignored, otherwise an
error will be generated. Alert messages are typically created by JavaScript to alert the browser user of an
invalid action, such as trying to submit a form that is not correctly filled out.
A common way to handle alert messages in a robot is to configure this property to ignore them, and then
configure the Store Ignored Alert Messages Here property below so that ignored alert messages are
stored in an appropriate variable. In a subsequent step, this variable can then be tested and suitable
action taken if it contains an alert message.
Store Ignored Alert Messages Here
This property specifies a variable in which ignored alert messages should be stored. This is relevant only
when the Ignore Alert Messages option has been selected above.
483

Kofax Kapow User's Guide
Enable Timer Events (Classic browser only)
This property specifies whether timer events should be executed. Timer events are events that occur after
a specified amount of time and can be set up either by JavaScript using setTimeout() or setInterval() or
when a <meta> redirection specifies that the page should be redirected after a number of seconds.
Max. Wait for Timer Events (ms) (Classic browser only)
This property specifies the maximum number of milliseconds to wait for timer events to be executed, since
the beginning of the execution of the action. For example, if a page loads in 3000 ms and sets up some
timer events, and this property has been set to 30000 ms, only timer events that expire within 27000 ms
after the page load will be executed. Note that the wait for the timer events is done either in real-time or
just emulated, depending on the Wait Real-Time for Timer Events property below.
Wait Real-Time for Timer Events (Classic browser only)
This property specifies whether to actually wait the time specified by the Max. Wait for Timer Events
property above, or to just emulate the wait and execute any triggered timer events immediately. For many
timer events, it is not necessary to actually wait the period specified, and thus the robot can immediately
proceed. However, if the reason for the timer event is that e.g. one must wait for the web server to process
results, it may be necessary to wait real-time.
Delay Between Key Presses (ms)
This property specifies the amount of milliseconds to wait between key presses when emulating a user
typing on a keyboard. This only has relevance for step actions that enter text into a form.
Use CSS Style Sheets (Classic browser only)
This property specifies whether to load and parse CSS style sheets during the execution of the robot. This
may be necessary for the JavaScript on a page to work correctly. On the other hand, disabling the use of
style sheets can speed up the execution of page loads. Even if this option is disabled, the page view may
still load style sheets for display purposes, but this loading will not take place when the robot runs on the
server.
JavaScript Changes
JavaScript changes are an optional list of data converters that will be applied to the JavaScript before it
is executed. The changes are applied to all JavaScript that is executed, both event handlers, internal and
external scripts. The data converters are useful for making changes and corrections to the JavaScript.
For example, they can be used to define variables that the JavaScript expects to have been defined
by VBScript. The most common data converters to use for this purpose are Replace Text and Replace
Pattern.
When configuring the data converters, remember that they will be applied to the original JavaScript.
Therefore, it is recommended that you obtain this text, e.g. using the View Source function of your
standard browser for inline JavaScript or by downloading the file in case of external JavaScript. In the data
converter configuration window, you can paste the text into the input area in the lower left corner and click
the Test button to test that the converter performs the desired action on the text.
Important This option affects the way JavaScript is executed on pages that you load, that is the option
is applicable to Load Page and Create Page steps.
484

Kofax Kapow User's Guide
Plugins
This tab contains parameters to add and configure simulated plugins when using the browser.
Simulate support for
•From List: Click the plus sign and select a plugin from the list.
•From JSON Variable: Construct your own plugins using a JSON variable.
See Plugin Simulation from JSON Variable for more details.
Javascript Event Handlers Tab
This tab contains properties that determine which JavaScript event handlers should be executed. Note
that using the options of the Logging tab, you can obtain information about which event handlers are
executed during execution of the robot, in the Log window in Design Studio.
Enable Click Event Handlers
This property specifies whether onclick event handlers, if any, are executed when clicking a tag.
Enable Change Event Handlers
This property specifies whether onchange event handlers, if any, are executed when modifying a value in
a form.
Enable Form Event Handlers
This property specifies whether the onsubmit and onreset event handlers, if any, are executed when
submitting or resetting a form, respectively.
Enable Load Event Handlers
This property specifies whether the onload and onunload event handlers, if any, are executed when
loading / unloading a page or loading an image.
Enable Mouse Event Handlers
This property specifies whether the onmouseover, onmouseenter, onmouseout, onmouseleave,
onmousedown and onmouseup event handlers, if any, are executed when moving the mouse over or
clicking a tag.
Enable Drag Event Handlers
This property specifies whether the ondrag, ondragstart, ondragenter, ondragleave, ondragend and
ondragover event handlers, if any, are executed when the mouse is dragged over a tag.
Enable Key Event Handlers
This property specifies whether the onkeydown, onkeypress and onkeyup event handlers, if any, are
executed when entering text.
485

Kofax Kapow User's Guide
Enable Focus Event Handlers
This property specifies whether the onfocus, onfocusin, onfocusout, onblur, onactivate, onbeforeactivate
and ondeactivate event handlers, if any, are executed when a tag or document gains or loses focus.
Enable Capture Event Handlers
This property specifies whether the onlosecapture event handlers, if any, are executed when a tag or
document loses mouse capture.
Enable State Change Event Handlers
This property specifies whether the onreadystatechange event handlers, if any, are executed when the
state of a tag or ActiveX object changes.
Enable Error Event Handlers
This property specifies whether the onerror event handlers, if any, are executed when an error occurs.
Logging Tab
This tab contains properties used to determine the level of logging of the JavaScript execution performed
during execution of the robot. The logging information can then be obtained in the Log window in Design
Studio and may be used to understand which JavaScripts are executed, which errors occur, and so on.
Log All JavaScript Source
This property specifies whether the source of all JavaScripts executed are logged. Note that the
JavaScript may declare functions that themselves are not executed until they e.g. are called from an
event handler. You may use the JavaScript Changes property to make changes and corrections in the
JavaScript.
Log JavaScript Execution Trace
This property specifies whether to log a detailed trace of the JavaScript execution. This trace includes all
functions that are called and all properties that are set or retrieved.
For example, when
location.href =
"http://www.kapowtech.com"
is executed, the trace will read
GET location = [location]
followed by a
SET [location].href = "http://www.kapowtech.com"
Include Function Source in Trace
This property specifies whether to include the source code of the functions executed, in the trace of the
JavaScript execution.
486

Kofax Kapow User's Guide
Log JavaScript Event Handlers
This property specifies whether to log executed JavaScript event handlers.
Log Timer Events
This property specifies whether to log executed timer events. Timer events are events that occur after
a specified amount of time and can be set up either by JavaScript using setTimeout() or setInterval() or
when a <meta> redirection specifies that the page should be redirected after a number of seconds.
Log Loads
This property specifies whether to log all page and resource loads.
Log XML HTTP Requests
This property specifies whether to log XML HTTP Requests sent.
Log Absolute Positioning
This property specifies whether to log the absolute positioning of visual components such as menus that
are positioned using JavaScript.
Max. Log Entries
This property specifies the maximum number of log entries allowed. The minimum value is "1". If there
are more log entries than allowed, the first log entries will be discarded and will thus not appear in the Log
window.
Legacy Tab
This tab contains properties that should not be changed in most cases. The legacy properties have
been introduced to ensure backward compatibility with older version of the product. If a new feature is
introduced in the product that conflicts with the way things were done previously, an option is introduced
on this tab to ensure old robots will work and be backward compatible. On this tab, the default setting
represents the current way and the other setting is the old way.
Format Handling
This option specifies how to handle different document formats.
Download non-HTML (Default)
Kapow loads all supported non-HTML content to work with. You can preview CSV, JSON, text, Excel,
XML, and binary content and apply step actions to them. Use the Preview button to change the type of
the content.
Classic loading
You can specify how to handle different document formats for classic browser engine.
JSON
This property specifies how to handle JSON, which is one of the common response types when
calling web services. The default is to convert the JSON to XML which makes it easy to handle in
a standard way in Design Studio. Alternatively, it can be converted to HTML. The HTML is more
humanly readable than XML, but somewhat harder to extract from automatically.
487

Kofax Kapow User's Guide
Convert XML to HTML
This property specifies whether to convert XML documents to HTML documents or keep them as-
is. It is mainly used in old robots that work on the converted documents, as this was previously the
only option. In newer robots, it is normally more convenient to work directly on the XML structure.
Note To view XML content with the applied XSLT transformation in the windows view, select
Configure Robot > Default Options: Configure > Legacy tab > Format Handling: Classic
loading and clear the Convert XML to HTML option.
Convert Excel to HTML
This property specifies whether to convert Excel documents to HTML documents or keep them
as-is. It is mainly used in old robots that work on the converted documents, as this was previously
the only option. In newer robots, it is normally more convenient to work directly on the Excel
document, as this provides a faster and more spreadsheet-like display and user interface.
CSV
This property specifies whether to convert CSV documents to HTML documents or keep them
as text (in a PRE-tag). It is mainly used in old robots that work on the text representation, as this
was previously the only option. In newer robots, it is normally more convenient to work on a HTML
table representation of the CSV document and use the full power of Design Studio when doing
so. It is assumed that the CSV documents is encoded using commas (,) as separator character,
double quotes (") as quoting character and backslash (\) as escape character. If the document you
are loading does not conform to this convention you should use the Convert to Text option and
work on the document as text, e.g. using the Extract CSV step action.
Plugin Simulation from JSON Variable
You can construct your own plugins using a JSON variable. This is an example of how the JSON structure
can look like:
[
{
"name" : "Shockwave Flash",
"description" : "Shockwave Flash 18.0 r0",
"filename" : "NPSWF32_18_0_0_232.dll",
"mimeTypes" : [
{
"type" : "application/x-shockwave-flash",
"description" : "Adobe Flash movie",
"suffixes" : "swf"
},
{
"type" : "application/futuresplash",
"description" : "FutureSplash movie",
"suffixes" : "spl"
}
]
},
{
"name" : "Silverlight Plug-In",
"description" : "Silverlight Plug-In 5.1.40416.0",
"filename" : "npctrl.dll",
"mimeTypes" : [
{
"type" : "application/x-silverlight",
"description" : "npctrl",
488

Kofax Kapow User's Guide
"suffixes" : "scr"
},
{
"type" : "application/x-silverlight-2",
"description" : "",
"suffixes" : ""
}
]
}
]
You can use the following code to generate a JSON variable to be used in the plugin simulation. Just save
the code to an HTML file and open it in a browser. The generated text can then be copied directly to a
JSON variable on the Plugins tab of the Options window in Design Studio.
<!doctype html>
<html>
<body>
<div id="plugins"></div>
</body>
<script>
var plugins=[];
for(var n=0; n<navigator.plugins.length; n++) {
plugins.push({});
plugins[n].name=navigator.plugins[n].name;
plugins[n].description=navigator.plugins[n].description;
plugins[n].filename=navigator.plugins[n].filename;
plugins[n].mimeTypes=[];
for(var m=0; m<navigator.plugins[n].length; m++) {
plugins[n].mimeTypes.push({});
plugins[n].mimeTypes[m].type=navigator.plugins[n][m].type;
plugins[n].mimeTypes[m].description=navigator.plugins[n][m].description;
plugins[n].mimeTypes[m].suffixes=navigator.plugins[n][m].suffixes;
}
}
var json = document.getElementById("plugins");
json.innerHTML= JSON.stringify(plugins);
</script>
</html>
Step Configuration
A step can be configured using a number of properties. These are listed below.
Basic Tab
This tab contains various basic step properties.
Step Name
Here, you can enter the name of the step.
Step Comment
Here, you enter an optional comment about this step.
Finders Tab
This tab contains the tag or range finders used by the step to find the tags/ranges that the action of the
step should use. For more information, see the description of the Tag or Range Finders.
489

Kofax Kapow User's Guide
Action Tab
In this tab, you can select and configure the action of the step.
Error Handling Tab
This tab contains properties that control how to handle errors that occur during execution of this step.
Windows
A window holds HTML, XML or other content in a robot. One or more windows are always open, and one
window is the current window, i.e. the window containing the page that a step-action works on. In Design
Studio, each window is displayed in a tab, and the current window is marked with a yellow arrow.
Windows allow you to handle multiple pages simultaneously. Note, however, that a step can only work on
a single page at a time, so you need to change the current window whenever you want to work on another
page than the current one.
Using the appropriate step actions, you can:
• Open a new window using the New Window action
• Set the current window using the Set Current Window action
• Close a window using the Close Window action
In Design Studio, an easy way to insert a Set Current Window step is to right-click on the window's tab
and choose Set as Current Window.
When loading a page that loads other pages (e.g. a page containing a <frameset>-tag), each page will
automatically be loaded into a separate window.
Each window can have one or more named tags or ranges. Note that each named tag or range belongs to
a specific window.
Identifying a Window
Some step actions (for example the ones mentioned above) are configured to operate on a particular
window. The window may be identified in three ways:
• by its name as displayed in the window's tab or by the number of the window's tab
• by the found tag
• by a pattern matching against the windows name.
The name is the more stable of the two alternatives in face of robot changes, and also (most subtly) when
a step may be reached via different paths that open different windows. Thus the name is the preferred
way to identify a window. Matching does not work on windows showing variables, because the names of
these are fixed.
In some cases, however, the name is not the same every time the robot is run. For example, some Web
sites are based on frames but name these frames differently each time (while keeping the structure of
the frame set). Because the window name is derived from the frame's name, the window name is not
much use in such a case, and the windows must be referenced by their numbers. In these situations, it
is important to make sure that every path through the robot that can lead to the step action in question
results in the same window structure and window numbers.
490

Kofax Kapow User's Guide
You can also use tags to identify a window. The found tag must be a FRAME, IFRAME, OBJECT or
EMBED element. In Design Studio, the list of frames is displayed as a tree in the Frames View. Use the
Window in Found Tag option in the Set Current Window action to set the current window by the found
tag.
There are two alternative ways of identifying a window:
• Specifying a pattern for the window name
• Specifying a pattern for the (text or HTML) content of the window
In both cases, the pattern must be precise enough that only the name of a single window matches it.
Named Tags, Ranges, and JSON
Named tags, ranges, and JSON are markers that can be used for finding other tags, ranges, and some
JSON text respectively. Steps use Finders to find the elements they work on (either HTML/XML tags,
Excel ranges, or named JSON depending on the kind of content the step works with). A finder may be
based on what has been found by previous steps by referring to named tags, ranges, or JSON.
All named tags/ranges/JSON belong to a window. Each window can have any number of named tags/
ranges, but only of the appropriate type: Named tags for windows with HTML/XML content, named ranges
for windows with spreadsheet content, and named JSON for windows with JSON.
Named tags/ranges are set by many steps. For example, loop steps typically use a named tag/range as
a marker for the current iteration of the loop. You can also use the Set Named Tag, Set Named JSON, or
Set Named Range actions to explicitly name a tag, range, or JSON. This can be useful when you want to
simplify the finders in subsequent steps.
In Design Studio, the named tags or ranges in a window are shown using blue boxes. When you right-
click in the current window to perform an action on a tag or range, the Tag or Range Finders of the new
step will automatically be configured to search using the named tags or ranges of the window whenever
possible.
Tag, Range, and JSON Finders
A Finder is used to find a tag on an HTML/XML page, a range of cells in a spreadsheet document, or an
element in a JSON structure. Finders are used in steps, where they identify what part of the page the step
should work on. The list of Finders of the current step is located in the "Finders" tab in the Step View.
Finders look very different depending on the kind of page they work on, and the finders for each kind
are described separately. See Tag Finders for details on the kind of finders used with HTML/XML pages,
Range Finders for details on the kind of finders used with spreadsheet content, and JSON Finders for
details on JSON Finders.
Tag Finders
A Tag Finder is used to find a tag on an HTML/XML page. Tag Finders are used in steps, where they
define how to find the tag(s) to which the step should be applied. The list of Tag Finders of the current
step is located in the "Finders" tab in the Step View. Steps that work on spreadsheet content use Range
Finders rather than Tag Finders.
491

Kofax Kapow User's Guide
Understanding Tag Paths
In understanding how to use Tag Finders, the concept of a tag path is important. A tag path is a compact
text representation of where some tag is located on a page. Consider this tag path:
This tag path refers to an <a>-tag inside a <div>-tag inside a <body>-tag inside an <html>-tag.
html.body.div.a
A tag path can match more than one tag on the same page. For example, the above tag path will match
all of the <a>-tags on this page, except the third one:
<html>
<body>
<div>
<a href="url...">Link 1</a>
<a href="url...">Link 2</a>
</div>
<p>
<a href="url...">Link 3</a>
</p>
<div>
<a href="url...">Link 4</a>
<a href="url...">Link 5</a>
<a href="url...">Link 6</a>
</div>
</body>
</html>
You can use indexes to refer to specific tags among tags of the same type at that level. Consider this tag
path:
html.body.div[1].a[0]
This tag path refers to the first <a>-tag in the second <div>-tag in a <body>-tag inside an <html>-tag. So,
on the page above, this tag path would only match the "Link 4" <a>-tag. Note that indexes start from 0. If
no index is specified for a given tag on a tag path, the path matches any tag of that type at that level, as
we saw in the first tag path above. If the index is negative, the matching tags are counted backwards, i.e.
starting with the last matching tag which corresponds to index -1. Consider this tag path:
html.body.div[-1].a[-2]
This tag path refers to the second-to-last <a>-tag in the last <div>-tag in a <body>-tag inside an <html>-
tag. So, on the page above, this tag path would only match the "Link 5" <a>-tag.
You can use an asterisk ('*') to mean any number of tags of any type. For example, the tag path
html.*.p|div|td.a
This tag path refers to an <a> tag inside a <p>-, <div>-, or <td>-tag located anywhere inside an <html>
tag.
In a tag path, text on a page is referred to just as any other tag, using the keyword "text". Although text is
not technically a tag, it is treated and viewed as such in a tag path. For example, consider this HTML:
<html>
<body>
<a href="url...">Link 1</a>
492

Kofax Kapow User's Guide
<a href="url...">Link 2</a>
</body>
</html>
The tag path "html.body.a[1].text" would refer to the text "Link 2".
Tag Finder Properties
A Tag Finder can be configured using the following properties.
Find Where
In this property, you can specify where to find the tag relative to a named tag. The default value is
"Anywhere in Page", meaning that named tags are not used to find the tag.
Tag Path
In this property, you can specify the tag path as described in the previous section. The tag path can be
specified in several ways using a Value Selector.
Attribute Name
In this property, you can specify that the tag must have a specific attribute, for example "align".
Attribute Value
In this property, you can specify that the tag must have an attribute with a specific value. If the Attribute
Name property is set, the attribute value is bound to that specific attribute name.
• "Equals Text" specifies that the attribute value must match a specified text. Note that the text must
match the entire attribute value.
• "Containing Text" specifies that the attribute value must contain the specified text.
• "Pattern" specifies that the attribute value must match a pattern. Note that the pattern must match the
entire attribute value.
Tag Pattern
In this property, you can specify a pattern that the tag must match (including all tags inside it), for example
".*.*Stock Quotes.*.*". Some caution should be observed in using this property, since it can have
considerable impact on the performance of you robot. This is because the "Tag Pattern" may be applied
many times throughout a page just to find the one tag that it matches. One way to try and avoid this is to
choose "Text Only" for the "Match Against" property.
Match Against
In this property, you can specify that the "Tag Pattern" should match only the text or the entire HTML of the
tag. The default is to match only the text because this is normally much faster.
Tag Depth
This property determines which tag to use if matching tags are contained inside each other. The default
value is "Any Depth" which accepts all matching tags. If you select "Outermost Tag", only the outermost
tags are accepted, and similarly, if you select "Innermost Tag", only the innermost tags are accepted.
493

Kofax Kapow User's Guide
Tag Number
This property determines which tag to use if more than one tag matches the tag path and the other
criteria. You specify the number of the tag to use, either counting forwards from the first tag or counting
backwards from the last tag that matches.
Example
As an example, if you set the Tag Path property to "table", the Attribute Name property to "align", the
Attribute Value property to Fixed Text where the text must be "center", and the Tag Pattern property to
".*Business News.*", then the Tag Finder would locate the first <table>-tag that is center aligned and that
contains the text "Business News".
Range Finders
A Range Finder is used to find a cell or a range of cells in a spreadsheet. Range Finders are used in
steps, where they define how to find the cell(s) to which the step should be applied. The list of Range
Finders of the current step is located in the "Finders" tab in the Step View. Steps that work on HTML or
XML pages use Tag Finders rather than Range Finders.
You can select between different starting points when you configure a range finder:
Find Specified Range
Specify (in Range) a cell or range of cells using almost ordinary Excel syntax. Keep in mind that (in
contrast to Excel) the sheet name must be given.
The range can be specified in several ways using a Value Selector.
Find at Named Range
Specify in (Range) a previously defined named range as the starting point. It may have been defined by
for example a Set Named Range step or a Loop in Excel step.
Once a range has been selected as the starting point it may be adjusted in several ways as specified by
the Use property, which can make it both smaller or larger. See below for details.
Finally, the Use Upper Left Cell in Merged Cells property determines how to handle merged cells in
the spreadsheet. Remember that in Excel, adjacent cells can be "merged" visually to form a larger
cell with a single value. Excel considers the larger "merged cell" to have the same cell address as the
uppermost and leftmost sub-cell, and the value of the "merged cell" is found at this cell address (only).
This is mimicked accurately by Kapow but it is not always convenient when doing automated extraction,
especially as part of an iteration. Thus if you enable Use Upper Left Cell in Merged Cells and the range
refers to a single sub-cell within a "merged cell", then it is modified to refer to the uppermost and leftmost
sub-cell of the "merged cell" to make it easier to get at the contents.
Cell Ranges
When configuring a Range Finder to Find Specified Range you write a piece of text that refers to a cell (or
a range of cells). Such references are also displayed (and can be entered) in the Cell Range View at the
bottom of the Spreadsheet View. The basic form is known from Excel formulas, but Kapow provides some
extensions.
The following examples show the variants:
494

Kofax Kapow User's Guide
Sheet1!B3
The core elements and how they are put together: The sheet name ("Sheet1"), a separating exclamation
mark, a column name ("B") and a row number ("3"). This example refers to a single cell of the named
sheet.
B3
When the cell range reference is entered in the Cell Range View at the bottom of the Spreadsheet View,
the sheet name can be omitted if you want to refer to the currently displayed sheet. It will, however, be
added to the reference as soon as you press Enter. In a Range Finder you need to enter the sheet name
every time, as there is no notion of "currently displayed sheet" during execution of the robot. For this
reason the remaining examples will all include the sheet name.
Sheet3!B3:F14
How to refer to a range of cells from a single sheet: After the sheet name, you state the upper left and
lower right corners, separated by a colon. (It is not possible to have a range that extends over several
sheets.)
Sales!C
All of column "C" of the stated sheet. Open ended ranges like this one are not permitted in Excel, but are
very useful in robots that must be able to adapt to different sizes of Excel documents. When the robot
works on a specific document, it will automatically limit itself to the area of the document that actually
contains data. Open ended ranges will often be used in the Range Finder of a Loop in Excel step.
Sales!C:H
All of the columns C to H of the stated sheet and is an open ended range as explained above.
Suppliers!14
Open ended ranges can also be rows. This example refers to all of row 14 of the stated sheet.
Suppliers!14:29
A fixed range that refers to all of rows 14 up to and including 29 of the stated sheet.
'Total Sales'!B3
If the sheet name contains white space or certain special characters, it must be enclosed in single quotes.
If the sheet name contains a single quote, it must be entered as two single quote characters. The rules
are just the same as when sheet names are included in cell references in Excel formulas.
!B3
The Excel "document properties" (for example, the name of the author and the creation date of the
document) are made available in Kofax Kapow in the form of a special sheet whose name is empty.
Thus this example refers to the value of one of the document properties (the name of the property will be
available in the neighboring cell "!A3"). This is an extension over Excel.
JSON Finders
A JSON Finder is used to find necessary data in a JSON text. The list of Finders of the current step is
located in the Step View, Finders tab.
For more information about JSON and its terminology see Working with JSON.
JSON Finder Properties
A JSON Finder can be configured using the following properties.
495

Kofax Kapow User's Guide
Find Where
In this property, you can specify where to find a JSON element. The default value is "Anywhere in JSON",
meaning that named JSONs are not used in a search.
In this named JSON
This property is used when you select In Named JSON in the Find Where list. In this property, you can
specify whether to search in the selected Named JSON or you can specify a name of the Named JSON to
use.
Path
In this property, you can specify the path to the JSON element. The tag path can be specified in several
ways using a Value Selector.
JSON path expressions always refer to a JSON structure in the same way as XPath expression are used
in combination with an XML document. JSON path expressions are very similar to the JavaScript and use
the dot-notation, for example personnel.person[0].name. @top: element is required and tells the finder
to search from the top of the JSON.
Examples
JSON Path
The following is a simple JSON structure and a table with path examples and possible results.
{
"personnel" : {
"person" : [
{
"ID" : 0,
"name" : "Bob",
"age" : 26,
"isMale" : true
},
{
"ID" : 1,
"name" : "Ted",
"age" : 25,
"isMale" : true
},
{
"ID" : 2,
"name" : "Jill",
"age" : 47,
"exam" : "553213-3",
"isMale" : true
},
{
"ID" : 3,
"name" : "Rick",
"age" : 50,
"exam" : "553225-3",
"isMale" : true
}
]
}
}
XPath JSON Path Result
/personnel/person[2]/name @top:.personnel.person[1].name Ted
/personnel @top:.personnel Extracts all information from
"personnel"
496
Kofax Kapow User's Guide
If you want to extract a set of information from a JSON element, you can create an XML page
from JSON and extract necessary information using a text expression. For example, if you create
an XML page from the JSON above, select item[1] in the XML, and run an expression like
".*<name>"+TheInput+"</name>.*", as a result you should get something similar to 1Ted25true.
Finding a Named JSON
In the following example Named JSON is a part of a JSON text that can be used in a JSON Finder to
find "a":
In the following JSON text:
{ "a" : [{ "b" : [1,2,3] }], "c" :42 }
we can have the Named JSON mark
"b" : [1,2,3]
and thus we can have a JSON Finder perform a search with the following properties:
Find Where: In Named JSON
In this Named JSON: 1
Path: [1]
This finder will then find the number 2 in the list.
Patterns
A pattern is a way of describing a text. For example, the text "32" can be described as a text containing
two digits. However, other texts also contain two digits, e.g. "12" and "00". We say that these texts match
the pattern. (Design Studio patterns follow the Perl5 syntax.)
A pattern is composed of normal characters and special symbols. Each special symbol carries its own
special meaning. For example, the special symbol "." (dot) means any single character and matches all
single characters, e.g. "a", "b", "1", "2", ...
Special Symbols
You can use the following special symbols within a pattern.
Special Symbol Description
. any single character, e.g. "a", "1", "/", "?", "." etc.
\d Any decimal digit, e.g. "0", "1", ..., "9".
\D Any non-digit, e.g. same as "." excluding "0", "1", ..., "9".
\s Any whitespace character, e.g. " ", tab, and return
\S Any non-whitespace character, e.g. same as "." excluding " ", tab, and return
\w Any word (alphanumeric) character, e.g. "a", ..., "z", "A", ..., "Z", "0", ..., "9".
\W Any non-word (alphanumeric) character, e.g. same as "." excluding "a", ..., "z", "A", ..., "Z",
"0", ..., "9".
\n A line break character.
\r A carriage return character.
497
Kofax Kapow User's Guide
Special Symbol Description
\t A tab character.
[abc] Any character in the set a, b or c.
[^abc] Any character not in the set a, b or c.
[a-z] Any character in the range a to z, inclusive.
a|b Matches whatever the subpattern a would match, or whatever the subpattern b would match.
If you want a special character, such as "." or "\", to act as a normal character, you can escape it by adding
a "\" (backslash) in front of it. So, if you wish to match exactly the "." character, instead of any single
character, you should write "\.".
You can organize a pattern into subpatterns by the use of parentheses: "(" and ")". The pattern "abc" can
be organized as "(a)(bc)". Subpatterns are useful when applying pattern operators.
Example: Simple Example Patterns
Here are some examples of patterns and what they match:
Pattern Matches
.an All texts of length three ending with "an", e.g. "can" and "man" but not "mcan".
\d\d\s\d\d All texts of length five starting with two digits followed by a whitespace and ending with two
digits, e.g. "01 23" and "72 13" but not "01 2s"
m\.n\\o The text "m.n\o"
(good)|(bye) "good" and "bye" but not "goodbye"
Repeating Operators
These operator symbols will repeat the previous character, symbol, or subpattern.
Special Symbol Description
{m} Matches exactly m repetitions of the preceding subpattern.
{m,n} Matches between m and n repetitions (inclusive) of the preceding subpattern. It will match as
many subpatterns as possible.
{m,n}? Matches between m and n repetitions (inclusive) of the preceding subpattern. It will match as
few subpatterns as possible
{m,} Matches m or more repetitions of the preceding subpattern. It will match as many subpatterns
as possible.
{m,}? Matches m or more repetitions of the preceding subpattern. It will match as few subpatterns
as possible.
? The preceding subpattern, or the empty text. Shorthand for {0,1}
* Matches any number of repetitions of the preceding subpattern, or the empty text. Shorthand
for {0,}. It will match as many subpatterns as possible.
498
Kofax Kapow User's Guide
Special Symbol Description
*? Matches any number of repetitions of the preceding subpattern, or the empty text. Shorthand
for {0,}?. It will match as few subpatterns as possible.
+ Matches one or more repetitions of the preceding subpattern. Shorthand for {1,}. It will match
as many subpatterns as possible.
+? Matches one or more repetitions of the preceding subpattern. Shorthand for {1,}?. It will
match as few subpatterns as possible.
These operators repeat the previous character, symbol, or subpattern.
Example: Examples Using Repeating Operators
Here are some examples of patterns that use repeating operators, and what they match.
Pattern Matches
.* Any text, e.g. "hello", "1213" and "" (the empty text)
(abc)* Matches any number of repetitions of the text "abc", e.g. "", "abc", "abcabc", and
"abcabcabc", but not "abca"
(.*)(.*) Will match "abc" - the first subpattern will match "abc" and the second subpattern will match
"" (the empty text)
(.*?)(.*) Will match "abc" - the first subpattern will match "" (the empty text) and the second
subpattern will match "abc"
(.+?)(.*) Will match "abc" - the first subpattern will match "a" and the second subpattern will match
"bc"
\w*\d Will match "abc1abc1" - \w* matches "abc1abc" and \d matches "1"
\w*?\d Will match "abc1" but not "abc1abc1" - because the "\w*?" will only match "abc" and the
rest cannot be matched by \d
(\d\d){1,2} Matches either two or four digits, e.g. "12" and "67", but not "123".
(good)?bye "goodbye" and "bye".
More About Grouping
We have seen that "(" and ")" can be used for grouping subpatterns into a new subpattern. But this
actually serves another purpose: you can use these groups in expressions. To make a grouping that
cannot be used in expressions you can use "(?:".
You can refer to other groups in your pattern using \n, where n is the group number.
Example: Grouping Examples
Here are some examples of patterns that use grouping, and what they match
499

Kofax Kapow User's Guide
Pattern Matches
a(bc) Matches "abc", and you can refer to "bc" as $1 in your expressions.
Matches "abc", but you can not refer to "bc" in your expressions.
Matches "abc=abc", but does not match "abc=ab"
a(?:bc)
(.*)=\1
Expressions
An expression typically evaluates to a text. For example, the expression "The author of the book " +
Book.title + " is " + Book.author + "." evaluates to the text "The author of the book Gone with the Wind is
Margaret Mitchell.", if the attributes title and author of the Book variable contain the texts "Gone with the
Wind" and "Margaret Mitchell", respectively.
You can do also numeric calculations within the expression. For example, if the attribute Book.price
contains the price of a book, you can multiply it by 100 using the following expression:
Book.price * 100
Depending on where the expression occurs, an input text may be available for use in the expression. You
can refer to this input text in the expression using the INPUT notation. For example, if the input text is
"The time is " and you want to add the current time, you can use this expression:
INPUT + time(now())
Expression Types
Expression Type Notation Description Examples
Constant "text" A fixed text.
You can use the backslash character
(\) to enter special characters:
\n for line break
\r for carriage return
\f for form document
\t for horizontal tab
\b for backspace
\" for double quote
\' for single quote
\\ for backslash itself
\uxxxx for the unicode character with
encoding xxxx, where xxxx is four
hexadecimal digits.
"This is some \"quoted\"
text."
"This a text with line break\n,
tab \t and a unicode \u0035
character"
500
Kofax Kapow User's Guide
Expression Type Notation Description Examples
Constant >>text<< A fixed text. This notation can contain
anything, including quote characters,
except the end symbol (<<). The
backslash (\) character cannot be
used to enter special characters.
>>This is some "quoted"
text.<<
Variables variable.attribute
variable
The value of a variable. If the variable
is a complex type, an attribute name
must also be supplied.
Book.title
Integer
Input Text INPUT The input text, if any, to the
expression.
INPUT
Concatenation expr1 + expr2 The concatenation of the two
expressions expr1 and expr2.
"Title:" + Book.title
Subpattern Match $n If n > 0, the text that matches
subpattern n in the pattern. If n =
0, the text that matches the entire
pattern.
Note: This expression has meaning
only if there is a pattern associated
with the expression.
$1
Numeric Expression Operators: +, -, *, /, % The result of a numeric expression. Book.price * 100
Boolean Expression Operators: && (and),
|| (or)
The result of a boolean expression. performTransactions &&
Book.price < 30
Conditional
Expression
condition ? expr1 :
expr2
If condition evaluates to true, the
value of expr1 is used; otherwise the
value of expr2 is used.
Book.price < 30 ? "cheap" :
"expensive"
Function func(expr) The function func applied to the
result of the expression expr. See the
Functions section that follows this
table for the available functions.
capitalize(Book.title)
Current URL URL The current URL. URL
Current Window WINDOW The unique ID of the current window. WINDOW
Robot Name Robot.name The name of the robot. Robot.name
Execution ID Robot.executionId The current execution ID of the robot. Robot.executionId
Execution Errors Robot.executionErrors The execution errors encountered in
the previous branch of the nearest Try
step.
Robot.executionErrors
Note The >>text<< notation for a text constant is useful to specify a long text that contains many quote
characters, such as HTML. Using the >>text<< notation, you can use the text as is, and simply place the
>> and << symbols around it. If you use the "text" notation, you have to replace all quote characters in
the text with two consecutive quote characters.
501

Kofax Kapow User's Guide
Functions
Function Description
abs(arg) Returns the absolute value of the number.
base64Decode(arg) Decodes Base64 encoded data.
base64Encode(arg) Encodes binary data with Base64 encoding.
binaryToText(data[, encoding]) Decodes binary data into text. Uses the specified encoding if present,
or otherwise defaults to UTF-8 encoding.
capitalize(arg) Makes the first letter of every word upper case and all other letters
lower case.
ceil(arg) Rounds the number up to the nearest integer.
collapseSpaces(arg) Makes sure there are no two consecutive spaces.
contains(source, key) Returns whether the source contains the specified key.
date() Returns the current date in standard date format (yyyy-mm-dd).
day(args) Returns the day of month of the date given as an argument.
endsWith(source, key) Returns true if the source string ends with the specified key, or false
otherwise.
excelColStringToNumberFunction Converts a string from an Excel spreadsheet to a number.
excelNumberToColStringFunction Converts a number to a string in an Excel spreadsheet.
floor(arg) Rounds the number down to the nearest integer.
guid() Returns a randomly generated, globally unique ID (GUID).
hexDecode(arg) Decodes hex encoded data.
hexEncode(arg) Encodes binary data with hex encoding.
indexOf(source, key) Returns the first index of the key in the source, or -1 if not found.
length(arg) Counts the number of characters in the text, or the number of bytes if
given binary data.
max(a, b) Returns the greater of the two numbers.
md5(arg) Computes the MD5 checksum of the binary data given as an
argument.
min(a, b) Returns the smallest of the two numbers.
month(args) Returns the month of the date given as argument.
now() Returns the current date and time.
random() Returns a random number between 0 and 1.
removeSpaces(args) Removes all white space characters in the argument, such as SPACE,
\t, \n.
replacePattern(source, pattern, newText) Replaces every occurrence of the pattern "pattern" in text "source"
with the text "newText". The pattern match is case insensitive.
502

Kofax Kapow User's Guide
Function Description
replaceText(source, oldText, newText) Replaces every occurrence of the text "oldText" in the text "source"
with the text "newText". The match with "oldText" is case insensitive.
resolveURL(arg) Converts a URL from relative to absolute using the current URL.
round(arg) Rounds to the nearest integer.
shortTime(arg) Returns the time without fractional seconds (hh:mm:ss) for the date
given as an argument.
substring(source, startIndex, endIndex) Returns the portion of the source string starting at the startIndex and
up to the endIndex, not including the character at endIndex. If no
endIndex is specified, the function behaves as if the length of the
source string was given as endIndex.
startsWith(source, key) Returns true if the source string starts with the specified key, or false
otherwise.
textToBinary(text[, encoding]) Encodes text to binary data. Uses the specified encoding if present, or
otherwise defaults to UTF-8 encoding.
time(arg) Returns the time (hh:mm:ss.fff) for the date given as an argument.
toInteger(args) Converts the text to an integer. This can be useful if you want to
include it in calculations.
toNumber(args) Converts the text to a floating-point number. This can be useful if you
want to include it in calculations.
toLowerCase(arg) Converts all of the characters in the text to lowercase.
toUpperCase(arg) Converts all of the characters in the text to uppercase.
trim(arg) Removes all space from both ends of the text.
urlDecode(arg) Decodes the URL encoded text.
urlEncode(arg) URL encodes the text.
weekday(arg) Returns the name of the weekday (in English) for the date given as an
argument.
year(args) Returns the year of the date given as an argument.
Error Handling
When an error is encountered during execution of a step, it is handled as specified on the Error Handling
tab for the step's configuration. Test actions may also apply the same handling when a condition fails.
There are two aspects of handling an error or failed test: How and where to report or log the incident, and
how and where to proceed with execution of the robot.
Properties
Error Handling is configured using the following properties.
503

Kofax Kapow User's Guide
API Exception
This property specifies whether to report the incident back to the caller of the robot. Reporting works
differently depending on how the robot is executed:
• The property has no effect when the robot is executed in Design Mode in Design Studio because
the incident always is reported in this mode (except when it is handled using Ignore and Continue as
described below).
• When the robot is executed in Debug Mode, the report is added to the Error Reports tab.
• When the robot is run in the Management Console, reports are just counted (and displayed as the
number of errors encountered in the "previous" run of the schedule). In this scenario, we recommend
using the same value (checked or unchecked) as for Log as Error.
• When the robot is executed by a client via one of the APIs and runs in RoboServer, the report is sent
back to the caller via the API as follows:
RobotErrorResponse
This causes an exception at the caller side, at least when using the default RQLHandler. (This case
explains the name of the property.)
Note The property may be unchecked or checked, but may also be marked with an asterisk * meaning
that it has been explicitly set to a non-default value. This is explained in Show Changes from Default,
where it is also shown how to remove the asterisk and revert to the default value. When the default
value applies (that is, when no asterisk is present), be aware that the default varies according the
selection made under the Then property.
Log as Error
This property specifies whether to log the incident. This differs from reporting (see the preceding).
• When the robot is executed in Design Mode in Design Studio, the incident is added to the log that is
displayed when you select View Log in the View menu.
• When the robot is executed in Debug Mode, the incident is added to the Log tab.
• When the robot is run in RoboServer (from the Management Console or via the API), the incident is
logged in the place defined in the cluster settings for the given RoboServer. This is most likely the same
database that the Management Console uses.
Note The property may be unchecked or checked, but may also be marked with an asterisk * exactly as
explained earlier for API Exception.
Then
This property specifies how and where to continue execution of the robot after the incident. The following
options are available.
Skip Following Steps (Default)
The steps following the one with the error (or failed test condition) are not executed. Execution
otherwise proceeds as if they had been executed successfully.
Ignore and Continue
The step with the error (or failed test condition) is skipped, and execution continues with the following
step as usual.
504

Kofax Kapow User's Guide
Try Next Alternative
This can be used in a branch coming out of a Try step. Execution of the current branch from the Try
step is abandoned and execution continues with the first step on the next branch from that Try step.
Execution will continue there with the same robot state as for the first branch.
If the current branch is the last one from that Try step, Try Next Alternative is not illegal, but results in
an error ("all alternatives failed") which is handled according to the way error handling is configured for
the Try step.
When Try steps are nested, it is possible to select the relevant Try step among those that are on the
execution path to the current step.
Send Backwards (legacy)
This option is present only to provide backwards compatibility with robots created by Design Studio
versions prior to 8.0. It is described separately.
Next Iteration
This can be used within a loop, that is, following a loop step of some kind (except a Repeat-Next
loop). Execution of the current loop iteration is abandoned and execution continues with the next
iteration. That is, execution continues with the first step after the loop step, and with a robot state that
corresponds to the next looped-over item.
When loops are nested, it is possible to select the relevant loop in which to go to the next iteration.
Break Loop
This can be used within a loop, that is, following a loop step of some kind (including a Repeat-Next
loop). Execution of the loop is abandoned. Thus the current iteration is not finished, and subsequent
iterations are not executed at all. This means that execution continues with the same step as after
normal termination of the loop.
When loops are nested, it is possible to select the relevant loop among those that are on the
execution path to the current step.
Step References in At...
Under error handling you can select various ways to proceed in case an error occurs. The following three
ways listed require that you identify a previous step on the execution path (either a Try step or a loop step)
where execution should proceed. Execution proceeds at or after the selected step depending on which
one you select:
• Try Next Alternative
• Next Iteration
• Break Loop
When identifying the preferred step, you can select the "nearest step" (of the appropriate kind) or a
specific step by name. Sometimes, however, the preferred step does not appear in the selection list for a
number of reasons:
• Only named steps can be selected. If the step is unnamed (the default for Try steps), the step must be
given a name before it will appear in the selection list. If the step is the nearest one of the appropriate
kind, you can also reach it by selecting "nearest step."
• Remember that Next Iteration cannot be used with Repeat steps. Thus Repeat steps do not appear in
the selection list for Next Iteration.
505
Kofax Kapow User's Guide
• A step name never appears more than once in the selection list, because any reference always goes to
the nearest step (of the appropriate kind) with the selected name. Keep that in mind when modifying the
robot!
• If more than one path through the robot leads to the current step, an (appropriate) step with the
selected name must be present on every path to the current step. Otherwise, the name does not
appear on the selection list.
The last two rules support using error handling in an advanced way that is very similar to the try-catch
constructs in Java or C#. See the Try-Catch section for more on this. In those programming languages,
you "throw" a named "exception" at the point of error, and "catch" it (by name) somewhere in surrounding
code. In robots, you can do something similar with Try steps. The correspondence between the Java/C#
terms and the Design Studio terms is described in the table.
Java/C# term What to use in Design Studio
try The first branch of a Try step
Name of an exception Name of a Try step
throw E Handling an error with "Try Next Alternative at E"
catch E The second branch of a Try step named "E"
This way of thinking about error handling probably is most useful in large robots. When using error
handling this way, the names of the Try steps signal what kind of exceptional circumstances each Try
step's second branch handles.
Send Backwards (legacy)
Send Backwards (legacy) is one of the options for error handling. It is present only to provide backwards
compatibility with robots created by Design Studio versions prior to 8.0 and should not be used in new
robots.
Send Backwards is similar to another error handling option, Try Next Alternative, because it affects
execution of the branches that go out from a Try step. However, it does so in a quite different way. Its
immediate effect is that the steps following the current one are not executed (similar to Skip Following
Steps). Aside from that, execution of the current branch from the Try step continues. However, the error
is also "sent backwards" to the Try step and remembered there, which causes execution to continue with
the next branch of the Try step once execution of the current branch has finished successfully. This part
is similar to the effect of Try Next Alternative (although delayed), and the same comments regarding the
robot state apply.
If the current branch is the last one from that Try step, Send Backwards is not illegal, but results in an
error ("all alternatives failed") which is handled according to the way error handling is configured for the
Try step.
If there is no prior Try step to be found, the error is "sent backwards" to the beginning of the robot and is
reported via the API and logged just before execution of the robot finishes.
Send Backwards is quite difficult to work with because of the delayed effect, and we recommend Try Next
Alternative instead. When robots created using Design Studio versions prior to 8.0 are opened, they are
automatically modified to use Try Next Alternative instead of Send Backwards (whenever this can be done
without changing the results from the robot).
506

Kofax Kapow User's Guide
POST Requests as URLs
A standard URL can represent only a GET request, but not an HTTP POST request. To represent a POST
request as a URL, Kofax Kapow uses its own special URL format with the following syntax:
post://<url excluding the http protocol>??<encoded POST parameters>
or, for the https protocol:
posts://<url excluding the https protocol>??<encoded POST parameters>
or, for a relative URL without a protocol:
postx://<url without protocol>??<encoded POST parameters>
Example
A POST request to the URL
http://www.abc.com
with the encoded POST parameters
x=y&v=z
is represented as the following URL:
post://www.abc.com??x=y&v=z
The Library Protocol
You can use the Kofax Kapow non-standard library protocol to refer to a file that a robot belongs to in the
robot library.
For example, if the file MyPage.html is located in the folder MyFolder in the robot library folder, you can
refer to it using this URL:
library:/MyFolder/MyPage.html
This works whether the robot library is represented as a folder or is packed into a robot library file.
Value Selector
Use the Value Selector to specify a value in different ways, depending on your need.
Use the drop-down menu on the right side of the Value Selector to select one of the following ways to
specify the value (not all of these ways are available everywhere):
Value
Enter or select a fixed value.
Variable
Select the value of a variable.
507

Kofax Kapow User's Guide
Expression
Enter an expression.
Converters
Select a list of data converters, whose output is used as the value. (The input text to the data converters is
empty.)
URL Selector
Use the URL Selector to specify a URL in different ways, depending on your needs.
Use the drop-down menu at the top of the URL Selector to select one of the following ways to specify the
URL.
URL
Enter the URL directly in the text field provided. Note that standard URLs using the HTTP protocol can be
shortened. For example, you can enter www.kapowtech.com instead of http://www.kapowtech.com.
URL in Found Tag
Specifies that the found tag contains the URL. The found tag must be one of the following types:
• <a href="URL">
• <area href="URL">
• <frame src="URL">
• <iframe src="URL">
• <script src="URL">
• <param value="URL">
• <meta http-equiv="Refresh" content="...; url=URL">
URL in Variable
Specifies that the URL should be read from a specified variable.
URL from Expression
Specifies an expression as the URL to open.
URL from Converters
Specifies a list of data converters whose output is used as the URL to open.
Keyboard Help
Single-Line Text Fields
Description Keyboard Shortcut
Move to prev/next word Ctrl+Left, Ctrl+Right
Move to start/end of field Home/End
Select all Ctrl+A
Deselect all arrow keys
508
Kofax Kapow User's Guide
Description Keyboard Shortcut
Extend selection left/right Shift+Left, Shift+Right
Extend selection to start/end Shift+Home, Shift+End
Extend selection to prev/next word Ctrl+Shift+Left, Ctrl+Shift+Right
Copy selection Ctrl+C
Cut selection Ctrl+X
Paste from clipboard Ctrl+V
Delete next character Delete
Delete previous character Backspace
Multi-Line Text Fields
Description Keyboard Shortcut
Move to start/end of line Home, End
Move to prev/next word Ctrl+Left/Right
Move to start/end of text Ctrl+Home/End
Block move up/down PgUp, PgDn
Block move left Ctrl+PgUp
Block move right Ctrl+PgDn
Select all Ctrl+A
Copy selection Ctrl+C
Cut selection Ctrl+X
Paste Selected Text Ctrl+V
Delete next character Delete
Delete previous character Backspace
Insert line break Enter
Buttons
Description Keyboard Shortcut
Activate Spacebar
Drop-Down Menus
Description Keyboard Shortcut
Toggle menu up or down Alt+Up/Down
Multi-Line Text Fields
Description Keyboard Shortcut
Expand entry Right
509
Kofax Kapow User's Guide
Description Keyboard Shortcut
Collapse entry Left
Toggle expand/collapse for entry Enter
Move up/down one entry Up, Down
Move to first entry Home
Move to last visible entry End
Block move vertical PgUp, PgDn
Block move left Ctrl+PgUp
Block move right Ctrl+PgDn
Block extend vertical Shift+PgUp, Shift+PgDn
Select all Ctrl+A
Single select Ctrl+Spacebar
Lists
Description Keyboard Shortcut
Move within list Up, Down
Move to beginning of list Home
Move to end of list End
Select all entries Ctrl+A
Cut Ctrl+X
Copy Ctrl+C
Copy all entries Ctrl+Shift+C
Paste Ctrl+V
Tables
Description Keyboard Shortcut
Move to next cell Right Arrow
Move to previous cell Left Arrow
Move to first cell in row Home
Move to last cell in row End
Move to first cell in table Ctrl+Home
Move to last cell in table Ctrl+End
Select all cells Ctrl+A
510

Kofax Kapow User's Guide
Browser Tracer
The Browser Tracer is available from the Tools menu in Design Studio. The Browser Tracer can trace
HTTP traffic in Design Studio as well as JavaScript execution for robots written with the Classic browser
that was the default in pre-9.3 robots. The Browser Tracer is useful for performance tuning robots and
figuring out workarounds for sites that do not work out-of-the-box.
Tracing
To start tracing, enable the Record button. While recording, especially if using JavaScript recording, things
may run much slower than normal since vast amounts of data are collected. Make sure to disable the
Record button once you have traced the traffic you wanted.
HTTP Trace
The HTTP trace shows HTTP traffic. Selecting a trace entry shows the details about that HTTP event in
the detail view below the trace. The detail view shows the request and response headers, as well as the
request and response data sent. Normally, only POST requests will contain request data.
Note Pending loads are shown in blue.
Blocking URL
You can block certain URLs by right-clicking an item in the HTTP list and selecting Add URL to block.
The Configure URL Blocking Pattern dialog box opens for you to edit the URL pattern. See URL
Blocking for more information.
JavaScript Trace
JavaScript tracing is only available for robots that use the Classic browser that was default in pre-9.3
robots. If you have a robot that uses the Default browser, the JavaScript tab is not available.
Below each JavaScript trace, the JavaScript source code for the currently selected trace entry is shown.
When a trace entry is selected, the corresponding source code line is highlighted in the source view. The
trace entry is the runtime result of the execution of the highlighted source code line. Each source code
line may, of course, be executed multiple times, in which case multiple trace entries are produced, all
corresponding to the same source code line.
Stepping through trace entries can help you understand how a piece of JavaScript code works.
It is possible to turn off tracing of JavaScript if you are only interested in the HTTP trace. You do this by
clearing the Enable JavaScript Tracing check mark in the Trace menu.
Saving and Loading Trace Sessions
You can save trace sessions to load at a later time. A trace session contains both the Design Studio trace
and the proxy trace, and both JavaScript and HTTP traces. Saving a trace session can be useful if it is
large and you want to look at it in detail later, or if you want to mail it to someone else.
Note Bug reports submitted from Design Studio will automatically contain the current trace session, if
any.
511

Kofax Kapow User's Guide
Note If downloaded content is changed by "Page Changes" or "JavaSript changes", the browser tracer
adds an extra line where the changed content is shown in the response tab. The URL starts with
Rewritten.
Variable Validation Errors
Validation errors can occur on variables using types that are changed, renamed, or deleted. This topic
explains how to deal with these errors.
If a type used by a variable is missing, a validation error informing that the "type could not be found"
is shown. Resolve the error by creating a type with the name of the missing type, or by opening the
Configure Variable window and selecting another type for the variable.
A configuration problem with a type used by a variable can also result in a validation error on the variable
informing that it has an "invalid type". This problem is solved by rectifying the problem with the type or
selecting a different type for the variable from the Configure Variable window.
The validation error informing that some of the variable's initial/test values are "incompatible with its type"
is a bit more subtle, and not as self-explanatory as the preceding errors. The error occurs if a variable
has some initial/test values assigned to attributes and the variable's type is then changed such that one
or more of the values can no longer be assigned to the attributes. This happens if the attribute is deleted
from the type, or if the attribute type is changed so that the old assignment value is now incompatible. For
instance, if an initial value is assigned to an attribute with the attribute type Short Text, but the variable
type is changed so that the attribute now has the attribute type "Boolean," the old value can no longer be
assigned to it. To fix the problem, open the Configure Variable window the now non-assigned values are
shown and can be copied to other attributes. To clear the non-assigned values, and resolve the validation
error, exit the Configure Variable window by clicking OK. A prompt appears, informing that the values will
be discarded. After you click OK again, the validation error is resolved.
Supported Features in Excel
In this topic you can find both supported and unsupported features in Excel.
Formula Support
See https://poi.apache.org/spreadsheet/formula.html for details.
Features
Supported
• References: single cell & area, 2D & 3D, relative & absolute
• Literals: Number, text, boolean, error and array
• Operators: arithmetic and logical, some region operators
• Built-in functions: over 350 recognized, 280 evaluatable
• Add-in functions: 3 from Analysis Toolpack
• Font color using the format string such as [red]
• Conditional font color, such as in the example where negative numbers are red: #.##0;[Red]-#.##0
• Date formatting
512

Kofax Kapow User's Guide
Unsupported
• Manipulating array/table formulas (In Excel, formulas that look like "{=...}" as opposed to "=...")
• Region operators: union, intersection
• Parsing of previously uncalled add-in functions
• Preservation of whitespace in formulas (when POI manipulates them)
• Font changes, for example bold, size, etc.
• Background color in cell
• External file references from formulas
Function in POI
Supported Functions
ABS, ACOS, ACOSH, ADDRESS, AND, ASIN, ASINH, ATAN, ATAN2, ATANH, AVEDEV, AVERAGE,
BIN2DEC, CEILING, CHAR, CHOOSE, CLEAN, CODE, COLUMN, COLUMNS, COMBIN, COMPLEX,
CONCATENATE, COS, COSH, COUNT, COUNTA, COUNTBLANK, COUNTIF, COUNTIFS, DATE,
DAY, DAYS360, DEC2BIN, DEC2HEX, DEGREES, DELTA, DEVSQ, DOLLAR, EDATE, ERROR.TYPE,
EVEN, EXACT, EXP, FACT, FACTDOUBLE, FALSE, FIND, FLOOR, FV, HEX2DEC, HLOOKUP, HOUR,
HYPERLINK, IF, IFERROR, IMAGINARY, IMREAL, INDEX, INDIRECT, INT, INTERCEPT, IPMT, IRR,
ISBLANK, ISERROR, ISEVEN, ISLOGICAL, ISNA, ISNONTEXT, ISNUMBER, ISODD, ISREF, ISTEXT,
LARGE, LEFT, LEN, LN, LOG, LOG10, LOOKUP, LOWER, MATCH, MAX, MAXA, MEDIAN, MID, MIN,
MINA, MINUTE, MIRR, MOD, MODE, MONTH, MROUND, NA, NETWORKDAYS, NOT, NOW, NPER,
NPV, OCT2DEC, ODD, OFFSET, OR, PERCENTILE, PI, PMT, POISSON, POWER, PPMT, PRODUCT,
PV, QUOTIENT, RADIANS, RAND, RANDBETWEEN, RANK, RATE, REPLACE, REPT, RIGHT, ROMAN,
ROUND, ROUNDDOWN, ROUNDUP, ROW, ROWS, SEARCH, SECOND, SIGN, SIN, SINH, SLOPE,
SMALL, SQRT, STDEV, SUBSTITUTE, SUBTOTAL, SUM, SUMIF, SUMIFS, SUMPRODUCT, SUMSQ,
SUMX2MY2, SUMX2PY2, SUMXMY2, T, TAN, TANH, TEXT, TIME, TODAY, TRIM, TRUE, TRUNC,
UPPER, VALUE, VAR, VARP, VLOOKUP, WEEKDAY, WEEKNUM, WORKDAY, YEAR, YEARFRAC
Unsupported Functions
ACCRINT, ACCRINTM, AMORDEGRC, AMORLINC, AREAS, ASC, AVERAGEA, AVERAGEIF,
AVERAGEIFS, BAHTTEXT, BESSELI, BESSELJ, BESSELK, BESSELY, BETADIST, BETAINV,
BIN2HEX, BIN2OCT, BINOMDIST, CELL, CHIDIST, CHIINV, CHITEST, CONFIDENCE, CONVERT,
CORREL, COUPDAYBS, COUPDAYS, COUPDAYSNC, COUPNCD, COUPNUM, COUPPCD,
COVAR, CRITBINOM, CUBEKPIMEMBER, CUBEMEMBER, CUBEMEMBERPROPERTY,
CUBERANKEDMEMBER, CUBESET, CUBESETCOUNT, CUBEVALUE, CUMIPMT, CUMPRINC,
DATEDIF, DATESTRING, DATEVALUE, DAVERAGE, DB, DBCS, DCOUNT, DCOUNTA, DDB, DEC2OCT,
DGET, DISC, DMAX, DMIN, DOLLARDE, DOLLARFR, DPRODUCT, DSTDEV, DSTDEVP, DSUM,
DURATION, DVAR, DVARP, EFFECT, EOMONTH, ERF, ERFC, EXPONDIST, FDIST, FINDB, FINV,
FISHER, FISHERINV, FIXED, FORECAST, FREQUENCY, FTEST, FVSCHEDULE, GAMMADIST,
GAMMAINV, GAMMALN, GCD, GEOMEAN, GESTEP, GETPIVOTDATA, GROWTH, HARMEAN,
HEX2BIN, HEX2OCT, HYPGEOMDIST, IMABS, IMARGUMENT, IMCONJUGATE, IMCOS, IMDIV,
IMEXP, IMLN, IMLOG10, IMLOG2, IMPOWER, IMPRODUCT, IMSIN, IMSQRT, IMSUB, IMSUM, INFO,
INTRATE, ISERR, ISPMT, JIS, KURT, LCM, LEFTB, LENB, LINEST, LOGEST, LOGINV, LOGNORMDIST,
MDETERM, MDURATION, MIDB, MINVERSE, MMULT, MULTINOMIAL, N, NEGBINOMDIST, NOMINAL,
NORMDIST, NORMINV, NORMSDIST, NORMSINV, NUMBERSTRING, OCT2BIN, OCT2HEX,
ODDFPRICE, ODDFYIELD, ODDLPRICE, ODDLYIELD, PEARSON, PERCENTRANK, PERMUT,
PHONETIC, PRICE, PRICEDISC, PRICEMAT, PROB, PROPER, QUARTILE, RECEIVED, REPLACEB,
RIGHTB, RSQ, RTD, SEARCHB, SERIESSUM, SKEW, SLN, SQRTPI, STANDARDIZE, STDEVA,
STDEVP, STDEVPA, STEYX, SYD, TBILLEQ, TBILLPRICE, TBILLYIELD, TDIST, TIMEVALUE, TINV,
513
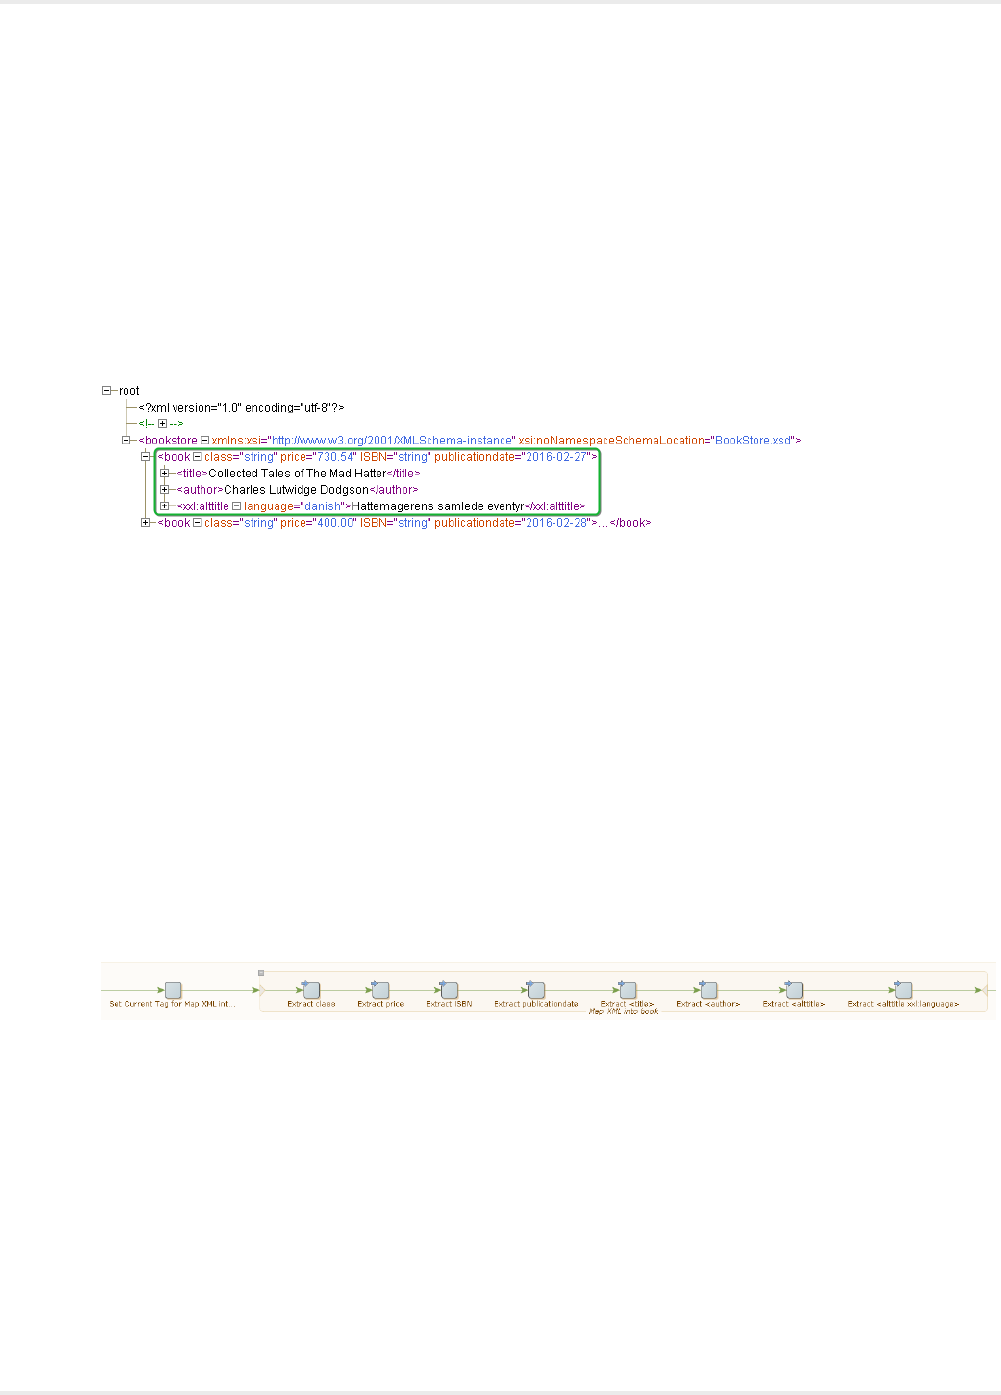
Kofax Kapow User's Guide
TRANSPOSE, TREND, TRIMMEAN, TTEST, TYPE, USDOLLAR, VARA, VARPA, VDB, WEIBULL, XIRR,
XNPV, YIELD, YIELDDISC, YIELDMAT, ZTEST
XML Data Mapper
Kapow version 9.1 and higher has an XML Data Mapper that allows convenient mapping of the data
records specified by an XML document into variables of suitable structure.
Create a Data Mapping
1. Select the relevant XML element in the source view:
For details about issues related to selection, see Selecting Data.
2. Configure the mapping using "Extract with XML Data Mapper" on the context menu of the selected
XML element.
3. On the Extract list, select With XML Data Manager.
The XML Data Manager window appears.
1. Map a source from the available list.
2. In the Target Variable area, select a target variable and type.
3. The bottom right area of the window is reserved for the configuration of details for individual
entity mappings.
For more information, see Configuring.
The step sequence that performs the mapping at runtime is automatically generated.
4. Click OK.
The steps are automatically created.
For more information, see Auto-generating Steps.
Selecting Data
While the selection of data is easy, it is important to know how the selection and mapper interact.
In the Source column, select an XML element to map entities into variable attributes. Use the mapper
to map the following entities to variable attributes:
• The attributes of the selected element itself. In the Sources column such attributes are listed as
plain text names.
514
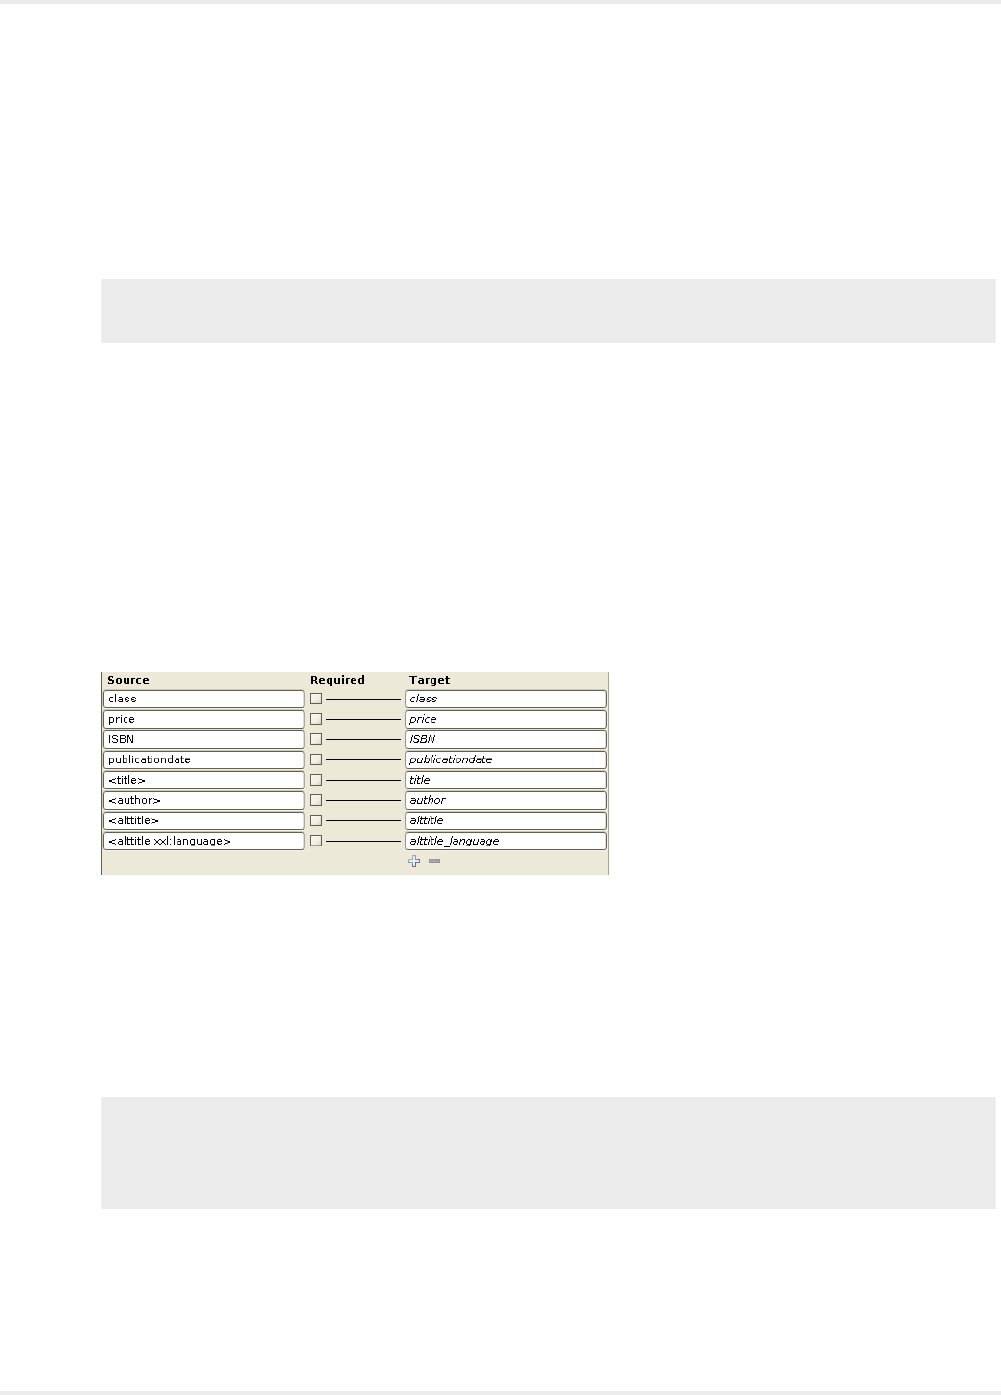
Kofax Kapow User's Guide
• The contents of sub-elements of the selected element that do not themselves contain sub-
elements. In the Source column, such elements appear in an XML-like format where names are
enclosed by < and >.
• The attributes of sub-elements of the selected element that do not themselves contain sub-
elements. In the Source column, such attributes also appear in an XML-like format where both the
enclosing element names and the attribute names are enclosed by < and >.
Note To activate the mapper for a section, at least one mappable element must be associated with
the selected element.
Configuring
The configuration step is where most of the user interaction takes place. The configuration step is
intended to identify an appropriate target variable attribute for each source entity that you wish to map.
You are not required to map all available sources.
1. In the Target Variable section, select Create a new Variable.
2. Enter a name for the variable.
3. Select Create a new Type.
4. Enter a type name.
Attribute names matching the source entities are automatically generated and a mapping is
suggested.
• To create a new variable from an existing type, select Use Existing Type. The system attempts
to map source entities where the type prescribes attribute names that coincide with the names
suggested by the sources.
• You can use an existing variable and associate it with a new type. Attribute names matching the
source entities are automatically generated and mapping is suggested.
• You can use an existing variable and an existing type. The system will try to map sources
automatically based on the attributes in the type.
Note When a new mapping is initiated, the system automatically attempts to make appropriate
variable and type choices. Suggestions are made based on the XML element tag name . If a
variable has the same name, the variable and type are suggested. If a matching variable exists but
a type is named like the tag name, the system suggests creating a new variable using this type.
5. To map Entities, in the Source list, select an entity.
6. In the Target list, select an attribute.
A line connecting the source and the target shows the connection.
515
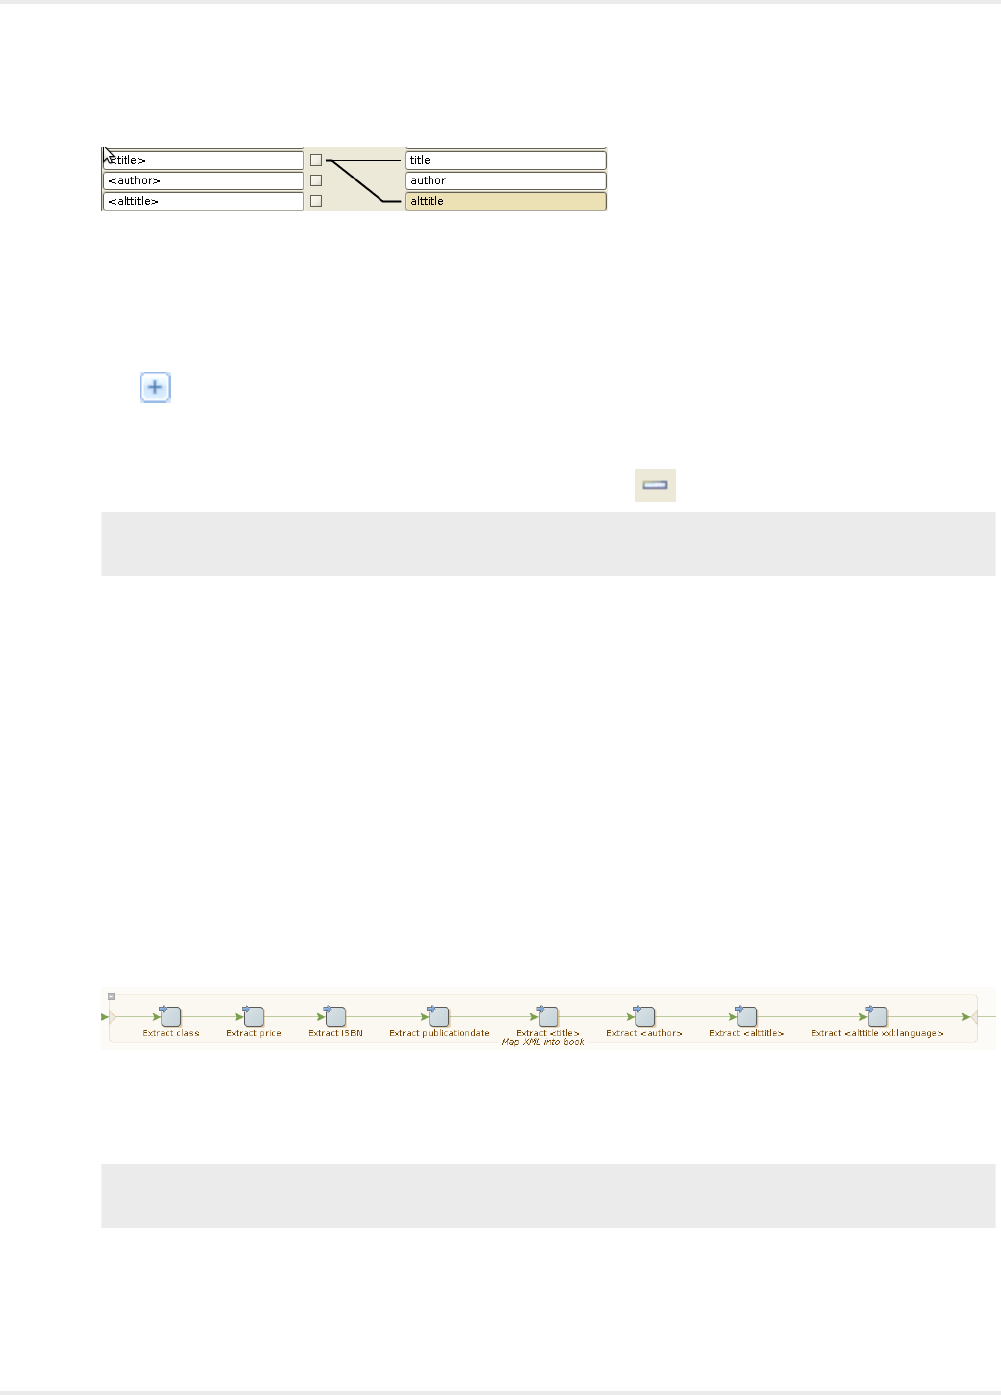
Kofax Kapow User's Guide
You can map a single source to more than one target.
7. If the source entity is required for the overall mapping to be sound, select the check box next to the
Source entity.
Associations can be dissolved as easily as they are created. To clear an association, hover the line
close to the target and click the red cross that appears.
8. If no target attribute is suitable for the source entity is available, select the source element and click
add .
The Add Attribute window appears.
9. Enter a name and type for the attribute.
To remove an attribute, select the attribute and click remove .
Note This only works with attributes added in the current invocation of the mapper, such as
attributes that have not yet been persisted in the corresponding type file.
10. To configure the target attribute, select the attribute.
Configuration attributes appear.
You can associate data converters with the mapping, such that data may be brought into acceptable
form.
You can select Trim Spaces if the source entity is an XML attribute.
• You can change the target attribute name and type.
• Associate data converters with the mapping such that data is brought into an acceptable form.
• Select to clear Trim Spaces for XML attributes.
Auto-generating Steps
1. When the configuration of a data mapping is done, click OK.
The system auto-generates the actual steps required to perform the implied extractions and inserts
the steps into the robot. The procedure always generates exactly one extract or extract tag attribute
step for each association created in the mapper.
2. Anchor the data mapping by a named tag identifying the original XML element you selected.
If such a named tag does not exist, a Set Named Tag step is generated and inserted into the robot
just before the actual data mapping.
Note Sometimes such a Set Named Tag is not necessary because a suitable named tag is already
in place. This often occurs when the mapping is part of a loop.
516
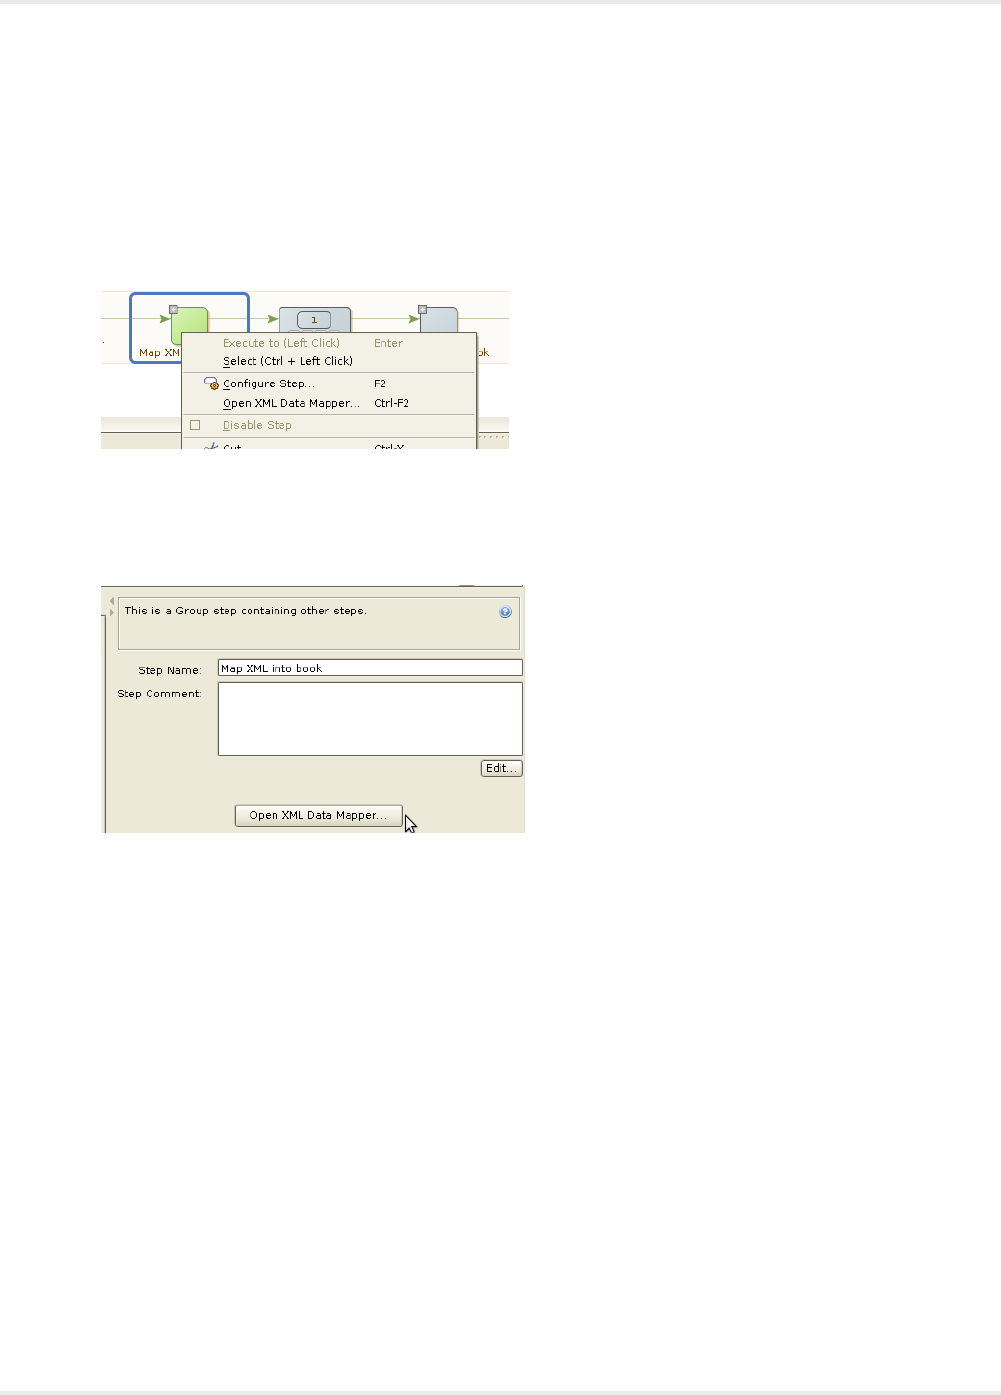
Kofax Kapow User's Guide
Edit a Data Mapping
Once a data mapping is configured, you can use the data mapper to open and edit it. Since data
mappings are associated with group steps, the ability to reopen the mapper is also connected to group
steps.
1. To open a data mapping, right-click a group step and select Open XML Data Mapper.
This will only work if the group step is the current step, that is, green. If it is not green, there may not
be XML information to support the mapper.
Alternatively, you can open the mapper for a group step that is current on the associated step view
and click Open XML Data Mapper
2. Once open, the mapper will behave exactly as described in Create a Data Mapping.
3. Edit the data mapping steps manually if needed.
Note that only certain changes are compatible with the XML data mapper. Opening a data mapping
is subject to a number of conditions, essentially expressing that the group step MUST be a real data
mapping.
• The group step may not contain control structure in the form of branches, loops, or similar.
• The group step must contain at least one extract or extract tag attribute step.
• The extractions must all refer back to a named tag and it must be the same.
• The extractions must all target attributes of the same variable.
• For any given attribute of this variable, there may only be one extraction.
• No extraction may use a tag finder where an asterisk '*' occurs.
• All targeted attributes must exist in the underlying type.
517

Kofax Kapow User's Guide
URL Blocking
In the Configure URL Blocking Pattern window you can specify a URL blocking pattern and add this
pattern to the robot's list of Blocked URL Patterns. Once you specify the pattern and click OK, the robot is
re-executed.
You can use special symbols and edit the pattern in the Pattern Editor. See Patterns for more information.
Web Authentication
Website robots in Kapow can use different authentication over a network. The authentication setting is
specified under Credentials on the All Loading tab of the Default Options window. You can use either
Standard or OAuth credentials. See OAuth for more information.
With the Standard Credentials option Kapow supports Basic, Digest, NTLM, and Negotiate protocols.
For Windows systems, Kapow uses the Security Support Provider Interface (SSPI) to provide security
services to calling applications. For Unix, Kapow uses the Generic Security Service API (GSS-API)
libraries for Negotiate protocol and developed proprietary NTLM support implementation.
Note Your Linux installation must include Generic Security Service API (GSS-API) libraries to use cross-
platform authentication. See Supported Platforms in the Kapow Installation Guide for more information.
In case a user needs to have access to remote network resources, delegation must be set up to access
those resources. For more information about setting up authentication and delegation rules, see Microsoft
documentation at msdn.microsoft.com and support.microsoft.com.
Kapow automatically detects the type of authentication during the login process and in most situations
provides authentication parameters in the required format. For NTLM protocol, SPN (Service Principal
Name) string is always as follows: HTTP/HostName:port. For Negotiate protocol, SPN may be with or
without the port number.
In some cases you may need to create an spn.txt file and explicitly provide authentication parameters.
Create spn.txt in the bin directory of the Kapow installation directory, for example C:\Program Files
\Kapow 10.2.0.1 x64\bin. The file includes three parameters that can be specified independently.
spn.txt file format
Parameter Description Example
<host>:<port>::allow_port=[true|
false]
Specifies whether to include
port number in SPN.
false (default): Do not
include port number
true: Include port number
localhost::allow_port=true
<host>:<port>::delegate=[true|
false]
Turns on delegation usage
for the specified account.
false (default): Do not use
delegation
true: Use delegation
localhost::delegate=true
518

Kofax Kapow User's Guide
Parameter Description Example
<host>:<port>=<FQDN> Enter host name in the
form of a fully qualified
domain name (FQDN) of the
computer running the robot.
This parameter overrides the
allow_port parameter and
Kapow uses the exact string
specified here.
localhost=COMPUTERNAME.companyname.com
When Negotiate protocol is used in the environment with multiple websites running on the same hostname
with different port numbers and using different application pool identities, you can set allow_port to true
and specify a non-standard port for the SPN, for example:
localhost:8888::allow_port=true
Also, it is possible to use port as a part of the mask to assign SPN server, such as
localhost:8888=server:555.
Logging
If you encounter errors during web authentication, you can turn on Webkit logging in the
log4j.properties file as follows: log4j.logger.webkit=TRACE. The log file should contain information
about used authentication properties and SPN string. Look for the following lines in the log file
Setting SPN to : 'Service Principal Name (SPN)'
Delegate : [ON|OFF]
Non-standard port : [ON|OFF]
Setting NTLM SPN to : 'SPN string'
See "log4J" section in the Cluster Logs topic for details.
RoboServer
RoboServer is the Kofax Kapow application for running robots as a service to clients. Once started,
RoboServer accepts requests from clients, such as robot execution requests, and sends back responses,
such as the objects that a robot extracted during its execution.
For an in-depth description of the RoboServer, please see Kapow Administrator's Guide.
Start RoboServer
You can start the RoboServer using the following actions.
• Click the RoboServer program icon (or the Start Management Console program icon which starts both
the Management Console and RoboServer).
• Start the RoboServer from the command line.
• Run the server as a service. For more information about running RoboServer as a service, see Starting
Servers Automatically.
519
Kofax Kapow User's Guide
To invoke RoboServer from the command line, open a Command Prompt window, navigate to the bin
folder in the Kapow installation folder and type:
RoboServer
If all necessary parameters are specified in the roboserver.settings configuration file, the RoboServer
starts.
If any of the necessary parameters is missing, the RoboServer specifies an error and displays the usage
help and available parameters.
RoboServer Parameters
The command line for starting a RoboServer may include the following parameters:
RoboServer [-cl <arg>] [-cpuThreads <arg>] [-h]
[-maxConcurrentRobots <arg>] [-maxQueuedRobots <arg>] [-MC] [-mcUrl
<arg>] [-p <arg>] [-pauseAfterStartupError] [-s <arg>] [-sslPort
<arg>] [-v] [-V]
Regardless of how you start RoboServer, it accepts the parameters in the following table. Note that you
can edit all the parameters in the RoboServer Settings utility. See RoboServer Configuration for more
details.
Parameter Description
-cpuThreads <arg> Specifies the number of CPU threads to use.
-h
--help
Displays help.
-maxConcurrentRobots <arg> Specifies the maximum number of concurrently executed
robots.
-maxQueuedRobots <arg> Specifies the maximum number of robots in the queue.
-mcUrl <arg> Specify which Management Console to register to in the
following format:
http[s]://
<username>:<password>@<hostname>:<port
number>
Example: -mcUrl http://
admin:password@localhost:8080/
ManagementConsole
-pauseAfterStartupError
-v |
-verbose
This optional parameter causes RoboServer to output
status and runtime events.
-V |
-version
This optional parameter causes RoboServer to output the
version number, and then exit.
520
Kofax Kapow User's Guide
Parameter Description
-MC
--scheduler
This optional parameter triggers the Management Console
to be started as part of RoboServer. The Management
Console runs on an embedded web server configured
through the Settings application.
-cl
--cluster <arg>
This optional parameter automatically registers the
roboserver with the specified cluster on the Management
Console. In the following example the roboserver registers
itself with the Production cluster.
Example: -cl Production
Example: -mcUrl http://
admin:password@localhost:8080/
ManagementConsole -cl Production
-s <service-name:service-parameter> |
-service <service-name:service-parameter>
This parameter specifies a RQL or JMX service that
RoboServer should start. This parameter must be specified
at least once, and may be specified multiple times to start
multiple services in the same RoboServer. The available
services depend on your installation.
Example: -service socket:50000
Example: -service jmx:50100
-p <port-number> |
-port <port-number>
This is shorthand for calling -s socket:<port-
number>
Example: -port 50000
-sslPort <arg> This is a shorthand for writing -s ssl:<port number>
Available services
-service socket:<portNumber> <portNumber>: The port number for the socket-service to
listen on.
-service ssl:<portNumber> <portNumber>: The port number for the socket-service to
listen on.
-service
jmx:<jmx_port_Number>,<jmx_rmi_url>
<jmx_port_Number>: The port number for the JMX
service to listen on.
<jmx_rmi_url>: Optional RMI host and port for the JMX
service. Use if you need to connect through a firewall.
Example: example.com:51001
Note that to set passwords, you must either use the RoboServer Settings utility or the ConfigureRS tool.
For more information, see RoboServer Configuration and RoboServer Configuration - Headless Mode.
Starting Servers Automatically
If your installation includes any server functionality, you can configure it to start the servers automatically.
521

Kofax Kapow User's Guide
When referring to "server functionality", we mean RoboServers and the Management Console (license
server). In fact these two components are provided by the RoboServer, depending on the arguments
supplied to it when it starts.
The RoboServer Parameters topic contains a detailed description of the command-line arguments for
the RoboServer program. To enable the RoboServer program to execute robots, specify the -service
argument. Similarly, the -MC argument enables the Management Console functionality (see Management
Console (License Server) in the Installation Guide).
The following topics details how to make RoboServer start automatically on Windows and Linux.
Shutting Down RoboServer
RoboServer can be shut down using the command line tool ShutDownRoboServer. Run
ShutDownRoboServer without arguments to see the various options for how to shut down the server,
particularly how to handle any robots currently running on the server.
522
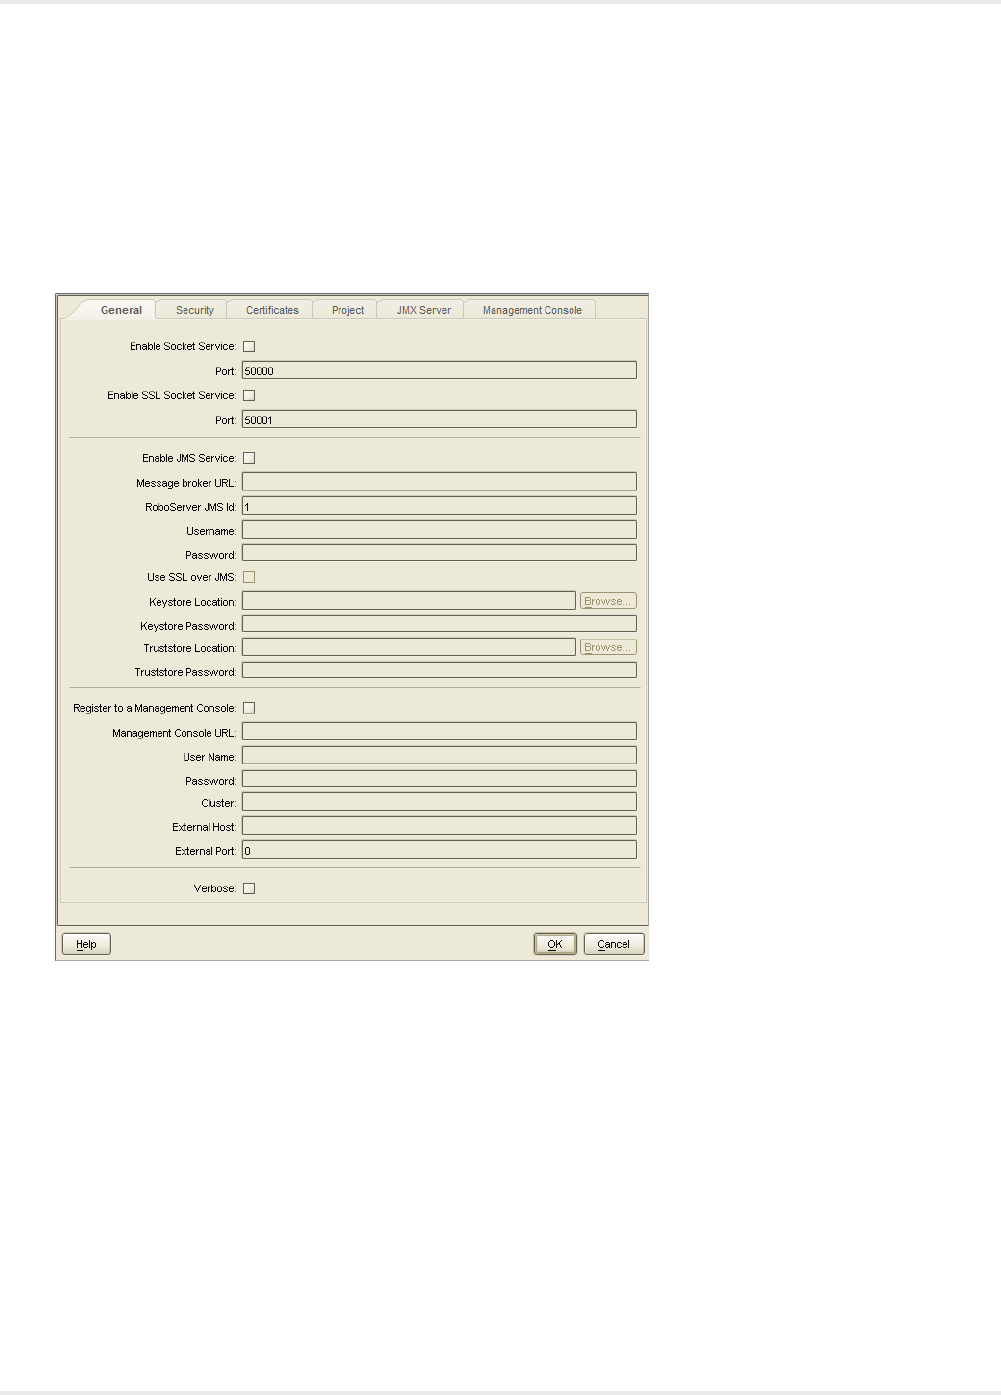
Kofax Kapow User's Guide
RoboServer Configuration
You can configure RoboServer through the RoboServer Settings application. RoboServer Settings can be
started from the Windows Start menu.
Settings Main Window
Using this application, you can configure the following:
• General: Socket service options, enable and configure JMS Service options, Management Console
connection options, and the Verbose option.
• Security: Security settings such as authentication and permissions.
• Certificates: The use of certificates.
• Project: The location of the default v project.
• JMX Server: The JMX server.
• Management Console: Configuration of the embedded Management Console.
After changing any of the settings, click OK to store the new settings, and then restart any RoboServers
that are running, to make the changes take effect.
523

Kofax Kapow User's Guide
Starting from Kapow version 10, all RoboServers must auto register to the Management Console.
Therefore, the URL and credentials for the Management Console along with the cluster name must be
specified when starting the RoboServer (either at the command line or using the RoboServer Settings
application).
Kapow contains several command-line tools to help you modify the settings in batch mode. For example,
you can create several users with specified permissions. See Configuring RoboServer in Headless Mode.
If you need to change the maximum amount of RAM that RoboServer can use, see Change the RAM
Allocation in the Administrator's Guide.
RoboServer Configuration - Headless Mode
Kapow ships with several utilities to configure your RoboServer from a command line. The utilities are
located in the bin subfolder of the Kapow installation folder. Note that the configuration files are user-
dependent and stored in the user folder. For more information, see the Important Folders topic in the
Kapow Installation Guide.
• ConfigureRS: Sets the JMX password and the Management Console password in the RoboServer
settings file (roboserver.settings).
• ConfigureMC: Sets Management Console administrator and certificate passwords in the mc.settings
file.
• ConfigureRSUser: Adds and removes users and updates user credentials in the rsusers.xml file.
Information in this file is used to authenticate API requests.
For help on usage, run utilities with an -h option.
To set a connection to the Management Console that the RoboServer will register to, type the following
command:
ConfigureRS -mcUrl http://admin:password@localhost:8080/ManagementConsole
To create a user user1 with Password1 password and all permissions type the next command:
ConfigureRSUser user1 Password1 -a
To enable authentication of API requests, you must open rsusers.xml and change the enabled attribute to
true, as shown in the following example.
Sample rsusers.xml configuration file
<?xml version="1.0" encoding="UTF-8"?>
<userConfiguration enabled="true">
<users>
<user username="user1" password_hash="20c7628c31534b8718a1da00435505e4262e3f4dc305">
<startRobot/>
<stopRobot/>
<shutdownRoboServer/>
</user>
</users>
</userConfiguration>
524

Kofax Kapow User's Guide
Sample roboserver.settings configuration file
# Settings file for RoboServer. Some configurations contains encrypted passwords and should not
be edited by hand,
these should be modified using dedicated commandline tools.
# The directory of use on RoboServer when the API used the DefaultRoboLibrary. On windows \
must be escaped like this
c:\\\\users\\AppData\\Local\\Kapow\\...
defaultProject = /home/mikael.nilsson/Kapow/trunk
# Should RoboServer be allowed to access the fileSystem, or call commands/scripts. Values:
true/false
sec_allow_file_system_access = false
# Will RoboServer accept JDBC drivers sent from the Management Console. Values: true/false
sec_accept_jdbc_drivers = true
# Should RoboServer log all loaded URLs to the log4j audit log. Values true/false
sec_log_http_traffic = false
# If enabled RoboServer will check credentials for API requests. Values: true/false
sec_authenticate_api_requests = false
# If enabled RoboServer generate an error when accessing a https site without a valid
certificate. Values: true/false
cert_verify_https_certificates = false
# If enabled, RoboServer will only allow SSL connections from trusted client. Values true/false
cert_verify_api_certificates = false
# Configures if the the JMX service should be enabled
enable_jmx = false
# The port number for the JMX service to listen on.
jmx_port_Number = 50100
# If enabled, input for robots is exposed through JMX. Values: true/false
jmx_show_inputs = true
# Heartbeat notification interval, in seconds
jmx_heartbeat_interval = 0
# Configure if JMX should use RMI
enable_jmx_rmi = false
# Optional RMI host and port for the JMX service. Use if you need to connect through a
firewall. Example: example.com:51001
jmx_rmi_url =
# Enables authentication for JMX requests. Values: true/false
jmx_enable_authentication = true
# The user-name used for JMX authentication
jmx_username =
# The password used for JMX authentication. This should be created using the ConfigureRS
command line tool.
jmx_password =
# Configures if the socket service should be enabled
enable_socket_service = false
# Configures which port the RoboServer should be listening on
port = 50000
# Configures if the ssl socket service should be enabled
enable_ssl_socket_service = false
# Configures which ssl port the RoboServer should be listening on
ssl_port = 50001
525

Kofax Kapow User's Guide
# Configures if the JMS service should be enabled
enable_jms_service = false
# Configures which id the RoboServer should have when running JMS
jms_id = 1
# Configures the URL of the message broker when running JMS
broker_url =
# Configures if the RoboServer should register to a Management Console
enable_mc_registration = false
# Specify which Management Console to register to formatted as: http[s]://<hostname>:<port
number>
mc_URL =
# The user name to use for authentication to the Management Console
mc_username =
# The password to use for authentication to the Management Console
mc_password =
# Specifies which cluster the RoboServer should be registered to
cluster =
# Causes RoboServer to output status and runtime events
verbose = false
Sample mc.settings configuration file
# Settings file for Management Console. Passwords should not be edited by hand, but using the
'ConfigureMC' command line utility.
# Should the MC web-server start a HTTP listener. Values true/false
mc_http = true
# Configures the port of the http listener.
mc_http_port = 50080
# Should the MC web-server start a HTTPs listener. Values true/false
mc_https = false
# Configures the port of the HTTPS listener.
mc_https_port = 50443
# Password for the certificate used by the HTTPs listener. This should be created using the
ConfigureMC command line tool.
mc_https_cert_password = 3W2MTrL/b2k=
# Enables MC internal user management, to support multi user scenarios. Values: true/false
mc_enable_usermanagement = true
# The user-name of the MC super user.
mc_admin_user =admin
# The passwordHash of the MC super user. This is a salted SHA-256 hash.
mc_admin_password
=7800451255702ef8ae5f5fa0337833059d80b81d5af5872bdeafed230bab479896b6df4f63b25a24
# Configures which hosts are allowed to upload JDBC jar files to MC. Values: NONE, LOCALHOST,
ANY_HOST
mc_allow_jdbc_upload = LOCALHOST
526

Kofax Kapow User's Guide
Management Console
The Management Console is a web-based application for monitoring and managing your Kofax Kapow
installation, using the Management Console you can do the following:
• Enable collaboration and sharing using the repository.
• Manage user roles and permissions, and centrally administer the solution.
• Advanced scheduling of robots from the repository.
• Browse extracted data and export to MS Excel.
• Access detailed logs of production results and errors.
• Graphical dashboard for monitoring RoboServer health and resource usage.
• One-Click deployment of robots from Design Studio to the repository.
For more details refer to the Management Console documentation or the Management Console Tutorial.
Other Topics
This section contains reference help on some of the other important concepts that are used in the
Management Console.
Cron Schedule
A "cron" schedule is made up of six or seven sub-fields that together describe when the robots should be
run. The sub-fields are separated with one or more spaces, and represent:
1. Seconds
2. Minutes
3. Hours
4. Day-of-Month
5. Month
6. Day-of-Week
7. Year (optional field)
An example of a complete cron schedule is "0 0 12 ? * WED", which means "every Wednesday at 12:00
pm".
Individual sub-fields can contain ranges and/or lists. For example, the Day-of-Week field in the previous
example (that is, "WED") could be replaced with "MON-FRI", "MON, WED, FRI", or even "MON-
WED,SAT".
Wild-cards (the "*" character) can also be used, meaning "every possible value of this field". For example,
the "*" character in the Month field of the previous example would mean "every month". A "*" in the Day-
of-Week field would obviously mean "every day of the week".
527
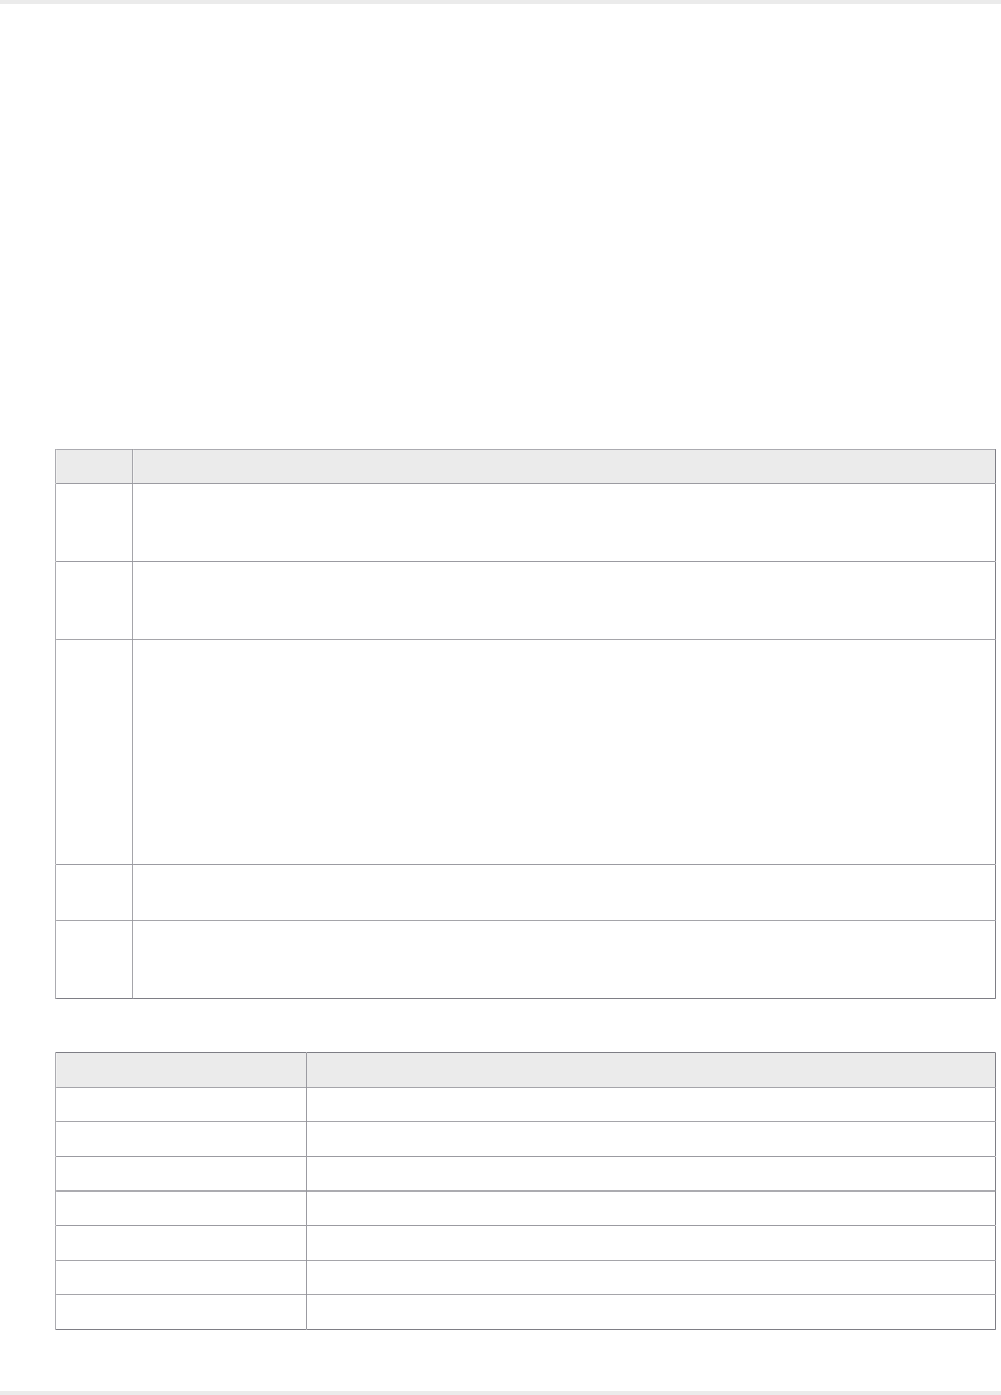
Kofax Kapow User's Guide
The set of valid values for each field is:
• Seconds: The numbers 0 to 59.
• Minutes: The numbers 0 to 59.
• Hours: The numbers 0 to 23.
• Day-of-month: The numbers 1 to 31 (but be careful about how many days there are in a given month).
• Month: The numbers 1 to 12, or the strings JAN, FEB, MAR, APR, MAY, JUN, JUL, AUG, SEP, OCT,
NOV and DEC.
• Day-of-week: The number 1 to 7 (1 is Sunday), or the strings SUN, MON, TUE, WED, THU, FRI and
SAT.
• Year: Any number.
In addition, a number of special characters may be used:
Definition
/ Specifies increments to values. For example, if you put "0/15" in the Minutes field, it means "every 15
minutes, starting at minute zero". If you use "3/20" in the Minutes field, it means "every 20 minutes during
the hour, starting at minute three" - in other words, the same as specifying "3,23,43".
? Allowed only in the Day-of-Month and Day-of-Week fields, and means "no specific value". This is useful
when you need to specify something in one of these two fields, but not the other. See the examples below
for clarification.
L Allowed only in the Day-of-Month and Day-of-Week fields. "L" is short-hand for "last", but its meaning
differs between the two fields.
In the Day-of-Month field, "L" means "the last day of the month" - day 31 for January, day 28 for February
on non-leap years etc.
If used in the Day-of-Week field by itself, it simply means "7" or "SAT", but if used in the Day-of-Week field
after another value, it means "the last xxx day of the month" - for example "6L" or "FRIL" both mean "the
last Friday of the month".
When using the "L" character, it is important not to specify lists or ranges of values, as you'll get confusing
results.
# Used in the Day-of-Week field to specify "the nth" XXX weekday of the month. For example, the value of
"6#3" or "FRI#3" means "the third Friday of the month".
W Specifies the weekday (Monday-Friday) nearest the given day. As an example, if you were to specify
"15W" as the value for the Day-of-Month field, the meaning is: "the nearest weekday to the 15th of the
month".
Examples
Cron schedule Explanation
0 0 12 * * ? Fire at 12pm (noon) every day
0 15 10 ? * * Fire at 10:15am every day
0 15 10 * * ? Fire at 10:15am every day
0 15 10 * * ? * Fire at 10:15am every day
0 15 10 * * ? 2005 Fire at 10:15am every day during the year 2005
0 * 14 * * ? Fire every minute starting at 2pm and ending at 2:59pm, every day
0 0/5 14 * * ? Fire every 5 minutes starting at 2pm and ending at 2:55pm, every day
528
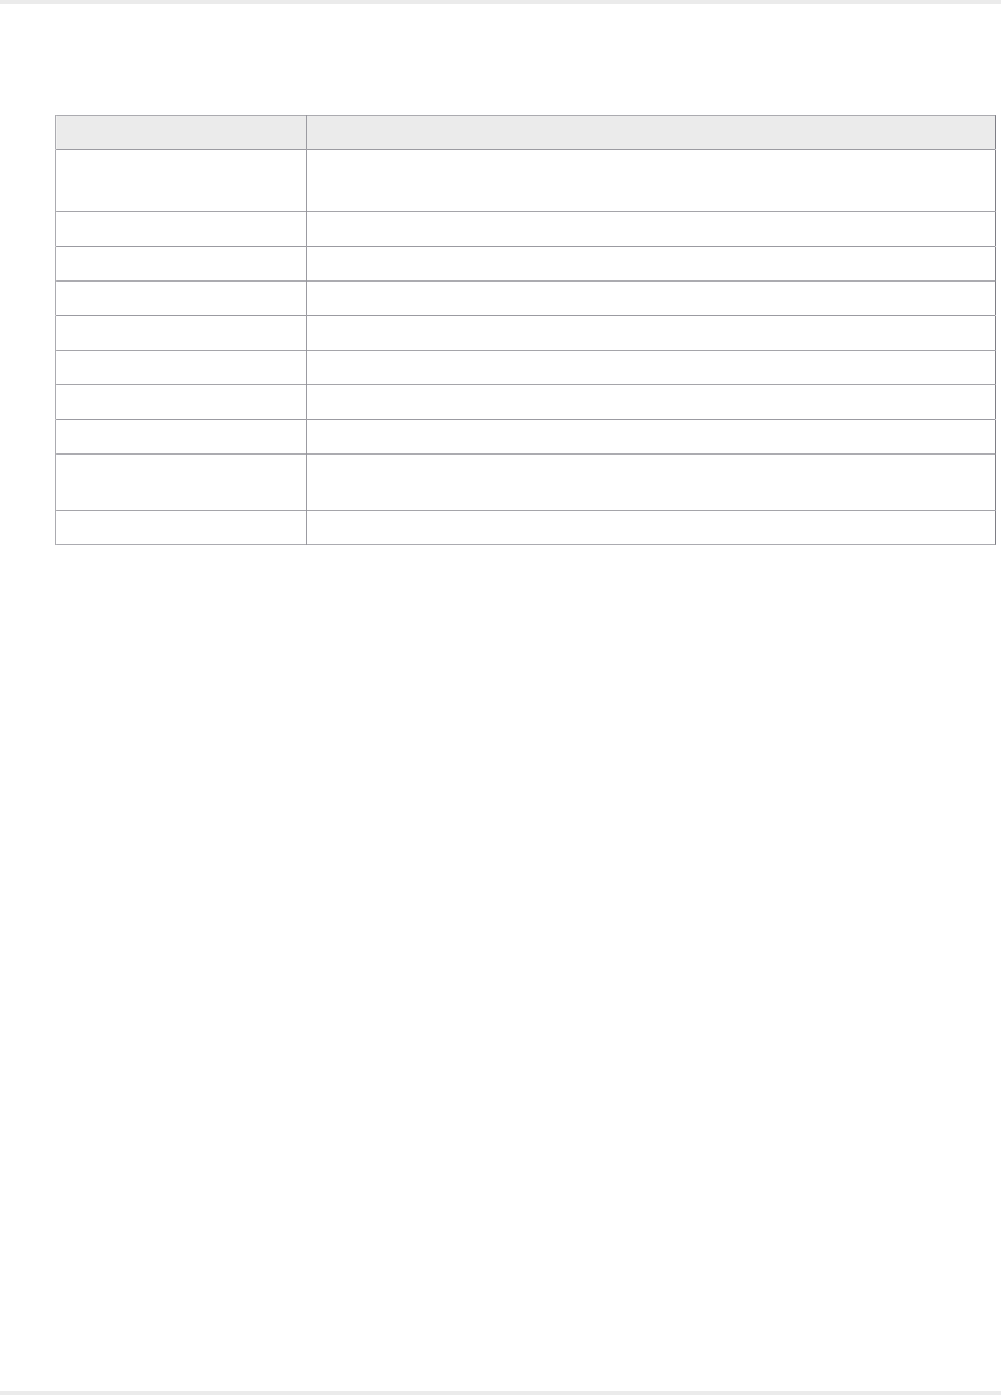
Kofax Kapow User's Guide
Cron schedule Explanation
0 0/5 14,18 * * ? Fire every 5 minutes starting at 2pm and ending at 2:55pm,
AND fire every 5 minutes starting at 6pm and ending at 6:55pm, every day
0 0-5 14 * * ? Fire every minute starting at 2pm and ending at 2:05pm, every day
0 10,44 14 ? 3 WED Fire at 2:10pm and at 2:44pm every Wednesday in the month of March.
0 15 10 ? * MON-FRI Fire at 10:15am every Monday, Tuesday, Wednesday, Thursday and Friday
0 15 10 15 * ? Fire at 10:15am on the 15th day of every month
0 15 10 L * ? Fire at 10:15am on the last day of every month
0 15 10 ? * 6L Fire at 10:15am on the last Friday of every month
0 15 10 ? * 6L Fire at 10:15am on the last Friday of every month
0 15 10 ? * 6L 2002-2005 Fire at 10:15am on every last Friday of every month during the years 2002, 2003,
2004 and 2005
0 15 10 ? * 6#3 Fire at 10:15am on the third Friday of every month
Filtering
Filter field in the Robots, Types, Snippets, Resources, and Databases tabs under Repository helps you to
filter a list of items to view by their names and path.
Note the following rules when applying filters:
• ? matches a single character, * matches zero or more characters
• When you type a search string without a forward slash and without any wildcard characters, the search
is performed as a substring matching the name of the items. For example, the search string "foo" would
match the robots foo and foobar regardless of the folder they are in.
• When you type a search string without a forward slash but with one or more wildcard characters, the
search is performed as pattern matching the full name of the item. For example, "foo*" would match the
robots foo and foobar regardless of the folders they are in, but would not match xxxfoo. The search
string "foo?ar" would match the robot foobar.
• When you type a search string containing a forward slash, the search is performed to match the full
path of the items, that is folder plus name. For example, the search string "sub1/foo" would match
sub1/foo, but not sub1/foobar. The search string "sub1/foo*" would match both sub1/foo and sub1/
foobar.
Java API
A copy of the Java API documentation is installed under the API folder in your Kapow installation folder,
for example C:\Program Files\Kofax Kapow 10.2.0.1\API. Open the Overview.html file in the API
folder and browse for the topic you are interested in.
You can also read the Developer's Guide that contains information about programming for Kapow. The
guide can be accessed in the Kapow > Documentation on the Start menu.
529

Kofax Kapow User's Guide
Using Proxy Services
Some IP proxy providers are beginning to offer built-in IP rotation services. Although this is convenient, it
is not always a useful service for those who need IP proxies.
Kapow does not recommend using an IP-rotation model where the proxy provider rotates the IP at random
or pre-set times, because not all web sites are able to or even allow maintaining a browser session across
an IP address change.
On the open Internet, IP rotation can work just fine, because the typical browser socket connection has
a very short life and the web site does not check the source IP address. Many web sites and shops
implement the most basic session management. With the increase in cyber-threats and focus on security,
many web sites are increasing their security level and adding IP address monitoring. It is a good practice
for web servers to detect and prevent in-session IP address changes for protection against Man-in-the-
Middle attacks. This is why all web banking sites and many other commercial and financial services sites
with user login are implementing protection against in-session IP address changes.
Since changing the IP address is likely to break the session in progress with the web-server, you cannot
arbitrarily rotate IP addresses while running robots. The best way to use proxies effectively is to control
the proxy from within the robot, for instance by using the Change Proxy step, or by using web services
provided by the proxy service.
If the rotation is done in the robot, with consideration of the remote website, in a way the transactions are
made within an IP address session, the robot should work fine.
See also:
•Change Proxy step
•Proxy Servers in Design Studio settings
• Configuring Proxy Servers in Management Console
Kapow Limitations
The following section describes some limitations of the Kapow product.
Browser
• Kapow uses a browser to interact with web sites or web applications. In fact, Kapow currently comes
with two different browsers, each optimized for different purposes - the Classic engine for legacy web
applications and the Default engine for modern web applications. However, these browsers - like any
other browsers in the market - are not compatible with every internal application or Internet web site.
• The web pages downloaded using Make Snapshot are a representation of the content and styles
downloaded from the internal browser in Kapow. When viewing the downloaded pages in a desktop
browser, they may render differently from viewing the original web page in that browser.
Excel
• When looping over a global Excel variable, certain step actions are not allowed inside the loop, that is
after the loop step. This is dynamically enforced, in other words it is first when the steps are executed
that the error occurs. The following step actions will always refuse to work on a global variable that the
530

Kofax Kapow User's Guide
robot loops over inside the loop: Insert Rows, Insert Columns, Remove Rows, Remove Columns and
Set Sheet Name.
• Excel modification is memory intensive and might not work on large Excel documents. The limit may
depend on many factors, for example, available memory on a design platform or a server platform, how
many modifications the robot does, etc. Therefore it is not possible to give precise criteria for when an
Excel document is too large for Kapow to handle.
• Formula support
See https://poi.apache.org/spreadsheet/formula.html for details on formula support.
• Unsupported Features
• Manipulating array/table formulas (In Excel, formulas that look like "{=...}" as opposed to "=...")
• Region operators: union, intersection
• Parsing of previously uncalled add-in functions
• Preservation of whitespace in formulas (when POI manipulates them)
• Font changes, for example bold, size, etc.
• Background color in cell
• External file references from formulas
• Sometimes, when your robot performs some actions on a very large Excel document, the processing
may become slow after several hundred iterations. To speed up the process, use the following settings
in your robot for Excel processing:
• Use Global variable
• Do not use the Ignore and Continue error handling
• Do not run your robot in Design mode
Note With all the above-mentioned conditions, if an error occurs when working with Excel, the
variable value is set to empty. You will need to inspect your robot to make sure you use the
supported Excel capabilities and correct the error to have a valid value in your variable.
See Supported Features in Excel for more information.
Password Length
All passwords used in the Kapow, for example, passwords for Cluster database, Logdb, Analytics, proxy,
and SMTP, must not exceed 117 bytes.
Database
Note the following limitations for IBM DB2 database
• The database must have a "table space" with a page size of at least 8192 KB to create all tables.
• Use "LANGUAGE SQL" for stored procedures. Stored procedures written with "LANGUAGE RPGLE"
are not supported.
Execution Mode
The following list contains steps that are not available in the Smart Re-execution mode.
• Call REST Web Service (old version)
• Call Web Service (old version)
• Clear Web Storage
• Crawl Pages
531

Kofax Kapow User's Guide
• Crawl Pages (old version)
• Divide Table
• Divide Tag (old version)
• Divide Text
• Divide Text (old version)
• Execute SQL (old version)
• Extract from Excel (old version)
• Extract from PDF (old version)
• Extract Image
• For Each File (old version)
• Hide Tag
• Insert Tag
• Load Data (old version)
• Make Snapshot
• Normalize Table
• Query Database (old version)
• Remove Table Rows
• Remove Tag Range
• Remove Tags
• Remove Tags (old version)
• Replace Tag
• Restore Tag
• Rewrite Page
• Rewrite Style Sheet
• Select File
• Set Top Tag (old version)
• Submit Form
• Transpose Table
• Unhide Tag
General
When collecting a large number of data elements, we recommend you to structure your robot for a divide-
and-conquer approach, so that each run of the robot collects only a portion of the data elements.
532
