LICENSEE MANUAL GÇô PROCESSORS Vol 6
User Manual: Pdf
Open the PDF directly: View PDF ![]() .
.
Page Count: 108 [warning: Documents this large are best viewed by clicking the View PDF Link!]

BIO-TECH MEDICAL SOFTWARE, INC.
BIOTRACKTHC WASHINGTON TRACEABILITY SYSTEM
LICENSEE MANUAL - PROCESSORS
Volume
6
2
BIO-TECH MEDICAL SOFTWARE, INC.
BioTrackTHC Washington Traceability System
Licensee Manual - Processors
LICENSEE MANUAL
PROCESSORS

3
© 2014 Bio-Tech Medical Software, Inc.
Fort Lauderdale, FL
Phone 800.797.4711
waquestions@biotrackthc.com

4
Table of Contents
CHAPTER 1: USER ACCESS 6
ADDING NEW USERS 6
MODIFYING AN EXISTING USER 8
CHAPTER 2: EMPLOYEES 10
REGULATIONS 10
ACCESSING THE EMPLOYEE SCREEN 11
ADD A NEW EMPLOYEE 12
MODIFYING AN EXISTING EMPLOYEE 13
DELETING AN EXISTING EMPLOYEE 14
CHAPTER 3: VEHICLES 15
ACCESSING THE VEHICLE SCREEN 15
ADD A NEW VEHICLE 16
MODIFYING AN EXISTING VEHICLE 17
DELETING AN EXISTING VEHICLE 18
CHAPTER 4: VENDORS 19
ACCESSING THE VENDOR SCREEN 19
VIEWING VENDOR INFORMATION 20
ACCCESSING THE PREFERRED VENDOR LIST 21
ADD A VENDOR 21
REMOVING A VENDOR 24
CHAPTER 5: STRAINS 25
REGULATIONS 25
ACCESSING THE STRAINS SCREEN 25
ADD A NEW STRAIN 26
MODIFYING AN EXISTING STRAIN 26
DELETING AN EXISTING STRAIN 27
CHAPTER 6: MARIJUANA-INFUSED PRODUCTS 28
REGULATIONS 28
ACCESSING THE PRODUCTS SCREEN 28
ADD A NEW PRODUCT 29
MODIFYING AN EXISTING PRODUCT 30
DELETING AN EXISTING PRODUCT 31
CHAPTER 7: INVENTORY ROOMS 32
ACCESSING THE ROOMS SCREEN 32
CREATING A NEW INVENTORY ROOM 33

5
MODIFYING AN EXISTING INVENTORY ROOM 34
DELETING AN INVENTORY ROOM 35
NAVIGATING INVENTORY ROOMS 36
CHAPTER 8: WHOLESALE INVENTORY TRANSFERS - INBOUND 40
INITIATING AN INVENTORY TRANSFER 40
INBOUND SHIPMENT 41
CHAPTER 9: PROCESSOR INVENTORY CONVERSIONS 44
TRACEABLITY LOGIC – INVENTORY CONVERSIONS 53
CONVERT FLOWER LOT TO USABLE MARIJUANA 54
CONVERT LOT INTO A MARIJUANA EXTRACT 57
CONVERT MARIJUANA EXTRACT INTO MARIJUANA-INFUSED PRODUCT 60
MOVE INVENTORY 63
CHAPTER 10: TRANSPORTATION MANIFESTS 70
REGULATIONS 70
CREATE A TRANSPORTATION MANIFEST 71
MULTI-STOP TRANSPORTATION MANIFESTS 75
VIEW MANIFESTS 76
VOID A MANIFEST 76
CHAPTER 11: WHOLESALE INVENTORY TRANSFERS - OUTBOUND 78
INITIATING AN INVENTORY TRANSFER 83
OUTBOUND SHIPMENT 85
CHAPTER 12: DESTRUCTION EVENTS 87
REGULATIONS 87
SCHEDULE INVENTORY DESTRUCTION 87
DESTROY INVENTORY 89
CHAPTER 13: SAMPLES 91
REGULATIONS 91
ACCOUNT FOR FREE SAMPLE 92
CHAPTER 14: INVENTORY ADJUSTMENTS 94
INVENTORY ADJUSTMENTS 99
CHAPTER 15: TAX OBLIGATION REPORT 102
REGULATIONS 102
ACCESSING THE TAX OBLIGATION REPORT 103
VIEWING THE TAX OBLIGATION REPORT 103
CONFIRMING AND ELECTRONICALLY SUBMITTING THE TAX OBLIGATION REPORT 105
DOWNLOADING AND PRINTING THE TAX OBLIGATION REPORT 106
SALES REPORTS 107
6
Chapter 1: User Access
In this chapter, you will learn how to:
Add, modify and remove user access to the Traceability System
In addition to the login credentials given to you by the WSLCB, the Traceability System
allows each licensee the abilility to grant system access to additional users for data
submission on your behalf. Please be aware that this is distinct from employees as defined
in Chapter 2: Employees (e.g., not all employees need to be given user access to the
Traceability System) and so adding users is not the same as adding employees.
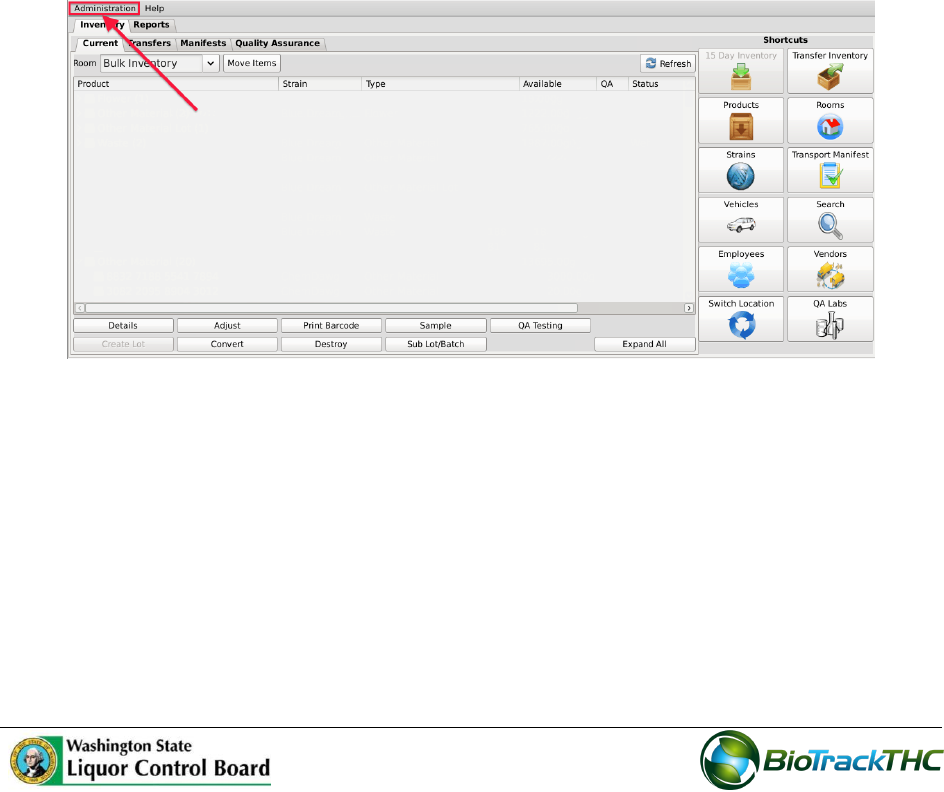
Adding New Users
To add new users into the system, click on the Administration menu near the top left
corner of the window.
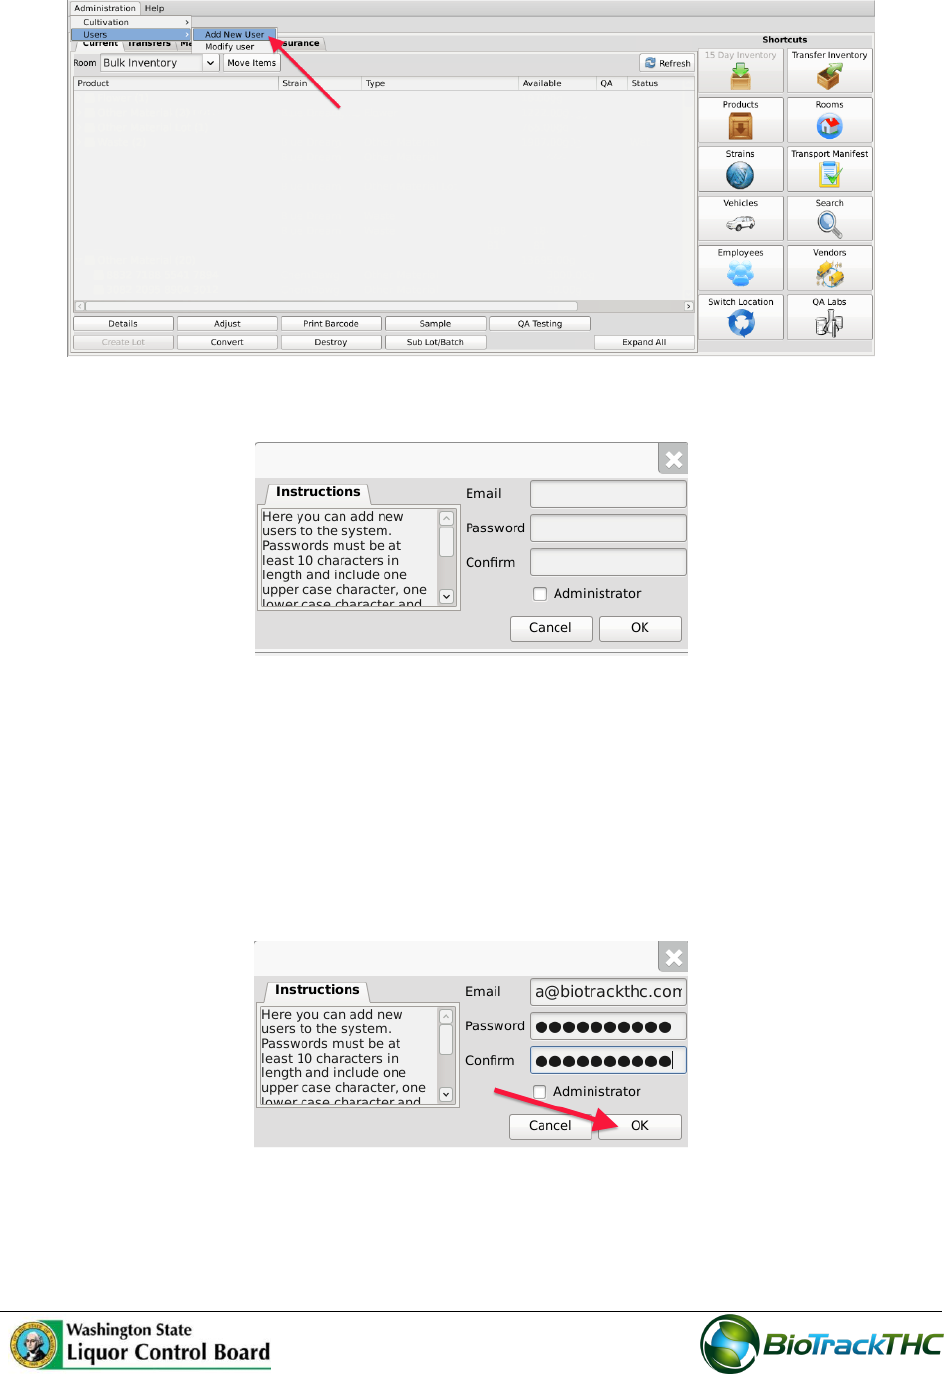
Hover the cursor over “Users” and then click on “Add New User”.
7
This will bring up the New User screen.
Within the Email text box, type the email address of the new user being granted
access.
Within the Password text box, enter the new user’s initial password.
o NOTE: the password must be at least ten (10) characters in length and
must include one upper case character, one lower case character, and
one number.
Click on the Administrator checkbox if the user is to have the ability to
add/modify/delete other users.
Click on the “OK” button when complete.
8
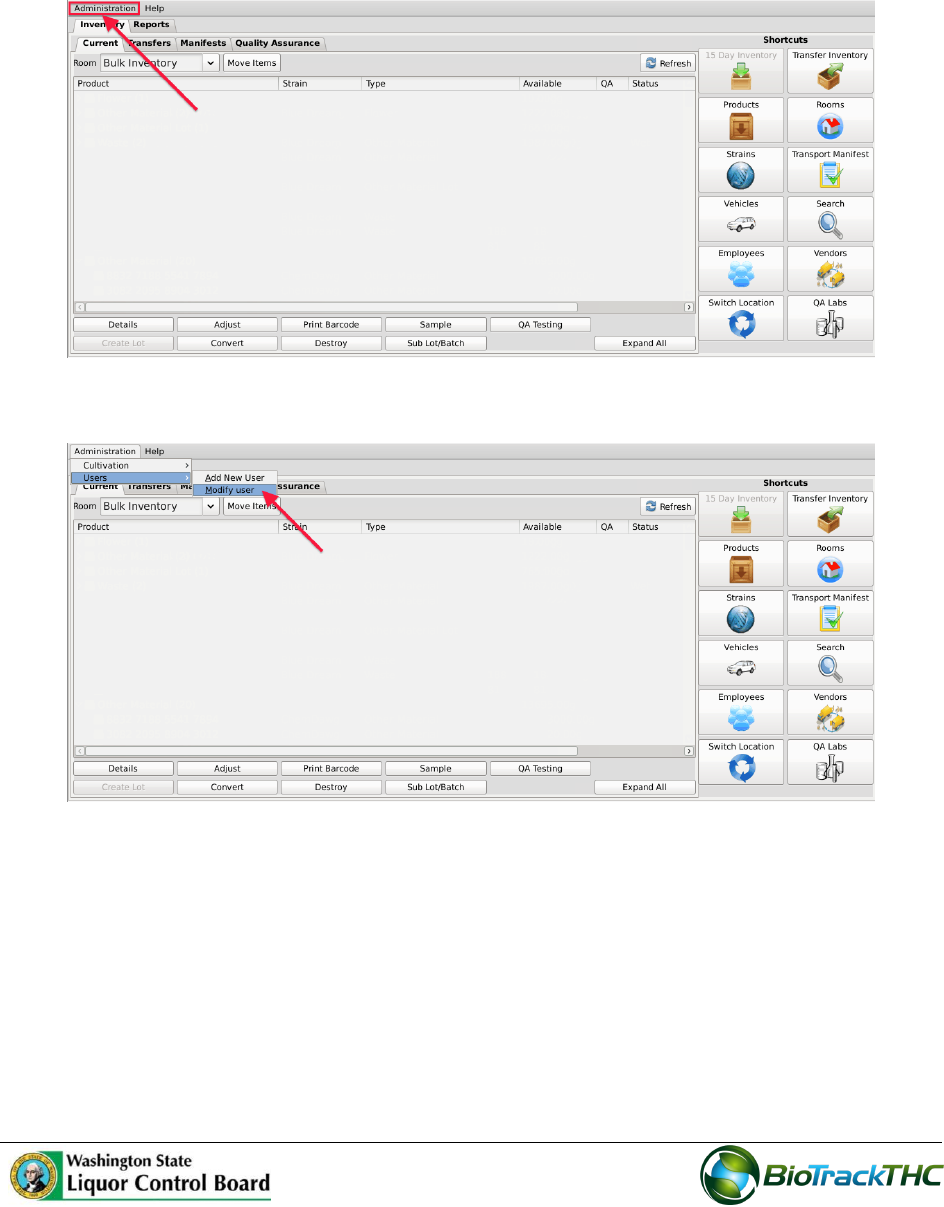
Modifying an Existing user
To modify users previously given access to the system, click on the Administration
menu near the top left corner of the window.
Hover the cursor over “Users” and then click on “Modify User”.
This will bring up the Modify User screen.
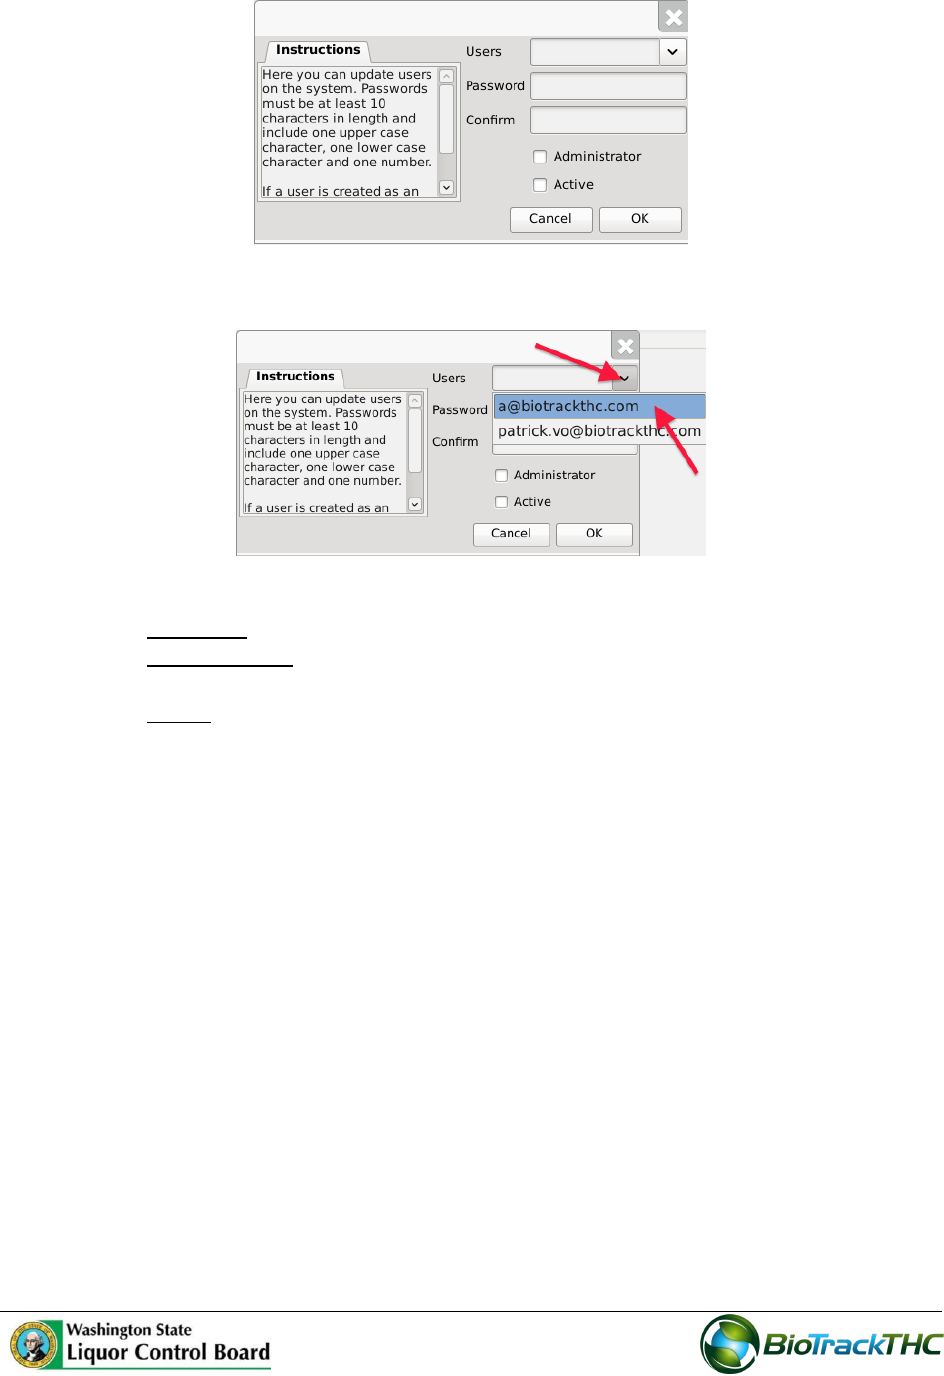
9
Select the user to be modified from the Users dropdown
You may modify the following:
o Password. The password associated with the user.
o Administrator. Checked (unchecked) box indicates the user is able (is not
able) to add/modify/delete other users.
o Active. Checked (unchecked) box indicates the user’s access is on (off). If
you are revoking a user’s access to the Traceability System, make sure that
this is unchecked.
Click on the “OK” button when complete.

10
Chapter 2: Employees
In this chapter, you will learn how to:
Add, modify and remove employees
Regulations
WAC 314-55-0815
(2) All applicants and employees working in each licensed establishment must be at least
twenty-one years of age.
WAC 314-55-083
(6) (g) Processors may sample one unit, per batch of a new edible marijuana-infused
product to be offered for sale on the market. Sampling for quality may not take place at a
licensed premises. Only the processor or employees of the licensee may sample the edible
marijuana-infused product. The processor must record the amount of each sample and the
employee(s) conducting the sampling in the traceability system.
(6) (h) Processors may sample up to one quarter gram, per batch of a new marijuana-
infused extract for inhalation to be offered for sale on the market. Sampling for quality may
not take place at a licensed premises. Only the processor or employee(s) of the licensee
may sample the marijuana-infused extract for inhalation. The processor must record the
amount of each sample and the employee(s) conducting the sampling in the traceability
system.
WAC 314-55-085
(1) Notification of shipment. Upon transporting any marijuana or marijuana product, a
producer, processor or retailer shall notify the board of the type and amount and/or weight
of marijuana and/or marijuana products being transported, the name of transporter, times
of departure and expected delivery. This information must be reported in the traceability
system described in WAC 314-55-083(4).
(5) (a) Only the marijuana licensee or an employee of the licensee may transport product;
11
Accessing the Employee Screen
To add new employes, view or change the information of existing employees, or delete
employees no longer needed, you will need to access the Employee screen.
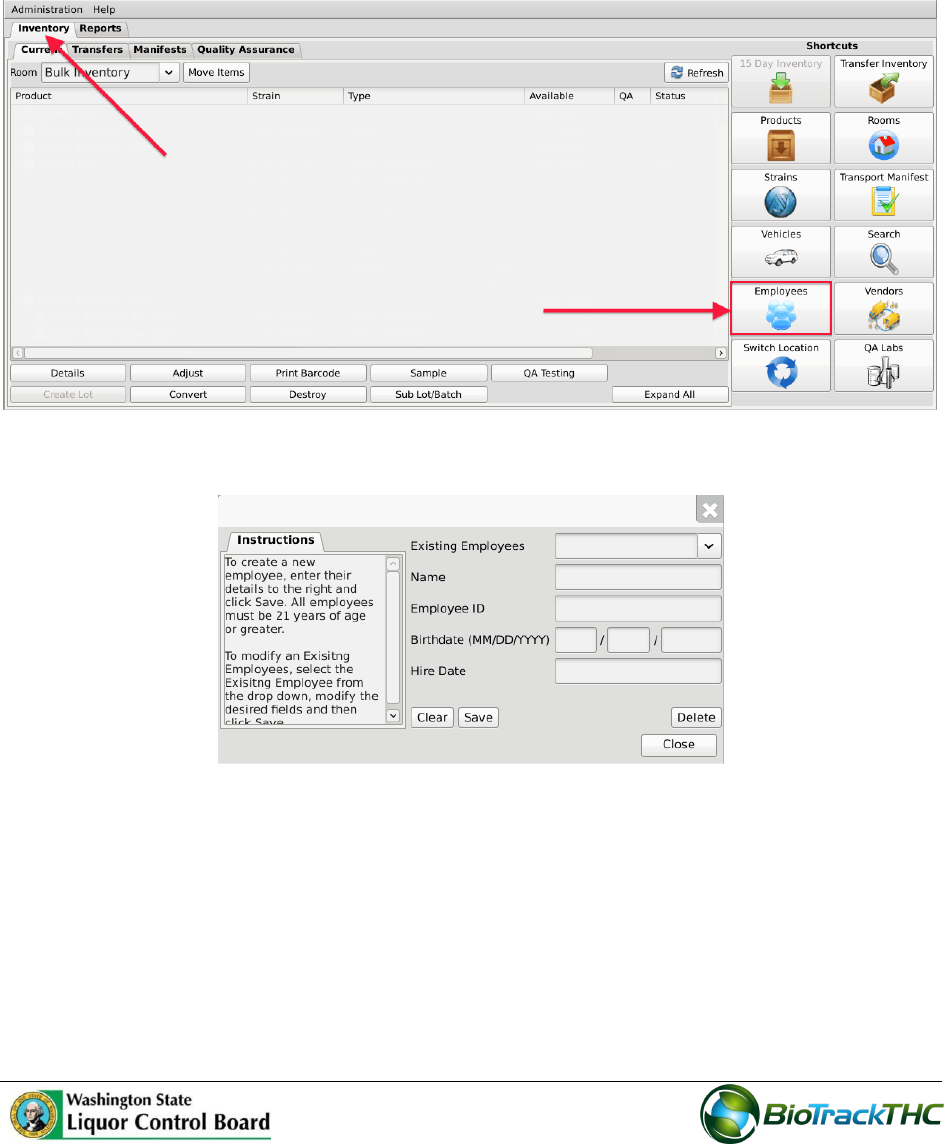
Navigate to the “Inventory” tab found in the top-left corner of the screen, and then
click on the “Employees” button located on the right-hand side of the home screen.
This will bring up the Employee screen.
12
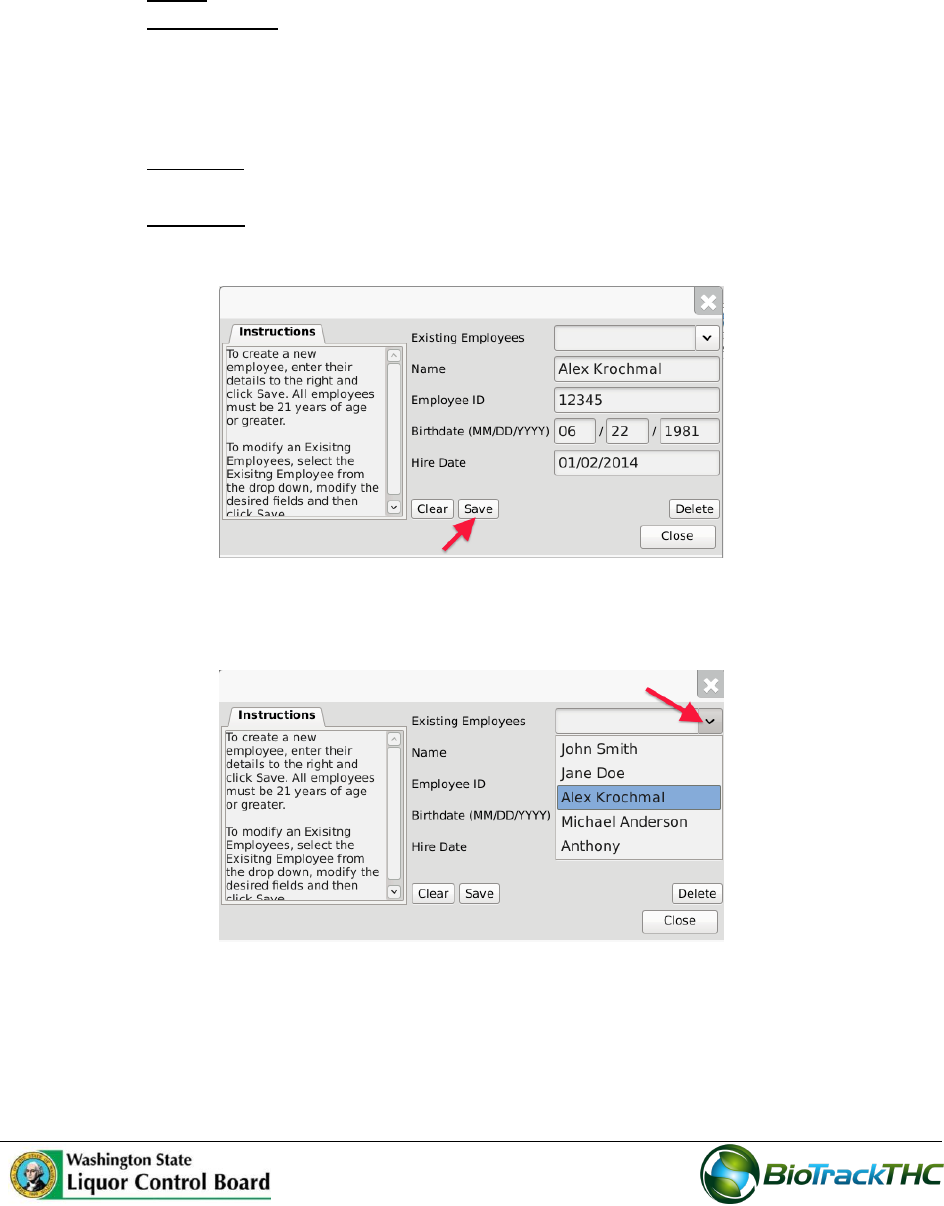
Add a New Employee
From the Employee screen, click on the “Clear” button to clear all fields and enter
the following information:
o Name: Enter the employee’s full name.
o Employee ID: Enter a unique identification number for the employee. This is
not a number assigned by the Traceability System or the WSLCB, but is
internal to your business. You may use payroll ID, driver license number, or
any other numbering system you see fit so long as each employee’s number is
unique and not to be re-used within your UBI.
o Birthdate: Enter the employee’s date of birth. Must be in the format of
MM/DD/YYYY.
o Hire Date: Enter the employee’s date of hire.
Click on the “Save” button once all of the required data has been entered.
The new employee will now appear within the Existing Employees dropdown for
selection.
13
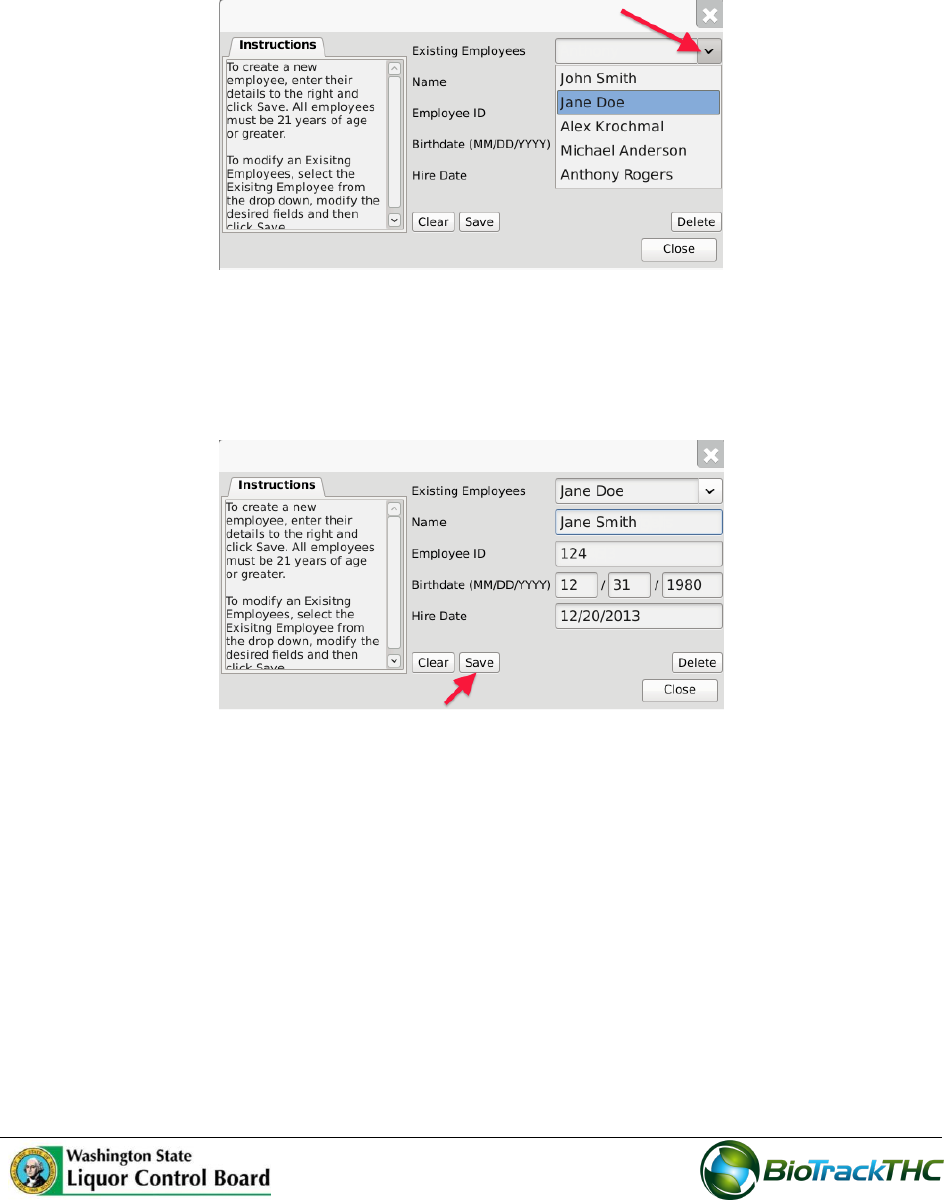
Modifying an Existing Employee
From the Employee screen, select the employee to be modified from the Existing
Employees dropdown.
Once selected, the employee’s information will automatically appear within their
respective fields.
Modify the necessary field/s (in the example below, Jane Doe changed her last name
to Jane Smith).
Click on the “Save” button when complete.
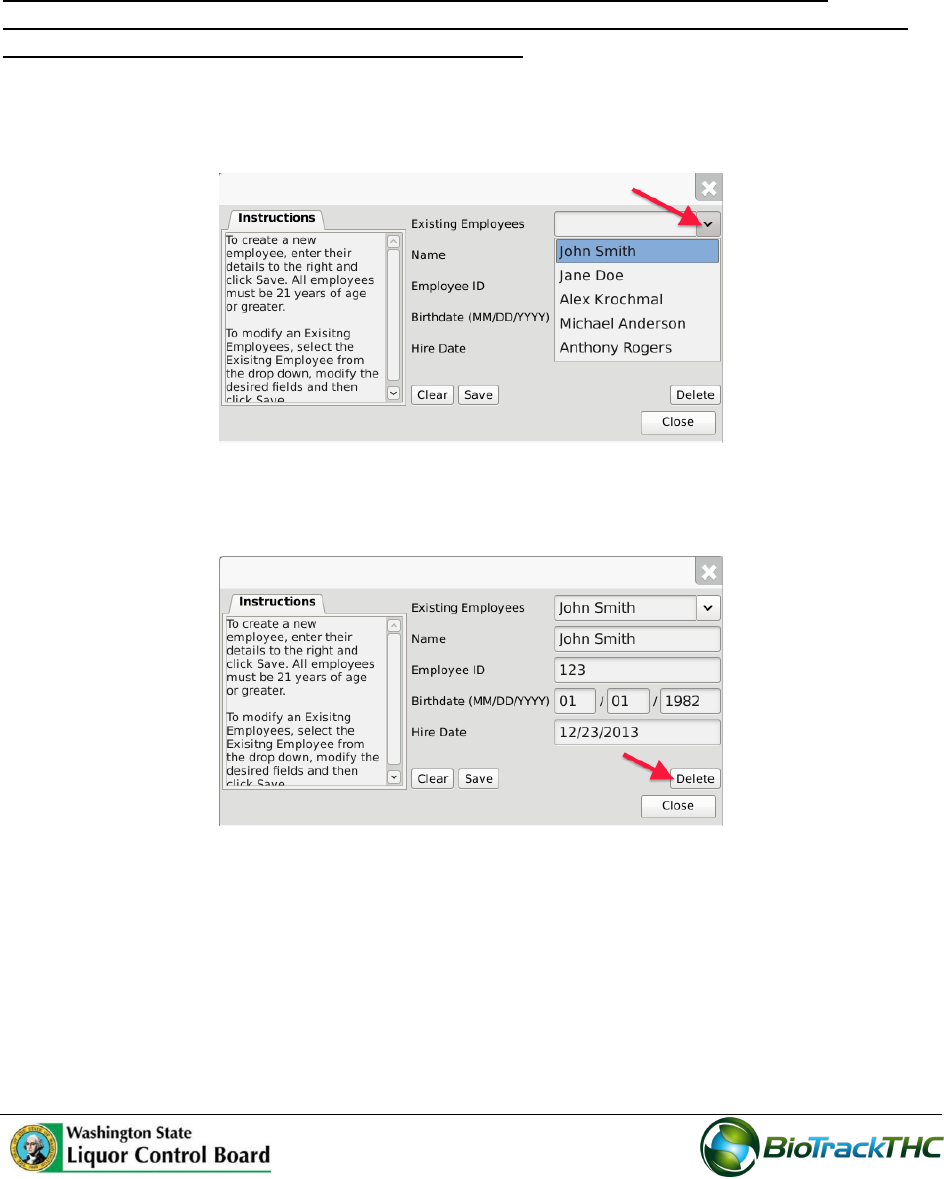
14
Deleting an Existing Employee
If you find that an existing employee is no longer needed (e.g., employee is terminated,
employee record was created in error, etc…) you may delete the employee record.
NOTE: Removing an employee does not delete any of the already submitted
Traceability System data associated with that employee record. It simply removes
the employee record from use moving forward.
From the Employee screen, select the employee to be deleted from the Existing
Employee dropdown.
Once selected, the employee’s information will automatically appear within their
respective fields.
Click on the “Delete” button.
15
Chapter 3: Vehicles
In this chapter, you will learn how to:
Add, modify and remove company vehicles
The Traceability System requires that you record accurate information regarding the
company vehicles that will be transporting marijuana or marijuana product because this
information will be required for the completion of Transportation Manifests.
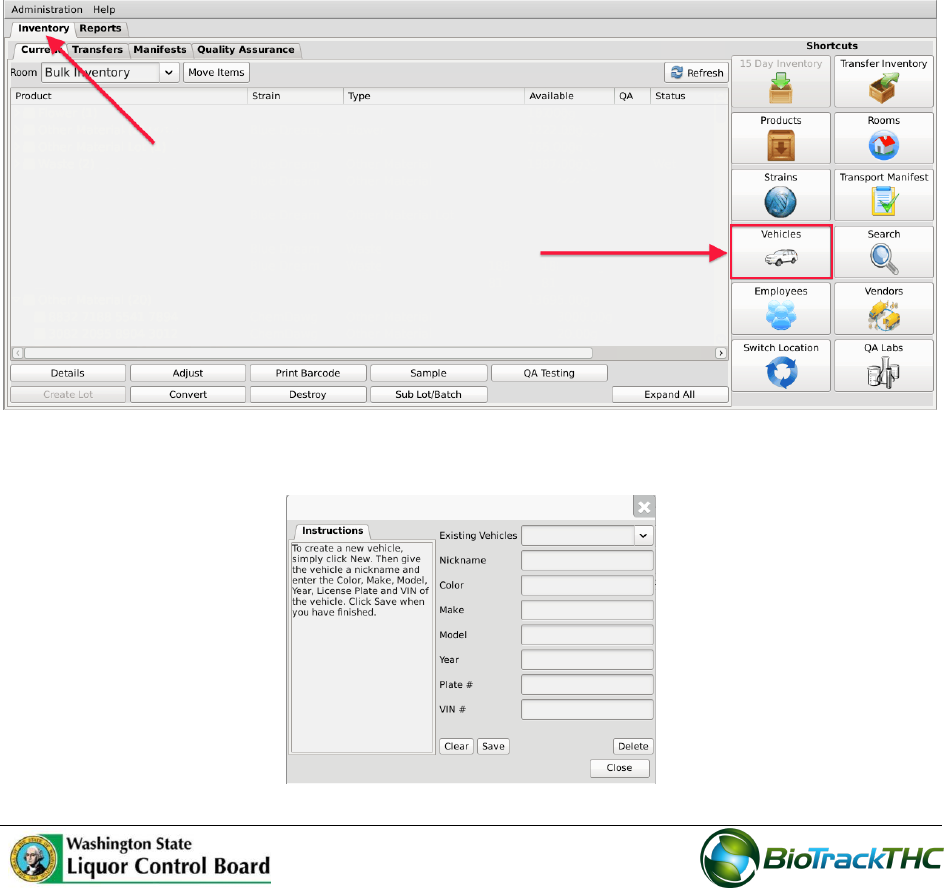
Accessing the Vehicle Screen
To add new vehicles, view or change the information of existing vehicles, or delete vehicles
no longer needed, you will need to access the Vehicle screen.
Navigate to the “Inventory” tab found in the top-left corner of the screen, and then
click on the “Vehicles” button located on the right-hand side of the home screen
This will bring up the Vehicle screen.
16
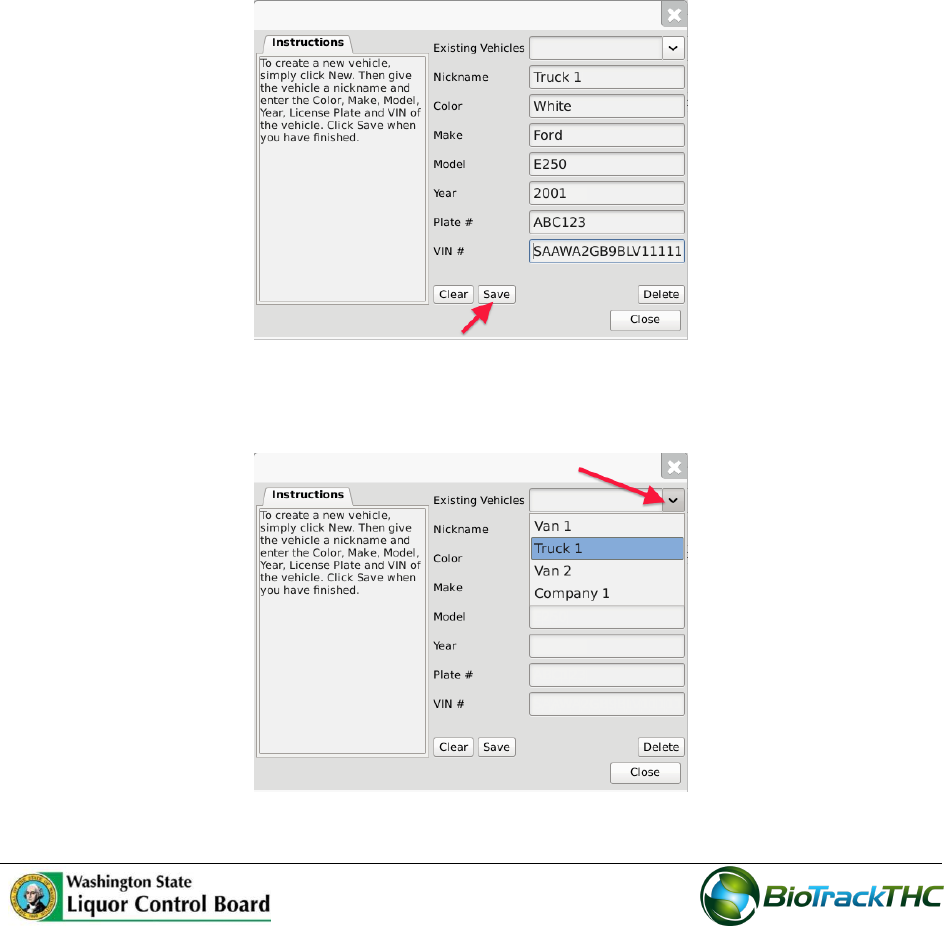
Add a New Vehicle
From the Vehicle screen, click on the “Clear” button to clear all fields and enter the
following information:
o Nickname: Enter a unique nickname with which you may easily identify the
vehicle within the system
o Color: Enter the vehicle’s color
o Make: Enter the vehicle’s make
o Model: Enter the vehicle’s model
o Year: Enter the vehicle’s year
o Plate #: Enter the vehicle’s license plate number
o VIN #: Enter the vehicle’s VIN. Note that VINs are 17 digits for all vehicles
post-1981. Prior to 1981, the VIN can be between 10 and 17 digits.
Click on the “Save” button once all of the required data has been entered.
The new vehicle will now appear within the Existing Vehicles dropdown for
selection.
17
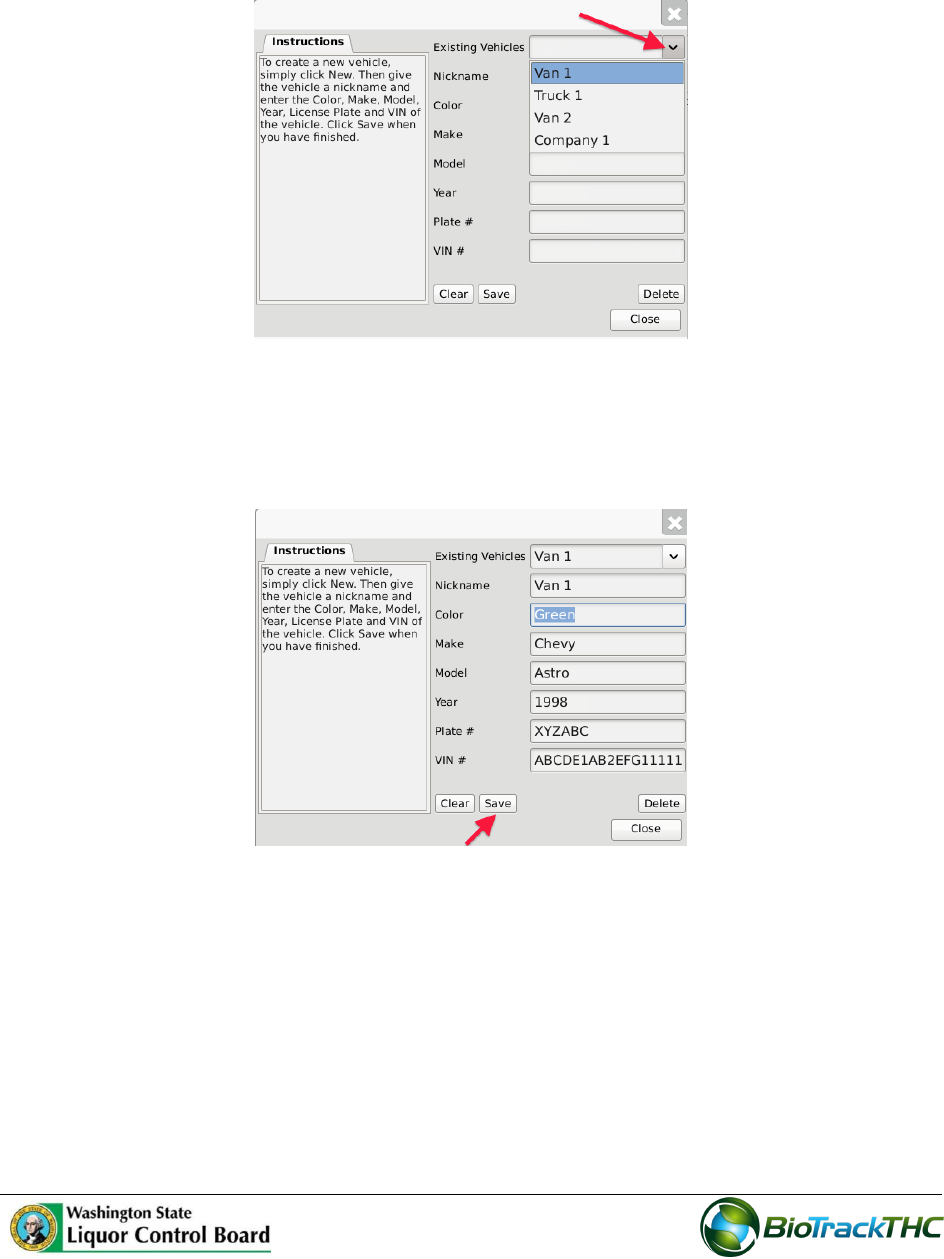
Modifying an Existing Vehicle
From the Vehicle screen, select the vehicle to be modified from the Existing Vehicles
dropdown.
Once selected, the vehicle’s information will automatically appear within their
respective fields.
Modify the necessary fields (in the example below, Van 1 changed color from White
to Green).
Click on the “Save” button when complete.

18
Deleting an Existing Vehicle
If you find that an existing vehicle is no longer needed (e.g., vehicle is sold, vehicle record
was created in error, etc…) you may delete the vehicle record.
NOTE: Removing a vehicle does not delete any of the already submitted Traceability
System data associated with that vehicle record. It simply removes the vehicle
record from use moving forward.
From the Vehicle screen, select the vehicle to be removed from the Existing Vehicles
dropdown
Once selected, the vehicle’s information will automatically appear within their
respective fields.
Click on the “Delete” button.
19
Chapter 4: Vendors
In this chapter, you will learn how to:
View Preferred Vendor List
Search for and Add Vendors to Preferred Vendor List
Remove Vendors from Preferred Vendor List
Within the Traceability System, vendors are Licensees outside of your own that you can
either wholesale to or make wholesale purchases from. You must add vendors to your
Preferred Vendor List in order to receive inbound shipments and to make outbound
shipments. The Traceability System cannot recognize any wholesale transactions from/to
non-Licensees.
Accessing the Vendor Screen
To view all possible vendors, add vendors to your Preferred Vendor List, or remove
vendors from your Preferred Vendor List, you will need to access the Vendor screen.
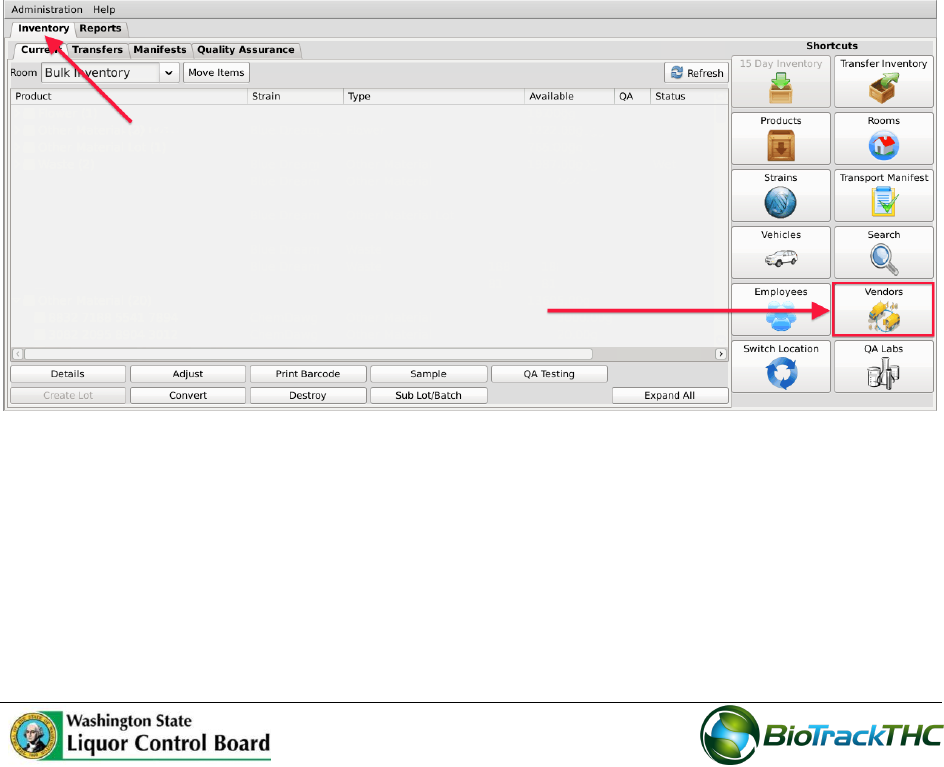
Navigate to the “Inventory” tab found in the top-left corner of the screen, and then
click on the “Vendors” button located on the right-hand side of the home screen
20
This will bring up the Vendor Information screen.
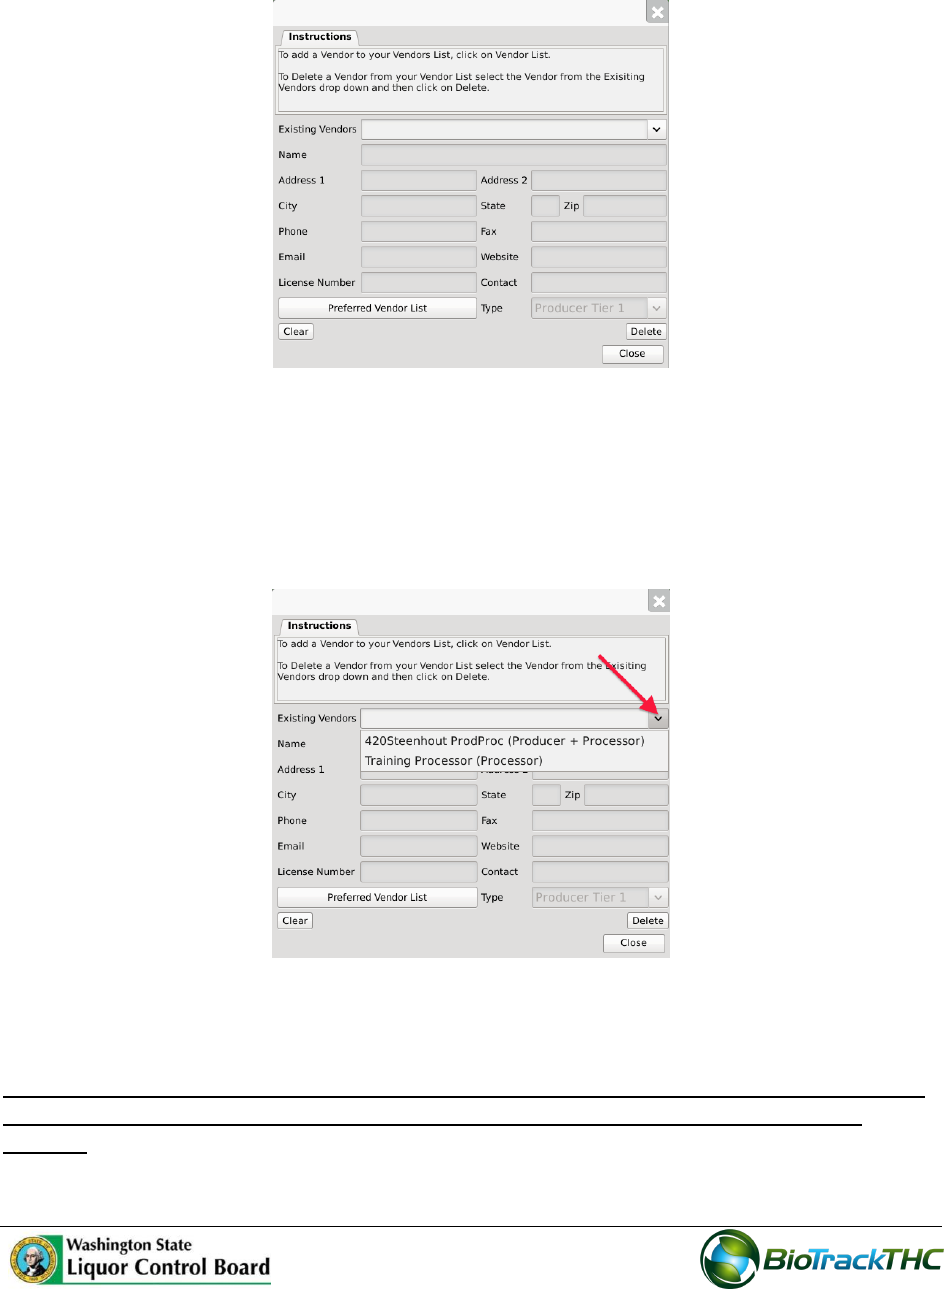
Viewing Vendor Information
The detailed information of Licensees that are on your Preferred Vendors List (i.e.,
those you have indicated that you do business with) may be found in the Existing
Vendors dropdown. Be aware that the dropdown will start empty and you will
need to add vendors per the instructions below.
Once selected, the vendor’s information will automatically appear within their
respective fields.
NOTE: You cannot create a vendor, nor can you edit vendor information as these are
WSLCB-approved Licensees and their information may only be changed by the
WSLCB.
21
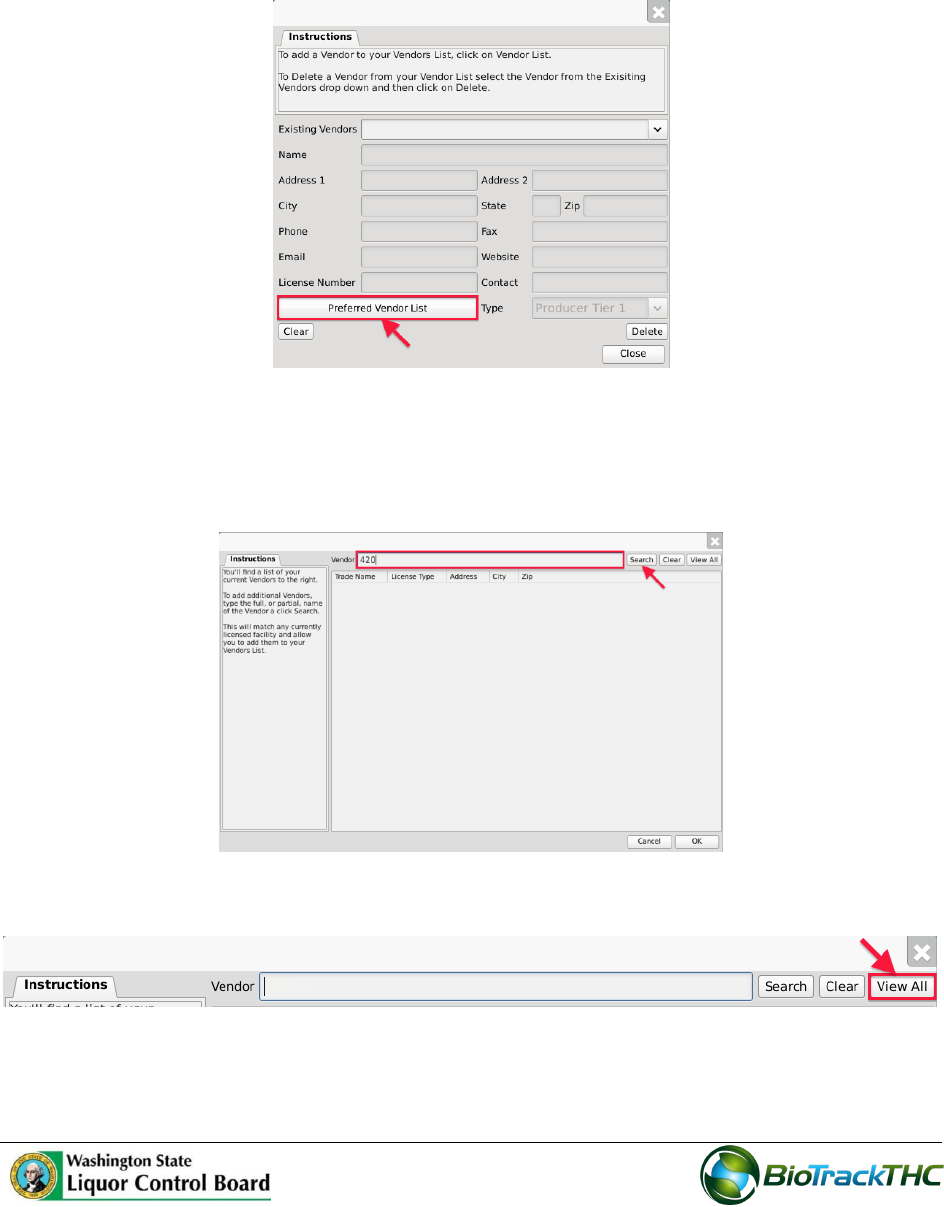
Acccessing the Preferred Vendor List
From the Vendor Screen, click on the “Preferred Vendor List” button to add or
remove other WSLCB-approved Licensees that you do business with.
Add a Vendor
From the Preferred Vendor List, enter the full or partial business name into the
search bar and click the “Search” button.
Alternatively, you may click “View All” to view the entire population of Licensees.

22
23
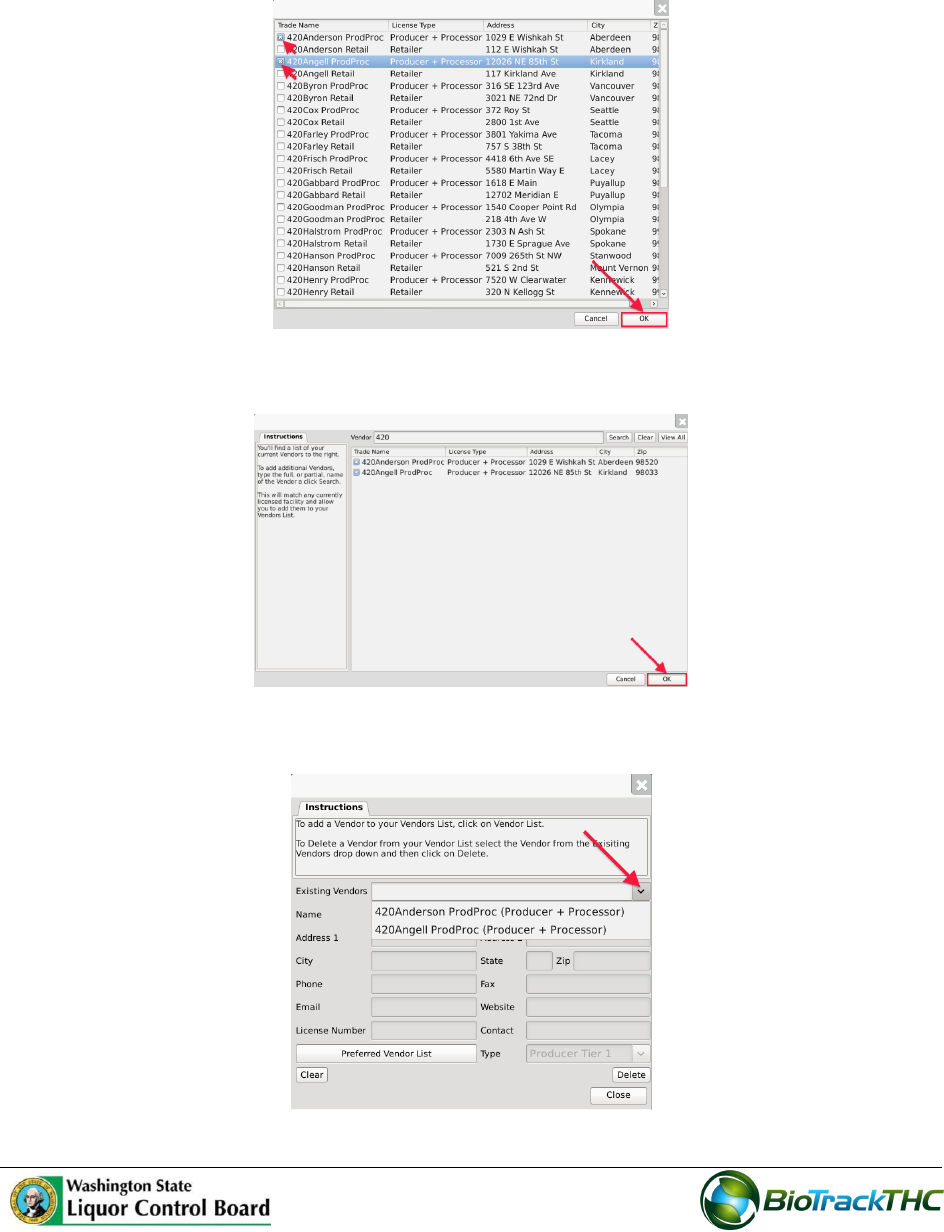
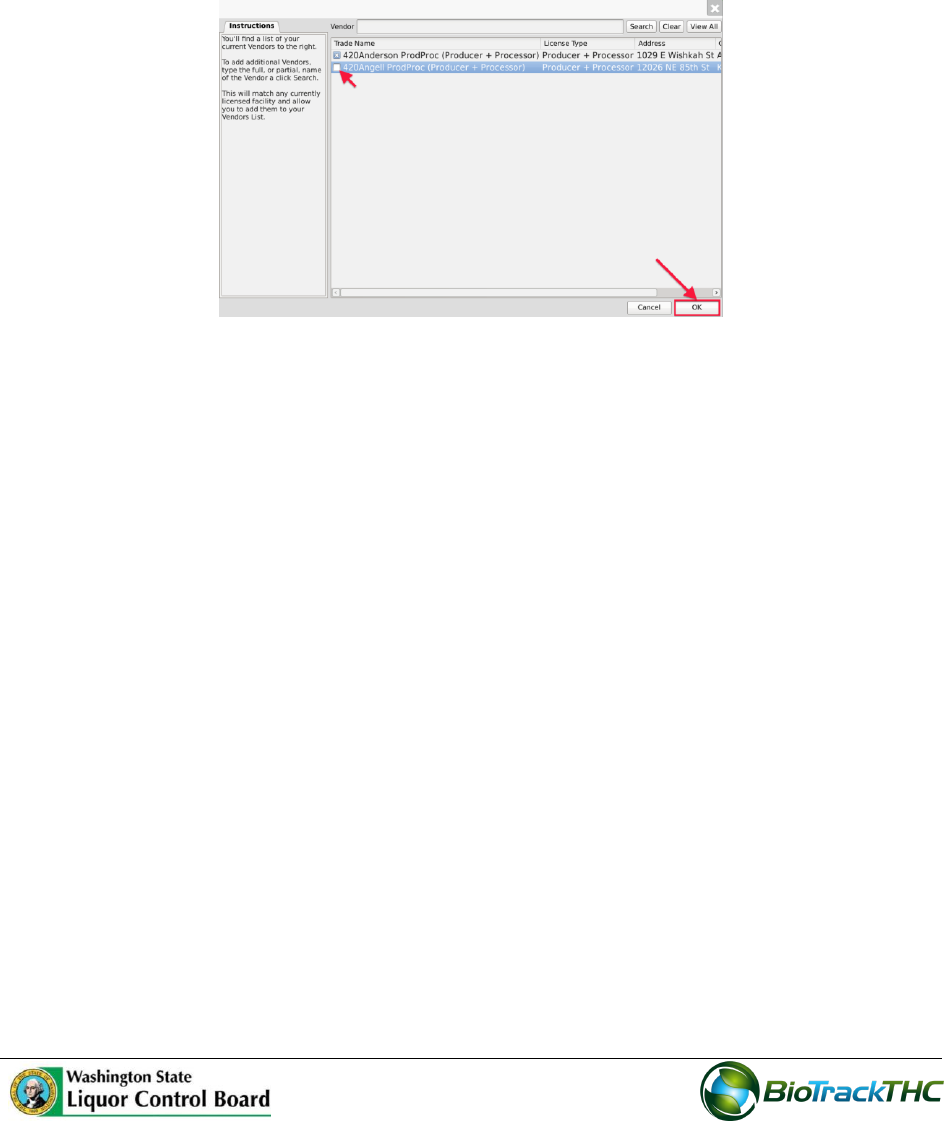
A list of all Licensees that match the search criteria will appear in a popup.
Click the checkbox(s) of the Licensee(s) to add to your Preferred Vendor List.
Click “OK” when complete.
Your Preferred Vendor List is now updated with the selections.
Click “OK” when complete.
The Vendors may now be selected from the “Existing Vendors” dropdown.
24
Removing a Vendor
If you find that you no longer do business with a vendor that is on your Preferred Vendor
List, you may remove the vendor from your Preferred Vendor List.
From the Preferred Vendor List, uncheck the checkbox to the left of the vendor to be
removed.
Click ”OK” when complete.
25
Chapter 5: Strains
In this chapter, you will learn how to:
Add, modify, and remove strains
Regulations
WAC 314-55-083
(11) "Marijuana strain" means a pure breed or hybrid variety of Cannabis reflecting similar
or identical combinations of properties such as appearance, taste, color, smell, cannabinoid
profile, and potency.
Accessing the Strains Screen
To add new strains, view or change the names of existing strains, or delete strains you no
longer use, you will need to access the Strains screen.
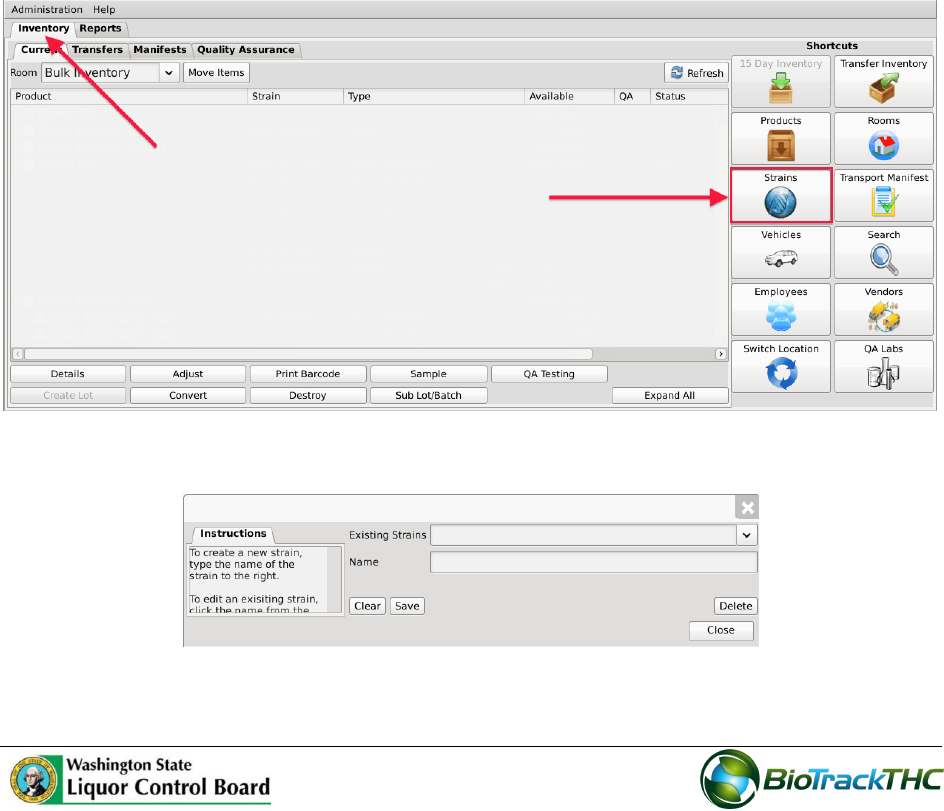
Navigate to the “Inventory” tab found in the top-left corner of the screen, and then
click on the “Strains” button located on the right-hand side of the home screen.
This will bring up the Strains screen.
26
Add a New Strain
From the Strains screen, click on the “Clear” button to clear all fields.
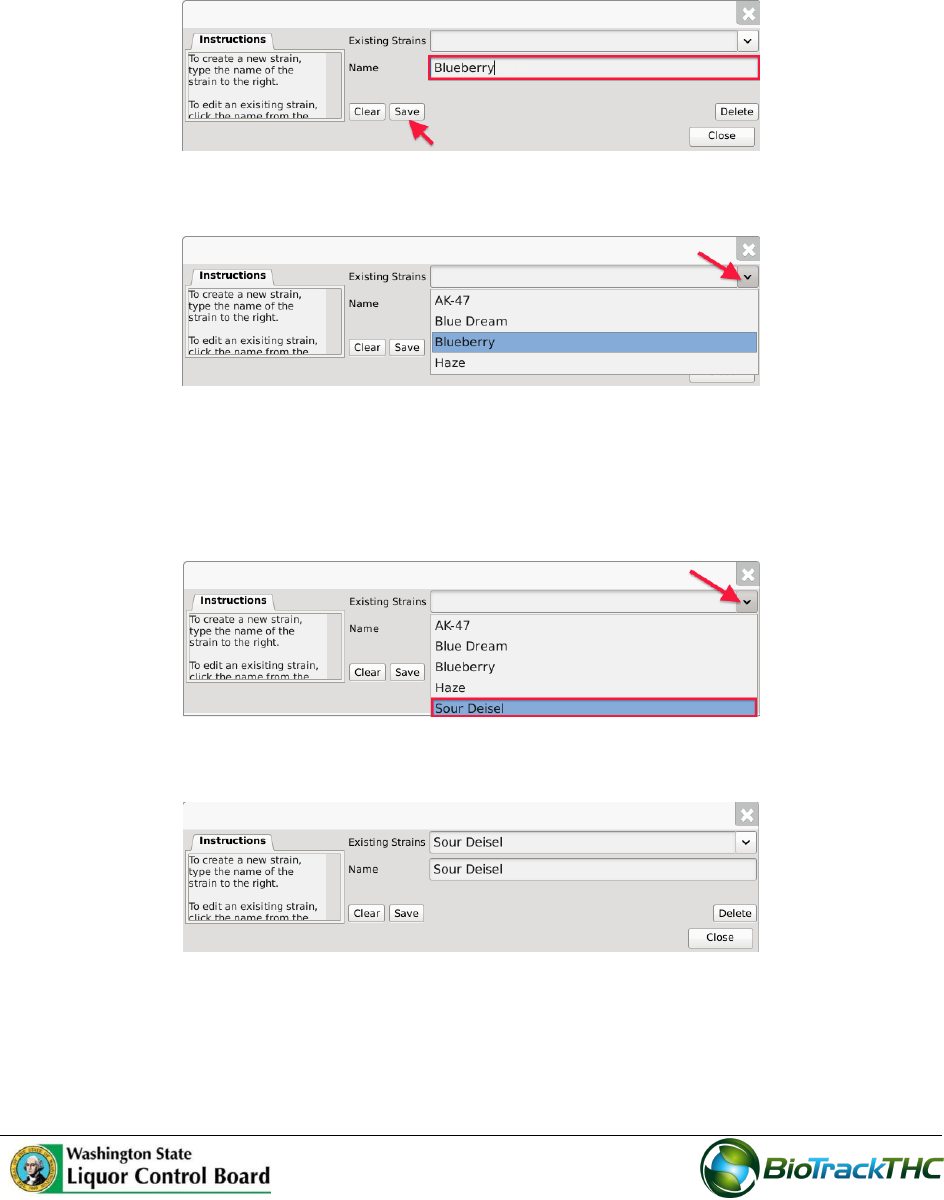
Within the Name text box, type the name of the new Strain (e.g., Blueberry, AK-47,
Sour Diesel, etc…).
Click on the “Save” button when complete.
The new strain will now appear within the Existing Strains dropdown list.
Modifying an Existing Strain
From the Strains screen, select the strain to be modified from the Existing Strains
dropdown (in the example, Sour Diesel is misspelled as “Sour Deisel”).
Once selected, the strain’s name will automatically appear within the Name text box.
27
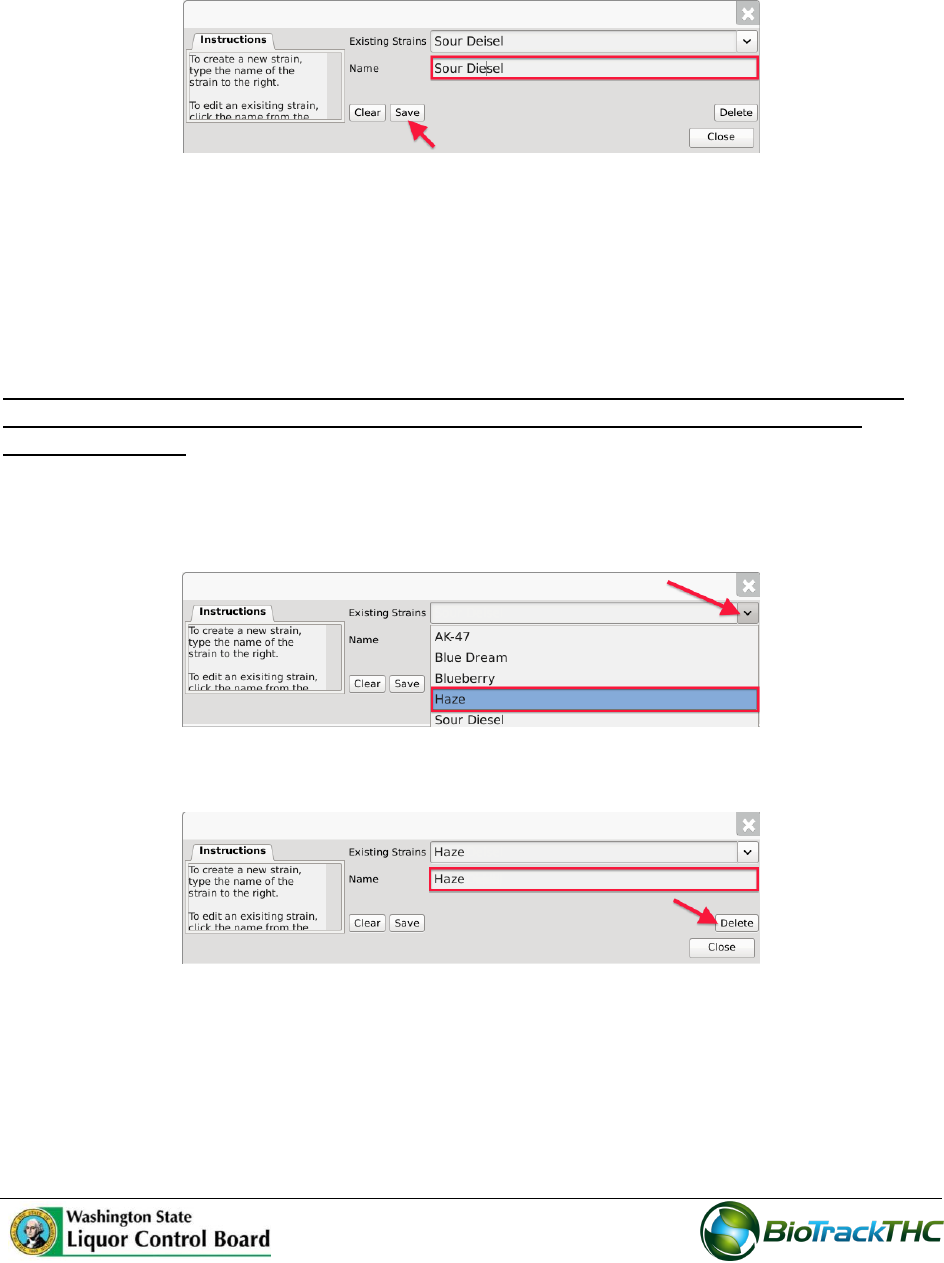
Within the Name text box, rename the strain as desired (in the example, “Sour
Deisel” is to be spelled correctly to “Sour Diesel”).
Click on the “Save” button when complete.
Deleting an Existing Strain
If you find that an existing strain is no longer needed (e.g., you no longer grow that strain),
you may delete the strain.
NOTE: Removing a strain does not delete any of the already submitted Traceabilty
System data associated with that strain. It simply removes the strain from use
moving forward.
From the Strains screen, select the strain to be deleted from the Existing Strain
dropdown.
Once selected, the strain’s name will automatically appear within the Name text box.
Click on the “Delete” button.
28
Chapter 6: Marijuana-Infused Products
In this chapter, you will learn how to:
Add, modify and remove marijuana-infused products (henceforth, “products”)
Regulations
WAC 314-55-077
(1) A marijuana processor license allows the licensee to process, package, and label useable
marijuana and marijuana-infused products for sale at wholesale to marijuana retailers.
Accessing the Products Screen
To add new products, view or change the information of existing products, or delete
products no longer needed, you will need to access the Products screen.
NOTE: This chapter only applies to marijuana-infused products. Pre-packaged
usable marijuana is already built into the system. Please see Chapter 9:
Processor Inventory Conversions regarding pre-packaged usable marijuana.
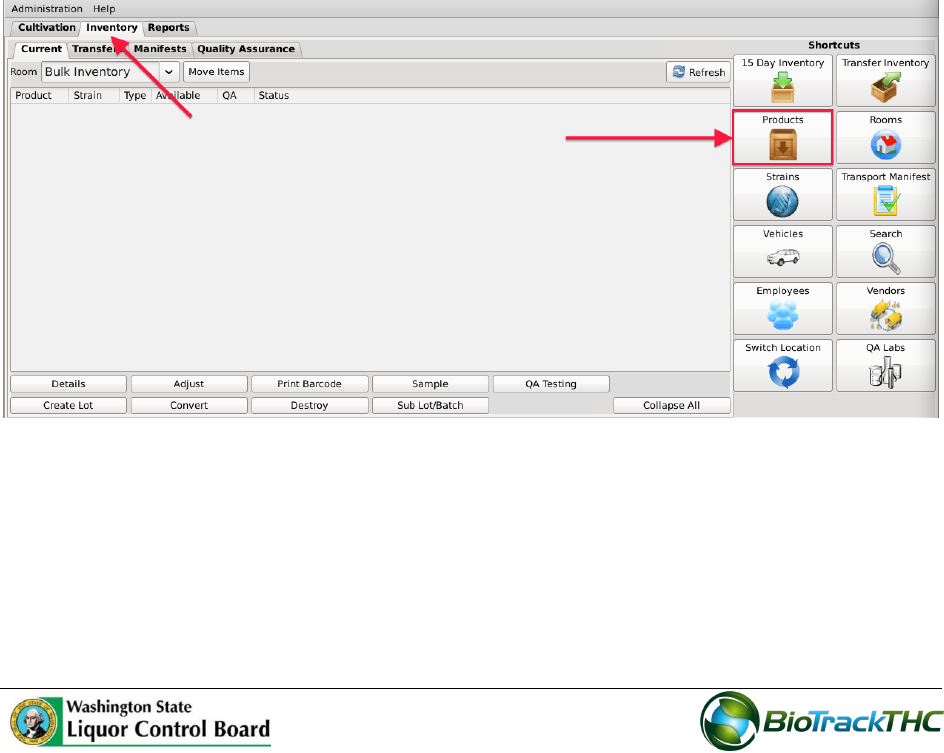
Navigate to the “Inventory” tab found in the top-left corner of the screen, and then
click on the “Products” button located on the right-hand side of the home screen.
29
This will bring up the Products screen.
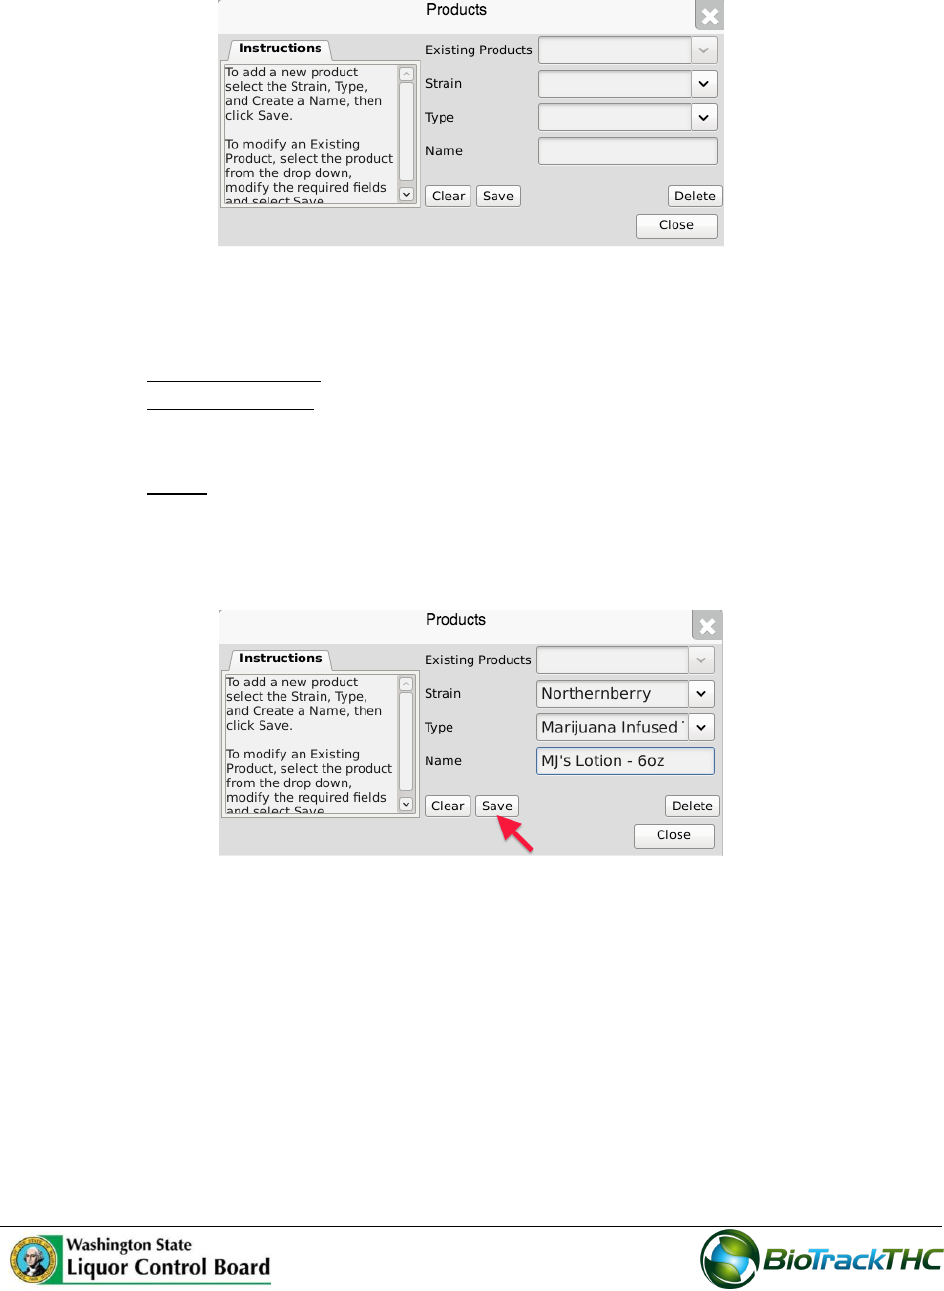
Add a New Product
From the Product screen, click on the “Clear” button to clear all fields and enter the
following information:
o Strain dropdown: Select the product’s strain.
o Type Dropdown: Select the product’s type. All products must fall into one of
the following types: Solid Marijuana Infused Edible, Marijuana Infused
Topical, Marijuana Extract for Inhalation, or Liquid Marijuana Infused Edible.
o Name: Type the name of the product. Enough detail must be used to
distinguish products from one another (e.g., Arnica Cannabis Cream 9oz,
Arnica Cannabis Cream 3oz, Lavender Cannabis Cream 9oz, etc…).
Click on the “Save” button once all of the required data has been entered.
The new product will now appear within the Existing Products dropdown for
selection.
30
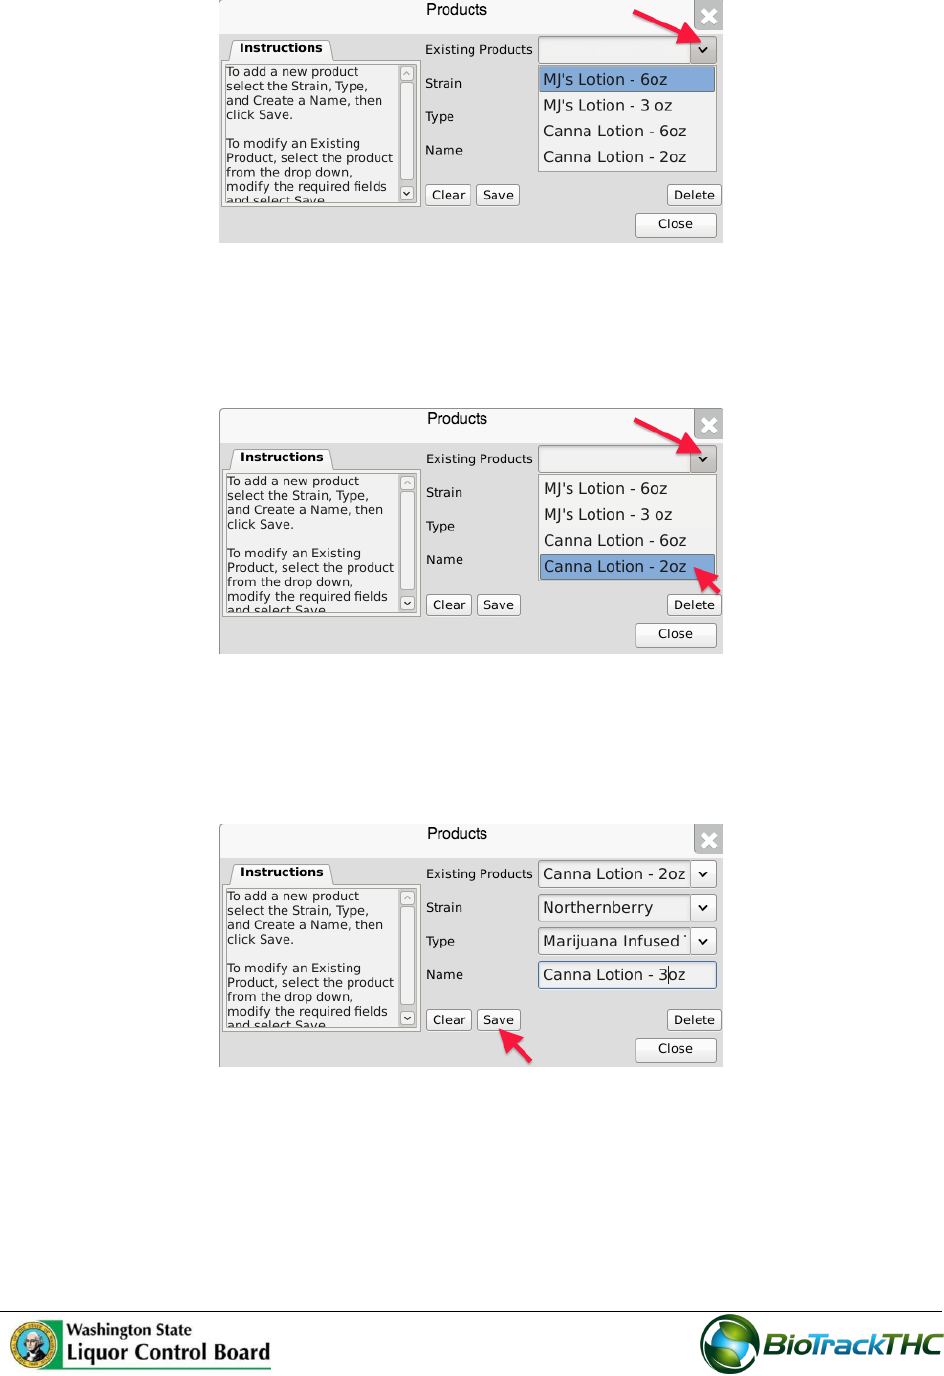
Modifying an Existing Product
From the Product screen, select the product to be modified from the Existing
Products dropdown.
Once selected, the product’s information will automatically appear within their
respective fields.
Modify the necessary field(s) (in the example below, Canna Lotion changed names
from 2oz to 3oz and changed strains from Blueberry to Northernberry).
Click on the “Save” button when complete.
31
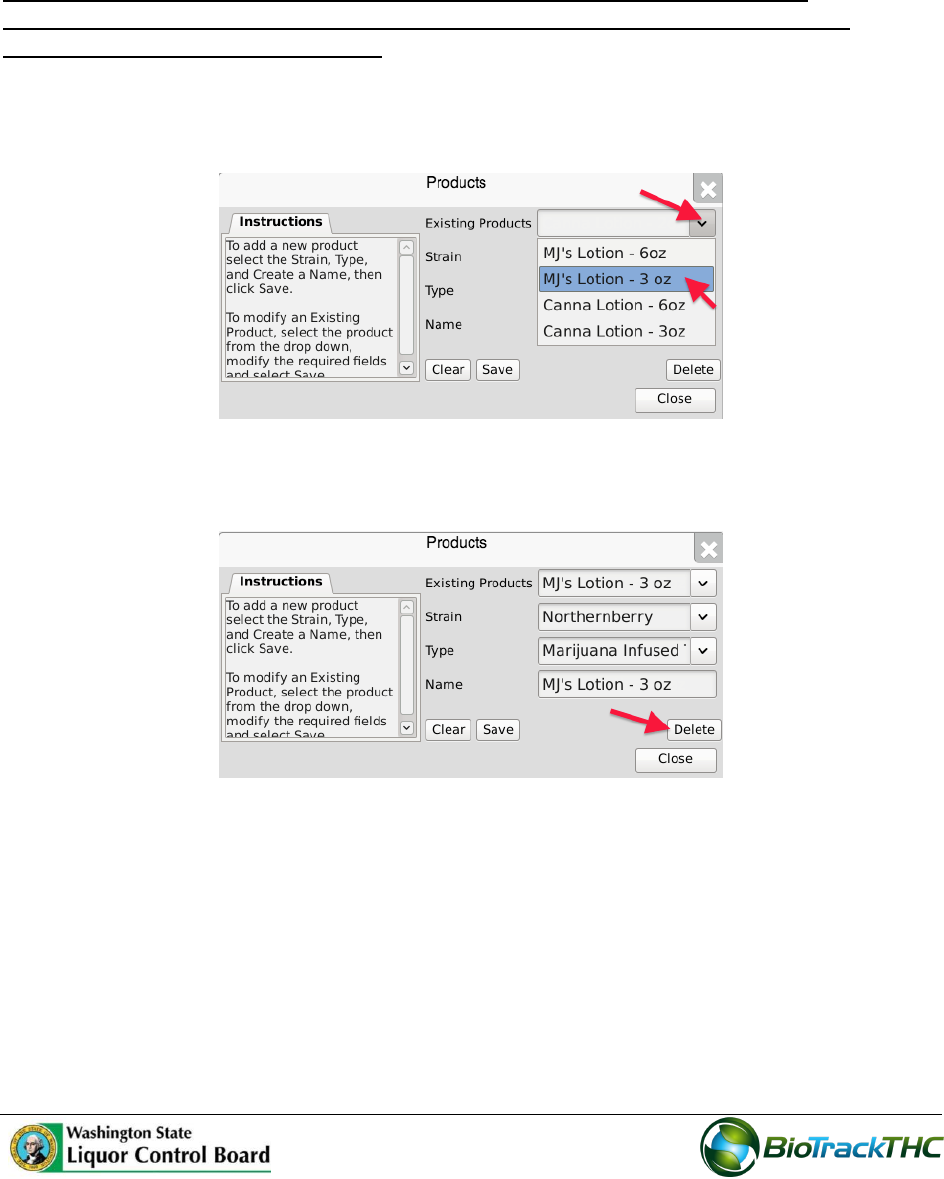
Deleting an Existing Product
If you find that an existing product is no longer needed (e.g., product line is terminated,
product record was created in error, etc…) you may delete the product record.
NOTE: Removing an product does not delete any of the already submitted
Traceability System data associated with that product. It simply removes the
product from use moving forward.
From the Product screen, select the product to be deleted from the Existing Product
dropdown.
Once selected, the product’s information will automatically appear within their
respective fields.
Click on the “Delete” button.
32
Chapter 7: Inventory Rooms
In this chapter, you will learn how to:
Add, modify and remove inventory rooms
Navigate the inventory rooms and screens
Inventory rooms represent a way to logicially segregate inventory items. You begin with
one room named “Bulk Inventory” and one room named “Quarantine”.
Accessing the Rooms Screen
To add new inventory rooms, change the names of existing inventory rooms, or delete
inventory rooms you no longer use, you will need to access the Rooms screen.
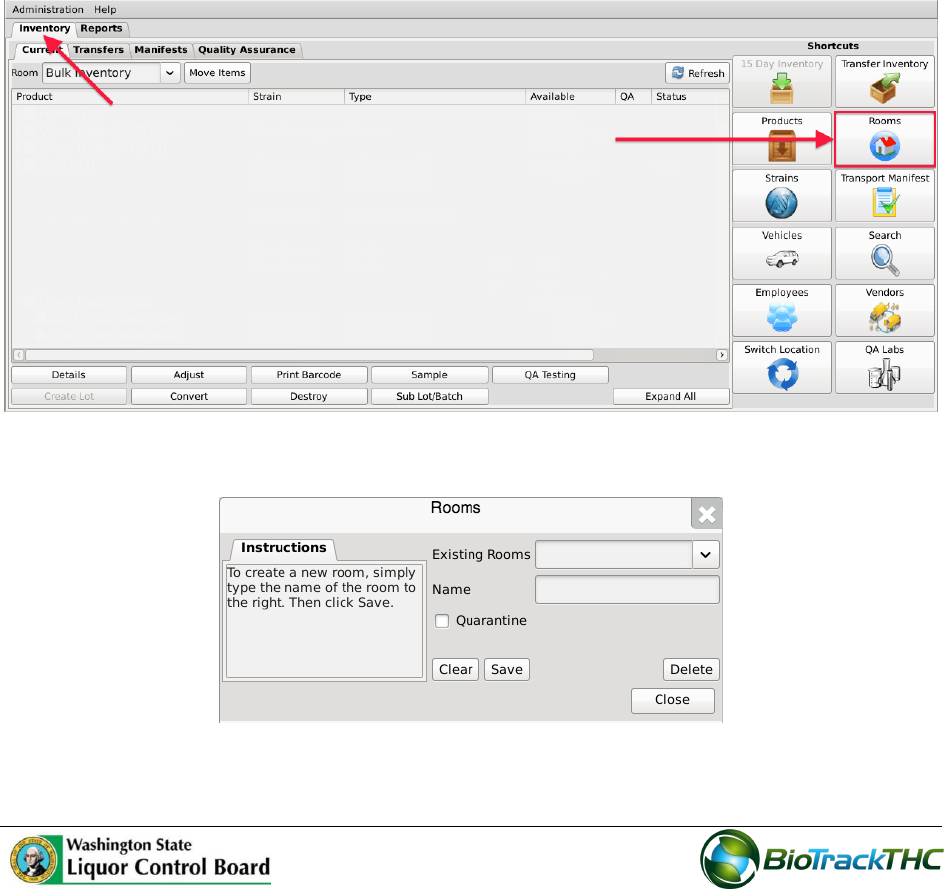
Navigate to the “Inventory” tab found in the top-left corner of the screen, and then
click on the “Rooms” button located on the right-hand side of the home screen.
This will bring up the Rooms screen.

33
Creating a New Inventory Room
From the Rooms screen, click on the “Clear” button to clear all fields.
Within the Name text box, type the name of the new Room (e.g., Safe, Extra Room
etc.).
Click on the “Save” button when complete.
The new room will now appear within the Rooms dropdown for selection.
If the room is to be a Quarantine room, be sure to click on the “Quarantine”
checkbox prior to saving.
34
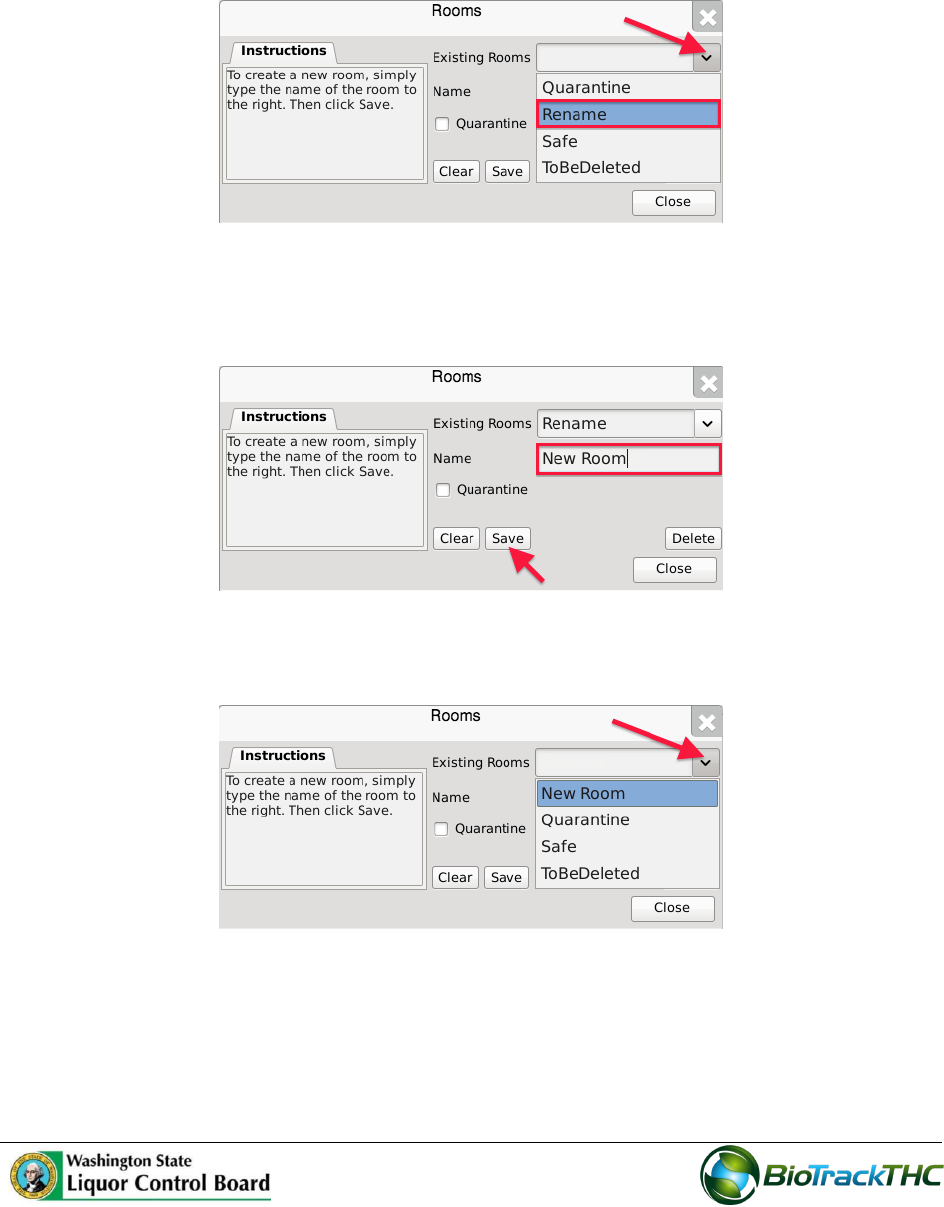
Modifying an Existing Inventory Room
From the Rooms screen, select the room to be modified from the Existing Rooms
dropdown.
Once selected, the room’s name will automatically appear within the Name text box.
Within the Name text box, rename the room as desired.
Click on the “Save” button when complete
The renamed room will now appear within the Rooms dropdown for selection.
35
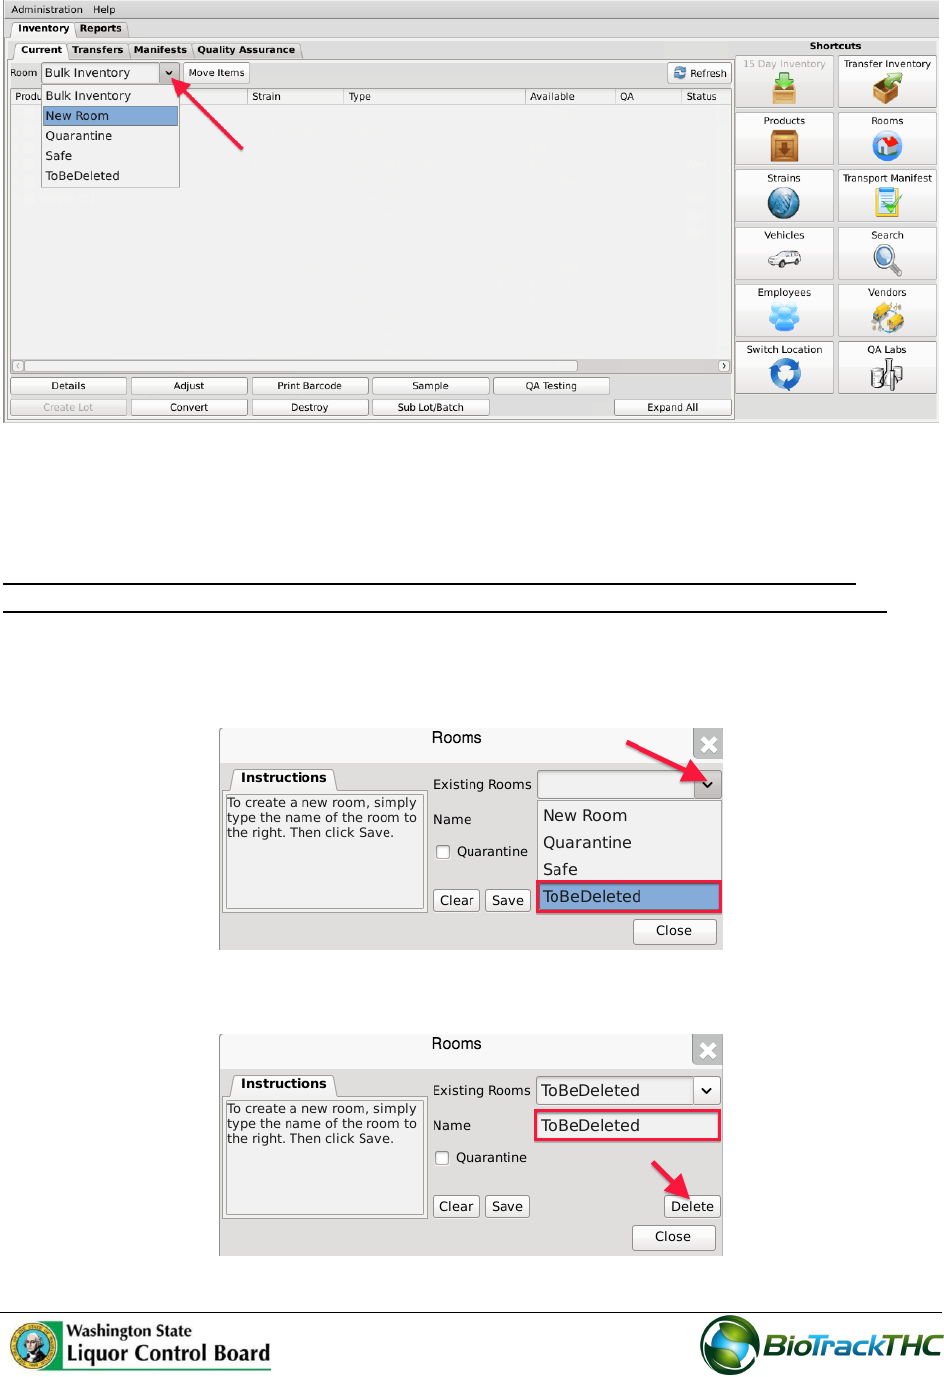
Deleting an Inventory Room
If you find that an existing inventory room is no longer needed, you may delete the room.
NOTE: Removing a room does not delete any of that room’s already submitted
Traceability System data. It simply removes the room from use moving forward.
From the Rooms screen, select the room to be removed from the Existing Rooms
dropdown.
Once selected, the room’s name will automatically appear within the Name text box.
36
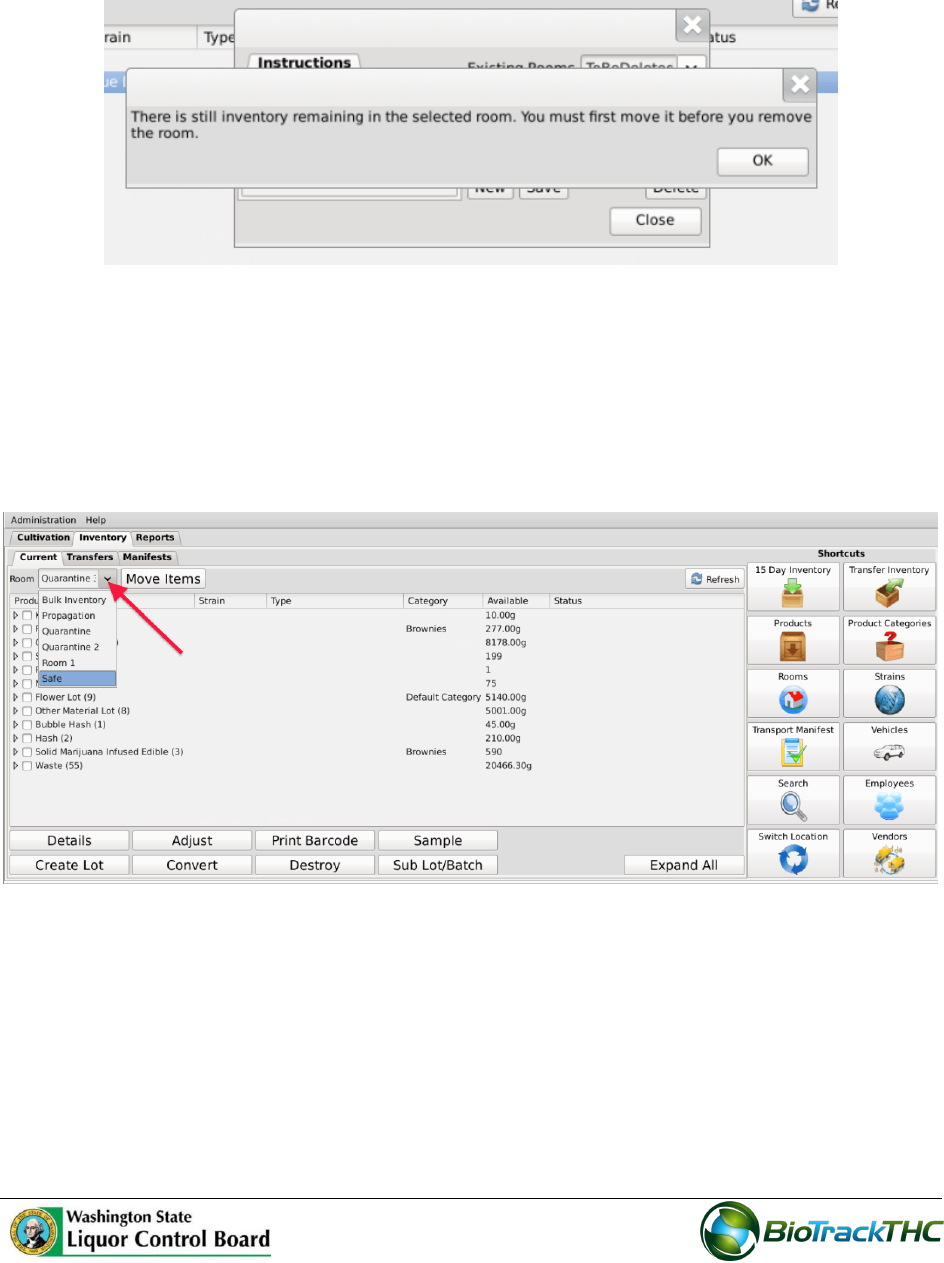
Click on the “Delete” button.
o If there is still inventory in the room, the following will appear:
o If there is no longer any inventory still in the room, the Traceability System
will allow removal of the room
Navigating Inventory Rooms
When in the “Inventory” tab, all of the existing rooms are listed within the Room dropdown
in alphabetical order.
Click on a room to view its contents.
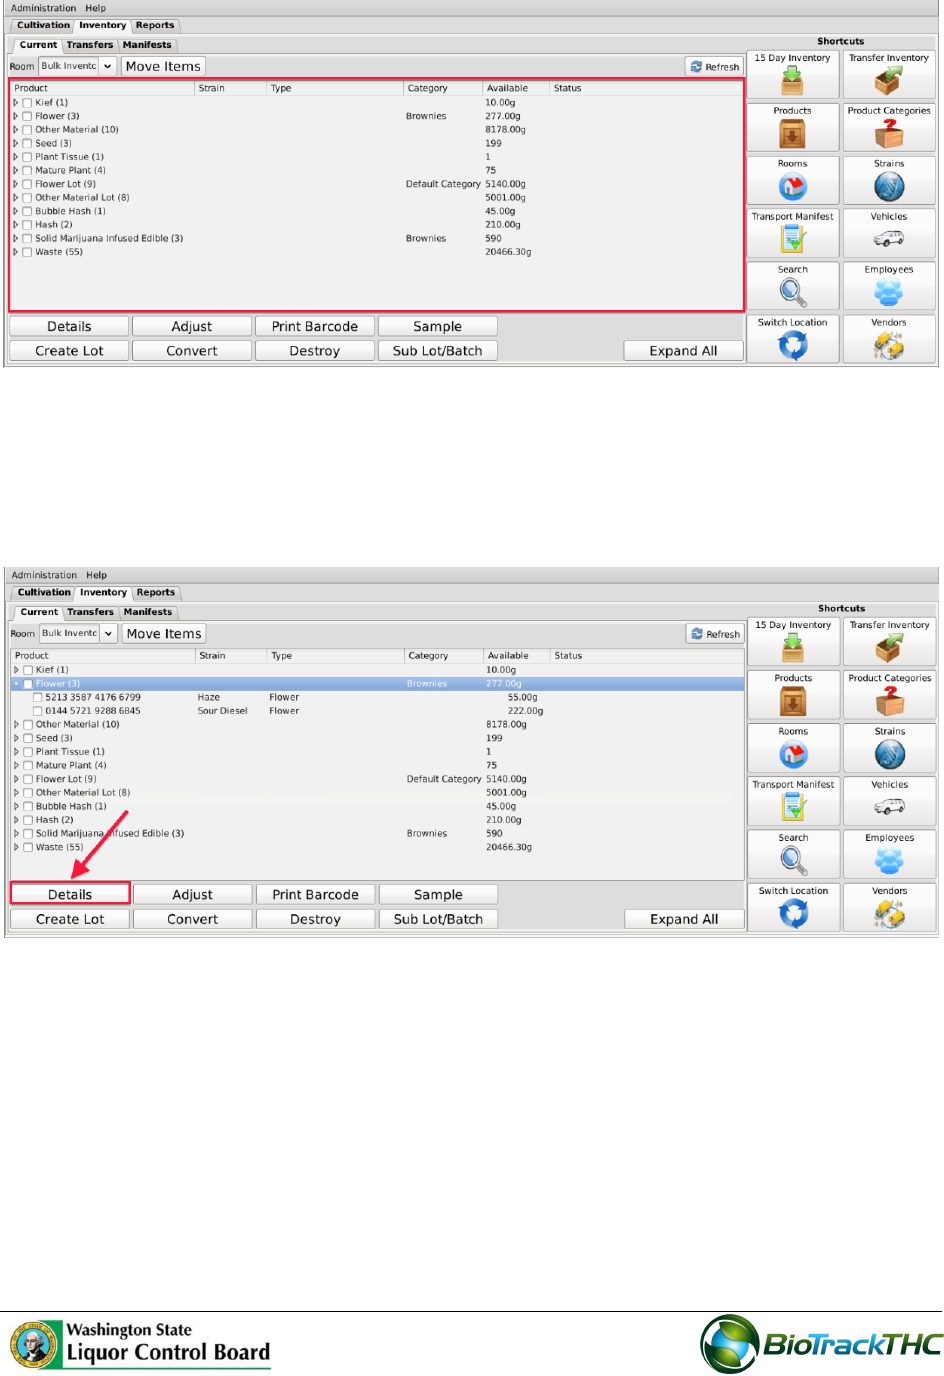
The primary window lists the contents of the selected room. Inventory items are grouped
by product type as defined by the WSLCB. The number in parentheses that appears to the
right of the product type indicates how many Traceability Identifiers are grouped within it,
if more than one.
37
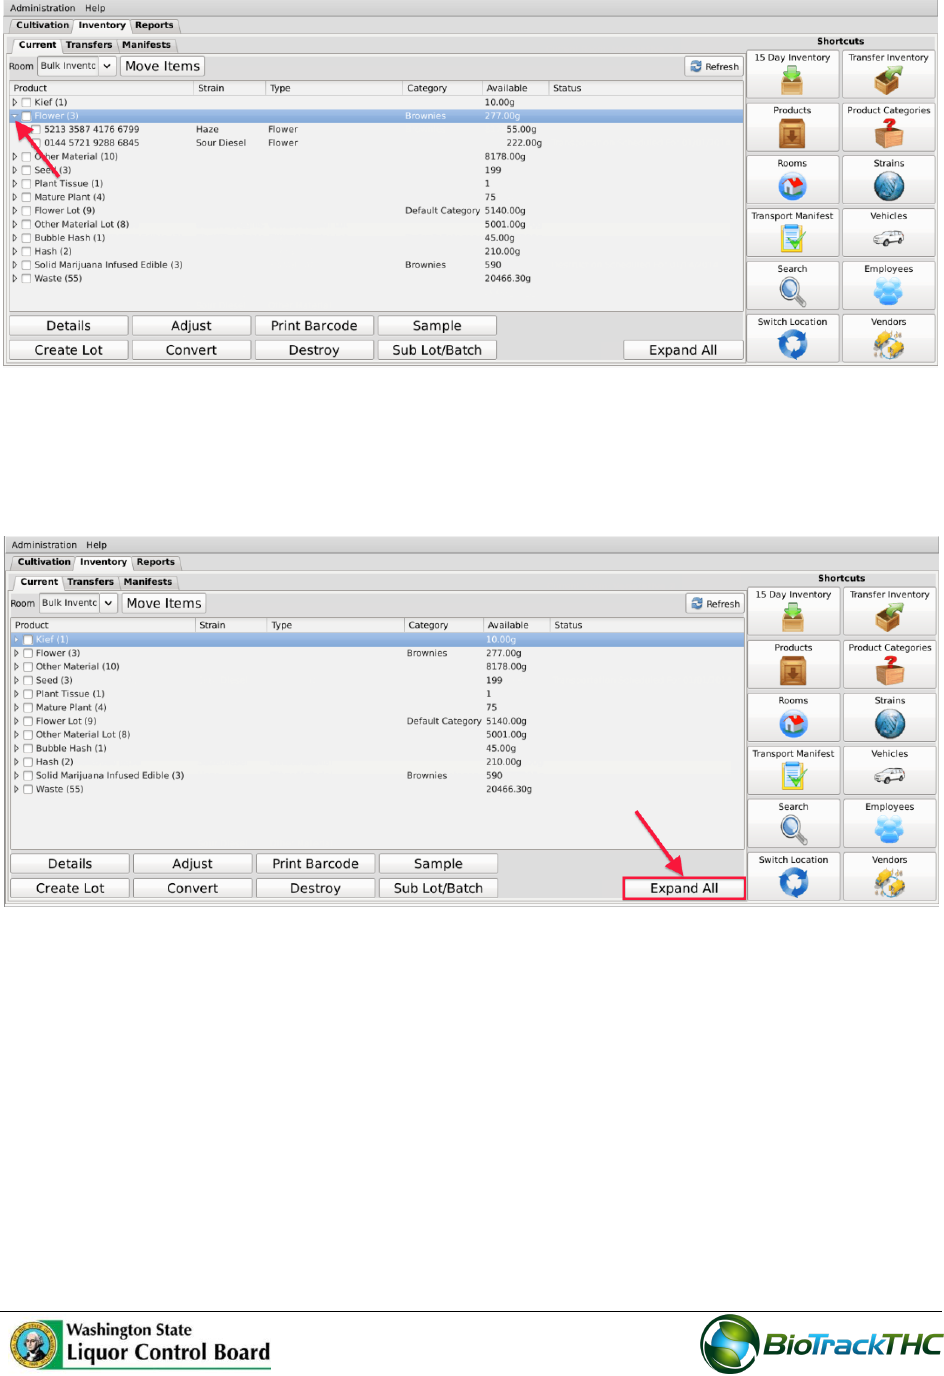
To view the individual inventory items contained within a group you can perform either of
the following three actions:
Double-click on a group;
Single-click on a group to highlight it, and then click the “Details” button found in the
bottom-left corner of the screen;
Single-click on the Expand/Collapse arrow to the left of the product type.
38
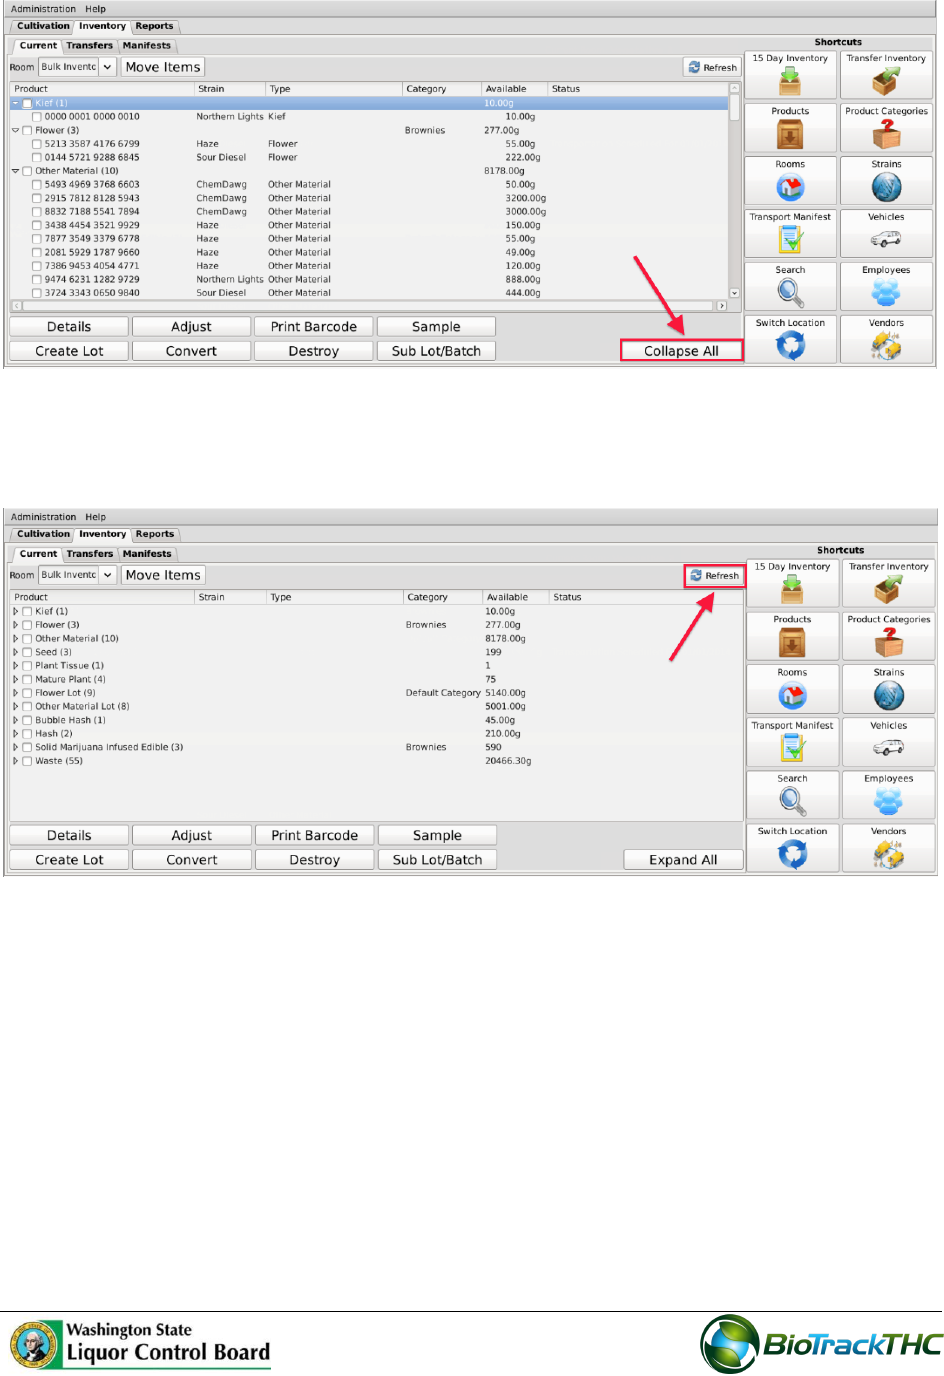
In addition to expanding/collapsing groups individually, you may expand/collapse all
groups at once by clicking on the “Expand All” / “Collapse All” button located in the lower-
right corner of the screen. The button alternates from “Expand All” to “Collapse All” and
back every click.
39
If at any time you perform an action in the Traceability System and it appears that the
Traceability System did not update, try clicking on the “Refresh” button found in the upper-
right corner of the screen.
40
Chapter 8: Wholesale Inventory Transfers - Inbound
In this chapter, you will learn how to:
Complete an inbound inventory transfer
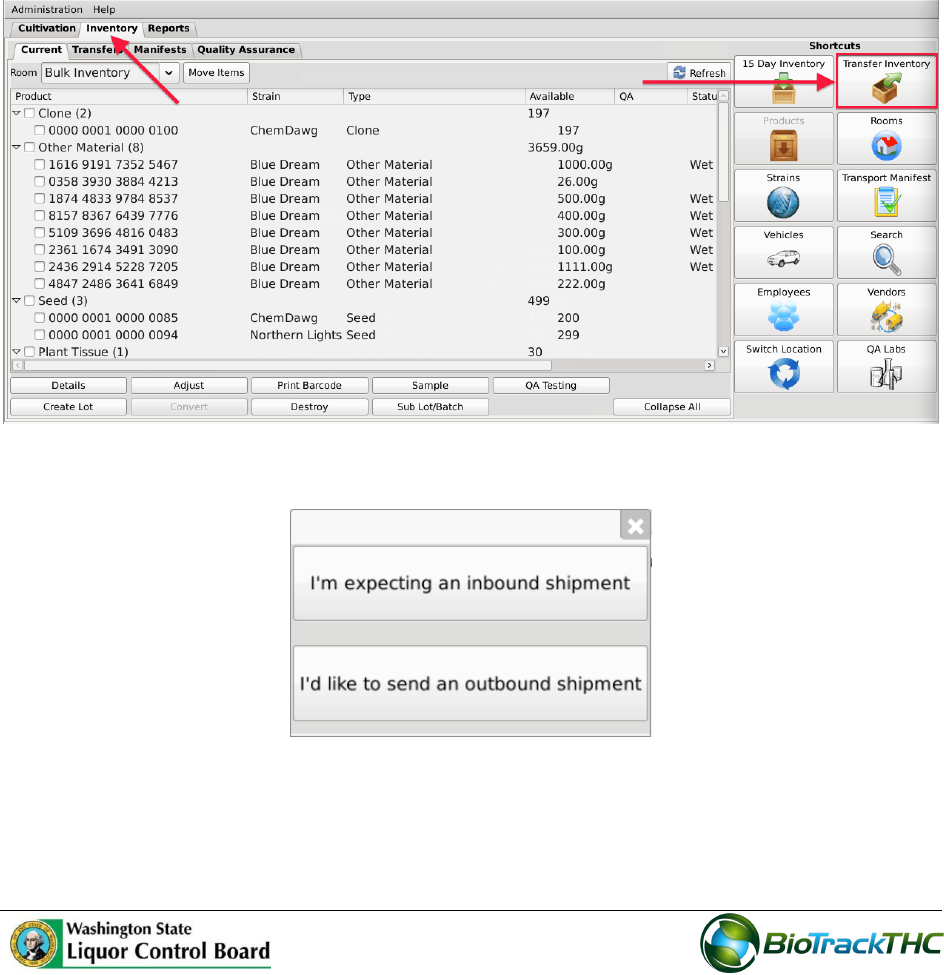
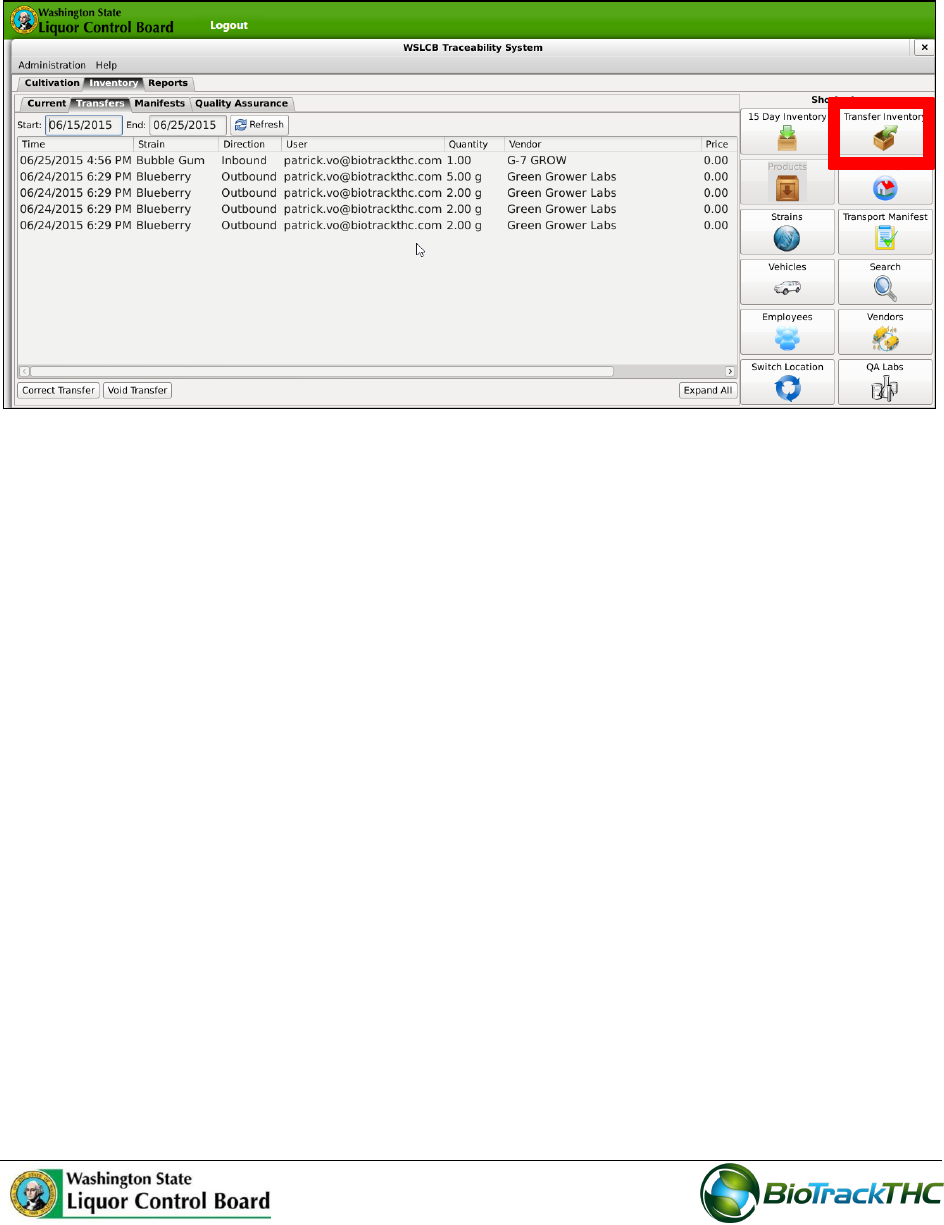
Initiating an Inventory Transfer
To receive inbound shipments and send outbound shipments in the Traceability System,
you will need to
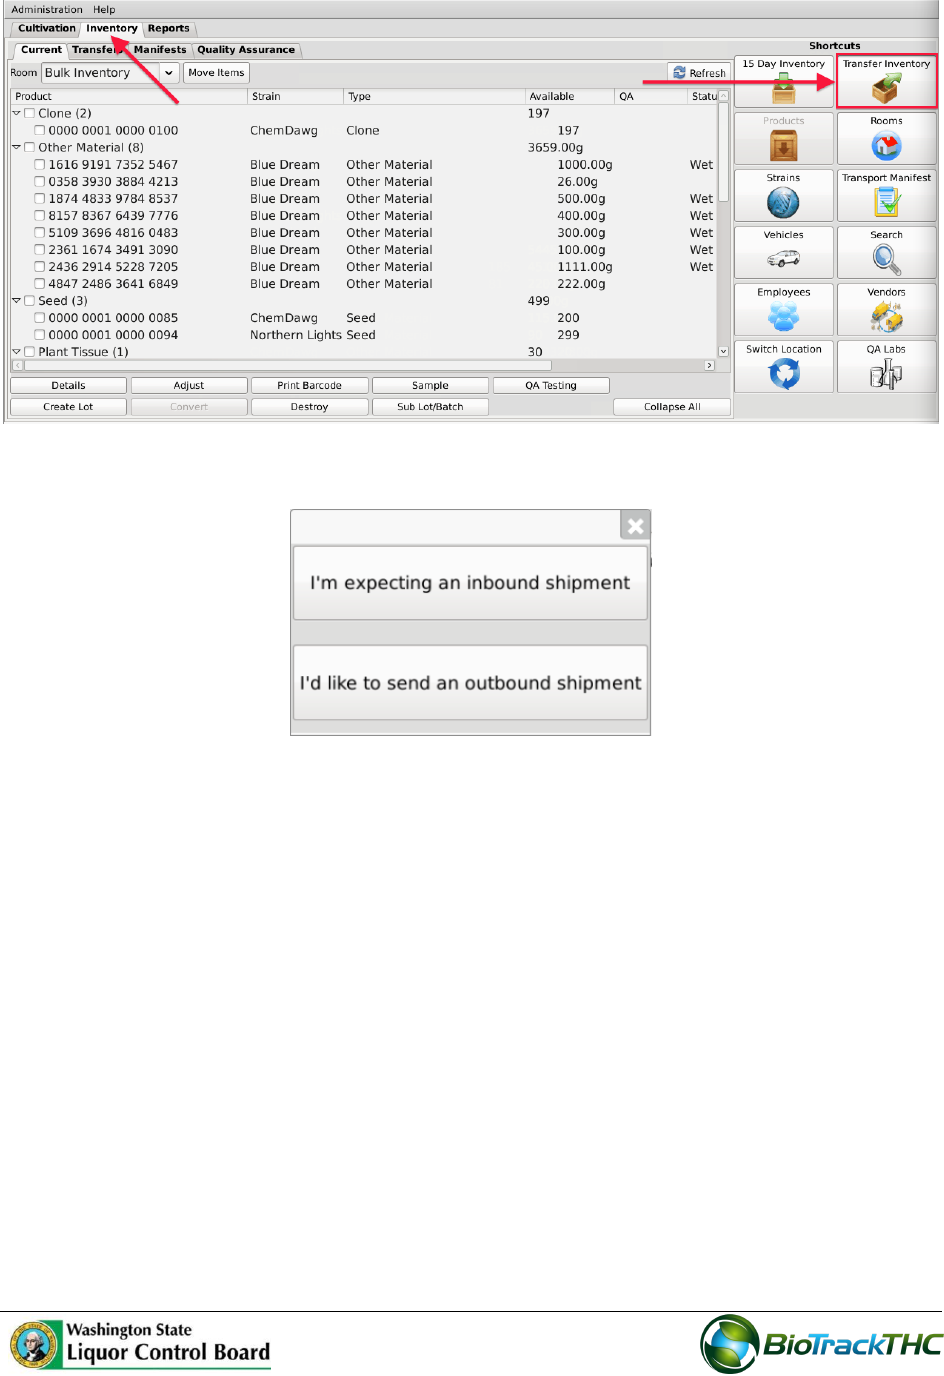
Navigate to the “Inventory” tab found in the top-left corner of the screen, and then
click on the “Transfer Inventory” button located on the right-hand side of the screen.
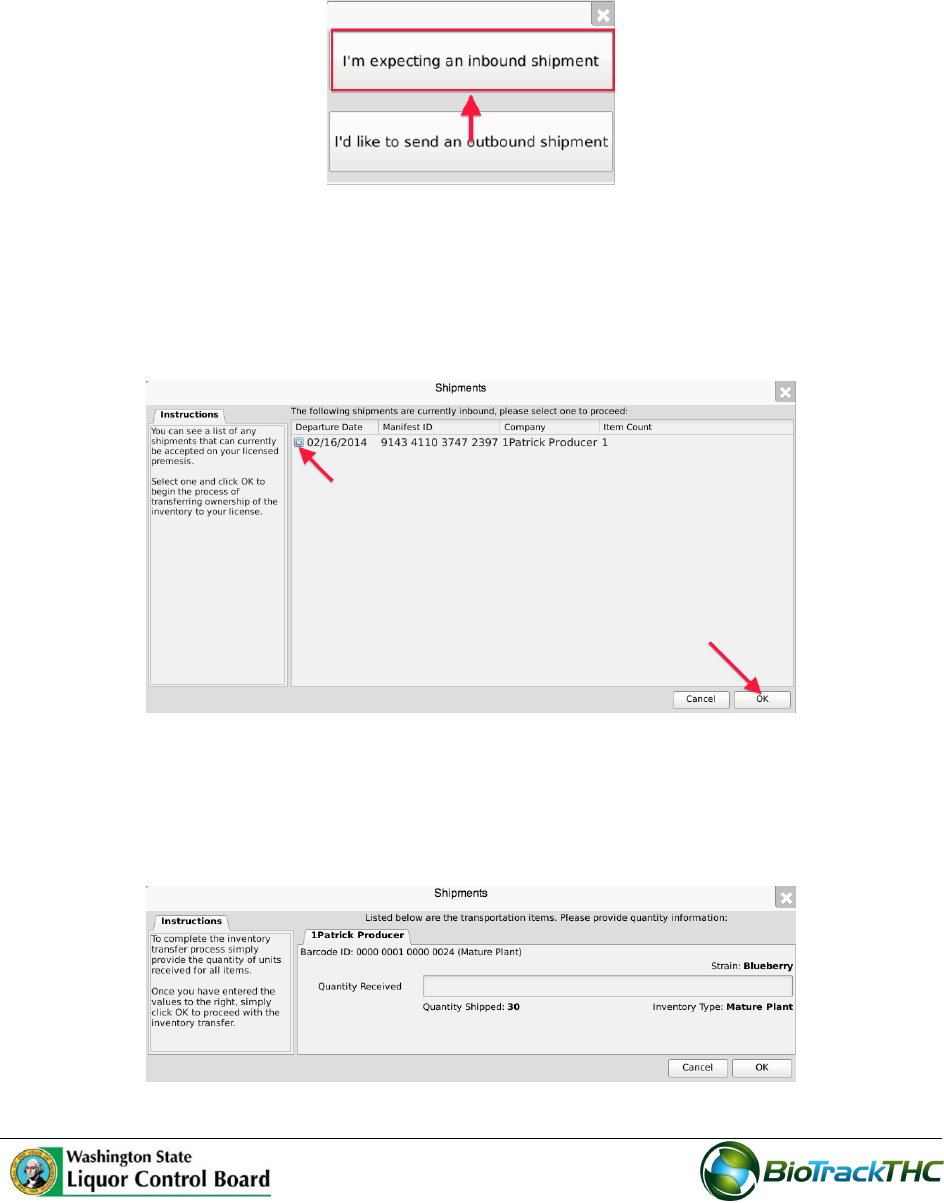
The following pop-up appears:
41
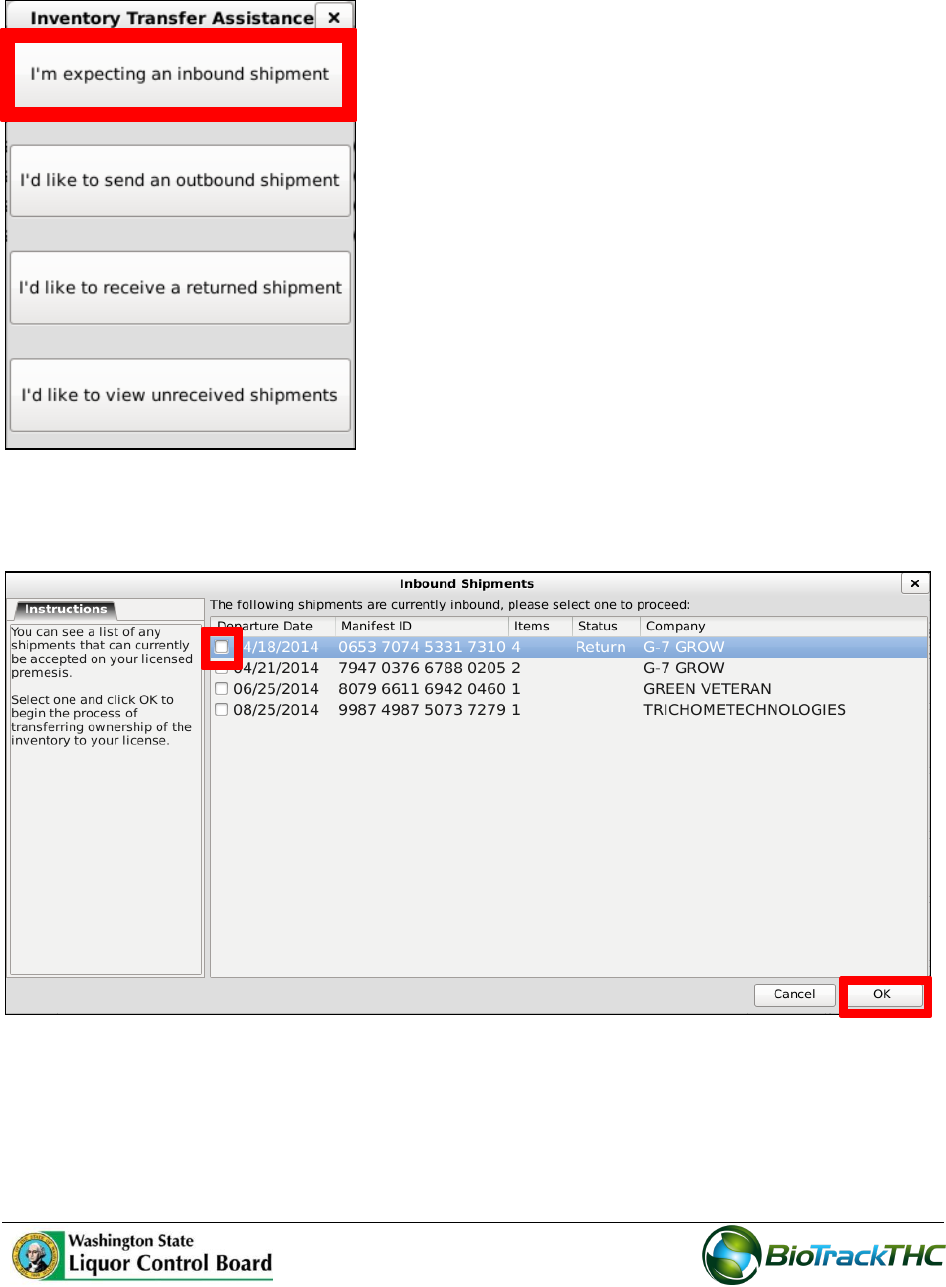
Inbound Shipment
To receive an inbound shipment,
Click on “I’m expecting an inbound shipment”
A list of all currently filed but not-yet-received inbound manifests from vendors
appears.
Click on the checkbox to the left of the manifest being received.
Click “OK”.
The Receipt Confirmation screen, which lists the inventory associated with the
manifest, appears. Note that though the example illustrates only one item, multiple
items may be associated with the manifest and each item will have its own line
accordingly.
42
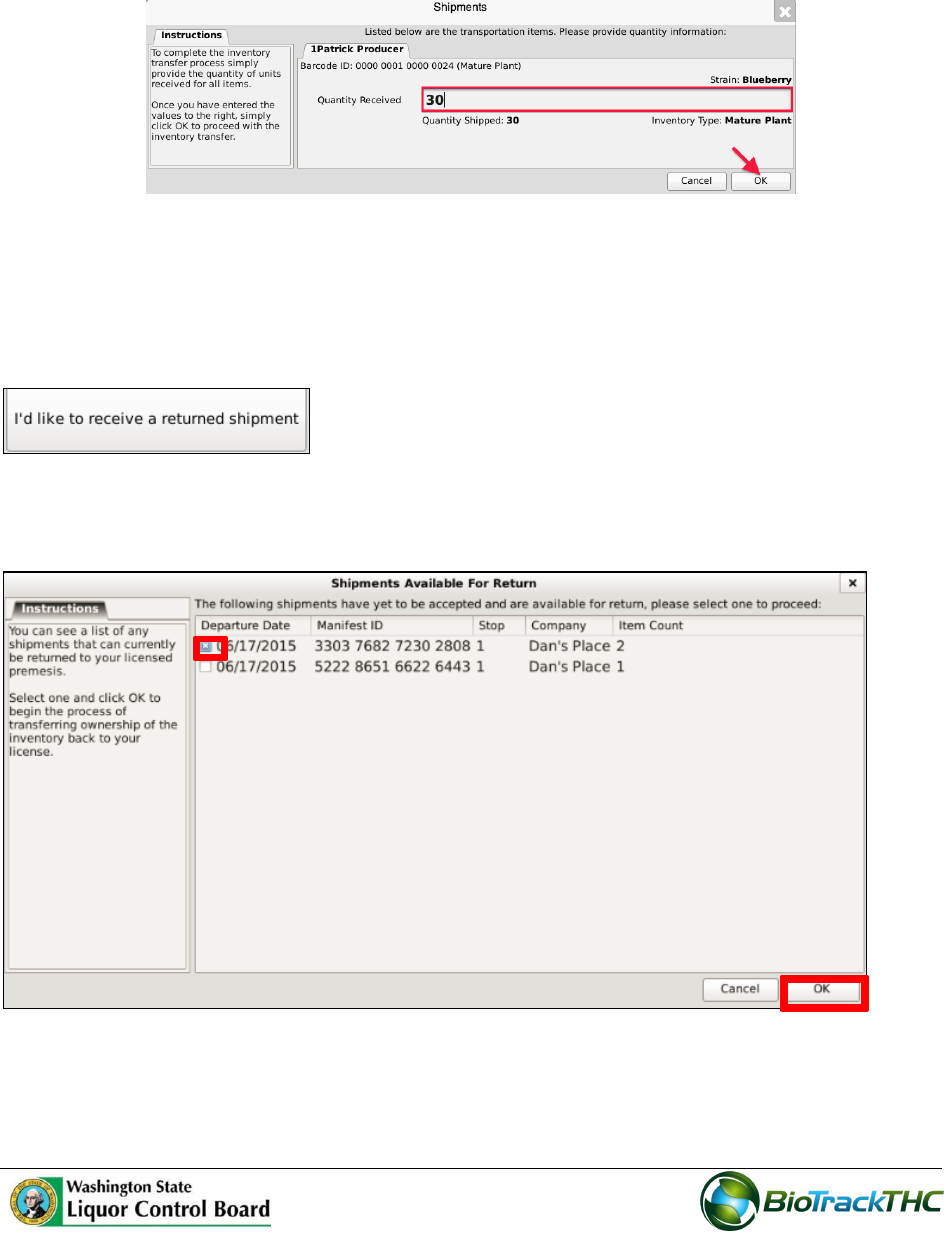
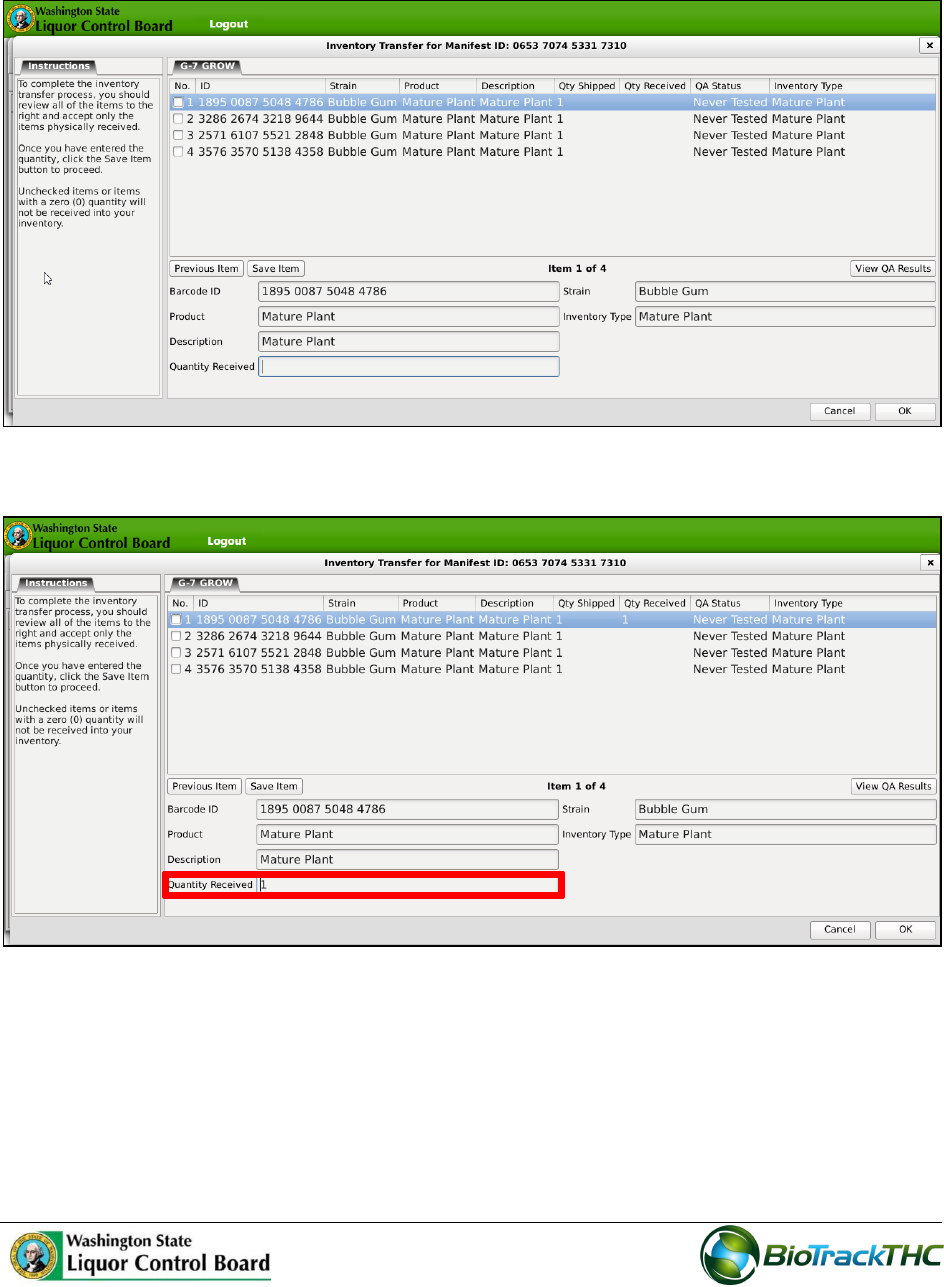
Enter the Quantity Received for each item that is on the manifest.
Click the “OK” button after all quantities received are entered.
The Traceability System automatically moves the inventory on the manifest into the
Bulk Inventory room.
To receive a returned shipment
Click to retrieve inventory from a shipment that has been partially accepted or rejected.
1. Check the box of the returned shipment you want to view. Click the ‘OK’ button.
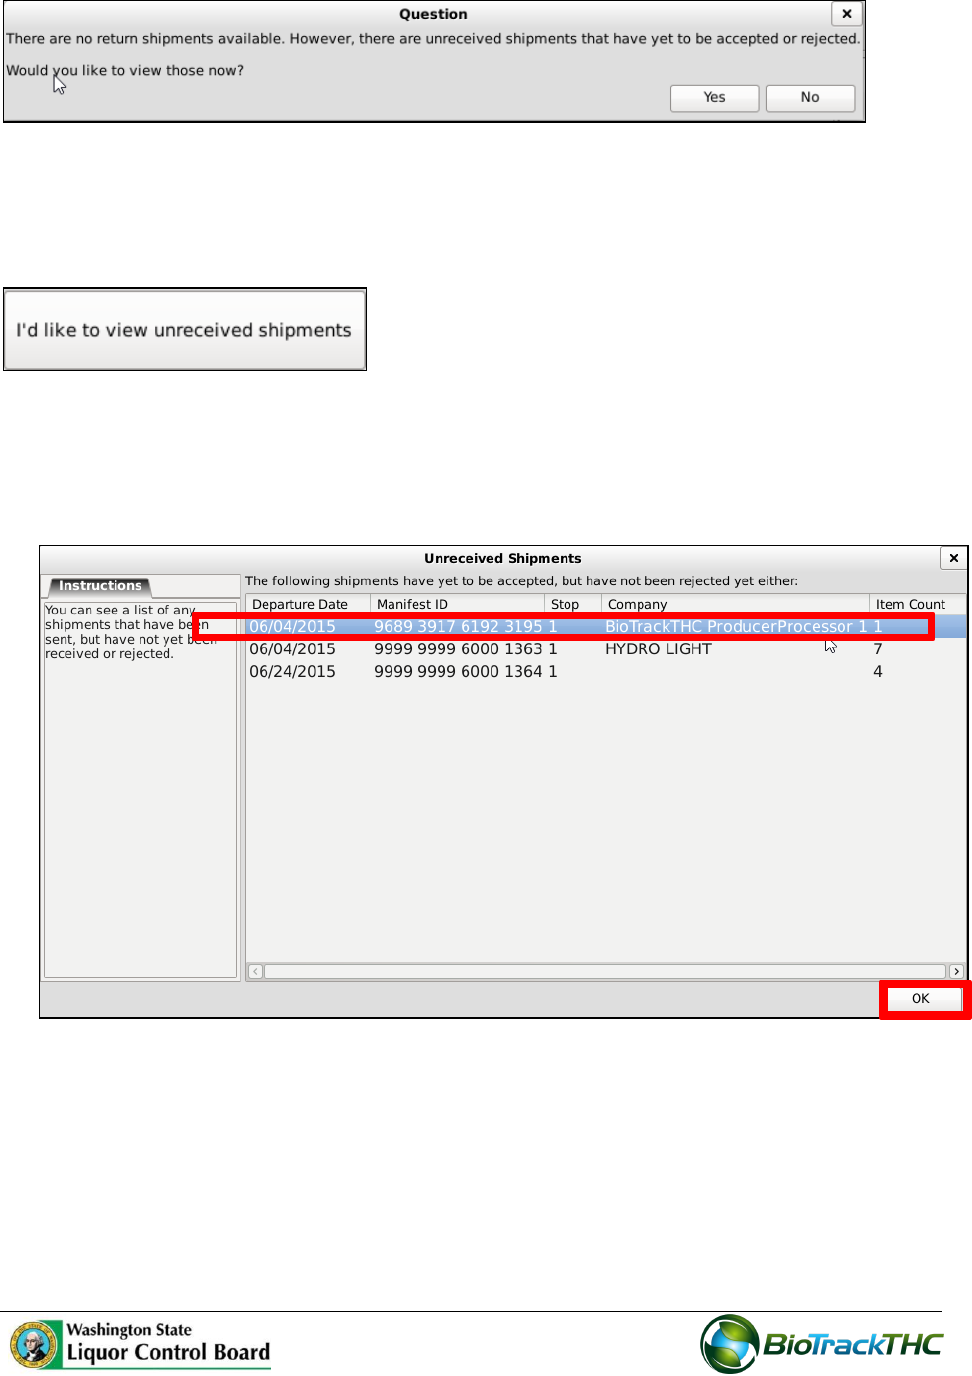
Note: If there are no return shipments available, the ‘Question’ screen will appear. It
will give you the option to view shipments that haven’t been accepted or rejected.
43
To view unreceived shipments
Click to view shipments you have transferred out, but have not been processed by the
recipient.
1. Click the unreceived shipment that you want to view. Click the ‘OK’ button to close
the screen.
Note: Unreceived shipments are considered outstanding invoices.
44
To partially accept or reject items:
1. From the ‘Inventory Transfer’ screen, click ‘Transfer Inventory’.
45
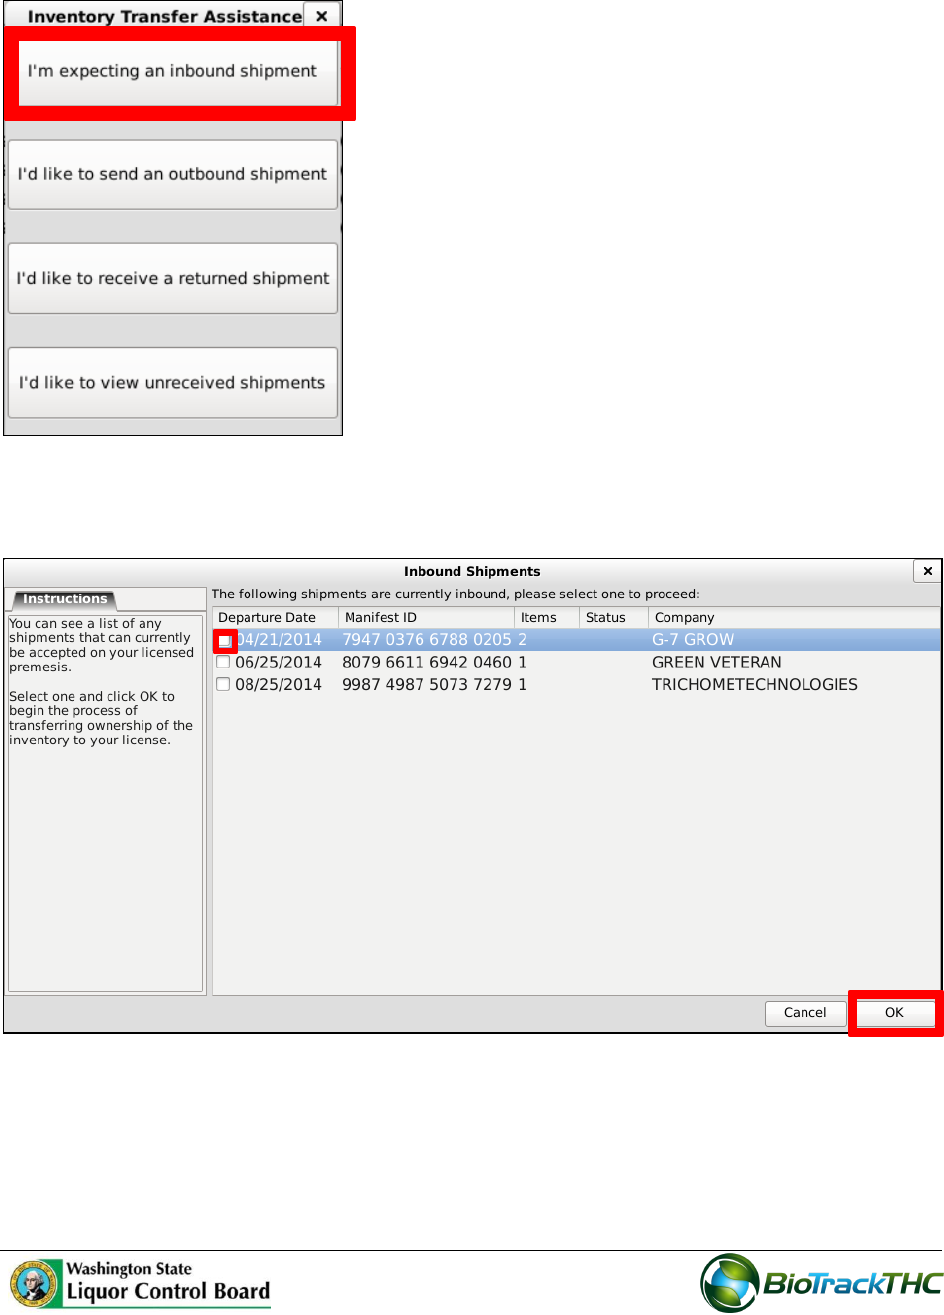
2. Click ‘I’m expecting an inbound shipment’.
3. Select the shipment you want to partially accept or reject. Check the appropriate box
in the Departure Date column. Click the ‘OK’ button.
46
4. The ‘Inventory Transfer for Manifest ID’ screen displays.
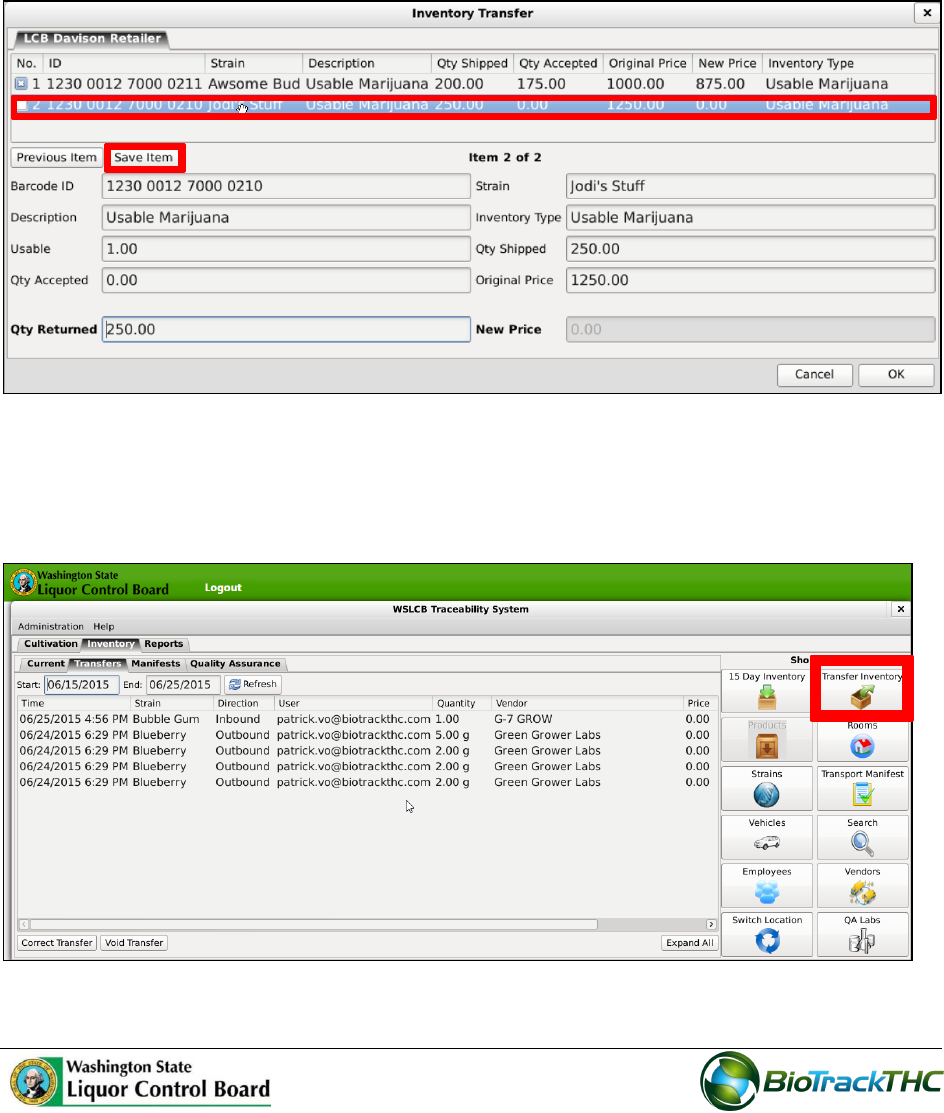
5. Select the item you would like to receive and enter the quantity received.
47
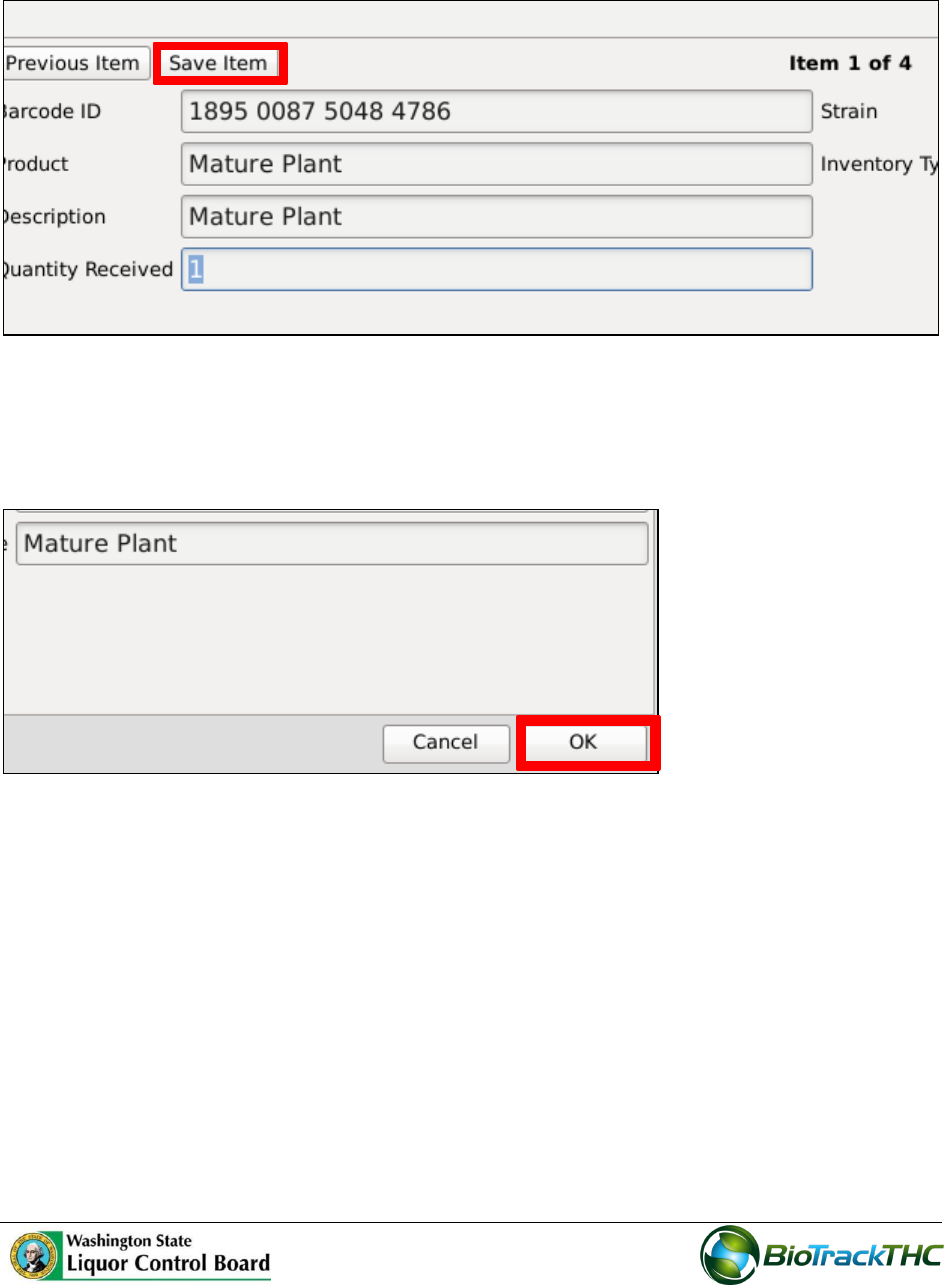
6. Click the ‘Save Item’ button.
Note: Repeat the process until all items have been received. Items that are not
processed will automatically be rejected.
7. Click the ‘Ok’ button on the bottom right corner of the screen.
48
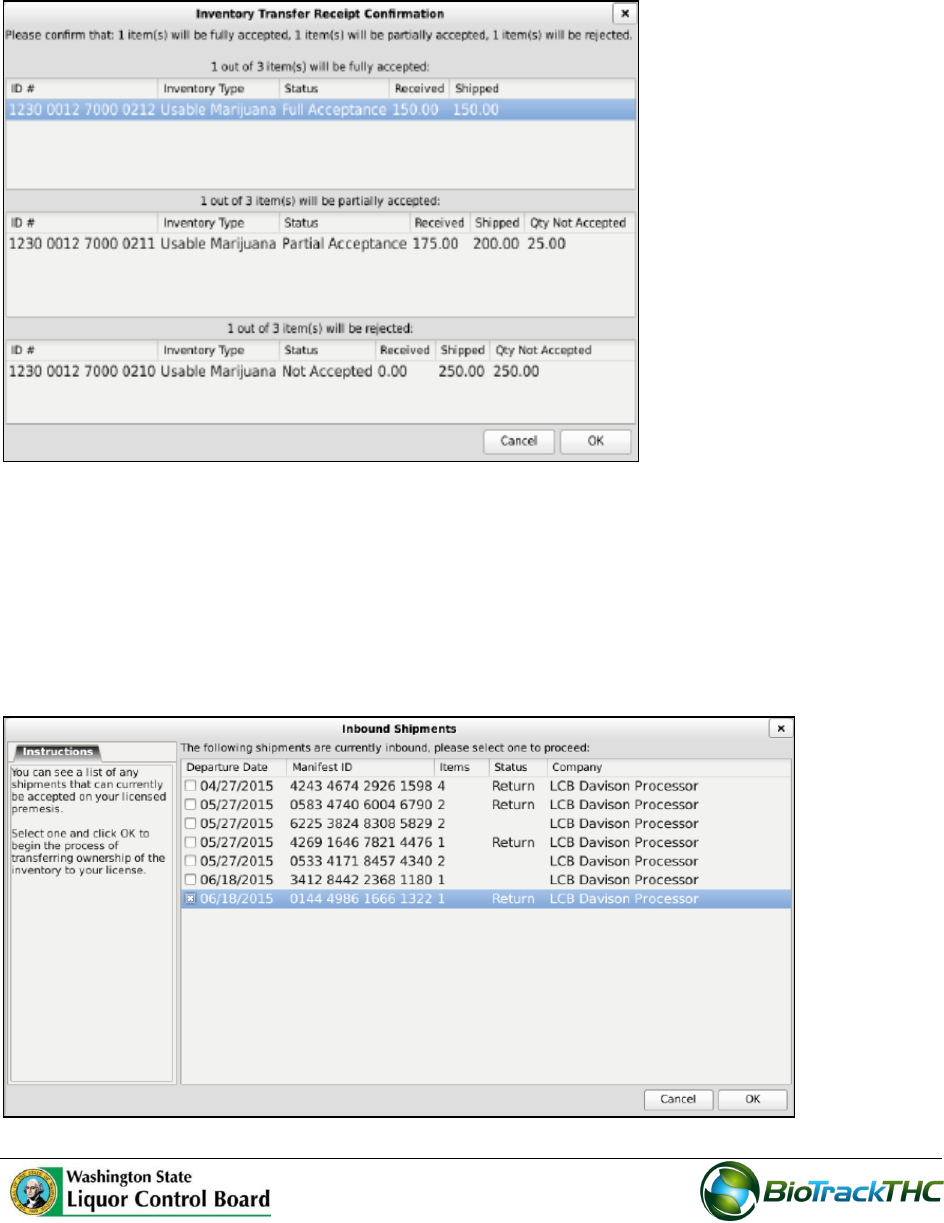
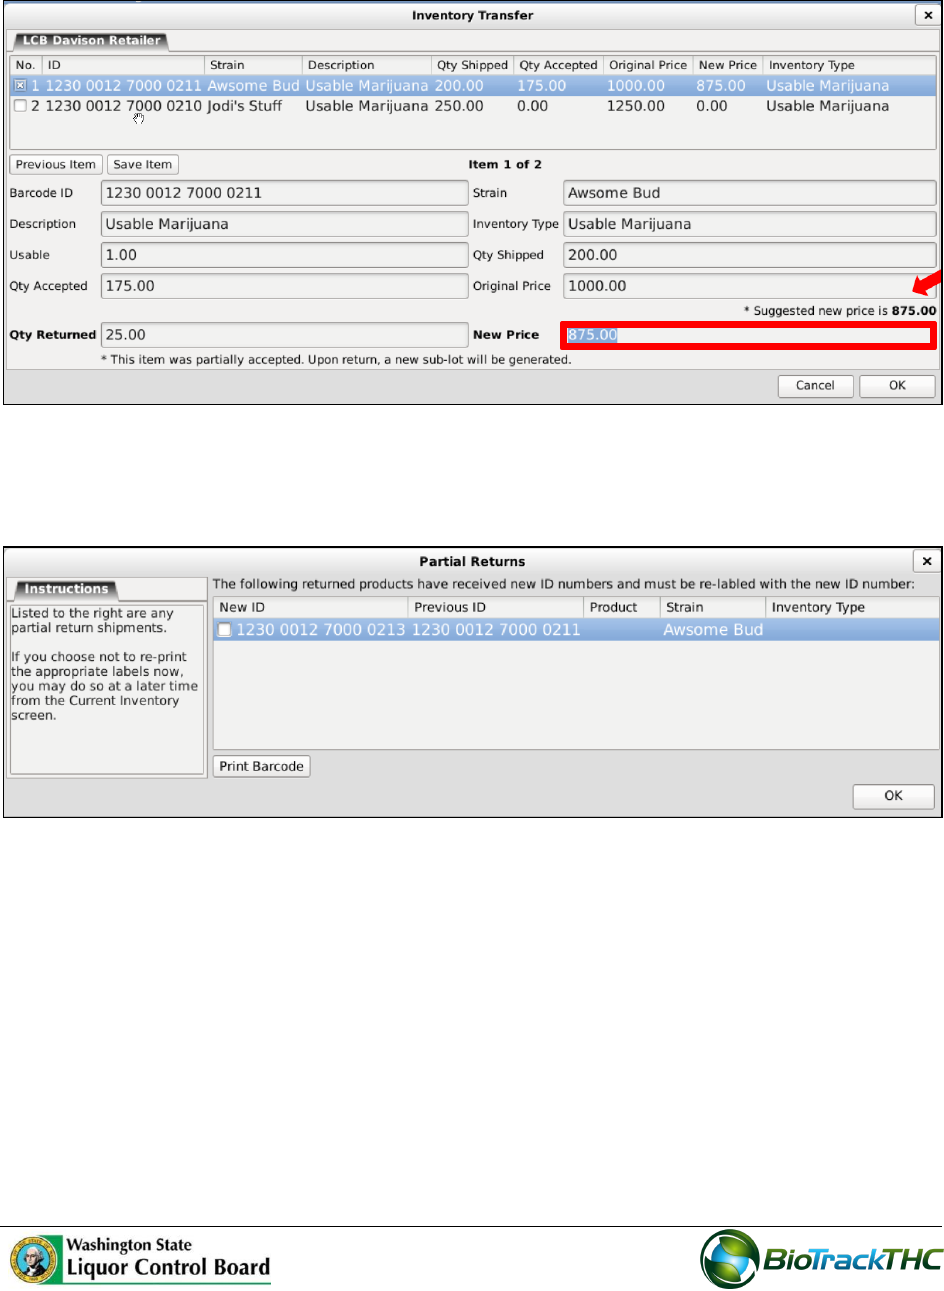
8. The ‘Inventory Transfer Receipt Confirmation’ screen displays. Here, you can view
items that will be fully accepted, partially accepted and rejected. Review and
confirm receipt of inventory.
9. Click the ‘Ok’ button to continue. Click the ‘Cancel’ button to go back and make
changes.
Note: Items that are rejected will be available in the inventory transfer screen
until the licensee who shipped the inventory receives the rejected items back into
their inventory.
49
Note: The user can add a new price for partially accepted items. In the ‘Inventory
Transfer’ screen, the system generates a suggested price based on the unit price.
Note: Rejected items retain the original Inventory ID number. Partially received
items will automatically receive a new laboratory ID number. These items will need
to be relabeled with the new Inventory ID number immediately.
50
To re-accept a rejected item:
1. From the “Inventory Transfer’ screen, select the item you want to accept back into
inventory and click the “Save Item” button.
Note: A new price of $0.00 is automatically entered for the item.
To view QA results in Transfer Inventory:
1. From the ‘Inventory Transfer’ screen, click ‘Transfer Inventory’.
51
2. Click ‘I’m expecting an inbound shipment’.
3. Select the shipment you want to partially accept or reject. Check the appropriate
box in the Departure Date column. Click the ‘OK’ button.
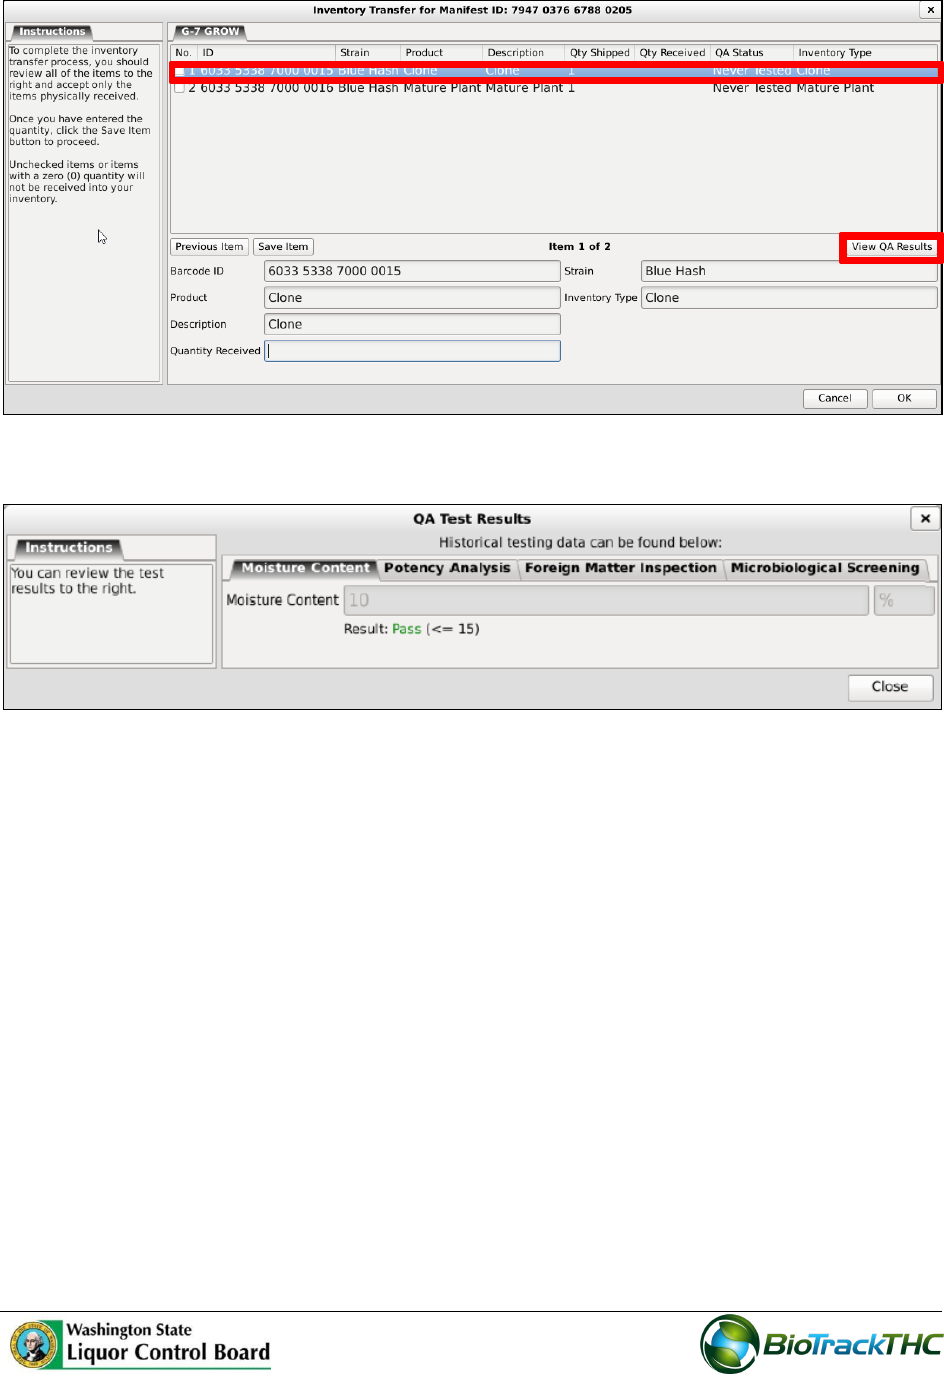
4. The ‘Inventory Transfer for Manifest ID’ screen displays. Select the manifest. Click
the ‘View QA Results’ button.
52
5. The ‘QA Test Results’ screen displays.
53
Chapter 9: Processor Inventory Conversions
In this chapter, you will learn how to:
Convert a Flower Lot into Useable Marijuana
Convert a Flower Lot or Other Material Lot into Marijuana Extract
Convert Marijuana Extract into Marijuana-Infused Product
Move inventory between inventory rooms
Traceablity Logic – Inventory Conversions
The system has many controls in place to reduce the potential for errors and to ensure that
the product workflow is consistent with regulations. With respect to the Inventory
Conversion menu—which will be discussed throughout this chapter—the menu will only
display conversion options that are possible with the inventory you currently have on hand
within the room selected.
A Flower Lot is required to produce Usable Marijuana.
A Lot of either Flower or Other Material is required to produce an Extract.
An Extract is required to produce Liquid Marijuana Infused Edible, Marijuana
Extract for Inhalation, Marijuana Infused Topicals, and Solid Marijuana Infused
Edible.
The menu in its entirety will only display should the room selected contain all of the
precursors for each product type. The left-side displays all Intermediate Products
that are required for some of the End Products displayed on the right-side.
Otherwise, should the system detect that the precursor for a particular inventory
type is not present in the room selected, then the system will remove that option
from the menu until it is present.
54
Convert Flower Lot to Usable Marijuana
This function will notify the Traceability System of the creation of a usable marijuana from
a flower lot.
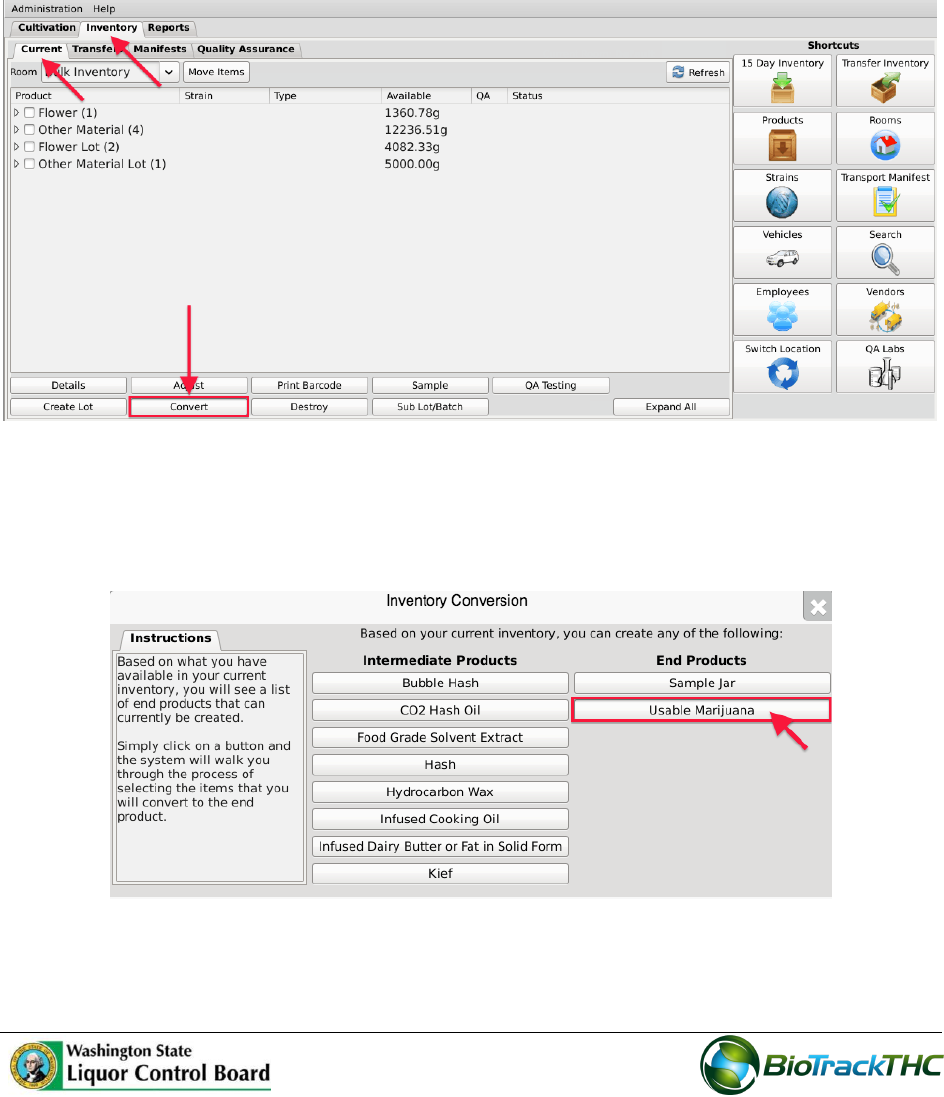
Navigate to the Inventory Room within which the flower lot inventory is located
(make sure that you are within the Inventory tab and the Current sub-tab).
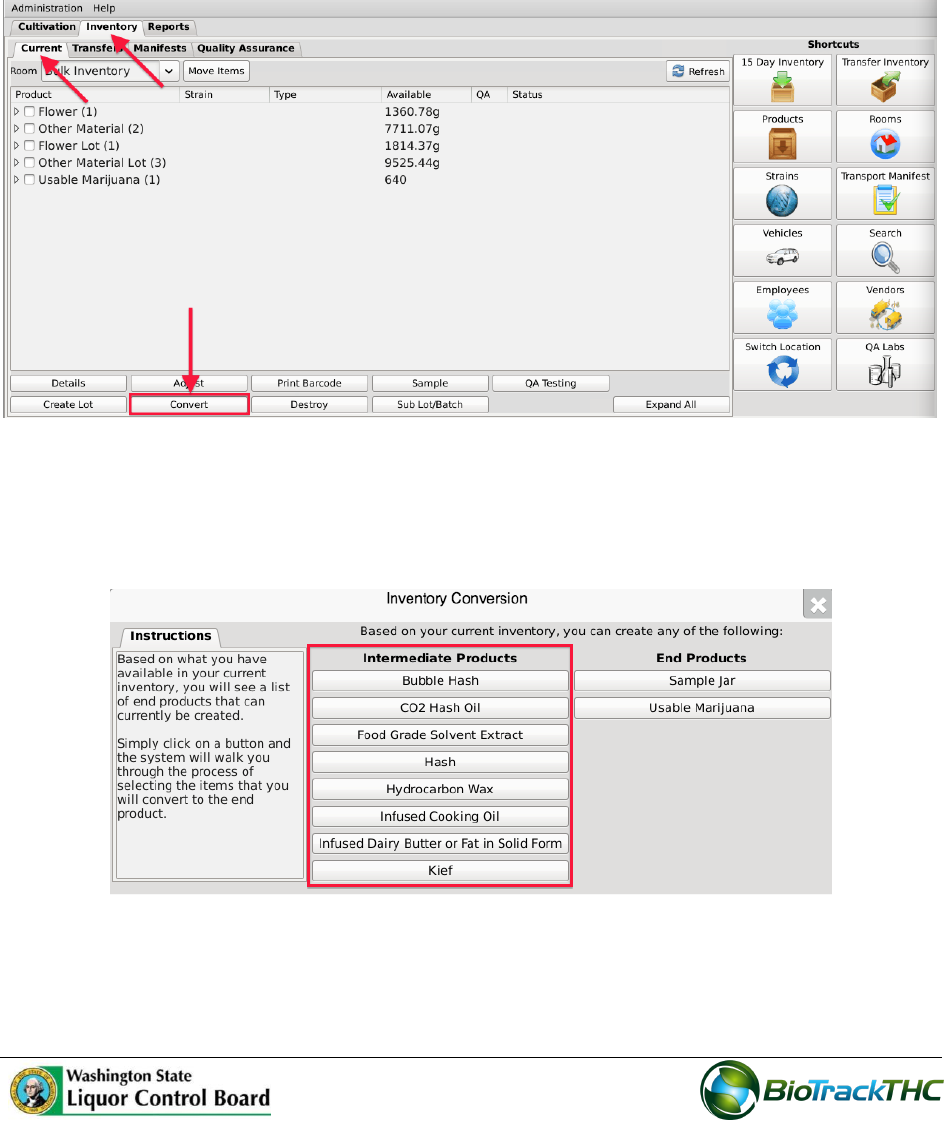
Click on the “Convert” button at the bottom of the screen.
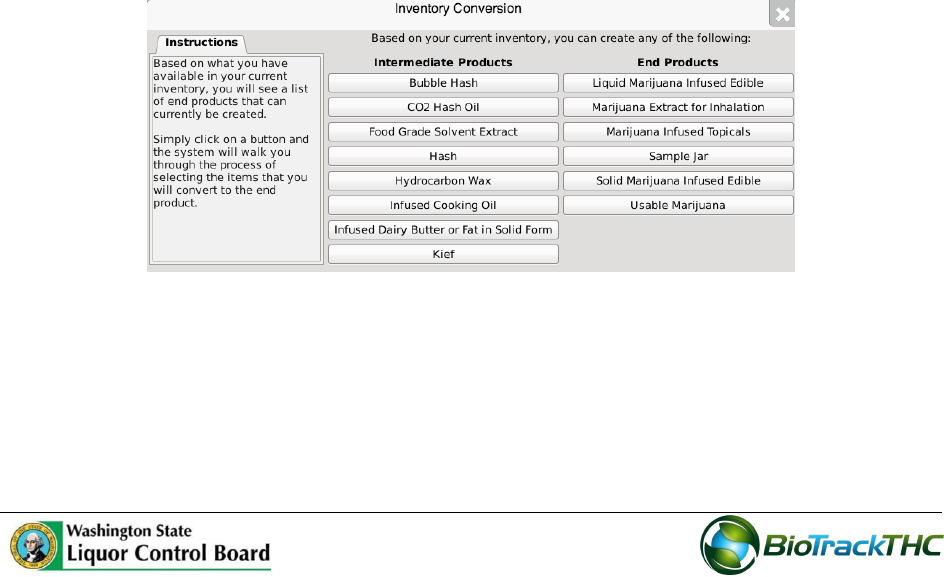
The Inventory Conversion menu then appears. This menu lists all of the possible
inventory types that can be created. Since there are no extracts in inventory for this
example, the only End Products available are Sample Jars and Usable Marijuana.
Click on “Usable Marijuana”button.
55
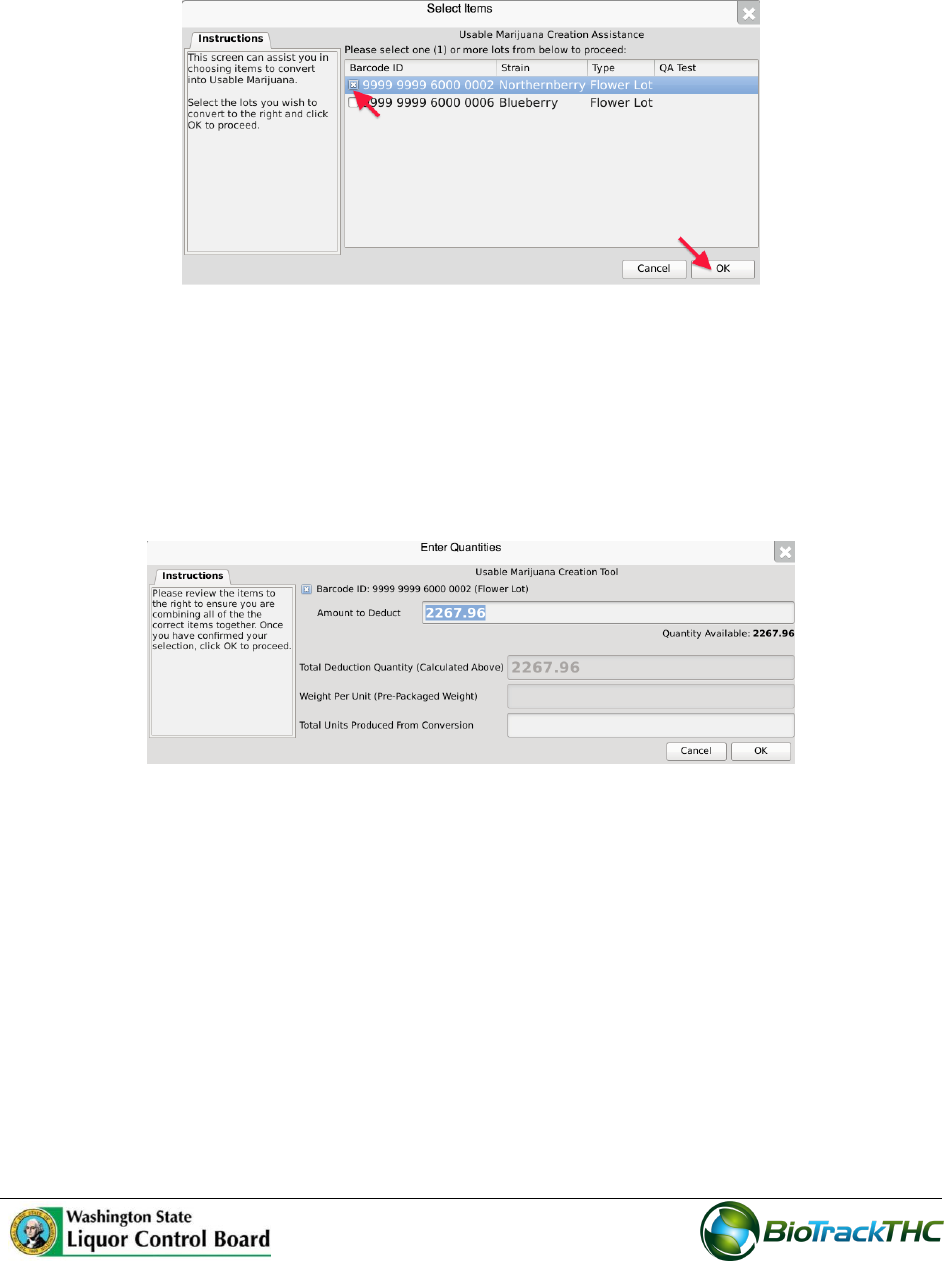
Select an item from the list of available inventory appropriate for creating Usable
Marijuana.
Click on “OK”.
The Usable Marijuana Creation Tool then appears. This screen summarizes all of the
relevent information for the conversion, including: the Traceability Identifier of the
source inventory item, the Quantity Available for use from the source item, the
Amount to Deduct from the source item that is going into the end product, and the
total Units Produced from Conversion. The Traceability System defaults to fully
using the source item in the conversion.
56
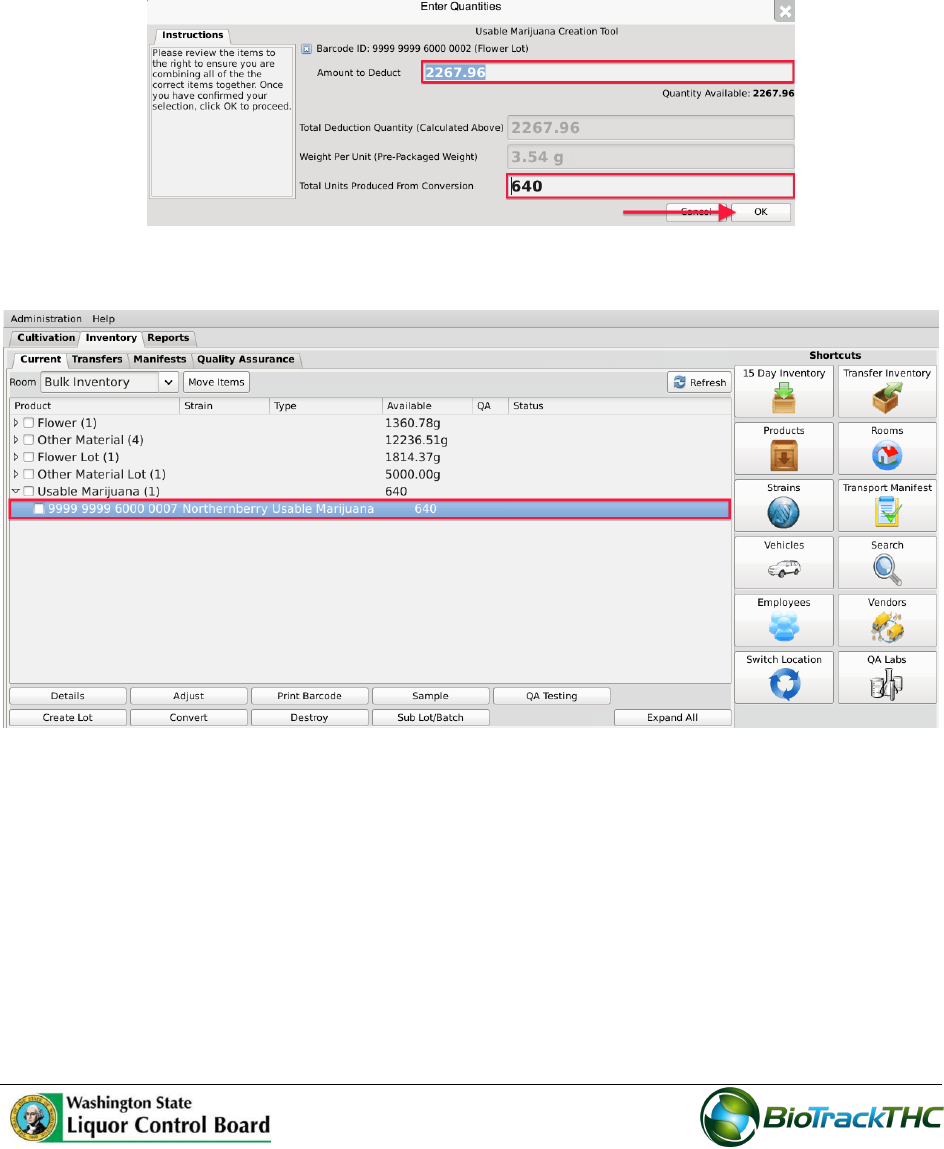
Adjust the amount within the “Amount to Deduct” field (if necessary) and input the
“Total Units Produced from Conversion” fields so that Traceability System numbers
matches how much is being converted and the resulting product. (In the example
below, a five pound flower lot is being converted in its entirety into 640 pre-packs of
one-eighth ounce [3.54 g] each.)
Click “OK” when complete.
The newly created Usable Marijuana may now be found within the same room.
57
Convert Lot into a Marijuana Extract
This function will notify the Traceability System of the creation of a marijuana extract from
a flower lot or other material lot.
Navigate to the Inventory Room within which the inventory lot is located (make
sure that you are within the Inventory tab and the Current sub-tab).
Click on the “Convert” button at the bottom of the screen.
The Inventory Conversion menu then appears. This menu lists all of the possible
inventory types that can be created.
The left column of options are all of the categories of extracts per regulation
(Intermediate Products).
For this example, we will select “Food Grade Solvent Extract” though any of the
option on the left-side of the menu are applicable.
58
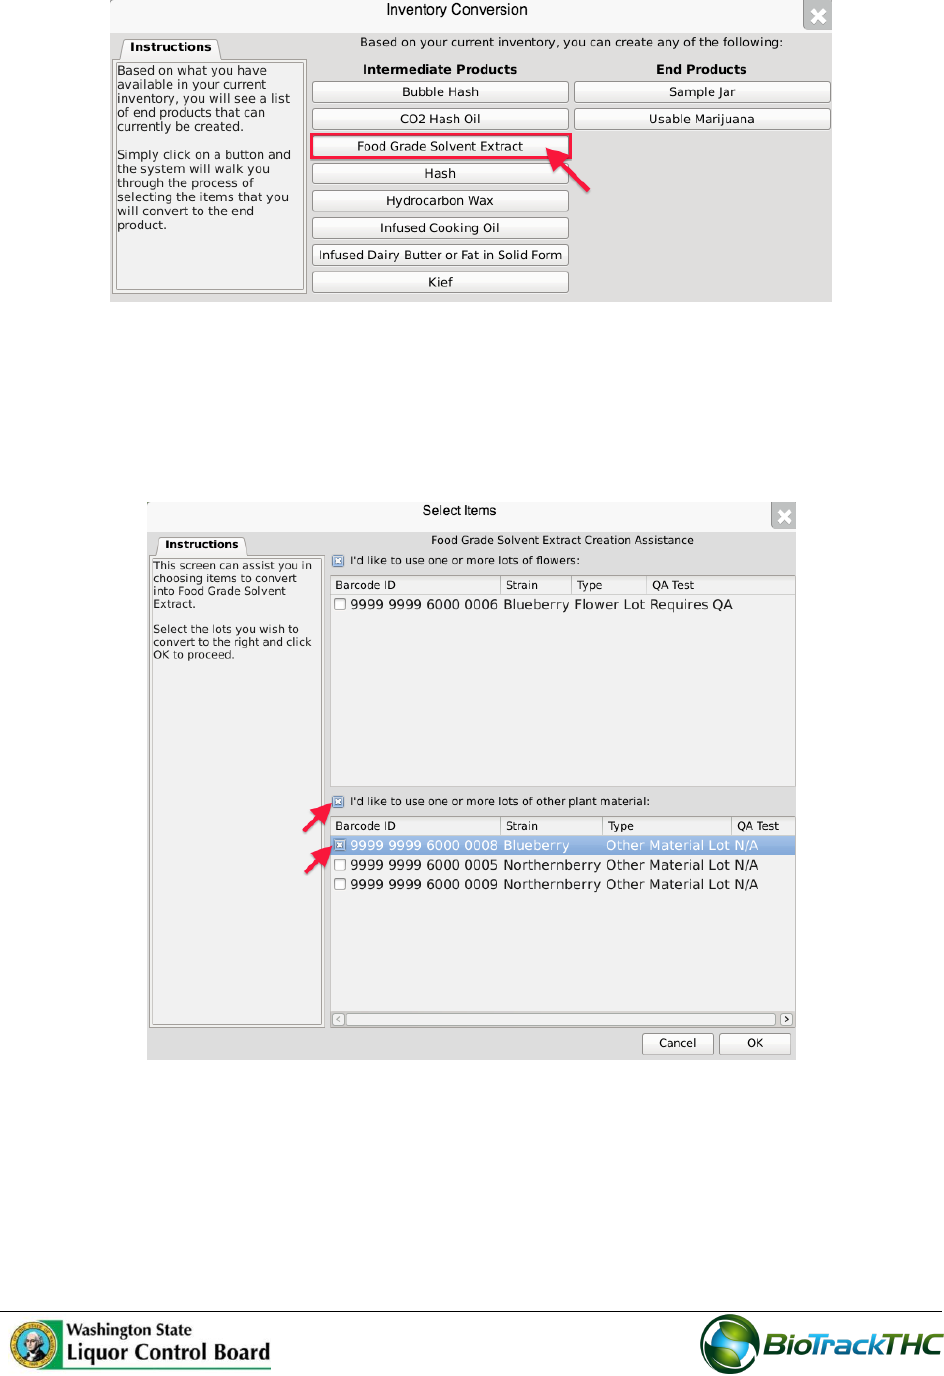
Upon selecting an extract option from the Inventory Conversion menu, the Extract
Creation Assistance tool appears. This tool lists all available inventory items that
are allowed for the creation of the extract.
Select one or more lots from the two lists, flower lot or other material lot.
Click “OK” when complete.
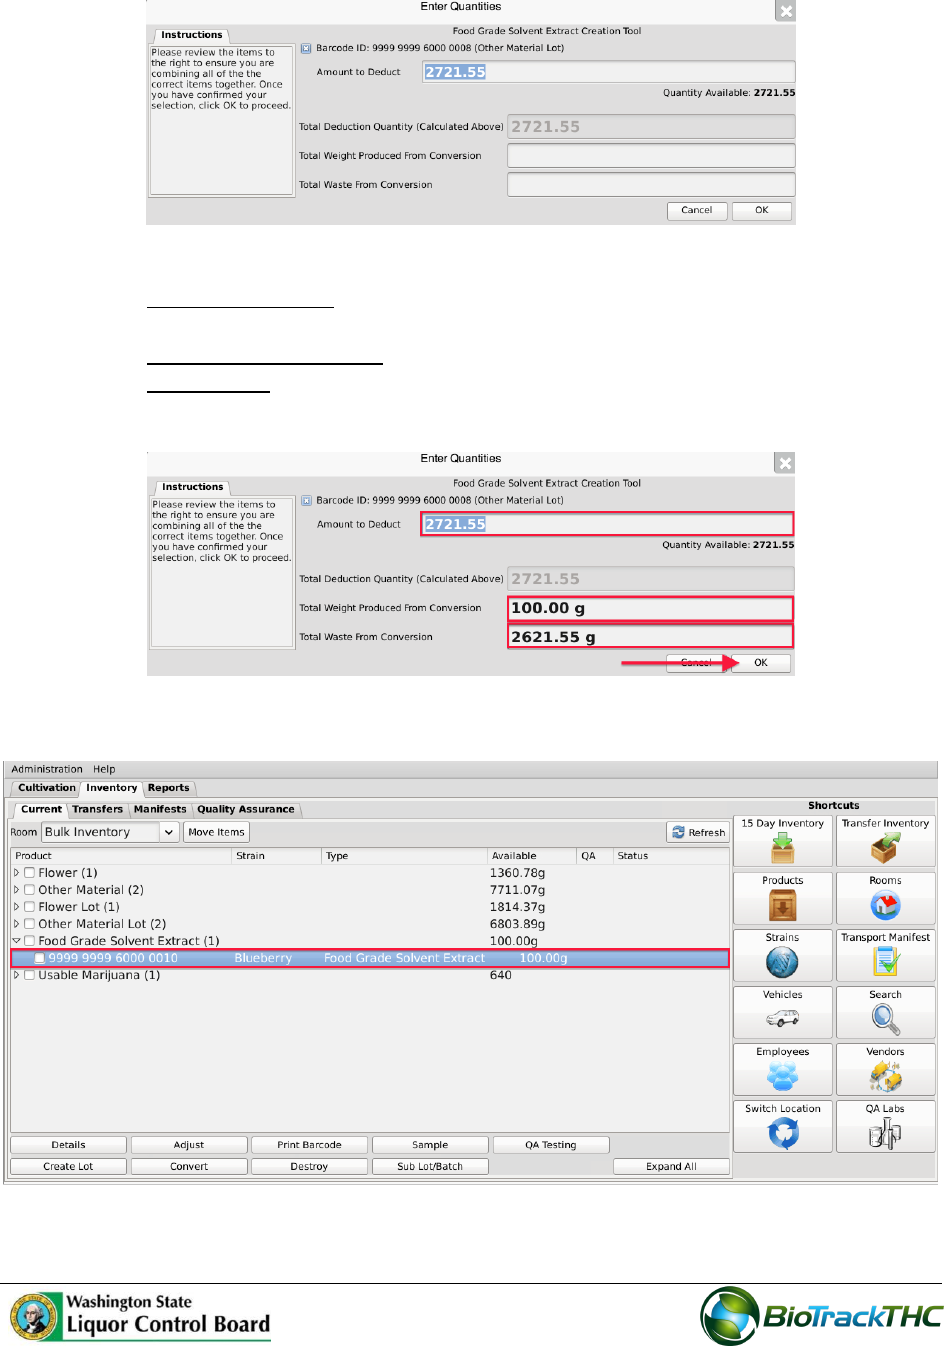
The Extract Creation Tool then appears. This screen summarizes all of the relevent
information for the conversion, including: the Traceability Identifier of the source
inventory item(s), the Quantity Available for use from the source item(s), the
Amount to Deduct from the source item(s) going into the end product, total Units
Produced and Total Waste from Conversion. The Traceability System defaults to
fully using the source item(s) in the conversion.
59
Enter in the following,
o Amount to Deduct: weight of Lot material that went into the conversion
process.
o Total Weight Produced: weight of the extract produced.
o Total Waste: weight of the waste generated from the conversion process
Click “OK” when complete.
The newly created extract may now be found within inventory.
60
Convert Marijuana Extract into Marijuana-Infused Product
This function will notify the Traceability System of the creation of a marijuana-infused
product from a marijuana extract.
Navigate to the Inventory Room within which the inventory lot is located (make
sure that you are within the Inventory tab and the Current sub-tab).
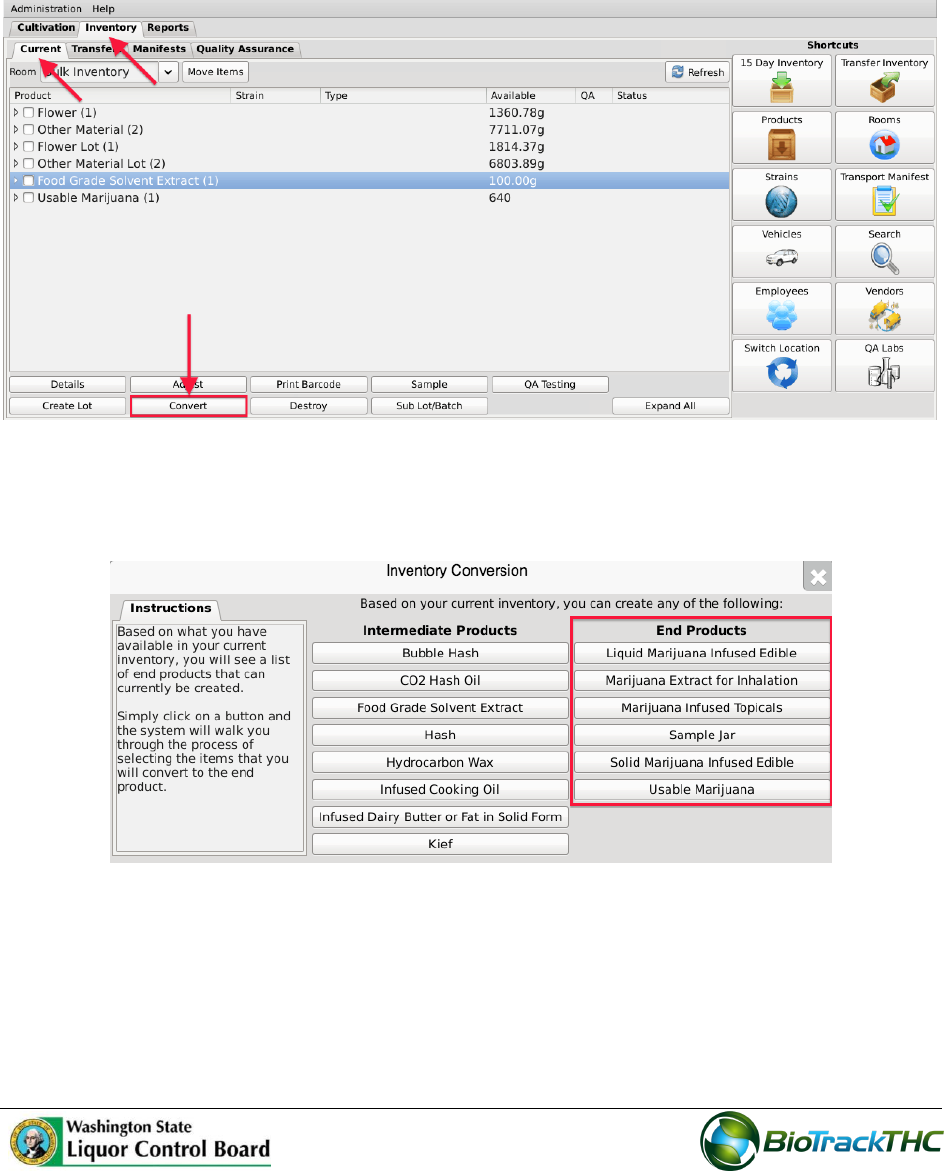
Click on the “Convert” button at the bottom of the screen.
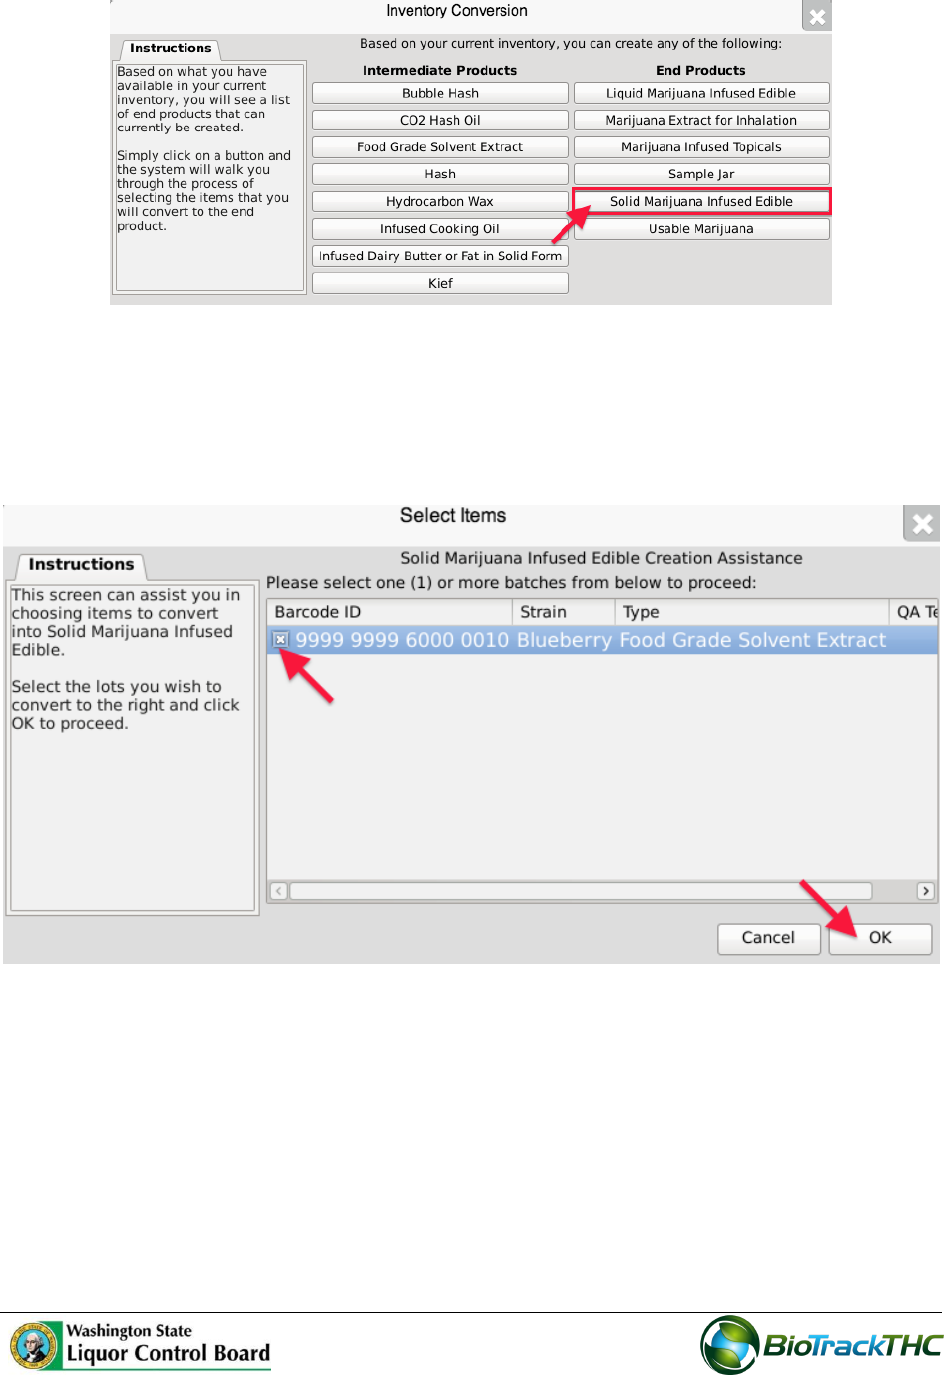
The Inventory Conversion menu then appears. This menu lists all of the possible
inventory types that can be created. Since there are extracts in inventory for this
example, all categories of End Products are available in the right column.
For this example, we will select “Solid Marijuana Infused Edible” though any of the
option on the right-side of the menu are applicable (except Usable Marijuana and
Sample Jar).
61
Upon selecting an end-product option from the Conversion Menu, the Product
Creation Assistance tool appears. This tool lists all available inventory items
(extracts) that are allowed for the creation of the product.
Select one or more batches of extract.
Click “OK” when complete.
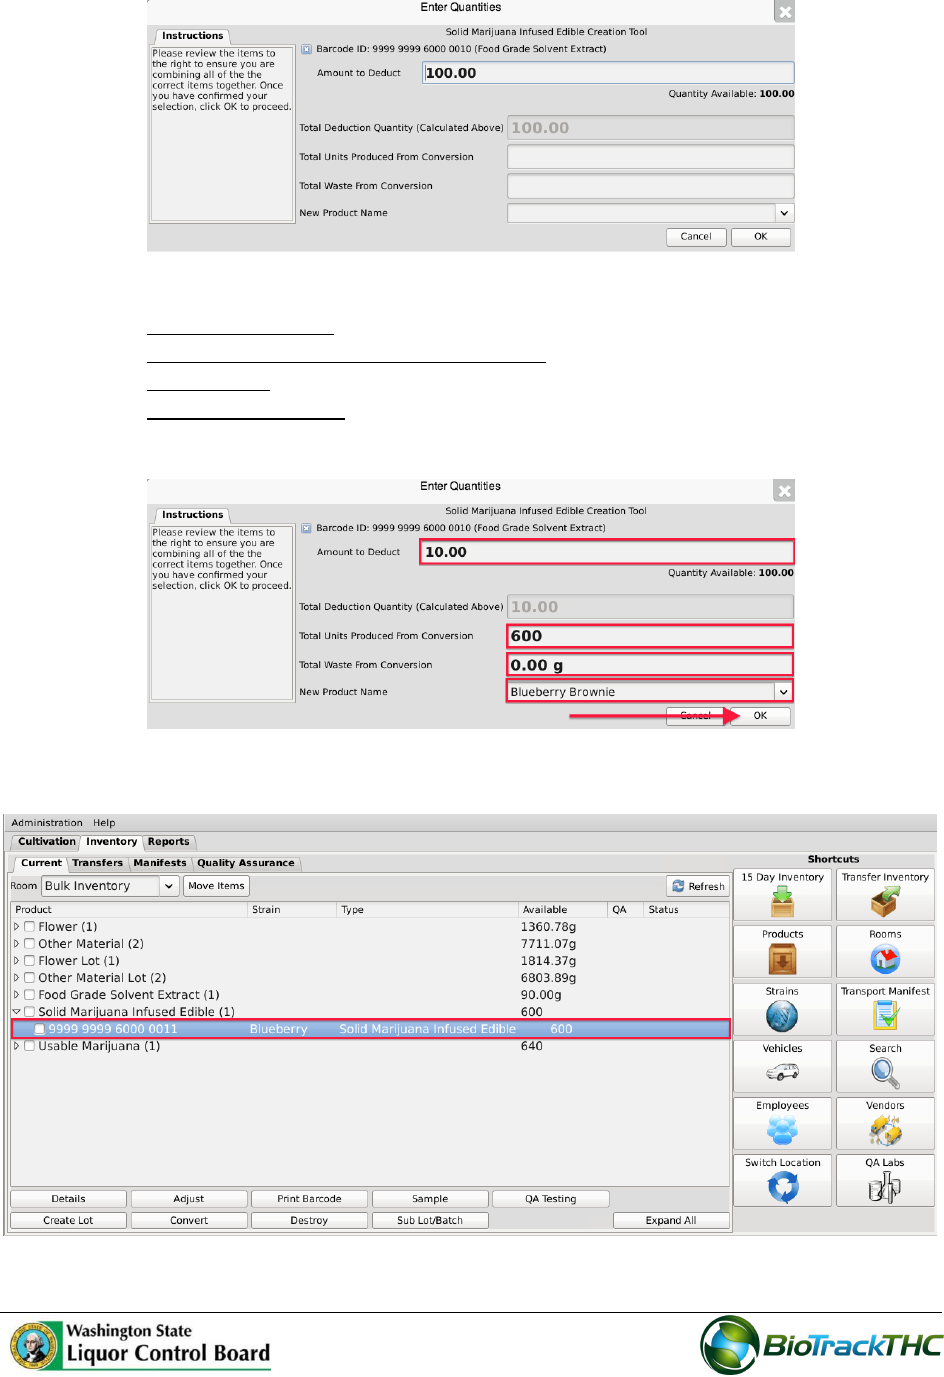
The Product Creation Tool then appears. This screen summarizes all of the relevent
information for the conversion, including: the Traceability Identifier of the source
inventory item(s), the Quantity Available for use from the source item(s), the
Amount to Deduct from the source item(s) going into the end product, total Units
Produced and Total Waste from Conversion. The Traceability System defaults to
fully using the source item(s) in the conversion.
62
Enter in the following,
o Amount to Deduct: weight of extract that went into the conversion process.
o Total Units Produced From Conversion: whole number units of product made
o Total Waste: weight of the waste generated from the conversion process.
o New Product Name: Select one of the Products from the dropdown menu.
Click “OK” when complete.
The newly created product may now be found within inventory.
63
Assign new inventory type
The user can assign new inventory types such as Marijuana Mix, Marijuana Mix Packaged
and Marijuana Mixed Infused. The new inventory types allow for more accurate pathways
for product hybrids such as caviar, etc.
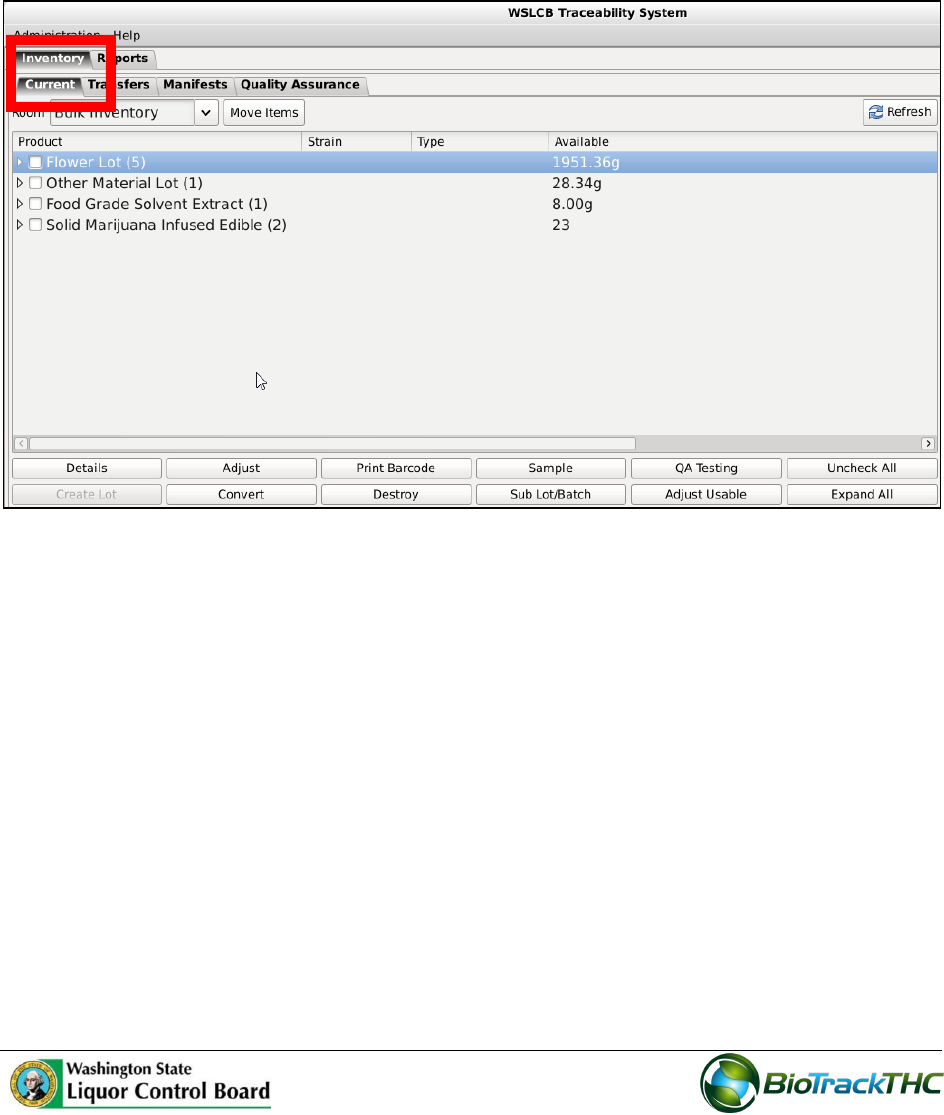
To view and assign new inventory types from the Processor or Producer/Processor
location:
1. Click the ‘Inventory’ tab. Click the ‘Current’ sub-tab.
64
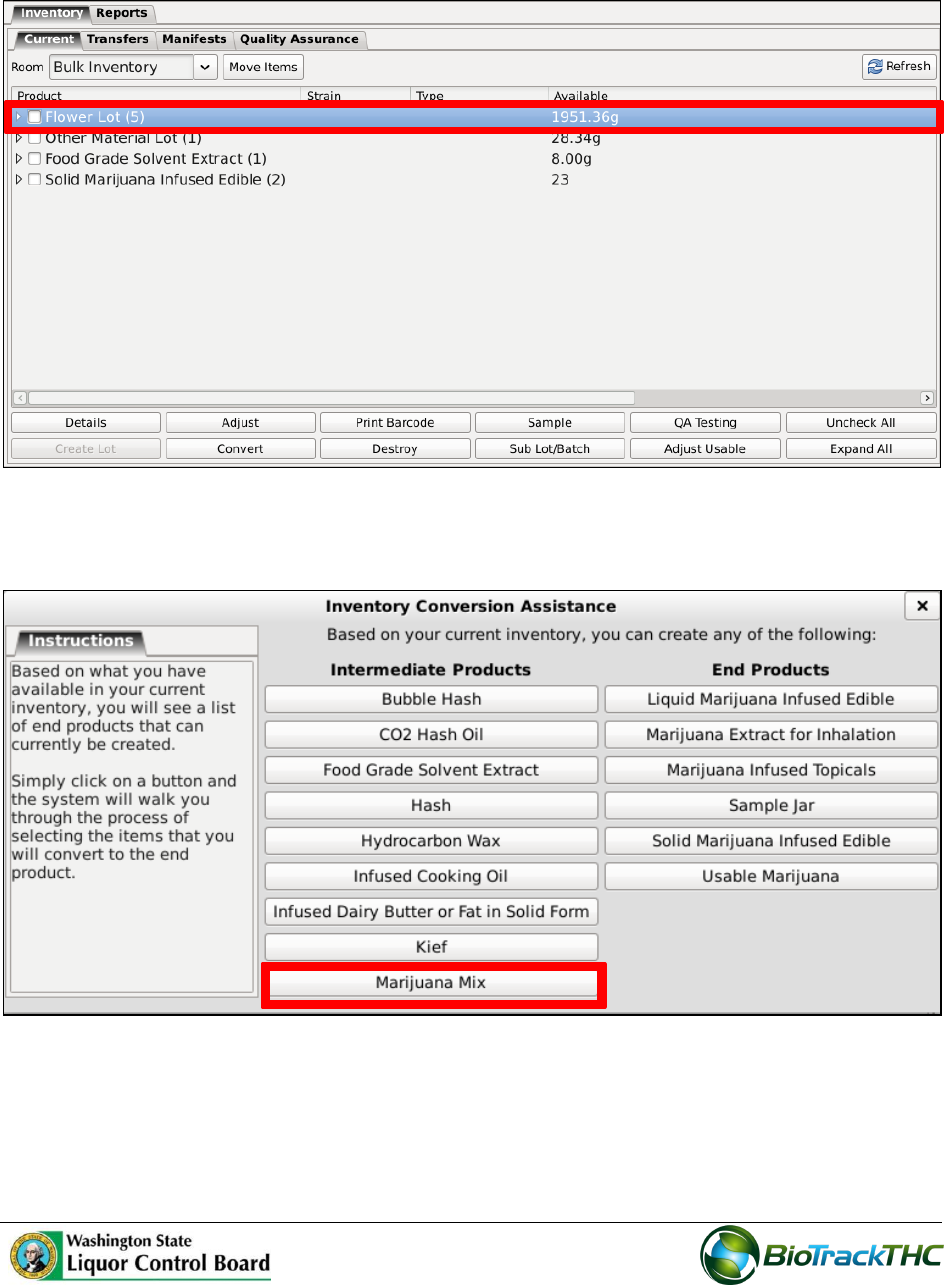
2. Select the Inventory Product and click the ‘Convert’ button.
3. The ‘Inventory Conversion Assistance’ screen displays with the new inventory type
options. Select the inventory type to create; for example ‘Marijuana Mix’.
65
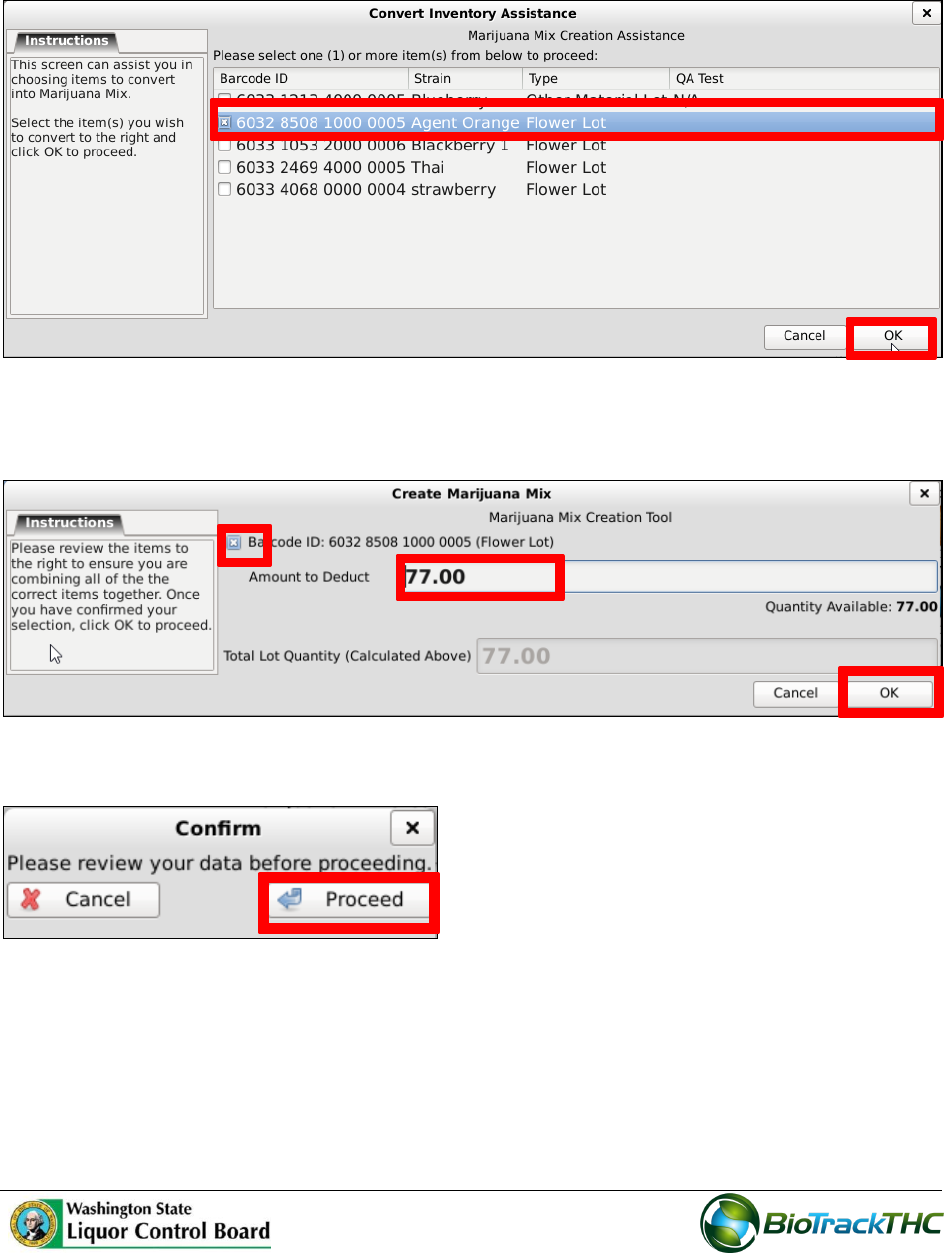
4. The ‘Marijuana Mix Creation Assistance’ screen displays. Select the item to convert
and click the ‘OK’ button.
5. The ‘Create Marijuana Mix’ screen displays. Click the barcode ID checkbox. Enter the
amount of product to convert from the total lot quantity. Click the ‘OK’ button.
6. Click the ‘Proceed’ button.
7. The ‘Question’ screen displays to confirm that the inventory lot was successfully
created. Click the ‘Yes’ button to print the new barcode.

66
Bypassing QA Testing for intermediate product that have already passed a QA test
1. Select the intermediate product you wish to convert. This is a product that shouldn’t
require any more testing.
2. Click the ‘Convert’ button.
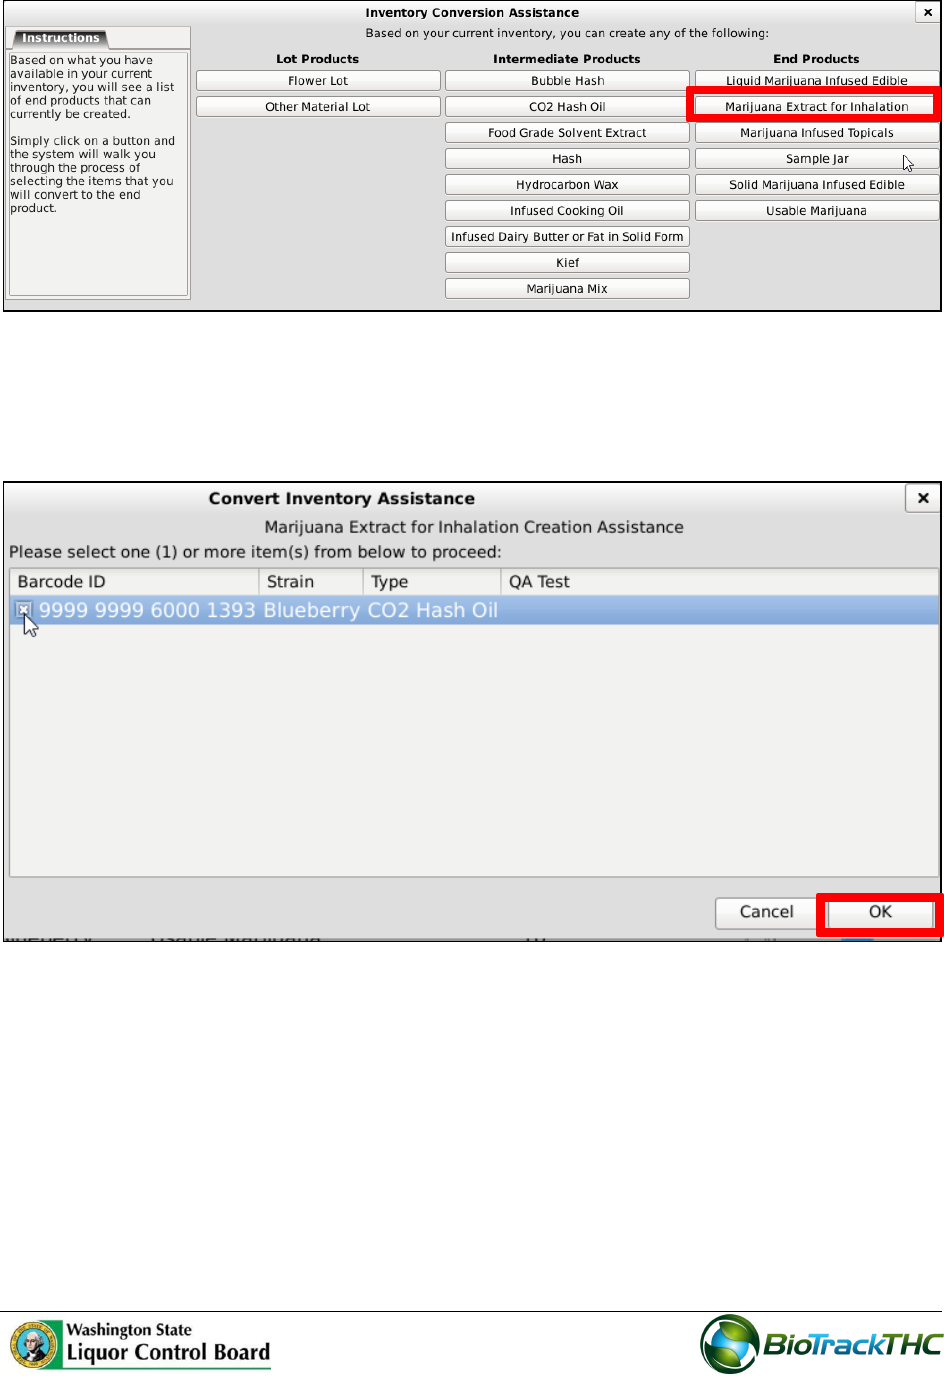
3. The ‘Inventory Conversion Assistance’ screen displays. Click on the end product that
you want to create, for example, Marijuana Extract for Inhalation.
67
4. The ‘Convert Inventory Assistance’ screen displays. Select the convert item.
5. Click the ‘OK’ button.
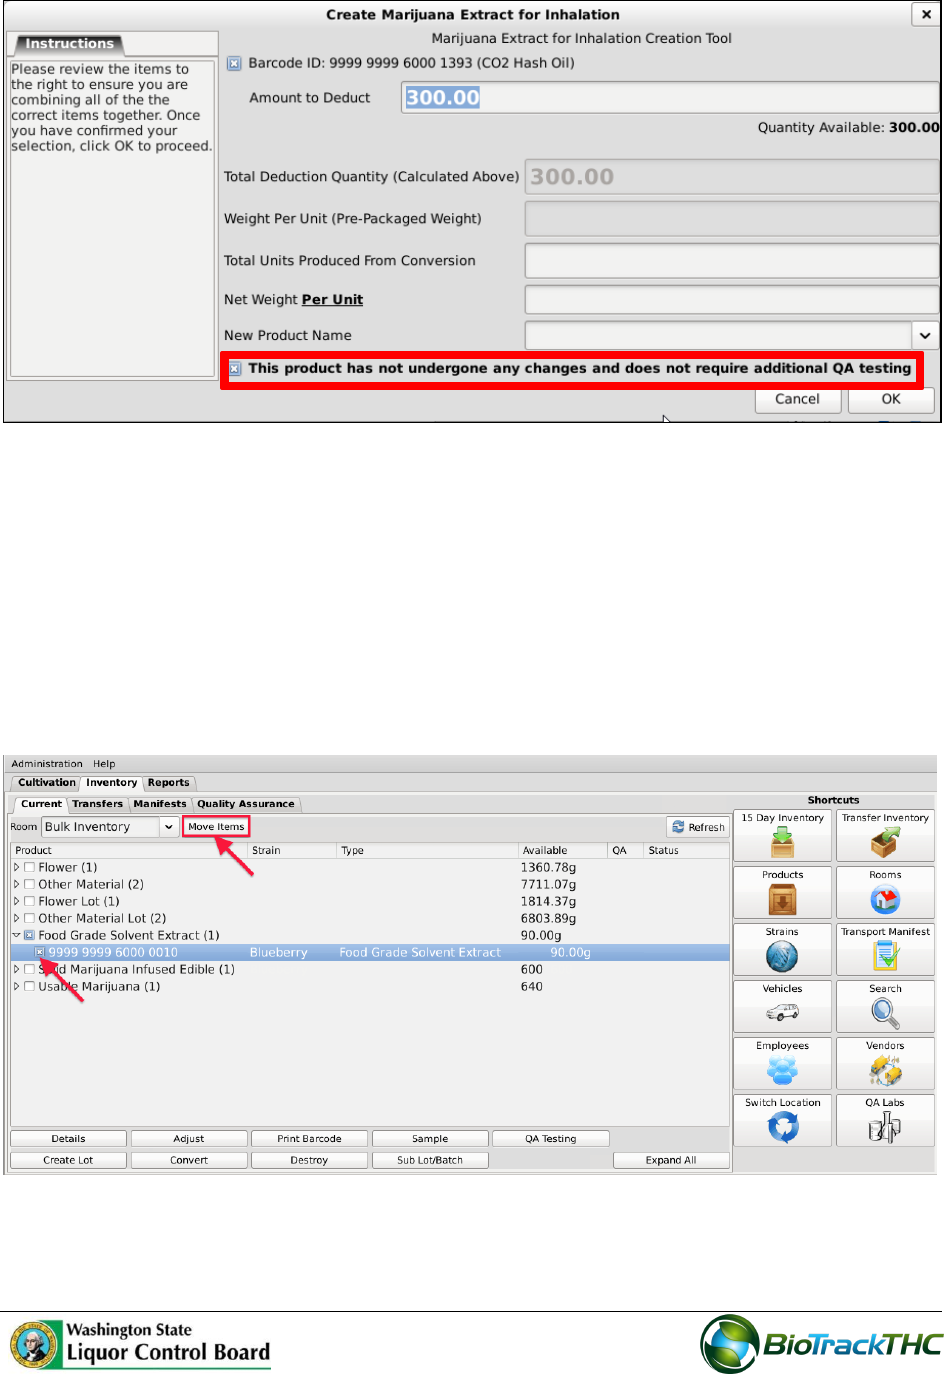
6. The ‘Create Marijuana Extract for Inhalation’ screen displays. Check the box at the
bottom if the product hasn’t changed and doesn’t require additional QA testing.
Note: The Net weight (net volume) of the end product is tracked in the ‘Net
Weight Per Unit’ field.
68
Move Inventory
You may move inventory from one inventory room to another using the following method:
Navigate to the Inventory Room within which the inventory is presently located
(make sure that you are within the Inventory tab and the Current sub-tab).
Click on the checkbox to left of the inventory item.
Click on the “Move Items” button
When the Move Inventory popup appears, select the destination room from the
“New Room” dropdown.

69
Click “OK” when complete.
You will now find that the inventory has been moved to the room selected.

70
Chapter 10: Transportation Manifests
In this chapter, you will learn how to:
Generate a Transportation Manifest
Modify a Transporation Manifest
Regulations
WAC 314-55-083
(3) (f) All marijuana or marijuana-infused products that are intended to be removed or
transported from marijuana producer to marijuana processor and/or marijuana processor
to marijuana retailer shall be staged in an area known as the "quarantine" location for a
minimum of twenty-four hours. Transport manifest with product information and weights
must be affixed to the product. At no time during the quarantine period can the product be
handled or moved under any circumstances and is subject to auditing by the liquor control
board or designees.
(4) (g) There is a twenty-four hour mandatory waiting period after the notification described in
this subsection to allow for inspection before a lot of marijuana is transported from a producer to
a processor;
WAC 314-55-085
(3) Transportation manifest. A complete transport manifest containing all information required
by the board must be kept with the product at all times.
71
Create a Transportation Manifest
To create the standardized Washington Marijuana Transportation Manifest for outbound
shipments, you will need to access the Transportation Manifest screen.
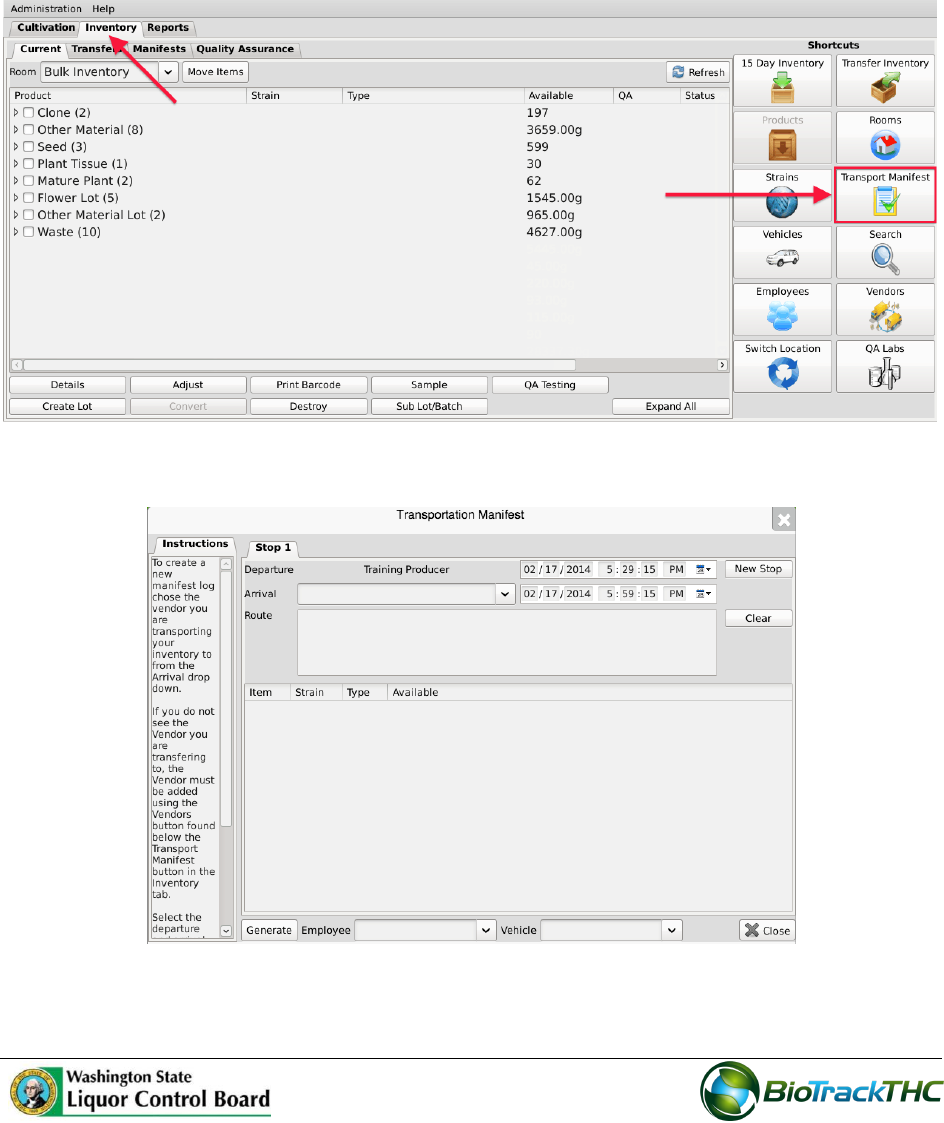
Navigate to the “Inventory” tab found in the top-left corner of the screen, and then
click on the “Transportation Manifest” button located on the right-hand side of the
screen.
This will bring up the Transportation Manifest screen.
72
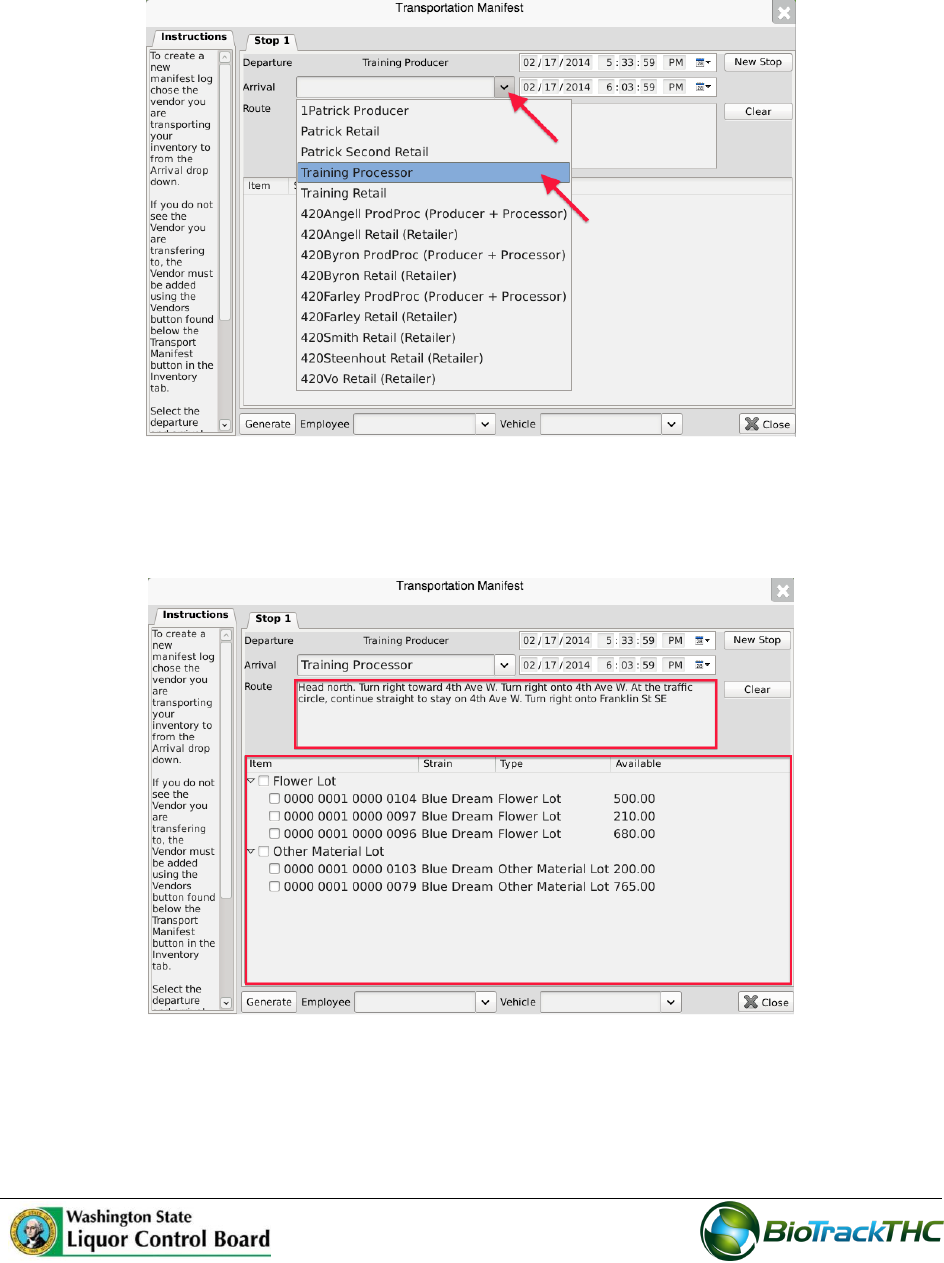
Select the destination Licensee from the “Arrival” dropdown. If the intended
recipient is not found within the dropdown, you will need to add the recipient to
your Preferred Vendor List as described in Chapter 4: Vendors.
Once “Arrival” is selected, the system automatically completes a default driving
“Route” and lists all of the available inventory items that can be included on the
manifest.
If the receiving Licensee is a Producer, only Seeds, Clones, Mature Plants, and Plant
Tissue will be available for selection.
If the receiving Licensee is a Processor, only Flower Lots and Other Material Lots
that have a status of “Passed QA” will be available for selection.
73
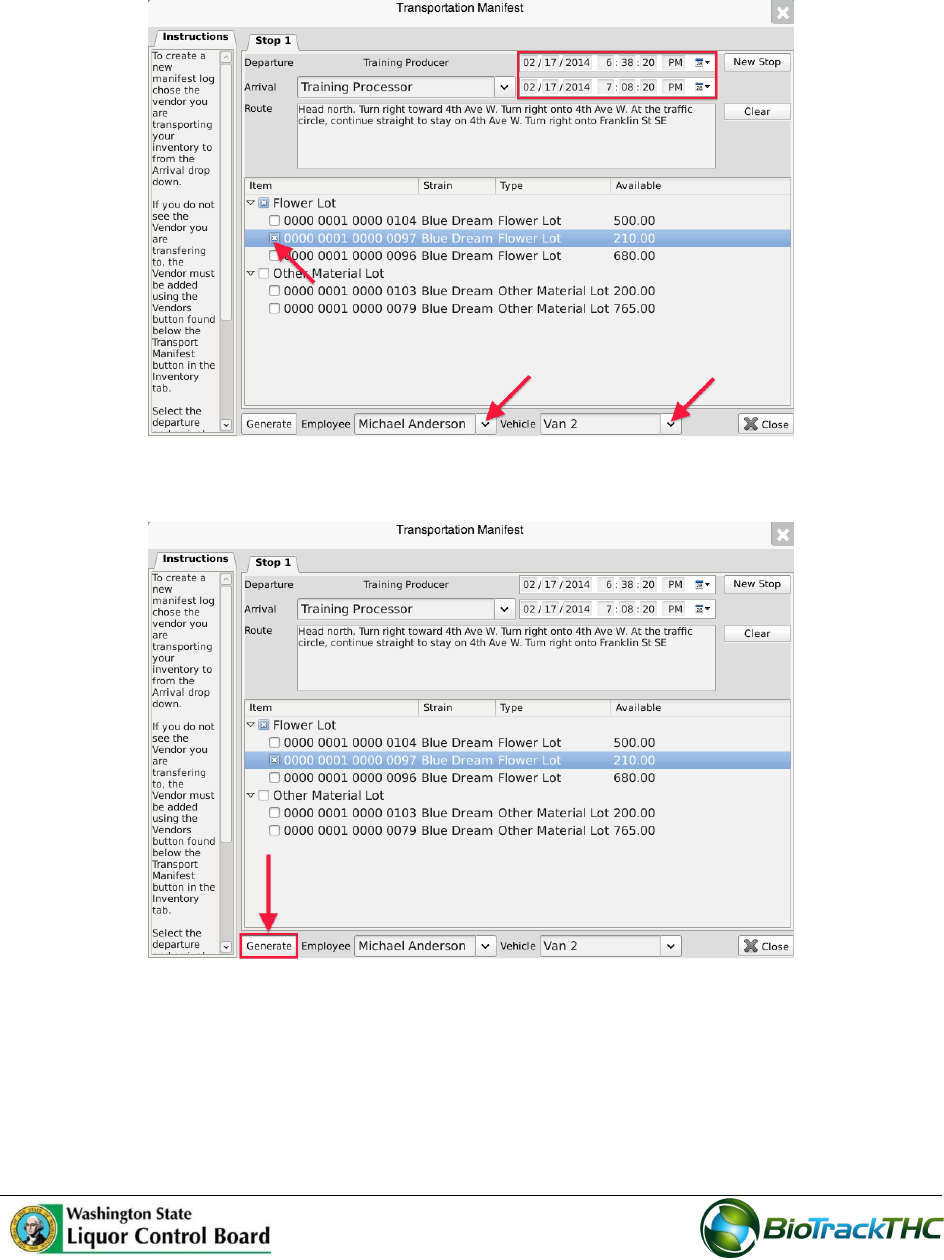
Within the inventory section, select the item(s) to be included on this manifest.
Select the Employee and Vehicle that will be transporting the inventory.
Select the expected departure date/time and the expected arrival date/time.
Click “Generate” when all of the manifest components have been completed.
74
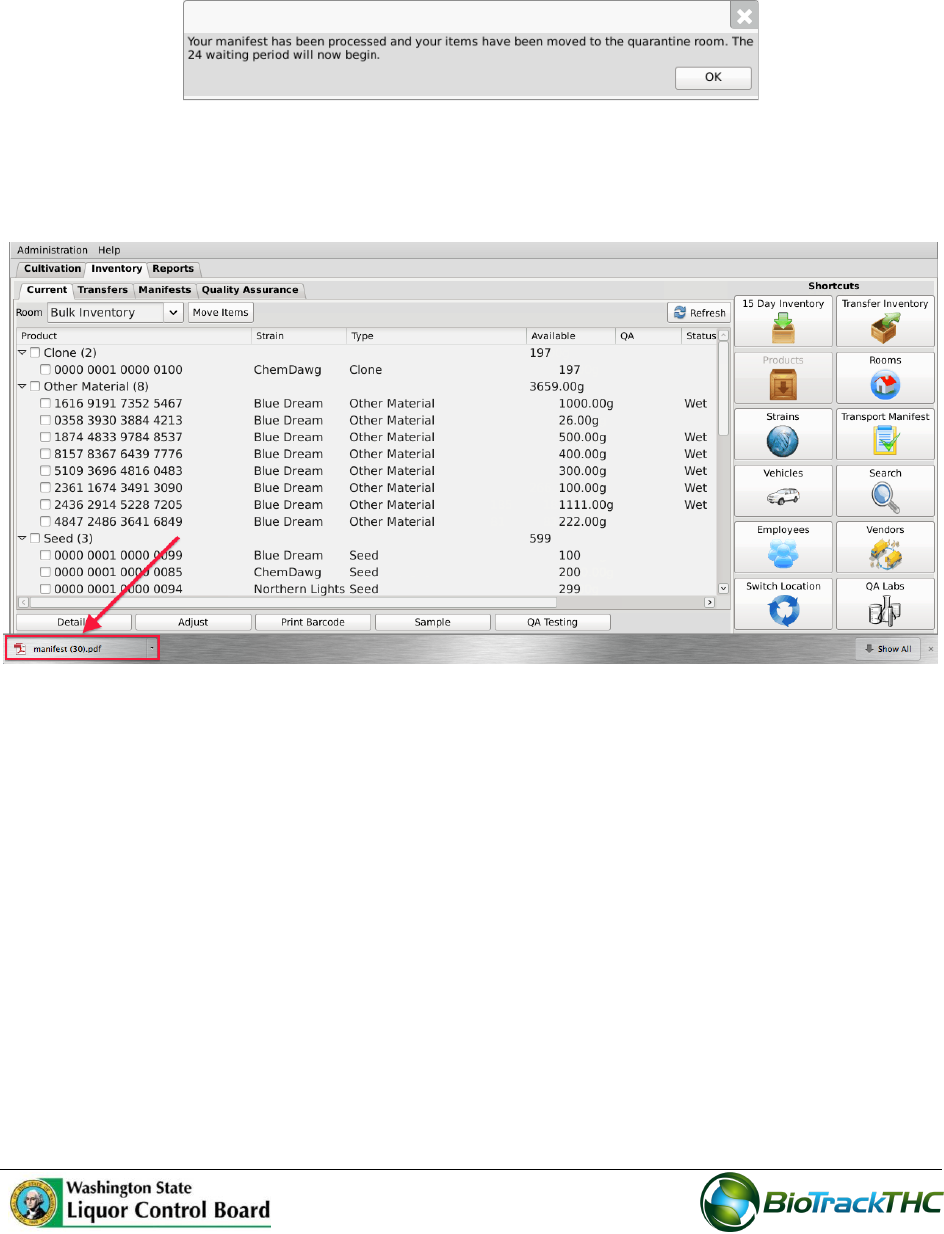
The following notice confirms (1) the Traceability System’s receipt of the digital
copy of the manifest, (2) the to-be-shipped items movement to the quarantine room
within the Traceability System, and (3) the start of the 24-hour waiting period.
Depending on your internet browser and your settings, your computer may
automatically begin downloading a pdf version of the manifest, or may prompt you
to allow, keep, or accept the file.
The inventory will automatically be moved to the Quarantine room for the
mandatory 24-hour waiting period.
75
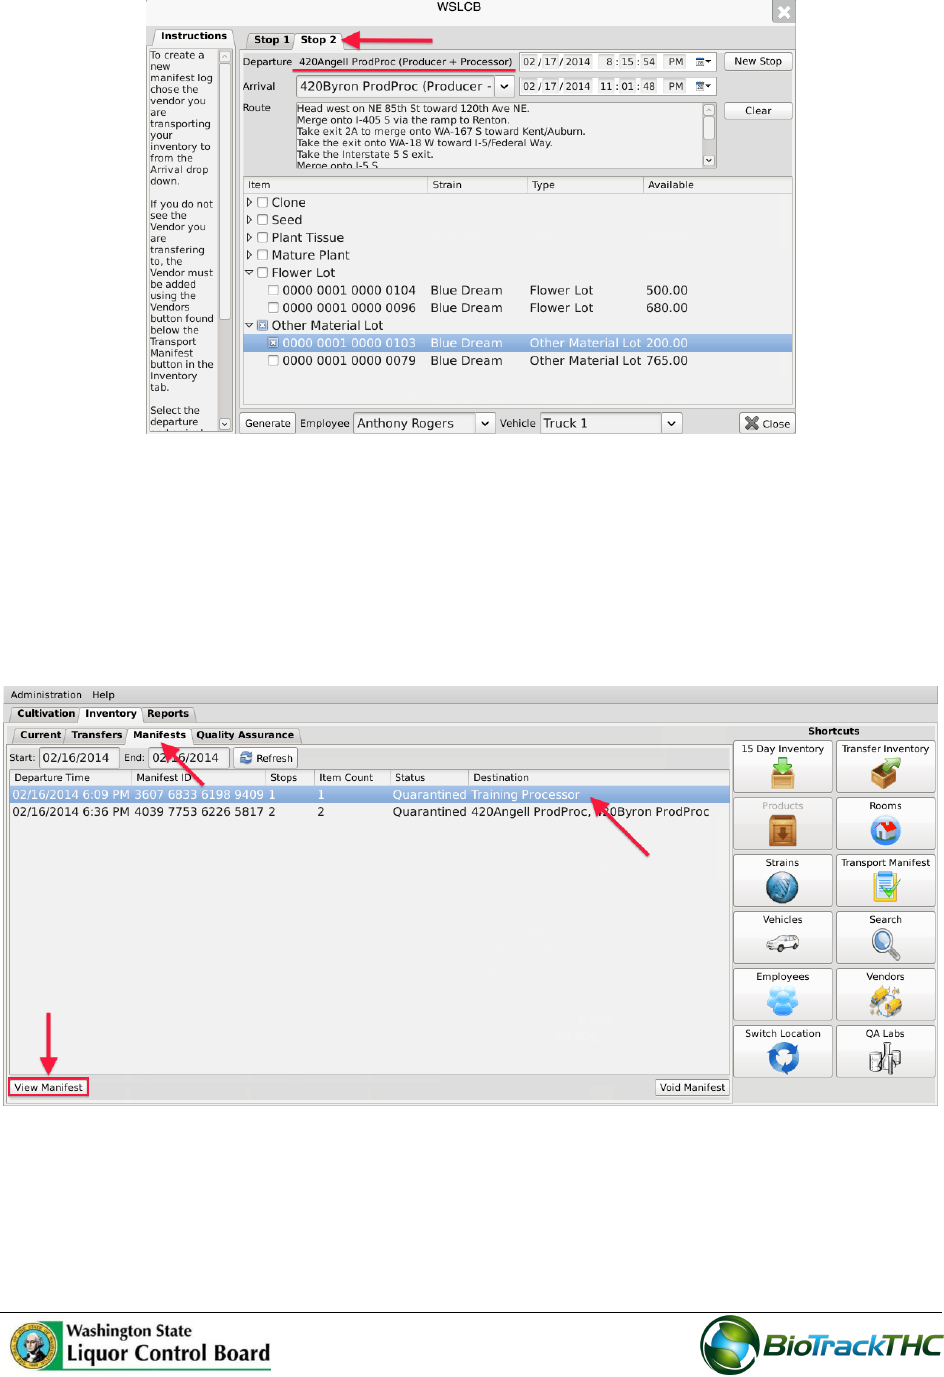
Multi-Stop Transportation Manifests
Perform the following steps to create a transportation manifest with multiple delivery
stops.
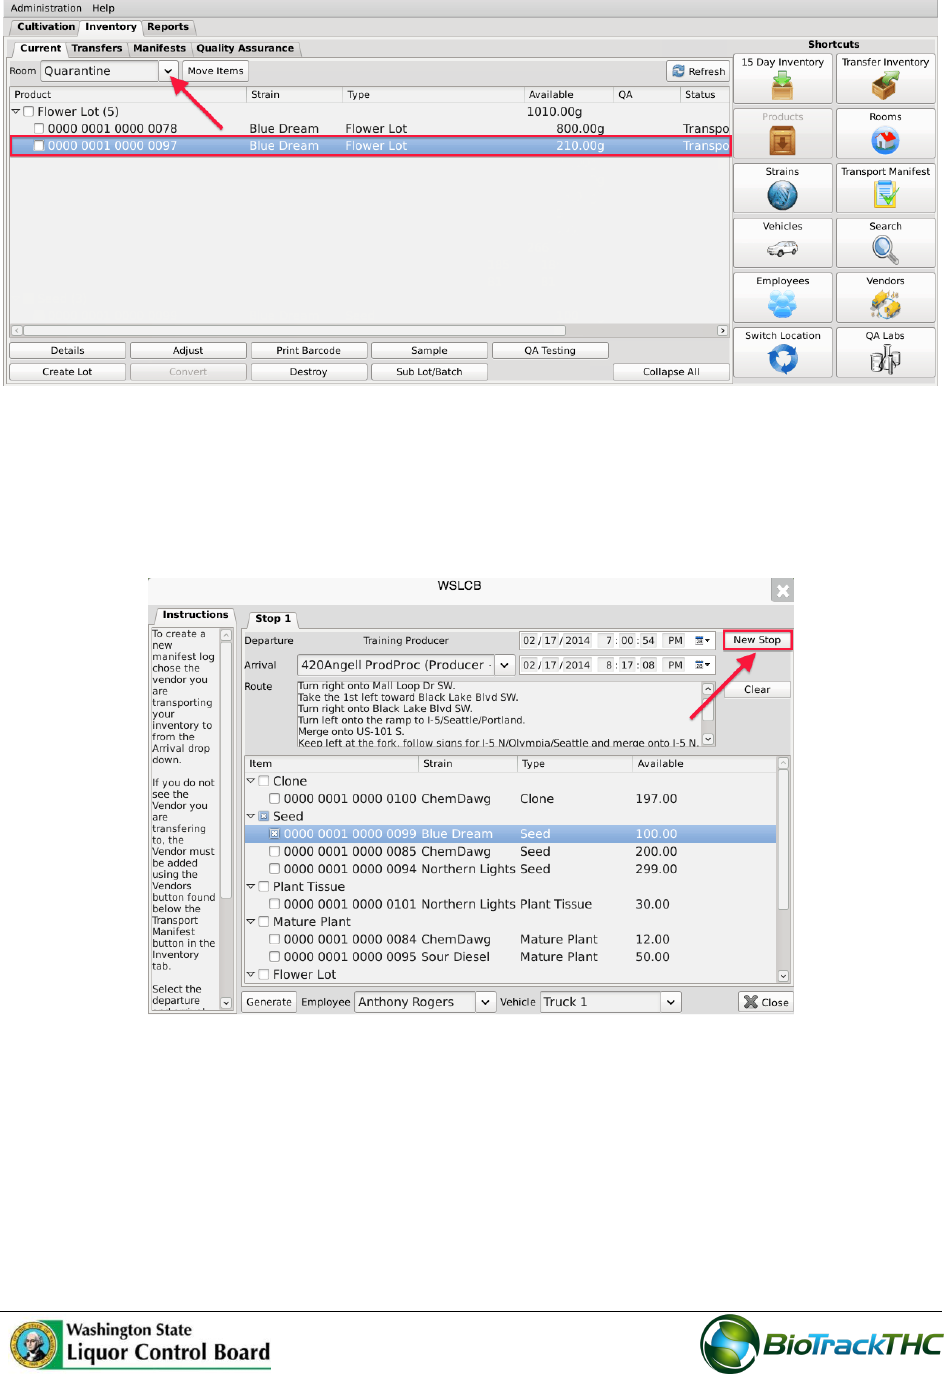
After completing the first stop on the manifest, click on the “New Stop” button.
A tab for a subsequent stop will appear with the Departure location pre-populated
with the Arrival location of the previous stop (e.g., if Licensee 123 is the destination
of the first delivery, then License 123 will be the starting point for the second
delivery).
76
Click on the “Generate” button when all stops have been created.
View Manifests
Once a transportation manifest has been entered into the Traceability System, you may re-
download it at any time by navigating to the Manifests tab.
Narrow the results by selecting a start-date and an end-date.
Select the desired manifest and then click on the “View Manifest” button.
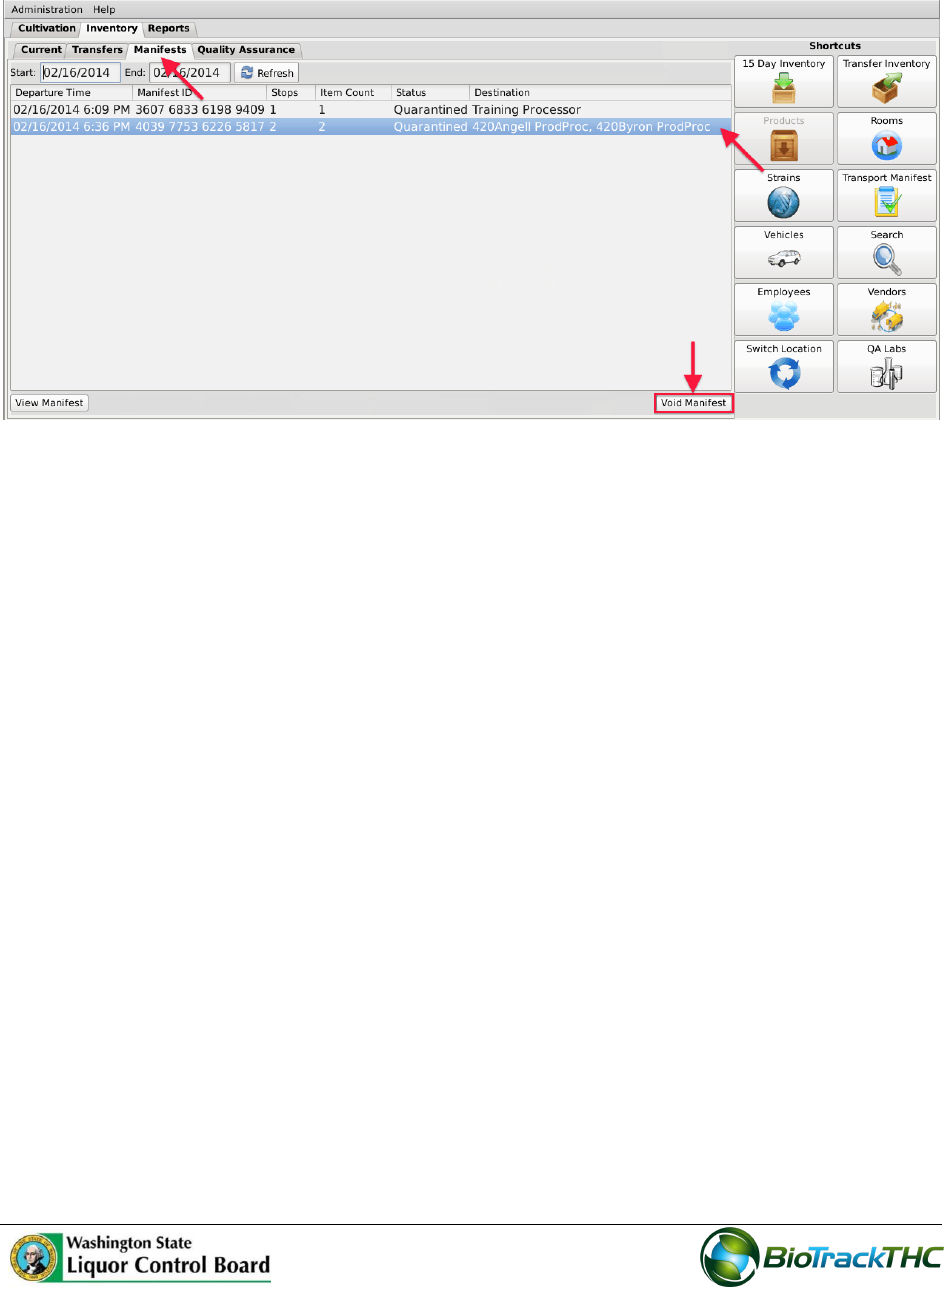
Void a Manifest
You may void a transportation manifest should it be necessary (e.g., the sale is cancelled or
the manifest needs to be changed), but only if the manifest’s status is still “Quarantined”.
Navigate to the Manifests tab.
77
Narrow the results by selecting a start-date and an end-date.
Select the to-be-voided manifest and then click on the “Void Manifest” button.
78
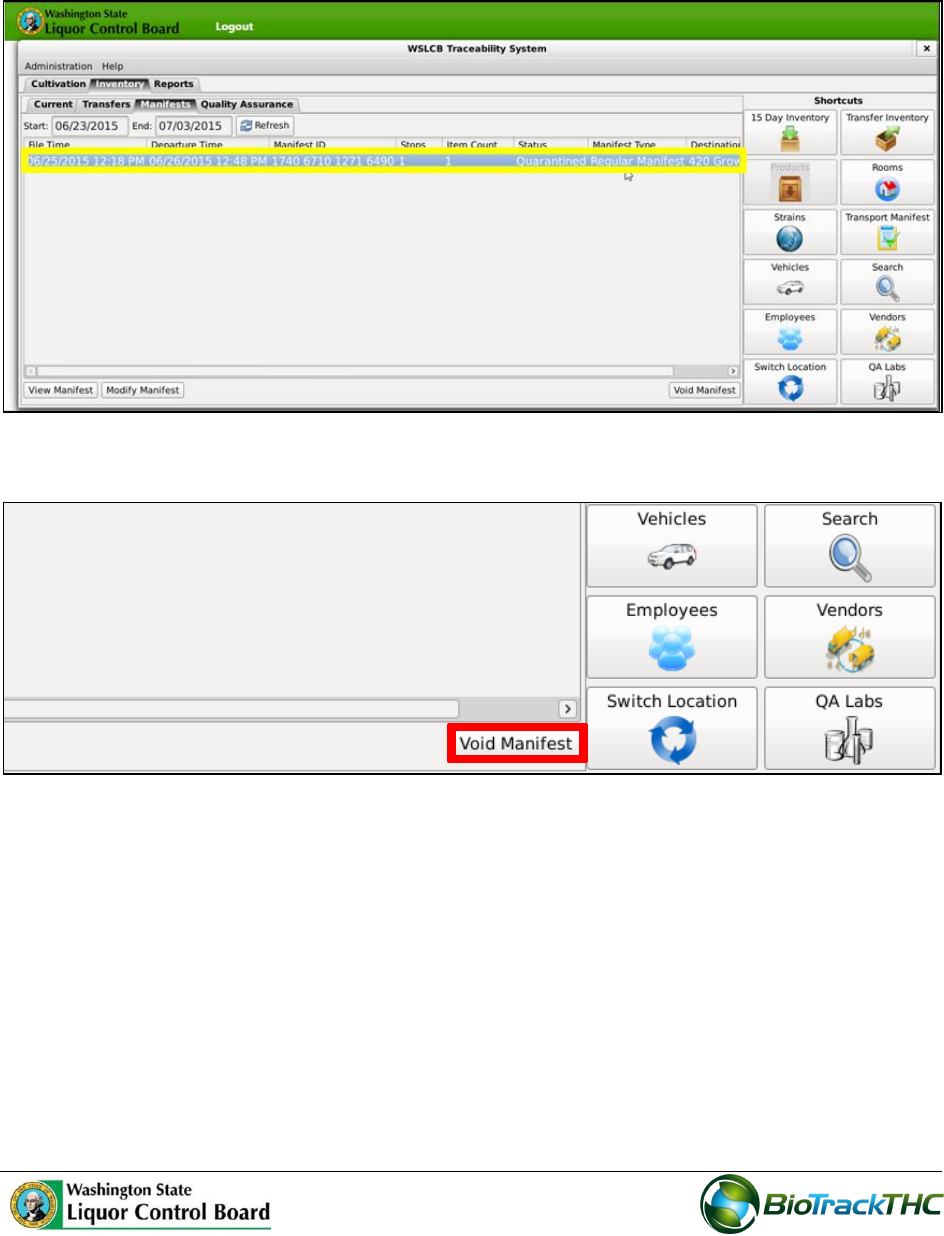
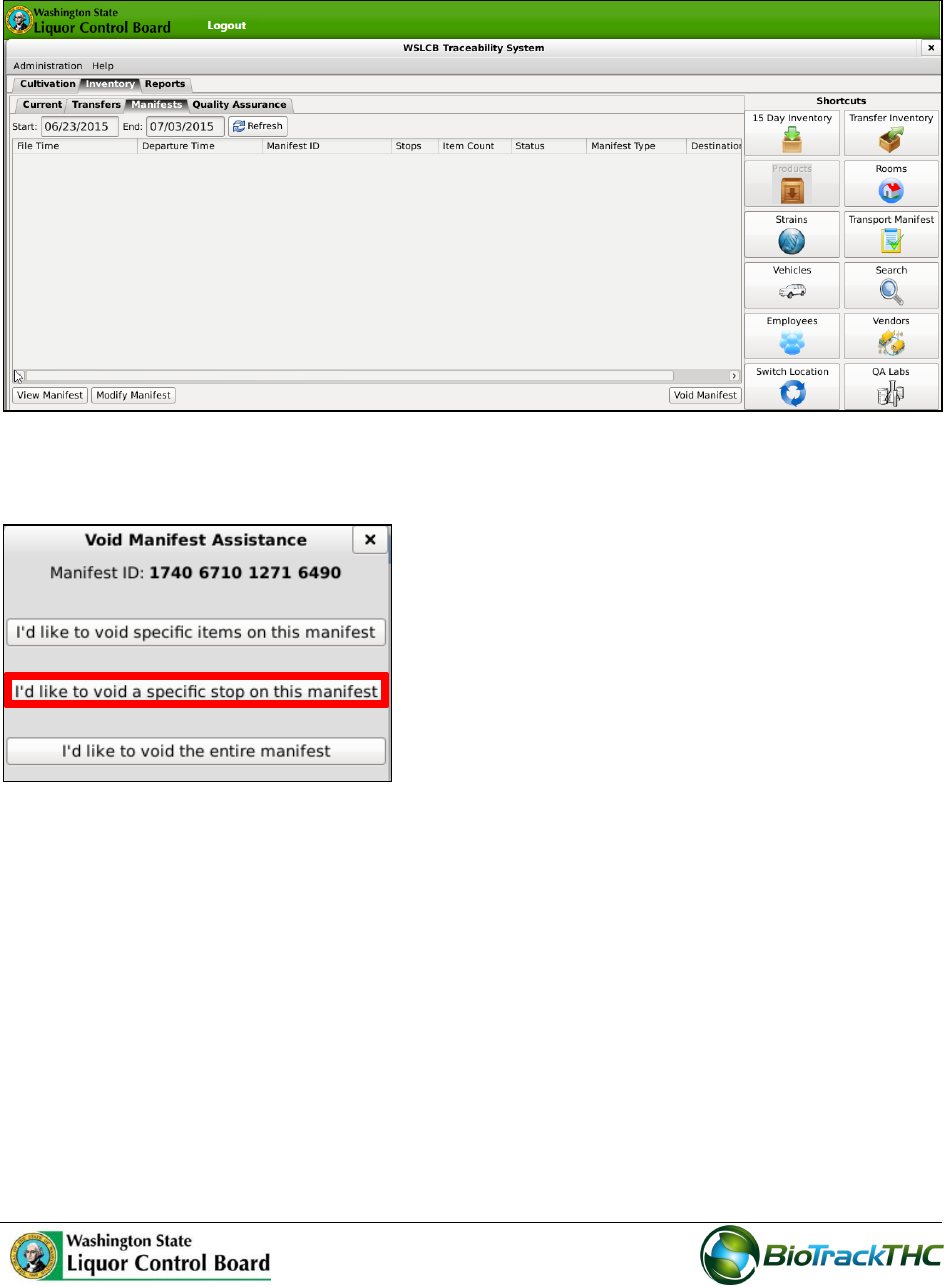
To void a partial manifest:
1. Click the Manifest tab and select the scheduled manifest you want to void.
2. Click the ‘Void Manifest’ button.
79
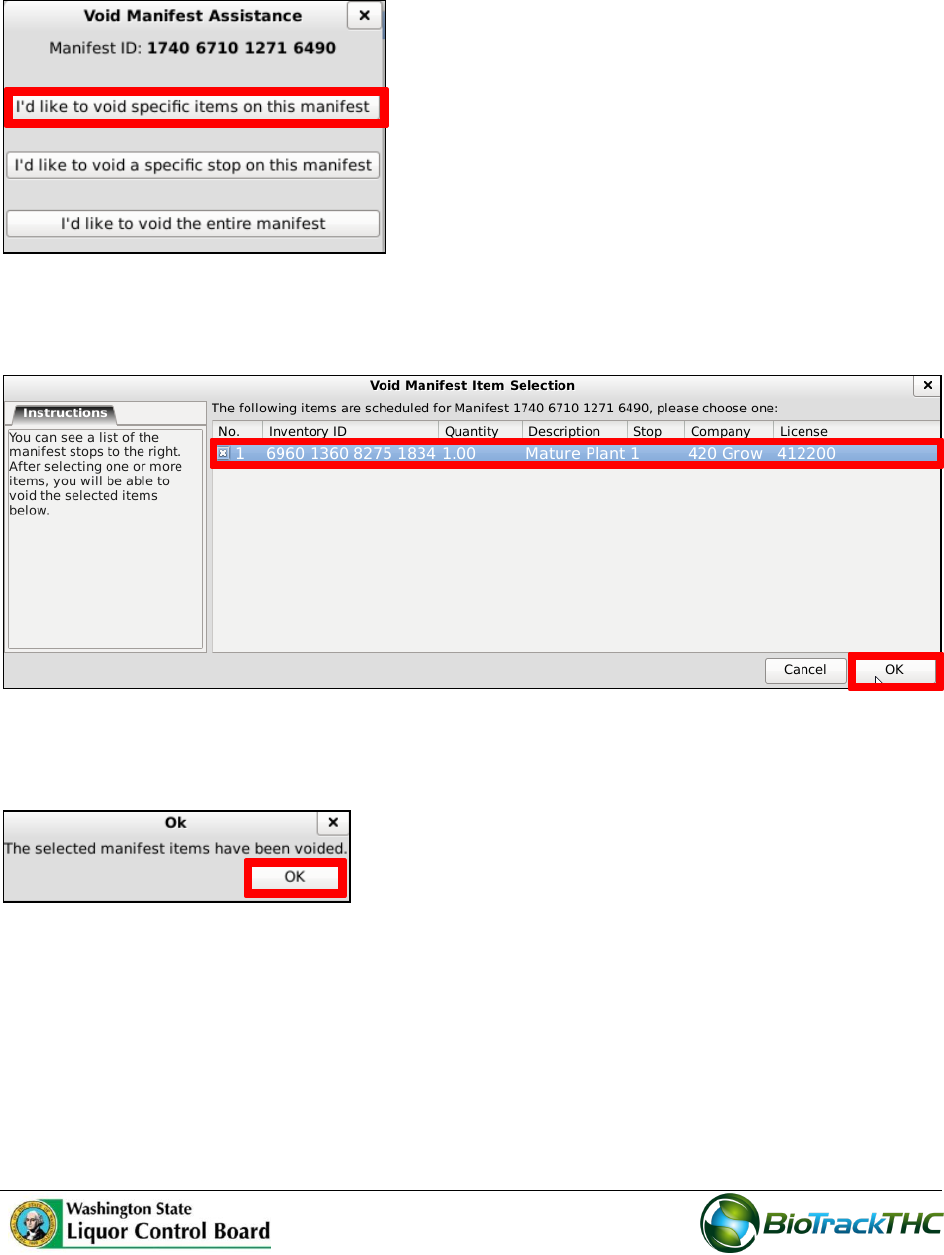
3. The ‘Void Manifest Assistance’ screen displays. Click the desired button. Here, we
will click the ‘I’d like to void specific items on this manifest’ button.
4. In the ‘Void Manifest Item Selection’ screen, select the item you want to void and
click the OK button.
5. The ‘OK’ screen displays to confirm that the manifest\item has been voided. Click
the ‘OK’ button.
80
6. The manifest has been voided and removed.
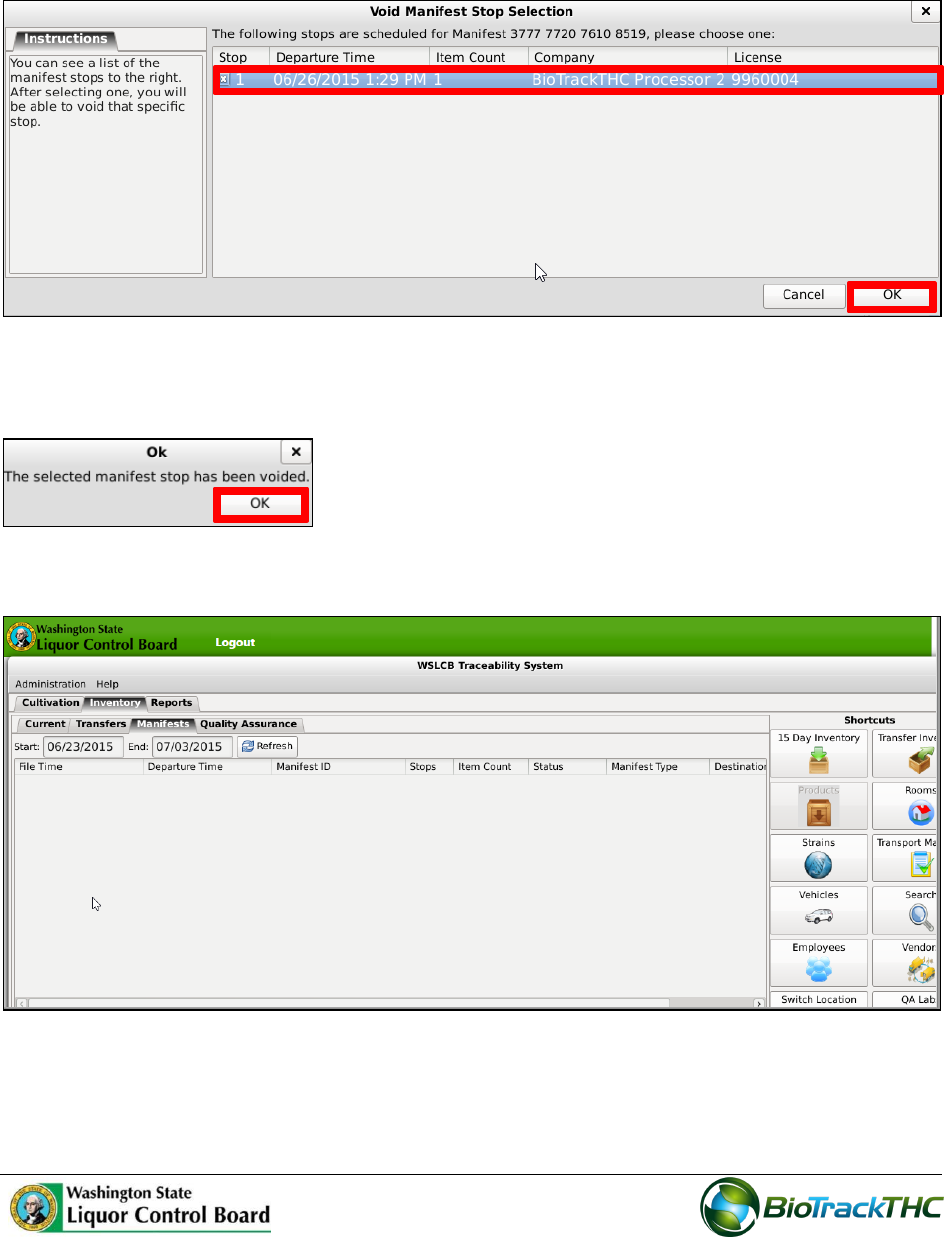
By clicking ‘I’d like to void a specific stop on this manifest’ on the ‘Void Manifest Assistance’
screen, the ‘Void Manifest Stop Selection’ screen displays.
81
1. Select the ‘Manifest Stop’ you want to void and click the ‘OK’ button.
Note: click the check box under the Stop column to select the item.
2. The ‘Ok’ screen displays to confirm that the manifest\item has been voided. Click
the ‘OK’ button.
3. The Manifest Stop has been voided and removed.
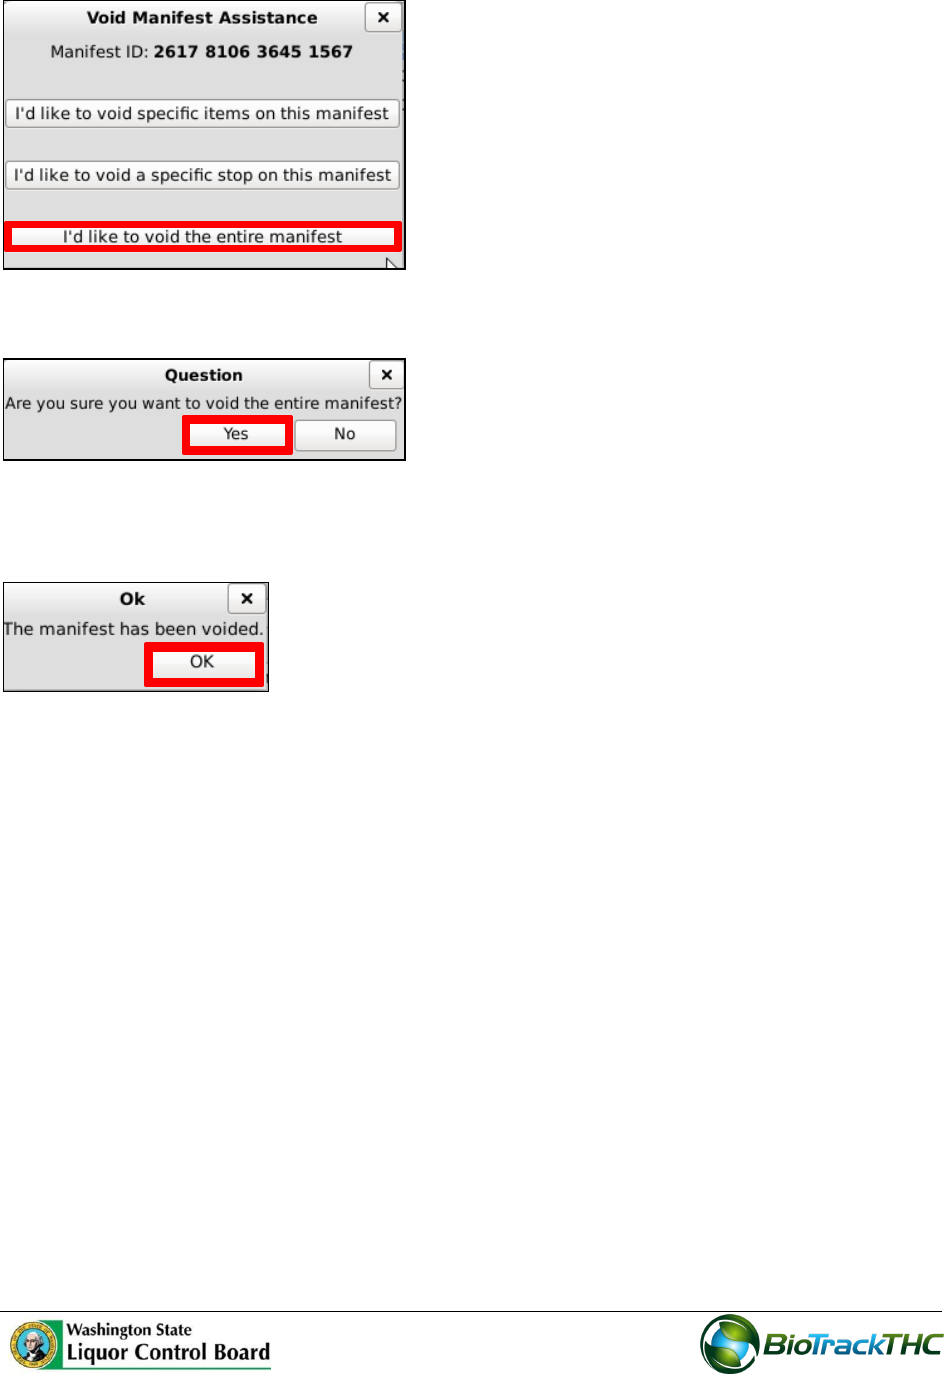
By clicking ‘I’d like to void the entire manifest’ on the Void Manifest Assistance screen, the
‘Question’ screen displays.
82
1. Click the ‘Yes’ button to confirm that you want to void the entire manifest.
2. The ‘OK’ screen displays to confirm that the manifest has been voided. Click the
OK button.
83
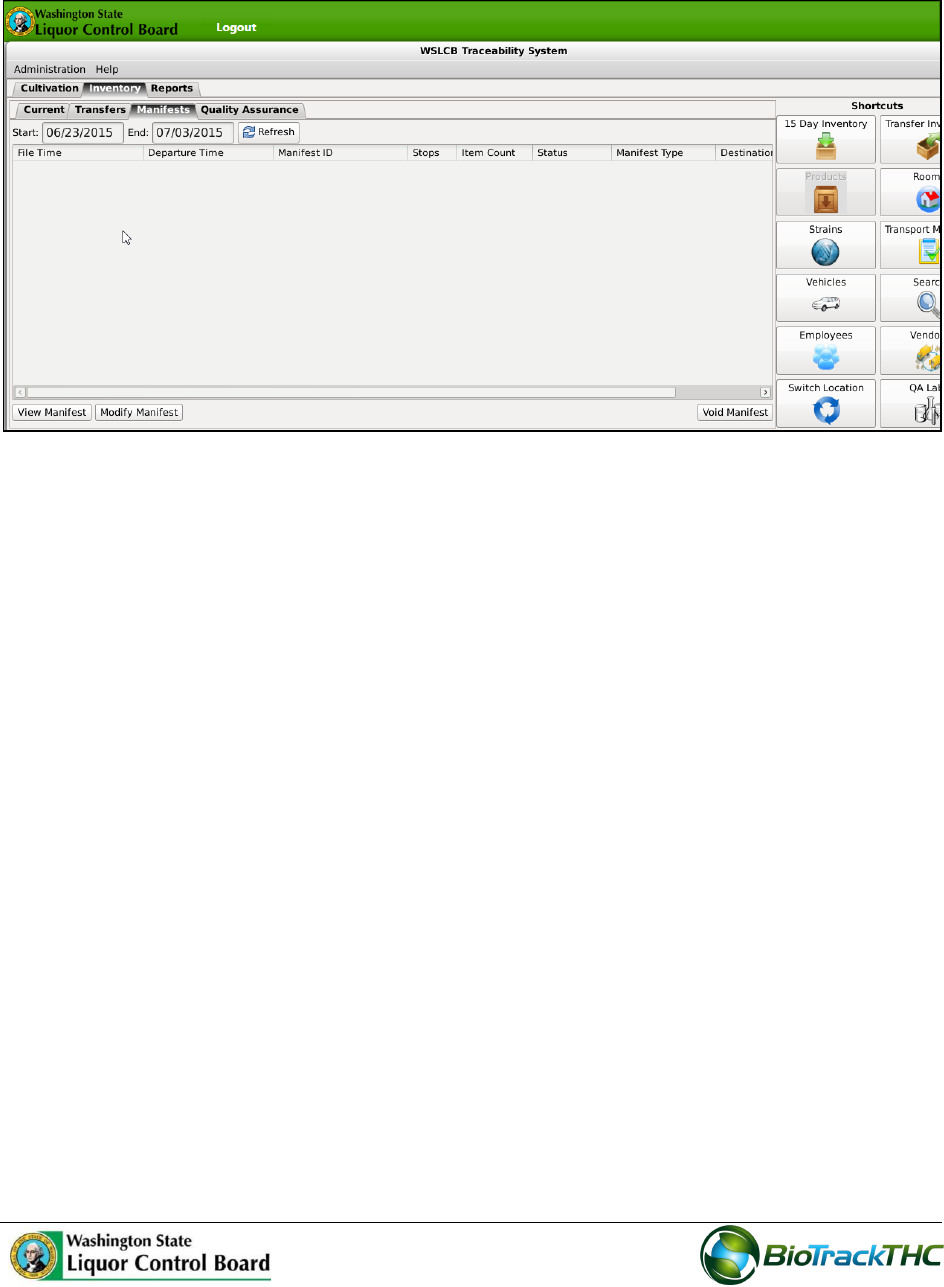
3. The Manifest has been voided and removed.
Chapter 11: Wholesale Inventory Transfers - Outbound
In this chapter, you will learn how to:
Complete an outbound inventory transfer
Initiating an Inventory Transfer
To receive inbound shipments and send outbound shipments in the Traceability System,
you will need to
Navigate to the “Inventory” tab found in the top-left corner of the screen, and then
click on the “Transfer Inventory” button located on the right-hand side of the screen.
84
The following pop-up appears:
85
Outbound Shipment
To send an outbound shipment,
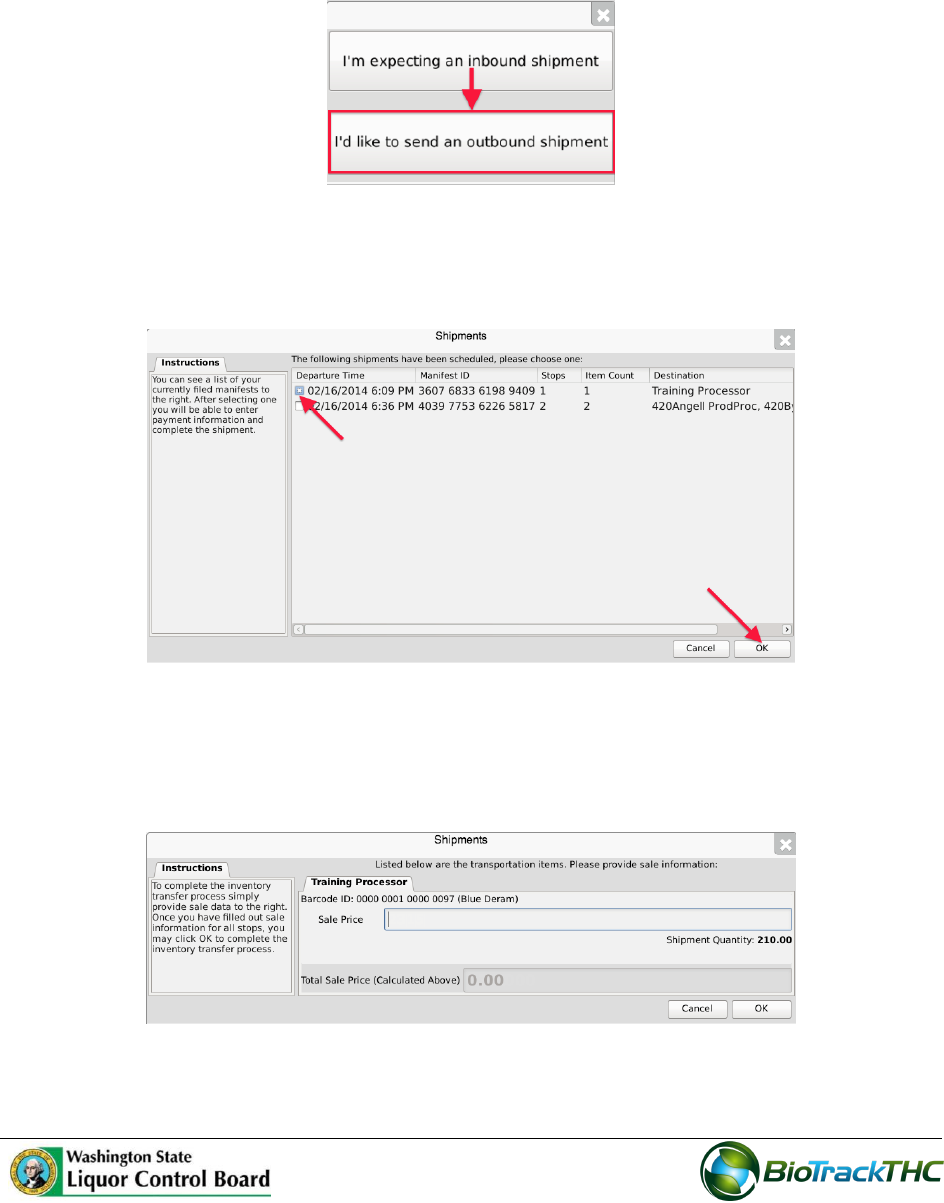
Click on “I’d like to send an outbound shipment”
A list of all currently filed but un-shipped outbound manifests to vendors appears.
Click on the checkbox to the left of the manifest being shipped.
Click “OK”.
The Sales Price screen, which lists the inventory associated with the manifest,
appears. Note that though the example illustrates only one item, multiple items may
be associated with the manifest and each item will have its own line accordingly.
86
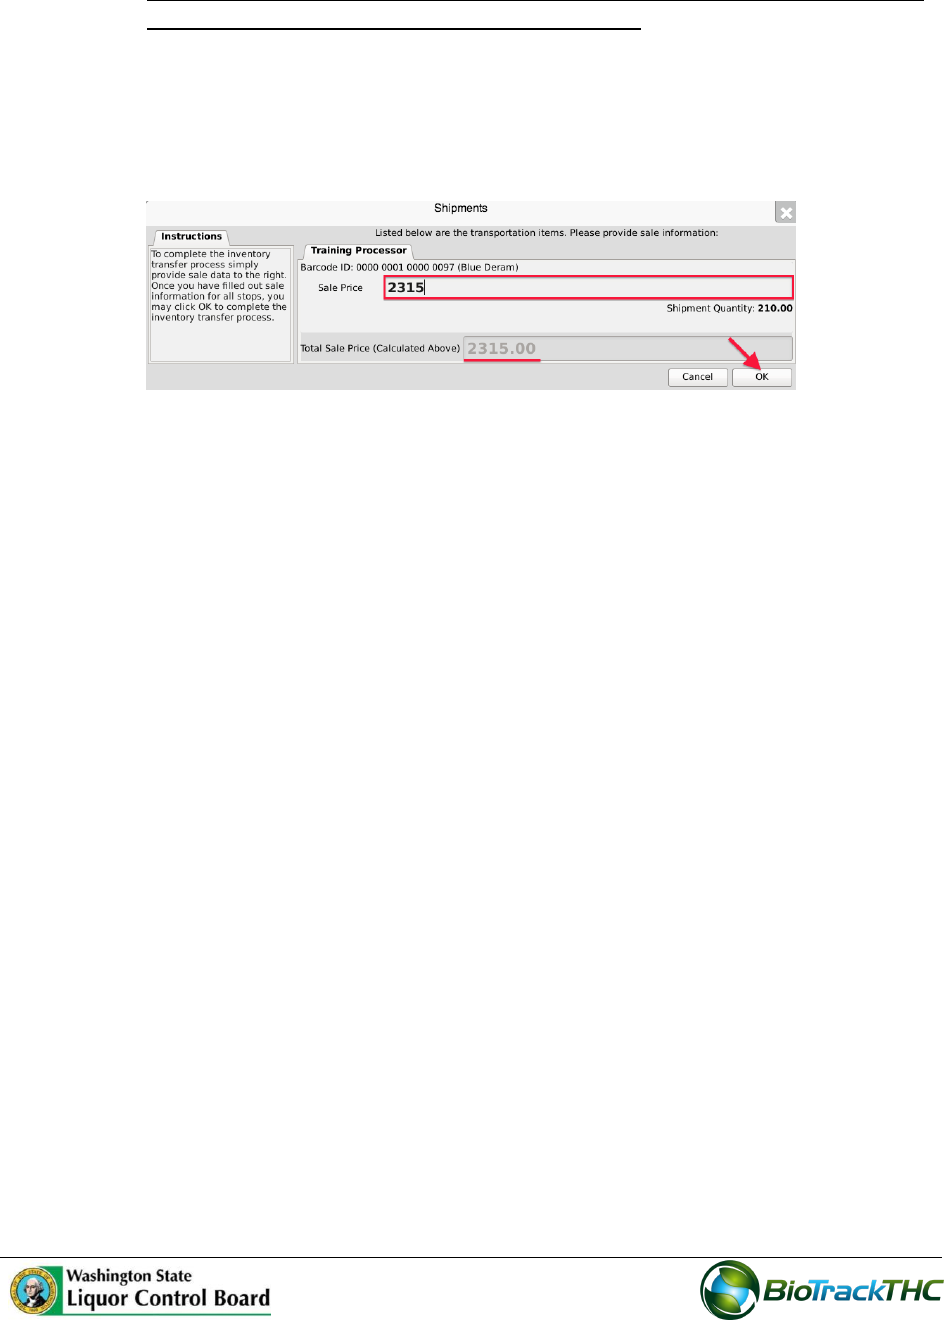
Enter the Sales Price of each item that is on the manifest.
o NOTE: BE SURE TO INCLUDE THE 25% EXCISE TAX IN THE SALES PRICE
ENTERED, BUT NOT STATE OR LOCAL TAXES.
o Example: if the pre-tax price of the item in the below example is $1,852, then
the Sales Price with the 25% excise tax equals $2,315 before state or local
taxes.
Click “OK” after all sales prices are entered (the total sales price is automatically
computed within the greyed-out box).
The Traceability System automatically moves the inventory on the manifest out of
the Quarantine room.
87
Chapter 12: Destruction Events
In this chapter, you will learn how to:
Schedule inventory for destruction
Regulations
WAC 314-55-083
(4) (f) There is a seventy-two hour mandatory waiting period after the notification described in
this subsection is given before any plant may be destroyed or a lot or batch of marijuana or
marijuana-infused product may be destroyed;
Schedule Inventory Destruction
This function allows you to schedule inventory for destruction. This event begins the 72-
hour waiting period before the Destroy Inventory function may be called on the inventory
item.
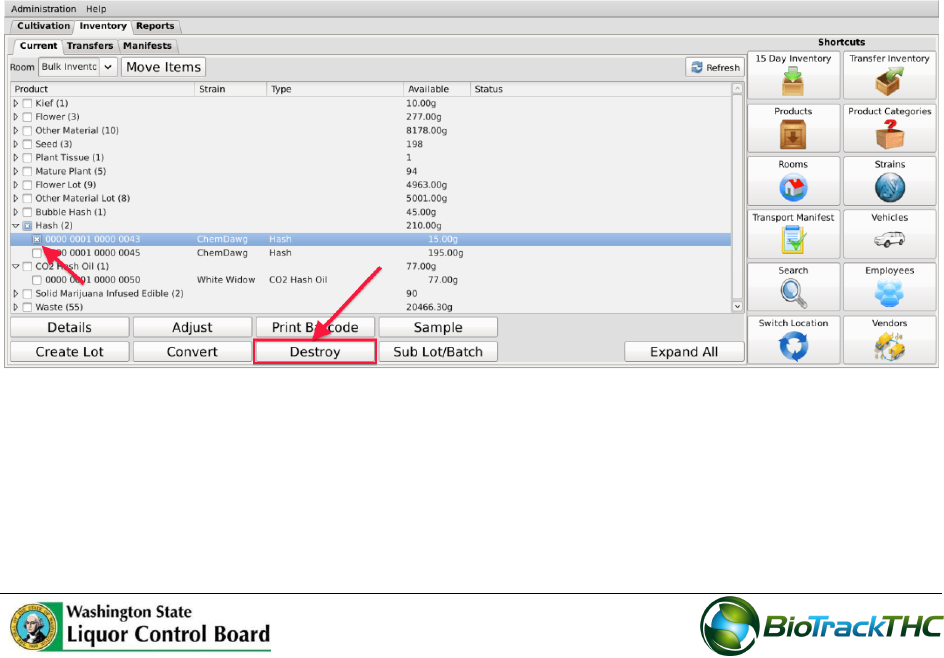
Navigate to the Inventory Room within which the to-be-destroyed inventory is
located (make sure that you are within the Inventory tab and the Current sub-tab).
Click on the checkbox to the left of the item to be destroyed.
Click on the “Destroy” button at the bottom of the screen.
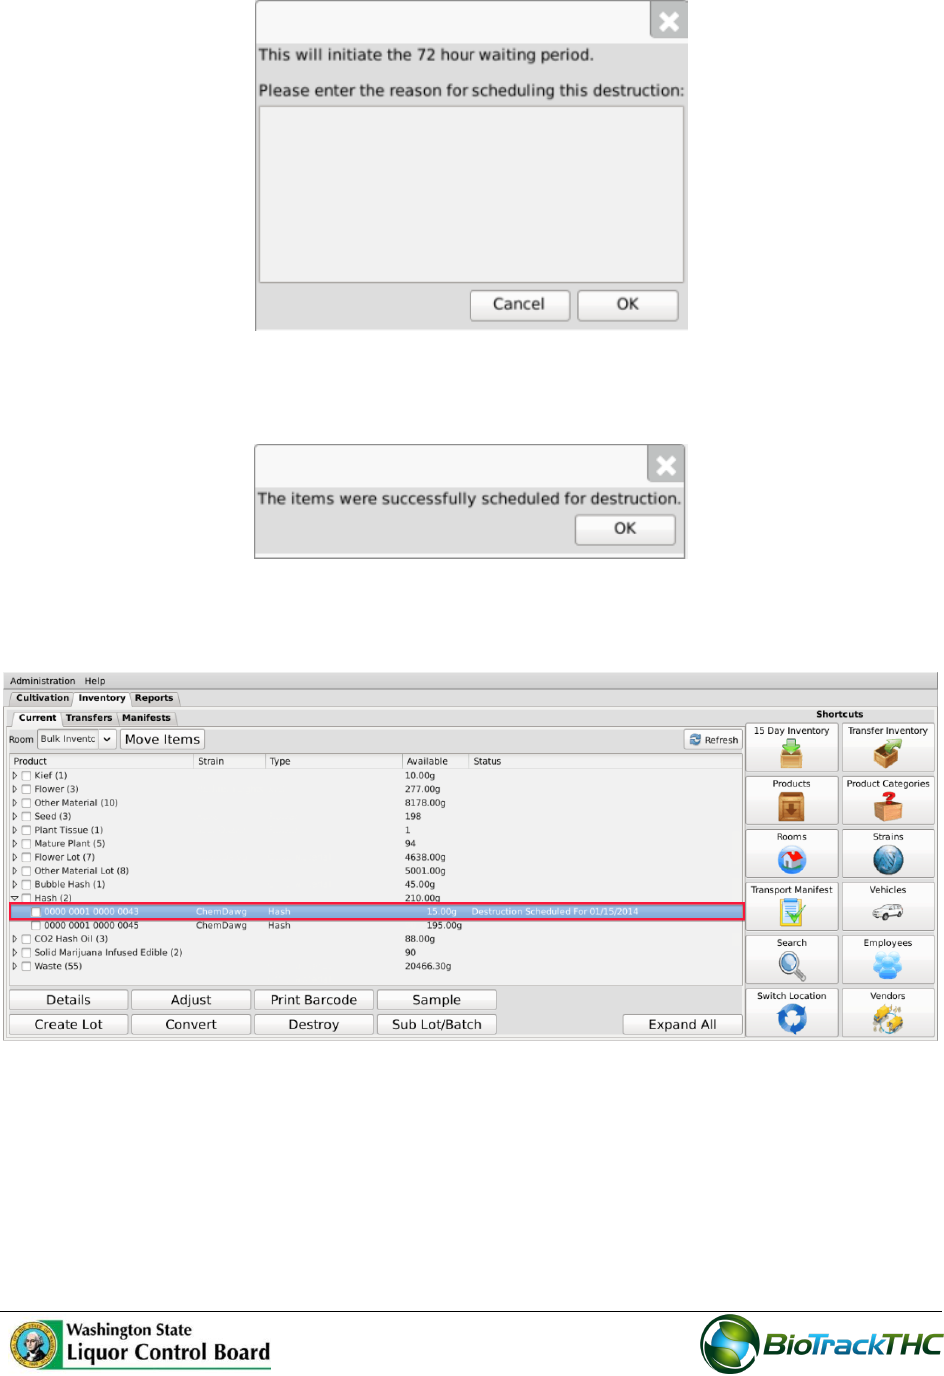
A pop-up window appears wherein you type the reason the item is being destroyed.
Click “OK” when completed.
88
Another pop-up window appears notifying you that the Traceability System has
accepted the scheduled destruction.
Note that the inventory item’s Status is updated to “Destruction Scheduled for
MM/DD/YYYY”.
89
Destroy Inventory
This function allows you to destroy an inventory item. Inventory may only be destroyed
after the waiting period has expired.
Navigate to the Inventory Room within which the inventory scheduled for
destruction is located (make sure that you are within the Inventory tab and the
Current sub-tab).
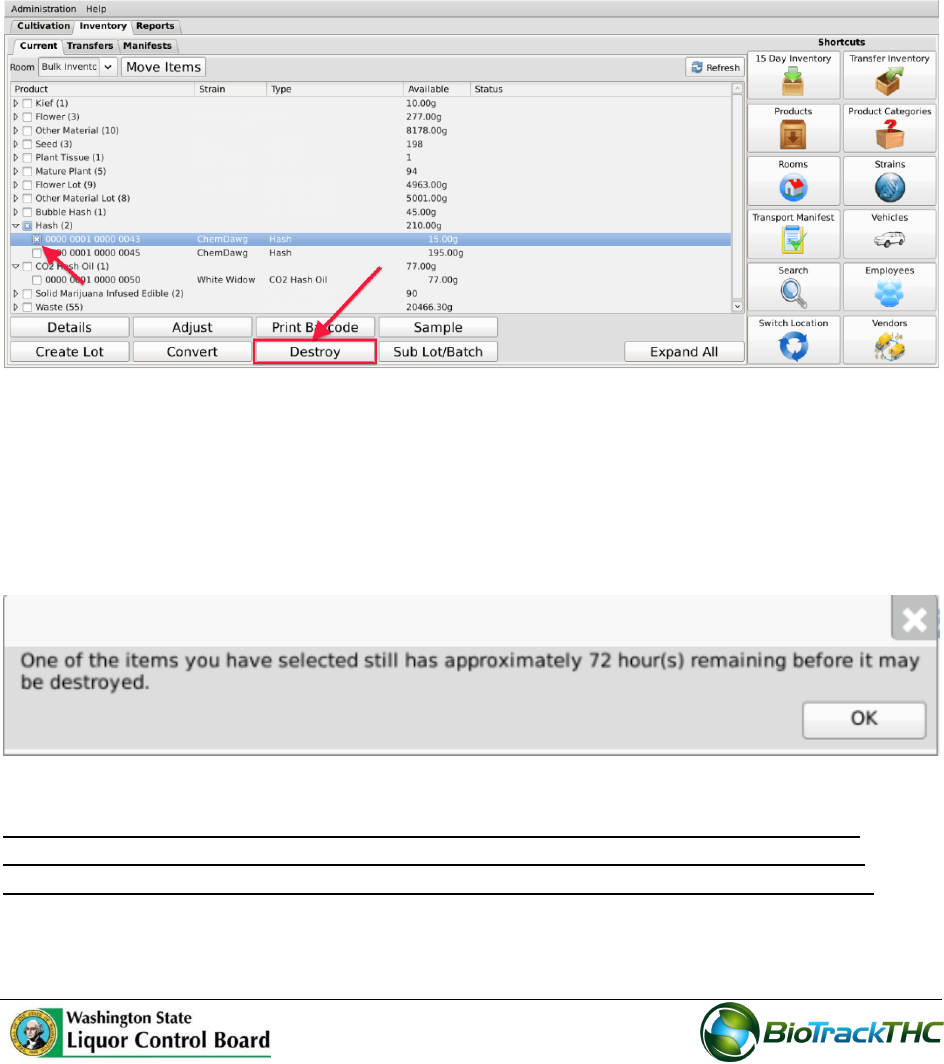
Click on the checkbox to the left of the item scheduled for destruction.
Click on the “Destroy” button at the bottom of the screen.
If the item’s 72-hour waiting period has elapsed, then the item is destroyed in the
Traceability System.
Should you attempt to destroy the inventory item prior to the 72-hour waiting
period expiring, a pop-up window appears to inform you how many hours remain in
the waiting period before that plant may be destroyed.
NOTE: Destroying an Inventory Item does not delete any of that item’s already
submitted Traceability System data. It simply removes the inventory from use
moving forward and that inventory will be identified as having been destroyed.

90

91
Chapter 13: Samples
In this chapter, you will learn how to:
Account for inventory deductions resulting from samples
Regulations
WAC 314-55-083
(4) The following information is required and must be kept completely up-to-date in a
system specified by the board:
(n) All free samples provided to another licensee for purposes of negotiating a sale;
(o) All samples used for testing for quality by the producer or processor;
(6) Free samples of useable marijuana may be provided by producers or processors, or
used for product quality testing, as set forth in this section.
(b) Samples are limited to two grams and a processor may not provide any one licensed
retailer more than four grams of usable marijuana per month free of charge for the
purpose of negotiating a sale. The processor must record the amount of each sample and
the retailer receiving the sample in the traceability system.
(c) Samples are limited to two units and a processor may not provide any one licensed
retailer more than six ounces of marijuana infused in solid form per month free of charge
for the purpose of negotiating a sale. The processor must record the amount of each
sample and the retailer receiving the sample in the traceability system.
(d) Samples are limited to two units and a processor may not provide any one licensed
retailer more than twenty-four ounces of marijuana-infused liquid per month free of
charge for the purpose of negotiating a sale. The processor must record the amount of
each sample and the retailer receiving the sample in the traceability system.
(e) Samples are limited to one-half gram and a processor may not provide any one
licensed retailer more than one gram of marijuana-infused extract meant for
inhalation per month free of charge for the purpose of negotiating a sale. The
processor must record the amount of each sample and the retailer receiving the
sample in the traceability system.
(g) Processors may sample one unit, per batch of a new edible marijuana-infused
product to be offered for sale on the market. Sampling for quality may not take place
at a licensed premises. Only the processor or employees of the licensee may sample
the edible marijuana-infused product. The processor must record the amount of
each sample and the employee(s) conducting the sampling in the traceability
system.
(h) Processors may sample up to one quarter gram, per batch of a new marijuana-
infused extract for inhalation to be offered for sale on the market. Sampling for
quality may not take place at a licensed premises. Only the processor or
employee(s) of the licensee may sample the marijuana-infused extract for
inhalation. The processor must record the amount of each sample and the
employee(s) conducting the sampling in the traceability system.
92
Account for Free Sample
This function will notify the Traceability System of inventory deductions resulting from
free samples provided to another licensee for purposes of negotiating a sale and samples
provided to processor/employee for quality sampling. Though the example screen shots
illustrate the accounting for product quality samples, accounting for sale negotiation
samples follows the same path.
Navigate to the Inventory Room within which the to-be-sampled inventory is
located (make sure that you are within the Inventory tab and the Current sub-tab).
If the product groups are collapsed, click on the expand arrow to view all of the
available inventory.
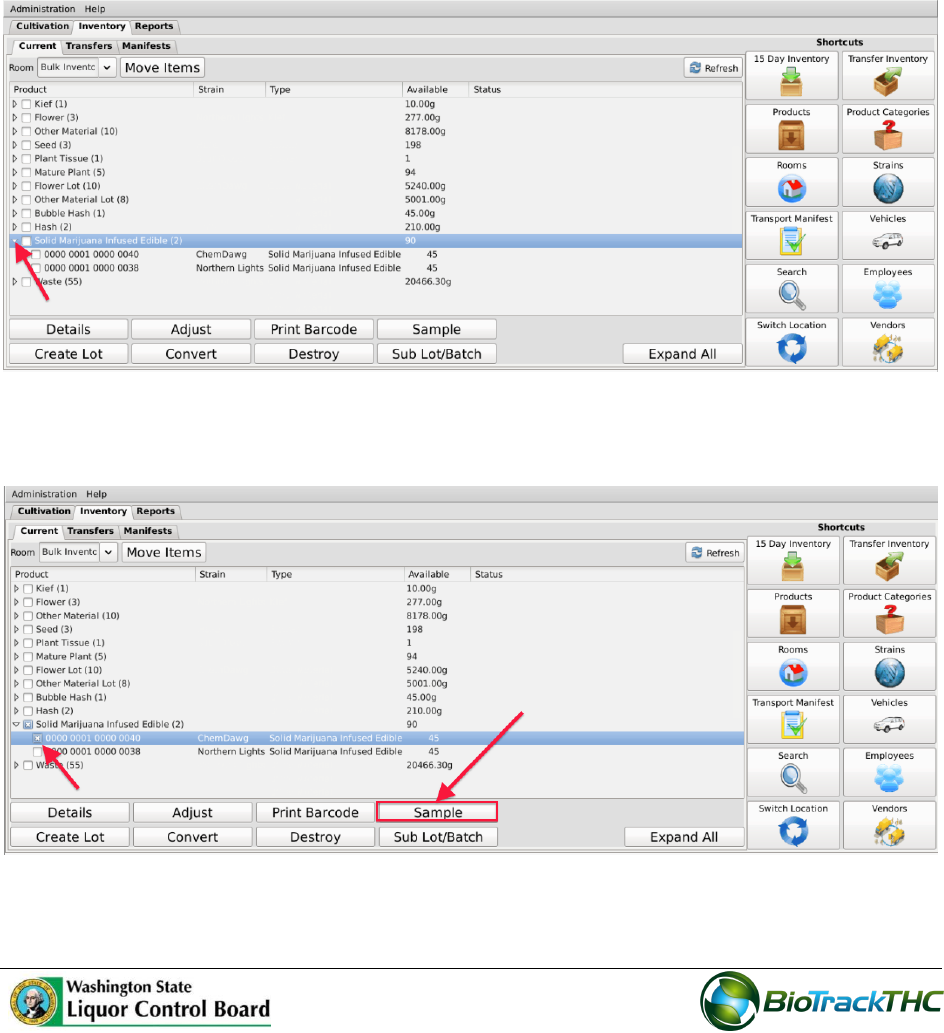
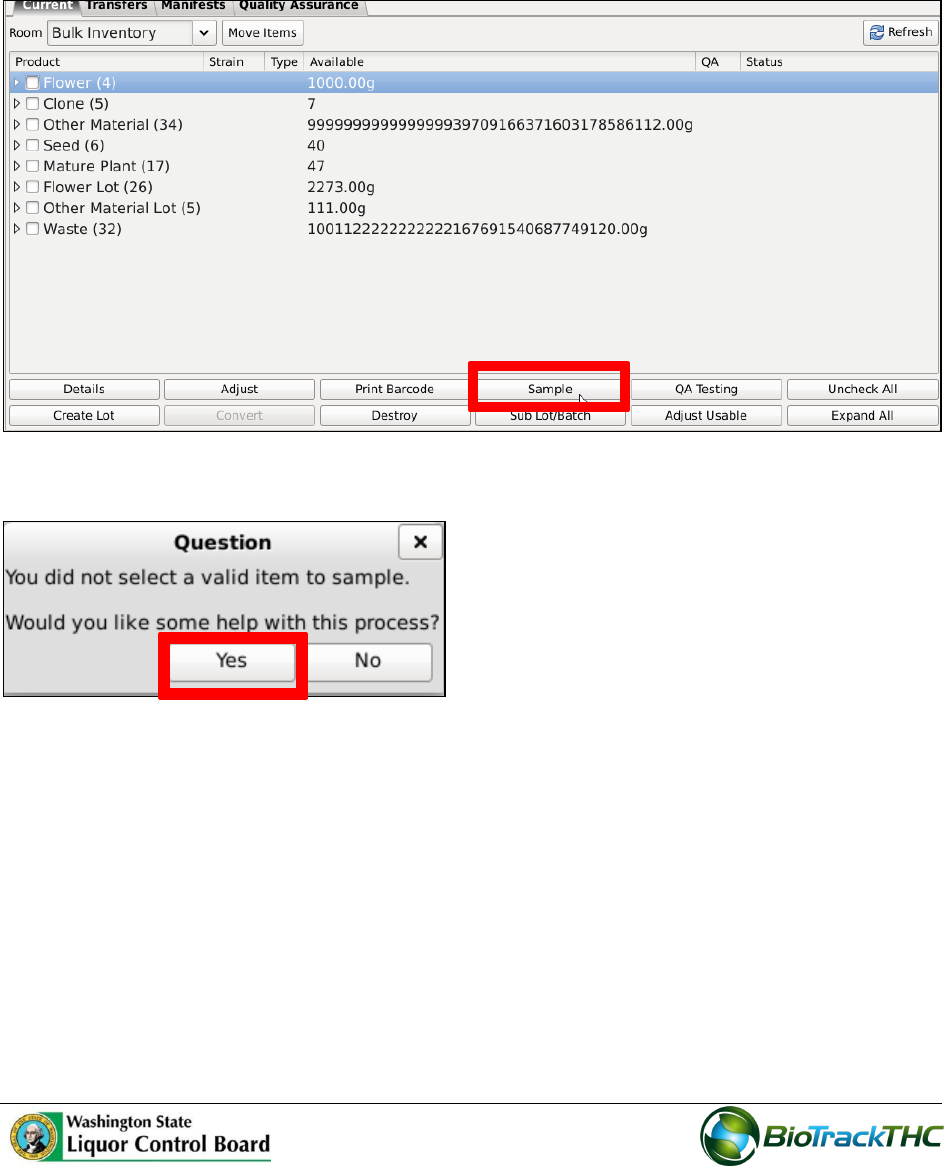
Click on the checkbox to left of the item to be sampled.
Click on the “Sample” button at the bottom of the screen
93
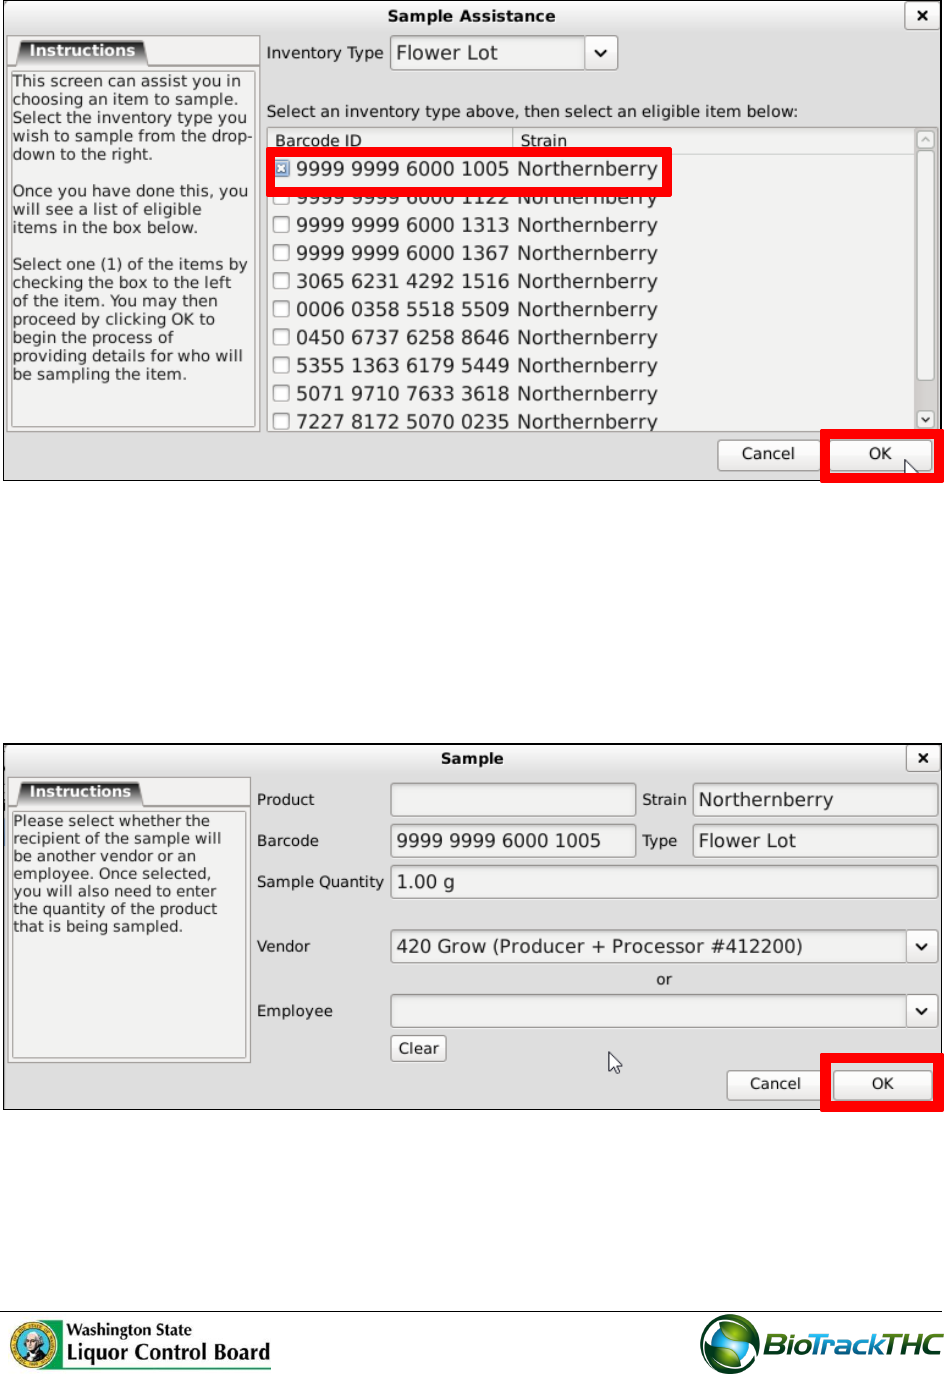
This will bring up the Sample screen.
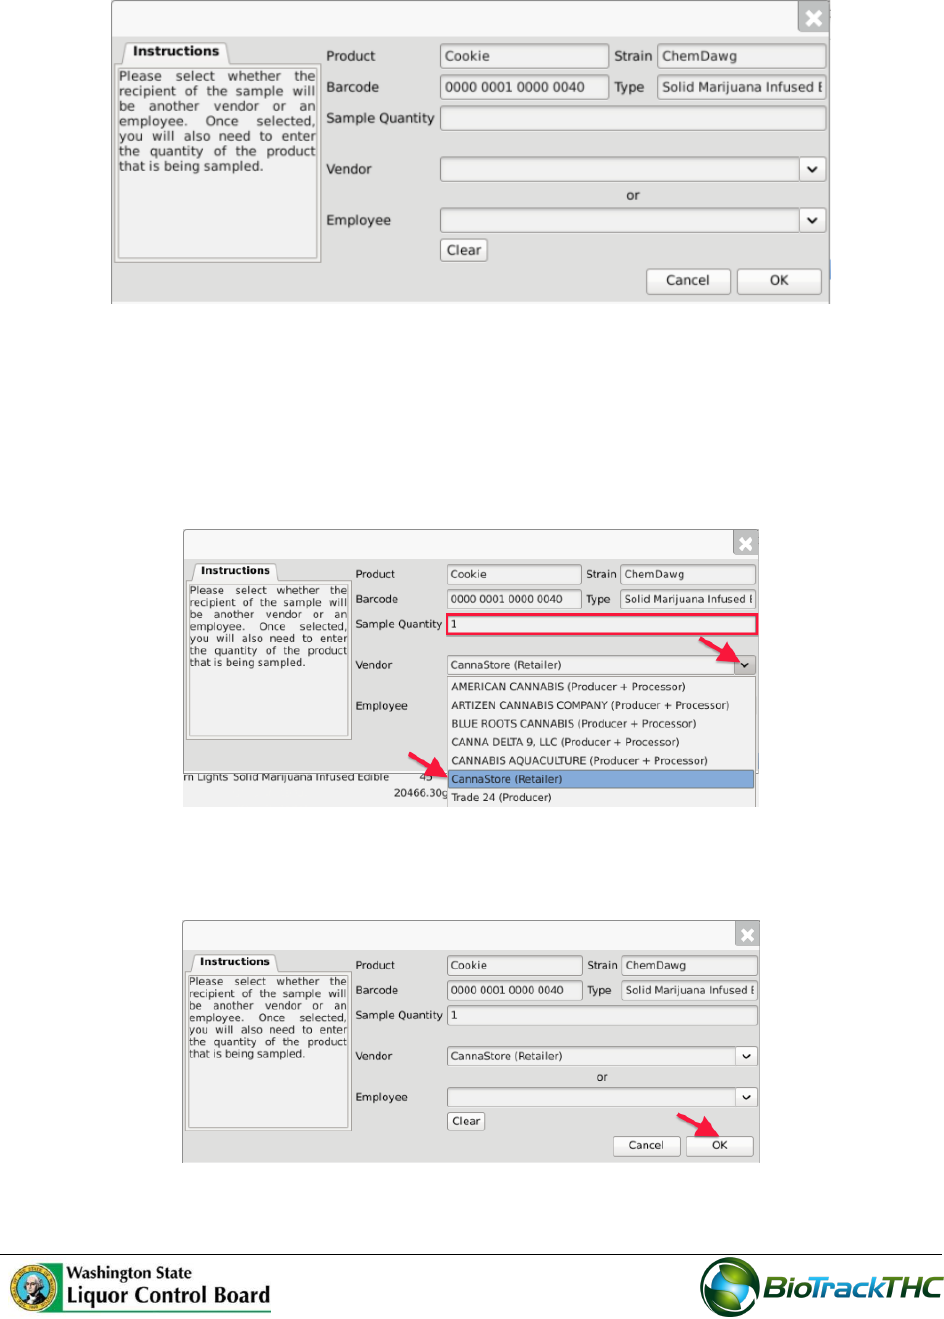
From the Sample screen,
o Enter the Sample Quantity, and
o Select the recipient of the sample from either
Vendor dropdown (if for negotiating a sale) or
Employee dropdown (if product quality sample).
Click on the “OK” button when complete.
Note: The sample generates a barcode to be placed on the manifest.
The Traceability System automatically deducts the sample quantity from inventory.
94
Approve Sample for Retesting
Once a valid item has been selected to sample, the same item needs additional approval to
be re-tested.
1. Create a sample by clicking on the ‘Sample’ button.
2. The ‘Question’ screen displays. Click the ‘Yes’ button.
3. The ‘Sample Assistance’ screen displays. Select the ‘Inventory Type’ and the eligible
strain.
95
4. The ‘sample’ screen displays.
5. Enter the ‘sample quantity’.
6. Select the ‘vendor’.
7. Click the ‘OK’ button.
8. The ‘Confirm’ screen displays. Click ‘Proceed’.
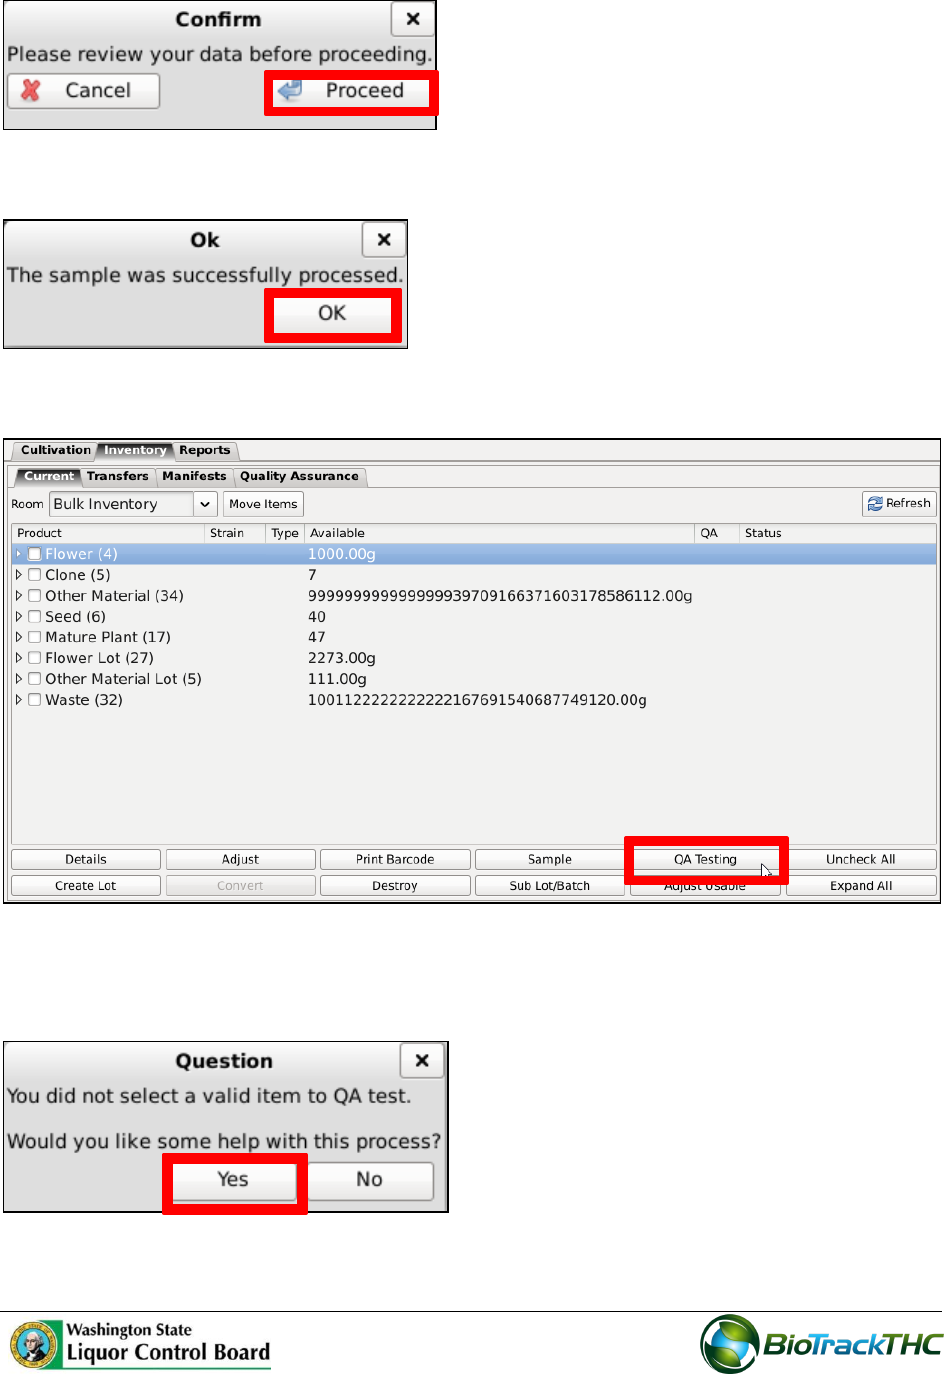
96
9. Click the ‘OK’ button.
10. From the Current Inventory screen, click the ‘QA Testing’ button.
11. The ‘Question’ screen displays. Click the ‘Yes’ button to view valid items.

97
12. Select the same ‘Inventory Type’ and eligible item as the previous sample that was
created.
13. Click the ‘OK’ button.
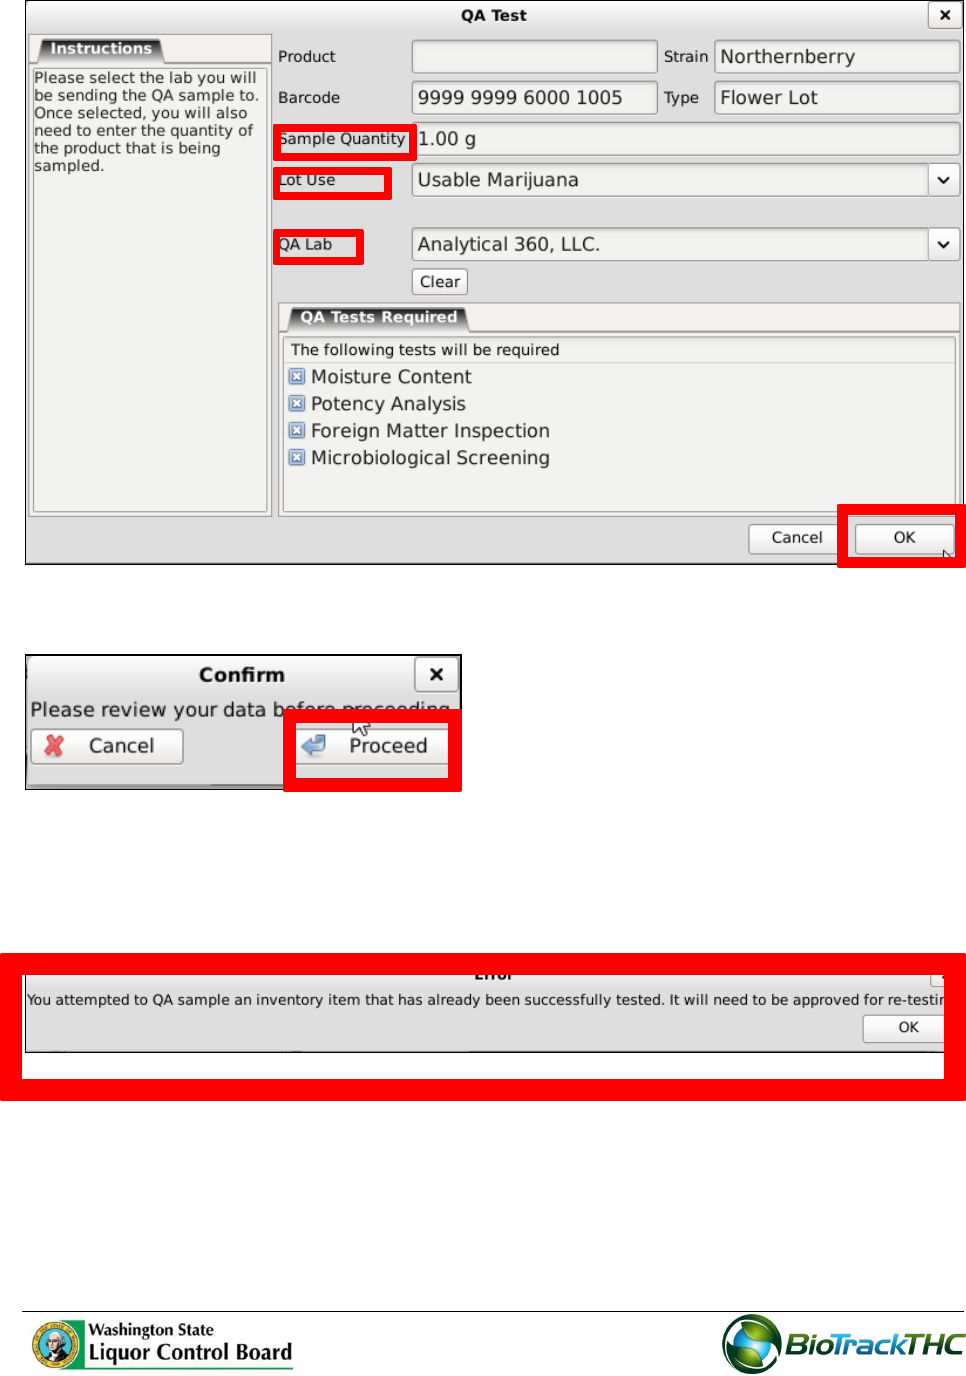
14. The ‘QA Test’ screen displays. Enter the ‘Sample Quantity’.
15. Select the ‘Lot Use’.
16. Select the ‘QA Lab’.
17. Click the ‘OK’ button.
98
18. The ‘Confirm’ screen displays. Click the ‘Proceed’ button.
19. The ‘Error’ screen displays. The sample was already tested and needs to be
approved for re-testing.
Chapter 14: Inventory Adjustments
In this chapter, you will learn how to:

99
Adjust Inventory
Inventory Adjustments
This function will notify the Traceability System of inventory deductions that are not
attributable to sales, samples, or destruction. The four types of adjustments are: Inventory
Audit; Theft; Seizure by Federal, State, Local, or Tribal Law Enforcement; and Mistake. The
following paragraph provides some guidelines with respect to when each type should be
used.
Inventory Audit. If after performing an inventory audit you find that actual inventory
quantities do not match quantities as reported in the Traceability System, and you are
unable to determine an explanation for the difference.
Theft. If inventory loss is determined to be due to theft.
Seizure by Federal, State, Local, or Tribal Law Enforcement. If inventory loss occurred
because of non-WSLCB law enforcement seizure.
Mistake. If it is determined that prior data submitted to the Traceability System was keyed
incorrectly. (This is the only type of adjustment that could result in an inventory increase).
Though the example screen shots illustrate an inventory adjustment due to theft, all of the
inventory adjustment types follow the same path.
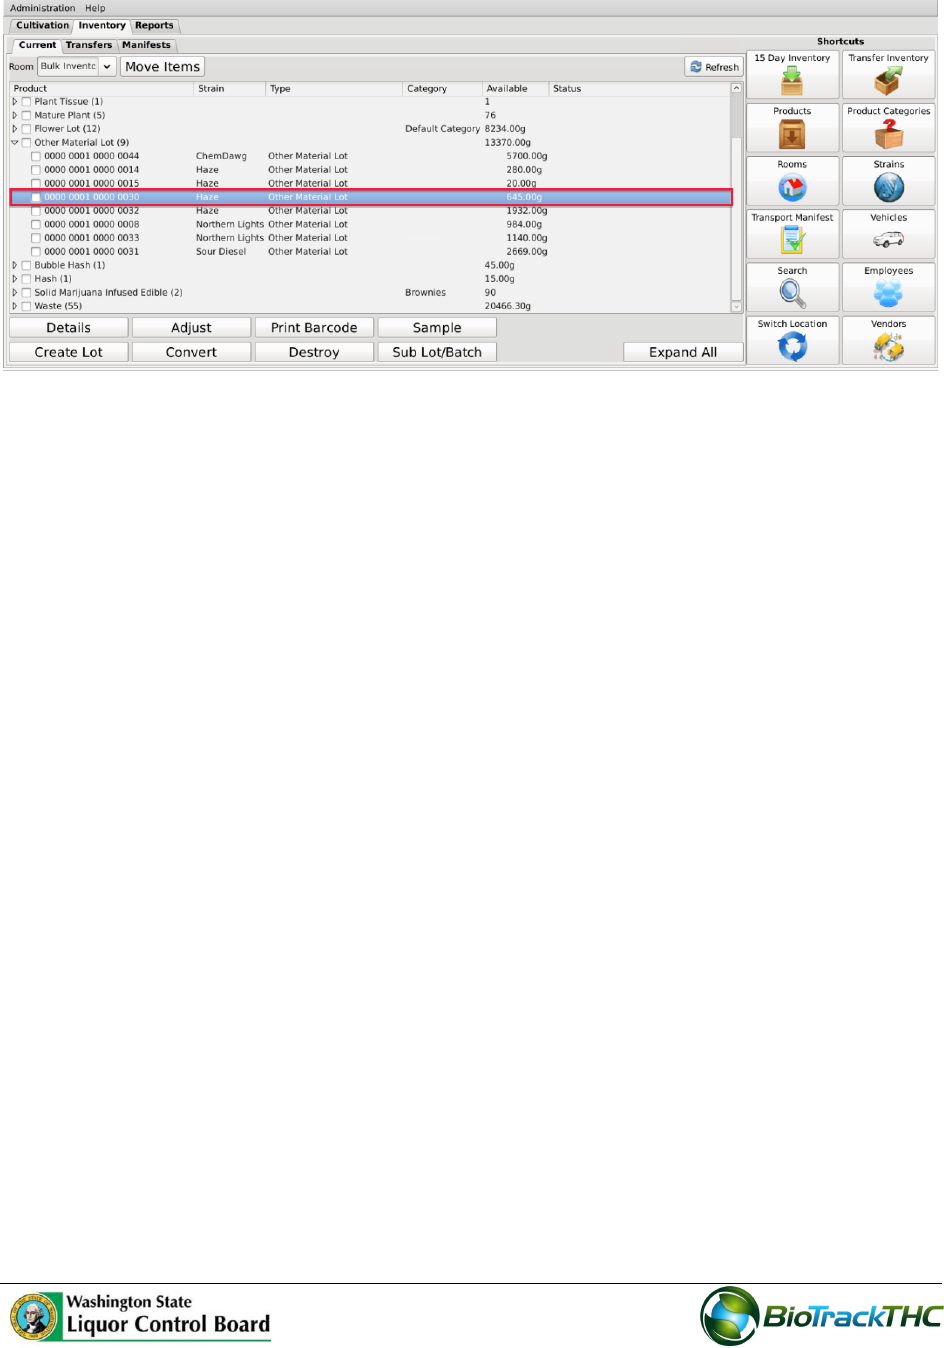
Navigate to the Inventory Room within which the to-be-adjusted inventory is
located (make sure that you are within the Inventory tab and the Current sub-tab).
Click on the checkbox to the left of the item to be adjusted.
Click on the “Adjust” button at the bottom of the screen.
This will bring up the Inventory Adjustment screen.
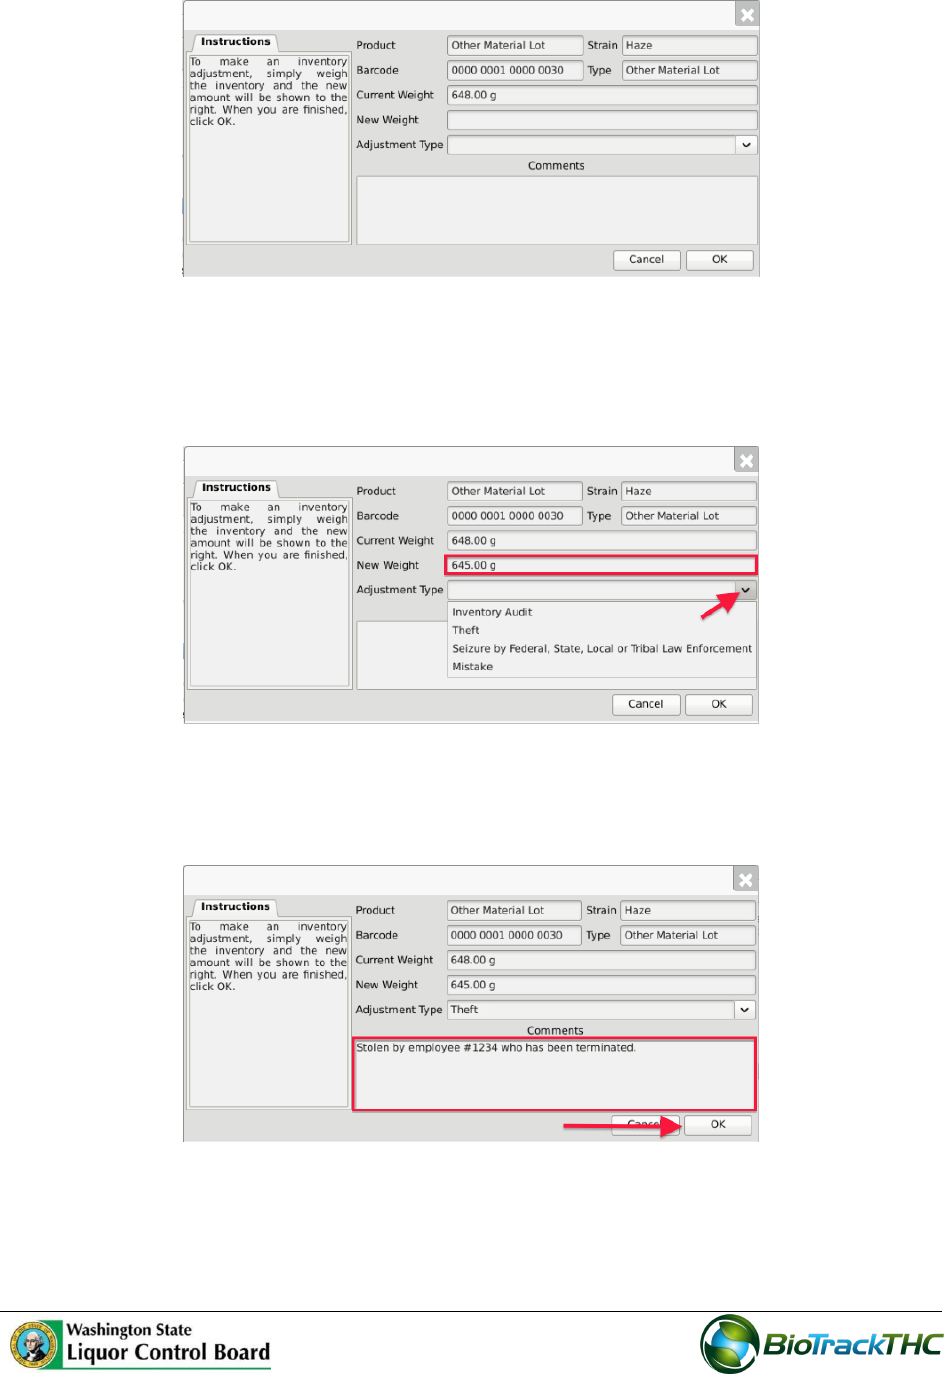
100
From the Inventory Adjustment screen,
o Enter the New Weight (current actual weight that needs to be reflected in the
Traceability System), and
o Select the Adjustment Type via the dropdown.
o Type in a detailed explanation for the inventory adjustment within the
Comments box.
Click the “OK” button when complete.
The item now reflects the actual weight and the reason for the discrepancy has been
submitted to the WSLCB.
101

102
Chapter 15: Tax Obligation Report
In this chapter, you will learn how to:
Access and submit the Tax Obligation Report
Regulations
WAC 314-55-089
What are the tax and reporting requirements for marijuana licensees?
(1) Marijuana licensees must submit monthly report(s) and payments to the board. The
required monthly reports must be:
(a) On a form or electronic system designated by the board;
(b) Filed every month, including months with no activity or payment due;
(c) Submitted, with payment due, to the board on or before the twentieth day of each
month, for the previous month. (For example, a report listing transactions for the
month of January is due by February 20th.) When the twentieth day of the month falls
on a Saturday, Sunday, or a legal holiday, the filing must be postmarked by the U.S.
Postal Service no later than the next postal business day;
(d) Filed separately for each marijuana license held; and
(e) All records must be maintained and available for review for a three-year period on
licensed premises (see WAC 314-55-087).
(3) Marijuana processor licensees: On a monthly basis, marijuana processors must
maintain records and report purchases from licensed marijuana producers, production of
marijuana-infused products, sales by product type to marijuana retailers, and lost and/or
destroyed product in a manner prescribed by the board. A marijuana processor licensee
must pay to the board a marijuana excise tax of twenty-five percent of the selling price on
each wholesale sale of usable marijuana and marijuana-infused product to a licensed
marijuana retailer.
WAC 314-55-092
What if a marijuana licensee fails to report or pay, or reports or pays late?
(1) If a marijuana licensee does not submit its monthly reports and payment(s) to the
board as required in WAC 314-55-089: The licensee is subject to penalties.
Penalties: A penalty of two percent per month will be assessed on any payments
postmarked after the twentieth day of the month following the month of sale. When the
twentieth day of the month falls on a Saturday, Sunday, or a legal holiday, the filing must be
postmarked by the U.S. Postal Service no later than the next postal business day.
(2) Failure to make a report and/or pay the license taxes and/or penalties in the manner
and dates outlined in WAC 314-55-089 will be sufficient grounds for the board to suspend
or revoke a marijuana license.
103
Accessing the Tax Obligation Report
You will need to access the tax obligation report section in order to view, electronically
confirm, export, and print your monthly tax obligation report.
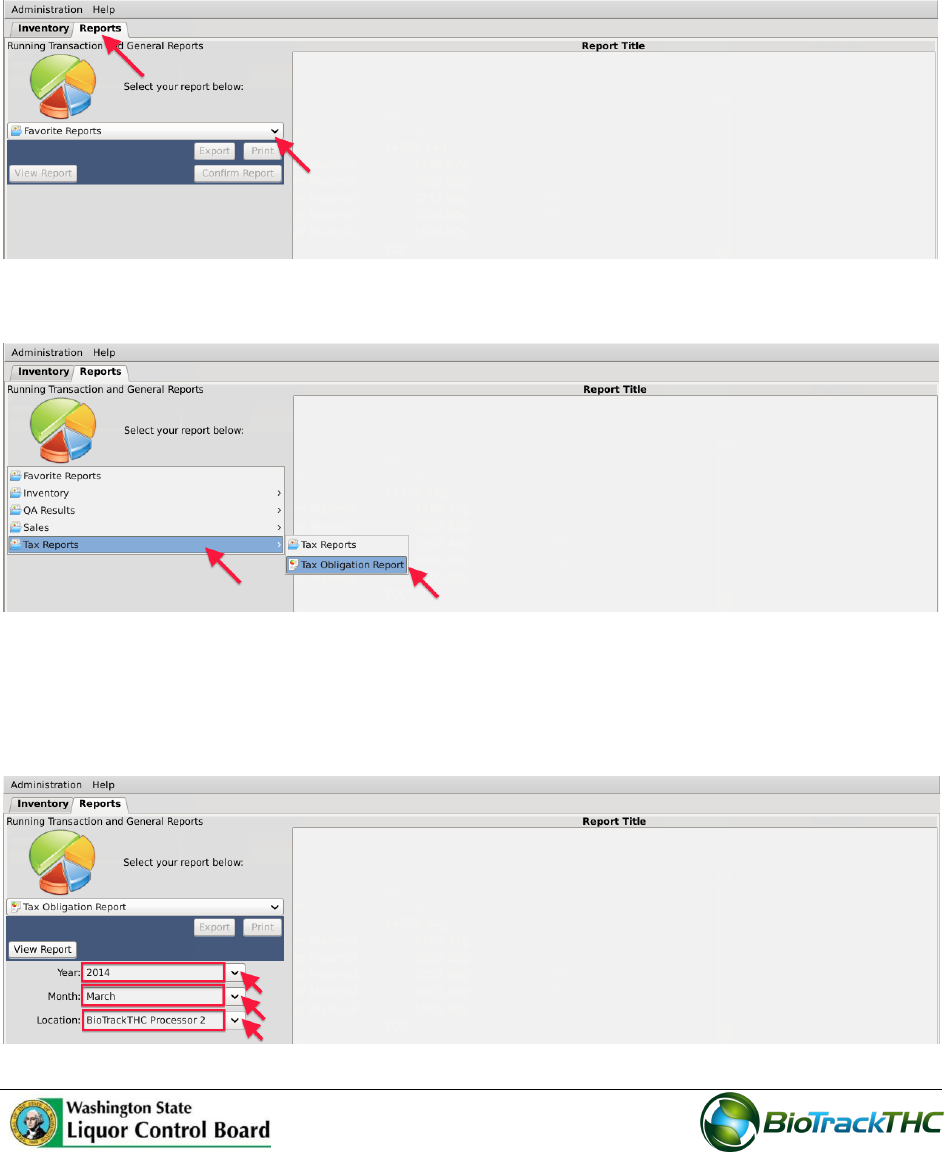
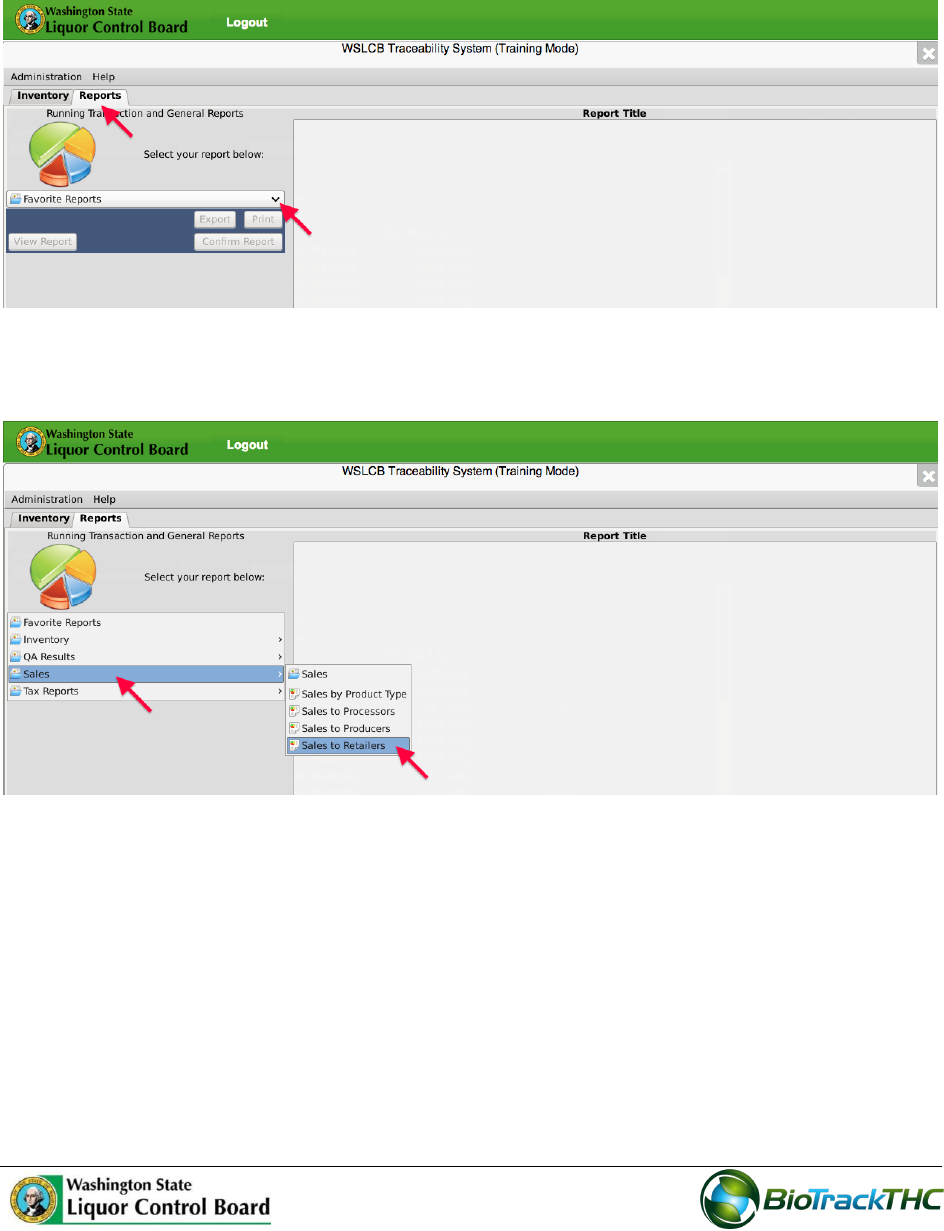
Navigate to the “Reports” tab found in the top-left corner of the screen, and then
click on the “Favorite Reports” dropdown located on the left-hand side of the screen.
Hover the cursor over “Tax Reports” and then click on “Tax Obligation Report”.
Viewing the Tax Obligation Report
Using the provided dropdowns select the desired year, month, and location (if more
than one) for the report.
104
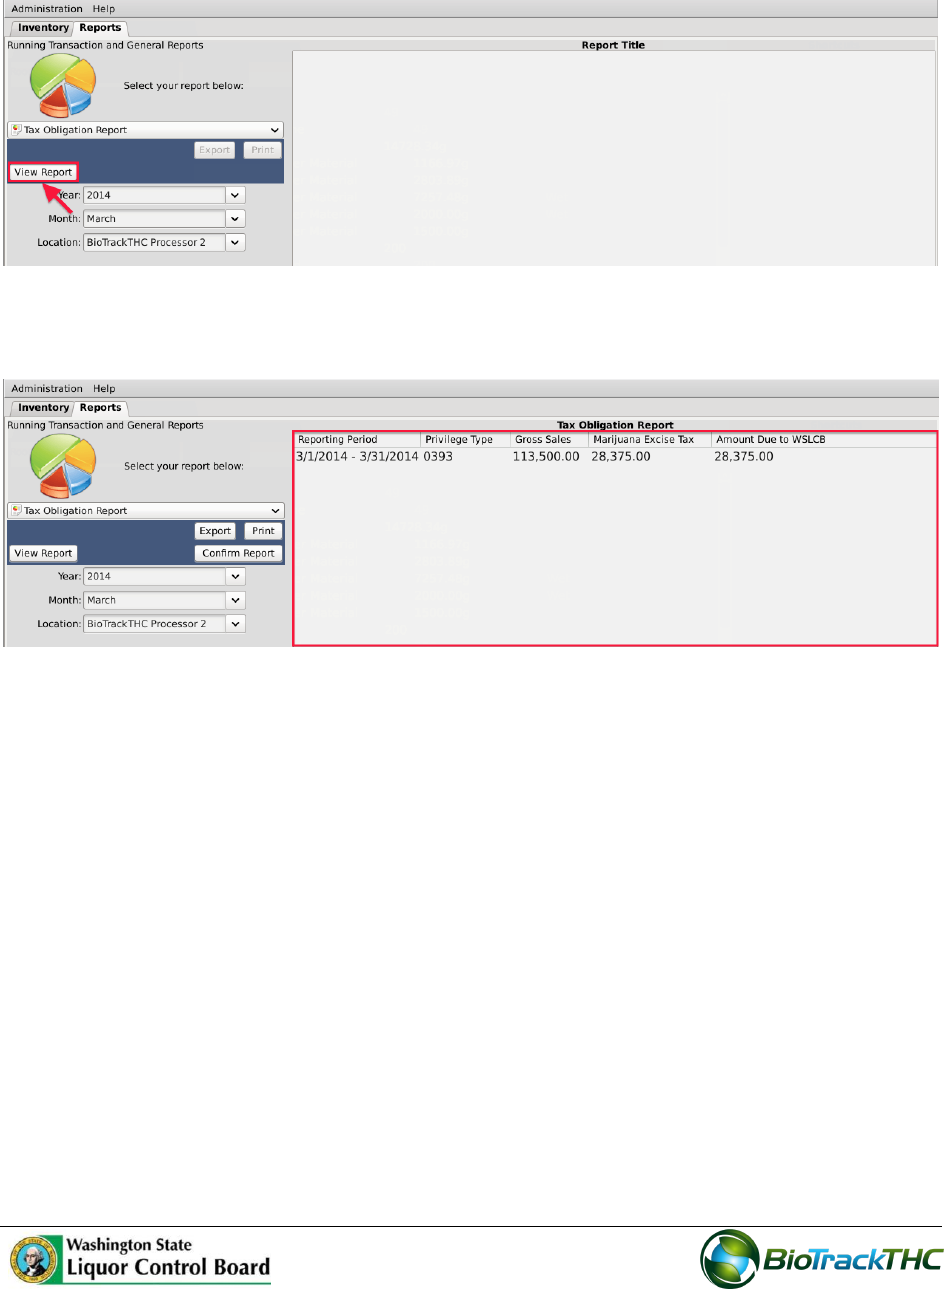
When complete, click “View Report”.
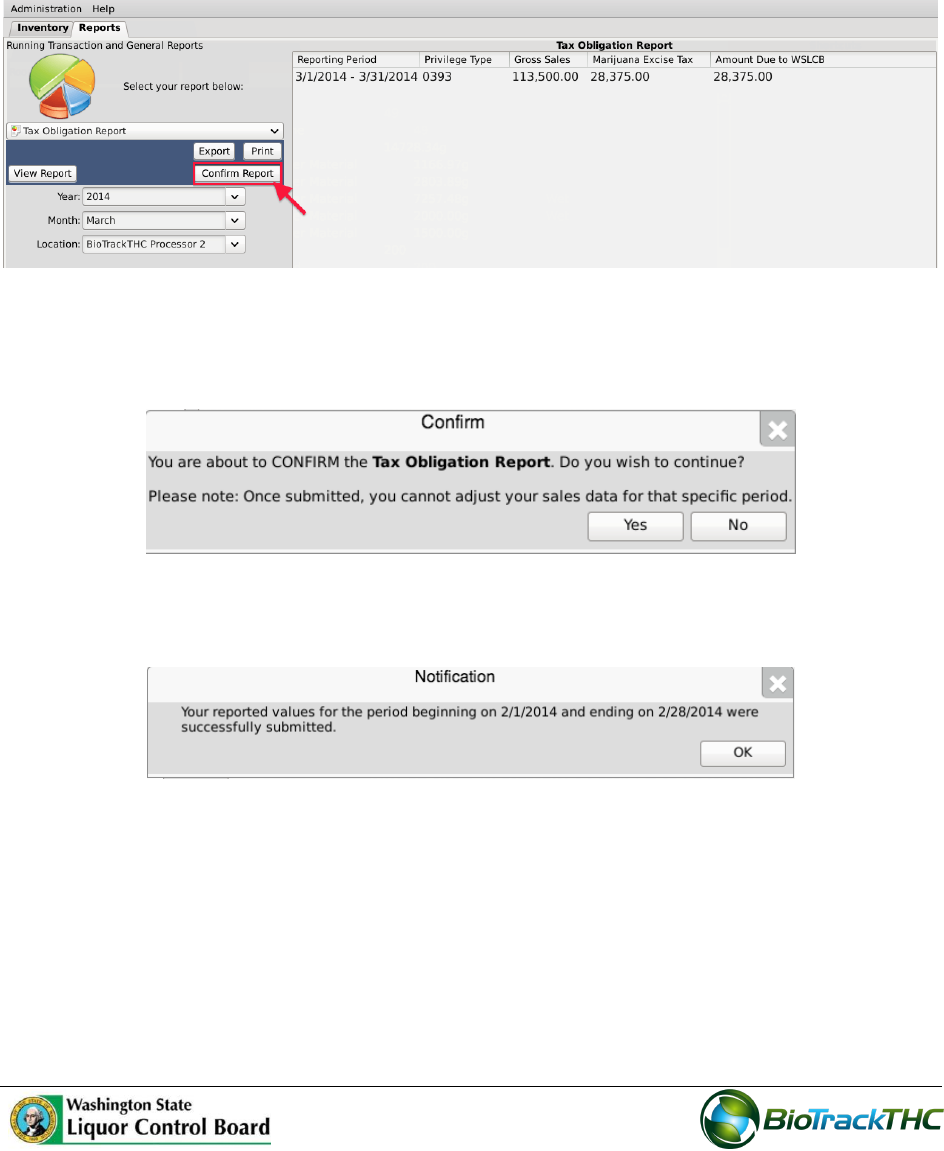
The primary window will populate with the Reporting Period, Privilege Type, Gross
Sales, Marijuana Excise Tax, and Amount Due to the WSLCB.
NOTE: IF YOUR INTERNAL RECORDS DO NOT MATCH THE REPORT, PLEASE
REVIEW THE LAST SECTION OF THIS CHAPTER, TITLED “SALES REPORTS”, SO YOU
CAN RECONCILE SUBMITTED TRACEABILITY DATA WITH YOUR INTERNAL
RECORDS.
105
Confirming and Electronically Submitting the Tax Obligation Report
Once you have verified that the reporting period’s gross sales match your internal records,
you will need to electronically submit the tax obligation report to the WSLCB through the
Traceability System.
Click on the “Confirm Report” button.
A prompt will appear warning you that once the tax obligation report is confirmed,
you may no longer adjust sales data for that specific period. Click “Yes” when you
wish to confirm.
You will see the following notification when the WSLCB has received the
confirmation of the reporting period’s tax obligation report.
NOTE: IF YOU DISCOVER AN ERROR IN THE REPORTING PERIOD AFTER THE
CONFIRMATION HAS BEEN PROCESSED, YOU WILL NEED TO CONTACT THE
WSLCB TO HAVE THE REPORTING PERIOD TEMPORARILY UNLOCKED IN ORDER
TO MAKE THE NECESSARY PRIOR-PERIOD REPORTING ADJUSTMENTS.

106
Downloading and Printing the Tax Obligation Report
Once you have confirmed the Tax Obligation Report within the Traceability System, you
must download and print the tax obligation report for the purposes of sending it to the
WSLCB with payment due.
Click on the “Print” button.
Depending on your internet browser and your settings, your computer may
automatically begin downloading a pdf version of the tax obligation report, or may
prompt you to allow, keep, or accept the file.
Open and print the tax obligation report pdf file and follow its instructions for
remitting the hardcopy of the report and payment to the WSLCB.
107
Sales Reports
You may view your sales activity—as entered into the Traceability System—by looking up
the sales reports within the Reports tab.
Navigate to the Reports Tab and click on the “Favorite Reports” dropdown
Hover your cursor over the “Sales” category and then select the licensee-type that
you would like to look-up.

108
Three dropdown menus will appear on the left-hand side. Select the year, month,
and location (if you have multiple locations under the same UBI) that you would like
to look-up and then click on the “View Report” button.
A breakdown of total sales to each licensee for the reporting period selected will
display in the primary report window.
