Palo Alto Networks Application Framework Lab Guide
User Manual: Pdf
Open the PDF directly: View PDF ![]() .
.
Page Count: 45
- Full Lab Deployment Instructions
- Application Framework FAQs
- API Usage Examples
- API Explorer Only Deployment Instructions
- Application-Framework-Lab
- Palo Alto Networks Application Framework Full Lab Deployment via AWS CloudFormation
- Prerequisites
- Lab Topology and features
- Security Hardening Considerations
- Palo Alto Networks Customer Support Portal Configuration
- S3 Bucket Creation and Upload
- API Explorer App Activation Process
- Appendix A: Explanation of the CFT services and usage
- Appendix B: Default hostname to IP and VM Mapping
- Appendix C: Sample log outputs in the monitor tab
- Application-Framework-FAQs
- Application Framework Partner Beta Program - Frequently Asked Questions
- What is the Application Framework Partner Beta Program?
- Where can I go to find/acquire X?
- How can I report an issue/bug with X?
- How can I deploy X?
- How can I register my own app?
- Where do I find my client_id, client_secret, etc., needed for authorization/OAuth?
- How are we tracking customers who click from the app portal to the 3rd-party app.
- How does a 3rd-party partner get paid for app usage?
- Can we develop with dummy data/sample logs in Logging Service?
- What region is the Logging Service data center physically located?
- Are Logging Service column names supported in SQL filter SELECT expressions?
- How often can the Event Service API be polled? Why doesn't Event Service API push data?
- Why does the Event Service poll return an emply list even when logs are present?
- Where do I get the "channelID" for the Event Service?
- What is the duration of the OAuth Authorization Token?
- How can the app framework protect against real time threats?
- Why I cannot generate the OTP on Customer Support Portal?
- Logging Service doesn't work (I can't see logs on Panorama):
- API-Curl-Examples
- Palo Alto Networks Application Framework API Explorer Curl Examples
- API-Explorer-Lab
- Palo Alto Networks Application Framework API Explorer Deployment via AWS CloudFormation

Palo Alto Networks Application Framework - Lab Guide
Copyright (C) 2018 - Palo Alto Networks, Inc. 1/45

This document describes how to automatically set up a lab environment on Amazon Web Services that can be used to generate logs for Palo Alto Networks Application Framework. It is meant for Palo Alto Networks Partners that need a
quick way to start developing for Application Framework.
It also provides instructions on how to pair the API Explorer application with Application Framework.
Doc Revision: 2018-05-01-07:41:39 (UTC)
Please make sure you always download the latest revision of this document and the required files:
Wiki home: https://github.com/PaloAltoNetworks/appframeworklab/wiki
This document: https://github.com/PaloAltoNetworks/appframeworklab/wiki/Application-Framework-Lab
Documentation PDF (incl FAQ): https://github.com/PaloAltoNetworks/appframeworklab/blob/master/pdf/LabGuide.pdf
AWS Full Lab CFT JSON file - https://raw.githubusercontent.com/PaloAltoNetworks/appframeworklab/master/cft/appframework-lab.json
NGFW S3 Bucket Zip: https://paloaltonetworks.box.com/s/l88f9zonvlr7fb5ihf49kbkrcdw4kfp2
LAB Miscellaneous S3 Bucket Zip: https://github.com/PaloAltoNetworks/appframeworklab/blob/master/buckets/appframework-conf.zip
This lab environment requires the following:
A valid Palo Alto Networks Customer Support Portal (CSP) Account with the SuperUser, Logging Service and Directory Sync Service roles enabled for your organization
A valid AWS Account
Palo Alto Networks Licenses:
Panorama (serial number and support Auth Code)
VM-Series Firewall (2x Auth Codes per firewall (base and bundle)))
Logging Services (Auth Code)
AWS Region with 5 available Elastic IPs (4 if not deploying Kali Linux)
Files required for deployment (provided by Palo Alto Networks):
CloudFormation Template (JSON file)
2 ZIP files containing the S3 bucket data
(Not mandatory but highly recommended) A second or third level domain configured in AWS Route53 (i.e. lab.yourcompany.com with NS records pointing to AWS Route 53 DNS Servers): ask your Palo Alto Networks
representative for more details.
The AWS CloudFormation template automatically deploys a network topology that can be used to generate different logs end events to be sent to the Palo Alto Networks Application Framework.
The following components are included in the template:
Panorama (10.0.0.20 + EIP assigned for remote reachability)
Next-Generation Firewall VM Series with the following interfaces:
Management: 10.0.0.99 (+ EIP assigned for remote reachability)
Public (10.0.0.100) (+ EIP assigned for remote reachability)
Internal (10.0.1.11)
API Explorer VM running RHEL (10.0.0.55 + EIP assigned for remote reachability)
Kali Linux VM (10.0.0.88 + EIP assigned for remote reachability)
Ubuntu Web Server behind the firewall (10.0.1.101, reachable via SSH through the firewall Public EIP on port 221)
Windows Server 2012 R2 Domain Controller behind the firewall (10.0.1.20, reachable via RDP through the firewall Public EIP on port 3389)
The network topology is depicted in the following diagram:
Application-Framework-Lab
Palo Alto Networks Application Framework Full Lab Deployment via
AWS CloudFormation
Prerequisites
Lab Topology and features
Copyright (C) 2018 - Palo Alto Networks, Inc. 3/45

Once created, the environment automatically starts generating traffic through a web crawler installed on the Ubuntu Web server VM. It automatically and periodically updates the User-to-IP mapping on the firewall via API, so the traffic
logs will appear with "user1" as source user. The crawler also periodically downloads a sample test PE from the Palo Alto Networks web site, that will trigger a Wildfire event. SSL Decryption is automatically enabled on the firewall with
SSL Forward Proxy, and all the web requests from the VMs in the private subnet are decrypted: both the Ubuntu Web server VM and the Windows Domain Controller trust the Firewall pre-created certificate for SSL Decryption. The
certificate used by the NGFW for decryption is static and has been pre-added in the environment configuration to simplify the automation: it is possible to replace it post deployment (instructions are not provided in this document).
For details on VM information and useful commands, see Appendix A
For details on EIP associations, see Appendix B
Some URL categories (sports, finance) are configured to be blocked or to generate alerts on the firewall, and the web crawler will hit those categories, to automatically generate URL filter events.
A Kali Linux VM is also deployed and can used to generate attacks on the Ubuntu Web Server VM, in order to generate Threat Logs on the Firewall (need to be done manually, see Appendix A).
NAT rules are configured on the Firewall Public Interface (10.0.1.100, with an EIP associated to it) that allow reachability to the VMs behind it:
Port 3389 to RDP into the Windows Domain Controller
Port 221 to SSH on the ubuntu Web VM
The CloudFormation template allows to specify an Administrative password that is automatically configured on the following systems:
Next-Generation Firewall (for the admin user)
Panorama (for the admin user)
API Explorer VM (for the ec2-user user)
API Explorer application (for the admin user)
Kali Linux VM (for the ec2-user user)
Windows Domain Controller:
Domain Admin user (specified at deployment, default is 'paloalto')
Other users (user1, user2, user3 -- also with Domain Admin privileges)
Since the password is used widely, it's recommended to select one with a good level of complexity.
Note: if you delete the Stacks deployed through this CFT, make sure you manually delete the EC2 Volumes that are left, otherwise you will end up using space unnecessarily.
This environment is meant for development use only, it's not security hardened for production. Specifically, the following security considerations should be known:
Password authentication via SSH is enabled on both API Explorer (ec2-user user) and Ubuntu Web server (ubuntu user) VMs, using the Administrative password
Active Directory Password Complexity is disabled
Administrative password is provided as an environment variable for the installation scripts on the API Explorer, Ubuntu Web Server and Windows Server VMs (part-001 script in Linux VMs, c:\cfn\scripts\pw.txt in Windows), so it
may be visible in some of the log files (i.e. /tmp/panorama_setup.log and /var/log/user-data.log on the API Explorer VM and under the logs in c:\cfn on the Windows Server VM)
The Panorama/NGFW SSH private key must be uploaded in the S3 bucket to automate the password reset process
To perform manual hardening of the environment, the following post-deployment steps are suggested:
Manually change all the passwords
Replace the SSH key for authentication on NGFW and Panorama for admin users
Disable Password based authentication on API Explorer and Ubuntu Web Server VMs
Security Hardening Considerations
Copyright (C) 2018 - Palo Alto Networks, Inc. 4/45

Re-enable Password complexity on Domain Controller
Replace the Decryption SSL certificate on NGFW, and import it on both Ubuntu Web Server VMs and Domain Controller
This document is not meant to provide instructions for the above steps.
This section describes how to register the licenses and activate the services on the Palo Alto Networks Customer Support Portal (CSP)
1. Login to support.paloaltonetworks.com using your CSP (Customer Support Portal) account
2. Navigate to "Assets" and click on "Register New Device", then select "Register device using Serial Number or Authorization Code", then "Submit""
3. Insert your Panorama serial number and fill in the other required fields. Then click on "Agree and Submit":
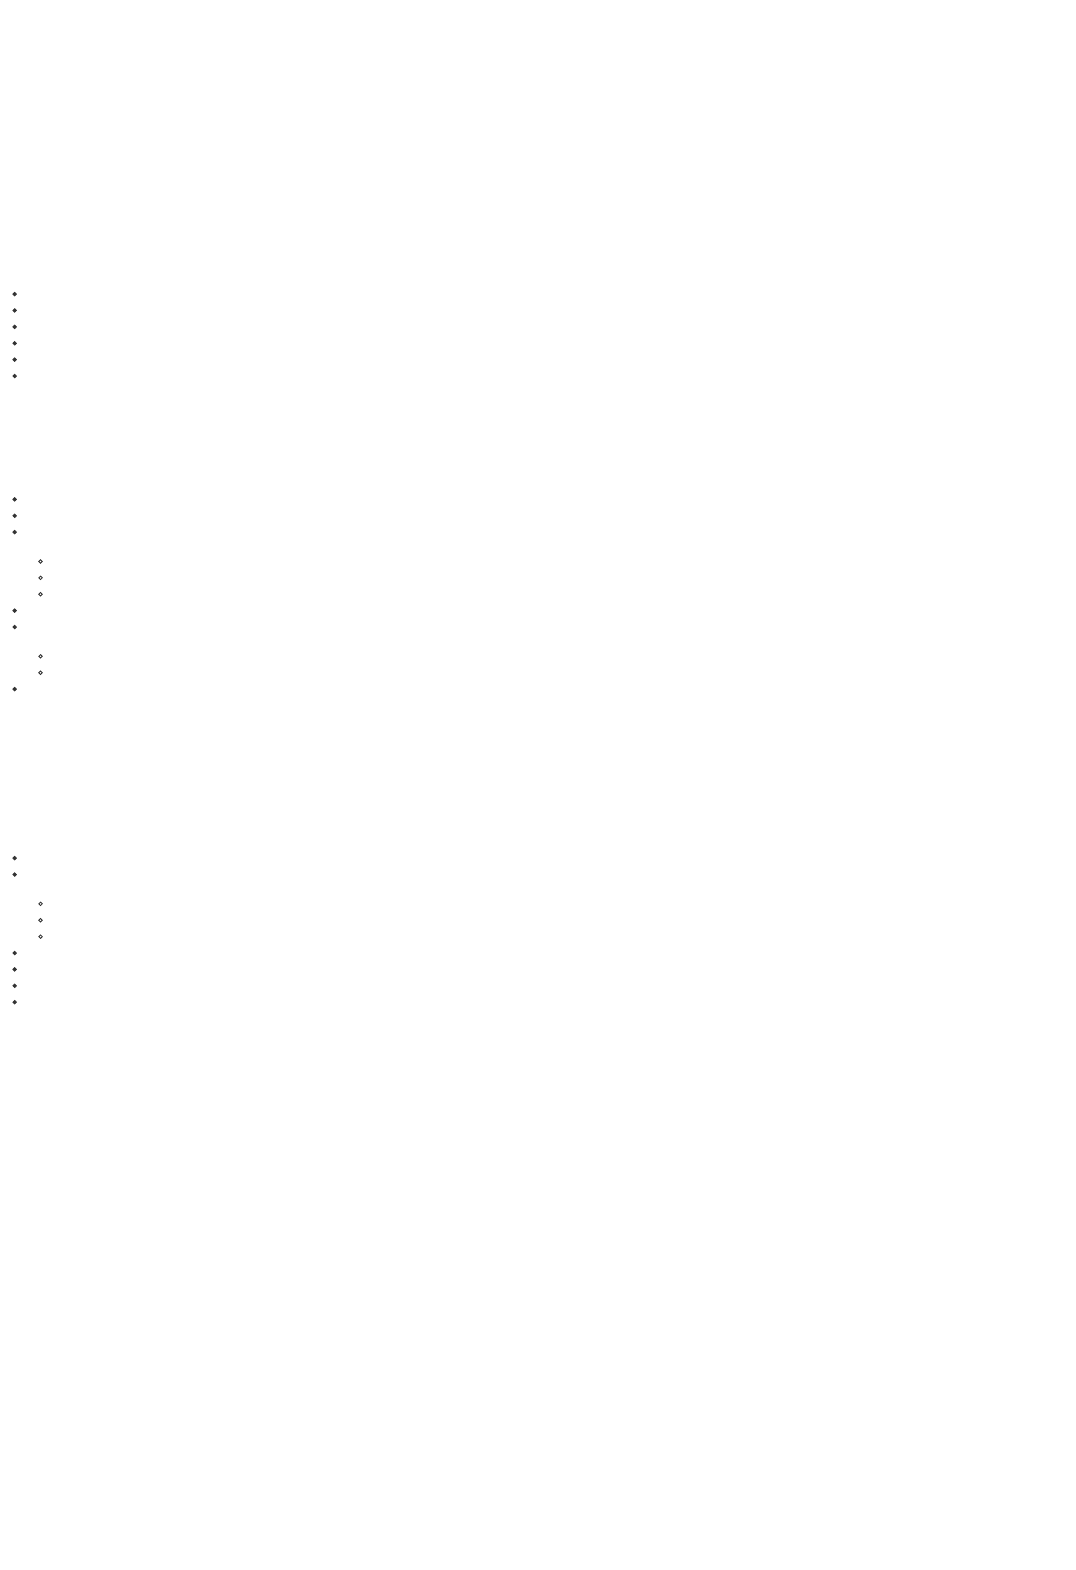
4. You will need to associate the Panorama Support Authcode with the Panorama serial that you registered. From the "Devices" page under the "Assets" tab, click on the "Actions" icon on the line that correspond to the Panorama
serial number you just added:
5. Select "Activate Auth-Code", insert the Panorama support Auth-Code (the one that corresponds to the PAN-SVC-NFR-PRA-25 SKU) and click on "Agree and Submit"":
Palo Alto Networks Customer Support Portal Configuration
Copyright (C) 2018 - Palo Alto Networks, Inc. 5/45
6. Navigate to "Assets", then go to "VM-Series Auth-Codes", select "Add VM-Series Auth-Code". Enter the VM-Series Auth-Code (the one that corresponds to the PAN-VM-100-NFR SKU) and click on "Agree and Submit":
7. Navigate to "Assets", then select "Cloud Services" and click on "Activate Cloud Services Auth-Code".
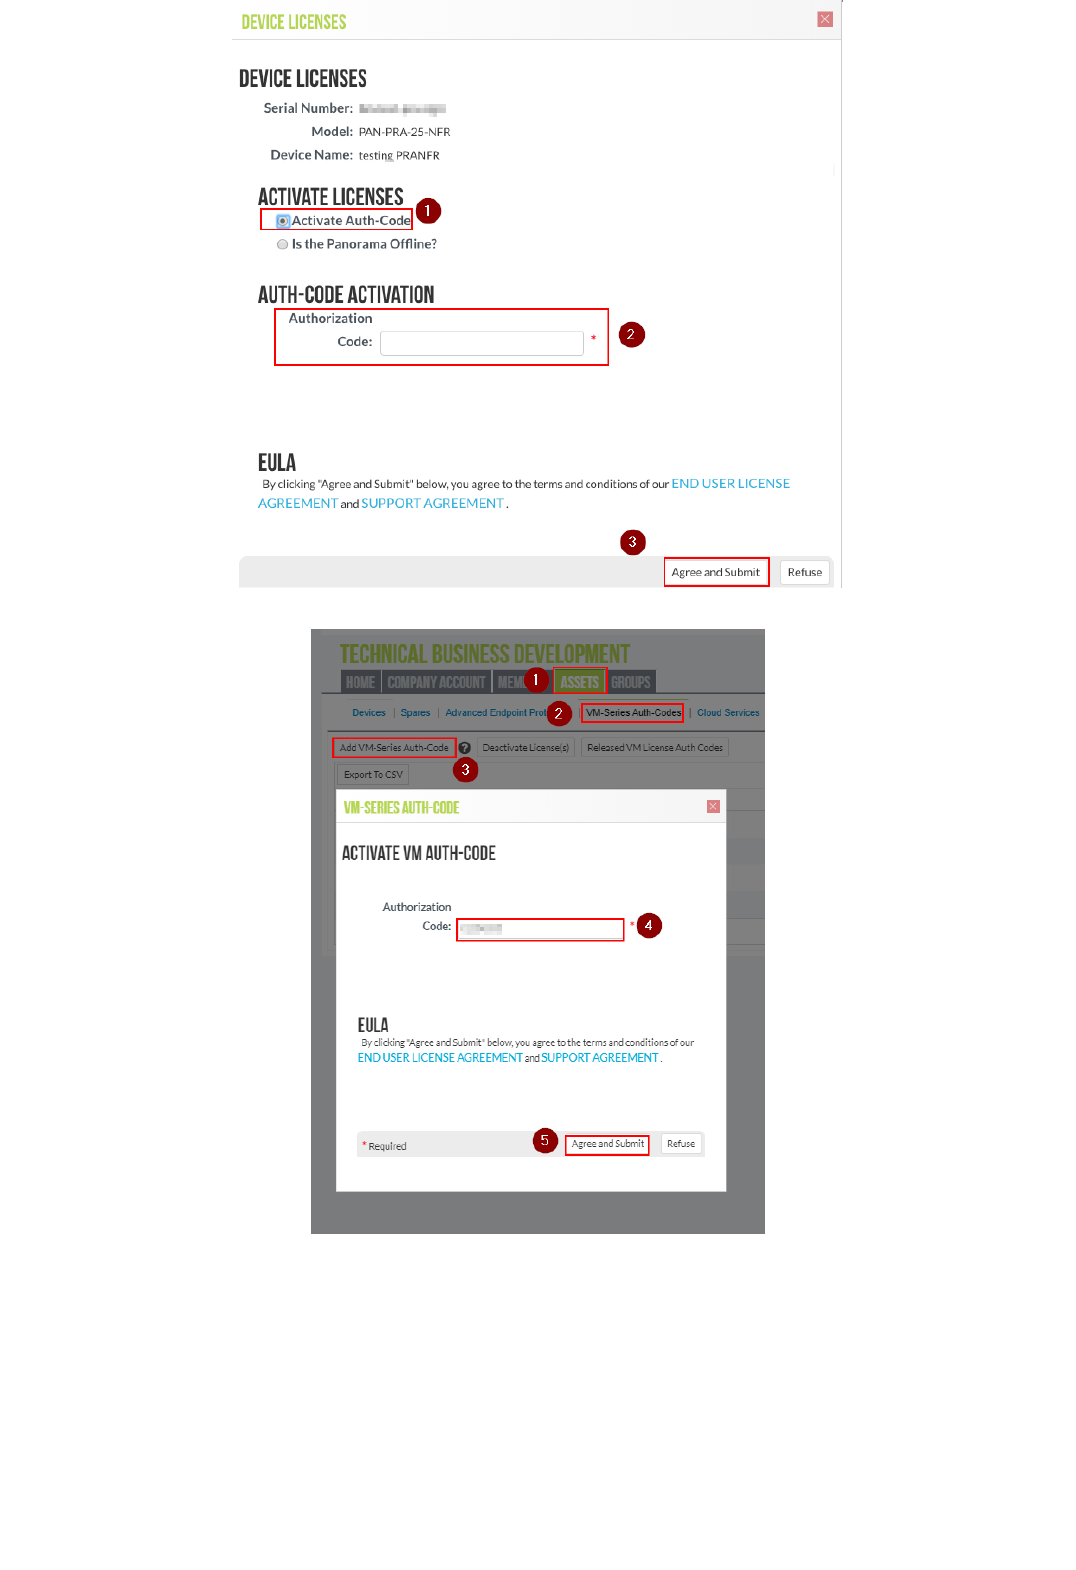
8. Enter the Logging Service Auth-Code. Then select the serial number of the Panorama device that you entered in the previous step, and the region (americas). Then click on "Agree and Submit:":
Copyright (C) 2018 - Palo Alto Networks, Inc. 6/45
Note: If you don't see the option to activate the Cloud Services, you might not have the required permissions in CSP.
##AWS Configuration
This section describes the configuration of the AWS required components to deploy the lab components. You'll need a KeyPair, two S3 buckets and (optional) a Route53 Hosted Zone. You'll also need to accept the terms for Palo Alto
Networks VM-Series, Panorama and Kali Linux.
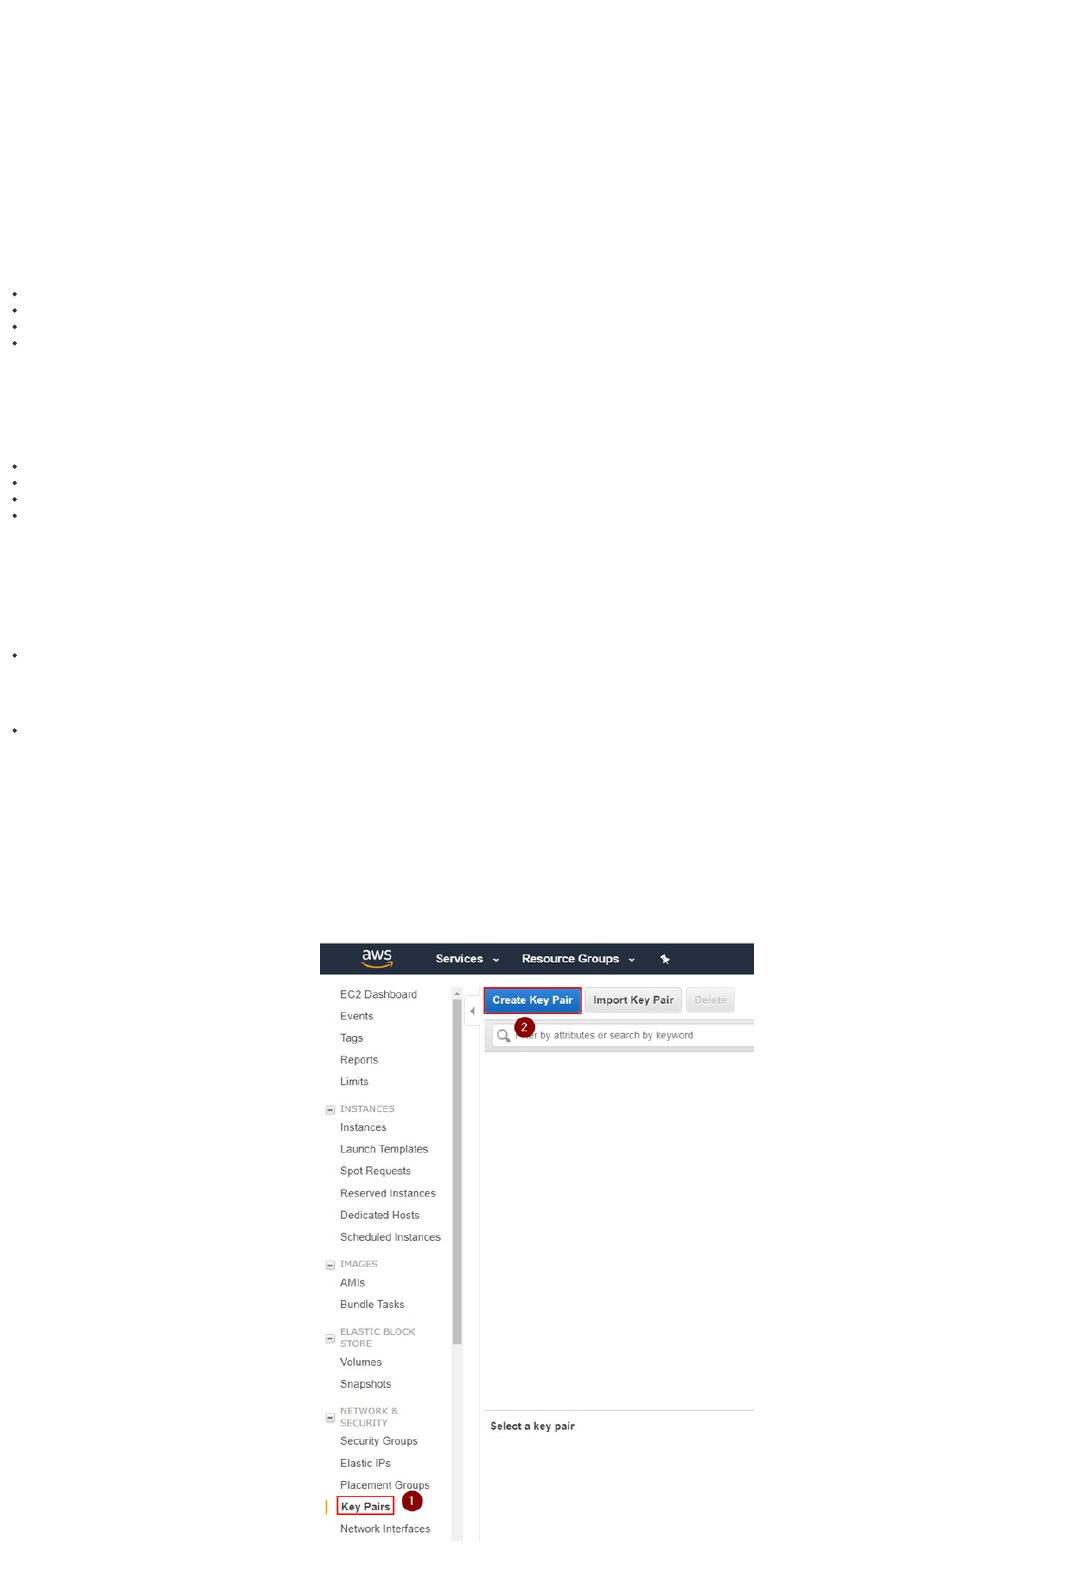
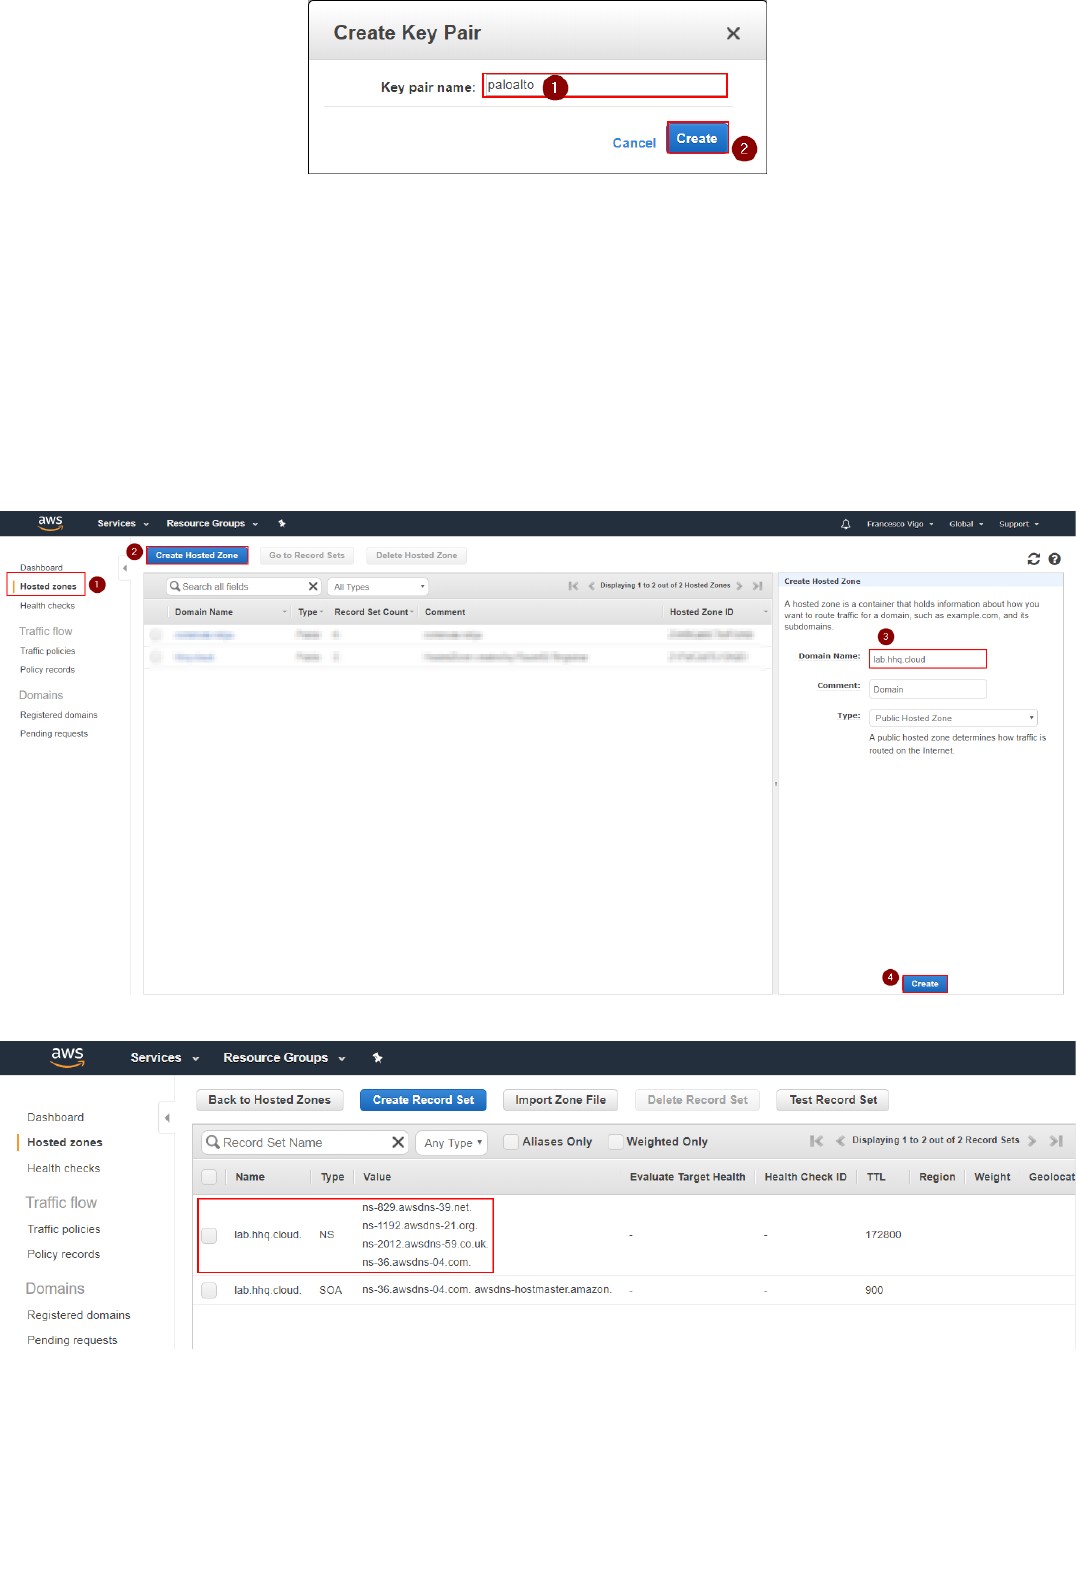
1. Navigate to your selected region (i.e. us-east-1), select the EC2 service and under "Network & Security" select "Key Pairs" and click on "Create Key Pair":
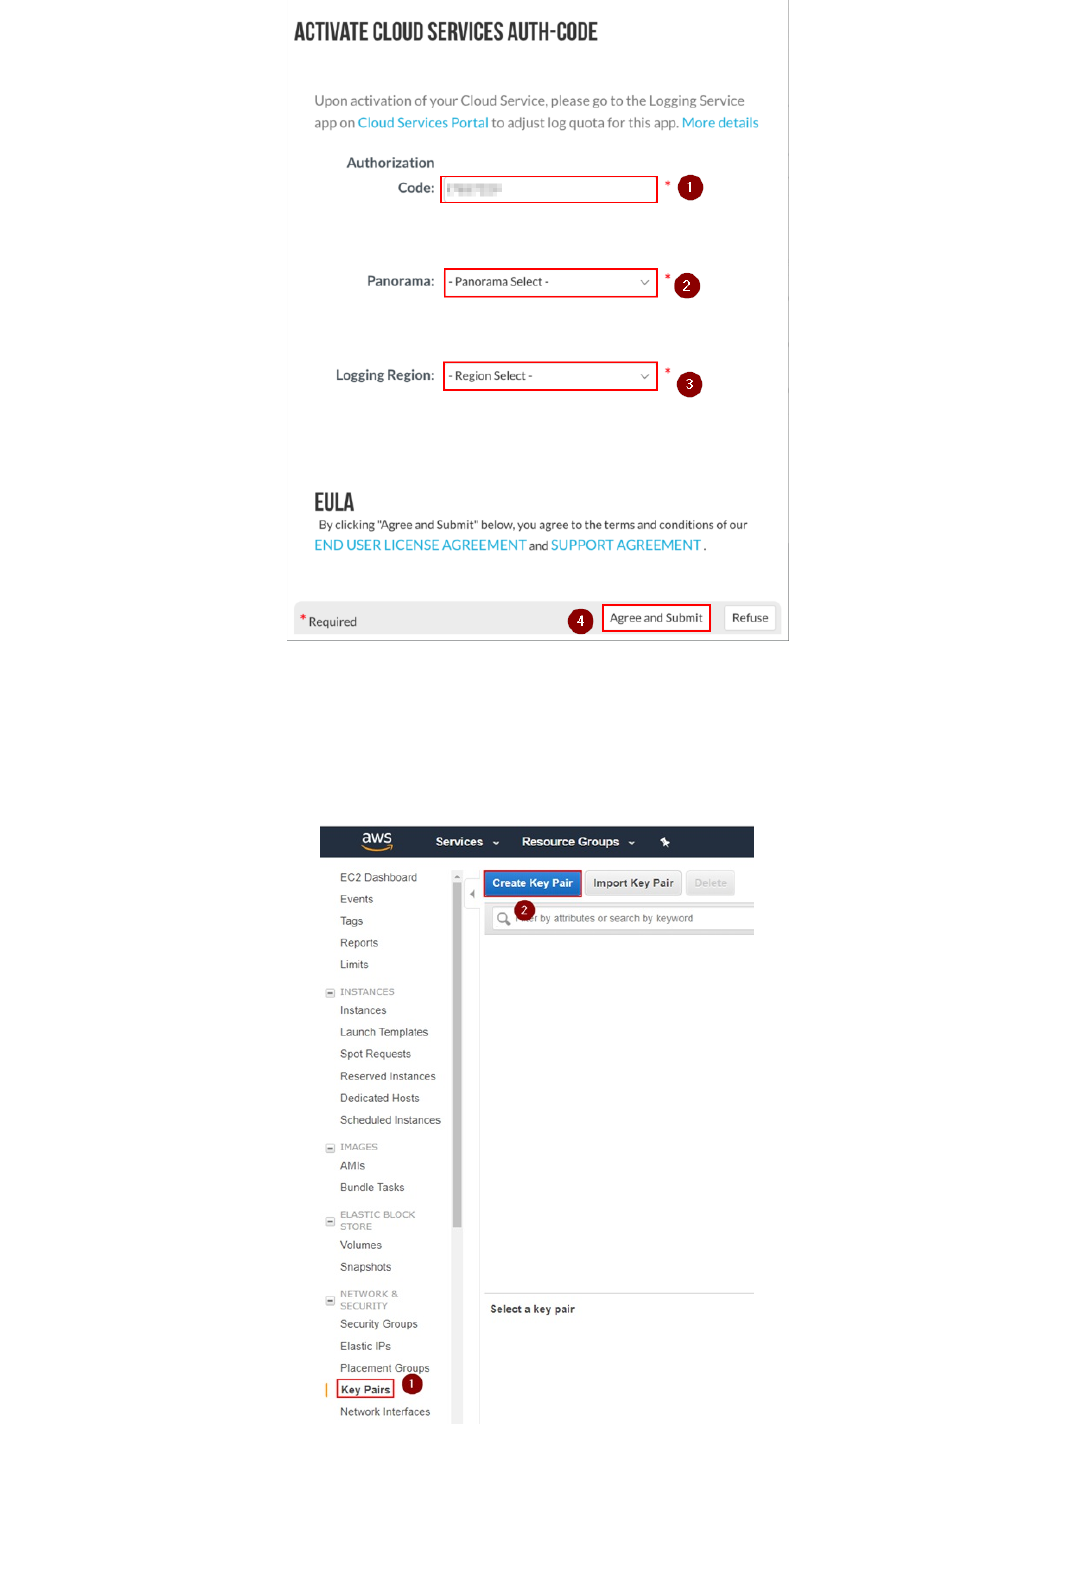
2. Insert a keypair name and click on "Create". In the example, we use "paloalto". This will create a "paloalto.pem" private key and the AWS Web UI will prompt you to download it.
Key Pair Creation
Copyright (C) 2018 - Palo Alto Networks, Inc. 7/45
3. Download the Private Key to your local machine. The file name of this example will be paloalto.pem, but you can choose an arbitrary name. You will need to upload this file in an S3 bucket later.
Palo Alto Networks should have provided you two URLs to download the required files, that you will need to upload into 2 separate S3 buckets. One is used for the Firewall provisioning and the other for the miscellaneous lab
configurations. Download and unzip the archives in two separate folders that correspond to the two buckets:
In the example we use appframework-ngfw for the firewall configuration and appframework-conf for the lab miscellaneous configuration. You can use any arbitrary name for the S3 buckets, but they will have to be unique in AWS.
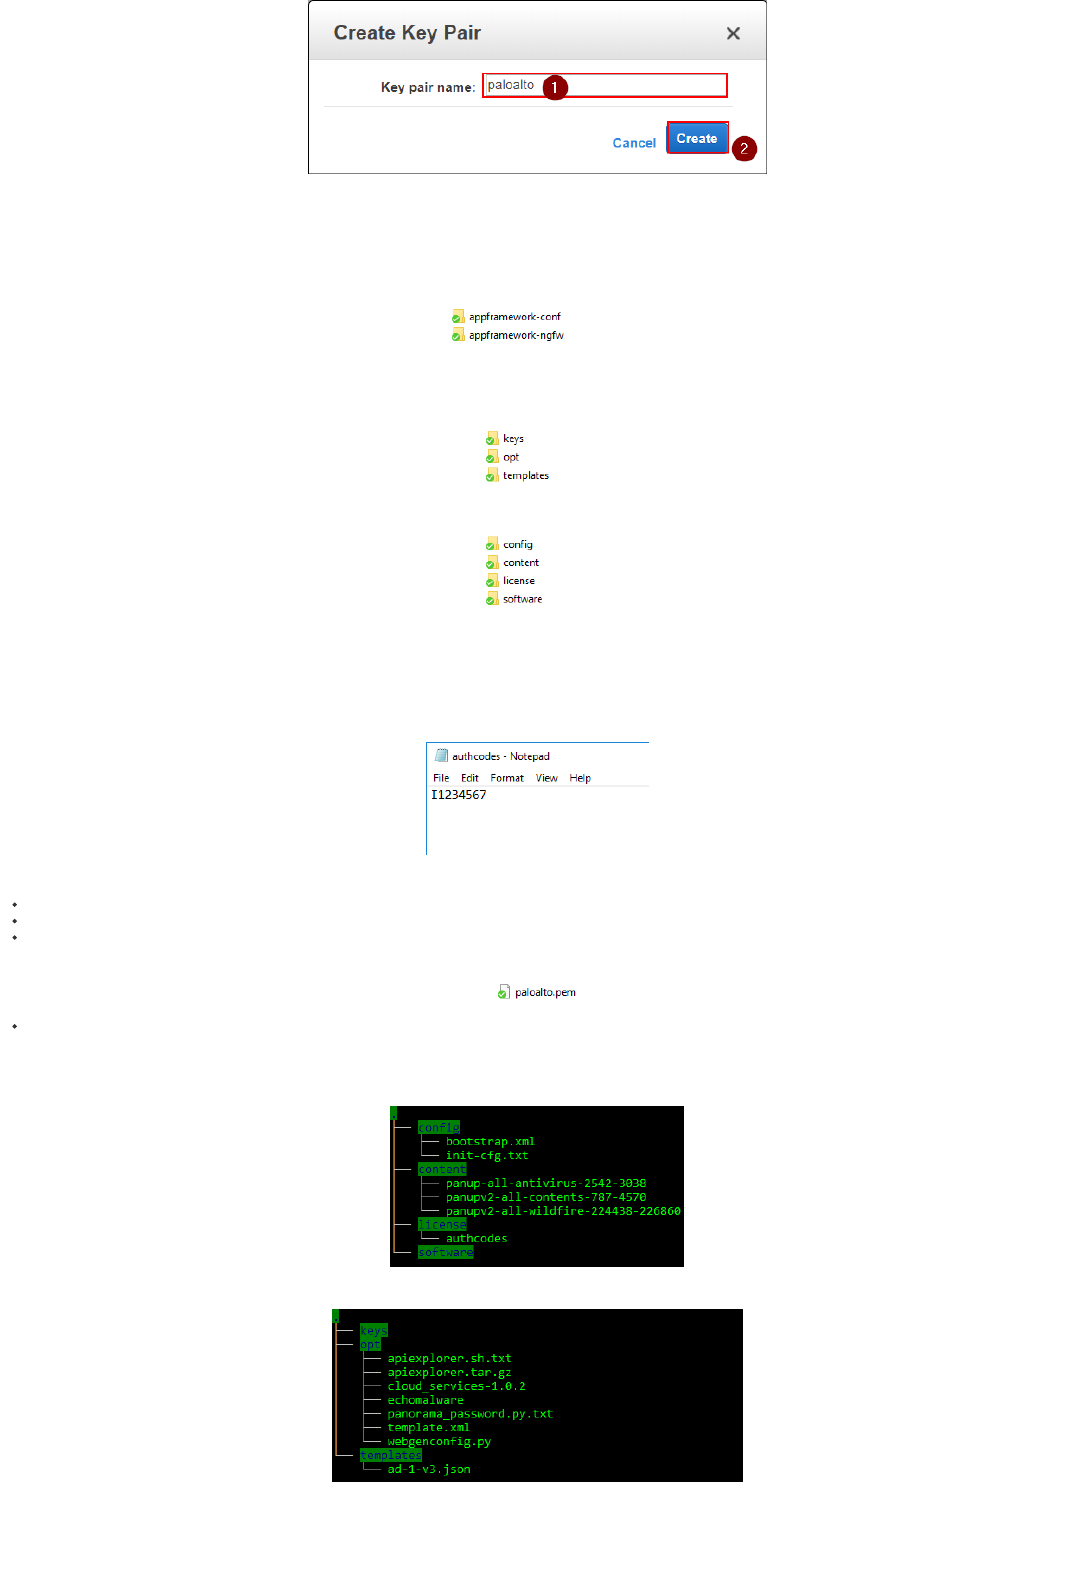
If you look inside the configuration bucket folder (appframework-conf in the example), you will see 3 sub-folders (keys, opt, templates):
If you look inside the NGFW bucket folder (appframework-ngfw in the example), you will see 4 folders (config, content, license, software):
Most of the files should be left untouched, however there are two actions required before uploading the files to AWS S3.
To prepare the configuration files do the following:
1. Add the Firewall Auth-Code:
2. On your local machine, navigate to the folder that corresponds to the NGFW configuration bucket (appframework-ngfw in the example), go to the "license" sub-folder and edit the ""authcodes"" file and insert (without any
newlines) the NGFW Auth-Code you received from Palo Alto Networks:
Note: you will need to use the authcode that corresponds to the "PAN-VM-100-NFR" SKU, the same one you previously registered in the Customer Support Portal.
Save the file
Add the Firewall and Panorama AWS Private Key
On your local machine, navigate to the folder that corresponds to the lab configuration bucket (appframework-conf in the example), go to the "keys" sub-folder and copy in it the private key file that you previously generated and
downloaded from the AWS UI (paloalto.pem in the example):
You can name your key filename however you prefer, but that exact filename will have to be entered as the input to the CFT file later in the deployment process.
Once you've updated the files, the trees of both folders should look similar to the following:
1. NGFW Configuration Folder (filenames in the "content" folder might differ):
2. Lab Configuration folder:
You are now ready to create the S3 Buckets in AWS and upload these files.
S3 Bucket Pre-Configuration
Copyright (C) 2018 - Palo Alto Networks, Inc. 8/45
To create the S3 Buckets and upload the files, go through the following steps:
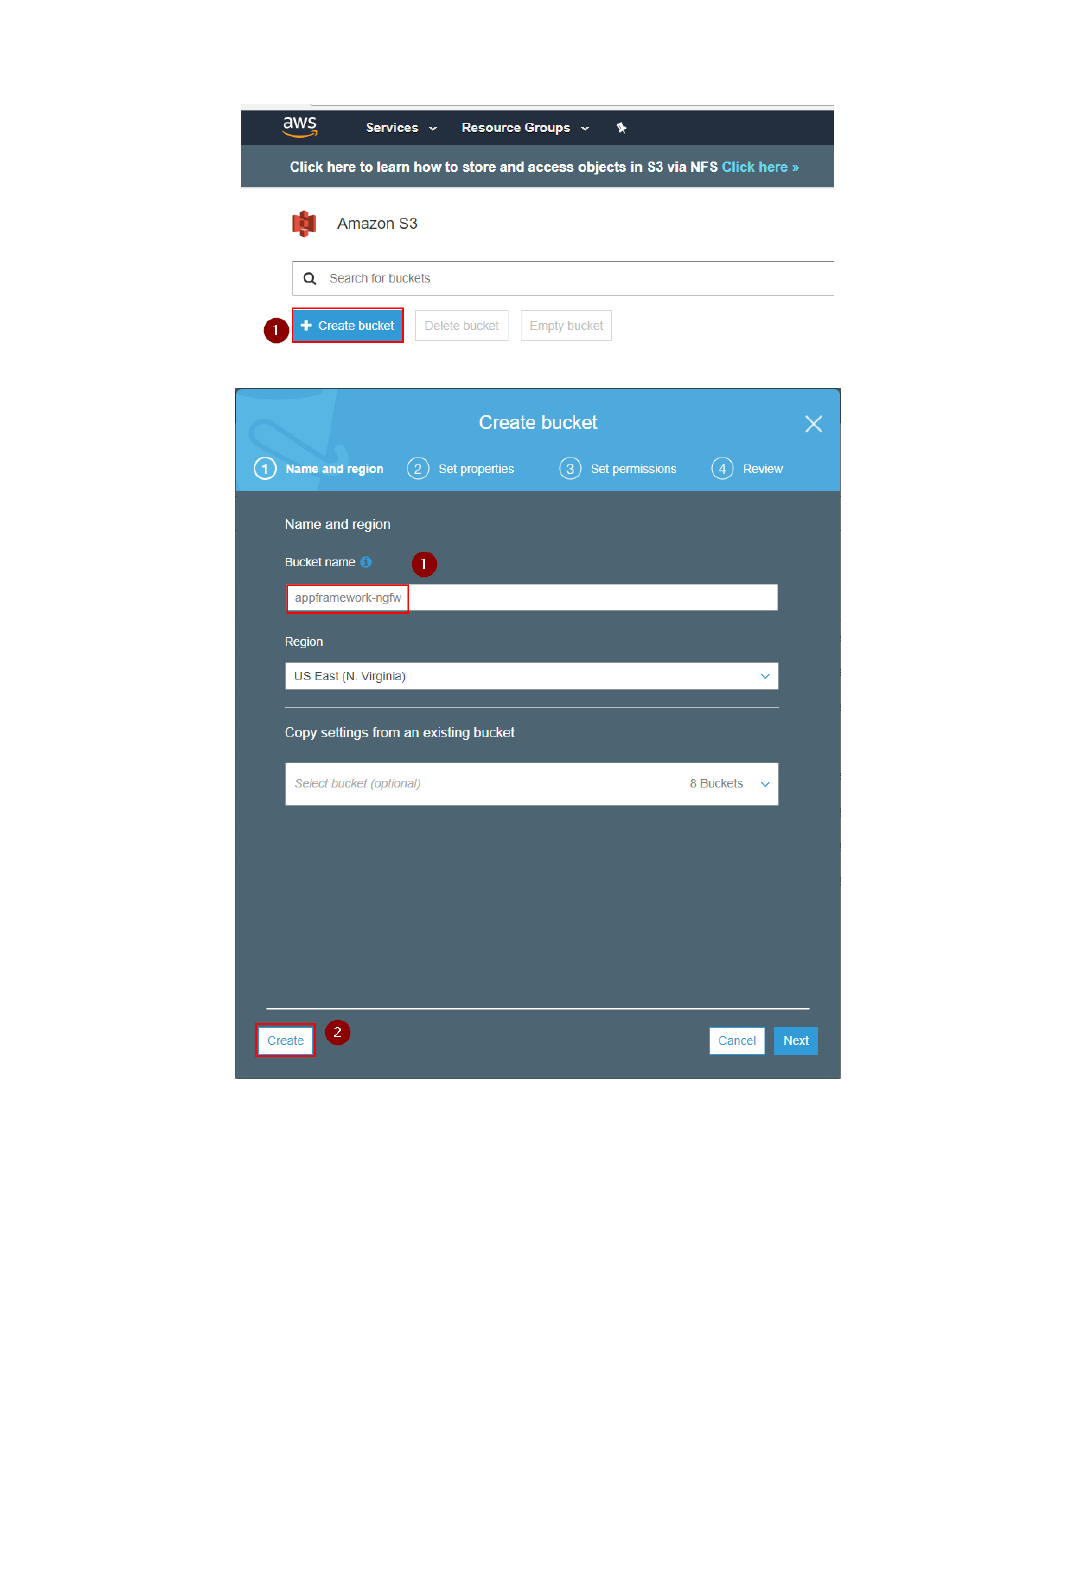
1. Go to AWS S3 and create two S3 buckets for the NGFW and lab configuration respectively (appframework-ngfw and appframework-conf in the example). To create an S3 bucket, click on "Create Bucket":
2. Enter the name of the Firewall configuration bucket (appframework-ngfw in the example) and select Create:
3. Repeat the same process for the Miscellaneous lab configuration S3 bucket (appframework-conf in the example):
S3 Bucket Creation and Upload
Copyright (C) 2018 - Palo Alto Networks, Inc. 9/45
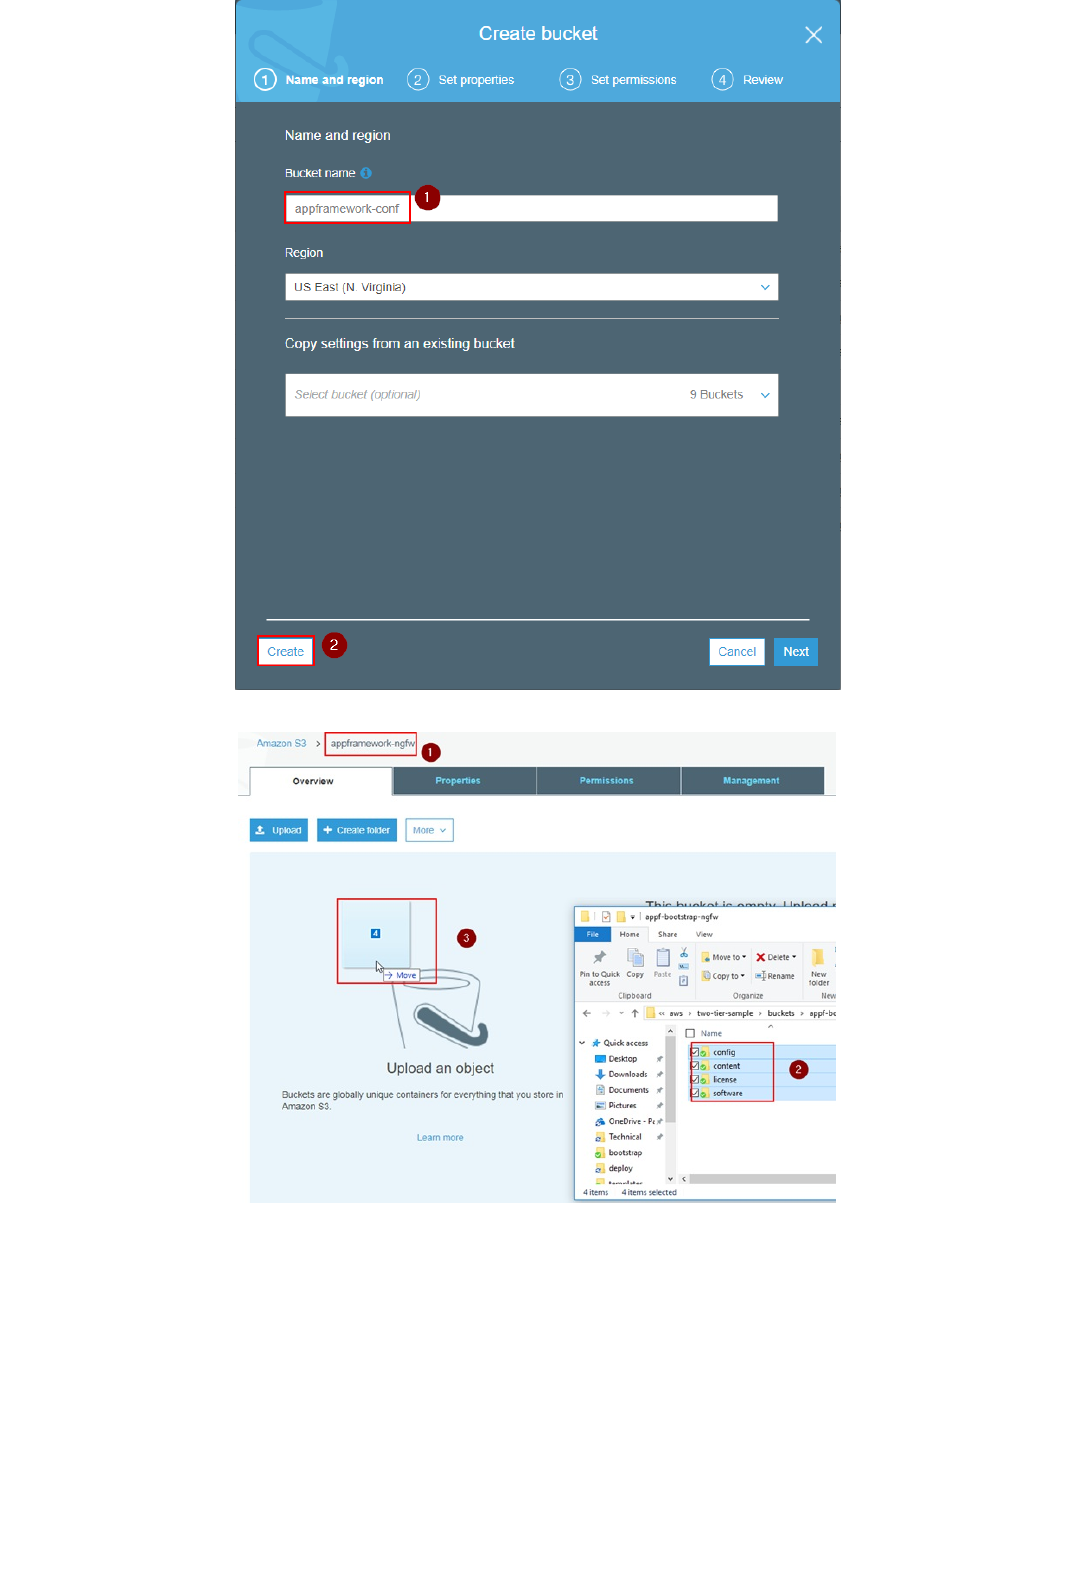
4. You can now upload the content in the respective buckets by dragging and dropping the files from your computer using the AWS S3 UI. The next picture shows the appframework-ngfw bucket:
5. Make sure the 4 folders (config, content, license, software) are copied in the root of the S3 bucket, and click "Upload":
Copyright (C) 2018 - Palo Alto Networks, Inc. 10/45
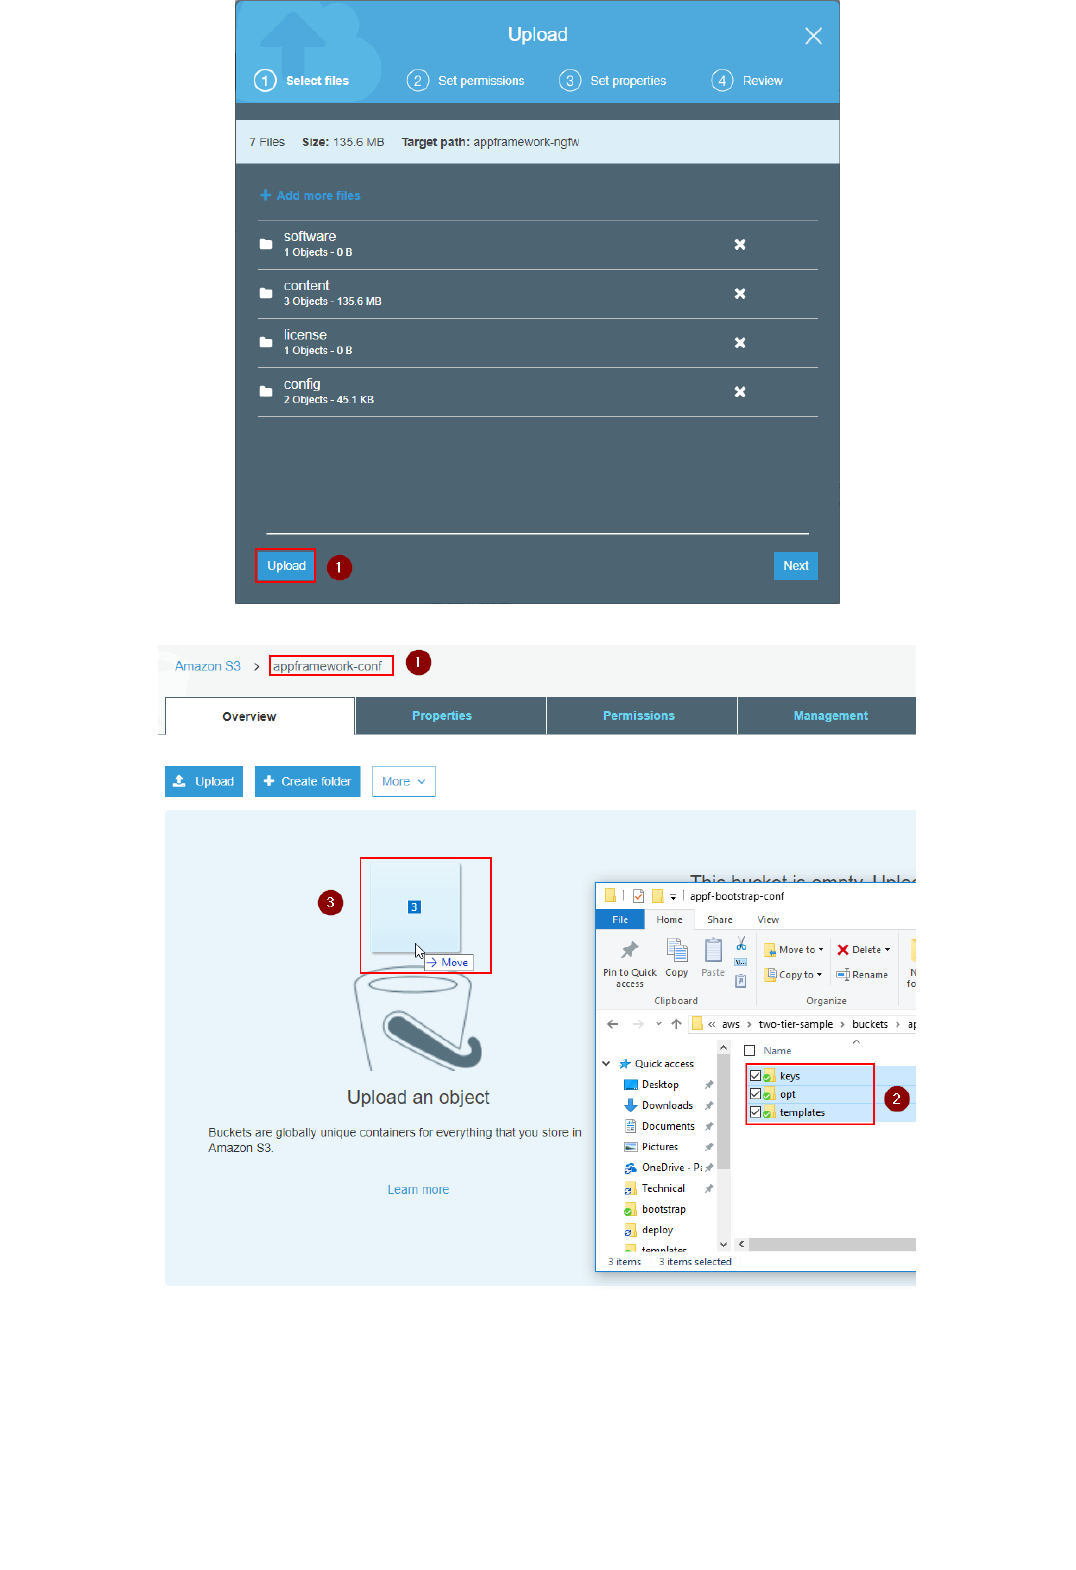
6. Repeat the process for the lab configuration bucket:
Copyright (C) 2018 - Palo Alto Networks, Inc. 11/45
Note: the Drag&Drop feature sometimes doesn't copy all the files. Please double check that you have everything there.
The CloudFormation Template deploys a series of VMs (Firewall, Panorama, API Explorer, Kali Linux, etc.) and AWS can automatically associate DNS names to the Elastic IPs that are used by EC2. To do that, you need a Route53
public Hosted Zone configured in your AWS environment. This step is optional: you can just connect to the VMs via their Elastic IP addresses, or manually configure your DNS entries at a later stage if you're not using Route53.
However, this step is highly recommended.
The public DNS zone you use can either be an existing second-level domain (i.e. yourcompanylab.com), or a third-level domain (lab.yourcompany.com). It must be publicly resolvable, so you need to be the registered owner of the
domain. As an option, you can register a new domain directly through the AWS console and add it automatically in Route53.
If you don't have the opportunity to use a second or third level domain in Route53, ask your Palo Alto Networks contact for support to get a fourth level domain delegated to your Route53 DNS Servers.
Note: the CFT can automate the creation and registration of a valid SSL certificate that corresponds to the FQDN of your API Explorer instance (this way the browser won't provide warnings when you connect to it), through a free
service called "Let's Encrypt" (https://letsencrypt.org). If you want to automatically generate the Let's Encrypt certificate through the CFT, you must have the Route53 configuration enabled, otherwise the process will fail. Hence, if you
don't want to use Route53 for this step, the API Explorer certificate must be a self-signed one. The CFT parameters provide options to disable the configuration of Route53 and Let's Encrypt.
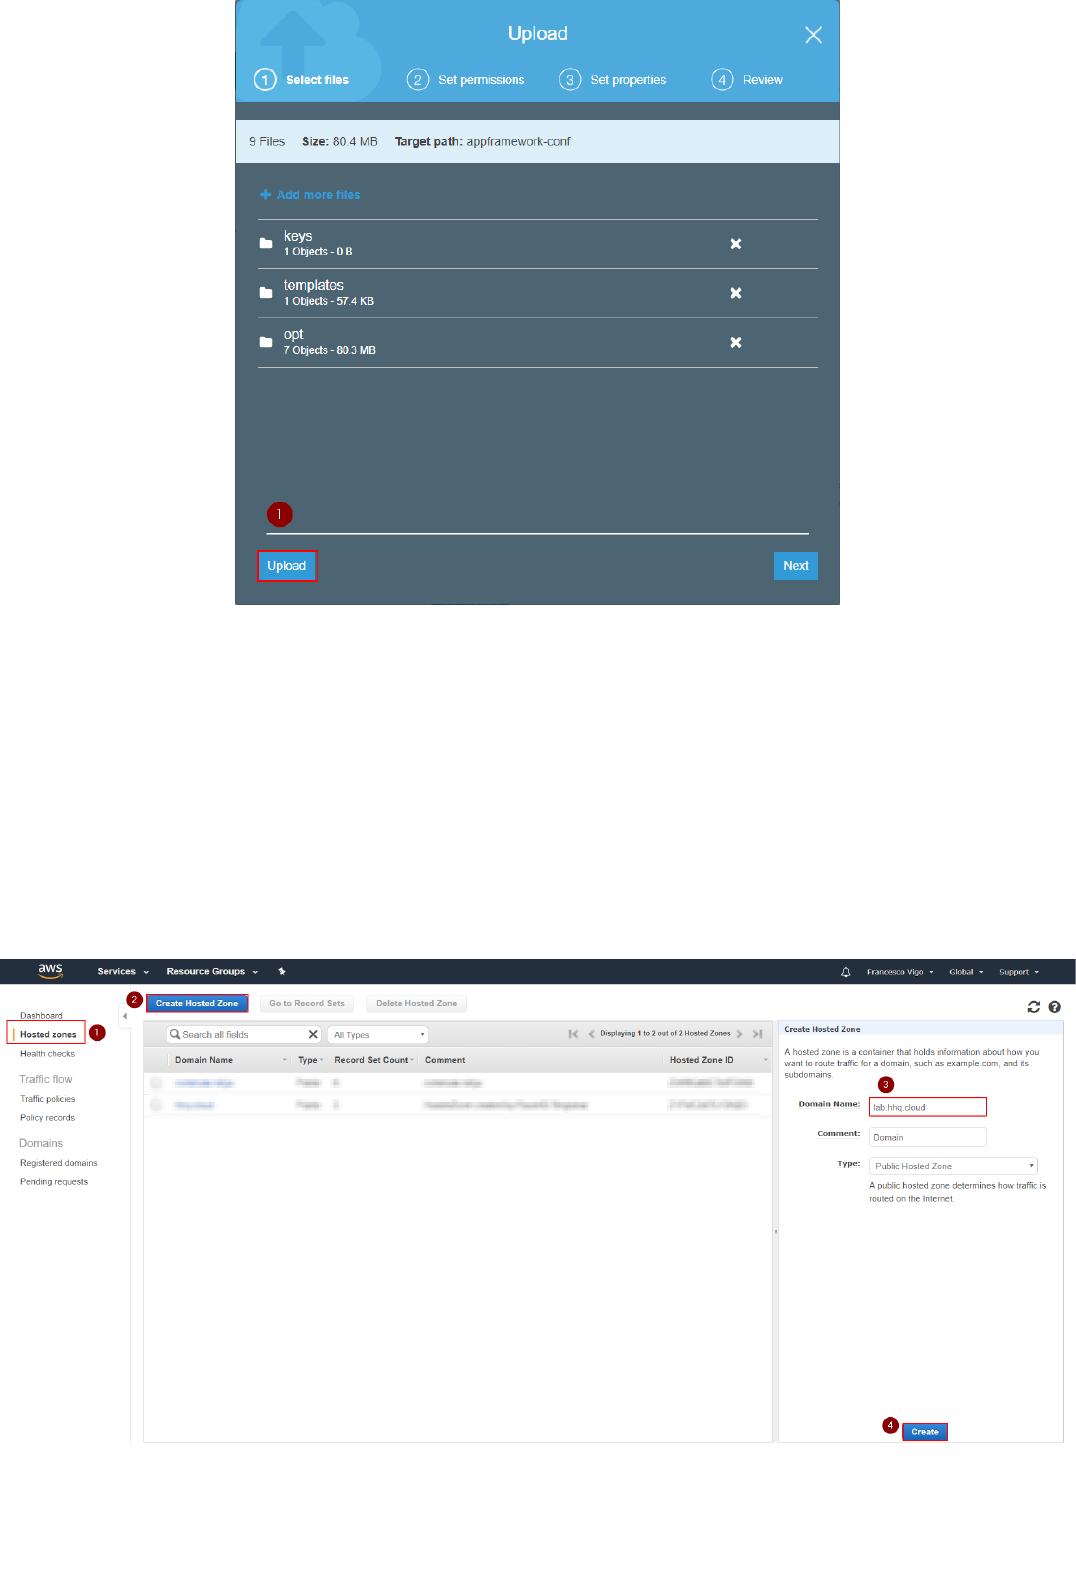
To configure a Hosted zone in AWS Route 53, proceed through the following steps:
1. Navigate to AWS "Route53", go to "Hosted zones" and click on "Create Hosted Zone". Enter the domain name: it must be a public domain name (second or third level) where you have permissions configure name servers for
(i.e. yourcompanylab.com or lab.yourcompany.com). The type must be "Public Hosted Zone." Then click on Create:
2. Look at the AWS Name Servers listed in the NS record and configure your Domain Hosting provider platform to use them for the selected domain:
Route53 Zone Configuration
Copyright (C) 2018 - Palo Alto Networks, Inc. 12/45
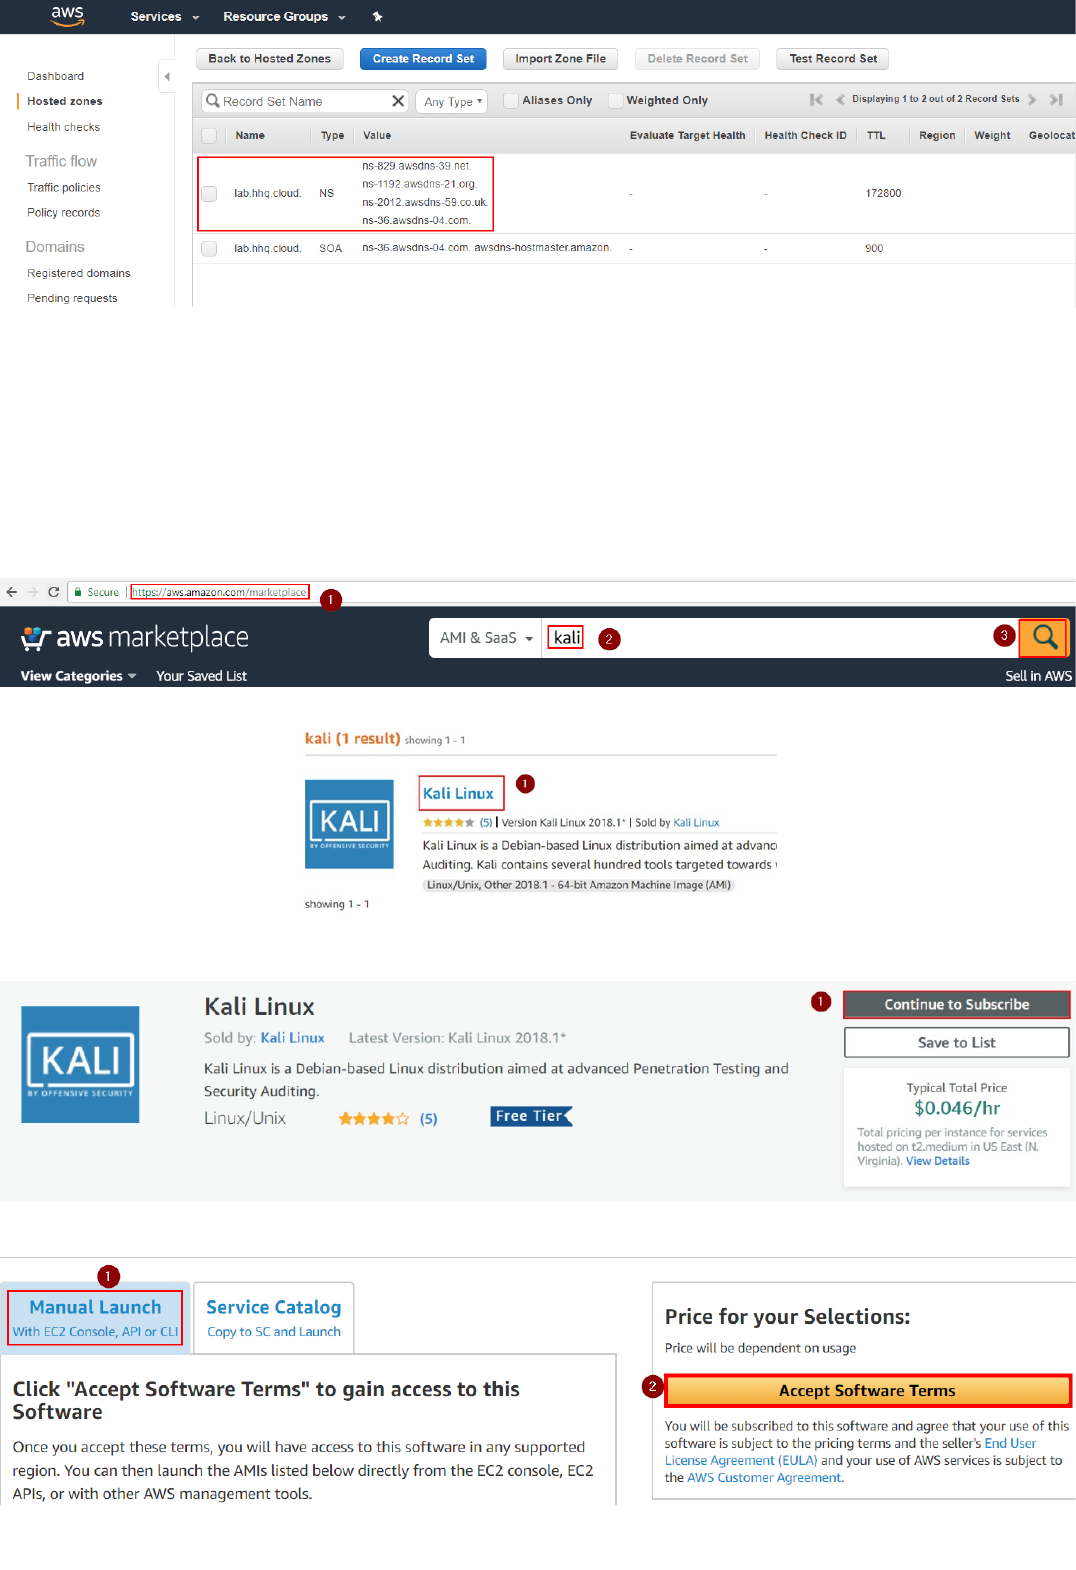
In this example we are using the third-level domain "lab.hhq.cloud".
Note: if you registered the domain through AWS, you don't need any additional configuration as it will be automatically registered in Route
53. If you're using a different domain hosting platform (i.e. GoDaddy, NameCheap, etc), the configuration on how to configure your domain to use AWS Route53 DNS servers will be different depending on your provider.
If you're being helped by Palo Alto Networks to use a fourth level domain, please provide the Name Servers to your contact.
To deploy some of the VMs, you first need to activate them on the AWS marketplace. Note that deploying Kali Linux is optional (is useful to generate threats in the firewall logs) so, if you don't need it, you can skip the step for Kali Linux
(but not for NGFW and Panorama).
To activate the solutions on the AWS Marketplace, follow this procedure:
1. Navigate to the AWS Marketplace (https://aws.amazon.com/marketplace), search for "kali" and click on the search icon:
2. In the results page, click on "Kali Linux":
3. In the Kali Linux page, click on "Continue to Subscribe":
4. Select "Manual Launch" and click on "Accept Software Terms":
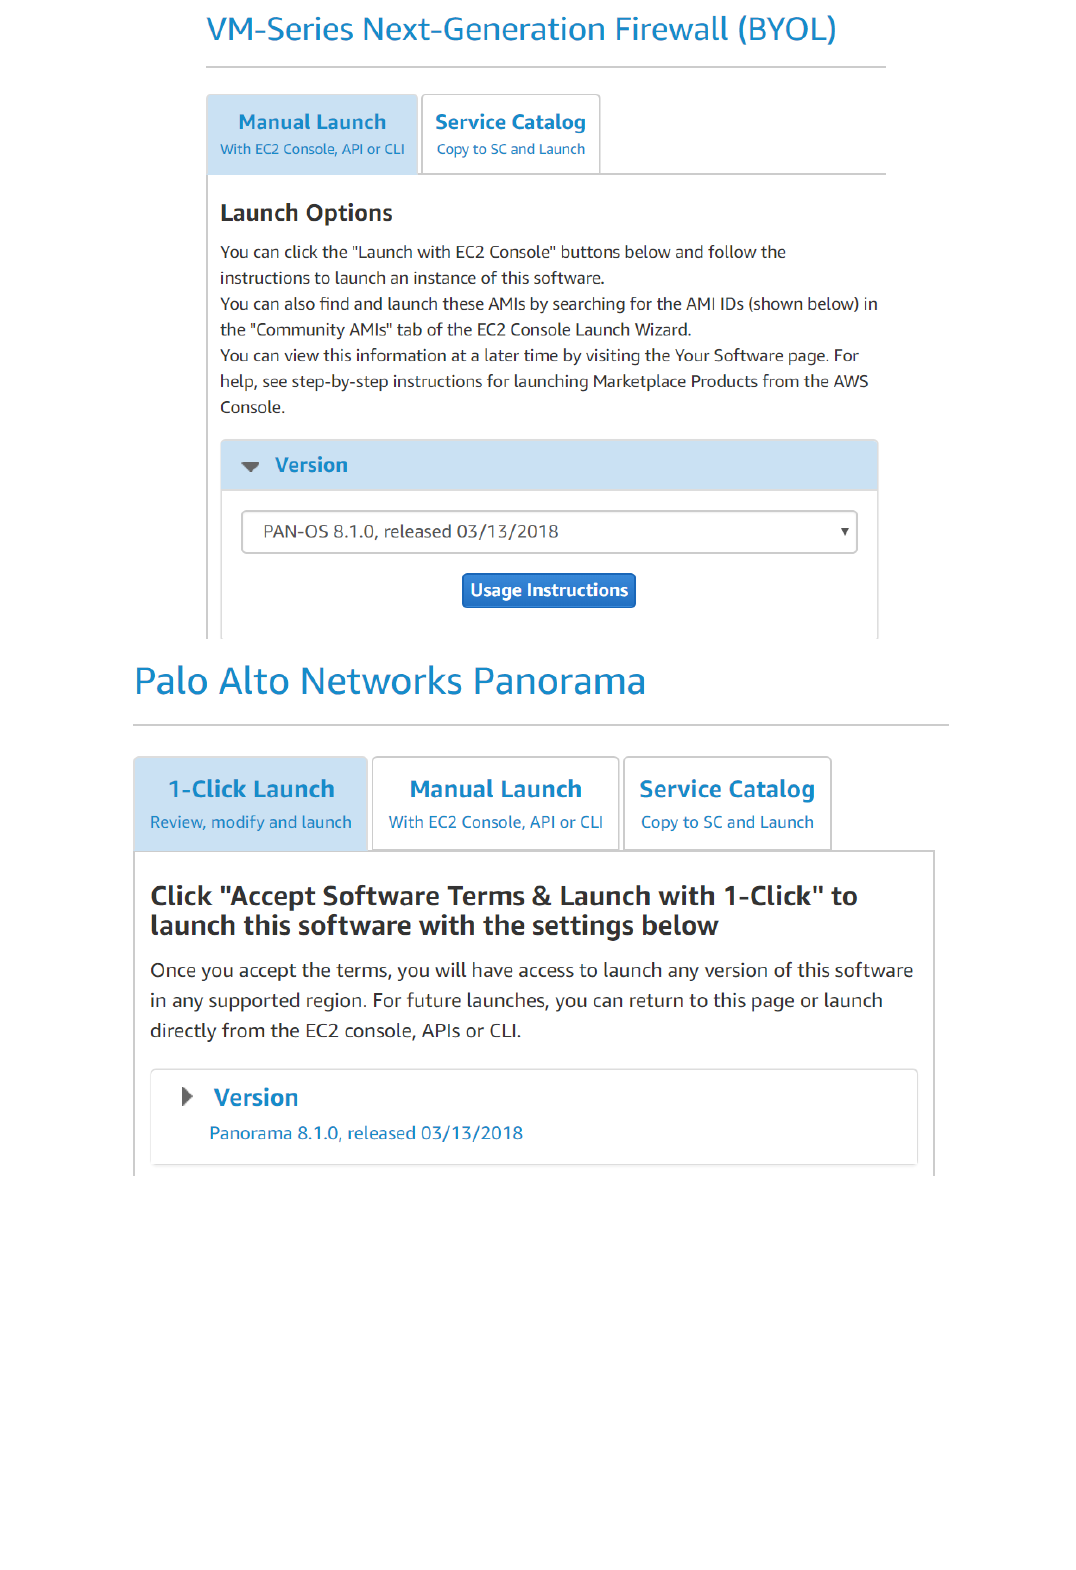
5. Repeat the same procedure for both Palo Alto Networks "VM-Series Next-Generation Firewall (BYOL)" and "Palo Alto Networks Panorama"
Activate Kali Linux and Palo Alto Networks VMs Series on AWS Marketplace
Copyright (C) 2018 - Palo Alto Networks, Inc. 13/45
You can now deploy the AWS CloudFormation Template (CFT) to create the lab environment. Before starting, make sure that you have 5 Elastic IPs (EIPs) available in the region you want to deploy the CFT (by default AWS limits EIPs
to 5 per region per account).
Proceed with the following steps:
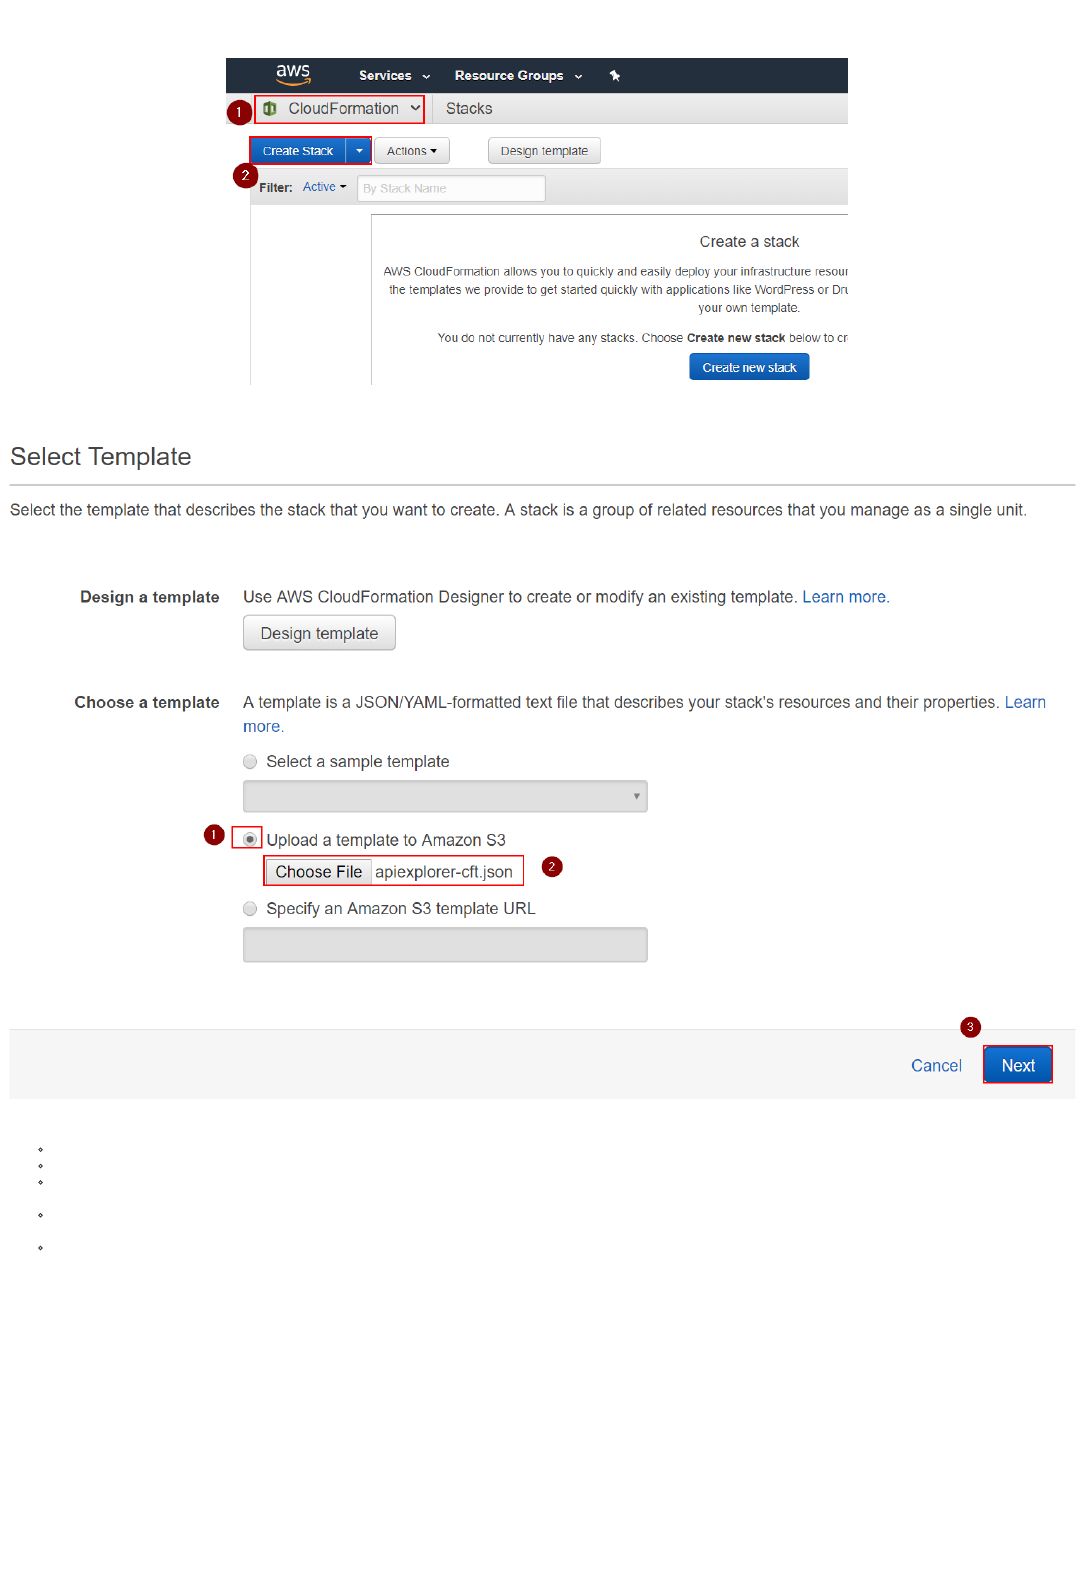
1. Navigate to "AWS CloudFormation" and select "Create Stack":
Deploy the CloudFormation Template
Copyright (C) 2018 - Palo Alto Networks, Inc. 14/45
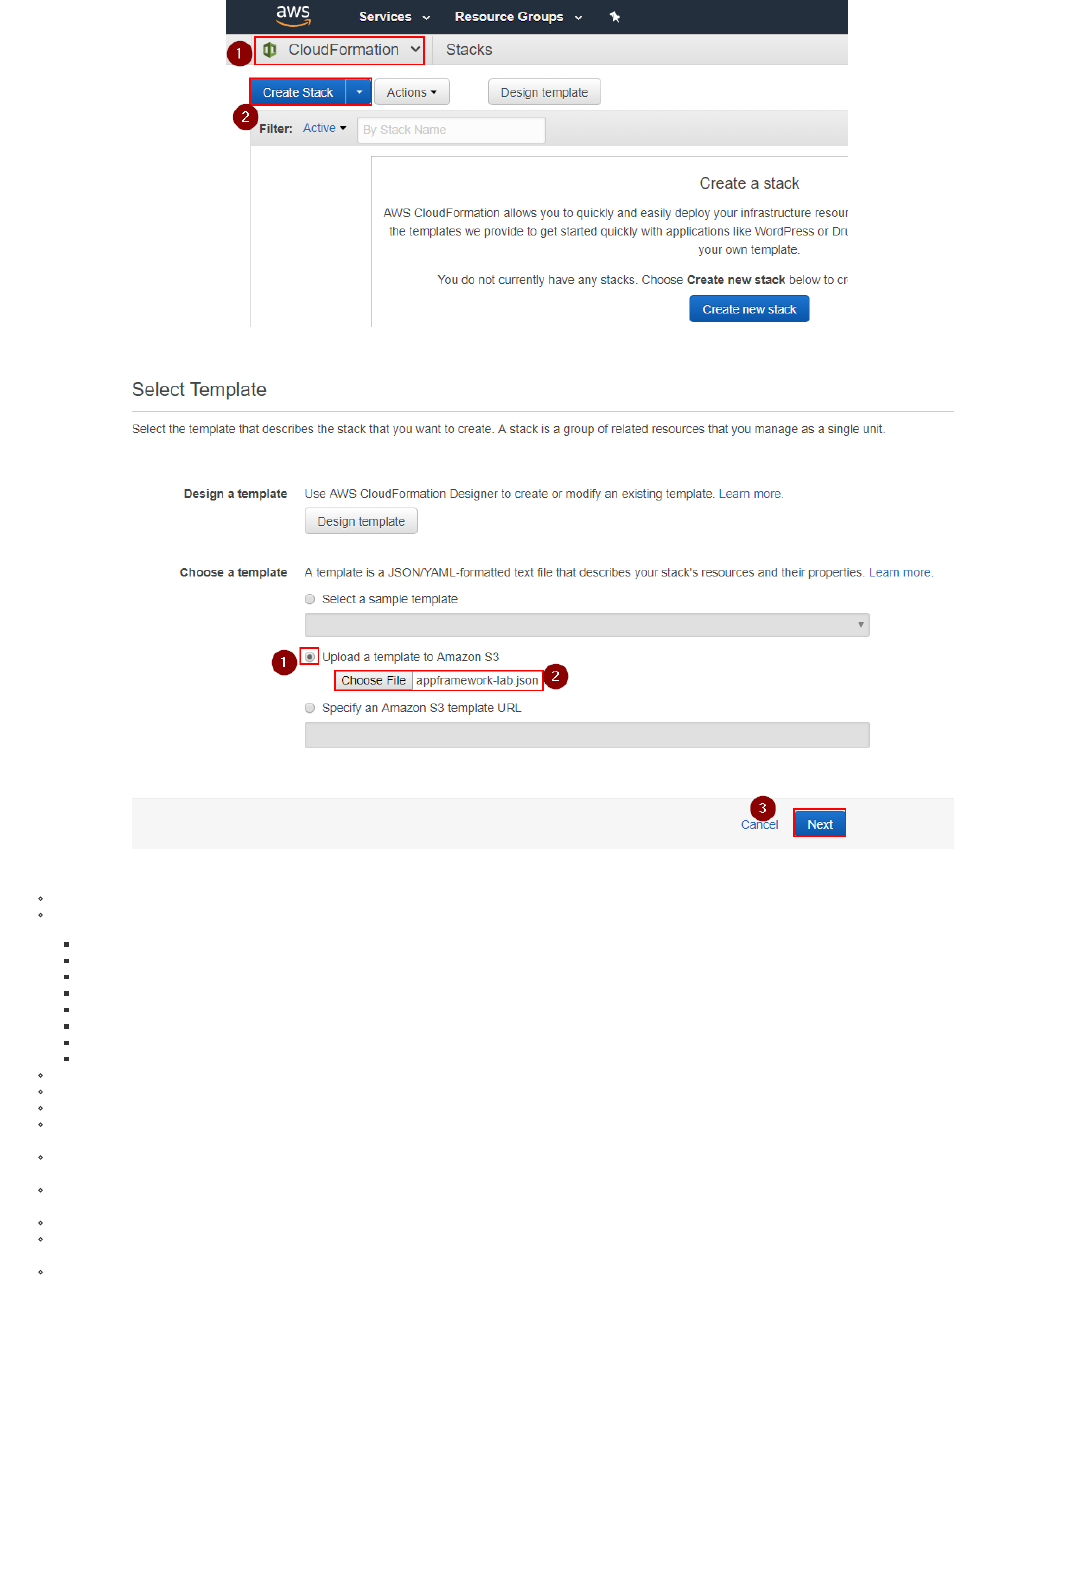
2. Select "Upload a template to Amazon S3", and upload the template JSON file provided by Palo AltoNetworks (appframework-lab.json in the example), then click on Next:
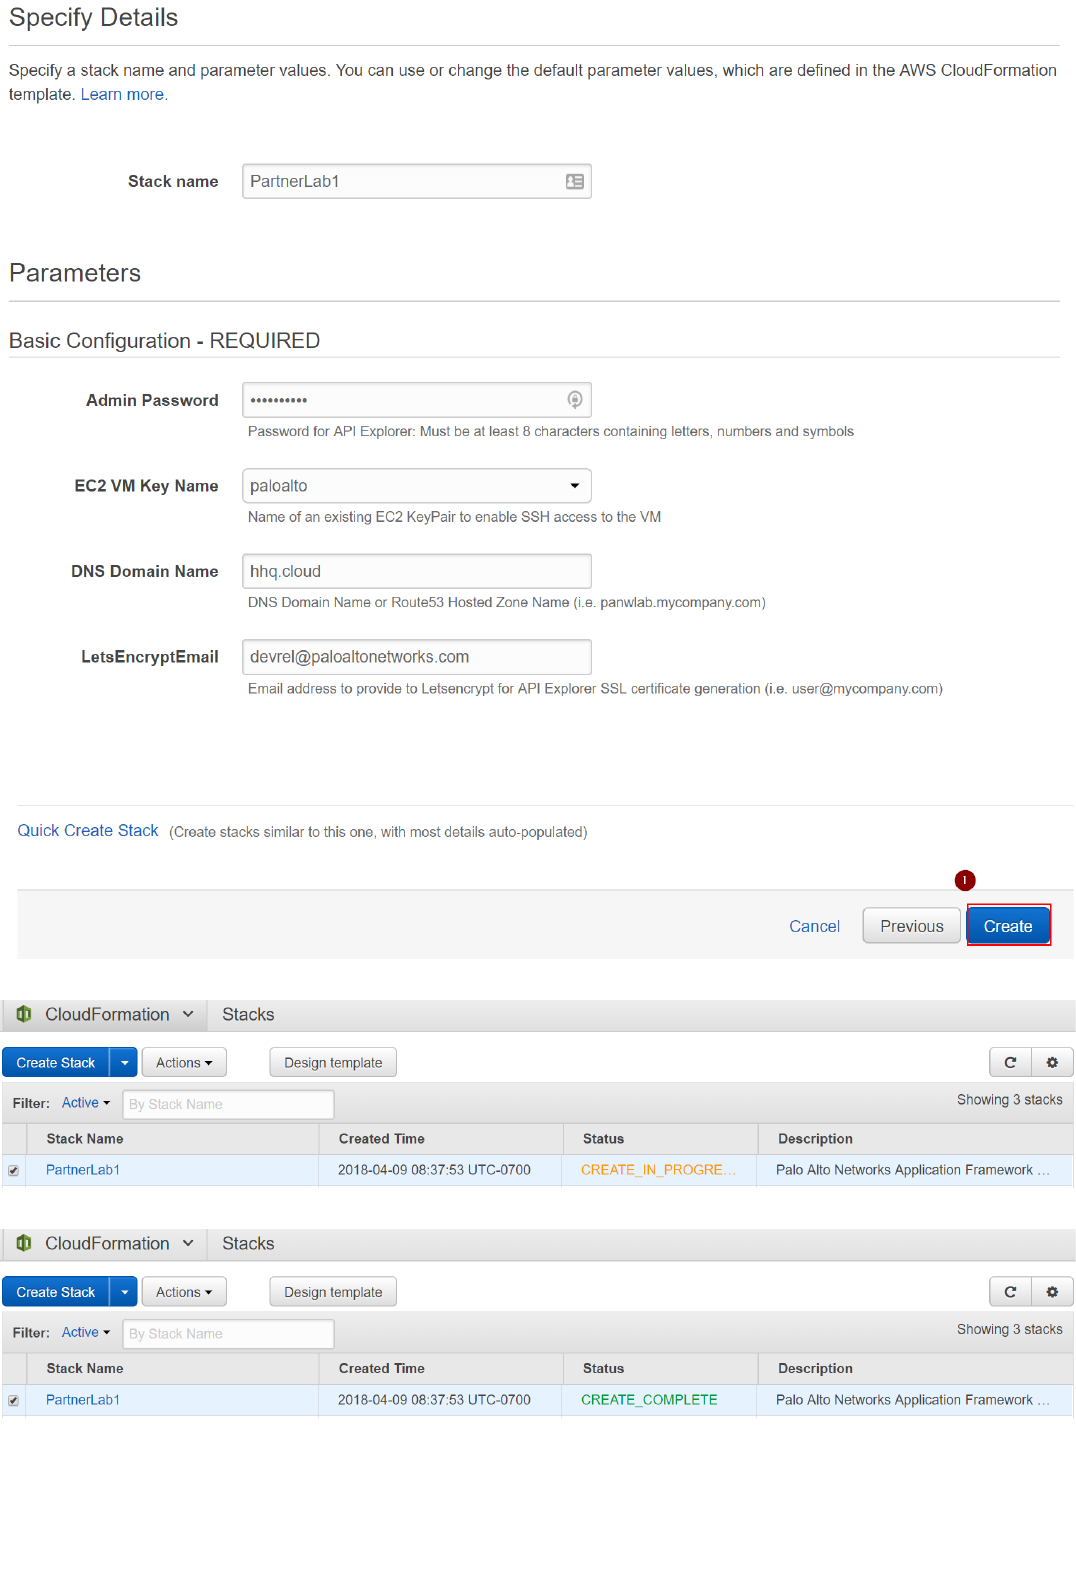
3. Insert the required parameters:
Stack name: an arbitrary name for this deployment (i.e. PartnerLab1)
Admin Password: an arbitrary password that will be used for the following systems:
NGFW admin user
Panorama admin user
API Explorer VM ec2-user user (SSH login with password will be enabled)
API Explorer application admin user
Ubuntu Web Server ubuntu user (SSH login with password will be enabled)
Kali Linux ec2-user
Windows Domain Controller admin (the default username is "paloalto", but can be changed in the advanced parameters below)
Windows Domain Users (user1, user2, user3)
Environment Config Bucket Name: the name of the S3 miscellaneous lab configuration bucket that you previously created. In the example, appframework-conf was used.
Bootstrap Bucket Name: the name of the S3 NGFW configuration bucket that you previously created. In the example, appframework-ngfw was used.
Bootstrap Bucket Region: select the AWS region where the Bootstrap Bucket was created (us-east-1 in the example)
Private Key File: the relative path in the configuration bucket of the NGFW/Panorama private key file. In the example the file is named paloalto.pem and you uploaded it in the keys subfolder of the environment configuration
bucket. Hence, the parameter would be "keys/paloalto.pem". If you named the file differently, provide the right name.
EC2 VMs Key Name: from the drop down menu, select the KeyPair that you want to use for the non-Palo Alto Networks VMs (Kali Linux, API Eplorer VM, Ubuntu VM). It can be the KeyPair that you previously created in
EC2, or a different one of your choice.
Panorama and NGFW Key Name: from the drop down menu, select the KeyPair that you want to use for the Palo Alto Networks VMs (Panorama and NGFW). This must be the KeyPair that you have previously created
(named "paloalto" in the example), whose private key was uploaded to the miscellaneous lab configuration S3 bucket.
Panorama Serial: Insert the Panorama Serial number that was provided by Palo Alto Networks
DNS Domain Name: Insert the domain name zone that you have configured on Route53. If you don't have it, add a domain name and select "false" under both the "Configure Route53" AND the "Create API Explorer
LetsEncrypt Cert" fields in the Advanced Configuration section. In the example we use the hhq.cloud domain.
LetsEncrypt Email: Insert your (valid) email address that will be used to request a Let's Encrypt SSL certificate for the API Explorer.
Leave the other parameters to the default values unless you are a power user and you know what you're doing.
The following screenshot shows an example configuration:
Copyright (C) 2018 - Palo Alto Networks, Inc. 15/45
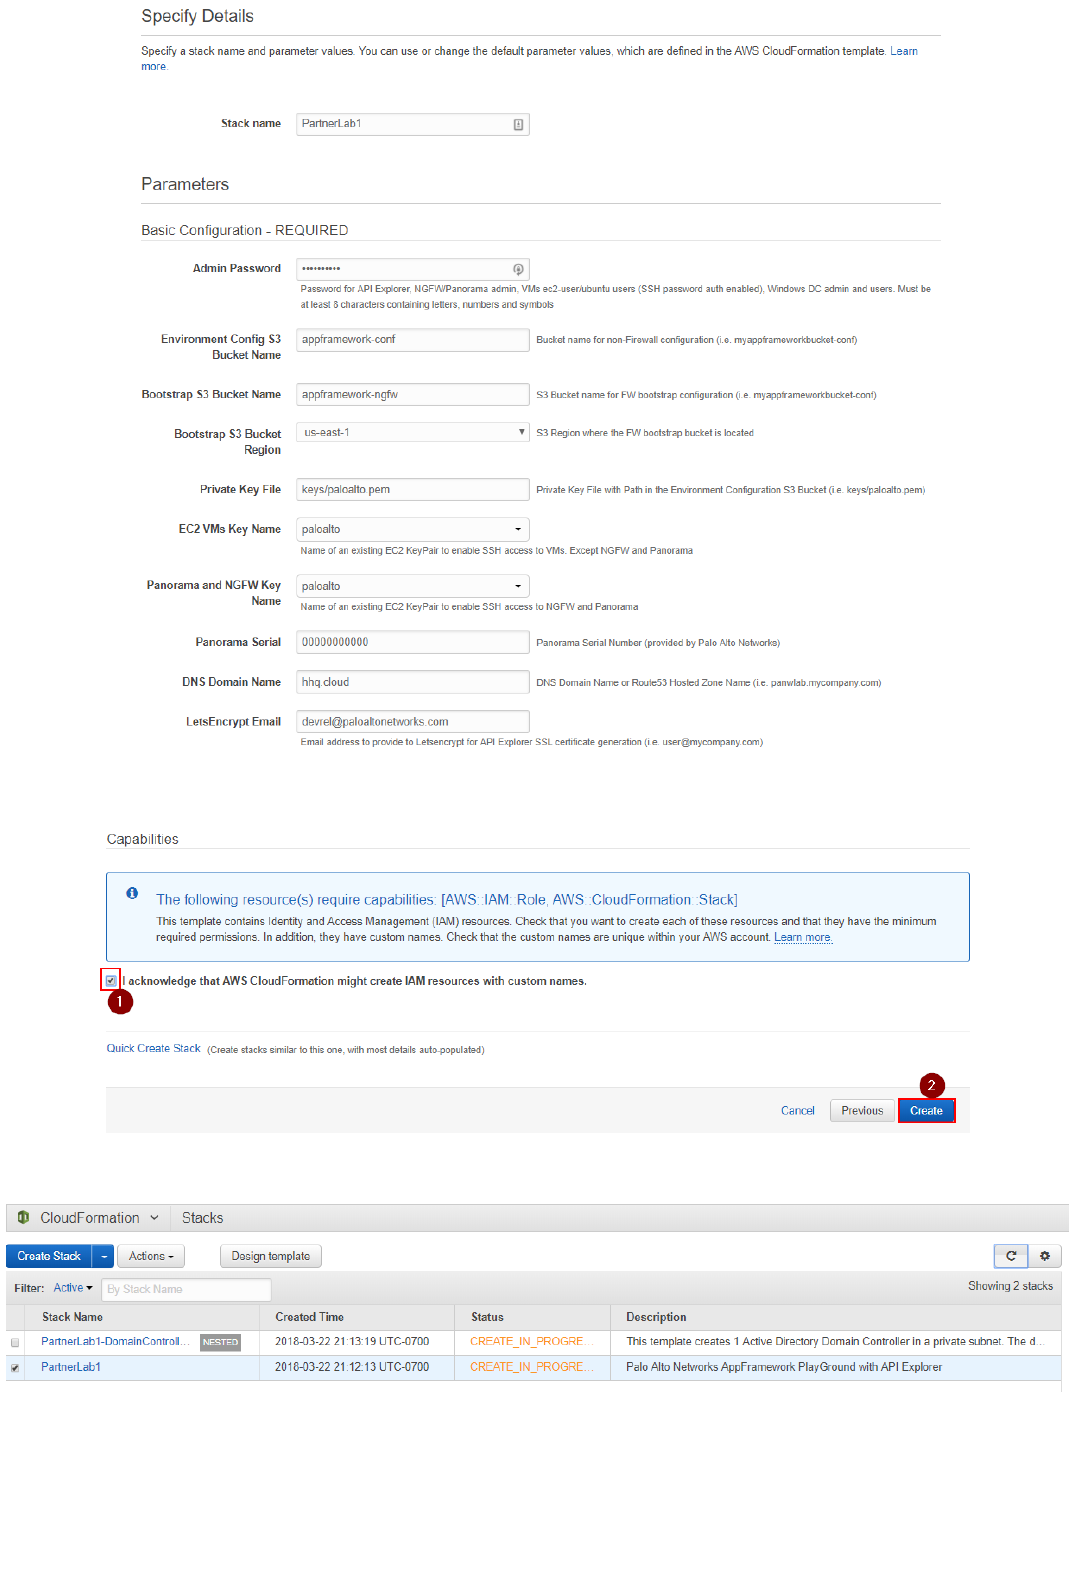
4. Click on "Next" twice.
5. In the Review page, at the bottom, under "Capabilities", check the "I acknowledge that AWS CloudFormation might create IAM resources with custom names" box, and click on "Create":
Note: the CFT will create two IAM roles to allow some of the VMs to Read the files from the two S3 buckets that you've previously created.
6. Sit down and relax, the whole process will take 30-35 minutes to complete:
7. The deployment will show CREATE_COMPLETE once everything is done:
Copyright (C) 2018 - Palo Alto Networks, Inc. 16/45

Note: if you run in an error, make sure you added the right licenses and Auth-Codes, check the FAQ document and reach out to your Palo Alto Networks contact for support.
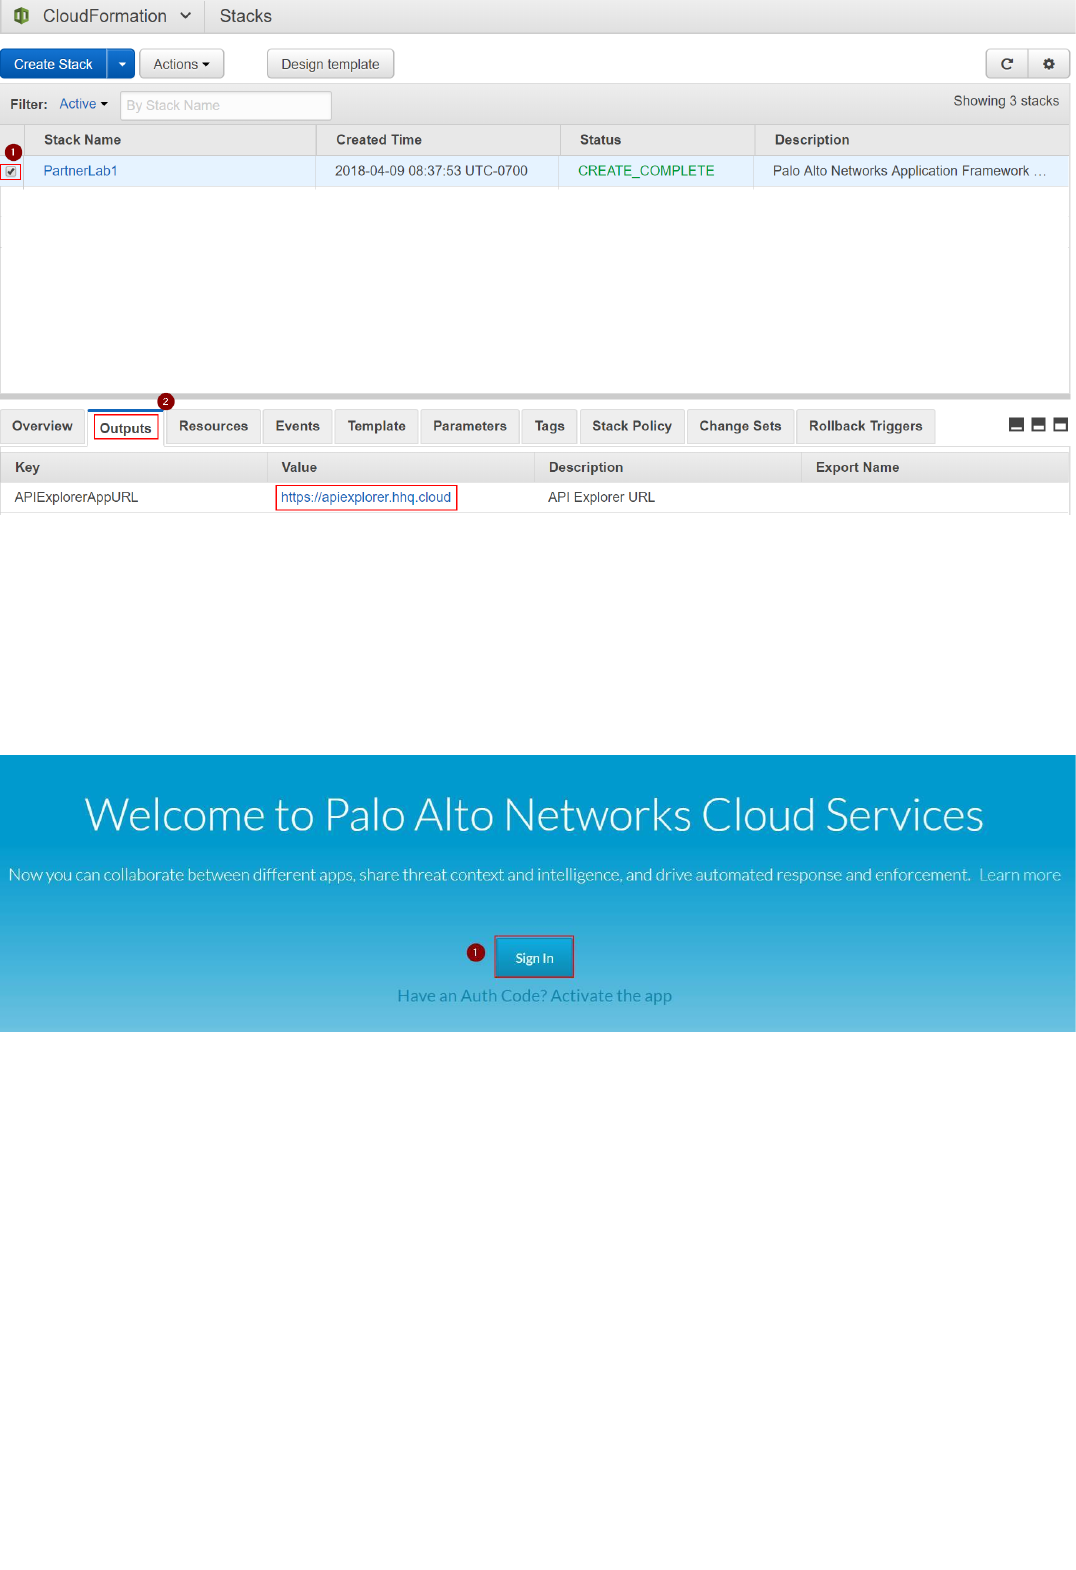
8. Select the template and click on the Outputs tab of the to view the deployment information (IP addresses and FQDNs) of the lab:
9. You can also see all the DNS records added to Route53 records for easier access:
####AT THIS STAGE YOU SHOULD STOP. A MANUAL CONFIGURATION STEP TO POINT THE FIREWALL AND PANORAMA TO THE DEVELOPER INSTANCES IS REQUIRED, PLEASE REACH OUT TO YOUR PALO ALTO
NETWORKS TECHNICAL CONTACT FOR THIS.
The last step of the process requires to pair your Panorama Instance with Logging Service:
1. Navigate back to https://support.paloaltonetworks.com and login with your CSP credentials
2. Go to "Assets", "Cloud Services" and click "Generate OTP". Select the Panorama instance you've created (corresponding to the Panorama Serial Number) and click on "Generate OTP":
Panorama Pairing with Logging Service
Copyright (C) 2018 - Palo Alto Networks, Inc. 17/45
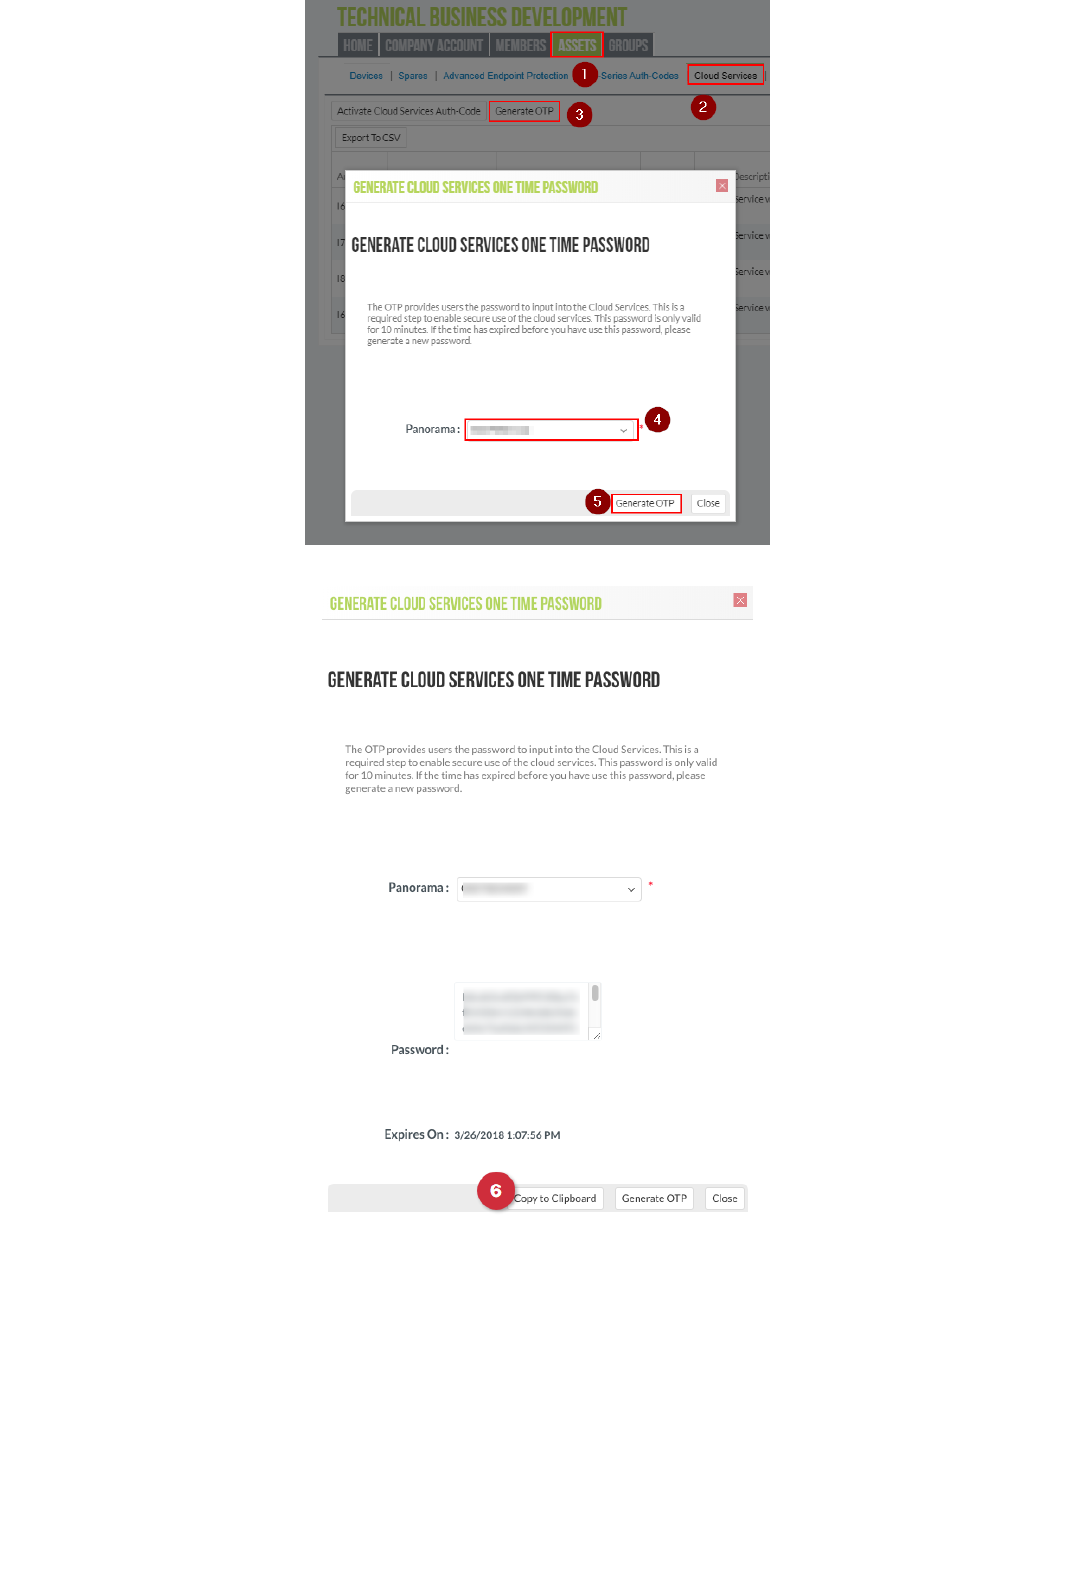
3. Copy the generated One Time Password in your browser clipboard by clicking on "Copy to Clipboard" (6):
4. Login to Panorama via the web UI, navigating to https://panorama.lab.yourdomain.com (assuming that Route53 has used to automatically create the FQDN, otherwise look at the EIP of the Panorama instance). Use the "admin"
user and the password you have configured in the template.
5. On the Panorama UI, navigate to "Panorama", "Cloud Services", "Configuration".
6. Insert the previously copied One Time Password (OTP) to complete the pairing and click on "OK (7):
Copyright (C) 2018 - Palo Alto Networks, Inc. 18/45

After the pairing is complete, in the "Configuration" page under "Cloud Services", you should see a dashboard similar to the following:
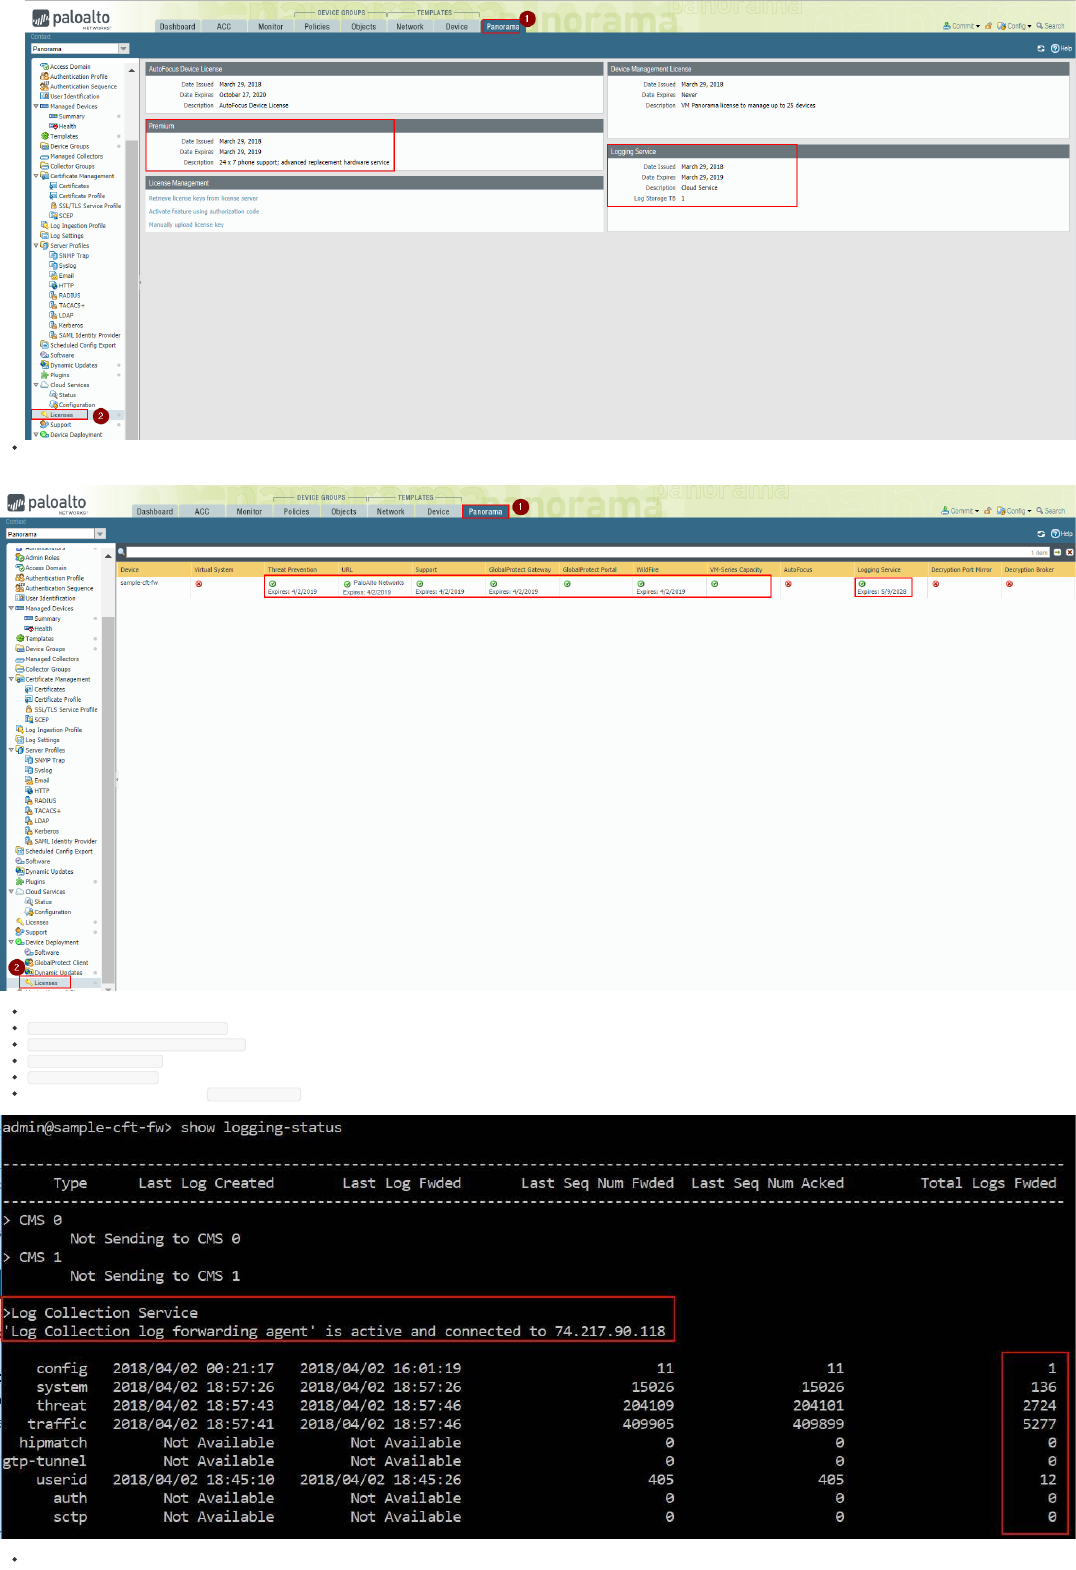
7. On the Panorama UI, navigate to "Panorama", "Device Deployment", "Licenses" and click on "Activate".
8. Select the firewall (sample-cft-fw in the example), insert the Services Bundle Auth-Code (the one that corresponds to the PAN-VM-100-BND-NFR4 SKU) and click on "Activate":
Copyright (C) 2018 - Palo Alto Networks, Inc. 19/45

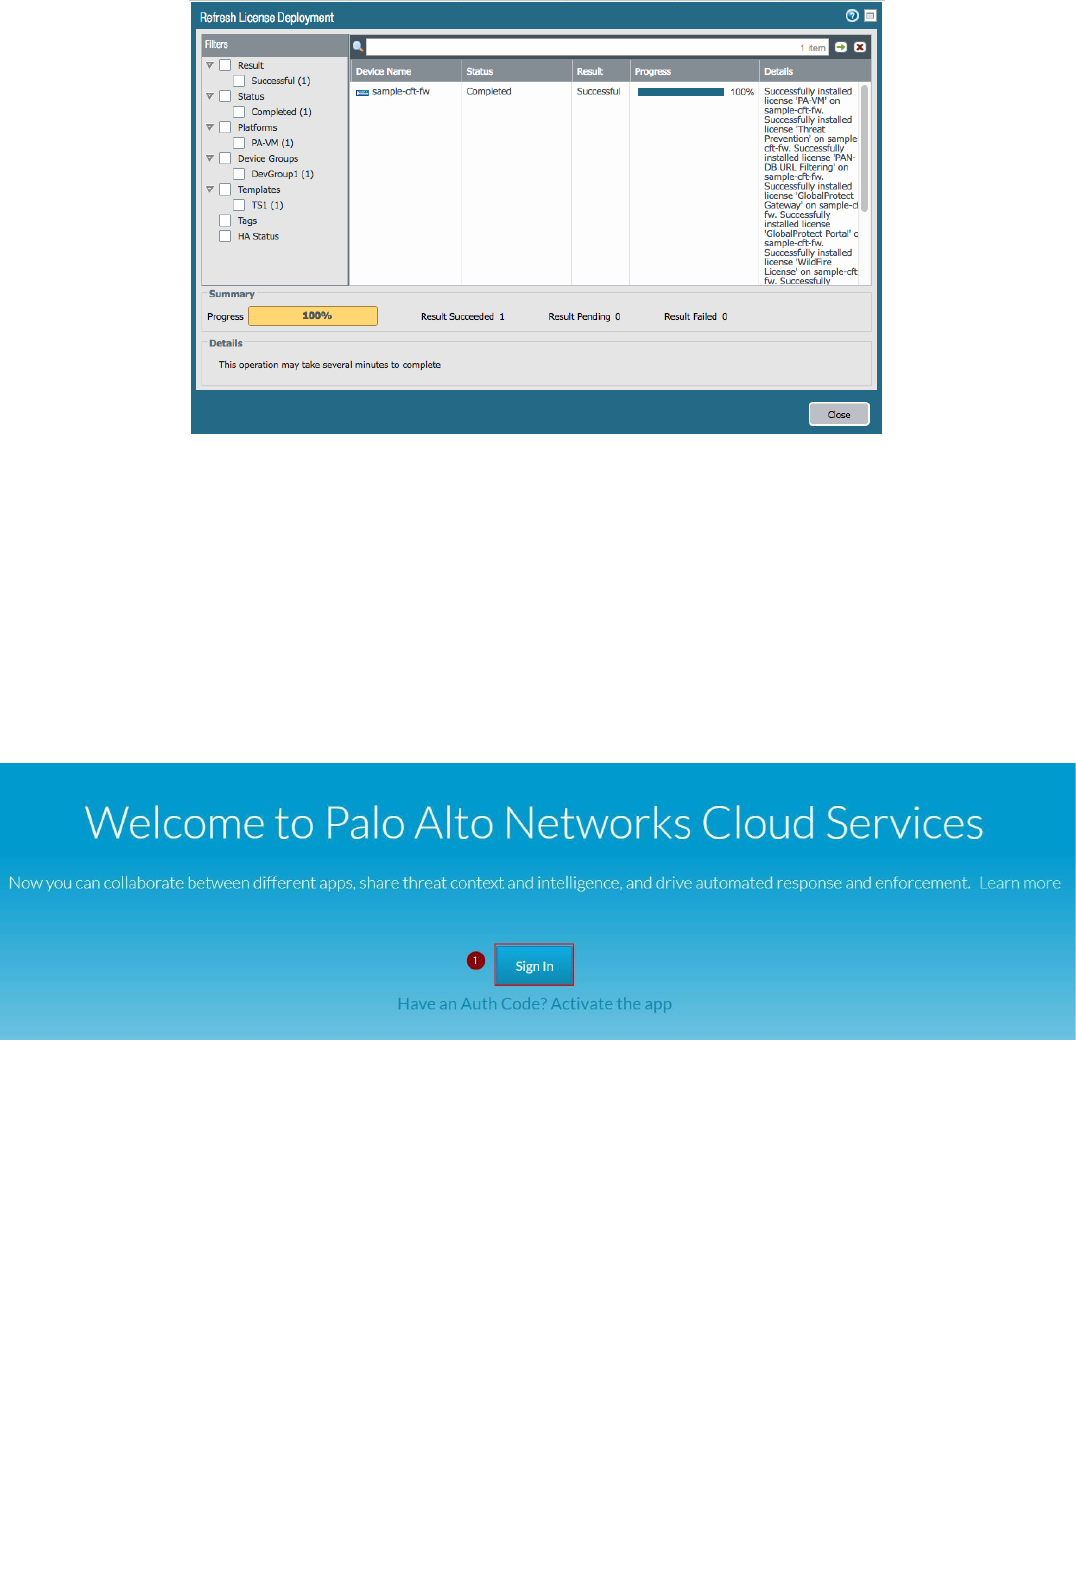
9. On the Panorama UI, navigate to "Panorama", "Device Deployment", "Licenses" and click on Refresh.
10. Select the firewall (sample-cft-fw in the example) and click on "Refresh" to refresh the licenses:
The refresh process will take a few seconds. Wait until it completes:
Copyright (C) 2018 - Palo Alto Networks, Inc. 20/45
After the license refresh is complete, wait a few minutes.
Under the Monitor tab in Panorama you should be able to view Logs (see Appendix C)
Congratulations, the setup is complete!
You can work with your Palo Alto Networks contact to register the API Explorer application in the Application Portal, and then activate it (see the next section of this document for details)
This section describes how to Activate the API Explorer application and start interacting with the APIs.
Note: this section requires the manifest file activation part to be already configured, otherwise you will not see your API Explorer application in the App Portal. You will also be provided a Client ID and a Client Secret by your Palo Alto
Networks contact.
To activate the API Explorer, follow this process:
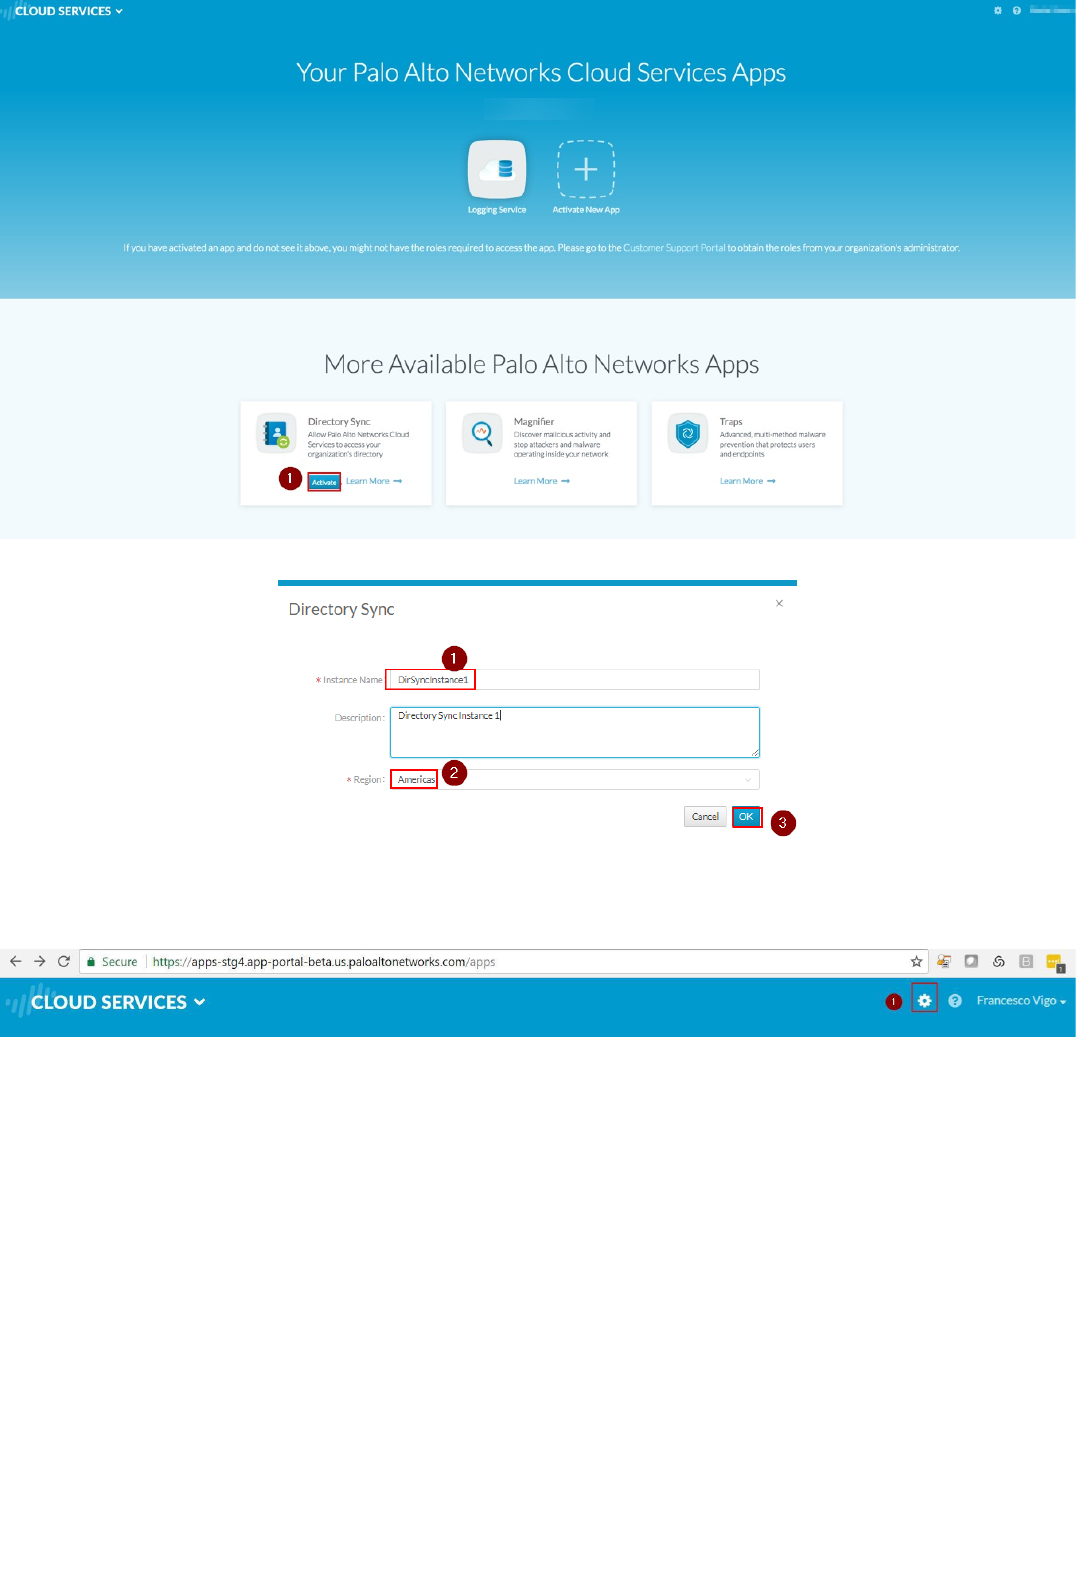
1. Navigate to the App Portal beta environment: https://apps-stg4.app-portal-beta.us.paloaltonetworks.com and Sign in with your Customer Support Portal credentials:
2. Activate an instance of Directory Sync Service by clicking on the Activate button in the Directory Sync tile:
API Explorer App Activation Process
Copyright (C) 2018 - Palo Alto Networks, Inc. 21/45

3. Enter an arbitrary Instance Name and select Americas as Region, then click on Ok:
Note: You don't need to actually register an Active Directory agent to it if you don't need to interact with AD data to build your integration. Or you can deploy the Directory Sync Agent on the windows Domain Controller, by following the
Getting Started Guide, not covered by this manual
4. Review the configuration by clicking on the Settings icon in the top right corner:
Make sure that you have a Logging Service instance, and a Directory Sync instance.
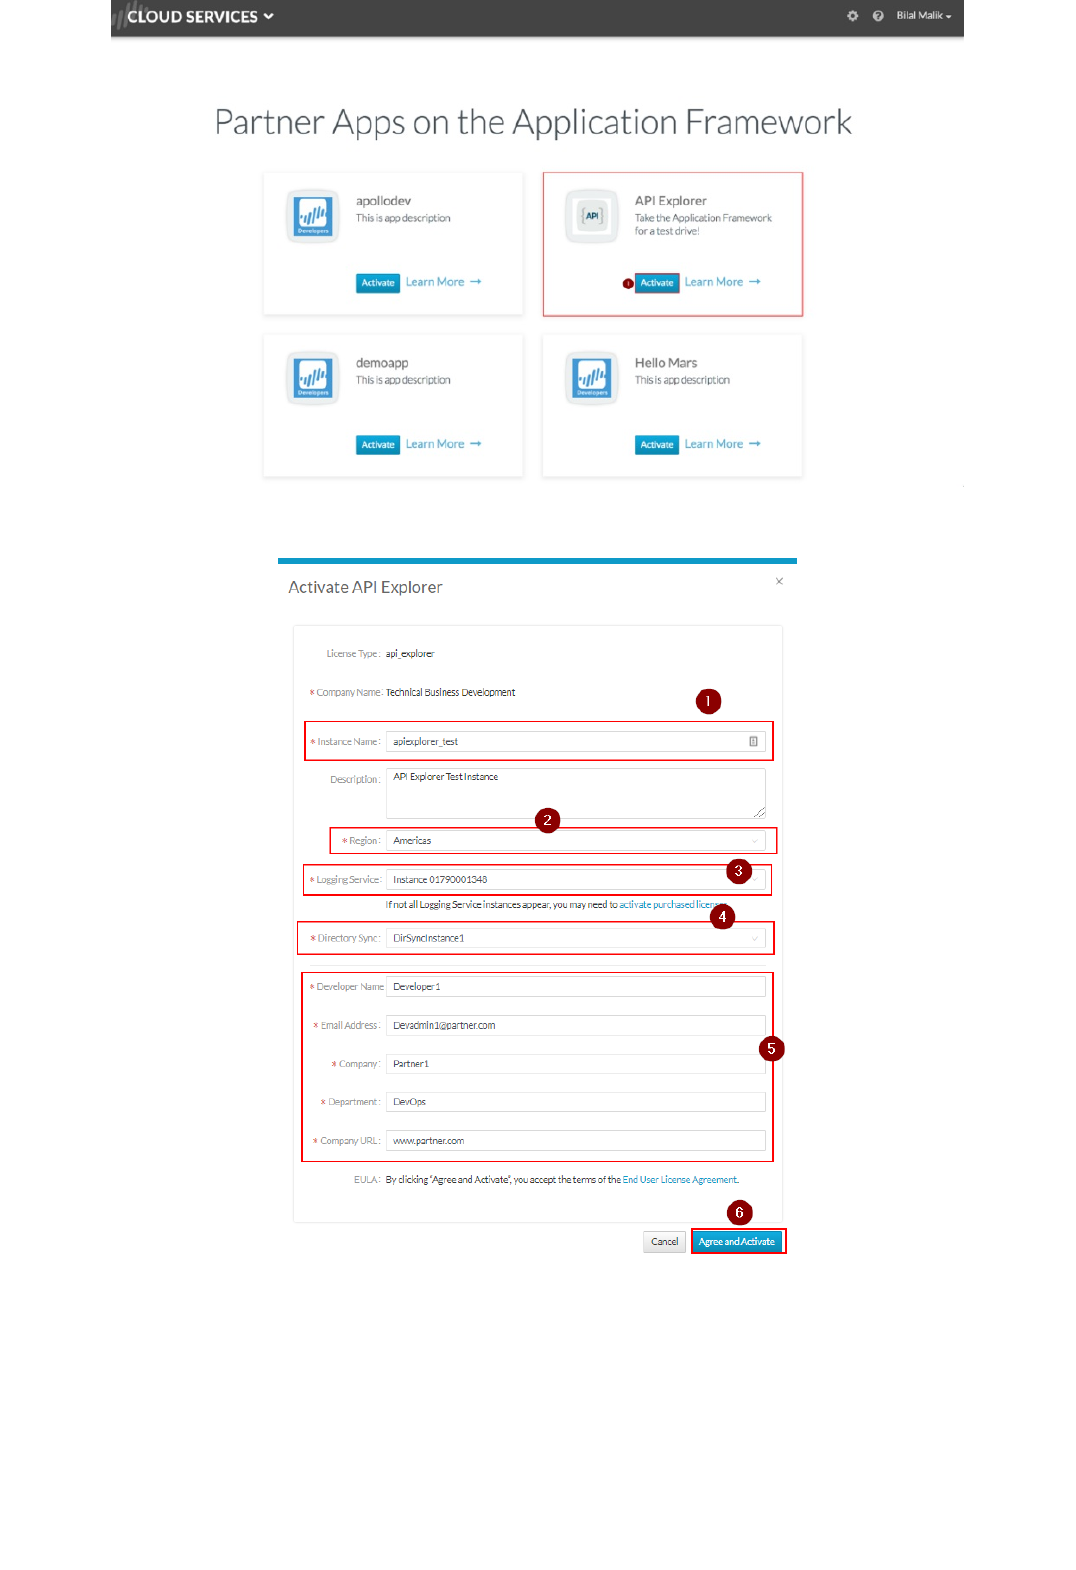
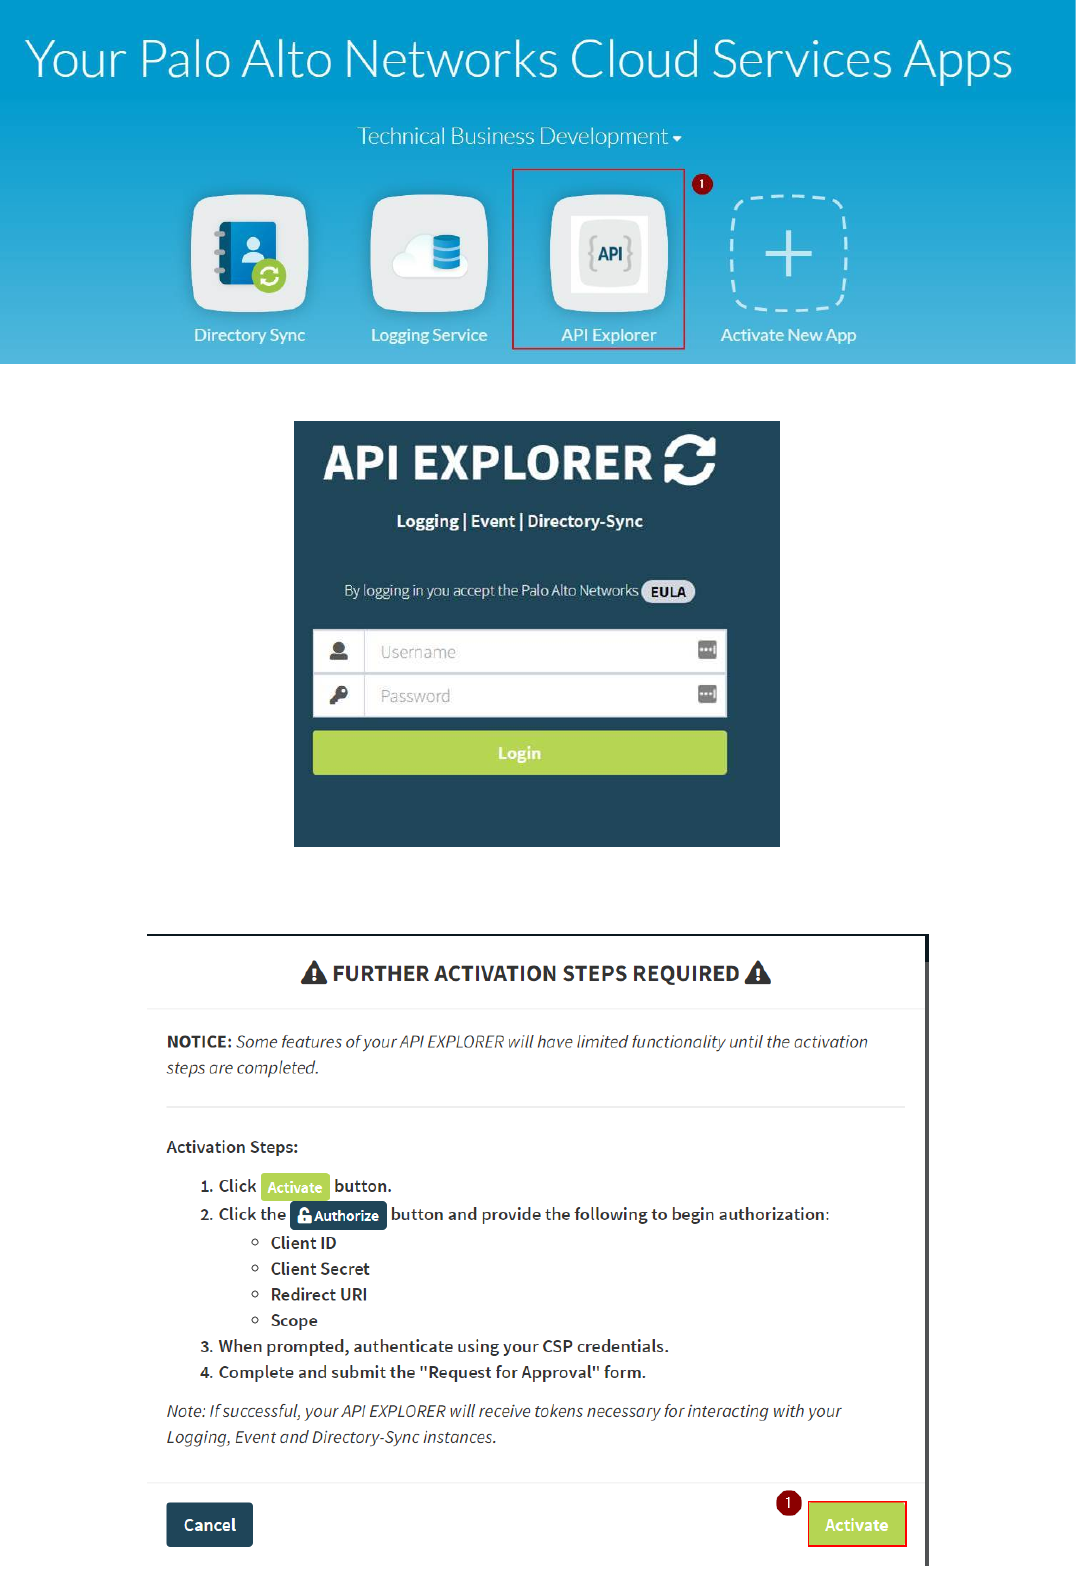
5. Go back to the main page and navigate to the botton of the Application Portal page, under "Partner Apps on the Application Framework". Select the application (i.e. YourCompany - API Explorer) and click on the "Activate"
icon:
Copyright (C) 2018 - Palo Alto Networks, Inc. 22/45
Note: if you don't see your API Explorer App, reach out to your Palo Alto Networks technical contact for support.
6. Enter the required parameters, then select "Agree and Submit":
7. At this point you should see the instance of your "API Explorer" App in the "Your Palo Alto Networks Cloud Services Apps" section of the App Portal:
Copyright (C) 2018 - Palo Alto Networks, Inc. 23/45

8. Click on your API Explorer App icon and you will be redirected to your API Explorer instance (the FQDN of your AWS API Explorer instance). Login as admin (the password is the one you set as part of the CloudFormation
Template parameters, same as Firewall and Panorama):
Note: Make sure that you login on the API explorer App for the first time through link on the Cloud Services Portal. Do not login on the API Explorer by navigating to the FQDN directly with your browser, as some required tokens must
be passed to the API Explorer by the Cloud Services Portal through the link.
9. At the first Login, the API explorer app will ask you to perform the Activation. Click on the "Activate" button:
Copyright (C) 2018 - Palo Alto Networks, Inc. 24/45
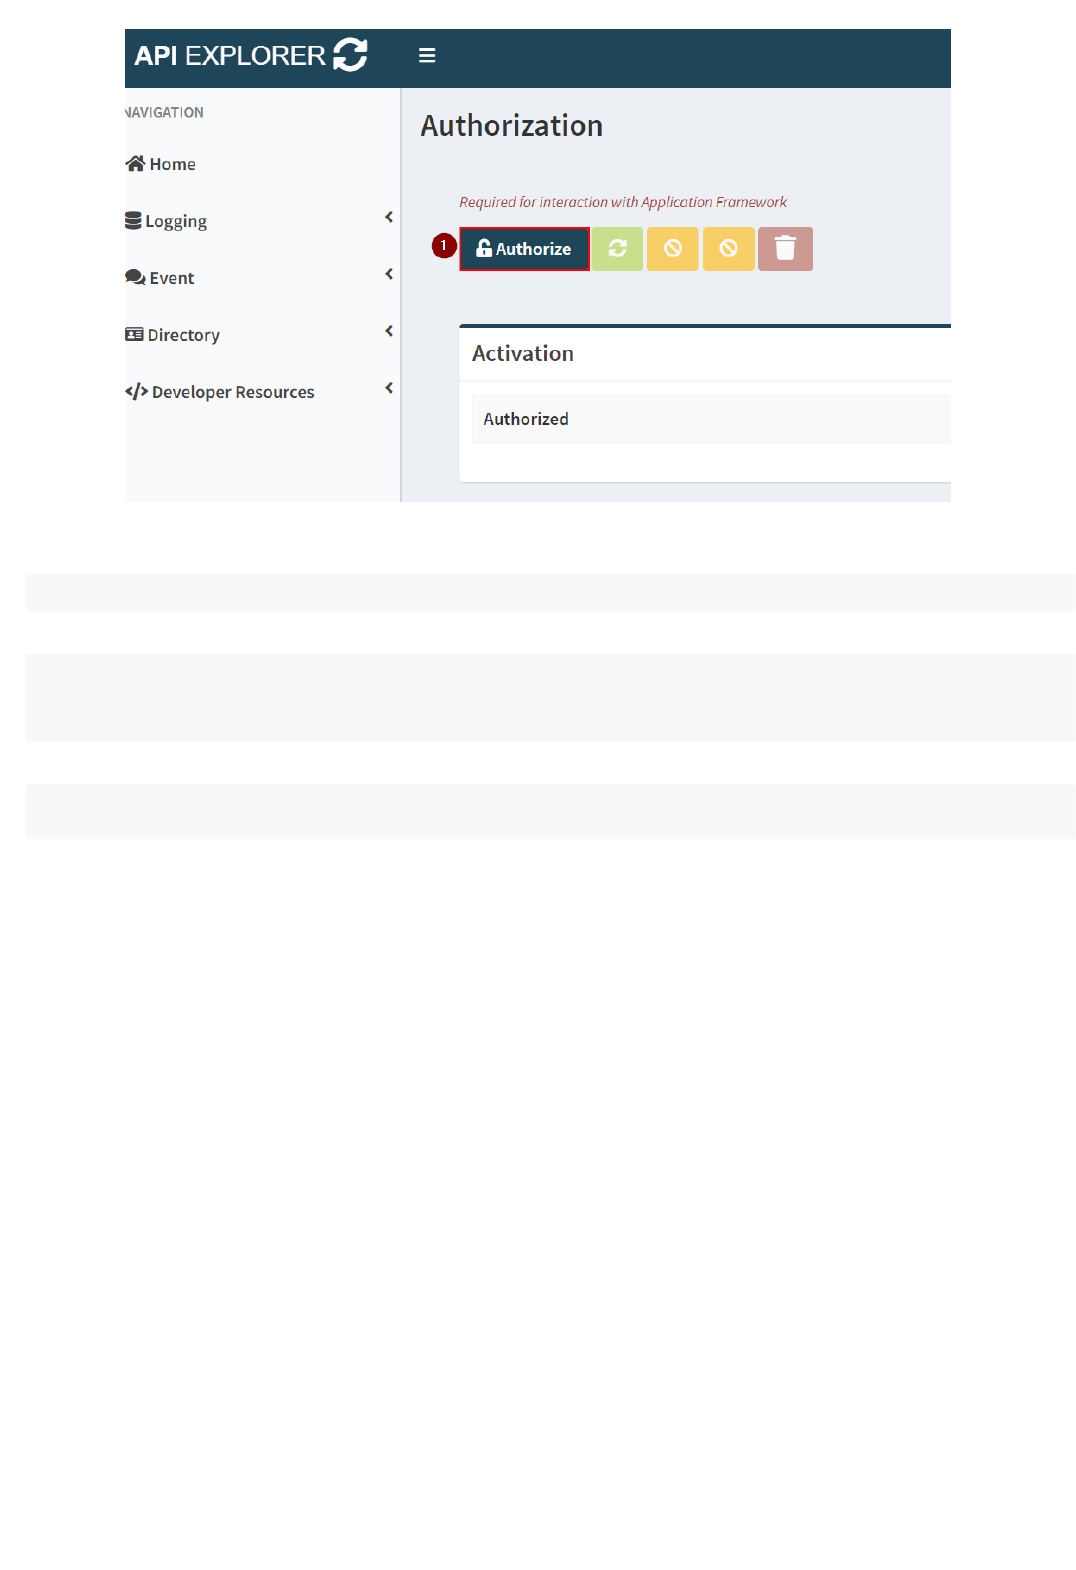
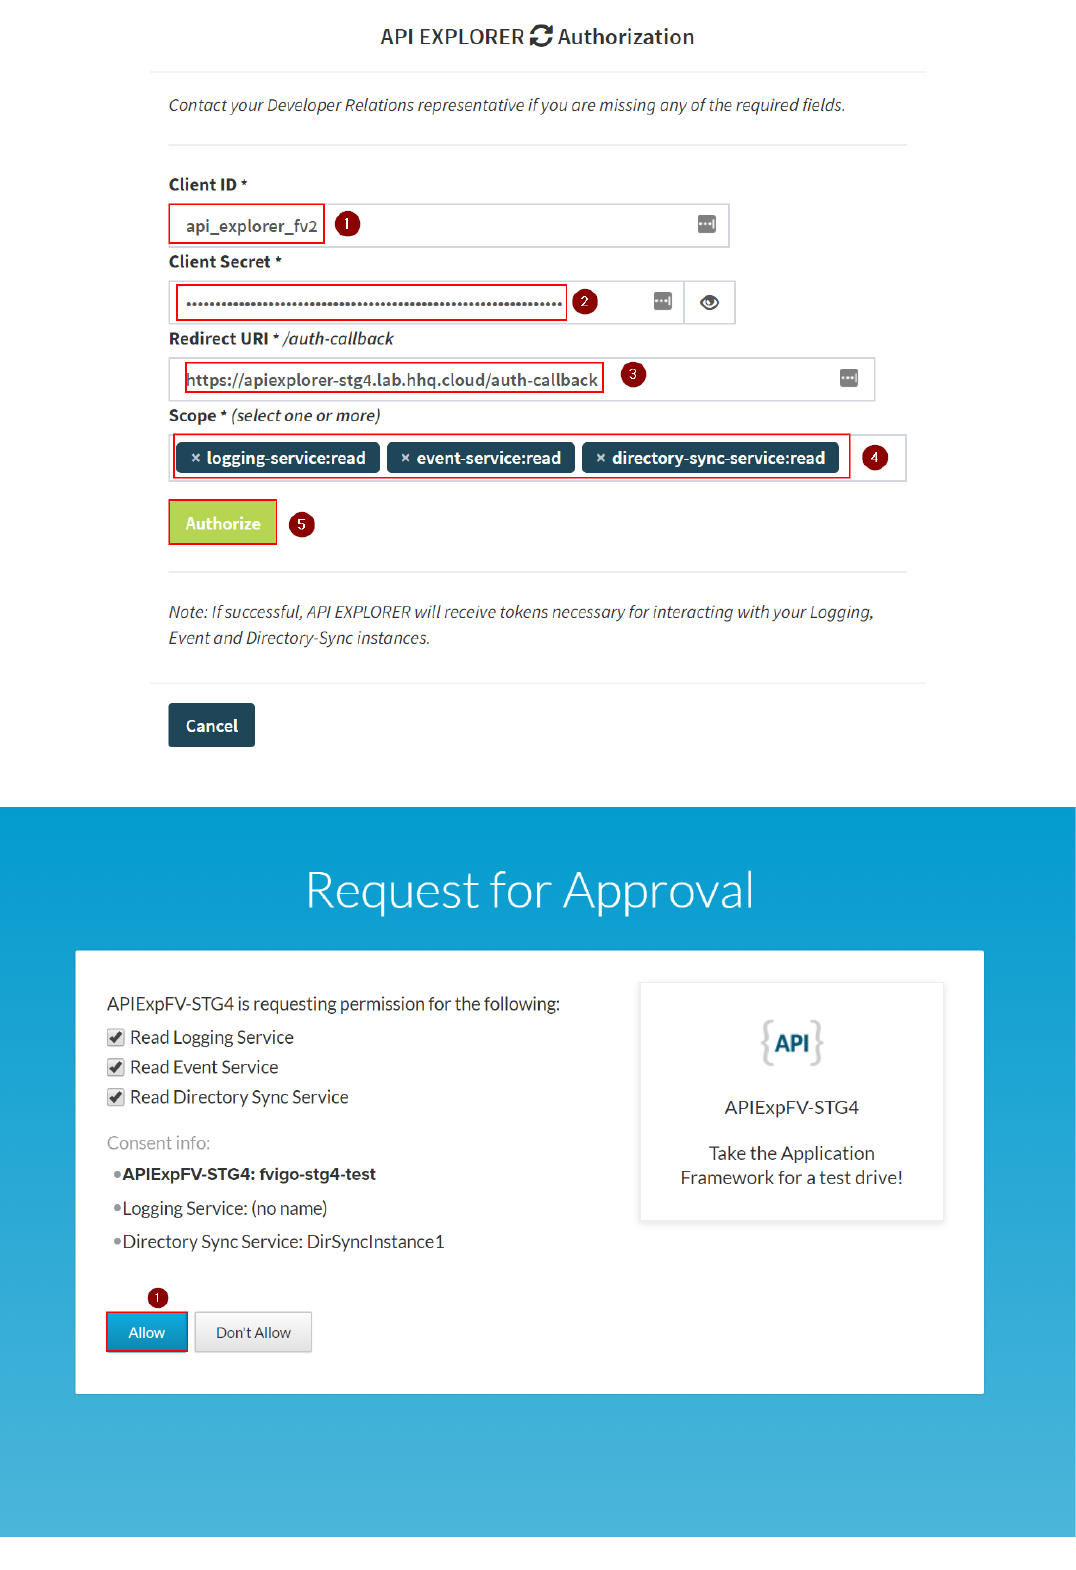
10. In the Authorization page, click on "Authorize":
11. Insert the required parameters:
a. Client ID and Client Secret that you obtained from your
Palo Alto Networks technical contact
b. Redirect URI should be correspond to your API Explorer instance
with the /auth-callback route (i.e.
<https://apiexplorer.lab.yourcompany.com/auth-callback> --
https://apiexplorer-stg4.lab.hhq.cloud/auth-callback in this
example)
c. Scope must be "logging-service:read" , "event-service:read"
and "**directory-sync-service:read**" . Do not select write scopes
at the moment.
12. Click on "Authorize":
Copyright (C) 2018 - Palo Alto Networks, Inc. 25/45

13. The "Request for Approval" page on the Identity Provider will show up. Click on "Allow":
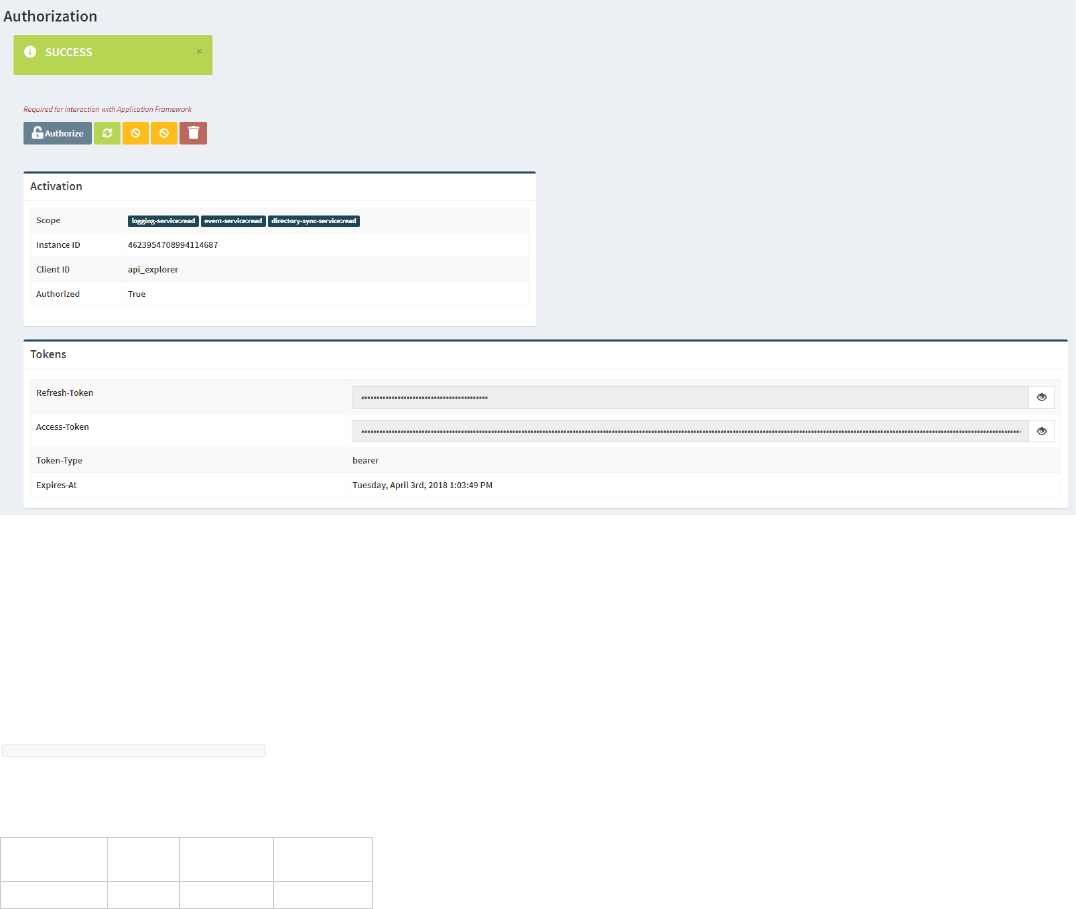
14. If the authorization is successful, you should see the Tokens in the Authorization page, and the application should work:
Copyright (C) 2018 - Palo Alto Networks, Inc. 26/45
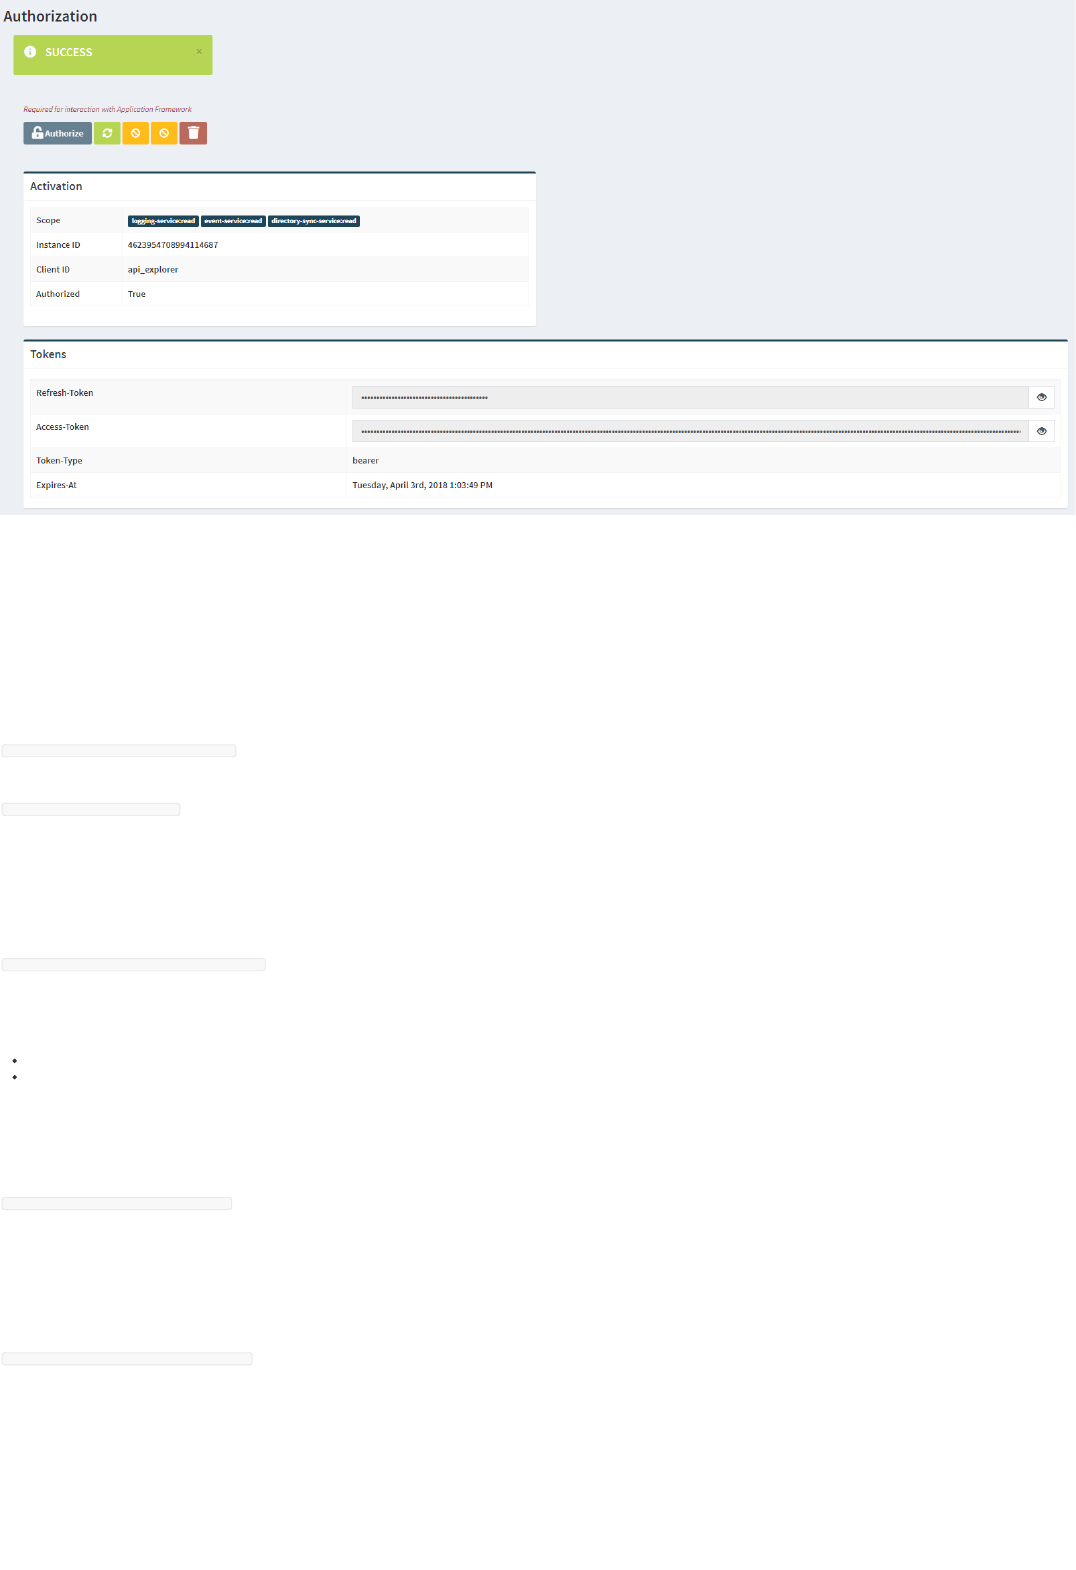
Congraturations: You can now use the functions of the API Explorer. For example, the "Query Explorer" from the left menu.
Make sure you look at the Application-Framework-FAQs for additional details.
Used to generate exploits to trigger Threat events on NGFW
Access server directly with SSH private key with the ec2-user user:
# ssh -i paloalto.pem ec2-user@kali.lab.yourcompany.com
Run threats against web server:
# sudo uniscan -u http://10.0.0.100 -esqdwb
Runs the API Explorer application
Access the WebUI: https://apiexplorer.lab.yourcompany.com
You can also access directly with SSH private key with the ec2-user user:
# ssh -i paloalto.pem ec2-user@apiexplorer.lab.yourcompany.com
Public IP of the NGFW eth1 interface :
Use port 221 to access WEB VMthrough SSH (username is ubuntu)
Use port 3389 to accessWindows Domain controller through RDP
Palo Alto Networks Next-Generation Firewall
Access directly with SSH privatekey with the admin user:
# ssh -i paloalto.pem admin@ngfw.lab.yourcompany.com
Or via the WebUI: https://ngfw.lab.yourcompany.com
Palo Alto Networks Panorama
Access directly with SSH private key with the admin user:
# ssh -i paloalto.pem admin@panorama.lab.yourcompany.com
Or via the WebUI: https://panorama.lab.yourcompany.com
Traffic generation VM and Web Server
Internal address that can bereached through NGFW public interface (see above)
A web crawler runs on it (for URL and traffic logs, etc)
Access server with SSH private key through firewall mapped port221 with the ubuntu user:
Appendix A: Explanation of the CFT services and usage
Kali Linux VM
API Explorer VM
Public IP
Next-Generation Firewall (NGFW)
Panorama
Ubuntu Web Server
Copyright (C) 2018 - Palo Alto Networks, Inc. 27/45
# ssh -i paloalto.pem ubuntu@public.lab.yourcompany.com -p 221
# crontab -l (shows the command in the crontab to register IP-to-User mapping with the NGFW API every 15 minutes)
# /home/ubuntu/web-traffic-generator (web traffic generator. It's started during the first boot butwon't restart at VM reboot). Configuration is in config.py
Restart the Web traffic Generatorwith the following command: REQUESTS_CA_BUNDLE=/etc/ssl/certs/ca-certificates.crt nohup python /home/ubuntu/web-traffic-generator/gen.py 1>>/tmp/webgen.stdout 2>>/tmp/webgen.stderr &
Windows 2012R2 Domain Controller
Internal IP that can be reached via RDP through NGFW public interface (see above)
Login as yourdomain\youruser (default PANWDOMAIN\paloalto), or as user1, user2 or user3
The password is the one you configured in the CFT.
You can install the Directory Sync Service agent on this VM if you want to use it.
Public Hostname Internal
IP
EIP
assigned? VM
kali 10.0.0.88 Y Kali Linux VM
apiexplorer 10.0.0.55 Y API Explorer VM
public 10.0.0.100 Y NGFW Public Interface
ngfw 10.0.0.99 Y NGFW Management Interface
panorama 10.0.0.20 Y Panorama Management Interface
N/A 10.0.1.101 N Ubuntu Web Server VM
N/A 10.0.1.20 N Windows Domain Controller VM
Note: to see these you should generate some threats with Kali Linux, as explained in Appendix A.
Useful commands:
Domain Controller:
Appendix B: Default hostname to IP and VM Mapping
Appendix C: Sample log outputs in the monitor tab
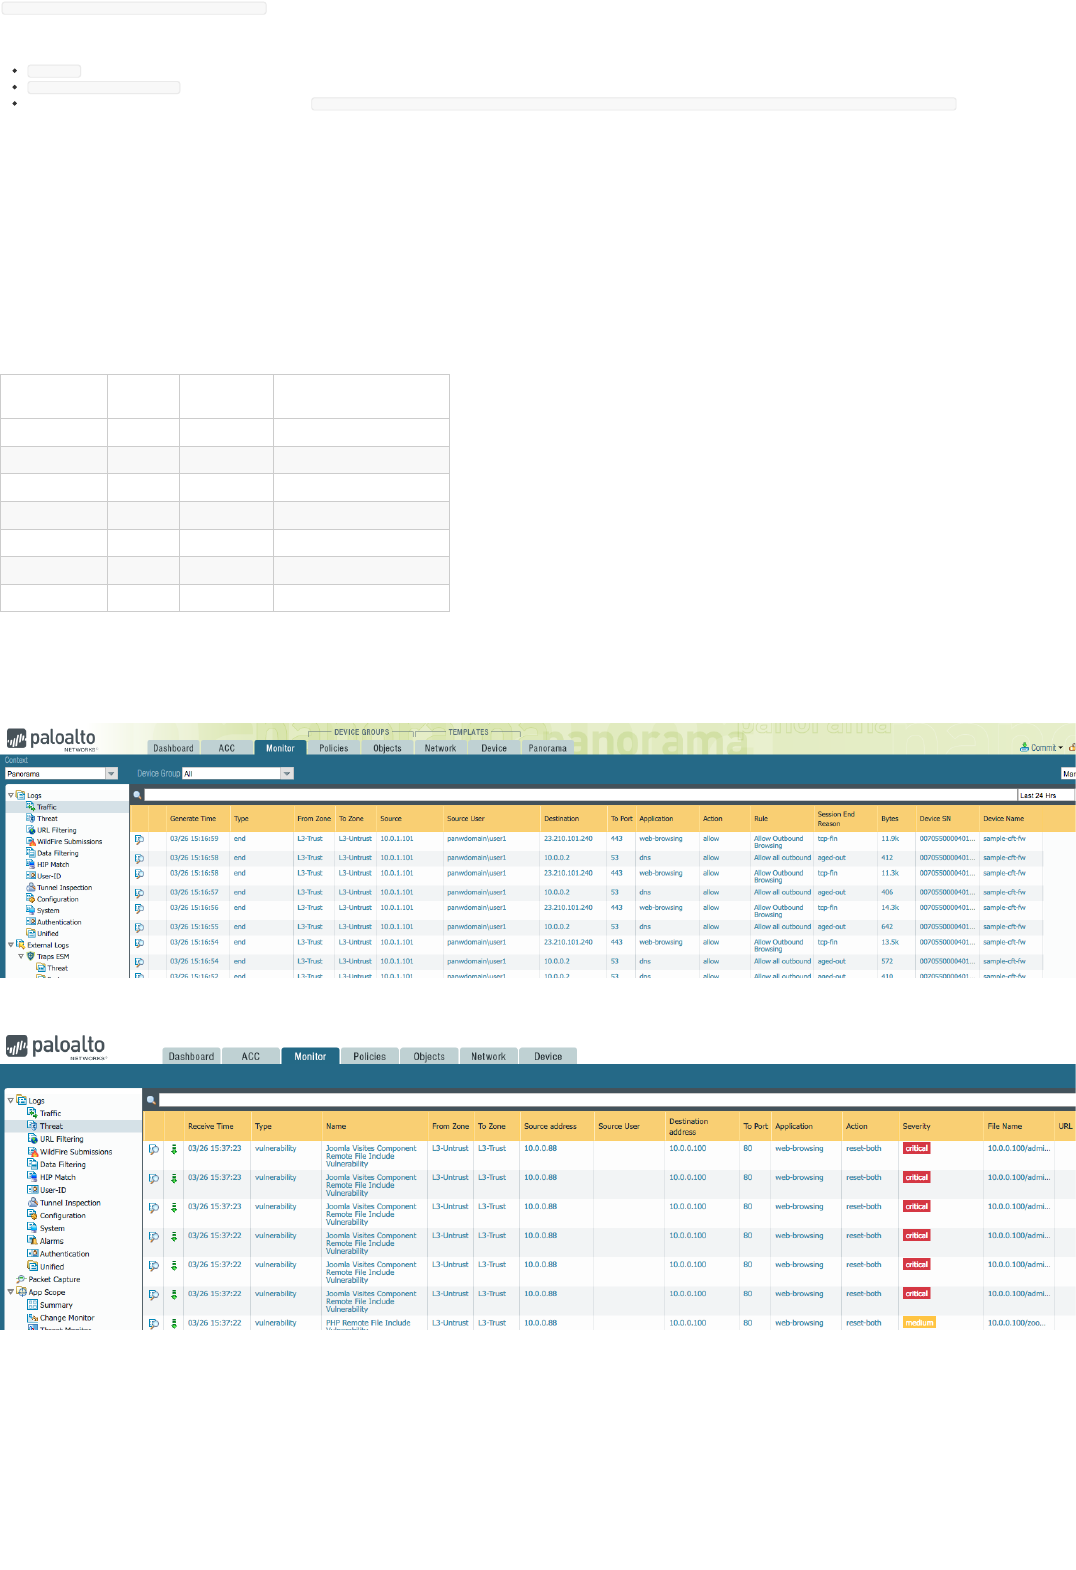
Traffic
Threat
URL Filtering
Copyright (C) 2018 - Palo Alto Networks, Inc. 28/45
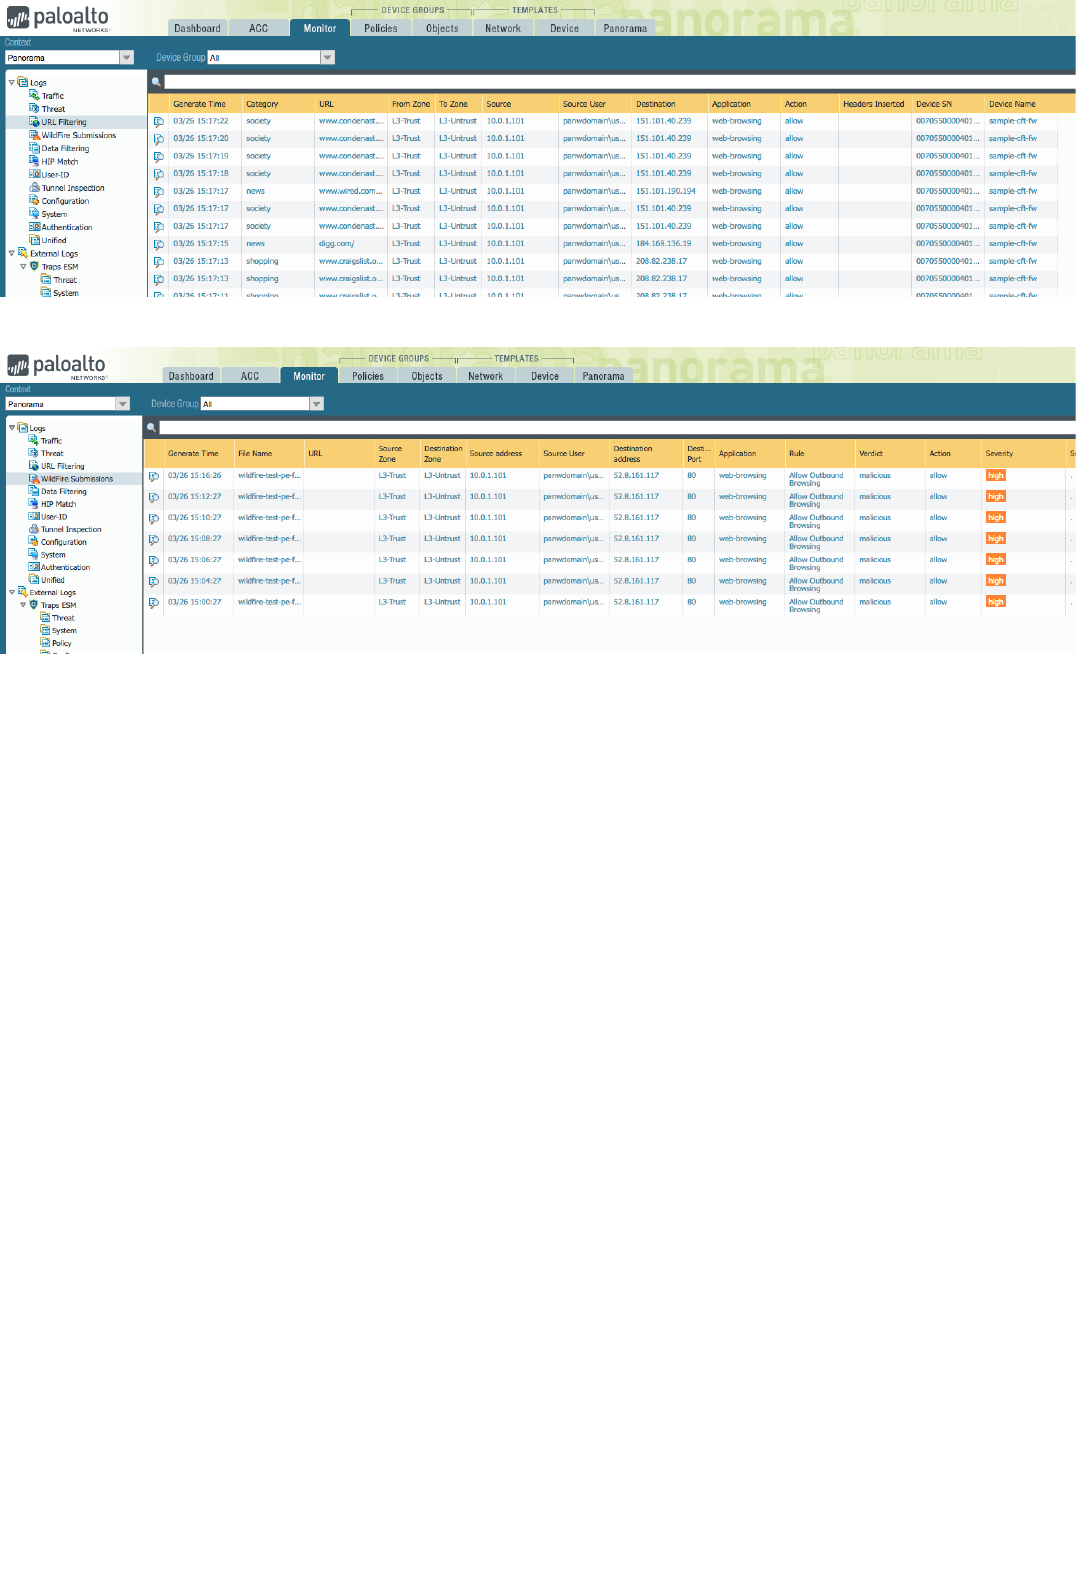
Wildfire Submissions
Copyright (C) 2018 - Palo Alto Networks, Inc. 29/45
Doc Revision: 2018-05-01-07:41:39 (UTC)
Please make sure you always download the latest revision of this document and the required files:
Wiki home: https://github.com/PaloAltoNetworks/appframeworklab/wiki
This document: https://github.com/PaloAltoNetworks/appframeworklab/wiki/Application-Framework-FAQs
As Ignite 2018 draws near, Palo Alto Networks is providing partners preview access to the Application Framework to work on their specific integrations.
API reference and Getting-Started documentation (ask your Palo Alto Networks representative to get access to the shared folder if you cannot reach it)
https://paloaltonetworks.app.box.com/folder/46344564211
Authorization codes/serials/licenses
Please contact your Palo Alto Networks representative.
pancloud SDK
https://github.com/PaloAltoNetworks/pancloud
API Explorer (sample app)
https://github.com/PaloAltoNetworks/apiexplorer
Lab Deployment Documentation
https://github.com/PaloAltoNetworks/appframeworklab/wiki
APIs
Please contact your Palo Alto Networks representative.
pancloud SDK
Create a GitHub issue following the submission guidelines published in the repo.
Gitter: https://gitter.im/PaloAltoNetworks/pancloud
Contact your Palo Alto Networks representative.
API explorer
Create a GitHub issue following the submission guidelines published in the repo.
Gitter: https://gitter.im/PaloAltoNetworks/pancloud
Contact your Palo Alto Networks representative.
API Explorer
https://paloaltonetworks.box.com/s/s0hc5umuxsumjb6t3vcwtnkzh9isbkcf
Developer Environment on AWS
https://paloaltonetworks.box.com/s/s0hc5umuxsumjb6t3vcwtnkzh9isbkcf
Work with your Palo Alto Networks representative to generate the required manifest.json file.
Contact your Palo Alto Networks representative.
Although the Cloud Services Portal logs the username of the person that "Activates" a 3^rd^-party app, it will be up to the vendor/partner to record tracking/accounting data when a user "Signs Up" or "Signs In" for/to the 3^rd^-
party app from the CSP.
This has not been defined yet.
Application-Framework-FAQs
Application Framework Partner Beta Program - Frequently Asked
Questions
What is the Application Framework Partner Beta Program?
Where can I go to find/acquire X?
How can I report an issue/bug with X?
How can I deploy X?
How can I register my own app?
Where do I find my client_id, client_secret, etc., needed for authorization/OAuth?
How are we tracking customers who click from the app portal to the 3rd-party app.
How does a 3rd-party partner get paid for app usage?
Can we develop with dummy data/sample logs in Logging Service?
Copyright (C) 2018 - Palo Alto Networks, Inc. 30/45
Yes, we have the option to stream any log type to any Logging Service instance (using jlogger). The sample logs are derived from our Palo Alto Networks demo labs and do not contain sensitive data.
However, unless the circumstances require it, it is recommended for 3rd-party developers to deploy or configure a lab suitable for generating logs. We provide an AWS CloudFormation Template (CFT) that can be used for the
purpose.
North America.
Please refer to the official API documentation for supported features. Undocumented features are not supported and subject to change without notice. Developers should avoid using undocumented features.
Column names in SELECT expressions are not supported but may return valid results. For example, to return only the source and destination IP address columns, include those column name in the SELECT expression, e.g:
SELECT src,dst FROM panw.traffic
For names that conflict with SQL keywords, prepend the underscore character to the field name, e.g:
SELECT _from FROM panw.traffic
Push will not be available in 1.0. You should poll as often as needed by your app.
There are subtle but significant differences in the Event Service and Logging Service SQL filters that can produce unexpected results.
For the Event Service, the table reference must be enclosed in back quotes. For example:
{"filters":[{"panw.traffic":"SELECT * FROM panw.traffic"}]} will return no results.
{"filters":[{"panw.traffic":"SELECT * FROM `panw.traffic`"}]} works as expected.
Use the static value "EventFilter"
1 hour (3600 seconds). You can use the refresh token to generate a new authorization token
Please continue to rely on a properly configured NGFW, Traps, WildFire, for protection against real-time threats.
Retroactive protection is possible using a combination of MineMeld,
EDLs, or a 3rd-party supplied on-premise agent capable of updating
NGFW firewall security policy.
Plase make sure that your account has SuperUser, Logging Service and Directory Sync Service permissions on Cloud Services Portal
Check that you have the proper licenses registered in Panorama (navigate to "Panorama" - "Licenses" and make sure you have both "Logging Service" licenses and Support (can be either "Standard" or "Premium"):
What region is the Logging Service data center physically located?
Are Logging Service column names supported in SQL filter SELECT expressions?
How often can the Event Service API be polled? Why doesn't Event Service API push data?
Why does the Event Service poll return an emply list even when logs are present?
Where do I get the "channelID" for the Event Service?
What is the duration of the OAuth Authorization Token?
How can the app framework protect against real time threats?
Why I cannot generate the OTP on Customer Support Portal?
Logging Service doesn't work (I can't see logs on Panorama):
Copyright (C) 2018 - Palo Alto Networks, Inc. 31/45
Check that you have the proper licenses registered in the Firewall (navigate to "Panorama" - "Device Deployment" - "Licenses" and make sure you have "Support", "URL", "Threat Prevention", "WildFire", "VM-Series Capacity" and
"Logging Service" licenses enabled:
On the Panorama CLI, run the following commands and provide the output to your Palo Alto Networks Representative:
show plugins cloud\_services logging-service info
request plugins cloud\_services logging-service status
show system state | match lcaas
show system state | match cust
On the Firewall CLI, run the command " show logging-status ". The output should be like the one in following picture:
Other useful Firewall CLI commands (provide the output to your Palo Alto Networks Representative):
Copyright (C) 2018 - Palo Alto Networks, Inc. 32/45

request logging-service-forwarding certificate info
request logging-service-forwarding status
request logging-service-forwarding customerinfo show
show system state | match cust
show system state | match lcaas
less mp-log lcaas_agent.log
tail mp-log ms.log
debug log-receiver rawlog_fwd_dpi stats global show verbose
Restart Log Receiver on Firewall:
debug software restart process log-receiver
Copyright (C) 2018 - Palo Alto Networks, Inc. 33/45
This document describes some examples on how to interact with the Application Framework API using curl.
Doc Revision: 2018-05-01-07:41:39 (UTC)
Please make sure you always download the latest revision of this document and the required files:
Wiki home: https://github.com/PaloAltoNetworks/appframeworklab/wiki
This document: https://github.com/PaloAltoNetworks/appframeworklab/wiki/API-Curl-Examples
The following example shows how to run a query for 10 logs from the panw.traffic table. Note that the AUTH_TOKEN must be provided. startTime and endTime are used to determine the time window during which logs are searched.
curl -X POST -H "Content-Type: application/json" -H "Authorization: Bearer AUTH_TOKEN" -d '{"startTime": 0, "endTime":1609459200, "maxWaitTime":0, "query": "SELECT * FROM panw.traffic LIMIT 10" }' "https://apigw-stg4.us.paloaltonetworks.com/logging-service/v1/queries"
The response will look similar to:
{"queryId":"a8c81c89-0a2e-419c-b771-9283a2722e9a","sequenceNo":0,"queryStatus":"RUNNING","clientParameters":{},"result":{"esResult":null,"esQuery":{"table":["panw.traffic"],"query":{"aggregations":{},"size":10},"selections":[],"params":{}}}}
You can extract the queryId (a8c81c89-0a2e-419c-b771-9283a2722e9a) and use it to collect results.
To poll for a query result, use the following command (specifying the right queryId)
curl -X GET -H "Content-Type: application/json" -H "Authorization: Bearer AUTH_TOKEN" "https://apigw-stg4.us.paloaltonetworks.com/logging-service/v1/queries/a8c81c89-0a2e-419c-b771-9283a2722e9a/0"
The response will look similar to:
{"queryId":"a8c81c89-0a2e-419c-b771-9283a2722e9a","sequenceNo":0,"queryStatus":"JOB_FINISHED","clientParameters":{},"result":{"esResult":{"took":335,"hits":{"total":6489137,"maxScore":2,"hits":[LOGS_HERE]},"id":"a8c81c89-0a2e-419c-b771-9283a2722e9a","from":0,"siz
e":10,"completed":true,"state":"COMPLETED","timed_out":false},"esQuery":{"table":["panw.traffic"],"query":{"aggregations":{},"size":10},"selections":[],"params":{}}}}
If the status is still RUNNING wait until it completes and try again. If the status is FINISHED there will be other results in additional sequences. If the status is JOB_FINISHED it is the last result set. Please look at the documentation for
more details.
To delete a query, use the following command (specifying the right queryId):
curl -X DELETE -H "Content-Type: application/json" -H "Authorization: Bearer YOUR_TOKEN" "https://apigw-stg4.us.paloaltonetworks.com/logging-service/v1/queries/a8c81c89-0a2e-419c-b771-9283a2722e9a"
A successfull response will be:
{"success":true}
API-Curl-Examples
Palo Alto Networks Application Framework API Explorer Curl
Examples
Logging Service
Create a query
Get Poll results
Delete Query
Copyright (C) 2018 - Palo Alto Networks, Inc. 34/45
This document describes how to automatically set up an Application Framework API Explorer instance on Amazon Web Services It is meant for Palo Alto Networks Partners that need a quick way to start developing for Application
Framework.
It also provides instructions on how to pair the API Explorer application with Application Framework.
Doc Revision: 2018-05-01-07:41:39 (UTC)
Please make sure you always download the latest revision of this document and the required files:
Wiki home: https://github.com/PaloAltoNetworks/appframeworklab/wiki
This document: https://github.com/PaloAltoNetworks/appframeworklab/wiki/API-Explorer-Lab
Documentation PDF: https://github.com/PaloAltoNetworks/appframeworklab/blob/master/pdf/LabGuide.pdf
API Explorer JSON file: https://raw.githubusercontent.com/PaloAltoNetworks/appframeworklab/master/cft/apiexplorer-cft.json
This lab environment requires the following:
A valid AWS Account
A Palo Alto Networks Enabled Network Instance
AWS Region with 1 available Elastic IP
(Not mandatory but highly recommended) A second or third level domain configured in AWS Route53 (i.e. lab.yourcompany.com with NS records pointing to AWS Route 53 DNS Servers): ask your Palo Alto Networks
representative for more details.
This environment is meant for development use only, it's not security hardened for production. Specifically, the following security considerations should be known:
Administrative password is provided as an environment variable for the installation scripts on the API Explorer and Ubuntu Web Server VMs, so it may be visible in some of the log files (i.e. /tmp/panorama_setup.log on the API
Explorer VM)
To perform manual hardening of the environment, the following post-deployment steps are suggested:
Manually change all the passwords
This document is not meant to provide instructions for the above steps.
This section describes the configuration of the AWS required components to deploy the lab components. You'll need a KeyPair and (optional) a Route53 Hosted Zone. Y
1. Navigate to your selected region (i.e. us-east-1), select the EC2 service and under "Network & Security" select "Key Pairs" and click on "Create Key Pair":
2. Insert a keypair name and click on "Create". In the example, we use "paloalto". This will create a "paloalto.pem" private key and the AWS Web UI will prompt you to download it.
API-Explorer-Lab
Palo Alto Networks Application Framework API Explorer Deployment
via AWS CloudFormation
Prerequisites
Security Hardening Considerations
AWS Configuration
Key Pair Creation
Copyright (C) 2018 - Palo Alto Networks, Inc. 35/45
3. Download the Private Key to your local machine. The file name of this example will be paloalto.pem, but you can choose an arbitrary name. Y
The CloudFormation Template deploys a VM (API Explorer) and AWS can automatically associate DNS names to the Elastic IPs that are used by EC2. To do that, you need a Route53 public Hosted Zone configured in your AWS
environment. This step is optional: you can just connect to the VMs via their Elastic IP addresses, or manually configure your DNS entries at a later stage if you're not using Route53. However, this step is highly recommended.
The public DNS zone you use can either be an existing second-level domain (i.e. yourcompanylab.com), or a third-level domain (lab.yourcompany.com). It must be publicly resolvable, so you need to be the registered owner of the
domain. As an option, you can register a new domain directly through the AWS console and add it automatically in Route53.
If you don't have the opportunity to use a second or third level domain in Route53, ask your Palo Alto Networks contact for support to get a fourth level domain delegated to your Route53 DNS Servers.
Note: the CFT can automate the creation and registration of a valid SSL certificate that corresponds to the FQDN of your API Explorer instance (this way the browser won't provide warnings when you connect to it), through a free
service called "Let's Encrypt" (https://letsencrypt.org). If you want to automatically generate the Let's Encrypt certificate through the CFT, you must have the Route53 configuration enabled, otherwise the process will fail. Hence, if you
don't want to use Route53 for this step, the API Explorer certificate must be a self-signed one. The CFT parameters provide options to disable the configuration of Route53 and Let's Encrypt.
To configure a Hosted zone in AWS Route 53, proceed through the following steps:
1. Navigate to AWS "Route53", go to "Hosted zones" and click on "Create Hosted Zone". Enter the domain name: it must be a public domain name (second or third level) where you have permissions configure name servers for
(i.e. yourcompanylab.com or lab.yourcompany.com). The type must be "Public Hosted Zone." Then click on Create:
2. Look at the AWS Name Servers listed in the NS record and configure your Domain Hosting provider platform to use them for the selected domain:
In this example we are using the third-level domain "lab.hhq.cloud".
Note: if you registered the domain through AWS, you don't need any additional configuration as it will be automatically registered in Route
53. If you're using a different domain hosting platform (i.e. GoDaddy, NameCheap, etc), the configuration on how to configure your domain to use AWS Route53 DNS servers will be different depending on your provider.
If you're being helped by Palo Alto Networks to use a fourth level domain, please provide the Name Servers to your contact.
You can now deploy the AWS CloudFormation Template (CFT) to create the lab environment. Before starting, make sure that you have one Elastic IP (EIP) available in the region you want to deploy the CFT (by default AWS limits
EIPs to 5 per region per account).
Route53 Zone Configuration
Deploy the CloudFormation Template
Copyright (C) 2018 - Palo Alto Networks, Inc. 36/45
Proceed with the following steps:
1. Navigate to "AWS CloudFormation" and select "Create Stack":
2. Select "Upload a template to Amazon S3", and upload the template JSON file provided by Palo AltoNetworks (apiexploer-cft.json in the example), then click on Next:
3. Insert the required parameters:
Stack name: an arbitrary name for this deployment (i.e. PartnerLab1)
Admin Password: an arbitrary password that will be used for the API Explorer application admin user.
EC2 VMs Key Name: from the drop down menu, select the KeyPair that you want to use for the non-Palo Alto Networks VMs (Kali Linux, API Eplorer VM, Ubuntu VM). It can be the KeyPair that you previously created in
EC2, or a different one of your choice.
DNS Domain Name: Insert the domain name zone that you have configured on Route53. If you don't have it, add a domain name and select "false" under both the "Configure Route53" AND the "Create API Explorer
LetsEncrypt Cert" fields in the Advanced Configuration section. In the example we use the hhq.cloud domain.
LetsEncrypt Email: Insert your (valid) email address that will be used to request a Let's Encrypt SSL certificate for the API Explorer.
Leave the other parameters to the default values unless you are a power user and you know what you're doing.
The following screenshot shows an example configuration:
Copyright (C) 2018 - Palo Alto Networks, Inc. 37/45
4. Click on "Next" twice.
5. In the Review page, Click on "Create":
6. Sit down and relax, the whole process will take a few minutes to complete:
7. The deployment will show CREATE_COMPLETE once everything is done:
8. Select the template and click on the Outputs tab of the to view the deployment information (IP addresses and FQDNs) of the lab:
Copyright (C) 2018 - Palo Alto Networks, Inc. 38/45
####AT THIS STAGE YOU SHOULD STOP AND MAKE SURE THAT THE CLOUD ENVIRONMENT IS READY. PLEASE REACH OUT TO YOUR PALO ALTO NETWORKS TECHNICAL CONTACT FOR THIS.
This section describes how to Activate the API Explorer application and start interacting with the APIs.
Note: this section requires the manifest file activation part to be already configured, otherwise you will not see your API Explorer application in the App Portal. You will also be provided a Client ID and a Client Secret by your Palo Alto
Networks contact.
To activate the API Explorer, follow this process:
1. Navigate to the App Portal beta environment: https://apps-stg4.app-portal-beta.us.paloaltonetworks.com and Sign in with your Customer Support Portal credentials:
2. Activate an instance of Directory Sync Service by clicking on the Activate button in the Directory Sync tile:
API Explorer App Activation Process
Copyright (C) 2018 - Palo Alto Networks, Inc. 39/45
3. Enter an arbitrary Instance Name and select Americas as Region, then click on Ok:
Note: You don't need to actually register an Active Directory agent to it if you don't need to interact with AD data to build your integration. Or you can deploy the Directory Sync Agent on the windows Domain Controller, by following the
Getting Started Guide, not covered by this manual
4. Review the configuration by clicking on the Settings icon in the top right corner:
Make sure that you have a Logging Service instance, and a Directory Sync instance.
5. Go back to the main page and navigate to the botton of the Application Portal page, under "Partner Apps on the Application Framework". Select the application (i.e. YourCompany - API Explorer) and click on the "Activate"
icon:
Copyright (C) 2018 - Palo Alto Networks, Inc. 40/45

Note: if you don't see your API Explorer App, reach out to your Palo Alto Networks technical contact for support.
6. Enter the required parameters, then select "Agree and Submit":
7. At this point you should see the instance of your "API Explorer" App in the "Your Palo Alto Networks Cloud Services Apps" section of the App Portal:
Copyright (C) 2018 - Palo Alto Networks, Inc. 41/45
8. Click on your API Explorer App icon and you will be redirected to your API Explorer instance (the FQDN of your AWS API Explorer instance). Login as admin (the password is the one you set as part of the CloudFormation
Template parameters, same as Firewall and Panorama):
Note: Make sure that you login on the API explorer App for the first time through link on the Cloud Services Portal. Do not login on the API Explorer by navigating to the FQDN directly with your browser, as some required tokens must
be passed to the API Explorer by the Cloud Services Portal through the link.
9. At the first Login, the API explorer app will ask you to perform the Activation. Click on the "Activate" button:
Copyright (C) 2018 - Palo Alto Networks, Inc. 42/45

10. In the Authorization page, click on "Authorize":
11. Insert the required parameters:
a. Client ID and Client Secret that you obtained from your
Palo Alto Networks technical contact
b. Redirect URI should be correspond to your API Explorer instance
with the /auth-callback route (i.e.
<https://apiexplorer.lab.yourcompany.com/auth-callback> --
https://apiexplorer-stg4.lab.hhq.cloud/auth-callback in this
example)
c. Scope must be "logging-service:read" , "event-service:read"
and "**directory-sync-service:read**" . Do not select write scopes
at the moment.
12. Click on "Authorize":
Copyright (C) 2018 - Palo Alto Networks, Inc. 43/45
13. The "Request for Approval" page on the Identity Provider will show up. Click on "Allow":
14. If the authorization is successful, you should see the Tokens in the Authorization page, and the application should work:
Copyright (C) 2018 - Palo Alto Networks, Inc. 44/45
Congraturations: You can now use the functions of the API Explorer. For example, the "Query Explorer" from the left menu.
Runs the API Explorer application
Access the WebUI: https://apiexplorer.lab.yourcompany.com
You can also access directly with SSH private key with the ec2-user user:
# ssh -i paloalto.pem ec2-user@apiexplorer.lab.yourcompany.com
Public Hostname Internal
IP
EIP
assigned? VM
apiexplorer 10.0.0.55 Y API Explorer VM
Appendix A: Explanation of the CFT services and usage
API Explorer VM
Appendix B: Default hostname to IP and VM Mapping
Copyright (C) 2018 - Palo Alto Networks, Inc. 45/45
