Combo_train_050830 LG Dishwasher LDF9810ST Presentation
2013-04-09
: Pdf Lg - Dishwasher - Ldf9810St - Presentation LG - Dishwasher - LDF9810ST - Presentation LG
Open the PDF directly: View PDF ![]() .
.
Page Count: 97
- Slide Number 1
- Slide Number 2
- Contents
- Preliminary
- Preliminary
- Safety Tips
- Warranty
- Specifications
- Features
- Features
- Features
- Installation
- Installation
- Installation
- Electrical Installation
- Water Supply Preparation
- Installation
- Installation
- Installation
- Drain Connection
- Drain Connection
- Drain Connection
- Water Connection
- Electrical Connection
- Final Installation
- Control Panel
- Control Panel
- Control Panel
- Control Panel
- Programs
- Dual Intensity Spray Wash
- Dual Intensity Spray Wash
- Adding Detergent
- Adding Detergent
- Adding Detergent
- Adding Detergent
- Detergent Chart
- Adding Rinse Aid
- Adding Rinse Aid
- Adding Rinse Aid
- Adding Rinse Aid
- Program Chart
- Test Mode
- Error Codes
- Error Codes
- Error Codes
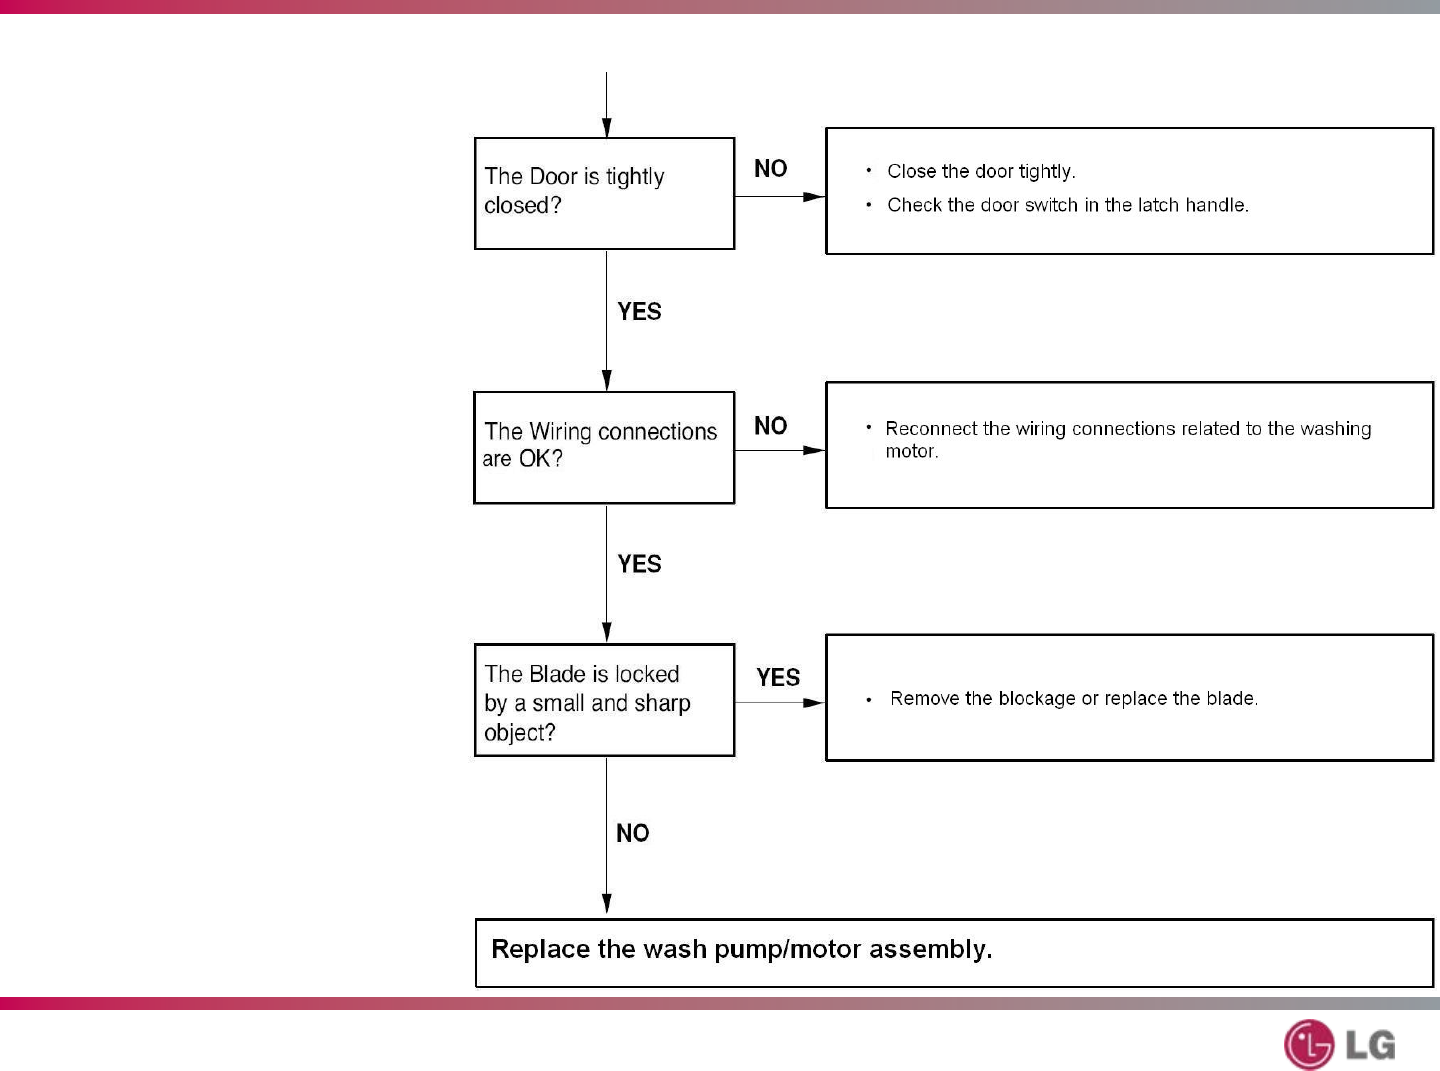
- Error Codes
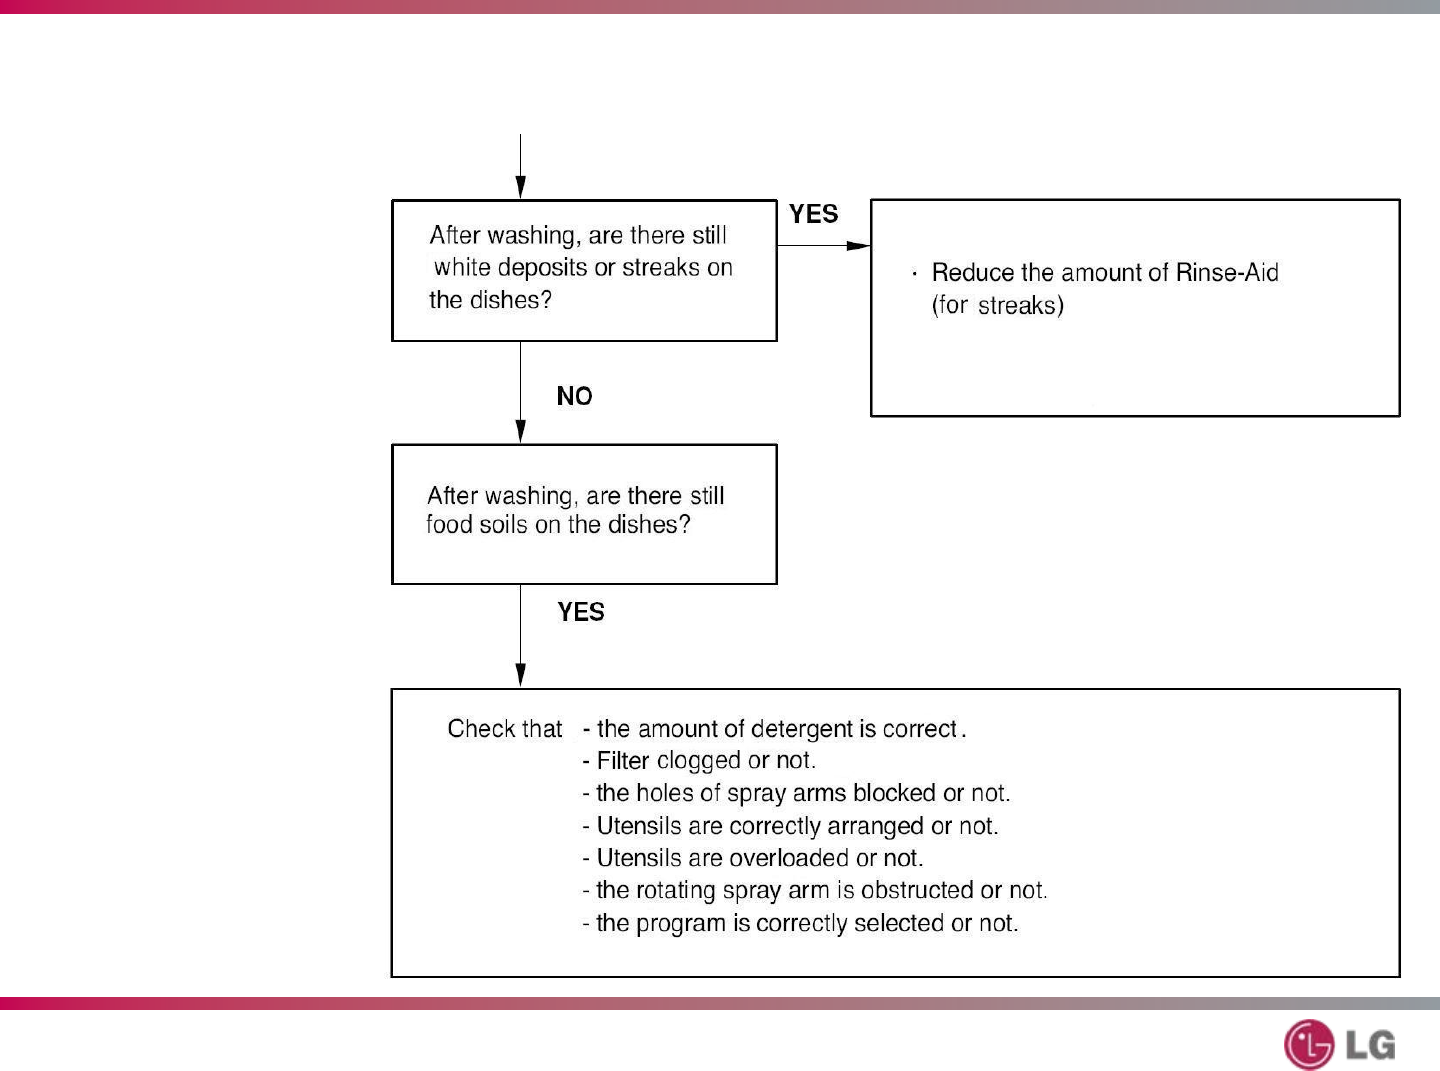
- Error Codes
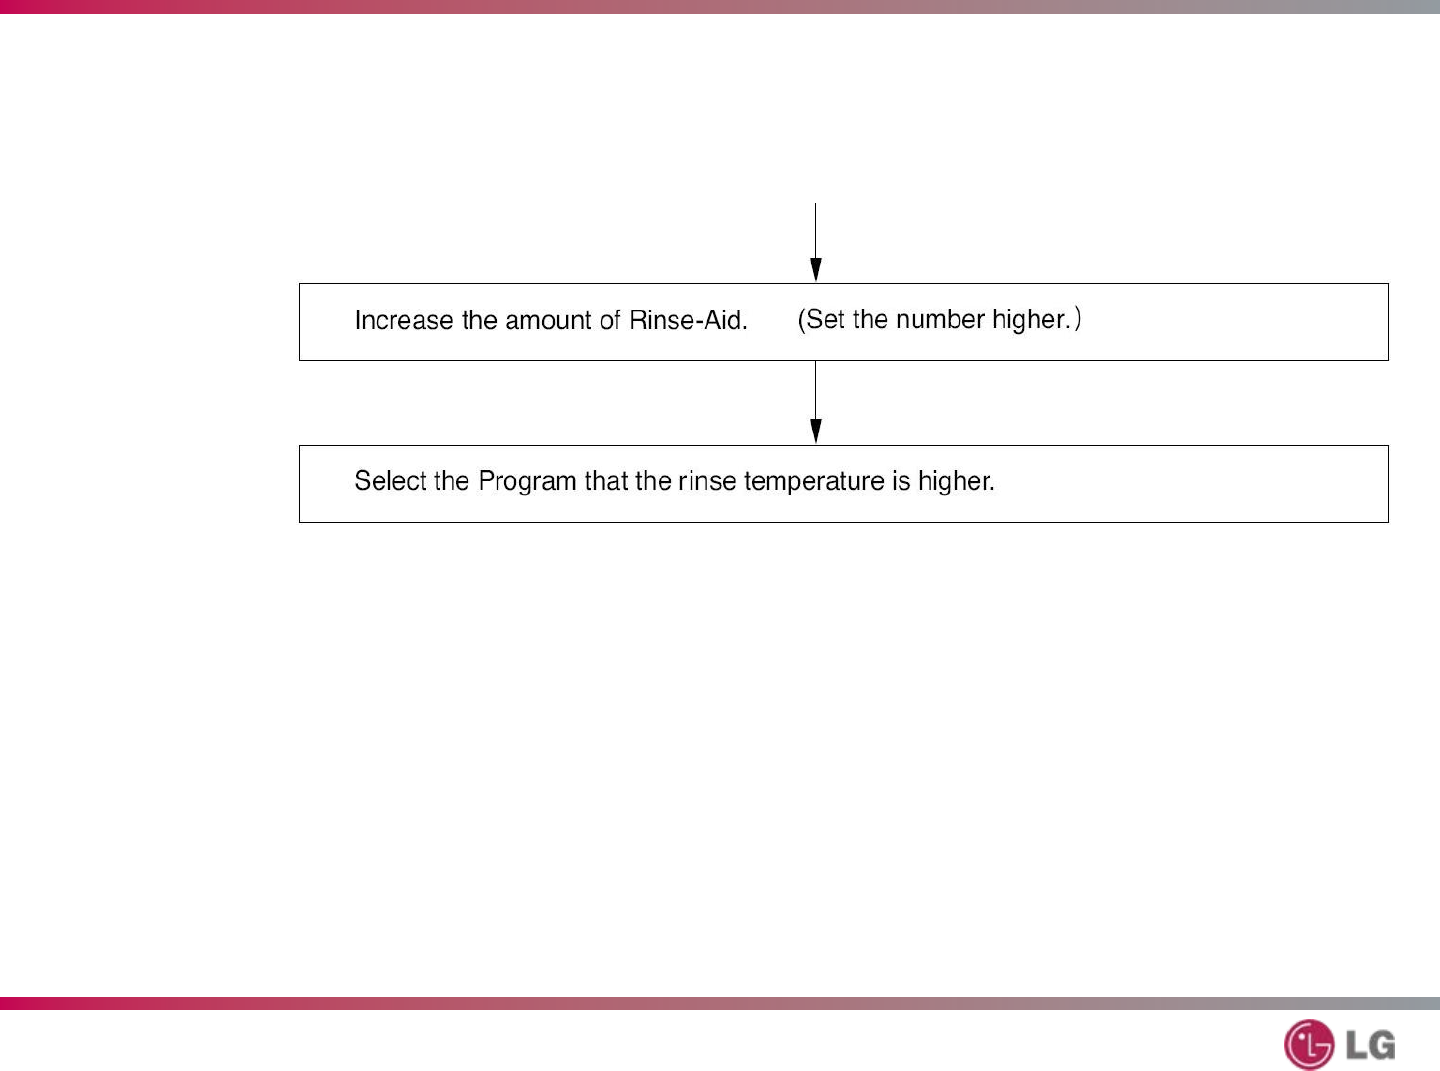
- Error Codes
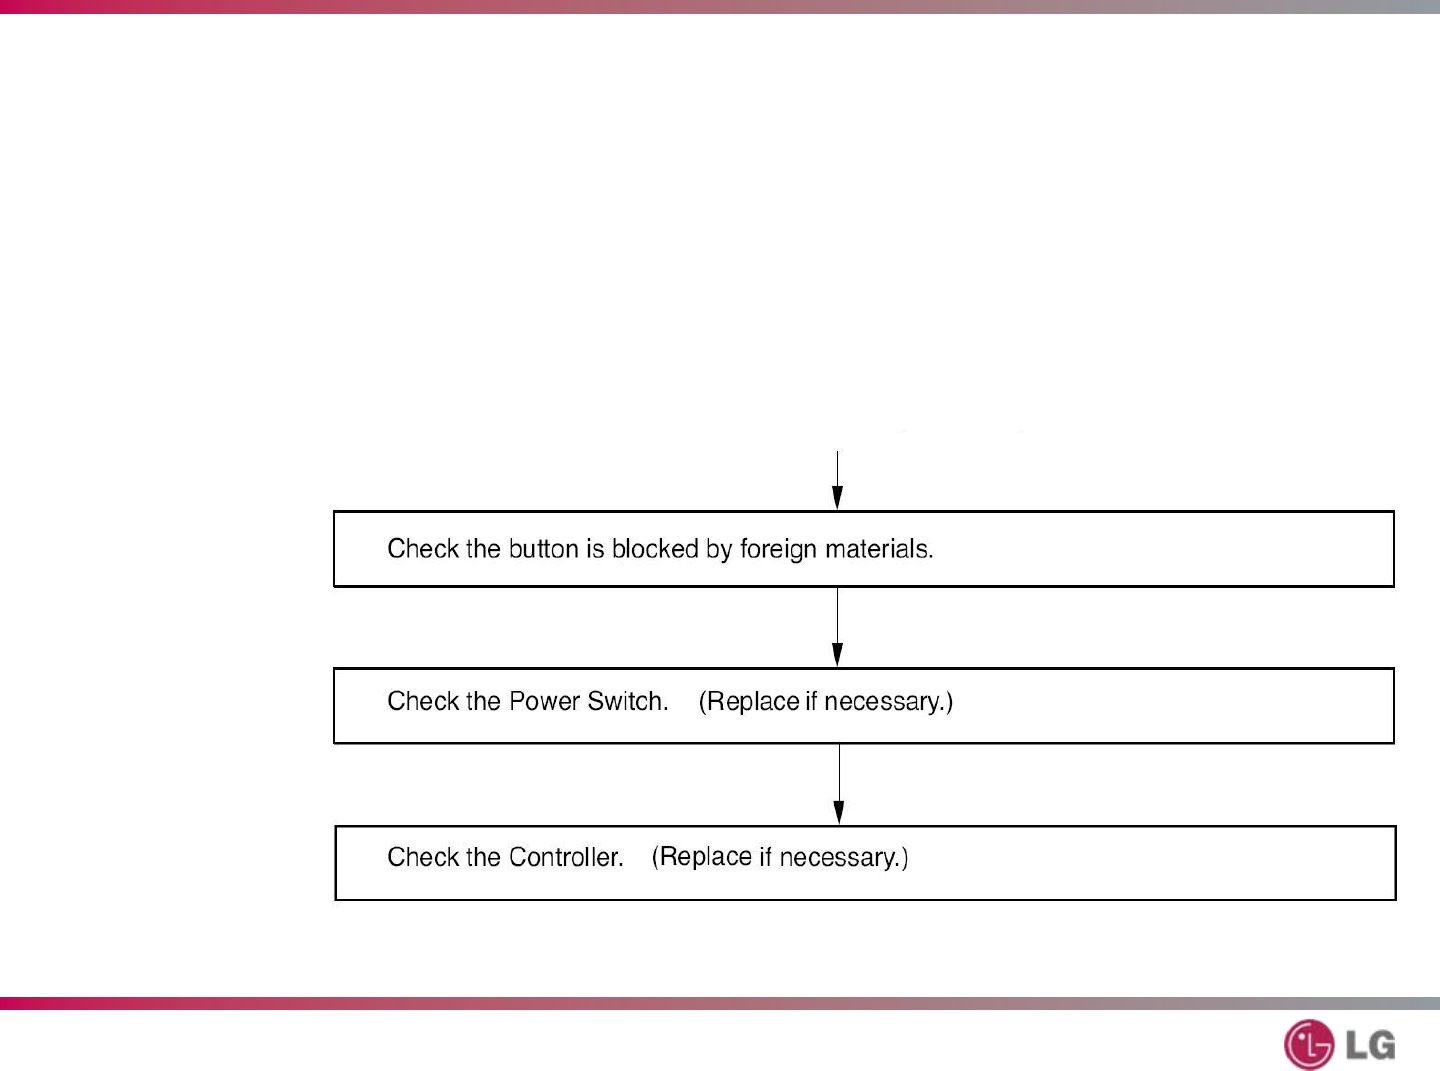
- Steam Generator Error Codes
- Troubleshooting
- Troubleshooting
- Troubleshooting
- Troubleshooting
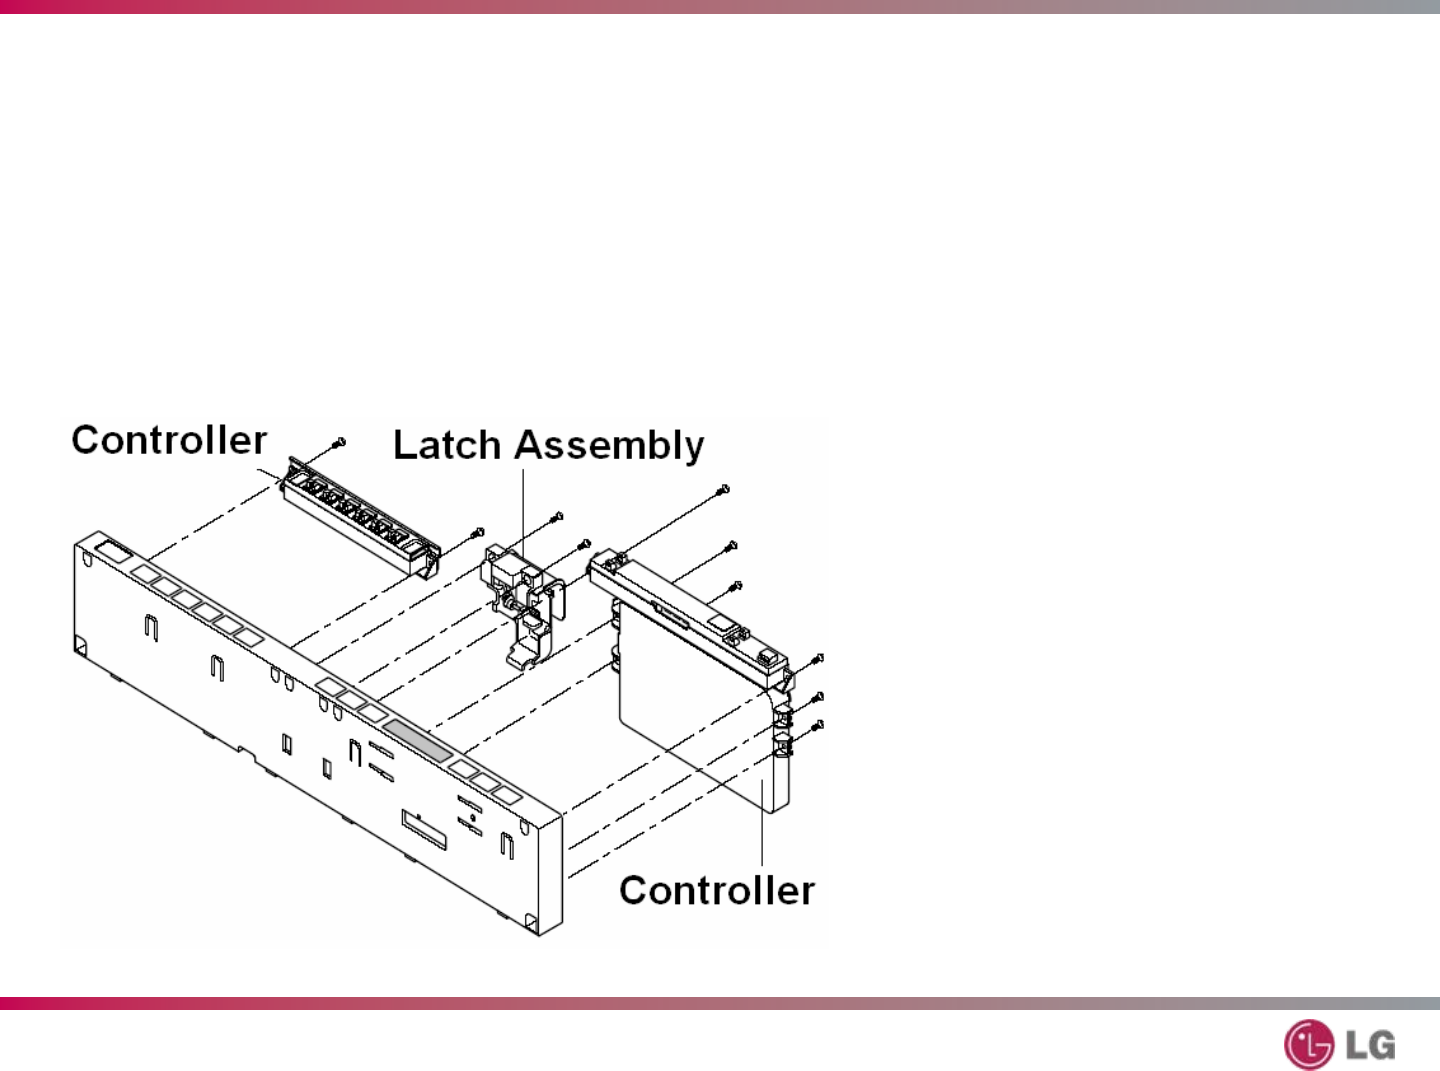
- Troubleshooting
- Disassembly and Repair
- Lower Cover and Insulation
- Cabinet and Tub Insulation
- Front Cover
- Control Panel Assembly
- Control Panel Assembly
- Fan Assembly
- Detergent Dispenser
- Door Spring (Right and Left)
- Door Liner
- Lower Frame
- Lower Frame
- Drain Hose Holder
- Base Cover
- Line Noise Filter
- Float Switch Assembly
- Wiring Diagram
- Cabinet Base
- Float Assembly
- Steam Generator
- Steam Generator
- Inlet Valve
- Air Breaker Assembly
- Sump Assembly
- Preliminary
- Heater and Drain Motor
- Vario Motor
- Soil (Turbidity) Sensor
- Preliminary
- Cutlery Rack Rail
- Upper Rack Rail
- Wiring Diagram
- Exploded View
- Exploded View
- Serial Number (Old Style)
- Serial Number (New Style)
- Parts List
- Ohm’s Law and Watt’s Law
- Ohm’s Law
- Conversion Information
- Service Bulletins
- Slide Number 97
1
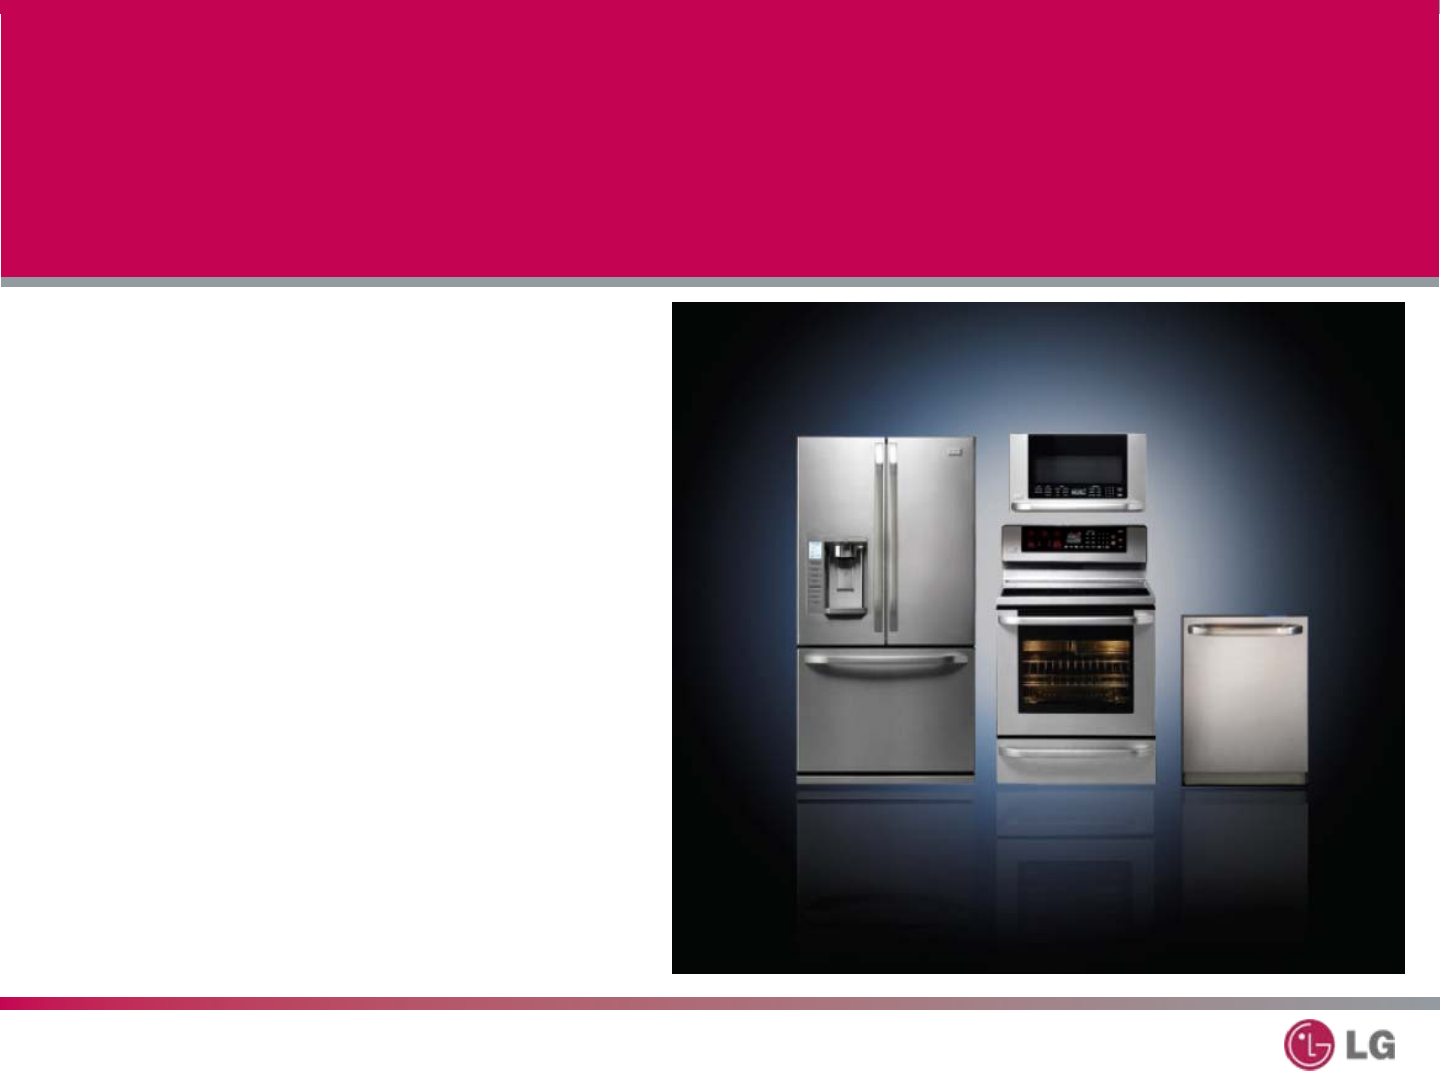
LDF9810ST – Steam Dishwasher
Product Training
STEAM
DISHWASHER
LDF9810ST
Ver. 1.0 080123

2
LDF9810ST – Steam Dishwasher
LG Electronics in no way supports, condones, or will
tolerate the solicitation of personnel while in attendance
to this, or any LG event. Furthermore, there will be no
communication of salary, benefits or job descriptions in
general. Anyone found to be part of any such
communication will immediately be dismissed from this
class, and will not be allowed to attend future events.
LG supplies this training class for the benefit of all in attendance, we ask your
assistance in keeping this a professional meeting and to remain focused only on the
technical improvement and education of our service network.
No Solicitation

3
LDF9810ST – Steam Dishwasher
Safety Notices and Warnings 1
Contact Information 1
Contents 2
Specifications 4
Safety Notices (Gas and Electric) 5
Serial Number Identification 6
Introduction 7
Controls 8
Installation 9
Accessories 10
Drying Rack 10
Contents
T-1
4
LDF9810ST – Steam Dishwasher
IMPORTANT SAFETY NOTICE
DISCLAIMER
MODIFICATIONS
ESD ISSUE
REGULATORY INFORMATION
Preliminary
T-3
Slide Number Page in Training Manual

5
LDF9810ST – Steam Dishwasher
COMPLIANCE
The responsible party for this device’s compliance is:
LG Electronics Alabama, Inc.
PO Box 240007
Huntsville, AL, 35813
Preliminary
T-3

6
LDF9810ST – Steam Dishwasher
Safety Tips
T-4
• Unplug or disconnect the dishwasher before
starting repairs.
• Steam is HOT! Use caution when dealing with live
steam or hot parts.
•Do not stand on the open door.
•Do not allow children to play in the dishwasher.
• Do see the rest of the safety tips on page 4 in the
training manual.

7
LDF9810ST – Steam Dishwasher
Warranty
T-5

8
LDF9810ST – Steam Dishwasher
Specifications
T-6
ITEM SPECIFICATION
Rated Input 120 VAC
, 60Ø
Installation Built-in
Capacity 14 place settings
Dimensions (inches) 23⅞
X 25 X 33⅞
Weight (pounds) 128
Door Color Black, White, Stainless
Tub Stainless Steel
Control Electronic
Programs 6 Cycles

9
LDF9810ST – Steam Dishwasher
Features
T-6
Ultra Large Capacity
Removable Cutlery Rack
Slim Direct-Drive Motor
Hybrid Drying System
Vario Spray System
Self-Cleaning Filter
Dual Intensity™ Wash Cycle
Steam Washing and Steam Delicate™
Light Tough Buttons and Blue LCD
Auto-Off
10
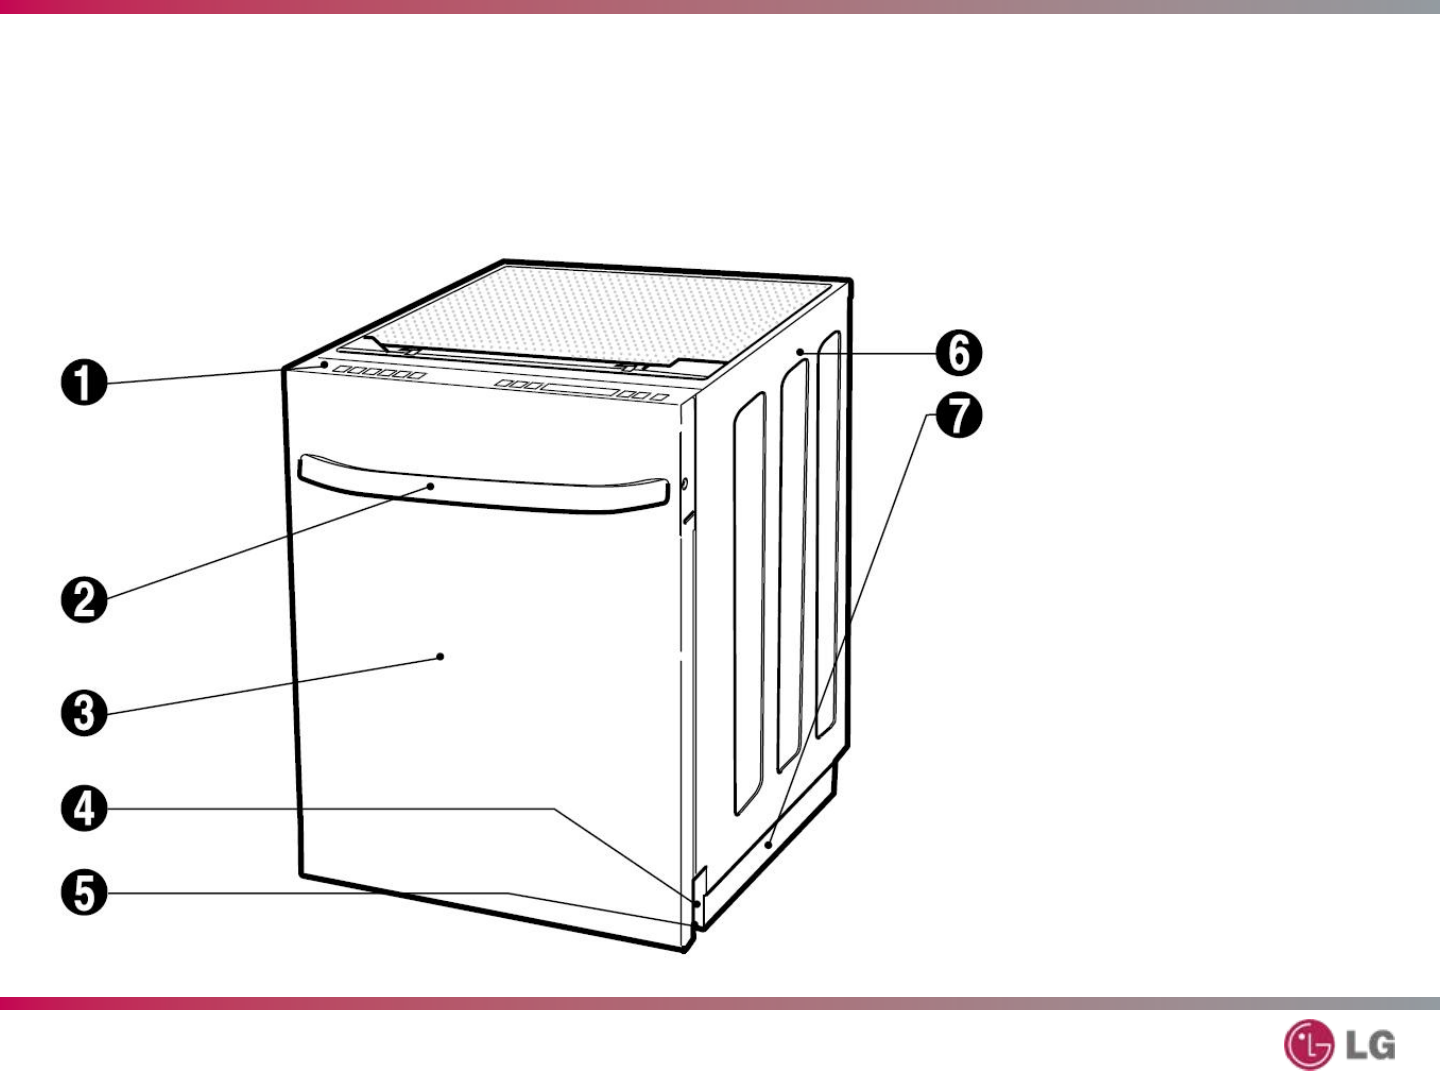
LDF9810ST – Steam Dishwasher
Features
T-7
1. Control Panel
2. Door Handle
3. Front Cover
4. Lower Cover
5. Leveling Foot
6. Side Cabinet
7. Base
11
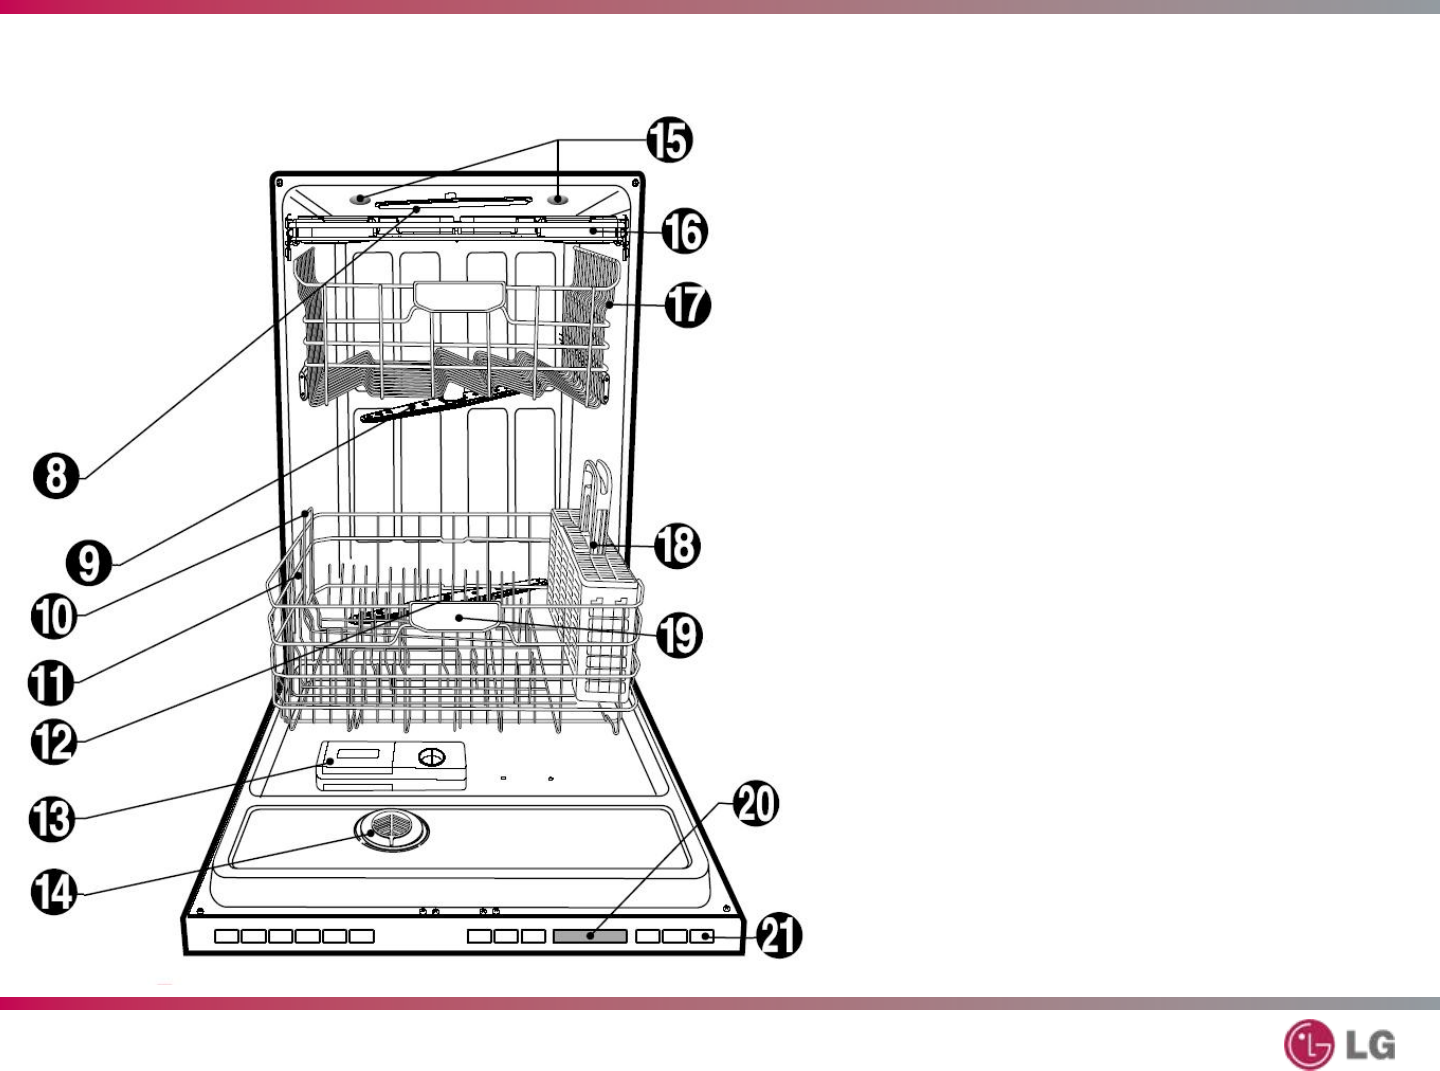
LDF9810ST – Steam Dishwasher
Features
T-7
8. Top Spray Arm
9. Upper Spray Arm
10. Removable Tines
11. Steam Nozzle
12. Lower Spray Arm
13. Dispenser
(Detergent / Rinse Aid)
14. Vapor Vent Cover
15. Tub Lamps
(IllumiTub™)
16. Cutlery Rack
17. Upper Rack
18. Cutlery Basket
19. Lower Rack
20. Blue LCD Display
21. Power Button

12
LDF9810ST – Steam Dishwasher
Installation
T-8
Installation is covered briefly for the servicer who may
need to uninstall and reinstall the dishwasher for repairs.
For new installations, please refer to the installation guide
that was supplied with the dishwasher.
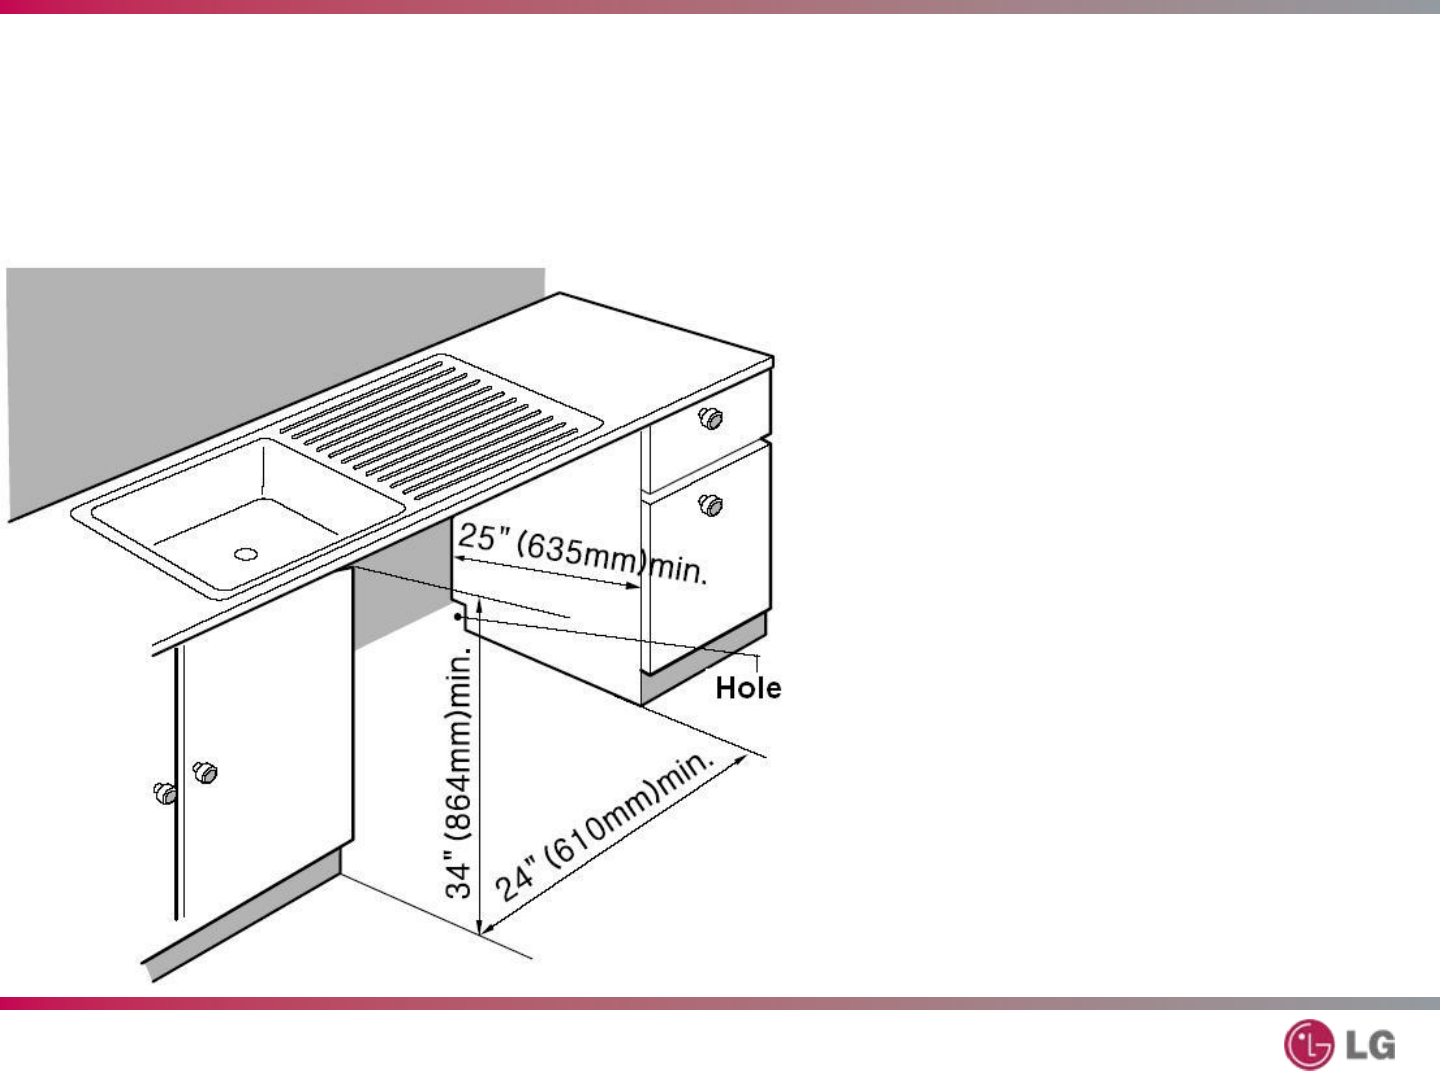
13
LDF9810ST – Steam Dishwasher
Installation
T-8
Drill a 1½” hole on either
side to allow for the drain
hose, water supply hose,
and electrical cable. The
opening must be in an area
within 4” (100 mm) of the
back wall and 4” (100 mm)
of the floor.
If there is a floor in the
cabinet under the sink, it
will be necessary to cut
through it to connect the
water, drain, and electrical
cable under the sink.

14
LDF9810ST – Steam Dishwasher
Installation
T-8
The dishwasher must be
supplied with 120 VAC 60 Hz
1Ø current as indicated on the
rating plate and connected to a
properly fused and grounded
dedicated 20-amp circuit.
The wire or water supply can
be fed from either side, and
both from the same side,
depending upon source
location.
They must be run in the
channels under the dishwasher,
as shown in the drawing.

15
LDF9810ST – Steam Dishwasher
Electrical Installation
T-9
The dishwasher can be hardwired if necessary and if
permitted by local code. We recommend the use of a
dishwasher installation kit, available at most hardware and
home supply stored. This kit includes a cordset, a flexible
water supply line, and the elbow connector necessary to
connect it.
Using a cordset requires an electric outlet under the sink
accessible when the dishwasher is installed. The cordset
makes it easier to disconnect the dishwasher from power
while working on it and makes removal and replacement
easier. As stated earlier, installation requires a properly fused
and grounded dedicated circuit.

16
LDF9810ST – Steam Dishwasher
Water Supply Preparation
T-9
The dishwasher may be connected to either HOT or COLD
water. If the hot water can not maintained below 149° F, the
dishwasher must be connected to the cold water supply.
Lay out the water supply line as indicated on page 14 of the
training manual. Use sealing tape or joint compound to
avoid leaks.
17
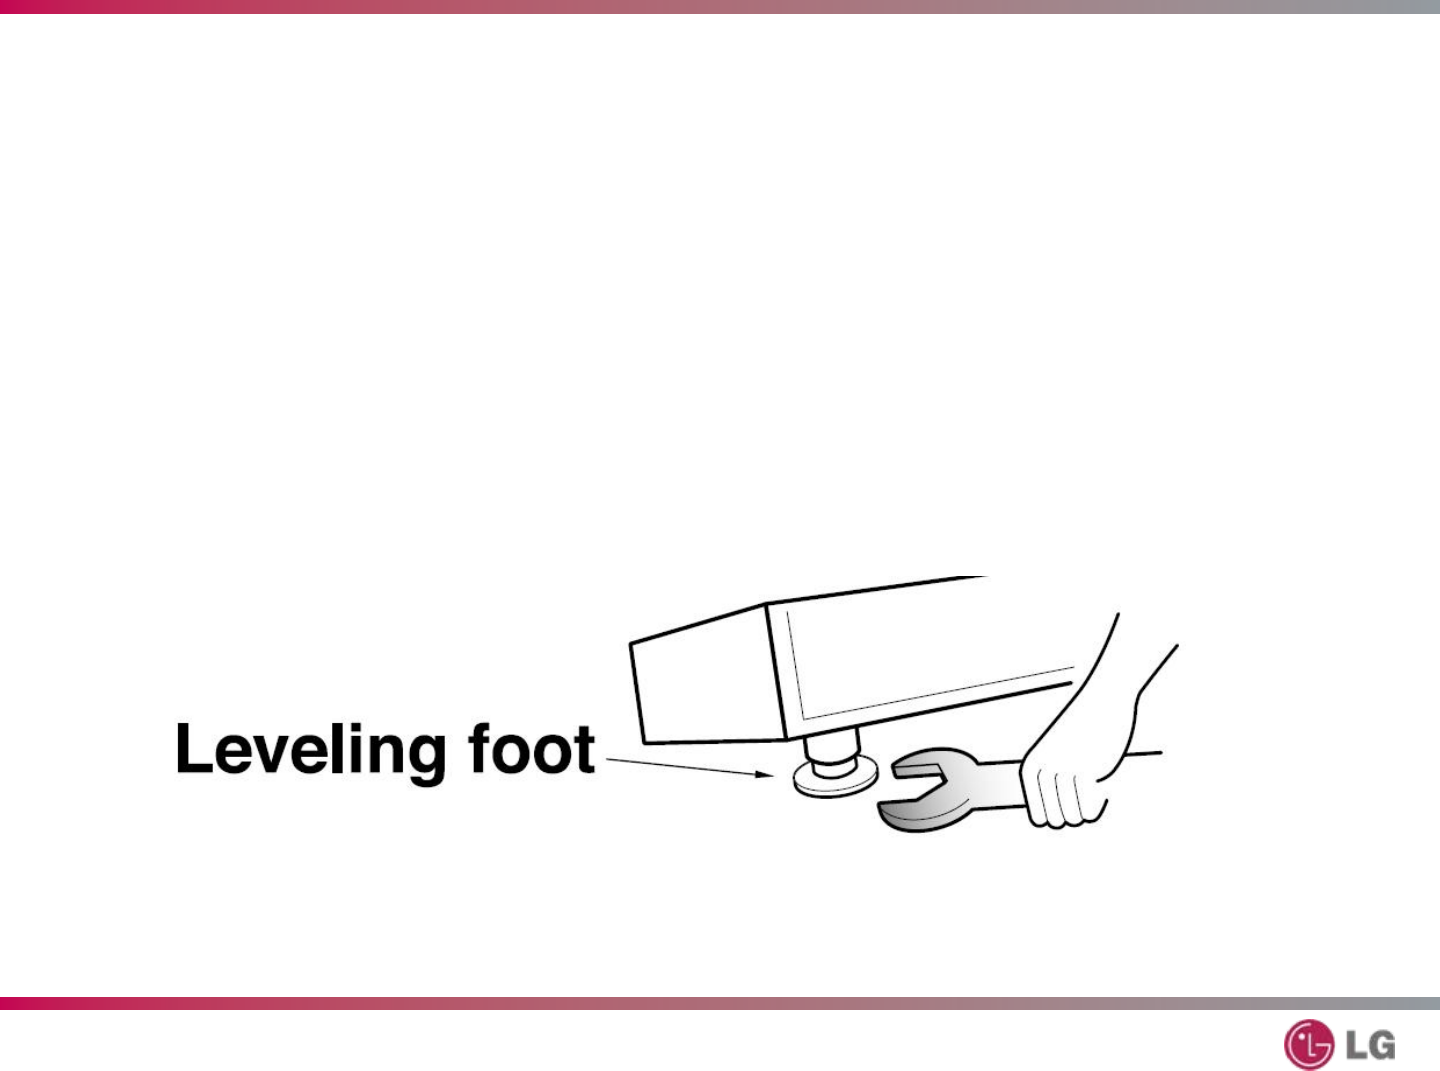
LDF9810ST – Steam Dishwasher
Installation
T-9
Adjust the legs to the required height for the dishwasher
to slide under the countertop and be level. Check the
level using a spirit level.
18
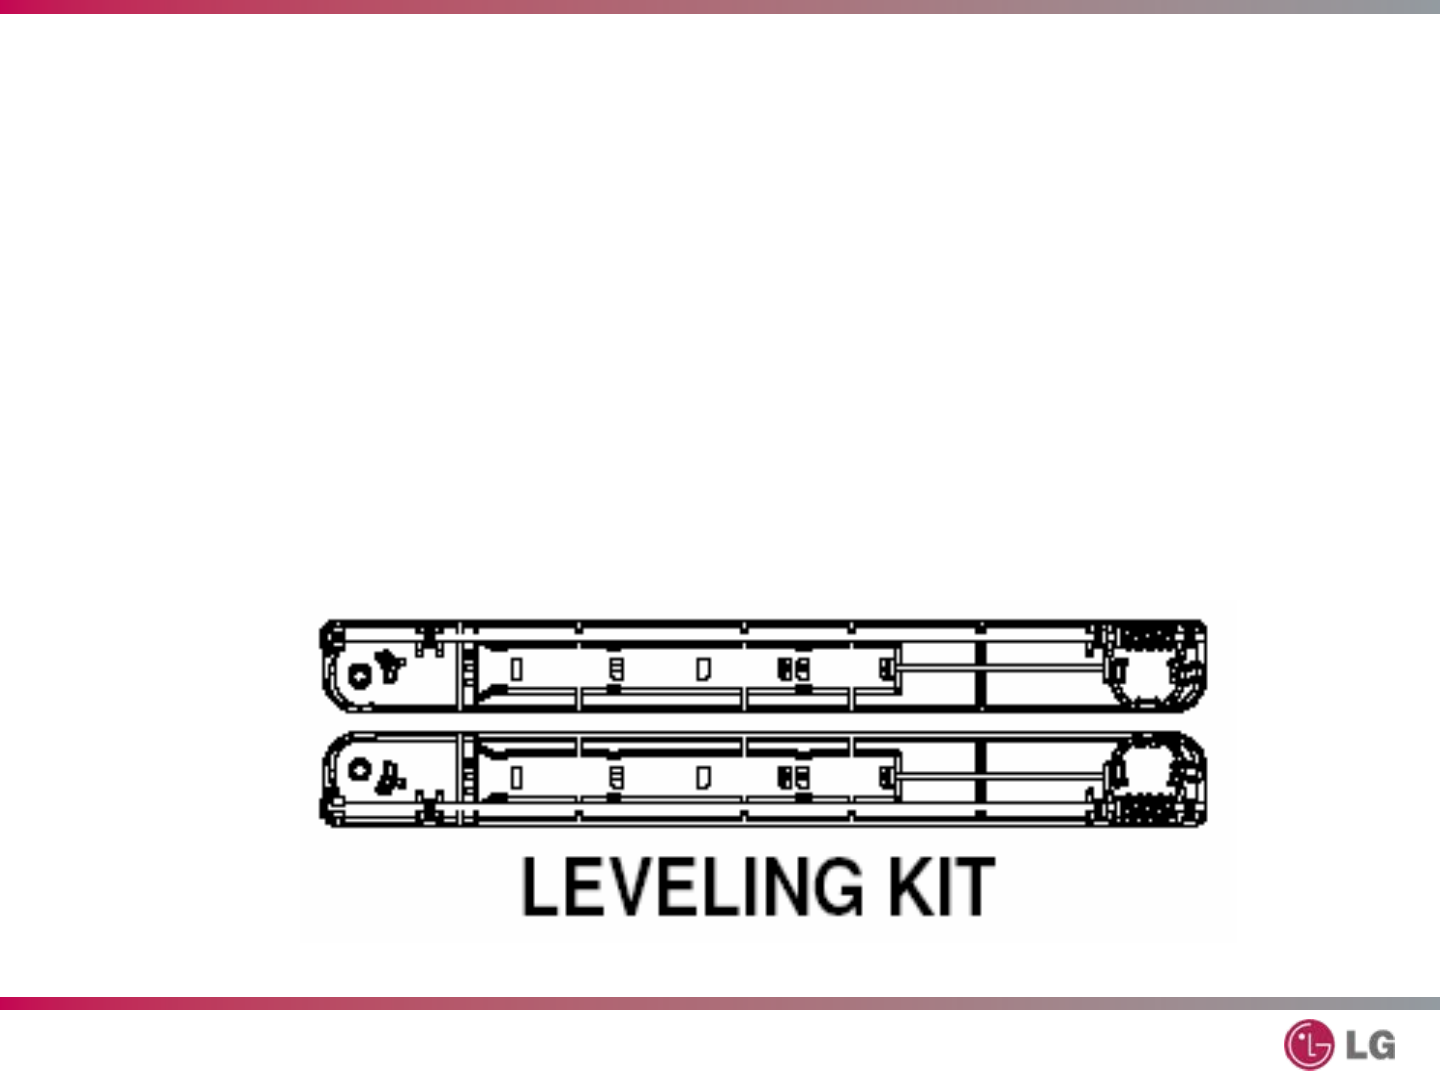
LDF9810ST – Steam Dishwasher
Installation
T-9
Attach the leveling feet kit to allow for fine tuning when the
dishwasher is pushed into place.
19
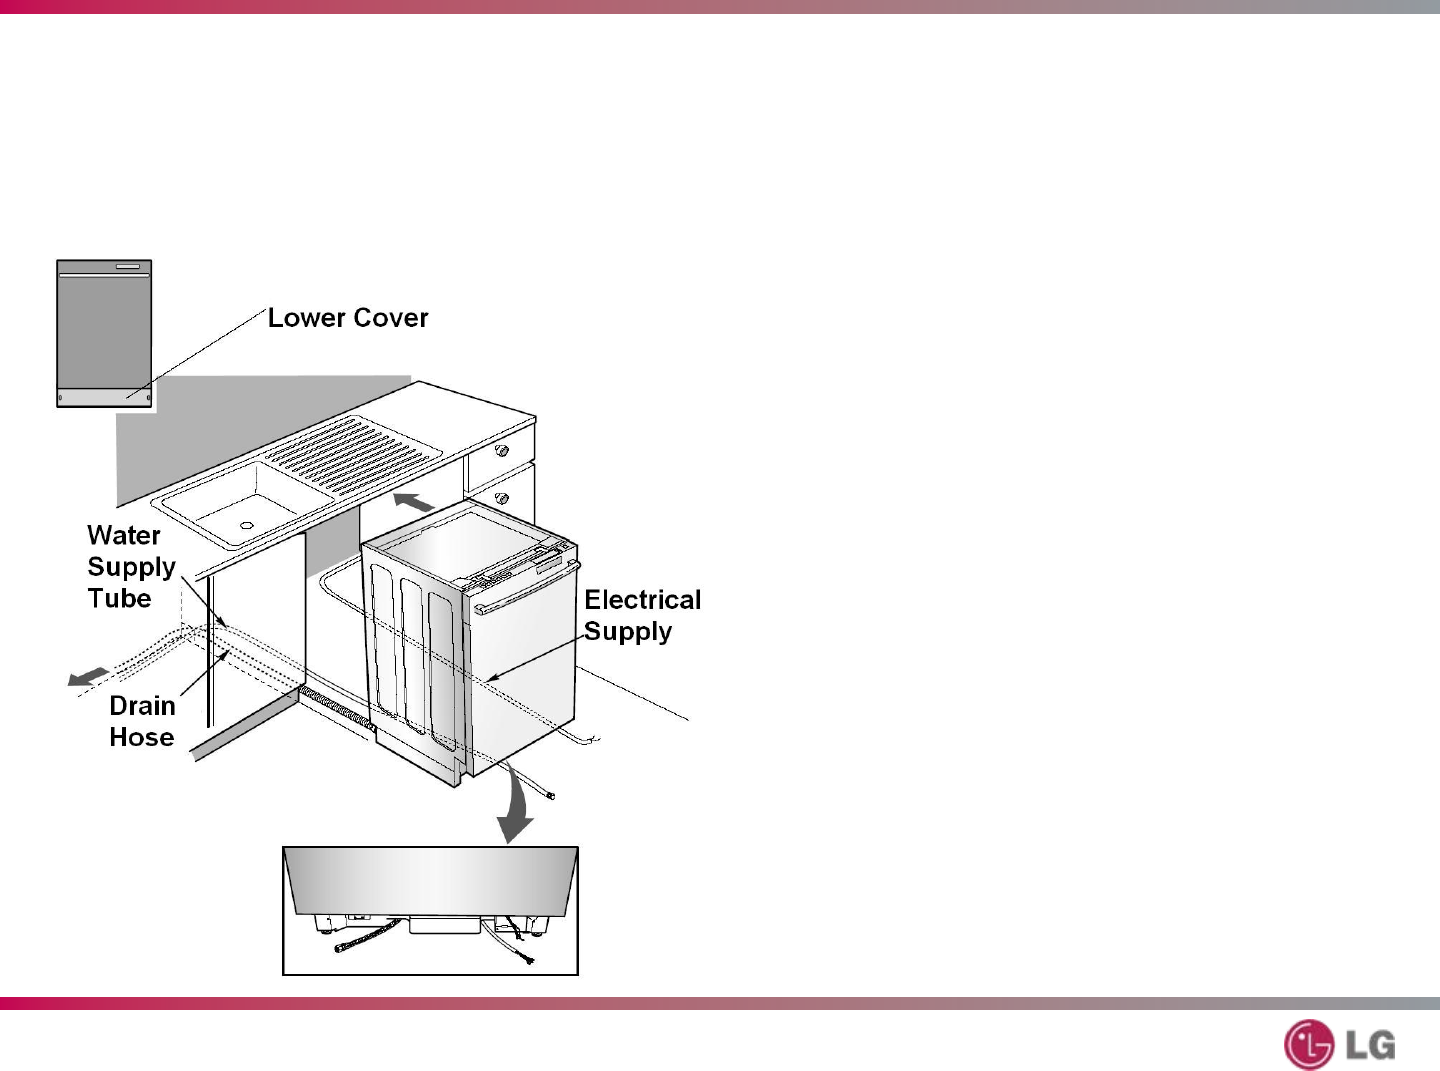
LDF9810ST – Steam Dishwasher
Installation
T-9
To complete the installation:
Remove the lower cover.
Make sure the legs are adjusted
and the dishwasher is level.
Lay out the electrical cable,
water supply tube, and drain
hose as shown.
Slide the dishwasher carefully
back into place.
Make the appropriate
connections, as directed on
subsequent slides.

20
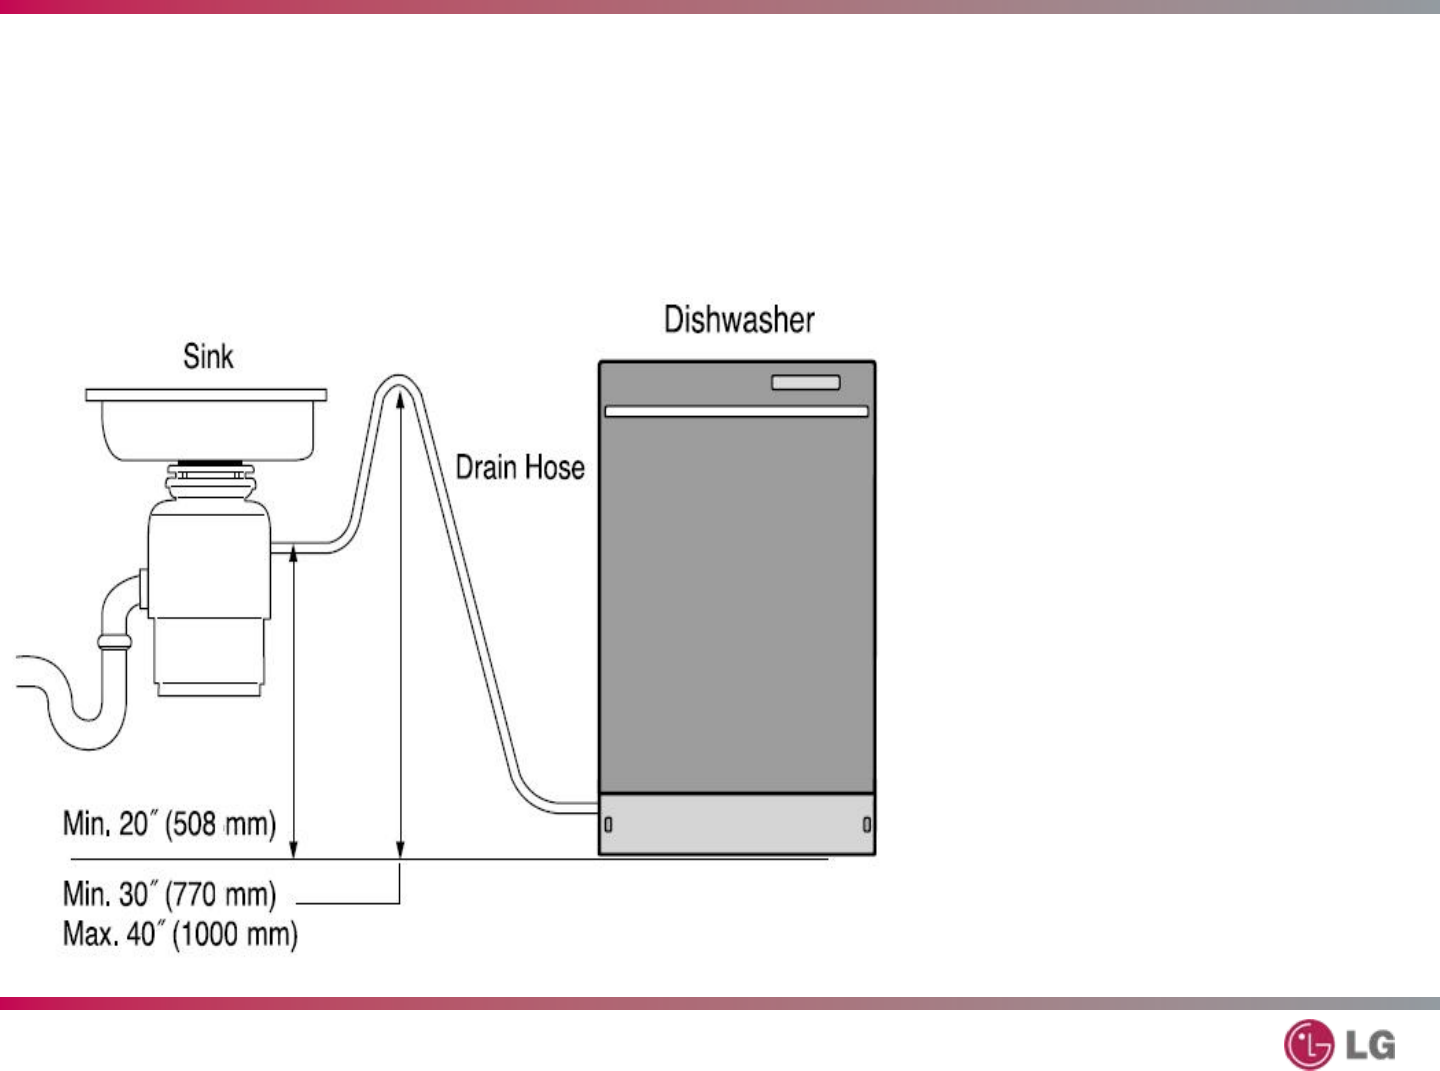
LDF9810ST – Steam Dishwasher
Drain Connection
T-10
The drain hose must be connected in a manner that
meets the local plumbing code. If the end of the drain
hose does not fit the available connector, an adapter
may be obtained from a local hardware or plumbing
supplier.
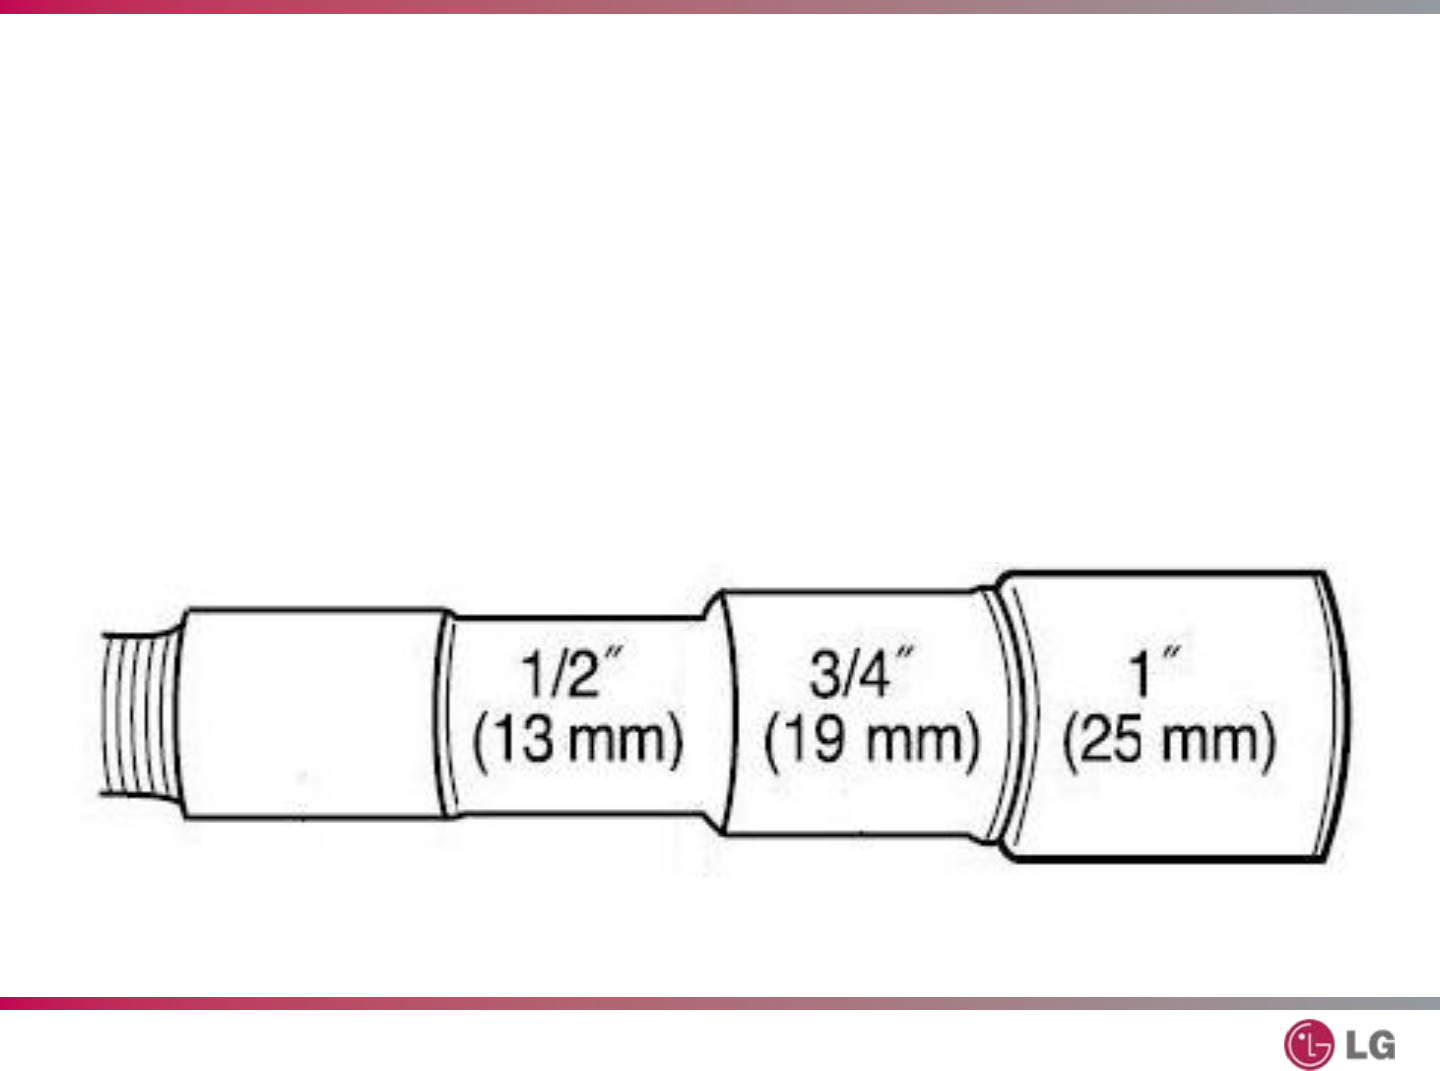
21
LDF9810ST – Steam Dishwasher
Drain Connection
T-10
The rubber end can be cut off for the correct size attachment.
22
LDF9810ST – Steam Dishwasher
Drain Connection
T-10
Most garbage
disposers have a
dishwasher drain fitting
built in to them. If your
installation does not
include a disposer, you
can use a special tail
piece with a drain
attachment available at
most hardware and
home supply stores.
23
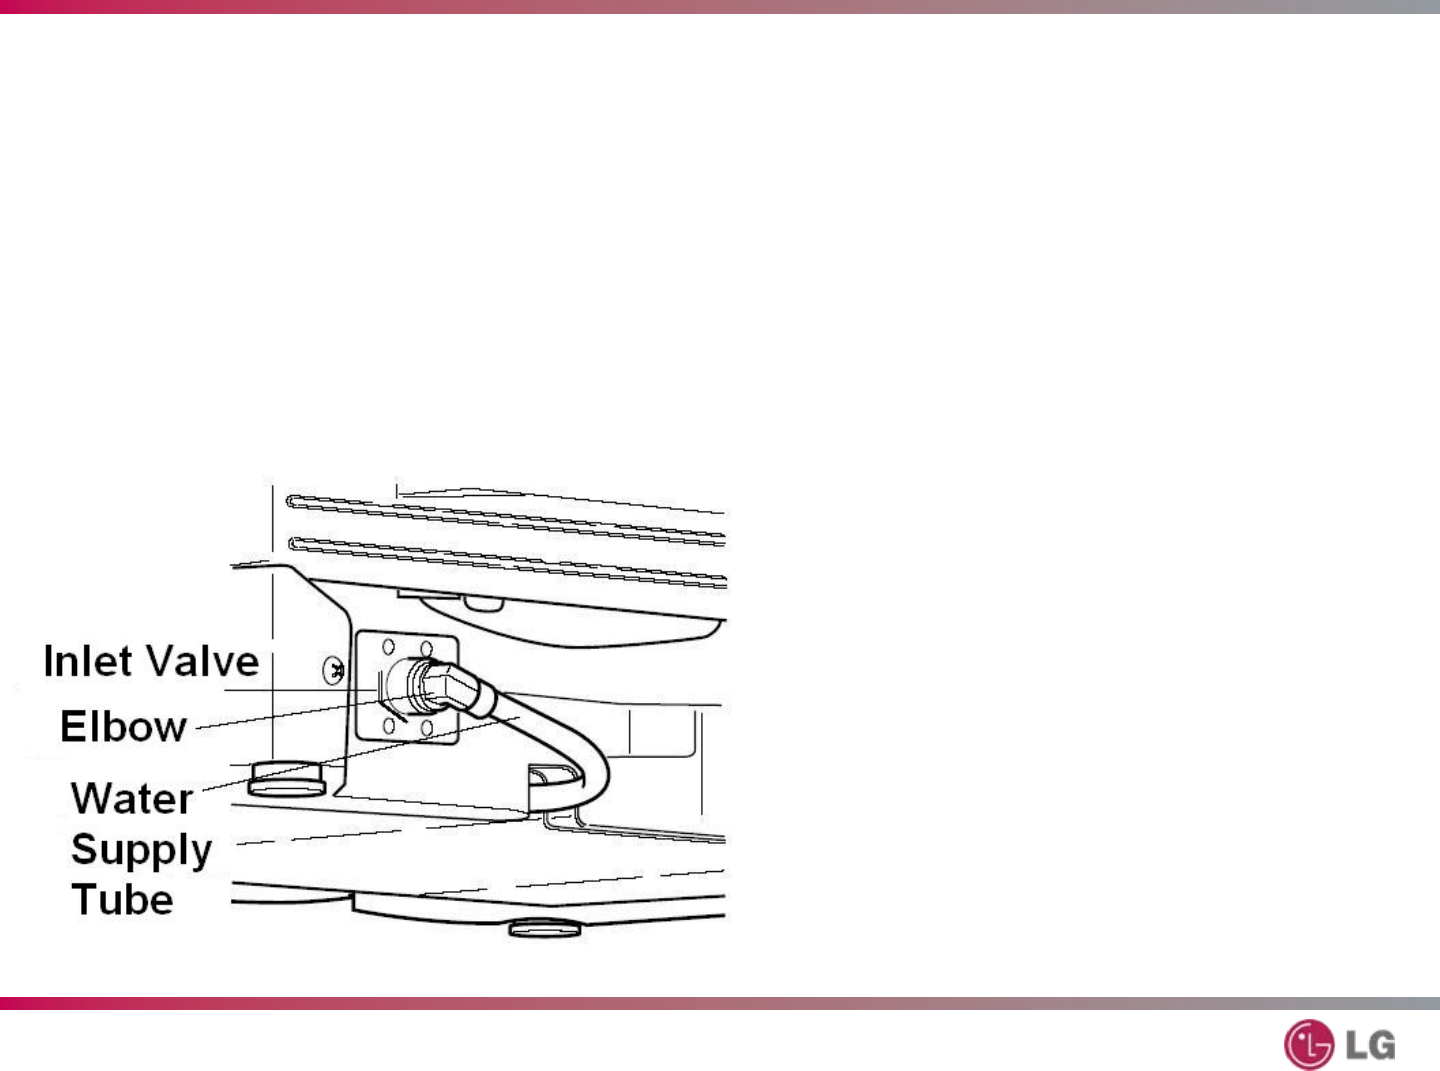
LDF9810ST – Steam Dishwasher
Water Connection
T-10
Turn off the water supply and
connect the elbow to the inlet
valve.
Connect the flexible supply
tube to the elbow.
Use sealing tape to make all
connections.
Make sure the supply line is
not kinked.
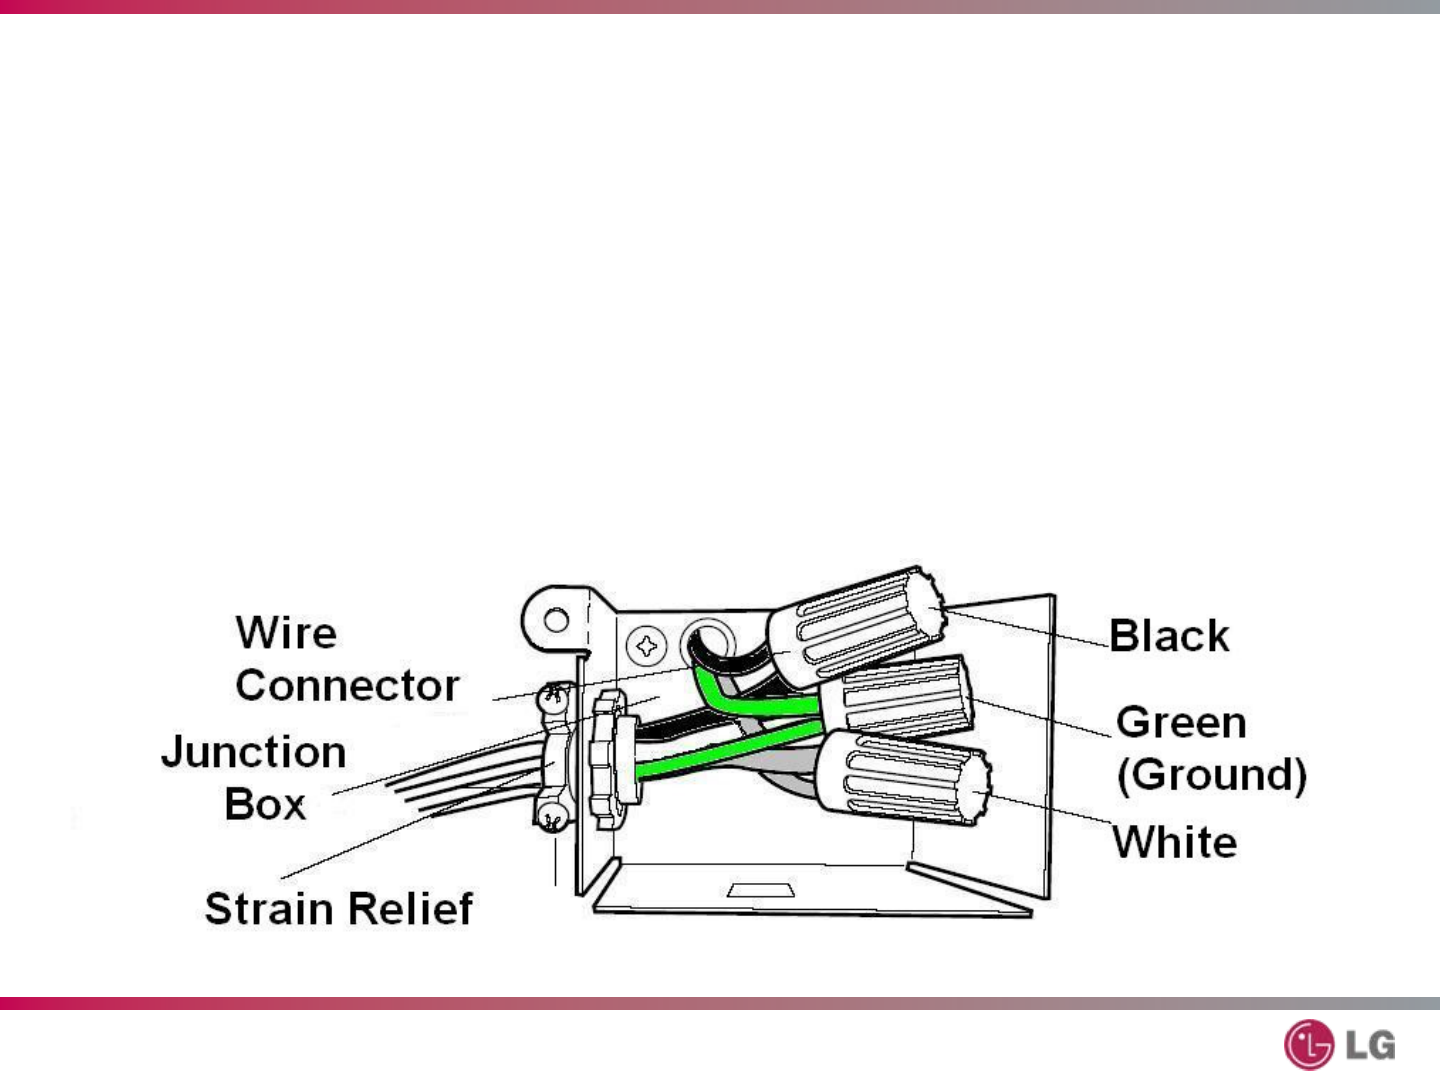
24
LDF9810ST – Steam Dishwasher
Electrical Connection
T-10
Use wire connectors and replace the cover on the junction
box. (12/2 w/ ground, 20-amps)

25
LDF9810ST – Steam Dishwasher
Final Installation
T-11
1. Turn on the water at the valve under the sink.
2. Turn on the power at the fuse or breaker (or plug in
the cordset at the outlet under the sink.
3. Run the dishwasher through one QUICK cycle
to check the operation and to check for water leaks.
4. Replace the lower cover.
When the door is closed, the top edge with the controls
should be under the countertop.

26
LDF9810ST – Steam Dishwasher
Control Panel
T-12
SOAK Heavily soiled loads, with cooked-on foods
POWER SCRUB Normal soil level, everyday loads
NORMAL Normal soil level, everyday loads
STEAM DELICATE Washing delicate items, crystal, stemware
QUICK Light soil level, recently used dishes
and cutlery
RINSE ONLY Rinses only, no washing
27
LDF9810ST – Steam Dishwasher
Control Panel
T-12
STEAM Adds steam to SOAK, POWER SCRUB,
and Normal cycles
RINSE Pressing cycles through Sanitary, Extra Rinse,
or both
SPRAY Pressing cycles through Strong, Medium,
or Soft spray
HALF LOAD Pressing chooses either upper or lower rack
instead of both
continued

28
LDF9810ST – Steam Dishwasher
Control Panel
T-12
DELAY START Each press delays the start by one hour
up to 24 hours
CHILD LOCK Press and hold to engage/disengage
CANCEL Press and hold STEAM DELICATE
and NORMAL
continued
29
LDF9810ST – Steam Dishwasher
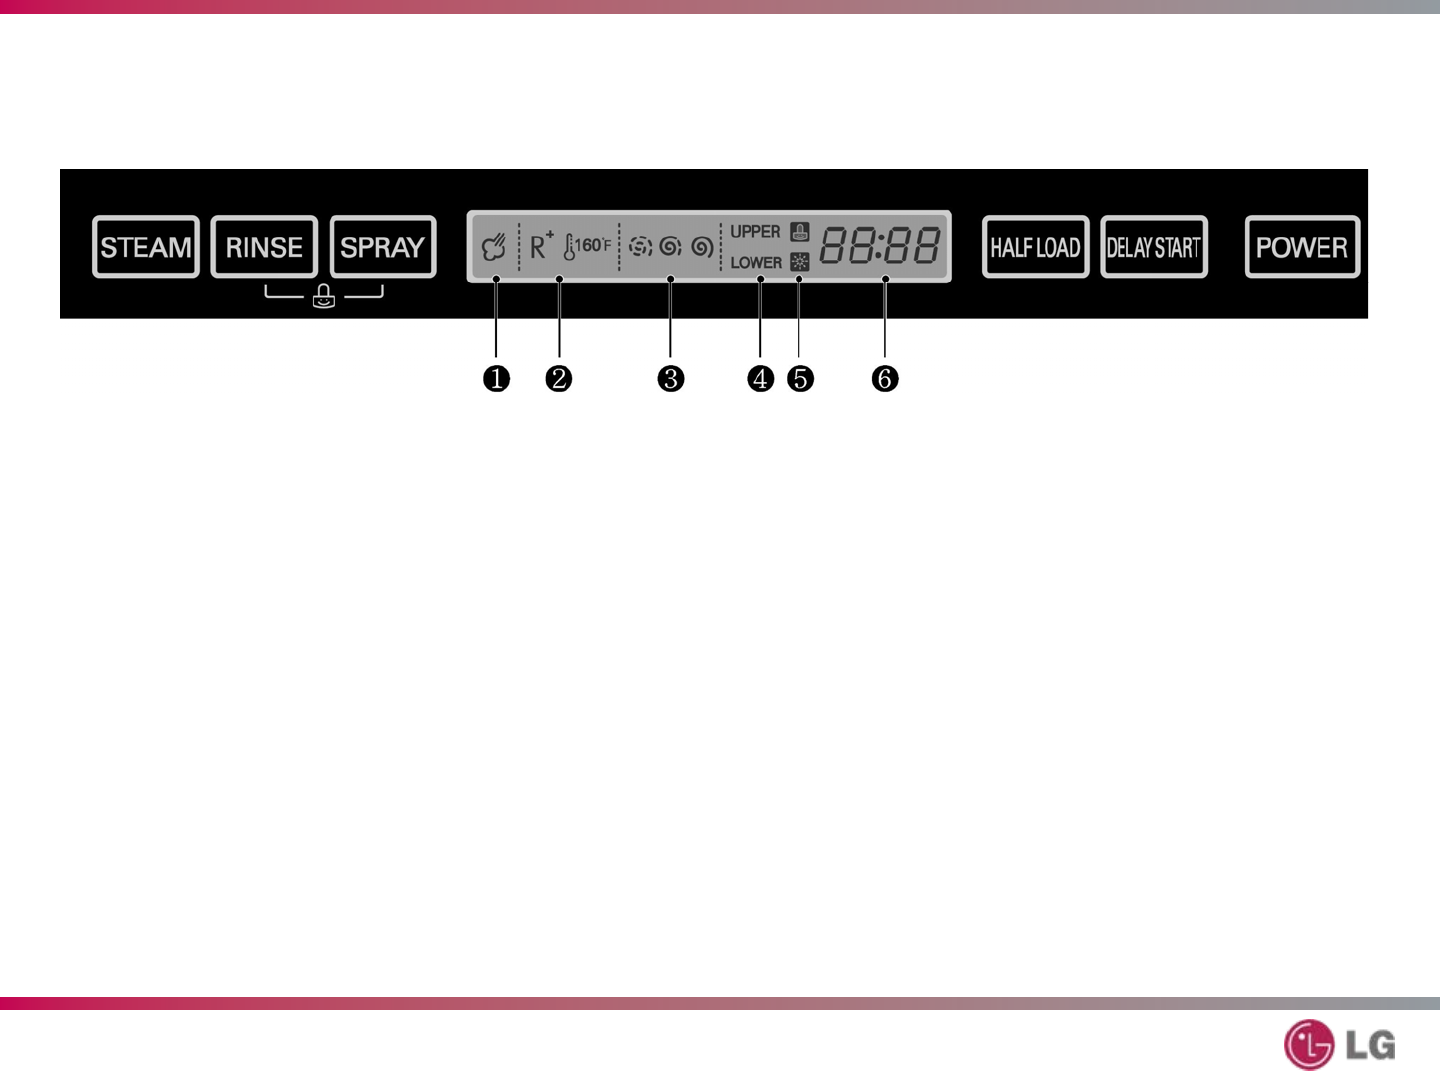
nSteam option indicator – blinks if
selected
oRinse indicator – blinks if selected
pSpray indicator – blinks if selected
qHalf load indicator
rChild Lock – illuminated when
engaged
Rinse Aid – illuminated when refill is
required
sTime remaining before cycle ends
Control Panel
T-12
30
LDF9810ST – Steam Dishwasher
Programs
T-13

31
LDF9810ST – Steam Dishwasher
Dual Intensity Spray Wash
T-13
The spray intensity for the upper lower racks is
programmable by the customer. By selecting SOFT SPRAY
for the upper rack and STRONG SPRAY for the lower rack,
you can wash delicate items like stemware on top while
washing pots and pans on the bottom.

32
LDF9810ST – Steam Dishwasher
Dual Intensity Spray Wash
T-13
1. Press and hold SPRAY to illuminate the indicator.
2. Press SPRAY to set the intensity for the upper rack.
(Strong/Medium/Soft/Off)
3. Press HALF LOAD to confirm the selection for the
upper rack.
4. Press SPRAY to set the intensity for the lower rack.
5. Press HALF LOAD to confirm the selection for the
lower rack.
6. Select other options.
7. Close the door.
8. The dishwasher will start.

33
LDF9810ST – Steam Dishwasher
Adding Detergent
T-14
Detergent must be added to the dispenser before the start
of every cycle except RINSE ONLY. The detergent
chamber holds 1.4 oz. (40 g) when full.
If the dishes are only moderately dirty, it might be possible
to use less detergent.
34
LDF9810ST – Steam Dishwasher
Adding Detergent
T-14
Press the latch button to
open the detergent chamber.
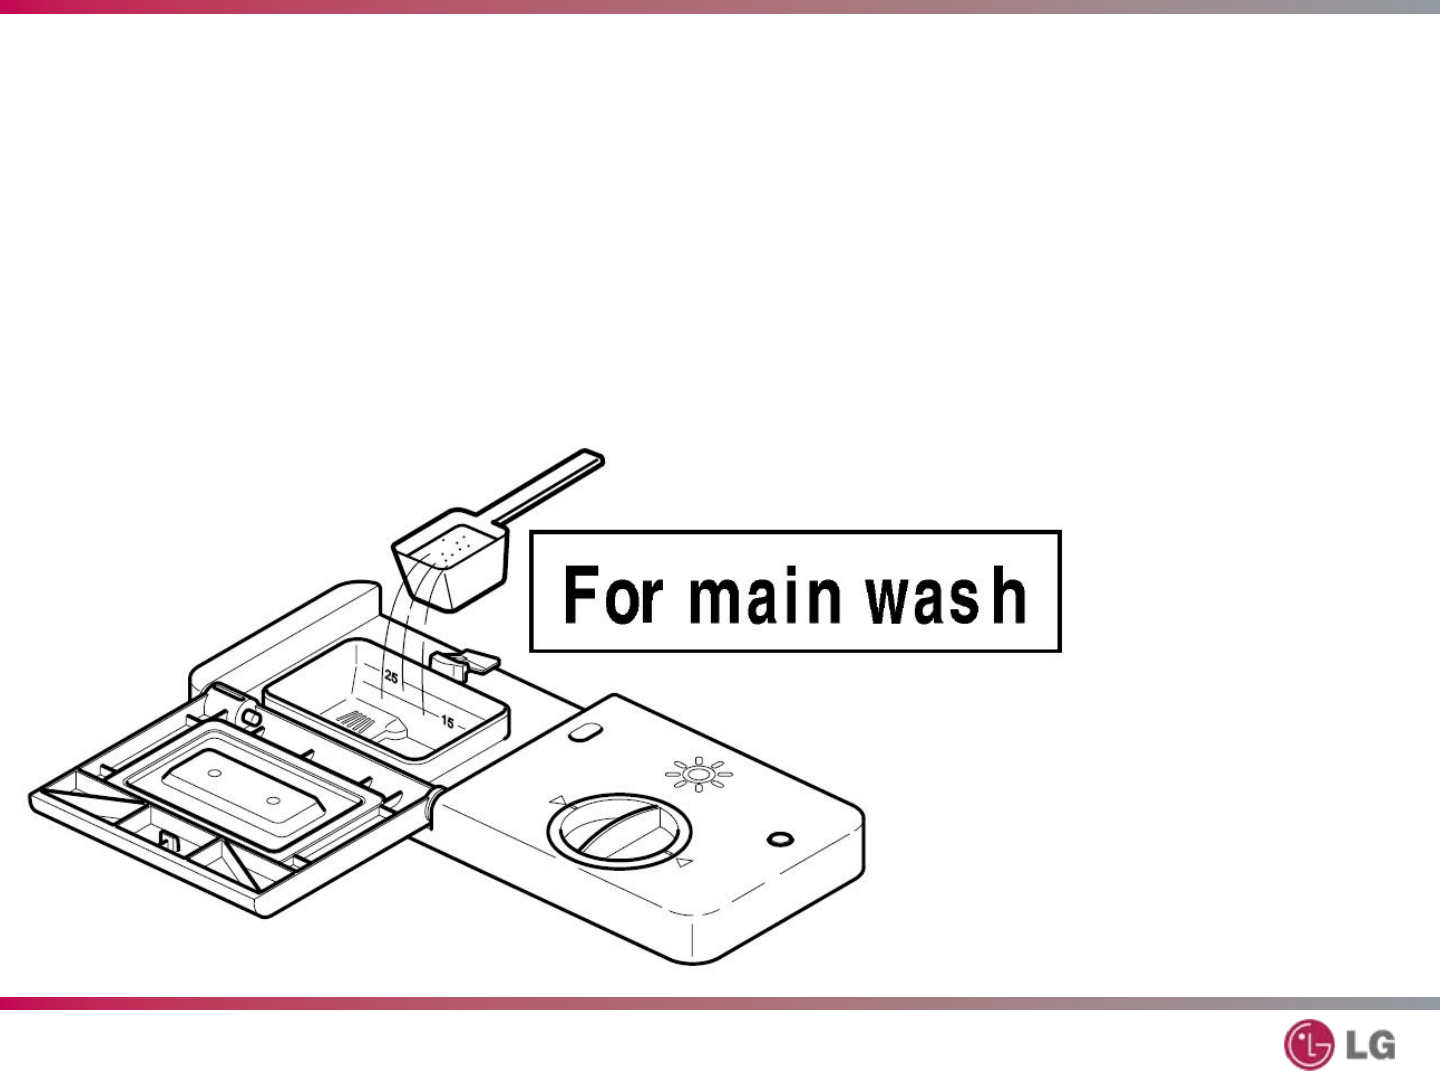
35
LDF9810ST – Steam Dishwasher
Adding Detergent
T-14
Add detergent in the proper amount.
(See chart, later slide.)
Close the cover and be sure the
latch clicks.
36
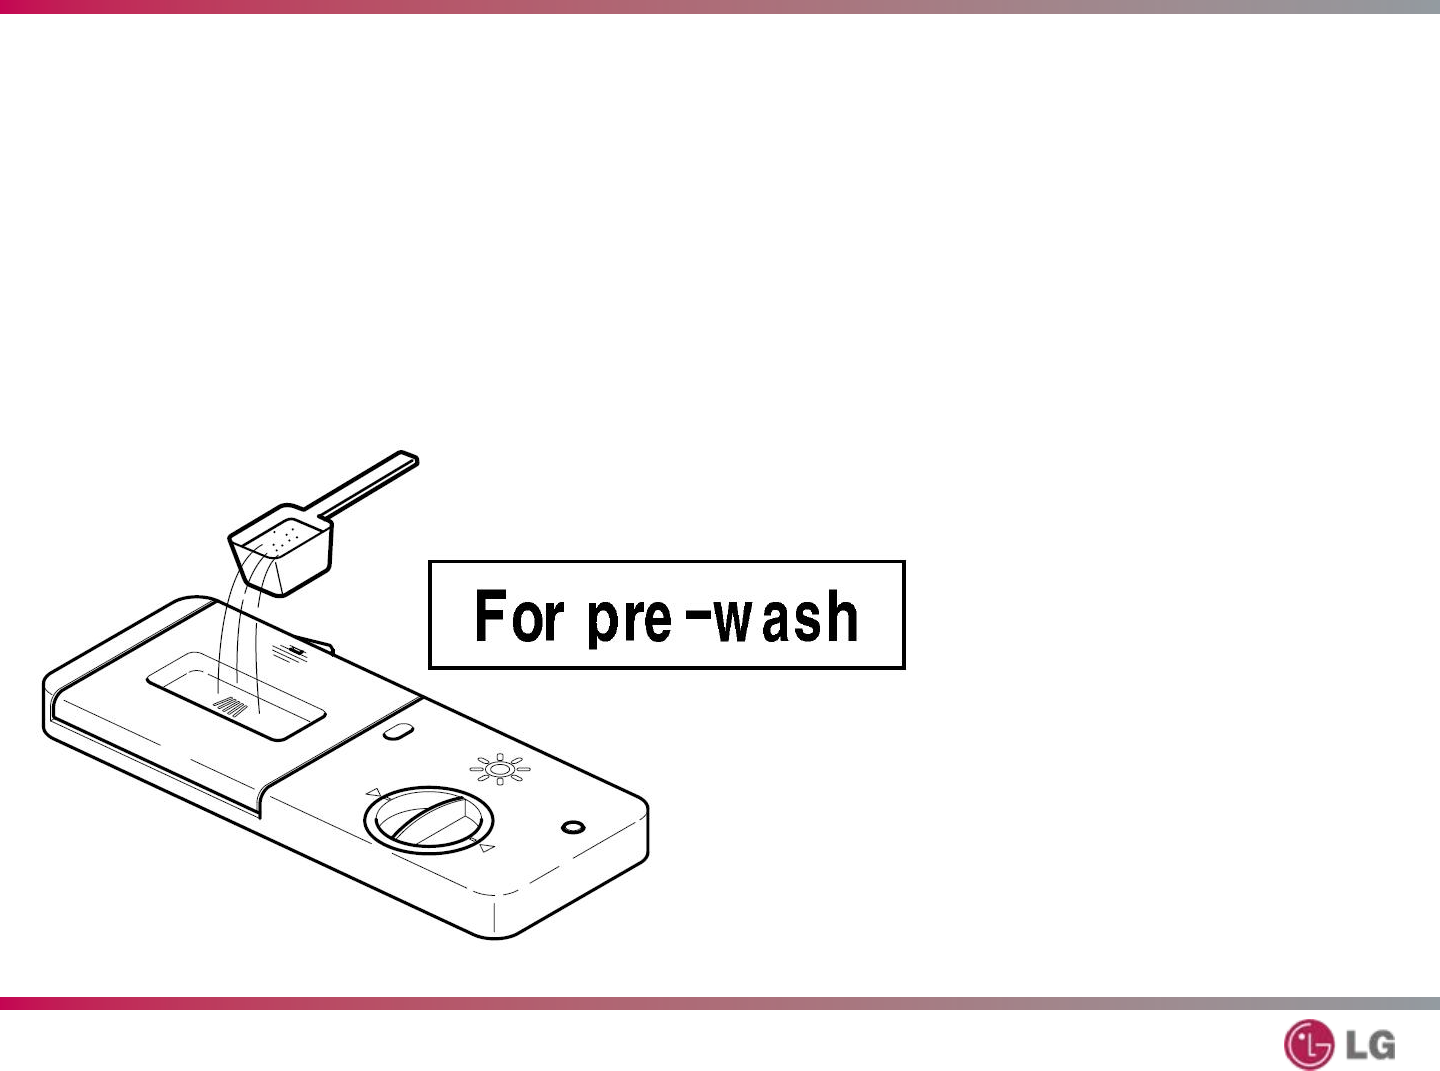
LDF9810ST – Steam Dishwasher
Adding Detergent
T-14
If pre-wash cycle is selected (in
SOAK or POWER SCRUB only),
add the appropriate amount of
pre-wash detergent in the recess
on the door cover. When you
close the dishwasher door, the
detergent will fall into the tub.
NOTE: Too much detergent can
leave a film on the dishes.
37
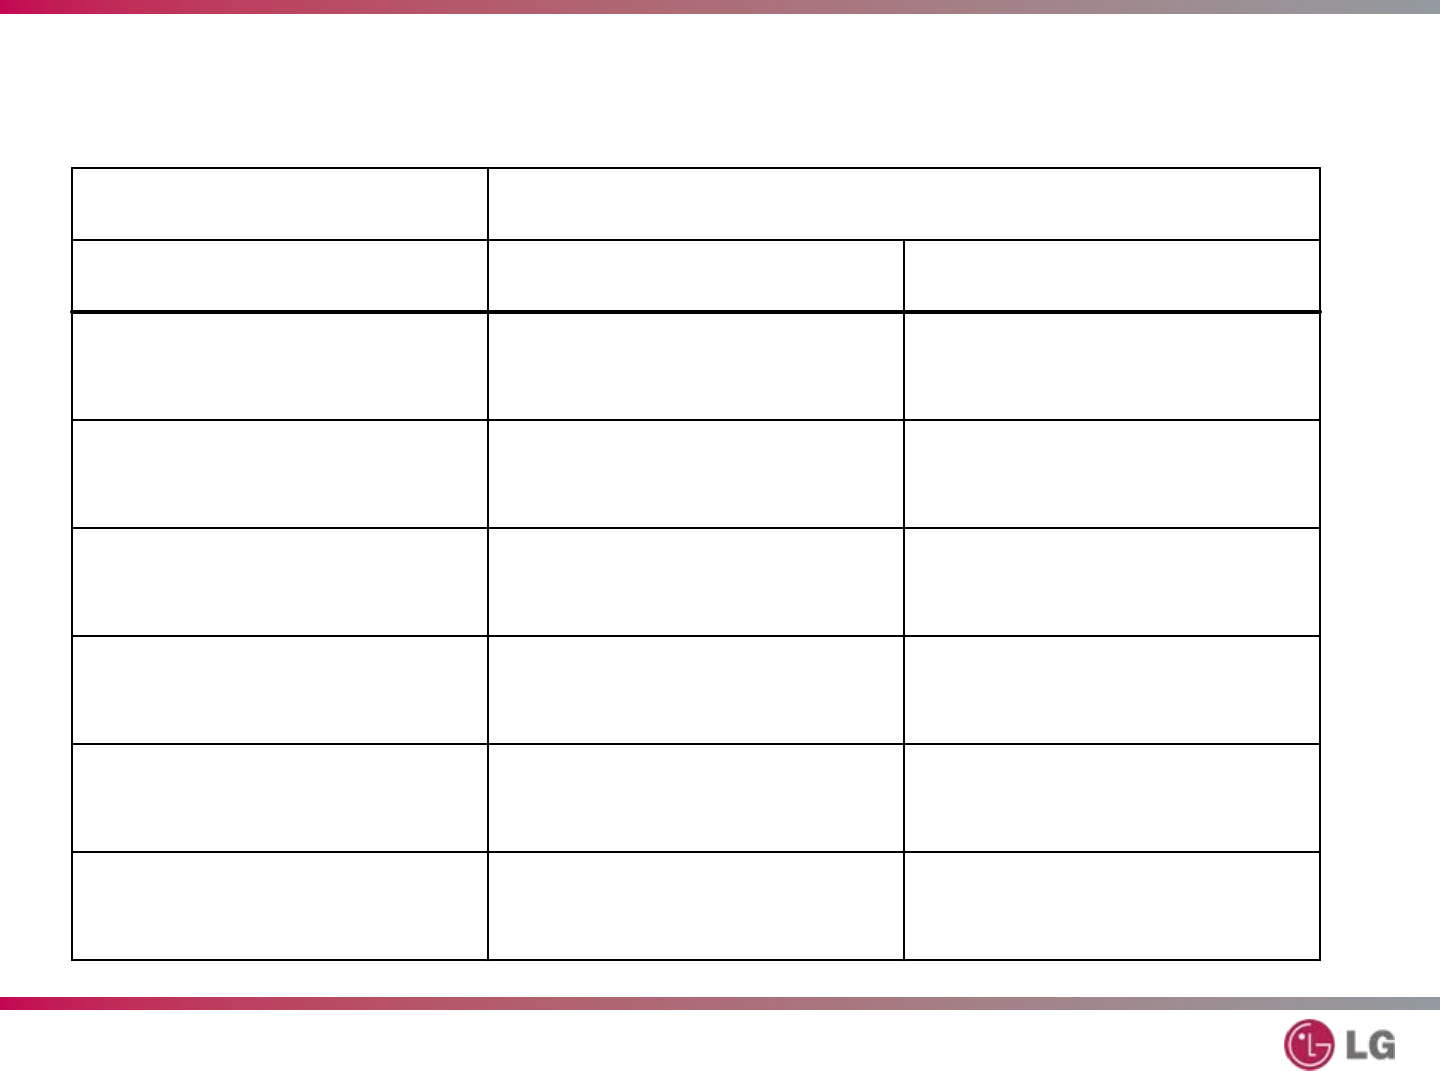
LDF9810ST – Steam Dishwasher
Detergent Chart
T-14
CYCLE Amt. Detergent
Soak Full (0.35 oz.) ¾ full (1.05 oz.)
Power Scrub Full (0.35 oz.) ¾ full (1.05 oz.)
Normal None ½ full (0.7 oz.)
Steam Delicate None ½ full (0.7 oz.)
Quick None ¼ full (0.3 oz.)
Rinse Only None ½ full (0.7 oz.)
38
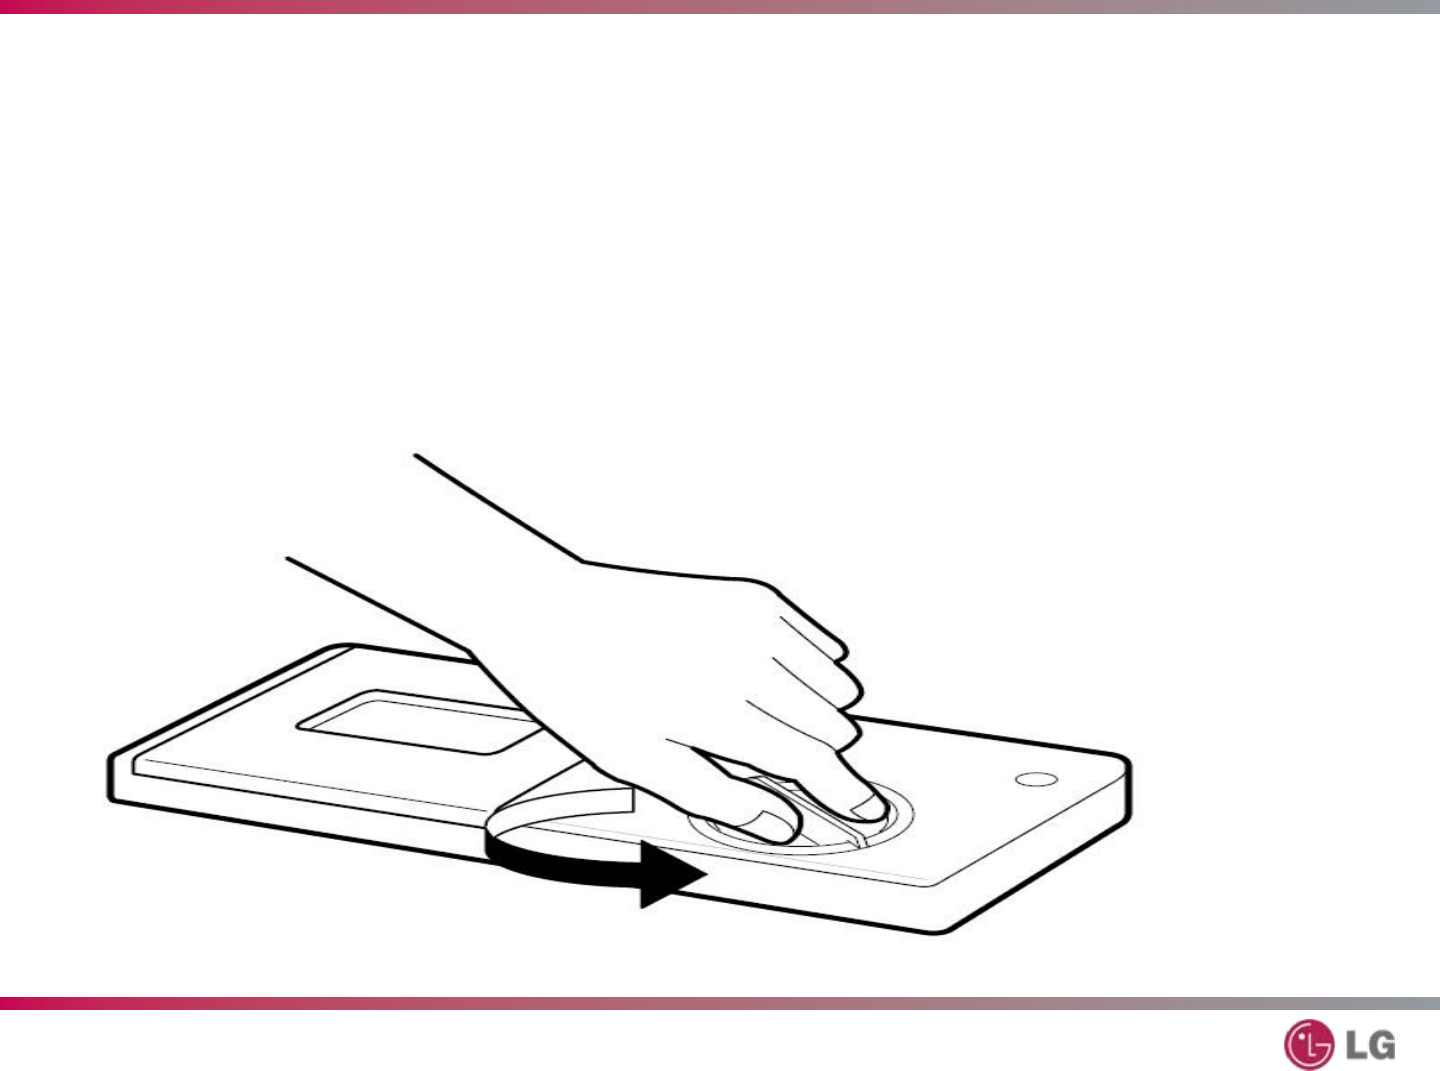
LDF9810ST – Steam Dishwasher
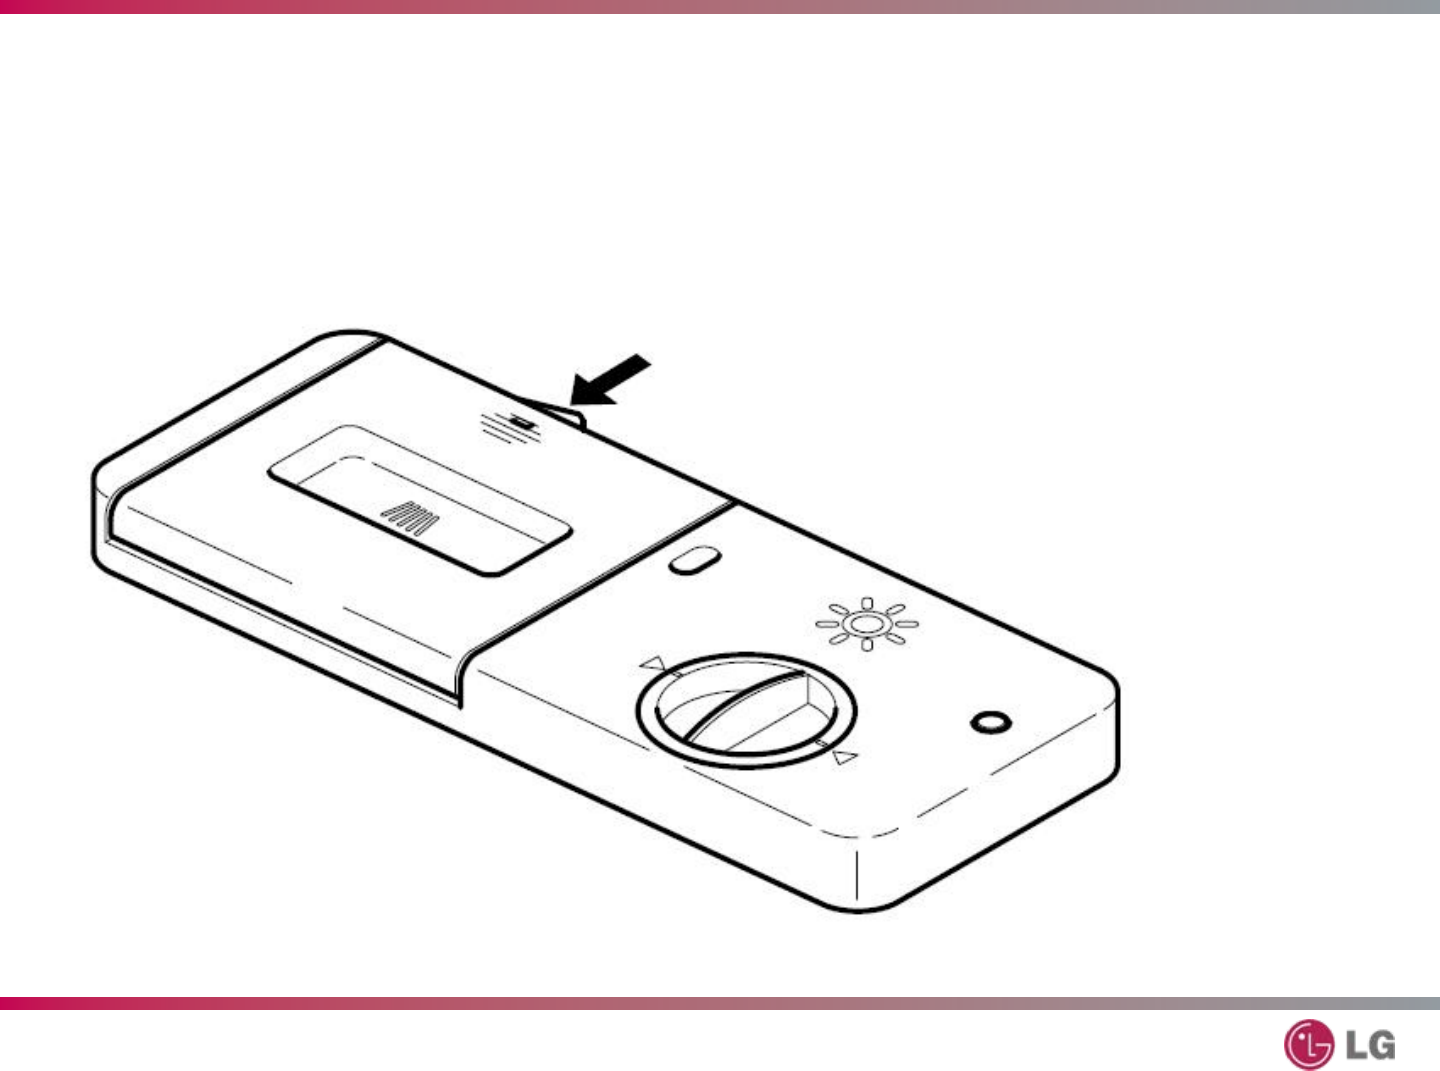
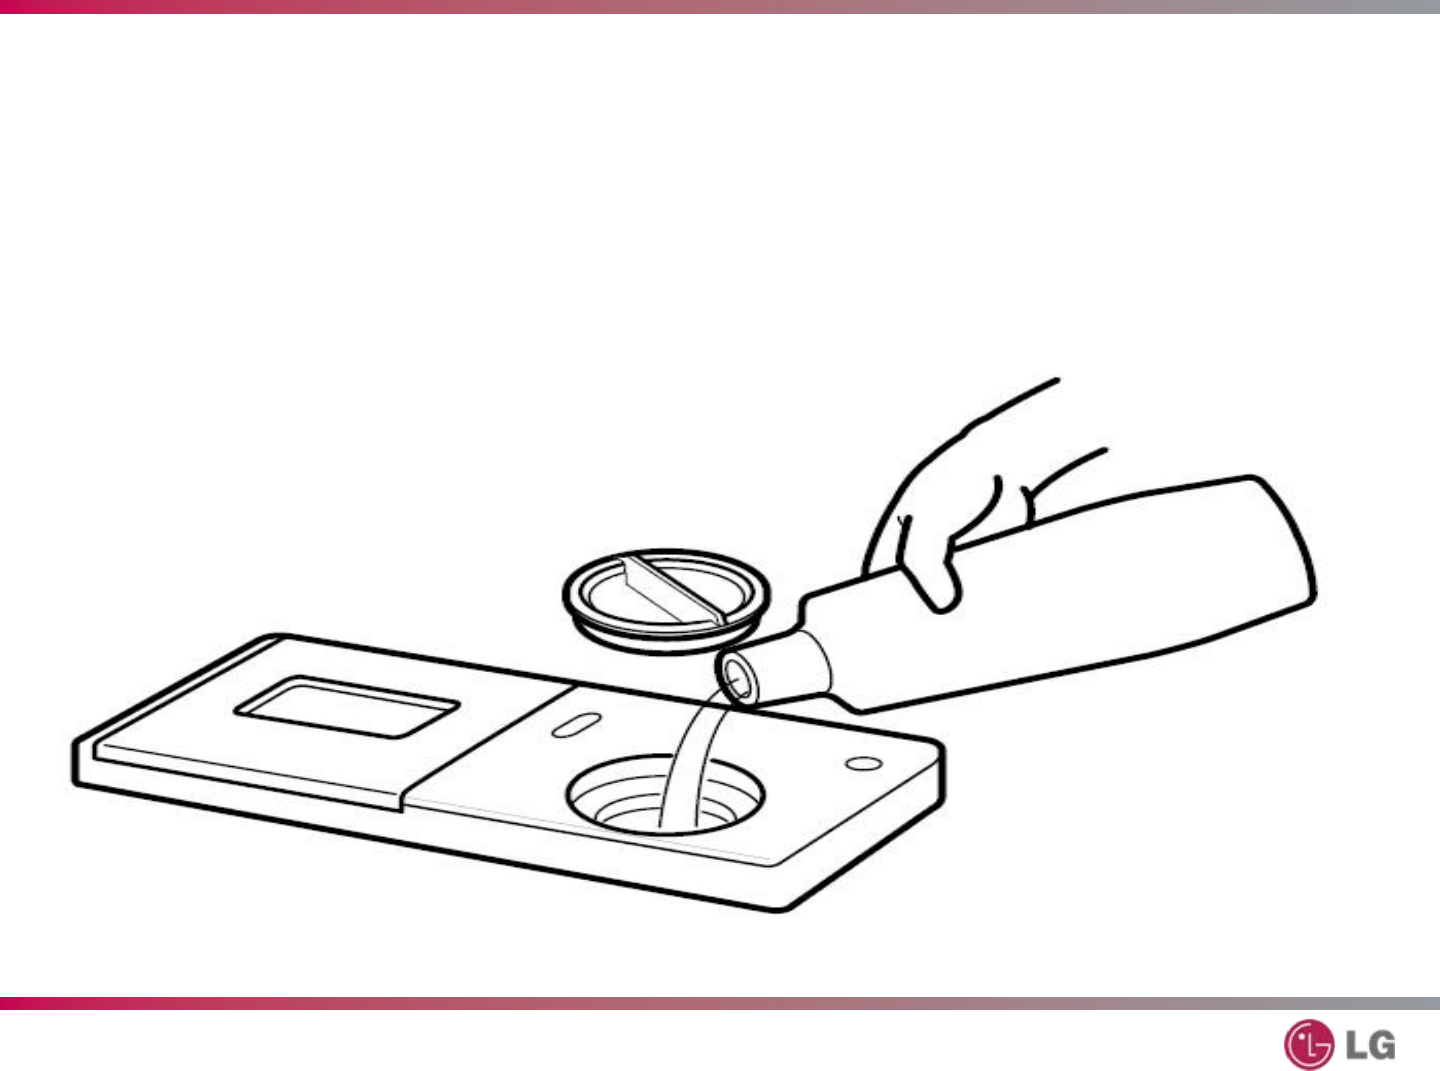
Adding Rinse Aid
T-15
Turn the round cap
counterclockwise and remove it.
39
LDF9810ST – Steam Dishwasher
Adding Rinse Aid
T-15
Fill the reservoir. It holds 4.8 oz. (145 ml)
Replace the cap and lock it.
40
LDF9810ST – Steam Dishwasher
Adding Rinse Aid
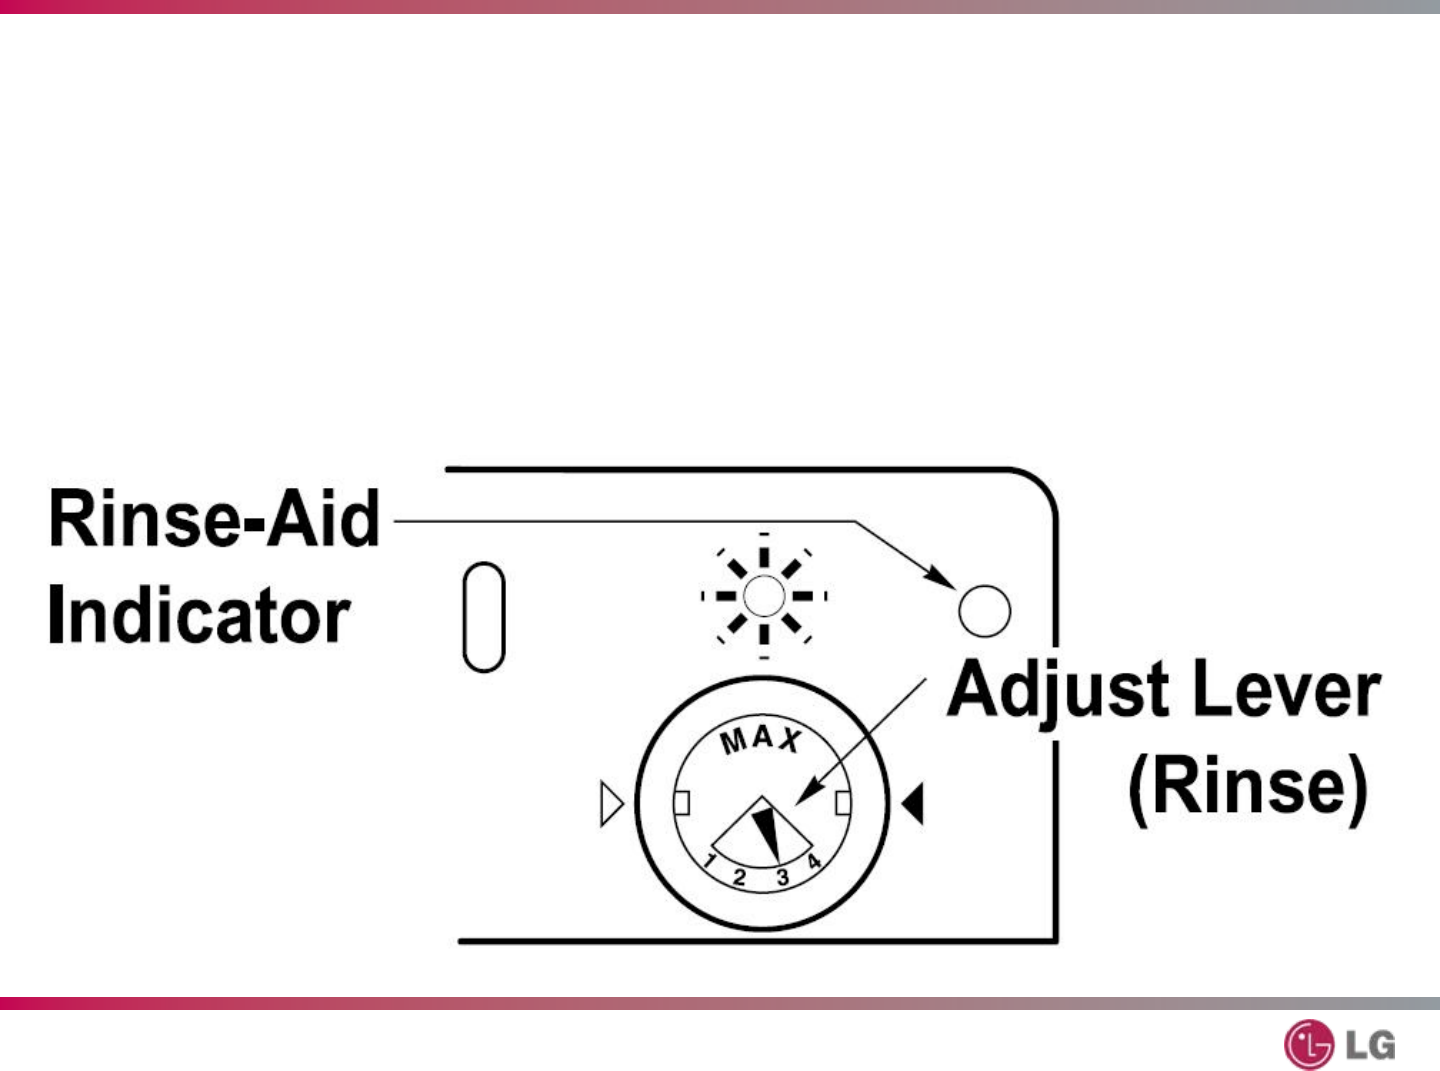
T-15
Adjust the rinse-aid setting
as necessary.

41
LDF9810ST – Steam Dishwasher
Adding Rinse Aid
T-15
The factory setting for rinse aid dispensing is 3.
Too little rinse aid contributes to spotting, streaking, and
poor drying performance. Too much rinse aid causes
foaming, which leads to poor washing performance.
How often you refill the dispenser depends upon your
washing habits, including the rinse aid setting, the number
of loads per month you wash, and other factors.
The indicator light will illuminate when the level is low at the
start of a load.
42
LDF9810ST – Steam Dishwasher
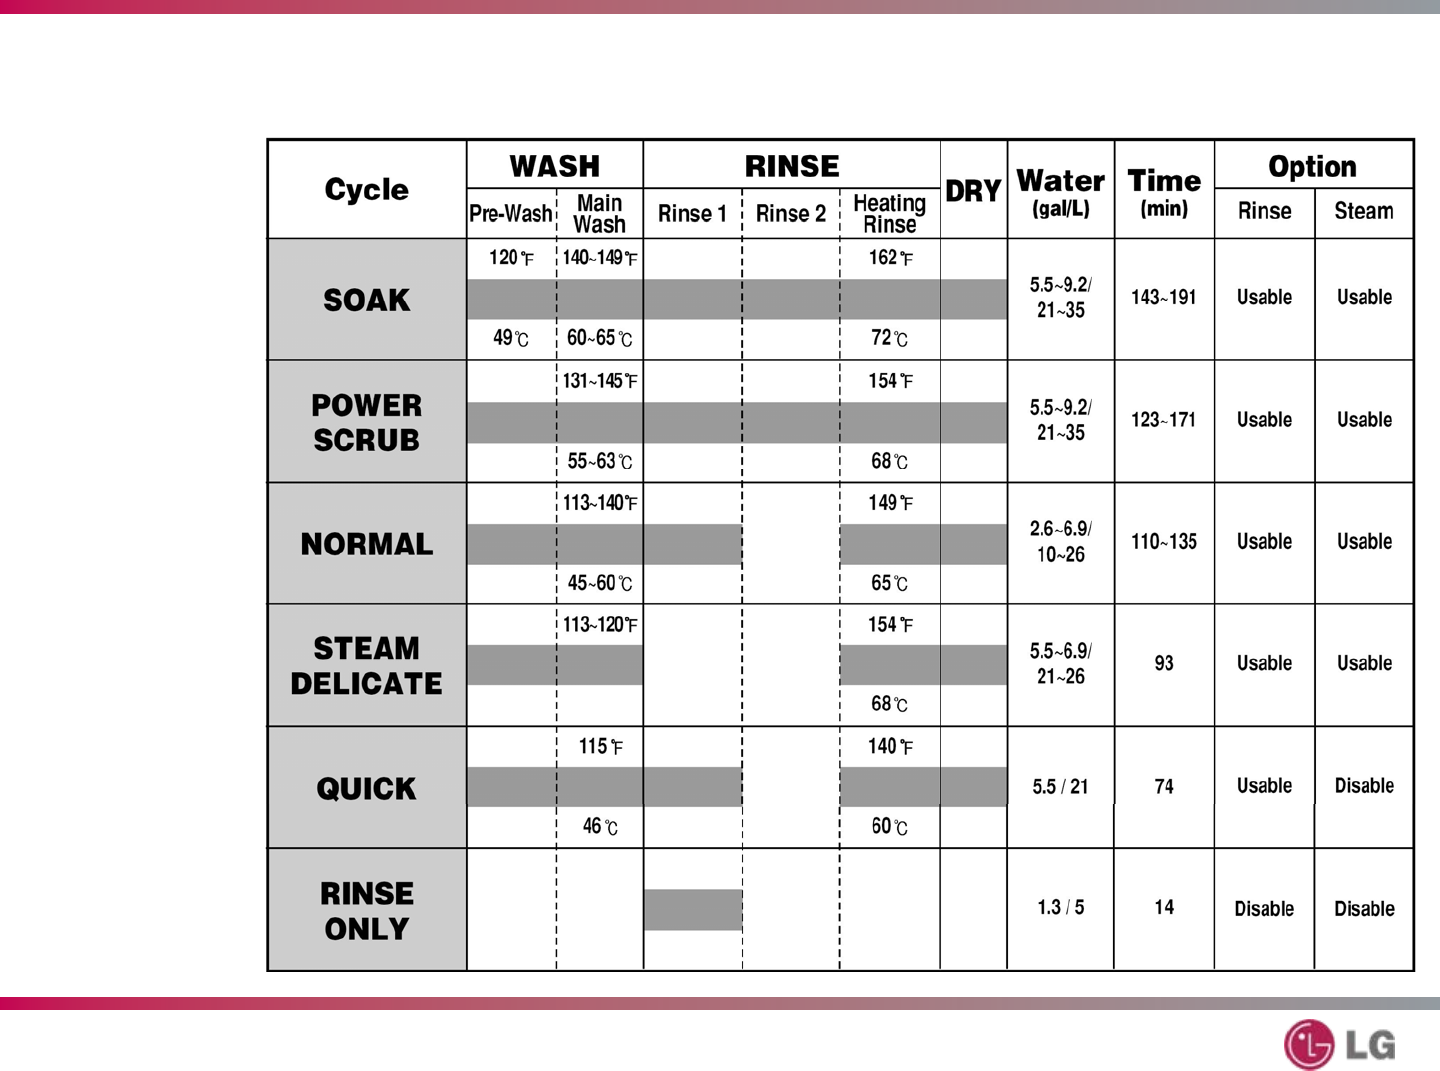
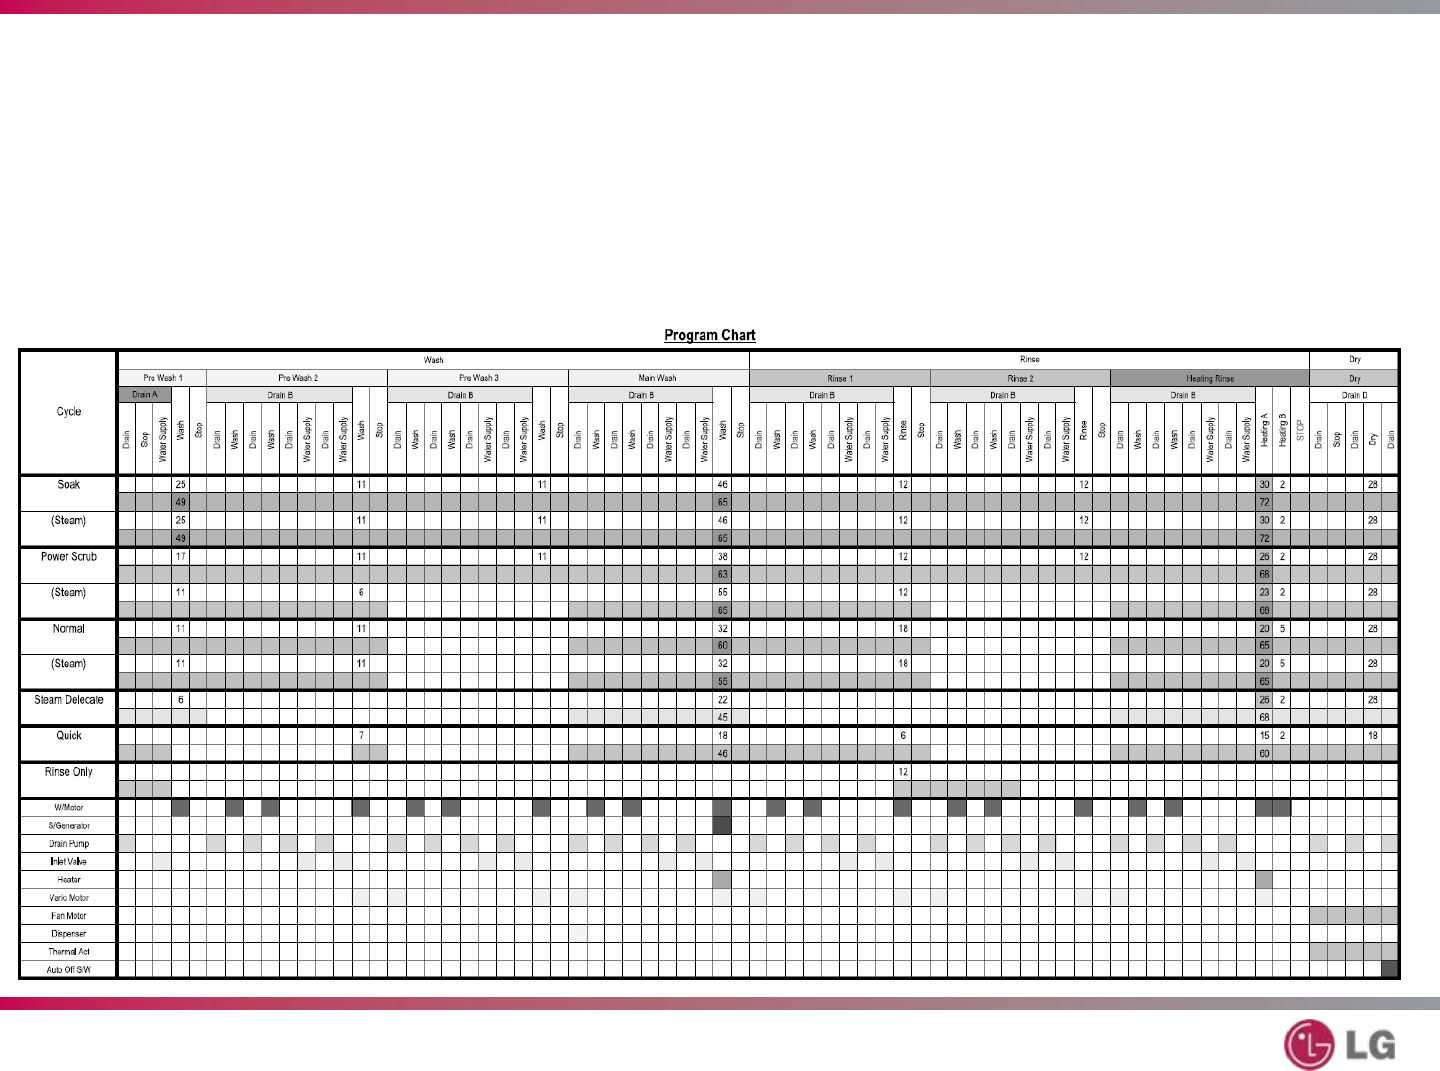
Program Chart
T-16
43
LDF9810ST – Steam Dishwasher
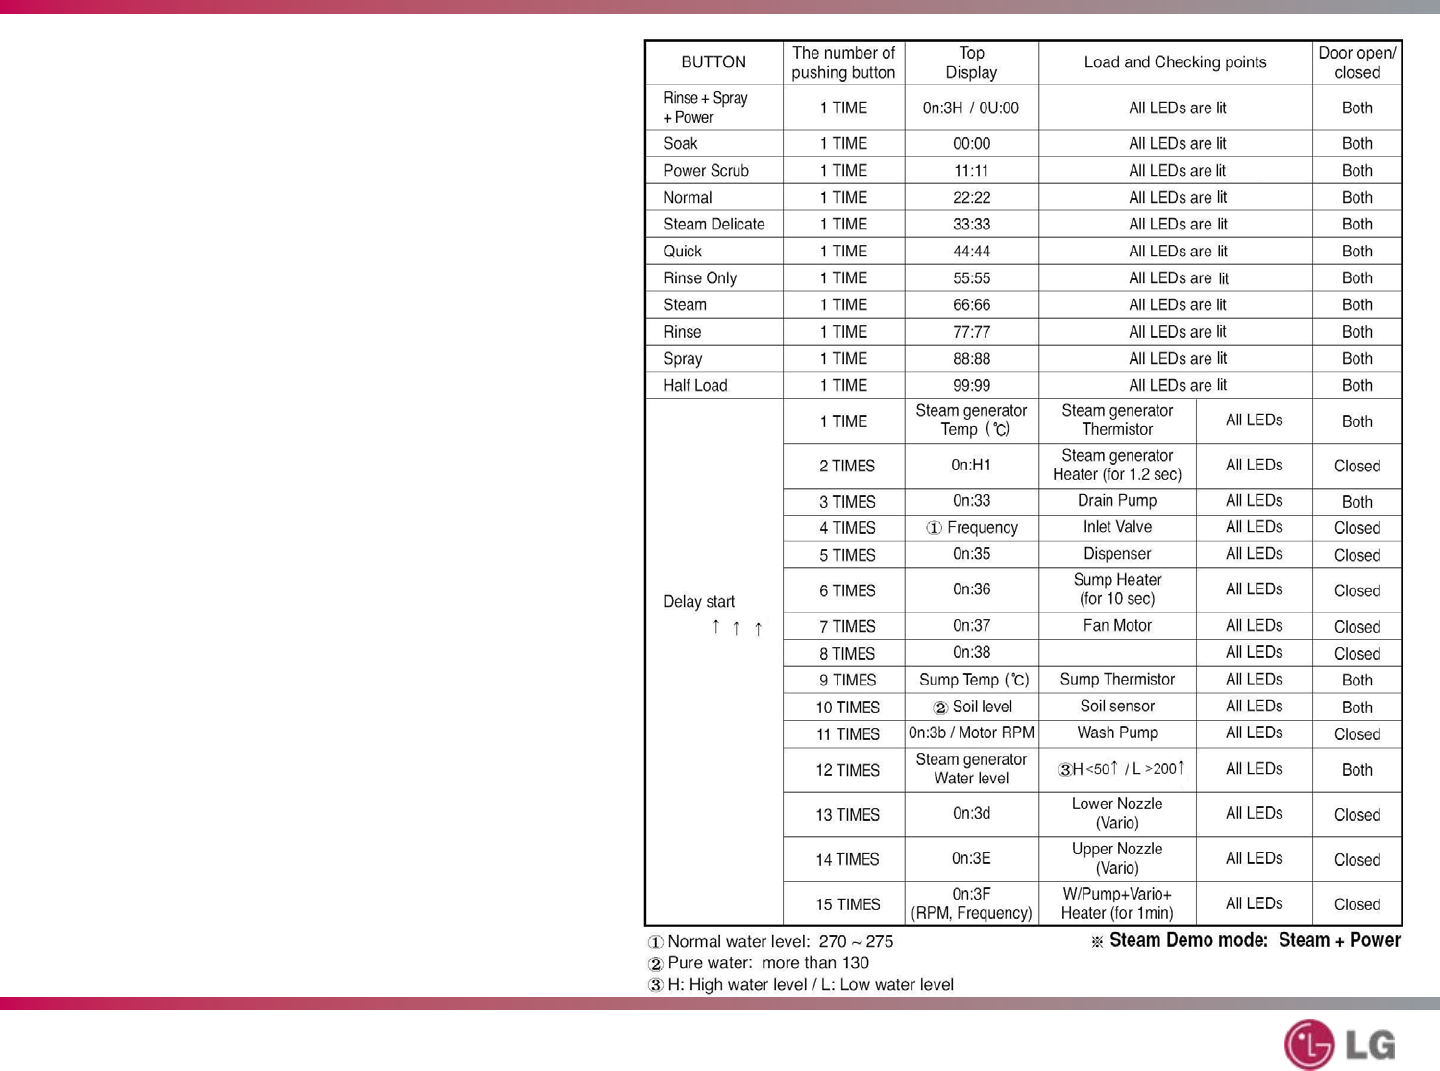
Test Mode
T-17
44
LDF9810ST – Steam Dishwasher
ERROR CODE POSSIBLE CAUSE SOLUTION
INLET ERROR
Water not to
normal level after
10 minutes’ fill
time
•Water supply valve
closed
•Water supply shut off
•Inlet hose kinked
•Water pressure low
(below 10 psi)
•Inlet valve defective
•Inlet valve filter clogged
•Hall sensor defective
•Input impeller is bound
•Check valve
•Check resistance of
valve (950~1,300Ω)
•Clean the inlet filter
•Check frequency in test
mode (page 13)
•Replace air breaker
Error Codes
T-18
45
LDF9810ST – Steam Dishwasher
ERROR CODE POSSIBLE CAUSE SOLUTION
DRAIN ERROR
Not completely
drained after 5
minutes’ drain
time
• Drain hose
kinked
or blocked
• Wiring
connection
defective
• Drain outlet of
sump blocked
• Drain pump, drain
motor, or drain
circuit is defective
• Remove the kink
or blockage
• Check the wiring
connection
• Check the sump
for
blockage
• Measure the
resistance of
drain motor (20 ~ 40
Ω)
Replace motor or
repair
circuit
Error Codes
T-18
46
LDF9810ST – Steam Dishwasher
ERROR CODE POSSIBLE CAUSE SOLUTION
LEAKAGE
ERROR
Excessive motor
RPM due to
water leakage
• Water leakage in
hose
connections
• Water leak from
damage
• Sump seal
leakage
• Drain hose not
high
enough
• Washing pump
impeller is
damaged or worn
• Replace hose
connections
•Repair damage
• Reseat or
replace seal
• Adjust hose to
meet
installation
requirements
• Replace impeller of
washing pump
Error Codes
T-18
47
LDF9810ST – Steam Dishwasher
ERROR
CODE POSSIBLE CAUSE SOLUTION
FILL ERROR
Excess water
supplied and
drain pump runs
automatically
• Inlet valve defective
•Main board defective
• Replace inlet valve
•Replace main board
Error Codes
T-18
48
LDF9810ST – Steam Dishwasher
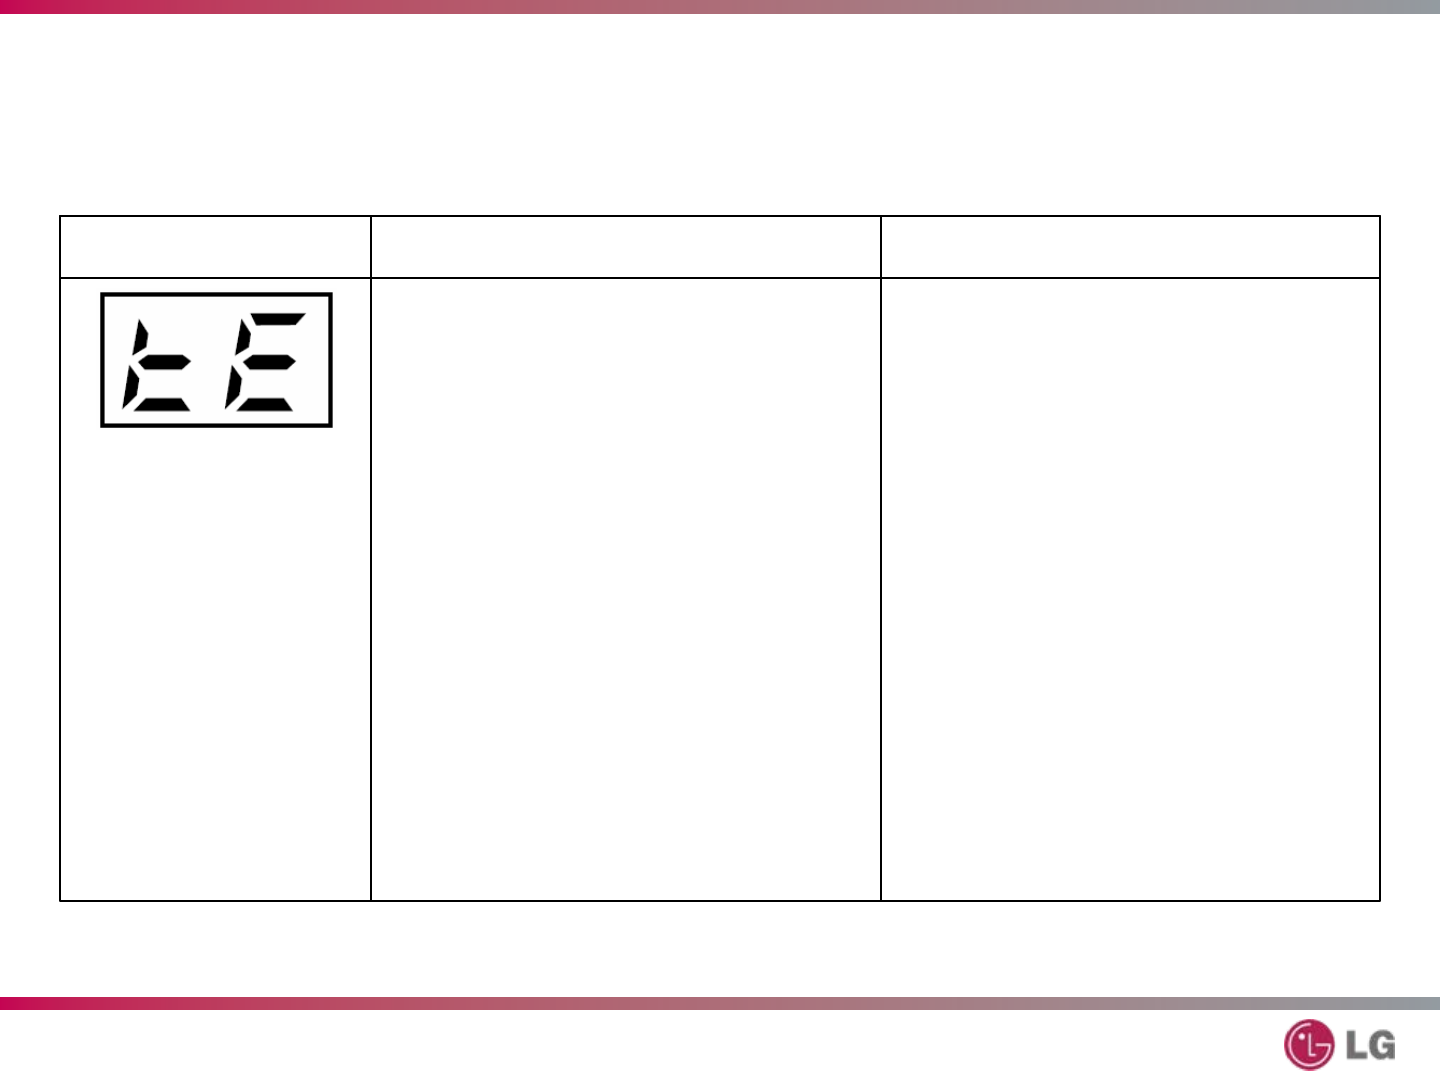
ERROR CODE POSSIBLE CAUSE SOLUTION
THERMAL
ERROR
Water not to
normal level after
10 minutes’ fill
time
• Inlet water
temperature too
hot (over 194° F or
90 °C)
• Wiring connection
defective
• Thermistor
defective
•
Check water temperature
using TEST MODE (See
Page 13.)
•
If temperature is
displayed, adjust water
temp. to 120°
F (40°
C).
•
If temp. is not displayed,
check wiring connections
and resistance of the
thermistor (11~14 KΩ
@
77°
F or 25°
C).
Error Codes
T-19
49
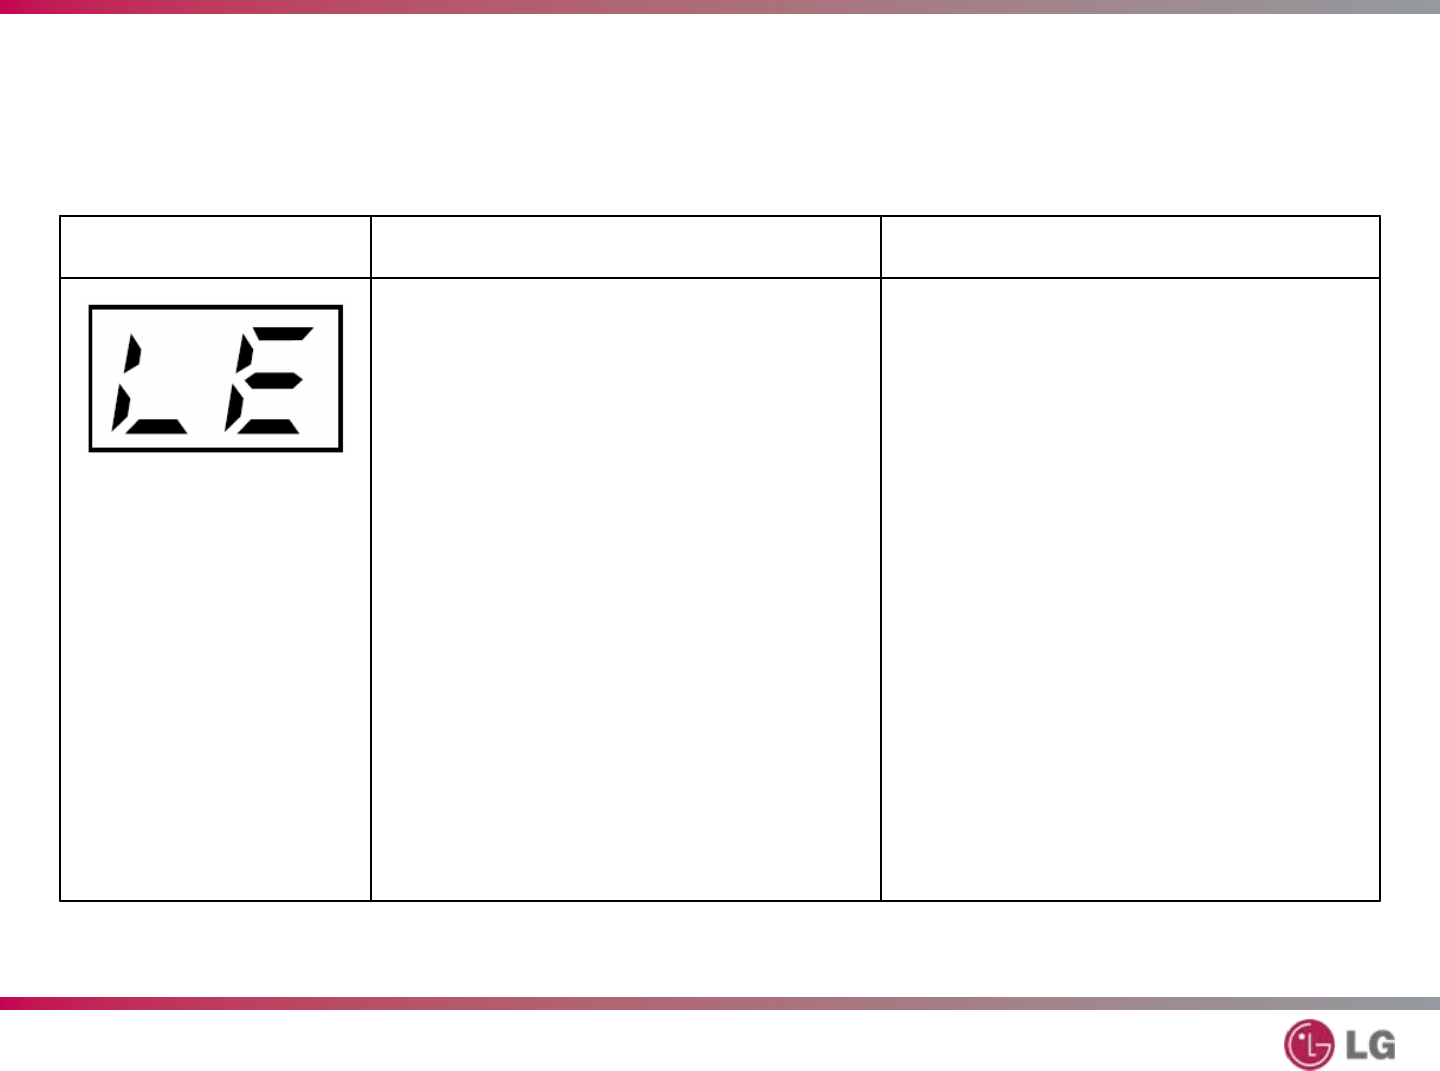
LDF9810ST – Steam Dishwasher
ERROR CODE POSSIBLE CAUSE SOLUTION
LOCK ERROR
Motor is locked
or hall sensor is
defective.
• Wiring connection
loose
• Wash pump impeller
locked
• Wash motor rotor is
locked
•Blade is locked
• Check wiring
connections
• Check wash pump for
blockage
•Replace wash motor
• Check the sump for
blockage
•Replace the main board
Error Codes
T-19
50
LDF9810ST – Steam Dishwasher
Steam Generator Error Codes
T-19
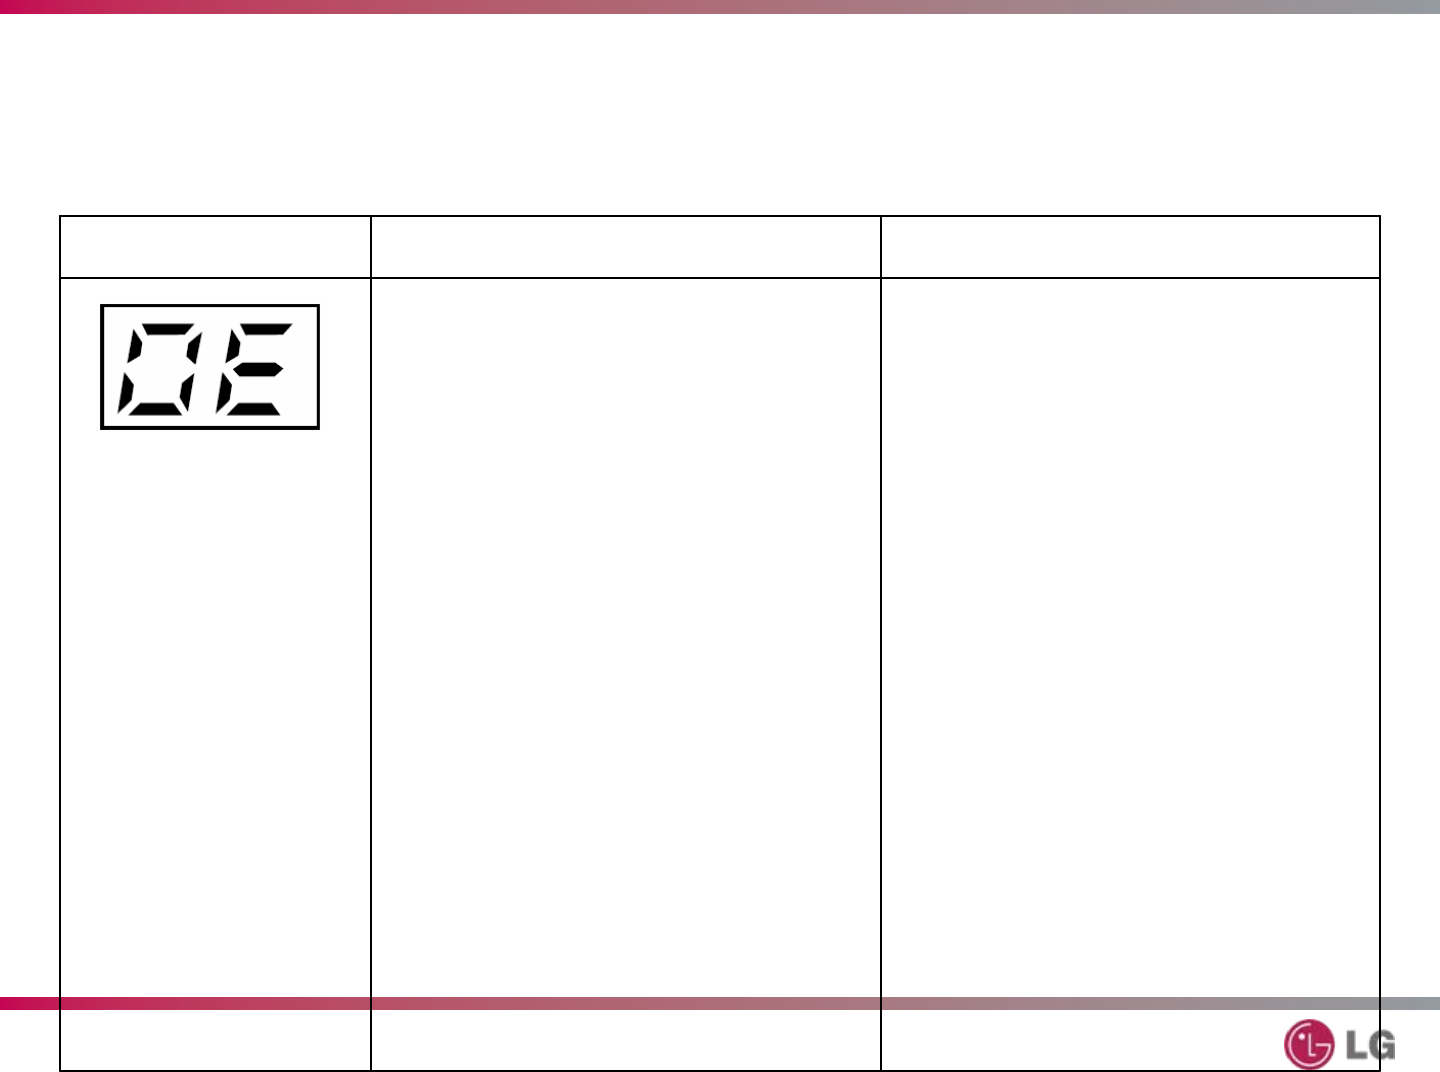
ERROR CODE CONDITION SOLUTION
00 : EO Normal
00 : E1 Steam generator
temperature is too high
(over 239°
F or 115°
C)
Check water level
sensor and thermistor
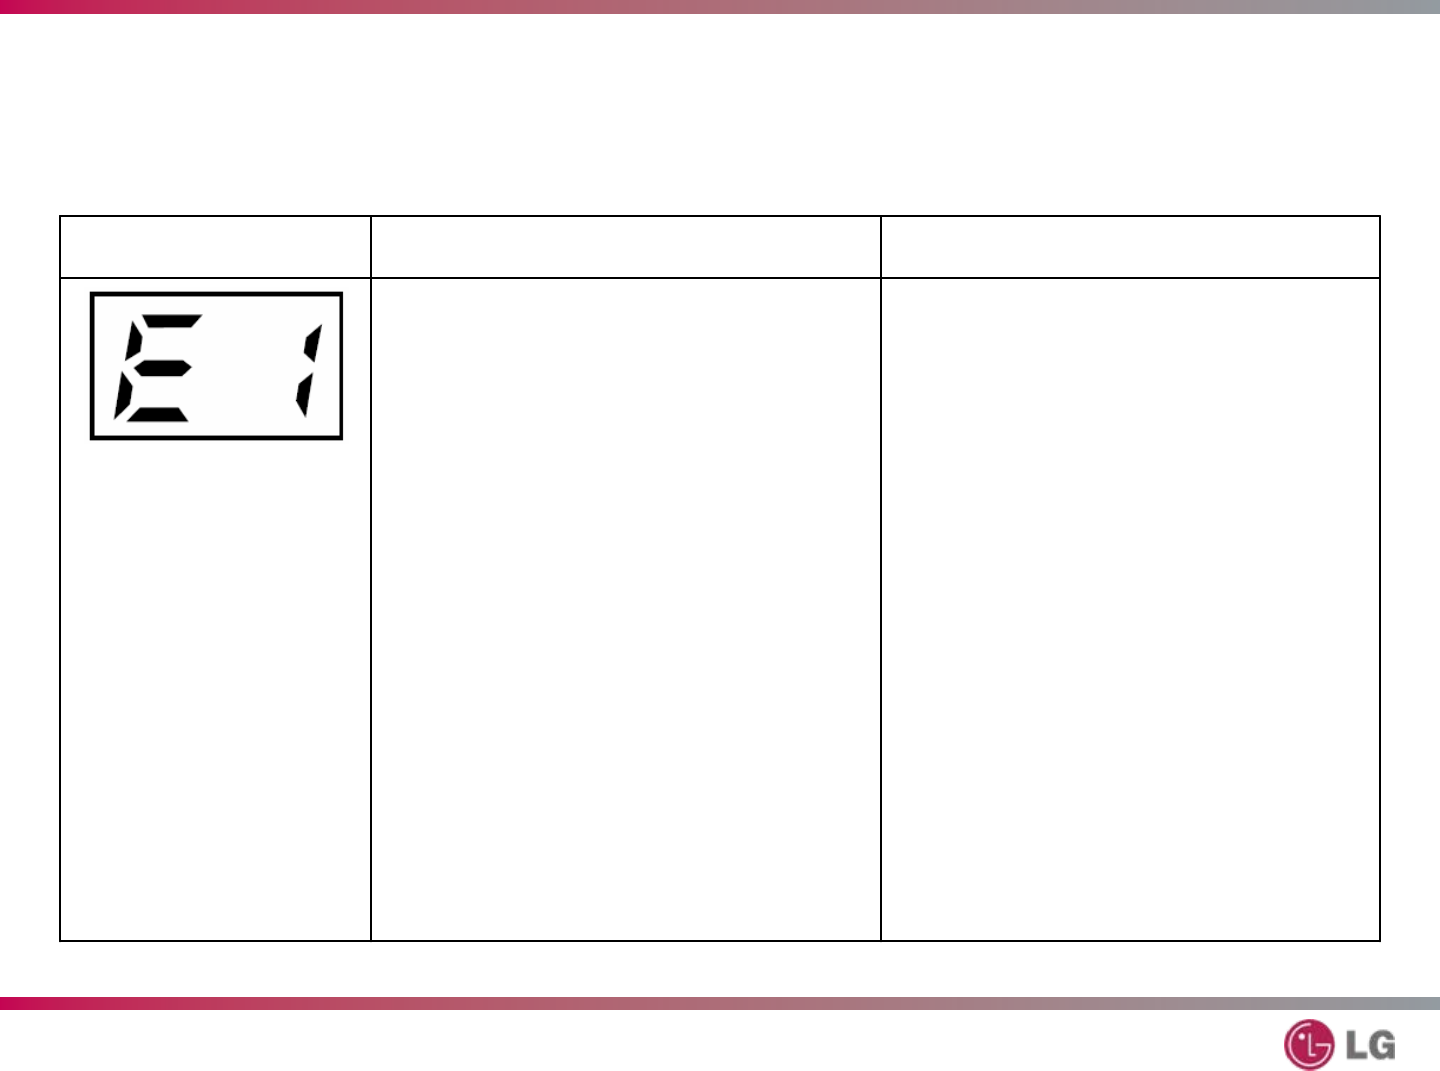
00 : E2 Water level sensor
failure Check water level
sensor and connection
00 : E3 Water level too low Check water level
sensor and inlet valve
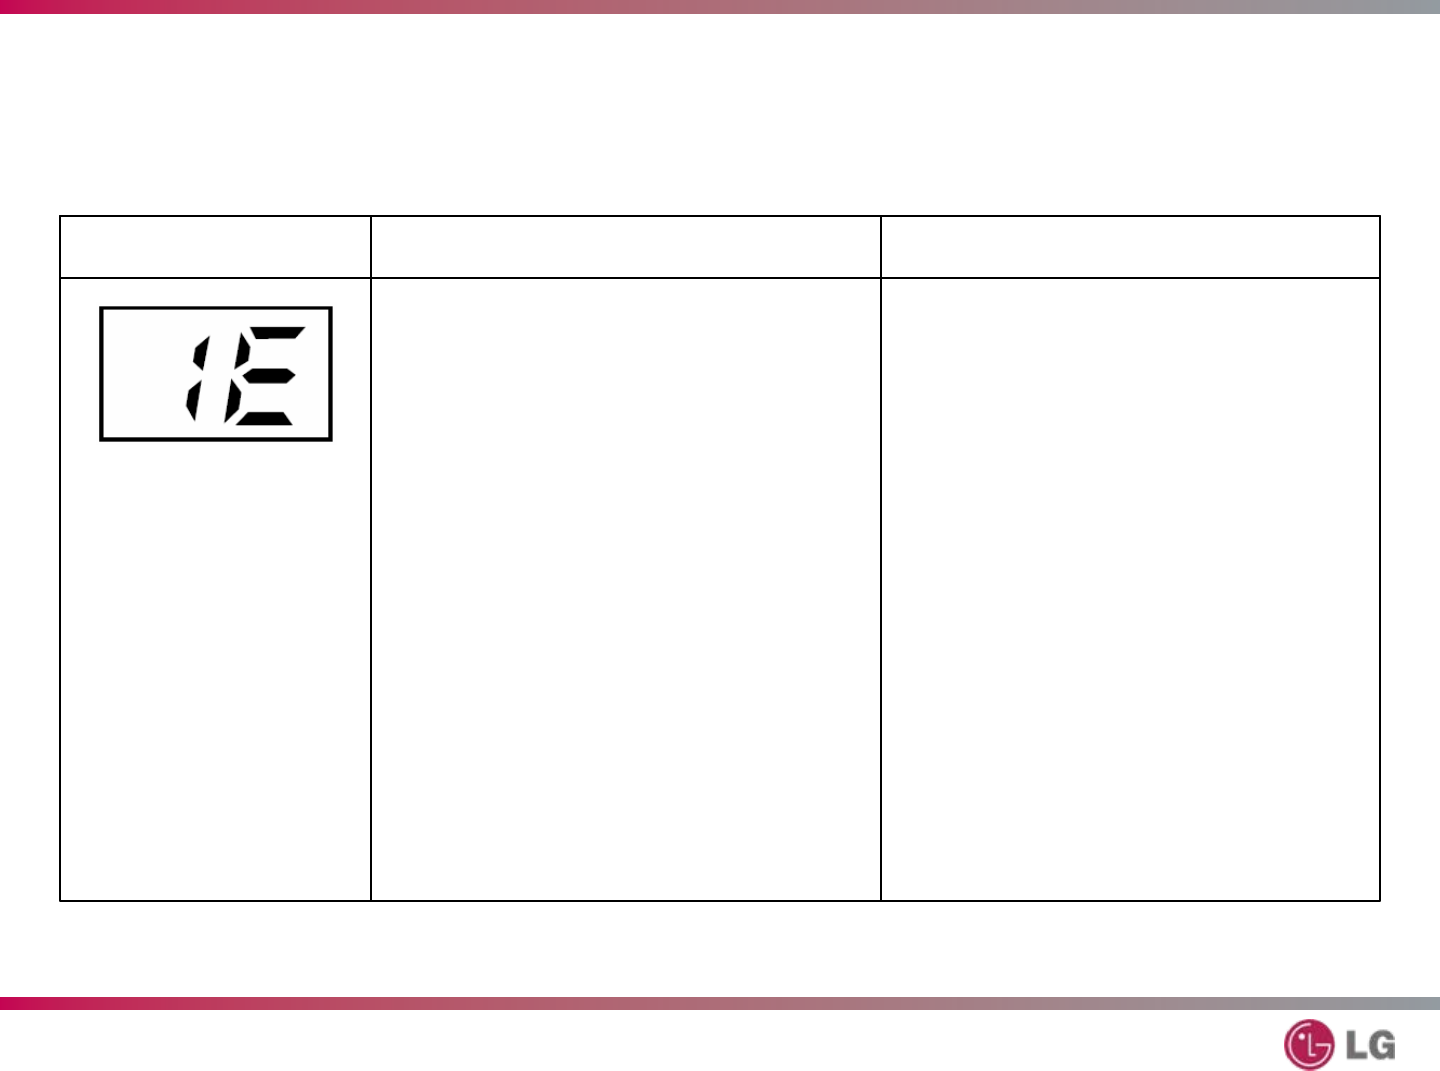
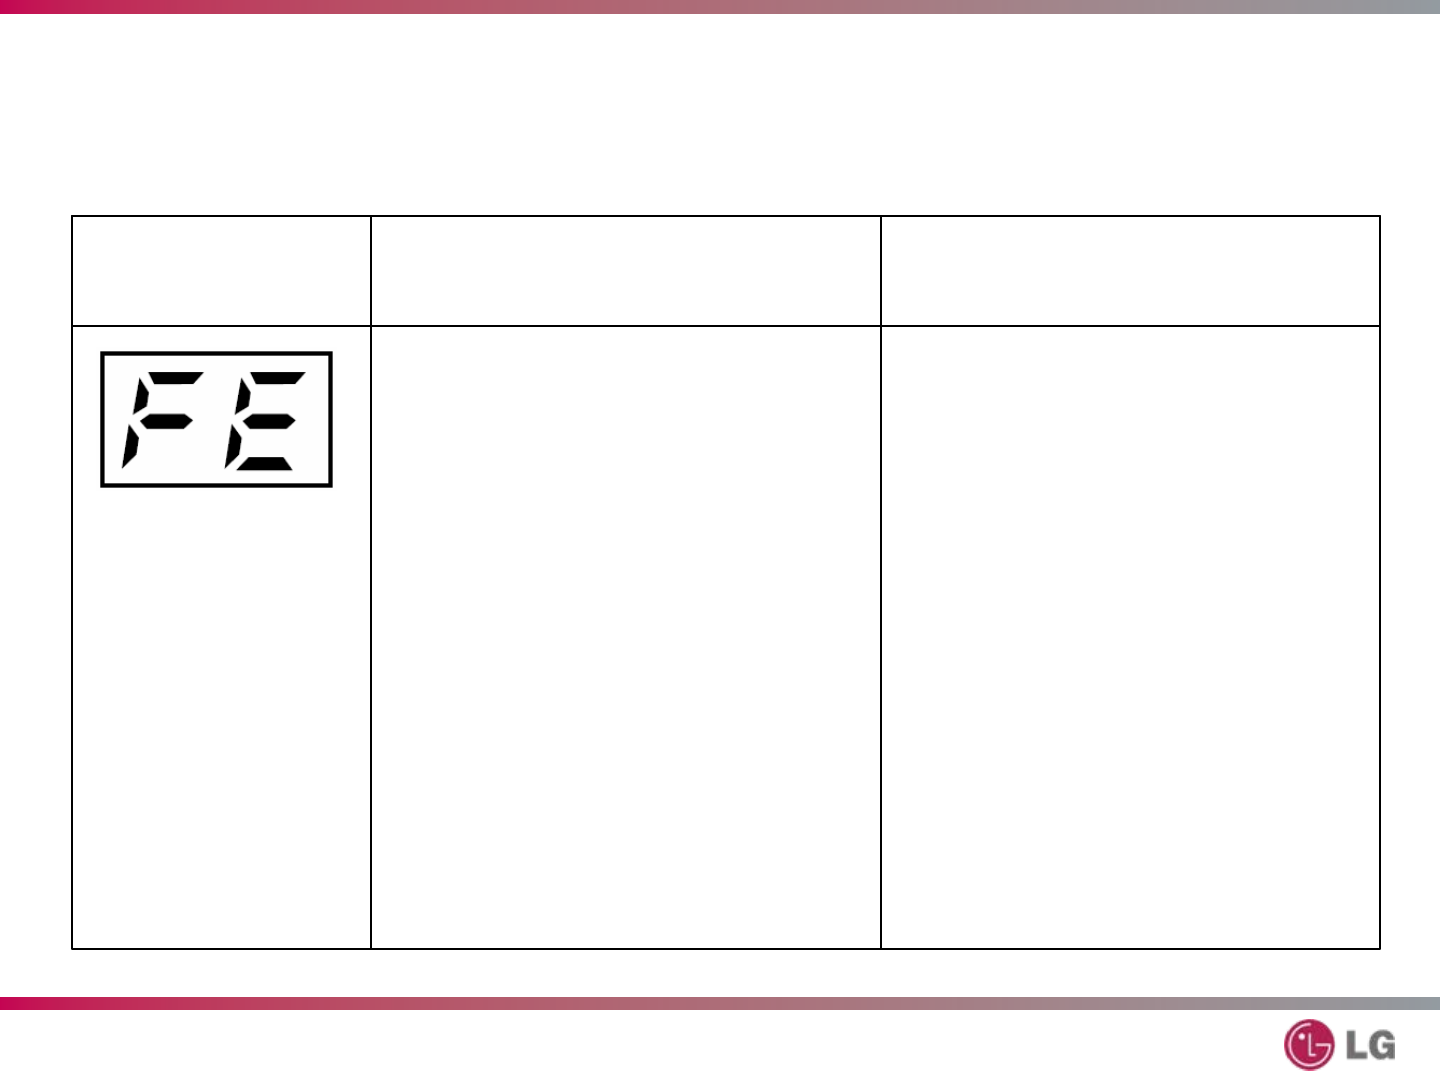
00 : E4 Steam generator
temperature is too low
(under 158°
F or 70°
C)
Check heater and
thermistor
00 : E5 Normal
51
LDF9810ST – Steam Dishwasher
Troubleshooting
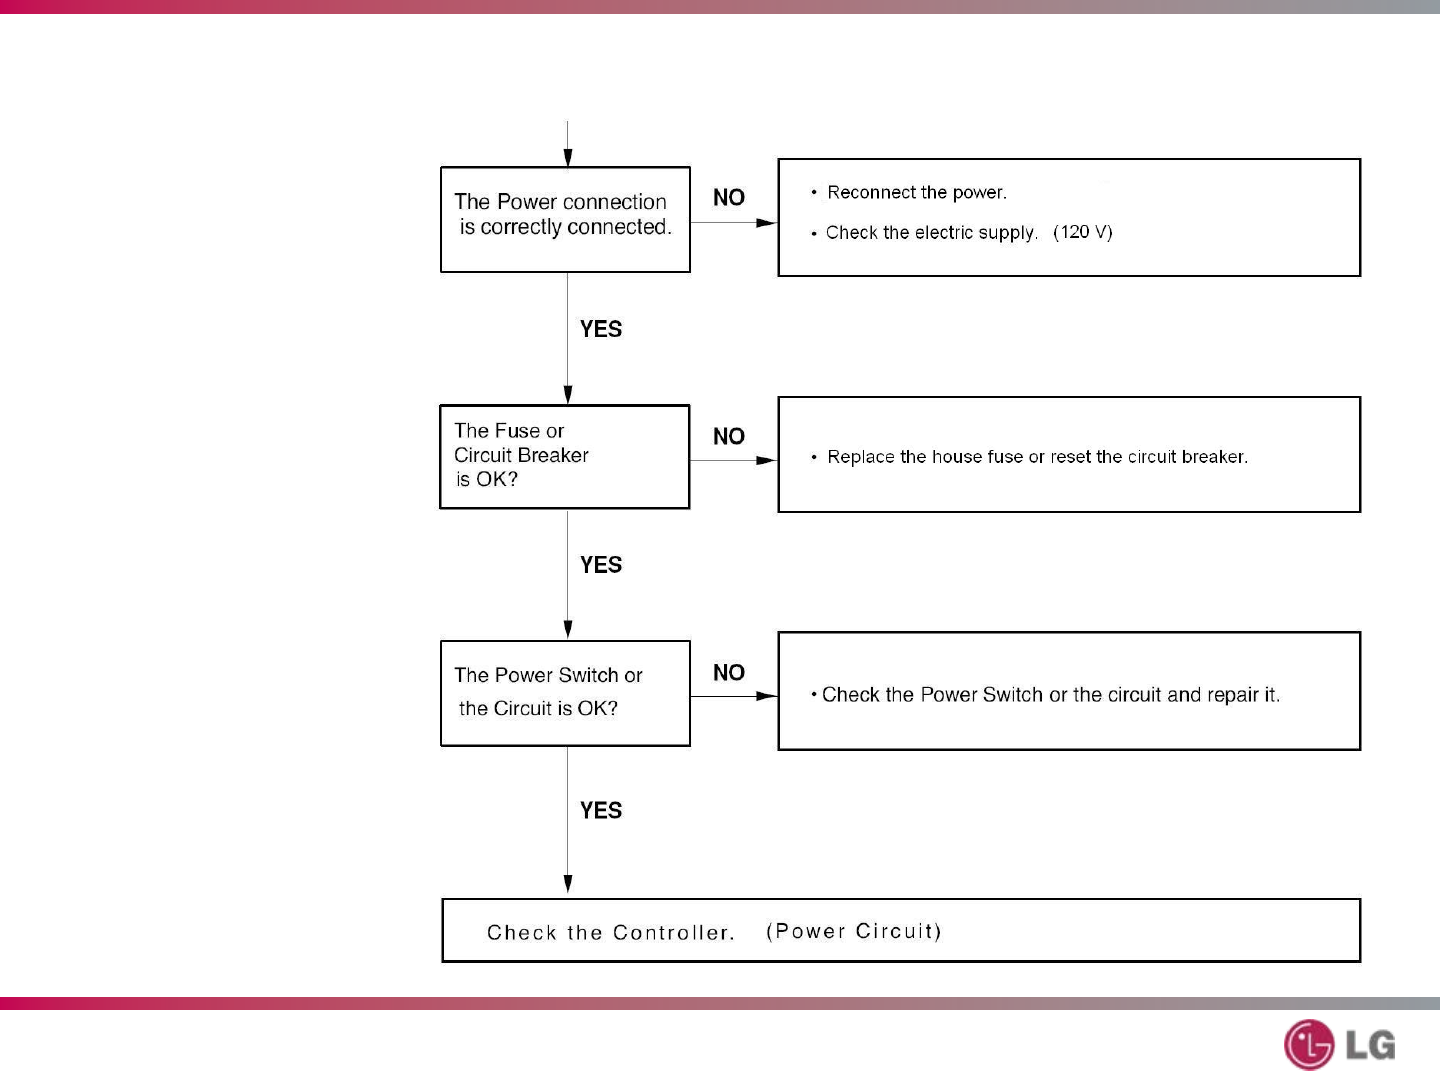
T-20
No Power
52
LDF9810ST – Steam Dishwasher
Troubleshooting
T-21
Wash Motor /
Pump Motor
Does Not Run
53
LDF9810ST – Steam Dishwasher
Troubleshooting
T-22
Poor
Washing
54
LDF9810ST – Steam Dishwasher
Troubleshooting
T-22
Poor
Drying
55
LDF9810ST – Steam Dishwasher
Troubleshooting
T-23
Power Does Not Turn Off
Automatically At End Of Cycle

56
LDF9810ST – Steam Dishwasher
Disassembly and Repair
T-24
Before disassembling the dishwasher:
• Unplug the dishwasher or turn off the breaker (or fuse)
Disconnect the wire if the dishwasher is hard-wired.
• Turn of the water supply
• Remove all dishes and racks
• Disconnect the water supply line to avoid hose damage
• Have some towels ready to catch the spillage from
water left in the dishwasher and to keep the floor safe.
57
LDF9810ST – Steam Dishwasher
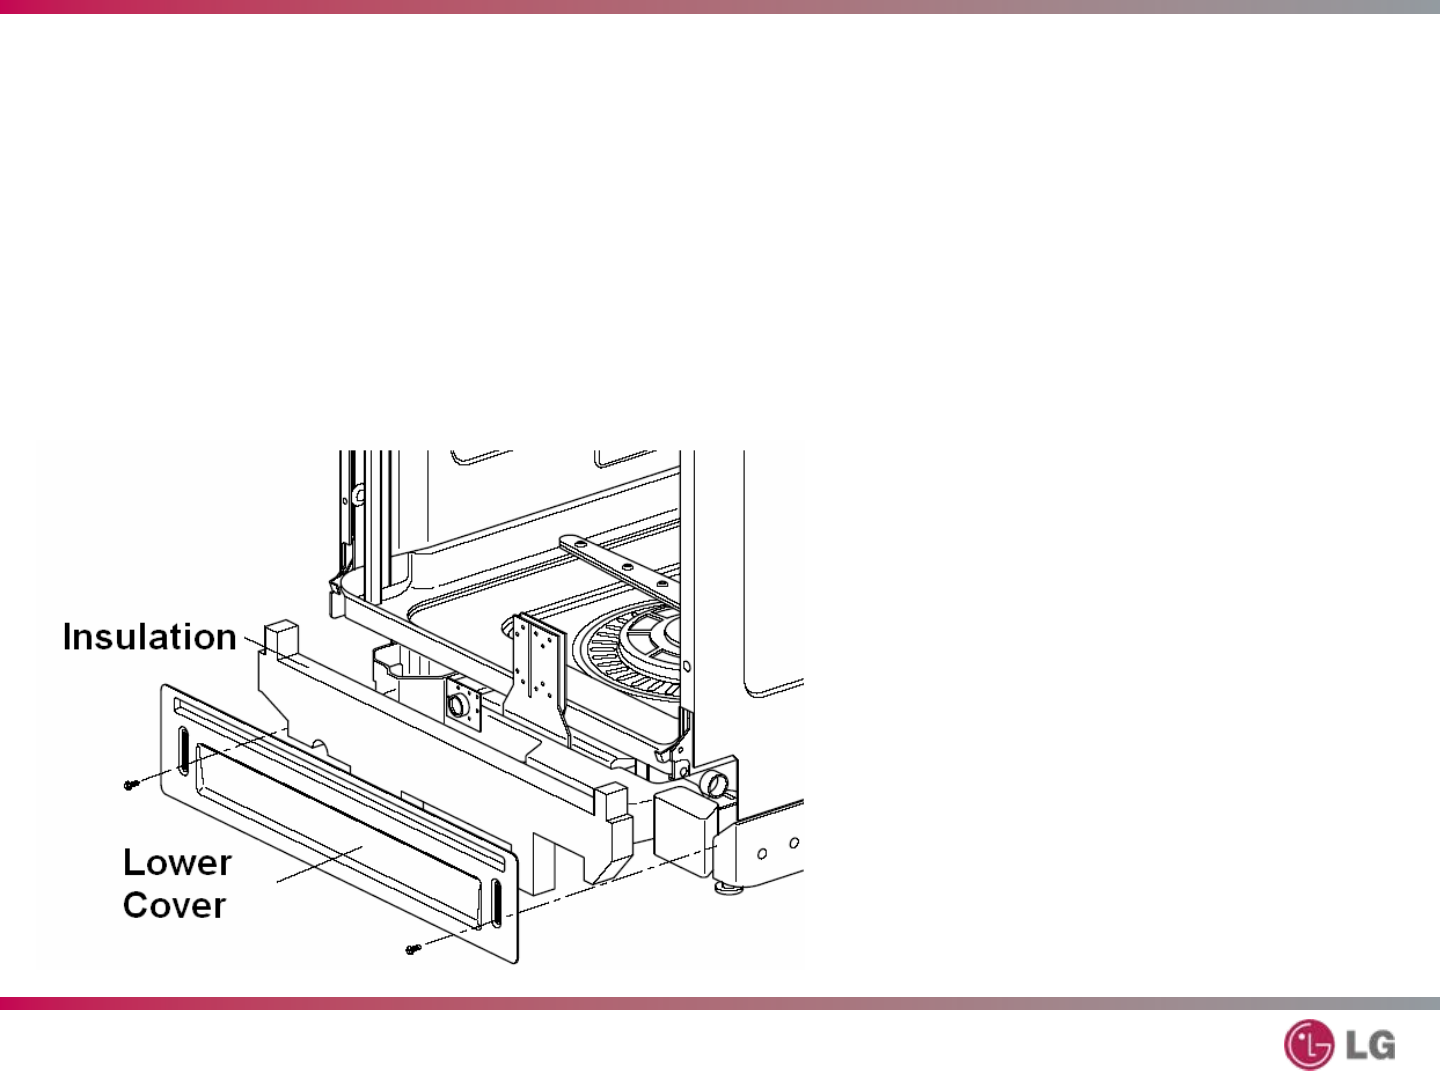
Lower Cover and Insulation
T-24
Remove the two screws
in the lower cover.
Remove the insulation.
Disconnect the water
supply hose and the
electric cable if you are
removing the
dishwasher for service.
58
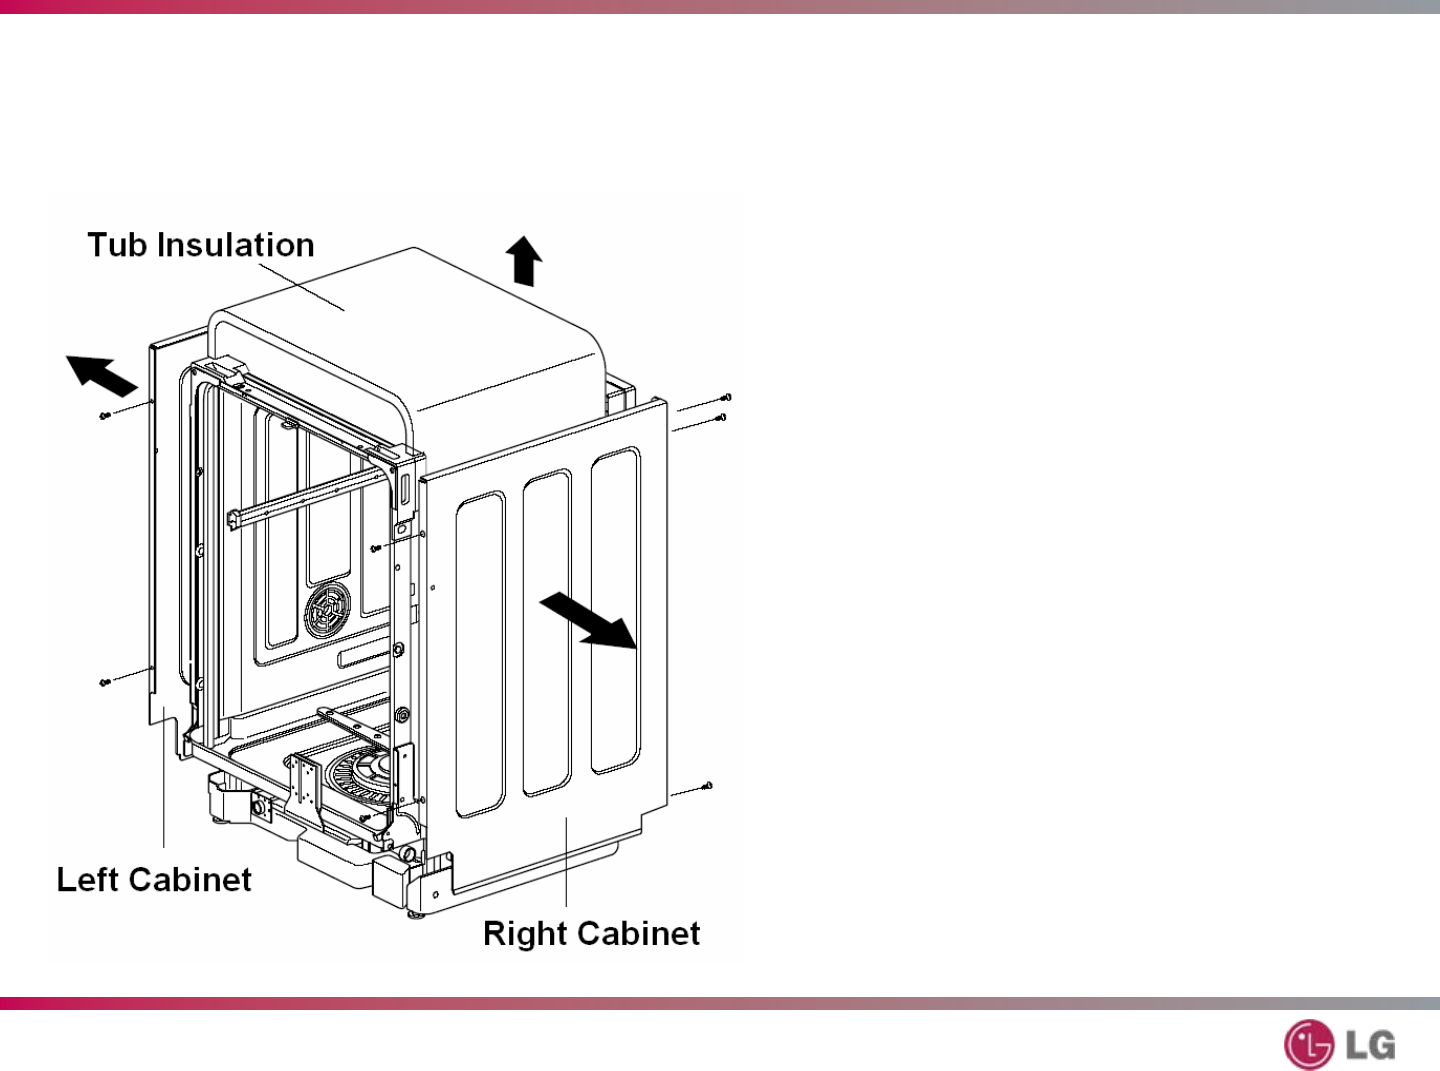
LDF9810ST – Steam Dishwasher
Cabinet and Tub Insulation
T-24
Right Cabinet –
Remove two screws at
the front and three
screws at the rear.
Left Cabinet –
Remove two screws at
the front and three
screws at the rear.
Insulation –
Remove the insulation
blanket carefully by lifting
straight up.
59
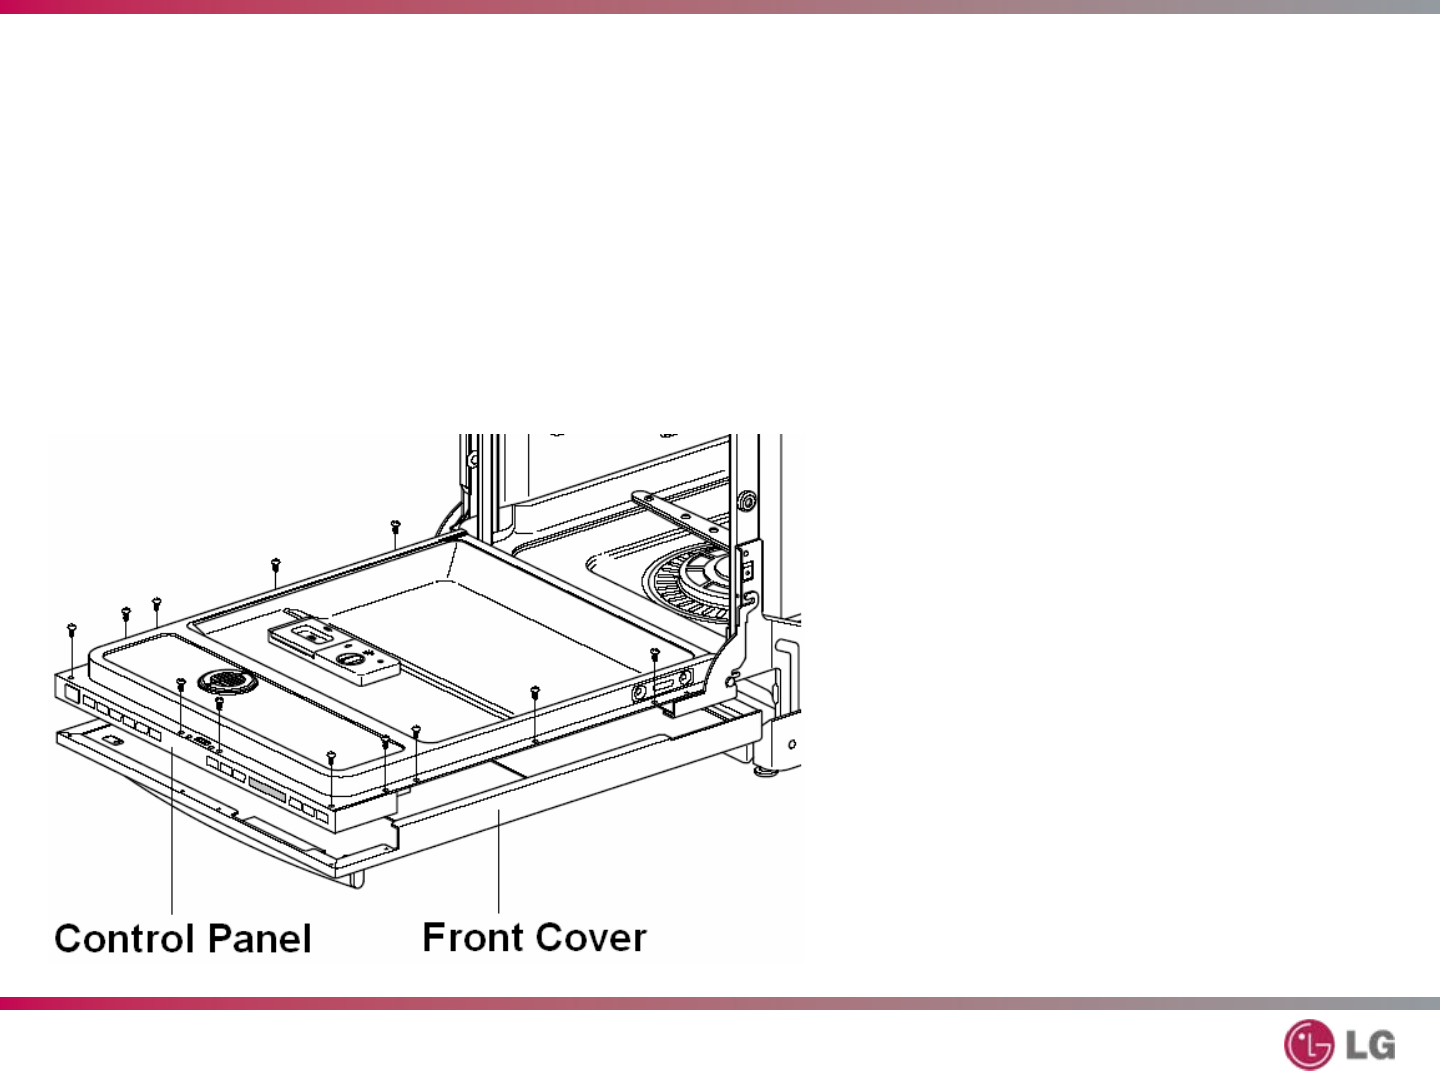
LDF9810ST – Steam Dishwasher
Front Cover
T-25
Open the door.
Remove 12 screws
(stainless steel).
60
LDF9810ST – Steam Dishwasher
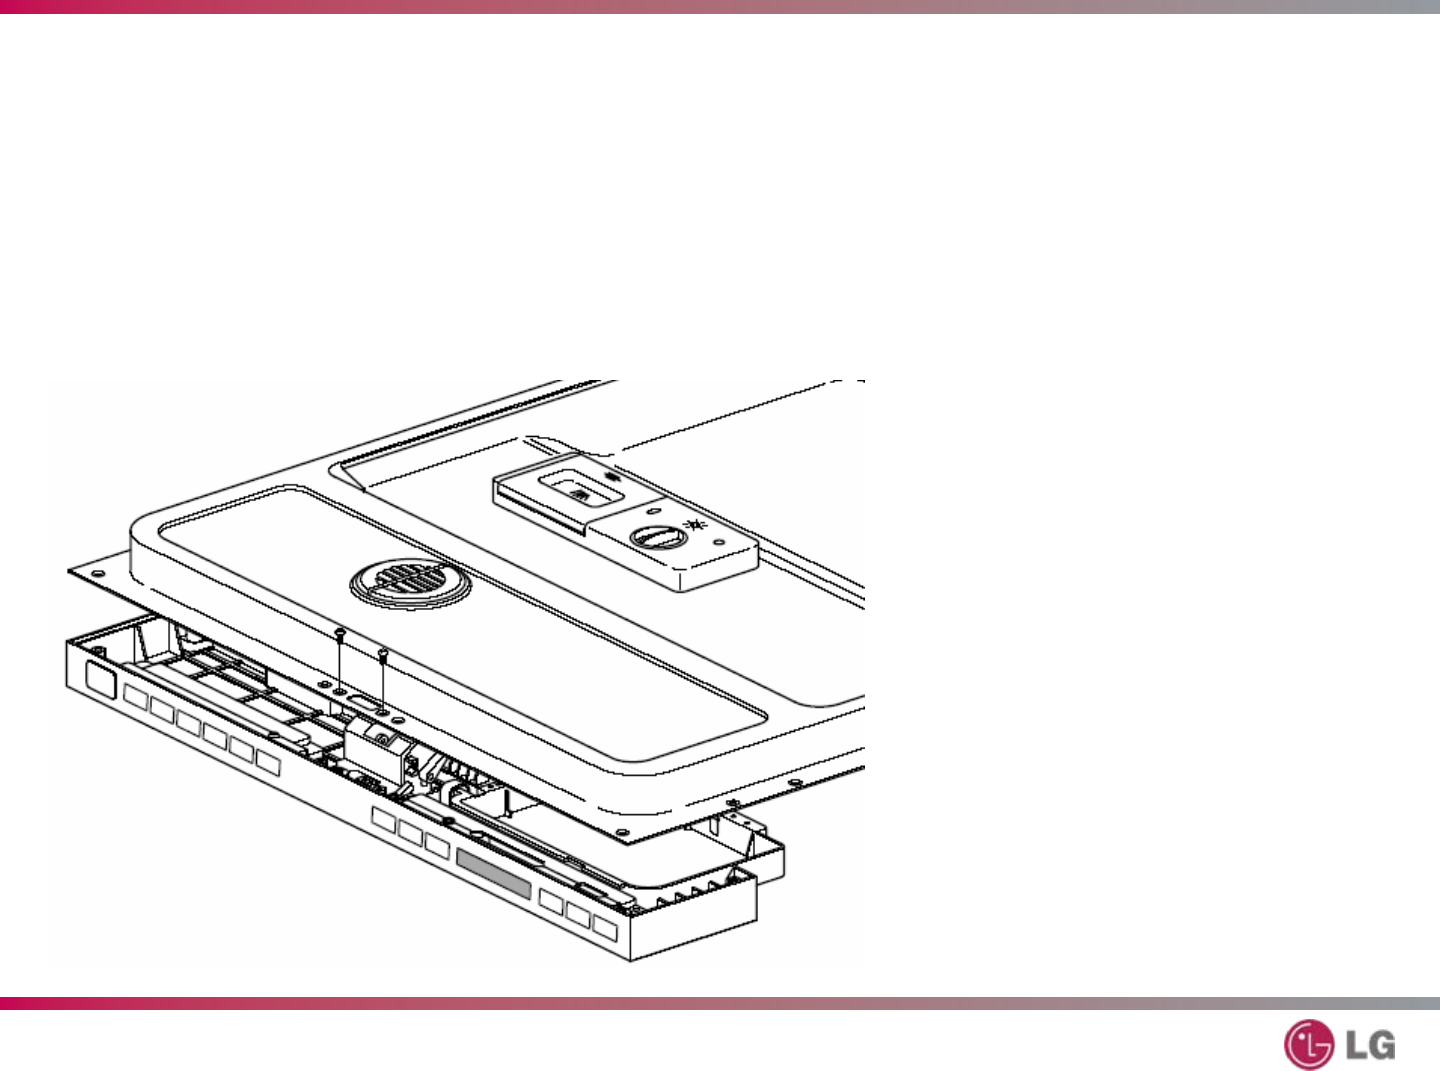
Control Panel Assembly
T-25
Remove 2 screws
(stainless steel).
Remove the wire
connections.
(Do not reverse at
reassembly!)
Remove the latch
assembly.
61
LDF9810ST – Steam Dishwasher
Control Panel Assembly
T-25
Remove the front
display.
Remove 8 screws to
take out the controller
(main board).
Reassembly is the
reverse order of
disassembly. Be careful
to avoid reversing the
connectors.

62
LDF9810ST – Steam Dishwasher
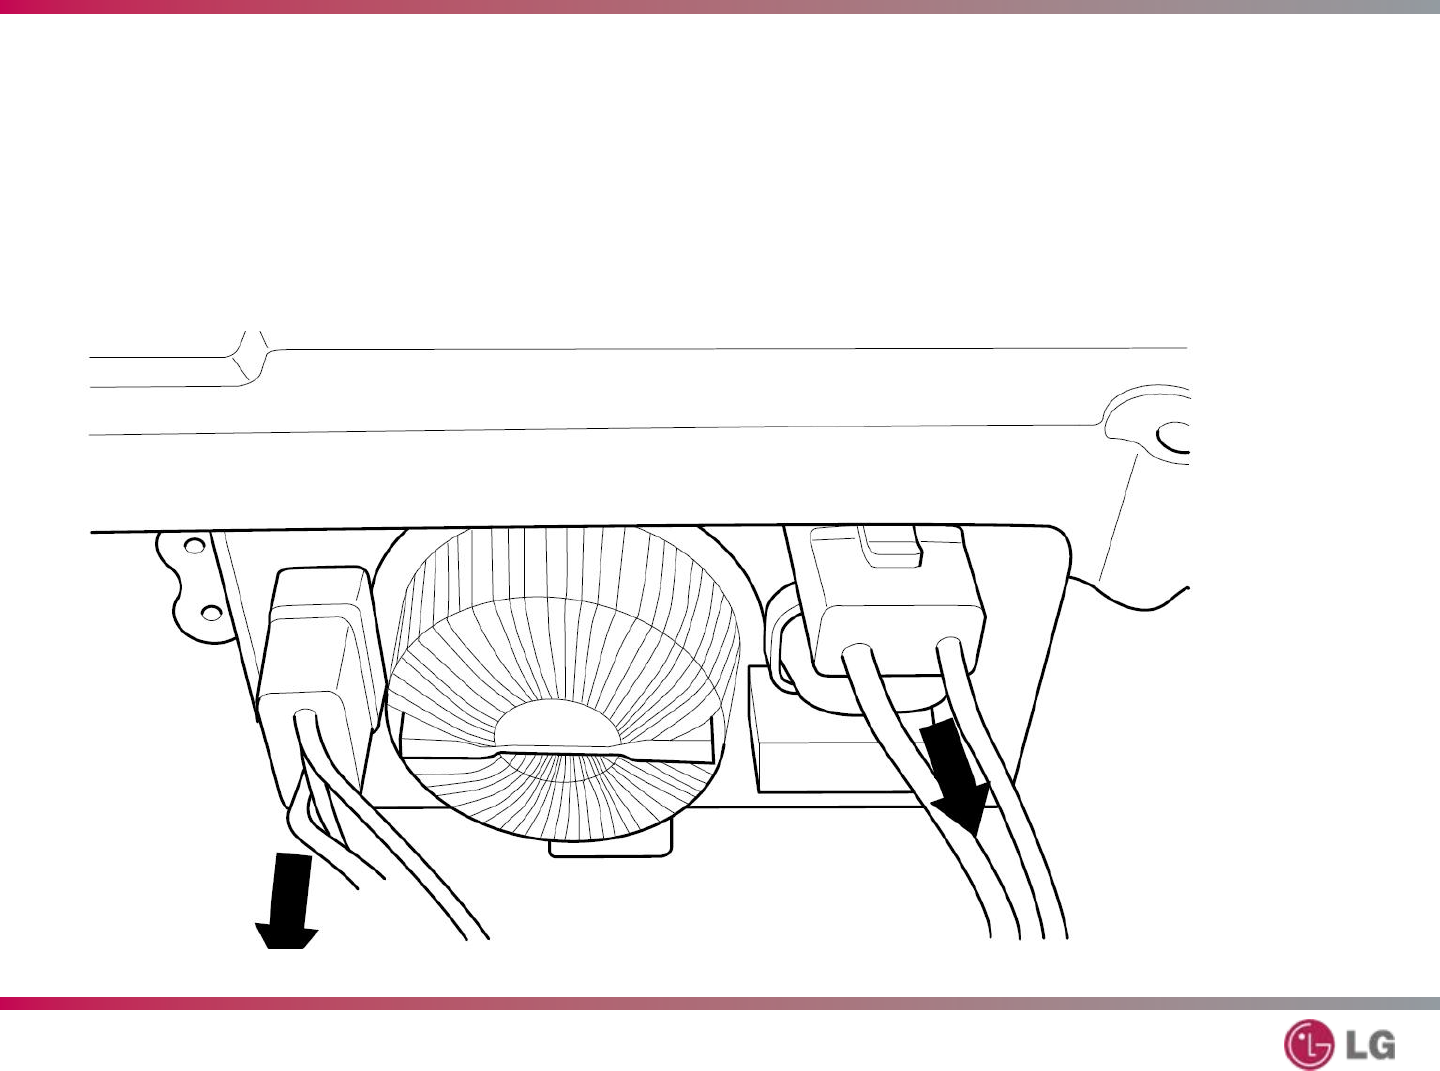
Fan Assembly
T-26
Remove the front cover.
(See page 25.)
Remove 4 screws and a
ground screw for the door
bracket.
Remove the wire connections
from the fan.
Remove the air duct.
Unscrew the inner cover to
remove the fan assembly.
63
LDF9810ST – Steam Dishwasher
Detergent Dispenser
T-26
Remove the wire
connections.
Remove the 2 brackets
(6 screws).
Use a screwdriver to pry
the flange up to release
the dispenser.
64
LDF9810ST – Steam Dishwasher
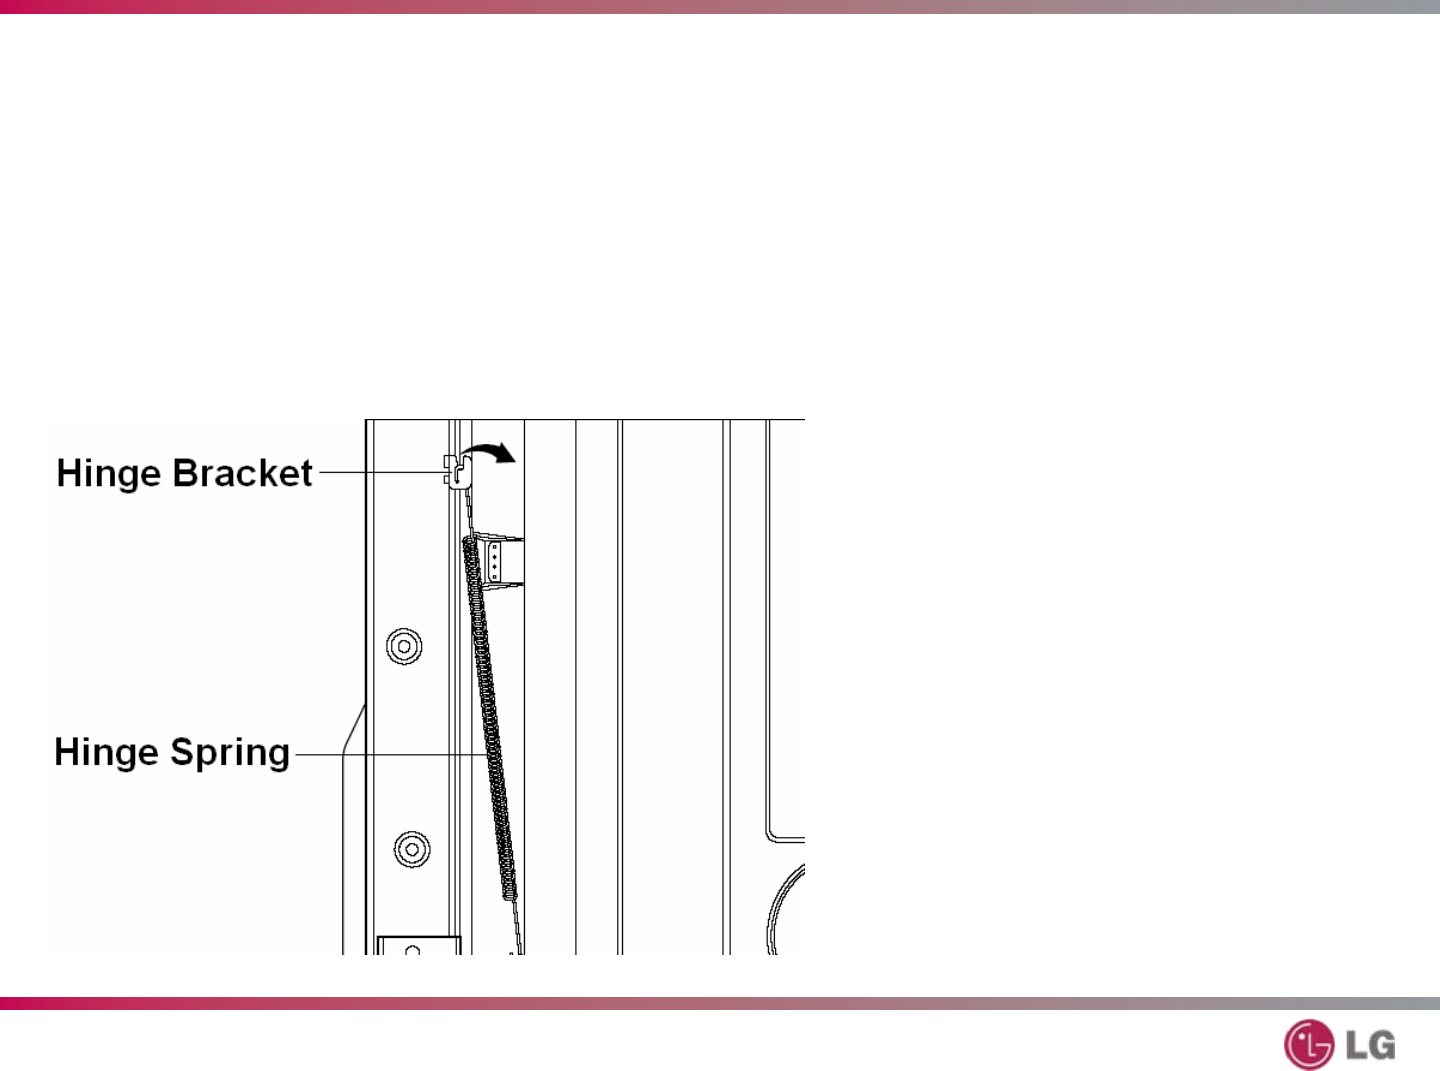
Door Spring (Right and Left)
T-26
Pull the spring upward
and take it off the hinge
bracket.
Take the spring off the
hinge.
65
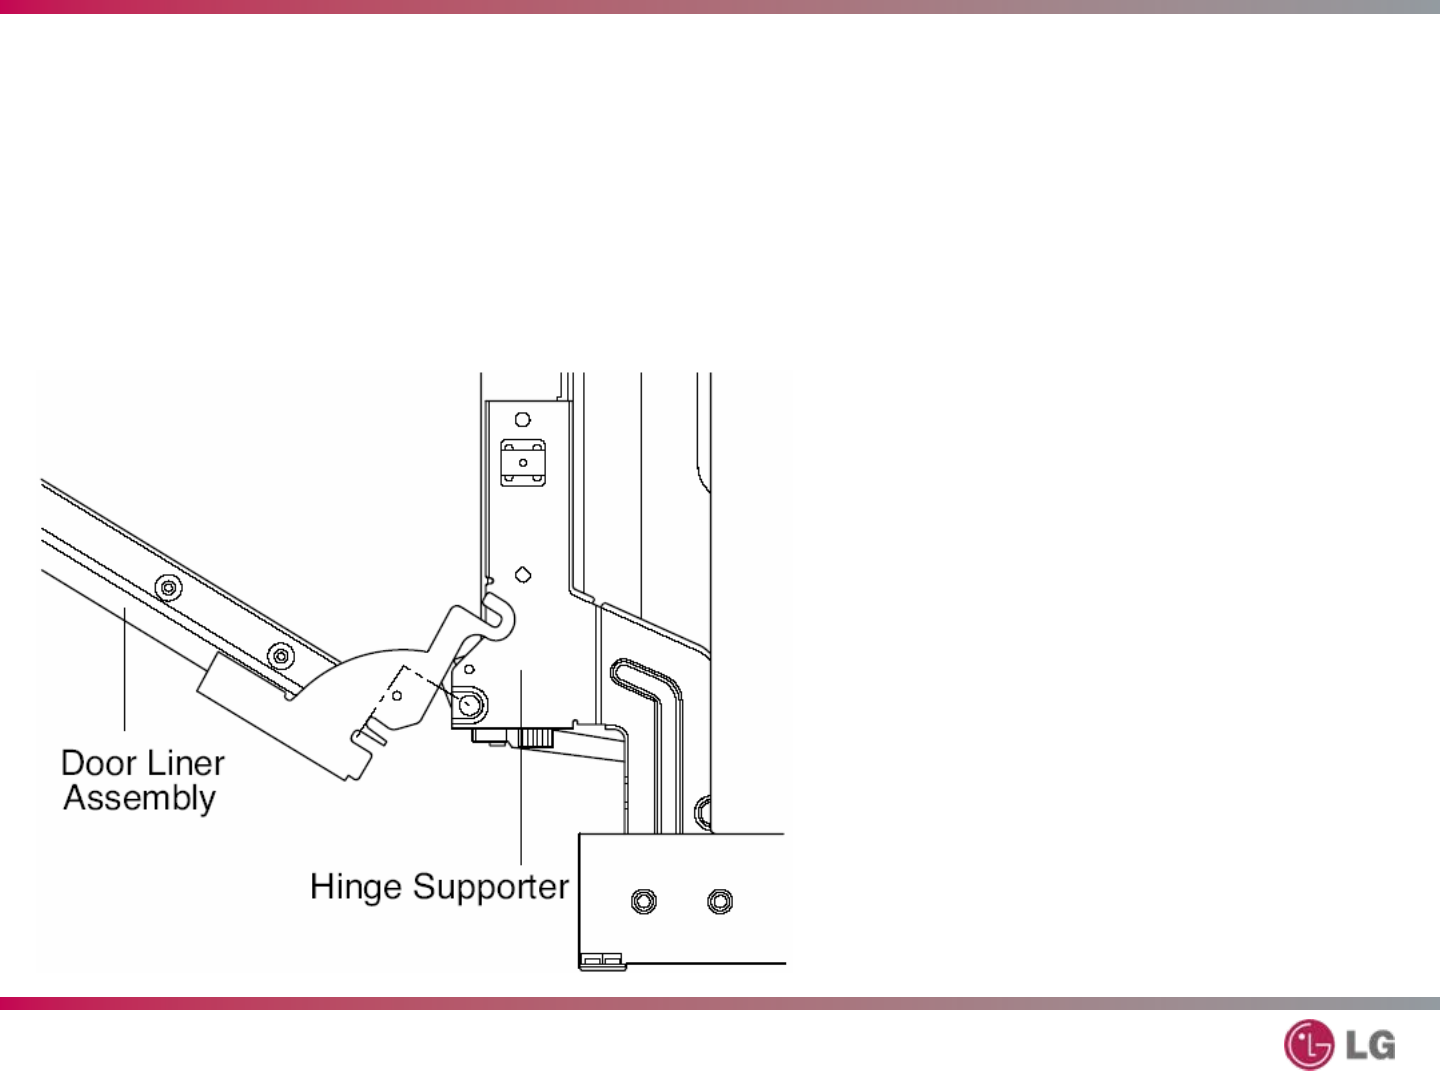
LDF9810ST – Steam Dishwasher
Door Liner
T-26
Open the door.
Pull the door liner upward
off the hinge supporter.
66
LDF9810ST – Steam Dishwasher
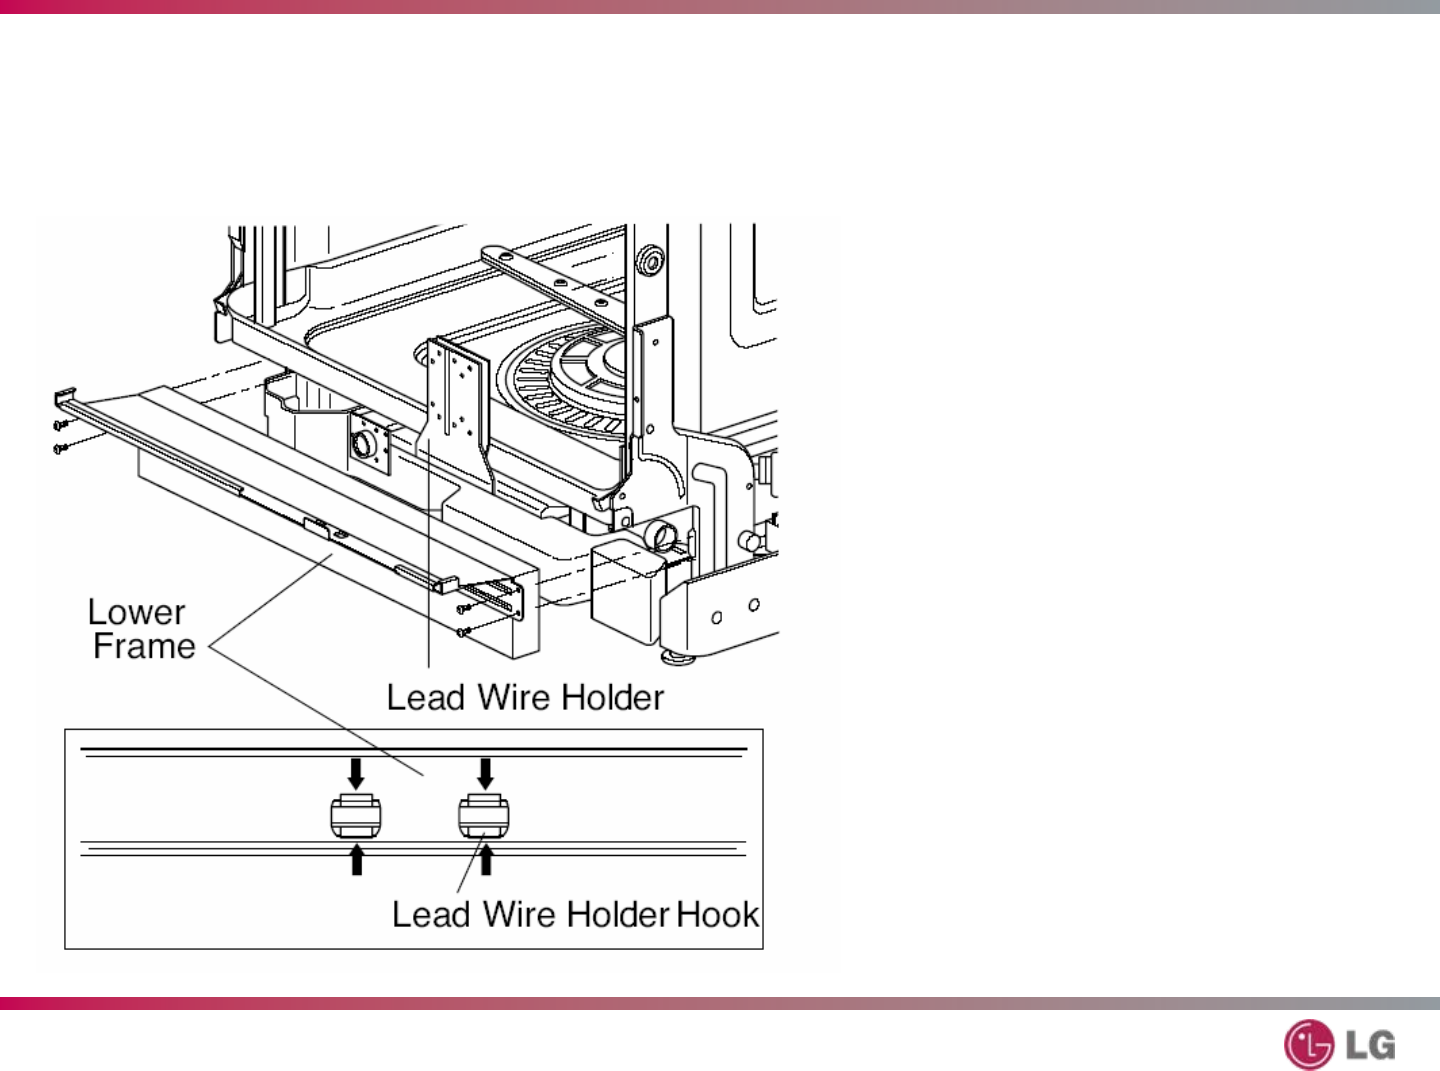
Lower Frame
T-27
Press the holder hooks
as shown.
Remove the 4 screws.
67
LDF9810ST – Steam Dishwasher
Lower Frame
T-27
Turn the dishwasher upside-down.
68
LDF9810ST – Steam Dishwasher
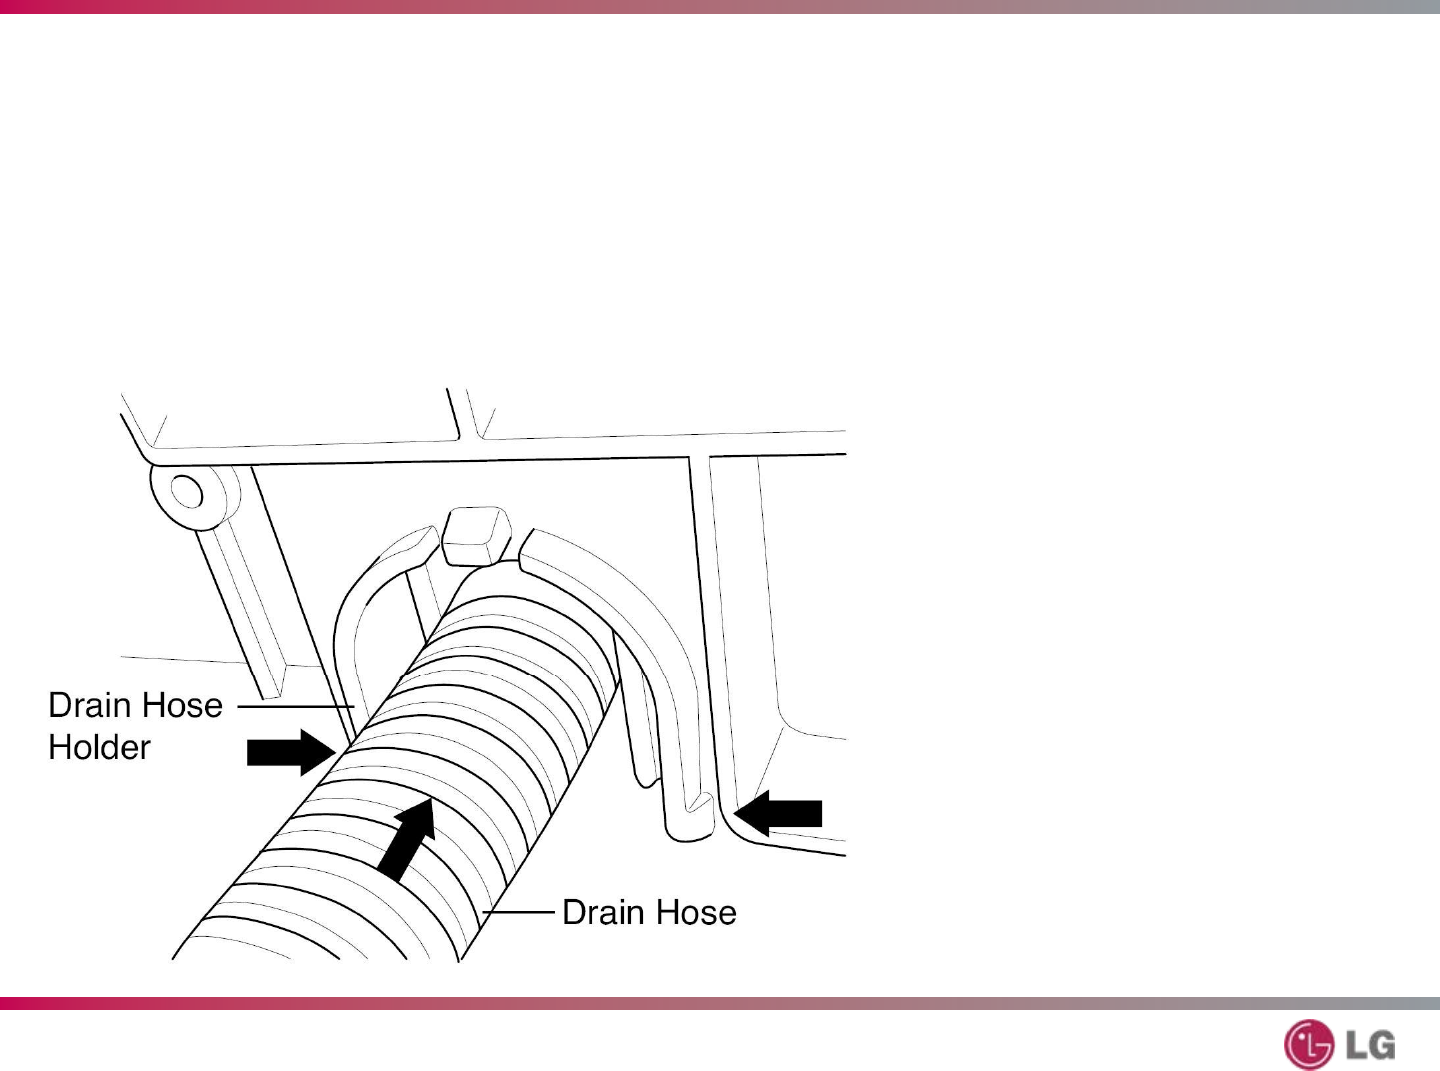
Drain Hose Holder
T-27
Press the holder hook
as shown.
Pull the drain hose and
remove the drain hose
holder.
69
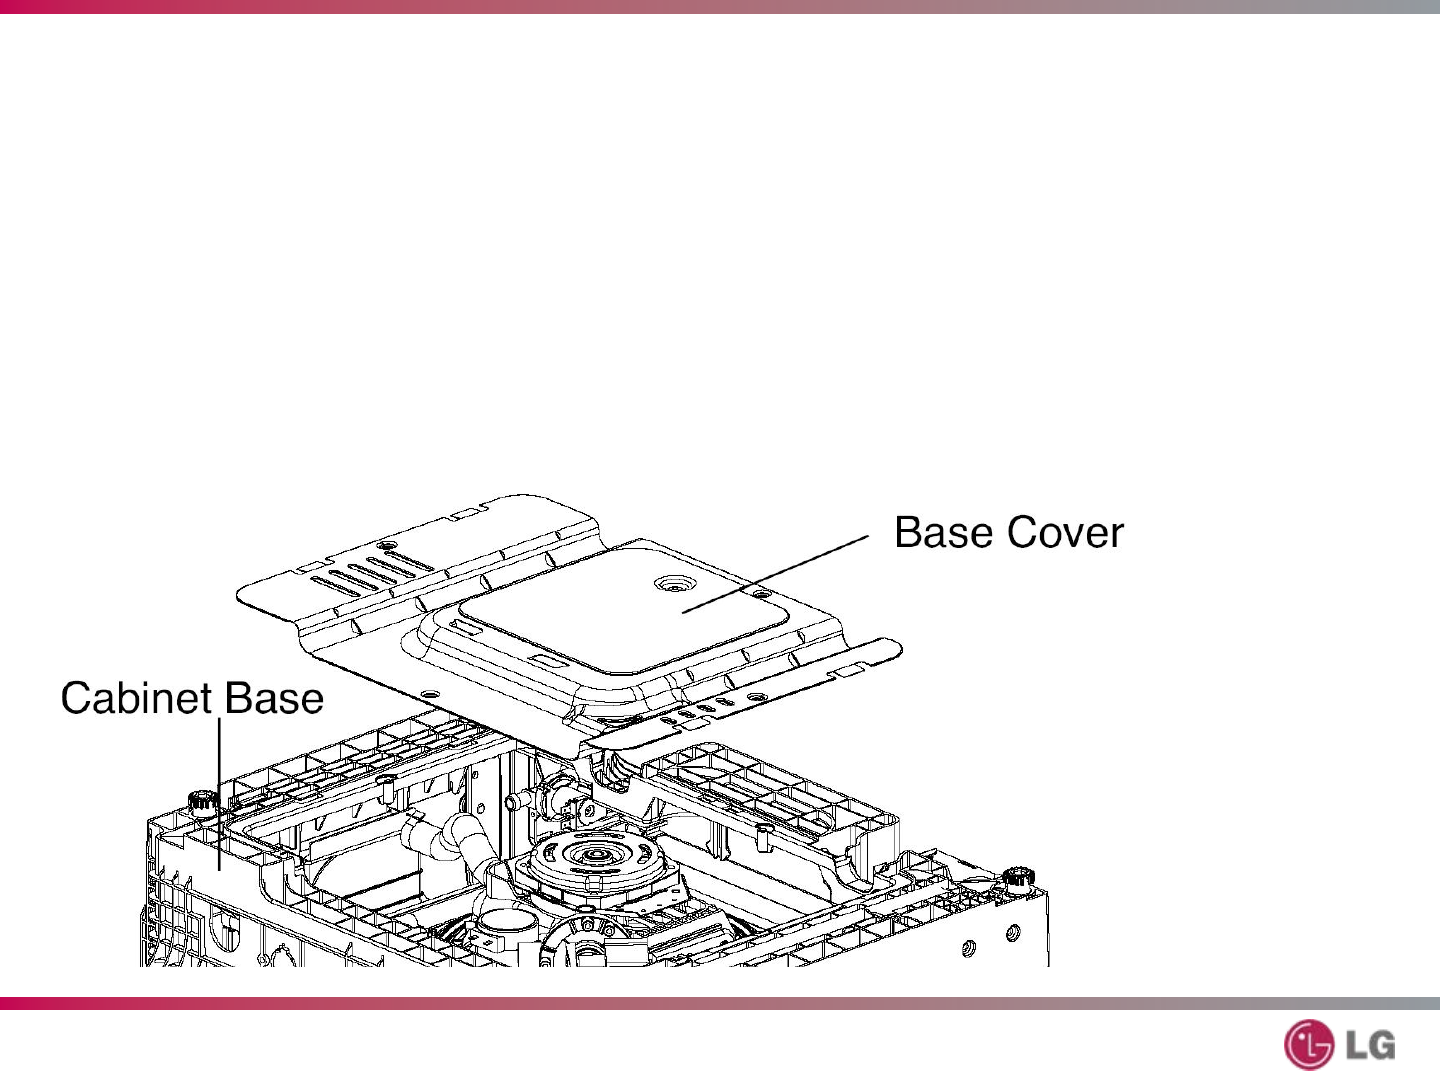
LDF9810ST – Steam Dishwasher
Base Cover
T-27
Remove 2 screws.
Lift the base cover out of the base.
70
LDF9810ST – Steam Dishwasher
Line Noise Filter
T-28
Disconnect both connectors
of the line noise filter.
71
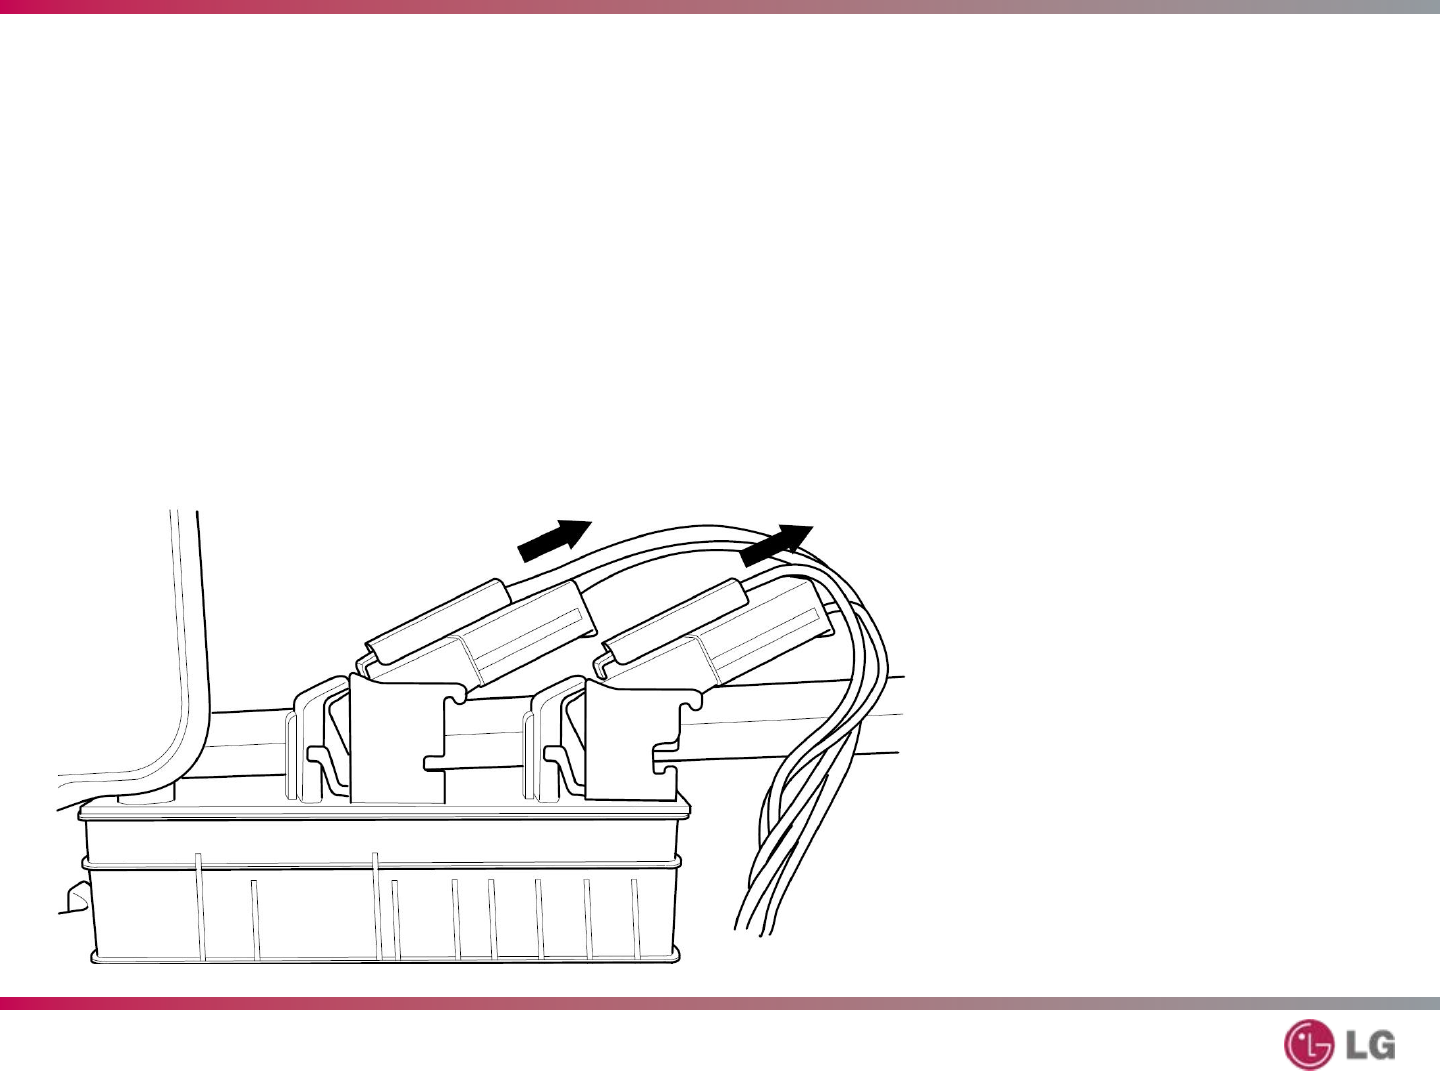
LDF9810ST – Steam Dishwasher
Float Switch Assembly
T-28
Remove the connections
from the float assembly
micro switches. Mark them
to ensure you can
reconnect them correctly
after repairs

72
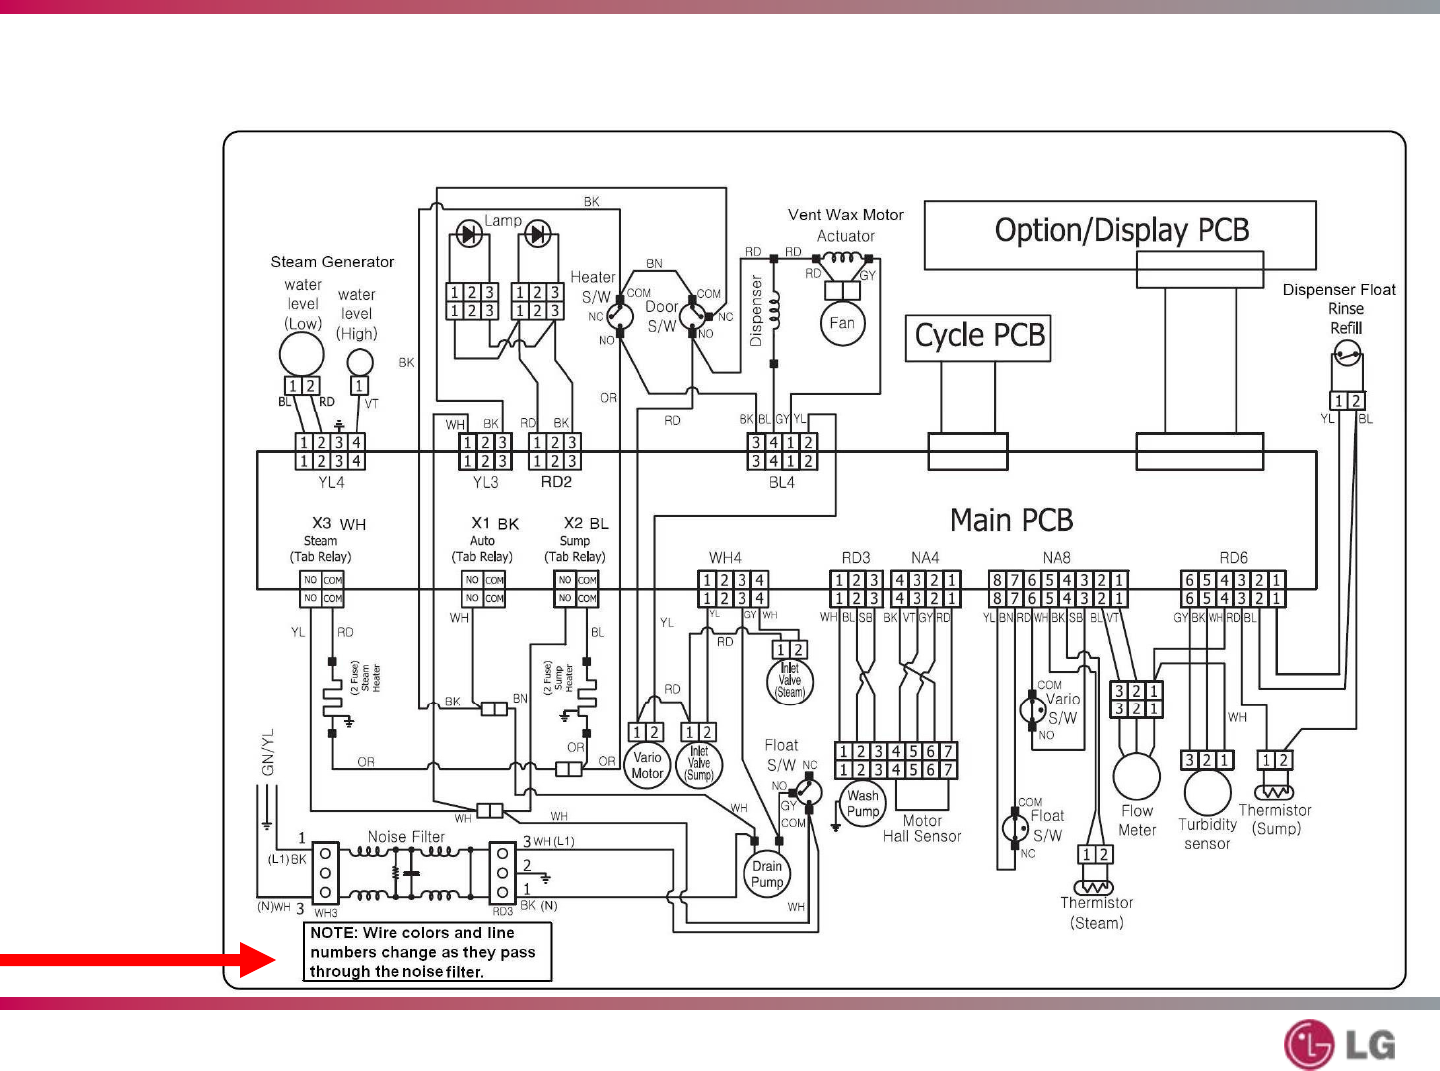
LDF9810ST – Steam Dishwasher
Wiring Diagram
T-28
The wiring diagram is attached to the back of the lower cover.
73
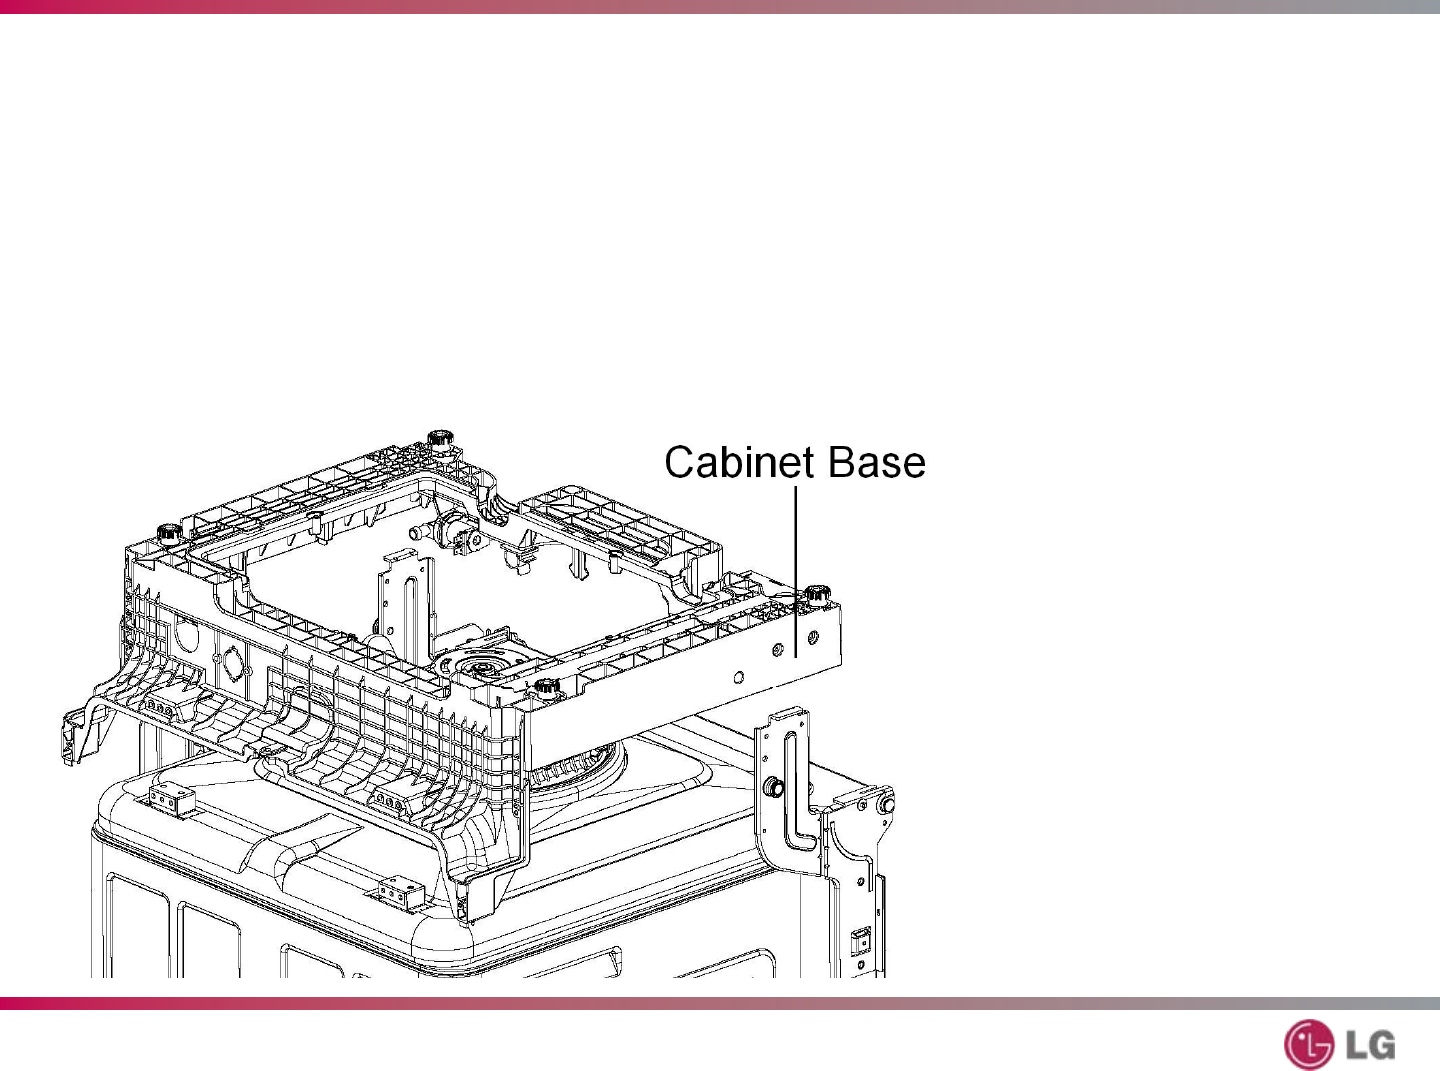
LDF9810ST – Steam Dishwasher
Cabinet Base
T-28
Remove 8 screws
around the base.
Lift the base upward
off the dishwasher.
74
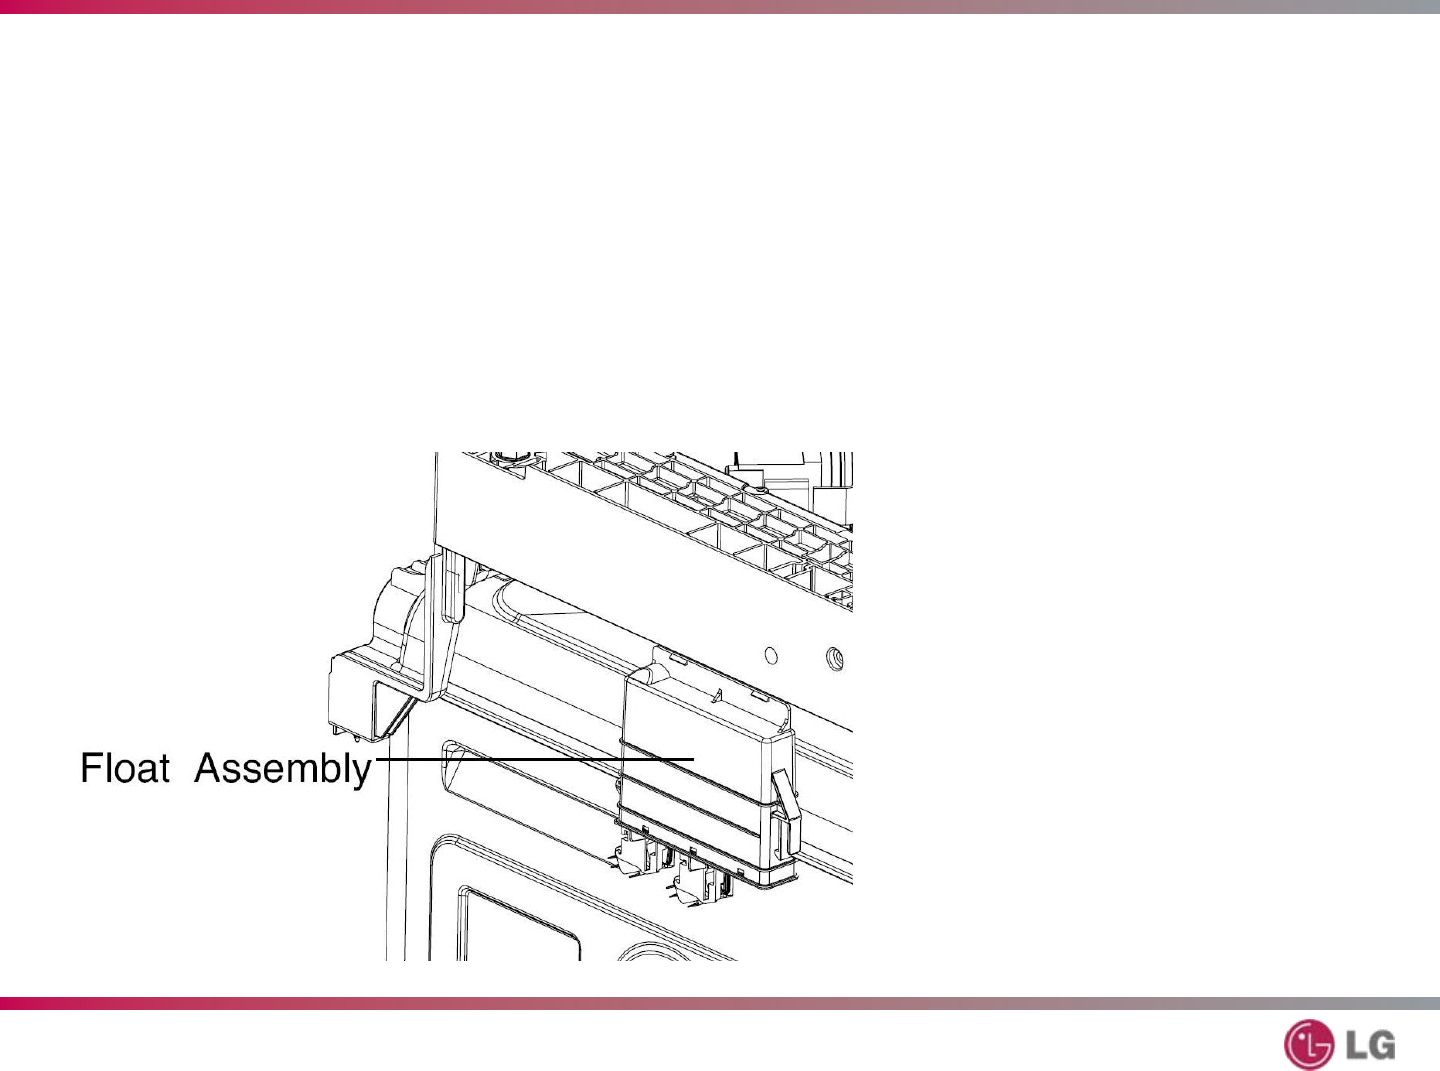
LDF9810ST – Steam Dishwasher
Float Assembly
T-28
Press the hook to
separate the float
assembly.
Pull the float assembly
free.

75
LDF9810ST – Steam Dishwasher
Steam Generator
T-29
Squeeze the hose
clamps and remove the
3 hoses from the steam
generator.
Remove 2 screws to
take out the steam
generator.
NOTE: Be careful in
case the steam
generator is still hot
or has hot water in it.
76
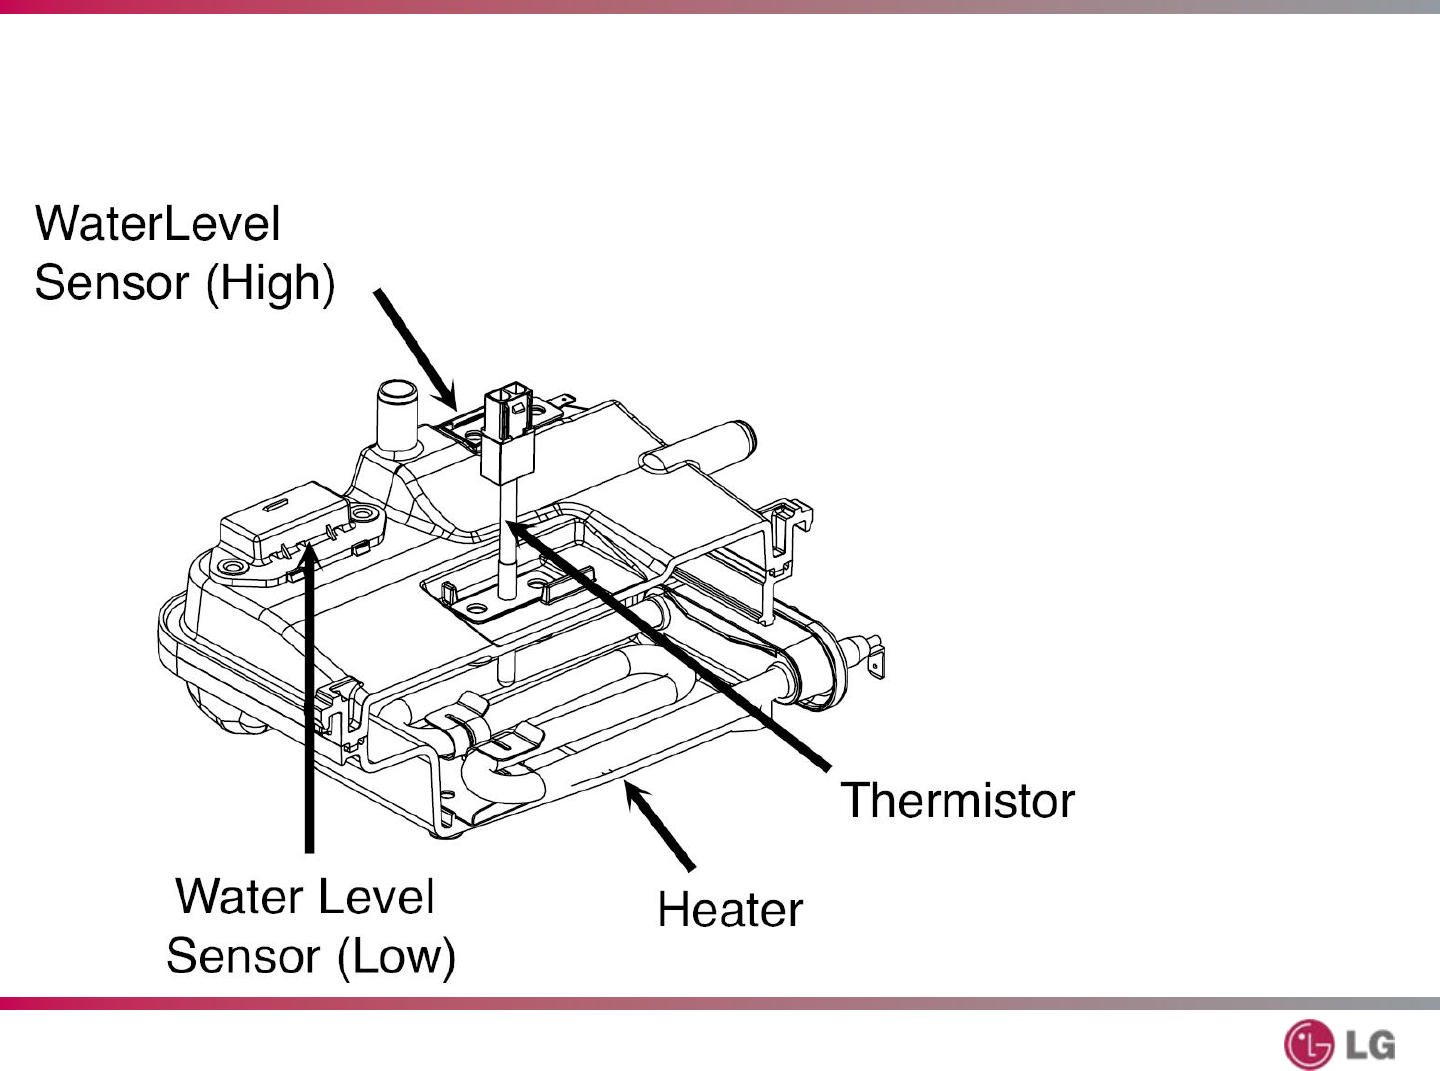
LDF9810ST – Steam Dishwasher
Steam Generator
T-29
The steam generator is
sold as an assembly. The
individual parts (heater,
thermistor, and sensor)
are not repairable or
replaceable.
77
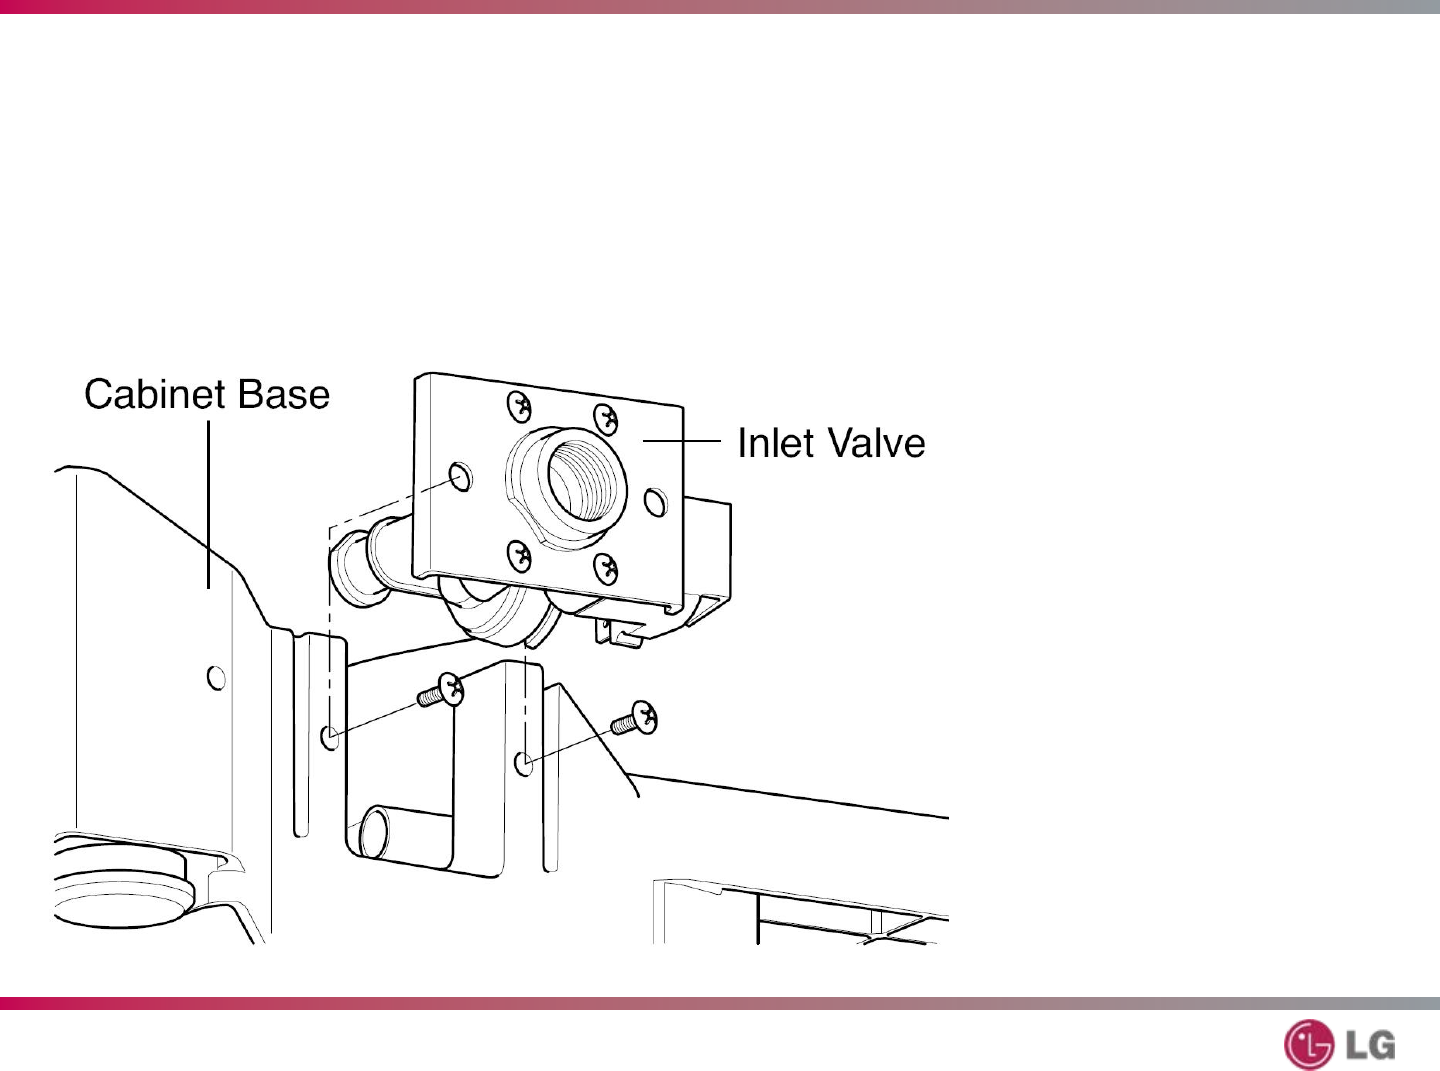
LDF9810ST – Steam Dishwasher
Inlet Valve
T-29
Disconnect the
water supply line.
Remove the
electrical ground
wire.
Remove 2 screws
that hold the valve
to the base and take
out the valve.
78
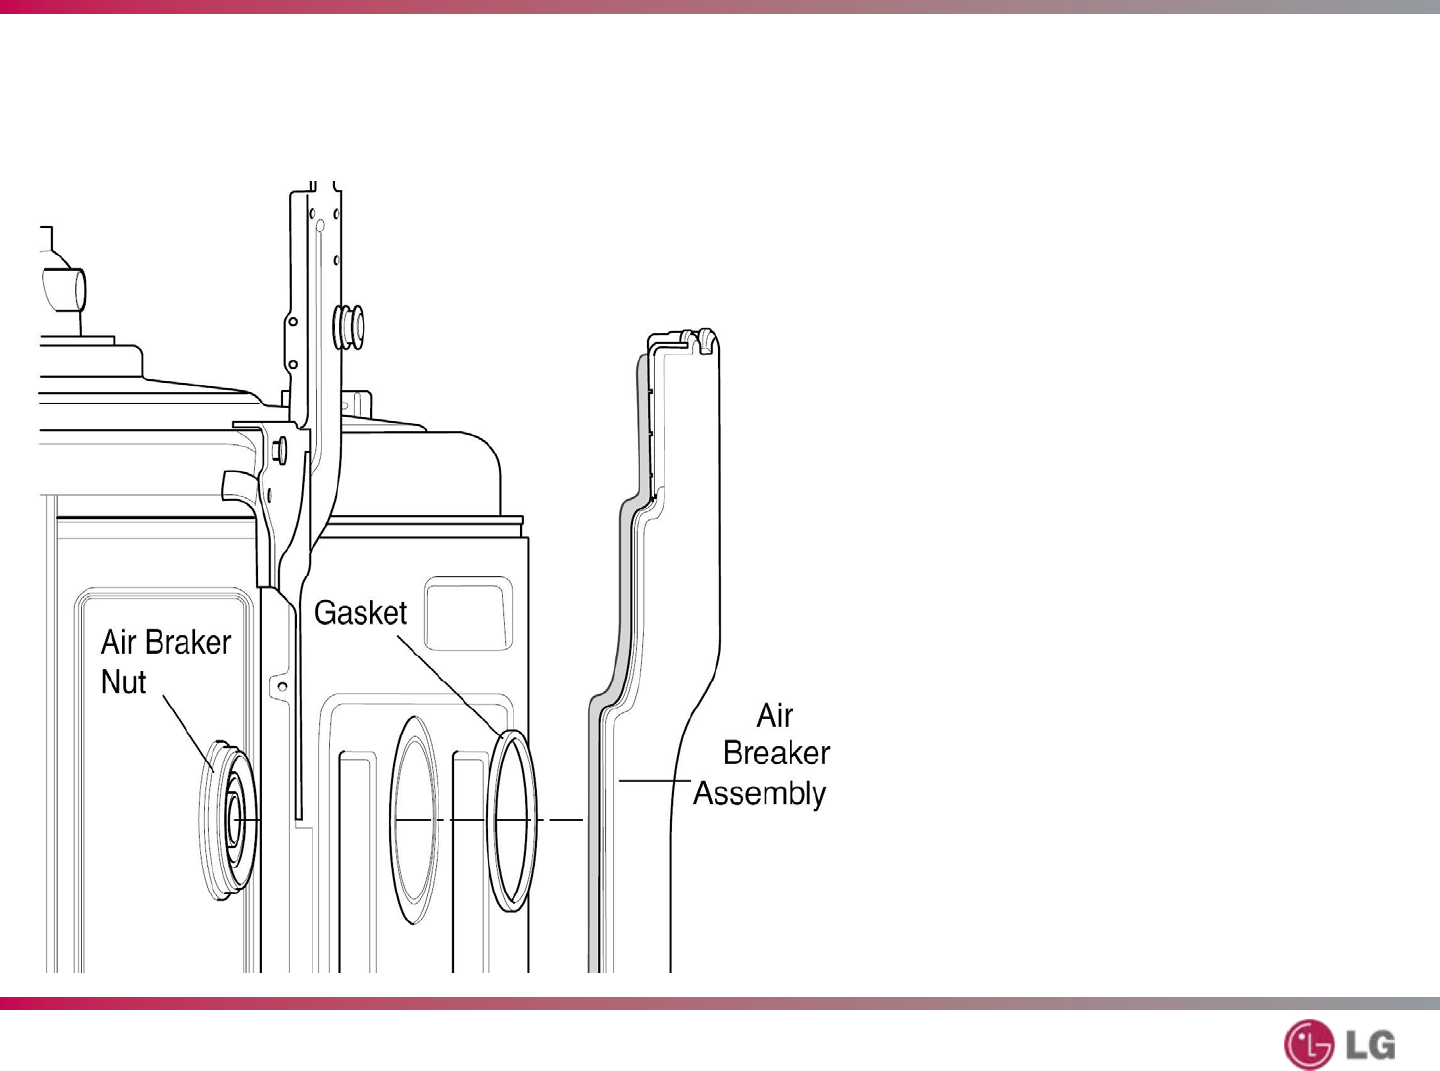
LDF9810ST – Steam Dishwasher
Air Breaker Assembly
T-29
Disconnect three hoses
from the air breaker
assembly.
Unscrew the cover on
the inside of the
dishwasher.
Be sure not to lose the
gasket (O-ring) that fits
between the outside of
the tub and the air
breaker assembly.
79
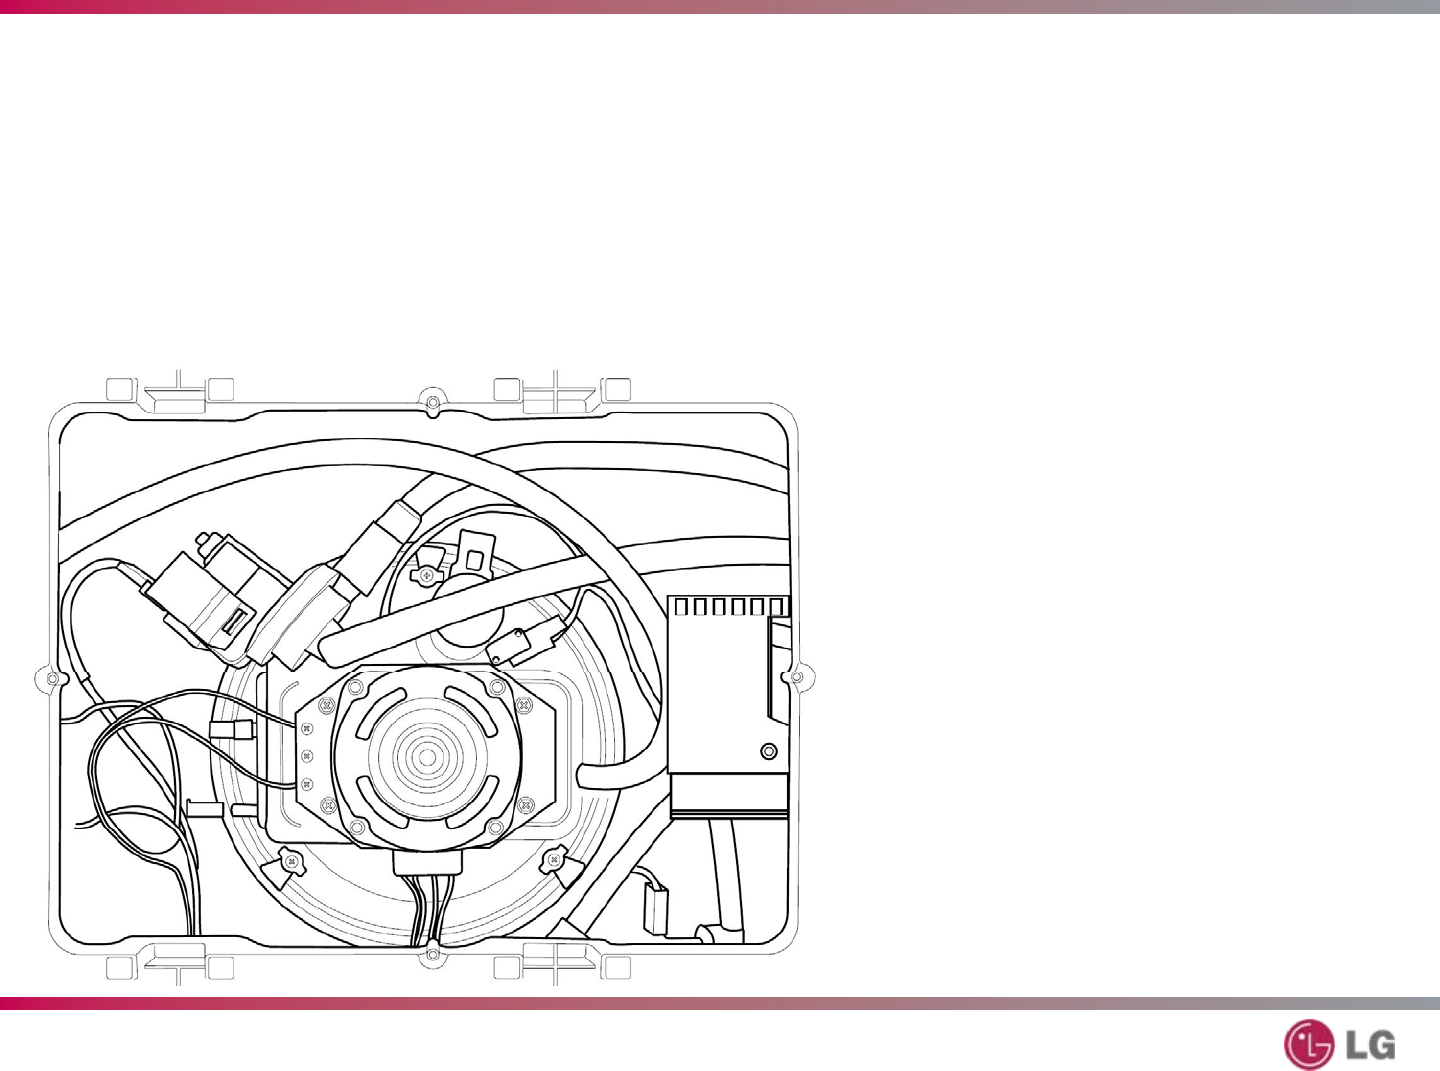
LDF9810ST – Steam Dishwasher
Sump Assembly
T-30
Remove the wiring
connections, including the
ground wires attached
by screws.
Remove the hose
connections.
Lift the sump assembly
out of the base of the
dishwasher.
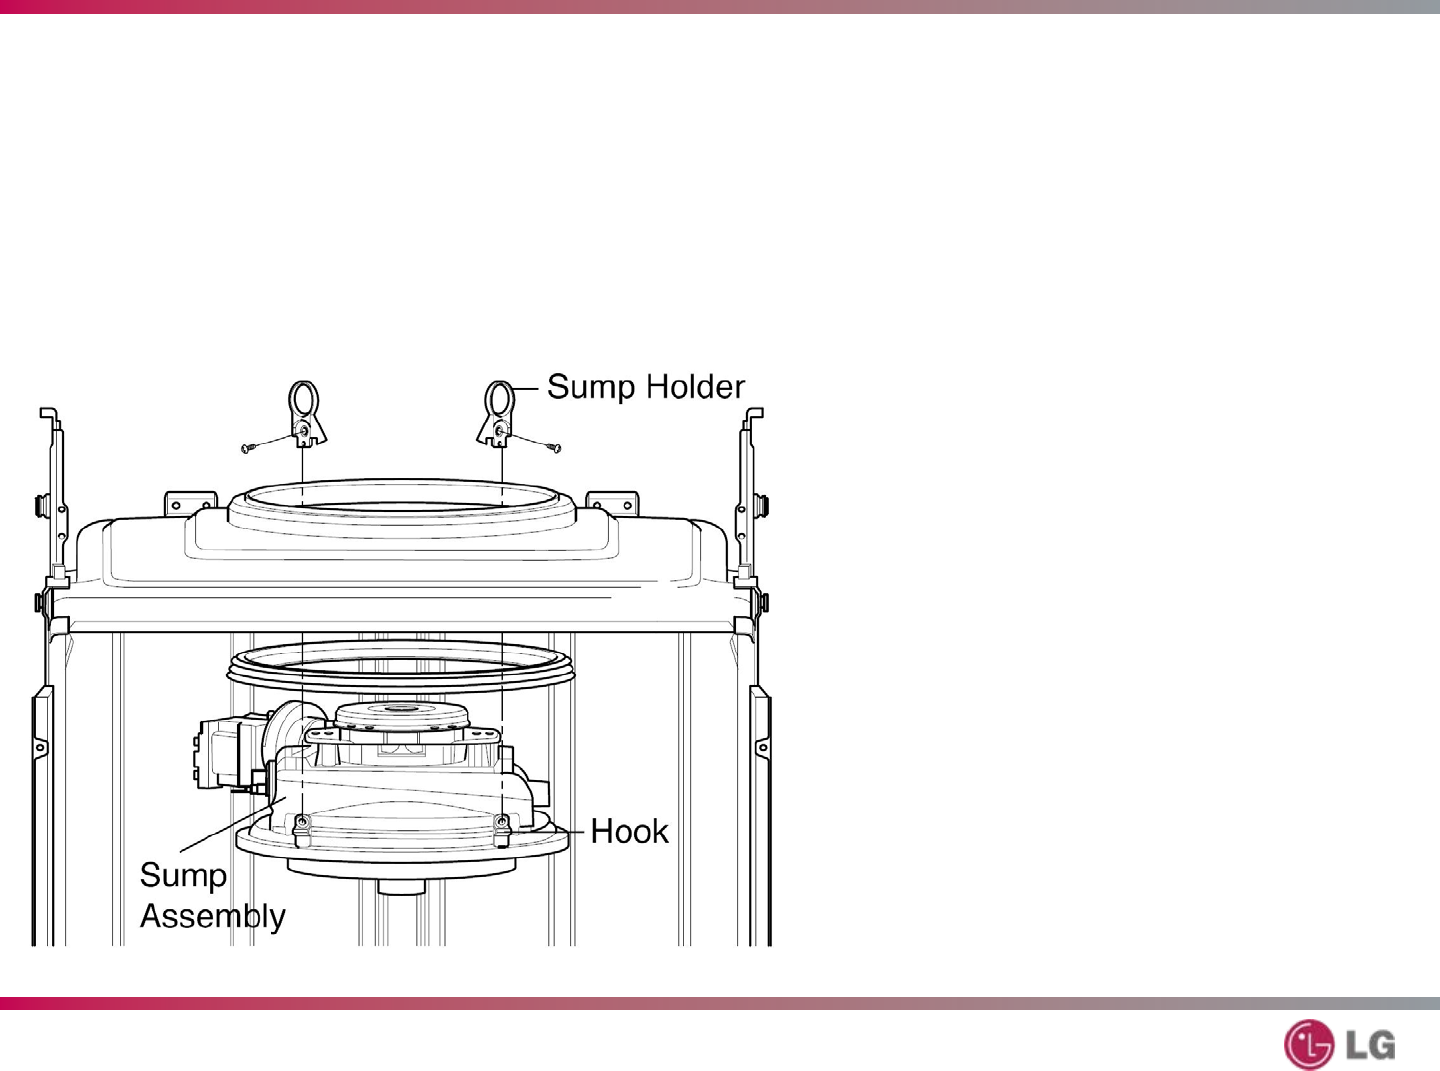
80
LDF9810ST – Steam Dishwasher
Preliminary
T-30
Remove the 2 screws and
sump holder clips. Be careful
not to let the sump assembly
fall into the tub.
Press the hooks gently
toward the center of the
sump assembly and lower
the sump assembly into the
tub while supporting it with
one hand.
81
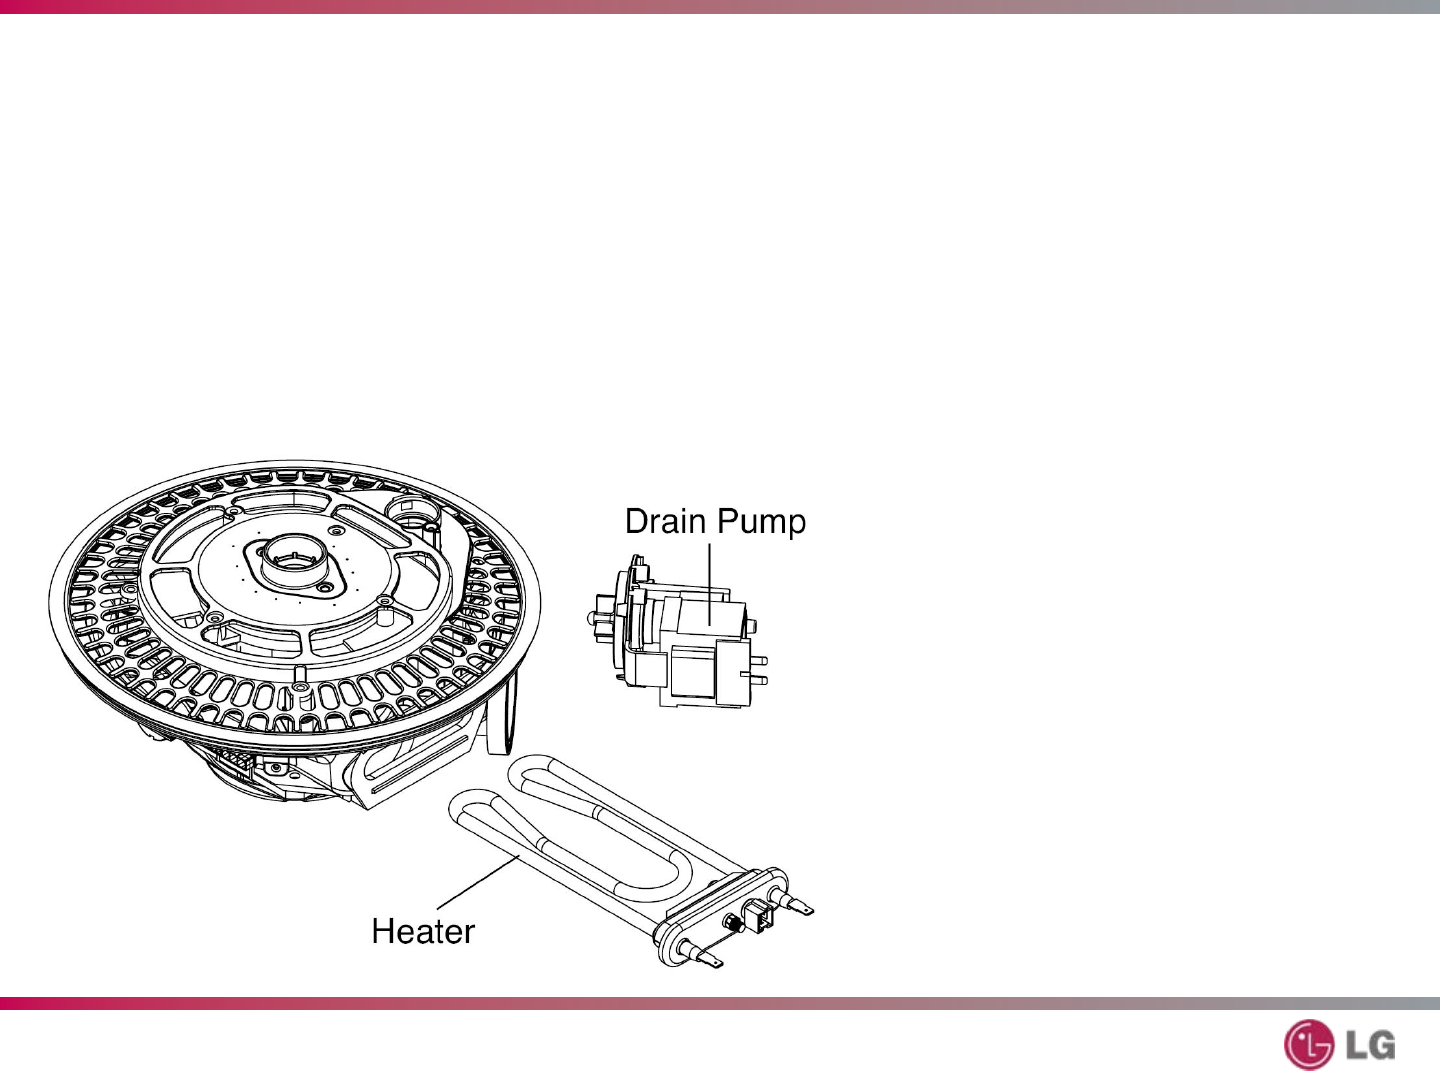
LDF9810ST – Steam Dishwasher
Heater and Drain Motor
T-30
Loosen the nut on the
heater retainer to the end
of the shaft and wiggle the
heater out of the sump.
Remove 3 screws and
detach the drain pump
from the sump.
82
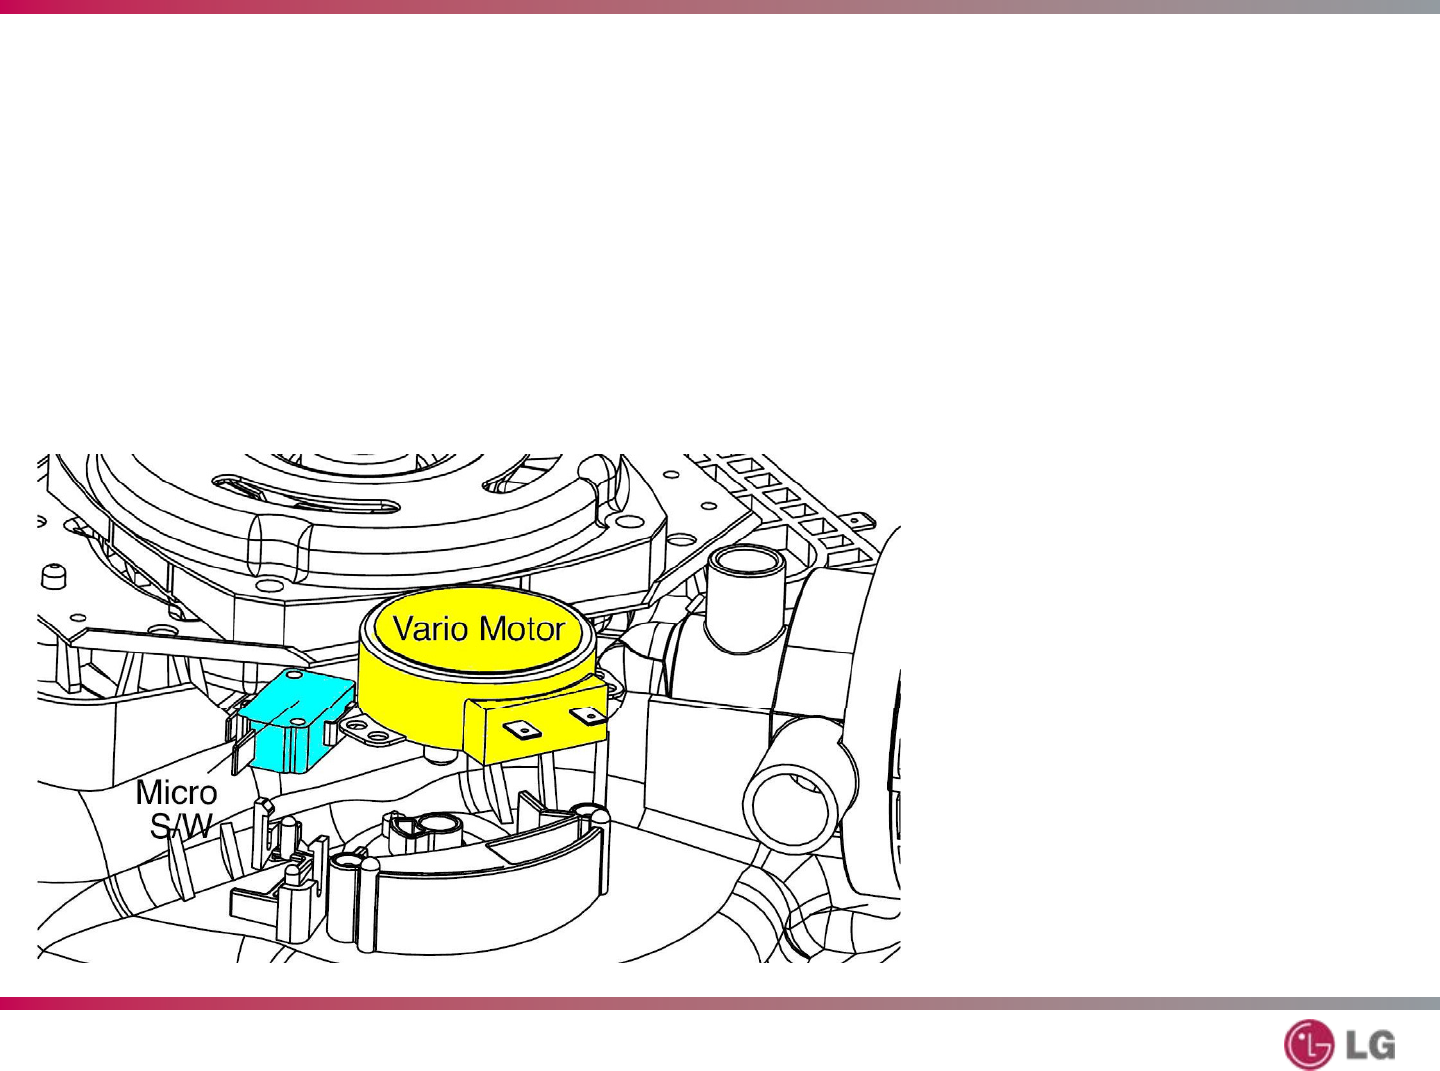
LDF9810ST – Steam Dishwasher
Vario Motor
T-30
Remove 2 screws
that attach the vario
motor to the sump.
Remove the vario
motor and the micro
switch.
83
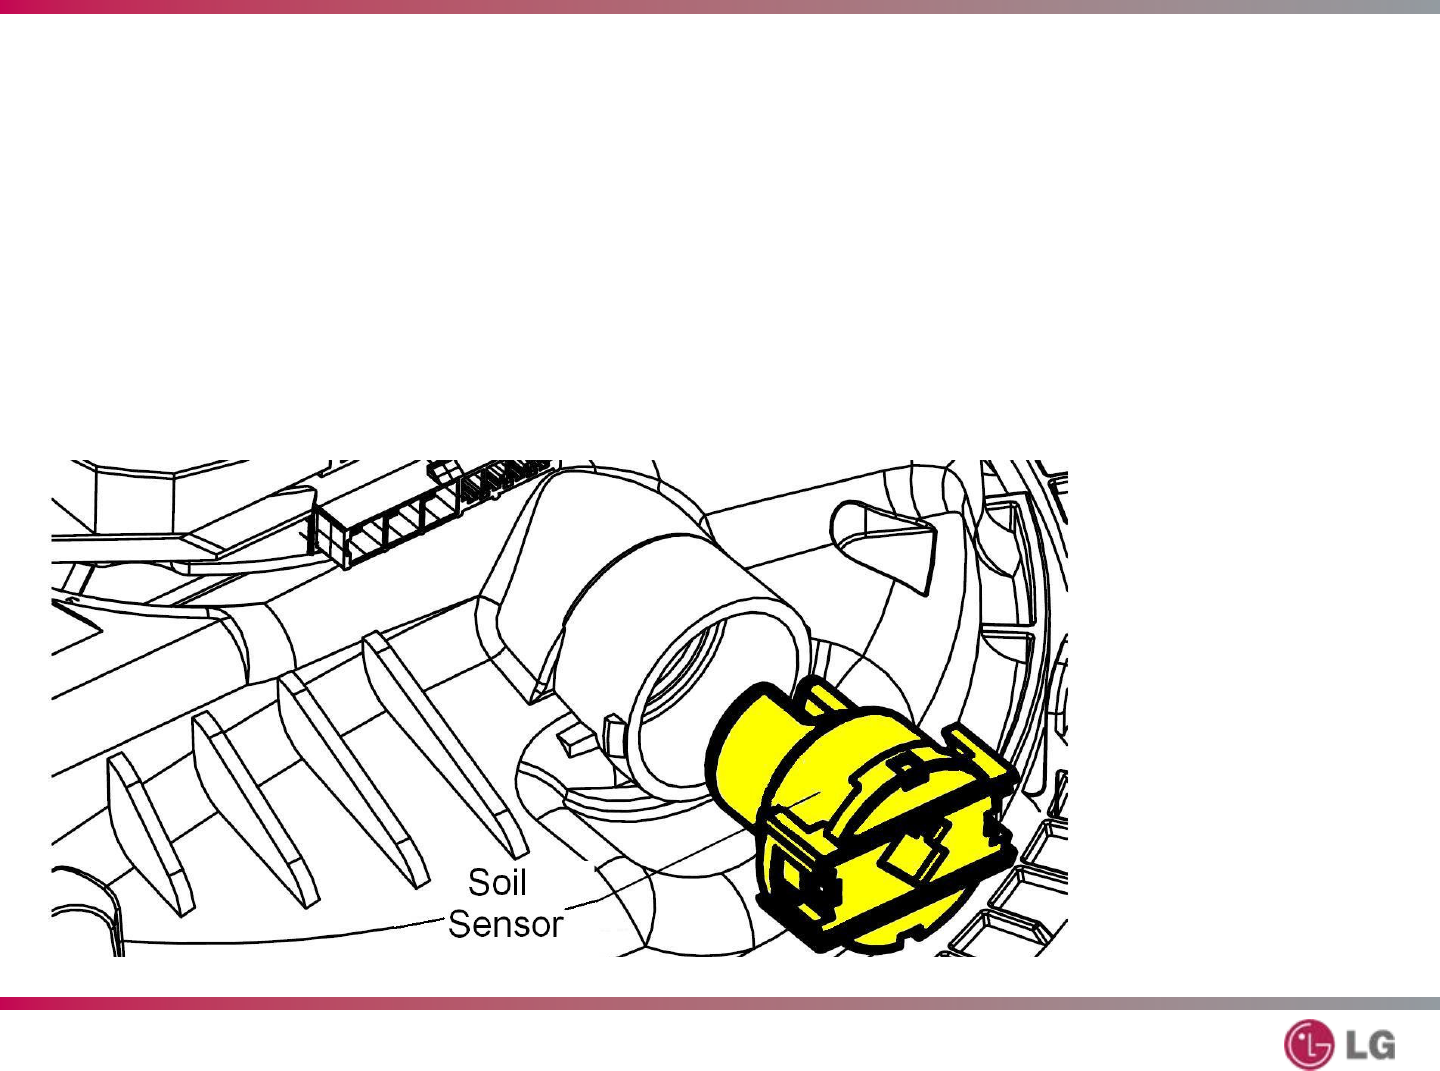
LDF9810ST – Steam Dishwasher
Soil (Turbidity) Sensor
T-31
Lift the retaining clips
and pull the soil sensor
(turbidity sensor) from
the sump.
84
LDF9810ST – Steam Dishwasher
Preliminary
T-31
When reassembling the sump. be
careful to avoid kinking or damaging
the small seals and gaskets inside it.
(See page 39 in the exploded view.)
85
LDF9810ST – Steam Dishwasher
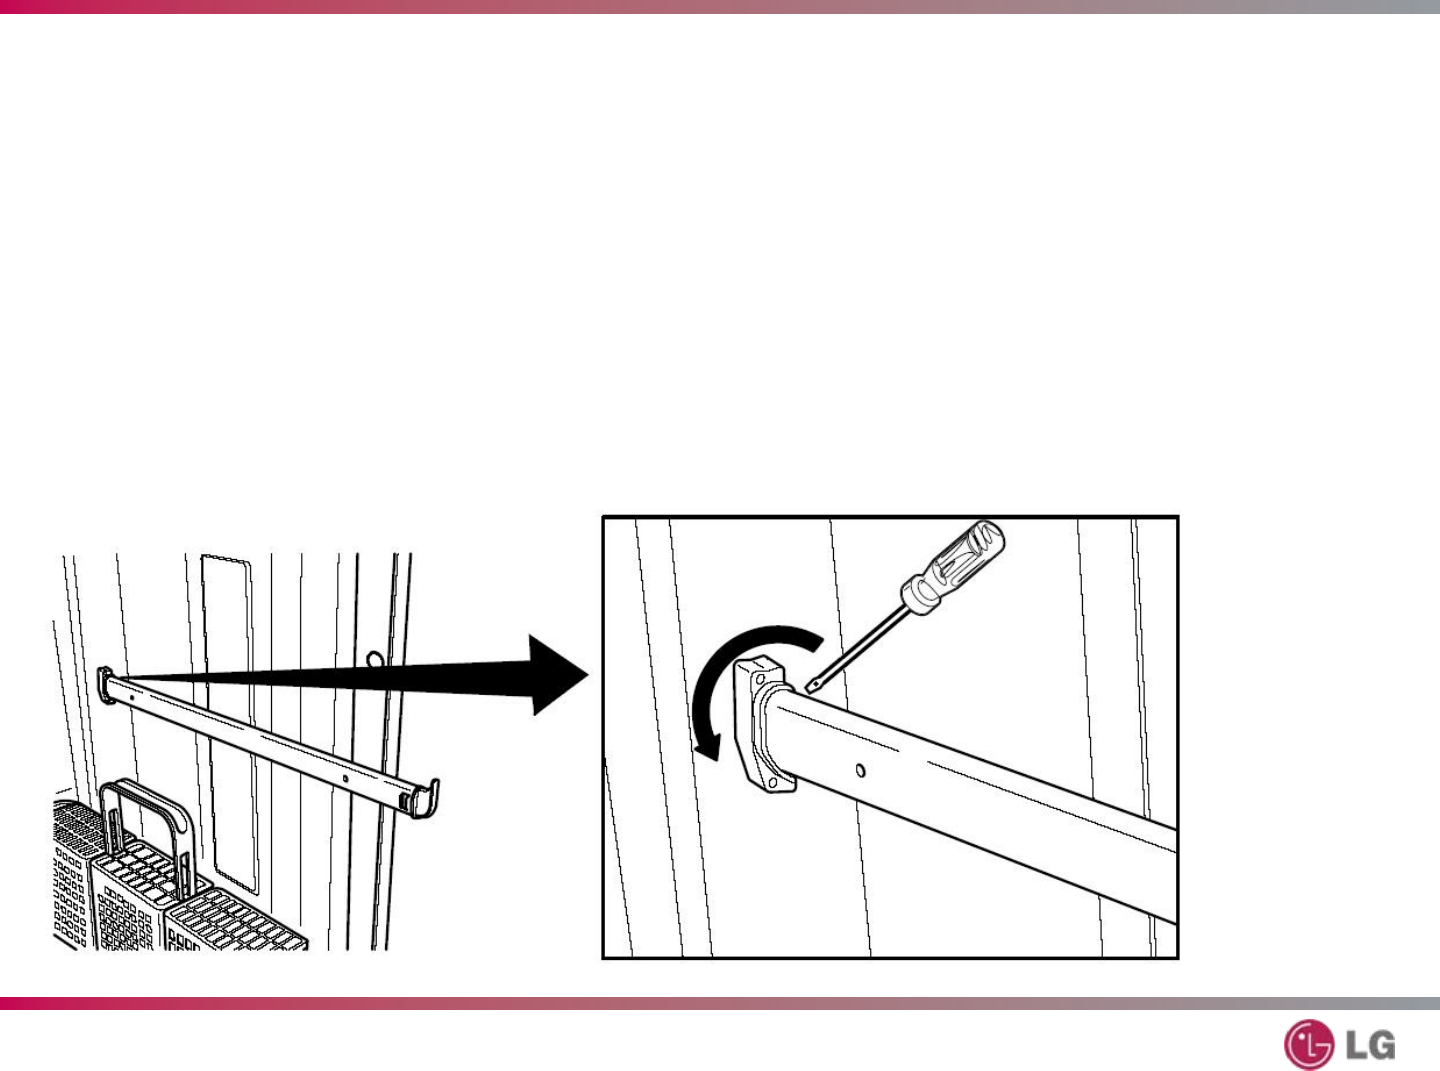
Cutlery Rack Rail
T-32
Insert a screwdriver in the gap
behind the rail at the back end
and pry the end cap off.
It is easily broken, so have a
replacement available.
86
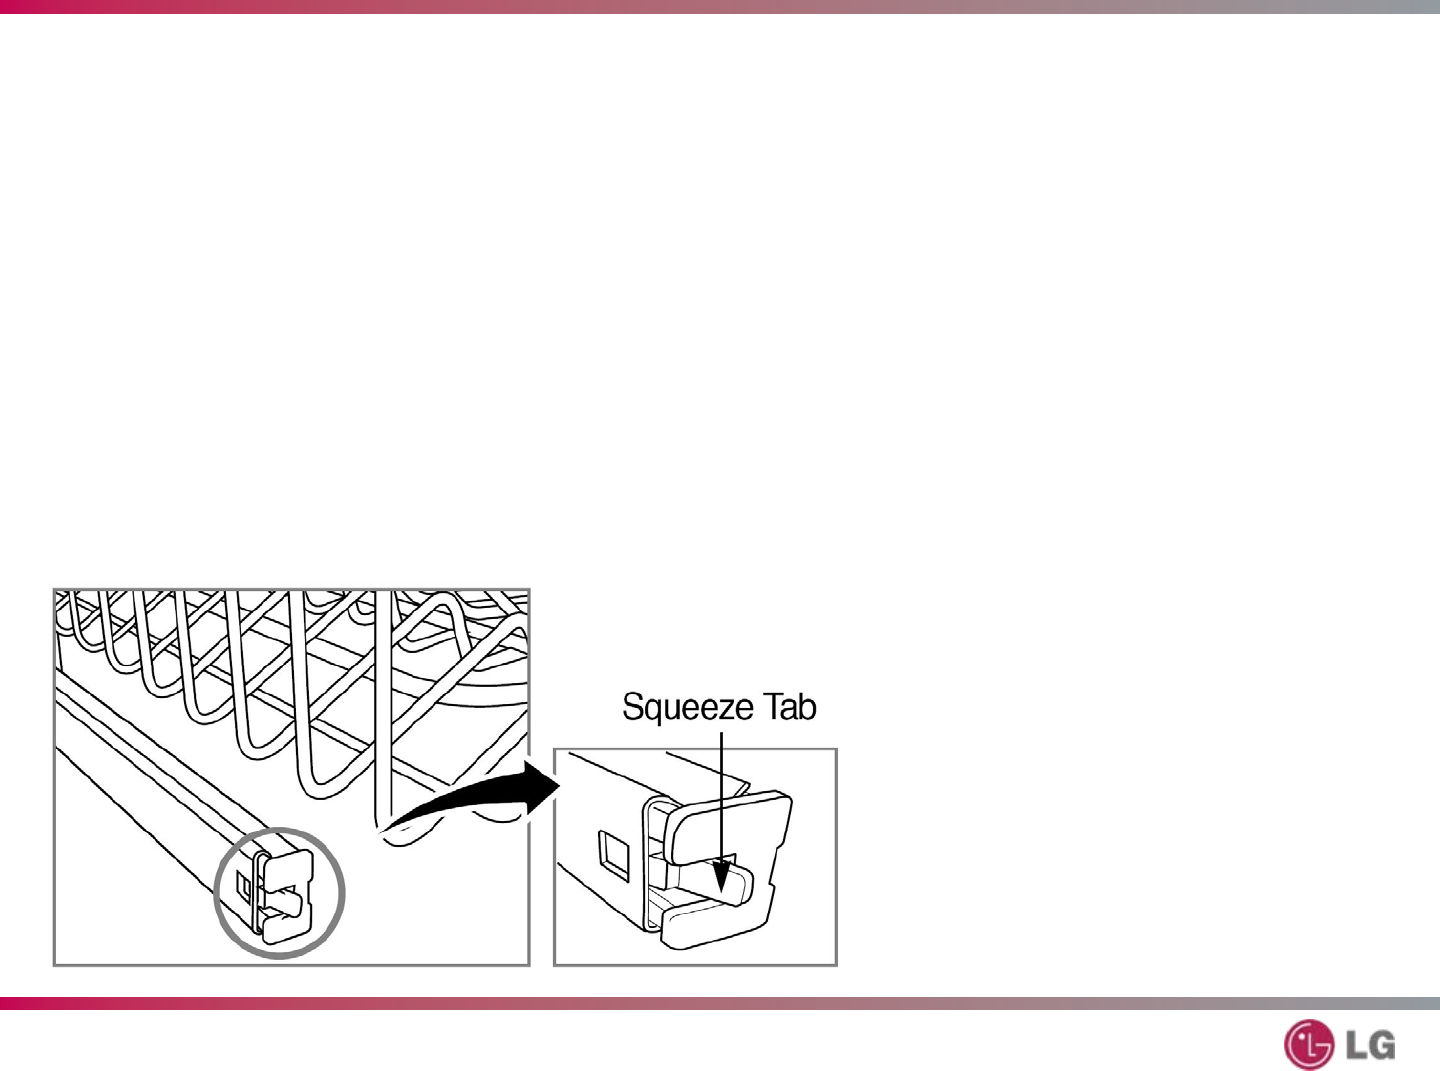
LDF9810ST – Steam Dishwasher
Upper Rack Rail
T-32
Pull the upper rack out until it stops.
Squeeze the tab of the stopper and pull the
stopper out. Be careful the upper rack does
not fall out of the rail while you do this.
Pull the upper rack out of the slides.
87
LDF9810ST – Steam Dishwasher
Wiring Diagram
T-33
88
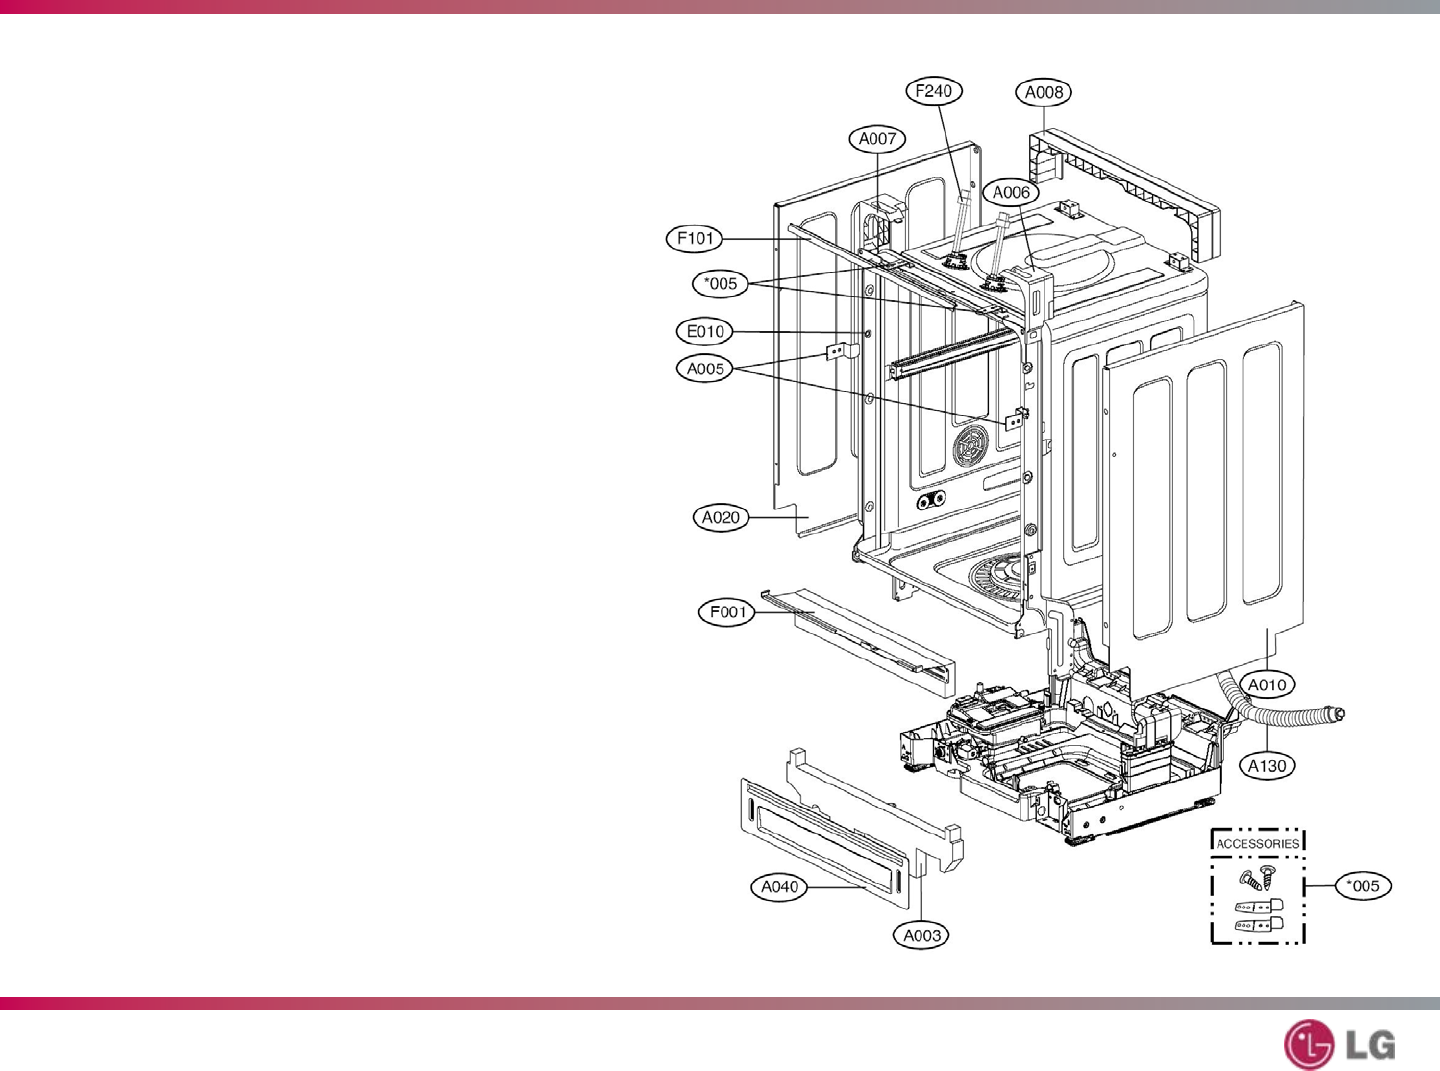
LDF9810ST – Steam Dishwasher
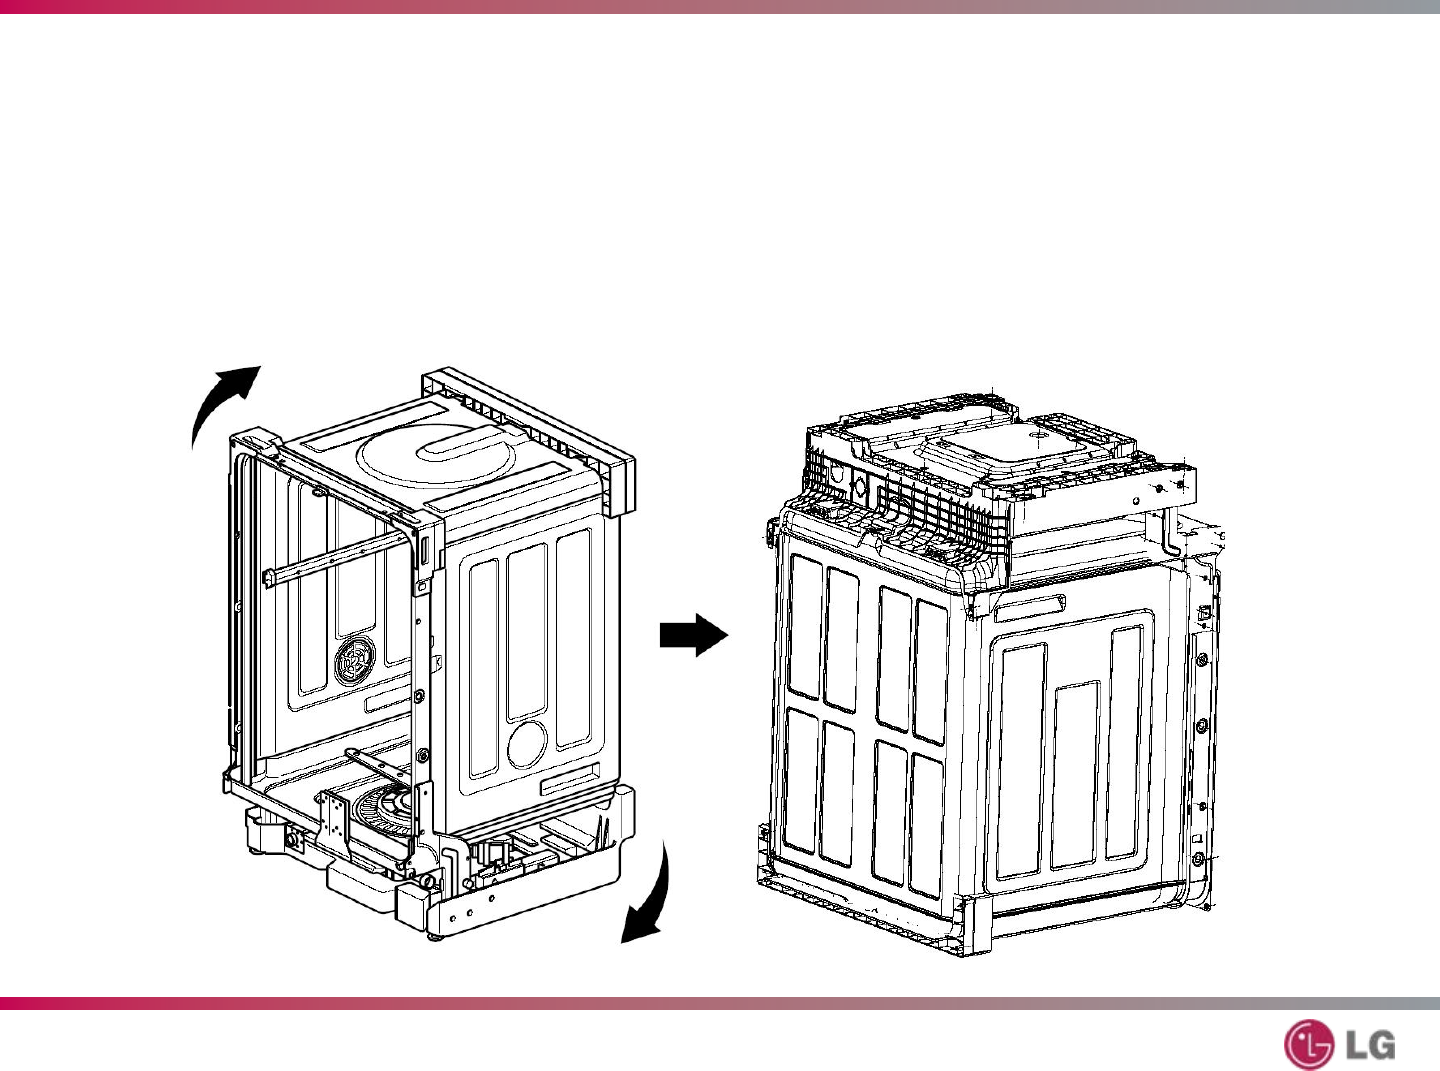
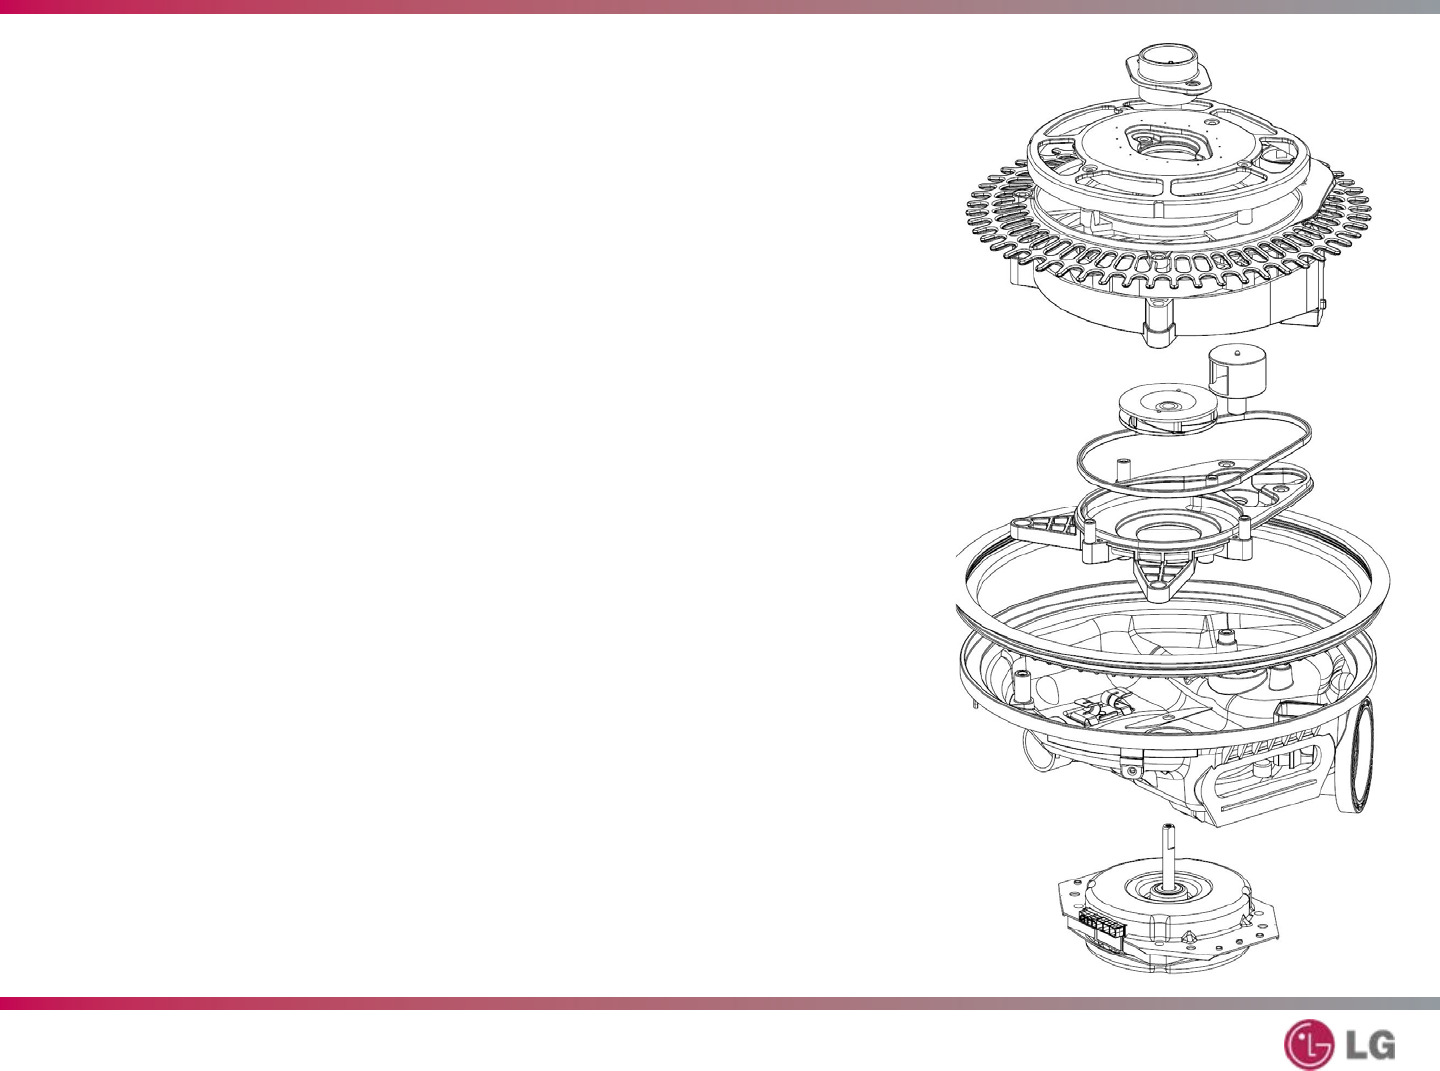
Exploded View
T-34~39
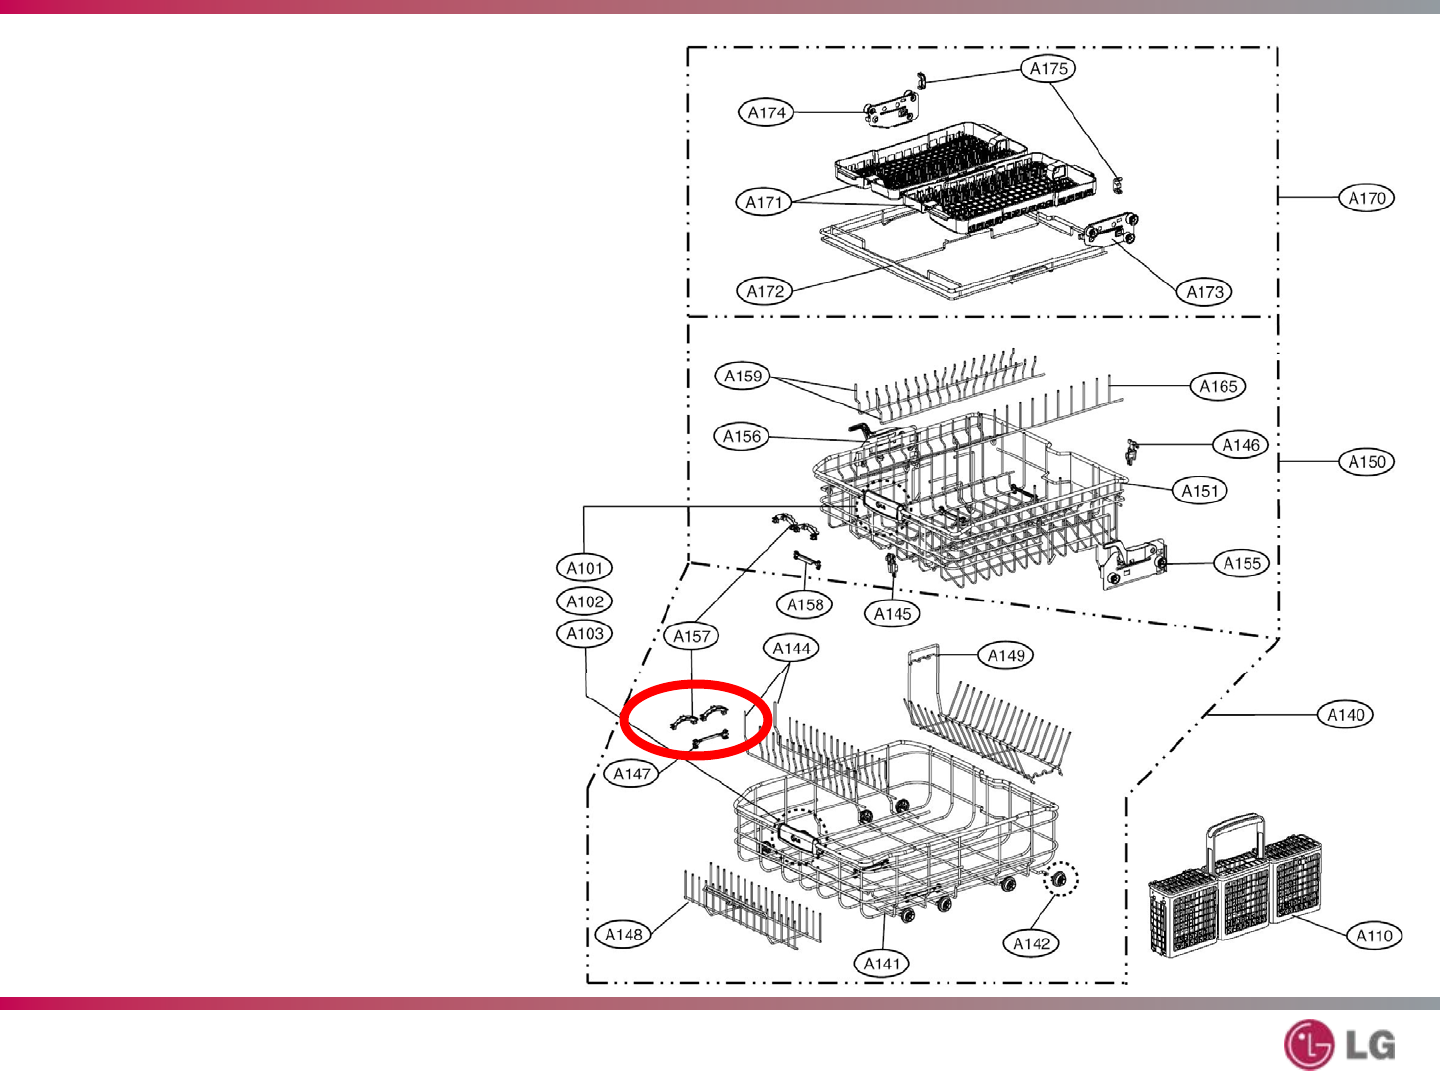
89
LDF9810ST – Steam Dishwasher
Exploded View
T-34~39
90
LDF9810ST – Steam Dishwasher
Serial Number (Old Style)
T-40
[Example] 801KW3400251
801 KW 00251
Production Numbe
r
[Internal code]
Manufactured January 2008
34
Made in Korea
91
LDF9810ST – Steam Dishwasher
Serial Number (New Style)
T-40
Sequential number
Internal code
Model ID
Production site (2 Letters)
12345 KR 406 YP 000002 + Options
New Serial Code (ETA Mid 2008)
Year and month of production (YMM
)

92
LDF9810ST – Steam Dishwasher
Parts List
T-41~44
Loc. Part Number Description Qty.
*001 AFN31666719 Owner's Manual 1
*002 3890DZ3015A Box, Carton 1
*003 MFL37554802 Manual, Service 0
*005 5001DD4001A Accessory Assembly 1
A003 ACV34326901 Damper (Insulation) 1
A005 4810DD4002B Bracket, Top 2
A006 4980ED2015A Supporter, Holder 1
A007 4980ED2014A Supporter, Holder 1
A008 4980ED2018B Supporter, Holder 1
A010 3090ED1001F Cabinet 1
A020 3091DD1001F Cabinet Assembly 1
A040 3551DD2001E Cover Assembly, Lower 1
93
LDF9810ST – Steam Dishwasher
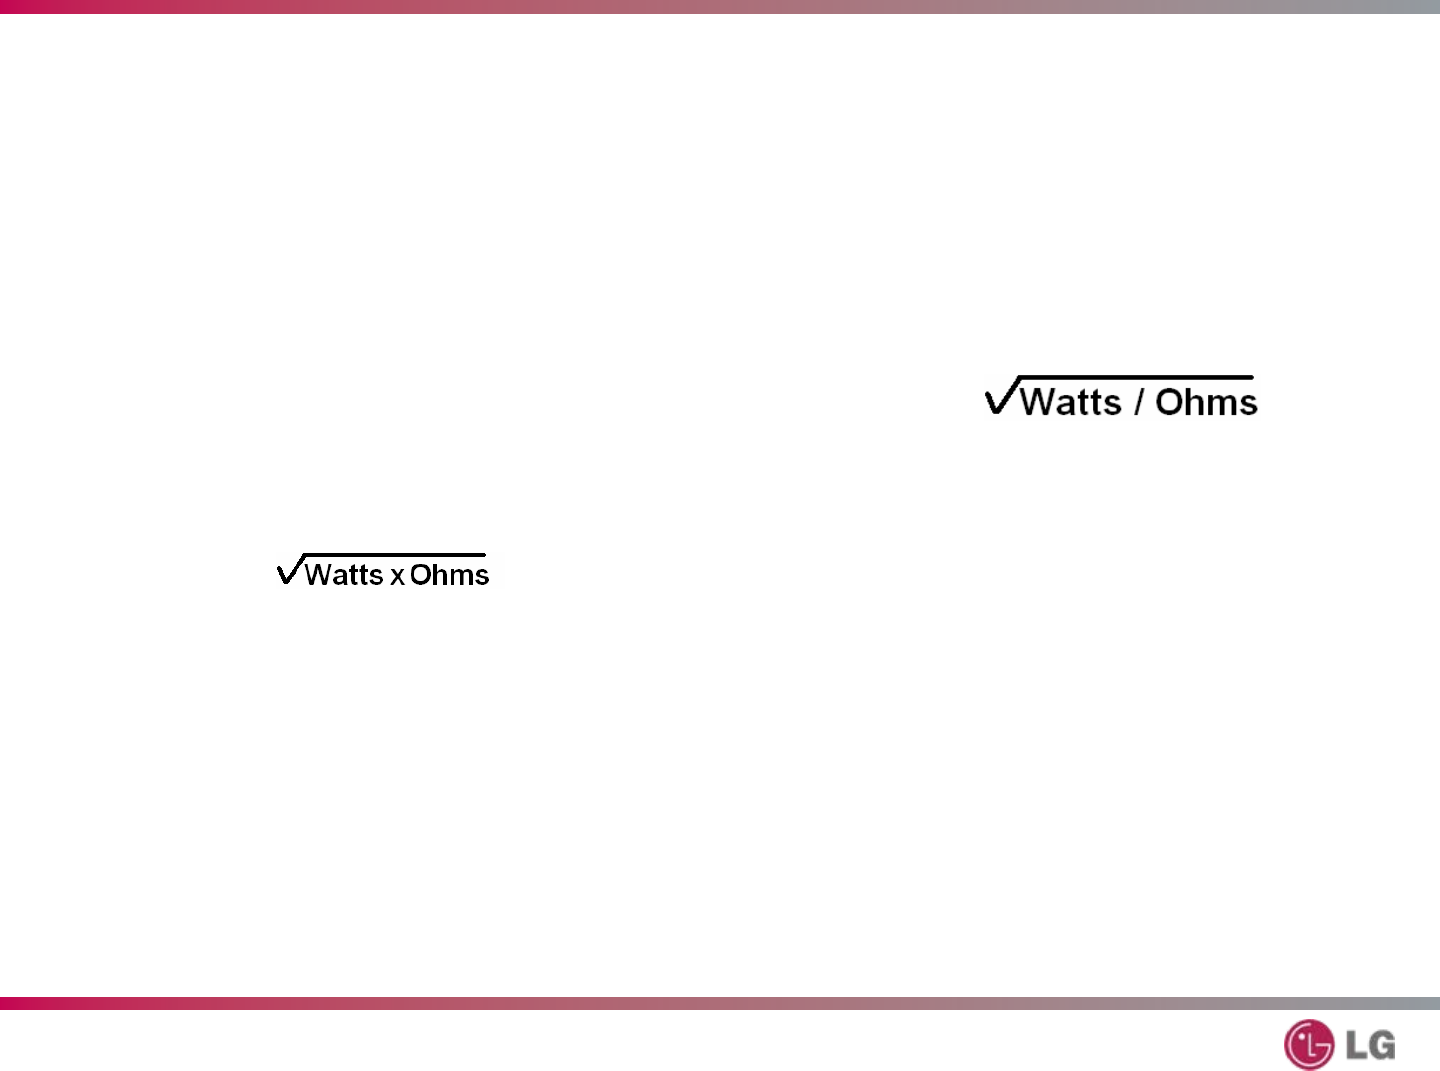
Ohm’s Law and Watt’s Law
T-45
P = WATTS
Watts = Volts2 x Ohms
Watts = Amperes2 x Ohms
Watts = Volts x Amperes
I = AMPERES
Amperes = Volts / Ohms
Amperes = Watts / Volts
Amperes =
E = VOLTS
Volts =
Volts = Watts / Amperes
Volts = Amperes x Ohms
R = OHMS
Ohms = Volts / Amperes
Ohms = Volts2 / Amperes
Ohms = Watts / Amperes2
94
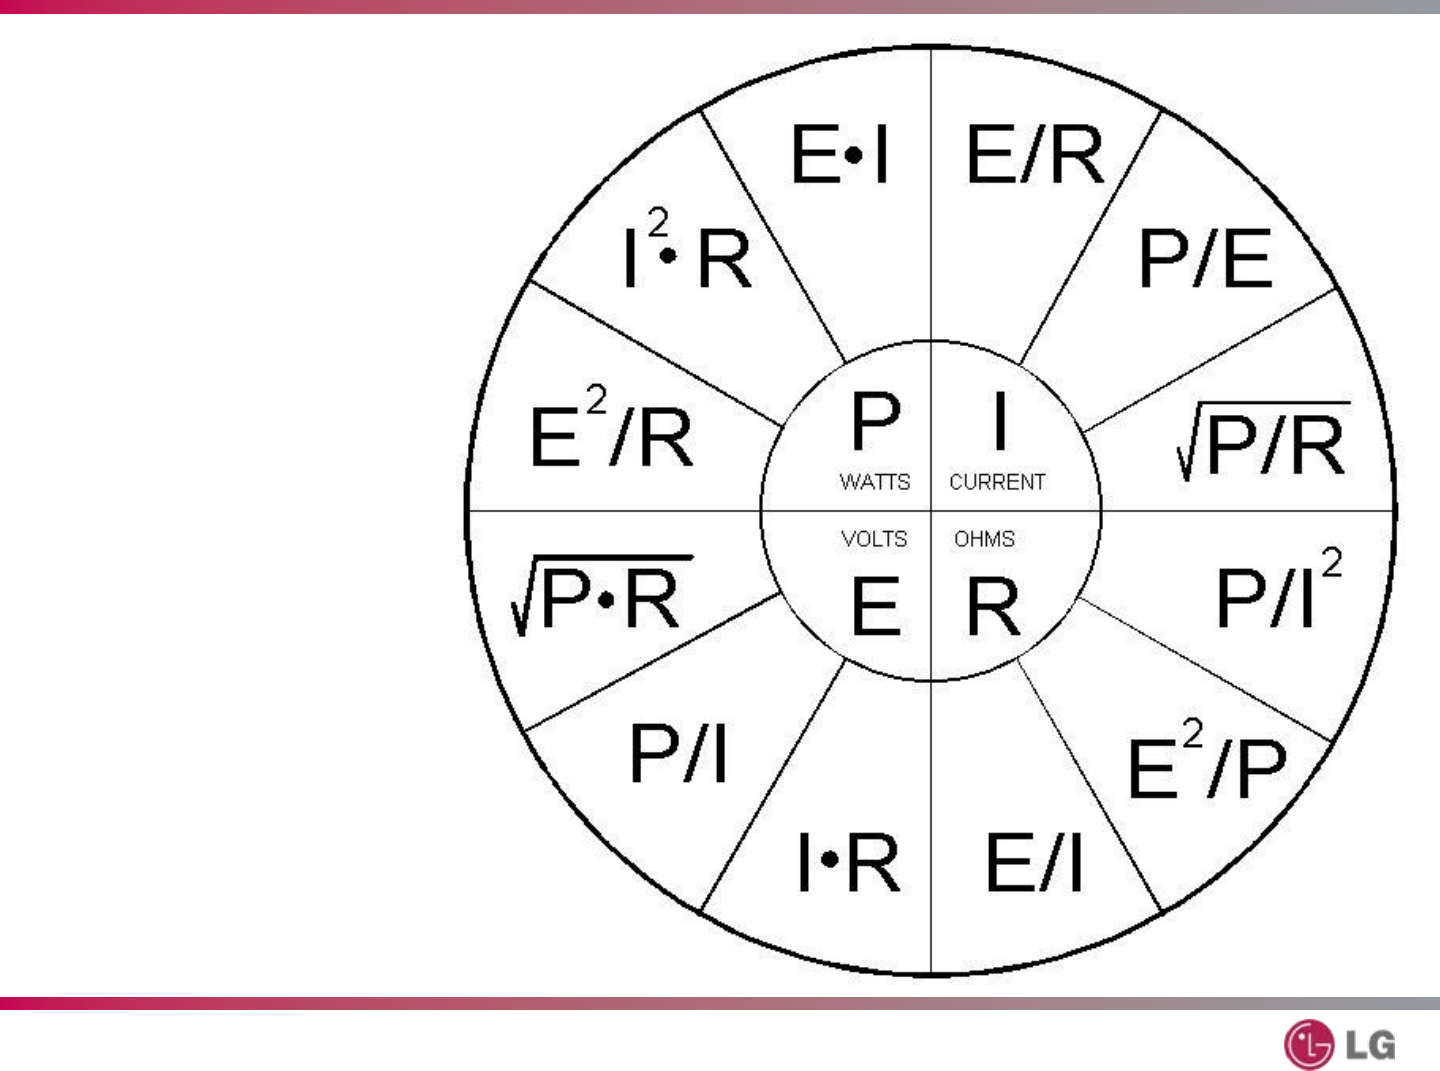
LDF9810ST – Steam Dishwasher
Ohm’s Law
T-3
95
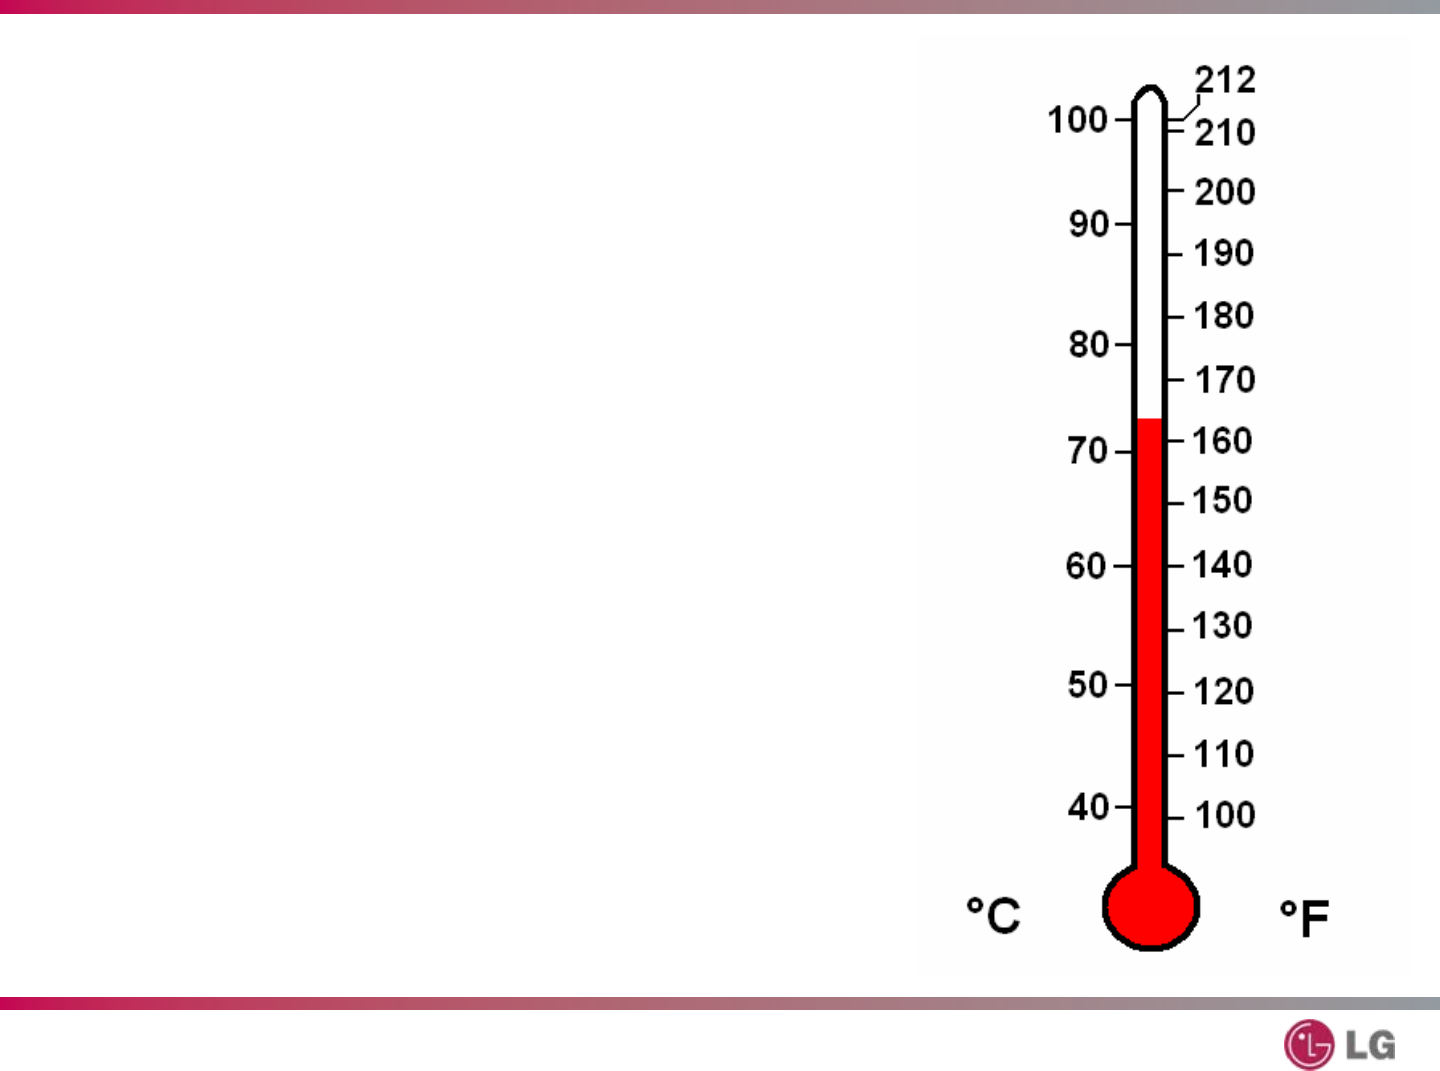
LDF9810ST – Steam Dishwasher
Conversion Information
T-46
°F = (9/5) °C + 32
°C = (5/9) x (°F – 32)
ml X 30 = ounces
96
LDF9810ST – Steam Dishwasher
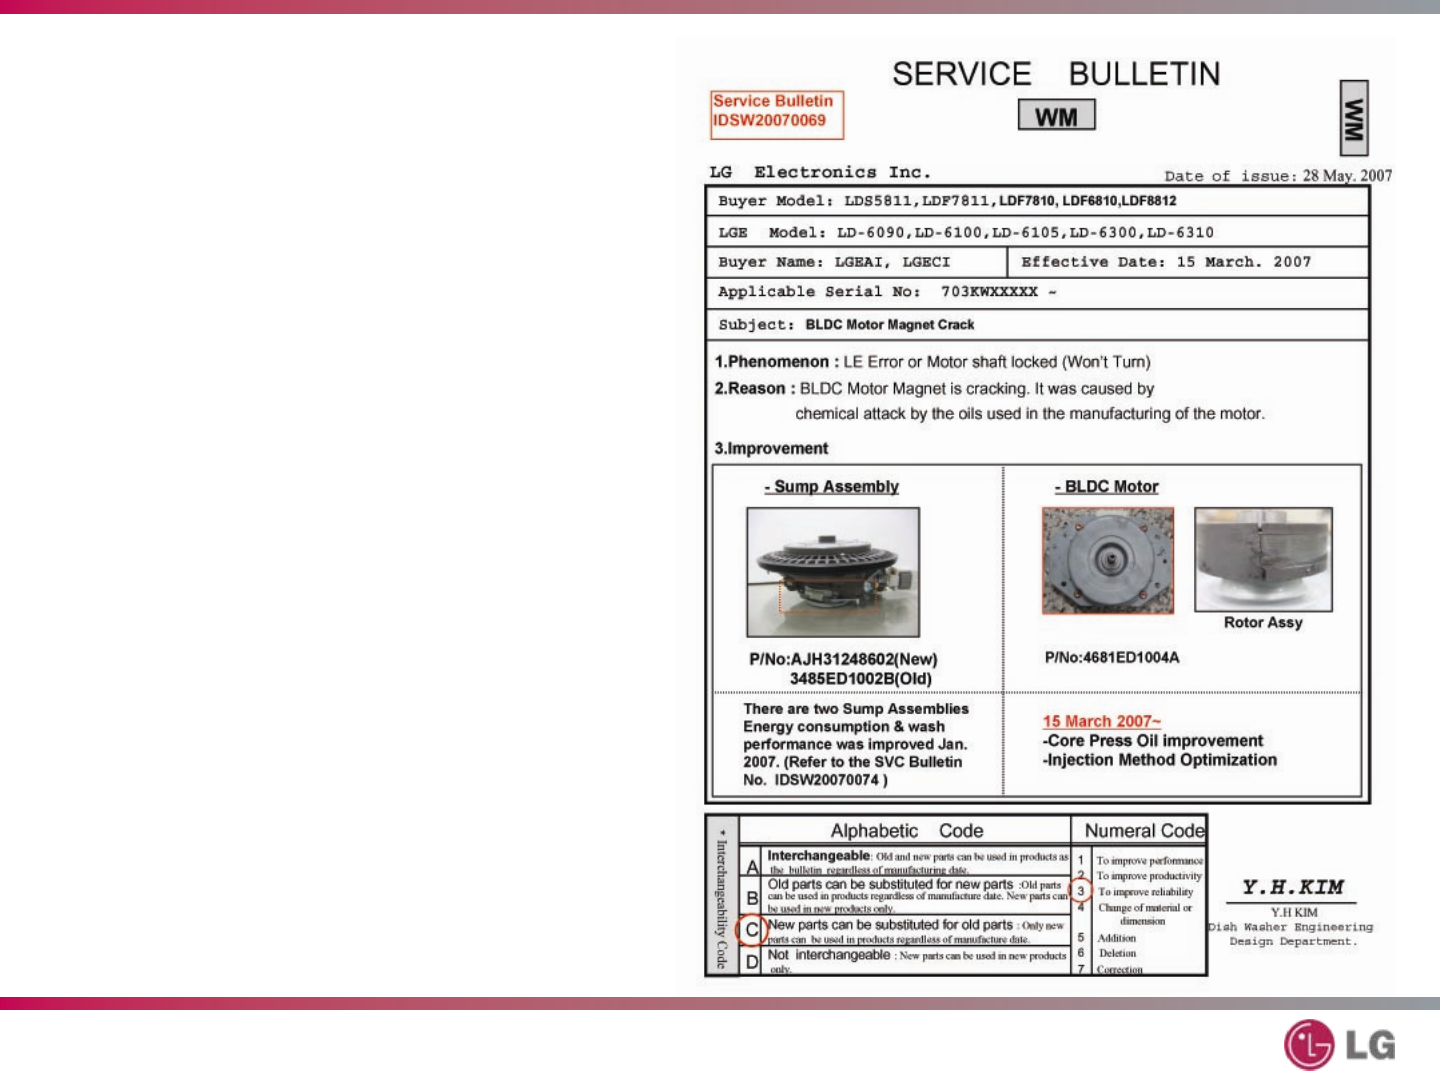
Service Bulletins
T-47~47
97
LDF9810ST – Steam Dishwasher
